GETTING STARTED PACK - Snap-on
10
diagnostics.snapon.com/tritond8 BC Previous Vehicle and Data Quick Lookups Tools Scanner OBD-II/EOBD Scope Multimeter Guided Component Tests Previous Vehicle and Data Quick Lookups Tools Scanner OBD-II/EOBD Scope Multimeter Guided Component Tests GETTING STARTED PACK
-
Upload
khangminh22 -
Category
Documents
-
view
3 -
download
0
Transcript of GETTING STARTED PACK - Snap-on

diagnostics.snapon.com/tritond8BC
Previous Vehicleand Data
Quick Lookups Tools
Scanner OBD-II/EOBD Scope MultimeterGuided ComponentTests
Previous Vehicleand Data
Quick Lookups Tools
Scanner OBD-II/EOBD Scope MultimeterGuided ComponentTests
GETTING STARTED PACK
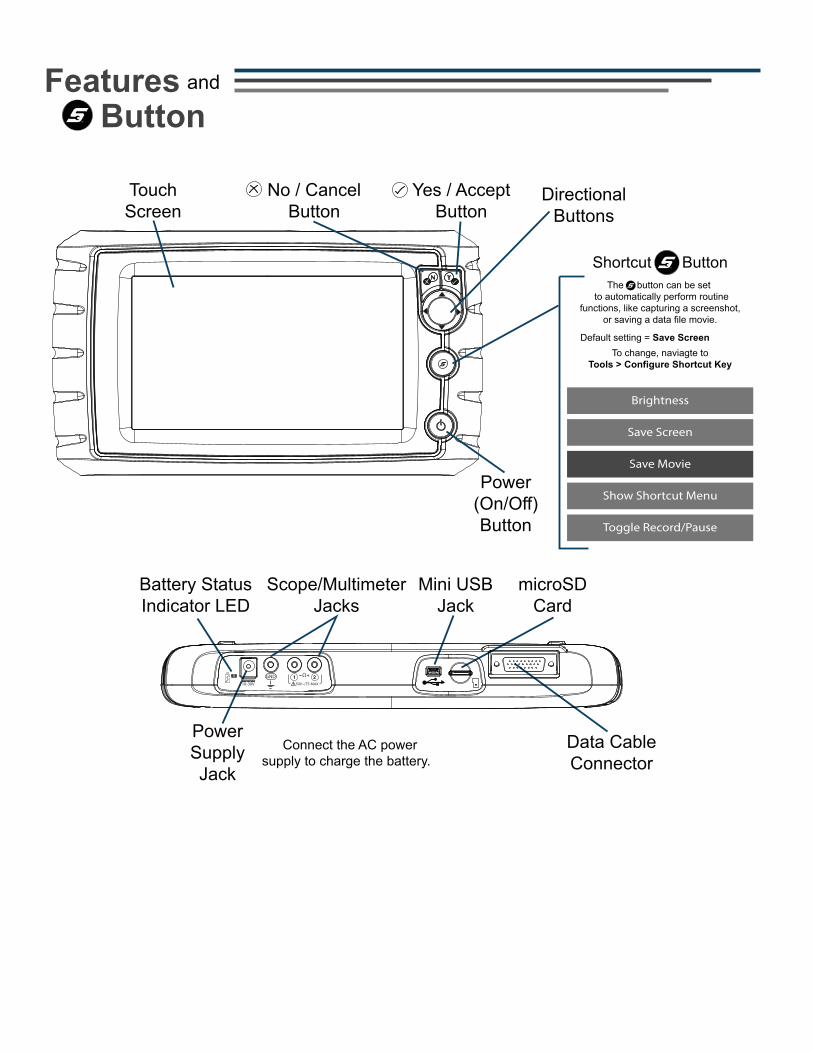
Features and
Button
TouchScreen
No / CancelButton
Yes / AcceptButton
DirectionalButtons
Power(On/Off)Button
Battery StatusIndicator LED
Mini USBJack
microSDCard
Data CableConnector
Connect the AC powersupply to charge the battery.
PowerSupplyJack
Shortcut ButtonThe button can be set
to automatically perform routine functions, like capturing a screenshot,
or saving a data file movie.
Default setting = Save ScreenTo change, naviagte to
Tools > Configure Shortcut Key
Brightness
Save Screen
Save Movie
Show Shortcut Menu
Toggle Record/Pause
1 210-30V
GND - +Ω50V~/75-MAX
Scope/MultimeterJacks
Previous Vehicleand Data
Quick Lookups Tools
Scanner OBD-II/EOBD Scope MultimeterGuided ComponentTests
Previous Vehicleand Data
Quick Lookups Tools
Scanner OBD-II/EOBD Scope MultimeterGuided ComponentTests
4
5
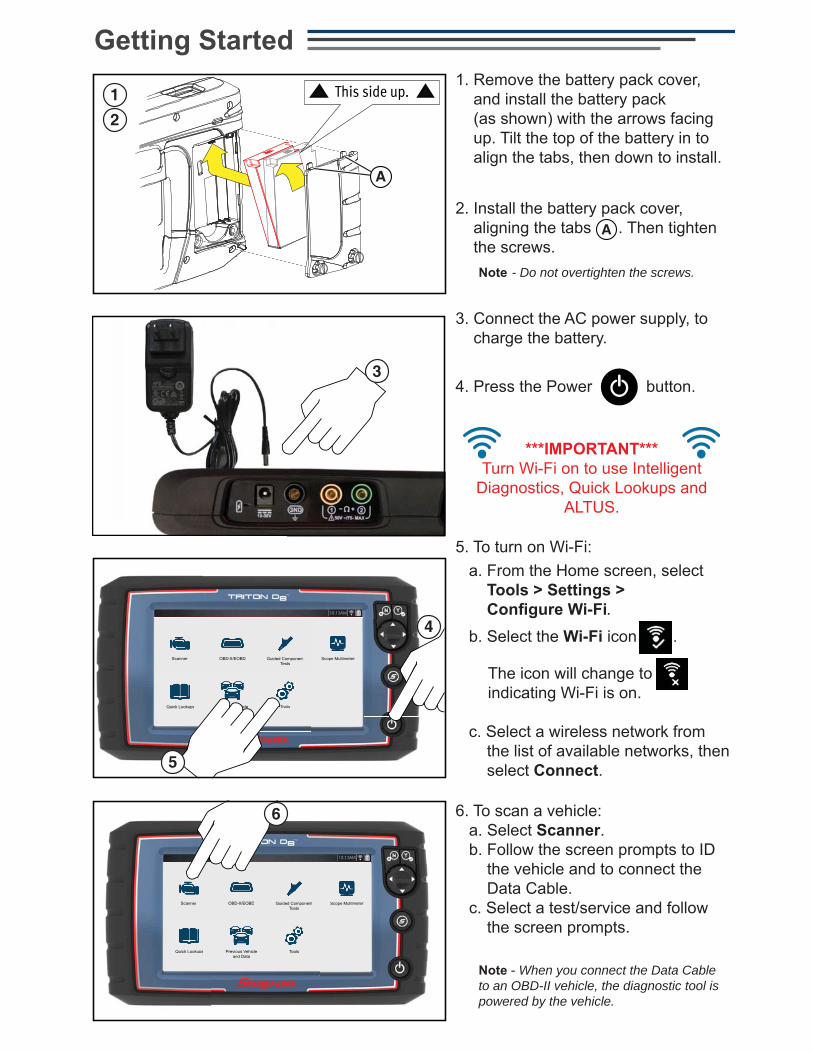
Getting StartedThis side up.
A
1
2
1. Remove the battery pack cover, and install the battery pack (as shown) with the arrows facing up. Tilt the top of the battery in to align the tabs, then down to install.
2. Install the battery pack cover, aligning the tabs . Then tighten the screws.
Note - Do not overtighten the screws.
4. Press the Power button.
Note - When you connect the Data Cable to an OBD-II vehicle, the diagnostic tool is powered by the vehicle.
6. To scan a vehicle: a. Select Scanner. b. Follow the screen prompts to ID the vehicle and to connect the Data Cable. c. Select a test/service and follow the screen prompts.
3. Connect the AC power supply, to charge the battery.
3
Previous Vehicleand Data
Quick Lookups Tools
Scanner OBD-II/EOBD Scope MultimeterGuided ComponentTests
Previous Vehicleand Data
Quick Lookups Tools
Scanner OBD-II/EOBD Scope MultimeterGuided ComponentTests
6
A
a. From the Home screen, select Tools > Settings >
.
b. Select the icon .
The icon will change to indicating Wi-Fi is on.
c. Select a wireless network from the list of available networks, then select Connect.
***IMPORTANT*** Turn Wi-Fi on to use Intelligent
Diagnostics, Quick Lookups and ALTUS.
5. To turn on Wi-Fi:

The Introduction to Intelligent Diagnostics slide show helps you get familiar with
Scanner Basics
Scanner
Intelligent Diagnostics - Scan multiple systems in a single touch
Data Graphing - View multiple graphs at once for data comparison analysisTests/Resets - Perform functional component tests, and adaptive relearns
1. Select Scanner , from the Home screen.2. Select the vehicle make.3. As prompted, identify the vehicle.4. Select a system (e.g. Code Scan, Engine, Transmission, Body, etc.).5. Connect the Data Cable to the vehicle and diagnostic tool.6.
Scanner makes vehicle communication easy, by providing full scanning functionality including these features and more!
The built-in demonstration program includes a slide show Introduction to Intelligent Diagnostics, and allows you to interactively explore Scanner functions without actually connecting to a vehicle. The interactive demonstration allows you
selection, Code Scan, PID graphs, Intelligent Diagnostics and more!
1. Select Scanner , from the Home screen.2. Select , from the vehicle make menu. 3. Select > > >
.4. Select (demo mode
5. Select Engine > > > , to display the code results list.
From the code results list there are two demonstration options: a - Continue interactive demo, see . b - View slide show, see .
Introduction to Intelligent Diagnostics
Select , then use the onscreen and icons to navigate the slides. Select “X” at anytime to exit and return to the codes results list screen.

Intelligent Diagnostics Demonstration
Displays the most likely repairs and probable causes for
200 400 6004-2221TP IND ANGLE...
0-2620APP IND ANG...
TAC Data - ENGINE SPEED (RPM) 640 - 4000
200 400 600
Top Repairs200180160140120100
80604020
00k 25k 50k 75k 100k 125k 150k 175k 200k
replaced spark plug (537)replaced spark plug wire (262)replaced ignition coil (53)replaced fuel injector (35)cleaned throttle body (28)cleaned engine fuel system (18)
Intelligent DiagnosticsCodes found: 3 Engine Code - P0300, Engine Misfire Detected (Sympt...
Connected
1. Select a code from the code results list.2. Select to display the Intelligent Diagnostics multi-card
Intelligent Diagnostics gives you access to
all in one menu.
menu.
to use Intelligent Diagnostics. Not required for Demo.
the selected code.
and Recalls related to the selected code. Displays TSB’s, Campaigns
Smart Data uses “real-world” data to preset the PIDs upper and lower
a potential issue.
Displays a custom list of PIDs related to the selected code.

Quick Lookups
information and functional scanner tests easy!
• Scanner Reset of Service Interval
• Reset Procedures and Information • Repair Procedures • Scanner Reset of Service Indicator
® Displays the Top Real Fix for the code.
Displays repair procedures, tests and tips related to the code.
Displays troubleshooter tips related to the selected code.
of bi-directional tests that can be used to verify component or system operation during troubleshooting.
components and sensors, including step-by-step instructions.
Scope Multimeter
more!• Volts DC• Volts AC RMS•••
•••••
• •
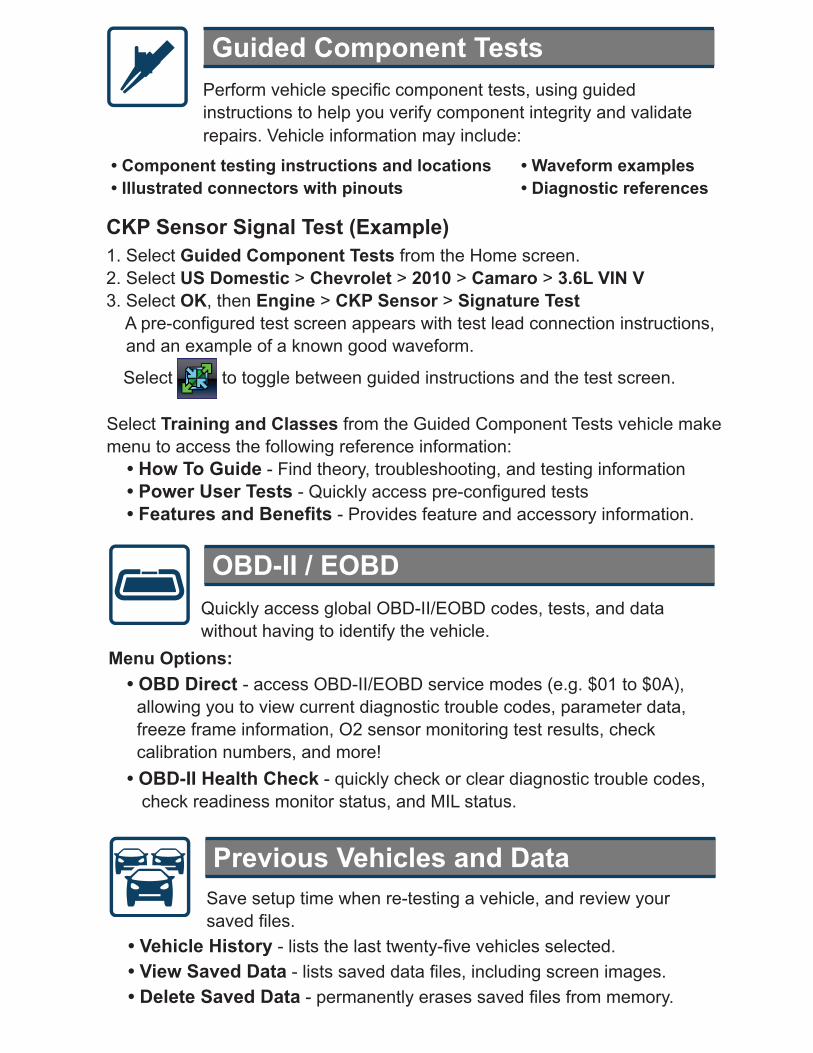
OBD-II / EOBD
Previous Vehicles and Data
• OBD Direct - access OBD-II/EOBD service modes (e.g. $01 to $0A), allowing you to view current diagnostic trouble codes, parameter data, freeze frame information, O2 sensor monitoring test results, check calibration numbers, and more! • - quickly check or clear diagnostic trouble codes,
•
Quickly access global OBD-II/EOBD codes, tests, and data without having to identify the vehicle.
Save setup time when re-testing a vehicle, and review your
1. Select from the Home screen.2. Select > > 2010 > > 3. Select , then Engine > >
and an example of a known good waveform.
Guided Component Tests
instructions to help you verify component integrity and validate
Select from the Guided Component Tests vehicle make menu to access the following reference information:
• • Diagnostic references
• •
• - Find theory, troubleshooting, and testing information• Power User Tests• - Provides feature and accessory information.
repairs. Vehicle information may include:
Select to toggle between guided instructions and the test screen.
Automatically* transfer Code Scan results to ALTUS, our cloud-based mobile-friendly site. Then use your mobile device to access, print and share the Vehicle System Report.
* Wi-Fi connection required.
1. From the Home screen, select Tools > Settings > .2. Turn Wi-Fi on and select a network.3. , PIN
and needed to register. Record these numbers.4. Create your ALTUS account (see below).
1. Visit and select from the Login screen.2. Enter the required information and create a and , then select Create.
Done.4. Log in using your and .5. Answer the security questions, then select .
tab. 7. Select , enter your , PIN, , and .8. Log out of , then select the browser tab to get started.
1. Visit and select Login (upper right screen).2. Log in using your current and . 3. Open the (login required again).4. From the tab, select .5. Enter your , PIN, , and .6. Log out of , then select the browser tab to get started.
New User:
:
Using a mobile device or PC - if you already have a SureTrack® account, then follow the instructions below. If you are a new user, then you will need to create an online account.
Using a mobile device or PC - if you already have a SureTrack® account, then follow the instructions below. If you are a new user, then you will need to create an online account.
Using ALTUS™
From ALTUS you can also access TM Connect (SSC) - the application

To activate your warranty, and ensure you have access to the latest software upgrades, register your diagnostic tool today.
Extended warranty protection is available for an additional 12, 24 or 36 months.Contact your local Snap-on representative for information.
Before using this diagnostic tool, read and understand the user manual. Download the user manual from:
Before using this diagnostic tool, read and understand the Important Safety Information document provided within this kit. The Important Safety Information document is also available at:
Snap-on is continually enhancing our diagnostic software to provide our customers with the latest information available, not only for new vehicles but for older vehicles as well. When new
or visit:

Snap-on is a trademark, registered in the United States and other countries, of Snap-on Incorporated. All other marks are trademarks or registered trademarks of their respective holders. ©2018 Snap-on Incorporated. All pictures and illustrations shown are for reference purposes only. All information including specifications herein are subject to change without notice. EAZ0128L02A Rev. A
Get the most from your new diagnostic tool.The latest software upgrades are as close as yourSnap-on Representative’s van, or for more informationvisit: diagnostics.snapon.com
To maximize your productivity, Snap-on Training Solutionsoffers in-depth, multi-level training at no charge, available 24/7 at: diagnostics.snapon.com/trainingsolutions
Before using this diagnostic tool, read and understand: • The Important Safety Information - included in this kit • The TRITON D8™ User Manual - available online at: diagnostics.snapon.com/usermanuals
Important Information