GENERAL SPECIFICATION - UNDP | Procurement Notices
301
GENERAL SPECIFICATION PROPOSED NEW POHNPEI STATE EMERGENCY OPERATIONS CENTER (EOC)/ FIRE STATION R.S. ROQUE ARCHITECTS R.S.ROQUE ARCHITECTS | P.O. Box 6, Kolonia Pohnpei, FSM 96941
-
Upload
khangminh22 -
Category
Documents
-
view
0 -
download
0
Transcript of GENERAL SPECIFICATION - UNDP | Procurement Notices
GENERAL SPECIFICATION PROPOSED NEW POHNPEI STATE EMERGENCY
OPERATIONS CENTER (EOC)/ FIRE STATION
R.S. ROQUE ARCHITECTS
R.S.ROQUE ARCHITECTS | P.O. Box 6, Kolonia Pohnpei, FSM 96941
R.S. ROQUE ARCHITECTS 1
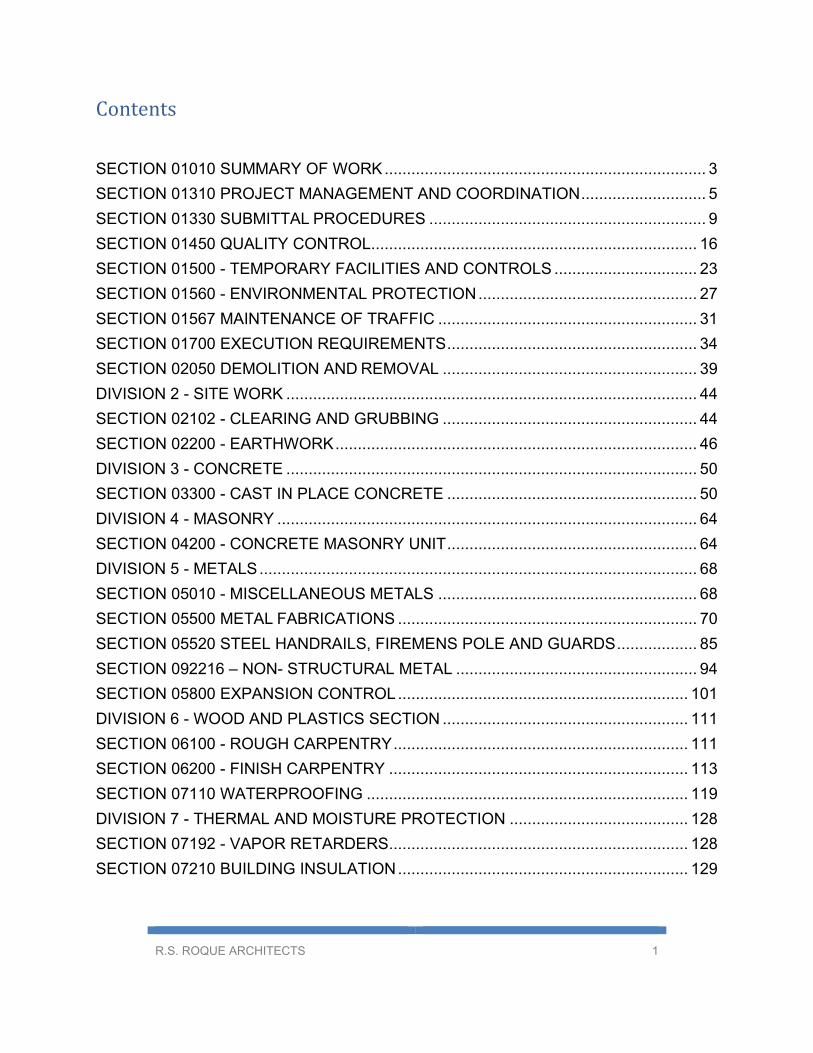
Contents SECTION 01010 SUMMARY OF WORK ........................................................................ 3
SECTION 01310 PROJECT MANAGEMENT AND COORDINATION ............................ 5
SECTION 01330 SUBMITTAL PROCEDURES .............................................................. 9
SECTION 01450 QUALITY CONTROL ......................................................................... 16
SECTION 01500 - TEMPORARY FACILITIES AND CONTROLS ................................ 23
SECTION 01560 - ENVIRONMENTAL PROTECTION ................................................. 27
SECTION 01567 MAINTENANCE OF TRAFFIC .......................................................... 31
SECTION 01700 EXECUTION REQUIREMENTS ........................................................ 34
SECTION 02050 DEMOLITION AND REMOVAL ......................................................... 39
DIVISION 2 - SITE WORK ............................................................................................ 44
SECTION 02102 - CLEARING AND GRUBBING ......................................................... 44
SECTION 02200 - EARTHWORK ................................................................................. 46
DIVISION 3 - CONCRETE ............................................................................................ 50
SECTION 03300 - CAST IN PLACE CONCRETE ........................................................ 50
DIVISION 4 - MASONRY .............................................................................................. 64
SECTION 04200 - CONCRETE MASONRY UNIT ........................................................ 64
DIVISION 5 - METALS .................................................................................................. 68
SECTION 05010 - MISCELLANEOUS METALS .......................................................... 68
SECTION 05500 METAL FABRICATIONS ................................................................... 70
SECTION 05520 STEEL HANDRAILS, FIREMENS POLE AND GUARDS .................. 85
SECTION 092216 – NON- STRUCTURAL METAL ...................................................... 94
SECTION 05800 EXPANSION CONTROL ................................................................. 101
DIVISION 6 - WOOD AND PLASTICS SECTION ....................................................... 111
SECTION 06100 - ROUGH CARPENTRY .................................................................. 111
SECTION 06200 - FINISH CARPENTRY ................................................................... 113
SECTION 07110 WATERPROOFING ........................................................................ 119
DIVISION 7 - THERMAL AND MOISTURE PROTECTION ........................................ 128
SECTION 07192 - VAPOR RETARDERS ................................................................... 128
SECTION 07210 BUILDING INSULATION ................................................................. 129
R.S. ROQUE ARCHITECTS 2
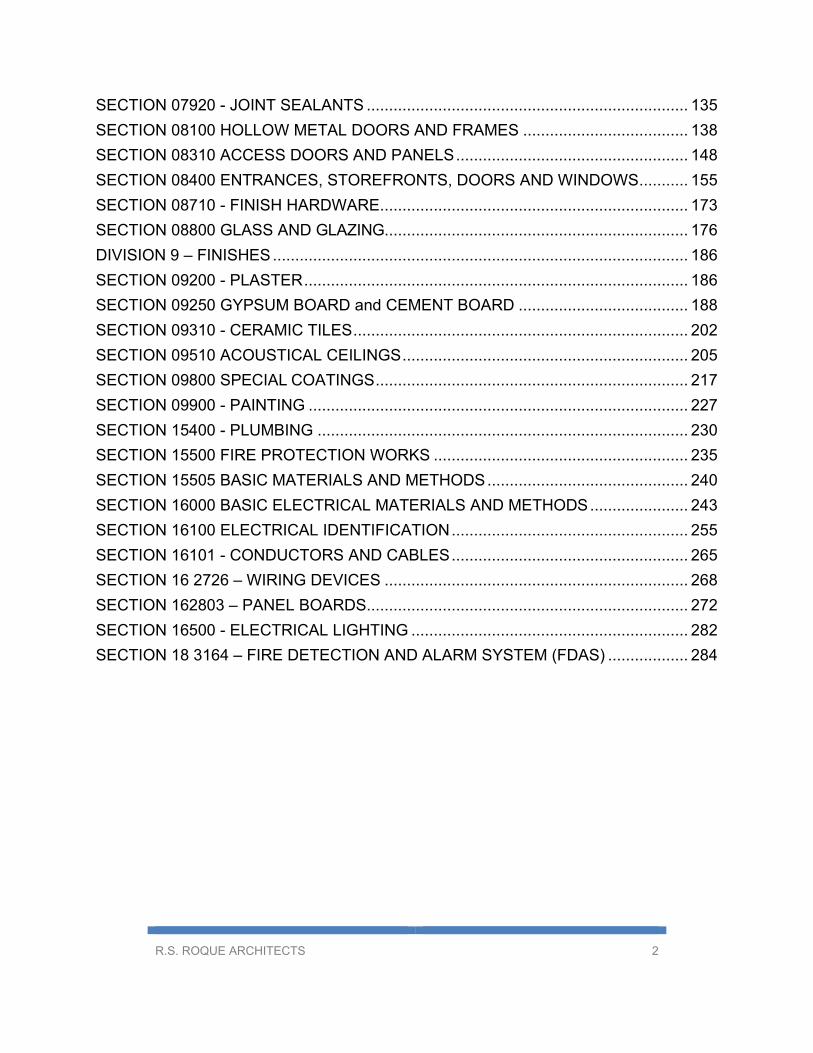
SECTION 07920 - JOINT SEALANTS ........................................................................ 135
SECTION 08100 HOLLOW METAL DOORS AND FRAMES ..................................... 138
SECTION 08310 ACCESS DOORS AND PANELS .................................................... 148
SECTION 08400 ENTRANCES, STOREFRONTS, DOORS AND WINDOWS ........... 155
SECTION 08710 - FINISH HARDWARE ..................................................................... 173
SECTION 08800 GLASS AND GLAZING.................................................................... 176
DIVISION 9 – FINISHES ............................................................................................. 186
SECTION 09200 - PLASTER ...................................................................................... 186
SECTION 09250 GYPSUM BOARD and CEMENT BOARD ...................................... 188
SECTION 09310 - CERAMIC TILES ........................................................................... 202
SECTION 09510 ACOUSTICAL CEILINGS ................................................................ 205
SECTION 09800 SPECIAL COATINGS ...................................................................... 217
SECTION 09900 - PAINTING ..................................................................................... 227
SECTION 15400 - PLUMBING ................................................................................... 230
SECTION 15500 FIRE PROTECTION WORKS ......................................................... 235
SECTION 15505 BASIC MATERIALS AND METHODS ............................................. 240
SECTION 16000 BASIC ELECTRICAL MATERIALS AND METHODS ...................... 243
SECTION 16100 ELECTRICAL IDENTIFICATION ..................................................... 255
SECTION 16101 - CONDUCTORS AND CABLES ..................................................... 265
SECTION 16 2726 – WIRING DEVICES .................................................................... 268
SECTION 162803 – PANEL BOARDS ........................................................................ 272
SECTION 16500 - ELECTRICAL LIGHTING .............................................................. 282
SECTION 18 3164 – FIRE DETECTION AND ALARM SYSTEM (FDAS) .................. 284

R.S. ROQUE ARCHITECTS 3
SECTION 01010 SUMMARY OF WORK
PART 1 GENERAL
1.1 SUMMARY
A. Section Includes:
1. Work covered by the Contract.
2. Contractor’s use of the premises.
3. Occupancy requirements.
B. The Contract, as used in this Scope of Work – General Specification, has the meaning ascribed to such term in Article 1 of the Contract.
1.2 WORK COVERED BY CONTRACT
A. Provide and pay for all labors (and arrange their accommodation, if any), materials, services, equipment, permits, fees, licenses, taxes, and other items necessary for the execution, installation and completion of all work indicated in the Contract.
B. The work involves the construction of POHNPEI STATE EOC/FIRE
STATION IN KOLONIA in FSM. Work includes, but is not limited to, demolition, earthwork, site utilities. Work also includes concrete foundations, slabs-on-grade, concrete, cast-in-place concrete, metal roofing, metal fabrications, thermal and sound insulation, concrete masonry unit walls, non-structural metal framing, carpentry, cement board walls and gypsum and acoustic ceilings, ceramic tile, resilient flooring, acoustical ceilings, doors and windows, glazing, hollow metal doors and frames, wood doors, door hardware, cabinetry and fixtures, toilet fixtures and accessories, painting, fire protection system, electrical, plumbing, complete and ready for use.
C. Coordination: The work of this Contract includes coordination of
the entire work of the Project, from the beginning of activity through project close-out and the warranty periods.
D. Drawings: Preparation of “As-Built” Drawings showing the location of all
new work.
E. Summary of References: Work of the Contract can be summarized by reference to the Specifications Drawings, Addenda and Modifications to the Contract issued subsequent
R.S. ROQUE ARCHITECTS 4
to the initial printing of these Specifications, and including, but not necessarily limited, to printed matter referenced by any of the above.
1.3 CONTRACTOR’S USE OF PREMISES
A. During construction, the Contractor shall have full use of the t Site
and to the immediate area for construction operations. Contractor shall minimize disruption to the public and to activities in and around adjacent roads, streets, buildings and other facilities.
B. The Contractor must limit use of the premises to construction
activities only in the areas indicated:
1. Confine operations to areas within the Contract limits indicated. Portions of the Site beyond the areas in which construction operations are permitted are not to be disturbed or used.
2. Keep driveways and entrances serving the public and
adjacent buildings and properties clear and useable at all times. Do not use these areas for parking or storage of materials unless approved, in writing, by the Employer’s representative.
3. Schedule deliveries to minimize time and space required for
storage of materials and equipment on the Site.
4. Provide temporary fencing, barricades, signage, traffic control and personnel necessary for public safety.
END OF SECTION
R.S. ROQUE ARCHITECTS 5
SECTION 01310 PROJECT MANAGEMENT AND COORDINATION
PART 1 GENERAL
1.1 SUMMARY
A. Section Includes:
1. Administrative and supervisory personnel.
2. Submittals.
3. Contractor’s quality control.
4. Coordination.
5. Project coordination.
6. Pre-Construction meeting.
7. Progress meetings.
8. Pre-Installation meetings.
9. Schedule of Values.
1.2 CONTRACTOR’S QUALITY CONTROL
A. Perform project quality control in accordance with requirements in the Contract and as
specified in Section 01450 - Quality Control.
B. Coordinate the scheduling of inspections and testing required by the individual Specification Sections and in accordance with Section 01450 - Quality Control.
1.3 COORDINATION DRAWINGS
A. Prepare and distribute coordination drawings where close coordination is required for the
installation of products and materials fabricated off-site by separate entities, and where limited space availability requires maximum utilization of space for the efficient installation of different components. Show the interrelationship of components shown on separate Shop Drawings. Indicate the required installation sequences.
1.4 PROJECT COORDINATION
A. Coordinate construction activities and the work of all trades under various Sections of
these Specifications and work of the Contract to facilitate the orderly installation of each part of the work. Coordinate construction operations included under different Sections of the Specifications and the Contract that are dependent upon each other for proper installation, connection and operation.

R.S. ROQUE ARCHITECTS 6
B. Coordinate the construction activities of this Contract with Contractors retained separately
the Employer.
C. Where installation of one part of the work is dependent upon installation of other components, either before or after that part of the work, schedule construction activities in a sequence to obtain an uninterrupted installation.
D. Obtain drawings, manufacturer's product data, instructions, and other data to provide a
proper and complete installation.
1. Check field dimensions prior to installing products. Verify necessary clearances and means of access for equipment from storage to the final position.
2. Make data and information available to all trades involved.
E. Ensure that utility requirements of operating equipment are compatible with the building
utilities. Coordinate the work of various Specification Sections for installation and final connection of the equipment.
1. Ensure that mechanical, plumbing and electrical rough-ins have been installed and
are properly sized and located.
F. Coordinate space requirements and the installation of mechanical, plumbing and electrical work indicated diagrammatically on the Drawings. Follow the routing shown for pipes, ducts, conduits and wiring as closely as possible; make runs parallel with the lines of the building. Utilize spaces efficiently to maximize accessibility for other installations, for maintenance, and for repairs.
G. Where space is limited, coordinate the installation of different components to ensure maximum accessibility for required maintenance, service and repairs.
H. Provide for installation of items scheduled for future installation.
I. Where necessary, prepare memoranda for distribution to each party involved outlining
special procedures required for coordination. Prepare memoranda for the Employer’s representative, separate contractors, where coordination of their work is required.
J. In finished areas, conceal pipes, ducts, conduit and wiring within the construction.
Coordinate the location of fixtures and outlets with finish elements.
K. Coordinate completion and cleanup of the work of the separate Sections in preparation for completion of the Project.
L. After occupancy, coordinate access to the Site for correction of defective work and work
not in accordance with the Contract, to minimize disruption of the Employer’s activities. 1.5 PRE-CONSTRUCTION MEETING
A. The Employer’s representative will schedule a Pre-Construction Meeting after issuance
of a Notice to Proceed.
B. Attendance: Employer’s representative, Engineers, Contractor’s team representative

R.S. ROQUE ARCHITECTS 7
designated by the Contractor
C. Agenda:
1. Submission of executed Bonds and Insurance Certificates.
2. Distribution of Contract.
3. Submission of the Schedule of Values.
4. Designation of personnel representing the parties to the Contract.
5. Procedures and processing of Requests for Information (RFI), field decisions,
submittals, substitutions, applications for payment, change proposals, Change Orders, and contract closeout procedures.
6. Scheduling.
7. Construction facilities and temporary controls.
D. The Contractor will record minutes of the meeting and distribute copies to the participants
and those affected by the decisions made. 1.6 PROGRESS MEETINGS
A. The Contractor will schedule and administer meetings throughout progress of the work at
intervals to be determined. A weekly site meeting shall be held between the engineer and the representative of the Contractor in order to verify that the Works are progressing normally and are executed in accordance with the Contract.
B. The Contractor will make arrangements for meetings, prepare an agenda, distribute copies
to participants and preside over the meetings.
C. Attendance: Employer’s representative, Engineers, Contractor’s team representative designated by the Contractor.
D. Agenda:
1. Minutes of previous meetings.
2. Work progress.
3. Status of payments.
4. Field observations, problems, and decisions.
5. Submittals Schedule and the status of submittals.
6. Status of off-site fabrications and delivery schedules.
7. Progress Schedule.

R.S. ROQUE ARCHITECTS 8
8. Corrective measures to regain projected schedules, if necessary.
9. Planned progress during the succeeding work period.
10. Quality and work standards and pre-installation meetings.
11. Pending change proposals and effect of proposed changes on the progress
schedule, and coordination.
12. Other business relating to the work.
13. Safety Briefs
D. The Employer’s representative will record the minutes and distribute copies to the participants.
1.7 PRE-INSTALLATION MEETING
A. When required by an individual Specifications Section, or as determined necessary by the Employer’s representative, convene a Pre-Installation Meeting at the Site prior to commencing the work of that Section.
B. Require attendance of the parties directly affecting, or affected by the work of the specific
Specifications Section.
C. Notify the Engineer seven (7) days in advance of the meeting date.
D. Prepare an agenda and preside at the meetings:
1. Review requirements of the Contract, conditions of installation, preparation, and installation procedures.
2. Review coordination with related work.
E. The Contractor shall record minutes of the meetings and distribute copies to the participants and those affected by the decisions made.
END OF SECTION

R.S. ROQUE ARCHITECTS 9
SECTION 01330 SUBMITTAL PROCEDURES
PART 1 GENERAL
1.1 SUMMARY
A. Section Includes:
1. Submittal procedures.
2. Product data, Shop Drawings, samples and miscellaneous work.
3. Assurance / Control submittals.
a. Certificates.
b. Manufacturer's installation instructions.
4. Employer representative’s action.
1.2 DEFINITIONS
A. Product Data: Includes manufacturers' standard printed information on materials, products and systems; not especially prepared for this Project, other than the designation of selections from among available choices printed therein.
B. Shop Drawings: Include specially prepared technical data for this Project, including
drawings, details, diagrams, performance curves, data sheets, schedules, templates, patterns, reports, calculations, instructions, measurements and similar information not in standard printed form.
C. Samples: Include both fabricated and unfabricated physical examination of materials,
products and units of work; both as competed units and as smaller portions of units of work; either for limited visual inspection or, where indicated, for more detailed testing and analysis.
D. Mock-Ups: A special form of samples, which are too large or otherwise inconvenient for
handling in the specified manner for transmittal of sample submittals.
E. Design Calculations: As required to show that component parts of a system meet the design criteria and performance requirements. Manufacturers published calculations or as certified by a professional engineer. Subject to approval of the Employer's representative, manufacturer or fabricator certifications may be accepted in lieu of calculations.

R.S. ROQUE ARCHITECTS 10
F. Miscellaneous Submittals: Includes warranties, maintenance agreements, workmanship bonds, project photographs, survey data and reports, physical work records, quality testing and field measurement data, operating and maintenance materials, extra and overrun stock, devices and similar information; applicable to the work and not processed as product data, shop drawings or samples.
1.3 SUBMITTALS
A. Submit two (2) copies of a proposed Schedule of Submittals to the Employer’s representative within 30 days after signing of Contract. List all items requiring submittal for review and approval by the Engineer / Employers representative.
B. Schedule of Submittals. Include the following:
1. Indicate the type of submittal: Product Data, Shop Drawing, sample, certificate,
warranty, technical representative's report or other submittal.
2. Identify the Specifications Section number, Section paragraph number where the item is specified and a description of the item being submitted.
3. Indicate the scheduled date for initial submittal, date for approval and date for
possible re-submittal for each required submittal.
C. Coordinate the Schedule of Submittals with the Construction Schedule.
1.4 SUBMITTAL PROCEDURES
A. General:
1. Coordination and Sequencing: Coordinate the preparation and processing of submittals with performance of the work so that the work will not be delayed by submittals. Coordinate and sequence different categories of submittals of the same work, and or interfacing units of work, so that one will not be delayed by coordination of the submittal review with another.
2. Transmit each submittal to the Employer’s Representative on an Employer-
approved transmittal form.
3. On the Transmittal form, provide a place to indicate the Project name, date, “To:”, “From:”; names of the Contractor, subcontractors, suppliers, manufacturers, pertinent drawings(s), detail number(s), Specifications Sections, category and type of submittal, purpose, description, distribution record (for both transmittal and submittals), and signature of the transmitter.
4. Identify variations from the Contract and product or system limitations which may
affect successful performance of the completed work.
5. Apply the Contractor's stamp, signed or initialed certifying that review, verification of the products required, field dimensions, adjacent construction work and the coordination of information, is in accordance with requirements of the work and the Contract.

R.S. ROQUE ARCHITECTS 11
6. Provide space for the Employer’s representative's /Engineer's remarks and “Action
stamp”. 7. Sequentially number each transmittal form. Provide the original number and a
sequential alphabetic suffix on each re-submittal.
8. Package each submittal appropriately for transmittal handling.
9. Schedule submittals to comply with the scheduling requirements of the Construction Schedule.
10. On each re-submittal, identify all changes made since the previous submission.
11. Distribute copies of reviewed submittals to the field, subcontractors and suppliers,
as appropriate. Instruct the parties to promptly report any inability to comply with the provisions.
12. Submittals not required will not be processed.
13. Submittals received from sources other than through the Contractors office will be
returned without action.
14. Except as otherwise indicated in individual Specifications Sections, comply with the requirements specified herein for each indicated category of submittal. Provide and process intermediate submittals, where required between the initial and final submittals, similar to initial submittals.
B. Product Data:
1. Collect required data into one submittal for each unit of work or system; mark each
copy to show which choices or options are applicable to the Project.
2. Include manufacturers standard printed information such as catalog cuts, manufacturer's published instructions, standard color charts, roughing-in diagrams and templates, standard wiring diagrams, performance curves and other similar items. Include manufacturers standard printed recommendations for application and use, compliance with standards, application of labels and seals, notation of field measurements which have been checked, and special coordination requirements.
3. Mark each copy to identify the applicable products, models, options, and other
data. Supplement the manufacturers' standard data with information unique to this Project.
4. Indicate product utility and electrical characteristics, utility connection
requirements, and the location of utility outlets for service to functional equipment and appliances.
5. Submit the number of copies the Contractor requires, plus four (4) copies to be
retained by the Employer's representative. Submit six (6) sets of product data; three (3) sets will be returned. Maintain one (1) set of product data at the Site, available
R.S. ROQUE ARCHITECTS 12
for reference.
6. Do not submit product data or permit its use on the Project until compliance with requirements of the Contract has been confirmed by the Contractor.
7. Do not proceed with the installation of materials, products or systems until the
final copy of applicable product data is in the possession of the installer.
C. Shop Drawings:
1. Provide newly prepared information on reproducible sheets, with graphic information at accurate scales, and with the name of the preparer indicated. Show dimensions and notes based on field measurements. Identify materials and products in the work shown. Provide key plans or cross reference to room numbers to identify the location of multiple elements. Indicate compliance with standards and special coordination requirements. Identify deviations from the Contract, check dimensions; check that trades have been coordinated and that no conflict will develop in its installation.
2. Indicate special utility and electrical characteristics, utility connection
requirements, and location of utility outlets for service to functional equipment and appliances.
3. Shop Drawings: Submit for review. After review, produce copies and distribute in
accordance with SUBMITTAL PROCEDURES above.
4. Submit in the form of one (1) translucent reproducible transparency and two (2) blueline or blackline prints. The transparency will be returned to the Contractor after review.
5. Do not allow copies of shop drawings without appropriate final “Action” markings
by the Employers representative to be used in connection with the work.
D. Samples:
1. Submit samples to illustrate the functional and aesthetic characteristics of the product, with integral parts and attachment devices. Coordinate sample submittals for interfacing work.
2. Include full Project information on each sample submitted.
3. Provide units identical to the final condition of the proposed materials or products
of the work. Include Arrange samples of not less than three (3) units where unavoidable variations must be expected, and describe or identify variations between the units of each set. Provide a full set of optional samples where selection is required. Include information with each sample to show generic description, source or product name and manufacturer, limitations, and compliance with standards. Submit samples for review and confirmation of color, pattern, texture, and kind.
4. Submit samples of finishes in the available colors, textures and patterns.

R.S. ROQUE ARCHITECTS 13
5. Submit the number of samples specified in the individual Specifications
Sections; a minimum of two (2), one of which will be retained by the Employer’s representative. At Contractors option, provide preliminary submittal of a single set of samples for review and action. Otherwise, initial submittals will be considered the final submittal unless returned with an action mark that requires re-submittal. Submit three (3) sets of samples in the final submittal; two (2) sets will be returned.
6. Maintain one (1) final set of samples at the Site, in suitable condition and available
for quality control comparisons. 7. The Employer’s representative will not “test samples”, except as otherwise
indicated, for compliance with other requirements, which are the responsibility of the Contractor.
8. Returned samples intended or permitted to be incorporated into the work are so
indicated in the individual Specifications Sections Samples; must be in an undamaged condition at the time of acceptance.
E. Mock-Ups:
1. Mock-ups and similar samples indicated in individual Specifications Sections are
recognized as a special type of sample. Comply with the requirements for samples, to the greatest extent possible, and process transmittal forms to provide a record of activity.
F. Certificates:
1. When specified in individual Specifications Sections, submit certification by the
manufacturer to the Employer’s representative in the quantities specified in Product Data above.
2. Indicate that the material or product conforms to or exceeds the specified
requirements. Submit supporting reference data, affidavits and certifications as appropriate.
3. Certificates may be recent or previous test results on materials or products, but
must be acceptable to the Employer’s representative.
G. Inspection and Test Reports:
1. Classify each as either “product data” or “shop drawing”, depending upon whether the report is uniquely prepared for the Project or a standard publication or workmanship control testing at the point of production. Process accordingly.
H. Manufacturers Installation Instructions:
1. When specified in individual Specification Sections, submit printed instructions for
delivery, storage, assembly, installation, adjusting, and finishing in the quantities specified in Product Data above.
2. Indicate special procedures, perimeter conditions requiring special attention and
R.S. ROQUE ARCHITECTS 14
special environmental criteria required for the application or installation. I. Standards:
1. Where copy submittal is indicated, and except where specified integrally with
“Product Data”, submit two (2) copies for the Employer representative's use. Where workmanship at the Site and elsewhere is governed by standards, furnish additional copies to the fabricators, installers and others involved in performance of the work.
J. Closeout Submittals:
2. Refer to individual Specifications Sections and to “closeout” paragraphs for
specific requirements on submittal of closeout information, materials, tools and similar items.
K. Record Document Copies:
1. Submit one (1) set.
L. Maintenance / Operating Manuals;
1. Submit two (2) bound sets.
M. Materials and Tools:
1. Refer to individual Specifications Sections for the required quantities of spare
parts, extra and overrun stock, maintenance tools and devices, keys, and similar physical units to be submitted.
N. Administrative Submittals:
1. Submit three (3) copies. No copies will be returned.
O. General Distribution:
1. Provide additional distribution of submittals to the subcontractor, suppliers,
fabricators, installers, governing authorities and others as necessary for proper performance of the work. Include such additional copies in the transmittal when required to receive an Action marking before final distribution. Record distributions on the transmittal forms.
1.5 EMPLOYER REPRESENTATIVES ACTION
A. For submittals where action and return is required or requested, the Employer's representative will review each submittal, mark to indicate the action taken, if any, and return promptly, generally within 20 days excluding delivery time to and from the Contractor. When a submittal is to be reviewed by an off-island consultant or when it must be held for coordination, 25 days will be required for review.
1. Compliance with the specified characteristics is the Contractor's responsibility.
R.S. ROQUE ARCHITECTS 15
2. No action will be taken on submittals for information, closeout documents, record
documents and other submittals for similar purposes.
B. Action Stamp: Employer’s representative will stamp each submittal to be returned to the Contractor with a uniform, self-explanatory Action stamp. The stamp will be appropriately marked, as follows, to indicate the action taken: 1. "Accepted" or “Approved”: Final Unrestricted Release. When a submittal is
marked "Accepted" or “Approved”, that part of the work covered by the submittal may proceed provided it complies with the requirements of the Contract; final acceptance will depend upon that compliance.
2. "Accepted or Approved as Noted": Final-But-Restricted Release. When a
submittal is marked "Accepted, or Approved as Noted", that part of the work covered by the submittal may proceed provided it complies with the notations and corrections marked on the submittal and meets requirements of the Contract; final acceptance will depend on that compliance.
3. "Rejected or Disapproved: Submit Specified Item" or "Revise and Resubmit":
Returned for Re-submittal. When a submittal is marked "Rejected or Disapproved: Submit Specified Item", or "Revise and Resubmit," do not proceed with the work covered by the submittal, including purchasing, fabrication, delivery or other activity. Revise or prepare a new submittal in accordance with the notations; re-submit without delay. Repeat as necessary to obtain an acceptable action mark.
a. Do not permit submittals marked "Rejected or Disapproved: Submit
Specified Item" or "Revise and Resubmit" to be used at the Site or elsewhere where work is in progress.
4. "Returned: Not Required": Where a submittal is primarily for information or
record purposes, special processing or other activity, the submittal will be returned, marked "Returned: Not Required".
C. Any review and approval by the Employer’s representative of any Product Data, Shop
Drawings, or Samples is only for conformance to the general design concept of the work and does not extend to consideration of structural integrity, safety, detailed compliance with the Contract or any other obligation of the Contractor. Review and approval of any such data does not relieve the Contractor from its obligation to meet his requirements under the Contract , not shall it give rise to any claim in favor of the Contractor or any third party against the Employer.
END OF SECTION
R.S. ROQUE ARCHITECTS 16
SECTION 01450 QUALITY CONTROL
PART 1 GENERAL
1.1 SUMMARY
A. Section Includes:
1. Employer’s representatives quality assurance (QA).
2. Contractors quality control (QC).
3. Quality control procedures.
4. Testing and inspection laboratory services.
5. Contractors field inspection and testing.
6. Contractors reports.
7. Contractors testing and inspection reports.
8. Non-compliance check-off list.
9. Completion and inspection of work.
1.2 REFERENCES
A. American Society for Testing and Materials (ASTM):
1. ASTM C 802 - Practice for Conducting an Inter laboratory Test Program to Determine the Precision of Test Methods for Construction Materials.
2. ASTM C 1077 - Practice for Laboratories Testing Concrete and Concrete
Aggregates for Use in Construction and Criteria for Laboratory Evaluation.
3. ASTM C 1093 - Practice for Accreditation of Testing Agencies for Masonry.
4. ASTM D 3740 - Practice for Minimum Requirements for Agencies Engaged in Testing and / or Inspection of Soil and Rock as Used in Engineering Design and Construction.
5. ASTM D 4561 - Practice for Quality Control Systems for Organizations Producing
and Applying Bituminous Paving Materials.
R.S. ROQUE ARCHITECTS 17
6. ASTM E 329 - Specification for Agencies Engaged in Construction Inspection and / or Testing.
7. ASTM E 543 - Specification for Agencies Performing Nondestructive Testing.
8. ASTM E 699 - Practice for Evaluation of Agencies Involved in Testing, Quality
Assurance, and Evaluating of Building Components.
1.3 SUBMITTALS
A. Submit four (4) copies of a proposed Contractor Quality Control Plan within fifteen (15) days after receipt of the Notice to Proceed.
B. Contractors Quality Control Plan. Indicate the following:
1. Quality Control Organization: In chart form, showing relationship of the Quality
Control organization to other elements of the Contractor's organization.
2. Names and qualifications of personnel in the Quality Control organization, including the Contractors Quality Control Representative, inspectors, independent testing and inspection laboratory, independent fire alarm test and certification agency, independent fire sprinkler test and certification agency, independent HVAC test and balance agency, etc.
3. Procedures for reviewing coordination drawings, Shop Drawings, certificates,
certifications and other submittals.
4. Testing and Inspection Schedule, keyed to the Construction Schedule, indicating tests and inspections to be performed, names of persons responsible for the inspection and testing for each segment of the work, including preparatory, initial and follow-up.
5. Proposed forms to be used including Contractor's Daily Report, Contractor' s Test
and Inspection Report, and Non-Compliance Check-Off List.
C. Independent Testing and Inspection Laboratory. Submit the following:
1. Name.
2. Address.
3. Telephone number.
4. Name of full-time registered Engineer.
1.4 EMPLOYER REPRESENTATIVES QUALITY ASSURANCE
A. The Employer’s representative/Engineer will inspect the quality of work being installed, review and verify the accuracy of changes in the work, receive and distribute the Contractor' s submittals, determine compliance with the Contract and preside at progress and coordination meetings.

R.S. ROQUE ARCHITECTS 18
B. The Employer’s representative will arrange for factory tests when needed; at the
Contractor' s cost. C. Employer’s Field Inspection: The Employer’s representative will perform inspections of the
work for quality assurance (QA).
1.5 CONTRACTORS QUALITY CONTROL
A. The Contractor is responsible for the overall quality of the work performed by the Contractor and subcontractors working under this Contract. The quality of any part of the work must not be less than that required by the Contract. If the Employer’s representative determines that the quality of the work does not conform to the Contract, the Employer’s representative will notify the Contractor, in writing. The Contractor must correct the identified deficiencies and advise the Employer’s representative of the corrective action taken within 7 days of the date of notification.
B. Monitor quality control over the Contractors staff, subcontractors, suppliers, manufacturer's, products, services, site conditions and workmanship.
C. Comply fully with the manufacturer's published instructions, including each step in the sequence of installation.
D. Should the manufacturer's published instructions conflict with the Contract , request clarification from the Employer’s representative before proceeding.
E. Comply with the specified standards as a minimum quality for the work, except where more stringent tolerances, codes or specified requirements indicate higher standards or more precise workmanship.
F. Perform the work by persons who are thoroughly qualified and trained in their respective trade to produce workmanship of the specified quality.
G. Secure products in place with positive anchorage devices, designed and sized to withstand wind and seismic loads, stress, vibration, physical distortion and disfigurement.
H. Perform tests required by governing authorities and utility agencies having jurisdiction.
I. Contractors Field Inspection: The Contractor or his authorized representative(s) shall
inspect all work under this Contract for quality control (QC).
1.6 QUALITY CONTROL TESTING:
A. Field tests made at, or in the vicinity of the Site in connection with the actual construction, including but not limited to, concrete batch plants, asphalt batch plants and similar establishments directly involved in the construction process.
1. Field Tests by the Contractor: The Contractor shall perform all field testing
specifically required of him in the Contract Specifications and all field tests required by Applicable Publications@ referenced in the Contract Specifications. The cost of
R.S. ROQUE ARCHITECTS 19
testing shall be borne by the Contractor. The Contractor shall furnish all equipment, instruments, qualified personnel and facilities necessary to perform all tests required by the Contract . The required testing services shall be performed by the Contractor or acquired by the Contractor through a qualified commercial testing laboratory. If a commercial testing laboratory is retained to perform tests under this Contract, all test reports shall be certified by the laboratory. Test reports shall include the acceptable value for each specification item, actual test results obtained, methods used, and a statement that the product, equipment or system conforms or does not conform to the Specifications requirements.
2. Field Tests by Employer: Field tests conducted by the Employer will be
made as necessary to assure quality or as otherwise provided herein.
B. Factory tests made at the point of manufacture of various products shipped to the Site as a unit.
C. Certified tests made by approved testing agencies on material and / or equipment to be
incorporated into the Project under the Contract. These tests are those performed by Factory Mutual, Underwriters Laboratories, Inc., and others.
1. Manufacturers Certified Tests: Certified tests on materials to be incorporated into
the work will be acceptable, provided they are performed by the manufacturer or by Employer’s representative approved agencies or laboratories, show that the materials conform to the Specifications, and that tests and certifications meet the requirements of the paragraph entitled Quality Assurance@ below.
1.7 TESTING AND INSPECTION LABORATORY SERVICES
A. Selection and Payment:
1. Employment and payment for services of an Independent Testing and Inspection
Laboratory to perform specified testing and inspection shall be by the Contractor.
2. Employer Approval of Laboratories: All laboratory work performed under this Contract shall be done by a Laboratory approved by the Employer’s representative, whether the laboratory is employed by the Contractor or by others, or is owned and operated by the Contractor. The basis of approval includes the following:
a. Laboratories performing work in connection with concrete, steel and
bituminous material must conform to American Society for Testing and Materials (ASTM) E 329.
b. Laboratories performing work not in connection with concrete, steel and
bituminous materials must conform to Sections 3 and 4 of ASTM E 329.
3. Employment of Independent Testing and Inspection Laboratory in no way relieves the Contractor of his obligation to perform work in accordance with the requirements of the Contract.
B. Quality Assurance:

R.S. ROQUE ARCHITECTS 20
1. Comply with the requirements of ASTM C 802, ASTM C 1077, ASTM C 1093,
ASTM D 3740, ASTM D 4561, ASTM E 329, ASTM E 543, ASTM E 699 and ASTM E 1691.
C. Laboratory Responsibilities:
1. Test samples of mixes submitted by the Contractor.
2. Provide qualified personnel at the Site. Cooperate with the Employer's
representative and the Contractor in the performance of services.
3. Perform the specified sampling, testing and inspection of products in accordance with the specified standards.
4. Determine compliance of the materials and mixes with requirements of the
Contract.
5. Promptly notify the Contractor’s Quality Control Representative and the Employer's representative of observed irregularities or non-conformance of work or products.
6. Perform additional tests as required by the Employer’s representative.
1.8 CONTRACTORS FIELD INSPECTION AND TESTING
A. Contractor: Test and inspect the work provided under this Contract to ensure that the work is in compliance with the Contract requirements. Required tests and inspections are indicated in the individual Specifications Sections.
B. Preparatory Inspection: Performed prior to beginning the work and prior to beginning each segment of work and includes:
1. Review of Contract requirements.
2. Review of Shop Drawings and other submittal data after approval and return.
3. Examination to assure that the materials and equipment conform to the Contract
requirements.
4. Examination to assure that the required preliminary or preparatory work is complete.
C. Initial Inspection: Performed when a representative portion of each segment of the work has been completed, and includes:
1. Performance of the required tests.
2. Quality of the workmanship.

R.S. ROQUE ARCHITECTS 21
3. Review for omissions and dimensional errors.
4. Examination of products used, connections and supports.
5. Approval or rejection of the inspected segment of work. D. Follow-Up Inspections: Performed daily and more frequently, as necessary, to ensure that non-complying work has been corrected.
E. Testing and Inspection: Perform testing and inspection in accordance with requirements of the individual Specifications Sections.
1.9 CONTRACTOR'S WEEKLY REPORTS
A. Submit weekly reports to the Employer's representative for days that work was performed. Include the following information:
1. Contractor’s name and address.
2. Job reference and information.
3. Date, weather, minimum and maximum temperatures, rainfall and other pertinent
weather conditions.
4. Daily workforce (gender wise break-up) of the Contractor and subcontractors, by trade.
5. Description of the work started, on-going work, and work completed by each subcontractor.
6. Coordination implemented between the various trades.
7. Approval of substrates received from various trades.
8. Non-conforming and unsatisfactory items to be corrected.
9. Health and Safety Incidents, Trainings and Grievances, if any of workers (including
resolution of grievances provided).
10. Remarks.
1.10 CONTRACTOR'S TESTING AND INSPECTION REPORTS
A. Prepare and submit a written report of each test and inspection, signed by the Contractors Quality Control Representative performing the inspection, within two (2) days after the day the inspection was made. B. Include the following on the written inspection reports:
1. Cover sheet prominently identifying that the inspection "CONFORMS" or "DOES
NOT CONFORM" to the Contract.
2. Date of the inspection and date of the report.
R.S. ROQUE ARCHITECTS 22
3. Project name, location, solicitation number and Contractor.
4. Names and titles of individuals making the inspection.
5. Description of the Contract requirements for inspection by referencing the Specifications Section.
6. Description of the inspection made, interpretation of the inspection results, and
notification of significant conditions at the time of the inspection. 7. Requirements for follow-up inspections.
1.11 NON-COMPLIANCE CHECK-OFF LIST
A. Maintain Check-Off List of work that does not comply with the Contract, stating specifically what is non-complying, date the faulty work was originally discovered and the date the work was corrected. There is no requirement to report deficiencies corrected the same day the deficiency was discovered. Submit a copy of the Non-Compliance Check-Off List of non-complying work items on a weekly basis for review at the next Progress / Coordination Meeting.
1.12 COMPLETION AND INSPECTION OF WORK
A. Prior to final acceptance by the Employer's representative, submit a certification signed by the Contractor stating that all work has been inspected and that all work, except as specifically noted, is complete and in compliance with the Contract.
B. Record Documents: By Contractor’s Quality Control Representative. Ensure that "Record Documents" required for Closeout Submittals, are marked to show any deviations made during construction and are kept current on a daily basis. Upon completion of the work, certify the accuracy of the "Record Documents" and submit to the Employer' s representative.
END OF SECTION
R.S. ROQUE ARCHITECTS 23
SECTION 01500 - TEMPORARY FACILITIES AND CONTROLS
PART 1 - GENERAL
1.01 REQUIREMENTS INCLUDED
A. Temporary Utilities B. Temporary Controls C. Contractor’s Camp Site D. Barriers E. Protection F. Cleaning During Construction G. Removal
1.02 RELATED REQUIREMENTS
A. Section 01560 - Environmental protection B. Section 01700 - Contract Closeout: Final cleaning.
1.03 TEMPORARY UTILITIES
A. ELECTRICITY
1. Pohnpei State Electrical Utility lines are located on the Site. Obtain engineers
approval prior to any temporary connection or distribution. Contractor shall provide and pay for all electrical power costs associated with camp and construction activities for the project with the exception of the Employers filed office.
2. Contractor may furnish motor generator sets and suitable distribution system. 3. Provide service required for construction operations and equipment testing,
with branch wiring and distribution boxes located to allow service and lighting by means of construction type power cords.
B. Water: When Contractor pipes water from a stream source or well, piping must follow
along right-of-way of road until intersecting camp access road, then follow along access road to camp site. Construct storage tanks and treatment facilities when required on the contractor’s campsite.
C. Lighting: Provide lighting for construction operations. Permanent lighting may be used
during construction. Maintain lighting and make routine repairs. D. Ventilation: Provide as required to maintain specified conditions for construction
operations, to protect materials and finishes from damage due to temperature or humidity. Provide ventilation of enclosed areas to cure materials, to disperse humidity, and to prevent accumulations of dust, fumes, vapors or gases.
1.04 SANITARY FACILITIES
R.S. ROQUE ARCHITECTS 24
A. Provide and maintain required sanitary facilities (separate for male and female as
required) and enclosures conforming to local public health rules and regulations.
1.05 TEMPORARY CONTROLS
A. Unexploded ordinance: Systematic sweeping has not been performed. Take appropriate measures and precautions. Should old unexploded ordinance be unearthed, leave the ordinance undisturbed and report in immediately to the Engineer, who will contract an Ordinance Disposal Team for safe removal. Inform all employees of these safety precautions.
B. Traffic: Great caution is urged when operating construction equipment along roads or near
villages in order that accidents involving local pedestrians can be averted. A Traffic Control Plan is to be developed and implemented by the Contractor for the movement of equipment and material. The Contractor shall use every reasonable means to prevent any of the roads or bridges communicating with or on the routes to the Site from being damaged by any traffic of the Contractor or any of his sub-contractors and, in particular, shall select routes, choose and use vehicles and restrict and distribute loads so that any such extraordinary traffic as will inevitably arise from the moving of plant and material from and to the Site shall be limited as far as reasonably possible and so that no unnecessary damage may be occasioned to such roads and bridges.
C. Explosives: Blasting or use of explosives is not permitted.
D. Radio Transmitter Restrictions: To preclude accidental actuation of sensitive
electronic equipment, conform to the restrictions and procedures for the use of radio transmitting equipment as delineated by the Contracting Officer. Under no circumstances shall transmitters be used without prior approval of the Engineer.
E. Storm Protection: Should warnings or winds of gale force or stronger be issued, take
every practicable precaution to minimize danger to persons, to the work, and to adjacent property. These precautions include closing openings, removing loose materials, tools and equipment from exposed locations, and removing or securing scaffolding and other temporary work.
1.06 CONTRACTOR’S CAMP SITE
If a campsite is required by the Contractors operations it’s location shall be designated by the Engineer and approved by the Employer. It shall comply with the following;
A. Provide adequate facilities on the Site to house (separate accommodations for male
and females) and feed non-resident workers for the duration of construction.
B. Restore the Site to its original condition upon completion.
C. Provide and maintain an underground sewage disposal system sufficiently distant and

R.S. ROQUE ARCHITECTS 25
down gradient from water wells.
D. Provide adequate security and maintenance of entry/exit register for all workers at the Campsite.
E. Some food and dry good items are commercially available on Pohnpei. Contractor is
advised to provide his own arrangements as necessary to support operation of the camp.
F. The Contractor’s campsite must be approved by the Chief State Sanitarian with
respect to living accommodations, sanitation facilities, food preparation areas, water, wastewater, garbage disposal, etc.
G. The Contractor is to develop and implement a grievance redressal mechanism for the
workers with clear indications of the redressal mechanism and display of the identity of the Grievance Officer at the Campsite.
H. Provide adequate emergency and medical services at the Campsite.
1.07 BARRIERS
A. Provide and maintain barriers and warning signs are required to maintain public safety at construction areas and to protect existing facilities and adjacent properties from damage from construction operations.
B. Trenches and Excavations: Provide adequate barriers and protection at trenches and
excavations. Cover excavations under roadways for safety and to permit passage of traffic. Backfill pipeline trenches as soon as possible to minimize danger. Not more than 300 LF of trench may be left open at any time.
C. Provide barriers around trees and plants, which may be designated to remain.
1.08 PROTECTION
A. Provide protection of installed products to prevent damage from subsequent
operations. Remove when no longer needed, prior to completion of work. B. Control traffic to prevent damage to components and surfaces.
C. Dewatering: Keep excavated pits and trenches free of rain and ground infiltrated
water at all times, unless waived by Engineer.
1.09 CLEANING DURING CONSTRUCTION
A. Control accumulation of waste materials and rubbish. Periodically dispose of waste off-site.
R.S. ROQUE ARCHITECTS 26
B. Clean interior areas prior to start of finish work. Maintain areas free of dust and other contaminants during finishing operations.
1.10 REMOVAL
A. Remove temporary materials, equipment, services, barriers and construction when
no longer required prior to substantial completion inspection.
B. Clean and repair damage caused by temporary installation or use of temporary facilities. 1. Remove underground installations to a depth of 2 feet. Grade site as
indicated.
2. Restore permanent facilities used during construction to specify or to original condition.
3. Repair damaged surfaces to match adjacent surfaces.
4. Prior to final inspection, remove temporary lamps in all light fixtures and
install new lamps.
END OF SECTION

R.S. ROQUE ARCHITECTS 27
SECTION 01560 - ENVIRONMENTAL PROTECTION
PART 1 - GENERAL
1.01 SCOPE
A. Protection of Natural Resources B. Historical and Archaeological protection C. Erosion and sediment control D. Control and disposal of solid, chemical and sanitary wastes E. Dust control F. Noise control
1.02 ENVIRONMENTAL PROTECTION REQUIREMENTS
A. During the life of the contract, provide and maintain environmental protective
measures to control pollution that develops during normal construction practices. Provide measures to correct conditions that develop during the construction of permanent or temporary environmental features associated with the project. Comply with all local, State and National rules and regulations pertaining to water, air and noise pollution. There shall be no disposal of materials on the Site and run offs and spillages of materials offsite.
Part 2 - EXECUTION
2.01 PROTECTION OF NATURAL RESOURCES
A. Preserve the natural resources within the project boundaries and outside the limits
of permanent work in their existing condition or restore to an equivalent or improved condition upon completion of the work. Confine construction activities to areas defined by the work. Confine construction activities to areas defined by the work schedule, drawings and specifications
B. Land Resources
1. Except in areas indicated to be cleared, do not remove, cut, deface, injure
or destroy trees or shrubs without special permission from the Engineer. Do not fasten or attach ropes, cables or guys to any existing nearby trees for anchorage unless specifically authorized by Engineer.
2. Protect existing remaining trees from injury and damage. Remove displaced
rocks from un-cleared areas. Protect monuments and markers. 3. Repair or restore to their original condition all trees and other landscape
features scarred or damaged by equipment or operations. Obtain approval of the repair or restoration from the Engineer prior to its initiation.

R.S. ROQUE ARCHITECTS 28
4. Remove all signs of temporary construction facilities such as haul roads, work areas, structures and stockpiles of excess or waste materials and all other vestiges of construction. Grade and finish temporary use areas in conformance with surrounding areas.
C. Water Resources
1. Perform work in a manner to prevent adverse environmental impact on water
resources.
2. Oily substances: Take special measures to prevent oily or other hazardous substances from entering the ground, drainage areas or local bodies of water. Surround temporary fuel oil, petroleum or liquid chemical storage tanks with a temporary earth beam of sufficient size and strength to contain the contents of the tanks in the event of content leakage or spillage.
D. Fish and Wildlife Resources
1. Take steps required to prevent interference or disturbance to fish and
wildlife. Do not alter water flows or otherwise significantly disturb native habitat adjacent to the project area which are critical to fish and wildlife except as may be indicated or specified.
2.02 HISTORICAL AND ARCHAEOLOGICAL PRESERVATION
A. Carefully preserve and report immediately to the engineer all items having any
apparent historical or archaeological interest, which are discovered in the course of any construction activities.
B. If additional bones, or living sites are discovered leave the archaeological find
undisturbed and immediately report the find to the Engineer. If it is determined that the emergency salvage is required, earthwork in the immediate area of the find may be delayed from three to five days.
C. Any delays encountered in construction schedule due to discovery of historical or
archaeological finds will be given due consideration in adjusting the time of completion.
2.03 EROSION AND SEDIMENT CONTROL
A. Burn-off: Burn-off of ground cover is not permitted.
B. Borrow Pit Areas: Control borrows pit areas to prevent sediment from entering nearby streams or waterways. Restore areas, including those outside borrow pit, disturbed by borrow and haul operations. Restoration includes grading replacement of topsoil, and establishment of permanent vegetative cover. Uniformly grade side-slopes of borrow pit to a slope of 30 degrees or less with the horizontal. Uniformly grade bottom of borrow pits to provide a flat bottom and drain by outfall ditches or other suitable means.
R.S. ROQUE ARCHITECTS 29
C. Protection of Erodible soils: Immediately finish earthwork brought to final grade as
indicated or specified. Immediately protect side slopes and back slopes upon completion of rough grading. Plan and conduct earthwork in a manner to minimize the duration of exposure of unprotected soils.
D. Temporary protection of Erodible soils: Utilize the following methods to prevent
erosion and control sedimentation:
1. Mechanical retardation and control of Runoff: Mechanically retard and control the rate of runoff from the construction of diversion ditches, benches and beams to retard and divert runoff to protected drainage course.
2. Sediment Basins: Trap sediment in temporary sediment basins. Pump dry
and remove accumulated sediment after each storm. Use a paved weir or vertical overflow pipe for overflow pipe for overflow. Remove collected sediment from the Site. Institute effluent quality monitoring programs as required by the environmental agencies.
3. Borrow: Not permitted in areas where suitable environmental control is not
possible.
4. Vegetation and Mulch: Provide temporary protection on back slopes as soon as rough grading is completed or sufficient soil is exposed to require protection to prevent erosion. Use accelerated growth of permanent vegetation, temporary vegetation, mulching or netting. Stabilize slopes by seeding, anchoring mulch in place, covering with anchored netting, sodding or a combination of these and other methods for effective erosion control.
2.04 CONTROL AND DISPOSAL OF SOLID, CHEMICAL AND SANITARY WASTES
A. Pick up solid wastes and place in containers, which are emptied on a regular schedule. The preparation, cooking and disposing of foods are strictly prohibited on the Site. Handle and dispose of wastes to prevent contamination of the Site and other areas. On completion, leave areas clean and natural looking. Obliterate signs of temporary construction and activities incidental to construction of the permanent work in place.
B. Rubbish and Debris: Use Pohnpei State authorized disposal area only.
C. Garbage disposal: Transport garbage to a Pohnpei State landfill. Garbage is defined
as refuse and scraps resulting from the preparation, cooking, dispensing and consumption of food.
D. Chemical waste: Store chemical waste in corrosion resistant containers labeled to
identify type of waste and date filled. Remove containers form the Site and dispose in accordance with National, State and local regulations. Notify the Engineer
R.S. ROQUE ARCHITECTS 30
immediately of oil or hazardous material spills.
E. Petroleum products: Conduct fueling and lubricating of equipment and motor vehicles in a manner that affords the maximum protection against spills and evaporation. Dispose of lubricants to be discarded and excess oil in accordance with approved procedures meeting environmental regulations.
2.05 DUST CONTROL
A. Keep dust down at all times, including non-working hours, weekends, and holidays. B. Observe the following precautions.
1. Air blowing is permitted only for cleaning non-particulate debris such as
steel reinforcing bars.
2. During loading operations water down debris and waste materials to allay dust.
3. Use enclosed chutes and containers for conveying debris from above to
ground floor level.
4. Cover trucks hauling debris or fine materials.
2.06 NOISE CONTROL
A. When available, make the maximum use of “low noise-emission” products. B. No blasting or use of explosives is permitted. C. Muffle internal combustion engine-powered equipment to minimize noise and
properly maintain to reduce noise to acceptable levels. D. Avoid construction work during night hours as much as possible to avoid noise
disturbance of nearby localities due to construction activities.
END OF SECTION
R.S. ROQUE ARCHITECTS 31
SECTION 01567 MAINTENANCE OF TRAFFIC
PART 1 GENERAL
1.1 SUMMARY
A. Section Includes.
1. Devices.
2. Signs.
3. Barriers and channelizing devices.
4. Traffic maintenance.
5. Coordination.
1.2 GENERAL REQUIREMENTS
A. Traffic control and safety devices shall be in accordance with Part VI of the Manual on
Uniform Traffic Control Devices (MUTCD) for Streets and Highways, latest edition: U.S. Federal Highways Administration, hereinafter referred to as the Manual@.
B. Prior to beginning work, the Contractor shall submit a Traffic Control Plan to the
Department of public safety (DPS) and Pohnpei state TC&I, for review and approval. An approved copy shall be furnished to the Employer’s representative. The Contractor shall also include a schedule listing the types and number of traffic control and safety devices proposed for use.
C. Unless otherwise approved, or directed by the Engineer the minimum widths for one-lane
and two-lane traffic shall be 10 feet and 20 feet, respectively.
PART 2 PRODUCTS
2.1 DEVICES
A. Traffic control devices shall conform to the applicable specifications, standards and principles of the Manual, except as amended herein. The traffic control devices shall be used at the Site for construction, construction survey, and related work that might endanger passing motorists, pedestrians and workers.
1. Traffic control devices, shall be in place prior to the start of any construction,
maintenance, construction survey, and related work and shall not be removed until the obstruction or danger of obstruction no longer exists. Where work is performed in stages, there shall be in place those devices that apply to the conditions and activities present during the stage in progress.

R.S. ROQUE ARCHITECTS 32
2. All signs, markers, barricades, cones, lights, and other devices indicating the existence of special conditions and activities shall remain in place until their need is no longer required, unless otherwise directed by the Employer’s representative. Signs that do not apply to the existing conditions and activities shall be removed or covered. All devices employed shall be neatly constructed and shall be repaired, cleaned, repainted, and properly maintained in good condition. Special care shall be taken to see that shrubbery, construction materials, equipment, spoil and other obstructions do not obscure any sign, light or barricade, particularly at intersections and curves.
3. When it becomes necessary to excavate along or across a roadway or any lane
thereof, the work shall be performed to avoid existing peak traffic hours. The Contractor must coordinate this work with DPS, TC&I.
2.2 SIGNS
A. Regulatory signs, warning signs and guide signs used at construction, surveying or other sites shall be reflectorized, and shall conform to the basic standards prescribed in the Manual and as specified in the applicable Sections of the Specifications. Generally, signs shall be placed in the most effective locations to assure the fastest and most adequate driver response time. All advance warning signs shall be placed on each approach and shall indicate the general character of the work being done, and the distance from the sign to the actual work area.
B. The Employer’s representative may waive any requirements specified herein, if advance
application is made by the Contractor when, in his judgment, the placement of signs may not be feasible or such placement may interfere with progress of the work.
2.3 BARRIERS AND CHANNELIZING DEVICES
A. Barriers and channelizing devices used at work sites shall follow the basic standards
prescribed in the Manual and the following provisions:
1. When it is necessary to confine traffic to singular lanes, additional transverse barricades and drums shall be placed at close intervals (approximately 120 feet spacing on tangents and curves of more than 500 feet radius and at approximately 60 feet spacing on curves of 500 feet radius or less) in the closed lane.
2. Where hazardous locations occur, a series of Type II barricades, cones or drums
shall be placed in longitudinal rows along the edge of the closed area (continuously for barricades and at approximately 15 feet for cones and drums).
PART 3 EXECUTION
3.1 TRAFFIC MAINTENANCE
A. The Contractor shall conduct construction operations with minimum interference with traffic on roads, streets and driveways, and he shall have under construction, no greater length or amount of work than he can prosecute properly with due regard to the rights of the public.

R.S. ROQUE ARCHITECTS 33
Roads, streets and driveways shall be kept free of dirt and debris at all times. Convenient access to driveways, houses and buildings along the line of the work shall be maintained. In all areas, the Contractor shall install and maintain appropriate signs, lights. Flares and barricades for protection of the public. Such signs and barricades and their placement shall conform to instructions contained in Part VI of the MUTCD for Streets and Highways. All vehicles to and from the Site is to maintain a speed limit defined by the Contractor. In addition, all drivers of vehicles are to maintain valid driving licenses which will be verified by the Contractor prior to their engagement. The Contractor is expected to be familiar with all applicable laws and regulations and compliance with such laws is considered a part of the Contract for this work.
3.2 COORDINATION
A. In the case of conflict between the MUTCD and the Specifications, the most stringent requirements shall apply.
B. This Section shall be coordinated with all related documents affecting the work.
C. All work shall be coordinated through the Employer’s representative.
END OF SECTION

R.S. ROQUE ARCHITECTS 34
SECTION 01700 EXECUTION REQUIREMENTS
PART 1 GENERAL
1.1 SUMMARY
A. Section Includes:
1. Examination.
2. Preparation.
3. Execution.
4. Cleaning.
1.2 EXAMINATION
A. Visit the Site to determine the existing conditions.
1. Take field measurements and verify field conditions, compare field measurements, conditions, locations of survey benchmarks, and other information known to the Contractor, with the Drawings and this Specifications before starting the work.
2. Be responsible for determining conditions of the Site, including all existing
improvements, paving, above and below ground utilities, and existing construction.
3. Contact local utility companies and agencies and make arrangements to obtain utility locations and marking service before the start of work.
B. Review Bidding and Contract.
1. Carefully study and compare the Contract with each other.
2. Be responsible for thorough knowledge of the Contract and their relationship to
each other.
C. Verify that existing conditions and substrate surfaces are acceptable and meet the manufacturer's requirements for the application or installation of work.
R.S. ROQUE ARCHITECTS 35
D. Verify that the substrate is capable of structurally supporting attachment of the work being applied or installed.
E. Examine and verify specific conditions described in the individual Specifications Sections.
F. Verify that utility services are available, of the correct characteristics, and in the correct
location for the installation of work.
1.3 PREPARATION
A. Construction Layout:
1. Be responsible for the accuracy of measurements, elevations, lines, and grades of the work.
2. Do not scale Drawings. Use the dimensions indicated on the Drawings for the
laying out of work.
3. Errors in construction caused by the Contractor scaling Drawings to obtain measurements for laying out the work is the responsibility of the Contractor. By scaling Drawings, the Contractor assumes responsibility for the performance of such work, and is responsible for the cost of corrective work.
4. Perform field work necessary to lay out and maintain work to the dimensions
indicated in the Contract.
B. Field Engineering:
1. Establish permanent benchmarks on the Site referenced to established control points indicated on the Drawings. Record locations, with horizontal and vertical data, on the Project Record Drawings.
2. Establish elevations, lines, and levels, for work using survey instrumentation for:
a. Site improvements including pavements; stakes for grading, fill and topsoil
placement; utility locations, slopes, and invert elevations.
b. Grid or axis for structures.
c. Building foundations, column locations, and finish floor elevations.
d. Location of existing utilities necessary to adjust, move, or relocate existing structures, utility poles, lines, services, and other items located within the Site or affected by the work.
3. Periodically verify layouts by the same means.
C. Preparation for product Installation:
1. Conduct a Pre-Installation Meeting when specified in the individual Specifications
Sections.

R.S. ROQUE ARCHITECTS 36
2. Obtain, read, and understand applicable reference standards and manufacturer's
published instructions regarding erection, application, and installation of products. 3. Clean substrate surfaces before applying products.
4. Seal cracks and openings of substrates before applying products.
5. Apply manufacturer’s required or recommended substrate primer, sealer, or
conditioner before applying products in contact or bond.
1.4 EXECUTION
A. Cutting and Patching:
1. Employ skilled and experienced tradesmen to perform cutting and patching work.
2. Submit a written request, in advance of cutting or altering elements which affect:
a. Structural integrity of an element.
b. Integrity of weather-exposed or moisture-resistant elements.
c. Efficiency, maintenance, or safety of an element.
d. Visual quality of sight exposed elements.
3. Execute cutting, fitting, and patching to complete work, and to:
a. Fit several parts together, to integrate with other work.
b. Uncover work to install or correct ill-timed work.
c. Remove and replace defective and non-conforming work.
d. Remove samples of installed work for testing.
e. Provide openings in elements of the work for penetrations of mechanical and electrical work.
4. Execute work by methods that will avoid damage to other work, and will provide
proper surfaces to receive patching and finishing.
5. Cut masonry and concrete materials using a masonry saw or core drill.
6. Restore work with new products in accordance with requirements of the Contract.
7. Fit work tight to pipes, sleeves, ducts, conduit, and other penetrations.
8. Maintain the integrity of wall, ceiling, and floor construction; completely seal voids.

R.S. ROQUE ARCHITECTS 37
9. Refinish surfaces to match adjacent finishes. For continuous surfaces, refinish to the nearest intersection; for an assembly, refinish the entire unit.
10. Identify any hazardous substance or condition exposed during the work to the
Employer’s representative for a decision or remedy. B. Installation:
1. Refer to the installation requirements in individual Specifications
Sections. 2. For each product, inspect the substrate and conditions under which the work will
be performed. Do not proceed with the work until the unsatisfactory conditions have been corrected.
3. Comply with manufacturer's published installation instructions and
recommendations, to the extent that instructions and recommendations are more explicit or stringent than requirements in the Contract.
4. Inspect products ready for installation immediately upon delivery to the Site.
a. Inspect products immediately before the start of application, installation, or
erection.
b. Reject damaged and defective products.
5. Verify and check dimensions and measurements before the start of application, installation or erection.
6. Coordinate the closing-in of work with required inspections and tests.
a. Do not cover work until inspected and approved by the appropriate person
or entity.
b. Uncover work that has not been inspected as directed by the Employer’s representative.
7. Provide fasteners, attachments, connection devices, and methods as indicated on
the Drawings, or as specified.
a. Where not indicated or specified, provide appropriate methods necessary for securing the work.
b. Secure work plumb, level and true to line.
b. Provide for expansion and building movement.

R.S. ROQUE ARCHITECTS 38
1.5 CLEANING
A. Cleaning During Construction: Coordinate with Section 01500 - Temporary Facilities and Controls.
END OF SECTION

R.S. ROQUE ARCHITECTS 39
SECTION 02050 DEMOLITION AND REMOVAL
PART 1 GENERAL
1.1 SUMMARY
A. Section Includes:
1. Demolition and removal of existing structures, concrete pads, water lines, sewer lines, fences, and other items as indicated on the Drawings, and as required to accomplish the work.
2. Disconnection, capping and identification of utilities.
3. Removal and disposal of miscellaneous items that will be a hindrance or
hazardous to the work to be done, as directed by the Engineer.
4. Demolition of designated structures, foundations, walls, columns, beams and roofs.
5. Removal of suspended ceilings and components; light fixtures, grills and diffusers.
6. Removal of designated partitions and components; frames, doors and windows.
7. Removal of designated building equipment, fixtures and cabinetry.
8. Removal of designated finishes and specialty items.
9. Disconnection, capping and identification of utilities.
10. See Mechanical Sections for fire sprinkler, air conditioning and ventilation systems
requirements.
11. See Electrical Sections for lighting, power and alarm systems requirements.
12. Protection of materials removed and stored for re-use.
13. Construction and maintenance of temporary partitions to allow continual occupancy of adjacent building areas.
14. Disposal of materials at approved off-site location(s).
15. Procedures for safe conduct of the work.
16. Protection of property to remain.
17. Coordination with other work.
1.2 DESCRIPTION OF WORK
A. The extent of the demolition and removal work is indicated on the Drawings and as

R.S. ROQUE ARCHITECTS 40
specified herein, and includes the demolition of designated existing construction, equipment, fixtures and cabinetry; protection of materials for re-use; construction of temporary partitions; disconnection, capping and identification of utility services; removal and disposal of debris; and protection of property to remain.
1.3 SUBMITTALS
A. Section 01330 - Submittal Procedures: Procedures for submittals.
1. Submit a demolition and removal plan for approval before work begins. Include
procedures for careful removal and disposition of the materials specified to be salvaged, disconnection schedule for utility services, coordination with other work, and a detailed description of methods and equipment to be used for each, and the sequence of operation.
1.4 REQUIREMENTS
A. Conform to Section 01560 - Environmental Protection and applicable codes and
regulations of authorities having jurisdiction for demolition, removal and disposal.
B. Obtain written clearances from all public and private utility companies and agencies serving the Site prior to the start of any demolition work. Request that each utility agency mark the location of their utility service.
C. Obtain all required government Permits.
D. Conform to applicable regulatory procedures if hazardous, toxic or contaminated materials
are encountered. Immediately notify the Engineer, in writing.
E. Conduct demolition to minimize impact on existing and adjacent structures. Protect existing structures, utilities, and other items of properties to remain from damage during demolition and removal operations.
F. Minimize interference with adjacent building occupancies.
G. Immediately cease operations if adjacent structures appear to be in danger, and take
appropriate corrective measures to ensure safety of the structures and occupancies.
1.5 PROJECT CONDITIONS
A. Provide, erect, and maintain temporary shoring, dust barriers, and security and protection barriers.
B. Conduct demolition to minimize interference with adjacent building areas.
C. Maintain protected access and egress at all times.
D. The use of explosives will not be permitted.
PART 2 PRODUCTS

R.S. ROQUE ARCHITECTS 41
Not Used
PART 3 EXECUTION
3.1 EXAMINATION
A. Section 01700 - Execution Requirements: Verification of existing conditions before starting the work.
B. Verification of Conditions: Verify that measurements, surfaces, materials, substrates and
conditions are as indicated.
C. Report, in writing, prevailing conditions that will adversely affect satisfactory execution of the work of this Section, Do not proceed with the work until the unsatisfactory conditions have been corrected.
3.2 PREPARATION
A. Construct and maintain weatherproof closures for unprotected existing openings.
B. Construct and maintain temporary partitions or barriers to prevent the spread of dust,
fumes, noise and smoke to adjacent occupied facilities.
C. Protect existing work not indicated to be altered or removed.
D. Provide bracing and shoring as required for work to remain.
E. Disconnect, remove and cap designated utility services within the demolition area. Mark the location of disconnected utilities. Identify and indicate the capped locations on the Project Record Documents.
3.3 REMOVAL
A. Do not begin demolition until authorization has been received from the
Engineer.
B. Notify the Engineer, in writing, ten (10) working days prior to commencement of the work.
C. Construct demolition in an orderly and careful manner. Protect existing construction to remain.
D. Where indicated, remove foundation walls and footings to the dept below finished grade,
as shown.
E. Remove concrete curbs, walks and asphalt paving on grade. Backfill, rough grade and compact areas affected by the demolition.
F. Dust and Noise Control:
1. Dust resulting from the demolition shall be controlled to prevent the spread to
occupied portions of the area, and to avoid creation of a nuisance in surrounding

R.S. ROQUE ARCHITECTS 42
areas. The use of water will not be permitted when it will result in, or create hazardous, objectionable conditions, flooding or pollution.
2. Noise associated with the demolition shall be minimized by the selection and use of the proper equipment, procedures implemented, time of day, or day of the week the work is to be accomplished, to minimize the adverse effects of noise from operations and activities of the Contractor.
G. Traffic Control Plan: Where pedestrian and driver safety is endangered in the area of the
removal work, install traffic barricades with flashing lights.
H. Existing Work: Protect existing work which is to remain in place, be reused, or remain the property of the Employer. Repair items, which are to remain but are damaged during performance of the work, to their original or better condition or replace with new. Provide new supports and reinforcements to existing construction weakened by the demolition and removal work. Repairs, reinforcements and structural replacements must be approved by the Engineer.
I. Relocations: Perform removal and reinstallation of relocated items, as indicated, with
workmen skilled in the trades involved. Coordinate with the agency that has jurisdiction over a utility to be relocated. Repair items to be relocated, which are damaged or replace damaged items with new undamaged items, as approved by the Engineer.
J. Ownership of Materials: Except where specified in other Sections, all material and
equipment removed, and not reused, shall become the property of the Contractor and shall be removed from the Site. The ownership of materials resulting from demolition, and materials and equipment removed, is vested in the Contractor upon approval of the Contractor' ' s demolition and removal plan and procedures, and authorization by the Engineer. The Employer will not be responsible for the condition or loss of, or damage to, such property after the Contract award. Prospective purchasers shall not be allowed on the Site to view materials and equipment to be sold by the Contractor.
K. Salvage: The Contractor shall remove existing facilities, as necessary or as indicated;
salvage usable materials as directed; store, transport, stockpile and / or protect materials at the location designated. All salvaged materials shall remain the property of the Employer.
L. Disposition:
1. Refuse resulting from demolition operations shall be hauled to an approved
disposal site(s) or landfill and shall be disposed of in a manner to meet all applicable federal and local requirements, regulations and laws regarding environmental protection, health, safety and public welfare.
2. Remove rubbish and debris from the Site daily. Do not allow accumulation inside
or outside the building. Store materials that cannot be removed daily in areas designated by the Engineer.
3. Materials shall not be left on the Site, moved to adjoining properties or areas,
or be buried on-site.
4. Refuse may not be burned on the Site.
R.S. ROQUE ARCHITECTS 43
5. Remove and promptly dispose of contaminated, vermin infested, and dangerous
materials encountered. M. Restore damaged surfaces, equipment and fixtures to their condition prior to beginning
the work, with the same type materials, size and finish as the existing. Damage to existing facilities, structures, utilities or other work to remain shall be repaired by the Contractor using materials equal to or better than those existing, and at the Contractor' ' s expense.
3.4 CLEANUP
1. Upon completion of demolition and removal operations, the entire area shall be cleaned of
all debris and rubbish in a manner satisfactory to the Engineer.
2. Leave the areas of work in a broom clean condition.
END OF SECTION

R.S. ROQUE ARCHITECTS 44
DIVISION 2 - SITE WORK
SECTION 02102 - CLEARING AND GRUBBING
PART 1 - GENERAL
1.01 WORK INCLUDED
A. Clearing and grubbing the Site prior to the grading work
1.02 RELATED WORK
A. Section 02200 - Earthwork
1.03 QUALITY ASSURANCE
A. Use adequate numbers of skilled workers thoroughly trained and experienced.
1.04 PROTECTION
A. Roads and adjoining land: Keep roads and adjoining land free of dirt and debris at all times.
B. Blasting: The use of explosives will not be permitted.
PART 2 - PRODUCTS (None)
PART 3 - EXECUTION
3.01 CLEARING: Clearing shall consist of the felling, trimming and cutting of trees into sections, and the satisfactory disposal of the trees and other vegetation designated for removal, including downed timber, snags, brush, and rubbish occurring within the areas to be cleared. Cut off flush with or below the original ground surface trees, stumps, roots, brush and other vegetation in areas to be cleared. Remove surface boulders.
3.02 GRUBBING: Grubbing shall consist of the removal and disposal of roots larger that 3 inches in
diameter, matted roots and designated stumps from the indicated grubbing areas. Excavate this material together with logs, organic and metallic debris, brush and refuse and remove to a depth of not less than 12 inches (unless indicated otherwise on plans and/or in other specification sections) below the original soil surface in areas indicated to be grubbed and in areas indicated as construction areas. Fill depressions made by grubbing with suitable material and compact in accordance with the requirements specified in Section 02200 Earthwork to make the profile of the new surface match that of the existing adjacent surface of the ground.
3.03 DISPOSAL OF CLEARED AND GRUBBED MATERIALS:

R.S. ROQUE ARCHITECTS 45
Remove from the Site unless indicated otherwise on the drawings and/or other specification sections.
END OF SECTION
R.S. ROQUE ARCHITECTS 46
SECTION 02200 - EARTHWORK PART 1 - GENERAL
1.01 WORK INCLUDED
A. Building footing excavation, back filling, under slabs filling, compaction, and
dewatering.
1.02 QUALITY ASSURANCE
A. Use adequate numbers of skilled workers thoroughly trained and experienced.
1.03 APPLICABLE PUBLICATIONS: The publication listed below form a part of this specification to
the extend referenced. The publications are referred to in text by the basic designation only.
A. American Society for Testing and Materials (ASTM) Publications:
C33-84 C136-84
Concrete Aggregates Sieve Analysis of Fine and Coarse Aggregates
D1140-54 (1971) Amount of material in soils finer than the No.
200 (75 um) Sieve
D1556-82 Density of Soil in Place by the
Sand-Cone method
D1557-78 Moisture Density Relations of Soils and Soil
Aggregate Mixtures Using 10-lb. (4.54 kg) Rammer and 18-inch (45 7 mm) Drop
D2419-74 (1979) Test for Sand equivalent value of soils and fine
aggregate
D2487-83 Classification of Soils for Engineering
Purposes
D3017-78 Moisture content of soil and soil aggregate in place
by Nuclear Method (Shallow Depth)

R.S. ROQUE ARCHITECTS 47
D4318-83 Liquid limit, Plastic limit and plasticity index of Soils.
1.04 SUBMITTALS
A. Compaction test results: In accordance with Part 3 of this section.
1.05 DELIVERY AND STORAGE:
Deliver and store materials in a manner to prevent contamination or segregation.
PART 2 - PRODUCTS
2.01 SOIL MATERIALS: In general, shall be free of debris, roots, wood, scrap, material, vegetable matter, refuse, soft unsound particles, deleterious or objectionable materials. A. Granular Fill: Capillary water barrier under building pad shall conform to the
requirements for soil materials under above and shall be a clean, coarse grained crushed stone, uncrushed gravel, or crushed gravel conforming to the following gradation: 90 to 100 percent passing the ¾ inch sieve and zero to five percent passing the No. 4 sieve and with a sand equivalent of not less than 50 when tested in accordance with ASTM D 2419.
B. Selected Fill: Material shall be coral or basalt and shall be free or organic and other
perishable matters and fragments larger than 4” in any dimension, and shall conform to the following requirements:
SIEVE SIZE PERCENT PASSING WEIGHT
3 inches 100 No. 4 30-60 No. 200 8-25
Liquid limit 25 maximum Plasticity index 6 maximum
C. Structural Fill shall be a non-expansive fill material such as dredged coral and or
quarried material having a plasticity index not greater than 15 and liquid limit not more than 40.
PART 3 - EXECUTION
3.01 SURFACE PREPARATION
A. Unsuitable Material: Vegetable matter, sod, muck, and rubbish shall be removed
under concrete slabs.
3.02 EXCAVATION
R.S. ROQUE ARCHITECTS 48
A. General: After excavation to the dimensions indicated on the drawings, the exposed bottom surface of outside building areas to be filled shall be scarified to a depth of 6 to 8 inches, moisture conditioned as necessary and re-compacted to at least 95 percent compaction in accordance with ASTM D 1556 and D 1557. Keep excavations free from water while construction is in progress. Notify the Soils Engineer immediately in writing in the event that it becomes necessary to remove hard, soft, weak, or wet material to a depth greater than indicated. Excavations cut below the depths indicated shall, unless otherwise specified, be refilled with structural fill and be compacted to 95 percent of ASTM D1557 maximum density. Soil disturbed or weakened by the Contractor’s operations and soils permitted to soften from exposure to weather shall be excavated to 95 percent of ASTM D1557 maximum density. All additional work of this nature will be at the Contractor’s expense.
B. Excavations for Proposed Buildings:
1. For concrete pads, the existing sub grade area shall be excavated to a depth below the planned bottom of the pad and filled with 8-inch maximum lifts of structural fill to the limits shown on the drawings. If soft, yielding soil, as determined by the Soils Engineer, is encountered at the excavated depth, then the thickness of the structural fill under the thickened slab edge shall be increased. Each lift shall be compacted to at least 95 percent of the maximum dry density as determined by ASTM D 1557, the top 6 inches, which shall be compacted to 95 percent.
2. For building footings, excavation shall be to the planned bottom of the footing.
If soft, yielding soil, as determined by the Soils Engineer, is encountered at this depth, additional excavation shall be done to the depth equal to one-footing depth, and filled with structural fill compacted to at least 95 percent maximum density. If the soil is still soft and yielding at this excavated depth, as determined by the Soils Engineer, the soils shall be over excavated for an additional depth equal to one-footing width below the planned footing bottom. After the over excavation is completed, the over excavated areas shall be backfilled with general fill material with each 8-inches maximum lift compacted to at least 95 percent maximum density, the top 12-inches shall be structural fill compacted to at least 95 percent maximum density. If the bottom of the over excavated area is still too soft, as determined by the Soils Engineer, a 12-inch layer of granular fill, as specified in paragraph 2.01A of this section, shall be placed on the bottom before placing the general fill.
3.03 FILLING AND BACK FILLING
A. Fill beneath structures: Under spread footings and concrete slabs, shall be placed in
accordance with the dimensions shown on the drawings and in lifts of maximum 8 inches thick with each lift compacted to 95 percent maximum density, before the overlaying lift is placed. Concrete slabs-on-grade floors shall be supported by granular fill and/or structural fill to the limits shown on the drawings. Backfill adjacent to structural elements shall be placed as far as practicable as the adjacent structural elements have been completed and accepted. Backfill against concrete shall be done only when directed by the Soils Engineer.
3.04 COMPACTION: Testing shall be in accordance with ASTM D 1556 and D1557 to

R.S. ROQUE ARCHITECTS 49
maximum densities indicated in paragraph 3.02 and 3.03 of this section.
A. Tests: Fill, backfill and granular fill shall be tested in accordance with ASTM C136 for conformance to ASTM C33, ASTM D2419 and ASTM D2487 gradation limits. Test fill and backfill for material finer than the No. 200 sieve in accordance with ASTM D1140. Test fill and backfill for liquid limit and for plasticity index in accordance with ASTM D4318. Test fill and backfill materials for moisture density relations in accordance with ASTM D1557. Perform one of each of the required tests for each material used when directed. Provide additional tests as specified above for each source change. Perform density tests in randomly selected locations and in accordance with ASTM D1556 as follows:
Materials Test Frequency
1. Fill and Backfill 1 per lift per 200 SF 2. Sub grade 1 per lift per 200 SF 3. Under footings 1 per lift per 100 SF & each unit 4. Under slabs and
Other structures 1 per lift per 100 SF
END OF SECTION
R.S. ROQUE ARCHITECTS 50
DIVISION 3 - CONCRETE
SECTION 03300 - CAST IN PLACE CONCRETE PART 1 - GENERAL
1.01 WORK INCLUDED
A. Provided cast in place concrete as indicated on the drawings, and as required for a complete installation.
1.02 SUBMITTALS
A. Shop Drawings: The following shop drawings shall be submitted to and approved by
the Engineer before work is started.
1. Reinforcing steel drawings: Shop drawings for reinforcing steel shall be prepared in accordance with ACI 315. They shall indicate bending diagrams, assembly diagrams, splicing and laps of rods and shapes, dimensions and details of bar reinforcing and accessories. Scaled dimensions from structural drawings shall not be used in determining the lengths of reinforcing rods.
2. Formwork Drawings: Shop drawings shall cover all formwork required. They
shall show general arrangement of forms, sizes and grades of lumber, panels and related components. Shop drawings shall indicate schedules of placement, construction and control joints and their method of forming: locations of inserts, tees, sleeves and other related items.
B. Contractor - Furnished Mix Design: A concrete mix design for each class of concrete
included in the work shall be submitted to the Engineer for approval.
1.03 DELIVERY AND STORAGE
A. Cement: Cement shall be stored immediately upon receipt. Cement in bags shall be stored in a suitable weatherproof structure which shall be as air-tight as practicable, floor shall be elevated above the ground a distance sufficient to prevent the absorption of moisture.
Bags shall be stacked close together to reduce circulation of air but shall not be stacked against outside walls; the manner of storage shall permit easy access for inspection and identification of each shipment. Bulk cement shall be transferred to elevated air tight and weatherproof bins. At the time of use all cement shall be free flowing and free of lumps. Cement that has been in storage longer than 6 months will be tested by standard mortar tests or other tests as deemed necessary by the Engineer to determine its suitability for use and such cement shall not be used without approval of the Engineer.
B. Aggregates: Aggregates shall be stored on areas covered with tightly laid wood
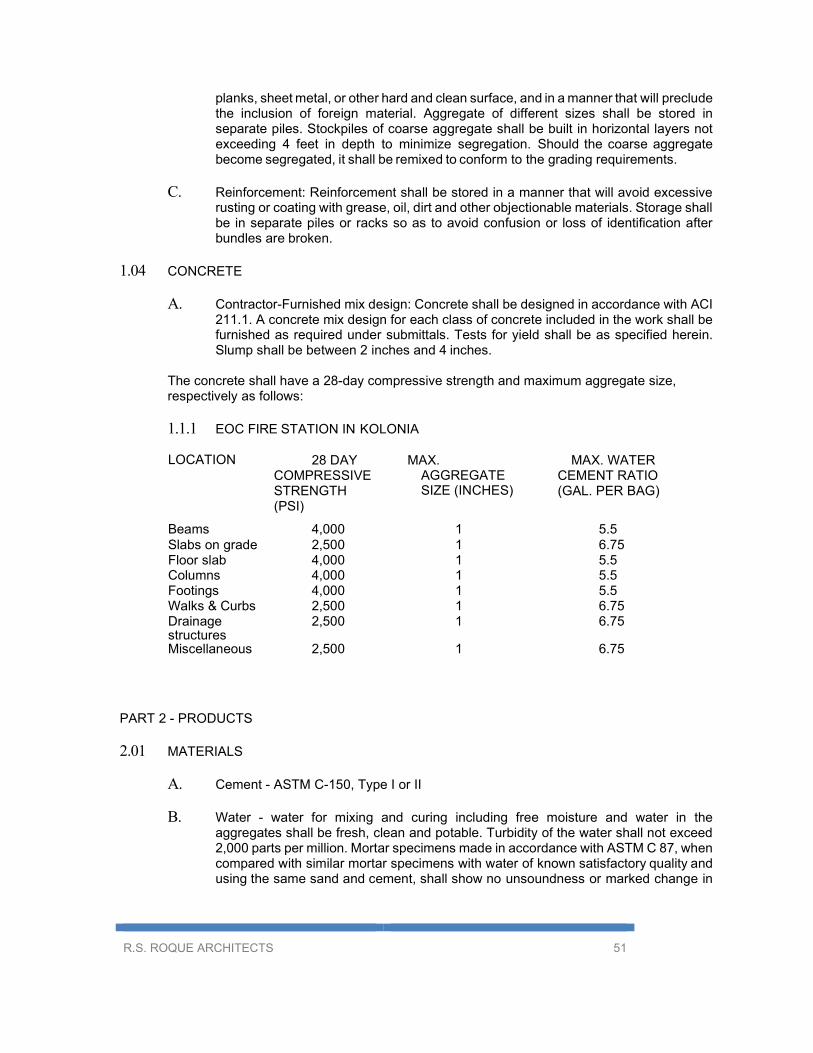
R.S. ROQUE ARCHITECTS 51
planks, sheet metal, or other hard and clean surface, and in a manner that will preclude the inclusion of foreign material. Aggregate of different sizes shall be stored in separate piles. Stockpiles of coarse aggregate shall be built in horizontal layers not exceeding 4 feet in depth to minimize segregation. Should the coarse aggregate become segregated, it shall be remixed to conform to the grading requirements.
C. Reinforcement: Reinforcement shall be stored in a manner that will avoid excessive
rusting or coating with grease, oil, dirt and other objectionable materials. Storage shall be in separate piles or racks so as to avoid confusion or loss of identification after bundles are broken.
1.04 CONCRETE
A. Contractor-Furnished mix design: Concrete shall be designed in accordance with ACI
211.1. A concrete mix design for each class of concrete included in the work shall be furnished as required under submittals. Tests for yield shall be as specified herein. Slump shall be between 2 inches and 4 inches.
The concrete shall have a 28-day compressive strength and maximum aggregate size, respectively as follows:
1.1.1 EOC FIRE STATION IN KOLONIA
LOCATION 28 DAY
COMPRESSIVE STRENGTH (PSI)
MAX. AGGREGATE SIZE (INCHES)
MAX. WATER CEMENT RATIO (GAL. PER BAG)
Beams 4,000 1 5.5 Slabs on grade 2,500 1 6.75 Floor slab 4,000 1 5.5 Columns 4,000 1 5.5 Footings 4,000 1 5.5 Walks & Curbs 2,500 1 6.75 Drainage structures
2,500 1 6.75
Miscellaneous 2,500 1 6.75
PART 2 - PRODUCTS
2.01 MATERIALS
A. Cement - ASTM C-150, Type I or II
B. Water - water for mixing and curing including free moisture and water in the aggregates shall be fresh, clean and potable. Turbidity of the water shall not exceed 2,000 parts per million. Mortar specimens made in accordance with ASTM C 87, when compared with similar mortar specimens with water of known satisfactory quality and using the same sand and cement, shall show no unsoundness or marked change in

R.S. ROQUE ARCHITECTS 52
setting and the comprehensive strength of mortar specimens at 28 days shall be at least 95 percent of the compressive strength of the specimens made with water of known satisfactory quality.
C. Aggregates - Aggregates shall be normal weight and shall conform to ASTM C 33 except as modified herein. All aggregates for exposed concrete surfaces shall be obtained from one source. Aggregates shall be free from any substance, which may be deleteriously reactive with the alkalis in the cement in an amount sufficient to cause excessive expansion of the concrete. Acceptability of the aggregate shall be based upon satisfactory evidence furnished by the Contractor to the Engineer for approval, that the aggregate is free from such materials.
1. Fine aggregates from different sources of supply: Fine aggregates from
different sources of supply shall not be mixed or stored in the same stockpile or use alternately in the same structure. The fineness modulus of fine aggregates shall be not less than 2.40 or greater than 2.90 except as listed herein for 0.375 and 0.25 maximum sizes.
Fineness modulus greater then 0.20 more or less than that of the representative sample submitted shall be rejected unless at the option of the Engineer the aggregate is accepted subject to by the Engineer and for which no change in the contract price will be made. Fine aggregate shall be graded according to the following limits:
Sieve Percentage passing
3/8 inch 100 No. 4 95 to
100 No. 8 80 to
100 No. 16 50 to 85 No. 30 25 to 60 No. 50 10 to 30 No. 100 2 to 10
The fineness modulus of fine aggregate for corresponding coarse aggregate maximum sizes shall be as follows:
Coarse Aggregate: Maximum size Fine modules
0.5 inch and larger 2.40-2.90
0.375 inch 2.60-3.00 0.25 inch 2.90-3.20
1. Coarse Aggregate: Grading of coarse aggregate shall be in accordance with the following tables:
a. Separate sizes of coarse aggregates shall be combined with other
sizes of the proportioning plant in proportions by weight to produce an aggregate meeting the grading specified herein.
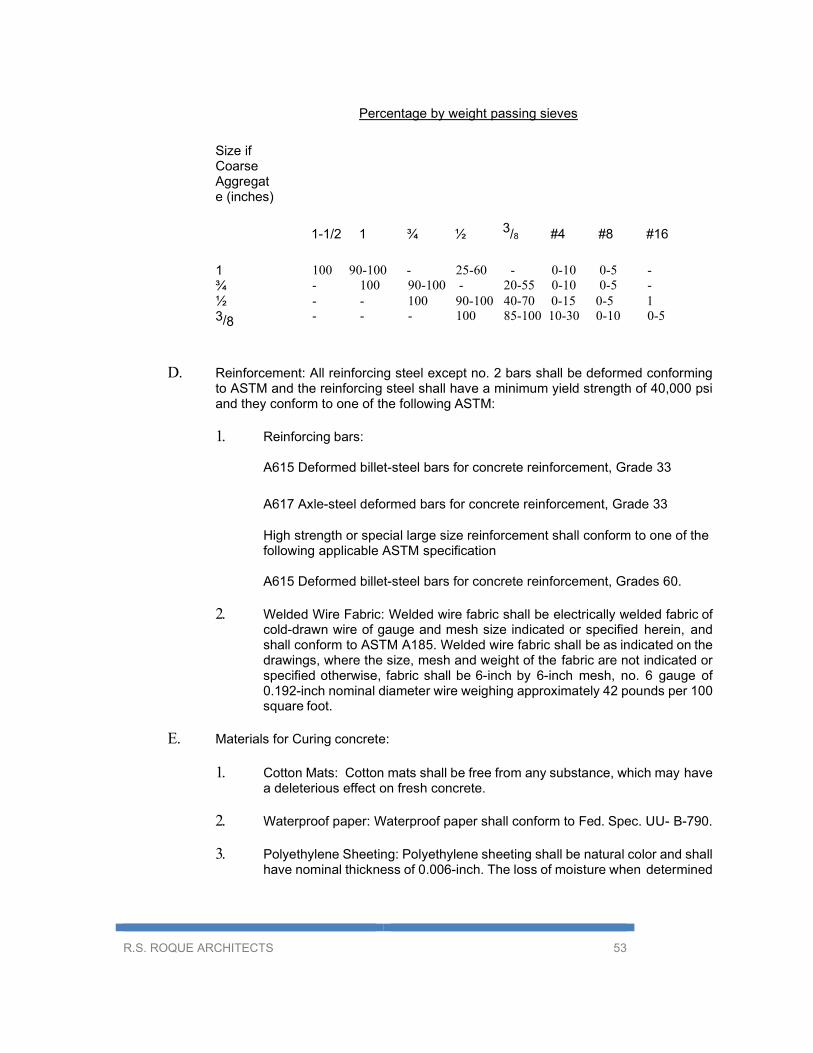
R.S. ROQUE ARCHITECTS 53
Percentage by weight passing sieves
Size if Coarse Aggregate (inches)
1-1/2 1 ¾ ½ 3/8 #4 #8 #16
1 ¾ ½ 3/8
D. Reinforcement: All reinforcing steel except no. 2 bars shall be deformed conforming to ASTM and the reinforcing steel shall have a minimum yield strength of 40,000 psi and they conform to one of the following ASTM:
1. Reinforcing bars:
A615 Deformed billet-steel bars for concrete reinforcement, Grade 33
A617 Axle-steel deformed bars for concrete reinforcement, Grade 33
High strength or special large size reinforcement shall conform to one of the following applicable ASTM specification
A615 Deformed billet-steel bars for concrete reinforcement, Grades 60.
2. Welded Wire Fabric: Welded wire fabric shall be electrically welded fabric of
cold-drawn wire of gauge and mesh size indicated or specified herein, and shall conform to ASTM A185. Welded wire fabric shall be as indicated on the drawings, where the size, mesh and weight of the fabric are not indicated or specified otherwise, fabric shall be 6-inch by 6-inch mesh, no. 6 gauge of 0.192-inch nominal diameter wire weighing approximately 42 pounds per 100 square foot.
E. Materials for Curing concrete:
1. Cotton Mats: Cotton mats shall be free from any substance, which may have
a deleterious effect on fresh concrete.
2. Waterproof paper: Waterproof paper shall conform to Fed. Spec. UU- B-790.
3. Polyethylene Sheeting: Polyethylene sheeting shall be natural color and shall have nominal thickness of 0.006-inch. The loss of moisture when determined
100 90-100 - 25-60 - 0-10 0-5 - - 100 90-100 - 20-55 0-10 0-5 - - - 100 90-100 40-70 0-15 0-5 1 - - - 100 85-100 10-30 0-10 0-5
R.S. ROQUE ARCHITECTS 54
in accordance with ASTM C156 shall not exceed 0.055 gram per square centimeter of surface.
4. Polyethylene-coated: Polyethylene coated burlap shall be 4 mils thick white opaque
polyethylene film impregnated or extruded into one side of the burlap. Burlap shall weigh not less than 9 ounces per square yard and shall conform to Fed. Spec. CCC-C-467. The loss of moisture when determined in accordance with ASTM C156 shall not exceed 0.055 gram per square centimeter of surface.
F. Chemical floor hardener: Chemical floor hardener shall be zinc or magnesium flu silicate dissolved in water at one to two and a half pounds per gallon of water, Ashford Formula, Sikagard/Cure Hard or an approved chemical floor hardener.
G. Joint-Sealing Materials: As specified under Section 07920, “Sealants and Caulking”.
H. Expansion Joint Filler: Expansion joint filler shall be preformed type conforming to ASTM D1752.
2.02 FORMS
2. General Requirements: Forms shall be provided for all concrete not indicated or specified
otherwise.
Forms shall be set true to line and grade and maintained so as to insure completed work within the allowable tolerances specified, and shall be mortar- tight. The contractor shall be responsible for the adequacy of forms and form supports. Bolts and rods used for internal ties shall be arranged so that when the forms are remove, all metal will be not less than 2 inches from any surface for concrete which will be exposed to sea water or other destructive agents, not less than 1-1/2 inches for concrete exposed to weathering and for water tight and oil tight concrete, and not less than one inch for unexposed concrete. Wire ties shall not be used where the concrete surface will be exposed to weathering and where discoloration will be exposed. All formwork shall be provided with adequate clean-out openings to permit inspection easy cleaning after all reinforcement had been placed. In columns, walls and similar members of small dimensions the height of forms for each vertical lift shall not exceed 6 feet unless suitable openings are provided at not more than 6-foot vertical intervals to permit proper placing the concrete. Where forms for continuous surfaces are placed successive units, the forms shall be fitted over the completed surface to obtain accurate alignment of the surface and to prevent leakage of mortar. Panel forms shall be constructed to provide tight joints between panels.
All forms shall be constructed so that they can be removed without damaging the concrete. All exposed joints, edges, land external corners shall be chambered a minimum of ¾-inch unless specified otherwise herein. Forms for heavy girders and similar members shall be constructed with a proper chamber as indicated. Concrete for footings may be placed in excavations without forms. The dimensions of excavations in earth shall be not less than 3 inches outside of the concrete lines indicated.
B. Materials for Forms: Forms shall be of wood, plywood, or steel. Forms for concrete
pavements, except on curves, shall be metal; on curves, flexible or curved forms of
R.S. ROQUE ARCHITECTS 55
metal may be used. Wood forms, for surfaces exposed to view in the finished structure and requiring a smooth form finish, shall be plywood. For unexposed surfaces, undressed square-edge lumber may be used. Plywood shall be concrete-form plywood not less than 5/8-inch thick and shall conform to Department of Commerce PS-1 free of raised grain, torn surfaces, worn edges, patches, or other surface defects, which would impair the texture of the concrete surface. Surfaces of steel forms shall be free from irregularities, dents, and sags.
2. Coating: Before placing the concrete, the contract surfaces of forms shall be coated with a non-staining mineral oil or suitable non-staining form coating compound or shall be given two coats of nitro cellulose lacquer, except as specified otherwise.
Mineral oil shall not be used on forms for surfaces, which are to be painted. For surfaces not exposed to view in the finished structure and when the temperatures is above 40 degrees F, sheeting may be wetted thoroughly with clean water. All excess coating shall be removed by wiping with cloths. Reused forms shall have the contact surfaces cleaned thoroughly; those, which have been coated, shall be given an additional application of the coating.
D. Tolerances and Variations: The Contractor shall set and maintain concrete forms to ensure
that, after removal of the forms and prior to patching and finishing, no portion of the concrete work will exceed any of the tolerances specified. Variations in floor levels shall be measured before removal of supporting shores. The contractor shall be responsible for variations due to deflection, when the latter results from concrete quality or curing other than that which has been specified.
PART 3 - EXECUTION
3.01 MIXING:
A. Mixing:
1.1 for EOC/fire station - DESIGN OF CONCRETE MIX Concrete shall be proportioned by Option C, ASTM C-94. Cement and strength requirements shall be in accordance with Table 1 of this specification. Unless otherwise specified, compressive strength shall be 4000 pounds per square inch and air entrainment shall be included. Unless otherwise specified, the concrete mixture shall be designed to use a maximum size coarse aggregate of 1- 1/2 inches. Unless otherwise specified, the slump shall be 3 to 5 inches. Air content by volume shall be 5-7% of the volume of concrete. Calcium chloride or other corrosive accelerators shall not be used unless otherwise specified. The proportioning of cement, sand and gravel, and water shall be such as to produce a workable concrete mixture (neither too sandy nor too harsh), with no more water in the mixture than is necessary to create the required degree of plasticity for proper handling and consolidation. In emergencies, the mixing may be done by hand if so authorized by the Engineer. Mixing shall begin within 30 minutes after the cement has been added to the aggregates. The time of mixing after all cement and aggregates are in the mixer drum shall be not less than one minute for mixers having a capacity of one cubic yard or less; for mixers having a capacity of one time shall be increased 15 seconds for each additional cubic yard or fraction thereof of additional capacity. A reduction in the aforementioned mixing times shall be permitted in accordance with ASTM C94 if mixer performance tests, made at the Contractor’s option and at his expense, indicate adequate mixing times shall be permitted
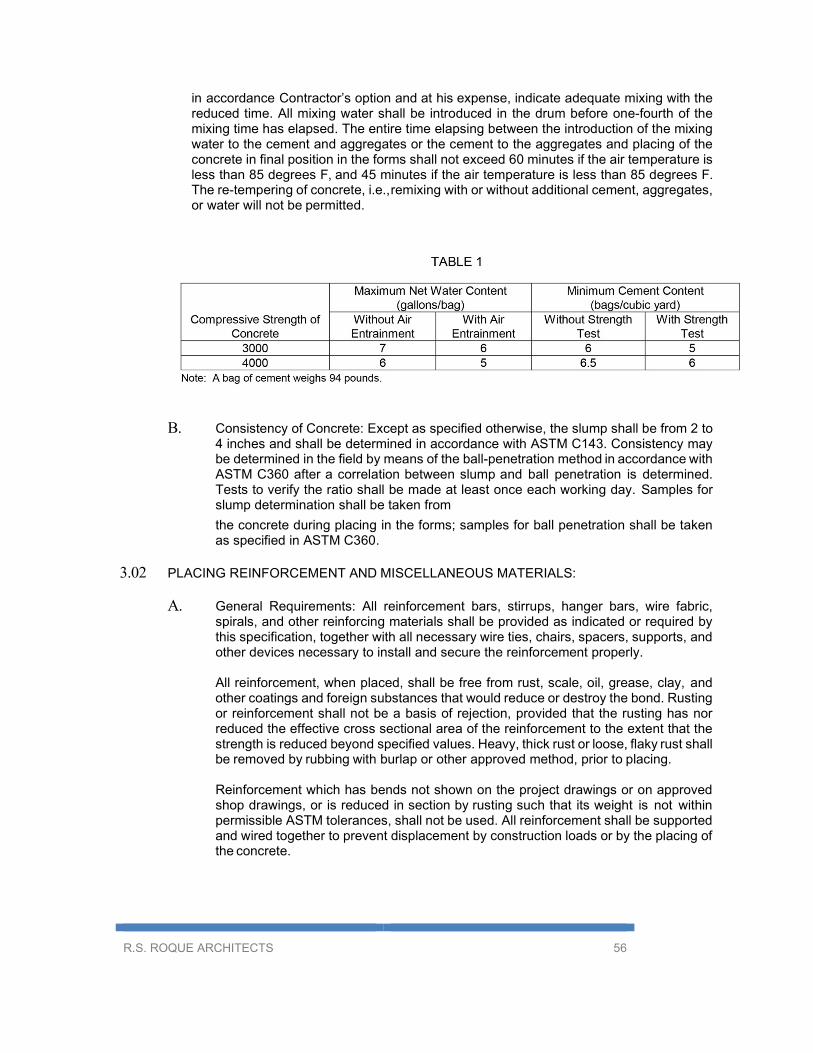
R.S. ROQUE ARCHITECTS 56
in accordance Contractor’s option and at his expense, indicate adequate mixing with the reduced time. All mixing water shall be introduced in the drum before one-fourth of the mixing time has elapsed. The entire time elapsing between the introduction of the mixing water to the cement and aggregates or the cement to the aggregates and placing of the concrete in final position in the forms shall not exceed 60 minutes if the air temperature is less than 85 degrees F, and 45 minutes if the air temperature is less than 85 degrees F. The re-tempering of concrete, i.e., remixing with or without additional cement, aggregates, or water will not be permitted.
B. Consistency of Concrete: Except as specified otherwise, the slump shall be from 2 to 4 inches and shall be determined in accordance with ASTM C143. Consistency may be determined in the field by means of the ball-penetration method in accordance with ASTM C360 after a correlation between slump and ball penetration is determined. Tests to verify the ratio shall be made at least once each working day. Samples for slump determination shall be taken from the concrete during placing in the forms; samples for ball penetration shall be taken as specified in ASTM C360.
3.02 PLACING REINFORCEMENT AND MISCELLANEOUS MATERIALS:
A. General Requirements: All reinforcement bars, stirrups, hanger bars, wire fabric,
spirals, and other reinforcing materials shall be provided as indicated or required by this specification, together with all necessary wire ties, chairs, spacers, supports, and other devices necessary to install and secure the reinforcement properly.
All reinforcement, when placed, shall be free from rust, scale, oil, grease, clay, and other coatings and foreign substances that would reduce or destroy the bond. Rusting or reinforcement shall not be a basis of rejection, provided that the rusting has nor reduced the effective cross sectional area of the reinforcement to the extent that the strength is reduced beyond specified values. Heavy, thick rust or loose, flaky rust shall be removed by rubbing with burlap or other approved method, prior to placing.
Reinforcement which has bends not shown on the project drawings or on approved shop drawings, or is reduced in section by rusting such that its weight is not within permissible ASTM tolerances, shall not be used. All reinforcement shall be supported and wired together to prevent displacement by construction loads or by the placing of the concrete.
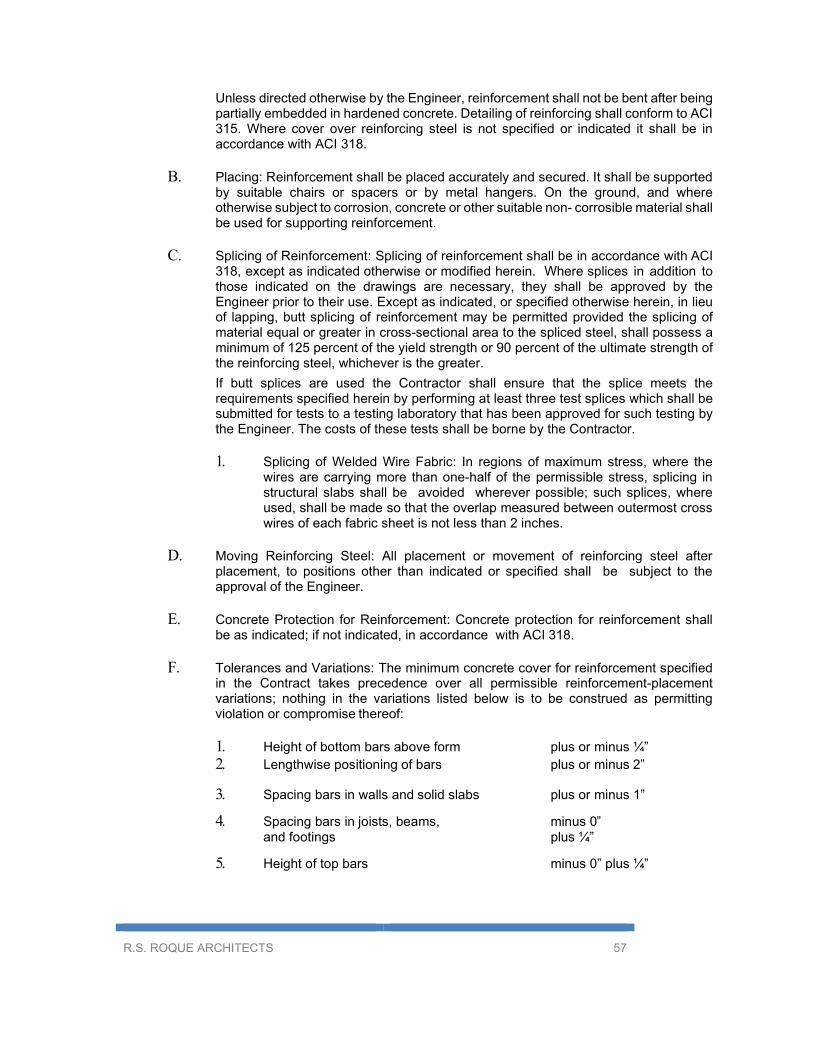
R.S. ROQUE ARCHITECTS 57
Unless directed otherwise by the Engineer, reinforcement shall not be bent after being partially embedded in hardened concrete. Detailing of reinforcing shall conform to ACI 315. Where cover over reinforcing steel is not specified or indicated it shall be in accordance with ACI 318.
B. Placing: Reinforcement shall be placed accurately and secured. It shall be supported
by suitable chairs or spacers or by metal hangers. On the ground, and where otherwise subject to corrosion, concrete or other suitable non- corrosible material shall be used for supporting reinforcement.
C. Splicing of Reinforcement: Splicing of reinforcement shall be in accordance with ACI
318, except as indicated otherwise or modified herein. Where splices in addition to those indicated on the drawings are necessary, they shall be approved by the Engineer prior to their use. Except as indicated, or specified otherwise herein, in lieu of lapping, butt splicing of reinforcement may be permitted provided the splicing of material equal or greater in cross-sectional area to the spliced steel, shall possess a minimum of 125 percent of the yield strength or 90 percent of the ultimate strength of the reinforcing steel, whichever is the greater. If butt splices are used the Contractor shall ensure that the splice meets the requirements specified herein by performing at least three test splices which shall be submitted for tests to a testing laboratory that has been approved for such testing by the Engineer. The costs of these tests shall be borne by the Contractor.
1. Splicing of Welded Wire Fabric: In regions of maximum stress, where the wires are carrying more than one-half of the permissible stress, splicing in structural slabs shall be avoided wherever possible; such splices, where used, shall be made so that the overlap measured between outermost cross wires of each fabric sheet is not less than 2 inches.
D. Moving Reinforcing Steel: All placement or movement of reinforcing steel after
placement, to positions other than indicated or specified shall be subject to the approval of the Engineer.
E. Concrete Protection for Reinforcement: Concrete protection for reinforcement shall
be as indicated; if not indicated, in accordance with ACI 318.
F. Tolerances and Variations: The minimum concrete cover for reinforcement specified in the Contract takes precedence over all permissible reinforcement-placement variations; nothing in the variations listed below is to be construed as permitting violation or compromise thereof:
1. Height of bottom bars above form plus or minus ¼” 2. Lengthwise positioning of bars plus or minus 2”
3. Spacing bars in walls and solid slabs plus or minus 1”
4. Spacing bars in joists, beams, minus 0” and footings plus ¼”
5. Height of top bars minus 0” plus ¼”

R.S. ROQUE ARCHITECTS 58
6. Stirrup spacing
a) For any one stirrup plus or minus 1”
b) For over-all group of stirrups plus or 1”
3.03 CONVEYING AND PLACING CONCRETE:
A. Conveying: Concrete shall be conveyed from the mixer to the forms as rapidly as practicable by proper methods, which will not cause segregation or loss of ingredients. It shall be deposited as nearly as practicable in its final position in the forms. At any point in the conveying, the free vertical drop of the concrete shall not exceed 3 feet. Chuting will be permitted only where the concrete is deposited into a hopper before it is placed in the forms. Conveying equipment shall be cleaned thoroughly before each run. All concrete shall be deposited as soon as practicable after the forms and the reinforcement have been inspected and approved by the Engineer. Concrete, which has segregated in conveying, shall be removed and disposed of as directed by the Engineer.
B. Placing Concrete: No concrete shall be placed after there is evidence of initial set.
Concrete placement will not be permitted when weather conditions prevent proper placement and consolidation. The placement of concrete in uncovered areas, during periods of heavy precipitation will not be allowed except with the specific concurrence of the Engineer. Sub grades of earth or other material shall be properly prepared and, if necessary covered with heavy building paper or other suitable material to prevent the concrete from becoming contaminated. Before placing concrete on porous sub-grades, they shall be dampened. Forms shall be clean of dirt, construction debris and water. Fresh concrete shall not be placed on vertical supporting members such as columns and walls without approval of the Engineer. Concrete shall be deposited in approximately horizontal layers 12 to 20 inches deep in a manner to preclude the formation of cold joint between successive layers. The method of depositing concrete shall be such as to avoid displacing the reinforcement and segregating the aggregate. Concrete shall be worked about the reinforcement and embedded fixtures and into corners and angles of the forms care being taken to avoid overworking, which may result in segregation.
On the bottom of beams, slabs and girders where the congestion of steel near the forms makes placing difficult, a layer of mortar equal to the approved concrete mix, with the coarse aggregates removed and 5- to 6- inch slump, shall be deposited to cover the surface to a depth of approximately one inch before placing the concrete.
Water, which accumulates on the surface of the concrete during placing, shall be removed by absorption with porous materials in a manner that prevents removal of cement. Pumping of concrete through aluminum pipe shall not be permitted.
C. Vibration: All concrete, with the exception of concrete slabs 4 inches or less in depth,
shall be compacted with high frequency, internal mechanical vibrating equipment supplemented by hand spading and tamping. Concrete slabs 4 inches or less in depth shall be consolidated by wood tampers, spading and settling with a heavy leveling straight edge. Vibrators shall be designed to operate with vibratory element submerged in the concrete, and shall have a frequency of not less than 6,000

R.S. ROQUE ARCHITECTS 59
impulses per minute when submerged. The vibrating equipment shall be adequate at all times in number of units and power each unit to consolidate the concrete properly. Vibration of forms and reinforcement shall not be employed except when authorized specifically bythe Engineer. Vibrators shall be discontinued when the concrete has been compacted thoroughly and ceases to decrease in volume.
D. Construction joints: Joints not shown on the drawings shall be made and located so
as to least impair the strength of the structure and shall be subject to approval of the Engineer. In general, they shall be located near the middle of the spans of slabs, beams, and girders unless a beam intersects a girder at this point, in which case the joints in the girders shall be offset a distance equal to twice the width of the beam. Horizontal joints in walls and columns shall be at the underside of floors, slabs, beams or girders and at the top of footings or trade slabs. Beams shall be placed at the same time as slabs. Joints shall be perpendicular to the main reinforcement.
1. Reinforcement in Construction Joints: All reinforcing steel and welded fabric
shall be continued across joints. Keys and inclined dowels shall be provided as indicated. Longitudinal keys at least
2. Preparation of Surface: The surface of the concrete at all joints shall be
thoroughly cleaned and all laitance removed.
3. Bonding: When a bonded construction joint is required, bond shall be obtained by one of the following methods.
a. The use of a bonding compound for concrete, conforming to Mil.
Spec. MIL-B-19235.
b. The use of suitable chemical retardant, which delays but does not prevent settling of the surface mortar. Retarded mortar shall be removed within 24 hours after placing to produce a clean exposed aggregate bonding surface.
c. By roughening the surface of the concrete in proper manner, which
will expose the aggregate uniformly and will not leave laitance, loosened particles of aggregate uniformly and will not leave laitance, loosened particles of aggregate or damaged concrete at the surface.
E. Expansion joints, Cleavage joints, Water stops and Embedded Items:
1. Expansion joints and cleavage joints: Expansion joints and cleavage joints
shall not be less than ½ inch wide except as indicated otherwise. Expansion joints not exposed to weather shall be filled completely with preformed joint material conforming to ASTM D1752. Expansion joints exposed to weather and cleavage joints between vertical masonry surfaces and floor slabs laid on earth shall be filled to a depth of one inch from the surface or face of the concrete with preformed joint material conforming to ASTM D1751 or ASTM D1752. The one-inch deep space above the preformed material shall be cleaned after the concrete has been cured, and when dry, filled flush with joint sealing material. Reinforcement of other embedded metal items bonded to

R.S. ROQUE ARCHITECTS 60
the concrete, except dowels in floors bonded on only one side of joint, shall not be permitted to extend continuously through any expansion joint.
2. Other embedded items: All sleeves, inserts, anchors and embedded items
required for joining work or for its support shall be placed prior to concreting.
All sub-contractors, whose work is related to the concrete or must be supported by it, shall be given sample notice and opportunity to introduce or furnish embedded items before the concrete is placed.
All ferrous metal sleeves, inserts, anchors, and other embedded ferrous items exposed to the weather or where rust should impair the appearance or finish of the structure shall be galvanized.
3. Placing embedded items: Expansion joint material, water stops, and embedded items shall be positioned accurately and supported against displacement. Voids in sleeves, insert and anchor slots shall be filled temporarily with readily removable material to prevent the entry of concrete into the voids. Aluminum shall not be embedded in concrete except where aluminum is protected from directed contact with the concrete.
2. Reinforcing bars: Bars may be moved as necessary to avoid interference with other
reinforcing steel, conduits, or embedded items, but not so as to impair design strengths of the members.
If bars are moved more than one bar diameter, the resulting arrangement of bars shall be subject to the approval of the Engineer.
F. Placing Concrete in Hot Weather: Placing concrete in hot weather shall be in
accordance with ACI 305 except as modified herein. In hot weather, extra care shall be taken to reduce the temperature of the concrete being placed, and to prevent rapid drying of newly placed concrete. When the outdoor ambient temperature is more than 90 degrees F; the temperature of the concrete shall be placed not exceed 90 degrees F; the fresh concrete shall be shaded as soon as possible after placing and curing shall be started as soon as the surface of the fresh concrete is sufficiently hard to permit it without damage.
3.04 SURFACE FINISHES:
A. Repair of Surface defects: All surface defects including tie holes, minor honeycombing and otherwise defective concrete shall be repaired with cement mortar. Cement mortar for patching shall be the same composition as that used in the concrete, except that for exposed surfaces part of the cement shall be white Portland cement to provide a finish floor matching the surrounding concrete.
Patching shall be done as soon as the forms are removed; areas of surfaces, which are to be cured with a curing compound, shall be covered during the application of the compound. All areas to be patched shall be cleaned thoroughly. Minor honeycombed or otherwise defective areas shall be cut out to solid concrete to a depth of not less than one inch.
The edges of the cut shall be perpendicular to the surface of the concrete. The area
R.S. ROQUE ARCHITECTS 61
to be patched and at least 6” adjacent thereto shall be saturated with water before placing and shall be remixed occasionally during this period with a trowel without the addition of water.
A grout of cement and water mixed to the consistency of paint shall then be brushed onto the surfaces to which the mortar is to be bonded. The mortar shall be compacted into place and screened slightly higher than the surrounding surface. Patches shall be cured as specified for the concrete. Holes extending through the concrete shall be filled by means of plunger type gun or other suitable device from the unexposed face. The excess mortar shall be wiped off the exposed face with a cloth. Finished surface shall be protected from stains and abrasions.
As cast finish against steel, plywood, forms and rubber finish shall be equal in workmanship, texture and general appearance to that of sample panels specified herein. Concrete with excessive honeycombing, which exposes the reinforcing steel or other defects, which affect the structural strength of the member, shall be rejected or the defects corrected as directed by the Engineer, and at the expense of the contractor.
B. Finishing of Formed Surfaces: Finishing of formed surfaces shall be accomplished as
soon as practicable after form removal and repair of surface defects. Finishing shall be accomplished as specified herein where indicated.
1. As Cast Finishes:
a. Smooth Form finish: The form facing material shall produce a smooth,
hard, uniform texture on the concrete. Tie holes and defects shall be patched. All fins shall be completely removed.
b. Rough Form Finish: No selected form facing materials are required
for rough form finish surfaces. Tie holes and defects shall be patched. Fins exceeding ¼ inch in height shall be chipped off or rubbed off. Otherwise, surfaces shall be left with the texture imparted by the forms.
C. Un-indicated Finish: Finishes not indicated on the drawings shall be as follows:
1. Smooth Form Finish: For all concrete surfaces exposed to public view.
2. Rough Form Finish: For all concrete surfaces not exposed to public view.
3.05 FLOOR FINISHES:
A. General requirements: The finishes specified herein include surface finishes, treatments, and toppings for floors and slabs. For floors in which drains occur, special care shall be exercised to slope the floors uniformly to the drains.
In all areas where ceramic tile or quarry tile are to be laid, the concrete base slab shall be depressed as indicated to provide a finished floor at the same elevations as
R.S. ROQUE ARCHITECTS 62
surrounding areas. All floor slabs where finish is not indicated or specified shall receive a single steel toweling. Dry cement shall not be placed directly upon the new concrete surface to absorb excess moisture.
B. Sample Panels: Sample panels shall be submitted as specified herein under
“Submittals”.
D. Curing: Finished floor surfaces shall be cured adequately as specified herein. Colored-shake and metallic-aggregate surfaces shall be cured with liquid or wax membrane forming compounds as recommended by the manufacturer of the surfacing material.
1. Curing with Water: Moist or wet curing with water or by complete covering
with waterproof membrane sheets shall be continuous for 7 days at temperatures of 60 degree F and above, and for longer periods at lower temperatures, as necessary.
E. Cleaning: Upon completion of the work, all concrete floors, except those having a sealer-hardener finish, shall be cleaned as follows: After sweeping with an ordinary broom to remove the loose dirt, the finish shall be wetted with soapsuds and rubbed with a scrubbing machine fitted with a wire brush or fine steel wool.
The suds shall be mopped up, and the surface shall be flushed with clean warm water, after which a final scrubbing by hand in lieu of machine scrubbing will be permitted. Floors having sealer-hardener finish shall be cleaned of loose dirt and debris by sweeping with ordinary brooms or by other suitable method.
3.06 PROTECTION:
A. General requirements: Concrete shall be protected adequately from injurious action
by sun, rain, flowing water and mechanical injury, and shall not be allowed to dry out from the time it is placed until the expiration of the minimum curing periods specified herein. Curing shall be accomplished by moist curing or by application of liquid chemical or liquid membrane forming compound, except as specified otherwise herein.
Membrane-forming compound shall not be used on surfaces for which special finish is specified, on any surface to painted, waterproofed, tiled, roofed or where coverings are to be bonded.
Completion of curing shall be initiated immediately following the removal of forms. The temperature of the air next to the concrete shall be maintained at not less than 40 degrees F. for the full curing periods. Heating of the concrete in place shall be affected by venters heaters or steam coils under canvas covers or by other suitable means.
The temperature within enclosures shall not exceed 100 degrees F, and adequate moisture shall be applied to the concrete surface during the heating period to prevent it from drying out.

R.S. ROQUE ARCHITECTS 63
The rate of cooling after the protection period shall be approximately on degree F per hour for the first 24 hours and 2 degrees F per hour thereafter. Concrete shall be protected against freezing for the full curing period specified herein.
B. Curing periods: When the 7-day compression test cylinders, representative of parts
of a structure already placed, indicate that the 28-day strengths may be less than 90 percent of the design strengths, those parts of the structure shall be given additional curing, as directed by the Engineer. Cast-in-place parts of a structure which will be permanently submerged in fresh water may be cured for not less than 12 hours, provided they are submerged immediately thereafter. Curing, except steam curing, shall be as follows:
Time (minimum) Concrete Element (Where applicable)
7 days all concrete not specified otherwise 10 days Pavement not under cover
C. Removal of forms and protection: Forms shall be removed in a manner
which will prevent damage to the concrete. Forms shall not be removed without approval of the Engineer, or before the expiration of the minimum periods specified herein.
Days after placing
Side forms on beams, girders, columns, and walls (lifts 15 feet and under) 1
Forms for columns and walls (lifts over 15 feet) 2
Supporting forms for arches, beams, girders, and slabs 14
Sufficient shoring members to support dead load plus construction loads on beams, girders, slabs and arches shall be provided for a period of 8 days in addition to the 6 days specified herein. If curing temperatures are below 50 degrees F, the minimum time for removal of forms and shores shall be 50 percent greater than specified. The time for removal of forms for structures not included herein shall be as directed by the Engineer. Concrete work shall be protected from damage during the construction.
3.07 MISCELLANEOUS CONSTRUCTION:
A. Concrete Lintels, Coping and Sills: Concrete lintels, coping and sills shall be either cast-in-place or pre-cast concrete. All exposed surfaces shall be smooth and true, with sharp edges
END OF SECTION

R.S. ROQUE ARCHITECTS 64
DIVISION 4 - MASONRY
SECTION 04200 - CONCRETE MASONRY UNIT
PART 1 - GENERAL
1.01 WORK INCLUDED
A. Unit masonry work as indicated on the drawings and specified herein.
1.02 APPLICABLE PUBLICATIONS: The publications listed below form a part of this specification to the extend referenced. The publication are referred to in the text by the basic designation only.
A. American Society for Testing and Materials (ASTM) Publications: A82-
79 Cold-Drawn Steel Wire for Concrete Reinforcement
A615-82 Deformed and Plain Billet-Steel Bars for Concrete
Reinforcement
C90-75 (R1981) Hollow Load-Bearing Concrete Masonry Units
C129-75 (R1980) Non-Load-Bearing Concrete Masonry Units
C144-81 Aggregate for Masonry Mortar
C150-81 Portland Cement
C270-80 (Rev. A) Mortar for Unit Masonry
C476-90 Grout for Reinforced and Non-reinforced Masonry
1.03 SUBMITTALS: Meet the Applicable requirements of Section 01300.
A. Certified Test Reports: Submit certified efflorescence test reports on
masonry units and mortar that are to be exposed to weathering.
Schedule tests far enough in advance of starting masonry work to permit re-testing if necessary. Test five pairs of specimens of each type of masonry unit for efflorescence in accordance with ASTM C 67. If any pair is rated “effloresced,” reject the units represented by the samples.
R.S. ROQUE ARCHITECTS 65
1.04 DELIVERY AND STORAGE: Deliver cementitious materials to the Site in unbroken containers, plainly marked and labeled with manufacturer’s names and brands .
Store cementitious materials in dry, weather tight sheds or enclosures and handle so as to prevent entry of foreign materials and damage by water or dampness. Store masonry units off the ground and handle with care to avoid chipping and breakage. Protect materials from damage and, except for sand, keep dry until used. Cover sand to prevent instrusion of water and foreign materials and to prevent drying. Do not use materials containing frost or ice.
PART 2 - PRODUCTS
2.01 CONCRETE MASONRY UNITS: Units of modular dimensions and air, water, or steam
cured. Store Type II units at the Site before use a minimum of 28 days for air cured units, 10 days for atmospheric steam or water cured units, and 3 days for units cured with steam at a pressure of 120 to 150 psi and at a temperature of 350 to 365 degrees for at least 5 hours. Surfaces of units which are to be plastered or stuccoed shall be sufficiently rough to provide a suitable bond; elsewhere, exposed surfaces of units shall be comparatively smooth and of uniform textures.
A. Hollow Load-Bearing units: ASTM C 90, Grade N-I or N-II,
made with normal weight aggregate, Provide load-bearing units for all exterior walls, foundation walls, load-bearing walls, and shear walls.
B. Hollow Non-load-Bearing Units: ASTMC 129 , Type I or II, made with normal
weight aggregate. Load-beating units may be provided in lieu of non-load-bearing units.
2.02 MORTAR
A. Portland Cement: ASTMC 150, Type I or II.
B. Hydrated Lime: ASTMC 207, Type S.
C. Masonry Cement: ASTMC 91, except that for masonry cement used in a mortar
for exterior walls, the air content of the mortar specimen shall be not more than 16% by volume in lieu of 22%. Container shall bear complete instruction’s for proportioning and mixing to obtain the required types of mortar.
D. Sand: ASTMC 144.
E. Water: Clean, potable and free from substances which could adversely affect
the mortar.
F. Mortar Types: ASTMC 270, Type M for foundation walls; Type N or S for non-

R.S. ROQUE ARCHITECTS 66
load-bearing; Type S for all other masonry work; except where higher compressive strength is indicated on structural drawings.
2.03 ACCESSORIES
A. Horizontal and vertical reinforcing bars: ASTMA 615.
PART 3 - EXECUTION
3.01 INSTALLATION: Coordinate masonry work with the work of other trades to
accommodate built-in items to avoid cutting and patching. Do not change source of supply of materials after the work has started if the appearance of the finished work would be affected.
A. Protection:
1. Stains: protects exposed surfaces from mortar and other stain. When
mortar joints are tooled, remove mortar from expose surfaces with fiber brushes and wooden paddles. Protect base of walls from splash stains by covering adjacent ground with sand, saw dust or polyethylene.
2. Loads: Do not apply uniform loads for at least 12 hours or
concentrated loads for at least 72 hours after masonry is constructed.
3. Provide temporary bracing as required to prevent damage during
construction.
B. Workmanship: Carry masonry up level and plumb all around. Furnish and use story poles or gage rods throughout the work. Changes in coursing or bonding after the work is started will not be permitted. Do not carry one section of the walls is started will not be permitted. Do not carry one section of the walls up in advance of the others. Step back unfinished work for joining with new work. Toothing will be not permitted. Check heights of masonry with an instrument at each floor and at sills and heads of openings to maintain the level of the walls. Build in door and window frames, louvered openings, anchors, pipes, ducts, and conduits carefully and neatly as the masonry work progresses. Fill spaces around metal door frames solidly with mortar. Handle masonry units with care to avoid chipping, cracking and spalling of faces and edges. Drilling, cutting, fitting and patching to accommodate the work of others shall be performed exposed work.
C. Mortar Mixing: Measure mortar materials in proper containers to maintain
control and accuracy of proportions. Do not measure materials with shovels. Mix mortar in mechanical batch mixer for not less than 3 nor more than 5 minutes after all ingredients are in so as to produce a uniform mixture. Add water gradually as required to produce a workable consistency. Do not load mixer

R.S. ROQUE ARCHITECTS 67
beyond its rated capacity. Keep mortar boxes, pans, and mixer drums clean and free of debris and dried mortar. Retemper mortar which has stiffened because of evaporation by adding water and mixing to obtain a workable consistency. Do not use or retemper mortar which has not been placed in final position within 2-1/2 hours after the initial mixing. Do not use anti-freeze compounds, salts, or any other substance to lower the freezing point of mortar.
END OF SECTION
R.S. ROQUE ARCHITECTS 68
DIVISION 5 - METALS
SECTION 05010 - MISCELLANEOUS METALS
PART 1 - GENERAL
1.01 SCOPE: Furnish material, equipment and perform labor required to complete:
A. Steel fasteners, plates, bolts, and anchorage
B. Other miscellaneous metals as indicated
See drawings for sizes, detail and location of work required.
C. carbon steel A36
1.02 RELATED WORK
A. Section 084000 – doors and windows
B. Section 09900 – Painting
C. concrete
1.03 QUALITY WORK:
A. Quality control provisions of General requirement apply to this section. Approvals except those field tests and applications shall be submitted for approval.
B. Use adequate numbers of skilled workers that are thoroughly trained and
experienced.
PART 2 PRODUCTS
A. Mild steel angles, flat bars, square bars, channels, straps, brackets, dowels, frames, connectors, sheets and plates with thickness, shape, size and designed as indicated in the drawings.
B. Galvanized iron - plates, connectors and all other as indicated in the drawing
(conform to ASTM A123).
C. Bolts and Accessories - conforms to ASTM A307 and ASTM A323. D. Aluminum - Aluminum by Reynolds or Hooven or approved equal, for doors and
windows frames and as indicated in the drawings. E. carbon steel A36
R.S. ROQUE ARCHITECTS 69
F. Wide flange steel for rafters G. Stainless Steel: AISC, Type 304 for fumed and welded products; ASTM A 276 for
base shapes and forging; ASTM A 167 or A 176, as best suited for plates sheets and strip. Satin finish typical.
PART 3 - EXECUTION
3.01 PREPARATION/INSTALLATION
A. Make all work-formed to shape and size shown and assembles as detailed.
B. Cut, sheer and punch to produce clean, true lines and surfaces with burrs removed.
C. Provide all work with proper clearances. Fabricate and install in a manner to provide for expansion and contraction but will ensure rigidity and provide close fitting of sections. Fabricate and install as directed by Manufacturer.
D. Conform the technique of welding employed, the appearance and quality of welds
made, the method used in correcting defective work to the requirement of the Standard Code for welding.
E. Bolts - Tighten all bolts to a bolt tension not less than the proof load given in the
applicable ASTM specifications for the type of bolt used.
F. Painting (Coating) - Clean all steel work of loose mill scale, loose rust, dirt and other foreign matter by wire brushing, or by sand blasting prior to painting.
Remove oil and grease deposits by solvent.
Apply two (2) coats of red oxide primer to all bare metals except aluminum and stainless and other finish metal that are not intended to received painting.
Finish coat shall be applied as direct under Section 09900.
3.02 INSPECTION
A. Subject material and workmanship at all times to the inspection of the Engineer or Constructing Office at place of fabrication and to all places of work.
B. Inspection of welding shall be performed in accordance with the provision of Section 6 of the Standard Code of Welding in Building Construction of the American Welding Society.
END OF SECTION

R.S. ROQUE ARCHITECTS 70
SECTION 05500 METAL FABRICATIONS
PART 1 GENERAL
1.1 SUMMARY
A. Section Includes:
1. Rough hardware.
2. Miscellaneous framing and supports.
3. Loose bearing and leveling plates.
4. Counters and equipment supports.
5. Miscellaneous steel trim.
6. Shelf and relieving angles.
7. Steel ladders.
8. Pipe bollards.
9. Metal bar gratings.
10. Cast-in-place stair nosing and thresholds.
11. fabricated steel enclosure for fire exit
12. roofing support
B. Related Sections:
1. Section 03300 - Cast-In-Place Concrete: Substrate for attachments.
2. Section 04200 - Reinforced Unit Masonry: Substrate for attachments.
3. Section 05520 - Steel Handrails and Railings: Inserts and anchorage for.
4. Section 09900 - Painting: Metal finishes.
5. Products Furnished But Not Installed Under this Section: Inserts and anchors preset in masonry and concrete for anchorage of metal work.
1.2 DESCRIPTION OF WORK
A. The extent of metal fabrications is indicated on the Drawings, schedules and as specified herein, and includes providing, fabricating and installing items made from iron and steel shapes, plates, bars, strips, tubes, pipes and castings which are not structural steel or other
R.S. ROQUE ARCHITECTS 71
metal systems specified elsewhere herein.
B. All light iron and miscellaneous metal work not specified under another Section,but required for the work shall be provided under this Section whether or not specifically referred to herein.
1.3 REFERENCES
A. The publications listed below form a part of this Specification to the extent referenced.
Publications are referred to in the text by basic designation only.
B. American Institute of Steel Construction (AISC):
1. Specification for Structural Steel for Buildings.
C. American National Standards Institute (ANSI):
1. ANSI B18.5 - Round Head Bolts (Inch Series).
2. ANSI B18.6.1 - Wood Screws (Inch Series).
D American Society of Civil Engineers (ASCE):
1. ASCE / SEI 7 - Minimum Design Loads for Buildings and Other Structures.
E. American Society for Testing and Materials (ASTM):
1. ASTM A 27 / A 27M - Specification for Steel Castings, Carbon, for General Application.
2. ASTM A 47 / A 47M - Specification for Ferritic Malleable Iron Castings.
3. ASTM A 48 / A 48M - Specification for Gray Iron Castings.
4. ASTM A 36 / A 36M - Specification for Carbon Structural Steel.
5. ASTM A 53 / A 53M - Specification for Pipe, Steel, Black and Hot-Dipped, Zinc-
Coated, Welded and Seamless.
6. ASTM A 123 / A 123M - Specification for Zinc (Hot-Dip Galvanized) Coatings on Iron and Steel Products.
7. ASTM A 134 - Specification for Pipe, Steel, Electric-Fusion (Arc)-Welded (Sizes
NPS 16 and Over).
8. ASTM A 153 / A 153M - Specification for Zinc Coating (Hot-Dip) on Iron and Steel Hardware.
9. ASTM A 167 - Specification for Stainless and Heat-Resisting Chromium-Nickel
Steel Plate, Sheet, and Strip.
10. ASTM A 176 - Specification for Stainless and Heat-Resisting Chromium Steel

R.S. ROQUE ARCHITECTS 72
Plate, Sheet, and Strip.
11. ASTM A 276 - Specification for Stainless Steel Bars and Shapes.
12. ASTM A 307 - Specification for Carbon Steel Bolts and Studs, 60,000 PSI Tensile Strength.
13. ASTM A 500 / A 500M - Specification for Cold-Formed Welded and Seamless
Carbon Steel Structural Tubing in Round and Shapes.
14. ASTM A 501 - Specification for Hot-Formed Welded and Seamless Carbon Steel Structural Tubing.
15. ASTM A 568 / A 568M - Specification for Steel, Sheet, Carbon, Structural, and
High-Strength, Low-Alloy, Hot-Rolled and Cold-Rolled, General Requirements for.
16. ASTM A 653 / A 653M - Specification for Steel Sheet, Zinc-Coated (Galvanized) or Zinc-Iron Alloy-Coated (Galvannealed) by the Hot-Dip Process.
17. ASTM A 780 - Practice for Repair of Damaged and Uncoated Areas of Hot-Dip
Galvanized Coatings.
18. ASTM C 1107 / C 1107M - Specification for Packaged Dry, Hydraulic-Cement Grout (Nonshrink).
19. ASTM E 330 - Test Method for Structural Performance of Exterior Windows,
Doors, Skylights and Curtain Walls by Uniform Static Air Pressure Difference.
20. ASTM E 935 - Test Methods for Performance of Permanent Metal Railing Systems and Rails for Buildings.
21. ASTM E 936 - Practice for Roof System Assemblies Employing Steel Deck,
Preformed Roof Insulation, and Bituminous Built-Up Roofing.
F. American Welding Society (AWS):
1. AWS D1.1 / D1.1M - Structural Welding Code - Steel.
G. Americans with Disabilities Act Accessibility Guidelines (ADAAG):
1. Accessibility Guidelines for Buildings and Facilities.
H. International Code Council:
1. International Building Code (IBC), 2009.
I. National Association of Architectural Metal Manufacturers (NAAMM):
1. Metal Finishes Manual for Architectural and Metal Products.
2. MBG 531 - Metal Bar Grating Manual.

R.S. ROQUE ARCHITECTS 73
3. MBG 532 - Heavy Duty Metal Bar Grating Manual.
4. MBG 533 - Welding Specification for Fabrication of Steel, Aluminum and Stainless Steel Bar Grating.
J. SSPC: The Society for Protective Coatings (formerly Structural Steel Painting Council):
1. SSPC Painting Manual.
2. SSPC PA 1 - Specification Procedure for Shop, Field and Maintenance Painting of
Steel.
3. Paint 20 - Specification of Zinc-Rich Coating Type 1 - Inorganic and Type II - Organic.
4. SSPC SP 2 - Requirements for Hand Tool Cleaning of Steel Surfaces.
5. SSPC SP 3 - Requirements for Power Tool Cleaning of Steel Surfaces.
6. SSPC SP 6 - Standard for Commercial Blast Cleaning of Steel Surfaces.
7. SSPC SP 7 - Standard for Brush-Off Blast Cleaning of Steel Surfaces.
8. VIS 3 - Guide and Reference Photographs for Steel Surfaces Prepared by Power
and Hand-Tool Cleaning.
1.4 DEFINITIONS
A. Custom Metal Fabrications: Metal fabrications custom built for a specific Project purpose.
B. Pre-Manufactured Metal Fabrications: Metal fabrications which are factory-fabricated for a specific architectural purpose. These products may require modification to meet the Project requirements, but their primary manufactured purpose is not altered.
C. Non-Structural Metal Fabrications: Metal work which has not been designed by the Project
Structural Engineer, and which is not part of the Structural Engineers documents.
1.5 SYSTEM PERFORMANCE
A. Structural Performance: Provide assemblies which, when installed, comply with the following minimum requirements for structural performance, unless otherwise indicated.
1.6 SUBMITTALS
A. Section 01330 - Submittal Procedures: Procedures for submittals.
1. Product Data: Manufacturer' ' s specifications, anchor details and installation
instructions for pre-manufactured products. Submit data indicting materials used in miscellaneous metal fabrications, including paint products and grout.
2. Shop Drawings:

R.S. ROQUE ARCHITECTS 74
a. Drawings for fabrication and erection of miscellaneous metal fabrications;
including plans, elevations and details of sections and connections. Show anchorage and accessory items. Provide templates for anchor and bolt installations by others.
b. Where materials or fabrications are required to comply with requirements
for design loadings, include structural computations, materials properties and other information for structural analysis. Prepare under the seal of a professional structural engineer for products requiring structural engineering to meet the Performance Requirements.
c. Include profiles, sizes, connection attachments, reinforcing, anchorage,
size and type of fasteners and accessories, erection drawings, elevations, welded connections using standard AWS welding symbols with net weld lengths.
d. Take field measurements prior to the preparation of Shop Drawings and
prefabrication when possible. Allow for trimming and fitting where taking of field measurements before fabrication might delay construction.
3. Samples:
a. Submit representative samples of materials and finished products as
requested by the Engineer.
1.7 QUALITY ASSURANCE
A. Qualifications:
1. Fabricator: Company specializing in fabricating the products specified with a minimum of five (5) years documented experience.
2. Installer: Company experienced in performing the work of this Section with a
minimum of five (5) years documented experience.
B. Performance Requirements:
1. Provide the capacity to withstand the following loading requirements for exterior units:
a. Design, fabricate and install to resist combined positive and negative
windloading in accordance with IBC 2009, Section 1609 with a Vmph of 170, qs of 74.0 psf, exposure [B] [C] [D] and importance factor [1.0] [1.25] [1.5], as applicable per ASCE 7.
2. Provide assemblies which, when installed, comply with the following minimum
requirements for structural performance, unless otherwise indicated.
a. Treads and Platforms of Steel Stairs: Capable of withstanding a uniform load of 100 pounds per square foot, or a concentrated load of 300 pounds
R.S. ROQUE ARCHITECTS 75
so locates as to produce maximum stress conditions.
C. Take field measurements prior to the preparation of Shop Drawings and fabrication, where possible. Do not delay the construction. Allow for trimming and fitting when the taking of field measurements before fabrication might delay the work.
D. Pre-assemble items in the shop to the greatest extent possible, to minimize field splicing
and assembly. Disassemble units only as necessary for shipping and handling limitations. Clearly mark units for reassembly and a coordinated installation.
1.8 DELIVERY, STORAGE AND HANDLING
A. Section 01600 - Product Requirements: Transport, handle, store and protect the products.
B. Protect materials from corrosion, deformation and other damage during delivery, storage
and handling.
C. Deliver product to the Site in the fabricator' ' s original, unopened packages, containers or bundles.
D. Store and protect the materials with a weatherproof covering; ventilate to avoid
condensation.
PART 2 PRODUCTS
2.1 MATERIALS
A. Use only materials which are smooth and free of surface blemishes including pitting, seam marks, roller marks, rolled trade names and roughness for fabrication of miscellaneous metal work which will be exposed to view.
B. Steel Plates, Angles, and Other Structural Shapes: ASTM A 36 / A 36M.
C. Steel Pipe: ASTM A 53 / A 53M. Type and grade (if applicable), as selected by the fabricator
and as required for the design loading. Black finish, unless galvanizing is indicated. Standard weight (Schedule 40), unless otherwise indicated.
D. Galvanized Steel Pipe and Tube: ASTM A 53 / A 53M.
E. Steel Tubing: Cold-formed, ASTM A 500 / A 500M or hot-rolled, ASTM A 501.
F. Sheet Steel, Galvanized: ASTM A 123 / A 123M.
G. Sheet and Strip Steel, Hot-Rolled: ASTM A 568 / A 568M.
H. Structural Steel Sheet: Hot-rolled, ASTM A 134 or cold-rolled ASTM E 936, Class 1; of
grade required for the design loading.
I. Galvanized Structural Steel Sheet: ASTM A 653 / A 653M, of grade required for the design loading. Coating designation as indicated, or if not indicated, G90.
R.S. ROQUE ARCHITECTS 76
J. Stainless Steel: AISI Type 304 for fumed and welded products. ASTM A 276 for base
shapes and forging; ASTM A 167 or A 176 as best suited for plates, sheets and strip. Satin finish typical.
K. Gray Iron Castings: ASTM A 48, Class 30.
L. Malleable Iron Castings: ASTM A 47, grade as selected by the fabricator.
M. Steel Bar Grating: ASTM A 36 / A 36M or NAAMM MBG 531.
N. Brackets, Flanges and Anchors: Cast or formed metal of the same type material and finish
as the supported fabrications. O. Concrete Inserts. Threaded or wedge type; galvanized ferrous castings, either malleable
iron, ASTM A 47, or cast steel, ASTM A 27. Provide bolts, washers and shims, as required, hot-dip galvanized, ASTM A 153.
P. Non-Shrink, Non-Metallic Grout: Premixed, factory-packaged, non-staining, non-corrosive,
non-gaseous grout complying with ASTM C 1107 (formerly CE CRD-C621). POR-ROK Anchoring Cement by Minwax Co. division of Eastman Kodak Co., or approved equal. Comply with the manufacturer' ' s printed instructions.
Q. Welding Materials: AWS D1.1 / D1.1M. Type required for the materials being welded.
R. Anchors:
1. Threaded Type, Concrete Inserts: Galvanized malleable iron or cast steel capable
of receiving 3/4" diameter machine bolts.
2. Slotted Type, Concrete Inserts: Welded box type, fabricated with a minimum 1/8" thick galvanized pressed steel plate with slots to receive 3/4" diameter square head bolts, and knockout cover.
3. Expansion Shield, Masonry Anchorage: FS FF-2-325.
4. Toggle Bolts: FS FF-B-588, type, class and style as required.
S. Fasteners:
1. Provide zinc-coated fasteners for exterior use or where built into exterior walls,
Select fasteners for the type, grade and class required.
2. Bolts, Nuts and Washers at Interior Locations: ASTM A 307, Grade A, regular hexagon head.
3. Bolts, Nuts and Washers at Exterior Locations: ASTM A 307, galvanized per
ASTM A 153.
4. Bolts, Round Head: ANSI B18.5.
5. Lag Bolts: Square head type, FS FF-B-561.

R.S. ROQUE ARCHITECTS 77
6. Plain Washers: Round, carbon steel, FS FF-W-92.
7. Lock Washers: Helical spring type, carbon steel, FS FF-W-84.
8. Masonry Anchorage Devices: Expansion shields, FS FF-S-325.
9. Toggle Bolts: Tumble-wing type, FS FF-B-588, type, class and style as required.
10. Machine Screws: Cadmium plated steel, FS FF-S-92.
11. Wood Screws: Flat head carbon steel, FS FF-S-111.
T. Primers:
1. Primer for Field Painting: Provide one of the following:
a. No. 99 Red Primer by Tnemec Co.
b. Ceco No. 15 Primox by Chessman-Elliot Company.
c. No. 7-C-19 by Rowe Products, Inc.
2. Touch-Up Primer for Galvanized Surfaces: High zinc dust content paint for re-galvanizing welds in galvanized steel, complying with SSPC-Paint-20 and ASTM A 780.
3. Section 01600 - Product Requirements: Product options and substitutions:
Substitutions: Permitted.
U. Concrete Fill:
1. Concrete Materials and Properties: Comply with the requirements of Division 3 Sections for normal weight, ready-mix concrete with minimum 28-day compressive strength of 4,000 psi, 440 pounds cement per cubic yard, minimum, and a W/C ration of 0.65, maximum, unless higher strength is indicated.
2. Non-Slip Aggregate Finish: Factory-graded, packaged material containing fused
aluminum oxide grits or crushed emery as abrasive aggregate; rust-proof and non-glazing; unaffected by moisture and cleaning materials.
2.2 ROUGH HARDWARE
A. Furnish bent or otherwise custom fabricated bolts, plates, anchors, hangers, dowels and
other miscellaneous steel and iron shapes as required for framing and supporting woodwork, and for anchoring or securing woodwork to concrete or other structures. Straight bolts and other stock rough hardware items are specified in Sections of Division 6.
B. Fabricate items to the sizes, shapes, and dimensions required. Furnish malleable-iron
washers for heads and nuts which bear on wood structural connections; elsewhere, furnish steel washers.
R.S. ROQUE ARCHITECTS 78
2.3 MISCELLANEOUS FRAMING AND SUPPORTS
A. General: Provide steel framing and supports for the applications indicated, or which are not a part of the structural steel framework, as required to complete the work.
B. Fabricate miscellaneous units to the sizes, shapes, and profiles indicated or, if not
indicated, of the required dimensions to receive adjacent other construction retained by framing and supports. Except as otherwise indicated, fabricate from structural steel shapes, plates, and steel bars, of welded construction using mitered joints for field connections. Cut, drill, and tap units to receive hardware, hangers, and similar items.
1. Equip units with integrally welded anchors for casting into concrete or building into
masonry.
2. Furnish inserts if units must be installed after concrete has been placed.
3. Except as otherwise indicated, space anchors and inserts 16" o.c., and provide the minimum number of anchor units in the form of steel straps 1-1/4" wide x 8" long.
2.4 LOOSE BEARING AND LEVELING PLATES
A. Provide loose bearing and leveling plates for steel items bearing on concrete or masonry construction, made flat, free from warp and twist, and of the required thickness and bearing area. Drill plats to receive anchor bolts and for grouting, as required. Galvanize after fabrication.
2.5 MISCELLANEOUS STEEL TRIM
A. Provide shapes and sizes indicated for the profiles shown. Unless otherwise indicated,
fabricate units from structural steel shapes, plates, and steel bars, with continuously welded joints and smooth exposed edges. Use concealed field splices wherever possible. Provide cutouts, fittings, and anchorages as required for the coordination of assembly and installation with other work.
B. Hot-dip galvanize miscellaneous framing and supports in exterior locations and where
indicated.
2.6 SHELF AND RELIEVING ANGLES
A. Provide structural steel shelf and relieving angles of the sizes indicated for attachment to concrete farming. Provide slotted holes to receive 3/4" bolts, spaced not more than 6" from the ends and at not more than 24" o.c., unless otherwise indicated.
B. Hot-dip galvanize shelf angles to be installed on exterior concrete framing. C. Furnish wedge-type concrete inserts, complete with fasteners, for attachment of shelf and
angles to cast-in-place concrete.
2.7 PIPE BOLLARDS
A. Fabricate pipe bollards from Schedule 80 galvanized steel pipe.
B. Fabricate sleeves for bollard anchorage from galvanized steel pipe with 1/4" thick steel

R.S. ROQUE ARCHITECTS 79
plate welded to the bottom of the sleeve.
2.8 METAL BAR GRATINGS
A. Provide close mesh bar gratings using bars of the type, material, sizes, spacing and construction indicated, or if not indicated, to support the truck loadings indicated. Comply with the AStandard Specifications for Metal Bar Grating and Metal Bar Grating Treads@ portion of the NAAMM, AMetal Bar Grating Manual@.
B. Material: Steel.
C. Type Grating: Welded.
D. Bearing Bars: Size and shape as required by the anticipated loading.
E. Cross Bars: Rectangular. Provide true alignment and equal spacing of the cross bars by
notching the bearing bars prior to welding. Do not notch the bearing bars at supports to maintain elevation.
F. Traffic Surface: Plain.
G. Edge Band openings in the grating which interrupt four or more bearing bars with bars of
the same size and material as the bearing bars.
H. Steel Finish: Hot-dip galvanized with a coating of not less than 1.5 oz. per square foot of coated surface.
2.9 METAL STAIR NOSINGS
A. Material: Cast aluminum with hatched aluminum abrasive surface, 1/4" nosing lip x 3"
minimum depth, embedded; one piece the full width of stair treads and landings.
B. Manufacturers: 1. DSA3 by American Safety Technologies.
2. Style 3511 by American Safety Tread Co.
3. Type 231 by Wooster Products Inc.
4. Section 01600 - Product Requirements: Product options and substitutions:
Substitutions: Permitted.
2.10 FABRICATION
A. Fabricate steel items according to the approved Shop Drawings and to the applicable portions of AISC Specifications.
B. Pre-assemble products in the shop to the greatest extent possible. Disassemble units only
as necessary for shipping and handling limitations. Clearly mark units for re-assemble and installation.

R.S. ROQUE ARCHITECTS 80
C. For fabrications exposed to view, use materials which are smooth and free of surface blemishes including pitting, seam marks, roller marks, roller trade names and roughness. Remove blemishes by grinding or by welding and grinding prior to cleaning, treating and the application of surface finishes, including zinc coating.
D. Workmanship: Use materials of the size and thickness indicated or, if not indicated, as
required to produce the strength and durability in the finished products for the intended use. Work to the dimensions indicated or accepted on the Shop Drawings, using proven details of fabrication and support. Use the type of materials indicated or specified.
E. Form exposed work true to line and level with accurate angles and surfaces and straight
sharp edges. Fabricate items with joints tightly fitted and secured. Make exposed joints butt tight, flush and hairline. Ease exposed edges to a radius of approximately 1/32", unless otherwise indicated. Form bent-metal corners to the smallest radius possible, without causing grain separation or otherwise impairing the work.
F. Conceal welds where possible. Weld corners and seams continuously, complying with
AWS and the Building Code. At exposed connections, grind the exposed welds smooth and flush to match and blend with the adjoining surfaces.
G. Form exposed connections with hairline joints, flush and smooth using concealed fasteners
wherever possible. Use exposed fasteners of the type indicated or, if not indicated, Phillips flat-head (countersunk) screws, or bolts.
H. Exposed Mechanical Fastenings: Flush countersunk screws and bolts, unobtrusively
located, except where specifically noted otherwise; consistent with the design.
I. Provide anchorage of the type indicated, coordinated with the supporting structure. Fabricate and space anchoring devices to provide adequate support for the intended use. Fabricate anchorage and related components of the same material and finish as the metal fabrication, unless indicated otherwise.
J. Cut, reinforce, drill and tap miscellaneous metal work, as indicated, to receive the finish
hardware and similar items.
K. Fabricate joints which will be exposed to weather in a manner to exclude water, or provide weep holes where water may accumulate.
L. Galvanizing: For items indicated to be galvanized, apply zinc-coating by the hot-dip process in compliance with the following requirements:
1. ASTM A 153 / A 153M for galvanizing iron and steel hardware.
2. ASTM A 123 / A 123M for galvanizing both fabricated and un-fabricated iron and
steel products made of un-coated rolled, pressed, and forged shapes, plates, bars, and strip 0.0299" thick and heavier.
3. ASTM A 123 / A 123M for galvanizing assembled steel products.
2.11 FINISHES, GENERAL
A. Comply with NAAMM, Metal Finishes Manual for Architectural and Metal Products, for
R.S. ROQUE ARCHITECTS 81
recommendations relative to the application and designation of finishes.
B. Finish metal fabrications after assembly.
2.12 SHOP PAINTING AND PROTECTIVE COATING
A. Conform to SSPC-PA 1, including preparation for painting.
B. Apply shop primer to un-coated surfaces of metal fabrications, except those with a galvanized finish or to be embedded in concrete, masonry, or sprayed-on fireproofing, unless otherwise indicated. Comply with the requirements of SSPC-PA 1, APaint Application Standards, Guides and Specifications No. 1", for shop painting.
C. Preparation for Shop Priming: Prepare un-coated ferrous metal surfaces to comply with the
minimum requirements indicated below for SSPC surface preparation specifications and the environmental exposure conditions of the installed metal fabrications:
1. Interiors (SSPC Zone 1A): SSPC-VIS 3.
2. Exteriors (SSPC Zone 1B): SSPC-SP 6.
D. Shop primer for Ferrous Metal: Fast-curing, lead-free, abrasion-resistant, rust-inhibitive
primer selected for compatibility with the substrates and with the types of alkyd-type paint systems indicated, and for compatibility to provide a sound foundation for field-applied topcoats, despite prolonged exposure; complying with the performance requirements of FS TT-P-86, Types I, II and III.
E. Hot-Dip galvanizing and zinc coatings applied on products fabricated from rolled, pressed,
and forged steel shapes, plates, bars and strips shall comply with ASTM A 123 / A 123M. Galvanized surfaces, for which a shop coat of paint is specified, shall be chemically treated to provide a bond for the paint. Except for bolts and nuts, all galvanizing shall be done after fabrication.
F. Clean surfaces of rust, scale, grease and foreign matter in accordance with SSPC-SP 1
Solvent Cleaning, prior to finishing. Prepare surfaces for painting in accordance with SSPC-SP 2, SSPC-VIS 3 or SSPC-SP 7.
G. Do not prime surfaces that will be in direct contact with concrete, or where field welding is
required. H. Prime paint items scheduled, with one coat.
PART 3 EXECUTION
3.1 EXAMINATION
A. Section 01700 - Execution Requirements: Verification of existing conditions before starting the work.
B. Verification of Conditions: Verify that field measurements, surfaces, substrates and
conditions are as required, and ready to receive the work.
R.S. ROQUE ARCHITECTS 82
C. Report, in writing, prevailing conditions that will adversely affect satisfactory execution of
the work of this Section. Do not proceed with the work until the unsatisfactory conditions have been corrected.
3.2 PREPARATION
A. Coordinate and furnish anchorages, setting drawings, diagrams, templates, instructions,
and directions for the installation of anchorages, such as concrete inserts, sleeves, anchor bolts, and miscellaneous items having integral anchors to be embedded in concrete or masonry.
B. Coordinate the delivery of such items to the Site.
3.3 INSTALLATION
A. Fastening to In-Place Construction: Provide anchorage devices and fasteners, where necessary, for securing miscellaneous metal fabrications to in-place construction, including threaded fasteners for concrete and masonry inserts, toggle bolts, through-bolts, lag bolts, wood screws, and other connectors, as required.
B. Cutting, Fitting, and Placement: Perform cutting, drilling, and fitting required for the
installation of miscellaneous metal fabrications. Set fabrications accurately in location, alignment, and elevation with edges and surfaces level, plumb, true, and free of rack; measured from established lines and levels.
C. Setting Loose Plates: Clean concrete or masonry bearing surfaces of any bond-reducing
materials, and roughen to improve bond to the surfaces. Clean the bottom surface of bearing plates.
D. Set loose leveling and bearing plates on wedges, or other adjustable devices. After the
bearing members have been positioned an plumbed, tighten the anchor bolts. Do not remove the wedges or shims, but if protruding , cut-of flush with the edge of the bearing plate before packing with grout. Use metallic non-shrink grout in concealed locations where not exposed to moisture; use non-metallic, non-shrink grout in exposed locations, unless otherwise indicated. Pack grout solidly between bearing surfaces and pates to ensure that no voids remain.
E. Provide temporary bracing or anchors in the formwork for items to be built into concrete,
masonry or similar construction.
F. Fit exposed connections accurately together to form hairline joints. Weld connections that are not to be left as exposed joints, but cannot be shop welded because of shipping size limitations. Grind exposed joins smooth and touch-up shop paint coat. Do not weld, cut or abrade the surfaces of exterior units which have been hot-dip galvanized after fabrication, and are intended for bolted or screwed field connections.
G. Bollards:

R.S. ROQUE ARCHITECTS 83
1. Anchor bollards in concrete by means of pipe sleeves preset and anchored into a concrete footing. After bollards have been inserted into sleeves, fill the annular space between the bollard and the sleeve solid with non-shrink, non-metallic grout, mixed and placed to comply with the grout manufacturer' ' s directions.
2. Fill bollards with concrete and round off the top.
H. Metal Bar Gratings:
1. Comply with the recommendations of NAAMM, AMetal Bar Gratings Manual@, for
the installation of gratings, including installation clearances and standard anchoring details.
2. Secure removable units to supporting members with the type and size clips and
fasteners indicated, of if not indicated, as recommended by the grating manufacturer for the type of installation conditions shown.
3. Secure non-removable units to supporting members by welding where both
materials are the same, otherwise fasten by bolting, as indicated.
I. Field Welding: Comply with the AWS Code for procedures of manual shielded metal-arc welding, appearance and quality of the welds made and methods used in correcting welding work, and the following:
1. Use materials and methods that minimize distortion and develop strength and
corrosion-resistance of the base metal.
2. Obtain fusion without undercut or overlap.
3. Remove welding flux immediately.
4. At exposed connections, finish exposed welds and surfaces smooth and blended so no roughness shows after finishing and the contour of the welded surface matches the adjacent surfaces.
J. Touch-Up For Galvanized Surfaces: Clean the welds, bolted connections and abraded areas, and apply two (2) coats of galvanizing repair paint in compliance with SSPC Paint 20 and ASTM A 780.
K. Touch-Up Painting: Immediately after erection, clean field welds, bolted connections, and
abraded areas of shop paint, and paint exposed areas with the same material as used for shop painting; comply with SSPC-PA 1 requirements for touch-up of field painted surfaces.
1. Apply by brush or spray and provide a minimum dry film thickness of 2.0 mils.
3.4. ISOLATION REQUIREMENTS
A. Dissimilar Metals:
1. Where metal surfaces are in contact with, or fastened to dissimilar metals except
stainless steel, zinc or zinc coating, the metal shall be protected from the dissimilar metal.
R.S. ROQUE ARCHITECTS 84
2. Where drainage from a dissimilar metal passes over the metal, paint the dissimilar
metal with a non-lead pigmented paint.
B. Cementitious Materials: Paint metal where in contact with mortar, concrete, masonry or other cementitious material, with an alkali-resistant coating such as heavy-bodied bituminous paint or epoxy paint.
C. Wood Contact: Isolate metal from cedar, redwood, oak and acid-treated lumber by means
of unbroken 6-mil polyethylene construction sheet or a heavy coating of metal-protective paint.
D. Surfaces in contact with sealants after installation need not be coated with any type of
protective material.
3.5 FIELD QUALITY CONTROL
A. Section 01450 - Quality Control: Field inspection.
B. Inspect fabrications and installations for alignment, attachment to the structure, and secure and rigid installation.
3.6 ADJUSTING AND CLEANING
A. Section 01700 - Execution Requirements: Adjusting the installed work.
END OF SECTION
R.S. ROQUE ARCHITECTS 85
SECTION 05520 STEEL HANDRAILS, FIREMENS POLE AND GUARDS
PART 1 GENERAL
1.1 SUMMARY
A. Section Includes:
1. Steel handrails and guards.
2. Stainless guardrails.
3. firemen’s pole
B. Related Sections:
1. Section 03300 - Cast-In-Place Concrete: Substrate for anchoring handrails and guards.
2. Section 04200 - Reinforced Unit Masonry: Substrate for anchoring handrails and
guards.
3. Section 05500 - Metal Fabrications: Inserts and anchors for handrails and guards.
4. Section 09900 - Painting: Finishing of handrails and guards.
C. Products Furnished By But Not Installed Under this Section: Inserts and anchors preset in concrete and masonry for anchorage.
1.2 DESCRIPTION OF WORK
A. The extent of handrails and guards work is indicated on the Drawings and as specified
herein, and includes providing, fabricating and installing miscellaneous steel handrails and guards not included in other Sections of these Specifications.
B. Handrails and guards shall comply with the applicable Building Code, ADAAG, and other
Codes and standards which apply to this work of this Section.
1.3 REFERENCES
A. The publications listed below form a part of this Specification to the extent referenced. Publications are referred to in the text by basic designation only.
B. American Institute of Steel Construction (AISC):
1. Specification for Structural Steel for Buildings.
C. American National Standards Institute (ANSI):
R.S. ROQUE ARCHITECTS 86
1. ANSI B18.5 - Round Head Bolts (Inch Series).
2. ANSI B18.6.1 - Wood Screws (Inch Series).
D. American Society for Testing and Materials (ASTM): 1. ASTM A 36 / A 36M - Specification for Carbon Structural Steel.
2. ASTM A 53 / A 53M - Specification for Pipe, Steel, Black and Hot-Dipped,
Zinc-Coated, Welded and Seamless.
3. ASTM A 123 / A 123M - Specification for Zinc (Hot-Dip Galvanized) Coatings on Iron and Steel Products.
4. ASTM A 136 - Specification for Pipe, Steel, Electric-Fusion (ARC)-Welded (Sizes
NPS 16 and Over).
5. ASTM A 153 / A 153M - Specification for Zinc Coating (Hot-Dip) on Iron and Steel Hardware.
6. ASTM A 167 - Specification for Stainless and Heat-Resisting Chromium-Nickel
Steel Plate, Sheet and Strip.
7. ASTM A 176 - Specification for Stainless and Heat-Resisting Chromium Steel Plate, Sheet and Strip.
8. ASTM A 276 - Specification for Stainless Steel Bars and Shapes.
9. ASTM A 500 / A 500M - Specification for Cold-formed Welded and Seamless
Carbon Steel Structural Tubing in Rounds and Shapes.
10. ASTM A 501 - Specification for Hot-Formed Welded and Seamless Carbon Steel Structural Tubing.
11. ASTM A 568 / A 568M - Specification for Steel, Sheet, Carbon, Structural, and
High-Strength, Low-Alloy, Hot-Rolled and Cold-Rolled, General Requirements for.
12. ASTM A 780 - Practice for Repair of Damaged and Uncoated Areas of Hot-Dip Galvanized Coatings.
13. ASTM C 1107 - Specification for Dry, Hydraulic-Cement Grout (Nonshrink).
E. American Welding Society (AWS):
1. AWS D1.1 / D1.1M - Structural Welding Code - Steel.
F. Americans with Disabilities Act Accessibility Guidelines (ADAAG):
1. Accessibility Guidelines for Buildings and Facilities.
G. International Code Council:
1. International Building Code (IBC), 2009.
R.S. ROQUE ARCHITECTS 87
H. SSPC: The Society for Protective Coatings (formerly Structural Steel Painting Council):
1. SSPC Painting Manual.
2. SSPC-PA 1- Shop, Field, and Maintenance Painting of Steel.
1.4 SUBMITTALS
A. Section 01330 - Submittal Procedures: Procedures for submittals.
1. Product Data: Submit manufacturers product specifications and installation instructions for the products and processes used in handrails and guards, including grouting and finishing.
2. Shop Drawings: Submit for fabrication and erection of handrails and guards,
including plans, elevations and details of fittings, connections, joining methods, sizes and shapes, anchorage, and relationship to other work. Provide templates for anchors and bolts installation by others.
3. Samples: Submit for each type of metal finish indicated. Prepare samples on metal
of the same gage and alloy to be used in the work. Include 6" long samples of stainless steel railing members including handrails, toprails, posts, and rail coverings, if any. Include samples of fittings and brackets.
4. Assurance / Control Submittals:
a. Manufacturers certificate that the product meet or exceed the specified
requirements.
b. Calculations indicating that the system and anchorage satisfies the performance requirements.
c. Documentation of experience indicating compliance with the specified
qualifications requirements.
1.5 QUALITY ASSURANCE
A. Qualifications:
1. Manufacturer: Company specializing in manufacturing the products specified with a minimum of five (5) years documented experience.
2. Installer: Company experienced in performing the work of this Section with a
minimum of five (5) years documented experience.
B. Performance Requirements: Handrails and guards shall be designed, fabricated and installed to meet the structural loading conditions below, unless otherwise indicated:
1. Handrails and guards shall be designed to resist a load of 50 pounds per linear foot
applied in any direction at the top and to transfer the load through the supports to the structure.

R.S. ROQUE ARCHITECTS 88
2. Handrails and guards shall be able to resist a single concentrated load of 200 pounds, applied in any direction, at any point along the top, and to transfer the load through the supports to the structure. This load need not be assumed to act concurrently with the loads specified above.
3. Intermediate rails (all those except the handrail), balusters and panel fillers shall
be designed to withstand a horizontally applied normal load of 50 pounds on an area equal to 1 square foot, including openings and space between rails. Reactions due to this loading are not required to be superimposed with those of the above loads.
C. Engineering of each handrail and guard assembly is the responsibility of the manufacturer
of the assembly.
D. Shop Assembly: Preassemble items in the shop to greatest extent possible to minimize field splicing and assembly. Disassemble units only, as necessary, for shipping and handling limitations. Clearly mark the units for reassembly and coordinated installation.
1.6 DELIVERY, STORAGE AND HANDLING
A. Section 01600 - Product Requirements: Transport, handle, store and protect the products.
B. Protect the materials from corrosion, deformation and other damage during delivery,
storage and handling.
C. Deliver products to the Site in the fabricator' ' s original, unopened packages, containers or bundles.
D. Store and protect the materials with a weatherproof covering; ventilate to avoid
condensation.
PART 2 PRODUCTS
2.1 MATERIALS
A. General: Comply with the standards indicated for shapes and types of metals indicated, or required for the handrail and guards components. For fabrication of miscellaneous metal work which will be exposed to view, use only materials which are smooth and free of surface blemishes including pitting, seam marks, roller marks, rolled trade names and roughness.
B. Steel:
1. Steel Plates, Shapes and Bars: ASTM A 36. 2. Steel Tubing: Cold-formed, ASTM A 500; or hot-rolled, ASTM A 501. 3. Structural Steel Sheet: Hot-rolled and cold-rolled ASTM A 568 / A 568M, Class 1;
of the grade required for the design loading.
R.S. ROQUE ARCHITECTS 89
4. Steel Pipe: ASTM A 53; type and grade as selected by the manufacturer, and as required for the design loading; black finish unless galvanizing is indicated;
standard weight (Schedule 40). 5. Stainless Steel: AISC, Type 304 for fumed and welded products; ASTM A 276 for base shapes and forging; ASTM A 167 or A 176, as best suited for
plates sheets and strip. Satin finish typical.
6. Brackets, Flanges and Anchors: Cast or formed metal of the same type material and finish as the supported rails.
C. Non-Shrink, Non-Metallic Grout: Pre-mixed, factory-packaged, non-staining, non-corrosive, non-gaseous, complying with ASTM C 1107 (formerly CE CRD-C621). Provide grout specifically recommended by the manufacturer for interior and exterior applications of the type specified in this Section.
D. Welding Electrodes and Filler Metal: Provide the type and alloy of filler metal and
electrodes recommended by the producer of the metal to be welded, and as required for color match, strength and compatibility in fabricated items.
E. Fasteners: Use fasteners of the same basic metal as the fastened metal. Do not use
metals which are corrosive or incompatible with the materials joined.
F. Provide concealed fasteners for the interconnection of handrail and guard components, and for their attachment to other work.
1. Provide Phillips flat-head machine screws for exposed fasteners.
G. Anchors and Inserts: Provide anchors of the proper type, size, and material for the type of
loading and installation condition shown, as recommended by the manufacturer, unless otherwise indicated. Use stainless steel anchors and inserts. Use lead expansion shield devices for drilled-in anchors. Furnish inserts required to be set into concrete and masonry work.
2.2 FABRICATION
A. General: Fabricate handrails and guards to the design, dimensions and details shown.
1. Provide handrail and guard members in the sizes, profiles and wall thickness indicated, with supporting posts and brackets of the size and spacing shown, but not less than required to support the design loads indicated.
2. The gripping portion of handrails with a circular cross section shall be as shown on
the Drawings, but shall have an outside diameter of at least 1-1/4" but not greater than 2".
3. Handrails shall return to a wall, guard or the walking surface or shall be continuous
to the handrail of an adjacent stair flight or ramp run.
4. Handrails shall extend horizontally at least 12" beyond the top riser and continue to
R.S. ROQUE ARCHITECTS 90
slope for the depth of one tread beyond the bottom riser.
5. At ramps where the handrails are not continuous between runs, handrails shall extend horizontally above landings 12" minimum beyond the top and bottom of ramp runs.
6. Handrail extensions shall be in the same direction of stair flights at stairways
and ramp runs at ramps.
7. Comply with ADAAG for additional extension requirements.
B. Steel Fabrication: Form exposed connections with hairline joints, flush and smooth. Weld corners and seams continuously, complying with AWS recommendations. At exposed connections, grind welds smooth and flush to match and blend with the adjoining surfaces.
1. Join steel handrail and guard members by butt-welding or welding with internal
connectors, at the fabricator' ' s option. At tee and cross intersections, provide coped joints.
2. At bends, join pipes by means of prefabricated elbow fittings or flush radius bends,
of the radiuses indicated. Form bends by the use of prefabricated elbow fittings and radius bends, or by bending the pipe at the fabricator' ' s option. Form simple and compound curves by bending pipe in jigs to produce a uniform curvature. Maintain the cylindrical cross section of the pipe throughout the entire bend without buckling, twisting or otherwise deforming exposed surfaces of the pipe.
3. Close exposed ends of pipes by welding 3/16" thick steel plate in place, or by the
use of prefabricated fittings.
4. Provide wall returns at the ends of wall-mounted handrails.
A. Brackets, Flanges, Fittings and Anchors: Provide the manufacturer's standard brackets, flanges, end closures, miscellaneous fittings and anchors for the connection of handrail and guard members to other work. Furnish inserts and other anchorage devices for connecting handrails and guards to concrete and masonry. Fabricate and space anchorage devices, as indicated, and as required to provide adequate support. Coordinate anchorage devices with the supporting structure.
C. Toe Boards: Where indicated, provide toe boards at guards around openings and the edge of
open-sided floors and platforms. Fabricate to the dimensions and details indicated, or if not indicated, use a 4" high x 1/8" plate welded to, and centered between, each guard post.
G. Weeps: For exterior exposed units, fabricate joints which will be exposed to weather, to
exclude water, or provide weep holes where water may accumulate.
2.3 FINISHES
A. Steel Finish: Paint finish per Section 09900 - Painting for galvanized and plain steel. Apply shop primer to the surfaces of metal fabrications, except those which are galvanized, or as indicated to be embedded in concrete or masonry, and in compliance with the
R.S. ROQUE ARCHITECTS 91
requirements of SSPC-PA 1 for shop painting. Apply an extra coat at exposed welds.
PART 3 EXECUTION
3.1 EXAMINATION
A. Section -01700 - Execution Requirements: Verification of existing conditions before starting the work.
B. Verification of Conditions: Verify that field measurements, surfaces, substrates and
conditions are as required, and ready to receive the work.
C. Report, in writing, prevailing conditions that will adversely affect satisfactory execution of the work of this Section. Do not proceed with the work until the unsatisfactory conditions have been corrected.
3.2 PREPARATION
A. Coordinate setting drawings, diagrams, templates, instructions, and directions for installation of anchorages, such as sleeves, concrete inserts, anchor bolts and miscellaneous items having integral anchors, which are to be embedded in concrete or masonry. Coordinate the delivery of such items to the Site.
B. Field Measurements: Take field measurements prior to the preparation of Shop Drawings
and fabrication, where possible. Do not delay job progress. Allow for adjustments during installation where the taking of field measurements before fabrication might delay the work.
3.3 INSTALLATION
A. Fit exposed connections accurately together to form tight, hairline joints.
B. Perform cutting, drilling and fitting required for the installation of handrails and guards. Set work accurately in location, alignment and elevation, plumb, level, true to line and free of rack, measured from established lines and levels. Do not weld, cut or abrade surfaces of handrail and guard components which have been coated or finished after fabrication, and are intended for field connection by mechanical means without further cutting or fitting.
C. Corrosion Protection: Paint metal surfaces where in contact with mortar, concrete or other
masonry materials with alkali-resistant coatings such as heavy-bodied bituminous paint or epoxy paint.
D. Adjust handrails and guards prior to anchoring to ensure matching alignment at abutting
joints. Space posts at the interval indicated, or if not indicated, as required by the design loadings.
E. Plumb posts in each direction. Secure posts and railing ends as follows:
1. Anchor posts in concrete by means of sleeves pre-set and anchored into
concrete. After posts have been inserted into sleeves, fill the space between the posts and sleeves solid with non-shrink, non-metallic grout, mixed and placed to comply with the grout manufacturer's instructions.
R.S. ROQUE ARCHITECTS 92
2. Leave anchorage joint exposed; wipe off excess grout and leave 1/8" build-up sloped away from the posts. For installations exposed on the exterior or to the flow of water, seal the grout to comply with the grout manufacturer's directions.
3. Anchor posts to metal surfaces with the manufacturer's standard fittings designed
for the purpose.
F. Anchoring Guard Ends:
1. Anchor guards into concrete or masonry with the manufacturer's standard fittings designed for the purpose.
2. Anchor guards to metal surfaces with the manufacturer's standard fittings using
concealed fasteners.
H. Attachment of Handrails and Guards to Walls:
1. Secure handrails and guards to walls with the manufacturer's standard wall brackets and end fittings. Provide brackets with 1-1/2" clearance between the wall and the inside face of handrails. Locate brackets as indicated or, if not indicated, at spacings required by the design loading.
2. Secure wall brackets and wall return fitting as follows:
a. Use the type of bracket with flanges tapped for concealed anchorage to
threaded hanger bolts.
b. For concrete and solid masonry anchorage, use drilled-in expansion shields and concealed hanger bolts.
c. For hollow masonry anchorage, use toggle bolts with square heads.
d. For stud partitions anchorage, use lag bolts fastened to treated wood
blocking between studs. Coordinate with the stud spacing for the accurate location of blocking members.
3.4. ISOLATION REQUIREMENTS
A. Dissimilar Metals: Where metal surfaces are in contact with, or fastened to dissimilar
metals except stainless steel, zinc or zinc coating, the metal shall be protected from the dissimilar metal. Where drainage from a dissimilar metal passes over the metal, paint the dissimilar metal with a non-lead pigmented paint.
B. Cementitious Materials: Paint metal where in contact with mortar, concrete, masonry or
other cementitious material, with an alkali-resistant coating such as heavy-bodied bituminous paint or epoxy paint.
C. Wood Contact: Isolate metal from cedar, redwood, oak and acid-treated lumber by means
of unbroken 6-mil polyethylene construction sheet or a heavy coating of metal-protective paint.
R.S. ROQUE ARCHITECTS 93
D. Surfaces in contact with sealants after installation need not be coated with any type of protective material.
3.5 CONSTRUCTION
A. Site Tolerances:
1. Maximum Variation from Plumb: 1/4".
2. Maximum Offset From True Alignment: 1/4".
3. Maximum Out-of-Position: 1/4".
3.6 ADJUSTING
A. Section 01700 - Execution Requirements: Adjusting the installed work.
B. Remove protective covering at completion of the Project, or when directed by the
Engineer.
C. Restore finishes damaged during installation and construction so no evidence of the corrective work is noticeable.
D. Return items which cannot be refinished in the field to the shop, make the required
alterations and refinish the entire unit, or provide a new unit.
3.7 FIELD QUALITY CONTROL
A. Section 01450 - Quality Control: Field inspection.
B. Inspect installations for accurate location, alignment, elevation, plumb, level, true and free of rack.
3.8 PROTECTION
A. Protect finishes of handrails and guards from damage during construction by use of
temporary protective coverings, approved by guard manufacturer.
END OF SECTION
R.S. ROQUE ARCHITECTS 94
SECTION 092216 – NON- STRUCTURAL METAL
FRAMING PART 1 – GENERAL 1.1 SUMMARY
A. Section Includes:
1. Non-Structural steel framing systems for interior partitions.
B. Related Requirements:
1. Section 09250 – gypsum and cement board 2. Section 05520 – non structural framing system
2.2 SUBMITTALS
A. Product Data: For each type of product.
Retain "Studs and Runners" Subparagraph below for third-party verification of products. SFIA's program certifies that studs and runners comply with the IBC, ASTM C 645, AISI S100, and AISI S220. Mechanical properties, coatings, dimensions, and labeling are checked.
1. Studs and Runners: Provide documentation that framing members' certification is
according to SFIA's "Code Compliance Certification Program for Cold-Formed Steel Structural and Non-Structural Framing Members”.
B. Manufacturers’ height limiting tables indicating products provided.
C. Evaluation Reports: Submit evaluation reports certified under an independent third party inspection program administered by an agency accredited by IAS to ICC-ES AC98, IAS Accreditation Criteria for Inspection Agencies.
D. The Collective Voice of America’s Steel Framing Industry The Steel Framing Industry Association (SFIA) is dedicated to expanding the market for cold-formed steel in construction through programs and initiatives that Promote the use of cold formed steel framing as a sustainable and cost-effective solution, Advocate the development and acceptance of favorable code provisions, Educate members with reliable data and other critical information that is essential to effective business planning, and create a positive environment for Innovation.
E. Manufacturer's Certification: Submit manufacturer's certification of product compliance with codes and standards along with product literature and data sheets for specified products. F. Sustainable Design Submittals:
1. Product Data for Credit MR 4.1 [and Credit MR 4.2]: For products having recycled content, documentation indicating percentages by weight of postconsumer and preconsumer recycled content. Include statement indicating cost for each product having recycled content.

R.S. ROQUE ARCHITECTS 95
2. Product Data for Credit MR 2.1 [and Credit MR 2.2]: For products diverted from disposal in landfills and incinerators, and where recycled resources are directed back to the manufacturing process. Include statement indicating percentage of materials diverted and recycled, and the costs associated with each.
3. Product Data for Credit MR 5: For products where product manufacturing is within a 500 mile radius of the jobsite and the point of extraction of the raw materials. Include a statement indicating the location and distances for the manufacturing plant and the point of extraction of raw materials in relation to the jobsite location.
1.3 QUALITY ASSURANCE
A. Provide certification of code compliance with the “Code Compliance Certification Program” implemented by the Steel Framing Industry Association (SFIA).
PART 2 - PRODUCTS
2.1 ACCEPTABLE MANUFACTURERS
2.2 PERFORMANCE REQUIREMENTS
A. Fire-Test-Response Characteristics: For fire-resistance-rated assemblies that incorporate nonstructural steel framing, provide materials and construction identical to those tested in assembly indicated, according to ASTM E 119 by, and displaying a classification label from, an independent testing agency acceptable to the authority having jurisdiction.
1. Construct fire-resistance rated partitions in compliance with tested assembly
requirements [indicated on drawings].
2. Rated assemblies to be substantiated from applicable testing using proposed products, by Contractor. B. STC-Rated Assemblies: For STC-rated assemblies, provide materials and construction identical to those tested in assembly indicated, according to ASTM E 90 and classified according to ASTM E 413 by an independent testing agency.
C. Horizontal Deflection: For wall assemblies, limited to [1/240] [1/360] of the wall height based on horizontal loading of [5 lbf/sq. ft. (239 Pa)] [10 lbf/sq. ft. (480 Pa)].
D. Design framing systems in accordance with American Iron and Steel Institute Publication S220 “North American Specification for the Design of Cold-Formed Steel Framing – Non- Structural Members”, except as otherwise shown or specified.
E. Design loads: As indicated on the Architectural Drawings or 5 PSF minimum as required by the International Building Code.
R.S. ROQUE ARCHITECTS 96
F. Design framing systems to accommodate deflection of primary building structure and construction tolerances and to withstand design loads with a maximum deflection of inches.
2.3 FRAMING SYSTEMS
A. Recycled Content of Steel Products: Postconsumer recycled content plus one-half of preconsumer recycled content not less than 25 percent.
B. Framing Members, General:
1. Protective Coating: Comply with ASTM C 645. Coatings shall have a protective coating meeting the requirements of ASTM A653/A653M, G40, or shall have a protective coating with an equivalent corrosion resistance.
a. Coatings providing equivalent corrosion resistance to a G40 shall demonstrate
equivalent corrosion resistance with an evaluation report acceptable to the authority having jurisdiction.
C. Studs and Runners: Comply with manufacturers’ for conditions indicated.
1. Steel Studs and Runners: ASTM C 645.
a. Minimum Base-Steel Thickness: indicated in the physical properties table of the submitted manufacturers literature, and cross referenced with the appropriate height determination table to meet required performance.
b. Depth: As Specified on the Architectural Drawings, and cross referenced with the appropriate height determination table to meet required performance. D. Slip-Type Head Joints: Where indicated, provide [one of] the following:
1. Single Long-Leg Runner System: top runner with 2-inch deep flanges (or as required) in thickness not less than indicated for studs, installed with studs friction fit into top runner and with continuous bridging located within 12 inches of the top of studs to provide lateral bracing.
2. Double-Runner System: top runners, inside runner with 2-inch deep flanges (or as
required) in thickness not less than indicated for studs and fastened to studs, and outer runner sized to friction fit inside runner.
3. Deflection Track: Steel sheet top runner manufactured to prevent cracking of finishes applied
to interior partition framing resulting from deflection of structure above; in thickness not less than indicated for studs and in width to accommodate depth of studs.
E. Firestop Tracks: Top runner manufactured to allow partition heads to expand and contract with movement of the structure while maintaining continuity of fire-resistance-rated assembly indicated; in
R.S. ROQUE ARCHITECTS 97
thickness not less than indicated for studs and in width to accommodate depth of studs.
F. Flat Strap and Backing Plate: Steel sheet for blocking and bracing in length and width indicated. 1. Minimum Base-Steel Thickness: As indicated on Drawings.
G. U-Channel Bridging: Steel, 0.054-inch minimum base-steel thickness, with minimum 1/2- inch wide flanges. 1. Depth: As indicated on Drawings. 2. Clip Angle: Not less than 1-1/2 by 1- 1/2 inches, 0.0538-inch thick, galvanized steel.
H. Hat-Shaped, Rigid Furring Channels: ASTM C 645. 1. Minimum Base-Steel Thickness: [0.018 inch] [0.0296 inch]. 2. Depth: [7/8 inch] [1-1/2 inches].
I. Resilient Furring Channels: 1/2-inch deep, steel sheet members designed to reduce sound transmission.
J. Carrying Channels: 0.054-inch uncoated-steel thickness, with minimum 1/2-inch wide flanges.
1. Depth: 3/4 inch. 2. Furring Brackets: Adjustable, corrugated-edge type of steel sheet with minimum
uncoated-steel thickness of 0.0296 inch. 3. Tie Wire: ASTM A641/A641M, Class 1 zinc coating, soft temper, 0.062-inch diameter wire, or
double strand of 0.048-inch diameter wire.
K. Z-Shaped Furring: With slotted or nonslotted web, face flange of 1-1/4 inches, wall attachment flange of 7/8 inch, minimum uncoated-steel thickness of 0.018 inch, and depth required to fit insulation thickness indicated.
2.4 AUXILIARY MATERIALS
A. General: Provide auxiliary materials that comply with referenced installation standards. 1. Fasteners for Metal Framing: Of type, material, size, corrosion resistance, holding power, and other properties required to fasten steel members to substrates.
B. Isolation Strip at Exterior Walls: Provide the following: 1. Foam Gasket: Adhesive- backed,
closed-cell vinyl foam strips that allow fastener penetration without foam displacement, 1/8 inch thick, in width to suit steel stud size.
PART 3 - EXECUTION
3.1 EXAMINATION
A. Examine areas and substrates, with Installer present, and including welded hollow- metal frames, cast-in anchors, and structural framing, for compliance with requirements and other conditions affecting performance of the Work.
B. Proceed with installation only after unsatisfactory conditions have been corrected.

R.S. ROQUE ARCHITECTS 98
3.2 PREPARATION
A. Coordination with Sprayed Fire-Resistive Materials:
1. Before sprayed fire-resistive materials are applied, attach offset anchor plates, zfurring members, or ceiling runners (tracks) to surfaces indicated to receive sprayed fire-resistive materials. Where offset anchor plates are required, provide continuous plates fastened to building structure not more than 24 inches o.c.
2. After sprayed fire-resistive materials are applied, remove them only to extent necessary for installation of non-load-bearing steel framing. Do not reduce thickness of fire-resistive materials below that required for fire-resistance ratings indicated. Protect adjacent fire-resistive materials from damage. Repair or replace any fire-resistive materials as required.
3.3 INSTALLATION, GENERAL
A. Installation Standard: ASTM C754. B. Install supplementary framing, and blocking to support fixtures, equipment
services, heavy trim, grab bars, toilet accessories, furnishings, or similar construction. C. Install bracing at terminations in assemblies. D. Do not bridge building control and expansion joints with non-structural steel
framing members. Frame both sides of joints independently.
3.4 INSTALLING FRAMED ASSEMBLIES
A. Install framing system components to spacings indicated, but not greater than spacings required by referenced installation standards for assembly types.
1. Single-Layer Application: [16 inches] [24 inches] o.c. unless otherwise
indicated. 2. Multilayer Application: [16 inches] [24 inches] o.c. unless otherwise indicated. 3. Tile Backing Panels: 16 inches o.c. unless otherwise indicated.
B. Where studs are installed directly against exterior masonry walls or dissimilar metals at exterior walls, install isolation strip between studs and exterior wall.
C. Install studs so flanges within framing system point in same direction.
D. Install tracks (runners) at floors and overhead supports. Extend framing full height
to structural supports or substrates above suspended ceilings except where partitions are indicated to terminate at or above suspended ceilings. Continue framing around ducts penetrating partitions above ceiling.
1. Slip-Type Head Joints: Where framing extends to overhead structural supports, install
to produce joints at tops of framing systems that prevent axial loading of finished assemblies.

R.S. ROQUE ARCHITECTS 99
2. Door Openings: Securely fasten vertical studs at jambs to jamb anchor clips on door
frames; install runner track section (for cripple studs) at head and secure to jamb studs. Fasteners shall not exceed height from face of framing members more than specified in ASTM C840.
a. Install two studs at each jamb unless a framing member has been
specifically engineered for the jamb. b. Extend jamb studs through suspended ceilings and attach to underside of
overhead structure if suspended ceiling system cannot withstand forces imposed by door swings.
c. If jamb studs cannot be attached to the overhead structure, the Design Professional should be consulted for bracing design.
3. Other Framed Openings: Frame openings other than door openings the same as required for door openings unless otherwise indicated. Install framing below sills of openings to match framing required above door heads.
4. Fire-Resistance-Rated Partitions: Install framing to comply with fire-resistance- rated assembly indicated and support closures and to make partitions continuous from floor to underside of solid structure.
a. Firestop Track: Where indicated, install to maintain continuity of fire-
resistance rated assembly indicated.
5. Sound-Rated Partitions: Install framing to comply with sound-rated assembly indicated.
6. Curved Partitions:
a. Bend track to uniform curve and locate straight lengths so they are tangent to arcs. b. Begin and end each arc with a stud, and space intermediate studs equally along arcs. On straight lengths of no fewer than two studs at ends of arcs, place studs 6 inches o.c. (or as required).
E. Direct Furring:
1. Screw to wood framing.
2. Attach to concrete or masonry with stub nails, screws designed for masonry attachment, or powder-driven fasteners spaced 24 inches o.c.
F. Z-Furring Members:
1. Erect insulation, specified in Section 07210 "Building Insulation," vertically and hold in place
R.S. ROQUE ARCHITECTS 100
with Z-furring members spaced 24 inches o.c. 2. Except at exterior corners, securely attach narrow flanges of furring members to wall with
concrete stub nails, screws designed for masonry attachment, or powder-driven fasteners spaced 24 inches o.c.
3. At exterior corners, attach wide flange of furring members to wall with short flange extending beyond corner; on adjacent wall surface, screw-attach short flange of furring channel to web of attached channel. At interior corners, space second member no more than 12 inches from corner and cut insulation to fit.
G. Installation Tolerance: Install framing members plumb within ¼ inch in 10 ft-0 in.
H. Installation Tolerance: Install each framing member so fastening surfaces vary not more than 1/8 inch from the plane formed by faces of adjacent framing.
END OF SECTION

R.S. ROQUE ARCHITECTS 101
SECTION 05800 EXPANSION CONTROL
PART 1 GENERAL
1.1 SUMMARY
A. Section Includes:
1. Exterior expansion joint sealing systems at junctures of buildings above and below grade.
2. Interior expansion joint cover assemblies.
3. Fire-rated joint sealing assemblies.
4. Pre-molded joint fillers.
5. Roof expansion joints.
6. Accessories.
B. Related Sections:
1. Section 03300 - Cast-In-Place Concrete: Substrate for attachment.
2. Section 07920 - Joint Sealers: Caulking and sealants.
1.2 DESCRIPTION OF WORK
A. The extent of the expansion control work is indicated on the Drawings and as specified herein and includes providing and installing expansion and contraction joints and accessories required for complete systems installation.
1.3 REFERENCES
A. The publications listed below form a part of this Specification to the extent referenced.
Publications are referred to in the text by basic designation only.
B. American Society for Testing and Materials (ASTM):
1. ASTM A 167 - Standard Specification for Stainless and Heat-Resisting Chromium-Nickel Steel Plate, Sheet and Strip.
2. ASTM B 221 - Standard Specification for Aluminum and Aluminum-Alloy Extruded
Bars, Rods. Wire, Shapes and Tubes.
3. ASTM C 920 - Standard Specifications for Elastomeric Joint Sealants.
4. ASTM E 1399 - Standard Test Methods for Cyclic Movement and Measuring the Minimum Joint Widths of Architectural Systems.
R.S. ROQUE ARCHITECTS 102
C. American Iron and Steel Institute (AISI).
D. International Code Council:
1. International Building Code (IBC), 2009.
E. Copper Development Association (CDA).
F. Federal Specifications (FS):
1. FS TT-C-494 - Coating Compound, Bituminous, Solvent Type, Acid Resistant.
G. National Association of Architectural Metal Manufacturers (NAAMM).
1.4 SUBMITTALS
A. Section 01330 - Submittal Procedures: Procedures for submittals.
1. Product Data: Manufacturer's product specifications, installation instructions and
general recommendations for each specified material and fabricated product.
2. Shop Drawings: Indicate layout, joining, profiles, and anchorages of expansion and contraction joint products.
3. Samples: 8" long samples of the specified materials to be exposed as finished
surfaces, when requested.
4. Assurance / Control Submittals:
a. Manufacturer's certificate that the products meet or exceed the specified requirements.
b. Documentation of experience indicating compliance with the specified
qualifications requirements.
1.5 QUALITY ASSURANCE
A. Single-Source Responsibility: Obtain all expansion joint cover assemblies from a single manufacturer.
B. Coordinate compatibility with expansion joint cover assemblies specified in other Sections.
C. Fire-Test-Response Characteristics: Where indicated, provide expansion joint cover
assemblies whose fire resistance has been determined per ANSI / UL 263, NFPA 251, UBC 43-1 or ASTM E 119, including hose stream test of vertical wall assemblies, by a nationally recognized testing and inspecting agency acceptable to the government authorities having jurisdiction.
1. Fire-Resistance Rating: Not less than the rating of the adjacent construction.
D. Qualifications:
R.S. ROQUE ARCHITECTS 103
1. Manufacturer: Company specializing in fabricating the products specified with a minimum of five (5) years documented experience.
2. Installer: Company experienced in performing the work of this Section with a
minimum of five (5) years documented experience.
E. Performance Requirements:
1. Design and install to withstand the following loading requirements, where applicable:
a. Design, fabricate and install to resist combined positive and negative
windloading in accordance with IBC 2009, Section 1609 with a Vmph of 170, qs of 74.0 psf, exposure [B] [C] [D] and importance factor [1.0] [1.25] [1.5], as applicable per ASCE 7.
b. In no case shall the combined loading be less than 75 psf.
c. Comply with requirements of the applicable Building Code, if more
stringent than the requirements stated above.
F. Section 01780 - Closeout Submittals: Procedures for closeout submittals.
1. Warranty: Submit a written Warranty with forms completed in the name of the Employer and registered with the manufacturer.
1.6 DELIVERY, STORAGE AND HANDLING
A. Section 01600 - Product Requirements: Transport, handle, store, and protect the
products.
B. Deliver products to the Site in the manufacturer' ' s original, unopened protective packaging.
C. Stack the materials to prevent twisting, bending and abrasion. Slope metal sheets to
ensure drainage. Provide ventilation.
D. Prevent contact with materials which may cause corrosion or discoloration.
1.7 JOB CONDITIONS
A. Coordinate the work of this Section with interfacing and adjoining work for the proper sequencing of each installation. Ensure the best possible weather resistance, appearance and durability of the work, and protection of the materials and finishes.
1.8 WARRANTY
A. Section 01780 - Closeout Submittals: Procedures for closeout submittals.
B. Special Warranty:
1. Provide a written Warranty jointly signed by the manufacturer and the installer
R.S. ROQUE ARCHITECTS 104
certifying that the products and the installation is free of defective materials and workmanship and will replace or repair any defective component or the system, in whole or in part, as necessary to provide an installation meeting its intended purpose and integrity.
2. Warranty Period: One (1) year for labor, materials and installation; two (2) years
against leaks from the date of Substantial Completion.
PART 2 PRODUCTS
2.1 MANUFACTURERS
A. Section 01600 - Product Requirements: Product Options: Substitutions permitted.
2.2 MATERIALS
A. Aluminum: ASTM B 221, alloy 6063-T5 for extrusions; ASTM B 209, alloy 6061-T6 for sheet and plates.
1. Protect aluminum surfaces to be placed in contact with cementitious materials with
a protective coating.
B. Bronze: ASTM B 455, alloy C38500 for extrusions; alloy C28000 Muntz Metal for plates.
C. Brass: UNS alloy C26000 for half hard sheet and coil.
D. Stainless Steel: ASTM A 167, Type 304 with non-slip finish, unless indicated otherwise, for plates, sheets, and strips. Finish as selected from the manufacturer' ' s standards..
E. Extruded Preformed Seals: Single or multicellular elastomeric profiles as classified under
ASTM D 2000, designed with or without continuous, longitudinal, internal baffles. Formed to fit compatible frames. Color as selected from the manufacturer' ' s standards.
F. Preformed Sealant: Manufacturer's standard elastomeric sealant complying with ASTM C
920, Use AT@, factory-formed and bonded to metal frames or anchor members. Color as selected from the manufacturer's standards.
1. Joints 2" Wide and Less: Withstand plus or minus 35% movement of the joint
width without failure.
2. Joints 2" to 4" Wide: Withstand plus or minus 50% movement of the joint width without failure.
G. Seismic Seals: Typical for exterior applications; two single-layered elastomeric profiles, one interior and one exterior, as classified under ASTM D 2000; retained in a set of compatible frames. Color as selected from the manufacturer' ' s standards.
H. Fire Barriers: Designed for the indicated or required dynamic structural movement without
material degradation or fatigue when tested in accordance with ASTM E 1399. Tested in maximum joint width condition with a field splice as a component of an expansion joint cover per ANSI / UL 263, NFPA 251, UBC 43-1, or ASTM E 119, including hose stream test

R.S. ROQUE ARCHITECTS 105
of vertical wall assemblies by a nationally recognized testing and inspection agency acceptable to the government authorities having jurisdiction.
I. Accessories: Manufacturer's standard anchors, fasteners, set screws, spacers, flexible
moisture barriers and filler materials, drain tubes, lubricants, adhesive, and other accessories compatible with the material in contact, as indicated or as required for a complete installation.
2.3 EXPANSION JOINT COVER ASSEMBLIES
A. General: Provide expansion joint cover assemblies of the design, basic profile, materials,
and operation indicated. Provide units comparable to those indicated or as required to accommodate the joint size, variations in adjacent surfaces, and dynamic structural movement without material degradation or fatigue when tested in accordance with ASTM E 1399. Furnish units in the longest practicable lengths to minimize the number of end joints. Provide hairline mitered corners where joints change directions or abuts other materials. Include closure materials and transition pieces, tee-joints, corners, curbs, cross-connections, and other accessories as required to provide continuous joint cover assemblies.
B. Moisture Barrier: Provide manufacturer's continuous, standard, flexible vinyl moisture
barrier under covers at roofs, exterior walls and locations indicated.
C. Fire-Rated Joint Covers: Proved expansion joint cover assemblies with manufacturer' ' s standard continuous flexible fire barrier seals under covers at locations indicated, to provide a fire-resistive rating not less than the rating of the adjacent construction.
D. Coverless Fire Barrier: Provide manufacturer' ' s standard continuous flexible fire barrier
seals at locations indicated, to provide a fire-resistive rating not less than the rating of the adjacent construction.
E. Metal Floor-to-Floor Joint Cover Assemblies: Provide continuous extruded metal frames
of the profile indicated with seating surface and raised floor rim or exposed trim strip to accommodate the flooring and concealed bolt and anchors embedded in concrete. Provide assemblies formed to receive cover plates of the design indicated and to receive filler materials, if any, between the raised rim of the frame and edge of the plate. Furnish depth and configuration to suit the type of construction and to produce a continuous non-slip wearing surface flush with the adjoining finish floor surface.
1. Partially Concealed Cover: Provide one frame on each side of the joint, designed
to accommodated the manufacturer' ' s floor cover plate and filler.
2. Exposed Cover: Provide one frame on each side of the joint, designed to support the floor plate and filler.
3. Flat Cover Plates: Provide cover plates of the profile and wearing surface
indicated. Extend flat plates to lap each side of the joint.
a. Filler Insert: Furnish abrasive-resistant flexible gasket filler between the edge of the cover plate and the raised rim of the frame to accommodate the required movement.

R.S. ROQUE ARCHITECTS 106
4. Fixed Cover Plates: Attach one side of the cover plate to a frame or finished wearing surface with the other side resting on the other frame or finished wearing surface to allow free movement.
5. Self-Centering Cover Plates: Concealed centering device with the cover plate
secured in or on top of the frames so as to have free movement on both sides. 6. Floor Cover Plate Wearing Surfaces: Provide cover plates with the following
type of wearing surface:
a. [Plain.]
b. [Fluted.]
c. [Recessed to receive full thickness of the flooring material.]
d. [Abrasive plate.]
e. [Adhesive filled plate.]
f. [Adhesive strip plate.]
7. Ceiling infill, if required, as detailed.
F. Floor-to-Wall Joints: Provide one frame on the floor side of the joint only. Provide wall side frame where required by the manufacturer' ' s design.
1. Angle Cover Plates: Attach angle cover plates for floor-to-wall joints to the wall with
countersunk, flat-head exposed fasteners secured to drilled-in-place anchor shields, unless otherwise indicated, at the spacing recommended by the joint cover manufacturer.
G. Metal Wall Joint Cover Assemblies: Provide continuous extruded metal frames of the
profile indicated. Concealed anchors embedded in concrete. Provide assemblies formed to receive cover plates of the design indicated.
1. Cover plates: Provide cover plates of the profile indicated. Extend plate to lap each
side of the joint. L000-82-11 and 000-92-11 by Architectural Art Manufacturing or approved equal.
H. Wall, Ceiling and Soffit Joint Cover Assemblies: Provide interior wall and ceiling expansion
joint cover assemblies of the same design and appearance. Provide exterior wall and soffit expansion joint cover assemblies of the same design and appearance. Provide wall expansion joint cover assemblies compatible with the floor expansion joint cover assemblies design and appearance.
1. Fixed Metal Cover Plates: Provide a concealed, continuously anchored frame
fastened to the wall, ceiling, or soffit only on one side of the joint. Extend the cover to lap each side of the joint to permit free movement on one side. Attach the cover to the frame with the cover in close contact with adjacent finish surfaces.
2. Floating Metal Cover Plates: Cover plate secured in or on top of the frames to permit free movement on both sides.

R.S. ROQUE ARCHITECTS 107
3. Self-Centering Cover Plates: Concealed centering device with the cover plate
secured in or on top of the frame to permit free movement on both sides.
4. Flexible Filler: Secure the approved flexible filler between the frames to compress and expand with movement.
I. Joint Cover Assemblies with Preformed Seals: Provide joint cover assemblies consisting of
continuously anchored aluminum extrusions and continuous extruded preformed seals of the profile indicated or as required to suit the types of installation conditions shown. Furnish extrusions designed to be embedded in or attached to concrete with lugs. Vulcanize or heat-weld splice, if any, to ensure hermetic joint conditions.
1. Cover Plate: Include extruded aluminum cover plate fastened to one side of the
joint and extend the plate to lap each side of the joint to permit free movement with the cover in close contact with the adjacent surfaces.
J. Joint Cover Assemblies with Elastomeric Sealant: Provide continuous joint cover
assemblies consisting of elastomeric sealant, factory-bonded to extruded aluminum frames of the profile indicated or required to suit the types of installation conditions shown. Provide frames for floor joints with means for embedding in or anchoring to concrete without using exposed fasteners and that will result in exposed surfaces of sealant and aluminum frames finishing flush with adjacent finished floor surfaces without exposing the anchors.
K. Compression Seals: Preformed, elastomeric extrusions having an internal baffle system in
sized and profiles shown or as recommended by the manufacturer. Provide lubricant and adhesive for installation as recommended by the manufacturer.
L. Foam Seal: Non-extruded, low-density, cross-linked, nitrogen-blown ethylene vinyl
acetate polyethylene copolymer foam; Evazote 380 E.S.P. by Royston or approved equal. Provide adhesive for the installation as recommended by the manufacturer.
2.4 METAL FINISHES
A. General: Comply with NAAMM, AMetal Finishes Manual@ for finish designations and
application recommendations, except as otherwise indicated. Apply finishes to products in the factory after fabrication. Protect finishes on exposed surfaces before shipment.
B. Aluminum Finishes: Medium Bronze, Anodized.
C. Bronze Finish: Comply with NAAMM, AMetal Finishes Manual@ for
recommendations relative to application and designations for finishes.
D. Natural Satin Finish: CDA Designation M32, mechanical finish, directional textured, medium satin.
E. Stainless Steel Finishes: Comply with NAAMM, AMetal Finishes Manual@
for recommendations relative to application and designations of finishes.
1. [Bright, Cold-Rolled Unpolished Finish: AISI, No. 2B finish.]

R.S. ROQUE ARCHITECTS 108
2. [Bright, Directional Polish: AISI, No. 3 finish.]
F. Factory Finish: Manufacturer' ' s standard factory finish.
PART 3 EXECUTION
3.1 EXAMINATION
A. Section 01700 - Execution Requirements: Verification of existing conditions before starting the work.
B. Verification of Conditions: Verify that field measurements, surfaces, substrates and
conditions are as required, and ready to receive the work.
1. Verify that roofing terminations and base flashings are in place, sealed, and secure.
C. Report in, writing, prevailing conditions that will adversely affect satisfactory execution of
the work of this Section. Do not proceed with the work until the unsatisfactory conditions have been corrected.
3.2 PREPARATION
. Manufacturer's Instructions: In addition to the requirements herein, comply with the
manufacturer's instructions and recommendations for the phases of work, including the preparation of substrates, application of materials, and protection of the installed work.
B. Coordinate and furnish anchorages, setting drawings, templates, and instructions for the
installation of expansion joint cover assemblies to be embedded in or anchored to concrete or to have recesses formed into the edges of concrete slabs for later placement and grouting-in of frames.
C. Fastening to In-Place Construction: Provide anchorage devices and fasteners where
necessary to secure expansion joint cover assemblies to in-place construction, including threaded fasteners with drilled-in expansion shields for masonry and concrete where anchoring members are not embedded in concrete. Provide fasteners of metal, type and size to suit the type of construction indicated and to provide for the secure attachment of expansion joint cover assemblies.
3.3 INSTALLATION
A. Cutting, Fitting, and Placement: Perform cutting, drilling, and fitting as required to install
expansion joint covers. Install joint cover assemblies in true alignment and in proper relationship to the expansion joints and adjoining finished surfaces, measured from established lines and levels. Allow adequate free movement for thermal expansion and contraction of the metal to avoid buckling. Set floor covers at elevations to be flush with adjacent finished floor materials. Locate wall, ceiling and soffit covers in continuous contact with adjacent surfaces. Securely attach in place with the required accessories. Locate anchors at intervals recommended by the manufacturer, but not less than 3" from each end and at not more than 24" on center.
R.S. ROQUE ARCHITECTS 109
B. Continuity: Maintain continuity of the expansion joint cover assemblies with a minimum number of end joints. Align metal members mechanically using splice joints. Cut and fit ends to produce joints that will accommodate thermal expansion and contraction of the metal to avoid buckling of the frames. Adhere flexible filler materials, if any, to the frames with adhesive or pressure-sensitive tape as recommended by the manufacturer.
C. Extruded Preformed Seals: Install seals complying with the manufacturer' ' s instructions
and with a minimum number of end joints. For straight sections, provide preformed seals in continuous lengths. Vulcanize or heat-weld field splice joints in preformed seal material to provide watertight joints using procedures recommended by the manufacturer. Apply adhesive, epoxy, or lubricant-adhesive approved by the manufacturer to both frame interfaces before installing the preformed seal. Seal transitions according to the manufacturer' ' s instructions.
D. Elastomeric Sealant Joint Assemblies: Seal end joints within continuous runs and joints at
transitions according to the manufacturer's directions, to provide a watertight installation.
E. Seismic Seals: Install interior seals in continuous lengths; vulcanize or heat-weld field splice joints in interior seal material to provide watertight joints using the manufacturer' ' s recommended procedures. Install exterior seals in standard lengths. Seal transitions and end joints in accordance with the manufacturer' ' s instructions.
F. Moisture Barriers: Install moisture gutters with a tight fit and sealed ends. Drain as
required.
G. Fire Barriers: Install fire barriers, including transitions and end joints, according to the manufacturer' ' s instructions so that the adjacent fire-rated construction is continuous.
3.4 ISOLATION REQUIREMENTS
A. Wood Contact: Isolate from cedar, redwood, oak and acid-treated lumber with an unbroken
6-mil polyethylene construction sheet or a heavy coating of metal-protective paint.
B. Aluminum Surfaces: Shall not directly contact other metals except stainless steel, zinc, or zinc coated. Where aluminum contacts another metal, paint the dissimilar metal with a primer followed by two coats of aluminum paint. Where drainage from a dissimilar metal passes over aluminum, paint the dissimilar metal with a non-lead pigmented paint.
C. Metal Surfaces: Paint where in contact with mortar, concrete, or masonry materials with an
alkali-resistant coating such as heavy-bodied bituminous paint.
3.5 REPAIRS TO FINISH
A. Scratches, Abrasions and Minor Surface Defects: May be repaired in accordance with the manufacturer' ' s printed instructions. Replace items which cannot be repaired to the satisfaction of the Engineer.
3.6 FIELD QUALITY CONTROL
A. Section 01450 - Quality Control: Field testing and inspection.
R.S. ROQUE ARCHITECTS 110
B. Inspect the floor slab, roof slab and wall construction, alignment and attachment to the
structure.
3.7 CLEANING
A. Section 01700 - Execution Requirements: Cleaning the installed work.
B. Do not remove protective coverings until the finish work in adjacent areas is complete. When the protective coverings are removed, clean the exposed metal surfaces in compliance with the manufacturer's instructions.
C. Remove substances which might cause corrosion of metal or deterioration of finishes.
3.8 PROTECTION
A. The installer shall advise the Contractor of required procedures for surveillance and
protection of the work during construction to ensure that all work will be without damage or deterioration at the time of Substantial Completion.
END OF SECTION
R.S. ROQUE ARCHITECTS 111
DIVISION 6 - WOOD AND PLASTICS SECTION SECTION 06100 - ROUGH CARPENTRY
1.01 SCOPE
A. Furnish all materials, tools, equipment, and supervision and perform the labor
required to complete:
1. Form works and wooden framing
1.02 DELIVERY AND STORAGE
A. Materials shall be delivered to the Site in an undamaged condition. Material shall be carefully stored off the ground to provide proper ventilation, drainage and protection against dampness. The Contractor at no expense to the Employer shall replace materials, which are defective and or damaged.
1.03 PROTECTION:
A. Protect all lumber from element. B. Provide and maintain temporary protection of the work as required to safeguard
completed work during the progress of the construction. C. Provide all the necessary rough stair, ladder, and runway, for convenient access to
all parts of the building until other permanent facilities are in place. D. Ensure that all required PPEs are provided to the workers during execution of their
task.
PART 2 - PRODUCTS
2.01 MATERIAL
A. Lumber - unless otherwise specified each piece of framing and board lumber, or
each bundle of small pieces of lumber, shall be identified by the grade mark of a recognized association or independent INSPECTION AGENCY USING SPECIFIC GRADING requirements of the association recognized as covering the species used.
B. Structural lumber shall be any of the species and grade listed in NFPA National
Design Specification for stress not less than 1700. Structural lumber shall be used for studs, jambs and joist and other members.
2.02 SIZES AND SURFACING
A. Sizes and surfacing of lumber shall conform to PS20 for dressed sizes of yard and structural lumber. All lumber shall be surfaced four sides. Sizes of framing lumber and board indicated on the drawings and specified herein given by nominal sizes, unless otherwise specified or indicated.
R.S. ROQUE ARCHITECTS 112
B. Moisture Content - The moisture content of lumber at the time of delivery to the job site shall be 18 percent maximum.
PART 3 - EXECUTION
3.01 INSTALLATION:
Framing lumber and other rough carpentry shall be fitted closely, set frame accurately to the required lines and levels, and secure rigidly in place. Framing members shall be spliced between bearing points.
All lumber and plywood shall be treated with wolmanized preservative, pressure treated or approved equal.
END OF SECTION

R.S. ROQUE ARCHITECTS 113
SECTION 06200 - FINISH CARPENTRY
PART 1 - GENERAL
1.01 WORK INCLUDED
A. Finish carpentry.
B. Installation of finishing hardware and metal and specialty items not normally installed by other trades.
1.02 RELATED WORK
A. Section 06100 - Rough Carpentry
1.03 APPLICABLE PUBLICATIONS: The publications listed below form a part of this specification
to the extent referenced. The publications are referred to in the text by the basic designation only.
A. Federal Publications (Fed. Spec.):
FF-B-588C & Am 1 Bolt, toggle, and expansion sleeve, screw
FF-N-105B & Am 4 Nails, brads, staples and spikes: Wire, cut and wrought
FF-S-111D Screw, wood
FF-S-325 & Am 3 Shield, expansion, nail, drive screw (devices, anchoring, masonry)
FF-T-1813 Tack
B. U.S. Department of Commerce, Product Standards (PS):
1-74 Construction and Industrial Plywood
20-70 & Am 1 American softwood lumber standard
C. U.S. Department of Commerce Commercial Standard (CS):
236-66 Mat-formed wood particle board (interior use)
D. American Wood Preserver’s Bureau (AWPB) Publications:
LP-2 (July 1975) Standard for softwood lumber, timber and plywood pressure treated with water-born preservatives for above ground use
R.S. ROQUE ARCHITECTS 114
LP-4 Standard for softwood lumber, timber and plywood
pressure treated with volatile petroleum solvent (LPG) pental solution for above ground use
E. National Woodwork Manufacturers Association (NWMA) Publication:
I.S. 4-70 & Addendum Water repellant preservative non-pressure
treatment for millwork
F. Redwood Inspection Service (RIS) Publication:
Standard specifications for grades of California Redwood lumber (1978 edition)
G. West Coast Lumber Inspection Bureau (WCLIB) Publications:
Standard Grading and Dressing Rules for west coast lumber (1976 edition)
H. Western Wood Products Association (WWPA) Publication:
Grading Rules for Western Lumber (1979 Edition)
1.04 SUBMITTALS: Meet the Applicable requirements of Section 01300.
A. Shop drawings: Submit shop drawings and cuts for pre-fabricated items. Include
details and erection data associated with the work of other trades; materials and species; sizes of parts; construction; fastenings and clearances.
B. Certificates of Grade: Submit certificates on graded but unmarked lumber for plywood
(unmarked for reasons of appearance) attesting that these materials meet the grade requirement specified herein.
The acceptance of certificates shall in no case jeopardize the Employer’s right to have lumber or plywood graded by an independent inspection agency when deemed necessary to assure compliance.
1.05 DELIVERY AND STORAGE:
A. Meet applicable requirements of Section 01600.
B. Stack materials to insure proper ventilation and drainage and protect against dampness before and after delivery. Store materials under cover in a well- ventilated enclosure and protect against extreme changes in temperature and humidity.
C. Do not store materials in the building until concrete, masonry and plaster are dry.
R.S. ROQUE ARCHITECTS 115
1.06 GRADEMARKING
A. Lumber: Each piece for each bundle shall be identified by the grade mark of a
recognized association or independent inspection agency that specializes in the particular species used. The Board of Review, American Lumber Standards Committee, to grade to species used, shall certify such association or independent inspection agency.
B. Plywood: Each sheet of plywood shall bear the mark of a recognized association or
independent inspection agency that maintains continuing control over the quality of the plywood. The mark for softwood plywood shall identify the plywood by species group or identification index, and shall show glue type, grade and compliance with US Department of Commerce PS 1.
1.07 OTHER QUALITY MARKING
A. Lumber and Plywood Specified or Indicated to be pressure-treated: Label each piece
with a permanent mark-indicating conformance with the applicable AWPB standard. The label shall be an AWPB approved quality mark or the mark of an independent inspection agency that maintains continuing control, testing, and inspection over the quality of the product.
B. Woodwork and Millwork specified or indicated to be non-pressure treated: Mark,
stamp, or label, indicating compliance with NWMA 1.S.4.
1.08 SIZES AND PATTERNS OF WOOD PRODUCTS:
Yard and board lumber sizes shall conform to US Department of Commerce PS 20. Except, as indicated or specified otherwise, sizes are nominal. Provide shaped lumber and millwork in the patterns indicated and which conform to standard patterns of the association recognized as covering the species used. Size references, unless otherwise specified, are nominal sizes, and actual sizes shall be within manufacturing tolerances allowed by the standard under which the product is produced.
1.09 MOISTURE CONTENT OF WOOD PRODUCTS: Air-dry or kiln-dry lumber. The maximum
moisture content of wood products at time of delivery to the job site shall be as follows:
A. Interior finish lumber, trim and millwork 1-1/4 inch or less on nominal thickness: 12 percent on 85 percent of the pieces and 15 percent on remainder.
B. Exterior treated or untreated finishes lumber and trim 4-inch or less in nominal
thickness: 15 percent.
C. Moisture content of other materials shall be in accordance with the standards under which the products are produced.

R.S. ROQUE ARCHITECTS 116
1.10 PRESERVATIVE TREATMENT OF WOOD PRODUCTS
A. Non-pressure Treatment: Preservative treat woodwork and millwork, such as exterior trim, door trim, and thresholds, in accordance with NWMA I.S. 4. Provide a liberal brush coat of preservative treatment to field cuts or holes.
B. Pressure Treatment: Pressure treat lumber and plywood such a fascia boards, soffits,
wood posts, porches, or wood members in contact with masonry or concrete in accordance with AWPB LP-2 or AWPB LP-4. Items of all-heart material of cedar, cypress, or redwood will not require preservative treatment, except if they are in direct contact with soil. Provide a liberal brush coat of preservative treatment to field cuts or holes.
PART 2 - PRODUCTS
2.01 MATERIALS:
A. Wood
1. Wood for finish: Provide species and grades indicated for materials to be
paint finished. Materials that are to be stain, natural, or transparent finished shall be one grade higher than that listed in accordance with the respective grading association. Provide only species indicated for materials to be stain, natural, or transparent finished. Provide species and grades in accordance with Table I.
Table I. Grades for Wood to Receive Paint Finish
Grading Rules Species Exterior and Interior Trim
WWPA Standard grading rules Douglas Fir-Larch Douglas Fir-South
All species: C-select except A for western
Engelmann Spruce-Lodgepole Pine
Red cedar and choice for Idaho white pine
Engelmann Spruce- Hem Fir Idaho White pine Lodgepole pine Mountain hemlock Mountain hemlock-Hem Fir Ponderosa pine-Lodgepole pine Subalpine fir White woods Western woods Western Cedars
R.S. ROQUE ARCHITECTS 117
Western Hemlock Douglas Fir-Larch Hem Fir Mountain Hemlock
Sitka spruce Western cedars Western Hemlock
All species: C & Btr VG, except A for Western Red Cedar
B. Softwood Plywood: US Department of Commerce PS 1. Interior type, A-B and B-B grade, any species group.
C. Particle board: US Department of Commerce CS 236.
D. Hardware: Provide sizes, types, and spacing of manufactured building materials
recommended by the product manufacturer except as otherwise indicated or specified. Provide hot-dipped galvanized steel or aluminum nails and fastenings where used on the exterior or exposed to the weather.
1. Expansion Shields: Fed. Spec. FF-S-325. Except as shown otherwise,
maximum size of devices in Groups IV, V, VI and VIII shall be 3/8 inch.
2. Toggle bolts: Fed. Spec. FF-B-588. 3. Wood screws: Fed. Spec. FF-S-111.
4. Wire Nails and Staples: Fed. Spec. FF-N-105.
5. Tacks: Fed. Spec. FF-T-1813.
E. Insect screen (eave vents): Copper, 18x14 mesh.
PART 3 - EXECUTION
3.01 INSPECTION: Examine the substrates and conditions under which work of this section will be
performed. Do not proceed until unsatisfactory conditions detrimental to timely and proper completion of the work have been corrected.
3.02 INSTALLATION
A. General Finish Work: Provide sizes, materials, land designs as indicated or as
specified herein. Where practicable, shop assembles finish items. Joints shall be tight and constructed in a manner that will conceal shrinkage. Miter trim and moldings at exterior angles and cope at interior angles and at returns. Material shall show no excessive warp. Install trim in the maximum practical lengths. Fasten finish work with
R.S. ROQUE ARCHITECTS 118
finish nails. Provide blind nailing where practicable. Set face nails for putty stopping.
1. Exterior Finish Work: Machine sand exposed flat members and square edges. Machine finish semi-exposed surfaces. Construct joints to exclude water.
In addition to nailing, glue joints of built-up items as necessary, for weather-resistant construction. Provide well-distributed end joints in built-up members. Shoulder joints in flat work. Hold back of wide- faced miters together with metal rings and glue. Fascias and other flat members, unless otherwise indicated, shall be ¾ inch thick. Provide door and window trim in single lengths. Provide braced, blocked, and rigidly anchored cornices for support and protection of vertical joints. Before installation of exterior finish materials, prime surfaces in accordance with Section 09900-Painting.
2. Interior Finish Work: Machine sand exposed surfaces at the mill. After
installation, sand exposed surfaces smooth. Provide window and door trim in single lengths. Before installation of interior finish materials, prime surfaces in accordance with Section 09900-Painting.
3.03 INSTALLATION OF ITEMS SPECIFIED IN OTHER SECTIONS:
A. Wood Door: Hang wood doors in frames specified in Section 08100. Fit and hang doors accurately and free from hinge bind with uniform clearance of 1/16 inch at heads and jambs. Allow ¼ inch clearance between top of floor covering and bottom of door. Verify exact degree of undercutting with samples of floor coverings to be used before installation of doors.
B. Finish Hardware:
1. Install finish hardware in accordance with the best standard practice.
2. Install hardware for labeled doors in strict accordance with manufacturers and
UL requirements.
3. After fitting, remove all hardware except butt. Store until painting is complete. Refit at completion.
4. Adjust moving parts to operate free and easy without binding. Hardware shall
be in perfect working order and keys tagged on delivery to Employer.
C. Specialties: Install metal and specialty items indicated in accordance with recommended by the manufacturer’s printed instruction, subject to modification on the job at the Engineer’s direction. Secure components, in true alignment, firmly into position for long life under hard use.
END OF SECTION
R.S. ROQUE ARCHITECTS 119
SECTION 07110 WATERPROOFING
PART 1 GENERAL
1.1 SUMMARY
A. Section Includes:
1. Below grade walls waterproofing.
2. Existing below grade walls affected by new construction waterproofing.
3. Planters waterproofing.
4. Concrete parking and traffic decks waterproofing.
5. Horizontal roof slabs supporting earth waterproofing.
6. Split concrete slabs waterproofing.
B. Related Sections:
1. Section 03300 - Cast-In-Place Concrete: Substrate for waterproofing.
1.2 DESCRIPTION OF WORK
A. The extent of each type of waterproofing is indicated on the Drawings and as specified herein, and includes providing and installing all waterproofing materials. Similar work used as an exposed finish is excluded by definition and, if required, is specified as roofing, flooring, special coating or other appropriate category.
1.3 REFERENCES
A. The publications listed below form a part of this Specification to the extent referenced.
Publications are referred to in the text by basic designation only.
B. American Society for Testing and Materials (ASTM):
1. ASTM C 642 - Test Method for Water Absorption.
2. ASTM D 56 - Test Method for Flash Point by Closed Cup Tester.
3. ASTM D 3960 - Practice for Determining Volatile Organic Compound (VOC) Content of Paints and Related Coatings.
4. ASTM E 514 - Test Method for Water Penetration and Leakage Through Masonry.
C. U. S. Environmental Protection Agency (EPA):
R.S. ROQUE ARCHITECTS 120
1. Method 24 - Determination of Volatile Matter Content.
1.4 SUBMITTALS
A. Section 01330 - Submittals: Procedures for submittals.
1. Product Data: Submit manufacturer' ' s specifications, recommendations for
water repellents for each surface specified, performance data, surface preparation and application instructions, precautions for materials which can contaminate the system, limitations to coating, protection and cleaning instructions and VOC content. Include recommendations for sealing penetrations, cracks and control, construction and expansion joints. Submit color charts for products required to be integrally colored.
2. Shop Drawings: Indicate details critical to water tightness of the membrane,
including, but not necessarily limited to, membrane transitions / terminations at perimeters, drains, sleeves and other penetrating elements.
3. Samples: For each type of waterproofing system, submit a 8-1/2" x 11" board
sample of each complete system. Where the membrane is a layered system, expose at least 1" of each succeeding layer. Top coats to be provided with Project required colors as selected.
4. Assurance / Control Submittals:
a. Manufacturer' ' s certificate that the products meet or exceed the
specified requirements.
b. Manufacturer's Material Safety Data Sheets (MSDS).
c. Manufacturer' ' s certification that the products supplied comply with applicable federal and local regulations controlling the use of volatile organic compounds (VOC).
d. Manufacturer's Instructions indicating procedures and conditions requiring
special attention, and cautionary procedures required during application.
e. Documentation of experience indicating compliance with the specified qualifications requirements.
C. Section 01780 - Closeout Submittals: Procedures for closeout submittals.
1. Warranty: Submit a written special Warranty with forms completed in the name of
the Employer and registered with the manufacturer.
1.5 QUALITY ASSURANCE
A. Qualifications:
1. Manufacturer: Company specializing in manufacturing the products specified with

R.S. ROQUE ARCHITECTS 121
a minimum of five (5) years documented experience, and has a record of successful in-service performance.
2. Applicator: Company experienced in applying the types of waterproofing required for this Project for not less than five (5) years, and is acceptable to the primary waterproofing materials manufacturer. Employees assigned to the Project shall have been trained by an approved waterproofing materials manufacturer.
B. Mockup: Apply water repellent to a mockup, either partial or full coverage, as directed,
before proceeding with the application. Comply with the application requirements contained herein.
C. Regulatory Requirements: Comply with applicable rules and regulations of the
pollution-control regulatory agency having jurisdiction regarding volatile organic compounds (VOC) and use of hydrocarbon solvents.
D. General: Obtain the primary materials from a single manufacturer. Provide secondary
materials only as recommended by the manufacturer of the primary materials.
E. Manufacturer' ' s Technical Representative:
1. The primary waterproofing materials manufacturer to make a Technical Representative available to monitor the on-going work to ensure proper application of the waterproofing system. The manufacturer must maintain the same Technical Representative for the duration of the Project.
2. Pre-Application Review: Prior to the start of work and the purchase of any
materials, the Manufacturer' ' s Technical Representative, who is to certify each application, shall visit the Site, review existing conditions, and review the Contract Document for appropriateness of the requirements with the specified manufacturer' ' s system including, but not necessarily limited to membrane requirements, substrate preparation, membrane terminations, reinforcements, flashing conditions, penetrations, including multiple penetration requirements, joints required and treatment and protection of the membrane.
3. Certification: After the Manufacturer' ' s Technical Representative' ' s review,
submit written certification of the appropriateness of the requirements, or submit other or additional specific recommendations, if any, to assure that the specified system is appropriate for the use intended and complete in scope to assure its intended performance. This should be coordinated with the Shop Drawing Submittal.
4. Substrate Certification: Submit the Technical Representative' ' s written
certification of compliance that the prepared substrate is in conformance with requirements necessary for the system installation. Certification of the substrate is to be accomplished just prior to the start of application of the membrane system.
5. Technical Representative' ' s Field Review of Work:
a. Number of Site Visits: Submit the manufacturer' ' s recommended
R.S. ROQUE ARCHITECTS 122
minimum number of times the Technical Representative is to field review the work to ensure success of the installation. Indicate when such visits are to be made.
b. Field Reports: For each visit, the Technical Representative shall submit
a detailed Field Report assessing each application. Field Reports to indicate the date, time of day, length of each visit, weather condition during the visit, condition of the substrate at the time of application, application procedures, and other important aspects that affect success of the application. Submit Reports within seven (7) days after each Site visit.
F. Performance Requirements: It is required that the waterproofing membrane be watertight,
and not deteriorate in excess of the limits published by the membrane manufacturer.
1.6 COORDINATION
A. Pre-Application Conference: Prior to start of the application of materials, meet at the Site with the Engineer, Contractor, Applicator and subcontractors whose work penetrates the surfaces to be waterproofed. Review the conditions, methods and procedures necessary for application of the work, including inspections of the areas of work, requirements of the Specifications and the manufacturer' ' s literature; review submittals and schedules.
B. Tolerances / Finish of Substrates: Coordinate with other trades providing substrates over
which the waterproofing is scheduled for the required tolerances, conditions and finish of the substrates necessary to ensure successful application of the work of this Section. Coordinate in a timely manner so other trades can implement their requirements in accordance with the Job Schedule. Submit documentation of the coordination, including the date of the coordination, with whom coordinated, and the requirements specified.
C. Control Joints: Control joints are indicated on the Drawings. Where additional or other
configuration for control joints is required in substrates other than what is currently required to ensure success of each membrane application, submit the requirements to the Engineer for review, and arrange with the substrate installer for installation of such control joints.
1.7 DELIVERY, STORAGE AND HANDLING
A. Section 01600 - Product Requirements. Transport, handle, store, and protect the products.
B. Deliver products to the Site in the manufacturer' ' s original, new and unopened
packages or containers with seals and labels intact; dry and undamaged, bearing the product name, color, manufacturer' ' s lot number, directions for use and precautionary labels.
C. Store materials not in actual use, in tightly covered containers. Maintain containers used in
the storage of materials, in a clean condition, free of foreign materials and residue.
D. Store materials in a well ventilated area, and in compliance with the manufacturer' ' s published instructions.
E. Store and handle materials to prevent deterioration and damage due to moisture,
R.S. ROQUE ARCHITECTS 123
temperature changes, contaminants, and other causes.
F. Protect against fire hazards and spontaneous combustion.
G. Keep storage areas neat and orderly. Remove waste daily.
H. Take all precautions to ensure that workmen and the work areas are adequately protected from health hazards resulting from handling, mixing and application of the materials.
1.8 JOB CONDITIONS
A. Proceed with the waterproofing work only after the substrate construction and penetrating work has been completed.
B. Environmental Requirements: Do not apply products under any of the following
conditions, except with the written recommendation of the manufacturer:
1. Substrate surfaces cured less than thirty (30) days.
2. Surfaces not dry for a minimum of 24 hours.
3. Rain predicted within 24 hours.
1.9 WARRANTY
A. Section 01780 - Closeout Submittals: Procedures for closeout submittals.
B. Special Warranty:
1. Provide a joint and severable written Warranty signed by the waterproofing materials manufacturer, Contractor and the Applicator, agreeing to repair or replace defective materials and workmanship, defined to include leakage of water, ruptures caused by cracking substrate up to 1/16", abnormal aging or deterioration of materials, and other failures of membranes to perform as required within the warranty period. Warranty shall include responsibility for removal and replacement of other work which conceals the waterproofing membrane.
2. During the warranty period, repairs and replacements required because of acts of
God and other events beyond the Contractor' ' s / Applicator' ' s control, and which exceed the performance requirements, shall be completed by the Contractor / Applicator and paid for by the Employer at the prevailing rates.
3. Warranty Period: Five (5) years from the date of Substantial Completion of the
waterproofing work.
PART 2 PRODUCTS
2.1 MANUFACTURERS
A. Section 01600 - Product Requirements: Product Options: Substitutions permitted.
R.S. ROQUE ARCHITECTS 124
2.2 SYSTEM
A. Other acceptable manufacturers systems shall be equivalent.
2.3 WATERPROOFING MATERIALS
A. WP-1 (for vertical and horizontal surfaces below grade, masonry backer walls and inside planters): Single component, fluid-applied, modified elastomeric waterproof membrane; 90 mils thickness for walls and vertical surfaces.
B. WP-2 (for horizontal roof slabs supporting earth or paving and split slab construction):.
C. WP-3 (for exposed concrete parking and vehicular traffic decks): Single component,
moisture-curing, polyurethane elastomeric membrane for parking stalls; for entrances, ramps and drives.
D. Caulking Compound: Single component, polyurethane as recommended by the primary waterproofing materials manufacturer.
E. Aggregate: As recommended by the manufacturer and approved by the
Engineer.
F. Other materials as recommended by the manufacturer of the prime materials.
2.4 PROTECTION / DRAINAGE BOARD
A. Composite structure of a molded, three-dimensional, high impact-resistant polymeric sheet with a filter fabric bonded to the open side.
1. Attach panels to the substrate with an adhesive recommended by the
manufacturer.
2.5 MISCELLANEOUS MATERIALS
A. Parge Coat: Where the manufacturer requires a portland cement parge coat over rough or porous substrates, the Contractor shall provide such parge coat as required at no additional cost. Failure of the parge coat or the absence of a parge coat will be considered as failure of the membrane system to perform as the parge coat is a required condition for the membrane' ' s success over substrates requiring a parge coat.
PART 3 EXECUTION
3.1 EXAMINATION
A. Section 01700 - Execution Requirements: Verification of existing conditions before starting the work.
B. Verification of Conditions: Verify that field measurements, surfaces, substrates and

R.S. ROQUE ARCHITECTS 125
conditions are as required, and ready to receive the work.
1. Verify that joint sealants are installed and cured.
2. Verify that surfaces to be coated are dry, clean, and free of efflorescence, oil, and other matter detrimental to application of the coating.
C. Report, in writing, prevailing conditions that will adversely affect satisfactory execution of the work of this Section. Do not proceed with the work until the unsatisfactory conditions have been corrected.
3.2 PREPARATION
A. Clean substrate surfaces of projections and substances detrimental to the work, acid etch
smooth surfaces, fill all voids to comply with recommendations of the prime materials manufacturer. Stripe coat all cracks up to 1/16" wide, rout and patch cracks larger than 1/16".
B. Moisture Content Testing: Just prior to application, test substrates with an electronic
moisture meter. Do not proceed until the moisture content is within the manufacturer's acceptable tolerances.
C. Protection of Other Work: Do not allow liquid or mastic compounds to enter and clog
drains, sleeves or conductors. Prevent spillage and migration onto other surfaces of the work by masking or otherwise protecting the adjoining work.
3.3 INSTALLATION
A. General: Comply with the manufacturer's instructions, except where more stringent
requirements are shown or specified, and except where Project conditions require extra precautions or provisions to ensure satisfactory performance of the work.
B. Thickness Testing: Monitor mil thickness application by a monitoring method
recommended by the Manufactures Technical Representative for each specific system.
C. Reinforcement: Unless otherwise acceptable, or as otherwise recommended, in writing, by the Manufacturer' ' s Technical Representative, reinforcement is to be provided as follows and in the manner indicated:
1. Material: Manufacturer' ' s recommended elastomeric sheet and / or polyester
fabric fully encapsulated in the primary membrane coating of a thickness equal to the total thickness required for the primary membrane, unless otherwise recommended by the manufacturer, and has been reviewed and approved on submittals.
2. Transitions: At transitions from vertical to horizontal, at inside and outside corners,
and at other similar transitions that are not expansion / control joints, penetrations, or cracks, embed reinforcement of a width that extends 6", minimum, onto each surface on each side of the intersection.
3. Expansion / Control Joints: Embed reinforcement of a width necessary to extend

R.S. ROQUE ARCHITECTS 126
the material 6", minimum, on each side of the joint, plus additional materials, as necessary, to accommodate movement of the joint. Small joints are to be bridged over backer rods placed in the joints. Reinforcement is to be looped down into the joints with backer rod placed in the loop.
4. Penetrations: 36" square reinforcement, but not less than necessary to extend out
in all directions from the penetration a distance of 12", minimum, beyond the flange of each penetration.
a. Pipes, Conduits, and Similar Components: Construct a form fitting
elastomeric boot 6", minimum, in height and with an integral elastomeric flange extending 6", minimum, onto the wall or deck. The boot shall be fully adhered to the penetrating element and fully encapsulated at the interface with the wall or deck. Apply 36" square reinforcement material over this, fully encapsulated in the primary membrane material.
b. Cracks: Encapsulated reinforcement of a width necessary to extend the
material 6", minimum, on each side of the crack.
3.4 APPLICATION
A. WP-1: Prime coat the substrate surface at the rate of 250 - 300 sq. ft. / gallon. Apply with rollers, two or more coats of (30 dry mils) at the rate of 4.5 gallons / 100 sq. ft. to produce 90 dry mils total thickness at vertical surfaces. Allow 18 hours curing time between coats.
1. Attach Protection / Drainage Boards to all vertical and horizontal surfaces with
adhesive per the manufacturer' ' s recommendations. Set panels with the fabric toward the earth side. Lap fabric a minimum of 2". Install at below grade walls and retaining walls. Lap fabric at the top of the highest course and embed in waterproofing to ensure that loose material cannot enter and accumulate behind the protection / drainage board. Backfill against boards with approved material.
B. WP-2: Apply a surface conditioner to concrete substrates in accordance with the
manufacturers instructions. Apply membrane in three (3) applications at a rate to provide a continuous monolithic coating of 30 dry mils, average thickness per coat, and 90 mils total thickness. Provide flashing in accordance with the manufactures standard details. Where protection board is required, embed into the membrane to ensure good bond. Place protection boards in a staggered pattern and butt boards tightly together.
C. WP-3: Prime and apply a 30 mil thick coating to cover and overlap shrinkage cracks,
integral flashings, caulked expansion joints and construction joints. Apply a 25 mil base coat, 25 mil intermediate coat, and two (2) 10 mil top coats to produce 70 mils total thickness, exclusive of aggregate. Broadcast aggregate in the first top coat.
3.5 MEMBRANE TESTING
A. Water Test: Conduct water containment tests to ensure that the membranes are watertight.
B. Horizontal Membranes: For installations where the primary membrane is horizontal,
contain waterproofed areas in a manner to prevent 2", minimum, depth of water from escaping by damming any open perimeters and sealing the drains.

R.S. ROQUE ARCHITECTS 127
C. Pan Membranes: For installations where the primary membrane forms a continuous
container with the bottom and all vertical sides enclosed, such as planters, seal the drains and fill the container to within 1@ of the top termination of the membrane.
D. Method of Containment: Dams, seals, and other methods used to contain water should be
capable of fully containing water for the period of time required. The method of containment should not damage the adjacent work.
E. Period of Containment: 48 hours without loss of water, except for that by natural
evaporation, and without evidence of failure in the membrane in any manner.
F. Report: Submit a report of tests to the Engineer indicting the location of the test, date and time of the test, weather conditions and results.
3.6 PROTECTION
A. Contractors Operations: The Contractor to verify the kinds of operations that will be conducted around or over installed membranes. The Engineer will advise the Contractor of the measures that must be implemented to ensure that the membranes will be without damage at the time of Substantial Completion.
B. Buried Installations: At the time of backfill / fill, at the time of installation of irrigation and
landscaping over buried membranes, and at any other time where the Contractor' ' s operations may have an adverse effect on a buried membrane system, the Manufacturer' ' s Technical Representative shall observe to ensure that the Contractor' ' s operations are being conducted in a manner that will protect the membranes from damage.
3.7 FIELD QUALITY CONTROL
A. Section 01450 - Quality Control: Field inspection.
B. Inspect installations for tight and waterproof joints and proper thickness of membrane
applications.
3.8 CLEANING
A. Section 01700 - Execution Requirements: Cleaning the installed work.
B. Clean all spills. Do not leave splatters or drips.
C. Do not allow seepage of waterproofing through joints.
END OF SECTION
R.S. ROQUE ARCHITECTS 128
DIVISION 7 - THERMAL AND MOISTURE PROTECTION
SECTION 07192 - VAPOR RETARDERS
PART 1 - GENERAL
1.01 SCOPE
A. Furnish materials, tools and perform the labor required to complete damp proofing vapor barrier applied on under slabs on grade and other purpose as indicated in the drawings.
1.02 DELIVERY
A. Deliver waterproofing materials to the Site in original sealed containers or packages
bearing the manufacturer’s name and brand designation, specification number, type and class.
1.03 STORAGE AND PROTECTION:
A. Store and protect waterproofing materials from damage weather, moisture and
extreme-temperature with extra-ordinary care.
1.04 SUBMITTAL
A. Meet the applicable requirements of Section 01300.
PART 2 - PRODUCTS
2.01 MATERIAL
A. Membrane damp proofing below slabs, use .006 Polyethylene or approved equal.
B. 10mm foil insulation
PART 3 - EXECUTION
3.01 DAMP PROOFING
A. Over clean, smooth level, and firmly tamped gravel fill or coral fill, apply one layer of .006 Vasqueen or Polyethylene or equivalent, each sheet lapping at 12 inches. Lap in direction with concrete is to be spread. Use care in laying reinforcement bars and during pouring of concrete to prevent puncturing membrane.
B. Install roofmate after the purlins and before installation of roof.
END OF SECTION
R.S. ROQUE ARCHITECTS 129
SECTION 07210 BUILDING INSULATION
PART 1 GENERAL
1.1 SUMMARY
A. Section Includes:
1. Semi-rigid insulation at underside of roofs at interior spaces.
2. Board insulation for split slabs and under decks.
3. Batt insulation at exterior stud walls of air conditioned spaces and at interior stud walls for sound control.
4. Semi-rigid board insulation at shafts and chases.
5. Exposed wall and ceiling insulation at Mechanical Rooms.
6. Spray-applied thermal and acoustical insulation for exposed ceilings.
B. Related Sections:
1. Section 03300 - Cast-In-Place Concrete: Substrate for installation of insulation.
2. Section 09250 – gypsum and cement board
3. Section 05600. – non structural framing system
1.2 DESCRIPTION OF WORK
A. The extent of each type of building insulation is indicated on the Drawings and as specified
herein, and includes providing and installing thermal, acoustical and spry-on insulation, and safing and smoke stops.
1.3 REFERENCES
A. The publications listed below form a part of this Specification to the extent referenced.
Publications are referred to in the text by basic designation only.
B. American Society for Testing and Materials (ASTM):
1. ASTM C 518 - Test Method for Steady-State Thermal Transmission Properties by Means of the Heat Flow Meter Apparatus.
2. ASTM C 612 - Specification for Mineral Fiber Block and Board Thermal Insulation.
R.S. ROQUE ARCHITECTS 130
3. ASTM C 665 - Specification for Mineral-Fiber Blanket Thermal Insulation for Light Frame Construction and Manufactured Housing.
4. ASTM D 5113 - Test Method for Determining Adhesion Attack of Rigid Cellular
Foam.
5. ASTM E 84 - Test Method for Surface Burning Characteristics of Building Materials.
6. ASTM E 119 - Test Method for Fire Tests of Building Construction and Materials.
1.4 SUBMITTALS
A. Section 01330 - Submittal Procedures: Procedures for submittals.
1. Product Data: Manufacturer' ' s product specifications and installation
instructions for each type of insulation and vapor barrier material required. Indicate product characteristics, performance criteria and limitations.
2. Assurance / Control Submittals:
a. Manufacturer's certificate that the products meet or exceed the specified
requirements.
b. Documentation of experience indicating compliance with the specified qualifications requirements.
1.5 QUALITY ASSURANCE
A. Qualifications:
1. Manufacturer: Company specializing in manufacturing the products specified
with a minimum of five (5) years documented experience.
2. Installer: Company experienced in performing the work of this Section with a minimum of five (5) years documented experience.
3. Use adequate number of skilled workmen, thoroughly trained and experienced in
the necessary crafts and are completely familiar with the specified requirements and methods for proper performance of the work of this Section.
B. Regulatory Requirements: Conform to the flame spread and smoke developed
requirements of the local authority having jurisdiction.
1.6 DELIVERY, STORAGE AND HANDLING
A. Section 01600 - Product Requirements: Transport, handle, store and protect the products.
B. Deliver products to the Site in the manufacturer' ' s original, unopened packages,
containers or bundles, bearing brand name, identification of the manufacturer, and material

R.S. ROQUE ARCHITECTS 131
identification.
C. Store inside, under cover, and in a manner to keep dry. D. Protect from weather, direct sunlight, moisture, surface contamination, and damage from
construction traffic and other causes.
PART 2 PRODUCTS
2.1 MANUFACTURERS
A. Section 01600 - Product Requirements: Product Options: Substitutions permitted.
2.2 THERMAL INSULATION
A. Concealed Glass Fiber Insulation Boards: Unfaced glass fiber thermal insulation, semi-rigid boards, friction-fit, 48" x 96" x 2-1/2" thick, R-13 or as indicated, ASTM C 612, Type 1A and 1B. Maximum flame spread rating 25, maximum smoke developed 50 when tested in accordance with ASTM E 84. AType 703" approved equal.
B. Polystyrene Insulation Boards: High density extruded polystyrene foam insulation, 48" x
96" x 1-1/2" thick, R-5.6, square edge, 1/2" x 1/4" drainage channels on bottom long edge, for installation over waterproofing membrane.
C. Concealed Wall Batt Insulation: Unfaced glass fiber thermal insulation, friction-fit, 16" or 24" widths as required x 3-1/2" thick, ASTM C 665, Type I. R-11 when tested in accordance with ASTM C 518. Maximum flame spread 10, maximum smoke developed 10 when tested in accordance with ASTM E 84 or approved equal.
2.3 ACOUSTICAL INSULATION
A. Concealed Noise Barrier Batt Insulation: Unfaced glass fiber acoustical insulation, friction-
fit, 16" or 24" widths as required x 3-1/2" thick, ASTM C 665, Type I. Maximum flame spread 10, maximum smoke developed 10 when tested in accordance with ASTM E 84 or approved equal.
B. Chase Wall Insulation: Unfaced glass fiber acoustical insulation, semi-rigid, friction-fit, 24"
x 96" x 1-1/2", ASTM C 665, Type I. R-5.8 when tested in accordance with ASTM C 518. ASTM E 119 for 1-hour fire rated partitions. Maximum flame spread 20, maximum smoke developed 20 when tested in accordance with ASTM E 84 and UL 723 or approved equal.
C. Exposed Generator Room Walls and Ceiling: FRK (foil) faced glass fiber thermal insulation, semi-rigid, 1-1/2" thick, ASTM C 612, Type 1A and 1B. Maximum flame spread 25, maximum smoke developed 50 when tested in accordance with ASTM E 84 approved equal.
2.4 SPRAY-ON INSULATION
A. Exposed Thermal-Acoustical Spray-Applied Cellulose: Textured fibered cellulose with
chemical binder and adhesives, mildew and mold treated, spray-applied, 3" thick, R-4.5 per inch, NRC of 1.0, Class I. Class AA@ flame spread rating per ASTM E 84. FMRC
R.S. ROQUE ARCHITECTS 132
Category I. AK-13" or approved equal. Color as selected.
B. Exposed Acoustical Spray Applied Cellulose: Textured fibered cellulose with chemical
binder, mildew and mold treated, spray applied. NRC .90 at 1" thick, AK-13 fc or approved equal. Color as selected.
2.5 OTHER MATERIALS
A. Insulation Anchors: Impaling pin-type with 2" diameter flat anchor head and wire spindles,
self- locking holding washers; designed for adhesive application to the underside of roof decks. Adhesive as supplied or approved by the insulation manufacturer.
B. Provide other materials, not specifically described but required for a complete and proper
installation, as recommended by the insulation manufacturer.
PART 3 EXECUTION
3.1 EXAMINATION
A. Section 01700 - Execution Requirements: Verification of existing conditions before starting the work.
B. Verification of Conditions: Verify that the areas, surfaces, substrates and conditions are
as required, and ready to receive the work.
1. Board Insulation:
a. Verify that the substrate and adjacent materials are dry and ready to receive the insulation and adhesive.
b. Verify that the insulation boards are dry, unbroken and free of damage.
2. Batt Insulation:
a. Verify that the adjacent materials are dry and ready to receive the
installation.
b. Verify that mechanical and electrical services within the walls have been installed, are properly placed, and has been tested.
3. Spray-applied Insulation:
a. Verify that the substrate and adjacent surfaces are dry and ready to
receive the insulation.
b. Verify that all equipment is operating properly.
A. Remove or protect against projections in the construction framing which might damage or prevent the proper installation or application of materials.

R.S. ROQUE ARCHITECTS 133
B. Report, in writing, prevailing conditions that will adversely affect satisfactory execution of the work of this Section. Do not proceed with the work until the unsatisfactory conditions have been corrected.
3.2 INSTALLATION
A. Install the work of this Section in strict accordance with the original design, requirements of government agencies having jurisdiction, and the manufacturer' ' s recommended installation procedures as approved. Anchor all components firmly into position.
3.3 INSTALLATION - ROOF INSULATION
A. Apply with stick pins, adhesively secured to the underside of the roof. Provide a minimum
of 8 pins per 4' x 8' board and 6 pins per 4' x 4' board, spaced per the manufacturer' ' s instructions. Butt all edges and ends of insulation tightly.
3.4 INSTALLATION - SPLIT SLABS AND UNDER DECKS
A. Set in an approved waterproof roof coating in accordance with the manufacturer' ' s
recommendations. Protect insulation from weathering, sunlight and traffic until the top deck has been placed.
3.5 INSTALLATION - WALL INSULATION
A. Install batt insulation in accordance with the manufacturer' ' s instructions, without gaps or
voids.
B. Wall Insulation: Friction fit for installation within metal framing. Carry around water and and waste piping, electrical junction boxes, outlets, conduit and other elements to ensure a complete acoustical barrier.
C. Trim insulation neatly to fit the spaces. Use batts free of damage. Fit insulation tight in
the spaces and tight to the exterior side of mechanical and electrical services within the plane of the insulation.
D. When faced, install the insulation with the factory-applied membrane facing the warm side
of the building space. Lap ends and side flanges of the membrane. Attach insulation in place to the framing. Tape seal butt ends and lapped side flanges. Tape seal tears and cuts in the membrane.
3.6 INSTALLATION - MECHANICAL ROOM WALLS AND CEILINGS
A. Install with impaling pins; bend prongs of pins inward so they are not a hazard. Tape joints.
Stop insulation 4" from light fixtures and heat producing equipment.
3.7 INSTALLATION - SPRAY-APPLIED INSULATION
A. Apply by authorized applicator utilizing authorized fiber machines and nozzles for control of the fiber / binder ratio. Prime or seal surfaces before applying as required by the insulation manufacturer. Apply the manufacturer' ' s standard fire-retardant mildew-resistant overspray.

R.S. ROQUE ARCHITECTS 134
3.8 FIELD QUALITY CONTROL
A. Section 01450 - Quality Control: Field inspection.
B. Inspect work for proper thickness, secure attachment to the substrate and in accordance with the manufacturer' ' s instructions.
END OF SECTION
R.S. ROQUE ARCHITECTS 135
SECTION 07920 - JOINT SEALANTS
PART 1 - GENERAL
1.01 WORK INCLUDED
A. Provide joint sealing, including but not limited to the following:
1. Sealing joint in exterior and interior walls.
2. Sealing wherever required to provide a watertight building.
3. Sealing of joints where indicated in paving, slabs and flat work.
B. This section contains general specifications pertaining to joint sealing and caulking throughout the project and establishes quality of products and installation for joint sealing work specified in other sections. Specific requirements in other sections supercede general or conflicting requirements of this section.
1.02 REFERENCE STANDARD: The publications listed below form a part of this specification to the
extend referenced. The publications are referred to in the text by the basic designation only.
A. Federal Specification (Fed. Spec.):
TT-S-00227E & Am 3 Sealing compound, elastomeric type, multi-component (for caulking, sealing, and glazing to buildings and other structures)
TT-S-00230C & Am 2 Sealing compound, elastomeric type,
multi-component (for caulking, sealing, and glazing to buildings and other structures)
B. American Society for Testing and Materials (ASTM) Publications: C834-
76 Latex sealing compound
C920-79 Elastomeric joint sealant
1.03 QUALITY ASSURANCE: Use only licensed joint sealing specialty contractor experienced in the application of sealant and employing skilled experienced workmen.
1.04 DELIVERY AND STORAGE:
A. Meet the applicable requirements of Section 01600.
B. Deliver materials to the job site in the manufacturer’s external shipping containers,
unopened, with brand names, date of manufacture, color and material designation clearly marked thereon. Label containers of elastomeric sealant as to type, class, grade

R.S. ROQUE ARCHITECTS 136
and use. Carefully handle and store all materials to prevent inclusion of foreign materials, or subjection to sustained temperatures exceeding 100 degrees or less than 40 degrees F.
PART 2 - PRODUCTS
2.01 MATERIALS: Conform to the reference documents listed for each use. Color of sealant and
caulking shall match adjacent surface color unless specified otherwise. For ASTM C920 sealant, use a sealant that has been tested on the type of substrate to which it will be applied.
A. Interior Caulking or Sealant: ASTM C 834, ASTM C920, Type S or M, Grade NS, class
12.5, use NT. Color of caulking or sealant shall be as selected.
B. Exterior sealant: For joints in vertical surfaces, provide ASTM C 920 Type S or M, Grade NS, Class 25, use NT. For joints in horizontal surfaces, provide ASTM C 920, type S or M, grade P, class 25, use T. Color of sealant as selected.
C. Floor joint sealant: ASTM C920, Type S or M, Grade P, Class 25, Use T. Color or
sealant as selected.
D. Primer for sealant: Non-staining, quick-drying type and consistency recommended by the sealant manufacturer for the particular application.
E. Bond breakers: Type and consistency recommended by the sealant manufacturer for
the particular application.
PART 3 - EXECUTION 3.01 INSPECTION: Examine the substrates and conditions under which work of this section will be
performed. Do not proceed until unsatisfactory conditions detrimental to timely and proper completion of the work have been corrected.
3.02 SURFACE PREPARATION
A. Surfaces clean, dry to the touch, and free from moisture, grease, oil, wax, lacquer,
paint or other foreign matter that would tend to destroy or impair adhesion.
B. Where adequate grooves have not been provided, clean out grooves to a depth of ½ inch and grind to a minimum width of ¼ inch without damage to the adjoining work. No grinding is required on metal surfaces.
C. Steel Surfaces: Remove loose mill scale by sandblasting or, if sand blasting is
impractical or would damage finish work, scraping and wire brushing. Remove protective coatings by sandblasting or using a solvent that leaves no residue.
D. Aluminum Surfaces: Remove temporary protective coatings from surfaces that will be
in contact with sealant. When masking tape is used as a protective coating, remove tape and any residual adhesive just prior to sealant application. Use non-staining
R.S. ROQUE ARCHITECTS 137
solvents recommended by the item manufacturer.
3.03 SEALANT PREPARATION: Do not modify the sealant by addition of liquids, solvents, or powders. Mix multi component elastomeric sealant in accordance with manufacturer’s printed instructions.
3.04 APPLICATION
A. Primer: Just prior to the application of the sealant or caulking compound, clean out all
loose particles from joints. Apply primer in accordance with compound’s manufacturer’s directions. Do not apply primer to exposed finish surfaces.
B. Bond Breaker: Provide bond breakers as recommended by the sealant manufacturer
for each type of joint and sealant used.
C. Sealant: Use a compound that is compatible with the material to and against which it is applied.
Do not use a compound that has exceeded its shelf life or has become too jelled to be discharged in a continuous flow from the gun. Apply the compound in accordance with the manufacturer’s printed instructions. Force the compound into joints with sufficient pressure to fill the joints solidly. Compound uniformly smooth and free of wrinkles.
1. Interior Sealant: Provide at all exposed joints in the building and at all joints
indicated to receive sealant or caulking.
2. Exterior Sealant: Provide sealant at joints around the perimeter of openings and at exposed joints on the building and at joints indicated to receive sealant.
3. Floor Joint Sealant: Provide sealant in control joints and in other floor joints
indicated or specified.
3.05 PROTECTION AND CLEANING
A. Protection: Protect areas adjacent to joints from compound smears. Masking tape may be used for this purpose if removed 5 to 10 minutes after the joint is filled.
B. Cleaning: Immediately scrape off fresh compound that has been smeared on masonry
and rub clean with a solvent as recommended by the compound manufacturer. Upon completion of compound application, remove remaining smears and stains resulting there from and leave the work in a clean and neat condition.
END OF SECTION
R.S. ROQUE ARCHITECTS 138
SECTION 08100 HOLLOW METAL DOORS AND FRAMES
PART 1 GENERAL
1.1 SUMMARY
A. Section Includes:
1. Steel doors.
2. Steel door frames.
3. Door vision panels.
4. Louvers.
5. Accessories.
B. Related Sections:
1. Section 03300 - Cast-In-Place Concrete: Substrate for anchorage.
2. Section 04200 - Reinforced Unit Masonry: Substrate for anchorage.
3. Section 08710 - Door Hardware: Hardware coordination.
5. Section 08800 - Glass and Glazing: Glass installed in vision panels in doors and steel window frames.
6. Section 09900 - Painting: Field painting and finishing of frames and doors.
1.2 DESCRIPTION OF WORK
A. The extent of standard steel doors and frames work is indicated on the Drawings and
Schedule and as specified herein, and includes providing and installing exterior entrance and storefront assemblies, designed and fabricated to comply with the requirements for system performance characteristics below, as demonstrated by testing of the manufacturer' ' s corresponding stock systems in compliance with the test methods designated.
B. Door hardware is specified in Section 08710.
1.3 REFERENCES
A. The publications listed below form a part of this Specification to the extent referenced.
Publications are referred to in the text by basic designation only. B. American Society of Civil Engineers (ASCE):
R.S. ROQUE ARCHITECTS 139
1. ASCE / SEI 7 - Minimum Design Loads for Buildings and Other Structures.
C. American Society for Testing and Materials (ASTM):
1. ASTM A 153 / A 153M - Specification for Zinc Coating (Hot-Dip) on Iron and Steel
Hardware.
2. ASTM A 568 / A 568M - Specification for Steel, Sheet, Carbon, Structural, and High-Strength, Low-Alloy, Hot-Rolled and Cold-Rolled, General Requirements for.
3. ASTM A 653 / A 653M - Specification for Steel Sheet, Zinc-Coated (Galvanized)
or Zinc-Iron Alloy-Coated (Galvannealed) by Hot-Dip Process.
4. ASTM A 1008 / A 1008M - Specification for Steel, Sheet, Cold-Rolled, Carbon, Structural, High-Strength Low-Alloy, High-Strength Low-Alloy with Improved Formability, Solution Hardened, and Bake Hardenable.
5. ASTM A 1011 / A 1011M - Specification for Steel, Sheet and Strip, Hot-Rolled,
Carbon, Structural, High-Strength Low-Alloy, High-Strength Low-Alloy with Improved Formability, and Ultra-High Strength.
6. ASTM D 2201 - Practice for Preparation of Zinc-Coated and Zinc-Alloy-Coated
Steel Panels for Testing Paint and Related Coating Products.
7. ASTM E 90 - Test Method for Laboratory Measurement of Airborne Sound Transmission Loss of Building Partitions and Elements.
8. ASTM E 330 - Test Method for Structural Performance of Exterior Windows,
Doors, Skylights and Curtain Walls by Uniform Static Air Pressure Difference.
9. ASTM E 413 - Classification for Rating Sound Insulation.
D. Americans with Disabilities Guidelines (ADAAG):
1. Accessibility Guidelines for Buildings and Facilities.
E. Door Hardware Institute (DHI):
1. DHI - The Installation of Commercial Steel Doors and Steel Frames, Insulated Steel Doors in Wood Frames and Builder's Hardware.
F. International Code Council:
1. International Building Code (IBC), 2009.
G. Steel Door Institute (SDI):
1. SDI-100 - Standard Steel Doors and Frames.
2. SDI-105 - Recommended Erection Instructions for Steel Frames.
R.S. ROQUE ARCHITECTS 140
H. National Fire Protection Association (NFPA): 1. Standard No. 80 - Standard for Fire Doors and Other Opening Protectives.
1.4 SUBMITTALS
A. Section 01330 - Submittal Procedures: Procedures for submittals.
1. Product Data: Identify door and frame materials, gauges, configurations, location
of cutouts, hardware reinforcement, fire-rating and finish.
2. Shop Drawings: Include elevations of each door type, details of each frame type, conditions at openings, details of construction, location and installation requirements of reinforcements and finish hardware, and details of joints and connections. Show anchorages and accessory items. Indicate door elevations, internal reinforcement, closure method, sidelights, and cutouts for louvers and vision panels.
3. Schedule: Provide for doors and frames using the same reference numbers for
details and openings as those used on the Drawings.
4. Samples: Full range of color samples for selection. Two (2) 6" x 6", minimum, of each color and texture selected from factory-finished doors and frames.
5. Assurance / Control Submittals:
a. Certificates:
1) Manufacturer' ' s Certificate that the products meet or exceed
the specified requirements.
2) Manufacturer' ' s certification that hot-dip galvanizing for doors and frames comply with the requirements.
3) Manufacturer' ' s certification that oversized fire-rated frame and
door assemblies have been constructed with materials and methods equivalent to the requirements for labeled construction.
b. Calculations indicating that exterior doors, frames and anchorages satisfy
the performance requirements.
c. Documentation of experience indicating compliance with the specified qualifications requirements.
B. Section 01780 - Closeout Submittals: procedures for closeout submittals.
1. Warranty: Submit a written special Warranty with forms completed in the name of
the Employer and registered with the manufacturer.
1.5 QUALITY ASSURANCE
A. Qualifications:
R.S. ROQUE ARCHITECTS 141
1. Manufacturer: Company specializing in manufacturing the products specified with
a minimum of five (5) years documented experience. 2. Installer: Company experienced in performing work of this Section with a minimum
of five (5) years documented experience.
3. Provide frames and doors complying with Steel Door Institute, SDI-100 ARecommended Specifications: Standard Steel Doors and Frames@ and as specified herein.
B. Performance Requirements:
1. Provide the capacity to withstand the following loading requirements for exterior
units:
a. Design and install to resist combined positive and negative windloading in accordance with IBC 2009, Section 1609 with a Vmph of 170, qs of 74.0 psf, exposure [B] [C] [D],and importance factor [1.0] [1.25] [1.5], as applicable per ASCE 7.
2. Fire-Rated Assemblies: Provide fire-rated doors investigated and tested as fire door
assemblies, complete with type of hardware to be used. Identify each fire door with recognized testing laboratory labels indicating the applicable fire-rating. Construct and install assemblies to comply with NFPA, Standard No. 80, and as herein specified.
1.6 DELIVERY, STORAGE AND PROTECTION
A. Section 01600 - Product Requirements: Transport, handle, store, and protect the
products.
B. Deliver hollow metal work cartoned or crated for protection during transit and storage.
C. Provide additional sealed plastic wrapping for factor-finished doors.
D. Deliver products to the Site in the manufacturer' ' s original, unopened packages, dry and undamaged with seals and labels intact.
E. Inspect products for damage. Minor damages may be repaired provided the finish items are
equal, in all respects, to new work, and acceptable to the Engineer; otherwise remove and replace the damaged items.
F. Store under cover in dry, weathertight conditions. Place units on 4" high wood sills or store
otherwise in a manner to prevent rust and damage. Provide 1/4" space between stacked doors to allow for air circulation. Avoid the use of non-ventilated plastic or canvas shelters. If the cardboard wrapper becomes wet, remove the carton immediately.
G. Break seals to permit ventilation.
1.7 WARRANTY

R.S. ROQUE ARCHITECTS 142
A. Section 01780 - Closeout Submittals: Procedures for closeout.
B. Special Warranty:
1. Provide a written Warranty, signed by the door manufacturer, and the door installer agreeing to repair or replace doors that do not meet the requirements, or that fail in materials or workmanship.
2. Warranty Period: Two (2) years from the date of Substantial Completion.
PART 2 PRODUCTS
2.1 MANUFACTURERS
A. Section 01600 - Product Requirements: Product Options: Substitutions permitted.
2.2 MATERIALS
A. Hot-Rolled Steel Sheets and Strip: Commercial quality carbon steel, pickled and oiled, complying with ASTM A 1011 / A 1011M and ASTM A 568 / A 568M.
B. Cold-Rolled Steel Sheets: Commercial quality carbon steel, complying with ASTM A 1008 /
A 1008M and ASTM A 568 / A 568M.
C. Galvanized Steel Sheets: Zinc-coated carbon steel sheets of commercial quality, complying with ASTM A 653 / A 653M, ASTM D 2201, G60 zinc coating, mill phosphatized.
D. Supports and Anchors: Fabricate of not less than 18 gage galvanized sheet steel.
E. Inserts, Bolts and Fasteners: Manufacturer' ' s standard units, hot-dip galvanized
complying with ASTM A 153 / A 153M, Class C or D, as applicable.
2.3 FABRICATION
A. Fabricate units rigid, neat in appearance, and free from defects, warp, twist and buckle. Fit and assemble units in the manufacturer' ' s plant. Fabricate KD or welded. Clearly identify work that cannot be permanently factory-assembled before shipment to assure proper assembly at the Site.
B. Weld the exposed surface of joints continuously; grind, dress, and make joints smooth, flush
and invisible. When prime painted, the use of metallic filler to conceal manufacturing defects is not acceptable.
C. Fabricate exposed faces of doors and panels, including stiles and rails of non-flush units
from only cold-rolled steel.
D. Fabricate frames, concealed stiffeners, reinforcement, edge channels, louvers and molding from either cold-rolled or hot-rolled steel (fabricator' ' s option); galvanized.
E. Fabricate doors, panels and frames from galvanized sheet steel. Close top and bottom

R.S. ROQUE ARCHITECTS 143
edges of doors as an integral part of the door construction or by the addition of inverted steel channels.
F. Exposed Fasteners: Unless otherwise indicated, provide countersunk flat Phillips head for
exposed screws and bolts; galvanized.
G. Sound-Rated (Acoustical) Assemblies:
1. Where shown or scheduled, provide frame and door assemblies which have been fabricated as sound-reducing type, tested in accordance with ASTM E 90 and classified in accordance with ASTM E 413.
2. Unless otherwise indicated, the minimum sound rating for acoustical assemblies
shall be STC 33.
H. Door Hardware Preparation:
1. Prepare doors and frames to receive mortised and concealed finish hardware in accordance with final Finish Hardware Schedule and templates provided by the hardware supplier. Comply with applicable requirements of ANSI A115 series specifications for door and frame preparation for hardware.
2. For concealed overhead door closers, provide space, cutouts, reinforcing and
provisions for fastening in the top rail of doors or heads of frames, as applicable.
3. Reinforce doors and frames to receive surface-applied hardware. Drilling and tapping for surface-applied finish hardware may be done at the Site.
4. Locate finish hardware as shown on final Shop Drawings or, if not shown, in
accordance with ARecommended Locations for Builder' ' s Hardware, Apublished by the Door and Hardware Institute and ADA Accessibility Guidelines.
I. Prepare frame for silencers. Provide three single rubber silencers for single doors; two
single silencers on the frame head at double doors without mullions.
J. Equip frames with one welded-in floor anchor in each jamb. Furnish a minimum of three (3) steel jamb anchors and two (2) head anchors for field insertion at a maximum of 24" o.c. Anchors shall be of the proper type for particular construction involved (i.e., masonry, concrete, metal framing, etc).
K. Factory install louvers and vision panels in prepared openings.
L. Shop Painting:
1. Clean steel surfaces of mill scale, rust, oil, grease, dirt, and other foreign materials
before application of paint.
2. Clean, treat and paint exposed surfaces of steel doors, louvers and frames including galvanized surfaces.
3. Apply one shop coat of rust-inhibitive enamel or primer paint, either air-

R.S. ROQUE ARCHITECTS 144
dryed or baked-on, of even consistency, and suitable as a base for the specified finish paint.
2.4 STANDARD STEEL FRAMES
A. Provide galvanized steel frames for doors, transoms, sidelights, borrowed lights, windows
and other openings of the types and styles shown on the Drawings.
B. Exterior Frames including sidelights, if required:
1. Cold-rolled steel; factory mitered corners and full-welded construction; 2" face, jamb dept as required or as shown on the Drawings; galvanized to ASTM D 2201.
2. 14 gage for exterior frames and other frames wider than 48".
3. 18 gage for all other frames.
C. Interior Frames:
1. Cold-rolled steel; 2" face, jamb depth as required or as shown on the Drawings.
2. 16 gage.
3. Fire-rated frames per NFPA, Standard No. 80.
D. Silencers: Except on weatherstripped frames, drill stops to receive three (3) silencers on the
strike jambs of single-swing frames and two (2) silencers on the heads of double-swing frames. Install plastic plugs to keep holes clear during construction.
E. Plaster Guards: Provide 26 gage, steel plaster guards or mortar boxes welded to the frames
at the back of door hardware cutouts where mortar or other materials might obstruct hardware operation.
F. Anchors: Equip frames with one welded-in floor anchor in each jamb. Furnish a minimum of
three (3) steel jamb anchors and two (2) head anchors for field insertion at a maximum or 24" o.c.. Anchors shall be of the proper type for the particular construction involved, i.e., concrete, masonry, metal framing, etc. Conceal fastenings unless indicated otherwise.
2.5 STANDARD STEEL DOORS
A. Exterior Doors: Extra Heavy-Duty, Grade III per SDI-100, 1-3/4" thick, types and styles as
indicated on the Drawings; top edge closed flush; 14 gage cold-rolled steel, galvanized to ASTM D 2201; insulated core.
B. Interior Doors: Standard-duty, Grade I per SDI-100, 1-3/4" thick, types and styles as
indicated on the Drawings; top edge closed flush; 16 gage cold-rolled steel. Fire-rated UL labeled where indicated or required by the Building Code.
C. Fire-Rated Doors: Per NFPA, Standard No. 80.
D. Vision Panels: Laminated glass in metal frames as required by the fire-rating. Install
removable steel stops on the room side of the doors.

R.S. ROQUE ARCHITECTS 145
E. Louvers:
1. Exterior: Weatherproof, stationary, where shown on the Drawings. Construct of AZ@ shaped, 16 gage, hot-dip galvanized steel blades. Space blades not more than 1-1/2" o.c.. Provide removable 1/4" stainless steel wire mesh screen at the interior face of doors, in formed metal frame with removable clips. Provide insect screens at lovers in exterior doors.
2. For fire-rated openings, provide tightly fitted, spring-loaded, automatic closing
louvers with operable blades equipped with a fusible link; arranged so metal overlaps metal at every joint.
3. Provide louvers complying with UL or NFPA standards only, and factory-applied in
doors.
4. Interior (Non-fire-rated): Roll-formed, 20 gage, galvanized steel, inverted AY@ blades; sight-proof; prime painted for field applied finish paint; size as indicated on the Drawings.
2.6 CORE CONSTRUCTION
A. Provide one of the following types of core construction (Contractor' ' s option):
1. Kraft Honeycomb: Phenolic treated.
2. Polyurethane: Foamed-in-place or laminated. 20 psi strength, 1.8 pcf density, 1/2"
maximum voids in any direction. Strength of bond between the core and the steel face sheets shall exceed strength of core so delamination will not occur during operating conditions.
3. Polystyrene: Rigid core of polystyrene foam board, 1500 psf compressive strength,
18 psi shear strength. Strength of the bond between the core and the steel face sheets shall exceed strength of core so that delamination will not occur under operating conditions.
4. Vertical Steel Stiffeners: 22 gage vertical steel stiffeners, spaced 6" apart and spot
welded to the face sheets at 6" on center. Insulate the spaces between stiffeners with loose fill insulation the full height of the door.
2.7 PROTECTIVE COATINGS
A. Bituminous Coating: Apply fibered asphalt emulsion at grout filled frames.
B. Primer: Exposed surfaces shall be cleaned, treated with Bonderite chemical and given one
baked-on shop coat of grey synthetic primer.
PART 3 EXECUTION
3.1 EXAMINATION
R.S. ROQUE ARCHITECTS 146
A. Section 01700 - Execution Requirements: Verification of existing conditions before starting the work.
B. Verification of Conditions: Verify that field measurements, surfaces, substrates and
conditions are as required, and ready to receive the work.
C. Report in writing, prevailing conditions that will adversely affect satisfactory execution of the work of this Section. Do not proceed with the work until the unsatisfactory conditions have been corrected.
3.2 INSTALLATION
A. General: Install standard steel doors, frames and accessories in accordance with the final
Shop Drawings, the manufacturer' ' s published instructions, as herein specified, and at the locations shown on the Drawings.
B. Door Installations:
1. Fit hollow metal doors accurately in frames, within clearances specified in SDI-
100.
2. Install fire-rated doors with the clearances specified in NFPA, Standard No. 80.
C. Frame Installations:
1. Comply with the provisions of SDI-105 ARecommended Erection Instructions for Steel Frames@, unless indicated otherwise.
2. Except for frames located at in-place concrete or masonry and at drywall
installations, place frames prior to construction of the enclosing walls. Set frames accurately in position, plumbed, aligned, and braced securely until permanent anchors are set. After the wall construction is completed, remove temporary braces and spreaders leaving the surfaces smooth and undamaged.
3. At in-place concrete construction, set frames and secure to adjacent construction
with machine screws and masonry anchorage devices.
4. In masonry construction, locate wall anchors at the hinge and strike levels. Building-in of anchors and grouting of frames is specified in Division 4 and as shown on the Drawings..
5. In steel framed partitions, install wall anchors at the hinge and strike levels. In
open steel stud partitions, place studs in wall anchor notches and wire tie. In closed steel stud partitions, attach wall anchors to studs with tapping screws.
6. Install fire-rated frames with clearances specified in NFPA, Standard No. 80.
D. Field Finish: Field paint door, frames, louvers and vision panel frames as specified in
Section 09900 - Painting.
3.3 CONSTRUCTION

R.S. ROQUE ARCHITECTS 147
A. Interface with Other Work:
1. Coordinate frame installations for size, location, and the particular construction involved.
2. Coordinate with the door opening construction, door frames, door hardware, door
louver and vision panel glazing installation. B. Site Tolerances:
1. Maximum Diagonal Distortion: 1/16" measured with straight edge from corner to
corner.
3.4 ADJUSTING
A. Section 01700 - Execution Requirements: Adjusting the installed work.
B. Immediately after installation, sand smooth any rusted or damaged areas of the prime coat and touch-up with a compatible air-drying primer.
C. Check and readjust operating door hardware items. Leave steel doors and frames
undamaged and in complete and proper operating condition.
D. Adjust hardware for smooth and balanced door and window movement.
3.5 FIELD QUALITY CONTROL
A. Section 01450 - Quality Control: Field inspection.
B. Inspect metal door, frame and window installations, alignment, attachment to structure, and operation.
3.6 CLEANING
A. Section 01700 - Execution Requirements: Cleaning installed Work.
B. Immediately prior to final inspection, remove protective plastic wrappings from prefinished
doors.
C. Wipe down all doors and frames before final acceptance inspection.
END OF SECTION
R.S. ROQUE ARCHITECTS 148
SECTION 08310 ACCESS DOORS AND PANELS
PART 1 GENERAL
1.1 SUMMARY
A. Section Includes:
1. Access door and frame units.
2. Wall- and ceiling-mounted locations.
B. Related Sections:
1. Section 03300 - Cast-In-Place Concrete: Substrate for anchorage.
2. Section 04200 - Reinforced Unit Masonry: Substrate for anchorage.
3. Section 05600 - Non-Load Bearing Steel Framing: Wall and ceiling framing for attachment of units.
4. Section 09250 - Gypsum Board: Adjacent wall and ceiling finish material.
5. Section 09900 - Painting: Field painting of door and frame units.
1.2 DESCRIPTION OF WORK
A. The extent of access door work is indicated on the Architectural, Mechanical, Plumbing and Electrical Drawings and as specified herein, and includes providing and installing access doors where access to mechanical, plumbing and electrical items is required, whether or not the access doors are shown on the Drawings.
1.3 REFERENCES
A. The publications listed below form a part of this Specification to the extent referenced. Publications are referred to in the text by basic designation only.
B. American Society for Testing and Materials (ASTM):
1. ASTM A 153 / A 153M - Specification for Zinc Coating (Hot-Dip) on Iron and Steel Hardware.
2. ASTM A 568 / A 568M - Specification for Steel, Sheet, Carbon, Structural, and High-Strength, Low-Alloy, Hot-Rolled and Cold-Rolled, General Requirements for.
3. ASTM A 653 / A 653M - Specification for Steel Sheet, Zinc-Coated (Galvanized) or Zinc-Iron Alloy-Coated (Galvannealed) by Hot-Dip Process.
4. ASTM A 1008 / A 1008M - Specification for Steel, Sheet, Cold-Rolled,
R.S. ROQUE ARCHITECTS 149
Carbon, Structural, High-Strength Low-Alloy, High-Strength Low-Alloy with Improved Formability, Solution Hardened, and Bake Hardenable.
5. ASTM A 1011 / A 1011M - Specification for Steel, Sheet and Strip, Hot-Rolled,
Carbon, Structural, High-Strength Low-Alloy, High-Strength Low-Alloy with Improved Formability, and Ultra-High Strength.
6. ASTM D 2201 - Practice for Preparation of Zinc-Coated and Zinc-Alloy-Coated Steel Panels for Testing Paint and Related Coating Products.
C. National Fire Protection Association (NFPA):
1. Standard No. 80 - Standard for Fire Doors and Other Opening Protectives.
1.4 SUBMITTALS
A. Section 01330 - Submittal Procedures: Procedures for submittals.
1. Product Data: Manufacturer' ' s technical data and installation instructions for each type of access door assembly, including setting drawings, templates, instructions and directions for installation of anchorage devices.
2. Shop Drawings: Indicate the location, size, type, finish, hardware, and
details of adjoining work for all access door units.
3. Schedule: Indicate all doors by type, size, rating and location keyed to the Drawings.
3. Assurance / Control Submittals:
a. Manufacturer's certificate that products meet or exceed the specified requirements.
b. Documentation of experience indicating compliance with the specified qualifications requirements.
B. Section 01780 - Closeout Submittals: Procedures for closeout submittals.
1. Project Record Documents: Accurately record the location of all access units.
2. Warranty: Submit a written special Warranty with forms completed in the name of
the Employer and registered with the manufacturer.
1.5 QUALITY ASSURANCE
A. Qualifications:
1. Manufacturer: Company specializing in manufacturing the products specified with a minimum of five (5) years documented experience.
B. Fire-Resistance Ratings: In all Corridor walls, rated partitions and ceilings, provide access

R.S. ROQUE ARCHITECTS 150
door assemblies with panel door, frame, hinge, and latch from a manufacturer listed in Underwriter' ' s Laboratories, Inc; AClassified Building Materials Index@ for 90 minutes rating.
1. Provide UL label on each fire-rated access door.
C. Size Variation: The selected manufacturer' ' s standard units may vary in size slightly from
the sizes indicated herein. Secure the Employer representative' ' s approval for sizes that differ from the units specified.
D. Coordination: Furnish inserts and anchoring devices which must be built into other work for
the installation of access doors. Coordinate delivery with other trades to avoid delaying the work.
1.6 DELIVERY, STORAGE AND HANDLING
A. Section 01600 - Product Requirements: Transport, handle, store, and protect the
products.
B. Deliver products to the Site in the manufacturer' ' s original, unopened packaging, dry and undamaged with seals and labels intact.
C. Handle and store to prevent damage to frames, panels and operating mechanisms.
1.7 WARRANTY
A. Section 01780 - Closeout Submittals: Procedures for closeout.
B. Special Warranty:
1. Provide a written Warranty, signed by the manufacturer, and the Installer agreeing
to repair or replace doors and panels that do not meet the requirements, or that fail in materials or workmanship.
2. Warranty Period: Two (2) years from the date of Substantial Completion.
PART 2 PRODUCTS
A. Section 01600 - Product Requirements: Product Options: Substitutions permitted.
2.2 ACCESS DOORS A. General: Manufacturers standard fully-welded steel construction. Provide units with means
for anchoring properly to the adjacent construction.
B. Non-Fire-Rated Units:
1. Doors:
a. Flush Units: 14 gage, minimum.

R.S. ROQUE ARCHITECTS 151
b. Recessed Units: 18 gage, minimum.
2. Hinges: Stainless steel, piano or pin type, concealed and continuous, 175 degrees opening, constant force closure, spring type.
3. Operation: Flush screw driver slot for quarter turn cam latch with welded steel
access sleeves at recessed panel doors.
C. Fire-Rated Units: As required for the fire-rating, but not less than the following:
1. Doors: Steel-faced, insulated core panel, 20 gage minimum.
2. Hinges: Stainless steel, piano or pin type, concealed and continuous, 175 degrees opening, constant force closure with spring or other self-closing mechanism.
3. Operation: Flush screw driver slot for quarter turn cam latch.
D. Unit Construction Types:
1. Non-Fire-Rated:
a. Flush: Flush door with bead to give the unit a frameless appearance.
b. Recessed: Recessed door to allow installation of acoustical tile, gypsum
board or similar finish into the recess to provide a concealed appearance. Units for plaster or mortarbed to have integral expanded metal lath.
c. Universal: Flush door with exposed frame, Exposed flange of frame not to
exceed 1" in width.
2. Fire-Rated: Flush insulated door with exposed frame. Exposed flange of frame not to exceed 1" in width, unless approved otherwise.
2.3 FABRICATION
A. General: Fabricate each access door assembly as an integral unit, complete, with all
necessary parts, and ready for installation.
B. Steel Access Doors and Frames: Fabricate units of continuous welded steel construction. Fill and grind welds smooth and flush with adjacent surfaces. Fabricate units square. Furnish attachment devices and fasteners of the type required to secure the units to the adjacent substrate. All doors in fire-rated assemblies shall have been tested and have a Class B, 1-1/2 hour fire-rating label attached.
C. Frames and Flanges:
1. Fabricate frames from 16 gage steel, minimum, with exposed flanges approximately 1" in width around the perimeter of the frame for units to be installed in the following construction types, except as noted:
a. Exposed concrete.

R.S. ROQUE ARCHITECTS 152
b. Exposed masonry.
c. Gypsum board.
d. Plaster.
e. Ceramic tile.
f. Wood paneling, flush type with wood inlay to match the adjacent panel.
2. For installation in masonry construction, fabricate frames with adjustable metal masonry anchors.
3. For installation in plaster finish, fabricate frames with galvanized expanded metal
lath, and exposed casing bead welded to the perimeter of the frame.
D. Access doors and frames for installation in concrete, masonry, plaster and ceramic tile shall be flush, stainless steel
E. Access doors for installation in gypsum board shall be concealed frame, recessed; finish as selected:.
F. For recessed panel doors, provide access sleeves for each locking device. Furnish plastic
grommets. Install in a hole cut thru the finish material.
G. Finish: Phosphate treated and shop painted with the manufacturer' ' s standard rust inhibitive primer.
2.4 ACCESSORIES
A. Anchorage Devices:
1. Devices of the type required to secure units to the abutting structure.
2.5 SCHEDULE
A. General: Where not otherwise indicated, provide access doors in accordance with the
following:
1. Size: As required to comfortably achieve the purpose for which access is required.
2. Types:
a. Flush: In non-public areas that are not restrooms, conference rooms or offices.
b. Recessed: In all public areas, restrooms, conference rooms and offices. c. Universal: In exposed concrete and masonry surfaces.
PART 3 EXECUTION
R.S. ROQUE ARCHITECTS 153
3.1 EXAMINATION
A. Section 01700 - Execution Requirements: Verification of existing conditions before starting the work.
B. Verification of Conditions: Verify that field measurements, surfaces, substrates and
conditions are as required, and ready to receive the work.
1. Verify that rough openings for the units are correctly located and properly sized.
C. Report, in writing, prevailing conditions that will adversely affect satisfactory execution of the work of this Section. Do not proceed with the work until the unsatisfactory conditions have been corrected.
3.2 INSTALLATION
A. Install units in accordance with the manufacturer's published instructions, where indicated
on Drawings, and where required for access.
B. Coordinate with mechanical, plumbing and electrical trades and other work requiring access.
C. Position units to provide convenient access to concealed work requiring access.
D. Set frames in position accurately and securely attached to supports with face panels plumb
and level in relation to the adjacent finish surfaces.
E. Field paint surfaces exposed to view. See Section 09900 - Painting.
F. Built-in anchors and grouting of frames in concrete and masonry is included in Sections of Divisions 3 and 4.
3.3 PROTECTION
A. Institute and maintain protective measures and take other precautions necessary to
ensure that all assemblies will be without damage and deterioration at the time of final acceptance.
3.4 ADJUSTING
A. Section 01700 - Execution Requirements: Adjusting the installed work.
B. Adjust hardware and panels after installation for proper operation.
C. Remove and replace panels and frames that are warped, bowed, twisted or otherwise
damaged.
3.5 FIELD QUALITY CONTROL A. Section 01450 - Quality Control: Field inspection.
R.S. ROQUE ARCHITECTS 154
B. Inspect installed units for location, alignment, plumb, level, attachment to framing, and operation.
3.6 CLEANING
A. Section 01700 - Execution Requirements: Cleaning the installed work.
B. Clean the units before final acceptance inspection.
END OF SECTION

R.S. ROQUE ARCHITECTS 155
SECTION 08400 ENTRANCES, STOREFRONTS, DOORS AND WINDOWS
PART 1 GENERAL
1.1 SUMMARY
A. Section Includes:
1. Aluminum and glass exterior and interior entrances.
2. Aluminum storefronts.
3. Aluminum sidelites.
4. metal flush doors.
5. Tempered glass doors.
6. Aluminum windows, fixed and operable.
7. Glass and glazing in-fill and vision panels.
8. Door hardware.
9. Window hardware.
10. Perimeter sealants.
B. Related Sections:
1. Section 03300 - Cast-In-Place Concrete: Substrate for anchorage.
2. Section 04230 - Reinforced Unit Masonry: Substrate for anchorage.
3. Section 07900 - Joint Sealers: Sealants for a weatherproof installation.
4. Section 08710 - Door Hardware: Hardware not specified in this Section.
5. Section 08800 - Glass and Glazing: Glazing for entrances, storefronts, sidelites, doors and windows including those specified herein to be factory-glazed.
6. Section 09110 - Non-Load Bearing Steel Framing: Non-structural framing for
adjacent wall and ceiling finishes.
7. Section 09250 - Gypsum Board: Adjacent wall and ceiling finish material.
8. Section 09900 - Painting: Field painting of components.
R.S. ROQUE ARCHITECTS 156
1.2 DESCRIPTION OF WORK
A. The extent of the work of this Section is indicated on the Drawings and Schedules and as specified herein, and includes providing and installing aluminum exterior and interior doors, entrances, storefronts, sidelites, flush doors, tempered glass doors, sliding doors and operable and fixed windows; tubular aluminum sections, shop-fabricated, factory-finished; glass and glazing in-fill; related flashings; anchorage and attachment devices; hardware; sealants.
B. Provide complete operating door assemblies including door curtains, guides, hardware, operators, motors, and installation accessories. Coordinate with other hardware requirements in Section 08700.
C. The systems are standard units to the shapes indicated, combined with extruded sections to create the profiles indicated.
D. Provide assemblies that have been designed and fabricated to comply with requirements of the system performance characteristics below, as demonstrated by testing the manufacturer' ' s corresponding stock systems in accordance with the test methods designated.
E. Preparation of openings, structural support, access panels, finish and trim for openings, construction of storage pockets and painting shall be furnished and installed under other Sections herein.
1.3 REFERENCES
A. The publications listed below form a part of this Specification to the extent referenced.
Publications are referred to in the text by basic designation only.
B. Aluminum Association (AA):
1. AA DAF45 - Designation System for Aluminum Finishes.
C. American Architectural Manufacturers Association (AAMA):
1. AAMA 101 - Specification for Windows, Doors and Skylights.
2. AAMA 501.1 - Methods of Test for Exterior Walls.
3. AAMA 605.2 - Specification for High Performance Organic Coating on Architectural Extrusions and Panels.
4. AAMA 607.1 - Specifications and Inspection Methods for Clear Anodic Finishes for
Architectural Aluminum.
5. AAMA 608.1 - Specification and Inspection Methods for Electolytically Deposited Color Anodic Finishes for Architectural Aluminum.
6. AAMA 611 - Specification for Anodized Architectural Aluminum.
7. AAMA 701.2 - Specifications for Pile Weatherstripping and Replaceable

R.S. ROQUE ARCHITECTS 157
Fenestration Weatherseals. 8. AAMA 1503.1 - Test Method for Condensation Resistance of Windows.
9. Manual #10 - Care and Handling of Architectural Aluminum From Shop to Site.
10. SFM-1-87 - Aluminum Storefront and Entrance Manual- AAMA Technical
Reference Manual - Volume III.
D. American National Standards Institute (ANSI):
1. ANSI A 117.1 - Safety Standards for the Handicapped.
2. A156.4 - Door Controls - Closers.
3. ANSI A 156.5 - Standard for Auxiliary Locks and Associated Products.
4. ANSI Z97.1 - Safety Glazing Materials Used in Buildings - Methods of Test.
E. American Society of Civil Engineers (ASCE):
1. ASCE / SEI 7 - Minimum Design Loads for Buildings and Other Structures.
F. American Society for Testing and Materials (ASTM):
1. ASTM A 36 / A 36M - Specification for Carbon Structural Steel.
2. ASTM B 209 - Specification for Aluminum and Aluminum-Alloy Sheet and Plate.
3. ASTM B 221 - Specification for Aluminum and Aluminum-Alloy Extended Bars, Rods, Wire, Profiles, and Tubes.
4. ASTM B 308 / B 308M - Specification for Aluminum-Alloy 6061-T6 Standard
Structural Profiles.
5. ASTM E 283 - Test Method for Determining the Rate of Air Leakage Through Exterior Windows, Curtain Walls, and Doors Under Specified Pressure Difference Across the Specimen.
6. ASTM E 330 - Test Method for Structural Performance of Exterior Windows,
Doors, Skylights and Curtain Walls by Uniform Static Air Pressure Difference.
7. ASTM E 331 - Test Method for Water Penetration of Exterior Windows, Skylight, Doors, and Curtain Walls by Uniform Static Pressure Difference.
8. ASTM E 547 - Test Method for Water Penetration of Exterior Window, Skylights,
Doors, and Curtain Walls by Cyclic Static Air Pressure Difference.
9. ASTM E 1996 - Specification for Performance of Exterior Windows, Curtain Walls, Doors, and Impact Protective Systems Impacted by Windborne Debris in Hurricanes.
R.S. ROQUE ARCHITECTS 158
10. ASTM F 588 - Test Methods for Measuring the Forced Entry Resistance of Window Assemblies, Excluding Glazing Impact.
11. ASTM F 842 - Test Methods for Measuring the Forced Entry Resistance of Sliding
Door Assemblies, Excluding Glazing Impact.
G. Americans with Disabilities Act Accessibility Guidelines (ADAAG).
H. American Welding Society (AWS):
1. AWS A5.10 / A5.10M - Specification for Bare Aluminum and Aluminum-Alloy Welding Electrodes and Rods.
2. AWS D1.1 / D1.1M - Structural Welding Code - Steel.
I. Code of Federal Regulations:
1. 16 CFR 1201 - Safety Standards for Architectural Glazing Materials.
J. Glass Association of North America:
1. Glazing Manual.
K. International Code Council:
1. International Building Code (IBC), 2009.
L. International Organization for Standards (ISO):
1. ISO 9001 - Quality Management Systems.
M. National Association of Architectural Metal Manufacturers (NAAMM):
1. Metal Finishes Manual for Architectural and Metal Products.
N. SSPC: Society for Protective Coatings (formerly Structural Steel Painting Council):
1. Paint 12 - Cold-Applied Asphalt Mastic (Extra Thick Film).
1.4 PERFORMANCE TESTING
A. General:
1. Perform tests on complete assembly mock-ups. Comply with the requirements
indicated below. Perform tests prior to the start of fabrication.
2. Where the manufacturer' ' s standard system complies with the requirements, and has been tested in accordance with the specified tests, provide certification by the manufacturer showing compliance with such tests.
B. Air Infiltration: Air infiltration rate shall not exceed 0.15 cfm / sq. ft. and 0.37 cfm / ft. of crack
length when tested at a static air pressure differential of 6.24 psf when tested per ASTM E
R.S. ROQUE ARCHITECTS 159
283.
C. Static Water Resistance: Specimen shall be subjected to a static pressure of 10.0 psf with a water spray application rate of 5 gph / sq. ft. for a duration of 15 minutes. No uncontrolled leakage is allowed. Tested per ASTM E 331.
D. Seismic Performance at Design Displacement:
1. For buildings 4-stories and higher.
2. The middle row of the anchors shall be shifted parallel to the plane of the wall for a distance of 0.75" in one direction, held for 10 seconds, then back to center, then the other direction 0.75", held for 10 seconds, then back to center. Visual observations shall be made at 1/4" displacements in both directions.
3. The test shall be repeated two additional times with no failure or gross permanent
distortion of the anchors, frames or glass. Glazing gaskets may not disengage and weather seals shall not fail.
E. Cyclic Water Resistance: Sliding doors shall be subjected to four (4) test cycles, with each
cycle consisting of a static pressure of 12.0 psf with a water spray application of 5 gph / ft for a duration of 5 minutes each, and a 1 minute duration with pressure released but water application continuously applied. No uncontrolled leakage is allowed. Tested per ASTM E 547.
F. Forced Entry Resistance: ASTM F 588 or ASTM F 842, performance level 10.
G. Uniform Load: No deflection in excess of L / 175 of the span of any framing member at a
structural test load equal to 1.5 times the specified design windload; no glass breakage or permanent set in the framing members in excess of 0.2% of their clear spans with a static air design load of 20 psf applied in the positive and negative directions in accordance with ASTM E 330.
H. Component Structural Tests: Perform operating, hardware, sash rail rigidity and other tests
called for by AAMA AVoluntary Guide Specification for Aluminum Architectural Windows".
1.5 SUBMITTALS
A. Section 01330 - Submittal Procedures: Procedures for submittals.
1. Product Data: Manufacturer' ' s technical product data, specifications, standard details, and installation recommendations for the components required. Provide component dimensions; describe components within the assembly, anchorage and fasteners, glass and glazing in-fill, hardware, and internal drainage details.
2. Shop Drawings: Drawings for fabrication and installation of the required systems;
indicate the system dimensions, framed opening requirements, tolerances, and affected related work; include plans, elevations, detailed sections of typical composite members, hardware mounting heights, reinforcement, and expansion and contraction joint locations. Show anchors, hardware and other components not included in the manufacturer' ' s Product Date; include glazing details.
R.S. ROQUE ARCHITECTS 160
3. Samples:
a. Aluminum Extrusions: Two (2) samples of each required aluminum finish on 12" long sections of the extrusion shapes required for the system.
b. The Engineer reserves the right to require additional samples which
show fabrication techniques, workmanship of component parts, design of the hardware and other exposed auxiliary items.
c. Glazing: Submit samples per Section 08800 - Glass and Glazing.
4. Assurance / Control Submittals:
a. Manufacturer's certification or test reports certifying that the products have been tested and comply with the performance testing requirements.
b. Calculations indicating that the system and anchorages meet the
Performance Requirements and the Building Code indicate anchor spacing. Indicate the number and placement of weld-in anchors and supplemental steel jamb and frame reinforcing, as necessary.
c. Certification that the door system meets the performance design criteria in
accordance with the following:
i. ANSI A 156.10.
ii. NFPA 101.
iii. UL 325.
iv. IBC - 2009.
d. Documentation of experience indicating compliance with the specified qualifications requirements.
f. Manufacturer' ' s Operation and Maintenance Data..
B. Section 01780 - Closeout Submittals: Procedures for closeout submittals.
1. Manufacturer' ' s Operation and Maintenance Manual.
2. Warranty: Submit a written special Warranty with forms completed in the name of the
Employer and registered with the manufacturer.
1.6 COORDINATION
A. Pre-Installation Meeting: Convene a Pre-Installation Meeting at the Site prior to beginning the work of this Section.
1. Require attendance of the Contractor, , Engineer, and representative of the
Installer.

R.S. ROQUE ARCHITECTS 161
2. Review the coordination required for proper installation.
3. Review preparation and installation procedures, and the coordination and scheduling required with other related work.
B. Check Shop drawings for other work to confirm that adequate provisions are made for
locating and installing doors in compliance with the requirements.
1.7 QUALITY ASSURANCE
A. Qualifications:
1. Manufacturer: a. Company specializing in manufacturing the products specified with a
minimum of five (5) years documented experience.
b. Company capable of providing field service representation during installation, approving an acceptable installer, and approving the installation.
2. Installer:
a. Company experienced in performing the work of this Section with a
minimum of five (5) years documented experience.
b. Company with supervisory staff trained and approved by the door manufacturer and with the trained supervisory personnel observing and directing the work.
c. Company capable of providing field service after installation.
B. Performance Requirements:
1. Provide assemblies capable of withstanding the wind loads and thermal
movements based on testing of the manufacturer' ' s standard units in assemblies similar to those indicated for this Project.
2. Provide the capacity to withstand the following wind loading requirements:
a. Design, fabricate and install to resist combined positive and negative
windloading in accordance with ASCE 7, Chapter 6 with a Vmph of 170, qs of 74.0 psf, exposure C and Importance Factor of 1.0.
3. Thermal Movement:
a. Provide for thermal movement resulting from the following maximum
change in ambient and surface temperatures to prevent buckling, opening of joints, over stressing of components, failure of joint sealants, failure of connections, and other detrimental effects. Base engineering calculations on surface temperatures of the materials due to both solar heat gain and nighttime heat loss.
R.S. ROQUE ARCHITECTS 162
i. Ambient temperature range: 120 F.
ii. Materials surface: 180 F.
C. Furnish complete units produced by a single manufacturer, including hardware,
accessories, tracks, mountings, and installation components.
D. Unless otherwise acceptable to the Engineer, furnish all units and assemblies for the entire Project by one manufacturer.
E. Design Criteria: The Drawings are based on standard aluminum entrance, storefront,
sidelite, sliding door and operable and fixed window systems. Other manufacturer' ' s standard system of similar and equivalent nature may be acceptable when the difference does not materially detract from the design concept or required performance, as judged solely the Engineer. The plans, elevations and details show the spacing of members as well as profiles and similar dimensional requirements, and the entrance, storefront, sidelights, and door and windows work.
1.8 DELIVERY, STORAGE AND HANDLING
A. Section 01600 - Product Requirements: Transport, handle, store, and protect the
products.
B. Protect finished aluminum surfaces with a strippable coating. Do not use adhesive papers or sprayed coatings which bond when exposed to sunlight or weather.
C. Pack, box, ship, unload, store and protect products in a manner to avoid breakage, abuse,
damage and defacement.
D. Deliver products to the Site in the manufacturer' ' s original, unopened protective packaging.
E. Store inside, protected from weather.
F. Stack vertically on edge to provide for water drainage and air circulation.
G. Break seals to permit ventilation.
1.9 WARRANTY
A. Section 01780 - Closeout Submittals: Procedures for closeout submittals.
B. Special Warranty:
1. Provide a joint and severable written Warranty signed by the manufacturer,
Contractor and Installer, certifying that the products and installation is free of defective materials and workmanship, and agreeing to repair or replace any defective component, or the system, in whole or in part, as necessary, to restore the product to its original intended state and integrity. Warranty shall include

R.S. ROQUE ARCHITECTS 163
responsibility for removal and replacement of other work which may conceal door parts.
2. Warranty Period: Two (2) years from the date of Substantial Completion.
PART 2 PRODUCTS
2.1 MANUFACTURERS
A. Subject to compliance with the Project requirements, manufacturers offering products which may be incorporated into the work include the following:
1. Alternate Manufacturers: Subject to compliance with the Project requirements, alternate manufacturers offering the specified items which may be incorporated in the work include the following:
a. local Asian manufacturers with equal specification
B. Section 01600 - Product Requirements: Product Options: Substitutions permitted.
2.2 MATERIALS AND ACCESSORIES
A. Aluminum Members: Alloy and temper as recommended by the manufacturer for strength, corrosion resistance, and application of the required finish; ASTM B 221 for extrusions, ASTM B 209 for sheets and plates.
B. Steel Sections: ASTM A 36 / A 36M; shaped to suit the mullion sections.
C. Reinforcement: Where fasteners screw-anchor into aluminum less than 0.125" thick,
reinforce the interior with aluminum or non-magnetic stainless steel to receive the screw threads, or provide standard non-corrosive pressed-in splined grommet nuts.
D. Brackets and Reinforcements: Manufacturer' ' s high-strength aluminum units where
feasible, otherwise, non-magnetic stainless steel. Steel reinforcing shapes to be stainless steel or hot-dip galvanized steel complying with ASTM A 123 / A 123M.
E. Concealed Flashings: Dead-soft stainless steel, 26-gauge minimum, or extruded
aluminum, 0.062" minimum, of an alloy and type selected by the manufacturer for compatibility with other components.
F. Anchors: Drill-in expansion bolts or weld-in type with in-place steel anchors welded to
steel plates anchoring the frame.
G. Fasteners:
1. Aluminum, non-magnetic stainless steel, or other materials warranted by the manufacturer to be non-corrosive, and compatible with aluminum components.
2. Do not use exposed fasteners for the attachment of hardware, except where
unavoidable and where clearly noted on submittal shop drawings.

R.S. ROQUE ARCHITECTS 164
3. Provide Phillips flat-head machine screws for exposed fasteners. Finish shall
match the finish of the adjoining metal.
H. Glass and Glazing Materials: Provide glass and glazing materials which comply with the requirement of Section 08800 - Glass and Glazing, including for doors and windows specified to be factory-glazed.
I. Weatherstripping: Provide compression-type weatherstripping at the perimeter of each
operating sash; manufacturer' ' s standard replaceable stripping of either molded neoprene gaskets complying with ASTM D 2000, or molded PVC gaskets complying with ASTM D 2287, or molded neoprene gaskets complying with ASTM C 509, Grade 4.
J. Sealant and Backing Materials: Unless otherwise indicated for sealants required within
fabricated window units, provide a type recommended by the product manufacturer for the joint size and movement, to remain permanently elastic, non-shrinking and non-migrating. Comply with Section 07900 - Joint Sealers, for installation of sealants and backing materials.
2.3 FABRICATION
A. Sizes and Profiles: The sizes for units, including profile requirements, shall be as indicated
and as required to meet the Performance Requirements. Any variable dimensions are indicated, together with maximum and minimum dimensions required to achieve the design requirements and coordination with other work.
B. Field Measurement: Wherever possible take field measurements prior to the preparation
of Shop Drawings and fabrication to ensure proper fitting of the work. Proceed with fabrication and coordination, as necessary, when the taking of field measurements might delay the work.
C. Prefabrication: To the greatest extent possible, complete fabrication, assembly, finishing, hardware application, and other work before shipment to the Site. Disassemble components only as necessary for shipping and installation.
1. Pre-glaze door and window units to the greatest extent possible, in coordination
with the installation and hardware requirements.
2. Do not drill and tap for surface-mounted hardware items until the time of installation at the Site.
3. Perform fabrication operations, including cutting, fitting, forming, drilling and
grinding of metal work in a manner to prevent damage to exposed finish surfaces. For hardware, perform these operations prior to the application of finishes.
4. Fabricate framing for glazing from the inside, except for large plates of glass
which may be glazed from the outside.
D. Glazing: Provide for the following edge clearances:
Single Glazed

R.S. ROQUE ARCHITECTS 165
Nominal edge cover (bite) 5/16" Minimum nominal edge clearance 1/8" Minimum face clearance 1/8"
1. Glass must be edge blocked to prevent contact with the metal framing.
E. Reinforcing: Install reinforcing, as necessary, to meet the Performance Requirements.
F. Welding: Comply with AWS recommendation to avoid discoloration; grind exposed welds
smooth and restore mechanical finish.
G. Continuity: Maintain accurate relationship of planes and angles, with hairline fit at contacting members.
H. Fasteners: Conceal fasteners wherever possible.
I. Weatherstripping: For exterior doors and windows, provide compression weatherstripping
against fixed stops, at other edges provide sliding weatherstripping retained in adjustable strip mortised into door edges.
J. Structural Silicon Sealant:
2.4 ALUMINUM ENTRANCES
A. Doors: Standard Aluminum Entrance, Series [350 Medium Stile] [500 Wide Stile] swing
door. Size as indicated on the Drawings.
1. Vertical Stile: [3-1/2"] [5"], single piece.
2. Top Rail: [3-1/2"] [5"], single piece.
3. Bottom Rail: 6-1/2", single piece.
B. Door Hardware:
1. Section 01310 - Project Management and Coordination: Verification of hardware components specified in Section 08710 - Door Hardware.
2. Door Hinges: Door manufacturer' ' s standard butt hinges, US32D finish.
3. Offset Pivots: Where indicated provide top, intermediate and bottom offset pivots;
assemblies complying with ANSI A 156.4, Grade 1 requirements; cast aluminum-alloy, baked epoxy finish to match the door finish; door manufacturer' ' s standard.
4. Concealed Overhead Closers: Single-acting manual, with built-in door stop,
105% hold open; door manufacturers standard. ADAAG compliant.
a. Force for pushing or pulling open interior doors shall not exceed 5-pounds.
b. For push button operated openers see 08710.
R.S. ROQUE ARCHITECTS 166
5. Push / Pulls and Panic Hardware: Standard to the door manufacturer, directly
mounted on the glass.
a. CP-II Push and CO-9 Pull. Finish to match door. Use where an exit device and / or exterior trim is not specified.
6. Deadlocks: Three-point locks, located in the bottom rail.
7. Door Locking Devices (where noted in Section 08710): Adams Rite MS+1890
deadbolt / latch, double cylinder operation. Finish: 628.
8. Exit Devices: Concealed vertical rods with crash bar doggable; exterior mortise trim finish for exterior / exit doors.
a. Latch shall release when subject to a 15-pound force.
9. Three-point Lock:foot bolt and head bolt .
10. Flush Bolt: Top and bottom flush; surface-mounted in the nose of the door stile.
11. Automatic Door Bottoms: 3/4" mortise type.
12. Floor-Mounted Holder: Rubber cushioned stop with door-mounted holder; door
manufacturer' ' s standard.
13. Weatherstripping (Exterior doors only): As selected from the manufacturer' ' s standards. a. Head and Jamb: Replaceable wool, polypropylene, or nylon wool pile
with aluminum strip backing, recessed in the frame; AAMA 701.2.
b. Sill: Semi-rigid polymeric material on aluminum anodized to match the door; EPDM sweep strip; 38-560.
14. Thresholds: Weatherproof, 4" or 6", as detailed, mill-finished aluminum, standard
for offset pivots; cut as required for carpet or tile adaptation as detailed. ADAAG compliant.
15. Other Hardware: As described in the door manufacturer' ' s literature, as
specified or as required.
16. Section 01600 - Product Requirements: Product Options: Substitutions permitted.
2.5 ALUMINUM STOREFRONTS
A. Provide a system combined with extruded aluminum sections, to the profiles indicated; designed to meet the Performance Requirements.
B. Storefront Framing System: Trifab Versa Glaze 451 / 451T, 2" x dimension shown,
extruded aluminum; minimum wall thickness of 0.080"; flush glazed.

R.S. ROQUE ARCHITECTS 167
C. Column Covers: 0.040" aluminum. Finish to match the storefront system.
D. Receptor Channel: Model No. 450-038 and 65-025; finish to match the storefront system.
E. Provide aluminum entrances fabricated to comply with the elevations and details shown
on the Drawings.
2.6 ALUMINUM FLUSH DOORS
A. Doors: Standard Flushline Series.
1. Face Sheets: 0.062" embossed aluminum.
2. Core: 3 lb. / cu. ft. density, foamed-in-place polyurethane, 1/8" thick tempered hardboard backing at each face, bonded to the core.
3. Reinforcement: Internally for the installation of hardware.
4. Trim: Beveled edge aluminum extrusion around the entire door perimeter and the
perimeter of glass and louver openings to receive the skin and hardboard.
5. Weatherstripping: Woodpile around the entire door perimeter.
6. Vision lites and Louvers: As indicated on the Drawings.
B. Hardware:
1. See Section 08710 - Door Hardware.
2. Supplemental Flush Door Storm Hardware: Provide intermediate barrel bolts at 30" o.c. to latch doors greater than 7'-0" in height, and at the center of door heads and sills to secure doors greater than 42" in width.
C. Frames: Trifab VG (Versa Glaze) 450
2.7 TEMPERED GLASS DOORS
A. Glass doors and framing system; factory-glazed with 1/2" thick tempered glass, minimum,
or as required to meet the Performance Requirements.
B. Glass: Brite Vue glass C. Hardware: As provided by the door manufacturer.
1. Push / Pulls: Manufacturer' ' s standard, as selected.
2.8 ALUMINUM WINDOWS AND SLIDING DOORS
A. General: The drawings and following paragraphs define the operating arrangement for the
types of sash (ventilators) required in the window units, and specify the minimum provisions for each type. The Drawings indicate which panels of each window unit are
R.S. ROQUE ARCHITECTS 168
operable sash and which are fixed. Where two or more types of operating sash are included in the same window unit, the operation of each is indicated, and the unit is considered a "Combination Window".
Provide the following:
1. High rise sill with subsill sill pan at each sliding door and window.
2. Swing limiters set at 4" at all operating sashes.
3. Insect screens with maximum opening at the lock side of the operating sashes
unless indicated otherwise.
B. Fixed Window Units: All joints of frames shall be butt type construction, neatly secured at each corner with integral screw ports; 3-1/8" main frame depth, 0.078" nominal wall thickness. Commercial line 7225 Non-Thermal, HC90
C. Casement Window Units: Out-swinging, interior glazed. 7225 Non-Thermal, HC90
D. Projecting Window Units: Out-swinging, top-hinged, unless otherwise noted, 2-1/4" frame
depth; horizontal pivoting with extruded 360 degree aluminum pivots; concealed limit stop and removable key handle lock at each vent; interior glazed. 7225 Non-Thermal, HC90
E. Horizontal Sliding Window Units: Commercial high performance quality, stainless steel
roller assemblies, locks and keepers, two-piece compensating head detail; 4" frame depth with interior insect screens; interior glazed. Series 7330
F. Vertical Sliding Units: Commercial high performance quality, stainless steel roller
assemblies, two factory-installed sash balances for each operating sash, locks and keepers, two-piece compensating head detail; 4" frame depth with interior insect screen; interior glazed. Series 7330
G. Sliding Aluminum and Glass Doors: Two-piece compensating channel subheads and jambs; heavy-duty interlocks and horizontal muntins, factory-glazed. HPS High Performance Sliding [60] [80] [100] [120]
H. Hardware:
1. Locking handles, cases, keepers, catches and fasteners shall be of a
corrosion-resistant material compatible with aluminum.
2. Hardware shall meet AAMA tests and be suitable for its intended use.
2.9 GLASS AND GLAZING MATERIALS
A. Glazing: As specified in Section 08800 - Glass and Glazing.
B. Double wet glaze with Dow 995, or approved equal.
2.10 SEALANT
A. Sealant and Backing Materials:

R.S. ROQUE ARCHITECTS 169
1. Perimeter Sealant: Type as specified in Section 07900 - Joint Sealers.
2. Sealant Used Within the System (Not for Glazing): Type as specified in Section 07900 - Joint Sealers.
2.11 HARDWARE
A. General: Provide the manufacturer' ' s standard heavy-duty hardware units, as indicated, scheduled, or as required for the operation of each door and window, as recommended by the manufacturer for the service required; finish to match the frame unless otherwise indicated.
2.12 FINISHES
A. Exposed Aluminum Surfaces:
1. Clear anodized or as selected from the manufacturer's standard
finishes.
2. Polyvinylidine fluoride, (Kynar) or equal as selected from manufacturer's standard colors.
B. Maintain same color range on doors, frames and other components. Do
not mix light and dark shades within an assembly.
PART 3 EXECUTION
3.1 EXAMINATION
A. Section 01700 - Execution Requirements: Verification of existing conditions before starting the work.
B. Verification of Conditions: Verify that field measurements, surfaces, substrates and
conditions are as required, and ready to receive the work. 1. Verify that related work performed under other Sections has been completed, and
is in accordance with approved Shop Drawings.
2. Verify that openings are dimensionally within allowable tolerances, plumb, level, clean and provide for proper anchoring.
C. Report in writing, prevailing conditions that will adversely affect satisfactory execution of
the work of this Section. Do not proceed with the work until the unsatisfactory conditions have been corrected.
3.2 INSTALLATION
A. Install doors and windows, complete, with all necessary hardware, jamb and head mold
strips, anchors, inserts, hangers, and equipment supports in accordance with approved Shop Drawings, manufacturer's instructions, to meet the Performance Requirements, and
R.S. ROQUE ARCHITECTS 170
as specified herein.
B. Attach to the structure to permit sufficient adjustment to accommodate construction tolerances and other irregularities.
C. Anchor and weld securely in place; provide alignment attachments and shims to
permanently fasten systems and units to the building structure. Anchorages shall be concealed.
D. Comply with AWS recommendation to avoid discoloration; grind exposed welds smooth
and restore the mechanical finish.
E. Align assemblies and units plumb, level and true to line, without warp or rack of framing members, doors, windows and panels. Maintain assembly dimensional tolerances; align with adjacent work.
F. Install sill flashings with turned up edges and ends; seal to adjacent work to form a water
tight dam.
G. Install compensating channels at door and window heads where indicated.
H. Ensure water drainage away from glazing.
I. Coordinate the attachment and seal of perimeter air and vapor barrier materials.
J. Provide thermal isolation where components penetrate or disrupt the building insulation. Pack fibrous insulation in shim spaces at the perimeter of assemblies and units to maintain continuity of the thermal barrier.
K. Install hardware using templates provided, and in accordance with the installation
requirements in Section 08710 - Door Hardware.
L. Drill and tap frames, doors and windows and apply surface-mounted hardware items in compliance with the hardware manufacturer' ' s instructions and templates. Use concealed fasteners wherever possible.
M. Set sill members, thresholds and other members in a bed of sealant, as indicated, or with
joint fillers or gaskets, as indicated, to provide a weathertight installation. Coordinate the installation with wall flashings and other components of the work. Comply with the requirements of Section 07900 - Joint Sealers.
N. Apply sealants to provide a watertight installation at all joints and intersections and at all opening perimeters. Install perimeter sealants and backing materials in accordance with the installation requirements of Section 07900 - Joint Sealers.
O. Set thresholds in a bed of mastic, and secure.
P. Refer to Section 08800 - Glass and Glazing for the installation of glass and other panels
shown to be glazed into doors, windows and framing, and not pre-glazed by the manufacturer.
Q. Separate aluminum and other corrodible metal surfaces from sources of corrosion and
R.S. ROQUE ARCHITECTS 171
electrolytic action at points of contact with other metals. Isolation Requirements:
1. Dissimilar Metals: Where aluminum surfaces are in contact with, or fastened to dissimilar metals except stainless steel, zinc or zinc coating, protect aluminum from the dissimilar metal. Where aluminum contacts another metal, paint the dissimilar metal with epoxy paint. Where drainage from a dissimilar metal passes over aluminum, paint the dissimilar metal with a non-lead pigmented paint.
2. Cementitious Materials: Paint aluminum where in contact with mortar, concrete or
other cementitious material, with an alkali-resistant coating such as heavy-bodied bituminous paint or epoxy paint.
3. Wood Contact: Isolate aluminum from cedar, redwood, oak and acid-treated
lumber by means of unbroken 6-mil polyethylene construction sheet or a heavy coating of metal-protective paint.
4. Surfaces in contact with sealants after installation shall not be coated with any type
of protective material.
3.3 ADJUSTING
A. Section 01700 - Execution Requirements: Adjusting installed work.
B. Adjust operating hardware to function properly, without binding, and to prevent tight fit at contact points and weatherstripping.
C. Doors operation shall meet ADAAG requirements for opening force.
D. Repair damaged finishes to match the original finish.
3.4 FIELD QUALITY CONTROL
A. Section 01450 - Quality Control: Field testing and inspection.
B. Inspect installations for alignment, level, plumb, secure attachment to the structure, and
smooth and proper operation.
C. On-Site Tests:
1. If the units do not appear to meet air or water infiltration requirements, the Employer, may require on-site tests shall be conducted for both air and water infiltration, with the door manufacturer' ' s representative present. The Engineer will select the unit(s) to be tested. If such unit(s) fail to meet the specified air and water requirements, the reason for failure shall be jointly determined.
2. Tests shall be conducted in accordance with AAMA 101-88.
3. The responsible Contractor shall correct tested units that do not meet the specified
requirements, and all units with similar deficiencies, at no additional cost to the Employer.
R.S. ROQUE ARCHITECTS 172
4. The cost for all successful tests, both original and retest shall be paid by the Employer. All unsuccessful tests, both original and retest, shall be paid for by the responsible Contractor.
5. The testing shall be done by an AAMA-accredited testing agency, selected by the
Engineer and the manufacturer, and shall be employed by the responsible Contractor.
3.5 CLEANING
A. Section 01700 - Execution Requirements: Cleaning the installed work.
B. Remove protective material from pre-finished aluminum surfaces.
C. Promptly after the installation of glass and sealants, clean the completed system, inside and out, exercise care to avoid damage to coatings and finishes.
D. Remove excess glazing and joint sealants, dirt, and other substances from aluminum
surfaces by a method acceptable to the sealant manufacturer.
E. Wash down exposed surfaces with a solution of mild detergent in warm water, applied with soft, clean wiping cloths. Take care to remove dirt from corners. Wipe surfaces clean and dry.
3.6 PROTECTION
A. Implement and maintain protective measures, and take other precautions necessary to
ensure that all assemblies will be without damage and deterioration at the time of Substantial and Final Completion.
END OF SECTION
R.S. ROQUE ARCHITECTS 173
SECTION 08710 - FINISH HARDWARE
PART 1 - GENERAL
1.01 SCOPE
A. Furnish materials, tools, and equipment and perform labor required to complete:
1. Door lever or locksets
2. Door hinges
3. Door stops and closers
4. And other finish hardware and accessories
1.02 RELATED WORK
A. Section 08400-Aluminum entrance door
B. Section 08210-Wood doors
1.03 QUALITY ASSURANCE
A. Use adequate number of skilled workers thoroughly trained and experienced.
1.04 APPLICABLE PUBLICATIONS
A. National Fire Protection Association (NFPA) Publication: 101
Life Safety Code (81)
B. Underwriter’s Laboratory, Inc. (UL) Publication:
Building Materials Directory (1983)
1.05 SUBMITTALS: Meet the applicable requirements of Section 01300.
A. Hardware list and catalog cuts: Submit hardware list, in triplicate, listing of each item of builder’s hardware accompanied by manufacturer’s catalog cuts for each different item of hardware.
B. Keying system submission: Before locks are delivered to the job site, submit keying
system for approval by the Engineer. Provide locks specified to be keyed with keying bitting charts, which shall be submitted to and approved by the Engineer prior to completion of the contract.
R.S. ROQUE ARCHITECTS 174
1.05 DELIVERY, STORAGE AND HANDLING
A. Meet the applicable requirements of Section 01300.
1.07 PACKAGING
A. Individually pack and deliver to job site in manufacturer’s original container each finish hardware item required. All hardware shall have all the necessary screws. Keep instructions and installations template for spotting mortising tools. Furnish packing list to identify the quantity and type of hardware in every package.
PART 2 - PRODUCTS
2.01 MATERIAL
A. Door lock and locksets:. All door locks should be lever type (Engineer’s approval).
1. Entrance lock, A10S lever design; stainless steel, satin, with dead locking
latch bolt. Grade 1 chasis, heavy duty design, for metal doors and grade 2 light weight design for remaining doors. UL listed with 3 hrs. fire resistance rating.
2. Deadbolt lock-stainless steel, B463, ANSI E2171, deadbolt thrown or
retracted from outside by key, inside turn until will retract bolt only. Refer to schedule of hardware for locations.
3. Door stops-door stops with holder, floor or wall mounted, with built- in hook,
approved by Engineer.
4. Provide master key, grand master key and great grand master key.
B. Cabinet, closet, drawer hardware:
1. Drawer pulls - solid brass, 4”x1-3/8” thick by 7/8”.
2. Door latches - best quality approved by the Engineer. 3. Drawer slides - light duty side mounted extension drawer slides, 20” long cold
rolled zinc plated, 75 pounds capacity. For all drawers.
C. Hinges:
1. Full mortise hinges - Brass BHMA or stainless steel BHMA or approved equal. Conformed to ANSI A1567, 4”x4” use for all wood flush doors. Number of hinges required in each door is described in the schedule of hardware.
2. Spring Hinges- Standard weight double acting spring hinges, dull brass finish,

R.S. ROQUE ARCHITECTS 175
6” leaf length, Lawrence or approved equal.
3. Blank brass continuous hinges-width size to match cabinet doors. For all cabinet doors except as indicated in the drawings. Substitution - self-closing hinges.
D. Closers
61356 PART 3 - EXECUTION
3.01 INSTALLATION, INSPECTION AND ACCEPTANCE
A. INSTALLATION: Install hardware following manufacturer’s instructions. Except indicated or specified otherwise, use fasteners furnished with hardware to fasten hardware in place. Fasten hardware to wood surfaces with full-threaded wood screws or sheet metal screws. Use machine screws set in expansion shields for fastening hardware to solid concrete and masonry surfaces. Use toggle bolts where required for fastening to hollow core construction. Use through bolts where indicated or specified and where necessary for satisfactory installation.
B. INSPECTION: Examine the substrates and conditions under which work of this
section will be performed. Do not proceed until unsatisfactory conditions detrimental to timely and proper completion of the work have been corrected.
C. ACCEPTANCE: After installation, protect hardware from paint, stains, blemishes, and
other damage until acceptance of work. Submit notice of operation testing 7 days before scheduled so that the testing can be witnessed.
Hinges, locks, latches, bolts, holders, closer and other items shall be adjusted to operate properly. Also demonstrate that tagged keys operate respective locks. After hardware is checked, deliver tagged keys to engineer. Correct, repair, and finish as directed errors in cutting and fitting and damage to adjoining work.
END OF SECTION

R.S. ROQUE ARCHITECTS 176
SECTION 08800 GLASS AND GLAZING
PART 1 - GENERAL
1.1 SUMMARY
A. Section Includes:
1. Glazing for entrances and storefronts.
2. Glazing for interior walls.
3. Glazing for pivot doors.
4. Glazing for window units.
5. Interior partitions relites.
6. Fire-rated glazing.
7. Low-E glazing
8. Glazing sealant installation.
B. Related Sections:
1. Section 01811 - Sustainable Design and Construction Procedures
2. Section 06200 - Finish Carpentry: Wood frames for interior glazing.
3. Section 07900 - Joint Sealers: Sealants for waterproofing glazing installations.
4. Section 08100 - Hollow Metal Doors and Frames: Glazing in metal doors and sidelites.
5. Section 08210 - Wood Doors: Glazing in wood doors, transoms and sidelites.
6. Section 08330 - Overhead Doors: Glazing in sectional doors.
7. Section 08400 - Entrances, Storefronts and Windows: Glazing installations.
8. Section 08420 - Aluminum Doors and Windows: Glazing in doors and windows.
9. Mirrors are specified in Section 10810 - Toilet Accessories.
1.2 DESCRIPTION OF WORK
A. The extent of glass and glazing work is indicated on the Drawings and Schedules and as
specified herein, and includes providing and installing glazing for exterior and interior doors

R.S. ROQUE ARCHITECTS 177
and windows, safety glass, interior relites, glass blocks, sealants and miscellaneous glazing materials.
1.3 REFERENCES
A. The publications listed below form a part of this Specification to the extent referenced.
Publications are referred to in the text by basic designation only.
B. American Society of Civil Engineers (ASCE):
1. ASCE / SEI 7 - Minimum Design Loads for Buildings and other Structures.
C. American National Standards Institute (ANSI):
1. ANSI Z97.1 - Safety Performance Specifications and Methods of Test for Safety Glazing Material Used in Buildings.
D. American Society for Testing and Materials (ASTM):
1. ASTM C 920 - Specification for Elastomeric Joint Sealants.
2. ASTM C 1036 - Specification for Flat Glass.
3. ASTM C 1048 - Specification for Heat-Treated Flat Glass - Kind HS, Kind FT
Coated and Uncoated Glass.
4. ASTM E 1996 - Specification for Performance of Exterior Windows, Curtain Walls, Doors, and Impact Protective Systems Impacted by Windborne Debris in Hurricanes.
5. ASTM F 1233 - Test Method for Security Glazing Materials and Systems.
E. Flat Glass Marketing Association (FGMA):
1. FGMA - Glazing Manual and Glazing Sealing Systems Manual.
F. National Fire Protection Agency (NFPA):
1. NFPA 257 - Standard on Fire Tests for Window and Glass Block Assemblies.
G. International Code Council:
1. International Building Code (IBC), 2009:
H. U. S. Consumer Product Safety Commission, CPSC 16 CFR, Part 1201 - Safety Standard
for Architectural Glazing Materials.
1.4 CONSTRUCTION
A. Interface with Other Work: Coordinate glazing with the installation of exterior aluminum entrances, storefronts, curtain walls, doors and windows as specified in Section 08410

R.S. ROQUE ARCHITECTS 178
hollow metal doors and windows specified in Section 08100; wood doors and windows specified in Section 08210.
1.5 SUBMITTALS
A. Section 01330 - Submittal Procedures: Procedures for submittals.
1. Product Data:
a. Submit two (2) copies of the manufacturer' ' s catalogs, including specifications and installation instructions for all glass products to be used and for glazing sealant and compound, gasket and miscellaneous materials required.
b. Glass: For each type of glass provide structural, physical and
environmental characteristics, size limitations, special handling and installation requirements.
c. Glazing compound: Provide chemical, functional, and environmental
characteristics, limitations and special application requirements.
d. Manufacturer' ' s engineering design to meet the performance requirements.
2. Calculations indicating glazing satisfaction of performance requirements
3. LEED Requirement: Actual light transmission level calculation to achieved LEED
credit required for this project.@
a. Complete the LEED Materials Submittal Form as provided in Section 01340 - Submittals - LEED Submittals, for procedures in this section.
b. Complete the LEED VOC Submittal Form as provided in Section 01340 -
Submittals - LEED Submittals, for products in this section.
4. Samples:
a. Glass: Two (2) samples 6" x 6" in size for each type of glazing, illustrating tinting, and finish of the glazing material. Label each sample indicating kind, quality and manufacturer as follows:
1) Tinted float glass.
2) Laminated glass.
3) Tempered glass.
4) Low-e glass.
5). Patterned glass.
R.S. ROQUE ARCHITECTS 179
b. Glass Blocks: Two (2) full size units.
c. Glazing Sealants: Three (3) copies of the manufacturer' ' s standard color selection.
5. Assurance / Control Submittals:
a. Manufacturer's certificate that the products meet or exceed the specified
requirements.
b. Calculations indicating that the materials satisfy the performance requirements.
c. Documentation of experience indicating compliance with the specified qualifications requirements.
B. Section 01780 - Closeout Submittals: Procedures for closeout submittals.
1. Warranty: Submit a written Warranty with forms completed in the name of the
Employer and registered with the manufacturer.
1.6 QUALITY ASSURANCE
A. Qualifications:
1. Manufacturer: Company specializing in manufacturing the products specified with a minimum of five (5) years documented experience.
2. Installer: Company experienced in performing the work of this Section with a
minimum of five (5) years documented experience.
B. Performance Requirements:
1. Provide the capacity to withstand the following loading requirements for exterior units:
a. Design and install to resist combined positive and negative windloading in
accordance with IBC 2009, Section 1609 with a Vmph of 170, qs of 74.0 psf, exposure [B] [C] [D], and importance factor [1.0] [1.25] [1.5], as applicable per ASCE 7. Size for areas of discontinuity and worst case scenario to be experienced by the building.
b. Height of windows and door units above the ground level are indicated on
the Drawings or can be calculated from the Drawings.
C. Identification: Provide labels where safety glazing is required. Each unit of tempered glass shall be permanently identified by the manufacturer. The identification shall be etched or ceramic fired on the glass and shall be visible after the glazing has been installed. Label per NFPA 80.
R.S. ROQUE ARCHITECTS 180
D. Grading and Labeling: Grade and label each light stating the quality and grade of the glass and the manufacturer' ' s name and brand designation. Leave labels intact until removal is directed by the Engineer. Label each individual glazing unit for fire-rated doors and windows in accordance with NFPA 80-1-7.4. Listing marks shall be visible after installation.
E. Perform the work in accordance with the FGMA, Glazing Manual.
F. All exterior glazing shall be wet sealed glazing gaskets and permited only for interior work.
1.7 DELIVERY, STORAGE AND HANDLING
A. Section 01600 - Product Requirements: Transport, handle, store, and protect the products.
B. Comply with the manufacturer' ' s instructions for shipping, handling, storing and
protecting glass and glazing products.
C. Deliver products to the Site in the manufacturer' ' s original, unopened packaging or crates.
D. Exercise exceptional care to prevent edge damage to the glass, rainbowing, discoloration
and damage to and deterioration of coatings, if any, on the glass.
1.8 JOB CONDITIONS
A. Pre-installation: Meet with the Glazier and other trades affected by the glass installation prior to beginning installation. Do not perform work under adverse weather or job conditions. Install liquid sealants only when the temperature is within the lower or middle one third of the temperature range recommended by the manufacturer.
1.9 WARRANTY
A. Section 01780 - Closeout Submittals: Procedures for closeout submittals.
B. Special Warranty:
1. Provide a manufacturer' ' s written Warranty against cracking, breakage,
staining, rainbowing, discoloration and for replacement.
2. Warranty Period: Two (2) years from the date of Substantial Completion.
PART 2 - PRODUCTS
2.1 MANUFACTURERS
A. Section 01600 - Product Requirements: Product Options: Substitutions permitted.
2.2 GLAZING MATERIALS
R.S. ROQUE ARCHITECTS 181
A. Standards:
4. Prime Glass: FS DD-G-451, ASTM C 1036.
5. Safety Glass: CPSC 16 CFR 1201.
6. Heat-Treated Glass: FS DD-G-1403, ASTM C 1048.
B. Float / Plate Glass: Type 1, quality q3, thickness as required to meet the performance requirements, but not less than 3/16", clear unless otherwise indicated. Curved or straight as indicated.
C. Laminated Safety and Security Glass: Standard two-ply laminated glass with minimum
0.060" Saflex interlayer. Thickness as required to meet the Performance Requirements or security criteria for the location, height and use or as indicated, but not less than 3/8". Where glazing is double pane, the laminate shall be installed as the exterior lite. Tint color as selected.
1. Impact Loads: Comply with South Florida Building Code, Section 2315 and 3513.
D. Tempered Glass: Heat treated to strengthen the glass in bending to not less than 4.5 times
the annealed strength, edges seamed, thickness as required to meet the performance requirements (3/16" thick, minimum). Exposed edges in the finished work shall be polished. Tint color as selected.
1. Where indicated as AFree of Tong Marks@, provide tempered glass produced
by manufacturer' ' s special process which eliminates tong marks.
E. Tempered Low-E: Hard coating on surface 4. Tint color as selected from manufacturers standards.
F. Polished Wired Glass or Patterned Wire Glass: Type II, minimum 1/4-inch thick, Class 1,
Form 1, quality q11, clear and polished both faces. Pattern as selected.
with
1. Fire Rating: Provide glass listed and labeled by UL Afire resistance@
complete steel channel stops.
G. Interior Fire Rated: Fire glass/mullion glazing system with pyrostop safety rated glass.
R.S. ROQUE ARCHITECTS 182
: 2.3 GLAZING SEALANT
A. Silicone: Single component, elastomeric, chemical curing; capable of water immersion
without loss of properties; non-bleeding, non-staining, non-sag; cured Shore A hardness of 15 - 25. Color black.
2.4 MISCELLANEOUS GLAZING MATERIALS
A. Cleaners, Primers and Sealers: Type recommended by the glazing sealant or gasket
manufacturer.
B. Setting Blocks: Neoprene of EPDM, 70 to 90 Shore A durometer hardness; compatible with the glazing sealant used.
C. Spacers: Neoprene of EPDM, 40 to 50 Shore A durometer hardness; self adhesive on one
side; compatible with the glazing sealant used.
D. Filler Rods: Closed cell or waterproof jacketed foam rod of polyethylene, butyl, neoprene, polyurethane, or vinyl; compatible with the glazing sealant used.
PART 3 - EXECUTION
3.1 STANDARDS AND PERFORMANCE A. Watertight and airtight installation of each glass product is required, except as otherwise
shown. Each installation must withstand normal temperature changes, wind loading, and impact loading (for operating sash and doors), without failure including loss or breakage of glass, failure of sealants or gaskets to remain watertight and airtight, deterioration of glazing materials, and other defects in the work.
B. Protect glass from edge damage during handling and installation, and subsequent
operation of glazed components of the work. During installation, discard units with significant edge damage or other imperfections.
C. Glazing channel dimensions, as indicated and specified, are intended to provide for the
necessary bite on the glass, minimum edge clearances, and adequate sealant thickness with reasonable tolerances. Adjust as required by the job conditions at the time of installation. Do not reduce the manufacturer' ' s recommended minimum edge bite on the glass.
D. Comply with the combined recommendations and technical reports by manufacturers of the glass and glazing products used in each glazing channel, and with recommendations of the Flat Glass Marketing Association, AGlazing Manual@, except where more stringent requirements are indicated.
E. Inspect each piece of glass just prior to installation, and discard any which have observable
edge damage or face imperfections.
R.S. ROQUE ARCHITECTS 183
F. Provide safety glass for all glazed panels within 48" of a door and where glazed panels are
less than 60" above any floor or any walking surface and elsewhere where required by the Building Code, performance data or as indicated.
G. Clean glazing channels and other framing members to receive glass just prior to glazing.
Remove coatings which are not firmly bonded to the substrate. Remove lacquer from metal surfaces where elastomeric sealants are used.
H. Apply primer or sealant to joint surfaces where recommended by the sealant manufacture.
3.2 EXAMINATION
A. Section 01700 - Execution Requirements: Verification of existing conditions before
starting the work.
B. Verification of Conditions: Verify that field measurements, surfaces, substrates and conditions are as required, and ready to receive the work.
1. Verify that openings for glazing are correctly sized and within tolerance.
2. Verify that surfaces of glazing channels or recesses are clean, free of obstructions
that may impede moisture movement and that weeps are clear and ready to receive the glazing.
C. Report, in writing, prevailing conditions that will adversely affect satisfactory execution of
the work of this Section. Do not proceed with the work until the unsatisfactory conditions have been corrected.
3.3 PREPARATION
A. Clean contact surfaces with solvent and wipe dry.
B. Seal porous glazing channels or recesses with substrate compatible primer or sealer.
C. Prime surfaces scheduled to receive sealant.
3.4 GLAZING INSTALLATION
A. Place setting blocks of the proper size in sill rabbet; locate at 1/4th the glass width from each corner; set blocks in a thin course of heel and toe compound, if any.
B. Install spacers of the proper size and spacing inside and out for glass sizes larger than 50
united inches, except where gaskets or pre-shimmed tape is used. Provide 1/8", minimum bite of spacers on the glass and use a thickness slightly less than the final compressed thickness of the tape.
C. Set each unit of glass in each series in uniformity with other pieces in pattern, draw, bow,
and other visually perceptible characteristics.
D. Provide for the following edge clearances (bite):
R.S. ROQUE ARCHITECTS 184
Single glazed
Nominal edge cover (bite) 5/16" Minimum nominal edge clearance 3/16" Minimum face clearance 3/16"
E. Glass must be edge blocked to prevent contact with metal framing.
F. Provide glazing sealant as required for the particular glazing application. Coordinate with
other Sections herein for material compatibility. Glazing gaskets are permitted only for interior locations.
G. Prevent exudation of the sealant or compound by forming voids or installing filler rods in
channels at the heel of jambs and heads, except as otherwise indicate and depending on the light size, thickness and type of glass, and in compliance with the manufacturer' ' s recommendations.
H. Provide filler rod where sealants are used in the following locations:
1. Head and jamb channels.
2. Tinted glass over 75 united inches in size.
3. Clear glass over 125 united inches in size.
I. Do not leave voids in sill channels except as specifically indicated or recommended by the
glazing manufacturer. Force sealant into the channel to eliminate voids and to ensure complete Awetting@ or bond of the sealant to the glass and channel surfaces.
J. Do not allow the sealant to close the weeps of aluminum framing.
K. Tool exposed surfaces of glazing liquids and compounds to provide a substantial Awash@
away from the glass.
L. Clean and trim excess glazing materials from glass and stops or frames promptly after installation; eliminate stains and discolorations.
M. Install pressurized tape and gaskets to protrude slightly out of the channel to eliminate dirt
and moisture pockets.
3.5 FIELD QUALITY CONTROL
A. Section 01450 - Quality Control: Field inspection.
B. Inspect the preparation for and installation of glazing.
3.6 CLEANING
A. Section 01700 - Execution Requirements: Cleaning the installed work.
B. Remove non-permanent labels after glazing has been completed and clean glass
R.S. ROQUE ARCHITECTS 185
surfaces.
C. Wash and polish glass on both surfaces not more than four (4) days prior the date scheduled for inspections intended to establish the date of Substantial Completion for each area of the Project. Wash with a solution of mild detergent in warm water applied with soft, clean wiping cloths. Take care to remove dirt from corners. Wipe surfaces clean and dry.
3.7 PROTECTION
A. Section 01700 - Execution Requirements: Protection of the installed work.
B. Protect exterior glass from breakage immediately upon installation by use of crossed streamers attached to framing and held away from the glass. Do not apply markers directly to the glass surface.
C. Remove and replace glass which has been broken, chipped, cracked, abraded or
damaged in other ways during the construction period, including by natural causes, accidents and vandalism.
END OF SECTION
R.S. ROQUE ARCHITECTS 186
DIVISION 9 – FINISHES SECTION 09200 - PLASTER
PART 1 – GENERAL
1.01 DESCRIPTION OF WORK
A. This Section covers all labor, materials, accessories, scaffolding and appurtenances
necessary for the complete re-installation of all plaster for the project. Items not mentioned specifically herein, which are necessary to make a complete installation shall also be included.
1.02 QUALITY ASSURANCE
A. Perform all work covered in this Section in conformance with the recommendations of the
following as they pertain to the work involved except where specified contrary herein.
1. Portland Cement Association 2. American National Standards Institute
1.03 PRODUCT DELIVERY, HANDLING AND STORAGE
A. Delivery Of Materials:
Manufactured materials shall be used only if delivered in the original, unopened containers, cartons or bundles bearing the manufacturer’s name, brand type and grade.
B. Storage of Materials, Equipment and Fixtures:
Materials will be kept dry unless ready to be used, off the ground, under cover, ventilated, and away from surfaces subject to dampness or condensation.
PART 2 – PRODUCTS
2.01 DESCRIPRION OF WORK:
A. Portland Cement shall conform to ASTM C 150, and be type I or IA. B. Aggregates for plaster shall conform to ASTM C 28 C. Water shall be clean, fresh, and potable.
2.02 MIXES:
A. Proportion of Plaster Mixes: Plaster mix shall be Class A, 1 Portland Cement and 2 parts sand.
PART 3 – EXECUTION
3.01 INSTALLATION/APPLICATION/PERFORMANCE/ERECTION
A. Required plaster thickness are indicated herein. B. Plastering
R.S. ROQUE ARCHITECTS 187
1. Cement Plaster Base Coats. Divide cement plaster with control joints at a maximum spacing of 6 feet each way for exterior cement plaster and 20 feet each way for interior cement plaster.
3.02 ADJUSTMENT AND CLEANING
A. Repairing and Cleaning.
1. Upon completion of carpentry and other work, repair any cracks, chipped places. Indented surfaces including patching; be careful not to injure or deface any of the finished work in the building. Make repairs by moistening plaster and filling in with new material, troweled or tamped flush with adjoining surfaces. Match in texture, all pointing and patching of plaster with existing plaster work. Joining previously applied plaster shall be perfectly flush.
2. Do not allow visible joints, cracks, crazes, tool marks, waves or other defects to appear in the finishes work. Removal of dirt or stains on finished plaster surfaces shall be by a method, which will not damage the surface of the finished plaster.
3. At the completion of the finish plaster work, clean all plaster from beads, screeds, base, and other trim. Repair walls and other surfaces, which have been stained, marred or otherwise damaged from the plastering work.
4. Remove all rubbish, unused materials, containers, and equipment from building resulting from this work, leaving floors broom clean.
3.03 SCHEDULES
A. Thickness of Plaster. Apply plaster, unless otherwise noted, to thickness’ as follows:
1. Cement Plaster: Over masonry or concrete, 5/8 inch.
B. Number of Coats. Two Coats (double back method) over masonry.
END OF SECTION

R.S. ROQUE ARCHITECTS 188
SECTION 09250 GYPSUM BOARD and CEMENT BOARD
PART 1 GENERAL
1.1 SUMMARY
A. Section Includes:
1. Gypsum board.
2. Cement board.
3. Gypsum sheathing.
4. Accessories.
5. Joint treatment.
6. Finishing.
B. Related Sections:
1. Section 06100 - Rough Carpentry: metal framing and blocking for attachment of gypsum board.
2. Section 07210 - Building Insulation: Sound attenuation blankets.
3. Section 07900 - Joint Sealers: Acoustical sealants.
4. Section 09110 - Non-Load Bearing Steel Framing: Metal framing for attachment of
gypsum board and cement board.
5. Section 09200 - Lath and Plaster: Finish for gypsum sheathing.
6. Section 09300 - Tile: Ceramic wall finish on gypsum board and cement board.
7. Section 09900 - Painting: Field paint finish on gypsum board.
1.2 DESCRIPTION OF WORK
A. The extent of gypsum board work is indicated on the Drawings and Schedules and as specified herein, and includes providing and installing gypsum board for all applications, cement fiber board, gypsum sheathing, galvanized and PVC trim, accessories and the finishing of installations exposed to view.
B. REFERENCES
The publications listed below form a part of this Specification to the extent referenced.
R.S. ROQUE ARCHITECTS 189
Publications are referred to in the text by basic designation only.
C. American Society for Testing and Materials (ASTM):
1. ASTM C 475 - Specification for Joint Compound and Joint Tape for Finishing Gypsum Board.
2. ASTM C 630 - Specification for Water-Resistant Gypsum Backing Board.
3. ASTM C 840 - Specification for the Application and Finishing of Gypsum Board.
4. ASTM C 954 - Specification for Steel Drill Screws for the Application of Gypsum
Panel Products or Metal Plaster Bases to Steel Studs From 0.033 inches (0.84 mm) to 0.112 inches (2.84 mm) in Thickness.
5. ASTM C 919 - Practice for Use of Sealants in Acoustical Applications.
6. ASTM C 1002 - Specification for Steel Self-Piercing Topping Screws for the
Application of Gypsum Panel Products or Metal Plaster Bases to Wood Studs or Steel Studs.
7. ASTM C 1280 - Specification for Application of Gypsum Sheathing.
8. ASTM C 1325 - Specification for Non-Asbestos Fiber-Mat Reinforced Cement
Substrate Sheets.
9. ASTM C 1396 - Specification for Gypsum Board.
10. ATM D 3678 - Specification for Rigid Poly (Vinyl Chloride) (PVC) Interior-Profile Extrusions.
11. ASTM E 119 - Test Methods for Fire Tests of Building Construction and Materials.
D. Gypsum Association (GA):
1. GA-201 - Gypsum Board for Walls and Ceilings.
2. GA-214 - Recommended Specification for Levels of Gypsum Board Finish.
3. GA-216 - Recommended Specifications for the Application and Finishing of
Gypsum Board.
4. GA-600 - Fire Resistance Design Manual. . E. International Code Council:
1. International Building Code (IBC), 2009.
1.3 SUBMITTALS
A. Section 01330 - Submittal Procedures: Procedures for submittals.
R.S. ROQUE ARCHITECTS 190
1. Product Data: Manufacturer' ' s product specifications and installation instructions for each gypsum drywall component, including other data required to show compliance with these specifications.
12. Assurance / Control Submittals:
a. Manufacturer' ' s certificate that the products meet or exceed the specified
requirements.
b. Documentation of experience indicating compliance with the specified qualifications requirements.
c. Test Reports from recognized testing laboratories, upon request.
1.4 QUALITY ASSURANCE
A. Qualifications:
1. Manufacturer: Company specializing in manufacturing the products specified with
a minimum of five (5) years documented experience.
2. Installer: Company experienced in performing the work of this Section with a minimum of five (5) years documented experience.
B. Fire-Resistance Ratings: Where gypsum drywall systems with fire-resistance ratings are
indicated, provide materials and installations which are identical to those of applicable assemblies tested per ASTM E 119 by a fire testing laboratory acceptable to the authorities having jurisdiction.
1. Provide fire-resistance rated assemblies identical to those indicated by
reference to GA File No. S in GA AFire Resistance Design Manual@ or to design designations in U.L. AFire Resistance Directory@ or in listing of other testing and agencies acceptable to the authorities having jurisdiction.
C. Single-Source Responsibility: Obtain gypsum board products from a single manufacturer,
or from manufacturer' ' s recommended by the prime manufacturer of the gypsum board.
1.5 DELIVERY, STORAGE AND HANDLING
A. Section 01600 - Product Requirements: Transport, handle, store and protect the products.
B. Deliver products to the Site in the manufacturer' ' s original, unopened, undamaged
packages, containers, or bundles bearing the brand name with identification labels intact.
B. Store materials inside and under cover; keep dry; protect from weather, direct sunlight, surface contamination, corrosion and damage from construction traffic and other causes.
D. Neatly stack gypsum boards flat to prevent sagging.
E. Handle to prevent damage to edges, ends and surfaces.
R.S. ROQUE ARCHITECTS 191
F. Protect corner beads and trim from being bent and damaged.
1.6 JOB CONDITIONS
A. Environmental Requirements, General: Comply with requirements of the referenced gypsum board application standards and recommendations of the gypsum board manufacturer for environmental conditions before, during and after installation.
B. Ventilation: Ventilate building spaces as required to remove water in excess of that required for the
drying of joint treatment materials immediately after application. Prevent drafts during hot, dry weather to avoid excessively rapid drying.
PART 2 PRODUCTS
2.1 MANUFACTURERS
A. Section 01600 - Product Requirements: Product Options: Substitutions permitted.
2.2 GYPSUM BOARD MATERIALS
A. General:
1. Provide boards where called for on the Drawings in lengths to minimize the number of end-to-end butt joints.
2. United States Gypsum (Sheetrock) designations are used in this Section to identify
gypsum board and accessory types, unless otherwise noted.
B. Standard Gypsum Board: ASTM C 1396; natural finish, paper faces, 1/2" at ceilings and over wall furring, 5/8" thick at walls unless noted otherwise, 48" width, maximum practical length to meet conditions; ends square cut, tapered edges.
1. Provide where gypsum board is called for unless otherwise indicated.
C. Fire-Resistant Gypsum Wallboard: Type X, ASTM C 1396; paper faces, 2" at ceiling, or
5/8" thick at walls, 48" width, maximum practical length to meet conditions; ends square cut, edges tapered; providing at least 1-hour fire-retardant rating when tested in accordance with ASTM E 119.
1. Provide where a fire-resistance rating is required.
D. Water-Resistant Gypsum Backing Board: ASTM C 630; 2" at ceiling and over wall furring,
and 5/8" thick at walls, 48" width, maximum practical length to meet conditions; ends square cut; edges tapered; ends and edges straight and solid. Board consisting of a non-combustible water-resistant gypsum core, surfaced on face and back with green treated water-repellent paper bonded to the core. Suitable for receiving paint or wallpaper and in compliance with IBC.
1. Provide at ceilings and walls in showers, toilets and other wet areas not scheduled for tile finish.

R.S. ROQUE ARCHITECTS 192
E. Impact / Penetration-Resistant Gypsum Board: Type X, ASTM C 1396, 5/8" thick, 48" width,
maximum practical length to meet the conditions, ends square cut; edges tapered; gypsum core with additives to enhance fire resistance; 1-hr fire-retardant rating when tested in accordance with ASTM E 119; surfaced with paper on the front, back and long edges; 0.30" GE Lexan film bonded to the back side to enhance impact / penetration resistance without penetration.
1. Provide at Corridor walls where indicated and other locations subject to high
abuse.
F. Tile Backing Board: 5/8" thick; inorganic fiberglass mat with moisture-resistant gypsum core; paperless; heat-cured acrylic coating; DensShield Tile Backer by Georgia-Pacific, or approved equal.
1. Provide at shower and toilet room walls scheduled to receive ceramic tile finish.
G. Cement Board: High density, glass fiber reinforced, 5/8" thick x 26" or 48" width; Durock
Cement Board as manufactured by United States Gypsum or approved equal.
1. Provide at shower and toilet room walls scheduled to receive ceramic tile finish, and at ceilings and walls exposed to the weather.
H. Gypsum Sheathing: ASTM C 630, 5/8" thick x 48" width x maximum practical length to
meet conditions; ends square cut; edges tapered; ends and edges straight and solid. Weather and sag resistant for exterior applications, water repellent paper faces suitable for painting or plastering.
1. Provide at ceilings and walls exposed to the weather.
I. Solid Shaftliner: 1" thick x 23-7/8" or 47-3/4" width, Type X core, ASTM C 1396, moisture-
resistant paper faces.
1. Provide at fire-rated shaft and chase walls, as indicated.
2.3 FASTENERS
A. Metal Framing: ASTM C 1002, Type S, Phillips-head recess, bugle head, corrosion-resistant, self-drilling, self-tapping, fine thread steel screws.
1. One Layer 1/2@ board: 1" long.
2. One Layer 5/8" board: 1-1/8" long.
2.4 TRIM ACCESSORIES
A. General: Install vinyl plastic accessories at exterior work and work in high humidity and
non-air-conditioned spaces. Use galvanized accessories at interior air conditioned, normally humidity areas.
B. Plastic Accessories: High-Impact PVC plastic; ASTM D 3678, including corner beads, stop
R.S. ROQUE ARCHITECTS 193
beads, casing beads, trim beads, baseboard and ceiling beads; as manufactured by Plastic Components, Inc. or approved equal.
C. Galvanized Accessories:
1. Edge Trim: Galvanized steel casing.
a. AL@ shape for tight abutment at edges; Sheetrock Brand, No. 200-B.
b. AJ@ shape at other locations; Sheetrock Brand, No. 200-A.
2. Corner Beads: Galvanized steel corner beads, Sheetrock Brand, Dur-A-Bead
Metal Corner Bead.
3. Control Joint: Roll-formed zinc; Sheetrock Brand, Zinc Control Joint.
D. Pre-finished Corners: Pre-finished inside corner reinforcement as manufactured by ULTRAFLEX or approved equal.
2.5 JOINT TREATMENT MATERIALS
A. General: Type recommended by the gypsum board manufacturer for the application,
except as otherwise indicated; ASTM C 475.
B. Reinforcing Tape: Cross-fibered paper with high tensile strength, roughened surface, accurate center crease; Sheetrock Brand, Heavy Drywall Joint Tape.
C. Joint Compound:
1. Single Grade: Multi-purpose grade for the entire application.
2. Two Grades:
a. Interior and Exterior Work: Use chemically-setting, powder compound type
for bedding and filling; Sheetrock Brand, Durabond Joint Compound or Easy Sand Lightweight Setting Type Joint Compound.
b. Topping: Use ready-mixed, lightweight, vinyl formulation or vinyl powder;
Sheetrock Brand, Lite Taping Joint Compound.
D. Water-Resistant Joint Compound: Special water-resistant type for treatment of joints, fastener heads and cut edges of water-resistant backing boards.
2.6 MISCELLANEOUS MATERIALS
A. General: Provide auxiliary materials of the type and grade recommended by the gypsum
board manufacturer.
B. Adhesives: Commercial adhesives; ASTM C 557.
1. Laminating: Special adhesive or joint compound specifically recommended by the gypsum board manufacturer for laminating gypsum boards.
R.S. ROQUE ARCHITECTS 194
2. Water-Resistant: Type I, organic adhesive for ceramic tile; ANSI A136.1.
C. Blocking and backing Plates: Provided by the trade responsible for Section 09110; located by the appropriate trade or as indicated below.
1. Casework and Other Trades: 14 gage galvanized steel, minimum; 3" wide x length
required.
2. Plumbing: Size as required for the relevant wall-hung fixture.
PART 3 EXECUTION
3.1 EXAMINATION
A. Section 01700 - Execution Requirements: Verification of existing conditions before starting the work.
B. Verification of Conditions: Verify that field measurements, surfaces, substrates, blocking
and backing plates and conditions are as required, and ready to receive the work.
C. Report, in writing, prevailing conditions that will adversely affect the satisfactory execution of the work of this Section. Do not proceed with the work until the unsatisfactory conditions have been corrected.
3.2 PRE-INSTALLATION MEETING
A. Prior to commencing work, meet on-site with the Engineer and all concerned trades to
review the work required by this Section.
3.3 GENERAL REQUIREMENTS
A. Install in accordance with reference standards, manufacturer' ' s instructions, product technical bulletins, product catalog and product carton instructions and as required to comply with seismic requirements.
B. Install supplementary framing, blocking and bracing at terminations in gypsum board
assemblies to support fixtures, equipment, heavy trim, grab bars, toilet accessories, cabinetry, furnishings and similar construction.
C. Install metal framing and gypsum board to enclose all pipes, ducts, conduit, etc. which
would otherwise be exposed in finished areas, regardless of whether or not furring is shown or indicated on the Drawings.
D. Enclosures to receive recessed light fixtures in fire-rated ceilings shall conform to U.L.
requirements for materials and assemblies. Provide U.L. Design No. P251 enclosures over all types of recessed lights.
E. Defects which appear in the work due to faulty workmanship and / or materials, shall be
repaired and refinished with materials and in a manner to meet the requirements of this Section.

R.S. ROQUE ARCHITECTS 195
3.4 GYPSUM BOARD INSTALLATION REQUIREMENTS
A. Application and Finishing Standards: Install in accordance with manufacturers published
instructions, GA-201, GA-216 and ASTM C 840. B. Install sound attenuation blankets as indicated, prior to the application of gypsum boards
unless the blankets can be readily installed after the boards have been installed.
C. Locate exposed end-to-end butt joints as far as possible from the center of walls and ceilings, and stagger not less than 1'-0" in alternate courses.
D. Install ceiling boards in the direction and in a manner that will minimize the number of end-
to-end butt joints and avoid end joints in the central area of each ceilings. Stagger end joints at least 1'-0".
E. Install wall / partition boards vertically to avoid end-to-end butt joints to the extent possible.
Use boards of maximum practical lengths; where applicable stagger end joints. Cut and saw all openings; do not core and punch. Apply edge bead to all exposed edges and outside corners.
F. Install exposed gypsum board with face side out. Do not install imperfect, damaged or
damp boards. Butt boards together for a light contact at edges and ends with not more than 1/16" open space between boards. Do not force boards into place.
G. Locate either edge or end joins over supports, except in horizontal applications or where
intermediate supports or gypsum board back-blocking is provided behind end joints. Position boards so both tapered edge joints abut, tapered edges against tapered edges and mill-cut ends against mill-cut or field-cut ends. Do not place tapered edges against cut edges or ends.
H. Stagger vertical joint over different studs on opposite sides of partitions.
I. Attach gypsum boards to supplementary framing and blocking provided for additional
support at openings and cutouts.
J. Isolate perimeter of non-load bearing gypsum board partitions at structural abutments. Provide 1/4" to 1/2" space and trim edges with AJ@ type, semifinished, edge trim. Seal joints with acoustical sealant.
K. Form control joints and expansion joints with space between edges of boards prepared to
receive trim accessories.
L. Space fasteners in boards in accordance with referenced standards and manufacturer' ' s recommendations, except as otherwise indicated.
3.5 GYPSUM BOARD INSTALLATION METHODS
A. Single Layer Applications:
1. Install single layer gypsum board in the most economical direction, with edges and
ends attached to firm bearing surfaces; panel ends aligning and parallel with

R.S. ROQUE ARCHITECTS 196
framing members.
2. Apply gypsum board on walls and partitions vertically unless indicated otherwise, and provide sheet lengths that will minimize the number of end-to-end butt joints.
3. Apply gypsum board on furring with no end joints. Locate edge joints over furring
members.
4. Apply gypsum board on ceilings prior to application on walls and partitions, to the greatest extent possible.
5. Treat cut edges, holes, fastener heads and joints, including those at angle
intersections in water-resistant gypsum board, cement board and gypsum sheathing at exterior ceilings and soffits with the specified joint compound. Treat prior to installation.
6. Do not align panel joints with edges of openings.
B. Wall Tile Base: Where gypsum board is the base for thin-set ceramic tile and similar rigid
applied wall finishes, install paperless tile backing boards.
C. Showers, tubs and similar Awet@ areas: Install paperless tile backing boards. Apply with uncut long edges at the bottom of the work, and space 1/4" above fixture lips. Seal ends, cut edges and penetrations of each piece with water-resistant adhesive or, where recommended by the backing board manufacturer, with water-resistant joint compound.
D. Double Layer Applications: Install gypsum backing board as the base layer and exposed
gypsum board for the face layer.
1. Apply base layer on ceilings prior to application of the base layer on walls / partitions; apply face layers in the same sequence. Offset joints between layers at least 10". Apply base layers at right angles to supports unless indicated otherwise.
2. Apply base layer and face layer on walls / partitions [vertically] [horizontally] with
joints of the base layer over supports and face layer joints offset at least 10" with base layer joints.
3. Apply base layer on furring members [vertically] [horizontally] and the face layer
either [vertically] [horizontally] with vertical joints offset at least one furring member. Locate edge joints of the base layer over furring members.
E. Single Layer Fastening Methods: Secure boards to supports as follows:
1. Install fasteners from the center of the panel field toward the ends and edges.
Install fasteners 3/8" from ends and edges of panels, and as follows:
a. Ceiling: 12" on center, perimeter and field.
b. Walls: 12" o.c. in the field of walls and 8" o.c. at vertical joints.
F. Double Layer Fastening Methods: Apply base layer of gypsum board and face layer to the
R.S. ROQUE ARCHITECTS 197
base layer as follows:
1. Fasten both the base layer and face layer to supports separately with screws.
G. One-Hour Fire-Rated Chase Walls: Install framing studs, shaftliner and face layers in strict accordance with the manufacturer' ' s instructions and the Building Code
H. Sound-Rated Walls: Where work is indicated, including double layer work and work on
resilient furring, seal the work at perimeters, control and expansion joints, openings and penetrations with a continuous bead of acoustical sealant including a bead at both faces of partitions.
1. Comply with the manufacturer' ' s recommendations for location of beads, and
close off sound-flanking paths around and through the work, including sealing of partitions above acoustical ceilings. Provide sound insulation at ceilings where walls do not extend to the slab above.
I. Acoustical Sealant Application: Comply with the details indicated or if not indicated, comply
with applicable published recommendations of the AGypsum Construction Handbook@ by the United States Gypsum Company.
J. Inspection of Acoustical Partitions: Gypsum board partitions with a STC rating of 52 or
higher shall not be closed and finished until inspected and approved by the Engineer.
K. Shower Room Ceilings: Install paperless gypsum board in accordance with the manufacturer' ' s instructions. Reinforce all joints with glass mesh tape and coat the entire surface with a recommended compound to provide a smooth, even finish over the entire surface.
3.6 GYPSUM BOARD TRIM INSTALLATION
A. General: Where feasible, use the same fasteners to anchor trim accessory flanges as used
to fasten the gypsum boards to supports. Otherwise, fasten flanges by nailing or stapling in accordance with the manufacturer' ' s instructions and recommendations.
B. Install plastic corner beads at external corners. Use the longest practical lengths. Place
edge trim where panels abut dissimilar materials.
C. Install plastic edge trim wherever the edge of gypsum board would otherwise be exposed or semi-exposed. Provide the type with face flanges to receive joint compound except where semi-finishing type is indicated. Install AL@ trim where work is tightly abutted to other work and install special kerf-type where other work is kerfed to receive the long leg of AL@ trim. Install AJ@ trim where the edge is exposed, revealed, gasketed, or sealant-filled (including expansion joints).
D. Install semi-finishing trim where indicated, and where exterior gypsum board edges are not
covered by applied moldings or indicated to receive trim with face flanges covered with joint compound.
E. Install plastic edge trim or pre-finished internal corners where indicated on wall panels at
junctures with ceilings.
R.S. ROQUE ARCHITECTS 198
F. Install control joints where indicated.
3.7 GYPSUM SHEATHING INSTALLATION
A. Install gypsum sheathing in accordance with the manufacturer' ' s instructions, GA-201,
GA-216 and GA-600.
1. Install single layer gypsum sheathing horizontally, with edges butted tight, tongue up with attachment to firm bearing.
B. Provide construction control joints at a maximum of 30 feet o.c., at inside corners and at all
intersections.
1. Install sheathing with 1/4" space between the edge of the sheathing and adjacent walls, beams, columns, and fascia construction.
C. Install screws at 12" o.c., maximum, to secure sheathing to the supporting substrate.
D. Protect all exposed gypsum cores at perimeter edges and penetrations by covering the core with trim.
E. Place edge trim where sheathing abuts dissimilar materials. Use longest practical lengths.
3.8 JOINT TREATMENT
A. Reinforce interior and exterior corners at ceiling and wall surfaces.
B. Apply 2" wide coated glass fiber tape at cement backer board corner joints.
C. Install control joints the full height of partitions consistent with the lines of building spaces,
with 1/4" gap between panels. Apply sealant at the back of the joint and a control joint accessory at the face.
D. Apply 3" wide initial coating of joint compound, press tape firmly into the compound; wipe
off excess compound. Apply a second coat of joint compound with tools of sufficient width to extend beyond the joint center approximately 4". Draw the joint compound down to a smooth even plane.
E. Sand after the second and third applications of joint compound. Do not raise the nap of the
paper when sanding.
F. Feather coats onto adjoining surfaces with a maximum camber of 1/32" in 12".
G. After drying or setting, sand or sponge joints, edges, and corners, eliminating high spots and excessive compound to produce a smooth finish surface.
H. Prepare surfaces to receive subsequent finishes to a height of 6" above the finished
ceiling.
3.9 GYPSUM BOARD FINISHING
R.S. ROQUE ARCHITECTS 199
A. General:
1. Refer to Sections on painting, coatings and interior design documents for decorative finishes to be applied to gypsum board work. Apply treatment at gypsum board joints (both directions), flanges of trim accessories, penetrations, fastener heads, surface defects and elsewhere as required to prepare the work for decoration.
2. Prefill open joints and rounded or beveled edges, if any; use the type of compound
recommended by the manufacturer.
3. Apply joint tape at joints between gypsum boards except where a trim accessory is indicated. Apply joint compound in three (3) coats (not including prefill of openings in the base); sand between the last two coats and after the last coat.
B. Skim Coat: Wherever gypsum board is to receive eggshell, semigloss or gloss paint finish,
apply a thin skim coat of joint compound over the entire gypsum board surface, after the three-coat joint and fastener treatment has been completed and is dry.
C. Base for Acoustical Tile: Where gypsum board is indicated as the base for adhesively-applied acoustical tile, install tape and two (2) coats compound treatment, without sanding.
D. Paperless Tile Backing Board or Cement Board Base for Ceramic Tile:
1. Comply with recommendations of the backing board manufacturer for the
treatment of joints behind ceramic tile.
2. In areas to be tiled, treat fastener heads with water-resistant joint compound. Fill tapered edges in gypsum panels with water-resistant joint compound, embed joint tape firmly and wipe off excess compound; follow immediately with a second coat of water-resistant joint compound over the taping coat; do not crown the joint. Fold and embed tape in all interior corners to form true angles.
3. In areas not to be tiled, treat fastener heads and embed tape as indicated above
using water-resistant joint compound but finish with two (2) coats of the joint compound used for regular gypsum board work.
3.10 GYPSUM BOARD FINISH LEVELS
A. Apply finish in accordance with the manufacturer's published instructions and GA-214
Finish Levels.
1. Level 1: All joints and interior angles shall have tape embedded in joint compound. Surfaces shall be free of excess joint compound. Tool marks and ridges are acceptable.
a. Application: In plenum areas above ceilings, in attics, in mechanical
rooms, in areas where the assembly is generally concealed and in other areas not normally exposed to view. Accessories not required unless shown or required by the rating. Where a fire-resistance rating is required for the gypsum board assembly, the details of construction shall be in accordance with reports of the fire tests of assemblies that have met the

R.S. ROQUE ARCHITECTS 200
fire-rating requirement.
2. Level 2: Embed tape and apply a separate first coat of joint compound to the tape, fasteners and trim flanges.
a. Application: Where panels are the substrate for tile.
3. Level 3: Embed tape and apply separate first and fill coats of joint compound to the
tape, fasteners and trim flanges.
a. Application: At surfaces scheduled to receive medium- or heavy-textured finishes or heavy wall coverings before painting.
4. Level 4: Embed tape and apply separate first, fill and finish coats of joint compound
to the tape, fasteners and trim flanges.
a. Application: At panel surfaces in mechanical and electrical spaces not exposed to public view.
5. Level 5: Embed tape in joint compound at all joints and interior angles and apply
three (3) separate coats of joint compound over all joints, angles, fastener heads and accessories. A thin skim coat of joint compound or a material manufactured especially for this purpose shall be applied to the entire surface. The surface shall be smooth and free of tool marks and ridges. Prepared surfaces shall be coated with a primer / sealer prior to the application of finish paint. Refer to Specification Section 09900 - Painting.
a. Application: For use where gloss, semi-gloss, enamel and non-textured
flat paints are specified, or where severe lighting conditions occur. Generally in all public areas exposed to view, except where noted otherwise, to provide a uniform surface and minimize the possibility of joints telegraphing and fasteners showing.
3.11 CONSTRUCTION
A. Interface with Other Work:
1. Coordinate the installation of firestopping materials specified in Section 07840 at
penetrations through fire-resistive rated gypsum board walls, partitions and ceilings.
2. Coordinate the installation of joint sealers specified in Section 07900 at
penetrations of non-fire-restive rated walls, partitions and ceilings.
3.12 PROTECTION
A. Protect other work and finishes from damage by the gypsum board work.
B. Provide protection and maintain conditions which will ensure that the gypsum board work will be without damage and deterioration at the time of Substantial Completion.

R.S. ROQUE ARCHITECTS 201
3.13 FIELD QUALITY CONTROL
A. Section 01450 - Quality Control: Field inspection.
B. Inspect the installed work for alignment, attachment to the structure, backing plates and openings for installations by other trades.
3.14 CLEANING
A. Section 01700 - Execution Requirements: Cleaning the installed work.
B. Clean and remove all debris from the Site.
C. Leave the entire Project clean.
END OF SECTION
R.S. ROQUE ARCHITECTS 202
SECTION 09310 - CERAMIC TILES
PART 1 - GENERAL
1.01 SCOPE
A. The work contemplated under this section includes all materials, tools, equipment and services necessary for and reasonably incidental to the completion of all ceramic tiles as shown on the drawings and as specified herein.
1.02 QUALITY ASSURANCE
A. Use adequate number of skilled workers thoroughly trained and experienced.
1.03 SUBMITTALS: Meet applicable requirements of Section 01300.
A. Contractor shall submit samples of ceramic tile for Engineer’s approval.
A. 12” x 12” ceramic tiles-unglazed (for toilet floor, walls)
B. 24” x 24” ceramic tiles (for flooring,kitchen and dining)
B. Submit a Master Grade Certificate for tile, certifying the grade, type and quality of
material. The covered by Master Grade Certificates shall bear certification marks on cartons and labels.
1.04 DELIVERY, STORAGE AND HANDLING
A. Meet the applicable requirements of Section 01600.
B. Meet requirements of ANSI A108.1, A108.5 and TCA A137.1. Deliver manufacturer’s
original unopened tile containers with grade seals unbroken, and labels or certification marks intact.
1.05 WARRANTY
A. Installation: Upon completion of this work, and as a condition of its acceptance, jointly
execute with the installer a warranty that floor tile has been installed in strict accordance with the specification and that the complete installation will not loosen, deteriorate or crack up under normal usage for a period of 5 years from date of installation. Replace loose tile, grout, sealant, and mortar at no additional cost.
PART 2 - PRODUCTS
2.01 MATERIALS
A. Ceramic tiles:

R.S. ROQUE ARCHITECTS 203
1. Floor tiles(kitchen) - shall be unglazed,24”x24” standard grade not less than
¼” thick.
2. Floor & Wall tiles(Toilets)-shall be unglazed, 12”x12”, standard grade not less than ¼” thick.
3. Counter tiles should be 24”x 24” ceramic tiles. 4. Ground and second Flooring should be 24” x 24” unglazed
5. Trim-compatible with type, color, thickness, face size and finish of specified
wall tiles.
6. Mortar-shall be pre-sanded, dry set, conforming to ANSI A108.1.
7. Adhesive-shall be Redi-set 200 or equal.
8. Grout-shall be commercial cement, waterproof, non-shrinking and shall conform to ASTM 1107.
PART 3 - EXECUTION
3.01 PREPARATION
A. Surfaces to receive tile shall be clean, free of paint oil, wash grease or other substances and shall have no variation in the place exceeding ¼” in 10 feet. Concrete slabs should be thoroughly cured before tile application is started. Concrete masonry surfaces shall be saturated with water before installation begins.
3.02 INSTALLATION
A. Setting tile:
1. Thoroughly soak in clean water mortar-set tile. Do not soak later- Portland
cement mortar-set or adhesive-set tile. 2. Solidly set tile in mortar beds. Float adhesive set tile into place, beat in and
level. Set with joints of uniform width as appropriate for size of tile. Rake joints if tile full depth of tile for grouting.
3. Set tile complete with complete angles, bull-nose caps and trim with joints of uniform width. Provide cove base between floor and walls.
4. Install wall tile before floor tile is laid.
5. Remove and reset any tile that is loose or that rings hollow.
B. Ceramic tiles shall be laid such that tiles against opposite walls are of equal with but
R.S. ROQUE ARCHITECTS 204
not less than half of a tile in width. Align all floor joints to give straight uniform grout lines parallel to walls. Make joints between pre- grouted sheets same width as joints within sheets. Tile sheets shall be placed on freshly laid mortar or adhesive while surface is tile plastic and tamped to ensure solid bedding. Trim units shall be installed along all finished edge of tile work.
3.03 WORKMANSHIP
A. Tile shall be laid by mechanics experienced in the trade. Tile cuts shall be made clean
and without ragged edges. Cut edges shall be ground to ease edges to match edges of white tiles. Fit work carefully at all corners, edges and around pipes and other built-in fixtures so escutcheons, covers, plates and collar will completely cover tile edge.
3.04 CLEAN UP AND PROTECTION
A. After installation is complete, tile work shall be thoroughly cleaned in accordance with
manufacturer’s recommendations. Acid shall not be used for cleaning glazed tiles. Rinse tile work thoroughly before and after use of chemical cleaners. Polish tile with soft cloth.
B. A protective coat of neutral cleaner solution shall be applied to all clean tile work.
Floors shall be covered with clean, heavy duty building paper before traffic permitted. Prior to final acceptance inspection, building paper shall be removed and the protective coating rinsed from all the tile work.
END OF SECTION

R.S. ROQUE ARCHITECTS 205
SECTION 09510 ACOUSTICAL CEILINGS
PART 1 GENERAL
1.1 SUMMARY
A. Section Includes:
1. Suspended metal grid ceiling system.
2. Perimeter trim.
3. Acoustical ceiling panels, suspended.
4. Acoustical ceiling panels, adhered to substrate.
B. Related Sections:
1. Section 07900 - Joint Sealers: Caulking of joints between perimeter trim and vertical surfaces.
2.
3. Section 16100 – basic electrical materials and methods
1.2 DESCRIPTION OF WORK
A. The extent of acoustical ceilings work is indicated on the Drawings and as specified herein, and includes providing and installing suspended metal ceiling grid, perimeter trim, acoustical panels, hanger devices, sealants and accessories for complete adhered and suspended ceiling systems.
1.3 REFERENCES
A. The publications listed below form a part of this Specification to the extent referenced.
Publications are referred to in the text by basic designation only.
B. American Society for Testing and Materials (ASTM):
1. ASTM A 641 - Specification for Zinc-Coated (Galvanized Carbon Steel Wire.
2. ASTM C 635 - Specification for Manufacture, Performance, and Testing of Metal Suspension Systems for Acoustical Tile and Lay-in Panel Ceilings.
3. ASTM C 636 - Practice for Installation of Metal Ceiling Suspension Systems for
Acoustical Tile and Lay-in Panels.
4. ASTM D 1779 - Specification for Adhesive for Acoustical Materials. 5. ASTM E 84 - Test Method for Surface Burning Characteristics of Building
Materials.

R.S. ROQUE ARCHITECTS 206
6. ASTM E 400 - Test Method for Analysis of Ores, Minerals, and Rocks by the Fire
Assay Preconcentration Optical Emission Spectroscopy.
7. ASTM E 413 - Classification for Rating Sound Insulation.
8. ASTM E 580 - Practice for Application of Ceiling Suspension Systems for Acoustical Tile and Lay-In Panels in Areas Requiring Seismic Restraint.
9. ASTM E 795 - Practices for Mounting Test Specimens During Sound Absorption
Tests.
10. ASTM E 1264 - Classification for Acoustical Ceiling Products.
C. International Building Code (IBC):
1. Applicable edition in the Project jurisdiction.
1.4 SUBMITTALS
A. Section 01330 - Submittal Procedures: Procedures for submittals.
1. Product Data: Manufacturer' ' s product specifications and installation instructions for each suspension system and type of seismic brace, and each acoustical ceiling material required; certified laboratory test reports and other data as necessary to show compliance with these Specifications.
2. Shop Drawings: Four (4) sets of accurate layout drawings based on actual field
measurements. Indicate all mechanical and electrical items, access panels and other items to be installed in the finished ceiling including seismic bracing locations.
3. Samples:
a. Two 6" x 6" square samples of each acoustical unit required, showing the
full range of exposed pattern, texture and color to be expected in the finished work.
b. Two 12" long samples of each exposed runner.
c. Two 12" long samples of each edge molding.
4. Assurance / Control Submittals.
a. Manufacturer' ' s certificate that the products meet or exceed the specified
requirements.
b. Documentation of experience indicating compliance with the specified qualifications requirements.
5. Maintenance Information: Manufacturer' ' s recommendations for cleaning and
refinishing acoustical units, including precautions against materials and methods
R.S. ROQUE ARCHITECTS 207
which may be detrimental to finishes and acoustical performance.
B. Section 01780 - Closeout Submittals: Procedures for closeout submittals.
1. Warranty: Submit a written special Warranty with forms completed in the name of the Employer and registered with the manufacturer.
1.5 COORDINATION
A. Coordinate layout and installation of the suspension system components and acoustical
ceilings with other work supported by or penetrating through the ceilings, including light fixtures, HVAC equipment, fire-suppression system components, and partition systems, if any.
B. Furnish layouts for inserts, clips and other supports required to be installed by other trades
for support of acoustical ceilings.
1. Furnish concrete inserts, steel deck hanger clips and similar devices to other trades for installation well in advance of the time needed for the coordination of other work.
C. Interface with Other Work:
1. Schedule the installation of acoustical units after all interior wet work has been
completed.
2. Install after all major above ceiling work has been completed.
3. Coordinate the location of hangers with other work.
4. Do not install acoustical units until after the building has been enclosed, dust generating activities have ceased, overhead work is complete, tested and approved and the air conditioning system is operational.
1.6 QUALITY ASSURANCE
A. Qualifications:
1. Manufacturer: Company specializing in manufacturing the products specified with
a minimum of five (5) years documented experience.
2. Installer: Company experienced in performing the work of this Section with a minimum of five (5) years documented experience; acceptable to the manufacturer as shown by a current written statement from the suspension system manufacturer.
C. Fire Performance Characteristics: Provide acoustical ceiling components identical to those
tested for the following fire performance characteristics, according to the ASTM test method indicated, by UL or other testing and inspecting agency acceptable to authorities having jurisdiction. Identify the acoustical ceiling components with appropriate marking by the testing and inspecting agency.

R.S. ROQUE ARCHITECTS 208
1. Surface Burning characteristics: Tested per ASTM E 84.
a. Flame Spread: 25 or less. b. Smoke Developed: 50 or less.
D. Fire Resistance Ratings: As indicated by reference to the design designation in UL AFire
Resistance Directory@ or AFM Approval Guide@ for floor, roof or beam assemblies in which acoustical ceilings function as a fire protective membrane, tested per ASTM E 119.
E. Fire-Rated Ceilings: Provide protection materials for lighting fixtures and air ducts to comply
with the requirements indicated for a rated assembly; conform to UL requirements for materials and assemblies. Provide UL Design No. P 251 enclosures over all types of recessed lights.
F. Limitations: The ceiling and suspension system shall be installed with vertical and lateral
seismic bracing as required by the building code. Ceilings shall not support materials or other building components. Ductwork, grilles, light fixtures, plumbing and like work shall have their own support system and shall not use the ceiling system or ceiling suspension wires for support.
1.7 DELIVERY, STORAGE AND HANDLING
A. Section 01600 - Product Requirements: Transport, handle, store and protect the
products.
B. Deliver products to the Site in the manufacturer' ' s original, unopened containers, dry and undamaged, with the brand name and type clearly marked.
C. Store under cover in dry, weathertight conditions.
D. Protect against damage from moisture, direct sunlight, surface contamination and other
causes.
E. Handle acoustical ceiling units carefully to prevent chipping of edges and damage to the units in any way.
1.8 JOB CONDITIONS
A. Do not install acoustical ceiling units until the space has been enclosed and weatherproof,
wet work in the space is completed and nominally dry, work above the ceiling is complete, and ambient conditions of temperature and humidity will be continuously maintained at values near those indicated for final occupancy.
B. Maintain a uniform temperature range of 60 - 85 F and relative humidity of no more than
70%, continuously, prior to, during and after installation.
1.9 WARRANTY
A. Section 01780 - Closeout Submittals: Procedures for closeout submittals.
R.S. ROQUE ARCHITECTS 209
B. Special Warranty:
1. Provide a written Warranty jointly signed by the manufacturer and the installer certifying that the products and the installation is free of defective materials and workmanship and will repair or replace any defective component or the system, in whole or in part, as necessary to restore the product to its original intended state and integrity.
2. Warranty Period: Ten (10) years from the date of Substantial Completion, subject to conditions.
1.10 MAINTENANCE
A. Section 01780 - Closeout Submittals: Procedures for closeout submittals.
B. Extra Materials: Provide not less than 5% of each type, size and color of acoustical ceiling
panels, from the same manufacturer as the materials installed.
PART 2 PRODUCTS 2.1 MANUFACTURERS
A. Suspension System: Subject to compliance with the Project requirements, manufacturers
offering specified items. B. Acoustical Panels: Subject to compliance with the Project requirements, manufacturers
offering the specified items. C. Section 01600 - Product Requirements: Product Options: Substitutions permitted.
2.2 METAL CEILING GRID SUSPENSION SYSTEMS, GENERAL
A. Standard for Metal Suspension Systems: Intermediate duty, hot-dipped galvanized steel
suspension grid of the type and finish indicated; comply with applicable requirements of ASTM C 635.
B. Edge Moldings and Trim: Metal or extruded plastic of the types and profiles indicated, or if
not indicated, provide manufacturer' ' s standard molding for edges and penetrations of the ceiling which fits with the type of edge detail and suspension system indicated.
1. For lay-in panels with reveal edge details, provide a stepped edge molding which
forms a reveal of the same depth and width as that formed between the edge of panels and flanges at exposed suspension members.
2. For circular penetrations of the ceiling, provide edge moldings fabricated to the
diameter required to fit the penetration exactly.
C. Finishes and Colors: Provide manufacturer' ' s standard finish for the type of system indicated, unless otherwise required. For exposed suspension members and accessories with painted finish, provide the color indicated or, if not otherwise indicated, as selected from the manufacturer' ' s full range of standard colors.
1. High Humidity Finish: Comply with ASTM C 635 requirements for ACoating Classification for Severe Environment Performance@.
R.S. ROQUE ARCHITECTS 210
D. Attachment Devices: Size for five (5) times the design load indicated in ASTM C 635, Table
1, Direct Hung.
1. Concrete Inserts: Inserts formed from hot-dipped galvanized sheet steel and designed for attachment to concrete and for embedment in concrete, with holes or loops for attachment of hanger wires.
2. Surface Devices: Standard, hot-dipped galvanized, angle hangers, shot stud
attached to concrete ceilings.
E. Hanger Wire: Galvanized carbon steel wire, ASTM A 641, soft temper, prestretched, Class 1 coating, sized for three (3) times the hanger design load indicated in ASTM C 635, Table 1, Direct Hung; not less than 12 gage for vertical hangers and lateral sway bracing.
F. Stiffner Braces: Manufacturer' ' s standard vertical struts or attachment to hanger wires to
hold the suspension system in place during seismic events.
G. Hold-Down Clips for Non-Fire-Rated Ceilings: For exterior ceilings and for interior ceilings with lay-in panels weighing less than one pound per square foot, provide hold-down clips spaced at 2'-0" o.c. on all cross tees.
2.3 EXPOSED METAL CEILING GRID SYSTEM
A. Intermediate duty, hot-dipped galvanized steel, exposed AT@; 15/16" wide; one-hour fire
rated; plug-in positive-lock connections, locking tee ends, main tees punched with cross tee and hanger wire holes, stabilizer bars, clips and splices, baked on paint finish; ASTM C 635. Color white, unless selected otherwise.
1. Moldings: [Angle] [Shadow] molding with exposed flange to match the grid system. Color to match the grid.
2. Section 01600 - Product Requirements: Product Options: Substitutions permitted.
2.4 CONCEALED METAL CEILING GRID SYSTEM
A. Intermediate duty, hot-dipped galvanized steel, concealed, 15/16" wide, one-hour fire
rated; plug-in positive lock connections, locking tee ends; ASTM C 635.
1. Moldings: [Angle] [Shadow].
2. Section 01600 - Product Requirements: Product Options: Substitutions permitted.
2.5 ACOUSTICAL CEILING UNITS, GENERAL
A. Standard for Acoustical Ceiling Units: Provide manufacturer' ' s standard units of the configuration indicated which are prepared for the mounting method designated and which comply with the requirements of ASTM E 400, including those indicated by reference to type, form, pattern, grade, noise reduction coefficient (NRC), ceiling attenuation class

R.S. ROQUE ARCHITECTS 211
(CAC), light reflectance (LR), edge detail, and joint detail, if any.
1. Mounting Method for Measuring NRC: No. 7 (mechanically mounted on special metal support), ASTM E 400 mounting per ASTM E 795.
B. Sound Attenuation Performance:
1. Provide acoustical ceiling units with ratings for ceiling attenuation class (CAC)
values of the range indicated as determined in accordance with ASTM E 413.
2. Provide acoustical ceiling units with ratings for ceiling sound attenuation class (STC) of the range indicated as determined according to AMA 1-II ACeiling Sound Transmission Test by Two-Room Method@ with ceilings continuous at partitions and supported by a metal suspension system of a type appropriate for ceiling units of the configuration indicated (concealed for tile, exposed for panels).
C. Colors, Textures, and Patterns: Provide products to match the appearance characteristics
indicated or, if not otherwise indicated, as selected from the manufacturer' s standard colors, surface textures, and patterns available for acoustical ceiling units and exposed metal suspension system members of the quality designated.
2.6 ACOUSTICAL CEILING UNITS
A. General: The following product type numbers in parenthesis are those used on the
Drawings.
B . (ACT-1): Mineral fiber, fire-resistant, Class A: flame spread 25 or less per ASTM E 1264, R-1.6, weight 1.0 lbs / sf, factory-applied vinyl latex paint finish, medium texture, non-directional, NRC .50 -.60, CAC 30 - 40, LR 0.80, angled tegular edge, 24" x 24" x 5/8". Color as selected.
1. Section 01600 - Product Requirements: Product Options: Substitutions permitted.
C. (ACT-2): Mineral fiber, fire-resistant, Class A: flame spread 25 or less per ASTM E 1264,
R-1.6, weight 0.9 lbs / sf, factory-applied vinyl latex paint finish, medium texture, non-directional, NRC .45-.55, CAC 30 - 40, LR 0.80, beveled edge, for concealed spline installations, 12" x 12" x 5/8". Color as selected.
1. Section 01600 - Product Requirements: Product Options: Substitutions permitted.
D. (ACT-3): Ceramic and mineral fabric composite, fire resistant, Class A: flame spread 25 or
less per ASTM E 1264, R-1.4, weight 1.40 lbs / sf, scrubbable factory-applied vinyl plastic paint, sag resistant, fine fissured, perforated, NRC .50 -.60, CAC 35 - 39, LR 0.80, square edge, lay-in, 24" x 24" x 5/8". Color white.
1. Section 01600 - Product Requirements: Product Options: Substitutions permitted.
2.7 MISCELLANEOUS MATERIALS
A. Tile Adhesive: Type recommended by the tile manufacturer, bearing UL label of Class 0 -
R.S. ROQUE ARCHITECTS 212
25 flame spread; comply with ASTM D 1779.
B. Tile Fasteners: Cadmium plated, type recommended by the tile manufacturer, length for not less than 1/2" penetration of substrate.
C. Acoustical Sealant: Resilient, non-staining, non-shrinking, non-hardening, non-skinning,
non-drying, non-sag sealant intended for interior sealing of concealed construction joints.
1. Section 01600 - Product Requirements: Product Options: Substitutions permitted.
PART 3 EXECUTION
3.1 EXAMINATION
A. Section 01700 - Execution Requirements: Verification of existing conditions before starting the work.
B. Verification of Conditions: Verify that field measurements, surfaces, substrates and
conditions are as required, and ready to receive the work.
1. Verify that the layout of hangers will not interfere with other work.
C. Report, in writing, prevailing conditions that will adversely affect satisfactory execution of the work of this Section. Do not proceed with the work until the unsatisfactory conditions have been corrected.
3.2 PREPARATION
A. Layout:
1. Locate the system on room axes according to the Reflected Ceiling Plan, as
indicated on the Drawings, or establish layout to balance the border tile widths at opposite edges of each ceiling. Avoid the use of less than 1/2 width units at borders.
2. Where the acoustical ceiling continues thru a wall opening, continue the
established pattern without interruption. One row of panels may be cut to less than full size, if necessary, to establish the pattern in the adjoining room.
B. Substrate Testing: Before installing adhesively applied tile on wet-placed substrates such
as cast-in-place concrete or plaster, test and verify that the moisture level is below the tile manufacturer' s recommended limits.
C. Prior to installation, store acoustical units for 24 hours, minimum, at the same temperature
and relative humidity as the space where the materials are to be installed.
3.3 INSTALLATION - GENERAL
A. Install materials in accordance with the manufacturer' s printed instructions, ASTM C 635

R.S. ROQUE ARCHITECTS 213
and ASTM C 636, in compliance with governing regulations, fire-resistance rating requirements as indicated, and industry standards applicable to the work.
3.4 INSTALLATION - CEILING SUSPENSION SYSTEM
A. General:
1. Install the suspension system with hangers supported only from the building
structural members. Locate hangers not less than 6" from each end and spaced at 4'-0" o.c. along each carrying channel or direct-hung runnner, unless otherwise indicated.
2. Install metal hanger tabs and clips attached to the structure above where required
for the attachment of suspension wires.
3. Secure wire hangers by looping and wire-tying, either directly to the structure or to inserts, eye-screws, or other devices which are secure, appropriate for the substrate, and which will not deteriorate or fail with age or temperature change.
4. Install hangers plumb and free from contact with insulation, ductwork and other
objects within the ceiling plenum which are not part of the supporting structure or ceiling suspension system. Where ducts or other equipment prevent the regular spacing of hangers, reinforce the nearest affected hangers and related carrying channels to span the extra distance. Splay hangers only where required to miss obstructions and offset resulting horizontal force by bracing. Where carrying members are spliced, avoid visible displacement of the face plane of adjacent members.
5. Install edge molding of the type indicated, at the perimeter of acoustical ceiling
areas, at the intersection of the ceiling and vertical surfaces and at locations where necessary to conceal the edges of acoustical units. Use the longest practical lengths. Provide edge molding at junctions with other interruptions. Secure at 16" o.c., maximum.
6. Screw-attach moldings to the substrate at intervals not over 16" o.c. and not more
than 3" from ends; level with the ceiling suspension system. Miter corners accurately and connect securely.
7. Rivet cross tee's to the edge molding at 48" o.c., typical.
8. In areas larger than 144 sq. ft., rivet the cross tees on two adjacent walls per ASTM E 580.
9. Do not support components on the main runners or cross runners if the weight
causes the total dead load to exceed the allowable limits. Do not eccentrically load the system or produce rotation of runners.
10. Install the system level, in a uniform plane, and free of twists, warp, dents,
scratches, stains and other defects. Variation from Flat and Level Surface: 1/8" in 12 feet.
11. Caulk between the edge molding and adjacent vertical surfaces.
R.S. ROQUE ARCHITECTS 214
B. Vertical Support System:
1. Suspension wires shall be 12 gage, minimum, galvanized, attached to main
runners at 4'-0" o.c., maximum, spacing in both directions.
2. Each wire shall be anchored to the structure above with a device capable of supporting 75 pounds, minimum.
3. Wires supporting fixtures shall be capable of supporting four (4) times the fixture
weight.
4. Suspension wires shall not hang more than 1:6 out of plumb, unless counter sloping wires are provided.
5. Wires shall not be attached to or bend around interfering work such as piping,
conduits or ductwork. Trapeze or equivalent devices shall be used where obstructions interfere with direct suspension. Trapeze shall be suspended back-to-back, 1-1/2" cold formed channels, minimum, for spans up to 6 feet.
C. Horizontal Support System:
1. Lateral support systems for ceilings shall be shown in detail on the Shop Drawings.
2. Adequacy of the system shall be demonstrated by calculations, and / or test
results, including adequacy of main runner intersection connections. Tests shall show a capacity of twice the calculated load to provide a safety factor.
3. Provisions shall be made for possible differential movement between ceilings and
side walls. The terminal ends of each main and each cross runner shall be wire supported. Wall trim angles shall not provide the primary support for runners.
4. Lateral support of ceilings shall not be provided by the angle trim, and runners
shall not be riveted to the wall trim.
D. Lateral Force Bracing: Provide cross-bracing for ceilings greater than 144 sq. ft. in area.
1. Where substantiating calculations are not provided, horizontal restraints shall be provided by four No. 12 gage wires secured to a main runner within 2" of a cross runner intersection and splayed 90 degrees from each other at an angle not exceeding 45 degrees from the plane of the ceiling. A strut fastened to the main runner shall extended up to and be fastened to a structural member supporting the roof or floor above. The strut shall be adequate to resist the vertical force induced by the bracing wires. These horizontal restraint points shall be placed 12 feet o.c. in both directions with the first point within 6 feet of each wall. Attachment of the restraint wires to the structure shall be adequate for the load imposed.
3.5 INSTALLATION - ACOUSTICAL PANELS
A. Arrange acoustical units and orient directionally patterned units, if any, in the manner
shown on the Drawings. If not indicated, install units with the pattern running in one
R.S. ROQUE ARCHITECTS 215
direction only, as approved by the Employer' s representative.
B. Fit the acoustical units in place free of damaged edges, dents, scratches, stains and other defects; install level and in a uniform plane.
C. Hold Down Clips: For fire-rated and security areas, install clips spaced at 2'-0" o.c. on all
cross tees. Do not install clips at panels for access and at one panel in each corner of a room.
D. Mark access panels with a black adhesive dot.
3.6 INSTALLATION - ACOUSTICAL PANELS ADHERED TO SUBSTRATE
A. Install acoustical panels in accordance with the panel manufacturer' s recommendations.
B. Apply adhesive in accordance with the adhesive manufacturer' s printed directions, unless
directed otherwise.
C. Spread only enough adhesive to permit the installation of acoustical panels before initial set.
D. Scribe panels to walls, columns, junction boxes, and other appurtenances as necessary to
produce tight joints.
3.7 FIELD QUALITY CONTROL
A. Section 01450 - Quality Control: Field inspection.
B. Inspect the ceiling grid suspension system installation, connections to the structure, edge moldings and acoustical panel placement.
3.8 ADJUSTING
A. Section 01700 - Execution Requirements: Adjusting the installed work.
B. Adjust the grid for alignment and level.
C. Adjust the acoustical panels for proper fit within the grid.
3.9 CLEANING
A. Section 01700 - Execution Requirements: Cleaning the installed work.
B. Clean exposed surfaces of the ceiling grid, perimeter trim, and acoustical panels.
C. Comply with the manufacturer' s instructions for cleaning and touch-up of minor finish damage.
D. Remove and replace work which cannot be successfully cleaned and repaired to
permanently eliminate evidence of damage.

R.S. ROQUE ARCHITECTS 216
END OF SECTION
R.S. ROQUE ARCHITECTS 217
SECTION 09800 SPECIAL COATINGS
PART 1 GENERAL
1.1 SUMMARY
A. Section Includes:
1. Special coating systems.
B. Related Sections:
1. Section 07900 - Joint Sealers: Sealants.
2. Section 09900 - Painting: Field application of special coatings.
1.2 DESCRIPTION OF WORK
A. The extent of special coatings work is indicated on the Drawings and Finish Schedule and as specified herein, and includes cleaning and preparation of all interior and exterior surfaces to be coated or finished and the application of coating on all interior and exterior surfaces scheduled.
B. Apply special coating on all exterior concrete, masonry and cement plaster including
fascia, soffits, walls of building, exposed concrete beams, exposed concrete retaining wlls and fences;, both horizontal and vertical surfaces.
C. Provide sealants for all joints covered by or touching the special coating material. See
Section 07900 - Sealants.
1.3 REFERENCES
A. The publications listed below form a part of this Specification to the extent referenced. Publications are referred to in the text by basic designation only.
B. American Society for Testing and Materials (ASTM):
1. ASTM E 84 - Test Method for Surface Burning Characteristics of Building
Materials.
1.4 GENERAL
A. It is the intent of this Section to outline requirements for the use of special coatings, but not to cover all details of the materials, preparation and application. The manufacturer's approved specifications, details and instructions shall govern the materials and application. The coating system provided and applied shall be appropriate for the construction materials, conditions of the Project, and its location.
1.5 SUBMITTALS A. Section 01300 - Submittal Procedure: Procedures for submittals.

R.S. ROQUE ARCHITECTS 218
1. Product Data: Submit for each type of coating specified.
a. Manufacturer' s technical information including coating analysis, and
application instructions for each material proposed for use.
b. Schedule listing the surfaces to be coated with cross reference to the specific coating and finishing system, and application. Identify each coating material by manufacturer's catalog number and general classification.
2. Samples:
a. Prior to beginning the coating work, provide color chips for the surfaces to
be coated. Use representative colors when preparing samples for review. Submit samples of the color and texture only for the Engineer' s review. Provide a listing of materials and application for each coat of each finish sample.
b. Provide two (2) - 12" x 12" samples of each finish, color and texture on
hardboard, using the same tools and techniques as for the actual application. Re-submit samples, as requested by the Engineer, until acceptable color, sheen, and texture is achieved.
3. Mock-Up: On actual wall surfaces and other exterior building components,
duplicate the paint finish matching the prepared samples. Provide full-coat finish samples on at least 100 sq. ft. of surface, as directed, until the required color, sheen and texture is obtained.
4. Assurance / Control Submittals:
a. Manufacturer's certificate that the products meet or exceed the specified
requirements.
b. Manufacturer's Material Safety Data Sheets (MSDS) for each coating type to be provided.
c. Manufacturer' s certification that the products supplied comply with
applicable federal and local regulations controlling the use of volatile organic compounds (VOC).
d. Manufacturer's instructions indicating procedures and conditions requiring
special attention, and cautionary procedures required during application.
e. Documentation of the applicator' s experience indicating compliance with the specified qualifications requirements.
B. Section 01780 - Closeout Submittals: Procedures for closeout submittals.
1. Warranty: Provide a written Warranty with forms completed in the name of the
Employer and registered with the manufacturer.

R.S. ROQUE ARCHITECTS 219
1.6 COORDINATION
A. Pre-Application Meeting: Convene a Pre-Application Meeting at the Site prior to beginning the coating work.
1. Require attendance of the Contractor, Engineer, Engineer, representatives of
the coating subcontractor and other finish products, and the mechanical and electrical trades.
2. Review the coordination and environmental controls required for proper
application of the coatings and ambient conditions in the areas to receive coatings.
3. Review preparation and installation procedures, and the coordination and scheduling required with the coating work.
1.7 QUALITY ASSURANCE
A. Qualifications:
1. Manufacturer: Company specializing in manufacturing the products specified with
a minimum of five (5) years documented experience.
2. Authorized Applicator: Company specialized in, and has successfully completed applications of the same or similar type of materials for not less than five (5) years.
a. Applicator shall be specifically approved as a factory-licensed Applicator
of the primary materials, in writing, by the coating system manufacturer.
b. Submit the manufacturer' s written approval and certification of the Applicator.
c. Applicator' s equipment and training shall conform to the manufacturer' s
standards.
e. Applicator shall conform strictly to the manufacturer' s AQuality Assurance Program@ requirements.
B. Regulatory Requirements:
1. Provide coating materials that conform to Federal, and local Government limits for
Volatile Organic Compounds (VOC) content.
C. Single Source Responsibility: Provide primers and other undercoat products by the same manufacturer as the finish coats. Use only thinners approved by the coating manufacturer, and use only within the recommended limits.
D. Coordination of Work: Review other Section of these Specifications in which prime paints
are to be provided to ensure compatibility of the total coating system for the various substrates. Upon the request of other trades, furnish information or characteristic of the finish materials, to ensure that compatible prime coats are applied.
E. The employer reserves the right to engage the services of an independent testing agency

R.S. ROQUE ARCHITECTS 220
to sample the coating material being used. Samples of material delivered to the project will be taken, identified, sealed and certified in the presence of the contractor. 1. The testing agency will perform appropriate tests for the following characteristics
as required by the Engineer.
a. Quantitative material analysis
b. Abrasion resistance
c. Apparent reflectivity
d. Flexibility
e. Washability
f. Absorption
g. Accelerated weathering
h. Dry opacity
i. Accelerated yellowness
j. Recoating
k. Skinning
l. Color retention
m. Alkali and mildew resistance
2. The Employer' s representative may direct the contractor to stop coating work if test results show material being used does not comply with specified requirements. This contractor shall remove noncomplying coating from the Site, pay for testing and recoat surfaces previously coated with rejected coating. The contractor may be required to remove rejected coating from previously coated surfaces if, upon application of specified coating, the two (2) coatings are incompatible.
1.8 DELIVERY, STORAGE AND HANDLING
A. Section 01600 - Product Requirements: Transport, handle, store and protect the products.
B. Deliver products to the Site in the manufacturer' s original, new and unopened
packages and containers bearing the following information:
1. Manufacturers name.
2. Name or title of the material.
3. Manufacturers lot number and date of manufacture.
R.S. ROQUE ARCHITECTS 221
4. Contents by volume for major pigment and vehicle constituents.
5. Color name and number.
6. Thinning or reducing instructions. 7. Application instructions including surface preparation and coverage.
8. Drying time.
9. Cleanup requirements.
C. Store products, not in actual use, in tightly covered containers, off the ground and under cover. Maintain containers used in the storage of coatings, in a clean condition, free of foreign materials and residue.
D. Store coating materials at a minimum ambient temperature of 45 F and a maximum
of 90 F, in a ventilated area, and in compliance with the manufacturer's published instructions.
E. Keep storage areas neat and orderly. Remove rags and waste daily.
F. Protect against fire hazards and spontaneous combustion.
G. Take all precautions to ensure that workmen and the work areas are adequately protected
from health hazards which might result from handling, mixing and application of coatings.
1.9 JOB CONDITIONS
A. Environmental Requirements:
1. Do not apply coating during rain, fog or mist when the relative humidity exceeds 85%, or to damp or wet surfaces, unless otherwise permitted by the coating manufacturer' s printed instructions.
2. Apply coating finishes only when the moisture content of the surfaces to be coated
is within the manufacturer's acceptable range for the type of finish to be applied.
3. Coating may be continued during inclement weather if the areas and surfaces to be coated are enclosed and within the humidity limits specified, and allowed by the coating manufacturer during application and drying periods.
. 4. Do not apply coatings in areas where dust is being generated.
1.10 WARRANTY
A. Section 01780 - Closeout Submittals: Procedures for closeout submittals.
B. Special Warranty:
1. Submit a written joint and severable Warranty, signed by the coating materials manufacturer, Contractor and the Applicator, agreeing to repair or replace
R.S. ROQUE ARCHITECTS 222
defective materials and workmanship due to failure of the coating to perform as re- quired within the warranty period.
2. During the warranty period, repairs and replacements required because of acts of
God and other events beyond the Contractor's / Applicator's control, and those which exceed performance requirements, shall be completed by the Contractor / Applicator and paid for by the Employer at the prevailing rates.
3. Warranty Period: Five (5) years from the date of Substantial Completion.
1.11 MAINTENANCE
A. Section 01780 - Closeout Submittals: Procedures for closeout submittals.
B. Extra Materials: Provide a stock of maintenance materials. Furnish maintenance materials matching the products installed, packaged with protective covering for storage, and identified with appropriate labels.
1. Finish Coat: Ten (10) gallons of each color.
C. Maintenance Data: Submit three (3) copies of the manufacturer' s recommended
maintenance practices for each type of coating applied, recommended maintenance materials, methods of repair, and suggested schedule for cleaning.
PART 2 PRODUCTS
A. Characteristics:
1. Type: Acrylic Latex.
2. Surface: Texture: High Profile (coarse).
3. Solids by volume: 53% minimum.
4. Dry film thickness (DFT): 18-20 Mils (minimum)
B. Other acceptable manufacturers systems shall be equivalent.
C. Accessory Materials:
1. Sealant: Manufacturers recommendation..
2. Joint backing, cleaner / primer / sealer, bond breaker tape: As recommended by the manufacturer.
PART 3 EXECUTION
3.1 EXAMINATION

R.S. ROQUE ARCHITECTS 223
A. Section 01700 - Execution Requirements: Verification of existing conditions before
starting the work.
B. Verification of Conditions: Verify that field measurements, surfaces, substrates and conditions are as required, and ready to receive the work.
1. Verify that substrate surfaces are durable, free of matter detrimental to adhesion and application of the coating materials.
3. Verify that substrate surfaces are smooth, free of honeycomb and pitting, and not
detrimental to full contact bond of the coating materials.
4. Verify that items which penetrate surfaces to receive the coating are installed and secured in-place.
C. Report, in writing, prevailing conditions that will adversely affect satisfactory execution of
the work of this Section. Do not proceed with the work until the unsatisfactory conditions have been corrected.
D. Starting of coating work will be construed as the Applicator's acceptance of the surfaces
and conditions within any particular area.
3.2 PREPARATION
A. Perform preparation and cleaning procedures in accordance with the manufacturer's instructions and as herein specified, for each particular substrate condition.
B. Remove hardware, hardware accessories, machined surfaces, plates, lighting fixtures, and
similar items in place and not to be coated, or provide surface-applied protection prior to surface preparation and coating applications. Following the completion of coating of each space or area, re-install all removed items.
C. Cementitious Materials: Prepare cementitious surfaces of concrete, and cement plaster
to be coated by removing efflorescence, chalk, dust, dirt, grease, oils, and by roughening as required to remove glaze. All cement plaster surfaces must cure at least 30 days prior to application of the coating.
1. Determine alkalinity and moisture content of surfaces to be coated by performing
appropriate tests. If surfaces are found to be sufficiently alkaline to cause blistering and burning of the finish coat, correct the condition before application. Do not apply over surfaces where moisture content exceeds that permitted in the manufacturer's printed directions.
D. Existing Surfaces:
1. Remove all loose and deleterious material including previous coatings which are
not fully adhered and acceptable to the manufacturer. Thoroughly clean by water blast or other suitable method as recommended by the manufacturer.
2. If directed by the manufacturer, provide barrier coats over incompatible primers or
coatings or remove and re-prime as required. Notify the Employer' s
R.S. ROQUE ARCHITECTS 224
representative, in writing, of any anticipated problems with using the specified coating systems on substrates previously coated.
E. Materials Preparation:
1. Mix and prepare coatings and finish materials in accordance with the
manufacturer's directions.
2. Maintain containers used in mixing and application of coating in a clean condition, free of foreign materials and residue.
3.3 INSPECTION
A. After cleaning remove defective concrete, honeycombs, cavities, joint crack voids and other defects by routing to sound material. To repair small areas in concrete, use a uitable epoxy mortar. For larger areas, use cementitious patching materials which are compatible with the system. Patching should be finished flush with the surrounding concrete. All patched areas should be given a light brush blast prior to painting.
B. Verify the porosity of the concrete substrate using a pump-up sprayer and water. The water
should uniformly soak into and darken the surface and not Abead up@. Failure to do so is an indication that additional surface preparation is required.
C. Check using a pH pencil, check the pH of the concrete panels, as well as, concrete patches
and sacking materials. PH level must be 10.0 or lower.
3.4 APPLICATION
A. Apply coating system in accordance with the manufacturer's instructions and directions. Apply primer if recommended by the coating materials manufacturer for conditions at the time of application.
B. Use applicators and techniques best suited for the substrate and type of material being
applied.
C. Do not apply coating over dirt, rust, scale, grease, moisture, scuffed surfaces, or conditions otherwise detrimental to the formation of a durable finish.
D. Apply materials at rate not exceeding that recommended by coating manufacturer for
surface being coated, less ten percent for losses.
E. Comply with manufacturer' s recommendations for drying time between coats.
F. Apply two (2) coats, using airless spray, at the rate of not more than 100 square feet per gallon, per coat. The total dry mil thickness of two coats shall be not less than 18 mils.
G. Finished surface shall be uniform in finish and color and free of pinholes, sagging, missed
areas, corduroy brush marks, streaks, laps or pile-up, and other imperfections.
H. The edges of special coatings adjoining other materials or colors shall be sharp and clean without overlapping.

R.S. ROQUE ARCHITECTS 225
I. Match the approved mock-up for color, texture and coverage.
J. Remove, re-finish or re-coat work not in compliance with the specified requirements and
approved mock-up.
3.4 FIELD QUALITY CONTROL
A. Section 01450 - Quality Control: Field inspection.
B. Inspect coating applications for the scheduled materials, color, sheen, texture, thickness, and coverage.
3.7 CLEANING
A. Section 01700 - Execution Requirements: Cleaning the installed work.
B. As work proceeds, and upon completion, promptly remove coating where spilled, splashed, and spattered.
C. During progress of the work, keep the premises free from any unnecessary accumulation
of tools, equipment, surplus materials, and debris. Remove discarded coating materials, rubbish, cans and rags from the Site at the end of each work day.
D. Collect waste, cleaning cloths, and materials which may constitute a fire hazard, place in
closed metal containers, and remove from the Site daily.
E. Upon completion of the work leave the premises neat and clean. Clean metal door and window frames, glass, and other coating-spattered surfaces. Remove spattered coatings by proper methods of washing and scraping, taking care to not scratch or otherwise damage finished surfaces.
3.8 PROTECTION
A. Protect the work of other trades, whether to be coated or not, against damage by the
coating and finishing operations.
B. Place AWet Paint@ signs, as required, as a warning of newly coated surfaces.
C. Remove temporary protective wrappings provided by other trades for the protection of their work, after completion of the coating operations.
D. Upon completion of the work of other trades, touch-up and restore all damaged or defaced
coated surfaces.
E. Correct any damage by cleaning, repairing or replacing and re-coating, as acceptable to the Employer' s representative.
F. Repair any damage resulting from inadequate or unsuitable protection.
G. Touch-ups shall blend with surrounding surfaces and be indistinguishable from the original
work.

R.S. ROQUE ARCHITECTS 226
END OF SECTION
R.S. ROQUE ARCHITECTS 227
SECTION 09900 - PAINTING
PART 1 - GENERAL
1.01 SCOPE
A. The work contemplated under this section shall include materials, labor, equipment and services necessary for and reasonably incidental for painting as specified, both exterior and interior walls, wood, hardboard, metal, plaster, or other surfaces as specified to make a thoroughly complete job in every respect, whether every item is specifically mentioned or not.
B. Work not included: There shall be no painting of copper, aluminum or other finish
materials unless otherwise directed by the Engineer.
1.02 DELIVERY
A. All materials shall be delivered to the job site in original unbroken manufacturers packages with the labels intact and be kept in a locked room to which the Engineer shall have access at all times.
PART 2 - PRODUCTS
2.01 PAINT DESIGNATION:
Surface Prime Final
a. Exterior concrete Acrylic base paint Elastomeric paint
b. Interior concrete Flat wall primer Semi-gloss latex
c. Wood doors Spackled/Flat Gloss Enamel
d. Jambs and Frame Spackled/Flat Gloss Enamel
e. Metals Anti-rust red oxide paint Enamel
f. Ceilings ceiling flat primer Flat latex
PART 3 - EXECUTION
3.01 CLEANING:
A. At the end of each workday, all combustible rags and empty container shall be removed, taking every precaution to prevent fire. At completion of the work, remove all surplus materials and debris. All paint spots, stains, spattering, etc., shall be
R.S. ROQUE ARCHITECTS 228
removed from adjacent surfaces and the job left in a clean and finished condition.
3.02 FINISH SCHEDULE
A. Surfaces shall be finished in accordance with the schedule for the surface material and finish desired as specified and indicated in drawings “schedule of finishes”.
Except as otherwise directed by the Engineer, apply three (3) coats after one coat of primer.
3.03 SUBMITTALS:
A. Test panels: The contractor shall prepare and submit sample panels of selected colors
or shade in 12 inch square plywood panels for approval by the Engineer.
END OF SECTION

R.S. ROQUE ARCHITECTS 229
R.S. ROQUE ARCHITECTS 230
SECTION 15400 - PLUMBING
PART 1 - GENERAL
1.01 SCOPE:
A. Provide materials that are new and conform to the standard of Underwriter Laboratories and shall conform to the latest edition of National Standard Plumbing Code and applicable local plumbing standard.
B. The work includes building plumbing (water and sanitary lines), materials, equipment,
tools, fixtures, installation and workmanship in accordance with National Plumbing Code.
C. For other miscellaneous required materials not specifically mentioned, shall be
provided of best quality of their respective kind.
1.02 RELATED WORK
A. Section 15010 - General requirement B. Section 02200- Earthwork: Excavation, Trenching and Backfilling
1.03 QUALITY ASSURANCE:
A. The quality control provisions of General requirement apply to this section. Approvals
except those required for field tests and applications shall be obtained before application is started.
B. Use adequate numbers of skilled workers that are thoroughly trained and
experienced.
1.04 SUBMITTALS - Meet the requirements of Section 15010 General Requirements.
A. Manufacturer’s Data and Compliance
1. Pipe and Fittings 2. Plumbing Fixtures and Accessories 3. All valve 4. Strainer 5. Drains C. And accessories
1.05 DELIVERY AND STORAGE A. Delivery and store materials and equipment in manner as specified in section 15010.
PART 2 - PRODUCTS
R.S. ROQUE ARCHITECTS 231
2.01 WATER, WASTE AND VENT PIPING: All pipes and materials for various services to be
standards.
A. Polyvinyl Chloride (PVC) pressure rated (SDR Series) ASTM D2241-
B. Polyvinyl Chloride (PVC) plastic pipe schedule 40, 80 and 120 ASTM D1785.
C. Polyvinyl Chloride (PVC) pipe and fittings schedule 40/80 ASTM D2466.
D. Copper Tubing - Type L and Type K ASTM B88 or ASTM B306. Solder joint fittings ASTM B32.
E. Galvanized Pipe - schedule 40 hot-dip threaded ends and threaded ends and threaded
fittings- ASTM A120, ANSI B16.12
F. CPVC PIPES for hot water lines
2.02 CLEAN OUTS: Shall be provided as indicated in the drawings.
A. Clean Out Thru Ground (COTG) - cast-iron or PVC Clean out and counter sunk plugs, provide concrete collar as indicated in the drawings.
B. Clean Out Thru Floor (FCO) - cast-iron clean out with secure floor plate with counter
sunk screw, polished bronze or nickel bronze, refer to drawings for details.
2.03 DRAINS - cast-iron floor drain with round adjustable height nickel-bronze strainer, reversible clamping collar and threaded strainers allow strainer height adjustment. For pipe size 2”0 or as indicated in the drawings. METMA, model 229 or equal.
For shower floor drains - provided as indicated in the drawings.
2.04 VALVES - provide valves with a minimum working pressure of 125 PSI and minimum of 180
degrees Fahrenheit hot water. Valves size ½” to 3” shall be threaded connections unless otherwise indicated. Check valves, angle valves, gate valves and etc.
For Valves use the following types:
Valve type Diameter serviced
Globe ¾” and smaller
Solid wedge type with screwed ends 3” and smaller
Iron body with flange ends 4” and larger
2.05 VALVE BOXES - buried valves shall be provided a valve box, cast-iron or PVC as indicated in the drawings.
R.S. ROQUE ARCHITECTS 232
2.06 MISCELLANEOUS PIPING MATERIALS
1. Union - Hot dip galvanized ANSI B16 for copper tubing FEDWW-U-516; schedule 80 for PVC.
2. Pipe Nipples - Hot dip galvanized schedule 80; copper alloy, FEDWW-N- 351;
schedule 80/120 for PVC.
3. Pipe Sleeves - shall be hot dip galvanized steel or as approved equal. Pipe sleeve shall be use where pipes passes thru concrete floor, walls, on partitions, refer to drawings for details.
4. Pipe Insulation - provide insulation, plastic tape for copper tubing, gooseneck and
other components.
2.07 PLUMBING FIXTURES - refer to the Summary of Materials. The following are approved equal.
A. Toilet Bowl – all toilet bowl should have flush valve (submit catalog for
Engineers approval)
B. Lavatory(countertop)- Oval-shaped self-rimming lavatory with rear overflow and cast-in soap dishes, for over-the-counter installation. (submit catalog)
With P.O. plug with chain and rubber stopper model S-203/205, P-trap 1-1/4” with clean out cap-escutcheon-chrome; brass angle valve and supply pipe for lavatories, model B-201/202; solid brass handles, hot and cold faucet, SSTL double handle, 4” wide wrist, self closing cast brass center set vandal proof cap, no. 1167-AV
E. Kitchen Sinks
1. Stainless steel kitchen sink-with single drain board, backsplash, gauge 18 type 302 SSR, with mount mixing faucet 8” swinging spout and aerator, chrome plated brass, 74GSAEL “Center Gard”.
F. Hose Bibb - PP, cast brass, with check valve.
PART 3 - EXECUTION
3.01 PLUMBING FIXTURES: Includes all plumbing fixtures shown in the drawings and specified
herein by the Engineer in all bids to be considered.
A. Install all plumbing fixtures in accordance with the manufacturer’s recommendations for installation. Furnish with brackets, cleats, plates and anchors required to support the fixtures rigidly in place.
B. After installation, fixtures shall be kept clean and working order. Any fixtures shall be
strictly not to use until the building has been turned over and accepted by the Employer.
R.S. ROQUE ARCHITECTS 233
C. Contractor shall be responsible for providing those portions of the fixtures, fittings,
which are not provided with fixture but are required for the complete installation.
D. Make all plumbing fixtures “Saniware standard” or “Central Gard” or approved equal.
3.02 WATER PIPES, FITTINGS, AND CONNECTIONS
A. Install all piping in strict accordance with the manufacturer’s specifications and instructions.
B. Polyvinyl Chloride (PVC) and fittings shall conform to ASTM D1785 schedule 40/80;
ASTM D2246.
C. Copper pipe as indicated in the drawings Type L and Type K underground or slabs on grade. Soldering fluxes shall be non-corrosive type. Never heat all soldered joint to more than 230 degrees C.
D. Cut all pipes accurately to measurements and work into place without wrinkling or
forcing, nor causing structured portions of the buildings to weaken. Whenever possible, run all piping to ground parallel with the lines of the building unless otherwise noted on the drawings.
E. Provide shut-off valve and drains. Install the cold water line with fall toward a main shut-off valve and drain.
F. Extend the piping to all fixtures, outlets and equipment from required gate valves installed in each branch near risers.
G. Cap or plug ends of pipes and outlet and leave ready for future connection.
H. Upon completion of the water system, flush out lines to clear system of particles and
dirt and clean all valve seats.
I. Sizes of main, risers, branches and connections shall be as indicated in the drawings, where size of connections to individual fixtures are not indicated, use the following sizing:
Fixtures Cold Water supply
Toilet Bowl w/ flush valve type 1”
Lavatories ½”
Slop sinks ½”
Hose Bibbs 1”
R.S. ROQUE ARCHITECTS 234
J. All hot water line piping and fittings shall be schedule 80 and other lines indicated in
the drawings.
K. Unions - provide unions that are extra heavy, PVC, schedule 80, galvanized hot-dip and copper.
Provide unions in long runs of piping for water supply and intervals as directed by the contracting officer. Provide in bypasses around equipment. No unions conceal in wall, partition and slabs.
3.03 WASTE, DRAIN, AND VENT PIPING AND OTHER RELATED WORKS
A. Installation of pipe and fittings shall be in accordance with the applicable requirement of the latest edition of National Plumbing Code.
B. Excavation, Pipe laying and Backfilling
1. Excavate to required depths and grades all excavation required for
installation of plumbing and waste and drainage system. Keep them open trench condition until the piping has been inspected, tested and approved.
Provide bell-holes so that pipe will rest as well tamped solid bedding along its entire length.
Lay pipes in trench true to line and grade. Lay water line and sewer in separate trenches.
2. Backfilling - after pipe lines has been tested, inspected and approved by the
contracting officer and prior to backfilling, remove all sheeting, branching and the excavation of all trash and debris.
Place backfilling carefully and tamp under and around the pipe in such a manner that the pipeline and joint are not disturbed.
Bring backfill to suitable elevation above grade to provide for anticipated settlement and shrinkage.
C. Testing- tests all plumbing pipelines in accordance with applicable requirement of
National Plumbing Code.
Test all water line by hydrostatic pressure, pressure test shall be 50 PSI in excess of maximum working pressure of the system, or shall not less than 150 PSI and shall hold at least 2 hours period. No allowable leak is considered.
END OF SECTION

R.S. ROQUE ARCHITECTS 235
SECTION 15500 FIRE PROTECTION WORKS
1.0 GENERAL DESCRIPTIONS:
The work to be done under the Division of the Specification consist of the fabrication complete in all details of the Fire Protection works at the subject premises and all work and materials incidental to the proper completion of the installation, except those portions of the work which are expressly stated to be done by others. All work shall conflict with such Codes, etc., which latter shall then govern. The requirements in regard to materials and appliances necessary for the complete installation of the work specified herein and indicated on the drawings. These specifications are intended to provide a broad outline of the required installation, but are not intended to include all details of design and construction.
2.0 WORK INCLUDED
Under this Division of the Specifications, provide all materials and equipment and perform all the work necessary for the complete execution of all the Fire Protection works as shown on the fire protection drawings, as herein specified, or both except as otherwise excluded, and which without excluding the generality of the foregoing shall not be limited to the following principal items of work:
A. Installation of automatic sprinkler system for all floors and areas indicated in the
drawings.
B. Supply and installation of wet standpipe risers, fire hose cabinets and accessories branch lines, cross mains, side mains, feed mains, inspector test points and hose header and auxiliary drain lines.
C. Supply and installation of fire department wet and dry connections, alarm valve;
check valves, zone valves, flow switches.
D. Supply and installation of fire pump and jockey pump and furnishing of related materials and accessories.
E. Supply of tools and stock of spare sprinkler heads, for each type of sprinkler in
accordance with NFPA 13.
F. Installation of dry chemical type portable extinguishers.
G. Complete testing of all Fire Protection systems.
H. Painting of piping equipment.
I. Supply and installation of pipe sleeves including sealants of pipe sleeves.
J. Installation of drainage piping, fittings, valves, up to drain stub-out from inspector
R.S. ROQUE ARCHITECTS 236
test and auxiliary drains provided by Plumbing Contractor.
K. Grouting of openings in floors and walls after all conduits or pipes are place and sealing of all such openings is not use.
L. Supply and installation of miscellaneous materials such as flanges, welding
accessories and other consumables required to complete work.
M. Preparation and submittal of as – built drawings.
N. Anything that has been omitted in any item of work or materials usually furnished which are necessary for the completion of the Fire Protection work as outline herein before. Such item must be and are hereby included in this Division of the work.
3.0 WORK NOT INCLUDED
The following principal items of work will be done under Divisions of these specifications or will be supplied and installed by others unless specifically specified otherwise hereunder :
A. Electrical power wiring and connections to all motors and equipment as required
will be provided under Division 16 ( Electrical ).
B. Water storage tank for domestic use and fire suppression ( General Contractor ).
C. Labor and material for pumps foundations.
D. Water supply pipes and valves for the cistern. E. Ceiling manhole for inspector test valve.
4.0 CODES, INSPECTION, PERMITS AND FEES :
4.1.1 The work under this contract is to be installed according to the latest
requirements of the following :
Fire Protection – Fire Code
National Fire Protection Association(U.S.A.) Codes Nos. 13,14, 20.
Nothing Contained in these specifications or shown on the drawings shall be construed as to conflict with National and Local Ordinances or Laws governing the installation of Fire Protection work, and all such laws and ordinances are hereby made part of these specifications. The Contractor is required to meet the requirements thereof.
4.1.2 Codes and standards of the following organizations other than mentioned above
are referenced in this division:
4.1.2.1 American Society for Testing and Materials ( ASTM ).
R.S. ROQUE ARCHITECTS 237
4.1.2.2 FM Engineering, Inc. Latest Approval Guide
4.1.2.3 American National Standards Institute ( ANSI )
4.1.2.4 National Electrical Manufacturers Association ( NEMA )
4.1.2.5 Underwriter’s Laboratories, Inc. ( UL )
4.1.2.6 International Organization for Standardization ( ISO )
4.1.3 All construction permits and fees required for this work shall be obtained by and at expense of the Contractor. The Contractor shall furnish the Engineer, the Engineer’s, and the Employer final certificates of inspection and approval from the proper government authorities after the competition of work. The contractor shall prepare all shop or working drawings, as-built plans and all other paper work required by the approving authorities.
4.1.4 Approval from authorities of all plans for construction shall be secured by the contractor.
4.1.5 Approval of the Contract by the Fire Department.
4.1.6 Approval of the complete shop drawings including the hydraulic calculations based
on actual field conditions, and subsequent revisions to these submittals shall be obtained by the contractor from the above- mentioned authorities before the start of work and the procurement of imported materials.
4.1.7 Fees required by above-mentioned authorities for approval of the Contract and
shop drawings shall be borne by this Contractor.
5.0 RECORD DRAWINGS :
5.1.1 The contractor shall, during the progress of the work, keep a record of all deviations of the actual installation from that shown on the contract drawings.
5.1.2 Upon completion of work, the Contractor shall submit five (5) copies
of As-built drawings, indicating the work actually and finally installed, including new information not originally shown in contract drawings, to the Engineers for approval as to conformance with the design concepts and compliance with pertinent Code provisions.
5.1.3 Approval of the As-built drawings by the Engineer’s shall be a
requirement for final acceptance of the completed works for final payment.
6.0 SHOP DRAWINGS, SAMPLES AND OTHER SUBMITTALS :
6.1.1 Contractor shall prepare and submit to the Engineer’s for approval of
the following :
6.1.1.1 Dimensional lay-out- drawings or shop drawings of all

R.S. ROQUE ARCHITECTS 238
system pipings.
List of miscellaneous materials proposed including pipe, fittings, valves, etc. accessories, identifying the manufacturer and type.
6.1.1.2 Sample of the following items with corresponding catalogues:
6.1.1.2.1 Pipes and fittings. 6.1.1.2.2 Fire hose cabinet.
6.1.1.2.3 Sprinkler heads. 6.1.1.2.4 Pipe sleeves.
6.1.1.2.5 Pipe hangers and supports
6.1.1.3 Field test report.
6.1.1.4 Such other shop drawings as indicated on the plans or as the Engineers may require.
6.1.2 All drawing and calculations should be signed and sealed by the
Contractors Registered Professional Mechanical Engineer or Sanitary Engineer.
6.1.3 All drawing etc., shall be submitted sufficiently in advance of field
requirements.
All submittals shall be complete and shall contain all required and detailed information.
7.0 COORDINATION:
7.1.1 Coordinate schedules of installation with work of other trades.
7.1.2 Systems provided shall be complete and operable and shall include
required accessories, fastenings, and supports.
7.1.3 Determine required location, arrangement and quantities of equipment and materials from the drawings, schedules and specifications.
7.1.4 All equipments shall be installed in strict accordance with
manufacturer’s recommendations.
7.1.5 Certain items of work specified in other contracts require connections to fire protection equipment, Contractor shall provide such connections as required.
R.S. ROQUE ARCHITECTS 239
8.0 GUARANTEE :
8.1.1 This Contractor shall guarantee that the fire protection system shall free from all defective workmanship and materials and will remain so far a period of one (1) year from the date of acceptance of the work. Any defects, appearing within the aforesaid period shall be remedied by this Contractor at his own expense.
8.1.2 The Contractor shall indemnify and save harmless, the
Employer, the Architects and the Engineers from and against all liability for damages arising from injuries or disabilities to person or damage to property occasioned by any act or omission of the Contractor or any of his Sub- contractors, including any and all expenses, legal or otherwise which maybe incurred by the Employer, the architect or the engineers, in the defense of any claim, action or suit.
END OF SECTION
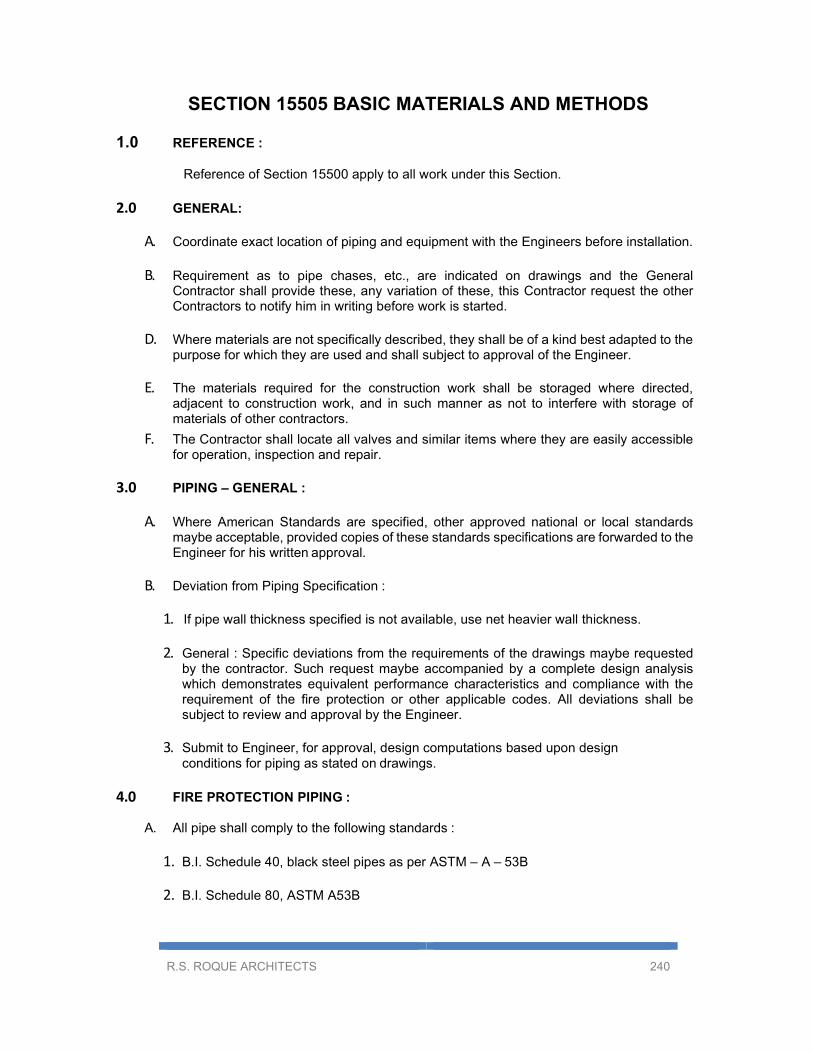
R.S. ROQUE ARCHITECTS 240
SECTION 15505 BASIC MATERIALS AND METHODS
1.0 REFERENCE :
Reference of Section 15500 apply to all work under this Section.
2.0 GENERAL:
A. Coordinate exact location of piping and equipment with the Engineers before installation.
B. Requirement as to pipe chases, etc., are indicated on drawings and the General Contractor shall provide these, any variation of these, this Contractor request the other Contractors to notify him in writing before work is started.
D. Where materials are not specifically described, they shall be of a kind best adapted to the
purpose for which they are used and shall subject to approval of the Engineer.
E. The materials required for the construction work shall be storaged where directed, adjacent to construction work, and in such manner as not to interfere with storage of materials of other contractors.
F. The Contractor shall locate all valves and similar items where they are easily accessible for operation, inspection and repair.
3.0 PIPING – GENERAL :
A. Where American Standards are specified, other approved national or local standards
maybe acceptable, provided copies of these standards specifications are forwarded to the Engineer for his written approval.
B. Deviation from Piping Specification :
1. If pipe wall thickness specified is not available, use net heavier wall thickness.
2. General : Specific deviations from the requirements of the drawings maybe requested
by the contractor. Such request maybe accompanied by a complete design analysis which demonstrates equivalent performance characteristics and compliance with the requirement of the fire protection or other applicable codes. All deviations shall be subject to review and approval by the Engineer.
3. Submit to Engineer, for approval, design computations based upon design
conditions for piping as stated on drawings.
4.0 FIRE PROTECTION PIPING :
A. All pipe shall comply to the following standards :
1. B.I. Schedule 40, black steel pipes as per ASTM – A – 53B
2. B.I. Schedule 80, ASTM A53B
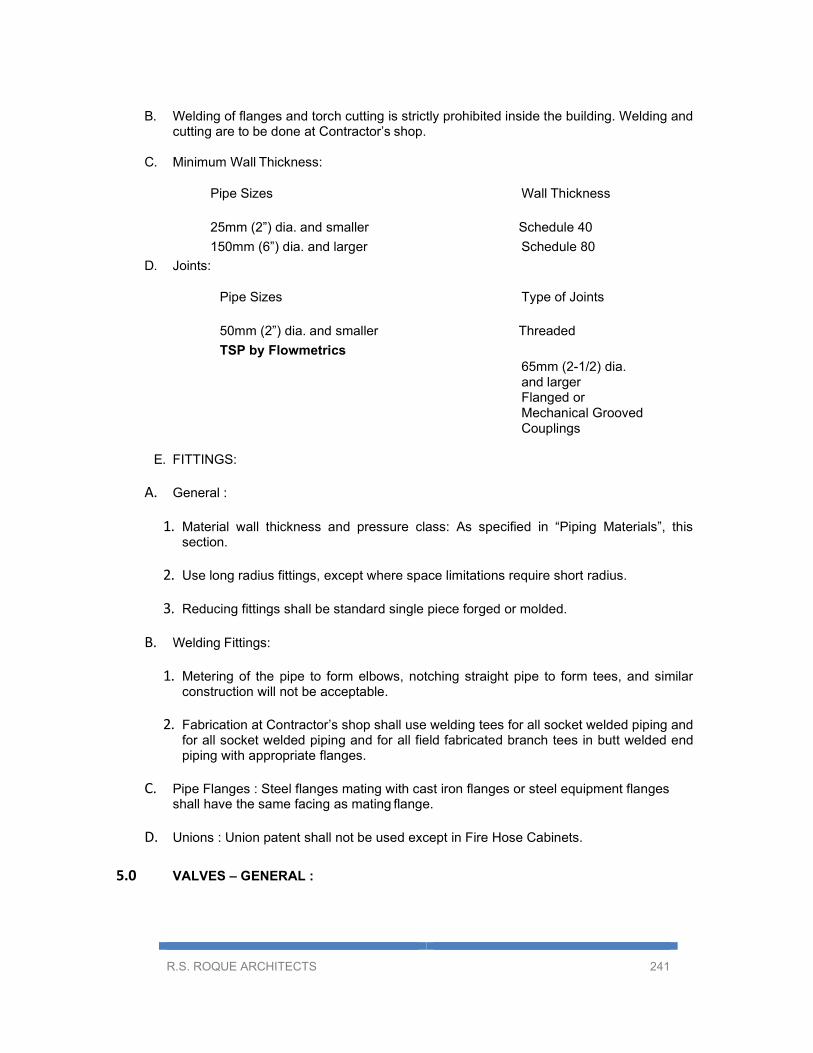
R.S. ROQUE ARCHITECTS 241
B. Welding of flanges and torch cutting is strictly prohibited inside the building. Welding and
cutting are to be done at Contractor’s shop.
C. Minimum Wall Thickness:
Pipe Sizes Wall Thickness
25mm (2”) dia. and smaller Schedule 40 150mm (6”) dia. and larger Schedule 80
D. Joints:
Pipe Sizes Type of Joints
50mm (2”) dia. and smaller Threaded TSP by Flowmetrics
65mm (2-1/2) dia. and larger Flanged or Mechanical Grooved Couplings
E. FITTINGS:
A. General :
1. Material wall thickness and pressure class: As specified in “Piping Materials”, this
section.
2. Use long radius fittings, except where space limitations require short radius.
3. Reducing fittings shall be standard single piece forged or molded.
B. Welding Fittings:
1. Metering of the pipe to form elbows, notching straight pipe to form tees, and similar construction will not be acceptable.
2. Fabrication at Contractor’s shop shall use welding tees for all socket welded piping and
for all socket welded piping and for all field fabricated branch tees in butt welded end piping with appropriate flanges.
C. Pipe Flanges : Steel flanges mating with cast iron flanges or steel equipment flanges
shall have the same facing as mating flange.
D. Unions : Union patent shall not be used except in Fire Hose Cabinets.
5.0 VALVES – GENERAL :

R.S. ROQUE ARCHITECTS 242
A. NFPA 13 : All valves shall be of same manufacturer for each class of piping insofar as possible for entire project.
B. Gate Valves : Disc type permitting repacking under pressure when wide open.
C. Gate valves shall be indicating with supervisory switch, O.S. and Y type.
6.0 SPRINKLER HEADS
A. Description : Automatic, solder fillet type, type upright, pendents or sidewall heads. Heads shall from single manufacturer having the same “K” of “5.6” Sprinkler heads 15500.
Application Type
Exposed or no Ceiling Standard automatic, upright type,
15mm dia. Orifice, 74’C ( 165’F) natural brass.
Typical Ceiling Area Quick response sprinklers 55 sec.
½ ft. ½ max. pendent type. Finishes shall be plain brass. Submit manufacturer’s color selection to the Engineer for approval.
B. Spare sprinkler Heads : Furnish as specified hereunder of each type and rating together
with maintenance service tools complete with glass covered box or cabinet.
END OF SECTION

R.S. ROQUE ARCHITECTS 243
SECTION 16000 BASIC ELECTRICAL MATERIALS AND METHODS
PART 1 – GENERAL
1.1 SUMMARY
A. This Section includes the following:
1. Safety considerations for outdoor substations.
2. Raceways.
3. Building wire and connectors.
4. Supporting materials for electrical components.
5. Concrete equipment bases/pads.
6. Touchup painting.
7. Sleeves for raceways & cables.
8. Sleeve seals.
9. Electrical identification.
1.2 ACRONYMS & ABBREVIATIONS
A. EMT: Electrical metallic tubing.
B. FMC: Flexible metal conduit.
C. RSC: Rigid steel conduit.
D. LFMC: Liquidtight flexible metal conduit.
E. RNC: Rigid nonmetallic conduit, Unplasticized Polyvinyl Chloride.
F. NEC: National Electrical Code
G. NFPA: National Fire Protection Association
H. ANSI: American National Standards Institute
I. IMC: Intermediate metal conduit
1.3 SUBMITTALS
R.S. ROQUE ARCHITECTS 244
A. Product Data: For each type of product indicated.
1.4 PRODUCT DELIVERY, STORAGE AND HANDLING
A. Deliver components in factory-fabricated water resistant packaging.
B. Handle components carefully to avoid damage to components, enclosures and finish.
C. Store components in a clean, dry space and protect from weather.
1.5 QUALITY ASSURANCE
A. Electrical Components, Devices, and Accessories: Listed and labeled as defined in NEC, by a testing agency acceptable to authorities having jurisdiction, and marked for intended use.
B. Compliant with the Latest Edition of National Electrical Code.
1.6 WORK COORDINATION
A. Coordinate chase block-outs, sleeves, and openings with general construction work and
arrange in building structure during progress of construction to facilitate the electrical installations that follow.
1. Set inserts and sleeves in poured-in-place concrete, masonry, and other
structural components as they are constructed.
B. Sequence, coordinate, and integrate installing electrical materials and equipment for efficient flow of the Work. Coordinate installing large equipment requiring positioning before closing in the building.
C. Coordinate electrical service connections to components furnished by utility companies.
1. Coordinate installation and connection of underground or overhead utility and
service, including provision for electric-metering facility.
2. Comply with requirements of the local government and of the utility company.
D. Coordinate location of access for electrical equipment that are concealed/recessed. Access doors and panels as specified Architectural Schedule.
E. Where electrical identification devices are applied to field-finished surfaces, coordinate
installation of identification devices with completion of finished surface.
F. Where electrical identification markings and devices will be concealed by acoustical ceilings and similar finishes, coordinate installation of these items before ceiling installation.
PART 2 - PRODUCTS
2.1 SAFETY CONSIDERATIONS FOR OUTDOOR SUBSTATIONS
R.S. ROQUE ARCHITECTS 245
A. Signage: Provide warning signage in English, and/or pictograph indicating "DANGER
— HIGH VOLTAGE" according to signage requirements of Section 11.8.
B. Metal Enclosures: Use metal enclosures around all live parts.
C. Locks: Provide key interlocks on switchgear doors to prevent access to live parts.
D. Clearances: Refer to the Latest Edition of the National Electrical Code and National Electrical Safety Code (ANSI C.2) for adequate clearances.
2.2 RACEWAYS/CONDUITS & FITTINGS
A. EMT: ANSI C80.3, zinc-coated steel, with compression fittings and/or set screw type. (shall
B. FMC: Zinc-coated steel. ,
C. LFMC: Zinc-coated steel with sunlight-resistant and mineral-oil-resistant plastic jacket.
D. RNC: NEMA TC 2, Schedule 40 PVC, with NEMA TC3 fittings.
E. IMC: ANSI C80.6, UL safety standard 1242, coated in hot galvanized coating on
exterior.
F. Raceway Fittings: Specifically designed for the raceway type used.
2.3 CONDUCTORS
A. Conductors, 3.5mm2 (12AWG) and Smaller: Solid copper.
B. Conductors, Larger Than 3.5mm2 (12AWG): Stranded copper.
C. Insulation: Thermoplastic, rated at 75 deg. C minimum.
D. Wire Connectors and Splices: Units of size, ampacity rating, material, type, and class suitable for service indicated.
2.4 SUPPORTING MATERIALS A. Material: Cold-formed steel, with corrosion-resistant coating acceptable to authorities
having jurisdiction.
B. Metal Items for Use Outdoors or in Damp Locations: Hot-dip galvanized steel.
C. Slotted-Steel Channel Supports: Flange edges turned toward web, and 14-mm- diameter slotted holes at a maximum of 50 mm o.c., in webs.
D. Slotted-Steel Channel Supports: Comply with "Metal Fabrications" for slotted channel
framing.
R.S. ROQUE ARCHITECTS 246
1. Channel Thickness: Selected to suit structural loading.
2. Fittings and Accessories: Products of the same manufacturer as channel
supports.
E. Nonmetallic Channel and Angle Systems: Structural-grade, factory-formed, glass- fiber-resin channels and angles with 14-mm- diameter holes at a maximum of 203 mm o.c., in at least one surface.
1. Fittings and Accessories: Products of the same manufacturer as channels and
angles.
2. Entire electrical system shall be fully rated.
F. Raceway and Cable Supports: Manufactured clevis hangers, riser and strut clamps, straps, ceiling trapeze hangers, wall brackets, and spring-steel clamps or click-type hangers.
G. Pipe Sleeves: ASTM A 53, Type E, Grade A, Schedule 40, galvanized steel, plain ends.
H. Cable Supports for Vertical Conduit: Factory-fabricated assembly consisting of threaded
body and insulating wedging plug for non-armored electrical cables in riser conduits. Plugs have number and size of conductor gripping holes as required to suit individual risers. Body constructed of malleable-iron casting with hot-dip galvanized finish.
I. Expansion/Anchor: Carbon-steel wedge or sleeve type.
J. Toggle Bolts: All-steel springhead type.
K. Powder-Driven Threaded Studs: Heat-treated steel.
2.5 CONCRETE BASES
A. Concrete Forms and Reinforcement Materials:
B. Concrete: 20.7-MPa, 28-day compressive
2.6 TOUCHUP PAINT
A. For Equipment: Equipment manufacturer's paint selected to match installed equipment finish.
B. Galvanized Surfaces: Zinc-rich paint recommended by item manufacturer.
C. Prevention of Corrosion: For all outdoor applications and all indoor applications in a harsh
environment (salt air). Metallic materials shall be protected against corrosion. Equipment enclosures shall have the standard finish and corrosion resistant coating by the manufacturer when used for most indoor installations.
D. Panelboards: Ability to remove access covers is required for maintenance activities. No

R.S. ROQUE ARCHITECTS 247
equipment shall be mounted within 900 mm of the front of the panel.
E. Field Testing: Final test data shall be provided to the COR for forwarding to the Systems Engineer/Condition Monitoring Office/Predictive Testing Group for inclusion in the Maintenance Database.
2.7 SLEEVES FOR RACEWAYS AND CABLES
A. Steel Pipe Sleeves: ASTM A 53/A 53M, Type E, Grade B, Schedule 40, galvanized steel,
plain ends.
B. Cast-Iron Pipe Sleeves: Cast or fabricated "wall pipe," equivalent to ductile-iron pressure pipe, with plain ends and integral water stop, unless otherwise indicated.
C. Sleeves for Rectangular Openings: Galvanized sheet steel with minimum 1.3- or 3.5-mm
(0.052- or 0.138-inch) thickness as indicated and of length to suit application.
D. Coordinate sleeve selection and application with selection and application of fire stopping.
2.8 SLEEVE SEALS
A. Description: Modular sealing device, designed for field assembly, to fill annular space
between sleeve and raceway or cable.
1. Sealing Elements: EPDM interlocking links shaped to fit surface of cable or conduit. Include type and number required for material and size of raceway or cable.
2. Pressure Plates: Stainless steel. Include two for each sealing element.
3. Connecting Bolts and Nuts: Stainless steel of length required to secure pressure
plates to sealing elements. Include one for each sealing element.
PART 3 - EXECUTION
3.1 COMMON REQUIREMENTS FOR ELECTRICAL INSTALLATION
A. Comply with NECA 1.
B. Measure indicated mounting heights to bottom of unit for suspended items and to center/top of unit for wall-mounting items.
C. Headroom Maintenance: If mounting heights or other location criteria are not indicated,
arrange and install components and equipment to provide maximum possible headroom consistent with these requirements.
D. Equipment: Install to facilitate service, maintenance, and repair or replacement of
components of both electrical equipment and other nearby installations. Connect in such a way as to facilitate future disconnecting with minimum interference with other items in

R.S. ROQUE ARCHITECTS 248
the vicinity.
E. Right of Way: Give to raceways and piping systems installed at a required slope.
F. Electrical equipment shall be designed and rated to operate in unusual environmental conditions such as wind-blown sand, salt atmosphere, flooding, ultraviolet rays due to altitude, high winds, etc. Where standard ratings are not available to match environmental conditions, equipment shall be derated as required to compensate for factors such as high altitude and ambient temperature. Equipment installed in conditioned spaces shall be designed and rated for the conditioned ambient.
3.2 RACEWAY APPLICATION
A. Use the following raceways for outdoor installations:
1. Exposed: IMC or EMT
2. Concealed: RNC
3. Underground, Single Run: uPVC.
4. Connection to Vibrating Equipment: LFMC.
5. Boxes and Enclosures: NEMA 250 for boxes and Type 4x for enclosures.
B. Use the following raceways for indoor installations:
1. Exposed: IMC or EMT
2. Concealed: RNC
3. Connection to Vibrating Equipment: FMC; except in wet or damp locations, use LFMC.
4. Damp or Wet Locations: IMC. 5. Boxes and Enclosures: NEMA 250 for boxes, and Type 1 for enclosures, unless
otherwise indicated.
3.3 RACEWAY AND CABLE INSTALLATION
A. Conceal raceways and cables, unless otherwise indicated, within finished walls, ceilings, and floors.
B. Install raceways and cables at least 150 mm away from parallel runs of water pipes.
Locate horizontal raceway runs above water piping.
C. Use temporary raceway caps to prevent foreign matter from entering.

R.S. ROQUE ARCHITECTS 249
D. Make conduit bends and offsets so ID is not reduced. Keep legs of bends in the same plane and straight legs of offsets parallel, unless otherwise indicated.
E. Use raceway and cable fittings compatible with raceways and cables and suitable for use
and location.
F. Install raceways embedded in slabs in middle third of slab thickness where practical, and leave at least 25-mm-concrete cover.
1. Secure raceways to reinforcing rods to prevent sagging or shifting during concrete
placement/pouring.
2. Space raceways laterally to prevent voids in concrete.
3. Make bends in exposed parallel or banked runs from same centerline to make bends parallel. Use factory elbows only where elbows can be installed parallel; otherwise, provide field bends for exposed parallel raceways.
G. Install pull string in empty raceways. Use monofilament/nylon plastic line with not less
than (90-kg) tensile strength. Leave atleast (300 mm) of slack at each end of the pull wire.
H. Install telecommunications and signal system raceways, 50 mm and smaller, in
maximum lengths of 45 m and with a maximum of two 90-degree bends or equivalent. Separate lengths with pull or junction boxes where necessary to comply with these requirements in addition to requirements above.
I. Connect motors and equipment subject to vibration, noise transmission, or movement
with a maximum of 1830-mm flexible conduit. Install LFMC in wet or damp locations. Install separate ground conductor across flexible connections.
J. Set floor boxes level and trim after installation to fit flush to finished floor surface.
3.4 WIRING METHODS FOR POWER, LIGHTING, AND CONTROL CIRCUITS
A. Feeders: Type THHN/THWN insulated conductors in raceway.
B. Underground Feeders and Branch Circuits: Type THWN insulated conductors in
raceway. C. Branch Circuits: Type THHN/THWN insulated conductors in raceway.
D. Remote-Control Signaling and Power-Limited Circuits: Type THHN/THWN insulated
conductors in raceway for Classes 1, 2, and 3, unless otherwise indicated.
E. LVSG: Type THHN/THWN insulated conductors in raceway and Type "SIS" for control circuits.
3.5 WIRING INSTALLATION
A. Install splices and taps that are compatible with conductor material and that possess

R.S. ROQUE ARCHITECTS 250
equivalent or better mechanical strength and insulation ratings than unspliced conductors.
B. Install wiring at outlets with at least 300 mm of slack conductor at each outlet. Pigtailing
conductors is not permitted.
C. Connect outlet and component connections to wiring systems and to ground. Tighten electrical connectors and terminals, according to manufacturer's published torque-tightening values. If manufacturer's torque values are not indicated, use those specified in UL 486A.
3.6 ELECTRICAL SUPPORTING MATERIALS APPLICATION
A. Damp Locations and Outdoors: Hot-dip galvanized materials or nonmetallic, U- channel
system components.
B. Dry Locations: Steel materials.
C. Support Clamps for PVC Raceways: Click-type clamp system.
D. Selection of Supports: Comply with manufacturer's written instructions.
E. Strength of Supports: Adequate to carry present and future loads, times a safety factor of at least four; minimum of 90-kg design load.
3.7 SUPPORT INSTALLATION
A. Install support devices to securely and permanently fasten and support electrical components.
B. Install individual and multiple raceway hangers and riser clamps to support raceways.
Provide Clamps, Attachments, and other hardware necessary for hanger assemblies and for securing hanger rods and conduits.
C. Support parallel runs of horizontal raceways together on trapeze- or bracket-type
hangers. D. Size supports for multiple raceway installations so capacity can be increased by a 25
percent minimum in the future.
E. Support individual horizontal raceways with separate, malleable-iron pipe hangers or clamps.
F. Install 6-mm diameter or larger threaded steel hanger rods, unless otherwise indicated.
G. Spring-steel fasteners specifically designed for supporting single conduits or tubing may
be used instead of malleable-iron hangers for 38-mm and smaller raceways serving lighting and receptacle branch circuits above suspended ceilings and for fastening raceways to slotted channel and angle supports.
R.S. ROQUE ARCHITECTS 251
H. Arrange supports in vertical runs so the weight of raceways and enclosed conductors is
carried entirely by raceway supports, with no weight load on raceway terminals.
I. Simultaneously install vertical raceway supports with conductors.
J. Separately support cast boxes that are threaded to raceways and used for fixture support. Support sheet-metal boxes directly from the building structure or by bar hangers. If bar hangers are used, attach bar to raceways on opposite sides of the box and support the raceway with an approved fastener not more than 610 mm from the box.
K. Install metal channel racks for mounting cabinets, panelboards, disconnect switches,
control enclosures, pull and junction boxes, transformers, and other devices unless components are mounted directly to structural elements of adequate strength.
L. Install sleeves for cable and raceway penetrations of concrete slabs and walls unless
core-drilled holes are used. Install sleeves for cable and raceway penetrations of masonry and fire-rated gypsum walls and of all other fire-rated floor and wall assemblies. Install sleeves during erection of concrete and masonry walls.
M. Securely fasten electrical items and their supports to the building structure, unless
otherwise indicated. Perform fastening according to the following unless other fastening methods are indicated:
1. Masonry: Toggle bolts on hollow masonry units and expansion bolts on solid
masonry units.
2. New Concrete: Concrete inserts with machine screws and bolts.
3. Existing Concrete: Expansion bolts.
4. Instead of expansion bolts, threaded studs driven by a powder charge and provided with lock washers may be used in existing concrete.
5. Steel: Welded threaded studs or spring-tension clamps on steel.
a. Field Welding: Comply with AWS D1.1.
6. Welding to steel structure may be used only for threaded studs, not for conduits, pipe straps, or other items.
7. Light Steel: Sheet-metal screws.
8. Fasteners: Select so the load applied to each fastener does not exceed 25
percent of its proof-test load.
3.8 IDENTIFICATION MATERIALS AND DEVICES
A. Install at locations for most convenient viewing without interference with operation and maintenance of equipment.
R.S. ROQUE ARCHITECTS 252
B. Coordinate names, abbreviations, colors, and other designations used for electrical identification with corresponding designations indicated in the Contract or required by codes and standards. Use consistent designations throughout Project.
C. Self-Adhesive Identification Products: Clean surfaces before applying.
D. Tag and label circuits designated to be extended in the future. Identify source and circuit
numbers in each cabinet, pull and junction box, and outlet box. Color- coding may be used for voltage and phase identification.
E. Install continuous underground detectable (WARNING tapes) during trench backfilling,
for exterior underground power, control, signal, and communication lines located directly above power and communication lines. Locate 150 to 200 mm below finished grade. If width of multiple lines installed in a common trench or concrete envelope does not exceed 400 mm, overall, use a single line marker.
F. Color-code 400/230 Volts system secondary service, feeder, and branch-circuit
conductors throughout the secondary electrical system as follows:
1. Phase A: Red.
2. Phase B: Yellow.
3. Phase C: Blue.
4. Neutral: White.
5. Ground: Green.
G. Install warning, caution, and instruction signs where required and needed to ensure safe operation and maintenance of electrical systems and associated systems. Install engraved plastic-laminated instruction signs where instructions are needed for system or equipment operation. Install metal-backed butyrate signs for outdoor items.
H. Install engraved-laminated emergency-operating signs with white letters on red background with minimum 9-mm-high lettering for emergency instructions on power transfer, load shedding, and other emergency operations.
3.9 UTILITY COMPANY ELECTRIC-METERING EQUIPMENT
A. Install equipment according to utility company's requirements. Provide grounding and
empty conduits as required by utility company.
3.10 FIRESTOPPING
A. Apply firestopping to cable and raceway penetrations of fire-rated floor and wall assemblies to achieve fire-resistance rating of the assembly.
3.11 CONCRETE BASES/PADS
A. Construct concrete bases of dimensions indicated, but not less than 100 mm (4 inches) wider, in lateral directions, than supported unit. Follow supported equipment

R.S. ROQUE ARCHITECTS 253
manufacturer's anchorage recommendations and setting templates for anchor-bolt and tie locations, unless otherwise indicated. Use 20.7-MPa, 28-day compressive-strength concrete and reinforcement as specified in Division Section "Cast-in-Place Concrete."
3.12 FIELD QUALITY CONTROL
A. Inspect installed components for damage and faulty work, including the following:
1. Raceways.
2. Building wire and connectors.
3. Supporting materials for electrical components.
4. Electrical identification.
5. Electric-metering components.
6. Concrete bases.
7. Electrical demolition/dismanting.
8. Cutting and patching for electrical construction.
9. Touchup painting.
B. Test electric-metering for proper operation, accuracy, and usability of output data.
1. Connect a load of known kW rating, 1.5 kW minimum, to a circuit supplied by the
metered feeder.
2. Turn off circuits supplied by the metered feeder and secure them in the "off" condition.
3. Run the test load continuously for eight hours, minimum, or longer to obtain a measurable meter indication. Use a test load placement and setting that ensure continuous, safe operation.
4. Check and record meter reading at end of test period and compare with actual
electricity used based on test load rating, duration of test, and sample measurements of supply voltage at the test load connection. Record test results.
5. Repair or replace malfunctioning metering equipment or correct test setup; then
retest. Repeat for each meter in installation until proper operation of entire system is verified.
3.13 REFINISHING AND TOUCHUP PAINTING
A. Refinish and touch up paint. Paint materials and application requirements are specified
in Division Section "Painting."
R.S. ROQUE ARCHITECTS 254
1. Clean damaged and disturbed areas and apply primer, intermediate, and finish coats to suit the degree of damage at each location.
2. Follow paint manufacturer's written instructions for surface preparation and for
timing and application of successive coats.
3. Repair damage to galvanized finishes with zinc-rich paint recommended by manufacturer.
4. Repair damage to PVC or paint finishes with matching touchup coating
recommended by manufacturer.
END OF SECTION
R.S. ROQUE ARCHITECTS 255
SECTION 16100 ELECTRICAL IDENTIFICATION
PART 1 - GENERAL
1.1 SUMMARY
A. This Section includes electrical identification materials and devices required to comply with ANSI C2, NFPA 70, OSHA standards, and authorities having jurisdiction.
1.2 QUALITY ASSURANCE
A. Comply with ANSI C2.
B. Comply with NFPA 70.
C. Comply with ANSI A13.1 and NFPA 70 for color-coding.
1.3 COORDINATION
A. Coordinate identification names, abbreviations, colors, and other features with
requirements in the Contract, Shop Drawings, manufacturer's wiring diagrams, and the Operation and Maintenance Manual, and with those required by codes, standards, and 29 CFR 1910.145. Use consistent designations throughout Project.
B. Coordinate installation of identifying devices with completion of covering and painting of
surfaces where devices are to be applied.
C. Coordinate installation of identifying devices with location of access panels and doors.
D. Install identifying devices before installing acoustical ceilings and similar concealment.
PART 2 - PRODUCTS
2.1 RACEWAY AND METAL-CLAD CABLE IDENTIFICATION MATERIALS
A. Comply with ANSI A13.1 for minimum size of letters for legend and for minimum length of color field for each raceway and cable size.
B. Color for Printed Legend:
1. Power Circuits: Black letters on an orange field.
2. Legend: Indicate system or service and voltage, if applicable.
C. Self-Adhesive Vinyl Labels: Preprinted, flexible label laminated with a clear, weather-

R.S. ROQUE ARCHITECTS 256
and chemical-resistant coating and matching wraparound adhesive tape for securing ends of legend label.
D. Snap-Around Labels: Slit, pretensioned, flexible, preprinted, color-coded acrylic sleeves
with diameter sized to suit diameter of raceway or cable it identifies and to stay in place by gripping action.
E. Snap-Around, Color-Coding Bands: Slit, pretensioned, flexible, solid-colored acrylic
sleeves, 50 mm (2 inches) long, with diameter sized to suit diameter of raceway or cable it identifies and to stay in place by gripping action.
F. Self-Adhesive Vinyl Tape: Colored, heavy duty, waterproof, fade resistant; 50 mm (2
inches) wide; compounded for outdoor use.
2.2 CONDUCTOR AND COMMUNICATION- AND CONTROL-CABLE IDENTIFICATION MATERIALS
A. Color-Coding Conductor Tape: Colored, self-adhesive vinyl tape not less than 0.08 mm
(3 inches) thick by 25 to 50 mm (1 to 2 inches) wide.
B. Marker Tapes: Vinyl or vinyl-cloth, self-adhesive wraparound type, with circuit identification legend machine printed by thermal transfer or equivalent process.
C. Aluminum Wraparound Marker Labels: Cut from 0.35-mm (0.014-inch) thick aluminum
sheet, with stamped, embossed, or scribed legend, and fitted with tabs and matching slots for permanently securing around wire or cable jacket or around groups of conductors.
D. Metal Tags: Brass or aluminum, 50 by 50 by 1.3 mm (2 by 2 by 0.05 inch), with stamped
legend, punched for use with self-locking nylon tie fastener.
E. Write-On Tags: Polyester tag, 0.38 mm (0.015 inch) thick, with corrosion-resistant grommet and polyester or nylon tie for attachment to conductor or cable.
1. Marker for Tags: Permanent, waterproof, black ink marker recommended by tag
manufacturer.
2.3 UNDERGROUND-LINE WARNING TAPE
A. Description: Permanent, bright-colored, continuous-printed, polyethylene tape.
1. Not less than 150 mm (6 inches) wide by 0.102 mm (4 mils) thick.
2. Compounded for permanent direct-burial service.
3. Embedded continuous metallic strip or core.
R.S. ROQUE ARCHITECTS 257
4. Printed legend shall indicate type of underground line.
2.4 WARNING LABELS AND SIGNS
A. Comply with NFPA 70 and 29 CFR 1910.145.
B. Metal-Backed, Butyrate Warning Signs: Weather-resistant, nonfading, preprinted, cellulose-acetate butyrate signs with 1-mm (0.0396-inch) galvanized-steel backing; and with colors, legend, and size required for application. 6.4-mm (1/4-inch) grommets in corners for mounting. Nominal size, 250 by 360 mm (10 by 14 inches).
C. Warning label and sign shall include, but are not limited to, the following legends:
1. Multiple Power Source Warning: "DANGER - ELECTRICAL SHOCK HAZARD -
EQUIPMENT HAS MULTIPLE POWER SOURCES."
2. Workspace Clearance Warning: "WARNING - OSHA REGULATION - AREA IN FRONT OF ELECTRICAL EQUIPMENT MUST BE KEPT CLEAR FOR 915 MM."
2.5 INSTRUCTION SIGNS
A. Engraved, laminated acrylic or melamine plastic, minimum 1.6 mm (1/16 inch) thick for signs up to. 129 sq. cm (20 sq. in) and 3.2 mm (1/8 inch) thick for larger sizes.
1. Engraved legend with black letters on white face.
2. Punched or drilled for mechanical fasteners.
3. Framed with mitered acrylic molding and arranged for attachment at applicable
equipment.
2.6 EQUIPMENT IDENTIFICATION LABELS
A. Adhesive Film Label: Machine printed, in black, by thermal transfer or equivalent process. Minimum letter height shall be 10 mm (3/8 inch).
B. Adhesive Film Label with Clear Protective Overlay: Machine printed, in black, by thermal
transfer or equivalent process. Minimum letter height shall be 10 mm (3/8 inch). Overlay shall provide a weatherproof and ultraviolet-resistant seal for label.
C. Self-Adhesive, Engraved, Laminated Acrylic or Melamine Label: Adhesive backed, with
white letters on a dark-gray background. Minimum letter height shall be 10 mm (3/8 inch).
D. Engraved, Laminated Acrylic or Melamine Label: Punched or drilled for screw mounting. White letters on a dark-gray background. Minimum letter height shall be 10 mm (3/8 inch).
E. Stenciled Legend: In nonfading, waterproof, black ink or paint. Minimum letter height
R.S. ROQUE ARCHITECTS 258
shall be 25 mm (1 inch).
2.7 MISCELLANEOUS IDENTIFICATION PRODUCTS
A. Cable Ties: Fungus-inert, self-extinguishing, 1-piece, self-locking, Type 6/6 nylon cable ties.
1. Minimum Width: 5 mm (3/16 inch).
2. Tensile Strength: 22.6 kg (50 lb), minimum.
3. Temperature Range: Minus 40 to plus 85 deg C (Minus 40 to plus 185 deg
F).
4. Color: Black, except where used for color-coding.
B. Paint: Paint materials and application requirements.
1. Exterior Concrete, Stucco, and Masonry (Other Than Concrete Unit Masonry):
a. Semigloss Acrylic-Enamel Finish: Two finish coats over a primer.
1) Primer: Exterior concrete and masonry primer.
2) Finish Coats: Exterior semigloss acrylic enamel.
2. Exterior Concrete Unit Masonry:
a. Semigloss Acrylic-Enamel Finish: Two finish coats over a block filler.
1) Block Filler: Concrete unit masonry block filler.
2) Finish Coats: Exterior semigloss acrylic enamel.
3. Exterior Ferrous Metal:
a. Semigloss Alkyd-Enamel Finish: Two finish coats over a primer.
1) Primer: Exterior ferrous-metal primer.
2) Finish Coats: Exterior semigloss alkyd enamel.
4. Exterior Zinc-Coated Metal (except Raceways):
a. Semigloss Alkyd-Enamel Finish: Two finish coats over a primer.
1) Primer: Exterior zinc-coated metal primer.
R.S. ROQUE ARCHITECTS 259
2) Finish Coats: Exterior semigloss alkyd enamel.
5. Interior Concrete and Masonry (Other Than Concrete Unit Masonry):
a. Semigloss Alkyd-Enamel Finish: Two finish coats over a primer.
1) Primer: Interior concrete and masonry primer.
2) Finish Coats: Interior semigloss alkyd enamel.
6. Interior Concrete Unit Masonry:
a. Semigloss Acrylic-Enamel Finish: Two finish coats over a block filler.
1) Block Filler: Concrete unit masonry block filler.
2) Finish Coats: Interior semigloss acrylic enamel.
7. Interior Gypsum Board:
a. Semigloss Acrylic-Enamel Finish: Two finish coats over a primer.
1) Primer: Interior gypsum board primer.
2) Finish Coats: Interior semigloss acrylic enamel.
8. Interior Ferrous Metal:
a. Semigloss Acrylic-Enamel Finish: Two finish coats over a primer.
1) Primer: Interior ferrous-metal primer.
2) Finish Coats: Interior semigloss acrylic enamel.
9. Interior Zinc-Coated Metal (except Raceways):
a. Semigloss Acrylic-Enamel Finish: Two finish coats over a primer.
1) Primer: Interior zinc-coated metal primer.
2) Finish Coats: Interior semigloss acrylic enamel.
C. Fasteners for Labels and Signs: Self-tapping, stainless-steel screws or stainless- steel machine screws with nuts and flat and lock washers.
PART 3 - EXECUTION

R.S. ROQUE ARCHITECTS 260
3.1 APPLICATION
A. Raceways and Duct Banks More Than 600 V Concealed within Buildings: 100-mm (4-inch) wide black stripes on 250-mm (10-inch) centers over orange background that extends full length of raceway or duct and is 300 mm (12 inches) wide. Stencil legend "DANGER CONCEALED HIGH VOLTAGE WIRING" with 75-mm (3- inch) high black letters on 500-mm (20-inch) centers. Stop stripes at legends. Apply to the following finished surfaces: 1. Floor surface directly above conduits running beneath and within 300 mm (12
inches) of a floor that is in contact with earth or is framed above unexcavated space.
2. Wall surfaces directly external to raceways concealed within wall.
3. Accessible surfaces of concrete envelope around raceways in vertical shafts,
exposed in the building, or concealed above suspended ceilings.
B. Accessible Raceways and Metal-Clad Cables More Than 600 V: Identify with "DANGER-HIGH VOLTAGE" in black letters at least 50 mm (2 inches) high, with snap-around labels. Repeat legend at 3-m (10-foot) maximum intervals.
C. Accessible Raceways and Metal-Clad Cables, 600 V or Less, for Service, Feeder, and
Branch Circuits More Than 30 A: Identify with orange snap-around label.
D. Accessible Raceways and Cables of Auxiliary Systems: Identify the following systems with color-coded, self-adhesive vinyl tape applied in bands:
1. Fire Alarm System: Red.
2. Fire-Suppression Supervisory and Control System: Red and yellow.
3. Combined Fire Alarm and Security System: Red and blue.
4. Security System: Blue and yellow.
5. Mechanical and Electrical Supervisory System: Green and blue.
6. Telecommunication System: Green and yellow.
7. Control Wiring: Green and red.
E. Power-Circuit Conductor Identification: For primary and secondary conductors No. 1/0
AWG and larger in vaults, pull and junction boxes, manholes, and handholes use metal tags. Identify source and circuit number of each set of conductors. For single conductor cables, identify phase in addition to the above.
F. Branch-Circuit Conductor Identification: Where there are conductors for more than three
R.S. ROQUE ARCHITECTS 261
branch circuits in same junction or pull box, use metal tags. Identify each ungrounded conductor according to source and circuit number.
G. Conductors to Be Extended in the Future: Attach write-on tags to conductors and list
source and circuit number.
H. Auxiliary Electrical Systems Conductor Identification: Identify field-installed alarm, control, signal, sound, intercommunications, voice, and data connections.
1. Identify conductors, cables, and terminals in enclosures and at junctions,
terminals, and pull points. Identify by system and circuit designation.
2. Use system of marker tape designations that is uniform and consistent with system used by manufacturer for factory-installed connections.
3. Coordinate identification with Project Drawings, manufacturer's wiring diagrams, and Operation and Maintenance Manual.
I. Locations of Underground Lines: Identify with underground-line warning tape for power,
lighting, communication, and control wiring and optical fiber cable. Install underground-line warning tape for both direct-buried cables and cables in raceway.
J. Warning Labels for Indoor Cabinets, Boxes, and Enclosures for Power and Lighting:
Comply with 29 CFR 1910.145 and apply self-adhesive warning labels. Identify system voltage with black letters on an orange background. Apply to exterior of door, cover, or other access.
1. Equipment with Multiple Power or Control Sources: Apply to door or cover of
equipment including, but not limited to, the following:
a. Power transfer switches.
b. Controls with external control power connections.
2. Equipment Requiring Workspace Clearance According to NFPA 70: Unless otherwise indicated, apply to door or cover of equipment but not on flush panelboards and similar equipment in finished spaces.
K. Instruction Signs:
1. Operating Instructions: Install instruction signs to facilitate proper operation and
maintenance of electrical systems and items to which they connect. Install instruction signs with approved legend where instructions are needed for system or equipment operation.
2. Emergency Operating Instructions: Install instruction signs with white legend on a
red background with minimum 10-mm (3/8-inch) high letters for emergency instructions at equipment used for power transfer and load shedding.
L. Equipment Identification Labels: On each unit of equipment, install unique designation
R.S. ROQUE ARCHITECTS 262
label that is consistent with wiring diagrams, schedules, and Operation and Maintenance Manual. Apply labels to disconnect switches and protection equipment, central or master units, control panels, control stations, terminal cabinets, and racks of each system. Systems include power, lighting, control, communication, signal, monitoring, and alarm systems unless equipment is provided with its own identification.
1. Labeling Instructions:
a. Indoor Equipment: Engraved, laminated acrylic or melamine label. Unless
otherwise indicated, provide a single line of text with 13-mm (1/2-inch) high letters on 38-mm (1-1/2-inch) high label; where 2 lines of text are required, use labels 50 mm (2 inches) high.
b. Outdoor Equipment: Engraved, laminated acrylic or melamine label.
Elevated Components: Increase sizes of labels and letters to those appropriate for viewing from the floor.
2. Equipment to Be Labeled:
a. Panelboards, electrical cabinets, and enclosures.
b. Access doors and panels for concealed electrical items.
c. Electrical switchgear and switchboards.
d. Transformers.
e. Electrical substations.
f. Emergency system boxes and enclosures.
g. Motor-control centers.
h. Disconnect switches.
i. Enclosed circuit breakers.
j. Motor starters.
k. Push-button stations.
l. Power transfer equipment.
m. Contactors.
n. Remote-controlled switches, dimmer modules, and control devices.
o. Battery inverter units.
R.S. ROQUE ARCHITECTS 263
p. Battery racks.
q. Power-generating units.
r. Voice and data cable terminal equipment.
s. Master clock and program equipment.
t. Intercommunication and call system master and staff stations.
u. Television/audio components, racks, and controls.
v. Fire-alarm control panel and annunciators.
w. Security and intrusion-detection control stations, control panels, terminal
cabinets, and racks.
x. Monitoring and control equipment. y. Uninterruptible power supply equipment.
z. Terminals, racks, and patch panels for voice and data communication and
for signal and control functions.
3.2 INSTALLATION
A. Verify identity of each item before installing identification products.
B. Location: Install identification materials and devices at locations for most convenient viewing without interference with operation and maintenance of equipment.
C. Apply identification devices to surfaces that require finish after completing finish work.
D. Self-Adhesive Identification Products: Clean surfaces before application, using materials
and methods recommended by manufacturer of identification device.
E. Attach nonadhesive signs and plastic labels with screws and auxiliary hardware appropriate to the location and substrate.
F. System Identification Color Banding for Raceways and Cables: Each color band shall
completely encircle cable or conduit. Place adjacent bands of two-color markings in contact, side by side. Locate bands at changes in direction, at penetrations of walls and floors, at 50-foot (15-m) maximum intervals in straight runs, and at 25-foot (7.6-m) maximum intervals in congested areas.
G. Color-Coding for Phase Identification, 600 V and Less: Use the colors listed below for
ungrounded service, feeder, and branch-circuit conductors.

R.S. ROQUE ARCHITECTS 264
1. Color shall be factory applied.
2. Colors for 400/230 Volts Circuits:
a. Phase A: Red.
b. Phase B: Black.
c. Ground: Green.
3. Field-Applied, Color-Coding Conductor Tape: Apply in half-lapped turns for a minimum distance of 150 mm (6 inches) from terminal points and in boxes where splices or taps are made. Apply last two turns of tape with no tension to prevent possible unwinding. Locate bands to avoid obscuring factory cable markings.
H. Metal Tags: Secure tight to surface of conductor or cable at a location with high visibility
and accessibility.
I. Underground-Line Warning Tape: During backfilling of trenches install continuous underground-line warning tape directly above line at 150 to 200 mm (6 to 8 inches) below finished grade. Use multiple tapes where width of multiple lines installed in a common trench or concrete envelope exceeds 400 mm (16 inches) overall.
J. Painted Identification: Prepare surface and apply paint according to Division
painting Sections.
END OF SECTION

R.S. ROQUE ARCHITECTS 265
SECTION 16101 - CONDUCTORS AND CABLES
PART 1 - GENERAL
1.1 SUMMARY
A. This Section includes building wires and cables and associated connectors, splices, and terminations for wiring systems rated 600 V and less.
B. Related Sections include the following:
1. Division 26-series Sections for single-conductor and multiconductor cables, cable
splices, and terminations for electrical distribution systems with 2001 to 35,000 V.
1.2 QUALITY ASSURANCE
A. Testing Agency Qualifications: Testing agency as defined by OSHA in 29 CFR 1910.7 or a member company of the International Electrical Testing Association and that is acceptable to authorities having jurisdiction.
1. Testing Agency's Field Supervisor: Person currently certified by the International
Electrical Testing Association or the National Institute for Certification in Engineering Technologies to supervise on-site testing specified in Part 3.
B. Electrical Components, Devices, and Accessories: Listed and labeled as defined in NEC
by a testing agency acceptable to authorities having jurisdiction, and marked for intended use.
C. Comply with the Latest Edition of National Electrical Code (NEC).
PART 2 - PRODUCTS
2.1 CONDUCTORS AND CABLES
A. Conductor Material: Copper only complying with NEMA WC 5 or 7; solid conductor for 2.0 mm diameter only, stranded for 5.5 mm2 (10 AWG) and larger. Copper shall be 99 percent conductivity and hard drawn.
B. Conductor Insulation Types: Type THHN-THWN, THW and XLPE.
2.2 CONNECTORS AND SPLICES
A. Description: Factory-fabricated connectors and splices of size, ampacity rating, material, type, and class for application and service indicated.
PART 3 - EXECUTION CONDUCTOR AND INSULATION APPLICATIONS
A. Service Entrance: Type THHN.
R.S. ROQUE ARCHITECTS 266
B. Exposed Feeders: Type THHN.
C. Feeders Concealed in Ceilings, Walls, and Partitions: Type THHN, single conductors in
raceway.
D. Feeders Concealed in Concrete, below Slabs-on-Grade, and in Crawlspaces: Type THHN, single conductors in raceway.
E. Exposed Branch Circuits, including in Crawlspaces: Type THHN, group conductors in
raceway.
F. Branch Circuits Concealed in Ceilings, Walls, and Partitions: Type THHN, group conductors in raceway.
G. Branch Circuits Concealed in Concrete and below Slabs-on-Grade: Type THHN, group
conductors in raceway.
H. Underground Feeders and Branch Circuits: Type THHN, group conductors in raceway.
I. Fire Alarm Circuits: Fire Rated Cable, in raceway.
J. Class 1 Control Circuits: Type THHN, in raceway.
K. Class 2 Control Circuits: Type THHN, in raceway.
L. Neutral Conductor: Where a secondary distribution system requires a neutral conductor, a full-sized neutral conductor shall be used throughout the system, such that that neutral conductor is not shared with any other branch circuit or feeder. If the secondary distribution system supports computers or other equipment that generates harmonics, double size neutrals shall be run from the subpanel boards feeding this equipment back to the MDP or service entrance. Neutral buses shall be sized to accommodate these conductors. Insulated equipment grounding conductors run with branch circuits shall be installed such that that conductor is not shared with any other branch circuit.
3.2 INSTALLATION
A. Conceal cables in finished walls, ceilings, and floors, unless otherwise indicated.
B. Use manufacturer-approved pulling compound or lubricant where necessary; compound used must not deteriorate conductor or insulation. Do not exceed manufacturer's recommended maximum pulling tensions and sidewall pressure values.
C. Use pulling means; including fish tape, cable, rope, and basket-weave wire/cable grips
that will not damage cables or raceway.
D. Install exposed cables parallel and perpendicular to surfaces of exposed structural members, and follow surface contours where possible.
E. Support cables according to Section 26 00 00 "Basic Electrical Materials and Methods".
F. Seal around cables penetrating fire-rated elements according to Section 26 00 00 Part
R.S. ROQUE ARCHITECTS 267
3.10 "Fire Stopping".
G. Identify and color-code conductors and cables according to Section 26 00 00 Part 3.8 "Identification Materials and Devices".
H. Install outdoor underground feeders in concrete encased ductbank.
I. Each electronic equipment rack shall be fed by an individual circuit breaker protected
branch circuit.
3.3 CONNECTIONS
A. Tighten electrical connectors and terminals according to manufacturer's published torque-tightening values. If manufacturer's torque values are not indicated, use those specified in UL 486A.
B. Make splices and taps that are compatible with conductor material and that possess
equivalent or better mechanical strength and insulation ratings than unspliced conductors.
1. Use oxide inhibitor in each splice and tap conductor for aluminum conductors.
C. Wiring at Outlets: Install conductor at each outlet, with at least 300 mm of slack.
3.4 FIELD QUALITY CONTROL
A. Testing: Perform the following field quality-control testing:
1. After installing conductors and cables and before electrical circuitry has been energized, test for compliance with requirements.
2. Perform each electrical test and visual and mechanical inspection stated in NETA
ATS, Section 7.3.1. Certify compliance with test parameters.
B. Test Reports: Prepare a written report to record the following:
1. Test procedures used.
2. Test results that comply with requirements.
3. Test results that do not comply with requirements and corrective action taken to achieve compliance with requirements.
END OF SECTION
R.S. ROQUE ARCHITECTS 268
SECTION 16 2726 – WIRING DEVICES PART 1 - GENERAL
1.1 SUMMARY
A. This Section includes the following:
1. Single and duplex receptacles, ground-fault circuit interrupters, and integral surge suppression units.
2. Single- and double-pole snap switches and dimmer switches.
3. Device wall plates.
4. Floor service outlets and multioutlet assemblies.
1.2 ACRONYMS & ABBREVIATIONS
A. EMI: Electromagnetic interference.
B. GFCI: Ground-fault circuit interrupter.
C. PVC: Polyvinyl chloride.
D. TVSS: Transient voltage surge suppressor.
1.3 SUBMITTALS
A. Product Data: For each type of product indicated.
B. Shop Drawings: List of legends and description of materials and process used for premarking wall plates.
C. Field quality-control test reports.
1.4 QUALITY ASSURANCE
A. Source Limitations: Obtain each type of wiring device through one source from a single manufacturer.
B. Electrical Components, Devices, and Accessories: Listed and labeled as defined in
NEC and marked for intended use.
C. Comply with the Latest Edition of National Electrical Code (NEC).
PART 2 - PRODUCTS
2.1 WIRING DEVICES, GENERAL
A. Wiring Devices: Provide U.S. NEMA type wiring devices and associated devices, boxes, and covers. Receptacles other than 230-volt general-purpose convenience
R.S. ROQUE ARCHITECTS 269
outlets shall be marked on the cover plates with voltage, amperage, phase, and frequency. Matching plugs shall be provided.
B. Wire and Cable: Select types of insulation according to the application. See the NEC for
insulation types, operating temperatures, ambient temperature, and voltage classes. Cable and wire sizes, types, and insulation shall be properly specified by the A/E using American standards in order to obtain the highest quality transmission for security, data, and other signal cables. Provide solid conductors for conductors sized 5.5 mm2 and smaller. Provide stranded conductors for conductors sized 8.0 mm2 and larger. Provide copper branch circuits and feeder conductors sized at 125 percent of full load capacity. Use full- sized neutral conductor and a separate ground conductor for each circuit. Circuits and feeders that supply power for electronic equipment may require an oversized neutral to compensate for high harmonic neutral currents. Such feeders must be identified in the design and the neutral increased to a minimum of two times full rated size. Non-metallic sheathed cable (“Romex”) is prohibited, and armored or metal clad cable, Types AC or MC is prohibited except as permitted in limited applications by DE/EEB.
C. Overload Protection: Copper conductors shall be provided overload protection in
accordance with NEC Table 310-6. Overload protection shall not exceed 15A for 2.5 mm2 conductors, 20A for 3.5 mm2 conductors or 30A for 5.5 mm2 conductors.
2.2 RECEPTACLES
A. Receptacles, General: General-purpose receptacles shall be installed on 15 and 20-amp branch circuits, and shall be of the grounding type with effective grounding contacts. NEMA type 5-20R receptacles, 20A, 300 Volts rated shall be used in all spaces. Flexible arrangements, such as for floor outlets or cable trays in office areas shall be provided to allow for partition rearrangement. An underfloor duct system shall not be used. G.F.C.I. protection shall be provided for receptacles in bathrooms, kitchen, and other wet areas and outdoors per NEC requirements. G.F.C.I. circuit breakers may be required in lieu of protection at the receptacle. Provide receptacle outlet as indicated in the plan.
B. Straight-Blade and Twist Locking Receptacles: Heavy-Duty grade. NEMA 6-20R, 20A,
400 Volts rated.
C. GFCI Receptacles shall not be used. Outlets designated for GFCI protection shall be fed from a GFCI circuit breaker. One GFCI breaker, rated for 10mA ground fault trip, 60Hz, 230V (line to neutral) shall be installed in an enclosure adjacent to the first receptacle in the branch circuit. This breaker will provide ground fault protection for all receptacles in the circuit.
D. Provide one 20 A and one 15 A cord plug cap for each duplex receptacle, and two of
each for each quadruplex receptacle. Plug caps shall be of the grounding type, utilizing only screw terminals for terminating conductors.
2.3 SWITCHES
A. Single- and Double-Pole Switches: Comply with DSCC W-C-896F.
B. Snap Switches: Heavy-Duty grade, quiet type.

R.S. ROQUE ARCHITECTS 270
2.4 WALL PLATES
A. Single and combination types to match corresponding wiring devices.
1. Plate-Securing Screws: Metal with head color to match plate finish.
2. Material for Finished Spaces: 1-mm- thick, brushed stainless steel.
3. Material for Unfinished Spaces: Galvanized steel
2.5 FLOOR SERVICE FITTINGS
A. Type: Modular, flush-type, dual-service units suitable for wiring method used.
B. Power Receptacle: NEMA Configuration 5-20R, unless otherwise indicated. Colors to match interior color scheme approved by the Engineer.
C. Signal Outlet: Blank cover with bushed cable opening, unless otherwise indicated.
2.6 FINISHES
A. Color:
1. All device faceplate shall be approved by the Engineer.
PART 3 - EXECUTION
3.1 INSTALLATION
A. Install devices and assemblies level, plumb, and square with building lines.
B. Install wall dimmers to achieve indicated rating after derating for ganging according to manufacturer's written instructions.
C. Install unshared neutral conductors on line and load side of dimmers according to
manufacturers' written instructions.
D. Arrangement of Devices: Unless otherwise indicated, mount flush, with long dimension vertical, and with grounding terminal of receptacles on top. Group adjacent switches under single, multi-gang wall plates where possible.
E. Remove wall plates and protect devices and assemblies during painting.
F. Adjust locations of floor service outlets to suit arrangement of partitions and furnishings.
3.2 CONNECTIONS
A. Ground equipment according to Section 26 02 01 "Grounding and Bonding."
B. Connect wiring according to Section 26 01 01 "Conductors and Cables." C. Tighten electrical connectors and terminals according to manufacturer's published
torque-tightening values. If manufacturer's torque values are not indicated, use those
R.S. ROQUE ARCHITECTS 271
specified in UL 486A.
3.3 FIELD QUALITY CONTROL
A. Perform the following field tests and inspections and prepare test reports:
1. After installing wiring devices and after electrical circuitry has been energized, test for proper polarity, ground continuity, and compliance with requirements.
2. Test GFCI operation with both local and remote fault simulations according to
manufacturer's written instructions.
B. Remove malfunctioning units, replace with new units, and retest as specified above.
END OF SECTION

R.S. ROQUE ARCHITECTS 272
SECTION 162803 – PANEL BOARDS
PART 1 - GENERAL
1.1 SUMMARY
A. This Section includes load centers and panelboards, overcurrent protective devices, and associated auxiliary equipment rated 600 V and less for the following types:
1. Lighting and appliance branch-circuit panelboards.
2. Distribution panelboards.
1.2 ACRONYMS & ABBREVIATIONS
A. Retain abbreviations that remain after this Section has been edited.
B. EMI: Electromagnetic interference.
C. GFCI: Ground-fault circuit interrupter.
D. RFI: Radio-frequency interference.
E. RMS: Root mean square.
F. SPDT: Single pole, double throw.
1.3 SUBMITTALS
A. Product Data: For each type of panelboard, overcurrent protective device, accessory, and component indicated. Include dimensions and manufacturers' technical data on features, performance, electrical characteristics, ratings, and finishes.
B. Shop Drawings: For each panelboard and related equipment.
1. Dimensioned plans, elevations, sections, and details. Show tabulations of
installed devices, equipment features, and ratings. Include the following:
a. Enclosure types and details.
b. Bus configuration, current, and voltage ratings.
c. Short-circuit current rating of panelboards and overcurrent protective devices.
d. Features, characteristics, ratings, and factory settings of individual
overcurrent protective devices and auxiliary components.
R.S. ROQUE ARCHITECTS 273
2. Wiring Diagrams: Power, signal, and control wiring. C. Qualification Data: For testing agency.
D. Field quality-control test reports including the following:
1. Test procedures used.
2. Test results that comply with requirements.
3. Results of failed tests and corrective action taken to achieve test results that
comply with requirements.
E. Panelboard Schedules: For installation in panelboards. Submit final versions after load balancing.
F. Operation and Maintenance Data: For panelboards and components to include in
emergency, operation, and maintenance manuals. Include:
1. Manufacturer's written instructions for testing and adjusting overcurrent protective devices.
2. Time-current curves, including selectable ranges for each type of overcurrent
protective device.
1.4 QUALITY ASSURANCE
A. Testing Agency Qualifications: Testing agency that is a member company of the Inter National Electrical Testing Association and that is acceptable to authorities having jurisdiction.
B. Electrical Components, Devices, and Accessories: labeled as defined in NEC, by a
testing agency acceptable to authorities having jurisdiction, and marked for intended use.
C. Comply with NEMA PB 1.
D. Comply with Latest Edition of NEC.
1.5 PROJECT CONDITIONS
A. Environmental Limitations: Rate equipment for continuous operation under the following conditions, unless otherwise indicated:
1. Ambient Temperature: Not exceeding 40 deg C (104 deg F).
2. Altitude: Not exceeding 2000 m (6600 feet).
B. Service Conditions: NEMA PB 1, usual service conditions, as follows:
1. Ambient temperatures within limits specified.
2. Altitude not exceeding 2000 m (6600 feet).
R.S. ROQUE ARCHITECTS 274
C. Interruption of Existing Electric Service: Do not interrupt electric service to facilities occupied by Post or others unless permitted under the following conditions and then only after arranging to provide temporary electric service according to requirements indicated:
1. Notify COR no fewer than two days in advance of proposed interruption of
electrical service.
2. Do not proceed with interruption of electrical service without COR’s written permission.
D. Unusual Service Condition: Engine generator equipment and installation shall operate under the following conditions.
1. High salt-dust content in the air due to sea-spray evaporation.
1.3 COORDINATION
A. Coordinate layout and installation of panelboards and components with other construction that penetrates walls or is supported by them, including electrical and other types of equipment, raceways, piping and encumbrances to workspace clearance requirements.
1.4 EXTRA MATERIALS
A. Keys: Six spares of each type of panelboard cabinet lock.
PART 2 - PRODUCTS
2.1 FABRICATION AND FEATURES
A. Enclosures: Flush or surface-mounted cabinets. NEMA PB 1, Type 1, to meet environmental conditions at installed location.
1. Outdoor Locations: NEMA 250, Type 4x.
2. Kitchen Areas: NEMA 250, Type 4X, stainless steel.
3. Other Wet or Damp Indoor Locations: NEMA 250, Type 3R.
4. Hazardous Areas Indicated on Drawings: NEMA 250, Type 7C.
5. Separate neutral and grounding buses for all panelboards.
B. Front: Secured to box with concealed trim clamps. For surface-mounted fronts, match
box dimensions; for flush-mounted fronts, overlap box.
C. Hinged Front Cover: Entire front trim hinged to box and with standard door within hinged trim cover.
D. Finish: Manufacturer's standard enamel finish over corrosion-resistant treatment or
primer coat.
R.S. ROQUE ARCHITECTS 275
E. Directory Card: With transparent protective cover, mounted inside metal frame, inside panelboard door.
F. Bus: Hard-drawn copper, 98 percent conductivity.
G. Bus Bars of Power Distribution and Branch Circuit Panelboards: Provide hard drawn
copper. The neutral bus shall be isolated from both the ground bus and the cabinet, except at the service entrance or at the output of separately derived systems and shall be grounded in accordance with the Latest Edition of NEC.
H. Main and Neutral Lugs: Compression type suitable for use with conductor material.
I. Equipment Ground Bus: Adequate for feeder and branch-circuit equipment ground
conductors; bonded to steel enclosure.
J. Service Equipment Label: UL labeled for use as service equipment for panelboards with main service disconnect switches.
K. Future Devices: Mounting brackets, bus connections, and necessary
appurtenances required for future installation of devices.
L. Isolated Equipment Ground Bus: Adequate for branch-circuit equipment ground conductors; insulated from steel enclosure.
M. Neutral Bus: Neutral bus rated 100 percent of phase bus and suitable for nonlinear
loads.
N. Split Bus: Vertical buses divided into individual vertical sections.
O. Skirt for Surface-Mounted Panelboards: Same gage and finish as panelboard front with flanges for attachment to panelboard, wall, and ceiling or floor.
P. Gutter Barrier: Arrange to isolate individual panel sections.
Q. Column-Type/Free Standing Panelboards: Narrow gutter extension, with cover, to
overhead pull box equipped with ground and neutral terminal buses. Feed- through Lugs: Compression type suitable for use with conductor material. Locate at opposite end of bus from incoming lugs or main device.
R. Provide 10 percent spare circuit breakers, 20 percent spaces for future breakers, and
20 percent overall spare current carrying capacity for future expansion.
2.2 PANELBOARD SHORT-CIRCUIT RATING
A. Fully rated to interrupt symmetrical short-circuit current available at terminals.
2.3 LOAD CENTERS
A. Overcurrent Protective Devices: Bolt-on, full-module circuit breaker.
B. Conductor Connectors: Mechanical type for main, neutral, and ground lugs and buses.
R.S. ROQUE ARCHITECTS 276
2.4 LIGHTING AND APPLIANCE BRANCH-CIRCUIT PANELBOARDS
A. Branch Circuit Panelboards: Branch protective devices in panelboards shall be of the bolt-on type circuit breakers. Locate panelboards at the utility area nearest the center of the load. Panelboards shall have main circuit breakers. Where multiple section panelboards are required, each section shall have a main breaker. Size panels as noted above.
B. Branch Overcurrent Protective Devices: Bolt-on circuit breakers, replaceable without
disturbing adjacent units.
C. Doors: Front mounted with concealed hinges; secured with flush latch with twist lock; keyed alike.
2.5 DISTRIBUTION PANELBOARDS
A. Power Distribution Panelboards serving three-phase motors and other power equipment shall be of circuit breaker type. Size the panel bus, lugs, and circuit breakers to match the ratings indicated in the Overcurrent Protective device coordination system fault level.
B. Doors: Front mounted, except omit in fused-switch panelboards; secured with vault-type
latch with twist lock; keyed alike.
C. Main Overcurrent Protective Devices: Circuit breaker.
D. Branch overcurrent protective devices shall be one of the following:
1. For Circuit-Breaker Frame Sizes 125 A and Smaller: Bolt-on circuit breakers.
2. For Circuit-Breaker Frame Sizes Larger Than 125 A: Bolt-on circuit breakers; plug-in circuit breakers where individual positive-locking device requires mechanical release for removal.
3. Fused switches.
2.6 OVERCURRENT PROTECTIVE DEVICES
A. Molded-Case Circuit Breaker: NEMA AB 1, with interrupting capacity to meet available fault currents.
1. Thermal-Magnetic Circuit Breakers: Inverse time-current element for low- level
overloads, and instantaneous magnetic trip element for short circuits. Adjustable magnetic trip setting for circuit-breaker frame sizes 800 A and larger.
2. Adjustable Instantaneous-Trip Circuit Breakers: Magnetic trip element with front-
mounted, field-adjustable trip setting.
3. Electronic Trip Unit Circuit Breakers: RMS sensing; field-replaceable rating plug; with the following field-adjustable settings:
a. Instantaneous trip.
R.S. ROQUE ARCHITECTS 277
b. Long- and short-time pickup levels.
c. Long- and short-time time adjustments.
d. Ground-fault pickup level, time delay, and I2t response.
4. Current-Limiting Circuit Breakers: Frame sizes 400 A and smaller; let- through ratings less than NEMA FU 1, RK-5.
5. Integrally Fused Circuit Breakers: Thermal-magnetic trip element with integral
limiter-style fuse listed for use with circuit breaker; trip activation on fuse opening or on opening of fuse compartment door.
6. GFCI Circuit Breakers: Single- and two-pole configurations with 30-mA trip
sensitivity.
B. Molded-Case Circuit-Breaker Features and Accessories. Standard frame sizes, trip ratings, and number of poles.
1. Lugs: Compression style, suitable for number, size, trip ratings, and material of
conductors.
2. Application Listing: Appropriate for application; Type SWD for switching fluorescent lighting loads; Type HACR for heating, air-conditioning, and refrigerating equipment.
3. Ground-Fault Protection: Remote-mounted relay and trip unit with adjustable
pickup and time-delay settings, push-to-test feature, and ground- fault indicator.
4. Communication Capability: Circuit-breaker-mounted, Universal-mounted, Integral or Din-rail-mounted communication module with functions and features compatible with power monitoring and control system.
5. Shunt Trip: 220 or 240 V trip coil energized from separate circuit, set to trip at 55
percent of rated voltage.
C. Fused Switch: NEMA KS 1, Type HD; clips to accommodate specified fuses; lockable handle.
2.7 CONTROLLERS
A. Motor Controllers: NEMA ICS 2, Class A combination controller equipped for panelboard mounting and including the following accessories:
1. Individual control-power transformers.
2. Fuses for control-power transformers.
3. Bimetallic-element overload relay.
R.S. ROQUE ARCHITECTS 278
4. Melting-alloy overload relay. 5. Indicating lights.
6. Seal-in contact.
7. Four convertible auxiliary contacts.
8. Push buttons.
9. Selector switches.
B. Contactors: NEMA ICS 2, Class A combination controller equipped for panelboard
mounting and including the following accessories:
1. Individual control-power transformers.
2. Fuses for control-power transformers.
3. Indicating lights.
4. Seal-in contact.
5. One convertible auxiliary contacts.
6. Push buttons.
7. Selector switches.
C. Controller Disconnect Switches: Adjustable instantaneous-trip circuit breaker, integrally mounted and interlocked with controller.
1. Auxiliary Contacts: Integral with disconnect switches to de-energize external
control-power source.
D. Contactors in Main Bus: NEMA ICS 2, Class A, mechanically held general-purpose controller.
1. Control-Power Source: Control-power transformer, with fused primary and
secondary terminals, connected to main bus ahead of contactor connection.
2. Control-Power Source: 220 V branch circuit.
2.8 ACCESSORY COMPONENTS AND FEATURES
A. Furnish accessory set including tools and miscellaneous items required for overcurrent protective device test, inspection, maintenance, and operation.
B. Furnish portable test set to test functions of solid-state trip devices without removal
from panelboard.

R.S. ROQUE ARCHITECTS 279
C. Fungus Proofing: Permanent fungicidal treatment for panelboard interior, including overcurrent protective devices and other components.
PART 3 - EXECUTION
3.1 INSTALLATION
A. Install panelboards and accessories according to NEMA PB 1.1.
B. Mounting Heights: Top of trim 1880 mm above finished floor, unless otherwise indicated.
C. Mounting: Plumb and rigid without distortion of enclosure. Mount recessed panelboards with fronts uniformly flush with wall finish.
D. Circuit Directory: Create a directory to indicate installed circuit loads after balancing
panelboard loads. Obtain approval before installing. Use a computer or typewriter to create directory; handwritten directories are not acceptable.
E. Install filler plates in unused spaces.
F. Provision for Future Circuits at Flush Panelboards: Stub four 25mm Ø empty conduits
from panelboard into accessible ceiling space or space designated to be ceiling space in the future. Stub four 25mm Ø empty conduits into raised floor space or below slab not on grade.
G. Wiring in Panelboard Gutters: Arrange conductors into groups and bundle and wrap with
wire ties after completing load balancing.
3.2 IDENTIFICATION
A. Identify field-installed conductors, interconnecting wiring, and components; provide warning signs as specified in Section 26 00 00 Part 3.8 "Identification Materials and Devices".
B. Panelboard Nameplates: Label each panelboard with engraved metal or laminated-
plastic nameplate mounted with corrosion-resistant screws.
3.3 CONNECTIONS
A. Install equipment grounding connections for panelboards with ground continuity to main electrical ground bus.
B. Tighten electrical connectors and terminals according to manufacturer's published
torque-tightening values. If manufacturer's torque values are not indicated, use those specified in UL 486A and UL 486B.
3.4 FIELD QUALITY CONTROL
A. Prepare for acceptance tests as follows:
1. Test insulation resistance for each panelboard bus, component, connecting supply, feeder, and control circuit.
R.S. ROQUE ARCHITECTS 280
2. Test continuity of each circuit.
B. Testing: After installing panelboards and after electrical circuitry has been energized, demonstrate product capability and compliance with requirements. 1. Procedures: Perform each visual and mechanical inspection and electrical test
indicated in NETA ATS, Section 7.5 for switches and Section 7.6 for molded-case circuit breakers. Certify compliance with test parameters.
2. Correct malfunctioning units on-site, where possible, and retest to demonstrate
compliance; otherwise, replace with new units and retest.
C. Balancing Loads: After Substantial Completion, but not more than 60 days after Final Acceptance, measure load balancing and make circuit changes as follows:
1. Measure as directed during period of normal system loading.
2. Perform load-balancing circuit changes outside normal occupancy/working
schedule of the facility and at time directed. Avoid disrupting critical 24- hour services such as fax machines and online data-processing, computing, transmitting, and receiving equipment.
3. After circuit changes, recheck loads during normal load period. Record all load
readings before and after changes and submit test records.
4. Tolerance: Difference exceeding 20 percent between phase loads, within a panelboard, is not acceptable. Rebalance and recheck as necessary to meet this minimum requirement.
D. Infrared Scanning: After Substantial Completion, but not more than 60 days after Final
Acceptance, perform an infrared scan of each panelboard. Remove panel fronts so joints and connections are accessible to portable scanner.
1. Follow-up Infrared Scanning: Perform an additional follow-up infrared scan of each
panelboard 11 months after date of Substantial Completion.
2. Instrument: Use an infrared scanning device designed to measure temperature or to detect significant deviations from normal values. Provide calibration record for device.
3. Record of Infrared Scanning: Prepare a certified report that identifies panelboards
checked and describes scanning results. Include notation of deficiencies detected, remedial action taken, and observations after remedial action.
3.5 ADJUSTING
A. Set field-adjustable switches and circuit-breaker trip ranges.
3.6 CLEANING
A. On completion of installation, inspect interior and exterior of panelboards. Remove paint splatters and other spots. Vacuum dirt and debris; do not use compressed air to assist

R.S. ROQUE ARCHITECTS 281
in cleaning. Repair exposed surfaces to match original finish.
END OF SECTION
R.S.ROQUE ARCHITECTS 282
SECTION 16500 - ELECTRICAL LIGHTING PART 1 - GENERAL 1.01 SCOPE: The contractor or electrical contractor shall supply and install all labor, materials,
tools, transportation, equipment, services and facilities required for the complete, proper and substantial installation of all electrical lighting with electronic ballasts shown on the plans or outlined in this specifications. The installation shall include all the material and devices not specifically mentioned herein or noted on the drawings, but which are necessary to make complete working installation of all electrical system.
1.02 RELATED WORK
A. Section 16400 - Service and distribution B. Section 16050 - Basic Electrical Material and Method
1.03 SUBMITTALS: Utilize the technology, classifications and methods prescribed by the IES
lighting handbooks, as applicable for the data, shop drawings and reports of the lighting system specified.
A. Data
1. Lighting fixtures
B. Shop drawing
1. Lighting fixture assemblies PART 2 - PRODUCTS 2.01 MATERIALS
A. Compact Flourescent Lighting shall be pin light type model FWK480-AMG 1x18W,PL Pin light Lamp, with aluminum reflector and glass, electronic Tridonic Atco Ballast 110V rated, 60Hz. Lamp holder and starter holder shall be BJB brand or approved equal.
B. 2'x4' lighting troffer 2x28watts T5 flourescent tube or approved equal.
C. 25watts wall bracket light
D. 28watts T5 flourescent tube for cove lighting
E. 25watts garden lights F. 30 watts pinlights
PART 3 - EXECUTION 3.01 INSTALLATION
A. Meet with all requirements of NFPA 70. Install all lighting fixtures plumb, level, square with ceiling and walls, in alignment with adjacent lighting fixtures and secure in accordance with the manufacturers direction and approved shop drawings. Mounting of lighting fixtures shall be approved by the Engineer or his representative before installation is started.
R.S.ROQUE ARCHITECTS 283
3.02 FIELD TESTS AND INSPECTION
A. Perform all field-tests and provide all labor, equipment and incidentals required for testing.
B. After installation of fixtures and at such time as the Engineer may require, conduct an
operatingtests for approval. Tests to be performed shall be in the presence of the Engineer or the Engineer.
C. Replace and correct all defective materials and workmanship disclosed as the result of
the tests given herein. Tests shall be such that each time of control equipment will function not less than five times.
3.03 WARRANTY:
A. A warranty for a period of one (1) year shall be provided against failure of components resulting from normal used and/or factory defects.
END OF SECTION
R.S.ROQUE ARCHITECTS 284
SECTION 18 3164 – FIRE DETECTION AND ALARM SYSTEM (FDAS) PART 1 – GENERAL
1.1. GENERAL REQUIREMENTS A. The work to be done in this Technical Specification consists of the Electrical and Auxiliary
Systems and related works, such as but not limited to fabrication, supply, delivery, and installation – complete in all aspects. All works and materials incidental to the completion of the project shall be included herein, except portions of works explicitly stated to be done by others. All works shall be in accordance with the latest edition of the Philippine Electronics Code, the regulations of the locality, the manufacturer’s standards, the requirements of the utility company and this Specification. This specification provides a broad outline of the required system and associated equipment, but not includes all details of equipment’s design and construction.
B. Standards and Codes References:
1. National Electrical Code (NEC)
2. National Fire Alarm and Signaling Code (NFPA 72)
C. Addressable, “open protocol” FDAS shall be provided.
1.2. SYSTEM DESCRIPTION
A. General: Provide a complete, non-coded addressable, microprocessor-based fire alarm system with initiating devices, notification appliances, and monitoring and control devices as indicated on the drawings and as specified herein.
B. Software: The fire alarm system shall allow for loading and editing instructions and operating
sequences as necessary. The system shall be capable of on-site programming to accommodate system expansion and facilitate changes in operation. All software operations shall be stored in a non-volatile programmable memory within the fire alarm control unit. Loss of primary and secondary power shall not erase the instructions stored in memory. System shall be capable of storing dual configuration programs with one active and one in reserve. Panel shall be capable of full system operation during a new configuration download.
C. History Logs: The system shall provide a means to recall alarms and trouble conditions in
chronological order for the purpose of recreating an event history. A separate alarm and trouble log shall be provided.
D. Recording of Events: Record all alarm, supervisory, and trouble events by means of system printer.
The printout shall include the type of signal (alarm, supervisory, or trouble) the device identification, date and time of the occurrence. The printout differentiates alarm signals from all other printed indications.
R.S.ROQUE ARCHITECTS 285
E. Wiring/Signal Transmission:
• Transmission shall be hard-wired using separate individual circuits for each zone of alarm
operation, as required or addressable signal transmission, dedicated to fire alarm service only. • Circuit Supervision: Circuit faults shall be indicated by a trouble signal at the FACP. Provide a
distinctive indicating audible tone and alphanumeric annunciation. • Constant Supervision Audio: When provided, audio notification appliance circuits shall be
supervised during standby by monitoring for DC continuity to end-of-line resistors.
F. Remote Access:
1. A personal computer or technician's laptop, configured with terminal emulation software shall have the ability to access the FACP for diagnostics, maintenance reporting and information gathering.
G. Required Functions: The following are required system functions and operating features:
1. Priority of Signals: Fire alarm events have highest priority. Subsequent alarm events are queued
in the order received and do not affect existing alarm conditions. Priority Two, Supervisory and Trouble events have second-, third-, and fourth-level priority, respectively. Signals of a higher-level priority take precedence over signals of lower priority even though the lower-priority condition occurred first. Annunciate all events regardless of priority or order received.
2. Noninterfering: An event on one zone does not prevent the receipt of signals from any other zone.
All zones are manually resettable from the FACP after the initiating device or devices are restored to normal. The activation of an addressable device does not prevent the receipt of signals from subsequent addressable device activations
3. Annunciation: Operation of alarm and supervisory initiating devices shall be annunciated at the
FACP and the remote annunciator, indicating the type of device, the operational state of the device (i.e alarm, trouble or supervisory) and shall display the custom label associated with the device.
4. Selective Alarm: A system alarm shall include:
a. Indication of alarm condition at the FACP and the annunciator(s). b. Identification of the device /zone that is the source of the alarm at the FACP and the
annunciator(s). c. Operation of audible and visible notification appliances until silenced at FACP. d. Selectively closing doors normally held open by magnetic door holders on the fire floor, floor
above and floor below. e. Unlocking designated doors. f. Shutting down supply and return fans serving zone where alarm is initiated. g. Closing smoke dampers on system serving zone where alarm is initiated. h. Initiation of smoke control sequence. i. Transmission of signal to the supervising station. j. Initiation of elevator Phase I functions (recall, shunt trip, illumination of indicator in cab, etc.)
in accordance with ASME/ANSI A17.1, when specified detectors or sensors are activated, as appropriate.

R.S.ROQUE ARCHITECTS 286
5. Supervisory Operations: Upon activation of a supervisory device such as a fire pump power failure, tamper switch, the system shall operate as follows:
a. Activate the system supervisory service audible signal and illuminate the LED at the control
unit and the remote annunciator. b. Pressing the Supervisory Acknowledge Key will silence the supervisory audible signal while
maintaining the Supervisory LED "on" indicating off-normal condition. c. Record the event in the FACP historical log. d. Transmission of supervisory signal to the supervising station. e. Restoring the condition shall cause the Supervisory LED to clear and restore the system to
normal.
6. Alarm Silencing: If the "Alarm Silence" button is pressed, all audible and visible alarm signals shall cease operation.
7. System Reset
a. The "System Reset" button shall be used to return the system to its normal state. Display
messages shall provide operator assurance of the sequential steps ("IN PROGRESS", "RESET COMPLETED") as they occur. The system shall verify all circuits or devices are restored prior to resetting the system to avoid the potential for re-alarming the system. The display message shall indicate "ALARM PRESENT, SYSTEM RESET ABORTED”.
b. Should an alarm condition continue, the system will remain in an alarmed state.
8. A manual evacuation (drill) switch shall be provided to operate the notification appliances without causing other control circuits to be activated.
H. Smoke Detectors: Maintenance and testing service providing the following shall be included with the
base bid:
1. Biannual sensitivity reading and logging for each smoke sensor. 2. Scheduled biannual threshold adjustments to maintain proper sensitivity for each smoke
sensor. 3. Threshold adjustment to any smoke sensor that has alarmed the system without the presence
of particles of combustion. 4. Scheduled biannual cleaning or replacement of each smoke detector or sensor within the
system. 5. Semi-annual functional testing of each smoke detector or sensor using the manufacturer's
calibrated test tool. 6. Written documentation of all testing, cleaning, replacing, threshold adjustment, and sensitivity
reading for each smoke detector or sensor device within the system. 7. The initial service included in the bid price shall provide the above listed procedures for a
period of five years after employer acceptance of the system.
I. Audible Alarm Notification: By voice evacuation and tone signals on loudspeakers in areas as indicated on drawings.
1. Automatic Voice Evacuation Sequence:
R.S.ROQUE ARCHITECTS 287
a. The audio alarm signal shall consist of an alarm tone for a maximum of five seconds followed by an automatic digital voice message. At the end of the voice message, the alarm tone shall resume. This sequence shall sound continuously until the "Alarm Silence" switch is activated.
b. All audio operations shall be activated by the system software so that any required future changes can be facilitated by authorized personnel without any component rewiring or hardware additions.
J. Manual Voice paging
1. The system shall be configured to allow voice paging. Upon activation of any speaker manual control switch, the alarm tone shall be sounded over all speakers in that group.
2. The control panel operator shall be able to make announcements via the push-to-talk paging microphone over the pre-selected speakers.
3. Total building paging shall be accomplished by the means of an "All Call" switch.
K. Firefighter's phone: Provide a supervised, two-way communication system between the Command Center/main fire alarm control panel and emergency phones.
1. The firefighter's phone system shall be capable of handling single or simultaneous conversations
with all phones connected into the system. As many as six phones shall be able to be connected into the active conversation.
2. The phone system circuits shall be designed to prevent static, hum or other interference for clear, intelligible two-way conversation between all phones of the system.
3. The phone system circuits shall be supervised, such that the FACP shall be able to differentiate between whether a handset has been plugged into the emergency phone jack and whether the circuit has a shorted wire.
4. A beeping busy signal shall indicate to the person attempting to use a remote phone that the signal is being received at the control unit and that the lines are intact.
5. The act of plugging a handset into an emergency phone jack or removal of any phone from its normal hook position shall cause an audible and visual indication at the control unit. Picking up of the master phone and acknowledgment of the phone circuit shall silence the tone and allow for direct two-way communications.
6. The act of unplugging handsets in use and replacement of remote phones to their cradle shall restore normal supervisory functions.
7. Provide emergency phone jacks as shown on the plans. Each jack shall be mounted on a stainless-steel single gang plate with the words "Fire Emergency Phone" screened on each.
8. Provide a minimum of five (5) pluggable emergency phones within a storage cabinet.
L. Fire Suppression Monitoring:
1. Water flow: Activation of a water flow switch shall initiate general alarm operations. 2. Sprinkler valve tamper switch: The activation of any valve tamper switch shall activate system
supervisory operations.
M. Power Requirements:
1. The control unit shall receive AC power via a dedicated fused disconnect circuit.
R.S.ROQUE ARCHITECTS 288
2. The system shall be provided with sufficient battery capacity to operate the entire system upon loss of normal AC power in a normal supervisory mode for a period of 24 hours with 10 minutes of alarm operation at the end of this period. The system shall automatically transfer to battery standby upon power failure. All battery charging and recharging operations shall be automatic.
3. All circuits requiring system-operating power shall be 24 VDC and shall be individually fused at the control unit.
4. The incoming power to the system shall be supervised so that any power failure will be indicated at the control unit. A green "power on" LED shall be displayed continuously at the user interface while incoming power is present.
5. The system batteries shall be supervised so that a low battery or a depleted battery condition, or disconnection of the battery shall be indicated at the control unit and displayed for the specific fault type.
6. The system shall support NAC Lockout feature to prevent subsequent activation of Notification Appliance Circuits after a Depleted Battery condition occurs in order to make use of battery reserve for front panel annunciation and control.
7. The system shall support 100% of addressable devices in alarm or operated at the same time, under both primary (AC) and secondary (battery) power conditions.
8. Loss of primary power shall sound a trouble signal at the FACP. FACP shall indicate when the system is operating on an alternate power supply.
1.3. SUBMITTALS
A. General: Submit the following according to condition of contract 1. Product Data: Product data sheets for the system components highlighted to indicate the
specific products, features, or functions required to meet this specification. Alternate or as-equal submitted under this contract must provide a detailed line-by-line comparison of how the submitted product meets, exceeds, or does not comply with the specification.
2. Wiring diagrams for the manufacturer.
3. Shop drawings showing system details including location of FACP, all devices, circuiting and details of graphic annunciator.
4. System power and battery charts with performance graphs and voltage drop calculations to
assure that the system will operate in accordance with the prescribed backup time periods and under all voltage conditions per UL and NFPA standards.
5. System operation description including method of operation and supervision of each type of
circuit and sequence of operations for all manually and automatically initiated system inputs and outputs. A list of all input and output points in the system shall be provided with a label indicating location or use of IDC, SLC, NAC, relay, sensor, and auxiliary control circuits.
6. Operation instruction for FACP.
7. Operation and maintenance data for inclusion in Operating and Maintenance Manual. Include
data for each type product, including all features and operating sequences, both automatic and manual. Provide the names, addresses, and telephone numbers of service organizations.
R.S.ROQUE ARCHITECTS 289
8. Product certification signed by the manufacturer of the fire alarm system components certifying that their products comply with indicated requirements.
9. Record of field tests of system.
B. Submission to Authority Having Jurisdiction: In addition to routine submission of the above
material, make an identical submission to the authority having jurisdiction. Include copies of shop drawings as required to depict component locations to facilitate review. Upon receipt of comments from the Authority, make resubmissions, if required, to make clarifications or revisions to obtain approval.
C. Qualifications: Qualified personnel include individuals who can demonstrate experience on similar system and have the following qualifications:
1. Factory trained and certified in fire alarm system design.
2. Licensed or certified by a local authority.
1.4. QUALITY ASSURANCE
A. Installation personnel shall be supervised by persons who are qualified and experienced in the
installation, inspection, and testing of fire alarm systems.
B. Each and every item of the Fire Alarm System shall be listed under the appropriate category by Underwriters Laboratories, Inc. (UL), and shall bear the “UL “label.
C. Comply with NFPA 72.
1.5. MAINTENACE ASSSURANCE
A. Maintenance Service Contract: Provide maintenance of fire alarm systems and equipment for a period of 12 months, using factory-authorized service representatives.
B. Basic Services: Systematic, routine maintenance visits on a quarterly basis at times scheduled with the Employer. In addition, respond to service calls within 24 hours of notification of system trouble. Adjust and replace defective parts and components with original manufacturer's replacement parts, components, and supplies.
C. Additional Services: Perform services within the above 12-month period not classified as routine maintenance or as warranty work when authorized in writing. Compensation for additional services must be agreed upon in writing prior to performing services.
D. Renewal of Maintenance Service Contract: No later than 60 days prior to the expiration of the maintenance services contract, deliver to the Employer a proposal to provide contract maintenance and repair services for an additional one-year term. Employer will be under no obligation to accept maintenance service contract renewal proposal.

R.S.ROQUE ARCHITECTS 290
1.6. EXTRA MATERIALS
A. General: Furnish extra materials, packaged with protective covering for storage, and identified with labels clearly describing contents as follows:
1. Break Rods for Manual Stations: Furnish quantity equal to 15 percent of the number of manual stations installed; minimum of 6 rods.
2. Notification Appliances: Furnish quantity equal to 10 percent of each type and number of units installed, but not less than one of each type.
3. Smoke Detectors or Sensors, Fire Detectors, and Flame Detectors: Furnish quantity equal to 10 percent of each type and number of units installed but not less than one of each type.
4. Detector or Sensor Bases: Furnish quantity equal to 2 percent of each type and number of units installed but not less than one of each type.
5. Printer Ribbons: Furnish 6 spare printer ribbons.
1.7. COORDINATION A. Coordinate the work in this section with other sections as required ensuring that the entire
work will be carried out in orderly, complete, and organized fashion.
1.8. SYSTEM REQUIREMENTS
A. Positive alarm sequence provides a timed delay of general alarm signal in a building and at a supervising station. This gives a trained responder up to 3 minutes to investigate the cause of an alarm signal. The time limits to acknowledge the alarm signal and reset the system are designed to assure all alarm system functions are actuated in the event personnel are not available to acknowledge, investigate and reset the alarm. The presignal feature is usually used only in special occupancies where fire does not necessarily pose an immediate threat to the occupants.
B. The signal from an automatic fire detection device selected for positive alarm sequence operation shall be acknowledge at the control unit by trained personnel within 15 seconds of annunciating in order to initiate the alarm investigation phase. If the signal is not acknowledged within 15 seconds, notification signals in accordance with the building evacuation or relocation plan and remote signals shall be automatically and immediately activated.
C. Trained personnel shall have up to 180 seconds during the alarm investigation phase to evaluate the fire condition and reset the system. If the system is not reset during the investigation phase, notification signals in accordance with the building evacuation or relocation plan and remote signals shall be automatically and immediately activated.
D. If a second automatic fire detector selected for positive alarm sequence is actuated during the alarm investigation phase, notification signals in accordance with the building evacuation or relocation plan and remote signals shall be automatically and immediately activated.
R.S.ROQUE ARCHITECTS 291
E. The system shall provide means for bypassing the positive alarm sequence.
PART 2 – PRODUCT
1.1. EQUIPMENT A. Equipment constructed and installed in conformity with the Code shall be listed for the
purpose for which it is used. Fire alarm system components shall be installed in accordance with manufactures installation instruction and NFPA 72.
1.2. Fire Alarm Control Panel (FACP)
A. A system component that receives inputs from automatic and manual fire alarm devices and might supply power to detection devices and to a transponder(s) or off premises transmitter(s).
B. FACP shall be properly protected in any possibility of damage by induced transients.
C. The FACP shall be key operated, located within a locked enclosure, or arranged to provide equivalent protection against unauthorized use.
D. The following FACP hardware shall be provided:
1. Power limited base panel with red cabinet and door, 120 VAC input power.
2. 2,000-point capacity where (1) point equals (1) monitor (input) or (1) control (output).
3. 2,000-points of Network Annunciation at FACP Display when applied as a Network node.
4. 2,000 points of annunciation where one (1) point of annunciation equals:
a. 1 LED driver output on a graphic driver or 1 switch input on a graphic switch input module.
b. 1 LED on panel or 1 switch on panel.
5. From all battery charging circuits in the system provide battery voltage and ammeter readouts on the FACP LCD Display.
6. One Auxiliary Relay, SPDT 2A @32VDC, programmable as a trouble relay, either as
normally energized or de-energized, or as an auxiliary control.
7. Power Supplies with integral intelligent Notification Appliance Circuit Class A for system expansion.
8. Four (4) form "C" Auxiliary Relay Circuits (Form C contacts rated 2A @ 24VDC, resistive),
operation is programmable for trouble, alarm, supervisory of other fire response functions. Relays shall be capable of switching up to ½ A @ 120VAC, inductive.
R.S.ROQUE ARCHITECTS 292
9. The FACP shall support (6) RS-232-C ports and one service port.
10. Remote Unit Interface: supervised serial communication channel for control and monitoring of remotely located annunciators and I/O panels.
11. Modular Network Communications Card.
1.3. System Components
A. Heat Sensing Fire Detector (Rate of Rise).
1. Thermal Sensor: Combination fixed-temperature and rate-of-rise unit with plug-in base and alarm indication lamp; 135-deg F fixed-temperature setting except as indicated.
2. Thermal sensor shall be of the epoxy encapsulated electronic design. It shall be thermistor-based, rate-compensated, self-restoring and shall not be affected by thermal lag.
3. Sensor fixed temperature sensing shall be independent of rate-of-rise sensing and]
programmable to operate at 135-deg F or 155-deg F. Sensor rate-of-rise temperature detection shall be selectable at the FACP for either 15-deg F or 20-deg F per minute
4. Sensor shall have the capability to be programmed as a utility monitoring device to monitor
for temperature extremes in the range from 32-deg F to 155-deg F.
B. Smoke Sensing Fire Detector. (Photoelectric)
1. General: Comply with UL 268, "Smoke Detectors for Fire Protective Signaling Systems." Include the following features:
• Factory Nameplate: Serial number and type identification.
• Operating Voltage: 24 VDC, nominal.
• Self-Restoring: Detectors do not require resetting or readjustment after actuation to restore normal operation.
• Each sensor base shall contain an LED that will flash each time it is scanned by the Control Unit (once every 4 seconds). In alarm condition, the sensor base LED shall be on steady.
• Each sensor base shall contain a magnetically actuated test switch to provide for easy alarm testing at the sensor location.
• Each sensor shall be scanned by the Control Unit for its type identification to prevent inadvertent substitution of another sensor type. Upon detection of a "wrong device", the control unit shall operate with the installed device at the default alarm settings for that
R.S.ROQUE ARCHITECTS 293
sensor; 2.5% obscuration for photoelectric sensor, 135-deg F and 15-deg F rate-of-rise for the heat sensor, but shall indicate a "Wrong Device" trouble condition.
• The sensor's electronics shall be immune from nuisance alarms caused by EMI and RFI.
• Sensors include a communication transmitter and receiver in the mounting base having a unique identification and capability for status reporting to the FACP. Sensor address shall be located in base to eliminate false addressing when replacing sensors.
• Removal of the sensor head for cleaning shall not require the setting of addresses.
2. Type: Smoke sensors shall be of the photoelectric or combination photoelectric / heat type.
3. Bases: Relay output, sounder and isolator bases shall be supported alternatives to the standard base.
C. Addressable manual Pull Stations.
1. Description: Addressable single- or double-action type, red LEXAN, with molded, raised-letter operating instructions of contrasting color. Station will mechanically latch upon operation and remain so until manually reset by opening with a key common with the control units.
D. Voice Alarm: Provide an emergency communication system, integral with the FACP, including voice alarm system components, microphones, amplifiers, and tone generators. Features include:
1. Amplifiers comply with UL 1711, "Amplifiers for Fire Protective Signaling Systems." Amplifiers shall provide an onboard local mode temporal coded horn tone as a default backup tone. Test switches on the amplifier shall be provided to test and observe amplifier backup switchover. Each amplifier shall communicate to the host panel amplifier and NAC circuit voltage and current levels for display on the user interface. Each amplifier shall be capable of performing constant supervision for non-alarm audio functions such as background music and general paging.
2. All announcements are made over dedicated, supervised communication lines. All risers shall support Class A wiring for each audio channel.
3. Status annunciator indicating the status of the various voice alarm speaker zones and the status of fire fighter telephone two-way communication zones.
E. Fire fighters' telephone communication system: Arrange system to use dedicated, two-way, supervised voice communication links between the FACP and remote fire fighters' telephone stations throughout the building.
R.S.ROQUE ARCHITECTS 294
F. Cabinet: Lockable steel enclosure. Arrange unit so all operations required for testing or for normal care and maintenance of the system are performed from the front of the enclosure. If more than a single unit is required to form a complete control unit, provide exactly matching modular unit enclosure.
G. Alphanumeric Display and System Controls: Panel shall include an 80-character LCD display to indicate alarm, supervisory, and component status messages and shall include a keypad for use in entering and executing control commands.
1. The system shall have the capability to provide expanded content, multi-line, operator interface displays as indicated on the drawings and specifications. The expanded content multi-line displays shall be Quarter-VGA (QVGA) or larger and be capable of supporting a minimum of 854 standard ASCII characters to minimize or eliminate the levels of navigation required for access to information when responding to critical emergencies and abnormal system conditions. The QVGA operator interface shall provide operator prompts and six contexts sensitive soft-keys for intuitive operative.
a. Expanded content, multi-line operator interfaces shall be capable of providing the following functions:
1.a. Dual language operation with Instant-Switch language selection during runtime.
1.b. Activity display choices for:
• First 8 Events. • First 5 Events and Most Recent Event (with first and most recent event time and date
stamps). • First Event and Most Recent Event (with first and most recent event time and date
stamps). • Scrollable List Display displays a scrollable list of active points for the event category
(alarm, priority 2, supervisory, or trouble) selected. The position in this list will be the last acknowledged point (not flashing) at the top followed by the next 7 unacknowledged points (flashing).
• General Event Status (alarm, priority 2, supervisory, or trouble in system). • Site plan.
1.c. Equal or hierarchal priority assignment. In systems with two or more operator interfaces, each operator interface shall be programmable to allow multiple operator interfaces to have equal operation priority or to allow hierarchal priority control to be assigned to

R.S.ROQUE ARCHITECTS 295
individual operator interfaces (locations).
1.d. Up to 50 custom point detail messages for providing additional point specific information in detailed point status screens.
1.e. Bitmap file import for operator interface display of site plan and background watermark images. Site plan status icons shall indicate area status for highest priority active events.
b. Expanded content, multi-line displays shall have the capability to provide Dual-Language operation as indicated on the drawings and specifications.
1.a. language selection shall be via a switch on the operator interface panel. Operator interface panels shall support instant-language-switchover during runtime to allow the operator to toggle between languages each time the language selection switch is operated, without requiring complicated multi-step processes.
1.b. Both one-byte and two-byte characters shall be supported.
1.4. Fire Fighters Telephones
1. Telephone Hand Sets: High-impact plastic handset, heavy-duty coil cord, and hook switch; connected to the FACP by means of dedicated, supervised communication lines. Handsets have a dynamic receiver and a carbon transmitter, operating on 24VDC.
2. A black master telephone handset with a push to talk button and a flexible-coiled self-winding
five (5) foot cord shall be provided and recessed within a protective unit-mounted enclosure at the command center.
3. Cabinet: Flush- or surface-mounted as indicated, 18-gage, minimum, painted steel with a
latched hinged door with trim labeled "Fire Fighters' Phone." Size to accommodate handset and cord.
1.5. Remote CRTS, PC annunciator and printers
1. Each RS-232-C port shall be capable of supporting and supervising a remote Printer; the FACP
shall support as many as two (2) remote displays. The Fire Alarm Control Panel shall support five (5) RS-232-C ports.
1.6. Remote LCD annunciator
R.S.ROQUE ARCHITECTS 296
1. Provide a remote LCD Annunciator, where required, with the same "look and feel" as the FACP
operator interface. The Remote LCD Annunciator shall use the same Primary Acknowledge, Silence, and Reset Keys; Status LEDs and LCD Display as the FACP.
2. Annunciator shall have super-twist LCD display with two lines of 40 characters each. Annunciator
shall be provided with four (4) programmable control switches and associated LEDs.
3. Under normal conditions the LCD shall display a "SYSTEM IS NORMAL" message and the current time and date.
4. Should an abnormal condition be detected the appropriate LED (Alarm, Supervisory or Trouble)
shall flash. The unit audible signal shall pulse for alarm conditions and sound steady for trouble and supervisory conditions.
5. The LCD shall display the following information relative to the abnormal condition of a point in the
system: • 40-character custom location label. • Type of device (e.g., smoke, pull station, waterflow). • Point status (e.g., alarm, trouble).
6. Operator keys shall be key switch enabled to prevent unauthorized use. The key shall only be removable in the disabled position. Acknowledge, Silence and Reset operation shall be the same as the FACP.
1.7. Emergency Power Supply
A. General: Components include battery, charger, and an automatic transfer switch.
B. Battery: Sealed lead-acid or nickel cadmium type. Provide sufficient capacity to operate the
complete alarm system in normal or supervisory (non-alarm) mode for a period of 24 hours. Following this period of operation on battery power, the battery shall have sufficient capacity to operate all components of the system, including all alarm notification devices in alarm mode for a period of 10 minutes.
1.8. Addressable Circuit Interface Modules
A. Addressable Circuit Interface Modules: Arrange to monitor or control one or more system
components that are not otherwise equipped for addressable communication. Modules shall be used for monitoring of waterflow, valve tamper, non-addressable devices, and for control of AHU systems.
B. Addressable Circuit Interface Modules will be capable of mounting in a standard electric outlet
box. Modules will include cover plates to allow surface or flush mounting. Modules will receive their operating power from the signaling line circuit or a separate two wire pair running from an appropriate power supply, as required
C. All Circuit Interface Modules shall be supervised and uniquely identified by the control unit.
Module identification shall be transmitted to the control unit for processing according to the
R.S.ROQUE ARCHITECTS 297
program instructions. Modules shall have an on-board LED to provide an indication that the module is powered and communicating with the FACP. The LEDs shall provide a troubleshooting aid since the LED blinks on poll whenever the peripheral is powered and communicating.
1.9. Wires and Conduits
A. Wires
1. Wiring shall be in accordance to National Electrical Code.
2. Wiring for fire alarm shall be not less than to 18AWG (1.0 mm dia.). Only copper conductors shall be permitted to use for fire alarm.
3. Wiring shall be Listed or approved by a recognized testing agency.
4. Wiring shall be fire resistance if not installed in metallic conduit or not embedded.
B. Conduit
1. Conduit shall be in accordance to National Electrical Code (N.E.C.).
2. Number of conductors in conduit or raceway shall not exceed to percentage fill specified in National Electrical Code.
3. RNC conduit shall be scheduled 40 and shall be embedded.
PART 3 – EXECUTION
3.1. INSTALLATION, GENERAL
A. Install system components and all associated devices in accordance with applicable NFPA Standards and manufacturer's recommendations.
B. Installation personnel shall be supervised by persons who are qualified and experienced in the
installation, inspection, and testing of fire alarm systems. Examples of qualified personnel shall include, but not be limited to, the following:
• Factory trained and certified personnel. • Personnel licensed or certified by state or local authority.
3.2. EQUIPMENT INSTALLATION
A. Furnish and install a complete Fire Alarm System as described herein and as shown on the plans. Include sufficient control unit(s), annunciator(s), manual stations, automatic fire detectors, smoke detectors, audible and visible notification appliances, wiring, terminations, electrical boxes, and all other necessary material for a complete operating system.

R.S.ROQUE ARCHITECTS 298
B. Existing Fire Alarm Equipment shall be maintained fully operational until the new equipment has been tested and accepted
C. Equipment Removal: After acceptance of the new fire alarm system, disconnect and remove the
existing fire alarm equipment and restore damaged surfaces. Package operational fire alarm and detection equipment that has been removed and deliver to the Employer. Remove from the Site and legally dispose of the remainder of the existing material
D. Water-Flow and Valve Supervisory Switches: Connect for each sprinkler valve required to be
supervised
E. Device Location-Indicating Lights: Locate in the public space immediately adjacent to the device they monitor
F. Install manual station with operating handle 48 inches (1.22 m) above floor. Install wall mounted
audible and visual notification appliances not less than 80 inches (2.03 m) above floor to bottom of lens and not greater than 96 inches (2.44 m) above floor to bottom of lens
G. Mount outlet box for electric door holder to withstand 80 pounds pulling force
H. Make conduit and wiring connections to sprinkler flow switches, sprinkler valve tamper switches, fire
suppression system control panels, duct smoke detectors.
3.3. PREPARATION
A. Coordinate work of this Section with other affected work and construction schedule.
3.4. WIRING INSTALLATION
A. System Wiring: Wire and cable shall be a type listed for its intended use by an approval agency
acceptable to the Authority Having Jurisdiction and shall be installed in accordance with the appropriate articles from the current approved edition of NFPA 70: National Electric Code (NEC).
B. Contractor shall obtain from the Fire Alarm System Manufacturer written instruction regarding the
appropriate wire/cable to be used for this installation. No deviation from the written instruction shall be made by the Contractor without the prior written approval of the Fire Alarm System Manufacturer.
C. Color Coding: Color-code fire alarm conductors differently from the normal building power wiring. Use
one color code for alarm initiating device circuits wiring and a different color code for supervisory circuits. Color-code notification appliance circuits differently from alarm-initiating circuits. Paint fire alarm system junction boxes and covers red.
D. Terminate circuit in control panel for Class "A" supervision.
E. Ethernet circuits shall be provided to the Fire Alarm Control Panel and Graphical Workstation Remote
Clients as shown on the plans.
3.5. FIELD QUALITY CONTROL
R.S.ROQUE ARCHITECTS 299
A. Manufacturer's Field Services: Provide services of a factory-authorized service representative to supervise the field assembly and connection of components and the pretesting, testing, and adjustment of the system.
B. Service personnel shall be qualified and experienced in the inspection, testing, and maintenance of
fire alarm systems. Examples of qualified personnel shall be permitted to include, but shall not be limited to, individuals with the following qualifications:
• Factory trained and certified. • Certified by a state or local authority. • Trained and qualified personnel employed by an organization listed by a national
testing laboratory for the servicing of fire alarm systems.
C. Pretesting: Determine, through pretesting, the conformance of the system to the requirements of the Drawings and Specifications. Correct deficiencies observed in pretesting. Replace malfunctioning or damaged items with new and retest until satisfactory performance and conditions are achieved.
D. Inspection:
• Inspect equipment installation, interconnection with system devices, mounting
locations, and mounting methods. • Verify that units and controls are properly installed, connected, and labeled and that
interconnecting wires and terminals are identified.
E. Acceptance Operational Tests:
1. Perform operational system tests to verify conformance with specifications:
• Each alarm initiating device installed shall be operationally tested. Each device shall be tested for alarm and trouble conditions. Contractor shall submit a written certification that the Fire Alarm System installation is complete including all punch-list items. Test battery operated emergency power supply. Test emergency power supply to minimum durations specified. Test Supervising Station Signal Transmitter. Coordinate testing with Supervising Station monitoring firm/entity.
• Test each Notification Appliance installed for proper operation. Submit written report
indicating sound pressure levels at specified distances. • Test Fire Alarm Control Panel and Remote Annunciator.
2. Provide minimum 10 days’ notice of acceptance test performance schedule to Employer, and local Authority Having Jurisdiction.
F. Retesting: Correct deficiencies indicated by tests and completely retest work affected by such
deficiencies. Verify by the system test that the total system meets the Specifications and complies with applicable standards.
R.S.ROQUE ARCHITECTS 300
G. Report of Tests and Inspections: Provide a written record of inspections, tests, and detailed test results in the form of a test log. Use NFPA 72 Forms for documentation.
H. Final Test, Record of Completion, and Certificate of Occupancy: Test the system as required by the
Authority Having Jurisdiction in order to obtain a certificate of occupancy. Provide completed NFPA 72 Record of Completion form to Employer and AHJ.
3.6. CLEANING AND ADJUSTING
A. Cleaning: Remove paint splatters and other spots, dirt, and debris. Clean unit internally using methods and materials recommended by manufacturer.
B. Occupancy Adjustments: When requested within one year of date of Substantial Completion, provide
on-site assistance in adjusting sound pressure levels and adjusting controls and sensitivities to suit actual occupied conditions. Provide up to three visits to the Site for this purpose.
3.7. TRAINING
N. Provide the services of a factory-authorized service representative to demonstrate the system and
train Employer's maintenance personnel as specified below.
1. Train Employer's maintenance personnel in the procedures and schedules involved in operating, troubleshooting, servicing, and preventive maintaining of the system. Provide a minimum of 8 hours' training.
2. Schedule training with the Employer at least seven days in advance.
END OF SECTION