GAME MANUAL
214
GAME MANUAL
-
Upload
khangminh22 -
Category
Documents
-
view
0 -
download
0
Transcript of GAME MANUAL

Game manual

Contents1. Introduction 7
1.1. System Requirements 81.2. Installing the Game 81.3. Uninstalling the Game 91.4. Product Updates 91.5. Multi-Player Registration 91.6. Game Forums 10
2. Historical Overview 10
3. Basic Gameplay 113.1. In-game Tutorials 113.2. The Manual 123.3. Scenarios 133.4. Key Concepts: Progression and Decline 133.5. Key Concepts: Your Nation 163.6. Key Concepts: Armies and Warfare 213.7. Turn Resolution 233.8. Link to Field of Glory 2 23
4. Getting Started 244.1. AI Levels and Game Options 244.2. Setting up 274.3. Information available on the Main Map 35
5. Regions and Provinces 395.1. Regions 405.2. Provinces 46

6. Managing Your Empire 506.1. Trading and Trade Goods 506.2. Buildings 566.3. Population Management 666.4. Loyalty and Unrest 726.5. Supply and Food Production 776.6. Income and Costs 79
7. Ruling Your Empire 807.1. Rulers 817.2. Government Type 817.3. Civilization Levels 817.4. Progression and Regression across Civilization Levels 837.5. Civil Wars 877.6. Government Age 897.7. Specific Rules for the Diadochi 907.8. Destruction and Rebirth of a Nation 907.9. The Nation Panel 91
8. Culture, Decadence and Legacy 948.1. Culture and Decadence 958.2. Legacy 988.3. Winning the Game 100
9. Diplomacy 1019.1. The Diplomacy Display 1019.2. Diplomatic Messages 1029.3. Diplomatic Relations 1029.4. Diplomatic Options 103

9.5. Implications of Positive Relations 1079.6. Risk of an attack 108
10. Military Units 10810.1. Issuing Orders 10910.2. Unit Types 11010.3. Combining Land and Naval Units 11210.4. Leaders 11210.5. Unit Information 11510.6. Recruitment 12010.7. Combat and Battles 12310.8. Raiding and Pirates 13110.9. Sieges 132
11. Combat and Field of Glory 2 13511.1. Before you can make the link 13611.2. Exporting a Battle 13611.3. Saving an ongoing battle 13911.4. Converting back to Field of Glory: Empires 140
12. Decisions 14012.1. Available to a level 1 Government 14012.2. Available at higher levels 14012.3. Enacting Decisions 14112.4. Variable Costs of Decisions 142
13. Weather 143
14. Editing the Game 143
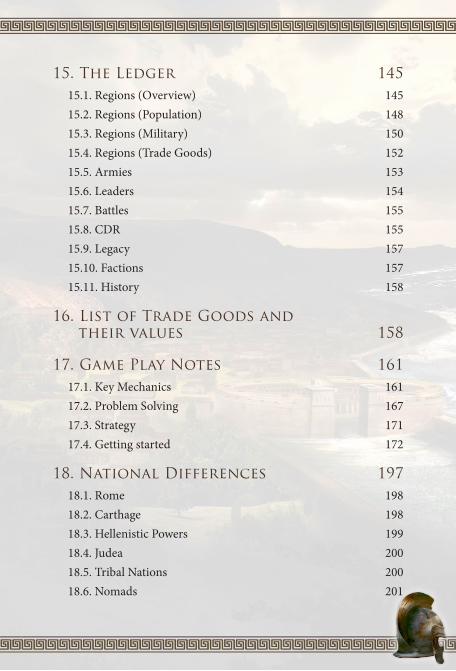
15. The Ledger 14515.1. Regions (Overview) 14515.2. Regions (Population) 14815.3. Regions (Military) 15015.4. Regions (Trade Goods) 15215.5. Armies 15315.6. Leaders 15415.7. Battles 15515.8. CDR 15515.9. Legacy 15715.10. Factions 15715.11. History 158
16. List of Trade Goods and their values 158
17. Game Play Notes 16117.1. Key Mechanics 16117.2. Problem Solving 16717.3. Strategy 17117.4. Getting started 172
18. National Differences 19718.1. Rome 19818.2. Carthage 19818.3. Hellenistic Powers 19918.4. Judea 20018.5. Tribal Nations 20018.6. Nomads 201

19. Design Notes 20119.1. Decline and Fall 20319.2. Combat 20519.3. Unique nations 20719.4. Trade 20819.5. Provinces 21019.6. Winning 21119.7. Having fun 212
20. Credits 212

7
1. Introduction
Field of Glory: Empires is a grand strategy game starting just after the death of Alexander the Great. At this stage Rome is not even the dominant power in Italy and Alexander’s empire is being fought over by his successors (the Diadochi).
Every faction in the game is playable (including those that may emerge as the game progresses – to do this you will need to swap your faction once the game has reached a suitable stage) but some provide more opportunities than others.
The player(s) have considerable choice in how they lead their nation forward. It is possible to win by building a small, cultured, economically rich state. Equally you can win by generating substantial legacy even as your aged, decadent, Empire crumbles around you.
A key feature of the game is the interplay between culture (mostly acquired by owning certain buildings) and decadence (derived from other buildings, conquest and the age of your government). Over time, the need to sustain the loyalty of your population will create problems managing decadence setting the scene for the decline of even the most powerful Empire.
To win, you need to build up your legacy. Conquering your objectives, owning some world renowned buildings and how long your government has existed will all contribute to your legacy. Thus an old, and possibly decaying, Empire will generate a lot of legacy – you will be remembered even as your Empire slips into decline.

8
1.1. System Requirements
Minimum Spec
Windows 7, 8, 102GHz processor4 GB Ram, 2 GB of HD spaceDirectX Compatible Sound Card1 GB DirectX 9 Compatible Graphics CardSlower Intel integrated video cards will require the game to run on lower graphics settings
Recommended Spec
As above but:2 GB dedicated DirectX 9 Compatible Graphics CardPlease ensure your graphics and sound drivers are up to date before playing the game or you may experience graphical glitches or more serious errors. Check your manufacturer’s website for the latest version, as new drivers are released regularly.
1.2. Installing the GamePlease ensure that your system meets the minimum requirements listed above.
If you purchased from the Slitherine or Matrix site you will have been provided a download link for the games installer. Have your Serial Number ready as you will need to enter it as part of the installation process. The Serial Number is included in the order receipt for downloads, or printed on the disk or box for hard copies. To install the game, either double click on the installation file you downloaded or insert the game’s disk into your drive (if you have disabled the auto run function on your CDROM double click on the installation archive file, then double click on the file that is shown inside the archive). Follow all on-screen prompts to complete

9
installation. If you have redeemed a Steam key or purchased via Steam you can also launch the game on Steam.
1.3. Uninstalling the GamePlease use the Add/Remove Programs option from the Windows Control Panel or the Uninstall shortcut in the games Windows “Start” menu folder to uninstall the game. Uninstalling through any other method will not properly uninstall the game.
1.4. Product UpdatesIn order to maintain our product excellence, Slitherine releases updates containing new features, enhancements, and corrections to any known issues. All our updates are available free on our website (www.slitherine.com) and can also be downloaded quickly and easily by clicking on the “Update” link in your Game Launcher or by using the “Update Game” shortcut in your Windows “Start” menu folder for the game.
If you have the Steam version, Steam will update it according to your settings.
1.5. Multi-Player RegistrationIf you bought the game directly from us, we highly recommend registering your game first before playing. You can simply do this through the game menu, from Multiplayer or directly at Slitherine’s website at:
https://www.slitherine.com/members/signup.aspThis is because you will need a registered account to play Multiplayer
games on Slitherine’s PBEM (play by e-mail) server. When registering you can choose to sign up to the newsletters to receive regular updates, offers and discounts on the rest of Slitherine’s catalogue so it is worth registering!
Steam users cannot currently register though are able to play multiplayer

10
1.6. Game ForumsOur forums are one of the best things about Slitherine. Every game has its own forum with our designers, developers and the gamers playing the game contributing ideas and discussing the game. If you are experiencing a problem, have a question or just an idea on how to make the game better, post a message there.
Go to www.slitherine.com and click on the Forums hyperlink
2. Historical Overview
Field of Glory: Empires starts in 310BCE, just after the death of Alexander. His generals have carved out their own parts of his empire and are seeking to take advantage of each other. In Italy, Rome is emerging as the dominant regional power while Carthage has the start of its mercantile empire.
The game covers five centuries of historical expansion, turmoil and collapse ending in 190 CE.
Players can take any of the major powers, secondary regional powers or an organised tribe and attempt to lead it to dominate either the world or a segment of the map while dealing with invasions, plagues, unrest and hostile powers. Any at-start nation is playable and the player can shift to take control of another nation during the game.
The at-start screen will indicate which nations are considered to be the most satisfying to play and that have the most developed set of decisions and traits.

11
3. Basic Gameplay
Field of Glory: Empires is an in-depth historical game that still allows players to diverge radically from history as they play the game. Key elements to the game are the ability to assign your population to various tasks, gaining culture, progressing to more advanced forms of government and the resulting ability to take decisions that affect your entire state.
In the end, the legacy of your state will determine if you win or lose but in the short term managing culture, decadence, expansion and resources such as metal, money and manpower will determine your progress.
This section provides a brief overview of the main game mechanics to help orientate new players. Further detail is then provided later in the manual. Basically, if you want a quick overview of the main game mechanics and an idea of the key issues, read this section and sections 17 and 18 of the manual first.
3.1. In-game TutorialsIn-game help can be accessed from most screens by clicking on the ? button. These are present on most pop-up screens and can be accessed at any stage.
This will usually allow you to access both an overview of the topic and further detailed information, as:

12
Also, every time you run the end-turn routine (or open a new game) information will pop-up. This may discuss some historical event during the game period or remind you of key gameplay concepts:
3.2. The ManualThis manual is designed to help you to play the game. The balance of this section gives a very quick overview of the main game mechanics and how they link together.
Further game play notes are in section 17. This is divided into a discussion of the main game mechanics, how to resolve some common problems, a brief discussion of how the game mechanics can be combined to give an overall strategy and a short play through of the opening turns of a Rome campaign.
Section 18 supplements the in-game material and gives you some broad hints as to how to play the main factions and what to expect in terms of special rules and events.

13
In general the manual does not include exact values for game parameters. These are almost all available in game, or from the fully moddable files supplied with the game. Since the manual had to be prepared before the final release version of the game code, some factors might change between writing and release and others will change after the game has been released. Instead, the manual tries to concentrate on the structure of key rules and concepts.
Equally the images used in the manual were all taken before the final release version. Thus there may be some differences either in style or information in the version of the game you are currently playing.
3.3. ScenariosField of Glory: Empires has a grand campaign starting in 310BCE that runs for 500 turns to 190 CE. You can play beyond this point but the winner will be determined at that stage. Equally the grand campaign can end earlier if one power establishes a dominant lead of three times as many legacy points as their nearest rival (8.2).
3.4. Key Concepts: Progression and DeclineThis section very briefly covers some of the main concepts in Field of Glory: Empires. They are all described in more detail later in the manual.
It is suggested you also read sections 17 and 18 as they provide play tips on how all these features come together in game play.
3.4.1. Legacy
Legacy is how you win a game.You gain legacy by owning regions (especially your objectives 8.2.1), certain types of buildings, how long your government has been in its current form and from particularly cultured regions.

14
Mostly, you only lose legacy by taking a decision (12) to raise an emergency levy when your state is in mortal danger.
Note that being at, or near, the top of the legacy table will bring advantages in-game (in particular in terms of gaining or retaining progression tokens). After T50, you can win the game at any time if you have three times the legacy of your nearest rival.
3.4.2. Progress Tokens
Progress tokens are a key ‘currency’ in the game. You can gain them mainly from being in tier III of culture-decadence ratio (CDR) table (8.1.5) or by capturing your objective regions (7.4.1). You lose them by being at the bottom (tier 1) of the CDR or losing your objective regions.
You can move from young to mature to glorious by gaining 5 progress tokens for each change. If you are glorious and gain another 5 progress tokens you will progress to a new civilisation level (subject to some constraints 7.4.2). If you are already a level 3 state and have already reached the status of Glorious then this will trigger a powerful, and very useful, Golden Age.
If you acquire -5 progress tokens (most likely from losing key regions or being in the lowest tier of the CDR) then your status will change to old and then to decadent (7.4.4). At this stage you will also suffer civil wars, increasing domestic unrest and inefficiency. It is also possible to revert to a lower civilisation level – or simply to collapse.
3.4.3. Culture and Decadence
As the game progresses, a state will see the ratio between its culture and decadence alter. Culture mainly comes from buildings in a region and the population assigned to producing culture. Decadence can result from buildings, the size and age of your state and the conquest of new regions. The ratio culture:decadence (called the CDR) is

15
an important part of the game as it determines whether your nation can progress or will slip back to a less advanced form of government.
3.4.4. Civilisation Levels
There are three civilisation levels running from I to III. The titles and effects vary according to your nation but basically gaining a higher level allows you access to better units and more powerful decisions. However, rushing to move your state to civilisation level III may not be the optimal strategy for long term survival (8.1.4) due to the way in which you gain decadence as you spend time in one level.
LeveL exampLes of Government types1 Horde, Tyranny, Kingdom, Oligarchy, Sect2 Tribe, City State, Monarchy, Kingdom, Republic, Hierocracy3 Confederation, Commonwealth, Empire, Federation, Theocracy
Each level is split into sub-levels. These are shown in the state’s title as ‘young’, ‘mature’, ‘glorious’, ‘old’ or ‘decadent’.
Different states will rename in different ways, so both Rome

16
(at level 2 a Republic), and most Monarchies, will become an Empire at level 3.
Different Government types have some particular consequences. In particular, it is worth noting that:
w A Level I tribal state with the traits of ‘clans’ or ‘infighting’ may endure a civil war every time the leader dies, so try to progress to level 2 as quickly as you can. A civil war is more likely, the more regions you hold and the lower their current loyalty (7.5);
w A Level 2 state cannot progress to level 3 unless it already holds at least 10 regions.
3.4.5. Progress Tiers
At the same time each state can be in one of three tiers depending on their location on the CDR table (8.1.5).
w In tier I, you run the risk of acquiring negative progress tokens. w In tier II the state will neither age nor progress (unless you
conquer or lose objective regions 7.4.1). w In tier III, the state can gain progress tokens.
3.5. Key Concepts: Your Nation3.5.1. Resources
Money, manpower and metal are produced by various buildings and are allocated to a central pool where they can be used to build new units or as part of various decisions.

17
Resources such as food and infrastructure exist at the regional level and are essential either for population growth (or the avoidance of starvation) or the creation of new buildings. If a province has been created, these can be shared between the various regions allowing shortages to be offset and more units to be produced (as these rely on military equipment stores).
Military equipment is produced by having the correct buildings in your regions. This is stored in either the region or shared across a province (if this has been formed) and used when new combat units are raised.
In addition, there are a variety of natural and manufactured resources in the game. These are used by buildings and may be traded between regions.
Most regions produce natural resources (some do not, some produce more than one), additional resources may be created due to the buildings in the region and finally others may be present due to trade links to other regions.
3.5.2. Regions and Provinces
The game map is divided into a number of regions and each has its own mix of natural resources, dominant terrain type and, over time, constructed buildings.
In addition, a player can form provinces once they own half the regions in a given area.
The province may allow recruitment of specialist units and will pool resources from all the individual regions that form the province.
So, for example, a single stable building in a given region will allow the recruitment of certain cavalry units in the entire province.
3.5.3. Building types
Field of Glory: Empires contains around 400 different building types. Some of these are common to all factions, some are variants of

18
these common buildings specific to a given faction, some represent unique buildings that can only exist once in the game (some of these, of course, predate the game start) and others can only be built once by each faction.
Each building will be assigned to one of four rows in the region window.
The top row contains buildings that are primarily about the production of food (green) or that help to keep the population healthy (blue). Any population assigned to this row will produce food. Health buildings will also contribute to growth by reducing the amount of food needed to trigger the next population point.
The second row contains buildings that create either infrastructure (pink) or allow the recruitment of particular military units, improve the defensiveness of the region, produce the equipment which is used by new units (red). Population assigned to this row will produce extra infrastructure.
The third row contains buildings that mostly produce money (yellow) and population assigned to this row will generate extra money.
The fourth row contains buildings that have either a cultural, scientific or religious aspect (purple). Population assigned to this row will produce extra culture and will also increase the loyalty of the region (up to one-third of the basic loyalty of the region). They will also produce a small amount of extra money.

19
Note that some buildings have multiple attributes and some have both positive and negative aspects.
As you create more of a particular type of building (such as food producing buildings) you can start to build more powerful options as well (6.2.2).
3.5.4. Objectives
Each state starts with a number of regions that are designated objectives. Capturing these will see the gain of progress tokens and the loss of such regions will see the loss of progress tokens. Over time, depending on the expansion path chosen by the player, new objectives maybe assigned.
Capturing an objective region will add less decadence (8.1.4) than taking any other region. In addition, owning your objectives will add to your legacy score (8.2).
3.5.5. Nation Abilities
Each state has a different set of attributes. In addition to the starting attributes, these will change as you take certain decisions and/or reach new Civilisation Levels.
These differences have a major impact on game play. You will find that some cannot recruit mercenaries (e.g. Sparta) while other states can recruit them more readily (e.g. Carthage). There are special rules for the various Hellenistic kingdoms (the Diadochi) recently carved out of Alexander’s Empire as these are prone to rapid collapse if the tide of history turns against them.
Equally most states can build specific buildings unique to their culture.

20
3.5.6. Rulers
While you cannot control the succession process, your ruler has a number of characteristics that can positively or negatively affect your realm.
Most states are ruled by a named individual but Republican Rome and Carthage are ruled by factions (again with a set of characteristics that may help or hinder you).
3.5.7. Decisions
As you play you will be offered the opportunity to take a variety of decisions. For a level I state these are limited but still useful. Some are common to all states such as the ability to convert surplus goods (money, metal or manpower) to one you lack or to buy and sell slaves or to free slaves and grant citizenship to foreigners.
Other decisions allow you to improve the quality of your at-start units, improve your trading acumen (6.1), deal with unrest, or change the overall focus of your state.

21
In addition there are decisions specific to individual states.
3.6. Key Concepts: Armies and Warfare3.6.1. Armies and Units
You can (and should) organise your individual units into armies. This is strongly recommended as some units are useful in combination with others, or have advantages in particular types of terrain and also you can assign a commander to the army. Commanders are essential as they will improve the chances of your units winning any duels with enemy units when a battle occurs (10.7) and in conducting sieges (10.9).
3.6.2. Resolving battles
In Field of Glory: Empires you can resolve the battles at one of four levels of detail. Within the game you have 3 options of: watching the battle resolve in some detail; checking over the outcome (which

22
will show you who won and the losses and damage to individual units); or, simply progress with turn resolution (you can always review the battle later using the turn log).
The alternative is you can export your battle to Field of Glory 2, resolve it using that game and import the results back into Empires.
3.6.3. Game Time and Harsh Weather
Each game turn in Field of Glory: Empires represents one year of time. Every fourth turn is treated as being a harsh turn which brings severe penalties for some regions and prevents movement in mountain and desert regions.
Note that in mountains and deserts, there is also a random chance each turn of bad weather.

23
3.6.4. Fog of War
Areas outside your Empire are obscured by the Fog of War. You can see changes to regional ownership and even the buildings constructed but have limited knowledge of military deployments. Fog of War is lifted if you have combat units in an adjacent region. Only ships or certain port and coastal fortification buildings (6.2.1) can lift Fog of War in naval regions.
Allies share information with each other, thus removing fog of war.
3.7. Turn ResolutionField of Glory: Empires is a ‘wego’ game. All players and the AI create orders for their army, any new buildings, raise new troops or enact decisions. These are then carried out during the turn resolution.
During this phase, units move across the map and battles are triggered and resolved. Combat resolution can be done using the Empires system, in which case you have a choice between watching a detailed review of the battle, checking the outcome (10.7) or proceeding with the turn. Equally, you can export a battle to Field of Glory 2 (11), resolve it using that game and then import the results back into Empires. At that stage any remaining movement and combat will be resolved.
At the end of the turn resolution, you will be presented with the Culture:Decadence Ratio screen (CDR) with this centred on your nation.
Once you have reviewed this, you can proceed to the next turn. Here you can review events in the turn resolution phase using the in-game log (4.3.2) or pop-ups and create a new set of orders.
3.8. Link to Field of Glory 2If you own Field of Glory 2 you have the option to export the battle to that game, resolve it using those rules and import the result back into Field of Glory: Empires (11.4).

24
The units represented in Field of Glory: Empires will be converted, and then the battle can be resolved. Final losses are then converted back to Empires and any additional losses due to retreating will be applied using the Empires game logic (10.7.6). You do not need to own any of the DLC from FoG2 to have access to all the units used to convert armies between the two games.
4. Getting Started4.1. AI Levels and Game OptionsChoosing the difficulty level modifies the game rules for both the player and the AI.
4.1.1. Impact on the AI
If you chose the ‘Easy’ level then the AI will be hampered in terms of production of manpower, money, infrastructure etc. It will also have some small malus in terms of combat.
As you move to ‘Experienced’ and harder levels then the AI gains additional bonuses which particularly make it easier to manage large cities without encountering substantial loyalty and/or decadence problems. This means that the AI may not have a large advantage in the early game, even at the higher difficulty levels, but will be more powerful in the mid/late game as cities grown in size.
At no AI difficulty level will the AI gain an advantage in battle.Once you go above the Easy level, the AI gains the following
bonuses (some of these will become more significant at the higher difficulty levels):
w A progressively increasing bonus in terms of decadence reduction; w It will not lose a unit to lack of supply unless it is besieged or the
faction no longer owns at least one region;

25
w The Administrative Burden (6.6.3) will be progressively reduced; w If it has to call on the Emergency Levy decision (12), it will gain
a progressively better army; w Progressively better base loyalty in its regions (6.4.3); w Progressively better legacy bonus for the more cultured regions
(8.2.1); w An extra slave redistribution per turn even if it lacks a slave
market (6.3.5); w At higher levels of difficulty, the AI will more often calibrate its
options and the depth of search for opportunities will increase; w At the higher difficulty levels, there will be a greater negative
diplomatic penalty (9.3) towards the player if they are in the lead on the legacy table (8.2) or hold the AI’s objectives.
4.1.2. Impact on the Player
Setting AI level will activate or alter the effect of certain game rules for the players.
The automatic slave re-assignment routine (6.3.5) will happen each turn on easy, may happen 50% of the time on balanced and will not occur on the higher levels. This will make it much harder to manage the slaves until you have sufficient Slave Markets built in your nation.
The administrative burden (6.6.3) will be disabled if you play on easy and this will make substantially more money available to the player. If you play on difficult or harder then:
w You do not receive a free capitol if you do not have one at the start of the game (6.2.5), this particularly affects tribal states who will need to build a capitol in a suitable region;
w There will be no advanced warnings of the threat of a Civil War (7.5);
w As you do better in terms of legacy, the AI will become more aggressive.

26
If you play on very hard (or more) then: w If Rome is AI controlled, it will not suffer any civil wars (7.5.5); w If a Usurper appears (7.5.2), they are more likely to appear closer
to your capitol but the rules in section 6.4.2 will still apply.
4.1.3. Game Options
In addition to setting the AI, the game options screen allows you to customise the game and display to suit your needs.
By default the computer will place the game in full-screen mode and at a resolution that suits your monitor.
Note that you can change faction using this screen at any time you wish in a game against the AI. That allows you to play a state (such as the Parthians) that emerges as the game progresses.You can opt to use one or more of these rules:
w Easy Supply (6.51); w Administrative Burden (6.6.3); or w Slower gain of progress tokens (7.4.1).

27
4.2. Setting upWhen you load a game you will be presented with the set-up screen:
This allows you to opt to load an existing saved game (if you have one saved) or to start a new game. You can also set up a multiplayer game, or access the support forums.
If you have resolved a battle using Field of Glory 2, then the option to ‘Import Battle Result’ will be shown.
You can swap the game language or use the ‘options’ function at the top left hand side (4.1.3) to change the display, and set the AI difficulty levels. You can also change the AI level by simply progressing to set up a new game or at any time if you are playing only against the AI.
Once you are happy with these choices, press on the back arrow and you will be returned to the main set up screen.
4.2.1. Creating a New Game
If you want to set up a new game, then first select ‘Scenarios’ from the main screen:
Then select the difficulty level you want to use (remember in a single player game you can alter this at any stage):

28
The next screen allows you to choose your faction. By default it will open showing Rome but you can scroll down the full list.
These are divided into ‘Major Nations’ ‘Remarkable Factions’ and ‘Other Factions’. The first group includes those nations that dominated (or came to dominate) their regions at the start of the game. Those in the second tier are perhaps best seen as secondary powers which have the capacity to become major powers – if they survive. The final group are all playable but you will find they have less special events than those in the top two groups.
Also those in the top group have a number of faction specific decisions and/or buildings that will become available during the game. The second group will have some relevant decisions and/or buildings (for example those shared by all

29
the Celtic or all the Germanic nations) linked to their ethnicity or historical development. The final group will only have access to the decisions and/or buildings available to any similar nation in the game but their military units may well differ from other similar states.
As you move between the possible options, you will see information that provides some historical context, in this case for the Achaean League
You can shift to view the gameplay notes that may give you some idea of an initial strategy with that nation.
Or to see the modifiers that apply to that country (at the start of the game).
Some modifiers are unique to that particular faction, others are shared across more than one state. For example, all ‘Monarchies’ receive the same bonus as do all the states described as Diadochi. However, every faction has at least one (usually more) unique attribute.
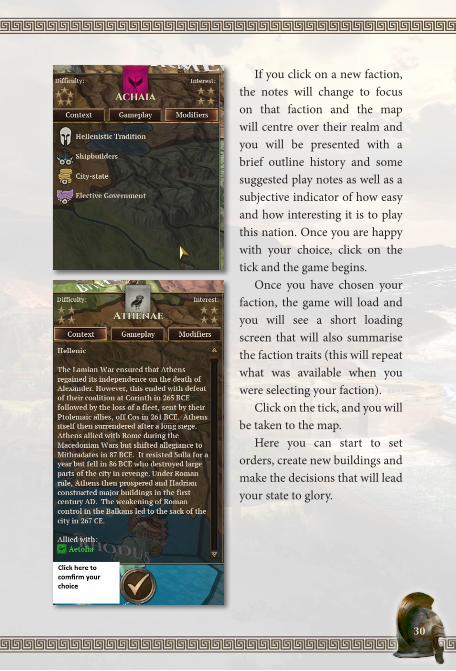
30
If you click on a new faction, the notes will change to focus on that faction and the map will centre over their realm and you will be presented with a brief outline history and some suggested play notes as well as a subjective indicator of how easy and how interesting it is to play this nation. Once you are happy with your choice, click on the tick and the game begins.
Once you have chosen your faction, the game will load and you will see a short loading screen that will also summarise the faction traits (this will repeat what was available when you were selecting your faction).
Click on the tick, and you will be taken to the map.
Here you can start to set orders, create new buildings and make the decisions that will lead your state to glory.

31
4.2.2. Loading an existing game
If you select this option you will be able to choose from either previous saves you have created, that were automatically created as part of the in-game end turn routines, or when the turn processing was stopped to allow you to export a battle to Field of Glory 2:
4.2.3. Multiplayer
Allows you to set up or resume a multiplayer game. Field of Glory: Empires using the Slitherine forum to regulate multiplayer game play.

32
To access the Multiplayer option, click on the option on the loading screen
Once you do this, you will be asked to log-in and provide your Slitherine forum password. Note that you only need to do this once, as the log-in routine will remember your details. Click on the tick to confirm.
You will then be taken to the game set up routine. This will show you any current games you are part of, allow you to set up a game and invite other players (either anyone interested or by invitation) or to accept a challenge from another player.
If you want to accept a challenge, click on ‘Accept Challenge’ and the available options will pop up as:
Click on the game you wish to join and then on ‘accept challenge at the bottom’
You will then see all the available nations in that particular game (note that this may be limited depending on how the game was set up). Select the nation of your choice, enter the challenge password (if one has been set)

33
Once you accept a challenge, it will show up under initially under ‘Accept Challenge’ showing the faction you have chosen. Once all the designated factions have been taken, the game will move to ‘my games’ and play can commence.
Once the game starts, it will be shown under ‘my games’ showing the game title, scenario, faction you are playing, the last player to have entered orders and the deadline for the next turn.
At the bottom, my turn will indicate if you need to input new orders, ‘opponent turn’ if you are waiting for the other player(s) to do so.
Choose the relevant game and click on the tick to play your turn.This will load Empires as normal.

34
The first screen you will encounter is the ‘chat screen’ where players may have left messages when they completed their last turn.
Click on this and you will be taken to the Culture and Decadence Screen (8.1.5) and then to a repeat of the last turn on the main game screen. In this case, the CDR will indicate which nations are player controlled (with the yellow symbol next to their name) and which are being run by the AI:
Once this is complete, you will be presented with the option to run it again or progress to setting your new orders.
Inputting your orders is similar to that described later in this manual for single player but with some small differences as to the options.
The third button from the left allows you to save the turn without actually submitting your orders. The ‘end turn’ option will load your saved orders to the server.
You can input any messages you wish to leave for the other players at this stage.
This will then return you to the main screen

35
4.2.4. Game Forum
Selecting this option will open the game discussion forums.
4.2.5. Quitting the Game
You can exit the game at any stage and have the option to return to the saved game screen, the loading screen or to exit completely.
4.3. Information available on the Main Map
Once you progress to the main map, you will see the starting position for your Empire (or the situation at the time of your saved game). You can change the map overlay using the various options in the lower right hand corner of the screen and explore the world using the mini-map:
You can zoom in or out using the mouse wheel and scroll around the map by placing your mouse against the top, bottom or side edges.
You can also use the arrow keys on your key board to move around the map, or click on the mini-map.
4.3.1. Key Information – top row
Across the top of the screen are three groups of buttons.

36
On the left hand side, the three buttons allow you to quit the game, select a range of options (these are the same as you could access when setting up the game) or save the current game (or to load an earlier game save). Note that in a multiplayer game you can use the save button to save your turn while you are working on it and before submitting it to the server.
The option screen allows you to change the AI status, game set up or your faction.
The middle block shows the following (note that in each case, placing your mouse on the image will provide extra information):
w Money (both the current total and the estimated change for the next turn)
w Manpower (both the current total and the estimated change for the next turn)
w Diplomacy, this switches you into Diplomacy Mode (9) w Nation Panel essential information about your faction (7.9) w Ledger, detailed statistics on your faction and the world (15) w Metal (both the current total and the estimated change for the
next turn) w Legacy, measures the success of your faction (8.2). Again this
will show both the current total and the estimated change the next turn.
On the right hand side is the button to end the turn. Below this is information about the current game turn and seasonal weather. Pressing the end turn button will mean that all units will move according to the orders you have set as the turn is resolved.
Note that the estimates, especially of money income, may be wrong due to the variability of the trading system (6.1.4) as key resources may cost more or less depending on where they are imported from (or cease to be available at all).

37
4.3.2. Key Information – bottom row
The bottom of the screen is divided into two sections. On the left hand side is the message log listing the events that happened last turn. This can be hidden from view if you wish as some key information will appear on the right hand side of the game screen.
Note this will usually be hidden when you start a game. On the top of this panel there are several filter options allowing
you to select how much detail you wish to see and allowing to select, for example, only those messages that relate to movement and combat.
On the right hand side you will see the mini-map and Map Overlay Buttons which allow you to change to information that is displayed on the main game map.
Above the minimap you can see a selection of map overlays for the main map. Each tooltip will provide information about their function and how to interpret the resulting map.
4.3.3. Key Information – right hand side
Down the right of the game screen are a series of buttons that highlight events that have just occurred during the previous turn’s resolution.
These will also be referenced on the map as icons.You can access more information either by using the buttons, the
turn log or accessing the information placed on the map.

38
4.3.4. Region Information
If you click on a region, you will be presented with more information about the state of that region and will be able to order new buildings or units, check on trade links or view any military units that are present.
These options are covered in more detail in section 5 below.
4.3.5. Military Units
You can access your military units either via the regional panel (as above) or by directly clicking on the unit.

39
Once you select a unit you will see all the armies (which can be of one or more units) present in that region including those hostile to your faction
Further information on how to interpret the information is provided in section 10.5.1.
5. Regions and Provinces
Your state is divided into one or more regions and these, in turn, might be grouped into provinces. Provinces can be created when a state controls at least half of the relevant regions and this is highly recommended as it allows greater pooling of resources such as food (6.5), infrastructure and military equipment (10.6) as well as access to any relevant regional units (10.2.4) and a reduction in the amount of decadence (8.1.4) generated by each of your regions.
It is worth noting that having a province does not stop you managing your state at the regional level. You can carry on making all decisions manually, fully automating or you can also mix using the automated regional assistance (5.2.4) with controlling some key builds or decisions manually.

40
5.1. RegionsRegions are the building blocks of your state. Each is coded for the dominant terrain type, may contain naturally occurring resources and usually has some type of urban centre with associated population. This urban centre will usually have one or more buildings and the region will have a population (of potentially different ethnicities and a mix of slaves and citizens) that can be allocated to the various sectors producing food, infrastructure, money or culture for your state.
5.1.1. Region Information Panel
The information for a region is summarised on the regional information panel:
More information will be shown immediately if you place your mouse on the relevant icon.
The top of the panel provides information about the region.
From left to right this is:

41
National Capital, this icon is only displayed if the region is also the national capital of the state.
Terrain type showing the movement cost for the region. Mousing over this will also show the natural defensive advantage of that terrain and the battle-line width that will apply if a battle occurs (10.7). The pop-up will also show the terrain in neighbouring regions.
Defensiveness shows an average defensive value for the region. Mousing over this will show the current strength of the walls, how many units will be created if the region is besieged and their combined combat power. Note this automatic garrison can be supplemented by also
placing regular troops to garrison the city (10.2.4).Regions that have just been conquered will not raise an automatic
garrison if they are attacked.Defensiveness is built up by creating key buildings. These are
indicated as adding 1 or more points of defensive value (siege resist) in their tool tip. Note that some buildings will create larger defensive walls or improve the garrison.
Decadence showing the current decadence score of the region. Mousing over will show all the buildings and events that contribute to the decadence score (both positive and negative).
If decadence producing buildings are removed, then the accumulated decadence will slowly dissipate over time.

42
Loyalty and revolt risk showing the current loyalty score and, if appropriate, the current revolt likelihood
Building Slots showing the number of structures built in the region (note that not all buildings take up a structure slot), mousing over this will show the number of structures and the number of slots currently available. Usually one population point will provide one building slot but this can
be expanded due to national traits or if you have particular buildings.
Population shows the current population and how long before the population grows. Mousing over this will provide information on how much food is needed for growth, the current food stockpile, how much is added to the stockpile each turn and the health bonus (derived from the number of buildings that generate or remove health).
Also having at least one health-related building will reduce the likelihood of the region being affected by a plague (more are better).
Ethnicity shows the dominant ethnicity in the region. Mousing over this will also show other ethnicities that are present (this will
not distinguish between citizens and slaves).
Objective status. This is only shown for

43
regions that are objectives to your faction. This will be shown differently if you already own the region or if it has yet to be conquered.
Other icons will be shown if there is a famine, food bonus, an event that affects the region, rebellion, the province has been recently conquered or the region is besieged and the tooltip will set out the implications.
On the right hand side are the buttons that allow to scroll between the regions of the province (if you have formed this), access suitable help or close the region screen.
On the left hand side of the screen are up to five (sometimes only one will be shown) options to change the view or access a new screen.
The options are: w Province will take you to the province screen, if it exists
(5.2.1). If the province does not yet exist but can be formed this will show a cross to remind you of the option;
w Unit queue (used to build new units); w Trade Details (used to access the trade screen); and, w Armies (used to access the army display if any military units are
in the region); w To diplomacy (will take you to the diplomacy screen 9.1), here
you will usually interact with the owner of the region.
Of these, trade details is the only one that will appear in every case. If the region is owned by one of the global nations (7) – in effect not by a named state – then the diplomacy button will be disabled as you cannot interact diplomatically with these regions.

44
The centre of the screen shows all the buildings that currently exist and the current population assignment. If you are currently building
something there it will show where the build indicator otherwise is, with the image of the building and an estimate as to how long it will take to complete.
This shows a region and the current building will be ready in 3 turns. The image below shows a region that is not currently building anything.
On the right hand side you have information on the current output of the region. Each indicator will
give you more information if you mouse over it. w Food: needed for keeping population alive, and feeding armies
in the region. If enough is stored, the population grows w Infrastructure: used for constructing
and maintaining buildings w Money: this shows the net income
after production, taxes, and import costs (see Trade) and is collected together for your entire state

45
w Culture: While this is aggregated at the state level, it is actually stored in each individual region (and can be lost if the region is conquered or revolts). Culture plays an important part in determining your nation’s progress. Equally regions with a high level of accumulated culture will generate additional legacy points (8.2.1) each turn;
w Manpower: again this is aggregated and collected together for your entire state
w Metal: again shows the net income and metal is collected together for your entire state
w Equipment: Determines how quickly new units can be recruited in the region. Some of this will be stockpiled if not used. If a province exists, then equipment is stored at the provincial level but is not combined at a national level.
5.1.2. Terrain Types
Each region has a single terrain type that is also used to determine military movement costs and the terrain used if a battle takes place.
Some military units have traits that make them more (or less) effective in certain types of terrain. In particularly, heavier units will perform worse in restricted or broken terrain compared to open terrain such as plains or deserts.
terrain type movement Cost Combat frontaGe notesPlain 2 (3) 12 (10)Forest 3 (3) 6 (5) 4Hill 3 (4) 8 (6) 3, 4, 5Arid-Hill 3 8 (6) 2, 4, 3Mountain 6 (impassable) 5 3, 5Alpine 8 (impassable) 3 3, 5Marsh 4 (2) 5 4Steppes 2 12

46
Desert 3 (impassable) 10 2Coastal 1 (2) 12Open Sea 2 (3) 16Ocean 2 (impassable) 16Strait 4 0
1 – Values in parentheses () apply if harsh weather applies to the region, note in some cases this prevents movement into the region.2 – Treated as Arid terrain for various modifiers.3 – Treated as rough terrain for various modifiers.4 – Treated as broken terrain for various modifiers.5 – Treated as mountainous for various modifiers.
5.1.3. Trade Goods
Most regions produce at least one trade good (either as a natural resource or manufactured by buildings in the region). These can give bonuses to production in the region and can also be traded between regions (6.1).
If you click on the trade good icon you will be shown the current situation for the region. This includes the goods that occur naturally, are manufactured or imported or are missing. At the top is also an estimate of the trade balance for the region showing how much is earnt by exporting goods and the costs of any imports (6.1.4).
515.jpgClicking on any of the images will tell you which buildings use
that good and where it is imported from (or potentially available if currently missing).
5.2. Provinces5.2.1. Creation and Loss of Provinces
A province can be formed when you control at least half of the province’s regions. Note that if a province is made up of an equal number of regions then you may not be able to form it if another power holds the other 50% and have already formed the province.

47
You will lose a province if you control under 50% of the regions. Thus a province can be disbanded and recreated multiple times during a game.
5.2.2. Provincial Capitals
These are created for each province once it is created. If you wish to move this, you can disband the existing provincial capital (this will take three turns and incur some loss of loyalty) and then a new provincial capital will be created in the region with the highest culture output.
5.2.3. Advantages of Provinces
A province allows you to pool resources and production across the regions of the province, as well as allowing the option of automating population and building management.
In addition to items that are fully pooled across the region (such as military equipment), resources such as food are partially pooled and moved between regions if one is short of food. If a region has a surplus of food or infrastructure points, it will share up to 50% of current production and 15% of anything that is stockpiled.
Finally, regions that are part of a province, only contribute 50% of the per-turn decadence score of a region on its own (8.1.4).
5.2.4. Automating Provincial Management
From the Province Information Panel you can opt to automate production and population allocation within a Province.
The first six buttons allow you to set provincial focus to food,
infrastructure, money or culture (this will mainly affect the allocation of the population). The fifth option is for a balanced approach (which will take some account of the needs of your wider state as well as the region) and the final button will restore manual control.
48
The options on the right hand side will determine the priority (if any) for the construction of new buildings. Again this can be cancelled and returned to manual control.
Even if you have opted for automatic control you can always intervene and set up a building of your choice. The automatic routine will not work until this one is completed and a new choice needs to be made.
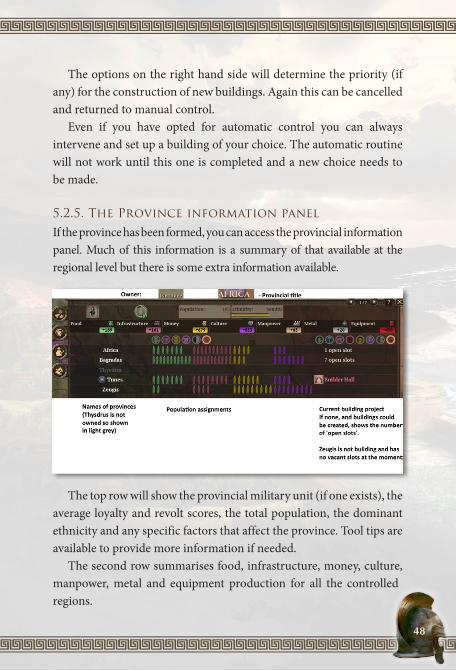
5.2.5. The Province information panel
If the province has been formed, you can access the provincial information panel. Much of this information is a summary of that available at the regional level but there is some extra information available.
The top row will show the provincial military unit (if one exists), the average loyalty and revolt scores, the total population, the dominant ethnicity and any specific factors that affect the province. Tool tips are available to provide more information if needed.
The second row summarises food, infrastructure, money, culture, manpower, metal and equipment production for all the controlled regions.

49
The main part of the screen shows all the existing regions, any special effects and what they are building. Tooltips will provide further information as to current production, growth and if any resources are missing for buildings in that region (6.1.1).
On the left hand side of the province screen are four or five buttons that take you to:
w Either the regional capital or the last region you were examining;
w The unit build screen (10.6); w The trade details either for the regional capital or the
last region you were examining; w To any armies or fleets (this is missing if none are
present in the province); w The diplomacy screen.
The middle section has a list of all your regions (note if you do not control a particular region it will be shown greyed-out) and the numbers assigned to food, infrastructure and culture. The final
column will show any current production. The region name will also indicate which is the provincial capital and any particular effects such as revolt risk.
Hovering your mouse over a regional line will bring up details such as current stocks, per turn production and how long before any building will be completed.

50
6. Managing Your Empire
6.1. Trading and Trade GoodsIn Field of Glory: Empires trade is mostly out of your immediate control. However, it is important as a means to bring needed resources to a region and, if well managed, can be a source of wealth for your nation. Resources are available if they are naturally occurring, manufactured or traded into the region or one of its neighbours.
If needed, trading is handled automatically and each turn each building checks for availability of these resources.
If they are locally available (i.e. in the region), no trade takes place but the good is used in production as required. If not, and they are available within the trade range (6.1.3), an automatic import happens. The exporter receives trade income, the importer pays a cost. There is no limit to the number of times a single resource can be exported. Note that a given state can both be the importer and exporter of a trade good (i.e. you can trade with yourself) and this can be profitable for a larger Empire as you will only pay half the price for the trade good but receive the full value in the sending region.
Resources needed for a building bonus are only checked for locally – they are never imported purely for the building with the bonus need, but they can be imported if required by another building. In this case, managing your set of buildings can help you maximise the value of some specialist types.
A full list of the trade goods and their basic values can be found in section 16.
6.1.1. Existence and Creation of Trade Goods
Trade goods can exist in a region due one of three mechanisms: w They occur naturally in the region;

51
w They are generated by a building in the region; w They are imported as part of a trading arrangement that brings
needed goods to the region.
6.1.2. ‘Needed’ and ‘Bonus’ Trade goods
Note there are different rules for how trading works for a good that is ‘needed’ in production as opposed to one that will give a ‘bonus’ if a particular building has access to it.
In effect, ‘bonus’ goods must already exist in the region (or a neighbouring) one to be used. They are not imported specifically to fulfil a bonus but can be imported if another building in the region ‘needs’ it for production.
6.1.3. Trading Acumen and Trading Range
The range over which you can acquire goods is influenced mainly by your national characteristics. Thus a mercantile state will be able to secure goods more readily than one that lacks this characteristic as will having roads and commercial ports.
If a particular good can be supplied from more than one region then the nation with the higher trading acumen has an advantage when this choice is made. Thus higher acumen means you will both tend to keep your own trades within your faction (if this is possible) and take trading opportunities from other factions (in effect stop them trading with themselves and ensure they trade with your regions).

52
Note that trading range is partly set at the faction level and partly by the buildings in a given region. Equally some regions may have a higher trading acumen than the rest of your faction due to particular buildings.
Goods can only be traded over a certain distance (again amended by your national characteristics). You can see this using the ledger or the regional display:
Having said this, you can improve your trading ability in one of three ways:
w You can enact a decision to give extra support to your merchants;
w You can enact a decision to change your national focus to become a trading nation;
w You can build certain buildings (mostly these are roads and some types of port-related buildings) that will extend the trading range or the trading acumen of a given region.

53
In addition, you are more likely to trade successfully if the good is in a region you (or your allies) own. Trading will not happen if you are at war with the owner of a region.
6.1.4. Value of Trading
Trade goods will give the seller the price of that particular good. If it is acquired from one of your own regions then only half the cost will be deducted, if it is acquired from an external source, the full cost will be deducted. In either case, the selling state will also receive the value of the trade good.
In effect, if you trade with yourself you will make a net income gain per turn, if you trade with another power, you will pay for the good, if you sell to another power you will receive the full value of the good.
If a needed good is not available, you will pay three times the notional price to ensure your building can work. In this case, note the good is not available in the region for any other purpose (so it cannot be used to fulfil a bonus production) but the building will function.
6.1.5. Buildings, Trade Goods and Net Income
Buildings interact with trade goods in one of three ways: w Some buildings will produce goods that can be traded or used by
other buildings in the same region; w If a good is listed as ‘needed’ then it will be in the region or
imported (either from your own state or another) or cash will be deducted from your income to compensate (the cost of this will be three times the basic cost of that trade good). Note that if the cash is deducted, while the building will be able to function the trade good will not actually be available in the region (this matters as other buildings may have been able to use it to generate a ‘bonus’);

54
Note that the trade panel will list all the bonus goods a region could benefit from but are currently not available.
w If a good is listed as needed for a ‘bonus’ it will not be imported purely for that reason. However, the good may already be available in the region (or a neighbouring one) due to local production or if another building has a ‘need’ for it.
In effect, to gain some potential bonuses you may need to plan what other buildings you will construct (either to produce or attract the required item) in order to fully benefit. Remember that goods are available in a region if they are present in any of the immediately linked regions if they are for ‘bonus’ production but must be in the region itself for ‘needed’ production.
One important aspect of the game is that you’ll want to own buildings that will either produce a particular trade good or create a need for it (so that it is imported into the region). Doing so allows ALL buildings using this trade good as a bonus to gain access to the good, in the region and any adjacent region. Succeeding in this ‘mini game’ can make the difference between being rich and powerful or being poor and struggling with high upkeep buildings that do not live up to their promise.

55
When planning a building you can check if a required good is available. If the region it will come from is not one of your own it will be coloured to show the current owner.
In consequence, the ‘estimated income’ for a new build will vary according to how you will acquire any required trade good. If the good is in the region (or a neighbour) then the value shown will be the full income. As you go down the various trade options (trade with yourself = 50% of cost; trade outside your border = 100% of cost; good brought in = 300%), the potential income will drop.
In the examples below, in the first instance, the Furnace needs Iron that is available from a region held by your faction. So only 50% of the trading cost is deducted (and the trade income is ascribed to the sending region).

56
In the second instance, the option to build the Thalassan Temple exists, but the needed good (coral) is not available. So the trading cost is three times the basic value of that particular good.
6.2. BuildingsBuildings can be constructed using the infrastructure points generated both by particular buildings and assigning the population to the infrastructure row (6.3.3).
Note that if no building is under production in a province (or the region if no province has been formed) then no infrastructure will be generated so you cannot store infrastructure points for future use. The exception to this is if you complete production of a building in a turn any unused infrastructure points are not used and are available to start the next structure.
However, if you have a province (5.2), then building in just one region will trigger the production of infrastructure in all the others.
This allows you to create relatively advanced buildings in an otherwise poor province as you can concentrate your production in just one region.
6.2.1. Building categories
Buildings in Field of Glory: Empires fall into six major categories: w Food Production (Green); w Health (Blue);

57
w Infrastructure (Pink-Red); w Military (Red); w Money (Yellow); and, w Culture (Purple).
The culture buildings set are further sub-divided into Government, Religion and Science buildings. In addition to their direct impact, they also influence how decisions around citizenship, slavery and religion will affect your nation.
Examples of Government buildings include: Tribal Council; Kings Residence; Governors Palace and the Courthouse.
Examples of Religion buildings include: Worship Place; Cult Site; Temple and Basilica.
Examples of Science buildings include: School and Scriptorium. This category is only of importance when considering the impact and cost of some national decisions (12.4).
Note that many buildings have secondary effects (i.e. they both affect their primary function and have an impact on other categories) and equally many have both positive and negative effects. So for example, some buildings may produce both money and metal and others may produce both loyalty and decadence.

58
Equally most buildings cost infrastructure to maintain so you will need to ensure you can afford to allocate enough of your population to infrastructure.
6.2.2. Building levels
Once you have three tier I buildings of one of the sub-categories set out in section 000, you might be offered the chance to build a more powerful tier II building of that type.
Some of these are new and others represent upgrades on an existing structure.
Once you have six buildings of a type then you might be offered the chance to build tier III buildings.
While most regions will need a mix of buildings at least to generate food and health and to retain loyalty, you might find it useful to specialise some regions on a particular category to unlock the higher level buildings and to gain from the way that some bonuses will stack. In particular some buildings increase output by a percentage rather than an absolute value and these are most useful in already productive regions
6.2.3. Buildings and structure slots
Most buildings take up one structure slot. However, there are a number of tier I buildings (such as the fresh water or public works options) that take no structure slot. Nonetheless, these buildings cannot be started unless there is a vacant slot. These are identified both in the detailed description and with a green star on the icon.
Some buildings represent upgrades on an existing structure. In this case the new building will occupy the same slot as the original and are also marked with a star to indicate you do not need a new slot for them (but you still must have a vacant slot before you can commence building them).

59
Finally there are a few tier 2 infrastructure buildings that will create a new empty slot so you can have more buildings than your notional manpower would support.
Normally, you gain (or potentially lose) structure slots as your population expands (or contracts if the region is hit by a plague or natural disaster). Some nations, notably Rome, gain a free additional slot in each region.
Remember that this is a product of total population so the number of slaves you have in a region counts.
If for any reason your population falls below the number of current structures you cannot build any more until it again exceeds that total.
If you really want to create a new building and all your slots are taken, it might be useful to disband one of your existing buildings. Remember this will have an adverse effect on population loyalty.
If you have no available slots, the option to create new buildings will be greyed-out.
Otherwise, clicking on the construction icon will open a new window.
When you do this, you will usually be offered a choice of up to six buildings, one for each of the sub-categories set out in section 6.2.1. Note that in certain circumstances buildings of a particular category might not be available.

60
Mousing over an option will produce information about the benefits, costs, any required trade goods and other implications of your choice.
Clicking on a building will commence the production.
6.2.4. Changing building choice (shuffling)
Each time you have the opportunity to create a new building you are presented with a random list of options. If you do not wish to build any of those offered click on the option to shuffle the structures
This will take one or more turns and then you will be presented with a new list of options. The cost of shuffling will be related to the current list of proposed buildings and the time spent shuffling will then compare this value to the per-turn infrastructure production.
In addition you will sometimes be offered a decision to ensure that certain buildings are more likely to be available than their base

61
chance. This is expensive but can be useful if you need to focus on particular buildings to develop your Empire.
6.2.5. Palaces and Capitols
Most factions start the game with a specific building for their ruler located in their capital region. Some states will have the ability to create more than one palace once they unlock level III culture buildings. This can mean you can have two (or more) capitols. In this case, they all function to trigger lost gold if they are captured and the largest (the one with the highest population and number of buildings) will be treated as the capital for certain decisions (such as the Corn Law options).
Tribal nations that start in civilisation level I will, If you are playing on easy or balanced, have a capitol added for free if you have a Palace, on higher difficulty levels one will need to be built (either as normal production or using a decision).
A state in Civilisation Level III can have two functioning palaces at the same time.
If you capture a capitol from an opponent, a portion of their stored gold (up to a maximum of 5,000 gold) will be looted and added to your gold stocks. If this will give you more than 2 capitols, then one of the existing ones will lose that status (but this cannot be your original capitol). In addition, this may create an ‘abandoned palace’ in the region that produces some legacy each turn but also creates a small amount of decadence.
You can move your original (or an extra) capitol if you need to. If you already have two then the second capitol will become your primary capitol (this is most likely to be where you have built a Summer Palace or a Second Palace). If you have no alternative a new capitol will be created in the region with the highest culture output.
This will take three turns to complete and you will lose some loyalty as a result.

62
6.2.6. Army construction ability
Roman legions in particular have the ability to build certain building types. These will give infrastructure and fortification boosts to the region and the buildings will then take up a slot (if they would normally). The buildings will remain even after the army has moved on.
This will allow the Romans rapidly to create a network of roads or fortifications as they expand.
6.2.7. Ports and Sea-Areas
Port-related buildings have three major roles in the game.They are needed to allow the player to build naval units and larger ships become available as structures such as the Shipyard are created. More powerful harbour and coastal fortifications will also lift the impact of Fog of War in adjoining sea regions.
As larger port-related buildings are constructed the movement delay imposed on units loading or unloading is reduced, allowing longer sea moves in that turn and reducing sea-movement related attrition.
If the port is blockaded, then a siege will be more successful in starving the garrison. Most ports open out onto a single sea area with this clearly shown by its location on the map. Some ports have access to two sea areas, this is shown by the harbour icon being in green (and showing two ships) as opposed the normal blue display.
If a port is fully blockaded it will be circled in red.

63
6.2.8. National and World Wonders
Some higher level buildings are designated as either national or world wonders.
National wonders are limited to one per faction and will often provide bonuses that apply across your state.
World wonders can only be built once in the entire world. Some of these are already built at the start of the game. Some of these options are initially limited in terms of where they can be built but later in the game can be constructed anywhere (assuming they are not already built).
Note that some of these buildings can either be built normally by spending infrastructure points or more quickly if you meet specific conditions. The tooltips for buildings such as the Colossus of Rhodes set out these options.

64
6.2.9. Culture Specific Buildings
Many ethnic groups have a number of buildings specific to that culture. These are often variants to the normal building. For example, the Celtic cultures all have variants of the generic ‘forge’ building. Equally they have groups of buildings that are more effective if more than one is present in a particular region.
6.2.10. Upgraded Buildings
Some buildings only become available if an earlier related building has been built. Examples include the ‘Large Farm’ that can replace a ‘Farm’.
If you take this option the new building will not require a new slot but will replace (and remove) the existing building. This means that all the costs and benefits of the earlier building are lost (but in most cases you will find the replacement clearly more effective).
Note in some case the original building took up no slot. The replacement will usually need a free building slot, an example of this shift is from the simple defensive palisade (no slot) to city walls (requires a slot).
6.2.11. ‘Master’ Buildings
A number of these are available and will be presented at random if you already have built the basic building. Some are limited to once per nation, others can be built in any eligible region.
Note that some, especially the various military types, allow for a small upgrade to eligible units. The upgrade will add +1 onto the relevant defensive score. However, it will only be applied to units that are currently based in the same region as the building. Equally, only one such bonus can be applied to a given unit, so a heavy cavalry unit, for example, can gain either from the ‘armourer’ building or the ‘stable’ building but not both.

65
In the main these buildings will give an additional bonus similar to that of the original, some extra culture or prestige and perhaps a unique trade good.
Some are replacements to the original (so do not take a new building slot) but others will exist in addition (so will take a new building slot).
6.2.12. Roads
Some buildings take the form of tracks and roads. These can reduce the movement costs if units move directly between regions with road systems (of the same or a better type). Road related buildings never take up a building slot but you need a spare slot before you can add or upgrade your existing network.
Once you have progressed beyond a track, the connection (if any) is shown on the map.
Also roads help by increasing the trade distance and commercial acumen (6.1.3) for that region. In turn this may allow you to import new trade goods.
6.2.13. Loss of Buildings
Buildings may be lost due to natural disasters such as an earthquake or a volcano. In addition, if you have negative infrastructure production in a region there is a chance that an existing building will be lost to lack of maintenance.
If the building selected for removal is either a World Wonder or a National Wonder (6.2.8), then it will be retained but you will lose a progress token instead.
6.2.14. Disbanding existing Buildings
You can order some existing buildings to be disbanded. Exceptions to this include Walls and the various World Wonders.

66
This will take two or more turns and will then release that building slot to be used for another building. Disbanding will also cause some short term reduction of loyalty.
6.3. Population ManagementA key part to game play is assigning your population according to your needs. In effect, they can work in any of the four production types and you need a large population if you are to construct the more advanced buildings.
Note that slaves are much less efficient than citizens when assigned to either culture or money generation but are equally effective in producing food and infrastructure.
Each population has a social class (citizen or slave), ethnicity, and loyalty. All this is viewable in their tooltips.
To move population click on the left of the block you want to move (this can be all, some or none of those available).
Click in the row you want to assign the population to and they will be allocated.

67
As you move population around you will see the production information on the right hand side vary. If you can, try not to have negative food production as this will lead to a famine and unrest. Negative infrastructure will not only slow or halt production but may also see existing buildings lost due to the lack of repair.
6.3.1. Ethnic Groups
All population points are allocated an ethnicity but this can change over
the game depending on their location and the usage of certain decisions.
Note that every state starts with a notional ethnicity.
The relationship between citizen ethnicity and state ethnicity is important for efficiency of production and especially for determining regional loyalty (6.4.3).
You can find your ethnicity on the nation panel:
6.3.2. Population Growth
The population of citizens will increase if you are producing more food than is needed to feed the current population (including slaves) and any military units stationed in the region. Failure to match at least their basic needs will lead to a famine, loss of population points and potential unrest or revolt.
If you build health buildings (6.2.1), each will reduce the amount of food needed for further expansion. So while it may not appear

68
at first sight as if health buildings contribute to growth they do. In addition, they may be able to finish a population growth instantly (this is more likely to happen in a region with very low population).
Slaves (6.3.5) will be acquired from winning battles and sieges or by buying more through your slave markets. They can be freed (by decision), sold or redistributed across your nation.
6.3.3. Implications of assigning population
You can re-assign population as many times as you wish during a turn. How you assign your population can have both direct and indirect implications.
The direct implication is that assigning more population to a given line will increase the production of that element (food, infrastructure,
money or culture), as:Citizens assigned to
culture will also have a small benefit in terms of producing money but, possibly more importantly, will also increase the overall loyalty of the region and reduce the accumulation of decadence.
6.3.4. Population Types
All your population is divided into either citizens or slaves. Slaves will mostly come from winning battles, successful sieges and conducting raids. If you have slave markets in your state you can buy extra slaves (or sell your existing ones to raise cash).
At the start of the game your population will be made up of one or more ethnic groups. Over time, as you expand, capture and free slaves, your population may become more diverse.

69
Population from an ethnic group you are at war with may become less loyal over time so you may want to avoid long wars of this type.
You can slowly change the ethnicity of your population by enacting certain decisions. The chance of a given population point converting to your ethnicity is related to their underlying unrest value (6.4.2, derived from their own ethnicity). Basically a Germanic population point is less likely to change ethnicity than a Hellenic one.
6.3.5. Managing your Slaves
While slaves will often make up a large proportion of your population, they need to be managed with some care.
Slaves contribute more ‘unrest’ which in turn can create lower loyalty and revolt risks (6.4.3) than citizens. Thus a region with many slaves can be hard to control and may need a permanent military garrison to reduce the risks of revolt.
To help you manage your slaves, you have some specific buildings and decisions that you can enact.
Slave Markets are complex buildings with advantages and disadvantages.
Their immediate effect is to generate some money per turn and also create some decadence in the province. More importantly, they interact with several decisions as described below to help you manage your slaves. The more slave markets you have, the more likely it is you will be offered these options.

70
If you have built or captured a slave market, then newly captured slaves will be allocated at random to any region with a slave market within 10 regions of the battle or raid that has such a market. If you do not have one, new slaves will usually be allocated to your capital.
Over time, if you do not move your slaves around you will find that certain regions become dominated by their slave population. Such regions can become unruly as the slaves become disloyal (this can especially happen when you are at war with their home state or ethnic group).
Each turn one slave population may be redistributed around your state to help control the numbers that are assigned to particular regions. These will not be removed from a region that has all its building slots in use (or has just two spare left). If you play on easy, this will be done every turn, if on balanced, each turn there is a 50% chance of it happening. At higher difficulty levels, this automatic re-assignment will not happen.

71
There are two decisions that may be available that help you to control your slaves and manage any problems.
One allows you to buy more, sell existing slaves or transfer them within your state. The transfer routine will move slaves from regions with a surplus (not always those with the slave markets). As above, no slaves will be moved if this would leave the region with less than 2 free construction slots.
Note that the selling routine will not observe this constraint and you can end up with less population than construction slots as a result. In this case, you will not be able to build any new structures until your population again exceeds the number of buildings.
The other allows to work your slaves more harshly (more output but more revolt risk), more gently, or start to free them. These decisions can help lower overall loyalty problems but will be badly received in those regions that actually have a slave market.

72
Sparta has unique rules for the acquisition of slaves to reflect its social structure. In this case new population points are created either as citizens or slaves (the chance of this happening will reflect the ratio of citizens:slaves in the capital region) but this will only happen in the region with the Spartan capitol building (so at the start of the game this will be Laconia but this can change over time).
6.4. Loyalty and UnrestEach region has a basic value for loyalty (usually 100 but this can be varied by nationality, government type and decisions). The basic loyalty value will also be affected by the buildings in the region and how you have allocated your population so can be over 100 in many circumstances.
This will then be reduced by the number and type of population present and if nearby regions are in revolt. Loyalty will also be lowered if a region has just been conquered, if it is suffering from a plague or famine or in the case of religious or ethnic unrest.
The result is then used to determine regional loyalty.You can see the loyalty of your regions either on the region tab,
province tab, via the ledger or using the map overlay. On the region tab, the loyalty indicator will be green if loyalty is over 75, yellow and
red if it is below 25. Any revolt risk will be shown as a red number.
The factors that currently affect loyalty in that region can be seen by mousing over the loyalty value on the regional screen.
You can also view the loyalty of regions by using the appropriate map overlay.

73
6.4.1. Raising Loyalty
Ensuring the loyalty of your population is very important. You can raise the loyalty of a region by building appropriate buildings, making certain decisions (but these are limited till you reach civilisation levels II and III) or assigning your population to the culture production line. If you place your population to the culture line, you produce culture and every 2 culture points generate +1 region loyalty. This bonus is capped at 1/3 of the base regional loyalty (with this value set for your faction and by game difficulty).
6.4.2. Effect of the different loyalty levels
At the highest loyalty level (75 or more), a region gains some benefits in terms of production and output. Equally a region with loyalty of 75 or more cannot secede from the state in the event of a civil war (7.5) breaking out.
If loyalty is 50 or less, there is a risk of revolt, this becomes very substantial if loyalty is under 25 (and this, in turn, will affect production).

74
6.4.3. Calculating Population Loyalty
Each population unit has a base score for unrest and this will vary according to their nationality. The loyalty penalty will vary according to the culture of the population point. If the population is a slave, this value is increased by +50%. So as an example German ethnic slaves will have a revolt risk of 6 (German) +3 (slave) giving a value of 9 for each one.
ethniC Groupbase LoyaLty per Citizen
Egyptian 2Hellene 2Indian 2Italic 3Celtic 4Balkanic 4Desertic 4Nubian 4Hispanic 5Iranian 5Semitic 5Caledonian 6Caucasian 6Germanic 6Nomadic 6
If the citizen is not of your main ethnic type then this score is used to determine the total unrest in a region. In other words, their contribution to total unrest will be the score for that ethnic group multiplied by the number of that ethnic group who are present.
If the citizen is of your main ethnic group then their loyalty penalty starts at 2 and will increase as your population expands. For the player this works as below (the AI gains some benefits in this regard depending on the difficulty level):

75
w The first 4, generate 2 points each; w The 5th to 8th citizens, generate 3 points each; w The 9th to 12th citizens, generate 4 points each; w The 13th and 14th: generate 5 points each; w This will carry on, with each extra pair of citizens generating
another point, so the 15th will generate 6 points and so on.
As a visual indicator, those with the lowest loyalty penalty (i.e. of 2 points) are underlined in green on the regional panel. Those with a loyalty of three or four are
underlined with yellow and red for those in the highest levels.Note that if all the citizens come from an ethnic group with a
high base-rate for disloyalty then it is possible that there will be no population groups underlined in green in that particular region.
Remember that many of the level II and level III culture buildings will give substantial loyalty benefits to offset this. But at the cost of increased decadence as you come to rely on circuses, arenas and noble districts to manage your population contentment.
In effect, as with the ageing mechanisms, over time a successful state will become progressively harder to manage making it a challenge to avoid either decadence or revolts.
6.4.4. Revolt Risk
Revolt risk is related to loyalty. If loyalty drops below 50, there is a chance that the region may revolt. Revolt risk can be managed by improving loyalty or by assigning military units to the region.

76
In addition to internal revolt risks, bordering an independent region increases the revolt risk. Each active unit from an independent or rebel nation adjacent to your region will lower its loyalty by 1.5.
In effect, if your Empire borders barbarian, independent or slave owned regions then the border regions will have higher unrest. However, if they are relatively under-populated then this may be manageable but you will probably need to deploy a permanent garrison if the region is relatively well populated.
6.4.5. Martial Law
Deploying troops in a region will reduce the revolt risk (but not increase loyalty). However, remember that units in a region with loyalty under 50% will not regain any lost hit points (10.5.8) so they may need to be redeployed if they become weakened in fighting or due to lack of supply.
Note that most military buildings will also generate a small reduction in the revolt risk as this simulates small detachments of troops below the game scale.
6.4.6. War Weariness
War weariness will build up over time when you are at war with this increasing by one per turn for each individual opponent you have (note there are exceptions for some of the Diadochi 7.7). When it is low, the only effect is some reduction of commerce. At its worst, it will trigger major losses of loyalty, an increase in decadence, a major loss of commerce, reductions in experience for newly raised units and a reduction in your overall manpower.
You can check your current war-weariness on the nation panel.If you have no war-weariness, this modifier will not be shown.

77
6.5. Supply and Food Production6.5.1. Supply
Supply for your military units in Field of Glory: Empires relies on the production of sufficient supply either in the region they occupy or an adjacent region (if it is friendly). Failure to keep an army supplied will lead to first a loss of combat efficiency and then the destruction of units.
Food is converted to supply points automatically when needed, with one food giving 5 points, and this ratio can be altered depending on your buildings, ruler or decisions. In addition, some powerful buildings generate ‘free supply’ each turn. If this is not required by units in the surrounding regions, the conversion does not happen.
Having a big army standing in a region will significantly slow its growth (it might even trigger a famine), as the soldiers are served before the population.
Provinces do not provide immediate benefits over a region regarding supplying the troops, although since food is partially averaged each turn across a province, the logistics should be easier to cope with.

78
6.5.2. Effect of lack of Supply
If a unit is out of supply then in the first turn it will lose one point of effectiveness (10.5.8), once it has lost all its effectiveness it will start to lose hit points. If an army can’t be maintained due to lack of resources (such as money) a similar process will be followed.
Play note: This means that weak units (such as skirmishers) are particularly vulnerable to the effects of being out of supply or a lack of maintenance.
6.5.3. Naval Resupply
Ships will also provide 1 free supply point per ship to an adjacent land unit (if this is needed after other sources of food have been used).
This supply can be provided both to units being moved by sea and to land units in a region adjacent to the coast.
6.5.4. Foraging
If a region does not have enough supply points for the military force present then the army will forage the land, unless it is already pillaged. Each unit foraging might pillage the region, and if this happens, food production will be reduced until the region recovers.
6.5.5. Sieges
In case of a siege, the defender can only draw some supply from the region under siege and but the overall food production is substantially reduced. However, an unblockaded port will increase the amount of food available due to smuggling.
The attacker can use supply generated that turn in the region or from adjacent friendly held regions.
Play note: This will make sustaining long term sieges in an isolated region, especially Islands, difficult unless you have a fleet that can assist in supplying your army.

79
6.5.6. Food Production
The amount of food a region will produce depends on three variables: terrain; population allocation; and buildings.
If food production in the region (perhaps modified by transfers across the province) is too low it will trigger a famine. If the region has a famine there is a 1% chance per turn that a population point will be lost.
Production will be decreased if the region has been raided, plundered or is in unrest. In addition certain decisions and national traits can increase or reduce food production.
Remember that slaves are as efficient as citizens when it comes to producing food so this should be taken account of when assigning workers.
6.6. Income and Costs6.6.1. Sources of Income
You have five main sources of income: w From trading (6.1); w From citizens assigned to the money production line of your
regions (6.3.3) with this value augmented by any relevant buildings;
w From citizens assigned to the culture production line of your regions;
w By raiding or piracy (10.8), if your nation has the appropriate traits;
w By looting an occupied region.
As such Field of Glory: Empires does not use the concept of setting a tax rate but the characteristics of your state, and your current ruler, can increase or decrease your income from trading and citizens.
In addition, some decisions will allow you to gain extra income, either as a one-off or for a number of turns.

80
6.6.2. Sources of Costs
The main expenses you face are: w Your army and navy; w Importing trade goods; w Raising new units.
If you lack the gold to pay for your army then each turn some units will face losses due to desertion. The effect of this is similar to being out of supply (6.5.2).
6.6.3. Administrative Burden
The administrative burden reflects the bureaucracy and inefficiency of running a state in this era. As such it depends of your nation size, your number of structures and your civilization level. This is a global cost and is deducted from your income to reflect the expenditure on your state. Nation size is the most important factor and a small nation will either have no or a negligible burden.
The administrative burden is not applied if you opt to play using the easy setting or opt to disable this feature (4.1.2 and 4.1.3).
7. Ruling Your Empire
Most nations in the game are based on one of the historical states that arose in the period of the game.
However, in addition there are a number of factions that are generic - called World Nations. These include various types of ethnic rebels, slaves, tribes in unconquered regions and rapinatore (basically pirates or brigands). These can arise as a result of a revolt or in a region not owned by any named nation. Left unchecked these can become a serious threat to any organised state in the region as

81
they sometimes will have access to powerful military units (especially rebels and local tribal groups).
Over time, some such areas may then produce an organised state of the appropriate cultural background.
Note that almost every combination of ethnic group, government type and government age and level has different features. These changes are in the main manual where appropriate and can be checked by looking at the detailed in-game tooltips.
7.1. RulersYour rulers are generated automatically as the old one dies. Their traits will affect the running of your state and give you bonuses or maluses.
Republican Rome and Carthage do not have rulers as such but factions. Factions will gain and lose control in part due to how well you do.
If your state is old, or even worse, decadent, then rulers are more likely to die each turn than normal.
7.2. Government TypeEvery Government has a type and current status and this can be further affected by entering a golden age or the impact of a long running war.
Over the game, a state may progress to higher civilisation levels, stagnate, become decadent or collapse into civil war. This process is driven by a combination of gaining or losing progress tokens as you try to manage the ratio between culture and decadence.
7.3. Civilization LevelsGovernment types are split into three civilization levels. The title of each level varies as follows:

82
LeveL typiCaL titLesI Tribal Horde, Tyranny, Kingdom, Oligarchy, SectII Tribe, City State, Monarchy, Republic, HierocracyIII Confederation, Commonwealth, Empire, Federation, Theocracy
Each of these has a set of traits that affect issues such as manpower generation, culture production and the speed at which decadence is gained (8.1.4).
7.3.1. Civilization Level I
At this level, very few decisions (12.1) are made available and these are less common in any case.
The administrative burden (6.6.3) is reduced reflecting lower levels of bureaucracy and state efficiency.
Nations with the traits ‘clans’ or ‘infighting’ are vulnerable to civil wars when their leader dies (7.5.3).
A Civilization level I nation that is ‘young’ (7.4.4) and has five negative process tokens (7.4.1) will collapse and be removed from play.
If a client-state (9.4.3) then will only provide 5% of income and 10% of manpower to owning power (usually client states hand over 15% of their income).
You have a lower chance of gaining a positive treaty if interacting with a Civilization Level III nation.
Some structures cannot be built such as tier III buildings (6.2.2), national or unique wonders (6.2.8).
The base trade range is 2.In addition, some government types give further penalties and
some military units cannot be raised.
7.3.2. Civilization Level II
At this level most of the Level I restrictions are removed. However, some buildings cannot be constructed (mostly these are some of the national or unique wonders) and the base trade range is set at 3.

83
7.3.3. Civilization Level III
At this level, you will have both the full range of decisions and these will be available more often. Those decisions that exchange one resource for another (say metal for manpower) are doubled in their effects (both the costs and advantages) and any gain is increased by a further 5% per trade acumen of your main capital region.
At this level the administrative burden will increase reflecting the complexity of your state.
If dealing with a Civilization Level I state then the chances of gaining a positive diplomatic outcome are increased.
The base trade range increased to 5 and you can have an extra capital region and gain one more military leader at any time.
A few buildings are no longer available to be built (those with a specifically tribal characteristic).
In addition, you can gain a Golden Age (7.4.5) and different types of government give additional bonuses. Finally some nations gain specific units such as Cataphracts, heavy warships, or Imperial Roman Legions.
7.4. Progression and Regression across Civilization LevelsIn each level, there are five sub-levels. These are shown by changing the name of by adding ‘young’, ‘stable’ or ‘glorious’, ‘old’ or ‘decadent’ respectively.
As an example, you may see titles such as ‘Stable Tribal Horde’, ‘Glorious City State’, ‘Young Republic’, ‘Old Empire’ or ‘Decadent Kingdom’. All these indicate both the civilisation level and sub-level of that particular state.
7.4.1. Gaining and Losing Progress Tokens
If you are in the top tier of the CDR (8.1.5), you can gain a progress token. If you are bottom tier you can lose a progress token. The

84
base probability of this happening will alter according to your current position on the legacy table (8.2.4).
Remember that in addition, you will usually gain or lose a token every time you take or lose one of your objectives. If you opt to make gaining progress tokens slower (4.1.3), then you may not always again a token on conquest but will still gain the other advantages of taking an objective region.
You can also lose progress tokens if a world wonder in a region you control is selected for destruction (6.2.13), in this case the building is spared but your neglect is noted across the civilised world.
7.4.2. Progression
To progress from young to stable to glorious you will need 5 progress tokens for each sub-level.
A Glorious nation has benefits in terms of base loyalty (6.4), legacy gain, the amount of experience needed to level up combat units (10.5.6) and the number of leaders available. However, it will also gain decadence more quickly since in this state government age (8.1.4) will generate decadence.
If a state has progressed to ‘glorious’ then if it gains another 5 progress tokens it may be able to progress to a higher civilisation level. Note you can only progress to level III if you own at least 10 regions.
A Glorious level III state will enter a Golden Age every time it gains five progress tokens.
7.4.3. Regression
If you lose progress tokens and have -5 then, again, the name applied to your state will change.
In this case a ‘young’ state will lose a civilisation level, probably face a civil war but will have the chance to regain some stability (at a much reduced level).

85
If you are ‘stable’ or ‘glorious’, then -5 tokens will mean you stay on the same civilisation level but become ‘old’.
An ‘old’ state faces a number of problems in terms of economic performance and gaining extra decadence. If a further -5 tokens are accumulated, then the state will become ‘decadent’. At that stage, you will face major problems with a loss of loyalty and penalties affecting your economy. A further -5 tokens and your state may lose a civilisation level but will have the chance to stabilise as a diminished ‘stable’ state (you are likely to have lost some regions due to the accompanying civil war).
The key issue here is the accumulation of decadence (8.1.4). This will slowly build up if you are Glorious or Old, more rapidly if you are Decadent. Equally you gain decadence by expansion, certain buildings and decisions. As long as you can off-set this by accumulating culture, you can progress or stay stable (say as a Glorious Empire – the top of civilisation level III). In turn, increasing decadence (and other challenges in terms of maintaining the loyalty of your citizens) will make it harder to retain a slot in tier III of the CDR (8.1.5), meaning that your ability to progress (or generate Golden Ages) will start to slow.
Thus maintaining a level III state can be a long term challenge as inevitably, decadence will slowly increase as you are no longer able to progress. This will be worsened due to the need to use buildings that generate a lot of decadence in order to control the loyalty of your large population (6.4.1).
Example 1: Antiochus starts as a Glorious Monarchy. If it acquires -5 tokens it will become an ‘old monarchy’ (this will also start to trigger the Diadochi mechanism of seeing regions defect to rivals). A further -5 and it will become a ‘decadent monarchy’. At this stage, if AI controlled, it will probably splinter into a number of smaller states (due to the special Diadochi mechanisms). For the player a further -5 will lead to civil war but also being a ‘Stable Monarchy’ – with the possibility of recovery.

86
Example 2: The Picts start as a horde. If they gain 5 progress tokens they progress to being a ‘stable horde’. Another 5 will see them become a ‘glorious horde’ and then another five moves them to civilisation level II as a ‘young tribe’.
7.4.4. Progression and Regression Table
This process is summarised below:
CiviLisation LeveL titLe Gain 5 proGress
tokensLose 5 proGress
tokens
I Young Become ‘Stable’, Government Age halved State Collapses.
I Stable Become ‘Glorious’ Government Age halved
Become ‘old’, Government Age halved
I Glorious Evolve to Civilisation Level II. Government Age halved
Become ‘old’, Government Age halved
I Old Become ‘Stable’, Government Age halved
Become ‘decadent’, Government Age halved
I Decadent Become ‘Old’ Government Age halved
Become ‘stable’, Civil War, Government Age halved.
II Young Become ‘Stable’, Government Age halved Civil War
II Stable Become ‘Glorious’, Government Age halved
Become ‘old’, Government Age halved
II GloriousEvolve to Civilisation Level III (if you have 10+ regions). Government Age halved
Become ‘old’, Government Age halved
II Old Become ‘Stable’, Government Age halved
Become ‘decadent’, Government Age halved
II Decadent Become ‘Old’, Government Age halved
Become ‘stable’, Civil War, Government Age halved.
III Young Become ‘Stable’, Government Age halved
Revert to Civilisation Level II, Stable, Civil War, Government Age halved
III Stable Become ‘Glorious’, Government Age halved
Become ‘old’, Government Age halved
III Glorious Enter a ‘Golden Age’ Become ‘old’, Government Age halved
III Old Become ‘Stable’, Government Age halved
Become ‘decadent’, Government Age halved
III Decadent Become ‘Old’, Government Age halved
Become ‘stable’, Revert to Civilisation Level II, Civil War, Government Age halved.

87
Notes:1. As you progress or regress, entering a new state may remove half of
your existing age (7.6). The exception to this is a ‘Golden Age’ where you retain your existing government age;
2. You can only move between civilisation levels at the steps noted, all other moves will keep you at your existing level and change the title of your state;
3. A civil war may well see you lose territory both to a usurper (7.5.2) and to other factions that have a claim to some of your existing regions.
4. Note that you cannot revert from Civilisation Level II to Civilisation Level I but you can revert from Level III to Level II.
7.4.5. Golden Age
A Golden Age will generate bonuses in terms of culture production, taxation, the experience level of newly raised units, and will reduce the decadence gain for newly conquered regions. Each Golden Age will last for 12 turns.
However, it will increase the rate at which your government ages (7.6).
In effect, you cannot escape the long term decadence problems of being in civilisation level III and being glorious by triggering repeated Golden Ages.
Nations undergoing a Golden Age will be marked in yellow on the CDR chart that appears at the end of the turn resolution process.
If you are still in a Golden Age and gain another five progress tokens, the original one will be cancelled and a new one will commence using the current turn as the start date.
7.5. Civil WarsCivil wars are a feature of the game and some nations are more vulnerable than others.
7.5.1. All Nations
All states will experience a civil war when they have 5 negative ageing tokens and are already decadent or if the resulting change

88
of government type will make you drop a civilisation level (7.3). Sometimes the revolt of an important region can also trigger a civil war.
7.5.2. Usurpers
If a Usurper faction appears in a civil war it will rejoin the original faction after 15 turns if the original state was AI controlled. Note that any other named factions that emerge from a civil war or regions that fall to non-specific factions (rebels, slaves or rapinatore etc.) will not revert to their original ownership.
Sometimes more than one Usurper faction will be created in a given civil war. If so they are all treated as being at war with each other.
7.5.3. Tribal Nations
Civil wars are a regular feature of some civilisation level I governments depending on their particular traits. In this case, every time your leader dies, there is a risk that the succession will be fought over leading to a civil war, until you progress to civilisation level II.
In this case, each region you own has a 10% of triggering a revolt (this will drop to 7% if you are Glorious). The chances of a region, with local loyalty above 75, triggering a revolt are further reduced and, in addition, such a region will not revolt.
7.5.4. The Diadochi
The Diadochi states are particularly vulnerable to collapse if they are either ‘old’ or ‘decadent’ as provinces may change allegiance. If they are AI controlled, loss of regions may provoke a complete collapse and the emergence of a number of smaller states from the ruins.
7.5.5. Rome
Rome is particularly vulnerable to Civil Wars once it is in Civilisation Level III and of sufficient size while it is young or stable. In this

89
case, one can occur regardless of how you manage decadence and ageing. Note that regions with a loyalty over 75 will not revolt under this mechanism.
7.6. Government AgeOver time your government (in this case representing your state) will age. Usually it will age at one year per game turn but some of the Diadochi have special rules in this respect (7.7).
Your current age can be found on your nation panel:
Your age will be reduced most times that you change either civilisation level or type (i.e. from young to old etc.) as set out in 7.4.4.
The decision to reform your government also allows you to reduce your government age.
If you are a ‘young’ or ‘mature’ state then government age does not contribute to your decadence score (8.1.4), but once you are glorious, old or decadent, then accumulated government age becomes part of your decadence score.
Note: This can mean that if you spend a long time as a mature state and then progress to glorious that your decadence might increase radically in a single turn as government age is now taken into account.

90
7.7. Specific Rules for the DiadochiThe Hellenistic successor states (the Diadochi) have particular problems in retaining their regions when they are losing a war. If they become old or decadent, there is a risk that their entire Empire will collapse. Equally border regions may change loyalty to a more dynamic and successful neighbour.
The Seleucids use the Satrapy system which gives a bonus in terms of a free unit for each province and more garrisons in each region. The disadvantage, however, is in terms of reduced income due to the cost of the Satrap.
Macedonia’s government age will not increase in any turn in which it grows by at least one region. However, if the number of regions does not expand, then Government Age increase will double for that turn.
The Antigonids will see their Government Age increase at double the normal rate in any turn in which they have no wars. If they are currently fighting between three and five wars, then they will not age and if they have six wars at any time they will lose 1 government age for each such turn.
The Ptolemies will see their Government Age double in any turn in which their fleet is less than half the combat power of their army. If their navy is larger (in terms of combat power) than their army, they will gain a bonus +5 legacy points per turn (in this case the fleet must be of at least 80 combat power).
All the Diadochi (including the Lysimachids) are vulnerable to crumble when played by the AI depending on their decadence and if they have lost their original national capital.
7.8. Destruction and Rebirth of a NationIf AI controlled, a nation is considered to be destroyed, and all of its existing diplomatic links are removed, if it loses all its regions.

91
The exception to this is if it still had some military units and was allied to another state. In that case, those military units will draw supply from their ally and may be able to conquer a region and thus re-establish their state. During this process, the original diplomatic links (alliances and wars) will be retained.
If a nation is completely destroyed it may be reborn if a suitable region is conquered by one of the ‘world nations’ (7). In that case, control may swap from the generic faction to the named nation. In this case, the new state will have no pre-existing diplomatic links and will start at peace with all other nations.
If a state returns under this mechanism, a notification will appear in the message panel.
7.9. The Nation PanelMuch of this information is summarised on the nation panel which you can access from the top of the game screen.

92
This provides an overview of the name of your state, how long your current government form has existed, your ruler, and your current culture, decadence and legacy scores.
In the middle you have the option to move onto more detailed screens.
7.9.1. Overview
This is displayed by default (shown above) and will tell you information about current wars, the size of your army or fleet, where you are in the legacy chart, where you in terms of the progress tiers, how many provinces and regions you own, your population and how much money, manpower and metal you possess.
7.9.2. Modifiers
This will show all the modifiers that currently affect your state. These are from your government type, traits and current decisions and your ruler.
Hovering the mouse over an image will bring up a detailed description of how it affects game play.

93
7.9.3. Decisions
A list of all the decisions currently available to your faction is shown on the nation panel. If you can enact one then it will be marked by a green tick. Again hovering your mouse over the text will bring up a tool tip that tells the impact of the decision and, if relevant, why you currently cannot carry it out.
Clicking on a decision will usually bring up a secondary set of choices with detailed information about the likely implications and costs.
7.9.4. Objectives
On the left hand side this will show you all the objectives you currently own. On the right hand side are those you have yet to conquer and information about who owns and your diplomatic status towards them.
7.9.5. Nation Traits
All the variables that currently affect your nation can be seen on the nation panel. Note that some of these are linked to your ethnicity or nation and others will be the result of your government level/type or recent decisions you have enacted.

94
It is possible to change some of your traits as the game progresses by using an appropriate decision.
8. Culture, Decadence and LegacyThe accumulation of culture and decadence is crucial to your nation’s progress. Produce too little culture or too much decadence and the nation will decay and revert to a less efficient state or collapse into civil war.

95
The process of calculating culture and decadence does not apply to the various ‘world nations’ (7).
8.1. Culture and Decadence8.1.1. Culture Points
The main role of culture in the game is to determine the progression or ageing of your state. This calculation involves both culture and decadence and the relative value of the two will determine which of the tiers (8.1.5) your state is in.
Culture is produced by the allocation of your population and the types of buildings in a region. In addition, population allocated to the culture line will increase loyalty and this can be a useful tool to reduce
the chance of revolt (6.4.1).Culture is notionally stored in the region where it was produced
and some can be lost when a region suffers from an invasion, pillage or a revolt.
8.1.2. Culture Points, Regional Development and Legacy Points
The number of historically produced culture points in a region will determine its development level. In turn, the better developed a region is, the more legacy points it will generate each turn.

96
Some legacy will be produced by regions with between 1,000 and 2,499 culture points (acquired since the start of the game) and this will be increased for regions with over 2,500 culture points.
8.1.3. Calculating Culture
The process of calculating the overall Cultural Value for your nation is: w For each region, the value is culture output of the region
multiplied by the loyalty value (since this can be below 100, it is possible to gain relatively small amounts of culture from an otherwise rich region) in the current turn.
w Take the average of this value for that region from the past 25 turns. w These two values are combined and then divided by two to give
the culture production in the current turn.
In effect, this will stop a large nation suddenly gaining or losing substantial amounts of culture in a single turn due to short term events. But you will immediately lose all the accumulated culture if the region is captured by another faction.
8.1.4. Calculating Decadence
Calculating decadence is slightly more complex but basically depends on the size of your nation, the types of buildings and the age of your nation (7.6).The detailed calculation is:
w Each region generates 1 decadence point: w This is reduced to 0.5 decadence points if the region is part of a
wider province; w Add up gains and reductions of decadence due to the buildings
in each region; w Newly conquered regions will give extra decadence until they
are pacified;

97
w Over time your government will ‘age’ and some of this age can be reduced when you change government type (7.2) or using one of the decisions (note these rules are slightly different for some of the Diadochi 7.5.4). If you are ‘Young’ or ‘Stable’ (7.4.4) then your age does not count for decadence. If you are Glorious, Old or Decadent, then government age will be used to calculate part of your total decadence score;
w Some nations gain short or longer term benefits in terms of decadence reduction depending on how well they do against particular criteria.
Note that once you reach a glorious state, your decadence might appear to increase significantly. Equally once you are glorious and in civilisation level III then your age and decadence will steadily build up as the only means to reduce this is to use some of the options from the citizenship decision (12.2).
Some buildings will remove decadence. These are mostly related to education and justice. In this case they will help offset any decadence that is earnt by that particular region but will not offset decadence due to government age for example.
8.1.5. Culture/Decadence Ratio (CDR)
This is calculated by comparing the total culture of your nation with its decadence.
Your nation is then compared to all the other states in the game and you are allocated to one of three tiers.

98
Note this allocation is relative to other states, not just a product of your own performance, so you can move up or down this chart even if your own CDR does not alter.
8.2. LegacyLegacy points are gained and lost during the game and are used to determine the winner either in-game or at the end.
If one nation builds a commanding lead during the game then they can be declared the winner. To do this, the leading nation, at any time after turn 50, will have to have at least three times as much legacy as the second placed nation.
Note that the legacy gain for being an old or decadent state is the inverse to the decadence gain. In effect, a state in this situation can generate substantial legacy even as it threatens to collapse due to internal tensions. Thus surviving in this difficult situation can be the basis for winning the game on the basis of accrued legacy.
8.2.1. Gaining Legacy
Legacy is gained from: w Having regions with over 2,500 culture points per turn; w Having regions with between 1,250 and 2,499 culture points per
turn; w How long your government has been in its current status with
this modified as a government of any tier that is Glorious gains 35% more Legacy and a Civilisation level III government gains a base of 27 Legacy Points per turn;
w How many objective regions you hold; w How many wonders and unique buildings you control

99
8.2.2. Losing Legacy
The main reason for losing legacy is due to decisions to raise emergency troops if your state is threatened.
You can also lose legacy if you send a diplomatic request that has no chance of being accepted, such as demanding that a powerful empire becomes your client state (9.4.3).
8.2.3. How to check your legacy score
The current legacy score is shown by accessing your Nation Panel on the main screen. This will show your current score and the gain from the most recent turn.
The current legacy generated each turn by category can be seen by clicking on this and accessing the legacy screen:
You can also see a summary of the situation by mousing over the legacy score on the main tool bar:

100
8.2.4. Secondary Benefits of Legacy
If you are at the top of the legacy table and in tier III of the CDR then there is an extra 5% chance each turn to gain a progress token.
If you are in the top 10% of the legacy table and in tier I of the CDR, the chance of a negative progress token is decreased by 5 percentage points.
8.3. Winning the GameYou can win the game in one of two ways.At the end of the game (190 CE) the state with the highest legacy score is declared the winner. Even if a faction has been eliminated, its legacy score is retained. So it is possible, especially for an AI controlled faction to win in 190CE despite having been eliminated earlier.
Alternatively, once the game progresses beyond turn 50, the game can be won at any stage if one power has three times the legacy of its nearest rival.
Note that in both cases, you can opt to carry on playing.
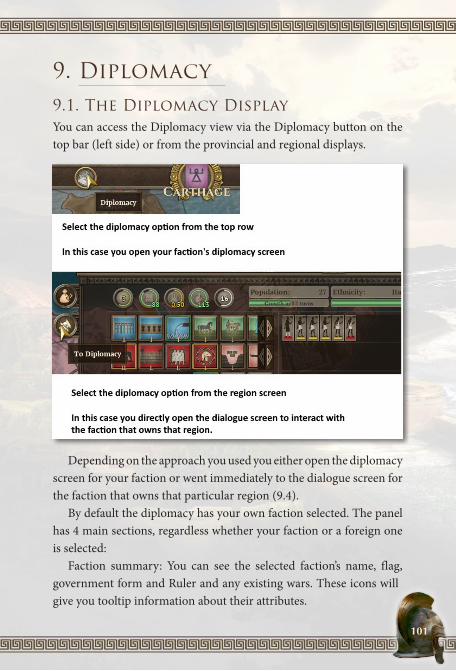
101
9. Diplomacy9.1. The Diplomacy DisplayYou can access the Diplomacy view via the Diplomacy button on the top bar (left side) or from the provincial and regional displays.
Depending on the approach you used you either open the diplomacy screen for your faction or went immediately to the dialogue screen for the faction that owns that particular region (9.4).
By default the diplomacy has your own faction selected. The panel has 4 main sections, regardless whether your faction or a foreign one is selected:
Faction summary: You can see the selected faction’s name, flag, government form and Ruler and any existing wars. These icons will give you tooltip information about their attributes.

102
Requests and our answers / Propose Treaty: If viewing your own faction, you can see here a list of any pending requests/proposals from other factions, and your replies to them, assuming the reply happened during this turn.
Treaties: Lists the active treaties of the selected faction. Click on a line to jump to the other party in that particular treaty.
Note that the remaining duration for any peace treaties is shown on this list.
9.2. Diplomatic MessagesOther states will send you messages as appropriate. Some of these are requests to agree a particular option such as for a co-operation treaty.
Some are triggered by your actions and the relative values (which can be based on military power, wealth, culture, decadence etc.) between your two nations. These do not lead to any immediate consequences but do indicate the relative relations between your powers. A message praising your recent successes might suggest now is a good time to seek an alliance. One gloating at a disaster, or praising some-one for attacking you, indicates poor relations and you may want to prepare for war at some stage.
9.3. Diplomatic RelationsThe chances of any action (except the unilateral ones, such as declaring war) are influenced by the relationships between the two countries, represented on a scale from -99 to +99. At -99, the hostility is

103
extreme between the two countries, at +99, the trust is so great that being allied seems almost natural.
There are two special relationships values also, -100 and +100. You can’t reach them by normal means, only through events or special decisions. -100 means you are locked in a permanent war, called a Feud. +100 means you are locked in a permanent alliance, called a Pact.
In addition to the relationship value between the two countries, relevant parameters that influence the decision of the other nation, if controlled by the AI, includes:
w The balance of power; w The relative control of objectives they want or ones you have in
their own territory; w the number of allies; w If you, or they are already at war.
All these and more play a role in the decision. For example, don’t expect a winning nation with allies to make peace with you, unless war exhaustion is crippling them (or another threat appears in their back). War exhaustion is the incentive to make peace as it increases as time passes and the wars accumulate against the country.
In effect, for most nations, every turn of war against every opponent adds one unit of war weariness (so you can gain more than one unit per turn) but this will be removed once a peace has been agreed.
9.4. Diplomatic OptionsNote that if you send a diplomatic request that the recipient will see as insulting, such as demand that a powerful Empire become your client state, you run the risk of lowering existing relations and losing some legacy points.
The diplomatic dialogue screen contains a list of the possible options, information about the state you are interacting with

104
(including an indication of how they regard your intentions) and a list of all their current treaties.
9.4.1. War and Peace
These allow you respectively to declare war on another nation or seek a peace deal. When trying to make peace, a tool-tip will show the chances of this being accepted and the reasons for this.
If a peace deal is accepted it will last for 10 years.
9.4.2. Alliance
Again the chance of this being accepted will be shown on the tool-tip along with the reason why. An alliance allows a shared Fog of War (i.e. your allies will lift FOW for you and you for them), shared supply lines and your armies will fight together (subject to the rules in 10.7.1).
Regions of allied nations trade use the same rules as apply for internal trade (or trade with a client state), making it more likely that trade goods will be exchanged.

105
Each turn of an alliance will see a slight boost to relationships.Note an ally conducts an independent foreign policy and may
ask you to support them in their wars. In this case, you will be automatically at war with either a state that attacked them, but you will only be involved if they were the aggressor if relations are over 50 (9.5).
These rules apply in reverse, so if you have relations of 45 and you attack another state that ally will not join you. However, they will come to your aid if you are attacked.
If a state has an ally and loses its last region, it will continue in the game if it had a fleet or army at that stage. These units will draw supply from their ally and the state can carry on interacting diplomatically with other states and can use its remaining army to invade other regions. After a number of turns these units will be removed from play.
Having an alliance will improve the accuracy of information on that faction in the game ledger (15).
9.4.3. Client State
This is a form of alliance but each turn the client will pay 15% of their money income to the major power and can’t make or break treaties (apart from trying to break from their protector).
Each turn of a client state relationship will see a slight boost to relationships.
Having a client state relationship will improve the accuracy of information on that faction in the game ledger (15).
9.4.4. Break Client State
This will allow the junior partner to break the current client state relationship. There is a chance this will provoke a war, especially if current relations are low.

106
9.4.5. Absorb a Client State
This option allows the senior partner to absorb a client state and its existing territory and armies will be treated as part of their realm.
9.4.6. Gift
If you opt to send a gift (of at least 100 gold up to the largest of either 50% of per-turn income or 10% of your treasury) this will improve relations as long as you are not currently at war.
The effect of the gift will depend on how rich is the target state and half the relationship boost will also apply to any allies of the recipient while any of their enemies will have a negative relationship shift relative to yourself.
Gifts are most useful if you want another treaty (such as an alliance) in the longer term. Note the negative impact on relations with any state that they are at war with.
9.4.7. Insult
In effect has the opposite effect of a gift but has no cost. Perhaps of most use when you want an alliance with a nation that your target is already at war with.
Since this lowers your mutual diplomatic value, it can also be useful if you want to be able to raid your neighbour but not actually risk a war. This option is available to a client state.
9.4.8. Co-operation Treaty
This is a weaker form of an alliance so is more likely to be accepted. Relationships will slowly improve and the chance to trade is increased but there is no shared line of sight, supply or military co-operation.
Equally, you will not be expected to support each other’s wars.If you have relations over 50, then you will not be able to declare
war on each other unless you first cancel the co-operation treaty.

107
Having a co-operation treaty will improve the accuracy of information on that faction in the game ledger (15).
9.4.9. Make Peace with
This will request that the target state makes peace with one of its rivals. The chance of success will depend on how close your relationships are rather than the current progress of the war.
The chance of a peace offer being accepted depends on the status of the two warring states (i.e. as would affect your own offers of peace), so even if your target agrees to seek peace there is no guarantee that a peace will occur. This option is available to a client state.
9.4.10. Declare War on
This asks your target state to declare war on another state. The chance of success will depend on how close your relationship currently is. This option is available to a client state.
9.5. Implications of Positive RelationsIt is worth noting that positive relations, in the absence of any other agreement, do not protect you from the risk of being attacked. All this does is to prevent a state from raiding you.
However, positive relations will make it easier to acquire either a co-operation agreement or an alliance.
If you have relations over 50 then a co-operation treaty will bring additional benefits as will alliance.
If you are under 50, then a co-operation treaty will not prevent a declaration of war (either directly or as a result of another alliance). If your relations are over 50, then you will need to break the co-operation treaty first and then declare war in a later turn.
If you have an alliance and relations are 50 or less, it will be treated as a defensive alliance. In this case you will defend your ally if they

108
are attacked but will not join in a war they started. If it is over 50, then you will support them in an aggressive war. The same rules apply if you are attacked or start a war.
9.6. Risk of an attackThe AI uses a number of factors when considering attacking a rival. These include existing relations but also a perception of weakness. If you are already embroiled in a war, especially if outnumbered or you are losing regions, then other powers may seek to take advantage of your weakness.
10. Military Units
Military units in the game are either land or naval. Land units can move by sea without needing specialist naval transports but are very vulnerable if attacked by warships while at sea.
Each unit has a cost in manpower, money, metal and military equipment to raise and will also cost manpower, money and metal to maintain.
Note that if you raise mercenaries, there is no manpower cost but they are relatively expensive to maintain.

109
10.1. Issuing Orders10.1.1. Movement
When you have an army selected (with left click), right clicking on a region will issue an order to begin moving there this turn, if it is a valid move. Right clicking on a sequence of regions will construct a route through those regions. Right clicking on the existing route will trim the route to the selected region (unless Ctrl is held to allow a loop or round trip).
Backspace can also be used to trim the last step from a route.When issuing a movement order, right clicking on a hostile city
will add an Assault order, right clicking on a friendly city will add a Garrison order for when the stack arrives.
Right clicking on a hostile army will instruct your army to attempt to intercept that army. Right clicking on another of your own armies will also attempt to intercept that army and merge with it.
When moving to an adjacent region, Shift-right clicking will use the direct route to that region even if there is a faster, indirect, route. When moving to a more distant region, Shift-right clicking will attempt to use a land route even if there is a faster route that uses naval transport.
10.1.2. Other Orders
Across the top of the unit panel are a series of orders you can give.
Split and Merge allow you to move units between stacks or to create a new stack.
Assault means the army will attempt to storm any fortress in the region. Storming a city while moving requires a specific movement order.
Garrison will place the army inside any fortified structure.Pillage will pillage the region (sometime netting money or slaves).Disband will disband the entire stack, easing up your maintenance.
In addition, some nations have the ability to raid (10.8). This

110
option will mean that one of the adjacent regions is chosen and a raid will take place. This may see the defeat of your raiders or the gain of substantial sum of money.
Stacks with a Roman legion present may also have the opportunity to build additional fortifications or roads (combined with the expenditure of gold)
10.2. Unit TypesField of Glory: Empires has a large number of different units. Some of these are specific to some particular factions, others can only be recruited in specific provinces or only once some powerful buildings exist.
10.2.1. Infantry
Light Infantry – usually operate as skirmishers (10.5.2). Some special variants include archers and slingers that have slightly different traits but can only be recruited in certain provinces;Regular (Medium) Infantry – typical infantry units without any particular strengths or weaknesses in combat. A major advantage is they all have the ‘besieger’ trait and thus are particularly useful in sieges. In certain terrain, they are better than heavy infantry. Can include Roman Alae and Auxiliaries, tribal units and other specialist variants.
The tribal infantry used by many nations can be seen as a variant of regular infantry but with some specific traits.Heavy Infantry – designed to stand in the centre of the battle line, best in open terrain as they are less effective in broken or constricted terrain. Variants can include the Roman Legions and Hellenistic Phalanxes;
10.2.2. Cavalry
Light Cavalry – invaluable for pursuing a beaten enemy or protecting your own retreat. Variants include Horse Archers that can be recruited from some provinces or factions;

111
Medium (Regular) Cavalry – of more use in combat than light cavalry. Many provincial variants exist in the game.Heavy Cavalry – effective in combat, especially against medium infantry;Cataphracts – similar to heavy infantry but slightly faster, they too are less effective in broken or constricted terrain.
10.2.3. Mercenaries
If mercenaries are recruited they usually fight as either medium infantry or medium cavalry.
10.2.4. Specialist Units
Some factions or regions allow the recruitment of elephants or chariots.Some unit types only appear when a region is attacked. These
include standard city militias and variants of the Palace Guard. These will defend the city walls and may fight in any field battles that occur in the region. In addition, if the appropriate buildings exist, the defenders may have siege engines.
10.2.5. Upgrades
Some decisions are available that will generate improved versions of all the above unit types.
To do this you will usually need to have built some tier III military buildings and have reached an appropriate Civilisation Level.
Note that Rome has different upgrades to the other powers. The first upgrade (Marian legions) will improve the main legion unit but not any other unit. The second (Imperial legions) is a further gain to the quality of the main legion unit and will also see alae and velites units upgrade to auxilia.

112
10.2.6. Ships
Three types of warship are generally available, including light, regular and heavy warships. Again there are regional and national variants to these basic unit types.
Pirate ships can only be built by some factions that also have the pirate lair building. Their primary use is to raid territory held by other factions (or a world nation) to bring back loot to their sponsor.
10.3. Combining Land and Naval UnitsNote that you can build a stack that combines both types. This will ensure the warships escort your army and protect them in the case of naval combat (10.7.7). Obviously such a stack is limited in only being able to move to water or marsh regions or ports.
10.4. LeadersThere is a pool of leaders that is refreshed periodically and the number of leaders depends on your faction traits, government type, leader attributes and can be increased by certain buildings.
Most nations will have 3 but this can range from 2 to 4 depending on national modifiers. More will be allocated if you are ‘Glorious’ (7.4.4), depending on the traits of your current ruler, if you are an Empire and from certain buildings such as the War Academy (each of these will generate an additional leader).
10.4.1. Death of Leaders
Leaders can die in combat, due to leading an army in a hostile region, by accident or be removed due to old age. Usually if a leader is lost a new one will be generated and will be available to you in the next game turn. Note a leader cannot be killed due to an accident if they have been available for less than six turns.

113
10.4.2. Leaders and Combat
Leaders have 2 main values used in battle: offense and defence, and this is chosen depending if their army is attacking or not.
The leadership score primarily determines the number of times a unit can roll the dice in a combat duel (10.7.4), so the better the leader, the higher the likely score for a given unit. In addition, they provide bonuses if they are either besieged or leading a stack that is a besieging a fortress.
Even a 0-0 leader benefits the stack so as a rule you should always allocate a leader to each stack.
10.4.3. Leadership Traits
In addition to their basic values, many leaders have traits that give them a bonus (or a malus) in particular situations. Thus it may sometimes be more useful to assign a lower ranked leader to a particular stack.The traits, and their effects, are:
trait effeCtsTactician +1 on attack and defend values if in a plain regionFlanker +1 on attack and movement values if in a plain regionStrategist +1 on defend and movement values if in a plain regionNavigator +2 movement if at seaAmbusher +1 on attack, -1 on defend values if in a forested region
Guerrilla Warrior+1 on attack, -1 on defend values if in a region with hills or mountains
Determined +1 on movement valuesRelentless +2 on movement values, -1 on defend valueSiege Expert +2 bonus in siegesLogistician -2 supply usageWilderness Expert -1 supply usage, +1 move in forests, hills, mountainsSpendthrift +1 supply usageCoward -1 movement, -1 on all values in a siege
Pampered+1 supply usage, -1 movement values in forests, hills, and mountains
Disorganized -1 movement

114
Note: the changes to attack and defend values are applied to the actual units in the stack.
10.4.4. Assigning and Removing Leaders
You can change the assignment of your leaders at any stage in creating your orders. Sometimes you will find your previous leader died or retired in the last turn so you will now need to appoint a new general.
Note that in any turn when a new leader is appointed (or new units are added to an existing stack), then the affected units will lose one experience level (10.5.6). So if it is completely new leader the entire stack will temporarily lose one experience level, if you add several new units to an existing stack then only those units will be affected.
If you can, try not to do this the same turn as your army will engage in an important battle.
Leaders can be assigned or replaced by clicking this button.
10.4.5. Admirals and Generals
In Field of Glory: Empires there is no firm distinction between these roles. Any leader can command either an army or a fleet, although you may find your choices influenced by their particular traits.
10.4.6. Leaders and Field of Glory 2
If you convert a battle to Field of Glory 2 then the leadership value will have some effect on unit quality and the number of sub-generals you have available.

115
10.5. Unit Information10.5.1. Unit statistics
Units have 2 main statistics for the melee battle phase: attack, defence.Ranged attack and defence uses another set of values and these only
come into play during the ranged combat phase (10.7.3).Units also have an effectiveness level, scored usually from 0 to 3
(but this can be 4 in exceptional circumstance), reflecting their morale and fatigue (10.5.7), an experience level (again scored from 0 to 4), and the number of hits (damage resistance) they can absorb before being destroyed ranging from 1 to 3.
10.5.2. Skirmishers
These may appear weak but are essential. In a battle they will try to inflict fatigue on the enemy before the main clash (10.7.3). Units that are tired or fatigued fight much less effectively.
In addition, the more experienced your skirmishers, the more likely they are to successfully target enemy units.
Archers are particular valuable as they can also provide a substantial support (10.7.4) bonus to front line units in the main combat phase.
In addition, skirmishers will give a +1 value when resisting a siege (10.9.3).
10.5.3. Stacks
Units can either be in a stack of their own or with other units. It is better to organise your units into stacks or armies for ease of movement and to improve co-operation.
Each stack will show the aggregate combat power of all the units in that stack, the supply usage (green if ok, yellow if there are not enough supplies in current region, red if the stack is out of supply) and its movement speed (the slowest unit in the stack will determine this).
In addition, the leader (10.4), if one is present, is shown.

116
The bulk of the stack panel is made up of all the individual units present.Across the top are the various actions that can be ordered for the
stack (10.1.2)
10.5.4. Managing stacks
To split a stack, select one or more units (by left clicking) and the units will be moved to a either a new stack or merged with an existing one.
To merge stacks, either select the stack tab, click on merge and then click on the stack you wish to merge that stack with. Alternatively you can select individual units and merge these with a different stack.
To create a new stack, select unit(s) and click on new and the unit(s) will move to that stack.
The option to assault is only available if you are besieging an enemy province. Selecting this will mean there will be an attempt to assault the besieged city in the next orders phase (10.9.1).
Garrison will place the stack inside the fortification of the region. If the unit is already garrisoning a city, this will be replaced by the option to exit which will place the unit outside the fortification.

117
Disband will eliminate either the entire stack or any selected units. If the stack was supplied when disbanded, some of the resources (metal, manpower etc.) used will be regained by the player.
If more than one stack is present (including enemy stacks), you can move between them by selecting the tabs.
10.5.5. Movement
Movement orders will be executed during the orders phase.During the turn resolution process each stack will move 1 movement point, then all the stacks will move a second movement point and so on. So if two stacks are adjacent to the same region, they will arrive in that region at the same time (regardless of their total movement points) unless one benefits from being able to follow a road. Once a stack has used up all its movement points it will stop for the rest of the turn so a stack with high movement allowance makes additional moves. As such, extra movement capacity does not make a unit ‘faster’ simply that it can move further in the game turn.
To move a stack, select the tab and move the mouse to the region you wish to move to. The numbers shown indicate how many turns this move will take.

118
Usually a movement path is green but will change to a red arrowhead if you target an enemy army (in which case the stack will follow that enemy until a battle takes place), dark blue if it is a naval unit moving by sea or light blue if it involves a river crossing.
Note that if you cannot enter a region, no movement order can be issued and this may be due to that region being held by a neutral power or due to seasonal issues such as blizzards or sand-storms.
A movement path can be cancelled by clicking on the original region. A particular movement route can be chosen by holding down the control key and right clicking to create the desired combination of regions. An existing movement path can have some regions removed by using the delete key to remove the final region in the current path.
If you hold down the shift key while plotting a movement path, it will try to take a land only route if this is possible.
In addition to crossing all-sea regions, naval units can move into coastal marshes.
If you target another stack with a movement order, the final step will appear with the arrowhead in red. If the stack is friendly the two will merge on arrival. If it is an enemy stack, you will try to pursue that stack if it moves rather than carry on to the original region.
Note you can combine ships and land units in the same stack. In this case, movement is limited to sea, marsh and regions containing a suitable port.
10.5.6. Experience Levels
Every unit has one of four experience levels. These range from newly recruited units, regulars, veterans to elite units.
Units will progress as they gain experience points from winning battles while some buildings, or national traits, will provide an initial boost. The speed at which experience points lead to gains in

119
level will vary according to your faction modifiers and sometimes your ruler will have traits that either speed or slow this process.
A unit’s current experience level, and accumulated experience points, can be found on the unit pop-up window as:
The more experienced a unit is, the better it will perform in
combat (10.7). Note that elite units will also cost more in per-turn maintenance.
10.5.7. Fatigue Levels
Units gain fatigue by moving and fighting and will lose it by resting.As a unit gains fatigue it moves from fresh, to being tired to exhausted.
Gaining fatigue has adverse effects in combat (10.7.4). If a unit is exhausted then it loses half of its melee strength, a ranged unit will not fire in the ranged phase and a support unit cannot support a front line combat unit.
10.5.8. Effectiveness
Effectiveness is an important game concept as it reflects the ability of a unit to fight and, in some cases, sustain itself. A unit with no remaining effectiveness will start to take strength losses (either in combat or as a result of attrition).
Effectiveness is a combination of troop morale and fatigue. In effect, low morale units are more vulnerable to the effects of being fatigued compared to high morale units.

120
10.5.9. Recovering Losses
If a unit takes hits or losses in combat it can recover if there are sufficient global resources (manpower, money and metal) and it is resting in a region with positive loyalty (i.e. over 50) and positive food production.
The presence of the hospital building will speed this process.If a unit has lost effectiveness, then this will be recovered first
(unless it is in a region with a hospital). Effectiveness can be recovered in any region as long as sufficient food is available.
10.6. Recruitment10.6.1. Recruiting New Units
The recruitment panel can be accessed either from the province or the regional tab:
If this is clicked, the unit build screen will appear
This will show all the units that can be built in that region or province. If the region or province is in unrest all the options will

121
be shown as red and a tooltip will explain why you cannot currently recruit there.
Otherwise some units will be shown with a green bar and these can be built.
In addition the recruitment tab will show a summary of resources used in the recruitment process. Money, Manpower and Metal displays the global value of these items, and Equipment will show what has been stockpiled, plus what will be produced in the next inter-turn phase in that region or province.
Clicking on any unit will provide details about its combat power, special attributes and how much it will cost to raise and maintain.
Clicking on the symbol will add one or more of that type of unit to the queue. Depending on the available military equipment in the region/province a unit may take more than one turn to complete. If you lack the needed manpower, money or metal then recruitment cannot be started.
You can remove units from the build queue by right clicking on it.Note the cost of some units will increase the more you raise (this is
noted on the unit build screen).

122
10.6.2. Unit Progression and development
Some units will change their combat values as the game progresses. This is linked to changes of government level (so say from level I to level II) and sometimes needs to be enacted with a decision. You may also need to have built particular buildings and this information is provided in the relevant tool-tips.
Such progressions will also often require the expenditure of additional resources.
10.6.3. Provincial Units
Almost every province in the game has a unique unit, with this shown pictorially on the province display as:
These units are often quite powerful or have unique traits but the cost of each unit will increase as you raise more.

123
10.6.4. Automatic Garrisons
If a region is under siege, an automatic garrison will be generated. The size of this will reflect the defensiveness of the region (5.1.1). If the region is the capital, then some, more powerful, Palace or Praetorian Guards will be added to this defensive force.
10.7. Combat and BattlesIn Field of Glory: Empires there are two ways to resolve battles. One is to resolve the combat using the routine embedded in this game. The alternative is to export the battle to Field of Glory2 and resolve it that way (11.2).
The discussion in this section only applies to battles being resolved using Field of Glory: Empires.
Combat happens automatically when 2 or more enemy factions are in the same region, except if the enemy units are inside the city. In this case a battle will only happen if the besiegers order an assault (10.9.1).
Only one battle can occur per region in a given impulse. If there are more than 2 enemy factions (and their allies), only 2 sides will fight in this impulse with these picked at random. The largest faction tends to be picked first, but this is subject to a random roll.
Each faction can be assisted by one ally, so it is a possible that 4 factions will take part in a 2 vs 2 battle. The ally will be the most numerous in the region (in case there is more than one).
Battles are treated as a form of movement and thus are resolved in the inter-turn phase when all movement orders are carried out. Each field battle has to end with the destruction or retreat of one side but may be spread over multiple rounds to achieve this.

124
10.7.1. Viewing the battle
If a battle happens the player has three choices. You can opt to watch the battle play out in detail, see the end of battle summary screen or simply proceed with the turn resolution. A battle can be viewed at any time in the next turn by going to the region, using the ledger (15.7) or the turn-log. It can be viewed from the turn log for the next two game turns if desired by setting the game-log filters.
Even if you opt not to watch the battle the process is the same.A battle is a series of duels between enemy units, over a single impulse.Each side is either defending or attacking. The defender in a battle
is the side with the biggest number of units not having moved this impulse (the only exception to this is if the defenders have sortied from a besieged city).
Defenders use the defence rating of their troops, attackers their attack.
10.7.2. Deployment
When a battle happens, the engine determines how units are deployed, aiming to match units against each other as far as possible. The deployment process uses the concept of ‘distance from center’ to determine the layout of units.
This score varies by unit type and, for example, Heavy Infantry have a score of 0 (so if present will be deployed in the center) whereas cavalry can have a score of up to 20 (so will tend to deploy on the flanks). The engine first deploys units with a low ‘distance from center’ value and then proceeds toward the flanks, until there is no room left (or units).

125
There is a separate distance to center value for open battle and for assaults (cavalry will only rarely be deployed in assaults).
Healthy units will tend to be picked before units that have been damaged.
The frontage (battle line width) is a function of the terrain (5.1.2) in the region but this maybe reduced if the battle is actually an attempt to storm a fortress.
Once the front line is full, units will be added to a second and possibly third line. Those with the ‘support’ trait will be placed in the front line if there are available slots but otherwise will be in the second line. Here they will be able to support a unit actually in combat but no more than one support can help a frontline unit under normal circumstances.
Visually, at the start, skirmishers will be deployed in front of the main battle line and the battle will commence with a ranged combat phase.
This process is best seen as creating the skirmish line that was a standard feature of most armies in this era. A lack of skirmishers will place that army at a significant disadvantage.
10.7.3. Ranged combat phase
All units with some ranged capacity will fire against the enemy in this phase. Some units can only hit the enemy frontline, some can reach the enemy support line or even the reserve units.

126
In term of gameplay, the mechanics used are the same as the duel process (10.7.4).
A ranged attack can never kill a unit, only inflict fatigue and tired or exhausted units then will have an extra penalty in the duel phase.
It is resolved by matching pairs of units. An already fatigued target is less likely to be selected if non-fatigued targets are available. Frontline units will be matched against frontline units as far as possible (remember that in this phase some of your skirmishers are deployed at the front) and a given unit may be attacked more than once.
While it may sound as if ranged combat is relatively unimportant, an army with either few ranged units or skirmishers will suffer badly against a better balanced opponent. Being fatigued in the duel combat phase is a serious handicap.
10.7.4. Duel combat phase
Once the ranged combat phase is over, skirmishers will retreat to the support line.
As far as possible, each front line unit will fight a single opponent but if one side has more units (and there is spare frontage) then they can gain the advantage of being able to flank their opponent.
Flanking attacks happen when a frontline unit has no opposition. In this case, the flanker will attack the enemy frontline unit closest to its

127
deployment unless this unit has already been flanked. If there is no such unit, it will attack an unflanked support unit (checking from periphery to the center of deployment). If there is no such unit, it will attack an unflanked reserve unit. If there is no such unit, the flanking unit will be used in the pursuit phase (if any) and inflict additional damage.
Support units provide one third of their ranged attack strength if they belong to the support category or +1 if it is a melee type unit, to the strength of the relevant combat units.
In combination, this sets up a triangle rule for combat resolution. The key factors are unit strength, army leadership and unit effectiveness. A weakness in one of these might be compensated by strengths in another factor.
Each combat is then resolved using three steps.Step One: Add up the defence or attack rating of the units, modify
according to terrain and the presence of any support units. The support value is provided by the units behind those committed. Some units are poor in melee in their own right (e.g. archers) but provide a good support value. The values will also reflect unit experience and fatigue level.
Step Two: The unit will roll one or more D10 and add the best score to their combat value determined above. The number of D10 available is determined by the relevant rating (attack or defence) of your general +1.
So a well led army has a higher chance that the die-roll actually used in combat is higher than that for an army with no general or a less able general.
Step Three: Each D10 has a guaranteed minimum value determined as 1 plus unit experience (from 0-3 depending on if it is a recent recruit or an elite unit) and its current effectiveness (from 0 to 2 for a fresh, properly supplied, unit). Any dice with a value below this level

128
will be rerolled until it, at least, matches the minimum value (and it can, as a result of this process, exceed the minimum).
In effect an exhausted elite unit may be beaten by a fresh recently recruited formation, especially if it is badly led and dependent on just one D10. On the other hand, this process will mean that well trained fresh troops are effective, even if in less than ideal terrain.
10.7.5. Combat results
Once all these modifiers have been generated they are compared: w If the difference is 0 between the 2 opponents, both sides will
lose one effectiveness point and take one hit. w If the difference is 1, the weakest side will lose 1 effectiveness point. w If the difference is 2, the weakest side will lose 1 hit point w If the difference is 3, the weakest side will lose 1 hit and 1
effectiveness point.

129
w Each difference over 3 will see the losses increase by 1 hit and 1 effectiveness point until it is destroyed
w If a unit is already at 0 for effectiveness, any further effectiveness losses are converted into hits.
w Some units have the skirmisher trait. Even if they lose a duel, if the enemy margin is not big enough, the winner will lose one effectiveness point.
10.7.6. Determining the overall outcome
At the end of the battle either one side will be forced to retreat or a new combat round will commence. Note that if a fresh round starts, it is possible that extra units may arrive for one or both sides depending on how far they have had to march.
To determine the outcome, each side sums up their losses in terms of both hits and lost effectiveness.
If the difference between these scores is 3 or more, then the side with the smallest value is the winner, otherwise the battle is a draw and will restart in the next impulse.
If neither side retreats another round of combat will occur with units chosen again according to 10.7.2. Thus a larger army may be able to ensure it keeps on fighting with fresh units even as its opponent has to use units that are tired and have already taken losses.
The winner will then inflict extra losses to the defeated, with these first taken as efficiency losses then as outright losses. Thus an army with all its units exhausted at the end of a battle will be very vulnerable in the pursuit phase. The damage inflicted in the pursuit phase is related to the flanking rating of each unit. Thus heavy infantry and phalanxes will inflict relatively few losses at this stage but cavalry and skirmishers will be very effective.
After most battles, the winner will receive one slave at their nearest capital or slave market (this may not happen after a very small battle).

130
The winner takes the region, unless the combat was an open field battle and there is still a city to capture.
10.7.7. Ground units caught at sea
If ground units are caught in a naval battle the process is similar to 10.7.4 above. However, the ground units lose all the advantages of their unit type and depend purely on the dice roll for their strength as they are treated as poorly armed transport ships. On the other hand, combat ships will fight using the full range of modifiers.

131
Thus unescorted armies are likely to suffer very heavy losses if they are caught by a hostile fleet.
Naval battles are otherwise conducted in the same way as land battles.
10.8. Raiding and PiratesSome states or leaders have the trait that allows them to raid their neighbours. If this option is selected then a raid will take place in one of the neighbouring regions. The chance of success is related to the size of the raiding force and strength of any defences and/or enemy armies.
If a region is successfully raided, then it will not be attacked again for the next six turns. However, during this period productivity will be badly affected as a result of the raid,
You can only raid (or be raided by) if you do not have cordial diplomatic relations (a value of +25)) with the target or are at war with them. You can always raid (or be raided by) a region that is owned by one of the world nations (7) – in effect not owned by an organised state.
Pirates operate in a similar way and can be ordered to raid if they are in a sea-area next to non-friendly regions.
Pirate ships are constructed using the special Pirate lair building and this is available to a number of factions (both tribal and those that traditionally relied on piracy such as the Pontics).

132
10.9. SiegesSieges are a particular form of combat.In this case, battle does not occur automatically but can occur if either the besieger orders an assault or the defender tries to sally out (most likely if they are starving).
In addition to any regular units and the automatic garrison, some cities may have some siege engines present. A Siege Workshop will

133
provide two of these and a Coastal Fortress up to three with these being particularly effective against any ships trying to blockade the harbour.
If a region is besieged then the chances of a positive outcome that turn is indicated by a pop-up message.
10.9.1. Assaults
You can opt to order an assault, either as part of the movement order or once the siege has started, and that will be resolved as a version of the usual combat resolution (note these battles cannot be exported to Field of Glory 2).
If you launch an assault and you are defeated, the battle will not be repeated this turn. Equally the attacker will not retreat from the region so the siege will be maintained. If the battle ended in a draw, a fresh assault will happen in the next round until one side wins.
An army can be ordered to assault any fortified cities on the move rather than wait for a new game turn. However, this is a high risk option as the defenders will be well rested and may be stronger than you anticipated.
The defending force will be made up of any normal military units in the city and the automatic garrison. Depending on the buildings present, this may be just a generic city guard, elite units charged with defending the nation’s capital or even large siege engines.
10.9.2. Besieging a City
If the region is well defended, or has strong walls, then it maybe better to besiege it for a number of turns. Depending on the relative strengths of the two sides, over time the defenders will weaken as they starve and the walls will be damaged making either an assault more likely to succeed or that the region will surrender.
If the besieged city is a port, it might be necessary to deploy a fleet off-shore in order to cut supply to the defenders. Note that some

134
regions have ports that open into more than one sea area and both will need to be blocked to ensure that no food comes into the city.
Over time a besieged army will weaken as it runs out of food but this can be slow if the city has buildings that allowed a large food stock-pile to be amassed. As long as there is a food stockpile (in this case a unit pays an extra unit of food for each point of effectiveness that is regained) the defender can regain effectiveness (10.5.8). If it has a hospital then there is a possibility it can also regain lost hit points.
10.9.3. Calculating relative Siege Capacity
To determine what will happen once a siege has started it is necessary to compare the relative siege values or capacity of each side.
For the attacker, add up the siege bonus provided by medium infantry and other units that have the besieger trait. Legions will provide 2 siege points per unit.
To this is added a maximum of +4 if a leader is present (+2 for having a leader, even a 0-0, and then their attack value). In addition some leaders have the siege trait (10.4.3) and can further improve this value. The leader score cannot exceed that of the combined value of all relevant infantry. So if only 2 units with the besieger trait are present, the leader value is capped at +2.
For the defender, the siege value is calculated in the same way and then the siege resist value of any buildings is added. Note that all skirmishers will provide a +1 siege resist as will Spartan units, Imperial Roman Auxilia and Legions in addition to any units with the siege trait.
The two values are compared and are capped between a minimum of -6 and a maximum of +6.
10.9.4. Outcome of the Siege Process
Each turn a random Die(10) is generated and added to the difference between the attacker and defender siege capacity.

135
If the net score is 4 or less then nothing happens unless the die roll was a 10.
In that case, or if the score was between 5 and 9, a low amount of attrition will be inflicted on the defender.
If the score was between 10 and 15 a high amount of attrition will be inflicted on the defender.
If the score was 16 (the highest value possible), then the defenders will surrender.
If the defenders did not surrender, another Die(10) is rolled and if the modified value is 9 or more, a breach will be made in the walls (this will reduce the defender’s siege value next turn or make it easier for an assault to succeed). In this case, if the unmodified roll was a 10 then a breach will occur regardless of the modified score.
11. Combat and Field of Glory 2You have the option to convert almost any battle in Empires to Field of Glory 2.
Each time you do this, a unique random number generator seed number is generated and this means that if you play the same battle (from the same export file) in FOG2 multiple times, the OOBs (and map) will be the same each time.
The only way to avoid this is to rerun the entire save turn routine and if the battle repeats (and you chose again to export it) a different seed number will be allocated and a different OOB and map generated.
There are no adjustments to make the battles more “even”. The situation is as it exists in the campaign situation. In addition, it is worth noting that the game has been balanced around the battle

136
system within Empires. So, in certain situations, it will be easier or harder to win if the battle is conducted in FOG2.
There are also no adjustments to take into account FOG2 difficult settings, except that playing on the lowest difficulty setting tweaks troop quality slightly in favour of the player, and on the highest difficulty setting tweaks troop quality slightly in favour of the AI.
11.1. Before you can make the linkBefore you can export a battle, you will need to have both Field of Glory 2 and Empires installed on your computer. After you have installed Empires you will need to run FoG2 once (Empires does not need to be open at this stage). It is important that FoG2 has been updated to the latest version for that game.
After this the export/import routine will then work automatically. This will automatically open or close the relevant game.
11.2. Exporting a Battle

137
Most battles that can occur in Empires can be exported to FOG2. The exceptions are naval battles or if you are assaulting city walls to resolve a siege.
To export a battle, select ‘export battle’
FOG2 will then open, select the ‘Battle’ option and load an ‘Empires Battle’

138
11.2.1. Converting Unit Types
If you decide to export a battle to Field of Glory 2, then the Empires army will be converted to FOG2 unit types. The conversion process is different depending on national characteristics. In particular, the common units in Empires such as Heavy Foot, Warriors, Mercenary Foot, Urban Militia and so on will be converted to something more closely resembling their historical prototype. So for example “Warriors” in a Gallic Army will translate to FOG2 Warbands, but those in an Italian army will translate to FOG2 Italian Foot, and those in a Spanish army to FOG2 Spanish scutarii.
In addition, some units translate to a mixture of FOG2 units, because this leads to more historically realistic armies. Pre-Marian Roman legionary units translate to a mixture of hastati/principes and triarii units, in approximately a 2:1 ratio. Horse archer units, if present in large numbers, translate to a mixture of Light Horse and Cavalry.
11.2.2. Converting Unit Characteristics
The experience points of Field of Glory: Empires units will be reflected in the unit quality of the FOG2 conversions as will the current effectiveness (10.5.8) of the Empires units.
If an Empires unit has missing hit points, the unit(s) in FOG2 will reflect this.
The quality of the general in Field of Glory: Empires will affect the quality of units selected in FOG2.
Unit traits from Field of Glory:Empires are not taken into account in the conversion process, but obviously units that convert to FOG2 medium foot will be more effective on hilly maps reflecting their relative advantages in Empires.

139
11.2.3. Army Size in FOG2
The Empires:FOG2 unit conversion ratio depends on the unit type, because it is points based. This is because the difference in effectiveness between various FOGE units is often significantly greater than the difference between the effectiveness of their FOG2 equivalents, so the more expensive (and more effective) FOGE units will translate to more FOG2 units than the cheaper ones.
For example, because Italian Foot in FOG2 are cheaper (and less effective) than Warbands, the unit conversion ratio for FOG2 Italian Foot: Empires Warriors will be higher than the unit conversion rate for FOG2 Warbands: Empires Warriors. Also, where different FOGE unit types convert to the same FOG2 unit type, the quality of the FOG2 units may be adjusted depending on which FOGE unit type they come from. Thus, for example, Urban Militia in some national archetypes may be extremely low quality versions of the standard units. They will also have a lower unit conversion ratio as they are much lower rated in FOGE points.
In addition, because the points value ratios do not match up to an exact number of FOG2 units, there is a random element. For example, if the points system means that an Empires unit is equivalent to 1.37 FOG2 units, the system will definitely generate one FOG2 unit, and there is a 37% chance of another one. So usually it will generate 1 unit, but 37% of the time it will generate 2.
To stop this producing over-large armies there is a control that will mean that armies can only gain about 3% over their notional size.
In larger battles the unit conversion ratio is down-scaled to keep the number of units manageable.
11.3. Saving an ongoing battleIf you are fighting a battle in FoG2 you can save this as normal, load it again within FoG2 and continue until you have completed the battle. There is no need to have to resolve the battle in a single sitting.

140
11.4. Converting back to Field of Glory: EmpiresOnce the battle is completed in FOG2 the results are converted back to Empires. Closing FoG2 will automatically open Empires and you will need to import the results using the normal loading screen (4.2.2).
FOG2 records whether the battle was a Decisive Victory, a Marginal Victory (player rout % less than enemy rout % at nightfall), a Marginal Defeat (player rout % more than enemy rout % at nightfall) or a Decisive Defeat. Additional pursuit losses are then added using the standard Field of Glory: Empires rules (10.7.6).
12. Decisions
Field of Glory: Empires uses a number of decisions to influence game play. Some of these are generic and can be used by any power depending on its government level and others are specific to individual factions.
12.1. Available to a level 1 GovernmentIf your government is the most basic type in the game you have access to a very limited set of decisions. Basically if you have sufficient manpower, money or metals you can use decisions to convert an excess in one to redeem a shortage in another.
A list of the level 1 government types can be found at 7.3.1.
12.2. Available at higher levelsOnce you advance to a higher level more decisions are available. These include raising loyalty via religious decisions, encouraging the conversion of other ethnic groups to your own, using corn laws to increase loyalty in your capital region and the buying, selling or freeing of slaves.

141
In addition, you can enact laws to convert the ethnicity of your population, increase food production, support your merchants, encourage religious festivals and set how your justice system operates.
Other options allow you to emphasise the type of building that is most likely to be available (6.2.1).
For military units, you can sometimes organise an emergency levy (at a cost in legacy points), upgrade units to a more advanced type, or acquire new ships.
Once you are in Civilisation Level III, decisions become available that allow you to increase the production of food, infrastructure, money or culture over time or to swap one of your at-start traits for something different. Note that some factions have decisions unique to themselves.
12.3. Enacting DecisionsYou will be told a decision is available in the message log, the icons on the right hand side of the main map or from the faction option on the top screen.

142
Clicking on this, will show you how many decisions are currently available to you:
Most decisions have multiple options and the costs and implications of your choices are set out in the resulting tool tips.
12.4. Variable Costs of DecisionsMany decisions have both a basic cost, usually the resources you need in order to play the decision and an actual cost. The latter maybe higher as many decisions cost more if you have more regions, or more of a particular building type.

143
13. Weather
The weather system in Field of Glory: Empires is relatively simple. Every fourth game turn will be treated as a harsh turn (with this creating snow or desert storms depending on the region). In this case no movement can take place into mountainous regions and movement and combat in other types of terrain will be affected.
Movement in desert regions is also prevented when hot summer weather occurs and creates a sandstorm.
You will be warned the turn before a harsh weather turn so you can plan your operations accordingly.
Note that some regions may experience severe weather even during the normal weather turns.
14. Editing the Game
Field of Glory: Empires can be extensively modded as almost every key function can be adjusted. This allows you to create new scenarios, alter the unit tables, adjust the game rules and the user interface to taste.
Also please visit the Field of Glory:Empires modding forum at http://www.slitherine.
com/forum/. for more information on modding and to discuss questions or ideas with other players.
Most of the key game concepts and rules can be amended using the .csv files in the game set up. This includes the effect or characteristics of unit types, terrain, and buildings and the methods used to translate unit types from Empires to FOG2.
You will find the majority of the underlying game files in the directory data>Database within your Empires set up. These allow a great deal of customisation of the game, but the main ones are:

144
w Units – allows you to amend the statistics of all the units in the game, including their combat values, how they are placed in an Empires battle, if they have particular traits, the cost to raise them and any pre-requisite buildings;
w Treaties – allows you to amend how long these will apply for and the relative impact on relations if you enact that option;
w Terrain – allows you to define the movement costs, combat frontage and the relative productiveness of various terrain types;
w Structures – allows you change all the characteristics of the buildings in the game;
w Resources – allows you to change the values (including their trade value) and characteristics of all the resources in the game;
w Modifiers – allows you to amend the various modifiers that define how ethnicity, government age and level, state values and factors such as war weariness operate;
w Governments – allows you to change the base taxation value for each type of government and how this will rename as it progresses (or regresses);
w Factions – allows you to modify the attribute of each named faction in the game including its traits and objectives;
w Ethnics – allows you to modify the attributes of the various ethnic groups including the traits they have and how rebellious they are;
w Decisions – allows you to modify all the decisions that are made available in the game, including their preconditions, costs and effect.
The game can also be modified by amending the various scripts (found in Data>scripts). Note that altering these files is more complex and an invaluable resource is the modding section of the ARCHON wiki at: http://archonwiki.slitherine.com/index.php/Modding

145
Examples of some scripts can be found in the SCENARIOTEMPLATE .bsf file in the main game folder.
15. The Ledger
The ledger is designed to provide easy access to information that you might want to use in managing your Empire and estimating the strength of your opponents.
Each screen can be sorted in various ways and clicking on information such as the faction name or region/province will take you to the relevant portion of the main game map.
Note that not all the information in the ledger is complete or accurate, especially for other factions. If you are allied with that faction (or in a client state relationship) then the error value will be +/-3%, if you have a co-operation agreement then the error value will be +/- 6%. Normally the error value is +/- 12%.
There are 11 tabs available within the ledger:
15.1. Regions (Overview)15.1.1. Outline
This will be shown by default and can be sorted to show either your own faction (again this is the default view) or that of another nation. Note that the information for other factions is partially obscured by the Fog of War.

146
15.1.2. Sorting
By default, the regions are sorted by province (in alphabetical order with those that are not part of a province at the top).
However, you can sort the table by using the drop down list.
15.1.3. Status
This will indicate any special factors affecting that region. This can include the results of decisions, the impact of plagues, whether a region has been recently conquered and whether it is in unrest. Placing the mouse over the images will bring up a tooltip that tells you what is affecting that region.
15.1.4. Objective
If this is shown as ‘yes’ then the region is one of your objectives.

147
15.1.5. Structures
The first number is the total number of structures in that region. In the brackets the numbers show the agricultural, healthcare, infrastructure, military, commerce and culture buildings.
15.1.6. Roads
This will show the level of roads that maybe in a region. If the line is shown as ‘- -‘ then there is no road.
15.1.7. Harbour
This will both show if there is a harbour present and, if so, the current Shipyard value. The latter is shown as a numerical value in brackets. The Shipyard level is important as it will determine what type (if any) of warships that can be recruited either in that region or the wider province.
15.1.8. Unique
This will show any unique buildings that are present in that region. Unique can be buildings that can only exist once in a given province (such as a Governor’s Palace), once in a given nation or are unique across the world.
Placing the mouse over the shown icons will bring up a display giving the name of each building.
15.1.9. Construction
This will show what is being built (if anything) in the region. Placing the mouse over the name will bring up a tool-tip telling you how many turns before it is complete.
If something could be started, this will shown by text that indicates there are a number of ‘open slots’. If nothing more can be built this will be shown as ‘- -‘.

148
15.1.10. Infrastructure
The final two columns will respectively show the stockpile of infrastructure and the amount generated by that region each turn. Note that the actual amount added to a region each turn maybe higher if it is part of region as spare infrastructure is shared between the constituent regions.
15.2. Regions (Population)15.2.1. Outline
This screen provides an overview of your population, and how much decadence/legacy each region provides.
15.2.2. Sorting
By default, the regions are sorted in alphabetical order with those that are not part of a province at the top.
15.2.3. Pop, Citizens, Slaves
These three columns allow you to see the total population and its division between citizens and slaves.
15.2.4. Growth in
Shows how many turns till the population expands given the current set of buildings, population allocation and modifiers.

149
15.2.5. Decadence, Dec. Rate
These two columns show the total amount of historical decadence in the region and the amount that is added (or sometimes subtracted) each turn.
If you want to see why decadence is increasing, click on the region name and you can see this from the region panel (5.1.1).
Note that if you lose a given region, the accumulated decadence is removed from your score and this is one reason why your decadence can go up and down as the game progresses.
15.2.6. Legacy
This shows the contribution of that region to your legacy. This is derived from particular buildings.
15.2.7. Loyalty, Revolt Risk
These two columns show your loyalty and revolt risk (if any). Again clicking on the region name will take you to the region panel where you can see the components to this score.
15.2.8. Ethnicity
This will show the dominant ethnicity in a region. If there are more than one the value is shown as xx% {name}. As above, the region panel will allow you to see the full ethnic make up.
15.2.9. Food
The next two columns show the accumulated food and the amount of food production per turn purely within that region. In the region panel, you can also see how this adjusted as resources are transferred within the wider province (if one exists).

150
15.2.10. Culture
These two columns show the accumulated culture and the pre-turn production in that region.
As with decadence, loss of the region will also mean the loss of some of the accumulated culture.
15.3. Regions (Military)15.3.1. Outline
This screen provides an overview of the defensive strengths of your regions, the locations of your armies, which units can be built, per turn production of money, manpower and metal and the production and accumulated amount of military equipment.
15.3.2. Sorting
By default, the regions are sorted by province (in alphabetical order with those that are not part of a province at the top).
However, you can sort the table by any of the column headings.
15.3.3. Walls
This shows both the current value of the walls (i.e. the total less any breaches) and the value derived from the military buildings in the region.

151
15.3.4. Garrison
This shows the automatic garrison value that will be generated if enemy units enter the region. Additional units may also be present.
15.3.5. Armies, Navies
This will show the combat power of any armies or navies in the region. Note that by default this screen only shows your own regions so you may need to swap the filter to ‘enemies’ to see the location of your units that are invading enemy regions.
15.3.6. Recruiting
This shows any units that are currently being recruited. Note that if the province has been formed, all recruitment will take place in the regional capital. The exception to this rule, are naval units that will appear at a suitable port if the regional capital does not have a harbour.
15.3.7. Unlocks
This shows units that have been unlocked, mostly by regional military buildings. Placing your mouse over the title (if any) will bring up a full list of the specialist units that can be built.
Note this will exclude generic unit types that can be built by any nation as long as sufficient resources exist.
15.3.8. Money, Manpower, Metal
These 3 columns show the per turn gain of money, manpower and metal from that region.
15.3.9. Military Equipment
These two columns show the stored military equipment and the per-turn production. Note that both these values are basically set by the type and number of military buildings in the region.

152
15.4. Regions (Trade Goods)15.4.1. Outline
This screen provides an overview of the trade goods (locally available, produced by buildings and gained via trade) in your regions and you can use it to calculate trade distances.
15.4.2. Sorting
By default, the regions are sorted by province (in alphabetical order with those that are not part of a province at the top).
However, you can sort the table by any of the column headings.You can also decide which trade goods you want to be displayed
which can help if you are looking for less common options.
15.4.3. Dist.
By default this column is blank. If you click on a row then the distance of all other regions to that one will be displayed. If the value is shown in green then a trade link is possible, if it is in brown the two regions are too far apart for your current trade range.
If the value is shown as ‘- -‘ then no possible link can be established. The most likely reason for this is a lack of a suitable port.
15.4.4. Trade Goods
The rest of the screen will show the trade goods that exist in the region.
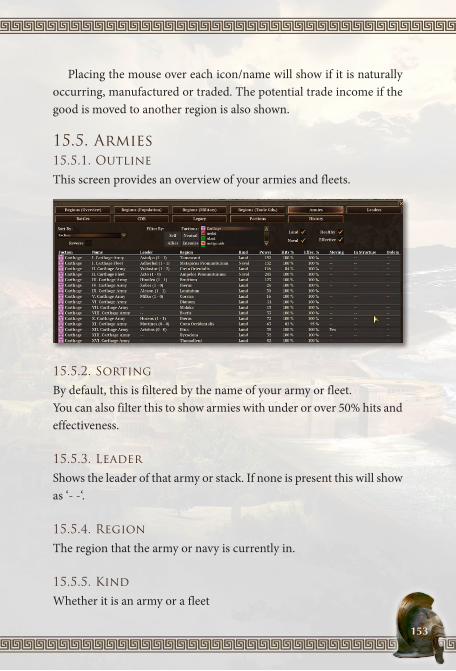
153
Placing the mouse over each icon/name will show if it is naturally occurring, manufactured or traded. The potential trade income if the good is moved to another region is also shown.
15.5. Armies15.5.1. Outline
This screen provides an overview of your armies and fleets.
15.5.2. Sorting
By default, this is filtered by the name of your army or fleet.You can also filter this to show armies with under or over 50% hits and effectiveness.
15.5.3. Leader
Shows the leader of that army or stack. If none is present this will show as ‘- -‘.
15.5.4. Region
The region that the army or navy is currently in.
15.5.5. Kind
Whether it is an army or a fleet
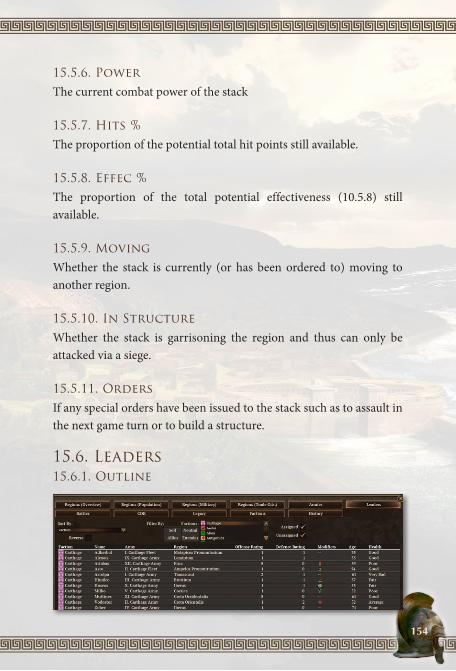
154
15.5.6. Power
The current combat power of the stack
15.5.7. Hits %
The proportion of the potential total hit points still available.
15.5.8. Effec %
The proportion of the total potential effectiveness (10.5.8) still available.
15.5.9. Moving
Whether the stack is currently (or has been ordered to) moving to another region.
15.5.10. In Structure
Whether the stack is garrisoning the region and thus can only be attacked via a siege.
15.5.11. Orders
If any special orders have been issued to the stack such as to assault in the next game turn or to build a structure.
15.6. Leaders15.6.1. Outline

155
This screen provides an overview of your leaders – both those commanding stacks and those without a current command.
15.6.2. Sorting
By default, this is filtered by the name of your leaders.You can also filter this to show those who are either assigned or not assigned to a stack.
15.7. BattlesThis screen provides an overview of the battles that have occurred in recent turns. It can be used to go the main battle screen.
15.8. CDR15.8.1. Outline
This screen provides an overview of the relationship between culture and decadence, your current form of government (7.2) and how many progress tokens are possessed.

156
On this screen, positive changes are shown in green and negative changes in brown.
15.8.2. Sorting
By default, this is filtered to place the nation with the highest CDR at the top of the screen.
15.8.3. CDR
The first two columns show the current rank order on the CDR screen (i.e. as shown at the end of the turn resolution) and any changes in order over the last turn.
15.8.4. Faction and Government
Clicking on the Faction will centre the map on its capital region.
15.8.5. HCV
These two columns show the current Historical Culture Value (HCV) and the changes in the most recent turn. HCV in turn is the average of the culture production in the current turn and that from the last 15 turns (8.1.3).
15.8.6. Decadence
These two show the accumulated decadence and the change in the last turn.
15.8.7. Ratio
These two show the ratio culture:decadence and the difference in the last turn.

157
15.8.8. Tokens
These two show the number of stored tokens and the difference in the last turn.
15.9. LegacyThis screen provides an overview of the relationship the legacy value of your state.
It shows your accumulated value, the total per-turn income and how this is divided across owned objective regions, structures, the total number of regions and your government age.
15.10. FactionsThis screen provides an overview of the key data for each faction.
It can be useful to estimate how powerful a potential opponent will be and also shows how much money, manpower and metal

158
they possess. Note this information may be wrong and is subject to Fog of War.
15.11. HistoryThis screen allows you to track key data for your state such as the HCV, CDR rank, number of progress tokens and others across the game. If you select the ‘recent’ option you will only see that last 40 turns but otherwise it will show changes since the start of the game.
16. List of Trade Goods and their valuesThe listing below shows the basic value of each trade good (used to calculate the benefits and costs of trade), whether it exists naturally or needs to be produced and the range of buildings that use it for their basic needs. Note this does not include a list of all the buildings that use a given trade good for a bonus (6.1.2).

159
item vaLue produCed [1][2] Used by [3]
Amber 6 N
Cattle 4 N, M Smokehouse, Cattle Pens, Tannery, Ishtar Gate
Ceramics 8 M Major Temple, Great TempleCloth 5 M Clothing ManufactureCoal 4 N, M Bloomery
Copper 7 N, M Copper Works, Forge, Copper Mine, Great Forge, Great Observatory, The Colossus
Coral 6 N Coral Emporium, Thalassan TempleCotton 6 M Spinning Mill (Cotton)Dates 4 N Delicacy Shop (Dates), Petra
Drugs 7 M Temple of Moloch, Hospital, Great Hospital, Medical school, Pythia, Master Herbalist
Dye 5 M Abu SimbelFigs 4 N Delicacy Shop (Figs)Fish 4 N, M
Flax 4 M Spinning Mill (Flax), Training Grounds, Barracks
Frankincense 8 N Great SanctuaryFurs 5 NGlass 7 M
Gold 11 N, M Bank, Gold Mine, Goldsmith, Great Mint, Midas Treasury
Grain 4 M Crop Festival, Mill, Large Mill, Great Mills
Hemp 4 M Pirates Lair, Major Harbour, Cothon, Great Cothon
Honey 6 M Delicacy Shop (Honey), Wax Workshop
Horses 5 N, M Stables, Master Rancher, Castrum Equitatum, Castrum Cataphractae, Racing Track
Iron 6 N, M Furnace, Weapons Manufacture, Tools Manufacture, Iron Mine, Large Mine, Arsenal, Citadel, Great Arsenal
Ivory 8 NLead 5 N, M Lead Mine, SewersLeather 4 M Siege Workshop
Lumber 4 M Builder Hall, Shipyard, Land Reclamation, Great Shipyard

160
Luxury 10 M
Satrap Palace, Emperor Palace, Grand Palace, Summer Palace, Luxury, Great Trade Centre, The Parthnon, The Pyramids, Temple of Apollo
Marble 6 N, M Noble District, Temple of ArtemisMyrrh 7 N Secret CultNaphta 5 N Archimedes Workshop, The Lighthouse
Nuts 4 N Delicacy Shop (Nuts), Druid Covenant, Druid Hideout, Hanging Gardens
Olive Oil 5 M Garum Shop
Papyrus 6 N, M Praeceptor House, School, Scriptorium, Bouleuterion, Academy, Royal Court, Great Court, Palace Library, Great Academy,
Perfumes 9 M Pleasure Mansion, Pleasure DistrictPottery 5 M Market, Fair, Stoa, Merchant DistrictPurple 9 N Dyeing MillSails 6 M Drydock, Trade Port, Commercial Port, Salt 5 M SalthouseShips 9 MSilk 8 M Amphitheatre, OdeonSilver 9 N Silver Mine, Jewelry Shop, League of Delos
Stone 4 N, M Aqueduct, Paved Roads, Marib Dam, Great Engineering School, Sphynx, Obelisk, The Great Wall, Tower of Babel
Sulfur 6 NTar 5 M Tar Workshop, Greek Fire TowerTin 5 N, M Bronze Works, Tin MineTools 7 M Asklepieion, Builders GuildWax 5 M Candle Shop
Weapons 7 M Gladiator School, Army Provisioner, Urban Guards, Military School, Great Military School, Palace Guard
Wild Beasts 7 N Circus, IrminsulWine 4 M Pleasure House
Wool 4 M Spinning Mill (Wool). Archery Range, Master Fletcher
Notes:[1] N = naturally occurring; M = created by a building (note that some can be either).[2] Note for many of the minerals (gold, tin etc.) and stone/marble they must naturally occur in the region where they are mined. The mine is needed, however, before they can be traded to other regions as useable goods.[3] This list is of buildings that need that trade good not those that use it for bonus production.

161
17. Game Play Notes
Note that the faction notes on the game set up screen include some indicative game play tips for that faction.
17.1. Key MechanicsA combination of this manual, the in-game tutorials and tool-tips and other guides should explain the basics of how to play the game. This section doesn’t cover the actual details (those are in the main body of the manual) but instead tries to explain how the key mechanics in the game fit together.
17.1.1. Legacy
In the end this determines if you win or lose. It can even hand you victory within the potential timespan of the game.
The problem is that the actions you need to undertake to gain legacy will also bring you problems of decadence and disloyalty.
You gain legacy mostly by the number of regions you hold (remember each brings decadence too), how rich those regions are (but a rich region will have a large population and some high level buildings bring decadence problems even if they help you solve the problem of low levels of loyalty), possession of certain buildings (many of which also cause decadence) and how long you have had your current government (guess what – this too often causes decadence).
So you may find over the first 100 or so turns, this is of little concern. You want to build up, make gains, generate legacy, but in the end it will start to catch up with you. As a civilisation level III Glorious State, your first few Golden Ages are a welcome boost, then you find you need them to make any progress at all, then you can no longer trigger them as your decadence level makes it hard to gain progress tokens from being in the top tier of the CDR.

162
Even the most powerful Empire is going to reach the stage where you appoint a horse to be a Senator. The good thing, though, is that an old or decadent Empire also generates a lot of legacy.
17.1.2. Loyalty, Decadence, Culture
These three are closely related as maybe clear from the discussion above. Culture clearly comes from having the right buildings and putting citizens into the culture line. Many of the culture related buildings also help with loyalty, but, especially the higher level culture buildings (circuses, gladiators, noble districts etc.) also bring extra decadence.
The challenge is that as your cities grow, you will inevitably run into greater loyalty problems. Sooner or later, you need to place more and more citizens onto the culture line simply to optimise the loyalty bonus. Then you need the decadence generating buildings to help control things. Then you need a large garrison to hold off unrest. All this removes citizens from making money, infrastructure or food.
Once you have a mature state with relatively large cities it may be worth thinking of reducing your slaves either by freeing them or selling them. Freeing slaves has the problem of creating unrest in regions with the Slave building but otherwise raises loyalty. Selling them may sound strange as it will cost you building slots but is useful as a means to reduce overall unrest across your state.
At a state level the ratio between culture and decadence is important as it determines if you are able to gain, or lose, progress tokens.
At a regional level, in the end the price of retaining loyalty is growing decadence.
17.1.3. Progress Tokens
These, and the overall CDR system (8.1.5), are again closely linked to concepts of legacy, culture and decadence.

163
At the start, you may struggle to place your nation in the top tier of the CDR as you need to prioritise production of other resources. In consequence, trying to avoid the bottom tier (if you can) and gaining tokens by careful conquest may be the best approach.
Over time you will probably find you own all your objective regions so become reliant on being in tier I for new progress tokens. If you have a rich state, for a while this might be relatively easy but the steady growth in decadence will make this much harder to sustain.
What may start to happen is that younger states, perhaps refreshed after a period of decline and unrest, may supplant you at the top of the table. If this happens, especially if you need to manage low loyalty, you will find yourself out of tier I and vulnerable to the loss of progress tokens.
17.1.4. Progress or Decline
In this case, you have a hard choice. Remain say as a civilisation level III state and gain the legacy points this generates – even if you slip into first being ‘old’ and then maybe ‘decadent’. Or accept your decline, revert to a lower civilisation level (7.4.4) and rebuild as a mature state after the inevitable territorial losses that this transition will trigger.
17.1.5. Rulers
While there is little that you can do to influence the succession process, you can gamble on becoming either old or decadent as a means to dispose of a particularly poor ruler.
If you are reasonably sure you can recover the situation this might be better than risking 30+ years of inept rule.
17.1.6. Trade
As befits the era, you have relatively little direct control over trade flows but you can influence what happens. It is useful to keep in

164
mind the distinction between trade goods that are ‘needed’ and those that give a ‘bonus’ in combination with certain buildings.
Needed goods can either be present naturally in the region, made in the region or traded from another region. If you trade with yourself, you gain the value that is paid but only pay half the cost (in effect, there is a net gain in terms of money). If you trade with a region outside your control, cost and reward is even, of course in reverse if one of your regions trades with another state you gain the payment. And every good can be traded as many times as possible.
If the good is needed but not available, it will be allocated indirectly. You pay three times the notional cost and the building will function. Note in this case, the good is not actually present so cannot be used for other production such as to provide bonus effects in another building.
Goods that give a bonus must already be in the region (or an adjacent region) – naturally occurring, made by another building or traded in to meet an existing ‘need’. So think carefully before constructing a building that only works well if it has the bonus goods to hand.
17.1.7. Armies
In the main, it is better to build well balanced armies rather than as many of the most powerful, expensive unit you have available.
Skirmishers are very useful for inflicting fatigue and protecting your own main combat units. They also operate as ‘support’ units in the main combat phase. They also assist defensively if besieged.
Cavalry are most valuable in converting a victory into a rout, or protecting your own retreating army. An all cavalry stack has the advantage of speed but may not be effective if it has to fight against a better balanced opponent.
Medium infantry come in various forms but have the advantage of the besieger trait. Without this, sieges will be slow. In addition,

165
they are relatively cheap making them good defensive units, especially if you need to use martial law to reduce the revolt risk in some regions.
Provincial units are usually slightly more effective than the generic unit of their type. In addition, some are very useful such as archers and some cavalry units. Others are very powerful and a valuable addition to any army. Remember that the more of a provincial unit you build, the more expensive they become.
The relationship between units and terrain is important. Some powerful heavy units are weakened in woods, marshes and other restrictive terrain. Some tribal units, especially those of German ethnicity, are particularly powerful in wooded terrain.
As a practical example, Roman legions are weaker in woods and marshes than early game Alae and later game Auxilaries. So the apparently less useful units are more effective in the right terrain.
Equally, a Roman legion based army will really struggle against German tribal infantry – as long as the battle is in a wooded region.
17.1.8. (Upgrading your Armies
There are four unrelated mechanisms that will allow you to field more powerful armies as the game progresses.
Experience will increase either from certain buildings (only affects newly raised units), leader or national traits or winning battles.
New unit types will become available as you create certain buildings (such as the barracks) or create provinces. Note that many at-start armies have units they cannot build at that stage – treat these with care until you can replace them.
Improved units will become available with certain decisions and, usually, having the requisite buildings. These will improve all units of a given type, so, for example, all your Medium Cavalry will take on new statistics.

166
Upgrades are available mostly from creating the ‘master’ version of some military buildings but are also, less commonly, available from the black market. This will add +1 to the defensive value of the appropriate unit and a given unit can only gain one such bonus (so for example heavy cavalry can gain this bonus from several sources but it will only be applied once). However, these upgrades will only be applied to units that are in the same region as the building.
17.1.9. Link to FoG2
It is worth remembering the game is not balanced around using FOG2 to resolve the battles. Thus you may find certain types of confrontation easier or harder using FOG2 than resolving via the Empires battle system.
Equally, your own competence with FOG2 will have a bearing on the outcomes.
17.1.10. Buildings
A degree of specialisation in some regions is worthwhile. Some of the higher level military, infrastructure and trading buildings can make a real difference and you need to be able to build them as soon as you can. Thus making sure you have six buildings of a particular type will unlock these options.
You can compensate for lack of food or infrastructure if you set up one or more regions in the province to specialise in these items.
However, you will tend to find that all regions need some health buildings as well as some that add to culture and loyalty. Health both eases the production of new population points and protects you from plagues. Culture producing buildings in turn make it easier to manage loyalty problems.
Equally, the random order in which buildings become available makes it harder to follow a particular strategy.

167
Two useful tips are: w Some buildings do not take up a building slot, either because
they replace an existing building or due to their criteria (e.g. the fresh water building). These can be very useful as a result as often population size is a major constraint on the number of buildings you can have;
w Remember that some buildings produce trade goods that others can use. So a degree of linking production to need can help, especially to ensure that expensive buildings with a lot of ‘bonus’ traits work effectively.
17.2. Problem SolvingAlmost every nation in the game has at least one problem or shortage that it needs to address in order to progress. These notes give some broad hints as to how to solve the more common of these.
17.2.1. Low Population and poor starting regions?
Common for many of the tribal nations but also to some extent affects the Ptolemies, Carthaginians and Seleucids.
One effective solution is to make the most use of the various buildings that do not use up a slot. In combination these will give you a boost in terms of health, income, infrastructure, money and culture. Beyond that the obvious advice is to focus on food production but you will probably need to balance this with some money, culture or military buildings.
17.2.2. Lack of Manpower?
Again a fairly common at start problem affecting many nations. While it is related to the overall population problem it has a different effect, in this case of limiting your army size.

168
To resolve this, there are a number of buildings that give extra manpower and some, such as the herbalist, are relatively cheap. Equally you will find the decisions that allow you to convert gold or metals into manpower for the army can make a real difference.
If you are relatively rich, the best solution to a manpower shortage is to rely on mercenaries. These are expensive in terms of gold so are best raised and dismissed to need.
17.2.3. Lack of Gold?
Sometimes this is easy to solve if you start with prosperous regions. Population assignment and a focus on commerce buildings will resolve any early problems. Be prepared to disband any excess troops (if you can’t pay them they will desert and you will not able to replace losses).
Again there are useful decisions that allow you to impose extra taxes or convert surplus manpower or metal into gold.
If you are a poor tribal nation (or have access to pirate vessels) do not under-estimate the value of raiding. You can probably pay for your standing army at the expense of your neighbours – just don’t expect them to like you for doing this.
17.2.4. Lack of Metal?
Probably the least important in the early game. You only need a lot of metal once you are recruiting heavy infantry in large numbers.
If this is your problem, look for those infrastructure buildings that generate extra metal production and you may need to plan your military strategy to see if you can capture some regions with suitable natural resources.
17.2.5. Stuck in the lowest tier of the CDR?
For the richer nations, the best solution is of course to allocate your population to culture. This can also be used for poor regions but

169
you may struggle in early game to generate all the food, infrastructure and culture you need. In this case, try to use the provincial mechanics and set up at least one region per province to generate food or infrastructure and use the others for culture.
The other solution is to reduce your decadence. So if you are conquering try to do so in a way that allows you to create provinces as soon as possible (this halves the decadence for owning each region). Also try to take your objective regions, these cost less in terms of decadence.
You may need to abandon, or avoid building, certain useful buildings that generate decadence.
At worst, be pragmatic. You can safely acquire three negative tokens and have a small safety net. Use your objectives to gain progress tokens, so as to control this situation. Try not to gamble when you have four, a sudden loss of an objective region to a revolt or invasion will trigger an adverse shift in terms of government type.
17.2.6. Why has my decadence suddenly increased?
This might happen for a few reasons. If you have just lost a region with a lot of accumulated culture then you can slip radically down the CDR. Equally, in the early game, small changes of either decadence or culture may have a large effect.
One other reason is if you have spent a long time as either a ‘young’ or ‘mature’ state then you will have built up a lot of government age. If you then become glorious, this accumulated age will then be converted into decadence. So, if you are playing a poor tribal power, this can produce the combination of reaching ‘glorious’ and triggering the application of a considerable amount of decadence.
17.2.7. Buildings with poor returns?
This can be very common, especially in the early game. The money income shown for the building is an estimate and if you have to

170
pay for the trade good, this can be very negative. As an example, if a building produces six gold and the needed trade good costs six gold, you will have one of four situations:
w A net +6 gold if the trade good is already present in the region; w A net +3 gold if you can trade with yourself (since the selling
region receives +6 gold but you only pay 3); w Neutral if you trade with someone else (here you pay 6 gold and
of course your trading partner gains the 6); w A negative -12 if the good needs to be bought (in this case
importation will cost you 18 gold and this eliminates any income from production).
In this case, the decision to set up a building may depend on how likely you think you can resolve the last situation or your other needs. Often you can build something that will produce the trade good. For example, a number of buildings use fish, building a fishery will generate this.
17.2.8. Needed and Bonus trade goods
This is an important distinction. If a good is needed for production it will be made available (even if at the cost set out in the section above). If it provides a bonus it will only be available if it is already in the region (or a neighbouring one).
You can make it available either by natural production or building something that in turn creates the good. Equally if a building needs that trade good (and can import it) then it becomes available for those that use it for a bonus.
So you may decide to construct a building that lacks the bonus goods as you can then fulfil this with other buildings or, as always, that you really need the other benefits that building might bring.

171
17.3. StrategyThe above notes may give you some feel for strategy options. In effect, in the end you need to gain legacy but there are a number of ways to achieve this.
Some nations tend to reward (or force) an aggressive approach, the Antiochids and Macedonians being examples of this. Others can reward a cautious, somewhat defensive approach. Carthage is a good example as the various trade bonuses means it can have a small number of very rich legacy producing regions by the middle of the game.
Gaining objective regions in the early game can be a quick way to obtain needed progress tokens but equally they may be held by a more powerful neighbour.
Try to avoid taking too many poor regions as this will produce decadence that is hard to absorb in the early game. You will probably find that the need to limit decadence is the largest constraint on early game expansion.
Especially if you start in Greece or Asia Minor, be opportunistic. You may have very powerful neighbours and they may be more fragile than they appear. Be prepared to wait and start to capture regions as they weaken. Both the Antiochids and Seleucids are vulnerable to rapid collapse.
The natural tendency is to prioritise moving onto civilisation level III and becoming ‘glorious’ as quickly as you can. However, in this situation you will then build up a lot decadence over time as you cannot progress to a new government form. In effect, it might be useful to slow this process so as to reduce your mid/late game challenge in terms of managing decadence.
By the mid/late game the challenge is how to gain legacy and control loyalty and decadence. Large cities with many slaves will be disloyal and probably produce a lot of decadence and a lot of legacy points.

172
Whether you try to manage this by avoiding becoming ‘old’ or accept some short term decline in order to recover later is one of the real challenges to playing Field of Glory:Empires.
17.4. Getting startedThis section is a short overview of the opening turns of a Rome campaign. Rome has a set of powerful special rules, partly offset by the likelihood of Civil Wars (7.5.5 and 18.1 discuss some of this, and more information is available in the in-game tooltips). However, at the start it is relatively weak and is engaged in a tricky war with the Senones.
This game has been played on Balanced difficulty and with a late beta build. So not only are some aspects random (such as the available set of buildings) but they may have changed a little since this was conducted.
The goal here, primarily, is to exemplify some of the advice set out above in sections 17.1 to 17.3.
17.4.1. Overview: Army

173
At the start Rome has 3 regions (it cannot form a province) and a relatively small army:
The core of the army is the at-start citizen legions
And those from allied towns
Note that while the legion appears to be more powerful, in poor terrain, it is actually no more powerful than the Allied legions (and a lot more expensive). In general, this weakness in poor terrain will have a bearing on how the war against the Senones progresses.
As part of the set-up, the leader is changed as Avidius’ main advantage is relative speed and that is not so useful in this context. Note that the tactician advantages of the chosen Caedicius are only effective in open terrain.

174
Changing commander will reduce the effectiveness of the stack for the next turn, but even so the army is ordered to move to Tiberus to stall any early invasion.
17.4.2. Overview: Economy
This shows the three regions, note the army is ordered to march to Tiberus. In this case Campania had been selected which is why it is shown in a lighter shade compared to the other regions.

175
This shows Latium at the start (5.1.1) with the partly random allocation of buildings and initial distribution of the population (6.3.3).
The available list of buildings can be accessed and in this case the choice was between the farm (top row) or the stables. In the end I chose the stables as Rome needs a lot of food to grow (but for the moment will take all my slaves as I lack a slave market 6.3.5). The Stables means I can raise cavalry. Note you can see the other military buildings that might appear on the right hand side.
Three military units are ordered. 2 legions (which can only be recruited in Rome) and 1 Velites unit. Note that they will all be available next turn as there is sufficient military equipment (10.6.1) in the region. Remember that while money, manpower and metal are held centrally for your faction, military equipment is retained at the region (or province) level.

176
Finally I redeployed some citizens. The main effect of these changes is to reduce the surplus food production and to improve the production of money and culture.
A similar process was undertaken with Tiberus, with just one population moved to culture from food.
Here the very useful Clear Water building was chosen. As a health building it speeds population growth and gives some protection against the plague (6.2.1), it also takes no building slot (6.2.3) which means the population can be used for something else. This

177
is a very useful strategy in the early game as you can build up your economy even if you lack population (17.2.1).
Three velites units are ordered here – note that they will not be completed for the next four turns due to a shortage of military equipment. I could have ordered some Alae here but will leave them for the final region.
Turning to Campania, again some population were moved from food to culture. At the start, rapid growth is not that important (at least for Rome) but I do not want to risk being in the lowest tier and gaining any negative progress tokens (7.4.1).
In this case the building choice was difficult but opted for a major harbour. Money and manpower are both going to be needed and if I am to build up my navy I will need at least one region with a

178
substantial harbour and port facilities. In effect, I intend to make Campania into a region that focusses on commerce buildings.
Finally 2 Alae legions are ordered. These will take some time to be raised.
All these changes of population and military builds have an effect on my production of money, manpower and metal.

179
With this, end turn and progress.
17.4.3. Turn 2
Once the turn execution is complete, we see the CDR table (8.1.5). Allocating all that population to culture has had the useful effect of pushing Rome into tier I (and thus eligible to gain a progress token 7.4.1).
Moving on from this, takes us to the map. Icons indicating events during the turn are available on the right hand side
of the game map (4.3.3), as icons on the relevant region or in the game log (4.3.2). If you mouse over the on-map icons, you will see the extra information shown below.
Tiberus completed its clear water so we can make a new choice. In this case, I opt for the training ground as again it takes no building slot, it gives a very useful bonus for units that are recruited in the region (remember we have 3 velite units being raised here) and is needed for the more powerful barracks.

180
Note that at the moment, this building has a large cost due to the lack of flax. This can’t be accessed by normal trading so I am paying 3 times the base cost (16). Despite needing to be careful about cash flow, I can cope with this for two reasons: (a) the bonus provided by the building; and, (b) flax is easy to access as the relevant building is a tier 1 food production. Furthermore once I have flax, there are some commerce buildings that will make use of it and yield a lot of money. In effect, before too long, somewhere in my state I will have flax production.

181
Finally the fresh units raised in Rome are ordered to join the army. Note that the movement arrow ends in a red tip indicating that the moving army is ‘targeting’ the other army.
Before moving on, it is a good idea to review if you have any decisions, from your nation panel (7.9.3) or the turn log. In this case, we have four and three can be actioned (the conditions for the other are not met).
In this case, I opt to take one of the decisions related to the Corn Laws. The 2 Corn Law decisions are expensive but improve loyalty in the capital. I opt for sanitation
works (the tool tip is shown) as gaining extra health buildings will both improve population growth and reduce the risk of population loss due to plague.

182
17.4.4. Turn 3
Again the turn opens with the CDR. I moved one population in Campania from culture to money last turn so that has dropped me a little bit I now have a progress token (the filled in circle next to my name).
At this stage with Rome I would regard any gains of
progress tokens as useful but not really essential.One very useful trait of the Roman legions is their ability to build
fortifications and roads. The type they can build improves as you move from to the Marian and then the Imperial Legion but in Tiberus I could build a fortified camp (6.2.6). I am not going to as this will not be a frontier region for long and 150 gold, at this stage, is quite a cost.

183
This turn also saw the creation of several buildings linked to the healthcare decision I took in turn 2, for example a salthouse in Rome:
17.4.5. Turn 4
This turn I am still (just) in tier 1 of the CDR and gained another progress token as a result.
However, my money situation is a bit of a concern, mainly due to the construction of my new military units.
Note how reliant I am on taxation not trade for income, this is very much a feature of Rome. However, some of this is related to my decisions such as to ignore the lack of flax above (17.4.3). Even though Rome is not a natural trading nation, over time, I should be able to at least ensure that commerce balances out.

184
However, on checking over the turn log I find a major problem.
The Samnites have the raiding trait (10.8). On T2 they had raided Latium and been defeated, this time they have succeeded. This will seriously reduce the output from Rome for a number of turns, and, annoyingly, they will have gained a lot of gold from this.
I have two options. I can build up relations with them (to at least 25) and they will stop raiding (9.5) but that is expensive and I do not have any spare money. Or I can declare war and try and defeat them,

185
but of course I am already at war with the Senones. For the moment, I will treat this as an example of bad luck, but as soon as I can, I will deal with the Samnites to stop this happening again.
My army rests in Tiberus and slowly builds up as the new units arrive.
17.4.6. Turn 5
As a result of moving some population from culture I slip into tier II of the CDR. For the moment, I am not worried about this.
Rome completes its building and I order a Tavern:This is a very useful building as it gives loyalty and money but with
no decadence. I know from past experience that Rome will have loyalty problems as my slaves are all going to be placed here for some time.
Tiberus also completes its building. I often set this region to specialise in infrastructure and military buildings but for the moment I have

186
concerns about my gold income. The crafter district is useful as it produces both a base amount of gold and a percentage uplift on overall production. It also takes no slot.
I also have access to some new decisions.
I won’t take the infrastructure option as it will cost me either loyalty or money. It is useful as you gain bonus infrastructure production but the cost is prohibitive (for Rome) at this stage.
The slave option is more useful. The Freedman option can be tricky if you have slave markets but otherwise the gain of 5 loyalty and the ability to convert slaves to citizens makes it a very powerful decision. Remember that slaves contribute more disloyalty than the equivalent

187
citizen (6.4.3) and also citizens work more efficiently than slaves for commerce and culture production (6.3.3).
17.4.7. Turns 6 to 10
Not too much happened between turn 6 and turn 9. I was mostly in tier II of the CDR, my last units were recruited and joined the main army and the freedman decision helped a lot with loyalty.
On turn 9, Campania completed its harbour and I opted for another commerce building.
This one has several advantages. It will produce a lot of money (and over time I will improve access to the bonus goods), it improves the money I make from trades using goods in Campania by 16% and gives me an extra region of trade range. This will make it easier both to gain goods and sell my local production.

188
On turn 10, Rome completed its Tavern and I take the crafter district. As above, this is a useful, simple building and is especially useful in a region that will be a major city in the end.
Worth also noting how much my loyalty has improved. A combination of the freedman decision and the Tavern has moved me up to 81. Since I am over 75, I gain a few production bonuses as a result.
Of more relevance, my army is now as ready as it ever will be, so its time to attack the Senones. They have two regions, Picenum and Aemilia.
Picenum is not a problem, it’s a plain (remember my general has a bonus in that sort of terrain), the worry is Aemilia. It will give a bonus to the defenders (+2) and only allows limited frontage (5.1.2). To make matters worse, my legions will fight badly in that type of terrain. This is one reason why I raised the extra Alae and Velites.

189
17.4.8. Turn 11
The first battle went very much as expected, before deciding how to resolve it you have this option.
In this case, I opted to simply view the report as it is going to be one sided and very much favour my army.

190
That ended as expected, even their units that escaped are badly damaged. My only losses were among my cavalry.
They still hold the region of Picenum as there was a stockade protecting the town.
I could besiege the town but I outnumber the defenders and would like to move onto Aemilia before their army recovers its losses. So I order an immediate assault (10.9.1).
17.4.9. Turn 12
Last turn I gained a fifth progress token (due to capturing Picenum) and progress to being a glorious civilisation II state (7.4.4).
Being glorious will give me a number of advantages in terms of military power, commerce and legacy. Note that I had no choice over this progression, whereas if I moved between Civilization Levels (7.3) I have a choice to decline. If I gain five more progress tokens I am eligible to progress to

191
Level III (an Empire) but I cannot do that unless I also hold at least 10 regions (7.4.2).
So we actually already know the assault worked.Again I took no losses and my cavalry recovered their lost effectiveness
(10.5.8). As my army is intact I can risk pushing onto Aemilia, if I had suffered damage, it would be better to wait a few turns.
Now I hold Picenum I can chose what to build there. I opt for the cult site for three reasons: (a) it leads to the very useful Temple; (b) there is a religious decision which only works in regions with religious buildings and raises loyalty; and, (c) the population is mostly Celtic and I would like them to convert to Italian for the loyalty benefits (6.4.3).
The production appears to be slow as I have the ‘just conquered’ malus.

192
This will reduce over time and the region will return to normal production.The regional display also allows me to access all the relevant
messages. Since I just captured their capitol, I also gain a portion of their treasury (6.2.5). This is a welcome boost to my gold stocks.

193
The army is ordered to march north.
17.4.10. Turn 13
Again, the battle screen gives an idea of the relative power of the two armies and options as to how to resolve it.
Since frontage is a major concern, I’d like to see what happens in some detail.
This shows the two armies. Note there are only 5 squares in use but I have more skirmishers. Also the game engine has prioritised my Alae over my Legions for the front line.
I win the ranged fire phase quite decisively (10.7.3).

194
This may not look much, but those tired and exhausted units will now fight much worse in the close combat phase. At the least this will cancel out their terrain advantage.
I win the duel phase as well, more losses will now be inflicted as they flee the field.
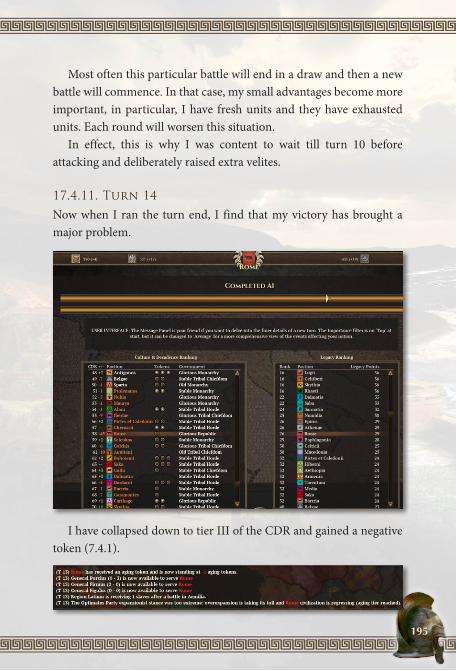
195
Most often this particular battle will end in a draw and then a new battle will commence. In that case, my small advantages become more important, in particular, I have fresh units and they have exhausted units. Each round will worsen this situation.
In effect, this is why I was content to wait till turn 10 before attacking and deliberately raised extra velites.
17.4.11. Turn 14
Now when I ran the turn end, I find that my victory has brought a major problem.
I have collapsed down to tier III of the CDR and gained a negative token (7.4.1).

196
It is not all bad, I have a slave in Latium as a result, but it seems as if I need to stop expanding for a while.
The reason is that a newly conquered, non-objective region generates a lot of decadence. In this case, 3.85 decadence has been added to my CDR. The amount (and the intensity of post-conquest unrest) will vary according to your faction and the ethnicity of the captured region. For example, most Hellenistic powers will gain little decadence if they capture Hellene cultured regions (7.9.5 and 18.3).
So I can try to offset this by creating more culture or accept a few turns of problems. It does mean, that I need to slow down the rate of conquest.
You can also use the ledger to check for regions that might be causing you decadence or loyalty problems (15.2).
17.4.12. Future Options
Clearly I need to stop expanding for a few turns.The next options are to absorb or conquer the Samnites and Etruscans or to carry on a campaign in Northern Italy. Sometimes the

197
Senones will have taken regions north of the Po which tends to pull Rome in that direction.
You need to either conquer or absorb the Etruscans to form the Italia Superior and you really need to do this fairly soon. To gain Italia Inferior will mean war with the Samnites and Tarentum.
Once you have done this, you can either prioritise an early shift to Civilisation Level III (i.e. an Empire 7.3.3) and perhaps avoid the worst problems of Civil Wars (7.5.5). Alternatively, try to stay as a Republic (there are advantages in the long term to doing this) and expand into Gaul, North Africa or Greece? All offer rewards.
18. National Differences
Note this section is designed to draw together the various special rules set out in the manual. It is not designed to replace the game play notes accessible in game nor to be a detailed analysis of every possible

198
modifier. In effect, it should serve as a short set of notes and warnings as to what to expect from each of the main ethnic groups. Equally it is not comprehensive, between variations of ethnicity and government type and age there is much more variance in the game than can be quickly captured.
18.1. RomeRome has a number of advantages. It can have one more building slot than its population allows and the various national modifiers and decisions give it extra leaders, a specialised naval unit and, of course, the legion. In turn legions can be used to build infrastructure (from tracks up to paved roads) and fortifications outside the normal regional building system. Basically you spend extra money to generate these buildings rather than using population assignment and a region can, in effect, build two structures at the same time.
However, this comes at a cost. You are far more vulnerable to Civil Wars than any other state (apart from some particularly fractious tribal nations) and these are a regular risk when you are ‘young’ or ‘mature’ and in Civilisation Level III. This is one way of simulating the frequent civil wars of the First Century BCE. You have two tools to handle this – keep as many regions over 75 loyalty as you possibly can (especially your core regions) and progress to a ‘Glorious’ Empire as quickly as you can. Of course, doing so, then means you will spend a long time in that form of government steadily acquiring decadence as a result.
18.2. CarthagePlayed well, Carthage will be a cash rich, manpower poor, state. Your religious buildings provide some interesting options to maintain loyalty but you do run the risk of revolts. One real issue is how far do you want a state that has a large group of connected regions. North Africa is mostly poor, so you will find that conquests there bring decadence and

199
costs long before they start to pay off. Spain offers opportunities but the relatively rebellious locals will mean you face ongoing revolts.
Carthage is possibly ideal for a cautious approach that prioritises gaining a scattered collection of rich regions and using your trading advantages to create a rich mercantile Empire.
18.3. Hellenistic PowersAll the Hellenistic cultured states have some similarities. In particular, you have a number of useful trade and religious buildings but you have less manpower than some other ethnic groups (though not as much a problem as Carthage faces). Equally conquering Hellene ethnic regions generates little decadence – but the other side is that taking non-Hellenic regions creates more. In addition, at the game start, Greece and Asia Minor are probably the richest part of the world.
This means if you can carve out a state based on that region, you will have a rich, relatively loyal, basis for your Empire. Unfortunately, the region is also full of other powers, both large and small, who will contest your gains.
Some Hellenistic states have a unique mix of Hellene and other ethnicities. Pontus, Bactria, Bythynia and Cappadocia of the starting nations all have unique traits and options (and problems) as a result.
18.3.1. The Diadochi
If you are one of the Diadochi make sure you read the rules in section 7.7. Each has some very particular rules but generally if any becomes old, or loses its capital, it is vulnerable to either losing border regions to another Diadochi or complete collapse.
18.3.2. Epirus
Has a special building, the Castrum Elephantidae, which can be used to generate elephants units for free. In addition, as with Syracuse

200
and Pontus it has the Ellines Soter modifier that means you gain no decadence (or a production penalty) if you take a Hellenic region but will gain extra decadence if you capture a non-Hellenic region.
18.3.3. Bactria
Has the unique buildings of the Kleros and Phrouria which can swap between aiding agriculture and commerce or as a defensive structure depending on if you are at war or peace.
18.3.4. Massilia
The Epitechismata and Katoika unique buildings favour settling on coastal regions. They are three versions of these and they can all be built in a region, leading to potentially very high productivity over time.
18.4. JudeaJudea is probably the most unique nation in the game. Careful study of the in-game notes is recommended, but you have to exploit your particular set of buildings, decisions and unique units if you are to survive.
18.5. Tribal Nations18.5.1. Celts and Germans
These two have much in common. Both gain from special buildings and excellent tribal infantry. With the Celts, trying to build all four shrines in a province is essential if you are to progress.
Be aware that the German tribes in particular are very vulnerable to civil wars (as you often have either the clans or infighting trait) on the death of a ruler and you should try to reach Civilisation Level II as soon as you can.
If you have the raiding trait, exploit this to the full. It is an invaluable way to earn much needed income.

201
18.5.2. Dacia
Dacia is initially secluded but has the basis for a strong economy with its gold and iron deposits. The special fortress buildings will reward a cautious start and the final level will create the basis for substantial expansion.
18.5.3. Other tribal nations
The main non-Celtic, non-German nation is the Picts. Here, exploit your capacity to raid, any special units or buildings and be careful of the likelihood of civil wars if in Civilisation Level I.
18.6. Nomads18.6.1. Steppes
The main feature of the Steppe nomads is that they have a building that will migrate from region to region. This herd, generates money and food, but cannot be relied on for long term economic development unless you control all the valid regions it can move to (it will not move outside nomadic cultured regions or into those with mountainous terrain).
18.6.2. Desert
The desert nomads all gain from the Oasis buildings and these are created automatically but, in turn, they will find it harder than normal to expand outside their own at start territories.
19. Design Notes
Field of Glory: Empires has been four years in development and contains ideas as to how to model the rise and decline of nations that have been worked on for much longer. Equally, it was designed from the start on the new ARCHON game engine so represents a complete

202
replacement of the older AGEOD game engine (though veterans from that system may recognise some in-game concepts and ideas).
Its earliest version envisaged the players starting with the foundation of Rome in 750 BCE so that almost every starting nation was little but an isolated, small, urban centre. The largest powers were all centred in the Eastern Mediterranean and the Near East. Over time, this changed to the current start date of 310 BCE primarily as this offers real opportunities for different outcomes to those that happened historically and the main states are relatively developed.
We know that historically Rome came to dominate the area represented by the game and that its expansion was checked by the forests of Germany, the open Steppes of southern Europe and the deserts of the Near East. Equally by the end of the game in 190 CE Rome is on the verge of 250 years of revolt, civil strife and fragmentation ending with the sacking of the city and a shift of its centre of gravity to Constantinople and its re-invention as an essentially Greek state. This took until 476 CE, so at the end of the game, Rome is entering a sustained period of instability but for a long time was able to cope with these stresses.
However, while that is what happened, the goal of a game is to allow other, plausible, outcomes to occur. Possible variants include Rome and Carthage having to co-exist in the Western Mediterranean, one of the Diadochi decisively winning the struggle for power after the death of Alexander or Greece and Asia Minor becoming broadly united under a single power. Or that a power outside the historical centres of Iran, Asia Minor, Greece or Italy might come to either regional or global importance?
In game terms, a key goal with Empires was not just to model conquest and expansion but also the features that lay behind first stagnation and then the collapse of powerful states. Equally, a major design goal was to present players with interesting choices, sometimes between flawed

203
options. If Empires was to work, stagnation and decline should not come from some external event (such as the emergence of a powerful late-game faction commonly used in many fantasy based 4X games) but from the player’s own, much earlier, choices.
Or to put it simply – ‘you reap what you sow’.The other part of the game design was to create a situation
where a player could influence key dynamics (such as trade or army construction) but did not have full control over the outcomes.
And finally, an important goal was this was all done in a way that made for fun and enjoyable gameplay.
19.1. Decline and FallThe interaction of legacy, culture, decadence and loyalty sits at the heart of the game.
We want you to consider, seriously, that your nation is a complex, fragile construct. If you manage it well through several simple yet subtle mechanisms, then -- most of the time – things will be all right. If you throw caution to the wind, by conquering rabidly and neglecting the welfare of your citizens, then there will be an internal reaction that sends your nation into turmoil and revolts.
Many games have a huge tendency to snow-ball. The stronger you are, the stronger you get. But history is full of examples showing that being bigger is no insurance for anything in the future. Just take Alexander the Great’s astonishing conquest of the Persian Empire. Or how the Roman Empire, at the peak of its expansion, was spending almost half the budget maintaining the army, then a significant part of the rest just for the state bureaucracy (with rampant embezzlement). In the game, the difficulty is that you, as the player, not only do you have powers that any Roman emperor would have dreamed off, but also you are much more rational and efficient than the rulers of the time. And somehow, if the game is to succeed and not be just

204
another paint-the-map program in disguise, we needed to manage to curb this tendency while not frustrating the gamer. A difficult task if there ever was one!
One means to alleviate frustration at the mechanisms is to provide tools so that nothing seems to be absolutely fixed. You can even escape the problems of being a decadent Empire – at other costs. Nothing is more frustrating that to have a rule somehow saying in one way or another: ‘Whatever you do, you shall fail’. And that’s why we have provided tools for almost all situations (we might have missed some, but they might be added later if needed). Because, this is still a game, and if you do it right, then you should be rewarded.
But that’s not to say it will be easy as the game likes to add constraining mechanisms everywhere. Disloyal regions, often the populous and the most productive ones, will need costly buildings to keep people in line .That by itself means an investment that will slow down snowballing. But then you’ll discover that the best buildings to have people stay loyal also increase decadence, and that decadence will slow down your expansion, unless you like usurpers and civil wars. At this stage, you need to start creating buildings that both generate loyalty and, less desirably, decadence. Bread and Circuses may have kept Rome more or less loyal for some time but it was expensive and held within it the seeds of its own destruction. You also have some tools to remove decadence, as you can reduce your government age by evolving from young to stable, or even from a civilization level to another. Equally there is a decision that allows you to reduce government age but at the risk of some unrest (yes, again loyalty and decadence are inter-linked). There are also a few buildings that actually remove decadence especially those connected with justice and education. So you have some tools that give you some control.
Culture is pivotal to the game, because it serves many purposes. The most straightforward and direct usage is ‘welfare’, a bonus

205
to loyalty, which you get if you have population assigned to Culture production. Thus you can offset unrest by placing your population in ‘unproductive’ (compared to producing food or money) activities. But as your cities grow, their typical level of loyalty will drop both for citizens and especially any slaves. Slaves, oddly enough, want to change their condition by revolting, or at least escaping. This too lowers the overall loyalty in the region. And when loyalty is too low, you can get revolts, either from the slaves, or from the citizens. They might even turn back to their former nation or master, if they are not from your main ethnicity. People are so ungrateful!
As above, this is meant to be fun, but your earlier decisions to expand, to accumulate slaves, to focus on population growth all have longer term consequences. So depending on your difficulty level and rate of expansion, it will be entirely possible for a player paying some attention to his empire to avoid the more acute crises that struck the Roman Empire (civil wars mainly). But you’ll have to make choices and be watchful of your expansion rate and how your citizens feel. Failing that, a usurper is always around the corner!
19.2. CombatAnother area where the game tries to balance a range of factors, and to remove the idea of there being a perfect answer, is the combat system. This has been discussed in detail in the main manual but the key issue was to stop a player creating a huge stack and just crushing their opponents.
So first, some units dominate in certain terrain and second even a powerful group of legions with no skirmishers to protect them will struggle against a better balanced army. Your ability to bring the full power of your army to bear is limited by the concept of frontage (something that AGEOD veterans will recognise as it appeared in 2004 in our first game: Birth of America). Equally a strong unit

206
may be relatively untrained or weakened by losses or lack of supply. And finally a good general may offset weaknesses in his army and beat a notionally stronger one.
This does not stop you winning by acting like a bull (or elephant) in a china shop. You can, if you have near-overwhelming power compared to your opponent. But you will find this situation unusual, and actually ineffective as we steer and nudge players through soft penalties and limits and not with some kind of ‘brick wall’ effects, but you can play in such a casual way, by simply adding more units to you r stacks for example. Or you can go with the flow, trying to comprehend the underlying mechanisms (rooted in history and reality) and understand that using badly led legions in deep forests can only take you so far.
This is mostly done through unit roles. And this can be done because units have a dozen or so parameters. When you design a game, it is always easier to introduce differences when the game has some richness, because you can’t go that far if you can only play with 2 values. It has a cost, because it adds complexity, but if you identify the determining parameters, then things will fall in place naturally and people will be able to use their common sense to play well. An easy example is flanking, that played an important part in battles, as if you managed to flank your opponent, winning was much easier and more likely. That’s an interesting parameter to play with, because it steers away the game from the usual propensity of having the costliest, heavy-hitting units as the queen of battles. With this one, you can have more humble units play a role (light cavalry or light troops).
Another example, deeply rooted in reality, was the use of skirmishing tactics. Again, managing to reproduce that is very good for your game, as you will make a weak unit play its part, and that’s harder to do than just going with the mantra: costly = better. And if in combining several factors, you achieve something that was a real, efficient tactic, then you know you are doing it right. For

207
example the infamous Parthian horse archers were known for their harassing tactics and that is reflected in the game, by combining traits like skirmishers and evaders. The first one will make a weak unit do damage to the other side, even if it loses a duel. The second trait will reduce your own loss, if you are faster than your enemy.
The pleasure here is what people in some games call ‘theory crafting’, i.e. devising your strategy, thinking of different possible outcomes and of the opposition you’ll face, in which context. Once you believe you have the recipe for victory, then the rest is fate.
Equally you will see this interaction of various types of units when conducting a siege. These are a game in themselves, rewarding again the side that uses a well balanced army, has the best leader and can wait for an ideal opportunity. Trying to rush it, or storm a well defended city with an army of heavy units might work, but you will take much heavier costs than if you approach the task cautiously and with the right type of army.
19.3. Unique nationsAlmost all nations in the ancient world had unique traits. Currently, Empires has not yet managed to add custom content to all of the 150+ possible nations, but we are working hard to flesh out this part. But it takes time to do things right. And by that I mean the aim here is not just about adding a value there or a number there. That would be boring (although something that can be done fast, but what a poor job that would be). That’s why we strive to add custom content that is really special and unique. Like Carthage specific rules about mercenaries. Or Epirus with the free elephants imported from over the sea. Or the very unique Ma’rib dam from Saba, etc. These variants really alter and tailor the game experience to something different, and nation A does not equal nation B. Because Empires is not chess. We don’t want to have all nations being equal, with the same chance of

208
success or strategy; on the contrary. If you want to play casually, take an easy nation, if you like to be the underdog, take Dacia and build up your fortresses, or take Rhodus and build a merchant empire all the while having a lousy army…
I very much liked Dominions, an independent game now on its fifth iteration. It has a lot of custom content, and I’m doing the custom content for Empires in exactly the same spirit as Illwinter is doing his for Dominions. I don’t mind that nations are not equal, on the contrary, I revel in them not being equal!
Also differences come from the combination of traits, military units and available decisions. This is done partly by some special rules that only apply to that nation but also by the way each nation has its own combination. So all monarchies have aspects in common, but a Hellenistic one has different additional traits to say Armenia.
Equally over time these traits change. You can take decisions that shift the focus of your entire nation and each of your rulers bring something unique (if not always welcome).
19.4. TradeOur trade system evolved quite ‘organically’. Often what I like to do is to start by analysing the reality of things. Because if you just copy another game feature, because it has been done and is working, then the copy, in addition to not being original, can lose any substance, as if all you are doing a photocopy of a photocopy (repeat that ten times!).
So trading. It’s all about opportunities. To be at the right place at the right moment, so that you can sell something people want. It meant that our regions had to need trade goods, and if some regions need goods, then some will produce it. Simple. But then trade is also about synergy. If I have cattle, I can sell it to people so they can eat (produce food). But then, how about creating a leather workshop to make use of the animal hides? And then this leather can perhaps be sold

209
on a market, or make light armors? And so on. It’s not just about ‘I produce resource X, then I get bonus Y’, that would (1) be boring, (2) not realistic and (3) would not lend to a ‘mini-game’ within the game.
I like such ‘mini-games’ within the game. What I mean is that you have this big feature, and you can make use of it without too much difficulty or understanding, but if you like to go deeper, then you get rewarded. A kind of double-layer effect, where first you learn the ropes, and then if it pleases you, you get more efficient and do better (the old cliché ‘easy to learn hard to master’, a sentence I despise almost as much as ‘do you have what it takes’, but I digress!).
And so was born our trade system where you have goods you need (and if you don’t have one, to not grind your economy to a halt, you can still have your building function but it will cost you a lot) and goods that are only bonuses.
The issue with a trade system that can potentially span an empire is the sheer amount of tedium it can lead to, if you ask people to check the complex web of trading routes. We had to simplify a lot here, because it would have turned the game into Economic simulator 50 CE… So routes are automated and generated by the system. If a trade good is within range, then you can import it (a trade good can service an indefinite amount of buildings). The risk here was to lose another aspect of trading, which is competition. We have tried to keep it as intact as possible, though the use of trade acumen, i.e. how good your merchants are.
A nation like Rhodes or Carthage have very good trade acumen, and will continuously snatch deals from others nations, even sometime replacing an internal trade with one of their own. And this might lead to tensions or even war! There are others subtleties to the system, like the trade range and the fact that the more goods you have, the higher chances to have your good picked for a trade deal. So automated trade, sure, but not dumb either. You just have to nudge commerce through indirect means that will take time to set up: adding a trade port to

210
increase both trade acumen and range, exploiting yet another vineyard so that it will be your wine and not the one of your neighbor that gets traded. Blockading an important enemy harbour means that all their iron for export can’t go by sea, etc. Much better than doing some kind of cheesy click-click manipulation to achieve an effect, right?
19.5. ProvincesWhat is initially fun can be a chore when done too much. And that’s what can happen when you manually manage your regions. Initially, it is quite engaging to decide if you need a farm or a market. But then once you have a lot of regions, the charm starts to wear off a bit (well it depends, if you are committed to a cut throat PBEM game, you’ll want all the advantages possible in the system). So we came up with the idea of provinces. The issue with automation and scaling up features is that the AI rules just can’t compete with the marvellous human brain with its 100,000 billion neurons. Lets be humble, a so called AI in a game can at best do a competent job, but not an astonishing one. So how to solve the conundrum? – by choices and rewards. Provinces in Empires are not forced upon you through the use of a stick or manacles. You don’t have to use them (choice). But if you do, they are not weakening you, on the contrary, they provide several bonuses (rewards). Only by doing so might players accept letting the ‘stupid AI, as in ‘ I don’t want a stupid AI to play for me’ enter their own, well-kept perfectly harmonious Zen garden. Humility, again. Accept this service player, the AI will do its best, and if you dislike what it does, you have all the rights in the world to alter all its decisions. And take this gift (extra provincial units, common pool of resources, etc.), just so you are happy! So in combination provinces bring key advantages (special units, some balancing of food and infrastructure) and some options (in terms of automation). You still choose how you wish to balance this.

211
19.6. WinningIn Empires, you are building your nation so that it endures the passage of time, and your achievement is measured through the legacy you’ll leave, even if in the end, your nation is no more.
There are several ways to achieve this goal. If you take a military approach, then you’ll want to plan your campaigns so that you conquer and hold your objective regions. These regions are set for each nation and represent loosely their historical progress or areas of interest. Some nations will have objectives set in a concentric way, around their capital, so they will expand outward in each direction. Other nations have several possible ‘tracks’ to follow, and when they get an objective in one of the tracks, then they are provided with another. For example, Rome has a track that represents its progress against Carthage, including Spain and Africa. Another track will let the Republic fight Epirus, Macedon and then go to Asia Minor, and so on.
Another possible approach to gaining Legacy is to make your regions very cultured, so that they produce legacy points by themselves. There are two levels here, and both demand substantial investment in the right buildings and decisions with the second level being quite a challenge to achieve. But if you devote your nation to the creation of prestigious buildings, it’s a possibility.
Yet another option is to pursue actively those national decisions that provide Legacy Points. These can include domestic reforms, or mounting a far away expedition to the border of the known world.
A final way to generate legacy is to try enduring the difficulty of managing a nation past its glory. Like Sparta perhaps, that clung to life for centuries well beyond its climax. This has no doubt left a lasting impression to the future generations, as few people know nothing about Sparta, even nowadays. Practically speaking, when your government is old or decadent, each turn you manage to survive

212
the vicissitudes happening to your nation, then a significant amount of Legacy Points will be given.
So the game is much more about painting the map in your color. Even if in the end all nations are trying to generate more legacy than their rivals, you can still get these points from different approaches, even if it is probably better to try a balanced approach perhaps with a focus on one.
19.7. Having funWhich brings us back to one of the key design decisions. The game should be challenging, realistic but also fun to play. Your problems come from your decisions and actions rather than being imposed on you by ad-hoc mechanisms. And you have a number of tools to avoid or manage the worst of these. This can involve not taking certain actions or accepting increased decadence to offset problems of loyalty. Or, as above, suffering all the problems of being an old or decadent Empire simply because despite all that can go wrong you are generating the legacy points you need to win the game.
Philippe Malacher, aka Pocus, May 2019.
20. CreditsAGEOD Game Design & Programming Philippe MalacherGraphics Koen BekkemaAdditional Graphics Pat WardAnimation Richard Evans

213
ARCHON ENGINEEngine Design & Programming Andrew Gardner, Philip Veale
AudioAudio Effects Design DBB Music + SoundAudio Supervisor & Lead Sound Designer Dan BewickAdditional Sound Design Matt NaussMusic Composed & Orchestrated By Alessandro Ponti
LOCALISATIONGerman MoGi GroupFrench Bénédicte DubraySpanish Pirro, Boores, Bender, Xesco, Juanjo, Andrés, Rothkildam, PapaX3, Nuria, Malatesta, MajandroManual Roger CookAdditional credit Uses Miles Sound System. Copyright©1991-2017 by RAD Game Tools, Inc
SLITHERINE CREDITS LISTChairman Jd McNeilDevelopment Director Iain McNeilTechnical Director Philip Veale

214
Creative Director Richard EvansMarketing Director Marco A. MinoliLead Producer Tamas KissProducers Bart Schouten, Adam Grace, Erik RutinsProduct Manager Alberto Casulini, Daniele MeneghiniSocial Media Manager Simone ParentiMedia Relations Paolo PagliantiProduction Design Adriana BienatiMarketing Assistant Sharon CesaroniManual Layout Myriam BellProduction Lead Matthew RavenwoodProduction Team Sam O’neillAdministration Dean Walker, Annick TuesleyCustomer Support Staff Paulo Costa, Joseph MillerWeb Development Valery Vidershpan, Andrea Nicola, Fernando Turi