Game Development with Ren'Py
361
Game Development with Ren’Py Introduction to Visual Novel Games Using Ren’Py, TyranoBuilder, and Twine — Robert Ciesla www.allitebooks.com
-
Upload
khangminh22 -
Category
Documents
-
view
0 -
download
0
Transcript of Game Development with Ren'Py

Game Development with Ren’Py
Introduction to Visual Novel Games Using Ren’Py, TyranoBuilder, and Twine—Robert Ciesla
www.allitebooks.com

Game Development with Ren’Py
Introduction to Visual Novel Games Using Ren’Py,
TyranoBuilder, and Twine
Robert Ciesla
www.allitebooks.com
Game Development with Ren’Py: Introduction to Visual Novel Games Using Ren’Py, TyranoBuilder, and Twine
ISBN-13 (pbk): 978-1-4842-4919-2 ISBN-13 (electronic): 978-1-4842-4920-8https://doi.org/10.1007/978-1-4842-4920-8
Copyright © 2019 by Robert Ciesla
This work is subject to copyright. All rights are reserved by the Publisher, whether the whole or part of the material is concerned, specifically the rights of translation, reprinting, reuse of illustrations, recitation, broadcasting, reproduction on microfilms or in any other physical way, and transmission or information storage and retrieval, electronic adaptation, computer software, or by similar or dissimilar methodology now known or hereafter developed.
Trademarked names, logos, and images may appear in this book. Rather than use a trademark symbol with every occurrence of a trademarked name, logo, or image we use the names, logos, and images only in an editorial fashion and to the benefit of the trademark owner, with no intention of infringement of the trademark.
The use in this publication of trade names, trademarks, service marks, and similar terms, even if they are not identified as such, is not to be taken as an expression of opinion as to whether or not they are subject to proprietary rights.
While the advice and information in this book are believed to be true and accurate at the date of publication, neither the authors nor the editors nor the publisher can accept any legal responsibility for any errors or omissions that may be made. The publisher makes no warranty, express or implied, with respect to the material contained herein.
Managing Director, Apress Media LLC: Welmoed SpahrAcquisitions Editor: Spandana ChatterjeeDevelopment Editor: Rita FernandoCoordinating Editor: Divya Modi
Cover designed by eStudioCalamar
Cover image designed by Freepik (www.freepik.com)
Distributed to the book trade worldwide by Springer Science+Business Media New York, 233 Spring Street, 6th Floor, New York, NY 10013. Phone 1-800-SPRINGER, fax (201) 348-4505, e-mail [email protected], or visit www.springeronline.com. Apress Media, LLC is a California LLC and the sole member (owner) is Springer Science + Business Media Finance Inc (SSBM Finance Inc). SSBM Finance Inc is a Delaware corporation.
For information on translations, please e-mail [email protected], or visit http://www.apress.com/rights-permissions.
Apress titles may be purchased in bulk for academic, corporate, or promotional use. eBook versions and licenses are also available for most titles. For more information, reference our Print and eBook Bulk Sales web page at http://www.apress.com/bulk-sales.
Any source code or other supplementary material referenced by the author in this book is available to readers on GitHub via the book’s product page, located at www.apress.com/9781484249192. For more detailed information, please visit http://www.apress.com/source-code.
Printed on acid-free paper
Robert CieslaHelsinki, Finland
www.allitebooks.com

This book is dedicated to my friend Jukka Virnes (1978–2018).
www.allitebooks.com

v
Table of Contents
Chapter 1: Stories and How to Craft Them �������������������������������������������1
A Little Introduction to Dramatic Elements �����������������������������������������������������������2
Antagonist �������������������������������������������������������������������������������������������������������2
Protagonist ������������������������������������������������������������������������������������������������������3
Alter Ego ����������������������������������������������������������������������������������������������������������4
Catharsis ���������������������������������������������������������������������������������������������������������5
Conflict ������������������������������������������������������������������������������������������������������������5
Cliché ���������������������������������������������������������������������������������������������������������������5
Deus Ex Machina ���������������������������������������������������������������������������������������������6
Double Entendre ����������������������������������������������������������������������������������������������6
Exposition ��������������������������������������������������������������������������������������������������������6
Flat/Round Character���������������������������������������������������������������������������������������6
Fourth Wall ������������������������������������������������������������������������������������������������������7
Narration/Narrator �������������������������������������������������������������������������������������������7
Onomatopoeia �������������������������������������������������������������������������������������������������7
Personification �������������������������������������������������������������������������������������������������8
Point of View (POV) ������������������������������������������������������������������������������������������9
About the Author ������������������������������������������������������������������������������xvii
About the Technical Reviewer �����������������������������������������������������������xix
Acknowledgments �����������������������������������������������������������������������������xxi
Introduction �������������������������������������������������������������������������������������xxiii
www.allitebooks.com

vi
Simile ��������������������������������������������������������������������������������������������������������������9
Soliloquy ����������������������������������������������������������������������������������������������������������9
Aristotelian Poetics �����������������������������������������������������������������������������������������������9
The Monomyth: A Hero’s Journey �����������������������������������������������������������������������12
Taking Back August – A Synopsis Act I: Departure ����������������������������������������13
Act II: Initiation �����������������������������������������������������������������������������������������������15
Act III: Return �������������������������������������������������������������������������������������������������21
The 12 Character Archetypes ������������������������������������������������������������������������������29
1� The Hero ����������������������������������������������������������������������������������������������������30
2� John/Jane Doe�������������������������������������������������������������������������������������������30
3� The Rebel ���������������������������������������������������������������������������������������������������31
4� The Joker ���������������������������������������������������������������������������������������������������31
5� The Ruler ���������������������������������������������������������������������������������������������������31
6� The Sage ����������������������������������������������������������������������������������������������������32
7� The Magician ���������������������������������������������������������������������������������������������32
8� The Creator ������������������������������������������������������������������������������������������������32
9� The Lover ���������������������������������������������������������������������������������������������������33
10� The Innocent One �������������������������������������������������������������������������������������33
11� The Explorer ���������������������������������������������������������������������������������������������33
12� The Healer �����������������������������������������������������������������������������������������������34
Ten Visual Novel Good Practices �������������������������������������������������������������������������34
1� Put the Story First ��������������������������������������������������������������������������������������34
2� Choose the Engine Carefully ����������������������������������������������������������������������35
3� Don’t Overlook the Audiovisuals ����������������������������������������������������������������35
4� Make Your Characters Grow ����������������������������������������������������������������������36
5� Honor the Sub-genre of Your Visual Novel �������������������������������������������������36
6� Use Clichés Wisely �������������������������������������������������������������������������������������36
7� Trim Unnecessary Elements ����������������������������������������������������������������������37
Table of ConTenTs

vii
8� Bond with Your Audience ���������������������������������������������������������������������������37
9� Only Provide the Endings Your Story Needs ����������������������������������������������38
10� Indulge in Forced Reading Sparingly �������������������������������������������������������38
Working for the Visual Novel Industry �����������������������������������������������������������������39
Visuals and Animation �����������������������������������������������������������������������������������39
Audio Production and Voice Acting ����������������������������������������������������������������41
Programming �������������������������������������������������������������������������������������������������41
Testing �����������������������������������������������������������������������������������������������������������42
Localization ���������������������������������������������������������������������������������������������������42
Musings on Inspiration ����������������������������������������������������������������������������������������43
Fighting the Writer’s Block ����������������������������������������������������������������������������������44
In Closing ������������������������������������������������������������������������������������������������������������46
Chapter 2: The (Ancient) Art of Interactive Fiction �����������������������������47
The Great Grandfather of the Visual Novel: ELIZA (1966) ������������������������������������47
The Grandfather of the Genre: Colossal Cave Adventure (1975) �������������������������48
The Early Trailblazers ������������������������������������������������������������������������������������������49
Infocom ����������������������������������������������������������������������������������������������������������49
Magnetic Scrolls ��������������������������������������������������������������������������������������������55
Level 9 Computing �����������������������������������������������������������������������������������������60
Other Notable Games in the Genre ����������������������������������������������������������������������64
King’s Quest: Quest for the Crown by Sierra On-Line (1984) �������������������������64
The Spellcasting Trilogy by Legend Entertainment (1990–1992) ������������������65
Timequest by Legend Entertainment (1991) ��������������������������������������������������67
Demoniak by Palace Software (1991)������������������������������������������������������������69
How They Did It – Early Tools for Interactive Fiction �������������������������������������������70
A Few Words on Parsers ��������������������������������������������������������������������������������71
Zork Interactive Language (ZIL) and the Z- machine ��������������������������������������72
Table of ConTenTs

viii
The Quill by Gilsoft (1983) �����������������������������������������������������������������������������74
Professional Adventure Writer by Gilsoft (1986) ��������������������������������������������75
Adventure Game Toolkit by David Malmberg (1987) ��������������������������������������75
Inform by Graham Nelson (1993–) �����������������������������������������������������������������75
In Closing ������������������������������������������������������������������������������������������������������������77
Chapter 3: The Modern Visual Novel ���������������������������������������������������79
The Visual Novel: Definitely Big in Japan ������������������������������������������������������������79
Tropes �����������������������������������������������������������������������������������������������������������������80
The Faceless Protagonist ������������������������������������������������������������������������������80
Dialogue Tree �������������������������������������������������������������������������������������������������80
The Endings Tree �������������������������������������������������������������������������������������������81
Into the Middle of Things/In Medias Res �������������������������������������������������������81
High School Geek ������������������������������������������������������������������������������������������81
Branch Cutting �����������������������������������������������������������������������������������������������82
Sword and Sorcery ����������������������������������������������������������������������������������������82
Core Concepts of Japanese-Influenced Visual Novels ����������������������������������������83
Anime ������������������������������������������������������������������������������������������������������������84
Bishoujo (also Galge) Games �������������������������������������������������������������������������84
Dating Sim �����������������������������������������������������������������������������������������������������84
Doujinshi Games ��������������������������������������������������������������������������������������������85
Eroge �������������������������������������������������������������������������������������������������������������86
Hentai ������������������������������������������������������������������������������������������������������������86
Isekai �������������������������������������������������������������������������������������������������������������87
Kamige/Kusoge ���������������������������������������������������������������������������������������������87
Kawaii ������������������������������������������������������������������������������������������������������������87
Kinetic Novel ��������������������������������������������������������������������������������������������������87
Otaku �������������������������������������������������������������������������������������������������������������88
Table of ConTenTs

ix
Otome ������������������������������������������������������������������������������������������������������������88
Magical Girlfriend ������������������������������������������������������������������������������������������88
Mahou Shoujo (The Magical Girl) �������������������������������������������������������������������88
Manga ������������������������������������������������������������������������������������������������������������89
Mecha ������������������������������������������������������������������������������������������������������������90
Moe(ge) ���������������������������������������������������������������������������������������������������������90
Nakige/Utsuge �����������������������������������������������������������������������������������������������90
Tsundere ��������������������������������������������������������������������������������������������������������90
Modern-Era Kamige, or the New Classics �����������������������������������������������������������91
Kanon by Key (1999) ��������������������������������������������������������������������������������������91
Air by Key (2000) �������������������������������������������������������������������������������������������92
Phoenix Wright: Ace Attorney by Capcom (2001) �������������������������������������������93
Digital: A Love Story by Christine Love (2010) �����������������������������������������������94
Katawa Shoujo by Four Leaf Studios (2012) ��������������������������������������������������95
Clannad by Key (2004, 2015) �������������������������������������������������������������������������96
Her Story by Sam Barlow (2015) �������������������������������������������������������������������97
Doki Doki Literature Club! by Team Salvato (2017) ���������������������������������������98
Open Sorcery by Abigail Corfman (2017) �����������������������������������������������������100
Simulacra by Kaigan Games (2017) �������������������������������������������������������������100
Simulacra: Pipe Dreams (2018) �������������������������������������������������������������������101
How We Do It – Modern Tools for Visual Novels ������������������������������������������������102
Ren’Py ���������������������������������������������������������������������������������������������������������102
Twine �����������������������������������������������������������������������������������������������������������103
Adrift ������������������������������������������������������������������������������������������������������������104
TyranoBuilder by STRIKEWORKS (2015) ������������������������������������������������������105
VN Maker �����������������������������������������������������������������������������������������������������107
In Closing ����������������������������������������������������������������������������������������������������������108
Table of ConTenTs

x
Chapter 4: Working in Ren’Py, Twine, and TyranoBuilder �����������������109
Ren’Py in Detail �������������������������������������������������������������������������������������������������110
How Ren’Py Works���������������������������������������������������������������������������������������111
Starting a New Project ��������������������������������������������������������������������������������112
The Ren’Py Workflow �����������������������������������������������������������������������������������113
The Basics of Ren’Py Scripting ��������������������������������������������������������������������114
Creating User Interaction: Menus ����������������������������������������������������������������118
Indentation and Text Blocks �������������������������������������������������������������������������119
Conditional Statements: if, elif, else ������������������������������������������������������������120
More on Control Statements ������������������������������������������������������������������������121
Twine in Detail ��������������������������������������������������������������������������������������������������122
Linking Passages Together ��������������������������������������������������������������������������124
Twine and Audiovisuals �������������������������������������������������������������������������������124
The Three Varieties of Twine ������������������������������������������������������������������������126
Twine’s Many Macros ����������������������������������������������������������������������������������126
Twine’s User Interface Functions ����������������������������������������������������������������128
A Few Words on the IFID ������������������������������������������������������������������������������131
Some Useful CSS Selectors �������������������������������������������������������������������������131
TyranoBuilder in Detail ��������������������������������������������������������������������������������������132
The TyranoBuilder Workflow ������������������������������������������������������������������������133
A Two-Scene Adventure �������������������������������������������������������������������������������135
Characters in TyranoBuilder ������������������������������������������������������������������������138
Adding Multimedia ��������������������������������������������������������������������������������������138
TyranoBuilder and Media Files ��������������������������������������������������������������������139
A Few Words on Game Settings ������������������������������������������������������������������139
Scripting in TyranoBuilder ���������������������������������������������������������������������������139
Live2D ����������������������������������������������������������������������������������������������������������141
In Closing ����������������������������������������������������������������������������������������������������������142
Table of ConTenTs

xi
Chapter 5: Deeper Down the Dungeon ����������������������������������������������145
Ren’Py, Containers, and Codecs ������������������������������������������������������������������������145
Using Video in Ren’Py ����������������������������������������������������������������������������������148
Advanced Audio Functionality in Ren’Py �����������������������������������������������������149
Advanced Image Properties �������������������������������������������������������������������������151
Customizing the Ren’Py GUI ������������������������������������������������������������������������154
Advanced TyranoBuilder Techniques �����������������������������������������������������������������156
Plugins ���������������������������������������������������������������������������������������������������������157
Of Variables and System Variables ��������������������������������������������������������������160
Randomized Dialogue ����������������������������������������������������������������������������������162
iScript vs� JavaScript �����������������������������������������������������������������������������������164
Clickable Image Areas ���������������������������������������������������������������������������������165
Custom Fonts in TyranoBuilder ��������������������������������������������������������������������166
Twine Magic ������������������������������������������������������������������������������������������������������167
Evoking JavaScript in Twine ������������������������������������������������������������������������169
Text Reveal Effect in CSS �����������������������������������������������������������������������������169
Spicing Up the Text ��������������������������������������������������������������������������������������170
An Introduction to Harlowe ��������������������������������������������������������������������������173
Enter Snowman! ������������������������������������������������������������������������������������������178
In Closing ����������������������������������������������������������������������������������������������������������184
Chapter 6: Deploying for Popular Platforms �������������������������������������187
Ren’Py and the Desktops ����������������������������������������������������������������������������������187
Minimum System Requirements �����������������������������������������������������������������188
Icons for Desktops ���������������������������������������������������������������������������������������189
Ren’Py for Mobile Devices ��������������������������������������������������������������������������������190
Deploying for Android ����������������������������������������������������������������������������������190
Icons and the Splash Screen �����������������������������������������������������������������������191
Table of ConTenTs

xii
Keybindings in Android ��������������������������������������������������������������������������������192
Testing Your Android App in Ren’Py �������������������������������������������������������������192
Deploying for iOS �����������������������������������������������������������������������������������������193
Xcode and the iOS Process ��������������������������������������������������������������������������193
Updating Your iOS Projects ��������������������������������������������������������������������������195
App Icons and Splash Screens for iOS ��������������������������������������������������������195
Deploying for Chrome OS/Chrome Browser ������������������������������������������������������197
Legalese for Android and iOS in Ren’Py ������������������������������������������������������198
Ren’Py for the Quirky: Raspberry Pi ������������������������������������������������������������������198
Setting Up a Pi for Ren’Py ���������������������������������������������������������������������������199
TyranoBuilder for Desktops �������������������������������������������������������������������������������199
TyranoBuilding for iOS ���������������������������������������������������������������������������������200
TyranoBuilding for Android ��������������������������������������������������������������������������201
Additional Android Advice ����������������������������������������������������������������������������204
Twine for the Desktops �������������������������������������������������������������������������������������204
Twine for iOS and Android ���������������������������������������������������������������������������205
The Wonders of PhoneGap Build �����������������������������������������������������������������205
Splash Screens for Android �������������������������������������������������������������������������208
Icons for Android �����������������������������������������������������������������������������������������208
Splash Screens for iOS ��������������������������������������������������������������������������������210
Icons for iOS ������������������������������������������������������������������������������������������������211
The Apple p12 Certificate and PhoneGap ����������������������������������������������������213
In Closing ����������������������������������������������������������������������������������������������������������214
Chapter 7: Three Little Games ����������������������������������������������������������217
Laying Out a Plan ����������������������������������������������������������������������������������������������217
Cast of Characters ���������������������������������������������������������������������������������������218
Locations �����������������������������������������������������������������������������������������������������219
Table of ConTenTs

xiii
Part I: The Beginnings of Taking Back August in Ren’Py �����������������������������������234
Starting the Project��������������������������������������������������������������������������������������234
Setting Up the Characters ���������������������������������������������������������������������������235
Custom Transitions ��������������������������������������������������������������������������������������236
Assigning Images to Characters ������������������������������������������������������������������237
Preparing Other Audiovisual Assets �������������������������������������������������������������237
Into the Fray! �����������������������������������������������������������������������������������������������239
Commenting Your Code �������������������������������������������������������������������������������241
Your First Menu �������������������������������������������������������������������������������������������241
Using Conditional Statements ���������������������������������������������������������������������244
Setting the Text Speed ���������������������������������������������������������������������������������249
Upgrading the Inventory System �����������������������������������������������������������������250
Adding Functions (and Reusing Variables) ��������������������������������������������������253
Particles with SnowBlossom �����������������������������������������������������������������������256
Randomizing Dialogue ���������������������������������������������������������������������������������261
Styles and Hyperlinks ����������������������������������������������������������������������������������262
Adding Videos ����������������������������������������������������������������������������������������������265
Text Speed on the Fly ����������������������������������������������������������������������������������265
More Fun with Text ��������������������������������������������������������������������������������������266
Part II: The Middle of Reginald’s Story with TyranoBuilder��������������������������������267
A Couple of Characters ��������������������������������������������������������������������������������268
On a Train �����������������������������������������������������������������������������������������������������268
TyranoBuilder, Assets, and Directories ���������������������������������������������������������269
Sounds on a Train ����������������������������������������������������������������������������������������271
First Glimpses of Interaction and Variables �������������������������������������������������277
Random Dialogue in TyranoBuilder ��������������������������������������������������������������279
Adding Labels in TyranoScript ���������������������������������������������������������������������281
Table of ConTenTs

xiv
The Might of the 3D Camera ������������������������������������������������������������������������282
TyranoScript Macros ������������������������������������������������������������������������������������282
Mixing Graphics with Text ����������������������������������������������������������������������������287
Graphical Buttons ����������������������������������������������������������������������������������������287
The Grand Finale Featuring Nasuka ������������������������������������������������������������288
Various Tags and Tools���������������������������������������������������������������������������������291
Part III: Telling Tales with Twine�������������������������������������������������������������������������294
Fonts and Colors ������������������������������������������������������������������������������������������296
Fun with Harlowe and Variables ������������������������������������������������������������������298
Custom Tags and Background Visuals ���������������������������������������������������������299
An Inventory in Harlowe ������������������������������������������������������������������������������302
Refining Our Inventory and the Twine Footer ����������������������������������������������303
Resuming Our Story ������������������������������������������������������������������������������������304
Unlocking Locations with Items ������������������������������������������������������������������307
Food, Dramatic Moments, and More Macros �����������������������������������������������308
Datamaps and Datasets ������������������������������������������������������������������������������309
Extreme Fun with Arrays �����������������������������������������������������������������������������310
More Visual Effects ��������������������������������������������������������������������������������������312
Real-Time Twine ������������������������������������������������������������������������������������������313
Our First Game Over ������������������������������������������������������������������������������������315
Hiding That Pesky Inventory ������������������������������������������������������������������������315
Adding Graphical Bars ���������������������������������������������������������������������������������317
Transitions and Rotation: More Visual Flair �������������������������������������������������318
Replacing Links with Passages �������������������������������������������������������������������319
Prompting the User ��������������������������������������������������������������������������������������320
In Closing ����������������������������������������������������������������������������������������������������������323
Table of ConTenTs

xv
Chapter 8: Promotional Strategies ���������������������������������������������������325
Your Online Audience ����������������������������������������������������������������������������������������325
Online Distribution for Budding Visual Novelists �����������������������������������������������327
Releasing for Free ���������������������������������������������������������������������������������������327
Selling Your Visual Novels ����������������������������������������������������������������������������329
Essential Marketing Practices ���������������������������������������������������������������������������331
Forum Decorum �������������������������������������������������������������������������������������������331
Demo Games �����������������������������������������������������������������������������������������������331
Penetrating the Market with Free Stuff �������������������������������������������������������332
Staying Serious About Platforms �����������������������������������������������������������������332
The Power of Localization ���������������������������������������������������������������������������332
Web Site ������������������������������������������������������������������������������������������������������333
Trailer Video �������������������������������������������������������������������������������������������������334
Blog �������������������������������������������������������������������������������������������������������������335
Visual Novel Databases �������������������������������������������������������������������������������336
In Closing ����������������������������������������������������������������������������������������������������������337
Index �������������������������������������������������������������������������������������������������339
Table of ConTenTs

xvii
About the Author
Robert Ciesla is a freelance writer from
Helsinki, Finland. He has a BA in journalism
and a knack for writing urban fiction and
directing short films. Robert has worked on
many video games on several platforms since
being a kid in the mid-1990s. His personal web
site is www.robertciesla.com.

xix
About the Technical Reviewer
Daniel Luque Soria has been a Python
developer for 5 years. He has worked as an
Odoo developer in several companies. In his
spare time, he has developed visual novels and
Ren’Py-related tools and contributed to the
Spanish localization of Ren’Py. He’s currently
focusing on game development with Unity3D.

xxi
Acknowledgments
I would like to thank my mother and all of my friends for their support
during the intense writing process.

xxiii
Introduction
If there’s one genre that doesn’t usually spring to mind when thinking of
popular video games (or video games in general), it’s anything text-based.
Many gamers see these types of games as something archaic or boring,
perhaps preferring to indulge in yet another first-person shooter. The
reality, however, is very different.
Although an old genre, interactive fiction and its more modern
cousin, the visual novel, are an increasingly thriving segment of the
industry. For example, Clannad HD Edition by developer Key outranked
some of the most popular action game franchises in Steam sales charts.1
Although initially a mostly Japanese phenomenon, today visual novels
are sold and/or downloaded in the millions worldwide. Doki Doki
Literature Club! by Team Salvato, a free visual novel with optional paid
add-ons, reached two million downloads in 2018 and continues to
exhibit a massive, global fan following.
The three tools presented in this book, Ren’Py, Twine, and
TyranoBuilder, offer everything you need for creating interactive fiction or
visual novels for multiple platforms. Best of all, the first two are completely
free to use. Gaining experience in any of these exceptional tools also opens
doors to other development systems, should the need for this arise, as well
as grants you with some general-purpose programming skills.
1 Clannad HD climbed on top of Grand Theft Auto V and Call of Duty: Black Ops III in the Steam sales charts of 2015. The game also received over $540,000 during its crowdfunding phase. Steam by Valve Software is the largest online distribution platform for video games.

xxiv
With this book I aim to give you, the budding developer, the means
you need to create your very own interactive adventures. Yet this book
is not only a DIY manual for fans of text-based games, nor is it a history
lesson, although that’s certainly a part of it. First and foremost, I want
to stir your creative capabilities and use language, any language, to its
fullest capacity in creating commercially viable and meaningful titles of
your own. Whether you choose humor, romance, fear, or some other part
of the human experience as your main influence in your initial games, I
urge you to hold nothing back, within limits of course, and enter the fray
with complete confidence. At best we are, after all, creating immersive
universes others can enjoy and relate to, like writers do.
InTroduCTIon

1© Robert Ciesla 2019 R. Ciesla, Game Development with Ren’Py, https://doi.org/10.1007/978-1-4842-4920-8_1
CHAPTER 1
Stories and How to Craft ThemWords, like 3D graphics, are information. Unlike fancy 3D graphics,
syllables put to good use convey a strong element of imaginative
interpretation from the reader’s part. One’s imagination is quite simply
sent soaring when reading. All of the abstract potential and lived
experience stored in our brains surfaces when interpreting syllables and
sentences (at least when one is enjoying what one is reading). It can be
argued that a person can therefore provoke more complex inner emotions
with pure language than with visual representations of things.
There’s a reason literary classics like Homer’s Iliad and Camus’ The
Stranger live on and storylines of 3D game franchises die after a few years
in the market. This is not to downplay a huge part of the industry, but to
remind developers that it’s okay to challenge the player in co-creating
your work in this powerful manner. It’s okay to focus on emotional impact,
which of course is no way limited to text-based games. But quite often too
much emphasis is put on visuals at the expense of a gripping storyline and
a rewarding dramatic arc. Outward minimalism can be a great co-creator
to bringing out one’s artistic ambitions in the world of video games as well.

2
In this chapter we’ll first examine some of the most common drama-
related concepts that are useful for anyone working in the field of writing
fiction. Then, we’ll explore the world of Aristotelian poetics. This is
followed by an in-depth look at Joseph Campbell’s “monomyth,” a very
popular trope in the world of entertainment, as well as the associated 12
character archetypes. Finally, we’ll delve into some useful practices for all
visual novelists.
A Little Introduction to Dramatic ElementsSome terms have become canonized throughout the history of literature,
dating back to ancient Greece. Let’s take a look at some of the most
fundamental concepts and how they relate to newer forms of literature
and thus also interactive fiction. These terms are useful for all types of
storytelling. We’ll start with the central concept of protagonist, then take
on more terms in an alphabetical order.
AntagonistAn antagonist is a villain in a story (see Figure 1-1), that is, someone who
makes life that little bit harder for our protagonist(s). Good antagonists
challenge our heroes, providing them with obstacles that enable their
growth. What usually separates an antagonist from an anti-hero is the
end goal. The former may use dubious means to achieve a more or less
morally sound goal. The latter will gladly rule over the world by any means
necessary.
Chapter 1 StorieS and how to Craft them

3
Note the following antagonists are best avoided due to oversaturation: moustache-twirling (more or less) southern gentlemen, powerful caped space kings, witches, and evil wizards who are definitely in the last age bracket before “dead” on all official documents.
ProtagonistA protagonist is a leading character (see Figure 1-2) whose actions and
decisions are watched most closely by the reader or gamer. Think the
enigmatic Gordon Freeman from the Half-Life franchise or The Adventurer
from the 1980s Zork series of interactive fiction games. More complicated
projects may naturally include numerous different protagonists, each with
their own challenges and dramatic arcs.
Figure 1-1. Dr. Unpleasant, an antagonist (at least in the context of this book) at your service. The evil grin is a giveaway.
Chapter 1 StorieS and how to Craft them

4
Not all protagonists are necessarily heroic or even morally sound. The
beloved janitor Roger Wilco from the classic Space Quest series of games
is a bit of a klutz, while Vegeta from the Dragon Ball Z universe can be
somewhat of a snob (to say the least). Not all main characters need be
from the goody-two-shoes school of drama. A bruised and bitter anti-hero
can indeed be a fun protagonist to write about and to deliver brutal truths
about the human condition in the process.
Alter EgoAn alter ego is a personality distinct from a character’s usual self and
a popular trope in visual novels. Think Clark Kent from the Superman
universe. Alter egos may be necessary to hide one’s true identity (think
secret agent) or they may be borne out of some kind of mental issues, as is
the case with characters suffering from multiple personality disorder.
Figure 1-2. Reginald Pennelegion, the protagonist from Taking Back August, this book’s tutorial game
Chapter 1 StorieS and how to Craft them

5
CatharsisA catharsis is sometimes the dramatic purging of a character’s emotional
baggage and/or stress. It is experienced after the completion of a major
task, and it usually grants the character new skills and a peace of mind.
In the visual novel sub-genre of dating simulators, forming a relationship
or getting married constitutes a form of catharsis. In more fantasy-based
games, defeating a powerful dragon or a malicious space lord is perhaps a
type of catharsis as well.
ConflictOne of the most important concepts in any type of drama is conflict. Conflict
is an often resolvable challenge, pitting a character against other characters
or circumstances. The resolution of conflicts results in some type of prize, be
it new skills or a better set of prospects for the hero/heroine and their allies.
Conflict isn’t limited to the strenuous relationship between a main
character and his or her antagonists. It can take place fully within the
psyche of the leading character, in the form of phobias, neuroses, or other
issues. Conflict can therefore be external or internal or a combination of
both. Naturally, conflict can also manifest as political strife or be related to
technology; a somewhat popular pop culture trope is “man vs. machine,”
after all. Great drama often ensues from conflict between humans and
society at large, or nature, too.
ClichéA cliché is an overused concept. Time turns most fresh ideas to clichés
eventually. Many fans of visual novels are fine with some of the clichés in
the genre, such as the ubiquitous high schooler protagonist. This may be
because many people have themselves been an awkward high schooler at
some point.
Chapter 1 StorieS and how to Craft them
6
Deus Ex MachinaA relatively popular dramatic device, deus ex machina refers to an external,
often all-powerful source that resolves some rather unsurmountable
difficulties. The expression is Latin for “a god from the machine.” Think of
a powerful giant robot appearing out of nowhere to help your heroes or
perhaps a benign artificial intelligence taking over the proceedings.
Double EntendreDouble entendre refers to a sentence which has two meanings. It can be
either intentional or accidental. The former variety is often risqué in its
nature, while the latter is not.
• Example #1: I’m having an old friend for dinner, a
cannibal told me once.
• Example #2: Something went wrong in the car crash,
expert says.
ExpositionThe background information on characters and their everyday lives is called
exposition. It’s needed to make your protagonist more relatable for your
audience. Scenes of exposition might explain some of the motivations for the
characters in your visual novel, based on their personal history and interests.
Flat/Round CharacterA flat character is more or less a background figure. He, she, or it isn’t
without a purpose, however. They simply aren’t given that much time in
your saga. Think of a mysterious shopkeeper who sells magic items and
vanishes after a transaction.
Chapter 1 StorieS and how to Craft them
7
A round character, on the other hand, is what your heroes and villains
are characterized as. They are given the most exposition in your visual novel.
They often have rich personalities and complicated motivations for their
actions and desires. The word “flat” can also be used again to describe a main
character who isn’t well-rounded and believable enough to carry the story.
Fourth WallA fourth wall refers to agreed-upon invisible wall which divides the events
of a dramatic work from its audience. When someone is “breaking the
fourth wall,” it means a character in a play, movie, visual novel, or other
such work acknowledges members of the audience.
Examples of visual novels breaking the fourth wall include Doki Doki
Literature Club! by Team Salvato (see Chapter 3) and Snow Sakura by D.O.
to name just two; the genre lends itself well to this practice.
Narration/NarratorNarration refers to one or more characters addressing the audience/
gamers directly, giving information or commenting on the twists in a story.
A narrator can be either the protagonist or a separate, often anonymous
entity. A narrator usually has more information than the heroes themselves.
OnomatopoeiaThis term refers to noises that imitate their own meaning. Onomatopoeia
is the vocal approximation of the associated sound (see Figure 1-3).
Some examples are animal sounds, such as “meow,” the feline classic, or
“coo” made popular by pigeons. Other examples include “bang” in the
context of a gun firing or the clock-inspired “tick tock.” You get the idea.
Onomatopoeia has been used to great effect in comic books and many
visual novels.
Chapter 1 StorieS and how to Craft them

8
PersonificationPersonification is the approach of giving human attributes to abstract
concepts, such as the sun or weather. When applied to non-human beings
or objects (e.g., animals), it’s known as anthropomorphism (see Figure 1- 4).
This is a very popular approach in art and culture dating back to the
earliest days of recorded history. Many successful video game franchises
feature personified protagonists and antagonists.
Figure 1-3. Some examples of onomatopoeic visual expression
Figure 1-4. An anthropomorphic egg
Chapter 1 StorieS and how to Craft them
9
Point of View (POV)A point of view is simply the angle from which a story is told. This point of
view can be divided into three types: objective, omniscient, and limited
omniscient. An objective POV refers to a character who isn’t any more
knowledgeable than the audience, whereas a character with an omniscient
POV knows everything about the proceedings. A limited omniscient POV
sits between these two.
The typical visual novel protagonist perspective can be therefore
described as a first-person objective POV. An all-wise oracle character
would be described as a third-person omniscient POV.
SimileA simile is simply the comparison of two different things using connecting
words such as like or than.
For example: He was cooler than a refrigerated
zucchini. She was quiet like a phantom.
SoliloquyThis term refers to a kind of monologue, which is only aimed at the
audience (i.e., the player). During soliloquies other characters present in
the scene stay quiet and blissfully ignorant of what was just being said.
Aristotelian PoeticsGreek philosopher Aristotle (384–322 BC) perhaps first outlined the
still thriving principles of drama in his monumental work, Poetics, from
335 BC. Although his concepts may seem outdated to some, they are the
core structure behind many popular and long-lived works of literature
Chapter 1 StorieS and how to Craft them

10
and related fields. You may pick and choose the concepts that suit your
particular needs as a game designer.
According to Aristotle, all art is a modified imitation of life.
Interestingly, he referred to language-based art as “the unnamable art
form,” dividing it into tragedy, comedy, and the epic poem. Out of these
three genres, tragedies and epics carried more value, since they could
better convey moral lessons which were paramount back in the day.
One may reach the conclusion that morality is often overlooked in
current popular culture, especially in video games.
There are six core qualities of Aristotle’s tragedies:
1. Morals: An overall noble quality to uphold decent
morals.
2. Realism for the audience to relate to.
3. Fitness of character: Appropriate characteristics for
the cast (e.g., brave knights, sneaky thieves).
4. Consistency: Characters need to continue living out
their established qualities throughout the work.
5. Necessity of action: The law of probability or
necessity must govern the work.
6. Idealism: Be truthful, but more beautiful than life.
As for comedy, the genre seemed to present to the world lesser, more
frivolous characters and was thus lesser of an art form of the three. The art
form of comedy was not entirely without merit in Aristotle’s opinion, as it
could serve well the purposes of political satire, thus at best reducing the
tension between the rulers and the ruled. In modern times some of that
logic may be lost. Just think of, say, those numerous comedic films starring
Adam Sandler which may or may not influence the betterment of society
(no offense to Mr. Sandler, of course).
Chapter 1 StorieS and how to Craft them

11
As stated, in addition to tragedy and comedy, Aristotle outlined
the genre of epic poetry. These works consisted of four elements: plot,
character, thought, and diction. Their subject matter often dealt with
ancient gods and those with superhuman abilities. Notable examples of
this genre include Homer’s Odyssey and the aforementioned Iliad. The
oldest known epic is the Mesopotamian classic The Epic of Gilgamesh all
the way from 2200 BC no less.
There are nine qualities in Aristotle’s epic poems:
1. An epic begins with a declaration of its theme.
2. The story itself often begins in the middle of the
action (lat. “in medias res,” a common approach
in, say, the video game Prototype by Radical
Entertainment and classic TV episodes of MacGyver).
3. In many cases, a muse is invoked (a muse is a goddess
who represents a specific type of art or science).
4. The scope of the epic is large, dealing with the
entire world or worlds (hence the use of epic as an
adjective in popular culture).
5. The cast of characters performs long monologues.
6. Heavy use of repetition.
7. The use of epic similes. They refer to the contrasting
of something ordinary to something extraordinary,
often spanning several lines (i.e., “The fax machine
made noises like a giant wild boar being irate, about
to devour the entire office”).
8. Emphasis on courage and other heroic ideals.
9. Epic poems embody the relevant society and its
values in considerable detail and scope.
Chapter 1 StorieS and how to Craft them

12
The Monomyth: A Hero’s JourneyDrama, in all its forms, is an evolving art form. One of the more prominent
voices in its study was Joseph Campbell (1904–1987), a Professor of
Literature at Sarah Lawrence College. He presented the concept of the
monomyth to the world with his magnum opus The Hero with a Thousand
Faces (1949).
Basically, Campbell argued that most sagas in human history are
following the same formula. The monomyth can be summoned in a quote
from the introduction in the book:
A hero ventures forth from the world of common day into a region of supernatural wonder: fabulous forces are there encountered and a decisive victory is won: the hero comes back from this mysterious adventure with the power to bestow boons on his fellow man.
Not all video games need the monomyth approach, but a text-based
game greatly benefits from it. It’s a tool that helps you work faster using a
tried and tested method. Don’t reinvent the wheel when you can simply
aim for a rewarding, time-honored approach. You may completely ignore
the monomyth in your game making, of course, but it may be somewhat of
a risky maneuver. The hero’s journey has a tendency to keep the audience
on its toes, after all.
The monomyth, that is, the hero’s journey, consists of 17 stages, which
are often grouped in a number of ways, most often as three separate acts.
We’ll now take a look at these concepts in the form of a synopsis for a little
visual novel, Taking Back August by yours truly. We will be creating this
game later in the book in three installments using Ren’Py, TyranoBuilder,
and Twine.
In the world of visual novels, it’s generally a good idea to fully flesh out
the story this way before delving into coding. Do yourself a favor: pen a
synopsis beforehand – especially if there’s more than one person in the team.
Chapter 1 StorieS and how to Craft them
13
Taking Back August – A Synopsis Act I: Departure 1. The Call to Adventure
the first stage of the hero’s journey often presents to the audience the current (and sometimes rather mundane) existence of the protagonist.
Reginald Pennelegion, a government cyber security expert and our
protagonist, is browsing nonsense at his desk workstation. He’s supposed
to be working on a big project, but instead he’s drifting into a world of
memes, online auctions, and silly video clips. Reginald is still depressed
about the passing of his best and only friend at the office, one Mervyn Popplewell.
Amidst his continuing browsing, Reginald receives a strange email
from his deceased colleague’s email address, no less. Startled, he opens the
message. It simply states: “Meet me at Hyde Park at seven o’clock tonight.
I’ll be by the Wellington Arch. Don’t tell anyone!”
2. Refusal of the Call
it’s not easy to jump head first into adventure. hesitation is part of both human nature and the hero’s journey.
Being very nervous, Reginald darts his eyes across the office premises.
Everything seems business as usual. This has to be a sick joke, he mutters
to himself. Reginald ponders whether he should report the strange email
or just delete it. He decides to keep browsing the Internet and pretending
to be working until quitting time.
Chapter 1 StorieS and how to Craft them

14
3. Supernatural Aid
in this stage of the journey, the protagonist seeks out a sage-like figure and possibly gains a special item or skill in the process.
Evening falls. Before clocking off, Reginald decides to investigate the origins of
the mysterious email with some outside help. He calls the office tech support
person who is an elderly gentleman by the name of Royston Honeybun.Royston tells Reginald there is no technical flaw behind the email – it’s
genuine. However, if Reginald plans to visit Hyde Park at seven o’clock,
Royston says he should pick up a certain item: an old cell phone from one
of the office drawers, for secure communication, he’s told. Reginald heeds
this advice and picks up the phone which was indeed located at a rather
obscure location. It’s really quite old, looking like it dates back to the 1980s.
4. Crossing the Threshold
there’s no going back to the ordinary world now.
It’s five past six o’clock. It’s still not too late to reach Hyde Park in time.
Reginald decides to go for it, come heck or high water. He puts the old
phone into his briefcase and leaves. Reginald exits the office feeling rather
nervous and unsure of what is waiting for him. But there’s no turning back
now. He’ll take his chances.
5. “Belly of the Whale”
now, it’s time for the first glimpses of real tribulation.
Hyde Park is just a walking distance from Reginald’s office. It’s getting
darker as he makes his way past busy Londoners. The Wellington Arch now
Chapter 1 StorieS and how to Craft them

15
looms in the distance. Eerily, it remains deserted save for our Reginald. No
one is there to greet him. Disappointed, he begins his trip home.
Strolling past his job, Reginald is flabbergasted: his office is engulfed
in flames! Maybe if he’d done some overtime instead of going to Hyde
Park, he could’ve prevented the fire. The fire brigade is on its way, but the
damage is done: months or years of work may have been destroyed for the
whole department.
Act II: Initiation 6. The Road of Trials
at this stage of the monomyth, it’s time to test our protagonist’s resolve to see what he or she is made of. the number of trials you put your hero/heroine through is, of course, up to you.
Panicking, Reginald is alarmed by the phone in his briefcase. The ancient
thing is ringing. Barely managing to answer the call, Reginald hears a
strange voice simply telling him to “Get the pink DVD under the plant and
get it out of there. You have ten minutes before it’s devoured by fire.” The
caller hangs up. What was he referring to?
It dawns to Reginald: it was about August, the prototype for the first
fully cyber-attack proof firewall to be implemented in all of Her Majesty’s
agencies later that year. No parts of it can perish. Reginald navigates
through the smoke and siren lights and manages to climb up a fire ladder
to his office while no one is watching. Clutching his briefcase to shield
from fire, he stumbles around the workplace to fetch the DVD with parts of
August on it. Using all of his willpower, Reginald manages to retrieve it and
return to ground floor, exhausted and coughing hard.
The phone in the briefcase rings again. The same voice answers.
“Well done,” it tells a startled Reginald Pennelegion, cyber security expert
extraordinaire. The voice continues: “Go home and stay there for further
instructions. Protect the disc with your life, if necessary.”
Chapter 1 StorieS and how to Craft them
16
7. The Meeting with the Goddess
this stage of the journey may or may not include a literal goddess. rather, at this point the hero or heroine is receiving aid in some form from a selfless character. it may be in the form of encouragement or advice from a romantic interest. perhaps this juncture of your story entails a set of special items. meeting the goddess deals with anything that helps your protagonist in times of stress. everyone needs a helping hand ever now and then.
The adrenaline begins to slowly wear off as Reginald paces toward his
residence. He’s about to open the apartment door when the old phone
rings again. This time, it’s a woman’s voice. “Whatever you do, don’t go
home! Leave London right now. Go as far North as you can. A train is your
best bet. I’ll call again. Go! And don’t lose the disc!”
Reginald ponders for a few seconds. He begins to hear a strange
humming noise coming from his flat. Putting his ear against the door, the
noise gets louder. He never leaves his appliances running. Something is
up. Reginald decides to heed the girl’s advice and leave. Running down the
street toward the train station, he looks back once more. A human-like figure
with unnaturally large eyes stares back. It’s dressed in light blue uniform,
briefly reminding him of a life-sized action figure of some kind. Now almost
tasting blood, Reginald dashes away from the sight as fast as he can.
8. Woman as Temptress
the eighth stage in the hero’s journey consists of some kind of distraction that seeks to derail your protagonist. it doesn’t have to be necessarily a temptress or any variety of the femme fatale
Chapter 1 StorieS and how to Craft them

17
(i.e., the seductive man-eater). it can be an activity, a proposition of some kind, that offers a way out of the whole saga. it is perhaps the very last chance to return to the former life for your protagonist.
After running what felt like a marathon, Reginald reaches Euston train
station, panting heavily. No one seems to have been following him.
He remembers the woman’s advice and looks for the next northbound
train. One leaves to Nottingham in 15 minutes. That’s north enough,
Reginald says to himself. He buys a ticket and prepares to board the train.
“Excuse me!” he suddenly hears. Out of nowhere, a dark-haired woman
dashes in front of him, blocking entrance to the train. “Is this the train to
Nottingham?” She gives a wide smile.
Reginald notices the woman has a name tag with his work logo on
it. But the way she appeared out of nowhere makes her suspect. He
confirms this is the correct train and pushes past her. Reginald finds his
seat and soon the train starts its trek. The woman sits opposite to him and
introduces herself “I’m Claire. We work at the same firm, I think. I’m in the
cyber-securities department.” Reginald reluctantly introduces himself and
gazes out of the window, watching London disappear little by little.
Noticing Reginald’s lack of enthusiasm for pleasantries, Claire dons
a pair of headphones and closes her eyes. Reginald is pleased there’s no
more small talk to interrupt his flow of thoughts. He’s pondering on his
next move. Where is he supposed to go after he arrives in Nottingham?
Reginald has no idea, but it was the advice he was given. Pulling out her
headphones, Claire suddenly offers a drink from a hip flask. “You know,
to pass the time with an esteemed colleague?” Reginald declines. “Suit
yourself,” Claire says taking a long sip from her flask.
Passing rows of drowsy commuters, a bald man in blue farmer’s
overalls approaches Reginald and Claire. He seems out of place and
somewhat strange in his mannerisms. He triggers something in Reginald,
who instinctively moves toward the corridor. Claire glances over and nods
at the strange man. Reginald begins pacing down the train corridor to the
Chapter 1 StorieS and how to Craft them

18
opposite direction. The bald man follows. Reginald is being chased. He
finds his way into a toilet and locks the door. Loud knocks sound off in his
eardrums. He’s trapped.
9. Atonement with the Father
during this dramatic stage, the protagonist makes peace with whomever holds most power in his or her journey. he or she reconciles with a mentor. this may or may not be an older male figure.
Reginald had intuitively held on to his briefcase with the phone still in it.
He switches it on, still not fully knowing how it works. After a few beeps,
it automatically connects to someone: it’s the woman who told him to go
north. “You’re on your way. Good. Are they after you?” she asks. Reginald
shares his predicament over the phone. “Just wait. Stay put. They’re not
authorized to use full force. Just wait. Then I need you to leave the train at
the next stop. Do you hear me?” The woman hangs up. Puzzled, Reginald
does what he’s told. The knocking continues for another 5 minutes or so
then abruptly stops.
Reginald opens the toilet door warily; there’s no one behind it. Claire
is gone as is the bald man. Reginald hears an announcement: next stop
Bedford. He was told to leave so he positions himself near the train doors,
ready to dash out. As soon as the train stops, Reginald is out on the streets,
looking over his shoulder. No one seems to be following him.
Only a mere minute into the crowds, Reginald is grabbed by the arm. “I
think we should find a quieter venue to talk,” a vaguely familiar voice tells
him. It’s Royston Honeybun from tech support. “I sent you the email in
your friend’s name. Sorry about that. I had to get you out of there,” he says.
The two find a free park bench, and Mr. Honeybun briefs Reginald on the
situation at hand. The upcoming government firewall, August, is designed
to be perfect. But Reginald made it too perfect. A Faction of the government
needs backdoors in it, vulnerabilities which can be utilized at their will.
Chapter 1 StorieS and how to Craft them
19
Now they want Reginald to undo some of his own work. Their people
couldn’t figure out how to decrypt these key parts of the code. Reginald
must give them these backdoors at any cost. These people are very
adamant about it. Thing is, this Faction is not on the people’s side. Reginald
is told to wait for a call. It’ll be Raine, he spoke with her on the train. Stay
put and god save the Queen, Mr. Honeybun says and disappears into the
night. “Don’t lose the phone. It’s the only one they can’t eavesdrop on,”
Mr. Honeybun informs Reginald. Our befuddled protagonist stays behind
on the park bench, digesting everything he was just told.
10. Apotheosis (Becoming Divine)
not necessarily having anything to do with divinity or magic, apotheosis refers to the stage where the protagonist achieves greater wisdom and/or resources, making the rest of the journey safer.
Only a mere minute or so later, the old mobile phone rings. “Raine?”
Reginald utters, answering the call. “You met with Honeybun. Good. Yes,
it’s me, Raine,” a female voice explains. She tells Reginald he must ditch
the phone as its being tracked by “them”: its signal encryption will be
compromised shortly. Raine also tells him if the “overalls man” finds him
now, it’s not just over for him: the entirety of Britain and later the rest of
Europe are in jeopardy.
Reginald is given a new set of coordinates and told he’s guaranteed
complete safety in this new location. The Faction can’t ever find him there.
Reginald drops the phone and embarks on the trip right away. A rather
complicated 3-day journey on trains, ferries, and fishing boats eventually
take him to Bouvet Island, Norway, the most remote island on the planet.
A human figure welcomes Reginald as he makes landfall in a blizzard.
Taking off his goggles, the host become recognizable: it’s Mervyn Popplewell,
Reginald’s supposedly dead former colleague. He shakes Reginald’s gloved
hand and says “Welcome to Bouvet Island, or limbo as I call it!”
Chapter 1 StorieS and how to Craft them

20
11. The Ultimate Boon (Reaching the Quest’s Goal)
at this stage the protagonist reaches his or her goal, which may be the acquisition of a special item or the completion of a specific task. however, the story doesn’t end here: he or she still needs to get back safely to the ordinary world.
After being escorted into a four-room underground bunker structure,
Mervyn informs Reginald he had to disappear from the world to be able
to complete his task, which he did. True government assigned him with
the duty of coming up with the means of fighting the Faction one on one.
“See, they’re not exactly human,” Mervyn says and continues, “They’re
semi-autonomous beings made from artificial flesh, controlled by other
beings – from a different galaxy.” Reginald finds it hard to believe, but
humors his resurrected former colleague anyway, who goes on to say:
“Faction members would pass any medical you and I would. They’re
indistinguishable from human beings with two exceptions: first, they
are completely impervious to heat and fire. Second, they don’t need to
breathe. They simply don’t need oxygen to function.”
Reginald is briefed he has a different, equally important task. He must
make sure the Faction never gets the backdoors they want in August,
the Britain-wide firewall-to-be. If they get them, they can infuse pretty
much every electronic device with malicious code that will render the
entire country vulnerable for manipulation and attack, shutting down
communications and wiping out or modifying crucial databases. This
attack is to take place almost immediately after the electronic takeover,
within 5–10 minutes to be exact. After that the Faction would move on to
other parts of Europe and finally the rest of the world.
As long as Reginald is on Bouvet Island, he’s unreachable by any
hostile forces. They don’t apparently have a plan B, according to British
intelligence. “You’re here to make August invulnerable. You must make
Chapter 1 StorieS and how to Craft them

21
modifications so after implementing them, not even you can undo them,”
Mervyn explains and continues, “You do have the pink DVD, don’t you?” to
which Reginald responds by taking the disc out of his briefcase. It contains
instructions how to create said modifications and also perfect plausible
deniability, a fail-safe system should August fall in the wrong hands. The
disc is classified far beyond “top secret.” To think it was kept under an
office plant, Reginald wonders. “Alright, let’s get to work,” Mervyn says,
“It shouldn’t take more than a couple of weeks. And remember, if you tell
anyone, well, make sure you don’t. Your country depends on it.”
In its current state, August is the biggest liability to world peace there
is. After all he’s been through, Reginald complies and starts studying the
techniques immediately the very same night. Astoundingly, he completes
the task by the next morning. August is no longer modifiable by anyone,
not even Reginald. All future backdoors have been made impossible to
implement and Reginald now knows how to create complete plausible
deniability even if captured (and tortured) by enemy agents. He is about
to submit the modifications to the firewall to the State Department from
Mervyn’s beat-up laptop computer with the slowest Internet connection
he’s ever experienced. It’s the northern lights, Mervyn explains. Ionic
activity slows down online business over here. Finally, Reginald presses
“Send.” Well done, Mervyn says. “August is carved in stone now, mate,” he
says while putting the pink DVD through a top-of-the-range shredding
machine, turning it into nothing but a pile of dust.
Act III: Return 12. Refusal of the Return
after all the adventures a protagonist has experienced, getting back to the ordinary world may not be so appealing. the 12th stage deals with this crisis.
Chapter 1 StorieS and how to Craft them

22
After a mere 2 days in the bunker, it begins to feel a second home to
Reginald. The outside world is dangerous, unpredictable. Food delivery
is provided weekly to the island by the British government, including
items like caviar, avocado with shrimp, and Belgian waffles. Reginald has
completed his task, going well beyond the call of duty as a mere cyber
security expert. A solitary man, he simply has nothing to go back to.
On the third day in the bunker, after filling in the blanks of their personal
lives, Mervyn tells he’s going back to England. A ferry is to pick him up some
hours later. After that he’ll work undercover for the government, dealing
with the Faction whenever one of their agents may appear. “They’re fairly
easy to spot, especially during the summer months,” Mervyn quips. “You’re
free to stay behind, but are you sure you wouldn’t want to come along?”
Mervyn presents one last time. Reginald declines politely. The time comes
for the two to depart. The former colleagues and current special agents
shake hands in the cold Norwegian winds. Mervyn disappears behind the
horizon and Reginald goes back to his new home, the four-room bunker.
The government has promised to install the latest and greatest
electronics to their base in Bouvet Island. Reginald feels resigned, but
content. He made a difference in the world, after all. Although completely
isolated, Reginald doesn’t miss anyone or anything. This freezing limbo,
as Mervyn called it, is a little arctic paradise. Reginald looks up to the sky.
Bright blue and green northern lights brighten up the skies. He’d forgotten
such a sight existed anywhere on the planet. Reginald is at peace. He’s
found home.
13. The Magical Flight
not usually taken literally, the magical flight refers to the troubles that await your protagonist as he or she flees from the extraordinary world. typically it’s a fight or flight situation, a tough one, where the hero must muster all available strength to survive.
Chapter 1 StorieS and how to Craft them

23
During his third day on the island, Reginald is startled by a noise. At
first it seemed to be coming somewhere inside the bunker, but it soon
became clear it’s originating from the surrounding sea. Reginald can’t
pinpoint its exact location, but it seems to be getting louder. He hurriedly
puts on his winter kit and goes outside to investigate. Reginald pinpoints
the source of the noise and associates it with a small orange dot in the
horizon. It’s obviously a boat of some sorts, slowly making its way toward
Bouvet Island, which was supposed to be the safest location on Earth for
Reginald and friends. If the craft’s crew is hostile, clearly the perimeter
has been breached.
Reginald flounders back to the bunker, locking up the doors carefully.
There don’t seem to be any tools for self-defense in it. The noise outside
is getting stronger. Reginald remembers what Raine told him: members of
Faction are impervious to heat. Perhaps they’re unusually sensitive to cold.
Reginald searches the entire bunker for any cutting tools. Apart from a few
dull dining knives, he comes up short. Outside, the orange dot has turned
into some kind of amphibious craft, gliding over the icy sea with ease.
The craft makes contact with terra firma, then parking itself some
hundred yards from the bunker. Reginald can do little else but observe
through the fortified bunker windows. After a few minutes of nothing but
howling wind, a somewhat petite female form leaves the craft and strolls
toward Reginald’s residence. She wears thick black rimmed glasses and a
dark blue winter jacket. There’s a knock on the entrance. “Reginald, it’s me,
Raine,” she informs and continues, “We must leave now.”
Reginald hesitantly opens the bunker door and steps outside. Raine
offers him a firm handshake and tells him there’s no time to explain.
“If you choose to stay, you may have a hard time fending them off,” she
says. Apparently the Faction boys have made landfall, too. Reginald and
Raine hurry over to the hovercraft, manned by two other agents of the
British government. There’s no sight of any antagonists yet. Now aboard
the craft and scurrying across the waves, Reginald and Raine notice a
second hovercraft emerging from the mist. “It’s them,” Raine tells Reginald.
Chapter 1 StorieS and how to Craft them

24
The black Faction craft is soon on the starboard side of Raine and Reginald
with more than a dozen of their stocky troopers aboard, wearing thick
layers of arctic clothing and military boots. Their black hovercraft mirrors
the course of that of Raine’s and soon begins to dash against it. Several of
the agents pounce and hold on to Raine’s craft, a few even managing to
climb aboard. She yells to Reginald: “Kick them off!” They start stomping
onto the antagonist agents slowing them down. However, none of them fall
to the icy water, instead making their way on to deck of Raine’s hovercraft.
She and Reginald back off inside the craft canopy as it gets overrun.
“We’re losing her!” the captain of the vessel says as the heavily
reinforced cabin door begins to come off its hinges. The antagonists clearly
possess extraordinary strength. “Where are your guns?” Reginald yells
in desperation. Raine tells they aren’t issued any. They wouldn’t do any
good if they did. “Get knives and stabbing weapons! Tear off their uniforms
and expose them to the cold! Open all hatches!” Raine orders the crew.
Reginald, along with one of the crew members, scrambles to find any self-
defense tools inside the hovercraft storage spaces. At that very moment,
the cabin door falls to the floor. At least half a dozen antagonists are about
to storm in.
14. Rescue from Without
often the stresses of a grand adventure take their toll on even the most heroic of protagonists. in the 14th stage, he or she receives assistance from a powerful ally.
At the exact moment the cabin is rushed by Faction forces, a new sharp
noise is introduced into the already intense cacophony. A stream of
water begins to flood the hovercraft cabin from the skies. It’s much more
intense than sea spray or rain. Reginald identifies the emerging sound
as a helicopter. “It’s Roy,” Raine yells and continues, “It has to be him!”
The antagonists begin to retreat and leap back onto their vessel. One of
Chapter 1 StorieS and how to Craft them

25
them is seen tearing off his winter uniform, making wretched noises while
being pulled inside the antagonist craft by the others. A few of the Faction
troopers fall into the ocean. Noticing this, Raine says: “Don’t worry Reg.
They can’t swim but they don’t need air to breathe. Just a longer walk
home for those two!” The hostile craft breaks off its course and heads off
somewhere beyond the horizon.
Now free of imminent threats, the helicopter hovers low, and it is
indeed Royston Honeybun at the helm. He waves toward a specific
direction. The captain of the hovercraft nods, and they both begin
advancing toward this destination. “I believe Roy just flushed out all of the
dirt,” Raine says. Royston’s voice starts crackling from the vessel’s radio:
“Not bad for an old office geek, eh? Follow me.” The hovercraft makes
landfall somewhere in the coast of Norway. An unremarkable car awaits
Reginald, Raine, and Royston. “There’s a private jet waiting for us at Oslo
Airport. Let’s get going,” Royston says, opening a passenger door.
After a long drive, the three enter the airport through an unusual
route, far from where any typical passengers would be entering the area.
A rather run-down jet awaits the group on a runway. Immediately after our
protagonists are done settling in their seats, the plane begins its takeoff.
“You may have not had the time to read the news,” Royston says, offering
Reginald a tablet computer. A headline startles him: “Buckingham Palace
and Number Ten on lockdown.” In an act of desperation and true to
their nature, Faction has decided to put Britain in a chokehold by taking
over the two main government bodies. “Their demands? The full source
code to August. And you with it, Reginald,” Royston explains. “They have
guaranteed you safety and we believe them. But only to an extent,” Royston
continues.
The team arrives in London after another long drive, this time from
Heathrow. “We have snipers all over the place,” Royston says. “Although
set back, the Faction isn’t powerless yet. And whatever happens, they have
their patsies ready for the media to blame it all on.” “And Her Majesty?”
Reginald asks and is told she and the rest of the Royal Family have been
Chapter 1 StorieS and how to Craft them

26
taken into a safe environment. However, the prime minister is still missing.
The public will be kept unaware of this fact for obvious reasons.
Reginald is told he needs to go the meeting area alone and reminded
of the numerous SAS snipers in the area. The Faction managed to enter
Buckingham Palace which has its surrounding areas sealed off from
the public for now. “One more thing,” Raine says. “We have numerous
reports of masses of varying sizes becoming dislodged in the bottom of
Windermere, Llyn Tegid, and Loch Ness. This probably has something to
do with the proceedings at hand. I thought you’d like to know, Reginald.”
“Your opponents number in the tens of thousands, Reggy boy,”
Royston says and continues, “But we still have upper hand, believe it or
not. We still got you. Good luck!” Reginald begins his stroll toward the
main entrance of Buckingham Palace. “Wait!” Raine yells, “I’ll join you.”
15. The Crossing of the Return Threshold
this stage deals with the challenges related to the integration of new skills and wisdom in the ordinary world. it may or may not include a duel with a powerful opponent with the protagonist using all his or her newly gained powers to their very fullest.
A duo of Faction operatives open the doors to Buckingham Palace. Raine
and Reginald are kept a careful eye on as they enter the premises after
being searched for weapons of any kind. Inside, an absolute silence makes
every footstep sound like a hundred decibels. Our friends are escorted into
the Throne Room, where two familiar faces await them: it’s Claire from
the train and her bodyguard, the overalls man. “Welcome to the palace,
friends,” Claire says, “Would you like some refreshments?” Reginald
declines her offer. “Very well, we’re all on a tight schedule I believe,” she
responds coldly and waves them to take seats opposite to her.
Raine and Reginald take their seats under the stern, cold eyes of the
overalls man. Claire informs them the Faction still wants the code for the
Chapter 1 StorieS and how to Craft them

27
backdoor to August. It would take approximately seven decades using
current government devices to access that part of the firewall. The Faction
could decrypt it with their technology so that after a year or two they
would have full access. But time is of the essence for them. “As it is for
you as well, my friends,” Claire says and continues, “Failure to do so will
result in two things: the execution of your prime minister and a massive
electromagnetic pulse which will cripple not only your capital city, but the
entirety of your country.”
The overalls man gives Reginald a tablet computer. “Do the right thing,
Reginald darling,” Claire says, joining him behind the tablet. Reginald
inserts the key codes necessary to access August the firewall. He activates
the system with all of the requested backdoors open – or so it seems. “Very
good, Mr. Pennelegion,” Claire says with a smile, grabbing the tablet from
Reginald and handing it over to the overalls man.
The Faction shouldn’t notice anything until about 5–10 minutes in. For
all intents and purposes, their plan is at work. “You’re staying with us until
we have confirmation. It shouldn’t take more than, say, 5–10 minutes. After
that, you’ll get the coordinates to your precious prime minister and you’re
free to leave,” Claire informs. The overalls man keeps his eyes on the tablet,
paying no mind to any other proceedings at hand.
Time passes slowly with Claire eyeing Reginald and Raine. Eventually,
the overalls man nods to Claire who in turn seems to become more at ease.
“Excellent. We have a deal. The coordinates are now being transferred
into your tablet,” she says and continues, “You’re free to leave.” Reginald
leaves the Throne Room with Raine under the watchful eyes of the Faction
troopers, now lining up the corridors en masse. Walking slowly toward the
front doors, Raine notices something in the corner of her eye: one of the
guards is having difficulty maintaining his balance. Soon, a few more seem
to lose composure and stagger. The air turns freezing cold. Raine whispers
to Reginald: “Do you feel that? That’s our cue to run.” A few remaining
guards attempt to go after our duo, but instead fall flat on the floor. Now
outside, shots are fired. It’s the government snipers at work. “We fumigated
Chapter 1 StorieS and how to Craft them

28
the palace air conditioning with our special blend: iodine and liquid
nitrogen mist. Their Achilles’s heel, Reg,” Raine says and adds, “An SAS
team is on its way to get our prime minister. We expect him back in less
than an hour.”
16. Master of Two Worlds
at this stage the protagonist becomes comfortable with both the ordinary world and the extraordinary one, being no longer puzzled by the unusual events that just unfolded. a sense of calm confidence awakens in the hero/heroine.
Told to take a few days off, Reginald manages to enter his home without
any hassle. Gone are the strange sounds and uninvited guests. He was
briefed 90% of at-large Faction troops have been defeated. The remaining
10% is heading back to their abode in the deepest depths of the lakes and
oceans. August the firewall is fully functional and running without any
backdoors.
Reginald inspects the ancient mobile phone he once used. He feels
an odd attachment to it and the mystery it once held. Reginald was also
briefed this wasn’t the last attempt of invasion by Faction. It wasn’t even
the first. They surface once every 20 years or so, getting progressively more
and more furious in their plans for world domination.
17. Freedom to Live
Basically, at the last stage the protagonist comes to full terms with mortality. he or she isn’t troubled by past mistakes or future threats, instead choosing to live in the present moment only. a fearlessness sets in.
Chapter 1 StorieS and how to Craft them
29
Returning to work, Reginald is greeted by renovators working on the
fire-damaged office. New computers and desks have already been
carried in. As per his usual daily tasks, he supervises the operation of
August, and all logs appear to show only everyday Internet activities.
Suddenly Royston shows up. It’s his last day at work and then it’s off to
start living those pensioner’s golden years. He asks our protagonist: “Reg,
old friend, how would you like to work in tech support?” Being startled by
the suggestion of a more menial position, Reginald reads between the lines
and agrees to move his post. Before moving on to a more secluded part
of the building, he takes one last look at the ancient mobile phone before
storing it in a very special filing cabinet, ready for use.
The EndThe synopsis for Taking Back August is but one example on how to
use the monomyth outlined by Joseph Campbell. Again, several works in
popular culture, including video games, have incorporated this approach
successfully to entice and excite the masses. While not a necessary tool
by any means, perhaps the structure of the monomyth triggers something
primordial in all of us, like it did for the ancient Greeks and Romans.
The 12 Character ArchetypesThe founder of analytical psychology, Carl Jung (1875–1961), inspired
Joseph Campbell and popularized the notion that there have been
basically 12 archetypes of characters present in storytelling ever since the
dawn of time. These archetypes have appeared in Aristotle’s peers’ work,
Shakespeare’s plays, and they continue to thrive in modern video games.
Understanding and consciously using archetypes helps you get a hold on
the dramatic arcs in your visual novels. They simply make your story more
relatable.
Consistency is important in any work of drama, including interactive
fiction. A character who fluctuates irrationally between different
Chapter 1 StorieS and how to Craft them

30
approaches and archetypes is annoying at best. Interesting characters
usually have traits from several different archetypes, but a single core
function. Although some form of transformation may take place within
a character’s psyche, especially in the case of the leading hero, the core
identity rarely changes.
All archetypes have a positive and a negative variety. There’s the
hero, a brave individual with sound morals. Then there’s the anti-hero, a
flawed person who barely manages to complete his or her adventures in a
satisfactory manner, possibly wrecking quite a few lives in the process.
1. The HeroThe hero is the main protagonist in any saga. He or she faces often
seemingly unsurmountable challenges, embarks on a fantastic journey,
experiences loss, and returns to his or her tribe a wiser person.
Examples: Arthur Dent from The Hitchhiker’s Guide
to the Galaxy by Infocom, Phoenix Wright from
Phoenix Wright: Ace Attorney by Capcom, Reginald
Pennelegion from Taking Back August by Robert
Ciesla, and Luke Skywalker from Star Wars
2. John/Jane DoeHe or she is the average citizen who just wants to belong. Not a risk-
taker, he or she plays it safe most of the time. A relatable, but sometimes
unremarkable, individual who goes with the flow and may be used to
embody apathy and collectivism.
Examples: The Woodcutter and his wife in King’s
Quest: A Quest for the Throne by Activision and
Uncle Owen and Aunt Beru from Star Wars
Chapter 1 StorieS and how to Craft them

31
3. The RebelWhether cast in an antagonist’s or a good guy’s role, the rebel makes his
own rules. He can be destructive if his demands aren’t met. The rebel is
prepared to go to any length to attain the goals at hand. He is tempted and
often succumbs to the dark side of morality.
Examples: Miles Edgeworth from Phoenix Wright:
Ace Attorney by Capcom and Han Solo from Star
Wars
4. The JokerThe joker is often a somewhat passive character, not contributing that
much to the most dramatic parts of the story. His or her mission is rather to
provide levity and elevate the mood of both the protagonist and the reader
amidst turbulent times.
Examples: Zaphod Beeblebrox from The Hitchhiker’s
Guide to the Galaxy by Infocom, Kano Kirishima
from Air by Key, Jack Dalton from MacGyver, and
Krusty the Clown from The Simpsons
5. The RulerA ruler can be either benevolent or a tyrant. He or she is usually the main
villain or the gray eminence in works of drama, working behind the scenes
and manipulating others.
Examples: The Wizard of Frobozz from Zork II by
Infocom, Vogon Jeltz from The Hitchhiker’s Guide
to the Galaxy by Infocom, and Dick Jones from
Robocop
Chapter 1 StorieS and how to Craft them

32
6. The SageA sage is the wise old person present in many sagas. He or she has a
hunger for the truth and can offer words of wisdom to the protagonist at a
time of need. Sages value knowledge over most other things in life, often
leading a life of solitude reading or writing books.
Examples: Ochimusha Master from _Summer
by Hooksoft, Mishio Amano from Kanon by Key,
Royston Honeybun from Taking Back August by
Robert Ciesla, and Lisa Simpson from The Simpsons
7. The MagicianAn archetype similar to the sage, a magician is different in his or her
approach to knowledge. Instead of merely learning theory, the magician is
keen to apply it. He or she wants to understand and transform the world.
In their negative pole, magicians can be very destructive. A magician’s
hunger for power can turn out to be his or her downfall.
Examples: The Dungeon Master from Zork III by
Infocom, Krill from Enchanter by Infocom, and
Dr. Emmett “Doc” Brown from Back to the Future
8. The CreatorOften an innovative scientist or a prolific artist, a creator has a one-track
mind for his or her craft. Creators are committed and often borderline
fanatic about their interest, whether it be art or some branch of science.
Example: Dr. Roach from Fish! by Magnetic Scrolls,
Dr. Abraham Perelman from A Mind Forever
Voyaging by Infocom, and Dr. Noonian Soong from
Star Trek: The Next Generation
Chapter 1 StorieS and how to Craft them

33
9. The LoverUsually the main love interest of the hero, a lover is there to provide
more or less unconditional emotional support. Not limited to a romantic
capacity, this archetype is generally interested in maintaining peace and
harmony between all, whenever possible.
Examples: Trillian from The Hitchhiker’s Guide
to the Galaxy by Infocom, Wakana Shimazu from
_Summer by Hooksoft, Raine from Taking Back
August by Robert Ciesla, and Juliet from Romeo and
Juliet by Shakespeare
10. The Innocent OneProviding support and a moral compass, the innocent ones can be gullible,
but come with a heart of gold. Probably the most selfless of all archetypes,
an innocent one may go so far as to self-sacrifice for a greater cause.
Examples: Floyd the robot in Planetfall by Infocom,
Hyun-ae an artificial intelligence from Analogue: A
Hate Story by Christine Love, and Rebecca “Newt”
Jorden from Aliens
11. The ExplorerExplorers are on a lifelong quest for independence. They strive to be
self-sufficient and adventurous, getting bored easily. Explorers gave us
new continents and planets to colonize. Their drive for expansion of our
awareness benefits us all. However, they might find themselves, and their
companions, in dire situations due to their recklessness.
Chapter 1 StorieS and how to Craft them

34
Examples: Ford Prefect from The Hitchhiker’s Guide
to the Galaxy by Infocom, Mervyn Popplewell from
Taking Back August by Robert Ciesla, and Indiana
Jones from Indiana Jones
12. The HealerEmpathetic and altruistic, healers express themselves by helping others.
They get pleasure in their ability to mend hearts and fix things. However,
healers are known to enable negative behaviors in others as their highest
priority is to alleviate suffering. As a result, some healers may become
bitter if they find out they have been used one time too many.
Examples: Yumemi Hoshino from Planetarian:
The Reverie of a Little Planet by Key and Dr. Frasier
Crane from Cheers and Frasier
Ten Visual Novel Good PracticesAlthough this book offers a comprehensive look at various types of text-
based games, the star of the show (and the financially most viable option
in 2019 and beyond) is the modern-era visual novel. Writing in this genre
benefits from certain practices that have provided useful for presenting
visual novels over the decades. We’ll now take a look at some of these most
crucial writing techniques. Of course, you’re free to use these tips only to
the extent you desire.
1. Put the Story FirstAs previously stated in this chapter, a good synopsis is a great idea before
embarking on any technical matters when it comes to the visual novel.
It’s a roadmap that aids you (or your team) in creating a consistent piece
Chapter 1 StorieS and how to Craft them

35
of interactive art. It pays to work your way through tutorials at first, yes,
but resist the temptation to jump right in when it comes to your first
serious project.
2. Choose the Engine CarefullyThe game-making scene in 2019 is vibrant and full of great products, all
more or less in direct competition with one another. Naturally, many of
them are genre-specific, and as the title of this book so boldly reveals,
some are catered for the visual novel enthusiasts. However, not all game
engines may be suitable for your skill level, project, or the way you prefer to
work. Study these engines before starting work on your visual novel: what
does it offer? Is it what your game works best with?
In this era of game-making tools, it’s mostly unnecessary to invest time
in getting to know the inner workings of a general-purpose programming
language, such as C++, if your goal is to produce a visual novel. However,
a working knowledge on the basics of programming can’t hurt and are
actually beneficial regardless of the tools you decide to use.
3. Don’t Overlook the AudiovisualsCharacter graphics, backgrounds, and music are very important
atmosphere builders in visual novels, too. Put focus on them. If you’re
unsure of your own ability to create commercially viable audiovisual
assets, hire and/or befriend someone who isn’t. It’s better to have no
visuals than amateurish or stock library graphics. Musical cues, too,
enhance your game and can signal important events to the players.
Be careful with recording your own voice acting. If it’s done poorly, it
will reflect very badly on the rest of your game, no matter how great it is in
other departments. It’s best to use professional voice actors or none at all
in your visual novels.
Chapter 1 StorieS and how to Craft them

36
And although they may seem superfluous, special effects such as
transitions can add that extra layer of polish to your products. Don’t overdo
them, but consider experimenting with every technique your chosen game
engine provides to fade-in and fade-out and add glitter to your games.
4. Make Your Characters GrowChange is generally considered fascinating in any variety of drama. A
protagonist or other character who starts off as a, say, timid high school
nerd and at the end of the game is still a timid high school nerd may not
excite your potential customers much. The most relevant characters in
your story should have an arc comprising taking on challenges and gaining
wisdom in the process. Give your characters goals, challenges, and rewards.
5. Honor the Sub-genre of Your Visual NovelPlayers usually have certain expectations when they’re choosing to play
a specific visual novel. This can range from expecting erotic content if the
title of a game suggests it to maintaining the key elements of a dating sim
throughout a game. Sudden genre skipping may frustrate gamers to the
point of not wanting to spend time on your products anymore. Decide
early on what the genre of your visual novel is, and commit to it. You can
experiment with other genres later on in your career, after all.
6. Use Clichés WiselyMost of the creativity in the game industry is in the visual novel. However,
in an era of thousands of visual novels for all major platforms, clichés
spread fast and only get you so far. There’s very little market for yet another
time loop (i.e., the movie Groundhog Day) or a sickly girl scenario – unless
you manage to be exceptionally gifted in its making.
Chapter 1 StorieS and how to Craft them

37
Being unique in your premises, characters, and approaches gets you
noticed, especially if you’re trying to break into the market. Think Doki Doki
Literature Club! by Team Salvato with its sinister inner workings (completely
in contrast with the cute characters) or Open Sorcery by Open Sorcery
Games which so eloquently conveys the inner world of a firewall program.
Then again, certain types of visual novels thrive on well-worn tropes
and clichés. They are to be expected in dating sims, for one; it may be hard
to imagine one without love meters and/or a limited in-game time frame
to work with. These and many other tropes will be looked into in detail in
Chapter 3 of this book.
7. Trim Unnecessary ElementsDon’t bring in a pizza delivery guy unless he has a more profound meaning
than providing your protagonists with low-grade sustenance. Maybe he’s
an awkward ex of your protagonist? Maybe “he did it”? Who knows, but
everything and everybody should have actual meaning within the confines
of your game’s universe. Don’t include superfluous items or settings either.
They only confuse and frustrate your audience.
Chekhov’s Gun is a classic dramatic principle which states that all
elements included in a story must be necessary to it. The principle takes
its name from Anton Chekhov (1860–1904), a Russian playwright who
popularized the concept. First used in traditional stagecraft, it applies
perfectly to visual novels as well.
8. Bond with Your AudienceYou may or may not choose an exotic locale for your game, such as a space
station, an alternate dimension, or a universe where vegan hamburgers
eat people. That’s all well and good, but no matter how otherworldly your
games get, you should strive to focus on a degree of relatability in your
characters and their challenges.
Chapter 1 StorieS and how to Craft them

38
Psychedelia is fun, but excessive tripping doesn’t usually work in a
video game context. Common human goals and motivations include
acceptance, vengeance, healing, forgiveness, self-discovery, and sharing.
Incorporate some of those in your characters to guarantee at least a degree
of bonding with your audience. The goal of “eating a human” while being a
vegan hamburger in and of itself may not be enough to achieve rapport.
9. Only Provide the Endings Your Story NeedsVisual novels are known for their multiple endings. And that’s all well and
good. These do provide longevity and replayability, after all. Of course,
you may be interested in creating a game with exactly one ending, that
is, a linear visual novel, such as most titles in the popular Ace Attorney
franchise. But in most cases, instead of focusing on the amount of endings,
spend your time on their quality. A couple of startling, dramatic endings is
better than a dozen strange and out-of-place ones.
10. Indulge in Forced Reading SparinglyForced reading refers to unskippable dialogue. It can create suspense
and enhance the dramatic proceedings – if done sparingly. It can be a
frustrating experience for your customers if done to an unnecessary extent.
Most text should be skippable in a visual novel. At the very least, make sure
you allow for personalized adjustments on how promptly the text appears
onscreen – most tools, such as Ren’Py, have that functionality built in.
Forced reading may work best during the final stages of your adventure or
during exceptionally dramatic scenes.
Chapter 1 StorieS and how to Craft them

39
Working for the Visual Novel IndustryThe writing creates the novel, visual or traditional. But usually there’s more
to it than that. Whether you’re working as a solitary developer or a part of a
team, it’s important to understand all of the fields involved in the genre of
visual novel and how they relate to the role of the writer.
Also, the more skills you acquire as a developer, the more valuable
you become to any industry as a whole. Although many visual novels are
indeed creations of the one-person “team,” there are many opportunities
in an industry of great size. You may not have to create a single visual novel
from top to bottom to become an asset to this business.
Now we’ll take a closer look at some of the specific fields within the
visual novel industry and how the art of writing applies to them.
Visuals and AnimationAlthough visuals don’t make the visual novel, they are obviously an
important factor in whether a game is a success or not (see Figure 1-5).
In this genre, graphical assets can be divided roughly into backgrounds
and characters (also referred to as character sprites). Often the neglected
asset, background graphics can enhance a game’s atmosphere. They can
be either photographic, drawings-based, computer generated, or any
combination of these.
Chapter 1 StorieS and how to Craft them

40
Character sprites are often the stars of a visual novel. They need to
be expressive enough to convey many degrees of emotion and lure the
player into the game’s universe. In rare cases, a contrast between chirpy
audiovisuals and some dark writing creates a shock effect, as is the case
with the 2017 hit game Doki Doki Literature Club! (see Chapter 3). Most
of the time, however, the style in which the visuals are created should
embody the spirit of the writing for maximum emotional impact. If you
have outsourced the production of your game’s visuals, you should have
as many meetings as are needed to hone in on the exact look you feel your
game needs to succeed.
Developers, especially at the earlier stages of their careers, are pretty
much starved for high-quality character graphics. They can make or break
a game, after all, regardless of the writing. Having talent as a visual artist in
any medium offers many opportunities to get your foot in the door.
Figure 1-5. SC2VN by Team Eleven features both impressive characters and backgrounds
Chapter 1 StorieS and how to Craft them

41
Audio Production and Voice ActingEver since CD-based storage became mainstream in the mid-1990s, visual
novels have been known to extensively incorporate speech. A writer
choosing to use voice acting in his or her games must know exactly all the
abilities and limitations the voice acting cast possesses. After the initial
meetings, get to know the people behind the voices as well as you can.
While no truly convincing music generator software exists as of 2019,
licensing options are plentiful. There’s several services offering game
soundtracks for free or for a nominal fee. Also, some creators of visual
novels have either an in-house composer or are themselves semi-pro
musicians. All this means making it solely as a composer in the world of
visual novels can be tricky.
ProgrammingThe coding aspect of making a visual novel is often enmeshed with the
writing progress. However, when working in a team setting with multiple
programmers, it is often a good idea to discuss the matter of proofreading.
Some coders are fine with assessing the fluency of your writing while
working as a coder. Often the programmers work ahead of schedule
(unlike writers, whose level of inspiration can be unpredictable) making
them agreeable to this extra task, if only to pass the time.
As mentioned previously in this book, extensive knowledge of
traditional, general-purpose programming languages is no longer a
prerequisite for creating visual novels. The main programming tool
presented in this book, Ren’Py, is a specialized language for the specific
purpose of creating games in the genre. Other tools specific for this type of
software exist, too, as we’ll see later in this book.
Chapter 1 StorieS and how to Craft them

42
TestingNo game can be complete without a proper testing phase. It aims to create
an enjoyable, bug-free product, but may have little to offer when it comes
to refining the dramatic turns in visual novels – apart from the process
of proofreading. No matter how intimately a writer/developer knows his
or her game, there’s unfortunately always room for typos and/or poor
grammar.
Even if you can cope with all the other necessary areas of visual novel
development, always have someone else proofread the entirety of your
manuscript before release. As previously stated, this person may be either
a programmer or an individual specializing fully in proofreading.
LocalizationLocalization is the process of introducing a video game (or other product)
for sale in a new region. It includes not only the translation of literary
assets but also the implementation of new audio, packaging, manuals, and
making sure the product takes potential cultural sensitivities into account.
Some regions, such as the German and Chinese markets, are known to be
particularly sensitive to specific cultural references.
No longer limited to the Asian markets, visual novels are increasingly
released in numerous languages. In fact, localization has been in demand
since the early days of text-heavy video games; dozens of titles have been
translated from, for example, Japanese to English by fans of these games.
In the field of translation work, a university degree isn’t necessarily a
prerequisite, but a solid command of two or more living (and popular)
languages obviously is.
While not perhaps as media sexy as coding or audiovisual work,
localization is nonetheless an important emerging field in the business of
visual novels. Out of all the fields presented in this section, the person or
team responsible for the localization needs to be most intimately aware of
Chapter 1 StorieS and how to Craft them

43
the writing and the original writer’s intent. Crucial plot developments can
be changed or lost completely in translation. Explain the exact meanings
in your dialogue to your localization team as thoroughly as you can. After
any stretch of the work is done, consult a native speaker in the localized
language to make sure your translated story is as authentic to the original
as possible.
Musings on InspirationFinding inspiration for your work as a writer is relatively easy: live your life.
Life is guaranteed to give you every piece of inspiration you need, whatever
your external circumstances may be. The difficulty is often in choosing to
share your most intense experiences. It’s mostly these moments that give
your products substance.
Writing a successful visual novel needs emotional intensity. Don’t
hesitate to share your troubles and victories. Shape them into a more
alluring package, if you will. Change settings to something completely
exotic and far removed from your Earthly dwellings. Leave names out
or change them, but be honest with your past experiences. Perhaps
paradoxically, the more personal you get with your writing, the more
relatable and cathartic it is for the public at large. The themes that are
recurring and/or important to you are important to others, too. People
appreciate those who are forward with sharing genuine emotion, as it is a
rarity in modern society where mostly vapid entertainment prevails. Visual
novels, on the other hand, are an intimate art form. They thrive from a
creative environment where emphasis is on emotion and not some passing
fad. Like classical literature, visual novels have a potentially timeless
quality about them. The same can only be grudgingly said about most first-
person shooter games, which may simply serve to document the violent
tendencies our current civilization seems to glorify.
Chapter 1 StorieS and how to Craft them

44
Reading in general is recommended for any writer. Not in the sense of
plagiarizing others, but rather to expand one’s mental horizons. You can
gain new refreshing perspectives from the work of other writers you share
values with, and even from those you don’t. And while your fellow authors
are probably a solitary (or cliquish) bunch, try to network with them.
You may also wish to experiment with more exotic sources for
inspiration. Jot down your dreams every morning. Dig up old photographs,
either those documenting your life or perhaps those taken at some
historical event, available online or from thrift stores. Listen to new genres
of music you haven’t previously experienced. There’s also thousands of
free visual novels for you to download and play: give them a shot. Do one
or all of these things; you never know what synapses get activated in your
brain leading to sudden surges in writing acumen.
Try just observing the world around you. Use all of your senses to
register what goes on around you. Even the most mundane events can
spark inspiration. Try breaking any routines you’ve come to expect, even
when it comes to the smaller things: ride different public transportation on
your way to A to B. Ask yourself questions and let your writing answer them
without any self-censorship. Revisit old meaningful locales if you still can.
As mentioned earlier in this book, a strong synopsis is the best way to
go for most developers working on visual novels. It is the ground on which
you build the rest of the product. However, remind yourself to only work on
stories that inspire you. You have no obligation to complete a boring story,
unless you’re specifically paid for one. If you change your mind halfway
into the synopsis, start from scratch with a new theme or setting.
Fighting the Writer’s BlockNo writer fully expects the dreaded writer’s block. Yet somehow it always
sneaks into the proceedings, especially with those looming deadlines
staring one right in the eye. Writer’s block is a serious, but treatable
Chapter 1 StorieS and how to Craft them

45
disease. It’s caused by two major pathogens: worry and perfectionism.
Luckily, this disease can be treated with some tried and tested home
remedies.
You can’t force compelling creative writing. When you find inspiration
lacking, the first step is to take a controlled break. Flush out the worry from
your mind by focusing on something completely different. Taking a nice,
long walk outdoors may have you catch a phrase that gives you new ideas to
work with. Meditation, in whatever form you’re happy with, may open doors
to bursts of creativity. Brainstorming online or offline with an interested
and/or experienced party is particularly helpful. Try to keep writing and
editing as two separate tasks. You don’t have to do them simultaneously.
Perfectionism in the field of writing is a dirty word for a reason. Nothing
stifles your creativity more than self-censorship. Don’t inflict it on yourself.
Accept some passages in your writing may turn out to be perfectly mediocre,
and that’s fine. You can, and should, always refine what you just wrote later.
Simple things like proper nutrition and hydration can fuel your creativity.
Many writers are lacking in self-care to some degree. Constantly low blood
sugar levels rarely help. Your body and brain need the natural kind of energy
from fruit and vegetables, especially under stress. It’s generally a good idea
to avoid quick fixes, like soda and refined sugar in any forms.
Don’t underestimate things like chronic stress which can take a
major toll on one’s health. What tends to ensue is insomnia, brain fog,
and cravings for sweets. A lack of stress release may be a factor many
writers suffer from, and it can be tricky to diagnose as it includes a variety
of ills. This or some other medical condition may be behind your lack of
enthusiasm. If you think this is the case, see a doctor. For first aid, consider
your current living habits. Do you exercise? Do you eat healthy foods or is
it mostly potato chips?
Writing is often a solitary activity. Eventually, cabin fever may set in,
along with the previously mentioned nutritious deficiencies and other
challenges. Stay sane and happy by making whatever little progress you
can muster each day and cherishing it. Addictions can either work for
Chapter 1 StorieS and how to Craft them

46
you or against you, but usually it’s the latter. If truly drastic measures are
needed, try reducing your use of social media for frivolous purposes or
delete (some of) it altogether.
Now, if you’re lucky enough to be free of deadlines for the time being
and find yourself uninspired to write, it’s simply time to experience more
of life and refill those reservoirs of inspiration. Believe it or not, but it’s an
automatic process if you give it space. Experiences and ideas compelling to
warrant great visual novels will arise out of everyday interaction. You don’t
have to visit exotic locales for inspiration, although some writers might
benefit from such adventures.
In ClosingAfter reading this chapter, you should have a solid understanding on how
to write drama and which elements contribute to interesting writing. You
are aware of the following core concepts and know how to apply them in
your visual novel writing:
• Relevant glossary terms
• The basics of Aristotelian poetics
• The monomyth as presented by Joseph Campbell and
how to use it
• The 12 character archetypes as popularized by Campbell
• Best practices on how to integrate the aforementioned
concepts into your visual novels
• What types of work are available within the industry of
visual novel games
In the next chapter, we’ll cover the rich history of interactive fiction
including some of the most legendary games in the genre throughout the
decades.
Chapter 1 StorieS and how to Craft them

47© Robert Ciesla 2019 R. Ciesla, Game Development with Ren’Py, https://doi.org/10.1007/978-1-4842-4920-8_2
CHAPTER 2
The (Ancient) Art of Interactive FictionThe origins of the visual novel can be traced back to the mid-1970s –
some say even the 1960s. Now, the term “interactive fiction” is defined as
software (i.e., a video game) which has text input as its main interactive
component. It’s crucial to know that, historically, interactive fiction has
greatly influenced the modern visual novel. This newer genre in turn is
defined as text-based video games that feature rich audiovisual elements
and, in general, rely on a non-typing-based system of user input.
In this chapter we’ll look at several historical interactive fiction titles
as they are the true roots for the modern visual novel genre. Also, we’ll be
talking about the software they used to create those titles of ancient times.
The Great Grandfather of the Visual Novel: ELIZA (1966)It can be argued ELIZA provided the interface basis for all games to come
in the genre of interactive fiction. A virtual psychiatrist, the program
presented a text-based, interactive artificial intelligence to the user.
Created in MIT during 1964 and 1966 by Joseph Weizenbaum, ELIZA
provided a primitive but sometimes convincing virtual therapist to vent
one’s worries to.

48
First appearing on IBM’s massive 7094 computer, ELIZA has been
ported to dozens of platforms over the years. Some claims have been made
of ELIZA passing the Turing test. This test examines whether an interaction
between a computer and its user is indistinguishable from human-to-
human interaction or not. The Turing test was created in 1950 by Alan
Turing, a gifted scientist and pioneer of computer science.
But ELIZA’s legacy is more than her use of real-time text-based
interaction. The software introduced a concept (i.e., an interactive artificial
intelligence) which is still mostly reserved for graphics-based products
in the context of game design. It is to be noted not many text-based
games feature a convincing artificial intelligence as one’s opponent or
companion, even in 2019. Perhaps one of you, dear fellow programmers,
should focus on this aspect of game design.
The Grandfather of the Genre: Colossal Cave Adventure (1975)The origins of the visual novel can be traced to an era of bell-bottom jeans,
disco, and room-sized mainframe computers. Colossal Cave Adventure
was the first work of interactive fiction, created by Will Crowther, an MIT
alumnus, in 1975. Often referred to as simply Adventure, the game ran
on a gigantic PDP-10 computer and offered, for the time, a revolutionary
interactive experience (see Figure 2-1). The premise was simple: find gold
treasures and escape the cave. Offering 78 map locations and absolutely no
graphics, Adventure pretty much started a video game genre.
Chapter 2 the (anCient) art of interaCtive fiCtion
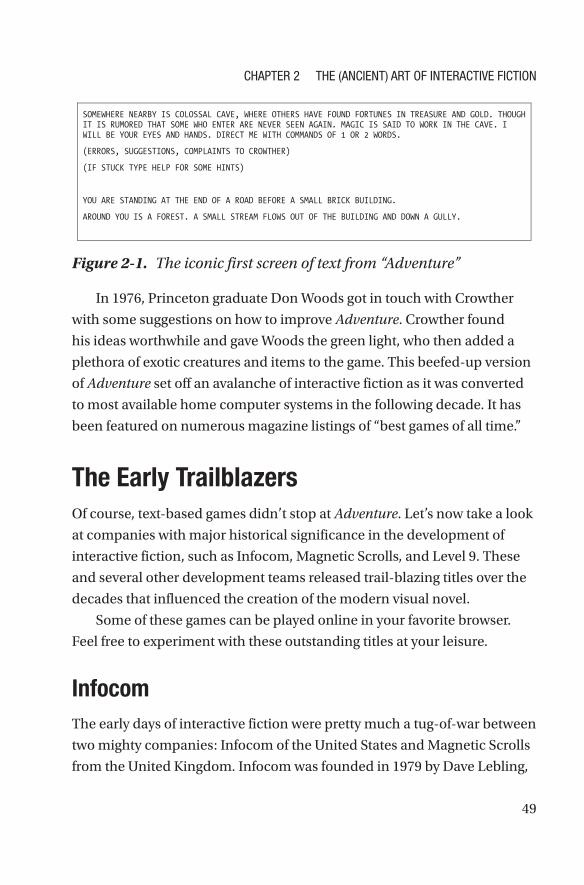
49
In 1976, Princeton graduate Don Woods got in touch with Crowther
with some suggestions on how to improve Adventure. Crowther found
his ideas worthwhile and gave Woods the green light, who then added a
plethora of exotic creatures and items to the game. This beefed-up version
of Adventure set off an avalanche of interactive fiction as it was converted
to most available home computer systems in the following decade. It has
been featured on numerous magazine listings of “best games of all time.”
The Early TrailblazersOf course, text-based games didn’t stop at Adventure. Let’s now take a look
at companies with major historical significance in the development of
interactive fiction, such as Infocom, Magnetic Scrolls, and Level 9. These
and several other development teams released trail-blazing titles over the
decades that influenced the creation of the modern visual novel.
Some of these games can be played online in your favorite browser.
Feel free to experiment with these outstanding titles at your leisure.
InfocomThe early days of interactive fiction were pretty much a tug-of-war between
two mighty companies: Infocom of the United States and Magnetic Scrolls
from the United Kingdom. Infocom was founded in 1979 by Dave Lebling,
SOMEWHERE NEARBY IS COLOSSAL CAVE, WHERE OTHERS HAVE FOUND FORTUNES IN TREASURE AND GOLD. THOUGH IT IS RUMORED THAT SOME WHO ENTER ARE NEVER SEEN AGAIN. MAGIC IS SAID TO WORK IN THE CAVE. I WILL BE YOUR EYES AND HANDS. DIRECT ME WITH COMMANDS OF 1 OR 2 WORDS.
(ERRORS, SUGGESTIONS, COMPLAINTS TO CROWTHER)
(IF STUCK TYPE HELP FOR SOME HINTS)
YOU ARE STANDING AT THE END OF A ROAD BEFORE A SMALL BRICK BUILDING.
AROUND YOU IS A FOREST. A SMALL STREAM FLOWS OUT OF THE BUILDING AND DOWN A GULLY.
Figure 2-1. The iconic first screen of text from “Adventure”
Chapter 2 the (anCient) art of interaCtive fiCtion
50
Marc Blank, Albert Vezza, and Joel Berez. The company was bought by
current-day multi-billion publisher Activision in 1986. Infocom continued
to produce outstanding interactive fiction throughout the 1990s, until
finally being dropped by its new owner in 2002.
The Zork Series (1977–1993)
The genre of interactive fiction didn’t reach its apex in Adventure. Zork I:
The Great Underground Empire was released in the immediate aftermath
of Adventure in 1977 by newcomers Infocom. It became the bestselling
video game of 1982 with a total of 32,000 copies sold for numerous systems
that year. By the time 1986 was on the calendars, Zork I had garnered over
370,000 sales. Clearly the gaming public loved their text adventures and
thirsted for more.
Another multi-platform release, Zork II: The Wizard of Frobozz, had
sold over 173,000 copies by the end of 1986. The trilogy was wrapped up
with Zork III: The Dungeon Master, which sold a decent 120,000 copies as
well. It was clear from the early days that text adventures had much going
for them also from a business standpoint.
Later Zork titles put more focus on the visuals rather than the prose,
and the developers did receive criticism from both enthusiasts and the
gaming press alike. Nonetheless, the Zork series were not a fad, lasting well
into the late 1990s, gaining both new fans and critical praise along the way.
The Zork phenomenon alone solidified Infocom as the most iconic
publisher of interactive fiction for nearly three decades, but they do have
several other successful titles under their belts.
The Enchanter Trilogy: Enchanter (1983), Sorcerer (1984), Spellbreaker (1985)
Having an elaborate spell casting system for the time, Enchanter was an
ambitious game even by Infocom’s high standards. Selling around 75,000
copies during its shelf life, the game featured a novice magician as its sole
Chapter 2 the (anCient) art of interaCtive fiCtion

51
underdog protagonist. You were facing Krill, a powerful warlock, with
nothing but some elementary spells to aid you.
Enchanter takes place in the same world as the Zork series, but it has a
more serious quality to it. The spell casting system adds a new dimension
to the somewhat contrived genre of fantasy interactive fiction. Although
not monumental in the writing department, Enchanter was a well-received
adventure and another successful title from Infocom.
Sorcerer picked up where Enchanter left, putting the player in the
victorious position of having defeated Krill the evil warlock. Still based
around a fun spell casting system, the game has you going after Belboz the
necromancer, who may have fallen to the dark side. You now have more
power as a wizard; however, the puzzles are trickier.
Rounding off the trilogy is Spellbreaker, the hardest of the three. The
Circle of Enchanters are panicking: magic is now beginning to fail all over
the land of Zork. After a rather surprising council meeting, the player is
thrust with the mission to find out why this is happening.
Mostly criticized for its harsh difficulty level, Spellbreaker had an
atmosphere of urgency and despair. For one, although there are powerful
new spells, spell casting is not guaranteed to work. The game is also much
larger in scope than any of the previous Infocom titles. Most players will
not complete the game without a guidebook. One for the hardcore gamer
crowd, Spellbreaker nonetheless provided a brilliant conclusion to the
Enchanter trilogy.
Planetfall (1983) and Stationfall (1987)
As the janitor on the starship S.P.S. Feinstein, your job is mostly to mop its
floors. For better or worse, the plot thickens as explosions rock the ship,
forcing you into an escape pod and on to a strange planet. Not the first
visitor to the planet Resida, you must discover the fate of those who came
before you.
Chapter 2 the (anCient) art of interaCtive fiCtion

52
Planetfall turned out to be another big hit for Infocom, receiving praise
for its writing and the inclusion of a purposeful sidekick in the form of
Floyd the loveable robot. He is still considered one of the most cherished
characters in interactive fiction.
In Stationfall, the sequel to the game, our janitor protagonist has been
promoted to Stellar Patrol duty. This may sound more interesting than
janitorial duties; however, our hero spends his time mostly filling forms.
Teaming up with Floyd the robot for the second time, our duo is in fact sent
on a mission to grab some more forms at a space station. With the station
mostly deserted, an enjoyable sci-fi mystery begins to unfold featuring an
alien skeleton and an ostrich, no less.
Stationfall was praised for the tight writing and for bringing back Floyd
the robot, a true fan favorite. Not a game for beginners, it’s an enjoyable
adventure for the more experienced gamers.
The Hitchhiker’s Guide to the Galaxy (1984)
Douglas Adams’ comedic hit series The Hitchhiker’s Guide to the Galaxy
was picked up by Infocom in 1984. Consisting of a TV series, radio plays,
and novels, the work suited the genre of interactive fiction extremely well.
The game was developed under the close supervision with the author of
the original work, Douglas Adams.
The absurdist sci-fi adventure was a massive hit, ending up selling over
400,000 copies during its (ever-continuing) lifespan. This game has been
converted to at least 17 different computer architectures, ranging from the
Apple II to current-day browsers.
The British Broadcasting Corporation released a 20th anniversary
version of the game in 2004 on their web site. As of 2019, a 30th
anniversary version of The Hitchhiker’s Guide to the Galaxy is still playable
on the BBC web site (www.bbc.co.uk/h2g2game).
Chapter 2 the (anCient) art of interaCtive fiCtion

53
Wishbringer (1985)
One for the novice gamers, Wishbringer was a well-written, critically
acclaimed adventure. Ending up as Infocom’s fifth bestselling game of all
time at 150,000 copies sold, it tells the story of a perfectly average postal
worker who stumbles upon a rather special envelope. After delivering
said envelope to the owner of “Ye Olde Magick Shoppe,” the protagonist
promises to retrieve her black cat who’s gone missing. Then finding
himself in a somewhat apocalyptic village called Witchville, he’s told he
only has a few hours to defeat a sorceress called The Evil One.
Described by some as simplistic, the game was not the most taxing
of Infocom’s adventures. Nonetheless, Wishbringer delivered a solid
interactive fiction experience for “everyone from ages 9 up,” as the
packaging stated. Clearly Infocom was experimenting with targeting
different gamer demographics, and when judged by Wishbringer’s sales,
they scored big time. The lesson here is this: from time to time, it does
a business a world of good to introduce new types of products to fresh
audiences.
Leather Goddesses of Phobos (1986) and Leather Goddesses of Phobos 2 (1992)
Classic fantasy aside, Infocom could also do salacious sci-fi like no other
developers. As the title suggests, Leather Goddesses of Phobos features
some rather leery antagonists – who are naturally up to no good. You
must stop them from taking over the planet in this tongue in cheek title,
released for most popular computer platforms of 1986. Leather Goddesses
is a campy, mildly erotic romp with the option to choose the level of smut
you’re comfortable with. It’s presented in a classic, minimalistic text-only
format as per usual for Infocom – and it still didn’t take anything from the
atmosphere and fun.
Chapter 2 the (anCient) art of interaCtive fiCtion
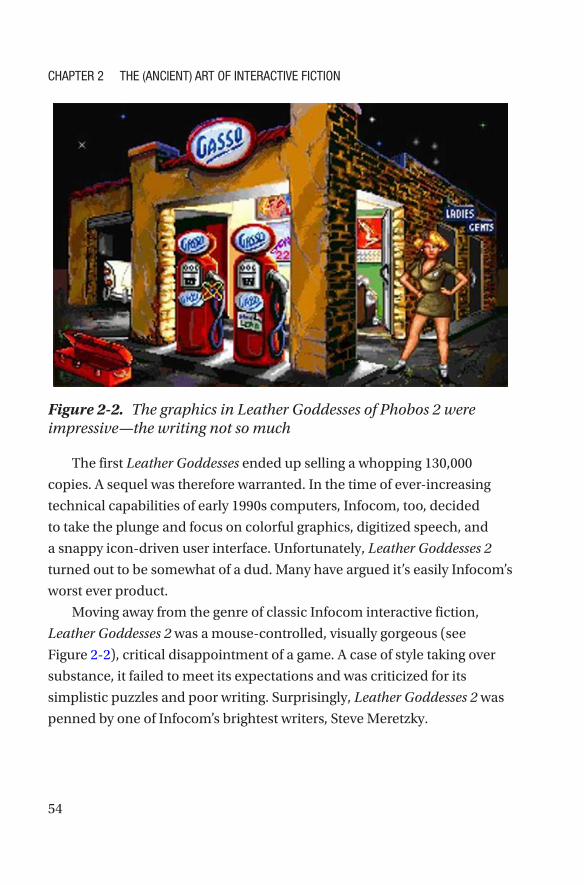
54
The first Leather Goddesses ended up selling a whopping 130,000
copies. A sequel was therefore warranted. In the time of ever-increasing
technical capabilities of early 1990s computers, Infocom, too, decided
to take the plunge and focus on colorful graphics, digitized speech, and
a snappy icon-driven user interface. Unfortunately, Leather Goddesses 2
turned out to be somewhat of a dud. Many have argued it’s easily Infocom’s
worst ever product.
Moving away from the genre of classic Infocom interactive fiction,
Leather Goddesses 2 was a mouse-controlled, visually gorgeous (see
Figure 2-2), critical disappointment of a game. A case of style taking over
substance, it failed to meet its expectations and was criticized for its
simplistic puzzles and poor writing. Surprisingly, Leather Goddesses 2 was
penned by one of Infocom’s brightest writers, Steve Meretzky.
Figure 2-2. The graphics in Leather Goddesses of Phobos 2 were impressive—the writing not so much
Chapter 2 the (anCient) art of interaCtive fiCtion

55
Magnetic ScrollsWe’ll now take a look at the other big player in the business of text-based
games, Magnetic Scrolls, through revisiting some of their most impressive
offerings. The company was founded by Anita Sinclair, Ken Gordon, and
Hugh Steers in London in 1984. It released several high-quality games
mostly during the 1980s.
Magnetic Scrolls fizzled out from the games market during the
early 1990s, but as of 2017 they have resurfaced as Strand Games (www.
strandgames.com). Having found the once lost source code for some of
their old text adventures, the Magnetic Scrolls team decided to recover it
and present it to the current generation of gamers. The project has so far
released two of their early games for modern platforms. New titles from
Strand Games may apparently appear in the future.
The Guild of Thieves (1987)
Known for their visual prowess, Magnetic Scrolls’ The Guild of Thieves was
a monumental multi-platform release. Centering on suspicious and more
or less criminal activities, the game is an atmospheric and challenging
experience set in the fantasy land of Kerovnia.
Divided roughly into four areas, the game world in The Guild of Thieves
is vast. Over a hundred locations total are divided between countryside,
a castle, a labyrinth, and a temple. The game features a plethora of
collectable items and fixed utilities depicting a living fantasy world well.
They include a fully functioning water closet (complete with toilet paper)
and a somewhat taxing container system: there’s plenty of items within
items in the game.
The Guild of Thieves was released for at least 11 platforms. The
graphical screens are impressive pretty much on all of them. It was a hit
among critics and enthusiasts alike, justifying a new release in December
of 2017 for modern platforms, 30 years after the original.
Chapter 2 the (anCient) art of interaCtive fiCtion

56
the Guild of thieves re-release by Strand Games (https://strandgames.com/games/theguild)
Corruption (1988)
A brilliant example of using then-current themes in a video game context,
Corruption dealt with 1980s politics in a realistic manner. This pleased
both critics and gamers at the time. In the game an average stockbroker
found himself in a world of trouble. Corruption, at its heart, was a detective
story. The tone of the game was steeped in cold war politics, enhanced by
realistic static graphics full of film noir aesthetics (see Figure 2-3).
Corruption featured one of the most intense atmospheres of any work
of interactive fiction. In some parts of the game, you could only enter one
command – and it had to be the right one, or else it was an instant game
over for you.
Figure 2-3. Corruption featured lifelike graphical screens
Chapter 2 the (anCient) art of interaCtive fiCtion

57
No doubt a lesson can be learned from this one: when properly
executed, current events always make for compelling interactive fiction.
After playing Corruption, offices suddenly become quite ominous. For best
results, enjoy the game with some late 1980s popular music.
Fish! (1988)
Magnetic Scrolls could deliver in a vast variety of themes. In a complete
departure from their previous release, Fish! was a surreal romp with an
aquatic protagonist (see Figure 2-4). You got to play as an actual goldfish,
doing your best to defend your planet Aquaria from a posse of antagonists
known as The Seven Deadly Fins.
Figure 2-4. A “plush lounge” in Fish!
Chapter 2 the (anCient) art of interaCtive fiCtion

58
Perhaps the developers felt they needed a break after the rather serious
nature of Corruption, so they came up with this whacky gem. Bizarre,
frivolous, and especially enjoyable for newcomers, Fish! was a risky move.
Despite the constant barrage of fish-related puns, the game was a hit.
Sometimes, taking a gamble with the concept pays off.
Wonderland (1990)
Kicking off the 1990s in style, Magnetic Scrolls released an innovative and
critically acclaimed adventure based on the Lewis Carroll classic Alice in
Wonderland. The game featured beautifully drawn, and often animated,
visuals. The user interface is now fully mouse-controlled, but not in a
gratuitous way. Resizable windows, a dynamic mapping system, and
intuitive menus only work to enhance the whole experience (see Figure 2- 5).
For the time this was all quite revolutionary. The developers definitely took
design cues from the leading operating systems, Windows and macOS, and
translated them into an immersive game world.
Chapter 2 the (anCient) art of interaCtive fiCtion
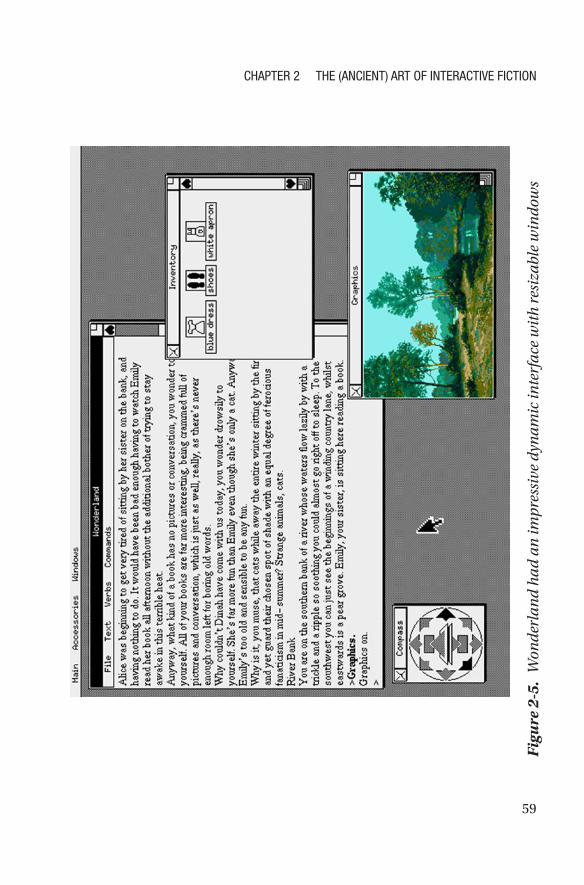
59
Figu
re 2
-5.
Won
derl
and
had
an im
pres
sive
dyn
amic
inte
rfac
e w
ith
resi
zabl
e w
indo
ws
Chapter 2 the (anCient) art of interaCtive fiCtion

60
In addition to the fun and fluid user engagement, Wonderland was
loyal to its source material. The game is a fine lesson in how to approach a
much loved classic and translate it into the digital domain. Wonderland is
one of the finest works of interactive fiction ever made.
Level 9 ComputingLevel 9 was a British developer of interactive fiction founded by the
brothers Mike, Nicholas, and Pete Austin. They operated between 1981
and 1991, delivering highly polished products of interactive fiction,
specializing in a trilogy approach.
Colossal Adventure (1983)
Capitalizing on the success of Will Crowther’s 1977 hit Adventure, Level 9
provided their audience with a beefed-up take on the original. The game
included 70 new locations in addition to Adventure’s 80 or so. A multi-
platform release, Colossal Adventure was criticized for its crude graphics,
but most critics agreed overall it was an improvement on the original.
Level 9 took a bit of a risk by infusing Tolkien lore into the game, which the
Tolkien Estate surprisingly didn’t object to – or know about.
The Silicon Dreams Trilogy (1986)
Firmly set in the sci-fi realm, this trilogy featured a coherent story arc
across all three games. Starring the stalwart Kim Kimberly, a citizen of
the future, the trilogy deals with the concept of mankind colonizing other
planets – and the associated issues which tend to follow.
Chapter 2 the (anCient) art of interaCtive fiCtion
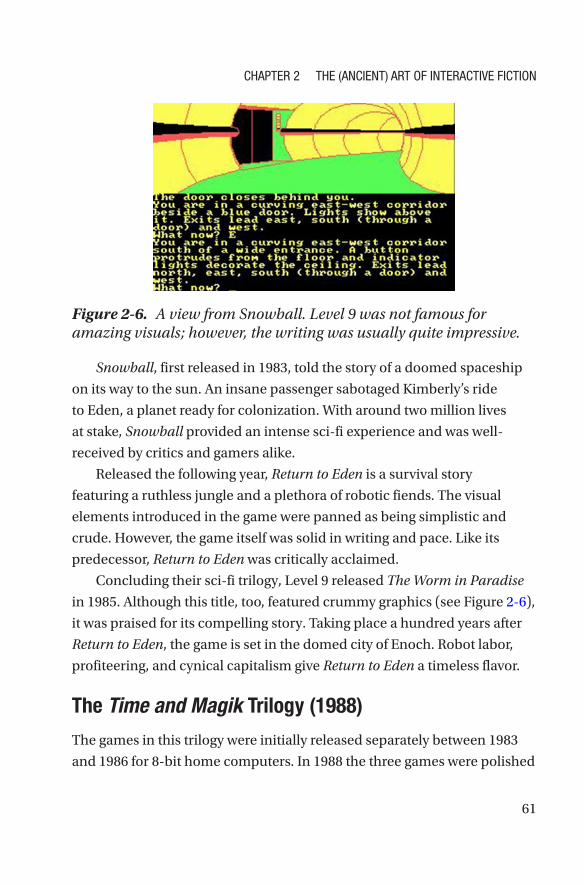
61
Snowball, first released in 1983, told the story of a doomed spaceship
on its way to the sun. An insane passenger sabotaged Kimberly’s ride
to Eden, a planet ready for colonization. With around two million lives
at stake, Snowball provided an intense sci-fi experience and was well-
received by critics and gamers alike.
Released the following year, Return to Eden is a survival story
featuring a ruthless jungle and a plethora of robotic fiends. The visual
elements introduced in the game were panned as being simplistic and
crude. However, the game itself was solid in writing and pace. Like its
predecessor, Return to Eden was critically acclaimed.
Concluding their sci-fi trilogy, Level 9 released The Worm in Paradise
in 1985. Although this title, too, featured crummy graphics (see Figure 2-6),
it was praised for its compelling story. Taking place a hundred years after
Return to Eden, the game is set in the domed city of Enoch. Robot labor,
profiteering, and cynical capitalism give Return to Eden a timeless flavor.
The Time and Magik Trilogy (1988)
The games in this trilogy were initially released separately between 1983
and 1986 for 8-bit home computers. In 1988 the three games were polished
Figure 2-6. A view from Snowball. Level 9 was not famous for amazing visuals; however, the writing was usually quite impressive.
Chapter 2 the (anCient) art of interaCtive fiCtion

62
and re-released as a compilation for a newer generation of platforms by
Mandarin Software. This time, Level 9 upped the ante on their visuals, too
(see Figure 2-7). However, only two games in this compilation, Red Moon
and The Price of Magik, formed a story arc.
Lords of Magic from 1983 featured a rather clever time-traveling plot.
The protagonist, a computer programmer, is contacted by one Father Time
in order to rescue treasures from nine different eras. These included the
time of the Roman Empire, the Age of Dinosaurs, and Ice Age. Well-written
by one Sue Gazzard, the game was loved by both the press and gamers.
Red Moon (originally released in 1985) and its sequel The Price of
Magik (from 1986) both won awards and featured a fair amount of role-
playing game elements. The latter incorporated a rather extensive spell
casting system for its time.
Chapter 2 the (anCient) art of interaCtive fiCtion
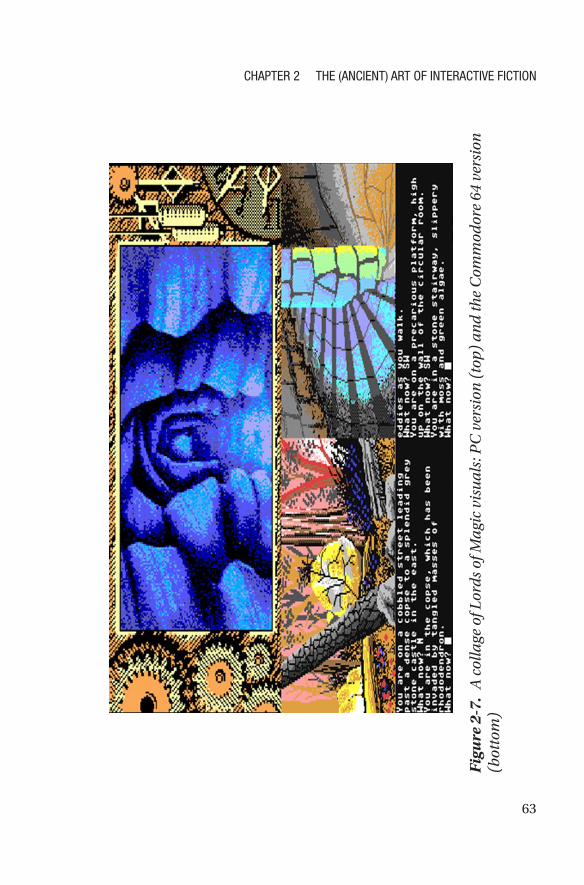
63
Figu
re 2
-7.
A c
olla
ge o
f Lor
ds o
f Mag
ic v
isu
als:
PC
ver
sion
(to
p) a
nd
the
Com
mod
ore
64 v
ersi
on
(bot
tom
)
Chapter 2 the (anCient) art of interaCtive fiCtion

64
Other Notable Games in the Genre“The Big Two” (i.e., Infocom and Magnetic Scrolls) and Level 9 weren’t the
only influential makers of quality interactive fiction by any means. Several
other development teams have since released impressive products. We’ll
now take a look at some of these fine text-based adventures.
King’s Quest: Quest for the Crown by Sierra On-Line (1984)Sierra On-Line, started in 1979 by Ken and Roberta Williams, became
an iconic publisher in the adventure game genre. Some very successful
franchises based on this game concept include the Space Quest, Police
Quest, and, indeed, the ongoing King’s Quest series. Only folding until
2004, Sierra On-Line had a long-lived and lucrative reign as makers of
quality adventure games.
In the first game in the series, one brave young knight, Sir Graham, has
aspirations of becoming the ruler in the Kingdom of Daventry. He must
recover specific magical items and solve numerous folklore-based puzzles
to impress King Edward, who himself plans to retire if all goes well. While
the graphics are naturally crude by current standards, the storytelling is
still quite enchanting.
Chapter 2 the (anCient) art of interaCtive fiCtion
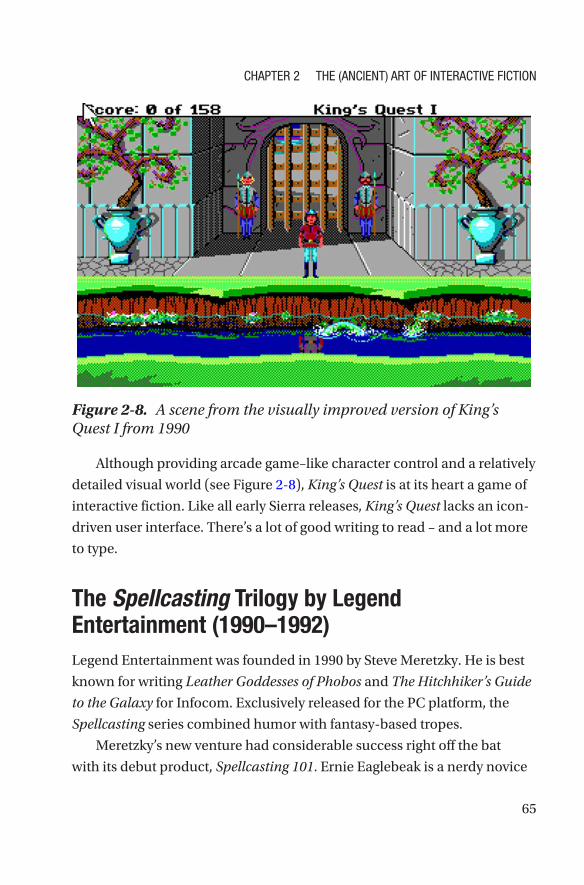
65
Although providing arcade game–like character control and a relatively
detailed visual world (see Figure 2-8), King’s Quest is at its heart a game of
interactive fiction. Like all early Sierra releases, King’s Quest lacks an icon-
driven user interface. There’s a lot of good writing to read – and a lot more
to type.
The Spellcasting Trilogy by Legend Entertainment (1990–1992)Legend Entertainment was founded in 1990 by Steve Meretzky. He is best
known for writing Leather Goddesses of Phobos and The Hitchhiker’s Guide
to the Galaxy for Infocom. Exclusively released for the PC platform, the
Spellcasting series combined humor with fantasy-based tropes.
Meretzky’s new venture had considerable success right off the bat
with its debut product, Spellcasting 101. Ernie Eaglebeak is a nerdy novice
Figure 2-8. A scene from the visually improved version of King’s Quest I from 1990
Chapter 2 the (anCient) art of interaCtive fiCtion

66
wizard who just wants to get the affections of one Lola Tigerbelly. Enrolling
in Sorcerer University, Ernie plans to gain the status and skills needed
to impress his crush. The trilogy deals with his escapades with the focus
being on student life difficulties, as the relatable protagonist fumbles
around. Apparently it’s not easy being a nerd in college, even when
possessing some magical abilities.
Spellcasting 101 kicked off a successful trilogy of games, being followed
by Spellcasting 201: The Sorcerer’s Appliance and Spellcasting 301: Spring
Break. The last game in the trilogy featured, for the time, impressive
256-color graphics (see Figure 2-9) in addition to solid sound card support,
adding to the game’s engaging audiovisual experience.
Figure 2-9. Spellcasting 301, like the other two titles in the trilogy, had crisp graphical screens
Chapter 2 the (anCient) art of interaCtive fiCtion

67
The mixture of the adult themes of Leather Goddesses and sparse but
high-resolution graphics proved to be a hit. The intuitive mouse-assisted
control method didn’t hurt either. Of course, you could also wear your
fingertips out if you preferred that.
Timequest by Legend Entertainment (1991)Not sticking solely to bespectacled wizards with juvenile interests,
Legend went on to add sci-fi titles to their catalogue. Timequest, like the
name perhaps suggests, deals with the time-traveling business and the
dangerous ramifications it may or may not entail. It was created by one
Bob Bates who, like Steve Meretzky, had worked previously at Infocom.
In Timequest Zeke S. Vettenmyer, a Lieutenant in the Temporal Corps,
has stolen a time machine (referred to as an interkron in the game’s
universe). By meddling with history, Vettenmyer is causing a ripple
effect in the timestream which will result in catastrophic events for the
human race. You, as a lowly private in the Temporal Corps, must trace the
Lieutenant in question and correct the wrongs he’s committing.
Chapter 2 the (anCient) art of interaCtive fiCtion

68
Figu
re 2
-10.
You
mee
t qu
ite
a fe
w h
isto
rica
l fig
ure
s in
Tim
equ
est.
Her
e’s
a fo
rmer
Bri
tish
pri
me
min
iste
r.
Chapter 2 the (anCient) art of interaCtive fiCtion
69
Using the same engine as the Spellcasting franchise, Timequest
provides crisp, high-resolution graphics and a gratifying mouse-
assisted interface. The odd melody plays at a few locations adding to the
atmosphere. The game was well-received, winning several video game
awards in the early 1990s. You don’t often get to meet such historical
figures as William Shakespeare, Winston Churchill (see Figure 2-10), and
baby Moses – especially during the course of a single day.
Demoniak by Palace Software (1991)Featuring a rather standard futuristic doomsday scenario for a plot,
Demoniak nonetheless broke new ground at the time of its release.
Penned by none other than Alan Grant, the writer behind Judge Dredd and
Batman comics, the game offers a well-written and somewhat anarchistic
experience as the namesake inter-dimensional demon and his four
bickering opponents clash. Whatever graphics are there all provide a touch
of atmosphere, being immensely well drawn in a cartoony fashion (see
Figure 2-11).
Chapter 2 the (anCient) art of interaCtive fiCtion

70
At first Demoniak seems like your typical text adventure. However,
you weren’t limited to playing as the main four protagonists. The game
impressed with a highly innovative feature: it allowed you to become most
of the 50 characters in the game. Should a character die, one could keep
playing with some other inhabitant of the game universe, all with their own
quirks and personalities. In addition, the WAIT command allows you to
simply watch the characters do their thing. Demoniak is an underrated gem.
How They Did It – Early Tools for Interactive FictionLike any type of software, text-based games can be created with a general-
purpose programming language of one’s choosing (e.g., C, C++, BASIC,
Java). However, even in the early days numerous dedicated creation tools
Figure 2-11. Although not plentiful, the graphical screens in Demoniak were impressive. Here’s Doc Cortex.
Chapter 2 the (anCient) art of interaCtive fiCtion

71
for the genre were available. Let’s now take a glance at some of these text-
adventure frameworks.
Not only were these software packages milestones in programming,
but their influence in video gaming is still felt today. Also, as is the case
with Graham Nelson’s Inform development system, some of these
historical products are still viable tools for making new games today.
A Few Words on ParsersA parser is a piece of software which interprets user’s input into logical
data structures. In the context of interactive fiction, parsers work between
the gamer and the game world, translating text input into actions that
correspond with the game’s logic and parameters set by the programmer.
The quality of parsers varies greatly between games of interactive
fiction. A poor parser doesn’t understand perfectly sensical language,
only accepting clumsy and/or wordy sentences. A good parser can accept
a multitude of verbs and nouns and even gather relevant words from
broken sentences. One of the reasons for Infocom’s massive success was
indeed in their impressive parser, which would work well with complex
sentences. Adventure by Will Crowther, although a legendary game, mostly
operated on a rather simple “verb and noun” system (e.g., only accepting
commands like GET DAGGER). In the decades to come, this was largely
considered a rather frustrating type of approach.
In the current era of visual novel development, typing is not a common
input method, so the said parsers are of little importance. Of course, there
remains a rather fervent fan base of old-school interactive fiction. Literally
thousands of noncommercial, home-brewed text adventures have been
created ever since the 1980s for various platforms. Not every enthusiast
made the switch to mouse-assisted input.
Chapter 2 the (anCient) art of interaCtive fiCtion

72
Zork Interactive Language (ZIL) and the Z- machineDuring Infocom’s heyday from the late 1970s to the late 1980s, their
developers utilized an in-house virtual machine called the Z-machine. The
way they distributed their software consisted roughly of two phases. First, a
Z-machine for a specific platform was developed (e.g., PC, C64, Amstrad).
Then, a system-independent adventure file (or Z-file) was created in
Infocom’s own programming language called Zork Interactive Language
(ZIL). Each of these files contained the game itself. ZIL itself is based on
the MIT Design Language (MDL) from 1971.
The Z-machine was available pretty much on all computer platforms
at the time. The same Z-files would run on any system with its specific
Z-machine, eliminating the need to develop games natively for each
system. This allowed for a simultaneous release for all dozen or so popular
computers of the time and helped propel Infocom to the top of the text-
adventure hill.
Starting its life way back in 1979, the mighty Z-machine isn’t dead yet;
modern interpretations of the system are available for current-day versions
of Windows, Linux, macOS, and iOS, among others. A rather prosperous
hobbyist scene has indeed formed around this beloved piece of software.
Although offering a rather succinct approach to programming
interactive fiction, ZIL is not for absolute beginners and takes a while to get
used to with its numerous commands. Listing 2-1 shows a sample room
definition using ZIL.
Listing 2-1. A sample room definition in Zork Interactive
Language (ZIL)
<ROOM APRESS-LOUNGE
(LOC OFFICE)
(DESC "The Apress Lounge")
Chapter 2 the (anCient) art of interaCtive fiCtion

73
(SOUTH TO MEETINGROOM)
(EAST TO KITCHEN)
(NORTH TO TOILET IF DOOR-UNLOCKED ELSE "The water closet
door won't budge.")
(ACTION APRESS LOUNGE-F)
(FLAGS RLANDBIT ONBIT)
(GLOBAL STAIRS)
(THINGS (SLIPPERY WET) (DOORKNOB HANDLE) SLIPPERY- HANDLE- F)
The RLANDBIT flag in ZIL denotes a room is land-based, instead
of being immersed in some kind of liquid. The ONBIT flag indicates the
room is illuminated by default. A keyword called THINGS is used to create
pseudo-objects which can’t be moved, but which take less memory than
actual ZIL objects; saving RAM and cutting on a game’s loading time were
a big deal back in the day.
Listing 2-2 shows a sample object definition in ZIL.
Listing 2-2. A sample object definition in ZIL for an expensive pen
<OBJECT PEN(LOC APRESS-LOUNGE)
(SYNONYM PEN MARKER)
(ADJECTIVE EXPENSIVE)
(DESC "expensive pen")
(FLAGS TAKEBIT)
(ACTION PEN-F)
(FDESC "An expensive ink-powered writing tool is on a table.")
(LDESC "There is a writing tool (ink-powered) here.")
(SIZE 2)>
The TAKEBIT flag indicates an object can be picked up by the player.
Other object flags in the ZIL language include WEARBIT, READBIT, and
CONTBIT for wearables, readables, and containers, respectively. The size
attribute denotes an item’s weight in the Z-machine universe. For example,
a boulder should have a size value much larger than our expensive pen.
Chapter 2 the (anCient) art of interaCtive fiCtion
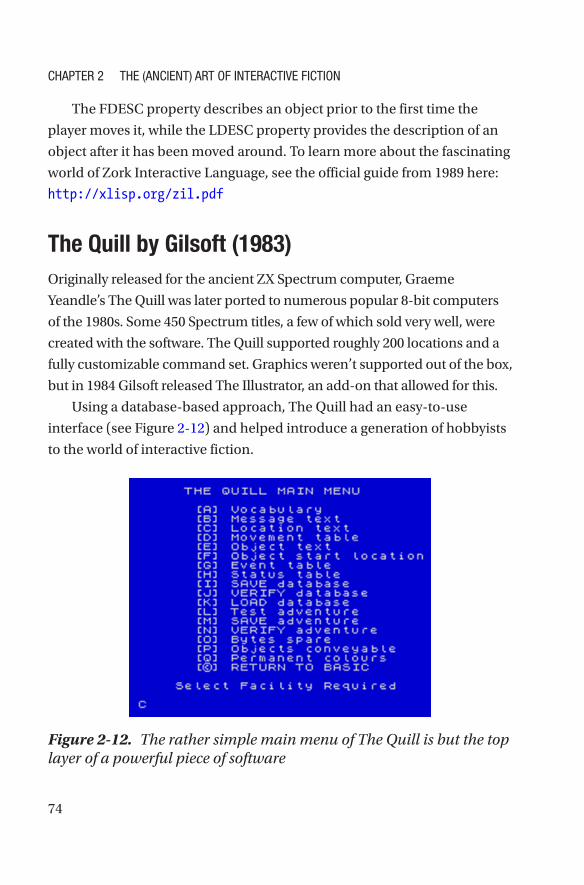
74
The FDESC property describes an object prior to the first time the
player moves it, while the LDESC property provides the description of an
object after it has been moved around. To learn more about the fascinating
world of Zork Interactive Language, see the official guide from 1989 here:
http://xlisp.org/zil.pdf
The Quill by Gilsoft (1983)Originally released for the ancient ZX Spectrum computer, Graeme
Yeandle’s The Quill was later ported to numerous popular 8-bit computers
of the 1980s. Some 450 Spectrum titles, a few of which sold very well, were
created with the software. The Quill supported roughly 200 locations and a
fully customizable command set. Graphics weren’t supported out of the box,
but in 1984 Gilsoft released The Illustrator, an add-on that allowed for this.
Using a database-based approach, The Quill had an easy-to-use
interface (see Figure 2-12) and helped introduce a generation of hobbyists
to the world of interactive fiction.
Figure 2-12. The rather simple main menu of The Quill is but the top layer of a powerful piece of software
Chapter 2 the (anCient) art of interaCtive fiCtion
75
Professional Adventure Writer by Gilsoft (1986)Yeandle’s sequel to The Quill, Professional Adventure Writer (PAW),
featured a similar intuitive user interface with the addition of a much more
advanced parser and other major enhancements. For one, visuals were
now more easily implementable in one’s adventures.
Around 400 adventures were created with PAW. Sadly, the software
was only ever released for the ZX Spectrum, and the (even then) practically
fossilized CP/M class of operating systems.
Adventure Game Toolkit by David Malmberg (1987)Featuring two methods of development to choose from, that is, the
standard and the professional, Adventure Game Toolkit (AGT) provided a
set of tools for both beginners and more advanced programmers alike.
AGT is based on Mark Welch’s Generic Adventure Game System
(GAGS) for the PC from 1985. Malmberg’s product featured a much
improved parser and greater scope. It was converted for numerous
platforms since its inception; the total number of games made with GAGS
and AGT hovers around a hundred or so. Although a tad clumsy to use by
today’s standards, AGT was (and is) capable of producing adventures on
par with Infocom’s classics.
Inform by Graham Nelson (1993–)Not exactly a beginner’s tool, Inform in its later versions became in fact
its very own programming language. This naturally allows for complete
control of one’s interactive fiction games or other related projects. Also, all
game files made with this software were 100% compatible with Infocom’s
famous Z-machine.
Chapter 2 the (anCient) art of interaCtive fiCtion

76
Inform was up to version 6 a somewhat traditional programming
language (see Listing 2-3). Version 7, however, is considered quite
revolutionary; this iteration of the software accepts full sentences. In
essence, creating a game with Inform 7 is almost like playing one (see
Listing 2-4).
Listing 2-3. A partial Inform version 6 listing
Constant Story "Example Quest";
Constant Headline "This is an example of Inform 6";
Include "Parser";
Include "VerbLib";
[ Initialise;
location = Storage_Room;
"Welcome to the storage room!";
];
Object Garage "Garage";
Object Front_Door "Front Door";
Object Storage_Room "Storage Room"
with
description "A spacious and cold room.",
e_to Garage,
n_to Front_Door,
has light;
Listing 2-4. A partial Inform version 7 listing
"Example Quest" by "Mr Programmer"
The story headline is "This is an example of Inform 7".
The Storage Room is a room. "A spacious and cold room."
Chapter 2 the (anCient) art of interaCtive fiCtion

77
The Garage is east of the Storage Room.
The Front Door is north of the Storage Room.
The Front Door is a door. The Front Door is closed and locked.
Inform is still a popular choice among developers of interactive fiction.
For one, it’s evident based on the tens of thousands of views on the topic
on sites like The Interactive Fiction Community Forum. Inform was even
used for the 1997 release Zork: The Undiscovered Underground, published
by software giants Activision. Other notable games using the various
versions of Inform include Galatea (2000) and Floatpoint (2006), both
created by Emily Short.
In ClosingAfter reading this chapter, you should have a solid understanding of the
history of interactive fiction. You are familiar with the following concepts
and know how they relate to your visual novel writing:
• What some of the biggest selling text-based games were
and what made them successful
• What parsers are and how interactive fiction was made
back in the day
The next chapter consists of a thorough look at more recent text-based
games, that is, visual novels; we’ll start our review at games released at the
turn of the millennium.
Chapter 2 the (anCient) art of interaCtive fiCtion
79© Robert Ciesla 2019 R. Ciesla, Game Development with Ren’Py, https://doi.org/10.1007/978-1-4842-4920-8_3
CHAPTER 3
The Modern Visual NovelAs demonstrated in the previous chapter, the road to the modern visual
novel has been a relatively long one. As of 2019, massive numbers of rooms
and items aren’t big deals. Gone are the technical limitations that once
dictated what was possible in video games. But before we review some
of the most impressive modern visual novels, we should get acquainted
with the related terminology. Many of these tropes have their origins in
Japanese culture as the established visual novel format originates from the
land of the rising sun.
The Visual Novel: Definitely Big in JapanAlthough audiovisual elements were found in the earlier text adventures,
by the turn of the millennium, technology had advanced quite a bit.
Computers no longer struggled with data crunching as they once did,
enabling game makers to indulge in a number of then-new techniques.
These included high-resolution graphics, CD-quality digital audio, and
Full HD video playback.
As mentioned, the visual novel is originally a Japanese phenomenon,
kicking off commercially in the late 1980s. According to Anime Advanced
and Advanced Media Network in 2006, almost 70% of PC games released

80
in Japan were visual novels.1 It has since become a popular genre of video
games worldwide.
TropesIn the popular vernacular, a trope is a frequently recurring thematic device.
Some tropes are to be avoided (those tend to be also called clichés),
while some are helpful in world building and user engagement. We’ve
simply learned to expect certain things from our entertainment over the
millennia. Quite a few of these tropes relate to the principles laid out by
Aristotle as discussed in Chapter 1, in fact.
The Faceless ProtagonistAn increasingly popular trope, this evokes a sense of mystery as well as
catering for each player individually. It’s easier to identify with a character
who isn’t specifically made to look like something you do not resemble in
real life. Examples include Gordon Freeman from the Half-Life franchise
and most protagonists in visual novels.
Dialogue TreeVirtually found in every visual novel out there, dialogue trees refer to the
points of choice in the flow of a storyline. In a good game of interactive
fiction, dialogue tree choices are logical and interesting and have an actual
effect in the proceedings of the game’s universe. These choices often
include whether to ask some virtual person on a date or not.
1 www.animenewsnetwork.com/press-release/2006-02-08/amn-and-anime- advanced-announce-anime-game-demo-downloads
Chapter 3 the Modern Visual noVel
81
The Endings TreeMost visual novels feature various end states for the storyline. These
are the good ending (sometimes referred to as The Golden Ending), the
bad ending, and the standard ending. The first two are more or less self-
explanatory, referring either to typical tragedy or victory. The standard
ending, however, refers to the finale resulting usually from indifference
from the player’s behalf. It is the result of mostly passive clicking on
choices and usually provides only the least impressive of endings: most
visual novels expect a degree of focus and intent from the players.
Some visual novels, such as Tsukihime (2001) by Type-Moon, feature a
number of endings in each category for a total of nine. The more endings
you implement, the more longevity your game obviously has. However,
you should only provide the endings your story needs.
Into the Middle of Things/In Medias ResIt’s often better to start a game in an interesting or unusual setting instead
of character X simply waking up in his bed. This is to grab the player’s
attention and not bore them with every banal passage leading into the
action. As introduced by Aristotle discussed in Chapter 1, this is a very
common trope in the visual novel genre and for a reason. Backtracking can
be done later as needed. Visual novels using this trope include Saya no Uta
by Nitroplus and Ef: A Fairy Tale of the Two by Minori.
High School GeekPerhaps the most popular character identity for current-day visual novel
protagonists, the high school geek is relatable for many as plenty of us have
been one at some point in time. Many fans of the game genre are indeed
currently teenagers, so from a demographic standpoint this also makes
Chapter 3 the Modern Visual noVel
82
sense. However, there’s no need to force high school geeks into your games
unless the story demands it.
Variations of this trope naturally exist all over in popular culture, such
as the regular Joe/Jane who gets a call to action, reaching new heights in
personal development after completing a challenge or several. Basically
most visual novels benefit from having at least one relatable character,
preferably as a protagonist.
Visual novels with this trope include Katawa Shoujo by Four Leaf
Studios and Doki Doki Literature Club! by Team Salvato – and a massive
swathe of other titles.
Branch CuttingWhen it comes to sequels in visual novels, most build on the premise
that the saga had one true ending (i.e., The Golden Ending). It might be
best if the other endings are ignored altogether in the follow-up product.
This is something developers need to keep in mind. Sticking to a single
canon is good for the franchise. Branching out too much might result in
a developer’s hard work getting confused with fan fiction when it comes
to sequels. Sticking to unified canon keeps the franchise strong. Leave the
more bifurcated storytelling to the fans of your product.
Sword and SorceryEmerging from common folklore and solidified by the works of
J.R.R. Tolkien, fantasy is a genre that has been pretty much troped to death.
For better or worse, most people have heard of long swords, elves, magic
spells, and dragons – even those “not in the know” of fantasy-based video
games and other varieties of popular culture. There may be thus some
fantasy fatigue among the general population, even among enthusiasts.
However, by spicing up the sorcery with elements of, say, sci-fi, new
developments have emerged from this age-old trope.
Chapter 3 the Modern Visual noVel
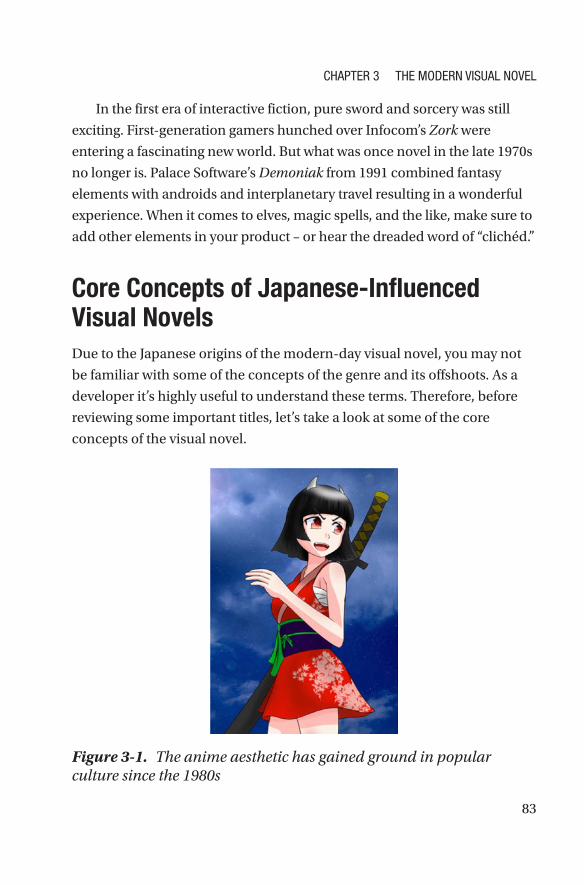
83
In the first era of interactive fiction, pure sword and sorcery was still
exciting. First-generation gamers hunched over Infocom’s Zork were
entering a fascinating new world. But what was once novel in the late 1970s
no longer is. Palace Software’s Demoniak from 1991 combined fantasy
elements with androids and interplanetary travel resulting in a wonderful
experience. When it comes to elves, magic spells, and the like, make sure to
add other elements in your product – or hear the dreaded word of “clichéd.”
Core Concepts of Japanese-Influenced Visual NovelsDue to the Japanese origins of the modern-day visual novel, you may not
be familiar with some of the concepts of the genre and its offshoots. As a
developer it’s highly useful to understand these terms. Therefore, before
reviewing some important titles, let’s take a look at some of the core
concepts of the visual novel.
Figure 3-1. The anime aesthetic has gained ground in popular culture since the 1980s
Chapter 3 the Modern Visual noVel

84
AnimeNow pretty much a visual novel staple, anime refers to a specific type
of visual style and animation originating in Japan. This can be either
hand-drawn or computer generated. Anime characters present us with
a wide variety of body proportions and facial features. The latter include
unusually large eyes and an agreed-upon set of default expressions for
most common emotions (see Figure 3-1). Also, hair in anime characters
tends to be more on the colorful and exotic side of things.
Music used in anime-based products, including visual novels, are
mostly upbeat pop songs. This genre is referred to as J-pop, short for
Japanese pop. J-pop in general became popular in its originating country
in the 1990s. It has since attracted fans all over the world.
The earliest Japanese animation, Namakura Gatana, was introduced
in Japanese cinemas in 1917. This 4-minute film told the story of a stingy
samurai with a taste for cheap swords. It was drawn by one Jun’ichi Kōuchi.
Bishoujo (also Galge) GamesThe word bishoujo is Japanese for beautiful girl. It’s also a sub-genre of
the visual novel that features, not surprisingly, a lot of attractive female
characters. Galge is sometimes used as a synonym for this type of game;
this is short for “gal game.”
Bishoujo games aren’t necessarily adult-oriented as many of them
don’t contain any age-restricted material. Think of bishoujo as the more
romantic cousin of eroge, which definitely is not for the whole family (see
Eroge in the following).
Dating SimShort for dating simulator, the concept of dating sims is quite self-
explanatory. The genre focuses on the player trying to impress his or her
Chapter 3 the Modern Visual noVel

85
love interest enough to score a relationship or marriage. Dating sims are
therefore usually somewhat more limited in subject matter than other
types of visual novels. Most dating sims are created with men in mind, but
those for females also exist. Also, same-sex dating sims have been released.
Quite a few dating sims feature similar themes: a high school setting,
a selection of characters to get infatuated by, and a complex set of internal
variables which determine whether you’re romantically successful or not.
Most dating sims can be classified as either bishoujo for male
audiences or otome for female gamers. However, not all bishoujo or otome
games are dating sims.
Doujinshi GamesBecause the visual novel is such a popular genre in Japan (and indeed,
increasingly so in the rest of the world), hobbyists have taken to it with
great enthusiasm ever since the 1990s. A doujinshi game refers to a home-
made visual novel, that is, one not published by any established company.
These types of games can be both fully original creations and fan fiction
based on commercial franchises.
Many doujinshi projects are derivatives of commercial anime
franchises. This can be seen as either a good or a bad thing, depending on
one’s taste. One must always tread carefully in the land of copyrights.
There are literally thousands of doujinshi games available, often as
free downloads, in every genre. However, many home-based creators put
a price on their work with great success. According to Media Create, a
Japanese sales tracking company, in 2007 almost half of the $1.65 billion
anime-based industry in Japan consisted of doujinshi games and other
hobbyist products.2 Some notable artists working in the genre include
Yoshitoshi Abe and Nanae Chrono.
2 www.m-create.com/
Chapter 3 the Modern Visual noVel

86
To avoid legal problems, a doujin mark was created in 2013 (see
Figure 3-2). This is a logo for a license format inspired by the creative
commons public copyright licenses.
ErogeA portmanteau of erotic and game, eroge is a genre of pornographic visual
novels. A blanket term, these types of games are usually classified by their
sub-genres, such as otome (see Otome in the following). Most major
publishers of video games, such as Sony, do not allow eroge games of the
more graphic variety officially published on their systems (in Sony’s case,
the PlayStation consoles).
HentaiThis term refers to any type of adult-themed entertainment produced
in Japan or heavily influenced by the anime aesthetic. There are plenty
of hentai visual novels, comics, and cartoons made all over the world.
Although hurt by piracy, hentai is a multi-billion industry in 2019.
Figure 3-2. The doujin mark
Chapter 3 the Modern Visual noVel
87
IsekaiIsekai refers to a genre of anime and visual novels where the protagonist
visits (or is trapped in) some other world. This can be a parallel universe of
either benign or malicious nature. Many visual novels, such as Air by Key,
can be labeled as isekai.
Kamige/KusogeKamige literally means god game. It refers to visual novels that a gamer
considers some of the best ever made. Kusoge, on the other hand, refers
to human refuse. In the context of visual novels, it’s naturally only used if a
particular game isn’t very enjoyable. Both concepts are subjective, but the
latter seems to enjoy somewhat of an objective status.
KawaiiBasically, kawaii refers to the culture of cuteness in Japan. It covers people,
animals, and basically all things which are found appealing in a superficial
sense. Many visual novels are presented in the kawaii-aware context with
the characters therein being shy but outwardly attractive. Anything cute
and adorable is kawaii.
Kinetic NovelThis term refers to a linear type of visual novel where the player cannot
make any choices regarding the flow of the story. Basically the only form
of control a player has in a kinetic novel is with the reading speed and/
or the language selection of the story. Examples of this genre include The
Spell by Hangover Cat Purrroduction and Highway Blossoms: Remastered
by Studio Élan.
Chapter 3 the Modern Visual noVel
88
OtakuUsed as a somewhat of a pejorative in Japan, otaku simply refers to any
enthusiast or fanatic. In the west it usually refers to someone who’s a fan of
Japanese popular culture, including anime and visual novels.
OtomeThis is a type of visual novel targeted at female audiences. Otome games
feature a female protagonist who seeks the affections of various attractive
male characters. Interestingly, many titles in this genre feature fully voice
acted dialogue instead of simply presenting it on the screen the traditional
way. Otome games may or may not include erotic visuals.
Magical GirlfriendNot to be confused with The Magical Girl (see the following), a magical
girlfriend is an attractive girl the (usually) male protagonist falls in love
with – and this time, the love is requited. The often down-on-his-luck guy
gets lucky for once, but it’s really not that simple.
Magical girlfriends, although loyal and wonderful in every way, tend
to sometimes inadvertently cause mishaps due to owning said magical
powers. Also, these women may always be human with a touch of magic;
some of them can be aliens, witches, angels, or even demons. This
further adds to the dramatic possibilities of a common Joe discovering an
extraordinary woman.
Mahou Shoujo (The Magical Girl)This is a popular trope in many franchises. Mahou Shoujo simply refers
to the adventures of attractive, young women with actual magical or
otherwise superhuman abilities. Sometimes the term majokko is also used.
Chapter 3 the Modern Visual noVel

89
The origin for this trope comes from, perhaps surprisingly, Bewitched,
an American sitcom that ran from 1964 to 1972. Two famous Japanese
animators (i.e., Mitsuteru Yokoyama and Fujio Akatsuka) have said the
TV show inspired them to introduce the trope into the world of otaku.
The Magical Girl has since been a staple in it for decades.
MangaThis oft-heard term refers to comic book art produced in Japan using specific
techniques. This style of drawing was created in the nineteenth century, and
it remains a popular art form for all ages in Japan and the rest of the world.
A lot of manga is drawn in black and white, although colorful manga
is also being produced. The first known manga magazine, Eshinbun
Nipponchi, was released in 1874. Created by Kawanabe Kyōsai (1831–1889)
and Nozaki Bunzō (1829–1894), the magazine folded after three issues.
However, it set in motion a phenomenon which shows no signs of slowing
down well over a century later.
Figure 3-3. An example of a mecha battle robot
Chapter 3 the Modern Visual noVel

90
MechaIn Japan the word mecha refers to any type of machinery. In a manga
or anime-related context, it often translates to “giant robots piloted by
humans” (see Figure 3-3), a rather common premise in general popular
culture, too. The sub-genre of combining mecha is also fairly popular;
in it individual robots can be seen combining to form one larger, more
powerful robot.
Moe(ge)An exceptionally light-hearted visual novel can be classified as moe(ge).
The characters in this genre tend to be even more cheerful and colorful
than in your run-of-the-mill anime. Some examples of moe(ge) include
Moe! Ninja Girls by NTT Solmare and LoveKami -Divinity Stage- by
MoeNovel.
Nakige/UtsugeSome sub-genres in visual novels are truly unique. Nakige refers to a crying
game, which aims to cause a powerful emotional reaction in the player.
This may be triggered by either great feelings of loss or joy.
Utsuge, on the other hand, stands for pretty much the opposite of
nakige, aiming to be as depressing an experience as possible. To each
gamer their own.
TsundereTsundere refers to the process of a previously hostile character becoming
more warm and open to other characters. This concept is crucial for many
games in the bishoujo and dating sim genres.
Chapter 3 the Modern Visual noVel
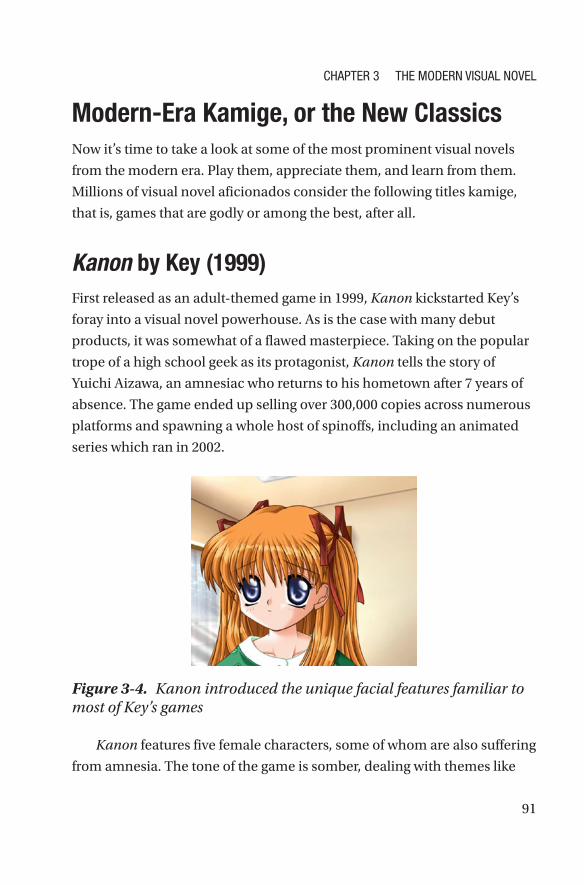
91
Modern-Era Kamige, or the New ClassicsNow it’s time to take a look at some of the most prominent visual novels
from the modern era. Play them, appreciate them, and learn from them.
Millions of visual novel aficionados consider the following titles kamige,
that is, games that are godly or among the best, after all.
Kanon by Key (1999)First released as an adult-themed game in 1999, Kanon kickstarted Key’s
foray into a visual novel powerhouse. As is the case with many debut
products, it was somewhat of a flawed masterpiece. Taking on the popular
trope of a high school geek as its protagonist, Kanon tells the story of
Yuichi Aizawa, an amnesiac who returns to his hometown after 7 years of
absence. The game ended up selling over 300,000 copies across numerous
platforms and spawning a whole host of spinoffs, including an animated
series which ran in 2002.
Kanon features five female characters, some of whom are also suffering
from amnesia. The tone of the game is somber, dealing with themes like
Figure 3-4. Kanon introduced the unique facial features familiar to most of Key’s games
Chapter 3 the Modern Visual noVel

92
past grudges and teenage cynicism. It’s not all dark, however, as Kanon
includes its fair share of uplifting miracles and great food. The game was
most heavily criticized for its predictable and unsatisfying ending. Also,
Kanon introduced to the world a drawing style which is somewhat divisive:
not all gamers are happy with those gigantic wide-set eyes Key likes to
adorn their characters with (see Figure 3-4).
Air by Key (2000)Just like Kanon, Air was first released as an adult-oriented game (i.e.,
eroge) for Windows and later ported as a non-erotic game for the
PlayStation 2 and Dreamcast consoles. A sequel to the much less
impressive Kanon, the game tells the story of Yukito, a traveling showman
and puppet master looking for a “flying girl.” Set in Kami, a quiet seaside
town in Japan, Air is a harrowing tale of longing with a distinctively surreal
slant. It featured the same distinctive graphical style as its predecessor.
Air is split into three distinct chapters, namely, Dream, Summer, and
Air, each featuring a different female love interest. The story is focused
on the theme of loss and told with the help of reincarnation, a religious
sect, and a thousand-year familial saga involving the aforementioned
flying girl. Yukito and his three love interests aside, Air features a couple of
surprisingly well-written and humorous side characters as well.
An emotional roller coaster, Air was criticized for lack of dramatic
buildup and the rather abrupt and shocking ending. Being Key’s second
ever offering, the game was rough around the edges here and there in
terms of presentation or lack thereof. However, Air remains a highly
replayable visual novel and a bona fide genre classic thanks to its rich
atmosphere and powerful drama. There’s never a tedious moment in
Kami, it seems.
Chapter 3 the Modern Visual noVel
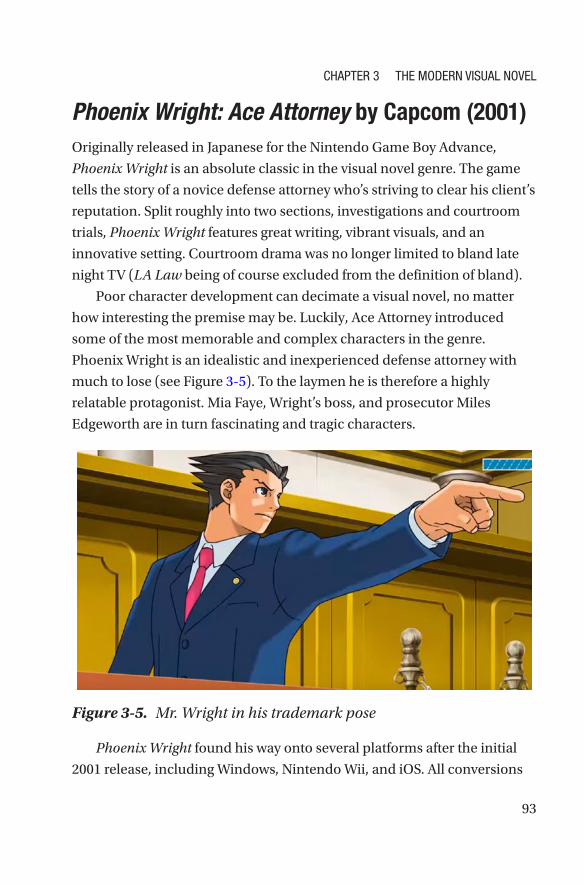
93
Phoenix Wright: Ace Attorney by Capcom (2001)Originally released in Japanese for the Nintendo Game Boy Advance,
Phoenix Wright is an absolute classic in the visual novel genre. The game
tells the story of a novice defense attorney who’s striving to clear his client’s
reputation. Split roughly into two sections, investigations and courtroom
trials, Phoenix Wright features great writing, vibrant visuals, and an
innovative setting. Courtroom drama was no longer limited to bland late
night TV (LA Law being of course excluded from the definition of bland).
Poor character development can decimate a visual novel, no matter
how interesting the premise may be. Luckily, Ace Attorney introduced
some of the most memorable and complex characters in the genre.
Phoenix Wright is an idealistic and inexperienced defense attorney with
much to lose (see Figure 3-5). To the laymen he is therefore a highly
relatable protagonist. Mia Faye, Wright’s boss, and prosecutor Miles
Edgeworth are in turn fascinating and tragic characters.
Phoenix Wright found his way onto several platforms after the initial
2001 release, including Windows, Nintendo Wii, and iOS. All conversions
Figure 3-5. Mr. Wright in his trademark pose
Chapter 3 the Modern Visual noVel

94
were universally praised, save for the Wii version due to it sticking to the
low-resolution graphics of the original.
This game set in motion a phenomenon of courtroom visual novels with
numerous sequels and related products. The latter include an anime series
and a feature length movie, which some critics consider the best video game
movie so far. Phoenix Wright is a great example of introducing new settings
into a somewhat stale genre and creating a major franchise in the process.
Digital: A Love Story by Christine Love (2010)Played in an interesting setting of 1980s operating system, Digital is
basically a tale of romance. The player gets to communicate with ∗Emilia,
a love interest via an old-school, pre-Internet network. Set in 1988, the
two team up to study and resolve the sudden disappearance of a number
of artificial intelligences. Rinsed in retro aesthetics (see Figure 3-6) and
early era Internet lore, Digital offers an engaging and poetic experience of
high- tech drama.
Figure 3-6. The art direction in Digital: A Love Story was a nod to old-school operating systems.
Chapter 3 the Modern Visual noVel

95
Digital was not surprisingly well-received. Its Spartan visuals and to-
the- point writing recreated an era wonderfully. The silent protagonist gave
the game an extra layer of mystery.
Released for free in early 2010, Digital: A Love Story went on to
entertain tens of thousands of gamers. Its developer, Christine Love, went
on to produce a number of successful titles. Sometimes a first-class free
product is what you need to penetrate a market. This seems to be the case
with quite a few developers of visual novels, in fact.
Katawa Shoujo by Four Leaf Studios (2012)Even though Katawa Shoujo features the most clichéd of visual novel
champions, a high schooler, the game presents a twist: most of the
characters have disabilities. The aforementioned protagonist, Hisao
Nakai, is transferred to a special high school after a heart attack caused by
his cardiac arrhythmia. What ensues is a fine dating simulator featuring
five potential romantic prospects, namely, Lilly, Emi, Hanako, Rin, and
Shizune. All of them have disabilities, ranging from blindness to burn scars.
Katawa Shoujo, Japanese for “Disability Girls,” was well-received and
garnered praise for featuring, but not fetishizing, people with disabilities.
Its visuals, the characters in particular, are rather impressive, too. Although
the game features some adult content, it can be skipped without hindering
the flow of the story too much.
A community-based game, Katawa Shoujo’s origins can be traced to
the 4chan image board, where the creators first came together. A team of
several dozens of visual artists, writers, and programmers then managed
to create something both original and compelling. In development since
2007, the game was finally released in early 2012 as a free download for
most major platforms.
Chapter 3 the Modern Visual noVel

96
Clannad by Key (2004, 2015)Originally released in 2004 as a Japanese-only game, Clannad was brought
to English audiences in late 2015. Typical of many visual novels, the game
features a troubled high schooler as its protagonist (see Figure 3-7). Not
only a commercial success on its own, the game went on to branch into a
whole line of products. These include books, an animated series, and an
animated film. Clannad is a sequel to Air.
The plot in Clannad centers on your protagonist’s relationships with
five other students at a fictional private high school. These are girls with
their strengths and challenges. You act as a kind of mentor, being a senior
after all, doing your part to help them with their school life. But Clannad
is far from mundane in its subject matter. In addition to the school and its
related locations, you also get to experience an Illusionary World and its
invisible denizen. This haunting setting takes place during the second part
of the game, 7 years after high school.
Figure 3-7. Expressive characters help make Clannad’s setting less mundane
Chapter 3 the Modern Visual noVel
97
It takes between 50 and a hundred hours, depending on one’s skill
and reading speed, to experience Clannad and its various endings in full.
Although not without its flaws (such as errant letters and typos), the game
is outstanding. Dealing with themes such as family life and loss, Clannad
was a highly successful multi-platform release, appearing also on consoles
such as PlayStation 3 and Xbox 360, among others.
Her Story by Sam Barlow (2015)Games using the approach called full motion video (FMV) have a bad
reputation for a reason. Most of them are lurid 1990s titles with little or
no substance and few gripping dramatic elements. However, Her Story is
an exception. The game is centered around a collection of videos from a
bygone interrogation concerning a man gone missing. A user interface
reminiscent of 1990s desktop operating systems lures you in as you try to
piece the story together (see Figure 3-8).
A winner of numerous accolades, Her Story is a unique combination
of minimalism, intense acting by the leading star Viva Seifert, and a heavy
atmosphere. While the game consists mostly of typing in keywords and
notes, it never fails to entertain. Her Story is a surprisingly long game,
easily taking several hours to complete. Little touches like reflections of
fluorescent lights on your virtual computer screen keep you going until you
reach the end of the story.
Chapter 3 the Modern Visual noVel
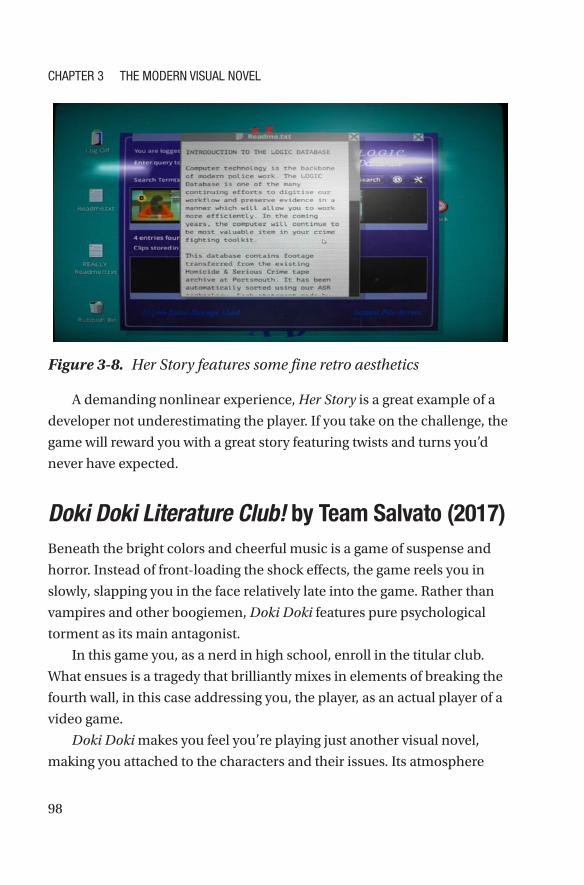
98
A demanding nonlinear experience, Her Story is a great example of a
developer not underestimating the player. If you take on the challenge, the
game will reward you with a great story featuring twists and turns you’d
never have expected.
Doki Doki Literature Club! by Team Salvato (2017)Beneath the bright colors and cheerful music is a game of suspense and
horror. Instead of front-loading the shock effects, the game reels you in
slowly, slapping you in the face relatively late into the game. Rather than
vampires and other boogiemen, Doki Doki features pure psychological
torment as its main antagonist.
In this game you, as a nerd in high school, enroll in the titular club.
What ensues is a tragedy that brilliantly mixes in elements of breaking the
fourth wall, in this case addressing you, the player, as an actual player of a
video game.
Doki Doki makes you feel you’re playing just another visual novel,
making you attached to the characters and their issues. Its atmosphere
Figure 3-8. Her Story features some fine retro aesthetics
Chapter 3 the Modern Visual noVel

99
is light at first, only to break your heart in less than an hour or so into the
proceedings. Lead programmer Dan Salvato has stated he has a love-
hate relationship with anime. He apparently wanted to create a game
that appeals to both anime enthusiasts and non-enthusiasts. One reason
behind the game is indeed criticism for the over-used light and cheerful
aesthetic found in many games in the genre.
A free game, Doki Doki has been downloaded in the tens of millions.
It also gathered a huge cult following in just a few months after its release.
Obviously, since the main product is provided for free, the developer
makes money off of it mostly via selling downloadable content (DLC), such
as soundtracks and other types of media.
Doki Doki Literature Club! is quite an experience with brilliant visuals
(see Figure 3-9), especially when it comes to the characters, drawn by
someone who calls themselves Satchel. The game demonstrates all the
power a good, well-written visual novel holds in the current year. The
visual novel, as a genre, is not only alive; it’s gaining new ground.
Figure 3-9. The visuals in Doki Doki Literature Club! are impressive and deceptively charming
Chapter 3 the Modern Visual noVel

100
Open Sorcery by Abigail Corfman (2017)With a unique protagonist and atmosphere, Open Sorcery is a tech noir text
adventure about an otherworldly firewall. BEL/S is a fire elemental bound
to some C++ code. The heroine can either use her powers to protect or to
destroy. Various threats need to be first scanned and then dealt with. These
include a variety of malicious spirits, doing their best to ruin someone’s
day with their respective powers. You can either attempt to fight them or
to learn from them through thorough investigation. Human beings can be
consulted, too, for their take on the proceedings.
Presented as a text-only game without other audiovisual elements
simply adds to the tech-heavy and intense cyberpunk atmosphere. BEL/S
is on a quest for awareness and the displayed inner dialogue reflects that
well. Elements of the surreal intermingle with technology effortlessly in
Open Sorcery, providing an entertaining adventure in cyberspace complete
with numerous different endings.
Simulacra by Kaigan Games (2017)Found footage is a popular trope in films in which a substantial part of the
story is presented as if it were discovered on video recordings. The events
onscreen are usually seen through the camera or the characters involved in
the proceedings. Based on this, Simulacra tells the story of Anna, who’s gone
missing. It’s your job to find out what happened to her using the videos and
other data stored on her cell phone. Simulacra shows not all quality visual
novels need to adhere to the anime aesthetic (see Figure 3- 10).
The somewhat sinister premise in Simulacra is beautifully executed
using nods to modern social media and excellent writing. Sifting through
Anna’s emails and other media, while voyeuristic, is thrilling. Although the
voice acting is weak in some places, the atmosphere in the game is top-
notch, only seriously dampened by overtly grating audio cues. The game
Chapter 3 the Modern Visual noVel

101
interface is polished and a pleasure to use, conveying the aesthetics of
current-day smart phones to a tee.
The game features a few sub-games, such as picture decryption
segments. Luckily, these are few and far between and don’t ruin the
atmosphere. The puzzles in Simulacra tend to be on the easy side.
Comparisons can be made with the mighty Doki Doki Literature Club!,
but Simulacra is even more engaging due to its realism and everyday
relatability. Like all good visual novels, the game also has plenty of
replayability value thanks to several different endings. You’ll never look at
social media the same way again after playing some Simulacra.
Simulacra: Pipe Dreams (2018)Fueled by the success of the first Simulacra, Kaigan Games released a free-
to- play sequel, Pipe Dreams, a year later. Although not as lengthy as the
first Simulacra, this game, too, provides a couple of hours of nonstop thrills
with no major flaws.
Figure 3-10. Simulacra reels you in with its realism
Chapter 3 the Modern Visual noVel

102
Once again you’re at a cell phone, going through its contents. This
time you’re communicating with your friend Teddy, who’s fallen on some
hard times. As is often the case these days, you communicate with other
characters via text messages. The odd video recording from one of them
breaks up the potential monotony well. Pipe Dreams is riddled with
amusing fake ads to demonstrate the phenomenon of ever-increasing
commercialization of our time.
Simulacra: Pipe Dreams works on many levels. For one, it’s a critique
of the modern video game industry; a quaint minigame is used to
demonstrate the flawed, overblown nature of the business. The other major
theme is addiction in general, which is naturally intertwined with the
aforementioned industry. Although said minigame becomes quite repetitive
(i.e., FlapeeBird, a tribute to Flappy Bird by Dong Nguyen), it never turns
into a chore. Simulacra: Pipe Dreams is a fine sequel to a great visual novel.
How We Do It – Modern Tools for Visual NovelsAlthough some of the old-school tools from the earlier decades can still
be used to create perfectly compelling text adventures, the majority
of modern games are naturally created with a new generation of
software. The main software focus of this book is on Ren’Py, Twine, and
TyranoBuilder, but it’s useful for any developer to know what other tools
are on offer for making these types of video games. Let’s take a look at
these modern tools and what they bring to the table.
Ren’PyOut of all the software presented in this chapter, Ren’Py (www.renpy.org/)
is the closest to a traditional programming language. It may very well be
the most complicated piece of software out of the five featured here, but
Chapter 3 the Modern Visual noVel

103
what Ren’Py offers is generous amounts of flexibility with very few
limitations. It’s simply in a league of its own, having the most features
while being relatively easy to master.
Ren’Py started its run way back in 2004 and it’s still going strong. Many
popular visual novels have been developed with it, including the wildly
successful Doki Doki Literature Club! and Digital: A Love Story, to name
just two. The system deploys for numerous platforms, that is, Windows,
Mac, Linux, iOS, and Android. Best of all, it’s a free download with no
hidden fees at any stage of the development. Games made with Ren’Py are
also quite easily localized to any language you can think of.
There’s very few limitations to the kind of audiovisual finesse you can
implement with Ren’Py, from impressive scene transitions to playback of
most audio and video formats to add atmosphere to your games. We’ll be
looking in depth at Ren’Py later in the book, but at this stage you should
just know it’s the reigning champion of visual novel engines, going from
strength to strength with each update it receives.
TwineTwine (twinery.org) is a hypertext-based game engine. Like Ren’Py, it’s
open source and completely free to use. Deploying for online, Windows,
Mac, and Linux, the software lends itself well to more minimalist games.
It’s great for beginners, as it doesn’t require any programming experience.
However, more advanced game makers can extend the capabilities of
Twine via its JavaScript and Cascading Style Sheet (CSS) support. While
many games made with Twine are of the text-only variety, you can inject
some amount of audiovisuals into your projects, too. It does pale in
comparison with the support for multimedia in Ren’Py and some other
systems featured in the segment. Keep that in mind if video files and/or
exotic audio formats are your thing.
Chapter 3 the Modern Visual noVel

104
Now, there are basically three choices for the overall approach to your
Twine projects, called Harlowe, Snowman, and SugarCube. For one, they
define the presentational style of your adventure. Harlowe provides the
classic Twine look. Snowman represents the most minimalistic approach
for more advanced creators, while SugarCube is the most modern style set
with support for saving games out of the box.
Twine comes in two flavors, Twine 1 and Twine 2. Although the latter
is more recent and thus advanced, some developers prefer the first version
so it’s still available for download. The user interface in Twine is graphical
and thus user-friendly. Not only is the development system available for
your desktops, you can also try making games online at the official site
using Twine 2: http://twinery.org/2/#!/welcome
A good example of a well-made Twine adventure is Open Sorcery by
Abigail Corfman. There’s something quite charming about the whole
Twine aesthetic.
AdriftSometimes called the easiest-to-use tool for creating text adventures, Adrift
is free to download. The mouse-driven developer interface is certainly
comfortable to use (see Figure 3-11). While being Windows-only software,
the system deploys for other platforms, that is, macOS, Linux, and online.
Game data is organized well in the Adrift editor, consisting of separate
categories for locations, items, characters, and so on. Although the system
is designed for old-school adventures (i.e., text-only interactive fiction)
instead of visual novels, some support for static images and audio files is
included. Some more advanced features, like array data structures and
dynamic variables, can also be easily implemented in Adrift without any
issues. However, should a debutante developer get intimidated by these
more advanced features, they can all be made to disappear by switching on
a “Simple Mode.”
Chapter 3 the Modern Visual noVel

105
Being completely mouse-driven and not requiring any coding, Adrift
is one for the beginners. A cozy piece of software, it is intuitive and fun
to use. From a consumer’s point of view, Adrift also has an impressive
auto-mapping feature in its output, making the gamer, too, feel more
comfortable playing these games. Adrift is well worth the small donation
the developer is asking for.
You can get Adrift here: www.adrift.co
TyranoBuilder by STRIKEWORKS (2015)For a measly $15 or so, you get a beginner-friendly, intuitive, and
powerful tool for making current-generation visual novels. That tool is
TyranoBuilder, and although it doesn’t let you go “under the hood” like
Figure 3-11. Adrift has a logical and well-organized user interface
Chapter 3 the Modern Visual noVel

106
some other software, its output is fully commercially viable. Visually,
it’s on par with Ren’Py, with extensive support for video and image file
formats. In fact, TyranoBuilder one ups Ren’Py in the visual category, since
it includes an impressive character animation system called Live2D. Said
system may be implementable in Ren’Py, but probably not as easily.
TyranoBuilder is a very friendly piece of software. Even prior to
getting down and developing with it, all important game settings are
presented in an understandable manner. The interface itself subscribes to
a so-called “drag and drop” approach, where various actions (e.g., display
text, change scene) are moved onto each scene to eventually make a
game. Positioning characters in these scenes is fun and instinctual, as it
should be, and an included asset library of visuals will get you started just
fine. A preview window (see Figure 3-12) is summoned atop your project
file for easy testing.
Figure 3-12. TyranoBuilder offers a clean, intuitive interface and a handy, floating preview window
Chapter 3 the Modern Visual noVel

107
The TyranoBuilder main application is available for both Windows and
macOS. The software deploys for Windows, macOS, and online. Additional
platforms (i.e., iOS and Android) are supported via third-party software.
You can get TyranoBuilder here: http://tyranobuilder.com/buy
VN MakerDegica is behind the very successful RPG Maker line of software. In 2017
they released the VN Maker (Visual Novel Maker) tool dedicated to the
development of visual novels. Geared toward beginners, it’s easy enough
to use, but is let down by unpredictable behavior and bugs. Also, at around
$55, it’s somewhat expensive especially when considering its competition
of completely free tools.
Like TyranoBuilder, VN Maker includes the very impressive Live2D
character animation technology. However, this time it’s only available
as a $20 DLC (i.e., downloadable content). The user interface, while not
terrible, isn’t as intuitive as its competitors’ efforts. The learning curve is
steeper. Thankfully, some good tutorials and other resources have become
available since the product’s initial release. For advanced developers, the
software offers additional possibilities in the form of JavaScript support.
Also, localization in VN Maker into any language is well executed.
One of the reasons we won’t be delving in depth into VN Maker
in this book is in its issues. Contrast the slowdowns and bugs with the
price and it’s apparent VN Maker isn’t the best choice for development.
The potential, however, is there. Who’s to say what kind of visual novel
powerhouse this software may transform into after a few updates?
You can get VN Maker here: http://visualnovelmaker.com
Chapter 3 the Modern Visual noVel

108
In ClosingAfter reading this chapter, you’ll have learned about the following topics:
• The most common tropes related to visual novels
• The most noteworthy modern visual novels and what
factors contributed to their success
• Which tools are prominently in use for visual novel
creation today
In the next chapter, we’ll get our feet wet with visual novel
development by actually working in Ren’Py, TyranoBuilder, and Twine.
Chapter 3 the Modern Visual noVel
109© Robert Ciesla 2019 R. Ciesla, Game Development with Ren’Py, https://doi.org/10.1007/978-1-4842-4920-8_4
CHAPTER 4
Working in Ren’Py, Twine, and TyranoBuilderIn this chapter we’ll be taking a hands-on approach with the three featured
tools for visual novel creation: Ren’Py, Twine, and TyranoBuilder. We’ll
go through the main elements to the user interfaces for each system and
explore the main features found in said tools. Although the main focus of
this book is on Ren’Py due to its most robust feature set and customization,
the other two tools both offer compelling approaches which may be more
suitable for some developers.
The tutorials in this chapter will be kept concise and simple. More
advanced techniques for the aforementioned three tools will be explored
later in this book in the form of three mini adventures. But for now, let’s
simply recap the main features of the three, shall we (see Table 4-1)?
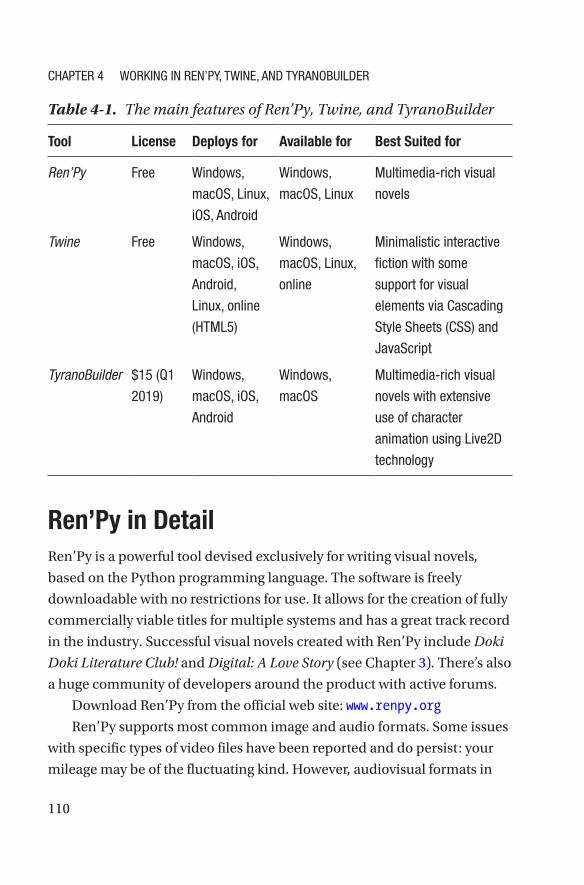
110
Ren’Py in DetailRen’Py is a powerful tool devised exclusively for writing visual novels,
based on the Python programming language. The software is freely
downloadable with no restrictions for use. It allows for the creation of fully
commercially viable titles for multiple systems and has a great track record
in the industry. Successful visual novels created with Ren’Py include Doki
Doki Literature Club! and Digital: A Love Story (see Chapter 3). There’s also
a huge community of developers around the product with active forums.
Download Ren’Py from the official web site: www.renpy.org
Ren’Py supports most common image and audio formats. Some issues
with specific types of video files have been reported and do persist: your
mileage may be of the fluctuating kind. However, audiovisual formats in
Table 4-1. The main features of Ren’Py, Twine, and TyranoBuilder
Tool License Deploys for Available for Best Suited for
Ren’Py Free Windows,
macOS, Linux,
iOS, Android
Windows,
macOS, Linux
Multimedia-rich visual
novels
Twine Free Windows,
macOS, iOS,
Android,
Linux, online
(HTML5)
Windows,
macOS, Linux,
online
Minimalistic interactive
fiction with some
support for visual
elements via Cascading
Style Sheets (CSS) and
JavaScript
TyranoBuilder $15 (Q1
2019)
Windows,
macOS, iOS,
Android
Windows,
macOS
Multimedia-rich visual
novels with extensive
use of character
animation using Live2D
technology
CHApTer 4 WOrking in ren’py, TWine, AnD TyrAnOBuiLDer

111
general are well supported in Ren’Py, and there shouldn’t be many issues
concerning them.
Debuting in 2004, Ren’Py is still a frequently updated and very popular
tool for visual novel development, showing no signs of stagnating anytime
soon. Now, let’s get started with this fine piece of software.
How Ren’Py WorksRen’Py is basically split into three components: the launcher program (see
Figure 4-1), the script files, and the audiovisual elements (i.e., images and
audio files). The launcher is basically a project manager which allows you
to create and access the various game projects you may be working on in a
streamlined fashion.
Figure 4-1. The Ren’Py launcher screen
CHApTer 4 WOrking in ren’py, TWine, AnD TyrAnOBuiLDer
112
Now, all script files in Ren’Py have the same file extension of .rpy
(e.g., script.rpy). These are of the common text-file variety and can be thus
edited with practically any text editor. Ren’Py doesn’t have a built-in editor
for its script files per se. However, a selection of free text editors is available
for download on both the Ren’Py web site and from inside the Ren’Py
launcher (i.e., if one is not installed, the program will provide you with a
selection of editors).
Starting a New ProjectProjects are easily created by simply clicking “Create New Project” in
the launcher. This new project will be added to the list displayed on the
launcher window. After clicking said link, you’ll be asked to select a file
directory and enter a name for your game. All of your project files will be
residing inside the chosen directory.
Next, you’ll get to choose a screen resolution for this project. On offer
are 1066 x 600, 1280 x 720 (HD), and 1920 x 1080 (Full HD). This choice
should usually depend on the size of the project artwork. Naturally,
it’s easier to scale down artwork rather than to scale up and still keep
it presentable (i.e., artwork in 1920 x 1080 looks fine scaled down to
1280 x 720, but not necessarily vice versa). Even older computers are
perfectly capable of running Ren’Py visual novels in Full HD resolution
as the projects aren’t power-hungry unlike, say, games of the 3D variety.
Again, the decision for the resolution should rest on the (projected)
specifications of your art files.
Finally, you’ll be asked to select a color theme for your game. Pick
one that suits your sensibilities best; this color theme can be changed
later if you so choose. After this step, a skeleton project template will be
created. Support for setting reading speed, loading, and saving will be
automatically generated for each new game in Ren’Py. Clicking “launch
project” in the launcher will let you try out this template right away.
CHApTer 4 WOrking in ren’py, TWine, AnD TyrAnOBuiLDer

113
The Ren’Py WorkflowSo the launcher serves as the central hub for your Ren’Py projects. You
could access the various files manually from the project directory, but it’s
often easier to do so via the launcher. In addition, you can perform several
handy special actions with the program (see Table 4-2).
Table 4-2. The Ren’Py launcher actions
Action Description Useful when
Navigate Script
Allows you to quickly find files,
labels, and other items in your
project
pinning down specific parts of
your project
Check Script (Lint)
runs the Lint script to make sure
your game scripts are error-free
encountering unusual behavior
from your visual novel project,
checking for errors prior to
release, just in case
Change/Update GUI
Allows you to change the color
scheme, user interface buttons,
and other aspects of the in-game
graphical user interface (gui)
The need for a new look for your
visual novel emerges
Delete Persistent
Deletes saved games and other
persistent data from your project
Testing your game from scratch,
ironing out any strange behavior
Force Recompile
recompiles all script files in your
project
ironing out any strange behavior,
importing an older project into a
newer version of ren’py
Build Distributions
Creates the executable files
of your game in the requested
format (e.g., pC, macOS, Linux)
you’re ready to distribute
your game to your requested
platforms
(continued)
CHApTer 4 WOrking in ren’py, TWine, AnD TyrAnOBuiLDer

114
As you can see, Ren’Py is quite packed with features. They may seem
daunting for the beginning visual novelist, but the core principles of the
software aren’t all that complicated. It’s just that the team behind Ren’Py
perhaps opted for more traditional methods of implementing a workflow.
In time and with enough motivation, you’ll be generating translations and
deploying for Android like it’s your second nature.
The Basics of Ren’Py ScriptingRen’Py is a very flexible yet simple scripting language. We’ll now take a
look at the fundamentals of what it all looks like and how it works. The
following is a rather rudimentary Ren’Py game script which nonetheless
demonstrates how to develop visual novels using Ren’Py.
Table 4-2. (continued)
Action Description Useful when
Android Starts the export process for
Android by installing the free
Ren’Py Android Packaging Tool (RAPT)
you’re releasing your visual novel
for the Android platform
iOS Starts the export process for iOS
by installing the free Renios tool
you’re releasing your visual
novel for the iOS platform (ipad,
iphone)
Generate Translations
Translate all in-game writing to
other languages using language
templates
The need or opportunity to
release your games for additional
markets arises
Extract Dialogue
exports in-game dialogue (or
other text) to an external file in
regular text and/or spreadsheet
format
proofreaders or other team
members need to read the
material without playing the
game
CHApTer 4 WOrking in ren’py, TWine, AnD TyrAnOBuiLDer

115
Note Character image files should share the names of the shorthand descriptions in the script; for example, in our little listing the default portrait for Markus should be named mar.png, in accordance with the shorthand name defined in the script (shown in bold). These files should also be placed in the images directory of your project.
init:
$ mar = Character('Markus')
image home = Image("home_of_markus.jpg")
image markus happy = Image("markus_happy.png")
image markus sad = Image("markus_sad.png")
label start:
scene home
show markus happy
mar "Here I am, at home and happy!"
hide markus happy
show markus sad
mar "But the milk seems to have run out."
"Markus is visibly saddened by the lack of dairy products."
hide markus happy
show mar
mar "Is it too late to go to the grocery store?"
CHApTer 4 WOrking in ren’py, TWine, AnD TyrAnOBuiLDer

116
Scripts in Ren’Py start with the initialization statement (i.e., init:)
under which we define the backdrop and character graphics and other
audiovisual assets in a visual novel. These can be then later referenced in
the game in an elegant fashion. In our example, the image file home_of_
markus.jpg is associated with the variable home. Whenever our protagonist
is at home and the image file needs to be summoned, it can be done by
simply invoking the variable name (i.e., home) instead of the full file name
(i.e., home_of_markus.jpg).
Similarly, whenever we need to present a specific character graphic,
such as a sad or a happy Markus, we assign these sad and happy character
image files with variables and invoke those instead of the file names. In our
example, only the command of “show markus happy” is needed to display
a happy protagonist. No need to use potentially complicated file names to
stain our source code. In the preceding text, we have only two states for the
protagonist (i.e., happy and sad), but Ren’Py naturally allows for as many
states as you need to convey different emotions.
Now, the game proper begins with a label statement (i.e., label start:).
It’s after this point that things begin appearing on your screen. Labels
are “jump cuts” in a Ren’Py game, which are usually triggered by user
choices. Labels can be thought of as scenes and moving between them as
scene changes. In our more basic example, there’s only one label and user
interaction has no bearing on the proceedings: the player is simply clicking
to see the next piece of dialogue with no choices available. You may name
these label elements any way you wish (e.g., label work: or label holiday:).
Right after our label, there’s a character definition statement. We
simply associate the arbitrarily chosen variable m with the character name
Markus. After this point the letter “m” is used to display dialogue spoken
by said character. The words “Here I am, at home and happy!” will be then
displayed onscreen in a typewriter-like fashion, as is often the case with
visual novels. It’s all quite simple and effective. Let’s next take a look at
some of the core elements in Ren’Py (see Table 4-3).
CHApTer 4 WOrking in ren’py, TWine, AnD TyrAnOBuiLDer

117
Table 4-3. Ren’Py language key elements
Element/Statement
Description Example(s) of Use
init: initialization label. used to
declare file name aliases
and other persistent data.
is typically followed by
image definitions
init:
image garage = Image
("garage.jpg")
image used to define aliases to
image files
image billy happy =
Image("billy.jpg")
image billy angry =
Image("billy2.jpg")
label Labels assign aliases to
specific access points in the
program listing
label garage:
"We're in the garage!"
Character macro
gives a shorthand alias to a
game character
$ b = Character('Billy')
$ c = Character('Christopher')
scene Deletes all visuals onscreen
before summoning a new
background graphic
scene garage
show Shows a character portrait
on top of the background.
you may give additional
descriptive terms to your
images, such as "James
happy" or "James angry"
show billy happy
(continued)
CHApTer 4 WOrking in ren’py, TWine, AnD TyrAnOBuiLDer

118
Creating User Interaction: MenusAlthough a genre of fully linear visual novels exists (called the kinetic
novel), it’s generally a good idea to give the player room to maneuver in
your adventures. For this, we introduce the menu element. These are used
in combination with labels and our new friend, the jump command. See
the following listing for an example of said element.
Table 4-3. (continued)
Element/Statement
Description Example(s) of Use
hide Hides a character portrait hide billy happy
Say statement
Outputs text onscreen,
either for narrative purposes
or assigned to a character
using the character macro
"The air is pregnant with
silence."
b "Christopher! Are you
here?"
c "Yes, Billy. I'm here."
Transitions Fade images smoothly using
a variety of effects (e.g.,
fade, dissolve). Summoned
by the command with
show billy angry
with fade
hide billy angry
with dissolve
play
sound
plays an audio file in one
of the numerous formats
supported by ren’py
play sound "soundfx1.ogg"
pause pauses the game. if a value
in seconds is omitted, the
game will remain paused
until the player presses a
mouse button
pause 2.0
CHApTer 4 WOrking in ren’py, TWine, AnD TyrAnOBuiLDer

119
Notice how we’re using Ren’Py character aliases for easy formatting,
referring to both Christopher and Billy simply as c and b, respectively, as
defined in Table 4-3.
b "Hey, Christopher, wanna get out of here?"
pause 2.0
menu:
"Yes. Let's go.":
jump outsideworld
"No. Let's stay put.":
jump stayput
label outsideworld:
c "Ah. Fresh air at last!"
jump endstory
label stayput:
c "Well, the garage *is* a pleasant space."
jump endstory
label endstory:
"And so ends our monumental tale."
play sound "fanfare.ogg"
Indentation and Text BlocksOne of the most common causes for errors in Ren’Py is the incorrect
use of indentation. The language is very sensitive to whitespaces and
even slightly off text placement. An incorrectly formatted script simply
won’t run in Ren’Py. The language interprets your script in blocks of text,
which need to adhere to a specific logic. In general, it’s a good idea to use
four spaces for making new text blocks, as is the case with the following
example.
CHApTer 4 WOrking in ren’py, TWine, AnD TyrAnOBuiLDer

120
"This here sentence is a part of block one."
if True:
"This sentence is part of a second block."
"Yes, this sentence is also part of a second block."
"Would you have guessed it? This belongs in said block, too."
"And here we go back to block one."
You must keep the amount of whitespaces (i.e., empty characters)
exactly the same in each block or Ren’Py gets very confused. In our
example, block one statements feature zero whitespaces before them. In
the second text block, however, each of the statements has four whitespaces
before it. Should any one of the statements in the second block feature a
different number of spaces before it, the program wouldn’t run.
Conditional Statements: if, elif, elseIn the previous listing, a new element peeked out at as the mighty if, that is,
the conditional statement. These are used to examine the state of variables.
Now, variables are arbitrarily named temporary storage elements for
recording and manipulating in-game information, such as a character’s
energy level or other attributes. Let’s see the conditional statement in more
detail in the next listing, shall we?
# Create a variable called "energy" and assign to it a random
value between 40 and 100
# We could've just used something like "$ energy = 100", but we
are a curious bunch
$ energy = renpy.random.randint(40, 100)
if energy >= 100:
b "Your energy level is optimal!"
CHApTer 4 WOrking in ren’py, TWine, AnD TyrAnOBuiLDer

121
elif energy >= 50:
b "Your energy level is acceptable."
else:
b "Darn it. You're almost out of energy."
play sound "klaxon.ogg"
pause 4.0
In the preceding example, we are examining the contents of the
variable called energy. We do this using the conditional statement if. If said
energy variable is set to 100 or greater, we display an enthusiastic message
of encouragement. Next, we introduce the elif statement. This is short for
else if. This branch of the program is executed should energy be greater
or equal to 50, but less than 100. Finally, we have the else statement. This
branch is triggered should energy fall below 50.
Any set of commands can be issued after these conditional statements;
you’re not limited to displaying text after them. As you may have gathered,
we did play a klaxon sound effect and paused the proceedings for 4
seconds in the last branch of our example.
More on Control StatementsUsing labels and jump commands is not the only way for fluent Ren’Py
script control. Another useful structure consists of label, call, and return
commands. The combination of these statements is demonstrated next.
c "Let's drink some healthy soda."
call drink_soda
c "Now we're done drinking soda."
return
CHApTer 4 WOrking in ren’py, TWine, AnD TyrAnOBuiLDer
122
label drink_soda:
c "Mm. Delicious, isn't it?"
return
The preceding example will output the following: “Let’s drink some
healthy soda. Mm. Delicious, isn’t it? Now we’re done drinking soda.” Using
the call command, we jump to the label of drink_soda from which we come
back to the main listing using the return command. For one, this technique
allows you to reuse parts of your code (i.e., the labels with return statements)
at specific intervals in your game. Again, you’re not limited to merely
displaying dialogue with said technique. It should also be noted that the
return statement prior to the label drink_soda makes sure we jump back into
the very beginning of the listing; this is a good way to end a Ren’Py script.
Twine in Detail
Note Twine is currently in its second major incarnation. This book deals exclusively with Twine 2.
Twine is a fine, intuitive choice for those who appreciate a more low-
key approach to game-making. Out of the box, the output is often rather
minimalistic in audiovisual terms and that can be a good thing. Also, at the
price of $0, you could do much worse. Twine’s user interface is designed
with said minimalism in mind with excellent results. Let’s take a look at its
main components, shall we?
Download Twine from the official web site: www.twinery.org
As you can see, the Twine launcher (see Figure 4-2) is quite a bit less
complicated than the one in Ren’Py. The main items of interest on it are
simply the green button, which creates a new story template, and the
previously stored adventures on the left.
CHApTer 4 WOrking in ren’py, TWine, AnD TyrAnOBuiLDer

123
Now, creating a new project is achieved by, as you guessed, clicking the
aforementioned green button entitled “+Story.” This will result in Twine
asking for a game title, which can be changed later if the need arises. After
this you’re taken to the main editor screen.
Game locations in Twine are called passages. At the start of a new
project, you’ll see a single passage which is represented by a square item.
The contents of this passage can be edited by clicking the pencil icon on
the item. This will take you to the room-editing screen, where you get to
describe the location/room the player starts his or her journey. Let’s type
something silly in there, like “Billy sure would enjoy a hot air balloon right
about now!”
Figure 4-2. The Twine launcher screen
CHApTer 4 WOrking in ren’py, TWine, AnD TyrAnOBuiLDer

124
Linking Passages TogetherAfter experimenting with Twine and creating a couple of different passages
(i.e., locations), you may wish to link these together to create interaction
and some semblance of gameplay. The following is the description for the
passage we just typed. Let’s add a link to another location to it:
Billy sure would enjoy a [[hot air balloon]] right about now!
By adding dual square brackets around a trigger word or expression,
we let Twine know this is a point of interaction in the game. Usually, this
leads to the player traveling to a new location.
But wait, shouldn’t we have created some sort of hot air balloon room/
passage for Billy before linking to it? The answer is no. Twine is clever
enough to automatically create new passages when the developer merely
references them in an existing location. Try it out.
Now we have two passages: the default room created by Twine and one
called “hot air balloon.” Let’s say we next want to create a third passage
which deals with Billy crashing into a mountain. Let’s edit the passage
called “hot air room” to look something like this:
Oh no! Billy is out of [[luck!|mountain]]
What happens now is Twine creates a new passage called “mountain.”
Although the trigger word is “luck!” in the passage, we are using a special
pipe character (i.e., |) to designate an alternate name for the new passage-
to- be. Passages in Twine don’t thus always need to be identical with their
links. This is very handy from the developer’s point of view, especially with
larger projects.
Twine and AudiovisualsBasically, Twine works on top of the good old HTML framework, by now
unfamiliar to none, from a consumer’s perspective at least: by now most
CHApTer 4 WOrking in ren’py, TWine, AnD TyrAnOBuiLDer

125
people have surfed the Web. Adding images and audio to your Twine
games works the same way as it does on any web site. Specific HTML
tags are issued for the desired effects. Twine also supports Cascading
Style Sheets (CSS), making sweeping changes to color themes and fonts a
breeze, even on the fly. We’ll take a closer look at CSS later in this chapter.
For now, see the table of the most useful HTML tags in the context of using
them in Twine (see Table 4-4).
Table 4-4. Useful HTML tags in Twine
Html Tag Function Example
<img> Displays image files in
almost all common formats
<img src="images/billy.jpg" />
<a href> Accesses a site on the
internet
<a href="http://www.robertciesla.com">
robert’s Site</a>
<audio> plays digital audio files in
mp3, Ogg, and wav formats
<audio autoplay>
<source src="audio/wind.ogg"
type="audio/ogg">
</audio>
<video> plays (local) video files in
mp4, Ogg, or WebM formats.
Width and height attributes
are useful and self-
explanatory. The autoplay
keyword plays back the file
without user input
<video width="400" height="240"
autoplay>
<source src="movie.mp4"
type="video/mp4">
<source src="movie.ogg"
type="video/ogg">
</video>
<iframe> used for embedding
youTube videos into your
projects
<iframe width="420" height="345"
src="https://www.youtube.com/embed/
tgbnymZ7vqy?autoplay=1"> </iframe>
CHApTer 4 WOrking in ren’py, TWine, AnD TyrAnOBuiLDer
126
The preceding tags and more are simply embedded within each
passage in Twine, intermingled with the script at your leisure.
The Three Varieties of TwineTwine actually contains three slightly different approaches to game design.
These are referred to as story formats. Each of them provides a different
set of macros (i.e., built-in commands) and JavaScript functionality. In
this chapter we’ll focus on the SugarCube story format. The other two are
called Harlowe and Snowman, and they will be examined in detail later
in this book. All of them cater to different needs of developers at various
stages of experience.
Twine’s Many MacrosIn addition to HTML support, Twine also includes some rather handy
macros that facilitate many features such as audio playback and variable
manipulation (see Table 4-5). Macros are utilized simply by typing them
into each passage alongside the dialogue.
You can use either local (i.e., stored on your computer) or online
audiovisual files in Twine. However, it’s generally recommended to stick
to local files as online resources can be taken down on a whim by the site
owner(s).
CHApTer 4 WOrking in ren’py, TWine, AnD TyrAnOBuiLDer

127
Table 4-5. Some useful macros for SugarCube built into Twine
Macro Function Example(s)
<<cacheaudio>> prepares an audio file for
playback, assigning it with a
handle
<<cacheaudio "forest"
"forest.mp3">>
<<cacheaudio "wow"
"http://www.soundbank.com/
wow.mp3">>
<<audio>> plays an audio file
plays an audio file in a loop
Stops the playback of an audio file
Seeks to specific time in a sound
(in seconds)
Sets the volume of a sound using
the range of 0 to 1 and plays it
<<audio "forest" play>>
<<audio "wow" play loop>>
<<audio "forest" stop>>
<<audio "music1" time 30>>
<<audio "music1" volume
0.2 play>>
<<setplaylist>> Collects a number of audio files
into a single continuous playlist.
Works in conjunction with
<<cacheaudio>>
<<cacheaudio "song1"
"song1.mp3">>
<<cacheaudio "song2"
"song2.mp3">>
<<setplaylist "song1"
"song2">>
<<playlist>> plays back the playlist set up
with <<setplaylist>>
Halts the playback of the playlist
<<playlist play>>
<<playlist stop>>
<<stopallaudio> Stops the playback of all audio
files
<<stopallaudio>
<<goto>> Jumps immediately into a new
passage
<<goto "pyramids">>
(continued)
CHApTer 4 WOrking in ren’py, TWine, AnD TyrAnOBuiLDer

128
As you can see, Twine features quite a bit of built-in commands to
help you make the best adventures out there. We have only scratched the
surface in this chapter. In addition, the JavaScript functionality of Twine,
although tricky for novices, opens up a world of possibilities for more
advanced features. With enough persistence, most things are possible with
Twine.
Twine’s User Interface FunctionsThe interface and workflow in Twine are indeed refreshingly simple
compared to, say, the ones in Ren’Py (as powerful as that software is). Let’s
take a look the few options we haven’t tackled yet.
Table 4-5. (continued)
Macro Function Example(s)
<<back>> goes back a number of passages
goes back one passage with the
link text "restaurant"
<<back go 5>>
<<back "restaurant">>
<<display>> Displays a second passage
within the current passage
<<display "pyramids">>
<<script>> executes JavaScript <<script>> alert( ‘Hello
there!’ ); <</script>>
<<set>> Manipulates a variable <<set $money to 0>>
CHApTer 4 WOrking in ren’py, TWine, AnD TyrAnOBuiLDer

129
Twine’s editor screen has a nice, blueprint-like look, just waiting to
impress the engineers among us (see Figure 4-3). The network of passages
is represented by boxes and arrows on several levels of magnification, if
necessary. This gives you a very clear picture of the proceedings.
Now, by clicking your game title, a menu of options appears (see
Table 4-6). Let’s take a look at what it has to offer.
Figure 4-3. The Twine editor screen
Table 4-6. The Twine game menu options
Option Description Useful for
Edit Story JavaScript
Allows the input of custom
JavaScript, to be executed at the
beginning of your game
More advanced users who are
augmenting Twine with new
functionality using pure JavaScript
Edit Story Stylesheet
Allows the editing of Cascading
Style Sheets (CSS) associated
with the project
improving and experimenting with
any aspect of the visuals in your
games
(continued)
CHApTer 4 WOrking in ren’py, TWine, AnD TyrAnOBuiLDer

130
Table 4-6. (continued)
Option Description Useful for
Change Story Format
Changes your project’s
development approach
experimenting with the three
available story formats (Harlowe,
Snowman, and SugarCube)
Rename Story
Allows you to change your game
name
experimenting with game titles. Can
be done at any stage of the project
without issues
Select All Passages
Selects all passage boxes in the
editor view
rearranging your story elements as
it grows in size
Snap to Grid
Makes all passage boxes align
with the editor grid
Organizing your passages; it’s a
matter of taste
Story Statistics
Displays pertinent information
about your game, such as the
number of passages, words, and
(text) characters
keeping score on the size of the
project, double-checking on the iFiD
(see “A Few Words on the iFiD” later)
View Proofing Copy
Displays the story in a single
text file
providing your story for proofreading,
checking for consistency
Publish to File
Creates an HTML file of your
story
Delivering your project to the desired
platforms (Windows, Mac, iOS,
online, etc.)
In addition to the aforementioned functions, Twine also allows you
to conduct searches using the “Quick Find” toolbar in the editor. This
function highlights all of the passages that contain the typed strings in real
time, no less.
CHApTer 4 WOrking in ren’py, TWine, AnD TyrAnOBuiLDer

131
A Few Words on the IFIDAs you might’ve noticed, Story Statistics in Twine reveal a long string
of characters referred to as an IFID. Since 2006, most games in the
genre of interactive fiction have been issued with a 32-digit Interactive
Fiction IDentifier (IFID). This unique, universal identifier is meant to be
permanent. Twine does its best to assign each of your projects one that
isn’t in conflict with any other existing titles.
Read more on the IFID on its official web site: https://ifdb.tads.org
Some Useful CSS SelectorsThe visual layouts in Twine games are primarily created using Cascading
Style Sheets (CSS). This is a mature online standard pretty much behind
every web site’s look and it works great with Twine. CSS is inserted using
the Edit Story Stylesheet button in the editor view. For those unfamiliar
with CSS, we’ll now review some key elements, called selectors, providing
examples of each (see Table 4-7).
Table 4-7. Useful selectors (i.e., CSS tags) to be used in Twine
Selector Description Example
body Controls the whole background’s
attributes, e.g., lets you adjust the
background color, font color, style, and
size
body {
background-color: white;
}
Sets the game background
color white
a
a:hover
Controls the links in a document
Controls the way links look when the
mouse pointer hovers over them
a { color: red; }
Sets all links to bright red
a:hover{ color: yellow; }
Sets all links to yellow when
hovered over
(continued)
CHApTer 4 WOrking in ren’py, TWine, AnD TyrAnOBuiLDer

132
The preceding examples are the tip of the iceberg of what you can
achieve with CSS. Although Twine games are primarily about the story,
the odd visual treat here and there can boost a game’s atmosphere
considerably.
TyranoBuilder in DetailTyranoBuilder offers a user-friendly, mostly mouse-driven game-making
experience for both beginners and more advanced developers alike.
Components are dragged onto each scene for tasks vital to any type of
visual novel (see Figure 4-4). This way you get to focus on writing with the
trade-off being customization and file format support; TyranoBuilder isn’t
exactly Ren’Py in that regard.
Download TyranoBuilder from the official web site:
www.tyranobuilder.com
Selector Description Example
#ui-bar Sets the left side user interface bar in
Twine’s SugarCube story format
#ui-bar { display: none; }
Hides the user interface bar
#story Sets the right side (i.e., the story display)
in SugarCube
#story { margin-left: 2.5em; }
Sets the left margin of the
story area
.passage Targets the story area background .passage { color: blue; }
Table 4-7. (continued)
CHApTer 4 WOrking in ren’py, TWine, AnD TyrAnOBuiLDer

133
TyranoBuilder shines in ease of use. It won’t take long for a complete
novice to churn out some type of visual novel or other. Although the
software provides a great deal of extendibility via its built-in TyranoScript
support, none of that is needed to create commercially viable products.
TyranoBuilder exports to most major platforms (i.e., Windows, Mac, iOS,
Android, online) and is truly a drag-and-drop piece of software.
The TyranoBuilder WorkflowThe launcher program in TyranoBuilder needs no explanation. You’re
simply presented with a list of previously created titles or the option to start
a new one. After choosing a project, the main view will pop up. It’s from
here that you add scenes, type in your masterpiece of a visual novel script,
Figure 4-4. The TyranoBuilder user interface
CHApTer 4 WOrking in ren’py, TWine, AnD TyrAnOBuiLDer

134
and insert components to create your game. It won’t take long to master
and is, in general, a pleasure to use. In each scene, the aforementioned
components are simply executed from top to bottom.
The components in TyranoBuilder can roughly be divided into three
categories: story flow, audiovisual asset control, and scripting. A large
swathe of these components are dedicated to visual effects; however, there’s
no real need for a massive amount of story-related elements. TyranoBuilder
has everything you need for compelling stories to be told. Let’s now take a
look at some of the core components of this software (see Table 4-8).
Table 4-8. The main TyranoBuilder components
Component Description Component Group
Text Displays dialogue Story
Label Assigns a label for skipping to when necessary Story
Jump Jumps to a label in any scene Story
Page Break Clears onscreen dialogue, moves the text placement
to the top of the display
Story
Stop Stops the story from advancing until user action Story
Branch Button Creates a button for user interaction Story
Wait pauses the story for a defined duration (set in
milliseconds)
effects
Join Scene Adds a user-defined character (created via the
Characters option in the top project menu) into a scene
Characters
Exit Scene removes a character from a scene Characters
Change Background
Changes the background with an optional transition
effect, available in 16 varieties
images
(continued)
CHApTer 4 WOrking in ren’py, TWine, AnD TyrAnOBuiLDer

135
A Two-Scene AdventureTo get an idea of how TyranoBuilder works, just create a new project from
the launcher. You’ll be asked for a number of things such as the type of
game, display size. Choose any configuration you’re comfortable with: no
specific settings are needed at this point.
When starting a new project with TyranoBuilder, you’ll be asked
whether you want to start work on a new visual novel or a sound novel. By
now you must be familiar with the genre of visual novel. A sound novel
is a lesser known category of game. The difference between the two is in
the presentation. Like their name states, visual novels contain a plethora
of visuals. A sound novel, on the other hand, is a more minimalistic game
with the writing often occupying the entire screen. Unlike one might think,
sound novels rarely contain voice acting. However, games in this genre
often feature ample use of music and sound effects. The term sound novel
was solidified by console developer Chunsoft, who launched their business
in the mid-1980s.
Now, we’ll take the default new TyranoBuilder project and add some
functionality to it. Try running the freshly created project to get a feel of
what the typical output of the software looks like (see Figure 4-5).
Component Description Component Group
Play Sound Effect
plays an audio file with an optional fade-in transition,
may be looped if needed. Volume can be set between
0% and 100%
Media
Stop Sound Effect
Stops a sound effect with an option fade-out transition Media
Table 4-8. (continued)
CHApTer 4 WOrking in ren’py, TWine, AnD TyrAnOBuiLDer

136
Next, exit the project and focus your attention on the left side of the
TyranoBuilder interface (see Figure 4-6). There’s three segments to this part
of the interface: components, assets, and scenes. First, click the scenes tab and
New Scene. Name the scene however you wish and click create. Now we’re
going to experiment with displaying dialogue and switching to a new scene.
TyranoBuilder will have changed views to this new scene. Click scene1
on the gray bar on the right to go back to the original scene. Then select
the component submenu from the left. Drag the component called Branch
Button onto the bottom part of the component view on the right. A new
panel will appear on the far right side of the interface. This is where you
enter any pertinent data for most of the components. Now, the crucial
attributes for the branch button element are Target, which sets the label to
jump to; Text, which names the button; and Positioning Tool which allows
you to set the position of the button using a graphical interface.
Figure 4-5. The TyranoBuilder default project. Always with the classrooms.
CHApTer 4 WOrking in ren’py, TWine, AnD TyrAnOBuiLDer

137
Note The stop component should be on the bottom in each scene. it is quite a show-stopper of a component. if you put it above the branch button component, for one, the button will never appear.
For now, we won’t put anything in the Target element. However, we will
enter a name for the button using the text element and position the button
using the positioning tool. Name and position the button as you will. Click
accept after both operations to finalize your choices. Save the scene.
Now, click the other scene on the gray bar. There’s nothing but a
single text element by default. Double-click it and edit the contents of the
dialogue to your liking. Next, drag a label component onto the top of the
component list, before the text component. Click this new component and
enter a name for the label. Let’s assume you typed “label1” for the sake of
convenience. Save the scene and go back to scene1.
It’s time to revisit the previously introduced branch button. Click it
and select Location. This is the box we use to select which scene we will be
hopping to. Next, click Target. Here we define the exact label the player will
be visiting via the button. Select label1 (or however you marked the label
in the second scene). Save the scene and run the game. The project should
Figure 4-6. The TyranoBuilder user interface in the default project
CHApTer 4 WOrking in ren’py, TWine, AnD TyrAnOBuiLDer

138
now display some dialogue, after which a button should appear, which
will take you to the second scene and display its dialogue. This is how we
create and navigate scenes in TyranoBuilder.
Characters in TyranoBuilderAn important aspect to any visual novel, TyranoBuilder offers a simple
way for managing your characters. To add characters, you simply click the
cogwheel icon with the portrait on it. Enter a name for your protagonist.
You now have a new character to use in your game. You’ll be able to assign
visuals to him/her and utilize the character components of TyranoBuilder.
Introduce a character in a scene with the join scene component.
By selecting this component and using the browse button, you can
attach an image file for this character. As with most visual elements in
TyranoBuilder, you can fade in your characters in style and position them
with the handy positioning tool. You can naturally have more than one
character onscreen at once. To make them all go away at the same time,
use the exit all component.
Adding MultimediaAs seen in Table 4-8, TyranoBuilder comes with several components for
adding most types of multimedia into your games. The process is simple:
drag the functionality you need (i.e., for audio, background image, or video)
onto the component view. Click Browse and point to the location of the file
on your hard drive. Most multimedia components have a fade- in feature,
which accepts milliseconds. One second equals a thousand milliseconds,
so for a 2-second fade-in, you’d enter the value of 2000 into the box.
We’ll go in depth into the audiovisual possibilities offered by
TyranoBuilder later in this book. For now, you should start experimenting
with components like Background Image, Play Music, and others found in
the TyranoBuilder component library.
CHApTer 4 WOrking in ren’py, TWine, AnD TyrAnOBuiLDer

139
TyranoBuilder and Media FilesThe sometimes problematic video file support of Ren’Py isn’t an issue in
TyranoBuilder. Although supporting only two video formats (i.e., WebM
and the somewhat exotic Ogg Video), these files play beautifully and can
add a touch of class to any project.
For static images TyranoBuilder supports the standard .png, .jpg, and
.gif formats. Although the software doesn’t play a huge amount of audio
file formats for its music and sound effects (i.e., just Ogg), there aren’t any
issues with playback.
A Few Words on Game SettingsTyranoBuilder’s options are hidden behind a cogwheel icon. The most
important options include the ability to change a game’s name on the go
(under the General tab) and to reconfigure controller device mappings.
You’ll find this functionality under Keyboard & Mouse. There you can
assign various in-game functions, such as Quick Load/Save and Skip
Dialogue, to the keys of your choice. In addition, you can change how your
game deals with mouse buttons and tablet gestures. And should you at
some stage want to change the garish default save/load game visuals and/
or the title screen look, the cogwheel is again your friend.
You can also visit the game settings panel if you choose to change your
game’s screen size, the in-game mouse cursor, and the base font type and
size. Should the TyranoBuilder user interface itself cause you to squint, you
can visit the namesake settings page and configure a larger font for your
dialogue input (this is highly recommended).
Scripting in TyranoBuilderIn addition to the drag-and-drop approach, TyranoBuilder offers a robust
scripting feature set. On offer are two languages: iScript and TyranoScript.
CHApTer 4 WOrking in ren’py, TWine, AnD TyrAnOBuiLDer

140
We’ll now explore some of possibilities these scripting languages offer,
without going into too much detail: that is reserved for later chapters in
this book.
TyranoScript is basically a text-based version of the TyranoBuilder
interface; instead of the drag-and-drop method, you get to type in the
commands. iScript, on the other hand, is an offshoot of JavaScript, the
much loved Internet staple. Basically, anyone familiar with JavaScript will
be right at home with iScript. There are a few differences, however. For
one, variables are treated differently.
To start using scripting in TyranoBuilder, you first drag either the
iScript or TyranoScript components onto the project scene. The following
is a simple passage in TyranoScript.
This line will be displayed as dialogue.
This line, too, but it will wait for a mouse click to continue. [l]
This here line will delete the previous lines. [p]
See? [p][r]
And this line will be presented underneath the previous one.
The preceding listing demonstrated TyranoScript’s tag functionality.
These tags, inserted in square commas after a line of text, control how
the dialogue is presented. The main tags for displaying dialogue are [l],
[p], and [r], as seen in the example. Let’s now take a slightly closer look at
iScript, shall we?
// This is a comment line for some JavaScript
var message = "Hello!"
window.alert(message);
// This is a comment line for an iScript-example
f.message = "Hello!"
window.alert(f.message);
CHApTer 4 WOrking in ren’py, TWine, AnD TyrAnOBuiLDer
141
The preceding simple examples demonstrate how TyranoBuilder
handles variables in iScript; in-game variables are declared using the suffix
of f. instead of the keyword var, as is the case in JavaScript. Apart from this,
the two scripting languages are quite similar in most ways. As you can
expect, one can considerably extend the functionality of TyranoBuilder
with iScript. However, this is not absolutely necessary and beginners
shouldn’t thus feel daunted by this prospect.
Live2DBackground images and video playback aside, TyranoBuilder offers some
impressive character visuals in the form of Live2D technology. Developed
by Tetsuya Nakajo, Live2D allows for the creation of animated 2D
characters without frame-by-frame animation or 3D models. Developers
input a set of 2D graphics into the Live2D framework, consisting of eyes,
arms, and other parts of a character. A skeletal structure is then defined
for the character, which can now be animated using a library of pre-
determined expressions and movements.
Although TyranoBuilder doesn’t offer a character creation kit for Live2D
per se, it still supports the technology; external software must be used to create
new Live2D characters. This will be looked into in detail later in this book.
For now, get to know some Live2D by experimenting with the default
character models shipping with TyranoBuilder. To enable Live2D, click
Project in the top bar, and select Add-In Components. Now, click Live2D
Components and select Ok. Your project now has Live2D components
available. However, we still need to import a Live2D character.
Select Asset Library from the top menu. Select Live2D from the
submenu. Double-click either one of the two available Live2D characters
to import it into the project (see Figure 4-7). Drag the Add Live2D
component onto the project timeline. Depending on your earlier choices,
select either Nasuka or dinogirl from the far-right component panel. Use
the Positioning Tool to set the position of your Live2D character.
CHApTer 4 WOrking in ren’py, TWine, AnD TyrAnOBuiLDer
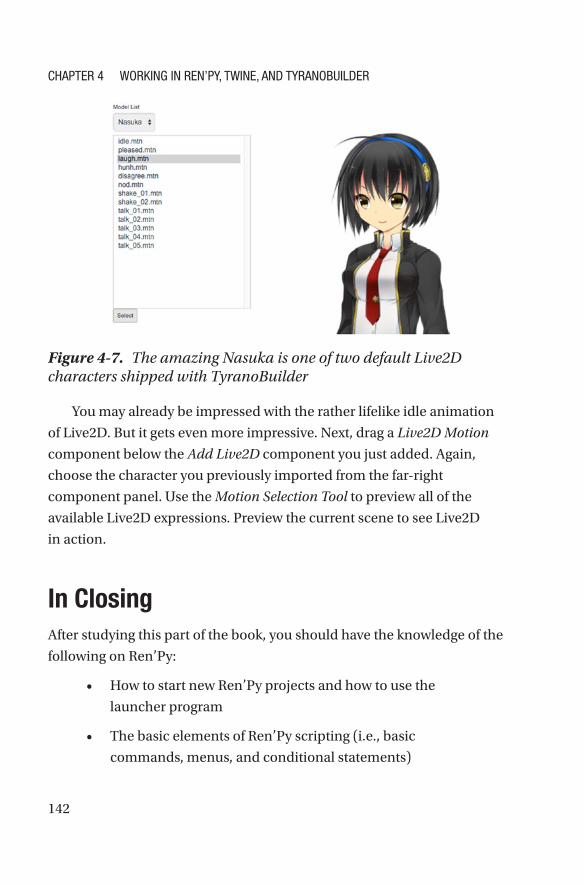
142
You may already be impressed with the rather lifelike idle animation
of Live2D. But it gets even more impressive. Next, drag a Live2D Motion
component below the Add Live2D component you just added. Again,
choose the character you previously imported from the far-right
component panel. Use the Motion Selection Tool to preview all of the
available Live2D expressions. Preview the current scene to see Live2D
in action.
In ClosingAfter studying this part of the book, you should have the knowledge of the
following on Ren’Py:
• How to start new Ren’Py projects and how to use the
launcher program
• The basic elements of Ren’Py scripting (i.e., basic
commands, menus, and conditional statements)
Figure 4-7. The amazing Nasuka is one of two default Live2D characters shipped with TyranoBuilder
CHApTer 4 WOrking in ren’py, TWine, AnD TyrAnOBuiLDer

143
• How Ren’Py handles indentation and text blocks
As for TyranoBuilder, you should be confident with the following:
• How to start new projects in TyranoBuilder
• How to create and navigate scenes
• The basics of the TyranoBuilder components and user
interface
• How to import Live2D characters and other assets into
a project
Finally, you should have these skills for Twine:
• How Twine organizes its rooms/locations as passages
and how to implement user interaction
• How to use multimedia in Twine projects via HTML or
built-in macros
• The basics of Cascading Style Sheets (CSS) in the
context of Twine development
In the next chapter, we’ll take a much closer look at the various
techniques for development with the software presented, including how to
include more complex multimedia elements in Ren’Py and how to script
in TyranoBuilder.
CHApTer 4 WOrking in ren’py, TWine, AnD TyrAnOBuiLDer
145© Robert Ciesla 2019 R. Ciesla, Game Development with Ren’Py, https://doi.org/10.1007/978-1-4842-4920-8_5
CHAPTER 5
Deeper Down the DungeonBy this stage, you’ll have some basic working knowledge on the workflow
of the three tools covered by this book: Ren’Py, Twine, and TyranoBuilder.
Now it’s time to dwell deeper into the more advanced techniques and
possibilities provided by these amazing pieces of software. Among many
other things, we’ll be looking at how to integrate video files into Ren’Py
code, how to enhance Twine games with Cascading Style Sheets (CSS),
and how to create randomized dialogue in TyranoBuilder.
Ren’Py, Containers, and CodecsThe information concerning video file formats isn’t exclusive for Ren’Py,
but is worth addressing as it affects basically any work in the field of digital
audiovisuals, including both TyranoBuilder and Twine development.
Video (and audio) files in general consist of two components:
containers and codecs. A video container is the full file, which includes the
video, audio, and in some cases the subtitles. A codec, on the other hand,
is the means of both compressing and decompressing (i.e., playing back)
the video file inside a container. There are numerous codecs available,
and they vary in their quality and compression ratio. Some of the most

146
popular container formats include .ogg, .webm, and .avi. These are almost
universally supported by most platforms, whether desktop or mobile.
As for codecs, good choices include H.264 (also known as MPEG-4),
MPEG-2, and MPEG-1. And just so you know, MPEG is an acronym for
Moving Picture Experts Group, established in 1988 by Hiroshi Yasuda and
Leonardo Chiariglione.
There are literally dozens of codecs available, but its best to stick to
these well-established formats for maximum compatibility. See Table 5-1
for a comparison of various codecs.
Table 5-1. Some of the most common video codecs
Codec License First Release
Features
VP9 Free 2012 Powerful high-resolution support (i.e.,
4K/8K UHD), lossless compression option
VP8 Free 2008 Robust multiprocessor support. Provides
good random access for video editing.
Best used for lower resolution video
Theora Free 2004 Potent Internet live streaming
capabilities, presentable even in
low-quality bitrates due to built- in de-
blocking filter
H.264 (MPEG-4) Free for
Internet use
2003 Effective at live Internet streaming,
supports resolutions up to
8192 × 4320 (including 8K UHD)
Xvid, a free implementation of MPEG-4 part 2
Free (GNU
General Public
License)
2001 Highly optimized due to active
development, almost universally
supported
(continued)
CHaPtER 5 DEEPER DowN tHE DUNGEoN

147
Now, we’ll take a detailed look into some of the container formats you
can house your codecs in (see Table 5-2).
Codec License First Release
Features
MPEG-2 Some patents
about to expire
as of 2019
1996 the DVD gold standard format, can
incorporate 5.1 surround sound in its
audio streams
MPEG-1 Free (patents
expired)
1989 works well with low-bitrate video (e.g.,
for smaller displays), considering both
its output quality and small file size
Table 5-1. (continued)
Table 5-2. Some of the most common video container formats
Container Format License First Release Supported Codecs
WebM Free 2010 VP8 and VP9 video, ogg Vorbis
and opus audio
Matroska Free 2002 any
Ogg Free 1993 theora and Dirac for video.
opus, Vorbis, and Speex for
audio
MPEG container(Note: not to be confused with MPEG- codecs)
Patent
encumbered
1993 MPEG-1 and MPEG-2 video.
MPEG-1 Layers 1, 2, and 3 (i.e.,
mp3) audio
AVI Presumed
free
1992 Most, including uncompressed
(Full Frame), Intel Real time
(Indeo), and Cinepak
CHaPtER 5 DEEPER DowN tHE DUNGEoN
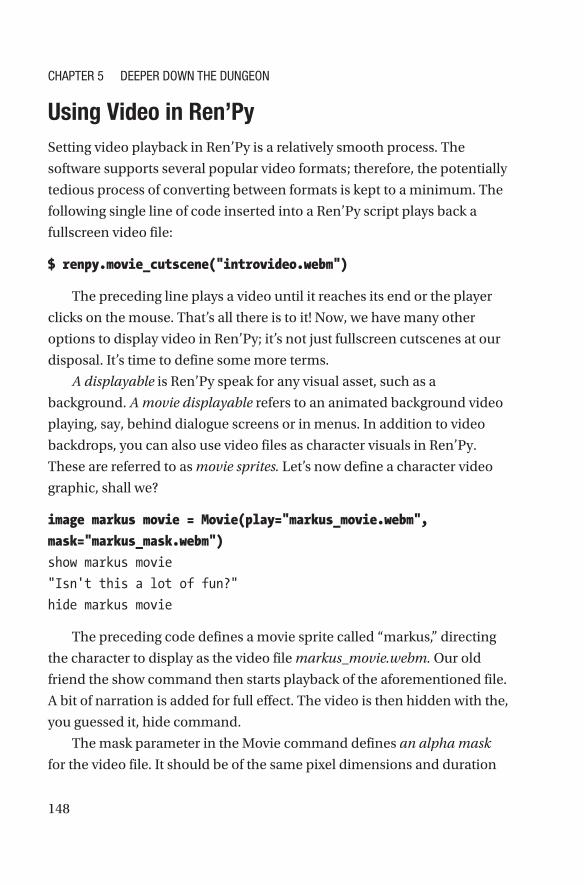
148
Using Video in Ren’PySetting video playback in Ren’Py is a relatively smooth process. The
software supports several popular video formats; therefore, the potentially
tedious process of converting between formats is kept to a minimum. The
following single line of code inserted into a Ren’Py script plays back a
fullscreen video file:
$ renpy.movie_cutscene("introvideo.webm")
The preceding line plays a video until it reaches its end or the player
clicks on the mouse. That’s all there is to it! Now, we have many other
options to display video in Ren’Py; it’s not just fullscreen cutscenes at our
disposal. It’s time to define some more terms.
A displayable is Ren’Py speak for any visual asset, such as a
background. A movie displayable refers to an animated background video
playing, say, behind dialogue screens or in menus. In addition to video
backdrops, you can also use video files as character visuals in Ren’Py.
These are referred to as movie sprites. Let’s now define a character video
graphic, shall we?
image markus movie = Movie(play="markus_movie.webm",
mask="markus_mask.webm")
show markus movie
"Isn't this a lot of fun?"
hide markus movie
The preceding code defines a movie sprite called “markus,” directing
the character to display as the video file markus_movie.webm. Our old
friend the show command then starts playback of the aforementioned file.
A bit of narration is added for full effect. The video is then hidden with the,
you guessed it, hide command.
The mask parameter in the Movie command defines an alpha mask
for the video file. It should be of the same pixel dimensions and duration
CHaPtER 5 DEEPER DowN tHE DUNGEoN
149
of the video file it’s associated with. The purpose of the alpha mask is
to denote the areas which are visible in the video file, that is, to hide the
unwanted edges and/or background in the video. Without it you’d have a
square or rectangular movie sprite; that wouldn’t be a good look.
When it comes to Ren’Py and alpha masks, the color white represents
full opacity in an image, while black denotes the fully transparent parts.
Advanced Audio Functionality in Ren’PyPlaying and stopping sound effects is fine, but sometimes you need a
more thorough approach to audio in Ren’Py. By default, Ren’Py takes the
approach of assigning one audio channel for music, one for sound effects,
and one for voice for a total of three channels. Each of these channels plays
back one audio file at a time. This is for convenience’s sake. If you insist,
you may define additional audio channels for more advanced purposes.
These are addressed later in this book.
The following three lines of code utilize the three default audio
channels. A song, a sound effect, and a piece of voice acting are played
here all at the same time, while some text is displayed onscreen.
play music "song1.ogg"
play sound "boom.mp3"
voice "dialogue1.ogg"
"Hello! How are you doing?"
Now, Ren’Py supports the .wav, .ogg, .mp3, and Opus audio file
formats. Out of these, the .wav format is perhaps the most cumbersome,
as it takes the most space and thus slows down your game’s delivery (i.e.,
download). Although the highest quality format, it’s better to use one of
the other ones instead of .wav (which is the uncompressed CD standard
audio format) when deploying the game for sale and/or download. When
your audio is still at the editing stage, however, only use .wav. The other
formats, being compressed, decay in quality after each edit-and-save
CHaPtER 5 DEEPER DowN tHE DUNGEoN

150
cycle. Wav does not. Think of any compressed file format as a photocopy
of the original file; a copy of a copy of a copy isn’t anywhere as readable, or
audible, as the original.
Audio Queues
For one, there’s nothing more atmospheric than a long and varied playlist
of music instead of a short repeating tune. We can achieve this quite easily
in Ren’Py with the queue command. In the following example, we define a
queue of three songs (in the .ogg format) for the default music channel of
Ren’Py and play it back.
queue music [ "song1.ogg", "song2.ogg", "happysong.ogg" ]
play music
Advanced Play and Stop Statements
The venerable play statement in Ren’Py can do a lot more than play back
a sound: you better believe it. You can even integrate the aforementioned
queue command with a play statement, in addition with some other
parameters. This example queues two songs in the mp3 format, fading
them both in and out for the duration of 2 seconds.
play music [ "song1.mp3", "song2.mp3" ] fadeout 2.0 fadein 2.0
Should you want to suddenly stop a song playing on the music
channel, fading it out in style during a 10-second period, you would
approach the situation in the following way:
stop music fadeout 10.0
If you ever need to insert some silence before your audio, use the
silence tag which, again, takes its variables in seconds. This is great for
those dramatic pauses.
play audio [ "<silence 2.5>", "song1.mp3" ]
CHaPtER 5 DEEPER DowN tHE DUNGEoN
151
Audio File Random Access
Ren’Py allows you to skip parts in an audio file on the fly. Using the from
command inside a play statement, you can specify the exact part you want
to skip, in seconds. The following example skips to the 2.5-second marker
in the audio file song1.mp3, playing until the 10.5-second marker.
play music "<from 2.5 to 10.5>song1.mp3"
Advanced Image PropertiesNaturally, you’re not limited to showing and hiding images in Ren’Py;
there’s a whole host of additional functions and properties at your
disposal. Let’s now take at some of the more useful ones, shall we?
Character Dialogue Color
In the previous chapter, we took a glance at how characters are defined in
Ren’Py script. To refresh your memory, it went a little something like this:
$ m = Character('Markus', color="#EE1100")
But wait, a new property has been sneakily introduced. The color
property uses hexadecimal values to define a color for a character’s dialogue.
It does this by mixing red, green, and blue (i.e., RGB) values for a brand new
color. The first two digits after the hashtag (#) set the red value, the third and
the fourth set the green value, and the remaining digits set the blue value.
The hexadecimal system (i.e., base 16) goes from numbers 0–9 to letters
A–F. The letters represent the values between 10 (i.e., A) and 16 (i.e., F).
This technique is universally used in HTML and CSS (i.e., Web Colors)
and all of the visual novel software featured in this book. In our example
the character of Markus is given a rather bright red dialogue color, reined
in slightly by adding a tiny amount of green. Let’s take a look at some of the
most common RGB-based colors in Table 5-3.
CHaPtER 5 DEEPER DowN tHE DUNGEoN

152
Quick Image Alignment
Ren’Py image elements come with a handy duo of properties, xalign
and yalign, which allow for quick adjustment of an image’s placement
onscreen. The xalign property sets the horizontal position, with the value of
0.0 being left, 0.5 being center, and 1.0 being right. Respectively, an image’s
vertical placement can be controlled by the yalign property, with the value
of 0.0 being top, 0.5 being center, and 1.0 being the bottom of the screen.
The following line of code prepares an image file, man.png, to be
displayed on the bottom right part of the display.
image man right = Image("man.png", xalign=1.0, yalign=1.0)
Advanced Transitions
Ren’Py offers some stylish transitions between scenes and for the various
visual elements within a game. They can be used in script by summoning
the with command or by editing the gui.rpy and/or options.rpy files for
more global use. Transitions in Ren’Py are very simple to utilize, and they
offer a lot in the way of production values.
Table 5-3. Some popular colors using the RGB hexadecimal method
Color Hexadecimal Value Color Hexadecimal Value
Black #000000 Yellow #FFFF00
White #FFFFFF Red #FF0000
Grey #808080 Purple #800080
Green #008000 Orange #FFa500
Blue #0000FF Burlywood #DEB887
CHaPtER 5 DEEPER DowN tHE DUNGEoN

153
show bg garage
with dissolve
"Well gosh darn it! We are in the garage, Ernie!"
This piece of script summons a background image presumably of a
garage using the classic dissolve transition to do so. But dissolving isn’t the
only one available in Ren’Py. Now, let’s examine those tasty transitions in
detail, shall we (see Table 5-4)?
Table 5-4. The major visual transitions in Ren’Py
Transition Description Transition Description
dissolve Fades between
images
slideleft, slideright, slideup, slidedown
Slides in the element
using the specified
directional command
fade Fades to black and
then onto a new
image
Vpunch Shakes the screen
vertically for 1
second
pixellate Pixellates the old
screen, de- pixellating
a new image
Hpunch Shakes the screen
horizontally for
1 second
blinds transitions the
screen using vertical
blinds
easeinleft,
easeinright,
easeintop,
easeinbottom
Similar to move,
except executed
using a more gradual
movement
zoomin Zooms in a new
image
irisin, irisout Brings in a new
image or hides the
current one using a
rectangular pattern
(continued)
CHaPtER 5 DEEPER DowN tHE DUNGEoN
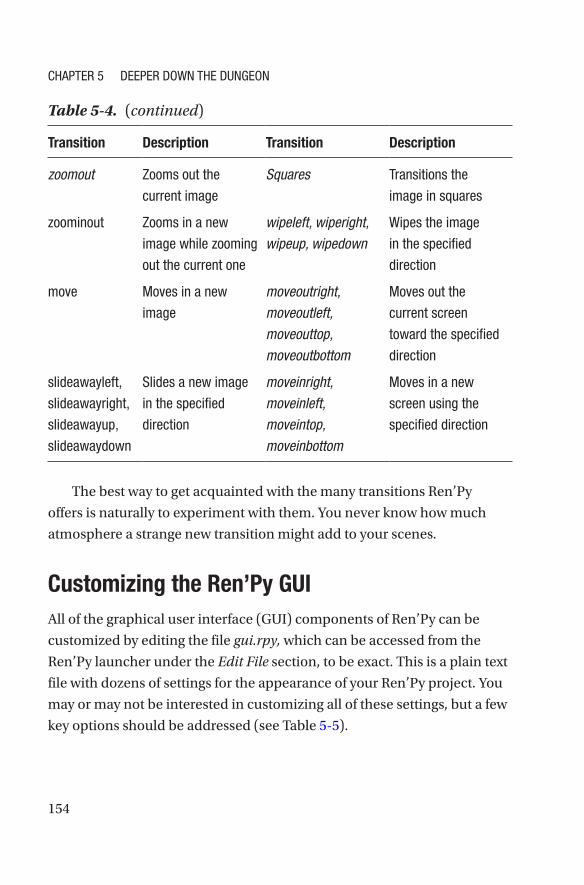
154
The best way to get acquainted with the many transitions Ren’Py
offers is naturally to experiment with them. You never know how much
atmosphere a strange new transition might add to your scenes.
Customizing the Ren’Py GUIAll of the graphical user interface (GUI) components of Ren’Py can be
customized by editing the file gui.rpy, which can be accessed from the
Ren’Py launcher under the Edit File section, to be exact. This is a plain text
file with dozens of settings for the appearance of your Ren’Py project. You
may or may not be interested in customizing all of these settings, but a few
key options should be addressed (see Table 5-5).
Table 5-4. (continued)
Transition Description Transition Description
zoomout Zooms out the
current image
Squares transitions the
image in squares
zoominout Zooms in a new
image while zooming
out the current one
wipeleft, wiperight, wipeup, wipedown
wipes the image
in the specified
direction
move Moves in a new
image
moveoutright, moveoutleft, moveouttop, moveoutbottom
Moves out the
current screen
toward the specified
direction
slideawayleft,
slideawayright,
slideawayup,
slideawaydown
Slides a new image
in the specified
direction
moveinright, moveinleft, moveintop, moveinbottom
Moves in a new
screen using the
specified direction
CHaPtER 5 DEEPER DowN tHE DUNGEoN

155
Now, the aforementioned gui.rpy isn’t the only file of interest when it
comes to customizing Ren’Py. Another one is called options.rpy, and it’s
also accessible from the launcher program, again, under Edit File. We’ll
take a closer look at some of its contents and what they entail to your visual
novels (see Table 5-6).
Table 5-5. Some useful options found in gui.rpy
Option/Line Description Option/Line Description
define gui.text_size
Sets the GUI text size.
Default value: 22
define gui.main_menu_background
Defines the
game main menu
background image
and location. Default:
“gui/main_menu.png”
define gui.text_color
Sets the dialogue color.
Default: white (#ffffff)
define gui.game_menu_background
Defines the in-game
menu background
image and location.
Default: “gui/game_
menu.png”
define gui.textbox_height
Sets the dialogue box
height in pixels. Default:
185 pixels
define gui.title_text_size
Sets the game title
text size. Default: 50
define gui.name_text_size
Sets the character name
size. Default: 30
define gui.interface_text_size
Sets the size of the
game interface text.
Default: 22
define gui.
text_font
Defines the font used
by your game. the font
file should be kept in the
game directory. Default:
DejaVuSans.ttf
define gui.label_text_size
Sets the size of the
game GUI label text.
Default: 24
CHaPtER 5 DEEPER DowN tHE DUNGEoN

156
Advanced TyranoBuilder TechniquesAlthough TyranoBuilder appears to be the simplest development tool
of the three presented in this book, there’s actually a lot of power under
the hood. We’ll now take a look at some of the powerful techniques
TyranoBuilder provides even for the beginner.
Table 5-6. Some useful options found in options.rpy
Option/Line Description Option/Line Description
define gui.show_name
Chooses whether to
show the game title or
not in the title screen.
Default: true
default preferences.afm_time
Sets the text auto-
forward delay. Default:
15. Valid values are
between 0 and 30
define config.has_sound
Shows or hides the
in-game sound mixer.
Default: true
define config.window_icon
Sets the game dock icon
and location. Default:
“gui/window_icon.png”
define config.has_music
Shows or hides the
music mixer. Default:
true
define config.intra_transition
Controls the type of
visual transition between
screens of the game
menu. Default: dissolve
define config.has_voice
Shows or hides the
voice mixer. Default:
true
define config.enter_transitiondefine config.exit_transition
Controls the type of
visual transition for
entering and exiting the
game menu. Default:
dissolve
default
preferences.
text_cps
Controls the text speed.
Default: 0. Values
higher than zero denote
characters per second
define config.after_load_transition
Sets the transition after
a game has been loaded.
Default: None
CHaPtER 5 DEEPER DowN tHE DUNGEoN

157
PluginsAs of January 2019, TyranoBuilder received a major update to version 182.
Not only is the software now fully 64-bit, but it also has more expandability
in the form of plugins. These are basically extra components available for
download for free. There’s about a dozen plugins (in English) to integrate
into your projects at the time of this update.
Visit the TyranoBuilder plugins page here: https://plugin.tyrano.jp/en
Download the plugins of your choice from the preceding link. These
are then added to the main software by clicking the TyranoBuilder top
menu and selecting Project ➤ Plugins. Click Add New and select the file
you just downloaded with the .tbp file extension.
Now, revisit the top menu and select Customize Tool Area. Scroll all
the way down on the dialogue window that just opened and select both
the Components checkbox and any checkboxes next to components you’d
like to activate in TyranoBuilder. You’ll now have a new section in the main
components dialogue, titled Plugins.
Although there’s surely many more on their way, let’s review the initial
selection of TyranoBuilder version 182 plugins next, shall we (see Table 5- 7)?
Table 5-7. Some of the new TyranoBuilder plugins and their uses
Plugin Description URL
Background Mask Transitions
Enables special transitions using mask images.
Includes dozens of masks for more exotic
transitions
https://
plugin.
tyrano.jp/en/
item/20007
Mask Transitions
Introduces special mask transitions for character
images. Includes 200 masks
https://
plugin.
tyrano.jp/en/
item/20014
(continued)
CHaPtER 5 DEEPER DowN tHE DUNGEoN

158
Plugin Description URL
Sleep and Awake
allows the player to save the game and embark
on a different quest altogether, then return to the
original adventure at will
https://
plugin.
tyrano.jp/en/
item/20001
Custom Save Game Thumbnail
Sets a custom thumbnail image for saved games,
instead of the tyranoBuilder defaults
https://
plugin.
tyrano.jp/en/
item/20002
Auto Save and Load
Introduces automatic loading and saving
components (i.e., reduces some of the player saved
game management)
https://
plugin.
tyrano.jp/en/
item/20003
Show Dialogue
Displays a confirmation dialogue on top of all other
elements in a game
https://
plugin.
tyrano.jp/en/
item/20009
Change Title
allows for the renaming of a game in progress. May
be used to denote different chapters in a game, for
one
https://
plugin.
tyrano.jp/en/
item/20010
Screen Filters
adds five new visual filters into your arsenal, such
as grayscale, sepia, and blur, for special effects
https://
plugin.
tyrano.jp/en/
item/20005
Table 5-7. (continued)
(continued)
CHaPtER 5 DEEPER DowN tHE DUNGEoN
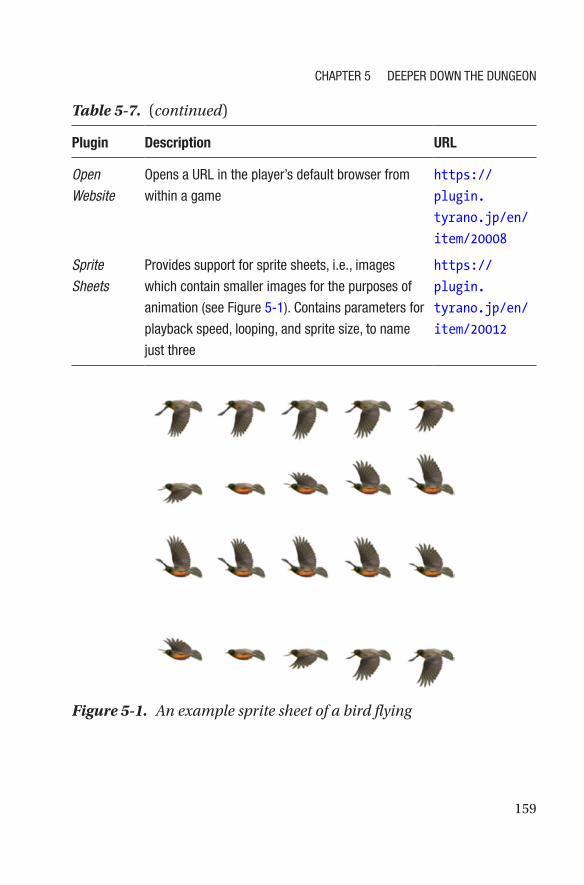
159
Table 5-7. (continued)
Plugin Description URL
Open Website
opens a URL in the player’s default browser from
within a game
https://
plugin.
tyrano.jp/en/
item/20008
Sprite Sheets
Provides support for sprite sheets, i.e., images
which contain smaller images for the purposes of
animation (see Figure 5-1). Contains parameters for
playback speed, looping, and sprite size, to name
just three
https://
plugin.
tyrano.jp/en/
item/20012
Figure 5-1. An example sprite sheet of a bird flying
CHaPtER 5 DEEPER DowN tHE DUNGEoN

160
Of Variables and System VariablesVariables are an important part of most visual novels. Using variables we
get to store the amount of gold a player might have or to calculate the odds
of him or her impressing a love interest. Variable data is stored in saved
games. TyranoBuilder has a Variables Manager, accessible from the top
Project menu (see Figure 5-2). It’s there we input variables and define their
initial values.
TyranoBuilder also supports permanent variables, referred to as system
variables. This information is stored on a system without depending on
any save game functionality. One common use for a system variable is the
number of times the player has completed the game; the game designer
might implement alternate endings dependent on the number of times the
quest is completed.
Variables are used via the System class of components in the
TyranoBuilder component library.
The System class consists of three components: process variable, input
box, and commit input. Of these the process variable (see Figure 5-3) is the
Figure 5-2. The Variables Manager in TyranoBuilder
CHaPtER 5 DEEPER DowN tHE DUNGEoN

161
most important for manipulating variable data. It is using this component
you can use arithmetic operations on your variables or assign random
values to them.
Now, to have variables have an impact on the story in your games, you
use them in combination with the Jump component, found under the Story
segment of the TyranoBuilder user interface.
Using variables to control the direction of your story is enabled
by clicking the conditional jump checkbox. This is demonstrated in
Figure 5- 4. In this jump component, we are going to transport to scene2
and its Happy_room label, but only if a condition is met. That condition
deals with a previously defined variable called gold; this variable must be
over ten in value for the condition to be true. Ten or nine won’t cut it.
Figure 5-3. The Process Variable component window in TyranoBuilder
CHaPtER 5 DEEPER DowN tHE DUNGEoN
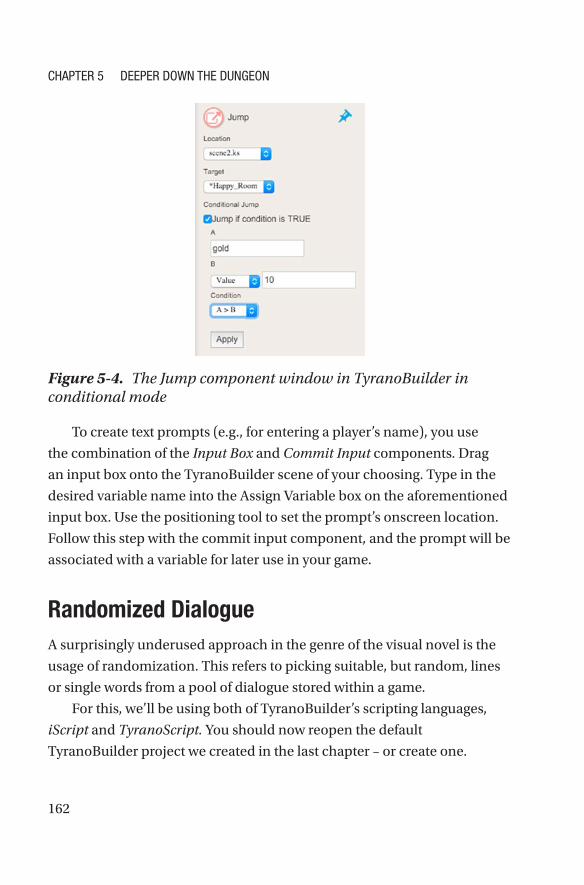
162
To create text prompts (e.g., for entering a player’s name), you use
the combination of the Input Box and Commit Input components. Drag
an input box onto the TyranoBuilder scene of your choosing. Type in the
desired variable name into the Assign Variable box on the aforementioned
input box. Use the positioning tool to set the prompt’s onscreen location.
Follow this step with the commit input component, and the prompt will be
associated with a variable for later use in your game.
Randomized DialogueA surprisingly underused approach in the genre of the visual novel is the
usage of randomization. This refers to picking suitable, but random, lines
or single words from a pool of dialogue stored within a game.
For this, we’ll be using both of TyranoBuilder’s scripting languages,
iScript and TyranoScript. You should now reopen the default
TyranoBuilder project we created in the last chapter – or create one.
Figure 5-4. The Jump component window in TyranoBuilder in conditional mode
CHaPtER 5 DEEPER DowN tHE DUNGEoN
163
First, drag an iScript component on top of the Text component. Leave
it blank for now. Then add a TyranoScript component between the two
aforementioned components. Copy the following listing into the iScript
component.
itemArray = [
"apple",
"keys",
"cucumber",
"fedora",
"headphones",
"potato"
];
randomItem = itemArray[Math.floor(Math.random()*itemArray.
length)];
In this listing we defined an array, which is a variable that can contain
several values. These values can be either numbers, single alphabetical
characters, or strings of text. We put some everyday items into our array,
the one we chose to call itemArray. We could’ve named it anyway we
wished, but that is one of the most logical choices for it.
Next, we defined a new variable called randomItem. In it we inserted
a value taken at random from the array we just defined. Don’t be startled
by the business inside the square brackets: it consists of a couple of simple
math functions that pick a random variable based on the number of items
inside said array (i.e., itemArray). In our case, because the array has six
elements (starting with apple, ending with potato), the line of code returns
a value between zero and five. Not one and six because arrays start at
zero. Math.floor is a function that rounds numbers, so you end up with “4”
instead of something like “4.34234.” The latter number wouldn’t work well
for us in the type of scenario we’re currently immersed in.
CHaPtER 5 DEEPER DowN tHE DUNGEoN
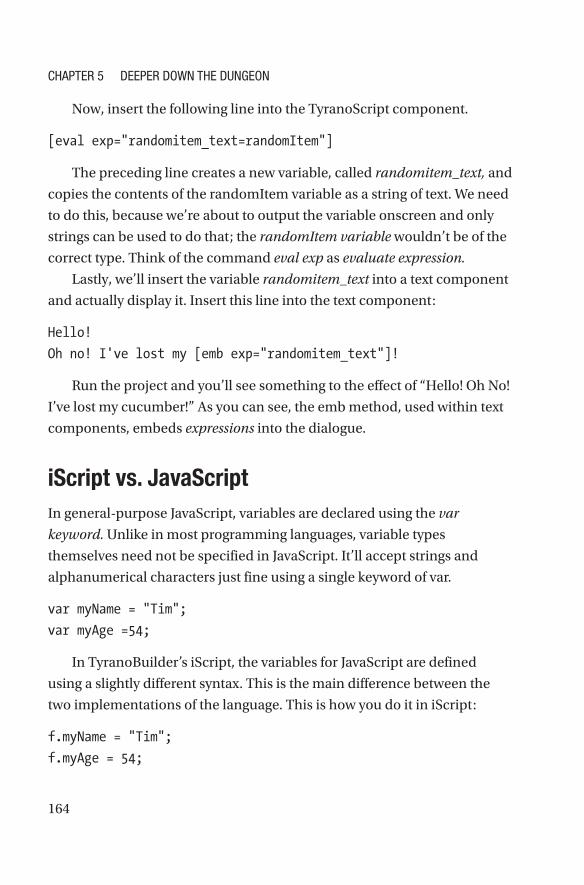
164
Now, insert the following line into the TyranoScript component.
[eval exp="randomitem_text=randomItem"]
The preceding line creates a new variable, called randomitem_text, and
copies the contents of the randomItem variable as a string of text. We need
to do this, because we’re about to output the variable onscreen and only
strings can be used to do that; the randomItem variable wouldn’t be of the
correct type. Think of the command eval exp as evaluate expression.
Lastly, we’ll insert the variable randomitem_text into a text component
and actually display it. Insert this line into the text component:
Hello!
Oh no! I've lost my [emb exp="randomitem_text"]!
Run the project and you’ll see something to the effect of “Hello! Oh No!
I’ve lost my cucumber!” As you can see, the emb method, used within text
components, embeds expressions into the dialogue.
iScript vs. JavaScriptIn general-purpose JavaScript, variables are declared using the var
keyword. Unlike in most programming languages, variable types
themselves need not be specified in JavaScript. It’ll accept strings and
alphanumerical characters just fine using a single keyword of var.
var myName = "Tim";
var myAge =54;
In TyranoBuilder’s iScript, the variables for JavaScript are defined
using a slightly different syntax. This is the main difference between the
two implementations of the language. This is how you do it in iScript:
f.myName = "Tim";
f.myAge = 54;
CHaPtER 5 DEEPER DowN tHE DUNGEoN
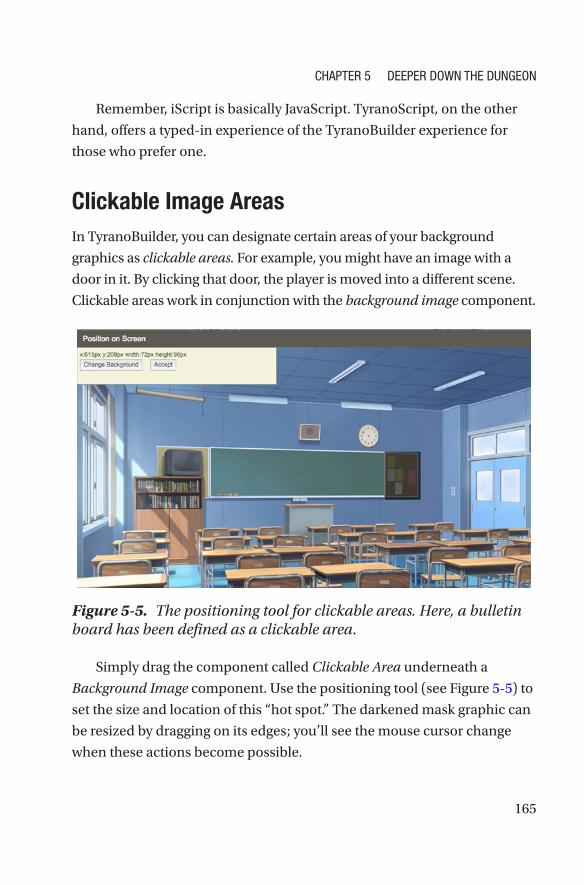
165
Remember, iScript is basically JavaScript. TyranoScript, on the other
hand, offers a typed-in experience of the TyranoBuilder experience for
those who prefer one.
Clickable Image AreasIn TyranoBuilder, you can designate certain areas of your background
graphics as clickable areas. For example, you might have an image with a
door in it. By clicking that door, the player is moved into a different scene.
Clickable areas work in conjunction with the background image component.
Simply drag the component called Clickable Area underneath a
Background Image component. Use the positioning tool (see Figure 5-5) to
set the size and location of this “hot spot.” The darkened mask graphic can
be resized by dragging on its edges; you’ll see the mouse cursor change
when these actions become possible.
Figure 5-5. The positioning tool for clickable areas. Here, a bulletin board has been defined as a clickable area.
CHaPtER 5 DEEPER DowN tHE DUNGEoN

166
Now, on the clickable area component panel, you’ll see two drop-
down menus: Location and Target. These point to the scene and its label
the player is transported to by clicking the aforementioned area.
Custom Fonts in TyranoBuilderTyranoBuilder offers you four choices for typefaces by default. Thankfully,
you’re not limited to using one of these. A custom font can be either set
project wide from the TyranoBuilder settings or utilized on a dialogue-to-
dialogue basis.
TyranoBuilder only has full support for the TrueType Font (.ttf ) format.
Luckily, as a popular format, there’s literally thousands of free and classy
fonts out there. Some notable foundries for typefaces include www.dafont.
com and www.1001freefonts.com.
To install a custom font in TyranoBuilder into your project, select
Projects ➤ Custom Fonts from the top menu. Click Add Font and
direct the program into your .ttf file. Now, to immediately change all
of your in-game dialogue to this new custom font, click the cogwheel
icon, taking you to Game Settings. Select Font Style from the menu
on the right. This will get you to the screen where you’ll be able to set
a plethora of font-related settings for your project, including those
dealing with custom typefaces.
For assigning custom fonts for specific parts of your game, you’ll
need to use the Change Font Style component found under the Messages
category on the main project view. Simply insert this component before a
Show Text component and work with the panel opening on your right to
use any custom fonts of your choice.
CHaPtER 5 DEEPER DowN tHE DUNGEoN

167
Twine MagicAlthough seeming deceptively minimalistic at first, Twine contains the
support for almost everything you need to add audiovisual flair to its
projects. As mentioned in the previous chapter, this is done via extensive
support for both JavaScript and Cascading Style Sheets (CSS), two staples
of the Internet. All examples in this part of the book assume we have
selected the SugarCube story format in Twine.
Although there are three story formats in Twine, you will see many
similarities between them. In fact, you’ll see plenty of similarities with
most Twine projects and general HTML or web development. This is
because Twine shares a lot of its functionality with HTML and its related
tags and techniques. Therefore, we’ll now rehash some of those good
old HTML elements which we are witness to daily by checking email or
shopping online (see Table 5-8).
Table 5-8. Some basic HTML elements which also work in Twine
HTML Element Description Example
<p> Paragraph <p>This is a paragraph</p>
<br> Line break This is a line.<br>This is another line.
<button> Create a button element <button>Click on this</button>
<ul> Sets up a list of
bulletpoints using <li>
for each point
<ul><li>Point</li><li>Another point</li></ul>
(continued)
CHaPtER 5 DEEPER DowN tHE DUNGEoN

168
HTML Element Description Example
<table> Sets up a table of
information using the
sub-elements of <tr>
for table row, <th> for
table header, and <td>
for table data
<table> <tr> <th>First Name</th> <th>Last Name</th> <th>Occupation</th> </tr> <tr> <td>Ben</td> <td>Smith</td> <td>Barbarian</td> </tr> <tr> <td>Jill</td> <td>Wordsmith</td> <td>Miner</td> </tr></table>
<b> Bold text Coming up: something in <b>bold</b>
<i> Italic text <i>This sentence is now italic, i.e. slanted</i>
<u> Underscore Oh good, some <u>underscored text</u>
<h1> Largest header style <h1>This is a rather big header</h1>
<h6> Smallest header style <h6>This you can't even read I bet</h6>
Table 5-8. (continued)
CHaPtER 5 DEEPER DowN tHE DUNGEoN

169
Evoking JavaScript in TwineFor the simplest of JavaScript sequences in your Twine games in the
SugarCube story format, all you need to do is open a passage and use the
script tags to execute your operation. See the following example.
<<script>> alert("Look at me!"); <</script>>
As you may remember from the previous chapter, more complicated
JavaScript should be inserted into the dedicated area in Twine called Edit
Story JavaScript. In fact, why don’t we do some of that right now?
Text Reveal Effect in CSSClicking Edit Story Stylesheet in the main project view and typing in some
well-placed strings gives you the entire power of CSS. The following lines
build a new class, called .css-reveal, which will reveal text from left to right in
a rather eye-catching manner. It was named so from the viewpoint of clarity.
.css-reveal
{
width: 30em;
white-space:nowrap;
overflow:hidden;
-webkit-animation: type 5s steps(75, end);
animation: type 5s steps(75, end);
}
@keyframes type{
from { width: 0; }
}
@-webkit-keyframes type{
from { width: 0; }
}
CHaPtER 5 DEEPER DowN tHE DUNGEoN
170
Now, use the following line inside a Twine passage to see the text
reveal effect in action. In it we’ve associated the preceding style with the
paragraph element, that is, <p>. We could’ve used many other elements for
this purpose.
<p class="css-reveal">Hello there!</p>
By now you’ll have hopefully grasped the method of both defining
and implementing CSS in your Twine projects. Use the method in the
examples that follow, too. Don’t feel intimidated by the contents of these
CSS statements; this book focuses on CSS only to the degree that is needed
to utilize it in your visual novel projects.
Spicing Up the TextLooking for creative ways of displaying your stories? Just try some of these
CSS properties. Copy and paste them into your Story Stylesheet in Twine,
implement them into your passages, and off you go. For clarity the names
of these styles are self-explanatory. Also, for your convenience, the parts
that go into your passages are presented in bold.
.shadow {
text-shadow: 0.07em 0.07em 0.07em #000;
}
.redglow {
text-shadow: 0 0 0.2em #F00;
}
.upside-down {
display: inline-block;
transform: scaleY(-1);
-webkit-transform: scaleY(-1);
}
CHaPtER 5 DEEPER DowN tHE DUNGEoN

171
.mirror {
display: inline-block;
transform: scaleX(-1);
-webkit-transform: scaleX(-1);
}
The following three CSS rules form a single effect, which accurately
depict the effects of the weather in Finland. Put them all into your Story
Stylesheet. Only call the last of the three in your passage to see it in action.
@-webkit-keyframes shake {
50% {
-webkit-transform: translateX(0.2em);
transform: translateX(0.2em)
}
}
@keyframes shake {
50% {
-webkit-transform: translateX(0.2em);
transform: translateX(0.2em)
}
}
.shake {
-webkit-animation: shake linear 0.1s 0s infinite;
animation: shake linear 0.1s 0s infinite;
display: inline-block;
}
Here’s another trifecta of CSS rules for creating an ominous and
continuous fade-in-out. Again, only use the last rule inside of your Twine
passages. You might spot the part where it says “4s.” Yes, these refer to
seconds. Change these values to either speed up or slow down the fades.
CHaPtER 5 DEEPER DowN tHE DUNGEoN

172
@-webkit-keyframes fade-in-out {
0%,
to {opacity: 0}
50% {opacity: 1}
}
@keyframes fade-in-out {
0%,
to { opacity: 0 }
50% { opacity: 1 }
}
.fade-in-out {
text-decoration: none;
animation: fade-in-out 4s ease-in-out infinite alternate;
-webkit-animation: fade-in-out 4s ease-in-out infinite
alternate;
}
Finally, we have a little something dynamic. The following CSS style,
when implemented into a passage, offers a resizable-textbox.
.resizable-textbox {
border: 2px solid;
padding: 20px;
width: 300px;
resize: both;
overflow: auto;
}
CHaPtER 5 DEEPER DowN tHE DUNGEoN
173
Now, try something like this in one of your Twine passages to see said
element in action:
<div class="resizable-textbox">First line<br>Second line<br>Third
line</div>
The player can then adjust the size of this box from the bottom right
corner of the textbox.
An Introduction to HarloweThe SugarCube story offers a fine workflow. But, as you might remember,
there’s two other alternatives built into Twine: Harlowe and Snowman.
Let’s now take a look at the hallowed Harlowe. First, create a new Twine
story using this story format.
Harlowe and the Might of jQuery
jQuery is an extension (i.e., a library) to JavaScript, created by John Resig
in 2006. It provides a wealth of powerful new functions to visually enhance
and accelerate your Twine (and JavaScript) development experience. And
yes, it can be fully integrated into Twine with all of its bells and whistles.
Let’s take a look at some of jQuery’s basics next.
jQuery and JavaScript are used using the tag <script> inside Harlowe
passages as needed. The following example, when typed into any Twine
passage, creates a gray bar and two standard buttons (i.e., button1 and
button2). These buttons are then assigned with the element we titled
superbox for the purposes of animation. The lines beginning with the
dollar sign (i.e., $) denote jQuery.
Try it out. The button titled “Action” will change the width element of
the bar to 300 pixels from the original 100 pixels. As for the reset button,
you may have a vague idea as to its purpose.
CHaPtER 5 DEEPER DowN tHE DUNGEoN

174
<script>
$(document).ready(function(){
$("#button1").click(function(){
$("#superbox").animate({width: "300px"});
});
$("#button2").click(function(){
$("#superbox").animate({width: "100px"});
});
});
</script>
<button id="button1">Action</button>
<button id="button2">Reset</button>
<div id= "superbox" style="background:#777; height:100px;
width:100px;"></div>
Now, the visual effects of jQuery are referred to as effect methods. In
the preceding example, we utilized only one of these methods: the one
called animate. A whole host of eye candy is available via this wonderful
JavaScript library. Most of these methods are utilized the same way. Each
effect is assigned to a specific HTML element in your Twine passage and
then called by user interaction.
To reiterate, the preceding example featured three arbitrarily labeled
elements: button1, button2, and superbox. Study the provided example to
get acquainted with the syntax and logic of using jQuery in your Harlowe-
based stories. Next we’ll take a look at some other effect methods at our
disposal (see Table 5-9) and how to implement them.
CHaPtER 5 DEEPER DowN tHE DUNGEoN

175
Table 5-9. Some common jQuery effect methods
Effect Method
Description Example
fadeIn Fades in an element.
optionally accepts the fade-
in values of “slow,” “fast,”
and milliseconds
$("button").click(function()
{$("#bluebox").fadeIn("fast");
$("#redbox").fadeIn("slow");});
<button>Click!</button><br>
<div id="bluebox"
style="width:60px;
height:60px; display:none;
background-color:red;"></
div><br>
<div id="redbox"
style="width:60px;
height:60px; display:none;
background-color:red;"></div>
fadeOut Fades out an element.
accepts the same optional
variety of values as fadeIn
$("button").click(function(){
$("#bluebox").fadeOut(1000);
$("#redbox").fadeOut("fast");
});
(continued)
CHaPtER 5 DEEPER DowN tHE DUNGEoN

176
Table 5-9. (continued)
Effect Method
Description Example
slideToggle Slides an element up or
down depending on its
current state. accepts same
optional values as fadeIn
and fadeout.
Note: the attribute of
display: none; is mandatory
in the element to slide in
and out
$(document).ready(function(){
$("#button").click(function(){
$("#panel").slideToggle(2000);
});
});
<style>
#panel, #button {
padding: 3px;
text-align: center;
background-color: #red;
border: solid 1px #yellow;
}
#panel {
padding: 40px;
display: none;
}
</style>
<div id="button">Click here
</div>
<div id="panel">Behold the
hidden message!</div>
CHaPtER 5 DEEPER DowN tHE DUNGEoN

177
More on Animate
Let’s go back to the first jQuery effect method presented in this chapter.
Our old friend animate is capable of much more than changing the width
of an element on the fly. Several attributes are available for simultaneous
tweaking. The following code, when entered into a Twine passage,
demonstrates this. Watch happybox evolve.
<style>
.happybox{
width: 100px;
height: 100px;
background: red;
margin-top: 30px;
border-style: solid;
border-color: black;
}
</style>
<script>
$(document).ready(function(){
$("button").click(function(){
$(".happybox").animate({
width: "200px",
height: "200px",
marginLeft: "30px",
borderWidth: "10px",
});
});
});
</script>
<button type="button">Look at me!</button>
<div class="happybox"></div>
CHaPtER 5 DEEPER DowN tHE DUNGEoN

178
Enter Snowman!The third and last available story format in Twine is called Snowman.
This is the most bare-boned approach to making games with Twine.
And that can be a good thing; it is the least restrictive of the story
formats. Snowman uses a formatting technique called Markdown.
This is a minimalistic approach created by John Gruber, where text
formatting is achieved using only a minimal amount of special
characters. Next we’ll take a closer look at basic text formatting in
Snowman (see Figure 5-6).
# Header1
## Header2
### Header3
#### Header4
##### Header5
###### Header6
*Emphasized*
**Bold**
~~Deletion~~
Putting the preceding code into a passage in Snowman produces the
result shown in Figure 5-6.
CHaPtER 5 DEEPER DowN tHE DUNGEoN

179
Snowman, JavaScript, and Underscore
The Snowman story format was designed primarily to be used in
conjunction with JavaScript and custom CSS. Therefore, it doesn’t feature
any built-in macros, unlike the SugarCube and Harlowe story formats.
Snowman includes a full implementation of the Underscore library,
created and updated by its growing team of enthusiasts and online since
2009. Underscore features over a hundred rather advanced methods for
data sorting and manipulation.
JavaScript, including Underscore, can be easily integrated into
Snowman passages using the tags <% and %>. To output the end results
of variable manipulation, you use the tags <%= and %>. See the following
example.
<% alert( 'Hello there, world!' ); %>
I wonder what 1+2 is? Oh, it's <%= 1+2 %>
Figure 5-6. An example of text formatting in the Snowman story format
CHaPtER 5 DEEPER DowN tHE DUNGEoN

180
Snowman and Variables
Variables can be defined and manipulated in this story format using a
global variable called s.
<%
s.myAge = 52;
s.myName = "Jimmy";
%>
Hi, my name is <%= s.myName %> and I'm <%= s.myAge %>!
<% ++s.myAge %>
Wait. I'm actually <%= s.myAge %>..
Rolling Dice in Snowman
Now, a more practical example is in order. The following lines can be
likened to rolling dice in Snowman, using the _.random method provided
by the Underscore library. Note the literal way the library is utilized with
the underscore character (i.e., _) prior to each method.
Rolling a four-sided die: <%= _.random(1,4) %><br>
Rolling a six-sided die: <%= _.random(1,6) %><br>
My real age is actually <%= s.myAge=_.random(53,100) %> years
young
As you can see, the _.random method takes two values to set the range
for the end results. Also, in the last line of our example listing, we assigned
a previously defined variable s.myAge with a random number between 53
and 100 to demonstrate further how variables work in Snowman.
CHaPtER 5 DEEPER DowN tHE DUNGEoN

181
Underscore and Arrays
Let’s dwell a tad deeper into the awesome power of the Underscore library,
which offers developers using the Snowman story format quite a bit of
extra functionality. For one, the library is very useful for building advanced
inventories for your games. And this is where arrays come in.
Arrays are created and displayed in Underscore (under Snowman)
like this:
<% var Friends = []; %>
<% var Items = ["Sword","Banana","Fedora"]; %><br>
Your inventory contains the following: <%= Items %>
<% Items.pop() %>
Well gosh darn it, you seemed to have lost your fedora!<br>
<br>Your inventory contains the following: <%= Items %>
The first line creates an empty array called Friends. More can be added
to this array later. Now, the second line creates an array called Items and
fills it with three values from the get-go. The third line simply prints the
contents of this array onscreen.
The fourth line is actually run-of-the-mill JavaScript; pop is a method
that deletes the last item in an array. As for adding items to arrays in
Snowman? Try this other basic JavaScript method: <% Items.push(“New
Fedora”,”Orange”); %>
Take a glance at some of the more useful methods Underscore provides
in Table 5-10. The possibilities for advanced item management and RPG
elements are limitless on Snowman when harnessing the power of the
Underscore library.
CHaPtER 5 DEEPER DowN tHE DUNGEoN

182
Table 5-10. Some useful methods for arrays in the Underscore library
Method Description Example(s)
_.find Searches for a specific type of
element in an array until such an
element is found
<% var DiscoverFedora =
_.find(["Fedora","Banana",
"Fedora"], function(string){
return "Fedora"; }); %>
<%= DiscoverFedora %>
_.last Returns the last element in an
array
<% var Items = ["Sword",
"Banana", "Fedora"]; %>
<% var Inventory = _.last
(Items); %>
<%= Inventory %>
_.first Returns the first element in an
array
<% var Items = ["Sword",
"Banana", "Fedora"]; %>
<% var Inventory = _.first
(Items); %>
<%= Inventory %>
_.each Iterates (processes) an array
invoking a function/method
which takes three arguments
(value, index, list)
<% var Items = ["Sword",
"Banana", "Fedora"]; %>
<% _.each(Items, function
(value, index, list) {%>
<%= index + ": " +
value+"<br>"%>
<%= "Full list: "+list %>
<% }); %>
(continued)
CHaPtER 5 DEEPER DowN tHE DUNGEoN

183
Table 5-10. (continued)
Method Description Example(s)
_.map Performs operations on all items
in an array, such as arithmetics
The original values are 1, 4,
and 5
<% var Example=_.map([1, 4, 5],
function(num){ return
num * 5; }); %>
After_.map multiplied each by
five, they are <%= Example %>
_.sample
Produces a random sample of
an array’s content. optionally
accepts the sample size. In this
example, we set the sample size
to two items
<% var Items = ["Sword",
"Banana", "Fedora"]; %>
<% var Sampling =
_.sample(Items,2) %>
<%= Sampling %>
_.size Returns the number of elements
in an array
<% var Items = ["Sword",
"Banana", "Fedora"]; %>
<% var Size = _.size(Items) %>
<%= Size %>
_.clone Clones an array <% var Items = ["Sword",
"Banana", "Fedora"]; %>
<% var Cloned = _.clone
(Items); %>
<%= Cloned %>
_.filter Filters through an array for
specific elements, returning all
of them
<% var Filtered =
_.filter([“Fedora”, “Banana”,
“Banana”], function(string) {
return string=="Banana" });
%>
<%= Filtered %>
CHaPtER 5 DEEPER DowN tHE DUNGEoN
184
Snowman and Audiovisuals
Since Snowman doesn’t include any handy macros out of the box, HTML
and JavaScript are its primary means of adding a little audiovisual flair to
your games. So, to add an image with an audio file player beneath it, you
could come up with something like this:
<p>This here is a fine image:</p>
<p><img src="https://upload.wikimedia.org/wikipedia/commons/6/
6e/Napoleon_crop.jpg" width="50%" height="50%"></p>
<p>Let's not forget about some audio!</p>
<p><audio controls>
<source src="https://upload.wikimedia.org/wikipedia/commons/
b/b4/United_States_Navy_Band_-_O_Canada.ogg" type="audio/ogg">
</audio></p>
As for jQuery and its impressive visual trickery? You’ll be happy to find
out you can use jQuery within your Snowman projects the same way you
would in your Harlowe games.
In ClosingThis chapter contained a hefty amount of information on the three fine
pieces of software featured in this book: Ren’Py, TyranoBuilder, and Twine.
After reading this rather intense chapter, you should have the knowledge of
the following for Ren’Py:
• Working with different video formats
• Audio playback, advanced image control, and visual
transitions
• How to customize the Ren’Py user interface using
configuration files
CHaPtER 5 DEEPER DowN tHE DUNGEoN

185
You should also have learned the following about TyranoBuilder:
• What plugins are and how they are integrated into your
games
• How to make randomized dialogue and use custom
fonts
• How variables work in TyranoBuilder and how they’re
used to control the story flow
As for Twine, you’ll have learned the following:
• The main differences between the three story formats
(SugarCube, Harlowe, and Snowman)
• How to use Cascading Style Sheets (CSS) to customize
the look of your Twine games
• Basic HTML elements and how to integrate them into
Twine
• The basics of jQuery and Underscore JavaScript
libraries
In the next chapter, we’ll look at how you can deploy your games to the
various desktop and mobile platforms available in Ren’Py, TyranoBuilder,
and Twine.
CHaPtER 5 DEEPER DowN tHE DUNGEoN

187© Robert Ciesla 2019 R. Ciesla, Game Development with Ren’Py, https://doi.org/10.1007/978-1-4842-4920-8_6
CHAPTER 6
Deploying for Popular PlatformsNot only is the software in this book powerful and highly usable, it
also deploys to a plethora of popular platforms rather wonderfully.
In this chapter, we’ll explore in detail how this is done for your Ren’Py,
TyranoBuilder, and Twine projects.
Ren’Py and the DesktopsRen’Py deploys out of the box for Windows, macOS, and Linux desktops,
without any or much configuration. This is done by simply clicking Build
Distributions from the Ren’Py launcher and selecting the platforms you
want to deploy your game on. There may be some confusion as to what
these different options refer to, so they are explained in further detail in the
following (see Table 6-1).

188
Minimum System RequirementsAlthough Ren’Py games in general are light on the computer system
requirements, they do have certain minimum hardware thresholds to
meet. These are discussed next (see Table 6-2). For example, ample
amounts of high-definition video tend to take a toll on a computer. In such
a scenario, the minimal requirements may not cover all of the stress a
game puts on hardware.
Luckily, the average PC in 2019 is rather capable of running almost
anything a developer in Ren’Py can throw at it. Even most basic of
customer PCs of today consist of 4 gigabytes (GB) of system memory
(i.e., RAM) with a nice dual-core CPU (i.e., processor) to play visual
novels perfectly comfortably on. In general, the visual novel is among
the least demanding genres of video games, although exceptions
can exist.
Table 6-1. Ren’Py deployment options for desktop operating systems
Option Description
PC: Windows and Linux Creates a compressed zip file for 32-bit Windows
and Linux, as well as 64-bit Linux
Linux x86/x86_64 Creates a compressed TAR.BZ2 file for 32- and
64-bit Linux
Macintosh x86/x86_64 Creates a zip file for 32- and 64-bit macOS
Windows x86 Creates a zip file for older 32-bit Windows
operating systems (e.g., Windows XP)
Windows, Mac, Linux for Markets
Outputs files for Windows, macOS, and Linux
optimized for online distribution via Itch.io and
Steam. These files are not meant to run directly
ChAPTeR 6 DePLOying fOR POPuLAR PLATfORmS

189
OpenGL and DirectX are visual frameworks supported by most video
cards of today, at least when it comes to the versions required by games
created with Ren’Py (i.e., OpenGL 2.0 and DirectX 9.0c). You do need to
keep an eye on which operating system you have; luckily Ren’Py doesn’t
require the latest versions of them for any platform, working well even on
an archaic Windows XP from 2001.
The file size of the final project file depends on how many audiovisual
assets your game used. It’s good to not go overboard with video files, for
example, to keep the file sizes and download times to a minimum. Always
experiment with both video and audio formats and their respective quality
settings to find a balance between fidelity and file size.
Icons for DesktopsRen’Py stores two files for application icons in the root directory: icon.
ico for Windows and icons.icns for macOS. If you want custom icons for
your game, which is highly recommended, you must store these files
in a special format; renaming a standard .png file won’t do. There are
several free programs online for creating these icon files. One of the best is
iconverticons, found on this page: https://iconverticons.com
Table 6-2. Minimum hardware requirements for Ren’Py games
Platform OS Version Processor RAM Graphics
Windows XP or higher Core 2 Duo 2.0 ghz 2.0 gB OpengL 2.0 or
DirectX 9.0c
macOS 10.6 (Snow Leopard)
or higher
Core 2 Duo 2.0 ghz
(64-bit only)
2.0 gB OpengL 2.0
Linux ubuntu 12.4 or higher Core 2 Duo 2.0 ghz 2.0 gB OpengL 2.0
ChAPTeR 6 DePLOying fOR POPuLAR PLATfORmS
190
Ren’Py for Mobile DevicesIn addition to desktop support, Ren’Py offers deployment for the popular
mobile operating systems of iOS and Android. The process for delivering
for these formats is a tad more complex, however, and will be looked at in
detail next.
Deploying for AndroidRen’Py supports the Android operating system to a great extent. However,
some visual glitches may appear. Test your games thoroughly on your
Android device(s).
Now, the first step in deploying for Android is to download the Ren’Py
Android Packaging Tool (RAPT). This is done simply by clicking Android
on the Ren’Py launcher; you’ll be asked to download the aforementioned
tool if you haven’t installed it yet.
Next, you’ll need the Java Development Kit from Oracle. It’s a
free download obtainable from the following URL: www.oracle.com/
technetwork/java/javase/downloads/jdk8-downloads-2133151.html
You now need to configure both your Android device and your PC for
software development. This involves installing an Android Debug Bridge
(ADB) connection between the device and your desktop computer. Follow
these steps:
1. Open the Settings app on your Android device.
Select Developer options, and enable USB
debugging.
2. Set up your PC to detect your device. The macOS
does this automatically. In Linux, you need to run
the command apt-get install adb to download a
package. As for Windows, you need to download
ChAPTeR 6 DePLOying fOR POPuLAR PLATfORmS
191
and install a USB driver specific to your version
of the Windows operating system: https://
developer.android.com/studio/run/oem-usb
3. Select Install SDK & Create Keys from the Ren’Py launcher’s Android screen. A digital key will be
created and used to sign packages that are sold on
the market (e.g., on Google Play).
4. Enter some information for Ren’Py about your game. Choose Configure from the launcher’s
Android menu.
5. Make sure your Android device is connected to your computer. Build your game by selecting Build
& Install from the Android menu of the Ren’Py
launcher. You may be asked to authorize your
computer for this activity.
Icons and the Splash ScreenRen’Py will create both the foreground and background icons for your
game in its base directory from image files you provide. On Android, these
icons are 432 x 432 pixels in size. The foreground icon is transparent, while
the background icon is not.
Pre-splash screens are displayed while your Ren’Py games are loading.
In the case of Android devices, they are quite crucial; the first time your
game is ran in Android, it will take some time as files will be unpacked
in the background. The file android-presplash.jpg in your project root
directory will be used as Android’s pre-splash screen.
ChAPTeR 6 DePLOying fOR POPuLAR PLATfORmS

192
Keybindings in AndroidIt’s worth noting that the following keybindings are enabled for Ren’Py
games running on Android:
• Home: Returns to the Android home screen,
suspending the current game and saving its state
• Menu: Summons the in-game menu
• Back: Rolls back
• Volume Up/Down: Used for volume control, as
expected
Testing Your Android App in Ren’PyRen’Py provides several software emulations for several types of Android
devices via the launcher’s Android menu. Your PC’s Esc key is mapped as
the menu button and the Page Up key as the back button for all of these
emulations. The following devices are available for emulation in Ren’Py:
• Android Phone: Touch is emulated using the mouse
when a button is held down.
• Android Tablet: Touch is emulated the same way as it
is for the simulated Android phone.
• Television/OUYA device: This selection emulates a
television-based Android device, including the OUYA
console. In addition to the controls available for the
other two platforms, in this mode the arrow keys
provide navigation, while Enter works as “select.” Also,
this mode provides a simulated “safe area” overlay.
Areas outside of this safe area may or may not display
on the average TV.
ChAPTeR 6 DePLOying fOR POPuLAR PLATfORmS

193
Deploying for iOSThe process of deploying Ren’Py projects for the iOS platform can only
be done on a desktop running macOS. iOS support provided by Ren’Py
is experimental as of Q1 2019. The developers state your projects aren’t
100% guaranteed to fit the tough standards of the Apple App Store,
although some games have made it through. Some technical issues, that
is, fallout from the export process, may be the cause. In addition, Apple
tends to prefer more “wholesome” titles in general for their App Store.
Therefore it makes sense to include as little violence and nudity in your
games as possible.
The tools for testing your games, however, are rather robust in Ren’Py.
Software emulations of the average iPhone and iPad are built right into the
software.
Now, the first step for deploying for iOS is to download the free renios
software; click the iOS link on the Ren’Py launcher and you’ll be asked
to do so, unless it’s already installed. Once done installing, a new set of
actions particular to iOS devices become available. Most importantly, you
now have the ability to emulate your games on virtual iPhones and iPads
using the two options below Emulation. Note: while this functionality
provides a preliminary view of your Ren’Py projects on the iOS platform,
extensive testing should be also done on actual hardware.
Xcode and the iOS ProcessApple doesn’t make it easy to get your games on the App Store. It’s a rather
time-consuming process as well as a tad pricey. However, the first step
is free, and it deals with installing Apple’s Xcode integrated development
environment (IDE). It’s safe to assume you already have an Apple ID if
you’re a Mac user. So, just download Xcode for free from the App Store on
your Mac and install.
ChAPTeR 6 DePLOying fOR POPuLAR PLATfORmS

194
Once you have Xcode on your Mac, the following steps enable you
to deploy your Ren’Py games for iOS. It’s time to get both thorough and
patient.
1. Enroll in the Apple Developer Program using the following link. Be prepared to pay an annual fee
of $99 (as of Q1 2019) for the iOS program. Your
personal Apple ID will be then associated with the
program.
• https://developer.apple.com/programs/enroll/
2. Use the Ren’Py launcher to create a new Xcode project. Do this by clicking iOS on the main
launcher page and Select Xcode Projects Directory.
Next, click Create Xcode Project. It will be named
automatically based on the game’s name in Ren’Py.
3. Access your new project in Xcode. Click Launch
Xcode in the Ren’Py launcher.
4. Add your Apple ID to Xcode’s Account Preferences. Go to the Accounts tab in Xcode. Use
the plus sign icon on the bottom of the screen to add
your Apple ID to the project.
5. Assign your project into a team. Select your project
in the Xcode project editor. Click General. Then click
Signing to show the relevant controls. Make sure
the checkbox for Automatically manage signing is
checked.
6. Execute your game on an iOS device. Connect an
iOS device to your Mac. Running your project on
actual iOS hardware will tell Xcode to create all the
necessary signing assets relevant for deployment.
ChAPTeR 6 DePLOying fOR POPuLAR PLATfORmS

195
7. Export your signing certificates and provisioning profiles. This is an optional, cautionary step for
peace of mind. To make backups of the signing
certificates and provisioning profiles (i.e., your
developer account), simply visit the Accounts tab
in Xcode and select Export Developer Accounts
from the bottom of the window beneath the list of
Apple IDs.
8. Enter a file name in the Save As field. Enter a
password in both the Password and Verify fields.
A file containing your developer account is now
safely encrypted and password protected at a
location of your choosing.
Oh, and should you later want to re-introduce a lost developer account
into the Xcode environment, just select Import Developer Accounts in the
Accounts tab and dig up a file you’ve previously created. And don’t forget
the password.
Updating Your iOS ProjectsWhenever you make changes in your Ren’Py project and want to transfer
them over to the iOS side of things, simply click Update Xcode Project in
the Ren’Py launcher. If you’ve recently updated to a new version of the
Ren’Py software itself, however, you need to create an entirely new Xcode
project for your games: using the aforementioned technique won’t work.
App Icons and Splash Screens for iOSBoth the app icons and splash screens for your iOS projects are
manipulated exclusively in Xcode. Apple is pretty strict when it comes to
the specifications of the icons (see Table 6-3).
ChAPTeR 6 DePLOying fOR POPuLAR PLATfORmS
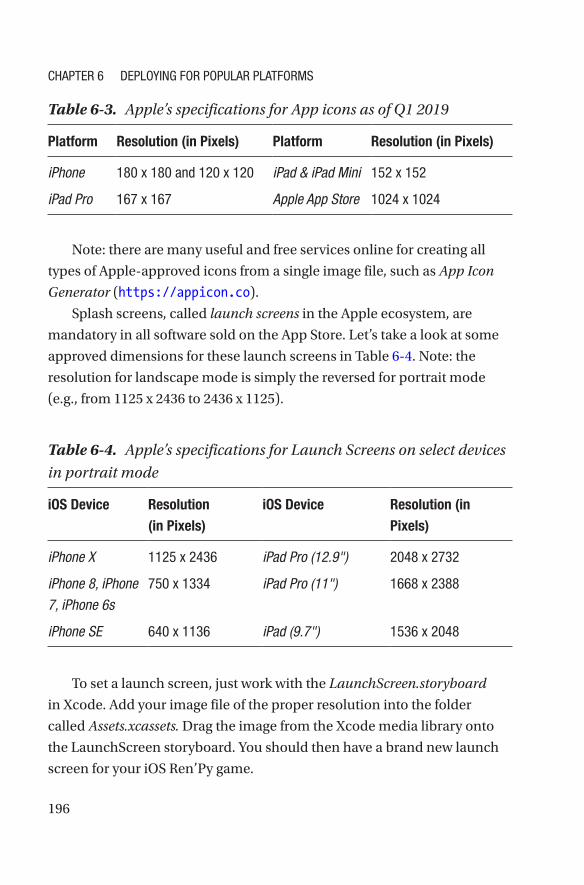
196
Note: there are many useful and free services online for creating all
types of Apple- approved icons from a single image file, such as App Icon
Generator (https://appicon.co).
Splash screens, called launch screens in the Apple ecosystem, are
mandatory in all software sold on the App Store. Let’s take a look at some
approved dimensions for these launch screens in Table 6-4. Note: the
resolution for landscape mode is simply the reversed for portrait mode
(e.g., from 1125 x 2436 to 2436 x 1125).
Table 6-4. Apple’s specifications for Launch Screens on select devices
in portrait mode
iOS Device Resolution (in Pixels)
iOS Device Resolution (in Pixels)
iPhone X 1125 x 2436 iPad Pro (12.9") 2048 x 2732
iPhone 8, iPhone 7, iPhone 6s
750 x 1334 iPad Pro (11") 1668 x 2388
iPhone SE 640 x 1136 iPad (9.7") 1536 x 2048
Table 6-3. Apple’s specifications for App icons as of Q1 2019
Platform Resolution (in Pixels) Platform Resolution (in Pixels)
iPhone 180 x 180 and 120 x 120 iPad & iPad Mini 152 x 152
iPad Pro 167 x 167 Apple App Store 1024 x 1024
To set a launch screen, just work with the LaunchScreen.storyboard
in Xcode. Add your image file of the proper resolution into the folder
called Assets.xcassets. Drag the image from the Xcode media library onto
the LaunchScreen storyboard. You should then have a brand new launch
screen for your iOS Ren’Py game.
ChAPTeR 6 DePLOying fOR POPuLAR PLATfORmS

197
Deploying for Chrome OS/Chrome BrowserGoogle’s Chrome OS is a Linux-based operating system which uses Chrome
as its primary online browser. The latter is a free download available for
most operating systems. Chrome OS is primarily distributed on specific
laptops and desktop computers, such as Chromebooks and Chromeboxes.
Now, Ren’Py games can be deployed for the Chrome browser to be played
as web applications by taking the following steps:
1. Download and install the latest version of the Chrome browser.
2. Download and install the Android Runtime for Chrome (ARC) software. Do this inside Chrome.
• https://chrome.google.com/webstore/detail/
arc-welder/emfinbmielocnlhgmfkkmkngdoccbadn
3. Package your game like you would for Android
(see “Deploying for Android” in this chapter).
4. Run the ARC software from inside of Chrome browser.
5. Locate the path to your application ending in .APK.
6. Set the following options: Landscape orientation,
Table form factor, Resize: disabled, and Clipboard
access: disabled.
Choose Test to run your game and Download Zip to generate a
compressed file ready for distribution on the Chrome Web Store.
ChAPTeR 6 DePLOying fOR POPuLAR PLATfORmS

198
Legalese for Android and iOS in Ren’PyParts of the Ren’Py Android Packaging Tool (RAPT) and the iOS
implementations of Ren’Py feature software libraries licensed under the
GNU Lesser/Library General Public License. This should be acknowledged
in the description of your game, just to be on the safe side. Simply integrate
the following note into the documentation of your game:
This program contains free software licensed under a number of licenses, including the GNU Lesser General Public License. A complete list of software is available at https://www.renpy.org/l/license/.
Ren’Py for the Quirky: Raspberry PiSince 2012 the computing scene has seen a surge of bare-boned and
somewhat quirky little devices. Such a device is called a Raspberry Pi, a
miniature computer of little cost, usually priced at under $40. With sales
of approximately 20 million by 2019, the Raspberry Pi has been quite a
success. With very little effort, you too can capitalize on this emerging
market with your Ren’Py games.
Ren’Py offers you the functionality to deploy to Raspberry Pi, but with
some caveats. Since the device is rather lightweight, some restrictions
apply that do not apply on Android or iOS. Your audiovisual assets should
be kept to a minimum when porting to Raspberry Pi. Consider making a
rather stripped-down version of your game for the system; a direct port
from a desktop computer isn’t usually a sound idea.
ChAPTeR 6 DePLOying fOR POPuLAR PLATfORmS

199
Setting Up a Pi for Ren’PyRaspberry Pi runs Raspbian, a Linux-based operating system. Ren’Py is not
guaranteed to work on anything else than a Raspberry Pi model 3B. Also,
the following settings should be set by typing sudo raspi-config into the
LXTerminal application in Raspbian:
• Memory split: 256 MB/1280 x 720 screen resolution or
lower/GL Driver: GL (Fake KMS)
Hold on: your Raspberry Pi isn’t quite ready to tackle Ren’Py yet.
In addition to the preceding text, you need to install a Linux version of
the SDK as well as the Raspberry Pi support files. Find the former on
the page provided in the following by clicking Download SDK tar.bz2.
The latter is also available on the same page, listed under Additional
Downloads.
• www.renpy.org/latest.html
TyranoBuilder for DesktopsTyranoBuilder is a very user-friendly tool also when it comes to exporting
to different platforms. The easiest to export to are Windows, macOS, and
browser. It simply takes a few clicks of the mouse.
Select Project ➤ Export Game from the top menu in TyranoBuilder.
Select either Browser Game, Windows Application, or Mac Application
from the Export Type drop-down menu. Confirm the export by clicking Ok
when presented with the prompt saying “Proceed with export?” After just
a few measly seconds of processing, you are given the option to open the
folder on your computer where the files were just created. You now have
the game in your chosen format, ready for distribution. That’s basically all
there is to it.
ChAPTeR 6 DePLOying fOR POPuLAR PLATfORmS

200
Note: it is a good practice to include a manual and license with your
game files, no matter how basic. A well-edited manual in a printable PDF
format can add a touch of class to any game.
TyranoBuilding for iOSThe effort needed for mobile deployment is, as always, more involved
than that for the desktops. That is the case for TyranoBuilder, too.
The initial steps are the same for iOS (and Android); select Project
➤ Export Game from the top menu in TyranoBuilder. You’ll get your
game in a distributable form in no time. However, this is where it gets
somewhat trickier.
The additional requirements for iOS deployment on TyranoBuilder are
quite similar to those for Ren’Py:
• A Macintosh computer running TyranoBuilder.
• An Apple Developer Account for iOS (costing
$99 a year).
• Xcode: Available for free from the App Store.
• Approval from The Apple App Store. A family-friendly
approach to your game writing helps.
For details on the aforementioned steps, see “Xcode and the iOS
Process” earlier in this chapter. What you need to bring to the table most
for iOS are a certificate and a provisioning profile, two little files that are
crucial for iOS deployment.
Note the following restrictions for iOS deployment: all of your games’
video files must be in the mp4 format. As for your audio files, they must be
in either the m4a or mp3 formats. Using other file formats may result in
your game not running properly. Also, avoid using Japanese characters in
your file names.
ChAPTeR 6 DePLOying fOR POPuLAR PLATfORmS

201
Now, you’ll also need a free piece of software called TyranoPlayer.
Download it from the following page:
• http://tyrano.jp/download/player/
TyranoPlayerFramework_ios_v112.zip
Open the TyranoPlayer file folder and a sub-folder titled
game. Copy all of the files you created earlier via the Export Game
function of TyranoBuilder to this directory. Locate the file called
TyranoPlayerFramework.xcodeproj in the TyranoPlayer directories and
double-click it to open Xcode.
The next step is to test your game on either a software simulation of an
iOS device or an actual iPhone and/or iPad. You can run iOS emulation in
Xcode by clicking the play button in the top of the Xcode interface. To test
your TyranoBuilder project on a hardware iPhone or iPad, simply connect
the device while Xcode is running; your device will appear in the emulator
box for you to test.
TyranoBuilding for AndroidTo deploy for Android, make the same initial steps by selecting Project ➤
Export Game from the top menu in TyranoBuilder. Next, you need to
install the Android Studio software, which is available for download
from the following URL: https://developer.android.com/studio. It’s a
rather hefty sized file at around a gigabyte, so you might want to go have
your tea break.
Then, it’s time to install TyranoPlayer for Android, which is
another free download: http://tyrano.jp/download/player/
TyranoPlayerFramework_android_v112.zip
ChAPTeR 6 DePLOying fOR POPuLAR PLATfORmS

202
As is the case with TyranoBuilder’s iOS deployment, your Android
projects should only contain video files in the mp4 format and audio files
in the m4a or mp3 formats. Also, Japanese characters are not supported in
file names.
Run Android Studio next. Select File ➤ New Project from the top
menu. Enter your project details, such as your application name, and
click next. On this screen, focus your attention on the Phone and Tablet
selection. For the setting for Minimum SDK, choose API 19: Android 4.4
(KitKat). Click next.
On the screen titled Add an Activity to Mobile, select Empty Activity as
the setting (see Figure 6-1).
Figure 6-1. The activity view in Android Studio
ChAPTeR 6 DePLOying fOR POPuLAR PLATfORmS

203
Next, confirm the following settings:
• Activity Name: “MainActivity”
• Layout Name: “activity_main”
Press Next and Finish. Android Studio will crunch some numbers for a
couple of minutes resulting in the project information needed to compile
your game. After this stage you still need to right-click the folder called
“app” in Android Studio (see Figure 6-2) and select Show in Explorer to
view the files.
Figure 6-2. The project view in Android Studio
ChAPTeR 6 DePLOying fOR POPuLAR PLATfORmS
204
When the explorer view opens, enter the directory /app/src. Delete
the folder called main. Now, bring up the folder you previously worked
with in TyranoPlayer. Copy the contents of the main directory built with
TyranoPlayer into the main directory created by Android Studio.
Enter Android Studio and click the play button on the top of the
interface. If the game works, you can congratulate yourself: you’re ready
to enter the rather lucrative Android market. If you see error messages,
you might be missing some crucial components. These can be installed
by clicking the text link stating Install missing platform(s) and sync project
at the very bottom of the message window. This might lead to downloads
the size of several gigabytes, so it’s time for another cup of tea. Choose a
simulation type and re-click the play button to test your project.
Additional Android AdviceThe landscape mode might not work properly on simulated Android
devices. However, this doesn’t mean it won’t work on actual hardware.
Also, your Android app name might be something ludicrous by default,
such as TyranoPlayerFramework. To change this, navigate to App ➤ Res
➤ Values in your TyranoPlayer file structure. Edit the file Strings.xml and
locate the line <string name=”app_name”>TyranoPlayerFramework </
string>. Change TyranoPlayerFramework into your game’s actual name
and save the file.
Twine for the DesktopsWith its standardized main components, HTML5 and JavaScript, Twine
games are perhaps the most compatible with the most operating systems
and devices. All desktop devices compatible with these technologies via
browsers (i.e., pretty much all of them) can run Twine games right after
they’ve been exported.
ChAPTeR 6 DePLOying fOR POPuLAR PLATfORmS
205
Exporting in Twine is done by simply clicking the cogwheel icon
next to a project in the main view. Then select Publish to File and select a
directory location for your files. You now have a game ready to run on most
desktops, regardless of their operating system, and most browsers online.
Twine for iOS and AndroidThe easiest way to deploy for both iOS and Android devices is by using a
free online tool, PhoneGap Build, provided by Adobe. What this service
does is it accepts HTML/JavaScript applications and churns out either iOS,
Android, or Windows Phone executables. Like you may have guessed, for
iOS, you should get familiar with the following resources:
• An Apple Developer Account for iOS (costing
$99 a year)
• Xcode: Available for free from the App Store
For details on the aforementioned steps, see “Xcode and the iOS
Process” earlier in this chapter. As always, what you need to bring to the
table for iOS are a certificate and a provisioning profile.
Now, as for PhoneGap Build, just sign up for a free Adobe account on
any Adobe site. This grants you access to the tool, which is to be found on
the following page: https://build.phonegap.com
Note: although PhoneGap Build still supports (as of Q1 2019) Windows
Phone, we won’t be looking at how to deploy to this platform. The reason
is the announcement in which Microsoft stated the end of support for
Windows Phone by the end of 2019.
The Wonders of PhoneGap BuildTo work with Adobe’s wonderful tool, you must upload a compressed
zip file containing two files: your exported Twine game and an xml
configuration file called config.xml. The following lines can be used as the
ChAPTeR 6 DePLOying fOR POPuLAR PLATfORmS
206
contents of the xml file. Simply copy and paste them into a new text file
and save it as config.xml. Note: make sure there are no empty lines at the
top of this file!
<?xml version="1.0" encoding="UTF-8" ?>
<widget xmlns = "http://www.w3.org/ns/widgets"
xmlns:gap = "http://phonegap.com/ns/1.0"
id = "com.happygame.example"
versionCode = "10"
version = "1.0.0" >
<name>Happy Game</name>
<description>
An amazing adventure set in the bathroom.
</description>
<author href="https://www.happygames.com" email="support@
happygames.com">
David McDeveloper
</author>
</widget>
Next, follow these steps:
1. Name your Twine file as index.html and nothing else. Find the file that came out of the Twine export
process and rename it.
2. Open config.xml and modify the file if needed.
3. Create a folder on your hard drive which has both index.html and config.xml. Nothing else is needed
in said folder, which you can call whatever you wish.
We’ll refer to this as the PhoneGap folder.
ChAPTeR 6 DePLOying fOR POPuLAR PLATfORmS

207
4. Compress the folder you just created. On a Mac,
this is achieved easily by navigating to the structure
where your PhoneGap folder is, right- clicking said
folder, and selecting Compress <folder name>. On
Windows you can use free utilities such as 7-zip to
create the .zip file.
• www.7-zip.org/
5. Go to Adobe’s PhoneGap page and click Upload a .zip file. Locate the zipped PhoneGap folder on your
PC and upload it.
6. Click Ready to build.
You should see blue download links for iOS, Android, and Windows
Phone by clicking Builds (see Figure 6-3). You can download and try the
Android (and Windows Phone) files right away. iOS is more finicky and
requires you to upload both a p12 certificate and a provisioning profile by
clicking No key selected and add a key in the PhoneGap panel. We’ll look at
the iOS implementation in detail later in this chapter.
Figure 6-3. The Builds view in PhoneGap
Note that you can also download apps by scanning the QR codes
presented by PhoneGap.
ChAPTeR 6 DePLOying fOR POPuLAR PLATfORmS
208
Splash Screens for AndroidTo create splash screen for your Android app, you need a single image
file with the dimensions of 360 x 480. Also make sure it is in the Portable
Network Graphics (PNG) format. Put this file into your PhoneGap folder.
Next, add the following code to the config.xml file, right before the tag of
</widget>.
<plugin name="cordova-plugin-splashscreen" source="npm"
spec="~3.2.1" />
<preference name="SplashScreenDelay" value="3000" />
<preference name="ShowSplashScreenSpinner" value="false" />
<preference name="FadeSplashScreen" value="false" />
<preference name="SplashMaintainAspectRatio" value="true" />
<preference name="SplashShowOnlyFirstTime" value="false" />
<splash src="splash.png" />
Icons for AndroidThe process of implementing icons for your Android app is a tad more
involving. We’ll go through it next, step by step:
1. Add the following code into config.xml, again,
before the tag </widget>.
<platform name="android">
<icon density="ldpi" src="res/icon/android/ldpi.png" />
<icon density="mdpi" src="res/icon/android/mdpi.png" />
<icon density="hdpi" src="res/icon/android/hdpi.png" />
<icon density="xhdpi" src="res/icon/android/xhdpi.png" />
<icon density="xxhdpi" src="res/icon/android/xxhdpi.png" />
<icon density="xxxhdpi" src="res/icon/android/xxxhdpi.png" />
</platform>
ChAPTeR 6 DePLOying fOR POPuLAR PLATfORmS

209
2. Navigate to your PhoneGap folder on your PC. Create a sub-folder called res and open it. Create
another sub- folder inside this folder called icon.
Again, open this folder and create yet another
folder called android. You should now have a folder
structure resembling YourApp/res/icon/android,
where YourApp is whatever name you gave to your
PhoneGap folder.
3. Create the icon file itself using your favorite image-editing program. The resulting file should
be 1024 x 1024 pixels in resolution and saved in the
PNG format.
4. Build a set of Google-approved app icons out of the base image file you just made. This is easiest
done using free online tools, such as ResizeAppIcon,
available on the following page:
• https://resizeappicon.com/
5. Find the link labeled Upload File on the aforementioned web site. Give the site the base
image file. Wait for the upload to complete.
6. Find the section on Android. Click the checkbox
labeled All.
7. Scroll down the page and find the section
Download Selected. This will result in a zip file
containing all of the necessary icons for your
Android project.
8. Unpack the zip file and copy the contents into your PhoneGap folder’s android sub-folder.
ChAPTeR 6 DePLOying fOR POPuLAR PLATfORmS

210
Splash Screens for iOSApple has stricter requirements for splash screens than Google. While a
single image file might work for Android, iOS requires several images in
numerous resolutions and orientations. Luckily, free online tools can help
you with this endeavor, too. One of the best is Resource Generator, available
on the following web site:
• www.resource-generator.com
The makers of this tool recommend nontransparent PNG files in a
2208 x 2208 pixel resolution for optimal splash screen creation. Simply
click Browse underneath Splash screen and navigate to this image file.
Click Upload files. After a minute or two, your gorgeous Apple-approvable
screens will have arrived on your PC.
Now, we need to navigate to your PhoneGap folder and create a new
sub-directory in res, called screen. And into screen you should create a new
folder called ios. The folder structure should look like this: YourApp/res/
screen/ios. Copy the files you created with Resource Generator into this
directory.
Next it’s time to add lines into the venerable config.xml file. As always,
insert the following lines before the tag called </widget>.
<platform name="ios">
<splash src="yourApp/res/screen/ios/Default-568h@2x~iphone.
png"platform="ios" width="640" height="1136" />
<splash src="yourApp/res/screen/ios/Default-667h.png"
platform="ios" width="750" height="1334" />
<splash src="yourApp/res/screen/ios/Default-736h.png"
platform="ios" width="1242" height="2208" />
<splash src="yourApp/res/screen/ios/Default-Landscape-736h.png"
platform="ios" width="2208" height="1242" />
ChAPTeR 6 DePLOying fOR POPuLAR PLATfORmS

211
<splash src="yourApp/res/screen/ios/Default-Landscape@2x~ipad.
png"platform="ios" width="2048" height="1536" />
<splash src="yourApp/res/screen/ios/Default-Landscape~ipad.png"
platform="ios" width="1024" height="768" />
<splash src="yourApp/res/screen/ios/Default-Portrait@2x~ipad.
png" platform="ios" width="1536" height="2048" />
<splash src="yourApp/res/screen/ios/Default-Portrait~ipad.png"
platform="ios" width="768" height="1024" />
<splash src="yourApp/res/screen/ios/Default@2x~iphone.png"
platform="ios" width="640" height="960" />
<splash src="yourApp/res/screen/ios/Default~iphone.png"
platform="ios" width="320" height="480" />
</platform>
Icons for iOSThe process for including Apple-approvable icons in your PhoneGap
project consists mostly of the same steps as the one for Android. Revisit
the ResizeAppIcon tool, upload your base image, and select iOS as your
platform of choice. Click Download Selected to receive your Appstore-
friendly icons.
If needed, create a sub-folder called res and open it. Also create
another sub-folder inside this folder called icon unless you previously did
so. Now, open this folder and create a new folder called ios. Unpack the
zip file you received your icons in into this directory. The folder structure
should now look like this: yourApp/res/icon/ios.
Also, add the following code into config.xml, again, before the tag
</widget>. Note: you can combine your splash screen and icon metadata
under the same <platform> tag. This is demonstrated in the following with
the bold line right before the end of the platform structure. All definitions
for iOS can and should go here, but for the sake of brevity, we won’t be
demonstrating this right now.
ChAPTeR 6 DePLOying fOR POPuLAR PLATfORmS
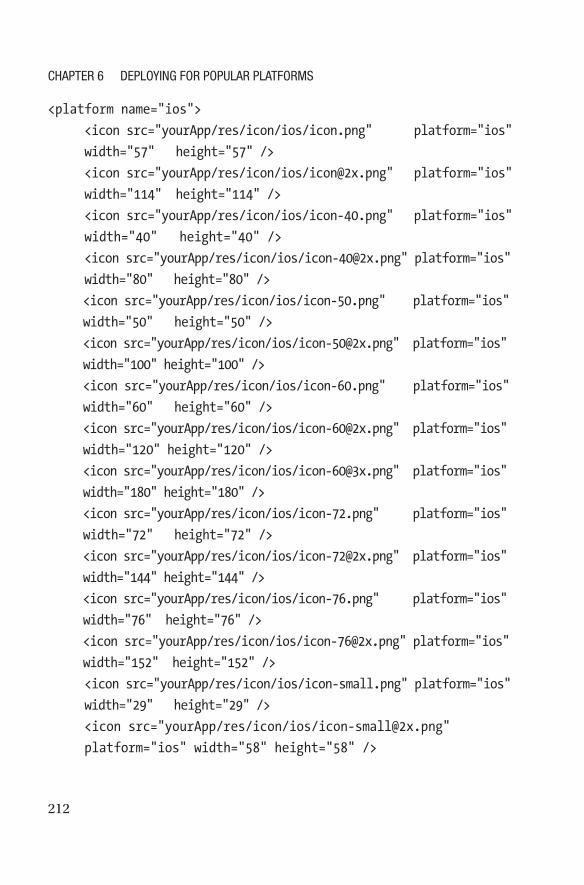
212
<platform name="ios">
<icon src="yourApp/res/icon/ios/icon.png" platform="ios"
width="57" height="57" />
<icon src="yourApp/res/icon/ios/[email protected]" platform="ios"
width="114" height="114" />
<icon src="yourApp/res/icon/ios/icon-40.png" platform="ios"
width="40" height="40" />
<icon src="yourApp/res/icon/ios/[email protected]" platform="ios"
width="80" height="80" />
<icon src="yourApp/res/icon/ios/icon-50.png" platform="ios"
width="50" height="50" />
<icon src="yourApp/res/icon/ios/[email protected]" platform="ios"
width="100" height="100" />
<icon src="yourApp/res/icon/ios/icon-60.png" platform="ios"
width="60" height="60" />
<icon src="yourApp/res/icon/ios/[email protected]" platform="ios"
width="120" height="120" />
<icon src="yourApp/res/icon/ios/[email protected]" platform="ios"
width="180" height="180" />
<icon src="yourApp/res/icon/ios/icon-72.png" platform="ios"
width="72" height="72" />
<icon src="yourApp/res/icon/ios/[email protected]" platform="ios"
width="144" height="144" />
<icon src="yourApp/res/icon/ios/icon-76.png" platform="ios"
width="76" height="76" />
<icon src="yourApp/res/icon/ios/[email protected]" platform="ios"
width="152" height="152" />
<icon src="yourApp/res/icon/ios/icon-small.png" platform="ios"
width="29" height="29" />
<icon src="yourApp/res/icon/ios/[email protected]"
platform="ios" width="58" height="58" />
ChAPTeR 6 DePLOying fOR POPuLAR PLATfORmS

213
<icon src="yourApp/res/icon/ios/[email protected]"
platform="ios" width="87" height="87" />
<splash src="www/res/screen/ios/Default-568h@2x~iphone.
png"platform="ios" width="640" height="1136" />
</platform>
The Apple p12 Certificate and PhoneGapUsing PhoneGap Build for iOS requires not only an Apple developer
certificate, but it needs to be provided in a specific format, which is the
Personal Information Exchange format. This is often referred to as the p12
certificate. The following steps tell you how this is done:
1. Open Keychain Access on your Mac. This tool is
found usually in your Applications/Utilities folder.
2. Select File ➤ Import to bring your Apple-provided certificate file (i.e., the file with the extension of .cer).
3. Select the Keys category in Keychain Access. Choose the private key associated with your iOS
Development Certificate. The key is identified by a
public certificate that is paired with it.
4. Hold down the CMD key and click the Developer Certificate. Select Export iOS Developer Certificate.
5. Save the keystore in the p12 format.
6. A prompt will appear requesting a strong password. This will be needed when transferring
your keys and certificates between keystores or
when signing apps.
ChAPTeR 6 DePLOying fOR POPuLAR PLATfORmS
214
In ClosingThis chapter dealt with how to deploy games made with Ren’Py,
TyranoBuilder, and Twine for the most popular platforms today. After
reading this chapter, you should have the knowledge of the following for
Ren’Py:
• How to deploy to Windows, macOS, and Linux desktops
• How to obtain and use Ren’Py Android Packaging Tool
(RAPT) to deploy for Android
• Using Android Runtime for Chrome (ARC) to create
web apps for Google’s Chrome OS and browser
• How to obtain the necessary frameworks and digital
certificates from Apple needed to deploy for iOS
After reading this chapter, you should have the knowledge of the
following for TyranoBuilder:
• Deployment to Windows, macOS, and browser
• How to deploy TyranoBuilder games for iOS using
TyranoPlayer and Apple’s Xcode
• How to obtain and use the Android Studio software to
deploy your games for Android
As for deploying in Twine, you should have the following knowledge at
this point:
• Deployment to Windows, macOS, and browser
• How to use Adobe’s PhoneGap Build online tool to
create both iOS and Android apps
ChAPTeR 6 DePLOying fOR POPuLAR PLATfORmS

215
Other things you have learned include
• How to use online tools to create icons and splash
screens to Apple’s and Google’s exact specifications
• What Apple’s p12 certificate is and how it’s obtained
• The “legalese” you should include in the
documentation of your Ren’Py games when deploying
for Android and iOS
In the next chapter, we’ll actually be implementing our know-how on
these pieces of software by creating three little games with them.
ChAPTeR 6 DePLOying fOR POPuLAR PLATfORmS

217© Robert Ciesla 2019 R. Ciesla, Game Development with Ren’Py, https://doi.org/10.1007/978-1-4842-4920-8_7
CHAPTER 7
Three Little GamesIn this chapter we’ll create an actual visual novel. We’ll see how the
synopsis from Chapter 1 translates into Ren’Py, Twine, and TyranoBuilder
as we create a little game called Taking Back August. This project will be
split between the three aforementioned frameworks with the majority of
the game being presented in Ren’Py.
You can, and should, write your own stories. However, it’s useful to see
how the process evolves from synopsis to game, especially if you haven’t
written your first game yet.
Laying Out a PlanBefore embarking on the coding side of things, it’s good to lay
out a plan for your adventure. This means you should catalogue
the characters and the most relevant venues in your game into
representations that can be easily referenced. It is paramount especially
when working in larger teams.
We’ll now lay out some tables for the techno-thriller Taking Back
August. For the purposes of this book, the method of tables works best.
Of course, you are free to use any visual approach in this process. The
crucial thing is to not skip this phase and go straight to the coding; such an
approach could backfire!
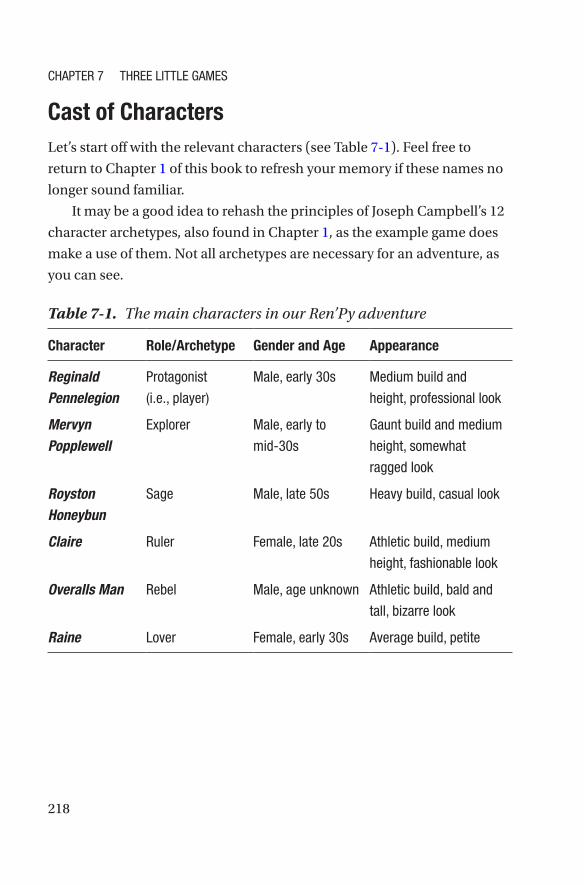
218
Cast of CharactersLet’s start off with the relevant characters (see Table 7-1). Feel free to
return to Chapter 1 of this book to refresh your memory if these names no
longer sound familiar.
It may be a good idea to rehash the principles of Joseph Campbell’s 12
character archetypes, also found in Chapter 1, as the example game does
make a use of them. Not all archetypes are necessary for an adventure, as
you can see.
Table 7-1. The main characters in our Ren’Py adventure
Character Role/Archetype Gender and Age Appearance
Reginald Pennelegion
Protagonist
(i.e., player)
Male, early 30s Medium build and
height, professional look
Mervyn Popplewell
Explorer Male, early to
mid-30s
Gaunt build and medium
height, somewhat
ragged look
Royston Honeybun
Sage Male, late 50s Heavy build, casual look
Claire Ruler Female, late 20s Athletic build, medium
height, fashionable look
Overalls Man Rebel Male, age unknown Athletic build, bald and
tall, bizarre look
Raine Lover Female, early 30s Average build, petite
CHAPtER 7 tHREE LittLE GAMES
219
LocationsVisual novels aren’t usually thought of in terms of the number of locations
or rooms. When it comes to the genre, the metric for depth is often the
number of words of dialogue and narration a game contains. On average,
it’s good to settle between 10,000 and 50,000 words total per game. Note:
for the sake of brevity, the tutorial games presented in this book will all fall
short of the aforementioned word count.
While the relevant characters in an adventure are easily catalogued, it’s
more challenging to decide on the number and type of venues (and later,
rooms) in a game. Too few locations hinder a game’s atmosphere, and too
many simply confuse the player. It’s best to start with a top-down approach
(see Table 7-2), focusing only on the most crucial venues first and splitting
them into smaller units (i.e., rooms).
We use three categories for mapping a story: settings, venues,
and rooms. This is for the sole reason of continuity, in regard to both
storytelling and the audiovisual side of things.
• Settings can and should share the same theme and
atmosphere, when it comes to the writing and/or
visual elements (e.g., the stylistic choices with the
backgrounds).
• Venues might, for example, share a soundtrack (or
other ambient backdrop) and/or visual components.
• Rooms included in a venue can usually be thought
of as being the smallest units for locations in a game,
some of which are interconnected.
CHAPtER 7 tHREE LittLE GAMES

220
Table 7-2. The main settings and venues in Taking Back August
Setting Venue Example Room Description
The Office Complex
Reginald’s work space
You’re idling at a tidy desk with a desktop
computer and stacks of papers. Only a
sticker of a cyborg woman makes your
workstation unique to all of the others’.
The Office Complex
The Top Floor (i.e., The Special Cell Phone Storage Area)
You enter a somewhat run-down part of
the office premises, several floors above
Reginald’s desk, and several decades
behind in furniture style and decoration.
London The Wellington Arch, Hyde Park
the Arch stands in the dark London night
as almost a sinister monument in the light
of recent events.
The Office Complex (On Fire)
Reginald’s desk All hell has broken loose in the inferno
that used to be your workplace. You
shield your face with your briefcase and
dive into the fire.
London (Residential Area)
Reginald’s Apartment Your once familiar dwelling is now clouded
in sinister apprehension as strange sounds
emit from behind the door.
London (Train Station)
Euston Train Station With the taste of blood in your mouth, you
frantically eye the timetables for the next
train; any train will do.
Train Train to Nottingham Sitting down in a mushy train seat, a
woman with black hair opposite to you
dons a smile. taking her headphones off,
she introduces herself.
(continued)
CHAPtER 7 tHREE LittLE GAMES

221
(continued)
Table 7-2. (continued)
Setting Venue Example Room Description
Bedford Streets
Bedford Train Station Doing your best to blend in the crowd, you
are suddenly shaken by an arm grabbing
you by the shoulder.
Bouvet Island, Norway
Bouvet Island You exit the hovercraft into an almost
alien world. the freezing temperature
chills your blood. the craft begins to
reverse immediately as you’re left to
deal with the Atlantic winds – and the
Faction – on your own.
Bouvet Island, Norway
The Underground Bunker
Unnoticeable from the outside, the four-
room structure is surprisingly roomy on
the inside. With better furniture, it could be
turned into an exotic hostel.
South Atlantic Ocean
The Hovercraft A second craft emerges a few hundred
yards to the starboard. Like the hovercraft,
it has no lights on. You begin to panic.
Norway Oslo Airport You enter an exceptionally busy airport
spanning what seems like miles. You take
some comfort in being able to disappear
into the massive crowd.
London Heathrow Airport Jet-lagged tourists pull their luggage
around a surprisingly calm Heathrow
as you mentally prepare for the fight of
your life.
CHAPtER 7 tHREE LittLE GAMES

222
Now it’s time to divide the aforementioned venues into smaller units.
After all, a game with only 14 locations tends to run out of steam rather
quickly. Using the three categories of locales, we map out some rooms for
the first setting (i.e., The Office Complex) of our adventure (see Table 7-3).
We’ll then do this for all of the different locations in the example game.
Table 7-3. The Office Complex setting in Taking Back August
Setting Venue Room Connects to Room(s)
The Office Complex
Reginald’s work space
Reginald’s desk Drinking fountain area, Royston’s desk
Drinking fountain area Reginald’s desk, The neighboring desk
The neighboring desk Drinking fountain area
The Top Floor (i.e., The Special Cell Phone Storage Area)
Royston’s desk Reginald’s desk, Special filing cabinet
Special filing cabinet Royston’s desk
Setting Venue Example Room Description
London Buckingham Palace there’s no time to admire the courtly
facades and stately monuments behind
you. You must only run. the sound of
gunfire makes you almost trip on the
exquisite pavement.
New Office Complex
Reginald’s new work space
Before moving on to a more secluded part
of the building, he takes one last look at the
ancient mobile phone before storing it in a
very special filing cabinet, ready for use.
Table 7-2. (continued)
CHAPtER 7 tHREE LittLE GAMES

223
Setting I: The Office Complex
As you may remember, our adventure begins with Reginald receiving a
mysterious email from a deceased former colleague, one Mervyn Popplewell.
Design notes for The Office Complex:
• The tone for the writing in this setting should be
somewhat somber and foreboding.
• As far as audio atmosphere building goes, the relevant
venues might benefit from copier machine sounds,
muffled voices, and perhaps a radio playing in the
background in one of the rooms.
Setting II: London
Now we’re on our way to the Wellington Arch, as per the instructions in the
mysterious email. On to the streets of London we go (see Table 7-4).
Table 7-4. The Office Complex setting in Taking Back August
Setting Venue Room Connects to Room(s)
London Hyde Park Hyde Park The Wellington Arch
The Wellington Arch, Hyde Park
The Wellington Arch Hyde Park
Street Road past the office The Wellington Arch
Flames in the distance None
CHAPtER 7 tHREE LittLE GAMES

224
Design notes for London:
• The tone for the writing in this setting should still be
foreboding.
• Audio wise, we should incorporate normal street
sounds: cars passing by, people talking into their cell
phones, footsteps, and perhaps the beeps of traffic
lights.
Setting III: The Office Complex on Fire
This is a troublesome moment in our protagonist’s adventure. Reginald
is determined to head back to the office, which is now almost completely
engulfed in flames (see Table 7-5). With nothing but a briefcase to shield
him, he takes on the challenge nonetheless.
Table 7-5. The Office Complex setting in Taking Back August
Setting Venue Room Connects to Room(s)
London Office back entrance
Back alley Fire ladder
The Office Complex (On Fire)
Fire ladder General Office Space
General Office Space Reginald’s desk
Reginald’s desk Neighboring desk A
Neighboring desk A Reginald’s desk, Neighboring desk B
Neighboring desk B Neighboring desk A
CHAPtER 7 tHREE LittLE GAMES

225
Design notes for The Office Complex (On Fire):
• The tone for the writing in this setting should be
distressed and confused.
• For audio, the sounds of fire engines, flames, and things
falling apart are what’s needed.
Setting IV: London (Residential Area)
At this point in the story, Reginald heads home, as instructed. However, things
aren’t quite ideal; strange sounds can be heard coming from his apartment.
In fact, entering his home would be downright detrimental to Reginald’s
health; hence, there’s no coming back from that room (see Table 7-6).
Table 7-6. London (Residential Area) setting in Taking Back August
Setting Venue Room Connects to Room(s)
London (Residential Area)
Reginald’s house
Street None
Corridor Street
Reginald’s Apartment Door
Corridor, Reginald’s Apartment
Reginald’s Apartment
None
Design notes for London (Residential Area):
• The writing in this brief but intense setting should
convey a sense of doom.
• When it comes to audio, the venue would benefit most
from echoing footsteps and bizarre, alien sounds.
CHAPtER 7 tHREE LittLE GAMES

226
Design notes for London (Train Station):
• The tone set in the previous setting continues; Reginald
is being pursued and he’s panicking, after all.
• Audio in this setting should be kept similar to the other
London-based settings, only to be slightly busier due to
higher concentration of people.
Setting VI: Train
Entering a train, Reginald feels slightly more at ease. However, this calm
won’t last very long; he’s still being chased (see Table 7-8). In fact, he ends
up locking himself in the train toilet with a pair of maniacs running after
him. Receiving a call on the special mobile phone, he’s told to leave at the
next station, which happens to be Bedford.
Setting V: London (Train Station)
Now under pressure to leave London immediately, Reginald dashes to the
train station. There, he enters the first northbound train (see Table 7-7).
Table 7-7. London (Train Station) setting in Taking Back August
Setting Venue Room Connects to Room(s)
London (Train Station)
Euston Train Station
Stephenson Statue Platform A
Platform A Stephenson Statue, Platform B
Platform B Train
Train None
CHAPtER 7 tHREE LittLE GAMES

227
Table 7-8. London (Train Station) setting in Taking Back August
Setting Venue Room Connects to Room(s)
Train Train to Nottingham Train doors None
Train car A Train car B, Train doors
Train car B Train car A
Train toilet Train car B, Train car C
Train car C None
Design notes for Train:
• This setting offers a breather in terms of dramatic
tension. However, toward the end of this setting, the
action ramps up again.
• The ambience should consist of quiet train noises, that
is, cars rolling and clicking on rails.
Setting VII: Bedford Streets
Reginald gets off at Bedford Station, unsure of what to do next. Dashing
around the platforms, he is shook as someone grabs him by the arm.
Luckily, it turns out to be Royston Honeybun, the guy from tech
support. They stroll into a small Bedford park, sitting down on a bench.
Reginald is then briefed on some of the details of the situation (see
Table 7-9).
CHAPtER 7 tHREE LittLE GAMES

228
Design notes for Bedford Streets:
• Aside from a single shock, this setting has a more
relaxed tone overall compared to the others so far. The
writing should reflect the fact that the protagonist now
feels somewhat safe, being in the presence of an ally.
• The audio for Bedford should be similar to that of the
London settings, although slightly more muted and
sparse.
Setting VIII: Bouvet Island, Norway
As Royston Honeybun departs into the night, Reginald receives another
call on the special mobile phone. Raine informs him he now needs to ditch
the phone and relocate to the most remote island on the planet: Bouvet
Island. A rather complicated trip involving numerous trains, ferries, and
fishing boats ensues, but Reginald makes it in a little less than 3 days
(see Table 7-10).
Table 7-9. The Bedford Streets setting in Taking Back August
Setting Venue Room Connects to Room(s)
Bedford Streets Bedford Station
Train platform A Train platform B
Train platform B Train platform A, Road to a Park
Road to a Park Park Bench
Park Bench
CHAPtER 7 tHREE LittLE GAMES
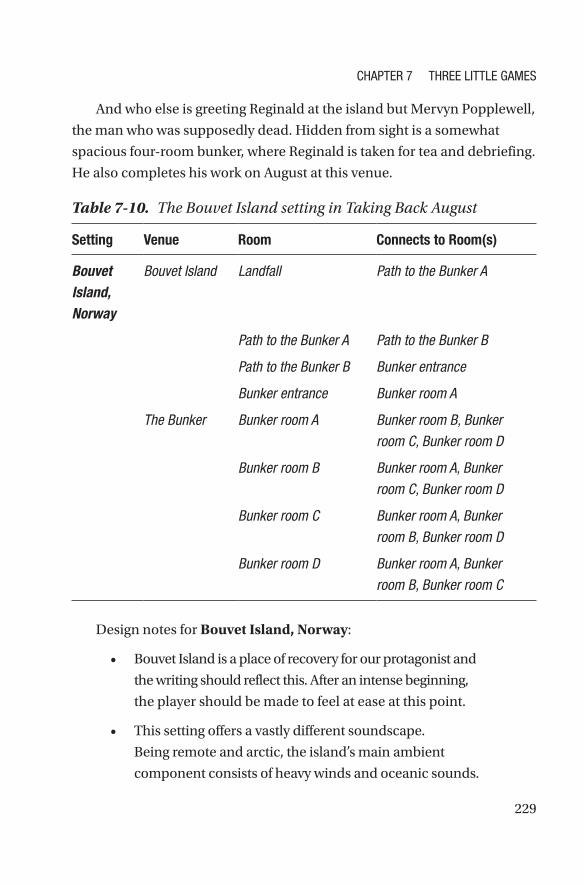
229
Table 7-10. The Bouvet Island setting in Taking Back August
Setting Venue Room Connects to Room(s)
Bouvet Island, Norway
Bouvet Island Landfall Path to the Bunker A
Path to the Bunker A Path to the Bunker B
Path to the Bunker B Bunker entrance
Bunker entrance Bunker room A
The Bunker Bunker room A Bunker room B, Bunker room C, Bunker room D
Bunker room B Bunker room A, Bunker room C, Bunker room D
Bunker room C Bunker room A, Bunker room B, Bunker room D
Bunker room D Bunker room A, Bunker room B, Bunker room C
And who else is greeting Reginald at the island but Mervyn Popplewell,
the man who was supposedly dead. Hidden from sight is a somewhat
spacious four-room bunker, where Reginald is taken for tea and debriefing.
He also completes his work on August at this venue.
Design notes for Bouvet Island, Norway:
• Bouvet Island is a place of recovery for our protagonist and
the writing should reflect this. After an intense beginning,
the player should be made to feel at ease at this point.
• This setting offers a vastly different soundscape.
Being remote and arctic, the island’s main ambient
component consists of heavy winds and oceanic sounds.
CHAPtER 7 tHREE LittLE GAMES

230
Setting IX: South Atlantic Ocean
A few days later, after being visited by Raine, Reginald is invited to leave
the bunker. An emergency is taking place in Buckingham Palace. Reginald
takes on the offer and boards a hovercraft. Some major action ensues in
this short but intense setting as enemy operatives storm the craft (see
Table 7-11).
With our team unable to fend for themselves, Royston Honeybun
comes to the rescue with his helicopter, creating a second venue for this
series of rooms.
Table 7-11. The South Atlantic Ocean setting in Taking Back August
Setting Venue Room Connects to Room(s)
South Atlantic Ocean
The Hovercraft Hovercraft deck Hovercraft control room
Hovercraft control room Hovercraft deck
Helicopter Rescue
Hovercraft control room Hovercraft deck
Hovercraft deck Hovercraft control room
Design notes for South Atlantic Ocean:
• The writing for this setting should convey a sense of
stress and immediacy.
• The audio in this setting should be very intense with
sound of the hovercraft’s engines providing a backdrop
for heavy footsteps, banging on the cabin door, ocean
sounds, and eventually the overbearing sound of a
helicopter at close range.
CHAPtER 7 tHREE LittLE GAMES

231
Setting X: Norway
Reginald and the gang make landfall somewhere on the coast of Norway.
A car is waiting for them, taking them to Oslo Airport where a private jet
awaits (see Table 7-12). A turbulent flight to London begins as Reginald
learns of a dire situation at Buckingham Palace.
Table 7-12. The Norway setting in Taking Back August
Setting Venue Room Connects to Room(s)
Norway Landfall Coast of Norway Car to Airport
Oslo Airport Car to Airport Airport Area A
Airport Area A Airport Area B, Car to Airport
Airport Area B Jet to London
Jet to London None
Design notes for Norway:
• The writing should reflect the lack of immediate threats,
as a large swathe of antagonists were defeated in the
previous setting. However, a situation at Buckingham
Palace is yet to be resolved; a lot is still at stake.
• This setting should have a somewhat soothing
series of ambient backdrops, from a now worry-free
hovercraft trip, to a long drive, to the sound of jet
engines spinning up.
Setting XI: London
Reginald and his friends arrive at Heathrow and immediately head to
Buckingham Palace, which is the ground zero for a rather messy situation
(see Table 7-13). The prime minister has been kidnapped and will only be
CHAPtER 7 tHREE LittLE GAMES

232
Table 7-13. The London setting in Taking Back August
Setting Venue Room Connects to Room(s)
London Heathrow Airport Arrivals Car to Central London
Car to Central London Constitution Hill
Buckingham Palace
Constitution Hill Main Entrance, Living Room
Main Entrance Throne Room, Constitution Hill
Throne Room Main Entrance
Reginald’s house Living Room Bedroom
Bedroom Living Room, Balcony
Balcony Bedroom
released if Reginald implements a back-doored, flawed implementation
of August the firewall. With the palace premises flooding with Faction
antagonists, a nervous Reginald sets foot in the Throne Room, where
Claire and her overalls-covered bodyguard await.
Reginald does, in fact, deliver the goods but in such a way that
August is fool-proof and inaccessible save for the British government.
Finally, SAS snipers finish the task as Reginald and Raine run to safety
from the palace. After a brief visit home, he goes back to work where
he learns he’s now earned the position once held by one Royston
Honeybun. The end!
Design notes for London:
• The tone for this setting should be rather matter-of-
fact, cool, and calculated as this reflects the most
reasonable approach our protagonist would take in
CHAPtER 7 tHREE LittLE GAMES

233
such a situation. Reginald has experienced quite a bit
in the last few weeks and is wiser and more resourceful
as a result of his adventures.
• Audio wise, the setting benefits from both the usual city
sounds (e.g., klaxons and crowd noises) and a more
minimalistic ambience inside Buckingham Palace. The
latter works to create a contrast between the intensity of
the things at stake and the externally rather austere actions.
Setting XII: The New Office Complex
Reginald returns to work. The office has been completely renovated during
his quest abroad. There’s no sign of any fire damage; fancy new computers
and desks adorn the premises (see Table 7-14).
Royston shows up, stating he’s retiring. He offers Reginald his old job
at “tech support.” Reading between the lines, Reginald agrees. He moves
his post to the top floor, close to the special cell phone, ready for any new
adventures that may follow.
Table 7-14. The New Office Complex setting in Taking Back August
Setting Venue Room Connects to Room(s)
New Office Complex
Reginald’s work space
Reginald’s desk Drinking fountain area, Royston’s desk
The new neighboring desk
Reginald’s new desk
The Special Cell Phone Storage Area
Royston’s desk (Reginald’s new desk)
Reginald’s new desk, Special filing cabinet
Special filing cabinet Royston’s desk
CHAPtER 7 tHREE LittLE GAMES
234
Design notes for New Office Complex:
• The writing should invoke a sense of triumph and
optimism.
• When it comes to audio, the New Office Complex is
a serene and modern environment with no intense
elements.
Part I: The Beginnings of Taking Back August in Ren’PyAccording to our catalogue of locations, we ended up with a total of 61
rooms for Taking Back August. This is enough to introduce you to the
Ren’Py workflow. It’s now time to move on to the coding process itself. As
previously mentioned, this is but a small adventure with the word count
falling somewhere between 2000 and 2500 words. We will, however, utilize
most of the powerful features Ren’Py offers for making this game.
Now, go ahead and launch Ren’Py; it’s showtime.
Starting the ProjectAfter opening the Ren’Py launcher, click Create New Project. You’ll be
asked to enter a project name. We’ll use Taking Back August. Next, Ren’Py
wants to know your choice of screen resolution, defaulting to 1280 x 720
(HD). This is a good choice, so merely click Continue. You’ll be presented
with a screen titled Select Accent and Background Colors. Pick the ones that
you fancy most. These settings can be changer later at any time.
After a few moments of processing, Ren’Py takes you back to the
launcher main screen. This is where you work on your adventures. Select
Taking Back August from the left, underneath Projects. You’ll find a file
CHAPtER 7 tHREE LittLE GAMES

235
called script.rpy under Edit File. Click it. The file should open within a text
editor. This is the main script for our game. We’ll mostly be working with
this file throughout this tutorial.
Ren’Py is very finicky with whitespaces and syntax. This can’t be
stressed enough. For example, some text editor software uses automatic
quotation mark adjustment, replacing the Ren’Py-friendly simple
quotation mark (i.e., “Hello”) with double curved quotes (i.e., “Hello”).
This will result in Ren’Py not being able to process the script. Make sure
to adjust your word processor’s options to not automatically “fix” said
punctuation.
Note: the title screen in a Ren’Py project is found by clicking gui on
the launcher. Now navigate to the overlay directory and you’ll find the
file (i.e., main_menu.png) for customization with your favorite image
editor.
Setting Up the CharactersYou’ll find some pre-made code in any new Ren’Py script file, featuring the
stalwart Eileen as the sole character. We’ll now start to replace this listing
with our own by first entering the main cast into the script, color coding
their names for the dialogue as we see fit.
Now, you might remember the fact that Ren’Py uses standard HTML-
compliant color coding. Each color definition is entered in hexadecimal
notation. The first two digits after a dash sign represent red, the next two
green, and the last two adjust the amount of blue in a hue. The range for
these values is between 0 and 9 for the first ten, continuing with A to F for
values between 10 and 16. As a refresher, this is what pure red would look
like: #FF0000. For black, we would enter #000000.
Look for the following line in the default script file (i.e., script.rpy):
define e = Character("Eileen")
CHAPtER 7 tHREE LittLE GAMES

236
Now add the following lines in its place:
define reg = Character("Reginald Pennelegion", color="#0099BB")
define merv = Character("Mervyn Popplewell", color="#007799")
define roy = Character("Royston Honeybun", color="#003399")
define rai = Character("Raine", color="#8888EE")
define cla = Character("Claire", color="#AA1100")
define man = Character("Overalls Man", color="#EE1100")
What this does is create the main cast of characters for our example
adventure, assigning each with a shorthand tag for more comfortable
typing later on. You’ll find these tags denoted in bold in the preceding
listing purely for the sake of convenience. When it comes to color coding,
we gave our protagonist and his crew a set of blueish hues, while the
antagonist side gets painted with red.
Custom TransitionsYou may remember the various stock visual transitions that Ren’Py
has built in (e.g., fade, dissolve, pixellate). While there’s nothing wrong
with using them, sometimes you want a little extra control over the
transitions in your game. Add the following line after the previous
ones; it’ll define a new 2-second transition called slideleft as well as one
called fireflash, both of which we’ll use later. The latter is a quick fade
to bright orange and back, for the dramatic purposes of simulating a
burning environment.
define slideleft = CropMove(2.0, "slideleft")
define fireflash = Fade(0.1, 0.0, 0.5, color="#e40")
CHAPtER 7 tHREE LittLE GAMES

237
Assigning Images to CharactersYou’ll notice the Ren’Py launcher has a link titled Open Directory ➤
images. This creates a directory view of the image files associated with the
active project.
Now, the naming convention in Ren’Py is as follows: each file name for
a character should share the exact one assigned in the preceding section
in this book (for the purposes of our example adventure). For example, for
our six characters, we’ll need six image files with the exact names of reg.
png, merv.png, roy.png, and so on. In our case, files named reg.png or Reg.
png would both work; however, Reginald.png wouldn’t.
Remember, Ren’Py takes images for characters in the PNG format,
although it also accepts WEBP files. For background files, the software
accepts JPG, PNG, and/or WEBP files.
Preparing Other Audiovisual AssetsAlthough Ren’Py automatically seeks out the character images provided
you’ve named those correctly, most other audiovisual assets need to be
defined in the script file. The vast swathe of these assets included in our
tutorial game consists of background graphics in the jpg format, as you
can see from the following code, which should sit below the character
definitions laid out previously.
One exception is the definition of a second expression for one of
our characters, Raine. She dons a more serious face at one point in
the adventure. This needs to be stated in the source code prior to said
moment. For logic’s sake, we use the additional keyword serious and type
in the following:
image rai serious = "rai_serious.png"
CHAPtER 7 tHREE LittLE GAMES

238
We can then summon this expression for Raine’s character at our
leisure, using something like rai serious “Yes, I’m being serious!” Feel free to
add any number of expressions for your characters using this method.
Just to reiterate: you can use the image statement to define both the
basic character portraits and any additional expressions (e.g., image
jimmy =“jimmy.png” or perhaps image jimmy happy = “jimmyhappy.
png”). However, you need a character definition before that (e.g., define
jimmy = Character(“Jimmy”), etc.) As you probably remember, we defined
our tutorial game’s characters and their associated image tags under the
header Setting Up the Characters a couple of pages ago.
Now, let’s define the sepia-toned visuals for the office complex in the
game. These can be summoned and hidden at your will using the show
and hide commands (e.g., show office will display the image file office1.jpg,
whereas hide office will, you might’ve guessed it, hide said image):
image office1 = "office1.jpg"
image office2 = "office2.jpg"
image email = "email.jpg"
image topfloor = "topfloor.jpg"
image cooler = "cooler.jpg"
Next, we assign some images for the outdoor scenes, this time the files
sharing a blue hue:
image london = "london.jpg"
image london2 = "london2.jpg"
image park = "park1.jpg"
image park2 = "park2.jpg"
image alley = "alley.jpg"
image door = "door.jpg"
image window = "window.jpg"
image station = "station.jpg"
CHAPtER 7 tHREE LittLE GAMES

239
Finally, we assign a quadruplet of fiery images representing the chaos
of a full-blown fire storm. They will be displayed at random at one point in
the adventure.
image fire1 = "fire1.jpg"
image fire2 = "fire2.jpg"
image fire3 = "fire3.jpg"
image fire4 = "fire4.jpg"
Into the Fray!Now, we’ll get to the meat of the action by setting up the scene with a few
descriptive lines of who you are and what you do. Provided the character
images are in the correct directory, we’ll also display our hero, Reginald,
with the nice custom sliding effect we defined earlier. We’ll also use
the xpos attribute to position him on the right side of the proceedings.
Remember, with xpos the value of 0.0 is the absolute left and 1.0 is the
absolute right.
But first, we define some variables. They will be used and explained in
detail later.
# The game starts here.
label start:
# Define variables
$ sips = 0
$ time = 0
$ items = []
$ dvd_found = False
CHAPtER 7 tHREE LittLE GAMES
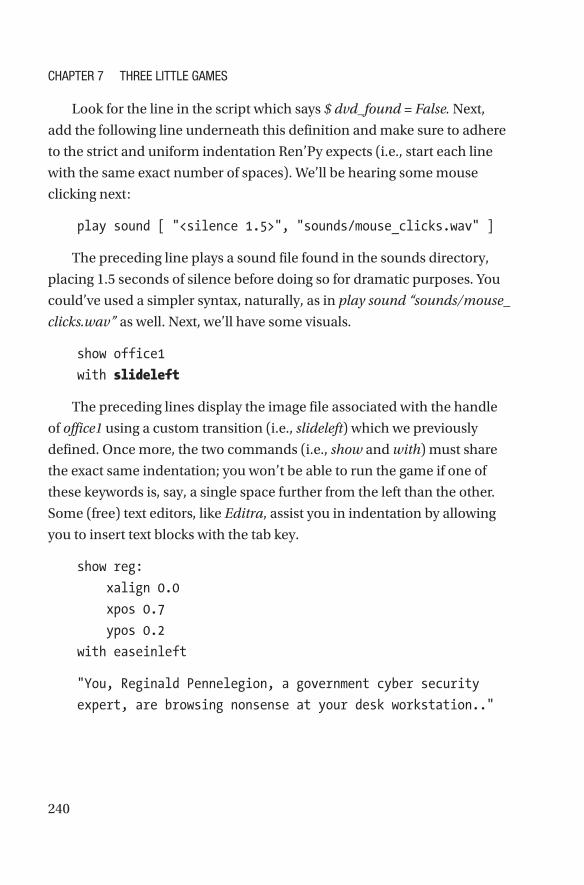
240
Look for the line in the script which says $ dvd_found = False. Next,
add the following line underneath this definition and make sure to adhere
to the strict and uniform indentation Ren’Py expects (i.e., start each line
with the same exact number of spaces). We’ll be hearing some mouse
clicking next:
play sound [ "<silence 1.5>", "sounds/mouse_clicks.wav" ]
The preceding line plays a sound file found in the sounds directory,
placing 1.5 seconds of silence before doing so for dramatic purposes. You
could’ve used a simpler syntax, naturally, as in play sound “sounds/mouse_
clicks.wav” as well. Next, we’ll have some visuals.
show office1
with slideleft
The preceding lines display the image file associated with the handle
of office1 using a custom transition (i.e., slideleft) which we previously
defined. Once more, the two commands (i.e., show and with) must share
the exact same indentation; you won’t be able to run the game if one of
these keywords is, say, a single space further from the left than the other.
Some (free) text editors, like Editra, assist you in indentation by allowing
you to insert text blocks with the tab key.
show reg:
xalign 0.0
xpos 0.7
ypos 0.2
with easeinleft
"You, Reginald Pennelegion, a government cyber security
expert, are browsing nonsense at your desk workstation.."
CHAPtER 7 tHREE LittLE GAMES

241
"You're supposed to be working on a big project, but
instead you're drifting into a world of memes, online
auctions, and silly video clips."
"You are still depressed about the passing of your best and
only friend at the office, one Mervyn Popplewell."
Running this project in Ren’Py will now result in the default Ren’Py
starting menu, followed by the preceding narration being displayed and a
lovely portrait of our protagonist sliding in. Don’t see any changes when
clicking Launch Project? Make sure to save your script file before switching
over to Ren’Py.
Commenting Your CodeIt’s a good idea to comment your code, especially if you’re working as a
part of a larger team. As a reminder, in Ren’Py this is done easily with the
hashtag character. Add this before the first line of narration (“Reginald
Pennelegion, a government...”):
# Room 1: Reginald's Desk
Despite Ren’Py’s rather stringent requirements when it comes to
indentation, you can luckily forgo that aspect of script writing when it
comes to comment lines. You can jot them however many spaces from the
left as you like; they aren’t considered a part of a text block in the software.
Your First MenuWe’ll now implement some interaction into the proceedings using the
menu element. The following lines add this functionality to our adventure.
Put them underneath the preceding comment. Again, unless you’re finicky
and uniform with your indentation, Ren’Py will not function. Also, you
CHAPtER 7 tHREE LittLE GAMES

242
can’t use the tab key on your keyboard to add whitespaces to your Ren’Py
code; it will merely result in an error message. Stick to pressing the space
bar instead.
Let’s insert some variable functionality into our budding project. To
define variables in Ren’Py, you use the following syntax: $ variable_name = 0.
These definitions should be put after the starter label. Make the one in our
project look like this:
label start:
$ sips = 0
$ time = 0
$ items = []
The variable called sips will be used to count the times our protagonist
ingests some water from the drinking station, as you’ll soon discover. The
variable called time will be used, perhaps unsurprisingly, to gauge the
passage of time. The variable named items is actually a currently empty
array of variables; we’ll be using it for a simple inventory system later on.
Unlike many programming languages, Ren’Py doesn’t have arrays per se.
Instead, it utilizes lists in their place.
Now, add the following code to the project after the comment line
(i.e., # Room 1: Reginald’s Desk):
menu deskaction:
"Choose your action"
"Visit the drinking station":
$ time += 1
stop sound fadeout 1.0
hide office1
show cooler
with dissolve
jump drinkingfountain
CHAPtER 7 tHREE LittLE GAMES

243
"Examine your colleague's desk":
$ time += 1
stop sound fadeout 1.0
hide office1
show office2
with dissolve
jump neighboringdesk
menu drinkingfountain:
"Choose your action"
"Return to your desk":
jump deskaction
"Drink":
$ sips += 1
"Gulp. You take sip number [sips]!"
jump deskaction
label neighboringdesk:
if time>3:
jump emailreceived
if time<=2:
"One of your colleagues left early. His desk is
much tidier than yours."
hide office2
show office1
with dissolve
show reg
jump deskaction
else:
"Yes, the desk next to yours is rather tidy."
hide office2
CHAPtER 7 tHREE LittLE GAMES

244
show office1
with dissolve
show reg
jump deskaction
Examine the preceding listing. It’s a simple demonstration of the main
Ren’Py control elements, highlighted in bold. The menu element doesn’t
work on its own and needs to be assigned with a label; in this case we
called it deskaction. A combination of jump and label elements takes the
player to wherever you want them. Indentation aside, do pay attention to
punctuation, such as the colons after both the labels and menu items.
When it comes to our variable, you’ll see it’s manipulated using the
operator of += and displayed by using square brackets. Since Reginald is
not a particularly thirsty character at this point, he’ll only take one sip per
visit to the drinking station. We could’ve made him drink, say, 60 sips using
said variable ($ sips += 60), but that would’ve been rather preposterous,
don’t you think?
Using Conditional StatementsWe can add variation and excitement to the stories with conditional
statements of if, elif, and else. Replace the lines of code starting at menu
drinkingfountain: and ending at jump deskaction with the following:
menu drinkingfountain:
"Choose your action"
"Return to your desk":
jump deskaction
"Drink":
$ sips += 1
play sound "sounds/gulp.wav"
CHAPtER 7 tHREE LittLE GAMES

245
if sips<3:
"Gulp. You take sip number [sips]"
show office1
with dissolve
jump deskaction
elif sips==3:
"Gulp. You are beginning to feel full at
sip number [sips]"
show office1
with dissolve
jump deskaction
else:
"You decided it was best to stop
drinking."
show office1
with dissolve
jump deskaction
As you can probably tell, Mr. Pennelegion really isn’t dehydrated,
stopping the hydration at sip number three. The aforementioned
conditional elements are bolded for your convenience, and they are used
here to study the contents of our one and only variable sips. If is a self-
explanatory statement. Elif stands for else if. If an else statement is present,
it will be executed if all other evaluations in the same text block fail.
As always, watch those colons, avoid pressing the tab key for
whitespaces, and make sure your indentation is perfect to keep Ren’Py
working. Now, let’s add some more conditional action into our script,
using the other variable we defined and called time. Add the sections in
bold under the previously typed code (do not re-type the other parts):
"Visit the drinking station":
$ time += 1
jump drinkingfountain
CHAPtER 7 tHREE LittLE GAMES

246
"Examine your colleague's desk":
$ time += 1
jump neighboringdesk
Also, add the following new lines directly under label neighboringdesk:
if time>4:
jump emailreceived
The preceding mechanic simply checks for the number of user actions
in the game so far (i.e., either drinking water or examining your colleague’s
desk), and when that number is greater than four, we’re jumping to a new
label called emailreceived.
Now we’re going to change the scenery somewhat. Add the following
lines to the script before return and after the listing so far (i.e., after the last
line with jump deskaction):
# Email time
label emailreceived:
scene email
with dissolve
The scene command deletes all displayables (i.e., backgrounds and
character sprites), presenting a new backdrop in their place. Now, let’s play
a little chime to add to the atmosphere.
play sound "sounds/email.wav"
"No time for that now! Your workstation sounds off.
You've received email."
"You open the message. It says: 'Meet me at Hyde Park
at seven pm tonight. I'll be by the Wellington Arch.
Don't tell anyone..'"
"'..signed Mervyn Popplewell'"
CHAPtER 7 tHREE LittLE GAMES
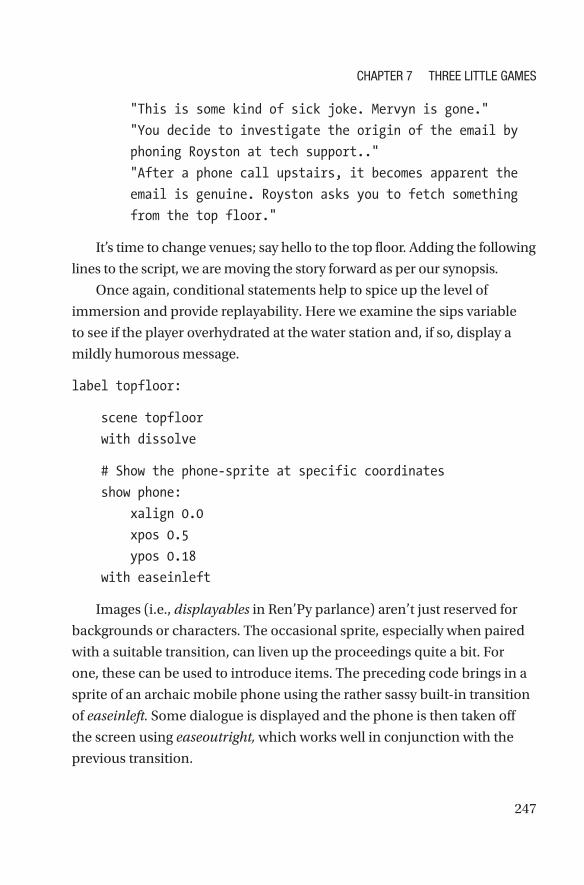
247
"This is some kind of sick joke. Mervyn is gone."
"You decide to investigate the origin of the email by
phoning Royston at tech support.."
"After a phone call upstairs, it becomes apparent the
email is genuine. Royston asks you to fetch something
from the top floor."
It’s time to change venues; say hello to the top floor. Adding the following
lines to the script, we are moving the story forward as per our synopsis.
Once again, conditional statements help to spice up the level of
immersion and provide replayability. Here we examine the sips variable
to see if the player overhydrated at the water station and, if so, display a
mildly humorous message.
label topfloor:
scene topfloor
with dissolve
# Show the phone-sprite at specific coordinates
show phone:
xalign 0.0
xpos 0.5
ypos 0.18
with easeinleft
Images (i.e., displayables in Ren’Py parlance) aren’t just reserved for
backgrounds or characters. The occasional sprite, especially when paired
with a suitable transition, can liven up the proceedings quite a bit. For
one, these can be used to introduce items. The preceding code brings in a
sprite of an archaic mobile phone using the rather sassy built-in transition
of easeinleft. Some dialogue is displayed and the phone is then taken off
the screen using easeoutright, which works well in conjunction with the
previous transition.
CHAPtER 7 tHREE LittLE GAMES
248
"You locate a mobile phone in an obscure location. It's
really quite old, looking like it dates back to the 80s.
You pick it up."
hide phone
with easeoutright
We’ll use a specific sound to signal to the player any inventory-related
events from now on. Also, we’ll add the first item to this inventory using
the method of append.
play sound "sounds/sound.wav"
$ items.append("special phone")
scene london
with dissolve
# If they player took their time drinking water, display a
message
if sips >= 3:
"You feel the need to use the bathroom, but you are in
a hurry.."
"You decide to follow the instructions in the strange
email. Hyde Park, here we come."
# Hyde Park
label hydepark:
play music [ "sounds/park.mp3" ] fadein 10.0 loop
The preceding line demonstrates the use of the music channel. Like
you may remember, Ren’Py has three channels for audio by default:
sound, music, and voice. Here we used the music channel to play some
background ambience from a park; by stating fadein and 10.0, we’ll be
fading in the track during a period of 10 seconds. By stating loop, we do
just that: we set the track so that it starts playing from the beginning each
time it reaches the end.
CHAPtER 7 tHREE LittLE GAMES
249
scene park
with dissolve
"Hyde Park is just a walking distance from the office. It's
getting darker as you make your way past busy Londoners.
The Wellington Arch now looms in the distance. "
$ items.append("coin")
# Sort the items-list
$ items.sort()
play sound "sounds/sound.wav"
"You notice a coin in the ground. You pick it up and pocket it."
Like you may have deduced, we used the previously empty items list for
the first time with the preceding bolded lines. We simply added two strings
(i.e., coin and special phone) into this list using the .append method. We
can study the context of the aforementioned list later in the game to direct
the proceedings of the adventure at hand. A typical use for Ren’Py’s list
structure would be checking if the player has a key to open a specific door.
Just to be fussy, we also used the handy sort method to put the items in
an alphabetical order (i.e., Coin followed by Special Phone instead of the
default order of vice versa).
Setting the Text SpeedYou may have noticed the dialogue is presented in a single block of text so
far without the classic method of one character at a time, as with most visual
novels. We’ll rectify this at once by accessing the file options.rpy from the
launcher application. Find the line that says default preferences.text_cps = 0
and change the number to 20. Save the file and re-run the game. You’ll now
enjoy a classic typewriter effect for the rest of the adventure.
CHAPtER 7 tHREE LittLE GAMES
250
Upgrading the Inventory SystemNow, the player would probably appreciate a visual representation of their
in-game belongings. After all, very few enjoy keeping a pen-and-paper
record of these things. Let’s add the following code to the very beginning
of the script file. The init statement makes sure the code is run before
anything else in the script.
init python:
items = []
def display_items_overlay():
if len(items)>0:
inventory = "Briefcase: "
for i in range(0, len(items)):
item_name = items[i].title()
if i > 0:
inventory += ", "
inventory += item_name
ui.frame()
ui.text(inventory)
config.overlay_functions.append(display_items_overlay)
The preceding code creates the fundamentals of an inventory listing,
displaying it on the top left corner of the screen. The Python statement tells
Ren’Py the lines to follow are to be interpreted as pure Python, that is, the
language Ren’Py is based on.
Now, our little inventory system works like this: if the previously defined
list called items contains at least one element, its contents are displayed
onscreen. Should it contain more than one element, these are to be displayed
but separated with commas. We implemented this inventory system from
the get-go, right after the variable definitions, so it runs in the background
throughout the game. Also, you might want to glance at Table 7-15 for some
handy methods delivering additional list manipulation in case you ever need it.
CHAPtER 7 tHREE LittLE GAMES

251
Tabl
e 7-
15.
Som
e u
sefu
l met
hods
for
list
man
ipu
lati
on in
Pyt
hon
an
d R
en’P
y
Met
hod
Desc
riptio
nEx
ampl
eM
etho
dDe
scrip
tion
Exam
ple
appe
ndAd
d to
list
fruit.
appe
nd(“
appl
e”)
coun
tCo
unts
the
num
ber o
f
item
s fo
und
in a
list
.
Case
- sen
sitiv
e
fruit.
coun
t(“Pe
ar”)
rem
ove
Rem
ove
item
from
list
pock
et.re
mov
e(“p
ie”)
sort
Sorts
the
item
s in
a li
st
alph
abet
ical
ly
last
_nam
es.s
ort()
inse
rtin
serts
an
item
at
give
n in
dex
posi
tion
inve
ntor
y.in
sert(
2,
“deo
dora
nt”)
clea
rRe
mov
es a
ll ite
ms
from
a lis
t
inve
ntor
y.cl
ear()
reve
rse
Reve
rses
a li
st
(e.g
., “F
ish”
, “Ca
t”
beco
mes
“Ca
t”,
“Fis
h”)
nam
es.re
vers
e()
len
Retu
rns
the
leng
th o
f
a lis
t (i.e
., th
e to
tal
num
ber o
f ite
ms
in a
list)
if le
n(ite
ms)
>0:
“Hoo
ray!
”
CHAPtER 7 tHREE LittLE GAMES

252
Let’s continue with the adventures of our protagonist, Reginald
Pennelegion. The following code goes after the line $ items.append(“coin”)
in the script:
scene park2
with dissolve
"You arrive at the Wellington Arch, on time. No-one is
there to greet you."
"You wait for quite a while, but not a soul approaches you."
"Disappointed, you begin the trip home."
Now, let’s engage in some rather dramatic events. The script continues:
# Office Inferno
label inferno:
"Your disappointment doesn't last long. You see flames in
the distance!"
reg "Maybe if I'd done some overtime instead of going to
Hyde Park I could've prevented this!"
play sound "sounds/phone.wav" loop
"Panicking, Reginald is alarmed by the phone in his briefcase.
The ancient thing is ringing. You answer the call."
stop sound
show roy:
xalign 0.0
xpos 0.2
ypos 0.2
with easeinright
roy "Get the pink DVD and get it out of there. You have ten
minutes before its devoured by fire."
CHAPtER 7 tHREE LittLE GAMES
253
hide roy
play sound "sounds/siren.wav" fadein 5.0 fadeout 5.0
"It's about August, the prototype for the first fully
cyber-attack proof firewall to be implemented in all of Her
Majesty's agencies later this year. "
Adding Functions (and Reusing Variables)Functions are reusable code that can be called when needed. They tidy
up the code and speed up the development process. In Ren’Py they are
invoked using the call command.
Add the following line underneath the current variable definitions:
$ dvd_found = False. This defines a boolean variable named dvd_found.
A boolean has only two states: true or false. These are great for flagging
events in a Ren’Py game. Like you may have gathered, the aforementioned
variable is used to check whether a special DVD is in your possession or
not. This is done in conjunction with a certain function, check_dvd, which
will be defined next.
Note Ren’Py is very picky with booleans. it simply refuses to acknowledge non-capitalized values for these types of variables. Make sure to capitalize them at all times (i.e., True is correct, while true causes an error).
Let’s next define three functions that will prove useful in our game’s
development. We do this by adding the following code into the script.
These and other functions should be defined in the script before the main
label (i.e., before label start:).
CHAPtER 7 tHREE LittLE GAMES

254
label show_fire:
$ num = renpy.random.randint(1, 4)
$ which = "fire" + str(num)
show expression which
with fireflash
return
label check_dvd:
# play sound if "dvd_found" hasn't been set to "True" yet
if dvd_found == False:
play sound "sounds/sound.wav"
$ if dvd_found == False: items.append("Pink DVD")
$ if dvd_found == False: items.sort()
$ if dvd_found == False: dvd_found = True
return
label checktime:
# call another function, show_fire, from within this function
call show_fire
play sound "sounds/woosh.wav"
$ time -= 5
if time < 5:
jump burn
return
The first function, show_fire, is used to select a backdrop at random
from a pool of four images. It uses a variable called num to draw a random
number between one and four. This number is then added to a string via a
second variable, which, that results in strings between fire1 or fire4. Finally,
this is passed on to a show command with the addition of a modifier called
expression to make it compatible with said command. The end result of
this function is a fiery background image being displayed using the custom
transition called fireflash we defined earlier.
CHAPtER 7 tHREE LittLE GAMES
255
The function called check_dvd first examines whether a boolean
variable called dvd_found is set to false. If so, an item is added to the
inventory using the append method. The items list is then also sorted
alphabetically. Finally, the variable (i.e., check_dvd) is set to true so that the
aforementioned processes won’t be run again. This is to avoid inserting the
pink DVD into the inventory more than once, which could happen if the
player revisited the room it’s available in (i.e., your other colleague’s desk).
Now, you may have noticed we pulled out the variable called time and
assigned it a value of 25. Reusing variables is a perfectly fine and, when
possible, recommended.
So, we are entering a rather hectic sequence in the adventure where
the player is frantically searching for a special pink DVD in a burning office
complex. The setting consists of four rooms (i.e., officefire, firedesk_a,
firedesk_b, and firedesk_c). The following information is classified: the pink
DVD is located in firedesk_c, that is, Your other colleague’s desk. Every dash
to a different room causes a 5-second reduction in the available time. Once
that reaches zero, the player is engulfed in flames and the game is over.
Back to the main script; it continues as follows (after “It’s all about
August..”):
# The Inferno Proper
label actionscene:
scene alley
with dissolve
play music [ "sounds/fireplace.mp3" ] fadein 10.0 loop
"You reach the back alley of the office building, feeling a
sense of urgency. It's now or never. You climb up the fire
ladder."
$ time = 25
call show_fire
CHAPtER 7 tHREE LittLE GAMES

256
Particles with SnowBlossomIt’s time to add some eye candy in the form of particles. These refer to
small image files (i.e., sprites) which are used in large numbers to create
effects such as rain, snow, and explosions. Ren’Py supports particles via
its built-in SnowBlossom effect. This effect has been used in quite a few
visual novels to push leaves and cherry blossoms around; we’ll use it for
animating a bunch of sparks.
# Set-up and display particles using the SnowBlossom-effect
image sparks = Fixed(
SnowBlossom(im.FactorScale("images/fireparticle.
png",1.0),count=12,start=5),
SnowBlossom(im.FactorScale(im.Alpha("images/
fireparticle.png",0.8),0.6), count=15,
yspeed=(50,125)))
The main attributes for SnowBlossom are as follows: count, start,
yspeed, and xspeed. Start refers to the delay between inserting a particle
into a scene, in seconds. In our script this is set to 5 seconds, as you
probably gathered. Count sets the maximum amount of particles
onscreen.
Next, yspeed addresses the vertical speed, while xspeed controls
the horizontal speed of sprites/particles. These two attributes can
take negative values and/or tuples of two numbers (i.e., (5,10) or
(−10,−5)). When used with tuples, Ren’Py selects a random value
between the two. With our sparks, a yspeed between 50 and 125 is
set for each particle, making them fall down rather slowly, which is
exactly what we want.
What we have in our game is actually two instances of SnowBlossom:
the first one (presented in bold) produces full-sized particles, while the
second one creates smaller variations of these sprites. This works to create
CHAPtER 7 tHREE LittLE GAMES

257
an illusion of depth. The second line of SnowBlossom also works on the
alpha channel (i.e., transparency) of the spark sprites, making these particles
translucent. It achieves this by adjusting the attribute of im.Alpha to 0.6.
Now, for a very basic example of SnowBlossom in action, you could do
something like this:
image sparks = Fixed(
SnowBlossom(im.FactorScale("images/fireparticle.png",1.0),
count=10, yspeed=(100,110), xspeed=(1,2), start=4))
The previous lines of script would create a nice snowfall effect.
However, our sparks need to be a tad more complicated so we’ll stick with
the previous code.
Next, we use the following single line to activate our particles; our dear
friend the show command is at work once again:
show sparks
menu officefire:
"Choose your action. You have [time] seconds left. You are
in the general office area."
"Dash to your desk":
call checktime
jump firedesk_a
"Dash to your colleague's desk":
call checktime
jump firedesk_b
"Dash to your other colleague's desk":
call checktime
call check_dvd
jump firedesk_c
CHAPtER 7 tHREE LittLE GAMES

258
The player is presented with three choices in each room. The checktime
function is called before changing locations. It simply reduces the time
variable by five units. Also, should the value of time fall under five, the
function makes sure the player is transported to the label burn as it is
indeed game over at that grim point.
The function named check_dvd is only ever requested if the player
visits the room with the DVD in it (i.e., firedesk_c). It would be unnecessary
to treat all of the rooms with this function; avoid redundant code if you can.
menu outwindow:
"Choose your action. You have [time] seconds left. You are
in the general office area."
"Climb Out the Window":
call checktime
jump window
"Dash to your desk":
call checktime
jump firedesk_a
"Dash to your colleague's desk":
call checktime
jump firedesk_b
"Dash to your other colleague's desk":
call checktime
call check_dvd
jump firedesk_c
There are two almost identical menus for the location of the
preceding General Office Area. The initial menu (i.e., officefire) is
presented, while dvd_found returns False; the second menu (i.e.,
outwindow) is put to use when said variable returns True. In other words,
the option to climb out the window becomes available, from this room
CHAPtER 7 tHREE LittLE GAMES

259
only, when the player has collected the DVD (as in he or she visited the
room firedesk_c at least once).
menu firedesk_a:
"Choose your action. You have [time] seconds left. You are
at your own desk. You find nothing but flames here."
"Dash to the general office area":
call checktime
if dvd_found == False:
jump officefire
else:
jump outwindow
"Dash to your colleague's desk":
call checktime
jump firedesk_b
"Dash to your other colleague's desk":
call checktime
call check_dvd
jump firedesk_c
menu firedesk_b:
"Choose your action. You have [time] seconds left. You are
at your colleague's desk. You find nothing but smoke here."
"Dash to the general office area":
if dvd_found == False:
jump officefire
else:
jump outwindow
"Dash to your desk":
call checktime
jump firedesk_a
CHAPtER 7 tHREE LittLE GAMES

260
"Dash to your other colleague's desk":
call checktime
call check_dvd
jump firedesk_c
Ah yes, finally we reach the special location with the DVD in it.
menu firedesk_c:
"Choose your action. You have [time] seconds left. You are
at your other colleague's desk."
"Dash to the general office area":
if dvd_found == False:
jump officefire
else:
jump outwindow
"Dash to your desk":
call checktime
jump firedesk_a
"Dash to your colleague's desk":
call checktime
jump firedesk_b
Should our protagonist suffer a fiery death and be in possession of the
aforementioned special DVD, we’ll display an additional line of narration
using a conditional statement, like this:
label burn:
"You pass out from the fumes and burn to death."
if dvd_found == True:
"They find your corpse clutching a scorched pink DVD.."
# Back to main menu
$ renpy.full_restart()
CHAPtER 7 tHREE LittLE GAMES
261
The command full_restart resets the game and takes the player back
to the main menu; it is game over after all. Now, a label for a successful
escape is inserted immediately afterward.
label window:
"You find your way out of the window and slide down the hot
fire ladder!"
Randomizing DialogueLet’s carry on with our story and add a new element: randomized dialogue.
For one, this will do wonders for replayability.
$ randomdialogue = renpy.random.choice(['The phone in the
briefcase rings again.',
'You are startled by a shrill noise emanating from your
briefcase.',
'The ancient mobile phone is ringing.'])
play sound "sounds/phone.wav" loop
# Display our random dialogue
"[randomdialogue]"
stop sound
show roy:
xalign 0.0
xpos 0.2
ypos 0.2
with dissolve
roy "Well done. Go home and stay there for further
instructions. Protect the disc with your life, if
necessary."
CHAPtER 7 tHREE LittLE GAMES

262
The line in bold displays one of the three lines of narration stored in
the variable called random_narration. As always, make sure your syntax is
perfect or Ren’Py will not play ball with you.
Now, should we need to conjure up a random value at some point in
our adventure, we would do this:
# Generate a random number between 20 and 80
$ random_number = renpy.random.randint(20, 80)
"You feel [random_number]%% motivated to continue your quest!"
In the preceding text, we created a variable called random_number
and assigned to it a value between 1 and 100. You can, of course, use any
range for these values that fits your project best (e.g., (5, 10) or perhaps
(0, 1000), etc.).
On the next line, we displayed this aforementioned variable. But why
the double character when it comes to the percentage sign? Well, without
this approach, Ren’Py would throw an error.
And should we have needed a random floating point value between
0 and 1 (e.g., 0.5 or perchance 0.9), we would’ve done this: $ random_
number = renpy.random.random()
Styles and HyperlinksOur little techno-thriller’s script resumes as follows:
label home:
scene london2
with dissolve
# We use the music-channel to play ambient sounds. This is
because only this channel
# allows for both the looping and the fadein for audio
play music [ "sounds/london_bridge.wav" ] fadein 10.0 loop
CHAPtER 7 tHREE LittLE GAMES

263
"The adrenaline begins to slowly wear off as you pace
towards your residence."
play sound "sounds/phone.wav" loop
"The old phone rings again."
stop sound
"This time, it's a woman's voice."
# Show the serious face for Raine
show rai serious:
xalign 0.0
xpos 0.2
ypos 0.2
with dissolve
The preceding passage demonstrates the use of character expressions
in Ren’Py. As you might remember, we defined a serious face for Raine
early on in the script, and with the simple command of show rai serious, we
summoned that look.
rai "{i}Whatever you do, don't go home!{/i} Leave London
right {u}now.{/u} Go as far North as you can. A train is
your best bet."
rai "I'll call again. Go! {b}And don't lose the disc!{/b}"
The next passage hides Raine’s serious expression and evokes her
natural cheeky expression, which is her default portrait. By omitting any
additional attributes, the show command defaults to the character image
files we named after their in-script shorthand (e.g., rai.png, roy.png, and
reg.png).
# Hide serious Raine and show her more cheeky face
hide rai
CHAPtER 7 tHREE LittLE GAMES

264
show rai:
xalign 0.0
xpos 0.2
ypos 0.2
We used three types of new styles in the preceding dialogue: bold,
italic, and underline (all presented in bold for your convenience). These
styles are implemented using tags created from curly brackets (i.e., { and })
with the desired style inside them. Use them sparingly to spice up the
dialogue every now and then.
Now, perhaps you feel like some blatant advertising by inserting
hyperlinks into the proceedings.
rai "Oh, and, why not visit {a=http://www.robertciesla.com}
this great site{/a} when you have the time?"
As with HTML, hyperlinks in Ren’Py are embedded using the a-tag.
A slightly more Spartan syntax is used in the latter framework as you can
see from the preceding example.
Sometimes you want to change the text size in game. This is done using
the intuitively named size tag. The following line utilizes this tag and also
demonstrates how you can combine different attributes.
rai "I personally visit that {size=+10}{i}fascinating{/i}
{/size} website every day."
hide rai
# Replace the ambient sound with another one
play music [ "sounds/ambience.wav" ] fadein 10.0 loop
# Again, the music-channel is great for ambience, too, for
its versatility with options
CHAPtER 7 tHREE LittLE GAMES

265
Adding VideosAs long as your video files are in the correct format, playing them
back in Ren’Py is a breeze. Next we summon the Python command of
renpy.movie_cutscene to play a video file, after which we fade in a new
background graphic (i.e., door.jpg). Once again, be very careful with the
capitalization and location of your video files or Ren’Py won’t play ball.
The sample video file is stored using the webM container format, which is
probably the most compatible and best choice for Ren’Py projects.
$ renpy.movie_cutscene("videos/Interlude.webm")
scene door
with dissolve
Note: your video editing software may not support exporting the
WebM format out of the box. It might be necessary to install plugins for
this purpose. Alternatively, you can first export to whichever high-quality
format you desire and then convert the video file into WebM using external
software. The following links provide some free tools for these tasks:
• Fnord’s Plugin for Adobe Premiere Pro and Media
Encoder: www.fnordware.com/WebM
• Transmageddon, a general-purpose WebM converter
for Linux: https://github.com/GNOME/transmageddon
• XMedia Recode, a WebM converter for Windows: www.
xmedia-recode.de/en
Text Speed on the FlyYou may remember us activating the typewriter effect for this project
earlier in this chapter using the options file (i.e., options.rpy). While that
approach indeed provides a global setting for characters per second (cps),
this can be controlled from inside the main script as well.
CHAPtER 7 tHREE LittLE GAMES

266
"You hear a strange humming noise coming from your flat.
Putting your ear against the door, {cps=5}the noise gets
louder.{/cps}"
By applying the cps tag to the desired passage, you can set the text
speed in game at your leisure. It works great for those more dramatic
moments in your story.
More Fun with TextRen’Py offers a wealth of styles for presenting your story; you aren’t limited
to the aforementioned attributes.
"{k=-1.5}Something is up.{/k} {k=1.5}You decide to heed the
girl's advice and leave.{/k}"
"Running down the street toward the train station you look
back once more.{vspace=25}{w}A human-like figure with
unnaturally large eyes stares back."
The preceding snippet of the script demonstrates three more effects:
text kerning, the vertical space, and the wait. Kerning refers to the space
between characters. A negative kerning value will bring the letters closer,
while a positive one will do the opposite.
A vspace element creates a vertical space of however many pixels you
want. The wait tag simply awaits a mouse click in the middle of dialogue
before continuing with the story.
"It's dressed in light blue uniform, briefly reminding you
of a life-sized action figure of some kind.{fast} Your
heart skips a beat or two."
The fast element displays the text after it in an instant, as per the
default setting in the Ren’Py options file.
CHAPtER 7 tHREE LittLE GAMES

267
scene station
with dissolve
stop music fadeout 5.0
"After running what felt like a marathon, you reach Euston
train station, panting heavily. No one seems to have been
following you."
"You remember the girl's advice and look for the next
northbound train.."
"You've now reached the end of this tutorial visual novel.
Check out the source code to learn more."
And that’s the end of the first part of Taking Back August. We’ve now
demonstrated most of the functionality of Ren’Py. And that’s how we
develop with this wonderful software, from synopsis to the game itself.
Perhaps you feel like completing the adventure with the building blocks
provided. In any case, we’re moving on to other software.
Part II: The Middle of Reginald’s Story with TyranoBuilderWe’re now switching to the world of TyranoBuilder with all of its graphical
user interface magic to resume telling the story of Taking Back August. Let’s
begin by simply creating a fresh new project in the software.
You may remember the concept of a sound novel from Chapter 4. This
is a more minimalistic variety of visual novel with the dialogue taking up
most of the space, with the emphasis being less on visual representations
of characters. We won’t be picking this approach, rather we’re going for the
more traditional style of game.
CHAPtER 7 tHREE LittLE GAMES
268
After entering the game’s name, set up the project as follows:
• Game Type: Visual Novel
• Screen Size: Landscape (1280 x 720)
• No Title Screen & No Menu Button (for Save, Load, etc.)
Delete the default background graphic by clicking the Background
Image block in the main designer view; we’re going to keep an ominous
minimalistic vibe going for this leg of the adventure, too.
A Couple of CharactersSince we’re exploring most of TyranoBuilder’s main functionality in
this tutorial project, we will be needing some characters to manipulate.
Select Project ➤ Characters from the top menu. Enter the following
characters one by one in the input box: Claire, Overalls, Reginald, and
Raine. TyranoBuilder will automatically create directories on your hard
drive for each character created. These are used to store the related
image files. These directories will be numbered in the order you created
the characters, that is, “1” for Claire, “2” for Overalls, and so on. You can
access them as sub-directories at ProjectName/data/fgimage. This will be
demonstrated in more detail later in this chapter.
On a TrainNow, on with the story. Our stalwart protagonist will find himself aboard a
train. Copy the following text block into the red Text field below Show Text.
After running what felt like a marathon, you reach Euston train
station, panting heavily. No one seems to have been following
you. You remember the girl's advice and look for the next
northbound train.
CHAPtER 7 tHREE LittLE GAMES

269
Next is another piece of narration for a second component of Show Text:
"Excuse me!", you suddenly hear. Out of nowhere, a dark-haired
woman dashes in front of you, blocking entrance to the train.
"Is this the train to Nottingham?" She gives a wide smile.
As we know, TyranoBuilder offers a robust graphical user interface for
making your visual novels with. However, we shouldn’t forget its scripting
features; the TyranoScript component offers a lot of flexibility for the
developer(s). We’ll be mostly utilizing TyranoScript from now on.
TyranoBuilder, Assets, and DirectoriesBefore utilizing any audiovisual assets, we need to get acquainted with the
TyranoBuilder directories. These will be automatically generated for each
project. Now, the most common way of using TyranoBuilder is via Steam,
regardless of the platform. To open your project directory using the Steam
app, take the following steps:
• Right-click TyranoBuilder in the Steam library view and
select Properties.
• Click the tab called Local Files.
• Click Browse Local Files.
A directory view of the TyranoBuilder program should open. Open
the myproject directory. Double-click the project name you’re interested
in working on (e.g., MyHappyGame). Double-click data. You’ll now see
a directory structure where you’ll be storing your audiovisual assets (see
Table 7-16). The audiovisual files and their corresponding directories will
be described in the following.
CHAPtER 7 tHREE LittLE GAMES
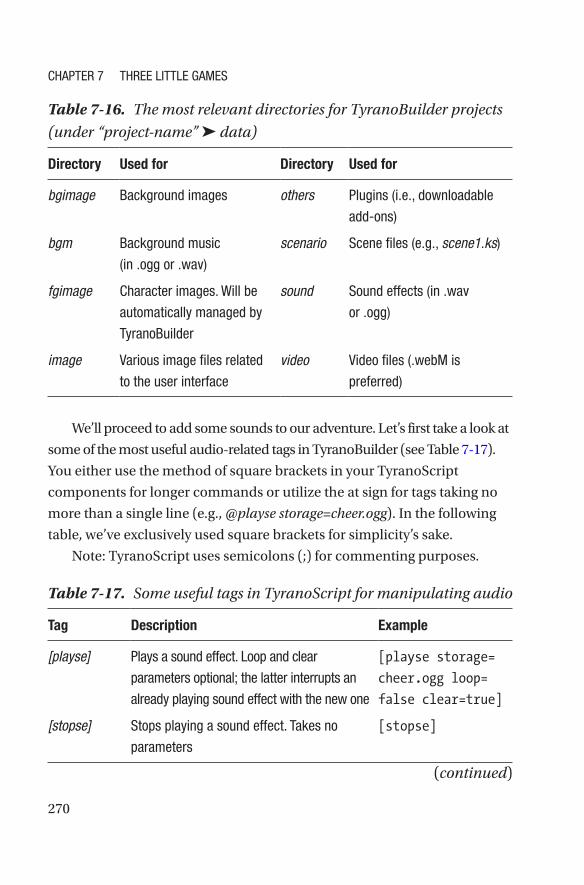
270
Table 7-16. The most relevant directories for TyranoBuilder projects
(under “project-name” ➤ data)
Directory Used for Directory Used for
bgimage Background images others Plugins (i.e., downloadable
add-ons)
bgm Background music
(in .ogg or .wav)
scenario Scene files (e.g., scene1.ks)
fgimage Character images. Will be
automatically managed by
tyranoBuilder
sound Sound effects (in .wav
or .ogg)
image Various image files related
to the user interface
video Video files (.webM is
preferred)
We’ll proceed to add some sounds to our adventure. Let’s first take a look at
some of the most useful audio-related tags in TyranoBuilder (see Table 7-17).
You either use the method of square brackets in your TyranoScript
components for longer commands or utilize the at sign for tags taking no
more than a single line (e.g., @playse storage=cheer.ogg). In the following
table, we’ve exclusively used square brackets for simplicity’s sake.
Note: TyranoScript uses semicolons (;) for commenting purposes.
Table 7-17. Some useful tags in TyranoScript for manipulating audio
Tag Description Example
[playse] Plays a sound effect. Loop and clear
parameters optional; the latter interrupts an
already playing sound effect with the new one
[playse storage=
cheer.ogg loop=
false clear=true]
[stopse] Stops playing a sound effect. takes no
parameters
[stopse]
(continued)
CHAPtER 7 tHREE LittLE GAMES

271
Table 7-17. (continued)
Tag Description Example
[seopt] Sets sound effect volume [seopt volume=70]
[wse] Waits for sound effect to stop playing before
continuing. takes no parameters
[wse]
[playbgm] Plays background music. Additional
parameters: loop, time (in milliseconds, for
the playback to start at)
[playbgm
storage="song1.
ogg" loop=true]
[stopbgm] Stops background music playback. takes no
parameters
[stopbgm]
[bgmopt] Sets the background music volume [bgmopt
volume=50]
[xchgbgm] Crossfades background music with another
track. Additional parameters: loop, time (in
milliseconds)
[xchgbgm
storage=song2.
ogg loop=true
time=4000]
[fadeoutbgm] Fades out background music track. takes
time in milliseconds
[fadeoutbgm
time=3000]
[fadeinbgm] Fades in background music track. takes
time in milliseconds
[fadeinbgm
time=5000]
Sounds on a TrainNow, onward with our adventure. Drag a component called Change
Background from the Images category below the previous component. Use
the component’s Browse button to the file called train2.jpg. Next add a
TyranoScript component beneath the component called exit scene. Insert
the following code:
CHAPtER 7 tHREE LittLE GAMES
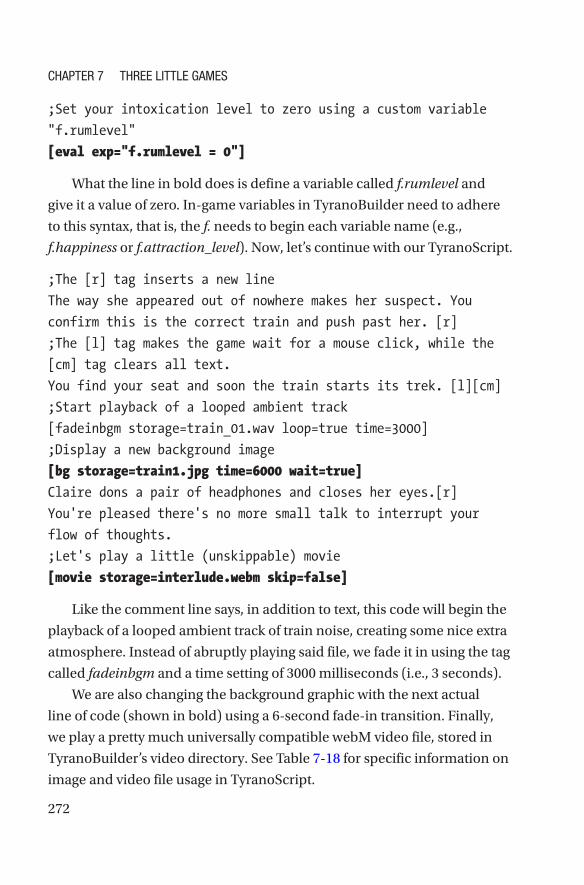
272
;Set your intoxication level to zero using a custom variable
"f.rumlevel"
[eval exp="f.rumlevel = 0"]
What the line in bold does is define a variable called f.rumlevel and
give it a value of zero. In-game variables in TyranoBuilder need to adhere
to this syntax, that is, the f. needs to begin each variable name (e.g.,
f.happiness or f.attraction_level). Now, let’s continue with our TyranoScript.
;The [r] tag inserts a new line
The way she appeared out of nowhere makes her suspect. You
confirm this is the correct train and push past her. [r]
;The [l] tag makes the game wait for a mouse click, while the
[cm] tag clears all text.
You find your seat and soon the train starts its trek. [l][cm]
;Start playback of a looped ambient track
[fadeinbgm storage=train_01.wav loop=true time=3000]
;Display a new background image
[bg storage=train1.jpg time=6000 wait=true]
Claire dons a pair of headphones and closes her eyes.[r]
You're pleased there's no more small talk to interrupt your
flow of thoughts.
;Let's play a little (unskippable) movie
[movie storage=interlude.webm skip=false]
Like the comment line says, in addition to text, this code will begin the
playback of a looped ambient track of train noise, creating some nice extra
atmosphere. Instead of abruptly playing said file, we fade it in using the tag
called fadeinbgm and a time setting of 3000 milliseconds (i.e., 3 seconds).
We are also changing the background graphic with the next actual
line of code (shown in bold) using a 6-second fade-in transition. Finally,
we play a pretty much universally compatible webM video file, stored in
TyranoBuilder’s video directory. See Table 7-18 for specific information on
image and video file usage in TyranoScript.
CHAPtER 7 tHREE LittLE GAMES

273
Tabl
e 7-
18.
Som
e u
sefu
l tag
s in
Tyr
anoS
crip
t for
wor
kin
g w
ith
laye
rs, t
ext,
and
imag
es
Tag
Desc
riptio
nEx
ampl
e(s)
[imag
e]Di
spla
ys a
n im
age.
Para
met
ers:
laye
r, pa
ge, v
isib
le, w
idth
, hei
ght,
x, y.
Sets
laye
r to
"bas
e" to
put
the
imag
e on
the
back
grou
nd.
Posi
tive
num
bers
put
the
imag
e on
the
fore
grou
nd.
Page
take
s ei
ther
"fo
re"
or "
back
".
[image storage="dude.jpg"
layer=1 page=fore visible=true
width="256" height="256" x="640"
y="200"]
[image storage="bg.
jpg" layer=base page=back
visible=true width="1280"
height="720" x="0" y="0"]
[bg]
Chan
ges
the
back
grou
nd im
age.
Para
met
ers:
met
hod,
tim
e, w
ait.
Met
hod
refe
rs to
tran
sitio
n ty
pe (i
.e.,
cros
sfad
e, e
xplo
de,
slid
e, b
lind,
bou
nce,
clip
, dro
p, fo
ld, p
uff,
scal
e, s
hake
, size
).
Wai
t spe
cifie
s w
heth
er o
r not
to s
top
proc
essi
ng u
ntil
the
trans
ition
is c
ompl
ete.
[bg storage=bg1.png method=slide
time=2000 wait=true]
[bg storage=bg2.png method=puff
time=4000 wait=false]
[layo
pt]
Cont
rols
dis
play
laye
rs.
Para
met
ers:
pag
e, v
isib
le, l
eft (
posi
tion
from
the
left)
, top
, op
acity
(0–2
55 w
here
255
is tr
ansp
aren
t).
[layopt layer=1 visible=true
opacity=100]
[layopt layer=1 visible=false]
(con
tin
ued
)
CHAPtER 7 tHREE LittLE GAMES

274
Tabl
e 7-
18.
(con
tin
ued
)
[ani
m]
Anim
ates
/mov
es a
n im
age
or c
hara
cter
spr
ite.
Optio
nal p
aram
eter
s: la
yer,
left,
top,
wid
th, h
eigh
t, op
acity
, co
lor,
time,
effe
ct.
Effe
ct ta
kes
thes
e pr
edef
ined
mac
ros:
jsw
ing
| de
f | e
aseI
nQua
d |
ease
OutQ
uad
| ea
seIn
OutQ
uad
| ea
seIn
Cubi
c |e
aseO
utCu
bic
| ea
seIn
OutC
ubic
|e
aseI
nQua
rt |
ease
OutQ
uart
|eas
eInO
utQu
art |
ea
seIn
Quin
t |ea
seOu
tQui
nt |
eas
eInO
utQu
int |
eas
eInS
ine
| ea
seOu
tSin
e |
ease
InOu
tSin
e |
ease
InEx
po |
eas
eOut
Expo
|
ease
InOu
tExp
o |
ease
InCi
rc |
eas
eOut
Circ
| e
aseI
nOut
Circ
|
ease
InEl
astic
| e
aseO
utEl
astic
| e
aseI
nOut
Elas
tic |
ea
seIn
Back
| e
aseO
utBa
ck |
eas
eInO
utBa
ck |
eas
eInB
ounc
e |
ease
OutB
ounc
e |
ease
InOu
tBou
nce.
[anim name="Billy" time=3000
left=100 top=40]
[anim name="Reginald"
time=2000 left=800 top=40
effect=easeInOutQuint]
[anim name="Gayelord"
time=1000 left=100 top=40
effect=easeInOutQuint color=red
opacity=50]
[pte
xt]
Disp
lays
text
. Acc
epts
HtM
L ta
gs.
Para
met
ers:
text
, siz
e, x
, y, c
olor
, ver
tical
.
[ptext layer=2 page=fore
text="Hello <br><i>friends!</i>"
size=30 x=30 y=180 color=green]
Tag
Desc
riptio
nEx
ampl
e(s)
CHAPtER 7 tHREE LittLE GAMES

275
[mte
xt]
Disp
lays
ani
mat
ed te
xt u
sing
doz
ens
of d
iffer
ent m
etho
ds.
Para
met
ers:
text
, x, y
, in_
effe
ct, o
ut_e
ffect
.
See https://tyrano.jp/mtext/
for a
full
live
dem
onst
ratio
n.
[layopt layer=0 visible=true]
[mtext text="Hello there!" x=200
y=100 in_effect="fadeIn" out_
effect="hinge"]
[layopt layer=0 visible=true]
[mtext text="Wow! What is this?"
x=200 y=100 in_effect="bounceIn"
out_effect="bounceOut"]
[filte
r]Ap
plie
s a
filte
r to
a la
yer o
r obj
ect.
Optio
ns: g
rays
cale
, sep
ia, s
atur
ate,
hue
, inv
ert,
opac
ity,
brig
htne
ss, c
ontra
st, b
lur.
[filter layer="0" sepia=50]
[filter layer="0" invert]
[free
_filt
er]
Disa
bles
filte
rs.
[free_filter]
[mov
ie]
Play
s an
mp4
mov
ie.
Para
met
ers:
ski
p (d
efin
es if
mov
ie is
ski
ppab
le o
r not
).
;Show an unskippable video-file
[movie storage="happymovie.mp4"
skip=false]
(con
tin
ued
)
CHAPtER 7 tHREE LittLE GAMES

276
Tabl
e 7-
18.
(con
tin
ued
)
[bgm
ovie
]Pl
ays
a vi
deo
back
grou
nd.
Para
met
ers:
vol
ume,
loop
.No
te: f
or m
axim
um c
ompa
tibili
ty b
etw
een
plat
form
s, u
se
web
M fi
les.
;Display a looping video at 80%
volume
[bgmovie storage="movie.webm"
volume=80 loop=true]
[sto
p_bg
mov
ie]
Stop
s pl
ayin
g a
vide
o ba
ckgr
ound
.[stop_bgmovie]
Tag
Desc
riptio
nEx
ampl
e(s)
CHAPtER 7 tHREE LittLE GAMES
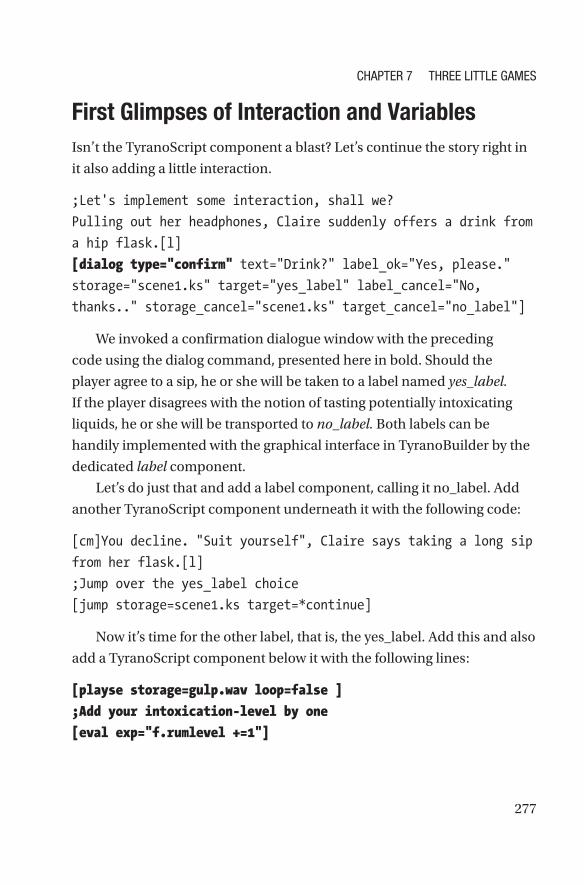
277
First Glimpses of Interaction and VariablesIsn’t the TyranoScript component a blast? Let’s continue the story right in
it also adding a little interaction.
;Let's implement some interaction, shall we?
Pulling out her headphones, Claire suddenly offers a drink from
a hip flask.[l]
[dialog type="confirm" text="Drink?" label_ok="Yes, please."
storage="scene1.ks" target="yes_label" label_cancel="No,
thanks.." storage_cancel="scene1.ks" target_cancel="no_label"]
We invoked a confirmation dialogue window with the preceding
code using the dialog command, presented here in bold. Should the
player agree to a sip, he or she will be taken to a label named yes_label.
If the player disagrees with the notion of tasting potentially intoxicating
liquids, he or she will be transported to no_label. Both labels can be
handily implemented with the graphical interface in TyranoBuilder by the
dedicated label component.
Let’s do just that and add a label component, calling it no_label. Add
another TyranoScript component underneath it with the following code:
[cm]You decline. "Suit yourself", Claire says taking a long sip
from her flask.[l]
;Jump over the yes_label choice
[jump storage=scene1.ks target=*continue]
Now it’s time for the other label, that is, the yes_label. Add this and also
add a TyranoScript component below it with the following lines:
[playse storage=gulp.wav loop=false ]
;Add your intoxication-level by one
[eval exp="f.rumlevel +=1"]
CHAPtER 7 tHREE LittLE GAMES
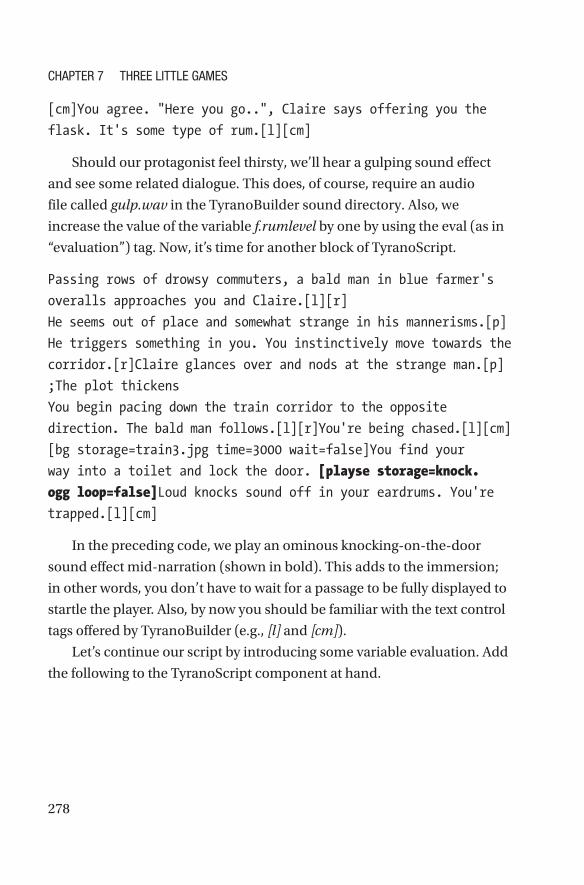
278
[cm]You agree. "Here you go..", Claire says offering you the
flask. It's some type of rum.[l][cm]
Should our protagonist feel thirsty, we’ll hear a gulping sound effect
and see some related dialogue. This does, of course, require an audio
file called gulp.wav in the TyranoBuilder sound directory. Also, we
increase the value of the variable f.rumlevel by one by using the eval (as in
“evaluation”) tag. Now, it’s time for another block of TyranoScript.
Passing rows of drowsy commuters, a bald man in blue farmer's
overalls approaches you and Claire.[l][r]
He seems out of place and somewhat strange in his mannerisms.[p]
He triggers something in you. You instinctively move towards the
corridor.[r]Claire glances over and nods at the strange man.[p]
;The plot thickens
You begin pacing down the train corridor to the opposite
direction. The bald man follows.[l][r]You're being chased.[l][cm]
[bg storage=train3.jpg time=3000 wait=false]You find your
way into a toilet and lock the door. [playse storage=knock.
ogg loop=false]Loud knocks sound off in your eardrums. You're
trapped.[l][cm]
In the preceding code, we play an ominous knocking-on-the-door
sound effect mid-narration (shown in bold). This adds to the immersion;
in other words, you don’t have to wait for a passage to be fully displayed to
startle the player. Also, by now you should be familiar with the text control
tags offered by TyranoBuilder (e.g., [l] and [cm]).
Let’s continue our script by introducing some variable evaluation. Add
the following to the TyranoScript component at hand.
CHAPtER 7 tHREE LittLE GAMES

279
;Evaluate and display variable
[if exp="f.rumlevel==1"] You feel a little tipsy...Your rum-
level is [emb exp=f.rumlevel].
[endif]
The preceding code evaluates our sole custom variable so far,
f.rumlevel, to see if it’s set to one. If so, the player will be shown a special
string of text containing the contents of the aforementioned variable. Now,
to recap the three of TyranoScript’s basic variable operations:
• [eval exp..] is for assigning values.
• [if exp..] is for comparing values.
• [emb exp..] is for displaying (i.e., embedding) variables.
• In-game variables need an f. in the front.
Random Dialogue in TyranoBuilderNow, let’s implement some randomized dialogue, like we did with Ren’Py.
;Play some looping audio and display one of three random lines
of narration
[playse storage=phone.wav loop=true ]
[cm][eval exp="f.random_number = Math.floor((Math.random() * 3)
+ 1)"]
[if exp="f.random_number==1"]Your ancient telephone rings.
[endif]
[if exp="f.random_number==2"]The nearly fossilized mobile phone
is ringing. [endif]
[if exp="f.random_number==3"]The relic of a telephone drowns
out all other noises. [endif]
CHAPtER 7 tHREE LittLE GAMES

280
We use the familiar eval tag to define a new variable called f.random_
number. This variable is then assigned a value between one and three
using two new functions: Math.floor and Math.random. The latter function
summons a random number. The former then rounds this floating point
number (e.g., 1.4) down into the nearest integer (e.g., 1).
Because Math.random starts its range at zero, we add a plus one to the
end of the expression. This value is then multiplied by three, creating a trio
of random choices for the end result: integers 1, 2, or 3.
Let us continue with the adventure.
;Display Raine and stop the phone from ringing
[chara_show name="Raine" wait=true top=40 left=50]
[stopse]
"You're on your way. Good. Are they after you?"[p]
"Just wait. Stay put. They're not authorized to use full force."[p]
[anim name="Raine" time=2000 left=800 top=40]
"I need you to leave the train at the next stop. Do you hear me?"
The woman hangs up.
[filter name="Raine" blur=20][chara_hide name="Raine" time=1000
wait=true]
[p]
Puzzled, you do what you're told. [playse storage=knock.ogg]The
knocking continues for another five minutes or so then abruptly
stops.
[playse storage=knock.ogg volume=30][p]
[bg storage=train2.jpg time=3000 wait=true]
You open the toilet door warily; There's no one behind it.
Claire is gone as is the bald man.[p]
The preceding code features mostly familiar elements, but we also
introduce the character-related methods of chara_show, chara_move,
and chara_hide. These are used here to summon and relocate our agent
extraordinaire, Raine. See Table 7-19 for more information on these tags.
CHAPtER 7 tHREE LittLE GAMES

281
In addition, we also added a blur filter on Raine slightly before her call
ends at 20% strength. Remember, these effects in TyranoBuilder can be
applied on full layers and single character sprites alike.
Adding Labels in TyranoScriptLabels aren’t only added using the graphical interface in TyranoBuilder;
TyranoScript offers this functionality as well. In the following code, we’re
once again examining the variable of f.rumlevel to gauge Reginald’s
energy level. The sections in bold demonstrate the label functionality of
TyranoScript as we’re introducing two new tags: jump and the asterisk-
powered label (e.g., *still_tipsy).
Ah yes, we shouldn’t forget one can use HTML tags, too, in
TyranoScript. This is also demonstrated in the following with the bold and
italic tags around the name of a lovely city.
[bg storage="platform1.jpg"]
You hear an announcement: next stop <b><i>Bedford!</i></b>[p]
[camera zoom=2 from_zoom=1 x=180 y=100 time=2000]
;Reset camera
[reset_camera]
As soon as the train stops, you're out on the streets, looking
over your shoulder. No one seems to be following you.[p]
[if exp="f.rumlevel==1"] [jump target=*still_tipsy]
[else] [jump target=*full_of_energy][endif]
;Add a label
*still_tipsy
You feel somewhat drowsy. But you must go on.[p] [jump
target=*resume_story]
;Add a second label
*full_of_energy
You feel adrenaline surging in your veins.[p]
CHAPtER 7 tHREE LittLE GAMES

282
*resume_story
Only a mere minute into the crowds, you're grabbed by the
arm![p]
The Might of the 3D CameraTyranoBuilder has a feature the developers (or marketing) decided to call
3D Camera. What this refers to are basically simple panning and zooming
capabilities for plain 2D images. Although slightly grandiose in its naming
convention, the compact feature set is actually usable as demonstrated in
the preceding code.
With a mere couple of tags, namely, [camera] and [reset_camera], we
added some dramatic zooming effects onto our scene, creating a sense
of urgency. Using the virtual camera is simple: you define the desired
amount of zoom and add some coordinates with an optional time setting
in milliseconds. The attribute of from_zoom specifies the pre-zoomed
dimensions of the image. In our example we let it stay at the original values
(i.e., at one). A reset_camera tag is then called to return the visuals to their
original settings; these tags are simple and fun to use. However, the 3D
Camera is best used sparingly.
TyranoScript MacrosMacros are a type of coder-defined shorthand. In essence you can define
new custom tags with them. The following lines in bold demonstrate this
approach. Two new tags are created mid-game and used to set text color
via the font color property.
;Define two macros
[macro name="redtag"][font color=0xff0000][endmacro]
[macro name="yellowtag"][font color=0xffff00][endmacro]
CHAPtER 7 tHREE LittLE GAMES
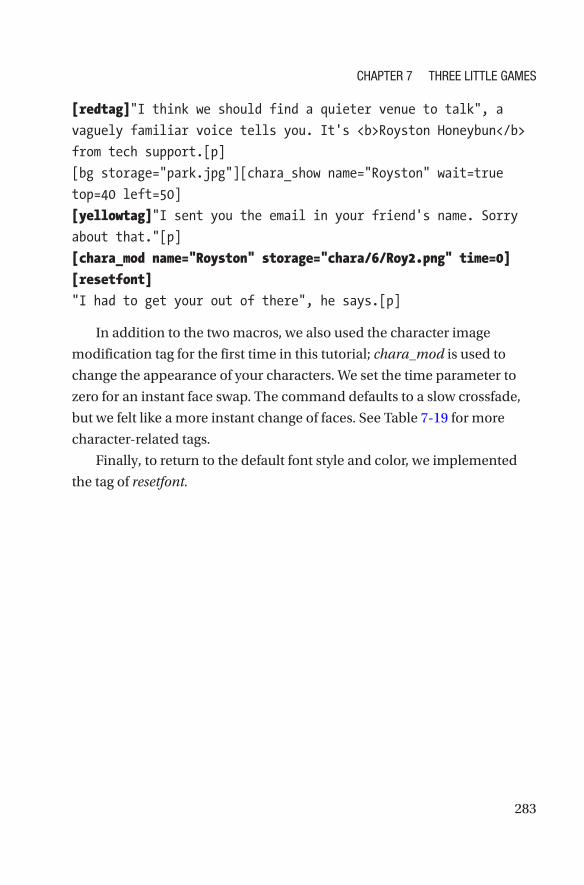
283
[redtag]"I think we should find a quieter venue to talk", a
vaguely familiar voice tells you. It's <b>Royston Honeybun</b>
from tech support.[p]
[bg storage="park.jpg"][chara_show name="Royston" wait=true
top=40 left=50]
[yellowtag]"I sent you the email in your friend's name. Sorry
about that."[p]
[chara_mod name="Royston" storage="chara/6/Roy2.png" time=0]
[resetfont]
"I had to get your out of there", he says.[p]
In addition to the two macros, we also used the character image
modification tag for the first time in this tutorial; chara_mod is used to
change the appearance of your characters. We set the time parameter to
zero for an instant face swap. The command defaults to a slow crossfade,
but we felt like a more instant change of faces. See Table 7-19 for more
character- related tags.
Finally, to return to the default font style and color, we implemented
the tag of resetfont.
CHAPtER 7 tHREE LittLE GAMES

284
Tabl
e 7-
19.
Som
e ta
gs fo
r ch
arac
ters
in T
yran
oScr
ipt
Tag
Desc
riptio
nEx
ampl
e(s)
[cha
ra_s
how
]Di
spla
ys c
hara
cter
.
Para
met
ers:
wai
t, tim
e, la
yer,
left,
top.
Wai
t cre
ates
a d
elay
ed a
ppea
ranc
e fo
r a
char
acte
r. ti
me
sets
the
trans
ition
tim
e in
mill
isec
onds
(the
def
ault
bein
g 10
00).
Laye
r set
s
the
char
acte
r’s s
peci
fic la
yer (
the
defa
ult b
eing
the
fore
grou
nd).
Left
and
top
cont
rol t
he im
age’
s
plac
emen
t.
[chara_show name="Billy"]
;Showing a character at a
specific
point
;on-screen with a delay
[chara_show name="Gayelord
" wait=true
top=100 left=50]
[cha
ra_h
ide]
Hide
s ch
arac
ter f
rom
scr
een.
[chara_hide name="Billy"]
CHAPtER 7 tHREE LittLE GAMES

285
[cha
ra_m
ove]
Relo
cate
s a
char
acte
r im
age
onsc
reen
usi
ng th
e
trans
ition
def
ined
with
cha
ra_c
onfig
.
Para
met
ers:
tim
e, a
nim
, lef
t, to
p, w
idth
, hei
ght,
wai
t, ef
fect
.An
im a
ccep
ts tr
ue o
r fal
se, a
nim
atin
g th
e im
age
in a
ccor
danc
e to
the
tyra
noBu
ilder
ani
mat
ion
mac
ros,
def
ined
in “
effe
ct”
(see
righ
t for
a li
st).
Wid
th a
nd h
eigh
t set
the
dim
ensi
ons
of th
e
imag
e at
the
dest
inat
ion
(in p
ixel
s).
[chara_move name="Gayelord"
time=2000 left=800 top=40 anim=true
effect=easeInCubic]
; TyranoBuilder animation macros:
;jswing |def |easeInQuad |easeOutQuad
;easeInOutQuad |easeInCubic
|easeOutCubic;easeInOutCubic
|easeInQuart |easeOutQuart
;easeInOutQuart
|easeInQuint |easeOutQuint
;easeInOutQuint|easeInSine|
easeOutSine ;easeInOutSine |easeInExpo
|easeOutExpo ;easeInOutExpo
|easeInCirc |easeOutCirc
;easeInOutCirc |easeInElastic
;easeOutElastic |easeInOutElastic
;easeInBack |easeOutBack
|easeInOutBack ;easeInBounce
|easeOutBounce ;easeInOutBounce (con
tin
ued
)
CHAPtER 7 tHREE LittLE GAMES

286
Tabl
e 7-
19.
(con
tin
ued
)
[cha
ra_m
od]
Alte
rs a
cha
ract
er’s
app
eara
nce.
Para
met
ers:
tim
e, re
flect
, wai
t, cr
oss.
Setti
ng re
flect
to “
true”
reve
rses
the
imag
e
horiz
onta
lly. C
ross
con
trols
whe
ther
the
new
imag
e is
cro
ssfa
ded
with
the
old
one.
tim
e se
ts
this
cro
ssfa
ding
in m
illis
econ
ds (w
ith a
def
ault
of 6
00 m
s).
;Basic character modification
[chara_mod name="Billy"
storage="billy/1/sadface.png"]
;More specific transition
[chara_mod name="Billy"
storage="billy/1/happyface.png"
cross=true time=1000]
[cha
ra_d
elet
e]Pe
rman
ently
era
ses
a ch
arac
ter f
rom
the
gam
e.[chara_delete name="Billy"
]
Tag
Desc
riptio
nEx
ampl
e(s)
CHAPtER 7 tHREE LittLE GAMES
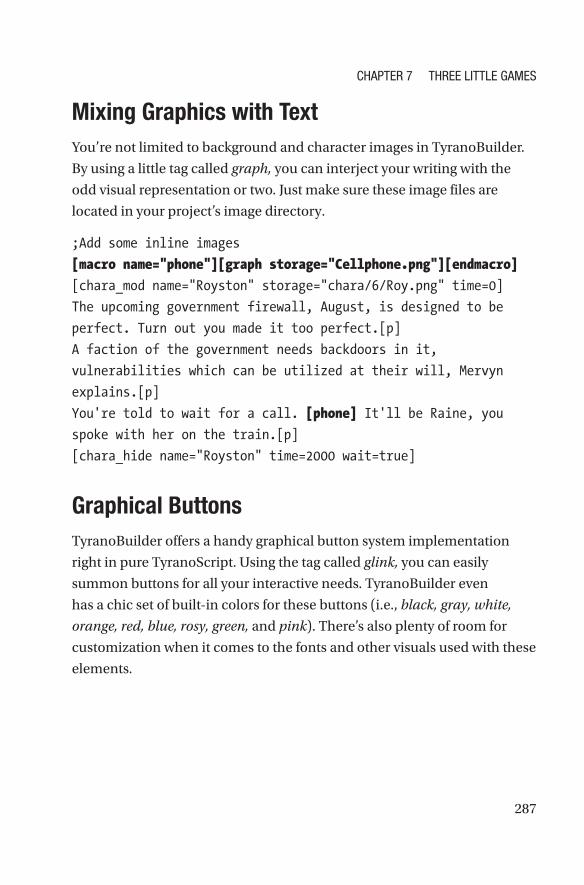
287
Mixing Graphics with TextYou’re not limited to background and character images in TyranoBuilder.
By using a little tag called graph, you can interject your writing with the
odd visual representation or two. Just make sure these image files are
located in your project’s image directory.
;Add some inline images
[macro name="phone"][graph storage="Cellphone.png"][endmacro]
[chara_mod name="Royston" storage="chara/6/Roy.png" time=0]
The upcoming government firewall, August, is designed to be
perfect. Turn out you made it too perfect.[p]
A faction of the government needs backdoors in it,
vulnerabilities which can be utilized at their will, Mervyn
explains.[p]
You're told to wait for a call. [phone] It'll be Raine, you
spoke with her on the train.[p]
[chara_hide name="Royston" time=2000 wait=true]
Graphical ButtonsTyranoBuilder offers a handy graphical button system implementation
right in pure TyranoScript. Using the tag called glink, you can easily
summon buttons for all your interactive needs. TyranoBuilder even
has a chic set of built-in colors for these buttons (i.e., black, gray, white,
orange, red, blue, rosy, green, and pink). There’s also plenty of room for
customization when it comes to the fonts and other visuals used with these
elements.
CHAPtER 7 tHREE LittLE GAMES

288
In the following, we’re implementing a three-button branching menu
demonstrating some of the styles available for the glink tag. Note: when
using graphical buttons, it’s wise to end the menu with the tag [s], which
pauses the adventure until the player makes a choice.
;Add graphical buttons
*cool_buttons
[glink target="ponder" text="Ponder" size=20 width="300" y=250
color=rosy font_color=0x000000]
[glink target="try" text="Relax" size=20 width="300" y=300
color=blue]
[glink target="resume_adventure" text="Onwards!" size=20
width="300" y=350 color=gray]
[s]
*ponder
You stay behind on the park bench, digesting everything you
were just told.[p] [jump target=*resume_adventure]
*try
You do your best to not ponder recent events, but you fail.[p]
*resume_adventure
The Grand Finale Featuring NasukaAnd so we’re about to move on from TyranoBuilder to other game-making
software, mainly Twine. But it’s not quite over yet. We’ll first display a fancy
farewell message using the tag of mtext, defined here to use a heftily sized
font. In addition, we’ll startle the player with a touch of the quake effect,
a visual novel staple. The position tag is also used to hide the message
background by setting its opacity attribute to zero.
The main attraction in this segment is, of course, the lovely Nasuka.
She’s a Live2D model, meaning she’s capable of much more than static
character images (no offense to Royston and Raine). Just a reminder: to
CHAPtER 7 tHREE LittLE GAMES

289
enable Live2D in TyranoBuilder, go to Project ➤ Customize Tool Area on
the top menu. Next, click the Live2D component selection. If you then go
to the Asset Library on the top menu, you’ll see a new drop-down menu for
Live2D assets, including Nasuka. She’s put to good use in this tutorial as
the listing continues:
What's this? Oh, you've reached the end of this tutorial game.
See the project files for the source code.[p]
[position opacity=0][quake count=3 time=200 hmax=20]
[live2d_new name="Nasuka"] [live2d_show name="Nasuka"]
[live2d_trans name="Nasuka" time=2000 left=200 top=-200]
[live2d_motion name="Nasuka" filenm="pleased.mtn" idle="ON" ]
[wait time="2000"]
[live2d_motion name="Nasuka" filenm="idle.mtn" idle="ON" ]
[mtext text="Cheerio!" layer=2 size=48 x=680 y=160 in_
effect="bounceIn" out_effect="hinge"]
[live2d_scale name="Nasuka" scaleX=4.8 scaleY=4.8 time=3000]
[live2d_opacity name="Nasuka" opacity=0 time=4000]
[wait time="3000"] [close ask=false]
As you can tell, our Live2D friend is assigned with quite a few tags
(see Table 7-20). First, she’s defined and displayed using live2d_new and
live2d_show. She’s then transported across the screen by 200 pixels to
the right and 200 pixels toward the top of the display using live2d_trans.
Nasuka is then assigned a motion file to display; in this case it’s the
intuitively named pleased.mtn. A 2-second delay is inserted for Nasuka to
show off her capabilities, after which she’s returned to her idle state using
the same tag of live2d_motion.
Next, we show off TyranoBuilder’s animated text tag, mtext. As
Nasuka bids us her adieus, she’s also scaled up in size (during a period
of 2 seconds) for maximum dramatic effect. After this it’s time to
automatically end the game using the close tag in tandem with its ask
parameter set to false.
CHAPtER 7 tHREE LittLE GAMES
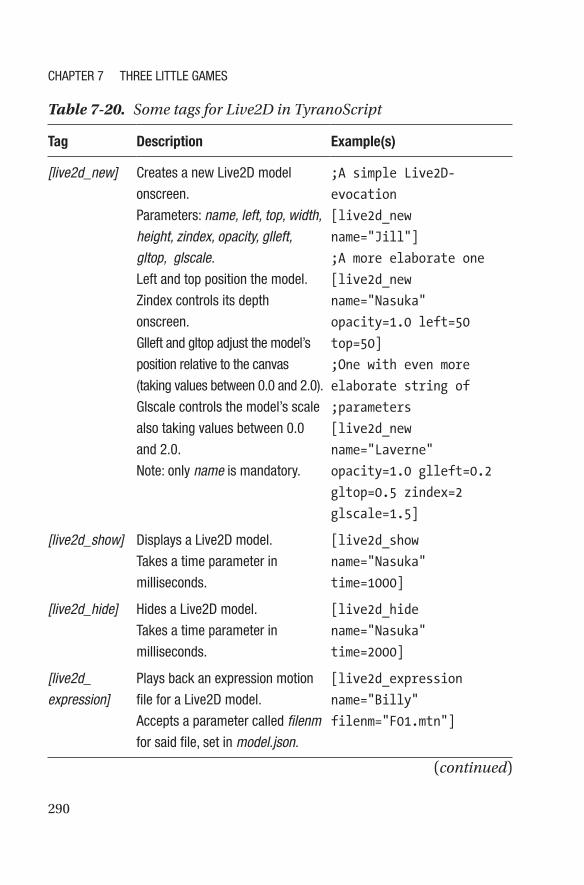
290
Table 7-20. Some tags for Live2D in TyranoScript
Tag Description Example(s)
[live2d_new] Creates a new Live2D model
onscreen.
Parameters: name, left, top, width, height, zindex, opacity, glleft, gltop, glscale.Left and top position the model.
Zindex controls its depth
onscreen.
Glleft and gltop adjust the model’s
position relative to the canvas
(taking values between 0.0 and 2.0).
Glscale controls the model’s scale
also taking values between 0.0
and 2.0.
Note: only name is mandatory.
;A simple Live2D-
evocation
[live2d_new
name="Jill"]
;A more elaborate one
[live2d_new
name="Nasuka"
opacity=1.0 left=50
top=50]
;One with even more
elaborate string of
;parameters
[live2d_new
name="Laverne"
opacity=1.0 glleft=0.2
gltop=0.5 zindex=2
glscale=1.5]
[live2d_show] Displays a Live2D model.
takes a time parameter in
milliseconds.
[live2d_show
name="Nasuka"
time=1000]
[live2d_hide] Hides a Live2D model.
takes a time parameter in
milliseconds.
[live2d_hide
name="Nasuka"
time=2000]
[live2d_expression]
Plays back an expression motion
file for a Live2D model.
Accepts a parameter called filenm
for said file, set in model.json.
[live2d_expression
name="Billy"
filenm="F01.mtn"]
(continued)
CHAPtER 7 tHREE LittLE GAMES

291
Tag Description Example(s)
[live2d_trans] Moves a Live2D model.
Parameters: left, top, time.Left and top take the amount of
pixels to move from the current
position. the optional parameter
of time is entered in milliseconds
(its default is 1000).
[live2d_trans
name="Nasuka" top=100
left=50 time=2000]
[live2d_opacity]
Sets the opacity of a Live2D
model.
Accepts time and opacity
parameters, the latter of which is
in the 0.0 to 1.0 range
[live2d_opacity
name="Nasuka"
opacity=0.5 time=1500]
[live2d_color] Adjusts the Live2D model color
using the RGB method. takes the
red, green, and blue parameters
in the range of 0.0 to 1.0.
[live2d_color
name="Nasuka" red=0.5
green=0.7 blue=1.0]
Table 7-20. (continued)
Various Tags and ToolsIn addition to all of the audiovisual power at your disposal, TyranoBuilder
offers much in the way of general-purpose scripting (see Table 7-21). For
one, you can display web sites in game using the HTML tag. The mouse
cursor and the glyph (i.e., the icon displayed when awaiting a mouse click)
are fully customizable.
Sometimes preloading assets is a good idea, in particular if there’s lots
of them. This can be achieved in TyranoBuilder by using a tag called, you
guessed it, preload.
CHAPtER 7 tHREE LittLE GAMES

292
Table 7-21. Some useful general-purpose tags in TyranoScript
Tag Description Example(s)
[title] Sets the game title. [title name="Chapter 2 of
Happy Game"]
[cursor] Changes the mouse cursor
image.
[cursor storage="new_
cursor.gif"]
[html] Adds an HtML layer. Can be
used for any HtML, including
embedding videos from, e.g.,
Youtube.
Parameters: top, left.
;Embed and autoplay a
great YouTube-video
[html top="50" left="50"]
<iframe src="http://
www.youtube.com/embed/
f4QBRgyitFs?&autoplay=1"
width="560" height="315">
</iframe>
[endhtml]
[endhtml] Ends the HtML layer. Uses no
parameters. See the preceding
[html].
[web] Opens a web site in the player’s
default browser.
[web url="http://www.
robertciesla.com"]
[glyph] Sets the location for the icon
displayed when awaiting for a
mouse click.
the image file is located in this
directory: tyrano/images/kag/nextpage.gif.Paremeters: fix (enables the next
two positional parameters), left, top.
;Set glyph coordinates by
enabling "fix"
[glyph fix=true left=100
top=100]
(continued)
CHAPtER 7 tHREE LittLE GAMES

293
Tag Description Example(s)
[dialogue] Displays a dialogue window. this
can be either a simple alert, an
ok/cancel window, or a text input
prompt.
Parameters: type (takes alert, confirm, input), target, storage, label_ok, label_cancel.in the confirm and input windows, the storage attribute
refers to the scene you’ll be
transported to when clicking a
choice. the target parameter
simply sets the label you’re taken
to within this scene.
You can also rename the contents
of the ok and cancel buttons
using the label_ok and label_cancel attributes (shown in bold).
;Simple alert
[dialog type="alert"
text="Hello!"]
;Ok/cancel window
[dialog type="confirm"
text="Say hi?" label_
ok="Yes!" storage="scene1.
ks" target="yes_label"
label_cancel="No."
storage_cancel="scene1.ks"
target_cancel="no_label"]
;Text input window
[dialog type="input"
text="Enter your name"
storage="scene1.ks"
target="happy_label"]
[loadcss] Loads a Cascading Style Sheet (CSS) while a game is in
progress. Great for completely
changing the look of a game,
when needed.
[loadcss file="./data/
others/css/new.css"]
[wait] Halts the game for a duration
defined in milliseconds.
[wait time="2000"]
Table 7-21. (continued)
(continued)
CHAPtER 7 tHREE LittLE GAMES
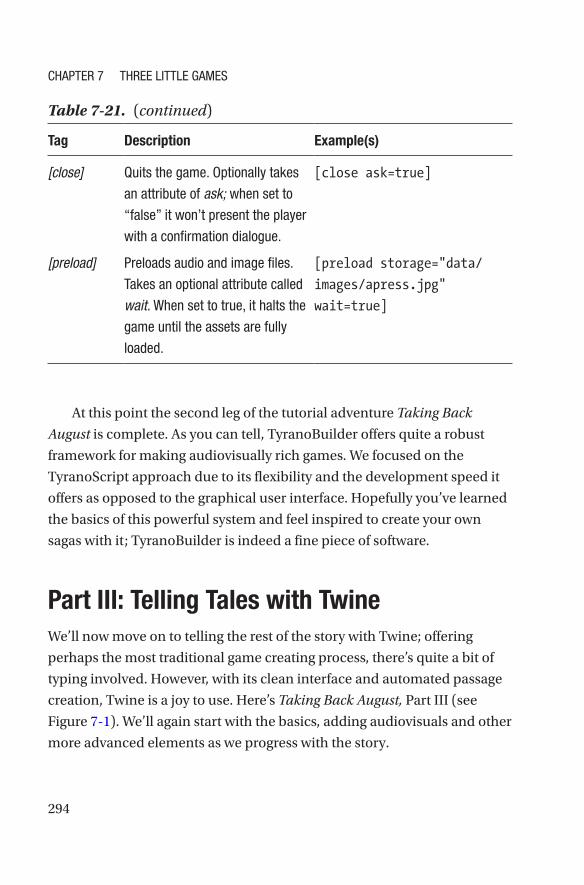
294
At this point the second leg of the tutorial adventure Taking Back
August is complete. As you can tell, TyranoBuilder offers quite a robust
framework for making audiovisually rich games. We focused on the
TyranoScript approach due to its flexibility and the development speed it
offers as opposed to the graphical user interface. Hopefully you’ve learned
the basics of this powerful system and feel inspired to create your own
sagas with it; TyranoBuilder is indeed a fine piece of software.
Part III: Telling Tales with TwineWe’ll now move on to telling the rest of the story with Twine; offering
perhaps the most traditional game creating process, there’s quite a bit of
typing involved. However, with its clean interface and automated passage
creation, Twine is a joy to use. Here’s Taking Back August, Part III (see
Figure 7-1). We’ll again start with the basics, adding audiovisuals and other
more advanced elements as we progress with the story.
Table 7-21. (continued)
Tag Description Example(s)
[close] Quits the game. Optionally takes
an attribute of ask; when set to
“false” it won’t present the player
with a confirmation dialogue.
[close ask=true]
[preload] Preloads audio and image files.
takes an optional attribute called
wait. When set to true, it halts the
game until the assets are fully
loaded.
[preload storage="data/
images/apress.jpg"
wait=true]
CHAPtER 7 tHREE LittLE GAMES

295
We’ll begin by opening up Twine and clicking the green plus sign to
create a new story and naming it. Let’s work with the popular Harlowe
story format. We’re immediately taken into the minimalistic user interface
of the software.
Double-clicking the first room (i.e., a passage in Twine parlance), we
enter this code:
Only a mere minute or so later, the old mobile phone rings.
"Raine?", you utter, answering the call. "You met with
Honeybun. Good. Yes, it's me, [[Raine]]", a female voice
explains.
(set: $variable to 0)
Figure 7-1. A project view of our completed tutorial game
CHAPtER 7 tHREE LittLE GAMES

296
As you may remember, entering double square brackets into a Twine
passage creates new ones. In the case of the preceding code, Twine
creates a new passage called Raine. Also, we used the Harlowe method of
declaring a variable, which we dubbed, well, $variable. Notice the use of
dollar sign, parentheses, and the tag called set:.
Fonts and ColorsThe default font looks rather plain. Let’s change that, shall we? Click the
game title (i.e., Taking Back August) and select Edit Story Stylesheet. We
can add Cascading Style Sheets (CSS) into this form. Go ahead and add the
following lines:
body, tw-story
{
font-family: Courier New;
font-size: 22px;
color: #EE9900;
text-shadow: 1px 1px 1px #000000;
background: rgb(194,169,45);
background: linear-gradient(180deg, rgba(194,169,45,1) 0%,
rgba(110,71,71,1) 31%, rgba(0,0,0,1) 86%, rgba(127,117,117,1)
100%);
}
All of our passages in this adventure will now have a somewhat more
pleasing Courier New font, complete with drop shadow, and a nice
autumnal color-gradient backdrop.
Now, Twine doesn’t package fonts into its output. Basically a player
needs to have the font you defined in Twine installed in their operating
system. Your safest bet is to use fonts generally found among most users.
These days you’re thankfully not usually limited to Times New Roman.
Popular fonts are sometimes referred to as web safe fonts (see Table 7-22).
CHAPtER 7 tHREE LittLE GAMES

297
Now, onto our adventure and its second passage, which should look
like this:
She tells you you must ditch the [[phone]] as it's being
tracked by "them": its signal encryption will be compromised
shortly.
The current color scheme is nice and all, but the blue links are kind of
an eyesore. Time to fix that by going back to the stylesheet editor in Twine.
Add the following lines after the previous lines of CSS:
tw-link /* Set both base link colors */
{ color: #ffcc00; }
tw-link:hover /* Set both hover link colors */
{ color: #ffff00; }
.visited /* Visited links */
{ color: #ffcc00; }
.visited:hover /* Visited hover links */
{ color: #ffff00; }
We’re in business; this look is much more uniform and pleasing to
the eye.
Table 7-22. Common web safe fonts
Font Type Font Type Font Type
Arial Sans- serif Garamond Sans- serif Times Serif
Arial Black Sans- serif Georgia Serif Times New Roman Serif
Bookman Serif Helvetica Sans- serif Trebuchet MS Sans- serif
Courier New
Serif Impact Sans- serif Verdana Sans- serif
CHAPtER 7 tHREE LittLE GAMES
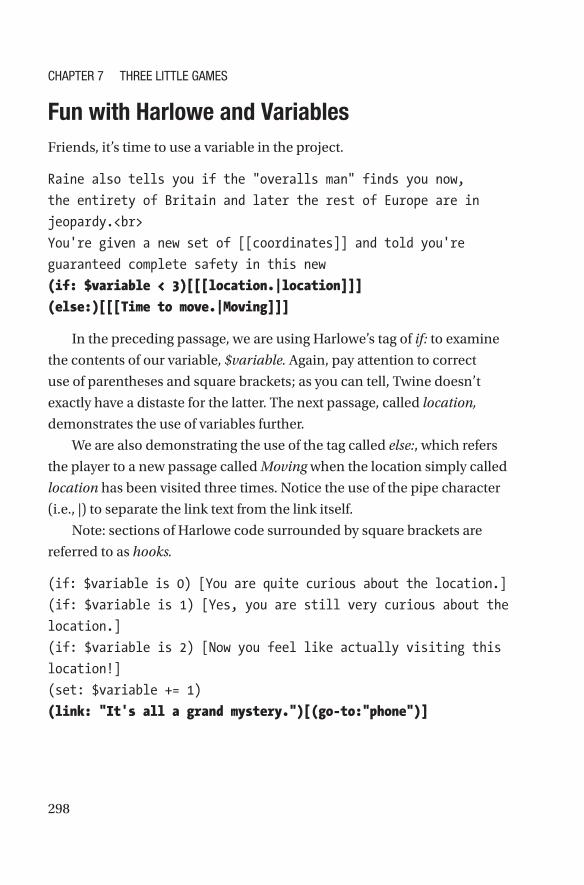
298
Fun with Harlowe and VariablesFriends, it’s time to use a variable in the project.
Raine also tells you if the "overalls man" finds you now,
the entirety of Britain and later the rest of Europe are in
jeopardy.<br>
You're given a new set of [[coordinates]] and told you're
guaranteed complete safety in this new
(if: $variable < 3)[[[location.|location]]]
(else:)[[[Time to move.|Moving]]]
In the preceding passage, we are using Harlowe’s tag of if: to examine
the contents of our variable, $variable. Again, pay attention to correct
use of parentheses and square brackets; as you can tell, Twine doesn’t
exactly have a distaste for the latter. The next passage, called location,
demonstrates the use of variables further.
We are also demonstrating the use of the tag called else:, which refers
the player to a new passage called Moving when the location simply called
location has been visited three times. Notice the use of the pipe character
(i.e., |) to separate the link text from the link itself.
Note: sections of Harlowe code surrounded by square brackets are
referred to as hooks.
(if: $variable is 0) [You are quite curious about the location.]
(if: $variable is 1) [Yes, you are still very curious about the
location.]
(if: $variable is 2) [Now you feel like actually visiting this
location!]
(set: $variable += 1)
(link: "It's all a grand mystery.")[(go-to:"phone")]
CHAPtER 7 tHREE LittLE GAMES

299
This passage (i.e., location) simply displays messages based on the
content of our variable. Three different messages are provided after which
this passage can’t even be visited from the previous passage of phone. As
it happens, we are entering an icy world. Let’s make the cosmetic side of
things reflect that. First, here’s the new passage itself (i.e., Moving).
You drop the phone and embark on the trip right away. A rather
complicated three-day journey on trains, ferries, and fishing
boats eventually take you to Bouvet Island, Norway, the most
remote [[island]] on the planet.
Custom Tags and Background VisualsLet’s add some visual variety into the passage. Insert the following CSS into
the game by clicking Edit Story Stylesheet:
tw-story[tags~="snow"] {
background-image:url("https://upload.wikimedia.org/wikipedia/
commons/4/44/Bouvet_island_0.jpg");
background-size: cover;
color: blue;
}
tw-story[tags~="snow"] tw-link {
color:blue;
}
tw-story[tags~="snow"] tw-link:hover {
color:white;
}
What the preceding lines do is to create three new element definitions:
one for the main story and two for our links. The text in bold is a part of
Twine’s custom tag system; you may remember the software allows you
CHAPtER 7 tHREE LittLE GAMES

300
to add specific tags to your passages. This is done by entering the editing
mode for a passage and clicking the icon entitled +Tag. You can then enter
these custom tags. Let’s do that for our current passage of Moving.
Note: make sure the capitalization of your tags is shared by both the
passage and the css definitions; Snow is very much different to snow in Twine.
Now the passage called Moving should have the customized tag of
snow with a non-capital s. In the CSS side of things, we’re using the tags
element (i.e., tags~=“snow”) to assign specific parameters to all passages
sharing the tag of snow. At the moment it’s just one room and this room
gets an auto-scaling background graphic courtesy of Wikipedia, a clear
blue font, and a brand new paint job for its links. These changes should
reflect the icy world of Bouvet Island far better than our former autumnal
color scheme.
As you probably gathered, using Twine’s custom tags is a great way
to change visual elements in a game with ease by having a specific set of
passages share them.
Say, why don’t we come up with even more custom looks for our future
passages? Let’s add the following code to the CSS of the project using the
Edit Story Stylesheet form:
tw-story[tags~="snow2"] {
color: ivory;
background: rgb(34,193,195);
background: linear-gradient(0deg, rgba(34,193,195,1) 0%,
rgba(157,157,157,1) 100%);
}
tw-story[tags~="snow2"] tw-link {
color:#444;
}
tw-story[tags~="snow2"] tw-link:hover {
color:white;
}
CHAPtER 7 tHREE LittLE GAMES
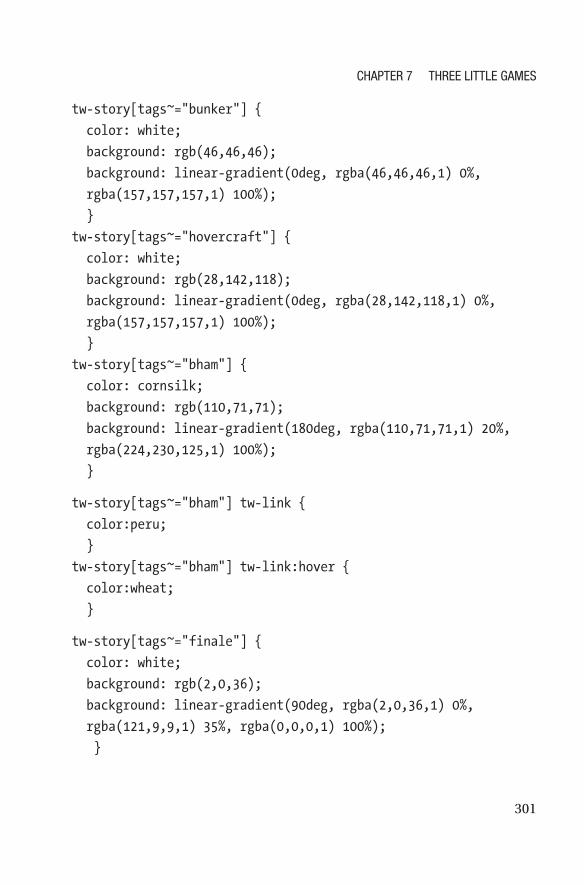
301
tw-story[tags~="bunker"] {
color: white;
background: rgb(46,46,46);
background: linear-gradient(0deg, rgba(46,46,46,1) 0%,
rgba(157,157,157,1) 100%);
}
tw-story[tags~="hovercraft"] {
color: white;
background: rgb(28,142,118);
background: linear-gradient(0deg, rgba(28,142,118,1) 0%,
rgba(157,157,157,1) 100%);
}
tw-story[tags~="bham"] {
color: cornsilk;
background: rgb(110,71,71);
background: linear-gradient(180deg, rgba(110,71,71,1) 20%,
rgba(224,230,125,1) 100%);
}
tw-story[tags~="bham"] tw-link {
color:peru;
}
tw-story[tags~="bham"] tw-link:hover {
color:wheat;
}
tw-story[tags~="finale"] {
color: white;
background: rgb(2,0,36);
background: linear-gradient(90deg, rgba(2,0,36,1) 0%,
rgba(121,9,9,1) 35%, rgba(0,0,0,1) 100%);
}
CHAPtER 7 tHREE LittLE GAMES

302
An Inventory in HarloweThe Harlowe story format has several macros suitable for in-depth variable
manipulation. It supports arrays, for one, which is a great data structure for
creating an inventory system. Let’s make one right now.
First, we need to configure an array, which is basically a group of
strings. There’s basically two ways of making it: either one with preexisting
items (i.e., strings) or one which is completely blank. Let’s configure the
former first. These definitions work best inserted into the first passage of
your game.
(set: $items to (a:))
Now, if you wanted an array/inventory with items, you would do
something like this:
(set: $items to (a: "key", "book", "mirror"))
To print the contents of the inventory, you use the macro of print: as
well as one called join, which specifies you want a comma character and
an “a” between the strings/items.
Your inventory contains a (print: $items.join(", a ")).
Adding and removing items to and from an array in Twine is simple
using basic arithmetic operators:
(set: $items to $items + (a: "key"))
(set: $items to $items - (a: "key"))
If you want your inventory to be of any use, you need to be able to
examine its contents. We would do this with the little macros called if: and
else:.
CHAPtER 7 tHREE LittLE GAMES

303
(if: $items contains "key")[You use the key to open the
[[locked door]].]
(else:)[The door won't budge. It remains locked. You need to
find a key for it.]
Note: the inventory in the tutorial game will be defined separately; the
preceding code is for the sake of demonstration only.
Refining Our Inventory and the Twine FooterAlthough the basic functionality for an inventory in Harlowe presented
earlier works, it could still be improved. For one, even if your inventory is
empty, it uses the comma convention to display the nonexistent contents.
Let’s change that right now.
(if: $items's length > 0)[Your inventory contains a (print:
$items.join(", a ")).]
(else:)[Your inventory is empty.]
Yes, that’s better; an empty inventory now displays a different message.
However, if you’re going to have an inventory in your game, wouldn’t you
want the option to access it whenever you wanted? To achieve this, we’ll
use a special passage in Twine called the footer. Basically, any room tagged
with footer will be a special passage displayed at every other passage.
So create a new passage, titling it whatever you want; “inventory”
would work. Assign a tag to this passage and call it footer. Again, this
passage will now display at the bottom of all of the other passages. Give it
the following content:
<hr>
(if: $items's length > 0)[Your inventory contains a (print:
$items.join(", ")).]
(else:)[Your inventory is empty.]
CHAPtER 7 tHREE LittLE GAMES

304
The HTML tag at the top gives your footer passage a nice horizontal
line to separate it from the other content in your game.
Now, for dramatic consistency, you may remember how our
protagonist Reginald heroically fetched an important pink DVD from a
building office. Let’s put that item into his inventory, shall we? Open the
very first passage in this Twine project and add the following line:
(set: $items to $items + (a: "Pink DVD"))
Resuming Our StoryLet’s get back to our game, Taking Back August, and utilize some of the
techniques outlined in the preceding text. The passage called island
should have the following contents:
A human figure welcomes you as you make landfall in a blizzard.
Taking off his goggles, the host becomes recognizable:
it's <b>Mervyn Popplewell</b>, your supposedly dead former
colleague. He shakes your gloved hand and says "Welcome to
Bouvet Island, or limbo as I call it!"
Go to [[bunker room A]], [[bunker room B]], [[bunker room C]],
or [[bunker room D]].
Remember our Story Stylesheet and all the definitions therein (e.g.,
snow, snow2)? Now it’s time to start tagging passages en masse to enable
all those visuals in our stylesheet. Tag the preceding passage with snow2
(see Figure 7-2). This will give it a unique look with a suitably icy color
scheme.
Also, the four bunker rooms we just created would benefit from a slight
variation in their backdrops. We can achieve this at this point by tagging
these rooms with the keyword “bunker,” which will assign some of our
previously defined, funky CSS elements to these passages.
CHAPtER 7 tHREE LittLE GAMES

305
Now then, Reginald is now facing a four-room underground bunker in
a very cold and desolate place. Let’s make it so that he has to collect three
additional items (from bunker rooms A, C, and D) for the story to progress:
a USB stick, a programming manual, and a password on a piece of paper.
The following is a table for the various bunker room passages (see
Table 7-23).
Figure 7-2. The island passage from Taking Back August (Part III)
CHAPtER 7 tHREE LittLE GAMES

306
Table 7-23. The bunker complex in Taking Back August for Twine
Passage Script
Bunker room A This room is exceptionally cold.
(if: $items contains "USB-stick")[The room is
empty.]
(else:)[You find a USB-stick!(set: $items to
$items + (a: "USB-stick"))]
Go to [[bunker room B]], [[bunker room C]],
or [[bunker room D]].
Bunker room B This room is quite barren.
(if: $items contains "Programming Manual")
[The room is empty.]
(else:)[You find a Programming Manual!(set:
$items to $items + (a: "Programming
Manual"))]
Go to [[bunker room A]], [[bunker room C]],
or [[bunker room D]].
Bunker room C The room is cold and empty.
Go to [[bunker room A]], [[bunker room B]],
or [[bunker room D]].
Bunker room D (if: $items contains "Password on a Piece of
Paper")[The room is empty.]
(else:)[You find a Password on a Piece of
Paper!(set: $items to $items + (a: "Password
on a Piece of Paper"))]
Go to [[bunker room A]], [[bunker room B]],
or [[bunker room C]].
CHAPtER 7 tHREE LittLE GAMES
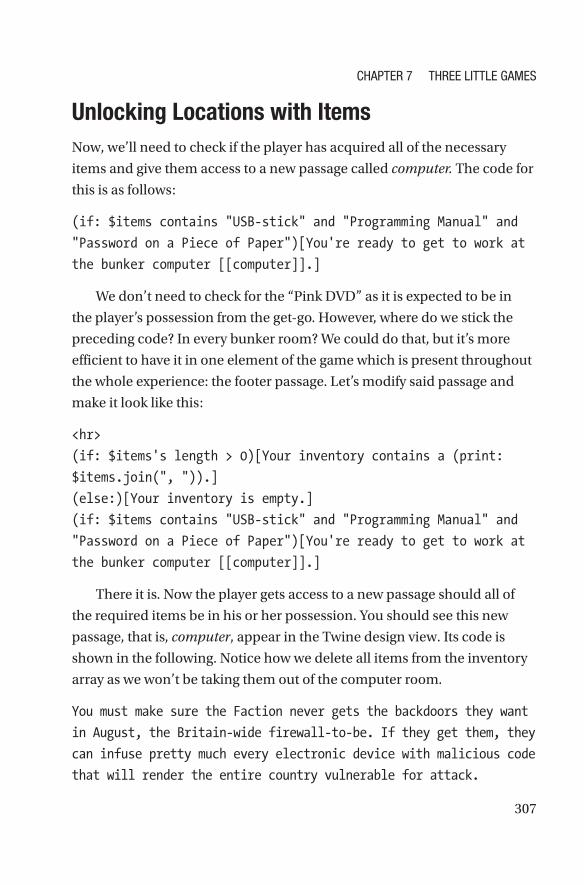
307
Unlocking Locations with ItemsNow, we’ll need to check if the player has acquired all of the necessary
items and give them access to a new passage called computer. The code for
this is as follows:
(if: $items contains "USB-stick" and "Programming Manual" and
"Password on a Piece of Paper")[You're ready to get to work at
the bunker computer [[computer]].]
We don’t need to check for the “Pink DVD” as it is expected to be in
the player’s possession from the get-go. However, where do we stick the
preceding code? In every bunker room? We could do that, but it’s more
efficient to have it in one element of the game which is present throughout
the whole experience: the footer passage. Let’s modify said passage and
make it look like this:
<hr>
(if: $items's length > 0)[Your inventory contains a (print:
$items.join(", ")).]
(else:)[Your inventory is empty.]
(if: $items contains "USB-stick" and "Programming Manual" and
"Password on a Piece of Paper")[You're ready to get to work at
the bunker computer [[computer]].]
There it is. Now the player gets access to a new passage should all of
the required items be in his or her possession. You should see this new
passage, that is, computer, appear in the Twine design view. Its code is
shown in the following. Notice how we delete all items from the inventory
array as we won’t be taking them out of the computer room.
You must make sure the Faction never gets the backdoors they want
in August, the Britain-wide firewall-to-be. If they get them, they
can infuse pretty much every electronic device with malicious code
that will render the entire country vulnerable for attack.
CHAPtER 7 tHREE LittLE GAMES

308
"You must make modifications so after implementing them, not
even you can undo them", Mervyn explains.
<!-- Clear inventory -->
(set: $items to (a:))
[[Finish Code]]
Food, Dramatic Moments, and More MacrosLet’s resume the story and introduce a few more macros for Harlowe. The
following code will be for the passage called Finish Code, created earlier.
It’s to be tagged as snow2 for the intended visual theme.
After a mere two days in the bunker, it begins to feel a second
home to you. The outside world is dangerous, unpredictable.
Food delivery is provided weekly to the island by the British
government, including items like caviar, avocado with shrimp,
and Belgian waffles.
<br>You've found home.
<!-- Time to "enchant" a food item -->
(enchant: "avocado with shrimp", (text-colour: white) + (text-
style:'bold'))
(display: "Food")
[[Fall Asleep]]
Harlowe allows you to change the styling in your passages using a
wonderful macro called enchant:. This macro gives developers great
flexibility to re-design some elements of their passages at will.
As for the macro called display: – it is used to show the contents of
external passages within a specific passage. For the preceding macro to
work, we need a brand new passage called Food in order to use display:.
The contents of Food could be simply something like this:
(Your favorite food is, indeed, avocado with shrimp!)
CHAPtER 7 tHREE LittLE GAMES

309
You’ll notice the enchant-macro addresses both the originating
passage of Finish Code and the later one called Food; in both passages the
same string (i.e., “avocado with shrimp”) will be highlighted.
Datamaps and DatasetsHarlowe includes support for data structures known as datamaps and
datasets. Simply put, what datamaps do is they create structures of key-
value pairings. They can be used to create character statistics or other
useful data collections. Datamaps utilize Harlowe’s common variable
definition of the dollar sign (e.g., $whatever_variable).
Accessing datamaps is done using the intuitive element of ‘s (e.g.,
$info’s) optionally with the macro called print:. The familiar if-else notation
also applies to datamaps as demonstrated next in the passage Fall Asleep,
again to be tagged with snow2 for the visuals.
<!-- Define a datamap with two keys (temperature and energy)
and assign them with values -->
(set: $info to (datamap: "temperature", -20, "energy", 5))
<!-- Display the datamap structures -->
Note: your energy-level is (print: $info's energy) out of 10.
The current temperature is (print: $info's temperature) C.
<!-- Check the values of the keys and display messages if
appropriate -->
(if: $info's energy is < 10)[You are somewhat tired.]
(if: $info's temperature is > 10)[It is quite warm!]
(else:)[It is very cold!]<br>
As for datasets, think of them as arrays (i.e., the type of structure
we used for our inventory system) that use specific, easy-to-remember
manipulators, such as “is in” and “contains” as demonstrated by the
CHAPtER 7 tHREE LittLE GAMES

310
following passage called Fall Asleep. Since an “alarm clock” isn’t included
in our dataset, the related second message won’t be displayed. Also note
the use of the handy and operator in the last line of dataset examination.
Now, the passage continues like this:
During your third day on the island, you're startled by a
noise. At first it seemed to be coming somewhere inside the
bunker, but it soon became clear it's originating from the
surrounding sea.
<!-- Create a new inventory with a dataset -->
(set: $briefcase to (dataset: "pencil", "eraser"))
<!-- Examine contents of the aforementioned dataset using "is
in" and "contains" -->
(if: "pencil" is in $briefcase)[You have your trusty pencil in
your trusty briefcase.]
(if: "alarmclock" is in $briefcase)[You are also carrying an
alarm clock in your briefcase.]
(if: $briefcase contains "eraser")[You are also carrying an
eraser in said briefcase.]
(if: $briefcase contains "eraser" and $briefcase contains
"pencil")[You feel well prepared.]
[[Go outside.]]
Extreme Fun with ArraysArrays in Harlowe’s can be manipulated in various ways; you’re not limited
to simply iterating through them in order. Let’s take a look at the next
passage (i.e., Go Outside.) and some of these nifty array manipulations
therein. This passage, too, could do worse than be tagged with snow2.
You pinpoint the source of the noise and associate it with a
small orange dot in the horizon. It's obviously a boat of some
sorts, slowly making it way towards Bouvet Island.
CHAPtER 7 tHREE LittLE GAMES

311
<!-- Create a new array, $array, assign four strings into it,
and randomize its order -->
(set: $array to (shuffled: "escape", "pencils", "fish",
"August"))
Panicking, you are thinking about (print: $array)!
<!-- Create another array, assign four numbers, rotate the
array by two -->
(set: $numbers to (a: 1,4,5,8))
And your briefcase lock number.. Which was it: (print:
$numbers) or(set: $numbers to (rotated: 2, ...$numbers))
(print: $numbers)?
<!-- Create a new array, fill it with four strings, arrange
them alphabetically -->
(set: $bands to (a: 'Abba', 'Megadeth', 'Tiffany', 'Enya'))
It's times like these you think about your favorite bands:
(print: (sorted: ...$bands)).
[[Hide in the bunker!]]
Some of the most useful array manipulations in Harlowe are shuffled:,
rotated:, and sorted:, as demonstrated in the preceding text. The triple dot
(i.e., ...) is called a spread operator in Twine. It’s used to insert all of the
values in an array into a macro (e.g., sorted: ...$bands).
Let’s continue onward to the next passage of us hiding in the bunker.
Oh and can you guess which tag would go well with such a passage? (It’s
bunker.)
The craft makes contact with terra firma. You can do little
else but observe through the fortified bunker windows. After
a few minutes of nothing but howling wind a somewhat petite
female form strolls towards your residence. She wears (either:
"thick black rimmed", "hipster") glasses and a (either: "dark
blue", "chic") winter jacket.
CHAPtER 7 tHREE LittLE GAMES

312
There's a knock on the entrance. "Reginald, it's me, <b>Raine
</b>", she informs and continues, "We must leave now. We only
have (random: 10,20) seconds!"
[[Enter the hovercraft.]]
In the preceding passage, we used two macros to create some variety:
the invigorating either: and the handy random:. The former’s function is
rather self-explanatory, while the latter creates a random whole number
between 10 and 20. You can, of course, enter any range of numbers at your
leisure for this macro.
More Visual EffectsNow, the plot thickens as we enter the hovercraft. We even animate the
text passages to reflect the tense atmosphere of the story at this point. Note
the use of hooks (i.e., square brackets) needed to envelop the paragraphs.
The following is a passage called Enter the hovercraft. For this and the
four passages that are connected to it, we should assign the tag of, yes,
hovercraft, for that oceanic color scheme.
(text-style: "Shudder")[Now aboard the craft and scurrying
across the waves, you and Raine notice a second hovercraft
emerging from the mist. "It's them", Raine tells you.]<br>
(text-style: "Rumble")[The black Faction craft is soon on the
starboard side of her and you with more than a dozen of their
stocky troopers aboard, wearing thick layers of arctic clothing
and military boots.]
(text-style: "Shudder")[(text-style: "Smear")[You and Raine
back off inside the craft canopy as it gets overrun.]]<br>
<!-- Apply an effect to a specific section in a passage (i.e.
[beg] and [ins]) -->
(set: $string to (text-style: "Shudder")) The heavily reinforced
cabin door $string[beg]$string[ins] to [[come off its hinges]].
CHAPtER 7 tHREE LittLE GAMES

313
As you can see, adding more than one visual effect to sections of a
passage using text-style involves using hooks to surround these other text-
styles with. Also, it’s possible to create reusable string variables for text-
styles and apply them where necessary. See Table 7-24 for a partial list of
these visual effects. Note: the usage is always (text-style: “effect name”)[text].
Table 7-24. Some settings for Twine’s “text-style” macro
Non-animated Effects Animated Effects
Bold Superscript Condense Rumble
Italic Subscript Shadow Shudder
Underline Mark Outline Blink
Strike Expand None Fade-in-out
Real-Time TwineGames made with Twine aren’t just limited to pensive clicking. Oh no:
one can implement some serious real-time drama with countdowns by
utilizing a macro called live:! Let’s try this out in the next passage, called
come off its hinges.
The antagonists are about to break through the cabin door.
[[Stay put!]] / [[Open the Door!]]
(set: $time to 15)
(set: $string to (text-style: "Shudder"))
(set: $string2 to (text-style: "Rumble"))
<!-- Display dramatic messages every 0.8 seconds-->
{(live: 0.8s)[
CHAPtER 7 tHREE LittLE GAMES

314
(either: "","","Double ")
(either: "$string[Thump!]", "Wham!", "Yikes!", "Oof!",
"$string2[Bam!]")
]}You have |amount>[$time] seconds left!
(live: 1.0s)[
(set: $time to it - 1)
(if: $time is 0)[(go-to: "Open the Door!")]
(replace: ?amount)[$time]
]
First, we create a simple variable called $time, assigning it with a value
of 15. If this variable reaches zero, the player is transported to a passage
called Open the Door!, which is also available as the “wrong” choice at the
top of the current passage through the usual means. Staying put is the only
way to survive this passage.
The macro called live: simply creates a real-time hook, to be repeated
by a specific interval. In this passage we assigned two live hooks: one
displays intense messages every 0.8 seconds, and the other decreases our
aforementioned variable by one every second. A macro called replace: is
utilized to display the updated contents of the timer variable. Also, you’ll
notice we utilize the previously introduced macro called either: to create
some variety in our messaging system.
But why don’t we make the countdown timer even more dramatic by
changing its color to red? We might as well make the numbers bold while
we’re at it using the font-weight attribute. Let’s add the following to the
Story Stylesheet:
tw-hook[name="amount"] {
color: red;
font-weight: bold;
}
CHAPtER 7 tHREE LittLE GAMES

315
Our First Game OverShould the player choose to open the cabin door while the invading forces
are aboard the hovercraft, the game ends. The passage called Open the
Door! should look like this:
You open the door in an attempt to fight the intruders. You
are overrun in seconds.
(live: 3s)[
(stop:)
(text-style: "Outline")[<h1>GAME OVER</h1>]
(link:"Try, Try Again")[(goto:"Start")]
]
You’ll notice it has a new macro called stop:. This is used in
conjunction with the live macro to create a 3-second delay before
displaying the dreaded words of “Game Over.”
Hiding That Pesky InventoryThere are passages in which the player doesn’t need to keep an eye at
the inventory; at times, keeping it displayed is just frustrating for your
audience. You may have noticed some of the recent passages in this
tutorial were quite busy. Let’s take care of that right now.
Find the inventory passage in the project. Make it look like this:
(if: $show_footer is true)[
<hr>
(if: $items's length > 0)[Your inventory contains a (print:
$items.join(", ")).]
(else:)[Your inventory is empty.]
(if: $items contains "USB-stick" and "Programming Manual" and
"Password on a Piece of Paper")[You're ready to get to work at
the bunker computer [[computer]].]
]
CHAPtER 7 tHREE LittLE GAMES

316
Some new sections are displayed in bold. What these do is examine
a boolean variable, $show_footer, to see if it’s set to “true” (booleans are
variables with only two states: true or false). If it is, a hook displaying the
inventory is shown. If said variable is set to false, no parts of the inventory
passage are shown. Note: be careful with the capitalization of booleans in
Twine, too. True is not the same as true.
Now, to enable or disable the inventory within any passage, enter one
of the following lines into it (preferably as the very first one for the sake of
clarity):
(set: $show_footer to false) <!-- Hide inventory -->
(set: $show_footer to true) <!-- Show inventory -->
See Figure 7-3 for the final form of our inventory passage. In our
project, we should hide the inventory in the following passages: Enter
the hovercraft. and Go Outside. Also, we should enable it in the very first
passage of the adventure, to make sure it defaults to being visible. In
addition, do remember the variable (i.e., $show_footer) maintains its value
until you change it again.
Figure 7-3. The completed inventory passage from Taking Back August (Part III)
CHAPtER 7 tHREE LittLE GAMES

317
Adding Graphical BarsThere’s nothing quite like visual representations of data in a video game
context. Whether you’re implementing character statistics or any type of
progress, you should invest some of your time into doing that visually. Let’s
create some of those fine bars right now in our next passage, called Stay put!
(set: $hose to 100)
A stream of water begins to flood the hovercraft cabin from the
skies. It's much more intense than seaspray or rain.
You identify the emerging sound as a helicopter. "It's Roy",
Raine yells and continues, "It has to be him!"
Royston is almost done removing the bad guys off the
hovercraft:
(live: 0.25s)[
(if: $hose>0)[
(set: $hose to $hose - (random: 1,5))
]
(print: '<progress value="' + (text: $hose) + '" max="100">
</progress>')
(if: $hose < 10)[ [[Follow Roy's helicopter!]]]
]
In this passage we’re simply introducing an HTML element known as
<progress> into the proceedings using the Twine macro called print:.
After first defining a new variable called $hose and giving it a value
of 100, we integrate this data into the progress element. By using the
now probably familiar live macro, we reduce said variable’s value
between one and five units every quarter of a second. However, we
have controls in place which guarantee that this will only occur if the
value of the aforementioned variable is above zero; we don’t want any
funny business to occur with our bars and data.
CHAPtER 7 tHREE LittLE GAMES

318
When the value of our hose-related variable falls below ten, a link to a
new passage (i.e., Follow Roy’s helicopter!) will be displayed. However, the
default visuals provided by the progress element are rather uninspiring.
Let’s summon some CSS to correct that, shall we? We create a nice new
look to our progress bar by adding the following code into the Story
Stylesheet:
progress {
background-size: 20px 20px, 100% 100%, 100% 100%;
box-shadow: 5px 5px 5px black;
}
What the preceding CSS does is give the progress bar a nice, thick
green look and a shadow to boot. Said shadow will be offset by 5 pixels
both horizontally and vertically, feature 5 pixels of blur, and be black in
color.
Transitions and Rotation: More Visual FlairYou can introduce parts of your passages in style with the macro known
as transition:. It takes a number of animation styles as its parameter. In
the following code, we used the rather striking pulse as our transition of
choice, which is a good way to display news headlines. In addition, we
can make things even more tabloidy by using a macro called text-rotate.
Finally, our old friend text-style emerges again to create an embossed and
smeared look for the headlines. The following passage is called Follow
Roy’s helicopter!
The hovercraft makes landfall somewhere in the coast of Norway.
An unremarkable car awaits you, Raine, and Royston. "There's a
private jet awaiting for us at Oslo Airport. Let's get going",
Royston says, opening a passenger door.
CHAPtER 7 tHREE LittLE GAMES

319
Picking up a newspaper in the car, a headline startles you:
(transition: "pulse") [
(text-style: "emboss")[
<h2>(text-style: "smear")[(text-rotate: 2)["Buckingham Palace
and Number Ten on lockdown!"]</h2>
(text-rotate: -2)["Britain shocked by PM's disappearance!"]]
]
Finish reading the [[newspaper]] ]
Replacing Links with PassagesWe continue the story in a passage called newspaper, which is presented in
the following. Here we utilize a macro called click-replace: to create a link
out of the string of “Proceed Inside..” Clicking this link will then display the
contents of a separately defined passage called Buckingham Court inside
the current one. It’s also the time to switch to a brand new color scheme
by tagging this passage with the magic word bham. This also goes for the
passage to follow, that is, Throne Room.
Your team arrives in London after another long drive, this time
from Heathrow. "We have snipers all over the place", Royston
says.
The Faction managed to enter Buckingham Palace which has its
surrounding areas sealed off from the public for now.
Proceed Inside..
(click-replace: "Proceed Inside..")[(display: "Buckingham Court")]
CHAPtER 7 tHREE LittLE GAMES
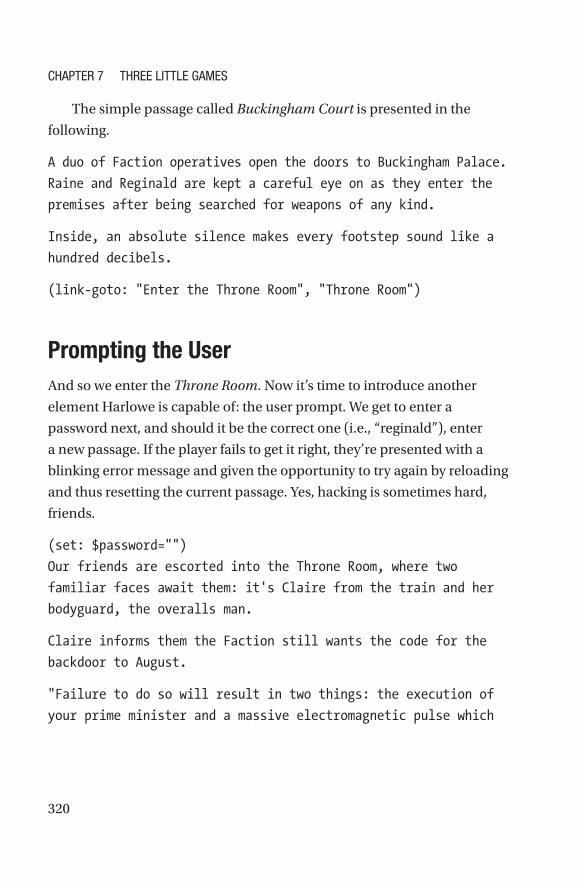
320
The simple passage called Buckingham Court is presented in the
following.
A duo of Faction operatives open the doors to Buckingham Palace.
Raine and Reginald are kept a careful eye on as they enter the
premises after being searched for weapons of any kind.
Inside, an absolute silence makes every footstep sound like a
hundred decibels.
(link-goto: "Enter the Throne Room", "Throne Room")
Prompting the UserAnd so we enter the Throne Room. Now it’s time to introduce another
element Harlowe is capable of: the user prompt. We get to enter a
password next, and should it be the correct one (i.e., “reginald”), enter
a new passage. If the player fails to get it right, they’re presented with a
blinking error message and given the opportunity to try again by reloading
and thus resetting the current passage. Yes, hacking is sometimes hard,
friends.
(set: $password="")
Our friends are escorted into the Throne Room, where two
familiar faces await them: it's Claire from the train and her
bodyguard, the overalls man.
Claire informs them the Faction still wants the code for the
backdoor to August.
"Failure to do so will result in two things: the execution of
your prime minister and a massive electromagnetic pulse which
CHAPtER 7 tHREE LittLE GAMES

321
will cripple not only your capital city, but the entirety of
your country", Claire explains.
> Enter password.(click: "password")[
(put: (prompt: "Enter Your Password (it's reginald):", "") into
$password)
(if: $password is "reginald")[(goto: "Done")](else:)[(text-
style: "blink")[> Access denied!](link-goto: "> Try again? <",
"Throne Room")
]
]
You’ll notice another macro we haven’t discussed yet: put:. This is
simply a different implementation of the familiar set macro which uses a
slightly different syntax; both of these macros create and modify variables.
Instead of (set: $password to ...), we chose to use (put: ... into $password).
We’re almost there. The two remaining passages are stylized with a
dramatic red hue courtesy of the tag called finale. The following passage is
called Done.
You activate the system with all of the requested backdoors
open – or so it seems.
"Very good, Mr Pennelegion", Claire says with a smile, grabbing
the tablet from Reginald and handing it over to the overalls man.
"Excellent. We have a deal. The coordinates are now being
transferred into your tablet", she says and continues: "You're
free to leave".
Walking slowly towards the front doors, Raine notices something
in the corner of her eye: one of the guards is having difficulty
maintaining his balance. The air turns freezing cold.
Raine whispers to you: "Do you feel that? That's our cue to
[[run!]]"
CHAPtER 7 tHREE LittLE GAMES
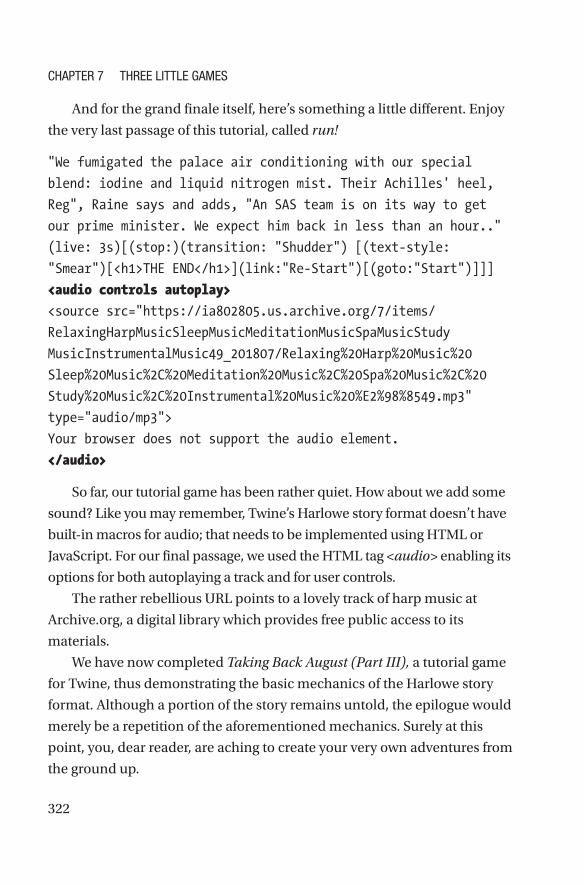
322
And for the grand finale itself, here’s something a little different. Enjoy
the very last passage of this tutorial, called run!
"We fumigated the palace air conditioning with our special
blend: iodine and liquid nitrogen mist. Their Achilles' heel,
Reg", Raine says and adds, "An SAS team is on its way to get
our prime minister. We expect him back in less than an hour.."
(live: 3s)[(stop:)(transition: "Shudder") [(text-style:
"Smear")[<h1>THE END</h1>](link:"Re-Start")[(goto:"Start")]]]
<audio controls autoplay>
<source src="https://ia802805.us.archive.org/7/items/
RelaxingHarpMusicSleepMusicMeditationMusicSpaMusicStudy
MusicInstrumentalMusic49_201807/Relaxing%20Harp%20Music%20
Sleep%20Music%2C%20Meditation%20Music%2C%20Spa%20Music%2C%20
Study%20Music%2C%20Instrumental%20Music%20%E2%98%8549.mp3"
type="audio/mp3">
Your browser does not support the audio element.
</audio>
So far, our tutorial game has been rather quiet. How about we add some
sound? Like you may remember, Twine’s Harlowe story format doesn’t have
built-in macros for audio; that needs to be implemented using HTML or
JavaScript. For our final passage, we used the HTML tag <audio> enabling its
options for both autoplaying a track and for user controls.
The rather rebellious URL points to a lovely track of harp music at
Archive.org, a digital library which provides free public access to its
materials.
We have now completed Taking Back August (Part III), a tutorial game
for Twine, thus demonstrating the basic mechanics of the Harlowe story
format. Although a portion of the story remains untold, the epilogue would
merely be a repetition of the aforementioned mechanics. Surely at this
point, you, dear reader, are aching to create your very own adventures from
the ground up.
CHAPtER 7 tHREE LittLE GAMES

323
In ClosingAfter finishing this fairly intense chapter, you should have knowledge on
the following:
• How to translate a synopsis into a catalogue of
locations and characters for visual novel development
• The importance of keeping track of interconnected
rooms/passages in a game
For Ren’Py, you are now fully familiar with
• Working with variables and creating branching stories
using conditional statements
• Performing advanced variable manipulation with lists
and Python
• Defining custom transitions and adding other
audiovisual elements, including particles
In the case of TyranoBuilder, you should be comfortable with
• TyranoScript and its most useful macros in place of, or
with, the graphical user interface
• Advanced character transitions
• The basics of implementing Live2D characters
For Twine, you’ll have mastered the following:
• Using the Harlowe story format and its main dedicated
macros
• Creating interconnected Twine passages and stylizing
them using Cascading Style Sheets (CSS) and HTML
• Using variables to influence game events
CHAPtER 7 tHREE LittLE GAMES

324
• Using basic Twine data structures, including inventory
systems using arrays
• Utilizing the live macro to create real-time events
That’s quite a lot of potentially new information to digest. Now, the
next chapter will be somewhat more amenable, dealing instead with
marketing essentials and promotional strategies.
CHAPtER 7 tHREE LittLE GAMES

325© Robert Ciesla 2019 R. Ciesla, Game Development with Ren’Py, https://doi.org/10.1007/978-1-4842-4920-8_8
CHAPTER 8
Promotional StrategiesLike stated early on in this book, the visual novel is a thriving genre. For
you, a developer, this means two things: stiff competition and flourishing
communities full of potential fans. In this chapter we’ll explore the
possibilities of said communities and other promotional tools you have at
your disposal. We’ll also be taking a look at the distribution side of things
in the form of various online platforms available today.
Your Online AudienceThe visual community is huge and ever-expanding. As a developer, you
should get acquainted with the main forums of the scene, to observe, to
participate, and especially to network in (see Table 8-1).

326
Table 8-1. The main online communities for visual novels and
interactive fiction (data for Q1 2019)
Community Members Description
Visual Novels on Redditwww.reddit.com/r/
visualnovels
55.6 k Reddit offers this popular and welcoming
community for fans of the visual novel genre
and developers alike.
Lemmasoft Forumslemmasoft.renai.us/forums
38.6 k Lemmasoft is a developer-focused and very
active forum with Tom Rothamel, the creator of
Ren’Py, as one of its administrators.
Visual Novel Databasevndb.org
14.3 k Focused on cataloguing the visual novel, VNDB
features over 24,000 games in its database. It
includes a fairly active forum, too.
Fuwanovel (Fuwa)forums.fuwanovel.net
10 k With a tagline of “make visual novels popular
in the west,” Fuwanovel offers a busy forum
with hundreds of thousands of posts and
counting. Focused on the player experience, it
also offers a discussion board for developers.
The Interactive Fiction Community Forumintfiction.org
7.4 k Intfiction.org is a well-organized resource for
those who prefer more old-school approaches
to adventure game-making (e.g., Twine).
Highly recommended for all enthusiasts and
developers in the genre.
The Interactive Fiction Databaseifdb.tads.org
7 k Like its name states, IFDB is a database which
also offers promotional opportunities for
developers in the form of recommendations.
CHapTeR 8 pRomoTIoNaL STRaTegIeS

327
Online Distribution for Budding Visual NovelistsThere are two universal basic types of products: commercial and free. As
discussed previously in this chapter and this book, a visual novel released
for free can do wonders for the developers. On the other hand, this beloved
genre is no longer a rarity on big commercial platforms such as Steam or
Good Old Games either. We will now explore the best venues for the online
distribution of both free and commercial visual novels.
Releasing for FreeA simple file hosting service is basically all what a developer needs to
distribute his or her visual novels; these are costless for all parties in
general (see Table 8-2). Just drop a link of your games to your potential
customers and you’re good to go. It’s not the most extravagant method of
game delivery, but it works. You may not even opt for a custom domain
(e.g., www.mygame.com), but that’s not recommended: sometimes it’s good
to rein in the thriftiness. Always have your own web site.
Now, let’s take a look at some of the best free distribution platforms.
Table 8-2. Some online platforms for free distribution of visual novels
(data for Q1 2019)
Service Represented Platforms
Description
Itch.io Windows, mac,
Linux, android,
ioS
Itch.io provides free online distribution with an optional
“name your price” model. The store has over 4000
visual novels in its virtual shelves as of Q1 2019.
The Itch.io community is a thriving one and well worth
leveraging for distribution, networking, and inspiration.
(continued)
CHapTeR 8 pRomoTIoNaL STRaTegIeS

328
Table 8-2. (continued)
Service Represented Platforms
Description
Game Jolt
Windows, mac,
Linux, vintage
computer Roms
Game Jolt hosts all three major desktop platforms as
well as the rather exotic format of Roms, which refer to
retro computer game files.
Similar to Itch.io, game Jolt offers a “name your price”
option for your downloads, meaning you can distribute
for free.
IndieDB Windows, mac,
Linux, all major
consoles
IndieDB is a well-established community and file
hosting service geared toward indie game developers.
Its main appeal is in the vibrant community.
CloudMe No restrictions CloudMe is a Swedish file hosting solution offering
3 gigabytes of free storage without traffic limitations.
Your individual file size is however limited to 150
megabytes. Cloudme is still a great choice for smaller
projects.
Download limit(s): none
Google Drive
No restrictions Google Drive requires a free google account from the
developer’s part, but not from the downloader. You get
a hefty 15 gigabytes of storage which is more than
enough for a few visual novels.
Download limit(s): 750 MB per hour or 1250 MB per day
Mega No restrictions Similar to google Drive, you get 15 gigabytes of free
storage with Mega.
Download limit(s): 10 GB per month
CHapTeR 8 pRomoTIoNaL STRaTegIeS

329
Selling Your Visual NovelsLet’s now explore the world of commercial software distribution platforms
(Table 8-3). Although most of them don’t require a submission fee, the
process may not turn out the way you desire. As soon as money is involved,
things get more complicated. Typically more mainstream games are
accepted in the world of commercial game distribution. Exotic niche
products don’t fare as well.
When approaching commercial distributors, it’s mandatory to have
some high-quality marketing materials ready. These include at least five
high-resolution screenshots and a video trailer, or two. Never email a
distributor without links or attachments to these materials.
Table 8-3. Some online platforms for commercial distribution of
visual novels (data for Q1 2019)
Service Platforms Description Submission Process
Steam Windows,
mac, Linux
Valve Software’s giant platform
offers its 150+ million users
tens of thousands of games in
every possible genre.
as for visual novels, Steam
hosts around 1.5K such titles
as of Q1 2019.
You keep 70% of revenue.
“Steam Direct”: pay a
fee of $90 and wait 2–3
weeks for approval.
Steam’s “hands-off”
approach implemented in
2018 guarantees only the
most offensive titles are
kept out of the store.
Epic Store
Windows,
mac
although the focus is on
showcasing the 3D prowess of
epic’s Unreal engine, the store
claims to be “engine agnostic.”
There don’t seem to be any
objections to genres either.
You keep 88% of revenue.
Fill in the store
submission form online.
(continued)
CHapTeR 8 pRomoTIoNaL STRaTegIeS
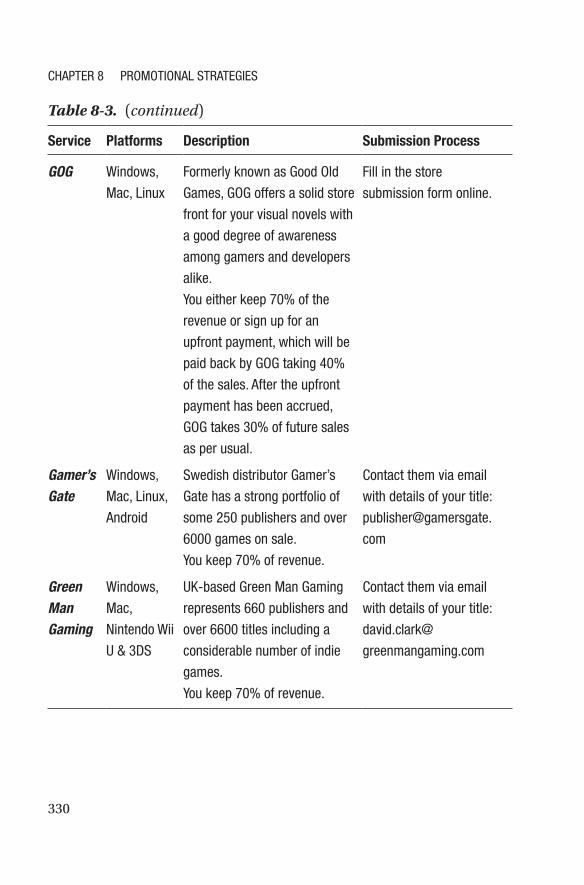
330
Table 8-3. (continued)
Service Platforms Description Submission Process
GOG Windows,
mac, Linux
Formerly known as good old
games, gog offers a solid store
front for your visual novels with
a good degree of awareness
among gamers and developers
alike.
You either keep 70% of the
revenue or sign up for an
upfront payment, which will be
paid back by gog taking 40%
of the sales. after the upfront
payment has been accrued,
gog takes 30% of future sales
as per usual.
Fill in the store
submission form online.
Gamer’s Gate
Windows,
mac, Linux,
android
Swedish distributor gamer’s
gate has a strong portfolio of
some 250 publishers and over
6000 games on sale.
You keep 70% of revenue.
Contact them via email
with details of your title:
publisher@gamersgate.
com
Green Man Gaming
Windows,
mac,
Nintendo Wii
U & 3DS
UK-based green man gaming
represents 660 publishers and
over 6600 titles including a
considerable number of indie
games.
You keep 70% of revenue.
Contact them via email
with details of your title:
david.clark@
greenmangaming.com
CHapTeR 8 pRomoTIoNaL STRaTegIeS
331
Essential Marketing PracticesMarketing a visual novel is pretty much the same as marketing any other
type of video game. As of 2019 run-of-the-mill social media (e.g., Facebook
and Twitter) is oversaturated and overrated for the indies; you may not
want to bother with much of it early in your career. There are, however,
several steps you can and need to take as an indie developer.
Forum DecorumWhichever forums you decide to engage with, make sure you behave
within certain parameters. When interacting with members on any forum,
stay civil and succinct. Be open to accepting even unasked for criticism as
long as it’s constructive. Reach out freely to other enthusiasts, but don’t
bicker and try not to convince anyone of anything in particular.
Demo GamesThe promotion of your visual novel doesn’t need to only start after you
and/or your team have completed work on it. You may want to invest your
time in producing a, say, time-limited demo version of your game for your
fans, your future fans, and potentially even journalists. Dedicated forums
are a great way to distribute your demo games and build whatever amount
of buzz you can for your products. Although your game doesn’t have to be
finished at the demo stage, it should be as polished as possible.
Note When presenting your visual novel demo to the world at large, it’s usually a good idea to give them an estimate of the demo’s playing time in minutes.
CHapTeR 8 pRomoTIoNaL STRaTegIeS

332
Penetrating the Market with Free StuffBesides creating polished products, one of the best ways of generating
interest toward your visual novels is to release it for free. As mentioned
earlier in this book, several games that ended up being downloaded in the
millions were released free of charge. Examples of this marketing strategy
include Digital: A Love Story by Christine Love and the phenomenon
called Doki Doki Literature Club! by Team Salvato. The former launched
Love’s video game career, while the latter is earning its team income by
selling downloadable content such as soundtracks.
Staying Serious About PlatformsThe tools developers have these days for creating visual novels are, for the
most part, designed to be multi-platform from the ground up. All developers
should strive to release their games for as many platforms as their tools
allow. However, there’s debate among software publishers on the issue
of simultaneous cross-platform release. A system-synchronized product
launch reduces marketing overhead. A staggered launch, on the other
hand, allows for things such as a potentially longer commercial lifespan
for your game. Less established indie developers may benefit most from a
simultaneous launch, as this gets the game out there as far as possible and
lets the developers know whether or not said product has any hit potential.
The Power of LocalizationIf there’s a genre of video games that benefits greatly from localization,
it’s the visual novel. The admittedly large English-speaking world aside,
there are numerous potentially lucrative markets out there untapped
by many developers. The main reason for this is obvious: a text-based
product needs a high degree of language ability from the ones doing the
localization. The average visual novelist may or may not be competent
CHapTeR 8 pRomoTIoNaL STRaTegIeS

333
in Simplified Chinese or the Korean standard language. Usually, extra
personnel must be hired for these tasks.
The average translation rate per word can range anywhere between
$0.02 and $0.07 for individual translators. The rate goes all the way up to
around $0.10–$0.25 for professional translation agencies. These include
businesses such as MoGi Group or Level Up Translation. Now, for a smallish
game of, say, 40,000 words at $0.09 per word, you would pay $3,600. A
120,000-word beast of a game at a similar rate would cost you $10,800.
A usually expensive endeavor then, localization nonetheless provides
opportunities to enter fresh markets with millions of potential new buyers.
It’s naturally best attempted when your product already has a proven track
record for its original release. It’s either that or you sign up for those hip
language courses and master a brand new language yourself.
Web SiteEven with all the social media platforms of today, it still pays to have a
custom web domain of your own. For maximum impact for a specific game,
create your domain around its title (i.e., supergame.com). Don’t bother
with dedicated forums or other communal features; these will pretty much
create themselves somewhere in social media if the demand exists.
Optimize your web site for mobile use and search engines. You may
even want to invest time into making separate web sites for desktops and
mobile devices. There are plenty of free templates for web sites online
which serve as great starting points for your site(s).
Search engines love text; balance the visuals on your site with lots of
original quality writing. Make sure your site is made with error-free HTML to
further enhance its status among search engines and potential customers;
the W3C Markup Validation Service is a great tool for this purpose.
CHapTeR 8 pRomoTIoNaL STRaTegIeS

334
There are many sites and free tools for developing and optimizing your
web site, some of which are presented as follows:
• W3C HTML5 Tutorial (www.w3schools.com/html)
• BlueGriffon HTML editor free for Windows, Mac, and
Linux (www.bluegriffon.org)
• Free CSS Templates (www.free-css.com)
• W3C Markup Validation Service (http://validator.
w3.org)
• Google Search Console (http://search.google.com/
search-console)
• Google PageSpeed (http://developers.google.com/
speed/pagespeed/insights)
• Bing Webmaster Tools by Microsoft (www.bing.com/
toolbox/webmaster)
• Yandex Webmaster Tools (http://webmaster.
yandex.com/welcome)
Trailer VideoEven if your game is a bare-boned text-only adventure game, an
audiovisually rich trailer can and should be made to present it in an
engaging way. Build extra atmosphere by utilizing a quality soundtrack.
Avoid cheap production values and built-in templates offered by pretty
much all video editing software.
Keep your trailer under 2 minutes in length and use at least some
footage from the game itself. Add a link to your online presence to the end.
If at some point you receive any positive press, make a new trailer with
these quotes included in it.
CHapTeR 8 pRomoTIoNaL STRaTegIeS

335
If you’re not familiar with trailer creation, learn basics of the trade – or
find someone who already knows what they’re doing. Some good, free
choices for editing software are listed next; find the program with the most
comfortable user interface for you and master it.
• Lightworks for Windows, Mac, and Linux (www.
lwks.com)
• HitFilm for Windows and Mac (http://hitfilm.com/
express)
• Shotcut for Windows, Mac, and Linux (http://
shotcut.org)
• OpenShot for Windows, Mac, and Linux (www.
openshot.org)
• Flowblade for Linux (http://jliljebl.github.io/
flowblade)
BlogKeeping a regular blog signals you’re active and thus serious about your
project. Blogs are a great way of processing feedback and interacting with
your potential supporters. Regular blogging is also a form of search engine
optimization, giving them data to chew on and index. If you decide to open
a game development blog, try to post on a weekly basis. Your topics might
include general progress updates on your game, announcements on a
demo version, or more technical posts aimed at your fellow developers.
You may even choose to center your entire online presence as a game
developer around a free blog service, such as WordPress.org or Blogger.
com. That is certainly a good approach when it comes to saving time;
however, you should register your own web domain even when using this
method. If you pick WordPress for your blog/web site, the cheapest option
for its hosting with a custom domain (as of Q1 2019) is at Bluehost.com,
costing you less than $3 per month.
CHapTeR 8 pRomoTIoNaL STRaTegIeS

336
Guest bloggers from the industry can also enhance your online
presence through link sharing. Reach out to your fellow developers for
this purpose in mind. Now, general-purpose blogging sites aside, there
are some platforms dedicated to game development. These include Gama
Sutra (http://gamasutra.com) and GameDev.net.
Visual Novel DatabasesAs a reminder, you should always submit data of your games into databases
and keep it up to date. Your go-to listings should include at least The Visual
Novel Database (www.vndb.org), The Interactive Fiction Database (http://
ifdb.tads.org), and good old Wikipedia. The last one requires some form
of “relevance” from your games (apparently tons of confirmed sales and/or
positive press) or your titles will be wiped off its pages. Still, you should edit
Wikipedia to your benefit at some point and hope it sticks.
• Wikipedia listing for Ren’Py Games
(http://en.wikipedia.org/wiki/
Category:Ren'Py_games_and_visual_novels)
• List of games at the official Ren’Py web site
(http://games.renpy.org)
• Itch.io’s list of top visual novels made with TyranoBuilder
(http://itch.io/games/genre-visual-novel/
made- with- tyranobuilder)
• Steam discussions for TyranoBuilder
(http://steamcommunity.com/app/345370/
discussions)
• Wikipedia page for Twine
(http://en.wikipedia.org/wiki/Twine_(software))
CHapTeR 8 pRomoTIoNaL STRaTegIeS
337
In ClosingFinishing this chapter, you’ll have learned about the following:
• The main free and commercial online distribution
platforms for your visual novels
• The importance of demo games and the possibilities
offered by localization
• Essential marketing practices, including custom web
domains and blogging
And here we are at the end of the book. The author sincerely hopes you
have gained some valuable information concerning the art of the visual
novel. Whether you choose Ren’Py, TyranoBuilder, Twine, or some other
amazing piece of software for game development, may you utterly succeed
in your ventures. Hopefully, you’ll become a celebrated part of the ever-
expanding community of interactive fiction, exploring important themes
and creating many entertaining products.
“Write a wise saying and your name will live forever.”
—Author unknown
CHapTeR 8 pRomoTIoNaL STRaTegIeS

339© Robert Ciesla 2019 R. Ciesla, Game Development with Ren’Py, https://doi.org/10.1007/978-1-4842-4920-8
Index
AAct I, departure
adventure call, 13Hyde Park, 14refusal call, 13supernatural aid, 14threshold, 14
Act II, initiationapotheosis, 19father, atonement, 18, 19goddess, 16quest’s goal, 20road trials, 15woman as temptress, 16, 17
Act III, returnfreedom to live, 28, 29magical flight, 22–24refusal, 21, 22rescue, 24–26threshold, 26–28two worlds, 28
Adrift editor, 104, 105Adventure Game
Toolkit (AGT), 75Anthropomorphism, 8Append method, 248Archive.org, 322Aristotelean poetics, 9–11
BBlog, 335Boolean variable, 253Brainstorming, 45
Ccall command, 253Cascading Style
Sheets (CSS), 125, 145, 296Change Background component, 271Characters per second (cps), 265chara_mod, 283Codecs, 146Commercial platforms, 327Creator, 32
DDatamaps, 3093D Camera, 282Demo games, 331Deskaction, 2443D graphics, 1Display macro, 308Dramatic elements
alter ego, 4antagonist, 2, 3

340
catharsis, 5cliché, 5conflict, 5deus ex machina, 6double entendre, 6exposition, 6flat/round character, 6fourth wall, 7narration/narrator, 7Onomatopoeia, 7personification, 8POV, 9protagonist, 3, 4simile, 9soliloquy, 9
EEditra, 240Enchant macro, 308Explorer, 33
FFile hosting service, 327from_zoom attribute, 282full_restart command, 261Functions, 253
Gglink tag, 287Graphical user interface (GUI), 154
graph tag, 287Guest bloggers, 336
HHarlowe, 126Harlowe story format, 302, 322Healer, 34Hero, 30Hero’s journey
departure (see Act I, departure)initiation (see Act II, initiation)return (see Act III, return)
HTML-compliant color coding, 235
Iinit statement, 250Innocent One, 33Inspiration, 43, 44Integrated development
environment (IDE), 193Interactive fiction
Colossal Cave Adventure, 48, 49ELIZA, 47, 48Infocom, 49–53level 9 computing, 60, 61, 63Magnetic Scrolls, 55, 56, 58text-based adventures, 64, 66,
67, 69, 70tools
AGT, 75parser, 71PAW, 75
Dramatic elements (cont.)
INDEX

341
Quill, 74ZIL, 72, 73
Interactive Fiction IDentifier (IFID), 131
iScript, 140, 162
J, KJohn/Jane Doe (example), 30Joker, 31jQuery effect methods, 175
LLaunch screens, 196Layout plan, Taking Back August
characters, 218locations, 219
Bedford Streets, 227, 228Bouvet Island, 228, 229London, 223, 224, 231, 232London (residential area),
225London (train station), 226new office complex, 233, 234Norway, 231office complex, 222–225South Atlantic Ocean, 230train, 226, 227
List manipulation method, 251Live2D technology, 141Live2D, TyranoScript, 290, 291Live macro, 314
Localization, 42Lover, 33
MMacros, 282Magician, 32Math.floor function, 163Mobile devices, Ren’Py
Android, 190, 191app icons, 196deploy OS/Chrome browser, 197iOS, 193keybindings, 192launch screens, 196pre-splash screens, 191RAPT, 198testing android, 192Xcode, 194, 195
Mountain, 124
NNasuka, 288Novel good practices
audience bond, 37, 38audiovisuals, 35characters grow, 36dramatic endings, 38engine, 35forced reading, 38story, 34
INDEX

342
sub-genre, 36unnecessary elements, 37using clichés, 36, 37
OOnline communities, 326Online distribution, visual novel
commercial software distribution platforms, 329, 330
free distribution, 327, 328Onomatopoeia, 7
P, QParser, 71Passages, 123Point of View (POV), 9Portable Network
Graphics (PNG), 208Print macro, 309, 317Professional Adventure Writer
(PAW), 75Proofreading, 42
RRaspberry Pi, 198Real-time Twine, 313, 314Rebel, 31Ren’Py, 41, 102
alpha mask, 148audio functionality, 149–151
components, 111, 112conditional statement, 120, 121control statements, 121, 122creating project, 112creating user
interaction, 118, 119definition, 110gui.rpy, 155image properties
alignment, 152character color, 151, 152transitions, 152–154
key elements, 117, 118launcher actions, 113, 114markus_movie.webm, 148mobile devices, Ren’Py (see
Mobile devices, Ren’Py)options.rpy, 155, 156play and stop, 150queue command, 150Raspberry Pi, 198, 199scripting language, 114, 116text block, 119, 120video codecs, 146, 147video container formats, 147video playback, 148
Ren’Py Android Packaging Tool (RAPT), 190
Ren’Py, desktopdeployment options, 188hardware requirements, 188, 189icons, 189
renpy.movie_cutscene command, 265
Novel good practices (cont.)
INDEX
343
Ren’Py, Taking Back Augustaudio channels, 248audiovisual assets, 237, 239character expressions, 263, 264characters setup, 235, 236conditional statements, 244–249define variables, 242functions, 253, 254hashtag character, 241hyperlinks, 264inventory system, 250, 252, 253kerning, 266menu element, 241, 244naming convention, 237project starting, 234, 235randomized dialogue, 261, 262sliding effect, 239SnowBlossom effect, 256–260starting menu, 241text speed, 249, 266transitions, 236variable, 255video files, 265vspace element, 266wait tag, 266
reset_camera tag, 282RGB hexadecimal method, 152Ruler, 31
SSage, 32scene command, 246show command, 257, 263
SnowBlossom effect, 256alpha channel, 257attributes, 256conditional statement, 260identical menus, 258particles, 256, 257
Snowman, 126Sort method, 249Steam app, 269Stop macro, 315
TTaking Back August project
characters, 218Ren’Py workflow (see Ren’Py,
Taking Back August)settings and venues, 220–222Twine (see Twine, telling tales)Twine, project view, 295TyranoBuilder, Reginald’s story
(see TyranoBuilder project)Text-rotate macro, 318Text-style macro, 313Trailer video, 334, 335Transition macro, 318Twine, 103
CSS, 125CSS selectors, 131, 132definition, 122Harlowe, 126
animate, 177and jQuery, 173–176
HTML elements, 167, 168
INDEX

344
HTML tags, 125, 126IFID, 131JavaScript, evoking, 169launcher screen, 123macros, 127, 128mountain, 124passages, 123Snowman, 126
audiovisuals, 184JavaScript and
underscore, 179Markdown technique, 178rolling dice, 180text formatting, 178, 179underscore
and arrays, 181–183variables, 180
text reveal effect, 169, 170text spicing, 170–172user interface functions
editor screen, 129game menu options, 129, 130
Twine, desktopandroid icons, 208, 209for iOS and android, 205iOS icons, 211, 213iOS p12 certificate, 213iOS splash screens, 210PhoneGap build, 206, 207splash screen android, 208
Twine, telling talesarrays, Harlowe, 310, 311click-replace macro, 319, 320
color scheme, 297custom tags, 300Edit Story Stylesheet, 299, 300footer, 303, 304graphical bars, 317, 318Harlowe method, 296, 302, 303inventory passage, 315, 316locations unlock, 307project view, 295real-time drama, 313, 314resume story, 304–306text-style, 313user prompt, 320, 321variable, 298web safe fonts, 297
TyranoBuilder, desktopfor Android, 201, 203, 204for iOS, 200, 201
TyranoBuilder project, 106adding multimedia, 138audio-related tags, 270, 271background graphic, 268characters tag, 268, 284, 286components, 134, 135creating project, 135, 136, 1383D camera, 282directories, 269, 270fadeinbgm, 272game settings panel, 139general-purpose tags, 292–294graphical button, 287, 288graphical user interface, 269image and video file, 272–276interaction, 277
Twine (cont.)
INDEX

345
iScript, 141join scene component, 138label component, 277labels, 281, 282Live2D, 141, 142, 289–291macros, 282randomized dialogue, 279–281scripting languages, 140sound directory, 278user interface, 133variable operations, 279
TyranoBuilder techniquesclickable areas, 165fonts, 166iScript vs. JavaScript, 164jump component, 161, 162plugins, 157–159process variables, 160, 161randomItem variable, 163randomization, 162–164system variables, 160variables manager, 160
TyranoPlayer, 201TyranoScript, 140, 162, 269, 270, 281
UUnderscore library, 179
VVirtual camera, 282Visual community, 325Visual Novel Database, 336
Visual novel industryanimation, 39, 40audio production and voice
acting, 41localization, 42programming, 41testing, 42
Visual novel, marketingblog, 335demo games, 331forums, 331free stuff, 332localization, 332, 333platforms, 332trailer video, 334, 335Visual Novel Database, 336web site, 333, 334
Visual novelsclassics, 91–102Japanese origins
anime, 84bishoujo, 84dating sims, 84doujinshi games, 85eroge, 86Hentai, 86Isekai, 87Kamige/Kusoge, 87kawaii, 87MAhou shoujo, 88manga, 89mecha, 90moe(ge), 90Nakige/Utsuge, 90
INDEX

346
Otome games, 88Tsundere, 90
toolsAdrift, 104, 105Ren’Py, 102Twine, 103TyranoBuilder, 106VN Maker, 107
tropesbranching, 82dialogue tree, 80ending tree, 81protagonist, 80sword and sorcery, 82, 83
Visual Novel (VN) Makertool, 107
WwebM container
format, 265Web safe fonts, 297Web site, 333, 334Writer’s block, 44–46
X, Yxpos attribute, 239
ZZork Interactive
Language (ZIL), 72
Visual novels (cont.)
INDEX