FKAD - In Home Delivery System - Department of ECE UCF
141
i University of Central Florida EEL 4914 Senior Design 2 Senior Design Project Document Fall 2018 FKAD - In Home Delivery System Group F: Dena Alawi [email protected] CpE Karl Mama [email protected] EE Ana Gomez [email protected] CpE Fabio Pardo [email protected] CpE Sponsor: Self-funded
-
Upload
khangminh22 -
Category
Documents
-
view
1 -
download
0
Transcript of FKAD - In Home Delivery System - Department of ECE UCF

i
University of Central Florida
EEL 4914 Senior Design 2
Senior Design Project Document
Fall 2018
FKAD - In Home Delivery System
Group F:
Dena Alawi [email protected] CpE
Karl Mama [email protected] EE
Ana Gomez [email protected] CpE
Fabio Pardo [email protected] CpE
Sponsor: Self-funded

ii
Table of Contents 1. Executive Summary ......................................................................................... 1
2. Project Description ........................................................................................... 3
2.1 Motivation .................................................................................................... 3
2.2 Goals and Objectives .................................................................................. 3
2.3 Requirements and Specifications ................................................................ 4
2.4 Customer Expectations ............................................................................... 6
2.5 House of Quality ......................................................................................... 8
2.6 Marketing and Engineering Requirements .................................................. 9
3. Research and Background Information .......................................................... 10
3.1 Existing Similar Projects and Products...................................................... 10
3.1.1 Walmart Partnered August Home “in-fridge” Delivery ......................... 10
3.1.2 Amazon Key ....................................................................................... 11
3.1.3 Summary ............................................................................................ 12
3.2 Relevant Technologies.............................................................................. 13
3.2.1 August Auto-Unlock ............................................................................ 13
3.2.2 Nest Cam ............................................................................................ 13
3.2.3 Nest x Yale Lock ................................................................................. 14
3.2.4 ADEL 3398 (Fingerprint + Password) ................................................. 15
3.2.5 Summary ............................................................................................ 16
3.3 Market Analysis ......................................................................................... 16
4.0 Research Considerations ............................................................................. 18
4.1 Microcontroller Considerations .................................................................. 18
4.1.1 ATMEGA328P .................................................................................... 19
4.1.2 MSP430 (G2x53) ................................................................................ 19
4.1.3 ATMEGA2560 ..................................................................................... 19
4.2 Wireless Communication Modules ............................................................ 19
4.2.1 CC300 WIFI Module ........................................................................... 20
4.2.2 ESP8266-F WIFI Module .................................................................... 20
4.2.3 ESP8266-01 WIFI Module .................................................................. 21
4.3 Streaming and Video Storage ................................................................... 21
4.4 Fingerprint sensor considerations ............................................................. 22
4.4.1 Fingerprint sensor: Hardware ............................................................. 22
4.4.2 Fingerprint sensor: Software ............................................................... 23

iii
4.5 Power Systems ......................................................................................... 24
4.5.1 Batteries or Solar Cell ......................................................................... 24
4.5.2 Voltage Regulators.............................................................................. 29
4.6 Display Implementations ........................................................................... 31
4.6.1 Liquid Crystal Display .......................................................................... 31
4.6.2 Organic Light-Emitting Diodes ............................................................ 32
4.7 Software Tools .......................................................................................... 33
4.8 Website Server Support ............................................................................ 35
4.9 Parts Selection Overview .......................................................................... 36
4.9.1 Microcontroller Selection ..................................................................... 36
4.9.2 WIFI Module Selection ........................................................................ 37
4.9.3 Fingerprint Sensor Selection ............................................................... 37
4.9.4 LCD Display selection ......................................................................... 38
4.9.5 Miscellaneous Parts Selection ............................................................ 38
5. Related Standards and Design Constraints .................................................... 41
5.1 Standards and Other Safety Concerns ...................................................... 41
5.1.1 Soldering Standards............................................................................ 42
5.1.2 Programming Standards ..................................................................... 44
5.1.3 Software and Systems Engineering Testing Standards ...................... 45
5.1.4 Design Impact of Software Testing Standards .................................... 48
5.1.5 IEEE Standards .................................................................................. 48
5.2 Realistic Design Constraints ..................................................................... 50
5.2.1 Economic Constraints ......................................................................... 51
5.2.2 Time Constraints ................................................................................. 51
5.2.3 Manufacturability Constraints .............................................................. 52
5.2.4 Sustainability Constraints .................................................................... 52
5.2.5 Social and Political Constraints ........................................................... 52
5.2.6 Health Constraints............................................................................... 53
5.2.7 Safety Constraints ............................................................................... 53
5.2.8 Ethical Constraints .............................................................................. 54
5.2.9 Environment Constraints ..................................................................... 54
5.2.10 Security Constraints .......................................................................... 55
6. Project Hardware and Software Design Details .............................................. 56
6.1 Hardware Design Details ........................................................................... 56

iv
6.1.1 Hardware Block Diagram .................................................................... 56
6.1.2 Hardware Design Overview ................................................................ 57
6.1.3 Microcontroller .................................................................................... 57
6.1.4 Battery Design Detail .......................................................................... 61
6.1.5 Lockbox and Fingerprint Scanner Design Details ............................... 61
6.1.6 Wi-Fi Details ....................................................................................... 63
6.1.7 Hardware Schematics ......................................................................... 64
6.2 Software Design Details ............................................................................ 66
6.2.1 Software Block Diagram ..................................................................... 66
6.2.2 Software Design Overview.................................................................. 67
6.3 Web Application Design ............................................................................ 69
6.3.1 Web Application Specifications & Mobile Responsiveness ................. 70
6.3.2 Architectural Design ............................................................................ 80
6.3.3 Database Design ................................................................................ 83
6.3.4 User Interface Design ......................................................................... 87
6.3.5 Detailed Design .................................................................................. 93
6.3.6 Cloud Hosting and Deployment .......................................................... 97
6.3.7 Web Application Summary.................................................................. 98
6.4 Fingerprint programming ........................................................................... 99
6.4.1 About the sensor ................................................................................. 99
6.4.2 Implementation and details of required protocols ............................. 100
7. Project Prototype Construction .................................................................. 106
7.1 Prototype Expectations ........................................................................... 106
7.1.1 Potential Hardware Issues ................................................................ 106
7.1.2 Potential Software Issues ................................................................. 108
7.2 Parts Acquisition and BOM ..................................................................... 110
8. Project Prototype Testing ............................................................................. 113
8.1 Hardware Testing .................................................................................... 113
8.1.1 Hardware Testing Overview .............................................................. 113
8.1.2 Microcontroller Testing ..................................................................... 114
8.1.3 Fingerprint Scanner Testing .............................................................. 115
8.1.4 Wi-Fi Functionality Testing................................................................ 116
8.1.5 Power Testing ................................................................................... 117
8.2 Software Testing ..................................................................................... 118

v
8.2.1 Software Testing Overview ............................................................... 118
8.2.2 Database and API Testing ................................................................ 119
8.2.3 User Experience Testing ................................................................... 120
8.2.4 User Interface Testing ....................................................................... 122
8.2.5 Simulated Testing ............................................................................. 123
9. Administrative Content ................................................................................. 126
9.1 Division of Labor...................................................................................... 126
9.2 Project Milestones ................................................................................... 127
9.3 Budget and Finance ................................................................................ 128
9.4 Stretch Goals .......................................................................................... 129
10. Conclusion .................................................................................................. 130
Appendices ........................................................................................................... A
Appendix A - Copyright Permissions ................................................................. A
Appendix B - Works Cited ................................................................................. B
List of Tables: Table 1 ................................................................. Error! Bookmark not defined. Table 2 ............................................................................................................... 18 Table 3 ............................................................................................................... 31
Table 4 ............................................................................................................... 33 Table 5 ............................................................................................................... 35 Table 6 ................................................................. Error! Bookmark not defined. Table 7 ................................................................. Error! Bookmark not defined. Table 8 ................................................................. Error! Bookmark not defined. Table 9 ................................................................. Error! Bookmark not defined. Table 10 ............................................................... Error! Bookmark not defined. Table 11 ............................................................... Error! Bookmark not defined. Table 12 ............................................................................................................. 87 Table 13 ............................................................................................................. 95 Table 14 ........................................................................................................... 111 Table 15 ........................................................................................................... 112
Table 16 ........................................................................................................... 114 Table 17 ........................................................................................................... 119 Table 18 ........................................................................................................... 126 Table 19 ........................................................................................................... 128 Table 20 ........................................................................................................... 128
List of Figures: Figure 1 .............................................................................................................. 11 Figure 2 .............................................................................................................. 12 Figure 3 .............................................................................................................. 14

vi
Figure 4 .............................................................................................................. 14 Figure 5 .............................................................................................................. 15
Figure 6 .............................................................................................................. 36 Figure 7 .............................................................................................................. 38 Figure 8 .............................................................................................................. 40 Figure 9 .............................................................................................................. 47 Figure 10 ............................................................................................................ 57
Figure 11 ............................................................................................................ 58 Figure 12 ............................................................................................................ 60 Figure 13 ............................................................................................................ 62
Figure 14 ............................................................................................................ 63 Figure 15 ............................................................................................................ 64 Figure 16 ............................................................................................................ 65 Figure 17 ............................................................................................................ 66
Figure 18 ............................................................................................................ 70 Figure 19 ............................................................................................................ 71
Figure 20 Figure 21 ........................................... Error! Bookmark not defined. Figure 22 ............................................................................................................ 80
Figure 23 ............................................................................................................ 81 Figure 24 ............................................................................................................ 82 Figure 25 ............................................................................................................ 85
Figure 26 ............................................................................................................ 85
Figure 27 ............................................................................................................ 86 Figure 28 ............................................................................................................ 87 Figure 29 ............................................................................................................ 88
Figure 30 ............................................................................................................ 90 Figure 31 ............................................................................................................ 90
Figure 32 ............................................................................................................ 91 Figure 33 ............................................................................................................ 91 Figure 34 ............................................................................................................ 92
Figure 35 Figure 36 .................................................................................... 92
Figure 37 ............................................................................................................ 96 Figure 38 ............................................................................................................ 97
Figure 39 .......................................................................................................... 101 Figure 40 .......................................................................................................... 102 Figure 41 .......................................................................................................... 103 Figure 42 .......................................................................................................... 103 Figure 43 .......................................................................................................... 104
Figure 44 .......................................................................................................... 105 Figure 45 .......................................................................................................... 105 Figure 46 .......................................................................................................... 113
Figure 47 .......................................................................................................... 118 Figure 48 .......................................................................................................... 121

1
1. Executive Summary For as far back most of us can remember people have been going to grocery stores and supermarkets like Publix or Walmart to buy their household essentials, food, and sometimes even clothing. Whatever it may be that people are buying, they’d usually go to their local stores for just about everything. However, more recently we’ve noticed a new wave in our society that’s steered from the norm of shopping to online shopping. Most people today have ordered at least something from an online service provider like Amazon or eBay. Currently companies are now transferring their knowledge of marketing and technology to the grocery store business. Walmart has even added the option to buy your groceries online, set a time to go to the store to pick up, and a Walmart employee carts your groceries to your parked car. Now it’s a race between companies like Amazon and Walmart for the in-home delivery market. The aim of this project will be to achieve a safe in-home delivery. In this project, we will use a lockbox that the homeowner will place on their front doorknob, like that of real estate lock boxes, for when a delivery is meant to be taken place. The lockbox will be hooked up to a fingerprint scanner for the delivery person to access during a specific time frame the delivery is meant to take place. Otherwise, if the delivery person is not there on time the fingerprint scanner will not be accepting any fingerprints. The fingerprint scanner is essential for authentication in this project. If the delivery is on time the fingerprint will authenticate the delivery person and dispense the house key. The lockbox is connected to the homeowners' Wi-Fi and with the dispensing of the key, the homeowner will be notified that the delivery has started with the use of a push notification to their mobile device. Essentially, the employeewill be linked to the smart home delivery mobile application with a body cam on their person that displays a live stream to the homeowners' client application, so the homeowner can watch the delivery take place from the possibility of being anywhere outside of their home. The delivery person can then place refrigerated items inside of the homeowners' fridge or if none of the items are meant to be refrigerated then they will place such items on the inside of the home next to the front door. Finally, the live stream will end once the key is placed back within the lockbox and the homeowner will be notified that the delivery has finished with a push notification. Accomplishing this task will be a difficult one as there are political, ethical, health, and safety constraints that require us to make this product a trustworthy and reliable alternative for the regular homeowner to do their shopping. Understandably, many homeowners are not comfortable with the idea of a stranger entering their home when they are away. We hope that this product will clear the homeowner of doubts and be executed in a professional and safe manner.

2
This rest of this report will document the Safe Home Delivery design process. It will first describe its motivations and goals. Then it will go into specifics about the requirements and specifications like the dimensions of the lockbox and its battery life. The research portion will dive into the reasoning as to why specific parts were chosen and why others were left out for this project as well as other similar projects that looked to achieve the same type of goals. Next, the document will discuss the constraints and standards, from IEEE to soldering, that affected the design of the project. The document will then discuss, in detail, the hardware and software design of the project. This will include schematics, functionality, block diagrams, and design flowcharts. Moving forward, the project document will discuss the PCB design and the possible methods of prototype testing the project separately for hardware and software then integrating them both for an integrated prototype testing. Finally, the administrative section will show the budget split up, the basic schedule for project milestone and the teams' division of labor.

3
2. Project Description A safe, reliable, commendable in-home delivery alternative that allows homeowners to be absent and do their daily activities, while their groceries are delivered and put into place. This section serves to provide to you the motivation for developing the Smart Home Delivery option as well as portray the projects goals and objectives. Furthermore, this section will discuss the requirements and specifications of the device and demonstrate a House of Quality diagram to show the devices marketing and engineering requirements.
2.1 Motivation
The motivation for this project is primarily to demonstrate our knowledge, apply what we have learned in our years at the university, display our abilities to self-learn material that we haven’t covered in previous courses, but most importantly to use all these tools to build a unique Smart Home Delivery product that can be possibly used in the real-world. The Smart Home Delivery option can be a new way for people to receive their packages and groceries more conveniently. With the ever-increasing demand of the 21st century for people to live busier lifestyles, the average homeowner values their time now more than ever before. While you’re at the gym, work, or just want to see your kids at soccer practice without having the voice in the back of your mind reminding you of much needed shopping to be done. This delivery option will be beneficial to all. Even for college students, we sometimes buy groceries and wait until everything is nearly depleted to go back again. More often, we end up eating sleep for dinner because finding the time to pull away from studying, projects and homework to drive to a supermarket will feel like a waste of our time. Alternatively, if perhaps you may have the time and would prefer the commodity of having your groceries/packages delivered, that option will be available. Our motivation was inspired by personal experience and with the thought to create jobs and to make people’s lives easier. As we all know, time is valuable.
2.2 Goals and Objectives
The main goal with Safe Home Delivery is to expand a commodity to the grocery delivery market by creating a reliable and trustworthy system to give a stranger complete access to your home, so they may deliver your groceries/packages while you are either at work, the gym, taking your kids to sports practice or simply just running errands. To do this, our first objective is to design a lockbox that the homeowner can place onto their front door knob. This device will be like that of a

4
keyholder that is frequently used in the real estate business. However, our next objective is to have the lockbox dispense a key with the implementation of a fingerprint scanner. As well as, aiming to have the Safe Home Delivery lockbox only dispense a key during a certain time frame that the delivery person designates that they will be at the home to deliver said groceries. If the delivery person is late or early, the lockbox will not dispense a key. Our next objective is to have the lockbox connected to the homeowners’ network using the built-in Wi-Fi capability within the microcontroller. A push notification will then be sent to the homeowner immediately that when a key is dispensed. Through the network, we intend to create complete transparency for the delivery in progress. Our goal to accomplish complete transparency for our Safe Home Delivery is by having the delivery person have a working body camera on them for when they enter the home. For as soon as they receive a key from the lockbox the bodycam on their person will begin a recording of the delivery person does within the home up, that the client can view until the delivery person replaces the key back within the lockbox, as of then the recording will finish, and the entire video will be placed in a repository for the homeowner on their client version of the web application. So, that the homeowner can review the delivery that took place at the time of their own choosing within our application. Our objective of making this product and in-home delivery device was mainly so the delivery person can put items inside of the homeowners’ fridge like eggs or milk. We aim to include these options on the software side for the client to decide if they want items placed. Lastly, our goal is to have this product be an affordable one and have the website be as user friendly as possible.
2.3 Requirements and Specifications
• Mobile Application (Software) Requirements and Specifications o Client Account Specifications
▪ Sign in/Sign up ▪ Requires ID number of Smart Home Lockbox on signup. ▪ Ability to view video. ▪ Input option for items to be placed in fridge. ▪ Input “note” option for anything the driver should know. ▪ Choose available time slot for delivery person. ▪ Reminder for homeowner to place lockbox on front doorknob
(day of delivery).

5
o Delivery Employee Account Specifications ▪ The delivery person will have a list of deliveries that are
needed to be made that day.
• View items that must be placed in fridge.
• View “note” left homeowner.
• Contain a checkbox for delivery completion.
• Send push notification to homeowner if delivery is on time or not.
▪ Ability to view feedback from homeowner after if feedback is returned.
o Software to Hardware Dependability Specifications ▪ Client must connect lockbox to home Wi-Fi
• If failure to do so, delivery cannot take place. ▪ Video recording begins when fingerprint scan is accepted. ▪ On fingerprint scan authorized, lockbox dispenses key. ▪ One fingerprint scan authorized, video recording begins. ▪ When key is placed back within lockbox, video recording
ends.
• Hardware Requirements and Specifications o Lockbox device must not exceed 10 lbs. o The lockbox device will require a wall charger. o Lockbox device battery will need to last 12 hours minimum. o The lockbox device will not exceed the price range of $200. o The lockbox must be easily removable by the client o The lockbox device must require Wi-Fi accessibility. o The microcontroller must have Wi-Fi capabilities. o Fingerprint scanner must be connected to the microcontroller. o The device will require at least 12 volts DC. o The device must be able to withstand changing climates without
overheating. o The camera must be paired to the system to begin/end video
recording. o Power Consumption must be less than 12 watts. o Dimension of the device will be around 9x6 inches.

6
• Mobile Requirements o Mobile Application must be mobile responsive. o Compatible with both iOS and Android platforms.
2.4 Customer Expectations
The main objective of this project is for clients to feel comfortable when having workers in his/her house while being absent. The client must feel comfortable giving some stranger access to their home. Delivering food inside the house and putting all groceries in its place is they goal, but as simple as it can be without the customer’s permission this project will not be successful. To achieve this permission several customer expectations must be met.
1. The client must buy a key holder containing full instructions of how to set it up when placing an order online. An identification number for the key holder must come with it. In the box as well as in the device. The identification must be unique to each key-hold. It will be engraved in the device. This will allow the client to fill the user account on the web app with no errors.
2. The client will expect a finger print scanner on the key-holder. They must set up the key-holder by saving its finger prints in it. The key-holder will only be able to work with the owners’ finger prints as well as the delivery employee.
3. The client will must feel complacent by knowing the employee’s finger print will only work for three hours. This three hours start counting at the time when the delivery was to happen. For example, if the delivery was set at 8:00 am then the key-holder will dispose the key to the driver when placing his finger print only arriving from 8:00am -10:00am. If driver arrives past 10:00 am he/she will not have access to the key, nor to enter the house.
4. The client must have an easy experience accessing the system. A button on the log in screen will be created for the client to create its user, place deliveries, check on updates, etc. Each option the user has on the mobile app must be clear and easy to follow each step. It has to be design fan a way any customer can navigate without getting lost.
5. The client will receive clear instructions of how to set up the key holder. The identification number has to be added to the user profile. Also, it will explain how to connect the device to the Wi-Fi as well as giving Wi-Fi permission to the employee who will eventually deliver the groceries. Also, explanations about to insert the how key into the device and how to remove the keys once the delivery is complete. These instructions will come when purchasing the key-holder, and in the web app.
6. The client must receive a notification when the delivery is arriving. When creating the user on the mobile app it will ask how the customer what to

7
be notified. It can be via text, email or both. This setting can up change at any time on the web app, the client can also disable if wanted.
7. The client will have access to a video recording of the employee delivering the merchandise. Once the employee takes the house keys from the key-holder the camera will be activated and record everything that is happening. This camera will be attach to the driver’s shirt and he/she will not have access to turning on or off the recording. The customer can watch the at any moment he/she wishes. He/she can watch after the day, or in the next days. This recording will be available for the client for two weeks.
8. The client must receive a notification when everything is in place and where the groceries where placed. Once the delivery is complete the employee will notify the system he has put all groceries in place. This will alert the client it was a successful delivery and it will have a list of all the items and where each one was placed.
9. The client must be notified when employee leaves the house and keys are place back in the key holder. Once keys are placed back in the key-holder, the device will block the drivers finger print and will only allow the client to open it back. This action will be also set as text or email to the client.
10. The client must expect its home to be in perfect conditions. Nothing must look different from how she/he left it. The employee will not have access to any other room but the kitchen unless specified in the delivery order. The client can confirm this but watch the recording.
11. The client will not feel compromise to be absent if delivery is placed. He/she can place orders no matter the circumstances.
12. The client can select the placement of each individual item. He/she can choose to refrigerate specific items, such as milk. Or can simply ask to drop all off in the kitchen. Each order can be customizable.
13. The client must expect delivery to be done professionally. All requests done on the web app under place order should be met. If the client wants any special requests, it will be submitted under notes in placement. The specifications can be altered between the moment to placing the order until an hour before the delivery. After meeting the deadline, the order will be blocked.
14. The client will have the option of canceling the order. The order will be open to any changes until an hour before the delivery. If the client wants to cancel the order it will have to be at any time before the deadline.
15. The client will be told the price of the delivery before placing it. The customer can either pay a small amount, $15 each delivery, or have a subscriptions/contract between vendors.
Notifications are activated with the key-holder and the driver. Driver will activate notifications about where the delivery is when driving or arriving to the client’s home. The key-holder will have sensors that will identify when the key is take out and when it is dropped off. All notifications can be disable in the web app down the settings tab.

8
2.5 House of Quality
Tradeoffs and marketing requirements are essential to develop an idea. These tradeoffs and marketing help to redefine the requirements and objectives of the intended system. Table 2 represents the House of Equality’s Engineering and Marketing Requirements
Power Consumption
Efficiency Weight Dimensions Cost
- - + - -
Low Power - ↑↑ ↑↑ ↑ ↑ ↑
Portability + ↑ ↓ ↑↑ ↑↑ ↑
Simplicity + ↓ ↓ ↓↓ ↓ ↑↑
Durability + ↑ ↑↑ ↓↓ ↓ ↑
Targets for Engineering Requirements
<12 Watts
>83% <10 pounds
9x6 inches
<$200
Table 1: House of Equality
Legend for the table above:
↑ = Positive correlation ↑↑ = Strong positive correlation ↓ = Negative correlation ↓↓ = Strong negative correlation + = Positive polarity Increasing the Requirement - = Negative polarity Decreasing the Requirement

9
In the next section, 2.6 Marketing and Engineering Requirements, there will be more of an explanation as to how both aspects balance each other and how they are necessary to understand for a team to build a product.
2.6 Marketing and Engineering Requirements
On the left side of Table 2.4.0 House of Equality, we specify our engineering requirements while as for on the top we specify the marketing requirements for the system. The market parameters are qualitative in nature and are focused on the elements of the project that usually influence an individual to purchase a device. Efficiency is an important market parameter because it defines the overall accessibility of the device from a non-technical standpoint that anyone can use the device effectively. Using the device should feel intuitive and simple while maintaining functionality. There is a parameter towards smaller dimensional devices with low power efficiency, portability, and low cost. The engineering parameters of the project are quantitative in nature. The product must be designed in a matter that it is durable for multiple uses. Simple enough for anybody to be able to use and remove. And its portability plays a big engineering parameter in designing the lockbox. The device must be as essentially easy, durable and portable for user friendliness. The low power engineering parameter intentionally plays a major impact on the designing of the device because considerably the device will include power modes that will minimize over power usage and the cost of maintaining the device.

10
3. Research and Background Information Considering the idea of in-home delivery has been around for some time now, there has yet to be a successful implementation of the service. Also, while there has always been the delivery of packages from online service providers like Amazon or eBay through the uses of the USPS or UPS, more recently grocery stores have been offering the instance of grocery delivery as well. However, these businesses require the homeowner to be present at the time the delivery will take place for the homeowner to receive said delivery. Now, with the advantages of technology constantly evolving and with the commodities that they seem to bring with them competitors such as Amazon and Walmart seem enticed to be the first companies with in-home deliveries. In this section we will dive into these similar projects as well as a few others and discuss research considerations for hardware and software that the team investigated for the building of our product.
3.1 Existing Similar Projects and Products
The market for in-home delivery market has yet to be a very reliable one or even has yet to exist. People have understandably concerns about the possibility of giving a stranger authorization to enter their home while they aren’t present. Therefore, we’ll look at a few projects attempting to break the glass ceiling in this market.
3.1.1 Walmart Partnered August Home “in-fridge” Delivery
August Home, a leading provider for all things smart lock, recently partnered with Walmart. Last September, Walmart with the help of August technologies announced that they would be testing their new service in Silicon Valley for “in-fridge” delivery. The customers would utilize August smart lock, located on the inside of the homes’ front door, linked with a smart numpad placed on the outside of the home for the delivery driver. The way that Walmart envisions this idea to work is first the customer on the Walmart website places their order. Then once the order is ready, a delivery driver will bring the groceries and other packages to house. The delivery driver would then receive a pre-authorized passcode by the homeowner to enter using the outside August numpad to allow delivery drivers a one-time entry to their home. Once the entry code is authorized, the linked August numpad opens the August smart lock on the inside. At this exact moment, the customer (homeowner)

11
receives a notification to their mobile device that their door has been opened by the delivery driver. Meanwhile, the homeowner is required to have August smart cameras in the home that follow delivery driver using robot vision for movement recognition. The customer will be able to view the delivery in progress with the help of the August home security cameras. All these devices are to be connected to the homeowners’ Wi-Fi for the delivery to take place. Once the delivery driver has completed the delivery and exits the home, the August smart lock will lock automatically, Figure 1.
Figure 1: August Smart Lock
3.1.2 Amazon Key
With the increase of online shopping and home deliveries becoming more popular, there’s also been an influx of porch package thefts. Amazon then created the Amazon Key in mind to combat porch thieves. This product is like the Walmart in-home delivery strategy however it doesn’t offer “in-fridge” delivery. It still allows delivery personnel to enter your home and delivery packages on the inside near your front door to ensure the preventiveness of porch thievery. While the idea of in-home delivery can be accepted by some and thought ludicrous by others, this won’t be stopping Amazon. Similarly, to Walmart’s approach to in-home delivery vision the home will have to be readily prepared for delivery but this time, of course, with Amazon products. Such as, Amazon’s Cloud Cam home security camera near the front door of the home. The homeowner will also need to acquire a compatible smart lock, and have it synced to the rest of the smart home unit. However, the Amazon Key service is only available to Amazon Prime holders, so you’ll need to buy the service for your in-home deliveries.

12
The Cloud Cam is required to be within 25 feet of the smart lock and facing the front door. On delivery day, Amazon sends the customer a notification of a four-hour window that their package will be delivered. Right before the delivery, the customer receives another notification that allows them the possibility to watch the delivery livestreamed, or the option of watching the delivery since it gets stored for about 24 hours. Unlike the Walmart option, the Amazon driver doesn’t receive a code but instead uses their handheld scanner to request authorization with Amazon for the door to open. Amazon then verifies that the package belongs to the address and the driver is near the door, then unlocks the door and turns on the Amazon Cloud Cam. While this Amazon system seems to be a valuable option, recently there was a notable bypass within the system by hackers. Hackers were able to open the smart lock and make the Amazon Cloud Cam stay on a static image before the door is opened, so that the homeowner doesn’t see the thief enter the house. Then the hacker restores the Amazon Cloud Cam to real-time. The homeowner doesn’t notice a thing.
Figure 2: Amazon Key
3.1.3 Summary
Based on the research results on both products by Amazon and Walmart, while it is a visionary idea and they seem to be the only companies pursuing this method of service, some customers might welcome the idea of in-home delivery while others will continue to find it rather peculiar. Regardless, these companies will still have to probably obtain more methods within their products to ensure

13
security and reliability for their customers so more people who find the idea odd can be comfortable with changing their views.
3.2 Relevant Technologies
This section documents the technologies that are like that of which we will be using for our project. These technologies aren’t a part of an entire in-home delivery service but rather individual components that are used currently by homeowners worldwide. These components could, however, be used to build an entire in-home delivery unit.
3.2.1 August Auto-Unlock
Auto-Unlock is a software algorithm designed by the company August. This technology is like that of modern vehicles on which they unlock the driver’s side when the car key is recognized to be nearby. Similarly, Auto-Unlock unlocks your smart lock using not only the August app but also your phones Bluetooth, Wi-Fi and GPS. When you are returning to your home and are within 200 feet from the door, your phone begins looking for the Smart Lock. When you are closer to the door, roughly 20-30 feet, and the August app senses your Smart Lock using the Auto-Unlock algorithm, your door will unlock, and the app enters a Home Mode. This type of relevant technology can be used by our in-home delivery service if the homeowner gave authorization to another device, specifically the delivery drivers mobile phone, during a certain time frame of a certain day to be allowed to open the door the front door and once the door is opened once and closed by the delivery drivers’ device, authorization is removed.
3.2.2 Nest Cam
Nest, the company of all smart home things, has within their arsenal a smart home cam. This smart cam has a built-in speaker to which the owner can speak through from their mobile device. This capability allows for homeowners to speak their family or even alarm intruders that they have notified the authorities. While the camera portion of this technology is what its traditionally most known for, the technological feature of the speaker is what can be related for our in-home delivery project. While our website application will have the option to leave a note for the delivery person to either place groceries by the floor or specify what food to be placed in the refrigerator. The team has also considered the option of incorporating a speaker functionality for communication between the delivery driver and the

14
homeowner just in case the homeowner forgot to place eggs on the items to be refrigerated. Figure 3 shows the Nest Smart Camera.
Figure 3: Nest Smart Cam
3.2.3 Nest x Yale Lock
Nest and Yale partnered to build a lock for the homes. They made a tamper-proof, key-free deadbolt that is connected to the Nest app. While it has the same functionalities of most other smart locks to lock and unlock the door with the use of the Nest app. This technology contains a numpad. The numpad is used for by people of whom the homeowner trusts enough to be given the passcode to the Nest x Yale Lock, Figure 4, to come and go as freely as they’d like.
Figure 4: Nest Lock Figure
15
Like the Walmart “in-fridge delivery” project that was discussed in section 3.1.1, in which a numpad designed by August is used to provide authorization, that project links wirelessly the numpad to a smart lock on the door that accepts or denies the passcode to provide authorization to the home. Meanwhile this technology provided by Nest x Yale eliminates the necessity of buying two devices, a smart lock and a smart numpad, to provide entrance for a delivery person. This is an alternative option that the team investigated that will be addressed later in the document to have a system incorporated with a numpad.
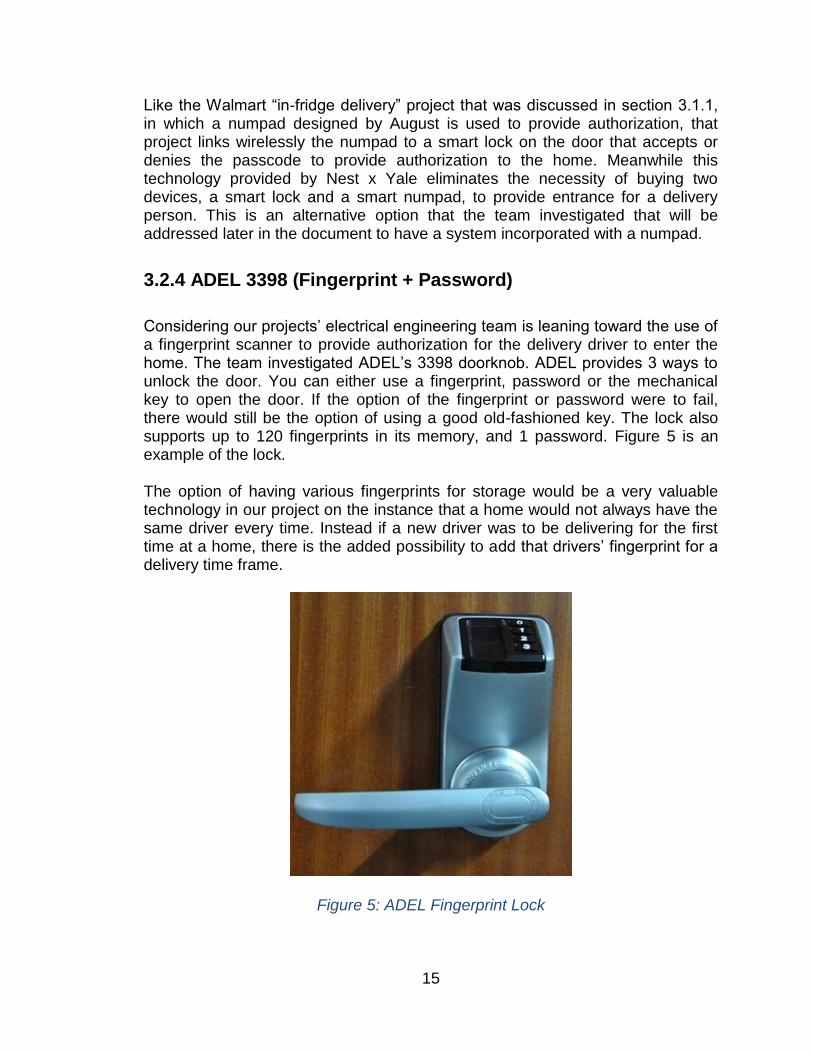
3.2.4 ADEL 3398 (Fingerprint + Password)
Considering our projects’ electrical engineering team is leaning toward the use of a fingerprint scanner to provide authorization for the delivery driver to enter the home. The team investigated ADEL’s 3398 doorknob. ADEL provides 3 ways to unlock the door. You can either use a fingerprint, password or the mechanical key to open the door. If the option of the fingerprint or password were to fail, there would still be the option of using a good old-fashioned key. The lock also supports up to 120 fingerprints in its memory, and 1 password. Figure 5 is an example of the lock. The option of having various fingerprints for storage would be a very valuable technology in our project on the instance that a home would not always have the same driver every time. Instead if a new driver was to be delivering for the first time at a home, there is the added possibility to add that drivers’ fingerprint for a delivery time frame.
Figure 5: ADEL Fingerprint Lock

16
3.2.5 Summary
All these relevant technologies have been investigated by the team in far greater depths looking into their dimensions and what type of hardware each of the devices used to produce a certain outcome. To provide the team more information on the direction that has seemed to be the most reliable and efficient at reaching the team goals. Some of the relevant technological features will be used in the final building of the product. The part selection overview for the in-home delivery device is discussed in 3.12.
3.3 Market Analysis
While all the most recently as stores have been introducing new and inventive ways of bringing new and returning customers back to their stores, online shopping has hit an influx of users all around the world. Encouraging these stores to update their online services to keep customer satisfaction. Within the last couple of years Walmart and Publix have made the availability of online grocery shopping and pick up at the time of the customers choosing an online and real-world commodity. Meanwhile, there’s also been a huge boom in food deliveries with even companies like Uber Eats, GrubHub, even DoorDash. The fact of the matter is people need to eat and they take huge advantages of services that let them continue their daily routine without having to worry about how they’re to get their next meal. As we notice with the two goliath corporations, Walmart and Amazon, competing head to head on who is going to accomplish the feat of bringing in-home deliveries to people world-wide, there is an obviously huge market for this. With enormous market potential there is no doubt that there is stellar profit if in-home delivery is done safely. In most recent event, last year reported enormous amounts of porch thievery, this lead for Amazon to brainstorm a type of service that people would be willing to try. Leading to include their Amazon Key service for their Amazon Prime customers. The team has asked around to colleagues and even they continue to feel that letting someone, who is a stranger, unlock their home is abnormal. Only to mention, that with an influx of hackers as well since people are becoming familiar with technologies to attempt malicious activities, people are worried that hackers may be able to hack into their smart door locks and open them to steal from the home. This security measure also needs to be addressed to be able to have a successful in-home delivery product. In the market standpoint, it’s an obvious matter that consumers can easily cut back on many necessary purchases, but food will never be one of these things. The average shopper takes around 40 minutes to an hour, while it’s also stated

17
on plenty websites that they also travel to the grocery store roughly twice a week for household items. People are learning to grow with technology and commodities at their fingertips. Once the glass ceiling for in-home deliveries is broken, we will see more companies following in their footsteps. With our in-home delivery project, we hope to achieve safety for the homeowner and their personal items but also provide a truly reliable product. While we will only be touching the security aspect of the product on a surface level. A much larger focus in security with this product in mind will be needed in order to provide a successful in-home delivery service.

18
4.0 Research Considerations This section explains the considerations that the team took for the choosing of hardware and software parts of the project. Specifically, for hardware the microcontroller, wireless communication modules, fingerprint sensor, display implementations, and power systems are documented. For the software portion the team composed the paper into sections for streaming and video storage, and software tools. This is one of the most necessary sections of the document that the team required to focus much attention to acquire the most lucrative pieces in the process of designing the product. Taking into consideration how both hardware and software pieces coincide with one another we found it useful to intertwine all options, hardware and software, with one another to give an understanding as to how they may communicate. The rest of this section will explain the certain aspects of each electrical and software-based components that were considered in the decision of building the final device.
4.1 Microcontroller Considerations
The microcontroller unit (MCU) for the lockbox is essential it will allow the communication between the fingerprint sensor to the board then to the WIFI module and vice versa. Comparing different MCUs that are usually used in most low power and simple projects are: Atmega328P, MSP430 (G2x53), and ATMEGA2560. Each MCU has its pros and cons, in which will be compared by its processing capability, amount of sources / material based around the device, as well as the power consumption of the MCU. The table below, Table 3, shows the comparison between the three MCUs.
Specification ATMEGA328P MSP430 (G2x53)
ATMEGA2560
Architecture 8-Bit AVR RISC 16-Bit RISC 8-Bit AVR RISC
Processor Speed 20 MHz 16 MHz 16 MHz
Storage Rom 32 KB 16 KB 256 KB
SRAM 2 KB 512 B 32 KB
Power Consumption
0.540 mW 0.506 mW 2.75 W
Table 3: Microcontroller Comparison Chart

19
4.1.1 ATMEGA328P
The Atmega328P has an 8-bit AVR RISC processor that has a clock speed up 20 megahertz (MHz), 32 kilobytes (KB) of flash program memory, 2 KB of SRAM, and although not mentioned in the table it is the only device with the EEPROM setting. The number of pins vary, but in this case the 32 pin TQFP would be used. Comparing this to the SAMD21 it may lack four out of the five specifications, it does have a better power consumption. Besides those downsides, it does have the processing power to communicate with the fingerprint sensor and to communicate with the WIFI module, which would be ideal, but the ATMEGA2560 is more designed for this project.
4.1.2 MSP430 (G2x53)
The MSP430 is also a popular MCU that was used for a great number of projects in previous classes. It has a 16-bit RISC processor that has a clock speed up to 16 MHz, 16 KB of flash program memory, 512 bytes of SRAM, and it does have the best power consumption out of all three devices. Comparing these numbers to the Atmega328P the specifications aren’t too far off, but when it comes to running such applications it may cause some delays in processing. Knowing the Atmega328P is used by Arduino on such boards, there are numerous number of sources that pertain to this MCU, whereas the MSP430 isn’t as open just like the Atmega328P, which is a downside for this MCU.
4.1.3 ATMEGA2560
The ATMEGA2560 is the last consideration, this MCU is quite similar to the ATMEGA328P. It’s developed by ATMEL as well, but this device offers more pins compared to both the ATMEGA328 and the MSP430, which is needed for our project. It offers 4 Universal Asynchronous Receiving Transmitting ports, contains 100 I/O pins, 256 kilobytes of flash memory, and an internal clock speed of 16 megahertz. Having 4 UART ports allows for smooth communication between out fingerprint scanner and Wi-Fi module. Due to the numerous amount of features on this MCU, this MCU is suitable for this project.
4.2 Wireless Communication Modules
The WIFI module for this project is a necessity not only for access when near the lockbox or quite a distance, but it will also be able to serve as its own host to

20
allow communication with the camera module. Therefore, flexibility and ease of access is a huge must for the modules discussed below.
4.2.1 CC300 WIFI Module
There are three WIFI modules under consideration, they are the CC3000 created by Texas Instruments, the ATWINC1500 created by Atmel, and the ESP8266EX created by Espressif. The CC3000 is the most commonly used module used when working most low powered microcontrollers. This module meets the IEEE 802.11 standard, it also supports all modes for security: wired equivalent privacy (WEP), WIFI protected access (WPA), WIFI protected access II (WPA2). The minimum and maximum voltage this device operates at is 2.7 and 4.8 volts respectively, it also has a terminal known as VIO_HOST which is defined as the voltage level of the host interface. It has a minimum and maximum voltage of 1.8 and 3.6 volts respectively, when communication occurs a high-level input voltage is needed in this case this value varies depending on the voltage inputted, in this case taking 1.80 to 1.95 volts the level is VIO_HOST multiplied by a constant value of 0.65 and as for the low-level signal it is VIO_HOST multiplied by a constant value of 0.35. The typical and maximum values for current consumption when transmitting are 260 and 275 milliamps, respectively. On the receiving end the typical and maximum values for current consumption are 92 milliamps and 103 milliamps, respectively.
4.2.2 ESP8266-F WIFI Module
The next WIFI module is the ESP8266-F this Wi-Fi module is quite similar to the Wi-Fi module that will be talked about below and they are both from the same manufacture ESPRESSIF. This Wi-Fi module is considerable for this project, but this device is set to be used as a standalone device, meaning it can be used as a separate MCU and as a Wi-Fi shield all in one. Therefore; having communication with the microcontroller wasn’t feasible. As for the voltage levels, for the low level it is the VIO voltage multiplied by a constant 0.25 and for the high level it is 3.6 volts. The current consumption when transmitting and receiving data varies, whether transmitting 11 Mbps to 54 Mbps the current consumption is 170 milliamps to 140 milliamps respectively. For the receiving end the current consumption remains at a constant rate of 50 milliamps. This Wi-Fi module is quite similar to parameter specifications for the ESP8266-01 due to the face that these two are from the same manufacturer. Due, to the fact that this Wi-Fi module acts better as a standalone than as a shield for our MCU was why the next Wi-Fi module was used.

21
4.2.3 ESP8266-01 WIFI Module
The ESP8266-01 is the last module under consideration, just like the two previously mentioned WIFI modules it follows the IEE 802.11 standard. The design of this device is quite unique it doesn’t require an externa antenna connected to its antenna port, instead it has a PCB trace on the mounted device. The security modes for this device is like the WIFI modules listed above except for the WEP condition. The operating voltage of this device has a minimum value and maximum value of 2.5 and 3.6 volts respectively, whereas the operating current is typically 80 milliamps. As for the voltage levels, for the low level it is the VIO voltage multiplied by a constant 0.25 and for the high level it is 3.6 volts. The current consumption when transmitting and receiving data varies, whether transmitting 11 Mbps to 54 Mbps the current consumption is 170 milliamps to 140 milliamps respectively. For the receiving end the current consumption remains at a constant rate of 50 milliamps. Comparing the current consumption values to the two modules above it does a better job in this field and for the voltage its quite close with the other two but it does have a lower maximum voltage operating point. This device is the most suitable for our project due to the communication and compact size. It uses UART to communicate which requires two lines while the CC3000 requires Serial Peripheral Interface (SPI). Also, setting the rate at which data is sent back and forth is quite simple to set on this device and it could also, be used as a dedicated station or connected as a client.
4.3 Streaming and Video Storage
For streaming and video storage we will be using the YouTube API. With YouTube’s new implementation of their livestream/broadcast system to schedule start and end times for broadcasts, it fits ideally for what we want. A free open-source software API that can mobile livestream (with the connection of the GoPro) to the mobile device and allowing unlisted/private streams for specific in-home delivery customers to view their deliveries that had been made. The YouTube API also allows us to have a free video storage, removing that worry of an intensive database to be needed. For the homeowner to be able to use the application they will need to have their Google information for signups of the device. This is because Google now owns YouTube. With, having their devices linked the team can then allow for specific playlists to be unlisted from YouTube’s entire search engine, except for the homeowners. We intend to incorporate this system with the Timestamp API as well. The fingerprint sensor will have the ability to manipulate the start and end times of the mobile broadcast. Using the Timestamp API, it will set the YouTube API for an immediate start of the broadcast. The broadcast will then end once the

22
delivery driver turns in the key back to the device and fingerprint scans for an end to the livestream. This side of the project will be mostly coded in Java considering all the documentation for the YouTube API is entirely in Java.
4.4 Fingerprint sensor considerations
The fingerprint sensor is a huge component for the design of this project, it will allow for the ease of access to the keys in a manner of time no need for waiting on a verification to be sent to your phone and then accessing the lockbox. Dependability, security, use of space are the main attributes when looking at the fingerprint sensor and of course ease of programmability is a huge plus.
4.4.1 Fingerprint sensor: Hardware
The first fingerprint sensor is the Fingerprint Scanner TTL (GT-521F32) which contains a 32-bit ARM Cortex M3 processor and it also has an onboard optical sensor. The price for this device is $31.95 before shipping and handling. This device can store up to 200 different fingerprints and the database of fingerprints can also be stored which can be used to pull raw images from the optical sensor. It has a resolution of 450 dots per inch (dpi) which translates to 450 pixels per inch (ppi), in terms of just pixels it is 258 by 202 pixels. On the security end it has a false acceptance rate of less than 0.001% as well as a false rejection rate of less than 0.1%, with these ratings this is ranked at level 3 out of 5. It needs less than 1.5 seconds to identify a unique fingerprint and takes less than three seconds to enroll three fingerprints, another small detail it works well with dry, moist, and even rough fingerprints these characteristics will be test once received. It also has a baud rate of 9600 bps and this is defined as how fast information is transmitted in a communication channel. This sensor baud rate isn’t as high compared to the Fingerprint Scanner sold by Adafruit™. For communication when transmitting data, it requires a low-level voltage of 0.8 volts (represents a logic of 0) and a high-level voltage of 2 volts (represents a logic of 1). On the receiving end the low-level voltage and high-level voltage are identical as the transmitting end. The next topic is the power consumption, this device operates at a voltage of 3.3 volts to approximately 6 volts and the maximum operating current is 130 milliamps; therefore, the power consumption for both cases are, at 3.3 volts the power consumption is 429 milliwatts and for 6 volts the power consumption is 780 milliwatts. Also, there is a section of the touch screen that requires a consumption of 3 milliamps and accounting for that with the 3.3 volts that is 9.9 milliwatts and once in standby mode a current of 5 microamps is being consumed which has power consumption 16.5 microwatts. Accounting for the

23
total power consumption by this device at 3.3 volts is 439.9165 milliwatts and at the 6 volts the total power consumption is 786.03 milliwatts. The last consideration is the fingerprint sensor sold by AdaFruit™ it is quite like the previously mentioned fingerprint senor; it has the same fingerprint security level. The main upside to this sensor is if the programmer were to run into any trouble there are files already created which coincides with similar projects, the users may be doing, and they are designed in the Arduino library and the Circuit Python library. The price of this device is $49.95 it is at least 18 dollars more than the Fingerprint Scanner TTL, but it does operate at a higher baud rate of 56,700 bps. For transmitting data when transmitting data, the low-level voltage is 0.4 volts and the high-level voltage varies from 2.4 to 3.3 volts. On the receiving end the low-level voltage is 0.6 volts and the high-level voltage requires minimum voltage of 2.4 volts. The power consumption of this device is quite like the Fingerprint sensor TTL, it operates at a voltage of 3.6 volts between 6 volts and an operating current of 120 milliamps and it has a typical current consumption of 100 milliamps, whereas the peak current is 150 milliamps. Accounting for both cases the typical value of power consumption at both the minimum and maximum voltages are 432 milliwatts and 720 milliwatts respectively. Foe the maximum value of power consumption, for both the minimum and maximum voltages are 540 milliwatts and 900 milliwatts respectively. Comparing this to the Fingerprint Scanner TTL this device is a little bit more efficient, but at the maximum characteristics this device is a little less efficient. Although not mentioned in this section the dimensions of this device are quite a downsize when compared to the Fingerprint Scanner TTL. These values can be seen in Section 5.1.6.2 Fingerprint Sensor Design.
4.4.2 Fingerprint sensor: Software
This section is composed of all similar projects for a fingerprint sensor and their approach to the hardware and software entities of their projects. Similar Projects As mentioned above, there are two fingerprint sensors being considered; The TTL (GT-521F32) and the fingerprint sensor sold by Adafruit Optical. This section will go over two exams of how a fingerprint sensor was programmed to perform a similar task as to our system requirement. A student who goes by the name Nodcah online has created a fingerprint scanning garage opener using the TTL (GT-521F32) [1]. His system supports new enrollments and allows access to all saved members. The library used here

24
in this system in an Arduino library created by Josh Hawley [2] and available to the public on GitHub. The library was built specifically to work with the TTL sensor and can be licensed for non-commercial use by giving credit to the Hawley. The TTL (GT-521F32) supports a database that can save 200 fingerprints. Hawley’s “Fingerprint_scanner-TTL” library supports a 3-step enrollment process, as well as a function with the prototype intVerify1_1(int id); the function compares a specific ID to the input to allow access. The project also goes utilizes a display for user interaction, however will not be discussed further here. The second project [3] studied uses Adafruit’s fingerprint sensor integrated in an automatic door lock. The project supports a wireless connection between the fingerprint sensor and the lock. The Wi-Fi module used is the CC3000 breakout board which is one of our system’s Wi-Fi module considerations. The source code for this specific project is open on GitHub as lock-control-fingerprint [4]. The project uses Adafruit's library [5]. The benefit of using this model against the Nodcah, is the Wi-Fi capability as our system will need to communicate to decide the fingerprint ID to be allowed access. However, the library does not support a function that compares to a specific ID although the ID can be returned if found in the database. Note, fingerprint IDs are registered before installation, Adafruit has more documentation on that. The database might be able to be controlled as Adafruit provides an API for their database. Regarding the system requirements, both libraries mentioned will allow access capabilities for anyone registered in the database. The change will be allowing the ID for a specific amount of time. If more modifications are needed to the library itself, the first option, Hawley’s Fingerprint_scanner-TTL library might have to be considered for copyright reason.
4.5 Power Systems
Discussed in this section are technological research relevant to the electronic design for this project including the power system. The power supply of a device is essential in every device not only does it convert one type of electrical power to another, but it can also convert a different form on energy into electrical energy. It typically is the largest component and interconnected with nearly every other component in the project’s design. Thus, as the lockbox is kept outside for periods of times a proper power system design is needed.
4.5.1 Batteries or Solar Cell

25
Due to the design of this device being portable, kept in a closed box, and kept outside during certain times it would be ideal to either use batteries or an external solar cell device that is mounted on the lockbox to power the device. For this device to be user friendly, rechargeable batteries would be the most ideal case and if the solar cell were to be used it would be able to supply power to the internal components for the time being.
4.5.1.1 Lithium-Ion (Li-Ion) Batteries
The Lithium-Ion battery was introduced not too long ago, it was developed by Sony and was carried out within a few years by bringing together different technology varying from film coating to electromechanical technology. To this day the Li-Ion battery has been researched with different materials showing that the likelihood of the Li-Ion battery will continue to grow. The reason behind lithium metal technology was due to the high specific energy and energy density of these cells as well as the high cell potential and low atomic weight. Li-Ion batteries come in many variations for their electrode composition. The negative electrode which is the anode during discharge and the positive electrode which is the cathode during discharge. Pure lithium is dangerous when used as the negative electrode component, an experiment that was conducted by the Exxon group utilized a Li-Ion battery known as 𝐿𝑖𝐶𝑙𝑂4, was unsafe due to the salt from the 𝐿𝑖𝐶𝑙𝑂4would dissolve in the solvent (primary dioxolane) which was shock sensitive and liable to explode under sufficiently strong shock conditions. Therefore, Li-Ion is used instead of pure lithium metals due to lithium metal’s inherent instability. The cycle life of the Li-Ion battery was very limited because of the poor recycling efficiency of the lithium electrode. After going through different types of material for the cathode, most batteries contain some type of oxidized material such as Lithium Cobalt Oxide 𝐿𝑖𝐶𝑜𝑂2(abbreviated as LCO) and Lithium Manganese Oxide 𝐿𝑖𝑀𝑛𝑂2(abbreviated as LMO), but the expenses and supply concerns have limited the upside of the LCO material and some safety incidents had arrived when using the LCO material. The charge cycle of the Li-Ion battery has two stages; constant current (CC) and constant Voltage (CV), but some chargers add or remove some stages when charging. Before reaching the point of the CC stage, a stage called conditioning is accounted for, the battery is charged with a limited current of 0.1 amps until it reaches a nominal voltage of 3 volts and this prevents the cell from overheating until it can accept the full current of the CC stage. The CC stage is next and during this stage, the Li-Ion battery is connected to a current-limited power supply, usually limited to 0.5-0.7 times the nominal battery capacity, thus continues the battery reaches a nominal voltage of some value and around this portion the batter is 70%-80% charged and in actual values this is around 4.1 or 4.2 volts, but this depends on the exact electrochemistry. Once the battery

26
reaches around 4.1 or 4.2 volts, the CV stage is accounted for, the charger acts as a voltage limited-power supply. The battery remains at the max nominal voltage while the charge current drops gradually. Once the charge current is between 3%-10% of the labeled capacity, the battery is fully charged. The present commercial Li-ion battery electrolytes limit the charging potential to about 4.2 volts, which in turn limits the amount of charge that present cathode materials can accept, because of the instability of 𝐿𝑖𝐶𝑜𝑂2at higher voltages due to a loss of oxygen. The industry developed great caution in applying higher current voltages and this is done by configuring with the charging method, most producers use a constant voltage charge until the current drops to a value about 10% of the initial value. This does not only allow for a full state of charge to be obtained with a minimum time on the charger while avoiding sudden oxygen loss [1], it also accounts for safety accidents. Now as mentioned before each charger has these two main stages settings but could have different approaches to determining when to switch stages. Li-Ion batteries does not need to be fully charged, in fact high voltage stress the battery; therefore, it is desired to not fully charge the battery. Advantages of Lithium-ion Batteries:
● High Cell Voltage: Li-Ion batteries have a very high cell voltage, this can be defined by the amount of energy per unit charge and this value also depends upon the ion composition as well. The nominal voltage cell is about 3.6 volts, but this just accounts for the LCO. Whereas both the Nickel-Cadmium (Ni-Cd) and Nickel-Metal Hydride (NiMH) having a nominal cell voltage of 1.2 volts. The Li-Ion voltage cell is three times the Nickel family.
● High Energy Density: Li-Ion batteries have a high energy density which is the amount of energy stored in a given system or region of space per unit volume. Li-Ion batteries typically have a value of 366 watt-hour per liter (Wh/L), while Ni-Cd has an energy density of 180 Wh/L, Li-Ion is about two times that value. This allows for electronic devices to operate for longer periods even when consuming more power.
● Self-Discharging: Self-discharge is the phenomenon of internal chemical reactions reduce the stored charge of the battery without any connection between the electrodes. The rate of self-discharge of Li-Ion batteries are much lower than that of other types of batteries, it has value of less than 10% but this is accounted self-discharge per month, whereas Ni-Cd and NiMH batteries have a self-discharge of 20% and 30% respectively [2].
● Low Maintenance: In this aspect low maintenance could be the need to periodically discharge the batteries to ensure that they do not exhibit a phenomenon called the memory effect. The Li-Ion battery does not need to be periodically maintained, whereas the Ni-Cd and NiMH batteries need to be periodically discharged 30-60 days and 60-90 days respectively.

27
Disadvantages of Lithium-Ion Batteries:
● Protection Required: Li-Ion batteries are not as flexible as some batteries such as lead acid and nickel batteries. They require protection to avoid being over charged and discharged too far, as well as the need to have the current maintained within certain limits. In modern integrated circuits, this can be accounted for.
● Transportation: There are certain restrictions placed on the Li-Ion batteries transportation, especially by air. Special care must be taken such as having protective covers to avoid short circuiting, when transporting.
● Cost: The Li-Ion battery is typically around 40% more costly than most manufactured batteries such as Ni-Cd. This is a factor, but not a huge one, only one battery will be needed to power this device.
4.5.1.2 Monocrystalline Solar Cell (Photovoltaic Device)
Solar cells and photodetectors are devices that convert an optical input into current. A solar cell is an example of a photovoltaic device, it generates voltage when exposed to light. The photovoltaic effect was discovered in 1839 and the first development of the photovoltaic device was built, using a Silicon PN junction in 1939. Conventional solar cells are made up of Silicon (Si) single crystal and has many different variations as well, they are characterized by their band gap energy which is the amount of energy needed to take an electron from the top of the valence band to the bottom of the conduction band, as well as their open circuit voltage, and efficiency. A solar cell is like a photodiode (photodetector), it is a photodiode that is unbiased and connected to a load (impedance). The distinctions between these two devices are photodiodes work on a narrow range of wavelength while solar cells need to work over a broad spectral range also known as the solar spectrum, solar cells are typically wide devices to account for maximum exposure, and the metrics of a photodiode is quantum efficiency, which is the power delivered per incident solar energy. A simple solar cell is a PN junction diode. The N region contains heavily doped negative charges which are electrons, meaning there is a great number of electrons in this region and this heavily doped region also allows for light to penetrate through it easily. The P region contains lightly doped positive charges known as holes, which is the opposite of the heavily doped N region and this allows for the depletion region to lie mostly on this side. The depletion region is the region where electrons and holes do not exist, but there are positive and negative ions.

28
The penetration of this device also depends on the wavelength and the absorption coefficient, which increases when the wavelength decreases meaning it is inversely proportional to the wavelength. The depletion region consists of electron-hole pairs (EHPs) which are created due to the built-in potential and electric field between the barriers of the depletion region. Electrons move to the N region and holes to the P region, even though the N region is heavily doped with electrons there is still a small number of holes in that region and the same goes with P region even if it is lightly doped [3]. The EHPs generated in the P and N regions can also contribute to the current. Typically, these are the EHPs that are generated within the minority carrier diffusion length. The minority carriers in either region can also diffuse into the depletion region and contribute to the current, meaning the total width of that region that contributes to the solar cell is the sum of the depletion region, diffusion length of the electrons, and the diffusion length of the holes. The carriers are extracted by metal electrodes on either side. A finger electrode is used on the top of the device to account for the electrical contact, so that there is sufficient surface for light to penetrate. The solar cell and every PN junction has a characteristic called the current-voltage characteristic (I-V). This depends on the intensity of the incident radiation and the operating point (external load) of the cell. If there is no load connected to the solar cell, then the only current that is accommodated is the current generated from EHPs which is caused by the incident light and this is known as photocurrent as well as the short circuit current. Applying a load resistance, allows for diffusion to occur which is where the majority carriers diffuse from their neutral regions to the opposite region making it nonneutral, this can also be called the forward bias current. The net current can be defined as the difference between the forward bias current and the photocurrent, keep in mind the forward bias current is larger than the photocurrent. The power of the solar cell can be defined as voltage multiplied by current. There are trade-offs, if higher power is needed the bandgap energy of the device would need to be larger and the intrinsic carrier concentration must be lowered, but this reduces the amount of radiation that can be absorbed. Advantages of Si Monocrystalline Solar Cells
● Efficiency: The efficiency as mentioned before is that solar cells can convert the highest amount of solar energy to electricity. This device has a typical value of 16%-24%, whereas Si polycrystalline structure has an efficiency from 12%-19%.
● Longevity: The monocrystalline solar cells can last up to three years; the efficiency of the device slightly drops off around 0.5% on average per year. Therefore, the need of replacing the solar panel is still needed, it just won’t be changed/charged as much the Li-Ion battery.

29
● Great Heat Resistance: As most solar cells electricity production drop as temperature rises, the solar cells are more efficient in warm weather. This term is known as the temperature coefficient, for the monocrystalline it drops every 0.04% per degree Celsius. Whereas, the polycrystalline structure drops every 0.051% per degree Celsius.
Disadvantages of Si Monocrystalline Solar Cells
● Cost: Solar cells made from single cell Si crystals has a complex process of developing. The reason for this is the need of obtaining a single pure crystal is time consuming.
● Fragile: Solar cells can be damaged by different elements, since this device will be kept outside the wind in a given area can be a factor, but there is a safety glass that helps protect the solar cells from external damages. The solar cell will be placed somewhere on the door lock which is hinged around the door, movement won’t be a huge issue.
● Seasonal Energy: Comparing the solar cell to different resources, the solar cell is highly seasonal. Different states experience longer season than others, areas with great amount of sunlight can thrive from this choice, but cold areas with less sunshine does not.
4.5.2 Voltage Regulators
The need for a voltage regulator is a huge essential need towards this project, since most of our components are broken off into different voltages. One device may need 5 volts whereas another device may need 3.3 volts to function; therefore, having a regulator is a must. Another way of looking at a voltage regulator is it can be treated with the use of power supplies which can be defined as a device that supplies energy to any type of circuit. Power supplies can be broken off into two categories, regulated and unregulated. The comparison can be seen on Table 4.5.2.
4.5.2.1 Regulated Power Supplies
Regulated power supplies can be broken off into two basic types such as linear or switching. Linear regulators are usually used in common applications where efficiency isn’t a huge factor, and, in a sense, it can be thought of as a component that is added to an unregulated circuit for regulation. The regulator ensures the output voltage will always stay at the rated value of the power supply, regardless of the current that the device is consuming [1]. A linear regulator is as mentioned before are used for low noise applications and they are considered a quite component due to not dealing with high-frequency switching. Also, linear regulators can only step-down an input voltage to produce a lower output voltage. It comes in two different variations where inputting a positive

30
voltage gives out a positive voltage (78XX) and the opposite where inputting a negative voltage gives out a negative voltage (79XX). The design aspect of the linear regulated power supply doesn’t need many external components, but it may require capacitors on both the input and output to account for the reduction of the AC voltage across those terminals. The efficiency of the device isn’t so great when compared to the switching regulator and this is caused by the increase of the voltage, using the equation 𝑉𝑑𝑟𝑜𝑝𝑜𝑢𝑡 =
𝑉𝑖𝑛(min) − 𝑉𝑜𝑢𝑡; therefore, as the voltage increases the voltage passing through
the device increases which increases the power dissipation in the device then this lowers the power dissipation on the output, which lowers the efficiency. To
measure efficiency using the equation 𝑃𝑜𝑢𝑡
𝑃𝑖𝑛∗ 100, it can be seen that as the
output power drops the efficiency drops. The switching regulator can be seen as a better device than the linear regulator, depending on the application. It has great ratings in efficiency, but also has the flexibility of stepping up or stepping down the output voltage as well as inversing the output voltage. To breakdown the efficiency more, since this device works with an internal switch in this case it could be a MOSFET it does vary with different devices. When the switch is open there is no need for energy distribution leading to power consumption, whereas when the switch is closed there is energy distribution, but for a small amount of time. These upsides come with downsides, when switching occurs noise starts to generate within the device, which can be accounted for by applying filter capacitors. Another downside is the need for external components such as inductors, a Schottky diode, and sometimes two resistors in the voltage divider fashion to account for the voltage reference pin.
4.5.2.2 Unregulated Power Supplies
Unlike regulated power supplies the unregulated power supplies are designed to produce a certain voltage at a particular current. The design of the structure contains a couple of capacitors, diodes, and a transformer. The power is always constant; therefore, if the current increases then the voltage must decrease and vice versa for the decrease of current, this constant power can be related with the power equation 𝑃 = 𝐼 ∗ 𝑉. Since the power is kept constant there is no need for the switching or linear configuration. Unregulated power supplies do not usually produce a clean constant voltage; therefore, there is a small amount of ripple voltage which can be caused by noise, but if the power supply and load requirements are closely matched there should not be a problem with the output of the device, but if there is a great difference, a nonclean voltage is produced, which contains a small amount of ripple voltage. Unregulated power supplies are mostly used in applications where

31
noise consideration isn’t a huge factor, it is also the less expensive alternative. Table 4 shows the differences between linear regulators and switching regulators.
Specifications Linear Regulators Switching Regulators
Capabilities Step-down Step-down, Step-up, Inversion
Cost Low Medium to High
Extra Components Capacitors Inductors, Diodes, Filter capacitors
Noise Low High (variable)
Power Efficiency Varies with Input voltage. High for small difference, Low for large difference
High efficiency
Table 4: Linear Regulators vs Switching Regulator
4.6 Display Implementations
The first approach for this design was to have a general lockbox that could be brought from a commercial store, but that approach was discontinued; therefore, the group will be designing a lockbox from 3D printing and the decision was made to include some type of display whether it was a liquid crystal display (LCD) or an organic light-emitting diode display. The determination of what display would be suitable is based on price, efficiency, ease of use, and dimensions. The comparisons can be seen on Table 4.6.
4.6.1 Liquid Crystal Display
A brief explanation on how liquid crystal displays (LCD) it is a device that operates by applying a varying electric voltage to a layer of liquid crystal, thereby inducing changes in its optical properties [1]. The LCD utilizes either the nematic or smectic phase the nematic phase is characterized by molecules that have no positional order but then point in the same direction [2]. Whereas the smectic phases is characterized as the molecules show a degree of translational order, also the molecules maintain the general orientation of the nematic phase, but also ten to align themselves in layers or planes [2].

32
The first LCD display that is under consideration is the basic 16 by 2-character LCD display created by Xiamen Ocular, priced at $15.95 and by its name it allows a basic 16 character by 2-line display. It operates at a minimum voltage of 2.7 volts to a maximum voltage of 5.5 volts; therefore, this device can be connected directly to the supply line of the buck regulator which provides a regulated voltage of 5 volts or to the low dropout regulator which regulates a voltage of 3.3 volts. This device can work with 8 bits which allows for the use of the ASCII characters and it can also work with 4 bits, but it would take a little bit more time to display the characters. This device has an external pin that allows for the adjustment of the backlight, with this situation a potentiometer could be used to adjust the brightness, but that won’t be necessary, so a standard 1 kΩ resistor would be placed in series with that pin to ground. The dimension of the device are measured as 80 mm in length, has a height of 36.05 mm, and a depth of 13.5 mm. The next LCD display that is also under consideration is the Serial enabled 16 by 2-character LCD priced at $24.95 it is like the LCD display that was described above. It operates at a voltage of 3.3 volts and this device can be controlled over a single-wire serial interface, which can be defined as the communication interface that transmits data as a single stream of bits. This connection could cause a problem with communication between the microcontroller and the WIFI module, but this device does have an adjustable baud rate between 2,400 and 38,400 bps. This defect could be accounted for by placing it onto a digital input / output pin, but its allowable baud rate is 1,200 bps; therefore, this can cause a slow line of communication. This device comes with a potentiometer on the backpack that allows for the adjustment of the contrast as well as having the ability to adjust the backlight brightness through the serial peripheral interface. The dimensions of this device are 80.01 mm in length, has a height of 36.8808 mm, and a depth of 25.4 mm, it is quite similar in size to the previously mentioned LCD display.
4.6.2 Organic Light-Emitting Diodes
A brief explanation of organic light-emitting diodes (OLED) it is a flat emitting technology, made by placing a series of organic thin films between two conductors [3]. It has the similar approach to the LCD screen, it utilizes electrical current to brighten the lights. OLED do not require a backlight and are also thinner and can be more efficient than LCD displays due to not requiring a white backlight. The first consideration is the SparkFun Micro OLED Breakout board, it has a cost of $15.95 it operates at a voltage of 3.3 volts and works at a maximum current of

33
20 milliamps, it also has a pixel rate of 64 pixels wide and 48 pixels tall. This device operates like the Serial enabled LCD display, it can be programmed by the SPI function or the 𝐼2𝐶 function, but as mentioned above if the SPI route is taken it alters the communication with the WIFI module and the microcontroller. The dimensions of this device are only given in the diagonal screen size which is 16.67 mm which isn’t large, but it does come with a clipped-on board used for wiring, but the dimensions of that portion aren’t talked about in the datasheet. The last consideration is the SparkFun micro OLED Breakout board (Qwiic), it is quite similar to the latter Breakout board it has a screen that is capable of 64 pixels wide and 48 pixels tall. The main difference is that this device is equipped with two Qwiic connectors, making it ideal for the 𝐼2𝐶 function to be utilized. It has an operating voltage of 3.3 volts and a maximum current consumption of 20 milliamps. It has the similar 𝐼2𝐶 function, but it does not have the SPI communication method. The dimensions is quite similar to the latter OLED display it has a diagonal screen size of 16.76 mm, it is also equipped with a clipped-on board, but this dimension isn’t described in the datasheet. Table 5 shows the specifications of liquid crystal display and organic light-emitting diodes.
Specifications Liquid Crystal Display Organic Light-Emitting Diodes
Dimensions Small Medium to large
Durability Very durable, can operate in a broader temperature range
Durable, depending on the temperature range
Efficiency Low (No backlight) Low-Medium (Backlight)
Power Consumption Low (varies with application)
Low (varies with application)
Price Low to high Low to high
Table 5: Liquid Display vs OLED
4.7 Software Tools
Various tools will be needed to completely cover all aspects of the software design. A few categories of tools will be utilized and set, mainly the computing environment, configuration management, and quality assurance. The computing environment such as the specific programming languages used. In addition to the configuration management tool for ensuring team members have a platform to collaborate and receive feedback from one another at the

34
earliest time possible. The third set of tools discussed are the quality assurance tools, so tools that will allow the developer to test code functionality as they progress in development. Computing Environment JavaScript is the main language used, however a few frameworks will be incorporated to make the design process effective and support many functionalities. The software system will be developed using JavaScript frameworks. A stack called MEAN will be used. This includes MongoDB and Express.js on the backend, which implements the database, more of that discussed in section 5.2.5. However, while traditionally the MEAN stack uses Angular.js, the developers will be using a modification to the stack which is the MERN stack to be able to exchange Angular.js with React.js. The components will be merged together with Node.js. The environment allows all the developer to be able to design, implement, and test locally on their individual machine, with different operating systems yet still have the same base guaranteeing that the software exchanged or shared still operates on their individual machine. Implementations and updates will be pushed to the server once the team has agreed on those changes. Configuration Management The tool that will be used for version control is GitHub, a free online service. However, the code will be open for the public to see and use if wanted if the free version is used. All developers will be able to commit and make changes whenever needed. However as mentioned above, set changes will have to be pushed to the master branch. The team as set a requirement that, pushes to the master branch will have to be approved by one another beforehand. GitHub allows separate branches to be created, so all developers will be able to manage their individual branch without approval so a faster development process. Quality Assurance Quality assurance will be focused on tools used for testing purposes, more on that will be discussed in the test plan section 7.2. For testing the database, third party applications will be utilized. Postman and Robo 3T are great applications to verify that the data is correct in its proper field and that the supported API calls are functioning. UI testing will be done manually and documented.
Summary

35
This is a brief overview of the tools discussed above are presented in Table 6. Component Tools Computing Environment
➢ Mongoose ➢ Express ➢ React.js ➢ Node.js
Configuration Management
➢ GitHub
Quality Assurance ➢ Postman ➢ Robo 3T
Table 6: Software Tools
4.8 Website Server Support
While considering a service to support the website’s database. Many options were compared including a physical environment and cloud services. The following give a brief description of pros and cons of each system considered. 4.8.1 Traditional physical environment Obtaining and maintaining a physical server in a datacenter to support the system was considered however passed on. Reasons for such a decision was cost and none of the team members are familiar with setting up a server. Therefore, Cloud services will be used. There are many cloud services available online where there’s no maintaining or contacting required. In addition, the great horizontal scaling capability is easier in a cloud environment than a traditional physical environment. A few services have been considered and compared bellow. 4.8.2 Cloud services A quick overview of pros and cons have been listed in Table 7. Amazon cloud services, and Microsoft azure, google cloud, and Digital Ocean were considered and compared. A rough comparison was performed for further inspection and deciding what's best for the system and minimizing the cost.
Vendor Pros Cons
AWS Dominance in the market Support scaling Global support
Too many subservices Might be hard to use

36
Azure Hybrid cloud. Integration with Microsoft tools. Support open source.
Incomplete tools
Google DevOps expertise. Support open source.
Not many data centers globally. Less features.
Digital Ocean Simplicity. most affordable.
Lacks analytics. Lacks hosted databases.
Table 7: AWS vs Azure vs GCP
While all services have their pros and cons, cost was a big factor in deciding what service to choose. The main two services that were considered were Amazon web services and Digital Ocean as they provided minimal cost. Second main factor was the support each service provided. Amazon web services was chosen. While from a cost perspective Digital ocean offered $50 credit for students through their GitHub account, amazon web services also offers a great deal for beginners has they have use of some of their basic services for free for a year. Not only was amazon web services chosen because of cost, its dominance of the current cloud service market was a big factor as well. Therefore, many resources and help can be found online if ever a problem arises.
4.9 Parts Selection Overview
Each part that is listed below were chosen based off ease of use, efficiency, dimensions, and overall design. This section will be broken off into the microcontroller, WIFI module, fingerprint scanner, LCD display, and the other components that will allow for these parts to function.
4.9.1 Microcontroller Selection
The first choice is the microcontroller which is the main component of the project. The device that is well suited for this project is the ATMEGA2560, it may seem strange not to choose the SAMD21, the reason for this is not that much processing power is needed for this project there will be external components added to the MCU, but it won’t have a huge toll on the MCU. Another factor that was accounted for was the ease of access to information on how these MCUs function whether with different applications ran or just simple instruction to certain pin layouts. The ATMEGA2560 was outstanding when it came down to this information, whereas the SAMD21 is a widely used MCU, but the amount of information compared to the ATMEGA2560 wasn’t as diverse and as for the

37
MSP430 MCU it wasn’t a widely used device; therefore, it was the third choice. Comparing the power consumption, it was obvious the MSP430 was ahead in that category and the Atmega328P was second in line, overall this decision was a great choice. If any problem occurs with the prototype testing, then the ATMEGA328P would be the ideal candidate.
4.9.2 WIFI Module Selection
The next topic discusses the selection of the WIFI module and for this choice the ESP8266-01 was selected, the main reason for this module was chosen due its communication peripheral, it uses the Universal Asynchronous Receiving Transmitting (UART) ports and for this project this was the ideal choice because it allows for the communication between the MCU and WIFI module to more organized. Whereas the CC3000 uses Serial Peripheral Interface, it is defined as a block of circuitry that is responsible for implementing serial communication and can also be defined as intermediary between parallel and serial interfaces. Since the microcontroller that was chosen has multiple UART ports. There was no problem having the Wi-Fi module and the fingerprint scanner communicate efficiently. Now if there was only UART port then the CC3000 would be used and another thing is the CC3000 is discontinued; therefore, using it for our project would have been challenging. For the power consumption the ESP8266-01 does win the battle it operates at a voltage of 3.6 volts and has a typical current consumption of 80 milliamps. For the CC3000 it operates at a voltage of 3.3 volts and has a maximum current consumption of 250 milliamps, the ESP8266-01 has a better efficiency; therefore, this section and section 4.2 shows why the ESP8266-01was chosen over the other two considerations.
4.9.3 Fingerprint Sensor Selection
The fingerprint sensor that will be used is the Fingerprint Scanner sold by Adafruit™. The reason for this is due to the feasibility and access of libraries that was developed for this fingerprint scanner and this was a huge plus because our fingerprints are stored onto internal memory of the fingerprint scanner and there is already a library that takes that image and verifies if its correct when running our code. In terms of power distribution this device could be used with both 3.3 volts and 5 volts, but for our sole purpose this device will be used with just 5 volts. Therefore, this fingerprint scanner was chosen for our project. It works correctly and perfectly fine for our project.

38
4.9.4 LCD Display selection
The LCD display that was chosen was neither. The main reason for this choice was to account for a certain amount of power that was being consumed by our entire circuit which was to be less than 7 Watts; therefore, if this was chosen the groups specifications of power dissipation would go over the designed threshold.
4.9.5 Miscellaneous Parts Selection
This section breaks off into the miscellaneous devices such as the level shifter, the voltage regulator which is comprised of the buck converter and the low dropout regulator, and a female jumper port that is used to connect the battery to the board.
4.9.5.1 USB-Serial Converter
The first topic is the FTDI-FT232RL this was chosen to be on our board in order to allow communication with our desktop or computer in order to debug any type of problem with our board. Also, it could be used to program our on-board Wi-Fi module due to the fact of having external Rx and Tx pins for UART. Previously listed was the Level Shifter, this was replaced with voltage dividers provided by resistors and this was only placed where the 5 volt logic level of our microcontroller would send a high level (5 volts) to another device whose high level is 3.3 volts.
Figure 6: USB-Serial Converter

39
4.9.5.2 Voltage Regulator
The 5-volt regulator that was chosen was the LM7805MPX/NOPB manufactured by Texas Instruments. This is a Low Dropout Regulator (LDO) and this was chosen due to the second setup for the Printed Circuit Board (PCB), instead of having a serial connection 9 volts feeds into both regulators bringing down the power consumption of both regulators and allowing for less heat to build up. Also, this device supplies a current of 1.5 Amps and this was accounted for based off of our servo motor. Some components on the boards require 3.3 volts, the first approach was to use a voltage divider with two resistors, but it will have an effect on how much current will be drawn by the device; therefore, the addition of a low dropout regulator (LDO). The choice for the 2nd low dropout regulator that supplies 3.3 volts is the AX1117EH manufactured by Diodes Incorporated the efficiency of this device will be ideal for this design since the input voltage is close to the output voltage, it also supplies a current of 1 Amp which is great for the splitting of the WIFI module and the fingerprint sensor, but running into quite some issues the Wi-Fi module doesn’t initialize itself when there is another component on the same regulator; therefore, the fingerprint scanner was moved to our 5 volt regulator. As mentioned before the design of the LDO is straightforward it needs two filter capacitors on both the input and output.
4.9.5.3 Servo Motor
The servo motor was chosen for this project based off of power consumption it requires a voltage of 5 volts and a current consumption at peak characteristics of 2.5 Watts compared to a solenoid at peak characteristics is 7.85 Watts and since we needed specifications of less than 7 Watts this discarded the Solenoid. As for communication there is a library that was created for solenoids functioning with our microcontroller which requires one pin to communicate with our microcontroller and as for the solenoid this required an inductor, transistor, and a diode in order for it operate correctly.
4.9.5.4 Female Jumper Port
The female jumper port isn’t a huge impact on the design, but it still needs to be recognized. It is placed in the project for the ease of using an external battery, whereas some printed circuit boards contain a coin cell casing to account for coin cell batteries. In this design that’s not the case, we are using the approach of a 9-volt battery that will be placed in a battery holder suited for the needs of the battery and we will have a male jumper wire connect from the battery housing to the female jumper port. Figure 7 shows the schematic of the female jumper.

40
Figure 7: Female Jumper Port

41
5. Related Standards and Design Constraints In this major section we document the standards that explain procedures and specifications used to design different materials and products that people and businesses use every day. Successful engineers are to understand their constraints and work according to the standards in the developing of a product. These standards provide guidelines for manufacturers and developers to utilize when creating and implementing a product. Numerous protocols must be followed in product design and application to avoid any scrutiny or detrimental liabilities that could arise if standards are not followed. Certain standards provide a set of requirements which aid in the compatibility of one system to another. For the in-home delivery device several standards can be referenced to guide our decisions including the soldering standards along with others in the document. The second half of this section documents the constraints that the team will have to work with in the progress of building the intended project. Those constraints have been realized by the Accreditation Board for Engineering and Technology that engineers must follow.
5.1 Standards and Other Safety Concerns
Students and Professionals alike can join a technical organization called IEEE or the Institute of Electrical and Electronics Engineers. This organization provides information on new technologies and standards for applications that include power, information technology, electronics and everything in the electricity realm. With an enormous amount of documentation on plentiful standards that can be used for all sorts of technologies, the IEEE has more than enough resources for the standards section of our document. These standards will include soldering, programming languages standards, and many more. There are other major organizations that provide engineering standards like the National Resource for Global Standards, also known as NSSN. As well as ANSI, the American National Standards Institute. The team has gathered standards based on the research of these organizations and some others. While these are just a small portion of multiple institutes that provide standards, standards can be accepted international, nationally, or at even a company level. Which is why so many committees and organizations are focused on the developing of different standards.

42
5.1.1 Soldering Standards
Soldering is the process of fixing one or more components as one by one by dissolving and running a solder in the joint. Soldering is broken off into two classifications, known as soft soldering and hard soldering. Soft soldering is the process of accounting for parts that may have been broken during the process of soldering at high temperatures. Whereas, hard soldering unites two elements of metals by spreading out into the holes of the component that are unlocked due to high temperature. The IPC-A-610 standard describes the specialized soldering finishes that should be accounted for such as immersion tin, palladium, gold etc. This criterion is based on design, process capability, and performance requirements. These standards apply to surface mounted (SMT), terminals, through holes, and many more. The first criteria mentioned is wetting which a property of soldering and this occurs when the solder has become molten at its eutectic temperature which is the lowest melting temperature of a certain compound for this case it is around 183° Celsius with an adequate amount of flux. Wetting angles should not try to exceed an angle of 90° whether it is soldering a component or soldering to a PCB termination. It also describes the primary difference between solder connections created by using tin-lead alloys and some processes using lead free alloys are related to the visual appearance of the solder. Lead-free alloys are more likely to have surface roughness such as a grainy or dull look and greater wetting contact angles. The IPC-T-50 standard branches off into soldering anomalies. The first soldering anomaly is the cold/rosin connection which is defined as a solder connection that shows poor wetting, and this can be characterized by a grayish, porous appearance. This can be caused by impurities in the solder, inadequate cleaning prior to soldering, and insufficient application of heat during the soldering process. Dealing with electronics the rosin solder connection is used instead of the acid solder connection which is used for plumbing purposes. Rosin solder connection is defined as a solder connection that has practically the same appearance as a lumped or rough surface which is defined as (cold solder), but it also shows evidence of entrapped rosin separating at the surfaces to be joined. A second criterion defined by the IPC-T-50 standard that should be avoided is dewetting it is defined as when the molten solder lays on a surface and then leaves behind irregularly-shaped mound of solder meaning that the solder will not bond with the designated part. Excess solder such as solder splashes or tinning on a metalized package body could cause defects on the certain device and this defect can be caused by the board not being dry prior to its meeting the wave soldering. Solder splashes on the metalized surface may be acceptable if the electrical performance is not compromised or required [1]. Another defect that should be avoided is solder balls/solder bridging which can be defined as

43
spheres of solder that remain after the soldering process and they have a diameter greater than 0.13 millimeters or they are within 0.13millimeter of traces, this violates the electrical clearance principle; therefore, it can also affect the electrical reliability of an assembled printed circuit board. Retaining back to the IPC-A-610 standard a circuit board is considered defective when there are five solder balls within 600 millimeters squared. This can be caused when there is air or water (trapped in solder paste) vapor escaping from the paste and turning into liquid. If the vapor escapes from the solder paste too fast, then a small amount of liquid solder will be taken from the soldering point between either an electrical component and the printed circuit board which creates a small solder ball that is formed when cooling takes place. There are ways to account for this defect is to ensure that the pad sizes are correct and spaced accordingly to the specified datasheet of the electrical component, as well as the thickness of the printed circuit board hole’s plating copper is greater than 25 micrometers to avoid trapping of water [2]. Continuing with the IPC-T-50 standard describes is the solder bridging which occurs when the solder forms an abnormal connection between two or more adjacent traces, pads or pins, and forms a conductive path [3]. There are many causes, but some common mistakes are there is no solder mask between two adjacent pads, the pads were manufactured too close to one another, paste slum has occurred or too much paste is applied to the pads. To avoid this defect before it occurs is to add solder mask between the pads, to ensure there is a zero-print gap between the printed circuit board and the stencil, and to make sure the stencil being used is cleaned before handling. Another defect to account for is solder splashing this can be recognized as small bursts of solder extending away from the point of soldering. The main causes of this anomaly are uneven temperature gradients within the receptor housing during solder flow, improper flux or solder selection, and incompatible housing or feed through plating. The same steps taken for solder bridging can be accounted for this defect as well, also it is best to allow enough time for heat to be introduced to the package housing and this is accomplished by thermocouple monitoring and accurately controlling the dwell time within the furnace prior to increasing temperature for solder flow. Fractured solder which is described as a defect that is seen after production or after the soldering process is finished which can be caused two factors such as overloading and fatigue. Overloading is caused in a short-term manner it can be caused by gross mishandling or misprocessing, which can cause the parts to develop thermo-mechanical stress levels that exceeds the fracture strength of the solder joints. Main causes can be simply dropping the application board or the final product from a certain distance, as well as forcing the product into a certain enclosure or within a certain module.

44
Fatigue is the cyclical stress, which can be caused by occurrence and redistribution of forces acting on a material. Simple causes such as temperature swings and mismatches between the coefficients of thermal expansion of the mounted devices’ solder joints and the application board. Prior to the actual fatigue fracture, deformation occurs when the temperature alternates between its high and low values. The deformation of the solder in joint is in the order of 1% and the movements are slow, with typical cycle times measured in hours. The last solder anomaly is lead free fillet lift which is defined in the IPC-T-50 standard as the phenomenon in which the solder filler is lifted off from the land of the board mainly during the flow solder process. This phenomenon is more likely to occur on the primary (solder destination) rather than on the secondary (solder source) side which is exposed to low soldering.
5.1.2 Programming Standards
Practice standards are set to ensure that code collaboration is at its best practice. Also, to establish a common understanding between team members to avoid unnecessary conflicts that may arise. Coding standards allow all team members to have an easier time following and grasping one another’s’ code.
5.1.2.1 Practice Standards Details
More than one coding standard will be utilized with a few modifications. Generally Agile Coding Standard will be employed, specifically Extreme Programming (XP). Agile focuses on the entire software process rather than the syntax rules of an exact language. The main characteristic of Agile according to VersionOne website is that Agile’s main characteristic “involves delivering working, tested software every iteration (two-four weeks). As the iterations flow, this demand creates a new kind of pressure as developers’ code more, modify code more, and stay focused on today’s deadlines”. The model applies well for making sure the team spreads out work and tasks throughout the entire semester. In addition to adding an additional experience as Agile is one of the most common standards in the industry. As tests are made throughout the whole process, this almost guarantees that the team will be able to verify that the different components of the software are working and successfully connected in earlier stages of the process evidently causing less pressure. Extreme Programming (XP) tends to create a sharing environment where all collaborators can work on the same component if needed, the following are the primary aspects of the standard.

45
● Test-first programming (or perhaps Test-Driven Development), ● Rigorous, regular refactoring, ● Continuous integration, ● Simple design, ● Pair programming, ● Sharing the codebase between all or most programmers, ● A single coding standard to which all programmers adhere
(VersionOne) The test-driven environment Agile creates as mentioned in VersionOne, allows for continues design and innovation. Therefore, the team has decided that there will be a few established tests that will take place early in the implementation process, where a some are partial tests. For example, the database and user interface components of the software design, more details on that are in section 7.2.
5.1.2.2 Coding Standards
While there are many variations of coding standards for each specific language. A couple of languages will be used to implement the system. However, since the application will be web-based, that main language is JavaScript. The standard agreed upon for coding in JavaScript is Drupal’s standard available free online. However, some modifications to the standard has been set and as follows:
● Indenting: Must use tabs ● Semicolon: Must use semicolons ● Blocks: curly brackets on new line (No Egyptian style) ● Functions: no space between function name and left parenthesis ● No spaces at end of lines ● File: Must have newline at end of file
To keep a professional image in addition to being able to track functionalities that have been implemented by a file, a header will have added to each file created. The <purpose> field will be required to give all details of the functions’ objective included in a file. This requirement was created to provide all team members will a clear declaration to avoid any replicas of functionality.
5.1.3 Software and Systems Engineering Testing Standards
This project will adapt the International Software Testing Standard called ISO/IEC/IEEE 29119. It is a set of standards for testing the software that can be used in any project, including Safe Home Delivery. The objecting of this testing

46
environment is to “provide […] a high-quality approach to testing that can be communicated throughout the world” [1].
The use of this standards will bring to this project proper testing processes, with the correct techniques and documentation. The project’s quality and format will improve by following this format, it will shape the system in industry standards and have proper functionality once all tests pass. Currently there are five standards:
• ISO/IEC 29119-1: Concepts & Definitions
• ISO/IEC 29119-2: Test Processes
• ISO/IEC 29119-3: Test Documentation
• ISO/IEC 29119-4: Test Techniques
• ISO/IEC 29119-5: Keyword Driven Testing
Part 1, Concept & Definitions objective is to clarify the use of all the upcoming tests. It introduces the vocabulary and explains what actions are going to be takes throughout the process of testing the software. Its main objective is to inform. Safe Home Delivery implements this standard in chapter 8 where all testing is outlined.
Part 2, Tests Processes, “specifies test processes that can be used to govern, manage and implement software testing” [2]. Test processes are divided into three parts: organizational test process, test management process and dynamic test processes.
This fist test process is in charge of designing procedures about the creation of the test specifications, as well as the maintenance and review. To fit the conditions of this project, the organizational test process refers to the four members as the organization.
Test management process consists of three sub-processes, test planning, test monitoring and control, and test completion. These sub-processes can be tested separately or combined. Once a test plan is established, testing begins. It has to be under control, keeping track of any success and failures. If any unplanned result occurs, then the testing plan has to be reviewed and reevaluate. Every test plan has to meet the guidelines of the organizational test process and all criteria must be met. Once the test plan is altered, the group may move to the test completion process.
After the test management process is complete the dynamic test process begins. The process requires test design and implementation, test environment set-up and maintenance, test execution, and test incident reporting. The objective is for test completion to perform correctly and have depending members aware of the process results.
Figure 8 shows a schema of a test process. It divides the process into the three

47
different layers and their behavior. Part 3, Test Documentation is a section that talks about how to document all tests and their results. It defines “templates for test documentation that cover the entire software testing life cycle” [3]. For each test there are specific requirements that can make the format of the template alter, although all templates must follow the same process defined on part 2.
Figure 8: Test Process Cheema Part 4, Test Techniques is a section of the standard which “defines test design techniques that can be used during the test design and implementation process that is defined in” Test Process, part 2 [4]. There are three different standard testing techniques and they depend on the the type of testing the software is being evaluated on; specification-based testing, structure-based testing, or experience-based testing.
On this project specification-based testing will be conducted on the hardware portion of the project as well as in the software portion. This testing technique will be conducted to check if all requirements are integrated in the system. If any of the original requirements are missing group members will evaluate the importance of the requirement and decided if the requirement has to be added to the project or neglect it.
Structure-based testing will be carried on by different parts of the project. It will test separate sections that from the skeleton of the project. Once the main structure is working correctly and passing all the testing then the add-ons and gadgets can be added. For example, the backend models will be tested making

48
sure the structure of the different users is complete and strong for the front end to use. Once all the functionalities of each model is complete the front end can access the data and create different way to present that information in useful ways.
Experience-base testing is the last layer of testing. This evaluates how the user experience the software, and how all functionalities are being presented. This testing technique will be used multiple times in multiple areas of the project. Such us, accessing the key correctly, or signing up as a new customer.
Lastly, but no least is part 5, Keyword Driven Testing. This is the last standard testing and it “is a way of describing test cases by using a predefined set of Keywords. These Keywords are names which are associated with a set of actions that are required to perform a specific step in a test case” [5]. They are helpful to each individual case to understand the intention of the test. Some Keywords can be useful to organize the order on which the test cases are evaluated. Others can be used to undermine the level of importance, or to clarify where in the test case the error happened.
5.1.4 Design Impact of Software Testing Standards
Using the standard ISO/IEC/IEEE 29119, there are several aspects of Safe Home Delivery design that will be impacted. Appling the standards mentioned in the chapter above 5.1.3 and showing all completed requirements will make this project well-founded. However, there are many techniques that are included that will not be needed for this project, therefore in this standard which are not necessary to the Solar Bike design, and for that reason some modifications will be made. These modifications will be only in benefit of the group and the project. All millstones will be tested and completed. One modification is the organizational test processes, all software developer members will have to review and approve, or any code added to the software. The proposition is carried by a group, meaning the organization is equal to the four group members. The test policy and strategy will be done and practiced by the individuals. The test techniques utilized will proceed from the testing standards and those defined by the team itself. To satisfy all specifications, the test techniques will be applied to all testing.
5.1.5 IEEE Standards
Batteries are devices that can store electrical energy in the form of chemical energy and convert that energy into electricity. There are three main components of a battery: two terminals made of different chemicals, the anode, and the

49
cathode; and the electrolyte, which separates these terminals. The electrolyte is a chemical medium that allows the flow of electrical charge between the cathode and anode. Once connected to a device, chemical reactions occur on the electrodes which causes a flow of electrical energy to the device. Each battery created has a set of standards/specifications that must be followed such as minimum distance between the flats of the positive and negative contacts, maximum diameter of the positive contact within the specified projection height, the maximum overall height of the battery, and many more. Detailed parameters that are highly details is the end-point voltage which is also known as the cutoff voltage, the open circuit voltage which is the voltage across the terminals of the battery when no external current flow is flowing, and the nominal voltage which is the suitable approximate value of voltage used to identify the voltage of a battery. The IEC 60086-2 standard pertains to the physical dimensions, discharge test conditions, discharge performance requirements of primary cells and batteries. A battery that was tested under these specifications is the R6C (high capacity) battery which could be a Zinc Carbon AA dry battery that has a nominal voltage of 1.5 volts, shelf life of 1 year, and a max height of 50.5 millimeters. The discharge condition such as the load resistance on the device, it does vary with each application it is used for and which battery is being accounted for, but for the R6C the minimum resistance it can achieve is 3.9 ohms and it has a maximum resistance of 43 ohms. The daily period usage is around a minimum of 15 seconds per minute with intervals of 8 hours per day and the maximum usage is 4 hours without stops. The end point voltage is varied as well with different applications, there is a minimum of 0.8 volts and a maximum of 1 volt. The minimum average duration is the average discharge rate, also varies between many applications. The minimum, minimum average duration is 47 minutes and the maximum, minimum average duration is 25 hours. The ANSI C18.2M standard describes the performance of portable rechargeable cells and batteries to ensure their safe operation under normal usage. All cells should have some type of venting process that shall incorporate a pressure relief mechanism or to be constructed in a way that will relieve excessive internal pressure at a certain rate that will not allow an explosion or self-ignition [1]. Each battery should have a temperature/current/voltage management, for Li-Ion and multi-cell nickel batteries, conditions of abnormal temperature rise shall be prevented with thermal limitation features. The terminals of the batteries must have a size and shape that must accommodate for the maximum anticipated current requirements and to reach this the terminal contact surfaces must be formed from conductive materials that shows great mechanical strength and corrosion resistance. Li-Ion or any

50
rechargeable batteries that are used for electronics, it shall have a necessary charge and discharge control feature that is accommodated for and if the electronic device fails then the battery should shut down. The batteries that must pass the ANSI C18.2M standard must pass a great amount of test. Each test is conducted on fully charged and fully discharged samples [2]. Test Procedures:
● Thermal Shock: Simulates the effect of exposure to high and low temperature extremes on the battery.
● Vibration: Simulate and determine the effects of vibration during normal transport.
● Mechanical Shock: Simulate and determine the effects on batteries of infrequent, non-repetitive shocks encountered during handling or transportation.
● External Short Circuit: Simulate and determine the effect of an accidental or abusive short-circuit of the positive and negative terminals. With a test temperature of 55 ± 2° Celsius.
● Overcharge: To determine the ability of a rechargeable battery to withstand an overcharge condition. Where each sample shall be charged at twice the recommended maximum continuous charge current for a period of 24 hours.
There are many more test procedures to account for and once these test procedures have been successfully passed. The batteries meet this specified standard, but this mostly focuses on rechargeable batteries.
5.2 Realistic Design Constraints
Every product or project has design constraints. Seeing as how an in-home delivery device is a sort of ludicrous idea to some people, there are the constraints of health and safety that will be addressed, as well as many others that we will acknowledge that are recommended by ABET. They will be split up into multiple categories, those of which that were noted by the Accreditation Board for Engineering and Technology, Inc. or ABET. In the following sections we will briefly discuss these constraints and how they apply to the in-home delivery device. These constraints are formed in combination with the understanding of the project’s requirement specification and are also decided by the end user’s needs, the manufacturer’s resources, and many more. These constraints usually observe realistic factors such as:
• Economic
• Time

51
• Manufacturability
• Sustainability
• Environmental
• Health
• Safety
• Ethical
• Social
• Political
• Security
5.2.1 Economic Constraints
Economic and time constraints are the largest hindrance on the development of the in-home delivery device. Because the entirety of the project is to be funded by the engineers working on it, economic considerations are a must and every part chosen must be evaluated to determine if the cost is worth the performance gained. The amount of money necessary to complete a project of this caliber adds up quickly due to external services and buying of parts. For our design, most of the cost will go towards printing circuit board, purchasing a microcontroller, purchasing a lockbox, and purchasing the fingerprint sensor. To save on money, we used a team members GoPro for the camera and other electronic components that we already owned so we did not have to buy new parts. Our research and development budget are miniscule compared to some of the other similar products on the market and our challenge lies in creating a similar design for a fraction of the cost.
5.2.2 Time Constraints
Like economic constraints, time constraints will also play a major role in the designing, prototyping, and testing of the final design. With only two semesters to bring our design from a conception to a functional product, time considerations will be taken throughout. Originally, we had planned for many more features to be added to the in-home delivery device in order to make it smarter and more reliable, but ultimately, we had to cut some in order to meet deadlines. Besides the actual implementation of the design, we will also have to spend time to fully understand the technologies we planned to use, and to figure out new technologies that would provide the capabilities we desired. Learning these new technologies and methodologies to create the functioning system we originally detailed took a considerable amount of time to do. Considering most of the team has not dealt with a sort of project of this magnitude and especially for the software developers on this project who will have to work with new languages that they were never taught will be a

52
tremendous challenge and even for the electrical engineer in learning to design a PCB for the first time. And while the team has created milestones for the group, these would act as soft deadlines that we may encounter trouble with in the development portion of the project. Our team has allocated slack time onto project milestones. However, hard deadlines are unavoidable and must be addressed.
5.2.3 Manufacturability Constraints
Manufacturability is considered as the entirety of the device or product. As to how the product will be constructed and if can be easily massively produced by a company. And while most of the design for the in-home delivery project utilizes standard components that are easily found online. While conveniently attainable design pieces for the product, we may however acknowledge in the following semester when the product is to be built that there may be some manufacturability constraints that will be involved with the product. The team had discussed the idea of buying lockboxes from Amazon that are intended for the realty business. With the intention of how the product is to be built, the lockbox will be completely configured for installing all the electrical equipment onto it. The team has also understood that there may be the possibility of encountering the manufacturability constraint of having to completely 3D printing a a casing for the electrical components to correctly fit and word accordingly. While we intend to design a product that does not require too much manufacturability we are aware of the possible constraints that the team may encounter. Another major concern, and constraint, is that with the lockbox being a certain kind of metal the electrical components will have trouble communicating with each other. We had to take this into consideration for our design.
5.2.4 Sustainability Constraints
As for sustainability, this constraint didn’t play much of a factor with our project or the designing of the device. While of course the team still needs to construct a device that is sustained until the end of senior design two. We require the product to be in good status until after the senior design showcase and presentations are complete. Therefore, this constraint didn’t play as big of a role in our designing of the product since it only needed to last only for a few months unlike other projects that require to sustain years.
5.2.5 Social and Political Constraints

53
The social and political value of our product is enormous. As mentioned previously before, a large percentage of people are reasonably against the idea of having a stranger enter their home without them being there. Even companies do not allow their employees to enter homes without the presence of the homeowner. And while there is great advantage with the product that the team is intending to build, there must be enough smart, reliable, and trustworthy features to rid the regular homeowners doubt. This is a major social constraint. Anything that is a social issue becomes a political issue. While there might be some people that are okay with the idea of having our product in use with their daily lives, it only takes the one wrong occurrence of something going terribly for the political constraint aspect to hinder this products growth. Giving a stranger authorization to enter a home becomes a serious political issue.
5.2.6 Health Constraints
Health constraints go hand in hand with the social and political constraints. However, we will also address the unfortunate event of a burglar intimidating the delivery driver while a delivery is in progress. If there is that unfortunate event that delivery in progress doesn’t go correctly. The homeowner within their mobile device while watching the livestream will have a button that they may press to alert the authorities. Even so, the delivery driver will have the same button to alert nearby authorities. According to the Department of Engineering Health and Safety, when experiencing a soldering burn to place burns under cold water for 15 minutes, report to a first aider in case of severe burns. Another constraint is that the device that the group intends to build must be a safe and reliable system. Where we must ensure protection to health by containing all key electrical elements in a safe contained enclosure where it is out of reach by the user and the user to not become in contact with any sort of electricity.
5.2.7 Safety Constraints
Safety constraints apply to even the delivery drivers in our project. With the off chance that the home that they are dropping deliveries at has a vicious animal. The delivery driver can then file a complaint in their UI driver that the delivery was unable to be done because of a strange occurrence. All the health and safety constraints are investigated to build a safe and trusted product. Some safety constraints that we are required to follow for this project is when soldering. The soldering standards and safety constraints seemingly go hand in hand. When soldering to never touch the element of the soldering iron considering that the soldering iron is at extremely hot 400 degrees Celsius. Another safety

54
constraint the team is to acknowledge is to hold wires too be heated with tweezers or clamps when soldering. Keep the cleaning sponge wet during use, always return the soldering iron to its stand when its not in use and to never put it down on the work bench. Most importantly, to turn the unit off and unplug when not in use. For safety reasons, and a necessary constraint when soldering is to wear protective eye gear in case of solder “spit”. The team has also decided to include emergency buttons onto the designing of the software development. In case that the user of the product feels a sort of threat, they may press on the web applications button to lock their homes premises and to alert the authorities.
5.2.8 Ethical Constraints
With the project that our group had in mind we encountered a few ethical constraints where the market that we are aiming to reach is compromised by people who are for the most part against the idea of having a stranger enter their home. Therefore, the constraint that we encounter in this situation is the constraint of trying to convince a person that our system will be a safe, reliable, and commendable in-home delivery service experience. At first even a some of the group members were unmotivated by the feat of being constrained by societies ethical standards to try and convince a group of people that our project will be a safe device. Nevertheless, the group realized that with companies like Walmart and Amazon trying to accomplish this same idea, this ethical constraint was one that we’d have to acknowledge and try to work around in the attempt of building a project that anybody may adopt to their overall routinely lives.
5.2.9 Environment Constraints
An environmental constraint that the product has is one that we agreed we’d hope to accomplish in that the product that will usually be placed outside on a homeowner’s front doorknob, is to not succumb to extreme heat. The technologies that we intend to use will be enclosed in a type of casing where the device would overheat and then therefore damage. Another sort of environmental constraint is dependent on the users’ front doorknob, they must in fact offer a key. This product is not intended for the use of doorknobs that are simply electrical and contain no key.

55
5.2.10 Security Constraints
Our system will be implemented onto one of the team members home network for testing and productivity. The team has acknowledged a constraint that recognizes that we may not be able to connect certain technological parts to the UCF network because of limited user permissions that we, the student engineers, have. Our developers will not be able to manipulate within the UCF server network, which with the production of in-home delivery device will provide potential vulnerabilities for UCF. While the entirety of the device is not build with the purpose of a completely secured software entity, the group has addressed that we do not want an easily hacked product that which we will showcase. Leading us to small constraint of adding some security features with the software.

56
6. Project Hardware and Software Design Details This section will discuss the design details of our in-home delivery service device. The hardware sections that will be discussed are hardware block diagram, design overview, microcontroller, battery housing, battery design details, lockbox and fingerprint scanner, Wi-Fi and Bluetooth details, and hardware schematics. The software section is comprised of two total sections. They are software design details and web application design. Subsections within the software design details enclose the software’s block diagram and a detailed design overview. The subsections within the web applications design will enclose the websites specification and mobile responsiveness features, its architectural design, the applications database design, how the web application use interface design will be produced to look, detailed design as to how clients, drivers, and administrators communicate with the websites application, the specifications for cloud hosting and deployment, and an overall summary as to how all these features will coincide. This section holds many important specifications and details as to the designing of the product. The team has ensured this section to be as descriptive as possible for the feasibility of building the product when the time comes.
6.1 Hardware Design Details
Hardware refers to the physical components that will be used to power and control the in-home delivery device. This section will display information pertaining to each of the subsystems of hardware design and the chosen parts for each hardware portions. All hardware specifications will be explained with necessary documentation.
6.1.1 Hardware Block Diagram
The hardware the design of this project is divided into two parts, a key holder, and a camera eligible to record and stream. Both designs need to be able to connect to the software design, so data can be transfer back and forth between them. Figure 9, block diagram represents the hardware components and what they need to accomplish.

57
Figure 9: Hardware Block Diagram
6.1.2 Hardware Design Overview
The designed in the section 6.1.1 above analyzes conceptually what the device will accomplish. The key holder device or lockbox with have a design and implementation with Wi-Fi access, fingerprint and mechanism to release the key on authorization accepted for key. The camera will be implemented onto a mobile phone and using the GoPro design and documentation the team will then transfer the video/livestream to the Websites API.
6.1.3 Microcontroller
The ATMEGA2560 is the most crucial piece of this design, it can be thought of as the middle man, who helps make everyone’s life much easier. It bridges the gap between communication with the peripherals and it will also account for data acquisition. The paragraph below will give a detailed explanation on how the communication between the microcontroller and WIFI module communicates as well as the microcontroller and the fingerprint scanner.
6.1.3.1 Communication peripherals

58
The communication between either the WIFI module or the fingerprint scanner to the MCU have different approaches on how the data is sent and how the data is received, this subsection will describe the general process on how most of the communication is done for both peripherals. The procedure of properly connecting these devices are to ensure the hardware setup, software programming, and the testing portion are executed in given manner. The Figure 10 below shows what communication peripherals are used and they both are universal asynchronous receiver-transmitter peripheral (UART), this determined by the red dots and the Pulse Width Modulation (PWM) determined by the light blue dots.
Figure 60: Communication Peripherals
UART PWM

59
6.1.3.2 Microcontroller and Fingerprint Scanner Communication
The first general step on ensuring this communication is setup properly is to ensure the communication lines are correct. The fingerprint scanner sold by Adafruit™ uses a communication peripheral known as Universal Asynchronous Receiver-Transmitter peripheral (UART), which can be defined as a block of circuitry that is responsible for implementing serial communication and it can also be thought of as in intermediary between the parallel and serial interfaces. The setup is straight forward for this communication peripheral, there are two lines that are used which is the transmitting (TXD) end of the MCU connecting to the receiving end (RXD) of the fingerprint scanner and vice versa for the receiving of the MCU to the transmitting end of the fingerprint scanner. There is a general setup on how fast the data is sent and when the data I used, the speed is based off of the baud rate of both devices and with the fingerprint scanner this can be varied, but the default baud rate is 9600 bits per second (bps). To ensure proper communication both ends must have the same baud rate, otherwise the data sent to one device would be too quick for it to process the data. Another approach on how to communicate properly is that most UART connections has some type of buffer and a buffer can be thought of as a safehouse for data to be stored until the microcontroller comes and gets it. The buffer that is used in this case is first in first out (FIFO) configuration, where it can be defined as a buffer that forces each byte or bit of your serial communication to be passed in the order received when its ready to be used. As mentioned in the prior section 4.9.5.1: USB-Serial Converter the MCU works at a voltage of 5 volts and the fingerprint scanner works at a voltage of 3.3 volts; therefore, when data is sent to and from this device its high-level voltage (digital logic 1) and low-level voltages (digital logic 0) are on a different scale compared to the microcontroller. In order for the microcontroller to receive data, it has to read a low-level voltage between -0.5 and 1.5 volts and for the high-level voltage it has to be between 3 and 5.5 volt, but the problem doesn’t lie here the fingerprint scanner when it transmits data, its high-level voltage is 5 volts and for its -low level voltage its value is 0.8 volts. For the low-level voltage its value can be read.
6.1.3.3 Microcontroller and WIFI Module Communication
The ESP8266-01 module will be the third party it will communicate with the middle man and allow for communication with the external party, in this case the external party would be a web server controlled by Adafruit. The ESP8266-01 uses universal asynchronous receiving transmitting ports to communicate as mentioned before. Since this communication is used, there is a clear UART communication peripheral due to the fact that the ATMEGA2560 allows for 4 UART ports to communicate efficiently and whether the CC3000 were to be used

60
via SPI. There would be no interference. Therefore, ESP8266-01 could be used via UAR and there would be no garbage data to be read. The definition of SPI communication can be broken down more, one device is said to be the master and the other is the slave. For this particular case the master is the microcontroller and the slave is the WIFI module. As mentioned before there is a clock that controls what data is to be sent and when it should be sent; therefore, the master should have that responsibility on what data is to be sent this pin is also known as (SCK). When data is sent from the master to the slave it uses a line known as master output slave input also known as MOSI and when data needs to be sent from the slave to the master, the clock generates a prearranged number of clock cycles and this allows the slave to send data using the master input slave output line also known as MISO. The Figure 11 describes how this communication is setup.
Figure 7 Serial Peripheral Interface As mentioned in the microcontroller and the fingerprint scanner the WIFI module also works with different reading levels. Since the WIFI module uses a value of 3.3 volts for its input and output lines, the same approach that was taken with the fingerprint scanner is taken with the WIFI module and the Figure 4.9.5.2, shows the lines of the MCU labeled as Line_5V is being set to the input lines and the output lines of the voltage divider is going to the input of the WIFI module.

61
6.1.4 Battery Design Detail
The battery housing for this project is straight forward it will have a battery holder that is suited for a 9-volt battery, most printed circuit boards have a coin cell casing, where it is easier to place the coin cell battery, but for our design it wouldn’t be ideal since our printed circuit board will be placed inside the lockbox. Therefore, the access to change or to adjust something would be a hassle, using a standard battery holder that can be seen in television remotes or gaming controllers, it will have a similar build to it. With that said creating a back pocket on the back of the 3D printed lockbox would be ideal and then screwing the battery holder in place will make a great access point for changing batteries. Since most battery housing don’t come with a male jumper on the opposite end, we will have to create a connection that allows for the male to connect to the female jumper that is placed onto the printed circuit board, but this shouldn’t be much of a problem to account for.
6.1.5 Lockbox and Fingerprint Scanner Design Details
The Lockbox has to have a friendly, durable, and ease of use aesthetic feel to it, as of now there aren’t set dimensions for the device, but knowing there will be a fingerprint scanner on the front end of the device is certain and also a LCD screen displaying a welcome sign of some sort and showing that the device is connected to the WIFI, will be placed as well ideally above the fingerprint scanner.
6.1.5.1 Lockbox Design
The lockbox will be centered around by the dimensions of the printed circuit board, as well as the consideration of whether a battery will be used or the solar cell. The dimensions of the devices will be measured in inches (‘’) and by height (H), length (L), and depth (D) respectively. If a battery were to be used a battery holder will have to be implemented which has the dimensions 0.669’’ (H) by 2.244’’ (L) by 0.669’’ (D) it also includes 6’’ wires which will be cut down if needed. If the lockbox were to include these parameters including the TTL (GT*521F32) fingerprint sensor which has a body dimension of 0.8267’’ (H) by 1.421’’ (L) by 0.2787’’ (D) and a window design of 0.6653’’ (H) by 0.5078’’ (L), the ideal design will have a height of 6.500’’ including the shackle, the length of the design ideally would be 4.500’’, and the depth would be 2.500’’; all these values are subject to change. Considering the solar cell, the lockbox will have to be redesigned around the solar cell mainly, the higher the voltage the bigger the solar cell gets, if a solar cell that produces 5.01 volts at it rated temperature coefficient were to be used then the dimensions of the device are 0.079’’ (H) by 1.378’’ (L) by 1.654’’ (D).

62
Even though the battery housing and solar cell are quite different in size it seems like the ideal lockbox would work perfectly with both designs. The inner storage of the design would have to be accounted for as well, for now the design would have dimensions of 2.500’’ (H) by 2.000’’ (L) by 1.000’’ (D). Most likely the design of the lockbox would be created using 3D printing due to most of the lockboxes seen does not have the dimensions needed, the ideal material used for the casing would be acrylonitrile butadiene styrene (ABS) plastic, this could be changed in the future, but the main reason is it has great impact resistance if dropped or slammed, easy to paint over, has a great amount of strength and stiffness, and can work in environments that are around 221º F.
6.1.5.2 Fingerprint Sensor Design
The fingerprint dimensions were mentioned previously in the section above, the reason for this choice is due to simplicity and size compared to the Fingerprint Sensor sold by Adafruit™, which has a dimension of 0.8464 ‘’ (H) by 2.204’’(L) by 0.7874’’ (D). The fingerprint sensor would be placed directly in the middle of the lockbox as shown in Figure12.
Figure 12: Lockbox Schematic The figure above is not too scale, but this just gives a rough design of what the front end would look like. The fingerprint scanner would be flush with the lockbox; therefore, the whole body of the fingerprint scanner will not be visible as seen in the figure above. This design allows for ease of access when connecting wires from the fingerprint scanner to its designated areas.

63
6.1.6 Wi-Fi Details
One means of wireless communication will be based on an external WIFI module that will be interfaced to the microcontroller, which will both work together to communicate with the fingerprint scanner to the door lock. WIFI is a wireless networking technology developed by the IEEE, it uses radio frequencies of 2.4 gigahertz and 5.8 gigahertz. As mentioned in the microcontroller section 6.1.3.3 we saw what form of communication is occurring with both the microcontroller and the WIFI module. This section is generally discussing the connections to and from the microcontroller, the full schematic of the WIFI module will be seen in the section 6.1.7; therefore, only the communication port will be shown, and this pin layout can be seen on Figure 13, which is shown below. It can not be seen in Figure 13, but there is a fourth input pin which is labeled as VIO_HOST and this will be discussed in the section below and for the transmitter and receiver pins those two pins are kept floating, it could be changed, and they could be used for a communication between the WIFI module and the door-latch.
Figure 13: Wi-Fi module Pin Layout The input pins will be discussed first, there are ideally four input pins, but the one that isn’t shown is the voltage that is connected to the 3.3-volt source, it is a reference line used to depict the voltage of the host which is the microcontroller. It should be 5 volts across the pin, but in the data-sheet it recommends using a value of 3.3-volts hence; therefore, the level shifter is used. The first input pin shown in Figure 13, is the SPI_CS and as defined before SPI is known as serial peripheral interface, CS stands for chip select it is connected to the slave select pin of the microcontroller, these pins are really effective when there are multiple salves being used. The next input pin is the SPI_DIN, DIN stands for data in and it is connected to the master output slave input line of the microcontroller, data is sent based off the rising edge of the microcontrollers clock. The last input pin that is being used is the SPI_CLK, CLK stands for clock and this is connected to the microcontrollers SCK line and SCK is the serial clock for the microcontroller.
Communication via MCU

64
There really isn’t a large number of output pins, this is really due to this device being the slave. The first output pin is the SPI_DOUT, DOUT stands for data out and since this is the slave this data can’t be sent when it pleases as discussed in section 6.1.3.3 the data coming out of the WIFI module has to have a prearranged cycle setup for it in order for it to not cause any miscommunication with the microcontroller. This line is connected to the master input slave output of the microcontroller. The last output pin is the SPI_IRQ, IRQ stands for interrupt request and as mentioned above the data going out has to wait for signal in order for it to send out data. Therefore, the SPI_IRQ sends a signal to microcontroller when it has information to be sent out and this pin can be connected to any digital pin that has the interrupt attribution.
6.1.7 Hardware Schematics
This section will pertain to the overall schematic of the components needed to operate this device, for the bill of materials that will be bought up in a section further on. The schematic will display broken off sections such as power, connections from the external components (headers), the WIFI module, the level shifter, and the microcontroller. Figure 14 shows the overall schematic of what components will be used on for the printed circuit board.
Figure 14: Lockbox Components Schematic Looking at the figure above, it can be seen some details weren’t discussed in previous sections for the WIFI module, it can be seen that it has an external antennae connected, this design approach was crucial because not just any

65
antennae could be used; therefore, finding a particular antennae and its Eagle library was quite challenging, another scenario is the value of the inductor it has a value of 150 micro-henries, and the pad size that was needed was a 0805, but since this inductor is large another approach had to be taken; therefore, the 0805 size had to be taken out of consideration. The same problem occurred for the 100 micro-farad capacitor, we have to use the largest pad for this which is a 2917, but all in all the layout of the device worked out accordingly. Taking a look at the microcontroller it can be seen that an external resonator is added, ideally it won’t most likely be used, but it will be soldered in if the communication between the fingerprint scanner and the microcontroller isn’t what we were expecting. Also, on the microcontroller for the reset in order to have any problems and floating it, a pull resistor is placed at the pin in order for it not read any low levels. If it seems unclear to see what the full design looks like Figure 15 will show the just the Power and WIFI Module components in much more detail, since the microcontroller schematic was shown earlier.
Figure 15: Power System and Wi-Fi Module Schematics

66
6.2 Software Design Details
The software design of the project is divided into two main parts. One a web application, and two a software that programs the camera and the key-holder. The ldivided in three parts. A data base to save all of clients and employees information, frontend web applications to have a nice user interface, and a backend web application that will make allow the web app to communicate with the data base. The software for the camera and key-holder is necessary for them to communicate. The key-holder will need to activate the camera to start or stop the recording. Also, both the key-holder and the camera need to communicate with the web application to transfer their data.
6.2.1 Software Block Diagram
The block diagram bellow in Figure 16 represents the software design divided into different blocks and how they are connected. The blocks are separated into three different items in the system. They all intersect by delivering the data to the database. The final design contains the video streams, delivery persons’ information, customers information, and other delivery information. Also the block diagram is separated into paths depending on the type of implementation, backend and frontend.
Figure 16: Software Block Diagram

67
6.2.2 Software Design Overview
The software for this project is heavily complex. Multiple programing languages are used for different areas. As seen in the block diagram in the section above 5.2.1 the software design has three different items that need to be programmed. The key-holder, the camera, and the web application. The key holder, for starters, needs software implementation using the C or C++ programming language on the microcontroller. The software has several requirements. It must connect to Wi-Fi and indicate if the connection is successful. The software must detect the router and alert if the connection is successful. The alert can be through a blinking LED, or it can be programmed to show on a digital screen in the key-holder. Another requirement is that the device must be able to send data to the database and store it. This data needs to be programed to be sent in specific situations. For example, when then key is taken out of the device the microcontroller should send an alert (put request) to the database with the key-holders id and the time it was performed. Also, when the key is removed the software should activate the camera and start recording. The camera is a device that will be purchase. It will be a GoPro camera that will be programmed to behave automatically. This camera comes with a powerful library open source call GoPro Hero, it is a Python library for controlling GoPro cameras over http. This will allow for the camera to record when the employee enters the client’s home and stream its recording to the web app. The goal is for the client to have the option of viewing what is happening in his/her house when being absent. The web application is the main controller, where everything communicates to. This system needs to have three layers to function properly, a database, a backend and a frontend. The data base will store all the information about the clients, the employees, and the deliveries. Within the clients’ different information will be store. The personal information such as, name, address, etc. and the key-holder id that the client has bought. The deliveries will have its own module, each one associated to the right client. Separately the drivers will be store also containing its own personal information, driving approvals as well as the deliveries they are assigned to them. The backend software design will be developed using Node. This layer will allow the frontend to communicate with the database. Also, it will store the data received by the key-holder, camera and user input correctly on the database. All communication to the backend will be through requests, there will be four types of requests used, get request, post request, delete request, and patch request. Post request, this will send new data to the system. For example, creating a new user and filling out all the personal information. This will send a post request with the name, last name, address, to the backend and the software will be in charge of storing into the database. On the other hand, get request, just like the name

68
says, it fetches information from the database. An good example to this request would be an employee looking up a delivery he/she has to do. The information of the delivery will be nicely shown on the web application by using the get request, finding the information in the database and returning its values to the frontend. Delete request functions similarly, the id of the object is sent as a parameter, when it finds the object on the database it deletes it. For example, if a client wants to cancel a delivery, he/she will go to the web app find the delivery and press the delete button. Once this is done then the backend will handle the delete request as explain above. Lastly, the patch request takes care of the changing any data that the client or the driver need to alter. For example, if address changes, then the patch request will take care of it. It will find the address on the database and replace it to the right string. The frontend design oversees making the system accessible to costumers and drivers. This requires a user interface design for users to have a great experience. For this reason, React, a JavaScript framework will be the programming language used. The web application will be link to a easy to remember URL for clients to use. This will route them to the main page, the log in page. After, the system will be divided into two routes, the drivers UI, and the customers UI. For the system to know if the user is a driver or a client, the user name and password will have to be authenticated. All permissions will be handle by the back end, and the results will show on the frontend. Once the user is logged in, he/she will have several options to navigate on the page. The routes will be handle by the frontend using reacts library, React-Router. This library will allow different components to load depending on what buttons are pushed. The frontend design should also take care of the recordings of each delivery. It should be able to stream live the deliveries as well as allowing the user and driver to access the videos when needed. Another must, is the instructions and set up of the key holder. When the user buys a key holder, it needs to be added to the database as well as have it connected to the home’s Wi-Fi. The Wi-Fi connection will be done through the software, once completed the key-holder is ready to be used. Over all, the three layers interlace and complement each other. Since the software is the physical final product, the design must be well done. To accomplish correct behaviors, the backend must be code with the right requests and handlers. And to allow for information to be deliver, updated and added the system the database needs a strong design.

69
6.3 Web Application Design
The section goes over details of the web application design and its process. The section is suitable for the developers to start implementing the design with little to no modifications needed. A big component of our system is the web-application; To make the design simplified a Use case diagram Figure 17 is created for developers and reviewers to be able to determine the main components and functionalities the application will perform and how it’s related to the outside world. A brief explanation of Use diagrams is provided to allow a thorough understanding. The stick figures are referred to as actors, which is anything that connects with the system from the outside world; therefore, drivers and users are considered actors. The oval shapes are use cases, which are action, based features the system supports. Use case diagrams support relationships, there are three different relationships used in our system. The extend relationship proposes that the base use case is a situation that can occur but not always. On the other hand, an include relationship suggests that the feature is necessary and must occur. The parent relationship, suggest that a child use case implements all parents features with additional characteristics.

70
Figure 17: Applications’ Use Case Diagram
6.3.1 Web Application Specifications & Mobile Responsiveness
This section will be composed of the specifications of certain aspects that the web application will be composed of. Also, considering one of the specifications/requirements that the team decided upon at the beginning of the class was to make the web application with the possible stretch goal option of using a tool like Native Script to transfer the web application into an android app. However, firstly, we’d like to make our application as a mobile responsive app. Section 6.3.1.1 will describe was mobile responsiveness is.
6.3.1.1 Mobile Responsiveness
Whenever you enter a website via your tablet or smartphone, you notice how everything looks nicely allocated and shifted to specific measurements. For example, on the regular website visiting on your personal computer. We may notice that perhaps a navigation bar that was on the main website when visiting on a smartphone that smartphone has shrunk into a list type of button navbar at the top of your smartphone. Most people don’t notice this shift because its so easily well done. However, we hope to accomplish this feat with our web application. Mobile responsiveness is the layout and/or content that responds or adapts based on the screen size of the platform that the website is displayed on. Typically, there have been four general screen sizes that responsive designs have been aimed to shift/adapt: the general-purpose widescreen computer, the smaller screen desktop computer (laptop), the tablet and the mobile smart phone. Having a website that is mobile responsive increases the positiveness of a user’s experience with the product. Considering with the product that the group has decided to develop, one of our requirement was for the website to be mobile responsive considering the homeowner would have to be away from home doing whatever it is they may need to be doing while the delivery driver reaches the home to deliver. The homeowner must be able to watch the livestream of the delivery being taken place from the possibilities of either a personal computer, a tablet or most importantly a smartphone. A responsive design makes it easier for users to share and link your content with a single URL. It also helps require less engineering time to maintain multiple pages for the same content. Reduces the possibility of common mistakes that affect mobile sites. Requires no redirection for users to have a device-optimized view, which reduces load time. Also, user agent-based redirection is error-prone and can degrade your site’s user experience.

71
With the aspect of mobile responsiveness, we have to apprehend the aspect of the mobile livestream. Seeing as how the client will be able to view the livestream on their mobile device, we will use Twitter’s Bootstrap framework client that is an open-source HTML, CSS, and JavaScript that is used for front-end development. With the help of this Twitter Bootstrap framework, that offers a dynamic website, responding in a gracefully on various computing devices. The team will be using this framework due to the fact of its free open-source and lengthy amount of documentation that allows the front-end coding aspect to be feasible.
6.3.1.2 Specifications
The following specifications are strictly specifications related to the web-application for develops to review during implementation process and use as milestones. These specifications go in depth beyond the earlier mentioned specifications in chapter 2. The speculations must be verifiable during testing. The software specifications are partitioned into functional, interface, user and human factor, documentation requirements and are formatted as follows in Figure 20.
Figure 20: Specifications Format
5.3.1.2.1 Functional Requirements

72
These are fundamental actions the team expects the web application be able to perform. Tables 1000- 1002 show functional requirements for this system’s web application.
No: 1000
Statement: The app shall validate users password by requiring it twice during sign up.
Source: Team
Dependency: The database must contain 2 password attributes.
Conflicts: None.
Supporting materials: None.
Evaluation Method: checking database contents when making fake accounts
Revision History: tested during database testing.
Software specification No. 1000
No: 1001
Statement: The app shall direct users to their home screen when an error occurs.
Source: Team
Dependency: user must be logged in.
Conflicts: Home screen must be complete. .
Supporting materials: None.
Evaluation Method: brute force and error and document observations.
Revision History: to be inspected before UI testing.
Software specification No. 1001

73
No: 1002
Statement: The app shall restrict users from accessing any data that is not associated with them. System will validate the current user at every function call.
Source: Team
Dependency: System must able to grasp current user in session at any time.
Conflicts: None.
Supporting materials: class diagram will show relationships of data.
Evaluation Method: check if the server validates user before function calls.
Revision History: validating prints to server terminal and shall be open during visit testing.
Software specification No. 1002
5.3.1.2.2 Interface Requirements
Interface requirements are descriptions of protocols for each interface in the system. For example, input and output data, precision of data, format of data if applicable, and timing issues. Tables 2000-2003 show Interface requirements for this system’s web application.
No: 2000
Statement: The app shall require 3 inputs for signup (username/email, password1, password2) and user will be directly prompted to profile page to enter remaining attributes related to the user.
Source: Team
Dependency: Database must contain the 3 main sign-up attributes
Conflicts: Errors during sign-up.
Supporting materials: data design section and UI path figures.
Evaluation Method: verify performance.
Revision History: tested when creating fake accounts.
Software specification No. 2000

74
No: 2001
Statement: The app shall keep a recording in the database for 5 days after a delivery.
Source: Team
Dependency: streaming must be supported at time of implementation and database must contain deadline attribute.
Conflicts: Database must be refreshed everyday for updates.
Supporting materials: data design section.
Evaluation Method: database will be manually checked to validate deletion
Revision History: through fake accounts, once streaming is tested.
Software specification No. 2001
No: 2002
Statement: The app shall only allow users to input data for deliveries at edit.
Source: Team
Dependency: database must support request updates
Conflicts: None.
Supporting materials: data design section.
Evaluation Method: view updates at refresh.
Revision History: tested at database and API testing.
Software specification No. 2002
No: 2003

75
Statement: The attributes in the app are in string format.
Source: Team
Dependency: None.
Conflicts: None.
Supporting materials: data design section.
Evaluation Method: view attributes in database.
Revision History: insert all types of characters as inputs.
Software specification No. 2003
5.3.1.2.3 User and Human Factors Requirements
User and human factors requirements are related to what level expertise is a user using the system expected to be at with technology as well as types of users, accommodations the system supports, and detecting misuse. Tables 3000-3001 show human requirements for this system’s web application.
No: 3000
Statement: the app shall support 3 types of users, clients, drivers, and administrators.
Source: Team
Dependency: database contains 3 types of users.
Conflicts: app must be able to detect which type of user is currently logged in.
Supporting materials: None.
Evaluation Method: print current user type in server terminal at sign in.
Revision History: check servers current user
Software specification No. 3000
No: 3001

76
Statement: The system expects users to have some level of previous interference with mobile apps.
Source: Team
Dependency: None.
Conflicts: None.
Supporting materials: None.
Evaluation Method: ask for users feedback.
Revision History: tested at UI testing.
Software specification No. 3001
No:3002
Statement: The system shall prompt user to either sign in or sign up in order to access the program.
Source: Team
Dependency: None.
Conflicts: None.
Supporting materials: Some sketches of the Desktop and mobile version have been created in the following figures 3.20-3.23:

77
Figure 4.2.6.0: Desktop log-in Figure 4.2.6.1: Mobile log-in
Figure 4.2.6.3: Desktop sign-up Figure 4.2.6.4: Mobile sign-up
Evaluation Method: Both prompts will be tested.
Revision History: The team will be confirming the follow up functionality of the prompts. To be expecting sign in/ sign up pages.
Software specification No. 3002
5.3.1.2.4 Data Requirements
Data requirements are any calculation the system shall make for display purposes or verification purposes. The only data requirement the web app has is in table 4000- 4001

78
No: 4000
Statement: the app shall view deliveries in order of expected delivery.
Source: Team
Dependency: must be able to sort by the attribute expected delivery.
Conflicts: cannot obtain expected devilry information from external API
Supporting materials: None.
Evaluation Method: view from fake accounts.
Revision History: make a request from database and view attribute.
Software specification No. 4000
No: 4001
Statement: The system shall retain customer information in collection format.
Source: Team
Dependency: Database implemented.
Conflicts: None.
Supporting materials:
Figure 3.3: ER diagram draft of the user table
Software specification No. 4001

79
5.3.1.2.4 Resource Requirements
Resource Requirements will go over tools used or/and services and items that will require maintenance. Tables Show Resource requirements 5000-5002 for this system’s web application.
No: 5000
Statement: The app shall have a domain name to be accessed at.
Source: Usability
Dependency: Must have purchased a domain name, must have a server to host the website on.
Conflicts: None
Supporting Materials: None
Evaluation Method: Check if the app can access the application from any browser.
Revision History: Taken care of when testing for browser support requirement.
Software specification No. 5000
No: 5001
Statement: The system shall be hosted on a cloud server
Source: Accessibility
Dependency: None
Conflicts: None
Supporting Materials: None
Evaluation Method: Can be accessed remotely
Revision History: maintained by developers in service chosen.
Software specification No. 5001
No: 5002
Statement: The system must maintain a database
Source: General Application

80
Dependency: Must have somewhere (server) to store the database
Conflicts: None
Supporting Materials: Database diagram
Evaluation Method: All of the necessary data is stored in an organized an unified manner
Revision History: database will be maintained and the structure updated if necessary.
Software specification No. 5002
6.3.2 Architectural Design
This section talks about some of the project’s specifications. It represents the project as a collection of hardware and software components and their interfaces to establish the framework. In this case: the user interface, users, networking and database. This sections is about the interaction and implementation of each component.
6.3.2.1 High Level Architecture
On a higher level architecture we see the relationship between the UI, Users, Networking and Database. They all have responsibilities that are essential for the system to behave correctly. On Figure 11 it demonstrates the integration off all components.
Figure 8 User Interface: the UI will be responsible for reading the user’s input and sending them to the backend. The UI should be accessible and easy to use so that users without a technology background can use it.

81
Users: will be responsible for managing the accounts and applicable functions of the user. Responsible for storing and authenticating the user login information Some of the functions available to the user will be view driver’s records, view deliveries, view schedule, input hours, etc. Networking: will be responsible for handling the backend of our application. The network should be able to receive and transmit data to the User Interface and to the Database. Database: the database will handle the storage of all models being used by our system. The models include the Admin Model, the Driver Model, the Client Model and the Delivery Model. The database will be hosted on a server that can be used to transmit and receive messages to the network.
Figure 9
The server acts as the central database, where multiple users can login and access the system, as well as make requests to the server for sending or receiving data. The server will handle the storage of all clients records as well as information on all the drivers. Users will be able to access all user functions and be able to update or modify the data. A REST API will be the tool to send and store data in the database. Figure 6.3.2.1.2. demonstrates how the REST API Architecture interacts with the system.
6.3.2.2 System-interface Architecture
The system interface architecture defines all components and their modules. It explains how all modules with in the component interact with each other. Figure 13 shows all the components this system will need with their components.

82
User Interface: the software interface architecture model, Figure 13, contains modules that will handle the front-end of our application. These components have several modules that must interact with each other as well as modules in the Networking component. The React Javascript view framework will be used to dynamically render component to the DOM. We chose to use React to handle the user interface because it allows us to easily change the state of the application when receiving data from the database. React will be used in tandem with Redux to manage the application’s state. All the data from the backend will be pulled into the Redux store which will then be rendered by React.
Figure 10 Networking: this component contains modules that will handle the back-end of our application. This component must be able to communicate with both the front-end and the database. Node.JS will be used to handle the back-end of our application. JWT tokens will be used to handle the authentication for application. When a user logs in, their password will be hashed and compared to the hashed password stored in the database. Once the user is validated, the backend will issue a new JWT token to the user to authenticate any future requests. We will be using the Mongoose library to communicate between our database (MongoDB) and our backend server. Database: this component will be responsible for handling and storing all of the data associated with our application. MongoDB will handle all of the storage for our application. The database will store user information, patient data, and the

83
message model. The message model will store all of the information necessary to implement our messaging system.
6.3.3 Database Design
The software system will require a database to store user and driver information as well as order information to be able to retrieve the data whenever needed. The two main databases that were considered were either relational databases or document-oriented databases. Examples of the two databases were roughly compared and a summary is provided bellow. Relational databases: Specifically, SQL (Structured Query Language) database, the most common relational data was studied. A relational database compared to a document-oriented database is a lot more structured. Note, a table refers to a combination of related data. Where columns exist, and they have predetermined blueprint before being able to add any data or in more appropriate terms to a relational database, a row or a record, which can just be described as a filled entry. The blueprint, also referred to as setting up a schema must have a named column, in brief a field/attribute that describes the data that will be held in the column. In addition to the data type that the data entered in that column must abide by. For example, if the data contained in the field might be restricted to only integers, varchar, Booleans, etc. The major difference between relational databases and document-oriented databases is that a relation can be set between tables and unique identifiers must be present to be able to move from one table to another if a relation does exist. Document-oriented database: MongoDB, a common document-oriented database was examined for the software system; also referred to as a NoSQL database. Unlike, SQL does not require a structure neither from the database aspect nor from the order of its data fields. What relational databases refer to as tables, are called collections in Document-oriented. The question becomes how does one determine the data found? In a document-oriented database the data is defined in the document. Therefore, for each piece of data, its description or tile is attached to the data itself. Because MongoDB is usually written with JSON notation, which is the object representation of the JavaScript, the datatype is not required to be set beforehand. Note, this is a characteristic of JavaScript. Database decision: Considering the changes and relational aspects of the software development process. The software system will be constantly tested for user friendliness, therefore, is expected to have changes to the user data that might be needed to retrieve. In addition, the system only has three main collections of data, the drivers’ information, the users’ information, and most

84
importantly the order information. Therefore, a relation must be set from user to each users’ order and each order must be set to the driver who will be performing the order. However, some might consider that the system does not have a too many collections of data to cause relational confusion enough to require predetermined relationships. Therefore, a relational database is not necessarily required. With both the possible changes and relational aspects of the system considered, the database that will be used to implement the systems’ database is the document-oriented database, MongoDB. Because MongoDB provides more freedom and supports an easier process for adding to a collection’s fields. In addition, note that MongoDB can still simulate having relations between collections depending on the developers’ design. General database requirements: A unique key and schema are going to be implemented by the systems database. Because MongoDB will be used in this software’s system design, a related group of data will be referred to as a collection. To have access to a collections’ data, good practice is to have a unique field determined by the developer. Even though not required by MongoDB since it provides its own unique id whenever a record is created, or in other words, added to a collection. Note, some of SQL’s design process will still be used to create somewhat of a blueprint, referred to in MongoDB as a model. To connect one collection to another, an array of the unique identifier of the collection to connected will be saved. A general schema will be determined, yet not necessarily required for each record.
The unique identifier or key for each collection is as follows. The user information collection will use the email as the unique identifier. The driver information collection will be a driver id. The order collection will use MongoDB’s automatic id creation as the order id. The model design, other fields related to each collection and its unique identifiers, are shown in Figure 14.

85
Figure 11
Introduction to implementation: To have the database accessible to the frontend, the database will be required to be up in a server. In addition, to be able to communicate with the frontend, an API will be implemented. A RESTful API saves the database on a server and treats the frontend as a client, meaning it sends and receives data over http. The RESTful API performs operations provided a URI resource to sends/receive data in JSON format. The operations performed to retrieve data or send data are limited to a set of verbs are used to perform what is sometimes referred to as requests. The set yet not strictly restricted, is greatly recommended to be limited to http methods; the http methods recommended with a brief description are shown in the following in Figure 15.
Figure 12

86
Figure 13 Requests: The possible requests to be supported by the systems API with their functionality is decided for every collection before implementation. Figure 5.2.5.3. above shows the predetermined requests supported by the system and the exact functionality of each are discussed with examples to where they’d be used for frontend usage. The user collection will support GET, POST, PUT, PATCH, while the order collection will support GET, POST, PUT, PATCH. Finally, the driver collection will support GET, POST, PUT. Bellow is a table 4.2.5.4 of the description of each request that will be supported.
User collection
GET Retrievers users’ information to be displayed in user account.
POST Adds a new user at sign-up.
PUT Updates if user performs any changes to accounts.
PATCH Modifies existing user’s information. Order collection
GET Retrievers order information to be displayed to the user’s home page
POST Adds a new order once processed.
PUT Updates status of an order. Also, adds video recording when applicable.
PATCH Modifies existing delivery’s data.

87
Driver collection GET: Retrievers driver information.
POST: Adds a new driver once they’re added to the system.
PUT: Adds orders assigned to the driver.
DELETE: Deletes a driver's record if fired for example.
PATCH: Modifies existing driver’s data.
Table 2
6.3.4 User Interface Design
The goal of the user interface in this project is to create a design that is comfortable and enjoyable for the user. It should be a design that attracts the user to use this commodity multiple times. In order to accomplish this, the UI must follow some requirements. General requirements for the user interface are the following:
1. The UI must be designed to not be time consuming. Create a user, make orders, change data must not be time consuming.
2. The UI must be appealing to the eye. It should follow a color prattle defined fined in Figure 17.
3. The UI will be design based on the templates of Bulma or Bootstrap, open source CSS frameworks. All components created must follow the same style for the system to be consistent and not cause confusion [1].
4. The UI must be web and mobile friendly. The design must be consistent in both views.
5. The UI must allow to create users with the least amount of information as possible.
6. The UI must have three different designs, one for the drivers and one for the clients, and one for administrator.
Figure 14 All users must follow these design requirements to accomplish the goals of this project:
1. The UI must have a notification set up where drivers and clients can be alert when changes on the system are occurring.

88
2. The UI must have a navigation bar. Each type of user, administrator, driver, client, will be customize depending on the routes that each are allowed.
3. The UI must allow all users to log in and log out when desired. 4. All users must be able to change their personal information.
The administrator has persimmon to different routes on the software that drivers and clients can not access. Figure 18 shows the different paths the administrator can take once logged in. Also, the administrator has to have the following requirements:
1. The UI will only allow for administrators to create new drivers. 2. The UI will display a page where administrator can see all employees
profiles, deliveries and schedules. 3. The UI will allow administrators to schedule drivers. 4. Administrator UI will have the same design as the a regular employee The
administrator can request to deliver orders, just like any driver in the system.
5. The UI will allow administrators to disable drivers and schedule deliveries for all employees.
Figure 15 Just like the administrator drivers have their own specifications. They can only access certain routes on the systems. Figure 19 is a summary of all the paths the diver is allow to take when navigating on the system. The driver model of the user interface has to follow this requirements:

89
1. The UI will show a list of deliveries posted. They will be able to be sorted by time, distance, etc.
2. The UI must allow for driver to select what deliveries they whish to make. 3. The UI must allow full access to deliveries information only when the order
is happening. Once the delivery is complete the information will be blocked.
4. The UI must allow for driver to change the status of the delivery. 5. The UI must allow for driver to post his working availability, have track of
time worked and show the payment summary of each week.
Figure 16 Last but not least the customer’s user interface is personally designed. Each customer has permission to access only their information and their deliveries. The paths this user can take are reflected on Figure 20. Also, when building the UI the following requirements have to be taken in consideration: 1. The UI must be design for clients to submit their purchase number and list all
groceries that need to placed in the fridge. 2. The UI must show final delivery information listing all items specifications
and any notes the client wished to add. 3. The UI must allow for client to edit delivery in one click. The access to
deliveries posted must be under the navigation bar.

90
4. A dashboard must show summery and status of deliveries. It should have easy access to recording if available.
5. The UI must have a page that allows to subscribe the key holder in his/her user.
6. The UI must have a page that carries the user through the process of connecting the key-hold to the client’s Wi-Fi. It must be smooth for clients to not get overwhelm.
Figure 17
The user interface will be created following the style of the logo. The logo will be shown in almost every page under the navigation bar to keep consistency and remind the user what system they are navigating. The logo can be find in Figure 21. The logo is design expire on a childhood drawing of a house. It is one line that finishes with a circle, the package inside the house. It represents the groceries being delivered in side the house.

91
Figure 18
The user interface design will be following the following style:
• Website view will have the style like Figures 22 and 23. These figures are the primary designs of how the website for the the system will look like:
Figure 19

92
Figure 20
• Mobile view will have the style like Figures 24 and 25. These figures are the primary designs of how the mobile UI for the the system will look like:
Figure 21 Figure 22

93
6.3.5 Detailed Design
Stakeholders: In this groceries delivery system project there are several stakeholders identified. First the client, in this case the groceries stores. The groceries stores are the one that desires the system’s creation. Their goal is to delivery the groceries no matter if the customer is in its home or not. Another stakeholder is the user. In this case there are three different types of users, the administrator, the drivers and the customers. Administrators will use the system to stay on track of their employees, their information, and their schedules, as well as all orders done by the customers. The drivers are meant to know what their work schedule is, clock in and out, and they have to update their history/status when a delivery is in process or complete. The customers are meant to create delivery orders, customize their delivery, configure their key-hold, and view the recordings of their groceries being shipped.
6.3.5.1 Event Table:
The event table, Table 4, parses all the different actins that the project should implement. It gives an overall summary of the functions that should be added to the design when being created.
Event Name External Stimuli
External Responses Internal data and state
Login
selects login Takes user to home page
Sends an authorization request to the server which then either returns true or false depending on the credentials entered.
Logout Selects logout button
Takes user to login page
Deletes cookies from user device to clear their session.
Toggle Notifications
Toggles notifications switch on web app
Shows user that the notification switch is turned on
Updates data with new information, delivery or video added.

94
Add/change new information to delivery
Delivery button
Takes user to delivery page where all information is and can be added/change.
Inserts/updates new information to database table that holds user’s deliveries
View deliveries
Delivery button
Takes user to delivery page where all information shows
Gets all information from database table that holds user’s deliveries
View Employee Schedule
Selects view employee schedule button
Takes user to employee schedule calendar
Pulls user schedule info from the database
View Customer Info
Select view customer info button
Takes user to delivery-customer info page with all customer information
Pulls customers’ information from the database
Log Employee Hours
User clock in or clock out button
Displays timer for employee hours
Times amount of time logged by employee and saves it to the database
Get key
Driver uses finger print to get key
Finger print scanner reads driver’s print and delivers key
Scanner sends finger print data to database and verifies if data exits. Response is send back to key-holder.
Video Recording
Body camera records and stops recording
Camera is activated and deactivates with a signal when the key is taken out / or returned to the key-holder
Software will send a signal to camera to activate or deactivate. The recording with be store in the database.

95
Table 3
6.3.5.2 Class diagram
A class diagram is provided in Figure 26 to demonstrate all the functions that is needed by the web application. Most functions will interact with the database one way or another either to grab data or modify data. The main class is the User class which all three, customers, administrator and driver inherit. Note, while all three user have an EditProfile() method, they modify different aspects of their data, therefore was separate to each individually. For example, only the address attribute is available in the customer class, meaning that their EditProfile will be different than editing a driver's profile. Due to the recordings service used is dealt with outside the scope of our web application, recording is its separate outsourced class. However out system will save some information regarding recordings for controlling. For example, when the recording needs to be deleted or a reviewed for a customer. The delivery setup is mainly used on the set up delivery page for the customer. Our system will deal with all related functions and will be development in such a way where all developer will be able to modify and gather needed information accordingly.

96
Figure 23 This upcoming section will go over how our system will be organized in development process to provide a standard for all developers. The folders in the project will be organized as follows to support the different functions, figure 6.3.5.2.2 shows a template of what the projects’ windows finder would preferably look like.

97
Figure 24 The `api` folder is the responsible for all operations related to database and API calls. The `models` folder will contain the schemas of each database collection mentioned in the database design section. While the `controllers` folder will contain all functions related to each collection. Functions here will be strictly being controlled by its own parameters, thus no slugs or body will be used in these functions. However, in the `routes` folders, API request functions will be set. These function requests would then utilize controller functions to modify or access the database. The function request will be related to a class from the class diagram above or a page in the web application. Here is where the URL would be declared and if applicable, whether a body or slug is used for customization and be used to be pass as parameters for the controller's functions. notice, any response statuses will be directed in the function requests since files in routes are related to a class or page in our system. The `pages` folder will contain JavaScript files for every page in the system, the files in pages will utilize files from the component folders when needed. For example, the navigation bar is considered a component that will be implemented in most, if not all pages. The `CSS` folder will contain all the stylesheets related to pages and components. While the `photos` will contain the system’s picture and any pictures that might be needed for a better user experience.
6.3.6 Cloud Hosting and Deployment
As mentioned in section 4.8, the systems’ web application will be hosted on amazon web services (AWS). AWS offered a wide variety of services, Elastic Beanstalk will be used as it is one of the service that provide easy methods for hosting a web application. This section will go over how the web application is set up as well as any background information needed for developers understanding.

98
Amazon web services offers a service called Beanstalk that offers users a quick start to hosting a web application without dealing with detailed settings that one might be necessary to be editing when getting started. However, because Beanstalk is one of the simpler services out there, a database is not automatically created with the project. The database must be set up using a separate service in conjunction with beanstalk. There are two main options to connecting a database, either connect it directly with the web application or as a separate database that can be accessed from different systems. The second option might be best, to allow our system to access templates for the microcontroller to support setting the fingerprint scanner for expected driver at any time. The procedure is provided to allow developers to deploy the project right away without further research. However, when supporting the database on the cloud, options must be revisited for further inspection. Procedure using AWS’s Beanstalk
1. Sign up. 2. Choose Beanstalk as the service. 3. Fill in application name, platform as Node.js. 4. Upload the source code from local machine as a zip folder.
Note: only zip the files without the main project folder. 5. Proceed to Configuration. 6. Edit Environment settings to contain a project name. In Addition to the
Domain if applicable, otherwise AWS offers a URL. Note: Domain must be purchased through another service.
7. Edit Instances to choose a specific datacenter. 8. Edit Container Options to modify the Node command to the projects’ start
script. 9. A database service must be used to support a database, go through EC2
setting.
6.3.7 Web Application Summary
The web application is almost the entirety of the projects software portion. The web application will be able to communicate the homeowner and the driver. The delivery drivers electronic components with the fingerprint scanner for the key-box to dispense and begin a livestreaming event. The web application will be connected to a YouTube API to enable a livestreaming event that will be unlisted/private from YouTubes live broadcasts on their side of the webservice. The client/homeowner will be able to then later view the livestreams that have taken place on an embedded YouTube playlist that will be available from the

99
MongoDB storage, that stores the links of specific dates that deliveries took place with the help of anchors for each date. The client/homeowner will have their FKAD in-home delivery service signup registered with the google client to enable all these features considering that Google owns YouTube and will make this feat a breeze.
6.4 Fingerprint programming
The fingerprint scanner the system will be utilizing, the TTL (GT-521F32), comes with supported protocols or in other words functions for convince. The command packets in the programming guide [1] were inspected and the protocols supported is ideal for our systems’ objective. This section goes over the required measures to be taken and an explanation of how the fingerprint software commands are transferred for implementation. In addition to how the code flow will be implemented for verification and enrollment respectively.
6.4.1 About the sensor
The most crucial information to be aware of when working with the TTL (GT-521F32) fingerprint sensor, is how capturing works including information about it’s database works and how data is transferred. The TTL (GT-521F32) does indeed capture a picture of ones’ fingerprint. However, the picture is encrypted in what is referred to as a template, which is 498 bytes each. This is mostly to save space that would have been required otherwise if the original fingerprint scan was saved in the database. For a clearer perception, when the system is verifying ones’ fingerprint, it converts it to a template and compares that template to templates saved in the database. Each template in the database is associated to a unique ID number that starts at zero. Therefore, when the system is expected to return or send a fingerprint as a parameter to be compared or verified, the ID that starts at zero and not the template is used. In the programming guide offered by sparkfun [1], the file goes over all the supported packets in details. Packets are data sent over a network and is read by the host or the sensor to encrypt and acknowledge the message intended. Packets usually hold the sender and destination information as well as any information needed by either the device or the host. TTL (GT-521F32) has supports 3 types of packets, command packets, response packets, as well as data packets. The following will address the most significant components of each of the TTL (GT-521F32) packets developer need to be aware of when working with the device.

100
Command packets are usually send by the host to the device/sensor. The two main components to be addressed is its command and parameter data. The command is a word in size, precisely 2 bytes in size. Each command or in other words, function or protocol the device supports corresponds to a hexadecimal for the device to understand and execute the command associated with. The parameter is input used to send any information the device might need to execute a command or to inform the device on the expected data to be returned. However, the parameter is limited to 4 bytes, in other words is dword in size, so that’s when data packets come in. Data packets are usually used here for transferring templates between the host and device since templates are 498 bytes. The main component of the data packet is the data which can vary in size in bytes. The size is predefined per prototype. However, the parameter in the command packets can send the ID that corresponds to a template or the baud rate for example. Data packets can be sent from either the host or device/sensor. Finally, the Response packets are sent from the device/sensor in response to a command packet. The main two components of the response packet are Response and parameter. The Response is a word in size and either sends 0x30 as an (ACK) acknowledgement to imply a success of a command sent, or 0x31 as a (NACK) Non-acknowledgement to imply an error that may have occured while executing the command sent. The parameter is dword in size and holds output the host might be expecting. In case of an ACK response, the parameter can hold data like the ID or a signal identifying a state. On the other hand, in case of a NACK, the parameter would hold an error code at corresponds to a specific error related to the command the was executed.
6.4.2 Implementation and details of required protocols
The implementation design will go over details of some of the protocols used as well as an estimate of the expected software flow. The exact function calls are referred for developers to be able to implement the design almost immediately. This section will go over general setup, then enrollment process and expected data control for supporting all drivers. Lastly the individual lockbox fingerprint sensor implementation.
6.4.2.1 Sensor Setup
The programming language used will be C++ as the libraries needed are in C++ as well. The main library included is a library created by Josh Hawley, “FPS_GT511C3” [2], with all the protocols supported. The second library that

101
might be needed is the “SoftwareSerial” library to connect to the microcontroller. Note the correct pins need to be defined in code after including the libraries. To be able to communicate with the sensor, the UART baud rate needs to be changed accordingly. A protocol called ChangeBaudrate is available in the library. However, in code, Hawley has a function prototype that takes in a unsigned long integer which is the baud rate desired to be set up as. The function returns a Boolean indicating its success. Note, in Hawley’s library, this function was not tested, therefore the packet details might be needed for developers to recreate the function. Figure 28 shows how the command and response packet are set up.
Figure 25
6.4.2.2 Enrollment and Central database
The ideal situation to support any driver who might use the system, a central database would be used to save all drivers’ templates. The templates would later be sent to each individual lockbox with a specific drivers’ template to be in the sensors’ own database for a certain timeframe. Therefore, when a new driver is entered in the system, they need to go through the enrollment process then our system needs to get the template and save it centrally. Hawley’s library, “FPS_GT511C3”, supports all the functions needed for the enrollment process. Figure 29 previews the code flow for enrollment process. Shaded figures are functions already set up in the “FPS_GT511C3” library. Notice the enrollment process requires 3 fingerprint captures, therefore the process of each capture is similar; the flowchart is condensed such that the process is repeated for Enroll1, Enroll2, and Enroll3.

102
While Hawley’s library implements all the necessary functions need for the enrollment process, saving the template function is not implemented. The template will be needed to send to individual lockboxes for verification. There are two methods for getting the template, either the getTemplete or a modification of Enroll3 function can be used. The Enroll3 function implemented by Hawley does not send back the template to host. Therefore if used, it must be modified to do so. The packet details for Enroll3 is provided in Figure 30 for developers to work with Hawley’s code and modify it accordingly. The other option is to implement the getTemplete function after regular enrollment method as shown in the flowchart above. Packet details are provided in Figure 31 for reference.
.
Figure 26

103
Figure 27
Figure 28

104
6.4.2.3 Template Setup and Verification implementation
For security measures, a driver’s fingerprint is only available for a set timeframe. When a driver is expected to do the delivery, their template will be set in the specified sensor and deleted after a specific time frame or once the delivery has been made, whichever comes first. Our system shall support expecting more than one driver in the same time frame. Thus, the Id parameter will be checked before setting a template in the sensor’s database. Figure 32 shows the flowchart of the expected setting up and verification process respectively.
Figure 29 Again, the issue arises where the function needed is not supported by Hawley’s library. Therefore must be implemented by the developers. setTemplete’s protocol details are provided in Figure 33 and 34 below.

105
Figure 30
Figure 31

106
7. Project Prototype Construction The following section describes the expectations and the steps that will be taken for the hardware and software components of the lockbox. The bill of materials is also talked about in this section for clarity purposes there are two bills of material tables one for the minor components and one for the major components. The final design of the schematic was shown in Figure 34 from here the design of the printed circuit board is underway and the final layout will be generalized and sent to a vendor for manufacturing.
7.1 Prototype Expectations
This section talks about the different potential issues this project can have while building. It is divided into the hardware issues and the software issues. They both try to predict what could go wrong if specifications are not followed, and also what awareness this project should have before it fails. This section is important because the project is under schedule, therefore planning ahead of what to watch out for helps the project to advance and not get delay for issues that can be avoided.
7.1.1 Potential Hardware Issues
Hardware issues can happen for many reasons, it can be because the device is does not have enough power, or some parts are not compatible, soldering can be done incorrectly, and many more reasons. To detect the error, we have to have a good understanding of each element on the device, their behaviors, the cos and pros. When building the project there will be multiple errors, but we will try to point out some obvious one that can be avoid in time of construction. One of the most common errors in hardware is the time delay on parts. The project needs to account on how long each part will take to get to the team members to start working on it. All parts should be purchase in advance to not add any delays on the project. If any parts were to get delay this will affect the time constrains of the projects and will bottle neck in the production of the project. The project only has only four months to be completed, to avoid any suspension parts must be listed and purchase as soon as possible. If any components are not useful and need to be replace they will be bought immediately. Also, if there are any components that are not completely decided which brand is better and compatible, all options will be purchase and the once not used will be later return. This will allow the project to continue their construction process without unnecessary delays.

107
Another similar issue that can be presenting is ordering items that are no functional, or are later used and destroyed by overheating or improper soldering. This usually happens to smaller and delicate components. This kind of issues can be prevented by buying multiple of the same kind. For example, if wee need only two resistors to decrease the voltage across the finger print scanner, it would be clever to buy multiple resistors. Do to scheduling is better to invest some money that get behind by waiting on parts. The heart of the hardware is the board, where most components are going to be added and communicate to each other. An issue that can occur is designing the board wrong. All parts need to be taken into account and be carefully placed without creating any shortages. The stencil manufacturer and the board itself are one of the most expensive components of the project. Selecting the correct board and its parts carefully can avoid multiple issues and time delays. It is very important to arrange every item, place, pad on the board correctly. All items must be placed where they are being powered properly and are able to perform their job without any inconvenience. This is also critical for the physical printed circuit board to be perfect on the first couple of tries. There is no time to design the board multiple times. The companies that produce the board and stencil will generate the board as told, no changes can be done once submitted the plan. If an error occurs, it will cost the project time and money. A common mistake that can be easy to fix, if caught right away, is shortages created when soldering components. This can happen due to incorrect handling or bad equipment. Some components can be very small and hard to solder, if the soldering iron is in good conditions soldering can go smoothly. When soldering parts to the board, for example the microprocessor or the Wi-Fi module, it is possible to shortage two pins or two pads by adding metal in between. Usually the soldering iron comes with more tools to ease the process. A microscope can allow to catch any shortages and without it, it cannot be detected. A desoldering pump is a very useful tool that allows to remove metal that is not wanted. This can prevent a lot of shortages. For this project only one prototype of a key-holder will be created. When creating only one prototype an issue that can occur is the software not distinguishing different key-holders are saving a finger-print to every device. The hardware implementation on the finger-print has to be perfectly set for the software not to fail. One issue can be not synchronizing the fingerprint scanner to the micro-controller properly. The fingerprint scanner it has an adjustable baud rate which is how fast the communication can be sent to the MC. Both have to have the same rate, it can be adjusted from 9600-115200 bps (baud rate per second), ideally, they should work synchronous. Another issue can be is miss reading the data and storing the wrong fingerprint, this can affect the performance of the key-holder. The data can be sent and received by both the fingerprint sensor and the MCU. This will affect the performance of the product and it will also create some

108
problems with the database. To avoid this problem, the finger-scanner has to be connected correctly to the MCU and programmed the data only once. In order to accomplish the correct, set up, the level shifters must be managed precisely. For example, the UART communication between the MCU and fingerprint input voltage has to be between 2 and 4.5 volts (this project will power 3.3 Volts) and low levels have to be between 0 and 1.35, give 3.3 Volts as high, low must be 0.67 Volts. This specification is essential, so the digital logic is able to read 1 or 0. Following this requirement the fingerprint data will be able to behave and the project will be able to continue without an unnecessary issue. One likely issue that the hardware can face is the antenna. Team members that are in charge of setting up the Wi-Fi and/or Bluetooth need to measure how strong the signal is. According to the research made for this project is not necessary to add an external antenna, although it should be taken into account. The PCB board has an antenna, but the signal might not be strong enough to send and receive data from/to the network. This issue needs to be resolved once it is in contraction, awareness might help solve any problems sooner. To avoid most common mistakes with hardware is to read the specifications of each element. Make sure each one is being powered appropriately and programmed like the instructions say. If the behavior of any element is unknown, it should be tested separately before it is added to the final prototype.
7.1.2 Potential Software Issues
As with all other software-based projects the team understands that we may encounter some software problems every now and again. These potential problems must be considered seeing as to how we will be installing software onto electrical devices that have highly limited resources and debugging capabilities. Nevertheless, in this section it is documented the potential software issues that most developers encounter one way or another when building a project. These issues are: incorrect calculations, incorrect data edits, ineffective data edits, incorrect coding, inadequate software performance, confusing or misleading data, software that is difficult to navigate, inconsistent processing, difficult to maintain and understand, unreliable results or performance, incorrect matching and merging of data, data searches that yield incorrect results, incorrect processing of data relationships, incorrect file and data handling, and inadequate security controls. Now we the following paragraphs will address how each of these issues might impact the developing of the software for the team. Incorrect calculation – are the key determinant whenever mathematical functions and mathematical operators are involved in the project. These may lead to incorrect outputs if the operators weren’t correctly used giving an incorrect

109
output. Incorrect data edits – This is when the software does not apply existing data edits correctly. For example, when having the potential ability to add certain data entries for a specific data set that isn’t normally allowed. Ineffective data edits – this is when the data edits are in place and working correctly, but still they fail to prevent incorrect data to be entered into the in-place system. For instance, when searches or sorts are performed on the address field, the search or sort may not find the intended address. Inadequate software performance – this refers to slow system response times and transaction throughput rates. This is possible, when the system is trying to authenticate the delivery driver’s fingerprint and is having a difficult and longtime processing the query. Confusing or misleading data – this means that the data shown to users may be correct, but the users might not fully understand how to interpret the data. Software that is difficult to navigate – most of us have experienced first-hand the frustration of using software that is difficult to use and often leads to frustrating times. This also influences a user’s experience with the product. Inconsistent processing – software that only works correctly in one environment, referring to software that has designed for one environment and cannot be easily transported to another environment. Difficult to maintain and understand – refers to the ability of a programmer or developer to maintain the software. With insufficient coding comments, the software would be difficult to understand and maintain. To main software, the person performing the maintenance must analyze and understand the software. This will be difficult with insufficient comments. Unreliable results or performance – means that the software does not deliver consistently correct results and/or cannot be depended to work correctly each time its used. Incorrect matching and merging of data – refers to when data is obtained from previous tests and is matched or merged with recent tests, possible issues. Data searches that yield incorrect results – means that a search retrieves incorrect data as the results of the search. This is a possible issue when specifying a certain fingerprint meant for delivery but the data search in the database processes a different delivery driver’s fingerprint for authentication and causes an issue. Incorrect processing of data relationships -means that data relationships are not created or maintained correctly between one or more data elements. For example, the system may allow for a fingerprint of a delivery driver that cannot perform the delivery that day. Incorrect file and data handling – refers to the software incorrectly retrieving data from files or tables. This could include retrieving data of a delivery that needs to be refrigerated but there are not refrigerated items in the list, a possible issue that may occur. Inadequate security controls – this means that unauthorized access to the system is not adequately controlled and detected. This is possible with the software considering there will be a set of three possible clients using the software: a delivery driver, the client, and the administrator. Possible issue may be certain UI’s being available for the incorrect user.

110
7.2 Parts Acquisition and BOM
As of now the parts have not been ordered, it would be ideal for the prototype board to be developed first before ordering the physical parts to place on the printed circuit board and also the printed circuit board design is still under review and a couple of considerations will be made after prototype testing. Table 5 will be below displaying the name of the minor parts such as capacitors, resistors, inductors, and the female headers. It will display quantity ordered, description, model/manufacturer number, and the part number.
Part Quantity Description Part Number Price
C1 1 Ceramic capacitor, 22uF,
T=±20%, V.R=10V
C2012X7S1A226M125AC $0.41
C2 1 Electrolytic capacitor, 100uF,
T=±10%, V.R=35V
EEHZK1V101XP $0.89
C3 1 Ceramic capacitor, 10uF,
T=±10%, V.R=35V
C2012X5R1V106K085AC $0.21
C4 2 Ceramic capacitor, 0.1uF,
T=±10% V.R.=16V
C0805Y104K4RACAUTO $0.12
C5 1 Ceramic capacitor, 2.2pF,
T=±0.5pF, V.R=50V
C0805C229D5GACTU $0.03
C6 1 Ceramic capacitor, 10pF,
T=±5%, V.R=50V
08055A100JAT2A $0.02
C7 2 Ceramic capacitor, 1uF,
T=±10%, V.R=10V
GRM219R61A105KA01D $0.04
D1 1 Rectifier diode, F.V=450mV,
𝐼𝑑=1A, V.R=20V
1N5817 $0.41
L1 1 Shielded inductor, 150uH, T=20%,
I=0.95A
CLF7045NIT-151M-D $0.74
L2 1 High frequency inductor, 2.2nH,
F=6 GHz
PM0805-2N2M-RC $0.13
R1 1 Thin film, 10kΩ, T=±0.1%, V.R=100V
PCF0805-13-10KBT1 $0.99

111
1X02 3 Female headers, 0.1”, through hole
vertical
LS-00010 $1.45
Table 4
Regarding back to the table some words are shortened to account for space, T: Tolerance, V.R: Voltage rating, F.V: Forward voltage which is the smallest voltage drop needed across that diode, 𝐼𝑑 is the forward bias diode current, F: Frequency, and I: current in the inductor. The table above shows the minor components such as the resistors, capacitors and resistors. There will be another table that displays the main components such as the microcontroller, WIFI module, level shifter, and the voltage regulators. Therefore, Table 6 shows the bill of materials (BOM) for the main components.
Part Quantity Description Part Number Price Microcontroller 1 8-bit, F=20MHz,
TQFP-32 pins ATMEGA328P-AN $4.25
Antennae 1 F.C=2.4 GHz, BW=420 MHz,
Pmax=1W
ANT7020LL05R2400A $0.58
WIFI module 1 F.R.F=2.4GHz, M.I=SPI
CC3000MOD $26.86
Level Shifter 1 Non-inverting, buffer, SOIC pin
layout
CD74HC4050M $0.17
Resonator 1 Ceramic, F.T=±0.7%, F=16
MHz
PBRC16.00MR70X000 $0.30
Voltage Regulator
1 Step down (buck), 5V reg.,𝐼𝑂=75 mA,
S.F=65KHz
MAX638ACSA+ $5.00
Voltage Regulator
1 Low drop out, 3.3 V reg., 𝐼𝑂=500 mA
LM2937ES-3.3/NOPB $1.04
Fingerprint Scanner
1 450 dpi, UART &USB
communication
GT-521FX2 $31.95
LCD Display 1 5X8 dots with cursor, built-in
controller
GDM1602K $15.95
Lock-style solenoid
1 Electro-magnet controlled, Vin=9V
1512 $14.95
Battery Holder 2 On/OFF switch, holds 9V batteries
17 $5.10
Male Jumper Cables
1 0.1" pitch, 6” wires
758 $3.95

112
Total Price: $115.54
Table 5
Table 5 and 6 are split up for clarification purposes. Breaking down some of the terms TQFP: is the package layout for the microcontroller, BW: Bandwidth, Pmax: max power the antennae consumes, F.C: Center frequency, F.R.F: Center frequency of the WIFIs’ module radio frequency, F.T: Frequency tolerance, S.F: Switching frequency, 𝐼𝑂: Output current.

113
8. Project Prototype Testing The following sections are sectioned into hardware and software components that are expected to be tested in the development process. The hardware and software both provide a timeline of the expected order the individual components will be tested. Ideally, every component should be tested before the final assembled product. This is to allow further inspection and discovering faults. This section will go into great detail on how each part will be tested to ensure the device is working to specifications. It is important that the product works to specs so that the results of communicating the software and the hardware goes as designed. Testing each part individually will allow for the project construction to go more easily. A few of the parts that need to be tested are the fingerprint scanner, the Wi-Fi’s functionality with the device, power testing, and most importantly the microcontroller. There will be software testing as well, but the hardware is the more import factor of the section.
8.1 Hardware Testing
This section will go over the different components of hardware that is expected to be tested in the development process individually. The sections will go into detail of how the components will be tested. First section is the database, since it is expected to be implemented in the early stages of development. An overview is provided to recognize the process.
8.1.1 Hardware Testing Overview
Figure 32 Testing the hardware is crucial to ensure the final product will perform properly. Figure 35 shows a general timeline for the hardware components that will be

114
tested in a recommended order. Note the following Table 7 shows each component that will be tested along with any limitations and dependencies.
Component Dependency
Microcontroller Programing language and components
Power Microcontroller power requirement
Wi-Fi module Programming protocols and microcontroller
Fingerprint Scanner Microcontroller must be define
Camera/video recording N/A
Table 6
8.1.2 Microcontroller Testing
With the microcontroller chosen to be the ATMEGA2560, a 100-pin microcontroller from Atmel. Probably the best known in Arduino brand of development platforms. We will be conducting various tests with this microcontroller since it is the main component of the product that will control the rest of the hardware pieces. Firstly, we have to notice if the Atmega is alive, for example if it provides a heartbeat or known as the bootloader feature for Arduino board that tells the user if the microcontroller is alive or not. It will blink the LED attached to the pin 13 right after boot. If it doesn’t blink three times anymore, we will have to known that if it had ever blinked after boot before. We will also have to note when performing microcontroller testing that the resistors R2 and LED1 are not strictly required for the programming but will be included for the testing purposes. The Arduino chosen will contain a bootloader considering that the programming of the ATMEGA2560 is not that easy to test if the microcontroller does not come equipped with a bootloader. Without the bootloader will in fact run 16 times slower than the code should, and the Arduino IDE compiles the code to run at 16 MHz and not 1 MHz. With the bootloader however, testing will go more feasibly considering that config register s is set to use an external crystal as clock. Simply for the microcontrollers testing environment, the team member will plug the board into a USB port on the computer and check the green LED power indicator to make sure that it has illuminated. Standard Arduino boards have a green LED power indicator located near the reset switch. An orange LED near the center of the board would flash on and off when the board is powered up. If

115
the power LED doesn’t illuminate when the board is connected to the computer, then the board is probably not receiving any power. When testing and the flashing led is being controlled by code running on the board (output pin 13). If the pin 13 LED is flashing, the sketch is running correctly, meaning that the chip on the board is working. If the green power LED is on but the pin 13 LED is not flashing, it could be that the factory code is not on the chip. There has been a noted error when ordering a AtMega328P, receiving a AtMega328 instead. So, troubleshooting is needed prior to any work to make sure of correct microcontroller. All following coding tests will be performed using software language C/C++. Testing these code snippets to see if Arduino responds accordingly as intended with each test using the Arduino’s IDE.
8.1.3 Fingerprint Scanner Testing
This section will cover the entire aspect of testing the fingerprint scanner. Seeing as how the fingerprint scanner part in the project plays an extremely major role. It will be imperative to have this technology working properly before implementation with other parts. To make sure that the fingerprint scanner is working we will use a documentation from the Arduino library of a blinking test, this will be in greater detail later. However, simply, if the fingerprint offers a blink when testing it then that means that the tech is working an we may proceed with other tests, including storing fingerprints to the fingerprint scanners database.
8.1.3.1 Overall Objective for Software Test Activity:
The focus of this test is to demonstrate the behavior of the fingerprint scanning. It should be able identify each individual fingerprint and store that data onto the database of the system.
8.1.3.2 Description of Test Environment:
The environment of this test consists of two finger print scanners and the code that programs it. The code should be able to compile and execute different actions.
1. It should be able to translate the finger print into data and store the print to the database.
2. The code should be able to compare different fingerprints and identify if they are equal or not.
3. The code should be able to delete fingerprints data from the database if asked to.

116
4. The code should be able to notify when fingerprint does not exist in the database.
5. The code should alert when fingerprint can’t be read and try again. 6. If error occurs the code should identify why and tell user what to do. For
example, if error or reading the print, finger must be place again. 7. The fingerprint scanner should be able to connect to respond to key-
holders microcontroller. 8. The fingerprint scanner should configure with the UI, backend and
database correctly.
8.1.3.3 Overall Stopping Criteria
This testing will be done by trial and error. Multiple fingerprints will be store, deleted and compare. Different people using different fingers will be asked to use the fingerprint scanner. The testing will be concluded once no errors occur. Errors are identified as:
• Not identifying any finger print
• Not storing any data
• Not differentiating from various fingerprints
• Not identifying the fingerprint with one store previously.
8.1.4 Wi-Fi Functionality Testing
This section goes into detail with the purpose of connecting the system with the clients Wi-Fi and the process of demonstrating that there is no error with the test. Considering, a test fails if in fact the test was successful. The team will deploy multiple tests to ensure that the fingerprint is synced and also the device entirely is synced to offer communication with the delivery driver and the homeowner who is using our product.
8.1.4.1 Overall Objective for Software Test Activity:
The focus of this test is to demonstrate the behavior of the Wi-Fi on the key-holder. It should be able to connect to a home Wi-Fi router with no errors.
8.1.4.2 Description of Test Environment:
The environment of this test consists the microprocessor, its Wi-Fi module and the code that programs it. Also, the Wi-Fi module has to connect to a router, therefore a working router should be present and allow for device to connect. The code should be able to compile and execute different actions.

117
1. The appropriate baud rate which should be set up, it usually is 115200 2. It should be set up on the right port (COM port) 3. The device should show its own IP address 4. The device should connect to router. 5. The device should appear on the list of devices connected to router 6. The board should have an LED light up when the module is connected
to Wi-Fi 7. The device should be able to disconnect from Wi-Fi 8. The LED from the board should turn off when device disconnects from
Wi-Fi. 9. Device should have disappeared from list of devices connected to
router when disconnected.
8.1.4.3 Overall Stopping Criteria
This testing will be done by trial and error. Multiple trials on connecting and disconnecting from router will be done. Also, different routers will be used to test the device can connect to different networks without errors. The testing will be concluded once no errors occur. Errors are identified as:
• Not identifying its own IP address
• Not connecting to Wi-Fi
• LED not turning on or off
8.1.5 Power Testing
This testing phase is very crucial because without power our device won’t be able to function properly or at all. Therefore, the Low Dropout Regulators have to be able to supply enough current to different components and provide a regulated voltage that is within 5 percent of its ideal value. The device in general should be able to run for at least 10 minutes maximum, for every two hours. As mentioned earlier in our design, the components require different voltages and they also account for different currents; therefore, in order to have accurate test results, this can be practiced on a breadboard with both low dropout voltage regulator, one for the 5 volt regulator and the 3.3 volt regulator. For the 5 volt low dropout reuglator applying three loads in parallel would be the most thought out scenario because the microcontroller, servo motor, and the fingerprint scanner will feed off this power supply; therefore, applying three loads will show how exactly the low dropout regulator can work under these conditions. For the 3.3 volt low dropout regulator this approach was taken because at first a voltage divider will be placed the output of the buck converter and inputted into the WIFI module, that would work, but there will be a load affect to account for

118
caused by the resistors and since the WIFI module needs at least 250 milliamps, the resistors will lower the current going to the WIFI module. For the low dropout it will supply a regulated voltage of 3.3 volts, but accounting for the 5% it could will still be able to supply the right voltage for the two components which are the WIFI module and the fingerprint scanner. Just to be on the safe side when working with these devices different capacitor values will be used to see which can account for filtering out any unwanted AC voltage. Also, for the low dropout regulator since it is not a switching regulator the efficiency can be calculated once received and this tested value can be compared with the theoretical value.
8.2 Software Testing
This section will go over the different components of software that is expected to be tested in the development process individually. The sections will go into detail of how the components will be tested. First section is the database, since it is expected to be implemented in the early stages of development. An overview is provided to recognize the process.
8.2.1 Software Testing Overview
Figure 33
Testing the software is crucial to ensuring the system will perform properly. Figure 36 shows a general timeline for the software components that will be tested in a recommended order. Note the following Table 8 shows each component that will be tested along with any limitations and dependencies.
Component Dependency
User interface End UI completed with functionality
User experience Design implemented, or draft completed

119
Database functionality N/A
Database API integrated UI must be implemented
Table 7
8.2.2 Database and API Testing
This section will talk about the process of testing the database and the API. It will cover the objectives as well as listing the steps of how the testing will be done.
8.2.2.1 Overall Objective for Software Test Activity:
To verify that the database was successfully implemented, and the server is running, the RESTful API that was used will be tested to verify request functionality. Also, to verify that the correct records are sent/retrieved from/to the correct collection. The API will be tested twice, once while being built on the developers end and the other when integrated with the frontend and the website is up and running.
8.2.2.2 Description of Test Environment:
In the development phase, Dena will be testing the functionality of each supported request in addition to creating a detailed table with each requests’ functionality for easier understanding by the frontend developers. The tools that will be used are ROBO 3T and POSTMAN. While the RESTful API is being developed, after each request has been implemented, a test will be running for verification. POSTMAN is an application that allows one to test a request and view the JSON file sent back from the server. Therefore, will be used at the end of each requests’ implementation. ROBO 3T is an application that provides a visual representation of the current database while the server is running. Therefore, at any point in time the entries can be examined. The application will be used to verify that any changes caused by the POST, PUT, or DELETE requests are implemented. Once the API is integrated with the frontend, the functionality of the requests will be tested again. However, unlike the development phase testing, the requests’ functionality will be tested by the frontend usage. For example, when signing up, a POST request is sent when a user presses the ‘submit’ button. The changes in the database will be examined for verification. Note, the implementation of the frontend is the focus with this portion of the testing. To confirm that the correct requests are connected to the appropriate user interface operations.

120
8.2.2.3 Overall Stopping Criteria
To determine when to stop database testing or how problems could be solved. If errors occur, in the case of a determined functionality of a request is found to not be applicable to implement; the team will hold a meeting to figure an alternative functionality. In the case of or a team member having trouble finding a solution; another team member will be assigned to find a proper solution to. For both cases, a decision should be made within 2 days of testing. Once all tests have been performed and no errors have been reported or fixed, the API will be considered good to deliver and assumed to be error-free.
8.2.3 User Experience Testing
User Experience is a nebulous term. There’s a definite split between “good” user experience and a “bad” user experience. At a high level, user experience is the aggregate and subjective experience of using a product such as a website or an application. It contains more than just good visual design or proper usability. In order to have a wonderful user experience our app must comply with all of the following: useful, usable, desirable, valuable, findable, accessible, credible. Useful – The product must be useful, the more useful the better. Usable – Ease of use, if it’s too complicated or confusing to use, the product would have already lost, usability is necessary. Desirable – Our quest for efficiency must be tempered by an appreciation for the power and value of image, identity, brand, and other elements of emotional design. Findable - We must strive to design navigable web sites and locatable objects, so users can find what they need. Accessible –just as our buildings have elevators and ramps, our websites should be accessible people with disabilities, today it’s good business and the ethical thing to do. Credible – we must know the website design elements that influence whether users trust and believe what the website can tell them. Finally, valuable – our website must deliver value to our end users, it must contribute to the bottom line and improve customer satisfaction. In This section we will describe the overall objective and the description of the test environment for our users. This feedback is overall valuable to developing of a credible service that we intend to build with our product. So then offering surveys for feedback from our clients is a necessary one. For the team to know in what user experience aspects to improve upon and/or make them easier to navigate across the website and to eliminate the possibility of excessive bugs in the future.

121
8.2.3.1 Overall Objective for Software Test Activity:
The focus of this test is to determine whether the UI design is user friendly and easily understood by users who have little experience with technology.
8.2.3.2 Description of Test Environment:
The test will be performed manually. The test will be performed when a design of a specific page is drafted or implemented; Not both, unless effective changes have been made. The test simply consists of having at least five volunteer users with little technology experience examine the design and providing feedback. The following form in Figure 37 will be used for critical feedback on areas such as color schemes, task understanding, overall look, and readability.
Figure 34
8.2.3.3 Overall Stopping Criteria
The testing will stop when at least 5 different individuals have provided feedback and at least 4/5 approve friendliness of the design. Changes will be made until stopping criteria has been reached.

122
8.2.4 User Interface Testing
This section is about the user interface and how its implementation will be tested. The goal is to have a final product that runs correctly, and the interface is working perfectly. The following tests described on this section will talk about the functionalities the user interface must have in order to have this part of the project complete. Each test will discuss the environment that is necessary to pass all the requirements as well as a fully description on how the test will be conducted.
8.2.4.1 Overall Objective for Software Test Activity:
The focus of this test is to determine if the user interface is complete and working correctly. All pages must be link and load the correct data. The testing will be divided into three parts. The first test will be conducted using the user interface as an admin user, the second one will be done as a driver user, and lastly the client user will be tested. All tests and subtests will be done manually.
8.2.4.2 Description of Test Environment:
Admin user test will be performed multiple times, testing different situations. For this specific user the test need to pass:
• Log in successfully and be directed to the correct dashboard. The navigation bar should have settings, employees, deliveries, and schedule.
• Navigate to admins settings correctly, this should have all possible sub routes link correctly and all components should be loaded.
• Admins personal information must be loaded correctly from the data base. Once information is correct tests changing some data will be run. Once the information is load correctly this test is complete.
• Navigate to drivers. All drivers must be listed correctly.
• Administrator should be able to create new drivers successfully. When created the driver will be given a user name and password.
• Administrators should be able to navigate to schedule. The user interface should load the admins schedule as well as every driver.
• Administrator should log out successfully. Drivers user test will be also performed multiple times. Once the admins test is completed the driver’s test will be conducted. This test will make sure this list below is successful:
• Drivers must be able to log in correctly from the driver’s URL.
• Drivers must test the user name and password given by the administrator. Once logged in correctly a change in password will be tested.

123
• Drivers dashboard must be loaded with the right components. They should have access to settings, deliveries, and schedules.
• Drivers must be able to select a delivery and modify status of delivery.
• Client should log out successfully. Clients user interface is the most complex since more options are given. All situations must be tested:
• Client must be able to sign in and later log in with user and password created.
• Log in should link to the correct dashboard. It should load the client’s settings, deliveries, and payments.
• Client must be able to see its personal information.
• Key-holders should be able to set up correctly.
• All deliveries made by the client should be listed on the deliveries route. It should allow to see each delivery individually. Loading all information, and recording.
• The recording must be able to play in good quality, 1080p.
• A delivery can be placed correctly.
• All items in the order that need to be refrigerated must be able to be added to the order.
• Drivers must be able to re visit the order placed, check on the status and make any changes.
• Drivers notifications should work correctly as well as the its settings.
• Drivers should log out successfully.
8.2.4.3 Overall Stopping Criteria
The testing will stop when all subtests are passing. For each section a sheet will be created having a testing criterion each having a pass or fail column. The section will be tested for all sub tests and later revise the ones failed. The testing process will continue until all tests are successful. Changes can be done and new tests can be added within the process. The user interface must be in perfect conditions before finalizing the project.
8.2.5 Simulated Testing
In this section of the document it will describe the testing environment for the simulation if the hardware portion is working.
8.2.5.1 Overall Objective for Software Test Activity:

124
The focus of this test is to determine the overall system is working correctly. The testing will consist of simulating clients placing an other and a driver delivering it. In order for the test to be successful all notifications, hardware and software elements must be responding correctly.
8.2.5.2 Description of Test Environment:
The testing environment consists of setting up the key-holder, the video recording camera, a testing driver and a testing client. First the key-holder has to be in place containing an object. That object will be representing the client’s home key. Once set up a fictitious user will place an order. The driver system will send a notification about the delivery. The driver must be able to answer and simulate a delivery. The delivery will be impersonated, testing the respond of the UI, the key-holder and the camera. After the driver obtains the delivery notification he/she will use the finger print lock on the key-hold and take the key. The camera must record right after and the video should be shown in the clients user. After the recording being successful the driver will simulate the return of the home key and lock the key-holder. This should stop the recording and send a notification to the client. In order for this test to be fully successful the following requirements must be met, otherwise changes will be done and the test will be rerun:
1. The key-holder must be connected the Wi-Fi successfully. 2. The key must be able to set in place without letting anyone to access it
unless being authorized. 3. The finger print must work perfectly. Only the finger print of the driver and
home owner should work. 4. The key-holder must signal the camera to turn on once key is taken out of
the compartment. 5. The key-holder must signal the camera to turn off when the key is put
back in the compartment. 6. The camera must be recording at all times of the delivery. 7. The video recording must be transmitted live allowing the client to watch it. 8. The video recording must be store in the database and allow client to
watch it when desired. 9. The video recording must have good quality and avoid buffering. 10. The driver must be alert of a delivery by a text message or email as soon
as delivery is placed. 11. The client must be notified by text message or email that delivery is on its
way. 12. The client must be notified by text message or email that driver is in the
home and video is available. 13. The client must be notified by text message or email that delivery is
complete and the key is back in the key holder.

125
8.2.5.3 Overall Stopping Criteria
The testing will stop once all requirements are met. If errors occur, they will be taken care of immediately and a small report will be conducted. The reports will help the debugging. They will state what when wrong when simulating a specific situation. Sub tests will be continuing to run unless they depend on a fail test. All developers will be in charge of testing, some will check for errors and other will fix anything that is not working depending on the area of expertise. When all testing succeeds then the system will be announced as complete.

126
9. Administrative Content This section talks about the project and how it will be approached. It breaks the project into sections and subsections; they all get assigned different team members. Milestones and budget, are also included in this sections. The milestones are divided into the spring semester, Senior Design 1 and the fall semester Senior Design 2. The budget on the other hand is the over cost of the project.
9.1 Division of Labor
To accomplish this project, the group decided to separate the project in different tasks and assigning them to different members. All members were allowed to take the tasks they wish to work on. Some will have more than one member since the section can be too complex for only one teammate. Table 9.1.1 shows all sections and who will work on them. Column one list all the different parts, followed with an X indicating who will that charge.
Ana Dena Fabio Karl
Key-Holder Mechanism X X
Microcontroller Assembly X X X
Wi-Fi connection X X
Finger Print set up X X
Camera set up Video Stream and Recording X X
Camera and Finger Print connection to database
X X
Build Database X
Build frontend for Clients X X
Build frontend for Drivers X
Build frontend deliveries X
Synchronize Camera software with frontend X X
Synchronize Key-Holder/Finger Print Software with frontend
X X
Table 8

127
9.2 Project Milestones
Overview of milestones per semester: Spring 2018 semester In depth research for what exact technologies will be used for the project. The mechanical aspect of the keylock would be designed and somewhat tested for the design decision. Team members will spend most of the semester self-learning web app development, working with APIs, implementing databases as well as getting familiar with the database service that will be used. The graphic aspect of the webapp would be designed by the end of the semester as well.
Fall 2018 semester
By the end of the semester have the keylock prototype ready and all software designs implemented and in network.
Milestone timesheet Note: does not include all deliverables, as it will be later updated.
No: Task Deadline Status Responsible
Senior Design I (Spring 2018)
1 Ideas January Done Team
2 Project selection January Done Team
3 Initial divide and conquer paper February Done Team
Research and Design
4 Camera system to use March-April Done N/A
5 Server to use March Done Dena
6 Microcontroller to use March Done Karl
7 Video recording methodology March Done Ana
8 Lockbox details March Done Karl
9 Power Supply March Done Karl

128
10 UI draft design March Done Team
11 Programming languages March Done Dena, Ana, Fabio
12 PCB layout April Done Karl
13 Final 120 page report May Done Team
Senior Design II (Fall 2018)
14 Build lock box prototype September Done Team
15 Software implemented October Done Team
16 Testing November Done Team
17 Final report November Done Team
18 Final presentation November Done Team
Table 9
9.3 Budget and Finance
Estimated project budget
Item Estimated price
Details if applicable
Gopro $0 Donated acquired
AWS (database) $0 Free 12 month trial used
Lockbox $50 Might buy 2
Microcontroller $39 Arduino MKR WAN 1300
DC-DC Buck Converter $3.22 and RS LM2575T and TPS560200
Fingerprint Scanner 5V $31.95 TTL (GT-521F32)
Table 10

129
9.4 Stretch Goals
The team has only two stretch goals in mind. The first is getting our website application onto mobile devices with an app. The second is far-fetched but we hope to make a product that may possibly be of interest to some buyers. From the get-go of senior design one we had in mind of making a website application with mobile responsiveness because none of us had experience with making a mobile application. While the feat, would have been an interesting one tackling that goal from the beginning we were satisfied with making it a web application. Now, with some insight of how web applications may be transferred onto Android applications using a tool called Native Script that transfers your web applications into an android app. We aim to somewhat make the web application with the mindset as to perhaps towards the end of the semester for senior design two we may transfer it onto an Android. The second stretch, as far-fetched as it may be, is one that we hope that we make a product that we are proud of and perhaps get some talks with a business plan.

130
10. Conclusion To conclude, within the entirety of this document there is a detailed overview as to how the team will develop this project. While it is not an easy feat, we have researched enough projects and investigated sufficient electronic components that we feel confident that we can build an essentially useful product. The team has researched software alternatives to go about designing the product, and with all the knowledge that we have gathered from the software research, the team will be excited to be using new programming languages that will enhance their skills and gain new ones. Overall, we intend to make a product that is both useful and commendable. In the direction of adding a fingerprint sensor to the keylock for with multiple UI’s specifically for each of the comparting persons of the project. With all the information we obtained, we may encounter some of the issues from the constraints and will follow the protocols for all the standards. Also, take into consideration the testing portion of the project. We hope, that in senior design two, the team is prepared enough with all that is within this documentation.

A
Appendices
Appendix A - Copyright Permissions
Figure 6.1.3.3 Email approval
Figure
Figure

B
Figure
Figure
Appendix B - Works Cited
[3.7.1-1] Nodcah, “DIY fingerprint scanning garagae door opener”, Instructables.com, 19 Oct. 2014, http://www.instructables.com/id/DIY-Fingerprint-Scanning-Garage-Door-Opener/ [3.7.1-2] Hawley. Josh, Fingerprint_scanner-TTL, 2013, Github repository, https://github.com/sparkfun/Fingerprint_Scanner-TTL [3.7.1-3] “Remote Controlled Door Lock Using a Fingerprint Sensor & Adafruit IO.” Introduction | Remote Controlled Door Lock Using a Fingerprint Sensor & Adafruit IO | Adafruit Learning System, https://learn.adafruit.com/remote-controlled-door-lock-using-a-fingerprint-sensor-and-adafruit-io/introduction [3.7.1-4] marcoschwartz , “Lock-control-fingerprint”, Github repository, https://github.com/openhomeautomation/lock-control-fingerprint [3.7.1-5] Adafruit, “Adafruit-fingerprint-Sensor-Library” , Github repository, https://github.com/adafruit/Adafruit-Fingerprint-Sensor-Library

C
[4.5.1.1-1] Instructables, “Li-ion Battery Charging,” Instructables.com, 15-Oct-2017. Available: http://www.instructables.com/id/Li-ion-battery-charging/. [Accessed: 08-Apr-2018]. [4.5.1.1-2] K. Araujo, “Battery Cell Comparison,” Epec Engineered Technologies - Build to Print Electronics. Available: http://www.epectec.com/batteries/cell-comparison.html. [Accessed: 08-Apr-2018]. [4.5.1.2-3] “Lecture 19: Solar cells.” Available: http://nptel.ac.in/courses/113106062/Lec19.pdf. [4.5.2-1] “What's The Difference Between Regulated & Unregulated Power Supplies?,” APG. [Available: https://www.apgsensors.com/about-us/blog/whats-the-difference-between-regulated-and-unregulated-power-supplies. [Accessed: 08-Apr-2018]. [4.6.1-1] D. Dunmur and H. G. Walton, “Liquid crystal display,” Encyclopædia Britannica, 03-Aug-2015. [Online]. Available: https://www.britannica.com/technology/liquid-crystal-display. [Accessed: 24-Apr-2018]. [4.6.1-2] “Liquid Crystal Phases,” Materials Duke, 21-Sep-2004. [Online]. Available: 2http://materials.duke.edu/XCOURSES/ME83/lcrystals2.pdf. [4.6.2-3] “An introduction to OLED displays,” OLED introduction and basic OLED information | OLED-Info. [Online]. Available: https://www.oled-info.com/introduction. [Accessed: 24-Apr-2018]. [3.12-1] Harvey, Cynthia, and Andy Patrizio. “AWS vs. Azure vs. Google: Cloud Comparison.” Datamation, 20 Dec. 2017,https://www.datamation.com/cloud-computing/aws-vs.-azure-vs.-google-cloud-comparison.html [5.1.1-1] “IPC-A-610 F Acceptability of Electronic Assemblies ,” IPC-A-610 F Acceptability of Electronic Assemblies . Available: http://www.ipc.org/committee/drafts/7-31b_d_610F-draft-Feb2012.pdf. [Accessed: 11-Feb-2011]. [5.1.1-2] “IPC-A-610 F Acceptability of Electronic Assemblies ,” IPC-A-610 F Acceptability of Electronic Assemblies . Available: http://www.ipc.org/committee/drafts/7-31b_d_610F-draft-Feb2012.pdf. [Accessed: 11-Feb-2011]. [5.1.1-3] “IPC-A-610 F Acceptability of Electronic Assemblies ,” IPC-A-610 F Acceptability of Electronic Assemblies. Available: http://www.ipc.org/committee/drafts/7-31b_d_610F-draft-Feb2012.pdf. [Accessed: 11-Feb-2011].

D
[4.1.2-1]“Agile Programming Best Practices.” VersionOne, https://www.versionone.com/agile-101/agile-software-programming-best-practices/ [4.1.2-2] Drupal’s Javascript standard https://www.drupal.org/docs/develop/standards/javascript/javascript-coding-standards [5.1.5-1] “for Portable Rechargeable Cells and Batteries—,” ANSI C18.2M, Part 2-2007 . Available: https://old.tic.ir/Content/media/article/NEMA C18.2M PART 2 (2007)_0.PDF. [5.1.5-2] “for Portable Rechargeable Cells and Batteries—,” ANSI C18.2M, Part 2-2007 Available: https://old.tic.ir/Content/media/article/NEMA C18.2M PART 2 (2007)_0.PDF. [5.1.3-1] Murnane, Tafline. “ISO/IEC/IEEE 29119 Software Testing.” ISO/IEC/IEEE 29119 Software Testing Standard, www.softwaretestingstandard.org/. [5.1.3-2] Murnane, Tafline. “ISO/IEC/IEEE 29119-2: Test Processes.” ISO/IEC/IEEE 29119 Software Testing Standard, www.softwaretestingstandard.org/part2.php. [5.1.3-3] Murnane, Tafline. “ISO/IEC/IEEE 29119-3: Test Documentation” ISO/IEC/IEEE 29119 Software Testing Standard, www.softwaretestingstandard.org/part3.php. [5.1.3-4] Murnane, Tafline. “ISO/IEC/IEEE 29119-4: Test Techniques” ISO/IEC/IEEE 29119 Software Testing Standard, www.softwaretestingstandard.org/part4.php. [5.1.3-5] Murnane, Tafline. “ISO/IEC 29119-5: Keyword Driven Testing” ISO/IEC/IEEE 29119 Software Testing Standard, www.softwaretestingstandard.org/part5.php. [5.2.3-1] Thomas, Jeremy. “Bulma: a Modern CSS Framework Based on Flexbox.” Bulma: a Modern CSS Framework Based on Flexbox, bulma.io/. [5.2.3-2] Fabrizio, Bianchi. “The super fast color schemes generator”. Coolors: https://coolors.co/ [5.2.5-1] “About.” REST API Tutorial, https://restfulapi.net/http-methods/ [6.4-1]Programming guide

E
https://cdn.sparkfun.com/assets/learn_tutorials/7/2/3/GT-521F52_Programming_guide_V10_20161001.pdf [6.4-2] Hawley. Josh, Fingerprint_scanner-TTL, 2013, Github repository, https://github.com/sparkfun/Fingerprint_Scanner-TTL ADEL 3398 (Fingerprint + Password), www.adellock.com/en/products/adel_3398_fingerprint_password.asp. “Auto-Unlock: How It Works on August Smart Lock | August Home Blog.” August, 14 Dec. 2017, august.com/2017/12/14/how-auto-unlock-works/. Birkett, Alex, et al. “User Experience Testing: A Conversion-Focused Guide.” CXL, 11 Aug. 2017, conversionxl.com/blog/user-experience-testing/. “Here Are Some Interesting Facts and Figures about the US Grocery Shopping Habits » StartUp Port.” StartUp Port, 17 June 2017, startup-port.com/blog/interesting-facts-figures-us-grocery-shopping-habits/. [email protected]. “Soldering Safety.” Department of Engineering Health & Safety, 5 Jan. 2018, safety.eng.cam.ac.uk/procedures/Soldering/soldering-safety. Lardinois, Frederic, and Greg Kumparak. “Nest Launches a New $349 Smart Outdoor Security Camera.” TechCrunch, TechCrunch, 25 Sept. 2017, techcrunch.com/2017/09/20/nest-launches-a-new-349-smart-outdoor-security-camera/. Liu, Gia. “Everything You Need to Know about Amazon Key.” Digital Trends, 6 Mar. 2018, www.digitaltrends.com/home/what-is-amazon-key/. “Microcontroller Testing.” LTX-Credence, ltxc.com/microcontroller-testing. “Nest × Yale Lock | Key-Free Smart Deadbolt.” Nest, Nest Labs, Inc., nest.com/lock/nest-yale-lock-key-free-smart-lock/overview/. Perez, Sarah. “Walmart Partners with Smart Lock Maker August to Test in-Home Delivery of Packages and Groceries.” TechCrunch, TechCrunch, 25 Sept. 2017, techcrunch.com/2017/09/21/walmart-partners-with-smart-lock-maker-august-to-test-in-home-delivery-of-packages-and-groceries/. Rice, Randall. “The 20 Most Common Software Problems.” Software Testing Training and Software Testing Consulting - ISTQB Software Testing Certification Training, www.riceconsulting.com/home/index.php/General-Testing-Articles/the-20-most-common-softwar