Exporters' Operations Guide - Ministry of Commerce - CO ...
202
MINISTRY OF COMMERCE CERTIFICATE OF ORIGIN AUTOMATION WEBSITE EXPORTERS’ OPERATIONS GUIDE v16.08.28 PAGE 1 Ministry of Commerce Certificate of Origin Automation Website www.certificateoforigin.moc.gov.kh Exporters’ Operations Guide Revision 16.08.28 28 th August 2016
-
Upload
khangminh22 -
Category
Documents
-
view
0 -
download
0
Transcript of Exporters' Operations Guide - Ministry of Commerce - CO ...
MINISTRY OF COMMERCE CERTIFICATE OF ORIGIN AUTOMATION WEBSITE EXPORTERS’ OPERATIONS GUIDE v16.08.28 PAGE 1
Ministry of Commerce
Certificate of Origin Automation Website
www.certificateoforigin.moc.gov.kh
Exporters’ Operations Guide
Revision 16.08.28 28th August 2016

MINISTRY OF COMMERCE CERTIFICATE OF ORIGIN AUTOMATION WEBSITE EXPORTERS’ OPERATIONS GUIDE v16.08.28 PAGE 2
Table of Contents
1 About Certificate of Origin Automation Website ............................................................................... 10
1.1 What is a Certificate of Origin? ................................................................................................... 10
1.2 Preferential and Non-preferential COs ....................................................................................... 10
1.3 Countries Requiring CO ............................................................................................................... 11
2 Exporters’ Workflow ........................................................................................................................... 12
2.1 Exporter Registration Process ..................................................................................................... 12
2.2 Request Workflow for Exporters ................................................................................................ 12
2.3 Certificate of Origin Workflow for Exporters .............................................................................. 13
2.4 Possible States of Certificate of Origin Applications ................................................................... 14
3 Registration Process ............................................................................................................................ 15
3.1 Create New Account ................................................................................................................... 16
4 Login .................................................................................................................................................... 17
4.1 Forgot Password ......................................................................................................................... 17
5 Navigating Your Way Within The Website .......................................................................................... 19
5.1 Edit Profile ................................................................................................................................... 20
5.1.1 Users not associated with an Exporter Company ............................................................... 20
5.1.2 Users associated with an Exporter Company ..................................................................... 21
5.1.3 E-Signature Enrolment ........................................................................................................ 22
6 Create New Certificate of Origin ......................................................................................................... 24
6.1 Form A ......................................................................................................................................... 24
6.1.1 Application Priority ............................................................................................................. 24
6.1.2 Exporter Details ................................................................................................................... 25
6.1.3 Consignee Details ................................................................................................................ 25
MINISTRY OF COMMERCE CERTIFICATE OF ORIGIN AUTOMATION WEBSITE EXPORTERS’ OPERATIONS GUIDE v16.08.28 PAGE 3
6.1.4 Transport Details ................................................................................................................. 25
6.1.5 Add Item(s) To CO Form ...................................................................................................... 26
6.1.6 Edit Item(s) From CO Form ................................................................................................. 27
6.1.7 Delete Item(s) From CO Form ............................................................................................. 27
6.1.8 Upload Supporting Document(s) ........................................................................................ 28
6.1.9 Delete an Uploaded Supporting Document ........................................................................ 28
6.2 Form A (Version 2) ...................................................................................................................... 29
6.2.1 Transport Details ................................................................................................................. 29
6.3 Form AANZ .................................................................................................................................. 30
6.3.1 Transport Details ................................................................................................................. 30
6.3.2 Subject of Third Party Invoicing .......................................................................................... 30
6.3.3 Back-to-Back Certificate of Origin ....................................................................................... 31
6.3.4 Other Form Declarations..................................................................................................... 31
6.4 Form AB ....................................................................................................................................... 32
6.4.1 Exporter Details ................................................................................................................... 32
6.4.2 Transport Details ................................................................................................................. 33
6.5 Form AI ........................................................................................................................................ 34
6.5.1 Other Form Declarations..................................................................................................... 34
6.6 Form AJ ....................................................................................................................................... 35
6.6.1 Transport Details ................................................................................................................. 35
6.7 Form AK ....................................................................................................................................... 36
6.7.1 Other Form Declarations..................................................................................................... 36
6.8 Form D ......................................................................................................................................... 37
6.8.1 Application Priority ............................................................................................................. 37
MINISTRY OF COMMERCE CERTIFICATE OF ORIGIN AUTOMATION WEBSITE EXPORTERS’ OPERATIONS GUIDE v16.08.28 PAGE 4
6.8.2 Exporter Details ................................................................................................................... 37
6.8.3 Consignee Details ................................................................................................................ 38
6.8.4 Transport Details ................................................................................................................. 38
6.8.5 Item Details ......................................................................................................................... 39
6.8.6 Add Item(s) To CO Form ...................................................................................................... 39
6.8.7 Edit Item(s) From CO Form ................................................................................................. 41
6.8.8 Delete Item(s) From CO Form ............................................................................................. 41
6.8.9 Add Product(s) To CO Form ................................................................................................ 42
6.8.10 Edit Product(s) From CO Form ............................................................................................ 44
6.8.11 Delete Product(s) From CO Form ........................................................................................ 44
6.8.12 Third-Country Invoicing....................................................................................................... 44
6.8.13 Back-to-Back CO .................................................................................................................. 45
6.8.14 Other Form Declarations..................................................................................................... 45
6.8.15 Supporting Document(s) ..................................................................................................... 45
6.8.16 Delete an Uploaded Supporting Document ........................................................................ 46
6.9 Form DFTPI-LDC .......................................................................................................................... 47
6.9.1 Transport Details ................................................................................................................. 47
6.10 Form E ......................................................................................................................................... 48
6.10.1 Third Party Invoicing ........................................................................................................... 48
6.10.2 Movement Certificate ......................................................................................................... 49
6.10.3 Other Form Declarations..................................................................................................... 49
6.11 Form KLDC ................................................................................................................................... 50
6.11.1 Transport Details ................................................................................................................. 50
6.12 Form N ........................................................................................................................................ 51

MINISTRY OF COMMERCE CERTIFICATE OF ORIGIN AUTOMATION WEBSITE EXPORTERS’ OPERATIONS GUIDE v16.08.28 PAGE 5
6.12.1 Transport Details ................................................................................................................. 51
6.12.2 CO Form Item(s) .................................................................................................................. 52
6.12.3 CO Form Product(s) ............................................................................................................. 53
6.13 Form S ......................................................................................................................................... 54
6.13.1 Transport Details ................................................................................................................. 54
6.14 Form SPT ..................................................................................................................................... 55
6.15 CO Reference Form ..................................................................................................................... 56
6.15.1 Transport Details ................................................................................................................. 56
6.15.2 CO Form Item(s) .................................................................................................................. 57
6.15.3 CO Form Product(s) ............................................................................................................. 58
7 CO Forms Actions ................................................................................................................................ 59
7.1 Save As Draft ............................................................................................................................... 59
7.2 Submit ......................................................................................................................................... 59
7.3 Print Preview ............................................................................................................................... 60
7.4 Discard ........................................................................................................................................ 62
7.5 Cancel Changes ........................................................................................................................... 62
7.6 Cancel CO .................................................................................................................................... 62
7.7 Copy CO ....................................................................................................................................... 62
7.8 Replace CO .................................................................................................................................. 65
7.9 Lost CO ........................................................................................................................................ 66
7.10 Abort CO ...................................................................................................................................... 67
7.11 Download Digitally Signed CO ..................................................................................................... 68
8 Application Enquiry: Search For CO Applications ............................................................................... 70
8.1 Sort by Columns .......................................................................................................................... 72

MINISTRY OF COMMERCE CERTIFICATE OF ORIGIN AUTOMATION WEBSITE EXPORTERS’ OPERATIONS GUIDE v16.08.28 PAGE 6
8.2 Filter Applications ....................................................................................................................... 73
9 CO Inbox .............................................................................................................................................. 74
9.1 Express CO Applications .............................................................................................................. 75
9.2 Service Level Agreement for Certificates of Origin ..................................................................... 75
9.3 Exporter Service Level Agreement .............................................................................................. 75
9.4 Search by Exporter Company ...................................................................................................... 76
9.5 Search by Form Type ................................................................................................................... 78
9.6 Sort by Columns .......................................................................................................................... 80
9.7 Filter Applications ....................................................................................................................... 81
10 Pay For An Individual CO Application Online via Acleda Bank ............................................................ 82
10.1 Payment Confirmation Page ....................................................................................................... 87
10.2 Acleda Bank Online Payment Pages ............................................................................................ 88
10.3 View Successful Payment Transaction Details ............................................................................ 92
10.4 Filter Payments ........................................................................................................................... 94
11 Pay For An Individual CO Application Online via Wing Payment ........................................................ 95
11.1 Payment Confirmation Page ..................................................................................................... 100
11.2 Wing Online Payment Pages ..................................................................................................... 101
11.3 View Successful Payment Transaction Details .......................................................................... 103
11.4 Filter Payments ......................................................................................................................... 105
12 Pay For An Individual CO Application Manually ................................................................................ 106
12.1 View Successful Payment Transaction Details .......................................................................... 108
12.2 Rejected Manual Payment(s) .................................................................................................... 109
12.3 Filter Outstanding Payments .................................................................................................... 111
13 Payment Advices: Pay For Multiple CO Applications ........................................................................ 112
MINISTRY OF COMMERCE CERTIFICATE OF ORIGIN AUTOMATION WEBSITE EXPORTERS’ OPERATIONS GUIDE v16.08.28 PAGE 7
13.1 By Exporter Company ............................................................................................................... 112
13.1.1 Print Payment Advice ........................................................................................................ 116
13.2 Pay Online with Acleda Bank .................................................................................................... 117
13.3 Pay Online with Wing ................................................................................................................ 123
13.4 Manual Payment ....................................................................................................................... 126
13.5 Rejected Manual Payment ........................................................................................................ 128
14 Payment Advices ............................................................................................................................... 129
14.1 Outstanding Payment Advices .................................................................................................. 129
14.2 Paid Payment Advices ............................................................................................................... 131
14.3 Print Payment Advice ................................................................................................................ 131
14.4 CO Expiration ............................................................................................................................ 132
15 Payment Receipts ............................................................................................................................. 134
16 Print Approved Certificate Of Origin ................................................................................................. 136
16.1 CO Form Print History ............................................................................................................... 137
17 Verify CO ........................................................................................................................................... 140
18 Request Inbox ................................................................................................................................... 142
18.1 Sort by Columns ........................................................................................................................ 144
18.2 Filter Requests .......................................................................................................................... 145
19 Exporter Management – Register an Exporter Company ................................................................. 146
19.1 Register a new Exporter Company or Associate with an existing Exporter Company.............. 146
20 Exporter Management – Exporter Company Amendment ............................................................... 159
20.1 Update company details ........................................................................................................... 159
20.2 Add an authorized user ............................................................................................................. 164
20.3 Change an authorized user’s role ............................................................................................. 169
MINISTRY OF COMMERCE CERTIFICATE OF ORIGIN AUTOMATION WEBSITE EXPORTERS’ OPERATIONS GUIDE v16.08.28 PAGE 8
20.4 Remove an authorized user ...................................................................................................... 171
20.5 Renew exporter company registration ..................................................................................... 173
20.6 Reminder ................................................................................................................................... 178
21 Stock Management ........................................................................................................................... 179
21.1 Register a Raw Material ............................................................................................................ 179
21.1.1 Search By HS Code ............................................................................................................ 180
21.2 Raw Material Enquiry ................................................................................................................ 180
21.3 Update Raw Material ................................................................................................................ 181
21.4 Delete Raw Material ................................................................................................................. 182
21.5 Raw Materials Quantity Control ............................................................................................... 183
21.5.1 Import New Stock ............................................................................................................. 183
21.5.2 Re-export Existing Stock .................................................................................................... 185
21.5.3 Stock Wastage ................................................................................................................... 187
21.5.4 CO Processing .................................................................................................................... 188
22 Product Management ....................................................................................................................... 189
22.1 Register a Product ..................................................................................................................... 189
22.1.1 Search HS Code by HS Code .............................................................................................. 191
22.1.2 Search HS Code by Description ......................................................................................... 192
22.1.3 Search HS Code by List All ................................................................................................. 194
22.1.4 Add Raw Material.............................................................................................................. 194
22.1.5 Edit Raw Material .............................................................................................................. 195
22.1.6 Delete Raw Material ......................................................................................................... 196
22.2 Product Enquiry ........................................................................................................................ 196
22.3 Update a Product ...................................................................................................................... 196

MINISTRY OF COMMERCE CERTIFICATE OF ORIGIN AUTOMATION WEBSITE EXPORTERS’ OPERATIONS GUIDE v16.08.28 PAGE 9
22.4 Delete a Product ....................................................................................................................... 197
23 Product Fee Management ................................................................................................................ 199
23.1 Register a Product Fee .............................................................................................................. 199
23.2 Product Fee Enquiry .................................................................................................................. 201
23.3 Update a Product Fee ............................................................................................................... 201
23.4 Delete a Product Fee ................................................................................................................. 202

MINISTRY OF COMMERCE CERTIFICATE OF ORIGIN AUTOMATION WEBSITE EXPORTERS’ OPERATIONS GUIDE v16.08.28 PAGE 10
1 About Certificate of Origin Automation Website
This Certificate of Origin Automation Website affords the ability to exporters and manufacturers to
create, submit and electronically pay for certificates of origin (CO) over the Internet 24 hours a day,
seven days a week.
With each exporter and/or manufacturer having the ability to self-generate COs, export processes are
streamlined with efficiencies optimized for cost and time.
COs created via this website are subject to the review and final approval of the Ministry of Commerce
and exporters will be notified automatically of submitted CO statuses via their registered e-mail.
1.1 What is a Certificate of Origin?
A certificate of origin (CO) is a document used in international trade to certify goods made in the
country from which they are exported from. A CO is completed by the exporter and certified by a
recognized issuing body – in the Kingdom of Cambodia’s case, Ministry of Commerce (MOC), attesting
that the goods in a particular export shipment have been produced, manufactured or processed in a
particular country.
For a CO to be valid, it must be signed by the exporter and countersigned by MOC.
1.2 Preferential and Non-preferential COs
Non-preferential COs see goods that do not benefit from any preferential treatment and do not
emanate from bilateral or multilateral free trade agreements (FTA).
Preferential COs attest that goods in a particular shipment are of a certain origin under the definitions of
a particular bilateral or multilateral FTA. This certificate is required by a country’s customs authority in
deciding whether the imports should benefit from preferential treatment in accordance with special
trading areas or customs unions such as the European Union, ASEAN or the North American Free Trade
Agreement (NAFTA) or before anti-dumping taxes are enforced.

MINISTRY OF COMMERCE CERTIFICATE OF ORIGIN AUTOMATION WEBSITE EXPORTERS’ OPERATIONS GUIDE v16.08.28 PAGE 11
1.3 Countries Requiring CO
Cambodia issues various different types of Preferential Tariff Certificate of Origin:
ASEAN-Australia-New Zealand: Certificate of Origin form AANZ
China: Certificate of Origin Form AC
India: Certificate of Origin Form AI
Korea: Certificate of Origin Form AK
Japan: Certificate of Origin Form AJ
Vietnam: Certificate of Origin Form S
General System of Preferences (LDC and LLDC): Certificate of Origin Form A
Non-Preferential Tariff: Can be issued using Certificate of Origin Form N

MINISTRY OF COMMERCE CERTIFICATE OF ORIGIN AUTOMATION WEBSITE EXPORTERS’ OPERATIONS GUIDE v16.08.28 PAGE 12
2 Exporters’ Workflow
2.1 Exporter Registration Process
Exporters are required to register for an account at the website (officerco.moc.gov.kh) to gain access to
its features. After registration, an e-mail will be sent to the address on record for the account to be
activated before access to the site is granted. After activation, the exporter then has full access to all
features accorded to exporters on the site.
Figure 2.1: Exporter registration process workflow
2.2 Request Workflow for Exporters
Exporters are required to submit requests that are subject to approval by MOC for the following actions:
1. register a new exporter company (subject to fees)
2. associate account with an existing exporter company (subject to fees)
3. update the details of an exporter company
4. addition of authorized user(s) to an exporter company.
After an exporter submits are request, if the request is subject to fees, the exporter will first have to pay
for the request. Once payment is made, the request will either Approve or Reject the request. Changes
will take effect once the request is approved.
Figure 2.2: Request workflow

MINISTRY OF COMMERCE CERTIFICATE OF ORIGIN AUTOMATION WEBSITE EXPORTERS’ OPERATIONS GUIDE v16.08.28 PAGE 13
2.3 Certificate of Origin Workflow for Exporters
Figure 2.3: Certificate of Origin workflow diagram
Registered exporters have the following functions available to them for every created certificate of
origin (CO) on the website:
1. Save as Draft – created COs that are incomplete or are not ready to be submitted yet can be
saved as draft to be completed at another time or submitted later.
2. Submit CO – this function submits completed COs to the Ministry of Commerce (MOC) for
review and subject to final approval before a submitted CO is deemed to be valid.
3. Resubmit Returned CO – submitted COs that are deemed incomplete by MOC will be returned
to the exporter for amendment or additional information to be resubmitted again.
4. Cancel CO – this function allows the exporter to cancel a CO regardless of its state.
5. Pay Online – exporters are required to pay for the Exporter Manufacturers’ Fee (EMF) and
Service Fee online for verified COs before final approval.
6. Pay Manually – exporters are required to pay for the Exporter Manufacturers’ Fee (EMF) and
Service Fee manually for verified COs subject to approval by MOC Finance personnel.
7. Print CO – paid and approved COs can be printed on pre-preprinted CO Forms and signed by the
exporter before final physical submission to MOC offices for endorsement.

MINISTRY OF COMMERCE CERTIFICATE OF ORIGIN AUTOMATION WEBSITE EXPORTERS’ OPERATIONS GUIDE v16.08.28 PAGE 14
2.4 Possible States of Certificate of Origin Applications
The possible workflow states of CO Forms that will appear on the website:
1. Draft – CO Forms that have been created by the exporter that have not been submitted to the
Ministry of Commerce (MOC) for review.
2. Submitted – CO Forms that have been submitted and are in the process of review by MOC
officers.
3. Reviewed – CO Forms that have been reviewed by MOC officers and are in the process of being
verified.
4. Verified – CO Forms that have been reviewed and verified by MOC officers and are pending
payment by the exporter.
5. Paid – CO Forms that have been paid by the exporter and are pending final approval or rejection
by MOC management.
6. Paid Manually – CO Forms that have been paid by the exporter through manual payment and
are pending a verification from the MOC Finance personnel.
7. Returned – CO Forms that have been reviewed by MOC officers that have been returned to the
exporter for amendment before resubmission.
8. Resubmitted – CO Forms that are resubmitted after having been previously returned by MOC
officers.
9. Rejected – CO Forms that have been rejected by MOC officers or MOC management.
10. Cancelled – CO Forms that have been cancelled by the exporter.
11. Approved – CO Forms that have been approved by the MOC management.
12. Lost – CO Forms that are lost by the exporter.
13. Aborted – CO Forms that are aborted by the exporter.

MINISTRY OF COMMERCE CERTIFICATE OF ORIGIN AUTOMATION WEBSITE EXPORTERS’ OPERATIONS GUIDE v16.08.28 PAGE 15
3 Registration Process
To register for a new account, browse to www.certificateoforigin.moc.gov.kh and click on the Login/Sign
Up button on the top right corner of the page (see Figure 3.1).
Figure 3.1: www.certificateoforigin.moc.gov.kh website top navigation bar
An Exporter Login box will popup (see Figure 3.2). Clicking on the Create New Account button will lead
you to the Create New Account page.
Figure 3.2: Exporter Login popup box

MINISTRY OF COMMERCE CERTIFICATE OF ORIGIN AUTOMATION WEBSITE EXPORTERS’ OPERATIONS GUIDE v16.08.28 PAGE 16
3.1 Create New Account
At the Create New Account page, enter your details and click Submit. Fields marked with (*) are
mandatory.
Figure 3.3: Successful account registration page
After successful submission (see Figure 3.3), an email will be sent to your registered email address.
When you receive the e-mail, please click on the provided link to activate your account.
Figure 3.4: Successful login message
Upon successful activation of your account (see Figure 3.4), you may proceed to login with your
registered e-mail address and password by clicking on the Login button.

MINISTRY OF COMMERCE CERTIFICATE OF ORIGIN AUTOMATION WEBSITE EXPORTERS’ OPERATIONS GUIDE v16.08.28 PAGE 17
4 Login
If you have previously registered for and activated your account and would like to login from the home
page (www.certificateoforigin.moc.gov.kh), click on the Login/Signup button on the top right corner of
the page.
At the Exporter Login popup (see Figure 3.2), enter your registered email address and password and
click on the Login button.
4.1 Forgot Password
Figure 4.1: Forgot Your Password Page
If you have forgotten your password, click on the “Forgot Your Password?” link at the Exporter Login
popup (see Figure 3.2). You will be redirected to the Forgot Your Password page (see Figure 4.1).
Type in your e-mail address and click the Submit button. An e-mail with a password reset link will be
sent to your registered e-mail address.
Once you’ve clicked on the password reset link in the e-mail, you will be redirected to the Reset Your
Password page (See Figure 4.2). Enter and confirm your new password and click on the Submit button to
reset your password.

MINISTRY OF COMMERCE CERTIFICATE OF ORIGIN AUTOMATION WEBSITE EXPORTERS’ OPERATIONS GUIDE v16.08.28 PAGE 18
Figure 4.2: Reset Your Password page
After successful password reset (see Figure 4.3), you may login to the website using your new password.
Figure 4.3: Successful Password Reset page

MINISTRY OF COMMERCE CERTIFICATE OF ORIGIN AUTOMATION WEBSITE EXPORTERS’ OPERATIONS GUIDE v16.08.28 PAGE 19
5 Navigating Your Way Within The Website
After login, you will be presented with your CO Inbox page. Click on your name at the top right corner of
the page (see Figure 5.1) to access your account settings menu.
Figure 5.1: CO Inbox Page with Account Settings menu
Account Settings available to you:
1. Edit Profile – update your particulars to keep your information up-to-date
2. Change Password – update your password every once in a while to keep your account
secure from unauthorized access
3. Logout – Logout from the Certificate of Origin Website so that no unauthorized users will
have access to your account when you are away from your computer or device, especially if
it is a shared or public device.

MINISTRY OF COMMERCE CERTIFICATE OF ORIGIN AUTOMATION WEBSITE EXPORTERS’ OPERATIONS GUIDE v16.08.28 PAGE 20
5.1 Edit Profile
Public Users are able to edit their profile. Navigate to it by placing your mouse over your name > Edit
Profile. Refer to Figure 5.2.
5.1.1 Users not associated with an Exporter Company
Users not associated with an Exporter Company can freely edit and update their profile.
Figure 5.2: Edit Profile Page
There are three tabs in the Edit Profile Page (see Figure 5.2):
MINISTRY OF COMMERCE CERTIFICATE OF ORIGIN AUTOMATION WEBSITE EXPORTERS’ OPERATIONS GUIDE v16.08.28 PAGE 21
1. Identification – containing personal information
o Click on the Submit button to update personal information.
2. Contact Details & Supporting Documents – containing company information, contact details and
supporting documents
o Click on the Save button to update company information, contact details and/or
uploaded supporting documents
3. E-Signature – containing the E-Signature for the registered user (Only shown to Users associated
with an Exporter Company)
o Click on the Submit button to update the E-Signature
5.1.2 Users associated with an Exporter Company
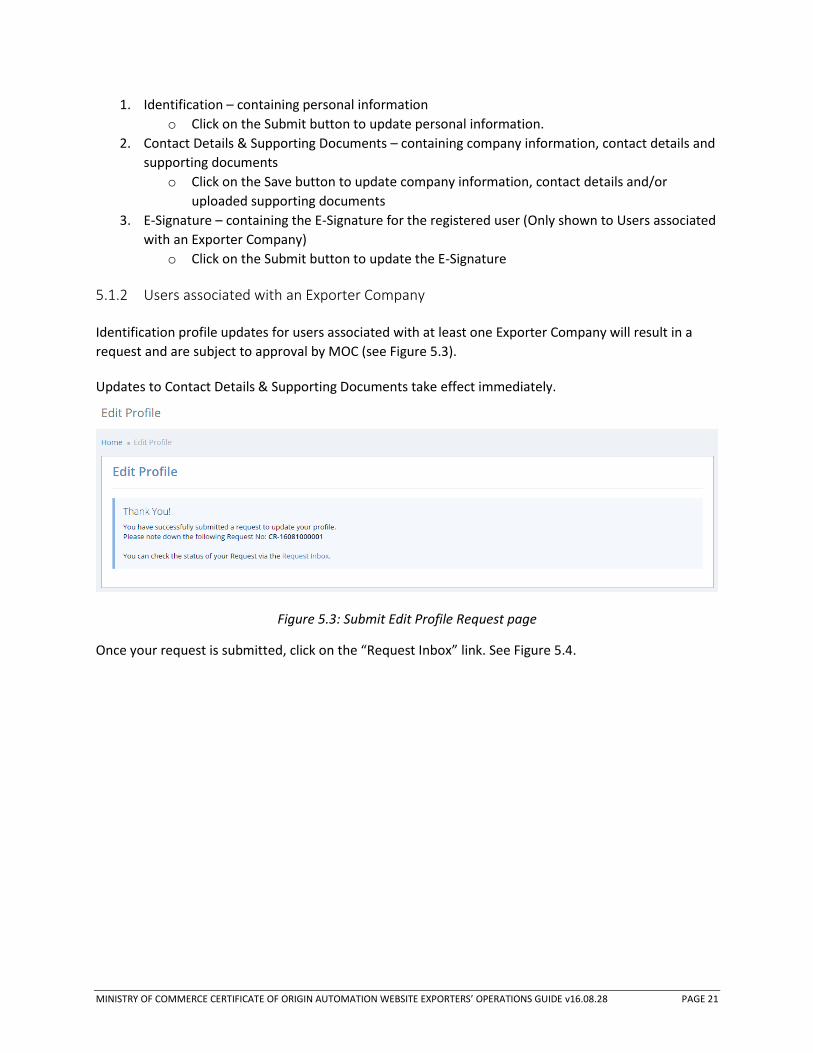
Identification profile updates for users associated with at least one Exporter Company will result in a
request and are subject to approval by MOC (see Figure 5.3).
Updates to Contact Details & Supporting Documents take effect immediately.
Figure 5.3: Submit Edit Profile Request page
Once your request is submitted, click on the “Request Inbox” link. See Figure 5.4.

MINISTRY OF COMMERCE CERTIFICATE OF ORIGIN AUTOMATION WEBSITE EXPORTERS’ OPERATIONS GUIDE v16.08.28 PAGE 22
Figure 5.4: Request Inbox for Update User Profile Request
If the request is subject to fees, the request status will be displayed as “Pending Payment”. For “Pending
Payment” requests, navigate to the Outstanding Payments page to make payment.
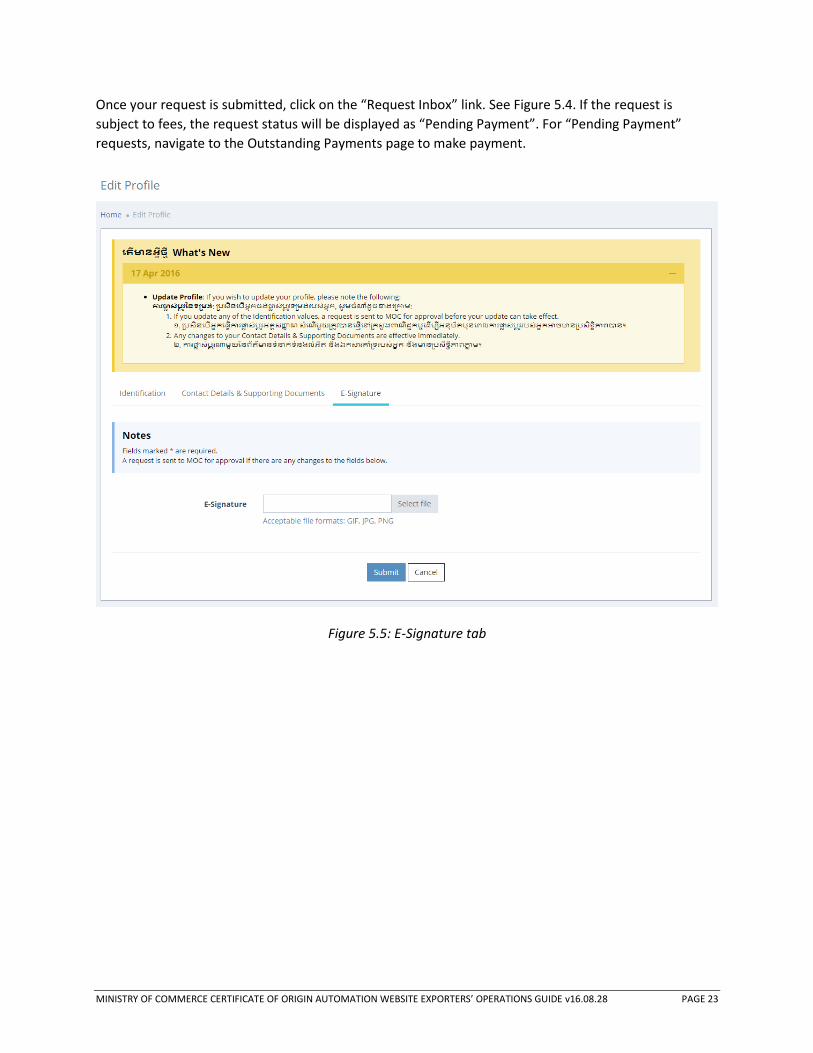
5.1.3 E-Signature Enrolment
Users associated with an exporter company can enroll for an E-Signature to obtain a digitally signed CO
Form. To enroll for an E-Signature, navigate to Edit Profile page and click on the E-Signature tab. Refer to
Figure 5.5. Select a file and ‘Submit’ to send a request for the enrolment of an E-Signature. The request
will be subject to approval by MOC.
MINISTRY OF COMMERCE CERTIFICATE OF ORIGIN AUTOMATION WEBSITE EXPORTERS’ OPERATIONS GUIDE v16.08.28 PAGE 23
Once your request is submitted, click on the “Request Inbox” link. See Figure 5.4. If the request is
subject to fees, the request status will be displayed as “Pending Payment”. For “Pending Payment”
requests, navigate to the Outstanding Payments page to make payment.
Figure 5.5: E-Signature tab

MINISTRY OF COMMERCE CERTIFICATE OF ORIGIN AUTOMATION WEBSITE EXPORTERS’ OPERATIONS GUIDE v16.08.28 PAGE 24
6 Create New Certificate of Origin
6.1 Form A
To create a new CO Form A, navigate to the Certificate of Origin > New Application > Form A menu and
click on Form A (see Figure 6.1).
Figure 6.1: Create New CO Form Application menu
You will then be redirected to the CO Form A creation page. Mandatory fields marked with an asterisk
(*) are required to be filled in or selected.
The What’s New section is updated every release. This section highlights the latest release updates.
6.1.1 Application Priority
Each CO is grouped into one of two categories – Standard or Express (To be implemented at a later date)
Figure 6.2: Application Priority Section
MINISTRY OF COMMERCE CERTIFICATE OF ORIGIN AUTOMATION WEBSITE EXPORTERS’ OPERATIONS GUIDE v16.08.28 PAGE 25
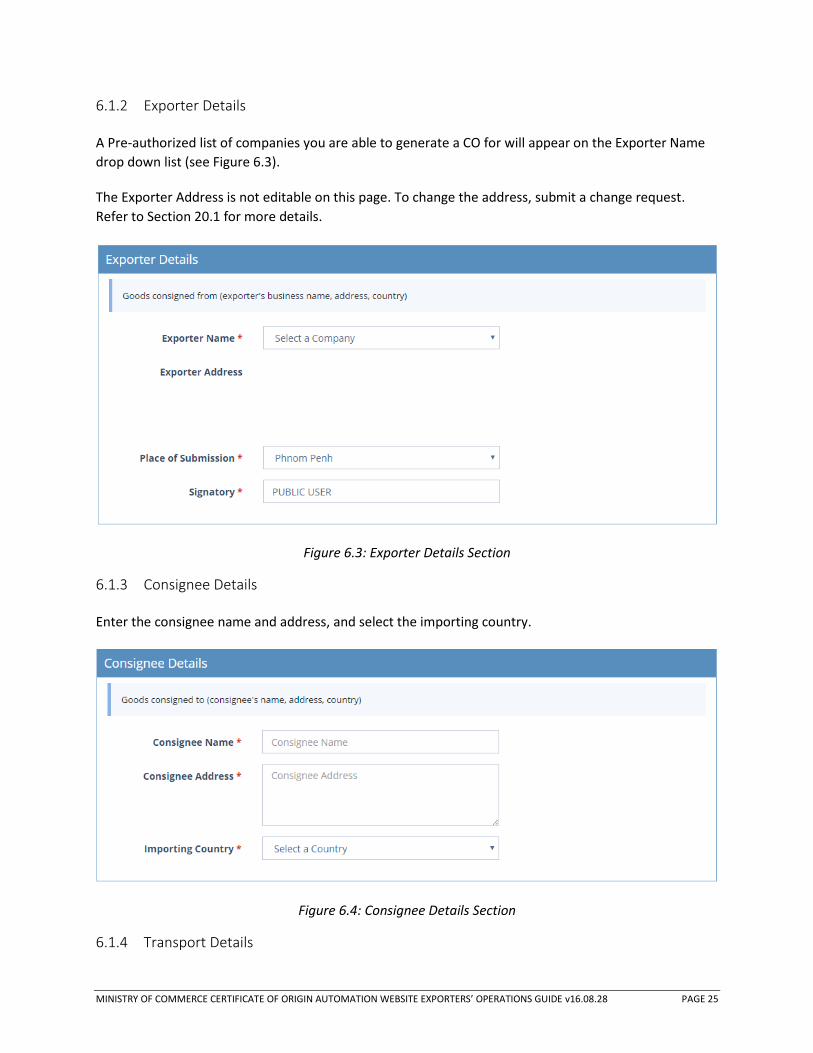
6.1.2 Exporter Details
A Pre-authorized list of companies you are able to generate a CO for will appear on the Exporter Name
drop down list (see Figure 6.3).
The Exporter Address is not editable on this page. To change the address, submit a change request.
Refer to Section 20.1 for more details.
Figure 6.3: Exporter Details Section
6.1.3 Consignee Details
Enter the consignee name and address, and select the importing country.
Figure 6.4: Consignee Details Section
6.1.4 Transport Details
MINISTRY OF COMMERCE CERTIFICATE OF ORIGIN AUTOMATION WEBSITE EXPORTERS’ OPERATIONS GUIDE v16.08.28 PAGE 26
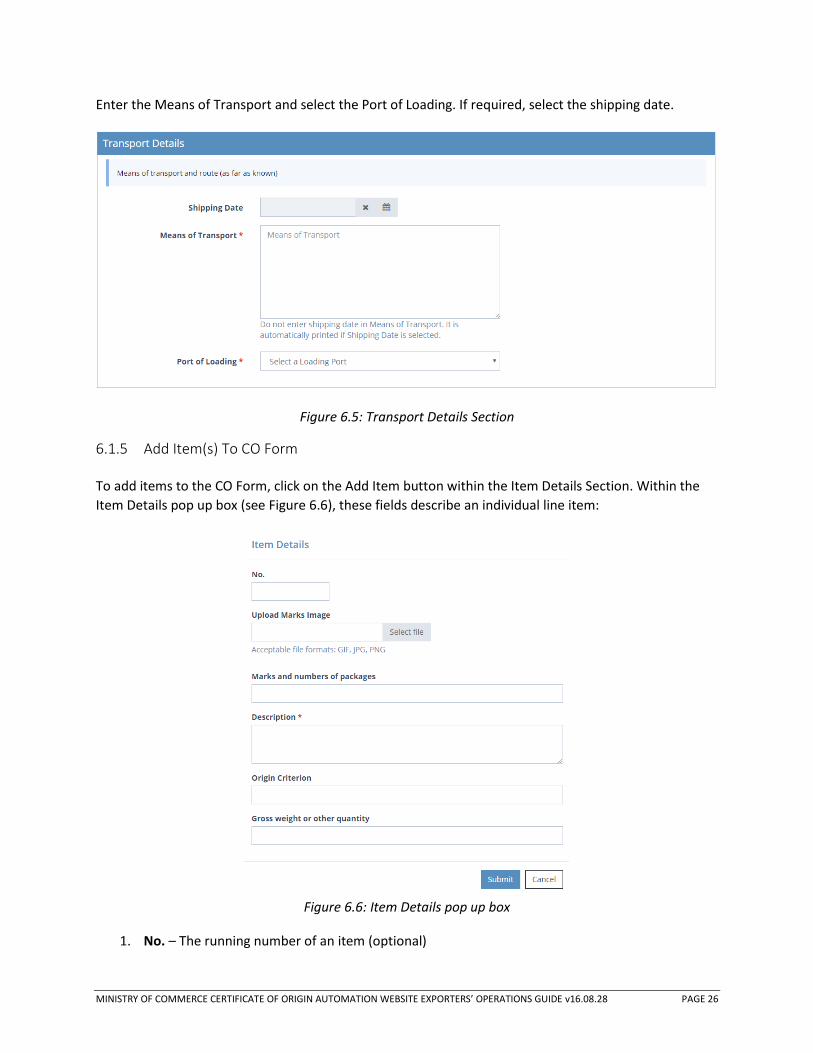
Enter the Means of Transport and select the Port of Loading. If required, select the shipping date.
Figure 6.5: Transport Details Section
6.1.5 Add Item(s) To CO Form
To add items to the CO Form, click on the Add Item button within the Item Details Section. Within the
Item Details pop up box (see Figure 6.6), these fields describe an individual line item:
Figure 6.6: Item Details pop up box
1. No. – The running number of an item (optional)

MINISTRY OF COMMERCE CERTIFICATE OF ORIGIN AUTOMATION WEBSITE EXPORTERS’ OPERATIONS GUIDE v16.08.28 PAGE 27
2. Upload Marks Image – If the item has a mark, click on the Select File button to upload its
corresponding marks images (optional)
3. Marks and numbers of packages – A description of the marks and/or a description of the
numbers of packages of the item. (optional)
4. Description – Description of the item. (mandatory)
5. Origin Criterion – Origin criterion of the item (optional)
6. Gross Weight or Other Quantity – Gross Weight or Quantity of the item. If a numeric or decimal
value is entered in this column, it will be totaled automatically and the total will be displayed in
the “Total Quantity” field in numeric format and in the “Total Quantity (in words)” field
represented in English words. (optional)
Click on the Submit button to add an item after filling in the required and applicable fields.
After clicking on the submit button, you will see your item added on the grid and the “Total Quantity”
and “Total Quantity (in words”) fields will also have been automatically filled in and added up for you if a
quantity was added. See Figure 6.7.
Figure 6.7: Item Details section after an item has been added
To add another item, simply click on the Add Item button again and repeat the process.
6.1.6 Edit Item(s) From CO Form
To edit an individual line item, click on the blue pencil button on the action column on the far right.
(Refer to Figure 6.6).
6.1.7 Delete Item(s) From CO Form

MINISTRY OF COMMERCE CERTIFICATE OF ORIGIN AUTOMATION WEBSITE EXPORTERS’ OPERATIONS GUIDE v16.08.28 PAGE 28
To delete an individual line item, click on the red X button on the action column on the far right. (Refer
to Figure 6.6).
6.1.8 Upload Supporting Document(s)
To submit the CO form successfully successfully, a minimum of one supporting document (in any format)
must accompany its submission.
To upload a supporting document, click on the “Upload Supporting Document(s)” button in the
Supporting Documents section (see Figure 6.8). At the Supporting Documents pop up box (see Figure
6.9), select the file to be uploaded and enter its description at the File Description field.
Figure 6.8: Supporting Documents Section
Figure 6.9: Supporting Documents pop up box
6.1.9 Delete an Uploaded Supporting Document
To delete a previously uploaded supporting document, click on the red X button on the action column
on the far right.

MINISTRY OF COMMERCE CERTIFICATE OF ORIGIN AUTOMATION WEBSITE EXPORTERS’ OPERATIONS GUIDE v16.08.28 PAGE 29
6.2 Form A (Version 2)
To create a new CO Form A (Version 2), navigate to the Certificate of Origin > New Application > Form A
(Version 2) menu and click on Form A (Version 2) (see Figure 6.1).
You will then be redirected to the CO Form A (Version 2) creation page. Mandatory fields marked with
an asterisk (*) are required to be filled in or selected.
For details on how to fill up specific sections in the form, please refer to Form D, Section 6.8.
6.2.1 Transport Details
Enter the Means of Transport and select the Port of Loading. If required, select the shipping date.
Figure 6.10: Transport Details Section

MINISTRY OF COMMERCE CERTIFICATE OF ORIGIN AUTOMATION WEBSITE EXPORTERS’ OPERATIONS GUIDE v16.08.28 PAGE 30
6.3 Form AANZ
To create a new CO Form AANZ, navigate to the Certificate of Origin > New Application > Form AANZ
menu and click on Form AANZ (see Figure 6.1).
You will then be redirected to the CO Form AANZ creation page. Mandatory fields marked with an
asterisk (*) are required to be filled in or selected.
For details on how to fill up specific sections in the form, please refer to Form D, Section 6.8.
6.3.1 Transport Details
Enter the Means of Transport / Port of Discharge and select the Port of Loading. If required, select the
Shipment Date and enter the Vessel’s Name / Aircraft.
Figure 6.11: Transport Details Section
6.3.2 Subject of Third Party Invoicing
If the CO Form requires Third Party Invoicing, select the Third Party Invoicing by switching it to a “Yes”.
Once “Yes” is selected, the Invoice No., Invoice Date, and Invoice Description fields will be editable and
mandatory.
Select “Yes” on the Print on CO field to print the Invoice No. and Invoice Date on the CO.

MINISTRY OF COMMERCE CERTIFICATE OF ORIGIN AUTOMATION WEBSITE EXPORTERS’ OPERATIONS GUIDE v16.08.28 PAGE 31
Figure 6.12: Subject of Third Party Invoicing Section
6.3.3 Back-to-Back Certificate of Origin
If applicable, select the Back-to-Back CO by switching it to a “Yes”. Once “Yes” is selected, the CO
Reference No., and the CO Issue Date fields will be editable and mandatory.
Figure 6.13: Back-to-Back Certificate of Origin Section
6.3.4 Other Form Declarations
In the “Other Form Declarations” section, select the applicable fields by switching them to a “Yes”.
Corresponding checkboxes will be printed on the CO.
Figure 6.14: Other Form Declarations Section

MINISTRY OF COMMERCE CERTIFICATE OF ORIGIN AUTOMATION WEBSITE EXPORTERS’ OPERATIONS GUIDE v16.08.28 PAGE 32
6.4 Form AB
To create a new CO Form AB, navigate to the Certificate of Origin > New Application > Form AB menu
and click on Form AB (see Figure 6.1).
You will then be redirected to the CO Form AB creation page. Mandatory fields marked with an asterisk
(*) are required to be filled in or selected.
For details on how to fill up specific sections in the form, please refer to Form D, Section 6.8.
6.4.1 Exporter Details
As an exporter, you may generate a CO Form only for your company. As an agency, you may generate
CO Forms for companies you are authorized to represent. A Pre-authorized list of companies will appear
on the Exporter Name drop down list. You may not change any company name on this list. After the
Exporter has been selected, the Exporter Address will be filled and, a Signatory can be selected (see
Figure 6.15).
The following fields are mandatory:
1. Exporter Tel
2. Designation/Position in Company
The values of the aforementioned fields are extracted from the Exporter Profile and are updated in the
Exporter Amendment page (see Chapter 19).
Note: Form AB cannot be submitted successfully if any of these fields are empty.
Figure 6.15: Exporter Details Section
MINISTRY OF COMMERCE CERTIFICATE OF ORIGIN AUTOMATION WEBSITE EXPORTERS’ OPERATIONS GUIDE v16.08.28 PAGE 33
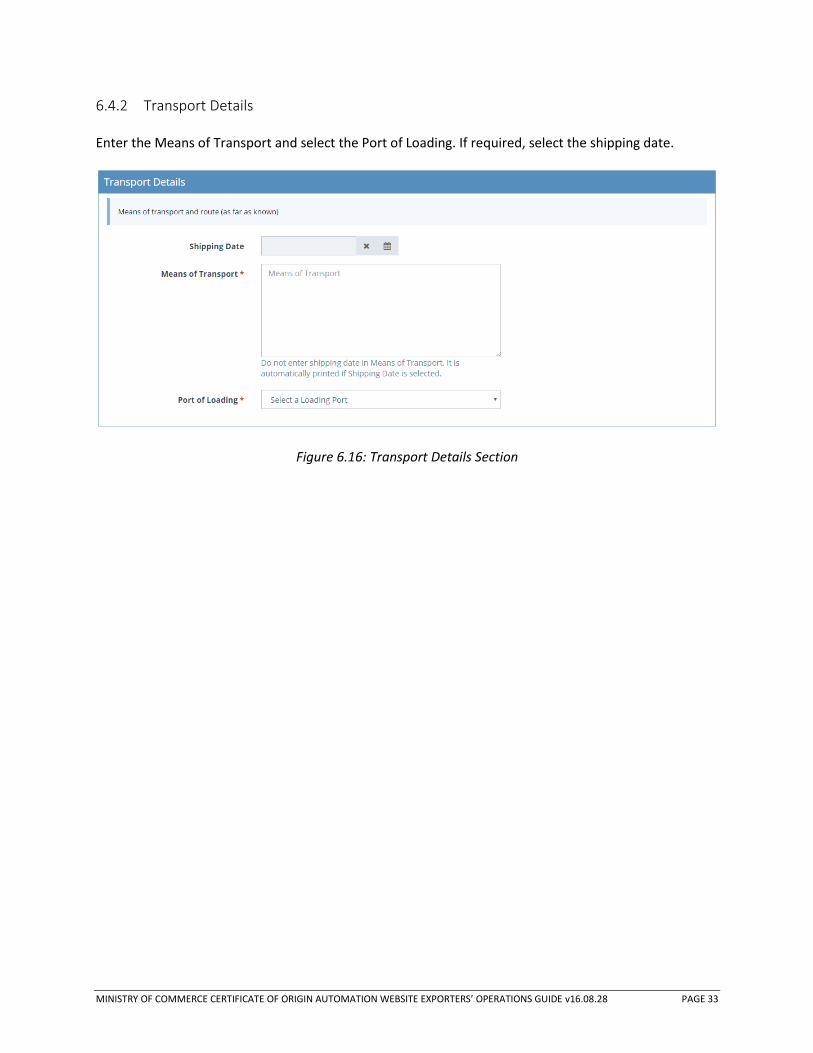
6.4.2 Transport Details
Enter the Means of Transport and select the Port of Loading. If required, select the shipping date.
Figure 6.16: Transport Details Section

MINISTRY OF COMMERCE CERTIFICATE OF ORIGIN AUTOMATION WEBSITE EXPORTERS’ OPERATIONS GUIDE v16.08.28 PAGE 34
6.5 Form AI
To create a new CO Form AI, navigate to the Certificate of Origin > New Application > Form AI menu and
click on Form AI (see Figure 6.1).
You will then be redirected to the CO Form AI creation page. Mandatory fields marked with an asterisk
(*) are required to be filled in or selected.
For details on how to fill up specific sections in the form, please refer to Form D, Section 6.8.
6.5.1 Other Form Declarations
In the “Other Form Declarations” section, select the applicable fields by switching them to a “Yes”.
Corresponding checkboxes will be printed on the CO.
Figure 6.17: Other Form Declarations Section
MINISTRY OF COMMERCE CERTIFICATE OF ORIGIN AUTOMATION WEBSITE EXPORTERS’ OPERATIONS GUIDE v16.08.28 PAGE 35
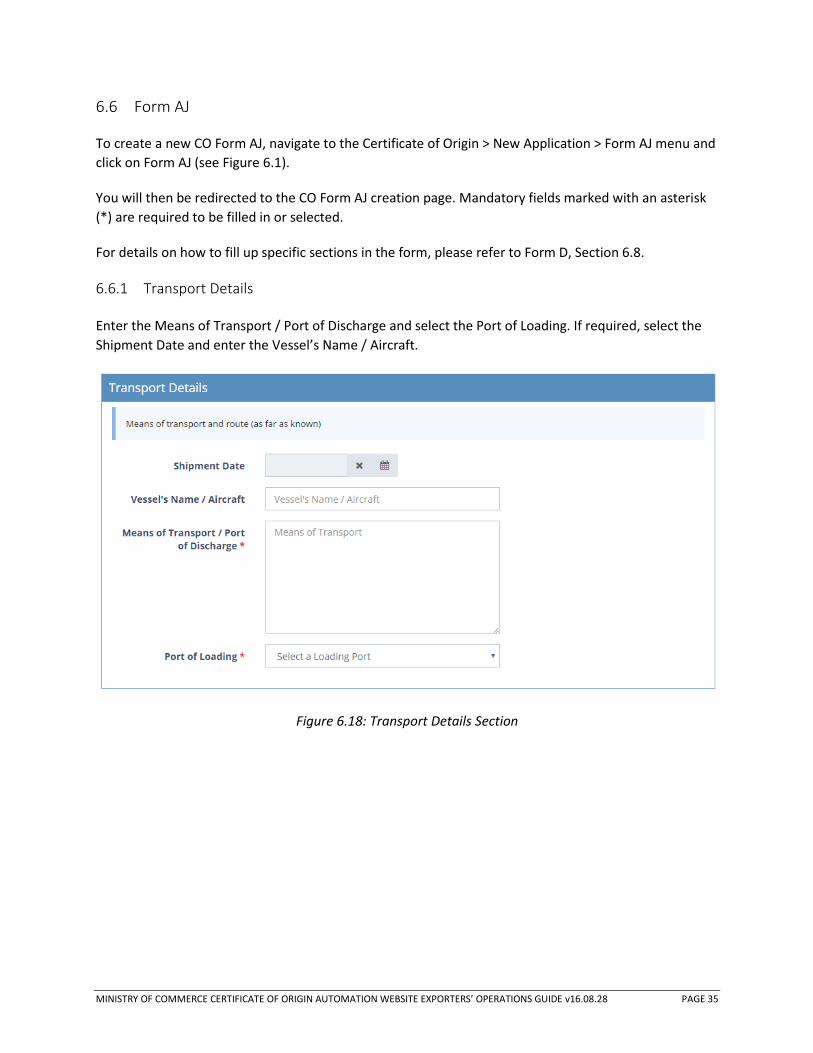
6.6 Form AJ
To create a new CO Form AJ, navigate to the Certificate of Origin > New Application > Form AJ menu and
click on Form AJ (see Figure 6.1).
You will then be redirected to the CO Form AJ creation page. Mandatory fields marked with an asterisk
(*) are required to be filled in or selected.
For details on how to fill up specific sections in the form, please refer to Form D, Section 6.8.
6.6.1 Transport Details
Enter the Means of Transport / Port of Discharge and select the Port of Loading. If required, select the
Shipment Date and enter the Vessel’s Name / Aircraft.
Figure 6.18: Transport Details Section

MINISTRY OF COMMERCE CERTIFICATE OF ORIGIN AUTOMATION WEBSITE EXPORTERS’ OPERATIONS GUIDE v16.08.28 PAGE 36
6.7 Form AK
To create a new CO Form AK, navigate to the Certificate of Origin > New Application > Form AK menu
and click on Form AK (see Figure 6.1).
You will then be redirected to the CO Form AK creation page. Mandatory fields marked with an asterisk
(*) are required to be filled in or selected.
For details on how to fill up specific sections in the form, please refer to Form D, Section 6.8.
6.7.1 Other Form Declarations
In the “Other Form Declarations” section, select the applicable fields by switching them to a “Yes”.
Corresponding checkboxes will be printed on the CO.
Figure 6.19: Other Form Declarations Section

MINISTRY OF COMMERCE CERTIFICATE OF ORIGIN AUTOMATION WEBSITE EXPORTERS’ OPERATIONS GUIDE v16.08.28 PAGE 37
6.8 Form D
To create a new CO Form D, navigate to the Certificate of Origin > New Application > Form D menu and
click on Form D (see Figure 6.1).
You will then be redirected to the CO Form D creation page. Mandatory fields marked with an asterisk
(*) are required to be filled in or selected.
6.8.1 Application Priority
Each CO is grouped into one of two categories – Standard or Express (To be implemented later.)
Figure 6.20: Application Priority Section
6.8.2 Exporter Details
A Pre-authorized list of companies you are able to generate a CO for will appear on the Exporter Name
drop down list. After the Exporter has been selected, the Exporter Address will be filled and, a Signatory
can be selected (see Figure 6.28).
Note that the Exporter Address is not editable. To change the address, submit a change request. Refer
to Section 20.1 for more details.
Figure 6.21: Exporter Details Section

MINISTRY OF COMMERCE CERTIFICATE OF ORIGIN AUTOMATION WEBSITE EXPORTERS’ OPERATIONS GUIDE v16.08.28 PAGE 38
6.8.3 Consignee Details
Enter the consignee name and address, and select the importing country.
Figure 6.22: Consignee Details Section
6.8.4 Transport Details
Enter the Means of Transport / Port of Discharge and select the Port of Loading. If required, select the
departure date and enter the Vessel’s Name / Aircraft.
Figure 6.23: Transport Details Section
MINISTRY OF COMMERCE CERTIFICATE OF ORIGIN AUTOMATION WEBSITE EXPORTERS’ OPERATIONS GUIDE v16.08.28 PAGE 39
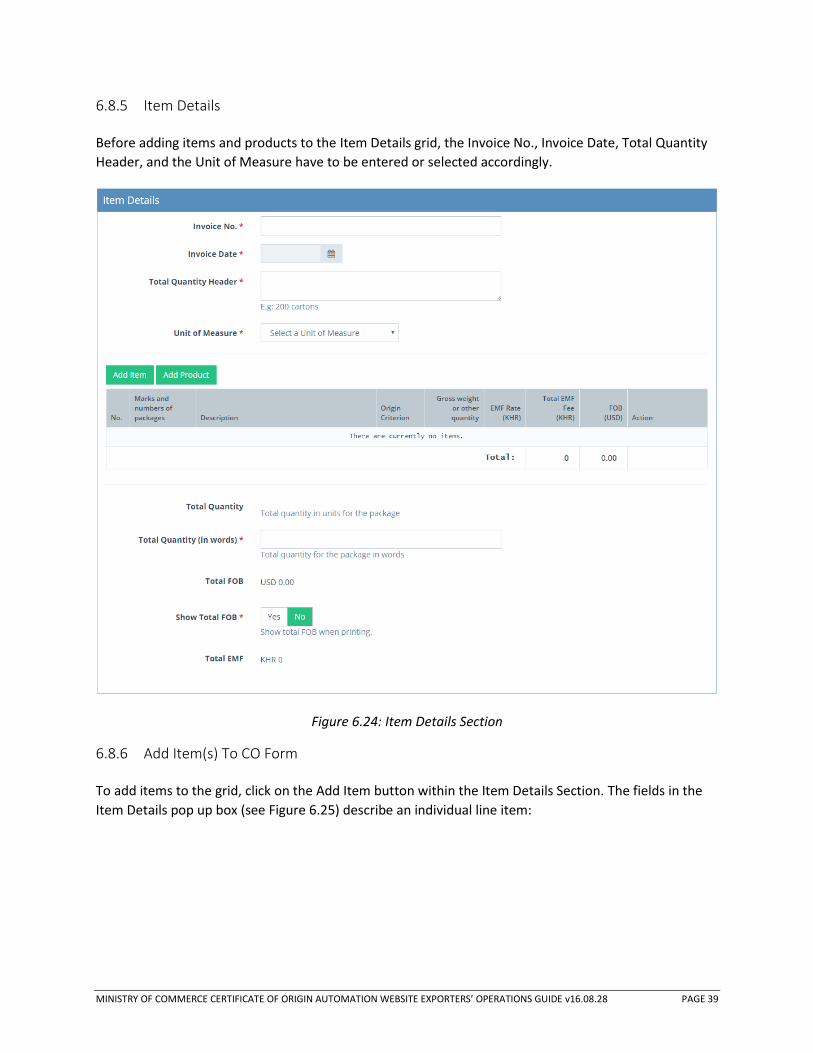
6.8.5 Item Details
Before adding items and products to the Item Details grid, the Invoice No., Invoice Date, Total Quantity
Header, and the Unit of Measure have to be entered or selected accordingly.
Figure 6.24: Item Details Section
6.8.6 Add Item(s) To CO Form
To add items to the grid, click on the Add Item button within the Item Details Section. The fields in the
Item Details pop up box (see Figure 6.25) describe an individual line item:

MINISTRY OF COMMERCE CERTIFICATE OF ORIGIN AUTOMATION WEBSITE EXPORTERS’ OPERATIONS GUIDE v16.08.28 PAGE 40
Figure 6.25: Item Details pop up box
1. No. – The running number of an item (optional)
2. Upload Marks Image – If the item has a mark, click on the Select File button to upload its
corresponding marks images (optional)
3. Marks and numbers of packages – A description of the marks and/or a description of the
numbers of packages of the item. (optional)
4. Description – Description of the item. (mandatory)
5. Origin Criterion – Origin criterion of the item (optional)
Click on the Submit button to add an item after filling in the required and applicable fields.
After clicking on the submit button, you will see your item added on the grid. (See Figure 6.26)

MINISTRY OF COMMERCE CERTIFICATE OF ORIGIN AUTOMATION WEBSITE EXPORTERS’ OPERATIONS GUIDE v16.08.28 PAGE 41
Figure 6.26: Item Details section after an item has been added
To add another item, simply click on the Add Item button again and repeat the process.
6.8.7 Edit Item(s) From CO Form
To edit an individual line item, click on the blue pencil button on the action column on the far right.
(Refer to Figure 6.33).
6.8.8 Delete Item(s) From CO Form
To delete an individual line item, click on the red X button on the action column on the far right. (Refer
to Figure 6.26).

MINISTRY OF COMMERCE CERTIFICATE OF ORIGIN AUTOMATION WEBSITE EXPORTERS’ OPERATIONS GUIDE v16.08.28 PAGE 42
6.8.9 Add Product(s) To CO Form
To add products to the grid, click on the Add Product button within the Item Details Section. The fields in
the Product Details pop up box (see Figure 6.27) describe an individual product:
Figure 6.27: Product Details pop up box
1. Upload Marks Image – If the product item has a mark, click on the Select File button to upload
its corresponding marks images (optional)
2. Marks and numbers of packages – A description of the marks and/or a description of the
numbers of packages of the product item. (optional)
3. Product – Select the product to be added. A product can be selected only after the Exporter
Name, Unit of Measurement, and Importing Country have been selected. (mandatory)
4. Product FOB – The FOB value of the product.
5. Show Product FOB – For the FOB to be printed on the CO Form, click on the Switch to change it
to ‘Yes’.
6. Product Item(s)

MINISTRY OF COMMERCE CERTIFICATE OF ORIGIN AUTOMATION WEBSITE EXPORTERS’ OPERATIONS GUIDE v16.08.28 PAGE 43
a. No. – The running number of a product item (optional)
b. Description – Description of the product item. (mandatory)
c. Criterion – Origin criterion of the product item (optional)
d. Quantity – Quantity of the product item. (mandatory)
To add a product line item, click on ‘+’ button after filling in Product Item(s) table. To add more product
line items, fill in the Product Item(s) fields and click on ‘+’ again. Once the product line items have been
added, click on the Add button to add the product item(s) to the Item Details Section grid.
After clicking on the Add button, the product item will be added to the grid and if a numeric value was
entered at the “Quantity” field, the “Total Quantity” and “Total Quantity (in words”) fields will also have
been automatically filled in. (See Figure 6.28)
The “Total Quantity (in words)” field is editable directly should you choose to change the representation
of its contents.
Figure 6.28: Item Details section after a product has been added
To add another product item, simply click on the Add Product button again and repeat the process.

MINISTRY OF COMMERCE CERTIFICATE OF ORIGIN AUTOMATION WEBSITE EXPORTERS’ OPERATIONS GUIDE v16.08.28 PAGE 44
6.8.10 Edit Product(s) From CO Form
To edit an individual line item, click on the blue pencil button on the action column on the far right.
(Refer to Figure 6.28).
6.8.11 Delete Product(s) From CO Form
To delete an individual line item, click on the red X button on the action column on the far right. (Refer
to Figure 6.28).
6.8.12 Third-Country Invoicing
If the CO Form requires Third-Country Invoicing, select the Third-Country Invoicing by switching it to a
“Yes”. Once “Yes” is selected, the Invoice No., Invoice Date, and Invoice Description fields will be
editable and mandatory.
Select “Yes” on the Print on CO field to print the Invoice No. and Invoice Date on the CO.
Figure 6.29: Third-Country Invoicing Section
MINISTRY OF COMMERCE CERTIFICATE OF ORIGIN AUTOMATION WEBSITE EXPORTERS’ OPERATIONS GUIDE v16.08.28 PAGE 45
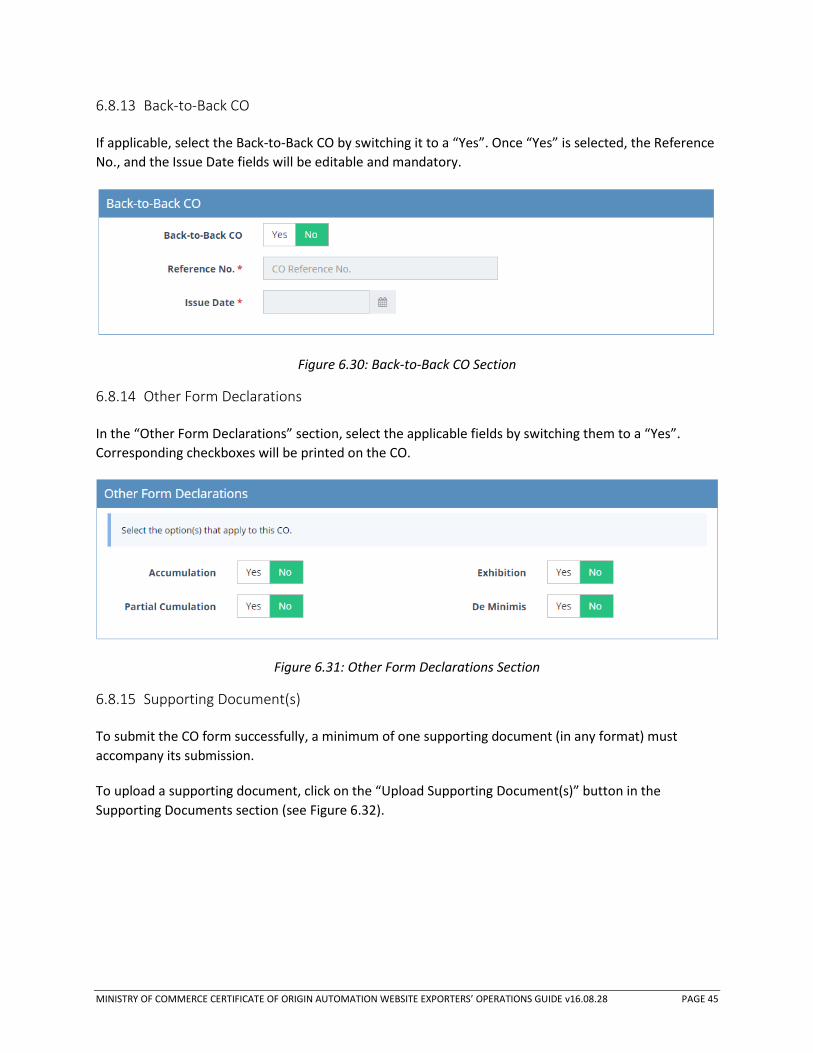
6.8.13 Back-to-Back CO
If applicable, select the Back-to-Back CO by switching it to a “Yes”. Once “Yes” is selected, the Reference
No., and the Issue Date fields will be editable and mandatory.
Figure 6.30: Back-to-Back CO Section
6.8.14 Other Form Declarations
In the “Other Form Declarations” section, select the applicable fields by switching them to a “Yes”.
Corresponding checkboxes will be printed on the CO.
Figure 6.31: Other Form Declarations Section
6.8.15 Supporting Document(s)
To submit the CO form successfully, a minimum of one supporting document (in any format) must
accompany its submission.
To upload a supporting document, click on the “Upload Supporting Document(s)” button in the
Supporting Documents section (see Figure 6.32).

MINISTRY OF COMMERCE CERTIFICATE OF ORIGIN AUTOMATION WEBSITE EXPORTERS’ OPERATIONS GUIDE v16.08.28 PAGE 46
Figure 6.32: Supporting Documents Section
At the Supporting Documents pop up box (see Figure 6.33), select the file to be uploaded and enter its
description at the File Description field.
Figure 6.33: Supporting Documents pop up box
6.8.16 Delete an Uploaded Supporting Document
To delete a previously uploaded supporting document, click on the red X button on the action column
on the far right. Refer to Figure 6.32.

MINISTRY OF COMMERCE CERTIFICATE OF ORIGIN AUTOMATION WEBSITE EXPORTERS’ OPERATIONS GUIDE v16.08.28 PAGE 47
6.9 Form DFTPI-LDC
To create a new CO Form DFTPI-LDC, navigate to the Certificate of Origin > New Application > Form
DFTPI-LDC menu and click on Form DFTPI-LDC (see Figure 6.1).
You will then be redirected to the CO Form DFTPI-LDC creation page. Mandatory fields marked with an
asterisk (*) are required to be filled in or selected.
For details on how to fill up specific sections in the form, please refer to Form D, Section 6.8.
6.9.1 Transport Details
Enter the Means of Transport and select the Port of Loading. If required, select the shipping date.
Figure 6.34: Transport Details Section
MINISTRY OF COMMERCE CERTIFICATE OF ORIGIN AUTOMATION WEBSITE EXPORTERS’ OPERATIONS GUIDE v16.08.28 PAGE 48
6.10 Form E
To create a new CO Form E, navigate to the Certificate of Origin > New Application > Form E menu and
click on Form E (see Figure 6.1).
You will then be redirected to the CO Form E creation page. Mandatory fields marked with an asterisk
(*) are required to be filled in or selected.
For details on how to fill up specific sections in the form, please refer to Form D, Section 6.8.
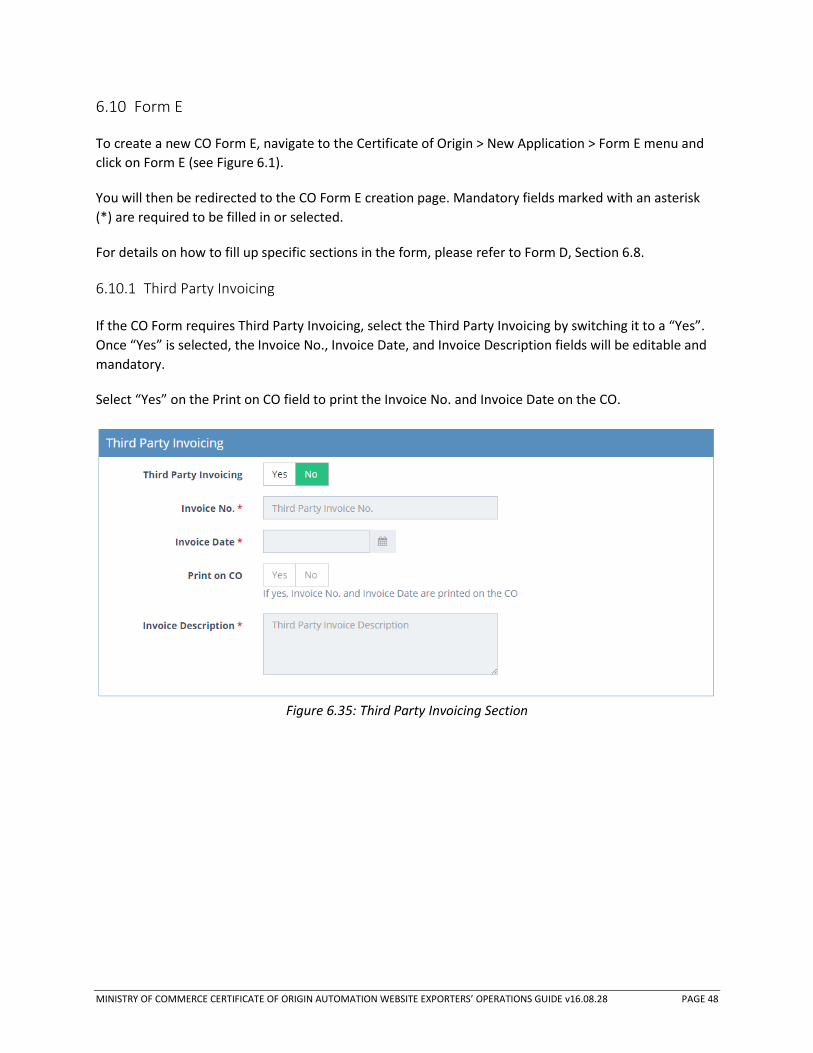
6.10.1 Third Party Invoicing
If the CO Form requires Third Party Invoicing, select the Third Party Invoicing by switching it to a “Yes”.
Once “Yes” is selected, the Invoice No., Invoice Date, and Invoice Description fields will be editable and
mandatory.
Select “Yes” on the Print on CO field to print the Invoice No. and Invoice Date on the CO.
Figure 6.35: Third Party Invoicing Section

MINISTRY OF COMMERCE CERTIFICATE OF ORIGIN AUTOMATION WEBSITE EXPORTERS’ OPERATIONS GUIDE v16.08.28 PAGE 49
6.10.2 Movement Certificate
If applicable, select the Movement Certificate by switching it to a “Yes”. Once “Yes” is selected, the
Reference No., and the Issue Date fields will be editable and mandatory.
Figure 6.36: Movement Certificate Section
6.10.3 Other Form Declarations
In the “Other Form Declarations” section, select the applicable fields by switching them to a “Yes”.
Corresponding checkboxes will be printed on the CO.
Figure 6.37: Other Form Declarations Section
MINISTRY OF COMMERCE CERTIFICATE OF ORIGIN AUTOMATION WEBSITE EXPORTERS’ OPERATIONS GUIDE v16.08.28 PAGE 50
6.11 Form KLDC
To create a new CO Form KLDC, navigate to the Certificate of Origin > New Application > Form KLDC
menu and click on Form KLDC (see Figure 6.1).
You will then be redirected to the CO Form KLDC creation page. Mandatory fields marked with an
asterisk (*) are required to be filled in or selected.
For details on how to fill up specific sections in the form, please refer to Form D, Section 6.8.
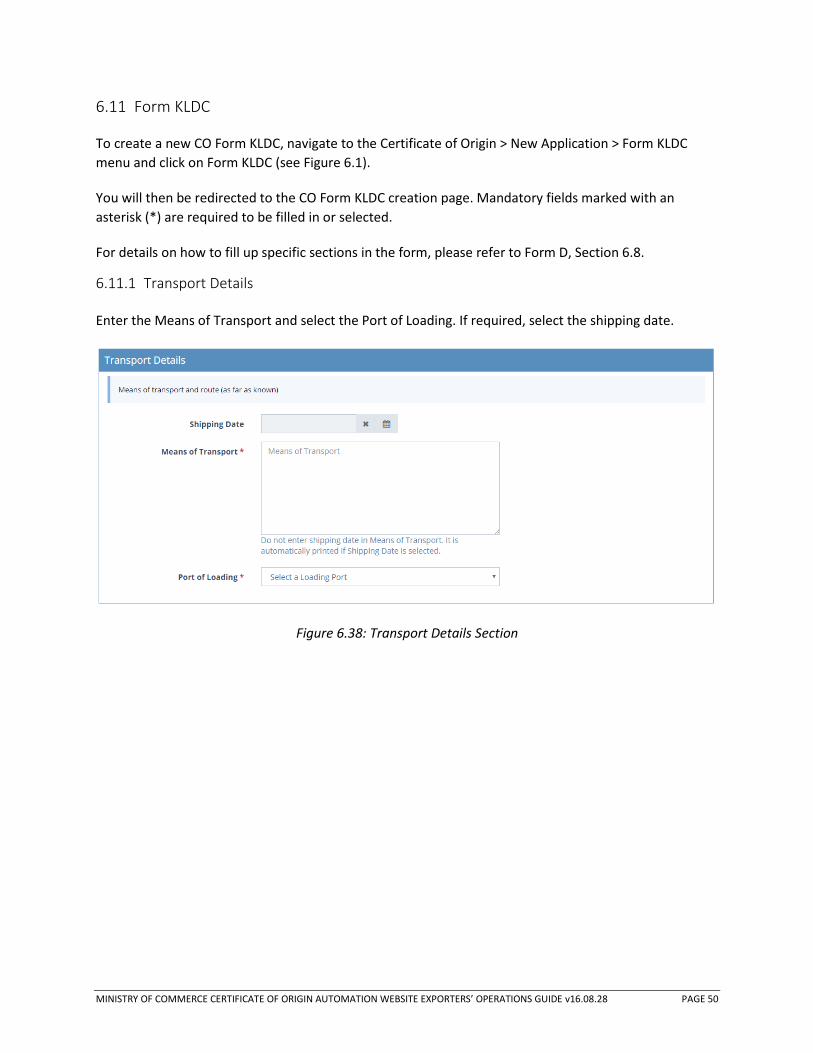
6.11.1 Transport Details
Enter the Means of Transport and select the Port of Loading. If required, select the shipping date.
Figure 6.38: Transport Details Section
MINISTRY OF COMMERCE CERTIFICATE OF ORIGIN AUTOMATION WEBSITE EXPORTERS’ OPERATIONS GUIDE v16.08.28 PAGE 51
6.12 Form N
To create a new CO Form N, navigate to the Certificate of Origin > New Application > Form N menu and
click on Form N (see Figure 6.1)
You will then be redirected to the CO Form N creation page. Mandatory fields marked with an asterisk
(*) are required to be filled in or selected.
For details on how to fill up specific sections in the form, please refer to Form D, Section 6.8.
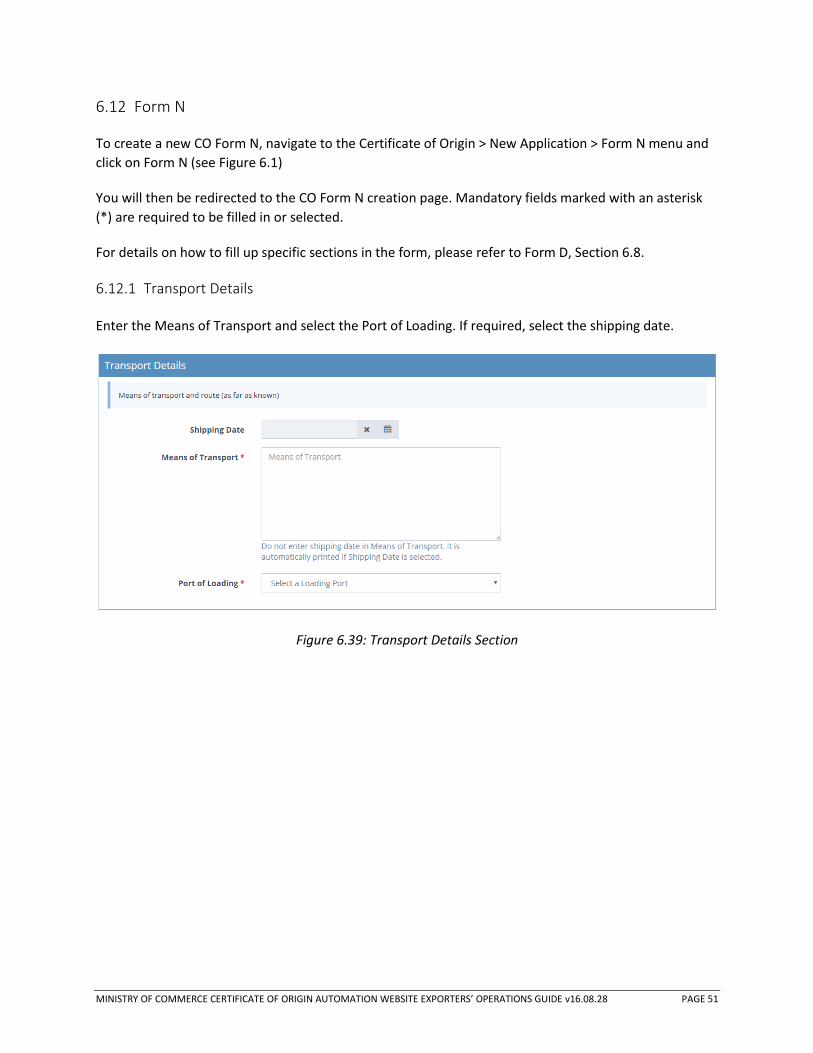
6.12.1 Transport Details
Enter the Means of Transport and select the Port of Loading. If required, select the shipping date.
Figure 6.39: Transport Details Section

MINISTRY OF COMMERCE CERTIFICATE OF ORIGIN AUTOMATION WEBSITE EXPORTERS’ OPERATIONS GUIDE v16.08.28 PAGE 52
6.12.2 CO Form Item(s)
For details on how to Add, Edit, or Delete CO Form Item(s), please refer to Form D Section 6.8. For CO
Form N, the Origin Criterion field is not applicable and therefore not editable. Refer to Figure 6.40.
Figure 6.40: Item Details pop up box

MINISTRY OF COMMERCE CERTIFICATE OF ORIGIN AUTOMATION WEBSITE EXPORTERS’ OPERATIONS GUIDE v16.08.28 PAGE 53
6.12.3 CO Form Product(s)
For details on how to Add, Edit, or Delete CO Form Product (s), please refer to Form D Section 6.8. For
CO Form N, the Origin Criterion field is not applicable and therefore not editable. Refer to Figure 6.41.
Figure 6.41: Product Details pop up box

MINISTRY OF COMMERCE CERTIFICATE OF ORIGIN AUTOMATION WEBSITE EXPORTERS’ OPERATIONS GUIDE v16.08.28 PAGE 54
6.13 Form S
To create a new CO Form S, navigate to the Certificate of Origin > New Application > Form S menu and
click on Form S (see Figure 6.1).
You will then be redirected to the CO Form S creation page. Mandatory fields marked with an asterisk
(*) are required to be filled in or selected.
For details on how to fill up specific sections in the form, please refer to Form D, Section 6.8.
6.13.1 Transport Details
Enter the Means of Transport / Port of Discharge and select the Port of Loading. If required, select the
departure date and enter the Truck’s Name / Aircraft.
Figure 6.42: Transport Details Section

MINISTRY OF COMMERCE CERTIFICATE OF ORIGIN AUTOMATION WEBSITE EXPORTERS’ OPERATIONS GUIDE v16.08.28 PAGE 55
6.14 Form SPT
To create a new CO Form SPT, navigate to the Certificate of Origin > New Application > Form SPT menu
and click on Form SPT (see Figure 6.1).
You will then be redirected to the CO Form SPT creation page. Mandatory fields marked with an asterisk
(*) are required to be filled in or selected.
For details on how to fill up specific sections in the form, please refer to Form D, Section 6.8.

MINISTRY OF COMMERCE CERTIFICATE OF ORIGIN AUTOMATION WEBSITE EXPORTERS’ OPERATIONS GUIDE v16.08.28 PAGE 56
6.15 CO Reference Form
To create a new CO Reference Form, navigate to the Certificate of Origin > New Application > CO
Reference Form menu and click on CO Reference Form (see Figure 6.1).
You will then be redirected to the CO Reference Form creation page. Mandatory fields marked with an
asterisk (*) are required to be filled in or selected.
For details on how to fill up specific sections in the form, please refer to Form N, Section 6.13.
6.15.1 Transport Details
Enter the Means of Transport and select the Port of Loading. If required, select the shipping date.
Figure 6.43: Transport Details Section

MINISTRY OF COMMERCE CERTIFICATE OF ORIGIN AUTOMATION WEBSITE EXPORTERS’ OPERATIONS GUIDE v16.08.28 PAGE 57
6.15.2 CO Form Item(s)
For details on how to Add, Edit, or Delete CO Form Item(s), please refer to Form D Section 6.8. For CO
Reference Form, the Origin Criterion field is not applicable, therefore not editable. Refer to Figure 6.44.
Figure 6.44: Item Details pop up box

MINISTRY OF COMMERCE CERTIFICATE OF ORIGIN AUTOMATION WEBSITE EXPORTERS’ OPERATIONS GUIDE v16.08.28 PAGE 58
6.15.3 CO Form Product(s)
For details on how to Add, Edit, or Delete CO Form Product (s), please refer to Form D Section 6.8. For
CO Reference Form, the Origin Criterion field is not applicable, therefore not editable. Refer to Figure
6.45.
Figure 6.45: Product Details pop up box

MINISTRY OF COMMERCE CERTIFICATE OF ORIGIN AUTOMATION WEBSITE EXPORTERS’ OPERATIONS GUIDE v16.08.28 PAGE 59
7 CO Forms Actions
Various actions are available during the creation lifecycle of a CO Form. At the bottom of the data entry
page is a row of buttons representing possible actions (see Figure 7.1).
Figure 7.1: Create New CO Form Actions
7.1 Save As Draft
Choose this option to save your CO Application at its current state if you are not ready to submit your
CO Form to the Ministry of Commerce yet. You can return to edit its contents at a later time.
7.2 Submit
Choosing this option submits your completed CO Form A Application to the Ministry of Commerce for
review. For this action is successful, the information entered into the application must be complete and
meet minimum requirements for submission.
Figure 7.2: Submit CO Confirmation Message
After clicking “Submit” button, a confirmation message will be shown as in Figure 7.2. After you click on
“Yes”, you will be directed to Figure 7.3.
Upon successful CO Form A submission, a unique reference no will be generated for the submitted form.
See Figure 7.3.

MINISTRY OF COMMERCE CERTIFICATE OF ORIGIN AUTOMATION WEBSITE EXPORTERS’ OPERATIONS GUIDE v16.08.28 PAGE 60
Figure 7.3: Successful CO Form A Submission Page
7.3 Print Preview
Print preview gives you a visual preview of a pre-printed CO Form complete with the correct information
entered at time of action. (see Figure 7.4) This feature is useful to visualize how entered information will
appear when printed. Previews are generated in real-time as you add or change form data.
Note that as this CO Form has not been submitted and undergone the review and approval process, not
all information on this form will be visible, especially information to be filled in by officers of the
Ministry of Commerce.

MINISTRY OF COMMERCE CERTIFICATE OF ORIGIN AUTOMATION WEBSITE EXPORTERS’ OPERATIONS GUIDE v16.08.28 PAGE 61
Figure 7.4: CO Form A print preview

MINISTRY OF COMMERCE CERTIFICATE OF ORIGIN AUTOMATION WEBSITE EXPORTERS’ OPERATIONS GUIDE v16.08.28 PAGE 62
7.4 Discard
Discard is shown when a CO form is edited on from a draft. When discard is clicked on, you will exit from
the data entry page and if a saved draft of this CO Form A exists, it is deleted from the database, making
in irretrievable in the future.
7.5 Cancel Changes
Cancel changes reverts changes made in the CO Form to its last saved version.
7.6 Cancel CO
To cancel an in-process or approved CO at any time after submission, search for the CO Application in
the Application Enquiry page (See Section 8.0) or click on the individual CO Application at the CO Inbox
page (see Section 9.0).
At the CO Form details page, click on the Cancel CO button to cancel the certificate of origin. (See Figure
7.5).
Figure 7.5: CO Form details page
7.7 Copy CO
A Certificate of Origin can be copied in the event that you need to keep some of the original details of
any particular CO but wish to change a few things. Note that the Copy CO can be done at any status of a
CO.
At the top-right corner of the container of every CO, there is a copy button. (Refer to Figure 7.6) Click on
the button to copy that particular CO. Note that all fields will be copied over into the new CO, except
supporting documents.
Figure 7.6: Approved CO Action buttons
MINISTRY OF COMMERCE CERTIFICATE OF ORIGIN AUTOMATION WEBSITE EXPORTERS’ OPERATIONS GUIDE v16.08.28 PAGE 63
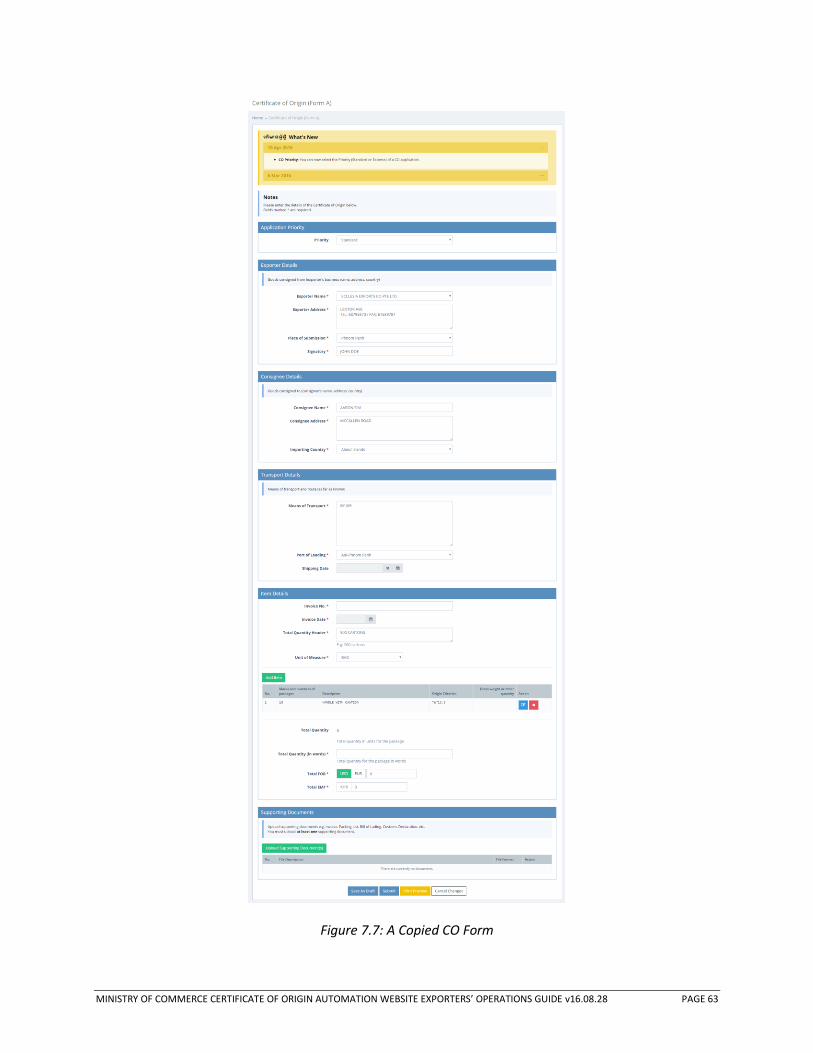
Figure 7.7: A Copied CO Form

MINISTRY OF COMMERCE CERTIFICATE OF ORIGIN AUTOMATION WEBSITE EXPORTERS’ OPERATIONS GUIDE v16.08.28 PAGE 64
As can be seen from Figure 7.7, after clicking the Copy CO button, you will be directed to a new CO page
with the contents of the new CO form copied over from the original CO.
Note however that these are CO Form fields that would NOT be copied over:
Shipping Date
Invoice Date
Invoice No.
Gross weight or other quantity
Total Quantity
Total Quantity (in words)
Total FOB (Only the value would NOT be copied, the type of currency will still be there)
Total EMF
Supporting Document

MINISTRY OF COMMERCE CERTIFICATE OF ORIGIN AUTOMATION WEBSITE EXPORTERS’ OPERATIONS GUIDE v16.08.28 PAGE 65
7.8 Replace CO
An approved Certificate of Origin can be replaced with a new CO and the exporter pays the difference if
the new CO’s EMF fee is higher than the original approved CO. However, if the new CO’s EMF fee is
lower, the difference will not be refunded.
At the top-right corner of the container of every Approved CO, there is a Replace CO button. (Refer to
Figure 7.6) Click on the button to replace that particular CO. Note that none of the fields will be copied
over except for the Exporter Name and Address, which is not editable. Refer to Figure 7.8. For a
Replacement CO, the Replacement CO Section will be shown with the Reference Number of the CO
being replaced. Fill in the details as required and click on ‘Submit’ at the bottom of the page, and ‘Yes’ in
the confirmation dialog to submit the replacement CO application.
Figure 7.8: A Replaced CO Form

MINISTRY OF COMMERCE CERTIFICATE OF ORIGIN AUTOMATION WEBSITE EXPORTERS’ OPERATIONS GUIDE v16.08.28 PAGE 66
7.9 Lost CO
If an approved Certificate of Origin is lost, a Lost CO application can be submitted and the exporter pays
the fees for the application if required.
At the top-right corner of the container of every Approved CO, there is a Lost CO button. (Refer to Figure
7.6) Click on the button to replace that particular CO. Note the Exporter Signatory field is editable. Refer
to Figure 7.9. Edit the Exporter Signatory as required and Click on ‘Submit’ at the bottom of the page,
followed by ‘Yes’ in the confirmation dialog to submit the Lost CO application.
Figure 7.9: A Lost CO Form

MINISTRY OF COMMERCE CERTIFICATE OF ORIGIN AUTOMATION WEBSITE EXPORTERS’ OPERATIONS GUIDE v16.08.28 PAGE 67
7.10 Abort CO
An approved Certificate of Origin can be aborted and the exporter pays the fees for the application if
required.
At the top-right corner of the container of every Approved CO, there is an Abort CO button. (Refer to
Figure 7.6) Click on the button to abort that particular CO. Note that none of the fields will be editable.
Refer to Figure 7.10. Click on ‘Submit’ at the bottom of the page, and ‘Yes’ in the confirmation dialog to
submit the Abort CO application.
Figure 7.10: An Aborted CO Form

MINISTRY OF COMMERCE CERTIFICATE OF ORIGIN AUTOMATION WEBSITE EXPORTERS’ OPERATIONS GUIDE v16.08.28 PAGE 68
7.11 Download Digitally Signed CO
A digitally signed Certificate of Origin can be downloaded from the Approved CO’s page. Click on the
Download Signed Form under CO Form tab and the digitally signed form will be downloaded. Refer to
Figures 7.11 and 7.13.
Figure 7.11: Download Signed CO button

MINISTRY OF COMMERCE CERTIFICATE OF ORIGIN AUTOMATION WEBSITE EXPORTERS’ OPERATIONS GUIDE v16.08.28 PAGE 69
Figure 7.11: Downloaded Digitally Signed CO

MINISTRY OF COMMERCE CERTIFICATE OF ORIGIN AUTOMATION WEBSITE EXPORTERS’ OPERATIONS GUIDE v16.08.28 PAGE 70
8 Application Enquiry: Search For CO Applications
The Application Enquiry page, accessed by selecting the Certificate of Origin > Application Enquiry menu,
allows you to search for a CO Form created with your account. (See Figure 8.1).
Figure 8.1: Application Enquiry page
A CO Form can be searched for and by any combination of these criteria:
1. Reference/Invoice No. – The CO Form Reference/Invoice No.
2. Exporter/Consignee – The exporter or consignee name or address specified in the CO Form.
3. Form – CO Form types filter
4. Status – The current status of the CO Form. The various status options are listed on the page. To
select multiple status, click on those that are required. (For detailed CO Form status description,
see Section 2.1)
Click on the Search button to begin the search process. Search results and displayed in the grid below
the search options. Clicking on a particular CO from redirects you to the CO Form details page.

MINISTRY OF COMMERCE CERTIFICATE OF ORIGIN AUTOMATION WEBSITE EXPORTERS’ OPERATIONS GUIDE v16.08.28 PAGE 71
*Note that for CO’s with an Express priority, a star will be present on the star column for that CO. See
Figure 8.2.
Figure 8.2: Application Enquiry showing CO with Approved status

MINISTRY OF COMMERCE CERTIFICATE OF ORIGIN AUTOMATION WEBSITE EXPORTERS’ OPERATIONS GUIDE v16.08.28 PAGE 72
8.1 Sort by Columns
To sort the table by specific columns, click on the particular column header for the column to be sorted.
By default, the table is sorted by the last updated column.
Figure 8.3: Application Enquiry page sorted by the Status column
As can be seen from Figure 8.3, the table in the Application Enquiry page is being sorted in Ascending
Order by the column: Status.

MINISTRY OF COMMERCE CERTIFICATE OF ORIGIN AUTOMATION WEBSITE EXPORTERS’ OPERATIONS GUIDE v16.08.28 PAGE 73
8.2 Filter Applications
The Filter feature allows applications to be searched based on the following:
1. Reference No.
2. Invoice No.
3. Exporter Name
4. Consignee Name
To search for an application based on either of the above, type the keyword that is being looked for in
the Filter text field and the search result will contain all the applications with the keyword present. See
Figure 8.3.
Figure 8.4: Application Enquiry search using Filter by the Exporter Name column

MINISTRY OF COMMERCE CERTIFICATE OF ORIGIN AUTOMATION WEBSITE EXPORTERS’ OPERATIONS GUIDE v16.08.28 PAGE 74
9 CO Inbox
The CO Inbox is the first page you are directed to after login (see Figure 9.1). This page displays the
status of all in-process CO Forms as well as CO Forms that require your action. (For detailed CO Form
status description, see Section 2.1)
Figure 9.1: CO Inbox page

MINISTRY OF COMMERCE CERTIFICATE OF ORIGIN AUTOMATION WEBSITE EXPORTERS’ OPERATIONS GUIDE v16.08.28 PAGE 75
In Figure 9.1, the CO Inbox page is shown. There is a table displaying all the COs that you have created
before, as well as their relevant statuses. Above the table are two drop-down lists to enable you to filter
out all COs pertaining to a particular exporter company and/or CO Form types.
9.1 Express CO Applications
When implemented, express CO application submissions will be highlighted with a star on the second
column. See Figure 9.1.
9.2 Service Level Agreement for Certificates of Origin
In accordance to MOC’s Service Level Agreement to exporters, Certificates of Origin (COs) are to be
processed within 12 business hours from time of submission.
If a submitted CO approaches or exceeds 9 business hours from time of submission, the Last Updated
field will be highlighted in yellow. See Figure 9.1.
If a submitted CO exceeds 12 business hours from time of submission, the Last Updated field will be
highlighted in RED. See Figure 9.1.
9.3 Exporter Service Level Agreement
Once a CO application has been Verified, an exporter is expected to pay for the verified COs within 72
business hours. If payment is still pending for verified COs after 72 hours, the Status column will be
highlighted in RED. See Figure 9.1.
If a verified CO has not been paid after 15 business days, the CO application will be cancelled and the
exporter is required to submit a new CO application.

MINISTRY OF COMMERCE CERTIFICATE OF ORIGIN AUTOMATION WEBSITE EXPORTERS’ OPERATIONS GUIDE v16.08.28 PAGE 76
9.4 Search by Exporter Company
Figure 9.2: CO Inbox page with Exporter Company drop-down list
To filter all COs pertaining to a particular Exporter Company, you can use the drop-down list given above
the table to filter out the COs you want. See Figure 9.2.
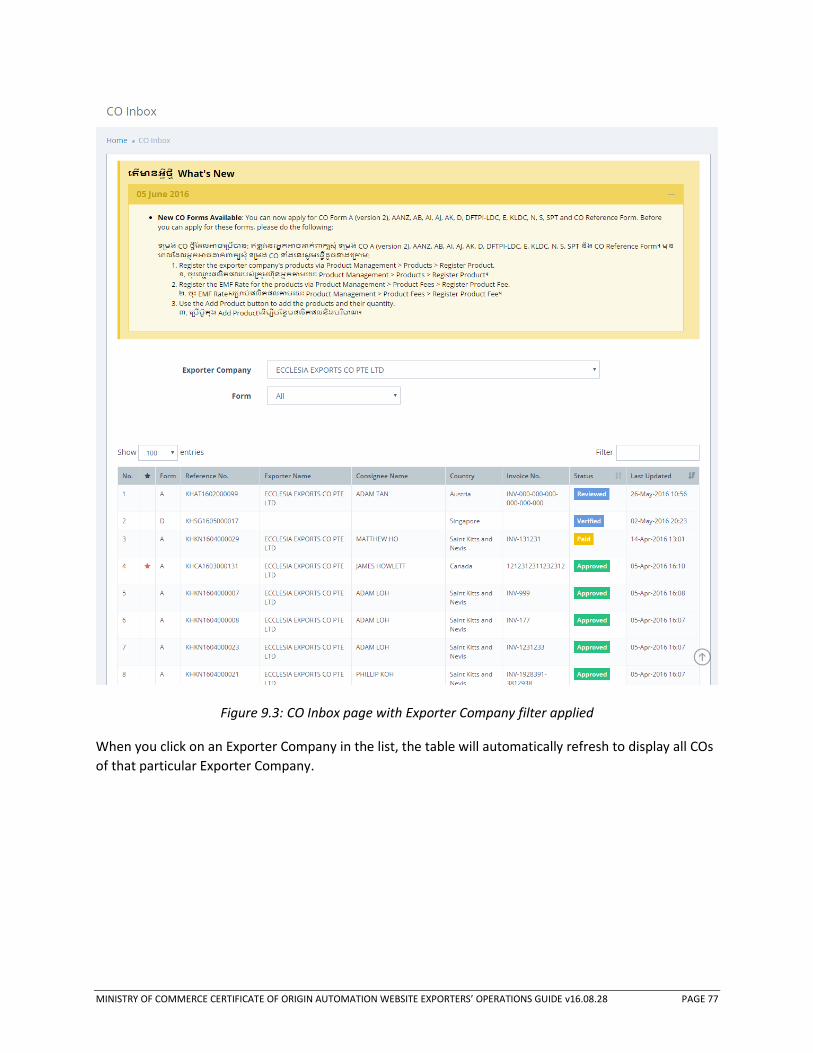
MINISTRY OF COMMERCE CERTIFICATE OF ORIGIN AUTOMATION WEBSITE EXPORTERS’ OPERATIONS GUIDE v16.08.28 PAGE 77
Figure 9.3: CO Inbox page with Exporter Company filter applied
When you click on an Exporter Company in the list, the table will automatically refresh to display all COs
of that particular Exporter Company.

MINISTRY OF COMMERCE CERTIFICATE OF ORIGIN AUTOMATION WEBSITE EXPORTERS’ OPERATIONS GUIDE v16.08.28 PAGE 78
9.5 Search by Form Type
Figure 9.4: CO Inbox page with Form drop-down list
To filter all COs pertaining to a particular CO Form type, use the drop-down list above the table to filter
the COs. See Figure 9.4.

MINISTRY OF COMMERCE CERTIFICATE OF ORIGIN AUTOMATION WEBSITE EXPORTERS’ OPERATIONS GUIDE v16.08.28 PAGE 79
Figure 9.5: CO Inbox page with Form filter applied
When a Form type is selected, the table will automatically refresh to display all COs of that particular
Form type.

MINISTRY OF COMMERCE CERTIFICATE OF ORIGIN AUTOMATION WEBSITE EXPORTERS’ OPERATIONS GUIDE v16.08.28 PAGE 80
9.6 Sort by Columns
To sort the table by specific columns, click on the particular column header for the column to be sorted.
By default, the table is sorted by the last updated column.
Figure 9.6: CO Inbox page sorted by Status
As can be seen from Figure 9.6, the table in the CO Inbox page is being sorted in Ascending Order by the
column: Status.
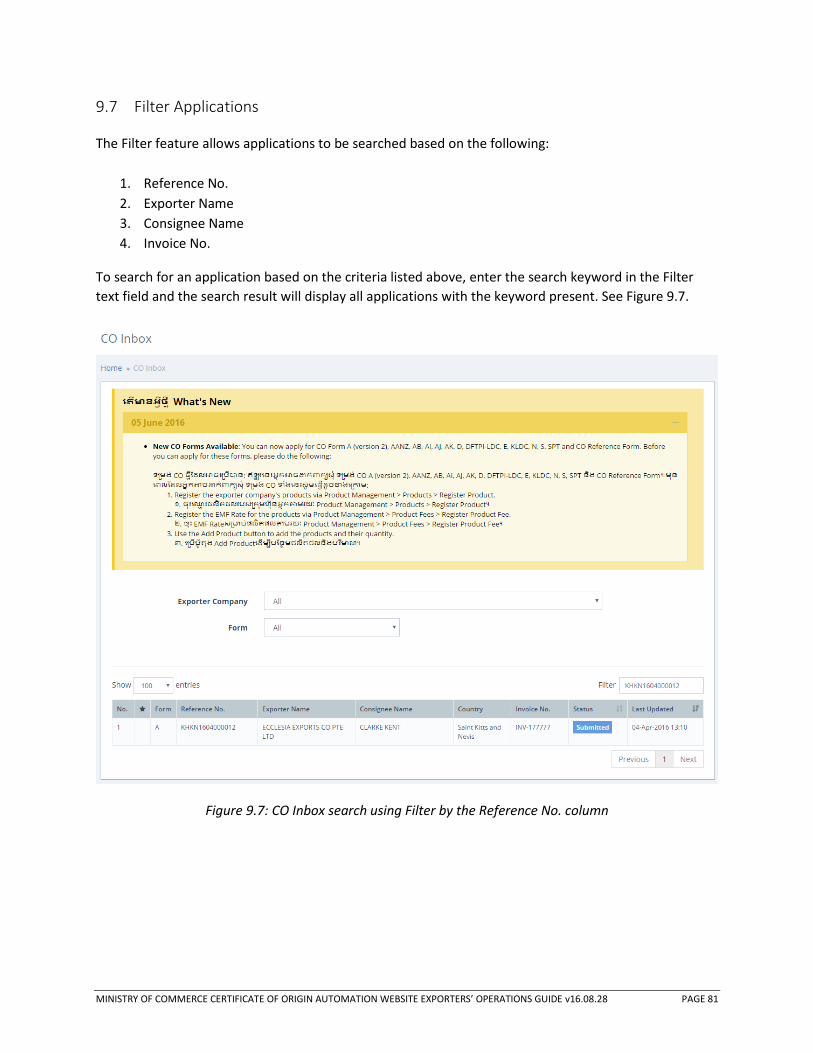
MINISTRY OF COMMERCE CERTIFICATE OF ORIGIN AUTOMATION WEBSITE EXPORTERS’ OPERATIONS GUIDE v16.08.28 PAGE 81
9.7 Filter Applications
The Filter feature allows applications to be searched based on the following:
1. Reference No.
2. Exporter Name
3. Consignee Name
4. Invoice No.
To search for an application based on the criteria listed above, enter the search keyword in the Filter
text field and the search result will display all applications with the keyword present. See Figure 9.7.
Figure 9.7: CO Inbox search using Filter by the Reference No. column

MINISTRY OF COMMERCE CERTIFICATE OF ORIGIN AUTOMATION WEBSITE EXPORTERS’ OPERATIONS GUIDE v16.08.28 PAGE 82
10 Pay For An Individual CO Application Online via Acleda Bank
Before final approval of your CO application, full payment must be made for it. To pay for CO
applications, go to your CO Inbox (see section 9.0).
Only CO applications with the status “Verified” can be paid for (see Figure 9.1).
Click on a “Verified” CO application and you will be redirected to the CO Form details page.
Click on the “Fees and Payment” tab to see the payment breakdown of the individual CO application
into EMF Fees and Service Fee. (See Figure 10.1)
To pay for the individual CO application, click on the Pay Fees button.
Figure 10.1: Fees & Payment tab and Pay Fees button

MINISTRY OF COMMERCE CERTIFICATE OF ORIGIN AUTOMATION WEBSITE EXPORTERS’ OPERATIONS GUIDE v16.08.28 PAGE 83
Figure 10.2: Pay Fees button mouse over
When you mouse over the Pay Fees button, you will see the drop-down list for the total amount
payable. Click on that button and you will be directed to the Outstanding Payments page. See Figure
10.3.

MINISTRY OF COMMERCE CERTIFICATE OF ORIGIN AUTOMATION WEBSITE EXPORTERS’ OPERATIONS GUIDE v16.08.28 PAGE 84
Figure 10.3: Outstanding Payments page
At the Outstanding Payments page, you can pay for only all payments that are currently payable for an
exporter company, or pay for an individual payment.

MINISTRY OF COMMERCE CERTIFICATE OF ORIGIN AUTOMATION WEBSITE EXPORTERS’ OPERATIONS GUIDE v16.08.28 PAGE 85
Figure 10.4: Unsaved Payment Advice Page
Before making a payment, you would need to save the payment advice to save the outstanding
payments at the current state.

MINISTRY OF COMMERCE CERTIFICATE OF ORIGIN AUTOMATION WEBSITE EXPORTERS’ OPERATIONS GUIDE v16.08.28 PAGE 86
Figure 10.5: Payment Advice page for selected CO
You will be directed to the Payment Advice page to make payment for saved payment advice. Click on
the Pay Online with Acleda Bank button under Online Payment section.
Note that you can also print a printer-friendly page of the current payment advice by clicking on the
printer button at the top right-hand side of the page. See Figure 10.6.

MINISTRY OF COMMERCE CERTIFICATE OF ORIGIN AUTOMATION WEBSITE EXPORTERS’ OPERATIONS GUIDE v16.08.28 PAGE 87
Figure 10.6: Payment Advice Print Preview
10.1 Payment Confirmation Page
Figure 10.7: Payment Confirmation page
You will be directed to the Payment Confirmation page after clicking on the Pay Online with Acleda Bank
button.

MINISTRY OF COMMERCE CERTIFICATE OF ORIGIN AUTOMATION WEBSITE EXPORTERS’ OPERATIONS GUIDE v16.08.28 PAGE 88
10.2 Acleda Bank Online Payment Pages
Click on “Pay Now!” button to redirect to the Acleda payment page. Select your payment option
according to the Acleda Bank account and click Proceed. See Figure 10.8.
Figure 10.8: Acleda Bank Payment Page – Select Your Payment Option
Enter your account details on the next page. See Figure 10.9

MINISTRY OF COMMERCE CERTIFICATE OF ORIGIN AUTOMATION WEBSITE EXPORTERS’ OPERATIONS GUIDE v16.08.28 PAGE 89
Figure 10.9: Acleda Bank Payment Page – Enter Your Account Details
Enter One-Time PIN (OTP) delivered via SMS or via SoftKey. See Figure 10.10.

MINISTRY OF COMMERCE CERTIFICATE OF ORIGIN AUTOMATION WEBSITE EXPORTERS’ OPERATIONS GUIDE v16.08.28 PAGE 90
Figure 10.10: Acleda Bank Payment Page – Enter OTP
If payment is successful, you will be shown the page in Figure 10.12.
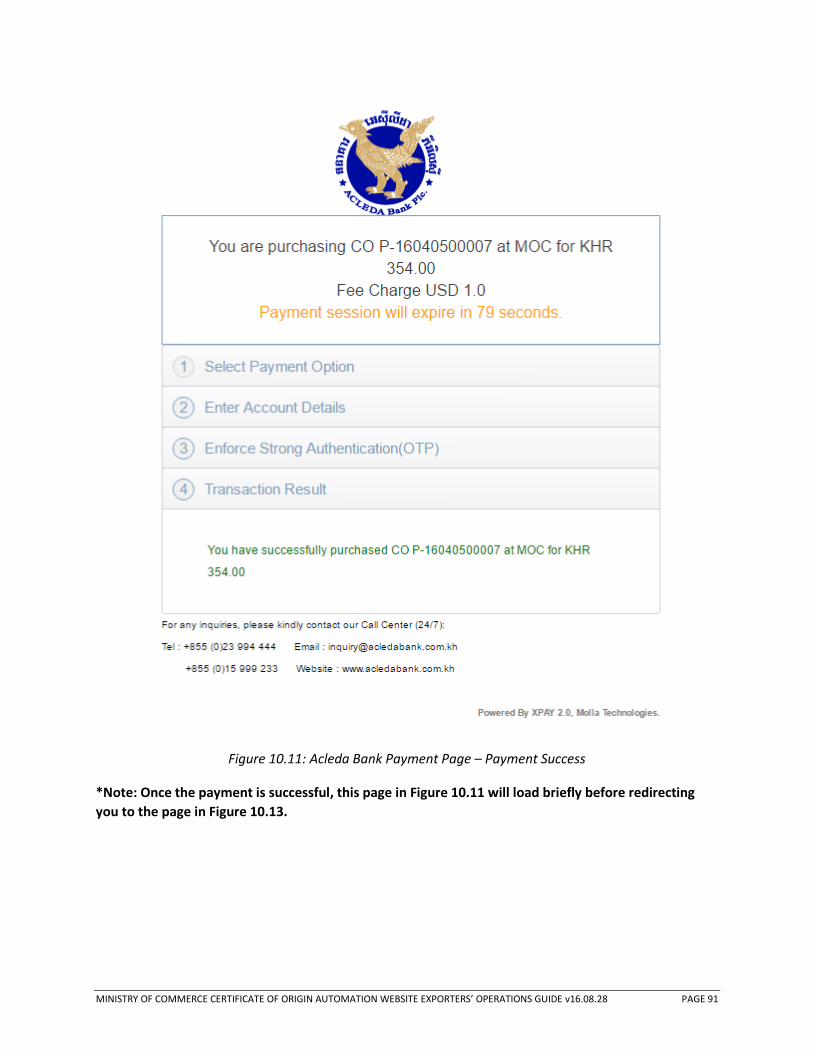
MINISTRY OF COMMERCE CERTIFICATE OF ORIGIN AUTOMATION WEBSITE EXPORTERS’ OPERATIONS GUIDE v16.08.28 PAGE 91
Figure 10.11: Acleda Bank Payment Page – Payment Success
*Note: Once the payment is successful, this page in Figure 10.11 will load briefly before redirecting
you to the page in Figure 10.13.
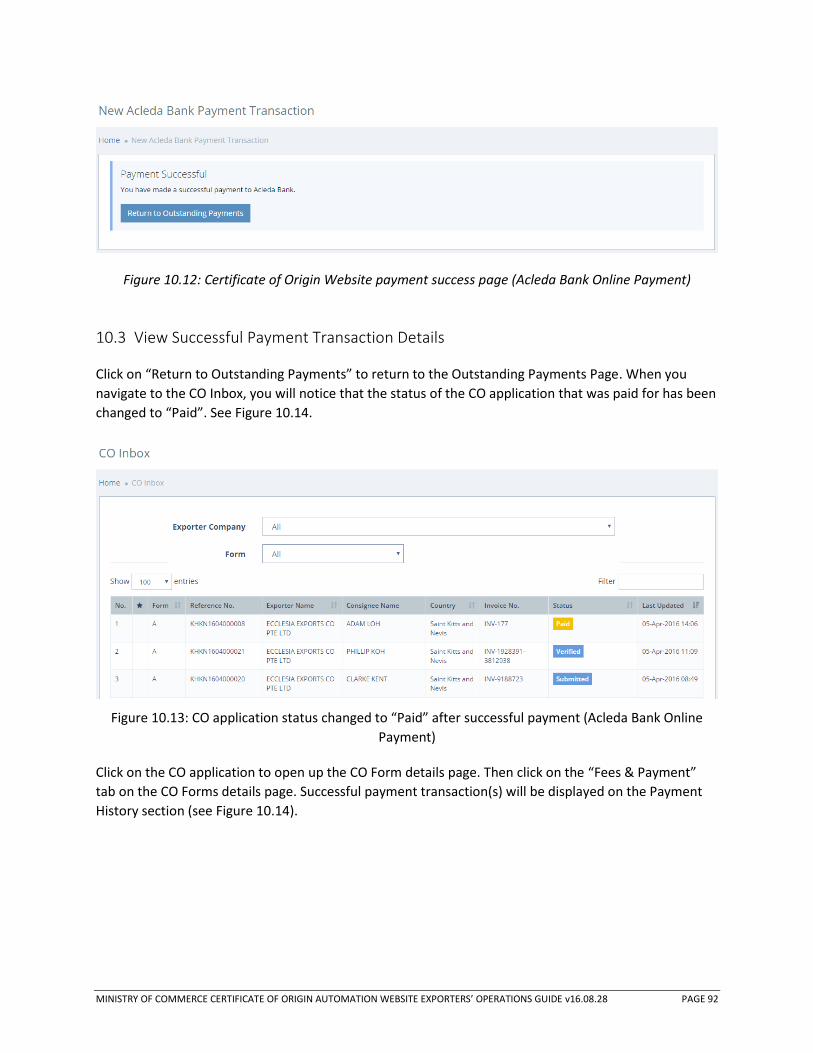
MINISTRY OF COMMERCE CERTIFICATE OF ORIGIN AUTOMATION WEBSITE EXPORTERS’ OPERATIONS GUIDE v16.08.28 PAGE 92
Figure 10.12: Certificate of Origin Website payment success page (Acleda Bank Online Payment)
10.3 View Successful Payment Transaction Details
Click on “Return to Outstanding Payments” to return to the Outstanding Payments Page. When you
navigate to the CO Inbox, you will notice that the status of the CO application that was paid for has been
changed to “Paid”. See Figure 10.14.
Figure 10.13: CO application status changed to “Paid” after successful payment (Acleda Bank Online
Payment)
Click on the CO application to open up the CO Form details page. Then click on the “Fees & Payment”
tab on the CO Forms details page. Successful payment transaction(s) will be displayed on the Payment
History section (see Figure 10.14).
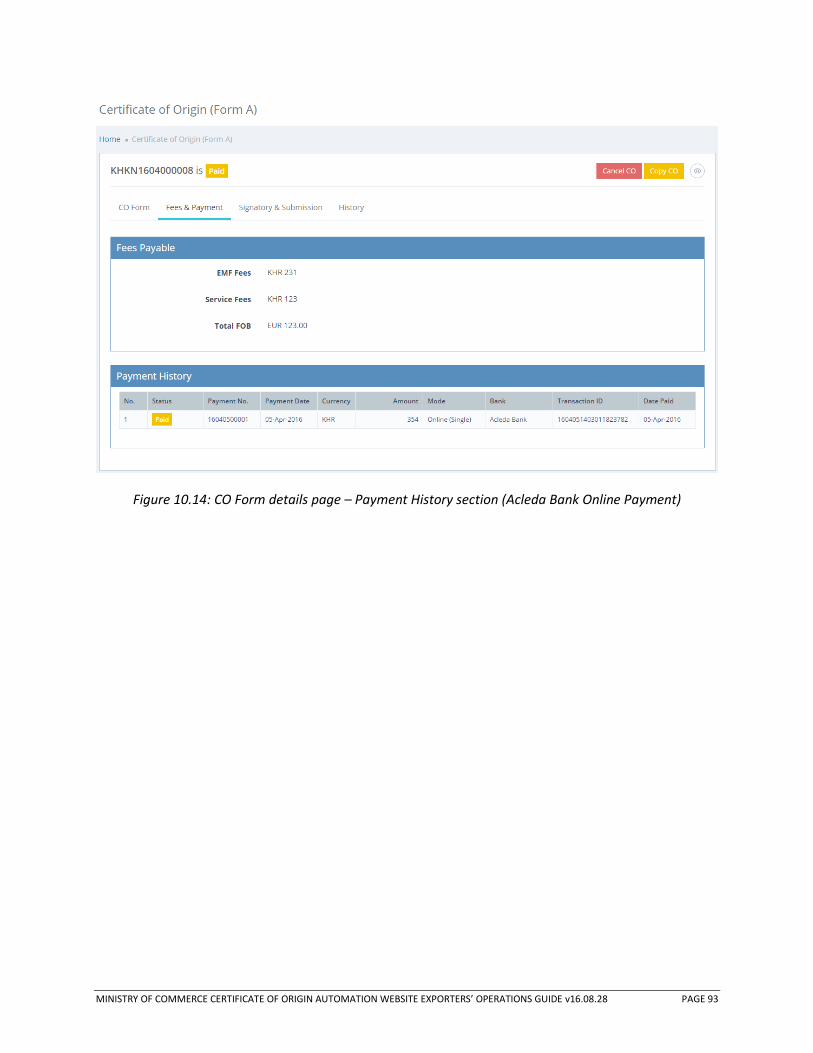
MINISTRY OF COMMERCE CERTIFICATE OF ORIGIN AUTOMATION WEBSITE EXPORTERS’ OPERATIONS GUIDE v16.08.28 PAGE 93
Figure 10.14: CO Form details page – Payment History section (Acleda Bank Online Payment)
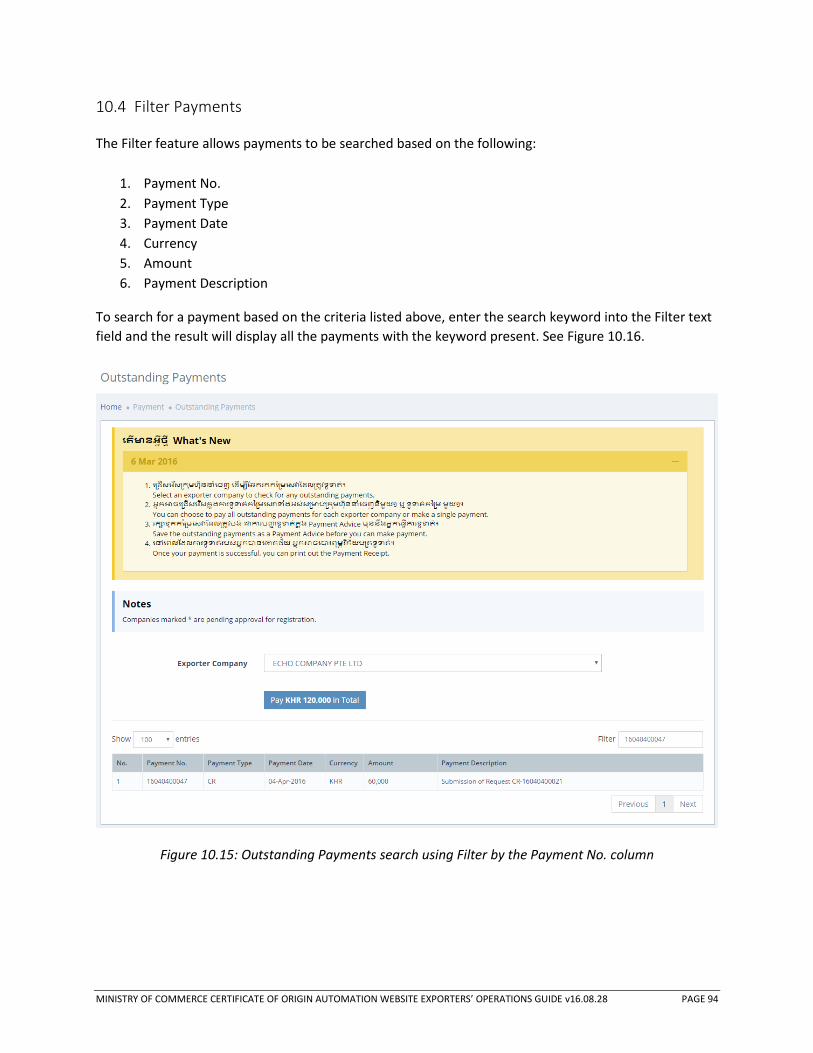
MINISTRY OF COMMERCE CERTIFICATE OF ORIGIN AUTOMATION WEBSITE EXPORTERS’ OPERATIONS GUIDE v16.08.28 PAGE 94
10.4 Filter Payments
The Filter feature allows payments to be searched based on the following:
1. Payment No.
2. Payment Type
3. Payment Date
4. Currency
5. Amount
6. Payment Description
To search for a payment based on the criteria listed above, enter the search keyword into the Filter text
field and the result will display all the payments with the keyword present. See Figure 10.16.
Figure 10.15: Outstanding Payments search using Filter by the Payment No. column
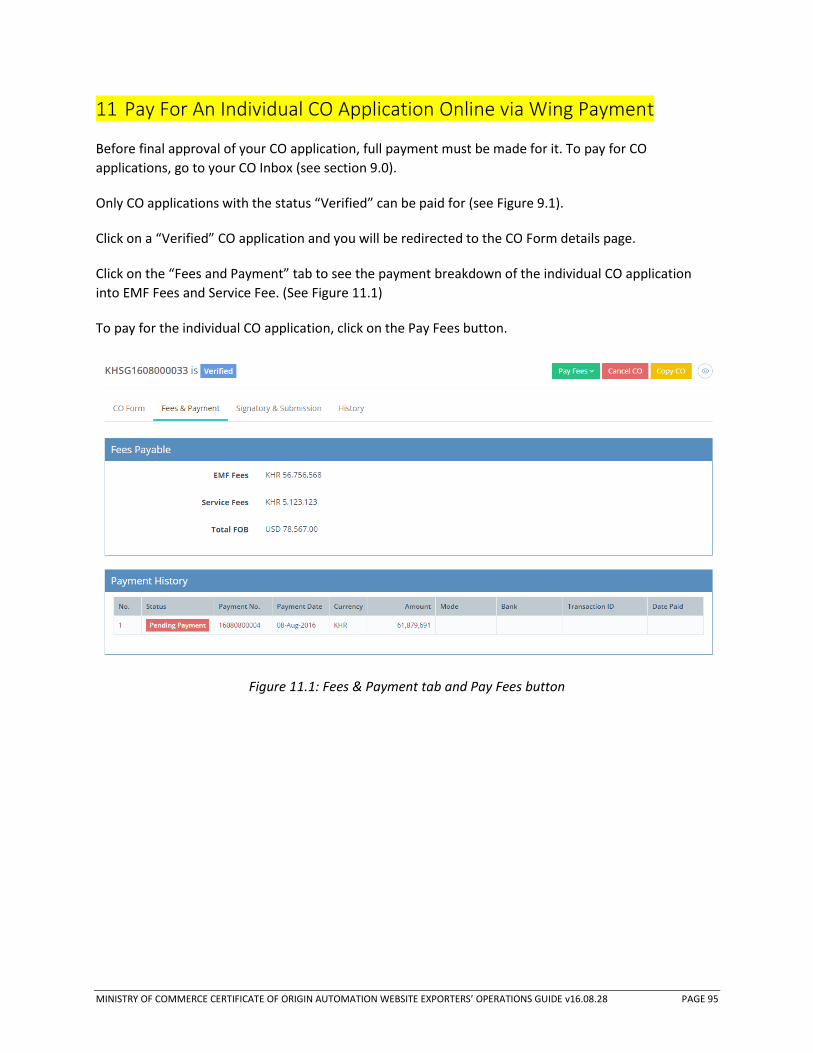
MINISTRY OF COMMERCE CERTIFICATE OF ORIGIN AUTOMATION WEBSITE EXPORTERS’ OPERATIONS GUIDE v16.08.28 PAGE 95
11 Pay For An Individual CO Application Online via Wing Payment
Before final approval of your CO application, full payment must be made for it. To pay for CO
applications, go to your CO Inbox (see section 9.0).
Only CO applications with the status “Verified” can be paid for (see Figure 9.1).
Click on a “Verified” CO application and you will be redirected to the CO Form details page.
Click on the “Fees and Payment” tab to see the payment breakdown of the individual CO application
into EMF Fees and Service Fee. (See Figure 11.1)
To pay for the individual CO application, click on the Pay Fees button.
Figure 11.1: Fees & Payment tab and Pay Fees button
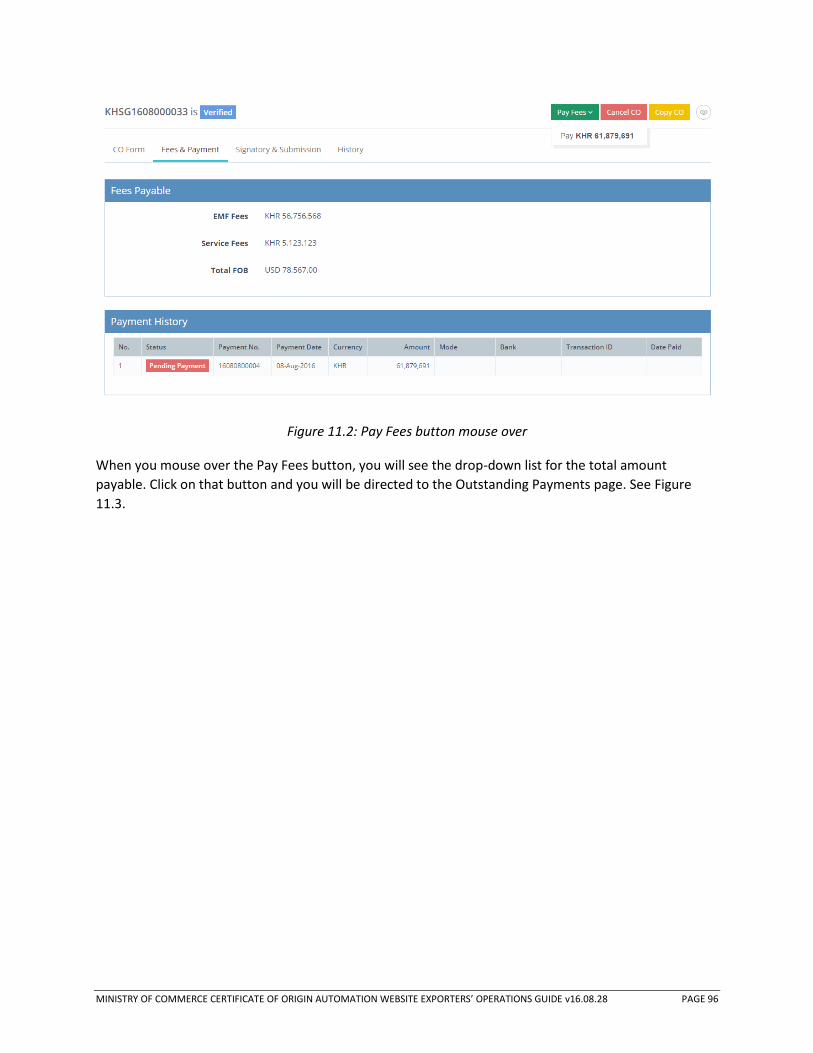
MINISTRY OF COMMERCE CERTIFICATE OF ORIGIN AUTOMATION WEBSITE EXPORTERS’ OPERATIONS GUIDE v16.08.28 PAGE 96
Figure 11.2: Pay Fees button mouse over
When you mouse over the Pay Fees button, you will see the drop-down list for the total amount
payable. Click on that button and you will be directed to the Outstanding Payments page. See Figure
11.3.
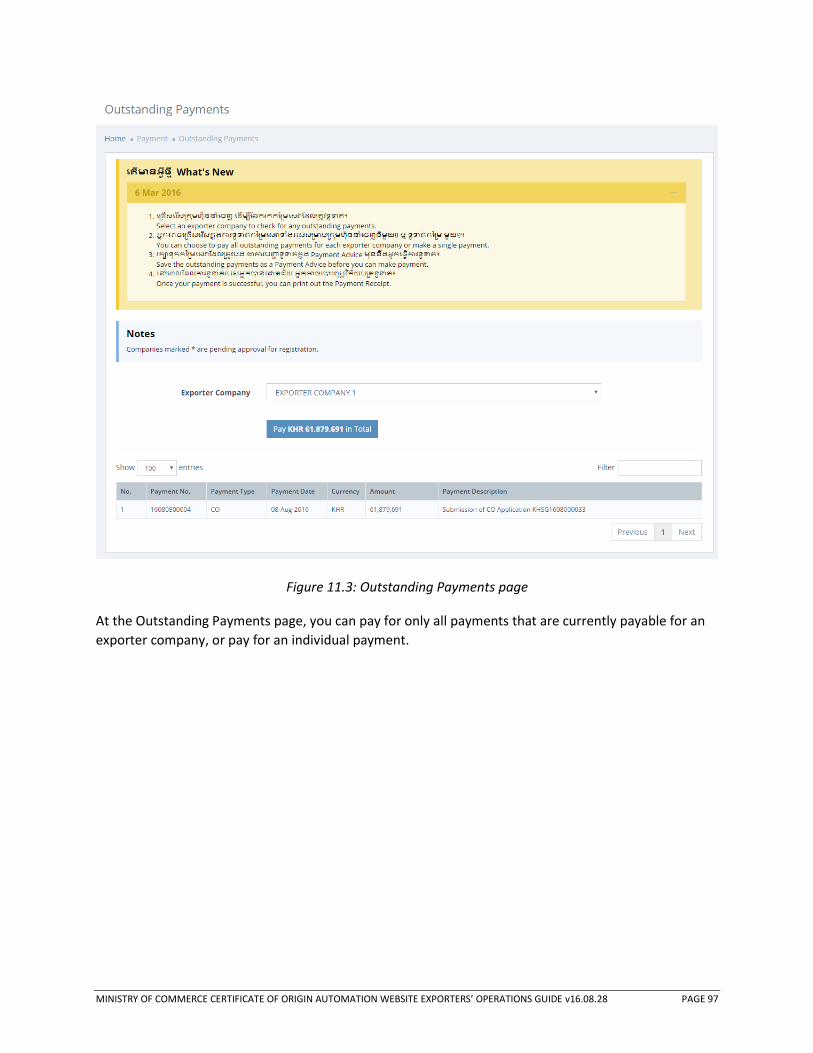
MINISTRY OF COMMERCE CERTIFICATE OF ORIGIN AUTOMATION WEBSITE EXPORTERS’ OPERATIONS GUIDE v16.08.28 PAGE 97
Figure 11.3: Outstanding Payments page
At the Outstanding Payments page, you can pay for only all payments that are currently payable for an
exporter company, or pay for an individual payment.
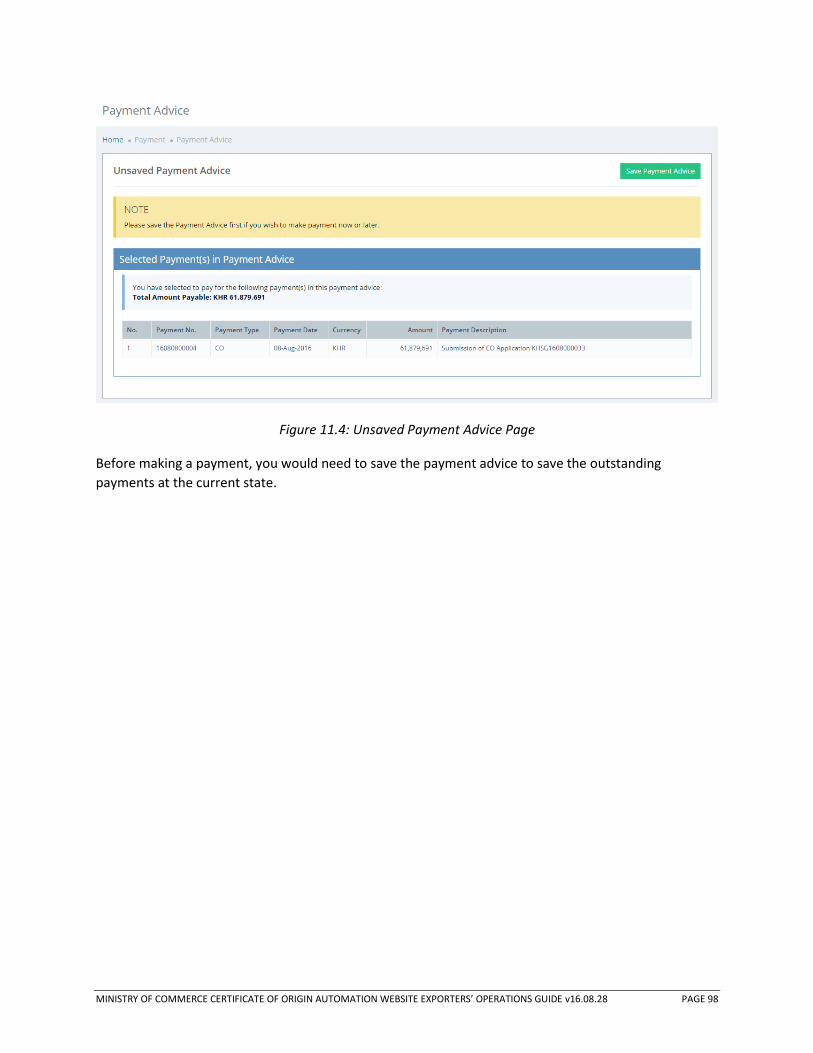
MINISTRY OF COMMERCE CERTIFICATE OF ORIGIN AUTOMATION WEBSITE EXPORTERS’ OPERATIONS GUIDE v16.08.28 PAGE 98
Figure 11.4: Unsaved Payment Advice Page
Before making a payment, you would need to save the payment advice to save the outstanding
payments at the current state.

MINISTRY OF COMMERCE CERTIFICATE OF ORIGIN AUTOMATION WEBSITE EXPORTERS’ OPERATIONS GUIDE v16.08.28 PAGE 99
Figure 11.5: Payment Advice page for selected CO
You will be directed to the Payment Advice page to make payment for saved payment advice. Click on
the Pay Online with Wing button under Online Payment section.
Note that you can also print a printer-friendly page of the current payment advice by clicking on the
printer button at the top right-hand side of the page. See Figure 11.6.

MINISTRY OF COMMERCE CERTIFICATE OF ORIGIN AUTOMATION WEBSITE EXPORTERS’ OPERATIONS GUIDE v16.08.28 PAGE 100
Figure 11.6: Payment Advice Print Preview
11.1 Payment Confirmation Page
Figure 11.7: Payment Confirmation page
You will be directed to the Payment Confirmation page after clicking on the Pay Online with Wing
button.

MINISTRY OF COMMERCE CERTIFICATE OF ORIGIN AUTOMATION WEBSITE EXPORTERS’ OPERATIONS GUIDE v16.08.28 PAGE 101
11.2 Wing Online Payment Pages
Click on “Pay Now!” button to redirect to the Wing payment page. Key in your Wing Account number
and Payment Code and click on “Continue”. See Figure 11.8.
Figure 11.8: Wing Payment portal page
Upon clicking “Continue”, you will be brought to the Wing Payment Confirmation page. See Figure 11.9.
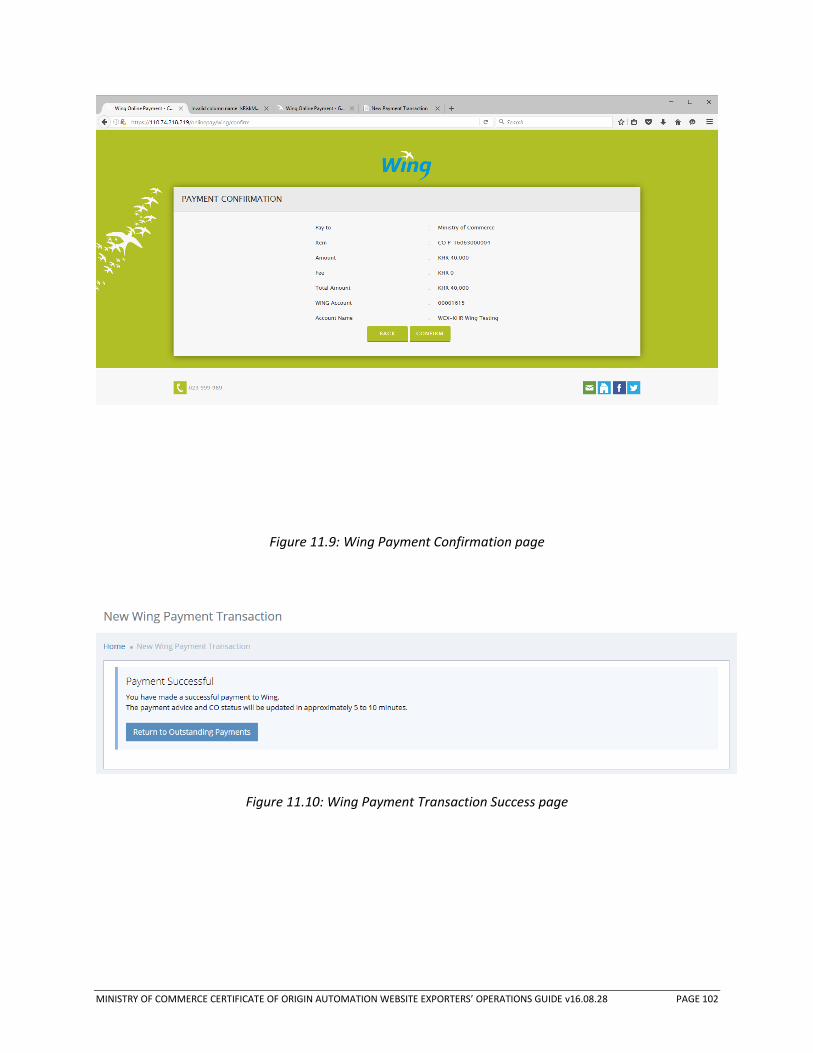
MINISTRY OF COMMERCE CERTIFICATE OF ORIGIN AUTOMATION WEBSITE EXPORTERS’ OPERATIONS GUIDE v16.08.28 PAGE 102
Figure 11.9: Wing Payment Confirmation page
Figure 11.10: Wing Payment Transaction Success page
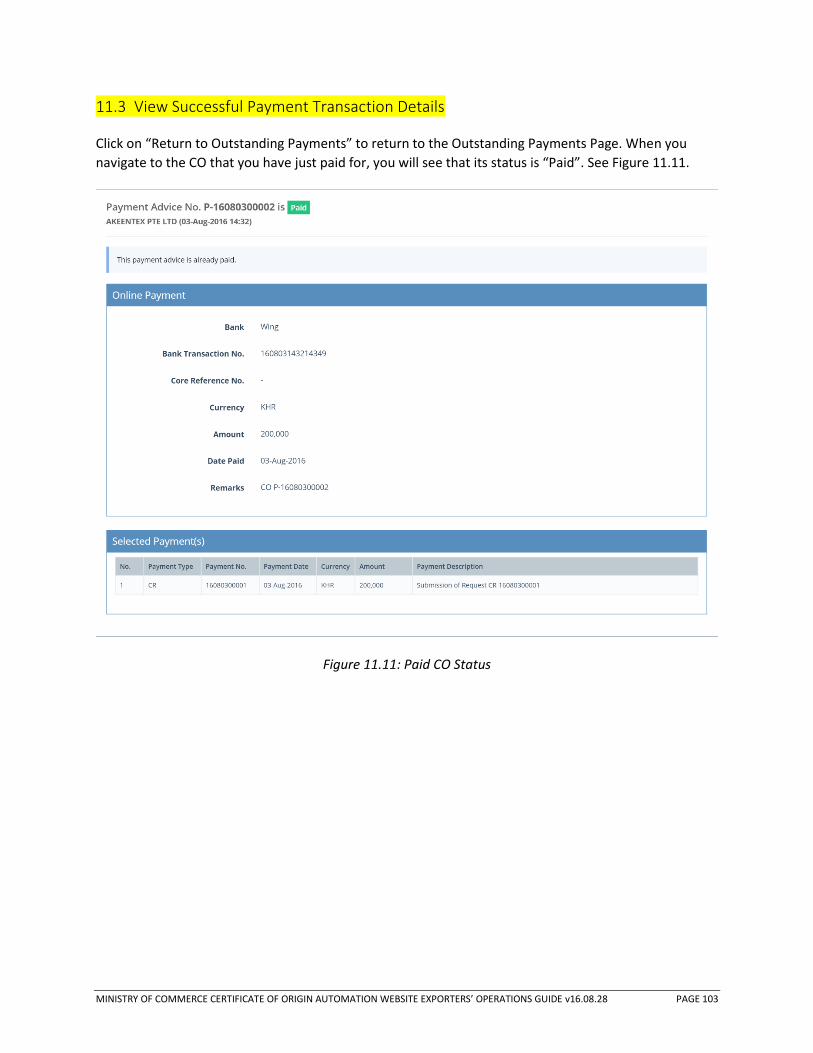
MINISTRY OF COMMERCE CERTIFICATE OF ORIGIN AUTOMATION WEBSITE EXPORTERS’ OPERATIONS GUIDE v16.08.28 PAGE 103
11.3 View Successful Payment Transaction Details
Click on “Return to Outstanding Payments” to return to the Outstanding Payments Page. When you
navigate to the CO that you have just paid for, you will see that its status is “Paid”. See Figure 11.11.
Figure 11.11: Paid CO Status
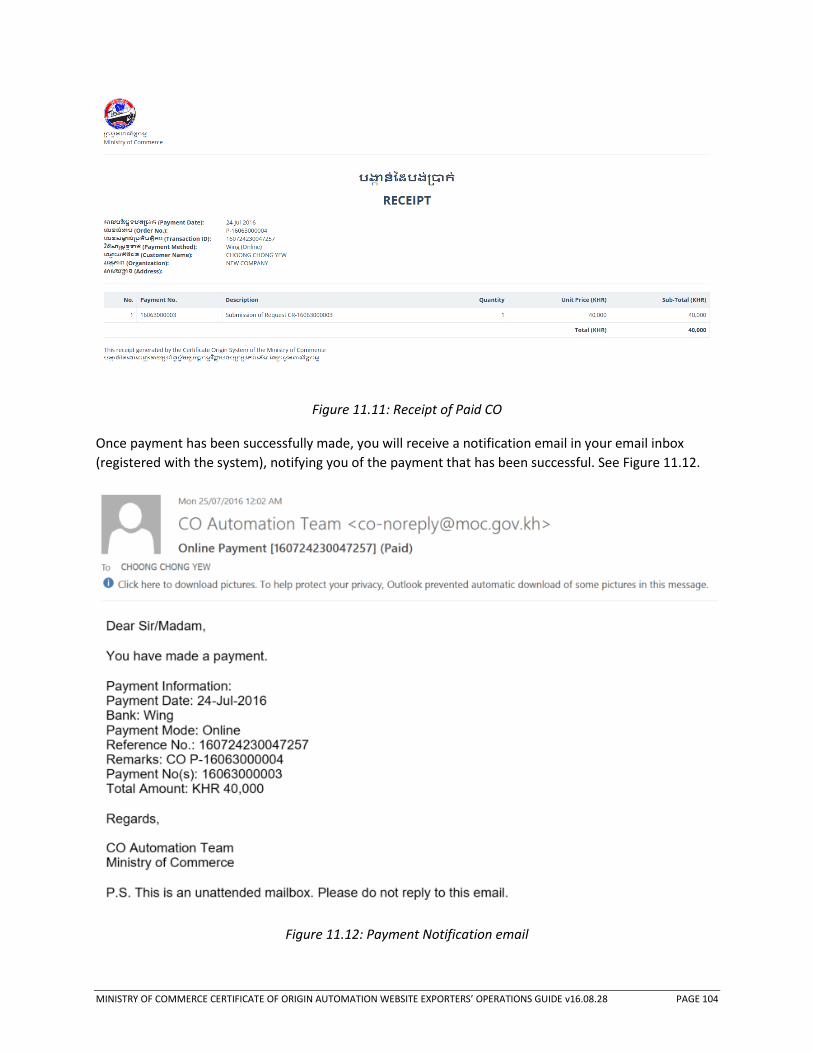
MINISTRY OF COMMERCE CERTIFICATE OF ORIGIN AUTOMATION WEBSITE EXPORTERS’ OPERATIONS GUIDE v16.08.28 PAGE 104
Figure 11.11: Receipt of Paid CO
Once payment has been successfully made, you will receive a notification email in your email inbox
(registered with the system), notifying you of the payment that has been successful. See Figure 11.12.
Figure 11.12: Payment Notification email

MINISTRY OF COMMERCE CERTIFICATE OF ORIGIN AUTOMATION WEBSITE EXPORTERS’ OPERATIONS GUIDE v16.08.28 PAGE 105
11.4 Filter Payments
The Filter feature allows payments to be searched based on the following:
7. Payment No.
8. Payment Type
9. Payment Date
10. Currency
11. Amount
12. Payment Description
To search for a payment based on the criteria listed above, enter the search keyword into the Filter text
field and the result will display all the payments with the keyword present. See Figure 11.13.
Figure 11.13: Outstanding Payments search using Filter by the Payment No. column

MINISTRY OF COMMERCE CERTIFICATE OF ORIGIN AUTOMATION WEBSITE EXPORTERS’ OPERATIONS GUIDE v16.08.28 PAGE 106
12 Pay For An Individual CO Application Manually
At this page, your payment advice is shown. Click on the “Pay Manually” button to make the payment
manually.
Figure 12.1: Payment Advice Page

MINISTRY OF COMMERCE CERTIFICATE OF ORIGIN AUTOMATION WEBSITE EXPORTERS’ OPERATIONS GUIDE v16.08.28 PAGE 107
Figure 12.2: Manual Payment Page Filled Up
Figure 12.2 shows the Manual Payment page with all mandatory fields filled in.
Figure 12.3: Certificate of Origin Website payment success page (Manual Payment)
Once you click the ‘Return to Outstanding Payments” button in Figure 12.3, you will be brought to the
Outstanding Payments Page.

MINISTRY OF COMMERCE CERTIFICATE OF ORIGIN AUTOMATION WEBSITE EXPORTERS’ OPERATIONS GUIDE v16.08.28 PAGE 108
12.1 View Successful Payment Transaction Details
Figure 12.4: CO application status changed to “Paid Manually” after successful payment (Manual Payment)
When you go back to the CO Inbox, you will be able to see the status of the CO that you have just
recently paid for. As can be seen in the Figure above, the status is ‘Paid Manually’.
*Note: The CO record has its status changed to “Paid Manually” in Figure 12.4 as the payment has to
be approved by MOC Finance before it is changed to “Paid”.

MINISTRY OF COMMERCE CERTIFICATE OF ORIGIN AUTOMATION WEBSITE EXPORTERS’ OPERATIONS GUIDE v16.08.28 PAGE 109
Figure 12.5: CO Form details page – Payment History section (Manual Payment)
Select a CO and click on the Fees & Payment tab. At the Payment History section, these are the possible
statuses:
1. Pending Payment – payment has to be made against this CO
2. Pending Verification – manual payment has been made pending verification by MOC Finance
3. Paid – payment has been made. In the case of manual payments, the payment has been verified
by MOC Finance.
12.2 Rejected Manual Payment(s)
In the event that the MOC Finance personnel rejects the Manual Payment, the status of the CO will
revert back to ‘Verified’. This means that the original payment was unsuccessful and another payment
transaction would have to be performed. See Figure 12.6.

MINISTRY OF COMMERCE CERTIFICATE OF ORIGIN AUTOMATION WEBSITE EXPORTERS’ OPERATIONS GUIDE v16.08.28 PAGE 110
Figure 12.6: CO application status changed back to “Verified” after rejection of payment (Manual
Payment)
Figure 12.7: CO Form details page – History section (Rejection of Manual Payment)
Rejected payments are recorded in the CO History tab. See Figure 12.7.
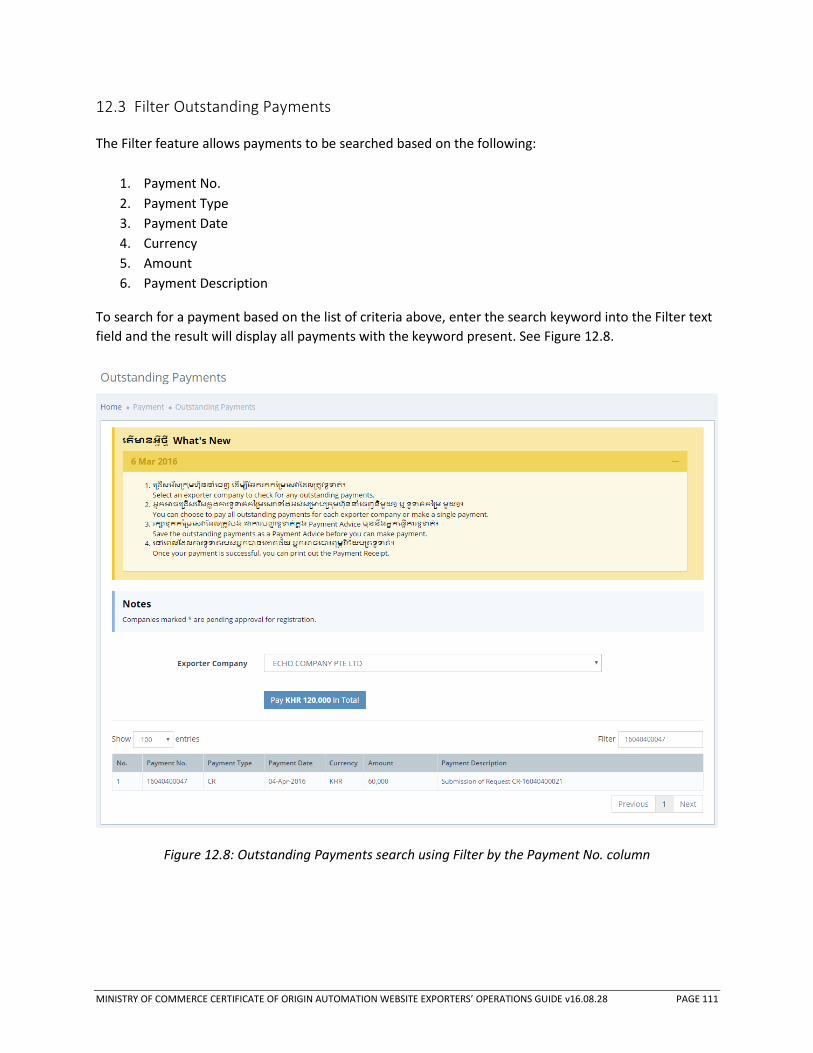
MINISTRY OF COMMERCE CERTIFICATE OF ORIGIN AUTOMATION WEBSITE EXPORTERS’ OPERATIONS GUIDE v16.08.28 PAGE 111
12.3 Filter Outstanding Payments
The Filter feature allows payments to be searched based on the following:
1. Payment No.
2. Payment Type
3. Payment Date
4. Currency
5. Amount
6. Payment Description
To search for a payment based on the list of criteria above, enter the search keyword into the Filter text
field and the result will display all payments with the keyword present. See Figure 12.8.
Figure 12.8: Outstanding Payments search using Filter by the Payment No. column
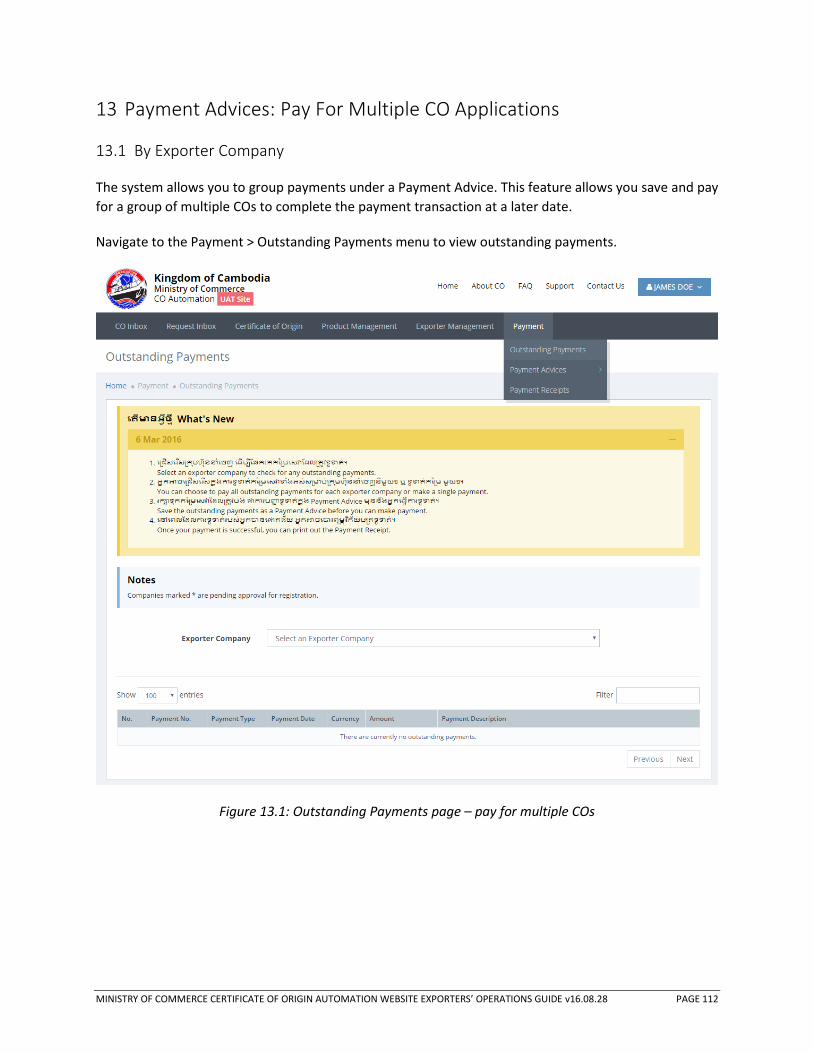
MINISTRY OF COMMERCE CERTIFICATE OF ORIGIN AUTOMATION WEBSITE EXPORTERS’ OPERATIONS GUIDE v16.08.28 PAGE 112
13 Payment Advices: Pay For Multiple CO Applications
13.1 By Exporter Company
The system allows you to group payments under a Payment Advice. This feature allows you save and pay
for a group of multiple COs to complete the payment transaction at a later date.
Navigate to the Payment > Outstanding Payments menu to view outstanding payments.
Figure 13.1: Outstanding Payments page – pay for multiple COs
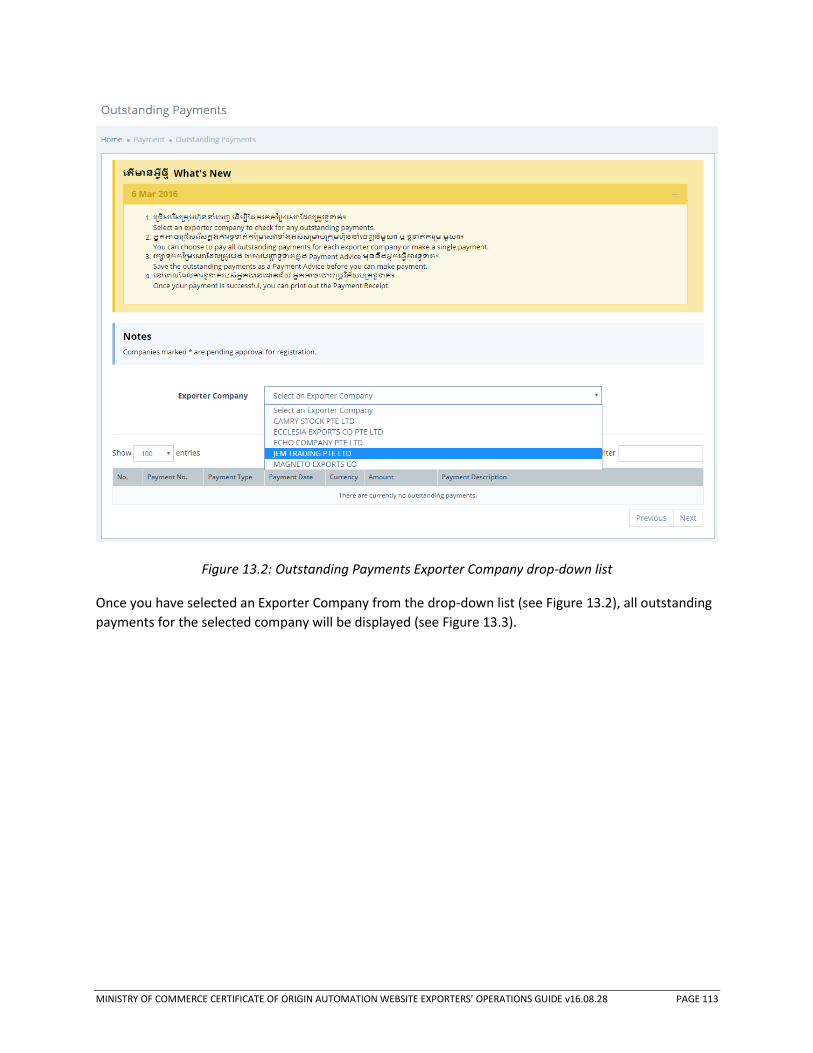
MINISTRY OF COMMERCE CERTIFICATE OF ORIGIN AUTOMATION WEBSITE EXPORTERS’ OPERATIONS GUIDE v16.08.28 PAGE 113
Figure 13.2: Outstanding Payments Exporter Company drop-down list
Once you have selected an Exporter Company from the drop-down list (see Figure 13.2), all outstanding
payments for the selected company will be displayed (see Figure 13.3).

MINISTRY OF COMMERCE CERTIFICATE OF ORIGIN AUTOMATION WEBSITE EXPORTERS’ OPERATIONS GUIDE v16.08.28 PAGE 114
Figure 13.3: Outstanding Payments filtered by Exporter Company
Click on the “Pay KHR<amount> in Total” button to proceed to the next page (see Figure 13.4).

MINISTRY OF COMMERCE CERTIFICATE OF ORIGIN AUTOMATION WEBSITE EXPORTERS’ OPERATIONS GUIDE v16.08.28 PAGE 115
Figure 13.4: Unsaved Payment Advice page
The Unsaved Payment Advice page (Figure 13.4) displays a list of outstanding payments. Click on “Save
Payment Advice” to save the group of displayed outstanding payments.

MINISTRY OF COMMERCE CERTIFICATE OF ORIGIN AUTOMATION WEBSITE EXPORTERS’ OPERATIONS GUIDE v16.08.28 PAGE 116
Figure 13.5: Saved Payment Advice page
The figure above shows the Saved Payment Advice page. Saved payment advices can be accessed by
navigating to the Payment > Payment Advices > Outstanding menu.
13.1.1 Print Payment Advice
To print a payment advice, click on the printer icon at the furthest right column. A new window will
open with the print dialog displayed.

MINISTRY OF COMMERCE CERTIFICATE OF ORIGIN AUTOMATION WEBSITE EXPORTERS’ OPERATIONS GUIDE v16.08.28 PAGE 117
Figure 13.6: Print Payment Advice for Multiple Payment
13.2 Pay Online with Acleda Bank
You will be redirected to the Payment Confirmation page once you click on “Pay Online with Acleda
Bank” in Figure 13.5. Click on the “Pay Now!” button at the Payment Confirmation page (see Figure
13.7).
Figure 13.7: Acleda Bank Payment Confirmation page
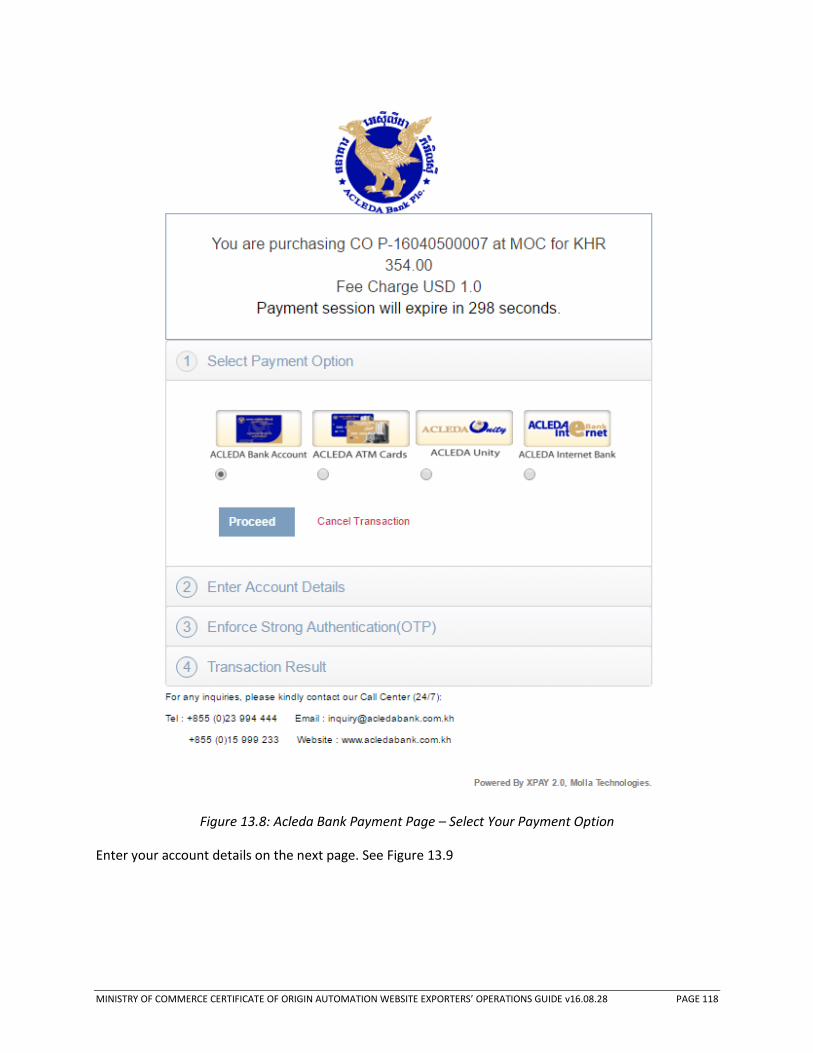
MINISTRY OF COMMERCE CERTIFICATE OF ORIGIN AUTOMATION WEBSITE EXPORTERS’ OPERATIONS GUIDE v16.08.28 PAGE 118
Figure 13.8: Acleda Bank Payment Page – Select Your Payment Option
Enter your account details on the next page. See Figure 13.9
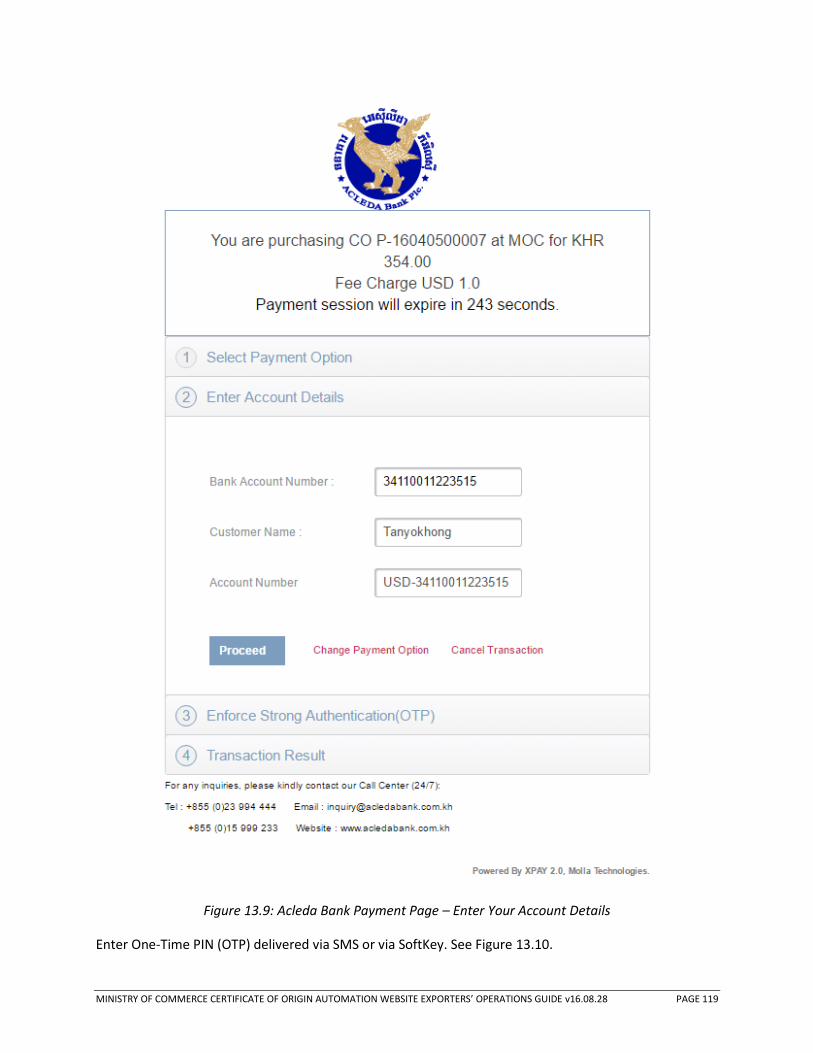
MINISTRY OF COMMERCE CERTIFICATE OF ORIGIN AUTOMATION WEBSITE EXPORTERS’ OPERATIONS GUIDE v16.08.28 PAGE 119
Figure 13.9: Acleda Bank Payment Page – Enter Your Account Details
Enter One-Time PIN (OTP) delivered via SMS or via SoftKey. See Figure 13.10.
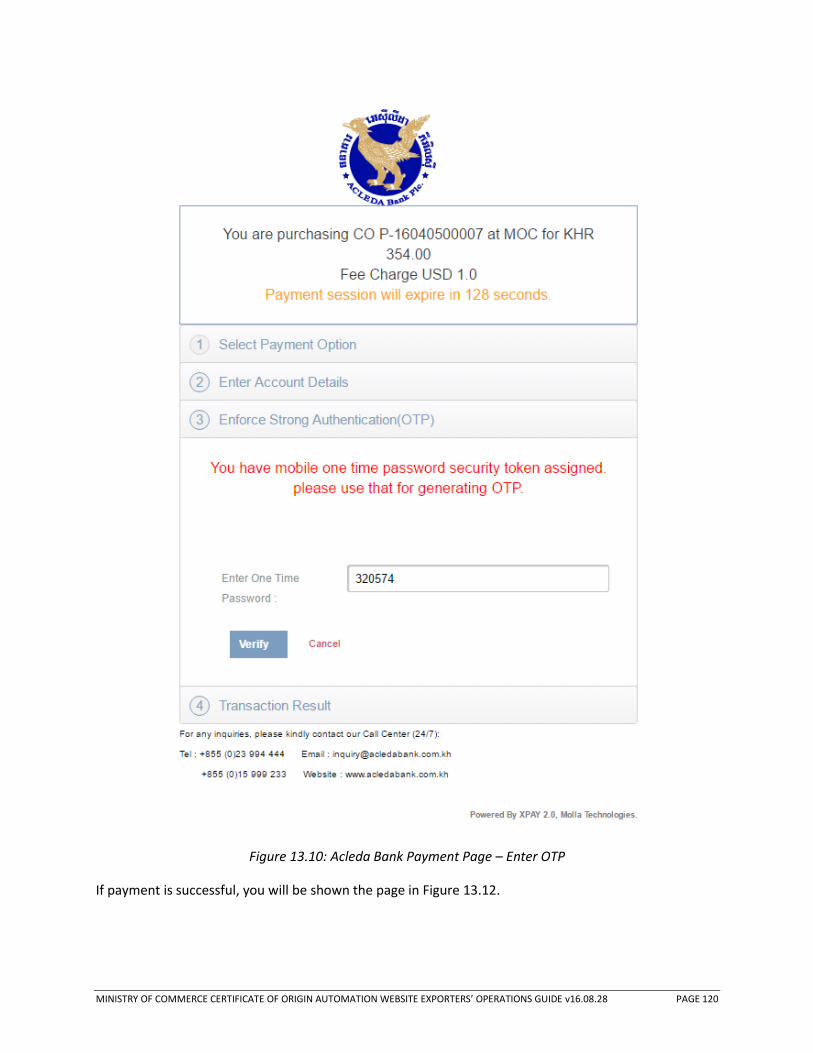
MINISTRY OF COMMERCE CERTIFICATE OF ORIGIN AUTOMATION WEBSITE EXPORTERS’ OPERATIONS GUIDE v16.08.28 PAGE 120
Figure 13.10: Acleda Bank Payment Page – Enter OTP
If payment is successful, you will be shown the page in Figure 13.12.

MINISTRY OF COMMERCE CERTIFICATE OF ORIGIN AUTOMATION WEBSITE EXPORTERS’ OPERATIONS GUIDE v16.08.28 PAGE 121
Figure 13.11: Acleda Bank Payment Page – Payment Success
*Note: Once the payment is successful, this page in Figure 13.11 will load briefly before redirecting
you to the page in Figure 13.13.

MINISTRY OF COMMERCE CERTIFICATE OF ORIGIN AUTOMATION WEBSITE EXPORTERS’ OPERATIONS GUIDE v16.08.28 PAGE 122
Figure 13.12: Payment Successful page

MINISTRY OF COMMERCE CERTIFICATE OF ORIGIN AUTOMATION WEBSITE EXPORTERS’ OPERATIONS GUIDE v16.08.28 PAGE 123
13.3 Pay Online with Wing
You will be redirected to the Payment Confirmation page once you click on “Pay Online with Wing” in
Figure 13.5. Click on the “Pay Now!” button at the Payment Confirmation page (see Figure 13.13).
Figure 13.13: Payment Confirmation page
You will be directed to the Payment Confirmation page after clicking on the Pay Online with Wing
button.

MINISTRY OF COMMERCE CERTIFICATE OF ORIGIN AUTOMATION WEBSITE EXPORTERS’ OPERATIONS GUIDE v16.08.28 PAGE 124
Click on “Pay Now!” button to redirect to the Wing payment page. Key in your Wing Account number
and Payment Code and click on “Continue”. See Figure 13.14.
Figure 13.14: Wing Payment portal page
Upon clicking “Continue”, you will be brought to the Wing Payment Confirmation page. See Figure
13.15.

MINISTRY OF COMMERCE CERTIFICATE OF ORIGIN AUTOMATION WEBSITE EXPORTERS’ OPERATIONS GUIDE v16.08.28 PAGE 125
Figure 13.15: Wing Payment Confirmation page
Figure 13.16: Wing Payment Transaction Success page

MINISTRY OF COMMERCE CERTIFICATE OF ORIGIN AUTOMATION WEBSITE EXPORTERS’ OPERATIONS GUIDE v16.08.28 PAGE 126
13.4 Manual Payment
At the Payment Advice page, click on the “Pay Manually” button to make manual payment for the group
of payments. You will then be redirected to the Manual Payment Page. See Figure 13.17.
Figure 13.17: Manual Payment page
Key in the applicable manual payment fields and click “Submit”. Once a manual payment is submitted,
you will be redirected to the “Payment Successful” page (see Figure 13.18). Click “Return to Outstanding
Payments”.

MINISTRY OF COMMERCE CERTIFICATE OF ORIGIN AUTOMATION WEBSITE EXPORTERS’ OPERATIONS GUIDE v16.08.28 PAGE 127
Figure 13.18: Payment Successful page
Figure 13.19: CO Inbox page with CO status updated to “Paid Manually”
At your CO Inbox, the status of the paid for COs have been updated to “Paid Manually”. See Figure
13.20. Once the manual payment has been verified by MOC Finance, the status will be updated to
“Paid”.

MINISTRY OF COMMERCE CERTIFICATE OF ORIGIN AUTOMATION WEBSITE EXPORTERS’ OPERATIONS GUIDE v16.08.28 PAGE 128
13.5 Rejected Manual Payment
In the event that MOC Finance rejects the Manual Payment transaction, the status of the affected COs
will revert to “Verified” (see Figure 13.20). A new payment transaction has to be performed – either
online or manually.
Figure 13.20: CO status revert to “Verified” upon manual payment rejection

MINISTRY OF COMMERCE CERTIFICATE OF ORIGIN AUTOMATION WEBSITE EXPORTERS’ OPERATIONS GUIDE v16.08.28 PAGE 129
14 Payment Advices
Payment Advices form a single or a group of payments for which a payment transaction – online or
outstanding, is made against. Payment Advices can be saved for a payment to be transacted or finalized
at a later time.
14.1 Outstanding Payment Advices
All saved outstanding payment advices can be accessed via the Payment > Payment Advices >
Outstanding menu.
Figure 14.1: Outstanding Payment Advices Page
Figure 14.1 displays outstanding payment advices. Click on an individual payment advice to view details
of the individual payment advice. See Figure 14.2.

MINISTRY OF COMMERCE CERTIFICATE OF ORIGIN AUTOMATION WEBSITE EXPORTERS’ OPERATIONS GUIDE v16.08.28 PAGE 130
Figure 14.2: Payment Advice Page

MINISTRY OF COMMERCE CERTIFICATE OF ORIGIN AUTOMATION WEBSITE EXPORTERS’ OPERATIONS GUIDE v16.08.28 PAGE 131
14.2 Paid Payment Advices
All paid payment advices can be accessed via the Payment > Payment Advices > Paid menu.
Figure 14.3: Paid Payment Advices Page
Figure 14.3 displays outstanding payment advices. Click on an individual payment advice to view details
of the individual payment advice.
14.3 Print Payment Advice
To print a payment advice (see Figure 14.4), click on the printer icon either at the top right-hand corner
of the window within each Payment Advice record or the printer icon at the last column of the
Outstanding or Paid pages.

MINISTRY OF COMMERCE CERTIFICATE OF ORIGIN AUTOMATION WEBSITE EXPORTERS’ OPERATIONS GUIDE v16.08.28 PAGE 132
Figure 14.4: Print Preview of Payment Advice
14.4 CO Expiration
COs that are Verified and are pending payment will automatically expire after 15 days. To view COs
that have expired, navigate to Application Enquiry under Certificate Of Origin. Select Expired under
Status and click on ‘Search’ to view the Expired Cos. Refer to Figure 14.5. Click on the application to view
the CO’s details. Refer to Figure 14.6.
Figure 14.5: Expired COs under Application Enquiry

MINISTRY OF COMMERCE CERTIFICATE OF ORIGIN AUTOMATION WEBSITE EXPORTERS’ OPERATIONS GUIDE v16.08.28 PAGE 133
Figure 14.6: Expired CO’s details

MINISTRY OF COMMERCE CERTIFICATE OF ORIGIN AUTOMATION WEBSITE EXPORTERS’ OPERATIONS GUIDE v16.08.28 PAGE 134
15 Payment Receipts
To view Payment Receipts, navigate to the Payment > Payment Receipts menu. See Figure 15.1. Click on
the printer icon on the far right column to print an individual Payment Receipt. A new window will open
with the print dialog displayed (see Figure 15.2).
Figure 15.1: Payment Receipts page

MINISTRY OF COMMERCE CERTIFICATE OF ORIGIN AUTOMATION WEBSITE EXPORTERS’ OPERATIONS GUIDE v16.08.28 PAGE 135
Figure 15.2: Payment Receipt printer-friendly page

MINISTRY OF COMMERCE CERTIFICATE OF ORIGIN AUTOMATION WEBSITE EXPORTERS’ OPERATIONS GUIDE v16.08.28 PAGE 136
16 Print Approved Certificate Of Origin
To print an Approved CO Form, navigate to the Certificate of Origin > Application Enquiry menu. See
Figure 16.1.
Figure 16.1: Application Enquiry Page
Enter the appropriate information into the CO Form Reference No. and/or Exporter/Consignee fields,
click on the Approved status button and finally, click on the Search button to search for the desired
Approved CO Form.
Click on the individual CO Form that you would like to print and it will bring you to the CO Form details
page. See Figure 16.2.
Click on the Print CO button to print the CO on pre-printed forms. A PDF file will be generated with just
the CO Form contents. This PDF file is suitable to be printed on pre-printed CO Forms.

MINISTRY OF COMMERCE CERTIFICATE OF ORIGIN AUTOMATION WEBSITE EXPORTERS’ OPERATIONS GUIDE v16.08.28 PAGE 137
16.1 CO Form Print History
Every CO Form print is recorded and tracked together with other CO Form activity. Click on the History
tab to view CO Form activity. See Figure 16.4.
Figure 16.2: Approved CO Form details page with Print CO button

MINISTRY OF COMMERCE CERTIFICATE OF ORIGIN AUTOMATION WEBSITE EXPORTERS’ OPERATIONS GUIDE v16.08.28 PAGE 138
Figure 16.3: Printed CO Form

MINISTRY OF COMMERCE CERTIFICATE OF ORIGIN AUTOMATION WEBSITE EXPORTERS’ OPERATIONS GUIDE v16.08.28 PAGE 139
Figure 16.4: CO Form History
The user and IP address of every CO Form print out will be recorded in the CO History. See Figure 16.4.

MINISTRY OF COMMERCE CERTIFICATE OF ORIGIN AUTOMATION WEBSITE EXPORTERS’ OPERATIONS GUIDE v16.08.28 PAGE 140
17 Verify CO
To verify the current status of an existing Certificate of Origin, click on the Verify CO button on the main
page, next to the Login/Signup button.
Figure 17.1: Top Navigation bar for Internet site
When a user clicks on the Verify CO button as shown in Figure 17.1, he/she will be brought to the Verify
CO page with the Verify CO form. See Figure 17.2.
Figure 17.2: Verify CO Form
In the Verify CO function, only three types of CO statuses will be returned in the Verify CO function:
1. Approved
2. Cancelled
3. Rejected (displayed as Cancelled)
In the event that the Verify CO search yields a result, the Reference Number, Status, Signatory, Means of
Transport and Issued Date fields will be displayed. See Figure 17.3.

MINISTRY OF COMMERCE CERTIFICATE OF ORIGIN AUTOMATION WEBSITE EXPORTERS’ OPERATIONS GUIDE v16.08.28 PAGE 141
Figure 17.3: Verify CO for CO with Approved Status
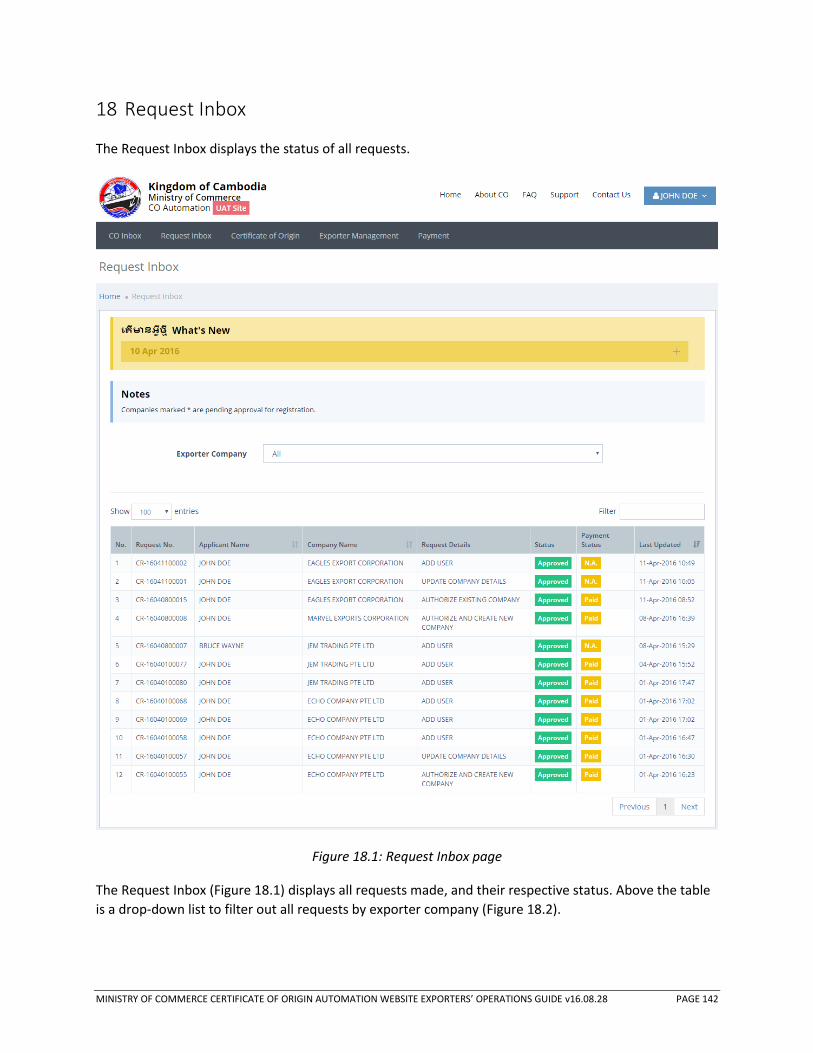
MINISTRY OF COMMERCE CERTIFICATE OF ORIGIN AUTOMATION WEBSITE EXPORTERS’ OPERATIONS GUIDE v16.08.28 PAGE 142
18 Request Inbox
The Request Inbox displays the status of all requests.
Figure 18.1: Request Inbox page
The Request Inbox (Figure 18.1) displays all requests made, and their respective status. Above the table
is a drop-down list to filter out all requests by exporter company (Figure 18.2).

MINISTRY OF COMMERCE CERTIFICATE OF ORIGIN AUTOMATION WEBSITE EXPORTERS’ OPERATIONS GUIDE v16.08.28 PAGE 143
Figure 18.2: Request Inbox page with Exporter Company drop-down list

MINISTRY OF COMMERCE CERTIFICATE OF ORIGIN AUTOMATION WEBSITE EXPORTERS’ OPERATIONS GUIDE v16.08.28 PAGE 144
18.1 Sort by Columns
To sort the table by specific columns, click on the particular column header for the column to be sorted.
By default, the table is sorted by the last updated column.
Figure 18.3: Request Inbox page sorted by Company Name
In Figure 18.3, the Request Inbox table is sorted in Ascending Order by the Company Name column.

MINISTRY OF COMMERCE CERTIFICATE OF ORIGIN AUTOMATION WEBSITE EXPORTERS’ OPERATIONS GUIDE v16.08.28 PAGE 145
18.2 Filter Requests
The Filter feature allows requests to be filtered based on the following criteria:
1. Request No.
2. Applicant Name
3. Company Name
4. Request Details
To search for a request based on the criteria listed above, enter the search keyword in the Filter text
field and the search result will display all requests with the keyword present. See Figure 18.4.
Figure 18.4: Request Inbox search using Filter by the Request Details column

MINISTRY OF COMMERCE CERTIFICATE OF ORIGIN AUTOMATION WEBSITE EXPORTERS’ OPERATIONS GUIDE v16.08.28 PAGE 146
19 Exporter Management – Register an Exporter Company
19.1 Register a new Exporter Company or Associate with an existing Exporter Company
To register for a new exporter company or associate with an existing exporter company, navigate to
Exporter Management > Register Exporter Company. See Figure 19.1. Performing this action will trigger
a request.
Figure 19.1: Register An Exporter Company page
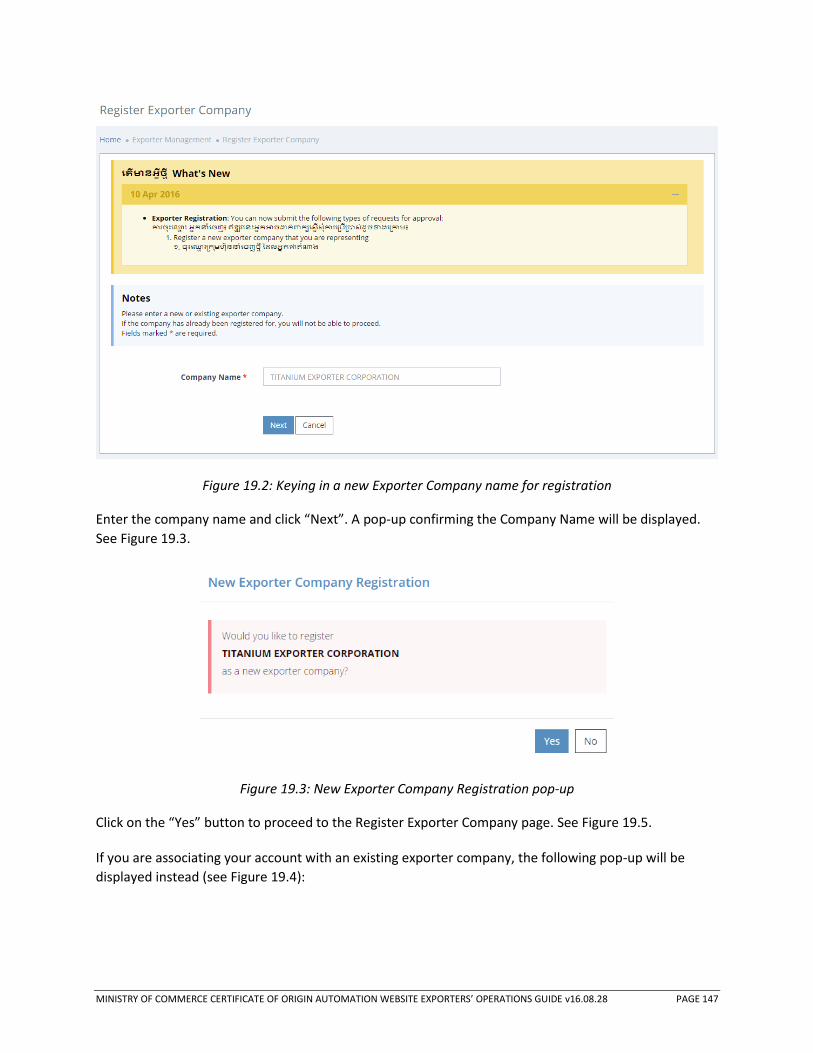
MINISTRY OF COMMERCE CERTIFICATE OF ORIGIN AUTOMATION WEBSITE EXPORTERS’ OPERATIONS GUIDE v16.08.28 PAGE 147
Figure 19.2: Keying in a new Exporter Company name for registration
Enter the company name and click “Next”. A pop-up confirming the Company Name will be displayed.
See Figure 19.3.
Figure 19.3: New Exporter Company Registration pop-up
Click on the “Yes” button to proceed to the Register Exporter Company page. See Figure 19.5.
If you are associating your account with an existing exporter company, the following pop-up will be
displayed instead (see Figure 19.4):
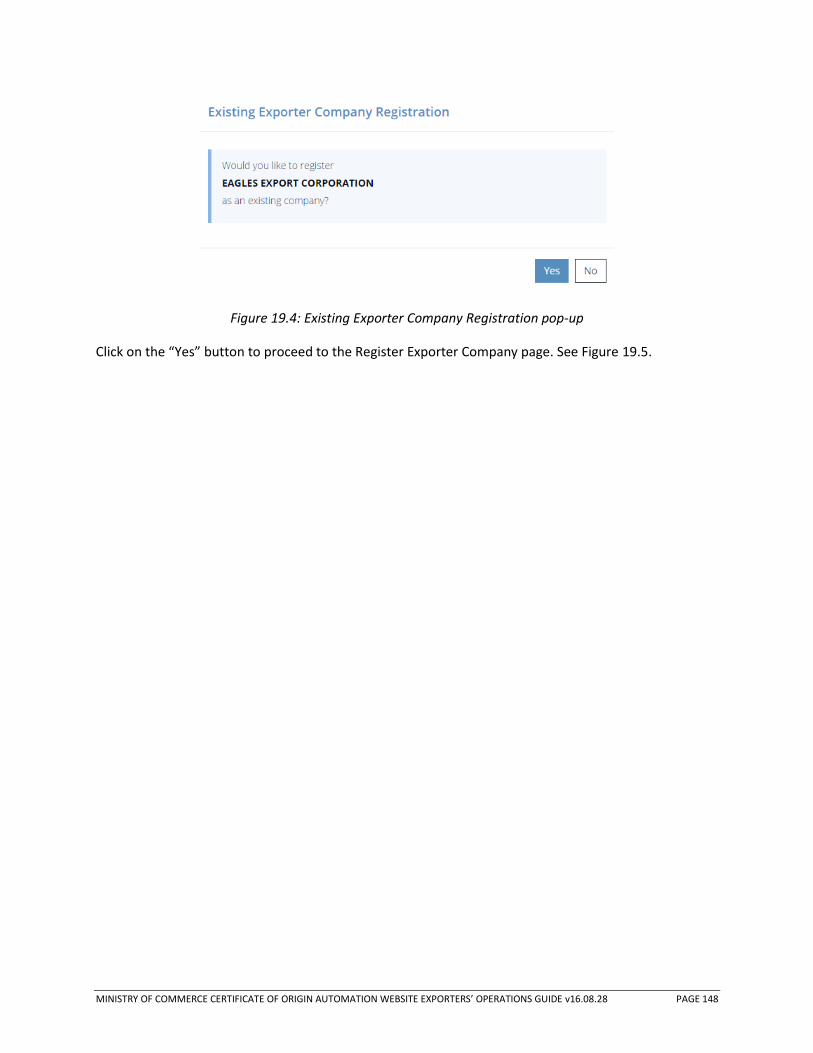
MINISTRY OF COMMERCE CERTIFICATE OF ORIGIN AUTOMATION WEBSITE EXPORTERS’ OPERATIONS GUIDE v16.08.28 PAGE 148
Figure 19.4: Existing Exporter Company Registration pop-up
Click on the “Yes” button to proceed to the Register Exporter Company page. See Figure 19.5.

MINISTRY OF COMMERCE CERTIFICATE OF ORIGIN AUTOMATION WEBSITE EXPORTERS’ OPERATIONS GUIDE v16.08.28 PAGE 149
Figure 19.5: Register Exporter Company details page for a new company
Fill in all mandatory fields and click “Submit”.
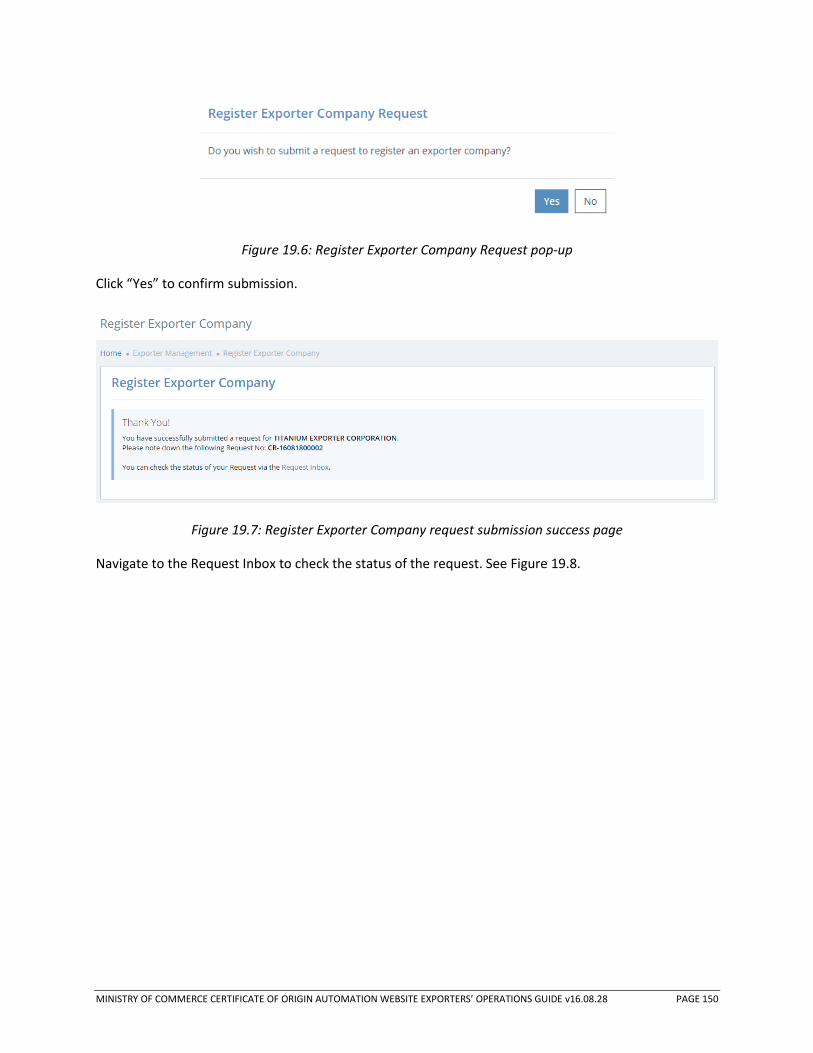
MINISTRY OF COMMERCE CERTIFICATE OF ORIGIN AUTOMATION WEBSITE EXPORTERS’ OPERATIONS GUIDE v16.08.28 PAGE 150
Figure 19.6: Register Exporter Company Request pop-up
Click “Yes” to confirm submission.
Figure 19.7: Register Exporter Company request submission success page
Navigate to the Request Inbox to check the status of the request. See Figure 19.8.

MINISTRY OF COMMERCE CERTIFICATE OF ORIGIN AUTOMATION WEBSITE EXPORTERS’ OPERATIONS GUIDE v16.08.28 PAGE 151
Figure 19.8: Request Inbox showing the status and payment status of the Register New Exporter Company Request
If the request is subject to fees, the request status will be displayed as “Pending Payment”. For “Pending
Payment” requests, navigate to the Outstanding Payments page to make payment.
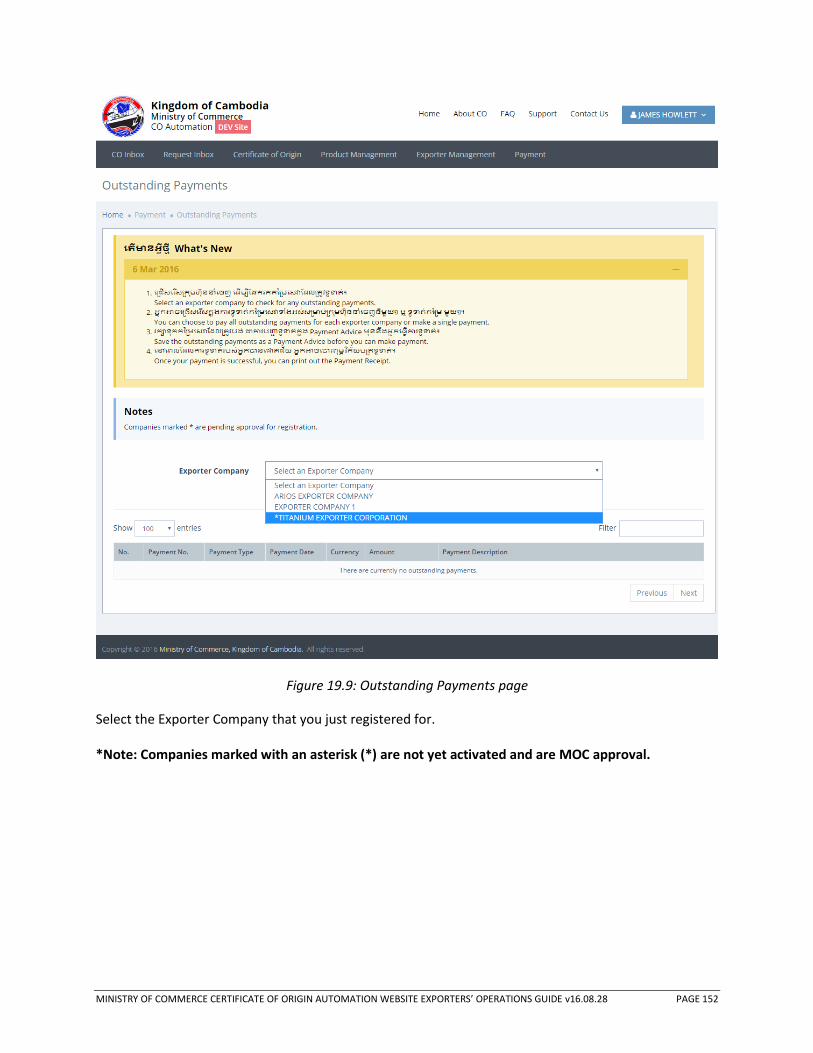
MINISTRY OF COMMERCE CERTIFICATE OF ORIGIN AUTOMATION WEBSITE EXPORTERS’ OPERATIONS GUIDE v16.08.28 PAGE 152
Figure 19.9: Outstanding Payments page
Select the Exporter Company that you just registered for.
*Note: Companies marked with an asterisk (*) are not yet activated and are MOC approval.

MINISTRY OF COMMERCE CERTIFICATE OF ORIGIN AUTOMATION WEBSITE EXPORTERS’ OPERATIONS GUIDE v16.08.28 PAGE 153
Figure 19.10: Outstanding Payments page with payment selected
After selecting the company, and click on the “Pay KHR <Amount> in Total” button to proceed to the
payment advice page. See Figure 19.11.
*Note: As of this writing, the fee to register a new Exporter Company or associating an account with
an existing company is KHR 400,000.

MINISTRY OF COMMERCE CERTIFICATE OF ORIGIN AUTOMATION WEBSITE EXPORTERS’ OPERATIONS GUIDE v16.08.28 PAGE 154
Figure 19.11: Unsaved Payment Advice for registering a new Exporter Company request
Click on the “Save Payment Advice” button.

MINISTRY OF COMMERCE CERTIFICATE OF ORIGIN AUTOMATION WEBSITE EXPORTERS’ OPERATIONS GUIDE v16.08.28 PAGE 155
Figure 19.12: Payment Advice page for registering a new Exporter Company request
Payment can be made online with Acleda Bank, Wing or manually.
Refer to sections:
10 – Pay For An Individual CO Application Online via Acleda Bank
11 – Pay For An Individual CO Application Online via Wing Payment
12 – Pay for An Individual CO Application Manually
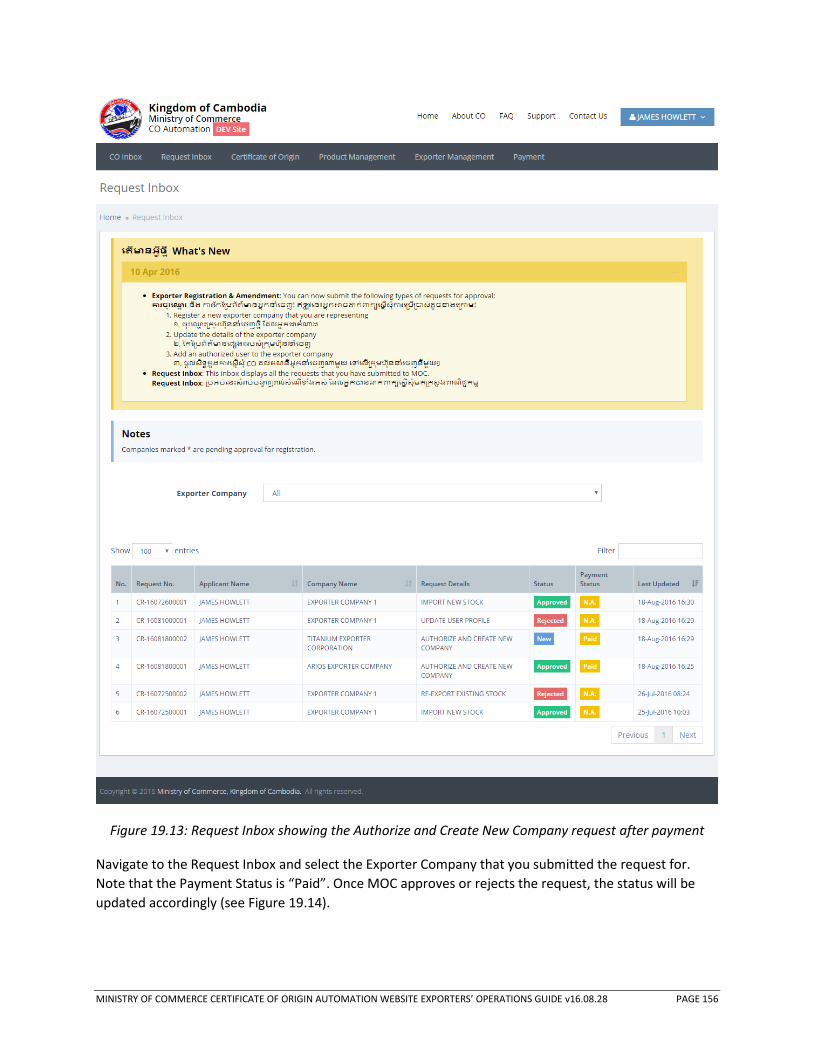
MINISTRY OF COMMERCE CERTIFICATE OF ORIGIN AUTOMATION WEBSITE EXPORTERS’ OPERATIONS GUIDE v16.08.28 PAGE 156
Figure 19.13: Request Inbox showing the Authorize and Create New Company request after payment
Navigate to the Request Inbox and select the Exporter Company that you submitted the request for.
Note that the Payment Status is “Paid”. Once MOC approves or rejects the request, the status will be
updated accordingly (see Figure 19.14).

MINISTRY OF COMMERCE CERTIFICATE OF ORIGIN AUTOMATION WEBSITE EXPORTERS’ OPERATIONS GUIDE v16.08.28 PAGE 157
Figure 19.14: Request Inbox showing the Authorize and Create New Company request after approval

MINISTRY OF COMMERCE CERTIFICATE OF ORIGIN AUTOMATION WEBSITE EXPORTERS’ OPERATIONS GUIDE v16.08.28 PAGE 158
Figure 19.15: Exporter Amendment page for registering a new company
Navigate to Exporter Management > Exporter Amendment. Select the Exporter Company that was just
registered. Note your role is an Admin for the just registered company (see Figure 19.15).

MINISTRY OF COMMERCE CERTIFICATE OF ORIGIN AUTOMATION WEBSITE EXPORTERS’ OPERATIONS GUIDE v16.08.28 PAGE 159
20 Exporter Management – Exporter Company Amendment
20.1 Update company details
Public Users with Admin roles for an Exporter Company can update the company’s details. Navigate to
Exporter Management > Exporter Amendment. See Figure 20.1. Performing this action will trigger a
request.
Figure 20.1: Exporter Amendment page
Select the Exporter Company from the drop-down list and click on “Update Company Details” button.
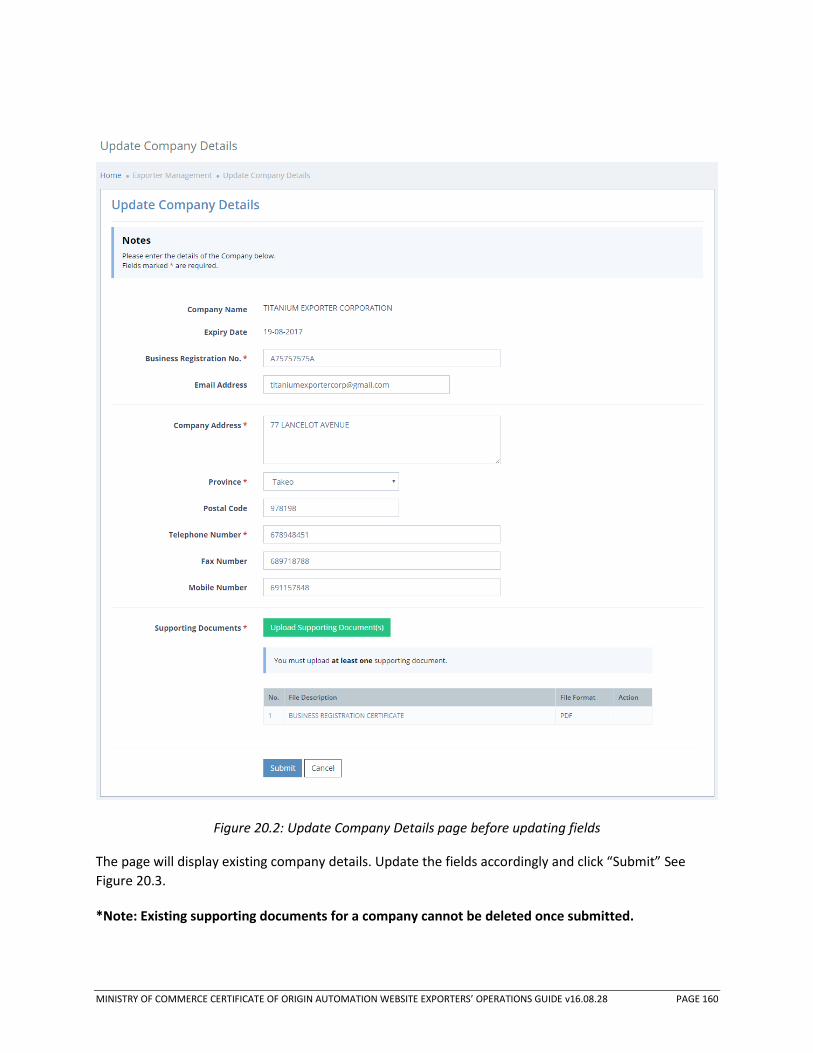
MINISTRY OF COMMERCE CERTIFICATE OF ORIGIN AUTOMATION WEBSITE EXPORTERS’ OPERATIONS GUIDE v16.08.28 PAGE 160
Figure 20.2: Update Company Details page before updating fields
The page will display existing company details. Update the fields accordingly and click “Submit” See
Figure 20.3.
*Note: Existing supporting documents for a company cannot be deleted once submitted.
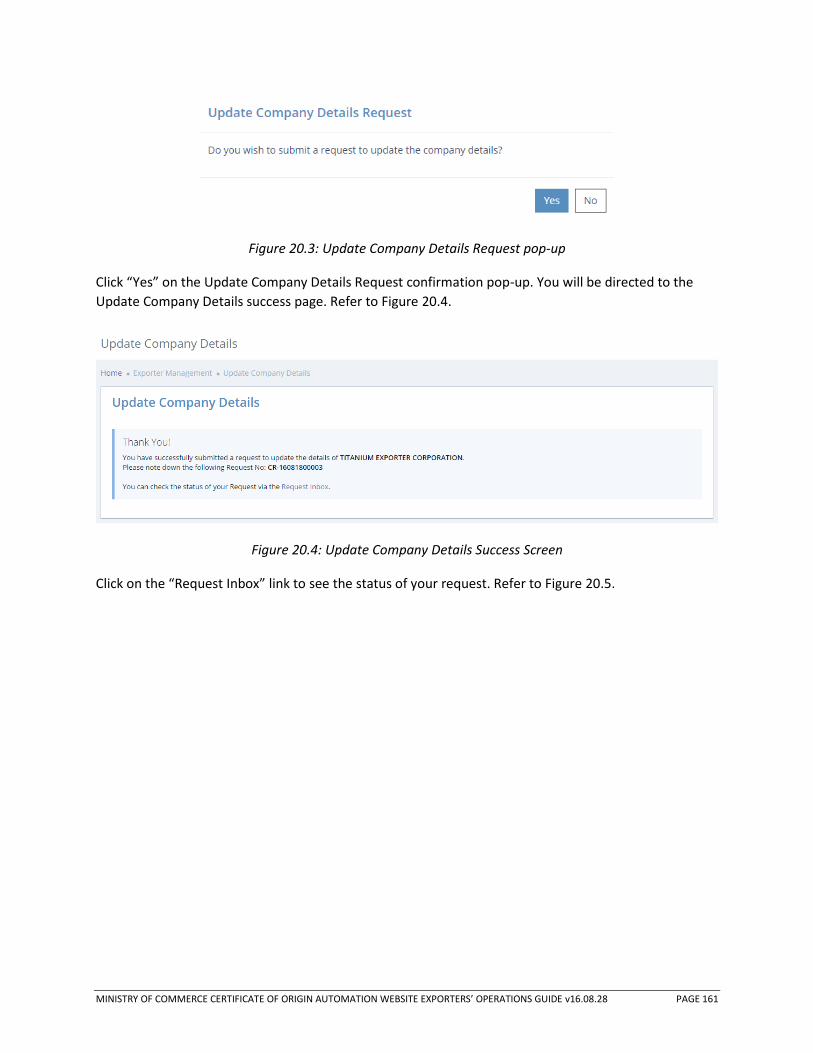
MINISTRY OF COMMERCE CERTIFICATE OF ORIGIN AUTOMATION WEBSITE EXPORTERS’ OPERATIONS GUIDE v16.08.28 PAGE 161
Figure 20.3: Update Company Details Request pop-up
Click “Yes” on the Update Company Details Request confirmation pop-up. You will be directed to the
Update Company Details success page. Refer to Figure 20.4.
Figure 20.4: Update Company Details Success Screen
Click on the “Request Inbox” link to see the status of your request. Refer to Figure 20.5.

MINISTRY OF COMMERCE CERTIFICATE OF ORIGIN AUTOMATION WEBSITE EXPORTERS’ OPERATIONS GUIDE v16.08.28 PAGE 162
Figure 20.5: Request Inbox page for updating a company’s details

MINISTRY OF COMMERCE CERTIFICATE OF ORIGIN AUTOMATION WEBSITE EXPORTERS’ OPERATIONS GUIDE v16.08.28 PAGE 163
Figure 20.6: Request Inbox for an update of company’s details that is approved
Once your request is approved, the updates take effect.

MINISTRY OF COMMERCE CERTIFICATE OF ORIGIN AUTOMATION WEBSITE EXPORTERS’ OPERATIONS GUIDE v16.08.28 PAGE 164
20.2 Add an authorized user
Public Users with Admin roles for an Exporter Company are able to add authorized users to the
company. Navigate to Exporter Management > Exporter Amendment. See Figure 20.7. Performing this
action will trigger a request.
Figure 20.7: Exporter Amendment page for adding an authorized user.
Select the company from the Exporter Company drop-down list and click on the “Add Authorized User”
button. The Add Authorized User pop-up will be shown. See Figure 20.8.

MINISTRY OF COMMERCE CERTIFICATE OF ORIGIN AUTOMATION WEBSITE EXPORTERS’ OPERATIONS GUIDE v16.08.28 PAGE 165
Figure 20.8: Add Authorized User pop-up
Enter the email address of the public user you wish to authorize, his/her designation/position in the
company, and then select the role: Admin or Ordinary.
Click on the “Submit” button once the form is filled. You will be directed to the Add Authorized User
success page (see Figure 20.9).
Figure 20.9: Add Authorized User success page
Click on the “Request Inbox” link. You will be directed to the page in Figure 20.10.

MINISTRY OF COMMERCE CERTIFICATE OF ORIGIN AUTOMATION WEBSITE EXPORTERS’ OPERATIONS GUIDE v16.08.28 PAGE 166
Figure 20.10: Request Inbox for adding a new user

MINISTRY OF COMMERCE CERTIFICATE OF ORIGIN AUTOMATION WEBSITE EXPORTERS’ OPERATIONS GUIDE v16.08.28 PAGE 167
Figure 20.11: Request Inbox for the adding of a new user after approval
Once your request is approved, the changes in your request will take effect. See Figure 20.13.

MINISTRY OF COMMERCE CERTIFICATE OF ORIGIN AUTOMATION WEBSITE EXPORTERS’ OPERATIONS GUIDE v16.08.28 PAGE 168
Figure 20.12: A new user has been authorized
Navigate to Exporter Management > Exporter Amendment to view the newly added authorized user.

MINISTRY OF COMMERCE CERTIFICATE OF ORIGIN AUTOMATION WEBSITE EXPORTERS’ OPERATIONS GUIDE v16.08.28 PAGE 169
20.3 Change an authorized user’s role
Exporter Company Admins can change the roles of other authorized users. Navigate to Exporter
Management > Exporter Amendment. See Figure 20.13.
Figure 20.13: Exporter Amendment page for editing an Authorized User
Select the company name from the Exporter Company drop-down list. Click on the user to change
his/her designation/position in company or role (see Figure 20.14). *Note: You cannot make changes to
your own account.

MINISTRY OF COMMERCE CERTIFICATE OF ORIGIN AUTOMATION WEBSITE EXPORTERS’ OPERATIONS GUIDE v16.08.28 PAGE 170
Figure 20.14: Edit Authorized User (before changes)
Switch the user’s role and click on the “Submit” button. Changes will take effect immediately.

MINISTRY OF COMMERCE CERTIFICATE OF ORIGIN AUTOMATION WEBSITE EXPORTERS’ OPERATIONS GUIDE v16.08.28 PAGE 171
20.4 Remove an authorized user
Exporter Company Admins can remove authorized users from the company. Navigate to Exporter
Management > Exporter Amendment. See Figure 20.15.
Figure 20.15: Exporter Amendment page
Click on the “X” button to remove an authorized user. A pop-up confirmation will be displayed. See
Figure 20.16.

MINISTRY OF COMMERCE CERTIFICATE OF ORIGIN AUTOMATION WEBSITE EXPORTERS’ OPERATIONS GUIDE v16.08.28 PAGE 172
Figure 20.16: Remove an authorized user pop-up
A pop-up confirming that you wish to remove the authorized user from the company will appear. Click
on the “Yes” button and the user will be removed from the company immediately.
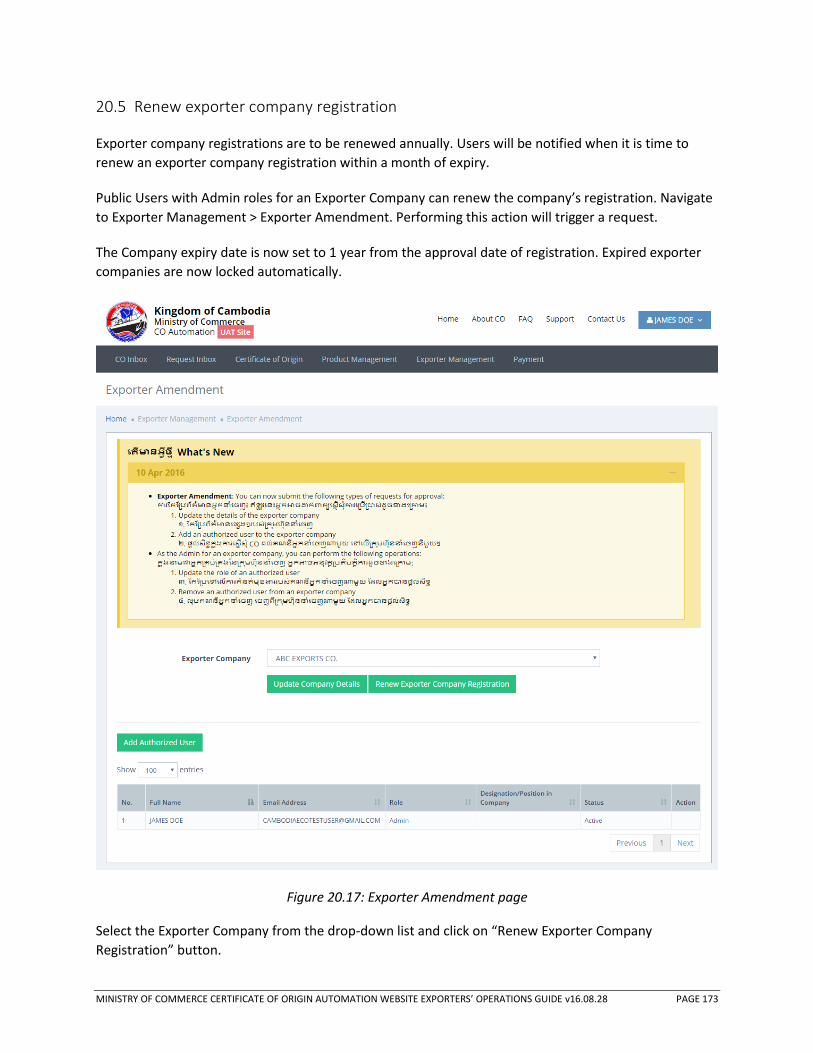
MINISTRY OF COMMERCE CERTIFICATE OF ORIGIN AUTOMATION WEBSITE EXPORTERS’ OPERATIONS GUIDE v16.08.28 PAGE 173
20.5 Renew exporter company registration
Exporter company registrations are to be renewed annually. Users will be notified when it is time to
renew an exporter company registration within a month of expiry.
Public Users with Admin roles for an Exporter Company can renew the company’s registration. Navigate
to Exporter Management > Exporter Amendment. Performing this action will trigger a request.
The Company expiry date is now set to 1 year from the approval date of registration. Expired exporter
companies are now locked automatically.
Figure 20.17: Exporter Amendment page
Select the Exporter Company from the drop-down list and click on “Renew Exporter Company
Registration” button.
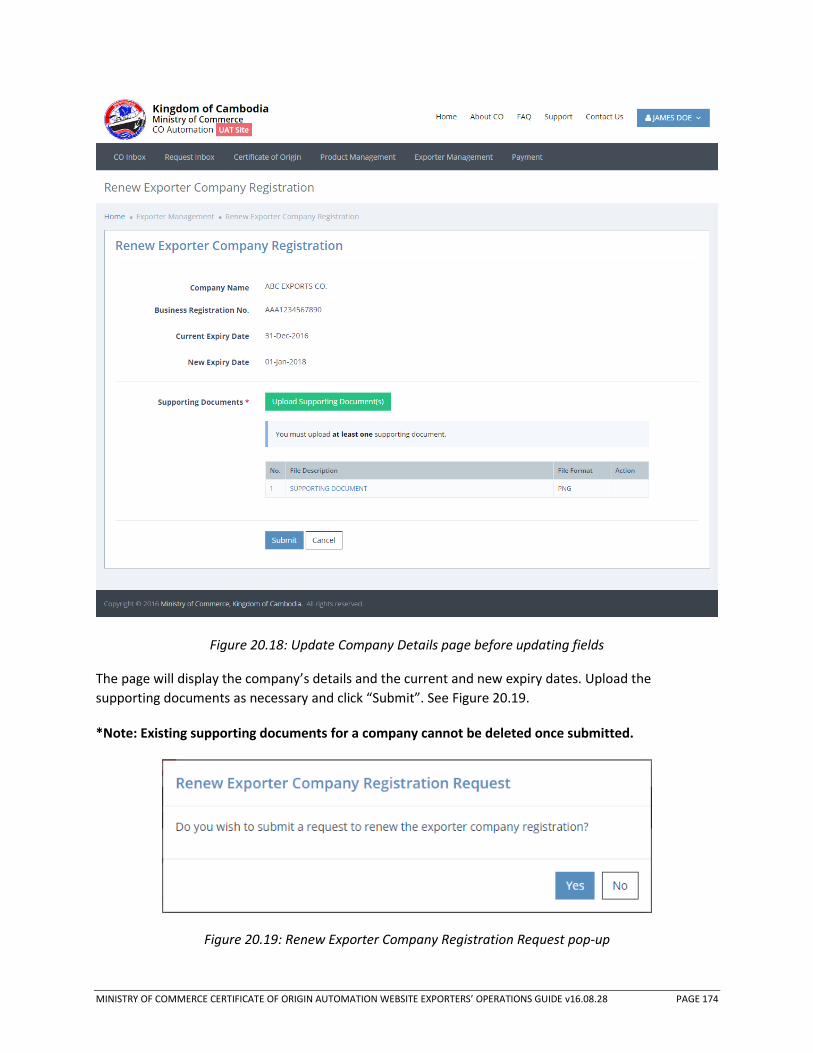
MINISTRY OF COMMERCE CERTIFICATE OF ORIGIN AUTOMATION WEBSITE EXPORTERS’ OPERATIONS GUIDE v16.08.28 PAGE 174
Figure 20.18: Update Company Details page before updating fields
The page will display the company’s details and the current and new expiry dates. Upload the
supporting documents as necessary and click “Submit”. See Figure 20.19.
*Note: Existing supporting documents for a company cannot be deleted once submitted.
Figure 20.19: Renew Exporter Company Registration Request pop-up
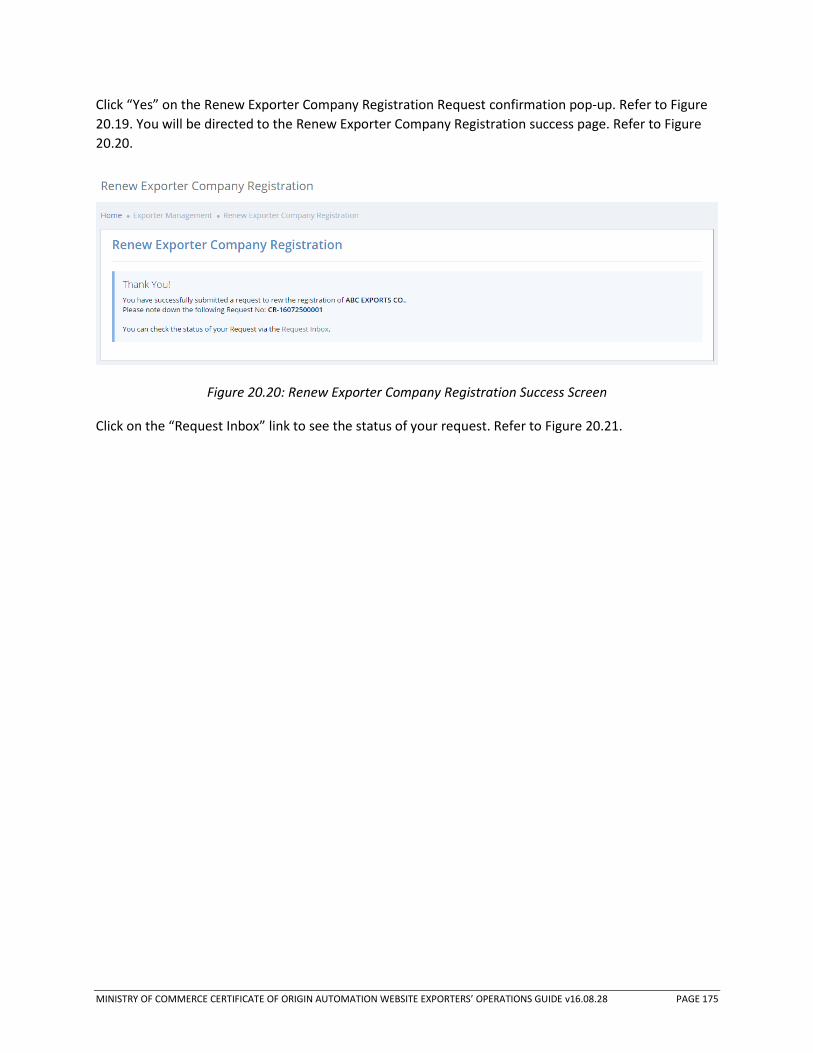
MINISTRY OF COMMERCE CERTIFICATE OF ORIGIN AUTOMATION WEBSITE EXPORTERS’ OPERATIONS GUIDE v16.08.28 PAGE 175
Click “Yes” on the Renew Exporter Company Registration Request confirmation pop-up. Refer to Figure
20.19. You will be directed to the Renew Exporter Company Registration success page. Refer to Figure
20.20.
Figure 20.20: Renew Exporter Company Registration Success Screen
Click on the “Request Inbox” link to see the status of your request. Refer to Figure 20.21.

MINISTRY OF COMMERCE CERTIFICATE OF ORIGIN AUTOMATION WEBSITE EXPORTERS’ OPERATIONS GUIDE v16.08.28 PAGE 176
Figure 20.21: Request Inbox page for renew exporter company registration
If the request is subject to fees, the request status will be displayed as “Pending Payment”. For “Pending
Payment” requests, navigate to the Outstanding Payments page to make the payment. Upon making the
payment, MOC will be able to approve or reject the request.

MINISTRY OF COMMERCE CERTIFICATE OF ORIGIN AUTOMATION WEBSITE EXPORTERS’ OPERATIONS GUIDE v16.08.28 PAGE 177
Figure 20.22: Request Inbox for renew exporter company registration that is approved
Once your request is approved, the registration will be renewed.

MINISTRY OF COMMERCE CERTIFICATE OF ORIGIN AUTOMATION WEBSITE EXPORTERS’ OPERATIONS GUIDE v16.08.28 PAGE 178
20.6 Reminder
Reminders are shown for companies that are:
1. Expiring
2. Expired
3. Locked
In the event you see a reminder window (See Figure 20.23), you will have to renew the exporter
company. Refer to section 20.5. If it is a locked registration, please contact Ministry of Commerce.
Figure 20.23: Reminder for locked company

MINISTRY OF COMMERCE CERTIFICATE OF ORIGIN AUTOMATION WEBSITE EXPORTERS’ OPERATIONS GUIDE v16.08.28 PAGE 179
21 Stock Management
Products and product fees have to be registered before they can be selected in CO forms.
21.1 Register a Raw Material
To register a raw material, navigate to Product Management > Raw Materials > Register Raw Material.
You will be directed to the Register Raw Material page. (See Figure 21.1).
On the register raw material page, fill in all mandatory fields and click on “Submit” to register the raw
material.
Figure 21.1: Register raw material page
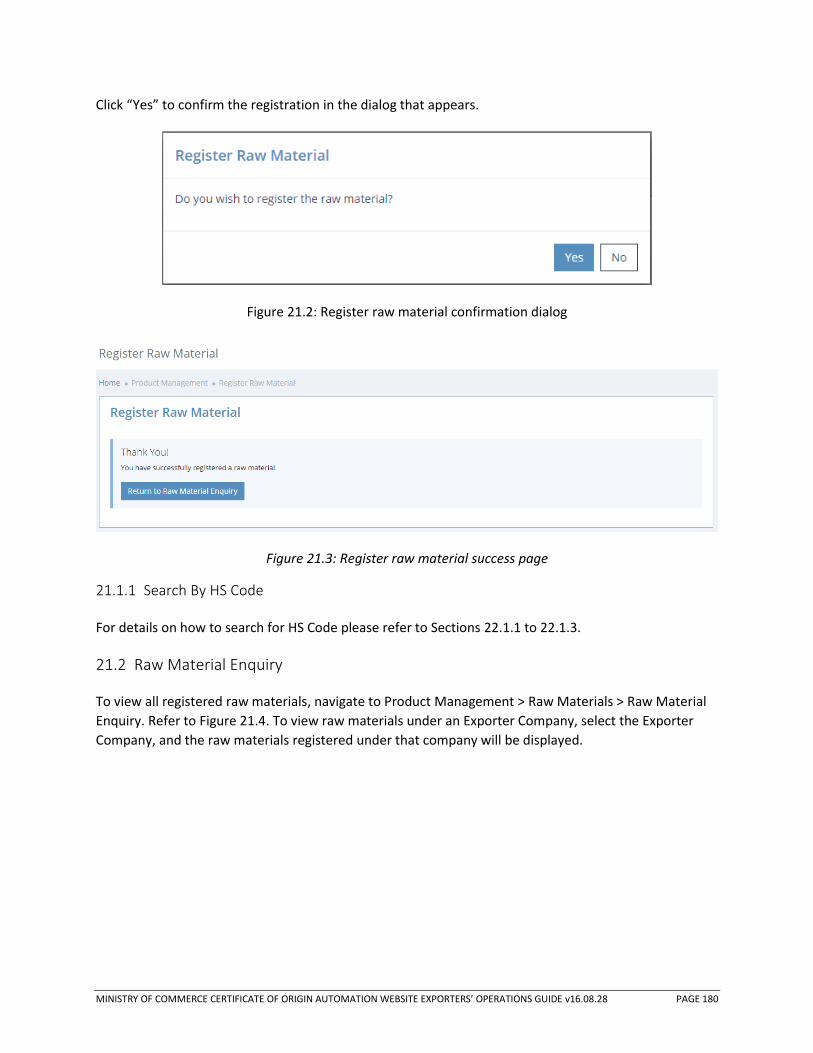
MINISTRY OF COMMERCE CERTIFICATE OF ORIGIN AUTOMATION WEBSITE EXPORTERS’ OPERATIONS GUIDE v16.08.28 PAGE 180
Click “Yes” to confirm the registration in the dialog that appears.
Figure 21.2: Register raw material confirmation dialog
Figure 21.3: Register raw material success page
21.1.1 Search By HS Code
For details on how to search for HS Code please refer to Sections 22.1.1 to 22.1.3.
21.2 Raw Material Enquiry
To view all registered raw materials, navigate to Product Management > Raw Materials > Raw Material
Enquiry. Refer to Figure 21.4. To view raw materials under an Exporter Company, select the Exporter
Company, and the raw materials registered under that company will be displayed.

MINISTRY OF COMMERCE CERTIFICATE OF ORIGIN AUTOMATION WEBSITE EXPORTERS’ OPERATIONS GUIDE v16.08.28 PAGE 181
Figure 21.4: Raw materials enquiry page
21.3 Update Raw Material
To edit or update a raw material, navigate to Product Management > Raw Materials > Raw Material
Enquiry and select the raw material you wish to update. You will then be redirected to the Update Raw
Material Page with the selected raw material’s details filled in. (See Figure 21.5).
Update the raw material’s details as required and click on ‘Save’ to update the raw material’s details.

MINISTRY OF COMMERCE CERTIFICATE OF ORIGIN AUTOMATION WEBSITE EXPORTERS’ OPERATIONS GUIDE v16.08.28 PAGE 182
Figure 21.5: Update raw material page
21.4 Delete Raw Material
To delete a raw material, navigate to Product Management > Raw Materials > Raw Material Enquiry and
select the raw material you wish to delete. You will then be redirected to the Update Raw Material page.
(See Figure 21.5).
Click on ‘Delete’ on the bottom of the page to delete the raw material. Click on “Yes” in the confirmation
dialog that appears to confirm the deletion.

MINISTRY OF COMMERCE CERTIFICATE OF ORIGIN AUTOMATION WEBSITE EXPORTERS’ OPERATIONS GUIDE v16.08.28 PAGE 183
Figure 21.6: Delete raw material confirmation dialog
21.5 Raw Materials Quantity Control
21.5.1 Import New Stock
To import new stock, navigate to Product Management > Raw Materials > Raw Material Enquiry and
select the raw material you wish to import new stock for. You will then be redirected to the Update Raw
Material page. (See Figure 21.5).
Click on ‘Import New Stock’ to go to the Import New Stock page. Refer to Figure 21.7. On the Import
New Stock page, fill in all mandatory fields and click on “Submit”. Click on ‘Yes’ in the confirmation
dialog to submit a request to MOC to import new stock. Refer to Figure 21.8.
Navigate to “Request Inbox” to see the status of the request. Once the request is approved, the quantity
of the raw material will increase.
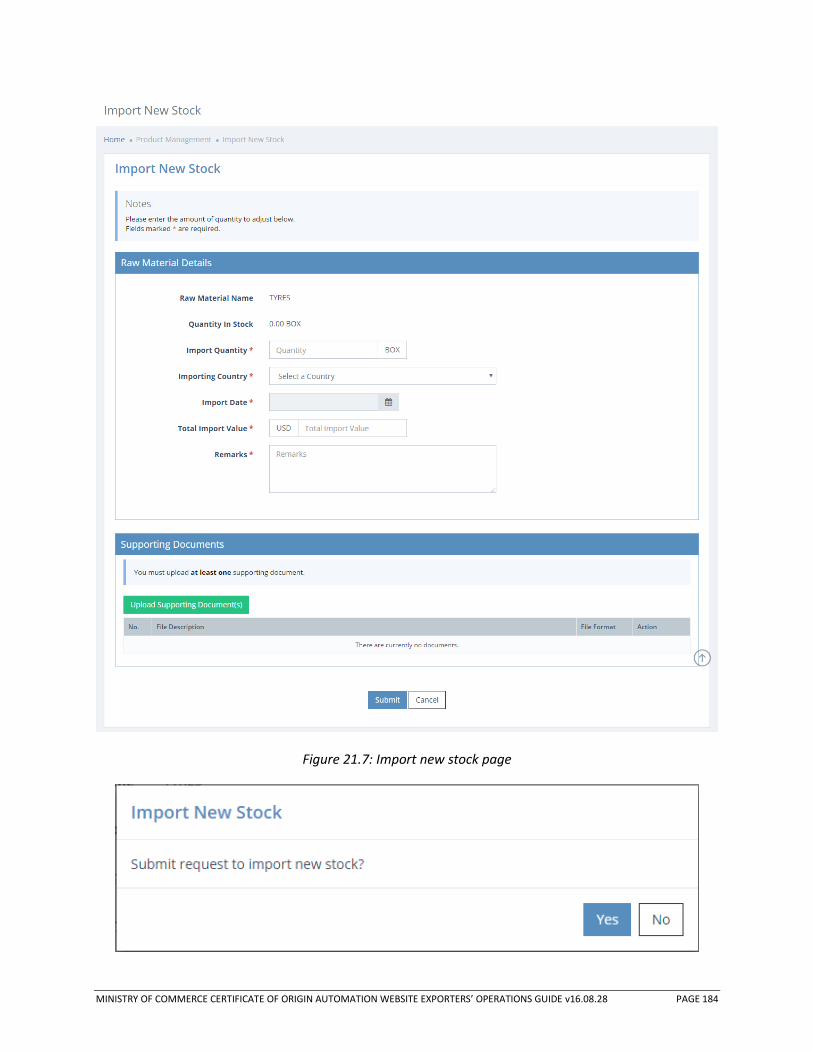
MINISTRY OF COMMERCE CERTIFICATE OF ORIGIN AUTOMATION WEBSITE EXPORTERS’ OPERATIONS GUIDE v16.08.28 PAGE 184
Figure 21.7: Import new stock page

MINISTRY OF COMMERCE CERTIFICATE OF ORIGIN AUTOMATION WEBSITE EXPORTERS’ OPERATIONS GUIDE v16.08.28 PAGE 185
Figure 21.8: Import new stock confirmation dialog
21.5.2 Re-export Existing Stock
To re-export existing stock, navigate to Product Management > Raw Materials > Raw Material Enquiry
and select the raw material you wish to re-export existing stock for. You will then be redirected to the
Update Raw Material page. (See Figure 21.5).
Click on ‘Re-export Existing Stock’ to go to the Re-export Existing Stock page. Refer to Figure 21.9. On
the Re-export Existing Stock page, fill in all mandatory fields and click on “Submit”. Click on ‘Yes’ in the
confirmation dialog to submit a request to MOC to re-export existing stock. Refer to Figure 21.10.
Navigate to “Request Inbox” to see the status of the request. Once the request is approved, the quantity
of the raw material will decrease.
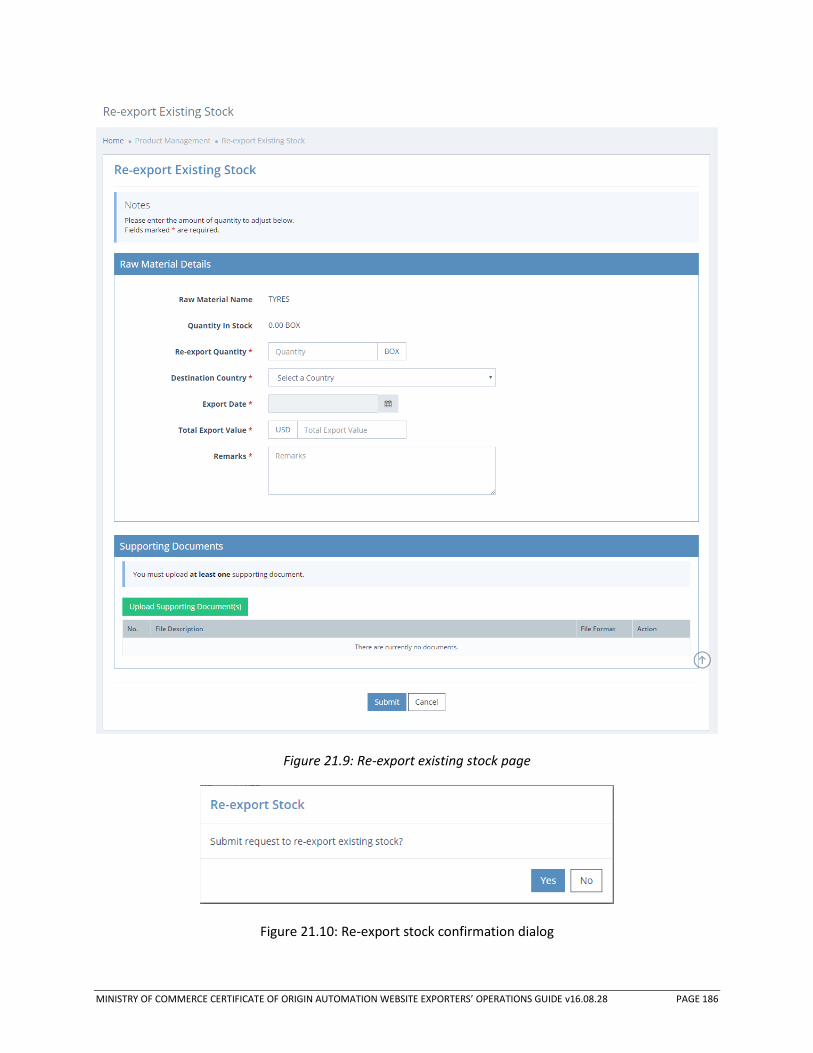
MINISTRY OF COMMERCE CERTIFICATE OF ORIGIN AUTOMATION WEBSITE EXPORTERS’ OPERATIONS GUIDE v16.08.28 PAGE 186
Figure 21.9: Re-export existing stock page
Figure 21.10: Re-export stock confirmation dialog
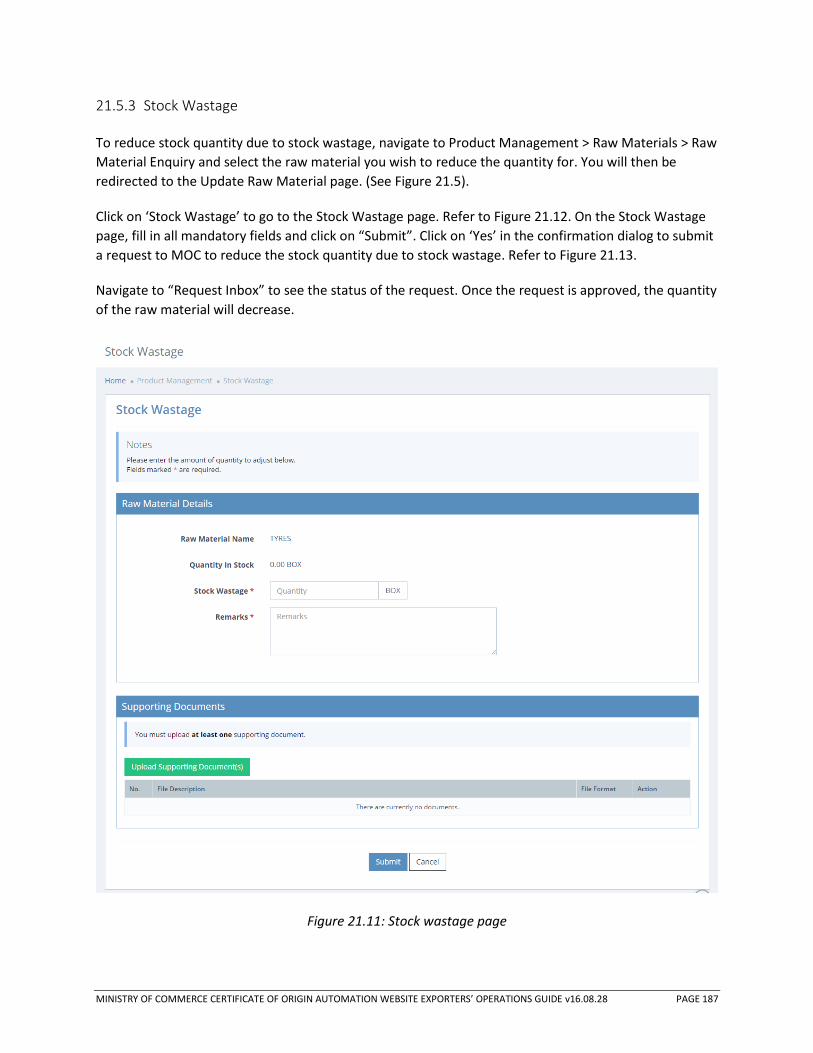
MINISTRY OF COMMERCE CERTIFICATE OF ORIGIN AUTOMATION WEBSITE EXPORTERS’ OPERATIONS GUIDE v16.08.28 PAGE 187
21.5.3 Stock Wastage
To reduce stock quantity due to stock wastage, navigate to Product Management > Raw Materials > Raw
Material Enquiry and select the raw material you wish to reduce the quantity for. You will then be
redirected to the Update Raw Material page. (See Figure 21.5).
Click on ‘Stock Wastage’ to go to the Stock Wastage page. Refer to Figure 21.12. On the Stock Wastage
page, fill in all mandatory fields and click on “Submit”. Click on ‘Yes’ in the confirmation dialog to submit
a request to MOC to reduce the stock quantity due to stock wastage. Refer to Figure 21.13.
Navigate to “Request Inbox” to see the status of the request. Once the request is approved, the quantity
of the raw material will decrease.
Figure 21.11: Stock wastage page

MINISTRY OF COMMERCE CERTIFICATE OF ORIGIN AUTOMATION WEBSITE EXPORTERS’ OPERATIONS GUIDE v16.08.28 PAGE 188
Figure 21.12: Stock wastage confirmation dialog
21.5.4 CO Processing
When CO Form application is submitted, the corresponding raw material of products in the CO will be
reduced accordingly. If the CO Form application is cancelled or rejected, the raw material quantity will
be reversed.
MINISTRY OF COMMERCE CERTIFICATE OF ORIGIN AUTOMATION WEBSITE EXPORTERS’ OPERATIONS GUIDE v16.08.28 PAGE 189
22 Product Management
Products and product fees have to be registered before they can be selected in CO forms.
22.1 Register a Product
To register a product, navigate to Product Management > Products > Register Product. You will be
directed to the Register Product page. (See Figure 22.1).
On the register product page, fill in all mandatory fields and click on “Submit” to register the product.

MINISTRY OF COMMERCE CERTIFICATE OF ORIGIN AUTOMATION WEBSITE EXPORTERS’ OPERATIONS GUIDE v16.08.28 PAGE 190
Figure 22.1: Register product page
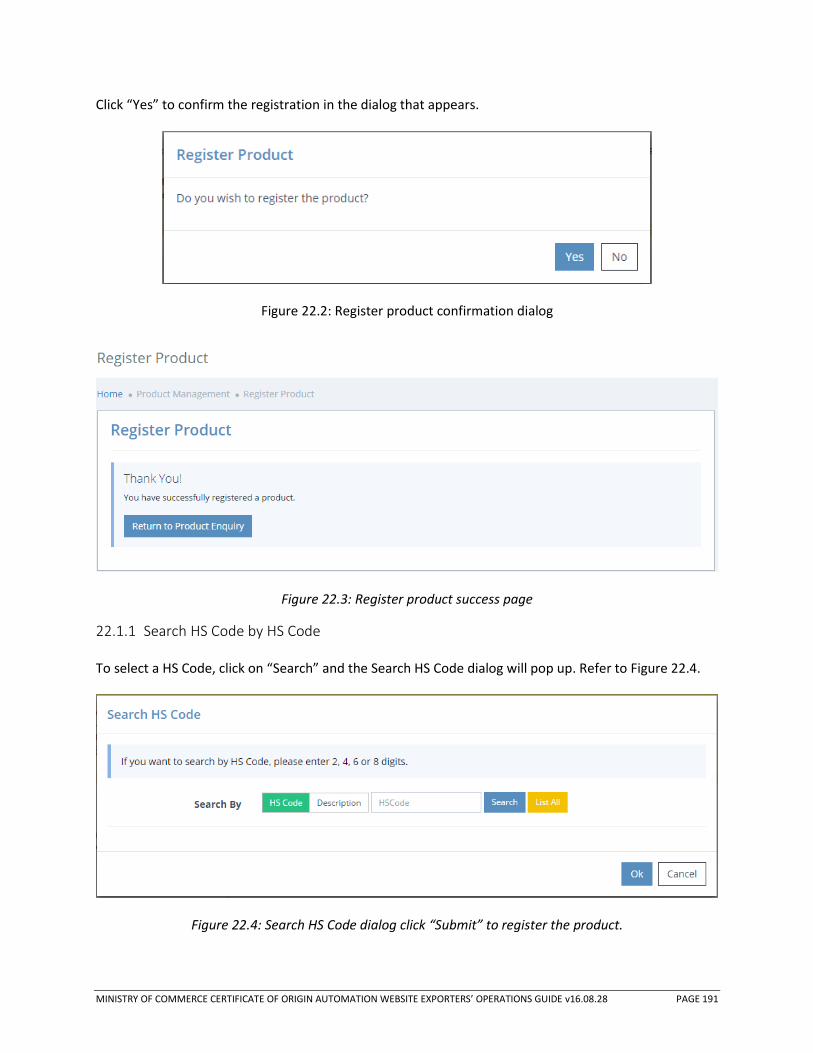
MINISTRY OF COMMERCE CERTIFICATE OF ORIGIN AUTOMATION WEBSITE EXPORTERS’ OPERATIONS GUIDE v16.08.28 PAGE 191
Click “Yes” to confirm the registration in the dialog that appears.
Figure 22.2: Register product confirmation dialog
Figure 22.3: Register product success page
22.1.1 Search HS Code by HS Code
To select a HS Code, click on “Search” and the Search HS Code dialog will pop up. Refer to Figure 22.4.
Figure 22.4: Search HS Code dialog click “Submit” to register the product.

MINISTRY OF COMMERCE CERTIFICATE OF ORIGIN AUTOMATION WEBSITE EXPORTERS’ OPERATIONS GUIDE v16.08.28 PAGE 192
To search by HS Code, enter 2, 4, 6 or 8 digits and click on “Search”. From the result tree, expand the
folders as required by clicking on the “+” and, select the applicable 6- or 8-digit HS Code for the product
and click on “Ok”. Refer to Figure 22.5.
Figure 22.5: Search HS Code dialog (Search By HS Code)
22.1.2 Search HS Code by Description
To search by Description, switch the “Search By” field in Figure 22.5 to Description. Enter the
description, and click on “Search”. (See Figure 22.6).
From the result list, select the applicable HS Code to view the HS Code tree. Expand the folders as
required by clicking on the “+” and, select the 6 or 8 digits HS Code for the product and click “OK”. (See
Figure 22.7).

MINISTRY OF COMMERCE CERTIFICATE OF ORIGIN AUTOMATION WEBSITE EXPORTERS’ OPERATIONS GUIDE v16.08.28 PAGE 193
Figure 22.6: Search HS Code dialog (Search By Description)
Figure 22.7: Search HS Code dialog (Search By Description)

MINISTRY OF COMMERCE CERTIFICATE OF ORIGIN AUTOMATION WEBSITE EXPORTERS’ OPERATIONS GUIDE v16.08.28 PAGE 194
22.1.3 Search HS Code by List All
To search by listing all the HS Codes, click on “List All” to display the HS Code tree/directory. From the
result tree, expand the folders as required by clicking on the “+” and, select the applicable 6- or 8-digit
HS Code for the product and click “OK”. (See Figure 22.8).
Figure 22.8: Search HS Code dialog (Search By List All)
22.1.4 Add Raw Material
To add a Raw Material, click on “Add Raw Material” and the Bill of Material Details dialog will pop up.
Refer to Figure 22.9. Select a Raw Material Name, enter the Quantity required to make up a unit of the
product being registered, and click on “Submit” to add the raw material. Add additional raw materials as
applicable to make up the product.
*Note that products with HS Codes beginning from 01 to 24 are exempted from raw materials
association.
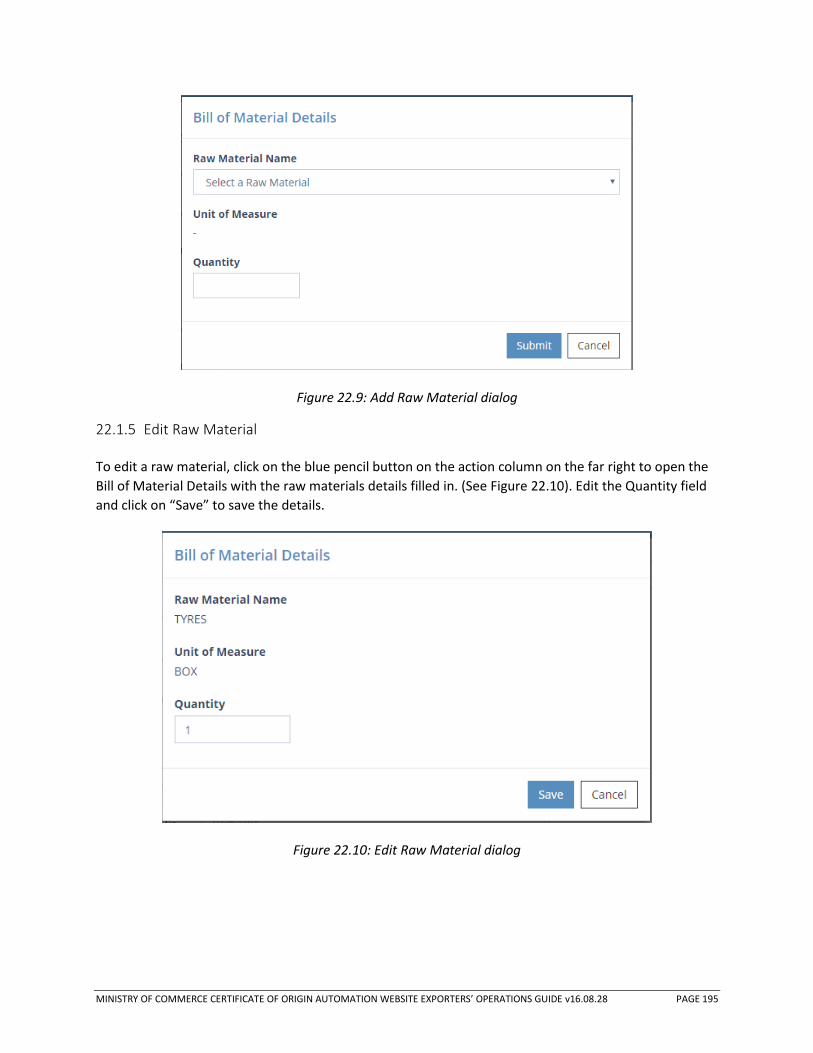
MINISTRY OF COMMERCE CERTIFICATE OF ORIGIN AUTOMATION WEBSITE EXPORTERS’ OPERATIONS GUIDE v16.08.28 PAGE 195
Figure 22.9: Add Raw Material dialog
22.1.5 Edit Raw Material
To edit a raw material, click on the blue pencil button on the action column on the far right to open the
Bill of Material Details with the raw materials details filled in. (See Figure 22.10). Edit the Quantity field
and click on “Save” to save the details.
Figure 22.10: Edit Raw Material dialog

MINISTRY OF COMMERCE CERTIFICATE OF ORIGIN AUTOMATION WEBSITE EXPORTERS’ OPERATIONS GUIDE v16.08.28 PAGE 196
22.1.6 Delete Raw Material
To delete a raw material, click on the red X button on the action column on the far right and “Yes” in the
Delete Bill of Material confirmation dialog. (See Figure 22.11).
Figure 22.11: Delete Raw Material confirmation dialog
22.2 Product Enquiry
To view all registered products, navigate to Product Management > Products > Product Enquiry. Select
the Exporter Company and the products registered under that company will be displayed. Refer to
Figure 22.13.
Figure 22.12: Product enquiry page
22.3 Update a Product
To update a product, navigate to Product Management > Products > Product Enquiry and select the
product you wish to update. You will then be redirected to the Update Product page with the selected
product’s details filled in. (See Figure 22.13).
Update the product’s details as required and click on ‘Save’ to update the product’s details.

MINISTRY OF COMMERCE CERTIFICATE OF ORIGIN AUTOMATION WEBSITE EXPORTERS’ OPERATIONS GUIDE v16.08.28 PAGE 197
Figure 22.13: Update product page
22.4 Delete a Product
To delete a product, navigate to Product Management > Products > Product Enquiry and select the
product you wish to delete. You will then be redirected to the Update Product page. (See Figure 22.13).

MINISTRY OF COMMERCE CERTIFICATE OF ORIGIN AUTOMATION WEBSITE EXPORTERS’ OPERATIONS GUIDE v16.08.28 PAGE 198
Click on ‘Delete’ on the bottom of the page to delete the product. Click on “Yes” in the confirmation
dialog that appears to confirm the deletion.
Figure 22.14: Delete product confirmation dialog
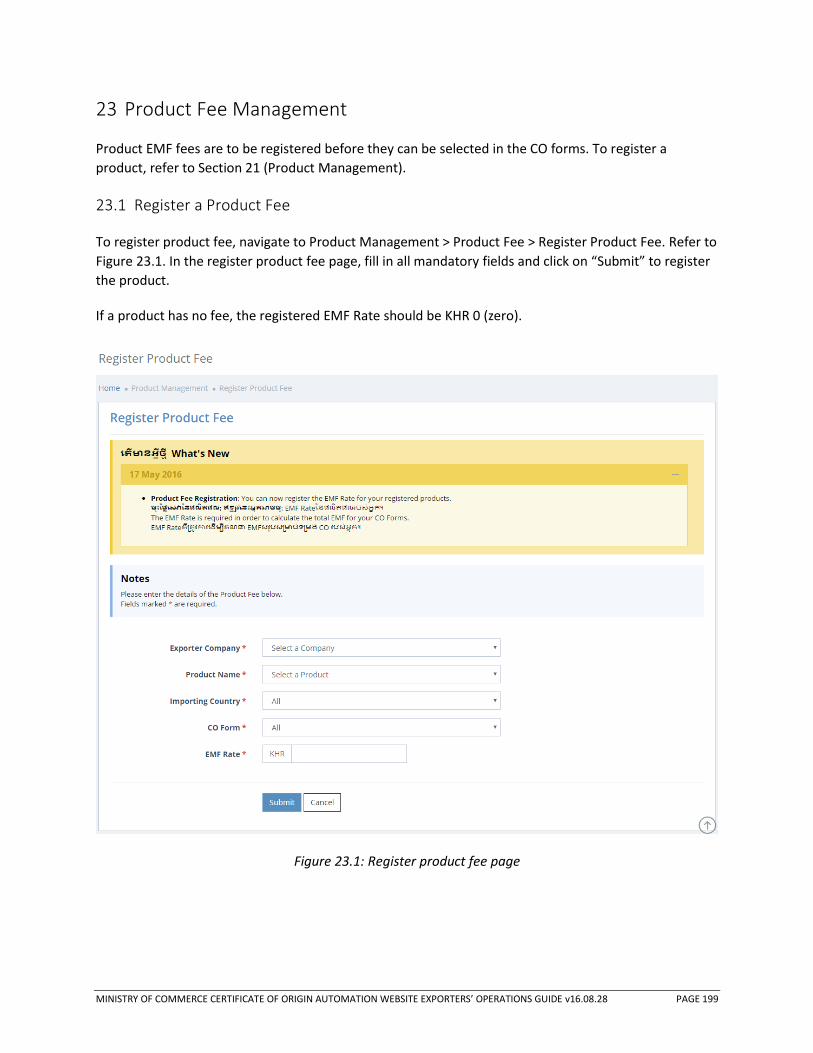
MINISTRY OF COMMERCE CERTIFICATE OF ORIGIN AUTOMATION WEBSITE EXPORTERS’ OPERATIONS GUIDE v16.08.28 PAGE 199
23 Product Fee Management
Product EMF fees are to be registered before they can be selected in the CO forms. To register a
product, refer to Section 21 (Product Management).
23.1 Register a Product Fee
To register product fee, navigate to Product Management > Product Fee > Register Product Fee. Refer to
Figure 23.1. In the register product fee page, fill in all mandatory fields and click on “Submit” to register
the product.
If a product has no fee, the registered EMF Rate should be KHR 0 (zero).
Figure 23.1: Register product fee page

MINISTRY OF COMMERCE CERTIFICATE OF ORIGIN AUTOMATION WEBSITE EXPORTERS’ OPERATIONS GUIDE v16.08.28 PAGE 200
Click “Yes” to confirm the registration in the dialog that appears.
Figure 23.2: Register product fee confirmation dialog
Figure 23.3: Register product fee success page

MINISTRY OF COMMERCE CERTIFICATE OF ORIGIN AUTOMATION WEBSITE EXPORTERS’ OPERATIONS GUIDE v16.08.28 PAGE 201
23.2 Product Fee Enquiry
To view all registered product fees, navigate to Product Management > Product Fee > Product Fee
Enquiry. Refer to Figure 23.2. To view products in a specific exporter company, select an Exporter
Company from the drop-down list.
Figure 23.2: Product fee enquiry page
23.3 Update a Product Fee
To edit a product fee, navigate to Product Management > Product Fee > Product Fee Enquiry and select
the product’s fee you wish to update. You will then be redirected to the Update Product Fee page. Refer
to Figure 23.3. Edit the product fee details as required and click on ‘Save’ to save the details.
If a product has no fee, the registered EMF Rate should be KHR 0 (zero).
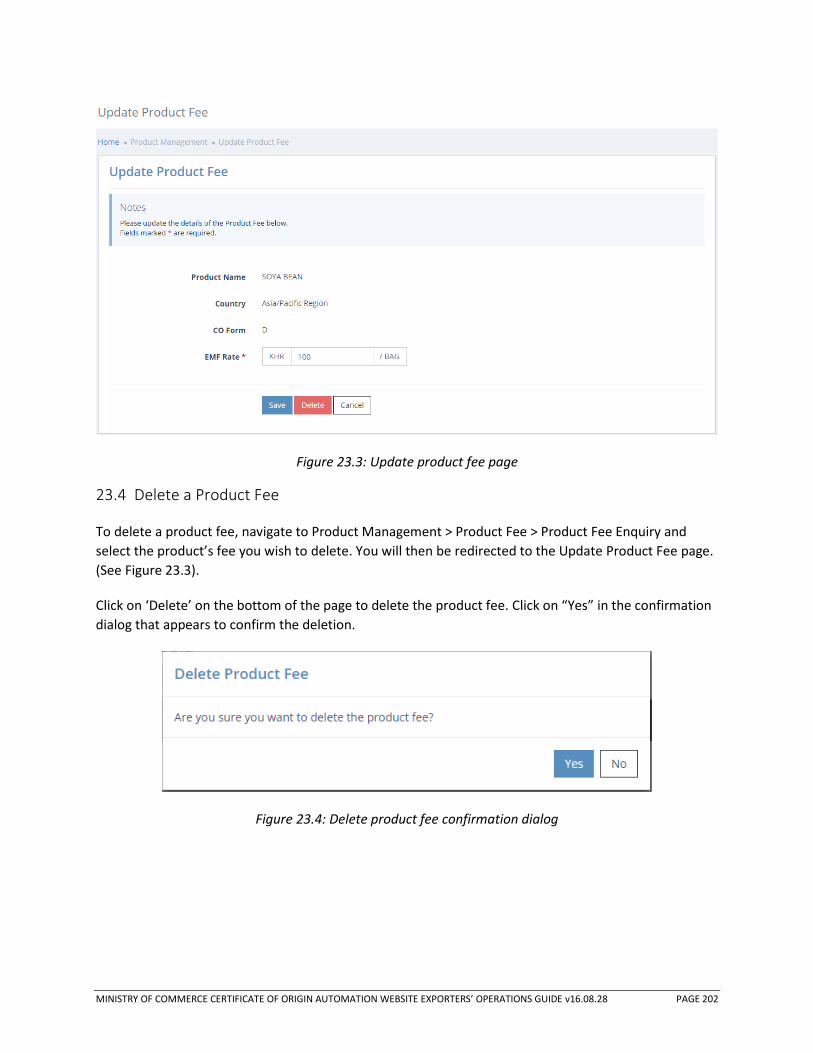
MINISTRY OF COMMERCE CERTIFICATE OF ORIGIN AUTOMATION WEBSITE EXPORTERS’ OPERATIONS GUIDE v16.08.28 PAGE 202
Figure 23.3: Update product fee page
23.4 Delete a Product Fee
To delete a product fee, navigate to Product Management > Product Fee > Product Fee Enquiry and
select the product’s fee you wish to delete. You will then be redirected to the Update Product Fee page.
(See Figure 23.3).
Click on ‘Delete’ on the bottom of the page to delete the product fee. Click on “Yes” in the confirmation
dialog that appears to confirm the deletion.
Figure 23.4: Delete product fee confirmation dialog