Using Oracle Commerce
366
Using Oracle Commerce F41708-01 July 2021
-
Upload
khangminh22 -
Category
Documents
-
view
0 -
download
0
Transcript of Using Oracle Commerce

Using Oracle Commerce
F41708-01July 2021
Using Oracle Commerce,
F41708-01
Copyright © 1997, 2021, Oracle and/or its affiliates.
This software and related documentation are provided under a license agreement containing restrictions onuse and disclosure and are protected by intellectual property laws. Except as expressly permitted in yourlicense agreement or allowed by law, you may not use, copy, reproduce, translate, broadcast, modify, license,transmit, distribute, exhibit, perform, publish, or display any part, in any form, or by any means. Reverseengineering, disassembly, or decompilation of this software, unless required by law for interoperability, isprohibited.
The information contained herein is subject to change without notice and is not warranted to be error-free. Ifyou find any errors, please report them to us in writing.
If this is software or related documentation that is delivered to the U.S. Government or anyone licensing it onbehalf of the U.S. Government, then the following notice is applicable:
U.S. GOVERNMENT END USERS: Oracle programs (including any operating system, integrated software,any programs embedded, installed or activated on delivered hardware, and modifications of such programs)and Oracle computer documentation or other Oracle data delivered to or accessed by U.S. Government endusers are "commercial computer software" or "commercial computer software documentation" pursuant to theapplicable Federal Acquisition Regulation and agency-specific supplemental regulations. As such, the use,reproduction, duplication, release, display, disclosure, modification, preparation of derivative works, and/oradaptation of i) Oracle programs (including any operating system, integrated software, any programsembedded, installed or activated on delivered hardware, and modifications of such programs), ii) Oraclecomputer documentation and/or iii) other Oracle data, is subject to the rights and limitations specified in thelicense contained in the applicable contract. The terms governing the U.S. Government’s use of Oracle cloudservices are defined by the applicable contract for such services. No other rights are granted to the U.S.Government.
This software or hardware is developed for general use in a variety of information management applications.It is not developed or intended for use in any inherently dangerous applications, including applications thatmay create a risk of personal injury. If you use this software or hardware in dangerous applications, then youshall be responsible to take all appropriate fail-safe, backup, redundancy, and other measures to ensure itssafe use. Oracle Corporation and its affiliates disclaim any liability for any damages caused by use of thissoftware or hardware in dangerous applications.
Oracle and Java are registered trademarks of Oracle and/or its affiliates. Other names may be trademarks oftheir respective owners.
Intel and Intel Inside are trademarks or registered trademarks of Intel Corporation. All SPARC trademarks areused under license and are trademarks or registered trademarks of SPARC International, Inc. AMD, Epyc,and the AMD logo are trademarks or registered trademarks of Advanced Micro Devices. UNIX is a registeredtrademark of The Open Group.
This software or hardware and documentation may provide access to or information about content, products,and services from third parties. Oracle Corporation and its affiliates are not responsible for and expresslydisclaim all warranties of any kind with respect to third-party content, products, and services unless otherwiseset forth in an applicable agreement between you and Oracle. Oracle Corporation and its affiliates will not beresponsible for any loss, costs, or damages incurred due to your access to or use of third-party content,products, or services, except as set forth in an applicable agreement between you and Oracle.

Contents
1 Understand Oracle Commerce
Product features 1-1
2 First Steps
Subscribe to Oracle Commerce 2-1
Prepare for store development 2-1
Become familiar with the administration interface 2-1
3 Work with the Dashboard
View reports 3-2
Find documentation and training videos 3-2
Enter basic store information 3-2
4 Design Your Store Layout
Access layouts 4-1
Understand the default layouts 4-1
Create a new layout instance (cloning) 4-2
Customize your store layouts 4-2
Customize layout components 4-3
Work with layout components 4-4
Customize slots 4-7
Customize stacks 4-10
Modify your page layout settings 4-14
Upgrade deployed widgets 4-16
Work with role-based layouts 4-17
Preview your store 4-18
5 Customize Your Store’s Design Theme
Understand the default theme 5-1
iii

Create a new theme (cloning) 5-1
Customize your theme 5-1
Modify theme code 5-4
Apply a theme to a site 5-4
Delete a theme 5-5
6 Modify Your Storefront Using Code Editing Tools
Modify a component’s code 6-1
Modify the theme CSS style sheet 6-2
Use developer tools to customize your store 6-2
7 Manage Your Catalog
Understand catalogs 7-1
Work with independent catalogs 7-2
Work with filtered catalogs 7-4
Work with legacy catalogs 7-7
Create legacy catalogs 7-9
Associate catalogs with sites or accounts 7-11
Edit catalog items without publishing 7-11
Create and edit product types 7-14
Create and work with products 7-22
Find products in catalogs 7-23
Create and work with SKUs 7-25
Create add-on products 7-28
Organize products in collections 7-30
Configure catalogs with optional collections 7-35
Link and unlink collections and products 7-37
Create default parent collections 7-38
Create custom properties for collections 7-41
Add metadata to products and collections 7-44
Display related products 7-45
Configure AI Recommendations Rules 7-46
Display product recommendations 7-52
Add images to products 7-53
Create gift cards 7-56
Manage inventory 7-56
Preview your changes 7-58
iv
8 Manage SEO
Configure URL patterns 8-1
Customize SEO tags 8-5
Manage SEO content 8-7
Understand canonical tags 8-8
Utilize widgets for SEO 8-10
Understand SEO snapshots 8-12
Configure URL redirects 8-13
Edit the robots.txt file 8-14
Customize structured data 8-16
Understand XML sitemaps 8-16
Understand SEO localization 8-18
Control access to storefront servers 8-19
9 Manage Search Settings
Understand index fields 9-1
View index fields 9-1
Understand the searchable field ranking list 9-2
Add fields to the searchable field ranking list 9-3
Edit the searchable field ranking list 9-4
Understand the thesaurus 9-4
Create and edit thesaurus entries 9-5
Understand keyword redirects 9-7
Create and edit keyword redirects 9-8
Refine and order search results 9-10
Multiple sites and search 9-13
Configure dynamic content 9-13
Use the search REST APIs 9-15
10
Manage Media for Your Store
View the media library 10-1
Upload media files 10-1
Edit and remove media files 10-3
Import image assignments 10-4
11
Import and Export Catalog Items and Inventory
Understand export guidelines 11-1
Export catalog items 11-2
v
Import catalog items and inventory 11-5
12
Manage Promotions
Understand promotions 12-1
Understand promotion targets 12-1
Understand currency-specific promotions 12-3
Understand audience-specific promotions 12-3
Understand site-specific promotions 12-4
Copy an existing promotion 12-4
Create an order discount promotion 12-5
Create an item discount promotion 12-6
Create a buy one get one promotion 12-7
Create a shipping discount promotion 12-8
Create a gift with purchase promotion 12-9
Define a promotion 12-10
Enable and disable promotions 12-18
Organize promotions in folders 12-19
Include or exclude products, SKUs, or collections 12-20
Exclude promotions 12-22
Add a coupon code to a promotion 12-23
Manage promotions with stacking rules 12-25
Manage upsell messages 12-26
13
Define Audiences
Understand audience definitions 13-1
View the list of audiences 13-11
Create an audience 13-12
Update an audience 13-13
Copy an existing audience 13-14
Disable an audience 13-15
Delete an audience 13-15
View audience usage 13-16
Add personalization to headless applications 13-16
14
Configure Tax Processing
Understand tax processor integrations 14-1
Understand the Tax Code property 14-2
Configure the AvaTax integration 14-2
Configure the Vertex O Series integration 14-3
vi

Integrate with an external tax processor 14-4
Configure Ship from Warehouse Locations 14-4
Disable all tax processors 14-5
15
Configure Payment Processing
Configure payment settings 15-1
Configure the CyberSource integration 15-1
Configure the PayPal integration 15-4
Configure the Chase Paymentech integration 15-5
16
Configure Shopper Settings
Configure the password policy 16-1
Configure the logged-in shopper session 16-2
Configure guest checkout 16-3
Disable soft login 16-3
Configure account-based shoppers 16-3
Configure shopper registration 16-4
17
Configure Email Settings
Enable the types of email your store sends 17-1
Configure Abandoned Cart settings 17-5
Ensure emails are not rejected as spam 17-5
Configure an Alternate SMTP Email Relay 17-6
18
Configure Internal User Accounts
Understand role-based access control 18-1
View role contents 18-8
Create new user profiles 18-8
Edit user profiles 18-9
Deactivate and reactivate user profiles 18-10
Access the Commerce administration interface 18-11
19
Configure Shipping
Create shipping regions 19-1
Create a shipping method 19-1
Specify a fallback shipping method 19-3
Specify a default shipping country 19-4
vii
Configure shipping surcharges 19-4
Understand externally priced shipping methods 19-4
20
Configure Wish Lists
Understand wish list features 20-1
Implement wish lists 20-4
Configure Facebook access and announcements 20-4
Enable wish list email settings 20-5
Edit wish list widget content 20-7
Set up wish lists in a multiple site environment 20-7
Configure wish lists for OSF applications 20-8
21
Localize Your Store
Understand store localization 21-1
Select additional languages 21-2
Prepare your catalog for translation 21-3
Import translations for catalog items 21-4
Manually translate properties 21-4
Translate store text 21-4
Configure the default locale for a site 21-5
Create items in the default locale of a site 21-5
Use a specific locale code in a REST request 21-6
Troubleshoot translation issues 21-6
22
Configure Price Groups
Understand price groups 22-1
Create and edit price groups 22-3
Manually add prices to products and SKUs 22-5
Import prices for products and SKUs 22-5
Activate price groups 22-6
Update prices without publishing 22-7
Work with price group inheritance 22-8
23
Use Volume Pricing for Products
Understand volume pricing 23-1
Add volume prices to a product 23-1
Display volume pricing in a storefront 23-2
Understand volume price display in a product listing 23-3
viii
Understand volume price display on the Product Layout 23-4
24
Publish Changes
Understand publishing 24-1
Understand worksets 24-3
Save changes to worksets 24-3
Create and edit worksets 24-4
Schedule publishing 24-6
25
Configure Business Accounts
Understand accounts, contacts, and contracts 25-1
Understand delegated administration 25-2
Work with accounts 25-2
Work with account addresses 25-8
Work with account contacts 25-10
Work with account contracts 25-15
Understand shoppers and new account registration requests 25-16
Submit new account registration information as a business shopper 25-17
Work with account registration requests 25-18
Work with registration requests to review, change status, approve, and reject requests 25-21
Understand contact registration requests 25-22
Submit new contact registration information 25-24
Understand working with contact registration requests 25-24
Work with contact requests to review, change status, approve, and reject 25-30
Delete contact information 25-33
26
Create Page Layouts that Support Different Types of Shoppers
Understand the different types of shopper 26-1
Create cloned layouts 26-2
Restrict guest checkout 26-2
Manage pages for account-based shoppers 26-3
Configure page layouts for account hierarchies 26-4
Manage page layouts to support account and contact registration requests 26-5
27
Use Order Approvals
Understand order approvals 27-1
Enable or disable order approvals 27-2
Understand the purchase limit for order approvals 27-3
ix
Set a price hold period 27-3
Manage approvers for an account 27-4
Understand how approvers approve and reject orders 27-4
Understand the effect of order approvals on scheduled orders 27-5
Notify users of order approval-related events 27-5
28
Run Multiple Stores from One Commerce Instance
Understand what is shared among sites 28-1
Define a site 28-2
View, preview, and publish sites 28-3
29
Accessibility Tasks
About keyboard shortcuts 29-1
30
Secure Your Service
Understand security features 30-1
Perform security tasks 30-3
A Appendix: Layout Widgets and Elements
Account Addresses A-1
Account Contacts A-1
Account Details A-1
Address Book A-1
Add Product to Wish List A-2
Assets A-2
Asset Details A-2
Breadcrumb A-2
Cart Shipping A-2
Cart Summary A-3
Category Content A-3
Checkout Schedule Orders A-3
Collection A-3
Collection Navigation A-3
Collection Navigation Basic A-3
Content Item A-3
Customer Address A-4
Checkout Address Book A-4
Customer Profile A-4
x
CyberSource Payment Authorization A-4
Footer A-5
Guided Navigation A-5
Gift Card A-5
Header A-5
Hero A-6
Login/Registration Checkout A-6
Loyalty Details A-6
Loyalty Payment A-6
Managed Account Address Book A-7
No Search Results A-7
Notifications A-7
Order Approvals A-7
Order Approval Settings A-7
Order Confirmation A-8
Order Confirmation Summary A-8
Order Confirmation with Additional Info A-8
Order Details A-8
Order Details with Additional Info A-9
Order History A-9
Order Summary A-9
Order Summary Checkout A-9
Orders Pending Approval A-9
Overlayed Guided Navigation A-9
Page Not Found A-10
Pay After Approval A-10
Payment Details A-10
Payment Methods (Formerly Split Payments Widget) A-10
Payment Gateway Options A-10
Product Details A-11
Product Listing A-11
Product Recommendations A-12
Product Social Meta Tags A-13
Product Quick View A-13
Promotion A-13
Purchase Lists A-13
Purchase List Details A-13
Quick Order A-14
Quote Details A-14
Related Products A-14
Return Items A-15
xi
Return Item Details A-15
Request Quote A-15
Review Order A-15
Scheduled Order A-15
Scheduled Order List A-16
Scheduled Order - Checkout A-16
Search Results A-16
Shopping Cart A-16
Split Payments A-16
Update Password A-16
Web Content A-16
Wish List Canvas A-17
Wish List Content A-17
Wish List Header A-17
Wish List Invitation A-18
Wish List Notification Settings A-18
Wish List Settings Header A-18
Wish List Welcome A-18
xii

1Understand Oracle Commerce
Oracle Commerce is a scalable, flexible eCommerce solution designed specifically to run inthe Oracle Cloud. The service provides the infrastructure and tools necessary to build ahighly customizable, feature-rich storefront for your business.
Commerce comprises the following core pieces:
• The Commerce administration interface, which you use to design and manage your store.You access it through the URL given to you by Oracle when you subscribe to the service.The URL is similar to the following:<youroracledomain.com>/occs-admin/#
• Your storefront, located at the URL Oracle provides. Initially you are provided with a testversion of the site, which you modify through the administration interface to create yourown store.
• The Agent Console, which your customer service representatives can use to assistshoppers with their orders. The Agent Console is typically located at<youroracledomain.com>/occs-agent/#. The Agent Console is described in Understand the Agent Console.
Note: Oracle supplies you with three separate environments as part of your subscription:testing (also called development), staging, and production. The URLs for the threecomponents shown above vary for each environment.
Commerce also provides the following pieces:
• Developer features for extending the capabilities of your store, including a set of RESTAPIs and tools for customizing widgets. See Understand Extension Features and Createa Widget .
• Integrations with third-party vendors (for example, tax calculation services and paymentprocessors) and other Oracle Cloud services. For more information on the integrationsavailable, refer to the Oracle Help Center page for Commerce.
Product featuresThis section lists some of the key capabilities that are available with or supported byCommerce and indicates where you can find more information about them.
With Commerce, you can perform the following operations related to managing aneCommerce storefront:
• Customize the templates and layouts that determine how your store looks. See DesignYour Store Layout.
• Manage your catalogs, inventory, and pricing. See Manage Your Catalog and ConfigurePrice Groups.
• Translate your catalogs and content into different languages and display prices in locale-appropriate currencies. See Localize Your Store.
• Provide advanced search tools for your site. See Manage Search Settings.
1-1
• Manage your Search Engine Optimization (SEO) strategy. See Manage SEOSettings.
• Offer discounts and promotions. See Manage Promotions.
• Personalize storefront content for different shoppers. See Define Audiences.
• Support a loyalty points program. See Work with Loyalty Programs.
• Offer product recommendations and display related products. See Display productrecommendations and Display related products.
• Manage transactional emails between the store and your shoppers. See ConfigureEmail Settings.
• Support wish lists with links to social networks. See Configure Wish Lists.
• Integrate with payment and tax processors. See Configure Payment Processingand Configure Tax Processing.
• View reports about your store. See Understand Your Reports.
Business-to-Consumer and Business-to-Business Commerce
Commerce supports both business-to-consumer (B2C, sometimes referred to as retail)and business-to-business (B2B) models. In B2C, your store sells to individualshoppers. In B2B, your store sells to buyers who represent another company ororganization.
B2B features are not enabled by default in your environment. Note that B2B is referredto as “account-based commerce” in the Commerce documentation.
For more information, see Configure Business Accounts.
Running multiple stores
You can manage more than one storefront from a single subscription to Commerce.Certain elements, for example shopper profiles, can be shared among your sites. Formore information, refer to Run Multiple Stores from One Commerce Instance.
Chapter 1Product features
1-2

2First Steps
Before you can start developing your store, there are some preparatory steps you mustperform, including activating the service, reviewing the initial materials provided by Oracle,and becoming familiar with the web-based administration interface for Oracle Commerce.
This section provides information on these steps.
Subscribe to Oracle CommerceBefore you can start using Commerce, you must purchase a subscription.
For information on how to do so, please contact an Oracle sales representative: http://www.oracle.com/us/corporate/contact/index.html
After purchasing your subscription, you will receive an email asking you to activate theservice by confirming your order. An Oracle representative will then contact you to providethe URLs for your Commerce environments and the credentials you use to log into theadministration interface and other parts of the site. You will also receive additional informationwith links to extensive resources to help you get started.
Prepare for store developmentThe materials you receive from Oracle after you subscribe to the service include detailedinformation about preparing for store development.
It is important to review these materials carefully with your Oracle representative andcomplete any required preliminary tasks to ensure your implementation goes as smoothly aspossible. In addition, it is suggested that you review the product documentation and becomefamiliar with the key concepts of the Commerce administration interface.
You can access the latest product documentation and training videos through the Oracle HelpCenter. The Commerce page also contains links to blogs, developer communities, andSupport. (Please note that some of these resources require an account for access.)
The administration interface also provides direct links to the documentation and videos asdescribed in Work with the Dashboard.
Important: Commerce is designed to provide your shoppers with a fast, responsivestorefront. However, it is critical to consider site performance from the beginning of yourimplementation project and build performance testing into your development strategy as earlyas possible. It is highly recommended that your site developers read Improve Performancebefore starting any customization work.
Become familiar with the administration interfaceThe Commerce administration interface (sometimes referred to as the Admin UI) is a web-based application you use to perform many of the tasks required to set up and maintain yourstorefront.
2-1

You access it at the URL provided to you by Oracle after you subscribe to the service.The URL typically takes the following form:
<youroracledomain.com>/occs-admin/#
For initial development, you use the administration interface running in your testenvironment.
As part of setting up your service, Oracle configures an administrator account thatallows a designated person at your organization to log in and start creating accountsfor other users as needed. The materials you receive from Oracle after you subscribeto the service include instructions on how the designated administrator can completethe login fields for the first time. For more information, refer to Access the Commerceadministration interface.
Chapter 2Become familiar with the administration interface
2-2

3Work with the Dashboard
The dashboard is the first page you see after you log into Oracle Commerce. It allows you tonavigate to the different functional areas of the administration interface.
The dashboard is shown in the image below.
Use the icons in the left pane to navigate to the functional areas described below.
• Catalog: Manage products and SKUs.
• Marketing: Create promotions and target content to specific audiences.
• Design: Change the layout and other design elements of your store.
• Media: Manage your catalog images.
• Search: Manage your store’s catalog search features.
• Accounts: Create and manage accounts and contacts for a store that is used foraccount-based commerce. Note that these features may not be available in yourenvironment.
• Settings: Configure other features your store supports, for example shopper profiles andemails.
3-1

• Reports: View report data for your store.
• Service Operations: View messages about webhook status (webhooks are usedto transmit data related to store activities. For more information, see UseWebhooks).
• Publishing: Push new content and other changes to your storefront.
If options you are expecting to see do not appear, the role assigned to your profile maynot have access to them. Refer to Understand Role-based Access Control for moreinformation.
The dropdown list in the main area of the page shows the name of the store you areworking on (in the illustration, Commerce Site). If you have set up more than onestore, you can use the dropdown list to switch to a different store. See Run MultipleStores from One Commerce Cloud Instance.
The dashboard also contains the following elements:
• Reports for orders, gross revenue, and site visits over the last seven days. Thedata applies to store whose name is showing at the top of the report display.
• The most recent Commerce blog posts.
• Links to documentation and training videos.
• The Commerce version running in your environment.
View reportsThe dashboard automatically displays a snapshot of report data for orders, grossrevenue, and site visits.
The data applies to the store whose name is showing at the top of the display. Clickthe arrow under any report to switch the view. Click View Full Report to display thereport on the Reports page.
You can access more reports through the Reports icon.
For more information, see Understand Your Reports.
Find documentation and training videosYou can access product documentation and training videos from the dashboard.
• Click How Do I? to view the documentation.
• Click Videos and Tutorials to view a list of available training videos.
You can also access the product documentation and videos through the Oracle HelpCenter.
Enter basic store informationYou must enter basic information about your store before you perform any other setupsteps.
In some cases, you will not be able to change this information after you enter it.
To enter the basic information for your store:
Chapter 3View reports
3-2
1. Log into the administration interface at the URL provided to you by Oracle. Typically youwould use the administration interface in your test environment for this task. (See Become familiar with the administration interface.)
2. Click the Settings icon.
3. Select Setup.
4. If your Commerce instance runs multiple sites (stores), pick a site to configure from thelist that appears above the settings list. See Run Multiple Stores from One CommerceInstance for more information.
5. Click the General tab.
6. In the Site Title field, enter the value you want to use for the HTML <title> tag of yourstore’s home page. This value is typically used by search engines as the title thatappears for your store in a list of search results. It is also visible to shoppers in a numberof places, for example in browser tabs, and it is offered to them as the default text forbookmarks.
7. In the Site Base URL field, enter your production store’s base URL. You do not need toinclude the protocol (HTTP or HTTPS) in the URL. If you do, it will be stripped off whenyou save the settings. The actual protocol used will always be HTTPS, regardless of whatyou specify. So, for example, if you enter www.examplestore.com in the Site BaseURL field, the actual base URL for the site is https://www.examplestore.com. See Understand the site base URL for more information.
8. On the Location tab, fill in the following fields:
• Default Time Zone
• Site Time Zone
• Store Default Language
• Additional Store Languages for the Store
• Reporting Currency
Important: Do not change your store’s default language once you set it, especially if youhave already created catalog items such as products, SKUs, and collections. See Localize Your Store for more information.
You do not have to select a default language for the administration interface. Theadministration interface automatically displays in your browser’s preferred language,provided it is a language that Oracle Commerce supports. See Languages supported bythe storefront for more information.
9. On the URL Patterns tab, customize the URL pattern for your store’s product andcollection pages. See Configure URL patterns for more information.
Understand the site base URL
Each site running on your Commerce instance must have a different base URL. The site baseURL setting is used as the prefix for all of the site’s URLs. For example, if a site’s base URLis https://www.examplestore.com, the URL for a specific product might be https://www.examplestore.com/cowboy-shirt/product/prod10002.
If your Commerce instance runs multiple sites, there are several strategies available for usingsite base URLs to distinguish between sites:
• Use unique domain names. For example, www.shoestore.com andwww.glovestore.com.
Chapter 3Enter basic store information
3-3

• Use unique top-level domains. In particular, country-code top-level domains areoften used to distinguish country stores. For example, www.examplestore.frand www.examplestore.it.
• Use unique subdomains. For example, shoestore.examplestore.com andglovestore.examplestore.com, or fr.examplestore.com andit.examplestore.com.
• Use unique pathnames. This approach uses context roots (subdirectories) todistinguish sites. For example, www.examplestore.com/shoes andwww.examplestore.com/gloves, or www.examplestore.com/fr and www.examplestore.com/it.
If your site uses the subdirectory structure for the base URL, and a shopper with itemsin their cart switches from one site to another site with the same base URL, if thoseitems are available for sale on the site they switch to, those particular items will remainin the cart. Any items not available for sale on the site the shopper switches to will beremoved from the cart.
Define additional store settings
As described in the previous section, the Setup page contains some required valuesyou must specify before you start development on your store. The page also containssome general settings that are optional or can be specified later in the developmentprocess. These additional settings are described below.
• Favicon: Optional. Select an image to use as the favorite or shortcut icon for yoursite’s pages. Browsers display this image in a number of places, for example in abookmark list.
• No-Image Image: Optional. Select the default image to use for any product if noother image is available.
• Theme: Optional. Select a theme for this site. If your Commerce instance includesmultiple sites, you can select a different theme for each site. See Run MultipleStores from One Commerce Instance for more information about creating andconfiguring multiple sites. See Customize Your Store’s Design Theme for moreinformation about themes.
• Default catalog: Optional. If you create multiple catalogs, select a default catalogfor the site. By default, the value of this setting is the master catalog. For moreinformation, see Manage Your Catalog.
• Make Default Site: Optional. If your Commerce instance includes multiple sites,select the Make Default Site checkbox to make the current site the default. See Run Multiple Stores from One Commerce Instance for more information aboutcreating and configuring multiple sites.
• Location tab: Default Price Group and Additional Price Groups (optional).
Oracle Commerce uses price groups to manage and display prices in differentcurrencies. Your Oracle Commerce instance comes with one configured price group,whose currency is US Dollars. If you want to display prices in other currencies, youmust create new price groups, one for each currency. See Configure Price Groups formore information.
Important: Price groups you add to the Additional Price Groups field can be seenand selected by all shoppers who visit your store. If your store uses account-basedcommerce, do not select price groups that are associated with accounts in theAdditional Price Groups field. Prices associated with specific accounts should be
Chapter 3Enter basic store information
3-4
seen only by logged-in contacts from those accounts. See Configure Business Accounts formore information.
Chapter 3Enter basic store information
3-5
4Design Your Store Layout
Your storefront is made up of layouts, which represent the different page types that canappear, such as product details, checkout, and order confirmation. The default layouts act astemplates, and you use them to design, adjust, and preview your pages before publishinglive.
Layouts contain a set of design tools, known as widgets, that define the structure of your webstore pages. Several widgets are themselves made up of configurable sub-componentelements. Widgets contain within them the specific UI functionality to which they relate. Forexample, the Order Confirmation layout contains information on items ordered, prices,shipping address, and so on. Each layout’s widgets combine to form the overall page layout.Accessible via a component library, widgets can be added, removed, cloned, and customized.
Note: You can use an extension to upload custom widgets and widget elements to your store.See Understand Extension Features for more details.
Access layoutsTo access layouts, click the Design icon on the dashboard. The default Layout tab isdisplayed.
You will see overviews of the layout page types. To avoid excessive scrolling, use the Filtericon, or Sort drop down, to access your preferred layout. In addition to the selection filters,you can choose whether or not to display layouts for accounts, and you can search for aspecific layout by entering details in to a Filter layouts box.
The layout configuration menu icons displayed on the right of your layout overview enableyou to customize each of the layouts. Here you can access the Layout Settings, CloneLayout, Grid View, and Preview configuration menus.
Understand the default layoutsA flag icon next to a layout name indicates the default layout instance for any given layouttype. The default layout is used if no other layout is assigned based on the page contents.
Opening the Layout tab displays overviews of the layout page types available in Commerce.
Note: Non-default layout instances may not be visible to shoppers with the exception of theArticle, Product Details, and Collections layouts assigned to selected products, product typesor collections. This is also dependent on the shopper’s chosen viewport.
Each time you clone a layout instance, you have the option to make that newly-cloned layoutthe default.
4-1

Create a new layout instance (cloning)You can create a new layout instance by cloning an existing layout instance; this actionmakes a copy of the original.
When creating the newly-cloned layout you can configure settings such as sites,notes, viewports, default settings, and SEO information. To do so, complete thefollowing steps:
1. Click the Design icon, and click the Layout tab.
2. Navigate to the layout you want to clone by either searching by name, or filteringby layout, site, or viewport.
3. Highlight the layout overview, and click the Clone Layout option from theconfiguration toolbar.
The New Layout dialog screen is displayed.
4. Enter the newly-cloned layout’s name and any related notes. See Customize yourstore layouts for more details.
Note: Within the Collections layout you can assign the newly-cloned layout to acollection. Collections represent groups of products which have similar properties,such as, women’s dresses or men’s shoes. You should also note that within theProduct layout you can assign the newly-cloned layout to a product type orproduct.To select a collection, product type, or product, begin by typing or pasting sometext in the relevant text box within the Layout Assignment section. The filtermatches letters or numbers that you type, wherever they appear in the name, notjust at the beginning. Usually, as you type more characters, there are fewermatches. You can assign a layout to more than one collection. As products andcollections are made available from all catalogs, you must ensure you haveassigned the catalog that is relevant for your site.
5. (Optional) Configure the new layout with one of the following checkbox options:
• Make Default Layout - defines the new layout as the default. This layout isrendered for anonymous shoppers and registered shoppers.
• Display Layout to Account Shoppers Only - restricts the new layout toaccount-based shoppers only.
You can enable these settings when designing a set of layouts for youranonymous and registered shoppers, and another set for your account-basedshoppers. See Create Page Layouts that Support Different Types of Shoppers formore details.
6. Enter all other settings, such as the preferred Site, Viewport, Page Title, PageAddress, Cart Preview, Layout Preview, and any new metadata tag information.
7. Click Save to confirm all settings. You can preview your newly cloned layout byclicking the Layout Preview icon.
Customize your store layoutsYou can use the layout configuration toolbar options to customize the design of yourweb store pages.
Chapter 4Create a new layout instance (cloning)
4-2

The toolbar is accessed on the right hand side of any layout overview, visible as a row oficons. The same configuration options are also available above any layout opened via GridView, within which the Layout Preview also provides access.
You can also use custom widgets and elements to extend the functionality of your web store.See Understand widgets for more details. This may be especially useful for developersworking on implementations of Oracle Commerce. This guide also provides you with ageneral summary of each of the widgets and elements. See Appendix: Layout Widgets andElements.
Customize layout componentsLayouts have access to a set of components in the form of widgets, slots, applicationJavaScript, and stacks, displayed within a component library. .
Before designing your store pages, you can choose which of these are visible, and which arehidden from view. Those which are visible are consequently available for use in the relevantlayouts.
By default, the Quote Details and Request Quote widgets are automatically hidden. You willneed to unhide these widgets if you are enabling quoting functionality on your web store.
Note: Choosing to hide components already in use has no impact on those particularinstances.
To customize layout components:
1. Click the Design icon and display the Components tab.
2. Filter which component types are displayed by using the Type or Source filters. You canalso search for a specific component by entering details in to a Filter box.An overview list of components displays. It includes the component type, the number ofinstances, and the latest version number.
3. (Optional) A green arrow next to the overview information indicates that an update isavailable for that particular component. Click the arrow to update the component to thelatest version. If an update is not available, then a green check mark is displayed.
4. (Optional) To view all hidden components, click the Show Hidden Components buttonnext to the filters - the eye icon overlaid with a strikethrough line indicates the hiddenstatus.
5. (Optional) To view all unhidden components, which are the components that are availablefor use in layouts, click the Do Not Show Hidden eye icon button next to the filters.
6. Highlight your preferred component.
7. To hide your highlighted component from the component library, click the eye icon. Doingso means that this particular component will not be available within the Componentsmenu of any associated layouts.Note: Any existing instances will remain in use.
8. To unhide your highlighted component from view, click the eye icon overlaid with astrikethrough line. This is now available for use in layouts.
9. Click the component name to expand the component’s details. From here you can selectthe following elements:
• Extend JavaScript button: Opens a JavaScript file for a widget, which you can editand save. This JavaScript will be applied to all instances of the widget. The Extend
Chapter 4Customize layout components
4-3

JavaScript button is visible for non-extension widgets. For more information onthis feature, see Use the JavaScript Code Layering User Interface feature.Note: The widget JavaScript is only editable for custom widgets that have hadtheir editable JavaScript property activated.
• Go To Widget Code icon: Displays the coding options page. See Modify acomponent’s code for more details.
• Widget Settings icon: Opens the configuration options available for thatparticular widget.
• Download Source icon: Downloads the widget file for each widget instance.
• Applies to all Sites check box: Ensures settings are applied across all sites,when running multiple instances of Oracle Commerce. This option applies onlyin the case of a global widget or an application JavaScript component.
Work with layout componentsEach layout has an associated component library that provides access to a group oflayout-specific widgets and/or elements and stacks.
Choose your preferred layout from the Layout tab, and select the Grid Viewconfiguration option to display it in a structured grid. Accessible via an expandablemenu at the bottom of the screen, the Components menu’s widgets and stacks can bedragged to the layout’s grid and rearranged as required.
Within Grid View you can access each individual widget’s settings via the LayoutSettings icon. Here you can name the widget or add related internal notes which donot appear on your live store. Several widgets also contain a configurable Settingsmenu as well as a Layout menu where the widget’s elements can be customized.
Note: When adding multiple collections to the Collections layout, you may see an errordisplayed if the collection IDs exceed the maximum field length of 255 characters. Inorder to avoid this limitation, you can clone the layout, and add any additionalcollections to the new identical layout.
Widget and stack settings can include the following menu tabs:
• Layout - provides access to sub-component elements.
• Settings - provides access to the general widget configurations.
• About - provides general information including the widget instance version and anindication of whether the latest version is in use. See Upgrade deployed widgetsfor more details. Clicking the Go to Widget Code button within the About tabtakes you directly to that widget’s code.
Add widgets to a layout
To add widgets to a layout:
1. Click the Design icon and display the Layout tab.
2. Using the Home Layout as an example, select the Home Layout default instance,and click the Grid View icon. This is where the structure of your page is defined.
3. Locate the relevant section of the grid where you want to add a new instance of awidget and click to highlight an existing region.
4. The new widget instance can be added above, below, or as part of the selectedregion’s location.
Chapter 4Work with layout components
4-4
5. Click the highlighted region’s row header to display the toolkit.
6. Create a new row above , or below , your current selection.OR
Use the cursor selection arrows on either side of the region’s edges to re-size it into anew position within the existing region.
Note: The Grid View region defaults to a maximum width of 12 columns. When a GridView row contains more than one region, the combined column width must total 12.
7. Open the Components section at the bottom of your screen to select a widget type.
8. Select the widget type and drag it to the new row, or within an existing row if relevant.When dragging a widget instance from the component library to your page layout, youare prompted to create a new version of that widget. If the widget already exists on thepage layout, then you can also clone the widget to create another copy.
9. Click Create New Widget Instance to confirm.OR
Click the Clone Widget icon to the right of the widget name.
10. Name the new widget instance, and click Save to confirm.
Rearrange/remove widgets in a layout
Locate the row region containing the widget you want to rearrange, or remove, within yourchosen layout’s Grid View section.
To rearrange widgets, drag them to rows, between rows or alongside other widgets within arow.
Note: Rows consist of 12 columns and can be resized into a number of region widths thattotal 12 by dragging the cursor selection arrows at the edges of the row. You can also clickthe Adjust Widths icon from the row header to open the Region Widths dialog and enter therow columns manually.
To remove a widget, highlight it and click the ‘x’ icon. You will see a message confirmingyou’ve removed that particular widget instance. Once the widget has been removed, you canthen delete that entire row by highlighting it and clicking the trash can icon.
Rearrange/remove elements
Several widgets contain elements which you can add, rearrange, and remove to achieve thelook you want for your chosen widget.
Elements are the sub-component parts that make up the overall widget structure. They canbe accessed via an element library within several of the widgets’ settings:
To access the elements:
1. Click the Design icon and display the Layout tab.
2. Highlight your preferred layout instance and open using the Grid View icon.Note: When you have multiple instances of layouts, using the search box to filter for yourpreferred layout may avoid excessive scrolling.
3. Double click the relevant widget to open. You can also open by clicking the Settings iconlocated on the top right corner of each widget.A new window opens displaying a combination of the Layout, Settings, and About menus,depending on which widget you have opened.
Chapter 4Work with layout components
4-5
Note: The About menu contained in each of the widget settings enables you to godirectly to that widget’s code by clicking the Go to Widget Code button.
4. Click the Layout option to display the elements.
5. Open the Element Library section at the bottom of your screen to select anelement
6. Drag and drop your chosen element. You can resize and rearrange elements,depending on where you want them to be displayed in the widget. Clicking the rowheader will open the Row Controls options where you can add rows above orbelow the current row. You can also adjust the widths of the regions and you canalso remove elements using the trash can or the individual element ‘x’ icon.
7. Save your choices and preview, or cancel to keep the existing panel layout.
Configure image elements and company logo
You can add images to your storefront via the Image element, including your companylogo. Access to the element is provided via any widget that contains an ElementLibrary.
To configure an image element, or company logo:
1. Click the Design icon and display the Layout tab.
2. Use the filter options to locate your preferred layout instance, and click the GridView icon.Note: When you have multiple instances of layouts, using the search box to filterfor your preferred layout may avoid excessive scrolling.
3. Highlight your preferred widget, or, in the case of configuring your company logo,highlight the Header widget. You can also add a new widget, rather than using pre-loaded widgets.
4. Double click the widget to open. Clicking the Settings icon located on the top rightcorner of each widget will also open it.A new window opens displaying a combination of the Layout, Settings, and Aboutmenus, depending on which widget you have opened.
Note: The About menu contained in each of the widget settings enables you to godirectly to that widget’s code by clicking the Go to Widget Code button.
5. Click the Layout option to display the elements.
6. (Optional) Delete the Logo element if you wish to upload your company logo.Note: When adding your company logo, you must delete the pre-loaded logoelement and replace it with a logo image.
7. Open the Element Library section at the bottom of your screen.
8. Drag the Image element to the row.
9. Click the Image element title to open the configuration options page.
10. Configure the image element by naming it, selecting where to retrieve the imagefrom, entering a hyperlink which is navigated to via the image, and adjusting theappearance settings.
11. Click Done to save and exit.
Chapter 4Work with layout components
4-6

Customize slotsSlots provide a means of content variation similar to stacks, however, only a single variant ofa slot will be returned to the visitor’s browser based on server-side rules.
Configure audience-based content slots
You can create several versions of your store content in order to reach a variety of targetaudiences. For example, content images may be based on gender, or age, categories.
To do so, you can add a Content Variation Slot to any layout.
To configure audience-based content:
1. Click the Design icon and display the Layout tab.
2. Navigate to any layout by using the filter options.
3. Select your preferred layout and click the Grid View icon.
4. Locate the relevant section where you would like to place a Content Variation Slot andhighlight an existing region.
5. Either:Select an existing region and ensure all widgets are removed so that just the region itselfremains.
Or
Add a new row (which contains regions) above or below using the arrows on the rowmenu bar.
6. See Work with layout components for details on adjusting a region’s width settings, andremoving widgets.
7. Open the Components menu, select Content Variation Slot and drag to the emptyregion. You will see a control (or default) variant, and an unassigned variant.
8. Drag and drop widgets from the Components menu to the default variant, as required.
9. Highlight the unassigned variant by clicking its name. You now have several configurationoptions available for the unassigned variant. These include, customizing the slot,choosing a target audience, or, configuring the slot settings, as described below:Note: Audiences are defined when a set of rules are created based on attributes of theshopper profile, and are then used for personalizing the shopper’s experience. See Define Audiences for more details.
To customize the slot, click the following options:
• Add variant ‘+’ button on the far right to add up to a maximum 10 variants, these canbe easily re-ordered via drag and drop.Note: The order of the variants follows a left to right sequence, with the leftmostvariant (after the default) having the highest priority.
• Remove variant ‘x’ button to the right of each variant name to remove it. You cannotremove the default, and you must have at least one variant in addition to that default.
• Target icon to open the targeting modal, where you can name each variant asrequired. (This modal can also be opened by double clicking the variant name.)
To target an audience:
• Click the target icon to display the target audience configuration options.
Chapter 4Customize slots
4-7
• Enter the name of the variant.
• Select your target audience name. This can be chosen from a list ofpredefined audiences as soon as you being typing. You cannot assign anaudience to the default variant.
• Choose your audience from the list of available audiences.
• (Optional) Select a start and end date.Note: Results vary depending on the combination of dates and audienceschosen: you can select a date without specifying an audience, in which case,the default of ‘All Shoppers’ is applied; you can select an audience withoutspecifying start and end dates, in which case, the results are shown for animmediate start date, and an indefinite end date; when a start date is notspecified, the results shown relate to an immediate start date; when an enddate is not specified, the results shown relate to an indefinite end date.
• Click ‘Add a Variant’ if you wish to add more variant slots.Note: You can reorder the variants by dragging each one to a new position ofpriority.
To configure the slot settings:
• Click the Settings icon to display the configuration options.
• Choose your slot name and description details.
• Click Save to confirm your settings.
10. Save your configurations.
11. Drag and drop widgets from the Components menu to the variant(s) as required.Note: You can drag a Progress Tracker, Vertical tabs, or an Accordion stack on tothe variants of a slot, sometimes referred to as a nested stack.
12. You must ensure that you publish the changes made to your store after assigningaudiences to slots, otherwise the personalized content will not be displayed on thestorefront.
Configure role-based content slots
When an Agent accesses your store in order to gain insight into a shopper’sperspective, they can view content based on their access role. You can, thereforecreate several versions of your store where the content is determined by the relevantaccess role. For example, the role of an Agent Supervisor, Administrator, or anAccount Manager may be assumed. See Create new orders for more details.
To configure a role-based content slot:
1. Open the Design icon and display the Layout tab.
2. Navigate to any layout by using the filter options.
3. Select your preferred layout and click the Grid View icon.
4. Locate the relevant section where you would like to add a role-based content slotand highlight an existing region.
5. Either:Select an existing region and ensure all widgets are removed so that just theregion itself remains.
Or
Chapter 4Customize slots
4-8

Add a new row (which contains regions) above or below using the arrows on the rowmenu bar.
6. See Work with layout components for details on adjusting a region’s width settings, andremoving widgets
7. Open the Components menu, select the ‘Role Based Slot’ option, and drag to the emptyregion. You will see a control (or default) variant, and an unassigned variant.
8. Highlight the unassigned variant by clicking its name. You now have several configurationoptions available for the unassigned variant. These include, customizing the slot,configuring the slot settings, or choosing an Agent access role, as described below:To customize the slot, click the following options:
• Add variant ‘+’ button on the far right to add up to a maximum 10 variants, these canbe easily re-ordered via drag and drop.
• Remove variant ‘x’ button to the right of each variant name to remove it. You cannotremove the default, and you must have at least one variant in addition to that default.
• Target icon to open the targeting modal, where you can name each variant asrequired. (This modal can also be opened by double clicking the variant name.)
To configure your slot settings:
• Click the Settings icon to display the configuration options.
• Choose your slot name and description details.
• Click Save to confirm your settings.
Role-based slot variants provide access differently than other roles. Roles are generallyonly containers and do not provide access by themselves. Roles contain privileges thatprovide access. However, role-based slots variants do provide access. Ensure that youare providing the correct level of access for your users by setting up the variantscorrectly.
The following example shows how role-based slots work:
• You define a role-based content slot and configures one variant for the CS Agentrole, which is a container for the CS Agent privilege and another variant for the CSAgent Supervisor role, which is a container for the CS Agent Supervisor role.
• You then create a custom role, Special Agent, that contains the CS Agent, Marketingand Preview privileges.
• Then you remove the CS Agent role from a specific user and give that user theSpecial Agent role instead.
• The user no longer sees the content in the variant for CS Agent, even though theyhave the CS Agent privilege. Because of the differences with role-based slot variants,you must ensure that you add Special Agent to the CS Agent variant.
To select the Agent access role:
• Click the target icon to display the access role configuration options.
• Enter the name of the variant.
• Choose your role from the list of available roles. This can be chosen from a list ofpredefined roles as soon as you being typing. You cannot assign a role to the defaultvariant.
• Click ‘Add a Variant’ if you wish to add more variant slots.
Note: You can reorder the variants by dragging each one to a new position of priority.
Chapter 4Customize slots
4-9
9. Save your configurations.
10. Drag and drop widgets from the Components menu to the variant(s) as required.Note: You can drag a Progress Tracker, Vertical tabs, or an Accordion stack on tothe variants of a slot, sometimes referred to as a nested stack.
11. You must ensure that you publish the changes made to your store after assigningaudiences to slots, otherwise the personalized content will not be displayed on thestorefront.
Customize stacksStacks enable you to group related widgets in to a distinct set of steps which can thenbe used for functional, navigational, or display purposes.
Specifically, the Progress Tracker, Vertical tabs, and Accordion stack options areavailable via the Components tool. You can also create a Popup stack that allows youto provide a summarized view of a product.
Add a Progress Tracker
You can use the Progress Tracker to add steps to your checkout flow. Adding progresstracker steps guides shoppers through the checkout process in a series of easy tofollow stages, right up until they ultimately pay for their item(s).
Note: The Progress Tracker is only available within the Checkout layout.
To create the Progress Tracker:
1. Click the Design icon and display the Layout tab.
2. Navigate to the Checkout Layout using the filter options.
3. Select the Checkout Layout, and click the Grid View icon.
4. Locate the relevant section where you want to add a progress tracker and click tohighlight an existing region.
5. Either:Click an existing region and ensure all widgets are removed so that only the regionitself remains.
Or
Add a row (which contains regions) above or below using the arrows on the rowmenu bar.
6. See Work with layout components for details.
7. Open the Components menu, select Progress Tracker, and drag to the emptyregion.You will see a default Progress Tracker containing three steps. You can nowcustomize the steps as required, or, you can configure the settings.
To customize the steps, click the following options:
• Add Step ‘+’ button on the far right of the Progress Tracker to add up to 10steps. Each step must follow concurrently.
• Remove Step ‘x’ button to the right of each step name to remove a step. Youmust have at least one step.
Chapter 4Customize stacks
4-10
• Step name to open the Step Label box where you can rename each step as required.
To configure the settings:
• Click the Settings icon to display the configuration options.
• Choose your text alignment, background and step text colors, and button labels. Youcan also select whether you want to allow the user to go back a step by checking theShow “Previous” Button.
• Click Save to confirm your settings.
8. Drag and drop widgets from the Components menu to each of the steps as required.Widgets can be dragged onto the currently active step; otherwise, you can drag a widgetto the name of a step (which is then automatically activated).
Note: You can drag a Progress Tracker, Vertical tabs, or an Accordion stack to the stepsof a stack, sometimes referred to as a nested stack.
Add vertical tabs
Adding vertical tabs to your web store enables shoppers to view a menu of associatedcategories as a vertical display. They can be used to vertically stack associated information inany layout and provide a means of avoiding too much screen content, and excessivescrolling.
Note: Account-based users can use vertical tab stacks as a dedicated section for theShopper Profile, including, account details, address book, update password, and so on.
To add vertical tabs:
1. Click the Design icon and display the Layout tab.
2. Navigate to any layout by using the filter options.
3. Select your preferred layout and click the Grid View icon.
4. Locate the relevant section where you want to add vertical tabs and click to highlight anexisting region.
5. Either:Click an existing region and ensure all widgets are removed so that only the region itselfremains.
Or
Add a row (which contains regions) above or below using the arrows on the row menubar.
6. See Work with layout components for details.
7. Open the Components menu, select Vertical Tabs, and drag to the empty region.You will see a default set of vertical tabs containing three steps. You can customize thesesteps as required, or you can configure the settings.
To customize the tabs, click the following options:
• Add Step ‘+’ button on the far right of the vertical tabs to add up to 10 steps. Eachstep must follow concurrently.
• Remove Step ‘x’ button to the right of each step name to remove a step. You musthave at least one step.
• Step name to open the Step Label box where you can rename each step as required.
To configure the settings:
Chapter 4Customize stacks
4-11
• Click the Settings icon to display the configuration options.
• Enter a name or notes, as required, and click Save to confirm your settings.
8. Drag and drop the required widgets from the Components menu to each of thesteps.Widgets can be dragged on to the currently active step, otherwise, you can drag awidget to the name of a step (which is then automatically activated).
Note: You can drag a Progress Tracker, Vertical tabs, or an Accordion stack to thesteps of a stack, sometimes referred to as a nested stack.
Add accordion stacks
Adding accordion stacks to your web store enables shoppers to view a menu ofassociated categories as a progression of steps. They can be used to stackassociated information in any layout and provide a means of avoiding too much screencontent, and excessive scrolling.
To add accordion stacks:
1. Click the Design icon and display the Layout tab.
2. Navigate to any layout by using the filter options.
3. Select your preferred layout and click the Grid View icon.
4. Locate the relevant section where you want to add accordion stacks and click tohighlight an existing region.
5. Either:Click an existing region and ensure all widgets are removed so that only the regionitself remains.
Or
Add a new row (which contains regions) above or below using the arrows on therow menu bar.
6. See Work with layout components for details.
7. Open the Components menu, select Accordion and drag to the empty region.You will see a default set of accordion stacks containing three steps. You can nowcustomize the steps as required, or you can configure the settings.
To customize the accordion stacks, click the following options:
• Add Step ‘+’ button on the far right of the vertical tabs to add up to 10 steps.Each step must follow concurrently.
• Remove Step ‘x’ button to the right of each step name to remove a step. Youmust have at least one step.
To configure the Accordion settings:
• Click the Settings icon to display the configuration options.
• Enter a name or notes within the About tab.
• Select the text alignment and colors for each of the steps within the Settingstab.
• Click Save to confirm your settings, otherwise cancel.
8. Drag and drop the required widgets from the Components menu to each of thesteps.
Chapter 4Customize stacks
4-12
Widgets can be dragged on to the currently active step, otherwise, you can drag a widgetto the name of a step (which is then automatically activated).
Note: You can drag a Progress Tracker, Vertical tabs, or an Accordion stack to the stepsof a stack, sometimes referred to as a nested stack.
Add popup stacks
Adding popup stacks to your web store enables you to manage and configure content to bedisplayed as a screen that opens, or pops-up, in front of the one you are currently viewing.
Popup stacks contain a Main sub-region, and a Popup sub-region. These can be used byshoppers, for example, when they click a button and a log in/registration details page opensas a popup screen, or, when they are viewing a list of products and they click to open one ina summarized quick view popup screen.
To add popup stacks:
1. Click the Design icon and display the Layout tab.
2. Navigate to any layout by using the filter options.
3. Select your preferred layout and click the Grid View icon.
4. Locate the relevant section where you want to add a popup stack and click to highlight anexisting region.
5. Either:Click an existing region and ensure all widgets are removed so that only the region itselfremains.
Or
Add a new row (which contains regions) above or below using the arrows on the rowmenu bar.
6. See Work with layout components for details.
7. Open the Components menu, select Popup Stack and drag to the empty region.You will see two default sub-regions; Main, and Popup.
8. Open the Main sub-region. You can add a widget to the Main sub-region which triggersthe display of the widget in the Popup sub-region. In order for this to happen, you mustdo the following:
• Drag and drop the required widget from the Components menu to the Main sub-region.
• Open the widget’s Settings icon to display the configuration options, and open theAbout tab.
• Click the Go to Widget Code button.
The Template window opens, displaying lines of HTML code.
From here, you can also edit the widget’s style sheet, text snippets, or download thesource file. See Modify a component’s code for more details.
• Locate where in the template you wish to place the link that will launch the popup. Anexample of the link you may add to the code is shown below:
<a href="#" data-toggle="modal" data-bind="attr: {'data-target':$popupId}">Launch Popup</a>
9. Click Save to confirm your settings; otherwise click Cancel.
Chapter 4Customize stacks
4-13
10. Open the Popup sub-region and complete the following steps:
• Drag and drop the required widget from the Components menu to the Popupsub-region.
• Open the widget’s Settings icon to display the configuration options, and editas required.
Add a Quick View Popup Stack
An instance of the Popup Stack, known as the Quick View Popup Stack, is locatedwithin the Collection and Search Results layouts and enables shoppers to see asummarized view of a product. From there, they can then expand to view the fullproduct details, if required.
You can create other instances of the Quick View Popup Stack. See Understandwidgets for more details.
The Quick View Popup Stack is automatically provided with the following widgetinstances:
• Product Listing widget within the Main sub-region of the Collections layout.
• Search Results widget within the Main sub-region of the Search Results layout.
• Product Quick View widget within the Popup sub-region for both the Collection andSearch Results layouts. This widget instance is an instance of the Product Detailswidget for the selected product.
Modify your page layout settingsYou can customize your store’s page layouts by modifying the layout settings for eachof them.
Some common configuration settings across all layouts allow you to name the layoutand add reminder notes. Many of the layouts also allow you to create a page title, addmetadata to be used by search engines, and provide you with general informationrelating to default layouts.
In addition to those settings already mentioned, you can apply viewport(s) to newlycreated layouts. Refer to Create a new layout instance (cloning) for further informationon new layouts. As default layouts apply to all viewports, if you check the Make DefaultLayout box in your new layout, then viewport options are no longer available.
To access the configuration settings for layouts:
1. Open the Design page and click the Layout tab.
2. Select your preferred layout and click either the Layout Settings icon, or thelayout name. The settings window for the chosen layout opens.
3. Customize the layout settings, as required. You can refer to the settings tablebelow for details.
You can also delete any of the layouts by clicking the Delete button located on thebottom left of any of the layout settings. However, given that default layouts cannot bedeleted, you may notice that the delete button is not an option for default layouts.
The following table describes the layout settings and shows the layouts to which eachsetting belongs.
Chapter 4Modify your page layout settings
4-14
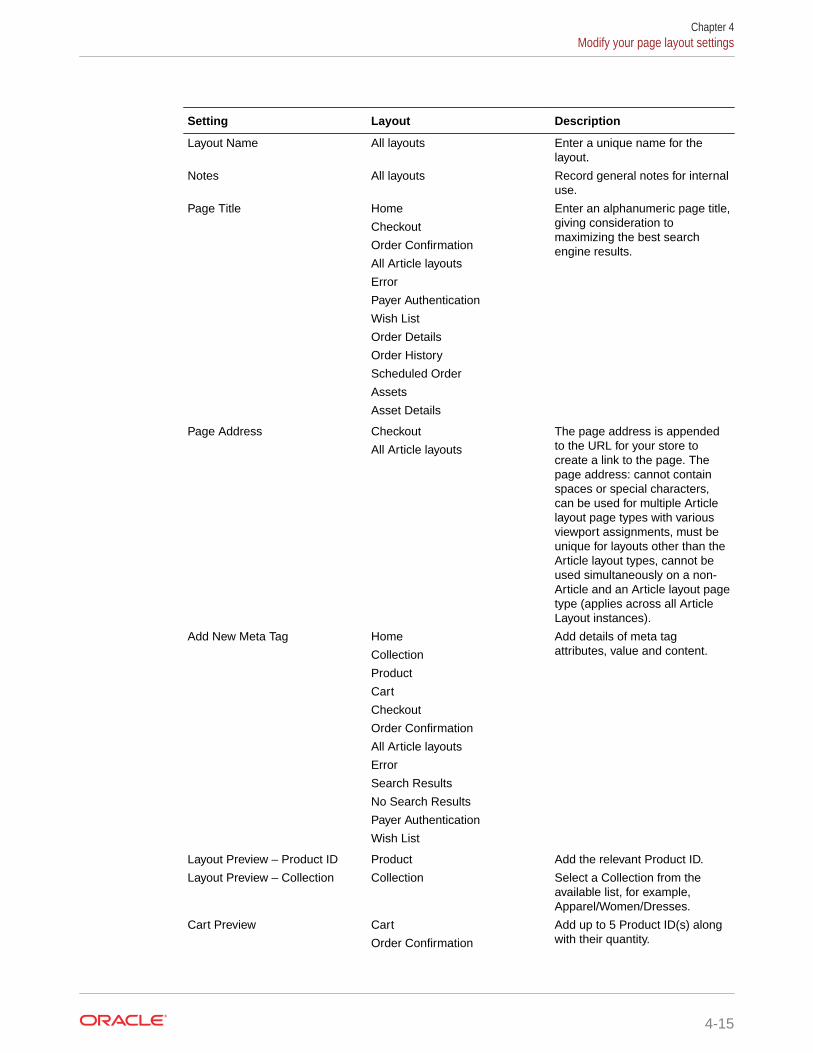
Setting Layout Description
Layout Name All layouts Enter a unique name for thelayout.
Notes All layouts Record general notes for internaluse.
Page Title Home
Checkout
Order Confirmation
All Article layouts
Error
Payer Authentication
Wish List
Order Details
Order History
Scheduled Order
Assets
Asset Details
Enter an alphanumeric page title,giving consideration tomaximizing the best searchengine results.
Page Address Checkout
All Article layouts
The page address is appendedto the URL for your store tocreate a link to the page. Thepage address: cannot containspaces or special characters,can be used for multiple Articlelayout page types with variousviewport assignments, must beunique for layouts other than theArticle layout types, cannot beused simultaneously on a non-Article and an Article layout pagetype (applies across all ArticleLayout instances).
Add New Meta Tag Home
Collection
Product
Cart
Checkout
Order Confirmation
All Article layouts
Error
Search Results
No Search Results
Payer Authentication
Wish List
Add details of meta tagattributes, value and content.
Layout Preview – Product ID Product Add the relevant Product ID.
Layout Preview – Collection Collection Select a Collection from theavailable list, for example,Apparel/Women/Dresses.
Cart Preview Cart
Order Confirmation
Add up to 5 Product ID(s) alongwith their quantity.
Chapter 4Modify your page layout settings
4-15

Setting Layout Description
Order Status Checkout Select from the list of orderstatuses.
Viewports Cart
Checkout
All Article layouts
Select a viewport to suit thevisible area of the display page.
Sites Cart
Checkout
All Article layouts
Assign layout pages to one ormore sites, when runningmultiple sites from your OracleCommerce instance.
Make Default Layout Cart
Checkout
Check to make this the defaultlayout.
Display layout to accountshoppers only
Cart
All Article layouts
Check to confirm this layout is fordisplay to account shoppers only.
SEO Metadata – MetaDescription
Home
All Article layouts
Enter a description for SEOmetadata that will be useful forsearch engine results.
SEO Metadata – Meta Keywords Home
All Article layouts
Enter page content keywords forSEO metadata that will be usefulfor search engine results.
Assign layouts to sites
When running multiple sites from your Oracle Commerce instance, you can assignlayouts to one or more sites. Each site corresponds to an individual store and canhave its own catalog. See Run Multiple Stores from One Commerce Instance for moredetails.
To assign a layout to a site:
1. Click the Design icon and display the Layout tab.
2. Select the page layout for which you wish to assign sites, and click the LayoutSettings icon. (The preceding table highlights which page layouts can beassigned to sites.)Note: When you have multiple instances of layouts, using the search box to filterfor your preferred layout may avoid excessive scrolling.
3. Scroll to the Sites option and begin typing the name of your preferred site. Afiltered list of matching sites is displayed.
4. Select the site(s) you wish to assign.
5. Click Save to confirm your selections.
Upgrade deployed widgetsWidget instances that have been deployed are not automatically upgraded when newversions of the widgets are released. This protects deployed widgets that have beencustomized from failing if the customizations are not compatible with the upgrades.
In order to use a new version of a widget, you must remove any existing instances ofthe widget from your page layouts and replace them with the upgraded version. Youalso need to re-create any template or style sheet customizations for the upgradedwidget.
Chapter 4Upgrade deployed widgets
4-16

To upgrade a deployed widget:
1. Make a copy of the template and style sheet code before the existing widget instancesare deleted, and save the copy to an external file.Note: This code can be used as a reference for editing the new widgets once they areplaced in the page layouts.
2. Log in to the Oracle Commerce administration interface.
3. Click the Design icon.
4. From the Layout tab, select the page layout that contains the widget you want toupgrade.Note: When you have multiple instances of layouts, using the search box to filter for yourpreferred layout may avoid excessive scrolling.
5. Click the Grid View icon.
6. Locate the widget on the page. Click the X icon to delete the instance.
7. At the bottom of the page, click Components.
8. Drag the upgraded widget and drop it in the same location as the widget you deleted.
9. Repeat these steps for all instances of the widget.
10. Edit the widget to include any modifications made to the previous instance. From theComponent tab on the Design page, double click and open the instance in Grid View,click the About tab and click the Go To Widget Code button. Base these changes on thecopy you made before deleting the widgets.
Work with role-based layoutsWhen reviewing your storefront in Preview, you can use role-based layouts that renderexclusively for selected roles.
The layout only renders in Preview if the user is authenticated and matches one of thedesignated roles.
Layouts of this type can be used in conjunction with any Commerce roles. For example, youcan use this feature to preview a page exclusively for developers with the Design role,allowing them to test changes before they are made on the production storefront application.
Role-based layouts provide access differently than other roles. Roles are generally onlycontainers and do not provide access by themselves. Roles contain privileges that provideaccess. However, role-based layouts do provide access. Ensure that you are providing thecorrect level of access for your users by setting up the layouts correctly.
The following example shows how role-based layouts work:
• You define a role-based layout to be viewed in Preview by developers with the Designrole. The Design role is a container for the Design privilege.
• You then create a custom role, Special Designer, that contains the Design, Marketing andPreview privileges.
• Then you remove the Design role from a specific user and give that user the SpecialDesigner role instead.
• The user no longer sees the layout in Preview, even though they have the Designprivilege. Because of the differences with role-based layouts, you must ensure that youadd Special Designer to the layout.
Chapter 4Work with role-based layouts
4-17

To create a role-based layout:
1. Access the role-based layout from the Design page, Layout tab.
2. Navigate to the Role layout by using the filter options.
3. On the Layout Settings, Role Layout dialog, create a layout name, set the layoutas the default layout (optional), and, if you are working with a cloned layout, selectthe applicable viewport(s).
4. Click the Role field to use the role picker functionality. You can select one or moreroles for this layout.
Note: If a role is not selected in the Role field, or if the selected role is deleted, thelayout is not rendered in Preview, even if accessed by an administrator, agent, oragent supervisor role.
5. Name the role display name.
6. For a cloned layout, include the page address and display name if applicable.
7. Click Save.
Once you have completed configuring the settings, create the page for Preview as youwould with any other layout, using grid view, components, and elements.
Preview your storeYou can preview your web store as you make changes to it, without the need topublish live.
To do so, open your chosen layout via the Grid View icon. Click the Layout Previewoption from the layout configuration menu and you are automatically shown therelevant layout in the preview pane.
Additionally, you can click Preview from the layout configuration menu to display thefull screen web store preview. Note: In environments running multiple sites from oneOracle Commerce instance, the particular layout associated with the site is displayed,and you can choose which site to view.
See Preview your changes for information about customizing a preview session.
Changes made to your storefront do not appear on your live store until you publishthem. See Publish Changes for more details.
Chapter 4Preview your store
4-18
5Customize Your Store’s Design Theme
A theme is a set of styling configurations, including colors, fonts, and other design elements,that defines the overall look and feel of your online store.
Commerce provides a default theme that you can copy and customize as required.
To access themes, click the Design page and open the Theme tab.
Understand the default themeOpening the Theme tab displays the sample theme. This is automatically activated as thedefault theme, highlighted by the Active icon.
The default theme contains pre-configured settings that can help you start creating your ownweb store. You can make adjustments to the settings, as required, once you have cloned thetheme. You will be able to see those configuration changes in your store/preview after youhave activated the newly customized theme.
Details on cloning and configuring your style settings are described in the following sections.
Create a new theme (cloning)Creating a new version, or cloning a copy of an existing theme, is possible for any themeincluding the one that is currently active.
To create a new theme:
1. Open the Design page and click Theme.
Note: When you are designing your web store for the first time, the currently active themeis displayed with the Active icon highlighted and a message instructing you to clone thetheme before customizing settings.
2. Click the Clone Theme button.
3. Enter a unique name for the cloned theme.
4. Click Save to confirm.
Alternatively, you can also choose to make another copy of your newly cloned theme byclicking Clone Theme. All configurations related to the activated theme are now availableto view or customize.
Customize your themeYou can customize your theme’s background, buttons and navigation tools. You can alsocustomize the typography settings.
This section includes the following information:
• Access basic theme information
5-1
• Style your theme’s background
• Style your theme’s buttons and navigation tools
• Customize your theme’s typography setting
• Compile your customized theme
Access basic theme information
The About menu tab displays basic information related to any given theme. Suchinformation includes Theme Name, Sites, Theme Notes, and details about the themefrom which the current theme has been cloned.
You can edit the Theme Name and Theme Notes as required. You can also make aclone of your theme by clicking the Clone Theme button, regardless of whether or notthe theme you are cloning is active.
Clicking the Go to Theme Code button opens that theme’s code for editing.
Style your theme’s background
The Backgrounds menu tab displays details on style, header, footer and navigationsettings relevant to any given theme.
Background style settings
These settings allow you to choose an image or background color to be used as thebackdrop for your web store.
Use these style settings to adjust the positioning, color settings, and repeat patternsfor your web store’s background.
Header row
These settings allow you to choose an image or background color to be used as thebackdrop for your web store’s top row header. This refers to the upper part of theheader bar running across the top of your web pages. This section contains site linksand customer login links.
Use these style settings to adjust the positioning, color settings, and repeat patternsfor your Header Top Row.
Footer row
These settings allow you to choose an image or background colors to be used as thebackdrop for your web store’s footer. This refers to the bottom section of your webpages.
Use these style settings to adjust the positioning, color settings, and repeat patternsfor your Footer.
Style your theme’s buttons and navigation tools
Your theme’s Buttons & Nav Menu tab displays details on style settings, colors, fonts,and sizes when using buttons and navigation colors within your web store.
Buttons
Choose your theme’s button style settings for use throughout your web store. Buttonstyle settings include sizes, styles, colors, and fonts for both primary and secondarybutton types.
Chapter 5Customize your theme
5-2
Navigation color settings
Choose your theme’s color settings for use throughout your web store’s navigation.Navigation color settings include top level, drop-down, and mobile navigation color settings.
Customize your theme’s typography setting
Choose your theme’s typography settings for use throughout your web store. Typographysettings enable you to set up various link colors as well as your default base font settings,and you can add new fonts via an external URL. The Link Color and Base Font Settingscan be inherited throughout all heading styles, or you can edit the heading styles and makeany changes you require to each one individually.
Compile your customized theme
Themes are compiled automatically. However, you can also compile a theme manually aftercustomization changes have been made, for example when you have added a new widget toa layout, or you have changed a theme’s code by updating a widget/stack Less file. You canalso compile a theme manually if a compile build has failed.
To do so:
1. On the Design page, click the Theme tab.
2. Click the Theme Compilation tab.
3. Click Build Theme.
4. Click Save to save the compiled changes.
If you have a significant number of sites, you may find that you must wait a considerableamount of time for all pending automatic theme compilations that occur when you publishyour changes. You can use the following endpoints to disable automatic theme compilation,where themes are compiled automatically when changes occur. For example when updatesto stacks, slots, or page layouts are updated.
You can use the Admin API to review and set automatic compilation of themes.
To obtain the compilation settings for themes, issue a GET command to /ccadmin/v1/themes/compilationSettings/getThemeCompilationSettings. A successfulresponse body will contain the compileThemesAutomatically boolean property that indicatesif themes will be compiled automatically.
To configure compilation settings for themes, issue a PUT command to /ccadmin/v1/themes/compilationSettings/setThemeCompilationSettings with thecompileThemesAutomatically property set to true or false. Setting the property to trueindicates that the theme should be automatically compiled. If automatic theme compilation isdisabled, you will need to manually compile your themes using the Themes tab of andadministration interface before publishing any assets that contain style updates.
Once you have issued a PUT command, a successful response body contains thecompileThemesAutomatically property that indicates whether or not the theme will becompiled automatically. Note that if compilation settings are invalid or cannot be saved, the70030 error, which indicates that one or more of the given compilation settings is invalid, orthe 70031 error, which indicates that an error occurred when trying to save the compilationsettings, will display.
Chapter 5Customize your theme
5-3
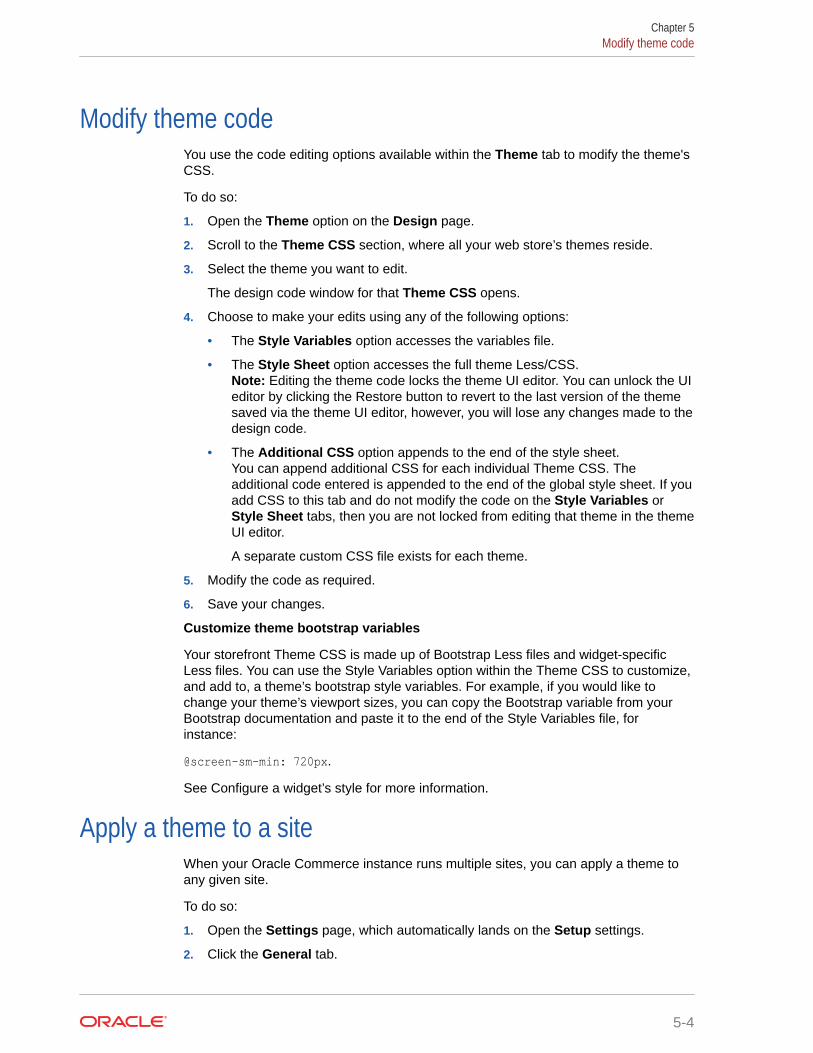
Modify theme codeYou use the code editing options available within the Theme tab to modify the theme'sCSS.
To do so:
1. Open the Theme option on the Design page.
2. Scroll to the Theme CSS section, where all your web store’s themes reside.
3. Select the theme you want to edit.
The design code window for that Theme CSS opens.
4. Choose to make your edits using any of the following options:
• The Style Variables option accesses the variables file.
• The Style Sheet option accesses the full theme Less/CSS.Note: Editing the theme code locks the theme UI editor. You can unlock the UIeditor by clicking the Restore button to revert to the last version of the themesaved via the theme UI editor, however, you will lose any changes made to thedesign code.
• The Additional CSS option appends to the end of the style sheet.You can append additional CSS for each individual Theme CSS. Theadditional code entered is appended to the end of the global style sheet. If youadd CSS to this tab and do not modify the code on the Style Variables orStyle Sheet tabs, then you are not locked from editing that theme in the themeUI editor.
A separate custom CSS file exists for each theme.
5. Modify the code as required.
6. Save your changes.
Customize theme bootstrap variables
Your storefront Theme CSS is made up of Bootstrap Less files and widget-specificLess files. You can use the Style Variables option within the Theme CSS to customize,and add to, a theme’s bootstrap style variables. For example, if you would like tochange your theme’s viewport sizes, you can copy the Bootstrap variable from yourBootstrap documentation and paste it to the end of the Style Variables file, forinstance:
@screen-sm-min: 720px.
See Configure a widget’s style for more information.
Apply a theme to a siteWhen your Oracle Commerce instance runs multiple sites, you can apply a theme toany given site.
To do so:
1. Open the Settings page, which automatically lands on the Setup settings.
2. Click the General tab.
Chapter 5Modify theme code
5-4

3. Either:
• Enter settings details to create a new site. See Enter basic store information forfurther information.
• Choose your site from the site picker search box above the Settings menu options toopen a site already created.
4. Scroll to the Theme drop down list and choose the theme you wish to activate for thesite.
5. Save your changes to confirm.
Upon opening the Theme tab on the Design page, you will see the Active icon next to thetheme that has been activated for that particular site within the Custom Themes section.
Delete a themeTo delete a theme, click Theme on the Design page, and then open the theme you wish todelete.
You can delete any opened theme by clicking the Delete button at the bottom of any of theconfiguration settings tabs. A message displays confirming the successful deletion of thetheme.
Note: You cannot delete the currently active theme or any purchased themes.
Chapter 5Delete a theme
5-5

6Modify Your Storefront Using Code EditingTools
Several code editing options, primarily aimed at developers, are available within the Designpage. They enable you to work with widget code, theme variables, CSS style sheets, stylevariables, text snippets, and component libraries.
Important: Caution should be taken at all times when editing and publishing code as anychanges can have an adverse effect on your site’s functionality. See Publish Changes formore details.
Modify a component’s codeYou can modify a component’s code via the HTML template, style sheets, or text snippets.
1. Open the Design page and click Components.
2. Filter the components that are displayed by choosing from the Type or Source filters. Youcan also search for a specific component by entering details in to a Filter box.
3. A list of components displays which includes overview information on the componenttype, the number of associated instances, and the latest version number. There are alsoseveral customization options available.
4. Select the component you wish to edit and click either its name or the Details icon. Thecomponent details open to display overview information on the list of instances, thecomponent type, the number of associated instances, the latest version number, and thelayout(s) associated with the component.
5. (Optional) The Extend JavaScript button is visible for non-extension widgets. Click thebutton to open the JavaScript file and modify the code. For more information on thisfeature, see Use the JavaScript Code Layering User Interface feature.
Note: The widget JavaScript is only editable for custom widgets that have had theireditable JavaScript property activated.
6. Click the icon to go to the coding options page. The HTML Template windowautomatically opens, displaying lines of HTML code. Immediately above the menu tabs isthe Settings icon, which you can select if you wish to make changes to the componentsettings.
7. Depending on the task you wish to perform, you can now either:
• Modify the code within the HTML Template option.
• Modify the Less/CSS by selecting the Style Sheet option. Oracle Commerce makesuse of Less in the style sheets. Less is a CSS pre-processor which requires the stylesheet files to be compiled to produce CSS and provides additional features such asvariables and functions. For further details on Less, refer to http://lesscss.org.
• Modify the component’s text by selecting the Text Snippets option. See Customizeyour web store’s text for more information on modifying your store’s global text.All available values for your chosen component are displayed as editable links.
6-1
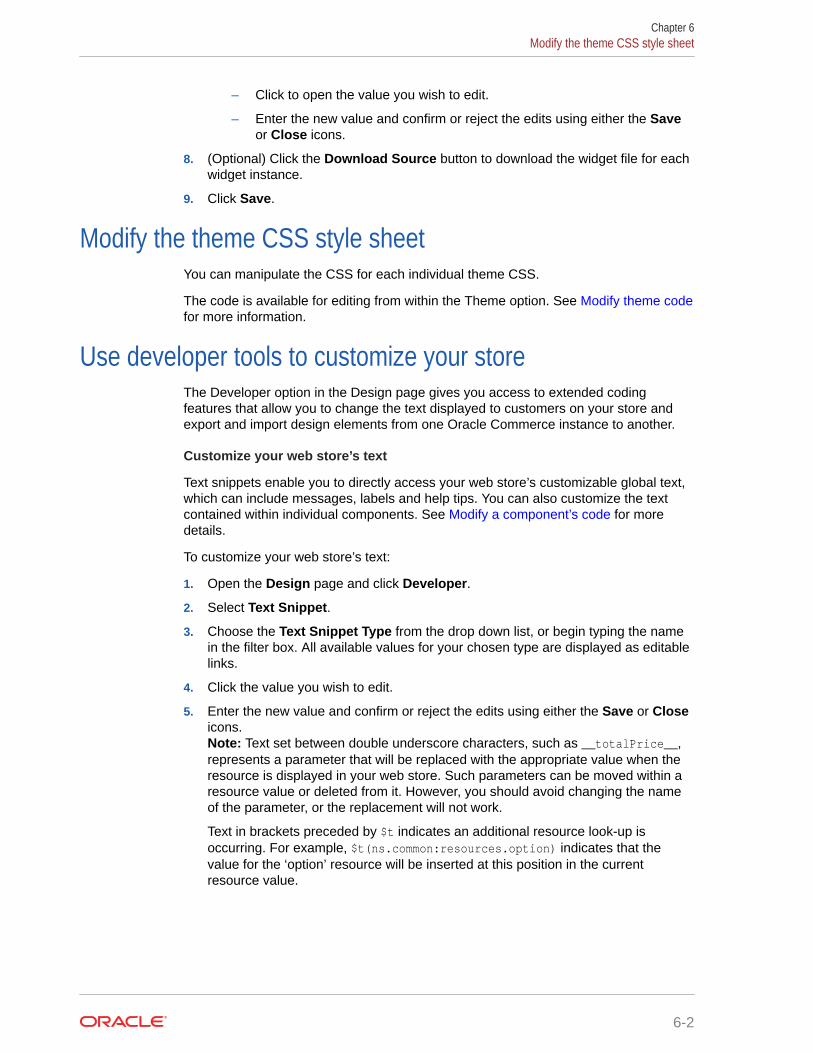
– Click to open the value you wish to edit.
– Enter the new value and confirm or reject the edits using either the Saveor Close icons.
8. (Optional) Click the Download Source button to download the widget file for eachwidget instance.
9. Click Save.
Modify the theme CSS style sheetYou can manipulate the CSS for each individual theme CSS.
The code is available for editing from within the Theme option. See Modify theme codefor more information.
Use developer tools to customize your storeThe Developer option in the Design page gives you access to extended codingfeatures that allow you to change the text displayed to customers on your store andexport and import design elements from one Oracle Commerce instance to another.
Customize your web store’s text
Text snippets enable you to directly access your web store’s customizable global text,which can include messages, labels and help tips. You can also customize the textcontained within individual components. See Modify a component’s code for moredetails.
To customize your web store’s text:
1. Open the Design page and click Developer.
2. Select Text Snippet.
3. Choose the Text Snippet Type from the drop down list, or begin typing the namein the filter box. All available values for your chosen type are displayed as editablelinks.
4. Click the value you wish to edit.
5. Enter the new value and confirm or reject the edits using either the Save or Closeicons.Note: Text set between double underscore characters, such as __totalPrice__,represents a parameter that will be replaced with the appropriate value when theresource is displayed in your web store. Such parameters can be moved within aresource value or deleted from it. However, you should avoid changing the nameof the parameter, or the replacement will not work.
Text in brackets preceded by $t indicates an additional resource look-up isoccurring. For example, $t(ns.common:resources.option) indicates that thevalue for the ‘option’ resource will be inserted at this position in the currentresource value.
Chapter 6Modify the theme CSS style sheet
6-2

Customize your store’s code using the Design Code Utility tool
The Design Code Utility is a command-line tool that integrates Oracle Commerce with yourIDE or code editor. It allows you to customize user-modifiable source code from a Commerceserver and then upload it again.
To access the Design Code Utility:
1. Open the Design page and click Developer.
2. Select Developer Tools.
3. Under Design Code Utility, click Download.
4. Save the ZIP file to a location on your local machine and extract its contents.See Use the Design Code Utility for more details.
Use server-side extensions
Some Oracle Commerce features are implemented as server-side extensions that can run onthe Node.js server associated with your Commerce environment. To use one of thesefeatures, you must download the extension from the Commerce administration server. Youcan then optionally customize the extension and upload it to your Node.js server.
To download a server-side extension:
1. Open the Design page and click Developer.
2. Select Server-Side Extensions. A list of files available for download is displayed.
3. Find the ZIP file for the server-side extension you want to download.
4. Click the associated Download Extension icon and save the file to a location on yourlocal machine.
The list of files available for download includes application files and library files. For example,for the punchout feature, there is an application file named punchout-app.zip and alibrary file named punchout-lib.zip. The application file contains the complete extension(including the library module), so you typically need to download only it and not the library file.The library file contains the business logic for the extension, and it is provided as a separatedownload so you can obtain updates when they are supplied.
To customize a server-side extension you have downloaded, you must first extract thecontents of the ZIP file. Note that when you customize the extension, you should not makeany changes to the library module, which is found in the following directory in the extension:
node_modules/@oracle-commerce-cloud/<SSE_name>-lib
For example, the punchout library module is found here:
node_modules/@oracle-commerce-cloud/punchout-lib
When you have finished your modifications, reassemble the application ZIP file and use thePOST /ccadmin/v1/serverExtensions endpoint to upload it to your Node.js server.
Update the library in a server-side extension
Chapter 6Use developer tools to customize your store
6-3

After you have downloaded the application file for a server-side extension andextracted the contents to a directory, you can replace the library module with anupdated version (if one is available).
To update the library in a server-side extension:
1. Download the library file for the extension. For example, for the punchoutextension, download punchout-lib.zip.
2. Extract the contents of the library file.
3. Use the extracted contents of the library file to replace the library module in theextension application.
4. Reassemble the application ZIP file and use the POST /ccadmin/v1/serverExtensions endpoint to upload it to your Node.js server.
For more information about developing server-side extensions, see the following poston the Oracle Partner Network:
https://community.oracle.com/groups/oracle-commerce-cloud-group/blog/2017/07/21/working-with-commerce-cloud-server-side-extensions
Change the storefront framework version
The storefront framework comprises the JavaScript and CSS files used to managemany of the widget and theme elements that can appear in your storefront, includingcode that has been customized by your developers. You can choose to restore theprevious version of the storefront framework or upgrade to the latest version. See Restore or upgrade the storefront framework version for more details.
Chapter 6Use developer tools to customize your store
6-4

7Manage Your Catalog
A catalog organizes your products, SKUs, and collections in a hierarchy that reflects the wayusers will navigate to them on your store. Your store contains only one catalog, but thatcatalog can contain any number of collections, which can contain any number of productsand associated SKUs.
Note: Your store may be configured to allow the assignment of catalogs to businessaccounts. See Configure Business Accounts for information about accounts and contacts.
If a user does not have the correct access to a catalog the following conditions apply:
• The editors for the catalog and its collections, products and SKUs will be read-only. If acollection of product also belongs to other catalogs to which the user does have access,the item will be editable.
• UI controls for actions that the user cannot perform may be hidden or disabled.
• Some icons and menu options will change from Edit to View.
• In some catalog pickers, some items will be unavailable.
The topics in this section describe how to set up and manage your catalog.
Understand catalogsA catalog organizes your products, SKUs, and collections in a hierarchy that reflects the wayusers will navigate to them on your store.
A catalog contains collections, which in turn, contain products.
By default, Commerce includes a single catalog called Product Catalog, where you cancreate all the collections, products, and SKUs available to your store. There are times,though, when you might want to provide shoppers with a more customized shoppingexperience by creating additional catalogs. You can create and assign additional catalogs inthe following instances:
• Multiple stores: You can run multiple stores (called sites) from a single instance ofCommerce. Each site has a unique domain and you can assign each site its own catalog.For example, suppose you sell soccer jerseys. You could create a separate store for eachteam whose jerseys you sell. You would assign each store a catalog that contains onlyproducts for that team. Fans could easily find and purchase their team’s gear withouthaving to sift through merchandise for other teams. For details about running multiplesites, see Run Multiple Stores from One Commerce Instance.
• Account-based stores: Commerce lets you create accounts for companies that dobusiness with you, such as manufacturers, distributors, and wholesalers. You can provideeach account with a catalog that meets its specific business requirements. It is unlikelythat all account-based shoppers will need to purchase all products your store sells, soproviding an account with its own focused catalog makes it easier for those shoppers tofind and purchase the right products. Logged-in contacts who shop on your store can seeand purchase only the products in the catalog associated with their account. For detailsabout creating and managing accounts, see Configure Business Accounts.
7-1

• Rules set by an external system. By default, Commerce assigns catalogs andprice groups to sites or, for account-based commerce, to accounts. However, youmight want to override these default assignments with different catalogs and pricegroups for each registered shopper. For example, you can personalize the catalogand prices a shopper sees based on geographic location or level in a loyaltyprogram. For more information, see Assign Catalogs and Price Groups toShoppers.
Commerce lets you create the following types of catalogs:
• Independent catalogs are catalogs that are not dependent on any other catalog inyour environment. Collections you add to an independent catalog can be exclusiveto that catalog, or can be linked to a number of different catalogs. The ProductCatalog that Commerce includes by default is structured as an independentcatalog. See Work with independent catalogs for more information.
• Filtered catalogs provide custom views into the master catalog. Filtered catalogslet you add products to a catalog without defining collections in that cataloghierarchy. See Work with filtered catalogs for more information.
• Legacy catalogs are an older type of secondary catalogs that provide customviews into the Product Catalog. See Work with legacy catalogs for moreinformation.
Work with independent catalogsIndependent catalogs are catalogs that are not dependent on any other catalog,including the Product Catalog that is included with Commerce.
An independent catalog can contain links to collections and products that are alreadyin other catalogs, or it can contain collections and products that are not associatedwith any other catalogs.
All catalogs you create in the Commerce user interface are independent catalogs. (Youmust use the Admin API to create legacy catalogs and filtered catalogs. See Work withfiltered catalogs and Work with legacy catalogs for more information.)
Understand independent catalog structure
You can perform all catalog-related tasks on any independent catalog:
• View details for a product or a collection.
• Create a new product or collection.
• Link an existing product or collection.
• Edit or delete an existing product or collection.
• Rearrange products in a collection or rearrange collection hierarchy.
• Access the following options from the Manage Catalogs menu: Product Types,Price Groups, Inventory, and Upload Media.
Any changes you make to linked collections and products are automatically applied toall independent catalogs that are linked to the items that were changed. See Link andunlink collections and products for more information. Remember that you must publishany changes you make to catalogs before they will appear on your stores.
Chapter 7Work with independent catalogs
7-2

Create independent catalogs
This section describes the steps you must complete to create a new independent catalog andadd or link collections to it.
To create a new independent catalog:
1. On the Catalog page, click Manage Catalogs and select New Catalog.
2. Enter values for the Catalog Name and Catalog ID.You cannot change the Catalog ID once you create the catalog.
3. Click Create.
To add or link collections to a catalog:
1. Click the Collections link on the left-hand side of the catalog’s details page.
2. Click Edit.
3. Select a collection from the list. You can filter the list by typing or pasting some text in theCollections box.The filter control matches letters or numbers that you type, wherever they appear in thename or ID, not just at the beginning. Usually, as you type more characters, there arefewer matches. When you see the item you want, select it.
Note: Selecting a child collection does not add its parent collections to the catalog.
4. Click Add Selected.
5. Click Done when you finish adding collections.
6. (Optional) You can specify a default collection where Commerce creates products thathave no parents, for example, products that come in on a feed. Click the SelectCollection button and select a collection from this catalog.If you do not select a default collection, Commerce creates products with no parents inUnassigned Collections.
7. Click Save when you finish making changes.
8. Publish your changes. See Publish Changes for more information.
Edit and delete independent catalogs
You can change a catalog’s name and associated collections; you cannot change its ID. Youcan delete a catalog that is not associated with any sites or accounts. You can delete anyadditional catalogs that you created, but you cannot delete the Product Catalog that isincluded with Commerce.
Important: Deleting assets, such as products, catalogs, shipping methods, etc., can result indiscrepancies in your system, which may produce errors. It is recommended that you disableassets instead of delete them.
To edit or delete a catalog:
1. Select the catalog to edit or delete in one of the following ways:
• On the Catalog page, select a catalog from the drop-down list at the top of thecatalog page to display the catalog.
• On the Catalog page, click the Manage Catalogs button and select All Catalogs.Click the name of the catalog you want to edit.
Chapter 7Work with independent catalogs
7-3
2. To edit the catalog, click Edit Catalog, then change the catalog name or itscollections. Click Save when you finish making changes.
3. To delete the catalog, click Edit Catalog, then click the Delete button.If the catalog is already associated with accounts or sites, you must first remove itfrom all accounts or sites before you can delete it. See Work with accountcontracts for information about removing a catalog from an account. See Configure Sites for information about associating catalogs with sites.
You cannot delete a catalog that is the base catalog for a filtered catalog.
Work with filtered catalogsA filtered catalog provides a filtered view of an existing independent catalog.
Filtered catalogs let merchants scale to a larger number of catalogs with less work andprovide flexibility for merchants who sell to a number of accounts or in a number ofcountries. Filtered catalogs provide central management of collections and taxonomiesand give merchants fine-grained control of account-level availability of products.
While independent catalogs can contain different collections and products, a filteredcatalog references only products and collections that are already in its baseindependent catalog; you can, however, show or hide selected products from withinthe filtered view.
You must create the first new filtered catalog in your Commerce instance with theAdmin API or via import. Once you have created the initial catalog, you can work withfiltered catalogs on the Catalog page in the administration interface.
You can assign filtered catalogs to sites or, if your store supports account-basedcommerce, to business accounts. You assign filtered catalogs in the same way youassign independent catalogs. See Associate catalogs with sites or accounts for details.
Understand the benefits of filtered catalogs
Because filtered catalogs let merchants scale to a larger number of catalogs andreduce manual duplication of effort, they are useful for merchants who share catalogtaxonomies (collection hierarchies) across catalogs but want to have unique productmembership per account or site.
This section describes two cases where a merchant would benefit from using filteredcatalogs.
• An account-based merchant has one large master catalog that contains all theproducts the merchant sells.The merchant sells to a large number of accounts and assigns the full mastercatalog to about two-thirds of them. Each of the remaining accounts requires acatalog that contains a subset of the products from the master catalog.
The merchant can set up a filtered view of the master catalog for each remainingaccount. Each filtered view has the same taxonomy as the master catalog, butcontains only the products that are appropriate for the account to which it isassigned. For example, 70% of the products from the master catalog can bemarked as core products that are available in all the filtered views. The remainingproducts can be tagged as needed on a per-view basis.
• A merchant has two master catalogs, one for sales in Europe and one for sales inNorth America. They have country store sites for Spain, Germany, UK, France,Italy, the US, Canada, and Mexico.
Chapter 7Work with filtered catalogs
7-4

To avoid the need to recreate the hierarchy for each country catalog, the merchantcreates a filter view catalog based on the European master catalog for each of thefollowing country stores: Spain, Germany, UK, France, and Italy.
Similarly, the merchant creates filtered catalogs based on the North American catalog forCanada and Mexico. (The US store uses the full master catalog.)
The entire Wellness collection is not available in Spain, so a business user can hide allproducts from this collection in the filtered view for the Spanish site. After she publishesher changes, the Wellness collection no longer appears in the menu for the Spanish site.Three products in the Nail Polish collection are not available for sale in Germany due toingredients restrictions. The business user can navigate to the Nail Polish Collection inthe German filtered view and hide the three products that are not available in Germany.Once she publishes her changes she will see that three nail polishes are no longershowing up in the Nail Polish Collection on the German site.
Similarly, the entire Footspa collection is not available in Canada, so a business user canhide all products from this collection in the Canadian filtered view of the North Americanmaster catalog.
Keep in mind that performance can be impacted if each filtered view contains a large numberof non-core products. The best approach to filtered views is to have a set of core productsand filter out by exception.
Understand the structure of filtered catalogs
There are a number of tasks that you cannot perform in filtered catalogs. You can perform thefollowing tasks only in the independent catalog that the filtered view is based on:
• Create a new product or collection.
• Edit or delete an existing product or collection.
• Rearrange products in a collection or rearrange collection hierarchy.
• Work with product types, price groups, inventory, and media.
Any changes you make in a base independent catalog are automatically applied to thefiltered views that include the items that were changed. Remember that you must publishyour changes before they will appear on your stores.
Create a filtered catalog
The administration interface supports creating independent catalogs only. To create filteredcatalogs, you must use the Admin API.
Note: You can also create new filtered catalogs by using the CSV import feature. See Importcatalog items and inventory to learn how to create filtered catalogs by importing.
To create a catalog, you can use the createCatalog endpoint in the Admin API. ThecatalogVersion and baseCatalog properties specify that you are creating a filtered catalog:
• Set the value of catalogVersion to 3 to specify that the createCatalog endpoint shouldcreate a filtered catalog.
• The value of baseCatalog must be the catalog ID of an existing independent (version 2)catalog. Otherwise, the request returns an error.
The createCatalog request cannot associate collections with the new filtered catalog. If therequest includes categoryIds, an error is returned.
Chapter 7Work with filtered catalogs
7-5
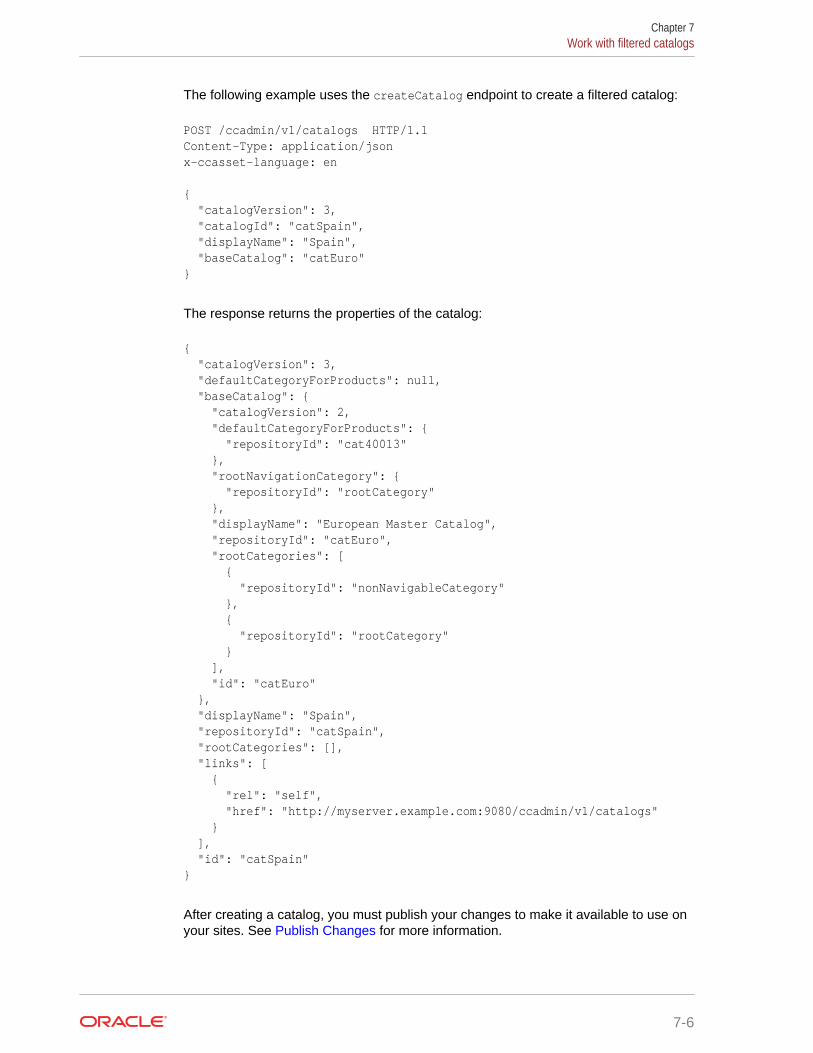
The following example uses the createCatalog endpoint to create a filtered catalog:
POST /ccadmin/v1/catalogs HTTP/1.1Content-Type: application/jsonx-ccasset-language: en
{ "catalogVersion": 3, "catalogId": "catSpain", "displayName": "Spain", "baseCatalog": "catEuro"}
The response returns the properties of the catalog:
{ "catalogVersion": 3, "defaultCategoryForProducts": null, "baseCatalog": { "catalogVersion": 2, "defaultCategoryForProducts": { "repositoryId": "cat40013" }, "rootNavigationCategory": { "repositoryId": "rootCategory" }, "displayName": "European Master Catalog", "repositoryId": "catEuro", "rootCategories": [ { "repositoryId": "nonNavigableCategory" }, { "repositoryId": "rootCategory" } ], "id": "catEuro" }, "displayName": "Spain", "repositoryId": "catSpain", "rootCategories": [], "links": [ { "rel": "self", "href": "http://myserver.example.com:9080/ccadmin/v1/catalogs" } ], "id": "catSpain"}
After creating a catalog, you must publish your changes to make it available to use onyour sites. See Publish Changes for more information.
Chapter 7Work with filtered catalogs
7-6
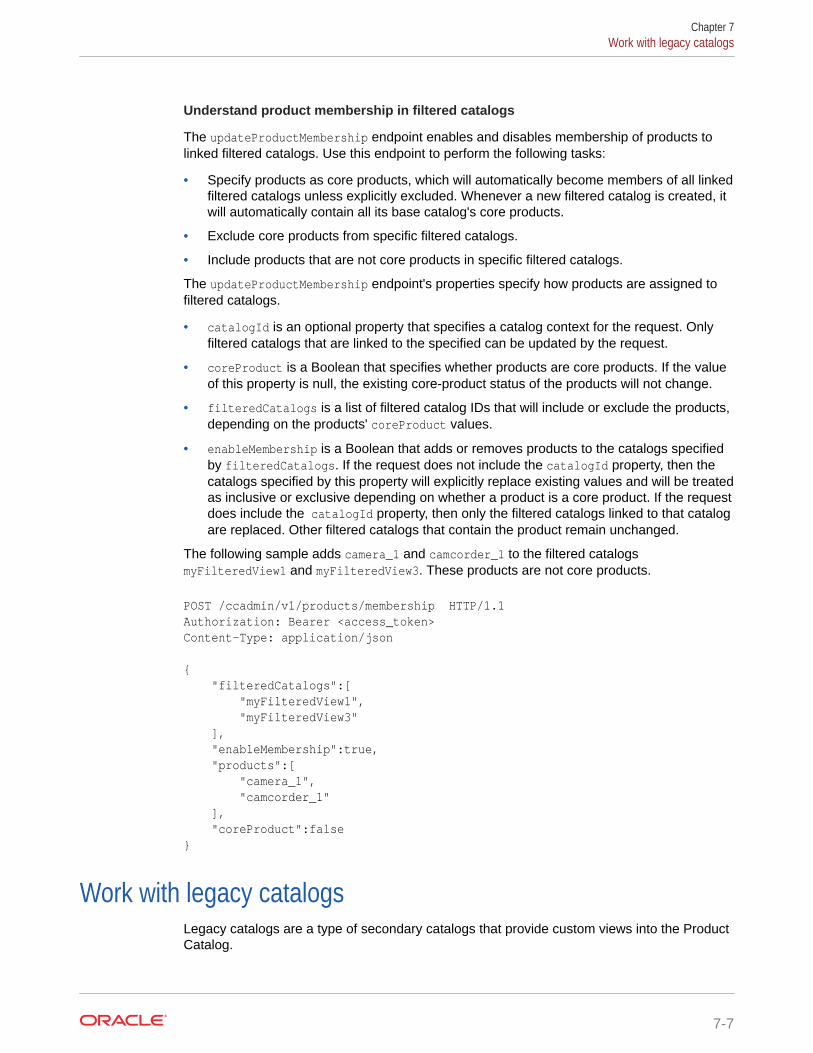
Understand product membership in filtered catalogs
The updateProductMembership endpoint enables and disables membership of products tolinked filtered catalogs. Use this endpoint to perform the following tasks:
• Specify products as core products, which will automatically become members of all linkedfiltered catalogs unless explicitly excluded. Whenever a new filtered catalog is created, itwill automatically contain all its base catalog's core products.
• Exclude core products from specific filtered catalogs.
• Include products that are not core products in specific filtered catalogs.
The updateProductMembership endpoint's properties specify how products are assigned tofiltered catalogs.
• catalogId is an optional property that specifies a catalog context for the request. Onlyfiltered catalogs that are linked to the specified can be updated by the request.
• coreProduct is a Boolean that specifies whether products are core products. If the valueof this property is null, the existing core-product status of the products will not change.
• filteredCatalogs is a list of filtered catalog IDs that will include or exclude the products,depending on the products' coreProduct values.
• enableMembership is a Boolean that adds or removes products to the catalogs specifiedby filteredCatalogs. If the request does not include the catalogId property, then thecatalogs specified by this property will explicitly replace existing values and will be treatedas inclusive or exclusive depending on whether a product is a core product. If the requestdoes include the catalogId property, then only the filtered catalogs linked to that catalogare replaced. Other filtered catalogs that contain the product remain unchanged.
The following sample adds camera_1 and camcorder_1 to the filtered catalogsmyFilteredView1 and myFilteredView3. These products are not core products.
POST /ccadmin/v1/products/membership HTTP/1.1Authorization: Bearer <access_token>Content-Type: application/json
{ "filteredCatalogs":[ "myFilteredView1", "myFilteredView3" ], "enableMembership":true, "products":[ "camera_1", "camcorder_1" ], "coreProduct":false}
Work with legacy catalogsLegacy catalogs are a type of secondary catalogs that provide custom views into the ProductCatalog.
Chapter 7Work with legacy catalogs
7-7

As the name implies, legacy catalogs are an older style of Commerce catalog.Release 21A of Commerce includes a new type of secondary catalog called a filteredcatalog. To learn how and why to use filtered catalogs to provide views into yourmaster catalog, see Work with filtered catalogs.
By default, Commerce includes a single catalog called Product Catalog. Legacycatalogs are secondary catalogs that provide custom views into the Product Catalog.Unlike independent catalogs, which can contain different collections and products,legacy catalogs reference only products and collections that are already in the ProductCatalog.
You must use the Admin API (see Create legacy catalogs) to create new legacycatalogs, but you can edit and delete them in the administration interface (see Edit anddelete legacy catalogs). You cannot convert a legacy catalog to an independentcatalog.
You can assign legacy catalogs to sites or, if your store supports account-basedcommerce, to business accounts. You assign legacy catalogs in the same way youassign independent catalogs. See Create or update an account contract to learn howto assign a catalog to a business account. See Enter basic store information to learnhow to assign a catalog to a site.
This section includes the following topics:
• Understand legacy catalog structure
• Edit and delete legacy catalogs
Understand legacy catalog structure
In a Commerce instance that supports legacy catalogs, there are a number of tasksthat you can perform only in the Product Catalog:
• View details for a product or a collection.
• Create a new product or collection.
• Edit or delete an existing product or collection.
• Rearrange products in a collection or rearrange collection hierarchy.
• Access the following options from the Manage Catalogs menu: Product Types,Price Groups, Inventory, and Upload Media.
Any changes you make in the Product Catalog are automatically applied to all legacycatalogs that include the items that were changed. For example, if you update theProduct Catalog by adding a new product to a collection that is part of a catalogassociated with one of your country stores, the new product automatically appears inthat legacy catalog. Remember that you must publish any changes you make tocatalogs before they will appear on your stores.
Commerce does not index legacy catalogs for storefront search.
Edit and delete legacy catalogs
Although you must use the Admin API to create new legacy catalogs, you can edit anddelete them on the Catalog page in the administration interface. See Create legacycatalogs for more information about creating these catalogs.
Chapter 7Work with legacy catalogs
7-8

You can change a legacy catalog’s name and associated collections, but you cannot changeits ID. You can delete a catalog that is not associated with any sites or accounts. You cannotdelete the Product Catalog.
To edit or delete a legacy catalog:
1. Select the catalog to edit or delete in one of the following ways:
• On the Catalog page, select a catalog from the drop-down list at the top of thecatalog page to display the catalog.
• On the Catalog page, click the Manage Catalogs button and select All Catalogs.Click the name of the catalog you want to edit.
2. To edit the catalog, click Edit Catalog, then change the catalog name or its collections.Click Save when you finish making changes.
3. To delete the catalog, click Edit Catalog, then click the Delete button.If the catalog is already associated with accounts or sites, you must first remove it fromall accounts or sites before you can delete it. See Work with account contracts forinformation about removing a catalog from an account. See Configure Sites forinformation about associating catalogs with sites.
Create legacy catalogsThe administration interface supports creating independent catalogs only.
If you want to create legacy catalogs, you must use the Admin API. You can then edit thesecatalogs using either the Admin API or the administration interface.
This section explains how to create legacy catalogs using the Admin API. For informationabout editing legacy catalogs in the administration interface, see Work with legacy catalogs.For additional information about creating and editing legacy catalogs using the Admin API,see the REST API documentation in the Oracle Help Center.
Note: You can also create new legacy catalogs by using the CSV import feature. However,you must first use the API to enable support for them. See Enable support for legacy catalogsfor more information. See Import catalog items and inventory to learn how to create legacycatalogs by importing.
Enable support for legacy catalogs
Before you can create legacy catalogs, you must enable support for creating them. To do this,you use the saveAdminConfiguration endpoint in the Admin API to set the value of thesupportVersion1Catalogs property. If your Commerce environment has any legacy catalogs,the value of this property defaults to true, and an error is returned if you attempt to set it tofalse. If your Commerce environment does not have any legacy catalogs, the value of thisproperty defaults to false, but you are free to change the value to true. The following exampleenables support for legacy catalogs:
PUT /ccadmin/v1/merchant/adminConfiguration HTTP/1.1Authorization: Bearer <access_token>Content-Type: application/json
{ "supportVersion1Catalogs": true}
Chapter 7Create legacy catalogs
7-9
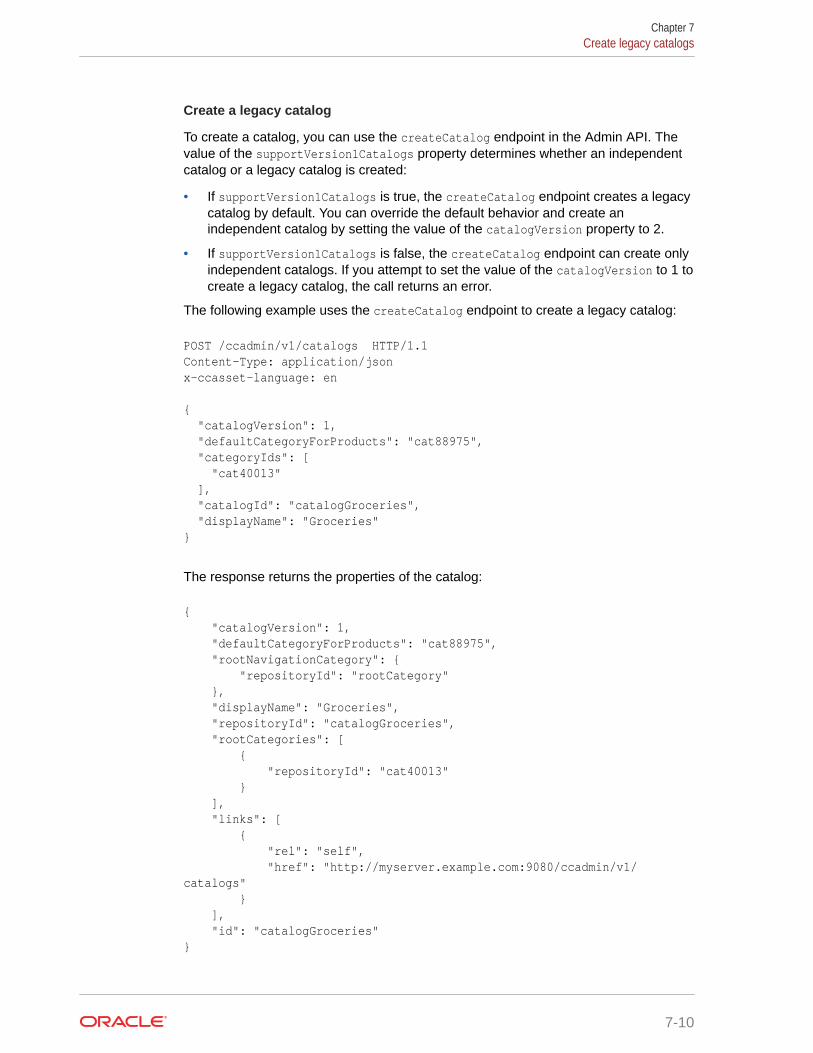
Create a legacy catalog
To create a catalog, you can use the createCatalog endpoint in the Admin API. Thevalue of the supportVersion1Catalogs property determines whether an independentcatalog or a legacy catalog is created:
• If supportVersion1Catalogs is true, the createCatalog endpoint creates a legacycatalog by default. You can override the default behavior and create anindependent catalog by setting the value of the catalogVersion property to 2.
• If supportVersion1Catalogs is false, the createCatalog endpoint can create onlyindependent catalogs. If you attempt to set the value of the catalogVersion to 1 tocreate a legacy catalog, the call returns an error.
The following example uses the createCatalog endpoint to create a legacy catalog:
POST /ccadmin/v1/catalogs HTTP/1.1Content-Type: application/jsonx-ccasset-language: en
{ "catalogVersion": 1, "defaultCategoryForProducts": "cat88975", "categoryIds": [ "cat40013" ], "catalogId": "catalogGroceries", "displayName": "Groceries"}
The response returns the properties of the catalog:
{ "catalogVersion": 1, "defaultCategoryForProducts": "cat88975", "rootNavigationCategory": { "repositoryId": "rootCategory" }, "displayName": "Groceries", "repositoryId": "catalogGroceries", "rootCategories": [ { "repositoryId": "cat40013" } ], "links": [ { "rel": "self", "href": "http://myserver.example.com:9080/ccadmin/v1/catalogs" } ], "id": "catalogGroceries"}
Chapter 7Create legacy catalogs
7-10

After creating a catalog, you must publish your changes to make it available to use on yoursites. See Publish Changes for more information.
Associate catalogs with sites or accountsOnce you have created and published a catalog, it is ready to be associated with one or moresites. If your Commerce environment supports account-based commerce, you can alsoassociate published catalogs with accounts.
You can assign both independent and legacy catalogs to sites and accounts. See Understandcatalogs for information about the differences between independent and legacy catalogs.
See Configure Sites for information about creating a new site and associating a defaultcatalog with it. See Work with account contracts for information about associating a catalogwith an account.
Edit catalog items without publishingDirect catalog editing allows you to update your live catalog and web site without runningthrough publishing steps.
This feature is not designed to be turned on and off. We recommend you choose thepublishing strategy that makes sense for your business based on a number of factors,including how large your catalog is and its source, how often you will need to make changesto it (high frequency/volume of publishes), and the organization of your team.
By default, when you create or modify catalog items, the changes you make must bepublished before they take effect. However, you can optionally configure Commerce so thatyou can make changes to the following catalog items directly on the storefront withoutpublishing:
• Catalogs (not including catalog media)
• Product types
• Collections
• Products and add-on products
• SKU and SKU bundles
Publishing catalog changes works well for many merchants, particularly those that changetheir catalogs relatively infrequently. Some merchants, however, have a large number ofproducts and update their catalogs frequently, in some cases updating them every day ormultiple times a day. For these merchants, Commerce provides the ability to make catalogchanges available on the storefront immediately, bypassing the publishing process.
Enabling the direct catalog editing feature means:
• You can immediately display any changes without the need to publish.
• You can directly push your entire catalog data to production by avoiding the publishingstep. This is particularly useful when changes to products, collections, or SKUs occurfrequently.
• When direct catalog editing is enabled, your site’s URL patterns must use IDs to specifyproducts and collections. Using URL slugs instead of IDs in URL patterns will causeerrors. See Configure URL patterns for more information.
• Search content updates run every 15 minutes to ensure the search index is up-to-date.
Chapter 7Associate catalogs with sites or accounts
7-11

Consider direct catalog editing if you are getting catalog data from an external system,such as a supplier or a PIM, and passing that data through without requiring users tomake changes to that catalog data; or if you frequently publish a large number of itemsor assets. You may also want to consider it if you are concerned about publishingtimes, which increase when changes affect a large number of assets, and/or whenthere is a high volume of product catalog changes.
You might also want to use direct editing if you are concerned about lockout, sinceduring a publishing event, users cannot work with administration interface tools. Thisfeature may also be helpful if you have distributed teams, with a number of individualspublishing throughout the day and/or from multiple time zones.
Direct catalog editing is not designed to be turned on and off, and as such, you shouldconsider this process to be part of your environment. Because this feature is workingwith a live production site, you should carefully consider whether direct catalog editingis something that you want to enable.
Understand additional considerations when using direct catalog editing
Choosing to use direct catalog editing and bypassing the publishing process comeswith some trade-offs, including:
• You will not be able to preview any changes you make before they are inproduction.
• Search indexing runs every fifteen minutes, which might result in a lag betweenwhen changes go live and when that changed is indexed and appears in anysearch or navigation results.
• Product recommendations do not immediately reflect direct catalog edits. Instead,the recommendations service exports the catalog daily in order to generateproduct recommendations, which can mean that the products returned may be upto 24 hours old.
Important: Enabling direct catalog editing automatically enables direct price editing.For more information about direct price editing, see Update prices without publishing.(You can choose to use direct price editing on its own, even if you choose to use thedefault publishing process for catalog changes.)
Since direct catalog editing is not designed to be turned on and off, you shouldconsider whether or not it makes sense to use this feature, ideally during your siteimplementation as you are thinking through your business processes. Because thisfeature is working with a live production site, you should carefully consider whetherdirect catalog editing is something that you want to enable.
Perform prerequisite checks
There are a few things that you should check before enabling and disabling directcatalog editing:
• There are no items in the search indexing queue.
• If your stores have any unpublished catalog or price changes, you must publishthem before attempting to enable direct catalog editing. Additionally, make sure noimports or publishing events are happening while you are enabling direct catalogediting.
• Your site's URL patterns are using IDs to specify products and collections.
Chapter 7Edit catalog items without publishing
7-12

Note that the updateDirectEditConfiguration endpoint will perform the necessaryvalidations and return the appropriate errors.
Update your catalog without publishing
To update your catalog directly without publishing, enable direct catalog editing using theupdateDirectEditConfiguration endpoint.
For example:
PUT /ccadmin/v1/merchant/directEdit/catalog{ "enable" : true}
Use direct catalog editing
If you create or modify a catalog item when direct catalog editing is enabled, (using theadministration interface, an endpoint, or an import process) the changes you make areavailable on the storefront without publishing; they do not appear in the list of changes thatare returned by REST endpoints or appear in the Publishing page of the administrationinterface (although the data that is live on the site is reflected and editable in theadministration interface tool elsewhere).
When you publish changes, Commerce initiates an indexing operation so the search index isupdated to reflect the changes. However, with direct catalog editing, catalog items on theproduction server can be changed without publishing, which means catalog items in the indexmay become out of date. See Manage Search Settings for more information.
To ensure the index is kept up-to-date, enabling direct catalog editing enables a schedule thatperforms incremental indexing every 15 minutes. Performing a publishing operation does nottrigger an index when direct catalog editing is enabled. However, if you have already used thesetSearchPartialSchedule endpoint in the Search Data and Indexing API to set up adifferent incremental indexing schedule, that schedule will remain in place instead.
Note: When bulk import is running, you will notice that storefront performance is slowerbecause bulk import requires continual purging and invalidation of the storefront cache. Referto Perform Bulk Export and Import for additional information.
Disable direct catalog editing
Before disabling direct catalog edit, refer to Perform prerequisite checks for more information.
You can disable direct catalog editing by using the updateDirectEditConfigurationendpoint to set the enable property back to false. Doing so initiates a full publishing process.
It is worth noting, however, that you should decide which mode makes most sense for yourstore, and continue to use that mode unless your business needs change. The feature is notdesigned to be turned on and off frequently. Disabling direct catalog editing may cause aconsiderable delay, because Commerce must then synchronize your publishing server withthe catalog on your production server.
After disabling direct catalog editing, direct price editing remains enabled, as doesincremental indexing. If you then turn off direct price editing, incremental indexing iscanceled.
Chapter 7Edit catalog items without publishing
7-13

However, if you used the setSearchPartialSchedule endpoint to create a differentincremental indexing schedule, disabling catalog editing does not cancel that scheduleunless you have set the parseString parameter to "* * * * * 0,15,30,45".
Understand scheduled site map generation
Site maps are generated nightly and direct catalog editing does not modify thatbehavior.
Note: All site maps are updated, even if your catalog updates only impact a smallnumber of your overall site maps.
Create and edit product typesProduct types are templates for products you add to your catalog.
They contain properties that describe a product, such as fabric type or availablecolors. They can also optionally contain properties that request shopper input, such asthe message to include with a gift or the initials to use for a monogram. When amerchandiser creates a new product, the properties available to fill out depend on theproduct type they select.
This section includes the following topics:
• Understand the base product type
• Edit the base product type
• Understand custom product types
• Create custom product types
• Property types
Understand the base product type
The built-in base product type contains basic product and SKU properties that apply toall products and SKUs in your catalog. Custom product types automatically inherit allthe base product type’s properties.
The following table describes the default product properties for the base product type:
Property Description
Name (required) Short, descriptive name that identifies theproduct.
Product ID (required) The ID that identifies the product internally.Each product ID must be unique within yourcatalog.
Description A short description to display with the product.
Brand The name of the manufacturer.
List Price (required) Default price of the product before anydiscounts or promotions.
If your store supports more than one currency,enter a list price for each price group shown.See Configure Price Groups for moreinformation.
Chapter 7Create and edit product types
7-14

Property Description
Sale Price Sale price of the product.
If your store supports more than one currency,enter a sale price for each price group shown.See Configure Price Groups for moreinformation.
Shipping Surcharge Additional shipping charges that apply to theproduct because of size, weight, or specialhandling.
If your store supports more than one currency,enter a shipping surcharge for each pricegroup shown. See Configure Price Groups formore information.
Product Tax Code A tax code to assign to the product that allowsyour tax processor to make the appropriate taxcalculations. For more information, see Configure Tax Processing.
Long Description Detailed descriptive text to display with theproduct. The long description is created withan HTML editor called CKEditor that you canuse to edit and apply rich-text formatting.
Active Specifies whether the product is displayed onyour store and in search results. By default,the Active option is not selected.
Discountable Specifies whether the product can bediscounted by Commerce promotions. Bydefault, the Discountable option is selected.For more information, see Understandpromotion targets.
Not For Individual Sale Specifies whether the product can bepurchased only as part of a complex,customizable product. For example, if yourstore sells laptops, some of the individualcomponents such as motherboards orgraphics cards may not be for sale asindividual products but can be sold ascomponent parts of a customized product.
Products marked as not for individual sale donot appear in collections shoppers browse onyour store or in search results.
Unlike inactive products, which shopperscannot purchase at all, products marked asnot for individual sale can be purchased, butonly as a component of a customizableproduct.
By default, the Not For Individual Sale option isnot selected.
Note: To create customizable products, youmust have an active Oracle CPQ account.
Not Returnable Indicates that the storefront elements allowingshoppers to initiate a return from their orderhistory should not be active for this product.
Chapter 7Create and edit product types
7-15
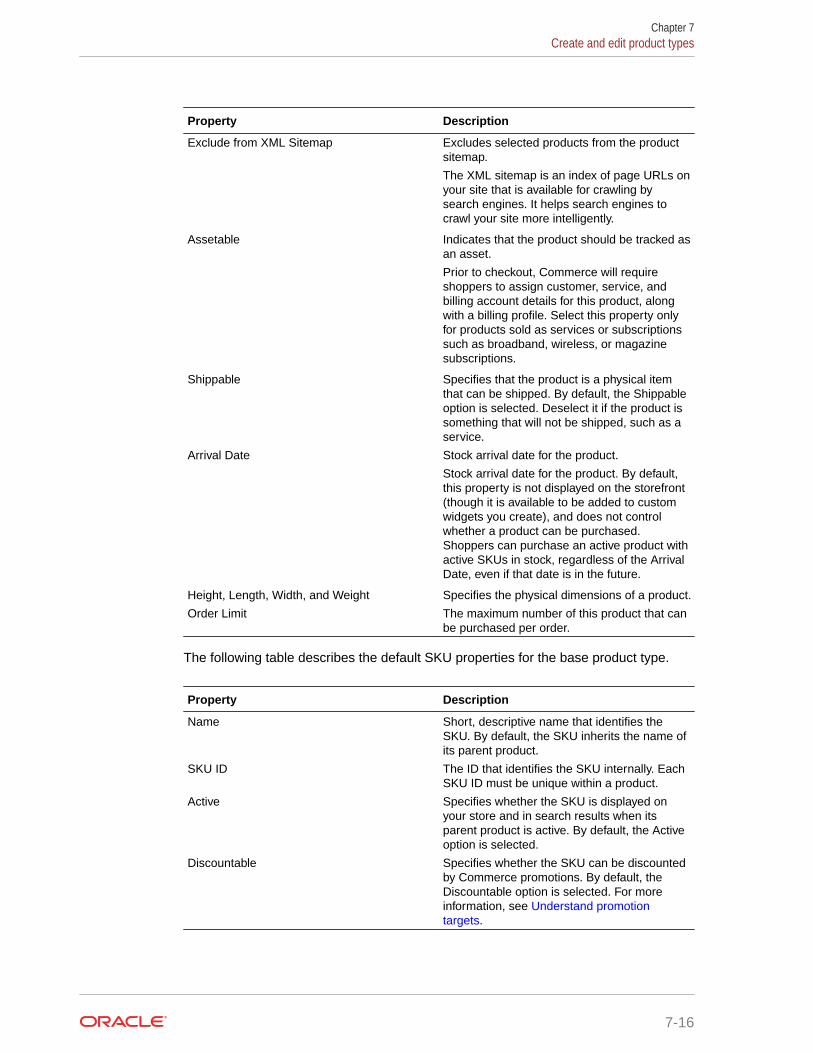
Property Description
Exclude from XML Sitemap Excludes selected products from the productsitemap.
The XML sitemap is an index of page URLs onyour site that is available for crawling bysearch engines. It helps search engines tocrawl your site more intelligently.
Assetable Indicates that the product should be tracked asan asset.
Prior to checkout, Commerce will requireshoppers to assign customer, service, andbilling account details for this product, alongwith a billing profile. Select this property onlyfor products sold as services or subscriptionssuch as broadband, wireless, or magazinesubscriptions.
Shippable Specifies that the product is a physical itemthat can be shipped. By default, the Shippableoption is selected. Deselect it if the product issomething that will not be shipped, such as aservice.
Arrival Date Stock arrival date for the product.
Stock arrival date for the product. By default,this property is not displayed on the storefront(though it is available to be added to customwidgets you create), and does not controlwhether a product can be purchased.Shoppers can purchase an active product withactive SKUs in stock, regardless of the ArrivalDate, even if that date is in the future.
Height, Length, Width, and Weight Specifies the physical dimensions of a product.
Order Limit The maximum number of this product that canbe purchased per order.
The following table describes the default SKU properties for the base product type.
Property Description
Name Short, descriptive name that identifies theSKU. By default, the SKU inherits the name ofits parent product.
SKU ID The ID that identifies the SKU internally. EachSKU ID must be unique within a product.
Active Specifies whether the SKU is displayed onyour store and in search results when itsparent product is active. By default, the Activeoption is selected.
Discountable Specifies whether the SKU can be discountedby Commerce promotions. By default, theDiscountable option is selected. For moreinformation, see Understand promotiontargets.
Chapter 7Create and edit product types
7-16
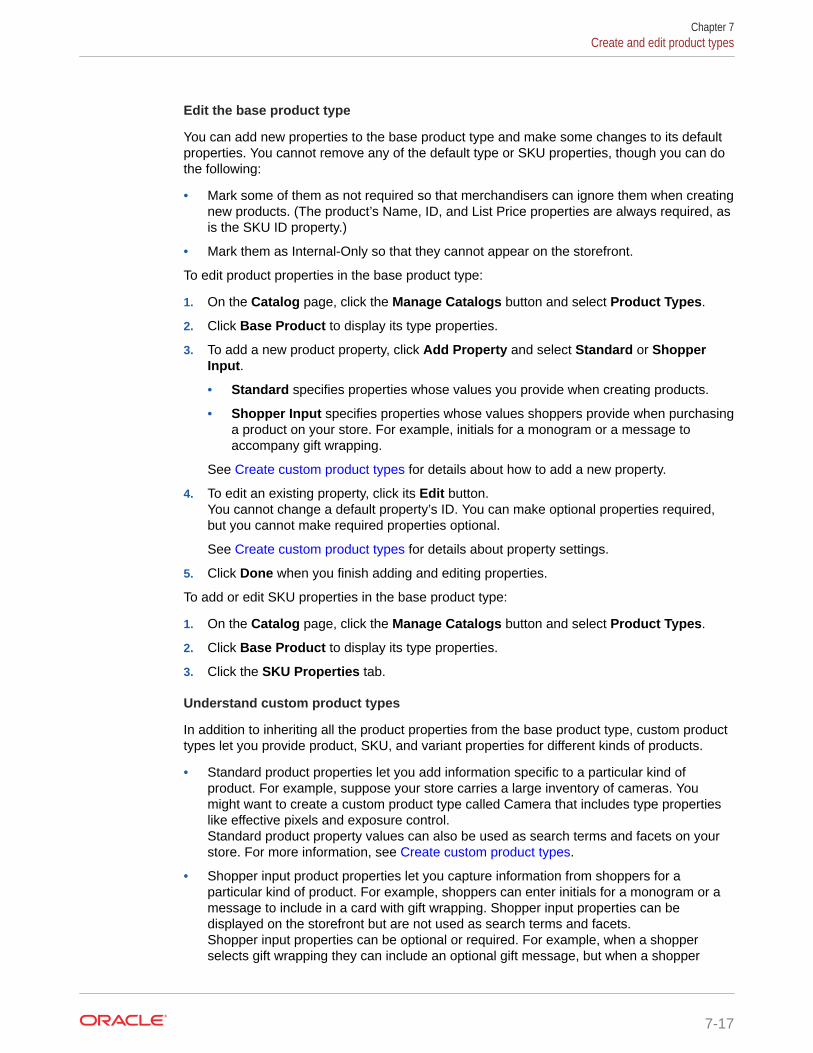
Edit the base product type
You can add new properties to the base product type and make some changes to its defaultproperties. You cannot remove any of the default type or SKU properties, though you can dothe following:
• Mark some of them as not required so that merchandisers can ignore them when creatingnew products. (The product’s Name, ID, and List Price properties are always required, asis the SKU ID property.)
• Mark them as Internal-Only so that they cannot appear on the storefront.
To edit product properties in the base product type:
1. On the Catalog page, click the Manage Catalogs button and select Product Types.
2. Click Base Product to display its type properties.
3. To add a new product property, click Add Property and select Standard or ShopperInput.
• Standard specifies properties whose values you provide when creating products.
• Shopper Input specifies properties whose values shoppers provide when purchasinga product on your store. For example, initials for a monogram or a message toaccompany gift wrapping.
See Create custom product types for details about how to add a new property.
4. To edit an existing property, click its Edit button.You cannot change a default property’s ID. You can make optional properties required,but you cannot make required properties optional.
See Create custom product types for details about property settings.
5. Click Done when you finish adding and editing properties.
To add or edit SKU properties in the base product type:
1. On the Catalog page, click the Manage Catalogs button and select Product Types.
2. Click Base Product to display its type properties.
3. Click the SKU Properties tab.
Understand custom product types
In addition to inheriting all the product properties from the base product type, custom producttypes let you provide product, SKU, and variant properties for different kinds of products.
• Standard product properties let you add information specific to a particular kind ofproduct. For example, suppose your store carries a large inventory of cameras. Youmight want to create a custom product type called Camera that includes type propertieslike effective pixels and exposure control.Standard product property values can also be used as search terms and facets on yourstore. For more information, see Create custom product types.
• Shopper input product properties let you capture information from shoppers for aparticular kind of product. For example, shoppers can enter initials for a monogram or amessage to include in a card with gift wrapping. Shopper input properties can bedisplayed on the storefront but are not used as search terms and facets.Shopper input properties can be optional or required. For example, when a shopperselects gift wrapping they can include an optional gift message, but when a shopper
Chapter 7Create and edit product types
7-17

selects monogramming, they must supply the letters that will be monogrammed onthe main product.
See Support add-on products for an example of incorporating a custom shopperinput property into a widget so shoppers can use it on the storefront.
• SKU properties let you add information specific to a SKU. For example, you couldcreate custom SKU properties that hold UPC codes or IDs that represent SKUs inan external order management system.SKU property values can also be used as search terms and facets on your store.For more information, see Create custom product types.
• Variant properties represent options you can combine to create SKUs. Forexample, if a shirt is available in three sizes and two colors, size and color are itsvariant properties.Variant property values can also drive image display on your store’s productdetails and category pages. Select one variant property per product that getsimages assigned to each of its values. For example, suppose a shirt called CottonTee is available in three colors, red, blue, and green. You can assign separateimages to each color value. When a shopper navigates to the shirt’s productdetails page and selects the color green, the main image changes to the greenshirt.
You can also display style-based products on category pages. That is, images foreach value of the selected variant appear as separate products on your store.Continuing with the shirt example, suppose the shirt is part of the Tops & Teescategory. When a shopper navigates to Tops & Tees, the shirt appears three timeson the page, once in each of the available colors.
For more information, see Create custom product types.
Create custom product types
To create a custom product type:
1. On the Catalog page, click the Manage Catalogs button and select ProductTypes.
2. Click New Custom Type.
3. Enter a name for the new product type and click Save.You can now add product, SKU, and variant properties to the new product type.
To add standard product properties to a custom product type:
1. On the product type’s Product Properties tab, click Add Property and selectStandard.
2. Select a property type and enter values to define it.The property type you select controls the type of editor merchandisers see whenthey create products using this new type. For more information, see Propertytypes.
3. Click Save.
4. Repeat steps 1 through 3 for each new standard product property you want to addto the product type. When you are finished, click Done.
To add shopper input properties to a custom product type:
1. On the product type’s Product Properties tab, click Add Property and selectShopper Input.
Chapter 7Create and edit product types
7-18

2. Select a property type and enterThe property type you select controls the type of editor shoppers see on your store. . Formore information, see Property types.
3. Click Save.
4. Repeat steps 1 through 3 for each new standard product property you want to add to theproduct type. When you are finished, click Done.
To add SKU properties to a custom product type:
1. On the product type’s SKU Properties tab, click Add Property.
2. Select a property type and enter values to define it.The property type you select controls the type of editor merchandisers see when theycreate products using this new type. For more information, see Property types.
3. Click Save.
4. Repeat steps 1 through 3 for each new SKU property you want to add to the producttype. When you are finished, click Done.
To add variant properties to a custom product type:
1. On the product type’s Variant Properties tab, click Add Property.
2. Enter a name, ID, and values for the property. Press the ENTER key after you type eachproperty value.For example, to add color variants to a property type, you could enter the following:
Name: Color
ID: color
Values: Poppy, Navy, Charcoal, White
Tip: You can drag values to reorder them. The order values appear in here is their defaultorder on the product detail page on your store, though you can change the order forindividual products. See Sort variant values on the product details page for moreinformation.
3. Click Save.
4. Repeat steps 1 through 3 for each new variant property you want to add. When you arefinished, click Done.
You can configure how images are displayed for property values of one variant per producttype. Select a variant whose properties look different in images, such as color.
To configure image display for a variant property’s values:
1. On the product type’s Variant Properties tab, click Edit for the property you want to use.
2. Under display properties, select Allow product images at variant property value level.This allows you to assign a different image to each of the variant’s values.
3. If you also want to display images for each value separately on collections pages, selectDisplay product entries in product listing by these property values.Important: Once you save these options, you cannot change them.
4. Click Save.
See Add images to products for information about how to assign images to the values on aproduct-by-product basis.
Chapter 7Create and edit product types
7-19

Property types
The following table describes the properties you can add to a product type or SKUtype.
Property type Allows the merchandiser to enter
Short text A single line of unformatted text.
Text area One or more paragraphs of unformatted text.This is also known as a long text property. Fordetails about this property type, see Add longtext properties to products and SKUs.
Rich text One or more paragraphs of formatted text.
Note: A rich text property can have a defaultvalue of no more than 255 characters.However, if you import or manually enter thevalue, it can have multiple paragraphs, eachwith more than 255 characters.
Number A numeric value.
Check box A single true/false property.
Date A date and time property with a calendarpicker.
Selection list A list property that allows a single selectionfrom a specified set of values.
The following table describes the settings for each standard product or SKU property:
Setting Description
Label (required) The label that appears above the propertyeditor in the product dialog.
Property ID (required) The ID that identifies the property internally.
Each property ID must be unique within yourcatalog, although the administration interfacedoes not always prevent you from creatingmultiple properties with the same ID. If aproperty in the base product type and acustom property in a custom product typehave the same property ID, the value of theproperty in the base product type alwaysoverwrites the value of the property in thecustom product type.
Default Value A value that is pre-populated in the propertyeditor. Properties that are required must havedefault values.
Values For a Selection List property, the set of stringsto display in the list. You must add at least onestring. Press Enter after you finish typing eachstring to add it to the Values field.
Required Specifies whether a property must be setbefore a merchandiser can save a product. Bydefault, properties are not required.
Chapter 7Create and edit product types
7-20

Setting Description
Translatable Specifies whether a short-text or rich-textproperty can be translated. By default,properties are not translatable.
If you select this option, you cannot change itlater.
Display Properties Select Visible in Storefront if you want to beable to display the property on your store. Thisis the default setting for all properties.
Select Internal Only if you do not want theproperty to appear on your storefront.
Note that shopper input properties cannot beInternal Only.
Allow property to be searched Allows shoppers to search on values enteredfor properties.
This setting is available for short text andnumber properties.
You must also add the property to thesearchable field ranking to make it searchable.See Add fields to the searchable field rankinglist.
Allow property to be search facet Allows shoppers to use the property as arefinement when filtering search results.
This setting is available for short text andnumber properties.
Allow property to be a multi-select search facet Allows shoppers to use the property as arefinement when making multiple selections tofilter search results. For example, shopperscould filter results by selecting several brands.
This setting is available for short text andnumber properties.
The following table describes the settings for each shopper input product property:
Setting Description
Label (required) The label that appears above the property editoron your store’s pages.
Property ID (required) The ID that identifies the property internally. Eachproperty ID must be unique within a product type.
Shopper Input Prompt Helper text that appears with the property editoron your store’s pages.
Default Value A value that is pre-populated in the property editor.Properties that are required must have defaultvalues.
Values For a Selection List property, the set of strings todisplay in the list. You must add at least one string.Press Enter after you finish typing each string toadd it to the Values field.
Required for Shopper Specifies whether a property must be set before ashopper can complete the purchase. By default,properties are not required.
Chapter 7Create and edit product types
7-21

Add long text properties to products and SKUs
Long text properties (called Text Area in the administration interface Property Typesdialog) let you store a large amount of plain unformatted text, such as content in CSV,JSON, or new-line-separated list formats.
No long text properties are available by default, but you can create and add long textproperties to any Commerce product type or SKU type, using either the administrationinterface or the Admin API.
To create a long text property in the administration interface, follow the instructions in Create custom product types. To create a long text property with the Admin API, usethe createProductTypeSpecification endpoint for product types and thecreateSkuProperty endpoint for SKU types. See Learn about the APIs for informationabout accessing the REST API documentation.
Create and work with productsA product is a navigational end-point in your catalog, for example, a camera or a pairof shoes.
Once you have defined product types as described in Create and edit product types,you can use those types to create or import new products. This section describes howto work with products on the Commerce Catalog page. To learn how to import productsinto your catalog, see Import and Export Catalog Items and Inventory.
This section includes the following topics:
• Create products
• Activate and deactivate products
• Delete products
Create products
If a collection is selected when you create a product, the new product is automaticallycreated in that collection. Otherwise, it is created in Unassigned Products. If thecollection where you create a product is linked to other parents, the product will appearin all locations the collection is linked to. You cannot create products in the StorefrontNavigation or Non-Navigable root collections. See Organize Products in Collections formore information.
This section describes how to create a new product. See Link and unlink collectionsand products to learn how to link an existing product to a collection.
To create a new product:
1. On the Catalog page, click the New Product button and select New from themenu that appears.
2. Select a product type and click Select.
3. Enter values for the product’s properties.The properties you see depend on the product type you selected.
See Understand the base product type for information about the default propertiesavailable to all products.
4. Click Create.
Chapter 7Create and work with products
7-22

Now you can create SKUs by combining the properties you entered. See Create and workwith SKUs for more information. You can also add images. See Add images to products formore information.
Activate and deactivate products
By default, a newly-created product is not active, which means that none of the product’sSKUs are displayed on your store. You might want to deactivate a product if inventory is lowor if the product will soon be discontinued.
Deactivating a product prevents it from appearing on your store or in search results but doesnot remove it from your environment. (See Delete products for information about permanentlyremoving a product.) If you deactivate a product that is linked to more than one parent,Commerce deactivates it in all locations.
To deactivate a product:
1. On the Catalog page, open the product you want to deactivate.
2. On the General tab of the product details page, uncheck the Active setting and clickSave.
Delete products
Deleting a product permanently removes the product and all its associated SKUs fromCommerce. All price lists that included prices for the product’s SKUs are automaticallyupdated. If you delete a product that is linked to more than one parent, Commerce deletes itin all locations.
Once you delete a product, you cannot retrieve it. Deleting a product might also affect ordersand reports that include the product’s SKUs. An alternative to deleting a product is marking itas inactive so that it is no longer displayed. See Activate and deactivate products for moreinformation.
Important: Deleting assets, such as products, catalogs, shipping methods, etc., can result indiscrepancies in your system, which may produce errors. It is recommended that you disableassets instead of deleting.
To delete a product:
1. On the Catalog page, select the product whose SKUs you want to delete.
2. On the General tab, select SKUs and click Delete Selected SKUs.
3. Confirm that you want to delete the SKUs.
Find products in catalogsYou can perform custom, rule-based searches to quickly find products in collections andcatalogs.
The Catalog page in the administration interface always opens in Search Products view,which is empty until you perform a search or select a collection that contains products.
You can perform a simple search by entering a product name or product ID into the searchfield at the top of the page, or you can create a rule that searches using other productproperties, including custom properties. By default, the search returns results from allcatalogs, though you can filter the results so only products from the current catalog aredisplayed.
Chapter 7Find products in catalogs
7-23
To find products in your catalogs:
1. On the Catalog page, select Search Products.
2. (Optional) To search only a specific collection, select it in the catalog's collectionhierarchy. You can also select Unassigned Products and Unassigned Collections.
3. In the search box, type or paste full or partial product names, IDs, or both.
• Separate multiple entries with commas.
• You can mix names and IDs in the same search. For example, entering thefollowing search terms returns all products whose names and IDs include theword glass as well as the item whose ID is xprod2162:glass, xprod2162
• If you enter just a comma, the search will not start, even if your catalogincludes products whose names include commas.
• There is a limit of 1000 characters and 200 search terms, whichever comesfirst. If there are more than 200 search terms, all terms past 200 are ignored. Ifthere are duplicate IDs, any ID past the first is ignored.
4. To search on properties other than Product Name and Product ID, create a rule.See Create rules to search for products for more information.
Create rules to search for products
A rule automatically finds products based on product properties in a product type youspecify. You cannot save search rules. If you navigate away from the Catalog page,any search rules you created will not persist when you return.
To create a search rule, follow these steps:
1. On the Catalog page, click Search Products and then click the Custom Searchicon next to the search text box.
2. Select a product type to use from the Product Types list, then click the CreateRule button.You can select only one product type per rule.
3. Select a property from the drop-down list in the rule. The available propertiesdepend on the product type you selected in the previous step. You can select onlyone property per rule.
4. Select an operator that links the property to a value that you will specify in the nextstep.The operators you see depend on the type of property you selected. See Createand edit product types for details about product types and the types of propertiesthey can contain.
5. Select or enter a value for the property.For some values, such as parent collections, Commerce displays a list for you tochoose from. For others, such as Availability Date or Brand, you must type in avalue. The rule editor does not validate any text, numeric, or date values you type.
6. If you create more than one rule, select one of the following options from theMatch list to specify how the rules behave together. You can select one optiononly for the entire set of rules.
• Any Rules: If a product matches any rule in the set, it is returned in the searchresults.
Chapter 7Find products in catalogs
7-24

• All Rules: (default) If a product matches all the rules in the set, it is returned in thesearch results.
7. Click Search.
Example: Search for missing information
The following example shows how to find all the products with no images that are currentlydisplayed on your store so you can quickly fix them by adding images. In this example, youwill create two rules that are both evaluated together. One rule searches for all products thatdo not have product images and the other searches for all active products.
To find active products with no images, follow these instructions:
1. On the Catalog page, click Search Products and then click the Custom Search icon.
2. Select All from the Product Types list and All Rules from the Match list.
3. Click the Add Rule button.
4. In the new rule, select Product Images from the Properties list and Does Not Existfrom the Operators list.
5. Click the Add Rule button again to add a second rule.You'll see that the second rule starts with AND because you selected All Rules in step 2.
6. In the second rule, select Active from the Properties list and True from the Operatorslist.
7. Click Search when you finish creating the rules.
The search results will display all the products without images that are active on your store.You can click a product in the results to open its details pane, where you can add images toits Media tab.
Create and work with SKUsA SKU (stock keeping unit) represents a purchasable instance of a product on your store.
Customers do not actually purchase products, they purchase SKUs. A product can haveseveral different SKUs associated with it, representing varieties, sizes, and colors. Forexample, the product Sundress, which is available in two different colors and five sizes, hasten associated SKUs, one for each size/color combination. Each product must have at leastone SKU.
You create SKUs by combining a product’s variant properties. Each product must have atleast one SKU for customers to purchase and for Commerce to index for searching. Youcreate SKUs by combining a product’s variant properties. If a product was created from aproduct type that has no variant properties, you must still create a single SKU for it.
This section includes the following topics:
• Create SKUs
• Deactivate SKUs
• Delete SKUs
• Sort variant values on the product details page
• Create SKU bundles
Chapter 7Create and work with SKUs
7-25

Create SKUs
To create a SKU for a product with no variant properties:
1. On the Catalog page, select the product for which you want to create the SKU.
2. Click the SKUs tab.
3. Select the SKU and add an ID and optionally, a name, for it.
4. Click Create.
To create SKUs for a product with variant properties:
1. On the Catalog page, select the product for which you want to create SKUs.Note: You cannot add variant properties and create multiple SKUs for productscreated with the base product type. For more information, see Create and editproduct types.
2. On the SKUs tab, select values for each variant property.Click the variant to see a full list of available values. Select a value from the list. Tonarrow the list, begin typing some text. The filter matches characters that you typewherever they appear in the value, not just at the beginning. Usually, as you typemore characters, there are fewer matches.
3. When you have selected all the variant properties you want to combine into SKUs,click Display Combinations.
4. Select each SKU you want to assign to the product and add an ID and optionally, aname, for each SKU you select. SKU IDs are required and each must be uniquewithin the product.
5. Click Create.
If a SKU’s product was created with a product type that includes custom SKUproperties, you can edit them once you have created the SKUs.
To edit SKU property values:
1. On the Catalog page, select the product whose SKUs you want to update.
2. On the SKUs tab, click the SKU ID of the SKU to update.
3. Click the SKU Properties tab and edit the SKU properties.If the SKU’s parent product was created from a custom product type, the name ofthe tab will be the name of the product type instead of SKU Properties.
4. Click Save.
By default, SKUs inherit the list and sale prices of their parent product. You canoverride these prices on a per-SKU basis. To change the price for a SKU:
1. On the Catalog page, select the product whose SKUs you want to update.
2. On the SKUs tab, click the SKU ID of the SKU to update.
3. Click the SKU’s Price Groups tab and then click the Edit icon.
4. Enter a new list price or sale price value.
5. Click Save.
Chapter 7Create and work with SKUs
7-26

Deactivate SKUs
By default, all a product’s SKUs are active, which means that when the product is active, allSKUs are displayed on your store. You might want to deactivate a SKU if inventory is low or ifthe SKU contains a variant that will soon be discontinued, like a seasonal color.
Deactivating a SKU prevents it from appearing on your store or in search results but does notremove it from the product. (See Delete SKUs for information about permanently removing aSKU from a product.) If you deactivate all a product’s SKUs but do not deactivate the product,the product is still visible and appears in search results but shoppers cannot buy it. See Create and work with products for information about deactivating a product.
To deactivate a SKU:
1. On the Catalog page, select the product whose SKUs you want to deactivate.
2. On the SKUs tab, click the ID of a SKU.
3. On the SKU details page, uncheck the Active setting and click Save.
Delete SKUs
Deleting a SKU permanently removes it from a product. If you want to keep the SKU but nolonger display it, mark it as inactive. See Delete SKUs for more information.
To remove SKUs from a product:
1. On the Catalog page, select the product whose SKUs you want to delete.
2. On the SKUs tab, select SKUs and click Delete Selected SKUs.
3. Confirm that you want to delete the SKUs.
Sort variant values on the product details page
By default, variant values appear on the product details page in the order specified when youcreated the product type. You can override the default order for individual products.
To reorder variant values on the product details page:
1. On the Catalog page, open the product whose variant values you want to reorder.
2. On the SKUs tab, select the name of the variant whose values you want to reorder fromthe Configure Storefront Display list.
3. Reorder the values and click Update or Save.
4. Click Save to close the product.
Create SKU bundles
A SKU bundle is a single SKU that is composed of several other SKUs. SKU bundles allow agroup of items to be purchased as a single item but treated as multiple items in orderfulfillment. The SKUs that make up a bundle are always the same; a shopper cannotcustomize a SKU bundle. For example, a gift basket created as a SKU bundle alwayscontains the same items; shoppers cannot choose the contents of the gift basket.
SKUs in a bundle can be sold exclusively in the bundle, but you can also sell themindividually.
Commerce automatically sets the inventory for a SKU bundle based on available inventory ofthe SKUs the bundle contains. For example, suppose a SKU bundle (SKU C) contains 1 of
Chapter 7Create and work with SKUs
7-27

SKU A and 2 of SKU B. There are 20 of SKU A and 10 of SKU B in stock. Therefore,SKU C’s (the bundle’s) stock is 5 because that is how many bundles couldsuccessfully be purchased given the current inventory of SKU A and SKU B. See Manage inventory for more information.
If the SKU that serves as the bundle is set as not discountable, then the entire SKUbundle cannot be discounted, even if some of the SKUs it contains are marked asdiscountable. Similarly, if the SKU that serves as the bundle is marked asdiscountable, then the entire SKU bundle can be discounted, even if some of theSKUs it contains are marked as not discountable
Creating a SKU bundle is a three-step process:
1. Create the SKU that will serve as the bundle.
2. Add SKUs to the bundle.
3. Specify how many of each SKU the bundle contains.
The procedures that follow describe each of these steps in detail.
To create the SKU that serves as the bundle:
1. Create a product that will include the SKU bundles. See Create and work withproducts for more information.Since SKU bundles cannot be customized by shoppers, you might want to createa product that contains a number of similar SKU bundles to offer shoppers choice.For example, suppose you want to bundle a variety of scented votive candles intodifferent combinations of three. In this case, create a product called Votive Packs.
2. In the new product, create the SKUs that will serve as the bundles See CreateSKUs for more information.Continuing with the votive candle example, create a SKU for each combination ofscents you want to sell.
To add SKUs to a SKU bundle:
1. Select a SKU and click the Bundled SKUs tab.
2. Click the Include SKUs button.
3. Select one or more SKU IDs from the list. You can filter the list by typing or pastingall or part of a SKU ID in the SKUs box.
4. Click Add Selected.
5. Click Done when you finish adding SKUs.
To specify the number of each SKU that the bundle will contain:
1. On the Bundled SKUs tab, click the quantity for the SKU you want to edit.
2. Enter a new value and click the Save icon.
3. Click the Save button on the SKU tab when you finish updating quantities.
Create add-on productsAdd-on products let shoppers customize or enhance their purchases with optionalextras like monogramming, gift wrap, or warranties.
You link an add-on product to a main product so shoppers see it on the main product’sdetails page and can optionally purchase it along with the main product.
Chapter 7Create add-on products
7-28

This section describes how to create and link add-on products in your catalog. To learn howto display add-on products in your store’s layouts, see Support add-on products.
Keep the following points in mind when working with add-on products:
• An add-on product is available for all the main product’s SKUs. You cannot link an add-onproduct only to specific SKUs. For example, if monogramming is available for a tote bag,you cannot specify that monogramming is available only for canvas SKUs but not leatherSKUs.
• For an add-on product with multiple SKUs, you do not have to link all the SKUs to a mainproduct. For example, suppose an add-on product for warranties includes SKUs for 1-year, 2-year, and 3-year protection. It may not be appropriate to offer a 2-year or 3-yearwarranty on inexpensive items, so you can choose to offer only the 1-year warranty onthose items.
• Add-on products can be products that you let shoppers buy separately, for example, USBcables or chargers could be sold separately and could also be sold as add-on productsfor phones. It does not make sense for certain types of add-ons, like monograms and giftwrapping, to be sold on their own, but for add-on products that can be purchasedseparately, the price is the same, whether the product is purchased on its own or as anadd-on to another product.
• Volume pricing is not supported for add-on products.
• When a product is discounted by a promotion, add-on products linked to are alsodiscounted. See Understand how add-on products affect promotions for moreinformation.
Follow these steps to create an add-on product:
1. Create a product type for the add-on product. This lets you add product, SKU, and variantproperties specific to each type of add-on product, such as color, style, and text for amonogram, or length of coverage for a warranty. See Create and edit product types formore information.
2. Create the add-on product from the product type you created in the previous step. See Create and work with products for more information.
3. Create one or more SKUs for the new product. See Create SKUs for more information.Continuing with the monogram example, create a SKU for each combination ofmonogram colors and styles you want to offer.
4. Add inventory for each SKU. See Manage inventory for more information.
Follow these steps to link an add-on product to a main product:
1. On the Catalog page, select the main product to which you want to link add-on products.
2. On the Add Ons tab, click the Include Add Ons button.
3. Select one or more products from the list. You can filter the list by typing or pasting all orpart of a product name or ID in the Add Ons box.
4. Click Add Selected.
5. Click Done when you finish adding products.
6. By default, Commerce includes all an add-on product’s SKUs, but you can remove anythat are not appropriate for the main product.Click an add-on product to display its SKUs, then click the X icon next to a SKU toremove it. If you remove all a product’s SKUs, Commerce automatically removes theadd-on product.
Chapter 7Create add-on products
7-29

7. Click Save.
Import and export add-on products
You can use the import feature to create add-on products and link them to otherproducts in your catalog. See Import and Export Catalog Items and Inventory fordetails about how to import and export data in Commerce.
The easiest way to format a file for importing catalogs is to start by exporting a file thatyou can use as a template for items you want to add or modify. See Export catalogitems for more information about how to export data.
When you look at the exported spreadsheet, you can see that the second row displayscolumn headings that contain the internal names of the exported properties. TheaddOnProduct column includes product IDs for the add-on products and theaddOnSku column includes SKU IDs for each SKU available for the products in thecorresponding addOnProduct cell.
Product data begins in the third row and continues for the remainder of thespreadsheet. If an item does not have a value for a property, the corresponding cell isblank. When an add-on product has multiple SKUs, its addOnProduct cell containsmultiple entries for each product, one for each of the SKUs and its addOnSku columncontains multiple entries, one for each available SKU. Multiple entries are separatedwith a| (vertical bar.
For example, suppose a product has optional monogramming. There are threemonogramming SKUs, one for each of three colors. The addOnProduct cell in thespreadsheet might look like this:
item1:Product_19Mg|item2:Product_19Mg|item3:Product_19Mg
The addOnSku cell in the spreadsheet might look like this:
item1:Sku_19red|item2:Sku_19blu|item3:Sku_19grn
Organize products in collectionsCollections organize your catalog into a hierarchy that provides a navigationalframework for your store.
Collections can contain both products and other collections.
Note: Commerce also supports directly linking products to independent catalogswithout adding those products to collections.
Understand collections
Collections organize your catalog into a hierarchy that provides a navigationalframework for your store. Collections can contain both products and other collections.
Each Commerce catalog includes two root collections. These collections cannot bedeleted or made children of any other collections. These are the only two rootcollections a catalog can contain; you cannot create other root collections.
• Storefront Navigation is the starting point in the navigational structure of thecatalog. It contains all the catalog’s collections, products, and SKUs.
Chapter 7Organize products in collections
7-30
• Non-Navigable contains products and collections, like gift wrapping or monogramming,that shoppers can buy but not browse to as part of the hierarchical catalog on your store.
Collections, except root collections, can belong to multiple catalogs. See Link and unlinkcollections and products for more information.
To create new products in a collection, see Create products. To link existing products to acollection, see Link and unlink collections and products.
Understand Unassigned Products and Unassigned Collections
Products and collections that are not assigned to any parent in any catalog hierarchy appearin these lists above the collection hierarchy on the Catalog page. Products that are not part ofany collection appear in the Unassigned Products list. Collections that have no parentcollection appear in the Unassigned Collections list.
Unassigned products do not appear in the navigation for your store and are not returned inany search results. Unassigned collections are not returned in search results.
A product or collection becomes unassigned when one of the following things happens:
• It has been removed from all other collections.
• It has been unlinked from all parents.
• It is imported into Commerce with no parent collection.
• You specifically created a product in Unassigned Products.
You can view and work with unassigned products and collections just as you do any others inyour catalog hierarchy. You cannot create new collections or drag existing collections in theUnassigned Collections lists. You can link a product or collection to a collection in theUnassigned Collections list. You can create new product in the Unassigned Products list butyou cannot link an existing product there.
There are several ways to move an item out of the Unassigned Products or UnassignedCollections lists:
• Drag both products and collections to a parent in the catalog hierarchy.
• Move both products and collections to a parent in the catalog hierarchy. See
• Link collections to a parent in the catalog hierarchy. See Link and unlink collections andproducts for more information.
Create collections
You can create a collection that is a child of either of the two root collections, StorefrontNavigation or Non-Navigable. You cannot create a new collection at the root level of acatalog.
This section describes how to create a new collection. To link an existing collection, see Linkand unlink collections and products.
To create a new collection:
1. On the Catalog page, click the New Collection button and select New from the list thatappears.
2. Fill in the property fields in the New Collection screen.
3. Click Save.
Chapter 7Organize products in collections
7-31

The following table describes the properties Commerce provides for collections. Youcan also use the REST APIs to create custom properties for collections. See Createcustom properties for collections for more information.
Property Description
Name (required) Short, descriptive name that identifies thecollection. Collection names do not have to beunique.
Collection ID (required) The ID that identifies the collection internally.Each collection ID must be unique within yourcatalog.
Description A short description to display with thecollection.
Long Description Detailed descriptive text to display with thecollection. The long description is created withan HTML editor called CKEditor that you canuse to edit and apply rich-text formatting.
Exclude from XML Sitemap Excludes selected collections from thecollections sitemap.
The XML sitemap is an index of page URLs onyour site that is available for crawling bysearch engines. It helps search engines tocrawl your site more intelligently.
Selected Parents All the collection’s parent collections.
By default, when you create a new collection, ithas a single parent, Storefront Navigation.
To change a collection’s parents, click the Editbutton and select collections from the list. See Link and unlink collections and products formore information.
To make the collection a child of anothercollection, select a collection in the ChangeParent list.
If you remove all a collection’s parents,Commerce moves it to the UnassignedCollections list.
Status Specifies whether the collection is displayedon your store.
Active: The collection is displayed on yourstore.
Inactive: The collection is not displayed onyour store. This is the default setting for newroot collections.
Inherited from parent: The collection’s status isthe same as its parent. This is the defaultsetting for new child collections.
Reorder products in collections
Each product has a specific position in the collection. The page coding in theCommerce layouts and widgets uses the position to control the order in whichproducts appear on the collection pages.
If you reorder products in a collection that is linked to other collections or catalogs, thecollection’s product order is the same in all places the collection appears.
Chapter 7Organize products in collections
7-32

To reorder products in a collection:
1. On the Catalog page, navigate to the collection that contains products you want torearrange.
2. You can drag a product to a new position in either Grid View or List View.
3. To use numbers to move a product to a new position in the collection, click the List Viewbutton at the top of the page, then change the product's number.Enter a number from 1 to the number of products in the collection. If the number youenter is greater than the number of products, rearranging moves the product to the end ofthe list.
4. To move a product to the top of a collection, click the arrow icon at the right-hand side ofthe product’s tile.
Move collections
You can reorder collections by dragging them to new positions in an independent catalog’scollections list: If a collection is linked to multiple parents, the new order is the same in allcatalogs. You cannot move a collection to the root position in a catalog. You cannot move aparent collection to one of its children.
1. On the Catalog page, navigate to the collection you want to move.
2. Perform one of the following tasks:
• Drag the collection to a new position in the hierarchy and drop it. A vertical lineappears at a potential drop location when you hover over it.
• Right-click the collection and click Edit. Click the Edit button next to the SelectedParents field and select a new parent for the collection.
Find products in collections
To learn how to perform custom, rule-based searches for products in collections andcatalogs, see Find products in catalogs.
Sort products in collections
To display a collection of products, click the corresponding link in the left column of theCatalog page, and then choose a sort option from the Display Order list. The list includesoptions for sorting by name, ID, or price, in ascending or descending order.
Note that the Display Order list is disabled for search results.
Delete collections
Deleting a collection that has more than one parent removes it from all parent collections. Youcan delete only empty collections. If you want to delete a collection that contains products orother collections, remove them first.
To delete a collection:
1. On the Catalog page, navigate to the collection you want to delete.
2. Click the edit link.
3. In the collection’s details dialog, click Delete.
4. Confirm that you want to delete the collection.
Chapter 7Organize products in collections
7-33

Remove products from collections
Removing products from a collection does not remove them from the catalog. If aproduct has more than one parent collection, removing it from one collection does notautomatically remove it from others. If you remove a product from its only parentcollection, it is automatically moved to the Unassigned Products list.
You can also remove a product from a collection on the product’s details page. See Link and unlink collections and products for more information.
To remove products from a collection:
1. On the Catalog page, navigate to the collection where you want to removeproducts.
2. Hover over the product to remove until the remove icon appears.Tip: To remove multiple products, select all the products you want to remove andthen click the remove icon on any of them.
3. Click the remove icon.
Add images to collections
Use a collection’s Media tab to upload and arrange collection images that will appearon your store, for example, a hero image that appears on a category landing page.You can upload JPG, PNG, and GIF files. Commerce automatically sizes your imagesfor display on different devices, such as laptops, tablets, and mobile phones.
Note: This section describes how to upload images to individual collections. See Manage Media for your Store for information about using the media library, includinginformation about uploading a ZIP file of images and other types of media that areautomatically assigned to products and collections in your catalog.
Once you assign images to a collection, you can tag them to specify how they aredisplayed on your store via the Category Content widget. For example, an imagetagged with Hero is displayed as the hero image on the category landing page. Formore information about the Category Content widget, see Design Your Store Layout.
To add an image to a collection:
1. On the Catalog page, navigate to the product to which you want to add images.
2. On the product’s Media tab, click Add Images and select Add New.
3. Select an image to upload.You can upload only one image at a time. If you select a file with the same nameas a file you already uploaded, the new file replaces the existing one.
4. Click Save.
To assign an image to a product from the media library:
1. On the Catalog page, open the product to which you want to add images.
2. On the product’s Media tab, click Add Images and select Media Library.
3. Select images to assign to the product and click Add.For details about selecting, sorting, and searching for images in the media library,see Manage Media for your Store.
4. Click Save.
Chapter 7Organize products in collections
7-34
To tag an image for display in the Category Content widget:
1. On the Catalog page, open the collection whose images you want to tag.
2. On the collection’s Media tab, hover over the image and click the Tag icon.
3. Click the Tags field and select a tag value to assign to the image.You can select Hero, Large, Medium, Small, or Thumbnail.
You can assign the same tag to more than one image. For example, if you assign theHero tag to several images for the same collection, the images are displayed in acarousel on the category landing page.
4. Click the check mark icon to save your tags.
5. Click Save.
Configure catalogs with optional collectionsYou can link products directly to an independent catalog without adding them to anycollections.
By default, you add products to collections to organize your catalog into a hierarchy andprovides a navigational framework for your store. You can also link products directly to acatalog, without adding them to any collections. Linking new products directly to a catalogcan speed up catalog deployment, especially for large catalogs.
Understand catalogs with optional collections
You can link products directly to independent catalogs; you cannot link products directly tolegacy catalogs or to a filtered view of an independent catalog. (Catalogs with directly-linkedproducts do support filtered views, however.)
You can create catalogs with all products directly linked, or you can create catalogs thatinclude a mix of directly-linked products and products in collections. You can also adddirectly-linked products to collections, except in the default Product catalog that ships withCommerce; product linked directly to that catalog cannot be in any of its collections.
Note: If your environment uses a default collection for products, a product directly linked tothe catalog will also be added to the default collection for products. See Create default parentcollections for more information about setting a default collection for products.
On your storefront, shoppers can find directly-linked products by searching. Keep in mind,though, that by default, collections control catalog hierarchy and navigation.Therefore,shoppers cannot browse to products that are only directly-linked to a catalogunless you have created a custom menu/taxonomy structure with custom links. Storefrontsthat are driven entirely by search require this type of customization, for example.
Understand the difference between optional collections and filtered views
A filtered catalog provides a filtered view of an existing independent catalog. Catalogs withdirectly-linked products do support filtered views, and while both features can speed upcatalog creation and deployment, they address different merchant concerns.
• Filtered views let merchants scale to a larger number of catalogs with less work andprovide flexibility for merchants who sell to a number of accounts or in a number ofcountries. Filtered catalogs provide central management of collections and taxonomiesand give merchants fine-grained control over the availability of products for each accountor country while maintaining a single collection structure across catalogs.
Chapter 7Configure catalogs with optional collections
7-35
• Directly linking products to catalogs lets merchants who have very large catalogsdeploy more quickly because they do not have to manage collections and assignproducts to them. Directly linking products to catalogs is especially useful formerchants who want a purely search/facet driven storefront or those who managetheir taxonomies externally and do not want to replicate this effort in Commerce.
• Filtered views and direct linking of products can be used together and can beespecially useful for merchants who need to scale to a larger number of catalogsbut who also manage taxonomies externally.
For more information about creating filtered views, see Work with filtered catalogs.
Find products directly linked to catalogs in the administration interface
You can quickly find products that are linked directly to catalogs by performing a rule-based search on the Catalog page in the administration interface.
To create the search rule, follow these steps:
1. On the Catalog page, click Search Products and then click the Custom Searchicon next to the search text box.
2. Select a product type to use from the Product Types list, then click the CreateRule button. You can select only one product type per rule.
3. Select Directly Linked Catalogs from the drop-down list in the rule. You canselect only one property per rule.
4. Select an operator that links the property to a value that you will specify in the nextstep. You can select contains, does not contain, exists, or does not exist.
5. If you selected the operator contains or does not contain, select a catalog tosearch. If you selected the operator exists or does not exist, you do not need toselect a catalog.
6. Click Search.
For more information about searching for products, see Find products in catalogs.
Link products directly to a catalog
This section describes how to link a product directly to a catalog in the administrationinterface. To learn how to link products to a catalog by importing them, see Importcatalog items and inventory. To learn how to link products to a catalog with the RESTAPI, see information about the /ccadmin/v1/products endpoints in the REST API forOracle Commerce Cloud documentation.
To link an existing product to a catalog:
1. On the Catalog page, navigate to the product you want to link. See Find productsin catalogs for more information.
2. On the product’s Membership tab, click the Edit List button under DirectlyLinked Catalogs.
3. Display available catalogs by typing or pasting some text in the search box.The filter control matches letters or numbers that you type, wherever they appearin the name or ID, not just at the beginning. Usually, as you type more characters,there are fewer matches. When you see the item you want, select it.
4. Select one or more catalogs and click Add Selected.
Chapter 7Configure catalogs with optional collections
7-36

5. (Optional) to unlink the product from a catalog, remove a catalog from the Selections list.
• To remove a single catalog, click the x at the end of a catalog's name.
• To remove all catalogs from the list, click the Clear List button.
6. Click Done when you finish adding catalogs.
Link and unlink collections and productsLinking a collection or product associates it with a parent.
Linking is useful when you want a product to appear in multiple collections or a collection toappear in multiple catalogs. Linked items have multiple parents, one parent for each location.When you make a change to the item in one location, that change is reflected in all locations.
For example, suppose your catalog contains a product called Gas Hibachi in the Outdoorscollection and you want it to also appear in a seasonal Father’s Day Gifts collection. You cansimply link it to that collection.
You can link both products and collections to multiple parent collections. To link a collection toanother catalog, add it to the catalog’s Included Collections list. (See Understand catalogs formore information.)
This section includes the following topics:
• Link and unlink products
• Link and unlink collections
Link and unlink products
You can link a product to one or more collections. Products appear in more than one catalogwhen they are linked to collections that are part of different catalogs.
If you unlink a product from all its parent collections, Commerce moves it to the UnassignedProducts list.
To access all products in your environment, regardless of their parent collections or catalogs,click the All Products lists that appears above the collection hierarchy on the administrationinterface Catalog page. See Find products in collections for more information.
To link an existing product to a collection:
1. On the Catalog page, navigate to the collection where you want to link products.
2. Click the New Product button and select Link Existing Products from the menu thatappears.
3. By default, Commerce lets you search for products in all catalogs. To search for productsin a specific catalog, click the Catalogs button and select a catalog.
4. Select one or more products from the list. You can filter the list by typing or pasting sometext in the Products box.The filter control matches letters or numbers that you type, wherever they appear in thename or ID, not just at the beginning. Usually, as you type more characters, there arefewer matches. When you see the item you want, select it.
5. Click Add Selected.
6. Click Done when you finish adding products.
To link products to multiple parent collections at the same time
Chapter 7Link and unlink collections and products
7-37
1. On the Catalog page, navigate to the product you want to work with and open it.
2. On the product’s Membership tab, click the Edit button.
3. By default, Commerce lets you search for collections in all catalogs. To search forproducts in a specific catalog, click the Catalogs button and select a catalog.
4. Select a collection from the list. You can filter the list by typing or pasting some textin the Collections box.The filter control matches letters or numbers that you type, wherever they appearin the name or ID, not just at the beginning. Usually, as you type more characters,there are fewer matches. When you see the item you want, select it.
5. Click Add Selected.
6. (Optional) to unlink the product from a collection, remove a collection from theIncluded Collections list.
• To remove a single collection, click the x at the end of a collection’s name.
• To remove all collections from the list, click the Remove All button.
7. Click Done when you finish adding collections.
Link and unlink collections
You can link a collection to one or more parent collections. If you unlink a collectionfrom all its parent collections, Commerce moves it to the Unassigned Collections list.See Work with independent catalogs to learn how to link collections to catalogs.
To link a collection to a parent:
1. On the Catalog page, navigate to the collection you want to be the parent.
2. Right-click the collection in the tree and click Link Existing Collection.
3. By default, Commerce lets you search for collections in all catalogs. To search forproducts in a specific catalog, click the Catalogs button and select a catalog.
4. Select a collection from the list. You can filter the list by typing or pasting some textin the Products or Collections box.The filter control matches letters or numbers that you type, wherever they appearin the name or ID, not just at the beginning. Usually, as you type more characters,there are fewer matches. When you see the item you want, select it.
5. (Optional) By default, the collection you right-clicked is automatically selected asthe parent collection, but you can change it by selecting a new collection from theSelect Parent Collection list.
6. Click Link.
To unlink a collection from a parent:
1. On the Catalog page, navigate to the collection you want to unlink.
2. Right-click the collection in the tree and click Unlink From Parent.If you unlink a collection from its last parent, Commerce moves it to theUnassigned Collections list.
Create default parent collectionsA collection or product can be the child of more than one collection, in more than onecatalog. Its default parent is the collection that determines its hierarchy in a catalog.
Chapter 7Create default parent collections
7-38

Linking products and collections to multiple catalogs provides a more flexible catalog strategy,but can complicate navigation. This is especially true if a shopper accesses a collection orproduct through a search engine rather than by traversing the catalog hierarchy.
A product or collection's parentCategory and parentCategoryScope properties allow you tospecify a default parent collection for each catalog where a product or collection is linked.The value of parentCategory must be the categoryId of a collection that is one of the item'sexisting parents.
The scope of the parent setting, that is, where it should be applied, is specified by itsparentCategoryScope property. You set both properties when you create or update acollection with the createCollection and updateCollection endpoints, or when you createor update a product with the createProduct and updateProduct endpoints.
The parentCategoryScope property can have one of the following values:
• base specifies that the parentCategory collection is the default parent in all catalogswhere it is included. Use this scope when you want to specify the default parent collectionthat should apply wherever the collection or product is shared, unless it is overridden fora specific catalog.
• catalogSpecific specifies that the parentCategory collection is the default parent onlyfor the catalog specified by catalogId. Use this scope for a product that should beavailable only in a specific catalog, for example, a product that can be sold only in acertain country. Setting a catalogSpecific value does not change the existing basevalue. If no base value is set, Commerce automatically sets the base value as the samevalue you set for catalogSpecific.
• global specifies the default parent category for a product or collection and applies it inevery catalog where the item appears. The global scope resets the base scope valueand removes all catalog context from the collection or product's default parent.
• revertToBase removes the catalogSpecifc scope for the catalog in context for theproduct or collection and sets its default parent back to the base scope.
If no scope is specified in a PUT or POST request, and a catalog-specific value exists, therequest uses that value. Otherwise, the request uses the base value.
Set a default parent for a collection
This section contains Admin API examples that show how to set a default parent for acollection. To update a collection, issue a PUT request to the /ccadmin/v1/collections/{id} endpoint. To create a collection, issue a POST request to the /ccadmin/v1/collections/{id} endpoint.
The examples in this section are based on the following scenario:
A Commerce instance includes two sites, one for US shoppers and one for UK shoppers.Each site has its own catalog, usCatalog and ukCatalog, respectively. The BigBrandcollection is linked to the following locations in both catalogs:
• UK-Catalog / StorefrontNav / New / BigBrand
• UK-Catalog / StorefrontNav / Brands / BigBrand
• US-Catalog / StorefrontNav / New / BigBrand
• US-Catalog / StorefrontNav / Tableware / Brands / BigBrand
Chapter 7Create default parent collections
7-39
The following example updates the default parent collection for BigBrand to Brands.This change affects both catalogs, since the Brands collection exists in both.
PUT /ccadmin/v1/collections/bigBrand
{ "properties":{ "parentCategoryScope": "base", "parentCategory" : "Brands" } }
The following example updates the default parent collection for BigBrand to New in theUS Catalog only. It does not affect BigBrand's default parent collection in the UKCatalog.
PUT /ccadmin/v1/collections/bigBrand
{ "properties":{ "catalogId": "usCatalog", "parentCategoryScope": "catalogSpecific", "parentCategory" : "New" }}
The following example updates the default parent collection for BigBrand to Brands.This change affects both the US and UK catalogs, even if a catalog-specific defaultparent was previously set, as in the previous example.
PUT /ccadmin/v1/collections/bigBrand
{ "properties":{ "parentCategoryScope": "global", "parentCategory" : "Brands" }}
The following example updates the default parent collection for BigBrand to New in theUK Catalog only. It does not affect BigBrand's default parent collection in the USCatalog.
PUT /ccadmin/v1/collections/bigBrand
{ "properties":{ "catalogId": "ukCatalog", "parentCategoryScope": "catalogSpecific", "parentCategory" : "New" }}
Chapter 7Create default parent collections
7-40

The following example clears the catalog-specific parent setting from the previous example.The default parent collection for BigBrand in the UK Catalog is now set to Brands, which wasset as the base value in the first example in this section. Note that the request includes acatalog context ("catalogId": "ukCatalog"). A catalog context is required to set theparentCategoryBase torevertToBase.
PUT /ccadmin/v1/collections/bigBrand
{ "properties":{ "catalogId": "ukCatalog", "parentCategoryScope": "revertToBase" }}
Set a default parent for a product
This section contains Admin API examples that show how to set a default parent for aproduct with the /ccadmin/v1/products endpoints. To update a product, issue a PUT requestto the /ccadmin/v1/products/{id} endpoint. To create a product, issue a POST request tothe /ccadmin/v1/products/{id} endpoint.
The code examples in this section are based on the following scenario:
A Commerce instance includes two sites, one for US shoppers and one for UK shoppers.Each site has its own catalog, usCatalog and ukCatalog, respectively. A serving platter islinked to the following locations in both catalogs:
• UK-Catalog / StorefrontNav / New / Large Oval Platter
• UK-Catalog / StorefrontNav / Brands / BigBrand / Large Oval Platter
• US-Catalog / StorefrontNav / New / Large Oval Platter
• US-Catalog / StorefrontNav / Tableware / Large Oval Platter
The following example updates the default parent collection for the Large Oval Platter to New.This change affects both catalogs, since the New collection exists in both.
PUT /ccadmin/v1/products/prod_largeOvalPlatter
{ "properties":{ "parentCategoryScope": "base", "parentCategory" : "New" } }
Create custom properties for collectionsCollections include a predefined set of properties that store information about collections youuse to organize your catalog.
In addition to these predefined properties, you can create custom collection properties. Thissection describes how to use the Commerce Admin REST APIs to add custom properties tocollections. See Use the REST APIs for information you need to know before using the APIs.
Chapter 7Create custom properties for collections
7-41
Understand item types
Item types are templates for Commerce assets, such as collections and promotions.They contain properties that describe the asset.
The category item type lets you work with the collections in a Commerce catalog. Youcan use the updateItemType endpoint to modify the category item type. You canmodify existing properties by changing the values of their attributes and create customproperties by specifying their attributes. SeeSettable attributes of shopper typeproperties for descriptions of these attributes. The next section provides an example ofcreating a custom property for collections.
Create a custom collections property
To add custom properties to the category item type, issue a PUT request to the /ccadmin/v1/itemTypes/category endpoint on the administration server.
Use the following format:
• The request header must specify the x-ccasset-language value.
• The request body is a map where each key is the ID of a new property, and eachvalue is an object that specifies the values of the attributes of the property.
• Each object is also a map, with each key being the name of an attribute and eachvalue being the corresponding attribute value.
Note that the ID of a custom property must include the underscore character (_). Thisensures that the ID will not conflict with any properties that Commerce adds to itemtypes in the future. The endpoint returns an error if you attempt to create a customproperty without an underscore in its ID.
Remember to publish the new property once it is successfully created. See PublishChanges for more information.
The following example shows a sample request for adding a custom text property tothe category item type:
PUT /ccadmin/v1/itemTypes/category HTTP/1.1Authorization: Bearer <access_token>x-ccasset-language: enContent-Type: application/json
{ "specifications": [ { "id": "_myNewProperty", "label": "My New Property", "type": "shortText", "required": false, "uiEditorType": "shortText", "uiwritable": "true", "localizable": false, "hidden": false, "propertySortPriority": "100" } ]}
Chapter 7Create custom properties for collections
7-42

The response includes the property you created.
...{ "hidden": false, "length": 254, "label": "My New Property", "type": "shortText", "required": false, "searchable": false, "writable": true, "internalOnly": false, "uiEditorType": "shortText", "default": null, "audienceVisibility": null, "localizable": false, "textSearchable": false, "id": "_myNewProperty", "dimension": false, "propertySortPriority": "100", "editableAttributes": [ "internalOnly", "default", "audienceVisibility", "hidden", "textSearchable", "label", "dimension", "propertySortPriority", "required", "searchable" ] }...
When you add a custom property to the category item type, the property is added to allcollections, including any new collections you create and any collections that already exist. Itappears on the General tab of every collection's details page in the administration interface.Business users can view, add, and edit values for custom collection properties, just as theydo for predefined properties. (See Organize products in collections for more information.)Custom collection properties themselves cannot be edited in the administration interface; youcan perform these tasks only with the Admin API.
Access custom collections properties
Storefront and Agent Console developers can access custom properties of the category itemtype with the following Store API and Agent API endpoints:
• getCollection returns a collection by ID.
• listCollections returns a list of collections by a list of IDs.
• listItemTypes returns information about item types by a list of IDs.
• getItemType returns information about an item type by ID.
Chapter 7Create custom properties for collections
7-43
• getPage returns a specific page. For category page responses, custom propertiesare also returned as part of the response.
Keep the following points in mind when accessing custom properties with Store orAgent endpoints:
• If a custom property is specified as internal only (by setting the attributeinternalOnly=true when you create the property), it will not be returned by anyStore endpoints.
• Custom properties appear at the top level of the response.
• Only getCollection returns custom properties for child collections. The requestmust include the parameter expand=childCategories. For example:
GET /ccstore/v1/collections/rootCategory?catalogId=storefrontCatalog&maxLevel=1000&expand=childCategories&fields=childCategories%28items%29
• There is no view model support for custom properties of the category item type.
Add metadata to products and collectionsYou can enter metadata search information including a title, keywords, and adescription for each product and collection in your catalog.
The metadata is then tagged and retrieved as part of a search via a search engine anddisplayed in the results.
This section describes how to add metadata to products and collections. You can alsoadd alt-text and titles to images assigned to products and collections. See Add alt textand titles to images for more information.
To enter metadata for a product or collection:
1. On the Catalog page, open the relevant product or collection for which you wantto enter metadata search information.
2. Open the product or collection’s Metadata tab. By default, the following propertiesare automatically assigned to metadata when a product or collection is created:
• Title Tag: The Name of the product or collection.
• Meta Keywords: The Name and Parent Collection of a product. The Nameand Selected Parent of a collection.
• URL Slug: The Name of the product or collection.
• Meta Description: The Name and Description of the product or collection.
3. To change the current information you must check Edit Manually and enter thetext within each box.To change back to the default alt text, check Edit Manually and click ResetDefault.
4. Enter a Title Tag. This is normally the product or collection title.
5. Enter Meta Keywords. These are used by search engines to find the mostrelevant information when processing a search request. Search engines determinethe relevance of a search request against these keywords.
Chapter 7Add metadata to products and collections
7-44
6. Enter a URL Slug. This is a unique, URL-friendly version of the Name of the product orcollection. A URL slug can contain only lowercase letters (a-z), numbers (1-9), and alimited number of special characters (- _ % ~). Using a unique URL slug ensures that youdo not encounter storefront display issues, such as, 404 errors. See Configure URLpatterns for more informationFor example, for the product named Button Down Shirt, the URL slug could bebutton_down_shirt.
See Understand canonical tags for information on signaling the source, or original, URLof a page to search engines.
7. Enter Meta Description. This description can promote your site to search engine users.
8. Click Save.
Display related productsUse a product’s Related Products tab to select products to display in the Related Productswidget on the Product layout and specify the order in which the related products appear.
Use the Details tab to configure how the products look in the widget, for example, whethernames and prices are displayed for related products. For more information, see Design YourStore Layout.
This section includes the following topics:
• Add and organize related products
• Import and export related products
Add and organize related products
To select and organize related products:
1. On the Catalog page, navigate to the product to which you want to add related products.
2. On the product’s Related Products tab, click Manage Products.
3. Select products to display.To select products, begin by typing or pasting some text in the box. The list of productsthat appears matches letters or numbers that you type, wherever they appear in the assetname or ID, not just at the beginning.
Note: If you select inactive products, the Related Products widget will not display them.For more information about active and inactive products, see Understand the baseproduct type.
4. When you finish adding related products, click Display Products.The Related Products widget will display the products in the order they appear here. Youcan rearrange them by dragging them to new positions.
5. Click Save.
Import and export related products
You can use the Oracle Commerce import process to import and export a product’s fixedrelated products. See Import and Export Catalog Items and Inventory for details about how toimport and export products in Oracle Commerce.
Chapter 7Display related products
7-45

The easiest way to format a file for importing related products for products is to start byexporting a file that you can use as a template for the items you want to add or modify.See Export catalog items for more information about how to export.
When you look at the exported spreadsheet, you can see that the second row displayscolumn headings that contain the internal names of the exported properties. ThefixedRelatedProducts column includes product IDs for the products to display in theRelated Products widget on the Product layout.
Product data begins in the third row and continues for the remainder of thespreadsheet. If an item does not have a value for a property, the corresponding cell isblank. When you import multiple related products, separate each ID with a comma.The order of the IDs in the spreadsheet controls the order of products displayed on theproduct details page.
See Import catalog items and inventory for more information about how to import yourchanges back into the catalog.
Configure AI Recommendations RulesCommerce lets you create complex recommendation strategies in the administrationinterface. You can manage these rules across widgets on different page layouts.
Product recommendations are generated by an AI-powered learning engine.Strategies and global exclusions work in harmony with this engine to provide granularcontrol over the merchandising experience.
• Recommendation strategies are rules you build to customize the kinds of productsthat are recommended to shoppers.
• Global exclusions are rules you build to prevent certain products from ever beingrecommended to shoppers.
Understand recommendations strategies
Commerce product recommendations are generated by an AI-powered learningengine. The engine analyzes each shopper's behavior in real time to recommend themost relevant products at every interaction.
Commerce provides a number of pre-defined strategies that let you restrict displayedrecommendations, for example, to products the shopper has most recently viewed, orproducts that are most frequently bought by other shoppers who have also viewed aproduct that a shopper is currently viewing.
In addition to these pre-built strategies, Commerce lets you create your own strategiesthat provide customized guidance to the recommendations engine. You can usestrategies to restrict the kinds of products that are recommended, creating a morecurated experience for shoppers and providing the flexibility to tailor yourrecommendations plan to match your merchandising goals.
Each custom strategy is made up of one or more recommendation groups. Arecommendation group is a set of conditions that are evaluated together to specify agroup of product recommendations. If a strategy includes multiple recommendationgroups, the Product Recommendations widget will display products returned by eachrecommendation group sequentially, that is, all products returned by the firstrecommendation group, followed by all products returned by the secondrecommendation group, and so on.
Chapter 7Configure AI Recommendations Rules
7-46

If a product is returned by multiple recommendation groups in a strategy, it appears only oncein the Product Recommendations widget. The product’s display position will be determined bythe first recommendation group that returns it.
The following table describes each type of condition you can add to a recommendationgroup.
Condition type Description
Brand The value of the product’s brand property in thecontext of the current product or products beingviewed. If there are multiple products, such as theproducts in a cart or a wish list, products in any ofthe brands can be part of the condition.
Browsed Together Returns recommended products based on themost frequently browsed products by othershoppers associated with the product the shopperis currently viewing.
Collection The condition returns products based on either thesame collection or collections in the context of thecurrent product or products being viewed, or onlyin collections you specify. If multiple collections arerepresented, products in any of the collections canbe recommended. If there are no collections incontext, no restrictions are placed on therecommendations.
A product can be in one or more collections. Formore information, see Organize products incollections.
Manually Related Products Returns recommended products based on theproducts specified as related products for thecurrent product or products being viewed. SeeDisplay related products for more informationabout adding related products to a specificproduct.
Most Recently Viewed Returns products the shopper has viewed.Recommended products are displayed startingfrom the most recently viewed. First-time shopperson the site are offered no productrecommendations.
Price Lets you select a price range of products torecommend.
Price Type Lets you select products from specific price listgroups to recommend.
Purchased Together Uses the context of the product the shopper iscurrently viewing. Recommended products aredisplayed based on the most frequently purchasedproducts by other shoppers associated with theproduct the shopper is currently viewing.
Chapter 7Configure AI Recommendations Rules
7-47
Condition type Description
Top Sellers Restricts recommendations to global top sellers. Ifthe recommendation group contains otherconditions, Top Sellers will be applied after allother rules.
The algorithm for the Top Sellers strategy is basedon products purchased. It generally considers thetop ten percent of recently-purchased productsfrom the product catalog to offer asrecommendations. The strategy does not offerproducts in a sequential order of most purchaseditems and has no time restrictions as to whenitems were purchased. Top Sellers is designed topersonalize items recommended to each uniqueshopper. While a particular product might sellmore frequently than other products, that productmay not be recommended based on a shopper’snavigation of the site.
Understand product context
Product context lets you decide whether a condition for a recommendation group orexclusion rule should be dynamically inferred from the current page. The followingprocedure explains the steps Commerce goes through to provide context forrecommendations conditions when the shopper is viewing pages on your store:
1. If the current page has a brand or collection, it is used for the context of Brand orCollection.
2. Otherwise, if the current page has a product, its brand, parent collections, co-browses, and co-buys are used as the context for Brand, Collections, BrowsedTogether, and Purchased Together conditions.
3. Otherwise, if there are current wish lists, the products in the wish lists are used todefine the context as described in the previous step.
4. Otherwise, if an order has been placed in the current session, the products in theorder are used to define the context as described in step 2. An order is defined asan item that has been purchased during the shopper’s current session. The itemcould have been placed in the cart during a past session.
5. Otherwise, if the shopper has added products to their cart but not purchased them(either in this session or their most recent previous session), the products in thecart are used to define the context as described in step 2.
6. Otherwise, no context is found, so the current condition will not apply.
Display recommendations
Once you have created and published custom recommendations strategies, you cancustomize the Product Recommendations Carousel widget to use specific strategiesfor different locations on your site. This helps you create more specialized productselections appropriate to each shopper's current context. When you customize thewidgets settings on the Design page in the administration interface, you can select anycustom strategies you published, along with the out-of-the-box strategies. For moreinformation, see Display product recommendations.
Chapter 7Configure AI Recommendations Rules
7-48

Create recommendation strategies
To create a recommendation strategy, follow these steps:
1. On the Marketing page, click Strategies under AI Recommendations.
2. Click the New Strategy button.
3. Enter the name, ID, and optional description for the strategy.Strategy Display Name: A name for the strategy that will appear in the list of strategies inthe administration interface. Each global strategy name must be unique. The name canbe up to 50 characters long.
Strategy ID: Commerce automatically creates a unique ID based on the display nameyou entered. You can change the ID while you are creating the strategy, but you cannotchange it once the strategy is saved. An ID can contain only alphanumeric characters ornumbers (a-z, A-Z, 0-9) and must be unique.
Strategy Description: An optional description of the strategy that helps other usersunderstand it. The description can be up to 1,000 characters long.
4. Define the strategy by adding recommendation groups. By default, a blankrecommendation group is already visible and ready for you to add conditions.
5. Click the Add Condition button.
6. Select a value from the Select a condition type list. You can select only one type percondition. For details about each condition type, see the table earlier in this section.
7. If you selected Brand, Collection, Price, or Price Type, you must select an operator thatlinks the property to a value that you will specify in the next step. The operators you seedepend on the condition type you selected.
• For Brand and Collection, you can select is, which matches the rule to the propertyyou will select in the next step or is same as context, which matches the rule to .
• For Price you can select from several numeric operators that match the rule to pricesor price ranges. For example, select is less than if you want the condition to returnall products priced at less than $50.
• For Price Type you can select is, which matches the rule to a single price group, isone of, which matches the rule to more than one price group, or is same as context,which matches the rule to the shopper’s current price group.
8. Select or enter a value for the condition property. For Collection and Price Type,Commerce displays a list for you to choose from. For Brand and Price, you must type in avalue. The rule editor does not validate any text, numeric, or date values you type.
9. To add another condition to the recommendation group, click the Add Condition buttonagain and specify the details for the new condition.If a recommendation group contains more than one condition, it returns products thatmatch all the conditions. Products that match only some of the conditions but not all, arenot returned by the recommendation group.
10. When you are finished adding conditions to the recommendation group, click Save.
11. To add another recommendation group to the strategy, click Add RecommendationGroup.
12. When you are done adding recommendation groups, click Save to save the strategy.
Chapter 7Configure AI Recommendations Rules
7-49
13. You must publish strategies in order for them to take effect on your productionstorefront, though once saved, they are immediately available for preview. See Publish Changes for more information.
Recommendation strategies examples
You could use the AI Recommendations rule builder to create the following samplerecommendations strategies.
• Suppose you want to create a dynamic cross-sell on the Product Detail Page thatfocuses on brand affinity. You could create a strategy with the following threerecommendations groups. Set the maximum number of returned products in eachgroup to four.
– Group 1 includes two conditions: Brand is the same as context and Collectionis not same as context.
– Group 2 includes two conditions: Brand is the same as context and PurchasedTogether.
– Group 3 includes two conditions: Brand is the same as context and BrowsedTogether.
This strategy recommends up to four products that have the same brand butbelong to a different collection, followed by up to four products that are the samebrand and frequently purchased together, followed by the remaining products thatare browsed together (but not necessarily purchased together).
• Suppose you want to recommend an outfit when the shopper is viewing anyapparel item. A custom recommendations strategy can dynamically generate anoutfit recommendation that automatically promotes products from complementarycollections. You could create a strategy with the following four recommendationsgroups. Set the maximum number of returned products in each group to one.
– Group 1 includes two conditions: Collection is Men’s Tops and Collection is notsame as context.
– Group 2 includes two conditions: Collection is Men's Pants and Collection isnot same as context, Number of Products = 1.
– Group 3 includes two conditions: Collection is Men’s Shoes and Collection isnot same as context.
– Group 4 includes two conditions: Collection is Men’s Belts and Collection isnot same as context.
To display these recommendations, create a custom Product Details layout whereyou define the Product Type as Men’s Apparel and Men’s Footwear and place theRecommendations widget on the layout. Customize the widget to use this customstrategy by selecting it from the Strategy dropdown on the widget’s settings.
Now, when the shopper is on any men’s apparel or footwear product details page,they will see recommendations from the complementary collections.
Create global exclusions
Global exclusion rules let you exclude certain products from all recommendationsresults, ensuring they are never recommended to shoppers. You can exclude productsfrom recommendations based on their brand, parent collections, price range, or pricetype. Once you publish a global exclusion, it automatically takes affect on your site.
To select products to exclude from recommendations follow these steps:
Chapter 7Configure AI Recommendations Rules
7-50
1. On the Marketing page, click Global Exclusions under AI Recommendations.
2. Click the New Global Exclusion button.
3. Enter the name, ID, and optional description for the rule.Global Exclusion Display Name: A name for the rule that will appear in the list of globalexclusions in the administration interface. Each global exclusion rule name must beunique. The name can be up to 50 characters long.
Global Exclusion ID: Commerce automatically creates a unique ID for the rule based onthe display name you entered. You can change the ID while you are creating the rule, butyou cannot change it once the rule is saved. An ID can contain only alphanumericcharacters or numbers (a-z, A-Z, 0-9) and must be unique.
Global Exclusion Description: An optional description of the rule that helps other usersunderstand it. The description can be up to 1,000 characters long.
4. Define the exclusion rule.Select a type of property to use from the Select a condition type list. You can select onlyone type per rule:
• Brand lets you select from all the manufacturer values assigned to products in yourcatalog. For more information about the Brand property, see Create and edit producttypes.
• Collection lets you select a collection whose products you want to exclude. You canselect a collection from across all catalogs or from a specific catalog.
• Price lets you select a price range of products to exclude.
• Price Type lets you exclude products from specific price list groups.
Select an operator that links the property to a value that you will specify in the next step.The operators you see depend on the condition type you selected.
• For Brand and Collection, you can select is, which matches the rule to the propertyyou will select in the next step or is same as context, which matches the rule towhatever product the shopper is currently viewing, as well as any products in theshopper’s cart or wish lists.
• For Price you can select from several numeric operators that match the rule to pricesor price ranges. For example, select is less than if you want to exclude all productspriced at less than $50 from recommendations.
• For Price Type you can select is, which matches the rule to a single price group, isone of, which matches the rule to more than one price group, or is same as context,which matches the rule to the shopper’s current price group.
5. Select or enter a value for the condition property. For Collection and Price Type,Commerce displays a list for you to choose from. For Brand and Price, you must type in avalue. The rule editor does not validate any text, numeric, or date values you type.
6. Click the Create button when you are finished with rule.
7. You must publish strategies in order for them to take effect on your production storefront,though once saved, they are immediately available for preview. See Publish Changes formore information.
Global exclusion examples
You could use the AI Recommendations rule builder to create the following global exclusions.
• Never recommend anything from the brand MySample.
Chapter 7Configure AI Recommendations Rules
7-51
In the Global Exclusion Definition, select Brand as the condition, select is as theoperator, then MySample in the text box.
• Never recommend anything in the Health and Wellness collection.In the Global Exclusion Definition, select Collection as the condition, select is asthe operator, and then select Health and Wellness (including catalog context)from the Collection dropdown list.
• Never recommend products that cost less than $25.In the Global Exclusion Definition, select Price as the condition, select less thanas the operator, and then enter 25 in the text box.
• Never recommend products that are on sale.In the Global Exclusion Definition, select Price Type as the condition, select is asthe operator, and then select Sale Price from the dropdown list.
Display product recommendationsCommerce includes a Product Recommendations widget you can use to provideautomated, personalized product recommendations to each shopper. The widget canbe placed in any layout, and the same widget instance can be shared over as manypages as necessary to provide recommendations to your shoppers.
Commerce lets you create complex recommendation strategies and global exclusionsin the administration interface. Product recommendations are generated by an AI-powered learning engine. Strategies and global exclusions work in harmony with thisengine to provide granular control over the merchandising experience. To learn how tocreate strategies that you can use with the Product Recommendations widget, see Configure AI Recommendations Rules.
Note: For information on including recommendations in emails your store sends, see Customize Email Templates.
To display product recommendations:
1. Click the Design icon.
2. From the Layout menu, select the layout in which you want to provide productrecommendations.
3. Clone the layout to preserve the original layout for future use as a template. Formore information, see Design Your Store Layout.
4. Open the layout in grid view. Create any new rows as needed to accommodate thewidget.
5. From Components, drag and drop the Product Recommendations widget intothe layout in the location you want the recommendations to appear. You can createa new widget instance or use an existing instance.
6. Making changes to widget settings is optional. Either accept the widget defaultsettings or click the Settings icon located on the widget instance to edit the widgetsettings.
• Setting changes to Recommendations Title affects font styles and displaytext for the widget. For information on changing the font, see Customize YourStore’s Design Theme.
• The Recommendations carousel is where the recommendations aredisplayed, affected by the number of recommendations to show, the strategy,and the restriction. Additional conditions may affect the appearance of the
Chapter 7Display product recommendations
7-52

carousel. For example, a smart phone screen may display fewer recommendedproducts by virtue of its available screen size.
7. On the widget settings dialog, click Settings to make changes to maximum number ofproduct recommendations, strategies, restrictions, and collection(s). Changes to widgetsettings are optional.
• Enter the maximum number of recommendations to appear in the widget instance.The default is 12.
While the default is 12, the number of recommendations displayed to your shoppers isbased on strategies and restrictions as well as your catalog configuration. Screen widthalso influences the number of recommendations displayed in the widget instance at onetime.
As a best practice, choose a number of recommendations so that all recommendationscan be viewed in the carousel with one or two clicks of the Next button.
• Select the strategy, restriction, or collection(s) associated with the displayedrecommendations. For details about built-in and custom strategies, see Configure AIRecommendations Rules
• Click Save.
The following table describes the restrictions you can apply to displayed recommendations:
Manage personal data in product recommendations
The Product Recommendations widget collects personal data as defined by the EU GeneralData Protection Regulation (GDPR). However, if you have configured your site to requestcookie consent, and the shopper has declined to provide that consent, the widget does notcapture or use personal data for the visit. Specifically, the Product Recommendations widgetchecks for the existence of the GDPRCookieP13nConsentGranted cookie. If the cookie isnot present on the shopper’s browser, personal data is not collected. Cross-sessionrecommendations are not available for the shopper, and the Most Recently Viewed strategy isnot maintained for him or her. The shopper is thus treated as a new, unknown shopper foreach session.
For detailed information on how to configure your site to request consent, refer to Manage theUse of Personal Data.
Add images to productsUse a product’s Media tab to upload and arrange product images that will appear on yourstore.
You can upload JPG, PNG, and GIF files. Commerce automatically sizes your images fordisplay on different devices, such as laptops, tablets, and mobile phones.
Note: This section describes how to upload images to individual products. See ManageMedia for Your Store for information about using the media library, including information aboutuploading a ZIP file of images and other types of media that are automatically assigned toproducts and collections in your catalog.
This section includes the following topics:
• Add and assign images
• Manage images for variant values
• Add alt text and titles to images
Chapter 7Add images to products
7-53

• Reorder images
• Remove images
Add and assign images
If you upload multiple images, the first image displayed on the Media tab is used asthe primary image for the product. To see how images will be displayed on your store,go to the Design page and select the Product layout. For more information aboutlayouts, see Design Your Store Layout.
To add an image to a product:
1. On the Catalog page, navigate to the product to which you want to add images.
2. On the product’s Media tab, click Add Images and select Upload New.
3. Select an image to upload.You can upload only one image at a time. If you select a file with the same nameas a file you already uploaded, the new file replaces the existing one.
4. Click Save.
To assign an image to a product from the media library:
1. On the Catalog page, open the product to which you want to add images.
2. On the product’s Media tab, click Add Images and select Media Library.
3. Select images to assign to the product and click Add.For details about selecting, sorting, and searching for images in the media library,see Manage Media for Your Store .
4. Click Save.
Manage images for variant values
If you specified that product images should be displayed at the variant property valuelevel, you can assign a separate main image to the product for each value. Forexample, you can assign a separate image to each color.
To manage images for variant values:
1. On the Catalog page, navigate to the product whose images you want to manage.
2. On the product’s Media tab, select a variant value from the drop down list.By default, Always Shown is selected. This means that the same image isdisplayed for each of the values.
Note: If you uploaded a ZIP file of images that were automatically assigned to theproduct, those images are assigned to Always Shown. See Automatically assignimages to products and collections for more information.
3. To add an image for the selected value, click Add Images and select eitherUpload New or Media Library.
4. Select an image to upload or assign.You can assign more than one image to each value.
5. Repeat steps 2 through 4 for each value that requires images.
6. Click Save.
Chapter 7Add images to products
7-54
Add alt text and titles to images
Alt text and titles provide descriptions of images assigned to products and collections.
• Search engines index alt text and use it to return images for user queries. Alt text is alsoused when shoppers cannot view images on the web. For example, a blind shopper’sscreen reader reads an image’s alt text when it reaches the image on a category page onyour store.
• A title is used as a tooltip, or hover text, when a shopper points to the image.
By default, Oracle Commerce uses a product or collection’s name for both the alt text and titletext for all images assigned to that product or collection. You can edit the default alt text andtitle text on the product or collection’s Media tab.
Note: You can also add keywords, titles, and descriptions to products and collections. See Add metadata to products and collections for more information.
To edit an image’s alt text and title:
1. On the Catalog page, open the product or collection whose image you want to edit. Clickthe Media tab.
2. Hover over the image and click the Edit current image icon when it appears. A newscreen displays containing the image properties.
3. To change the current Alt Text you must check Edit Manually and enter the new text inthe text box.To change back to the default alt text, check Edit Manually and click Reset Default.
4. To change the current Title you must check Edit Manually and enter the new one in thetext box.To change back to the default title, check Edit Manually and click Reset Default.
5. Click Save.
Reorder images
The first image displayed on a product’s Media tab is used as the primary image for theproduct on your store. The remaining images are displayed on the product details page in theorder they appear on the Media tab.
To reorder images:
1. On the Catalog page, open the product whose images you want to reorder. Click theMedia tab.
2. To make an image the primary image for the product, do either of the following:
• Drag the image to beginning of the list.
• Hover over the image and click the star icon when it appears.
Remove images
When you remove an image from a product, you cannot access it again with the Commercetools. If you remove the primary image, the next image on the Media tab becomes theprimary image. If you remove all images from a product, a placeholder is displayed on yourstore.
To remove an image from a product:
Chapter 7Add images to products
7-55
1. On the Catalog page, navigate to the product whose images you want to remove.
2. On the product’s Media tab, select an image click the X icon when it appears.Tip: To remove multiple images, select all the images you want to remove andthen click the X icon on any of them.
3. Confirm that you want to remove the selected images.
Create gift cardsThis section describes how to add gift cards to your catalog.
You create a gift card just as you do any other product in your catalog. This release ofCommerce does not support electronic gift cards. You can sell only physical gift cardsthat are shipped to shoppers. See Integrate with a Gift Card Payment Gateway forinformation about integrating with a gift card payment provider to enable shoppers touse gift cards to make purchases on your store.
To add gift cards to your catalog:
1. (Optional) Create a collection for gift cards. You can also add your gift cards to anyexisting collection in your catalog.
2. If your store sells different styles of gift cards, create a new product type for giftcards. You will use the product type to add variant properties for the different typesof cards or envelopes you want to offer. For example, the variant property CardStyle could have the values Classic, Happy Birthday, and Congratulations.If your store sells only one style of gift card, you do not have to create a producttype. Simply use the base product type.
For more information, see Create and edit product types.
3. Create a new product with the Gift Card or base product type.The List Price property specifies the gift card’s denomination. You must create aseparate product for each denomination. For example, if your store sells gift cardsin $25, $50, $75, and $100 denominations, you must create four gift card products.
For more information, see Create and work with products.
4. Create SKUs for each gift card. For more information, see Create and work withSKUs.
5. Add images for the gift cards. For more information, see Add images to products.
6. (Optional) If your store uses a branded name for your gift cards, you can replacethe phrase “gift card” with that name in places like your checkout page. For moreinformation, see Customize your web store's text.
Manage inventoryBy default, Commerce maintains one set of inventory values for each SKU.
This section describes how to view and update the inventory and stock threshold foreach product and SKU in your catalogs. Additionally, you can use the CommerceAdmin API to perform the following inventory tasks:
• Manage preorder and backorder counts and thresholds. See Manage Inventory forPreorders and Backorders for more information.
Chapter 7Create gift cards
7-56

• Maintain inventory for specific locations, such as stores and warehouses. See ManageMultiple Inventory Locations for more information.
Important: The inventory list includes both published and unpublished products. You do nothave to publish inventory changes. Changes you make to inventory for published productsare immediately visible on your store. Changes you make to inventory for new (unpublished)products will appear on your store with the rest of the product information the next time youpublish changes.
To add or update inventory:
1. On the Catalog page, click Manage Catalogs, then select Inventory.The Inventory page is empty until you search for products or SKUs.
2. In the search box, type or paste full or partial product names, SKU IDs, or both.
• Separate multiple entries with commas.
• You can mix names and IDs in the same search.
• The search will not start if you enter just a comma, even if your catalog includesproducts whose names include commas.
• There is a limit of 1000 characters and 200 search terms, whichever comes first. Ifthere are more than 200 search terms, all terms past 200 are ignored. If there areduplicate IDs, any ID past the first is ignored.
Commerce displays the following inventory details for each product or SKU:
• Inventory count: The number of items that are physically in stock.
• Stock threshold: A value you specify that indicates when an item should display asout-of-stock on your storefront. An item is considered out-of-stock when the inventorycount is less than or equal to the stock threshold value.
• Status: Icons that specify if a SKU or product is out-of-stock or if a product includessome SKUs that are out-of-stock.
3. Double-click the SKU's inventory count and enter a new value.Press Enter to save the new value and move to the inventory count of the next SKU inthe list. You can also click somewhere else on the page to save the new value withoutmoving to the next SKU.
4. (Optional) Double-click the SKU's stock threshold and enter a new value.Press Enter to save the new value and move to the stock threshold of the next SKU inthe list. You can also click somewhere else on the page to save the new value withoutmoving to the next SKU.
Note: You can quickly make a number of inventory changes at once by importing them. Formore information, see Import and Export Catalog Items and Inventory.
Customize inventory status messaging
You can view and update the inventory status message that displays to your shoppers. Themessaging displayed to shoppers is configurable , as follows:
1. Open the Design page and click the Layout tab.
2. Open the Product layout and click the Grid View option.
3. Locate the Product Details widget and open the Settings icon, visible on the top rightcorner of each widget.
4. Click the Layout option to display the elements and select Inventory Status.
Chapter 7Manage inventory
7-57

You can now see the Product Details widget inventory status tabs, allowing youto customize the messaging displayed for each of the different statuses:
• In Stock
• Out of Stock
• PreOrder
• BackOrder
5. Add your message to the relevant inventory status.
6. Customize the message settings, and preview.
7. Click Done to save your configurations, and Save to exit the widget settings.
Preview your changesBefore you publish any changes, preview them so you can see how they will appearon your live store.
Nothing you do in a preview session affects your production storefront.
To launch a preview session at any time, click the Preview button. The previewsession launches in a new browser tab or window. If your instance supports more thanone store, select the store to preview from the drop-down list at the top of the previewwindow. To end the preview session, simply close that tab or window.
You can apply the following settings to a preview session:
• Audience shows how the store looks to specific groups of shoppers.
• Account shows how an account-based store looks to shoppers associated with aspecific account.
• Date shows how the store looks at a specified future date and time.
• Viewport shows how the store’s pages look on different devices, such as desktopsand mobile phones.
Preview a store by audience
Audiences help you target content to certain groups of shoppers. Previewing a storeas a member of an audience shows how the store looks to a shopper who is amember of the audience. See Define Audiences to learn how to create and useaudiences.
To preview a store as the member of an audience:
1. Click the Preview button to launch a new preview session in a new tab or window.
2. Click the Site Preview Settings icon.
3. On the Display tab, click the Audience box and select an audience from the list.You can filter the list by typing or pasting some text in the Audience box.
4. You can add more than one audience, but you can select only one at a time.
5. Click Apply.
If you select a disabled audience, Commerce treats it as enabled during the previewsession.
Chapter 7Preview your changes
7-58

If you select more than one audience, Commerce displays the content based on the priorityof each audience assigned to a content variation slot. See Customize slotsfor moreinformation.
Preview a store by viewport
Previewing a store by viewport lets you see how the store’s pages look on different devices,such as mobile phones, tablets, and laptops.
To preview a store by viewport:
1. Click the Preview button to launch a new preview session in a new tab or window.
2. Click the Site Preview Settings icon.
3. On the Display tab, select a viewport breakpoint to preview.XS (extra small resolutions)
SM: (small resolutions)
MD: (medium resolutions)
LG: (large resolutions)
4. Click Apply.
Preview a store by date and time
Previewing a store by date and time lets you see how the store’s pages look if your changeswere published at a future date and time. The date and time filter allow you to view thefollowing types of content:
• Promotions and promotional content scheduled for a future date and time.
• Widgets configured in slots against a future date and time.
Commerce evaluates preview dates and times based on the date and time on the server.
To preview a store by date and time:
1. Click the Preview button to launch a new preview session in a new tab or window.
2. Click the Site Preview Settings icon.
3. In the Date field, click the calendar icon and select a date. Click the clock icon to set thehour, minute, and AM/PM portions of the time. .
4. Click Apply.
Chapter 7Preview your changes
7-59

8Manage SEO
Search Engine Optimization (SEO) is a term used to describe a variety of techniques formaking your store’s pages more accessible to web spiders (also known as web crawlers orrobots) used by Internet search engines to crawl the Web to gather pages for indexing.
The goal of SEO is to increase the ranking of the indexed pages in search results, and tomake sure shoppers view the pages you want them to see when they search. The topics inthis section describe several SEO techniques and the built-in tools that Commerce providesfor implementing them.
Configure URL patternsIn Commerce, you can customize the URL structure of your store’s Collection and Productpages so they mirror your SEO strategies.
This section includes the following topics:
• Plan URL patterns
• Understand default URL patterns
• Customize URL patterns
Plan URL patterns
Keep the following points in mind as you plan your URL patterns:
• It is best to customize URL patterns when you are planning and testing your store. If youchange a URL pattern on your production storefront, you must specify a URL redirect forthat pattern. Otherwise, older bookmarked URLs will display an error page instead of thepages you intended.
• Each URL pattern must be a valid URL for the page type (Collection or Product) andmust contain only components that are valid for the page type. For example, if youinclude the variable {brand} in the Collection pattern, you will not be able to save yourchanges because brand is not a collection property.
• Each URL pattern uniquely identifies each product and collection via id numbers, or, youcan use the URL slug to enter descriptive terms. For example, /product/{=seoUrlSlugDerived}
– descriptive URLs for categories may not be required as, by definition, categoriesshould already have distinctive unique names.
– descriptive URLs for products may be necessary as products can have similar names(slugs) and could, therefore, benefit store maintenance.
• Each URL pattern can contain up to 254 characters and cannot contain spaces or specialcharacters except – (dash).
• It is best to plan URL patterns bearing in mind that each URL must be unique. This isnecessary in order to avoid storefront display issues, such as, 404 errors, or the wrongcollection being displayed.
8-1

Keep the following points in mind as you plan your URL patterns and your Commerceinstance supports more than one language:
• Commerce automatically creates URL patterns for each supported language.Commerce uses your catalog translations for the variables values, but you mustmanually translate any words that are not variables. For example, in the defaultproduct page URL pattern, you must manually translate the word product. Formore information, see Localize Your Store.
• Although it is possible to configure a different product and collection page URLpattern for each language supported by your site, it is recommended to maintainURL pattern consistency between each language. This allows you to translate anyfixed parts you many have in your URL patterns for each language.
• There is a language prefix (a language subdirectory) that is automatically includedfor each additional language supported by your site. This subdirectory is notincluded in the default language URL structure for a multi-lingual site. Forexample, if you support 3 languages for your site: English, Spanish, and French,with English being the default language, your URL structures will be as follows:
English URLs: www.example.com/my-url-patterns
Spanish URLs: www.example.com/es/my-url-patterns
French URLs: www.example.com/fr/my-url-patterns
Understand default URL patterns
By default, Commerce uses the following URL patterns for Category and Productpages:
• Collection page: /{seoTitleDerived}/category/{id} For example, /cameras-and-camcorders/category/cameracat.
• Product page: /{seoTitleDerived}/product/{id} For example, /striped-button-down/product/prod10001.
Understand URL slug patterns
Clicking the Build URL Slugs button generates a URL mapping table, allowing theslug value to be used as a unique url pattern identifier instead of the {id} property.
This enables you to define the URL patterns with a descriptive slug value, prefixedwith ‘=’. The ‘=‘ symbol is used with the seoUrlSlugDerived pattern only and ensuresthat the specified products and collections are returned from the server, as highlightedbelow:
• Collection page: /category/{=seoUrlSlugDerived}, for example /category/cameras-and-camcorders.
• Product page: /product/{=seoUrlSlugDerived}, for example, /product/samsung-f90bn-hd-flash-memory-camcorder.
Customize URL patterns
To customize URL patterns for your store:
1. Click the Settings icon.
2. Select Setup and then click the URL Patterns tab.
Chapter 8Configure URL patterns
8-2

3. If your Commerce instance runs multiple sites, pick a site to configure from the list at thetop of the settings list. See Run Multiple Stores from One Commerce Instance for moreinformation.
4. Click the Collection Page URL.
5. Type the new pattern and click the Save icon when you are done. Note: URL slug valuesmust be unique, if not, a warning message is displayed indicating that this must be thecase.Variables must be inside {} (curly braces, for example, {id} or {seoTitleDerived}). For a listof variables for Collection Page URLs and Product Page URLs, see the tables that followthis procedure.
6. (Optional) Check the Auto Redirect box so that shoppers who have bookmarked olderURLs are automatically redirected to the new URL. Auto Redirect is selected by defaultand will only redirect from the default URLs, not from previous patterns.
7. If you want to use URL slugs rather than IDs in your URLs, you will need to click theBuild URL Slugs button.
8. (Optional) You can simplify your URL slugs by clicking the Build URL Slugs button. Youwill notice that the most recent date and time the URL slug table was built is displayed.Simplifying URL slugs removes any special characters, replaces spaces with hyphens,and simplifies into lowercase. Once the simplified URL slugs have been built, you willneed to manually update the URL pattern to use the new URL slug. For example, "/product/{=seoUrlSlugDerived}".Note: If a warning displays informing you that URL slugsare not unique, then a uniqueness check can be performed in order to fix this issue. See Perform uniqueness checks for URL patterns for details.
9. Click the Product Page URL and repeat steps 4 – 6 to update the URL pattern for theproduct page.
10. Check if the URL pattern was changed by clicking through your store. You may also wishto check that redirected URLs work correctly.
The following table describes the available properties for Collection Page URL patterns. Eachproperty displays the value of the corresponding collection property. For more informationabout collection properties, see Organize products in collections.
Collection Page URL Variable Description
displayName The collection’s Name property. (A short,descriptive name that identifies the collection.)
Id The collection’s ID property. (The ID that identifiesthe collection internally.)
Description* The collection’s Description property. (A shortdescription to display with the collection.)
parentCategory The display name of the collection’s currentparent.
seoDescriptionDerived* The collection’s Meta Description property. See Add metadata to products and collections for moreinformation.
seoTitleDerived* The collection’s Title Tag property. See Addmetadata to products and collections for moreinformation.
seoUrlSlugDerived The collection’s URL Slug property. See Addmetadata to products and collections for moreinformation.
Chapter 8Configure URL patterns
8-3
* These variables should not be used as queryable elements in URL patterns (that is,they are not included in Build URL Slugs).
The following table describes the available properties for Product Page URL patterns.Each variable displays the value of the corresponding product property. For moreinformation about product properties, see Understand the base product type.
Product Page URL Variable Description
displayName The product’s Name property. (A short,descriptive name that identifies the product.)
Id The product’s ID property. (The ID thatidentifies the product internally.)
Description* The product’s Description property. (A shortdescription to display with the product.)
parentCategory The display name of the product’s currentparent collection.
Brand The name of the manufacturer.
Type The product type. If the product was createdwith the Base product type, this value is notdisplayed. See Create and edit product typesfor more information.
seoDescriptionDerived* The product’s Meta Description property. See Add metadata to products and collections formore information.
seoTitleDerived* The product’s Title Tag property. See Addmetadata to products and collections for moreinformation.
seoUrlSlugDerived The product’s URL Slug property. See Addmetadata to products and collections for moreinformation.
* These variables should not be used as the elements in URL patterns.
Perform uniqueness checks for URL patterns
The uniqueness of URL patterns plays a significant role in ensuring your site does notencounter storefront display issues, such as 404 errors or the wrong collection beingdisplayed. Therefore, you must ensure the URL patterns used produce unique URLsfor each product and category.
It is worth noting that the uniqueness check for URL patterns is required only whenyou have clicked the Build URL Slugs button and you are using {=seoUrlSlugDerived}in your URL pattern.
You can use the Catalog export file to check that categories and/or products do nothave a shared URL slug value. To do so:
1. Go to Catalog and click the Export button to export the Catalog data.
2. Select the item you wish to export and click Export. This exports the data in theform of an Excel spreadsheet.
3. Open the Excel data.
4. Scroll to the seoUrlslugs column and sort alphabetically.The seoUrlslugs column may not contain any data; this happens only when URLslugs have already been built.
Chapter 8Configure URL patterns
8-4

5. Identify instances that are identical, and do one of the following:Either
6. Edit the values for the duplicated seoUrlslugs within Excel, and click Save. You mustthen click Import, choose the edited file, and click Upload File. Click the Validate button toconfirm.Or
7. On the Catalog page, open the product with the duplicated URL and go to the Metadatatab. To change the current information, check Edit Manually and enter the text withineach box. You can change back to the default alt text by checking Edit Manually andclicking Reset Default.
8. Click Save.
Note: The uniqueness check procedure is automatically performed when the Build URLbutton is clicked, producing a list of duplicates via the API response. However, you cancontinue to perform the above procedure as required.
Customize SEO tagsCommerce provides the option to modify meta tag patterns, or customize the meta tags onany static page. Meta tags are placed within the code of your web store pages and provideadditional information to the search engine. They control how, and suggest what, results getdisplayed in the search results.
Web search engines partly base their rankings of pages on the words that appear in certainHTML tags, particularly <meta> tags and the <title> tag.
A common SEO technique is to list key search terms in those tags in order to raise theranking of the pages for those terms. While you should avoid “keyword stuffing” – that is,overloading tags with content and keywords that are not helpful for shoppers, especiallykeywords that have nothing to do with the content of your store – you can customize thesetags.
This section includes the following topics:
• Tag store pages
• Customize URL slugs
• Tag metadata for images
• Add Open Graph tags to product and wish list pages
Tag store pages
Meta title and meta description optimization play a vital role in SEO as both elements aredisplayed in the search results. The meta title tag is taken into consideration in the rankingprocess. The meta description is used by Google in Search Engine Results Pages (SERPs)snippets, and may encourage users to click on your page, thereby potentially impacting yourclick-through rate.
Commerce automatically adds <title>, <meta name="keywords">, and <metaname="description"> tags to the headers of several types of pages on your store.
For each product and collection page in your store, Commerce sets the default values ofSEO tags to the following:
• <title> tag: The value of the Name property of the product or collection.
Chapter 8Customize SEO tags
8-5

• <meta name="keywords"> tag: The values of the Name and Parent Collectionproperties of a product. The values of the Name and Selected Parent properties ofa collection.
• <meta name="description"> tag: The values of the Name and Descriptionproperties of the product or collection.
You can customize the metadata for these tags when you edit a product or collectionon the Catalog page in the administration interface. To learn how to customize themetadata that Commerce automatically turns into tags, see Add metadata to productsand collections.
For content pages, such as the home page and article pages on your store,Commerce sets the default values of SEO tags to the following:
• <title> tag: The value of the Site Name property.
• <meta name="keywords"> tag: By default, there is no metadata in this tag.
• <meta name="description"> tag: By default, there is no metadata in this tag.
You can customize the metadata for these tags when you edit a layout on the Designpage in the administration interface.
Customize URL slugs
A URL slug is the SEO-friendly, human-readable part of product and collection pageURLs. Commerce automatically creates a URL slug for each product and collectionpage that is set to the value of the Name property for the product or collection.
You can customize the URL slug when you edit a product or collection on the Catalogpage in the administration interface. For example, you could edit the slug to excludespecial characters that can cause problems for robots that index your pages, and re-test to see if the problems reoccur. To learn how to customize a URL slug, see Addmetadata to products and collections.
Tag metadata for images
An alt attribute attached to an image file helps search engines understand what theimage shows, and rank it in the image search. Images can deliver a significant part ofsite traffic so it is worthwhile to use descriptive:
• file names - rename the file before uploading to the Commerce, for example, red-bag.jpg is better than 3847539.jpg.
• alt attribute - a few words describing what the image presents. Alts and titleattributes can be customized via a bulk CSV upload.
Commerce automatically adds alt text and title attributes to the <img> tag for eachimage on a product or collection page on your store.
• Search engines index alt text and use it to return images for user queries. Alt textis also used when shoppers cannot view images on the web. For example, a blindshopper’s screen reader reads an image’s alt text when it reaches the image on acategory page on your store.
• A title is used as a tooltip, or hover text, when a shopper points to the image.
By default, both attributes are set to the value of the Name property for the product orcollection. You can customize the alt text and title when you edit a product or collectionon the Catalog page in the administration interface. See Add alt text and titles toimages for more information.
Chapter 8Customize SEO tags
8-6
Add Open Graph tags to product and wish list pages
The Product Social Meta Tags widget automatically adds Open Graph (OG) protocol metatags to product pages to control the content displayed when a page is shared on Facebook.To learn how to customize the Product Social Meta Tags widget, see Share using email,Facebook, Pinterest, or Twitter and Product Social Meta Tags.
You can add custom tags to the header of any page by creating them in the Additional MetaTags section of the page layout. To learn how to customize metadata for page tags, see Design Your Store Layout.
Manage SEO contentCommerce enables you to manage the SEO content within your store by providingconfigurable title and meta descriptions, headings, category and product descriptions,accessible content, and product variants.
Generate title/meta description
Commerce provides auto generated title and meta descriptions for the display name, brandname, and body content of your store. You can configure patterns based on default or customfields for each page type, with each static page displaying a preview of how your pagesnippet will look in search results.
Duplication of SEO tags, where the same title or meta tag value is propagated across pagesof a given type, should be avoided. It is good practice to customize your homepage title andmeta description as title tags are taken into account in organic rankings. Whilst metadescriptions suggest to Google what should be displayed in an organic snippet. To optimizeyour meta descriptions you should highlight product features for a higher click through rate.
Headings
Commerce supports unique heading tags (H1-H6) on each page type. The heading tagdefault settings are:
• <h1> - product/category name or page title
• <h2> - your product or category description field value
• <h3> - inside the main unique body content; not to be used for repetitive site-widewidgets
• <h4> - <h6> tags are used in the remaining site-wide page elements (such as reviews,similar products, etc.)
When planning heading tags for your Commerce site, keep in mind the following points:
• place primary keywords inside H1 headings, secondary keywords are allocated in H2headings.
• H1-H2 tags with the highest importance should be unique. Therefore, it is advisable tomake key headings different from the page title. In particular, H1-H2 tags should beplanned out for the homepage, product, category, and static article pages.
• customize the H1-H6 placements directly within in the widget source code.
• avoid constraining heading placements with CSS styling.
• ensure heading tags do not make any changes in page layouts.
Chapter 8Manage SEO content
8-7
Category/product descriptions
Each category or single product page should have a unique description as it isrecommended to tailor your site copy without duplication from the product details. Forexample, category descriptions can be placed at the bottom of the page to achieveusability on mobile and for the benefit of SEO.
Content accessible to web crawlers
To aid accessibility on mobile devices, ensure your most relevant content is instantlyvisible once a user lands on a page. Copy hidden under a “see more” link, or beneathtabs, must be present in the prerendered version of the page.
To view the DOM of a prerendered page:
1. Open Chrome Developer Tools and navigate to the Network tab.
2. Switch the User-Agent to Googlebot and reload the page.
3. Click on the Elements tab. You will see the prerendered version of DOM. Note: Ifyou use onClick or onScroll events to load additional content on the page, it willnot be included in the prerendered version of DOM.
4. Search the DOM to check if the content has loaded. Note: If you use video orimages, it is recommended to always provide captions, ALT/TITLE attributes andtranscriptions for video content.
Product variants
Multiple variants of the same product should be published under one URL page toavoid duplicate content issues. This is the case when there is little that differentiatesthe product - such as color, size, pattern, etc. It is also recommended to use dropdowns and selectors to help shoppers pick their product features on a single productpage. Sizes are most often implemented as a drop down with a URL that does notchange, or with a parameter added to create a URL canonicalized to the primaryproduct URL.
For instances when a product type may be perceived as two different items, productscan be submitted as separate indexable URLs, especially if a shopper is more likely touse the variation of the product in their searches. For example, a product such as aneyeshadow with two unique variant names would be two different items. In this case,each variant = unique indexable URL. You may want to consider the number ofpotentially duplicate product variants that can result from adding separate indexableURLs for each variant.
Understand canonical tagsEach of your web store pages has a canonical link (or tag) embedded within the headsection code. This link signals the source, or original, URL of a page to searchengines.
Use canonical links
When a given page on your web store can be accessed via several URLs, then thecanonical link indicates to search engines which version of that page is the originalversion. This is also the case when there are multiple pages with different URLscontaining only slight content variations.
Chapter 8Understand canonical tags
8-8
The use of canonical links within your web store pages improves search engine rankings assearch engines use them to consolidate links to duplicate, or similar, content. This meansthey assign a higher ranking value to those pages marked as the source URL.
An example of how this may look on your site is outlined below.
Say a robot lands on the following link:
http://www.mystore.com/shoes/category/mens_shoes
In the <head>, this page might include the canonical URL
<html><head><link rel="canonical" href="http://www.mystore.com/shoes/category/mens_shoes">
If a robot follows a link somewhere that lands the same page, but with a different address,such as:
http://www.mystore.com/footwear/category/mens_shoes
The canonical URL would point to the first category.
<html> <head>
<link rel="canonical" href="http://www.mystore.com/shoes/category/mens_shoes">
Use canonical and pagination tags
Commerce provides two different pagination layouts: numeric (default), or rel="next" andrel="prev" links.
For the first page in a sequence on the numeric pagination layout, you will see a normalrequest for the category page and a request for page zero of the sequence. Zero should beused to display the first batch of content on the product listing pages. All canonical tags onpaginated pages in a sequence should be self-referential, so the URLs might look likewww.example.com/category/c1234, www.example.com/category/cshoes/2,www.example.com/category/c1234/3, and so on. The rel=canonical attribute for “/1”will point to the page zero category page URL.
If the page type is ‘Article’ then a non-parameterized self-reference is added.
Each shopping and article page contains a <link> element with the attributerel="canonical". If the page type is:
• ‘Home’ then the canonical attribute points to https://www.hostname.domain.
• ‘Product’, then a self-reference is added to the non-parameterized version of that productdetail page.
• ‘Collection’, then canonical elements are added based on whether or not the listingincludes pagination, as described earlier: page zero, page /2, page /3, and so on.
The pagination layout with the HTML attributes rel="next" and rel="prev" indicate tosearch engines that the relationship between individual URLs should follow a logical
Chapter 8Understand canonical tags
8-9
sequence. These are automatically added when there is more than one pagedisplaying items from one Collection.
If there is a previous page in the sequence, you will see the rel="prev" elementreferring to the previous page.
If there is a next page in the sequence, you will see the rel="next" element referringto the next page.
Therefore, aside from page “zero” and the last page in a given sequence, all in-between compound pages will contain both rel=”prev” and rel=”next”.
Making changes to your pagination configurations can result in some of thesubsequent URLs being inaccessible to search engines. For example, you may wantto use an infinite scroll to load additional items in a Collection, however, search enginecrawlers do not scroll so everything that appears after an event of scrolling will not bediscovered by the crawler. Therefore, you should not remove your pagination linksfrom mobile views, and prior to your site launch you should always verify they work.The numeric pagination layout provides optimal SEO for all store types, whereas therel="next" and rel="prev" links work best where there are 1 or 2 paginated pages.
Use canonical and language tags
When at least one additional storefront language exists, then the 'hreflang' tag isadded to all pages. Regardless of whether a multi-lingual store uses directories orsubdomains, 'hreflang' annotations must be used as these signal the relationshipbetween multi-lingual sites. Canonical tags across different language sites shouldalways be self-canonical.
Utilize widgets for SEOYou can use several of the widgets within Commerce's Design page to facilitate SEO.
This section includes the following topics:
• Customize the Page Not Found widget
• Utilize the Pop-up Stack widget
• Optimize the Breadcrumbs widget
• Optimize widgets on mobile screens
• Understand meta robot tags in widgets
Customize the Page Not Found widget
Web sites display Error 404 pages when a page cannot be found on the server, forexample, if a shopper tries to access your store with a bookmarked URL for a productyour store no longer carries.
Commerce uses the Page Not Found widget to display a message to the shopper thatthe page they searched for has not been found. (This widget is available for the Errorlayout.) You can benefit from adding links to other category pages within the message,for example, include deep links to the most popular collections.
Note: There is a unique URL for each of the page layouts, providing a direct link to theindividual layout previews without the need to navigate from the Layout tab.
Chapter 8Utilize widgets for SEO
8-10

Customizing the Page Not Found widget and Error layout can help reduce site abandonmentwhen shoppers reach your error page. Make sure the page reflects your store’s branding andincludes links to other pages, such as bestselling products (see Display productrecommendations for more information), the store’s home page, or important categories.
To learn how to customize layouts and widgets, see Customize your store layouts.
Utilize the Pop-up Stack widget
The Pop-up Stack widget’s modal windows appear when a user interacts with your site.Commerce's platform prevents pop-up messages or loaders from being included in theprerenders, consequently these are not shown to Googlebot or other web crawlers.
You should consider the appearance of pop-up windows on user interaction (events likeclicking or scrolling) and their potential impact on decreasing the bounce rate and userfrustration. Test your pop-up widgets and ensure:
• multiple modal windows are not triggered at the same time.
• modal windows can be easily dismissed.
• the visibility of key body content on the landing pages is not obscured.
Optimize the Breadcrumbs widget
The Breadcrumbs widget is available for category and product pages, and can also beenabled for static pages. Breadcrumb navigation reflects the dependencies between pagesand helps to better understand the structure of those pages, usually containing links.
Breadcrumbs should always be visible for mobile view. To improve usability, they can bemoved to the bottom of the page, beneath the product/category descriptions. It is advisable totest breadcrumbs on various tablet and mobile resolutions and decide which placementworks best for your site.
Optimize widgets on mobile screens
As mobile screens limit the ability for all of the page widgets to be visible, you should ensurethe following elements (widgets) are always present on smaller resolutions:
• deep menu links (for example, via drop down menus) - shoppers must be able to drilldown through the category hierarchy tree
• breadcrumbs - can be allocated above/below product listings
• pagination links - infinite scroll can be added on top of numeric links to compound pagesin a sequence
• page heading
• category descriptions
• product descriptions
Note: Commerce generates HTML prerenders as responsive. The same snapshot code isserved to both Googlebot mobile and desktop. Mobile-first indexing means that Googlebotmobile will be decisive in organic rankings. You should be aware that although the elementswill be accessible for crawling for Googlebot mobile, parity between crucial page elementsbeing rendered on both mobile and desktop must be assured.
Chapter 8Utilize widgets for SEO
8-11
Understand meta robot tags in widgets
Several widget types contain a default meta robot 'noindex' tag which prevents themfrom being indexed, but are still accessible to web crawlers. Content pages, such aswish lists, are set to 'noindex'. It is not recommended to change the directives forthose subdirectories. If a page is set to 'noindex' that page will no longer be availablein the search results.
You can choose between meta robots 'index,follow' and 'noindex,follow' on aper page basis, as well as revoke the default 'noindex' on a directory level.
Note: Unlike canonical tags, which provide suggestions only, a meta robots tag is adirective that is always followed by search engines.
Understand SEO snapshotsSEO generates static snapshots every 24 hours or whenever changes are published.These snapshots provide a prerendered copy of a storefront page. However, asCommerce does not have control over how often a crawl happens, search engineresults are not guaranteed to reflect the latest changes.
All key SEO settings from your client side rendered store are mirrored when OCCscripts generate HTML snapshots of your site, so you can be sure that signals sent tosearch engines are consistent. The default setting ensures prerendered snapshots areserved to Googlebot and other search engine bots. However, you can modify yourpreferences and decide whether JavaScript client side rendered, or HTML, snapshotsshould be served to other crawlers.
As Commerce uses a JavaScript framework it is worth noting that all search engineshave some limitations in terms of processing JavaScript and rendering JavaScript-heavy pages. In order to help search engines with crawling and indexing, Commercerenders the page and static snapshots of your pages directly to the search enginecrawlers. These snapshots provide a prerendered copy of a storefront page.Prerendering aims to speed up the indexing of fresh content published in your store,such as, new product or collection pages.
Search engines (such as Google) regularly update URL information based on a stricttimeout. When pages are provided to Google after the timeout, the request is canceledand the page is not updated. Therefore, Commerce uses prerendered snapshots inorder to ensure storefront pages are delivered to Google as quickly as possible.
Commerce generates an already-rendered version of a storefront URL and stores astatic copy of the page (excluding dynamic elements or JavaScript) on the server toensure a fast retrieval. Note also that Commerce generates distinct snapshots for bothmobile and desktop.
Your store's key SEO settings are mirrored when Commerce generates HTMLsnapshots of your site, ensuring that signals sent to search engines are consistent.The default setting ensures prerendered snapshots are served to search engine bots.However, you can modify your preferences and decide if JS client side rendered, orHTML snapshots should be served to other crawlers.
Chapter 8Understand SEO snapshots
8-12
Configure URL redirectsYou can configure URL redirects for your site that specifically relate to 301 and 302 browserresponse codes, indicating that your redirected URL has either permanently or temporarilymoved, respectively.
In the case of a 301 redirect, the URL is moved to a new target permanently. This type ofredirection can help with moving the SEO authority from the old URL to the new equivalent.The following example illustrates a 301 redirect with an example site base URL:www.example-shop.com/example with the redirection rule:
• originUrl: /smartphones/collection/id1234?show=all
• targetUrl: /fr/smartphones/collection/id789?show=20
It is worth noting that 302 redirects are the preferred choice if you want to redirect a page fora limited amount of time.
URL redirects are created/deleted using the createRedirect and deleteRedirect endpointsin the Admin REST API. You can set a maximum number of redirects in order to avoidperformance degradation by changing the property maxDbEntries in SeoRedirectionManager.Currently the total number of entries in the database defaults to 1 million.
URL redirection rules can be setup on a per site basis as each of the URL redirects arerelative to the site base URL. If a siteId is not provided, then the rule acts as a globalredirect for all sites. The following table describes the properties for redirecting URLs:
Parameter Description
originUrl Origin URL of the redirect.
siteId ID of the site to which the redirect belongs.
type Redirect type (301 or 302).
targetUrl Destination URL of the redirect.
Query parameters are not copied from the origin to target URL, instead you are required toinclude them in the definition of the redirect rule. When deleting a URL redirect, you specifythe ID of the rule to delete using the path parameter of the deleteRedirect endpoint. Forexample: DELETE /ccadmin/v1/redirects/30001.
The following example illustrates a 301 redirect:
POST /ccadmin/v1/redirects HTTP/1.1 Authorization: Bearer <access_token> Content-Type: application/json { "originUrl": "/smartphones/collection/id1234?show=all", "siteId": "siteUS","type": 301,"targetUrl": "/fr/smartphones/collection/id789?show=20"}
See the Oracle Commerce REST API documentation in the Oracle Help Center for moreinformation.
Chapter 8Configure URL redirects
8-13

Edit the robots.txt fileThe robots.txt file controls how web robots access and index your store’s pages.
For more information about robots.txt and the Robots Exclusion Protocol, visitwww.robotstxt.org.
If you run multiple sites within a single instance of Commerce, each site has its ownrobots.txt file. See Configure Sites to learn how to create multiple sites.
To view your store’s current robots.txt file:
1. Enter the following URL into your browser:https://[store url]/robots.txt
where [store url] is the base URL for your store.
2. Commerce displays the contents of the current robots.txt file.
If you run multiple sites and keep language versions in directories, for example,example.com/de/, example.com/es/, you do not need to create a separate robot.txt filefor each version. This is only the case for multiple sites over sub domains.
The Commerce robots.txt file below shows the updated contents after theserecommendations have been made:
User-agent: *Disallow: /cartDisallow: /en/cartDisallow: /checkoutDisallow: /en/checkoutDisallow: /profileDisallow: /en/profileDisallow: /searchresultsDisallow: /en/searchresultsDisallow: /confirmationDisallow: /en/confirmationDisallow: /wishlist_settingsDisallow: /en/wishlist_settingsDisallow: /wishlistDisallow: /en/wishlist
Sitemap: http://[store url]:8080/sitemap.xml
User-agent: * means that the exclusion rules should apply to all robots. You canreplace the * (asterisk) with the name of a specific robot to exclude, for example,Googlebot, or Bingbot.
Each Disallow: /[page] entry indicates a page that robots should not visit. You shouldnot remove any of the Disallow: entries from the default robots.txt file, though youmight want to include additional pages that you want robots to ignore. If you are testingyour store and do not want any robots to crawl any pages, you might want yourrobots.txt file to look like this:
User-agent: * Disallow: /
Chapter 8Edit the robots.txt file
8-14

If you plan to use your staging site as your production site when development and testing iscomplete, you will need to change the content in the robots.txt file to the custom settingspresented above. If you tested on a separate staging domain, Commerce inputs a validdefault robots.txt for you for your production storefront when you go live.
You cannot edit the robots.txt file in the administration UI. You must edit it with the CommerceAdmin REST API. See Use the REST APIs for information about the REST APIs.
To update the robots.txt file, issue a PUT request to /ccadmin/v1/merchant/robots. The body of the request must include the entire contents of the file, in text/plainformat.
When you update the robots.txt file, it will not be overwritten until the next PUT request issent to /ccadmin/v1/merchant/robots.
If you run multiple sites within a single instance of Commerce, you must specify the sitewhose robots.txt file you are updating in the x-ccsite header in the PUT request. If you donot specify a site, the request updates the default site’s robots.txt file.
The following example shows a PUT request that adds your error page to the list of pages forrobots to ignore.
PUT /ccadmin/v1/merchant/robots HTTP/1.1Content-Type: text/plainAuthorization: Bearer <access_token>
{User-agent: *Disallow: /cartDisallow: /checkoutDisallow: /profileDisallow: /searchresultsDisallow: /confirmationDisallow: /wishlist_settingsDisallow: /wishlistDisallow: /errorSitemap: http://{occs-host}/sitemap.xml}
Note: The XML sitemap is an index of page URLs on your store that is available for crawlingby search engines. It helps search engines to crawl your site more intelligently. Only pages,products, and collections that can be seen by anonymous shoppers (that is, visitors to yourstore who are not logged in) are included in the generated sitemaps. Each sitemap.xmlincludes a <lastmod> tag that provides the date and time the item was last published. See Understand XML sitemaps for more information.
Upload a custom robots.txt file
The updateRobotsFile endpoint allows you to upload a custom robots.txt file. Howeverin previous versions of Commerce, when publishing or on startup, the RobotsManagerautomatically replaced this custom robots.txt with an auto-generated one. In this case itwas advisable to contact support who were required to manually disable automaticrobots.txt generation.
From the current version of Commerce, the updateRobotsFile endpoint automaticallydisables the automatic robots.txt file generation. Additionally, the new endpoint /
Chapter 8Edit the robots.txt file
8-15
ccadmin/v1/merchant/seoConfig allows you to query, or update, the status ofautomatic robots.txt file generation.
Understand internal search results pages
Internal search refers to the search option on your own website when internal searchresults pages are generated. To prevent creating low-quality pages, internal searchresults are excluded from crawling in the robots.txt file and are not found in SearchEngine Results Pages (SERPs).
Note: You can use Google Analytics to track internal search queries and use thereports to regularly monitor for:
• the discovery of new keywords that customers use when searching for yourproducts.
• hints of navigational issues - users may be looking for existing categories that aredifficult to find in your main navigation.
Customize structured dataCommerce automatically generates a valid markup for the homepage, product, andcollection pages with: Products, Breadcrumbs, ItemLists, Reviews, WebSite, andOrganization properties.
The functionality to highlight page elements on certain template types and display inSearch Engine Results Pages (SERPs) is limited to Google only. Therefore, yourmarkup would not be seen by other search engines. Commerce enables you to switchoff the default markup for given page types, and substitute it with your custom scripttemplate that utilizes values from Commerce variables.
JSON-LD is Google’s recommended implementation. When customizing your JSON-LD, include as many applicable properties as possible to create different structureddata templates for different product types in your store.
You can use the Structured Data report in the Google Search Console to monitor howGoogle interprets JSON-LD scripts across your store, and check for any markup errorsand warnings referring to missing properties. You can also verify how Google seesstructured data on a per page basis.
Understand XML sitemapsCommerce auto generates valid XML sitemaps for all of your store pages, or resourcetypes.
Commerce resource types include:
• product
• category
• static pages
• video
• images
• supplementary pages: blog/lifestyle section
Chapter 8Customize structured data
8-16

Determine page visibility settings
These settings will determine whether a URL appears in an XML sitemap:
• ActiveThis option hides a given page from the shopper. If a previously published product isdeactivated, you will be prompted to specify its redirect path. If you deactivate a category,you are prompted to provide a direct path and warning displays indicating that you areabout to orphan your products. These will then be displayed in a separate folder for youto assign to other active categories
• Meta robots directiveCommerce provides two options: index,follow (default) and noindex,follow. The latter willexclude the page from Google search results, but crawlers will still follow and crawl anylinks on that page.
• Canonical tagThis should be self-referential (default setting), or your custom URL.
• Exclude from SitemapThis allows you to exclude specific pages from being included in XML sitemaps.
Your XML sitemaps should be submitted in Google Search Console and Bing Webmastertools. If your store’s static image assets are hosted externally/on subdomains then additionalhostnames should be verified in Search Console, and XML image sitemaps submitted forthose properties. Any possible crawling issues related to images can, therefore, bemonitored.
Work with the image XML sitemap
A separate XML image sitemap file utilizes both required and optional sitemap tags toindicate to search engines which site images are to be crawled and indexed. By default, onlykey body images, such as, product photos or homepage banners, are included in XMLsitemaps. Additional tags are utilized to include the image caption and title.
Images are also included in the default structured data output in JSON-LD. Commerce allowsthe customization of ALT and TITLE image attributes through editing single images in theMedia section, or bulk CSV upload. The default values for product imagery include:
• ALT → product {displayName}
• TITLE → product {description} (short)
ALT and TITLE image attributes should be unique and not duplicates of product displaynames or descriptions. It is recommended that you do not use too many keywords or repeatthe same attribute content. All product images should have descriptive file names prior tobeing uploaded, and dashes should be used to separate words, for example, example-phone-v2-C328.jpg should be used instead of image_8974.jpg.
Note: You should avoid embedding copy into banners as this is illegible to web crawlers.Instead, overlay text on top of imagery as only the ALT and TITLE attributes can beinterpreted. Also avoid using CSS background images and instead use standard HTML <imgsrc=””> to add imagery that you want to appear in search results (namely all product photoson both product/collection pages). To add design elements, such as, arrows, bars, smallicons, and so on, you can use the CSS background property.
Chapter 8Understand XML sitemaps
8-17
Verify the XML sitemap
You can verify the validity of all your domains and subdomains in a search engine,such as Google Search Console.
Submitting a valid XML sitemap file will influence how quickly your pages are crawledand subsequently indexed. Google's Index Coverage report provides feedback on howquickly new URLs are being processed. Note:You should allow some time for thisinformation to finalize as even though Googlebot may have seen your URLs, it doesnot mean they will be automatically included in the index.
Sitemap submissions for larger sites enables you to verify the most importantdirectories of the main site as separate properties for easier monitoring. For multi-sitestore directories, you can verify the language subdirectories as separate properties.
Understand SEO localizationCommerce platform auto generates hreflang tags that adhere to Google guidelines.The hreflang tags enable search engines to serve the correct regional or languageURLs in search results based on the searcher's country and language preferences.
Plan your targeting
You are required to specify how many countries and language variants your site willtarget. Consider how many translations you will be able to provide - you could target20 countries, but you may only have to provide English, French, and Germanlanguage variants.
You will also need to decide on the number of country top level domains (cTLDs) yoursite will incorporate under one Commerce panel. cTLDs such as .co, .uk, .ie., or .pt willtypically target their relevant country only, however, they are all perceived to be equalby Google, so there is no disadvantage in terms of rankings to gain organic visibilitywith a domain.co.uk on google.com.
You may also choose to target multiple languages and locales from one gTLD only(.com, .org, .net), for example, example.org/en-gb/, example.org/en-au. Yourfinal choice will also depend on the collection of domains already in use by yourbusiness.
When URL structures are planned out, country URL prefixes should not be used asthey are redundant. For example, example.com/us-kitchen-accessories/orexample.com/us-pottery/.
They do not contribute to the overall understanding of what a given page is about. Ifthe same domain is to target other languages/countries, subdirectories arerecommended (rather than subdomains).
Monitoring
Google Search Console allows to verify your language and locale targeting settings inthe Search Traffic, International Targeting report. The Language report can list up to1,000 errors with your hreflang implementation:
Note:For single language stores: if your domain is a generic TLD, you will be able tospecify your site-wide language setting.
Chapter 8Understand SEO localization
8-18

Content localization
The purpose of multi-language stores is not only to translate the contents to cater to differentmarkets, but also to make content suited for the locales you wish to target. The process oflocalization should go beyond translation only: accepting payments in local currency, addingpayment methods specific to a locale, adjusting delivery information for each geographicallocation, using appropriate measurement systems. Also, you should always ensure that youadjust any visual communications to suit different cultures accordingly.
Control access to storefront serversIn addition to the servers running your production storefront, you may have various otherstorefront servers used for development, testing, and staging purposes.
To prevent unwanted access to your storefront servers by web crawlers and other processes,Commerce provides a basic authentication system. (This system does not apply toadministrative servers, as these servers already require OAuth 2.0 authentication to accessany content.) The basic authentication system checks various values associated with anincoming request, such as the hostname, client IP address, and headers. If any of thesevalues is specifically whitelisted, the request is accepted without a challenge, but if not, adialog is displayed for entering a username and password. For example, your productionserver is typically configured to bypass authentication if the request is sent to the official siteURL (such as www.example.com), but the dialog is displayed if the request is sent to theinternal hostname (such as ccstore-xxxx-xxxx.oracleoutsourcing.com).
The primary purpose for the basic authentication system is not security, but rather to preventaccessing the servers in an unexpected way. For example, if a web crawler accesses a testserver, the authentication system prevents it from indexing pages, so that web search resultsdo not direct shoppers to that server. On the production server, web crawlers are permitted toindex pages, but only when the pages are accessed via the official site URL.
Note that the basic authentication system is completely separate from any shopper login. Onyour production server, shoppers should never see the authentication dialog unlesssomething is misconfigured.
Your servers are configured by default to display the authentication dialog only whenappropriate. You should typically not need to make any changes to the configuration.However, the Admin API does include endpoints you can use to make changes to theconfiguration, including the username and password, whitelisted headers, IP addresses, andhostnames:
• To see your current settings, use the getBasicAuthConfiguration endpoint.
• To change your settings, use the updateBasicAuthConfiguration endpoint.
For more information about these endpoints, see the Oracle Commerce REST APIdocumentation in the Oracle Help Center:
http://docs.oracle.com/cloud/latest/commercecs_gs/CXOCC/
Chapter 8Control access to storefront servers
8-19
9Manage Search Settings
The Search page in the administration interface contains a read-only table that lists allproperties that are searchable or serve as facets. You can use the Search page to configurethe searchable field rankings that determine how searches work in your store.
The Search page also lets you create synonyms for shoppers’ search terms in a thesaurus orcreate keyword redirects for search terms. You can see the Search page only if you havebeen assigned the Admin or Search role.
The topics in this section describe how to set up and manage search settings.
Understand index fieldsA catalog property must be indexed before it can be considered when a shopper searches inyour store.
To add a property to the index, select either or both of the following options in the property’sconfiguration in the catalog:
• Allow property to be searched
• Allow property to be a search facet
After you publish this change, the property is added to the index, where it is represented byan index field.
In order for a shopper’s search term to be matched against an index field’s contents, the fieldmust be configured as searchable in the catalog, (the first option previously described), andmust be added to the searchable field ranking list. Searchable field ranking changes takeeffect after the next time you publish.
View index fieldsThe Index Fields page displays a read-only list of all the index fields for your site.
To display the list, click Index Fields on the Search page. The list provides the followinginformation for each index field:
• SearchableIf this field is selected, shoppers can search on values entered for this property.
• FacetIf this field is selected shoppers can use this property as a refinement when filteringsearch results.
• Multi-selectIf this field is selected, shoppers can use this property as a refinement and make multipleselections to filter search results. For example, shoppers could filter results by selectingseveral colors.
9-1
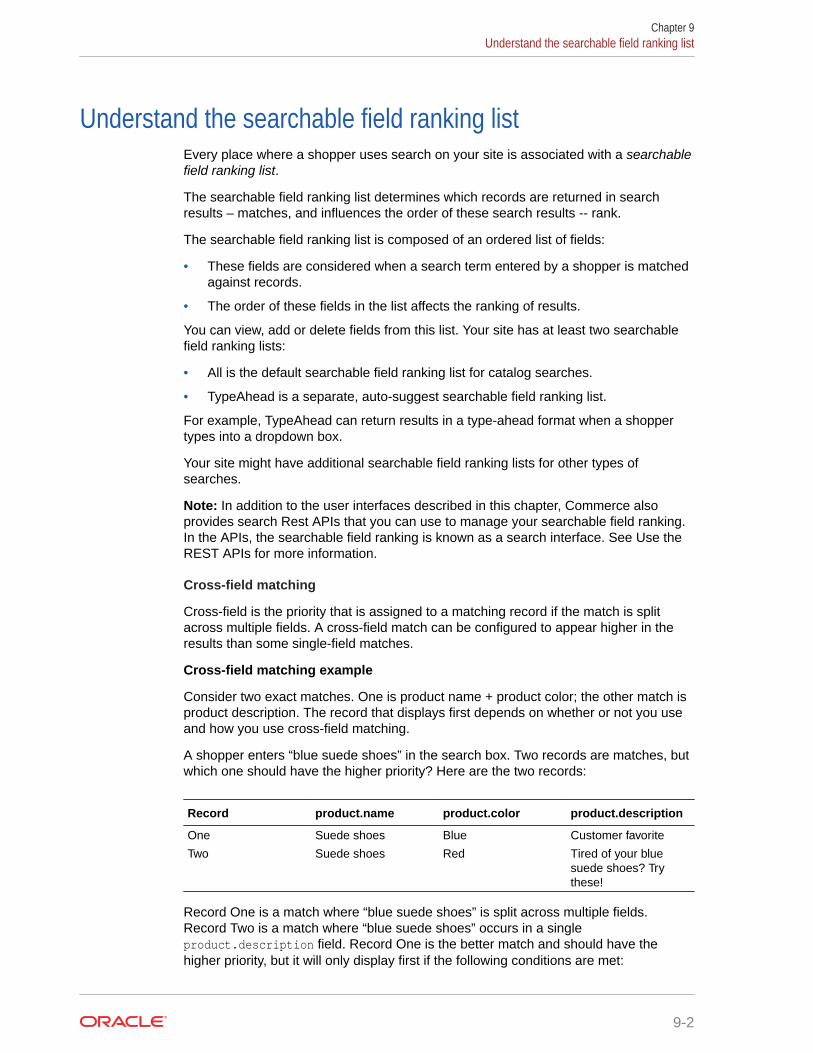
Understand the searchable field ranking listEvery place where a shopper uses search on your site is associated with a searchablefield ranking list.
The searchable field ranking list determines which records are returned in searchresults – matches, and influences the order of these search results -- rank.
The searchable field ranking list is composed of an ordered list of fields:
• These fields are considered when a search term entered by a shopper is matchedagainst records.
• The order of these fields in the list affects the ranking of results.
You can view, add or delete fields from this list. Your site has at least two searchablefield ranking lists:
• All is the default searchable field ranking list for catalog searches.
• TypeAhead is a separate, auto-suggest searchable field ranking list.
For example, TypeAhead can return results in a type-ahead format when a shoppertypes into a dropdown box.
Your site might have additional searchable field ranking lists for other types ofsearches.
Note: In addition to the user interfaces described in this chapter, Commerce alsoprovides search Rest APIs that you can use to manage your searchable field ranking.In the APIs, the searchable field ranking is known as a search interface. See Use theREST APIs for more information.
Cross-field matching
Cross-field is the priority that is assigned to a matching record if the match is splitacross multiple fields. A cross-field match can be configured to appear higher in theresults than some single-field matches.
Cross-field matching example
Consider two exact matches. One is product name + product color; the other match isproduct description. The record that displays first depends on whether or not you useand how you use cross-field matching.
A shopper enters “blue suede shoes” in the search box. Two records are matches, butwhich one should have the higher priority? Here are the two records:
Record product.name product.color product.description
One Suede shoes Blue Customer favorite
Two Suede shoes Red Tired of your bluesuede shoes? Trythese!
Record One is a match where “blue suede shoes” is split across multiple fields.Record Two is a match where “blue suede shoes” occurs in a singleproduct.description field. Record One is the better match and should have thehigher priority, but it will only display first if the following conditions are met:
Chapter 9Understand the searchable field ranking list
9-2
• Your searchable field ranking list uses cross-field matching.
• Cross-field matches have a higher priority than a single product.description fieldmatch.
There are no rules for which fields in a searchable field ranking list should be given a higherpriority than cross-field matches, but you likely want to consider structured fields such ascategory, brand, color, or features. Fields that allow more unstructured or free-form content,such as a product description, should be given a lower priority and should display after cross-field matches.
Cross-field matching is enabled by default for each searchable field ranking list. To disablecross-field matching, you must use the search REST APIs.
Relevance Ranking
Search field ranking is taken into account by configurable modules that sort the records insearch results as part of a relevance ranking strategy. For information about how to configurethe sorting of search results, see Specify which index fields are included in searches.
Add fields to the searchable field ranking listTo make a field searchable, it must be configured as searchable in the catalog and be amember of a searchable field ranking list.
Follow these steps to add a field to a searchable field ranking list.
1. Click the Search icon in the dashboard.
2. On the Search page, click Searchable Field Ranking.
3. Click the searchable field ranking list to which you want to add a field.The searchable field ranking list displays index fields that are searchable. The order ofthe fields in the searchable field ranking list affects the ranking of search results. Fieldshigher up in the list have a greater ranking and search requests that match values inthese fields appear first in your search results.
4. Under Add Field, select the index field that you want to add to the searchable fieldranking list. You can also type the name of an index field in the box, and Commerce filtersthe list to match what you have typed. The match is not case sensitive.If you cannot find the field, you must find the associated property in the catalog, click“Allow property to be searched,” and then publish your changes. See Create and editproduct types for more information. Note that it might be several minutes after publishingcompletes for the new index field to appear.
5. The field is added to the bottom of the list of index fields.
6. Click the field and then click and drag it to the position in the list that reflects its rank.
7. Click Save.
Changes to the searchable field ranking list do not affect your store until after you publish.
Configure cross-field matching
If cross-field matching is enabled for this searchable field ranking list, you can configurewhere you want cross-field matches to display in a list of search results. To learn more aboutcross-field matching, see Cross-field matching.
1. On the Search page, click Searchable Field Ranking.
Chapter 9Add fields to the searchable field ranking list
9-3

2. Click the searchable field ranking list in which you want to configure cross-fieldmatching.The searchable field ranking list displays a slider next to the list of index fields. Ifthe slider is disabled you cannot configure cross-field matching. To enable cross-field matching, use the search REST APIs.
Moving the slider handle up or down changes where cross-field matches display inyour search results. Matches for index fields above the slider handle have a higherpriority. These matches appear before any cross-field matches. The index fieldsbelow the slider handle have a lower priority than cross-field matches.
3. Move the slider handle up to give cross-field matches a higher priority, or down togive them a lower priority.
4. Click Save.
Edit the searchable field ranking listThe order of the fields in the searchable field ranking list affects the ranking of searchresults.
You can change the rank of index fields or remove them altogether from thesearchable field ranking list.
1. On the Search page, click Searchable Field Ranking.
2. Click the searchable field ranking list that you want to edit.
3. To change a field’s priority in search results, click the field and then click and dragit to the position in the list that reflects the priority you want.
4. If you want to remove an index field so it is no longer considered for matches insearch results in this ranking, click the delete icon.
5. Click Save.
If you want to stop using a field for search in all searchable field ranking lists, youcan deselect “Allow property to be searched,” in the catalog and then publish yourchanges. See Create and edit product types for more information. Commercerecommends removing the index field from all searchable field ranking lists.
Understand the thesaurusThe thesaurus provides a way to include alternate terms for a shopper’s search query.
The thesaurus lets you create the synonyms that capture other ways of expressingqueries relevant to your store.
You can add two kinds of synonyms to your thesaurus:
• One-way thesaurus entries provide alternate ways of expressing query words orphrases that apply in a single direction only.For example, you could define a one-way mapping so that all queries for computerwould also return matches containing laptop, but queries for laptop would notreturn results for the more general computer. You can add an unlimited number ofsynonyms to a one-way entry, and Commerce expands the query to search foreach synonym with the same one-way relationship.
Chapter 9Edit the searchable field ranking list
9-4
• Equivalent thesaurus entries establish a mutual equivalence relationship between wordsor phrases. The words and phrases are interchangeable. A query for one term would alsoreturn results for all other terms.For example, an equivalent might specify that the phrase “notebook” is interchangeablewith the phrase “laptop.”
In the Rest API an equivalent thesaurus entry is known as a multi-way entry. See Configure a thesaurus.
In addition to the user interfaces described in this section, Commerce also provides searchREST APIs that you can use to manage your thesaurus. See Configure a thesaurus for moreinformation.
Tips on using the thesaurus
The thesaurus can help customers find products in your store, but poorly conceived entriesmight not be useful. To maximize the potential of the thesaurus, review the following tips:
• Do not create thesaurus entries for common spelling corrections. Commerce fixesmisspelled words automatically.
• Do not create equivalent entries with different cases of the same word. The thesaurus isnot case sensitive.For example, entries such as Tartan = tartan are unnecessary.
• Do not create an equivalent entry for a word with multiple meanings.For example, “khaki” can refer to a color as well as to a style of pants. If you create anequivalent synonym for khaki = pants, then a shopper’s search for khaki towels couldreturn irrelevant results for pants.
• Do not create an equivalent synonym between a general and several more-specificterms, such as top = shirt = sweater = vest. This increases the number of results theshopper has to go through while reducing the overall accuracy of the items returned. Inthis instance, if a shopper searches for “vest,” the shopper also gets results for “sweater.”You get better results by creating individual one-way entries between the general term“top” and each of the more-specific terms. In that case a search for vests would onlyreturn vests, not sweaters, too. Only a search for “top” would return both sweaters andvests.
• Do not create an entry that includes a term that is a substring of another term in the entry.For example, consider an equivalent entry of “tackle” and “bait and tackle.” If shopperstype “tackle,” they get results for “tackle” or “bait and tackle.” These are the same resultsthey would have received for “tackle” without the thesaurus. If shoppers type “bait andtackle,” they get results for “bait and tackle” or “tackle,” causing the “bait and” part of thequery to be ignored.
• Avoid multiple word entries where single-word entries are appropriate.In particular, avoid multiple word forms that are not phrases that shoppers are likely totype, or to which phrase expansion is likely to provide relevant additional results. Forexample, the equivalent entry “King Aethelbert of Wessex” = “King Athelbert of Wessex”should be replaced with the single-word entry Aethelbert = Athelbert.
Create and edit thesaurus entriesYou create synonyms for shoppers’ search terms by adding them to the thesaurus, which youaccess from the Search page in the administration interface.
You must be assigned the Admin or Search role to create or edit thesaurus entries. Changesto the thesaurus do not affect your store until after you publish. See Publish Changes.
Chapter 9Create and edit thesaurus entries
9-5

You can see how your thesaurus entries behave when shoppers search for items bypreviewing your store. Click Preview and then search for items that you expect totrigger the thesaurus entries that you want to test. For more information aboutpreviewing your store, see Preview your changes.
View the list of thesaurus entries
The thesaurus page displays a list of all the thesaurus entries that have been added toyour store. Each entry displays the following information:
• Search terms for one-way entries with an arrow that point to a list of synonyms.Equivalent entries show synonyms only.
• The type of entry: one-way or equivalent.
• The last modified date, and the user that modified the entry.
The list can be sorted by clicking Sort By and selecting the type of entry, modified byuser, or date modified. Sorting always resets your view of the list to the first page. Youcan filter the list by starting to type a search term, synonym, or user name in the Filterlist box.
Create one-way thesaurus entries
One-way thesaurus entries apply in a single direction only. When a shopper enters thespecified search term, the search results include the results for all of the synonyms forthe entry.
1. On the Search page, click Thesaurus.
2. Click New Entry.The New Entry dialog displays with the default One-way option selected.
3. In the Search Term field, enter the word or phrase that a shopper might enter as aquery.
4. In the Synonyms field, enter all the words or phrases to which a shopper’s searchterm might map. The search results for the search term include the results for allthe synonyms. Press Enter or Tab between entries.Note that the entries in this field do not map to one another or back to the term inthe Search Term field. If a shopper enters a term in the synonym list, the searchresults only include the results for that term.
5. Click Create.
Create equivalent thesaurus entries
Equivalent thesaurus entries are mutually related words or phrases. When a shopperenters any of the terms in a query, the search results include the results for all of theother synonym terms.
1. On the Search page, click Thesaurus.
2. Click New Entry.
3. Click Equivalent.
4. In the Synonyms field, enter all the mutually related words or phrases that ashopper might enter into a Search box. Press Enter or Tab between entries.Note that the entries in this field are equivalent. This means that each of theentries in this field produce the same search results when entered by a shopper.The entries are interchangeable.
Chapter 9Create and edit thesaurus entries
9-6
5. Click Create.
Edit an entry
You can edit an existing thesaurus entry as follows:
1. On the Search page, click Thesaurus.
2. Click the entry in the list.
3. If necessary, change the entry type.If you change the entry from one-way to equivalent, the existing search termautomatically moves to the beginning of the synonyms list.
If you change the entry from equivalent to one-way, the existing synonyms remain intact,and a blank Search Terms field appears.
4. Update a synonym by deleting it and re-entering it.
5. Click Save.
Delete an entry
To delete an entry from the thesaurus:
1. On the Search page, click Thesaurus.
2. Type a synonym or a search term for the entry that you want to delete into the Filter Byfield.
3. Click the trash can icon next to the entry.
4. When the confirmation appears, click Delete.
Understand keyword redirectsYou can configure a keyword redirect to send shoppers to a location in your store or anexternal site when they enter a specified search term. This lets you display a relevantpromotional page or product category page instead of a typical list of search results.
A keyword redirect is triggered by one or more search terms; the target of a keyword redirectis a URL in your store or an external site. For example, a keyword redirect with the searchterm “delivery” and the URL “http://shipping.example.com” redirects shoppers to“http://shipping.example.com” if they use “delivery” as a search term.
Site-specific keyword redirects
You can define a keyword redirect that applies to all sites or one or more specific sites only.The same search term, entered on different sites, can redirect shoppers to different pages.For example, if Site A and Site B have different policies for returns, you can set up the term“returns” to take shoppers to different pages depending on the site where they are shopping.
You can filter the list of keyword redirects by site to easily find all of the keyword redirectsdefined for a specific site.
Match modes
The keyword redirect has three match modes. You can set the match mode to a non-defaultsetting by using the search REST APIs. See Configure the ranking of records in searchresults for more information.
Chapter 9Understand keyword redirects
9-7

• ExactDefault match mode. A search query triggers a redirect only if the shopper’ssearch query matches the keyword or a close variant exactly. The search querycannot include additional words before or after the matching terms.
For example, if the keyword is “support” and the shopper enters “support,” then theshopper is redirected. If the shopper enters “customer support,” then she is notredirected.
• PhraseA search query triggers a redirect if the terms in a shopper’s query match all theterms in a keyword or a close variant in the same order. The search query mightinclude additional words before or after the matching terms.
For example, if the keyword is “customer support” and the shopper enters“customer support telephone number” then the shopper is redirected. If theshopper enters “support customer” or just “support,” she is not redirected.
• AllA search query triggers a redirect if the terms in a shopper’s query match all theterms in a keyword or a close variant, but not necessarily in the same order.The search query might include additional words before or after the matchingterms.
For example, if the keyword is “customer support” and the shopper enters“telephone support customer number,” then the shopper is redirected. If theshopper enters “telephone support number,” then she is not redirected.
Integration with the thesaurus
If you create a thesaurus entry that corresponds to a search term for a keywordredirect, the keyword redirect has priority over the thesaurus entry.
For example, you might have a keyword redirecting “curtains” to http://example.com/fallsale/curtains.
If you have a one-way thesaurus entry, with a search term of “curtains” and synonymsof “drapes, shades” then the following occurs:
• A shopper who enters “curtains” as a search term is redirected to http://example.com/fallsale/curtains.
• A shopper who enters “drapes” or “shades” as a search term is not redirected.
If you have an equivalent thesaurus entry, with synonyms of “curtains, drapes, shades”then the following occurs:
• A shopper who enters “curtains” as a search term is redirected to http://example.com/fallsale/curtains.
• A shopper who enters “drapes” or “shades” as a search term is not redirected.
Create and edit keyword redirectsYou can create and edit keyword redirects for shoppers’ search terms on the KeywordRedirects page.
Open the Keyword Redirects page from the Search page. You must be assigned theAdmin or Search role. Changes to the keyword redirects do not affect your store untilafter you publish. See Publish Changes.
Chapter 9Create and edit keyword redirects
9-8
You can see how your keyword redirect entries behave when shoppers search for items bypreviewing your store. Click Preview and then search for items that you expect to trigger thekeyword redirect entries that you want to test. For more information about previewing yourstore, see Preview your changes.
View the list of keyword redirects
The Keyword Redirects page displays a list of keyword redirects that have been added toyour store. Each entry displays the following information:
• Keywords that the shopper enters.
• A redirect page which is the absolute or relative URL to which the shopper getsredirected.
• A clickable icon that displays the redirect page in a new tab or window.
• The read-only match mode field.
• The last modified date, and user.
By default all keyword redirects are displayed. You can filter the list of keyword redirects bysite.
The list can be sorted by clicking the Sort By list and selecting keyword, redirect page,modified by user order, or date modified order. Sorting always resets your view of the list tothe first page. You can filter the list by starting to type a keyword, redirect URL, match mode,or user name in the Filter terms box.
Work with redirect URLs
Commerce recommends using relative URLs for redirecting shoppers to internal pages withinthe store and only using absolute URLs for redirecting shoppers to external pages outside ofthe store. Relative URLs are especially important for internal pages because your previewstorefront and production storefront have different hostnames. Using relative URLs in thiscase allows you to preview and test your keyword redirects before you publish.
Create a keyword redirect
All keyword redirects that you add using the administration interface have a match mode ofExact.
1. On the Search page, click Keyword Redirects.
2. Check to see if the keyword has already been entered. If a keyword has multiple entrieswith different redirect URLs, you might get unexpected results.
3. Click New Entry.
4. By default, the keyword redirect you create is global, that is, it applies to all sites. Tocreate a keyword redirect that applies to one or more specific sites, deselect Globalunder Sites, click the Select items box and select the site or sites.
5. In the Keyword field, enter the term to be redirected to a page.
6. In the Redirect field, enter the absolute or relative URL for the page to which you wantthe shopper to be redirected. The entry must begin with http://, https://, or a forwardslash (/).
7. Click Create.
8. Verify the redirect URL by clicking the redirect icon next to the URL.The URL displays the redirect page in a new tab or window.
Chapter 9Create and edit keyword redirects
9-9

Edit a keyword redirect
You can modify the keywords or the redirect URLs for keyword redirect entries.
1. On the Search page, click Keyword Redirects.
2. Click the keyword entry in the list.You can update an existing keyword or the redirect URL, or the site it applies to.
3. Click Save.
4. If you edited the redirect URL, verify it by clicking the redirect icon next to the URL.The URL displays the redirect page in a new tab or window.
Delete a keyword redirect
1. On the Search page, click Keyword Redirects.
2. Click the trash can icon next to the entry.
3. When the confirmation appears, click Delete.
Refine and order search resultsThere are several ways to influence the ordering of the search results your shopperssee in your store: specifying dynamic curation criteria, boosting and burying products,and using facets.
Use dynamic curation
Dynamic curation allows you to influence the ordering of search results when theshopper navigates to a category (collection) or enters a search term. With this feature,you can create dynamic curation rules. Each rule has a destination (a collection orsearch terms), a set of criteria for ordering the search results, and an importance levelfor each criterion. Search uses your prioritization and blends the criteria to generate asort order.
For example, in collections within Women’s, you can prioritize products that arenewest, bestselling, and in stock; whereas within Men’s, you can prioritize bestselling,in stock, and most viewed. As another example, you can display in-stock and on-saleitems near the top of the search results.
The dynamic curation feature does not replace the configuring Searchable FieldRanking feature, but rather supplements it. For text searches, it is best to configureSearchable Field Ranking to return the most relevant results first, and use dynamiccuration rules sparingly. Otherwise, you might not display the most relevant resultsconsistently.
You cannot test views and sales in Dynamic Curation in your staging or testenvironment.
Dynamic curation rules apply to all search-driven pages (where another dynamiccuration rule does not apply), and not to collection pages driven by the repository. Forexample:
• If your storefront is customized such that the category pages accessed from thetop-level collections are search-driven, the curated ordering applies on thosepages.
Chapter 9Refine and order search results
9-10
• If the shopper uses guided navigation to navigate to a category page, the curatedordering applies on that page.
• If your storefront is not customized, the collection pages accessed from the top-levelcollections are repository-driven, and dynamic curation rules do not apply to them.
In addition, with the default search settings in Commerce, consider the following:
• When a curation rule has search terms as a destination, the rule serves only as atiebreaker - that is, it takes effect only when two or more products that have the samerelevance need to be ordered.
• When a curation rule has a collection as a destination, the criteria in the rule have a moredirect effect, since relevance is not a consideration in the ordering. A rule defined for acollection applies to all sub-collections, except for any sub-collections that have their ownrules.
Also be aware that because the underlying algorithm blends the criteria, predicting the searchresults order exactly may not always be possible.
Implement dynamic curation
This section describes how you can use the dynamic curation feature to influence theordering of search results. Any changes you make will take effect in production after youpublish them.
Create a curation rule
Follow these steps to create a new curation rule:
1. On the Search page, click Dynamic Curation.
2. Click New Curation Rule.
3. Select the site the rule applies to.
4. Select a collection or enter one or more search terms to define which search results willbe ordered.
5. Click Add Criteria to select the criteria.Note: If you choose Newness as a criterion, it will only apply to products that are lessthan 100 days old. In addition, if Arrival Date is not populated for a product, Creation Datewill be used instead.
Note: The In Stock criterion only uses the default inventory; location-level inventories arenot supported.
6. Use sliders to rate the importance of each criterion you have selected.
7. If you selected Product type, select and order the product types.
8. Click Create.
Update a curation rule
Follow these steps to edit an existing curation rule:
1. On the Search page, click Dynamic Curation.
2. Click on the curation rule you want to edit from the list of dynamic curation rules.
3. Update the collection or search terms to define which search results will be ordered.
4. Click Edit Criteria.
5. Use sliders to rate the importance of each criterion you have selected.
Chapter 9Refine and order search results
9-11

6. Click Save.
7. Optionally click Save and Preview to preview the search results you just curated.For site-specific rules, click the preview button on the header of the administrationinterface.
Delete a curation rule
Follow these instructions to delete a curation rule:
Note: The default rule cannot be deleted.
1. On the Search page, click Dynamic Curation.
2. Click on the curation rule you want to delete from the list of dynamic curation rules.
3. Click Delete.
4. When the confirmation appears, click Delete.
Boost and bury products
In addition to specifying the dynamic curation criteria, you can promote (boost)products to the top of the search results and move products to the bottom of thesearch results (bury).
Follow these instructions to boost or bury products:
1. On the Search page, click New Curation Rule.
2. Select the site the rule applies to.
3. Select a collection or enter one or more search terms to define which searchresults will be ordered.
4. Click Add Products under Select products to boost or Select products to buryto search for, select, and add products to be boosted or buried, respectively. In thegrid of boosted or buried products, you can reorder products using drag and dropor the context menus. Alternatively, switch to the list view to edit the products'sequence numbers.
5. Click Create.
6. Optionally click Create and Preview to preview the search results you justcurated. For site-specific rules, click the preview button on the header of theadministration interface.
Note: You can boost a maximum of 200 products and bury a maximum of 200products.
Order facets
You can select and order the facets that appear in the Guided Navigation widget whenthe shopper views search results or navigates to a search-driven collection.
• You can specify the default facets. These facets appear in the Guided Navigationwidget on any search-driven page that does not have its own explicitly defined listof facets.
• You can create an ordered list of facets for a specific collection. These facetsappear in the Guided Navigation widget when the shopper views the collection’ssearch-driven page.
Chapter 9Refine and order search results
9-12
• You can create an ordered list of facets for one or more search terms. These facetsappear in the Guided Navigation widget when the shopper enters any of the searchterms.
Follow these instructions to add facets:
1. On the Search page, click Facet Ordering and then New Facet Ordering Rule.
2. Select the site the rule applies to.
3. Select a collection or enter one or more search terms to define which search resultswhose facets you want to order.
4. Click the Add facet field to add facets.
5. Click Create and then Save.
Understand the behavior when a collection is created in two catalogs
If you create a collection in two catalogs on the same site, with the same path in eachcatalog, the collection will appear once in Dynamic Curation and Facet Ordering, under thesite’s default catalog. A rule created for this collection will apply in both catalogs.
If you create a collection in two catalogs on different sites, or in two catalogs on the samesite, but with a different path in each catalog, the two collections will both appear in thecollection picker in Dynamic Curation and Facet Ordering. If you want the same rule to applyto both collections, you must create the rule twice, once for each collection.
Multiple sites and searchIf you run multiple sites within a single instance of Commerce, these sites share a singlesearch configuration.
Your sites share the following search features:
• All searchable field ranking lists
• A single thesaurus
Configure dynamic contentWith Dynamic Content, merchandisers can return dynamic content alongside products andnavigation.
For one or more search terms, or for any collection, you can choose dynamic media from themedia library. When a shopper enters one of the search terms, or navigates to the collection,the metadata for the image along with the search results are returned. For example, a searchcontaining the term "sale" may display a clickable banner with "Click here to go to our salepage".
Open the Dynamic Content page from the Search page. You must be assigned the Adminor Search role. Changes to the dynamic content do not affect your store until after youpublish.
You can see how your dynamic content rules behave when shoppers search for terms or viewa collection by previewing your store by clicking Save and Preview. If a widget has beencreated and placed on the Search Results or Collection layout, you can see the destinationand that the image you specified is displayed.
Chapter 9Multiple sites and search
9-13

Create a dynamic content rule
Follow these steps to create a new dynamic content rule:
1. On the Search page, click Dynamic Content.
2. Click New Content Rule.
3. Select the site the rule applies to.
4. Select a collection or enter one or more search terms to define the search resultswhere you want to spotlight your content. Or you can select All destinations onthe selected sites.
5. Click Select Media to select or add an image to display. Multiple image selectionis not supported.
6. Optionally enter URL information in the Link URL field. A shopper who clicks onthe image will be taken to this URL.
7. Click Create.
Update a dynamic content rule
Follow these steps to edit an existing dynamic content rule:
1. On the Search page, click Dynamic Content.
2. Click to open the dynamic content rule you want to edit from the list of dynamiccontent rules.
3. Update the site, destination or media.
4. Click Save.
5. Optionally click Save and Preview to preview the search results. For site-specificrules, click the preview button on the header of the administration interface.
Delete a dynamic content rule
Follow these steps to delete a dynamic content rule:
1. On the Search page, click Dynamic Content.
2. Click to open the dynamic content rule you want to delete from the list of dynamiccontent rules.
3. Click Delete.
4. When the confirmation appears, click Delete.
Create dynamic content widgets
To display dynamic content, you create a dynamicContentList widget. The widget canbe added to the Search Results layout or the Collection layout of Storefront or Agent.The widget also ensures that a shopper who clicks on the image is redirected to theURL specified in the rule.
In the search response, the dynamic content is returned in the additional contentproperty and this is mapped to the additional content property in thesearchResultsDetails view model. The widget instances interact with the view modelto retrieve and display the image.
Chapter 9Configure dynamic content
9-14

A dynamicContentList widget could be created in a way similar to the following example,which you could store in a file named dynamiccontent-widget.js:
define( ['jquery', 'knockout', 'ccLogger', 'pubsub'], function($, ko, CCLogger, pubsub) { 'use strict'; return { onLoad : function(widget) { widget.dynamicContentList = ko.observableArray(); widget.searchSuccess = function(result) { if(this.dynamicContent && this.dynamicContent.contents && this.dynamicContent.contents.length>0){ widget.dynamicContentList(this.dynamicContent.contents); } else { widget.dynamicContentList([]); } }; $.Topic(pubsub.topicNames.SEARCH_RESULTS_UPDATED).subscribe(widget.searchSuccess); $.Topic(pubsub.topicNames.SEARCH_RESULTS_FOR_CATEGORY_UPDATED).subscribe(widget.searchSuccess); } } });
Once you have retrieved the dynamic content image URL, you can display it using yourwidget template. The display.template file might contain the following:
<div id="cc-dynamic-content"><!-- ko if: dynamicContentList().length > 0 --><h3> Displaying dynamic content </h3><!-- ko foreach: dynamicContentList--><!-- ko if: $data['@type'] == "Media" --><div id="banner" ><a data-bind="attr:{href: $data['linkURL']}"><img class="img-responsive center-block" data-bind="ccResizeImage: { isSrcSetEnabled : true, source: $data['imageUrl'] }"/></a><br/></div><!-- /ko --><!-- /ko --><!-- /ko --></div>
Use the search REST APIsSome search-related tasks cannot be done through the administration interface and can onlybe completed using the search REST APIs.
Chapter 9Use the search REST APIs
9-15

The following tasks must be completed through the REST APIs:
• Create and delete a searchable field ranking list
• Enable and disable cross-field matching
• Enable different types of partial matching
• Specify snippet sizes
• Select modules that sort search results as part of a relevance ranking strategy
• Configure locales, search term wildcards, and spelling dictionaries
See Use the REST APIs for more information.
Chapter 9Use the search REST APIs
9-16

10Manage Media for Your Store
You can upload and manage product and collection images, as well as media that you use inother places on your store, such as a hero image on the home page. Commerceautomatically sizes your images for display on different devices, such as laptops, tablets, andmobile phones.
This section describes how to use the Media tab to upload and manage images that appearon your store.
View the media libraryClick the Media icon to see all the files in your media library displayed in a grid.
Media files are initially sorted by name, though you can also sort them by size or last-modified date. You can also display them in a list.
The media library stores files in the following folders:
• Products - contains media files assigned to and available to products.
• Collections - contains media files assigned to and available to collections.
• General contains media files you can access when you configure the design elements foryour store. See Design Your Store Layout for more information.
Click Products, Collections, or General to view and access just that folder’s media files andto upload the selected types of files. Click All Media to view and access all files in your medialibrary. You cannot move media files from one folder to another.
Click an image to display details for that file, including name, path, size, file type, and thedate and time it was last modified.
There is a unique URL for each published item in your media library, providing a direct linkthat lets you open the item in a browser. Format the URL as follows:
<youroracledomain.com>/file/<path>
• <youroracledomain.com> is the URL Oracle provides to access your store.
• <path> is the value of the Path field, which you can see when you click the image on theMedia page.
For example, suppose the file oled4kwarranty.pdf contains a warranty for a TV sold on yourstore www.example2.com. The file is stored in the General folder. Use the following URL toaccess the PDF:
www.example2.com/file/general/oled4kwarranty.pdf
Upload media filesYou can upload individual files to the media library or you can compress media files in a ZIPfile, which you then upload to Commerce.
10-1

You can name media files so they are automatically assigned to products or collectionsin your catalog.
This section includes the following topics:
• Automatically assign images to products and collections
• Upload individual images
• Upload multiple media files
Automatically assign images to products and collections
You can format image-file names so that they are automatically are assigned toproducts and collections in your catalog when you upload them.
Format file names for product and collection images as follows:
<product_id>.<name>.<file_type>
<collection_id>.<name>.file_type>
• <product_id> is the product’s Product ID property. See Create and work withproducts for more information.
• <collection_id> is the collection’s Collection ID property. See Create collectionsfor more information.
• <name> is the descriptive name portion of the file.
• <file_type> is the file extension. Only JPG/JPEG, PNG, and GIF files can beautomatically assigned to products and collections.
For example, suppose you want to assign several images to a pair of boots whoseproduct ID is xprod2102. You could upload the following files:
xprod2102.bootsideview.pngxprod2102ridingboottopview.pngxprod2102.ridingbootfrontview.png
Keep the following in mind when you name media files to upload:
• A file cannot be assigned to a product or collection if a file of the same name isalready assigned to it.
• The file name is case-sensitive. For example, the system considersxprod030.rattanchair.jpg and xprod030.Rattanchair.jpg to be twodifferent files.
Product IDs are case sensitive. xprod030 and XPROD030 are different product IDs.
You can also import assignments in bulk for images that you have already uploaded.See Import image assignments for more information.
Upload individual images
You can upload individual JPG/JPEG, PNG, and GIF files to the media library. You canname media files so they are automatically assigned to products or collections in yourcatalog once they are uploaded. See Automatically assign images to products andcollections for more information.
To upload a single image:
Chapter 10Upload media files
10-2
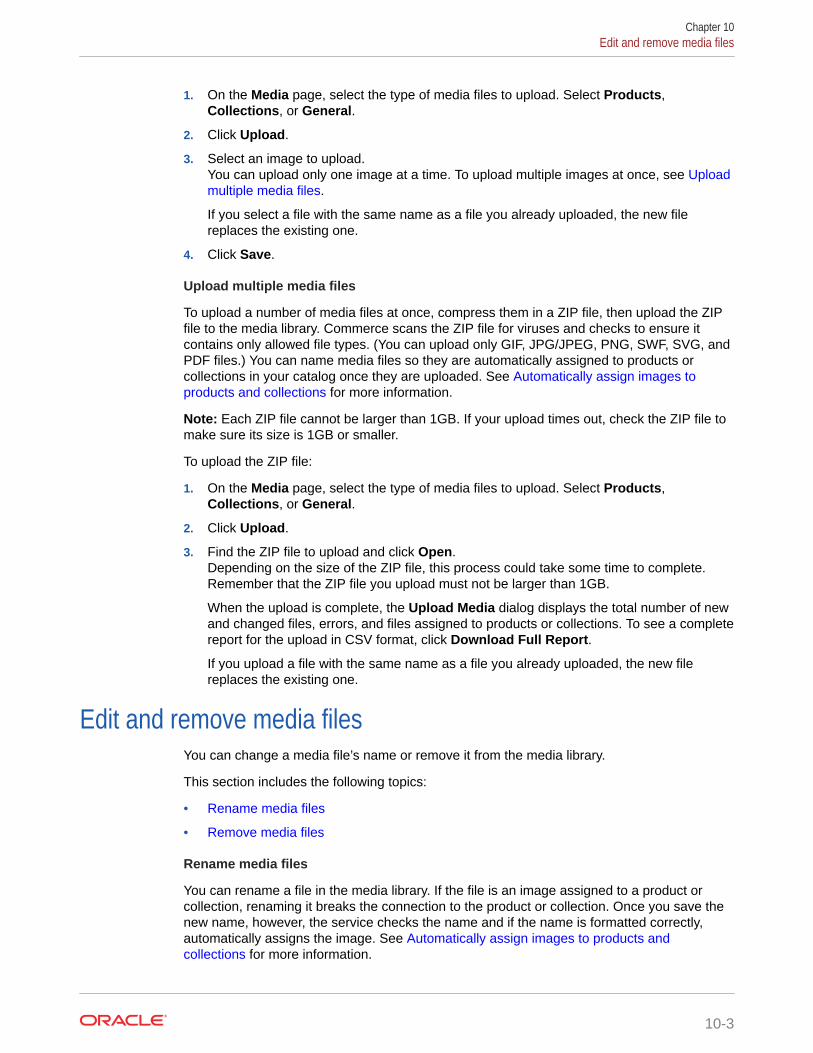
1. On the Media page, select the type of media files to upload. Select Products,Collections, or General.
2. Click Upload.
3. Select an image to upload.You can upload only one image at a time. To upload multiple images at once, see Uploadmultiple media files.
If you select a file with the same name as a file you already uploaded, the new filereplaces the existing one.
4. Click Save.
Upload multiple media files
To upload a number of media files at once, compress them in a ZIP file, then upload the ZIPfile to the media library. Commerce scans the ZIP file for viruses and checks to ensure itcontains only allowed file types. (You can upload only GIF, JPG/JPEG, PNG, SWF, SVG, andPDF files.) You can name media files so they are automatically assigned to products orcollections in your catalog once they are uploaded. See Automatically assign images toproducts and collections for more information.
Note: Each ZIP file cannot be larger than 1GB. If your upload times out, check the ZIP file tomake sure its size is 1GB or smaller.
To upload the ZIP file:
1. On the Media page, select the type of media files to upload. Select Products,Collections, or General.
2. Click Upload.
3. Find the ZIP file to upload and click Open.Depending on the size of the ZIP file, this process could take some time to complete.Remember that the ZIP file you upload must not be larger than 1GB.
When the upload is complete, the Upload Media dialog displays the total number of newand changed files, errors, and files assigned to products or collections. To see a completereport for the upload in CSV format, click Download Full Report.
If you upload a file with the same name as a file you already uploaded, the new filereplaces the existing one.
Edit and remove media filesYou can change a media file’s name or remove it from the media library.
This section includes the following topics:
• Rename media files
• Remove media files
Rename media files
You can rename a file in the media library. If the file is an image assigned to a product orcollection, renaming it breaks the connection to the product or collection. Once you save thenew name, however, the service checks the name and if the name is formatted correctly,automatically assigns the image. See Automatically assign images to products andcollections for more information.
Chapter 10Edit and remove media files
10-3
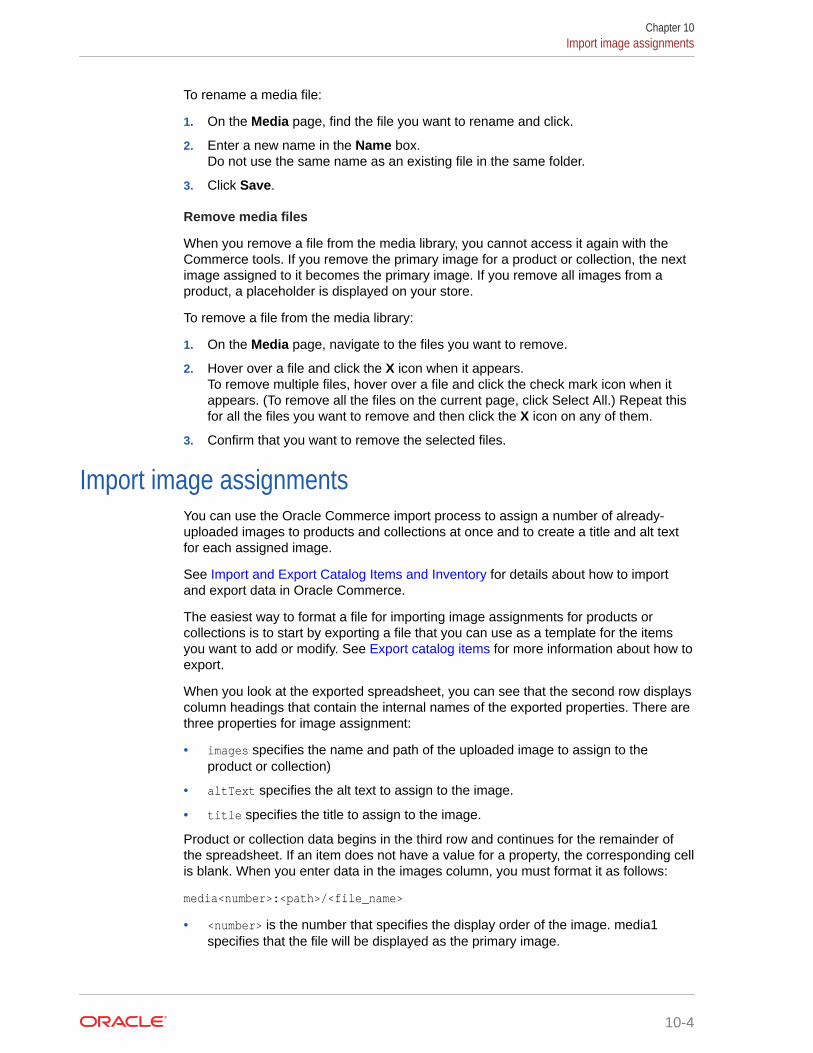
To rename a media file:
1. On the Media page, find the file you want to rename and click.
2. Enter a new name in the Name box.Do not use the same name as an existing file in the same folder.
3. Click Save.
Remove media files
When you remove a file from the media library, you cannot access it again with theCommerce tools. If you remove the primary image for a product or collection, the nextimage assigned to it becomes the primary image. If you remove all images from aproduct, a placeholder is displayed on your store.
To remove a file from the media library:
1. On the Media page, navigate to the files you want to remove.
2. Hover over a file and click the X icon when it appears.To remove multiple files, hover over a file and click the check mark icon when itappears. (To remove all the files on the current page, click Select All.) Repeat thisfor all the files you want to remove and then click the X icon on any of them.
3. Confirm that you want to remove the selected files.
Import image assignmentsYou can use the Oracle Commerce import process to assign a number of already-uploaded images to products and collections at once and to create a title and alt textfor each assigned image.
See Import and Export Catalog Items and Inventory for details about how to importand export data in Oracle Commerce.
The easiest way to format a file for importing image assignments for products orcollections is to start by exporting a file that you can use as a template for the itemsyou want to add or modify. See Export catalog items for more information about how toexport.
When you look at the exported spreadsheet, you can see that the second row displayscolumn headings that contain the internal names of the exported properties. There arethree properties for image assignment:
• images specifies the name and path of the uploaded image to assign to theproduct or collection)
• altText specifies the alt text to assign to the image.
• title specifies the title to assign to the image.
Product or collection data begins in the third row and continues for the remainder ofthe spreadsheet. If an item does not have a value for a property, the corresponding cellis blank. When you enter data in the images column, you must format it as follows:
media<number>:<path>/<file_name>
• <number> is the number that specifies the display order of the image. media1specifies that the file will be displayed as the primary image.
Chapter 10Import image assignments
10-4
• <path>/<file_name> specifies the full path to the image and the name of the image file,including the extension. The path and file name for an image is shown in the Path field onits details page, which you access from the Media page. See View the media library formore information.
Note: When you import multiple image assignments for a product or collection, you separatethem with a | (vertical bar). Therefore, you should not use this character in any media filenames.
See Import catalog items and inventory for more information about how to import yourchanges back into the catalog.
Chapter 10Import image assignments
10-5
11Import and Export Catalog Items andInventory
You can export products, SKUs, collections, and catalogs to a file in CSV (Comma SeparatedValue) format so you can work with them outside of Oracle Commerce and easily importchanges back into your Commerce environment.
The following are examples of changes you can make by exporting and importing data:
• If you are a new Commerce customer, you can import an existing catalog to initiallypopulate your storefront.
• If new catalog information arrives on an automated feed, you can format and edit the newassets in bulk and import them into your catalog.
• If you receive updates from a number of people, you can incorporate all the changes intoyour catalog at once instead of manually entering each change.
• You can quickly make bulk edits or perform global operations (like search and replace orspell-checking) on catalog assets in a spreadsheet and then import those changes backinto your catalog.
• You can distribute asset information for review to people who do not have access to theCommerce tools.
• If you let shoppers view your store in different languages, you can import translations foreach language your store supports.
You can also import inventory data, such as inventory count and stock threshold, for productsand SKUs into your catalog.
Understand export guidelinesThis section provides information that helps you plan and understand your export.
• You can export products, SKUs, collections, and catalogs.
• You can export only one type of item in each export procedure. For example, you cannotexport both products and collections to the same spreadsheet; you must export theproducts in one export procedure and then export the collections in another.
• Exporting catalogs exports properties that describe each of your catalogs, such as ID,display name, and root categories. Exporting catalogs does not export the products,SKUs, and collections the catalogs include.
• When you export products, SKUs, collections, and catalogs, all available properties areautomatically exported. You cannot change the list of properties to export.
• If you modified a product, SKU, collection, or catalog, the modified version is exported,even if you have not published the changes. For items you have not modified, thepublished version is exported.
• If your Commerce instance uses multiple catalogs, you can export products, SKUs, andcollections from a specific catalog or from all catalogs. You can also export items in
11-1
Unassigned Products and Unassigned Collections, which are not associated withany catalogs.
Export catalog itemsThis section describes how to export catalog items.
It includes the following topics:
• Export products, SKUs, and collections
• Export catalogs
• Specify export filter criteria
• View the exported data
Export products, SKUs, and collections
Follow these steps to export products, SKUs, or collections to a spreadsheet:
1. On the Catalog page, click the Export button.
2. Select the items to export: Products, Product Variants (SKUs), or Collections.
3. If your Commerce instance includes multiple catalogs, specify which catalogs toexport from: Select All Catalogs to export the selected items from all catalogs.This is the default selection.
4. If your store supports more than one language, select the language to export fromthe Language list. This list does not appear if your store supports only onelanguage.
5. If you want to export a subset of items, select Filter Items Being Exported See Specify export filter criteria for more information.
6. Click Export.Once you click the Export button, the operation cannot be canceled and youcannot work on other tasks until the export is complete.
7. When the export is complete, your browser displays a dialog box where youchoose whether to open or save the spreadsheet.If you click Cancel in this dialog box, the export file is not saved and you mustrepeat the export procedure.
8. See View the Exported data for information about how to understand the exporteddata.
Export catalogs
Follow these steps to export information about all catalogs to a spreadsheet:
1. On the Catalog page, click the Export button.
2. Select Catalogs from the list of items to export.
3. If you want to export a subset of items, select Filter Items Being Exported See Specify export filter criteria for more information.
4. Click Export.Once you click the Export button, the operation cannot be canceled and youcannot work on other tasks until the export is complete.
Chapter 11Export catalog items
11-2

5. When the export is complete, your browser displays a dialog box where you choosewhether to open or save the spreadsheet.If you click Cancel in this dialog box, the export file is not saved and you must repeat theexport procedure.
6. Read View the Exported data for information about how to understand the exported data.
Specify export filter criteria
By default, when you export products, SKUs, collections, and catalogs, Commerce exports allof the type of item you selected. To export fewer items, you can create rules that filter theitems based on properties you specify, such as a parent collection for products.
Note: You cannot save filter rules. If you select a different type of item to export or navigateaway from the Catalog page, any filter rules you created will not persist when you return.
To create a rule while exporting items, follow these steps:
1. In the Export Catalog dialog, select Filter Items Being Exported.The operators you see depend on the type of property you selected.
2. If you selected a specific catalog to export from and that catalog has filtered views, youcan select one from the Select Filtered View list. The default selection is All FilteredViews.
3. Click Add Rule.
4. Select a property from the drop-down list in the rule. The available properties depend onthe type of items you are exporting. You can select only one property per rule.
5. Select an operator that links the property to a value that you will specify in the next step.The operators you see depend on the type of property you selected.
6. Select or enter a value for the property.For some values, such as Parent Collections, Commerce displays a list for you to choosefrom. For others, such as Name or ID, you must type in a value. The rule editor does notvalidate any text, numeric, or date values you enter.
7. If you create more than one rule, select one of the following options from the Match list tospecify how the rules behave together. You can select only one option for the entire set ofrules.
• Any: If an item matches any rule in the set, it is exported.
• All: (default) If an item matches all the rules in the set, it is exported
8. Click Export.
View the exported data
The exported CSV file can be viewed and edited using a spreadsheet program such asMicrosoft Excel. The default file name follows the format <YYMMDDhhmmss>export.csv.For example, a file exported January 30, 2017 at 11:43:27 AM is named170130114327export.csv.
The exported data follows a specific format that can be used to re-import the spreadsheet toCommerce. The following figure shows an example of exported product data in aspreadsheet:
Chapter 11Export catalog items
11-3

Row One: Repository, Item Type, Formatting Options, and Process Messages
The first row is reserved for the repository path and item type, any formatting options,and any warning or error messages.
• The first column of row one (cell A1) contains the repository path and the item typeseparated by a colon. For example: /atg/commerce/catalog/ProductCatalog:product
• Columns two through six (cells B1, C1, D1, E1, and F1) contain data formattingoptions:
TIMEFORMAT appears in the third column (cell C1) and shows the format used for dateswith a time stamp, for example, TIMEFORMAT=MM/dd/yyyy HH:mm:ss.
If your store supports more than one language and you selected a different exportlanguage than the default language for your store, LOCALE appears in the fifth column(cell E1) and shows the ISO locale format for the language, for example, en_US.
If your Commerce instance includes multiple catalogs and you selected a specificcatalog to export from,CATALOG appears in the sixth column (cell F1) and shows thecatalog ID, for example, CATALOG=movieCatalog.
Row Two: Property Headings
The second row displays column headings that contain the property names of theexported properties. The ID property is always the first column (cell A2) and is alwayslabeled “ID” regardless of the actual repository name of the ID property.
Note: The spreadsheet contains the Property ID and Label of the property and not thelocalized display name.
Rows Three and Greater: Data
Catalog data begins in the third row and continues for the remainder of thespreadsheet. If an item does not have a value for a property, the corresponding cell isblank.
Data for filtered catalogs
When you export products or SKUs and your Commerce instance contains filteredcatalogs, the second row of the exported spreadsheet includes column headings thatcontain the following property IDs:
• The coreProduct column specifies whether the item is a core product in thecatalog.
• The filteredCatalogs column includes the Catalog IDs that specify filteredcatalog the item belongs to.
See Work with filtered catalogs for more information.
Data for exported catalogs
When you export catalogs, the second row of the exported spreadsheet alwaysdisplays column headings that contain the following internal property IDs.
• The ID column includes the Catalog ID for each catalog.
Chapter 11Export catalog items
11-4
• The displayName column includes the Catalog Name for each catalog.
• The catalogVersion column includes an integer that specifies the type of catalog. 1specifies a legacy catalog, 2 specifies an independent catalog, and 3 specifies a filteredcatalog. See Understand catalogs for more information.Note: You cannot change a catalog’s catalogVersion value if you import the file backinto Commerce. If you do, the import will fail.
• The rootCategories column includes a comma-separated list of Collection IDs for thecollections in each legacy catalog.This column contains values only for catalogs whose catalogVersion value is 1.
• The rootNavigableCategory column includes the navigable root collection for eachcatalog whose catalogVersion value is 2. The default value for this property isrootCategory.
• The rootNonNavigableCategory column includes the non-navigable root collection foreach for each catalog whose catalogVersion value is 2. The default value for thisproperty is nonNavigableCategory.
• The defaultCategoryForProducts column includes the Collection ID of the collectionthat will automatically be the parent of any product created or imported in this catalogwithout a specified parent.This column contains values only for catalogs whose catalogVersion value is 2.
Import catalog items and inventoryThe import feature lets you work with products, SKUs, collections, and catalogs outside ofCommerce and import them, in spreadsheet format, back into Commerce.
Importing provides a convenient method for adding items and batch editing.
You can also import inventory data for products and SKUs into your catalog. Importinginventory is a separate procedure from importing products, SKUs, collections, and catalogs.
The following procedure is an overview of the steps you perform to import either catalogitems or inventory from a spreadsheet into Commerce:
1. Create a spreadsheet in the correct format for importing to Commerce. For moreinformation see Export catalog items and Format a file for import.
2. Load the file and validate that the items can be imported.
3. Import the spreadsheet. For more information, see Import products, SKUs, collections, orcatalogs.
4. Review the outcome of the import for any errors or warnings. For more information, see Validate and preview items.
5. Review the imported items on the Catalog page.
Format a file for import
The easiest way to format a file for importing products, SKUs, collections, or catalogs is tostart by exporting a file from your catalog that contains the items you want to modify. If youare importing inventory, you must manually create the import file starting with a blankspreadsheet.
Caution: If you leave a cell blank, a property value might be deleted. See instructions later inthis section for marking data to ignore.
Chapter 11Import catalog items and inventory
11-5

Required formats for importing a spreadsheet
The first row and first column of the spreadsheet are reserved for use by the importprocess and must contain specific information. The first row contains information aboutthe data that is being imported and the first column (except for row 1) contains the IDproperty of the items being imported.
In the first row of the spreadsheet, you must specify the repository, item type, and anyspecial formats for data types, as follows:
• For catalog items: The first column of row one (cell A1) must contain the internalcomponent path and should be left exactly as exported when you created theimport template. For example, the following path indicates that the spreadsheetcontains products:/atg/commerce/catalog/ProductCatalog:product
• For inventory: Cell A1 must contain the following path:atg/commerce/inventory/InventoryRepository:inventory
• Use the additional columns in row one (cells B1 through D1) to specify any specialproperty formatting, such specific date formats. Each format must be in its owncell, but it does not have to appear in any particular order. The following tabledescribes the formatting options:
Description Format in Spreadsheet Requirements
Format of date propertyvalues, such as 01/31/2009
DATEFORMAT=MM/dd/yyyy
The day, month, and yearindicators can appear in anyorder to match your data, forexample dd/MM/yyyy
Required if any importedproperties are of type date.
The date value must exactlymatch the format, for example03/15/2014 instead of 3/15/14.
Format of timestamp propertyvalues, such as 31/01/200922:45:01
TIMEFORMAT=
MM/dd/yyyy HH:mm:ss
The day, month, and yearindicators can appear in anyorder to match your data, forexample, dd/MM/yyyyHH:mm:ss
To use 12-hour time, theformat is MM/dd/yyyyhh:mm:ss aa, where aa canbe either AM or PM, forexample 03/15/2009 05:30:00AM
Required if any importedproperties are of typetimestamp.
The timestamp value mustexactly match the format, forexample 03/15/2014 05:30:00instead of 3/15/14 5:30.
ISO locale format of thelanguage you are importing.See Localize Your Store formore information aboutimporting translations.
LOCALE=locale
The ISO locale format for thelanguage, for example,en_US.
Required if you are importingtranslations for a particularlanguage.
Chapter 11Import catalog items and inventory
11-6
Description Format in Spreadsheet Requirements
ProductCatalog:sku LOCALE=locale
ID=SKU
displayName=
parentProduct=
Type=
configurable=TRUE/FALSE
productLine=
productFamily=
barcode=
active=TRUE/FALSE
nonreturnable=TRUE/FALSE
bundledSkusItem=item1:Sku_5Cxy|item2:Sku_27Gxyzii
bundledSkusQuantity=item1:2|item2:1
configurationMetadataName=
configurationMetadataValue=
The ISO locale format for thelanguage, for example,en_US.
Qualified SKU
Text name
Parent product, if any.
An empty string or a valid typethat is defined in therepository.
TRUE/FALSE
Product Line, if any.
Product Family, if any.
Qualified barcode
TRUE/FALSE
TRUE/FALSE
SKUs in the bundle.
Quantity of each SKU inbundledSkusItem
Meta data name, if any.
Value forconfigurationMetadataName
Beginning with the second row, the first column of the spreadsheet is reserved for the IDproperty of the imported items. No other property can occupy column one.
• For catalog items: The second row (cell A2) contains the ID heading, which is always IDregardless of the actual name of the repository item’s ID property. The remaining rows(cells A3 and greater) contain the ID values for each imported item. Any rows with blankID values are skipped during import.
• For inventory: The second row (cell A2) contains the ID heading, which is alwayscatalogRefId regardless of the actual name of the repository item’s ID property. Cell B2contains the label stockLevel. Cell C2 contains the label stockThreshold. Cell D2contains the label preorderLevel. Cell E2 contains the label preorderThreshold. Cell F2contains the label backorderLevel. Cell G2 contains the label backorderThreshold. CellH2 contains the label availabilityDate.
Keep in mind that ID values can contain only alphanumeric characters, hyphens (-), andunderscores (_).
For details about preorder and backorder levels and thresholds, see Manage Inventory forPreorders and Backorders.
Import file size limitations
The maximum number of item rows that can be imported from a single spreadsheet is25,000. If you import more than 25,000 items, any items above that limit are not imported andthe import report includes a message that tells you the import was truncated.
Format for importing non-ASCII characters
When you import text properties (such as display names for products, SKUs, and collections)that contain non-ASCII characters, you must save the CSV file with UTF-8 encoding before
Chapter 11Import catalog items and inventory
11-7
you import it. Otherwise, the non-ASCII characters will appear garbled in theadministrative interface.
Note: When you export text properties that contain non-ASCII characters, thosecharacters do not automatically display in the exported CSV file. In order to displaythese characters in the CSV file you must save it with UTF-8 encoding
Format for importing custom-property values
If your spreadsheet includes values for custom properties, it must include a columnwith the heading type in the second row. For each row that includes a value for acustom property, this column must include the ID of the product type that contains theproperty.
Format for adding new items
The import feature allows you to create new items when you import your spreadsheet.To create an item, add a row to the spreadsheet and enter property values for eachcolumn. If you leave a cell blank, then the value for that property is set to null. If youleave the ID column blank, the item is skipped and not created.
Creating new items is supported only for importing products, SKUs, and collections. Itis not supported for importing inventory.
You assign an ID value for the new item in one of the following ways:
• Enter NEW in the ID column to let Commerce create an ID.The new item is created using an automatically generated ID. The NEW keywordmust be typed in all capital letters and must be the only value in the cell.
• Enter a unique ID in the ID column.A new item is created with the ID you enter.
To create a new top-level collection, in addition to adding the new row, you must alsoadd the new collection’s ID to the fixedChildCategories column of the rootCategoryrow. For example, if you add a row to the spreadsheet to add a new category whoseID is cat5000, you must also add the ID cat5000 to the fixedChildCategories columnof the rootCategory. Otherwise, the new collection will not appear in the Catalog treein the administration interface.
Note: To create an item, you must provide values for required properties.
Format for adding new items to specific catalogs
You can use import to create new products, SKUs, and collections in specificindependent (version 2) catalogs. (By default, products, SKUs, and collections areimported into the main Product Catalog that is included with Commerce.) See Workwith independent catalogs for more information.
In order to create new items in specific catalogs, you must enable support for thefeature. To do this, you issue a PUT command to the adminConfiguration endpoint inthe Admin API to set the value of the useCatalogHeaderForCreatingNewItemsproperty to true. For example:
PUT /ccadmin/v1/merchant/adminConfiguration HTTP/1.1Authorization: Bearer <access_token>Content-Type: application/json
{
Chapter 11Import catalog items and inventory
11-8

"useCatalogHeaderForCreatingNewItems": true, "useCatalogHeaderForCreatingNewItems": true,}
To create new products, SKUs, or collections in a specific catalog, include CATALOG=<id> inthe first row of the CSV file, where <id> is the Catalog ID of the catalog where you want tocreate the items. You must specify the ID of an existing independent catalog.
New collections without a specified parent are created in Storefront Navigation in thespecified catalog.
If you configured the catalog to have a default collection for products, new products without aspecified parent are created in that collection. Otherwise, new products without a specifiedparent are created in Unassigned Products. See Import catalogs for more information.
If the catalog is associated with existing filtered catalogs, you can specify valid filteredcatalogs by Catalog ID in the filteredCatalogs column.
If products are to be directly linked to catalogs, you can specify valid independent catalogs byCatalog IDs in the directCatalogs column. If you are importing products into a specificcatalog (that is, if the first row of the CSV file includes CATALOG=<id>), the value in a product'sdirectCatalogs cell must match the CATALOG=<id> Catalog ID if that product is being linkeddirectly to that catalog
Format for deleting property values
You can delete a property value of an item when you import it. To delete a property value,leave the corresponding cell blank.
• If you try to delete a required property value, such as pricelist, the spreadsheet cannot bevalidated and the import will fail.
• If the property has a default value, leaving the cell blank resets the value to the default.
• If you delete a cell in the spreadsheet but do not want to delete the property value duringimport, you can mark the cell as ignored. See Marking Data to Ignore.
This delete format does not apply when you are adding items to collection properties. If youformat a column to prepend or append items to a collection, blank cells are automaticallyignored during import -- nothing is added or removed from the collection. See Format foradding items to a collection property.
Marking data to ignore
When you import a spreadsheet, the file might contain data that you do not want to include inthe import, for example, columns with formulas or notes, columns containing a property thatyou do not want to edit, or blank cells that might cause data to be deleted. To remove theseitems from the import, you can mark columns (properties), rows (individual items), or cells(individual property values) to be ignored by the import process.
Use the keyword IGNORE, in all capital letters, to mark data that you want to ignore duringimport, as shown in the following table:
To ignore this Do this
Ignore a column of data, such as a single propertyor extra column
Type IGNORE in the column heading (row 2).
Ignore an item (a single row) Type IGNORE in the ID cell for the item (column 1).
Ignore a property for an item (a single cell) Type IGNORE in the cell.
Chapter 11Import catalog items and inventory
11-9
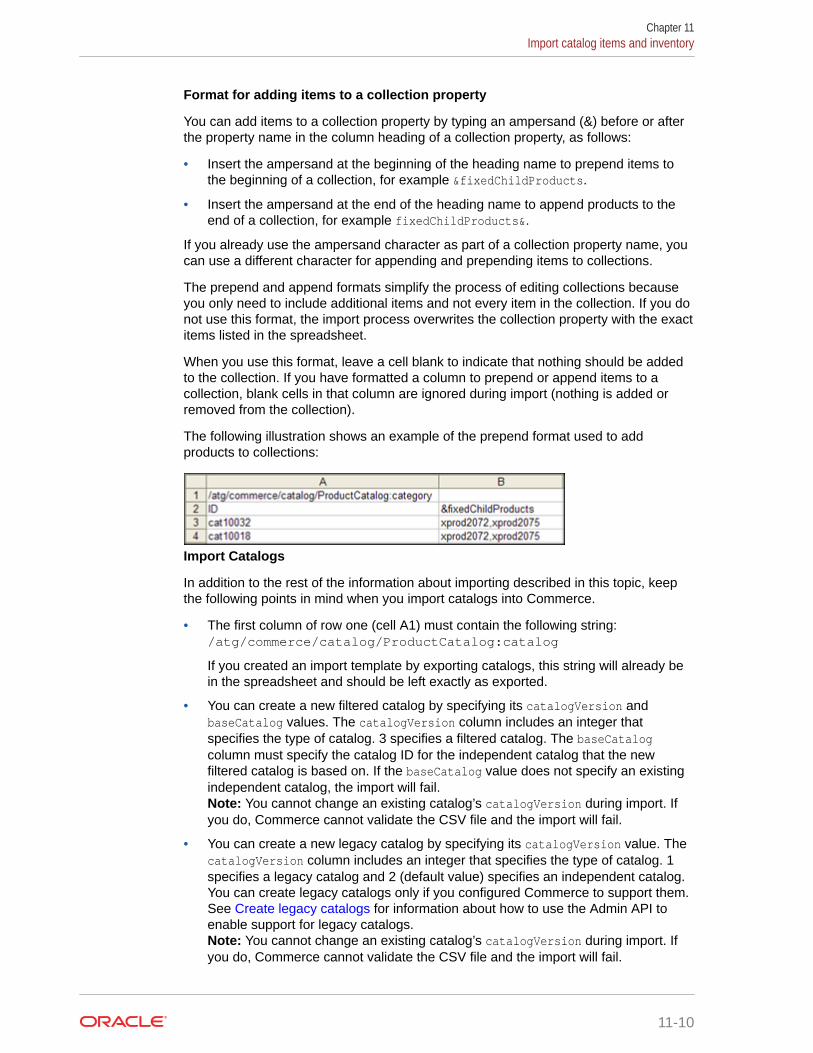
Format for adding items to a collection property
You can add items to a collection property by typing an ampersand (&) before or afterthe property name in the column heading of a collection property, as follows:
• Insert the ampersand at the beginning of the heading name to prepend items tothe beginning of a collection, for example &fixedChildProducts.
• Insert the ampersand at the end of the heading name to append products to theend of a collection, for example fixedChildProducts&.
If you already use the ampersand character as part of a collection property name, youcan use a different character for appending and prepending items to collections.
The prepend and append formats simplify the process of editing collections becauseyou only need to include additional items and not every item in the collection. If you donot use this format, the import process overwrites the collection property with the exactitems listed in the spreadsheet.
When you use this format, leave a cell blank to indicate that nothing should be addedto the collection. If you have formatted a column to prepend or append items to acollection, blank cells in that column are ignored during import (nothing is added orremoved from the collection).
The following illustration shows an example of the prepend format used to addproducts to collections:
Import Catalogs
In addition to the rest of the information about importing described in this topic, keepthe following points in mind when you import catalogs into Commerce.
• The first column of row one (cell A1) must contain the following string:/atg/commerce/catalog/ProductCatalog:catalog
If you created an import template by exporting catalogs, this string will already bein the spreadsheet and should be left exactly as exported.
• You can create a new filtered catalog by specifying its catalogVersion andbaseCatalog values. The catalogVersion column includes an integer thatspecifies the type of catalog. 3 specifies a filtered catalog. The baseCatalogcolumn must specify the catalog ID for the independent catalog that the newfiltered catalog is based on. If the baseCatalog value does not specify an existingindependent catalog, the import will fail.Note: You cannot change an existing catalog’s catalogVersion during import. Ifyou do, Commerce cannot validate the CSV file and the import will fail.
• You can create a new legacy catalog by specifying its catalogVersion value. ThecatalogVersion column includes an integer that specifies the type of catalog. 1specifies a legacy catalog and 2 (default value) specifies an independent catalog.You can create legacy catalogs only if you configured Commerce to support them.See Create legacy catalogs for information about how to use the Admin API toenable support for legacy catalogs.Note: You cannot change an existing catalog’s catalogVersion during import. Ifyou do, Commerce cannot validate the CSV file and the import will fail.
Chapter 11Import catalog items and inventory
11-10

• The rootCategories column includes a comma-separated list of Collection IDs for theroot collections in each legacy catalog. This cell must be blank if the catalogVersionvalue is 2; otherwise, the import will fail.If you are creating or updating a legacy catalog, the only values you can add to therootCategories cell are the IDs of root collections for the Product Catalog, includingrootCategory and nonNavigableCategory. See Understand catalogs to learn about theProduct Catalog.
• The rootNavigableCategory column includes the navigable root collection for eachcatalog whose catalogVersion value is 2. The default value for this property isrootCategory.You cannot change the value of rootNavigableCategory for an existing catalog and thiscell must be blank if the catalogVersion value is 1; otherwise, the import will fail.
• The rootNonNavigableCategory column includes the non-navigable root collection foreach for each catalog whose catalogVersion value is 2. The default value for thisproperty is nonNavigableCategory.You cannot change the value of rootNonNavigableCategory for an existing catalog andthis cell must be blank if the catalogVersion value is 1; otherwise, the import will fail.
• The defaultCategoryForProducts column includes the Collection ID of the collectionthat will automatically be the parent of any product created or imported in this catalogwithout a specified parent.This column can contain values only for catalogs whose catalogVersion value is 2;otherwise, the import will fail.
Validate and preview items
When you import a file, Commerce validates the file, first verifying that the file is formattedcorrectly and contains data that can be imported, then validating the spreadsheet. If youreceive errors or warnings prior to the actual import, you can stop the task, edit thespreadsheet to remove any errors, and then upload the file again.
After executing the validation phases and importing the spreadsheet, Commerce displays theoutcome of the import in a results dialog box.
File validation
When you select a file for import, Commerce validates the file format and the formats of thefirst two rows of the spreadsheet. If there is an error in the file, a message appears on theImport dialog.
Errors that can occur during this phase include the following:
• The file is not in CSV format.
• The repository or item type in the first column of row 1 is not valid.
• The file is missing the ID column or it is not the first column.
• Row 2 of the file contains properties that do not exist for this item type or have amisspelled property name.
• The file contains properties that are not allowed.Note: Commerce does not export these types of properties, so if the spreadsheetcontains them, they were added to it manually and should be removed.
• The file contains a timestamp or a date property but does not have a correspondingTIMESTAMP or DATE format in row 1.
Item validation
Chapter 11Import catalog items and inventory
11-11
After the file is uploaded and passes file validation, Commerce validates all items anddisplays the outcome in the Import window. You can also download a full validationreport.
The validation process determines how many imported items have changed, howmany are new, and how many are unchanged.
Note: To improve performance, Commerce does not check to see if a SKU hasduplicate variants during item validation. If you find duplicate SKU variants in yourcatalogs, you can simply delete them.
Errors or warnings that can occur during item validation include:
• The value in the spreadsheet cannot be converted to the correct type for aproperty, for example, a date does not include two digits for the month, or a letteror symbol appears in a numeric property.
• A value for a required property is missing.
• A repository ID in a property value cannot be found.If the unknown ID is for the same type of item that is being imported, the messageis a warning because the item might be created elsewhere in the spreadsheet. If itis a different item type, the message is an error.
Note: If the ID column contains a non-existent repository ID, a new item is createdwith that ID. See Format for Adding New Items.
Import products, SKUs, collections, or catalogs
Before you import your products or SKUs for the first time, you must create producttypes and variant properties in Commerce. For more information, see Manage YourCatalog.
Follow these steps to import products, SKUs, or collections from a spreadsheet:
1. On the Catalog page, click the Import button.
2. In the Import dialog, click Browse and locate the CSV file to import.
3. Click Upload File.
4. Click Validate.Note: Depending on the size of the spreadsheet, this process could take severalminutes to complete.
The Import dialog displays the total number of changed, new, and unchangeditems, as well as any errors or warnings. To see a full validation report, clickDownload Full Report.
5. Click Import.
The new and changed items are added to the catalog. You can now publish them toyour storefront.
Note: If direct price editing is enabled for your Commerce store, any price changesyou import are available on the storefront without publishing. Other product changes,however, must still be published. As a result, prices may exist on your productionsystem before the associated products do. These prices will be applied to the productswhen they are published. See Update prices without publishing for more information.
Chapter 11Import catalog items and inventory
11-12
Import inventory
Follow these steps to import inventory information for your products and SKUs from aspreadsheet into Commerce:
1. On the Catalog page, click Manage Catalogs and select Inventory.
2. On the Manage Inventory page, click the Import button.
3. In the Import dialog, click Browse and locate the CSV file to import.
4. Click Upload File.
5. Click Validate.Note: Depending on the size of the spreadsheet, this process could take several minutesto complete.
The Import dialog displays the total number of changed, new, and unchanged items, aswell as any errors or warnings. To see a full report, click Download Full Report.
6. Click Import.
The new inventory data is added to your catalog and is automatically updated on yourstorefront.
Chapter 11Import catalog items and inventory
11-13

12Manage Promotions
Promotions allow you to offer discounts on specific products or groups of products.
For example, you might decide to promote a range of products for Mother’s Day byhighlighting them with an image on your site’s “Welcome!” page and offering a 10 percentdiscount if customers order them by a specific date.
This section describes how to work with promotions on the Marketing page. You can also usethe Commerce Admin API to programmatically create a number of promotion types that arenot available in the UI. For more information, see Create Custom Promotions.
Understand promotionsA promotion defines both the conditions an order must meet before qualifying for a discount,and how the discount is applied.
For example, you can specify that a customer can get a discount on a specific video gameconsole, on orders of more than $50, or on purchases made during July.
By default, promotions are available to all shoppers, but once you create a promotion, youcan make it available only to customers who provide a coupon code. See Add a coupon codeto a promotion for more information.
An order might qualify for more than one promotion. In this case, promotions are applied inorder of priority, with low priority numbers applied first. Commerce sorts the promotions by thevalue of the Priority property. A promotion’s priority is evaluated against other promotions ofthe same type. For example, item discounts are evaluated only against other item discounts,not against order discounts. If an order qualifies for multiple promotion types, item discountsare applied first, followed by order discounts. Promotions that are of the same type and havethe same priority have no guaranteed sequence, so the order in which they are evaluated isundefined.
When you preview your store, you can see how your promotions behave when users shop foritems. Simply click the Preview button and then shop for items that you expect to trigger thepromotions you want to test. For more information about previewing your store, see Previewyour changes.
Commerce templates provide an easy way to create the following types of promotions:
• Order discount: The entire order is discounted. See Create an order discount promotionfor more information.
• Item discount: The shopper receives a discount on an item or items. See Create an itemdiscount promotion and Create a buy one get one promotion for more information.
• Shipping discount: The shopper receives discounted or free shipping. See Create ashipping discount promotion for more information.
Understand promotion targetsA target is an item that is discounted or given by a promotion.
12-1
This section describes how promotions are applied to items and includes the followingtopics:
• Understand which items cannot be discounted by default
• Understand how add-on products affect promotions
• Understand the Discountable property for products and SKUs
Understand which items cannot be discounted
The following items cannot be discounted by Item Discount, Buy One Get One, Buy XGet Order Discount, or Buy X Get Shipping Discount promotions. Even if you addthem to a promotion’s offer, Commerce will not consider them for the promotion.
• Items already acting as qualifiers for any other Item Discount, Buy One Get One,Buy X Get Order Discount, or Buy X Get Shipping Discount promotion.
• Items already discounted by any other Item Discount, Buy One Get One, Buy XGet Order Discount, or Buy X Get Shipping Discount promotion, including thecurrent promotion.
• Items with zero prices.
• Items with negative prices.
• Items whose prices are lower than promotion price.
Note: By default, items on sale do qualify for promotions and can be promotiontargets.
Understand how add-on products affect promotions
Add-on products let shoppers customize or enhance their purchases with optionalextras like monogramming, gift wrap, or warranties. Add-on products cannot be usedto qualify a product for a promotion, nor can they be explicitly targeted by a promotion.However, when a promotion targets a product in the cart that includes add-ons, thepromotion discounts the total item price, that is, the price of the product plus the priceof any add-ons. For example, suppose a promotion offers 20% off all wirelessheadphones. A $200 pair of headphones comes with an optional $40 replacementwarranty. When a shopper places both the headphones and the warranty in the cart,the promotion discounts the total cost of the headphones and warranty ($240) for adiscount of $48. You cannot apply a discount only to a parent product and not its add-ons. Keep this in mind when designing your promotions, especially when designingpromotions that might offer products with optional add-ons as free gifts. See Createadd-on products for more information.
When determining if a product with add-ons can be the target of a promotion,Commerce considers the Discountable property of a parent product only; it does notconsider the Discountable property of any of the parent’s add-ons. For example,suppose a set of wireless headphones is discountable but an optional chargeravailable as an add-on product is not discountable. When a shopper places both theheadphones and the charger in the cart, the charger will be discounted by any item ororder promotion that discounts the headphones, even though the charger’sDiscountable property is set to false. See Create and work with products to learn howto set the Discountable property for products and SKUs.
Understand the Discountable property for products and SKUs
Each product and SKU you create in Commerce has a Discountable property. Bydefault, the Discountable property is set to true; this means that the product or SKU is
Chapter 12Understand promotion targets
12-2
available to be used as a promotion target for item discount and order discount promotions.(Shipping discount promotions ignore the Discountable property.) If you set the Discountableproperty to false, the product or SKU can never be discounted by any item or orderpromotion, even if you add it to a promotion’s offer condition.
Note: The Discountable property does not affect promotions from an external system that youaccess with the External Promotions webhook .
Products and SKUs marked as not discountable can act as qualifiers for item and shippingdiscount promotions, but they cannot contribute to the qualifying order total for order discountpromotions. For example, suppose a promotion offers 20% off orders of at least $65. If a cartis valued at $75 but contains a $25 shirt marked as not discountable, the order does notqualify for the promotion; the shopper must add $40 in discountable items to the cart in orderfor the order to qualify for the promotion.
To prevent not-discountable items from acting as qualifiers, exclude them from a promotion inone of the following ways:
• Add individual products or SKUs to the Buy Condition’s Excluded Items list.
• Create the following rule in the Buy Condition’s Excluded Items section:Type = Base Product, Attribute = Discountable, Value = False
Understand currency-specific promotionsIf your store uses price groups to support multiple currencies, you can specify that apromotion applies only to items purchased in specific currencies.
For example, you can create an order discount called “Spend 100 Euros, get 10 Euros off”that applies to the product prices in all price groups that contain the currency Euro. Or youcan create a promotion that applies only if the shopper is paying with a specific credit card.
When you create a promotion, you use the Price Groups field to specify the price groups forwhich the promotion is valid.
If you select one or more price groups, the promotion is valid only for those price groups. Ifyou leave the Price Groups field blank, the promotion is valid for all price groups.
Understand audience-specific promotionsAn audience represents a segment of the shoppers that visit your store.
You define an audience by creating a set of rules based on attributes of the shopper profile.You can create promotions that can be claimed only by shoppers who are members ofspecific audiences. For example, a 20% off store-wide promotion could apply only toemployees of a certain company or shoppers with a high average order value.
When you create a promotion, you use the Target Audience field on the Availability tab toselect the audiences whose members are eligible for the promotion. If you select one or moreaudiences, the promotion is valid only for members of those audiences. If the TargetAudience field contains no audiences, all shoppers are eligible for the promotion, assumingthey meet the other qualifying conditions.
You can select both enabled and disabled audiences for a promotion. If you select a disabledaudience, the promotion is not valid for that audience until you enable the audience.
If an audience you added to a promotion is later deleted, Commerce does not automaticallyremove the deleted audience from the promotion, but adds an icon that indicates it has been
Chapter 12Understand currency-specific promotions
12-3
deleted. You should remove deleted audiences from the promotion. If all the audiencesassociated with a promotion are deleted, the promotion will never be available to anyshoppers.
See Define Audiences for more information about creating and managing audiences.
Understand site-specific promotionsIf your store supports multiple sites, you can specify that a promotion applies to itemspurchased only from specific sites.
Your Commerce instance initially has a single site, or store. You can, however, runmultiple sites from a single Commerce instance. Each site corresponds to a store. Forexample, you might have a site that sells jerseys for a specific team, and you maywant to apply a promotion only to items sold on that site.
When you create a promotion, you use the Sites field to specify the sites on which thepromotion is valid. If you select one or more sites, the promotion is valid only for thosesites. If you select the Applies to All checkbox, the promotion is valid on all sites.
Copy an existing promotionCreating a new promotion based on an existing one lets you easily create a number ofsimilar promotions, and lets you reuse promotions that were successful in the past.
When you copy an existing promotion, the following values are automatically copied tothe new promotion:
• Display name (By default, this will be set to the name of the promotion that wascopied, followed by (copy). For example, Summer Sale (copy).
• Description
• Price groups
• All condition and offer properties
• Priority
• Folder
• Excluded promotions
When you copy an existing promotion, the following values are not copied to the newpromotion:
• Start and end dates
• Promotion ID (A new ID is automatically assigned when you save the promotion.)
• Stacking rules
• Coupon or coupon batch
• Enabled status
• Any translations for shopper-visible properties, such as the name of the promotion.You can copy an existing promotion only in the store’s default language. Once yousave the copied promotion, you can translate properties into other languages yourstore supports. See Localize Your Store for more information.
Chapter 12Understand site-specific promotions
12-4

You can copy promotions created on the Promotions page of the administration interface. Youcannot copy custom promotions created with the rawPmdlTemplate promotion template. Formore information about custom promotions, see Create Custom Promotions.
To copy an existing promotion:
1. On the Promotions page, click the row of the promotion to copy and then click the Copybutton.Click anywhere in the row except on the link that is the promotion’s name. Clicking thatlink opens the existing promotion.
2. Enter information about the promotion that was not copied.
3. Click Save.
4. (Optional) Create a coupon code that customers must provide to redeem the promotion.See Add a coupon code to a promotion for more information.
Create an order discount promotionAn order discount promotion discounts an entire order.
Commerce includes the following order discount promotion templates:
• Spend Y for Order Discount discounts an order when a shopper spends a specifiedamount. You can discount orders by a fixed amount, such as $20, or by a percentage,such as 15%.You can configure this promotion to apply bigger discounts as the value of an orderincreases. For example, a promotion might discount a $75 order by 10%, a $100 order by15%, and an order of $150 or more by 20%.
• Spend Y in X Get Order Discount discounts an order when the shopper spends aspecified amount in specified product areas. For example, Spend $50 in Back-to-SchoolFashions, Get 20% Off Your Entire Order.
• Buy X Get Order Discount discounts an order when a shopper buys something in aspecified product area. For example, Buy 2 Kids Backpacks, Get 10% Off Your EntireOrder. See Understand promotion targets for information about how this type of orderdiscount interacts with item discounts.You can configure this promotion to discount any order, regardless of how muchshoppers spend or what items they purchase.
When Commerce sends the JSON representation of an order in the body of a webhook or aresponse to a REST API request, order discount promotions are listed individually in anorderDiscountInfos map within each cart item's JSON representation. The map includes thepromotion ID, discount amount, and coupon codes (if applicable) for each order discountapplied to the order. The following sample shows part of an Order Submit webhook body foran order that is discounted by two different order discount promotions.
... "orderDiscountInfos": [ { "couponCodes": [], "amount": 59.7, "promotionId": "orderDiscount" }, { "couponCodes": ["coupon101"],
Chapter 12Create an order discount promotion
12-5

"amount": 3.65, "promotionId": "promo10001" } ],...
To create a new Order Discount promotion, follow these steps:
1. On the Promotions page, click New Promotion and select Spend Y for OrderDiscount, Spend X in Y Get Order Discount, or Buy X Get Order Discount.
2. Enter the name, description, and price groups for the promotion. See Entergeneral promotion information for details about each field.
3. Enter condition and offer details for the promotion. See Enter condition and offerinformation for details about each field.
4. On the promotion’s Availability tab, define the promotion’s lifecycle and enterinformation that determines when the promotion is active and usable. See Enterpromotion availability information for details about each field.
5. (Optional) Specify promotions that cannot be combined with this one. See Excludepromotions for more information.
6. Click Save.
7. (Optional) Create a coupon code that customers must provide to redeem thepromotion. See Add a coupon code to a promotion for more information.
Create an item discount promotionAn item discount promotion discounts one or more qualifying items.
Oracle Commerce includes the following types of item discount promotion templates:
• Get Item Discount automatically discounts one or more qualifying items withoutrequiring the shopper to make any other purchases. For example, 20% Off AllKids’ Backpacks.
• Spend Y in X Get Item Discount discounts one or more qualifying items when theshopper spends a specified amount in specified product areas. For example,Spend $100 in Back-to-School Fashions, Get 20% Off Kids’ Backpacks.
You can create a promotion that discounts one of more items when a customer spendsthe specified amount anywhere in your store (Spend Y Get Item Discount) byspecifying that shoppers can spend the minimum amount on any item. For example,Spend $100, Get 20% Off Kids’ Backpacks. See Enter condition and offer informationfor details.
Each item in a shopper’s cart can be discounted by only one item discount promotion,even if it qualifies for more than one item discount. Item discount promotions areevaluated in order of priority, with low priority numbers applied first. Item discountpromotions that have the same priority have no guaranteed evaluation order. Forexample if a shirt qualifies for three item discount promotions, and all three promotionshave the same priority, there is no way to be certain which promotion will be applied tothe shirt when a shopper places it in her cart.
To create a new Get Item Discount or Spend Y in X Get Item Discount promotion:
Chapter 12Create an item discount promotion
12-6

1. On the Promotions page, click New Promotion and select Get Item Discount or SpendY in X Get Item Discount.
2. Enter the name, description, and price groups for the promotion. See Enter generalpromotion information for details about each field.
3. Enter condition and offer details for the promotion. See Enter condition and offerinformation for details about each field. See Sample item discount promotion for anexample that explains how different condition and offer settings can affect the discount.Note: The Get Item Discount promotion has no buy condition.
4. On the promotion’s Availability tab, define the promotion’s lifecycle and enter informationthat determines when the promotion is active and usable. See Enter promotionavailability information for details about each field.
5. (Optional) Specify promotions that cannot be combined with this one. See Excludepromotions for more information.
6. Click Save.
7. (Optional) Create a coupon code that customers must provide to redeem the promotion.See Add a coupon code to a promotion for more information.
Sample item discount promotion
This section describes a promotion called Summer Skirt Sale. When a shopper spends $100anywhere in the Bags and Luggage collection, the promotion discounts one skirt by 25%. Theitems to include and exclude for offer are the same as items in buy condition. At least onequalifying item must be purchased. The discount order is least expensive item discountedfirst and the promotion uses list prices to sort the discount order. The promotion discounts amaximum of one item.
A shopper’s cart contains the following items:
• One backpack, list price $100
• One skirt, list price $100, on sale for $75
• One skirt, list price $200, on sale for $50
The backpack fulfills the promotion condition. The discount is applied to the skirt thatcosts $75, not to the one that costs $50, because the less-expensive skirt has a higher listprice.
Create a buy one get one promotionA buy one get one (sometimes called BOGO or Buy X Get Y) promotion discounts an itemwhen a customer buys another, often similar, item.
A common buy one get one condition is that the shopper buys an item in a collection andreceives a discount on a second item in that collection. For example, when a shopper buystwo tops, she gets one for 50% off. A common Buy X Get Y condition is that a shopper buysone or more items and receives a discount on a related item. For example, when a shopperbuys a pair of hiking boots, she gets a free pair of hiking socks.
To create a new buy one get one promotion, follow these steps:
1. On the Promotions page, click New Promotion and select Buy One Get One.
2. Enter the name, description, and price groups for the promotion. See Enter generalpromotion information for details about each field.
Chapter 12Create a buy one get one promotion
12-7

3. Enter condition and offer details for the promotion. See Enter condition and offerinformation for details about each field. See Sample buy one get one promotion foran example that explains how different condition and offer settings can affect thediscount.
4. On the promotion’s Availability tab, define the promotion’s lifecycle and enterinformation that determines when the promotion is active and usable. See Enterpromotion availability information for details about each field.
5. (Optional) Specify promotions that cannot be combined with this one. See Excludepromotions for more information.
6. Click Save.
7. (Optional) Create a coupon code that customers must provide to redeem thepromotion. See Add a coupon code to a promotion for more information.
Sample buy one get one promotion
This section describes a promotion called Summer Shoes: Buy One Get One. When ashopper buys one pair of shoes from the collection Ladies Shoes, the promotiondiscounts another pair from that collection by 50%. The buy condition includes thecollection Ladies Shoes but excludes its child collection Ladies Designer Shoes. Theitems to include and exclude for offer are the same as items in buy condition. At leastone qualifying item must be purchased. The discount order is least expensive itemdiscounted first and list prices are used to sort the items. The promotion discounts amaximum of 2 items.
A shopper’s cart contains the following items:
• One pair of ladies sandals, list price $100
• One pair of ladies designer boots, list price $800
In this case, the discount is not applied to either item. The designer boots are excludedfrom the buy condition, so the sandals cannot be discounted. While the sandals docount toward the buy condition, the boots are excluded from the offer, so they cannotbe discounted.
Another shopper’s cart contains the following items:
• One pair of ladies sandals, list price $100
• One pair ladies sandals, list price $75
In this case, the $75 sandals receive the discount. If you edit the promotion to applythe discount to the most expensive item first, then the $100 sandals receive thediscount.
Create a shipping discount promotionA shipping discount promotion offers free or discounted shipping via shipping methodsyou associate with the promotion.
Shipping discount promotions can discount both internally-priced and externally-pricedshipping methods. Shipping discount promotions you create with templates on thePromotions page apply the shipping discount to an entire order. To apply a shippingdiscount to an individual shipping group within an order, you must create a custompromotion with the Commerce Admin API.
Chapter 12Create a shipping discount promotion
12-8
Note: Shipping surcharges are not affected by shipping promotions and are added to theorder total during checkout. See Manage Your Catalog and Configure Shipping for moreinformation about shipping methods and shipping surcharges.
You can create the following types of shipping discounts:
• Get Shipping Discount discounts shipping for all orders with no required buy condition
• Spend Y Get Shipping Discount discounts shipping when the shopper spends at least aspecified amount.
• Spend Y in X Get Shipping Discount discounts shipping when the shopper spends atleast a specified amount in specified product areas. For example, Spend $50 in Back-to-School Fashions, Get Free Shipping On Your Entire Order.
• Buy X Get Shipping Discount discounts shipping when the shopper purchases specifieditems.
To create a new shipping discount promotion:
1. On the Promotions page, click New Promotion and select Get Shipping Discount,Spend Y Get Shipping Discount, Spend Y in X Get Shipping Discount, or Buy X GetShipping Discount.
2. Enter the name, description, and price groups for the promotion. See Enter generalpromotion information for details about each field.
3. Enter condition and offer details for the promotion. See Enter condition and offerinformation for details about each field. See Sample buy one get one promotion for anexample that explains how different condition and offer settings can affect the discount.Note: Get Shipping Discount does not require a buy condition.
4. On the promotion’s Availability tab, define the promotion’s lifecycle and enter informationthat determines when the promotion is active and usable. SeeEnter promotion availabilityinformation for details about each field.
5. (Optional) On the promotion’s Exclusion Rules tab, specify promotions that cannot becombined with this one. See Exclude promotions for more information.
6. Click Save.
7. (Optional) Create a coupon code that customers must provide to redeem the promotion.See Add a coupon code to a promotion for more information.
Create a gift with purchase promotionGift with purchase promotions let you give a customer a free item as part of their order.
You can create two types of gift with purchase promotions:
• Gift with Item Purchase gives the shopper a free gift with a purchase. You can offer a giftwith any purchase or with the purchase of a specific item. This promotion can apply onlyonce per shopping cart. Gift items cannot act as qualifiers for the promotion. Forexample, suppose you create a promotion that offers a free votive candle with anypurchase. If the shopper adds one votive candle to the cart, that candle is not repriced tofree. If the shopper then adds another item to the cart, that item qualifies the cart for thepromotion, and the votive candle is repriced to free.
• Spend Y Get Gift with Purchase gives the shopper a free gift when they spend aspecified amount. For example, “Spend $100, get a free $10 gift card.” Gift items cannotact as qualifiers for the promotion, so if a shopper adds a gift item to the cart, its price
Chapter 12Create a gift with purchase promotion
12-9
does not count toward the Spend Y total. This promotion can apply only once pershopping cart; if a shopper adds two of the qualifying item, only one will berepriced to free.
When a shopper’s cart qualifies for a gift with purchase promotion, one of the followingthings happens:
• If no item in the cart meets the offer criteria, the gift item is automatically added tothe cart. The gift item cannot act as a qualifier for other promotions.
• If the shopper has already added the gift item to their cart, the item is repriced tobe free. Once the gift item is repriced, it can no longer act as a qualifier for otherpromotions.
If the shopper removes the gift from a qualifying cart, Commerce does notautomatically re-add the gift while the cart still qualifies for the promotion. There aretwo ways to add the gift again:
• If the shopper re-adds the gift item to the cart, the item is repriced to free if the cartstill qualifies for the promotion.
• If the cart becomes unqualified (for example, if the shopper removes itemsrequired for the buy condition) and then qualified again (for example, if theshopper adds back items required for the buy condition), Commerce automaticallyre-adds the gift.
When an item appears in an order object (for example, in the body of an Order Submitwebhook), the property gwp specifies whether the item was given as part of a gift withpurchase promotion. For gift items, the value of the gwp property is true; for all otheritems, the value is false. For example:
"gwp":true,
To create a new gift with purchase promotion, follow these steps:
1. On the Promotions page, click New Promotion and select Gift with ItemPurchase or Spend Y Get Gift with Purchase.
2. Enter the name, description, and price groups for the promotion. See Entergeneral promotion information for details about each field.
3. Enter condition and offer details for the promotion. See Enter condition and offerinformation for details about each field.
4. On the promotion’s Availability tab, define the promotion’s lifecycle and enterinformation that determines when the promotion is active and usable. See Enterpromotion availability information for details about each field.
5. (Optional) Specify promotions that cannot be combined with this one. See Excludepromotions for more information.
6. Click Save.
7. (Optional) Create a coupon code that customers must provide to redeem thepromotion. See Add a coupon code to a promotion for more information.
Define a promotionYou define a promotion by entering basic descriptive information, the buy conditionand offer, and the promotion's availability.
Chapter 12Define a promotion
12-10
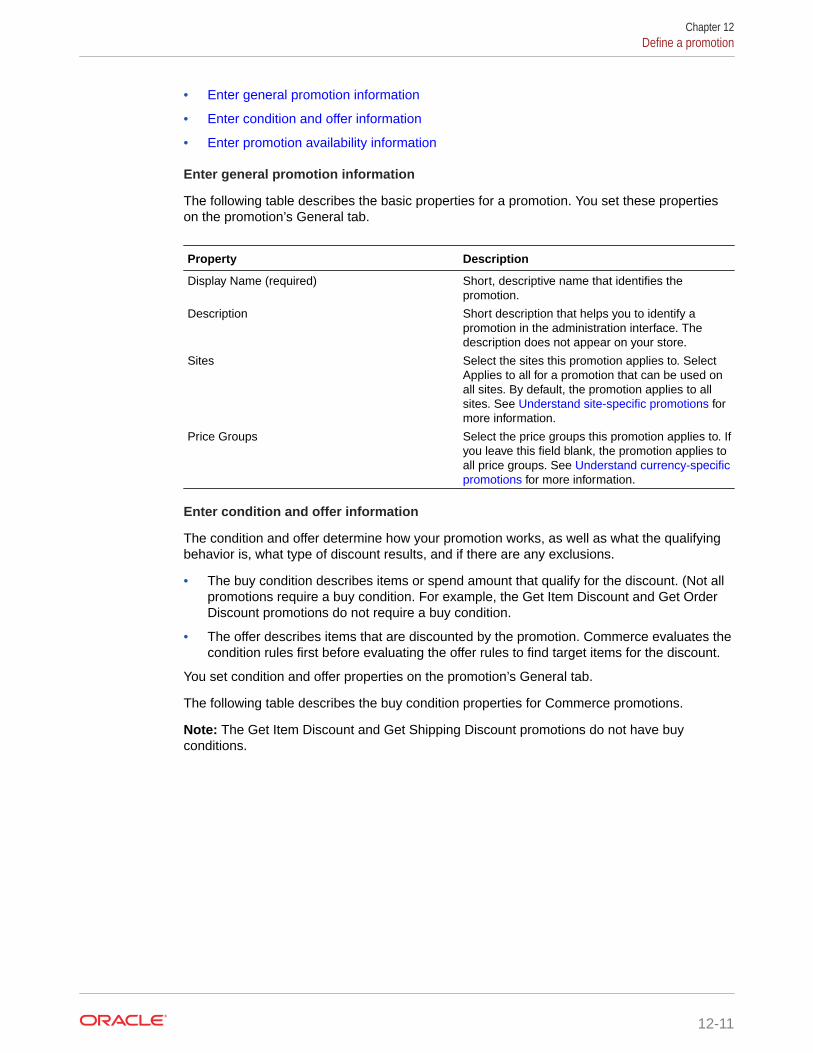
• Enter general promotion information
• Enter condition and offer information
• Enter promotion availability information
Enter general promotion information
The following table describes the basic properties for a promotion. You set these propertieson the promotion’s General tab.
Property Description
Display Name (required) Short, descriptive name that identifies thepromotion.
Description Short description that helps you to identify apromotion in the administration interface. Thedescription does not appear on your store.
Sites Select the sites this promotion applies to. SelectApplies to all for a promotion that can be used onall sites. By default, the promotion applies to allsites. See Understand site-specific promotions formore information.
Price Groups Select the price groups this promotion applies to. Ifyou leave this field blank, the promotion applies toall price groups. See Understand currency-specificpromotions for more information.
Enter condition and offer information
The condition and offer determine how your promotion works, as well as what the qualifyingbehavior is, what type of discount results, and if there are any exclusions.
• The buy condition describes items or spend amount that qualify for the discount. (Not allpromotions require a buy condition. For example, the Get Item Discount and Get OrderDiscount promotions do not require a buy condition.
• The offer describes items that are discounted by the promotion. Commerce evaluates thecondition rules first before evaluating the offer rules to find target items for the discount.
You set condition and offer properties on the promotion’s General tab.
The following table describes the buy condition properties for Commerce promotions.
Note: The Get Item Discount and Get Shipping Discount promotions do not have buyconditions.
Chapter 12Define a promotion
12-11
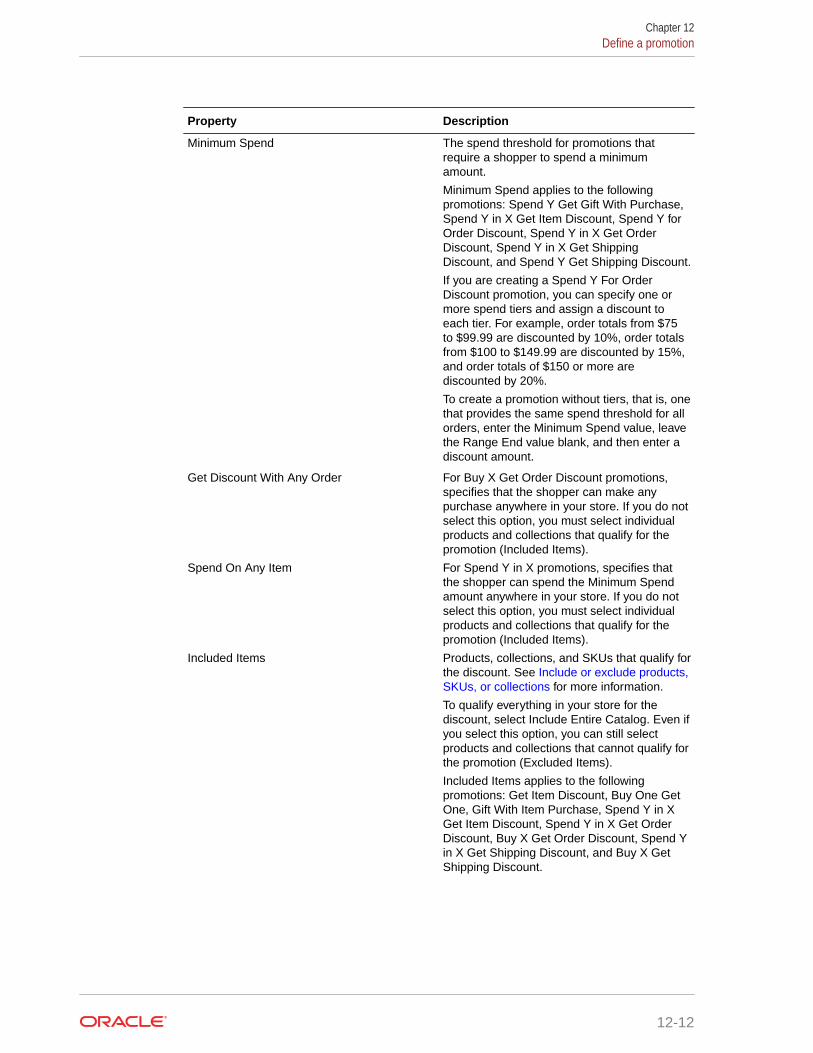
Property Description
Minimum Spend The spend threshold for promotions thatrequire a shopper to spend a minimumamount.
Minimum Spend applies to the followingpromotions: Spend Y Get Gift With Purchase,Spend Y in X Get Item Discount, Spend Y forOrder Discount, Spend Y in X Get OrderDiscount, Spend Y in X Get ShippingDiscount, and Spend Y Get Shipping Discount.
If you are creating a Spend Y For OrderDiscount promotion, you can specify one ormore spend tiers and assign a discount toeach tier. For example, order totals from $75to $99.99 are discounted by 10%, order totalsfrom $100 to $149.99 are discounted by 15%,and order totals of $150 or more arediscounted by 20%.
To create a promotion without tiers, that is, onethat provides the same spend threshold for allorders, enter the Minimum Spend value, leavethe Range End value blank, and then enter adiscount amount.
Get Discount With Any Order For Buy X Get Order Discount promotions,specifies that the shopper can make anypurchase anywhere in your store. If you do notselect this option, you must select individualproducts and collections that qualify for thepromotion (Included Items).
Spend On Any Item For Spend Y in X promotions, specifies thatthe shopper can spend the Minimum Spendamount anywhere in your store. If you do notselect this option, you must select individualproducts and collections that qualify for thepromotion (Included Items).
Included Items Products, collections, and SKUs that qualify forthe discount. See Include or exclude products,SKUs, or collections for more information.
To qualify everything in your store for thediscount, select Include Entire Catalog. Even ifyou select this option, you can still selectproducts and collections that cannot qualify forthe promotion (Excluded Items).
Included Items applies to the followingpromotions: Get Item Discount, Buy One GetOne, Gift With Item Purchase, Spend Y in XGet Item Discount, Spend Y in X Get OrderDiscount, Buy X Get Order Discount, Spend Yin X Get Shipping Discount, and Buy X GetShipping Discount.
Chapter 12Define a promotion
12-12
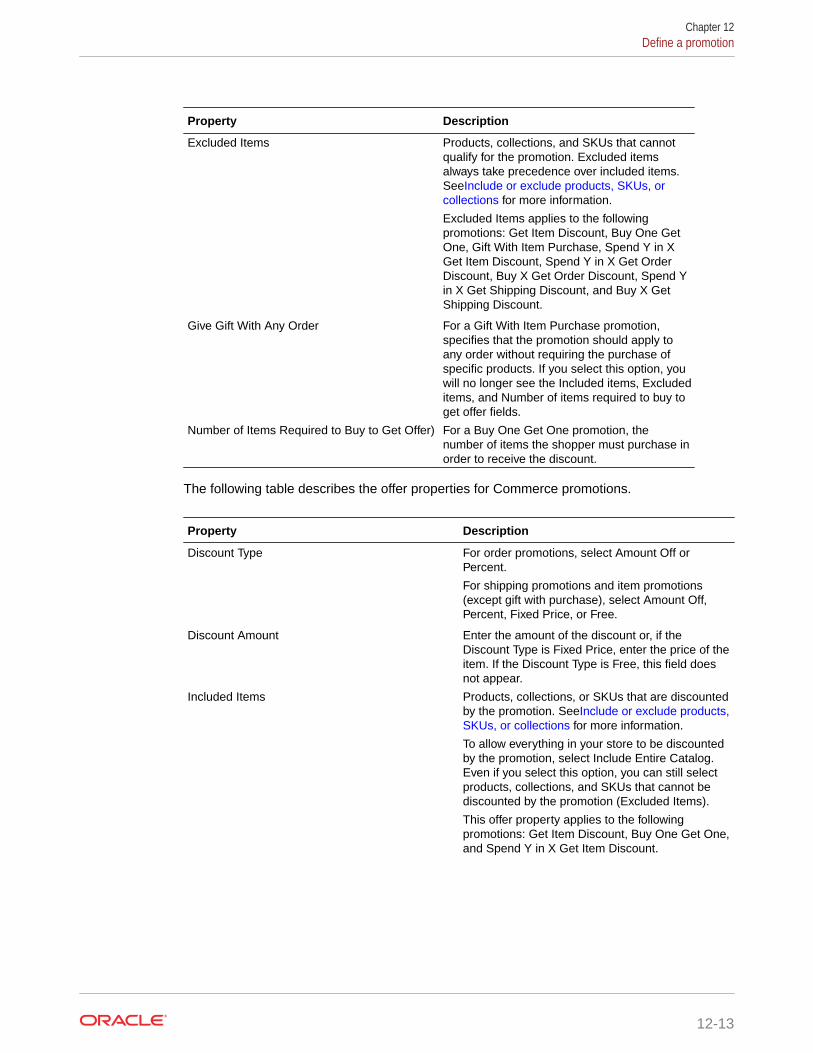
Property Description
Excluded Items Products, collections, and SKUs that cannotqualify for the promotion. Excluded itemsalways take precedence over included items.SeeInclude or exclude products, SKUs, orcollections for more information.
Excluded Items applies to the followingpromotions: Get Item Discount, Buy One GetOne, Gift With Item Purchase, Spend Y in XGet Item Discount, Spend Y in X Get OrderDiscount, Buy X Get Order Discount, Spend Yin X Get Shipping Discount, and Buy X GetShipping Discount.
Give Gift With Any Order For a Gift With Item Purchase promotion,specifies that the promotion should apply toany order without requiring the purchase ofspecific products. If you select this option, youwill no longer see the Included items, Excludeditems, and Number of items required to buy toget offer fields.
Number of Items Required to Buy to Get Offer) For a Buy One Get One promotion, thenumber of items the shopper must purchase inorder to receive the discount.
The following table describes the offer properties for Commerce promotions.
Property Description
Discount Type For order promotions, select Amount Off orPercent.
For shipping promotions and item promotions(except gift with purchase), select Amount Off,Percent, Fixed Price, or Free.
Discount Amount Enter the amount of the discount or, if theDiscount Type is Fixed Price, enter the price of theitem. If the Discount Type is Free, this field doesnot appear.
Included Items Products, collections, or SKUs that are discountedby the promotion. SeeInclude or exclude products,SKUs, or collections for more information.
To allow everything in your store to be discountedby the promotion, select Include Entire Catalog.Even if you select this option, you can still selectproducts, collections, and SKUs that cannot bediscounted by the promotion (Excluded Items).
This offer property applies to the followingpromotions: Get Item Discount, Buy One Get One,and Spend Y in X Get Item Discount.
Chapter 12Define a promotion
12-13
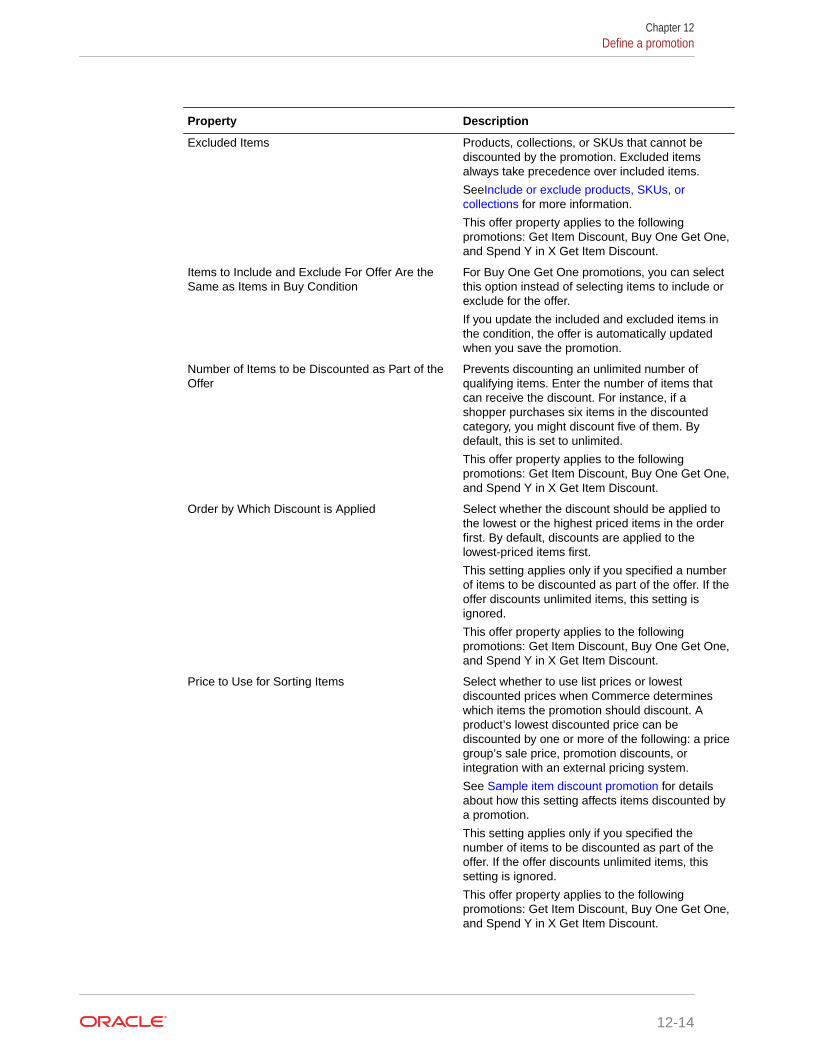
Property Description
Excluded Items Products, collections, or SKUs that cannot bediscounted by the promotion. Excluded itemsalways take precedence over included items.
SeeInclude or exclude products, SKUs, orcollections for more information.
This offer property applies to the followingpromotions: Get Item Discount, Buy One Get One,and Spend Y in X Get Item Discount.
Items to Include and Exclude For Offer Are theSame as Items in Buy Condition
For Buy One Get One promotions, you can selectthis option instead of selecting items to include orexclude for the offer.
If you update the included and excluded items inthe condition, the offer is automatically updatedwhen you save the promotion.
Number of Items to be Discounted as Part of theOffer
Prevents discounting an unlimited number ofqualifying items. Enter the number of items thatcan receive the discount. For instance, if ashopper purchases six items in the discountedcategory, you might discount five of them. Bydefault, this is set to unlimited.
This offer property applies to the followingpromotions: Get Item Discount, Buy One Get One,and Spend Y in X Get Item Discount.
Order by Which Discount is Applied Select whether the discount should be applied tothe lowest or the highest priced items in the orderfirst. By default, discounts are applied to thelowest-priced items first.
This setting applies only if you specified a numberof items to be discounted as part of the offer. If theoffer discounts unlimited items, this setting isignored.
This offer property applies to the followingpromotions: Get Item Discount, Buy One Get One,and Spend Y in X Get Item Discount.
Price to Use for Sorting Items Select whether to use list prices or lowestdiscounted prices when Commerce determineswhich items the promotion should discount. Aproduct’s lowest discounted price can bediscounted by one or more of the following: a pricegroup’s sale price, promotion discounts, orintegration with an external pricing system.
See Sample item discount promotion for detailsabout how this setting affects items discounted bya promotion.
This setting applies only if you specified thenumber of items to be discounted as part of theoffer. If the offer discounts unlimited items, thissetting is ignored.
This offer property applies to the followingpromotions: Get Item Discount, Buy One Get One,and Spend Y in X Get Item Discount.
Chapter 12Define a promotion
12-14
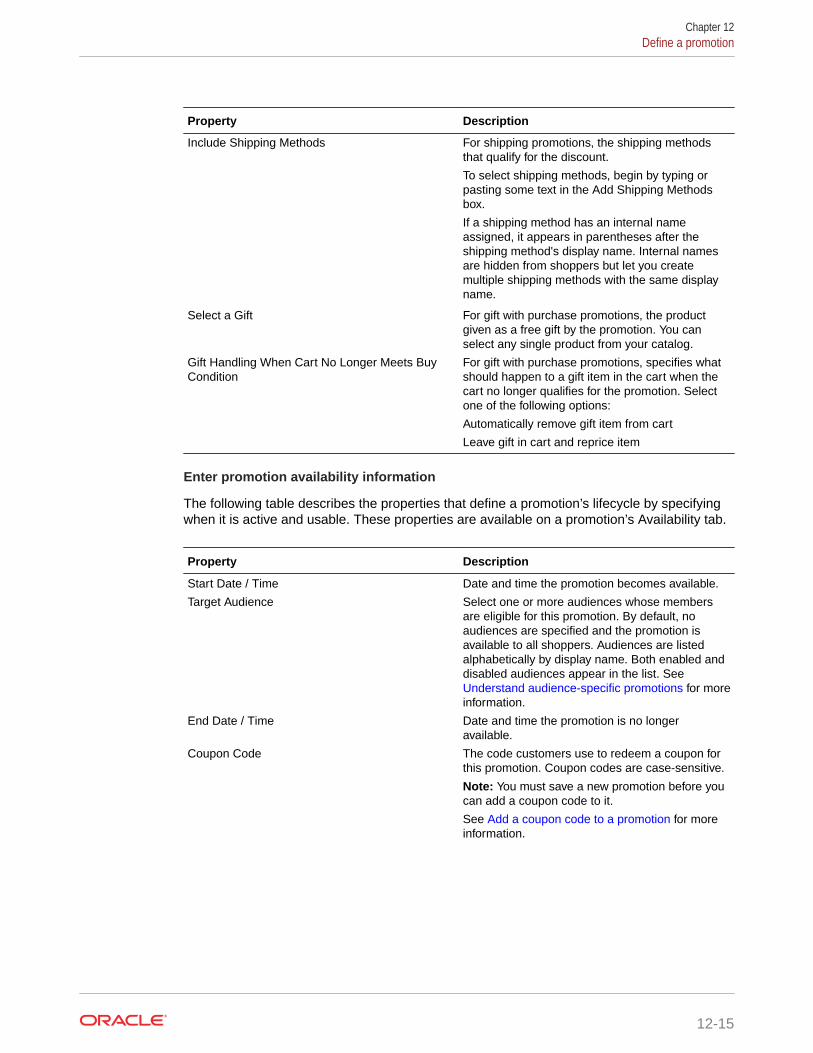
Property Description
Include Shipping Methods For shipping promotions, the shipping methodsthat qualify for the discount.
To select shipping methods, begin by typing orpasting some text in the Add Shipping Methodsbox.
If a shipping method has an internal nameassigned, it appears in parentheses after theshipping method's display name. Internal namesare hidden from shoppers but let you createmultiple shipping methods with the same displayname.
Select a Gift For gift with purchase promotions, the productgiven as a free gift by the promotion. You canselect any single product from your catalog.
Gift Handling When Cart No Longer Meets BuyCondition
For gift with purchase promotions, specifies whatshould happen to a gift item in the cart when thecart no longer qualifies for the promotion. Selectone of the following options:
Automatically remove gift item from cart
Leave gift in cart and reprice item
Enter promotion availability information
The following table describes the properties that define a promotion’s lifecycle by specifyingwhen it is active and usable. These properties are available on a promotion’s Availability tab.
Property Description
Start Date / Time Date and time the promotion becomes available.
Target Audience Select one or more audiences whose membersare eligible for this promotion. By default, noaudiences are specified and the promotion isavailable to all shoppers. Audiences are listedalphabetically by display name. Both enabled anddisabled audiences appear in the list. See Understand audience-specific promotions for moreinformation.
End Date / Time Date and time the promotion is no longeravailable.
Coupon Code The code customers use to redeem a coupon forthis promotion. Coupon codes are case-sensitive.
Note: You must save a new promotion before youcan add a coupon code to it.
See Add a coupon code to a promotion for moreinformation.
Chapter 12Define a promotion
12-15
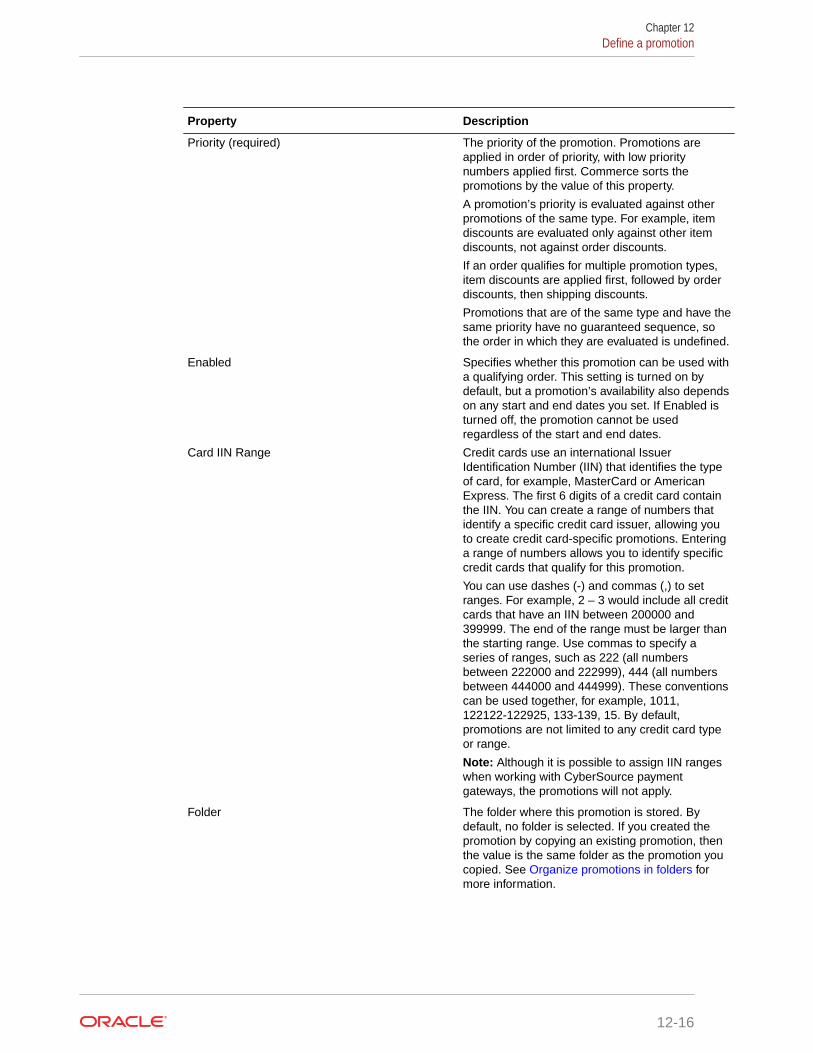
Property Description
Priority (required) The priority of the promotion. Promotions areapplied in order of priority, with low prioritynumbers applied first. Commerce sorts thepromotions by the value of this property.
A promotion’s priority is evaluated against otherpromotions of the same type. For example, itemdiscounts are evaluated only against other itemdiscounts, not against order discounts.
If an order qualifies for multiple promotion types,item discounts are applied first, followed by orderdiscounts, then shipping discounts.
Promotions that are of the same type and have thesame priority have no guaranteed sequence, sothe order in which they are evaluated is undefined.
Enabled Specifies whether this promotion can be used witha qualifying order. This setting is turned on bydefault, but a promotion’s availability also dependson any start and end dates you set. If Enabled isturned off, the promotion cannot be usedregardless of the start and end dates.
Card IIN Range Credit cards use an international IssuerIdentification Number (IIN) that identifies the typeof card, for example, MasterCard or AmericanExpress. The first 6 digits of a credit card containthe IIN. You can create a range of numbers thatidentify a specific credit card issuer, allowing youto create credit card-specific promotions. Enteringa range of numbers allows you to identify specificcredit cards that qualify for this promotion.
You can use dashes (-) and commas (,) to setranges. For example, 2 – 3 would include all creditcards that have an IIN between 200000 and399999. The end of the range must be larger thanthe starting range. Use commas to specify aseries of ranges, such as 222 (all numbersbetween 222000 and 222999), 444 (all numbersbetween 444000 and 444999). These conventionscan be used together, for example, 1011,122122-122925, 133-139, 15. By default,promotions are not limited to any credit card typeor range.
Note: Although it is possible to assign IIN rangeswhen working with CyberSource paymentgateways, the promotions will not apply.
Folder The folder where this promotion is stored. Bydefault, no folder is selected. If you created thepromotion by copying an existing promotion, thenthe value is the same folder as the promotion youcopied. See Organize promotions in folders formore information.
Chapter 12Define a promotion
12-16
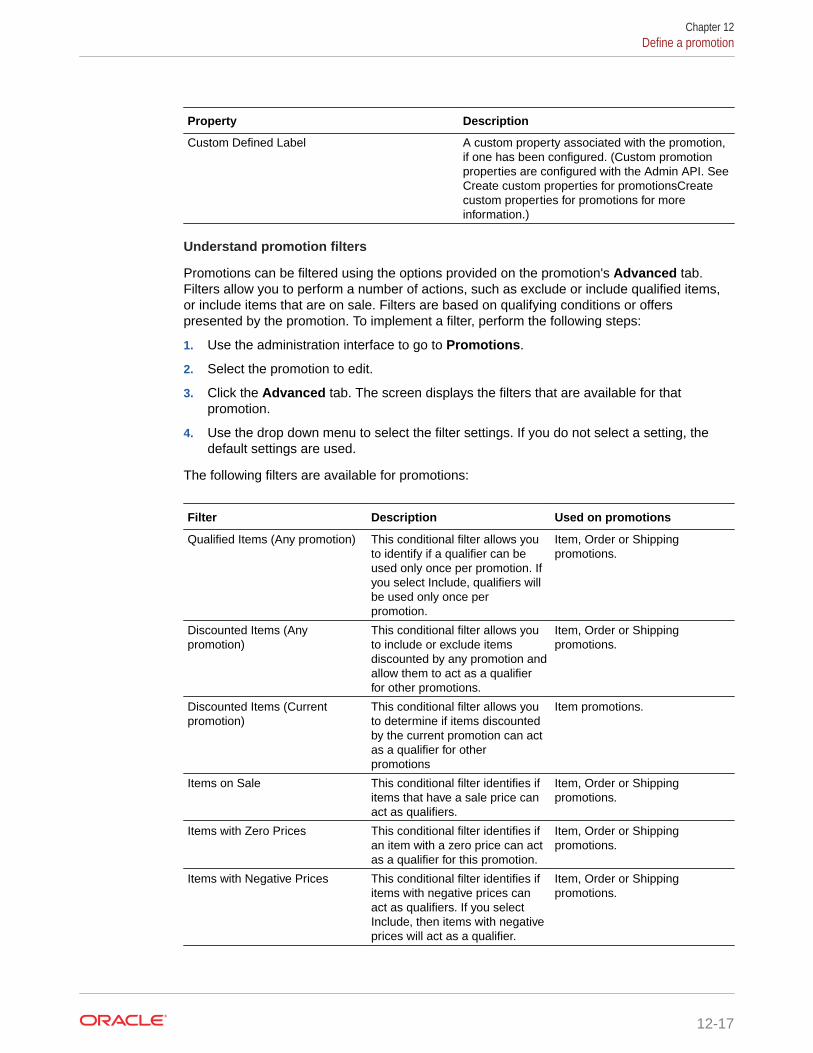
Property Description
Custom Defined Label A custom property associated with the promotion,if one has been configured. (Custom promotionproperties are configured with the Admin API. SeeCreate custom properties for promotionsCreatecustom properties for promotions for moreinformation.)
Understand promotion filters
Promotions can be filtered using the options provided on the promotion's Advanced tab.Filters allow you to perform a number of actions, such as exclude or include qualified items,or include items that are on sale. Filters are based on qualifying conditions or offerspresented by the promotion. To implement a filter, perform the following steps:
1. Use the administration interface to go to Promotions.
2. Select the promotion to edit.
3. Click the Advanced tab. The screen displays the filters that are available for thatpromotion.
4. Use the drop down menu to select the filter settings. If you do not select a setting, thedefault settings are used.
The following filters are available for promotions:
Filter Description Used on promotions
Qualified Items (Any promotion) This conditional filter allows youto identify if a qualifier can beused only once per promotion. Ifyou select Include, qualifiers willbe used only once perpromotion.
Item, Order or Shippingpromotions.
Discounted Items (Anypromotion)
This conditional filter allows youto include or exclude itemsdiscounted by any promotion andallow them to act as a qualifierfor other promotions.
Item, Order or Shippingpromotions.
Discounted Items (Currentpromotion)
This conditional filter allows youto determine if items discountedby the current promotion can actas a qualifier for otherpromotions
Item promotions.
Items on Sale This conditional filter identifies ifitems that have a sale price canact as qualifiers.
Item, Order or Shippingpromotions.
Items with Zero Prices This conditional filter identifies ifan item with a zero price can actas a qualifier for this promotion.
Item, Order or Shippingpromotions.
Items with Negative Prices This conditional filter identifies ifitems with negative prices canact as qualifiers. If you selectInclude, then items with negativeprices will act as a qualifier.
Item, Order or Shippingpromotions.
Chapter 12Define a promotion
12-17

Filter Description Used on promotions
Qualified Items This offer filter includes orexcludes items that have actedas qualifiers for another discount.If you include these items, anyitem that acted as a qualifier foranother discount can be receivethe discount.
Item promotions only.
Discounted items (Anypromotion)
This offer filter determines ifitems that have already beendiscounted by the currentpromotion can receive thediscount again. If you includediscounted items, the items canreceive the discount again.
Item promotions only.
Discounted Items (Currentpromotion)
This offer filter includes orexcludes discounted items fromthe current promotion.
Item promotions only.
Items on Sale This offer filter includes orexcludes items that were pricedwith a sales price from receivingthe discount.
Item promotions only.
Items with Zero Prices This offer filter includes orexcludes items that have zeroprices.
Item promotions only.
Items with Negative Prices This offer filter identifies if itemswith negative prices can receivethe discount. If you include itemswith negative prices, they willreceive the discount.
Item promotions only.
Items with Prices Lower thanPromotion Price (Fixed Pricepromotions only)
This offer filter includes orexcludes items that have a pricelower than the promotion price.This applies to fixed pricepromotions only.
Item promotions only.
Enable and disable promotionsYou can enable and disable promotions within qualifying orders.
A promotion is available to be used with a qualifying order if both of the following aretrue:
• You have selected the Enabled checkbox on the promotion's Availability tab.
• The qualifying order is placed during the time specified by the promotion’s startand end dates.
The easiest way to disable a promotion is to uncheck its Enabled checkbox.
Important: Deleting assets, such as products, catalogs, shipping methods, etc., canresult in discrepancies in your system, which may produce errors. It is recommendedthat you disable assets instead of delete them.
Chapter 12Enable and disable promotions
12-18
Organize promotions in foldersYou can create folders to organize your promotions so they are easier to find and work with.
This section includes the following topics:
• Create a promotions folder
• Edit a promotions folder
• Add promotions to a folder
• Delete a promotions folder
Create a promotions folder
To create a promotions folder, follow these steps:
1. On the Promotions page, click the Manage Folders button.
2. Click Create New Folder.
3. Enter a name for the folder and, if you want it to be a child of another folder, click theLocate Folder Under drop-down list and select a parent folder.
4. Click Create.
Edit a promotions folder
You can change a folder’s name and parent folder. You cannot change a folder’s ID.
To edit a promotions folder, follow these steps:
1. On the Promotions page, click the Manage Folders button.
2. Click the edit icon for the folder you want to edit.
3. Change the folders name and/or parent folder.
4. Click Save.
Add promotions to a folder
You can add one or more promotions to a folder by selecting them from the Promotions listand then selecting a folder to add them to. You can also add a single promotion to a folder byspecifying a folder while creating or editing the promotion.
To add one or more promotions to a folder, follow these steps:
1. On the Promotions page, select the promotions to move to a folder.
2. Click the Manage Folders button.
3. Select a folder from the list.Note: You can add the promotions only to an existing folder; you cannot create a folderand add the selected promotions to it in a single step. If you click Create New Folder inthis dialog, Commerce does create a new folder, but does not add the selectedpromotions to it.
To change a promotion’s folder property follow these steps:
1. On the Promotions page, click the promotion to edit.
2. Select a folder from the Add Promotion To list.
Chapter 12Organize promotions in folders
12-19

3. Click Save.
Delete a promotions folder
Deleting a promotions folder does not also delete its contents. If you delete a folderthat contains promotions or other folders, they are automatically moved to the top levelin the folder list.
Important: Deleting assets, such as products, catalogs, promotions, etc., can result indiscrepancies in your system, which may produce errors. It is recommended that youdisable assets instead of delete them.
To delete a promotions folder, follow these steps:
1. On the Promotions page, click the Manage Folders button.
2. Click the edit icon for the folder you want to delete.
3. Click Delete.
4. Confirm that you want to delete the folder or click Cancel to keep the folder.
Include or exclude products, SKUs, or collectionsMost promotions must include at least one item that a shopper must buy to qualifytheir order for the discount (called the buy condition) and at least one item that can bediscounted by the promotion (called the offer).
You can specify products to include or exclude from a promotion’s condition or offerusing any combination of the following:
• Select one or more products from your catalog. All SKUs for a selected productare included or excluded from the buy condition or offer.
• Select one or more collections from your catalog. All products in a selectedcollection are included or excluded from the buy condition or offer.
• Select one or more SKUs from your catalog.
• Create one or more rules that automatically select products based on product,SKU, or variant properties you specify. For example, suppose you want to excludeall premium brands from a promotion that discounts athletic shoes. You wouldcreate a rule that includes the product property Brand and specifies which brandsto exclude. See Create rules to include or exclude items to learn how to create arule.
Keep the following in mind when you include and exclude items from a buy conditionor offer:
• Excluded items always take precedence over included items. For example, if anoffer includes the collection Movie Store Root but excludes its child collectionClearance Movies, no items in Clearance Movies will be discounted by thepromotion.However, if you include Clearance Movies but exclude its parent, Movie StoreRoot, then no movies, even those in the Clearance Movies collection, can bediscounted by the promotion.
• Commerce does not prevent you from adding the same item to both the includedand excluded items lists. In this case, the item is excluded.
Chapter 12Include or exclude products, SKUs, or collections
12-20
• If an included or excluded items list uses a combination of selected products, selectedcollections, and a set of rules, Commerce checks each item in the shopper’s cart to see ifit matches any of the products in the list or the set of rules.
• Promotions identify included and excluded products and collections by their IDs. If anitem is part of a promotion and you reassign its ID to different item, the promotionautomatically uses the new item with the reassigned ID. This may cause unexpectedresults.
To select products, collections, or SKUs to include or exclude from a buy condition or offer,follow these steps:
1. On a promotion’s details page, under Included Items or Excluded Items, click the Editbutton next to the Products or Collections box.
2. Select a product or collection from the list. You can filter the list by typing or pasting sometext in the Products or Collections box.The filter control matches letters or numbers that you type, wherever they appear in thename or ID, not just at the beginning. Usually, as you type more characters, there arefewer matches. When you see the item you want, select it.
3. Click Add Selected.
4. Click Done when you finish adding products or collections.
Create rules to include or exclude items
This section describes how to create a rule for a buy condition or offer. A rule automaticallyselects items based on product, SKU, or variant properties. For example, suppose youcreated a custom, internal property called Do Not Discount on the base product type.Merchandisers select this option for products in your catalog that should never be discountedby any promotion. To make sure that no promotions ever discount these products, create arule for each promotion’s offer that includes the base product property Do Not Discount andspecifies that its value should be True.
To create a rule that specifies products to include or exclude from a buy condition or offer,follow these steps:
1. On a promotion’s details page, under Included Items or Excluded Items, click the NewRule button.
2. Select a type of property to use from the Type list. You can select only one type per rule:
• Base Product lets you select from all the product properties associated with yourcatalog’s base product type, including custom properties you created.
• Base SKU lets you select from all the SKU properties associated with your catalog’sbase product type. SKUs created from the base product type can have SKUproperties but not variant properties.
• Custom Product Type Product lets you select from all the custom product propertiesassociated with a custom product type you created in your catalog, where CustomProduct Type is the product type’s name.
• Custom Product Type SKU or Variant lets you select a SKU property or variantproperty from a custom product type you created in your catalog, where CustomProduct Type is the product type’s name.
See Create and edit product types for more information about product properties andSKU properties. See Create and work with SKUs for more information about variantproperties.
Chapter 12Include or exclude products, SKUs, or collections
12-21
3. Select a property from the Attribute list. The available properties depend on theType you selected in the previous step. You can select only one attribute per rule.
• For Base Product, Commerce displays all the product properties associatedwith your catalog’s base product type (except ID), including custom propertiesyou created.
• For a custom product type, Commerce displays all the custom productproperties associated with the product type you selected. None of the baseproduct type properties are available in this list.
• For Base SKU, Commerce displays all the SKU properties associated with thebase product type, including custom SKU properties you created.
• For a custom product type SKU or Variant, Commerce displays all the SKUand variant properties associated with the product type you selected. None ofthe base SKU properties are available in this list.
4. Select an operator that links the property to a value that you will specify in the nextstep.The operators you see depend on the kind of property you selected as anattribute. For example, if you select the base product type property Arrival Date,the available operators are Before and After.
5. Select or enter a value for the property.For some values, such as variant values, Commerce displays a list for you tochoose from. (If you selected a custom product type SKU or Variant, the listincludes both SKU values and variant values, with any SKU values appearing firstin the list.) For others, such as Availability Date or Brand, you must type in a value.The rule editor does not validate any text or numeric values you type, so take carewhen you enter values and make sure you test promotions before they go live.The rule editor also does validate date values.
6. Click Done when you finish creating the rule.
7. If you create more than one rule for an included or excluded items list, select oneof the following Rule Matching options to specify how the rules in this set behavetogether:
• Match Any Rule: (default) If an item in a shopper’s cart matches any rule inthe set, that rule applies.
• Match All Rules: If an item in a shopper’s cart matches all the rules in the set,all the rules apply. If the item matches only some of the rules but not all, noneof the rules apply.
8. Click Save.
Exclude promotionsExclusion rules prevent customers from taking advantage of unintended synergyamong your promotions by letting you specify promotions that can never be combinedwith the current promotion.
For example, if a promotion offers 25% off all soccer equipment, you might want tospecify that another promotion, which offers 10% off all items in your catalog, cannotbe combined with it.
Keep the following in mind when you create exclusion rules for a promotion:
Chapter 12Exclude promotions
12-22
• Excluded promotions must have a lower priority than the promotion that is excludingthem.
• Use caution when excluding promotions, to prevent confusion as to exactly whenpromotions apply.
• If a promotion has already been applied to an order and that promotion excludes anotherpromotion, the excluded promotion cannot be re-included by any promotions that applylater in the pricing process.
• Exclusion rules for individual promotions are evaluated in addition to any stacking ruleexclusions. See Manage promotions with stacking rules for more information.
To select promotions to exclude from the current promotion, follow these steps:
1. On a promotion’s details page, click Exclusion Rules.
2. Click the Edit button next to the Promotions to Exclude box.
3. Select a promotion from the list. You can filter the list by typing or pasting some text in thePromotions box.The filter control matches letters or numbers that you type, wherever they appear in thename or ID, not just at the beginning. Usually, as you type more characters, there arefewer matches. When you see the item you want, select it.
The list contains the type of promotions you can exclude based on priority:
• Item promotions can exclude other item promotions, plus order and shippingpromotions
• Order promotions can exclude other order promotions, plus shipping promotions.
• Shipping promotions can exclude only other shipping promotions.
4. Click Add Selected.
5. Click Done when you finish adding promotions to exclude.
Add a coupon code to a promotionCoupons let you make promotions available only to shoppers who enter a valid coupon codeat checkout.
You can create a coupon with one code that can be used by anyone or a batch of uniquecodes all based on a prefix that you create. If you add a coupon code to a promotion,shoppers must provide the coupon code to apply the promotion to their order.
You cannot edit the code after you create it but you can delete it and create a new one.Coupon codes are case sensitive and must be unique across all promotions, evenpromotions that are not enabled.
You can limit the redemption of coupon codes in two ways:
• You can limit the number of times that code can be redeemed during the life of thepromotion. This limitation applies only to the code, not to individual shoppers.
• You can limit the number of times a shopper can apply a code to an order. For example,suppose a code
On the Marketing page, you can create one coupon code per promotion. However, you canuse the Admin API to associate more than one coupon with a promotion. If a promotion hasmultiple coupons or coupon batches associated with it, the promotion’s Availability pagedisplays the number of coupons and coupon batches, plus the ID for the first of each.
Chapter 12Add a coupon code to a promotion
12-23

Important: If you delete all a promotion’s coupons, Commerce automatically disablesthe promotion until you associate it with at least one coupon or coupon batch and thenre-enable it by selecting the Enabled checkbox on the promotion’s details page. See Enable and disable promotions for more information.
To create a coupon with one code that can be used by anyone, follow these steps:
1. On the Marketing page, click the promotion you want to associate with a couponcode.
2. On the promotion's Availability tab, click Create Coupon.
3. Select Single Code.
4. Enter the coupon code.Each coupon code must be unique; you cannot use the same one for multiplepromotions.
5. Enter the number of times the code can bu used or select Unlimited to create acoupon that has unlimited use during the time that the promotion is enabled.
6. Click Create.
7. Under Number of Uses Per Order, enter the number of times a shopper canredeem this promotion a single order or select Unlimited to allow unlimited use ona single order.
To create a batch of unique coupon codes based on a prefix you specify, follow thesesteps:
1. On the Promotions page, click the promotion you want to associate with a couponcode.
2. On the promotion's Availability tab, click Create Coupon.
3. Select Batch of Codes.
4. Enter the coupon code prefix.Each prefix must be unique; you cannot use the same one for multiple promotions.
5. Enter the number of coupons to create.
6. Enter the number of times an individual shopper can use the coupon or selectUnlimited to create a coupon that has unlimited use during the time that thepromotion is enabled.
7. Click Create.
8. Under Number of Uses Per Order, enter the number of times a shopper canredeem this promotion a single order or select Unlimited to allow unlimited use ona single order.
View and export coupon batches
You can view information about coupons within a coupon batch by exporting the batchto CSV format. The exported spreadsheet includes each code in the batch, thecoupon’s ID, the prefix you specified for the codes, the maximum number of uses, andthe promotion to which the coupon is assigned.
Chapter 12Add a coupon code to a promotion
12-24
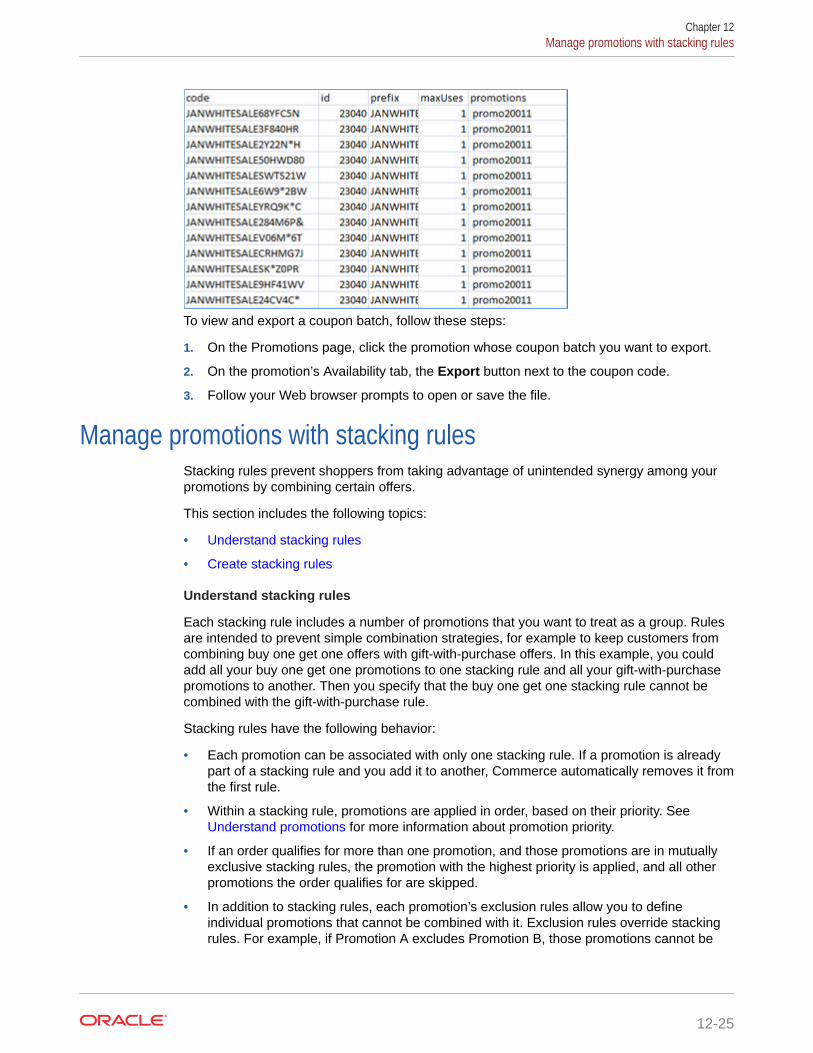
To view and export a coupon batch, follow these steps:
1. On the Promotions page, click the promotion whose coupon batch you want to export.
2. On the promotion’s Availability tab, the Export button next to the coupon code.
3. Follow your Web browser prompts to open or save the file.
Manage promotions with stacking rulesStacking rules prevent shoppers from taking advantage of unintended synergy among yourpromotions by combining certain offers.
This section includes the following topics:
• Understand stacking rules
• Create stacking rules
Understand stacking rules
Each stacking rule includes a number of promotions that you want to treat as a group. Rulesare intended to prevent simple combination strategies, for example to keep customers fromcombining buy one get one offers with gift-with-purchase offers. In this example, you couldadd all your buy one get one promotions to one stacking rule and all your gift-with-purchasepromotions to another. Then you specify that the buy one get one stacking rule cannot becombined with the gift-with-purchase rule.
Stacking rules have the following behavior:
• Each promotion can be associated with only one stacking rule. If a promotion is alreadypart of a stacking rule and you add it to another, Commerce automatically removes it fromthe first rule.
• Within a stacking rule, promotions are applied in order, based on their priority. See Understand promotions for more information about promotion priority.
• If an order qualifies for more than one promotion, and those promotions are in mutuallyexclusive stacking rules, the promotion with the highest priority is applied, and all otherpromotions the order qualifies for are skipped.
• In addition to stacking rules, each promotion’s exclusion rules allow you to defineindividual promotions that cannot be combined with it. Exclusion rules override stackingrules. For example, if Promotion A excludes Promotion B, those promotions cannot be
Chapter 12Manage promotions with stacking rules
12-25

combined, even if they are in the same stacking rule or stacking rules thatcombine with each other. See Exclude promotions for more information.
• If a promotion has already been applied to an order and that promotion excludesanother promotion, the excluded promotion cannot be re-included by anypromotions that apply later in the pricing process.
Create stacking rules
To create a new stacking rule, follow these steps:
1. On the Promotions page, click Stacking Rules.
2. Click the New Rule button to display the details page for the rule.
3. Enter a name for the new rule.
4. Specify promotions to add to the rule.
• Click Edit and select promotions to add to the rule. You can filter the list bytyping or pasting some text in the Promotions box.The filter control matches letters or numbers that you type, wherever theyappear in the name or ID, not just at the beginning. Usually, as you type morecharacters, there are fewer matches. When you see the item you want, selectit.
• Click Add Selected.
• Click Done when you finish adding promotions to the rule.
5. Specify the maximum number of promotions that can be applied to an order fromthis rule. The default value is Unlimited.If you specify a maximum number of promotions, Commerce evaluates the rule’spromotions in order, based on their priority. See Understand promotions for moreinformation about promotion priority.
6. Click the Create button.
Manage upsell messagesUpsell messages let you alert shoppers to promotions and show shoppers when theyare close to fulfilling a promotion’s buy or spend condition.
For example, suppose your store is running a Gift with Item Purchase promotion thatoffers a free team scarf with every two jerseys from the same team shop. When ashopper begins checkout with a cart that contains one jersey, the cart page coulddisplay the following message: Wait! Buy one more jersey to get a free scarf! Whenthe shopper adds a second jersey to the cart, the free gift is added and the messagecould change to: Enjoy your free scarf!
This section describes upsell messages and explains how to create them in theadministration interface. To learn how to customize widgets and elements so you candisplay the messages on your storefront, see Set up promotion upsell messages. Thissection includes the following topics:
• Understand upsell messages
• Understand tags
• Create upsell messages
• Localize upsell messages
Chapter 12Manage upsell messages
12-26

• Delete upsell messages
Understand upsell messages
Each promotion can have one set of upsell messages. Each set of upsell messages cancontain one each of the following three types of messages:
• Not Qualified: This is a global message that alerts shoppers to a promotion. For example,Free US Flat Rate Shipping On Orders Over $75.
• Partially Qualified: This message appears when a shopper has partially qualified for thepromotion. For example, Spend Just $10 More For Free Shipping!
• Success: This message appears when the shopper has qualified for the promotion. Forexample, Congratulations! Your Order Ships For Free!
Important: If a promotion requires a coupon code, shoppers will not see any of its upsellmessages, including the Not Qualified message, until they enter the coupon code in theshopping cart. See Add a coupon code to a promotion for more information about promotionsthat require coupons.
This section describes each type of upsell message you can create in the administrationinterface.
Not Qualified message
The Not Qualified message alerts shoppers to a promotion. You can show the message to allshoppers who can access the promotion, even if they have not yet started to qualify for it.Display a Not Qualified message where it can be easily seen by shoppers, for example, in abanner at the top of each page on your storefront.
Partially Qualified message
The Partially Qualified message appears when a shopper begins to qualify for the promotion.Partially Qualified messages are triggered by a value you specify, often called a closenessqualifier. For example, suppose a promotion offers free shipping when a shopper spends $75anywhere in the store and you want to display the Partially Qualified message when ashopper places anything in their cart. Set this value to 1 to display the message when anyitem that costs $1 or more is added to the cart. To display the message only when a shopperneeds to spend $25 or less to qualify for the promotion, set the value to 50.
Partially Qualified messages include variables that represent values to display in themessage. When the message is displayed on the storefront, Commerce replaces thevariables with the actual values that represent a shopper’s cart and its qualification for thepromotion.
The following table describes each variable and lists the promotion templates for which it isavailable.
Chapter 12Manage upsell messages
12-27

Variable Description Promotion Templates
{{AmountSpent}}
{{AmountStillNeeded}}
{{AmountSpent}} specifies theshopper’s current qualifyingspend amount.
{{AmountStillNeeded}}specifies the minimum spendamount to qualify for thepromotion minus the shopper’scurrent qualifying spendamount.
Note: Commerceautomatically adds theappropriate currency symboland separator to the amountsspecified by these variables.
Spend Y Get Gift withPurchase
Spend Y in X Get ItemDiscount
Spend Y in X Get OrderDiscount
Spend Y for Order Discount
Spend Y Get ShippingDiscount
Spend Y in X ShippingDiscount
{{QuantityBought}}
{{QuantityStillNeeded}}
{{QuantityBought}} specifiesthe number of qualifying itemsin the shopper’s cart.
{{QuantityStillNeeded}specifies the minimum numberof items to qualify for thepromotion minus the numberof qualifying items in theshopper’s cart.
Buy One Get One
Gift With Item Purchase
Buy X Get Order Discount
Buy X Get Shipping Discount
For promotions whose Partially Qualified messages use the {{QuantityBought}} and{{QuantityStillNeeded}} variables, Commerce does not change the message textbased on singular or plural quantities. For example, suppose a promotion offers 10%off with the purchase of three toys and the message displays when a shopper addsone toy to the cart. The message “Buy 2 more toys to get 10% off!” makes sense, butwhen the shopper adds a second toy to the cart, the message changes to “Buy 1 moretoys to get 10% off!” A better message in this instance is one that accommodates oneitem or multiple items. For example, “Toy Sale! Buy {{QuantityStillNeeded}} more to get10% off.”
You cannot create a Partially Qualified message for the following types of promotions,because they do not require buy or spend conditions:
• Get Item Discount
• Get Shipping Discount
• Gift with Item Purchase if the buy condition is set to Give Gift with Any Order.
Success message
The Success message lets a shopper know they have successfully qualified for thepromotion. The success message is displayed when the shopper’s cart qualifies forthe promotion.
Understand tags
Tags are strings that establish a relationship between upsell messages and thewidgets that will display them on your storefront. You add tags to upsell messageswhen you create them on a promotion’s Messaging tab. Then storefront developersadd the tags to widgets and that will display the messages to shoppers.
Chapter 12Manage upsell messages
12-28

You can assign one or more tags to a single upsell message. You can create and save amessage without adding tags to it, but a message with no tags cannot be displayed on yourstorefront.
Once you create a tag, it is available to all upsell messages in all promotions. You can assignthe same tag to more than one message, including messages for different promotions. Thiscan be useful if, you create similar promotions for different audiences or different sites. Forexample, you can assign the tag home to Not Qualified messages you want to display onyour store's Home page to alert shoppers to promotions. Similarly, you can assign the tagcart to Partially Qualified messages so shoppers can see how close they are to qualifyingwhen they go to check out.
If you assign the same tag to all three of a promotion’s upsell messages, the messagesreplace each other on the storefront wherever the tag displays them. For example, supposeyou assign the tag FreeShip to all three upsell messages for a promotion that offers freeshipping to any shopper who spends $150 on a single order. You configure the PartiallyQualified message so that it appears when the value of a shopper’s cart is at least $10. Youadd the FreeShip tag to a banner on your storefront. When a shopper arrives at the site, theysee the Not Qualified message (FREE U.S. Flat Rate shipping when you spend $150). in thebanner. When the shopper places an item priced at $49.99 in the cart, the Not Qualifiedmessage is replaced by the Partially Qualified message (Only $50.01 away from FREE U.S.Flat Rate shipping!). When the shopper places another item, priced at $75 in the cart, thePartially Qualified message is replaced by the Success message (Your order qualifies forFREE U.S. Flat Rate shipping!). If the shopper removes one of the items from the cart, theSuccess message is once again replaced by the Partially Qualified message.
For more information about how Commerce determines which messages to display for aspecific tag, see Set up promotion upsell messages.
Keep the following in mind when you create tags:
• Tags are case sensitive; for example, Commerce treats banner and BANNER as twodifferent tags.
• Do not use the following characters in tags: < > { } {{ }} “
• Tags must be published before widgets can use them on your storefront. See PublishChanges for more information.
You cannot delete tags in the administration interface. You must use the Admin APImessageTags endpoints to delete tags. See Set up promotion upsell messages for moreinformation.
Create upsell messages
This section describes how to create upsell messages and tags in the administrationinterface. To learn how to customize widgets and elements so you can display the messageson your storefront, see Set up promotion upsell messages.
You create the messages on a promotion’s details page, with an HTML editor calledCKEditor. You can write, update, and apply rich-text formatting to upsell messages.
To create upsell messages for a promotion:
1. On a promotion’s details page, click Messaging.
2. Enter and format the text for each message type.
3. Create or select tags to add to each message.
Chapter 12Manage upsell messages
12-29
• Click the Tag box and begin typing to display a list of existing tags. You canfilter the list by typing or pasting more text in the box.
• To add a tag from the list, select it and press Enter.
• To add a new tag, continue typing the text for the tag and then press Enter.
4. For Partially Qualified messages, enter an amount that will trigger display of themessage.
5. Click Create to save the message.
6. Publish your changes.
If you edit a promotion, check its upsell messages to see if they need to be updated.Changing a promotion’s condition or offer without changing its upsell messages cancause unexpected results. For example, suppose a promotion offers free shippingwhen a shopper spends $100 and its Partially Qualified message is configured toappear when the shopper has spent $60. If you change the promotion’s condition tooffer free shipping when the shopper spends $50, the unchanged Partially Qualifiedmessage might never appear, and when it does, it will present incorrect information.
Localize upsell messages
You can translate the text of Not Qualified, Partially Qualified, and Success messagesthe same way you translate other text that appears on your storefront. (See Translatestore text for more information.) You cannot translate tags or the variables you usewith Partially Qualified messages.
Commerce does not convert minimum spend amounts in promotions and upsellmessages across different currencies your store supports. If your store supportsmultiple currencies, create a separate version of each minimum-spend promotion foreach currency. See Understand currency-specific promotions for more information.
Delete upsell messages
You can delete one or more upsell messages from a promotion. Deleting a promotionalso deletes its upsell messages. Deleting upsell messages does not delete any tagsassigned to them. You must use the Admin API to delete tags. See Set up promotionupsell messages. for more information about deleting tags.
To delete an upsell message from a promotion:
1. On a promotion’s details page, click Messaging.
2. Click the Delete icon for the message you want to delete.
3. Confirm that you want to delete the message.
4. Publish your changes.
Chapter 12Manage upsell messages
12-30
13Define Audiences
Defining an audience allows you to target content to certain groups of shoppers. You definean audience by creating a set of rules based on attributes of the shopper profile. Theaudience can then be used by other tools for personalizing the shopper’s experience.
This section describes how to work with audiences on the Marketing page.
Understand audience definitionsAn audience represents a segment of the shoppers that visit your store.
You define these audiences in the Audience window by creating rules that include or excludeshoppers according to their profile attributes. For example, you could create an audiencecalled Student Females Outside Texas that includes female shoppers that have an .edu emailaddress, but excludes people living in Texas. The rules that define this audience might looksomething like this:
Include these people:
• People whose Gender is Female
• and whose Email Address ends with .edu
• and whose Shipping Address State is not Texas
After you define this audience, you can deliver personalized content to shoppers who matchStudent Females Outside Texas criteria.
To comply with the European Union General Data Protection Regulation (GDPR), a shoppermay be required to provide consent to have their shopper profile data used forpersonalization. If a registered shopper is required to provide GDPR profile personalizationconsent (if the GDPR profile personalization site setting is set to true for that site) and doesnot, the non-consenting shopper is not recognized as a member of any audience that usesshopper profile data even though they may meet the audience rules criteria. For informationon GDPR consent and profile-based personalization, see Manage the Use of Personal Data.
Parts of an audience definition
An audience definition is composed of the following parts:
• Display Name This is the name that appears in administration interfaces.
• ID This ID is automatically generated from the display name that you provide. You canoverride the generated one if you want and create your own ID.
• Rules This set of rules consist of one or more rules that you define to include or excludeshoppers.
• Enabled/Disabled This determines if an audience can be used in production. Noshopper is considered a member of a disabled audience even if the audience is in use bya content variation slot, a promotion, or an experiment.
13-1
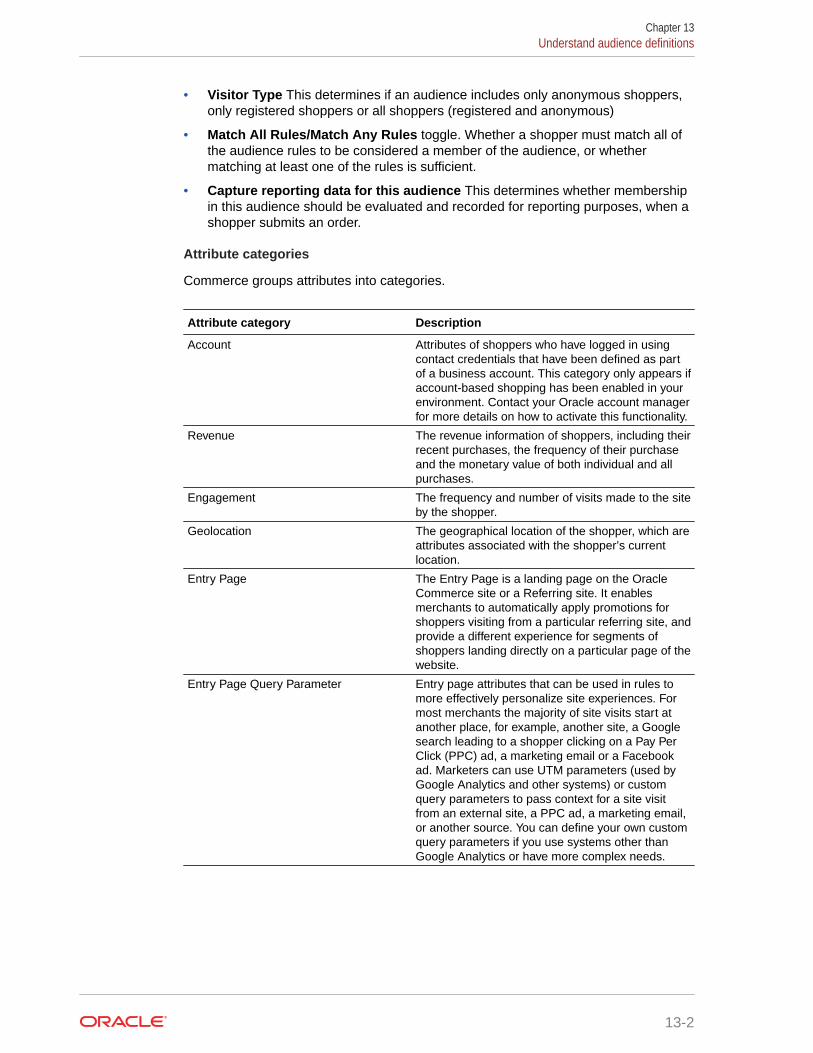
• Visitor Type This determines if an audience includes only anonymous shoppers,only registered shoppers or all shoppers (registered and anonymous)
• Match All Rules/Match Any Rules toggle. Whether a shopper must match all ofthe audience rules to be considered a member of the audience, or whethermatching at least one of the rules is sufficient.
• Capture reporting data for this audience This determines whether membershipin this audience should be evaluated and recorded for reporting purposes, when ashopper submits an order.
Attribute categories
Commerce groups attributes into categories.
Attribute category Description
Account Attributes of shoppers who have logged in usingcontact credentials that have been defined as partof a business account. This category only appears ifaccount-based shopping has been enabled in yourenvironment. Contact your Oracle account managerfor more details on how to activate this functionality.
Revenue The revenue information of shoppers, including theirrecent purchases, the frequency of their purchaseand the monetary value of both individual and allpurchases.
Engagement The frequency and number of visits made to the siteby the shopper.
Geolocation The geographical location of the shopper, which areattributes associated with the shopper’s currentlocation.
Entry Page The Entry Page is a landing page on the OracleCommerce site or a Referring site. It enablesmerchants to automatically apply promotions forshoppers visiting from a particular referring site, andprovide a different experience for segments ofshoppers landing directly on a particular page of thewebsite.
Entry Page Query Parameter Entry page attributes that can be used in rules tomore effectively personalize site experiences. Formost merchants the majority of site visits start atanother place, for example, another site, a Googlesearch leading to a shopper clicking on a Pay PerClick (PPC) ad, a marketing email or a Facebookad. Marketers can use UTM parameters (used byGoogle Analytics and other systems) or customquery parameters to pass context for a site visitfrom an external site, a PPC ad, a marketing email,or another source. You can define your own customquery parameters if you use systems other thanGoogle Analytics or have more complex needs.
Chapter 13Understand audience definitions
13-2
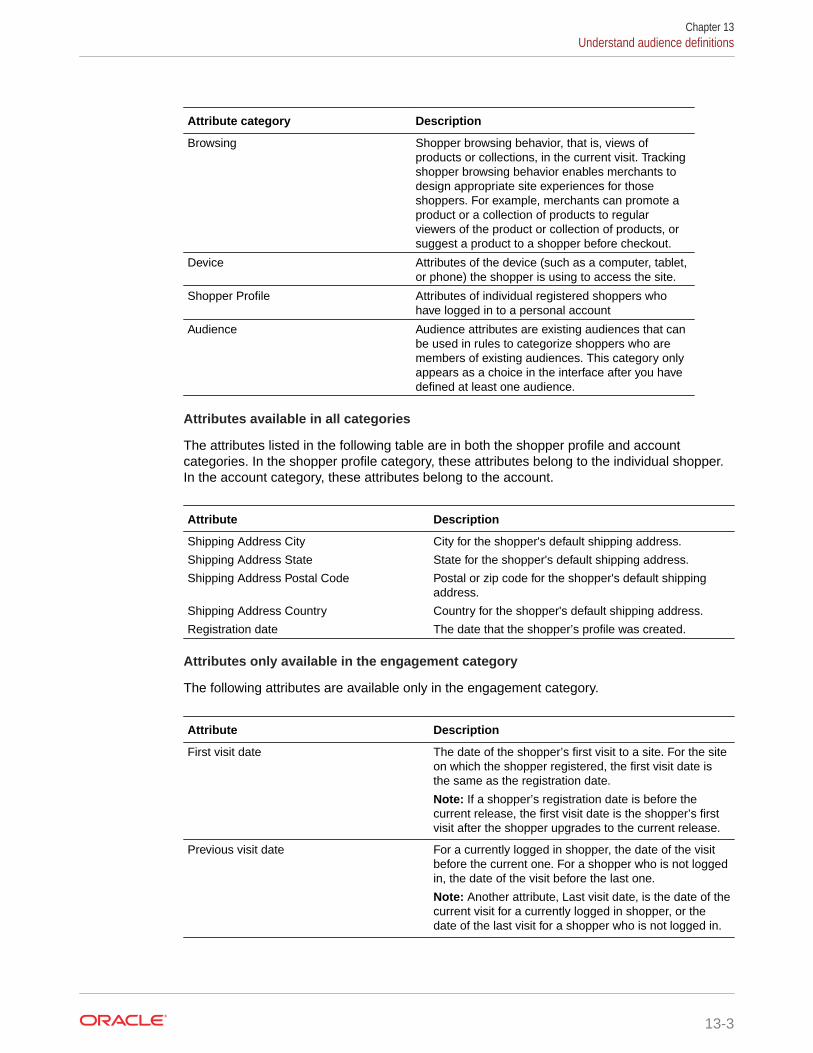
Attribute category Description
Browsing Shopper browsing behavior, that is, views ofproducts or collections, in the current visit. Trackingshopper browsing behavior enables merchants todesign appropriate site experiences for thoseshoppers. For example, merchants can promote aproduct or a collection of products to regularviewers of the product or collection of products, orsuggest a product to a shopper before checkout.
Device Attributes of the device (such as a computer, tablet,or phone) the shopper is using to access the site.
Shopper Profile Attributes of individual registered shoppers whohave logged in to a personal account
Audience Audience attributes are existing audiences that canbe used in rules to categorize shoppers who aremembers of existing audiences. This category onlyappears as a choice in the interface after you havedefined at least one audience.
Attributes available in all categories
The attributes listed in the following table are in both the shopper profile and accountcategories. In the shopper profile category, these attributes belong to the individual shopper.In the account category, these attributes belong to the account.
Attribute Description
Shipping Address City City for the shopper's default shipping address.
Shipping Address State State for the shopper's default shipping address.
Shipping Address Postal Code Postal or zip code for the shopper's default shippingaddress.
Shipping Address Country Country for the shopper's default shipping address.
Registration date The date that the shopper’s profile was created.
Attributes only available in the engagement category
The following attributes are available only in the engagement category.
Attribute Description
First visit date The date of the shopper’s first visit to a site. For the siteon which the shopper registered, the first visit date isthe same as the registration date.
Note: If a shopper’s registration date is before thecurrent release, the first visit date is the shopper’s firstvisit after the shopper upgrades to the current release.
Previous visit date For a currently logged in shopper, the date of the visitbefore the current one. For a shopper who is not loggedin, the date of the visit before the last one.
Note: Another attribute, Last visit date, is the date of thecurrent visit for a currently logged in shopper, or thedate of the last visit for a shopper who is not logged in.
Chapter 13Understand audience definitions
13-3

Attribute Description
Number of Visits The anonymous or registered shopper’s number ofvisits to a site. The number includes the current visit.For registered users who existed before the 18Drelease, the number of visits is set to the number oforders made. For anonymous shoppers who existedbefore 18D, the default number of visits is set to 2.
Attributes only available in the revenue category
The following are attributes that are available in the revenue category.
The following attributes are available for both logged-in shoppers and anonymousshoppers: First Purchase Date, Last Purchase Date, Last Purchase Amount, LifetimeAverage Order Value, Lifetime Spend, and Number of orders. For additionalinformation on these attributes, refer to Qualifying orders.
Attribute Description Site-Specific
First purchase date The date of the shopper’s first order. Ordermust be a qualifying order.
Yes
Last purchase date The date of the shopper’s last order. Ordermust be a qualifying order.
Yes
Last purchase amount Total of the shopper’s last order, including taxand shipping. Order must be a qualifying order.
Yes
Lifetime average order value Average of the shopper’s order totals,including tax and shipping. Orders must bequalifying orders.
Yes
Lifetime spend Grand total, including tax and shipping, of theshopper’s order totals. Orders must bequalifying orders.
Yes
Number of orders Number of orders for this shopper. Ordersmust be qualifying orders.
Yes
Attributes only available in the shopper profile category
The attributes listed in the following table are only available in the shopper profilecategory.
Attribute Description Site-specific (if multiplesites exist)
Date of Birth The shopper’s date of birth No
Email address The shopper’s email address No
Receive email A shopper can opt in/opt out ofemail notifications
No
Gender The shopper’s gender. Youcan only use this attribute in arule if you are collectinggender information in acustom widget.
No
Chapter 13Understand audience definitions
13-4

Attribute Description Site-specific (if multiplesites exist)
Currency The currency used whenmaking orders. Mandatory forthese properties:
Lifetime average order value
Lifetime spend
Last purchase amount
When the user creates a rulewith a currency property, thecurrency is initially set to thecurrency of the default pricelist group of the default site.
Yes
Note: If you use different default currencies on different sites, and you want to createaudiences based on Lifetime Spend or Lifetime Average Order Value, define an audience foreach site (currency). For example, you can define an audience “High Spenders USD” with therule “Lifetime Spend > 1000” and another audience “High Spenders euro” with the rule“Lifetime Spend > 940”.
Qualifying orders
A qualifying order must meet the following conditions.
• The order uses the shopper’s lifetime currency. The shopper lifetime currency is set tothe currency of the first order made in a monetary currency. If a shopper subsequentlymakes an order in a different monetary currency, the value of that order will not beincluded in monetary lifetime order values.Note that if a site’s default currency is monetary, and shoppers can use loyalty points topay for some or all of an order, then Lifetime spend and Lifetime average order valueattributes reflect only the monetary portion of the total - even if this total consists only oftax and shipping.
• The order is in one of the following states:
– SUBMITTEDThe order has completed the purchase process and has been submitted to the ordermanagement system.
– PROCESSINGThe order is being processed by the order management system.
– NO_PENDING_ACTIONThe order has been fulfilled, and processing of the order is complete.
• Each payment associated with the order is in one of the following payment states:
– AUTHORIZEDThe payment has been authorized and can be debited.
– SETTLEDThe payment has been debited successfully.
– PAYMENT_DEFERREDOnly applicable for invoice and PO orders where an invoice is sent to the shopper.
For more information on order and payment states, see Manage Orders.
Chapter 13Understand audience definitions
13-5

Attributes only available in the account category
The attributes listed in the following table are only available in the account category.
Attribute Description
Customer Type The type of industry to which this customerbelongs.
Name Name of the account
Type The type of organization, for example,department or division. This cannot be a nullvalue.
Billing Address City City where shopper’s bills are sent.
Billing Address State State where shopper’s bills are sent.
Billing Address Postal Code Postal code or zip code where shopper’s billsare sent.
Billing Address Country Country where shopper’s bills are sent.
Attributes only available in the geolocation category
The attributes listed in the following table are available in the geolocation category.
Attribute Description
Latitude Truncated latitude, that is, the integer portionplus first two decimal points. For example,North of 36 degrees North is represented bythe following:
Attribute: Latitude, Operator: North Of, Value:36.00
Longitude Truncated longitude, that is, the integer portionplus first two decimal points. For example, USstates between 165 degrees West and 105degrees West is represented by the following:
Attribute: Longitude, Operator: Westwardbetween,
Start Value: 165.00 West, End Value: 105.00West
Place A place can be a country, region or city. Startentering the name of the place, then usetypeahead to select the right value.
Note: Region differ in granularity by country.For example, in the United States, regions areequivalent to States; but in the UnitedKingdom they are equivalent to England,Wales and other regions.
Only cities worldwide with a population ofmore than 100,000 people are included.
Timezone Time zone is formatted as offset from GMTplus time zone and geographic area. Forexample, GMT-5 EST Eastern Standard Time.
Attributes only available in the entry page category
The attributes listed in the following table are available in the entry page category.
Chapter 13Understand audience definitions
13-6
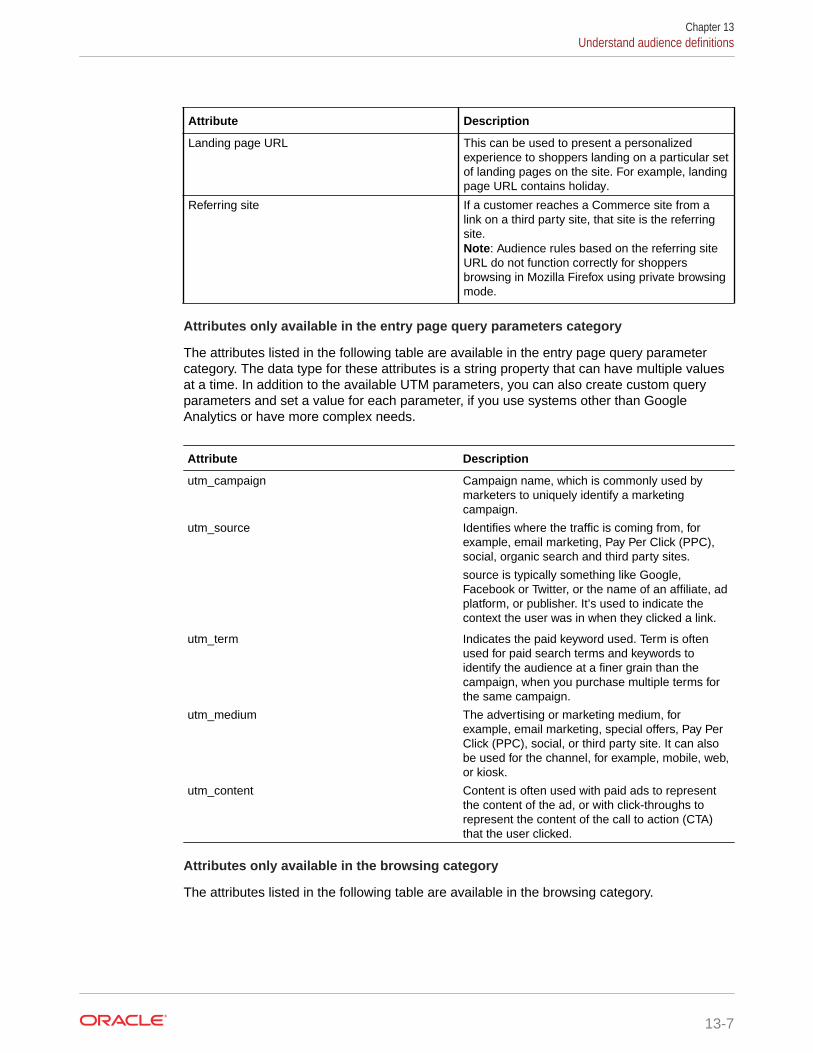
Attribute Description
Landing page URL This can be used to present a personalizedexperience to shoppers landing on a particular setof landing pages on the site. For example, landingpage URL contains holiday.
Referring site If a customer reaches a Commerce site from alink on a third party site, that site is the referringsite.Note: Audience rules based on the referring siteURL do not function correctly for shoppersbrowsing in Mozilla Firefox using private browsingmode.
Attributes only available in the entry page query parameters category
The attributes listed in the following table are available in the entry page query parametercategory. The data type for these attributes is a string property that can have multiple valuesat a time. In addition to the available UTM parameters, you can also create custom queryparameters and set a value for each parameter, if you use systems other than GoogleAnalytics or have more complex needs.
Attribute Description
utm_campaign Campaign name, which is commonly used bymarketers to uniquely identify a marketingcampaign.
utm_source Identifies where the traffic is coming from, forexample, email marketing, Pay Per Click (PPC),social, organic search and third party sites.
source is typically something like Google,Facebook or Twitter, or the name of an affiliate, adplatform, or publisher. It’s used to indicate thecontext the user was in when they clicked a link.
utm_term Indicates the paid keyword used. Term is oftenused for paid search terms and keywords toidentify the audience at a finer grain than thecampaign, when you purchase multiple terms forthe same campaign.
utm_medium The advertising or marketing medium, forexample, email marketing, special offers, Pay PerClick (PPC), social, or third party site. It can alsobe used for the channel, for example, mobile, web,or kiosk.
utm_content Content is often used with paid ads to representthe content of the ad, or with click-throughs torepresent the content of the call to action (CTA)that the user clicked.
Attributes only available in the browsing category
The attributes listed in the following table are available in the browsing category.
Chapter 13Understand audience definitions
13-7
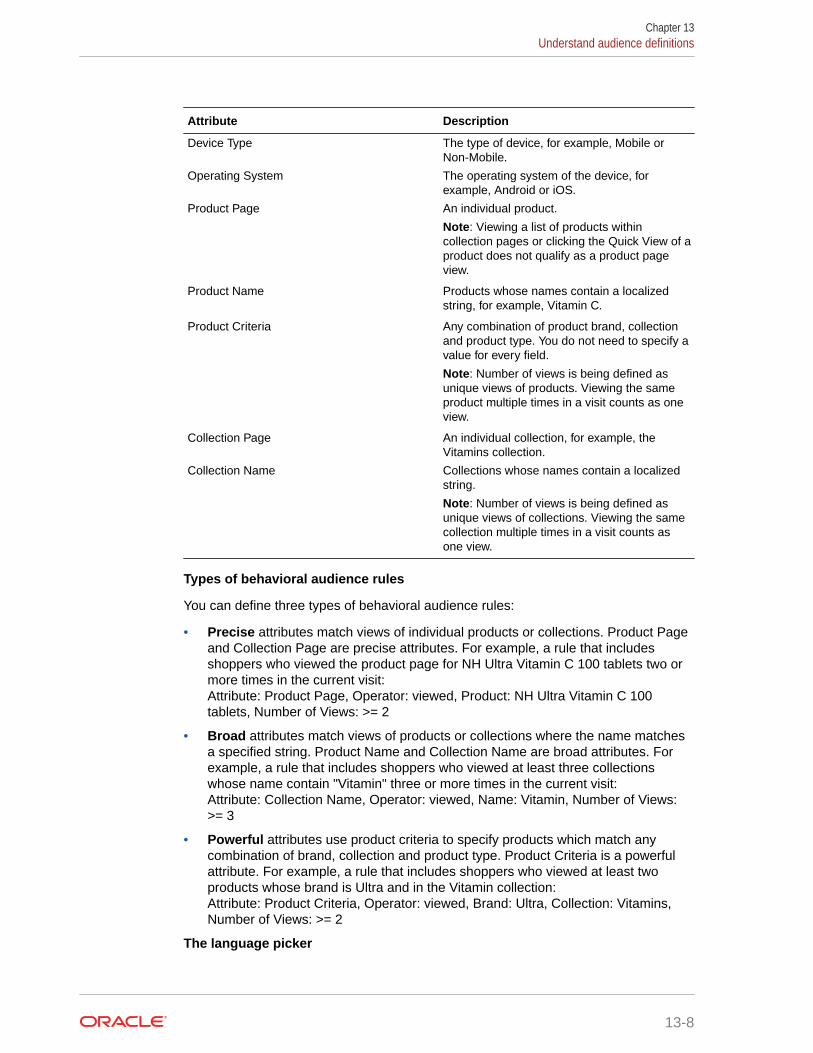
Attribute Description
Device Type The type of device, for example, Mobile orNon-Mobile.
Operating System The operating system of the device, forexample, Android or iOS.
Product Page An individual product.
Note: Viewing a list of products withincollection pages or clicking the Quick View of aproduct does not qualify as a product pageview.
Product Name Products whose names contain a localizedstring, for example, Vitamin C.
Product Criteria Any combination of product brand, collectionand product type. You do not need to specify avalue for every field.
Note: Number of views is being defined asunique views of products. Viewing the sameproduct multiple times in a visit counts as oneview.
Collection Page An individual collection, for example, theVitamins collection.
Collection Name Collections whose names contain a localizedstring.
Note: Number of views is being defined asunique views of collections. Viewing the samecollection multiple times in a visit counts asone view.
Types of behavioral audience rules
You can define three types of behavioral audience rules:
• Precise attributes match views of individual products or collections. Product Pageand Collection Page are precise attributes. For example, a rule that includesshoppers who viewed the product page for NH Ultra Vitamin C 100 tablets two ormore times in the current visit:Attribute: Product Page, Operator: viewed, Product: NH Ultra Vitamin C 100tablets, Number of Views: >= 2
• Broad attributes match views of products or collections where the name matchesa specified string. Product Name and Collection Name are broad attributes. Forexample, a rule that includes shoppers who viewed at least three collectionswhose name contain "Vitamin" three or more times in the current visit:Attribute: Collection Name, Operator: viewed, Name: Vitamin, Number of Views:>= 3
• Powerful attributes use product criteria to specify products which match anycombination of brand, collection and product type. Product Criteria is a powerfulattribute. For example, a rule that includes shoppers who viewed at least twoproducts whose brand is Ultra and in the Vitamin collection:Attribute: Product Criteria, Operator: viewed, Brand: Ultra, Collection: Vitamins,Number of Views: >= 2
The language picker
Chapter 13Understand audience definitions
13-8

The language picker is displayed on the Product Name, Collection Name and Product Criteriaattribute pages. The language picker contains a list of applicable store content languages (asdefined in Settings > Location). The default value is the store content language in use at thetime when the rule is created. Once you select a language, the value is used for the entiresession in the current visit. For example, if the selected language is English, the rule willmatch the English name of the product to the string. If only one language is defined for storecontent, the language string is displayed.
Use gender in rules for audiences
If you want to define an audience that uses the gender attribute in the rule, you must be surethat your store includes a gender element that a shopper can use to provide gender data. Youcan add this element by customizing a widget that is deployed in your store.
Gender is included as a property in the user view model which is available to all widgets. Youcan add gender to a widget by updating the HTML in the widget’s template. For example,
<div class="form-group row"> <div class="controls col-md-12"> <label class="control-label inline" for="CC-userRegistration-gender">Gender</label> <select class="col-md-5 form-control" data-bind="value:gender"> <option value="" disabled selected>Select your gender</option> <option value="male">Male</option> <option value="female">Female</option> <option value="unspecified">Unspecified</option> </select> </div></div>
For information about updating the HTML in a widget or stack, see Modify a component’scode.
Use numbers in rules for audiences
If you want to define an audience that uses a numeric attribute in a rule, note the following:
• You can only enter one number in a value field. You cannot enter a list of numbers.
• The number cannot be less than zero.
• The Between operator is inclusive. For the rule to be a match, a value must be equal toor between the low and high values.
Use dates in rules for audiences
If you want to define an audience that uses a date attribute in a rule, note that date values arerepresented as a series of values for each date unit: year, month, and day. When a rule with adate is evaluated, only the individual date unit that is specified is the unit that is changed.
The following example illustrates how rules with date properties are evaluated.
Let’s say that today’s date is May 5, 2017. This date can be expressed in these date units:
Year = 2017
Month =5
Day = 5
Chapter 13Understand audience definitions
13-9

In a rule with “More than 3 months ago”, “month” is the specified unit, so 3 issubtracted from the month unit:
Year = 2017
Month = 2 (that is, 5-3)
Day = 5
Therefore, any date before February 5, 2017 evaluates as true.
Months have different numbers of days, so let’s look at another example, where thisdifference can affect how your rule is evaluated. Let’s say that today is May 30, 2017.In the same rule with “More than 3 months ago,” “month” is still the specified unit, so 3is again subtracted from the month unit:
Year = 2017
Month = 2 (that is, 5-3)
Day = 30
A date of February 30, 2017 does not exist, but the rule can still evaluate dates. In thiscase all days in February would evaluate as true.
Weeks and date attributes
Remember that date values are represented as a series of values for each date unit:year, month, and day. There is no week unit. Weeks are the equivalent of seven days.For example, “more than 3 weeks ago,” is the same as “more than 21 days ago.”
Timestamps and the date attribute
Even though rules do not include timestamps in any of the available rule operators fordates, timestamps do affect how a rule is evaluated.
For example, let’s say that the rule for an audience is “Last Purchase Date is Lessthan 1 day ago”. The current date and time is March 15, 2017, 12:00 PM GMT. Therule evaluation will calculate a date exactly 1 day from the current date and time, whichwill be March 14, 2017, 12:00 PM GMT. If Last Purchase Date is equal to March 14,2017, 11:00 AM GMT, the rule evaluates as true. If Last Purchase Date is equal toMarch 14, 2017, 1:00 PM GMT, the rule evaluates as false.
Note that all time is evaluated in GMT.
Between operator in rules with date attributes
Just like with number attributes, when a date attribute uses a Between operator, theoperator is inclusive. For the rule to be a match, a value must be between or equal toone of the low and high date values.
Custom properties
You can create custom properties using the Admin API and include them as attributesin your rules when you define an audience. Custom properties are available in shopperprofile and account categories, and can be created as custom string property orcustom property for rich text fragment (custom rich text property. For example,partnerCustomerData contains the value: partner=AirPortugal ). The customproperty:
• Must be a string, Boolean, date, numeric, or rich text data type.
Chapter 13Understand audience definitions
13-10
• Must have audienceVisibility set to all for shopper profile properties, and to b2b foraccount properties.
• Can have appropriate value up to 1,000 characters if it's a custom rich text property.
• Is not used in the rules for calculating audience size if it's a custom rich text property.
The audienceVisibility attribute determines whether or not a property appears as a choicein the Attributes field of the audience interface.
• For shopper profile properties, see Manage Shopper Profiles.
• For account properties, see Manage an Account-based Storefront.
Estimated audience size
The Estimated audience size under Rules displays an estimate of how many users are in aspecific audience. It returns the number of registered shoppers that match any or all of therules depending on the current value of the Rule Matching selection list. Anonymousshoppers are not included in the estimates. In a multiple-site environment, the audience sizeis estimated for the default site. You can select an alternative site to see the impact onestimates.
Each successive rule shows the new size of the audience with that rule added.
• For Match Any Rule, each successive rule adds just those shoppers who satisfy that rulebut did not satisfy any of the previous ones. The audience can only grow or stay thesame size as rules are added, and each new size shows that growth.
• For Match All Rules, each successive rule adds a new restriction to the audience,removing shoppers who satisfied the previous rules but do not satisfy the new one. Theaudience can only decrease or stay the same size as rules are added, and each new sizeshows that decrease.
Changing the order of the rules affects the size estimates per rule on the Audiences page, butdoes not affect the audience size and shoppers evaluated as being members of theaudience. To see the accurate size of a rule on the Audiences page, create an audience withonly that rule.
If the GDPR profile personalization site setting is set to true for that site, audience sizeestimate takes GDPR into consideration for the numerator only in calculations. For example,among 100 shoppers, 40 have provided GDPR consent for that site, and 25 are in theaudience. Commerce displays:
• Audience size estimate of 25 shoppers for the site
• Audience size estimate of 25 shoppers for the site
Percentage value of shoppers as 25% (based on 25/100)For information on GDPR consent and profile-based personalization, see Understandconsent and profile-based personalization in Manage the Use of Personal Data.
View the list of audiencesThe Audiences page displays a list of all the audiences that have been defined for your store.You can view the name, description and usage information of each audience. You can sortand filter the list.
Click the Marketing icon and then clickAudiences. You must be assigned the Admin orMarketing role. Each audience entry displays the following information:
Chapter 13View the list of audiences
13-11

• Audience Name - short, descriptive display name that identifies the audience
• Description - longer description that explains the use or details of the audience
• Audience Usage – the users and the number of consumers of the audience
The list displays all audiences by default. The All Audiences view includes bothenabled and disabled audiences and regardless of its inclusion in reporting (a linechart icon next to an audience indicates the audience is used in reporting). Anaudience does not need to be published to appear in the list. You can change this viewby clicking All Audiences and selecting another view:
• Enabled Audiences includes only audiences that are available for targeting.
• Disabled Audiences includes audiences that are not available for targetingcontent.
• Audiences Used in Reports includes audiences for which membership isevaluated and recorded for reporting purposes, when a shopper submits an order.
The list can be sorted by clicking the Audience Name or Description column labels.You can filter the list by starting to type an audience name or description in the Filterlist box. Sorting or filtering always resets your view of the list to the first page.
Create an audienceYou can create a new audience on the Audiences page. Follow these instructions tocreate an audience.
1. On the Marketing page, click Audiences.
2. Click New Audience.
3. In the Audience Display Name field, enter a unique short descriptive name of nomore than 50 characters that describes the audience. This name displays in theadministration interfaces.
Note: You cannot reuse the name of a deleted audience.
For example, if you are targeting female students that are not in Texas, you canenter Student Females outside Texas.
After you finish typing and move to another field, the Audience ID fieldautomatically fills with an ID generated from the Audience Display Name.Commerce uses this ID internally. This ID is regenerated whenever you update theAudience Display Name field.
4. (Optional) Edit the automatically generated ID in the Audience ID field. You canedit an ID until you click Create.
An ID can only contain alphanumeric characters. It cannot contain spaces, specialcharacters, or non-Latin characters.
5. (Optional) In the Audience Description field, enter a description that helps you toidentify the audience in the administration interface.
The description should help you distinguish this audience from others, especially ifyou have exclusions. For example, “Female students and educators with eduaddresses. This audience excludes shipping addresses in Texas.
6. (Optional) If you do not want to enable the audience right away, deselect AudienceEnabled.
Chapter 13Create an audience
13-12
For example, you might want to disable an audience if you are creating a seasonalaudience, and that season has not started yet.
7. (Optional) If you want to evaluate membership in this audience and record it for reportingpurposes when an order is placed, select Capture reporting data for this audience.
If you have defined a large number of audiences, evaluating audience membership for allof them may adversely affect performance. You can use this check box to restrict the setof audiences for which membership is evaluated for reporting purposes.
8. In the Visitor Type field, select:
All shoppers – Both registered and non-registered shoppers.
Anonymous shoppers – Shopper who have not registered as a user for the site.
Registered shoppers – Shopper who have registered as a user for the site.
9. In the Rule Matching field, select:
Match Any Rule – A shopper must match at least one rule in order to be a member ofthis audience.
Match All Rules - A shopper must match all rules in order to be a member of thisaudience.
10. Click New Rule.
11. Select a category. See Attribute categories for more information.
12. Select the attribute, operator, and value you want to use. See these sections fordescriptions of the available attributes:
• Attributes available in all categories
• Attributes only available in the shopper profile category
• Attributes only available in the account category
If you selected Audience as a category in the previous step, then the Attribute fieldautomatically fills with the Membership attribute and you only have to set an operator andvalues, that is, one or more audiences.
The selections in the Operator and Values drop-down lists change depending on theattribute that you select. If the attribute has a limited set of values, the Value list includesall of your possible choices. If the attribute has an unlimited number of values, you cantype a unique value directly into the list.
13. Click Done.
14. (Optional) If you have more rules to add, click New Rule.
An audience can have a maximum of 100 rules.
15. When you have finished adding rules, click Create.
The audience is immediately available for use in personalization. The audience is notavailable in a production environment until it has been published.
Update an audienceYou can update an audience by changing the display name or description, or by adding,editing, or removing rules. You cannot change an audience ID.
To update an audience, follow these steps:
Chapter 13Update an audience
13-13

1. On the Marketing page, click Audiences.
2. (Optional) Change the view by clicking All Audiences and selecting another view.
3. Click the audience that you want to update.
4. Edit the Audience Name or Audience Description fields. The Audience ID fieldis read-only.
5. Add a rule by clicking New Rule just like you do when you initially create anaudience. See Create an audience.
An audience can have a maximum of 100 rules.
6. Edit a rule by clicking Edit next to the rule that you want to edit. Before you beginmaking changes, note the following.
• If you change the Category, then the Attribute field is reset for attributes thatare appropriate for that category. The rest of the rule is removed.If you changed the Category by mistake, cancel the edit to avoid having toenter the attributes again.
• If you change the Attribute, then the Operator field is reset for operators thatare appropriate for that attribute and the Value field is cleared.
Click Done when you are finished.
7. Click Save.
Changes to the audience name and description take effect for use in the audiencedefinition interface. Rule changes do not go live until you publish them. See PublishChanges.
Copy an existing audienceCreating a new audience based on an existing one lets you easily create a number ofsimilar audiences and lets you reuse audiences that successfully met your needs inthe past.
When you copy an existing audience, the following values are automatically copied tothe new audience:
• Audience Display NameBy default, this value will be set to the name of the audience that was copied,followed by (Copy). For example, New Students (Copy).
• Audience Description
• Rules
When you copy an existing audience, the following values are not copied to the newaudience:
• Audience IDA new audience ID is generated from the new audience display name. Forexample, a display name of New Students (Copy) generates an ID ofNewStudentsCopy.
• Enabled statusWhen you copy an audience, the new audience is automatically enabled even ifthe source audience was not enabled.
To copy an existing audience, follow these steps:
Chapter 13Copy an existing audience
13-14
1. On the Marketing page, click Audiences.
2. Click the row of the audience to copy and then click Copy.
Click anywhere in the row except on the link that is the audience name. Clicking that linkopens the existing audience.
3. Edit the Audience Display Name.
After you finish editing and move to another field, the Audience ID automatically fills withan ID generated from the Audience Display Name.
4. (Optional) Edit the automatically generated ID in the Audience ID field. You can edit anID until you click Create.
Just like when you create an audience, an ID can only contain alphanumeric characters.It cannot contain spaces, special characters, or non-Latin characters.
5. Edit the Audience Description, Enabled Status, and any rules that you want to change forthe new audience.
6. Click Create and then click Save.
Disable an audienceYou might want to disable an audience if for example it is an audience for a seasonal contentand that season has passed.
You can also disable an audience if you learn that you made a mistake in the audiencedefinition and you want to temporarily turn it off.
1. On the Marketing page, click Audiences.
2. (Optional) Change the view by clicking All Audiences and selecting another view.
3. Click the audience that you want to disable
4. Deselect Audience Enabled.
Disabling the audience takes effect immediately in the audience definition interface. Theaudience is not disabled in a production environment until you publish your changes.
Delete an audienceIf you delete an audience, it cannot be reinstated.
Any association that an audience has with targeted content is also removed when you deletethe audience. You cannot reuse the audience name or ID. If you want to reuse an audience atanother time, you should consider disabling the audience instead of deleting it. See Disablean audience.
1. On the Marketing page, click Audiences.
2. Click the audience that you want to delete.
3. Click Delete.
4. Confirm the deletion.
When an audience is deleted, it no longer appears in the audience definition interface, and noshopper will be considered a member of the audience. However, your site will continue tofunction. You can delete an audience first and remove all uses of it later.
Chapter 13Disable an audience
13-15
The audience is not deleted from your production environment until you publish yourchanges.
View audience usageOn the Audience Usage page, you can see which slots, audiences and promotions areusing an audience so that you have a full understanding before making a change,including deletion of an audience, which may have unintentional consequences.
You can also navigate to users of an audience directly from the Audience Usage page.To view audience usage, follow these steps:
1. On the Marketing page, click Audiences.
2. Click the name of an existing audience then the Audience Usage tab.
You can see the name, type and description of users of that audience.
3. To navigate to a user of an audience, click the name of that user. For example, FallStudent Promotion.
Add personalization to headless applicationsYou can configure headless applications, such as native OS apps or custom webapps, to establish a visit context for each shopper by evaluating the shopper'saudience membership.
Audiences allow you to target content to certain groups of shoppers. You define anaudience by creating a set of rules based on attributes of the shopper profile. See Define Audiencesfor information about audiences. Custom (that is, headless)applications call /ccstore/v1/audienceContext endpoints to use existing audiencesto personalize content.
Before you begin adding personalization to a headless application, make sure that thefollowing tasks are already complete:
• Use the Commerce administration interface to create audiences and set localesand site settings.
• Use the /ccadmin/v1/profiles endpoint to create shopper profiles.
• Make sure the custom application can call the Commerce REST APIs.
• Make sure the custom application conforms to the Internet Engineering Task Force(IETF) cookie spec RFC 6265. The application must be able to store cookiesspecified in REST responses and send them back in its REST requests.
View audience membership
You can use the REST API to pass a set of candidate audience IDs as query stringparameters, and get a response that includes the subset of IDs (if any) that pertain toaudiences a shopper belongs to. The must contain one or more of the following toidentify the shopper:
• Access token returned by the /login endpoint if the shopper is logged in or thesoft-login cookie returned from the /login endpoint if the shopper logged inpreviously.If the request does not include either of these, the shopper is consideredanonymous.
Chapter 13View audience usage
13-16

• Visit and visitor ID headers.
• x-ccsite header that identifies the site.
For example:
GET /ccstore/v1/audienceMembership?filter=audience123,audience234,audience345 Authorization: Bearer <access_token>
x-ccsite: siteUS X-CCVisitId: <visit ID> X-CCVisitorId: <visitor ID> Cookie: SOFT_LOGIN=plM0UbcY.... <encrypted profile ID>
The following is an example of the response returned:
200 OK { "audienceMembership": ["audience234", "audience345"] }
Shopper Profile rules
The Shopper Profile category includes attributes of individual registered shoppers who havelogged in to a personal account. See Understand audience definitions for details about theavailable Shopper Profile attributes.
In order to personalize based on these profile attributes, the shopper must have a profile.Once a shopper has a registered profile, the custom application can log in the shopper byusing the ccstore/v1/login endpoint. This endpoint sets a persistent cookie calledSOFT_LOGIN that expires after 14 months. In order to personalize based in profile attributes,the call to /audienceMembership must contain either the access token or the SOFT_LOGINcookie. Without either of these, the shopper is considered to be anonymous.
Geolocation rules
The Geolocation category includes attributes that identify the current geographical location ofthe shopper. See Understand audience definitions for details about the available Geolocationattributes.
If the custom application sends its requests through Akamai like the storefront app does, thenthose requests, including the one to /audienceMembeship, will include an additional header.For example:
X-Akamai-Edgescape: georegion=263,country_code=US,region_code=MA,city=CAMBRIDGE,dma=506,pmsa=1120,areacode=617,county=MIDDLESEX,fips=25017,lat=42.3933,long=-71.1333,timezone=EST,zip=02138-02142+02238-02239,continent=NA ,throughput=vhigh,asnum=21399
This header is all the /audienceMembership endpoint needs in order to determinemembership for Audiences with Geolocation rules. Otherwise, you must use the Store API to
Chapter 13Add personalization to headless applications
13-17
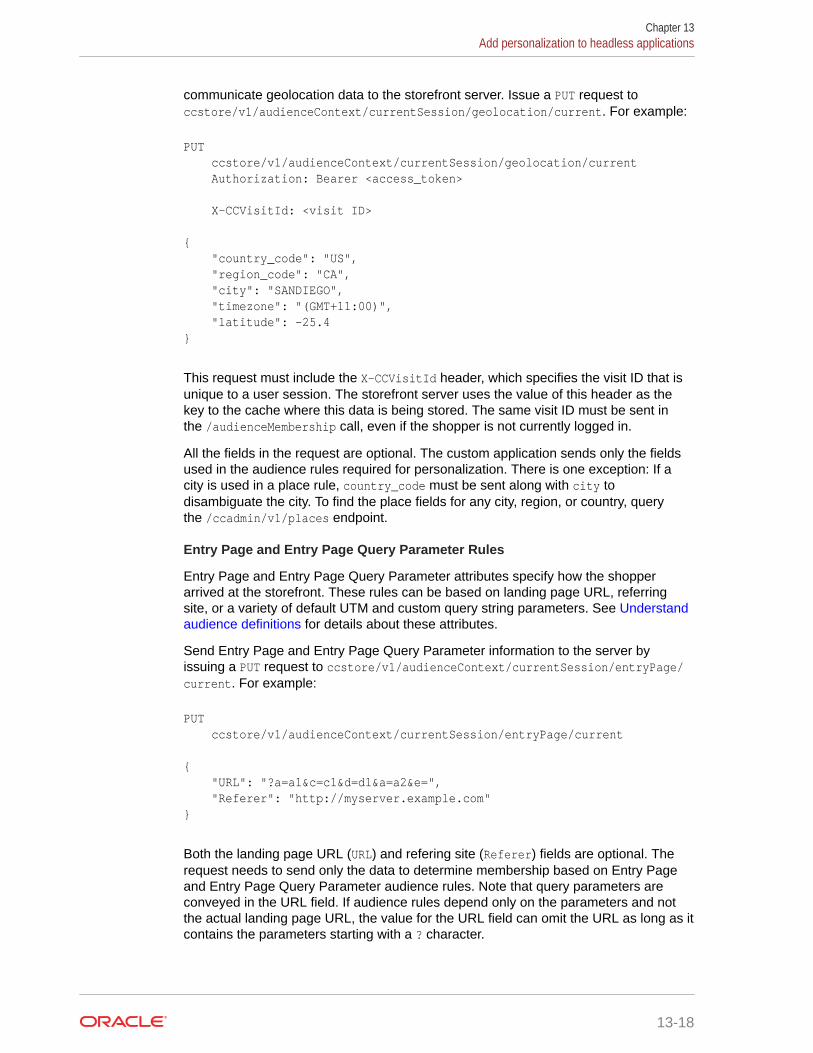
communicate geolocation data to the storefront server. Issue a PUT request toccstore/v1/audienceContext/currentSession/geolocation/current. For example:
PUT ccstore/v1/audienceContext/currentSession/geolocation/current Authorization: Bearer <access_token>
X-CCVisitId: <visit ID>
{ "country_code": "US", "region_code": "CA", "city": "SANDIEGO", "timezone": "(GMT+11:00)", "latitude": -25.4}
This request must include the X-CCVisitId header, which specifies the visit ID that isunique to a user session. The storefront server uses the value of this header as thekey to the cache where this data is being stored. The same visit ID must be sent inthe /audienceMembership call, even if the shopper is not currently logged in.
All the fields in the request are optional. The custom application sends only the fieldsused in the audience rules required for personalization. There is one exception: If acity is used in a place rule, country_code must be sent along with city todisambiguate the city. To find the place fields for any city, region, or country, querythe /ccadmin/v1/places endpoint.
Entry Page and Entry Page Query Parameter Rules
Entry Page and Entry Page Query Parameter attributes specify how the shopperarrived at the storefront. These rules can be based on landing page URL, referringsite, or a variety of default UTM and custom query string parameters. See Understandaudience definitions for details about these attributes.
Send Entry Page and Entry Page Query Parameter information to the server byissuing a PUT request to ccstore/v1/audienceContext/currentSession/entryPage/current. For example:
PUT ccstore/v1/audienceContext/currentSession/entryPage/current
{ "URL": "?a=a1&c=c1&d=d1&a=a2&e=", "Referer": "http://myserver.example.com"}
Both the landing page URL (URL) and refering site (Referer) fields are optional. Therequest needs to send only the data to determine membership based on Entry Pageand Entry Page Query Parameter audience rules. Note that query parameters areconveyed in the URL field. If audience rules depend only on the parameters and notthe actual landing page URL, the value for the URL field can omit the URL as long as itcontains the parameters starting with a ? character.
Chapter 13Add personalization to headless applications
13-18

This request must include the X-CCVisitId header, which specifies the visit ID that is uniqueto a user session. The storefront server uses the value of this header as the key to the cachewhere this data is being stored. The same visit ID must be sent in the /audienceMembershipcall, even if the shopper is not currently logged in.
Device rules
Device attributes specify the type of device (such as a computer, tablet, or phone) andoperating system (such as iOS or Android) the shopper is using to access the site. See Understand audience definitions for details about Device attributes.
Send device information to the server by issuing a PUT request to ccstore/v1/audienceContext/currentSession/deviceType/current. For example:
PUT ccstore/v1/audienceContext/currentSession/deviceType/current
{ "deviceType": "Mobile", "deviceOS": "iOS"}
This request must include the X-CCVisitId header, which specifies the visit ID that is uniqueto a user session. The storefront server uses the value of this header as the key to the cachewhere this data is being stored. The same visit ID must be sent in the /audienceMembershipcall, even if the shopper is not currently logged in.
Send information in a single request
You can send geolocation, entry page, query parameter, and device information in a singlerequest by issuing a PUT request to ccstore/v1/audienceContext/currentSession. Forexample:
PUT ccstore/v1/audienceContext/currentSession
{ "geolocation": { "country_code": "US", "region_code": "CA", "city": "SANDIEGO", "timezone": "(GMT+11:00)", "latitude": -25.4 }, "deviceData": { "deviceType": "Mobile", "deviceOS": "iOS" }, "entryPage": { "URL": "?a=a1&c=c1&d=d1&a=a2&e=", "Referer": "http://myserver.example.com" }}
Chapter 13Add personalization to headless applications
13-19

Sending a PUT request to the base ccstore/v1/audienceContext/currentSessionendpoint will replace all the data for each of the child endpoints, so use this endpointonly if you want to send all the data at once.
Browsing rules
Browsing attributes let you track shopper browsing behavior, that is, views of productsor collections, in the current visit. See Understand audience definitions for detailsabout Browsing attributes.
The ccstore/v1/audienceContext/addBrowsingEvent endpoint caches behavioralevents. The custom application must call this endpoint with a X-CCVisitId header andpass in the ID of the viewed item, the catalog ID, and whether the viewed item was aproduct or collection.
Chapter 13Add personalization to headless applications
13-20
14Configure Tax Processing
Commerce integrates with both Avalara AvaTax and Vertex O Series to automaticallycalculate sales tax in the shopping cart. Commerce uses the Avalara integration by default,but you can easily switch to the Vertex integration.
If you process taxes with a different tax processor, you can use webhooks to integrate withyour tax processor so it calculates taxes in the shopping cart. You can also disable all taxprocessor integration if you use an OMS or other external service to handle tax processing.
Some shoppers may have tax exempt status for certain purchases. For example, individualsworking for a charitable organization may be exempt from sales tax on items used in runningthe charity. To learn how to configure Commerce and your tax processor to handle taxexemptions, see Integrate with an external tax processor.
If you run multiple sites within a single instance of Commerce, these sites share the same taxprocessor settings, but each site can have its own ship-from address. See Run MultipleStores from One Commerce Instance for more information about creating sites.
If you are using a loyalty program, you can configure tax processing to convert to and fromloyalty points currency. For information on loyalty programs, refer to Work with LoyaltyPrograms.
Understand tax processor integrationsCommerce does not configure taxes, but integrates with tax processors that calculate salestax in the shopping cart.
You must have an active account for the tax processor you choose to integrate withCommerce, including for the built-in Avalara and Vertex integrations.
Commerce automatically uses the tax processor you have enabled to calculate taxes forevery order placed on your store. The tax processor calculates sales tax as part of the pricingoperation. When the shopping cart is priced with a request to include tax pricing (when theshopper begins the checkout process and when the order is submitted), Commerce sendsthe order information to the tax processor, which calculates the total tax amount and sends itback to Commerce. The response breaks down the tax into individual components, forexample, the total tax amount might include sales tax assessed by both the state and county.Widgets on the checkout page automatically display the tax information.
Commerce is not involved in the settlement process and is not the system of record for anyaspect of orders, including taxes. Commerce issues Sales Order calls (instead of Invoicecalls) to tax providers to get the tax in a response.
Commerce uses a fallback method for calculating taxes when it cannot connect to your taxprocessor’s web service in the event of an outage. See Monitor tax processors for detailsabout fallback tax calculation and information about configuring its settings.
If you want to display SKU prices with tax included, for example prices that include VAT,create a price group for those tax-inclusive prices. See Configure Price Groups for moreinformation. If your store uses price groups with tax-inclusive prices, you may need to update
14-1

your account on your tax processor’s site. For example, if your store uses tax-inclusiveprices, you must activate Avalara AvaTax with Global for your AvaTax account.
Understand the Tax Code propertyEach product and shipping method you create in Commerce has a Tax Code property.
Tax processors that integrate with Commerce use the value of the Tax Code propertywhen they calculate tax for each product or shipping method. The value you enter forthe Tax Code depends on your tax processor.
• For Avalara AvaTax, it is the Avalara tax code, also called goods and servicestype. For example, if your store sells gift cards, the value of the gift card product’sTax Code property can be the Avalara tax code for Gift Certificates orElectronically Delivered Gift Cards. For more information about tax codes inAvaTax, go to the Avalara Help Center at https://help.avalara.com and search fortax codes.
• For Vertex O Series, it is the code you assigned to a taxability category in Vertex OSeries. For example, if your store sells gift cards, the value of the gift cardproduct’s Tax Code property is the code you assigned to the Gift Certificates/Cards tax category in Vertex O Series.
Tax Code is not a required property; Commerce allows you to leave Tax Code blankwhen you create a product or shipping method. However, it is best practice to assign aTax Code to every product and shipping method you create. Otherwise, the taxcalculations may return unexpected results, such as a higher-than-anticipated taxamount. For example, if you leave a product or shipping method’s Tax Code propertyblank, Vertex calculates the tax at the maximum rate that guarantees compliance.
Configure the AvaTax integrationThe Avalara AvaTax integration is the default tax processor integration.
Commerce uses the tax processing settings you add when you configure theintegration when it communicates with Avalara during tax calculations. See Understand tax processor integrations for overview information about all tax processorintegrations.
You must have an active AvaTax account to use this integration. To learn how to signup for an account and configure it, go to http://www.avalara.com.
Important: As a merchant, it is your responsibility to add the appropriate nexusjurisdictions to your AvaTax company tax profile. (You configure your company profilein your Avalara AvaTax Admin console.) Nexus jurisdictions tell AvaTax where andwhen to calculate and report tax. All sales that occur in jurisdictions you have notconfigured in AvaTax result in a tax calculation that returns a value of zero tax.Commerce is not responsible for configuring or validating nexus jurisdictions. Visit theAvalara Help Center at https://help.avalara.com to learn about nexus jurisdictions.
Before you begin, make sure you have the following information for your AvaTaxaccount:
• The company code.
• The account number.
• The license key.
Chapter 14Understand the Tax Code property
14-2
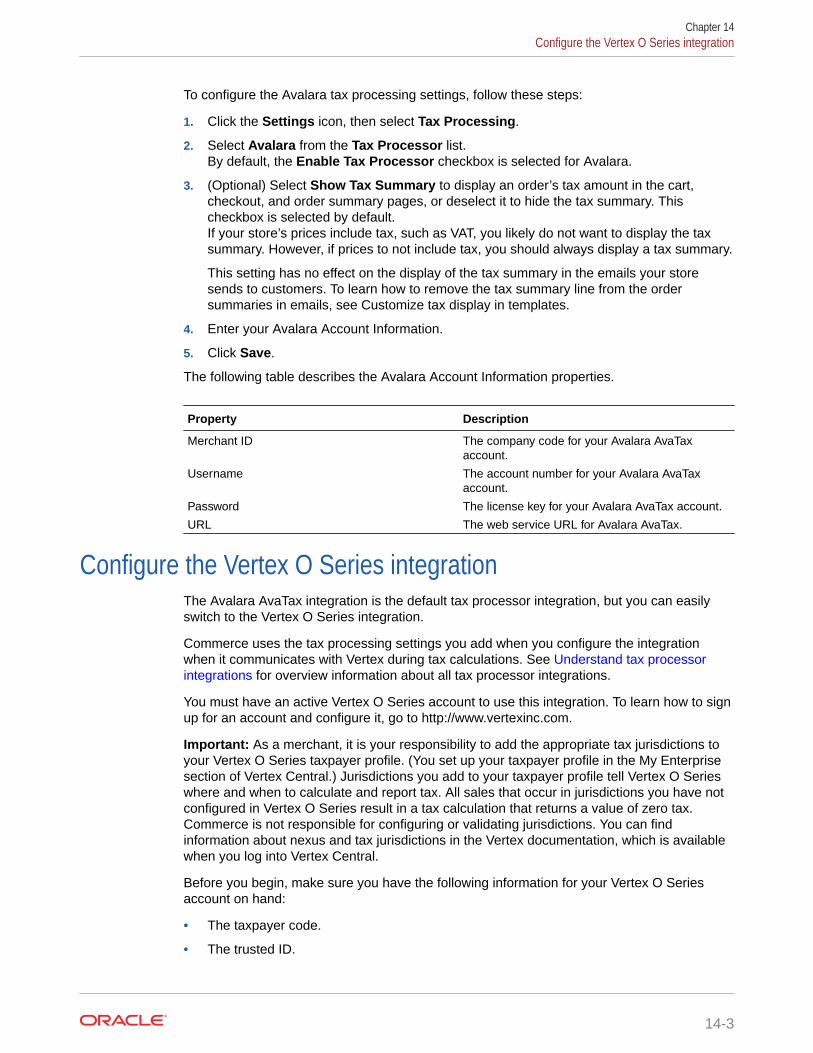
To configure the Avalara tax processing settings, follow these steps:
1. Click the Settings icon, then select Tax Processing.
2. Select Avalara from the Tax Processor list.By default, the Enable Tax Processor checkbox is selected for Avalara.
3. (Optional) Select Show Tax Summary to display an order’s tax amount in the cart,checkout, and order summary pages, or deselect it to hide the tax summary. Thischeckbox is selected by default.If your store’s prices include tax, such as VAT, you likely do not want to display the taxsummary. However, if prices to not include tax, you should always display a tax summary.
This setting has no effect on the display of the tax summary in the emails your storesends to customers. To learn how to remove the tax summary line from the ordersummaries in emails, see Customize tax display in templates.
4. Enter your Avalara Account Information.
5. Click Save.
The following table describes the Avalara Account Information properties.
Property Description
Merchant ID The company code for your Avalara AvaTaxaccount.
Username The account number for your Avalara AvaTaxaccount.
Password The license key for your Avalara AvaTax account.
URL The web service URL for Avalara AvaTax.
Configure the Vertex O Series integrationThe Avalara AvaTax integration is the default tax processor integration, but you can easilyswitch to the Vertex O Series integration.
Commerce uses the tax processing settings you add when you configure the integrationwhen it communicates with Vertex during tax calculations. See Understand tax processorintegrations for overview information about all tax processor integrations.
You must have an active Vertex O Series account to use this integration. To learn how to signup for an account and configure it, go to http://www.vertexinc.com.
Important: As a merchant, it is your responsibility to add the appropriate tax jurisdictions toyour Vertex O Series taxpayer profile. (You set up your taxpayer profile in the My Enterprisesection of Vertex Central.) Jurisdictions you add to your taxpayer profile tell Vertex O Serieswhere and when to calculate and report tax. All sales that occur in jurisdictions you have notconfigured in Vertex O Series result in a tax calculation that returns a value of zero tax.Commerce is not responsible for configuring or validating jurisdictions. You can findinformation about nexus and tax jurisdictions in the Vertex documentation, which is availablewhen you log into Vertex Central.
Before you begin, make sure you have the following information for your Vertex O Seriesaccount on hand:
• The taxpayer code.
• The trusted ID.
Chapter 14Configure the Vertex O Series integration
14-3
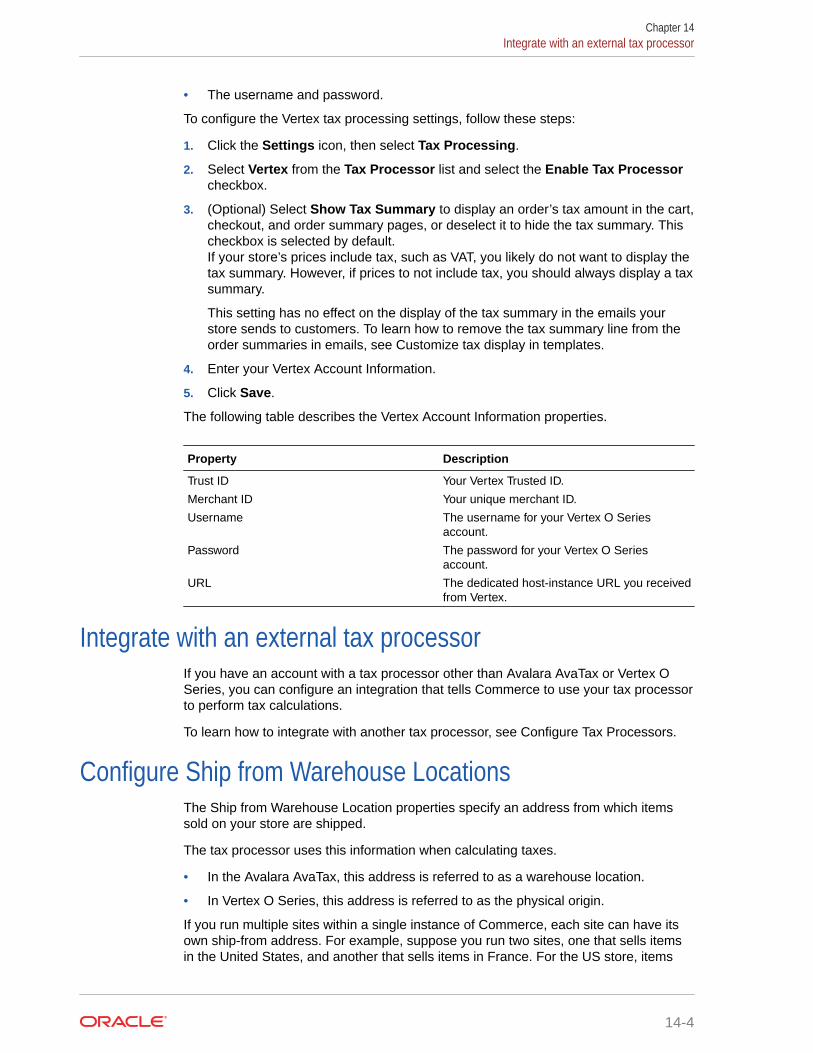
• The username and password.
To configure the Vertex tax processing settings, follow these steps:
1. Click the Settings icon, then select Tax Processing.
2. Select Vertex from the Tax Processor list and select the Enable Tax Processorcheckbox.
3. (Optional) Select Show Tax Summary to display an order’s tax amount in the cart,checkout, and order summary pages, or deselect it to hide the tax summary. Thischeckbox is selected by default.If your store’s prices include tax, such as VAT, you likely do not want to display thetax summary. However, if prices to not include tax, you should always display a taxsummary.
This setting has no effect on the display of the tax summary in the emails yourstore sends to customers. To learn how to remove the tax summary line from theorder summaries in emails, see Customize tax display in templates.
4. Enter your Vertex Account Information.
5. Click Save.
The following table describes the Vertex Account Information properties.
Property Description
Trust ID Your Vertex Trusted ID.
Merchant ID Your unique merchant ID.
Username The username for your Vertex O Seriesaccount.
Password The password for your Vertex O Seriesaccount.
URL The dedicated host-instance URL you receivedfrom Vertex.
Integrate with an external tax processorIf you have an account with a tax processor other than Avalara AvaTax or Vertex OSeries, you can configure an integration that tells Commerce to use your tax processorto perform tax calculations.
To learn how to integrate with another tax processor, see Configure Tax Processors.
Configure Ship from Warehouse LocationsThe Ship from Warehouse Location properties specify an address from which itemssold on your store are shipped.
The tax processor uses this information when calculating taxes.
• In the Avalara AvaTax, this address is referred to as a warehouse location.
• In Vertex O Series, this address is referred to as the physical origin.
If you run multiple sites within a single instance of Commerce, each site can have itsown ship-from address. For example, suppose you run two sites, one that sells itemsin the United States, and another that sells items in France. For the US store, items
Chapter 14Integrate with an external tax processor
14-4
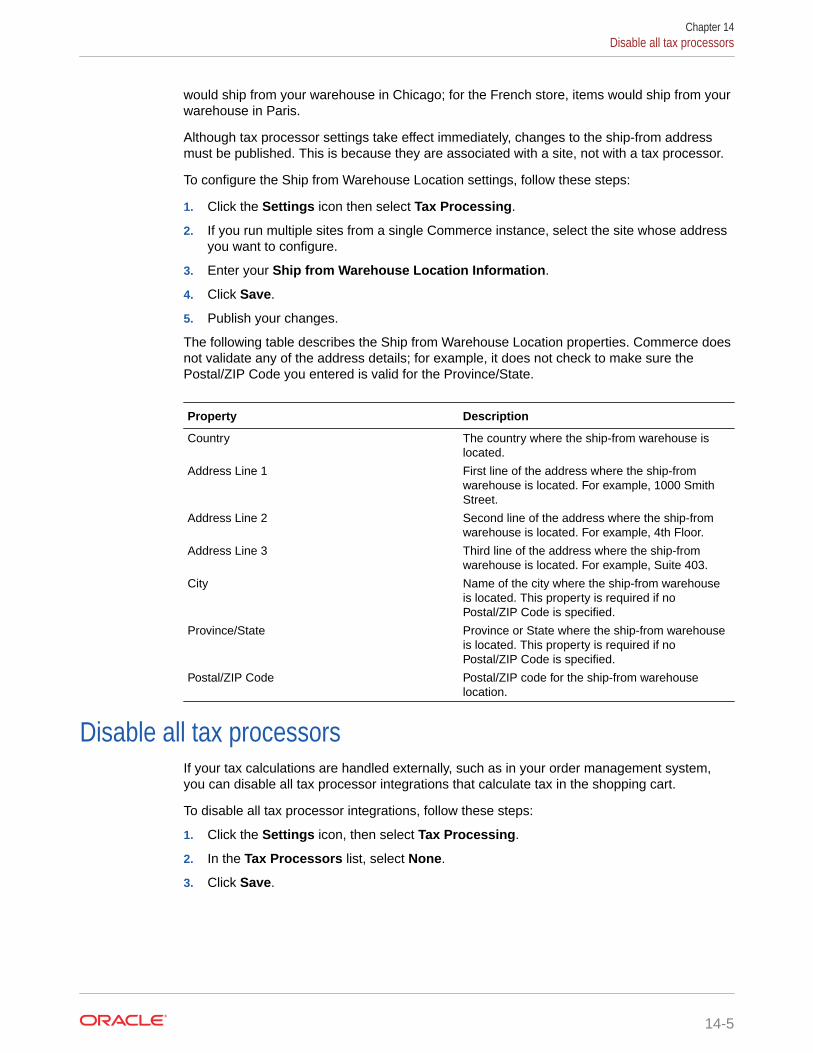
would ship from your warehouse in Chicago; for the French store, items would ship from yourwarehouse in Paris.
Although tax processor settings take effect immediately, changes to the ship-from addressmust be published. This is because they are associated with a site, not with a tax processor.
To configure the Ship from Warehouse Location settings, follow these steps:
1. Click the Settings icon then select Tax Processing.
2. If you run multiple sites from a single Commerce instance, select the site whose addressyou want to configure.
3. Enter your Ship from Warehouse Location Information.
4. Click Save.
5. Publish your changes.
The following table describes the Ship from Warehouse Location properties. Commerce doesnot validate any of the address details; for example, it does not check to make sure thePostal/ZIP Code you entered is valid for the Province/State.
Property Description
Country The country where the ship-from warehouse islocated.
Address Line 1 First line of the address where the ship-fromwarehouse is located. For example, 1000 SmithStreet.
Address Line 2 Second line of the address where the ship-fromwarehouse is located. For example, 4th Floor.
Address Line 3 Third line of the address where the ship-fromwarehouse is located. For example, Suite 403.
City Name of the city where the ship-from warehouseis located. This property is required if noPostal/ZIP Code is specified.
Province/State Province or State where the ship-from warehouseis located. This property is required if noPostal/ZIP Code is specified.
Postal/ZIP Code Postal/ZIP code for the ship-from warehouselocation.
Disable all tax processorsIf your tax calculations are handled externally, such as in your order management system,you can disable all tax processor integrations that calculate tax in the shopping cart.
To disable all tax processor integrations, follow these steps:
1. Click the Settings icon, then select Tax Processing.
2. In the Tax Processors list, select None.
3. Click Save.
Chapter 14Disable all tax processors
14-5
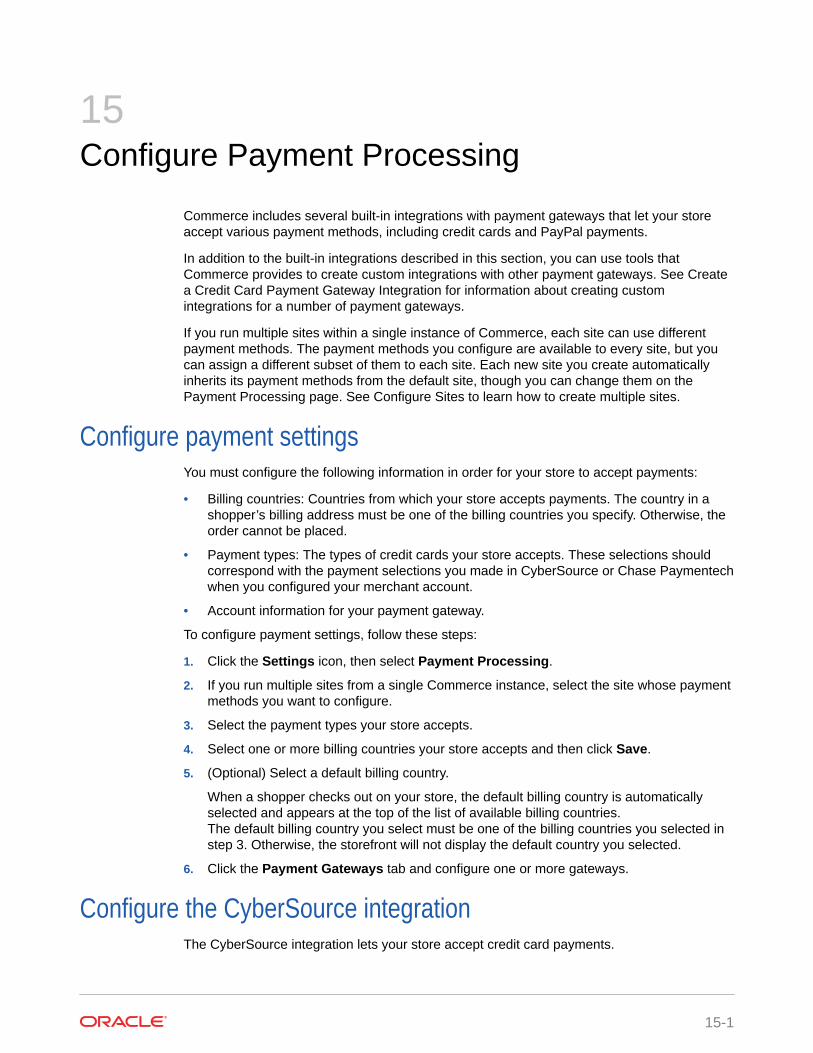
15Configure Payment Processing
Commerce includes several built-in integrations with payment gateways that let your storeaccept various payment methods, including credit cards and PayPal payments.
In addition to the built-in integrations described in this section, you can use tools thatCommerce provides to create custom integrations with other payment gateways. See Createa Credit Card Payment Gateway Integration for information about creating customintegrations for a number of payment gateways.
If you run multiple sites within a single instance of Commerce, each site can use differentpayment methods. The payment methods you configure are available to every site, but youcan assign a different subset of them to each site. Each new site you create automaticallyinherits its payment methods from the default site, though you can change them on thePayment Processing page. See Configure Sites to learn how to create multiple sites.
Configure payment settingsYou must configure the following information in order for your store to accept payments:
• Billing countries: Countries from which your store accepts payments. The country in ashopper’s billing address must be one of the billing countries you specify. Otherwise, theorder cannot be placed.
• Payment types: The types of credit cards your store accepts. These selections shouldcorrespond with the payment selections you made in CyberSource or Chase Paymentechwhen you configured your merchant account.
• Account information for your payment gateway.
To configure payment settings, follow these steps:
1. Click the Settings icon, then select Payment Processing.
2. If you run multiple sites from a single Commerce instance, select the site whose paymentmethods you want to configure.
3. Select the payment types your store accepts.
4. Select one or more billing countries your store accepts and then click Save.
5. (Optional) Select a default billing country.
When a shopper checks out on your store, the default billing country is automaticallyselected and appears at the top of the list of available billing countries.The default billing country you select must be one of the billing countries you selected instep 3. Otherwise, the storefront will not display the default country you selected.
6. Click the Payment Gateways tab and configure one or more gateways.
Configure the CyberSource integrationThe CyberSource integration lets your store accept credit card payments.
15-1
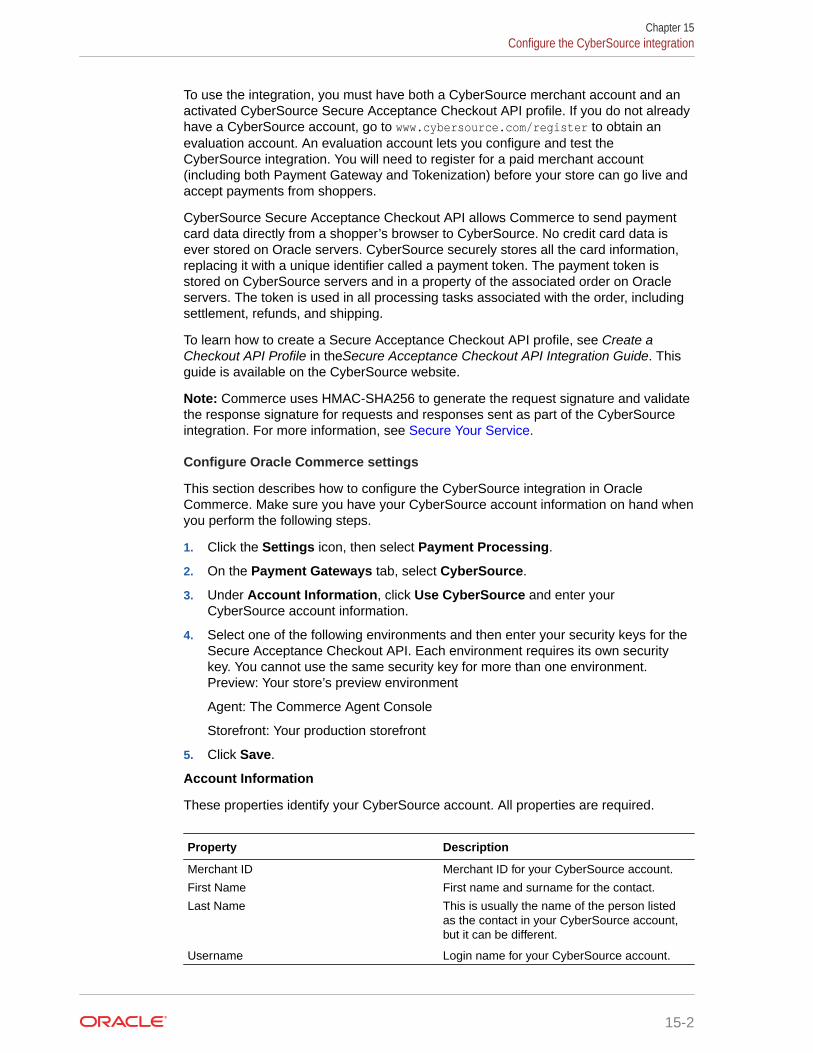
To use the integration, you must have both a CyberSource merchant account and anactivated CyberSource Secure Acceptance Checkout API profile. If you do not alreadyhave a CyberSource account, go to www.cybersource.com/register to obtain anevaluation account. An evaluation account lets you configure and test theCyberSource integration. You will need to register for a paid merchant account(including both Payment Gateway and Tokenization) before your store can go live andaccept payments from shoppers.
CyberSource Secure Acceptance Checkout API allows Commerce to send paymentcard data directly from a shopper’s browser to CyberSource. No credit card data isever stored on Oracle servers. CyberSource securely stores all the card information,replacing it with a unique identifier called a payment token. The payment token isstored on CyberSource servers and in a property of the associated order on Oracleservers. The token is used in all processing tasks associated with the order, includingsettlement, refunds, and shipping.
To learn how to create a Secure Acceptance Checkout API profile, see Create aCheckout API Profile in theSecure Acceptance Checkout API Integration Guide. Thisguide is available on the CyberSource website.
Note: Commerce uses HMAC-SHA256 to generate the request signature and validatethe response signature for requests and responses sent as part of the CyberSourceintegration. For more information, see Secure Your Service.
Configure Oracle Commerce settings
This section describes how to configure the CyberSource integration in OracleCommerce. Make sure you have your CyberSource account information on hand whenyou perform the following steps.
1. Click the Settings icon, then select Payment Processing.
2. On the Payment Gateways tab, select CyberSource.
3. Under Account Information, click Use CyberSource and enter yourCyberSource account information.
4. Select one of the following environments and then enter your security keys for theSecure Acceptance Checkout API. Each environment requires its own securitykey. You cannot use the same security key for more than one environment.Preview: Your store’s preview environment
Agent: The Commerce Agent Console
Storefront: Your production storefront
5. Click Save.
Account Information
These properties identify your CyberSource account. All properties are required.
Property Description
Merchant ID Merchant ID for your CyberSource account.
First Name
Last Name
First name and surname for the contact.
This is usually the name of the person listedas the contact in your CyberSource account,but it can be different.
Username Login name for your CyberSource account.
Chapter 15Configure the CyberSource integration
15-2

Security Keys for Secure Acceptance
These properties identify your CyberSource Secure Acceptance Checkout API profile. If youconfigure properties for both the Storefront and Agent configurations, use the sameproperties for both. All properties are required.
Property Description
Profile ID The ID for your CyberSource Secure AcceptanceCheckout API profile.
Access Key Authenticates your account with CyberSource.
Secret Key The secret key associated with the access key youentered. The secret key signs the transaction dataand is required for each transaction.
SOP URL The URL used to send the form to CyberSourcefor processing the payment.
For test and preview environments, set this to:
https://testsecureacceptance.cybersource.com/silent/embedded/pay
For production environments, set this to:
https://secureacceptance.cybersource.com/silent/embedded/pay
Test the CyberSource integration
Once the CyberSource integration is configured, you should be able to go to your store andplace a test transaction. If the transactions are successful, the orders will be visible in OracleCommerce reports in the CyberSource Business Center under Transaction Search.
Note: You cannot place test transactions in preview mode; you must place them from yourstore. See Preview your store for information about preview mode.
The following page provides a list of test credit card numbers:
https://www.cybersource.com/developers/other_resources/quick_references/test_cc_numbers/
Note that to enable communication between CyberSource and your Commerce sites, youmust add the appropriate URL and HTTP methods to the allowedOriginMethods property ofeach site object, and then publish your changes. For example, for a site whose ID is siteUK:
PUT /ccadmin/v1/sites/siteUK HTTP/1.1Authorization: Bearer <access_token>x-ccasset-language: en
{ "properties": { "allowedOriginMethods": { "https://testsecureacceptance.cybersource.com": "GET,PUT,POST,OPTIONS" } }}
Chapter 15Configure the CyberSource integration
15-3

For more information, see CORS support.
Configure the PayPal integrationThe PayPal Express Checkout integration lets your customers pay for purchases withtheir PayPal accounts.
To use the integration, you must have either a Business or Premier PayPal account.You should also have a PayPal Sandbox account with two test accounts.
You can configure the integration so that PayPal captures funds at the same time thepayment is authorized or you can capture funds later, for example, your ordermanagement system can capture funds when the order ships.
For more information about PayPal Express Checkout, see Getting Started withExpress Checkout in the PayPal developer documentation.
Configure PayPal settings
To configure the PayPal settings, follow these steps:
1. Click the Settings icon, then select Payment Processing.
2. On the Payment Gateways tab, under Payment Gateways, select PayPal.
3. Under Account information, click Use PayPal.
4. Enter your PayPal merchant account information.
5. Click Save.
Account Information
These properties identify your PayPal account. All properties are required.
Property Description
Client ID (Required) The API client ID for your PayPalaccount.
Secret Key (Required) The API secret key for your PayPalaccount.
Production If this setting is turned on, transactions occuron the live PayPal production environment. Ifthis setting is turned off (default), transactionsoccur on the PayPal Sandbox, a virtual testingenvironment.
Capture Payment Action Specify when PayPal should capture funds:
Order Placed: (default) PayPal authorizespayment and captures funds when the order issubmitted.
Order Shipped: PayPal authorizes paymentwhen the order is submitted but does notcapture payment. You are responsible formaking sure PayPal captures payment at alater time, ideally, when the order ships. Formore information, see Capture Payments Laterin the PayPal developer documentation.
Chapter 15Configure the PayPal integration
15-4

Understand PayPal requirements for account-based storefronts
Account-based storefronts have an additional requirement for shoppers who use PayPal astheir payment method. For more information, see Ensure PayPal shoppers provide first andlast name.
Configure the Chase Paymentech integrationThe Chase Paymentech integration lets your store accept credit cards.
To use the integration, you must have a Chase Paymentech merchant account.
The integration allows Commerce to send payment card details from a shopper’s browser toan Oracle server, which then sends the card details to Chase Paymentech, where thespecified transaction (authorization, void, or refund) is performed. No credit card data is everstored on Oracle servers. The Chase Paymentech response contains an authorization codeand transaction reference number, which are stored in a property of the associated order onOracle servers.
The gateway does not support tokenization via the Orbital Customer Profile Management.Therefore, a shopper who provided credit card details when submitting an order must providethe details again for subsequent transactions, such as obtaining a refund.
Note: Commerce uses HMAC-SHA256 to generate the request signature and validate theresponse signature for requests and responses sent as part of the payment gatewayintegrations. For more information, see Secure Your Service.
The gateway does not support Address Verification Service (AVS), so to make sure cards arenot automatically declined you must do one of the following on your Orbital Virtual Terminal:
• Turn off mandatory AVS checking.
• Configure your Merchant Selectable Response (MSR) settings to handle the AVSresponse codes so that a card is not automatically declined for “information not available”or “AVS not supported” codes. For more information about the response codes, see AVSResponse Codes on the Chase Paymentech Support Center.
Configure Chase Paymentech credit card settings
To configure the Chase Paymentech Credit Cards gateway settings, follow these steps:
1. Click the Settings icon then select Payment Processing.
2. On the Payment Gateways tab, under Payment Gateways, select Chase PaymentechCredit Cards.
3. Click Payment Gateway Enabled.
4. Select the environment to work in.Preview: Your store’s preview environment
Agent: The Commerce Agent Console
Storefront: Your production storefront
5. Enter your Chase Paymentech account information.
6. Click Save.
Chase Paymentech Account Information
Chapter 15Configure the Chase Paymentech integration
15-5

These properties identify your Chase Paymentech account. All properties are required.
Property Description
Username Login name for your Chase Paymentechaccount.
Merchant ID Gateway merchant account number for yourChase Paymentech account.
Merchant Secret Key The secret key associated with your MerchantID. The secret key signs the transaction dataand is required for each transaction.
Environment Specifies where transactions occur:
Sandbox: (default) Transactions occur on theChase Paymentech Sandbox, a virtual testingenvironment.
Production: Transactions occur on the liveChase Paymentech production environment.
Chapter 15Configure the Chase Paymentech integration
15-6
16Configure Shopper Settings
Shopper settings let you configure registration details, password policies, and session lengthfor registered customers. You do not have to publish changes you make to shopper settings;they take effect as soon as you save them.
Note:The Commerce APIs provide endpoints that you can use to create custom propertiesfor shopper profiles that you can display on your store or use internally in the administrationinterface. See Manage Shopper Profiles for more information.
In addition to these Shopper Settings, you can also restrict guest checkout. See Restrictguest checkout for more information.
Configure the password policyThis section describes the password management features included as part of Commerce.
Password management is an important part of administering any site that includes personalinformation.
The section includes the following topics:
• Configure strong passwords
• Force all passwords to expire
• Understand how forgotten passwords are handled
Configure strong passwords
Strong password checking lets you define criteria for new passwords; for example, you canspecify that new passwords cannot be duplicates of old ones or contain the same charactersas login names.
To configure strong passwords, follow these steps:
1. Click the Settings icon, then sShopper Settings.
2. Select one or more strong password settings.
• If you select Minimum Password Length, enter a number that specifies theminimum number of characters.
• If you select Must Include a Symbol Character, enter, or add to, a list of symbols.
• If you select Cannot Be A Previous Password, enter a number that specifies howmany most recent passwords cannot be used.
• If you select Expire Password, enter a number that specifies the number of daysuntil a new password expires.
3. Click Save.
16-1

Force all passwords to expire
In some cases, you may want to force the passwords of all registered users to expireat the same time. Registered shoppers will have to reset their passwords the next timethey log in.
To force all passwords to expire, follow these steps:
1. Click the menu icon, then select Settings.
2. Select Shopper Settings from the Settings list.
3. Click the Expire All Passwords button.
4. Confirm that you want to force all passwords to expire immediately.
Understand how forgotten passwords are handled
Registered shoppers who cannot remember their passwords can use the ForgottenPassword feature in the storefront to set a new password. The process works asfollows:
1. The shopper clicks the Forgotten Password link in the login screen and entershis or her email address.The system validates that the email address matches an existing shopper profile.If no match is found, the system does nothing, and the shopper does not receivean email.
2. The shopper clicks the Send Request button. A one-time use link is sent by thesystem to their email address.
3. Once the shopper receives the link and opens it, they are prompted to create andconfirm their new password.
Configure the logged-in shopper sessionYou can configure shopper sessions to automatically expire after a specified period ofinactivity.
The logged-out shopper can still access most areas of the store but must log in againto access secure pages, such as their profile or the checkout page. This is sometimesreferred to as soft login.To configure the logged-in shopper session, follow these steps:
1. Click the Settings icon, then select Shopper Settings.
When running multiple sites from your Oracle Commerce instance, yourconfigurations will be applied by site. Choose your site from the site picker at thetop of the Settings menu options.
2. Under Shopper Session, click Logged-In User Session Timeout.
3. Enter a number that specifies the session length, in minutes.
4. Click Save.
Chapter 16Configure the logged-in shopper session
16-2
Configure guest checkoutYou can require that anonymous shoppers log into their accounts before they check out.
This feature can be used for anonymous shoppers who will log into either an individualaccount or a business account.
To prevent guest checkout, follow these steps:
1. Click the Settings icon, then select Shopper Settings.
When running multiple sites from your Oracle Commerce instance, your configurationswill be applied by site. Choose a site from the site picker at the top of the Settings menuoptions.
2. Under Guest Checkout, uncheck the Allow checkbox.
In addition to selecting this setting, your pages must be modified at a widget code-level torestrict access to the Checkout UI itself. For details on doing so, see Manage GuestCheckout.
Disable soft loginA logged-out shopper can still see personalized content based on their profile.
This is referred to as soft login. Soft login allows a registered shopper who is returning to thesite to be identified and their site experience to be personalized.
Soft login is a per site setting, and is enabled by default. You can use the /ccadmin/v1/merchant/profilePolicies REST API endpoint to disable it. See Create a shopper profilefor details.
A shopper who is soft logged-in must log in to access their account page or to create anorder.
Configure account-based shoppersYou can allow a prospective account-based shopper to request registration of a new accounton your store.
Enabling this feature lets a shopper submit an account registration request for a new accountby providing required business details. The information is reviewed by an administrator fromthe merchant side after the shopper submits the required details, and, if needed, theadministrator may request additional details such as credit checks. The registration request isthen either approved or rejected. If the request is approved, the new contact for the accountis activated.
To configure the account-based shoppers feature, follow these steps:
1. Click the Settings icon, then select Shopper Settings.When running multiple sites from your Oracle Commerce instance, your configurationswill be applied by site. Choose a site from the site picker at the top of the Settings menuoptions.
2. Click from the Settings list.
3. Select Account-based Shoppers - Allow requests to register a new business Account
Chapter 16Configure guest checkout
16-3

4. Click Save.
The following provides additional details on what happens if this feature enabled:
• The Accounts page of the administrator user interface now includes a RegistrationRequests tab. This area lets you view, search, and work with account registrationrequests. For further details, refer to Configure Business Accounts.
• A Register for an account link appears on the Log In dialog box that is launchedfrom the Contact Login (for Managed Accounts) element of the Header widget.Clicking the link displays a new business-to-business registration request formdialog that the registrant fills in.
• The Store API for submitting a registration request can return a successful status.
The following provides additional details on what happens if this feature is disabled:
• The Register for an account link does not appear on the Log In dialog box that islaunched from the Contact Login (for Managed Accounts) element of the Headerwidget.
• If a prospective shopper is in the process of filling out a Register form and submitsit, they see the “Account registration is not available” error.
• If there are registration requests with statuses of New, Review, More Info Needed,or Rejected, the Registration Requests area remains in the Accounts area of theUI.
• If there are no registration requests with statuses of New, Review, More InfoNeeded, or Rejected, the Registration Requests area is hidden.
• The Store API to submit a registration request returns the error, “Accountregistration is not available.”
Note: To enable the store user interface to allow account-based shoppers to submit anaccount registration request, make sure you have a Contact Login element to theHeader widget in your site Home layout. For further details, refer to Create PageLayouts that Support Different Types of Shoppers.
Configure shopper registrationYou can configure shopper registration so that a shopper does not create a passwordon the storefront, but instead completes registration by clicking a secure link in anemail your store sends to an email address the shopper provides.
This section describes how to enable and configure the secure registration flow forshoppers. This feature is enabled by default for all new Commerce customers, startingwith Release 20.1.0. To support backward compatibility, the feature remains disabled ifyou upgraded to this release from Commerce 19.5.9 or earlier, though you can followthe procedures in this chapter to enable and configure secure registration flow.
Understand secure shopper registration
Prior to Commerce 20A, a shopper who created a new account entered a name, emailaddress, and password as part of the registration request on the storefront. Now, whenthe secure shopper registration flow is enabled, a shopper enters just a name andemail address, then submits the request. Commerce creates a shopper profile with anauto-generated password and sends a New Account email with a secure, tokenizedlink. The shopper clicks the link, then enters new password details to complete theregistration.
Chapter 16Configure shopper registration
16-4

When the secure registration flow is not enabled, a shopper who tries to create a newaccount using an email address from an existing shopper profile sees a warning that theemail address is already associated with an account. When the secure registration flow isenabled, Commerce does not display a warning, but sends a Forgotten Password email witha secure, tokenized link. You can customize the Forgotten Password email template with textthat explains that the email address is already assigned to an account.
Similarly, if your store supports account-based commerce and a shopper tries to submit anew account-registration request with an email address from an existing personal account,Commerce no longer displays a warning that the address is already associated with ashopper profile.
Enable the secure registration flow
To enable the secure registration flow, use the /ccadmin/v1/merchant/profilePoliciesendpoint in the Admin API to set the enableProfileRegistrationEmailCheck property totrue. For example:
PUT /ccadmin/v1/merchant/profilePolicies HTTP/1.1Authorization: Bearer <access_token>
{ "enableProfileRegistrationEmailCheck": true }
See Use the REST APIs for information you need to know before using the APIs.
Configure email templates
To implement the secure registration flow, you must enable the Forgotten Password and NewAccount emails. If you are upgrading from release 19.5.9 or earlier, you must download thelatest versions of these email templates. The latest version of the New Account templateincludes code to render the tokenized link and additional strings to support the newregistration flow. The latest version of the Forgotten Password template includes code thatdisplays a new customizable string if a shopper tried to register with an existing emailaddress.
Once you have downloaded the templates, customize them and then upload them. See Customize Email Templates for more information.
Update widgets
To implement the secure registration flow, make sure your layouts include the latest versionof the Login Checkout/Registration element. To replace a component with the latest version,see Upgrade deployed widgets.
Chapter 16Configure shopper registration
16-5

17Configure Email Settings
Commerce lets you configure and automatically send different types of email notifications tocustomers. In order to send email to customers, you must have an account with an emailservice.
For information about customizing the templates for emails your store sends, see CustomizeEmail Templates.
Enable the types of email your store sendsYou can use the Email Settings option in the administration interface to configure andautomatically send many types of emails from your store.
• Reset Password emails are sent when customers click the Forgotten Password link.
• Abandoned Order emails remind customers that they left unpurchased items in theirshopping carts. You can configure settings that determine when Abandoned Ordernotifications are sent. See Configure Abandoned Cart settings for more information.In addition, you can include product recommendations in Abandoned Order emails. Forinformation about product recommendations, see Display product recommendations. Tolearn how to customize email templates to include recommendations, see CustomizeEmail Templates.
• Items Shipped emails let customers know that their orders have shipped. This notificationis sent when Commerce receives confirmation from your order fulfillment system that anorder has shipped.
• Order Placed emails let customers know that an order has been submitted for fulfillment.This notification is usually sent as soon as an order is submitted, though if you specified aremorse period, the email is sent as soon as the time you specified for the remorseperiod has passed. See Understand the remorse period for more information aboutremorse periods.
• New Account emails are sent when customers have registered on the storefront.You can include product recommendations in New Account emails. For information aboutproduct recommendations, see Display product recommendations.
• Back-in-stock email notifications are sent to shoppers after they have clicked the NotifyMe link when viewing a product that is out of stock, and they have provided their emailaddress. The Notify Me email template must be enabled, and configured, in order for theback-in-stock email notifications to be sent when those products become available. See Understand back in stock notifications for more information.These email notifications are part of the built-in back in stock functionality. If yourCommerce environment integrates with an external system to track and notify shoppersabout inventory changes, enable the Inventory Update webhook, which notifies theexternal system when SKUs are back in stock. See Understand webhooks for moreinformation.
• For details about Wish List emails, see Configure Wish Lists.
• For additional types of email you can send, see later in this topic.
17-1

You can customize each type of email your store sends. For example, you can edit thetext or change the colors and fonts to match those of your store, add a company nameand logo to email templates for account-based storefronts, or add site details if yourCommerce instance runs multiple sites. See Customize Email Templates for moreinformation.
In order to send email to customers, you must enable the email type, and specify thename and email address that appears in the From field of that type of email. You canspecify a different name and email address for each type of email you enable.
To enable a type of email, follow these steps:
1. Click the Settings icon, then select Email Settings.
2. If you run multiple sites from a single Commerce instance, select the site whoseemail types you want to configure and enable.
3. Select the email type you want to set up.
4. Click Enabled.
5. (Optional) In the From Name field, enter a display name for the sender.
6. In the From Email field, enter a valid email address to use as the sender.Important: The address you enter must be a valid, active email account capableof receiving messages. If you use Oracle to send transactional emails or otheroutbound email for your Commerce site, which is typical, invalid sender emailaddresses will result in an email block. If you use another email service, an invalidemail address will result in bounces; a high number of bounces may cause theservice to suspend your email account.To test the address you want to use, send an email to it from any account andverify it does not bounce.
7. Click Save.
If your environment includes the Commerce Agent Console, you can also send thefollowing types of email.
• Agent Cancel Order emails are sent when an agent cancels an order during theremorse period.
• Agent Edit Order emails are sent when an agent amends an order during theremorse period.
• Agent Forgot Password emails are sent when an agent resets a customer’spassword.
• Agent Return Order emails are sent when an agent processes a return.
• Agent Return Order Refund emails are sent when an agent processes a returnwith a manual refund.
• Agent Shopper Registration emails are sent to customers who agents register onyour site.
If you are creating an account-based storefront, you can also send the following typesof email:
• Account Assignment Changed emails are sent when an active contact has beenadded to an account. This could happen because a new active contact is added toan account or an existing active contact has been moved from one account toanother. This email is also sent when an inactive contact that is already associatedwith an account is activated or when a contact is removed from an account. The
Chapter 17Enable the types of email your store sends
17-2

email contains a link that the contact can click to set a new password for logging in to thestorefront.You can cut down on the number of emails contacts receive when you make multipleaccount and role assignment changes at the same time. See Customize Email Templatesfor more information.
• Role Assignment Changed emails are sent when one or more roles are added orremoved from a contact.
• Contact Deactivated emails are sent to contacts when they are removed from the systemand are no longer associated with any accounts.
• Account Deactivated emails are sent to all contacts associated with an account when thataccount has been deactivated.
• Account Activated or New Contract Added emails are sent to all contacts associated withan account when the account is activated, a contract is added, or if the account is movedto a new parent, where it inherits the parent’s contracts by default.Note: Emails are sent only when the account is active and has at least one contract.
• A number of emails notify contacts about events related to order approvals. For moreinformation about these types of emails, see Notify users of order approval-relatedevents.
If you are creating a storefront that lets account-based shoppers submit a new accountregistration request for business accounts, you can also send the following specific types ofemail that are specific to that process. For further details on the new account registrationrequest process, refer to Configure Business Accounts.
• New registration requests emails are sent to business users with the administrator oraccount manager privilege.
• Account Request Approved - Manager emails are sent to administrators and accountmanagers.
• Account Request Rejected - Manager emails are sent to are sent to administrators andaccount managers.
• Account Request Acknowledgment - User emails are sent to the account requester to letthem know that their account request has been received and is under review.
• Account Request Approved - User emails are sent to the account requester to let themknow that their account request has been approved.
• Account Request Rejected - User emails are sent to the account requester to let themknow that their account request has been rejected.
• Account Assignment Changed emails are sent to a user when they become a new activecontact. In this case, the account registration requester has been successfully added toan account as an active contact. The email contains a link that the contact can click to seta new password for logging in to the storefront. The email also instructs the user tocontact their organization if additional access information is needed.
If you are creating a storefront that lets an existing account-based shopper (contact) or a non-account-based shopper submit a contact registration request , you can also send thefollowing types of email that are specific to that process. For further details on the contactregistration request process, refer to Configure Business Accounts.
Note: The templates for these emails can be found by going to the administration interfaceand clicking on the administration menu. Next, click Settings > Email Settings. All templatesassociated with contact request registration can be found in the Templates section of theEmail Settings page. All associated template names start with “Contact Request…”
Chapter 17Enable the types of email your store sends
17-3

• Email containing list of new contact registration requests - These are emails thatare sent to Administrators, Delegated Administrators, and Account Managers thatprovide lists of new self-registration requests. Each email includes (at most) 25contact self-registration requests and contains summary information about eachnew request. Also, for each account that has requests, an email is also sent to allDelegated Administrators on the account. The Administrators/Account Managersemails have a link to the Accounts Administration Page to obtain more details, arequested account ID, and a requested account name. The DelegatedAdministrator emails do not have this additional information.
• Email to Delegated Administrators requesting they check on a contact registrationrequest – When an Administrator assigns a new account and saves the request,updates the account on a request, and/or saves the request without accepting orrejecting it, Commerce sends an email to the account’s Delegated Administratorsso that they will know to check for a request that needs attention.
• Emails to Administrators, Delegated Administrators, and Account Managers whena contact request is accepted - When a contact self-registration request isaccepted (approved), one email is sent to all active internal users with theAdministrator and/or Account Manager privilege (if the approval was performed inthe Administrator user interface or via an Administrator endpoint). An email is alsosent to all Delegated Administrators on the account (regardless of where theapproval was performed).
• Emails to Administrators, Delegated Administrators, and Account Managers whena contact request is rejected - When a contact self-registration request is rejected,one email is sent to all active internal users with the Administrator and/or AccountManager privilege (if the rejection was performed in the Administrator userinterface or via an Administrator endpoint). An email is also sent to all DelegatedAdministrators on the account (regardless of where the rejection was performed).
• Email to a requester when Commerce receives a contact registration request -When a new contact self-registration request is received, an email is sent to therequester to communicate that the request has been received and is under review.
• Email to a requester when a contact registration request is approved - When anew contact self-registration request is approved, an email is sent to the requesterto communicate that the request was approved. It also informs them that they willreceive a separate email with additional information, including login information, ifneeded.
• Email to a requester when a contact registration request is rejected - When a newcontact self-registration request is rejected. It may also contain comments on whythe request was rejected
• Email to a requester when they have been activated as a contact - When thecontact is activated, an “Account Assignment Changed” email is sent to thecontact just as for any other newly activated contact who belongs to an account.
If your store allows shoppers to create and share purchase lists, you can enableemails to be sent to purchase list recipients. To enable this feature, go to the Settingssection of the administration user interface. In the Email Settings area of Settings, adda new template named “Purchase List Shared.”
The types of emails sent out with shared purchase lists include the following:
• An email that notifies a registered shopper that they are the recipient of apurchase list being shared by another registered shopper. It tells them that theyhave been granted access to purchase list XYZ (purchase list name). If the
Chapter 17Enable the types of email your store sends
17-4
purchase list has a description they will also see the purchase list description. There mayalso be list creator/owner comments in the email.It tells them that to access the purchase list, they need to view it on their profile on theirsite.
Note: Site is the name (with a link to the correct URL) of the site from which the ownershared the purchase list. The system does not take into consideration any restrictions onthe sites where the purchase list can be viewed.
• An email that notifies an account based contact that they are the recipient of a purchaselist being shared by another account based contact. It tells them that they have beengranted access to purchase list XYZ (purchase list name). If the purchase list has adescription they will also see the purchase list description. There may also be list creator/owner comments in the email.The system determines which site to include in the email as follows:
– If the site from which the owner shared the purchase list currently has a contract withthe account in whose context the list was shared (which will always be the case whenthe list is shared from the provided widget), then that site will be included in the email.Otherwise, the email includes any site that has a contract with the account in whosecontext the list was shared.
– If the account in whose context the purchase list was shared has no sites withcontracts, an email is not sent and the purchase list is not shared. The system alsoreturns an error to the list creator.
– The system does not take into consideration any restrictions on the sites where thepurchase list can be viewed.
Configure Abandoned Cart settingsIf you enable Abandoned Order emails, you can specify the number of days that must passbefore a shopping cart is considered abandoned and the minimum value that the cart mustcontain before an Abandoned Order email is sent.
To customize Abandoned Cart settings, follow these steps:
1. Click the Settings icon, then select Order Settings.
When running multiple sites from your Oracle Commerce instance, your configurationswill be applied by site. Choose a site from the site picker at the top of the Settings menuoptions.
2. Under Abandoned Cart Settings, enter an integer for the number of days after which ashopping cart is considered abandoned. The default setting is 7 days.
3. (Optional) Enter a value that specifies the minimum amount that the cart must be worth inorder for the system to send an Abandoned Cart email. The default setting is 0.
4. If you have configured the Cart Idle webhook, enter an integer for the number of minutesafter which a shopping cart is considered idle. The default setting is 20 minutes. See UseWebhooks for more information about the Cart Idle webhook.
5. Click Save.
Ensure emails are not rejected as spamYou must work with your email service provider to ensure your site can send and receiveemails correctly.
Chapter 17Configure Abandoned Cart settings
17-5

In addition to completing general configuration, make sure the Sender PolicyFramework (SPF) record is configured appropriately for your domain to prevent emailsthat your store sends from being rejected as spam.
To do so, add the following entry to the TXT record in your domain’s DNS zone file:
"include:_spf.atoracle.com"
Refer to http://www.openspf.org/ for more information on the Sender PolicyFramework.
Configure an Alternate SMTP Email RelayThe REST APIs provided with Oracle Commerce allows you to use an alternateSimple Mail Transfer Protocol (SMTP) relay to send email messages.
Oracle Commerce provides a default fully managed email service. However, ifnecessary due to your own corporate policies or needs, you can use an alternativeSMTP email relay. When you use your own SMTP Relay, you assume fullresponsibility for any deliverability concerns. Oracle Commerce’s responsibility in thissituation is limited to attempting to deliver the message to your SMTP relay,Deliverability includes making sure your email is not treated as spam as discussed in Ensure emails are not rejected as spam.
When you set up an SMTP email service property, your emailSMTPHost is added to theproxy and SMTP traffic is routed through the proxy so that it can reach your SMTPrelay.
Commerce allows you to use the REST API to configure your email service types. Forexample, if you issue a GET command to the /ccadmin/v1/email endpoint, and you willsee the default setting:
GET /ccadmin/v1/email
"emailServiceProperties":{ "emailServiceType" : "DEFAULT"}
The response contains two JSON objects: the emailSerivceProperties that containsthe email service settings, and an emailNotificationTypes object, which containsinformation on the available email types and their site-specific settings. For example:
{ "emailServiceProperties": { "emailServiceType": "DEFAULT" }, "links": [ { "rel": "self", "href": "/email" } ], "emailNotificationTypes": { "ccadmin_user_password_reset_v1": {
Chapter 17Configure an Alternate SMTP Email Relay
17-6

"recommendationsSupported": false, "displayName": "Oracle Commerce Administrator Password Reset", "description": null, "recommendationsStrategy": null, "version": 1, "enabled": false, "fromEmail": null, "recommendationsAllowAnyStrategy": true, "recommendationsRestriction": null, "fromName": null, "recommendationsAllowRestrictions": true, "includeRecommendations": false, "id": "ccadmin_user_password_reset_v1", "recommendationsPermittedStrategies": [], "numberOfRecommendations": 12 }, "placed_order_v1": { "recommendationsSupported": false, "displayName": "Order Placed", "description": null, "recommendationsStrategy": null, "version": 1, "enabled": false, "fromEmail": null, "recommendationsAllowAnyStrategy": true, "recommendationsRestriction": null, "fromName": null, "recommendationsAllowRestrictions": true, "includeRecommendations": false, "id": "placed_order_v1", "recommendationsPermittedStrategies": [], "numberOfRecommendations": 12 } }}
Important: Some of the configuration's details are not included in the response for securityreasons.
For information on working with email notifications, refer to Enable the types of email yourstore sends.
Note that the endpoint configuration uses the site context specified using the X-CCSiterequest header or the occsite query parameter. Omitting the site will display all of thesettings for your default site.
To set the SMTP email service type, issue a POST command to the /ccadmin/v1/emailendpoint and include the following properties:
• emailSMTPPort - Indicates the port to use when communicating with the SMTP host. Theport number should be either 465 or 587 and match the emailSMTPAuthMethod. Note thatyou can specify an SMTP server in the allowedURLs property by adding its domainname, such as smpt.example.com.
• emailSMTPHost - The SMTP host name.
• emailServiceType - This property is set to either DEFAULT or SMTP.
Chapter 17Configure an Alternate SMTP Email Relay
17-7
• emailSMTPAuthMethod - This identifies the authorization method as either SSL orTLS. This property indicates if the authorization method used by your SMTP serveruses Secure Sockets Layer (SSL with port 465, legacy) or Transport LayerSecurity (TLS with port 587, modern).
• emailSMTPUsername - The name used to log into the SMTP server.
• emailSMTPPassword - The user password for the SMTP Server. This field will notbe displayed when you issue a GET command.
For example:
"emailServiceProperties":{ "emailSMTPPort":"587", "emailSMTPHost":"smtp.myrelayservice.com", "emailServiceType":"SMTP", "emailSMTPAuthMethod":"TLS", "emailSMTPUsername":"smtpadmin" "emailSMTPPassword":"smtpadminpassword" }
If you issue a POST command to the /ccadmin/v1/email endpoint without passing in"emailServiceType":"SMTP" an error occurs indicating that you cannot changesettings when the email service type is set to DEFAULT. If you do not provide all of therequired settings described earlier, you will also get an error.
Once you have issued a POST command to the endpoint with the required properties,all email will switch to use the newly configured SMTP server.
Note that the endpoint configuration uses the site context specified using the X-CCSiterequest header or the occsite query parameter. Omitting the site applies all of thesettings for your default site.
To switch back the email service type to use the default email service, issue a PUTcommand to the /ccadmin/v1/email endpoint:
PUT /ccadmin/v1/email
"emailServiceProperties":{ "emailServiceType" : "DEFAULT"}
Your SMTP configuration settings will be reset to their default, internal values.
Chapter 17Configure an Alternate SMTP Email Relay
17-8
18Configure Internal User Accounts
Each person who works with the Commerce tools must have a valid user account to accessthe system. One default Administrator account is included with your Commerce instance.Only administrators can create and work with user accounts.
Note: You do not have to publish new user accounts or changes you make to existing ones.Changes to details like a user's name are available as soon as you save them. Forinformation on when to change a user's access control, refer to Edit user profiles.
Understand role-based access controlYou can control your internal user's access to specific catalogs and price groups.
You have a great deal of flexibility in setting up access control to align with the way that yourbusiness users work within your organization. You can configure access for situations whereyour business runs multiple country or brand sites that use different catalogs and pricegroups and are managed by separate teams. Or in situations where your business sells tomultiple accounts, you can configure access for the teams that manage their catalogs andprice groups.
You can enhance access control in these situations by creating security criteria that grant ordeny the ability to update specific catalogs or price groups. By adding security criteria toroles, and then assigning the roles to your users, you can allow your users to make changesonly to the catalog assets and prices for which they are authorized.
By using multiple roles, privileges and security criteria, you can provide multiple levels ofaccess. For example, a graphic designer needs different access to the administrationinterface than a merchandiser who sets up catalogs. Creating specific access controlsensures that internal users have the correct access and abilities to perform their jobseffectively.
Consider access control settings
When configuring access control, it's important to take the following into consideration:
1. Make sure that your access control strategy is easy to understand and easy toimplement. Overly complex access control strategies will be hard to maintain as yourenvironment grows.
2. Identify functions that the internal users perform, and what access is required. You canset up restrictions to various data or areas to the administration interface depending onthe user's tasks.
3. Identify roles that the internal users can be given. For example, is the user a designer, amerchandiser or an administrator? These can all be roles that indicate the user performsa specific task. A designer does not need access to all administrative functions, but doesneed access to Design, Preview and Publishing areas of the administrative interface.
4. Determine if there are security criteria necessary for controlling access. For example, tolimit the catalogs that a merchandiser has access to, you could create a security criterion
18-1
that identifies the specific catalog. This allows the merchandiser to access only thespecific catalog.
5. Create custom roles that contain security criteria created using the API, as well asprivileges. For information on working with the API, refer to Implement AccessControl for Internal Users.
Understand roles
Everyone who works with the administration interface or Agent Console must have avalid user profile to access the system. There is a single default Administrator profileincluded with your instance. Only administrators can create and work with userprofiles. Note that you do not need to publish user profiles when you create or updatethem.
Each internal user is assigned a role, or multiple roles, which in turn, containsprivileges. Roles can also contain security criteria and access rights. Entities within arole grant or deny access.
You must assign each user one or more roles. A role can contain privileges, securitycriteria and/or generic access right entities. You cannot assign one of these entitiesdirectly to a user, instead you assign a role that contains these entities. Commerceincludes a set of predefined roles, each containing a single privilege. You cannot addprivileges to, remove privileges from, or delete a predefined role.
Roles can determine whether to display a particular layout or content slot variant to auser. This functionality is primarily used in the Agent Console. For additionalinformation, refer to Work with role-based layouts. Roles can also be used to grantread or write access to a property.
The User Management area of the administration interface, which is available only tousers that have the Administrator privilege, allows you to assign roles to users. Notethat you cannot create or edit the contents of a role using the administration interface.To do this, you must use the Admin API, which is described in Implement AccessControl for Internal Users.
Understand privileges
Privileges grant access to areas of the administration interface or Agent Console. Forexample, the Catalog privilege provides access to the Catalog area of theadministration interface. A user needs at least one privilege to gain access to theadministration interface. Note that privileges cannot be edited or deleted. All privilegesare predefine; you cannot create a privilege.
Users can have multiple privileges across different roles. The user has all of theprivileges conferred by all of their assigned roles. For example, you could assign auser a Dashboard privilege that allows access to the administration interface, as wellas the Agent privilege that enables access to the Agent Console. These privilegescould be assigned to a user by means of a single role, or two roles.
The following table describes the access provided by the Commerce privileges. Notethat these privileges, and the roles that contain them, are separate from the roles thatare available for account-based storefront contacts.
Privilege Access
Administrator Full access to the administration interface.
Chapter 18Understand role-based access control
18-2
Privilege Access
CS Agent Full access to the Agent Console, with the exception ofManual Adjustments. Note: This privilege is available only ifthe Agent Console is available in your environment.
CS Agent Supervisor Full access to the Agent Console. Note: This privilege isavailable only if the Agent Console is available in yourenvironment.
Account Manager Full access to the Accounts page. Note: This feature may notbe enabled in your environment, refer to Configure BusinessAccounts for information.
Catalog Full access to the Catalog page (you must also assign theMedia role if the user will upload images for products, SKUs,and collections).
Dashboard Read access to the summary reports on the dashboard. Thedashboard is the landing page for the administration interfacethat users see when they log into Commerce. All of theprivileges that control access to the administration interfaceallow the user to see the dashboard. However onlyDashboard or Administrator privilege allows a user to see thesummary reports. A user who can see the summary reportson the dashboard requires the Reporting or Administratorrole to view the full reports.
Design Full access to the Design page.
Marketing Full access to the Marketing page.
Media Full access to the Media page.
Operations Full access to the Operations page.
Preview Access to the Preview button.
Publishing Full access to the Publishing page.
Reporting Full access to the Reporting page.
Search Full access to the Search page.
Settings Full access to all Settings pages except Access Control,Extensions, Extension Settings, Email Settings and WebAPIs (access to those settings is granted by the Administratorprivilege).
Refer to Configure Business Accounts for additional information on roles for storefrontcontacts.
Validate of privileges and roles
The following are validations that the system performs for all privileges and roles based uponthe action you perform:
• Create/Update Profile - The system validates that the profile has at least one role thatcontains at least one privilege
• Update Profile - The system verifies that you are not removing the Administrator privilegefrom yourself
• Delete Role - The system verifies that the user will still have the Administrator privilegewhen the role is deleted. Note that predefined roles cannot be deleted.
Chapter 18Understand role-based access control
18-3
Understand security criteria
Security criteria restricts a user's ability to update specific catalogs or price groups. Forexample, a user with the Catalog privilege might also have a security criterion thatnarrows catalog access allowing the ability to update only CatalogA and no othercatalogs. A user's security criteria acts as a filter that narrows the specific dataaccessible with their assigned privilege. Security criteria restricts update access butdoes not restrict read-only access.
Using security criteria is optional. You can use them to prevent certain users fromupdating specific catalogs or price groups. Note that to create, update or deletesecurity criteria, add them to roles or remove them from roles, you must use the API.Refer to Implement Access Control for Internal Users for additional information onworking with the APIs.
A given security criterion applies either to catalogs or to price groups. There are threetypes of security criteria that narrow user access:
• Grant: This grants update access to one or more specific catalogs or price groups.For example a user who has a single Grant security criteria for Catalogs A and Bcan update Catalogs A and B but cannot update any other catalogs.
• Deny: This denies access to one or more specific catalogs or price groups. Forexample, a user who has a single Deny security criteria for Catalogs C and D canupdate all catalogs except catalogs C and D.
• Grant None: This denies update access to all catalogs or price groups. A user witha Grant None security criteria for catalogs cannot update any catalogs.
Price group security criteria applies not only to updating the properties of a pricegroup, but also updating all of the prices within the price group. For example, asecurity criterion that grants update access to PriceGroup1 allows a user to update theproperties of PriceGroup1, as well as all the prices within PriceGroup1. Note thatupdate access to each price group is independent of access to any other price group,even if you are using price group hierarchies. Anyone who has update access to theCatalog privilege, and has update access to at least one price group, can create aprice group.
Catalog security criteria applies not only to updating the properties of the catalog, butalso updating all of the collections, products and SKUs within the catalog. Forexample, a security criterion that grants update access to Catalog A also grantsaccess to the collections, products and SKUs within Catalog A. Any user that has theCatalog privilege can create or update a product type. Similarly, any user who has theCatalog privilege, and has update access to at least one catalog, can create a catalog.
When working with catalog hierarchy and shared items, the following rules apply:
1. If you have access to at least one parent of an item, then you have access to theitem. If a product is shared by two catalogs, and you have update access to oneparent of the product, then you can update the product.
2. To link an item to a parent, you need access to both the item and to its destinationparent.
3. To unlink an item from a parent, you need access to that parent.
4. To delete an item, you need access to all of its parents. If it has no parent, yourequire access to the item itself.
Chapter 18Understand role-based access control
18-4
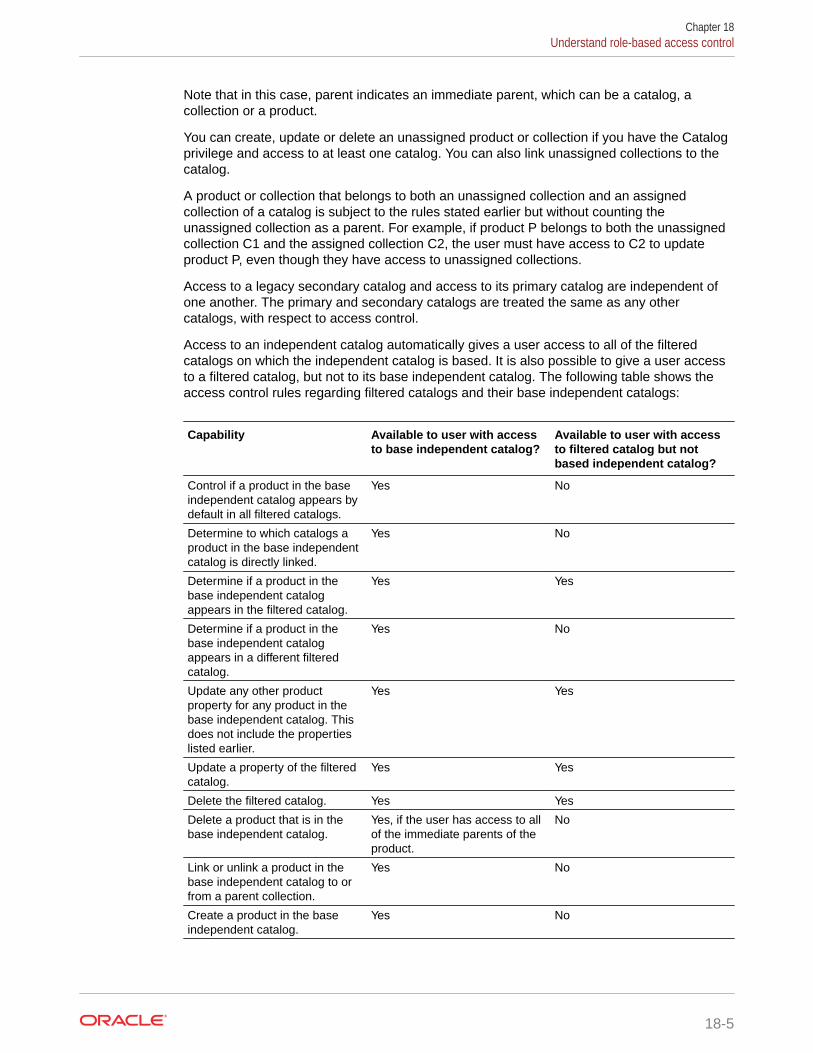
Note that in this case, parent indicates an immediate parent, which can be a catalog, acollection or a product.
You can create, update or delete an unassigned product or collection if you have the Catalogprivilege and access to at least one catalog. You can also link unassigned collections to thecatalog.
A product or collection that belongs to both an unassigned collection and an assignedcollection of a catalog is subject to the rules stated earlier but without counting theunassigned collection as a parent. For example, if product P belongs to both the unassignedcollection C1 and the assigned collection C2, the user must have access to C2 to updateproduct P, even though they have access to unassigned collections.
Access to a legacy secondary catalog and access to its primary catalog are independent ofone another. The primary and secondary catalogs are treated the same as any othercatalogs, with respect to access control.
Access to an independent catalog automatically gives a user access to all of the filteredcatalogs on which the independent catalog is based. It is also possible to give a user accessto a filtered catalog, but not to its base independent catalog. The following table shows theaccess control rules regarding filtered catalogs and their base independent catalogs:
Capability Available to user with accessto base independent catalog?
Available to user with accessto filtered catalog but notbased independent catalog?
Control if a product in the baseindependent catalog appears bydefault in all filtered catalogs.
Yes No
Determine to which catalogs aproduct in the base independentcatalog is directly linked.
Yes No
Determine if a product in thebase independent catalogappears in the filtered catalog.
Yes Yes
Determine if a product in thebase independent catalogappears in a different filteredcatalog.
Yes No
Update any other productproperty for any product in thebase independent catalog. Thisdoes not include the propertieslisted earlier.
Yes Yes
Update a property of the filteredcatalog.
Yes Yes
Delete the filtered catalog. Yes Yes
Delete a product that is in thebase independent catalog.
Yes, if the user has access to allof the immediate parents of theproduct.
No
Link or unlink a product in thebase independent catalog to orfrom a parent collection.
Yes No
Create a product in the baseindependent catalog.
Yes No
Chapter 18Understand role-based access control
18-5

Capability Available to user with accessto base independent catalog?
Available to user with accessto filtered catalog but notbased independent catalog?
Create any catalog, includingcreating a filtered catalog in anybase independent catalog.
Yes Yes
Create, update, link, unlink ordelete a collection in the baseindependent catalog.
Yes, although link and deleteactions may require access toother parent catalogs of thecollection.
No
Create, update or delete SKUsunder a product in the baseindependent catalog.
Yes No
When working with products and media, the user needs access to a product toperform the following media-related operations:
• Add a media item to the product from the Media Library. To upload new mediaitems to the product, the user also needs the Media privilege
• Update the product-specific override values of the properties of a media itemassigned to the product. For example, Alt Text or Title
• Remove the product-specific override values of the properties of a media itemassigned to the product. For example, resetting the properties to their defaultvalues
• Reorder the media items assigned to the product
• Specify which media item is the primary one for the product
• Remove a media item from the product
Access to a product's prices is controlled separately from access to the product itself.A user with the Catalog privilege can update a product's prices without having accessto the product itself, as long as the user has access to the price group in which theprices reside. Access to a product does not provide access to its prices. Only accessto a price group allows a user to update prices. The same applies to SKUs and theirprices. Note the following:
• To create a product, or update a product that was imported without prices, a usermust have access to every price group for which the includeAllProducts flag isset.
• To delete a product, a user needs access to all price groups containing prices forthe product.
Security criteria apply when catalog assets and prices are imported, either using theImport function in the UI, or when a logged-in user performs a bulk import. Bulkimports performed by registered applications are not subject to security criteria. If youuse catalog security criteria, it is recommended that you use APIs rather than the UIfor any catalog imports. This allows you to receive information about any records thatfail to import due to access restrictions.
Combine security criteria
A user can have multiple security criteria within one role, or across different roles. Thefollowing examples show the effects of having multiple security criteria:
Chapter 18Understand role-based access control
18-6

• A user with Grant access to PriceGroup1 and PriceGroup2 can update both PriceGroup1and PriceGroup2
• A user with Grant access to Catalog 1 and Catalog2 can update Catalog2, Catalog2, andcatalog assets whose immediate parents belong to Catalog1 or Catalog2
• A user with Deny access to PriceGroup1 and PriceGroup2 cannot update PriceGroup1 orPriceGroup2
• A user with Deny access to Catalog1 and Catalog2 cannot update Catalog1, Catalog2 orany catalog assets whose immediate parents belong only to Catalog1 or Catalog2
For example, consider the following rules. Note that in each of the following rules, the assetsare either catalogs or price groups:
• Grant Asset1 + Deny Asset2 = Grant Asset1
• Grant Asset1 + Deny Asset1 = Grant None
• Grant Asset1 + Deny Asset1 + Grant Asset2 + Deny Asset3 = Grant Asset2 (Grant andDeny Asset1 cancel themselves out.)
• Grant None + any other security criteria = Grant None
Understand system-generated roles
If a user with security criteria creates a catalog or price group, the system may generate arole for that user to ensure that he or she has access to the asset just created. The system-generated role contains a security criterion that grants access to the catalog or price group. Ifthe user subsequently creates another catalog or price group, the system adds a securitycriterion to the role, granting access to the new asset.
System-generated roles are visible in the Advanced section of the user's details in the UserManagement area of the administration console. System-generated roles function the sameas other roles, except that the system may keep adding security criteria.
Generic access rights
The access control described here does not modify existing functionality related to accessrights and the property-level access control that you use to meet the requirements of theGeneral Data Protection Regulation (GDPR). However, if you use APIs it is important to notethat privileges are a type of access right. Therefore non-privilege access rights are referred toas generic access rights. If a role contains generic access rights, they are visible in theAdvanced section of the role's details in the User Management area of the administrationconsole. Refer to Refer to Implement Access Control for Internal Users for more informationon using generic access rights to control access to the properties of data items.
Understand when access control takes effect
Changes to the contents of a user's access takes effect as follows:
1. Changes to a user's security criteria take effect the next time the user logs in. The user'saccess to specific catalogs or price groups does not change during their current session
2. Changes to a user's privileges take effect immediately, whenever any aspect of the UI orfunctionality checks for privileges
3. Changes to a user's generic access rights take effect immediately, when the user tries toaccess a property that is subject to access rights
Chapter 18Understand role-based access control
18-7
View role contentsAll internal users must have at least one privilege, and therefore at least one role, togain access to the administration interface.
When creating new or editing existing users, you must assign them roles. Roles cancontain privileges that grants the user access to various functions. To view theavailable roles, use the User Management area of the administration console.
Note that roles and roles and security criteria cannot be created in the administrationconsole, to create roles and security criteria, you must use the Admin API. Forinformation on using the API, refer to Implement Access Control for Internal Users. Inthe User Management area of the administration console, you can assign roles tousers and view the contents of roles.
To view a user's roles:
1. Select User Management from the administration console. This displays the UserManagement screen.
2. You can select a user based upon specific roles by using the All Roles dropdownand selecting or entering the roles. This will display all users that have this role. Oryou can select a user alphabetically, or by whether or not they are internally orexternally managed.
3. When the user's page has opened, in addition to their email and name information,you will see all of the roles associated with the user listed under the Roles section.You can add or remove roles by clicking Edit List.
4. Select the roles to add or remove.
5. Click Done to save the changes.
You can review or edit any system-generated roles using the Advanced section of theUser Management page. System-generated roles are roles that the system creates fora user to ensure that they have access to any catalog or price group they may havecreated. The system-generated role also contains a security criterion that grantsaccess to the catalog or price group the user created.
You can review the roles themselves by selecting the role listed next to a user's namein the User Management screen. This displays the name of the role, a description andthe privileges and security criteria contained in the role. Use the Advanced button tosee the any generic access rights contained in the role. Roles and security criteria canonly be created using the API. Refer to Implement Access Control for Internal Usersfor information on working with the API for access control.
Create new user profilesOne default Administrator profile is included with your Commerce instance, but youcan add as many internal user profiles (including administrators) as you need.
Only administrators can create and work with user accounts.
In order to comply with the Payment Card Industry Data Security Standard (PCI DSS),Commerce secures all logins to the administration interface with multi-factor strongauthentication. This means that each user must enter their username and password,plus a one-time passcode, each time they log into the administration interface. See
Chapter 18View role contents
18-8
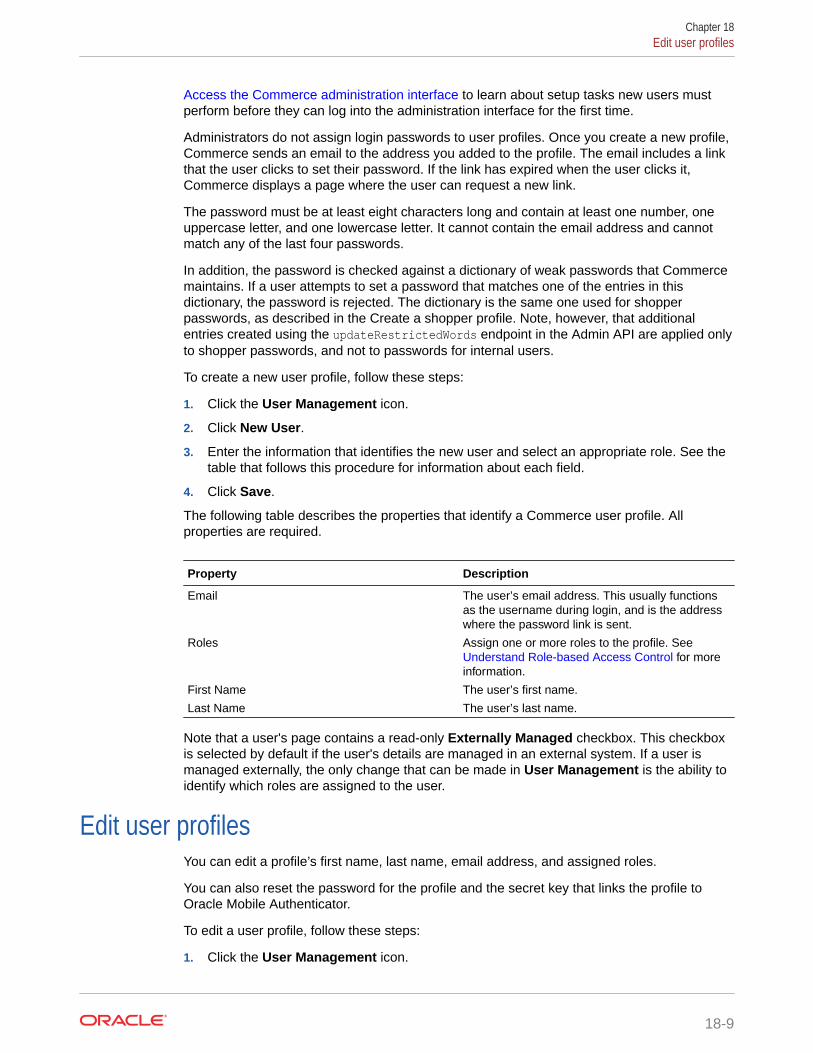
Access the Commerce administration interface to learn about setup tasks new users mustperform before they can log into the administration interface for the first time.
Administrators do not assign login passwords to user profiles. Once you create a new profile,Commerce sends an email to the address you added to the profile. The email includes a linkthat the user clicks to set their password. If the link has expired when the user clicks it,Commerce displays a page where the user can request a new link.
The password must be at least eight characters long and contain at least one number, oneuppercase letter, and one lowercase letter. It cannot contain the email address and cannotmatch any of the last four passwords.
In addition, the password is checked against a dictionary of weak passwords that Commercemaintains. If a user attempts to set a password that matches one of the entries in thisdictionary, the password is rejected. The dictionary is the same one used for shopperpasswords, as described in the Create a shopper profile. Note, however, that additionalentries created using the updateRestrictedWords endpoint in the Admin API are applied onlyto shopper passwords, and not to passwords for internal users.
To create a new user profile, follow these steps:
1. Click the User Management icon.
2. Click New User.
3. Enter the information that identifies the new user and select an appropriate role. See thetable that follows this procedure for information about each field.
4. Click Save.
The following table describes the properties that identify a Commerce user profile. Allproperties are required.
Property Description
Email The user’s email address. This usually functionsas the username during login, and is the addresswhere the password link is sent.
Roles Assign one or more roles to the profile. See Understand Role-based Access Control for moreinformation.
First Name The user’s first name.
Last Name The user’s last name.
Note that a user's page contains a read-only Externally Managed checkbox. This checkboxis selected by default if the user's details are managed in an external system. If a user ismanaged externally, the only change that can be made in User Management is the ability toidentify which roles are assigned to the user.
Edit user profilesYou can edit a profile’s first name, last name, email address, and assigned roles.
You can also reset the password for the profile and the secret key that links the profile toOracle Mobile Authenticator.
To edit a user profile, follow these steps:
1. Click the User Management icon.
Chapter 18Edit user profiles
18-9
2. Click the name of the user whose profile you want to change.
3. Once you have made your changes, click Save.
To edit roles to the user profile, click Edit List under Roles. The list of assigned rolesappears in the Selections pane. Search for a name or ID of a role to see it displayedin the search results. Double click on the role to add it to the selection. To delete aselection, select the X next to its name. Note that you can only create roles using theAPI. For information on using the API to create roles, refer to Implement AccessControl for Internal Users.
The user can change the password at any time by clicking the Forgot Password? linkon the administration interface login page and entering the email address associatedwith their profile, as described in the previous section. You can also force them to resetit.
To force a user to reset their password, follow these steps:
1. Click the User Management icon.
2. Click the name of the user.
3. Click Reset Password.
4. At the prompt, click Reset to confirm.Commerce sends a link to the email address associated with the user’s profile thatthe user can click to reset their password.
You can reset the secret key that links a user’s profile with Oracle Mobile Authenticator(OMA). You will need to reset the key if the original link in the user’s email has expired.When you reset a user’s secret key, they cannot log into the administration interfaceagain until they reconfigure OMA as described in Add your Commerce profile to OracleMobile Authenticator.
To reset a user’s secret key, follow these steps:
1. Click the User Management icon.
2. Click the name of the user.
3. Click Reset Key.
4. At the prompt, click Reset to confirm.Commerce sends a message to the email address associated with the profile. Themessage includes several ways that the user can associate the new key withOMA. See Access the Commerce administration interface for more information.
Understand access control changes
Whenever you change a user's security criteria, the change occurs the next time thatthe user logs in. While the user is logged in, access to specific catalogs or pricegroups does not change.
When you change a user's privileges, the change occurs immediately, meaning anytime system checks for privileges, it will retrieve the new privileges.
Deactivate and reactivate user profilesYou cannot delete internal user profiles but you can deactivate them.
Deactivated profiles cannot be used to access the service. Keep the following in mindbefore you deactivate user profiles:
Chapter 18Deactivate and reactivate user profiles
18-10

• Only users with the Administrator role can deactivate and reactivate profiles.
• You cannot deactivate the last user with the Administrator privilege.
• You cannot deactivate the profile you are currently logged in with.
• You can reactivate any deactivated profile.
• Commerce does not notify users when their profiles are deactivated or reactivated.
• Deactivating a profile does not automatically expire its password or secret key.
To deactivate a user profile, follow these steps:
1. Click the User Management icon.
2. Click the name of the user whose profile you want to deactivate.
3. Click the Deactivate button.
4. Confirm that you want to deactivate the profile.
To reactivate a user profile, follow these steps:
1. Click the User Management icon.
2. Click the name of the user whose profile you want to reactivate.
3. Click the Reactivate button.
4. Confirm that you want to reactivate the profile.
Access the Commerce administration interfaceAll users who work in the administration interface must have an internal user profile and mustunderstand how to log into the administration interface.
This section describes the tasks required to prepare your profile and access theadministration interface:
• Understand multi-factor authentication
• Prepare to use multi-factor authentication
• Download Oracle Mobile Authenticator
• Add your Commerce profile to Oracle Mobile Authenticator
• Create your password
• Log into the Commerce administration interface
Understand multi-factor authentication
Multi-factor authentication is an authentication mechanism that requires a user to present atleast two of the following three types of credentials when logging into an account:
• Something you know, like a password.
• Something you have, like a smart card or a one-time passcode.
• Something you are, like your fingerprint.
The Payment Card Industry Data Security Standard (PCI DSS) requires multi-factorauthentication for any user who accesses an administrative environment that handles carddata. Multi-factor authentication helps keep intruders out by providing an extra layer ofsecurity when users require access to environments that contain sensitive information.
Chapter 18Access the Commerce administration interface
18-11
Commerce implements this requirement by ensuring that each internal user enterstheir username and password, plus a one-time passcode (generated by Oracle MobileAuthenticator) every time they log into the administration interface.
Prepare to use multi-factor authentication
You will receive an automatically-generated email that contains the information youneed to perform the steps to set up multi-factor authentication.
• If you are a new Commerce user, you will receive an automatically-generatedemail whose subject line is Set Up Your Oracle Commerce Login once aCommerce administrator has created your profile.
• If you are an existing Commerce user, you will receive an automatically-generatedemail with the subject line Your Oracle Commerce Secret Key Reset once yoursite has been updated to a release of Commerce that requires multi-factorauthentication.
Your email contains the information you need to perform the following steps:
1. Download Oracle Mobile Authenticator to your iOS, Android, or Windows device.
2. Add your Commerce profile to Oracle Mobile Authenticator using the secret key inthe email.
3. Create your password for your Commerce profile.
4. Log into the Commerce administration interface with your username, password,and a one-time passcode generated by Mobile Authenticator.
Keep the following information about the email in mind:
• You will receive a separate email for each of your environments and must followthis procedure for each one. For example, if you have three environments, you willneed to follow the procedure three times – once for each environment – in order toaccess the administration interface in each environment.
• If you did not receive the automated email, check your spam or junk mail folder.
Download Oracle Mobile Authenticator
Oracle Mobile Authenticator (OMA) is a free app that generates the one-timepasscodes (unique, random numbers) you enter each time you log into the Commerceadministration interface. OMA does not require cell service or an internet connection togenerate one-time passcodes.
OMA is available for Android, iOS, and Windows devices, including PCs runningWindows 8.1+. The iOS app is available at the Apple app store, the Android app isavailable at the Google Play store, and the Windows app is available at the Microsoftstore, all under the name Oracle Mobile Authenticator. Visit the appropriate app storefor your device to learn about system requirements and download the app.
Download OMA to your device, launch it, and accept the end user license agreement.Then follow the instructions in Add your Commerce profile to Oracle MobileAuthenticator to link your Commerce profile to OMA.
Add your Commerce profile to Oracle Mobile Authenticator
After you install the Oracle Mobile Authenticator (OMA), you need to link it to yourCommerce profile. You do this by adding your profile’s secret key to OMA. Make sureyou have the email you received when your profile was created; it contains everything
Chapter 18Access the Commerce administration interface
18-12
you need to access the Authenticator Details page, where you add your profile to OMA in oneof the following ways:
Scan the QR code
Click the Create an OMA Entry link
Enter the key manually
Scan the QR code
If you are viewing the email on a device where OMA is not installed, like your computer, youcan open OMA on your mobile device and scan the QR code that you access from the email.If you are unable to successfully scan the code, see Click the Create an OMA Entry link or Enter the key manually for alternate ways to add your profile to OMA.
1. Open the OMA app on your mobile device, then tap Add Account.
2. Open the Set Up Your Oracle Commerce Login email and click the Oracle MobileAuthenticator Setup link to open the Authenticator Details page.
3. Scan the QR code that appears on the page using your device’s camera.Depending on your mobile device’s security settings, you may be prompted to enter youruser name and password.
After configuration is complete, the passcode generator screen begins displaying one-time passcodes.
If you scan an expired QR code, Commerce displays an error page. Contact your Commerceadministrator, who can reset the secret key. Once the key is reset, you will receive anotheremail.
Now you can continue to the steps in the next section, Create your password.
Click the Create an OMA Entry link
If you are viewing the Commerce email on the same device where OMA is installed, you cansimply click an enrollment link that opens the OMA app on your device and starts theconfiguration process.
1. Open the Set Up Your Oracle Commerce Login email on the device where OMA isinstalled and tap the Oracle Mobile Authenticator Setup link to open the AuthenticatorDetails page.
2. Tap the Oracle Commerce link.Depending on your mobile device’s security settings, you may be prompted to enter youruser name and password.
After configuration is complete, the passcode generator screen begins displaying one-time passcodes.
If you click an expired link, Commerce displays an error page. Contact your Commerceadministrator, who can reset the secret key. Once the key is reset, you will receive anotheremail.
Now you can continue to the steps in the next section, Create your password.
Enter the key manually
You can manually type or cut and paste the secret key into OMA.
Chapter 18Access the Commerce administration interface
18-13
To see the secret key, open the Set Up Your Oracle Commerce Login email and clickthe Oracle Mobile Authenticator Setup link to open the Authenticator Details page. Thesecret key is displayed at the bottom of the page.
To enter the secret key into OMA:
1. Open the OMA app on your device, then tap Add Account.Depending on your mobile device’s security settings, you may be prompted toenter your user name and password.
2. Tap Enter key manually.
3. Under Select Account Type, tap Oracle.
4. In the Account field, enter Commerce.
5. In the Key field, enter the secret key.
6. Tap Save.After configuration is complete, the passcode generator screen begins displayingone-time passcodes.
Create your password
Administrators do not assign login passwords to new user profiles. To create apassword for your new profile, open the Set Up Your Oracle Commerce Login emailand click the Create Password link. (If the link has expired when you click it,Commerce displays a page where you can request a new link. You will need to supplya one-time passcode when you reset your password. See Log into the Commerceadministration interface for more information.)
Your password must be at least eight characters long and contain at least one number,one uppercase letter, and one lowercase letter. It cannot contain your email address.The password is also checked against a list of weak passwords that Commercemaintains. If you try to create a password that matches one of the entries in thisdictionary, the password is rejected.
Now you can log into Commerce. See Log into the Commerce administration interfacefor details.
Log into the Commerce administration interface
Once you have linked your Commerce profile to Oracle Mobile Authenticator (OMA)and created your password, you are ready to log into the administration interface.
Important: You must generate a new one-time passcode each time you log into theadministration interface. This includes logging back in if you have been automaticallylogged out. Commerce does not currently mark a device as safe or save passcodesacross sessions.
To log into the administration interface, follow these steps:
1. Navigate to the Commerce sign in page with the URL provided to you by youradministrator.
2. Enter your username and password.
3. Launch the OMA app on the device where you installed it.A one-time passcode appears and the countdown begins until a new passcode isautomatically generated.
Chapter 18Access the Commerce administration interface
18-14
4. On the Commerce sign in page, enter the code into the One-Time Passcode box andclick Log In.
Chapter 18Access the Commerce administration interface
18-15

19Configure Shipping
A shipping method contains one or more shipping regions and shipping charges.
Your store must contain at least one shipping method that shoppers can select duringcheckout. If you create and enable more than one shipping method, shoppers choose from alist of the enabled shipping methods. Then, the selected method is associated with theshipping group selected in the shoppers’ order.
If you run multiple sites within a single instance of Commerce, these sites can share shippingmethods, or you can create site-specific shipping methods. See Create a shipping method forinformation about assigning shipping methods to specific sites. See Configure Sites to learnhow to create multiple sites.
Create shipping regionsShipping regions specify geographic areas your store will ship to.
Grouping shipping destinations into regions makes it easier to create shipping methods. Forexample, to create a ground shipping method for a store based in the United States, start bycreating a shipping region that includes the 48 contiguous U.S. states. When a customerenters a shipping address either at checkout or when creating a profile, the logic in theCustomer Address widget allows the customer to pick from only countries and regions thatare used in enabled shipping methods.To create a shipping region, follow these steps:
1. Click the Settings icon, then select Shipping Methods.
2. Click New Shipping Region.
3. Enter a name for the shipping region.
4. Select one or more countries to ship to and then one or more regions within eachselected country.
Tip: When you select a country, all its regions are automatically selected by default. Toselect only some regions, either deselect the regions you do not want to include oruncheck the Select All checkbox and then individually select regions.
5. Click Save.
Create a shipping methodYou must create at least one shipping method, even if your shipping is handled by a third-party fulfillment system.
Oracle Commerce supports the following shipping methods:
• Internally priced shipping method - A shipping method created in the administrationinterface whose price and availability is determined during checkout using internal rules.
19-1
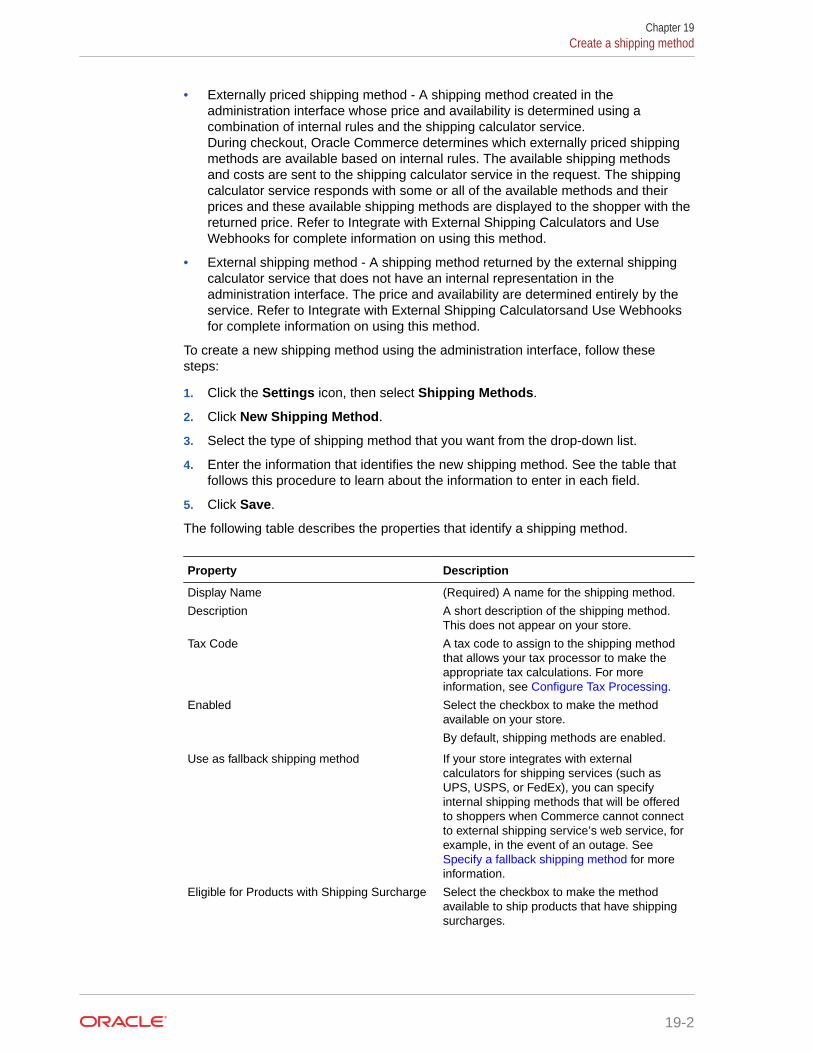
• Externally priced shipping method - A shipping method created in theadministration interface whose price and availability is determined using acombination of internal rules and the shipping calculator service.During checkout, Oracle Commerce determines which externally priced shippingmethods are available based on internal rules. The available shipping methodsand costs are sent to the shipping calculator service in the request. The shippingcalculator service responds with some or all of the available methods and theirprices and these available shipping methods are displayed to the shopper with thereturned price. Refer to Integrate with External Shipping Calculators and UseWebhooks for complete information on using this method.
• External shipping method - A shipping method returned by the external shippingcalculator service that does not have an internal representation in theadministration interface. The price and availability are determined entirely by theservice. Refer to Integrate with External Shipping Calculatorsand Use Webhooksfor complete information on using this method.
To create a new shipping method using the administration interface, follow thesesteps:
1. Click the Settings icon, then select Shipping Methods.
2. Click New Shipping Method.
3. Select the type of shipping method that you want from the drop-down list.
4. Enter the information that identifies the new shipping method. See the table thatfollows this procedure to learn about the information to enter in each field.
5. Click Save.
The following table describes the properties that identify a shipping method.
Property Description
Display Name (Required) A name for the shipping method.
Description A short description of the shipping method.This does not appear on your store.
Tax Code A tax code to assign to the shipping methodthat allows your tax processor to make theappropriate tax calculations. For moreinformation, see Configure Tax Processing.
Enabled Select the checkbox to make the methodavailable on your store.
By default, shipping methods are enabled.
Use as fallback shipping method If your store integrates with externalcalculators for shipping services (such asUPS, USPS, or FedEx), you can specifyinternal shipping methods that will be offeredto shoppers when Commerce cannot connectto external shipping service’s web service, forexample, in the event of an outage. See Specify a fallback shipping method for moreinformation.
Eligible for Products with Shipping Surcharge Select the checkbox to make the methodavailable to ship products that have shippingsurcharges.
Chapter 19Create a shipping method
19-2

Property Description
Sites If you run multiple sites within a single instanceof Commerce, you can make a shippingmethod available to all sites or only to sitesyou specify.
Select the Applies to All Sites checkbox if youwant this shipping method to be available onall sites. If you want this shipping method to beavailable only on specific sites, uncheck thecheckbox and select sites in the box below it.
Shipping Regions (Required) The geographic regions for thisshipping method. For more information, see Create Shipping Regions.
Price Groups Select the price groups this shipping methodapplies to. If you leave this field blank, theshipping method applies to all price groups.
Shipping Charges (Required) Shipping charges are based onorder cost. You specify one or more costranges and assign a shipping charge to eachrange. For example, order totals up to $50cost $5.95 to ship, order totals from 50.01to $74.99 cost $9.50 to ship, and order totalsof $75 or more ship for free.
Tip: To create a shipping method that providesthe same shipping cost on all orders (forexample, to offer free shipping), enter a RangeStart value of 0.00, leave the Range End valueblank, and then enter a shipping cost.
Note: An externally priced shipping methodcan be created without specifying shippingcharges, provided it is not a fallback shippingmethod.
Specify a fallback shipping methodIf your store integrates with calculators for shipping services, you can specify internalshipping methods that will be offered to shoppers when Commerce cannot connect to theexternal shipping service, for example, in the event of an outage.
The fallback shipping methods are displayed on the storefront during the checkout process.This prevents errors during order processing and allows orders to progress to the next step.
You can mark any number of shipping methods as fallbacks. You might want to create afallback method for each type of shipping method you expected to receive back from theexternal shipping service.
Internally priced shipping methods marked as fallback are returned only if Oracle Commercecannot connect to an external shipping service. Externally priced shipping methods markedas fallback are returned in both cases: The external price and availability are used if theservice responds and internal prices are used if the service does not respond.
See Integrate with External Shipping Calculators for more information about configuring whenCommerce uses a fallback shipping method.
Chapter 19Specify a fallback shipping method
19-3

Specify a default shipping countryYou can optionally specify a default country that automatically appears in the shippingaddress and appears at the top of the list of available shipping countries .duringcheckout.
The shopper can select a different shipping country.To specify a default shipping country, follow these steps:
1. Click the Settings icon, then select Shipping Methods.
2. Select a default shipping country.
The default shipping country you select must be a country from one of yourenabled shipping methods. Otherwise, the storefront will not display the defaultcountry you selected.
Configure shipping surchargesYou can apply additional shipping charges to products because of size, weight, orspecial handling requirements.
The surcharge is a fixed, monetary amount that applies to a specific product. Forexample, a kayak can have a shipping surcharge of $25, while a mattress, whosedelivery includes removal of an old bed, might have a surcharge of $75. A product’sshipping surcharge is the same for each available shipping method.Shipping surcharges are not affected by shipping promotions and are added to theorder total during checkout, after discounts have been applied. For example, ashipping promotion offers free ground shipping on all orders over $200. A shopperpurchases a $225 kayak with a $25 shipping surcharge. The order meets the free-shipping promotion condition, so the $30 ground shipping charge is removed, butthe $25 shipping surcharge remains.
To configure shipping surcharges, follow these steps:
1. Add the Shipping Surcharges property to the product types that you will use tocreate products that require surcharges. Shipping Surcharges is not a requiredproperty, so you can add it to a product type that you will use for other products.See Create and edit product types for information about adding properties to aproduct type.
2. Add a shipping surcharge amount when you create or edit a product. You can addthe surcharge manually in the administration interface or by importing productdetails. See Create and work with products for information about creatingindividual products in your catalog. See Import catalog items and inventory forinformation about importing new and updated products.
3. Specify the shipping methods that are available for products that have shippingsurcharges. See Create a shipping method for more information.
Understand externally priced shipping methodsExternally priced shipping methods can be created to represent each shipping methodthat can be returned by your shipping calculator service.
Chapter 19Specify a default shipping country
19-4

This allows you to take advantage of Oracle Commerce’s shipping promotion and taxcalculation features.
Externally priced shipping methods are created in the administration interface and their priceand availability are determined using a combination of internal rules and the shippingcalculator service. During checkout, Oracle Commerce determines which externally pricedshipping methods are available based on internal rules. The available shipping methods andcosts are sent to the shipping calculator service in the request. The shipping calculatorservice responds with some or all of the available methods and their prices and theseavailable shipping methods are displayed to the shopper with the returned price. OracleCommerce applies shipping promotions and calculate taxes for externally priced shippingmethods as it does for internally priced shipping methods. See Work with external shippingmethods for more complete information on this subject.
You create an externally priced shipping method through the Shipping Methods pageavailable from the Settings list. This is just like the existing internally priced shipping methodexcept there is a selection in the dropdown list to indicate that it is externally priced. Since theexternally priced shipping method is available in the administration interface in the same wayas internally priced shipping methods, this also includes the “applies to shipping methods”picker in shipping promotions.
Externally priced shipping methods behave the same as internal shipping methods. Shippingpromotions and taxes are applied to externally priced shipping methods the same way asthey are to internal shipping methods. The store recognizes the shipping regions associatedwith externally priced shipping methods as it does internal shipping methods. The storeshould recognize the shipping regions associated with an externally priced shipping methodthat is considered unavailable based on internal rules but is returned by the shippingcalculator. The service overrides the internal rules in this case and the resulting shippingmethod/storefront interface behaves the same as all other internal shipping methods. Formore information about webhooks and the Shipping Calculator service, refer to UseWebhooks.
You can also select “fallback” shipping methods for an externally priced shipping method.Fallback shipping methods are displayed only if the shipping calculator service fails (or doesnot respond or responds improperly). This gives you the ability to still take orders if theshipping carrier service is having problems. Refer to Specify a fallback shipping method formore information on setting up fallback shipping methods. You can also refer to Integrate withExternal Shipping Calculators for more information about shipping calculators and aboutconfiguring when Commerce uses a fallback shipping method.
Note: Externally priced shipping methods are supported in the administration interface andthe Admin API. These methods are not supported in the Agent Console. Merchants shouldnot create externally priced shipping methods if they need to support the feature in AgentConsole..
Create an externally priced shipping method
To create a new externally priced shipping method in the administration interface, followthese steps:
1. Click the Settings icon, then select Shipping Methods.
2. Click New Shipping Method.
3. Select Externally Priced from the drop-down list.
4. Enter the information that identifies the new externally priced shipping method. See Create a shipping method to learn about the information to enter in each field. For more
Chapter 19Understand externally priced shipping methods
19-5
information on externally priced shipping methods and how they work differentlyfrom other shipping methods, refer to Integrate with External Shipping Calculators.
5. Click Save.
Chapter 19Understand externally priced shipping methods
19-6
20Configure Wish Lists
This section provides an overview of the wish list features in Commerce.
It describes how to implement and maintain wish lists for your store.
Understand wish list featuresWish lists provide shoppers with the following:
• A way to create and manage a list of products they are considering buying. Included isthe ability to save items in wish lists and purchase easily from them later.
• The ability to create and manage multiple wish lists so shoppers can better organizeitems they may want to purchase.
• The ability to share their wish lists.
• The opportunity for shoppers to add comments to items in their wish lists.
• A social experience where shoppers can receive feedback and suggestions from friendsand family members they invite to their wish lists.
• Email notifications for key wish list-related activities.
Registered shoppers can participate in a variety of wish list activities, including:
• Creating wish lists with personalized names; the wish list privacy settings can be private,group, or shared. For more information, see Understand private, group, and shared wishlist privacy settings.
• Viewing up-to-date availability, price, and associated offers for the products included in awish list.
• Using an Add to Wish List button or selector on a product details page to choose whichwish list to add the product to; at this point, a new wish list can also be created.
• Adding a product from a wish list to a shopping cart for purchase.
• Editing and deleting owned wish lists.
• As a wish list owner: creating, editing, and deleting posts and comments.
• As a wish list member: adding a comment, deleting his or her comments, and deletingproduct posts he or she added along with all associated comments.
• Setting the priority and quantity for each product in a wish list.
• Sorting posts by date added and priority.
• Inviting friends to be a part of a wish list to encourage collaboration and feedback, andthe sharing of products and gift ideas.
• Moving product posts from one wish list to another. When moving the post, the shoppercan also create a new wish list for the post.
• Sharing wish list links via Facebook, Twitter, Pinterest, and email.
20-1
If the Pinterest icon is not visible on the shopper wish list pages, in the Wish Listlayout, upgrade to the newest version of the Wish List Header widget.
• Subscribing or unsubscribing from wish list email notification in his or herstorefront My Account settings. For more information, see Enable wish list emailsettings.
• Adding and changing wish list owner profile pictures; the pictures are visible nextto comments made by the owner or member.
• Receiving price change notifications on the product post.
• Email notifications indicating the product price in the currency chosen in thestorefront.
Each shopper profile can have up to 50 wish lists. Each wish list can The number ofproduct posts, text posts, and comments on an individual post is set to 100 per wishlist.
Understand private, group, and shared wish list privacy settings
A wish list owner can choose to designate a wish list as private, group, or shared.
A private wish list is visible only to the wish list owner.
A group wish list is visible to the wish list owner and people they invite as members.Owners and members can perform the following tasks in a group wish list:
• View the wish list.
• Add products to the wish list and delete any products they added. Deleting aproduct post deletes all its associated comments.
• Comment, delete, and edit their comments on a wish list; in addition, owners candelete any comments.
A shared wish list can be viewed by anyone who receives a link via Facebook, Twitter,Pinterest, or email. A wish list owner can share the link to any of their wish lists byclicking the Share button for Facebook, Twitter, Pinterest, or email. Once a wish list isshared, anyone with the link, whether logged in or anonymous, can also view the wishlist. However, only members of the wish list can view, comment, delete, and addproducts to the wish list.
The link to a shared wish list can be passed on in other ways (for example, via privateemail) to other people. Anyone with the link can view the wish list. Members’comments on a group wish list, as well as their names, become public if the ownerdesignates the wish list as shared. Oracle strongly recommends you add text to yourTerms of Use notifying your customers about this behavior.
A wish list owner can edit the privacy mode of a wish list at any time. Changing theprivacy setting from Shared or Group to Private makes the wish list viewable only bythe owner.
To edit from Shared or Group to Private, the owner must first delete all members fromthe wish list. However, once changed to Private, the wish list content is retained.Member names are noted as being no longer a member, and a generic profile pictureis displayed.
Share using email, Facebook, Pinterest, or Twitter
To accommodate social sharing on your site, do the following:
Chapter 20Understand wish list features
20-2

1. Click the Settings icon, then click Setup.
2. Click the URL Patterns tab.
3. This step is optional if your URL patterns are correctly configured. On the URL Patternspage, for the Product Page URL, double-click the link in the Value column to open theNew Value dialog. Edit the URL pattern using the available properties.URL patterns let you customize the URL structure for the different types of pages on yourstore. Select a page type and replace the components in the default pattern with valuesfor a new custom pattern. For more information, see Enter basic store information.
The new value will be applied to your product details pages once you click the checkmark at the top of the dialog. Click the x to cancel.
4. To add the social sharing links to your product details pages, in the administrationinterface, click Design.
5. Click the Select Layout tab. Click Product, and then click Product Layout.
6. Click the Grid View tab. In grid view, hover over the Product Details widget, and clickthe settings icon.
7. Depending on the types of social sharing you want to make available to your shoppers,add the following elements to the page:
• To add email, Facebook, and Twitter icon links to product detail pages, add the SocialSharing element.
• To add email, Facebook, Twitter, and Pinterest icon links to the product detail pages,add the Social Sharing 2 element.
8. Save your changes
For more information, see Work with layout components.
Shoppers can share a wish list link using email, Facebook, Pinterest, or Twitter by doing thefollowing:
1. If you have not already done so, set the privacy setting for the wish list to Shared. Makethis change by doing one of the following:
• Click the lock icon (Edit Wish List Settings) under the wish list name.
• Click the Wish list actions arrow at the right side of the page, and click Edit.
Privacy settings are made per wish list. Setting the privacy setting for one wish list doesnot affect the privacy setting for any other wish list.
2. On the right-hand side of the page across from the Wish List Owner name, click theShare by email, Share on Facebook (if available), Share on Pinterest, or Share onTwitter icon.If the Facebook icon is absent to your shoppers, you must add a Facebook App Id bylogging into the Commerce administration interface. See Configure Facebook access andannouncements for more information. To display the Pinterest icon, place the latestversion of the Wish List Header widget in the Wish List layout.
3. Follow the instructions to log into the email service, Facebook, Pinterest, or Twitter tosend the link.
Understand localization
Wish lists are localized as a part of the storefront localization. For more information, see Localize Your Store.
Chapter 20Understand wish list features
20-3

Implement wish listsTo use all the functionality of wish lists for your site, it is recommended you completethe following activities:
• Tailor your wish list appearance to match the rest of your storefront, using theDesign page in the administration interface. For example, wish lists inherit theglobal style settings for color, font, and page layout. For more information, see Design Your Store Layout.
• Add a Facebook App ID.
• Update the Wish List Header widget and Wish List Content widget in the Wish Listlayout.
• To include the Pin It on Pinterest icon, on the Product layout, update the AddProduct to Wish List widget. Include the Social Sharing 2 element in the ProductDetails widget.
• To have price formatting and currency appear in email notifications, include thelatest version of the Add Product to Wish List widget in the Product layout.
• Enable email settings.
• Update your email templates.
• Edit and use wish list widget content (optional).
Configure Facebook access and announcementsWish list owners and members can share links to products and invite friends viaFacebook using their Facebook accounts.
To enable the Share Wish List on Facebook and Invite Facebook Friends features foryour shoppers, do the following:
1. Make sure you have a Facebook App ID. To obtain a Facebook App ID, you musthave a Facebook account and register to become a Facebook developer.Facebook provides information on how to set up your site to allow sharing toFacebook. For more information, visit developers.facebook.com.
2. Once you obtain a Facebook App ID, log into the Commerce administrationinterface.
3. Click the Settings icon, then select Social Settings.
4. In the Facebook App ID field, enter your ID, and click Save.
5. To configure your Facebook app as a Canvas app, log into your Facebookmerchant account.
6. Create or edit your Canvas app, and enter the URL—https://[yourstorefront host name]/facebook/—as the Secure Canvas URL.
You can make changes to the content of the announcements your shoppers send toFacebook by editing the associated text snippets.
To view the editable text snippets:
1. On the Design page, click the Developer tab.
Chapter 20Implement wish lists
20-4

2. On the Text Snippets tab, select Social from the drop-down list.
You can change the values for the following keys by clicking the value and editing the newvalue field:
• socialFacebookInviteMessageText
• socialFacebookShareProductDescriptionText
• socialFacebookShareWishlistDescriptionText
• socialFacebookShareWishlistTitleText
The default text snippets are translated for all supported languages. If you make changes tothe default text snippets, you must manually translate them into different languages yourstore supports. See Customize your web store's text for more information.
Enable wish list email settingsFor wish lists to function properly, enable wish list email types in the administration interface.
To enable wish list emails, see Configure Email Settings.
Upon initial setup, emails sent by wish lists are text only. However, you can download any ofthe wish list email templates, update them, use HTML, and then re-upload them to fit withyour business environment and strategies. For more information, see Customize EmailTemplates.
Shoppers can opt to receive email notifications by doing one of the following:
• Click the I want to get email updates check box when creating an account.
• Click My Account > My Details, click Edit and select the I Want to Get Email checkbox.Click Save. My Wish List Setting is displayed. Under Email Notification Settings, clickYes for those emails they want to receive.
At any time, shoppers can edit the email notification settings in My Account.
The following table describes the types of email that are available for wish lists:
Email Type Description
Wish List New Comment Sent to all other members of a wish list when amember adds a comment to a product post. Anemail is not sent to the commenter.
Wish List New Member Sent to all current members of a wish list tointroduce a new member; this email is not sent tothe new member.
Wish List New Post Sent to all other members of a wish list when anew product post is added to the wish list or aproduct is moved to an established or new wishlist. If the product is already in the destination wishlist, no email is sent.
A product post is added when a shopper clicks theAdd to Wish List button or selector on a productdetails page. An email is not sent to the poster.
Chapter 20Enable wish list email settings
20-5
Additional notification email template properties
You can optionally use sections to add and organize related content if another sectionheading is needed.
Additional properties are available in the wish list notification email templates shouldyou want to customize your emails. For details about accessing the templates, see Customize Email Templates.
You can make template changes for the following:
• New comment email
– Wish list owner profile image URL
– Profile image URL of shopper who added a comment
– Product title
– Image URL of the product associated with the comment
– First and last name of the shopper who created the post associated with thecomment
– Full name of the email recipient
• New product post email
Ensure that the latest version of the Add Product to Wish List widget is added to theProduct layout.
• Current price (list price or sale price as applicable)
• Profile image URL of shopper who added the product; if a profile image has notbeen selected, an image called no image is sent.
• Profile image of wish list owner
• Full name of the email recipient
• New member email
• Profile image URL of new member
• Profile image URL of wish list owner
• Full name of the email recipient
Note: If no profile image has been set by the shopper, a generic image URL isdisplayed.
Additional email properties
You can add properties to the following wish list email templates:
• Wish List New Comment
• Wish List New Member
• Wish List New Post
See Customize Email Templates to learn how to download and edit email templates.
Chapter 20Enable wish list email settings
20-6
Edit wish list widget contentYou can edit any of the following wish list widgets on the Design page in the administrationinterface:
• Wish List Content
• Wish List Header
• Wish List Notification Settings
• Wish List Settings
• Wish List Welcome
• Shopper Profile Wish List
The Wish List Welcome widget is useful as it controls content that introduces wish lists toyour shoppers in a way that fits your brand and voice, and encourages customers to createwish lists. This brand information page is shown to shoppers prior to login. Once logged in,shoppers see their main wish list page.
The following layouts are affected by edits to the wish list widgets:
• For the Product Layout, use the Product Details widget, and Add to Wish List Buttonelement for placement of the button.
• For the Wish List Layout, use the Wish List Welcome widget to include branding andother site-specific text. Other widgets that affect the Wish List Layout include the WishList Invitation, Wish List Welcome, and Wish List Content widgets.
See Customize layout components for details about editing widgets.
Set up wish lists in a multiple site environmentWish lists are not shared among sites and must be configured on a per-site basis.
If your environment supports multiple sites where wish lists are configured, a registeredshopper can create wish lists on more than one site, but each wish list can be accessed onlyfrom the store where it was created.Note: When you delete a site, its associated wish list environment is also deleted, along withits shopper content.
Follow these steps to configure a wish list for an existing site. (To learn how to create a site,see Define a site.)
1. Click Settings icon, then select Setup.
2. Select a site from the drop-down list.
3. Click Save.
This action connects the site to the Oracle Commerce servers hosting the site wish lists.
4. (Optional) Click the Settings icon, then select Email Settingsto configure the Wish ListNew Comment, Wish List New Member, and Wish List New Post email notifications.For more information, see Enable wish list email settings.
Chapter 20Edit wish list widget content
20-7

Configure wish lists for OSF applicationsCommerce includes Open Storefront Application (OSF) widgets that let you add wishlists to your OSF applications.
Wish list plug-ins are included with Commerce, but they are not enabled and are notavailable by default in the reference application.
This section describes how to add wish list functionality to an OSF application. Thissection is intended for developers who want to use OSF to create Commercestorefront applications. The procedures in this section assume that you have set up aworking OSF development environment and have created an application where youwill add wish lists. For more information, see Understand the Open StorefrontFramework.
Add wishlist package dependencies to your application
Commerce provides a read-only npm (Node Package Manager) registry that you canaccess to obtain OSF packages and their dependencies.
1. Navigate to your <workspace-dir>/packages/apps/<appname> folder.
2. Run the following commands:yarn add @oracle-cx-commerce/wishlist-endpoints
yarn add @oracle-cx-commerce/wishlist-actions
yarn install
3. Ensure wishlist dependencies are installed to your local node_modules/@oracle-cx-commerce folder.
Add wish list plug-in exports to your application
You must export references that enable the application's endpoints to be accessedusing dynamic imports.
1. Navigate to your <workspace-dir>/packages/apps/<appname>/src/plugins/actions/index.js file and add the following line. Make sure this line appearsabove default exports:export * from '@oracle-cx-commerce/wishlist-actions'; //
2. Navigate to your <workspace-dir>/packages/apps/<appname>/src/plugins/actions/meta.js file and add the following line. Make sure this line appearsabove default exports:export * from '@oracle-cx-commerce/wishlist-actions/meta'; //
3. Navigate to <workspace-dir>/packages/apps/<appname>/src/plugins/endpoints/index.js file and add the following line. Make sure this line appearsabove default exports:export * from '@oracle-cx-commerce/wishlist-endpoints'; //
4. Navigate to <workspace-dir>/packages/apps/<appname>/src/plugins/endpoints/meta.js file and add the following line. Make sure this line appearsabove default exports:export * from '@oracle-cx-commerce/wishlist-endpoints/meta'; //
Chapter 20Configure wish lists for OSF applications
20-8

Allow shoppers to move items to a wish list from the cart
Once your OSF application has been built and deployed to the Commerce serverenvironment, you can use the administration interface's Design page to enable the Move toWish list functionality on the Cart page.
1. Log into Commerce and click the Design icon in the main menu. In the top-right corner ofthe Design page, you should see a dropdown menu where you can select a deployedOSF application.
2. Select your OSF application from the dropdown menu.
3. Use the Filter Layouts field to search for the Cart Page layout and then open the Cartcontainer.
4. Click on Settings icon on the Cart Item Details layout.
5. Click the Move to Wish List checkbox.
6. Publish your changes.
Understand wish list layouts and widgets
The wish list widgets let shoppers create and manage multiple wish lists. The OSF wish listwidgets make use of the Commerce wish list service and interface with the correspondingSocial Wish Lists API endpoints.
The wish list widgets let shoppers do the following tasks:
• Create, edit, and delete wish lists with different privacy settings: Private (Only the ownercan see and add to the list.), Group (Only the owner and people they invite can see,comment on, and add items to the list.), and Shared (Anyone with a link can see the list,but only the owner and people they invite can comment on and add items to the list.)
• Add items from a product's Product Details Page to a new or existing wish list. (Thedefault widgets do not support adding items to a wish list from the Product Listing Page,but you can extend them in your OSF workspace to add this functionality.)
• Move items from a wish list to the cart or from the cart to a wish list.
• Move items from one wish list to another.
• Edit or delete wish list items.
• Add comments to wish list items.
• Share wish lists with other people via a link or invite them to a wish list, where they canalso edit and comment on the list.
Note: The default widgets do not support sharing via Facebook, Pinterest, or Twitter, orreceiving automatic price change notifications for products in a wish list. Default wish listsalso do not show item availability (stock status). However, you can extend the widgets in yourOSF workspace to add this functionality. The out-of-the-box OSF wish list implementationalso does not currently allow the wish list owner to manage wish list settings.
Commerce includes the following wish list layouts:
• Wish Lists
• Wish List Details
• Commerce includes the following wish list widgets:
• Add to Wish List (Add this to the Product Details container)
Chapter 20Configure wish lists for OSF applications
20-9

• Wish List Details
• Wish Lists
• Wish List Breadcrumbs
Detailed information about each widget's code, including actions, selectors, fetchers,and endpoints, is available in the JS API documentation that you can download fromOracle Customer Connect.
Chapter 20Configure wish lists for OSF applications
20-10

21Localize Your Store
You can translate your catalog and store content into multiple languages so a shopper canautomatically see your store in the language specified by her browser’s locale. A shopper canalso manually select a language from a list of languages your store supports.
This section describes how to translate your store into other languages. For information abouthow to display your store’s prices in different currencies, see Configure Price Groups.
Understand store localizationEach language Commerce supports matches an ISO locale. For example, English(Australian) matches the en_AU locale.
You must assign a default language for each Commerce site you set up. You must create allcatalog items in the site’s default language and then translate them into the additionallanguages your site supports. See Prepare your catalog for translationand Import translationsfor catalog items for more information about translation. See Enter basic store information formore information about assigning default and additional languages to a site.
Important: Do not change your site's default language once you set it, especially if you havealready created catalog items like products, SKUs, and collections.
You can translate the values for short-text and rich-text properties for all catalog items. Forexample:
• Product names, descriptions, and brands
• Collection names and descriptions
• Variant property names and values. For example, you can translate both the variantproperty name Color and all its values, like green, blue, and red.
• Although not part of your catalog, you can translate the shopper-visible properties forsettings, for example, the names of shipping methods and promotions.
You can also translate store text that is not part of the catalog, for example, labels,messages, and help tips. See Translate store text for more information.
The shopper’s browser locale controls the format of numbers, including dates and prices. Youcannot manually change or customize number, date, or currency formats.
Note: Your store can support more than one currency. For information about selecting adefault currency when you set up the store, see Define additional store settings. Forinformation about displaying prices in other currencies, see Configure Price Groups.
Emails your store sends are already translated into all the languages that Commercesupports. You can customize the email text in all the languages your store supports. See Configure Email Settings for more information. Emails are sent in the language of theshopper’s browser when the event that triggered the email took place. For example, if ashopper places an order from a browser whose locale was set to ES, the service sends theSpanish translation of the Order Placed email.
21-1

Select additional languagesThe first step in translating your store is to select the additional languages you wantyour store to be displayed in.
Once you select additional languages, a new dropdown list appears at the top of theadministration interface. When you are ready to translate components of your catalogand store into a new language, select that language from the list before you starttranslation tasks.
To select additional languages your store supports:
1. Click the Settings icon.
2. Select Setup from the Settings list.
3. On the Location tab, click the Additional Store Languages field and select alanguage. See Languages supported by the storefront for the available options.Repeat this step for each new language your store will support.
When you remove any of the additional languages, shoppers can no longer selectthem from the Language list on your store.
To remove a supported language from your store:
1. Click the Settings icon.
2. Select Setup from the Settings list.
3. On the Location tab, in the Additional Store Languages field, click the X icon inthe corner of the language you want to remove.
Languages supported by the storefront
The following languages are supported for use in your store.
Note: Arabic (ar), Catalan (ca), Indonesian (id), Malay (ms), and Vietnamese (vi) aresupported for the storefront only; the administration interface is not translated intothese languages.
• Arabic – ar
• Bulgarian – bg
• Catalan – ca
• Chinese (Simplified) – zh_Hans
• Chinese (Traditional) – zh_Hant
• Croatian – hr
• Czech – cs
• Danish – da
• Dutch – nl
• English (Australian) – en_AU
• English (Canadian) – en_CA
• English (UK) – en_GB
Chapter 21Select additional languages
21-2
• English (US) – en_US
• Estonian – et
• Finnish – fi
• French – fr
• French Canadian – fr_CA
• German – de
• Greek – el
• Hungarian – hu
• Indonesian – id
• Italian – it
• Japanese – ja
• Korean – ko
• Latvian – lv
• Lithuanian – lt
• Malay – ms
• Norwegian – no
• Polish – pl
• Portuguese (Brazil) – pt_BR
• Portuguese (Portugal) – pt_PT
• Romanian – ro
• Russian – ru
• Serbian (Cyrillic) – sr_RS
• Serbian (Latin) – sr_Latn_RS
• Slovenian – sl
• Spanish – es
• Swedish – sv
• Thai – th
• Turkish – tr
• Ukrainian – uk
• Vietnamese – vi
Prepare your catalog for translationCreate all catalog items in your store’s default language and then translate them into theadditional languages your store supports.
Text for a short-text or rich-text properties can be translated when the property is marked astranslatable in the product type. Some properties, such as the Base product’s Name,Description, and Long Description properties, are marked as translatable by default. Newproperties you create are not marked as translatable by default. When you create new
Chapter 21Prepare your catalog for translation
21-3
properties you can decide if they will contain translatable content and mark themaccordingly. Once you mark a property as translatable, you cannot remove that setting.See Create and edit product types to learn how to mark properties as translatable.
Note: The names of collections and the names of shipping methods are automaticallytranslatable; there is no setting to mark them as such.
Import translations for catalog itemsThe easiest way to translate your catalog into the additional languages your storesupports is to export products, variants, and collections in your store’s defaultlanguage, replace the translatable strings with localized text in the spreadsheets, andimport them back into your catalog.
See Import and Export Catalog Items and Inventory for more information.
When you export catalog data for translation, you must select a language that theexport supports. If you select a different language than your store’s default language,LOCALE appears in the fifth column (cell E1) of the export spreadsheet and shows theISO locale code for the language, for example, LOCALE=fr.
When you import the translations back into your catalog, made sure LOCALE appears inthe fifth column (cell E1) of the import spreadsheet and shows the ISO locale formatfor the language you are importing, for example, LOCALE=fr.
Note: You cannot create new items when you import translations. All new items, eventhose created by import, must be created in your store’s default language.
Manually translate propertiesYou cannot import translations or other values for shopper-visible settings, such as thenames of shipping methods, so you must manually translate them.
You can also manually translate properties for catalog items, though importingtranslations is recommended when working with a large number of properties. See Import translations for catalog items for more information.To manually translate items:
1. Select the language to translate to from the content-language list at the top of thepage.
2. Open the item whose properties you want to translate.
3. Fields for translatable properties that you have not yet translated into thislanguage are blank.
Note: The untranslated names of product-type properties are not blank, butappear in the store’s default language.
4. Enter the translated value for each translatable property on the page.
5. Click Save.
Translate store textUse text snippets to translate the text displayed on your store into the differentlanguages your store supports.
Chapter 21Import translations for catalog items
21-4
Store text includes messages, labels, and help tips. You access and translate your store’stext snippets on the Design page. See Customize your web store’s text for more information.
Configure the default locale for a siteBy default, when a shopper visits an Oracle Commerce site, it displays in the browser'spreferred language if that language supported by the site. You can configure the site todisplay in the site's default language, even if it is not the browser's preferred language.
Each language Commerce supports matches an ISO locale. A site's default language isspecified internally by its defaultLocaleId property. To override the browser's preferredlanguage and display a site in the site's default language, Use the Admin API to set the siteobject’s useDefaultSiteLocale property to TRUE. (It is set to FALSE by default.)
Use the updateSite endpoint to modify the useDefaultSiteLocale property on an existingsite. For example:
PUT /ccadmin/v1/sites/100002 HTTP/1.1Authorization: Bearer <access_token>x-ccasset-language: en
{ "properties": { "useDefaultSiteLocale": "true" }}
When you set a site's useDefaultSiteLocale property to TRUE, you must also make sure thesite is using the most recent version of the Header widget and Language element.
See Configure Sites for more information about using the REST API to work with sites.
Create items in the default locale of a siteIn an environment with multiple Oracle Commerce sites, you can configure Commerce toallow merchandisers and developers to create new products, collections, and promotions inany site's default language.
By default, when you to use the administration interface or the API endpoints to createproducts, collections, and promotions, the requests include validation that makes sure thenew items are being created in the default locale of the default site. You must then manuallytranslate these items to other supported languages.
You can, however, use the Admin API saveAdminConfiguration endpoint to configureCommerce so that it bypasses this validation, allowing the creation of products, collections,and promotions in the default language of a site instead. The endpoint'soverrideDefaultLocaleValidation property is an array that contains one or more of thefollowing strings: createProduct, createCollection, and createPromotion.
Chapter 21Configure the default locale for a site
21-5
The following sample request configures Commerce to allow collections and productsto be created in the default language of any site:
PUT /ccadmin/v1/merchant/adminConfiguration HTTP/1.1Authorization: Bearer <access_token>x-ccasset-language: en
{"overrideDefaultLocaleValidation": ["createCollection", "createProduct"]}
Use a specific locale code in a REST requestRequests can include the x-ccasset-language header to instruct the endpoint to use aspecific locale code for content returned in the response.
The locale supplied in the header must be supported by your store. (See Selectadditional languages for more information.) The API endpoint documentation specifiesif the x-ccasset-language header is required or optional for an endpoint. See Learnabout the APIs for information about accessing the endpoint documentation.
Troubleshoot translation issuesThis section describes workarounds for common translation issues.
• If your store supports additional languages but you do not translate all thetranslatable shopper-visible properties, the untranslated strings will appear in thestore’s default language. This can result in multiple languages appearing on thesame page. For example, if you translate product names but not descriptions, thename and description will appear in different languages on the product detailspage.
• When you select a default language for your store, select a language that specifiesa neutral locale, not one that specifies a region-specific local. For example, selectEnglish not English (United States) or English (Canada). To support region-specific variants of the default language on your store, add them to the AdditionalStore Languages list. See Select additional languagesfor more information.
Note: In this release, there are no neutral-locale options for Chinese or Portuguese.You must select either Chinese (Simplified) or Chinese (Traditional) for Chineseand Portuguese (Portugal) or Portuguese (Brazil) for Portuguese.
Chapter 21Use a specific locale code in a REST request
21-6

22Configure Price Groups
A price group is a set of price lists (list price, sale price, and shipping surcharge), in a specificcurrency, for the products, SKUs, and shipping surcharges in a catalog.
Price groups let you price catalog items (products, SKUs, and shipping surcharges) inmultiple currencies so a shopper can select from a list of currencies your store supports andsee those prices on your store.
If a user does not have access to a price group, the following conditions apply:
• The editors for the price group and its prices are read-only
• Menu options for actions that the user is not authorized to perform may be hidden ordisabled
• Some icons and menu options will change from Edit to View only
Understand price groupsA price group is a set of price lists (list price, sale price, and shipping surcharge) in a specificcurrency for all products and SKUs in your catalog.
When a shopper selects the currency for an active price group, your store displays allproducts and SKUs in that price group’s prices. The following illustration shows the currencyselector on a store that lets shoppers choose to see prices in several currencies.
Your Oracle Commerce instance comes with one configured price group, with the currency inUS Dollars. You can edit this price group to give it a name that makes sense for yourenvironment, for example the name of your store.
If your store supports multiple currencies, create one price group for each currency that youwant customers on your store to be able to see. When your store supports multiple pricegroups, one price group is always the default, that is, the group whose currency and pricesare displayed when an anonymous shopper (that is, a shopper who is not logged in) visitsyour store. While shoppers can change price groups by selecting a different currency, thedefault prices are always displayed when a shopper returns to your store for a new shoppingsession.
If your store supports account-based commerce, you can create unique price groups for eachaccount registered on your store. See Configure Business Accounts for more information.
If your Commerce instance supports more than one store or site, you can create unique pricegroups for each site that runs on your instance. See Run Multiple Stores from OneCommerce Instance for more information.
22-1

If your store supports a loyalty-points program, you use the Admin REST API to createa currency for loyalty points. Then you create and activate a price group for the points,just as you would any other currency your store supports. See Create a customcurrency for loyalty points for details about creating a currency for loyalty points andassigning it to a price group.
Price groups are independent of the languages customers can view your store in. Forexample, if you translate your store into Japanese, but do not add a price group thatshows prices in Yen, shoppers can view the store in Japanese but the prices remain inUS Dollars. For information about how to translate your store into other languages,see Localize Your Store.
To create a new price group:
1. Create a new price group. See Create and edit price groups.
2. Add prices to each product in your catalog for the new price group. See Manuallyadd prices to products and SKUs and Import prices for products and SKUs.
3. Activate and display the price group. Optionally, make it the default price group sothat its prices are the ones shoppers automatically see when they first visit yourstore. See Activate price groups.
4. Publish your changes so they will appear on your store. See Publish Changes.If direct price editing is enabled for your Commerce store, any price changes youmake are available on the storefront without publishing. See Update prices withoutpublishing for more information.
Understand how price groups affect promotions
If your store uses price groups to support multiple currencies, you can specify that apromotion applies only to items purchased in specific currencies. For example,suppose you create a price group called GBP that lets shoppers view prices in BritishPound Sterling. You can then create an order discount called “Spend £100, get £10off” that applies only when a shopper displays your store’s prices in British PoundSterling and then purchases £100 worth of merchandise. See Understand currency-specific promotions for more information.
Understand how price groups affect shipping methods
If your store uses price groups to support multiple currencies, you can specify that ashipping method applies only to items purchased in specific currencies. For example,suppose you create a Ground Shipping method that is valid only for delivery to thecontinental USA. In addition to specifying the appropriate shipping region, you mightalso want to make sure that the shipping method is available only when a shopperdisplays your store’s prices in the default currency, US Dollars. See ConfigureShipping for more information.
Understand how to use price groups with loyalty programs
If your store supports a loyalty program, you use the Admin REST API to create acurrency that represents loyalty points. Then you create and activate a price group forthe points, just as you would any other currency your store supports. See Work withLoyalty Programs for details about creating a currency for loyalty points and assigningit to a price group.
If your store uses one of the built-in tax-processor integrations (Avalara AvaTax orVertex O-Series), you can use the REST Admin API to convert the value of points-based orders to monetary currency so that your tax processor can calculate taxes for
Chapter 22Understand price groups
22-2

the order. (See Work with Loyalty Programs for more information.) or you can turn off tax callsfor the points-based price group and make sure tax processing is handled externally, forexample, in your order management system. (See Create and edit price groups for moreinformation about configuring tax settings for price groups.)
Create and edit price groupsA price group is a set of prices in a specific currency for products and SKUs in your catalog.
To create a new price group:
1. On the Catalog page, click Manage Catalogs and select Price Groups.
2. On the Price Groups page, click the Price Group button.
3. Enter values for the price group’s properties.
4. Click Save.
Property Description
Name (required) Short, descriptive name that identifies the pricegroup. This name does not appear on your store.Each price group name must be unique withinyour store.
ID (required) The ID that identifies the price group internally.Each price group ID must be unique within yourstore. Even after you delete a price group, youcannot assign its ID to another price group.
Inherit prices from Use the drop-down menu to select a price group.This associates the new price group with anexisting price group, creating a price grouphierarchy. Prices from the new price group, or thechild price group, will be inherited from this parentprice group. See Work with price group inheritancefor more information.
Currency The ISO currency associated with the prices inthis price group.
If you created a custom currency for loyalty points,that currency is also available to assign to a pricegroup. See Create a custom currency for loyaltypoints for more information.
Chapter 22Create and edit price groups
22-3

Property Description
Tax Calculation Select one of the following options to specifywhether calls are made to your tax processor forthis price group:
Calculate tax: Commerce calls the tax processoryour store integrates with, which calculates andreturns tax for prices in this price group. Thisoption is selected by default.
Do not calculate tax: Commerce does not call thetax processor your store integrates with and no taxis calculated for prices in this price group.
This setting affects tax calculation only if yourstore uses one of the built-in tax-processorintegrations (Avalara AvaTax or Vertex O-Series),or an external tax-processor integration configuredwith the REST API. If you turned off tax calculationby selecting None as the tax processor on the TaxProcessing settings page, Commerce will notcalculate taxes for a price group, even if you selectCalculate tax here. See Configure Tax Processingfor more information.
Status Indicates if the price group is active.
Require all products to be in this price group. Select this option to require that every product inyour catalog has a corresponding list price in thisprice group before it can be activated. This optionis selected by default and must be selected for thedefault price list.
Include tax in the prices Select this option to display all prices in the pricegroup with tax (for example, VAT) included.
The prices you assign to a tax-inclusive pricegroup must already include a tax amount. If pricesinclude tax, your integrated tax processor back-calculates taxes for each order. That means thatwhen the call is made to the tax processor whenthe cart is priced, no tax is returned.
Once you save a price group with this optionselected, you cannot change this setting.
If you select this option, you may also need toconfigure additional settings on your taxprocessor. See Configure Tax Processing for moreinformation.
Edit price groups
Once you create a price group, you can change is its name. You cannot change its IDor the currency associated with it.
To edit a price group:
1. On the Catalog page, click Manage Catalogs and select Price Groups.
2. On the Price Groups page, click the name of the price group to edit.
3. Enter a new name.
4. Click Save.
Chapter 22Create and edit price groups
22-4

Delete price groups
To remove a price group from your system:
1. On the Catalog page, click Manage Catalogs and select Price Groups.
2. On the Price Groups page, click the name of the price group to delete.
3. Click Delete.
Manually add prices to products and SKUsYou can manually add prices to products and SKUs by updating either your catalog or theprice group itself.
• To add prices to individual items in your catalog, display the details page for a productand click the Price Groups tab. See Create and work with products for information aboutadding prices to a product or SKU.
• To add prices to the price group, display the details page for a price group and click theProducts link. A list of all products and SKUs in your catalog appears. You can add orchange the list price, sale price, or shipping surcharge for products or SKUs in the list.See Activate price groups for information about displaying a price group’s details.
Format prices
When entering prices, keep in mind that the locale of the browser you use to access theOracle Commerce administration interface controls number format and the price group’scurrency controls the precision specifier (the number of decimal places) in the pricesshoppers see on your store. For example, suppose your browser’s locale is US_EN and youare adding prices for a price group whose currency is Japanese Yen (JPY). If you enter aprice as 1240.89, Oracle Commerce displays the price as 1,241 because Japanese Yen doesnot display decimal places.
Import prices for products and SKUsThe easiest way to add prices to products and SKUs is to export products and, if applicable,SKUs, add prices for each price group to the spreadsheet, and import them back into yourcatalog.
See Import and Export Catalog Items and Inventory for more information.
When you look at the exported spreadsheet, you can see that the second row displayscolumn headings that contain the internal names of the exported properties. Each price grouphas three column headings:
• PLG:<id>PriceGroup.ListPrice
• PLG:<id>PriceGroup.SalePrice
• PLG:<id>PriceGroup.ShippingSurcharge
In each column heading, <id> is the ID for the price group. For example, the column of listprices for the default price group has the heading PLG:defaultPriceGroup.ListPrice.
Prices for the products or SKUs begin in the third row and continue for the remainder of thespreadsheet. If an item does not have a value for a property, the corresponding cell is blank.
Chapter 22Manually add prices to products and SKUs
22-5

Keep the following in mind when you import prices:
• Price groups are not dependent on languages (ISO formats) you may translateyour store into. Therefore, when you import prices into your catalog, the LOCALEthat appears in the fifth column (cell E1) of the import spreadsheet has no effecton the imported prices.
• If you create a new product via import, it must include a list price for each pricegroup in your catalog, even for price groups that are not yet active.
If you have configured price list group inheritance, note that when you export a productor SKU whose price is inherited from a parent price list group, the prices will display inthe spreadsheet as null.
Activate price groupsActivating a price group makes its prices available to be displayed on your store.
Once a price group is active, you can add it to your store. Then shoppers can select acurrency from a list of active currencies that appears at the top of each page of yourstore. Each currency in the list is associated with an active price group you chose todisplay.
Note: If your store supports account-based commerce, you can assign active pricegroups to accounts so logged-in contacts can see those prices. See ConfigureBusiness Accounts for more information.
To activate a price group:
1. On the Catalog page, click Manage Catalogs and select Price Groups.
2. On the Price Groups page, select the price group to activate.
3. Once the price group page is displayed, click the Activate button to activate.
4. Click Save.
5. To display prices from an active price group, add it to your store. See Displayactive price groups for more information.
If your catalog contains products when you create a price group and you chose toforce the price group to include all products in your catalog, you cannot activate thatprice group until it contains list prices for all products and SKUs in your catalog. If youtry to activate a price group and see an error message that says the group does notcontain list prices for all your products, check to see which products do not have pricesin the price group. You can check for missing prices in the following ways:
• Click the Products link on the price group’s details page to see products and theirprices. By default, all products are displayed. To show only products that do nothave list prices, select Show Only Products With No Prices from the dropdownlist in the upper-right corner of the page. Then add the missing prices.
• Export all the products in your catalog. When you view the spreadsheet, you caneasily see which products do not have list prices assigned from each price list.
For more information about adding missing prices, see Manually add prices toproducts and SKUs and Import prices for products and SKUs.
Chapter 22Activate price groups
22-6

Display active price groups
Activating a price group does not automatically add it to your store. To display an active pricegroup on your store, you must add it to your store’s Setup settings. You can also change thedefault price group on the Location tab of your store’s Setup settings page.
To display active price groups on your store:
1. Click the Settings icon.
2. Select Setup from the Settings list, then click the Location tab.
3. To change the default price group, select a price group from the Default Price Groupdrop-down list.Only price groups that include a list price for every product in your catalog are eligible tobe the default price group.
4. To display an additional active price group that shoppers can select, add it to theAdditional Price Groups field.To stop displaying a price group on your store, remove it from the Additional PriceGroups field.
Note: Price groups you add to the Additional Price Groups field can be seen andselected by all shoppers who visit your store. If your store uses account-based commerceand you have created price groups to associate only with specific accounts, do not selectthose price groups here. See Configure Business Accounts to learn how to display anactive price group only to logged-in contacts from a specific account.
5. Click Save.
6. Publish your changes. See Publish Changes for more information.If direct price editing is enabled for your Commerce store, any price changes you makeare available on the storefront without publishing. See Update prices without publishingfor more information.
Update prices without publishingBy default, when you create or modify product prices, the changes you make must bepublished before they take effect. You can optionally configure Oracle Commerce to makeprice changes directly on the storefront without publishing.
Publishing price changes works well for many merchants, particularly those that change theirprices relatively infrequently. Some merchants, however, have a large number of productsand change their prices frequently, in some cases updating prices several times a day. Forthese merchants, Oracle Commerce provides the ability to make price changes available onthe storefront immediately, bypassing the publishing process.
To enable this feature, you use the updateDirectPriceEdit endpoint. For example:
PUT /ccadmin/v1/merchant/directPriceEdit HTTP 1.1Authorization: Bearer <access_token>Content-Type: application/json
{ "enable": true}
Chapter 22Update prices without publishing
22-7

Note that if your stores have any unpublished price-related changes, you must publishthem before attempting to set enable to true, or the call will fail.
Use direct price editing
When direct price editing is enabled, if you create or modify a product (in theadministration interface, using an endpoint, or through an import process), pricechanges you make are available on the storefront without publishing; they do notappear in the list of changes that are returned by REST endpoints or appear in thePublishing page of the administration interface. Other product changes, however,must still be published. As a result, prices may exist on your production system beforethe associated products do. These prices will be applied to the products when they arepublished.
When you publish changes, Oracle Commerce initiates an indexing operation so thesearch index is updated to reflect the changes. With direct price editing, though, priceson the production server can be changed without publishing, which means prices inthe index may become out of date. To ensure the index is kept up to date, enablingdirect price editing also sets up a schedule to perform incremental indexing every 15minutes. However, if you have already used the setSearchPartialSchedule endpointin the Search Data and Indexing API to set up a different incremental indexingschedule, then that schedule will remain in place instead.
Disable direct price editing
You can disable direct price editing by using the updateDirectPriceEdit endpoint toset the enable property back to false. Doing this initiates publishing of all pendingchanges.
Note, however, that you should decide which mode makes sense for your stores, andcontinue to use it unless your business needs change. The feature is not designed tobe turned on and off frequently. Disabling direct price editing may cause aconsiderable delay, because Oracle Commerce must then synchronize your publishingserver with the prices on your production server.
Disabling direct price editing also cancels the incremental indexing schedule that wasset up when direct price editing was enabled. However, if you used thesetSearchPartialSchedule endpoint to create a different incremental indexingschedule, disabling direct price editing does not cancel that schedule.
Work with price group inheritanceYou can create parent-child relationships with price groups, which allow price groupsto inherit prices for list, sale and shipping surcharge prices.
Price groups specify list prices, sale prices and shipping surcharge prices. Using pricegroup inheritance allows you to define some customer-specific prices for someproducts and SKUs, while the rest of the prices are inherited from another price group.This feature is applicable for both consumer-based and account-based environments.
Understand price group hierarchy
When you create a new price group, or edit an existing one, you can specify a pricegroup from which to inherit prices. When you save a price group that inherits prices,known as a child price group, any prices that are not explicitly specified in the child willbe inherited from the group you identify, known as the parent price group. Wheneveryou make a change in the parent price group, the changes will be reflected in any
Chapter 22Work with price group inheritance
22-8

inherited prices in the child price group. For example, if you create a sale price in a parentprice group, any children that inherit the sale price will reflect the price you created in theparent price group. The currency, the setting for tax calculation and the setting thatdetermines if the SKU prices include tax are also set from the parent price group. Note thatthese settings cannot be changed once a price group is created. When choosing a newparent for an existing price group, your choices are limited to those price groups whosesettings for these properties are the same as the existing price group.
Although child price groups can have only one unique parent price group, parent price groupscan have more than one child. While child price groups may also have their own child pricegroups, the limit for the depth of price groups is three levels. Each price in a child price groupis inherited unless the inherited price is overridden by a price that is explicitly added to thechild.
Note that it is possible for a product or a SKU in a child price group to have a sale price thatis greater than or equal to a list price. This may occur because one or both of the prices isinherited and sale price validation does not occur on child price groups when a change ismade to its parent.
You can override the inherited list, sale, or shipping surcharge price for a product or SKU.Note that a SKU can inherit its price from its product or from the parent price group. Should aSKU price be empty in a child price group, the system will search for, and display a price bychecking for the product price in the current price group, followed by the SKU price in theparent, and then repeating this sequence for increasingly higher levels of the price group. Ifno price is found, then the SKU price is marked as "None defined". A product or a SKU in achild price group must either have an inherited price or an explicitly specified override price. Ifyou leave the price empty, it will be inherited. Therefore, there is no way to specify that theproduct or SKU has no price in the child price group, assuming that it has a price somewherein the hierarchy above.
Note: If you are using Admin APIs to obtain product prices, for a SKU that does not contain aprice in a child price group, the API returns the inherited price, if any; otherwise it returns anempty price.
Create a new price group hierarchy
To create a price group hierarchy, use the Catalog button in the administration interface. Foradditional information on creating and editing price groups, refer to Create and edit pricegroups:
1. Use the drop-down menu to select Price Groups.
2. Click the Create New Price Group button.
3. Provide the name, ID as usual.
4. Select the Inherit prices from check box. Use the drop-down menu to select the parentPrice Group.
5. Select the rest of the options as needed. Note that the Require all products to be inthis price group checkbox means that every product must have an explicitly specifiedlist price in the price group. For the purposes of this checkbox, an inherited price wouldnot be sufficient. For this reason, this flag is always set to false in a child price group.
6. Click the Create button to save the new price group.
You need to activate your price group for prices to be displayed on your store. Child pricegroups can only be active if the parent is active. Parent price groups cannot be deleted. Forinformation on activating price groups, refer to Activate price groups.
Chapter 22Work with price group inheritance
22-9
23Use Volume Pricing for Products
Many companies offer discounts to people who purchase products in volume.
Commerce supports this type of pricing for the products in your catalog. This section providesdetails on how volume pricing is specified for a product as well as information on how tomake sure volume pricing appears correctly on your storefront.
Understand volume pricingYou can specify volume pricing for a product in two ways, bulk pricing or tiered pricing.
For bulk pricing, the same price is applied to the entire quantity of a product that is purchasedbut that price is determined by where the quantity purchased falls within the volume pricingstructure. For example, consider the following volume prices:
1 – 10, $2.00
11-20, $1.90
21 – 50, $1.80
51 – 200, $1.70
If a shopper purchased 25 units of this product, the bulk price for the product would fall intothe 21 – 50 level of the pricing structure, making the bulk price for this product calculate to 25units at $1.80 each.
For tiered pricing, the price of the product changes based on the quantity purchased withineach level of the pricing structure. For example, using the same volume pricing structureabove, if a shopper bought 25 units of this product, the tiered price would be calculated asfollows:
10 units at $2.00 (for the 1 – 10 level)
10 units at $1.90 (for the 11 – 20 level)
5 units at $1.80 (for the 21 – 50 level)
Add volume prices to a productYou can specify volume prices for both the list price and sale price for a product.
Volume pricing can be used in any combination for the list and sale prices, for example, youcan specify volume pricing for both the list and sale prices, or for only the list price, or for onlythe sale price.To specify a volume price for a product:
1. Access the price group that contains the product. For details on how to do so, see Editprice groups.
2. Click Products to view the products assigned to a price group.
23-1
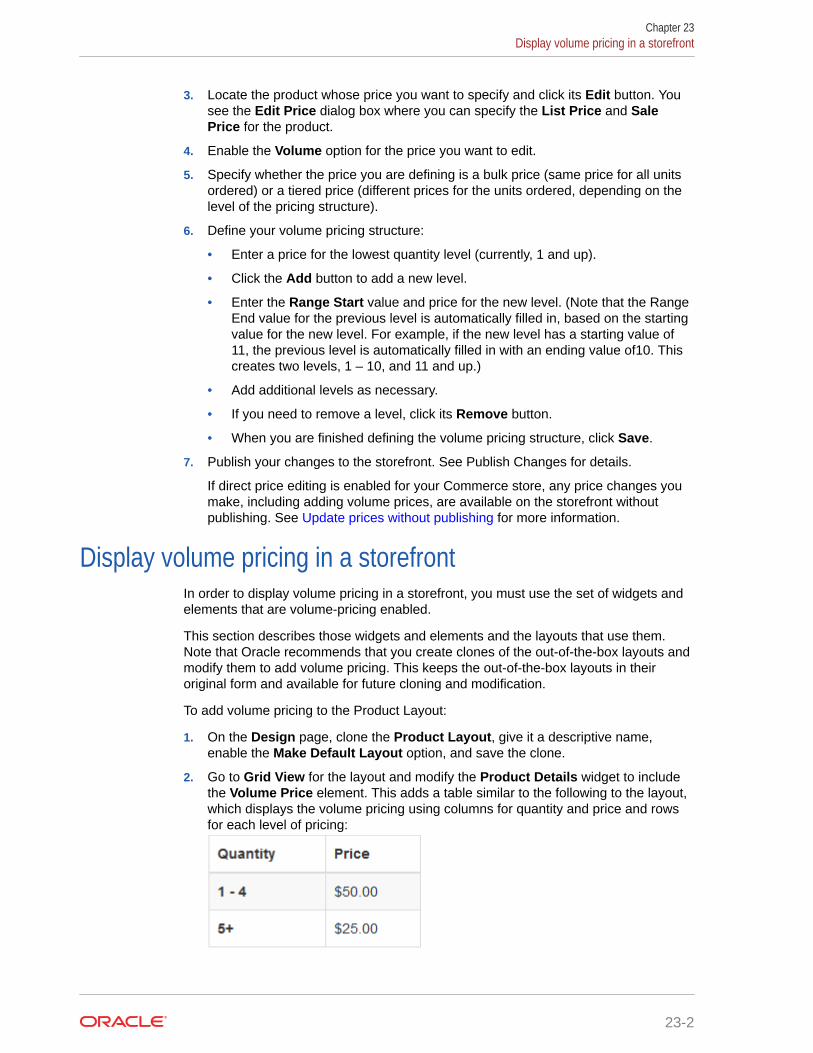
3. Locate the product whose price you want to specify and click its Edit button. Yousee the Edit Price dialog box where you can specify the List Price and SalePrice for the product.
4. Enable the Volume option for the price you want to edit.
5. Specify whether the price you are defining is a bulk price (same price for all unitsordered) or a tiered price (different prices for the units ordered, depending on thelevel of the pricing structure).
6. Define your volume pricing structure:
• Enter a price for the lowest quantity level (currently, 1 and up).
• Click the Add button to add a new level.
• Enter the Range Start value and price for the new level. (Note that the RangeEnd value for the previous level is automatically filled in, based on the startingvalue for the new level. For example, if the new level has a starting value of11, the previous level is automatically filled in with an ending value of10. Thiscreates two levels, 1 – 10, and 11 and up.)
• Add additional levels as necessary.
• If you need to remove a level, click its Remove button.
• When you are finished defining the volume pricing structure, click Save.
7. Publish your changes to the storefront. See Publish Changes for details.
If direct price editing is enabled for your Commerce store, any price changes youmake, including adding volume prices, are available on the storefront withoutpublishing. See Update prices without publishing for more information.
Display volume pricing in a storefrontIn order to display volume pricing in a storefront, you must use the set of widgets andelements that are volume-pricing enabled.
This section describes those widgets and elements and the layouts that use them.Note that Oracle recommends that you create clones of the out-of-the-box layouts andmodify them to add volume pricing. This keeps the out-of-the-box layouts in theiroriginal form and available for future cloning and modification.
To add volume pricing to the Product Layout:
1. On the Design page, clone the Product Layout, give it a descriptive name,enable the Make Default Layout option, and save the clone.
2. Go to Grid View for the layout and modify the Product Details widget to includethe Volume Price element. This adds a table similar to the following to the layout,which displays the volume pricing using columns for quantity and price and rowsfor each level of pricing:
Chapter 23Display volume pricing in a storefront
23-2

To add volume pricing to the Order Details Layout:
1. On the Design page, clone the layout, give it a descriptive name, enable the MakeDefault Layout option, and save the clone.
2. Go to Grid View for the layout, remove the instance of the Order Details widget andreplace it with an instance of the Order Details with Additional Info widget.
To add volume pricing to the Order Confirmation Layout:
1. On the Design page, clone the layout, give it a descriptive name, enable the MakeDefault Layout option, and save the clone.
2. Go to Grid View for the layout, remove the instance of the Order Details widget, andreplace it with an instance of the Order Details with Additional Info widget.
To add volume pricing to the Cart Layout and Cart Layout with Shipping layouts, you mustupgrade the Shopping Cart widget used on those layouts to the latest version. If you have notmodified the Shopping Cart widget, this is a simple matter of removing the existing instanceof the widget and replacing it with the latest version. If you have modified the Shopping Cartwidget, see Upgrade deployed widgets for details on upgrading an already deployed widgetin Commerce.
Understand volume price display in a product listingNo modifications are necessary to add volume pricing to the Product Listing widget that canbe included on the Collection Layout and Search Results Layout.
If volume prices are available for a product, they will be taken into account in the productlisting. The highest price (that is, the price associated with the smallest quantity purchased) isused for the product listing.
Depending on the configuration of a product, the prices displayed in a product listing can takeseveral forms, an example of which is shown below.
In this illustration, the following prices are displayed:
Chapter 23Understand volume price display in a product listing
23-3

• WatchThis product has two variant child SKUs. One child SKU has a volume pricewhose highest value (lowest quantity) is $60.99. The other child SKU has avolume price whose highest value of $62.99. The product listing displays $60.99- $62.99 for the price.
• Brief CaseThis product has a single non-variant child SKU. The child SKU has a volumeprice whose highest value is $49.99. The product listing displays $49.99 for theprice.
• ClockThis product has a single variant child SKU. The child SKU has one volume priceset in the list price list and another set in the sale price list. The highest value inthe sale volume price is $60.99. This is displayed in red as the sale price. Thehighest value in the list volume price is $62.99. This is displayed in the productlisting as the non-sale price, that is, “Was $62.99.”
• LanternThis product has two variant child SKUs. One child SKU has a simple list priceof $29.50 and the other child SKU has a volume price whose highest valueis $62.99. The price is displayed as $29.50 - $62.99.
Understand volume price display on the Product LayoutThe behavior of the volume price table on the Product Layout is dictated by the type ofproduct being displayed.
Product with a single, non-variant SKU
In this case, the volume price table shows the prices for the single, non-variant SKU.Because it is a non-variant SKU, no other pickers, such as color or size, are displayed.
Product with a single, variant SKU
In this case, the volume price table is shown for the single, variant SKU. Other pickersare displayed; however, choosing values from them does not alter the volume pricetable.
Product with multiple, variant SKUs
For a product with multiple, variant SKUs, there are several scenarios, describedbelow.
Multiple, variant SKUs use the same volume price values
In this case, the volume price table is displayed for all SKUs but it does not changewhen a SKU variant is selected.
Multiple, variant SKUs use different volume price values
Your catalog may include a product with multiple, variant SKUs that use differentvolume price values, for example, SKU 1 uses volume price scheme A and SKU 2uses volume price scheme B. In this case, the volume price table changes dependingon the SKU that is currently selected on the Product Layout page.
Some SKUs use volume pricing and some do not
Chapter 23Understand volume price display on the Product Layout
23-4

In this case, the volume price table is only displayed when a SKU is selected that uses avolume price.
Product with a single SKU and both list and sale prices
For a product with a single SKU that has both list and sale prices, the sale price always takespriority and the volume price table is rendered when the sale price is specified using volumepricing. To break it down further, there are several scenarios:
• The single SKU has volume prices set in both the list and sale price lists. In this case, thevolume price table is displayed but it is populated with the prices specified in the saleprice list.
• The single SKU has a volume price set in the list price list and a non-volume price set inthe sale price list. In this case, the volume price table does not appear on the ProductLayout; only the non-volume sale price is rendered.
• The single SKU has a non-volume price set in the list price list and a volume price set inthe sale price list. In this case, the volume price table appears on the Product Layout andcontains the sale volume prices.
Chapter 23Understand volume price display on the Product Layout
23-5
24Publish Changes
Most items that you create or change in Commerce do not appear on your store until youpublish them. The topics in this section describe the publishing process.
Understand publishingCommerce saves publishable changes to named worksets. When you want to publishchanges, you publish the workset that contains them. You can publish the changes in allworksets at once, or you can pick a specific workset to publish.
This section provides details about how Commerce handles publishible changes. SeeUnderstand worksets to learn about how Commerce uses worksets to organize thosechanges.
Keep the following points in mind as you prepare to publish changes:
• Commerce does not use versioning for items you edit and publish. There is only oneversion of each item in your system.For example, a merchandiser changes the long description and list price of a product andthen saves his changes but does not publish the workset they are saved in. Later thatday, his manager changes the product’s list price again, saves her changes to the sameworkset and then publishes the workset. The most recent changes to the product—themerchandiser’s long description and the manager’s list price—are published.
Similarly, a single item can be saved to multiple worksets. In this case, the most recentchanges to the item, no matter which workset they are in, get published first. Looking atthe previous example, suppose the merchandiser saved a product’s new long descriptionand price list in #julyWorkset and then his manager changed the product’s price list againand saved the change in #default. No matter which of these worksets is published first,the result is the same: the merchandiser’s long description and the manager’s list priceare published. Then Commerce removes the product from the workset that has not yetpublished.
• You cannot roll back or undo published changes.
• Some changes do not need to be published, and take effect on your production server assoon as you save them. See Changes that do not require publishing for more information.
• Some changes must be published together to maintain the integrity of their relationships.See Understand dependencies for more information.
• While changes are being published, you cannot work with any publishable items in theadministration interface. Commerce displays a Publish in Progress message dialog toinform you of this state.Although you cannot use the administration interface, programs that implement theCommerce REST APIs might still attempt to update endpoints while changes are beingpublished. During a publish operation, Commerce responds to all PUT or POST calls toendpoints that update publishable resources with HTTP status code 503, ServiceUnavailable.
24-1

Changes that do not require publishing
Not all changes you make are added to worksets for publishing. Some changes madein the administration interface take effect on your production storefront as soon as yousave them. Some changes are automatically published during the next publish.
The following types of changes take effect as soon as you save them and are notadded to worksets for publishing. Commerce lets you know you are making thesetypes of changes by displaying a message in the changes tracker. See Understandworksets for more information.
• Shopper settings, such as changes to the password policy.
• Access control settings, such as changes to internal user profiles.
• Inventory updates.
• Account settings, for stores that support account-based commerce.
• If direct price editing is enabled for your Commerce store, any price changes youmake are available on the storefront without publishing. See Update prices withoutpublishing for more information.
• If direct catalog editing is enabled for your Commerce store, any catalog changesyou make are available on the storefront without publishing. See Edit catalog itemswithout publishing for more information.
The following types of changes are automatically published with the next workset orfull publish that happens after they are saved. Commerce lets you know you aremaking these types of changes by displaying a message in the changes tracker. See Understand worksets for more information.
• Search settings, like index fields. Search settings to not appear in any worksetchanges list.
• Certain changes you make to the catalog, such as creating a new product type orchanging a price list group, appear as a single item called Catalog Configuration.The Catalog Configuration item appears at the top of the changes list in everyworkset until it is published.
Understand dependencies
Some Commerce items must be published together to maintain the integrity of theirrelationships. For example, if you update the description of a shipping method,Commerce must also publish the method's associated shipping regions, even if youdid not make any changes to them. When you save changes to the shipping method,Commerce calculates the appropriate dependencies (the associated shipping regions)and also adds them to the same workset as the shipping method you saved.
Additionally, Commerce performs a final check before publishing a workset anddisplays dependencies that are not already in the changes list on the workset'sReview and Schedule page. This list is populated by changes to dependencies thatare saved in two different worksets. Consider the shipping method example describedabove. Both the shipping method and its associated shipping regions added to thesame workset. But before that workset is published, suppose another user saveschanges to one of the associated shipping regions in a different workset. The shippingmethod whose changes are saved in the first workset is not automatically added to thechanges list in the second workset. But when the second workset is published,Commerce displays the shipping method as a dependency on that workset's Reviewand Schedule page.
Chapter 24Understand publishing
24-2

Understand worksetsA workset is a named group of changes that are published together. When you want topublish changes, you publish the workset that contains them. You can publish the changes inall worksets at once, or you can pick specific worksets to publish.
Worksets help you organize changes so you can more easily track and publish related itemstogether. For example, suppose you are working on a holiday campaign that you want to golive at the end of November. You can create a workset called #holidayPromotions. Then,users who work on Commerce items that support the campaign, like promotions, and SKUs,collections, and layouts, can save their changes to this workset. Then, the workset can bepublished at a pre-scheduled time.
Commerce includes one workset, named #default. If you do not create any other worksets,Commerce automatically saves all publishable changes to #default.
When you save a change to a publishable item, Commerce automatically saves it to theactive workset. If your Commerce environment includes multiple worksets, you can save yourchanges to a different workset or move saved changes from one workset to another, but allchanges that require publishing are saved in at least one workset. There is no way to publishitems outside of a workset.
Some Commerce items must be published together to maintain the integrity of theirrelationships. For example, if you update the description of a shipping method, Commercemust also publish the method’s associated shipping regions, even if you did not make anychanges to them. When you look at the workset that includes the shipping method, you willnotice that it also contains the associated shipping regions. If you move the shipping methodto a different workset, Commerce automatically moves the associated shipping regions.
Understand who can create and publish worksets
Commerce administrators control each internal user's access to specific administrationinterface pages and tasks with roles and privileges. Only users who have the Publishingprivilege assigned can create and publish worksets.
Any user who can edit Commerce items, such as catalogs, can view their changes in theworkset that contains them, and can move their changes to a different existing workset.
For more information about privileges, see Understand role-based access control.
Save changes to worksetsWhen you log into the administration interface, you see the Changes tracker at the bottom ofthe main menu.
The Changes tracker is displayed only to users whose profiles allow them to edit publishableitems. For example, a user who can edit catalog items will see the tracker but a user who canedit only accounts will not see it.
The information the tracker displays changes, depending on where you are working in theadministration interface. See Understand publishing for more information about these kinds ofchanges.:
• When you navigate to a page where changes are always included in the next publish, thechanges tracker displays the active workset as paused and notifies you that changes youmake go live at the next publish.
Chapter 24Understand worksets
24-3

• When you navigate to a page where changes do not require publishing, thechanges tracker displays the active workset as paused and notifies you thatchanges you make go live as soon as you save them.
Create and edit worksetsOne default workset (named #default) comes with Commerce. Until you create yourown worksets, all publishable changes are automatically saved in this default workset.
Remember that before you can create worksets, your Commerce user profile musthave the Publishing privilege assigned. (See Understand who can create and publishworksets for more information.) All administration interface users who can access theChanges page can see all worksets, no matter who created them.
To create a workset:
1. On the Changes page, click Publishing Schedule.
2. Click Add to Schedule and select New Workset.
3. Enter a name for the workset.The name can be up to 25 characters long and can contain only letters, numbers,hyphens (-), and underscores (_).
Although not required, it is a good idea to assign unique workset names to makethem easier to identify.
Once a workset is created, you cannot change its name in the administrationinterface, though you can change it with the Admin REST API.
4. Click Create.The new workset appears in the publishing schedule, marked as Not Scheduled.Commerce adds a # symbol to the beginning of the name of every workset.
Specify the active workset
Your changes are automatically saved in the active workset. Creating a new worksetdoes not automatically make it the active workset.To make your new workset theactive workset, select it from the Active Worksets dropdown list at the top of theChanges page.
Move items to a different workset
You can move items from one workset to another, though you cannot simply removethem from their current workset without specifying a new home for them. If an item hasdependencies, they are automatically moved to the other workset. To move items to adifferent workset:
1. On the Changes page, select a workset from the Active Workset dropdown list.
2. Select individual items to move or click the Select Page icon to select all the itemsin this workset.See View changes in a workset to learn how to sort and filter a workset to moreeasily find items to select.
3. Click the Move button.
4. Select a workset to move the changes to and then click Move.
Chapter 24Create and edit worksets
24-4

Delete a workset
You can delete only empty worksets. If you want to delete a workset that contains items,Commerce lets you select a new workset for them during the delete process. If you delete theactive workset, the #default workset automatically becomes the active workset. You cannotdelete the #default workset.
1. On the Changes page, click Publishing Schedule.
2. Click the Delete Workset icon for the workset. If the workset is empty, simply confirm thatyou want to delete it.
3. If the workset contains changes, select a workset to move them to and then click Delete.
Keep in mind that Commerce automatically deletes a workset (except #default, which isnever deleted) once its contents have been successfully published.
View the contents of a workset
To see the contents of the active workset, click it in the Changes tracker. Commerce displaysthe workset on the Changes page. To see the contents of a different workset, select it fromthe Active Workset dropdown list.
Each item in the workset list displays an icon you can click to see details about whenchanges were made and who made them:
• If only one author has made changes, the author's avatar appears in the icon.
• If two or more authors have made changes, the icon displays the number of authors.
Click the icon to see the names of authors who saved changes to the item since it was lastpublished, as well as the date and time each change was made.
If an item is a member of more than one workset, the item also displays the number ofworksets it belongs to. Click this link to see a list of all the worksets the item belongs to. See Understand worksets for more information about how Commerce publishes items that are inmultiple worksets.
Filter and sort items in a workset
The filtering features let you display a subset of a workset's items. Sorting lets you displayitems by date, from either newest or oldest. Filtering items in a workset is useful for tasks likeselecting items to move to a different workset. However, filtering does not select specificitems to publish; all items in a workset are published when that workset is published.
Select the Filter By check boxes along the left-hand side of the page to find specific types ofitems and changes in the workset. Filter By options include:
• Author: The user who made the change.
• Status: The type of change made to the item (edited, imported, new, and deleted).
• Area: The type of item (catalog, design, marketing, media, pricing, and setting).
• Application: The type of storefront application a design item belongs to (StorefrontClassic or Open Storefront Framework).
Click Clear Filters to clear all check boxes and display all the items that were filtered out bythe Filter By options.
To use the Filter Change List field, begin typing in the field. The list changes to include thoseitems matching your criteria.
Chapter 24Create and edit worksets
24-5
To sort the displayed items from newest or oldest, click the Sort dropdown at the top ofthe page and select a sort order.
Schedule publishingYou can publish the active workset immediately or schedule a future date and time topublish it.
You can also schedule a full publish, which publishes all worksets at once.
Publish a workset
You can publish the active workset immediately or schedule it to publish at a futuretime.
To schedule a publish:
1. Navigate to the Changes page of the workset you want to publish from the ActiveWorkset dropdown list.
2. Click the Publish Workset button.Commerce displays the workset's Review and Schedule page.
If the workset contains any dependencies, they are listed on this page. See
3. Specify when to publish the workset:To publish the workset right now, click Publish Immediately.
To publish the workset at a future time, click the Start Time field to display acalendar/clock widget where you can pick a future date and time. (Click Done toclose the widget.) Then click Publish at Selected Time.
If another publish has already been scheduled for the date and time you choose,Commerce displays an error and you cannot schedule the event until you pick a dateand time that does not conflict with another scheduled publish. You can reschedule aworkset publish by following these steps and publishing immediately or selecting adifferent time to publish.
Schedule a full publish
A full publish targets all changes in all worksets. When a full publish runs, allunpublished worksets, even those that are not currently scheduled to publish, arepublished to your production storefront. When the full publish finishes, all worksets(except the #default workset) are removed from the schedule and deleted.
You can schedule a full publish to run one time, or you can create a schedule that runsfull publishes at regular intervals, for example, nightly.
To schedule a full publish:
1. On the Publishing Schedule page, click Add to Schedule and select FullPublish... from the dropdown list.
2. In the Schedule Full Publish dialog, enter the following information:
• A name for the publish event. The name is optional. If you do not enter aname, Commerce uses the default name, Unnamed publishing event.
• If you are scheduling a one-time full publish event, set a start date and time,and ensure the Repeat field is set to None. The Stop Time field is disabled forone-time publish events.
Chapter 24Schedule publishing
24-6

• If you are scheduling a recurring full publish, set a start date and time, and use theRepeat menu to select a time period—hourly, daily, weekly, monthly, or yearly.The dates and times you specify here use the time zone you configured on theLocation tab on your store's Setup settings. For information on viewing and changingthe time zone, see Enter basic store information.
3. Click Schedule.The new event appears on the Publishing Schedule page.
Once you have scheduled a full publish, you cannot reschedule it. You must cancel it andthen schedule a new one.
Cancel a scheduled publish
You can cancel a scheduled workset publish or a full publish on the Publishing Schedulepage.
• To cancel a full publish, click the event's Delete from Schedule icon.
• To cancel a workset publish, click the workset's Unschedule Workset icon.Canceling a publish does not delete the workset, but marks it as Not Scheduled in thePublishing Schedule.
Chapter 24Schedule publishing
24-7
25Configure Business Accounts
Oracle Commerce allows you to create accounts for companies that do business with you,such as manufacturers, distributors, and wholesalers.
Each account represents a single organization and a unique customer. Only Commerceusers whose accounts include the Administrator role can set up accounts for organizations,and work with these accounts using the administration interface. See Understand Role-basedAccess Control for more information.
Note: This feature may not be enabled in your environment.
With Oracle Commerce, you can also allow a prospective account-based shopper to submit anew account registration request for an account using the store. This feature lets a shoppersubmit a new account registration request by providing required business details. Aftersubmitting the required details, the information is reviewed by an administrator from themerchant side and, if needed, there may a request for additional details such as credit checksand more. The request is then either approved or rejected. If the request is approved, thenew contact for the account is activated.
Understand accounts, contacts, and contractsAccount-based commerce uses a combination of accounts, contacts, and contracts tomanage access to a storefront by companies that do business with you.
In order to provide an organization with access to an account-based storefront, theorganization needs an account on that storefront with pertinent details such as theorganization name, logo, billing and shipping addresses, tax reference number, and so on.
An account can contain sub accounts that represent multiple hierarchies of organizationalstructure. For example, a principal account represents a company. That account can containa number of sub accounts that represent divisions or business units, and each division subaccount can contain a sub account for each department in the division. Sub accounts canautomatically inherit account properties, billing and shipping addresses, and contract detailsfrom parent accounts. See Work with accounts for more information about creating accounts.See Configure page layouts for account hierarchies for information about how to configurelayouts and widgets to support hierarchies.
Each account is associated with a list of contacts. A contact is an individual within anorganization who is allowed to purchase from the account-based storefront. You createcontacts in the Commerce administration interface, but you can also assign delegatedadministration privileges to contacts so they can create and manage other contacts. See Understand delegated administration and Work with account contacts for more information.
Work with Multiple Stores from One Commerce Instance
When working with multiple sites, accounts must be associated with a contract, whichassigns a catalog and a group of price lists for a given site. A contract between the storefrontand the organization defines what products the organization can purchase on the site andhow much it will pay for them. Note that before a contact can access a site, the contact’saccount must have an associated contract.
25-1
You can configure the following business account-specific information on a per sitebases:
• contracts
• approval settings
• payment method types
• shipping methods
For additional information on working with multiple sites, refer to the Run MultipleStores from One Commerce Instance.
If a primary account includes sub accounts, each sub account automatically inherits itsparent’s contracts by default. See Work with account contracts for more information.
Understand delegated administrationOnce you set up an account for an organization, you can assign roles to contacts thatallow them to manage certain aspects of their accounts.
Delegated administrators do not have access to the Commerce administration UI.Delegated administrators perform all account-management tasks on their My Accountpages, which are available once they log into your store.
Changes saved by a delegated administrator or approver are immediately visible bothon the storefront and in the Commerce administration interface.
See Understand account-based roles for details on the roles available to contacts.
Work with accountsCommerce administrators use the administration interface to work with accounts.
Administrators can create and modify accounts, as well as provide accountinformation, such as addresses, contacts, contracts and logos. Accounts can accessmultiple sites. Once you have created an account, you can use the site selector tochoose the site to work with. Once you have created account assets, such as acontact or a contract, you can indicate which sites to work with using the All Sites tab.
For a user to successfully log into a store, the account must be active, the user’scontact should be active and the account should be associated with a valid contract. Ifa business has multiple entities, such as departments or divisions, that require adifferent set of products or prices, you can create a separate sub account for eachentity.
Each contact can be associated with multiple principal accounts and sub accounts,though in the case where a contact is associated with more than one account, you canassign a default account to each contact. When a contact that is associated with morethan one account is logged into your online store, they can switch to any of their activeaccounts by selecting an account from a drop-down list in the store’s header. They canadd items to the cart for one account, then switch to another account and add items tothat account’s cart. The shopping cart for one account persists while a contact isshopping for another account.
Contacts must be created by either a Commerce administrator or another contact whois a designated administrator. Contacts cannot register on your store themselves.
Chapter 25Understand delegated administration
25-2

Create an account
You can specify whether a new account is a principal account or a sub account:
• A principal account is an account that does not have a parent account. It can be a stand-alone account or it can be the top-level account in an account hierarchy.
• A sub account is the child account of another account in an account hierarchy.When you create sub accounts, Commerce does not limit the depth of the hierarchy, butsub accounts inherit account properties only up to the 14th level.
To create a new principal account:
1. On the Accounts List page, click New Account.
2. Enter the information that identifies the new account. See the table that follows thisprocedure for information about each property.By default, Principal Account is already selected under Location in Hierarchy.
3. Click Save.
4. Now you can associate addresses, contacts, and contracts with the account you justcreated. See Work with account addresses, Work with account contacts, and Work withaccount contracts for more information. You can also work with an account’s orderapproval settings. See Use Order Approvals for more information.
To create a new sub account:
1. On the Accounts List page, click New Account.
2. Enter a name for the account in the Account Name box.
3. Under Location Hierarchy, select Sub Account.
4. Click the Edit button next to the Parent Account box.
5. Select an account from the list. You can filter the list by typing or pasting some text in theAccounts box.The filter control matches letters or numbers that you type, wherever they appear in thename or ID, not just at the beginning. Usually, as you type more characters, there arefewer matches. When you see the account you want, select it.
6. Click Done.
7. By default, the sub account inherits its Description, Classification, DUNS Number,Account Type, Unique Identification Number, Tax Reference Number, VAT ReferenceNumber, and Account Logo from the parent account. To replace an inherited value,uncheck the Inherit checkbox next to the property you want to change, and then enter thenew information. See the table that follows this procedure for information about eachproperty.
8. Click Save.
9. Now you can associate addresses, contacts, and contracts with the account you justcreated. See Work with account addresses, Work with account contacts, and Work withaccount contracts for more information. You can also work with an account’s orderapproval settings. See Use Order Approvals for more information.
The following table describes the properties that identify an account.
Chapter 25Work with accounts
25-3
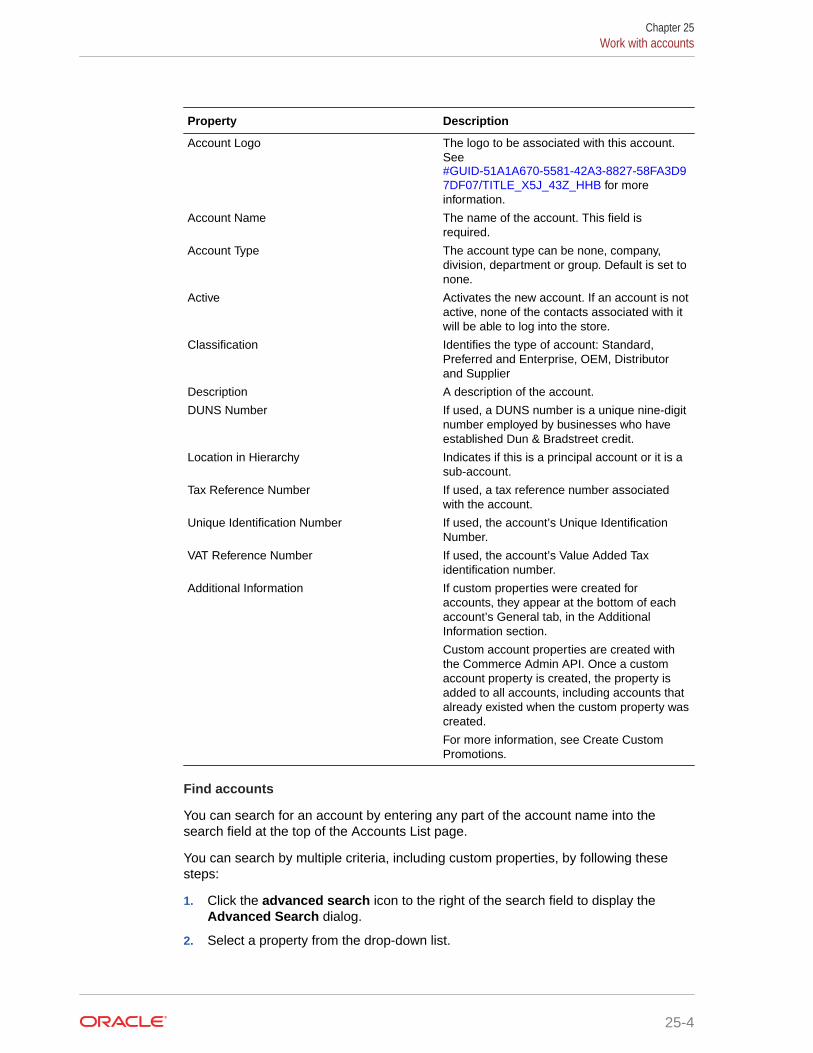
Property Description
Account Logo The logo to be associated with this account.See #GUID-51A1A670-5581-42A3-8827-58FA3D97DF07/TITLE_X5J_43Z_HHB for moreinformation.
Account Name The name of the account. This field isrequired.
Account Type The account type can be none, company,division, department or group. Default is set tonone.
Active Activates the new account. If an account is notactive, none of the contacts associated with itwill be able to log into the store.
Classification Identifies the type of account: Standard,Preferred and Enterprise, OEM, Distributorand Supplier
Description A description of the account.
DUNS Number If used, a DUNS number is a unique nine-digitnumber employed by businesses who haveestablished Dun & Bradstreet credit.
Location in Hierarchy Indicates if this is a principal account or it is asub-account.
Tax Reference Number If used, a tax reference number associatedwith the account.
Unique Identification Number If used, the account’s Unique IdentificationNumber.
VAT Reference Number If used, the account’s Value Added Taxidentification number.
Additional Information If custom properties were created foraccounts, they appear at the bottom of eachaccount’s General tab, in the AdditionalInformation section.
Custom account properties are created withthe Commerce Admin API. Once a customaccount property is created, the property isadded to all accounts, including accounts thatalready existed when the custom property wascreated.
For more information, see Create CustomPromotions.
Find accounts
You can search for an account by entering any part of the account name into thesearch field at the top of the Accounts List page.
You can search by multiple criteria, including custom properties, by following thesesteps:
1. Click the advanced search icon to the right of the search field to display theAdvanced Search dialog.
2. Select a property from the drop-down list.
Chapter 25Work with accounts
25-4

You can search by account name, account ID, or any custom short text properties thathave been added to the account.
3. Click Add Criteria to add another property to the search.Each search can contain up to five properties.
4. If you are searching on more than one property, select one of the following:
• Match all: (default) Search results include the accounts that match all the searchcriteria. If an account matches some of the criteria but not all, it is not returned.
• Match any: Search results include the accounts that match any search criteria.
5. Click Search.
Associate a contact with an account
You can create contacts without associating them with an account by following theinstructions described in Work with account contacts. This section describes how to associateexisting contacts with an account.
Note: A sub account does not inherit its parent account’s contacts. You must add manuallyadd contacts to a new sub account.
To associate a contact with an account:
1. On the Accounts page, click Accounts List and select the account to modify.
2. Click the Contacts tab.
From this screen you can create a new contact or associate an existing contact. When youadd a contact to an account, Commerce sends an email to the contact’s address thatcontains a link for setting a new password. The password must conform to the passwordpolicy you set on the Shopper Settings page. For more information, see Configure ShopperSettings.
To create a new contact to associate with an account:
1. Select the New Contact button.
2. Enter the required fields, which include Last and First Name, and Email/Login ID.Note: You cannot modify the email address once the contact has been saved.
3. Verify that the account displayed is the correct account.
4. Click the Active check box to activate the contact.Note: Only active contacts can log into the store.
5. Click Save.
To associate an existing contact:
1. Select Add Contact button.
2. Select the contact from the table
3. You can search for a contact by entering the first name, last name or email address intothe search field.
4. Click Add.
Modify an account
Only an Oracle Commerce administrator can modify an account using the following steps:
1. On the Accounts page, click Accounts List and select the account to modify.
Chapter 25Work with accounts
25-5

2. If you have multiple sites, use the All Sites tab to select the site associated withthe account.
3. Enter the updated information for the account.
4. Click Save.
Add account approval
You can add account approval limits to an account. Note that approval limits are sitespecific. Refer to the Use Order Approvals section for information on order approvals.Set the approval limits using the following steps:
1. On the Accounts page, click Accounts List and select the account to modify.
2. Select the Approvals tab.
3. Check the Require approval checkbox and set the approval limit.
4. If your environment uses an external service that can determine approval settings,select the check box. See Use Webhooks for information on extending the OrderApproval services and working with webhook APIs.
Add or change an account logo
Logos or media files must be loaded using the Media page before they can beassociated with an account. Refer to the Upload media files section for information.
To add or change a logo, perform the following steps:
1. On the Accounts page, click Accounts List and select the account to modify.
2. Click the Select Image button.
3. Select the media file from the Media Library.
4. Click Add.
5. The image is displayed in the logo field.
You can delete the logo by clicking the X in the upper right corner.
Move an account
You can move an account to a new position in its current hierarchy or you can move itto a different hierarchy. Keep the following in mind when you plan to move an account:
• You cannot make a parent account a sub account of any of its children. Forexample, you cannot make a principal account a sub account in its currenthierarchy.
• You can move both principal and sub accounts to different hierarchies.
• Changing a sub account to a principal account moves it to the top of a newhierarchy.
• When you move a parent account, all its sub accounts move with it.
• Any account keeps its addresses, contracts, and contacts when you move it. If anaccount has no addresses and you move it to be a sub account, it automaticallyinherits any available addresses from its new parent.
To make a sub account a principal account:
1. On the Accounts page, click Accounts List and select the account to move.
Chapter 25Work with accounts
25-6

2. Click Principal Account under Location in Hierarchy.
3. If the account inherited property values from its parent, you must replace those values.See #GUID-51A1A670-5581-42A3-8827-58FA3D97DF07/GUID-E3CA4A72-A9F7-4247-9BED-57F8F4BA88FA for details about account properties.
To move an account to a new parent:
1. On the Accounts page, click Accounts List and select the account to move.
2. If the account is currently a principal account, click Sub Account under Location inHierarchy.
3. Click the Edit button next to the Parent Account box.
4. Select an account from the list. You can filter the list by typing or pasting some text in theAccounts box.The filter control matches letters or numbers that you type, wherever they appear in thename or ID, not just at the beginning. Usually, as you type more characters, there arefewer matches. When you see the account you want, select it.
5. Click Done.
6. By default, the moved account inherits its Description, Classification, DUNS Number,Account Type, Unique Identification Number, Tax Reference Number, VAT ReferenceNumber, and Account Logo from the parent account. To replace an inherited value,uncheck the Inherit checkbox next to the property you want to change, and then enter thenew information. See the table that follows this procedure for information about eachproperty.
7. Click Save.
Deactivate an account
You cannot delete an account; however you can deactivate an account. When an accounthas been deactivated, no contact that has been associated with the account will be allowedto log into the store.
1. On the Accounts page, click Accounts List and select the account to deactivate.
2. Uncheck the Active checkbox to indicate that the account has been deactivated.
3. Click Save.
Associate shipping and payment methods with an account
When you create or update an account, you can specify shipping and payment methods usedwith the account. These methods can be set for accounts that are associated with a site.
Before you can associate any shipping or payment methods, you must configure the methodsso that shoppers can use them. Shipping methods, which are configured using the Settings >Shipping Methods tab, are described in the Configure Shipping. Payment methods areselected using the payment gateway tab in Settings > Payment Gateways. For information onconfiguring payment methods, refer to the Configure Payment Processing.
To associate shipping and payment methods:
1. Select or create an account.
2. Select the Shipping/Payment tab.
3. If you click the Use All of the Site Shipping Methods checkbox, all of the shippingmethods used on the currently selected site will be available and will be displayed.
Chapter 25Work with accounts
25-7

If you deselect the check box, add the shipping methods to use. You can selectmultiple methods
4. If you click the Use All of the Site Payment Method Types checkbox, all of thepayment method types used on the currently selected site will be available. If youdeselect the check box, add the payment method types to use. You can selectmultiple methods.
Note that if the shipping method or payment method type is added to a site in Settings,and you have not selected the associated Use all check box, you must manually addthe new shipping or payment method to an account before shoppers can use it.
A shipping method or payment method type that is associated with an account/site paircannot be removed or disabled. You can remove the association by going to theaccount’s Shipping/Payment table, selecting the site and deleting the shipping orpayment method.
Work with account addressesEach account can be associated with multiple addresses, such as billing and shippingaddresses in different states.
An account’s addresses appear in the following places:
• The Managed Account Address Book is seen by each of the account’s logged-incontacts. Contacts who are buyers can select billing and shipping addresses fromthe available account addresses when they place orders. Additionally, contactswho are delegated administrators and/or Account Address Managers can add andmanage addresses for the account from their My Account page on the storefront.
• The Address pane in the Commerce administration interface. Only Commerceadministrators can see and work with addresses here. Contacts who aredelegated administrators cannot access the Commerce administration interface.
Create account addresses
To create an address for an account:
1. Navigate to the account’s Addresses page in the administration interface or on thestorefront:
• Commerce administrators in the administration interface: On the Accountspage, click the name of the account. Then click the Addresses button on theleft-hand side of the screen.
• Delegated administrators on the storefront: Click My Account, then clickAccount Addresses.
2. Click New Address and enter the address details.The table that follows this procedure describes the Address properties. Addressproperties in this table are part of the default address format that ships withCommerce. If your Commerce environment includes custom address formats,different properties might be available when you create an address. Additionally,custom address formats might make some of the required properties in this tableoptional. Contact your Site Administrator for details about creating addresses withcustom address formats.
3. Click Save.
Chapter 25Work with account addresses
25-8
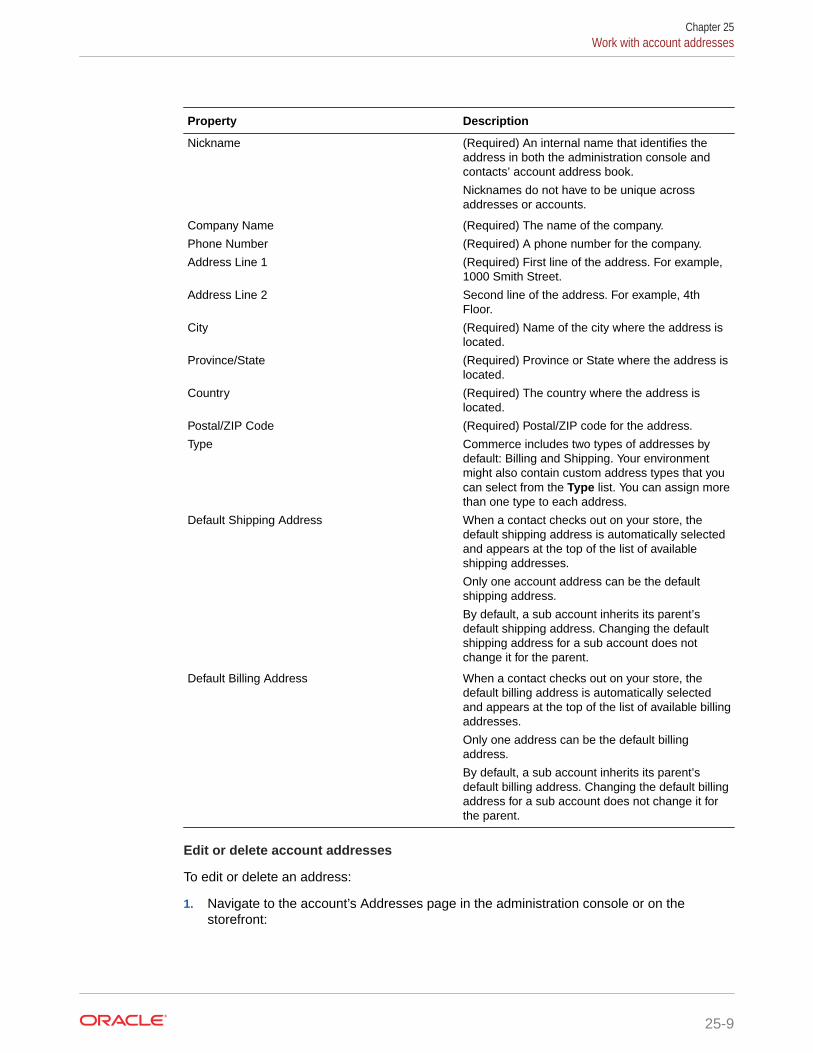
Property Description
Nickname (Required) An internal name that identifies theaddress in both the administration console andcontacts’ account address book.
Nicknames do not have to be unique acrossaddresses or accounts.
Company Name (Required) The name of the company.
Phone Number (Required) A phone number for the company.
Address Line 1 (Required) First line of the address. For example,1000 Smith Street.
Address Line 2 Second line of the address. For example, 4thFloor.
City (Required) Name of the city where the address islocated.
Province/State (Required) Province or State where the address islocated.
Country (Required) The country where the address islocated.
Postal/ZIP Code (Required) Postal/ZIP code for the address.
Type Commerce includes two types of addresses bydefault: Billing and Shipping. Your environmentmight also contain custom address types that youcan select from the Type list. You can assign morethan one type to each address.
Default Shipping Address When a contact checks out on your store, thedefault shipping address is automatically selectedand appears at the top of the list of availableshipping addresses.
Only one account address can be the defaultshipping address.
By default, a sub account inherits its parent’sdefault shipping address. Changing the defaultshipping address for a sub account does notchange it for the parent.
Default Billing Address When a contact checks out on your store, thedefault billing address is automatically selectedand appears at the top of the list of available billingaddresses.
Only one address can be the default billingaddress.
By default, a sub account inherits its parent’sdefault billing address. Changing the default billingaddress for a sub account does not change it forthe parent.
Edit or delete account addresses
To edit or delete an address:
1. Navigate to the account’s Addresses page in the administration console or on thestorefront:
Chapter 25Work with account addresses
25-9
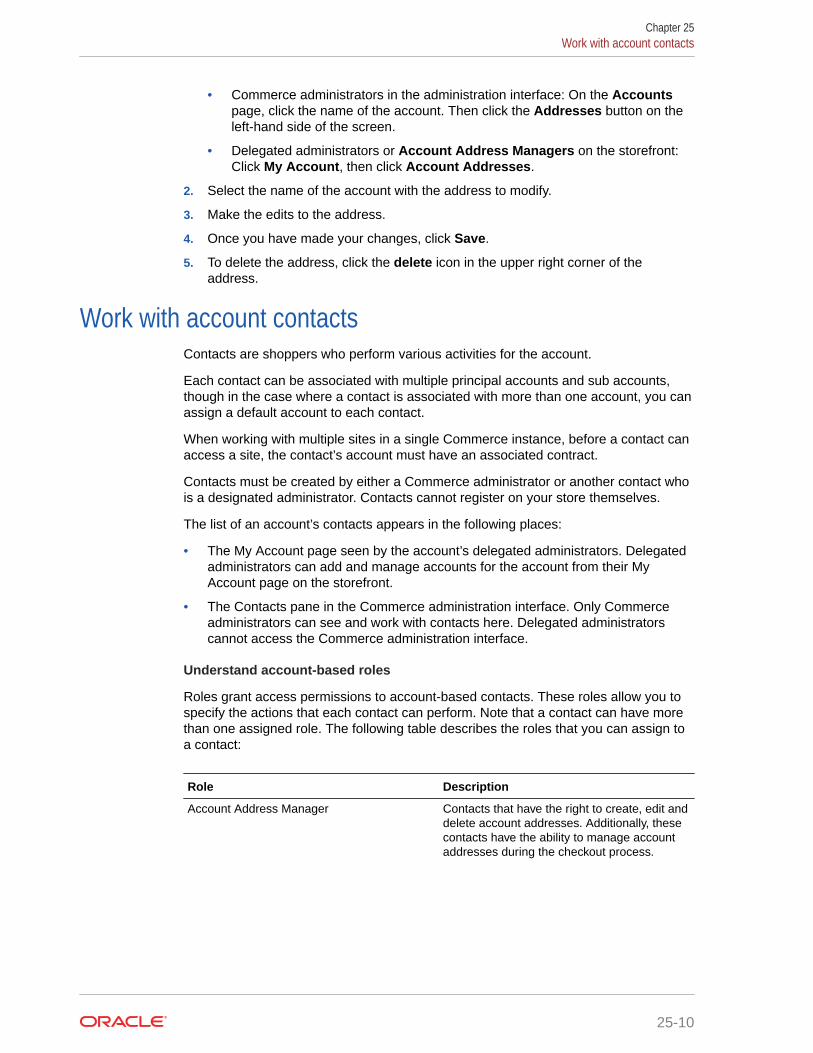
• Commerce administrators in the administration interface: On the Accountspage, click the name of the account. Then click the Addresses button on theleft-hand side of the screen.
• Delegated administrators or Account Address Managers on the storefront:Click My Account, then click Account Addresses.
2. Select the name of the account with the address to modify.
3. Make the edits to the address.
4. Once you have made your changes, click Save.
5. To delete the address, click the delete icon in the upper right corner of theaddress.
Work with account contactsContacts are shoppers who perform various activities for the account.
Each contact can be associated with multiple principal accounts and sub accounts,though in the case where a contact is associated with more than one account, you canassign a default account to each contact.
When working with multiple sites in a single Commerce instance, before a contact canaccess a site, the contact’s account must have an associated contract.
Contacts must be created by either a Commerce administrator or another contact whois a designated administrator. Contacts cannot register on your store themselves.
The list of an account’s contacts appears in the following places:
• The My Account page seen by the account’s delegated administrators. Delegatedadministrators can add and manage accounts for the account from their MyAccount page on the storefront.
• The Contacts pane in the Commerce administration interface. Only Commerceadministrators can see and work with contacts here. Delegated administratorscannot access the Commerce administration interface.
Understand account-based roles
Roles grant access permissions to account-based contacts. These roles allow you tospecify the actions that each contact can perform. Note that a contact can have morethan one assigned role. The following table describes the roles that you can assign toa contact:
Role Description
Account Address Manager Contacts that have the right to create, edit anddelete account addresses. Additionally, thesecontacts have the ability to manage accountaddresses during the checkout process.
Chapter 25Work with account contacts
25-10
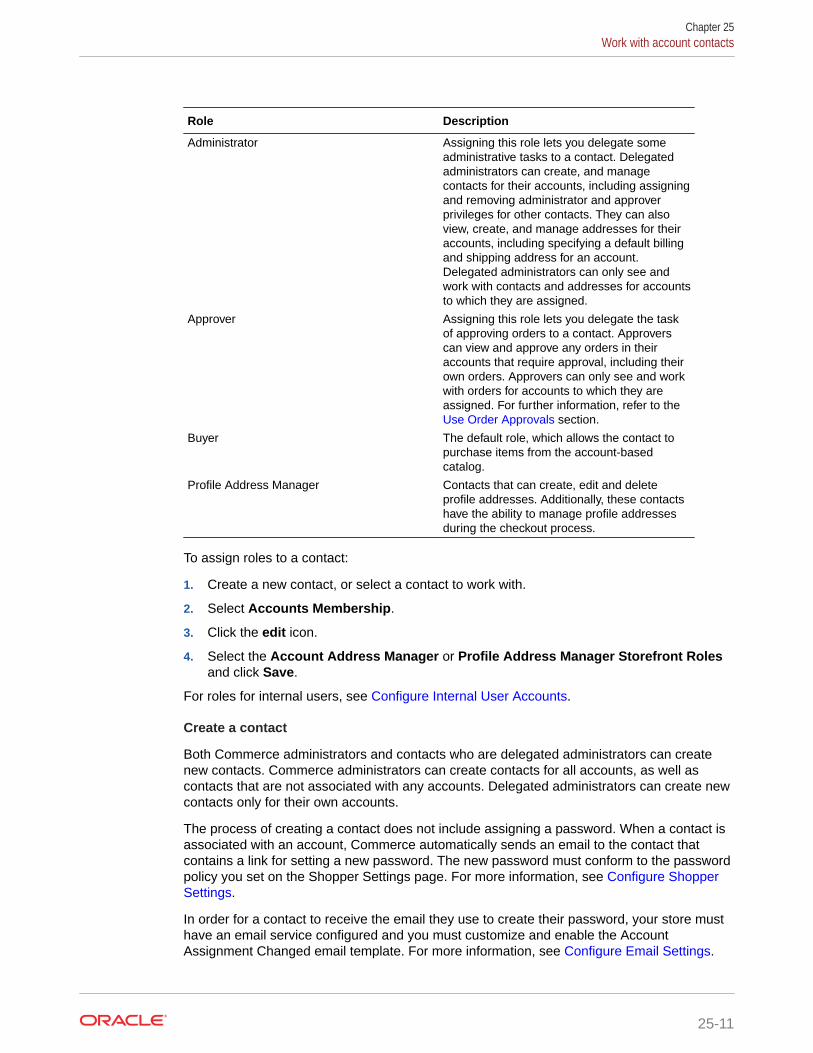
Role Description
Administrator Assigning this role lets you delegate someadministrative tasks to a contact. Delegatedadministrators can create, and managecontacts for their accounts, including assigningand removing administrator and approverprivileges for other contacts. They can alsoview, create, and manage addresses for theiraccounts, including specifying a default billingand shipping address for an account.Delegated administrators can only see andwork with contacts and addresses for accountsto which they are assigned.
Approver Assigning this role lets you delegate the taskof approving orders to a contact. Approverscan view and approve any orders in theiraccounts that require approval, including theirown orders. Approvers can only see and workwith orders for accounts to which they areassigned. For further information, refer to the Use Order Approvals section.
Buyer The default role, which allows the contact topurchase items from the account-basedcatalog.
Profile Address Manager Contacts that can create, edit and deleteprofile addresses. Additionally, these contactshave the ability to manage profile addressesduring the checkout process.
To assign roles to a contact:
1. Create a new contact, or select a contact to work with.
2. Select Accounts Membership.
3. Click the edit icon.
4. Select the Account Address Manager or Profile Address Manager Storefront Rolesand click Save.
For roles for internal users, see Configure Internal User Accounts.
Create a contact
Both Commerce administrators and contacts who are delegated administrators can createnew contacts. Commerce administrators can create contacts for all accounts, as well ascontacts that are not associated with any accounts. Delegated administrators can create newcontacts only for their own accounts.
The process of creating a contact does not include assigning a password. When a contact isassociated with an account, Commerce automatically sends an email to the contact thatcontains a link for setting a new password. The new password must conform to the passwordpolicy you set on the Shopper Settings page. For more information, see Configure ShopperSettings.
In order for a contact to receive the email they use to create their password, your store musthave an email service configured and you must customize and enable the AccountAssignment Changed email template. For more information, see Configure Email Settings.
Chapter 25Work with account contacts
25-11
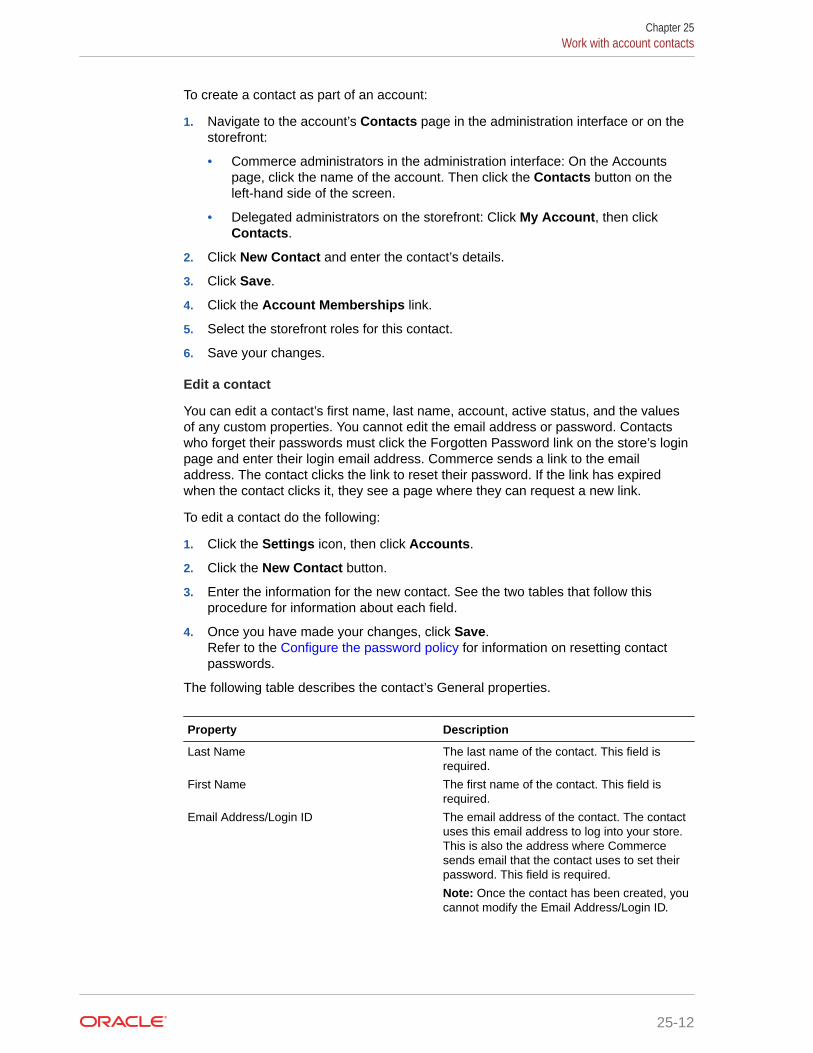
To create a contact as part of an account:
1. Navigate to the account’s Contacts page in the administration interface or on thestorefront:
• Commerce administrators in the administration interface: On the Accountspage, click the name of the account. Then click the Contacts button on theleft-hand side of the screen.
• Delegated administrators on the storefront: Click My Account, then clickContacts.
2. Click New Contact and enter the contact’s details.
3. Click Save.
4. Click the Account Memberships link.
5. Select the storefront roles for this contact.
6. Save your changes.
Edit a contact
You can edit a contact’s first name, last name, account, active status, and the valuesof any custom properties. You cannot edit the email address or password. Contactswho forget their passwords must click the Forgotten Password link on the store’s loginpage and enter their login email address. Commerce sends a link to the emailaddress. The contact clicks the link to reset their password. If the link has expiredwhen the contact clicks it, they see a page where they can request a new link.
To edit a contact do the following:
1. Click the Settings icon, then click Accounts.
2. Click the New Contact button.
3. Enter the information for the new contact. See the two tables that follow thisprocedure for information about each field.
4. Once you have made your changes, click Save.Refer to the Configure the password policy for information on resetting contactpasswords.
The following table describes the contact’s General properties.
Property Description
Last Name The last name of the contact. This field isrequired.
First Name The first name of the contact. This field isrequired.
Email Address/Login ID The email address of the contact. The contactuses this email address to log into your store.This is also the address where Commercesends email that the contact uses to set theirpassword. This field is required.
Note: Once the contact has been created, youcannot modify the Email Address/Login ID.
Chapter 25Work with account contacts
25-12
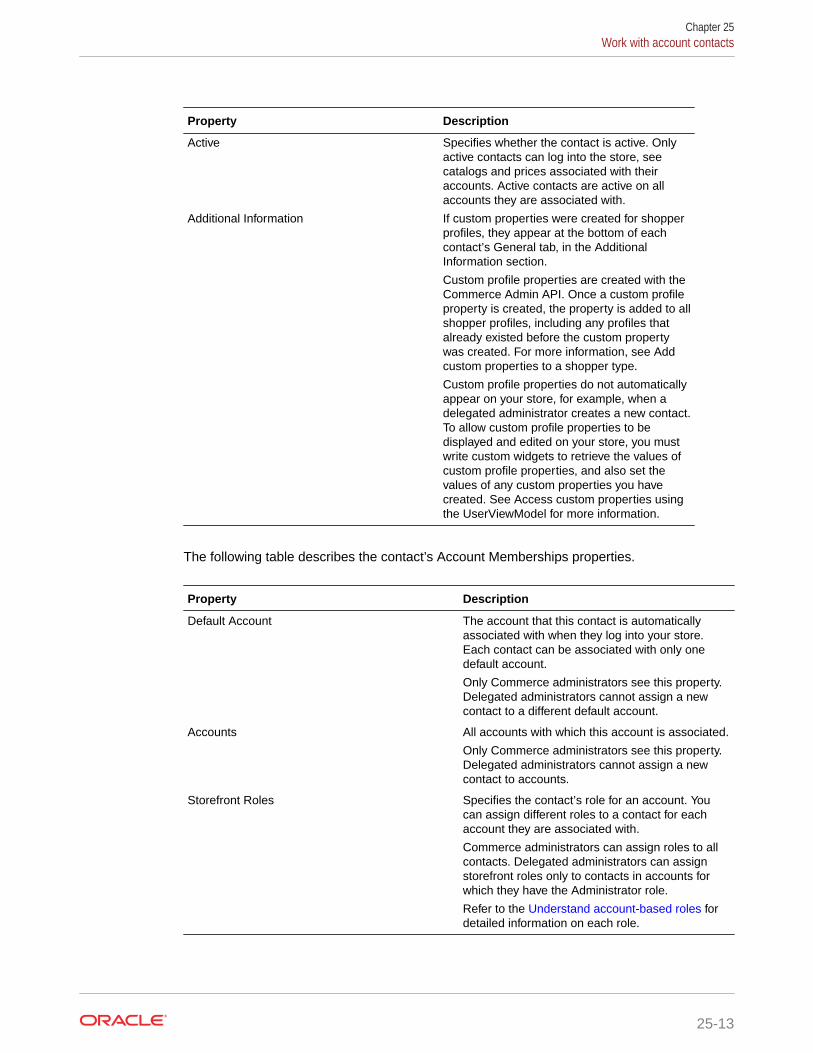
Property Description
Active Specifies whether the contact is active. Onlyactive contacts can log into the store, seecatalogs and prices associated with theiraccounts. Active contacts are active on allaccounts they are associated with.
Additional Information If custom properties were created for shopperprofiles, they appear at the bottom of eachcontact’s General tab, in the AdditionalInformation section.
Custom profile properties are created with theCommerce Admin API. Once a custom profileproperty is created, the property is added to allshopper profiles, including any profiles thatalready existed before the custom propertywas created. For more information, see Addcustom properties to a shopper type.
Custom profile properties do not automaticallyappear on your store, for example, when adelegated administrator creates a new contact.To allow custom profile properties to bedisplayed and edited on your store, you mustwrite custom widgets to retrieve the values ofcustom profile properties, and also set thevalues of any custom properties you havecreated. See Access custom properties usingthe UserViewModel for more information.
The following table describes the contact’s Account Memberships properties.
Property Description
Default Account The account that this contact is automaticallyassociated with when they log into your store.Each contact can be associated with only onedefault account.
Only Commerce administrators see this property.Delegated administrators cannot assign a newcontact to a different default account.
Accounts All accounts with which this account is associated.
Only Commerce administrators see this property.Delegated administrators cannot assign a newcontact to accounts.
Storefront Roles Specifies the contact’s role for an account. Youcan assign different roles to a contact for eachaccount they are associated with.
Commerce administrators can assign roles to allcontacts. Delegated administrators can assignstorefront roles only to contacts in accounts forwhich they have the Administrator role.
Refer to the Understand account-based roles fordetailed information on each role.
Chapter 25Work with account contacts
25-13
Find contacts
You can search for a contact by entering first name, last name, or email address intothe search field at the top of the Contacts List page.
To search by multiple criteria, including custom properties, click the advanced searchicon to the right of the search field to display the Advanced Search.
1. Select a property from the drop-down list.You can search by first name, last name, email address or any custom short textproperties that have been added to profiles.
2. Click Add Criteria to add another property to the search.Each search can contain up to five properties.
3. If you are searching on more than one property, select one of the following:
• Match all: (default) Search results include the contacts that match all thesearch criteria. If a contact matches some of the criteria but not all, it is notreturned.
• Match any: Search results include the contacts that match any search criteria.
4. Click Search.
Deactivate a contact
You cannot delete a contact, but both Commerce administrators and delegatedadministrators can deactivate a contact. Contacts who are no longer active cannot loginto any of the accounts to which they were assigned. See #GUID-7293FC33-A16B-4C40-A4F3-150198E9F236/TITLE_MRM_MBF_3HB for details about setting acontact’s Active property.
Commerce administrators can also remove a contact’s association with an account inthe administration interface. See #unique_224/unique_224_Connect_42_TITLE_DY4_MCZ_HHB for more information.
Allow contacts to create addresses
Business account contacts can be allowed to add or manage an account address oran individual shopper’s address during the checkout process if they have beenconfigured with the appropriate role.
To allow a contact to create a shopper’s address when placing an order, assign thatcontact the Profile Address Manager Role. This role allows a contact to see, selectand create a new profile address when they are working with profiles or placing anorder. Note that this role is not required to see or select a profile when working withprofiles or placing an order.)
A contact can also be allowed to create or edit an account address when working witha profile or placing an order. To do this, give the contact the Account Address Managerrole. Note that this role is not required to see or select an account address whenworking within the profile or placing an order. It is possible for a contact to have boththe Account Address Manager and Profile Address Manager roles. By default, thedelegated administrator has both of these roles. Contacts do not have these roles bydefault.
When implementing this feature on the store front, you need to ensure that you havethe latest version of the Managed Account Address widget, which allows contacts tomanage addresses when placing an order, if they have been assigned the appropriate
Chapter 25Work with account contacts
25-14
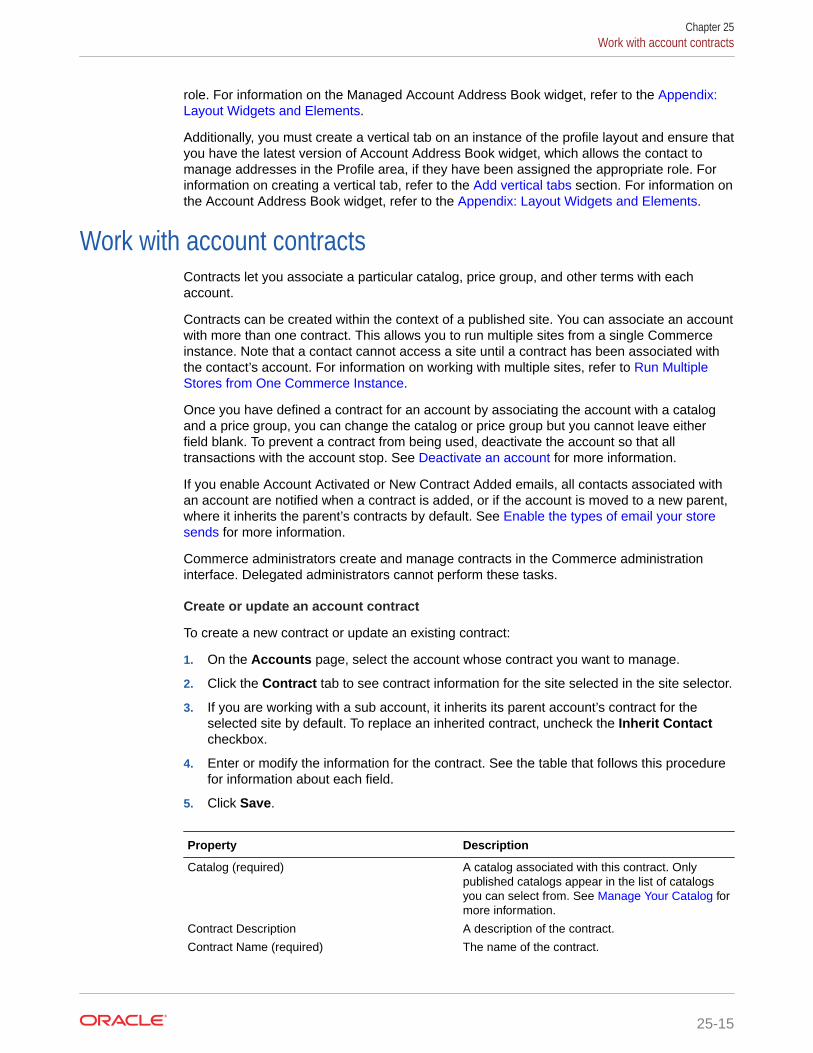
role. For information on the Managed Account Address Book widget, refer to the Appendix:Layout Widgets and Elements.
Additionally, you must create a vertical tab on an instance of the profile layout and ensure thatyou have the latest version of Account Address Book widget, which allows the contact tomanage addresses in the Profile area, if they have been assigned the appropriate role. Forinformation on creating a vertical tab, refer to the Add vertical tabs section. For information onthe Account Address Book widget, refer to the Appendix: Layout Widgets and Elements.
Work with account contractsContracts let you associate a particular catalog, price group, and other terms with eachaccount.
Contracts can be created within the context of a published site. You can associate an accountwith more than one contract. This allows you to run multiple sites from a single Commerceinstance. Note that a contact cannot access a site until a contract has been associated withthe contact’s account. For information on working with multiple sites, refer to Run MultipleStores from One Commerce Instance.
Once you have defined a contract for an account by associating the account with a catalogand a price group, you can change the catalog or price group but you cannot leave eitherfield blank. To prevent a contract from being used, deactivate the account so that alltransactions with the account stop. See Deactivate an account for more information.
If you enable Account Activated or New Contract Added emails, all contacts associated withan account are notified when a contract is added, or if the account is moved to a new parent,where it inherits the parent’s contracts by default. See Enable the types of email your storesends for more information.
Commerce administrators create and manage contracts in the Commerce administrationinterface. Delegated administrators cannot perform these tasks.
Create or update an account contract
To create a new contract or update an existing contract:
1. On the Accounts page, select the account whose contract you want to manage.
2. Click the Contract tab to see contract information for the site selected in the site selector.
3. If you are working with a sub account, it inherits its parent account’s contract for theselected site by default. To replace an inherited contract, uncheck the Inherit Contactcheckbox.
4. Enter or modify the information for the contract. See the table that follows this procedurefor information about each field.
5. Click Save.
Property Description
Catalog (required) A catalog associated with this contract. Onlypublished catalogs appear in the list of catalogsyou can select from. See Manage Your Catalog formore information.
Contract Description A description of the contract.
Contract Name (required) The name of the contract.
Chapter 25Work with account contracts
25-15

Property Description
External Contract Reference Alphanumeric value that allows you to storecontract references from an external system.
Price List Group (required) A price group associated with this contract. Onlyactive, published price groups appear in the list ofprice groups you can select from. See ConfigurePrice Groups for information.
Site Information on the site associated with thiscontract including the site name and URL. Notethat only a published site can be associated with acontract.
Terms and Conditions Text field to provide terms and conditions of thecontract.
Understand shoppers and new account registration requestsYou can allow a prospective account-based shopper to request registration of a newstore account.
Enabling this feature lets a shopper submit an account registration request for a newaccount by providing required business details. The information is reviewed by anadministrator from the merchant side after the shopper submits the required details,and, if needed, the administrator may request additional details from the shopper suchas credit checks. The registration request is then either approved or rejected. If therequest is approved, the new contact for the account is activated.
An example of how the basic process works is provided in the list that follows. Thishigh-level description is provided only as example and an introduction and does notnecessarily mean that your process would work exactly this way.
For example, all of the emails that are sent during the approval/rejection process areonly lightly touched upon in the example process flow. For more detail on theautomated emails described in the process, refer to Configure Email Settings.
• The administrator for the account-based shopper enables the ability for a shopperto request registration of a new store account in the Settings area of administratoruser interface. Refer to Configure Account-based Shoppers in the ConfigureShopper Settings section for more details.
• A prospective account-based shopper uses the store user interface to submit anew account registration request. When the registration request is received, itsstatus at this point is New.
• The administrator sees the new registration request in the Registration Requestsarea of the Accounts page. Refer to Work with account registration requests formore information on how to view and work with these types of requests.
• The administrator opens the registration request and begins reviewing it.
• The administrator saves some review changes and/or explicitly sets the requeststatus to Review.
• Another administrator reopens the registration request to review it and decidesmore information is needed before an approval decision can be made. Thisadministrator can then change the status to More Info Needed.
Chapter 25Understand shoppers and new account registration requests
25-16

• Outside of the store, the administrator emails the account requester asking for additionalinformation.
• The account requester sends the administrator the required information and sends it backto the administrator.
• After reading the account requester’s email, the other administrator opens the registrationrequest, adds the new/missing information, and sets the registration request’s statusback to Review.
• The original administrator opens the registration request and makes a decision whetherto accept or reject the account request.
• If the administrator accepts the registration request, an approval email is sent to theaccount requester. The registration request then disappears from the RegistrationRequest list and appears in the Account list. The account requester then becomes acontact in the new account.
• If the administrator rejects the registration request, they can optionally enter comments toadd to the rejection email.
The rejection email is sent to the account requester and the registration request remains inthe Registration Request list with a status of Rejected.
Submit new account registration information as a businessshopper
Prospective account-based shoppers can submit a new account registration request usingthe store.
This feature lets a shopper submit a new account registration request for a new account byproviding required business details.
If account-based shoppers is enabled, the shopper who wants to submit a new accountregistration request clicks on the Register For An Account link found at the bottom of theLogin dialog box. A form dialog box is presented where they provide their name, address,phone number, and some notes to accompany their request if needed.
Note: When the API is used to submit a new registration request with multiple addresses,each address must have a unique nickname. If multiple addresses are submitted with thesame nickname, only one is saved. The same is true when the API is used to create anaccount with multiple addresses.
They must also provide a Company Name and Name Of A Related Existing Account (ifneeded). Company Name is the name of the company for which the shopper is a business-to-business buyer. They are not registering as a regular consumer shopper. The companyname will be pre-populated into the Account Name in the General tab (see below) of theregistration request that the administrator sees. The Related Existing Account field is a pieceof information provided by a prospective company buyer if, for example, they want to be abuyer who wants to register a new account for the Southern Division of a larger account thatalready exists. This is where they would indicate the name of the larger account that alreadyexists. This field is optional.
After this information is entered correctly, the shopper requesting the account clicks Submit tobegin the account request approval process. They receive a Thank You message thatacknowledges that their request has been submitted and that they may be contacted if moreinformation is needed. The shopper can also click Cancel to cancel the process.
Chapter 25Submit new account registration information as a business shopper
25-17

Once an account request has been submitted, the administrator can go to theRegistration Requests area on the Accounts area and view, update, accept, and rejectaccount registration requests. Anyone with the administrator and/or account managerRole can view, update, accept, and reject registration requests.
Work with account registration requestsWhen the shopper submits the requested initial information, the administrator can seethe new registration request in the Registration Requests area of the Accounts pagewhere they can then view, search, and work with account registration requests.
Anyone with the Administrator and/or Account Manager Role can view, update, accept,and reject registration requests.
After the initial submission of the required details by the shopper, the account requestis reviewed from the merchant side by the administrator. At this point, the administratormay also request from the shopper additional details such as credit checks and more.Upon receipt of all the requested information, the administrator then either approve orreject the registration request. If the request is approved, the new contact with theaccount is activated and can then begin transacting business.
The new registration request list in the Registration Requests area of the Accountspage provides the information in a list divided into columns titled Company Name,Request ID (generated by the system), Request Date, and Status. The registrationrequest list is paginated.
The Status of a request can be either New (the request is new and has not beenviewed), Review (the request has been viewed or changed and needs to be actedupon), More Info Needed (the request has been viewed and an action needs to betaken to collect more account or shopper information before the request is approved orrejected), or Rejected (the account request has been rejected and no contact hasbeen activated).
You can use the Commerce Admin REST API to add a custom rich-text property toaccounts that gives administrators a place to log and track internal notes forregistration requests. See Create custom properties for accounts for an example thatshows how to create and use this kind of custom property.
Note: As mentioned, custom properties can be introduced with the registration requestonce the request has been approved but they are not saved by default. If you wish tosave these custom properties, you can use the Commerce Admin API to add customproperties to registration requests by using the updateItemType endpoint with theorganizationRequest item type. For details on doing so, see Use the REST APIs.
Work with the account registration request list
The new registration request list in the Registration Requests area of the Accountspage lets you do the following:
• Filter the list by status. The default view of the list is to show all statuses.
• Use a typeahead search box. The placeholder text in the box is ‘Filter accountrequests.” When you type a string, the list is filtered to records containing thatstring in the Company field.
• Sort the list by Request ID, Company, or Request Date. The default sort order isby Request date.
Chapter 25Work with account registration requests
25-18

• Look at other pages of the list as the list is paginated as the list grows longer.
Search for a specific registration request
In the search box found in the Registration Requests list view, you can search for registrationrequests by Company or by Request ID.
You can also use an Advanced Search control (same as found in the accounts and contactsuser interfaces) to search for registration requests by creating expressions like the following:
<property 1> contains <value 1> <property 2> contains <value 2> ... <property 5> contains <value 5>
You can also specify “Match Any” or “Match All.”
The properties available for this type of search must be:
• Of type string OR
• A custom string property of a registration request, account, or profile OR
• Properties such as Account, Name, Account Number, Company Name, Tax ReferenceNumber, First Name, Last Name, Email Address, and more.
Also, the Advanced Search control feature presents you with an indented dropdown list ofchoices of string properties and custom properties to help you select fields that you may wantto choose from other information groups. Use these steps:
1. Click the advanced search icon to the right of the search field to display the AdvancedSearch dialog.
2. Select a property from the drop-down list.
3. You can search by Account, Contact, and Registration Request information groups orany custom short text properties that have been added to the account.
4. Click Add Criteria to add another property to the search. Each search can contain up tofive properties.
5. If you are searching on more than one property, select one of the following:
• Match all: (default) Search results include the accounts that match all the searchcriteria. If an account matches some of the criteria but not all, it is not returned.
• Match any: Search results include the accounts that match any search criteria.
6. Click Search.
You can also use a typeahead search box for an account by entering any part of the accountname into the search field at the top of the Registration Requests page.
View and edit account registration list request details
To look at and/or edit an actual new or existing registration request from the list in theRegistration Requests area of the Accounts page, click the Registration ID (which is a link) ofthe request found in the list.
Each request displays four tabs of information. Some of the fields on the tabs can be viewedand some can be edited. These tabs are:
• Request tab containing the following fields:
Chapter 25Work with account registration requests
25-19

– Status – A dropdown list that can be used to change the status of therequests. The choices are New, Accept, Reject, More Info Needed, andReview.
– Request ID, Registration Request Date, Site Where Request Originated, andNotes from the requester. These are all Read-only.
• General tab containing the following fields (grayed out if the account was rejected):
– Company Name from Request and Related to Existing Account. These areRead-only.
– Account Name. This is the Company Name provided by the requester.
– Classification – This is a dropdown list to select details about the classificationof the type of account.
– Account Type - This is a dropdown list to select a specific type of account.
– Tax Reference Number, DUNS Number, Unique Identification Number, andVAT Reference Number – These are all inherited from the Company Account.
• Contact tab containing the following fields (grayed out if the account was rejected):
– First and Last Name – These are Read-only. For an existing contact, the FirstName and Last Name stored in the system take precedence over thosesubmitted, and are the ones displayed.
– Email/Login ID – These are editable unless it is the email address of anexisting account-based contact, in which case it is read-only in the UI. (It iseditable via API in either case.). The administrator cannot change the emailaddress to the email address or login ID of an existing shopper.
• Address tab containing the following fields (grayed out if the account wasrejected). This page displays all addresses that have been submitted. By default,each address consists of the following editible properties. These addressproperties are part of the default address format that ships with Commerce. If yourCommerce environment includes custom address formats, different propertiesmight be available on the Address tab. Additionally, custom address formats mightmake some of the required properties in this list optional. Contact your SiteAdministrator for details about creating addresses with custom address formats.
– Nickname
– Company
– Address 1
– Address 2
– City
– Zip/Postal Code
– Country
– State/Province
– Type
– Phone
If there is no address associated with the request, you are shown the message “Thisregistration request does not have an associated address.”
Chapter 25Work with account registration requests
25-20
Below the tabs, there is a Cancel button and a Save button. If you click Cancel, any changesyou have made are discarded. There is no confirmation dialog. The Save button applieschanges made in all tabs.
Work with registration requests to review, change status,approve, and reject requests
When you have enabled Account-based Shoppers in the Shopping Settings areas and areable to view the registration requests, you can see these requests in the RegistrationRequests area of the Accounts page.
The following provides an example of the change/approval/rejection process that occurs witha new registration request.
When a new account request is received, the request enters the system with a status of Newuntil you either change the status of the request and save it, or you open the request withoutchanging it.
If you save changes that do not include a status change:
1. An error occurs and the detail view is kept open.
2. If the save is successful and the status is New, the status is then changed to Review. Ifthere is an exception with provided addresses, then there may have to be some editingdone in another dialog. Finally, close the detail view and return to the list view.
If you save changes that include a status change:
1. If there are changes other than the status change, save them.
2. If an error occurs, you see an error message but the detail view is kept open.
3. If the save is successful, you can move on to making the status change
If you make a status change of Review or More Info Needed
1. Change the status.
2. Close the detail view and return to the request list view.
If you choose Accept from the status dropdown list while making a status change:
1. You are given the option to provide comments that are added to the acceptance emailsent to the shopper who made the request. The comments are limited to 1000characters.
2. You are requested to Click Accept to Create this as a New Account. To edit the accountafter accepting it, select the account in the Accounts List.
3. If you chose Accept on the confirmation dialog, you are shown a confirmation dialog whilemaking changes. Be sure to check the uniqueness of the account name. If it is aduplicate, you receive an error message that the account name already exists and thatyou should choose another one. You are also returned to the list view. Assuming theaccount name is unique, add the account to the Accounts UI. The contact is now anactive contact on the account.
4. Close the detail view and return to the list view.
5. Remove the registration request from the list view. The account and contact are bothinactive at this point. If the contact is already an active contact, that person remainsactive.
Chapter 25Work with registration requests to review, change status, approve, and reject requests
25-21

6. An approval email is sent to the shopper who submitted the registration request. Ifyou click Cancel on the confirmation dialog, you are returned to the detail view.
If you chose Reject from the status dropdown:
1. You are given the option to provide comments optional comments that are addedto the rejection email sent to the shopper who made the request. The commentsare limited to 1000 characters.
2. You are requested to Click Reject to Reject the Registration Request. Once thisrequest is rejected, it can no longer be edited or accepted.
If you click Reject on the confirmation dialog:
1. Change the status to Rejected.
2. Close the detail view and return to the list view.
3. The rejected registration request appears in the list.
4. All fields in the registration request become read-only. In the details view, all of thetabs besides the Request tab are grayed out.
5. A rejection email is sent to the shopper who submitted the registration request.
6. Clean up the entry after it is rejected. When a registration request is rejected, youcan hard delete the pending contact and organization. Do not delete the contact ifit is an existing contact.
7. The email address (username) of the contact is now free for re-use for a newaccount-based or regular (anonymous) contact.
Understand contact registration requestsIn addition to account registration requests, you can allow an existing account-basedshopper (contact) or a registered non-account-based shopper to submit a contactregistration request.
A registered non-account-based shopper can be defined as a shopper with an emailaddress that is not registered. An existing account-based shopper would have anemail address that was registered as part of their role as an account-based shopper.
Note: A logged-in account-based shopper can also submit a contact request with theemail address of a different account-based contact or with an email address that doesnot exist in the system. A contact registration request cannot be submitted by/for anexisting registered non-account-based shopper - that is, with the email address of anexisting registered non-account-based shopper. If the email address is that of aregistered non-account-based shopper, the system returns the error message that theemail address must be new or be that of an existing account-based contact.
A contact registration request means that either type of shopper wishes to be addedas a contact to an existing business account. The contact registration request is theneither approved or rejected by a merchant administrator or by a delegatedadministrator. This type of request is not the same as an account registration requestthat is described in previous sections of this chapter. Unlike account registrationrequests, there is not an administrator user interface setting to enable or disable thisfeature.
The request process feature lets a shopper submit a request to be added as a contactto an existing business account by providing required contact and account details. Theinformation is reviewed by an administrator or a delegated administrator from the
Chapter 25Understand contact registration requests
25-22
merchant side after the shopper submits the required details. If needed, the administratormay request additional details from the shopper. Additional information that is needed mustbe requested and received separately from this feature either via a phone call or throughemails. The contact registration request is then either approved or rejected. If the request isapproved, the new contact for the account is activated and added to the account.
Understand the contact registration request process flow
An example of how this basic contact registration request process works is provided in theprocedural list that follows. Anyone with an Administrator, Delegated Administrator, and/orAccount Manager Role can view, update, accept, and reject contact self-registration requests.
Note: This high-level description is provided only as example and an introduction and doesnot necessarily mean that your process would work exactly this way. For example, all of theemails that are sent during the approval/rejection process are only lightly touched upon in theexample process flow. For more detail on the automated emails described in the process,refer to Configure Email Settings.
• A registered non-account-based shopper or an existing account-based shopper uses thestore interface (via a widget provided with the layout) to request to be added as a contactto Account A. Refer to Submit new contact registration information for additional details.
• The registered non-account-based shopper or an existing account-based shopper getsan email acknowledging that the request has been received. The request’s status is New.
• The administrator or the delegated administrator for Account A are notified via an emailthat there is a new contact self-registration request that has been received.
• The administrator sees the new request in the Contact Registration Requests area of theAccounts administration user interface. The delegated administrator sees the request viaa widget provided on the store.
• The administrator or the delegated administrator for Account A opens the registrationrequest and begins reviewing it.
• The administrator or the delegated administrator for the account saves some changesand/or explicitly sets the status to “Review.”
• The delegated administrator for the account decides more information is needed beforean approval decision can be made and changes the status to “More Info Needed.”
• Outside of Commerce, the delegated administrator emails the registered non-account-based shopper asking for information.
• The registered non-account-based shopper sends the delegated administrator an emailwith the required information.
• After reading the registered non-account-based shopper’s email, the delegatedadministrator opens the request, adds some information, and sets the request’s status toReview.
• The administrator or the delegated administrator opens the request and makes adecision.
• If they accept the request then
– Optionally, they provide comments (if needed) to add to the approval email.
– The request disappears from the Request list.
– The registered non-account-based shopper receives an email indicating that thecontact request is approved.
– The shopper now appears as a contact in Account A.
Chapter 25Understand contact registration requests
25-23

• If the administrator or the delegated administrator rejects the request then
– Optionally, they can provide comments to add to the rejection email.
– The request remains in the Contact Registration Requests list with a statusRejected.
– The shopper receives an email indicating that their request is rejected.
Submit new contact registration informationExisting account-based shoppers (contacts) or registered non-account-basedshoppers submit a new contact registration request using the store.
This feature lets the shopper submit a new contact registration request by providingrequired business details through the store user interface.
To submit a new contact registration request using the store, do the following
• Login and a Register user interface will appear
• Select Join an existing business account
• Enter the following information in the Register user interface:
– First name of contact
– Last name of contact
– Email address of contact
– Account ID
– Any comments to be added to the request (entered in the Note field)
• Click Submit to submit the request or click Cancel if you wish to cancel therequest.
Once a contact request has been submitted, the administrator can go to theRegistration Requests area in the Accounts area and view, update, accept, and rejectcontact registration requests. A business user with Administrator or Account Managerrole can view, update, accept, and reject registration requests in the Accounts area. ADelegated Administrator can perform the same functions using the ContactRegistration Requests widget on the Storefront.
Understand working with contact registration requestsWhen a shopper submits the required information for the contact registration request,an Administrator sees the new registration request in the Contact Requests area of theAccounts page, and can view, search, and work with contact registration requeststhere.
A Delegated Administrator can perform the same functions using the ContactRegistration Requests widget on the store.
Both Contact Requests and Account Requests menu items appear as sub-items underRegistration Requests in the Accounts navigation page in the administration userinterface. Anyone with the Administrator and/or Account Manager Role can view,update, accept, and reject registration requests.
Note: The Contact Requests tab always appears in the user interface. The AccountRequests tab will not appear if Account Registration is disabled in Settings and there
Chapter 25Submit new contact registration information
25-24

are no account registration requests with a status of New, Review, More Info Needed, orRejected.
After the initial submission of the required details by the shopper, the contact registrationrequest is reviewed from the merchant side by the administrator (or delegated administrator).At this point, the administrator (or delegated administrator) may also request from theshopper additional details such as credit checks and more. Upon receipt of all the requestedinformation, the administrator (or delegated administrator) then either approve or reject theregistration request. If the request is approved, the new contact with the account is activatedand can then begin transacting business.
Work with the contact registration request list
The information in the new contact registration request list can be looked at by bothAdministrators and Delegated Administrators. The information that follows describes thedifferences in the information that is available to each separate Role.
Via the administration user interface, the new contact registration request list forAdministrators in the Contact Requests area of the Accounts page provides the followinginformation in a list divided into the following:
Column Head Description
Request ID Request ID generated by the system. Thisprovides a link that opens the request details.
Requested Account ID Account ID that the requester provided
Requested Account Name Account Name that the requester provided
Email Address Email address that the requester provided
Last Name Last name that the requester provided
First Name First name that the requester provided
Originating Site Site on which the request originated
(Site name - or, if name is unavailable, Site ID)
Request Date Date when the request was received. (Notimestamp is provided)
Status Displays Status icon (for statuses of “Rejected”and “More Info Needed”)
The Status of a request can be either New (therequest is new and has not been viewed), Review(the request has been viewed or changed andneeds to be acted upon), More Info Needed (therequest has been viewed and an action needs tobe taken to collect more account or shopperinformation before the request is approved orrejected), or Rejected (the contact registrationrequest has been rejected and no contact hasbeen activated).
The status is the same regardless of which Adminis viewing it.
You can also do the following with the new contact registration request list:
• Filter the list by status. The default view of the list is to show all statuses.
• Use a typeahead search box. The placeholder text in the box is “Search for registrationrequest.” When you type a string, the list is filtered to records containing that string in theCompany field.
Chapter 25Understand working with contact registration requests
25-25

• Sort the list by the following:
– Email address: A-Z or Z-A
– First name: A-Z or Z-A
– Last name: A-Z or Z-A
– Request date: Newest or Oldest
– Request ID: A-Z or Z-A
– Requested account name: A-Z or Z-A
The default sort order is by Request date: Newest.
• Look at other pages of the list as the list is paginated as the list grows longer.
Column Head Description
Request ID Request ID generated by the system. Thisprovides a link that opens the request details.
Email Address Email address that the requester provided
Last Name Last name that the requester provided
First Name First name that the requester provided
Originating Site Site on which the request originated
(Site name - or, if name is unavailable, Site ID)
Request Date Date when the request was received. (Notimestamp is provided)
Status Displays Status icon (for statuses of “Rejected”and “More Info Needed”)
The Status of a request can be either New (therequest is new and has not been viewed),Review (the request has been viewed orchanged and needs to be acted upon), MoreInfo Needed (the request has been viewed andan action needs to be taken to collect moreaccount or shopper information before therequest is approved or rejected), or Rejected(the contact registration request has beenrejected and no contact has been activated).
The status is the same regardless of whichAdmin is viewing it.
The Delegated Administrator can also do the following with the information that theyare allowed to view:
• Filter the list by status. The default view of the list is to show all statuses.
• Use a typeahead search box. The placeholder text in the box is “Search forregistration request.” When you type a string, the list is filtered to recordscontaining that string in the Company field.
• Sort the list by the following:
– Email address: A-Z or Z-A
– First name: A-Z or Z-A
– Last name: A-Z or Z-A
– Request date: Newest or Oldest
Chapter 25Understand working with contact registration requests
25-26
– Request ID: A-Z or Z-A
The default sort order is by Request date: Newest.
• Look at other pages of the list as the list is paginated as the list grows longer.
Search for a specific registration request
As an Administrator in the Contact Request list view, you have access to Advanced Search inthe administrator user interface via a typeahead search box.
Note: This functionality is not available for Delegated Administrators in the store’sRegistration Requests widget.
The placeholder text is “Filter contact requests.” When you type a string, the Contact Requestlist is filtered to records containing that string in the Last Name field.
You can also use an Advanced Search control (same as found in the accounts, contacts, andcontact registration user interfaces to search for contact registration requests by creatingexpressions like the following:
<property 1> contains <value 1> <property 2> contains <value 2>...<property 5> contains <value 5>
You can also specify “Match Any” or “Match All.”
The properties available for this type of search must be:
• Of type string OR
• A custom string property of a contact registration request, account, or profile OR
• Queryable static string properties that include:
– Last Name
– Email Address
– First Name
– Contact Registration Request Property ID
– Request ID
– Requested Account ID
– Requested Account Name
– Approver Comments
– Notes from the Requester
Also, the Advanced Search control feature presents you with dropdown lists of two groups ofproperties with the headers Contact and Request.
The group and the order of the properties for each header are as follows:
• Under the Contact header:
– The Contact static properties listed above, in alphabetical order
– Any Contact dynamic properties, in alphabetical order
Chapter 25Understand working with contact registration requests
25-27

• Under the Request header:
– The Request static properties listed above, in alphabetical order
– Any Request custom properties, in alphabetical order
When you use the extended search control, keep in mind the following:
• The first row is populated with the “Last Name” property.
• The “contains” operator is not shown; it is implicit.
• Multiple terms with the same property are supported.
• “Match All” is the default.
• When an extended search is in effect, the text, “Advanced Search Results Shown”appears in the search box.
• After you perform an extended search, the next time you open the ExtendedSearch control, the criteria from your last search is displayed. This is true even ifyou have performed simple searches since performing the extended search. Thecriteria persist until you perform another extended search.
• The Extended Search control allows at most 5 criteria.
You cannot search for registration requests via store APIs.
View and edit contact registration request details
Contact registration request details be looked at and/or edited by both Administratorsand Delegated Administrators. Administrators use the Contact Requests area of theAccounts page in the administrator’s user interface to view, search, and work withcontact registration requests. A Delegated Administrator can perform the samefunctions using the Contact Registration Requests widget on the store.
The information that follows describes the differences in the information that isavailable for viewing and editing for each separate Role.
To look at and/or edit an actual new or existing contact registration request as anAdministrator, click the Request ID (which is a link) of the request found in theContacts Requests area of the Accounts page. When you do that you see a detail viewthat combines the following information:
• Data received from the requester
• All custom contact self-registration request properties
• Selected static contact (profile) properties
• All custom contact (profile) properties
Each request displays two tabs of information: Request and Contact. Some of thefields on the tabs can be viewed and some can be edited. The following contains moredetails on the information found on each tab:
• Request tab containing the following fields:
– Status – A dropdown list that can be used to change the status of therequests. The choices are New, Accept, Reject, More Info Needed, andReview.
The dropdown shows New when the request is first opened. Once the status changes,the New status is removed from the dropdown. If the profile has been deleted, theStatus can only be changed to Reject.
Chapter 25Understand working with contact registration requests
25-28
This field is Editable except if the Status is Rejected it becomes read-only. Also, if the contacthas been deleted, the Status can only be changed to Rejected.
• Request ID - Read-only.
• Request Date - Read-only in the user interface but editable via API.
• Site Where Request Originated - URL, Read-only in the user interface but editable viaAPI.
• Notes from the requester - Read-only in the user interface but editable via API.
• Rejection comments - Read-only in the user interface but editable via API. Displayed onlyif the request was rejected.
• Any custom properties that exist – Editable unless the Status is Rejected.
• Contact tab containing the following fields:
Note: This tab is grayed out if the profile has been deleted. This would occur either via theAgent API (for GDPR reasons) or because the request was rejected and the contact wasnew.
• First Name – Read only. For an existing contact, the First Name stored in Commercetakes precedence over the submitted First Name and is displayed here.
• Last Name – Read only. For an existing contact, the Last Name stored in Commercetakes precedence over the submitted Last Name and is displayed here.
• Email/Login ID – Read-only.
• Requested Account ID - Read-only in the user interface but editable via API.
• Requested Account Name - Read-only in the user interface but editable via API.
• Account Name - Accessed via the picker. Editable unless the status is Rejected. This isthe name of the account to which the contact will actually be added. This name will bepre-populated in the field with the requested account if the system identified the account.
• Any custom properties that exist – Editable unless the Status is Rejected. If the emailaddress is that of an existing contact, the existing contact’s property values takeprecedence over the submitted values and are the ones displayed.
If you click Cancel, any changes you have made are discarded. The Save button applieschanges made in all tabs.
Note: The previous fields described list fields that are displayed in the administrationinterface. The following fields can be edited only in the REST API:
• approverComments (listed above as Rejection Comments, but the field is also editable byAPI on an approved request)
• approvedBy
• approvedSource
As a Delegated Administrator, you can look at and/or edit the following information in acontact request that you are working on. Each request displays two tabs of information:Request and Contact. Some of the fields on the tabs can be viewed and some can be edited.The following contains more details on the information found on each tab:
• Request tab containing the following fields:
– Status – A dropdown list that can be used to change the status of the requests. Thechoices are New, Accept, Reject, More Info Needed, and Review.
Chapter 25Understand working with contact registration requests
25-29

The dropdown shows New when the request is first opened. Once the status changes,the New status is removed from the dropdown. If the profile has been deleted, theStatus can only be changed to Reject.
This field is Editable except if the Status is Rejected it becomes read-only. Also, if thecontact has been deleted, the Status can only be changed to Rejected.
• Request ID - Read-only.
• Request Date - Read-only in the user interface but editable via API.
• Site Where Request Originated - URL, Read-only in the user interface but editablevia API.
• Notes from the requester - Read-only in the user interface but editable via API.
• Rejection comments - Read-only in the user interface but editable via API.Displayed only if the request was rejected.
• Contact tab containing the following fields:
Note: This tab is grayed out if the profile was deleted. This would occur either via theAgent API (for GDPR reasons) or because the request was rejected and the contactwas new.
• First Name – Read only. For an existing contact, the First Name stored inCommerce takes precedence over the submitted First Name and is displayedhere.
• Last Name – Read only. For an existing contact, the Last Name stored inCommerce takes precedence over the submitted Last Name and is displayedhere.
• Email/Login ID – Read-only.
If you click Cancel, any changes you have made are discarded. The Save buttonapplies changes made in all tabs.
Note: The previous fields described list fields that are displayed in the DelegatedAdministrator user interface. The following fields are editable via API:
• approverComments (listed above as Rejection Comments, but the field is alsoeditable by API on an approved request)
• approvedBy
• approvedSource
Work with contact requests to review, change status,approve, and reject
Submitted contact registration requests can be seen in the Contact Requests area ofthe Accounts page.
The following information provides an example of an Administrator’s or DelegatedAdministrator’s change/approval/rejection process that occurs when working with anew contact registration request. When a new contact request is received, the requestenters the system with a status of New until you either change the status of therequest and save it, or you open the request without changing it.
• If you save changes that do not include a status change
Chapter 25Work with contact requests to review, change status, approve, and reject
25-30

– If an error occurs you receive an error message and the detail view is kept open.
– If the save is successful and the status is New, the status is then changed to Review.If there is an exception with provided addresses, then there may have to be someediting done in another dialog. Finally, the detail view closes and you are returned tothe list view.
• If you choose Accept from the status dropdown list while making a status change andhave clicked Accept to confirm the choice:
– You are given the option to provide comments that are added to the acceptanceemail sent to the shopper who made the request. The comments are limited to 1000characters.
– Validations are performed on the information if it is accepted.
– If there is an error, an error message is displayed and you are returned to the detailsview.
– If there are no errors, the contact is added to the account. The detail view is closedand you are returned to the list view. The request is removed from the list view.
– If the contact is new, it is activated. If it is an existing active contact, it is left active. Ifit is an existing inactive contact, it is left inactive.
– An approval email is sent to the shopper who submitted the request.
– If you click Cancel on the confirmation dialog, you are returned to the detail view.
• If you select Reject from the status dropdown list:
– You are given the option to provide comments that are added to the rejection emailsent to the shopper who made the request. The comments are limited to 1000characters.
– Validations are performed on the information that is rejected.
– If there is an error, an error message is displayed and you are returned to the detailsview.
– If there are no errors, the status is changed to Rejected.
– The detail view is closed and you are returned to the list view.
– The rejected request is kept in the list.
– All fields in the request are made read-only.
– In the details view, The “Contact” tab is grayed out (unless the contact is an existingcontact).
– The shopper who submitted the request is sent a rejection email.
– You must clean up the entry after it is rejected. When a contact request is rejected,you can hard delete the pending contact and organization. Do not delete the contactif it is an existing contact.
– If you click Cancel on the confirmation dialog, you are returned to the detail view.
A contact self-registration request does not ever need to have a Review or More Info Neededstatus. You can open a new request, make changes, change the status to Accept or Reject,and Save. In the example just described, the contact request goes from New to Rejected, orfrom New to adding the contact to the account.
Chapter 25Work with contact requests to review, change status, approve, and reject
25-31
Store the source of an approval or rejection
When a request is approved or rejected, Commerce stores the value of a sourceproperty that indicates where the approval or rejection came from. These are theoptions:
• If the administrator approved or rejected the request in the administrator userinterface, the system, “Administrator” is stored as the source.
• If the request was approved or rejected using the Admin endpoint, Commercestores “Administrator” as the source by default, or stores any string value providedin the call.
• If the request was approved or rejected in the store user interface or by the storeAPI, Commerce stores “Delegated Administrator” as the source.
• If the request was approved or rejected in the Agent user interface or by the AgentAPI, Commerce stores “Agent” as the source.
• If the request was approved or rejected by an external system, Commerce storesthe string value provided in the call (if provided).
Note: Source values that are provided are not localizable.
Understand more about working with contact requests
The following provides some additional information about working with contacts andnew contact registration requests:
• There is only one version of a contact. Therefore, an update to a contact’s detailsmade in one place (the Accounts user interface, the Account Registration userinterface, or the Contact Registration Request user interface) appears in all theuser interfaces.
• Re-using a contact with a pending contact registration request - If a shopper whois not yet a business account contact has a contact registration request pending,and the Administrator or Delegated Administrator wants to add the shopper to anexisting account, the Merchant Administrator must either approve the request andthen add the contact, or reject the request and then create the new contact.
If the Merchant Administrator tries to create a new contact, and the email address isthat of a contact registration request pending, the message, “The email address youentered has a pending contact registration request. To add the user to an account, youmust first approve or reject the request” is displayed.
If the Delegated Administrator tries to create a new contact, and the email address isthat of a contact registration request pending, the message, “The email address youentered has a pending contact registration request. You or the merchant must acceptor reject the request before you can add the user to an account” is displayed.
In a configuration where account-based shoppers and registered non-account-basedshoppers coexist, if a shopper (or an API) tries to create a new registered non-account-based shopper profile using an email address that has a pending businessaccount contact registration request, the message: “You cannot use this email addressat the moment. Please contact the system administrator” is displayed
• Cleaning up after a rejected request and re-using the contact - When a registrationrequest is rejected, you must hard delete the pending contact. (Do not delete thecontact if it is an existing contact.). After that is done the email address
Chapter 25Work with contact requests to review, change status, approve, and reject
25-32
(username) of the contact is now free for re-use for a new business account contact andregistered non-account-based shopper contact.
Delete contact informationWhen you delete a contact’s profile to comply with the European Union General DataProtection Regulation (GDPR) right to erasure, you must also remove personal informationabout the contact that appears in orders and other items, such as purchase lists.
You should redact these account-based commerce items before deleting the contact’s profile.
This section describes how to prepare for deleting a contact’s profile and delete or redactaccount-based commerce items that contain the contact’s personal information. See Deleteshopper information for information about deleting profiles for contacts, redacting orders, andredacting registration requests.
Delete purchase lists as an agent or administrator
Purchase lists (personal or shared) let shoppers quickly access frequently purchased items. Ifa contact has created (and possibly shared) purchase lists, delete them before you delete thecontact’s profile. You can delete purchase lists in the Commerce Agent Console or with theAgent API. Keep in mind the following:
• You (the Administrator) should ask the person to delete any purchase lists she created,before you delete their profile.
• The Commerce Agent Console or the Agent API can be used to delete the list even if thepurchase list is shared.
• When a shared purchase list is deleted, the recipients of a shared list do not receive anemail notification.
• To delete a purchase list in the Agent Console, find the contact’s profile page and clickthe Purchase Lists tab. See View customer results in Search for customers for moreinformation.
• To delete a purchase list with the Agent API, use the deletePurchaseList endpoint. (Iffor business reasons you do not want to delete purchase lists, you can redact theminstead.) See Delete or redact purchase lists in Delete shopper information for moreinformation.
See Enable Purchase Lists for details about purchase lists and shared purchase lists.
Prepare to delete the profile for an approver
The order approvals feature for account-based storefronts lets administrators enable orderapprovals for an account and specify a purchase limit. When a contact within the accountcreates an order that exceeds the purchase limit, the order is sent to an approver forconfirmation before it is submitted.
If a contact is assigned the Approver role, they can approve orders for their account. Beforeyou delete the profile for a contact who is an approver, perform the following tasks:
• Remove the Approver role from the contact for all accounts before deleting the profile. (Acontact’s profile cannot be deleted if the contact has the Approver role for any account.)See Manage approvers for an account for more information.
Important: Make sure each account still has at least one approver left. You cannot removethe Approver role from the last approver on the account or deactivate the last approver on theaccount if there are orders pending approval or the order approval feature is enabled.
Chapter 25Delete contact information
25-33

• Use the Admin API to remove the approver’s ID from all orders they approvedusing the Admin API. See Delete an approver in Delete shopper information formore information.
Deactivate scheduled orders
Scheduled orders let shoppers create an order and a schedule that determines thefrequency used to fill the order in the future. If a contact has created scheduled orders,deactivate them before you delete the contact’s profile so that the orders will no longerbe placed. Once scheduled orders are deactivated, you can either delete or redactthem. See Delete or redact scheduled orders in Delete shopper information for moreinformation.
You can deactivate scheduled orders in the Commerce Agent Console or with theAgent API:
• To deactivate a scheduled order in the Agent Console, find the contact’s profilepage and click the Scheduled Orders tab. See Schedule an order in Understandpunchout orders for more information.
• To deactivate a scheduled order with the Agent API, use theupdateScheduledOrder endpoint. See Understand Extension Features for detailsabout using the REST APIs.
See Create Scheduled Orders for details about scheduled orders.
Chapter 25Delete contact information
25-34

26Create Page Layouts that Support DifferentTypes of Shoppers
Commerce supports different types of shoppers including anonymous shoppers, individualshoppers and account-based shoppers.
The page layouts that you create must take these shoppers types into account and presentUI features that are appropriate for their tasks.
Note: The account-based commerce feature may not be enabled in your environment.Contact your Oracle account manager for more details on how to activate this functionality.
Understand the different types of shopperCommerce supports several types of shopper:
• Anonymous shoppers have not logged in and are not associated with a saved profile.These shoppers are also called guest shoppers.
• Registered shoppers are shoppers who log in to a personal account. These shoppers areallowed to self-register and manage their own billing and shipping addresses.
• Account-based shoppers are shoppers who log in using contact credentials that havebeen defined as part of a business account. They use account-level billing and shippingaddresses that have been created by a merchant administrator. Account-based shoppersneed to be given special roles in order to create and manage personal addresses, and/orcreate and manage account-level addresses. Refer to Work with account contacts and Work with account addresses for more information.
Account-based shoppers can be added to a business account by an administrator inCommerce. There is also an option for an account-based shopper to submit a new accountregistration request which is then either approved or rejected by an administrator for theaccount. The shopper requests a new account by providing required business details. Aftersubmitting the required details, the information is reviewed by an account administrator. Ifneeded, there may also be a request for additional details such as credit checks and otherinformation. The request is then either approved or rejected. If the request is approved, thenew contact with account is activated and can then begin transacting business with theaccount. After the shopper has been approved, they become an account-based shopper whologs in using contact credentials that have been defined as part of a business account. Referto Configure Account-based Shoppers and Configure Business Accounts for more details.
In Commerce, an anonymous shopper can browse and add items to her cart. Theanonymous shopper will see products in the default catalog and prices from the default pricelist group. Registered shoppers will also see products from the default catalog and defaultprice list group, while account-based shoppers will see the catalog and price list groupassigned to their business account.
If an anonymous shopper logs in to a business account, the login triggers a comparisonbetween the items in the shopper’s cart and the products available in the business account’sassigned catalog. If items exist in the cart that are not present in the business account’scatalog, those items are removed and the shopper is notified.
26-1

If an anonymous shopper logs into a personal account, no comparison is necessarybecause anonymous shoppers and registered shoppers use the same catalog andprice list group.
Understanding the types of shoppers your storefront must support is critical todesigning page layouts properly and making appropriate choices about the widgetsyou use. The following sections describe settings you can use to control the storefrontexperience for different types of shoppers.
Create cloned layoutsAs you create your layouts to support different types of shoppers, remember thatOracle recommends that you avoid modifying the out-of-the-box page layouts.
Instead, create clones of those layouts and modify them. As you modify your pagelayouts, keep in mind the following questions for each type of shopper your storefrontsupports:
• Which types of shopper should be able to view the layout? For example, do youneed one version of a layout for anonymous shoppers and a second version foraccount-based shoppers?
• Does the layout contain content that is inappropriate for a given type of shopper?For example, if your storefront requires a shopper to log in before being able tosee the catalog or search for items and add them to the cart, then you shouldconsider a layout for anonymous shoppers that removes access on the Homepage to catalog, search, and cart information.
Restrict guest checkoutYour site can require that anonymous shoppers log in before they check out.
This feature can be used for anonymous shoppers who will log into either an individualaccount or a business account.
To prevent guest checkout:
1. Click the Settings icon.When running multiple sites from your Oracle Commerce instance, yourconfigurations will be applied by site. Choose your site from the site picker at thetop of the Settings menu options.
2. Click Shopper Settings.
3. Under Guest Checkout, clear the Allow checkbox.
In addition to selecting this setting, your pages must be modified at a widget code-levelto restrict access to the Checkout UI itself. For details on doing so, see Manage GuestCheckout.
Chapter 26Create cloned layouts
26-2
Manage pages for account-based shoppersThis section provides guidance on how you can manage pages for account-based shoppers.
Restrict a page layout to account-based shoppers
When you clone a page layout, you can configure the new layout with one of the followingoptions:
• “Make Default Layout” defines the layout as the default. It is this layout that is renderedfor anonymous shoppers and registered shoppers.
• “Display layout to account shoppers only” restricts the layout to account-based shoppersonly.
Using these two settings, you can design a set of layouts for your anonymous and registeredshoppers and another set for your account-based shoppers. Note that this may not berequired for all layouts; in other words, if a layout does not need different content for thevarious shoppers types, you can have one default layout for all of them.
Restrict self-registration for account-based shoppers
Some out-of-the-box widgets allow self-registration while others do not. These widgets shouldbe used appropriately, depending on the types of shopper your storefront supports.Specifically, shoppers should not be allowed to self-register for a business account. In thecase of a storefront that supports both individual shoppers and account-based shoppers, yourUI should make it clear that any self-registration activity creates an individual shopperaccount, not a business account (see Note about preventing self-registration in account-based storefronts for more details). The following widget elements affect self-registration:
• The Login/Registration element in the Header widget allows self-registration while theContact Login (for Managed Accounts) element does not.
• The Registration Button element on the Wish List Welcome widget, available on the WishList Layout, allows self-registration. This element can be removed for pages that mustprevent account-based shoppers from self-registering.
Restrict address editing for account-based shoppers
Some out-of-the-box widgets allow shoppers to modify their billing and shipping addresseswhile others do not. In account-based storefronts, addresses are managed at the accountlevel and shoppers should not be allowed to modify them. As such, these widgets should beused appropriately, depending on the types of shopper your storefront supports. The followingwidgets affect address editing:
• The Customer Address Book widget, on the Checkout Layout and Checkout Layout withGiftCard layouts, allows address creation and editing. By contrast, the Account AddressBook widget on these layouts allows a contact to choose an address from those definedfor the account and to specify a person to ship to but further editing of the address is notavailable.
• The Customer Profile Widget on the Profile Layout allows customers to edit their billingand shipping addresses. To restrict address editing, account-based storefronts mustcreate a new profile widget that displays profile information but does not enable addressediting. For details on creating the new profile widget, see Manage account-basedshopper profiles.
Chapter 26Manage pages for account-based shoppers
26-3

Ensure account-specific catalogs and price groups are displayed for account-based shoppers
When they are created, business accounts are assigned a catalog and price group. Inthe storefront, account-based shoppers should be shown the catalog and price groupassigned to their business account. To ensure that the correct catalog and price groupis shown to an account-based shopper, you must use the latest version of theCollection Navigation widget on the Home Layout and the Shopping Cart widgets onthe Cart Layout. Server side code automatically determines which catalog and pricegroup to show and passes it to the storefront. The storefront then displays the catalogand price group it has been passed, via these two widgets. For instructions on how tocheck which version you are using, see Design Your Store Layout. If you are not usingthe latest version, you must upgrade to it. See Upgrade deployed widgets forinstructions on how to do so.
Display company name and logo to account-based shoppers
There are two places where you can choose to add a company name and logo to anaccount-based storefront:
• To the header in the storefront page layouts, using the Company Name andCompany logo elements in the Header widget.
• To the email templates used to generate automated email notifications. See theAdd company name and logo to account-based email templates section in Customize Email Templates for details on how to do this.
Configure page layouts for account hierarchiesAccount hierarchy allows you to configure your storefront so that changes that youmake to one account can be seen by other accounts.
Oracle recommends that you clone the out-of-the-box layouts and then make yourchanges to the clones. If your site only supports account-based shoppers, you canmark the clones as the defaults and make the account hierarchy changes to thosepages. If your site must support both account-based shoppers and other, non-accountaffiliated shoppers, then you will need two versions of the pages, one marked asdefault for the non-account affiliated shoppers and the other marked as “Display layoutto account shoppers only” for the account-based shoppers. In this scenario, you wouldmake the account hierarchy changes to the pages designed for the account-basedshoppers.
See Configure Business Accounts to learn how to create an account hierarchy andassign contacts to multiple accounts.
The modifications described in the sections below involve making sure you are usingthe correct version of some of the out-of-the-box widgets. A widget’s About tab,accessed by viewing a widget’s settings, tells you which version you are using. Toreplace a widget with the latest version, see Upgrade deployed widgets.
Header widget for account hierarchies
Make sure you are using version 6 or later of the Header widget on all pages that useit. Also, make sure the Contact Login (for Managed Accounts) element is included inyour Header widget instance. This element provides a picker that allows an account-based shopper to switch to any active account he belongs to.
Chapter 26Configure page layouts for account hierarchies
26-4

Checkout layout for account hierarchies
On the Checkout layout, make sure you are using version 3 or later of the Managed AccountAddress Book widget. This version allows the account-based shopper to view default, local,and inherited account-level addresses when specifying the billing and shipping address forthe order.
Profile layout for account hierarchies
On the Profile layout, make sure you are using the correct versions of the following:
• Account Addresses widget (version 3 or later). This version allows the delegatedadministrator to view an account’s default, local, and inherited addresses.
• Account Contacts widget (version 3 or later). This version does the following:
– Informs the delegated administrator if a contact belongs to multiple accounts.
– Prevents the delegated administrator from deactivating a contact if the contactbelongs to multiple accounts.
– Limits the delegated administrator to removing a contact from the current accountonly.
The Account Addresses and Account Contacts widgets are described in Add delegatedadministration to your storefront.
Order Details and Scheduled Order layouts for account hierarchies
On the Order Details layout, make sure you are using one of the following:
• Version 6 or later of the Order Details widget, or
• Version 4 or later of the Order Details with Additional Info widget
These versions prompt the shopper to switch accounts if she attempts to view details for anorder that was placed under an account other than the one she is currently logged into.
For the same reason, make sure you are using version 3 or later of the Scheduled Orderwidget on the Scheduled Order layout if your storefront includes the scheduled ordersfeature. See Create Scheduled Orders for more information.
Manage page layouts to support account and contactregistration requests
You can allow a prospective account-based shopper to request registration of a new storeaccount.
Enabling this feature lets a shopper submit an account registration request for a new accountby providing required business details. The information is then reviewed by an administratorfrom the merchant side after the shopper submits the required details, and, if needed, theadministrator may request additional details such as credit checks. The account registrationrequest is then either approved or rejected. If the request is approved, the new contact for theaccount is activated. Refer to Configure Business Accounts to learn more about accountregistration requests.
You can also allow an existing account-based shopper (contact) or a registered non-account-based shopper to submit a contact registration request. A registered non-account-based
Chapter 26Manage page layouts to support account and contact registration requests
26-5
shopper can be defined as a shopper with an email address that is not registered. Anexisting account-based shopper would have an email address that was registered aspart of their role as an account-based shopper. The contact request process featurelets a shopper submit a request to be added as a contact to an existing businessaccount by providing required contact and account details. The information is reviewedby an administrator or a delegated administrator from the merchant side after theshopper submits the required details. If needed, the administrator may requestadditional details from the shopper such as credit checks. The contact registrationrequest is then either approved or rejected. If the request is approved, the new contactfor the account is activated and added to the account. Refer to Configure BusinessAccounts to learn more about contact registration requests.
To manage and configure page layouts for account-based shopping that supportsaccount registration requests and contact registration requests, do the following:
• Enable the store user interface to allow business shoppers to submit an accountregistration request for a new account by providing required business details. Dothis by making sure you have a Contact Login (for Managed Accounts) element inthe Header widget in your site Home layout. That way, when an anonymousshopper or an account-based shopper logs in, a Contact Login (for ManagedAccounts) element displays a Register link that allows the shopper to submitcontact registration requests. For further details, refer to Customize your storelayouts for information on using different elements in your layouts.
• Make sure you have enabled the account registration feature in the Settings areaof Administrator user interface. Refer to Configure Account-based Shoppers in theConfigure Shopper Settings section for more details.
• Configure the correct automated emails that are generated during the accountregistration request and contact registration request approval/rejection process.Refer to Configure Email Settings for more information.
• If you want Delegated Administrators to be able to manage contact registrationrequests, add the Contact Registration Requests layout to the Profile Navigation -Account Shoppers widget, and configure the layout to appear to shoppers with theAdministrator role.
Chapter 26Manage page layouts to support account and contact registration requests
26-6

27Use Order Approvals
Commerce includes an order approvals feature for account-based storefronts.
This feature allows an administrator to enable order approvals for an account and specify apurchase limit. When a contact within the account creates an order that exceeds thepurchase limit, the order is sent to an approver for confirmation before it is submitted.
You can also integrate with an external system that determines if an order requires approval.This is useful if you want to use the system to create more complex rules than a simplepurchase limit to determine if an order requires approval. For example, you might want allorders that include specific items or that are shipped to certain addresses to require approval.See Enable Order Approvals to learn how to integrate with an external system for orderapprovals.
The sections in this chapter describe how to accomplish various order approval-related tasksin both the Commerce administration interface and the storefront. Note that, for the storefronttasks, this section assumes that order approvals have been properly configured on thestorefront side. For details on how to do this, see Enable Order Approvals.
Understand order approvalsWhen a shopper places an order that requires approval, that order is not submitted until theapproval has been given.
Approvers are notified, via email, when orders come in that require approval. An approvercan log in and see all orders that require approval for their account.
If the order is approved, what happens next depends on the type of payment method theshopper needs to use. Commerce cannot store credit card information, so it cannot maintaincredit card information for the time period in between when the order is placed and when theorder is approved. Therefore, if the shopper needs to use a credit card for payment, she mustreturn to the order’s details after the order has been approved and provide credit cardpayment information. The amount of time the shopper has to make payment on an approvedorder is configured via the Price Hold Period, described in Set a price hold period. Other thanpayment information, the shopper should not be able to modify any other order details.Limiting the shopper’s order editing ability requires some customization of the checkoutlayout, described in Manage the checkout flow for orders requiring approval.
If the shopper used a deferred payment method like invoice or cash when placing the order,no additional payment details are needed and the order is submitted immediately uponapproval.
When an approver approves an order that needs payment, an email is sent to the shoppernotifying her that the order has been approved and she should provide payment information.When an approver approves an order that does not need payment, the standard order placedemail is sent to the shopper, telling her that the order has been submitted.
If the approver rejects the order, the shopper is notified via email. Rejected orders cannot bemodified or re-submitted. However, the shopper can view the rejected order’s details and addits items to a new shopping cart to form the basis of a modified order that can pass approval.
27-1
Enable or disable order approvalsOrder approval settings are defined at the account level and apply to all contactswithin the account.
The order approval feature can be enabled or disabled either in the administrationinterface or on the storefront, but not both. If you configure the order approval settingsfrom the storefront, the corresponding settings in the administration interface becomeread-only.
Note: This section describes how to enable or disable the order approval feature whenyou set a purchase limit in Commerce. To set upCommerce the order approval featureusing the Order Approval webhook to integrate with an external system, see EnableOrder Approvals.
Order approvals can only be enabled if at least one contact in the account has theApprover role. See Manage approvers for an account for details on how to assign thatrole. When order approvals are disabled, the change only affects new orders. Existingorders that require approval continue to require approval.
To enable or disable order approvals in the administration interface:
1. Click the Accounts icon.
2. Select the account to be modified.
3. Click the Approvals tab.
4. If you are using multiple sites, select the name of the site. Approvals are site-specific.
5. If you are using an external approval system, select the Use external service todetermine approval settings check box. Note that when this option is selected, thedefault Require Approval option is disabled.
6. Enable the Require approval option and set the purchase limit above which ordersrequire approval. See Understand the purchase limit for order approvals for moredetails.
Before you can enable order approvals from the storefront, you must set an option inthe administration interface that gives control of the order approvals setting to thestorefront administrator. Note that when you set the option, the order approvalssettings in the administration interface become read-only.
To enable or disable order approvals in the storefront:
1. Click the Accounts icon.
2. Select the account to be modified.
3. Click the Approvals tab.
4. If you are using multiple sites, provide the name of the site, as approvals are site-specific.
5. Enable the administrator at the account can manage approvals option and clickSave.
6. On the storefront, log in as an administrator.
7. Click the My Account link.
Chapter 27Enable or disable order approvals
27-2

8. Click the Order Approval Settings tab.Note: The Order Approval Settings tab must be configured on the storefront before youcan use it and it also may use a different name if your implementation team chose to usea different one.
9. Enable the Require Approvals option and set the purchase limit above which ordersrequire approval. See Understand the purchase limit for order approvals for more details.
Understand the purchase limit for order approvalsThe purchase limit sets a value.
Orders that exceed this value require approval. If a purchase limit is not defined, no ordersrequire approval. If a purchase limit is set to 0, all orders require approval. There is onepurchase limit for the entire account and it applies to all contacts in the account, regardless ofrole (buyer, approver, or administrator). The currency for the purchase limit value isdetermined by the price list group associated with the account’s contract. In other words, if anaccount’s contract is associated with a price list group that uses Euros, then the purchaselimit is also in Euros.
If an account has multiple contracts, you must select a site when setting a purchase limit. Thepurchase limit applies to any orders submitted by buyers on the associated site.
Note: Display of a contact’s purchase limit is not included in the out-of-the-box widgets,however, you can write custom widget code to display this information. See Display acontact’s purchase limit in a widget for more information.
Set a price hold periodYou can set a price hold period, after which an approved order that is pending payment iscanceled by the system.
The time count starts from when an order is approved. The notification email that is sent to ashopper after an order is approved includes an expiration date and time that is based on theprice hold period. The shopper must pay for the order by this expiration date and time.
After the specified amount of time has passed, the order is marked for cancellation. To handlethe actual removal of these orders, a scheduled service runs that identifies orders that havebeen marked for cancellation and then removes them. See Set the frequency of canceledorder clean up for more information on this service.
The price hold is site-specific and applies to all accounts. The default setting is that there isno time limit. An order that has been canceled because of the time limit has a “Removed”status, which is the same as any other canceled order. Coupons that have been redeemed aspart of a canceled order are not released.
To set the price hold period:
1. Click the Settings icon.
2. Select the Site.
3. Click Payment Processing.
4. Click the Setup tab.
5. Enter a number of days and hours for the Price Hold Period and click Save.
Chapter 27Understand the purchase limit for order approvals
27-3

Note: When the Price Hold Period is modified, the new time limit applies to all orders,existing and new. This means that the expiration date and time that a contact sees inthe “Order Approved” notification email may become stale if the time limit has beenchanged after the contact has viewed the email. See Notify users of order approval-related events for more information about the “Order Approved” notification email.
Manage approvers for an accountAn approver can:
• View all orders requiring approval for their account.
• Approve any order requiring approval, including those that were submitted beforethe approver was assigned the Approver role.
• Approve his own orders.
An administrator assigning roles:
• Can assign the Approver role to himself.
• Cannot remove the Approver role from the last approver on the account ordeactivate the last approver on the account if there are orders pending approval orthe order approval feature is enabled.
To assign the approver role in the administration interface:
1. In the administration interface, click the Accounts icon.
2. Select the account to be modified.
3. Click the Contacts tab.
4. Select the contact you want to assign the Approver role to, click the Approver role,then save the contact.
To assign the approver role in the storefront:
1. On the storefront, log in as an administrator.
2. Click the My Account link.
3. Click the Account Contacts tab.
4. Select the contact you want to assign the Approver role to, click the Approver role,then Save the contact.
Understand how approvers approve and reject ordersOrder approval and rejection happens on the storefront, after order approval has beenenabled and orders have been submitted that require approval.
An approver can see a list of all orders pending approval, even those that werecreated before he became an approver.
To approve or reject orders:
1. On the storefront, log in as an approver.
2. Click the My Account link.
3. Click the Orders Pending Approval tab.
Chapter 27Manage approvers for an account
27-4

Note: The Orders Pending Approval tab must be configured on the storefront beforeyou can use it and it also may use a different name if your implementation team chose touse a different one.
4. Click the order ID to view the details for an order that needs approval.
5. Provide any optional comments and then click either Reject or Approve to reject orapprove the order, respectively. An email notification is sent to the shopper after an orderhas been approved or rejected.
Understand the effect of order approvals on scheduled ordersA scheduled order requires approval if one instance of the scheduled order exceeds thepurchase limit.
When a scheduled order is approved, the approval applies to every instance of the ordercreated based on the schedule. The approval will persist even if the prices of the scheduleorder change. Conversely, if Commerce determines that a new scheduled order does notrequire approval, that determination persists even if the prices change in the schedule orderand cause its total value to exceed the purchase limit at some point in the future.
The approval status of a scheduled order affects what the shopper can do with the order.When a scheduled order has been approved, the order is locked down and the only elementsthat can be edited are the schedule, the active or inactive setting, and the payment method.Note that a scheduled order does not go back for re-approval if the schedule is edited.
When a scheduled order has been rejected, none of the order’s instances will be allowed toproceed and the order cannot be edited. When a scheduled order is pending approval, itscontents will be repriced when the order’s details are viewed. The shopper can modify theschedule and the active/inactive setting of a scheduled order that is pending approval.
Note: Scheduled orders that already exist when the order approval feature is enabled areallowed to proceed without approval.
Notify users of order approval-related eventsEmails are sent to approvers and shoppers to notify them of various order approval-relatedevents.
You can enable or disable these emails in the administration interface (see Configure EmailSettings for more information). The order approval-related emails include the following:
• The Order Pending For Approval email is sent to all approvers when an order is placedthat requires approval.
• The Order Approved email is sent to the shopper when an order is approved and needspayment. Note that this email provides the shopper with an expiration date and time, afterwhich the order is canceled if payment has not been made. See Set a price hold periodfor more information.
• The Order Placed email is sent to the shopper when an order is approved that does notrequire payment. In this case, the order is submitted immediately upon approval and theshopper is notified via the Order Placed email.
• The Order Rejected email is sent to the shopper when an order is rejected.
• The Store Cancel Order email is sent to the shopper when an order is canceled becauseit exceeds the price hold period.
Chapter 27Understand the effect of order approvals on scheduled orders
27-5

• The Payment Failure email is sent to the shopper when an approved order thathas been paid for encounters a payment error.
Clicking the order link in any of these emails will take the shopper or approver to theOrder Details page for the order. From this page, the approver can approve or rejectthe order and provide optional comments. Also from the details page, the shopper canprovide payment for an order that has been approved. For an order that has beenrejected, a shopper can choose to add the order’s items to a new shopping cart toform the basis of a modified order that can pass approval.
You can modify the out-of-the-box email templates so that they match your storefront’slook and feel. See the Customize Email Templates for detailed information.
Chapter 27Notify users of order approval-related events
27-6
28Run Multiple Stores from One CommerceInstance
Your Commerce instance initially has a single site, or store; you can, however, run multiplesites from a single Commerce instance.
Each site corresponds to a store and can have its own catalog. For example, if your companyhas multiple brands, you can have one site per brand. You could also have a site whosecatalog includes items for sale in one country and another site whose catalog includes itemsfor sale in a different country.
This section discusses what you need to know before running multiple sites in yourCommerce instance.
Understand what is shared among sitesIf you choose to run multiple sites from a single Commerce instance, you should be awarethat some content and configuration is shared among the sites and some is not.
The following list describes what is shared by all of the sites in your Commerce instance:
• Tax processors are shared by all sites, but you can assign a different warehouse ship-from address to each site.
• A shopper’s profile is shared by all sites. This means that a shopper uses the samecredentials to log in on each site. If the shopper changes sites, he must log in each timebut he will use the same credentials. It also means that any billing or shipping addressesadded to a shopper’s profile are available to all sites.Note that, while profiles are shared across sites, the values of certain properties in theprofile can be site-specific. See Create a shopper profile for more details.
• Translations are shared by all sites. You can, however, specify different locales for eachsite.
• There is one search index for all sites and they share thesaurus entries, keywordredirects, and searchable field ranking lists.
Features and settings not included in this list can be configured on a per site basis. Forexample, catalogs, price groups, shipping methods, page layouts, promotions, emailtemplates, and so on can be configured on a per site basis. For site-specific information onthese features, refer to their documentation in Understand Oracle Commerce and Understand Extension Features.
Understand what is shared among business account sites
When your environment is configured to use business accounts, a contact’s profile is sharedacross sites. However, before a contact can log into a site and make purchases, the contact’saccount, must have an associated contract for each site. When you create a contract for anaccount, contacts can log into the site and make purchases using the product catalog andprices that have been assigned to their account. To enable a contact access to any site, theaccount must have a contract for the site.
28-1

Note that accounts can be associated with multiple contracts (one contract for eachsite), which allows you to have accounts that span multiple sites from a singleCommerce instance.
The following account-based entities are shared across sites:
• contacts
• the contact’s roles
• addresses
• account properties, including name, location in hierarchy, status, description,classification, type, DUNS number, Tax Reference number, Unique Identificationnumber, VAT reference number and the account logo
For information on working with business accounts, refer to the Configure BusinessAccounts section.
Define a siteA number of tasks required for creating and managing sites in a Commerce instancecan be done in the Commerce administration UI, though other tasks, such as enablinga site, are developer tasks that must be done via the Admin REST API.
Only users with the Administrator or Settings roles can create and manage sites. See Configure Internal User Accounts for information about assigning roles to users.
Create a site
This section describes how to create a new site in the administration interface. Sitesyou create in the administration interface are not automatically enabled. To enable anew site, you must use the Admin REST API. See Configure Sites to learn how toenable sites.
When you create a new site in the administration interface, you must give it a Site Titleand Site Base URL. Commerce automatically assigns it an ID, which is not visible inthe administration interface, but which you can access with the Admin REST API.
To create a new site:
1. Click the Settings icon.
2. Click the + button next to the Setup menu item to display the Create Site dialog.
3. Enter the following required information for the new site, then click Save:Site Title: Provides the default value of the <title> tag for all your store’s pages,including the store’s home page.
Site Base URL: Provides the base string value for absolute URL link generation,for example, for sitemap URLs.
4. Enter additional information about the store for the new site. See Enter basic storeinformation for details.
Change the default site
To simplify site creation, Commerce designates one site as the default site. When youcreate a new site in the administration interface, you must give it a unique Site Titleand Site Base URL. Commerce automatically assigns it an ID, which is not visible in
Chapter 28Define a site
28-2

the UI. The new site inherits all its other properties from the default site, though you canchange them on the Settings Setup page.
In addition to serving as a template for site creation, the default site is used as the destinationfor requests to your Commerce instance when a URL cannot be otherwise resolved. Forexample, if a shopper tries to access a store with a URL that does not match the productionURL (the primary URL for accessing the site) or any of the additional production URLs(alternate URLs that can be used to access the site), Commerce displays the home page ofthe default site.
There is always one default site in an individual instance of Commerce. Initially, this is the siteincluded with each Commerce instance. This site’s initial Site Title is Commerce Site and itsinternal ID is siteUS. Once you have created other sites, you can change which site is thedefault. A site must be enabled before you can make it the default. Sites you create in theadministration interface are not automatically enabled. To enable a new site, you must usethe Admin REST API. See Configure Sites in Configure Sites to learn how to enable sites.
To change the default site:
1. Click the Settings icon.
2. Select Setup from the list of settings.
3. Pick a site to make the default from the list that appears above the settings list.
4. On the General tab, select the Make Default Site checkbox.
5. On the General tab, select the Make Default Site checkbox.
6. Click Save on the General tab.
Delete a site
Deleting a site may affect many aspects of your store, including orders, reports, and anumber of store settings. You should not delete a site that is currently in use with yourproduction environment. You cannot delete the default site. If you want to delete the site thatis currently the default, first make a different site the default.
To delete a site:
1. Click the Settings icon.
2. Select Setup from the list of settings.
3. Pick a site to delete from the list that appears above the settings list.
4. On the General tab, click Delete.
5. Click Continue in the Warning box to confirm that you want to delete the site.
6. Click Save on the General tab.
View, preview, and publish sitesWhen a shopper views a site, the Commerce server detects the site from the URL and onlyreturns content appropriate for that site.
When you preview your sites in the administration interface, you can choose which site toview. When you publish changes, changes you have made for all sites are published,meaning you cannot filter the updates-to-publish list by site.
Chapter 28View, preview, and publish sites
28-3

29Accessibility Tasks
Oracle's goal is to make its products, services, and supporting documentation accessible toall users, including users that are disabled.
To that end, our documentation includes features that make information available to users ofassistive technology. This documentation is available in HTML format, and contains markupto facilitate access by the disabled community. Accessibility standards will continue to evolveover time, and Oracle is actively engaged with other market-leading technology vendors toaddress technical obstacles so that our documentation can be accessible to all of ourcustomers. For more information, visit the Oracle Accessibility Program website at http://www.oracle.com/us/corporate/accessibility/index.html.
About keyboard shortcutsCommerce supports standard keyboard shortcuts that are used in many softwareapplications.
In addition, the service provides its own shortcuts, which are described in this section.
Navigate the UI
The following table describes keyboard shortcuts you can use to navigate the Commerceadministration interface.
Keyboard Shortcut Result
Ctrl+` Opens the main menu.
Tab Navigates to the next focusable element.
Note: Use the right and left arrow keys to navigateamong the Home, Preview, Language, and Usericons that appear at the top right of every page inthe administration interface.
Shift+Tab Navigates to the previous focusable element.
Note: For keyboard users navigating the administration interface in Firefox on a Mac, tabbingto the Forgot Password? link on the login screen does not work as expected. To fix this issue,follow these steps:
1. Select System Preferences on the Mac.
2. Select Keyboard and display the Shortcuts tab.
3. Select the All Controls option.
Select items
The following table describes the keyboard shortcuts you can use to select navigable items.You can then move the selected items. For example, you might want to select several itemsto move to a different collection.
29-1
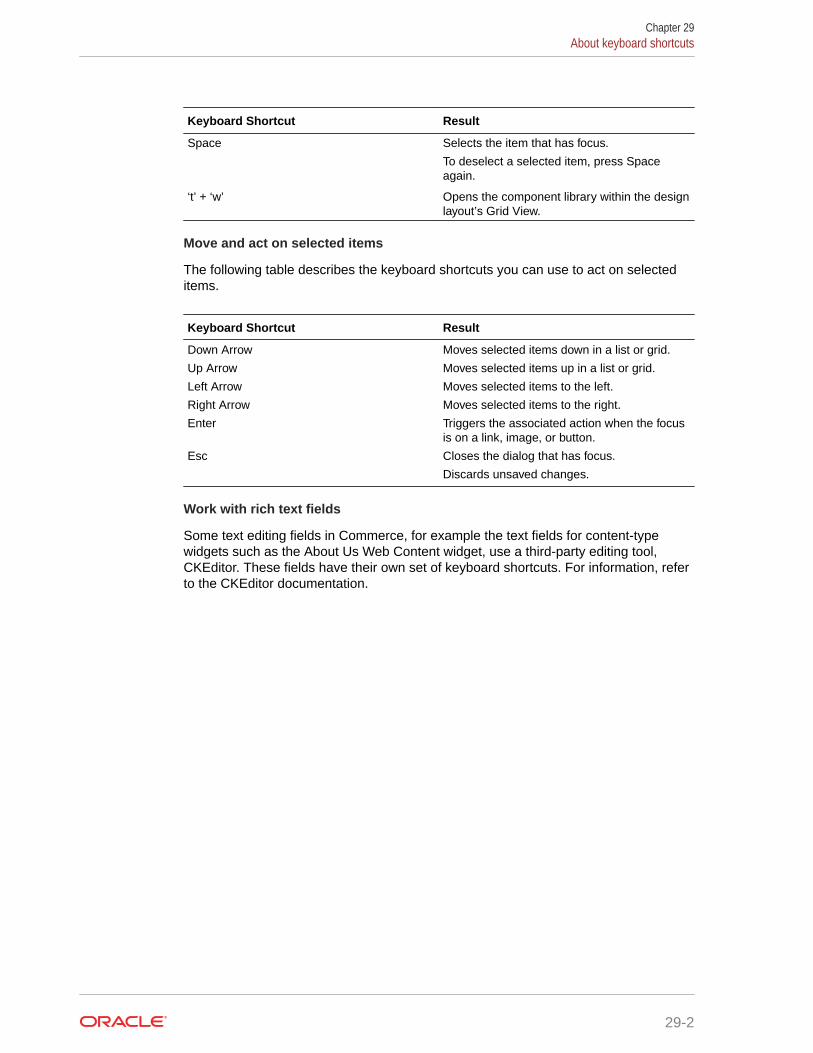
Keyboard Shortcut Result
Space Selects the item that has focus.
To deselect a selected item, press Spaceagain.
‘t’ + ‘w’ Opens the component library within the designlayout’s Grid View.
Move and act on selected items
The following table describes the keyboard shortcuts you can use to act on selecteditems.
Keyboard Shortcut Result
Down Arrow Moves selected items down in a list or grid.
Up Arrow Moves selected items up in a list or grid.
Left Arrow Moves selected items to the left.
Right Arrow Moves selected items to the right.
Enter Triggers the associated action when the focusis on a link, image, or button.
Esc Closes the dialog that has focus.
Discards unsaved changes.
Work with rich text fields
Some text editing fields in Commerce, for example the text fields for content-typewidgets such as the About Us Web Content widget, use a third-party editing tool,CKEditor. These fields have their own set of keyboard shortcuts. For information, referto the CKEditor documentation.
Chapter 29About keyboard shortcuts
29-2

30Secure Your Service
This section describes the security features built into Commerce, including the administrationinterface and the storefront. It also lists the tasks you must complete to secure the serviceyourself. It is extremely important to review and follow the directions in this section beforestarting to use Commerce.
In addition, it is recommended that you become familiar with the general guidelines Oracleprovides for securing all Cloud services. This information is available through the Cloud HelpCenter.
Understand security featuresThis section describes the security features of Commerce.
Password security
Passwords for administration interface users and shoppers accessing the storefront areimplemented using techniques that meet Oracle’s software security standards. See Secureyour Commerce logins for information on changing the initial password for the administrationinterface.
User authentication
Internal users who want to access the administration interface provide their login credentialsthrough an HTTPS request, which obtains an OAuth 2.0 bearer token. The token is then usedto verify the authenticity of the user for subsequent requests. Registered shoppers requiringaccess to secure pages, such as their profile or checkout, are authenticated in the same way.See Configure Shopper Settings for information about configuring the length of a logged-inshopper session.
The administration interface automatically logs users out after a period of inactivity, to complywith the Payment Card Industry Data Security Standard (PCI DSS). By default, this period is15 minutes. You can change this value by setting the sessionTimeout parameter using thesaveAdminConfiguration endpoint in the Admin API. For example, to change the period to30 minutes:
PUT /ccadmin/v1/merchant/adminConfiguration HTTP/1.1Authorization: Bearer <access_token>Content-Type: application/json
{ "sessionTimeout": 30}
You can set sessionTimeout to any integer from 3 to 120. Note that this timeout period alsoapplies to the access token that is returned when logging into the Admin API with logincredentials. See Use the REST APIs for information about logging into the REST APIs.
30-1
Payment gateway integrations
As explained in this guide, Commerce has built-in integrations with CyberSource andChase Paymentech for credit card processing. The security key and accountinformation required for these integrations are encrypted using a symmetric 256-bitAES key. For more information on the secure handling of credit and debit card data,refer to Configure Payment Processing.
Oracle Commerce integrates with PayPal Express Checkout. Calls to PayPal are notencrypted for transmission, as the merchant ID and secret key are never exposed onthe storefront. (All calls to PayPal are made over HTTPS and performed on the serverside.) For more information, refer to Configure the PayPal integration.
Web Service APIs
Commerce includes REST web service APIs you can use to provide integrations andextensions of the administration interface and the storefront. These APIs areimplemented using Jersey (JAX-RS) version1.14.
The APIs use the OAuth 2.0 security framework for data exchange.
Developers register their application in Commerce, which generates a JWT (JSONWeb Token) application key. If necessary, the key can be regenerated to revokeexisting access. For more information, refer to Register applications.
Customer accounts
Shoppers can choose to become registered customers by creating accounts throughyour storefront. You configure the password requirements (for example, length andcase) on the Shopper Settings page in the Commerce administration interface. It ishighly recommended that you familiarize yourself with guidelines for strong passwordsand set your storefront’s requirements accordingly.
If necessary, you can revoke account access for all registered customers by expiringall passwords. For more information, refer to Configure Shopper Settings.
Account information for registered customers is stored in a database-backedCommerce profile repository.
Webhooks
As described in this guide, Commerce can use webhooks to send JSON notificationsto specified URLs each time an event occurs, for example, each time a shoppercompletes an order. The webhook contents are signed using HMAC and hashed usingSHA256 and a secret key specific to your implementation. The key can beregenerated if necessary. For more information, refer to Use Webhooks.
PCI DSS compliance
Not all external systems you integrate with Oracle Commerce will comply with thePayment Card Industry Data Security Standard (PCI DSS). Oracle Commerceprovides webhooks that exclude payment details from the order data you send tosystems that do not comply with PCI DSS. For more information, refer to Understandwebhooks and PCI DSS compliance.
Chapter 30Understand security features
30-2
CORS support
For security purposes, web browsers implement the same-domain policy, which preventsJavaScript on a page served from one domain from accessing resources on another domain.In some cases, you may want to selectively override this policy to allow specific domains toaccess data on your sites.
To make this access possible, Commerce supports CORS (cross-origin resource sharing),which is a standard mechanism for implementing cross-domain requests. For moreinformation, refer to CORS support.
Perform security tasksThis section lists the tasks you must perform to harden the security of your instance ofCommerce.
Obtain an SSL certificate
The storefront uses SSL to encrypt sensitive data while it is being communicated betweenthe web server and the customer’s browser. To activate SSL and correctly identify yourcompany with your storefront, an SSL certificate is required.
You must obtain an SSL certificate for your company so it can be installed on the web server.After the certificate is installed, the customer’s browser displays several trust indicators,including the HTTPS URL protocol and the padlock icon, when he or she visits your store.For more information, contact your Oracle Support representative.
Secure your Commerce logins
A username and password are required to access the Commerce administration interface.You receive one initial username and password from Oracle as part of the process of settingup your service. Change the password immediately by following these steps:
1. Log into the Commerce administration interface.
2. Click the Settings icon and select Access Control.
3. Click the name of the initial user.
4. Ensure the Email Address field contains a valid email address to which you haveaccess.Note: If you add or change the email address, and then click Save, you may have torefresh the Access Control page for the new value to appear.
5. Click Reset User Password.
6. The system sends an email to the specified address. Use the link contained in the emailto change the password.
All administration interface passwords automatically expire after 90 days. After this period,users will be unable to access the service until they reset their passwords. To do so, theyshould click the Can’t Sign In link on the login page and follow instructions.
If your service has been upgraded from a previous release, the 90-day period starts after theupgrade.
User accounts are locked after six unsuccessful attempts to access the system.
Chapter 30Perform security tasks
30-3
Refer to Create new user profiles for instructions on how to create additional useraccounts and for information on the different access levels you can assign. It is highlyrecommended that you give each user the least amount of access he or she requires.Commerce enforces the password requirements described in Create new userprofiles, but you should ensure additional secure practices around login credentials, forexample by not emailing passwords to new users and by recommending regularpassword changes.
Ensure that accounts are deactivated promptly if they are no longer needed, forexample when an employee leaves the company. See Deactivate and reactivate userprofiles.
Implement Storefront Single Sign-On
Oracle Commerce enables you to integrate customer logins on your storefront with anexternal customer data store or identity management tool. For example, suppose youhave an existing informational website with a large number of customer accounts.When you create a new Commerce site, you may want to provide existing customerswith accounts on the commerce site. . For more information, refer to Implementstorefront SSO for account-based shoppers.
Chapter 30Perform security tasks
30-4

AAppendix: Layout Widgets and Elements
This section summarizes each of the widget types, accompanied by a brief outline of therelevant page layouts, and any associated elements, that can be found within the Designpage.
Account AddressesThis widget is used in account-based storefronts.
It allows all contacts to view account and profile addresses. Contacts with the Administrator,or Account Address Manager roles can create, edits, and delete account address, andspecify a default billing/shipping address for the account. It also allows contacts who have theProfile Address Manager role to create, edit, and delete profile addresses.
In order to use this widget, a vertical tab stack must be created with the Account Addresseswidget placed on a tab. This widget is read-only unless it is being used by the Profile AddressManager role and/or the Account Address Manager role.
It is available for the Shopper Profile layout.
Account ContactsThis widget is used in account-based storefronts.
It provides the Administrator with an interface for viewing, adding, removing, and modifyingaccount contacts. Using this widget, the Administrator can also activate a contact as well asassign roles to a contact.
In order to use this widget, a vertical tab stack must be created with the Account Contactswidget placed on a tab that is accessible to contacts with the Administrator role only.
It is available for the Shopper Profile layout.
Account DetailsThis widget enables the shopper to enter their account details, including their name and emailaddress, and is used for shopper profile information in account-based storefronts.
It is available for the Shopper Profile layout.
Address BookThis widget enables the shopper to enter their address details, and is used for shopper profileinformation in account-based storefronts.
It is available for the Shopper Profile layout.
A-1

Add Product to Wish ListThis widget enables the shopper to add a product to their wish list.
It is available for the Product layout.
AssetsThis widget enables the shopper to see any assets that are associated with theshopper’s account.
It is available for the Assets layout.
Asset DetailsThis widget enables the shopper to view the details for an asset selected from theAssets layout.
It is available for the Asset Details layout.
BreadcrumbThis widget enables the shopper to see breadcrumbs showing category hierarchies forboth categories and products.
Breadcrumbs help the shopper to navigate back to a category or product.
It is available for the Product, Search Results, and Collection layouts.
The following elements are available for the Breadcrumb widget:
• Breadcrumb Links
• Image
• Rich text
• Text
Cart ShippingThis widget enables the shopper to enter shipping address details and select ashipping method so they can see an estimate of shipping costs, including taxes etc.
It is available for the Cart layout.
The following elements are available for the Cart Shipping widget:
• Image
• Rich Text
• Shipping Address
• Shipping Methods
• Shipping Options
Appendix AAdd Product to Wish List
A-2

• Shipping Title
• Text
Cart SummaryThis widget enables the shopper to view a summary of the products added to their shoppingcart.
It is available for the Checkout layout.
Category ContentThis widget displays images, collection descriptions and collection long descriptions for aselected category.
It is available for the Collection layout.
Checkout Schedule OrdersThis widget creates a scheduled order on a checkout page.
The widget identifies things such as the scheduled order name and ID, next order date,schedule details, order contents, and so on. It is available on the Scheduled Order Layout.
See Configure page layouts for scheduled orders for more information.
CollectionThis widget displays items grouped together into a collection, for example, shoes, furniture,clocks etc.
It is available for all layouts.
Collection NavigationThis widget enables the shopper to navigate to a collection of items, and specifically providescategory navigation for larger catalogs.
It is available for all layouts.
Collection Navigation BasicThis widget enables the shopper to navigate to a collection of items, and specifically providescategory navigation for smaller catalogs.
It is available for all layouts.
Content ItemThis widget is used to retrieve data from a content management tool.
Appendix ACart Summary
A-3
After entering the URL and access token for the CaaS server, from where the data isretrieved, an asset ID is used to retrieve the particular content item.
It is available for all layouts.
Customer AddressThis widget enables the shopper to enter their shipping and billing addresses.
It is available for the Checkout layout.
Checkout Address BookThis widget provides the shopper with the ability to look-up and select saved shippingaddresses.
It is available for the Checkout layout.
Important: Account-based storefronts cannot use the Customer Address Book widget.This widget allows shoppers to edit their billing and shipping addresses. In account-based storefronts, shoppers require certain roles in order to manage profile andaccount addresses. The Managed Account Address Book widget enforces these rolerequirements, so it should be used instead of the Customer Address Book widget forthe checkout flow in account-based storefronts.
See the Create Page Layouts that Support Different Types of Shoppers chapter formore details.
Customer ProfileThis widget gives the shopper access to their personal details.
It is available for the Profile layout. Note: This widget may be affected in futurereleases by deprecations to default functionality.
Important: Account-based storefronts cannot use the Customer Profile widget. Thiswidget allows shoppers to edit their billing and shipping addresses. In account-basedstorefronts, shoppers must have specific roles in order to create and edit addresses.Therefore, the Customer Profile widget is inappropriate for account-based storefronts.Instead, for an account-based storefront, use a Profile layout with a vertical tab stackwith widgets appropriate to account-based shoppers, including the Account Addresseswidget.
See the Create Page Layouts that Support Different Types of Shoppers chapter formore details.
CyberSource Payment AuthorizationThis widget provides the ability to enter form data to be used for authenticatingpayments.
It is available for the Payer Authentication layout.
Appendix ACustomer Address
A-4

FooterThis widget provides a consistent footer throughout the web store, giving access to commonlinks.
Generally, footers may include privacy policy details, contact information, shipping links, sign-ups, social links and copyright information.
It is available for all layouts.
Guided NavigationThis widget allows the shopper to refine any given search, based on the search results.
Search refinements are displayed based on the entered ‘search’ term.
It is available for the following layouts:
• Collection Layout
• Search Results Layout
Gift CardThis widget enables the shopper to use a gift card as payment for their cart items.
It is available for the Checkout layout.
The following elements are available for the Gift Card widget:
• Gift Card Fields
• Image
• Rich Text
• Text
HeaderThis widget provides a consistent header throughout the web store, giving access to commonlinks such as the store logo, sign-in/register links, and shopping cart access.
It is available for all layouts.
The following elements are available for the Header widget:
• Cart link
• Currency
• Image
• LanguageNote: You can use the Hreflang Groups endpoints in the Admin API to create groupingsof sites and languages to use in hreflang tags on your pages. If you use this feature, youwill need to customize the language picker that is implemented by the Language element.
Appendix AFooter
A-5

See REST API for Oracle Commerce for more information about the HreflangGroups endpoints.
• Links
• Login/registration
• LogoNote: When adding your company logo, you must delete the pre-loaded logoelement and replace it with a logo image. To do so, drag the Image element to thewidget row, upload a new image of your logo, and configure the image as required.
• Rich Text
• Search
• Text
These elements are also available for the Header widget but should only be used inaccount-based storefronts (see the Create Page Layouts that Support Different Typesof Shoppers chapter for more details):
• Contact Login (for Managed Accounts)
• Company Logo
• Company Name
HeroThis widget is used for displaying marketing images.
It is available for all layouts.
Login/Registration CheckoutThis widget enables the shopper to either log in or register their details duringcheckout.
It is available for the Checkout layout.
Loyalty DetailsThis widget enables a registered shopper to view information on the status of theirloyalty program, including, points accumulated, points available for spending, pointsalready spent, and so on.
One loyalty program is detailed per shopper, however, this can be modified to displayall of a shopper’s loyalty programs memberships. For further information, refer to Workwith Loyalty Programs.
It is available for all layouts.
Loyalty PaymentThis widget informs the shopper that they have made a payment using their loyaltypoints.
Appendix AHero
A-6
In order to use loyalty points as a payment, the loyalty point gateway must be enabled.Details on how to integrate with a gateway for paying with loyalty points is described in Workwith Loyalty Programs.
It is available for the Checkout layout.
Managed Account Address BookThis widget is used in account-based storefronts.
This widget is used in account-based storefronts. It provides the shopper with the ability tolook up and select shipping addresses saved for the account they are associated with; seethe Create Page Layouts that Support Different Types of Shoppers chapter for more details.
It is available for the Checkout layout.
No Search ResultsThis widget enables the shopper to clearly see that no search results were found.
It is available for the No Search Results layout.
NotificationsThis widget provides the shopper with notifications related to their actions, for example,confirmation and validation messages.
It is available for all layouts.
Order ApprovalsThis widget allows an approver to approve or reject an order and provide comments whenviewing an order’s details.
Note that Order Approvals widget only appears in the storefront when an approver is viewingan order’s details. Otherwise, it is hidden.
It is available for the following layouts:
• Scheduled Order Layout
• Order Details Layout
Order Approval SettingsThis widget provides the delegated administrator with an interface for enabling and disablingorder approvals and setting the purchase limit.
In order to use this widget, a vertical tab stack must be created with the Order ApprovalSettings widget placed on a tab that is accessible to approvers only.
It is available for the Profile layout.
Appendix AManaged Account Address Book
A-7

Order ConfirmationThis widget enables the shopper to see order confirmation details upon placing anorder.
It is available for the Order Confirmation layout.
Order Confirmation SummaryThis widget enables the shopper to see a summary of their order upon placing anorder.
It is available for the Order Confirmation layout.
Order Confirmation with Additional InfoThis widget enables the shopper to view information related to invoice paymentselection and purchase order number(s) on the order confirmation page.
It is available for the following layouts:
• Order Confirmation Layout
• Order Details Layout
Order DetailsThis widget provides the shopper with details related to their order including date,status, product details etc.
It is available for the Order Details layout.
The Order Details widget also enables you to choose whether or not to provideshoppers with the ability to add a purchase list, or to cancel/return orders. .
Note: For shopper-initiated cancellations/returns:
• In order to use the cancellations/returns feature, the latest version of the OrderDetails widget must be utilized. This release of Oracle Commerce automaticallycontains the latest version, however, if you are running an older version ofCommerce you must ensure the Order Details widget is upgraded. See Upgradedeployed widgets for details on replacing a widget with the latest version.
• As the cancellations/returns feature is disabled by default, you must enable theseoptions within the Order Details widget to avail of the feature.
• Once shopper initiated returns are enabled, you will see the Return Items buttonwithin the Order History Details widget.
• Once shopper initiated cancellations are enabled, you will see the Cancel buttonwithin the Order History Details widget.
• Either shoppers or agents can begin the cancellation/returns process. Refer to Cancel an order for details on agent-initiated cancellations/returns.
Appendix AOrder Confirmation
A-8

Order Details with Additional InfoThis widget enables the shopper to view information related to invoice payment selection andpurchase order number(s) on the order details page.
It is available for the Order Details layout.
Order HistoryThis widget provides the shopper with a summary of their previous orders.
If you are running more than one site, the Order History widget displays information that issite-specific.
It is available for the following layouts:
• Shopper Profile Layout
• Order History Layout
Order SummaryThis widget enables the shopper to review their order from the cart page before proceeding tocheckout.
It is available for the Cart layout.
Order Summary CheckoutThis widget enables the shopper to review their order from the checkout page and then placetheir order.
Additionally, they may have an option to checkout with PayPal.
It is available for the Checkout layout.
Orders Pending ApprovalThis widget allows an approver to view a list of orders pending approval.
In order to use this widget, a vertical tab stack must be created with the Orders PendingApproval widget placed on a tab that is accessible to approvers only.
It is available for the Profile layout.
Overlayed Guided NavigationThe Guided Navigation widget allows the shopper to refine their search, based on the searchresults.
Search refinements are displayed based on the entered ‘search’ term.
This widget is optimized for mobile display.
Appendix AOrder Details with Additional Info
A-9
It is available for the Collection, and Search Results layouts.
Page Not FoundThis widget displays a message to the shopper that the page they searched for hasnot been found.
It is available for the Error layout.
Pay After ApprovalThis widget is used in account-based storefronts.
It provides the shopper with the ability to place an order, wait for the order to beapproved, and then make the payment once approval has been granted for that order.
It is available for the Checkout layout.
Payment DetailsThis widget enables the shopper to select their payment type and enter their cardpayment details.
It is available for the Checkout layout.
Payment Methods (Formerly Split Payments Widget)The Payment Methods widget enables shoppers to pay for orders by choosing from avariety of available payment methods, and is available as a component on theCheckout layouts.
It allows shoppers to choose between single or split payments, and encompasses arange of functionality that is specific to several individual widgets in Commerce. Forexample, enabling the shopper to select their payment type, enter their card paymentdetails, and using a gift card as a payment method. The individual widgets thatcombine to form the range of functions contained in the Payment Methods widgetinclude:
• Split Payments
• Payment Details
• Gift Card
• Payment Gateway Options
Note: If required, you can continue to use these widgets independently.
Payment Gateway OptionsThis widget provides the shopper with a list of payment gateway options for checkout.
It is available for the Checkout layout.
The following elements are available for the Payment Gateway Options widget:
Appendix APage Not Found
A-10

• Cash Payment
• Image
• Rich Text
• Text
Product DetailsThis widget displays the details of a product to the shopper.
This can include: image, description, variant detail, quantity, and stock indicator.
This widget also allows the shopper to add an item to their cart and share on social media oremail.
It is available for any layout.
The following elements are available for the Product Details widget:
• Add to Cart Button
• Add to Wish List Button
• Alternate Image Selector
• Back
• Description
• Image
• Inventory status (Refer to Customize inventory status messaging for details.)
• Long Description
• Name
• Price
• Product Image
• Product Quantity
• Rich Text
• Shipping Surcharge
• Social Sharing
• Text
• Variant options
• Volume Pricing
Product ListingThis widget displays a list of products relevant to the shopper’s navigation context.
When directly navigating via a collection, this widget displays products belonging to thatcollection. When navigating via a search, this widget displays a list of products matching thegiven search term. Each product is shown with the product image, name, and price.
It is available for the Collection, and Search Results layouts.
Appendix AProduct Details
A-11
You can configure a number of settings for this widget, including Display Options, andWeb Application Configuration options.
For information on how to use this widget in popup stacks, see Add Popup stacks.
Support generic sort on the product listing widget
The ProductListing widget uses productListingViewModel to fetch products,pagination, scroll and sort. You can enable the sort to use any product property as thesort parameter using this code in the product-listing widget:
widget.listingViewModel().useGenericSort = true;
You will need to update the sort options with the required parameters, described in thefollowing table. For example if you want to add the sort option as displayNameproperty, you might use the following:
var sortOptions = [{ "id": "displayName", "displayText": Name - Asc, "order": ko.observable("asc"), "maintainSortOrder": true, "serverOnly": true }];
Parameter Description
id This must be same as the property name onthe product on which you want to sort. Thiscan also be a dynamic property.
displayText This is the localized value of what you want todisplay in the widget.
Order Either asc for ascending sort order or desc fordescending sort order.
maintainSortOrder Set to true if you want the view models to usethe parameter set for Order. If set to false, theorder will default to asc for ascending order.
serverOnly Set to true for sorting on the server side. Set tofalse to sort on client side within the availabledata.
Product RecommendationsThis widget enables personalized shopper product recommendations to be displayedto the shopper.
It is available for all layouts.
The following elements are available for the Product Recommendations widget:
• Recommendations Title
• Recommendations Carousel
• Image
Appendix AProduct Recommendations
A-12
• Text
• Rich Text
For information on how to use this widget, see Display product recommendations.
Product Social Meta TagsThis widget provides meta tag support for structured data markup on web pages as well asother applications.
It provides Open Graph (OG) protocol meta tags to control the content displayed when apage is shared on Facebook. Additional meta tags are included for use with search engineoptimization (Schema.org, Pinterest, and Twitter). The meta tags provided in this widget are asubset of the meta tags available. Consult your company’s development team for moredetails on how to tailor this widget to your business needs.
It is available for the Product layout.
Product Quick ViewThis widget displays summarized details of a product to the shopper in the form of a popuppage.
This can include: image, description, name, and price.
It is available for the Collection, and Search Results layouts.
For information on how to use this widget, see Add popup stacks.
PromotionThis widget enables the shopper to apply a promotional coupon to their order.
It is available for the Checkout and Cart layouts.
Purchase ListsThe widget displays a list of purchase lists, and allows a shopper to select a purchase list tomodify, and use a search box to search for products.
It is available for the Profile layout.
Refer to Enable Purchase Lists for further details.
Purchase List DetailsThis widget displays details of individual purchase lists, and displays the details of anindividual purchase list.
All items are selected by default for addition into the cart. A shopper can select specific itemsto add to the cart or modify the quantities of the selected items. This widget also allows ashopper to search for and select products.
The widget also allows a purchase list creator to share a purchase list. You can sharepurchase lists with registered shoppers and account-based contacts.
Appendix AProduct Social Meta Tags
A-13

This widget is available in the Purchase List Details layout.
Refer to Enable Purchase Lists for further details.
Quick OrderThis widget enables shoppers to quickly add known items to their shopping cart byentering a combination of product name, and/or SKU ID, either in their entirety, or partthereof.
Shoppers can also import items to a Quick Order form from a CSV file.
In order to use the Quick Order layout/widget, the following tasks must be performed:
1. Any product property that you would like a shopper to be able to search for on thequick order page must be visible on the storefront and marked as “Allow Propertyto be Searched” in the product type in the catalog. Refer to the Property typessection of this document for further information.
2. Add the properties from the previous step to the TypeAhead searchable fieldranking list, as described in the Add fields to the searchable field ranking list, and Understand the searchable field rank sections of this document.
3. You have the option to configure the maximum number of items to add to the cart,and the default number of rows that appear on the Quick Order widget within thewidget Settings.
4. Place the Quick Order widget in a popup stack. Refer to the Add popup stackssection of this document for further information.
This widget is available for all layouts.
Bulk import using CSV file
To import items using a CSV file, the shopper would click on the Import file button,browse to a CSV file, and select it.
Each row of the import file must contain two columns:
• SKU ID (string)
• Quantity (numeric)
You can specify a maximum number of items that the shopper can import. If thenumber of items in your CSV file exceeds the configured maximum, an error messagewill display.
Quote DetailsThis widget provides the shopper with the details of a quote which they havepreviously requested.
It is available for the Order Details layout.
Related ProductsThis widget provides the shopper with related product recommendations, as definedby the merchant.
Appendix AQuick Order
A-14

Note: Only one instance of this widget should be included in the layout as multiple instancescan display redundant recommendations.
It is available for the Product layout.
The following elements are available for the Related Products widget:
• Related Products Title
• Related Products Carousel
• Image
• Rich Text
• Text
Return ItemsThis widget enables the shopper to initiate returns for returnable items.
It is used when shoppers click the Return Items button whilst viewing past orders on theOrder Details widget.
It is automatically available on the Return Items layout for the latest version of Commerce.However, if you are running an older version of Commerce, you must ensure that you dragthe Return Items widget to the Return Items layout as this layout will appear blank in olderversions. See Upgrade deployed widgets for further details on replacing a widget with thelatest version.
Return Item DetailsThis widget lists the details of items that have been returned by the shopper.
It is available on the Order Details layout.
Request QuoteThis widget enables the shopper to request a quote for their order.
It is available for all layouts.
Review OrderThis widget enables the shopper to review their order before placement.
It is available for the Checkout layout.
Scheduled OrderThis widget displays the details of a scheduled order such as the scheduled order name andID, next order date, schedule details, order contents, and so on.
It is available on the Scheduled Order Layout. See Configure page layouts for scheduledorders for more information.
Appendix AReturn Items
A-15
Scheduled Order ListThis widget displays a list of scheduled orders created by the current shopper.
It is available on the Profile Layout. See Configure page layouts for scheduled ordersfor more information.
Scheduled Order - CheckoutThis widget presents UI controls to the shopper that capture the schedule informationfor a scheduled order, including a name for the scheduled order, the start and enddates, the frequency, and the option to suspend the scheduled order.
It is available for the page types within the Checkout layout. See Configure pagelayouts for scheduled orders for more information.
Search ResultsThis widget displays search results – in a similar way to the Product Listing widget.
It is available for the Search Results layout.
Shopping CartThis widget enables the shopper to view the items added to their shopping cart.
The shopper can also use this widget to amend the cart details.
It is available for the Cart layout.
Split PaymentsThis widget enables the shopper to pay for an order using multiple payment methods.
It is available for the Checkout layout.
Update PasswordThis widget enables the shopper to update their password by entering their currentpassword and then updating this to a new one, and is used in account-basedstorefronts
It is available for the Shopper Profile layout.
Web ContentThis widget allows the merchant to display HTML content.
This includes About Us, Contact Us, Privacy, Returns and Shipping web content.
It is available for all layouts.
Appendix AScheduled Order List
A-16

The following elements are available for the Web Content widget:
• Image
• Rich Text
• Text
Within the Settings tab of each of the Web Content instances you can access a rich texteditor from the Element Library. (If you are using Version 2 of this widget, then it contains bydefault a single rich text element which is accessed upon opening the element in the Layouttab.) This allows you to make style configurations, view source content, and insert images viaa URL.
To add an image via a URL:
1. Find and open your preferred image in the Media page.
2. Copy the image location path.
3. Open the Image Properties icon within the relevant Web Content Widget instanceSettings tab.
4. Paste the URL in the Image Info tab URL text box.Note: When adding an image URL you must add a ‘/file’ immediately before the filename. For example, ‘/general/aboutus.jpg’ would become ‘/file/general/aboutus.jpg’.
5. Click OK to confirm.
Wish List CanvasThis logical widget allows a shopper to create an article page (a static text page) forFacebook Canvas display.
The associated page is shown exclusively on Facebook.
It is available in Components for use in the Wish List layout.
Wish List ContentThis widget works together with the Wish List Header widget to display the appropriate wishlist to the shopper.
In the administration interface, Layout preview, only the logged out state of this widget isdisplayed, showing no content. In the Storefront preview, providing an example of when theshopper is logged in, the contents of widget are then visible.
It is available in Components for use in the Wish List layout.
Wish List HeaderThis widget provides wish list management features that include the uploading of a profileimage, selecting the wish list to be displayed, and creating a wish list.
In Layout preview, only the logged out state of this widget is displayed: an empty line. InStorefront preview, when the shopper is logged in, this widget is visible. When not logged in,this widget is not visible.
Appendix AWish List Canvas
A-17

This widget works with the Wish List Content widget to display the appropriate wish listto the shopper.
It is available in Components for use in the Wish List layout.
Wish List InvitationThis widget is a logical widget with no UI, handling the wish list acceptance flow.
It creates a link to the shopper’s email client so the shopper can send an invitation to afamily member/friend to view their wish list. This widget is included by default. Nothingneeds to be configured to enable it. However, if customization is desired, makechanges to the widget through the Design page.
The wish list invite acceptance flow involves logging out the current user and triggeringthe invitation modal. Once the invitee logs back in to create a new account (for newusers) or logs in as a registered shopper, the link validates the invitation token andjoins the new member to the associated wish list. The widget handles the behavior ofmembers accessing a wish list.
It is available in Components for use in the Wish List layout.
Wish List Notification SettingsThis widget allows shoppers to opt in/opt out of their wish list email notifications.
Notifications include:
• Comment and product.
• New member.
The logged out state is shown in the preview.
It is available in Components for use in the Shopper Profile layout, the Wish List Profilelayout, found under Shopper Wish List Profile.
Wish List Settings HeaderThis widget displays the title and Back to My Account button for the Wish List Settingspage.
It is available in Components for use in the Wish List Profile layout, found underShopper Wish List Profile.
Wish List WelcomeThis widget allows the merchant to provide general welcome information to a shopperabout the wish list capability on their site, such as messaging to encourage wish listcreation, wish list features, and benefits of having a wish list.
In the administration interface, Layout preview, only the logged out state of this widgetis displayed, showing the introductory welcome message that a non-logged-in shoppersees when accessing a wish list, as well as log in and create an account buttons.
Appendix AWish List Invitation
A-18

The Wish List Welcome and Wish List Content Header widgets are associated. The Wish ListWelcome widget displays the logged out UI. The Wish list Header and Wish list Contentwidgets show the logged in UI. The Wish List Header widget determines which wish list toshow, and Wish list Content widget shows the wish list determined by the Wish List Headerwidget.
It is available in Components for use in the Wish List layout.
Appendix AWish List Welcome
A-19