using-oracle-autonomous-transaction-processing-adapter ...
39
Oracle® Cloud Using the Oracle Autonomous Transaction Processing Adapter with Oracle Integration F11444-32 April 2022
-
Upload
khangminh22 -
Category
Documents
-
view
2 -
download
0
Transcript of using-oracle-autonomous-transaction-processing-adapter ...

Oracle® CloudUsing the Oracle Autonomous TransactionProcessing Adapter with Oracle Integration
F11444-32April 2022

Oracle Cloud Using the Oracle Autonomous Transaction Processing Adapter with Oracle Integration,
F11444-32
Copyright © 2019, 2022, Oracle and/or its affiliates.
Primary Author: Oracle Corporation
This software and related documentation are provided under a license agreement containing restrictions onuse and disclosure and are protected by intellectual property laws. Except as expressly permitted in yourlicense agreement or allowed by law, you may not use, copy, reproduce, translate, broadcast, modify, license,transmit, distribute, exhibit, perform, publish, or display any part, in any form, or by any means. Reverseengineering, disassembly, or decompilation of this software, unless required by law for interoperability, isprohibited.
The information contained herein is subject to change without notice and is not warranted to be error-free. Ifyou find any errors, please report them to us in writing.
If this is software or related documentation that is delivered to the U.S. Government or anyone licensing it onbehalf of the U.S. Government, then the following notice is applicable:
U.S. GOVERNMENT END USERS: Oracle programs (including any operating system, integrated software,any programs embedded, installed or activated on delivered hardware, and modifications of such programs)and Oracle computer documentation or other Oracle data delivered to or accessed by U.S. Government endusers are "commercial computer software" or "commercial computer software documentation" pursuant to theapplicable Federal Acquisition Regulation and agency-specific supplemental regulations. As such, the use,reproduction, duplication, release, display, disclosure, modification, preparation of derivative works, and/oradaptation of i) Oracle programs (including any operating system, integrated software, any programsembedded, installed or activated on delivered hardware, and modifications of such programs), ii) Oraclecomputer documentation and/or iii) other Oracle data, is subject to the rights and limitations specified in thelicense contained in the applicable contract. The terms governing the U.S. Government’s use of Oracle cloudservices are defined by the applicable contract for such services. No other rights are granted to the U.S.Government.
This software or hardware is developed for general use in a variety of information management applications.It is not developed or intended for use in any inherently dangerous applications, including applications thatmay create a risk of personal injury. If you use this software or hardware in dangerous applications, then youshall be responsible to take all appropriate fail-safe, backup, redundancy, and other measures to ensure itssafe use. Oracle Corporation and its affiliates disclaim any liability for any damages caused by use of thissoftware or hardware in dangerous applications.
Oracle, Java, and MySQL are registered trademarks of Oracle and/or its affiliates. Other names may betrademarks of their respective owners.
Intel and Intel Inside are trademarks or registered trademarks of Intel Corporation. All SPARC trademarks areused under license and are trademarks or registered trademarks of SPARC International, Inc. AMD, Epyc,and the AMD logo are trademarks or registered trademarks of Advanced Micro Devices. UNIX is a registeredtrademark of The Open Group.
This software or hardware and documentation may provide access to or information about content, products,and services from third parties. Oracle Corporation and its affiliates are not responsible for and expresslydisclaim all warranties of any kind with respect to third-party content, products, and services unless otherwiseset forth in an applicable agreement between you and Oracle. Oracle Corporation and its affiliates will not beresponsible for any loss, costs, or damages incurred due to your access to or use of third-party content,products, or services, except as set forth in an applicable agreement between you and Oracle.

Contents
Preface
Audience v
Documentation Accessibility v
Diversity and Inclusion vi
Related Resources vi
Conventions vi
1 Understand the Oracle Autonomous Transaction Processing Adapter
Oracle Autonomous Transaction Processing Adapter Capabilities 1-1
Cloud Database Connectivity Support 1-3
Oracle Autonomous Transaction Processing Adapter Restrictions 1-4
What Application Version Is Supported? 1-5
Workflow to Create and Add an Oracle Autonomous Transaction Processing AdapterConnection to an Integration 1-5
2 Create an Oracle Autonomous Transaction Processing AdapterConnection
Prerequisites for Creating a Connection 2-1
Download the Credentials Wallet and Obtain Database Details 2-1
Satisfy Bulk Data Import Operation Prerequisites 2-1
Migrate from an Oracle Database Classic Cloud Service Database Instance to anOracle Autonomous Transaction Processing or Oracle Autonomous Data WarehouseDatabase Instance 2-4
Create a Connection 2-4
Configure Connection Properties 2-5
Configure Connection Security 2-6
Configure an Agent Group 2-8
Test the Connection 2-8
iii

3 Add the Oracle Autonomous Transaction Processing AdapterConnection to an Integration
Basic Information Page 3-1
Invoke Stored Procedure Page 3-2
Invoke SQL Statement Page 3-4
Table Operation Page 3-5
Import Tables Page 3-5
Relationships Page 3-6
Create Relationship Page 3-6
Attribute Filtering Page 3-6
Advanced Options Page 3-7
Operations on Table Page 3-7
Invoke Bulk Load from Object Storage Page 3-10
Summary Page 3-11
4 Implement Common Patterns Using the Oracle Autonomous TransactionProcessing Adapter
Methods for Connecting Oracle Integration to an Oracle Autonomous TransactionProcessing - Dedicated Database Instance with the Oracle Autonomous TransactionProcessing Adapter 4-1
Define a Select Operation on Database Tables 4-1
Upload Data from a Flat File into a Database Table 4-4
5 Troubleshoot the Oracle Autonomous Transaction Processing Adapter
Service Name Specified on the Connections Page is Too Long 5-1
Special Characters are Not Supported in Schema Names 5-1
iv

Preface
This guide describes how to configure this adapter as a connection in an integration in OracleIntegration.
Note:
The information in this guide applies to all of your Oracle Integration instances. Itdoesn’t matter which edition you’re using, what features you have, or who managesyour cloud environment. You’ll find what you need here, including notes about anydifferences between the various flavors of Oracle Integration when necessary.
Topics:
• Audience
• Documentation Accessibility
• Diversity and Inclusion
• Related Resources
• Conventions
AudienceThis guide is intended for developers who want to use this adapter in integrations in OracleIntegration.
Documentation AccessibilityFor information about Oracle's commitment to accessibility, visit the Oracle AccessibilityProgram website at http://www.oracle.com/pls/topic/lookup?ctx=acc&id=docacc.
Access to Oracle Support
Oracle customers that have purchased support have access to electronic support through MyOracle Support. For information, visit http://www.oracle.com/pls/topic/lookup?ctx=acc&id=info or visit http://www.oracle.com/pls/topic/lookup?ctx=acc&id=trs if youare hearing impaired.
v

Diversity and InclusionOracle is fully committed to diversity and inclusion. Oracle respects and values havinga diverse workforce that increases thought leadership and innovation. As part of ourinitiative to build a more inclusive culture that positively impacts our employees,customers, and partners, we are working to remove insensitive terms from ourproducts and documentation. We are also mindful of the necessity to maintaincompatibility with our customers' existing technologies and the need to ensurecontinuity of service as Oracle's offerings and industry standards evolve. Because ofthese technical constraints, our effort to remove insensitive terms is ongoing and willtake time and external cooperation.
Related ResourcesSee these Oracle resources:
• Oracle Cloud
http://cloud.oracle.com• Using Integrations in Oracle Integration
• Using the Oracle Mapper with Oracle Integration
ConventionsThe following text conventions are used in this document:
Convention Meaning
boldface Boldface type indicates graphical user interface elements associatedwith an action, or terms defined in text or the glossary.
italic Italic type indicates book titles, emphasis, or placeholder variables forwhich you supply particular values.
monospace Monospace type indicates commands within a paragraph, URLs, codein examples, text that appears on the screen, or text that you enter.
Preface
vi

1Understand the Oracle AutonomousTransaction Processing Adapter
Review the following conceptual topics to learn about the Oracle Autonomous TransactionProcessing Adapter and how to use it as a connection in integrations in Oracle Integration. Atypical workflow of adapter and integration tasks is also provided.
Topics:
• Oracle Autonomous Transaction Processing Adapter Capabilities
• Oracle Autonomous Transaction Processing Adapter Restrictions
• What Application Version Is Supported?
• Workflow to Create and Add an Oracle Autonomous Transaction Processing AdapterConnection to an Integration
Oracle Autonomous Transaction Processing AdapterCapabilities
The Oracle Autonomous Transaction Processing Adapter enables you to integrate the OracleAutonomous Transaction Processing database with Oracle Integration through use of a walletfor direct connectivity. Use the Oracle Autonomous Transaction Processing Adapter toexecute SQL queries or stored procedures in the Oracle Autonomous Transaction Processingdatabase. For example, quotes in Oracle CPQ Cloud can be created as Orders in the OracleAutonomous Transaction Processing database by executing SQL statements or storedprocedures using the Oracle Autonomous Transaction Processing Adapter.
The Oracle Autonomous Transaction Processing Adapter provides the following capabilities:
• Support for using a wallet for direct connectivity to connect to the Oracle AutonomousTransaction Processing - Shared (ATP-S) database in place of using the on-premisesconnectivity agent.
WARNING:
For direct connections (configured without using the connectivity agent), theOracle Autonomous Transaction Processing Adapter can only be used formaking outbound invocations as an invoke connection. This type of OracleAutonomous Transaction Processing Adapter-specific connection cannot beconfigured as a trigger connection in an integration. Use cases related toinbound polling must be implemented using the scheduled orchestrationintegration pattern.
• Support for accessing an Oracle Autonomous Transaction Processing – Dedicated (ATP-D) database with a wallet-based connection that uses the connectivity agent.
1-1

• Support for integrating an Autonomous Transaction Processing - Shared (ATP-S)database with a private endpoint. Integration is achieved with a wallet-basedconnection that uses the connectivity agent. See Configure Connection Security.
• Support for the bulk data import operation. This feature is supported for thefollowing scenarios:
– When using direct connectivity (that is, without use of the connectivity agent)
– When using the Oracle Autonomous Transaction Processing - Shared (ATP-S)database
– With the comma-separated value (CSV) data format only.
A typical bulk data import use case with the Oracle Autonomous TransactionProcessing Adapter consists of getting a data file from an FTP server orapplication (such as an HCM payroll system), placing the file in an object storagebucket, and placing the file contents into an Oracle Autonomous TransactionProcessing - Shared (ATP-S) database. The file can be in a format expected bythe database (for example, a CSV file) or in a format that the database is notexpecting (for example, XML or JSON). In that case, Oracle Integration is used totranslate the format into a CSV format that the database expects.
• Support for creating integrations with Oracle Autonomous Data Warehouse.
• Support for invocation of stored procedures in the Oracle Autonomous Database.
• Support for non-JDBC (PL/SQL record and PL/SQL table) datatypes in outboundinvocations of stored procedures.
• Support for execution of DML statements and SQL queries: Select, Insert,Update, and Delete.
Select the Run a SQL Statement option on the Basic Info page of the AdapterEndpoint Configuration Wizard to execute simple SQL queries. For complex SQLqueries, use stored procedures by selecting the Invoke a Stored Procedureoption on the Basic Info page of the Adapter Endpoint Configuration Wizard.Stored procedures can reduce the complexity of a SQL query.
• Support for updating or inserting multiple records in a single request.
• Support for performing a SELECT operation against database tables.
• Support for the operations on a table feature, which enables you to model SQLstatements with the Adapter Endpoint Configuration Wizard. The operation on atable feature also supports multiple records in a single request.
Note:
In Java, Unicode characters are represented as 2 bytes.
Oracle Autonomous Transaction Processing delivers a self-driving, self-securing, self-repairing database service that can instantly scale to meet demands of mission criticaltransaction processing and mixed workload applications. See AutonomousTransaction Processing.
The Oracle Autonomous Transaction Processing Adapter is one of many predefinedadapters included with Oracle Integration. You can configure the Oracle AutonomousTransaction Processing Adapter as a connection in an integration in OracleIntegration.
Chapter 1Oracle Autonomous Transaction Processing Adapter Capabilities
1-2

Cloud Database Connectivity SupportThis table describes cloud database connectivity support in Oracle Integration. Review thesecapabilities and use the adapter (Oracle Autonomous Transaction Processing Adapter,Oracle Autonomous Data Warehouse Adapter, or Oracle Database Cloud Service Adapter)appropriate to your environment.
Database Direct Connectivitywith Wallet
Connectivity Agentwith Username TokenPolicy
Connectivity Agentwith Wallet
Autonomous Database -Shared
(Oracle AutonomousTransaction Processing -Shared, OracleAutonomous DataWarehouse - Shared)
Supported Not supported Supported
Private Endpoint forAutonomous Database -Shared
(Oracle AutonomousTransaction Processing -Shared PrivateEndpoint, OracleAutonomous DataWarehouse - SharedPrivate Endpoint)
Not supported Not supported becauseOracle AutonomousTransaction Processing -Shared supports onlywallets
Supported
Autonomous Database -Dedicated
(Oracle AutonomousTransaction Processing -Dedicated, OracleAutonomous DataWarehouse - Dedicated)
Not supported Supported Supported
Autonomous Database -Dedicated
(Oracle AutonomousTransaction Processing -Dedicated PrivateEndpoint, OracleAutonomous DataWarehouse - DedicatedPrivate Endpoint)
Not supported Supported Supported
Oracle Database CloudService
Supported Supported Supported
Chapter 1Oracle Autonomous Transaction Processing Adapter Capabilities
1-3

Database Direct Connectivitywith Wallet
Connectivity Agentwith Username TokenPolicy
Connectivity Agentwith Wallet
Oracle CloudInfrastructure - BareMetal and VirtualMachine DatabaseSystems
(Oracle Database CloudService PrivateEndpoint)
Not supported Supported Supported
See Overview of Autonomous Databases and Bare Metal and Virtual Machine DBSystems.
Oracle Autonomous Transaction Processing AdapterRestrictions
Note the following Oracle Autonomous Transaction Processing Adapter restrictions inOracle Integration.
• Using the bulk data import operation with the connectivity agent is not supported.
• The database password length cannot exceed 20 characters.
• Database schema names with hyphens (-) are not supported.
• Starting with the August 2021 release, all new integrations that include storedprocedure or PureSQL database operations must finish within 240 seconds.Otherwise, the query times out and a Limit Exceeded error occurs. This restrictionapplies to new integrations only and impacts both connectivity agent and non-connectivity agent integrations. Integrations created prior to the August 2021release are not impacted by this restriction. The Perform an Operation on a Tableoperation (for example, insert, update, insert or update (merge), or select) alreadysupports this time threshold.
• Access to object storage is a requirement for using the bulk data import operation.Oracle Integration for SaaS consists of a subscription-based account dedicated toOracle Integration, and does not include services such as object storage. Youmust obtain a separate trial account to provision object storage for use with theOracle Autonomous Transaction Processing Adapter.
• For direct connections (configured without using the connectivity agent), theOracle Autonomous Transaction Processing Adapter can only be used for makingoutbound invocations as an invoke connection. This type of Oracle AutonomousTransaction Processing Adapter-specific connection cannot be configured as atrigger connection in an integration. Use cases related to inbound polling must beimplemented using the scheduled orchestration integration pattern.
• The PL/SQL boolean type is not supported as an IN/OUT parameter in a storedprocedure. However, you can create a wrapper stored procedure that convertsPL/SQL boolean to an integer and use those wrapper stored procedures in OracleIntegration.
Chapter 1Oracle Autonomous Transaction Processing Adapter Restrictions
1-4

• The Oracle Autonomous Transaction Processing Adapter uses JDBC drivers to interactwith the database and is restricted by JDBC driver constraints. Therefore, nested PL/SQLtypes ( for example, RECORD types inside a TABLE type) are not supported as IN/OUTparameters in a stored procedure. However, you can define OBJECT types inside theTABLE type.
• Cross schema stored procedures are not allowed in cases where Oracle Integration mustgenerate the wrappers.
Note:
There are overall service limits with Oracle Integration. A service limit is thequota or allowance set on a resource. See Service Limits.
What Application Version Is Supported?For information about which application version is supported by this adapter, see theConnectivity Certification Matrix.
See Connectivity Certification Matrix.
Workflow to Create and Add an Oracle Autonomous TransactionProcessing Adapter Connection to an Integration
You follow a very simple workflow to create a connection with an adapter and include theconnection in an integration.
Step Description More Information
1 Create the adapter connections forthe applications you want tointegrate. The connections can bereused in multiple integrations andare typically created by theadministrator.
Create an Oracle Autonomous Transaction ProcessingAdapter Connection
2 Create the integration. When youdo this, you add trigger and invokeconnections to the integration.
Create Integrations and Add the Oracle AutonomousTransaction Processing Adapter Connection to anIntegration
3 Map data between the triggerconnection data structure and theinvoke connection data structure.
Map Data of Using Integrations in Oracle Integration
4 (Optional) Create lookups that mapthe different values used by thoseapplications to identify the sametype of object (such as gendercodes or country codes).
Manage Lookups of Using Integrations in OracleIntegration
5 Activate the integration. Manage Integrations of Using Integrations in OracleIntegration
6 Monitor the integration on thedashboard.
Monitor Integrations of Using Integrations in OracleIntegration
Chapter 1What Application Version Is Supported?
1-5

Step Description More Information
7 Track payload fields in messagesduring runtime.
Assign Business Identifiers for Tracking Fields inMessages and Manage Business Identifiers for TrackingFields in Messages of Using Integrations in OracleIntegration
8 Manage errors at the integrationlevel, connection level, or specificintegration instance level.
Manage Errors of Using Integrations in Oracle Integration
Chapter 1Workflow to Create and Add an Oracle Autonomous Transaction Processing Adapter Connection to an Integration
1-6

2Create an Oracle Autonomous TransactionProcessing Adapter Connection
A connection is based on an adapter. You define connections to the specific cloudapplications that you want to integrate.
Topics:
• Prerequisites for Creating a Connection
• Create a Connection
Prerequisites for Creating a ConnectionSatisfy the following prerequisites appropriate to your environment for creating a connectionwith Oracle Integration.
• Download the Credentials Wallet and Obtain Database Details
• Satisfy Bulk Data Import Operation Prerequisites
• Migrate from an Oracle Database Classic Cloud Service Database Instance to an OracleAutonomous Transaction Processing or Oracle Autonomous Data Warehouse DatabaseInstance
Download the Credentials Wallet and Obtain Database DetailsYou must download the credentials wallet and obtain database details.
1. Download the client credentials wallet from the Oracle Autonomous TransactionProcessing instance. See Download Client Credentials (Wallet) of Getting Started withOracle Autonomous Database for Transaction Processing and Mixed Workloads.
2. Ensure that the target database is accessible.
3. Ensure that you have write permissions to the database.
4. Ensure that you have the required permissions to run stored procedures and SQLstatements.
5. Know the database service name.
6. Know the database service username and password for connecting to the database.
Satisfy Bulk Data Import Operation PrerequisitesIf you want to use the bulk data import operation, you must configure the Oracle AutonomousTransaction Processing Adapter to use the JDBC With OCI Signature security policy on theConnections page. Before you can successfully configure this security policy on theConnections page, you must complete the following prerequisites.
2-1

1. Create an object storage bucket in Oracle Cloud Infrastructure and obtain theOCID value of the compartment in which you create the storage bucket. You needthis value when configuring the security policy on the Connections page.
You specify the OCID of the object storage user on the Connections page whenconfiguring the JDBC With OCI Signature security policy. This user should havethe manage bucket and manage object privileges. Set the following policies tomanage privileges on the bucket and object in the object storage:
Allow group group_name to manage buckets in compartment compartment_name
Allow group group_name to manage objects in compartment compartment_name
See How Policies Work and Policy Reference.
2. Obtain the tenancy OCID and user OCID details in the Oracle Cloud InfrastructureConsole. You need these values when configuring the security policy on theConnections page. When you sign up for Oracle Cloud Infrastructure, Oraclecreates a tenancy for your company, which is a secure and isolated partition withinOracle Cloud Infrastructure where you can create, organize, and administer yourcloud resources.
a. Sign in to the Oracle Cloud Infrastructure Console.
b. In the upper left corner, select
, then select Home > Governance & Administration > Tenancy Details.
c. In the Tenancy Information section, click Show to display the OCID tenancyvalue.
d. Copy the value. You need this value when configuring the security policy onthe Connections page.
e. In the upper right corner, click the Profile icon and select User Settings.
Chapter 2Prerequisites for Creating a Connection
2-2

Note:
You can also select
in the upper left corner, then select Identity > Users to access the userprofile.
f. Click Show to display the OCID user value.
g. Copy the value.
3. Create an API signing key. You then specify the signing key in Oracle CloudInfrastructure.
a. Sign in to the Oracle Cloud Infrastructure Console to upload the public key.
b. In the upper left corner, select
, then select Identity > Users.
c. On the Users page, click the link of the user name to use.
d. Scroll down to the API Keys section, and click Add Public Key.
Note:
Only a private key without a pass phrase/password is supported.
e. In the Add Public Key dialog, enter the contents of the public key you created, andclick Add.
f. Copy the finger print value generated by Oracle Cloud Infrastructure. You need thisvalue when configuring the JDBC With OCI Signature security policy on theConnections page.
Chapter 2Prerequisites for Creating a Connection
2-3

Migrate from an Oracle Database Classic Cloud Service DatabaseInstance to an Oracle Autonomous Transaction Processing or OracleAutonomous Data Warehouse Database Instance
Perform the following steps if you want to migrate from an Oracle Database ClassicCloud Service database instance to an Oracle Autonomous Transaction Processing orOracle Autonomous Data Warehouse database instance.
1. Migrate all the required database objects, stored procedures, wrapper procedures,and tables to the destination Oracle Autonomous Transaction Processing orOracle Autonomous Data Warehouse database instance.
2. Change the Oracle Database Cloud Service Adapter connection details to point toan Oracle Autonomous Transaction Processing or Oracle Autonomous DataWarehouse database instance.
a. Go to the Connection page for the Oracle Database Cloud Service Adapter.
b. Click Configure Connectivity.
c. Specify the new host name.
d. Specify the new service name and click OK.
e. Click Configure Security.
f. Select the Oracle Wallet security policy.
g. Upload the wallet.
h. Specify the wallet password and reconfirm it.
i. Specify the database service username.
j. Specify the database service password, reconfirm it, and click OK.
k. Delete the agent from the connection.
3. Test the connection.
4. Once the test is successful, click Save to save the connection details.
5. Reactivate the integrations.
Create a ConnectionBefore you can build an integration, you have to create the connections to theapplications with which you want to share data.
To create a connection in Oracle Integration:
1. In the left navigation pane, click Home > Integrations > Connections.
2. Click Create.
Chapter 2Create a Connection
2-4

Note:
You can also create a connection in the integration canvas of:
• An orchestrated integration (See Define Inbound Triggers and OutboundInvokes.)
• A basic routing integration (See Add a Trigger (Source) Connection.)
3. In the Create Connection — Select Adapter dialog, select the adapter to use for thisconnection. To find the adapter, scroll through the list, or enter a partial or full name in theSearch field and click
Search.
4. In the Create Connection dialog, enter the information that describes this connection.
a. Enter a meaningful name to help others find your connection when they begin tocreate their own integrations. The name you enter is automatically added in capitalletters to the Identifier field. If you modify the identifier name, don't include blankspaces (for example, SALES OPPORTUNITY).
b. Enter optional keywords (tags). You can search on the connection keywords on theConnections page.
c. Select the role (direction) in which to use this connection (trigger, invoke, or both).Only the roles supported by the adapter are displayed for selection. When you selecta role, only the connection properties and security policies appropriate to that role aredisplayed on the Connections page. If you select an adapter that supports bothinvoke and trigger, but select only one of those roles, you'll get an error when you tryto drag the adapter into the section you didn't select. For example, let's say youconfigure a connection for the Oracle Service Cloud (RightNow) Adapter as only aninvoke. Dragging the adapter to a trigger section in the integration produces anerror.
d. Enter an optional description of the connection.
5. Click Create.
Your connection is created. You're now ready to configure the connection details, such asconnection properties, security policies, connection login credentials, and (for certainconnections) agent group.
Configure Connection PropertiesEnter connection information so your application can process requests.
1. Go to the Connection Properties section.
2. If configuring the connection to use direct connectivity (that is, you are not using theconnectivity agent):
a. In the Host field, specify the host.
b. In the Service Name field, specify the database service name. It is recommendedthat you use the low profile as the database service name. The database servicename is not the same as the database service username that you specify in theSecurity section.
Chapter 2Create a Connection
2-5

Note:
The service name must be the same as the one in the tnsnames.orafile in the wallet. However, if you receive an error when testing theconnection, it may be because the name is too long. See ServiceName Specified on the Connections Page is Too Long.
3. If configuring the connection to use the connectivity agent:
a. In the Host field, specify the host.
b. In the Port field, specify the SQL*Net port.
c. In the SID field, specify the database SID.
d. In the Service Name field, specify the database service name. It isrecommended that you use the low profile as the database service name. Thedatabase service name is not the same as the database service usernamethat you specify in the Security section.
Note:
You must specify either a SID or service name value. Do not specifyvalues for both fields.
Configure Connection SecurityConfigure security for your database connection by selecting the security policy andsetting login credentials. A database connection is only allowed for publicly accessibledatabases.
1. Go to the Security section.
2. Select the security policy.
3. If you select JDBC Basic Authentication:
Note:
Using the Username Password Token security policy, you can create andsuccessfully test the connection to the database without the connectivityagent if the database is present in the same private network as theOracle Integration instance. If the database is not in the same privatenetwork, it is not recommended that you connect without the connectivityagent because the connection won't be secure.
a. Enter the database service username and password to connect to the OracleAutonomous Transaction Processing database. The database serviceusername is the schema username for the user to log in to the database. Thedatabase service username is not the same as the database service namethat you specify in the Connection Properties section.
b. Re-enter the password a second time.
Chapter 2Create a Connection
2-6

4. If you select JDBC Over SSL:
Note:
The Oracle Autonomous Transaction Processing Adapter can connect throughthe connectivity agent when using the wallet. It can be used as a triggerconnection only if the connectivity agent is used in the connection. However, alloperations that you select on the Basic Info page such as Run a SQLStatement, Invoke a Stored Procedure, and Perform an Operation On atable are supported when configuring the adapter to use direct connectivity(without the connectivity agent).
a. In the Wallet field, select the check box, then click Upload to upload the wallet file.
b. Enter the wallet password, then re-enter it a second time to confirm.
c. Enter the database service username and password to connect to the OracleAutonomous Transaction Processing database. The database service username isthe schema username for the user to log in to the database. The database serviceusername is not the same as the database service name that you specify in theConnection Properties section.
d. Enter the database password a second time to confirm.
5. If you select JDBC With OCI Signature:
Note:
This option is required to use the bulk data import operation and is onlysupported when using direct connectivity (that is, you are not using theconnectivity agent).
a. In the Wallet field, select the check box, then click Upload to upload the wallet file.
b. Enter the wallet password, then re-enter it a second time to confirm.
c. Enter the database service username and password to connect to the OracleAutonomous Transaction Processing - Shared (ATP-S) database. The databaseservice username is the schema username for the user to log in to the database. Thedatabase service username is not the same as the database service name that youspecify in the Connection Properties section.
d. Enter the database password a second time to confirm.
e. In the Object Storage Region field, specify the region in which your object storage islocated (for example, us-ashburn-1).
f. In the Object Storage Tenancy OCID field, specify the value you copied from theOracle Cloud Infrastructure Console (for example,ocid1.tenancy.oc1.alphanumeric.value). See Prerequisites for Creating aConnection.
g. In the Object Storage Compartment OCID field, specify the value you copied fromthe Oracle Cloud Infrastructure Console (for example,ocid1.compartment.oc1.alphanumeric.value).
Chapter 2Create a Connection
2-7

h. In the Object Storage User OCID field, specify the value you copied from theOracle Cloud Infrastructure Console (for example,ocid1.user.oc1.alphanumeric.value).
i. In the Private Key field, click Upload to select the key you created. Ensurethat the key is in RSA (PKCS1) format.
Note:
Only a private key without a pass phrase/password is supported.
j. In the Finger Print field, enter the finger print that was generated when youcreated the key in the Oracle Cloud Infrastructure Console.
Configure an Agent GroupConfigure an agent group for accessing the service hosted on your premises behindthe fire wall.
1. Click Configure Agents.
The Select an Agent Group page appears.
2. Click the name of the agent group.
3. Click Use.
To configure an agent group, you must download and install the on-premisesconnectivity agent. See Download and Run the Connectivity Agent Installer and AboutConnectivity Agents and Integrations Between On-Premises Applications and OracleIntegration in Using Integrations in Oracle Integration.
Test the ConnectionTest your connection to ensure that it's configured successfully.
1. In the page title bar, click Test. What happens next depends on whether yourconnection uses a Web Services Description Language (WSDL) file.
If YourConnection...
Then...
Doesn't use a WSDL The test starts automatically and validates the inputs you providedfor the connection.
Uses a WSDL A dialog prompts you to select the type of connection testing toperform:
• Validate and Test: Performs a full validation of the WSDL,including processing of the imported schemas and WSDLs.Complete validation can take several minutes depending onthe number of imported schemas and WSDLs. No requests aresent to the operations exposed in the WSDL.
• Test: Connects to the WSDL URL and performs a syntaxcheck on the WSDL. No requests are sent to the operationsexposed in the WSDL.
2. Wait for a message about the results of the connection test.
Chapter 2Create a Connection
2-8

• If the test was successful, then the connection is configured properly.
• If the test failed, then edit the configuration details you entered. Check for typos,verify URLs and credentials, and download the diagnostic logs for additional details.Continue to test until the connection is successful.
• If using the JDBC With OCI Signature security policy, compartment ID verificationdoesn't occur during the connection test. The Adapter Endpoint Configuration Wizardhandles verification and authorization issues with the compartment OCID.
3. When complete, click Save, then click
.
Chapter 2Create a Connection
2-9

3Add the Oracle Autonomous TransactionProcessing Adapter Connection to anIntegration
When you drag the Oracle Autonomous Transaction Processing Adapter into an integration,the Adapter Endpoint Configuration Wizard appears. This wizard guides you throughconfiguration of Oracle Autonomous Transaction Processing Adapter endpoint properties.
The following sections describe the wizard pages that guide you through configuration of theOracle Autonomous Transaction Processing Adapter as an invoke in an integration. TheOracle Autonomous Transaction Processing Adapter cannot be configured as a triggerconnection in an integration.
Topics:
• Basic Information Page
• Invoke Stored Procedure Page
• Invoke SQL Statement Page
• Table Operation Page
• Operations on Table Page
• Invoke Bulk Load from Object Storage Page
• Summary Page
Basic Information PageSpecify a name, description, and operation type on the Basic Info page of each trigger andinvoke connection in your integration.
Element Description
What do you want to call yourendpoint?
Identifies the connection with a meaningful name thatdefines the purpose of connection. For example,CreateEmployeeInDB for a database connection that addsnew employee data. The name can include Englishalphabetic characters, numbers, underscores, and dashes.The name cannot include:
• Blank spaces (for example, My DB Connection)
• Special characters (for example, #;83& orrigh(t)now4)
• Multibyte characters
3-1

Element Description
What operation do you want toperform?
• Invoke a Stored Procedure — Select to run a storedprocedure on the database.
• Run a SQL Statement — Select to run a SQL query onthe database.
• Perform an Operation On a Table — Select to performone of the following operations on a table. You canupdate or insert multiple records in a single request.
– Insert– Update– Insert or Update (Merge)– Select
• Perform Bulk Data Import Operation — Select toperform one of the following bulk data import operationson a table. This option is only displayed if you configuredthe JDBC With OCI Signature security policy and areusing direct connectivity (that is, the connection is notconfigured to use the connectivity agent).– Perform Bulk Load: Loads a file into the object
storage bucket and puts it into the specifieddatabase table.
– Fetch Load Status: Fetches the status of a bulkdata import operation (either completed, failed, or inprogress).
Notes• When operations in a SQL statement such as Update,
Concat, and Merge accept values for the inboundinvocation of an integration, they do not work. Forexample, the following query does not work:
select concat(empname, 'ss') from DB_AQ where empno=#empno
select empno from DB_AQ where empname=concat(#empname, 'YY')
As a workaround, handle these scenarios duringpayload mapping. For example, perform a concatenationduring mapping of the payload. The final output can thenbe passed as input to the SQL query.
• IN/BETWEEN operators are not supported with bindparameters. Use greater than (>) and less than (<)operators instead.
Invoke Stored Procedure PageEnter the invoke stored procedure values. The Invoke a Stored Procedure pageappears when you select Invoke a Stored Procedure as the operation to perform onthe Basic Info page.
You can specify the following values on the Invoke a Stored Procedure page.
Chapter 3Invoke Stored Procedure Page
3-2

• Select the database schema that includes the data you want to query (for example, youwant to query details about an employee based on their employee ID).
• Select a stored procedure or package from the list that is displayed after you select thedatabase schema.
Note:
• Stored procedures return binary large objects (for example, BLOB databasedata types) as base64Binary types in XML. Depending upon the use cases,these can be decoded during transformation using inbuilt functions such asdecodeBase64 or can be passed as-is for downstream processing.
• Adapter input/output parameters are defined based on the stored procedureIN/OUT parameters. The IN parameter corresponds to the request and the OUTparameter is translated as the response. Procedures without parameters arenot listed in the Adapter Endpoint Configuration Wizard for database versions18c and above. You can pass a dummy parameter or create a wrapperprocedure with a dummy parameter to list it in the wizard.
• Stored procedures that contain Boolean or %rowtype as IN/OUT parametersare not supported. You can create wrappers on top of these stored proceduresto use them.
Element Description
Select Schema Select a database schema from the list. This actionrefreshes the page to display fields for selecting a packageor procedure to invoke. Special characters (for example, #)are not supported in schema names. See Special Charactersare Not Supported in Schema Names.
Select Package Select the database package. This action refreshes the pageto display the procedures available for the package.
When importing a predefined integration package containingPLS or SQL stored procedures, the wrapper package is notrecreated in the target database. To add the wrapperpackage, confirm JPublisher is installed on the targetdatabase and define the original stored procedure. Afterconfirming JPublisher is installed and the stored procedure isdefined, open the PL/SQL Wrapper utility and execute theadd scripts command to add the scripts included in theexported inventory archives (IAR) file.
Select Procedure Displays the in (inbound), out (outbound), and in/out(inbound/outbound) parameters for the selected package.
Arguments Display the in, out, and in/out parameters that are passedwith this procedure.
Chapter 3Invoke Stored Procedure Page
3-3

Invoke SQL Statement PageEnter the SQL statement values. The Run a SQL Statement page appears when Runa SQL Statement is selected as the operation to perform on the Basic Info page. Youcan specify the following values on the Run a SQL Statement page.
Note:
• Do not use schema/database names in SQL queries. Configure thedetails in the connection. For example:
Update HR.employee set HR.employee.first_name = 'Name' where HR.employee.employee_id='1'
can be changed to a simple query, such as:
Update employee set first_name = 'Name' where employee_id='1'
where HR is used in the connection details. This restricts a user withspecific privileges to a particular schema/database.
• When configuring the adapter as an invoke connection, ensure thatproper spaces are provided between key words for a pure SQLstatement. For example, the following statement fails during integrationactivation because there is no blank space between VALUES and (#.
INSERT INTO table_name VALUES(#EMPNO, #EMPNAME)
Add a blank space between VALUES and (#, and the statement issuccessfully processed.
INSERT INTO table_name VALUES (#EMPNO, #EMPNAME)
• When configuring the adapter as an invoke connection, define all bindparameters in the same order and define the parameters that takesabsolute values at the end.
INSERT INTO table_name (EMPNO, EMPNAME, EMPUUID, EMPPHONE, EMPHIREDATE) VALUES (#EMPNO, #EMPNAME, Sys_guid(), NULL, SYSDATE)
Element Description
SQL Query Identifies the SQL query.
Validate SQL Query Validates the SQL query syntax.
Chapter 3Invoke SQL Statement Page
3-4

Element Description
Status Displays the SQL query syntax validation status. Whensyntax validation is successful, the message Success!appears.
Table Operation PageYou can update or insert multiple records in a single request.
Note:
When you change the structure of a table (for example, you add or delete acolumn), you must re-import the table by doing a re-edit in the Adapter EndpointConfiguration Wizard. Go to the Import Tables page and re-import the same table,then click OK > Next > Done to complete the wizard. Only then are the tablechanges reflected in the integration.
Topics:
• Relationships Page
• Create Relationship Page
• Attribute Filtering Page
• Operations on Table Page
Import Tables PageFilter and select the tables to import based on the selected schema. These tables are used togenerate a SQL statement based on the operation selected.
You can import the following number of tables:
• A maximum of three tables for insert, update, and insert or update actions
• A maximum of five tables for the select - operation on table feature
• A maximum of five tables for the polling feature
Element Description
Schema Select the schema to use. The page is refreshed to displaythe tables available for selection.
Name Filter Filter the display of tables.
Available Select the tables on which to insert or update records.
Selected Displays the selected tables.
Chapter 3Table Operation Page
3-5

Relationships PageReview the relationships between the selected tables and optionally create, remove, orrename relationships. These relationships are used in the insert or update SQLstatements.
Element Description
Relationships Table Displays the relationships defined on the root databasetable and any related tables (one-to-one or one-to-many).
Create Click to create new relationships.
Remove Click to remove a selected relationship.
Rename Click to rename a selected relationship.
Create Relationship PageSpecify the parent and child relationships to use in the SQL statement.
Element Description
Parent Table Select the parent table.
Child Table Select the child table.
Mapping Type Select the mapping type (one-to-many, one-to-one, orone-to-one with the foreign key on the child table). Forexample, if you selected Employees as the parent tableand Departments as the child table, the followingoptions are displayed:• Employees has a 1:1 Relationship with
Departments• Employees has a 1:1 Relationship with
Departments (Foreign Key on Child table)• Employees has a 1:M Relationship with
Departments
Parent and Child Table Associate the foreign key fields to the primary key fields.
Relationship Name Optionally name the relationship (a default name isgenerated).
Attribute Filtering PageFilter out the attributes to exclude.
Element Description
Attributes Tree Deselect any attributes to exclude from the databasequery. You cannot exclude primary key attributes.
Chapter 3Table Operation Page
3-6

Advanced Options PageProvide additional advanced options such as sequencing. This is only valid for the insert andmerge operations.
Element Description
Table Displays the selected table.
Sequence Specify that the primary key is assigned from a sequence onany insert. Click Search and select a sequence from the list.
Operations on Table PageSelect the database tables. To use the bulk extract feature, you must choose the SELECToperation from the Perform an Operation On a Table list on the Basic Info page.
Operations on Table Page
Element Description
Schema Select the database schema that includes the tables toprocess.
Table Name Enter a filter with which to search the schema (for example,%TAB to search for tables with TAB in the name).
Table Type Specify the table type filter to get a subset of the appropriatedatabase objects, then click Search.
• ALL• TABLE• VIEW
Filter By Enter the initial letters to filter the display of table names.
Table Names Select the tables to import.
Note: It is recommended that you to import the tablestogether for the adapter to automatically recognize therelationship. If you import the tables separately, you mustexplicitly create the table relationship.
Import Tables Click to import the tables. The page is refreshed for you toselect the parent database table.
Select the parent database table Select the parent (root) table from the list. If using multiplerelated tables, this is the top-level parent table in therelationship. After making your selection, the page isrefreshed for you to view and edit the table relationships.
Add || Remove Tables Click to add more tables or remove tables no longer in use.
Review and manage parent databasetable relationships
Click Edit to view and edit the table relationships. Therelationships automatically identified by the adapter aredisplayed. See Review and manage parent database tablerelationships Option.
Review and filter columns fromselected database tables
Click Edit to view and edit the table attributes. You candeselect any attributes to exclude from the database queries.Primary key attributes cannot be excluded. See Review andfilter columns from selected database tables Option.
Chapter 3Operations on Table Page
3-7

Element Description
Review and edit SQL query Click Edit to view and edit the default SQL query. See Review and edit SQL query Option.
Note: This field is available for a Select operation on thetable.
Review and manage parent database table relationships Option
Table 3-1 - Review and manage parent database table relationships Option
Element Description
Create New Click to create a new relationship.
Relations View the existing parent and child tablerelations automatically created by the adapter.
Review and filter columns from selected database tables Option
Table 3-2 - Review and filter columns from selected database tables Option
Element Description
Attributes Tree View and deselect attributes automaticallycreated by the adapter.
Review and edit SQL query Option
Note:
This is only applicable for a Select operation on a table.
Table 3-3 - Review and edit SQL query Option
Element Description
SQL Edit Click to manually edit the query in the SQLQuery field.
Chapter 3Operations on Table Page
3-8

Table 3-3 (Cont.) - Review and edit SQL query Option
Element Description
Edit using Expression Builder Click to edit the query in the ExpressionBuilder.
• Add New: Click to add new criteria to theSQL query.
1. Click Add New.
2. In the First Argument field, clickEdit, and select the argument to add(for example, deptno).
3. In the Operator field, select theoperator to use for the comparisonfrom the dropdown list (for example,=).
4. In the Second Argument field, selectthe option to use:– Literal: Click to specify a value.
If selected, you are prompted toselect the data type (for example,integer) and specify the value.
– Parameter: Click to specify abind parameter.
– Query Key: Click to run thecomparison against anothercolumn in the table.
New criteria is appended to the SQLquery with a WHERE clause. If you addsubsequent SQL queries, they areappended to the SQL query with an ANDclause
• Add Nested: Click to add nested criteriato the SQL query.
• Edit: Click the edit the SQL criteria youspecified.
• Remove: Click the edit the SQL criteriayou specified.
Click to edit the query with the ExpressionBuilder.
Maximum Number of Records to be fetched Select the number of records to fetch with thisSQL query.
Chapter 3Operations on Table Page
3-9

Invoke Bulk Load from Object Storage PageSpecify the details for performing a bulk data import operation.
Element Description
Select Bucket Select the object storage bucket in which to place or delete thefile. The object storage buckets available for selection are locatedin the compartment that you specified on the Connections pagewhen creating the connection.
Note: If you don't have the privilege to access the buckets, a Useris Not authorized message is shown on the screen and noother options are listed.
Delete file from objectstorage after operationcompletion
Select to delete the file from the object storage bucket. Otherwise,the file remains in the bucket.
Review and specify thecopy_data format options
Click Edit to optionally specify the file format options. If notspecified here or sent in the mapper, all default options are used.The following options are displayed by default.• Delimiter: Select the field delimiter used in the file.
– Pipe– Single space– Comma– Semicolon– Tab– Other (Select to display a field for entering a custom
delimiter.)• Record Delimiter: Select the record delimiter used in the file.
A new line value is the default value.• Skip Headers: Specify the number of rows to skip at the top
of the file (if any).• Show Advanced Options: Click to optionally specify
advanced formatting options for the file. If no formattingoptions are specified, the default settings are used.If you want to specify an option that is not available in thewizard, you can send the format options as a JSON string inthe mapper as follows.
'{"delimiter" : "\"|\"", "quote" : "\"^\"", "ignoremissingcolumns" : "true", "dateformat" : "YYYY-MM-DD-HH24-MI-SS", "blankasnull" : "true"}'
Note: For special character usage in the JSON string, whenthe format options are sent in the mapper, the optionsprovided in the Adapter Endpoint Configuration Wizard areoverridden. In this case, the format options sent in themapper are only considered. It is recommended that youselect only one way of providing the format options (eitherfrom the wizard or through the mapper). If both are provided,the options in the mapper are only considered.
When complete, click OK to return to the Bulk Load fromObject Storage page.
Select Schema Select the database table schema.
Chapter 3Invoke Bulk Load from Object Storage Page
3-10

Element Description
Select Table Select the database table in which to write the file data. Based onyour selection, all the fields in that table are displayed forselection.
Table Columns Displays the columns (fields) in the table.Note: When selecting the fields in the table, select all the fields inthe order of the incoming data. If none of the fields are selected, adefault value is considered that takes into account that the datafields are in the same order as the table fields. Table columnnames with special characters such as spaces or a # are notsupported.
For example, assume the CSV file was formatted as follows:
booker12|123|Rachel|Johnsongray07|234|Laura|Johnson1johnson81|345|Craig|Johnson2jenkins46|456|Mary|Johnson
As an example, you may select to move the following tablecolumns to the Re-order columns as per input data list to matchthe order of the CSV file:• USERNAME• IDENTIFIER• FIRSTNAME• LASTNAME
Summary PageYou can review the specified adapter configuration values on the Summary page.
Element Description
Summary Displays a summary of the configuration values you defined onprevious pages of the wizard.
The information that is displayed can vary by adapter. For someadapters, the selected business objects and operation name aredisplayed. For adapters for which a generated XSD file is provided,click the XSD link to view a read-only version of the file.
To return to a previous page to update any values, click the appropriatetab in the left panel or click Back.
To cancel your configuration details, click Cancel.
Chapter 3Summary Page
3-11

4Implement Common Patterns Using theOracle Autonomous Transaction ProcessingAdapter
You can use the Oracle Autonomous Transaction Processing Adapter to implement thefollowing common patterns.
Topics:
• Methods for Connecting Oracle Integration to an Oracle Autonomous TransactionProcessing - Dedicated Database Instance with the Oracle Autonomous TransactionProcessing Adapter
• Define a Select Operation on Database Tables
• Upload Data from a Flat File into a Database Table
Methods for Connecting Oracle Integration to an OracleAutonomous Transaction Processing - Dedicated DatabaseInstance with the Oracle Autonomous Transaction ProcessingAdapter
Connectivity from Oracle Integration to an Oracle Autonomous Transaction Processing-Dedicated database instance using the Oracle Autonomous Transaction Processing Adaptercan be accomplished through the following methods.
• Connectivity agent: Use this approach when the Oracle Autonomous TransactionProcessing - Dedicated database instance is not publicly accessible and resides within aprivate subnet in your Virtual Cloud Network (VCN). With this topology, the OracleAutonomous Transaction Processing Adapter cannot directly access the OracleAutonomous Transaction Processing- Dedicated database instance. The connectivityagent must be deployed in your network to allow the connectivity agent access to theOracle Autonomous Transaction Processing- Dedicated database instance.
• Direct connectivity: Use this approach when the Oracle Autonomous TransactionProcessing - Dedicated database instance is directly accessible from Oracle Integration.In this case, the connectivity agent is not necessary. However, Oracle stronglyrecommends using Transport Level Security (TLS ) for the communication betweenOracle Integration and the Oracle Autonomous Transaction Processing- Dedicateddatabase instance to ensure the data being transmitted is encrypted in motion.
Define a Select Operation on Database TablesYou can define a SELECT operation to perform against database tables. This section providesa high level overview of creating an integration in which an Oracle Autonomous Transaction
4-1

Processing Adapter is configured as an invoke connection to retrieve table recordsfrom the Oracle Database.
To define a SELECT operation on database tables:
1. Configure SOAP Adapter and Oracle Autonomous Transaction ProcessingAdapter connections.
2. Select App Driven Orchestration in the Create Integration - Select a Style dialog.
3. Add and configure the SOAP Adapter as a trigger connection in the integration.
The SOAP Adapter is configured to accept an input and return the responsereceived from the invoke connection.
4. Add the Oracle Autonomous Transaction Processing Adapter as an invokeconnection in the integration.
This invokes the Adapter Endpoint Configuration Wizard.
5. On the Basic Info page, select Perform an Operation On a Table as the type ofoperation to perform and Select as the operation to perform on the table.
6. On the Operate On Table page, specify the schema and tables to import, and clickImport Tables. For this example, the following values are specified.
• Schema: HR
• Table Type: TABLE
• Table Name: %TAB• Selected Tables: EMPLOYEE_TAB and DEPARTMENT_TAB. The tables are
imported together for the Oracle Autonomous Transaction Processing Adapterto recognize the relation between the tables.
The page is refreshed for you to select the parent (root) database table.
7. Select the parent table (for this example, DEPARTMENT_TAB is selected).
This page enables you to:
• View the automatically created table relationships and create new ones.
• View and deselect attributes.
Chapter 4Define a Select Operation on Database Tables
4-2

• View and edit the automatically created SQL query.
8. If you want to edit the automatically created SQL query, click Edit to the right of Reviewand edit SQL Query.
a. Click Edit using Expression Builder. You can also manually edit the SQL query byclicking SQL Edit.
b. Click Add New to add new criteria to the SQL query. The automatically created SQLquery is displayed below the link.
c. Specify values for the following fields, and click OK.
• First Argument
• Operator
• Second Argument
For example:
Chapter 4Define a Select Operation on Database Tables
4-3

The criteria you specify are appended to the existing SQL query as part of aWHERE clause. Any additional SQL query criteria you specify are appendedas part of an AND clause. For example:
d. Click OK.
9. Click Next.
10. View your selections on the Summary page. Links to the tables you selected toimport and SQL query you specified are provided.
11. Click Done to exit the Adapter Endpoint Configuration Wizard.
12. Complete the integration by performing mapping and tracking tasks.
13. Activate the integration.
14. Copy the link to invoke the integration from under the How to Run link.
15. Invoke the integration from a tool such as the SOAP UI.
16. Review the values returned by the Oracle Autonomous Transaction ProcessingAdapter.
Upload Data from a Flat File into a Database TableThe Oracle Autonomous Transaction Processing Adapter can read rows of data inchunks from a comma-separated value (CSV) or XML file and insert them into a tablein the Oracle Autonomous Transaction Processing database. With support for cloudlibraries in the Oracle Autonomous Transaction Processing database, this operationcan be completed much faster. This section provides details about how to use the
Chapter 4Upload Data from a Flat File into a Database Table
4-4
Oracle Autonomous Transaction Processing Adapter to insert data from a large, flat CSV fileinto an Oracle Autonomous Transaction Processing database.
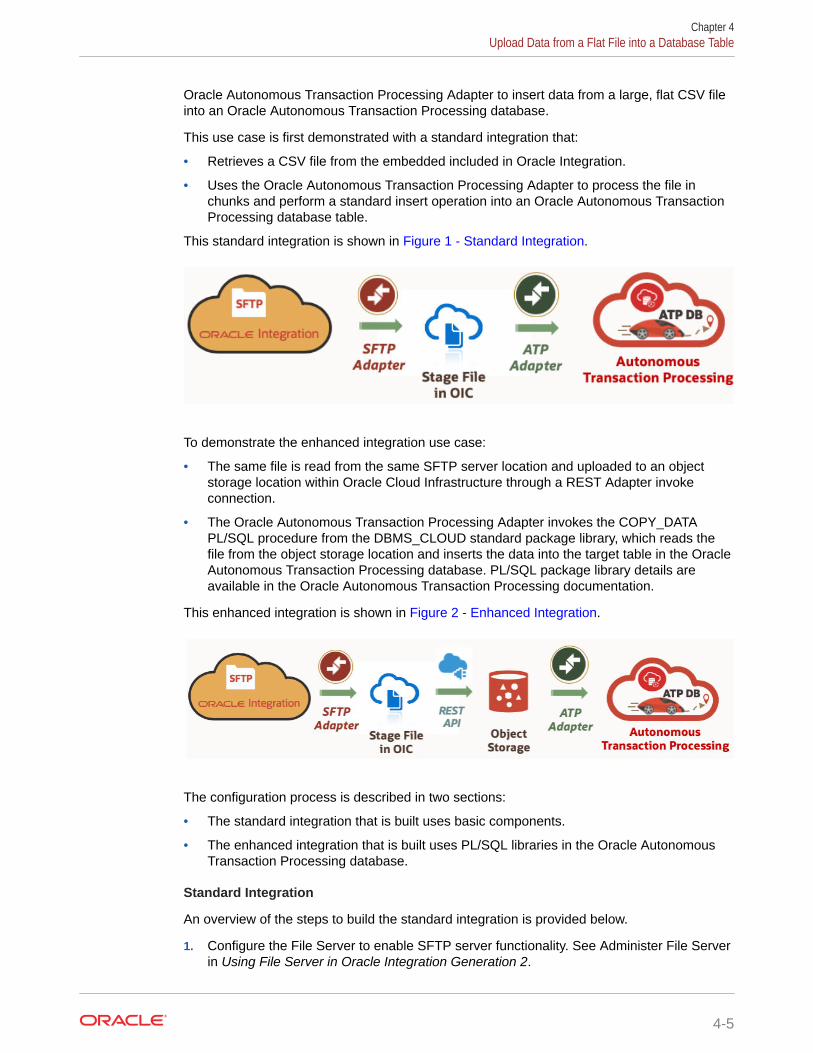
This use case is first demonstrated with a standard integration that:
• Retrieves a CSV file from the embedded included in Oracle Integration.
• Uses the Oracle Autonomous Transaction Processing Adapter to process the file inchunks and perform a standard insert operation into an Oracle Autonomous TransactionProcessing database table.
This standard integration is shown in Figure 1 - Standard Integration.
To demonstrate the enhanced integration use case:
• The same file is read from the same SFTP server location and uploaded to an objectstorage location within Oracle Cloud Infrastructure through a REST Adapter invokeconnection.
• The Oracle Autonomous Transaction Processing Adapter invokes the COPY_DATAPL/SQL procedure from the DBMS_CLOUD standard package library, which reads thefile from the object storage location and inserts the data into the target table in the OracleAutonomous Transaction Processing database. PL/SQL package library details areavailable in the Oracle Autonomous Transaction Processing documentation.
This enhanced integration is shown in Figure 2 - Enhanced Integration.
The configuration process is described in two sections:
• The standard integration that is built uses basic components.
• The enhanced integration that is built uses PL/SQL libraries in the Oracle AutonomousTransaction Processing database.
Standard Integration
An overview of the steps to build the standard integration is provided below.
1. Configure the File Server to enable SFTP server functionality. See Administer File Serverin Using File Server in Oracle Integration Generation 2.
Chapter 4Upload Data from a Flat File into a Database Table
4-5

2. Create an FTP Adapter connection to retrieve the file from the File Server.
3. Create an Oracle Autonomous Transaction Processing Adapter connection topoint to the target Oracle Autonomous Transaction Processing database.
4. Build the integration shown in Figure 1 - Standard Integration.
5. In the Adapter Endpoint Configuration Wizard, select the insert operation with thetarget table in the Oracle Autonomous Transaction Processing database.When complete, the integration looks as follows:
Enhanced Integration
An overview of the steps to build the enhanced integration is provided below.
1. Use the same SFTP connection built in Step 2 of the previous section.
2. Use the same Oracle Autonomous Transaction Processing Adapter connectionfrom Step 3 of the previous section.
3. Create a REST Adapter connection to upload a CSV file to an Oracle CloudInfrastructure object storage location.
4. Create PL/SQL credentials in the database to access the object store using theDBMS_CLOUD.CREATE_CREDENTIAL procedure.
5. Create a PL/SQL wrapper package and procedure to callDBMS_CLOUD.COPY_DATA using the credentials from Step 4 and the targettable in the Oracle Autonomous Transaction Processing database to insert thedata.
6. Build the enhanced integration shown in Figure 2 - Enhanced Integration.
7. In the Adapter Endpoint Configuration Wizard, instead of selecting the insertoperation, select the PL/SQL procedure option.
8. Select the wrapper procedure created in Step 5.
9. When complete, the integration looks as follows.
XML files can also be processed by DBMS_CLOUD. See this blog.
Chapter 4Upload Data from a Flat File into a Database Table
4-6

5Troubleshoot the Oracle AutonomousTransaction Processing Adapter
Review the following topics to learn about troubleshooting issues with the OracleAutonomous Transaction Processing Adapter.
Topics:
• Service Name Specified on the Connections Page is Too Long
• Special Characters are Not Supported in Schema Names
Additional integration troubleshooting information is provided. See Troubleshoot OracleIntegration in Using Integrations in Oracle Integration and the Oracle IntegrationTroubleshooting page in the Oracle Help Center.
Service Name Specified on the Connections Page is Too LongThe service name that you specify in the Service Name field on the Connections page isprovided in the tnsnames.ora file included in the wallet ZIP file downloaded from the OracleAutonomous Transaction Processing database. If the service name is too long, you receivethe following error when testing the connection:
Unable to test connection "MYATP". [Cause: CLOUD-0005]CLOUD-0005 : Unable to establish connection. Please check connection parametersNetwork Adapter could not establish the connection. Please check the wallet credentialsand ensure database is reachable.
Perform the following steps to resolve this error.
1. Ensure that the correct service name is provided.
2. Pick the name from the name-value pair. The tnsnames.ora file includes a list of servicenames.
3. Ensure that the database is reachable. Try connecting from any other SQL client toconfirm.
4. Ensure that the correct wallet credentials are provided.
Special Characters are Not Supported in Schema NamesIf you use schema names with special characters such as #, integration activation fails. Forstored procedures, the schema derives the names of the types in the XSD. If the type namecontains #, the XSD has problems with the name. Use a schema name that does not containany special characters.
5-1