erwin Data Modeler Workgroup Edition Implementation and ...
264
erwin Data Modeler Workgroup Edition Implementation and Administration Guide Release 2020 R1
-
Upload
khangminh22 -
Category
Documents
-
view
1 -
download
0
Transcript of erwin Data Modeler Workgroup Edition Implementation and ...

erwin Data Modeler
Workgroup Edition Implementation and
Administration Guide
Release 2020 R1

Legal Notices
This Documentation, which includes embedded help systems and electronically distributed materials (hereinafter referred to as the “Documentation”), is for your informational pur-poses only and is subject to change or withdrawal by erwin Inc. at any time. This Docu-mentation is proprietary information of erwin Inc. and may not be copied, transferred, reproduced, disclosed, modified or duplicated, in whole or in part, without the prior written consent of erwin Inc.
If you are a licensed user of the software product(s) addressed in the Documentation, you may print or otherwise make available a reasonable number of copies of the Docu-mentation for internal use by you and your employees in connection with that software, provided that all erwin Inc. copyright notices and legends are affixed to each reproduced copy.
The right to print or otherwise make available copies of the Documentation is limited to the period during which the applicable license for such software remains in full force and effect. Should the license terminate for any reason, it is your responsibility to certify in writing to erwin Inc. that all copies and partial copies of the Documentation have been returned to erwin Inc. or destroyed.
TO THE EXTENT PERMITTED BY APPLICABLE LAW, ERWIN INC. PROVIDES THIS DOCUMENTATION “AS IS” WITHOUT WARRANTY OF ANY KIND, INCLUDING WITHOUT LIMITATION, ANY IMPLIED WARRANTIES OF MERCHANTABILITY, FITNESS FOR A PARTICULAR PURPOSE, OR NONINFRINGEMENT. IN NO EVENT WILL ERWIN INC. BE LIABLE TO YOU OR ANY THIRD PARTY FOR ANY LOSS OR DAMAGE, DIRECT OR INDIRECT, FROM THE USE OF THIS DOCUMENTATION, INCLUDING WITHOUT LIMITATION, LOST PROFITS, LOST INVESTMENT, BUSINESS INTERRUPTION, GOODWILL, OR LOST DATA, EVEN IF ERWIN INC. IS EXPRESSLY ADVISED IN ADVANCE OF THE POSSIBILITY OF SUCH LOSS OR DAMAGE.
The use of any software product referenced in the Documentation is governed by the applic-able license agreement and such license agreement is not modified in any way by the terms of this notice.
The manufacturer of this Documentation is erwin Inc.
Provided with “Restricted Rights.” Use, duplication or disclosure by the United States Govern-ment is subject to the restrictions set forth in FAR Sections 12.212, 52.227-14, and 52.227-19(c)(1) - (2) and DFARS Section 252.227-7014(b)(3), as applicable, or their successors.
Copyright © 2020 erwin Inc. All rights reserved. All trademarks, trade names, service marks, and logos referenced herein belong to their respective companies.

3
Contact erwinUnderstanding your Support
Review support maintenance programs and offerings.
Registering for Support
Access the erwin support site and click Sign in to register for product support.
Accessing Technical Support
For your convenience, erwin provides easy access to "One Stop" support for all editions of erwin Data Modeler, and includes the following:
Online and telephone contact information for technical assistance and customer ser-vices
Information about user communities and forums
Product and documentation downloads
erwin Support policies and guidelines
Other helpful resources appropriate for your product
For information about other erwin products, visit http://erwin.com/products.
Provide Feedback
If you have comments or questions, or feedback about erwin product documentation, you can send a message to [email protected].
erwin Data Modeler News and Events
Visit www.erwin.com to get up-to-date news, announcements, and events. View video demos and read up on customer success stories and articles by industry experts.

4
Contents
Legal Notices 2
Contents 4
Modeling in the Multiuser Environment 14
erwin Data Modeler Workgroup Edition 15
Model Life Cycle Frameworks 16
Model-Driven Development Framework 17
System-Driven Model Framework 18
Informational Model Framework 19
Character Limitations 20
Mart Server Version Validation 21
Install and Configure an Oracle Mart 22
How to Install and Configure an Oracle Mart 23
Mart Architecture 26
Install a Mart or Upgrade a Mart? 29
Review the Prerequisites for an Oracle Mart 30
Create the Mart Database and Perform the Additional Tasks 34
Oracle SQL Commands 38
Install erwin Mart Server 39
Enable SSL for Tomcat 42
Use Mart Server as a Windows Service 45
Enable Logging in Local AppData 46
Initialize an Oracle Mart 47

5
Log In to erwin Mart Administrator and Configure Settings 50
Use a Pluggable Database 52
Create a Pluggable Database 54
Install erwin Mart Server with a Pluggable Database 56
Change the Mart Database Server 57
Troubleshooting 58
Unable to Create MartServer Service 58
Port out of range 58
Call failed on the server 59
Application Internal Error 59
ORA-12514 TNS listener does not currently know of service requested in con-nect descriptor 60
Mart already exists. Specify another database name 60
Initialize page is not loading in Internet Explorer 61
The Tomcat server is not starting properly. The Configure button is disabled. 61
A connection with the server could not be established 62
The server name or address could not be resolved 62
Invalid user ID or password 62
Error 12029 63
Unable to load the web page from my web browser 63
Internet Explorer Redirects to a Different Link 64
I have a very long Windows user name and I cannot log in to the Mart through erwin Data Modeler 64
SSL Certificate Error 65

6
Unable to save a model to Mart with an existing model name 65
Install and Configure a PostgreSQL Mart 66
How to Install and Configure a PostgreSQL Mart 67
Mart Architecture 70
Install a Mart or Upgrade a Mart? 73
Review the Prerequisites for a PostgreSQL Mart 74
Create a PostgreSQL Database 77
Install erwin Mart Server 79
Enable SSL for Tomcat 82
Use Mart Server as a Windows Service 85
Enable Logging in Local AppData 86
Initialize a PostgreSQL Mart 87
Log In to erwin Mart Administrator and Configure Settings 90
Change the Mart Database Server 93
Troubleshooting 94
Unable to Create MartServer Service 94
Port out of range 94
Call failed on the server 95
Application Internal Error 95
Mart already exists. Specify another database name 96
Initialize page is not loading in Internet Explorer 96
The Tomcat server is not starting properly. The Configure button is disabled. 97
A connection with the server could not be established 97

7
The server name or address could not be resolved 97
Invalid user ID or password 98
Error 12029 98
Unable to load the web page from my web browser 98
Internet Explorer Redirects to a Different Link 99
Chinese characters are replaced with question marks 99
I have a very long Windows user name and I cannot log in to the Mart through erwin Data Modeler 100
SSL Certificate Error 101
Unable to save a model to Mart with an existing model name 101
Install and Configure a SQL Server Mart 102
How to Install and Configure a SQL Server Mart 103
Mart Architecture 106
Install a Mart or Upgrade a Mart? 109
Review the Prerequisites for a SQL Server Mart 110
Create a SQL Server Database 113
Microsoft SQL Server 2005 Permissions 114
Specify Use of Foreign Characters With Microsoft SQL Server 115
Install erwin Mart Server 116
Enable SSL for Tomcat 119
Use Mart Server as a Windows Service 122
Enable Logging in Local AppData 123
Initialize a SQL Server Mart 124
Log In to erwin Mart Administrator and Configure Settings 127

8
Change the Mart Database Server 130
Troubleshooting 131
Unable to Create MartServer Service 131
Port out of range 131
Call failed on the server 132
Application Internal Error 132
ORA-12514 TNS listener does not currently know of service requested in con-nect descriptor 133
Mart already exists. Specify another database name 133
Initialize page is not loading in Internet Explorer 134
The Tomcat server is not starting properly. The Configure button is disabled. 134
A connection with the server could not be established 135
The server name or address could not be resolved 135
Invalid user ID or password 135
Error 12029 136
Unable to load the web page from my web browser 136
Internet Explorer Redirects to a Different Link 137
I have a very long Windows user name and I cannot log in to the Mart through erwin Data Modeler 137
SSL Certificate Error 138
Unable to save a model to Mart with an existing model name 138
Prepare to Use IIS with Mart 139
Configure IIS Web Server 139
Implement SSL for IIS 141

9
How to Upgrade any r9 Series Mart to the Current Version 143
Upgrade Performance Considerations 144
Review the Prerequisites 147
Upgrade the Mart Server Application 148
Configure the Mart Server 149
Restart the Mart Server Service 154
Log In to erwin Mart Administrator 155
Administer Mart 156
Adding a User 157
Add a User 159
Mart Users 160
Best Practices to Add a Group User 162
Verify if an Existing Profile Suits the User 163
How Profiles Work 164
Create a Profile 172
Verify if the Required Library Exists 175
Create a Library 176
Assign Permissions to a User 177
Examples 177
Sessions 179
Terminate Inactive or Closed Sessions 180
Delete Mart 181
Catalog Management 182

10
Library Structure Planning 183
Library Structure Organization 184
Library Security Levels 185
Library Structure Considerations 186
Manage Catalogs 187
Lock a Catalog Entry 189
Lock Behavior 191
Workgroup Modeling Reports 192
Create Reports Using Report Designer 198
Mart-Level Reports in Report Designer 206
Cross-Model Reports 207
Mart Model Reporting Status 209
Schedule Mart Report Synchronization 210
Use Multiple Threads to Update Mart Models for Reporting 212
Mart Report Data Compression 214
Generate the Current Diagram Picture 216
Modify the Workstation Registry 217
erwin® Data Modeler Workgroup Edition Performance 219
Optimize the Performance 220
Reindex the Database 222
Run the Oracle DBMS Reindex Script 223
Troubleshooting the Reindexing Script 224
Run the Database Statistics 225

11
Changing Application Name and Port Number 226
How to Change the Mart Server Application Name and Port Number 226
Microsoft SQL Server Tuning Recommendations 229
Physical Tuning Parameters 230
Database Placement 231
Data Redundancy 232
Server-Level Tuning Parameters 233
Named Cache Configuration 234
Database Tuning Parameters 235
Transaction Log 236
Threshold Procedures 237
"trunc. log on chkpt" Option 238
Database and Log Sizing 239
How to Maintain an Efficient Database 239
DBCC Commands 241
Oracle Tuning Recommendations 242
Recommended Disk Configurations 243
Database Configuration 244
Maximum Number of Processes 245
Shared Pool 246
Buffer Cache 246
Redo Log Files 247
Increase Space in Redo Logs 248

12
Redo Log Buffer 252
Checkpoints 253
Storage Parameters 254
Rollback Segments 255
Set Optimal Configuration for the Rollback Logs 256
Tablespaces 258
Sample Files 260
Sample workers.properties File 260
Sample isapi_redirect.properties File 262
Sample isapi_redirect.reg File 262
Sample uniworkers.properties File 263
Sample uriworkermap.properties File 263

13
erwin Product ReferencesThis document references the following erwin Inc. products:
erwin Data Modeler Workgroup Edition (erwin DM WE)
erwin Data Modeler Standard Edition (erwin DM)
erwin Data Modeler Navigator Edition (erwin DM NE)

14
Modeling in the Multiuser Environment
erwin Data Modeler Workgroup Edition coordinates the development and management of data models created with erwin Data Modeler.
This section contains the following topics
erwin Data Modeler Workgroup EditionModel Life Cycle Frameworks

15
erwin Data Modeler Workgroup Edition
erwin Data Modeler Workgroup Edition provides a multiuser modeling environment that makes coordinated, large-scale modeling possible. It enables collaboration among project managers, data modeling team members, and standards administrators by providing work-group modeling services, including conflict resolution, versioning, security, and standards management. You can coordinate the efforts of model teams to document existing systems, create new eBusiness systems, and drive data standardization. Model sharing encourages teamwork, so modelers can work together more efficiently to optimize model-based devel-opment. Your modelers get more work done in less time with better results.
Workgroup modeling operates in a three-tier architecture, where erwin Data Modeler con-nects to Mart server through a web server. The models are held in a database or Mart; you can use Microsoft SQL Server, Oracle, or PostgreSQL as the host database.
Workgroup modeling features are provided to help control updates to models when you are opening, closing, and saving models. The administrator installs the program and initializes the database on the DBMS server. The administrator also has the responsibility of setting up the library structure in which models are organized, and assigning security profiles to users. After a model is saved to the database, control of who can work on the model and how changes are saved to the model is handled by profiles, making it possible for workgroups to work on large models without confusion. erwin Data Modeler Workgroup Edition supports many security and administrative features related to its multiuser capabilities. For this reason, routine management is usually performed by a dedicated administrator. Admin-istrators can find detailed information regarding their tasks and responsibilities in the Administration Guide.
You can also use erwin Data Modeler Navigator Edition with erwin Data Modeler Work-group Edition. Read-only access is permitted to data models, so your workgroup can use this to share information with others without the risk that unauthorized changes might be saved to Mart.

16
Model Life Cycle Frameworks
Use one of the following model life cycle frameworks in your organization:
Model-Driven Development
Changes to the schema are made to the model first and then forward-engineered.
System-Driven Models
Changes are made directly to the schema and the schema is reverse-engineered into the model to reflect the changes.
Informational Models
Contains logical-only models, enterprise-wide models, or standards and sample mod-els.
Each type of framework has different considerations that you must think about when con-figuring your database and developing its supporting policies. You are not required to choose a particular framework, however, it helps to know your development process before building a library structure.

17
Model-Driven Development Framework
In the model-driven framework, the model is always the source of all changes. You create a new database schema by forward engineering the model. The life cycle of a model in the model-driven Development framework can follow a path like this:
Create the library structure (for example, Development, Test, and Production) and populate them with erwin Data Modeler templates.
Create the logical model in a development library.
Promote the model to the test library when it is ready.
Generate the schema from the test library.
Modify the test model as required and synchronize it to the schema.
Promote the model to the production library when it is ready.
Publish the refreshed production model.
Update the enterprise-wide model, if necessary.
Incorporate changes into the development model for further changes, and repeat the process.

18
System-Driven Model Framework
In the system-driven framework, there is an established information system from which you can reverse engineer database tables. The life cycle of a model in the system-driven Devel-opment framework can follow a path as described below:
Create the library structure (for example, Reverse Eng, Test, Production). You do not require erwin Data Modeler templates because you do not create models from scratch.
Reverse engineer the model from the information system into the designated library.
Enhance the model with logical information and input from analysts.
Update the model to reflect changes in the physical schema.
Create a version of the model.
Synchronize the schema and the model using Complete Compare.
Publish the model.
Repeat the last three steps as the system is modified.

19
Informational Model Framework
In the Informational Model framework, erwin Data Modeler Workgroup Edition contains logical-only models, enterprise-wide models, or standards and sample models. There is no forward engineering with the intent of using the schema. The life cycle of a model in the Informational Model framework can follow a path as described below:
Create the library structure and populate them with templates.
Develop the initial model. Use reverse engineering and model new components as required.
Publish the initial model to the appropriate parties for modification and refinement.
Get approval, and then version the model.
Publish the approved model.
Update and publish models as the enterprise model evolves.

20
Character Limitations
There is a limitation on the number of characters you can use for certain Mart Server para-meters. The following table gives information about such parameters:
Para-meter/Field
Character Limitation
User Name 450 (Server User, Windows User, and Group)
Note: For international OS (I18N), if the character set being used is DBCS (Double byte Character Set) then the character limit is 225.
Password 130
Email Address 130
Profile Name 130
Profile Descrip-tion
2000
Catalog Name 255
Catalog Descrip-tion
4000

21
Mart Server Version Validation
From erwin Data Modeler (DM) and erwin Mart Server (MS) 2019R1 onward, while con-necting to the erwin MS from erwin DM, version validation has been implemented as fol-lows:
1. Connecting from erwin DM 2019R1 to erwin MS lower than 2019R1 is not allowed.
2. Connecting from erwin DM lower than 2019R1 to erwin MS 2019R1 is not allowed.

22
Install and Configure an Oracle Mart
This section describes how you can install and configure a Mart on an Oracle database.
This section contains the following topics
How to Install and Configure an Oracle MartChange the Mart Database ServerTroubleshooting

23
How to Install and Configure an Oracle Mart
In the previous versions, erwin DM connected to the Mart database through the database cli-ent software. Now, the application connects to the Mart database through a web server. The database client software is no longer required.
The Mart comprises the following components:
Database
Stores the user data for the Workgroup Edition. You can use an Oracle 11g, 12c, or the certified versions 12c R2, 18c, and 19c database for the Mart database. If you are using Oracle 12c, you can use a pluggable database. You must use a new database and not an existing database that was created for an older version of the data mod-eling tool.
Applications
Includes a web-based component named erwin Mart Administrator that helps you manage the Mart through a web console.
Web server
Hosts erwin Mart Administrator. You can use a web server of your choice. If you have not installed a web server, use the erwin Mart Server option and install Tomcat.

24

25
Complete the following steps in the same order to install and configure the Mart:
1. Review the Prerequisites for an Oracle Mart.
2. Create the Mart Database and perform the additional tasks.
3. Install erwin Mart Server.
4. Use MartServer as a Windows Service.
5. Initialize an Oracle Mart.
6. Log in to erwin Mart Administrator and configure settings.
7. Use a Pluggable Database.
Back to Top

26
Mart Architecture
In the previous versions, erwin DM connected to the Mart database through the database cli-ent software. Now, the application connects to the Mart database through a web server. The database client software is no longer required. The web server includes a web-based admin-istration console erwin Mart Administrator. If you are using the Workgroup Edition, you must install and configure erwin Mart Administrator.
The Mart comprises the following components:
Database
Stores the user data for the Workgroup Edition. You can use an Oracle 11g, 12c, or the certified versions 12c R2, 18c, and 19c database for the Mart database. If you are using Oracle 12c, you can use a pluggable database. You must use a new database and not an existing database that was created for an older version of the data mod-eling tool.
Applications
Includes a web-based component named erwin Mart Administrator that helps you manage the Mart through a web console.
Web server
Hosts erwin Mart Administrator. You can use a web server of your choice. If you have not installed a web server, use the erwin Mart Server option and install Tomcat.
The following diagram shows the new architecture:

27
The new architecture has the following benefits:
Separate logical and physical users: In the previous versions, Mart (or Model Man-ager) users required database level privileges to access the Mart functionality. The Mart database administrators added or deleted users in the Mart database. This approach is changed now. The logical users are separated from physical users, so Mart Administrators can create the Mart users without creating the corresponding database users.
Authentication through Active Directory services: Earlier, if you wanted to provide access to a user group, you added each user individually. Now, because of the new architecture, you can use the Active Directory services and can provide access to the group. Anyone who is part of the group gets access.
Mart administration outside erwin Data Modeler: In the previous versions, Mart Administrators used erwin Data Modeler for administrative activities such as man-aging permissions. This required non-modelers to know how to use erwin Data

28
Modeler. In the new architecture, the administration component is built on a separate layer on top of erwin Data Modeler and is hosted on a web server. Mart Admin-istrators can access erwin Web Admin from any computer and can perform admin-istrative activities through a web console.
Back to Top

29
Install a Mart or Upgrade a Mart?
Use the following guidelines to determine if you must install a Mart or upgrade a Mart:
If you are new to erwin Data Modeler and have purchased the current version of Workgroup Edition, then install the current version of the Mart. Use the How to Install and Configure a Mart procedure that is appropriate for your Mart database.
If you have any earlier release of r9 series Mart, then upgrade the Mart to the cur-rent version. Use the How to Upgrade any r9 Series Mart to the Current Version pro-cedure to upgrade your Mart. The models that are created in any earlier release of r9 series are upgraded when a user connects to the current version Mart and opens the models.
If you have an existing Mart and the version is r7.3 through r8.2.9, install the current version Mart. Use the How to Install and Configure a Mart procedure that is appro-priate for your Mart database. After installing the Mart, use the Upgrade Mart utility to upgrade the Mart models from r7.3 through r8.2.9 to the current version.

30
Review the Prerequisites for an Oracle Mart
Before you install the Mart components, help ensure that the minimum system require-ments that are outlined in this topic are met.
You can use any of the following combinations to install erwin Data Modeler, the Mart data-base, and the MartServer application:
Install erwin Data Modeler, the Mart database, and the MartServer application on the same computer.
Install erwin Data Modeler, the Mart database, and the MartServer application on dif-ferent computers.
Install erwin Data Modeler and the Mart database on one computer, and install the MartServer application on a different computer.
Install erwin Data Modeler on one computer, and install the Mart database and the MartServer application on a different computer.
Ensure that you always install the MartServer application on Windows operating system.
System requirements for installing the MartServer application
Hardware requirements (based on physical hardware performance, not a virtual envir-onment):
Hardware requirements (based on physical hardware performance, not a virtual envir-onment):
2 GHZ or higher dual core processor
4 GB RAM (8 GB or more for large marts)
4 GB of disk space or more as required to support your specific mart
Operating system:
Microsoft Windows 7 SP1
Microsoft Windows 8.1
Microsoft Windows 10

31
Microsoft Windows Server 2008 R2 SP1
Microsoft Windows Server 2012, R2
Microsoft Windows Server 2016
Microsoft Windows Server 2019
Microsoft .NET Framework 4.0 and above
All current Microsoft Windows critical updates are applied
Database:
The Mart Server can use a standalone or can share an existing database server for an Oracle 11g, 12c, or the certified versions 12c R2, 18c, and 19c database. If you are using Oracle 12c, you can use a pluggable database.
To create the Mart, you must be the database schema owner user and you must have the DBA role in the target database on the Oracle server. The DBA role is required for the user who is specified in the Configure MartServer dialog. If the DBA privilege of this user is revoked, then erwin DM users will not be able to save model changes to the Mart.
(Optional) You have modified the following parameters in the initialization file (InitSID.ora):
Remote_OS_Authent=T
OS_Authent_Prefix=TRUE
(Optional) To use the Korean language with the Mart database, use KO16MSWIN949 or AL32UTF8 character set depending on your operating system language pack. For more information, see the Oracle documentation.
erwin Mart Administrator web client:
Supported browsers:
Microsoft Internet Explorer v10 or newer
Mozilla Firefox v30 or newer
Google Chrome v30 or newer
Apple Safari 6 or newer

32
Note: Ensure that your screen resolution is 1024 x 768 or higher. If your screen resolution is less than the minimum supported, some portions of the screen will not be visible.
Other requirements
Help ensure that the following additional requirements are met:
If you want to use Microsoft IIS as the web server, you have configured it.
The DBMS is installed and prepared for creating the Mart Database.
The Mart database is created. At least one user with administrator privileges is present. You have run the initial queries on the Oracle database. For more inform-ation about the initial queries, see the Implementation Guide.
If you want to add Windows Group users as Mart users, you have the Active Directory Server details.
Note: You can add Windows Group users as normal Mart users, but not as Mart administrators. A Mart administrator must be a server or Windows user.
Important disclaimer notice on all requirements
1. The requirements that are mentioned previously define the minimum requirements which permit the application to run with reasonable performance based on a small business use case scenario. The actual requirements for an enterprise-wide use case based on larger models and configurations require significantly greater resources to obtain acceptable performance.
2. These requirements are based on actual physical hardware (no virtual environment) and the following assumptions:
Minimal to no network overhead (both the database and application servers are locally installed)
Vendor's default install of the current version of their software (with all current service or fix packs)
No other applications sharing the defined hardware configuration (for example, a clean machine)
Any other hardware/software configurations are acceptable as long as they provide the same (or better) performance characteristics identified.

33
Back to Top

34
Create the Mart Database and Perform the Additional Tasks
Perform the following setup tasks in your DBMS environment before you can install and use the software:
1. Install the DBMS on the server where you plan to store the Mart.
Help ensure that you can create tables, indexes, stored procedures, and public syn-onyms. For more information about memory and disk space requirements, see the sys-tem requirements for each DBMS (Microsoft SQL Server, PostgreSQL, and Oracle).
2. Create a database that you want to use as the Mart. To use a pluggable database, see the Use a Pluggable Database topic.
Use the DBMS features to create or identify the required storage objects and the mart. The specific requirements vary depending on your DBMS type.
Note: To create, update, or delete a Mart in erwin Data Modeler Workgroup Edition, you must be the database schema owner and you must have the DBA role.
Additional Tasks
The DBA and the system administrator responsible for installing the software on an Oracle database management system performs these tasks.
Use graphical tools or SQL *Plus (all versions), SQL*DBA, or the Oracle Enterprise Man-agement Console to perform these tasks. Some SQL commands are included where appro-priate. The Data file paths, data file sizes, role names, and user names are included as examples only.
1. Check the SYSTEM tablespace.
The installation creates several stored procedures. All triggers, stored procedures, and packages are kept in the Oracle SYSTEM tablespace. The standard size of the SYSTEM tablespace assumes that you are not using procedural options, so the SYSTEM tablespace must be often expanded. If other Oracle applications are not using pro-cedural code, then expand the SYSTEM tablespace to 32 MB. If other Oracle applic-ations also use procedural code, expand the SYSTEM tablespace to at least 32 MB.

35
2. Check the Rollback Segment tablespace.
If your instance uses UNDO tablespace, do not create rollback segments.
Significant rollback space is required for installing and use. The rollback segments must be in their own separate tablespace and each have at least 16 MB of available space. There must be one rollback segment for every four concurrent users, with a maximum of 50 rollback segments. The available space must scale upward with increasing numbers of rollback segments. Finally, the rollback segment optimal para-meter must be set to control rollback segment growth and space consumption.
Note: For Steps 3, 4, and 5, use the Dictionary-managed tablespaces.
3. Create a data tablespace of at least 32 MB.
For example:
CREATE TABLESPACE MyMart
DATAFILE '/db01/oracle/rdbms9i/data/mymart.ora' SIZE 100M;
Or For Locally Managed extents:
CREATE TABLESPACE Mymart
DATAFILE '/db01/oracle/rdbms9i/data/mymart.ora' SIZE 100M
EXTENT MANAGEMENT LOCAL SEGMENT SPACE MANAGEMENT AUTO;
4. Create an index tablespace of at least 32 MB.
For example:
CREATE TABLESPACE MMARTINDEX
DATAFILE '/db02/oracle/rdbms9i/data/mmartindex.ora' SIZE 75M;
Or For Locally Managed extents:
CREATE TABLESPACE MMARTINDEX
DATAFILE '/db02/oracle/rdbms9i/data/mmartindex.ora' SIZE 75M
EXTENT MANAGEMENT LOCAL SEGMENT SPACE MANAGEMENT AUTO;

36
5. Create a temporary tablespace.
For example:
CREATE TEMPORARY TABLESPACE MMTEMP TEMPFILE '/db03/or-acle/rdbms9i/data/mmarttemp.ora' SIZE 50M;
Or For Locally Managed extents:
CREATE TEMPORARY TABLESPACE MMTEMP TEMPFILE '/db03/or-acle/rdbms9i/data/mmarttemp.ora' SIZE 50M
EXTENT MANAGEMENT LOCAL UNIFORM SIZE 1M;
Note: For more details about syntax and options regarding tablespace creation, see the appropriate Oracle documentation.
6. Create an Oracle user with DBA privileges for use by the erwin Data Modeler Work-group Edition Installer or designated schema owner.
Assign the data tablespace to this user as the default tablespace, and the temporary tablespace as the temporary tablespace to the user.
For example:
CREATE USER STEVE IDENTIFIED BY STEVE
DEFAULT TABLESPACE MyMart
TEMPORARY TABLESPACE MMTEMP
QUOTA UNLIMITED ON MyMart
QUOTA UNLIMITED ON MMARTINDEX;
GRANT DBA TO STEVE;
7. Create the erwin Data Modeler Workgroup Edition Installer role.
The following example is the role that the Oracle user requires to install erwin Data Modeler Workgroup Edition.
CREATE ROLE MMINSTALL;

37
8. Grant the Oracle privileges to the Installer role.
The following example shows the Oracle privileges that the erwin Data Modeler Work-group Edition Installer must install on Oracle. For the last command, log in as sys with the sysdba role in the user-name or the command will fail.
grant create sequence to MMINSTALL;
grant create table to MMINSTALL;
grant create view to MMINSTALL;
grant create materialized view to MMINSTALL;
grant drop public synonym to MMINSTALL;
grant create public synonym to MMINSTALL;
grant create procedure to MMINSTALL;
grant select on dba_data_files to MMINSTALL;
grant create session to MMINSTALL;
Note: To use the database, an Oracle user needs only the create session privilege.
9. Select the erwin Data Modeler Workgroup Edition tablespaces and Installer role.
When prompted for tablespace and role information, select the Workgroup Edition data tablespace, the Workgroup Edition index tablespace, and the Workgroup Edition Installer role.
Back to Top

38
Oracle SQL Commands
If a graphical DBMS access tool is not available, you can use Oracle SQL commands through SQL*DBA or SQL*Plus.
Example: Create a tablespace using the CREATE TABLESPACE command
CREATE TABLESPACE mm_data /* The tablespace name. */ DATAFILE C:\ORANT\DATABASE\mmdata.dat ᾉ/* The data file name. */ SIZE integer_value K or M or G /* The data file size */ DEFAULT STORAGE ( /* The default storage parameters */ INITIAL integer_value K or M or G /* The initial extent size */ NEXT integer_value K or M or G /* The next extent size */ PCTINCREASE integer_value /* The percent to grow extents */ MINEXTENTS integer_value /* The minimum number of extents */ MAXEXTENTS integer_value /* The maximum number of extents */ );
Example: Create an Oracle user using the CREATE USER command
CREATE USER mm_user_1 /* The user id name */ IDENIFIED BY password /* The user password */ DEAFULT TABLESPACE tablespace_name /* The user s default tablespace */ TEMPORARY TABLESPACE tablespace_name /* The user s temporary tablespace */ QUOTA unlimited_or_integer_K_M_G ON tablespace_name /* The user s quota on a tablespace */ ;
Example: Grant user privileges using the GRANT command
GRANT role_or_privilege_name TO user_or_role ;
Back to Top

39
Install erwin Mart Server
The Mart Server and Mart Admin war files are deployed on a Web server. You can either use an existing web server, or install the web server through the erwin MartServer 2020 R1 Installation Wizard. You must install erwin Mart Server and configure it regardless of whether you use Mart Server as a Windows service.
Note: Ensure that you have reviewed the Install a Mart or Upgrade a Mart topic before pro-ceeding.
Follow these steps:
1. Download the EDMMS2020R1(32-bit or 64-bit).exe file from the online erwin product page and run it.
The erwin MartServer 2020 R1(32-bit or 64-bit) Installation Wizard appears.
2. Go through the wizard steps to install erwin Mart Server.
Depending on the options you select, erwin Mart Server and/or Oracle OpenJDK and Tomcat are installed.
Note: For Mart Server 32-bit, ensure that you clear the JRE_HOME environment vari-able in the following cases:
l Upgrading from erwin Mart Server 2019 R1 to erwin Mart Server 2020 R1 l Installing erwin Mart Server 2020 R1 on a machine where erwin Mart Server
2019 R1 was previously installed
3. From the Windows Start menu, click All Programs, erwin, Mart Server 2020 R1(32-bit or 64-bit), Configure MartServer.
The erwin Mart Configuration dialog appears.
Configure the erwin Mart Server
1. Complete the following fields in the Mart Server tab:
Database Type
Specifies the database server type.

40
Port No.
Specifies the port number of the database server.
Server Name
Specifies the name of the database server where you have installed the Mart database. For example, suppose that you are using SQL Server as the Mart data-base. Enter the name of the computer where SQL Server is installed.
Instance Name
Specifies the name of the database instance.
Database Name
Specifies the name of the Mart database.
Note: If you are installing the Mart for the first time, use a new database. Do not use an existing database that was created for r7.3 through r8.2.9 Mart. If you are upgrad-ing the Mart from any earlier release of r9 series to the latest release, use the cor-responding Mart database.
User Name
Specifies the user name to connect to the Mart database. Enter the name of a user that is authenticated by the Mart database.
Note: Windows authentication (User Name field) is not supported for connecting to the Mart database from the Configure Mart Server window.
Password
Specifies the password to connect to the Mart database.
Note: The following fields--Domain Controller Name, Domain/User Name, and Pass-word are required only if you are using the Active Directory authentication. You can use the Active Directory authentication to initialize the Mart and to log in to erwin Mart Administrator.
Domain Controller Name
Specifies the fully qualified name of the Active Directory Server (Domain

41
Controller). Enter the name in the following format:
LDAP://server/distinguished-name
Example: ldap://mktgna:3268/dc=abc, dc=com
Here, mktgna is the server name. You can provide either the name of the server or the IP address. 3268 is the port number to which the server listens.
dc=abc, dc=com is the distinguished-name. The distinguished name is the full path of the object.
Note: If you do not know the Domain Controller Name, use the Nltest command or talk to your System Administrator.
Domain/User Name
Specifies the domain name and user name in the <domain name>/<user name> format.
Password
Specifies the password of the domain user.
Configure erwin Mart Administrator
1. Enter the following information in the Mart Administrator tab:
Server Name
Specifies the name of the computer where the Web Server is present. For example, if you are using Tomcat, enter the name of the computer where Tom-cat is installed.
Default: localhost
Port Number
Specifies the port number on which the Web Server is running.
Default: 18170
Application Name
Specifies the application name with which the Web Server is identified.

42
Default: MartServer
Transport Layer Security
Specifies if you want to connect to the Mart through a secured connection (SSL). Select this check box if you have implemented SSL.
Hosting Server
Specifies that you want to use the IIS web server to connect to the Mart. Select this check box only if you have configured IIS.
IIS Port
Specify the IIS port number that you want to use. This field is enabled only if you select the Use IIS check box. The default is 80.
Account Lockout Duration (Seconds)
Specify the duration (in seconds) for which an account should be locked whenever an incorrect password is entered five consecutive times. By default, it is set to five minutes (300 seconds). At the most, you can set it to 30 days (2592000 seconds).
2. Click Configure.
The erwin Mart Administrator and the Mart Server are configured.
Back to Top
More information:
Configure IIS Web ServerImplement SSL for IIS
Enable SSL for Tomcat
SSL enables you to access the Mart through a secured connection. You can enable SSL for Tomcat--the default web server, when you are installing the Mart for the first time.
Follow these steps:
1. If the Mart Server service is running, stop it. From the Windows Start menu, click All Programs, erwin, erwin Mart Server 2020 R1(32-bit or 64-bit), Stop MartServer

43
Service to stop the web server.
2. From the Windows Start menu, click All Programs, erwin, erwin Mart Server 2020 R1(32-bit or 64-bit), Enable SSL for Tomcat Webserver.
SSL is enabled for Tomcat and a security certificate is created. You must install this security certificate on all the computers from where you want to access the Mart.
3. From the Windows Start menu, click All Programs, erwin, erwin Mart Server 2020 R1(32-bit or 64-bit), Configure MartServer.
The erwin Mart Configuration dialog appears.
4. Go to the Mart Administrator tab and select the Transport Layer Security check box.
5. From the Windows Start menu, click All Programs, erwin, erwin Mart Server 2020 R1(32-bit or 64-bit), Start Mart Server Service.
6. From the Windows Start menu, click All Programs, erwin, erwin Mart Server 2020 R1(32-bit or 64-bit), erwin Mart Administrator 2020 R1(32-bit or 64-bit).
The erwin Mart Administrator home page appears and displays HTTPS in the address bar. If a certificate error appears, click Proceed Anyway to begin the session.
Important! If you want to connect to an SSL enabled Mart through API, you must first install the security certificate on the corresponding computer. Install the certificate through the data modeling tool. If you do not install the security certificate, the API will not be able to connect to the SSL enabled Mart.
Disable SSL and Access the Mart Through a Normal Connection
You can disable SSL at any time and access the Mart through a normal connection.
Follow these steps:
1. If the Mart Server Service is running, stop it. From the Windows Start menu, click All Programs, erwin, erwin Mart Server 2020 R1(32-bit or 64-bit), Stop Mart Server Ser-vice.
2. From the Windows Start menu, click All Programs, erwin, erwin Mart Server 2020 R1(32-bit or 64-bit), Disable SSL.
3. From the Windows Start menu, click All Programs, erwin, erwin Mart Server 2020 R1(32-bit or 64-bit), Configure MartServer.

44
The erwin Mart Configuration dialog appears.
4. Go to the Mart Administrator tab and clear the Transport Layer Security check box.
5. From the Windows Start menu, click All Programs, erwin, erwin Mart Server 2020 R1(32-bit or 64-bit), Start Mart Server Service.
6. From the Windows Start menu, click All Programs, erwin, erwin Mart Server 2020 R1(32-bit or 64-bit), erwin Mart Administrator 2020 R1(32-bit or 64-bit).
The erwin Mart Administrator home page appears and displays HTTP in the address bar.

45
Use Mart Server as a Windows Service
The current version of the Mart provides two ways to start the web server that hosts Mart Server:
Start the web server manually.
Use a Windows service to start the web server.
For example, if you have used Tomcat as the web server to host Mart Server, you can start Tomcat in two ways:
Start Tomcat through the startup.bat file or through a shortcut to this file.
Use a Windows service to start Tomcat.
The benefits of using a Windows service to start a web server are as follows:
Any user with administrative privileges on a computer can start the Windows service, whereas, only designated users can start a web server manually.
A Windows service runs regardless of whether a user has logged in. A manually-star-ted web server shuts down when the user who started it logs out.
Follow these steps:
1. From the Windows Start menu, click All Programs, erwin, erwin Mart Server 2020 R1(32-bit or 64-bit), Create MartServer Service to create the MartServer Windows ser-vice.
Creating the service is a one-time task. After the service is created, you only have to start and stop the service.
2. From the Windows Start menu, click All Programs, erwin, erwin Mart Server 2020 R1(32-bit or 64-bit), Start MartServer Service to start the web server.
You can find the log file, application.log, at C:\Win-dows\System32\config\systemprofile\AppData\Local\erwin\Mart Server\logs\.
Back to Top

46
Enable Logging in Local AppData
To enable logging in a user's AppData while using Mart Server as a Windows Service, do the following:
1. Once the service is created, go to service properties.
2. On the Log On tab, click This Account.
3. Enter the credentials.
4. Start the service.
Logging is now enabled for your instance of Mart Server as a Windows service. The log file, application.log, will be created at {user account}/AppData/Local/erwin/Mart Server/logs.

47
Initialize an Oracle Mart
When you access the Mart database through erwin Mart Administrator for the first time, you must initialize the database. You can initialize the database using a database authen-ticated user or a Windows-authenticated user.
Note: Before you proceed, verify that you have installed a DBMS, created the Mart data-base and run the initial queries. If the Mart is already initialized, the Login page appears.
When you open erwin Mart Administrator for the first time, the Initialize Mart web page appears.
Follow these steps:
1. If you are using MartServer as a Windows service, help ensure that the service is star-ted. If not, from the Windows Start menu, click All Programs, erwin, erwin Mart Server 2020 R1(32-bit or 64-bit), Start Mart Server to start the Mart Server.
A Windows command prompt window appears and indicates when the server starts.
2. From the Windows Start menu, click All Programs, erwin, erwin Mart Server 2020 R1(32-bit or 64-bit), erwin Mart Administrator 2020 R1(32-bit or 64-bit).
erwin Mart Administrator opens in your default browser.
3. Complete the following fields:
Username
Defines the user name with which you want to access the Mart. If you are using a Windows-authenticated user, enter the name in the <domain name>/<user name> format.
Password
Defines the password for the user name.
Note: A password should fulfill the following criteria:
Contains at least 1 lowercase character
Contains at least 1 uppercase character

48
Contains at least 1 number
Is minimum 6 characters in length
Is maximum 130 characters in length
Apart from the above criteria, special characters are optional.
Confirm Password
Confirms the password that you entered in the previous field.
Email Address
Defines the email address for the user account that you are creating.
Mart Role
Defines the role of the user for the Mart.
Table Tablespace
Defines the table tablespace in which the Mart tables are created.
Index Tablespace
Defines the index tablespace in which the Mart indexes are created.
4. Click Initialize.
The user name is added as an administrator of Mart, Mart is initialized, and the Login web page appears. Initializing is a one-time task. After Mart is initialized, the user who initialized must log in first. Later, any other user who wants to use erwin Mart Administrator can log in.
Note: The user name that is entered here is an application level user and not a database user. Remember the password that you have entered here, because without the password you cannot log in to erwin Mart Administrator for the first time.
In the previous releases, only a server user was allowed to initialize a Mart. From release r9.6, a Windows-authenticated user can also initialize a Mart. Further, a Windows-authen-ticated user can log in to a Mart as a Windows user.
To initialize a Mart with a Windows-authenticated user, follow these steps:

49
1. Provide the Active Directory details with user credentials in the Active Directory Details section in the erwin Mart Configuration dialog.
2. Open erwin Mart Administrator, enter the user name in the <domain name>/<user name> format. For more information about how to initialize a Mart, see the Work-group Edition Implementation and Administration Guide.
To log in as a Windows-authenticated user, follow these steps:
This procedure describes how to enable a Windows-authenticated user log in to a Mart that is already initialized. Use this procedure if the Mart is initialized with either a server user or a Windows-authenticated user.
1. Ensure that you have provided the Active Directory details with user credentials in the Active Directory Details section in the erwin Mart Configuration dialog.
2. Log in to the Mart as an administrator and add the required user as a Windows user in the Mart. Ensure that the user belongs to the Active Directory that was provided at the time of configuring the Mart.
Now the Windows-authenticated user can log in to erwin Mart Administrator by providing the user name in the <domain name>/<user name> format.
Note: A local Windows user who does not belong to a domain or who is not part of an Active Directory cannot log in to the Mart as a Windows user.
Back to Top

50
Log In to erwin Mart Administrator and Configure Settings
After the Mart is initialized, the user who initialized must log in first.
Note: If you enter an incorrect password five consecutive times, your account will be locked for five minutes (300 seconds) by default. You can change the time for which the account stays locked as follows:
1. From Windows Start menu, click All Programs, erwin, Mart Server 2020 R1(32-bit or 64-bit), Configure MartServer.
The erwin Mart Configuration dialog appears.
2. On the Mart Administrator tab, edit the value of the Account Lockout Duration (Seconds) field to an appropriate value. At the most, you can set it to 30 days (2592000 seconds).
When you log in to Mart for the first time, configure it per the requirements of your organ-ization. You can configure the following settings:
Default profile for the model creator
Use default password
Email notification
Follow these steps:
1. From the Windows Start menu, click All Programs, erwin, erwin Mart Server 2020 R1(32-bit or 64-bit), erwin Mart Administrator 2020 R1(32-bit or 64-bit).
The erwin Mart Administrator home page appears. If you have implemented SSL, HTTPS appears in the address bar.
2. Use the credentials with which you initialized the Mart and log in.
3. Click Settings.
4. Complete the following fields:
Default profile for model creator
Specifies the profile that is assigned to a user on a model. This profile is

51
assigned whenever a user creates a model and saves it to Mart for the first time. The user inherits the permissions of the default profile selected here on the model that is saved. For example, suppose that User1 is assigned with Modeler profile and the System Administrator selects Architect as the default profile for model creator. If User1 creates Model1 and saves it to Mart, for Model1, User1 inherits the permissions of Architect. Now, suppose that the Sys-tem Administrator selects Viewer as the default profile for model creator, and suppose that User1 creates Model2 and saves it to Mart. For Model2, User1 inherits the permissions of Viewer.
Use Default Password
Specifies the default password that you want to use for new users and for reset-ting passwords, in the absence of an SMTP server for emails.
Note: Select this option only if you do not have an SMTP server that is configured for emails.
SMTP host name
Specifies the name of the SMTP host. Enter the name in the mail.domain.com format. Notification emails are sent from this server.
Port number
Specifies the port number of the SMTP server. The default port number is 25. If your company is using an alternate port number for the mail server, specify that port number.
Authenticate
Specifies whether transactions with the SMTP server are authenticated. Select the check box to authenticate.
User name
Specifies the user name to authenticate the SMTP server. Select the Authentic-ate check box to enable authentication.
Password

52
Specifies the password to authenticate the SMTP server. Select the Authenticate check box to enable authentication.
Administrator email
Specifies the email ID of the Mart administrator. Notifications to Mart users are sent from this ID.
No-reply email from
Specifies the email ID from which administrative emails such as the password reset email are sent.
Use TLS Connection
Specifies whether transactions with the SMTP server use a Transport layer Security (TLS). If you intend to use a TLS connection, ensure that the User name and Administrator email correspond to each other.
Note: Select this option only if you want to use a TLS connection.
5. Click Save.
Mart options are configured.
You have installed and configured erwin DM Mart.
Back to Top
Use a Pluggable Database
This information applies to Oracle 12c.
You can use the pluggable database concept of Oracle 12c and create multiple Marts of the same Mart release in a single Oracle instance. For example, you can create two pluggable databases erwin_test and erwin_production in an Oracle global database erwin. You can configure these databases with the Mart Server one after the other and connect to one of them at a time.
Follow these steps to use multiple pluggable databases:
1. Create multiple pluggable databases, for example, erwin_test and erwin_production.
2. Install erwin Mart Server for the first pluggable database, for example, erwin_test.

53
3. Initialize the Mart for the first pluggable database, erwin_test. For more information on how to initialize the Mart, see the Initialize an Oracle Mart topic.
4. Log in to the Mart and create the models that you want to store in the test Mart.
5. To use the second pluggable database, follow these steps:
a. Stop the Mart server or the Mart server service.
b. Repeat Steps 1, 2, and 3 for the second pluggable database, erwin_production.
c. Start the Mart server or the Mart server service.
d. Log in to the Mart and create the models as required.

54
Create a Pluggable Database
You can use the pluggable database concept in Oracle 12c and create multiple Marts of the same Mart release.
Follow these steps:
1. Create a pluggable database in Oracle 12c.
For example, provide the Global Database Name as erwin and the Pluggable Database Name as erwin_test.
Note: For more information on how to create a pluggable database, see the Oracle documentation.
2. Run the following script on the computer where Oracle 12c is installed:
DROP TABLESPACE MMDATA INCLUDING CONTENTS AND DATAFILES CASCADE CONSTRAINTS;
DROP TABLESPACE MMINDEX INCLUDING CONTENTS AND DATAFILES CASCADE CONSTRAINTS;
DROP TABLESPACE marttemp INCLUDING CONTENTS AND DATAFILES CASCADE CONSTRAINTS;
ALTER SESSION SET CONTAINER=erwin_test;
CREATE TABLESPACE MMDATA datafile 'c:\r9mart2\MMDATA.dbf' size 300m autoextend on;
CREATE TABLESPACE MMINDEX datafile 'c:\r9mart2\MMINDEX.dbf' size 300m autoextend on;
CREATE TEMPORARY TABLESPACE marttemp tempfile 'c:\r9-mart2\tempdata.dbf' size 300m autoextend on;
DROP USER MMADMIN CASCADE;
CREATE USER MMADMIN IDENTIFIED BY MMADMIN DEFAULT TABLESPACE MMDATA TEMPORARY TABLESPACE MARTTEMP QUOTA UNLIMITED ON MMDATA QUOTA UNLIMITED ON MMINDEX;

55
DROP ROLE MMINSTALL;
CREATE ROLE MMINSTALL;
GRANT CREATE SEQUENCE TO MMINSTALL;
GRANT CREATE TABLE TO MMINSTALL;
GRANT CREATE VIEW TO MMINSTALL;
GRANT CREATE MATERIALIZED VIEW TO MMINSTALL;
GRANT DROP PUBLIC SYNONYM TO MMINSTALL;
GRANT CREATE PUBLIC SYNONYM TO MMINSTALL;
GRANT CREATE PROCEDURE TO MMINSTALL;
GRANT CREATE SESSION TO MMINSTALL;
GRANT MMINSTALL TO MMADMIN;
GRANT DBA TO MMADMIN;

56
Install erwin Mart Server with a Pluggable Database
The procedure to install erwin Mart Server for a pluggable database is same as the pro-cedure for a normal database. This topic describes only those fields that need different val-ues for a pluggable database. For more information on how to configure the erwin Mart Server, see the Install erwin Mart Server topic.
The following fields on the Configure the erwin Mart Server dialog need different values:
Server Name
Specifies the name of the database server where you have installed the Mart data-base. Enter the name of the computer where Oracle 12c is installed and the pluggable database erwin_test is created.
Database Name
Specifies the name of the pluggable Mart database. For example, erwin_test.
User Name
Specifies the user name to connect to the Mart database. Enter mmadmin or any other user account that you have created when you ran the script.
Password
Specifies the password to connect to the Mart database. Enter mmadmin or any other password that you have created when you ran the script.

57
Change the Mart Database Server
Sometimes, you may change the server on which the Mart database is installed, or you may restore the Mart database with a new name. When there is a change the server name or database name, reconfigure the MartServer.
Follow these steps:
1. Back up your Mart database.
2. Restore the database on the designated server.
3. If you use the same computer for Mart Server and restore the database in a different name, include the new database name in the erwin Mart Configuration dialog.
From the Windows Start menu, open the erwin Mart Configuration dialog. In the Mart Server tab, Database Name field, enter the new name with which the database is restored. Enter the current user name and password to access the database. If wrong information is provided here, you may be able to install the Mart, but you cannot log in and cannot use it.
4. If you use a different computer for Mart Server and restore the database in the same name, install the Mart Server on the new computer.
Use the Install erwin Mart Server procedure and install the Mart Server. In the Mart Server tab, Server Name field, enter the name of the new server where the database is restored. Enter the current user name and password to access the database. If wrong information is provided here, you may be able to install the Mart, but you can-not log in and cannot use it.
5. Stop the MartServer service and start it again.
6. From the Windows Start menu, click All Programs, erwin, erwin Mart Server 2020 R1(32-bit or 64-bit), erwin Mart Administrator 2020 R1(32-bit or 64-bit).
Enter the credentials of the Mart administrator and log in.

58
Troubleshooting
This section explains the errors that you can encounter while installing and configuring Mart, and how you can troubleshoot them.
Note: The Mart Server log files are available in the following location:
Windows 7: {user account}/AppData/Local/erwin/Mart Server-/logs/application.log
The latest version of Apache Tomcat does not support custom authorization-related error messages. Hence, a generic error message, "Unauthorized operation attempted. For more information, please review the log file.", is displayed. To understand the cause of the error, review the application.log file, which contains the description of the cause. Following is one such sample from the application.log file:
ERROR exception.MMException.setException: java.lang.Exception: User "johndoe" does not have required "View Users" permission on "User Management". Please contact the Mart Administrator for required permission.
Unable to Create MartServer Service
Symptom:
If Mart Server is upgraded to the latest version without stopping and deleting the Mart Server service of the earlier version, creating a new Mart Server service does not work.
Solution:
Run the sc Delete MartServer command to delete the Mart Server Service from command prompt and then try to create a Mart Server Service in the new version.
Port out of range
Symptom:
Whenever I connect to the web server, I get the following error message:
java.lang.IllegalArgumentException: port out of range 80821.
Solution:

59
Type the correct port number in the Configure erwin Mart Administrator s Server dialog and then restart your web server.
Back to Top
Call failed on the server
Symptom:
When I try to connect to the Mart server, I get the following error:
500 The call failed on the server; see server log for details
Solution:
The probable reasons for this error could be one of the following reasons:
The server name is not correct.
The application name is not correct. By default, the application name is MartServer and it is case-sensitive.
Type the correct server name and application name in the erwin Mart Administrator's Server dialog and the Configure MartServer Details dialog. Restart the web server.
Back to Top
Application Internal Error
Symptom:
When I try to connect to the database, I get the following error:
Application Internal Error
Solution
You get this error when the MartServer application is unable to connect to the required data-base. The following reasons are probable for this error:
The database details that are provided in the Configure MartServer Details dialog are incorrect.
The username and the password for the database are incorrect.

60
The database is not present.
The port number for the database is incorrect.
The network is down.
Ensure that you enter the correct details of your database in the Mart Server tab of the erwin Mart Configuration dialog.
Back to Top
ORA-12514 TNS listener does not currently know of service requested in connect descriptor
Symptom:
When I try to open the erwin Mart Administrator page, I get the Application Internal Error. The Tomcat windows shows the following error message:
ORA-12514, TNS:listener does not currently know of service reques-ted in connect descriptor
Solution:
Use a fully qualified instance name when starting the Mart Server.
Back to Top
Mart already exists. Specify another database name
Symptom:
When I try to connect to the Mart, I get the following error message:
An earlier mart is already present in the database you are trying to initialize. This process can not be continued. Please specify another database name to continue.
Solution:
You get this error when you connect to an old Mart that you have used for erwin DM Release r7 series, r8 series, or Beta release of any r9 series release.
Create a database and provide its details in the Configure MartServer Details dialog.

61
Back to Top
Initialize page is not loading in Internet Explorer
Symptom:
When I type the URL to initialize my Mart in Internet Explorer, the Initialize Mart page is tak-ing a long time to load.
Solution:
The Initialize Mart page does not load because the Active Scripting option in Internet Explorer is disabled.
To enable Active Scripting, follow these steps:
1. In Internet Explorer, click Tools, Internet Options.
2. In the Security tab, click the Custom Level button.
The Security Settings Local Intranet Zone window opens.
3. From the list of options, locate Scripting, Active Scripting, and select Enable. Click OK.
4. Restart Internet Explorer and enter the URL to initialize Mart.
The Mart Initialize page opens.
Back to Top
The Tomcat server is not starting properly. The Configure button is dis-abled.
Symptom:
My administrator has given me the Administrator rights and when I start the Tomcat server, I get a series of errors. Also, I cannot click the Configure button in the configuration dialog because it is disabled.
Solution:
Right-click Start Server, and click Run as Administrator.
The Tomcat server starts without any error, and the configuration button is enabled.
Back to Top

62
A connection with the server could not be established
Symptom:
When I try to connect to the web server from erwin Data Modeler, I get the following error message:
A connection with the server could not be established
Solution:
Verify that you have provided the correct port number and then reconnect to the web server.
Back to Top
The server name or address could not be resolved
Symptom:
When I try to connect to the web server from erwin Data Modeler, I get the following error message:
The server name or address could not be resolved
Solution:
Verify that the server name where the web server is installed is correct and then reconnect to the server.
Note: If erwin Data Modeler and the web server are installed on the same computer, you can give the server name as localhost. Suppose that erwin Data Modeler and the web server are installed on different computers. The server name is the name of the computer where the web server is installed.
Back to Top
Invalid user ID or password
Symptom:
When I try to connect to the server, I get the following error message:

63
Invalid user ID or password. Please try again to login.
Solution:
Type the correct user name and password.
Note: The user must be an application level user and not a database user.
Back to Top
Error 12029
Symptom:
When I connect to the web server, I get the following error message:
Error 12029
Solution:
Restart the web server.
Back to Top
Unable to load the web page from my web browser
Symptom:
When I type the URL in Internet Explorer or Google Chrome to connect to the web server, I get the following error messages:
For Internet Explorer
Internet Explorer cannot display the webpage
For Google Chrome
Oops! Google Chrome could not connect to localhost:18170
Solution:
Restart the web server.
Back to Top

64
Internet Explorer Redirects to a Different Link
Symptom:
Suppose that I install erwin Mart Server on a fresh machine. If I enable the SSL option and I invoke erwin Mart Administrator, Internet Explorer redirects the page to res://ieframe.dll//.
Solution:
Internet Explorer versions 8 through 10 have a security enhancement that blocks the fol-lowing types of sites:
Sites that have self-signed certificates
Sites that have self-signed certificates where the certificate does not match the URL
Follow any of these steps:
Install the certificate in the Trusted Root Certification Authorities store.
Add the site to trusted sites.
Set the Internet Explorer Security level to Medium Low.
I have a very long Windows user name and I cannot log in to the Mart through erwin Data Modeler
Symptom:
I have added a very long Windows user name similar to "Magdalena.Chalamalasetti" using the Mart Administrator. When the user tries to log in to the Mart through erwin Data Modeler, the name is truncated to "US\Magdalena.Chalamas" and the user cannot log in.
Solution:
The name is truncated due to a limitation with Windows. The Windows API returns the leg-acy user name that is limited to 20 characters. If the length of a user name exceeds 20 char-acters, for example, "US\Magdalena.Chalamalasetti", the name is displayed as "US\Magdalena.Chalamas" in the Connect to Mart dialog.
You can resolve this in one of the following ways:

65
Type the first 20 characters of the user name when you add the user as a Windows User, in the Mart Administrator. For example, instead of typing "US\Mag-dalena.Chalamalasetti", type "US\Magdalena.Chalamalas".
Use a Windows Group instead of the user's domain name. Using your Windows domain controller software, add the user to a Windows Group, and then add the group as a User Group in the Mart Administrator.
SSL Certificate Error
Symptom:
When you open Mart Administrator from Mart Server that is configured with an SSL cer-tification, an SSL certificate error appears.
Solution:
1. Replace localhost in the Mart Server URL with your computer name.
https://localhost:12345/MartAdmin/
https://<computer_name>:12345/MartAdmin/
2. Use the updated URL to access the Mart Server
Unable to save a model to Mart with an existing model name
Symptom:
When you save a model to Mart with an existing model name, a dialog with the following text appears.
Model '<model name>' already exists in library '<mart name>'. Rename the new model name
Solution:
Save the model with a different name.

66
Install and Configure a PostgreSQL Mart
This section describes how you can install and configure a Mart on a PostgreSQL database.
This section contains the following topics
How to Install and Configure a PostgreSQL Mart

67
How to Install and Configure a PostgreSQL Mart
In the previous versions, erwin Data Modeler connected to the Mart server directly. Now, erwin Data Modeler connects to the Mart server through a web server.
The Mart comprises the following components:
Database
Stores the user data for the Workgroup Edition. You can use PostgreSQL through ver-sion 9.6.2 or either of the certified versions, 9.6.15, 10.10, and 11.5 database for the Mart database.
Applications
Includes a web-based component named erwin Mart Administrator that helps you manage the Mart through a web console.
Web server
Hosts erwin Mart Administrator. You can use a web server of your choice. If you have not installed a web server, use the erwin Mart Server option and install Tomcat.
If you are using the Workgroup Edition, you must install and configure erwin Mart Admin-istrator.
The following diagram illustrates how to install and configure a Mart:

68
Complete the following steps in the same order to install and configure the Mart:

69
1. Review the Prerequisites for a PostgreSQL Mart
2. Create a PostgreSQL Database.
3. Install erwin Mart Server.
4. Use MartServer as a Windows Service.
5. Initialize a PostgreSQL Mart.
6. Log in to erwin Mart Administrator and configure settings.
Back to Top

70
Mart Architecture
In the previous versions, erwin DM connected to the Mart database through the database cli-ent software. Now, the application connects to the Mart database through a web server. The database client software is no longer required. The web server includes a web-based admin-istration console erwin Mart Administrator. If you are using the Workgroup Edition, you must install and configure erwin Mart Administrator.
Database
Stores the user data for the Workgroup Edition. You can use a PostgreSQL through ver-sion 9.6.2 or or either of the certified versions, 9.6.15, 10.10, and 11.5 database for the Mart database. You must use a new database and not an existing database that was created for an older version of the data modeling tool.
Applications
Includes a web-based component named erwin Mart Administrator that helps you manage the Mart through a web console.
Web server
Hosts erwin Mart Administrator. You can use a web server of your choice. If you have not installed a web server, use the erwin Mart Server option and install Tomcat.
The following diagram shows the new architecture:

71
The new architecture has the following benefits:
Separate logical and physical users: In the previous versions, Mart (or Model Man-ager) users required database level privileges to access the Mart functionality. The Mart database administrators added or deleted users in the Mart database. This approach is changed now. The logical users are separated from physical users, so Mart Administrators can create the Mart users without creating the corresponding database users.
Authentication through Active Directory services: Earlier, if you wanted to provide access to a user group, you added each user individually. Now, because of the new architecture, you can use the Active Directory services and can provide access to the group. Anyone who is part of the group gets access.
Mart administration outside erwin Data Modeler: In the previous versions, Mart Administrators used erwin Data Modeler for administrative activities such as man-aging permissions. This required non-modelers to know how to use erwin Data

72
Modeler. In the new architecture, the administration component is built on a separate layer on top of erwin Data Modeler and is hosted on a web server. Mart Admin-istrators can access erwin Web Admin from any computer and can perform admin-istrative activities through a web console.
Back to Top

73
Install a Mart or Upgrade a Mart?
Use the following guidelines to determine if you must install a Mart or upgrade a Mart:
If you are new to erwin Data Modeler and have purchased the current version of Workgroup Edition, then install the current version of the Mart. Use the How to Install and Configure a Mart procedure that is appropriate for your Mart database.
If you have any earlier release of r9 series Mart, then upgrade the Mart to the cur-rent version. Use the How to Upgrade any r9 Series Mart to the Current Version pro-cedure to upgrade your Mart. The models that are created in any earlier release of r9 series are upgraded when a user connects to the current version Mart and opens the models.
If you have an existing Mart and the version is r7.3 through r8.2.9, install the current version Mart. Use the How to Install and Configure a Mart procedure that is appro-priate for your Mart database. After installing the Mart, use the Upgrade Mart utility to upgrade the Mart models from r7.3 through r8.2.9 to the current version.

74
Review the Prerequisites for a PostgreSQL Mart
Before you install the Mart components, help ensure that the minimum system require-ments that are outlined in this topic are met.
You can use any of the following combinations to install erwin Data Modeler, the Mart data-base, and the MartServer application:
Install erwin Data Modeler, the Mart database, and the MartServer application on the same computer.
Install erwin Data Modeler, the Mart database, and the MartServer application on dif-ferent computers.
Install erwin Data Modeler and the Mart database on one computer, and install the MartServer application on a different computer.
Install erwin Data Modeler on one computer, and install the Mart database and the MartServer application on a different computer.
Ensure that you always install the MartServer application on Windows operating system.
System requirements to install the MartServer application
Hardware requirements (based on physical hardware performance, not a virtual envir-onment):
Hardware requirements (based on physical hardware performance, not a virtual envir-onment):
2 GHZ or higher dual core processor
4 GB RAM (8 GB or more for large marts)
4 GB of disk space or more as required to support your specific mart
Operating system:
Microsoft Windows 7 SP1
Microsoft Windows 8.1
Microsoft Windows 10

75
Microsoft Windows Server 2008 R2 SP1
Microsoft Windows Server 2012, R2
Microsoft Windows Server 2016
Microsoft Windows Server 2019
Microsoft .NET Framework 4.0 and above
All current Microsoft Windows critical updates are applied
Database:
The Mart Server can use a standalone or can share an existing database server for PostgreSQL through Release 9.6.2 database. Also, it is certified on PostgreSQL Release 9.6.15, 10.10, and 11.5.
The database user account that is used to configure the Mart must have super user permissions.
erwin Mart Administrator web client:
Supported browsers:
Microsoft Internet Explorer v10 or newer
Mozilla Firefox v30 or newer
Google Chrome v30 or newer
Apple Safari 6 or newer
Note: Ensure that your screen resolution is 1024 x 768 or higher. If your screen resolution is less than the minimum supported, some portions of the screen will not be visible.
Other requirements
Help ensure that the following additional requirements are met:
If you want to use Microsoft IIS as the web server, you have configured it.
The DBMS is installed and prepared for creating the Mart Database.
The Mart database is created. At least one user with administrator privileges is present.

76
If you want to add Windows Group users as Mart users, you have the Active Directory Server details.
Note: You can add Windows Group users as normal Mart users, but not as Mart administrators. A Mart administrator must be a server or Windows user.
Important disclaimer notice on all requirements
1. The requirements that are mentioned previously define the minimum requirements which permit the application to run with reasonable performance based on a small business use case scenario. The actual requirements for an enterprise-wide use case based on larger models and configurations require significantly greater resources to obtain acceptable performance.
2. These requirements are based on actual physical hardware (no virtual environment) and the following assumptions:
Minimal to no network overhead (both the database and application servers are locally installed)
Vendor's default install of the current version of their software (with all current service or fix packs)
No other applications sharing the defined hardware configuration (for example, a clean machine)
Any other hardware/software configurations are acceptable as long as they provide the same (or better) performance characteristics identified.
Back to Top

77
Create a PostgreSQL Database
If you are a DBA or a system administrator responsible for installing the software on a Post-greSQL database management system, perform the following tasks:
Use a graphical user interface (GUI) tool, such as pgAdmin or a similar tool, to create the erwin Data Modeler Workgroup Edition database. If a GUI tool is not available, you can use SQL Shell to type in the appropriate commands manually.
Configure PostgreSQL:
You can configure PostgreSQL database to accept any IP address.
Follow these steps:
1. Set the IP address to 0.0.0.0/0
2. Select the server.
3. Click Tools, Server Configuration, pg_hba.conf. Alternately, you can find the file at C:\Program Files\PostgreSQL\<version>\data.
4. Double-click the last empty column.
5. Complete the following fields:
Type
host
Database
all
User
all
Ip_Address
0.0.0.0/0
Method
md5

78
6. Select Enable and click Ok.
7. Click Save.
8. Click Reload Server.
The PostgreSQL database configuration is complete.
Back to Top

79
Install erwin Mart Server
The Mart Server and Mart Admin war files are deployed on a Web server. You can either use an existing web server, or install the web server through the erwin MartServer 2020 R1 Installation Wizard. You must install erwin Mart Server and configure it regardless of whether you use Mart Server as a Windows service.
Note: Ensure that you have reviewed the Install a Mart or Upgrade a Mart topic before pro-ceeding.
Follow these steps:
1. Download the EDMMS2020R1(32-bit or 64-bit).exe file from the online erwin product page and run it.
The erwin MartServer 2020 R1(32-bit or 64-bit) Installation Wizard appears.
2. Go through the wizard steps to install erwin Mart Server.
Depending on the options you select, erwin Mart Server and/or Oracle OpenJDK and Tomcat are installed.
Note: For Mart Server 32-bit, ensure that you clear the JRE_HOME environment vari-able in the following cases:
l Upgrading from erwin Mart Server 2019 R1 to erwin Mart Server 2020 R1 l Installing erwin Mart Server 2020 R1 on a machine where erwin Mart Server
2019 R1 was previously installed
3. From the Windows Start menu, click All Programs, erwin, Mart Server 2020 R1(32-bit or 64-bit), Configure MartServer.
The erwin Mart Configuration dialog appears.
Configure the erwin Mart Server
1. Complete the following fields in the Mart Server tab:
Database Type
Specifies the database server type.

80
Port No.
Specifies the port number of the database server.
Server Name
Specifies the name of the database server where you have installed the Mart database. For example, suppose that you are using SQL Server as the Mart data-base. Enter the name of the computer where SQL Server is installed.
Instance Name
Specifies the name of the database instance.
Database Name
Specifies the name of the Mart database.
Note: If you are installing the Mart for the first time, use a new database. Do not use an existing database that was created for r7.3 through r8.2.9 Mart. If you are upgrad-ing the Mart from any earlier release of r9 series to the latest release, use the cor-responding Mart database.
User Name
Specifies the user name to connect to the Mart database. Enter the name of a user that is authenticated by the Mart database.
Note: Windows authentication (User Name field) is not supported for connecting to the Mart database from the Configure Mart Server window.
Password
Specifies the password to connect to the Mart database.
Note: The following fields--Domain Controller Name, Domain/User Name, and Pass-word are required only if you are using the Active Directory authentication. You can use the Active Directory authentication to initialize the Mart and to log in to erwin Mart Administrator.
Domain Controller Name
Specifies the fully qualified name of the Active Directory Server (Domain

81
Controller). Enter the name in the following format:
LDAP://server/distinguished-name
Example: ldap://mktgna:3268/dc=abc, dc=com
Here, mktgna is the server name. You can provide either the name of the server or the IP address. 3268 is the port number to which the server listens.
dc=abc, dc=com is the distinguished-name. The distinguished name is the full path of the object.
Note: If you do not know the Domain Controller Name, use the Nltest command or talk to your System Administrator.
Domain/User Name
Specifies the domain name and user name in the <domain name>/<user name> format.
Password
Specifies the password of the domain user.
Configure erwin Mart Administrator
1. Enter the following information in the Mart Administrator tab:
Server Name
Specifies the name of the computer where the Web Server is present. For example, if you are using Tomcat, enter the name of the computer where Tom-cat is installed.
Default: localhost
Port Number
Specifies the port number on which the Web Server is running.
Default: 18170
Application Name
Specifies the application name with which the Web Server is identified.

82
Default: MartServer
Transport Layer Security
Specifies if you want to connect to the Mart through a secured connection (SSL). Select this check box if you have implemented SSL.
Hosting Server
Specifies that you want to use the IIS web server to connect to the Mart. Select this check box only if you have configured IIS.
IIS Port
Specify the IIS port number that you want to use. This field is enabled only if you select the Use IIS check box. The default is 80.
Account Lockout Duration (Seconds)
Specify the duration (in seconds) for which an account should be locked whenever an incorrect password is entered five consecutive times. By default, it is set to five minutes (300 seconds). At the most, you can set it to 30 days (2592000 seconds).
2. Click Configure.
The erwin Mart Administrator and the Mart Server are configured.
Back to Top
More information:
Configure IIS Web ServerImplement SSL for IIS
Enable SSL for Tomcat
SSL enables you to access the Mart through a secured connection. You can enable SSL for Tomcat--the default web server, when you are installing the Mart for the first time.
Follow these steps:
1. If the Mart Server service is running, stop it. From the Windows Start menu, click All Programs, erwin, erwin Mart Server 2020 R1(32-bit or 64-bit), Stop MartServer
83
Service to stop the web server.
2. From the Windows Start menu, click All Programs, erwin, erwin Mart Server 2020 R1(32-bit or 64-bit), Enable SSL for Tomcat Webserver.
SSL is enabled for Tomcat and a security certificate is created. You must install this security certificate on all the computers from where you want to access the Mart.
3. From the Windows Start menu, click All Programs, erwin, erwin Mart Server 2020 R1(32-bit or 64-bit), Configure MartServer.
The erwin Mart Configuration dialog appears.
4. Go to the Mart Administrator tab and select the Transport Layer Security check box.
5. From the Windows Start menu, click All Programs, erwin, erwin Mart Server 2020 R1(32-bit or 64-bit), Start Mart Server Service.
6. From the Windows Start menu, click All Programs, erwin, erwin Mart Server 2020 R1(32-bit or 64-bit), erwin Mart Administrator 2020 R1(32-bit or 64-bit).
The erwin Mart Administrator home page appears and displays HTTPS in the address bar. If a certificate error appears, click Proceed Anyway to begin the session.
Important! If you want to connect to an SSL enabled Mart through API, you must first install the security certificate on the corresponding computer. Install the certificate through the data modeling tool. If you do not install the security certificate, the API will not be able to connect to the SSL enabled Mart.
Disable SSL and Access the Mart Through a Normal Connection
You can disable SSL at any time and access the Mart through a normal connection.
Follow these steps:
1. If the Mart Server Service is running, stop it. From the Windows Start menu, click All Programs, erwin, erwin Mart Server 2020 R1(32-bit or 64-bit), Stop Mart Server Ser-vice.
2. From the Windows Start menu, click All Programs, erwin, erwin Mart Server 2020 R1(32-bit or 64-bit), Disable SSL.
3. From the Windows Start menu, click All Programs, erwin, erwin Mart Server 2020 R1(32-bit or 64-bit), Configure MartServer.

84
The erwin Mart Configuration dialog appears.
4. Go to the Mart Administrator tab and clear the Transport Layer Security check box.
5. From the Windows Start menu, click All Programs, erwin, erwin Mart Server 2020 R1(32-bit or 64-bit), Start Mart Server Service.
6. From the Windows Start menu, click All Programs, erwin, erwin Mart Server 2020 R1(32-bit or 64-bit), erwin Mart Administrator 2020 R1(32-bit or 64-bit).
The erwin Mart Administrator home page appears and displays HTTP in the address bar.

85
Use Mart Server as a Windows Service
The current version of the Mart provides two ways to start the web server that hosts Mart Server:
Start the web server manually.
Use a Windows service to start the web server.
For example, if you have used Tomcat as the web server to host Mart Server, you can start Tomcat in two ways:
Start Tomcat through the startup.bat file or through a shortcut to this file.
Use a Windows service to start Tomcat.
The benefits of using a Windows service to start a web server are as follows:
Any user with administrative privileges on a computer can start the Windows service, whereas, only designated users can start a web server manually.
A Windows service runs regardless of whether a user has logged in. A manually-star-ted web server shuts down when the user who started it logs out.
Follow these steps:
1. From the Windows Start menu, click All Programs, erwin, erwin Mart Server 2020 R1(32-bit or 64-bit), Create MartServer Service to create the MartServer Windows ser-vice.
Creating the service is a one-time task. After the service is created, you only have to start and stop the service.
2. From the Windows Start menu, click All Programs, erwin, erwin Mart Server 2020 R1(32-bit or 64-bit), Start MartServer Service to start the web server.
You can find the log file, application.log, at C:\Win-dows\System32\config\systemprofile\AppData\Local\erwin\Mart Server\logs\.
Back to Top

86
Enable Logging in Local AppData
To enable logging in a user's AppData while using Mart Server as a Windows Service, do the following:
1. Once the service is created, go to service properties.
2. On the Log On tab, click This Account.
3. Enter the credentials.
4. Start the service.
Logging is now enabled for your instance of Mart Server as a Windows service. The log file, application.log, will be created at {user account}/AppData/Local/erwin/Mart Server/logs.

87
Initialize a PostgreSQL Mart
When you access the Mart database through erwin Mart Administrator for the first time, you must initialize the database. You can initialize the database using a database authen-ticated user or a Windows authenticated user.
Note: Before you proceed, verify that you have installed a DBMS, created the Mart data-base and run the initial queries. If the Mart is already initialized, the Login page appears.
Follow these steps:
1. If you are using MartServer as a Windows service, help ensure that the service is star-ted. If not, from the Windows Start menu, click All Programs, erwin, Mart Server 2020 R1(32-bit or 64-bit), Start Mart Server to start the Mart Server.
A Windows command prompt window appears and indicates when the server starts.
2. From the Windows Start menu, click All Programs, erwin, Mart Server 2020 R1(32-bit or 64-bit), erwin Mart Administrator 2020 R1(32-bit or 64-bit).
erwin Mart Administrator opens in your default browser.
3. Complete the following fields:
Username
Defines the user name with which you want to access the Mart. If you are using a Windows-authenticated user, enter the name in the <domain name>/<user name> format.
Password
Defines the password for the user name.Note: A password should fulfill the following criteria:
Contains at least 1 lowercase character
Contains at least 1 uppercase character
Contains at least 1 number

88
Is minimum 6 characters in length
Is maximum 130 characters in length
Apart from the above criteria, special characters are optional.
Confirm Password
Confirms the password that you entered in the previous field.
Email Address
Defines the email address for the user account that you are creating.
4. Click Initialize.
The user name is added as an administrator of Mart, Mart is initialized, and the Login web page appears. Initializing is a one-time task. After Mart is initialized, the user who initialized must log in first. Later, any other user who wants to use erwin Mart Administrator can log in.
Note: The user name that is entered here is an application level user and not a database user. Remember the password that you have entered here, because without the password you cannot log in to erwin Mart Administrator for the first time.
In the previous releases, only a server user was allowed to initialize a Mart. From release r9.6, a Windows-authenticated user can also initialize a Mart. Further, a Windows-authen-ticated user can log in to a Mart as a Windows user.
To initialize a Mart with a Windows-authenticated user, follow these steps:
1. Provide the Active Directory details with user credentials in the Active Directory Details section in the erwin Mart Configuration dialog.
2. Open erwin Mart Administrator, enter the user name in the <domain name>/<user name> format. For more information about how to initialize a Mart, see the Work-group Edition Implementation and Administration Guide.
To log in as a Windows-authenticated user, follow these steps:
This procedure describes how to enable a Windows-authenticated user log in to a Mart that is already initialized. Use this procedure if the Mart is initialized with either a server user or a Windows-authenticated user.

89
1. Ensure that you have provided the Active Directory details with user credentials in the Active Directory Details section in the erwin Mart Configuration dialog.
2. Log in to the Mart as an administrator and add the required user as a Windows user in the Mart. Ensure that the user belongs to the Active Directory that was provided at the time of configuring the Mart.
Now the Windows-authenticated user can log in to erwin Mart Administrator by providing the user name in the <domain name>/<user name> format.
Note: A local Windows user who does not belong to a domain or who is not part of an Active Directory cannot log in to the Mart as a Windows user.
Back to Top

90
Log In to erwin Mart Administrator and Configure Settings
After the Mart is initialized, the user who initialized must log in first.
Note: If you enter an incorrect password five consecutive times, your account will be locked for five minutes (300 seconds) by default. You can change the time for which the account stays locked as follows:
1. From Windows Start menu, click All Programs, erwin, Mart Server 2020 R1(32-bit or 64-bit), Configure MartServer.
The erwin Mart Configuration dialog appears.
2. On the Mart Administrator tab, edit the value of the Account Lockout Duration (Seconds) field to an appropriate value. At the most, you can set it to 30 days (2592000 seconds).
When you log in to Mart for the first time, configure it per the requirements of your organ-ization. You can configure the following settings:
Default profile for the model creator
Use default password
Email notification
Follow these steps:
1. From the Windows Start menu, click All Programs, erwin, erwin Mart Server 2020 R1(32-bit or 64-bit), erwin Mart Administrator 2020 R1(32-bit or 64-bit).
The erwin Mart Administrator home page appears. If you have implemented SSL, HTTPS appears in the address bar.
2. Use the credentials with which you initialized the Mart and log in.
3. Click Settings.
4. Complete the following fields:
Default profile for model creator
Specifies the profile that is assigned to a user on a model. This profile is

91
assigned whenever a user creates a model and saves it to Mart for the first time. The user inherits the permissions of the default profile selected here on the model that is saved. For example, suppose that User1 is assigned with Modeler profile and the System Administrator selects Architect as the default profile for model creator. If User1 creates Model1 and saves it to Mart, for Model1, User1 inherits the permissions of Architect. Now, suppose that the Sys-tem Administrator selects Viewer as the default profile for model creator, and suppose that User1 creates Model2 and saves it to Mart. For Model2, User1 inherits the permissions of Viewer.
Use Default Password
Specifies the default password that you want to use for new users and for reset-ting passwords, in the absence of an SMTP server for emails.
Note: Select this option only if you do not have an SMTP server that is configured for emails.
SMTP host name
Specifies the name of the SMTP host. Enter the name in the mail.domain.com format. Notification emails are sent from this server.
Port number
Specifies the port number of the SMTP server. The default port number is 25. If your company is using an alternate port number for the mail server, specify that port number.
Authenticate
Specifies whether transactions with the SMTP server are authenticated. Select the check box to authenticate.
User name
Specifies the user name to authenticate the SMTP server. Select the Authentic-ate check box to enable authentication.
Password

92
Specifies the password to authenticate the SMTP server. Select the Authenticate check box to enable authentication.
Administrator email
Specifies the email ID of the Mart administrator. Notifications to Mart users are sent from this ID.
No-reply email from
Specifies the email ID from which administrative emails such as the password reset email are sent.
Use TLS Connection
Specifies whether transactions with the SMTP server use a Transport layer Security (TLS). If you intend to use a TLS connection, ensure that the User name and Administrator email correspond to each other.
Note: Select this option only if you want to use a TLS connection.
5. Click Save.
Mart options are configured.
You have installed and configured erwin DM Mart.
Back to Top

93
Change the Mart Database Server
Sometimes, you may change the server on which the Mart database is installed, or you may restore the Mart database with a new name. When there is a change the server name or database name, reconfigure the MartServer.
Follow these steps:
1. Back up your Mart database.
2. Restore the database on the designated server.
3. If you use the same computer for Mart Server and restore the database in a different name, include the new database name in the erwin Mart Configuration dialog.
From the Windows Start menu, open the erwin Mart Configuration dialog. In the Mart Server tab, Database Name field, enter the new name with which the database is restored. Enter the current user name and password to access the database. If wrong information is provided here, you may be able to install the Mart, but you cannot log in and cannot use it.
4. If you use a different computer for Mart Server and restore the database in the same name, install the Mart Server on the new computer.
Use the Install erwin Mart Server procedure and install the Mart Server. In the Mart Server tab, Server Name field, enter the name of the new server where the database is restored. Enter the current user name and password to access the database. If wrong information is provided here, you may be able to install the Mart, but you can-not log in and cannot use it.
5. Stop the MartServer service and start it again.
6. From the Windows Start menu, click All Programs, erwin, erwin Mart Server 2020 R1(32-bit or 64-bit), erwin Mart Administrator 2020 R1(32-bit or 64-bit).
Enter the credentials of the Mart administrator and log in.

94
Troubleshooting
This section explains the errors that you can encounter while installing and configuring Mart, and how you can troubleshoot them.
Note: The Mart Server log files are available in the following location:
Windows 7: {user account}/AppData/Local/erwin/Mart Server-/logs/application.log
The latest version of Apache Tomcat does not support custom authorization-related error messages. Hence, a generic error message, "Unauthorized operation attempted. For more information, please review the log file.", is displayed. To understand the cause of the error, review the application.log file, which contains the description of the cause. Following is one such sample from the application.log file:
ERROR exception.MMException.setException: java.lang.Exception: User "johndoe" does not have required "View Users" permission on "User Management". Please contact the Mart Administrator for required permission.
Unable to Create MartServer Service
Symptom:
If Mart Server is upgraded to the latest version without stopping and deleting the Mart Server service of the earlier version, creating a new Mart Server service does not work.
Solution:
Run the sc Delete MartServer command to delete the Mart Server Service from command prompt and then try to create a Mart Server Service in the new version.
Port out of range
Symptom:
Whenever I connect to the web server, I get the following error message:
java.lang.IllegalArgumentException: port out of range 80821.
Solution:

95
Type the correct port number in the Configure erwin Mart Administrator s Server dialog and then restart your web server.
Back to Top
Call failed on the server
Symptom:
When I try to connect to the Mart server, I get the following error:
500 The call failed on the server; see server log for details
Solution:
The probable reasons for this error could be one of the following reasons:
The server name is not correct.
The application name is not correct. By default, the application name is MartServer and it is case-sensitive.
Type the correct server name and application name in the erwin Mart Administrator s Server dialog and the Configure MartServer Details dialog. Restart the web server.
Back to Top
Application Internal Error
Symptom:
When I try to connect to the database, I get the following error:
Application Internal Error
Solution
You get this error when the MartServer application is unable to connect to the required data-base. The following reasons are probable for this error:
The database details that are provided in the Configure MartServer Details dialog are incorrect.
The username and the password for the database are incorrect.
The database is not present.

96
The port number for the database is incorrect.
The network is down.
Ensure that you enter the correct details of your database in the Mart Server tab of the erwin Mart Configuration dialog.
Back to Top
Mart already exists. Specify another database name
Symptom:
When I try to connect to the Mart, I get the following error message:
An earlier mart is already present in the database you are trying to initialize. This process can not be continued. Please specify another database name to continue.
Solution:
You get this error when you connect to an old Mart that you have used for erwin DM Release r7 series, r8 series, or Beta release of any r9 series release.
Create a database and provide its details in the Configure MartServer Details dialog.
Back to Top
Initialize page is not loading in Internet Explorer
Symptom:
When I type the URL to initialize my Mart in Internet Explorer, the Initialize Mart page is tak-ing a long time to load.
Solution:
The Initialize Mart page does not load because the Active Scripting option in Internet Explorer is disabled.
To enable Active Scripting, follow these steps:
1. In Internet Explorer, click Tools, Internet Options.
2. In the Security tab, click the Custom Level button.
The Security Settings Local Intranet Zone window opens.

97
3. From the list of options, locate Scripting, Active Scripting, and select Enable. Click OK.
4. Restart Internet Explorer and enter the URL to initialize Mart.
The Mart Initialize page opens.
Back to Top
The Tomcat server is not starting properly. The Configure button is disabled.
Symptom:
My administrator has given me the Administrator rights and when I start the Tomcat server, I get a series of errors. Also, I cannot click the Configure button in the configuration dialog because it is disabled.
Solution:
Right-click Start Server, and click Run as Administrator.
The Tomcat server starts without any error, and the configuration button is enabled.
Back to Top
A connection with the server could not be established
Symptom:
When I try to connect to the web server from erwin Data Modeler, I get the following error message:
A connection with the server could not be established
Solution:
Verify that you have provided the correct port number and then reconnect to the web server.
Back to Top
The server name or address could not be resolved
Symptom:
When I try to connect to the web server from erwin Data Modeler, I get the following error message:
The server name or address could not be resolved

98
Solution:
Verify that the server name where the web server is installed is correct and then reconnect to the server.
Note: If erwin Data Modeler and the web server are installed on the same computer, you can give the server name as localhost. Suppose that erwin Data Modeler and the web server are installed on different computers. The server name is the name of the computer where the web server is installed.
Back to Top
Invalid user ID or password
Symptom:
When I try to connect to the server, I get the following error message:
Invalid user ID or password. Please try again to login.
Solution:
Type the correct user name and password.
Note: The user must be an application level user and not a database user.
Back to Top
Error 12029
Symptom:
When I connect to the web server, I get the following error message:
Error 12029
Solution:
Restart the web server.
Back to Top
Unable to load the web page from my web browser
Symptom:

99
When I type the URL in Internet Explorer or Google Chrome to connect to the web server, I get the following error messages:
For Internet Explorer
Internet Explorer cannot display the webpage
For Google Chrome
Oops! Google Chrome could not connect to localhost:18170
Solution:
Restart the web server.
Back to Top
Internet Explorer Redirects to a Different Link
Symptom:
Suppose that I install erwin Mart Server on a fresh machine. If I enable the SSL option and I invoke erwin Mart Administrator, Internet Explorer redirects the page to res://ieframe.dll//.
Solution:
Internet Explorer versions 8 through 10 have a security enhancement that blocks the fol-lowing types of sites:
Sites that have self-signed certificates
Sites that have self-signed certificates where the certificate does not match the URL
Follow any of these steps:
Install the certificate in the Trusted Root Certification Authorities store.
Add the site to trusted sites.
Set the Internet Explorer Security level to Medium Low.
Chinese characters are replaced with question marks
Symptom:
I type Chinese characters in the Version Description dialog in erwin Mart Administrator. If I open erwin Data Modeler and go to the Catalog Manager window, I see that the Chinese characters are replaced with ????.

100
Solution:
Follow these steps:
1. Select Chinese for the Format, Location, and Locale fields in the computer where you have installed erwin Data Modeler, Mart server, and Mart database. (You can access these settings through the Control Panel.)
2. Open the Database Properties dialog for the Mart database and verify the value for the Collation field.
3. If the value is other than SQL_Latin1_General_CP1_CI_AS, create a database and assign this value for Collation. Initialize the Mart again.
I have a very long Windows user name and I cannot log in to the Mart through erwin Data Modeler
Symptom:
I have added a very long Windows user name similar to "Magdalena.Chalamalasetti" using the Mart Administrator. When the user tries to log in to the Mart through erwin Data Modeler, the name is truncated to "US\Magdalena.Chalamas" and the user cannot log in.
Solution:
The name is truncated due to a limitation with Windows. The Windows API returns the leg-acy user name that is limited to 20 characters. If the length of a user name exceeds 20 char-acters, for example, "US\Magdalena.Chalamalasetti", the name is displayed as "US\Magdalena.Chalamas" in the Connect to Mart dialog.
You can resolve this in one of the following ways:
Type the first 20 characters of the user name when you add the user as a Windows User, in the Mart Administrator. For example, instead of typing "US\Mag-dalena.Chalamalasetti", type "US\Magdalena.Chalamalas".
Use a Windows Group instead of the user's domain name. Using your Windows domain controller software, add the user to a Windows Group, and then add the group as a User Group in the Mart Administrator. For more information about how to add a User Group, see erwin Data Modeler r9 Workgroup Edition: Support for Dir-ectory Services video.

101
SSL Certificate Error
Symptom:
When you open Mart Administrator from Mart Server that is configured with an SSL cer-tification, an SSL certificate error appears.
Solution:
1. Replace localhost in the Mart Server URL with your computer name.
https://localhost:12345/MartAdmin/
https://<computer_name>:12345/MartAdmin/
2. Use the updated URL to access the Mart Server
Unable to save a model to Mart with an existing model name
Symptom:
When you save a model to Mart with an existing model name, a dialog with the following text appears.
Model '<model name>' already exists in library '<mart name>'. Rename the new model name
Solution:
Save the model with a different name.

102
Install and Configure a SQL Server Mart
This section describes how you can install and configure a Mart on a SQL Server database.
This section contains the following topics
How to Install and Configure a SQL Server MartChange the Mart Database ServerTroubleshooting

103
How to Install and Configure a SQL Server Mart
In the previous versions, erwin Data Modeler connected to the Mart server directly. Now, erwin Data Modeler connects to the Mart server through a web server.
The Mart comprises the following components:
Database
Stores the user data for the Workgroup Edition. You can use a Microsoft SQL Server 2012, 2014, 2014 SP1, 2016, 2016 SP1, 2016 SP2, 2017, or 2019 database for the Mart database. You must use a new database and not an existing database that was created for an older version of the data modeling tool.
Applications
Includes a web-based component named erwin Mart Administrator that helps you manage the Mart through a web console.
Web server
Hosts erwin Mart Administrator. You can use a web server of your choice. If you have not installed a web server, use the erwin Mart Server option and install Tomcat.
If you are using the Workgroup Edition, you must install and configure erwin Mart Admin-istrator.
The following diagram illustrates how to install and configure a Mart:

104
Complete the following steps in the same order to install and configure the Mart:

105
1. Review the Prerequisites for an SQL Server Mart.
2. Create an SQL Server Database.
3. Install erwin Mart Server.
4. Use MartServer as a Windows Service.
5. Initialize a SQL Server Mart.
6. Log in to erwin Mart Administrator and configure settings.

106
Mart Architecture
In the previous versions, erwin DM connected to the Mart database through the database cli-ent software. Now, the application connects to the Mart database through a web server. The database client software is no longer required. The web server includes a web-based admin-istration console erwin Mart Administrator. If you are using the Workgroup Edition, you must install and configure erwin Mart Administrator.
Database
Stores the user data for the Workgroup Edition. You can use a Microsoft SQL Server 2012, 2014, 2014 SP1, 2016, 2016 SP1, 2016 SP2, 2017, or 2019 database for the Mart database. You must use a new database and not an existing database that was created for an older version of the data modeling tool.
Applications
Includes a web-based component named erwin Mart Administrator that helps you manage the Mart through a web console.
Web server
Hosts erwin Mart Administrator. You can use a web server of your choice. If you have not installed a web server, use the erwin Mart Server option and install Tomcat.
The following diagram shows the new architecture:

107
The new architecture has the following benefits:
Separate logical and physical users: In the previous versions, Mart (or Model Man-ager) users required database level privileges to access the Mart functionality. The Mart database administrators added or deleted users in the Mart database. This approach is changed now. The logical users are separated from physical users, so Mart Administrators can create the Mart users without creating the corresponding database users.
Authentication through Active Directory services: Earlier, if you wanted to provide access to a user group, you added each user individually. Now, because of the new architecture, you can use the Active Directory services and can provide access to the group. Anyone who is part of the group gets access.
Mart administration outside erwin Data Modeler: In the previous versions, Mart Administrators used erwin Data Modeler for administrative activities such as man-aging permissions. This required non-modelers to know how to use erwin Data

108
Modeler. In the new architecture, the administration component is built on a separate layer on top of erwin Data Modeler and is hosted on a web server. Mart Admin-istrators can access erwin Web Admin from any computer and can perform admin-istrative activities through a web console.
Back to Top
109
Install a Mart or Upgrade a Mart?
Use the following guidelines to determine if you must install a Mart or upgrade a Mart:
If you are new to erwin Data Modeler and have purchased the current version of Workgroup Edition, then install the current version of the Mart. Use the How to Install and Configure a Mart procedure that is appropriate for your Mart database.
If you have any earlier release of r9 series Mart, then upgrade the Mart to the cur-rent version. Use the How to Upgrade any r9 Series Mart to the Current Version pro-cedure to upgrade your Mart. The models that are created in any earlier release of r9 series are upgraded when a user connects to the current version Mart and opens the models.
If you have an existing Mart and the version is r7.3 through r8.2.9, install the current version Mart. Use the How to Install and Configure a Mart procedure that is appro-priate for your Mart database. After installing the Mart, use the Upgrade Mart utility to upgrade the Mart models from r7.3 through r8.2.9 to the current version.

110
Review the Prerequisites for a SQL Server Mart
Before you install the Mart components, help ensure that the minimum system require-ments that are outlined in this topic are met.
You can use any of the following combinations to install erwin Data Modeler, the Mart data-base, and the MartServer application:
Install erwin Data Modeler, the Mart database, and the MartServer application on the same computer.
Install erwin Data Modeler, the Mart database, and the MartServer application on dif-ferent computers.
Install erwin Data Modeler and the Mart database on one computer, and install the MartServer application on a different computer.
Install erwin Data Modeler on one computer, and install the Mart database and the MartServer application on a different computer.
Ensure that you always install the MartServer application on Windows operating system.
System requirements to install the MartServer application
Hardware requirements (based on physical hardware performance, not a virtual envir-onment):
Hardware requirements (based on physical hardware performance, not a virtual envir-onment):
2 GHZ or higher dual core processor
4 GB RAM (8 GB or more for large marts)
4 GB of disk space or more as required to support your specific mart
Operating system:
Microsoft Windows 7 SP1
Microsoft Windows 8.1
Microsoft Windows 10

111
Microsoft Windows Server 2008 R2 SP1
Microsoft Windows Server 2012, R2
Microsoft Windows Server 2016
Microsoft Windows Server 2019
Microsoft .NET Framework 4.0 and above
All current Microsoft Windows critical updates are applied
Database:
The Mart Server can use a standalone or can share an existing database server for a Microsoft SQL Server 2012, 2014, 2014 SP1, 2016, 2016 SP1, 2016 SP2, 2017, or 2019 database.
The SQL Server 2012, 2014, 2014 SP1, 2016, 2016 SP1, 2016 SP2, 2017, and 2019 TRUSTWORTHY database property is no longer required for the mart. After you install this product, you can optionally reset this property to OFF.
The database user account that is used to configure the Mart must have the dba_owner role assigned.
(Optional) To use the Korean language, use the Korean_wansung_CI_AS character set. Select the character set while creating the Mart database (in the Collation field). For more information, see the SQL Server documentation.
erwin Mart Administrator web client:
Supported browsers:
Microsoft Internet Explorer v10 or newer
Mozilla Firefox v30 or newer
Google Chrome v30 or newer
Apple Safari 6 or newer
Note: Ensure that your screen resolution is 1024 x 768 or higher. If your screen resolution is less than the minimum supported, some portions of the screen will not be visible.
Other requirements
Help ensure that the following additional requirements are met:

112
If you want to use Microsoft IIS as the web server, you have configured it.
The DBMS is installed and prepared for creating the Mart Database.
The Mart database is created. At least one user with administrator privileges is present.
If you want to add Windows Group users as Mart users, you have the Active Directory Server details.
Note: You can add Windows Group users as normal Mart users, but not as Mart administrators. A Mart administrator must be a server or Windows user.
Important disclaimer notice on all requirements
1. The requirements that are mentioned previously define the minimum requirements which permit the application to run with reasonable performance based on a small business use case scenario. The actual requirements for an enterprise-wide use case based on larger models and configurations require significantly greater resources to obtain acceptable performance.
2. These requirements are based on actual physical hardware (no virtual environment) and the following assumptions:
Minimal to no network overhead (both the database and application servers are locally installed)
Vendor's default install of the current version of their software (with all current service or fix packs)
No other applications sharing the defined hardware configuration (for example, a clean machine)
Any other hardware/software configurations are acceptable as long as they provide the same (or better) performance characteristics identified.
Back to Top

113
Create a SQL Server Database
If you are a DBA or a system administrator responsible for installing the software on a Microsoft SQL Server database management system, perform the following tasks:
1. Use a graphical user interface (GUI) tool, ISQL (all versions), SQL Administrator, or Enterprise Manager to create the Mart database. If a GUI tool is not available, you can use ISQL to type in the appropriate commands manually.
Your databaseshould meet the following criteria:
The initial size of the database file should be set to 60 MB.
The initial size of the transaction log file should be set to 50 MB.
Set the maximum file size to unrestricted file growth for both files (recom-mended, but not required).
Increase the Set Auto grow file by 10 percent (recommended, but not required).
The new database is owned by the user who created it.
Set the Truncate Log on Checkpoint option and have the server generate checkpoints frequently. By selecting this option, the log is emptied periodically and should not fill up and cause rollbacks.
Note: For best performance ensure that separate devices are used to store the data and the transaction log.
2. Verify tempdb size.
Significant temporary space is required for installation and use. The temporary seg-ments need at least 16 MB of available space. You should also increase available space as the number of concurrent users increase.
Back to Top

114
Microsoft SQL Server 2005 Permissions
For a SQL Server 2005 Mart, you must have the bulkadmin permission designated. The abil-ity to do bulk inserts (which the public permission permitted previously) is no longer part of the public permission. As the administrator, you explicitly define this permission. Assign the bulkadmin permission to the physical user that connects to the database. If you do not define the permission, when you create a mart using a SQL Server 2005 database, and save it, an error appears.
Back to Top

115
Specify Use of Foreign Characters With Microsoft SQL Server
For Microsoft SQL Server modify your registry settings to have certain foreign language characters in your models recognized.
Follow these steps:
1. Click Run on the Start menu.
2. Enter regedit.
The Registry Editor opens.
3. Verify or add the following registry entry:
[HKEY_LOCAL_MACHINE\SOFTWARE\Microsoft\MSSQLServer\Client\DB-Lib]
"AutoAnsiToOem"="ON"
"UseIntlSettings"="ON"
4. Click File, Exit.
Your configuration is set to recognize foreign language characters in your models.
Back to Top

116
Install erwin Mart Server
The Mart Server and Mart Admin war files are deployed on a Web server. You can either use an existing web server, or install the web server through the erwin MartServer 2020 R1 Installation Wizard. You must install erwin Mart Server and configure it regardless of whether you use Mart Server as a Windows service.
Note: Ensure that you have reviewed the Install a Mart or Upgrade a Mart topic before pro-ceeding.
Follow these steps:
1. Download the EDMMS2020R1(32-bit or 64-bit).exe file from the online erwin product page and run it.
The erwin MartServer 2020 R1(32-bit or 64-bit) Installation Wizard appears.
2. Go through the wizard steps to install erwin Mart Server.
Depending on the options you select, erwin Mart Server and/or Oracle OpenJDK and Tomcat are installed.
Note: For Mart Server 32-bit, ensure that you clear the JRE_HOME environment vari-able in the following cases:
l Upgrading from erwin Mart Server 2019 R1 to erwin Mart Server 2020 R1 l Installing erwin Mart Server 2020 R1 on a machine where erwin Mart Server
2019 R1 was previously installed
3. From the Windows Start menu, click All Programs, erwin, Mart Server 2020 R1(32-bit or 64-bit), Configure MartServer.
The erwin Mart Configuration dialog appears.
Configure the erwin Mart Server
1. Complete the following fields in the Mart Server tab:
Database Type
Specifies the database server type.

117
Port No.
Specifies the port number of the database server.
Server Name
Specifies the name of the database server where you have installed the Mart database. For example, suppose that you are using SQL Server as the Mart data-base. Enter the name of the computer where SQL Server is installed.
Instance Name
Specifies the name of the database instance.
Database Name
Specifies the name of the Mart database.
Note: If you are installing the Mart for the first time, use a new database. Do not use an existing database that was created for r7.3 through r8.2.9 Mart. If you are upgrad-ing the Mart from any earlier release of r9 series to the latest release, use the cor-responding Mart database.
User Name
Specifies the user name to connect to the Mart database. Enter the name of a user that is authenticated by the Mart database.
Note: Windows authentication (User Name field) is not supported for connecting to the Mart database from the Configure Mart Server window.
Password
Specifies the password to connect to the Mart database.
Note: The following fields--Domain Controller Name, Domain/User Name, and Pass-word are required only if you are using the Active Directory authentication. You can use the Active Directory authentication to initialize the Mart and to log in to erwin Mart Administrator.
Domain Controller Name
Specifies the fully qualified name of the Active Directory Server (Domain
118
Controller). Enter the name in the following format:
LDAP://server/distinguished-name
Example: ldap://mktgna:3268/dc=abc, dc=com
Here, mktgna is the server name. You can provide either the name of the server or the IP address. 3268 is the port number to which the server listens.
dc=abc, dc=com is the distinguished-name. The distinguished name is the full path of the object.
Note: If you do not know the Domain Controller Name, use the Nltest command or talk to your System Administrator.
Domain/User Name
Specifies the domain name and user name in the <domain name>/<user name> format.
Password
Specifies the password of the domain user.
Configure erwin Mart Administrator
1. Enter the following information in the Mart Administrator tab:
Server Name
Specifies the name of the computer where the Web Server is present. For example, if you are using Tomcat, enter the name of the computer where Tom-cat is installed.
Default: localhost
Port Number
Specifies the port number on which the Web Server is running.
Default: 18170
Application Name
Specifies the application name with which the Web Server is identified.

119
Default: MartServer
Transport Layer Security
Specifies if you want to connect to the Mart through a secured connection (SSL). Select this check box if you have implemented SSL.
Hosting Server
Specifies that you want to use the IIS web server to connect to the Mart. Select this check box only if you have configured IIS.
IIS Port
Specify the IIS port number that you want to use. This field is enabled only if you select the Use IIS check box. The default is 80.
Account Lockout Duration (Seconds)
Specify the duration (in seconds) for which an account should be locked whenever an incorrect password is entered five consecutive times. By default, it is set to five minutes (300 seconds). At the most, you can set it to 30 days (2592000 seconds).
2. Click Configure.
The erwin Mart Administrator and the Mart Server are configured.
Back to Top
More information:
Configure IIS Web ServerImplement SSL for IIS
Enable SSL for Tomcat
SSL enables you to access the Mart through a secured connection. You can enable SSL for Tomcat--the default web server, when you are installing the Mart for the first time.
Follow these steps:
1. If the Mart Server service is running, stop it. From the Windows Start menu, click All Programs, erwin, erwin Mart Server 2020 R1(32-bit or 64-bit), Stop MartServer

120
Service to stop the web server.
2. From the Windows Start menu, click All Programs, erwin, erwin Mart Server 2020 R1(32-bit or 64-bit), Enable SSL for Tomcat Webserver.
SSL is enabled for Tomcat and a security certificate is created. You must install this security certificate on all the computers from where you want to access the Mart.
3. From the Windows Start menu, click All Programs, erwin, erwin Mart Server 2020 R1(32-bit or 64-bit), Configure MartServer.
The erwin Mart Configuration dialog appears.
4. Go to the Mart Administrator tab and select the Transport Layer Security check box.
5. From the Windows Start menu, click All Programs, erwin, erwin Mart Server 2020 R1(32-bit or 64-bit), Start Mart Server Service.
6. From the Windows Start menu, click All Programs, erwin, erwin Mart Server 2020 R1(32-bit or 64-bit), erwin Mart Administrator 2020 R1(32-bit or 64-bit).
The erwin Mart Administrator home page appears and displays HTTPS in the address bar. If a certificate error appears, click Proceed Anyway to begin the session.
Important! If you want to connect to an SSL enabled Mart through API, you must first install the security certificate on the corresponding computer. Install the certificate through the data modeling tool. If you do not install the security certificate, the API will not be able to connect to the SSL enabled Mart.
Disable SSL and Access the Mart Through a Normal Connection
You can disable SSL at any time and access the Mart through a normal connection.
Follow these steps:
1. If the Mart Server Service is running, stop it. From the Windows Start menu, click All Programs, erwin, erwin Mart Server 2020 R1(32-bit or 64-bit), Stop Mart Server Ser-vice.
2. From the Windows Start menu, click All Programs, erwin, erwin Mart Server 2020 R1(32-bit or 64-bit), Disable SSL.
3. From the Windows Start menu, click All Programs, erwin, erwin Mart Server 2020 R1(32-bit or 64-bit), Configure MartServer.

121
The erwin Mart Configuration dialog appears.
4. Go to the Mart Administrator tab and clear the Transport Layer Security check box.
5. From the Windows Start menu, click All Programs, erwin, erwin Mart Server 2020 R1(32-bit or 64-bit), Start Mart Server Service.
6. From the Windows Start menu, click All Programs, erwin, erwin Mart Server 2020 R1(32-bit or 64-bit), erwin Mart Administrator 2020 R1(32-bit or 64-bit).
The erwin Mart Administrator home page appears and displays HTTP in the address bar.
122
Use Mart Server as a Windows Service
The current version of the Mart provides two ways to start the web server that hosts Mart Server:
Start the web server manually.
Use a Windows service to start the web server.
For example, if you have used Tomcat as the web server to host Mart Server, you can start Tomcat in two ways:
Start Tomcat through the startup.bat file or through a shortcut to this file.
Use a Windows service to start Tomcat.
The benefits of using a Windows service to start a web server are as follows:
Any user with administrative privileges on a computer can start the Windows service, whereas, only designated users can start a web server manually.
A Windows service runs regardless of whether a user has logged in. A manually-star-ted web server shuts down when the user who started it logs out.
Follow these steps:
1. From the Windows Start menu, click All Programs, erwin, erwin Mart Server 2020 R1(32-bit or 64-bit), Create MartServer Service to create the MartServer Windows ser-vice.
Creating the service is a one-time task. After the service is created, you only have to start and stop the service.
2. From the Windows Start menu, click All Programs, erwin, erwin Mart Server 2020 R1(32-bit or 64-bit), Start MartServer Service to start the web server.
You can find the log file, application.log, at C:\Win-dows\System32\config\systemprofile\AppData\Local\erwin\Mart Server\logs\.
Back to Top

123
Enable Logging in Local AppData
To enable logging in a user's AppData while using Mart Server as a Windows Service, do the following:
1. Once the service is created, go to service properties.
2. On the Log On tab, click This Account.
3. Enter the credentials.
4. Start the service.
Logging is now enabled for your instance of Mart Server as a Windows service. The log file, application.log, will be created at {user account}/AppData/Local/erwin/Mart Server/logs.

124
Initialize a SQL Server Mart
When you access the Mart database through erwin Mart Administrator for the first time, you must initialize the database. You can initialize the database using a database authen-ticated user or a Windows authenticated user.
Note: Before you proceed, verify that you have installed a DBMS, created the Mart data-base and run the initial queries. If the Mart is already initialized, the Login page appears.
Follow these steps:
1. If you are using MartServer as a Windows service, help ensure that the service is star-ted. If not, from the Windows Start menu, click All Programs, erwin, Mart Server 2020 R1(32-bit or 64-bit), Start Mart Server to start the Mart Server.
A Windows command prompt window appears and indicates when the server starts.
2. From the Windows Start menu, click All Programs, erwin, Mart Server 2020 R1(32-bit or 64-bit), erwin Mart Administrator 2020 R1(32-bit or 64-bit).
erwin Mart Administrator opens in your default browser.
3. Complete the following fields:
Username
Defines the user name with which you want to access the Mart. If you are using a Windows-authenticated user, enter the name in the <domain name>/<user name> format.
Password
Defines the password for the user name.Note: A password should fulfill the following criteria:
Contains at least 1 lowercase character
Contains at least 1 uppercase character
Contains at least 1 number

125
Is minimum 6 characters in length
Is maximum 130 characters in length
Apart from the above criteria, special characters are optional.
Confirm Password
Confirms the password that you entered in the previous field.
Email Address
Defines the email address for the user account that you are creating.
4. Click Initialize.
The user name is added as an administrator of Mart, Mart is initialized, and the Login web page appears. Initializing is a one-time task. After Mart is initialized, the user who initialized must log in first. Later, any other user who wants to use erwin Mart Administrator can log in.
Note: The user name that is entered here is an application level user and not a database user. Remember the password that you have entered here, because without the password you cannot log in to erwin Mart Administrator for the first time.
In the previous releases, only a server user was allowed to initialize a Mart. From release r9.6, a Windows-authenticated user can also initialize a Mart. Further, a Windows-authen-ticated user can log in to a Mart as a Windows user.
To initialize a Mart with a Windows-authenticated user, follow these steps:
1. Provide the Active Directory details with user credentials in the Active Directory Details section in the erwin Mart Configuration dialog.
2. Open erwin Mart Administrator, enter the user name in the <domain name>/<user name> format. For more information about how to initialize a Mart, see the Work-group Edition Implementation and Administration Guide.
To log in as a Windows-authenticated user, follow these steps:
This procedure describes how to enable a Windows-authenticated user log in to a Mart that is already initialized. Use this procedure if the Mart is initialized with either a server user or a Windows-authenticated user.

126
1. Ensure that you have provided the Active Directory details with user credentials in the Active Directory Details section in the erwin Mart Configuration dialog.
2. Log in to the Mart as an administrator and add the required user as a Windows user in the Mart. Ensure that the user belongs to the Active Directory that was provided at the time of configuring the Mart.
Now the Windows-authenticated user can log in to erwin Mart Administrator by providing the user name in the <domain name>/<user name> format.
Note: A local Windows user who does not belong to a domain or who is not part of an Active Directory cannot log in to the Mart as a Windows user.
Back to Top

127
Log In to erwin Mart Administrator and Configure Settings
After the Mart is initialized, the user who initialized must log in first.
Note: If you enter an incorrect password five consecutive times, your account will be locked for five minutes (300 seconds) by default. You can change the time for which the account stays locked as follows:
1. From Windows Start menu, click All Programs, erwin, Mart Server 2020 R1(32-bit or 64-bit), Configure MartServer.
The erwin Mart Configuration dialog appears.
2. On the Mart Administrator tab, edit the value of the Account Lockout Duration (Seconds) field to an appropriate value. At the most, you can set it to 30 days (2592000 seconds).
When you log in to Mart for the first time, configure it per the requirements of your organ-ization. You can configure the following settings:
Default profile for the model creator
Use default password
Email notification
Follow these steps:
1. From the Windows Start menu, click All Programs, erwin, erwin Mart Server 2020 R1(32-bit or 64-bit), erwin Mart Administrator 2020 R1(32-bit or 64-bit).
The erwin Mart Administrator home page appears. If you have implemented SSL, HTTPS appears in the address bar.
2. Use the credentials with which you initialized the Mart and log in.
3. Click Settings.
4. Complete the following fields:
Default profile for model creator
Specifies the profile that is assigned to a user on a model. This profile is

128
assigned whenever a user creates a model and saves it to Mart for the first time. The user inherits the permissions of the default profile selected here on the model that is saved. For example, suppose that User1 is assigned with Modeler profile and the System Administrator selects Architect as the default profile for model creator. If User1 creates Model1 and saves it to Mart, for Model1, User1 inherits the permissions of Architect. Now, suppose that the Sys-tem Administrator selects Viewer as the default profile for model creator, and suppose that User1 creates Model2 and saves it to Mart. For Model2, User1 inherits the permissions of Viewer.
Use Default Password
Specifies the default password that you want to use for new users and for reset-ting passwords, in the absence of an SMTP server for emails.
Note: Select this option only if you do not have an SMTP server that is configured for emails.
SMTP host name
Specifies the name of the SMTP host. Enter the name in the mail.domain.com format. Notification emails are sent from this server.
Port number
Specifies the port number of the SMTP server. The default port number is 25. If your company is using an alternate port number for the mail server, specify that port number.
Authenticate
Specifies whether transactions with the SMTP server are authenticated. Select the check box to authenticate.
User name
Specifies the user name to authenticate the SMTP server. Select the Authentic-ate check box to enable authentication.
Password
129
Specifies the password to authenticate the SMTP server. Select the Authenticate check box to enable authentication.
Administrator email
Specifies the email ID of the Mart administrator. Notifications to Mart users are sent from this ID.
No-reply email from
Specifies the email ID from which administrative emails such as the password reset email are sent.
Use TLS Connection
Specifies whether transactions with the SMTP server use a Transport layer Security (TLS). If you intend to use a TLS connection, ensure that the User name and Administrator email correspond to each other.
Note: Select this option only if you want to use a TLS connection.
5. Click Save.
Mart options are configured.
You have installed and configured erwin DM Mart.
Back to Top

130
Change the Mart Database Server
Sometimes, you may change the server on which the Mart database is installed, or you may restore the Mart database with a new name. When there is a change the server name or database name, reconfigure the MartServer.
Follow these steps:
1. Back up your Mart database.
2. Restore the database on the designated server.
3. If you use the same computer for Mart Server and restore the database in a different name, include the new database name in the erwin Mart Configuration dialog.
From the Windows Start menu, open the erwin Mart Configuration dialog. In the Mart Server tab, Database Name field, enter the new name with which the database is restored. Enter the current user name and password to access the database. If wrong information is provided here, you may be able to install the Mart, but you cannot log in and cannot use it.
4. If you use a different computer for Mart Server and restore the database in the same name, install the Mart Server on the new computer.
Use the Install erwin Mart Server procedure and install the Mart Server. In the Mart Server tab, Server Name field, enter the name of the new server where the database is restored. Enter the current user name and password to access the database. If wrong information is provided here, you may be able to install the Mart, but you can-not log in and cannot use it.
5. Stop the MartServer service and start it again.
6. From the Windows Start menu, click All Programs, erwin, erwin Mart Server 2020 R1(32-bit or 64-bit), erwin Mart Administrator 2020 R1(32-bit or 64-bit).
Enter the credentials of the Mart administrator and log in.

131
Troubleshooting
This section explains the errors that you can encounter while installing and configuring Mart, and how you can troubleshoot them.
Note: The Mart Server log files are available in the following location:
Windows 7: {user home}/AppData/Local/erwin/Mart Server-/logs/application.log
The latest version of Apache Tomcat does not support custom authorization-related error messages. Hence, a generic error message, "Unauthorized operation attempted. For more information, please review the log file.", is displayed. To understand the cause of the error, review the application.log file, which contains the description of the cause. Following is one such sample from the application.log file:
ERROR exception.MMException.setException: java.lang.Exception: User "johndoe" does not have required "View Users" permission on "User Management". Please contact the Mart Administrator for required permission.
Unable to Create MartServer Service
Symptom:
If Mart Server is upgraded to the latest version without stopping and deleting the Mart Server service of the earlier version, creating a new Mart Server service does not work.
Solution:
Run the sc Delete MartServer command to delete the Mart Server Service from command prompt and then try to create a Mart Server Service in the new version.
Port out of range
Symptom:
Whenever I connect to the web server, I get the following error message:
java.lang.IllegalArgumentException: port out of range 80821.
Solution:

132
Type the correct port number in the Configure erwin Mart Administrator s Server dialog and then restart your web server.
Back to Top
Call failed on the server
Symptom:
When I try to connect to the Mart server, I get the following error:
500 The call failed on the server; see server log for details
Solution:
The probable reasons for this error could be one of the following reasons:
The server name is not correct.
The application name is not correct. By default, the application name is MartServer and it is case-sensitive.
Type the correct server name and application name in the erwin Mart Administrator s Server dialog and the Configure MartServer Details dialog. Restart the web server.
Back to Top
Application Internal Error
Symptom:
When I try to connect to the database, I get the following error:
Application Internal Error
Solution
You get this error when the MartServer application is unable to connect to the required data-base. The following reasons are probable for this error:
The database details that are provided in the Configure MartServer Details dialog are incorrect.
The username and the password for the database are incorrect.

133
The database is not present.
The port number for the database is incorrect.
The network is down.
Ensure that you enter the correct details of your database in the Mart Server tab of the erwin Mart Configuration dialog.
Back to Top
ORA-12514 TNS listener does not currently know of service requested in connect descriptor
Symptom:
When I try to open the erwin Mart Administrator page, I get the Application Internal Error. The Tomcat windows shows the following error message:
ORA-12514, TNS:listener does not currently know of service reques-ted in connect descriptor
Solution:
Use a fully qualified instance name when starting the Mart Server.
Back to Top
Mart already exists. Specify another database name
Symptom:
When I try to connect to the Mart, I get the following error message:
An earlier mart is already present in the database you are trying to initialize. This process can not be continued. Please specify another database name to continue.
Solution:
You get this error when you connect to an old Mart that you have used for erwin DM Release r7 series, r8 series, or Beta release of any r9 series release.
Create a database and provide its details in the Configure MartServer Details dialog.

134
Back to Top
Initialize page is not loading in Internet Explorer
Symptom:
When I type the URL to initialize my Mart in Internet Explorer, the Initialize Mart page is tak-ing a long time to load.
Solution:
The Initialize Mart page does not load because the Active Scripting option in Internet Explorer is disabled.
To enable Active Scripting, follow these steps:
1. In Internet Explorer, click Tools, Internet Options.
2. In the Security tab, click the Custom Level button.
The Security Settings Local Intranet Zone window opens.
3. From the list of options, locate Scripting, Active Scripting, and select Enable. Click OK.
4. Restart Internet Explorer and enter the URL to initialize Mart.
The Mart Initialize page opens.
Back to Top
The Tomcat server is not starting properly. The Configure button is dis-abled.
Symptom:
My administrator has given me the Administrator rights and when I start the Tomcat server, I get a series of errors. Also, I cannot click the Configure button in the configuration dialog because it is disabled.
Solution:
Right-click Start Server, and click Run as Administrator.
The Tomcat server starts without any error, and the configuration button is enabled.
Back to Top

135
A connection with the server could not be established
Symptom:
When I try to connect to the web server from erwin Data Modeler, I get the following error message:
A connection with the server could not be established
Solution:
Verify that you have provided the correct port number and then reconnect to the web server.
Back to Top
The server name or address could not be resolved
Symptom:
When I try to connect to the web server from erwin Data Modeler, I get the following error message:
The server name or address could not be resolved
Solution:
Verify that the server name where the web server is installed is correct and then reconnect to the server.
Note: If erwin Data Modeler and the web server are installed on the same computer, you can give the server name as localhost. Suppose that erwin Data Modeler and the web server are installed on different computers. The server name is the name of the computer where the web server is installed.
Back to Top
Invalid user ID or password
Symptom:
When I try to connect to the server, I get the following error message:

136
Invalid user ID or password. Please try again to login.
Solution:
Type the correct user name and password.
Note: The user must be an application level user and not a database user.
Back to Top
Error 12029
Symptom:
When I connect to the web server, I get the following error message:
Error 12029
Solution:
Restart the web server.
Back to Top
Unable to load the web page from my web browser
Symptom:
When I type the URL in Internet Explorer or Google Chrome to connect to the web server, I get the following error messages:
For Internet Explorer
Internet Explorer cannot display the webpage
For Google Chrome
Oops! Google Chrome could not connect to localhost:18170
Solution:
Restart the web server.
Back to Top

137
Internet Explorer Redirects to a Different Link
Symptom:
Suppose that I install erwin Mart Server on a fresh machine. If I enable the SSL option and I invoke erwin Mart Administrator, Internet Explorer redirects the page to res://ieframe.dll//.
Solution:
Internet Explorer versions 8 through 10 have a security enhancement that blocks the fol-lowing types of sites:
Sites that have self-signed certificates
Sites that have self-signed certificates where the certificate does not match the URL
Follow any of these steps:
Install the certificate in the Trusted Root Certification Authorities store.
Add the site to trusted sites.
Set the Internet Explorer Security level to Medium Low.
I have a very long Windows user name and I cannot log in to the Mart through erwin Data Modeler
Symptom:
I have added a very long Windows user name similar to "Magdalena.Chalamalasetti" using the Mart Administrator. When the user tries to log in to the Mart through erwin Data Modeler, the name is truncated to "US\Magdalena.Chalamas" and the user cannot log in.
Solution:
The name is truncated due to a limitation with Windows. The Windows API returns the leg-acy user name that is limited to 20 characters. If the length of a user name exceeds 20 char-acters, for example, "US\Magdalena.Chalamalasetti", the name is displayed as "US\Magdalena.Chalamas" in the Connect to Mart dialog.
You can resolve this in one of the following ways:

138
Type the first 20 characters of the user name when you add the user as a Windows User, in the Mart Administrator. For example, instead of typing "US\Mag-dalena.Chalamalasetti", type "US\Magdalena.Chalamalas".
Use a Windows Group instead of the user's domain name. Using your Windows domain controller software, add the user to a Windows Group, and then add the group as a User Group in the Mart Administrator. For more information about how to add a User Group, see erwin Data Modeler r9 Workgroup Edition: Support for Dir-ectory Services video.
SSL Certificate Error
Symptom:
When you open Mart Administrator from Mart Server that is configured with an SSL cer-tification, an SSL certificate error appears.
Solution:
1. Replace localhost in the Mart Server URL with your computer name.
https://localhost:12345/MartAdmin/
https://<computer_name>:12345/MartAdmin/
2. Use the updated URL to access the Mart Server
Unable to save a model to Mart with an existing model name
Symptom:
When you save a model to Mart with an existing model name, a dialog with the following text appears.
Model '<model name>' already exists in library '<mart name>'. Rename the new model name
Solution:
Save the model with a different name.

139
Prepare to Use IIS with Mart
If you want to use Microsoft Internet Information Services (IIS) as the web server, configure it before deploying Mart Server.
This section contains the following topics
Configure IIS Web ServerImplement SSL for IIS
Configure IIS Web Server
The Mart Server is built using Java technology. Therefore, if you want to connect to Mart through IIS, configure IIS to use the JK ISAPI redirector plugin. Using this plugin, IIS sends ser-vlet and JSP requests to Tomcat.
Note: This procedure describes how to configure IIS 6.0 for Microsoft Windows Server Enter-prise 2008. For more information about configuring other versions of IIS for other operating systems, see the respective vendor documentation.
Follow these steps:
1. Help ensure that Tomcat is working properly. Open a browser and type the following in the Address bar:
http://<servername>:18170/MartAdmin
The default Tomcat home page appears. <servername> is the name of the computer where you have installed Tomcat. 18170 is the default port number where Tomcat is running. If you are using a different port number, use that port number here. In addi-tion, help ensure that the port number you are using is included in the server.xml file. Typically, the server.xml file is available in the <Tomcat_Home>/conf folder.
2. Install IIS.
For more information about how to install IIS on Windows Server 2008, see Microsoft documentation.Note: Unlike IIS 6, for IIS versions 7, 8, and 10, the following Application Development role services are not installed by default:

140
ASP
CGI
ISAPI Extensions
ISAPI Filters
To select these role services explicitly while configuring IIS:
a. Under Server Roles, select Web Server.
b. Click Add Features.
c. Next, go to Web Server (IIS) > Role Services.
d. Under Application Development, select ASP, CGI, ISAPI Extensions, and ISAPI Fil-ters check boxes.
3. Create a folder, for example Native_IIS on the computer where you have installed IIS. Download the isapi_redirect.dll file for Windows from the Apache Tomcat website and copy to Native_IIS. If the name of the DLL file is not isapi_redirect.dll, rename it.
4. Create the workers.properties, isapi_redirect.properties, uniworkers.properties, uri-workermap.properties, and isapi_redirect.reg files in the Native_IIS folder.
Note: See the Appendix for sample workers.properties, uniworkers.properties, isapi_redirect.reg, isapi_redirect.properties, and uriworkermap.properties files.
5. Create a folder named Logs under Native_IIS. Create two empty files isapi.log and isapi_redirect.log under Logs.
6. Go to the Native_IIS folder, right-click the isapi_redirect.reg file, and click Merge.
7. Click Yes on the message.
The registry file is updated.
8. Follow these steps and create an IIS filter for the DLL placed in Step 5:
a. From the Windows Start menu, click Run, and then type inetmgr.
The Internet Information Services (IIS) Manager window opens.
b. Click the computer name and expand Sites.

141
c. Right-click Default WebSite and select Add Virtual Directory.
The Add Virtual Directory dialog appears.
d. Enter jakarta for Alias. Enter the path for the isapi_redirect.dll file in the Phys-ical Path field and click OK.
e. Click Default Web Site.
f. Double-click ISAPI filters and click Add under Action.
g. Enter Tomcat for Filter name. Enter the path for the isapi_redirect.dll file in the Executables field.
h. Click OK and the new ISAPI filter is added.
i. Click Default Web Site and then double-click Handler Mappings.
j. Click Edit Features and Permissions.
The Edit Features and Permissions dialog opens.
k. Select Execute and then click OK.
l. Click the computer name and then double-click ISAPI and CGI Restrictions.
m. Click Add under Actions.
n. Select the path for the isapi_redirect.dll file in the ISAPI or CGI Path field.
o. Select Allow extension path to execute and then click OK.
9. Restart the IIS web server.
10. Stop the MartServer service and start it again.
Note: See the Appendix for sample workers.properties, uniworkers.properties, isapi_redir-ect.reg, isapi_redirect.properties, and uriworkermap.properties files.
Back to Top
Implement SSL for IIS
If you have deployed Mart Server on IIS, you can implement SSL on IIS. SSL lets you access the Mart through a secured connection.

142
Note: This procedure describes how to enable SSL for IIS 6.0. If you are using a different ver-sion of IIS, see the relevant document on the Microsoft website for more information about installing IIS.
Follow these steps:
1. Open Internet Information Services (IIS) Manager.
2. Double-click Server Certificates and then click Create Self-Signed Certificate.
3. Enter a name for the certificate and click OK.
4. Right-click Default Web Site and click Edit Bindings.
5. Click Add and select https in the Type drop-down menu.
6. Select the certificate name that you have added in the SSL Certificate drop-down menu and click OK.
7. Select Default Web Site and then double-click SSL Settings.
8. Select the Require SSL check box and click Apply.
9. Restart IIS and then restart Tomcat.
Note: If the validity of the certificate expires, create another certificate.

143
How to Upgrade any r9 Series Mart to the Current Version
If you are using any earlier release of r9 series and you want to upgrade it to the latest release, upgrade the Mart Server application and the Mart database. The Mart server pro-gram is upgraded, so you must implement the upgraded software.
Important! The current Mart is designed to work with only the current version of erwin Data Modeler. If you try to connect the current Mart with an older version erwin Data Modeler such as r9.0.0, it may corrupt the Mart and cause unexpected behavior.
The following diagram illustrates how System Administrators can upgrade a Mart from any earlier release of r9 series to the latest release:

144
Complete the following tasks to upgrade a Mart of any earlier release of r9 series to the latest release:
1. Review the prerequisites.
2. Upgrade the Mart Server application.
3. Configure the Mart Server.
4. Restart the Mart Server service.
5. Log In to erwin Web Admin.
Back to Top
Upgrade Performance Considerations
Ensure that you consider mart size, model count, and associated versions while upgrading a Mart from an earlier version to the latest version. The following table provides sample data of the upgrade process. You can use this information as a guideline.
Mart Database Machine ConfigurationTime Taken (Upgrade from
lower version to erwin Mart 2020 R1)
Oracle 12c R2 (1221 Models , 42108498 million rows present M9Object Table)
8 GB RAM 1 CPU 50 minutes
SQL Server 2017 (1277 Models, 44294824 million rows present in M9Object Table)
8 GB RAM 1 CPU 142 minutes
Postgresql 9.6.15 (1020 Models, 33594468 million rows present in M9Object Table)
16 GB RAM 4 CPUs 15 minutes
Oracle 12c R1 (10784 Models, 505178719 million rows present in M9Object Table)
32 GB RAM AWS Machine
15 hours
Oracle 12c R1 (11980 Models, 32 GB RAM 4 CPU 20 hours 40 minutes

145
520732699 million rows present in M9Object Table)
Following are a few tips to ensure a smooth upgrade:
Before upgrading, ensure that you double the number of data files in tablespaces for MMDATA and MMINDEX in an Oracle mart.
Check the Report Upgrade status in the MartServerUpgrade.log file.
If the M9Object Table has high volume of data and models over 100 MB, run the upgrade on a machine that has 64 GB or more RAM.
For 64-bit operating system, based on the following parameters, change the number of threads from the default 8 to 3 in the upgrade.bat file located at C:\Program Files\erwin\Mart Server r9\MartUpgrade:
MartMachine Con-figuration
Update
Rows in M9Object table: 42108498 mil-lion
Model size: More than 100 MB
RAM less than 8 GB
Current: "%JRE_HOME%\bin\java.exe" -jar -Xms1g MartUpgrade\R9MartUpgrade.jar 0 4 8
Updated: "%JRE_HOME%\bin\java.exe" -jar -Xms1g MartUpgrade\R9MartUpgrade.jar 0 4 3
Rows in M9Object table: 520732699 mil-lion
Model size: More than 100 MB
RAM less than 32 GB
Current: "%JRE_HOME%\bin\java.exe" -jar -Xms1g MartUpgrade\R9MartUpgrade.jar 0 4 8
Updated: "%JRE_HOME%\bin\java.exe" -jar -Xms1g MartUpgrade\R9MartUpgrade.jar 0 4 3
In case of failures in upgrade, before you rerun the upgrade, ensure that you make the following change in the upgrade.bat file located at C:\Program Files\erwin\Mart Server r9\MartUpgrade.
Operating System
Update
32-bit Current:

146
rem 32bit jvmrem if increasing threads also increase min allocate memory to pre-vent outofmemory errors"%JRE_HOME%\bin\java.exe" -jar -Xms1g MartUp-grade\R9MartUpgrade.jar 0 4 2
Updated:rem 32bit jvmrem if increasing threads also increase min allocate memory to pre-vent outofmemory errors"%JRE_HOME%\bin\java.exe" -jar -Xms1g MartUp-grade\R9MartUpgrade.jar 1 4 2
64-bit
Current:rem 64bit jvm"%JRE_HOME%\bin\java.exe" -jar -Xms1g MartUp-grade\R9MartUpgrade.jar 0 4 8
Updated:rem 64bit jvm"%JRE_HOME%\bin\java.exe" -jar -Xms1g MartUp-grade\R9MartUpgrade.jar 1 4 8

147
Review the Prerequisites
Review the following prerequisites before you start the upgrade process:
If the Mart database is an Oracle database, the default tablespaces that were used for ini-tializing any earlier release of r9 series Mart are available for the latest release.
Back to Top

148
Upgrade the Mart Server Application
If you are upgrading a Mart from any earlier release of r9 series to the latest release, upgrade the Mart Server application.
Note: Refer to the Install a Mart or Upgrade a Mart topic before proceeding.
Follow these steps:
1. If you are running MartServer as a Windows service, stop the service and delete it.
Note: If you upgrade the Mart Server application without stopping the service, it may not start after you complete the upgrade process.
2. Download and run the EDMMS2020R1(32-bit or 64-bit).exe file from the erwin Sup-port site.
The erwin Mart Server 2020 R1(32-bit or 64-bit) Install Shield Wizard dialog appears.
3. Follow the wizard.
The Mart Server application is upgraded.
4. Restart your computer.
Back to Top

149
Configure the Mart Server
To connect to the latest Mart, you must configure the Mart Server. Use the same database that you have used for the r9.0.0 Mart (or any earlier release of r9 series Mart).
Note: See the Upgrade Considerations topic before proceeding.
Follow these steps:
1. From the Windows Start menu, click All Programs, erwin, erwin Mart Server 2020 R1(32-bit or 64-bit), Configure MartServer.
The erwin Mart Configuration dialog appears.
Configure the erwin Mart Server
Complete the following fields on the Mart Server tab:
Database Type
Specifies the database server type.
Port No.
Specifies the port number of the database server.
Server Name
Specifies the name of the database server where you have installed the Mart database. For example, suppose that you are using SQL Server as the Mart data-base. Enter the name of the computer where SQL Server is installed.
Instance Name
Specifies the name of the database instance.
Database Name
Specifies the name of the Mart database.
Note:

150
If you are installing the Mart for the first time, use a new database. Do not use an existing database that was created for r7.3 through r8.2.9 Mart.
If you are upgrading the Mart from any earlier release of r9 series to the latest release, use the corresponding Mart database. Also, for an Oracle mart, ensure that appropriate permissions for a materialized view are assigned to the installer role (GRANT CREATE MATERIALIZED VIEW TO MMINSTALL;). For more information, refer to the Prepare Your DBMS Environment topic.
User Name
Specifies the user name to connect to the Mart database. Enter the name of a user that is authenticated by the Mart database.
Note: Windows authentication (User Name field) is not supported for connecting to the Mart database from the Configure Mart Server window.
Password
Specifies the password to connect to the Mart database.
Note: The following fields--Domain Controller Name, Domain/User Name, and Pass-word are required only if you are using the Active Directory authentication. You can use the Active Directory authentication to initialize the Mart and to log in to erwin Mart Administrator.
Domain Controller Name
Specifies the fully qualified name of the Active Directory Server (Domain Con-troller). Enter the name in the following format:
LDAP://server/distinguished-name Example: ldap://mktgna:3268/dc=abc, dc=com
Here, mktgna is the server name. You can provide either the name of the server or the IP address. 3268 is the port number to which the server listens.
dc=abc, dc=com is the distinguished-name. The distinguished name is the full path of the object.

151
Note: If you do not know the Domain Controller Name, use the Nltest command or talk to your System Administrator.
Domain/User Name
Specifies the domain name and user name in the <domain name>/<user name> format.
Password
Specifies the password of the domain user.
Configure erwin Mart Administrator
Complete the following fields on the Mart Administrator tab:
Server Name
Specifies the name of the computer where the Web Server is present. For example, if you are using Tomcat, enter the name of the computer where Tomcat is installed.
Default: localhost
Port Number
Specifies the port number on which the Web Server is running.
Default: 18170
Application Name
Specifies the application name with which the Web Server is identified.
Default: MartServer
Transport Layer Security
Specifies if you want to connect to the Mart through a secured connection (SSL). Select this check box if you have implemented SSL.
Hosting Server
Specifies that you want to use the IIS web server to connect to the Mart. Select this check box only if you have configured IIS.

152
IIS Port
Specify the IIS port number that you want to use. This field is enabled only if you select the Use IIS check box. The default is 80.
Account Lockout Duration (Seconds)
Specify the duration (in seconds) for which an account should be locked whenever an incorrect password is entered five consecutive times. By default, it is set to five minutes (300 seconds). At the most, you can set it to 30 days (2592000 seconds).
2. Click Configure.The Mart Server Upgrade dialog box appears.
3. Click Yes.ReportExport screen appears.

153
On completion of report export process, the upgrade process is complete. erwin Mart Administrator and the Mart Server are configured.
Back to Top

154
Restart the Mart Server Service
When you modify the details of the Mart Server and Mart Administration programs, restart the Mart Server service.
Follow these steps:
1. From the Windows Start menu, click All Programs, erwin, erwin Mart Server 2020 R1(32-bit or 64-bit), Stop MartServer Service to stop the Mart Server service.
2. From the Windows Start menu, click All Programs, erwin, erwin Mart Server 2020 R1(32-bit or 64-bit), Start MartServer Service to start the Mart Server service.
Back to Top

155
Log In to erwin Mart Administrator
Log in to erwin Mart Administrator to verify if you have successfully upgraded the Mart Server from any earlier release of r9 series to the latest release.
Follow these steps:
1. From the Windows Start menu, click All Programs, erwin, erwin Mart Server 2020 R1(32-bit or 64-bit), erwin Mart Administrator 2020 R1(32-bit or 64-bit).
The erwin Mart Administrator log in page appears. If you have implemented SSL, HTTPS appears in the address bar.
2. Use the credentials with which you initialized the Mart and log in.
The erwin Mart Administrator home page appears.
The models that are created in any earlier release of r9 series are upgraded when a user connects to the latest release Mart and opens the models.
Back to Top

156
Administer MartThis section contains the following topics
Adding a UserSessionsDelete MartCatalog Management

157
Adding a User
As a System Administrator, after installing Mart, you add users, create libraries, and give permissions to users on the required libraries. You know which user should be of what type. You have the details of the profiles you want to create, and you know which profile to assign to which user.
This scenario describes how you can add users to Mart.
The following diagram illustrates how to add a user to Mart:
The following tasks describe how to add a user:

158
1. Add a user.
2. Verify if an existing profile suits the user.
3. Create a profile.
4. Verify if the required catalog or library exists.
5. Create a catalog or library.
6. Assign permissions to the user.
Back to Top

159
Add a User
As a Mart Administrator, you can add users so that they can access Mart. You delete users if they are not required to access the Mart. You know the type of user you want to add--a user that is authenticated by Mart, a user that is authenticated by the Windows network, or a Windows user group.
Follow these steps:
1. Open erwin Mart Administrator.
2. Click User Management, Add User.
3. Select one of the following options for User Type:
Server User
Specifies a Mart user that is authenticated by the credentials provided in Mart.
Windows User
Specifies a Mart user that is authenticated by the Windows network.
Group User
Specifies a Windows user group. All users that are part of the selected group can access Mart.
4. Enter the user name and email address. Confirm the email address.
Note: The user name field is displayed only for the Server User and Windows User options.
5. Click Save.
The user account is added and an email is sent to the user.
Back to Top

160
Mart Users
From r9 onwards, you can add individual users and Active Directory user groups to Mart. Individual users are categorized as Server users and Windows users, which are based on the way they are authenticated. There are no database level users in the current Mart.
The descriptions of user types are as follows:
Server User
Specifies the user that is authenticated by the Mart server. The server user is an application level user and not a database user. A server user provides the user name and password to log on to Mart. For example, Peter is a Business Analyst and reviews data models. Add Peter as a Server user as he accesses Mart only at the time of reviewing data models. Peter provides his user name and password to connect to Mart.
Note: Only a Server user can access erwin Mart Administrator. There are no database level users in the current Mart.
Windows User
Specifies the user that is authenticated by the Windows network. A Windows user need not provide the user name and password to log on to Mart. For example, Jane is a Data Modeler who works on Mart. Add Jane as a Windows user, so she accesses Mart using her Windows network credentials. Jane does not provide her user name and password to connect to Mart.
Also, Azure Active Directory (AD) users can connect to erwin Mart only through erwin Data Modeler by adding Azure AD user as a Windows user in the Mart Administrator. For example, AZUREAD\[email protected] or AZUREAD\abc or [email protected].
Note that this type of user cannot be used as a group user as Domain Controller is not available in Azure AD.
User Group
Specifies a user group that is part of an Active Directory. Use this option to add an entire group that accesses Mart. For example, you have a user group ABC-Domain\[email protected]. Add XYZDivision_AllModelers, so that

161
all users that are part of this group and are authenticated by ABC-Domain, connect to Mart. Users of this group do not have to provide their user name and password when they connect to Mart.
Note: A password should fulfill the following criteria:
Contains at least 1 lowercase character
Contains at least 1 uppercase character
Contains at least 1 number
Is minimum 6 characters in length
Is maximum 130 characters in length
Apart from the above criteria, special characters are optional.
Also, if you enter an incorrect password five consecutive times, your account will be locked for five minutes (300 seconds) by default.You can change the time for which the account stays locked as follows:
1. From Windows Start menu, click All Programs, erwin, Mart Server 2020 R1(32-bit or 64-bit), Configure MartServer.
The erwin Mart Configuration dialog appears.
2. On the Mart Administrator tab, edit the value of the Account Lockout Duration (Seconds) field to an appropriate value. At the most, you can set it to 30 days (2592000 seconds).
Back to Top

162
Best Practices to Add a Group User
The following are the best practices to add a Group User:
Suppose that you have a parent group that includes subgroups. To give access to all the subgroups under a parent group, add the parent group as a Group User.
Suppose that you want to give generic permissions to all users of a parent group and specific permissions to a subgroup. Add both, the parent group and the subgroup and give specific permissions to the subgroup. The permissions given to a subgroup take precedence over the permissions given to a parent group.
Suppose that you want to give generic permissions to a group and specific permissions to a particular user of the group. Add the group and add the particular user as a Win-dows user. The permissions given to a Windows user take precedence over the per-missions given to a group user.
Back to Top

163
Verify if an Existing Profile Suits the User
erwin DM Version 9 Mart has four built-in profiles:
Admin
Architect
Modeler
Viewer
Verify if any of these profiles suit the user you have created. If they do not, create the required profile.
Back to Top
More information:
How Profiles Work

164
How Profiles Work
The way profiles work depends on the following factors:
The type of user that is assigned to the profile.
The objects that are included in the profile.
The permissions that are assigned to the objects.
This section describes the permissions available for various types of users. The section also includes common user profiles and describes permissions for those profiles.
Type 1: Mart level
Includes items under Catalog Management, Mart, Permission Management, Session Management, and User Management.
Mart level permissions are granted only if a user is assigned to a profile on Mart.
The Mart level permissions are restricted or allowed at Mart Server itself. The only

165
exception is that Catalog Manager, Open is handled by the client.
Type 2: Catalog Object level
Includes items under Library, Model, and Version.
All library privileges, that is, create, delete, and modify are granted when a user is assigned to a profile on the Library or Mart.
Catalog Object level permissions are restricted or allowed at Mart Server itself. The only exception is that Model, Modify is also verified in erwin DM as part of live

166
semantic.
Type 3: Modeling Object level
Includes items under Modeling Object.
Modeling Object level permissions are used for restricting or allowing create, modify, and delete operations on modeling objects within the Catalog of type Model.

167
Modeling Object level permissions are restricted or allowed from live semantic in erwin DM.
Note: To be able to add an entity to the Subject Area and ER Diagram, set the Modify permission for Entity, Subject Area, and ER Diagram for the profile.

168
Permissions
Permission are defined as follows:
A profile assigned to a user on a catalog.
A Catalog could be the Mart, a Library, or a Model.
For more information about the types of users, see the Mart Users topic.
Authorization rules for users
The authorization rules for users are explained with examples for profiles and users. This approach helps you relate to a scenario that exists in your work environment and under-stand the rules better.
The authorization rules are explained based on the following sample catalog structure:
Mart
Library1
Model1
Model2
Library2
Model3
Model4
Consider the following sample profiles and users:
Sample profiles P1 and P2
Sample Server user SU1
Sample Active Directory (AD) user ADU1
Sample AD groups ADG1 and ADG2
Authorization Rules for Server User

169
Rule 1: P1 assigned to SU1 on Mart
SU1 gets the following privileges:
Type 1 privileges of P1 on Mart
Type 2 privileges of P1 on all libraries and models
Type 3 privileges of P1 on all models in Mart
Rule 2: P1 and P2 assigned to SU1 on Mart
SU1 gets the union of P1 and P2 privileges on the entire Mart. Type 1, 2, and 3 privileges are considered. Union here means that if a privilege is restricted in P1 but allowed in P2, it is allowed for SU1.
In this case, multiple profile rule does not apply, as the union of privileges is used.
Rule 3: P1 assigned to SU1 on Library1
SU1 gets the privileges assigned for P1 on the entire Library1.
Type 1 privileges are not considered.
Rule 4: P1 assigned to SU1 on Model1
SU1 gets the privileges assigned for P1 on Model1.
Type 1 privileges and some Type 2 (Library) are not considered.
Rule 5: P1 assigned to SU1 on Mart and P2 assigned to SU1 on Library1
SU1 gets the privileges of P1 on Mart and Library2, but not on Library1.
SU1 gets the privileges of P2 on Library1.
Rule 6: P1 assigned to SU1 on Mart and P2 assigned to SU1 on Model1
SU1 gets the privileges of P1 on Mart, Library1, Model2, and the entire Library2, but not on Model1.
SU1 gets the privileges of P2 on Model1.
Authorization Rules for Windows User

170
Rule 7:
If a Windows user is added as a Mart user, the rules of a Server User apply to the Windows user.
Authorization Rules for Group user
Rule 8: P1 assigned to ADG1 on Mart, ADU1 is part of ADG1, and ADU1 not added as user on Mart
ADU1 gets the privileges of P1 on Mart.
Rule 9: P1 assigned to ADG1 on Mart, P2 assigned to ADG1 on Library1, ADU1 is part of ADG1, and ADU1 is not added as user on Mart
ADU1 gets the privileges of P1 on Mart and Library2, but not on Library1.
ADU1 gets the privileges of P2 on Library1.
Rule 10: P1 assigned to ADG1 on Mart, P2 assigned to ADG2 on Mart, ADU1 is part of ADG1 as well as ADG2, and ADU1 is not added as user on Mart
ADU1 gets the union of P1 and P2 privileges on Mart.
Rule 11: P1 assigned to ADG1 on Mart, P2 assigned to ADG2 on Library1, ADU1 is part of ADG1 as well as ADG2, and ADU1 is not added as user on Mart
ADU1 gets the privileges of P1 on Mart and Library2.
ADU1 gets the union of P1 and P2 privileges on Library1.
Rule 12: P1 assigned to ADG1 on Mart, ADU1 is part of ADG1, and ADU1 is also added as user on Mart
Since ADU1 is also added as a user on Mart, the user is not considered a part of any group. The rules are same as that of a Windows user.
Rule 13: P1 assigned to ADG1 on Mart, P2 assigned to ADG2 on Mart, ADU1 is part of ADG1 only, ADG1 is subgroup of ADG2, and ADU1 is not added as user on Mart
ADU1 gets the privileges of P1 on Mart. This is because ADG1 is explicitly added on Mart and ADU1 is only part of ADG1.
Rule 14: P1 assigned to ADG1 on Mart, P2 assigned to ADG2 on Mart, ADU1 is part of ADG1 as well as ADG2, ADG1 is subgroup of ADG2, and ADU1 is not added as user on

171
Mart
ADU1 gets the union of P1 and P2 privileges on Mart.
Back to Top

172
Create a Profile
Profiles determine who can change the data or models in Mart. As a System Administrator, you can create profiles and can attach them to users for a catalog. When a user creates, modifies, or deletes an object in Mart, the profile determines if the operation is permitted. Each profile grants permissions at the following object levels, in the same hierarchical order:
Catalog Management
Library
Mart
Model
Locking
Modeling Object
Data Movement Rule
Data Source Object
Default value
Domain
ER Diagram
Entity
Relationship
Subject Area
Theme
Validation Rule
View
User-Defined Property
Version
Permission Management

173
Reports
Session Management
User Management
Note: Admin, Architect, Modeler, and Viewer profiles are created when you install Mart.
Follow these steps::
1. Open erwin Mart Administrator.
2. To add a profile, follow these steps:
a. Click Add Profile and enter a name for the profile.
b. Enter a description for the profile.
c. Expand the items in the Permission Details section and select the permissions you want to assign.
Any dependent permissions for the selected permissions are selected too. For example, if you select the Create Entity permission, then Model Modify, ER Dia-gram Modify, ER Diagram Modify under Subject Area, and Key Group Create permissions are also selected.
d. Click Submit.
The profile is saved.
3. To create a profile from an existing profile, follow these steps:
a. Enter a name for the profile.
b. Select Clone from existing profile and select a profile to clone.
c. Click Submit.
d. Expand the items in the Permission Details section and select the permissions you want to assign.
Any dependent permissions for the selected permissions are selected too. For example, if you select the Create Entity permission, then Model Modify, ER Dia-gram Modify, ER Diagram Modify under Subject Area, and Key Group Create permissions are also selected.
e. Click Submit.

174
The profile is saved.
Back to Top

175
Verify if the Required Library Exists
When you migrate your models to erwin DM Version 9 Mart, you can choose to create lib-raries and copy models to them. Verify if you can assign these libraries to the user you want to create. If not, create the required libraries.
Back to Top

176
Create a Library
A library is a collection of related models and a catalog is a group of libraries. Use libraries to add an extra level of security or isolate implementation differences, such as development and production environments.
Follow these steps:
1. Select Mart or an existing library and click New.
A new library appears with a default name.
2. Change the name per your requirement.
3. Enter a description for the library in the Description field and click Apply.
A library is created.
Back to Top

177
Assign Permissions to a User
As a System Administrator, you assign different levels of permissions to different profile users. Control the level of permission and assign a user or a group to a profile so that they have specific access. A user can be assigned to multiple profiles. For example, a user can have full permissions on one library and only view permissions on another.
Follow these steps:
1. Open erwin Mart Administrator.
2. Click Permissions Management, select the libraries that you want the user to access, and select a user or a group.
3. Assign a user or group to a profile and click Submit.
The profiles is assigned to the user or group.
Back to Top
Examples
This section describes steps to accomplish common business requirements.
Example: Provide permissions to view models in a specific library
Chris, a Business Analyst, has to access Mart to review the models you have copied to the For Review library. Chris only reviews the ER diagrams available in a specific subject area. He may modify the diagrams if required. Chris uses his Windows credentials to log on.
Follow these steps:
1. Add a Windows user named Chris.
2. Create a library named For Review and copy the required model to it.
3. Create a profile named Business Analyst and include the following permissions:
Model, Modify
Model, Modeling Object, Subject Area, Create and Modify
Model, Modeling Object, Subject Area, ER Diagram, Create and Modify

178
4. Assign the profile to Chris.
Chris can now log in to Mart using his Windows credentials and review the model.
Example: Set up Mart that allows users save models under a specific library and not under root
You are a System Administrator and you want Jane to create models only under a specific lib-rary and not under Mart root.
Follow these steps:
1. Add a Windows user named Jane.
2. Create a library named Projects_Jane.
3. Create a profile named Jane_Profile and include the following permissions:
Model, Create
Model, Modeling Object, Subject Area, Create and Modify
Model, Modeling Object, Subject Area, ER Diagram, Create and Modify
4. Click Permission Management.
5. Select Projects_Jane in the Select Catalog pane. Select Jane in the Select User/Group pane. Select Jane_Profile in the Assign User/Group to Profile pane.
6. Click Assign Profile and then click Submit.
Jane can create models and save them only under the Projects_Jane folder.
Back to Top

179
Sessions
When you log in to the mart, this event is recorded as the start of a session. During a ses-sion, the models that you open and the locks that are applied to each catalog entry are tracked. Each session has its own Action Log, contained in erwin Data Modeler, which logs the transaction information containing real-time changes that are made to a model. After you have logged out of the mart, the Action Log is cleared and the session is closed.
Session Manager lets you view a session and terminate your sessions. You can also assign the appropriate permission to a user to terminate a session.
To view a session, on the ribbon, click Mart > Session Manager. The Session Manager dia-log lists all the sessions of the current user.
You can also view and delete offline mart models that are saved in a session.
Note: Deleting the offline mart model does not delete the model from the stored location. It deletes the information about that model from erwin Data Modeler.
To delete an offline mart model, open the Session Manager dialog, and click Offline Mart Models. The Offline Mart Model Manager dialog opens. Select the Catalog item and click Delete offline mart models. The information about the offline mart model is deleted from erwin Data Modeler.

180
Terminate Inactive or Closed Sessions
Terminate an Inactive or a Closed session to release all the locks applied in that session. If a session is terminated, then all the information that is related to offline mart models in that session is deleted.
Follow these steps:
1. On the ribbon, click Mart > Session Manager.
The Session Manager dialog opens. It displays all the sessions of a user.
2. Select a session from the Sessions list and click Delete Session.
The selected session is terminated.

181
Delete Mart
As a Mart Administrator, you can delete Mart.
Important! If you delete Mart, all your libraries, models, and the associated data are deleted permanently.
Follow these steps:
1. Open the erwin Mart Administrator and click Delete Mart.
A warning message appears.
2. Type YES and click OK.
Mart is deleted and the Initialize Mart web page for your database appears.

182
Catalog Management
The catalog includes libraries, models, and versions of models. Libraries help you organize projects by grouping models together. For example, you can create a library to store models that share a workgroup, a security level, or a target server. Any number of libraries or mod-els can be created and stored in a catalog. By organizing your data models in libraries, you can also easily manage model merging and conflict resolution.
183
Library Structure Planning
Before you set up your library structure in the Catalog Manager, review how the workgroup modeling process works in your organization. To help you review your workgroup modeling process, answer the following questions:
How are erwin Data Modeler models moved from the development library to the production library?
How are the approval process for moving models documented and enforced?
How are erwin Data Modeler models merged into the enterprise model and who controls this process?
Do you use versioning to record the milestones of models?
Who has what type of access to each library?
Are erwin Data Modeler models generated to multiple target environments (such as Microsoft SQL Server and Oracle)?
How are you warehousing your data?

184
Library Structure Organization
During the model development life cycle, you must have an organized library structure. Hav-ing an organized library structure helps you move only those models that are intended for production to that level. You can structure your libraries in three distinct types:
Development Libraries
Contains models that are being created or updated.
Test Libraries
Contains finished models that are being tested before moving them to production.
Production Libraries
Contains the finished models that were tested and debugged.

185
Library Security Levels
After you have created your libraries, determine the security levels for each library. The fol-lowing examples give you an idea of how you can use libraries and security together to help safeguard models:
The entire modeling team can have access to the development library and read-only access to the test and production libraries. Authorized project leaders can be assigned to move models from the development library to the test library, and then from the test to the production library.
Models from other libraries (for example, Sales and Accounting) can be merged from their own libraries in the enterprise model. Modelers working on projects in the Sales or Accounting libraries can have read-only access to the enterprise library and full access to their own projects. Assign one person or group to manage integration to the enterprise model.
Modelers need full access to their own libraries and read-only access to the libraries of others. This type of security enhances production for the following reasons:
Everyone can see what everyone else is working on.
All models are stored in one location.
Permissions can be changed as different collaborations among modelers become necessary.

186
Library Structure Considerations
You must consider any or all of these suggestions when building a library structure:
Practical library names
Use practical and functional library names that help all users understand the purpose and type of models contained in the library. For example, you can use the format: Short System Name+Version+Stage (for example, Ora_8_Production).
Model naming and data type standards
Enforce naming and data type standards, which are vital to efficient workgroup mod-eling.
Note: For more information, see the erwin Data Modeler Online Help.
Rules for promoting models
Define a rigid and documented model approval and promotion process using different libraries for each development phase.
Rules for versioning models
Define versioning rules using different libraries for each development version (for example, Development Beta 1).
User rights and security
Apply stricter rights to libraries that contain mature models nearing the latter stages of development. You can also apply strict rights to individual models.
Publication
Generate reports to communicate milestones in the model development process.
Schema generation rules
Set up a library where you generate the model schema. Usually, you generate the model schema of promoted models only in the latter stages of development.

187
Manage Catalogs
A catalog is similar to a directory structure. It consists of libraries, data models, model ver-sions, and templates. Catalog Management displays a hierarchical tree of Mart and lets you manage your catalogs. It has all the features included in the Library Manager and Session Manager modules that were available in the previous releases of erwin Data Modeler Workgroup Edition.
Following are some of the features in Catalog Management:
Libraries
Use libraries to group related models. Libraries add an extra level of security or isolate implementation differences, such as development and production environments. A library can be part of another library or can be present under the Mart.
Sorting
In a catalog, the libraries are sorted alphabetically, and the models within the libraries are also sorted alphabetically. Versions are sorted newest to oldest; Named Versions appear first, and then Delta Versions follow. The catalog entries sort in the following order: Librar-ies, Models, Templates, and Versions respectively.
Context Menu
The context menu appears when you select a catalog entry and right-click. You can use the context menu to cut, copy, paste, and delete a library, model, or template. You can also use the context menu to mark a Delta version and delete, hide, and unhide Named and Delta versions.
You can create, delete, copy, and move catalog entries; you can hide and unhide versions.
Follow these steps:

188
1. Open erwin Mart Administrator and select the Catalog Management panel.
2. To create a library, follow these steps:
1. Click Create Library.
A library is created.
2. In the Edit Catalog section, edit Name and Description fields and click Submit.
The name and description are updated.
3. To create a Named version, follow these steps:
1. Select either a Named version or a Delta version of a data model and click Mark Version.
A Named version is created.
2. In the Edit Catalog section, edit the name and description fields and click Sub-mit.
The name and description of the Named version is updated.
4. To hide a model version, select the version from the Catalog pane, and click Hide Ver-sion.
5. To unhide a model version, select the model of that version, click Unhide Version. From the Hidden versions dialog, select your version and click OK.
6. To delete a catalog entry, select the entry and click delete.
The Delete button is disabled when the last existing version of a model, or all the ver-sions of a model are selected. The catalog entry is permanently deleted from Mart and it cannot be recovered.

189
Lock a Catalog Entry
You can lock any catalog entry, even mart, to restrict other users from editing it. You can view the current lock status of a catalog entry in the Locks section. Locks last until the dur-ation of a session or until removed. Locks can last even after a session is disconnected; it means that the user is disconnected from Mart but the lock is still preserved. You can work offline on a model without losing the lock. Only the Administrator can override any lock.
The following lock options are available in Mart:
Existence Lock
Prevents other users from deleting a catalog entry. When you have an Existence lock, other users can read and update, but not delete the catalog entry. You can edit or move the catalog entry but cannot delete the entry. The presence of an Existence Lock prevents anyone, other than the lock owner, from acquiring an Exclusive Lock on the entry. You can apply Existence Lock, Shared Lock, or Update Lock, with the existing Existence Lock, to the catalog entry.
Shared Lock
Prevents other users from editing the catalog entry. When a you have a Shared lock, other users can read, but cannot update or delete the catalog entry. You can open a model with Shared Lock in read-only mode; you cannot edit the model. The presence of a Shared Lock prevents anyone from acquiring Update Lock or an Exclusive Lock on the entry. You can apply Existence Lock with Shared Lock to a catalog entry.
Update Lock
Lets only the lock holder to edit the catalog entry. When you have an Update lock, other users cannot read, update, or delete the catalog entry. The presence of Update Lock on an entry prevents other users from acquiring any other locks, except Exist-ence Lock.
Exclusive Lock
Lets only the lock holder to edit a catalog entry. When you have an Exclusive lock, other users cannot read, update, or delete the catalog entry. In addition, no other user can add any type of lock on the entry.

190
Unlock Entry
Lets only the lock holder to unlock an entry.
Depending on the type of lock, you can move any entry in the catalog. Acquire Update Lock on a catalog entry before you move that entry.
You cannot move or copy a catalog entry if any of the following conditions is true:
the entry has any lock other than Existence Lock or Shared Lock
the parent of that entry has any lock, other than Existence Lock
the destination library or mart has any lock, other than Existence Lock

191
Lock Behavior
When you edit a catalog entry, locks are applied automatically to appropriate levels in the catalog to prevent other users from editing the entry. When the edit is complete, the locks are removed or downgraded automatically.
The following scenarios apply to locks when you edit a catalog entry:
When you load a model, Shared Lock is applied to the model and Existence Lock is applied to the parent entry up to the mart. After the model is loaded, Shared Lock is replaced with Existence Lock.
When you initially save a model, Update Lock is applied to the model automatically. After the model is saved, Update Lock is replaced with Existence Lock automatically. If you apply the Update Lock manually, the lock is retained until you release it manually, or until the model is closed.
When you incrementally save a model, Update Lock is applied to all the versions cre-ated between the opened version and the newly created version. After the model is saved, Update Lock is replaced with Existence Lock.
When you delete a model, Exclusive Lock is applied to the model. After the model is deleted, the lock is dropped.
When you delete a user, all the locks that the user had applied are deleted.
When you rename a library, Update Lock is applied to the library. After the library is renamed, the lock is removed.
When you load models for version compare, Shared Lock is applied to the root model. After the model is loaded, Shared Lock is removed.
When you merge or import objects during version compare, Update Lock is applied to the root model. When the merge or import is complete, Update Lock is removed.

192
Workgroup Modeling Reports
Modelers typically work from a common set of libraries and models, and share information about these objects with other users. One way to share information is by using reports, which details the information and definitions for a model. You can generate predefined reports to view the contents of specific libraries and models, view the changes and conflicts for specific models, and view the security structure for the database.
You can generate Mart reports using either the Report Designer, the Query Tool, or a third-party reporting tool.
Report Designer
Report Designer lets you create a wide variety of mart administrative reports and cross-model reports. You can create report templates for frequently used reports and you can export reports to the HTML, CSV, and PDF formats. You can create report solu-tions and include multiple report templates. For more information about the Report Designer, see the Online Help.
Reporting Tool
You can create custom reports using a third-party reporting tool. For more inform-ation about generating custom reports, see the Creating Custom Mart Reports using a Reporting Tool guide.
erwin Data Modeler Workgroup Edition includes the following predefined reports:
Cross Model Reports
The following table describes the cross-model reports that you can run against Mart:
Report Name Description
Attributes/Columns Provides information about attributes/columns of the mart mod-els
Design Layer Lineage Provides information about the model sources of the mart mod-els
Domains Provides information about Domains and Datatypes of Attributes of the mart models

193
Entities/Tables Provides information about the entities/tables of the mart mod-els
Naming Standard Provides a list of mart models that have active naming standard objects
Relationships Provides relationship information, such as parent and child tables of mart models
Subject Areas Provides information about the subject areas of the mart models
User Defined Properties Provides information about the UDPs present in the mart models
Views Provides information about the views present in the mart mod-els
The following table describes the filters available for the above reports:
Report Name Filter By Description
Attributes/Columns
Only The Attributes Within Entity
Filters attributes that are only part of entit-ies
Only The Attributes Without Comment
Filters columns without Comments
Only The Attributes Without Definition
Filters attributes without Definition
Only The Attributes Without Domains
Filters attributes whose domain is a default domain
Specify Attribute Name at Run Time
Filters the attribute whose name is spe-cified at run time
Specify Model Name at Run Time
Filters the model whose name is specified at run time
Design Layer LineageSpecify Model Name at Run Time
Filters the model whose name is specified at run time
Domains
Search Domain Name at Run Time
Filters the domain whose name is specified at run time
Specify Model Name at Run Time
Filters the model whose name is specified at run time

194
Entities/Tables
Only The Attributes Without Comment
Filters columns without Comments
Only The Attributes Without Definition
Filters attributes without Definition
Specify Attribute Name at Run Time
Filters the attribute whose name is spe-cified at run time
Specify Model Name at Run Time
Filters the model whose name is specified at run time
Naming StandardNSM_Option-Show Only Active NSM
Filters NSM Objects that are Active in Mart Models
Relationships
Exclude Rela-tionship On View
Specify Model Name at Run Time
Filters the model whose name is specified at run time
Specify Rela-tionship Name at Run Time
Filters Relationship Names that are present in the Mart and whose name is specified at run time
Subject Areas
Search Subject Area Name at Run Time
Filters the subject area whose name is spe-cified at run time
Specify Model Name at Run Time
Filters the model whose name is specified at run time
User Defined Properties
Search UDP Name at Run Time
Filters the UDP whose name is specified at run time
Specify Model Name at Run Time
Filters the model whose name is specified at run time
Views
Search View Name at Run Time
Filters the view whose name is specified at run time
Specify Model Name at Run Time
Filters the model whose name is specified at run time

195
Note: The filters available are mutually exclusive. Therefore, you can select only one of them at a time.
Mart Administrative Reports
The following table describes the mart administrative reports that can be run against mod-els in the mart:
Report Name
Description
Libraries Provides information about libraries present in the mart
Locks Provides information about locks present in the mart, such as the models and catalogs that are locked
Models Provides information about the models saved in the mart
Profiles Provides information about the profiles present in the mart
Sessions Provides information about the mart user sessions, such as the session status
User Logs Provides information about the actions performed by mart users
User Per-missions
Provides information about the permissions present for mart users
Users Provides information about mart users, such as the user type
The following table describes the filters available for the above reports:
Report Name Filter By Description
Libraries No Filter
Locks No Filter
Models No Filter
Profiles No Filter
Sessions
Active Session Filters active user sessions
Current User Filters all information of the user that is logged on currently or the use that runs the report
User LogsUser-Exclude Deleted Users
Filters log result of users, excluding the deleted users

196
User-Specify Users at Runtime
Filters the user whose name is specified at run time
Session_Log-Filter By Category- Authentication
Filters log-in, log-out, and authentication failure logs
Session_Log-Filter By Category- Cata-log
Filters actions performed on the Catalog Manager, such as open and close, initial save, incremental save, create catalog, and delete catalog
Session_Log-Filter By Category- Log
Filters users that cleared logs using the Log Management pane of the erwin Mart Administrator
Session_Log-Filter By Category- Misc
Filters logs of miscellaneous actions that are not covered under any category. For example, report execution
Session_Log-Filter By Category- Per-mission
Filters logs of actions performed using the Permissions pane of erwin Mart Admin-istrator
Session_Log-Filter By Category- Profile
Filters logs of actions performed using the Profile Management pane of the erwin Mart Adminsitrator
Session_Log-Filter By Category- User
Filters logs of actions performed using the User Management pane of the erwin Mart Administrator
Session_Log-Filter By Type- Error
Filters logs of actions that are registered as errors
Session_Log-Filter By Type- Info
Filters logs of actions that are registered as information. This is the default level for all actions except for actions that result into errors.
User PermissionsExclude Delete Users
Filters permission information of users, excluding deleted users

197
UsersExclude Delete Users
Filters information of users, excluding deleted users
Note: The filters available are mutually exclusive. Therefore, you can select only one of them at a time.
Bulk Editor
The Bulk Editor provides the selection, validation, and maintenance of model object metadata, permits reusable customization (option sets), and realtime access to model changes. Export results or selected rows to a CSV file. You can use the Bulk Editor to edit a small set of properties over a large number of objects. Changes and updates are imme-diately committed as you make them, field by field.
For more information, refer to the Using the Bulk Editor topic.
Query Tool
The Query Tool is used to query the repository through executing SQL SELECT statements against a local model or a model in the mart. You can use the Query Tool to create your own .QRY report file. Save your option set locally to the model or as an XML file. Export your results to a CSV file. You can execute a query against the objects and properties in the model, the metadata defining those objects and properties, and the action log that records the changes that are made to your model during the modeling session. You can create new queries or paste text from another source (such as a .SQL file) into a query. Although the Query Tool provides a built-in query interface in erwin Data Modeler, you can also use any third-party reporting tool that has ODBC capability to query erwin Data Modeler modeling data.
For more information, refer to the Query Tool topic.

198
Create Reports Using Report Designer
Report Designer lets you create a wide variety of reports and on the current data available in your data models. If you are working in the Workgroup Edition, you can create Mart administrative reports and cross-model reports. You can create report templates for fre-quently used reports and you can export reports to HTML, CSV, and PDF formats. You can create report solutions and include multiple report templates.
You cannot reuse the .RTB reports that were created using Report Template Builder, because the metamodel objects are changed. You must recreate the reports in Report Designer.
Several sample (pinned) reports are included with the application and they are available in the following location:
%Installdir%\erwin\Data Modeler r9\BackupFiles\Report Solutions
Also at the following location:
Windows 7
C:\Users\<user name>\AppData\Local\erwin\Data Model-er\9.8\Report Solutions
Note: The pinned reports are created using a Logical-Physical model. If you use the pinned reports with a Logical-only or a Physical-only model, it may result in inappropriate results.
Follow these steps:
1. Click Tools, Report Designer. The erwin Report Designer window opens.
2. To create a report solution, click Create new solution for reports on the toolbar.
If the current report solution is not saved already, you are prompted to save it. A new blank workspace appears.
3. To create a report template, follow these steps:
a. Click Create a Report on the toolbar. The Report Editor dialog appears.
b. Enter a name for the report.

199
c. Select the model type that you want to report on. Select Mart to create a report on the Mart data.
The items in the Select Report Subject pane change according to the Report Type that you select.
Note: You must have the Reports: View permission to create Mart reports.
d. In the Select Report Subject pane, select the item on which you want to gen-erate the report.
e. In the Select Report Fields pane, select the fields that you want to include in the report.
f. To create a report that filters specific objects and includes them in the report, use the Filter by option. This option is available only for entities, tables, attrib-utes, columns, subject areas, and indexes.
g. Click Run Report.
If you are creating a report on your Mart and you have selected an option under Filter By, the Mart Report Filter dialog opens.
h. Select the specific models that you want to get the results from. Enter the spe-cific model object name. Use wildcard characters, if necessary.
The report is generated and displayed. If you do not specify any model or entity, the generated report includes all the models. If you have used a wildcard, by default, the wildcard is applied to all the names. For example, if you type ID, the report includes Cust_ID and ID_For_Category. If the result is very large for Mart reports, the report is displayed in multiple pages (data grid). Use the nav-igational icons in the toolbar to view the subsequent pages.
i. (Optional) Click the Clear data in data grid icon to clear the results in the grid.
4. To configure report preferences, follow these steps:
a. Click Edit, Preferences. The Report Designer Preferences dialog appears.
b. Complete the following fields and click OK:
Add object type as prefix for the properties 'Name' and 'Physical Name'

200
Prefixes the object type to only the Name and Physical Name columns. For example, you are generating a report on entities and the cor-responding attribute names and data types. The column names in the report are displayed as Entity Name, Attribute Name, and Attribute Logical Data Type.
Add object type as prefix for all other properties
Prefixes the object type to all columns.
Note: These options work only when they are selected at the time of creating a report. If these options are selected at the time of modifying an existing report, they do not work.
Apply optimization mode if row count is more than
Specifies the number of rows at which the computer resources are optim-ized to display the report. If the row count in your report exceeds the num-ber that you specify here, the report is displayed in optimization mode. In this mode, the group and sort options are not available in the result grid. If no value is entered, the row count for optimization mode is considered as equal to the total row count of a report.
Number of top rows to display
Specifies the number of top rows that you want to display. This option dis-plays the first few rows that match a report criteria, when the result con-tains more rows than the number specified here.
5. To generate a report from an existing report template, select the template, right-click, and click Run.
6. To modify an existing report template, select the template, right-click and then click Properties. After you finish modifying, click Run Report.
Note: When you modify an existing report template and select more properties for the existing report subject, the selections are retained. If you select a different report subject, the previous report subject and its properties are not included in the report.

201
7. To customize the appearance of the report at the node-level, follow these steps:
a. Right-click the node and click Properties. Complete the following fields:
Name
Specifies the name of the node. By default the name of the selected object is displayed.
HTML Style
Note: These settings apply to both HTML and PDF reports.
Font Family: Specifies the font for the selected node.
Size: Specifies the font size for the selected node.
PDF Page Breaking: Specifies that you want to display the details of each node on a new page. The node for which this option is selected and the subsequent nodes are displayed on a new page. This option is not effective when the report has only one node. When the report has multiple nodes, do not set this option on the main node. Suppose your report nodes look like the following illustration:
If you apply the PDF Page Breaking option to the Child Relationship (above CR Physical Name) node, the CR Physical Name and Column Physical Name nodes are displayed on a new page.
Foreground: Specifies the text color.
Background: Specifies the background color.
202
Template Color: Specifies that the color that is specified in the template is used.
Bold/Italic/Underline/Strikeout: Specifies the effect for the text.
Width: Specifies the width of the selected node (report column). You can specify the width for any node and it is applied when the report is exported to HTML or PDF. However, the width is not applied to the last node (last column in the report) in a PDF report. This is because, the remaining length of the fixed page width is considered as the actual width of the column.
Alignment: Specifies the alignment of the text.
8. To export a report solution to HTML, follow these steps:
Right-click the report solution and click Export All to HTML. The Report Export dialog appears.
Click Browse and select the folder to which you want to export the report.
Go to the HTML tab and add the title in the Solution Title in HTML field.
Click OK. The report is generated in the specified folder.
9. To export a report to HTML, follow these steps:
a. Click the Clear data in data grid icon and clear the result grid.
This is a best practice and helps the application export the report without con-suming much of the computer resources.
b. Right-click the report and click Export to HTML. The Report Export dialog appears.
c. Click Browse and select the folder to which you want to export the report.
d. Go to the HTML tab and complete the following fields:
Select the template for exporting to HTML
Specifies the templates that you want to use with the HTML report. You can use customized templates, provided the formatting is similar to the default templates. The default templates are available in the following folder:

203
C:\Program Files\erwin\Data Modeler r9\Report\Template\Template-Default
Solution Title in HTML
Specifies the title for the entire report solution.
Report Header in HTML
Specifies the text that appears between the report title and the first line of the report.
Report Footer in HTML
Specifies the text that appears at the bottom of the report.
e. Click OK. The report is generated in the specified folder. If the report data spans multiple page grids in the Report Designer, the data is segregated into multiple sections in the HTML. The sections are first divided by model name and then by object name. This means that a section may include objects from different mod-els, which are sorted by model name and object name.
10. To view the HTML report on a different computer, include the computer name in the path to the filename. For example, if you have published the report to c:\er-win\reports folder on a computer that is named Comp001, use the following path to access it:
\\comp001\erwin\reports\index.htm
Note: The computer from which you are accessing the report must be in the same domain as the one in which the report is published. In addition, the user who is access-ing the report must have at least the read-only privileges on the corresponding folder.
11. To export a report or a report solution to CSV, follow these steps:
a. Right-click the report and click Export to CSV. Or, right-click the report solution and click Export All to CSV. The Report Export dialog appears.
b. Click Browse and select the folder to which you want to export the report.
c. Go to the TEXT tab and select the following options:
Format

204
Specifies whether you want to include the first-level object names mul-tiple times. For example, you have included entity names and attribute names in your report and you have selected No Duplicates. The entity name appears only once for all the corresponding attribute names. If you have selected Duplicates, the entity name appears as many times as the corresponding attribute names appear.
Text Qualifier
Specifies the symbol that you want to use to indicate the column headers.
Delimiters
Specifies how you want to separate two columns in the exported report. The option Comma Delimited creates a .CSV file and the remaining options create .TXT files.
d. Click OK. The report is generated in the specified folder.
12. To export a report to PDF, follow these steps:
a. Click the Clear data in data grid icon and clear the result grid.
This is a best practice and helps the application export the report without con-suming much of the computer resources.
b. Right-click the report and click Export to PDF. The Report Export dialog appears.
c. Click Browse and select the folder to which you want to export the report.
d. Go to the PDF tab and enter values/set the following fields:
Solution Title in PDF
Specifies the title for the entire report solution.
Report Header in PDF
Specifies the text that appears on the first line of every page of the report.
Report Footer in PDF
205
Specifies the text that appears at the bottom of every page of the report.
For each of these options, you can specify the font, size, color, and alignment.
Image Orientation
Specifies the direction of the images that are generated in the report. Images are generated for the Subject Area and ER Diagram reports, when you select properties under Graphical Members.
Font & Color
Specifies the styles to be used with respect to the font and its color.
Table of Contents
Indicates whether the report should contain a table of contents.
Index
Indicates whether the report should contain an index.
Comprehensive Report
Indicates whether the report should contain comprehensive tabular information based on the items selected for the report. Selecting this option lets you avoid information duplication in the report.
e. Go to the Advanced tab and enter values/set the following fields:
Report Logo
Lets you add a logo to the report. Also, lets you link the logo to a URL of your choice.
Logo Position
Specifies the position of the logo in the report.
Alignment
Specifies the alignment of the logo at the selected position in the report.
Custom Report

206
Lets you set custom colors to the various sections of the report. Select the Use Custom Colors check box to be able to select colors of your choice.
Select ER Diagram Format
Specifies the format of the ER diagram.
Page Size
Specifies the page size that would be used for printing the PDF copy of the report.
f. Click OK. The report is generated in the specified folder. If the report data spans multiple page grids in the Report Designer, the data is segregated into multiple sections in the PDF. The sections are first divided by model name and then by object name. This means that a section may include objects from different mod-els, which are sorted by model name and object name.
13. To add a report from another report solution, follow these steps:
In the Report Designer dialog, right-click the template name and click Add Report.
Select the report that you want to include (.erpt file) and click OK.
Save the report solution.
This section contains the following topics
Mart-Level Reports in Report DesignerCross-Model ReportsMart Model Reporting StatusSchedule Mart Report SynchronizationUse Multiple Threads to Update Mart Models for ReportingMart Report Data Compression
Mart-Level Reports in Report Designer
You can now generate reports on the Mart. The reports that you generate could be admin-istrative or about the model objects. For example, you can generate a report on the profiles that are attached to users, or on the list of entities without primary keys. When you gen-

207
erate the report, you can use the filter to search within specific objects. The filter supports SQL wildcard characters such as ? and %.
Note: You must have the Reports: View permission to create Mart reports.
Follow these steps:
1. Open erwin Data Modeler and log in to the Mart.
2. Click Tools, Report Designer.
3. Enter a name for the report and click Mart.
4. Select the report subject in the Select Report Subject pane.
5. [Optional] In the Select Report Fields pane, select Specify Attribute Name at Run Time or Specify Model Name at Run Time check box.
6. Select the properties that you want to include in the report and click one of the fol-lowing buttons:
a. Click Run Report.
If you have selected an option under Filter By, the Mart Report Filter dialog opens.
Select the specific models that you want to get the results from. Enter the spe-cific model object name. Use wildcard characters, if required.
The report is generated and displayed. If you do not specify any model or entity the generated report includes all the models. If you have used a wildcard, by default, wildcard is applied to all the names. For example, if you type ID, the report includes Cust_ID and ID_For_Category.
b. To add the report to the current Report Solution, click OK.
Cross-Model Reports
You can now generate a report on the properties of attributes and columns present across multiple models in a Mart. When you generate the report, you can use the filter to search within specific models. The filter supports SQL wildcard characters such as ? and %.
Follow these steps:

208
1. Open erwin Data Modeler and log in to the Mart.
2. Click Tools, Report Designer.
3. Enter a name for the report and click Mart.
4. Click Attribute/Column in the Select Report Subject pane.
5. In the Select Report Fields pane, select Specify Attribute Name at Run Time or Specify Model Name at Run Time check box.
6. Select the properties that you want to include in the report.
7. Click Run Report.
8. Select the specific models that you want to get the attributes from. Enter the attribute or column name.
By default, wildcard is applied to all the names. For example, if you type ID, the report includes Cust_ID and ID_For_Category.
9. Click OK.
The report is generated and displayed.
209
Mart Model Reporting Status
When a Mart model is modified and saved, although a confirmation message appears, the erwin internal tables are still updated in the background. Further, when multiple users modify and save models simultaneously, models (internal tables) are queued for updating. If you generate a report on the model at this moment, the latest updates are not included. To provide you the correct reporting status of a model, the following enhancements are imple-mented:
The Mart Open dialog is enhanced with a new column named Report Status. Report Status displays whether a model is ready for generating reports.
The status bar of erwin Report Designer shows the number of models that are ready for generating reports. The status Mart Report sync progress (X/Y) indicates that of the Y models that are available in the Mart, X models are ready for reporting.
The Report Status column includes the following statuses:
Updated
Specifies that the model is ready for report generation. When a report is generated on a model with this status, it includes the latest updates.
Updating
Specifies that the model is still being updated. When a report is generated on a model with this status, it does not include the latest updates. Further, when a model is saved for the first time, the report may not include any information.
Pending
Specifies that the model is queued for update. When a report is generated on a model with this status, it does not include the latest updates. Further, when a model is saved for the first time, the report may not include any information.

210
Schedule Mart Report Synchronization
In the Workgroup Edition, the model data and model report data are stored in separate internal tables. The model report data table (m9ReportData) includes only those columns that are required to generate model-specific reports. When you update a model and save the changes, both the tables are updated. Although erwin Data Modeler displays a mes-sage that the model is saved, the corresponding model report data table is still being updated in the background. In this scenario, if you try to generate a report, the report may not include the details that you have just updated. This means, there is a delay in the syn-chronization of model data and the model report data tables.
From this release onward, you can synchronize the tables dynamically or schedule the syn-chronization for a later time. Typically such synchronizations are scheduled for a time when there is minimum traffic on the server. The default is dynamic synchronization.
Dynamic Synchronization
Specifies that the model report data table is updated as and when the corresponding model is updated. You can see the reporting status of the source models in the Report Status column of the Mart Open dialog.
Scheduled Synchronization
Specifies that the model report data table is updated at the scheduled time. You can see the reporting status of the source models in the Report Status column of the Mart Open dialog.
Follow these steps:
1. Log out of the Mart and stop the Mart Server service.
2. Navigate to the \webapps\MartServer\WEB-INF folder on the computer where erwin Mart Server is installed. Typically, the path for this folder is as follows:
For a 32-bit version:
<installation folder>\erwin\Mart Server r9\Tom-cat\Webapps\MartServer\WEB-INF
For a 64-bit version:

211
<installation folder>\erwin\Mart Server r9\Tom-cat64\Webapps\MartServer\WEB-INF
3. Open the rest-context.xml file in a text editor such as Notepad and search for the fol-lowing line:
<property name="refreshReportData" value="true" />
4. Change the value to false.
5. Navigate to the following line:
<task:scheduled ref="reportTaskExecutor" method="run" cron="0 10 21 * * ?" />
6. Change the value for cron.
Here, cron indicates the scheduled time. In this example, cron="0 10 21 * * ?" indic-ates that the models are synchronized for report generation at 9:10 pm every day.
7. Save the XML file.
8. Start the Mart Server service and log in to the Mart.
Similarly, to change from scheduled to dynamic synchronization, change the value of <prop-erty name="refreshReportData" value="false" /> to true.

212
Use Multiple Threads to Update Mart Models for Reporting
In the Workgroup Edition, the model data and model report data are stored in separate internal tables. The model report data table (m9ReportData) includes only those columns that are required to generate model-specific reports. When you update a model and save the changes, both the tables are updated. Although erwin Data Modeler displays a mes-sage that the model is saved, the corresponding model report data table is still being updated in the background. In this scenario, if you try to generate a report, the report may not include the details that you have just updated. This means, there is a delay in the syn-chronization of model data and the model report data tables.
This delay happens because, the update process is handled by a single thread in your com-puter. From this release onward, you can configure a Mart to use multiple threads to update a model. Using multiple threads increases the performance of the update process and improves the time taken for large models to be available for reporting.
Follow these steps:
1. Log out of the Mart and stop the Mart Server service.
2. Navigate to the \webapps\MartServer\WEB-INF folder on the computer where erwin Mart Server is installed. Typically, the path for this folder is as follows: For a 32-bit version:
<install folder>\erwin\Mart Server r9\Tom-cat\Webapps\MartServer\WEB-INF
For a 64-bit version:
<install folder>\erwin\Mart Server r9\Tom-cat64\Webapps\MartServer\WEB-INF
3. Open the rest-context.xml file in a text editor such as Notepad and navigate to the fol-lowing line:
<property name="maxPoolSize" value="8" />

213
4. Change the value to a number of your choice.
The maximum number of threads that you can create depends on the system resources of your Mart server. If you enter a number, only the maximum number of threads that can be created per the system resources is created.
Default: 8
5. Save the XML file.
6. Start the Mart Server service and log in to the Mart.

214
Mart Report Data Compression
In the Workgroup Edition, the model data and model report data are stored in separate internal tables. The model report data table (m9ReportData) includes only those columns that are required to generate model-specific reports. When you update a model and save the changes, both the tables are updated. This approach is implemented to improve the per-formance of Mart report generation. From this release onward, you can improve the per-formance of Mart reporting further by changing the way the report information is stored in the report data table.
You can store the report information in two ways--binary or XML. By default, the report information is stored in binary format. Information is compressed in binary format, there-fore it occupies less space. However, regardless of the format in which the information is stored, the accuracy of the information remains the same. When you change the storage format, the information for a model is converted to the new format the next time the model is saved. After you change the storage format, if you do not update a model, the storage format for that specific model is not changed. For example, suppose that you have 50 mod-els in your Mart and the existing storage format is XML. The report data table has stored the information for all these models in XML format. Suppose that you change the format to binary and update 10 models today. The information for the 10 models is stored in binary format and the information for the remaining 40 models is in XML format.
Follow these steps:
1. Log out of the Mart and stop the Mart Server service.
2. Navigate to the \webapps\MartServer\WEB-INF folder on the computer where erwin Mart Server is installed. Typically, the path for this folder is as follows:
For a 32-bit version:
<installation folder>\erwin\Mart Server r9\Tom-cat\Webapps\MartServer\WEB-INF
For a 64-bit version:
<installation folder>\erwin\Mart Server r9\Tom-cat64\Webapps\MartServer\WEB-INF

215
3. Open the rest-context.xml file in a text editor such as Notepad and navigate to the fol-lowing line:
<property name="compressReportData" value="true" />
Default: True (binary format)
4. To change the format to XML, change the value to false.
5. Save the XML file.
6. Start the Mart Server service and log in to the Mart.

216
Generate the Current Diagram Picture
Use the Tools menu in erwin Data Modeler to generate a picture report of diagrams.
To generate the current diagram picture
1. Open the diagram for which you want to generate a picture.
2. Click Diagram Picture, Generate Current Diagram Picture on the Tools menu.
The Save As dialog opens.
3. Enter a name and location for the file and click Save.
The generated file is saved as an .EMF (Enhanced Metafiles) image and the Save As dialog closes. To view or print the diagram image, use any image viewer program to open the file.

217
Modify the Workstation Registry
To run the erwin 32-bit API in a 64-bit environment you must modify the workstation registry.
Follow these steps:
1. Copy the following code and paste it to a new Notepad file:
Windows Registry Editor Version 5.00 [HKEY_CLASSES_ROOT\Wow6432Node\CLSID\{9527D0BA-ED75-4b0e-BF4B-E35565DE9852}] @="erwin Data Modeler Script Client API" "AppID"="{9527D0BA-ED75-4b0e-BF4B-E35565DE9852}" [HKEY_CLASSES_ROOT\Wow6432Node\AppID\{9527D0BA-ED75-4b0e-BF4B-E35565DE9852}] "DllSurrogate"="" [HKEY_CLASSES_ROOT\Wow6432Node\CLSID\{40FDB0E6-D772-455d-B1C8-83CE79445403}] @="erwin Data Modeler Script Client API Property Bag" "AppID"="{40FDB0E6-D772-455d-B1C8-83CE79445403}" [HKEY_CLASSES_ROOT\Wow6432Node\AppID\{40FDB0E6-D772-455d-B1C8-83CE79445403}] "DllSurrogate"="" [HKEY_CLASSES_ROOT\Wow6432Node\CLSID\{6774E2C3-06E9-4943-A8D4-E3007AB1F42E}] @="erwin Data Modeler Script Client API" "AppID"="{6774E2C3-06E9-4943-A8D4-E3007AB1F42E}" [HKEY_CLASSES_ROOT\Wow6432Node\AppID\{6774E2C3-06E9-4943-A8D4-E3007AB1F42E}] "DllSurrogate"="" [HKEY_CLASSES_ROOT\Wow6432Node\CLSID\{7D7B1602-9832-4ac6-A224-F0092FAF0D7E}] @="erwin Data Modeler Script Client API Property Bag" "APPID"="{7D7B1602-9832-4ac6-A224-F0092FAF0D7E}"

218
[HKEY_CLASSES_ROOT\Wow6432Node\AppID\{7D7B1602-9832-4ac6-A224-F0092FAF0D7E}] "DllSurrogate"="" [HKEY_LOCAL_MACHINE\SOFTWARE\Classes\AppID\{9527D0BA-ED75-4b0e-BF4B-E35565DE9852}] [HKEY_LOCAL_MACHINE\SOFTWARE\Classes\AppID\{40FDB0E6-D772-455d-B1C8-83CE79445403}] [HKEY_LOCAL_MACHINE\SOFTWARE\Classes\AppID\{6774E2C3-06E9-4943-A8D4-E3007AB1F42E}] [HKEY_LOCAL_MACHINE\SOFTWARE\Classes\AppID\{7D7B1602-9832-4ac6-A224-F0092FAF0D7E}]
2. Name the Notepad file as 64_Bit_Upgrade.reg. Note down the folder where you have created this file.
3. After installing erwin DM version 9.0.0 through 2020 R1, right-click 64_Bit_Upgrade.reg and select Merge.
4. From the Windows Start menu, go to Run and type the following commands to re-register the EAL components:
regsvr32.exe "<Install Dir>\erwin\ Data Modeler r9\EAL.dll"
regsvr32.exe "<Install Dir>\erwin\ Data Modeler r9\Up-grade\R8_Binaries\EAL.dll".
5. Right-click 64_Bit_Upgrade.reg and select Merge again.
You can now run erwin 32-bit API in a 64-bit environment.
Back to Top

219
erwin® Data Modeler Workgroup Edition PerformanceThis section contains the following topics:
Optimize the PerformanceReindex the DatabaseRun the Database Statistics

220
Optimize the Performance
The performance of erwin Data Modeler Workgroup Edition depends on many factors. This appendix outlines some steps you can take to improve your performance. The five main com-ponents where a slow down can occur are the database, the server, the network, the client PC, and the erwin Data Modeler Workgroup Edition software.
You should regularly reindex the database and run the database statistics. Sometimes run-ning the database statistics alone does not affect the performance, however it is good prac-tice to run the database statistics on a regular basis to ensure the maximum performance of your database.
If you have many domains in a model, they consume a lot of memory and file space. Having too many domains can slow down erwin Data Modeler Workgroup Edition. If you need to use many domains, we suggest you create a template model to house them, and then import the specific domains that you need, to each of your individual models. If you are using the domains to enforce unique attribute or column naming standards, you can altern-atively use the erwin Glossary for that purpose.

221
Check the erwin Data Modeler Workgroup Edition Release Notes for the latest system requirements. Greater CPU speed, and more RAM and disk space result in better per-formance.

222
Reindex the Database
Over a period of time, database indexes become fragmented. A large number of inserts and deletes can lead to significant performance degradation. The scripts provided in this appendix rebuild the indexes and fix them. In some cases, it can make a significant dif-ference in the mart performance.
We recommend that you reindex your mart database nightly or during off-peak hours. As the index is recreated, the process can temporarily degrade the performance of your data-base. You can create an automated batch job to do the reindex. You should also reindex the database after a large model merge, a save to the mart, and right after a conversion of the mart when upgrading to a later version of the software.

223
Run the Oracle DBMS Reindex Script
As the new index is being built, it coexists with the old index in the database. For this reason, you should plan for enough space to store both the old index and the new index. When the index is rebuilt, the new index becomes available, the old index is dropped, and the space is reclaimed by the database. If you encounter any errors while rebuilding the indexes, re-run the statements. If you require more space to rebuild those specific indexes, add more stor-age to your index tablespace, and then try rebuilding those specific indexes again.
To run the Oracle DBMS reindex script:
1. Create the mmreindex.ora script and copy it locally.
2. Edit the script and replace 'MODELMART' with the name of the mart schema-owner and 'MMINDEX' with the name of the mart index tablespace. Save your changes.
3. Connect to SQL*PLUS as the user SYS.
4. Grant the 'ALTER ANY INDEX' privilege to the mart Schema Owner.
5. Run your Oracle query tool and execute the following at the SQL prompt: GRANT ALTER ANY INDEX TO <MART SCHEMA OWNER>;
6. Disconnect user SYS and Connect to your Oracle query tool as the Schema Owner.
7. Execute the following Script at the SQL Prompt:@c:\mmreindex.ora
Example: Oracle Reindex Script (MMReIndex.ora)
---------------------------------------------------------------------------------- -- Object: MMReIndex.ora -- Desc: Use this Procedure to ReIndex the MM ORACLE Repos-itory whenever a -- Merge/Save of big model is done to MM -- Limitation(s) is specific to Oracle Releases >= 817 -- For ORACLE DBMS < 8i Modify the script to Use NOPARALLEL -- NOTE: You will need to change MMOWNER to the Mart schema owner name. -- You will need to change MMINDEX to the Mart index tablespace.

224
-- Oracle indexes are not self-balancing. They become frag-mented after a large -- number of INSERTs and DELETEs which may lead to significant per-formance degradation. -- This script rebuilds the Mart indexes and cures them. ------------------------------------------------------------------------------------- set pagesize 1000 set linesize 2000 set verify off set feedback off set heading off spool c:\mmreindex.ora SELECT 'ALTER INDEX ' || USER || '.' || INDEX_NAME || ' REBUILD PARALLEL NOLOGGING COMPUTE STATISTICS TABLESPACE MMINDEX;' FROM DBA_INDEXES WHERE OWNER = UPPER ('MMOWNER') AND (INDEX_NAME like 'XPK%' or INDEX_NAME like 'XAK%' or INDEX_NAME like 'XIE%') order by index_name; spool off set heading on set pagesize 24 set verify on set feedback on @c:\mmreindex.ora /
Troubleshooting the Reindexing Script
Symptom:
The query tool responds as given below:
no rows selected not spooling currently
Solution:
You do not have the correct name for the mart schema-owner. Get the correct user name, replace 'MODELMART' with the user name, and re-run the script.

225
Run the Database Statistics
Database statistics show the distribution of the data in the database, and how the data is stored. When a database executes a query, it uses an optimizer to determine the best path to access the data. The optimizer relies on execution plans that specify the order in which the database accesses the tables and the exact steps used to pull the data. The database bases the creation of the execution plans on the database statistics.
As the data grows and changes, the statistics quickly become outdated and no longer reflect the true condition of the database. As a result, the execution plans no longer apply and the optimizer makes poor decisions when processing queries. You should run statistics regularly to ensure the maximum performance of your database and, therefore, your mart. We recommend that you run the database statistics nightly, and create an automated batch job to simplify the process.

226
Changing Application Name and Port Number
There may be times when you want to change the Mart application name from MartServer to something else. Similarly, you may want to change the port number on which the Web server is running from 18170 to something else. This section gives the procedures to modify the application name and the port number.
This section contains the following topics:
How to Change the Mart Server Application Name and Port Number
How to Change the Mart Server Application Name and Port Num-ber
There may be times when you want to change the Mart application name from MartServer to something else. Similarly, you may want to change the port number on which the Web server is running from 18170 to something else. This section gives the procedures to modify the application name and the port number.
Follow these steps:
1. Stop Tomcat server and all connections to the server.
2. If open, close the erwin Mart Configuration dialog.
3. Back up the "<installation directory>\erwin\Mart Server r9 folder.
4. Follow these steps and change the port number:
a. Navigate to the installation folder depending on the architecture of the Mart Server and operating system. Open the Sever.xml file.
For a 32-bit Mart Server on a 32-bit operating system, go to:
"C:\Program Files\erwin\Mart Server r9\Tomcat\conf"
For a 32-bit Mart Server on a 64-bit operating system, go to:
"C:\Program Files (x86)\erwin\Mart Server r9\Tomcat\conf"

227
For a 64-bit Mart Server on a 64-bit operating system, go to:
"C:\Program Files\erwin\Mart Server r9\Tomcat64\conf"
b. On Line 70, change 18170 to any port number of your choice. If you have enabled SSL, change the port number (18170) in the below section (shown in green color).
5. Follow these steps and change the application name
a. Navigate to the installation folder depending on the architecture of the Mart Server and operating system.
For a 32-bit Mart Server on a 32-bit operating system, go to: "C:\Program Files\erwin\Mart Server r9\Tomcat\webapps"
For a 32-bit Mart Server on a 64-bit operating system, go to: "C:\Program Files (x86)\erwin\Mart Server r9\Tomcat\webapps"
For a 64-bit Mart Server on a 64-bit operating system, go to: "C:\Program Files\erwin\Mart Server r9\Tomcat64\webapps"
b. Back up the MartServer.war file and the MartServer folder to a different com-puter.
c. Delete the MartServer folder.
d. Rename MartServer.war to <your application name>.war (any qualified name).
6. Change the configuration details in the MartConfiguration.config file.
The file is available in the C:\Users\<username>\AppData\Local\erwin\Mart Server folder.
7. Navigate to the installation folder depending on the architecture of the Mart Server and operating system. Change the URL in the following batch files:
For a 32-bit Mart Server on a 32-bit operating system, go to: "C:\Program Files\erwin\Mart Server r9\Tomcat\"
For a 32-bit Mart Server on a 64-bit operating system, go to: "C:\Program Files (x86)\erwin\Mart Server r9\Tomcat\"
For a 64-bit Mart Server on a 64-bit operating system, go to: "C:\Program Files\erwin\Mart Server r9\Tomcat64"

228
erwin MartAdmin.bat
Disable SSL for Tomcat MartServer.bat
Enable SSL for Tomcat MartServer.bat
8. Open the erwin Mart Configuration dialog and go to the Mart Administrator tab. Enter the new port number, new application name and the password, and then click Configure. The Mart is configured with a new application name and the new port num-ber.
9. Start the MartServer service.
10. When you log in to Mart from erwin Data Modeler, ensure that you provide the mod-ified port number and application name in the Connect to Mart dialog. For example, suppose that your new port number is 18172 and the new application name is erwinMartDB. In the Connect to Mart dialog, enter 18172 in the Port field, and erwinMartDB in the Application Name field.

229
Microsoft SQL Server Tuning RecommendationsThis section contains the following topics:
Physical Tuning ParametersServer-Level Tuning ParametersNamed Cache ConfigurationDatabase Tuning ParametersDatabase and Log SizingHow to Maintain an Efficient Database

230
Physical Tuning Parameters
The mart is dynamic, with many queries and data manipulations performed with each model save and load.
The configuration changes that must be made to Microsoft SQL Server for optimum per-formance with maximum fault tolerance and recoverability are provided.

231
Database Placement
erwin Data Modeler Workgroup Edition mart databases are written to in bursts of activity. Stored procedures and bulk insert statements are used to minimize overhead when saving data to Microsoft SQL Server. To optimize performance, place the database on low activity Microsoft SQL Server files. If possible, place the log and data segments on different physical drives to reduce contention between log writes and database reads.

232
Data Redundancy
Make sure that you make a copy of the transaction log on a separate drive to maximize recoverability of the database. If the up-time of the database is considered critical, make a copy of the database and the transaction logs, and other Microsoft SQL Server files you con-sider important.
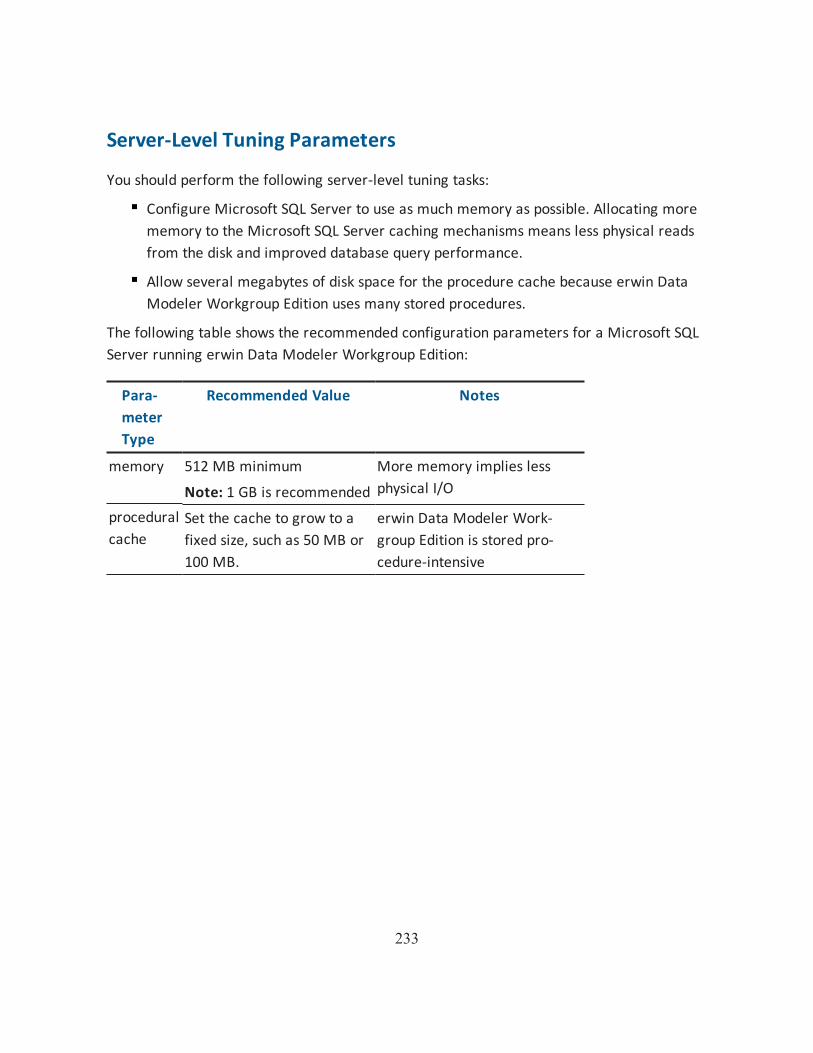
233
Server-Level Tuning Parameters
You should perform the following server-level tuning tasks:
Configure Microsoft SQL Server to use as much memory as possible. Allocating more memory to the Microsoft SQL Server caching mechanisms means less physical reads from the disk and improved database query performance.
Allow several megabytes of disk space for the procedure cache because erwin Data Modeler Workgroup Edition uses many stored procedures.
The following table shows the recommended configuration parameters for a Microsoft SQL Server running erwin Data Modeler Workgroup Edition:
Para-meter Type
Recommended Value Notes
memory 512 MB minimum
Note: 1 GB is recommended
More memory implies less physical I/O
procedural cache
Set the cache to grow to a fixed size, such as 50 MB or 100 MB.
erwin Data Modeler Work-group Edition is stored pro-cedure-intensive

234
Named Cache Configuration
For SAP ASE systems, consider setting up a 4 KB pool for the default data cache. SAP ASE writes I/O to the log more often in 4 KB increments than in 2 KB increments (the default). You can set up a 4 KB I/O pool using sp_poolconfig, but you must restart the server to enable the 4 KB I/O writes to the log. Set the pool up as a smaller subset of the cache.
Note: Be careful when making changes to the data caching systems in SAP ASE. Monitor your changes with SQL Monitor or sp_sysmon to ensure that the changes you make do not starve the 2 KB I/O pool or other caches.
The following shows the recommended size of the 4 KB I/O pool for small, medium, and large servers:
Server Size Data Cache Size 4 KB I/O Pool Size
Small 128 MB 4 MB
Medium 512 MB 6 MB
Large 1 GB 10 MB

235
Database Tuning Parameters
You can make database tuning adjustments in three different areas:
Transaction log
Threshold procedures
Database options
236
Transaction Log
The transaction log keeps a before and after image of each change made in the database. Microsoft SQL Server keeps a transaction log for each database.
Back up the transaction log frequently. This keeps the transaction log small and reduces the amount of data lost in the event of a severe database corruption.

237
Threshold Procedures
For SQL Server, the option to set a threshold procedure is not available. Ensure that you back up the log frequently to keep the log small.

238
"trunc. log on chkpt" Option
To ensure maximum recoverability, do not enable the trunc. log on chkpt option, since the log is cleared automatically after each checkpoint operation. If the database device becomes damaged with the log device still active and this option is set, the database cannot be recovered using the log files since they are almost empty.

239
Database and Log Sizing
Since the database is a dynamic environment, allow plenty of space for the models you cre-ate. Tests have shown that models generate between 10 KB and 20 KB of data per entity dur-ing initial save times. Log overhead per object is approximately 15 KB to 21 KB per entity. Allocate 50 to 65 percent of the database size to the log to avoid running out of room in the log for a typical model save.
An average mart can range in size between 200 MB and 1 Gig. Size the transaction log accordingly. A 50 MB data device can store several large models (about 2,500 entities and 100,000 total objects), but keep in mind that the database becomes more flexible and has less storage space issues when the data device is large.
The following table shows the recommended database size and log size for small, medium, and large marts:
Database Size Database Device Transaction Log Device
Small 200 MB 100 MB
Medium 500 MB 200 MB
Large 1 GB 400 MB
How to Maintain an Efficient Database
To maintain an efficient database, perform the following maintenance tasks:
Run UPDATE STATISTICS and execute sp_recompile frequently on every table in the database. This keeps the statistics up-to-date for the indexes, resulting in better over-all performance.
Periodically recreate the clustered indexes in the database to reduce fragmentation. Be sure to back up the database and transaction log daily.
Run DBCC CheckDB(), DBCC CheckCatalog(), and DBCC CheckAlloc() or DBCC NewAl-loc() on the database nightly, to check for corruption and inconsistencies in the data-base. Check the output of these queries and look for keywords like corrupt. Any

240
problems detected by these commands are sent to the query output, so save the files and scan them regularly.
The following table shows maintenance tasks and the recommended frequency for per-forming these tasks:
Maintenance Task
Recommended Frequency
Reason
DBCC Checkdb Nightly Check for corruption in databases.
DBCC NewAl-loc
Weekly Check for allocation corruption (Microsoft SQL Server only).
DBCC Check-Alloc
Weekly Check for allocation corruption (Microsoft SQL Server only).
DBCC Check-Catalog
Weekly Check for system table inconsistencies.
UPDATE STATISTICS
Nightly Recreates the statistics page for each index.
EXEC sp_recompile
Nightly Tells which stored procedures have changed.
Backup Data-base
Weekly Full backup of database should be done at least weekly, if not nightly.
Backup Trans-action Log
Daily Backing up the transaction log daily saves all committed transactions and clears the log.

241
DBCC Commands
Use the following DBCC commands to perform maintenance tasks on the database:
DBCC CheckDB(mart) go DBCC CheckAlloc(mart) go DBCC CheckCatalog(mart) go

242
Oracle Tuning RecommendationsThis section contains the following topics:
Recommended Disk ConfigurationsDatabase ConfigurationStorage Parameters

243
Recommended Disk Configurations
Oracle servers are available on many different platforms ranging from PCs to mainframes. To support the wide range of hardware platforms and application requirements, Oracle serv-ers have a number of configuration options that you can use to tailor the behavior of an Oracle database. You can also use these configuration options to tailor your database. Some of the options documented in this guide only apply to specific Oracle versions. For further information, see the appropriate Oracle documentation.
If the Oracle server is not dedicated to the erwin Data Modeler Workgroup Edition mart, as database administrator you must be careful to balance the requirements of all users on the server. This is particularly true for database servers that support OLTP (On Line Trans-action Processing) applications that require tight response characteristics.
The layout of Oracle database files on physical disk drives plays a major role in the per-formance of the database. When used with erwin Data Modeler Workgroup Edition, Oracle performs large bursts of database operations (fetches, inserts, updates, and deletes) in a short period of time. This usage pattern often requires Oracle to perform a significant amount of disk I/O operations. For good performance, it is important that as many I/O oper-ations as possible be performed in parallel. This enables Oracle to retrieve data faster dur-ing fetches and to write data faster during inserts, updates, and deletes.
To maximize parallel I/O access, split the Oracle database files across many physical disks. Ideally, you should place the database on four physical disks. If this is not possible, you can use three, two, or one disk systems.
Note: Installing Oracle on a single disk system causes significant performance degradation.

244
Database Configuration
Proper database configuration is essential to the smooth operation and good performance of an Oracle database. You can use the configuration options described to optimize the pro-cessing of your Oracle server.

245
Maximum Number of Processes
Oracle must be preconfigured at startup with a maximum number of processes that can access the database. The parameter that controls the maximum number of processes, called PROCESSES, is defined in the INIT.ora or INIT<SID>.ora file. It should be set to the max-imum potential number of concurrent users plus seven. The additional seven are for Oracle background processes that must also access the database. Setting the number of processes at a lower value can prevent some users from accessing the server during peak usage times. Setting the number of processes at a higher value can waste a small amount of system memory resources.

246
Shared Pool
The shared pool is an area of Oracle memory that includes two main structures:
The library cache, which stores parsed SQL and PL/SQL statements
The dictionary cache, which stores the Oracle data dictionary (or Oracle metadata)
The SHARED_POOL_SIZE parameter is defined in the INIT.ora or INIT<SID>.ora file and is used to regulate the size of the shared pool. Set the SHARED_POOL_SIZE parameter to a min-imum of 3500000 (3.5 million). Setting the shared pool to a smaller value can degrade per-formance, forcing Oracle to do disk I/O to retrieve objects that cannot fit in the shared pool. A larger shared pool may be required, depending on the size and number of models and the number of users.
Buffer Cache
The buffer cache serves as a memory cache for all data going to and from Oracle data files. When Oracle needs a block of data it first checks whether that block exists in the buffer cache. If it does, Oracle gets the data from the buffer cache avoiding disk access. Having a large enough buffer cache lets the Oracle server bypass most I/O requests.
Buffer cache size is controlled by the DB_BLOCK_BUFFERS parameter defined in the INIT.ora or INIT<SID>.ora file. Set the buffer cache to a minimum of 4 MB. Values smaller than 4 MB force Oracle to do many more I/O requests and significantly degrades the per-formance. Values larger than 4 MB improve performance and should be used if memory is available.
Note: In Oracle, the DB_BLOCK_BUFFERS parameter is specified as a number of database blocks instead of actual size in bytes. To compute the value of DB_BLOCK_BUFFERS, divide the desired buffer cache size in bytes by the database block size defined by the DB_BLOCK_SIZE parameter in the INIT.ora or INIT<SID>.ora file.

247
Redo Log Files
Redo log files contain a record of all Data Manipulation Language (DML) commands (such as INSERT, UPDATE, and DELETE commands) performed on the database. As DMLs are per-formed, the Oracle engine writes them to sequential redo log files. Periodically, an Oracle background process retrieves the DMLs from the Redo log files and writes the actual changes to the Oracle tablespace files. This mechanism lets Oracle defer most of the I/O burden associated with DMLs to a background process that does not slow down the client processes.
Note: Oracle Redo log files are treated by the database engine as a ring. When one file fills up, the engine performs a log switch and starts writing to the next log file in the ring. When that log file fills, the engine switches again.
The number and size of the Redo log files is an important performance consideration. If the log files are too small or if there are not enough of them in the ring, Oracle may have to stall on a log switch. If this happens, the DMLs in the next log in the ring may not have been written to the tablespace files, and therefore the next log file has not been archived by the background ARCH process. For more information about Redo log archiving, see the Oracle documentation.
Redo log files are created when the database is created. However, Redo log files can be added or deleted at any time using Data Definition Language (DDL) statements.
You should have at least four Redo log files, each 2 MB in size. A smaller number of Redo log files or a smaller Redo log file size can cause I/O bottlenecks. If the disk space is avail-able, using more than four Redo log files further reduces the chances of delayed log switches. Larger Redo log files improve performance, but care must be taken to adequately schedule checkpoints that write DMLs stored in the Redo logs to the tablespace files.
If the number of disks permits, you should mirror Redo log files by creating Redo log groups with two mirrored members per group. This offers the database some protection against single disk errors.

248
Increase Space in Redo Logs
The number and size of the Redo log files is an important performance consideration. Redo log files are created when the database is created.
To increase space in the Redo logs
1. Log in to Oracle using SQL*Plus as SYSDBA or SYSOPER and run the following script to create eight Redo logs that are 2 MB each:
rem -- parm1 -- temp dir
rem Generate creation script SELECT 'ALTER DATABASE ADD LOGFILE ''' || SUBSTR ( MEMBER , 1 , INSTR ( MEMBER , '\' , -1 , 1 ) ) || 'REDO_11.LOG'' SIZE 2M ;' from V$LOGFILE where ROWNUM = 1 and not exists ( SELECT 1 from V$LOGFILE where MEMBER like '%REDO_11.LOG' ) UNION
SELECT 'ALTER DATABASE ADD LOGFILE ''' || SUBSTR ( MEMBER , 1 , INSTR ( MEMBER , '\' , -1 , 1 ) ) || 'REDO_12.LOG'' SIZE 2M ;' from V$LOGFILE where ROWNUM = 1 and not exists ( SELECT 1 from V$LOGFILE where MEMBER like '%REDO_12.LOG' ) UNION
SELECT 'ALTER DATABASE ADD LOGFILE ''' || SUBSTR ( MEMBER , 1 , INSTR ( MEMBER , '\' , -1 , 1 ) ) || 'REDO_13.LOG'' SIZE 2M ;'

249
from V$LOGFILE where ROWNUM = 1 and not exists ( SELECT 1 from V$LOGFILE where MEMBER like '%REDO_13.LOG' ) UNION
SELECT 'ALTER DATABASE ADD LOGFILE ''' || SUBSTR ( MEMBER , 1 , INSTR ( MEMBER , '\' , -1 , 1 ) ) || 'REDO_14.LOG'' SIZE 2M ;' from V$LOGFILE where ROWNUM = 1 and not exists ( SELECT 1 from V$LOGFILE where MEMBER like '%REDO_14.LOG' ) UNION
SELECT 'ALTER DATABASE ADD LOGFILE ''' || SUBSTR ( MEMBER , 1 , INSTR ( MEMBER , '\' , -1 , 1 ) ) || 'REDO_15.LOG'' SIZE 2M ;' from V$LOGFILE where ROWNUM = 1 and not exists ( SELECT 1 from V$LOGFILE where MEMBER like '%REDO_15.LOG' ) UNION
SELECT 'ALTER DATABASE ADD LOGFILE ''' || SUBSTR ( MEMBER , 1 , INSTR ( MEMBER , '\' , -1 , 1 ) ) || 'REDO_16.LOG'' SIZE 2M ;' from V$LOGFILE where ROWNUM = 1 and not exists ( SELECT 1 from V$LOGFILE where MEMBER like '%REDO_16.LOG' ) UNION

250
SELECT 'ALTER DATABASE ADD LOGFILE ''' || SUBSTR ( MEMBER , 1 , INSTR ( MEMBER , '\' , -1 , 1 ) ) || 'REDO_17.LOG'' SIZE 2M ;' from V$LOGFILE where ROWNUM = 1 and not exists ( SELECT 1 from V$LOGFILE where MEMBER like '%REDO_17.LOG' ) UNION
SELECT 'ALTER DATABASE ADD LOGFILE ''' || SUBSTR ( MEMBER , 1 , INSTR ( MEMBER , '\' , -1 , 1 ) ) || 'REDO_18.LOG'' SIZE 2M ;' from V$LOGFILE where ROWNUM = 1 and not exists ( SELECT 1 from V$LOGFILE where MEMBER like '%REDO_18.LOG' ) . Spool &1.AddLog.ORA / Spool Off COMMIT ;
SELECT 'ALTER SYSTEM SWITCH LOGFILE ;' from V$LOG where ROWNUM < 5 . Spool &1.SwtchLog.ORA / Spool Off COMMIT ;
rem Generate Deletion script SELECT 'ALTER DATABASE DROP LOGFILE GROUP ' || TO_CHAR ( GROUP# ) || ' ;' from V$LOG where BYTES < 2097152 .

251
Spool &1.DropLog.ORA / Spool Off COMMIT ;
@&1.AddLog.ORA $Del &1.AddLog.ORA COMMIT ; @&1.SwtchLog.ORA $Del &1.SwtchLog.ORA COMMIT ; @&1.DropLog.ORA $Del &1.DropLog.ORA COMMIT ;
2. Run the following query to verify the new Redo log configuration:
SQLWKS> select group#, status, bytes from v$log;
Note: Oracle does not let you drop an older Redo log file that is still ACTIVE. If you must drop an older Redo log file that is still ACTIVE, drop that log file manually.

252
Redo Log Buffer
The Redo log buffer is an area in memory that Oracle uses to collect DMLs before they are written to the Redo log files. The log file write occurs when either a transaction commits or a Redo log buffer is full. Because erwin Data Modeler Workgroup Edition tends to gen-erate fairly large transactions, use a log buffer size of 163840 bytes. (For single disk Oracle installations, use a log buffer size of 655360 bytes.) Setting the Redo log buffer size to a value smaller than the recommended value can degrade I/O performance. Using a larger value requires more memory.
The Redo log buffer size is defined using the LOG_BUFFER parameter in the INIT.ora or INIT<SID>.ora file.

253
Checkpoints
An Oracle checkpoint is an event that posts DMLs from the Redo log files to the tablespace files. Checkpoints always occur after a Redo log file switch and can also be configured to occur at predefined time intervals. For erwin Data Modeler Workgroup Edition, which gen-erates large transactions, checkpoints should occur only after log switches to minimize I/O.
To ensure a checkpoint only after a log switch, do notset the LOG_CHECKPOINT_INTERVAL and LOG_CHECKPOINT_TIMEOUT parameters in the INIT.ora or INIT<SID>.ora file.

254
Storage Parameters
Object storage parameters in Oracle determine the amount of space allocated for each object in the database. Setting these parameters correctly is critical to both operation and performance of the database. Incorrect storage allocations can cause a database object to run out of space, which prevents you from saving models to the repository. Inefficient selec-tion of storage parameters can lead to performance problems by forcing Oracle to do time-consuming space management operations during DML statement execution.
Recommendations for storage parameter values differ based on the size of your model:
Small data models: 1 to 50 Entities
Medium data models: 51 to 100 Entities
Large data models: over 100 Entities

255
Rollback Segments
Rollback segments contain undo information for all changes performed by noncommitted transactions. Rollback segments are a shared resource used by all active transactions in the database. When a transaction starts, Oracle binds that transaction to a particular rollback segment. As DMLs in the transaction execute, rollback segment space is used. For large transactions, rollback segments may need to allocate new extents as the transaction con-tinues. When the transaction ends, a properly configured Oracle database releases the addi-tional rollback extents so that they can be used for other rollback segments. To ensure that the additional rollback extents are released, configure the OPTIMAL parameter for each roll-back segment.
Use a maximum of five transactions per rollback segment by setting the TRANSACTIONS_PER_ROLLBACK_SEGMENT parameter in the INIT.ora or INIT<SID>.ora file. Use the fol-lowing rollback segment storage parameters for small, medium, and large models:
Model Type
Initial Extent Size
Next Extent Size
Optimal Size
Small 1 MB 1 MB ~ 2 MB x (# of trans-actions)
Medium 6 MB 6 MB ~ 12 MB x (# of trans-actions)
Large 6 MB 6 MB ~ 12 MB x (# of trans-actions)
Note: The # of transactions is the maximum number of simultaneous erwin Data Modeler Workgroup Edition connections to Oracle.
In Oracle it is common to see the following error statement when the Rollback logs are not set up optimally:
ORA-01562 failed to extend rollback segment number string

256
Set Optimal Configuration for the Rollback Logs
For large transactions, rollback segments may need to allocate new extents as the trans-action continues. When the transaction ends, a properly configured Oracle database releases the additional rollback extents so that they can be used for other rollback seg-ments. To ensure that the additional rollback extents are released, configure the OPTIMAL parameter for each rollback segment.
To set the optimal configuration for the rollback logs of large databases
1. Log in to Oracle as SYS or SYSTEM and run the following query and check the result to view the current configuration of the Rollback Segments:
SQLWKS> select SEGMENT_NAME, INITIAL_EXTENT, NEXT_EXTENT, MIN_EXTENTS, MAX_EXTENTS, STATUS from dba_rollback_segs;
The result is:
SEGMENT_NAME INITIAL_EX NEXT_EXTEN MIN_EXTENT MAX_EXTENT STATUS SYSTEM 51200 51200 2 121 ONLINE RB_TEMP 102400 102400 2 121 OFFLINE RB1 2097152 2097152 2 121 ONLINE RB2 2097152 2097152 2 121 ONLINE RB3 2097152 2097152 2 121 ONLINE RB4 2097152 2097152 2 121 ONLINE RB5 2097152 2097152 2 121 ONLINE RB6 2097152 2097152 2 121 ONLINE RB7 2097152 2097152 2 121 ONLINE RB8 2097152 2097152 2 121 OFFLINE RB9 2097152 2097152 2 121 OFFLINE RB10 2097152 2097152 2 121 OFFLINE RB11 2097152 2097152 2 121 OFFLINE RB12 2097152 2097152 2 121 OFFLINE RB13 2097152 2097152 2 121 OFFLINE

257
RB14 2097152 2097152 2 121 OFFLINE RB15 2097152 2097152 2 121 OFFLINE RB16 2097152 2097152 2 121 OFFLINE 18 rows selected.
Note: In this example, there are sixteen rollback segments with 2 MB INITIAL EXTENT, 2 MB NEXT EXTENT, and MAX EXTENTS of 121 MB.
2. Run the following query for each Rollback Segment:
alter rollback segment rb1 offline; drop rollback segment rb1; create public rollback segment rb1 tablespace rollback_data storage (initial 6M next 6M minextents 2 maxextents 121 optimal 12M); alter rollback segment rb1 online; alter rollback segment rb2 offline; drop rollback segment rb2; create public rollback segment rb2 tablespace rollback_data storage (initial 6M next 6M minextents 2 maxextents 121 optimal 12M); alter rollback segment rb2 online; <Repeat for each Rollback Segment>
This query sets the optimal Rollback Segment configuration to 6 MB INITIAL EXTENT, 6 MB NEXT EXTENT, 2 MB MIN EXTENT, 121 MB MAX EXTENT, and 12 MB OPTIMAL.

258
3. Run the following query to verify the Rollback segment configuration changes:
SQLWKS> select SEGMENT_NAME, INITIAL_EXTENT, NEXT_EXTENT, MIN_EXTENTS,MAX_EXTENTS, STATUS from dba_rollback_segs;
The result is:
SEGMENT_NAME INITIAL_EX NEXT_EXTEN MIN_EXTENT MAX_EXTENT STATUS SYSTEM 51200 51200 2 121 ONLINE RB_TEMP 102400 102400 2 121 OFFLINE RB1 6291456 6291456 2 121 ONLINE RB2 6291456 6291456 2 121 ONLINE RB3 6291456 6291456 2 121 ONLINE RB4 6291456 6291456 2 121 ONLINE RB5 6291456 6291456 2 121 ONLINE RB6 6291456 6291456 2 121 ONLINE RB7 6291456 6291456 2 121 ONLINE RB8 6291456 6291456 2 121 ONLINE RB9 6291456 6291456 2 121 ONLINE RB10 6291456 6291456 2 121 ONLINE RB11 6291456 6291456 2 121 ONLINE RB12 6291456 6291456 2 121 ONLINE RB13 6291456 6291456 2 121 ONLINE RB14 6291456 6291456 2 121 ONLINE RB15 6291456 6291456 2 121 ONLINE RB16 6291456 6291456 2 121 ONLINE 18 rows selected.
Tablespaces
To improve performance you can create more than one tablespace for indexes. Then, after you install the software, you can move some indexes to the other tablespaces.
The following table lists the suggested initial sizes for DATA and INDEX tablespaces:
Tablespace Small Medium Large

259
DATA 200 MB 500 MB 1 GB
INDEX 200 MB 250 MB 500 MB
DATA and INDEX tablespaces with these initial sizes can accommodate at least ten models or versions.
260
Sample FilesThis section contains the following topics:
Sample workers.properties FileSample isapi_redirect.properties FileSample isapi_redirect.reg FileSample uniworkers.properties FileSample uriworkermap.properties File
Sample workers.properties File
The workers.properties file includes the following parameters:
worker.list
worker.<workername>.host
worker.<workername>.port
worker.<workername>.type
worker.<workername>.connection_pool_size
The descriptions of the parameters are as follows:
workers. list
Lists all the workers that are defined. When you start the web server, the plug-in instantiates these workers.
worker.<workername>.host
Defines the IP address of the computer where Tomcat (WA-OP) is installed.
worker. <workername>.port
Defines the port that the AJP workers inside Tomcat listen to. By default, AJP13.Work-ers listen to port 8009.

261
worker. <workername>.type
Defines the type of worker. The type of the worker can be ajp13, ajp14, jni, lb, or status.
worker. <workername>.connection_pool_size
Defines the number of connections made to AJP back-end.
The following is a sample workers.properties file:
# This file provides minimal jk configuration properties needed to
# connect to Tomcat.
#
# The workers that jk should create and work with
#
worker.list=lb,jk-status
#
# Defining a worker named node1 and of type ajp13
# Note that the name and the type do not have to match.
#
worker.node1.type=ajp13
worker.node1.host=localhost
worker.node1.port=8009
#
# Defining a load balancer
#
worker.lb.type=lb
worker.lb.balance_workers=node1

262
#
# Define status worker
#
worker.jk-status.type=status
Back to Top
Sample isapi_redirect.properties File
The following is a sample isapi_redirect.properties file:
extension_uri=/jakarta/isapi_redirect.dll
# Full path to the log file for the ISAPI Redirector
log_file=<path to the native_iis folder>\native_IIS\logs\isapi_redirect.log
# Log level (debug, info, warn, error or trace)
log_level=info
# Full path to the workers.properties file
worker_file=<path to the native_iis folder>\native_IIS\-workers.properties
# Full path to the uriworkermap.properties file
worker_mount_file=<path to the native_iis folder>\native_IIS\uri-workermap.properties
In this example, jakarta refers to the virtual directory you have added before you created the ISAPI filter.
Back to Top
Sample isapi_redirect.reg File
The following is a sample isapi_redirect.reg file:

263
REGEDIT4
[HKEY_LOCAL_MACHINE\SOFTWARE\Apache Software Foundation\Jakarta Isapi Redirector\1.0]
"extension_uri"="/jakarta/isapi_redirect.dll"
"log_file"="<path to the native_iis folder>\\native_IIS\\-logs\\isapi.log"
"log_level"="debug"
"worker_file"="<path to the native_iis folder>\\native_IIS\\-workers.properties"
"worker_mount_file"="<path to the native_iis folder>\\native_IIS\\uriworkermap.properties"
In this example, jakarta refers to the virtual directory you have added before you created the ISAPI filter.
Back to Top
Sample uniworkers.properties File
The following is a sample uniworkers.properties file:
/MartServer/*=node1
Sample uriworkermap.properties File
The following is a sample uriworkermap.properties file:
# This file provides sample mappings for example wlb
# worker defined in workermap.properties.minimal
# The general syntax for this file is:
# [URL]=[Worker name]
/*=lb
#

264
# Mount jkstatus to /jkmanager
# For production servers you will need to
# secure the access to the /jkmanager url
#
/jk-manager=jk-status
Back to Top