CITY OF MART, TEXAS BASIC FINANCIAL STATEMENTS ... - Mart, TX
Upload
khangminh22Category
view
4download
0
Release Notes Release 9.6.1
CA ERwin Mart Server

This Documentation, which includes embedded help systems and electronically distributed materials (hereinafter referred to as the “Documentation”), is for your informational purposes only and is subject to change or withdrawal by CA at any time. This Documentation is proprietary information of CA and may not be copied, transferred, reproduced, disclosed, modified or duplicated, in whole or in part, without the prior written consent of CA.
If you are a licensed user of the software product(s) addressed in the Documentation, you may print or otherwise make available a reasonable number of copies of the Documentation for internal use by you and your employees in connection with that software, provided that all CA copyright notices and legends are affixed to each reproduced copy.
The right to print or otherwise make available copies of the Documentation is limited to the period during which the applicable license for such software remains in full force and effect. Should the license terminate for any reason, it is your responsibility to certify in writing to CA that all copies and partial copies of the Documentation have been returned to CA or destroyed.
TO THE EXTENT PERMITTED BY APPLICABLE LAW, CA PROVIDES THIS DOCUMENTATION “AS IS” WITHOUT WARRANTY OF ANY KIND, INCLUDING WITHOUT LIMITATION, ANY IMPLIED WARRANTIES OF MERCHANTABILITY, FITNESS FOR A PARTICULAR PURPOSE, OR NONINFRINGEMENT. IN NO EVENT WILL CA BE LIABLE TO YOU OR ANY THIRD PARTY FOR ANY LOSS OR DAMAGE, DIRECT OR INDIRECT, FROM THE USE OF THIS DOCUMENTATION, INCLUDING WITHOUT LIMITATION, LOST PROFITS, LOST INVESTMENT, BUSINESS INTERRUPTION, GOODWILL, OR LOST DATA, EVEN IF CA IS EXPRESSLY ADVISED IN ADVANCE OF THE POSSIBILITY OF SUCH LOSS OR DAMAGE.
The use of any software product referenced in the Documentation is governed by the applicable license agreement and such license agreement is not modified in any way by the terms of this notice.
The manufacturer of this Documentation is CA.
Provided with “Restricted Rights.” Use, duplication or disclosure by the United States Government is subject to the restrictions set forth in FAR Sections 12.212, 52.227-14, and 52.227-19(c)(1) - (2) and DFARS Section 252.227-7014(b)(3), as applicable, or their successors.
Copyright © 2015 CA. All rights reserved. All trademarks, trade names, service marks, and logos referenced herein belong to their respective companies.

Contact CA Technologies
Understanding your Support
Review support maintenance programs and offerings.
Registering for Support
Access the CA Support online registration site to register for product support.
Accessing Technical Support
For your convenience, CA Technologies provides easy access to "One Stop" support for all editions of CA ERwin Data Modeler, and includes the following:
■ Online and telephone contact information for technical assistance and customer services
■ Information about user communities and forums
■ Product and documentation downloads
■ CA Support policies and guidelines
■ Other helpful resources appropriate for your product
For information about other Home Office, Small Business, and Enterprise CA Technologies products, visit http://ca.com/support.
Provide Feedback
If you have comments or questions about CA Technologies product documentation, you can send a message to [email protected].
If you would like to provide feedback about CA Technologies product documentation, complete our short customer survey, which is also available on the CA Support website, found at http://ca.com/docs.
CA ERwin Data Modeler News and Events
Visit www.erwin.com to get up-to-date news, announcements, and events. View video demos and read up on customer success stories and articles by industry experts.


Contents 5
Contents
Chapter 1: Welcome 9
New Features and Enhancements in CA ERwin Mart Server ....................................................................................... 9
Mart-Level Reports in Report Designer............................................................................................................... 10
Pinned Reports from the Report Designer Menu ............................................................................................... 10
Cross-Model Reports ........................................................................................................................................... 11
Enhanced Database Support ............................................................................................................................... 12
Mart Model Reporting Status ............................................................................................................................. 12
Initialize the Mart with a Windows-authenticated User ..................................................................................... 13
Schedule Mart Report Synchronization .............................................................................................................. 13
Use Multiple Threads to Update Mart Models for Reporting ............................................................................. 15
Mart Report Data Compression .......................................................................................................................... 16
Use Multiple Threads to Load Models ................................................................................................................ 17
Chapter 2: Install and Configure an Oracle Mart 19
How to Install and Configure an Oracle Mart ............................................................................................................ 20
Mart Architecture ............................................................................................................................................... 22
Install a Mart or Upgrade a Mart? ...................................................................................................................... 23
Review the Prerequisites for an Oracle Mart ...................................................................................................... 24
Create the Mart Database and Perform the Additional Tasks ............................................................................ 27
Install CA ERwin Mart Server .............................................................................................................................. 31
Use Mart Server as a Windows Service ............................................................................................................... 35
Initialize an Oracle Mart ...................................................................................................................................... 36
Log In to CA ERwin Mart Administrator and Configure Settings ......................................................................... 38
Use a Pluggable Database ................................................................................................................................... 39
How to Upgrade any r9 Series Mart to the Current Version ...................................................................................... 42
Review the Prerequisites .................................................................................................................................... 43
Upgrade the Mart Server .................................................................................................................................... 44
Configure the Mart Server .................................................................................................................................. 44
Restart the Mart Server Service .......................................................................................................................... 47
Log In to CA ERwin Mart Administrator .............................................................................................................. 48
Change the Mart Database Server ............................................................................................................................. 49
Troubleshooting ......................................................................................................................................................... 49
Port out of range ................................................................................................................................................. 50
Call failed on the server ...................................................................................................................................... 50
Application Internal Error ................................................................................................................................... 51
ORA-12514 TNS listener does not currently know of service requested in connect descriptor ......................... 51

6 Release Notes
Mart already exists. Specify another database name ......................................................................................... 52
Initialize page is not loading in Internet Explorer ............................................................................................... 52
The Tomcat server is not starting properly. The Configure button is disabled. .................................................. 53
A connection with the server could not be established...................................................................................... 53
The server name or address could not be resolved ............................................................................................ 53
Invalid user ID or password ................................................................................................................................. 54
Error 12029 ......................................................................................................................................................... 54
Unable to load the web page from my web browser ......................................................................................... 54
Test connection failed ......................................................................................................................................... 55
Internet Explorer Redirects to a Different Link ................................................................................................... 57
I have a very long Windows user name and I cannot log in to the Mart through CA ERwin Data Modeler ............................................................................................................................................................... 58
Chapter 3: Install and Configure a SQL Server Mart 59
How to Install and Configure a SQL Server Mart ........................................................................................................ 60
Mart Architecture ............................................................................................................................................... 62
Install a Mart or Upgrade a Mart? ...................................................................................................................... 63
Review the Prerequisites for a SQL Server Mart ................................................................................................. 64
Create a SQL Server Database ............................................................................................................................. 67
Install CA ERwin Mart Server .............................................................................................................................. 68
Use Mart Server as a Windows Service ............................................................................................................... 73
Initialize a SQL Server Mart ................................................................................................................................. 74
Log In to CA ERwin Mart Administrator and Configure Settings ......................................................................... 75
How to Upgrade any r9 Series Mart to the Current Version ...................................................................................... 76
Review the Prerequisites .................................................................................................................................... 77
Upgrade the Mart Server .................................................................................................................................... 78
Configure the Mart Server .................................................................................................................................. 78
Restart the Mart Server Service .......................................................................................................................... 81
Log In to CA ERwin Mart Administrator .............................................................................................................. 82
Change the Mart Database Server ............................................................................................................................. 83
Troubleshooting ......................................................................................................................................................... 83
Port out of range ................................................................................................................................................. 84
Call failed on the server ...................................................................................................................................... 84
Application Internal Error ................................................................................................................................... 85
Mart already exists. Specify another database name ......................................................................................... 85
Initialize page is not loading in Internet Explorer ............................................................................................... 86
The Tomcat server is not starting properly. The Configure button is disabled. .................................................. 86
A connection with the server could not be established...................................................................................... 87
The server name or address could not be resolved ............................................................................................ 87
Invalid user ID or password ................................................................................................................................. 87
Error 12029 ......................................................................................................................................................... 88

Contents 7
Unable to load the web page from my web browser ......................................................................................... 88
Test connection failed ......................................................................................................................................... 88
Internet Explorer Redirects to a Different Link ................................................................................................... 90
Chinese characters are replaced with question marks ....................................................................................... 90
I have a very long Windows user name and I cannot log in to the Mart through CA ERwin Data Modeler ............................................................................................................................................................... 91
Chapter 4: Install and Configure a Sybase Mart 93
How to Install and Configure a Sybase Mart .............................................................................................................. 93
Mart Architecture ............................................................................................................................................... 95
Install a Mart or Upgrade a Mart? ...................................................................................................................... 97
Review the Prerequisites for a Sybase Mart ....................................................................................................... 97
Create a Sybase Database ................................................................................................................................. 100
Install CA ERwin Mart Server ............................................................................................................................ 102
Use Mart Server as a Windows Service ............................................................................................................. 106
Initialize a Sybase Mart ..................................................................................................................................... 107
Log In to CA ERwin Mart Administrator and Configure Settings ....................................................................... 108
How to Upgrade any r9 Series Mart to the Current Version .................................................................................... 109
Review the Prerequisites .................................................................................................................................. 110
Upgrade the Mart Server .................................................................................................................................. 111
Configure the Mart Server ................................................................................................................................ 111
Restart the Mart Server Service ........................................................................................................................ 114
Log In to CA ERwin Mart Administrator ............................................................................................................ 115
Change the Mart Database Server ........................................................................................................................... 116
Troubleshooting ....................................................................................................................................................... 116
Port out of range ............................................................................................................................................... 117
Call failed on the server .................................................................................................................................... 117
Application Internal Error ................................................................................................................................. 118
ORA-12514 TNS listener does not currently know of service requested in connect descriptor ....................... 118
Mart already exists. Specify another database name ....................................................................................... 119
Initialize page is not loading in Internet Explorer ............................................................................................. 119
The Tomcat server is not starting properly. The Configure button is disabled. ................................................ 120
A connection with the server could not be established.................................................................................... 120
The server name or address could not be resolved .......................................................................................... 120
Invalid user ID or password ............................................................................................................................... 121
Error 12029 ....................................................................................................................................................... 121
Unable to load the web page from my web browser ....................................................................................... 121
Test connection failed ....................................................................................................................................... 122
Internet Explorer Redirects to a Different Link ................................................................................................. 124
I have a very long Windows user name and I cannot log in to the Mart through CA ERwin Data Modeler ............................................................................................................................................................. 125

8 Release Notes
Chapter 5: Create a Customized Security Message 125
Chapter 6: Prepare to Use IIS with Mart 126
Configure IIS Web Server ......................................................................................................................................... 127
Implement SSL for IIS ............................................................................................................................................... 129
Chapter 7: Mart Server Log Files 129
Chapter 8: Documentation Formats and Deliverables 129

Chapter 1: Welcome 9
Chapter 1: Welcome
Welcome to the CA ERwin Mart Server (Mart Server) Release Notes. Mart Server is an essential component in CA ERwin DM Version 9.0.0 through 9.6.0 Mart. The Mart Server is deployed on a web server and includes the software to communicate with the Mart Database and CA ERwin DM.
This section contains the following topics:
New Features and Enhancements in CA ERwin Mart Server (see page 9)
New Features and Enhancements in CA ERwin Mart Server
The following new features and enhancements are implemented in the current release of the CA ERwin Mart Server:
■ Mart-Level reports in the Report Designer (see page 10)
■ Pinned Reports from the Report Designer menu (see page 10)
■ Cross-Model Reports (see page 11)
■ Enhanced Database Support (see page 12)
■ Mart Model Reporting Status (see page 12)
■ Initialize the Mart with a Windows-authenticated User (see page 13)
■ Schedule Mart Report Synchronization (see page 13)
■ Use Multiple Threads to Update Mart Models for Reporting (see page 15)
■ Mart Report Data Compression (see page 16)
■ Use Multiple Threads to Load Models (see page 17)

New Features and Enhancements in CA ERwin Mart Server
10 Release Notes
Mart-Level Reports in Report Designer
You can now generate reports on the Mart. The reports that you generate could be administrative or about the model objects. For example, you can generate a report on the profiles that are attached to users, or on the list of entities without primary keys. When you generate the report, you can use the filter to search within specific objects. The filter supports SQL wildcard characters such as ? and %.
Note: You must have the Reports: View permission to create Mart reports.
Follow these steps:
1. Open CA ERwin Data Modeler and log in to the Mart.
2. Click Tools, Report Designer.
3. Enter a name for the report and click Mart.
4. Select the report subject in the Select Report Subject pane.
5. [Optional] In the Select Report Fields pane, select Specify Attribute Name at Run Time or Specify Model Name at Run Time check box.
6. Select the properties that you want to include in the report and click one of the following buttons:
a. Click Run Report.
If you have selected an option under Filter By, the Mart Report Filter dialog opens.
Select the specific models that you want to get the results from. Enter the specific model object name. Use wildcard characters, if required.
The report is generated and displayed. If you do not specify any model or entity the generated report includes all the models. If you have used a wildcard, by default, wildcard is applied to all the names. For example, if you type ID, the report includes Cust_ID and ID_For_Category.
b. To add the report to the current Report Solution, click OK.
Pinned Reports from the Report Designer Menu
You can now open the built-in reports from the Open pinned reports from disk toolbar item. The pinned reports are available in the local computer of the user. These reports are segregated into categories and each category of reports is available in a separate folder. You can create a folder of your own add the reports of your choice to it.

New Features and Enhancements in CA ERwin Mart Server
Chapter 1: Welcome 11
The following folder includes the built-in reports:
Windows XP
C:\Documents and Settings\All users\Application Data\CA\ERwin Data Modeler\9.6\Configuration\Report Solutions\
Windows 7
C:\Users\<user name>\AppData\Local\CA\ERwin Data Modeler\9.6\Report Solutions
Reports that are copied directly under this folder do not appear in the Pinned Reports dialog. The reports must be in a subfolder under this folder.
Follow these steps:
1. Launch ERwin Report Designer and click Open pinned reports from disk on the toolbar.
The Pinned Reports dialog appears.
2. Select the category of the report that you want to see.
3. Select one or more reports that you want to run and click OK.
The report is included to the current Report Solution and the Pinned Reports dialog closes.
Cross-Model Reports
You can now generate a report on the properties of attributes and columns present across multiple models in a Mart. When you generate the report, you can use the filter to search within specific models. The filter supports SQL wildcard characters such as ? and %.
Follow these steps:
1. Open CA ERwin Data Modeler and log in to the Mart.
2. Click Tools, Report Designer.
3. Enter a name for the report and click Mart.
4. Click Attribute/Column in the Select Report Subject pane.
5. In the Select Report Fields pane, select Specify Attribute Name at Run Time or Specify Model Name at Run Time check box.
6. Select the properties that you want to include in the report.
7. Click Run Report.

New Features and Enhancements in CA ERwin Mart Server
12 Release Notes
8. Select the specific models that you want to get the attributes from. Enter the attribute or column name.
By default, wildcard is applied to all the names. For example, if you type ID, the report includes Cust_ID and ID_For_Category.
9. Click OK.
The report is generated and displayed.
Enhanced Database Support
You can now use a SAP Adaptive Server Enterprise 16 database for the Mart database.
Mart Model Reporting Status
When a Mart model is modified and saved, although a confirmation message appears, the CA ERwin internal tables are still updated in the background. Further, when multiple users modify and save models simultaneously, models (internal tables) are queued for updating. If you generate a report on the model at this moment, the latest updates are not included. To provide you the correct reporting status of a model, the following enhancements are implemented:
■ The Mart Open dialog is enhanced with a new column named Report Status. Report Status displays whether a model is ready for generating reports.
■ The status bar of ERwin Report Designer shows the number of models that are ready for generating reports. The status Mart Report sync progress (X/Y) indicates that of the Y models that are available in the Mart, X models are ready for reporting.
The Report Status column includes the following statuses:
Updated
Specifies that the model is ready for report generation. When a report is generated on a model with this status, it includes the latest updates.
Updating
Specifies that the model is still being updated. When a report is generated on a model with this status, it does not include the latest updates. Further, when a model is saved for the first time, the report may not include any information.
Pending
Specifies that the model is queued for update. When a report is generated on a model with this status, it does not include the latest updates. Further, when a model is saved for the first time, the report may not include any information.

New Features and Enhancements in CA ERwin Mart Server
Chapter 1: Welcome 13
Initialize the Mart with a Windows-authenticated User
In the previous releases, only a server user was allowed to initialize a Mart. Now a Windows-authenticated user can also initialize a Mart. Further, a Windows-authenticated user can log in to a Mart as a Windows user.
To initialize a Mart with a Windows-authenticated user, follow these steps:
1. Provide the Active Directory details with user credentials in the Active Directory Details section in the CA ERwin Mart Configuration dialog.
2. Open CA ERwin Mart Administrator, enter the user name in the <domain name>/<user name> format. For more information about how to initialize a Mart, see the Workgroup Edition Implementation and Administration Guide.
To log in as a Windows-authenticated user, follow these steps:
This procedure describes how to enable a Windows-authenticated user log in to a Mart that is already initialized. Use this procedure if the Mart is initialized with either a server user or a Windows-authenticated user.
1. Ensure that you have provided the Active Directory details with user credentials in the Active Directory Details section in the CA ERwin Mart Configuration dialog.
2. Log in to the Mart as an administrator and add the required user as a Windows user in the Mart. Ensure that the user belongs to the Active Directory that was provided at the time of configuring the Mart.
Now the Windows-authenticated user can log in to CA ERwin Mart Administrator by providing the user name in the <domain name>/<user name> format.
Note: A local Windows user who does not belong to a domain or who is not part of an Active Directory cannot log in to the Mart as a Windows user.
Schedule Mart Report Synchronization
In the Workgroup Edition, the model data and model report data are stored in separate internal tables. The model report data table (m9ReportData) includes only those columns that are required to generate model-specific reports. When you update a model and save the changes, both the tables are updated. Although CA ERwin Data Modeler displays a message that the model is saved, the corresponding model report data table is still being updated in the background. In this scenario, if you try to generate a report, the report may not include the details that you have just updated. This means, there is a delay in the synchronization of model data and the model report data tables.
From this release onward, you can synchronize the tables dynamically or schedule the synchronization for a later time. Typically such synchronizations are scheduled for a time when there is minimum traffic on the server. The default is dynamic synchronization.

New Features and Enhancements in CA ERwin Mart Server
14 Release Notes
Dynamic Synchronization
Specifies that the model report data table is updated as and when the corresponding model is updated. You can see the reporting status of the source models in the Report Status column of the Mart Open dialog.
Scheduled Synchronization
Specifies that the model report data table is updated at the scheduled time. You can see the reporting status of the source models in the Report Status column of the Mart Open dialog.
Follow these steps:
1. Log out of the Mart and stop the Mart Server service.
2. Navigate to the \webapps\MartServer\WEB-INF folder on the computer where CA ERwin Mart Server is installed. Typically, the path for this folder is as follows:
C:\Program Files (x86)\CA\ERwin Mart Server
r9\Tomcat\webapps\MartServer\WEB-INF
3. Open the rest-context.xml file in a text editor such as Notepad and search for the following line:
<property name="refreshReportData" value="true" />
4. Change the value to “false”.
5. Navigate to the following line:
<task:scheduled ref="reportTaskExecutor" method="run" cron="0 10 21 * * ?" />
6. Change the value for cron.
Here, cron indicates the scheduled time. In this example, cron="0 10 21 * * ?" indicates that the models are synchronized for report generation at 9:10 pm every day.
7. Save the XML file.
8. Start the Mart Server service and log in to the Mart.
Similarly, to change from scheduled to dynamic synchronization, change the value of <property name="refreshReportData" value="false" /> to “true”.

New Features and Enhancements in CA ERwin Mart Server
Chapter 1: Welcome 15
Use Multiple Threads to Update Mart Models for Reporting
In the Workgroup Edition, the model data and model report data are stored in separate internal tables. The model report data table (m9ReportData) includes only those columns that are required to generate model-specific reports. When you update a model and save the changes, both the tables are updated. Although CA ERwin Data Modeler displays a message that the model is saved, the corresponding model report data table is still being updated in the background. In this scenario, if you try to generate a report, the report may not include the details that you have just updated. This means, there is a delay in the synchronization of model data and the model report data tables.
This delay happens because, the update process is handled by a single thread in your computer. From this release onward, you can configure a Mart to use multiple threads to update a model. Using multiple threads increases the performance of the update process and improves the time taken for large models to be available for reporting.
Follow these steps:
1. Log out of the Mart and stop the Mart Server service.
2. Navigate to the \webapps\MartServer\WEB-INF folder on the computer where CA ERwin Mart Server is installed. Typically, the path for this folder is as follows:
C:\Program Files (x86)\CA\ERwin Mart Server
r9\Tomcat\webapps\MartServer\WEB-INF
3. Open the rest-context.xml file in a text editor such as Notepad and navigate to the following line:
<property name="maxPoolSize" value="8" />
4. Change the value to a number of your choice.
The maximum number of threads that you can create depends on the system resources of your Mart server. If you enter a number, only the maximum number of threads that can be created per the system resources is created.
Default: 8
5. Save the XML file.
6. Start the Mart Server service and log in to the Mart.

New Features and Enhancements in CA ERwin Mart Server
16 Release Notes
Mart Report Data Compression
In the Workgroup Edition, the model data and model report data are stored in separate internal tables. The model report data table (m9ReportData) includes only those columns that are required to generate model-specific reports. When you update a model and save the changes, both the tables are updated. This approach is implemented to improve the performance of Mart report generation. From this release onward, you can improve the performance of Mart reporting further by changing the way the report information is stored in the report data table.
You can store the report information in two ways--binary or XML. By default, the report information is stored in binary format. Information is compressed in binary format, therefore it occupies less space. However, regardless of the format in which the information is stored, the accuracy of the information remains the same. When you change the storage format, the information for a model is converted to the new format the next time the model is saved. After you change the storage format, if you do not update a model, the storage format for that specific model is not changed. For example, suppose that you have 50 models in your Mart and the existing storage format is XML. The report data table has stored the information for all these models in XML format. Suppose that you change the format to binary and update 10 models today. The information for the 10 models is stored in binary format and the information for the remaining 40 models is in XML format.
Follow these steps:
1. Log out of the Mart and stop the Mart Server service.
2. Navigate to the \webapps\MartServer\WEB-INF folder on the computer where CA ERwin Mart Server is installed. Typically, the path for this folder is as follows:
C:\Program Files (x86)\CA\ERwin Mart Server
r9\Tomcat\webapps\MartServer\WEB-INF
3. Open the rest-context.xml file in a text editor such as Notepad and navigate to the following line:
<property name="compressReportData" value="true" />
Default: True (binary format)
4. To change the format to XML, change the value to “false”.
5. Save the XML file.
6. Start the Mart Server service and log in to the Mart.

New Features and Enhancements in CA ERwin Mart Server
Chapter 1: Welcome 17
Use Multiple Threads to Load Models
When you upgrade Mart models from a previous release to the current release using the Upgrade Mart utility, the time taken to upgrade depends on the number of models. Higher the number of models, longer is the time taken to upgrade. The reason for taking longer time is that the computer on which you run the wizard uses a single thread to process the models. From this release onward, you can configure the Upgrade Mart utility to use multiple threads and process multiple models simultaneously.
Note: The computer on which you run the upgrade process must have a minimum of 3 GB free memory to use multiple threads. If not, the message, "You need 3 GB free memory at least to launch multi-threads mode" appears.
The number of threads that you can use depends on the system resources of the computer on which you are running the Upgrade Mart utility. In addition, you can use a maximum of five threads.
Follow these steps:
1. From the Windows Start menu, go to All Programs, CA, ERwin, ERwin Data Modeler r9.6, MartUpgrade.
The Mart Upgrade dialog appears.
2. Click Upgrade Options and go to the Threads for Loading field. Enter a number that is less than 5.
Default: 1
Note: The computer on which you run the upgrade process must have a minimum of 3 GB free memory to use multiple threads. If not, the message, "You need 3 GB free memory at least to launch multi-threads mode" appears.
3. (Optional) To verify whether multiple threads are running for the upgrade process, open the Windows Task Manager and locate SourceConfigure.exe in the Processes tab. You can view the logs in the Working Directory for details of the models that failed upgrade.
4. Click Finish to start the upgrade process.


Chapter 2: Install and Configure an Oracle Mart 19
Chapter 2: Install and Configure an Oracle Mart
This section describes how you can install and configure a Mart on an Oracle database.
This section contains the following topics:
How to Install and Configure an Oracle Mart (see page 20) How to Upgrade any r9 Series Mart to the Current Version (see page 42) Change the Mart Database Server (see page 49) Troubleshooting (see page 49)

How to Install and Configure an Oracle Mart
20 Release Notes
How to Install and Configure an Oracle Mart
In the previous versions, CA ERwin DM connected to the Mart database through the database client software. Now, the application connects to the Mart database through a web server. The database client software is no longer required.
The Mart comprises the following components:
Database
Stores the user data for the Workgroup Edition. You can use an Oracle 10g, 11g, or 12c database for the Mart database. If you are using Oracle 12c, you can use a pluggable database. You must use a new database and not an existing database that was created for an older version of the data modeling tool.
Applications
Includes a web-based component named CA ERwin Mart Administrator that helps you manage the Mart through a web console.
Web server
Hosts CA ERwin Mart Administrator. You can use a web server of your choice. If you have not installed a web server, use the ERwin Mart Server option and install Tomcat.

How to Install and Configure an Oracle Mart
Chapter 2: Install and Configure an Oracle Mart 21
Complete the following steps in the same order to install and configure the Mart:
1. Review the prerequisites of an Oracle Mart. (see page 24)
2. Create the Mart Database and perform the additional tasks.
3. Install CA ERwin Mart Server. (see page 68)
4. Use MartServer as a Windows Service.
5. Initialize an Oracle Mart. (see page 36)
6. Log in to CA ERwin Mart Administrator and configure settings.
7. Use a Pluggable Database (see page 40).
Complete the following steps to upgrade a Mart from any earlier release of r9 series to the latest release:
1. Review the Prerequisites (see page 43)
2. Upgrade the Mart Server (see page 44)
3. Configure the Mart Server (see page 44)
4. Restart the Mart Server (see page 47)

How to Install and Configure an Oracle Mart
22 Release Notes
5. Log In to CA ERwin Web Admin (see page 48)
Mart Architecture
In the previous versions, CA ERwin DM connected to the Mart database through the database client software. Now, the application connects to the Mart database through a web server. The database client software is no longer required. The web server includes a web-based administration console—CA ERwin Mart Administrator. If you are using the Workgroup Edition, you must install and configure CA ERwin Mart Administrator.
The Mart comprises the following components:
Database
Stores the user data for the Workgroup Edition. You can use an Oracle 10g, 11g, or 12c database for the Mart database. If you are using Oracle 12c, you can use a pluggable database. You must use a new database and not an existing database that was created for an older version of the data modeling tool.
Applications
Includes a web-based component named CA ERwin Mart Administrator that helps you manage the Mart through a web console.
Web server
Hosts CA ERwin Mart Administrator. You can use a web server of your choice. If you have not installed a web server, use the ERwin Mart Server option and install Tomcat.
The following diagram shows the new architecture:

How to Install and Configure an Oracle Mart
Chapter 2: Install and Configure an Oracle Mart 23
The new architecture has the following benefits:
■ Separate logical and physical users: In the previous versions, Mart (or Model Manager) users required database level privileges to access the Mart functionality. The Mart database administrators added or deleted users in the Mart database. This approach is changed now. The logical users are separated from physical users, so Mart Administrators can create the Mart users without creating the corresponding database users.
■ Authentication through Active Directory services: Earlier, if you wanted to provide access to a user group, you added each user individually. Now, because of the new architecture, you can use the Active Directory services and can provide access to the group. Anyone who is part of the group gets access.
■ Mart administration outside CA ERwin Data Modeler: In the previous versions, Mart Administrators used CA ERwin Data Modeler for administrative activities such as managing permissions. This required non-modelers to know how to use CA ERwin Data Modeler. In the new architecture, the administration component is built on a separate layer on top of CA ERwin Data Modeler and is hosted on a web server. Mart Administrators can access CA ERwin Web Admin from any computer and can perform administrative activities through a web console.
Install a Mart or Upgrade a Mart?
Use the following guidelines to determine if you must install a Mart or upgrade a Mart:
■ If you are new to CA ERwin Data Modeler and have purchased the current version of Workgroup Edition, then install the current version of the Mart. Use the How to Install and Configure a Mart procedure that is appropriate for your Mart database.
■ If you have any earlier release of r9 series Mart, then upgrade the Mart to the current version. Use the How to Upgrade any r9 Series Mart to the Current Version procedure to upgrade your Mart. The models that are created in any earlier release of r9 series are upgraded when a user connects to the current version Mart and opens the models.
■ If you have an existing Mart and the version is r7.3 through r8.2.9, install the current version Mart. Use the How to Install and Configure a Mart procedure that is appropriate for your Mart database. After installing the Mart, use the Upgrade Mart utility to upgrade the Mart models from r7.3 through r8.2.9 to the current version.

How to Install and Configure an Oracle Mart
24 Release Notes
Review the Prerequisites for an Oracle Mart
Before you install the Mart components, help ensure that the minimum system requirements that are outlined in this topic are met.
You can use any of the following combinations to install CA ERwin Data Modeler, the Mart database, and the MartServer application:
■ Install CA ERwin Data Modeler, the Mart database, and the MartServer application on the same computer.
■ Install CA ERwin Data Modeler, the Mart database, and the MartServer application on different computers.
■ Install CA ERwin Data Modeler and the Mart database on one computer, and install the MartServer application on a different computer.
■ Install CA ERwin Data Modeler on one computer, and install the Mart database and the MartServer application on a different computer.
Help ensure that you always install the MartServer application on the Windows operating system.
System requirements for installing the MartServer application
Hardware requirements (based on physical hardware performance, not a virtual environment):
■ 2 GHZ or higher dual core processor
■ 4 GB RAM (8 GB or more for large marts)
■ 4 GB of disk space or more as required to support your specific mart

How to Install and Configure an Oracle Mart
Chapter 2: Install and Configure an Oracle Mart 25
Operating system:
■ Microsoft Windows Vista
■ Microsoft Windows Server 2008 SP2
■ Microsoft Windows Server 2003 SP2
■ Microsoft Windows 7
■ Microsoft Windows 8
■ Microsoft Windows 2012
■ Microsoft Windows XP SP3: As Microsoft has dropped support for Windows XP, CA ERwin Data Modeler will no longer be tested for compatibility with that operating environment. Should you encounter any problem(s) using CA ERwin Data Modeler you should first verify that the problem(s) encountered are not related to an unsupported operating environment before reporting the problem(s) to CA.
Note: CA ERwin Data Modeler is a 32-bit application and is fully compatible with 64-bit operating systems, except for the following known issues:
■ 64-bit database drivers and clients will not work with the application. The workaround is to use 32-bit database drivers and clients in the 64-bit operating system environment.
■ Running the CA ERwin API in a 64-bit environment requires some changes to the workstation registry. For more information about changing the registry, see the CA ERwin Data Modeler WE Implementation and Administration Guide.
■ Microsoft .NET Framework 3.5
■ All current Microsoft Windows critical updates are applied
Database:
■ The Mart Server can use a standalone or can share an existing database server for an Oracle 10g, 11g, or 12c database. If you are using Oracle 12c, you can use a pluggable database.
■ To create the Mart, you must be the database schema owner user and you must have the DBA role in the target database on the Oracle server. The DBA role is required for the user who is specified in the Configure MartServer dialog. If the DBA privilege of this user is revoked, then CA ERwin DM users will not be able to save model changes to the Mart.
■ (Optional) You have modified the following parameters in the initialization file (InitSID.ora):
Remote_OS_Authent=”T
OS_Authent_Prefix=TRUE
■ (Optional) To use the Korean language with the Mart database, use KO16MSWIN949 or AL32UTF8 character set depending on your operating system language pack. For more information, see the Oracle documentation.

How to Install and Configure an Oracle Mart
26 Release Notes
CA ERwin Mart Administrator web client:
■ Supported browsers:
– Microsoft Internet Explorer 8® or newer
– Mozilla Firefox® v.9.0 or newer
– Google Chrome 14 or newer
– Apple Safari 5 or newer
■ Adobe Flash plug-in version 8 or newer for the respective browser
Other requirements
Help ensure that the following additional requirements are met:
■ If you want to use Microsoft IIS as the web server, you have configured it.
■ The DBMS is installed and prepared for creating the Mart Database.
■ The Mart database is created. At least one user with administrator privileges is present. You have run the initial queries on the Oracle database. For more information about the initial queries, see the Implementation Guide.
■ If you want to add Windows Group users as Mart users, you have the Active Directory Server details.
Note: You can add Windows Group users as normal Mart users, but not the Mart administrator. A Mart administrator must be a database-authenticated user.
Important disclaimer notice on all requirements
1. The requirements that are mentioned previously define the minimum requirements which permit the application to run with reasonable performance based on a small business use case scenario. The actual requirements for an enterprise-wide use case based on larger models and configurations require significantly greater resources to obtain acceptable performance.
2. These requirements are based on actual physical hardware (no virtual environment) and the following assumptions:
■ Minimal to no network overhead (both the database and application servers are locally installed)
■ Vendor's default install of the current version of their software (with all current service or fix packs)
■ No other applications sharing the defined hardware configuration (for example, a “clean” machine)
Any other hardware/software configurations are acceptable as long as they provide the same (or better) performance characteristics identified.

How to Install and Configure an Oracle Mart
Chapter 2: Install and Configure an Oracle Mart 27
Create the Mart Database and Perform the Additional Tasks
Perform the following setup tasks in your DBMS environment before you can install and use the software:
1. Install the DBMS on the server where you plan to store the Mart.
Help ensure that you can create tables, indexes, stored procedures, and public synonyms. For more information about memory and disk space requirements, see the system requirements for each DBMS (Microsoft SQL Server, Sybase, and Oracle).
2. Create a database that you want to use as the Mart. To use a pluggable database, see the Use a Pluggable Database (see page 40) topic.
Use the DBMS features to create or identify the required storage objects and the mart. The specific requirements vary depending on your DBMS type.
Note: To create, update, or delete a Mart in CA ERwin Data Modeler Workgroup Edition, you must be the database schema owner and you must have the DBA role.
Additional Tasks
The DBA and the system administrator responsible for installing the software on an Oracle database management system performs these tasks.
Use graphical tools or SQL *Plus (all versions), SQL*DBA, or the Oracle Enterprise Management Console to perform these tasks. Some SQL commands are included where appropriate. The Data file paths, data file sizes, role names, and user names are included as examples only.
1. Check the SYSTEM tablespace.
The installation creates several stored procedures. All triggers, stored procedures, and packages are kept in the Oracle SYSTEM tablespace. The standard size of the SYSTEM tablespace assumes that you are not using procedural options, so the SYSTEM tablespace must be often expanded. If other Oracle applications are not using procedural code, then expand the SYSTEM tablespace to 32 MB. If other Oracle applications also use procedural code, expand the SYSTEM tablespace to at least 32 MB.
2. Check the Rollback Segment tablespace.
If your instance uses UNDO tablespace, do not create rollback segments.
Significant rollback space is required for installing and use. The rollback segments must be in their own separate tablespace and each have at least 16 MB of available space. There must be one rollback segment for every four concurrent users, with a maximum of 50 rollback segments. The available space must scale upward with increasing numbers of rollback segments. Finally, the rollback segment optimal parameter must be set to control rollback segment growth and space consumption.
Note: For Steps 3, 4, and 5, use the Dictionary-managed tablespaces.

How to Install and Configure an Oracle Mart
28 Release Notes
3. Create a data tablespace of at least 32 MB.
For example:
CREATE TABLESPACE MyMart
DATAFILE '/db01/oracle/rdbms9i/data/mymart.ora' SIZE 100M;
Or For Locally Managed extents:
CREATE TABLESPACE Mymart
DATAFILE '/db01/oracle/rdbms9i/data/mymart.ora' SIZE 100M
EXTENT MANAGEMENT LOCAL SEGMENT SPACE MANAGEMENT AUTO;
4. Create an index tablespace of at least 32 MB.
For example:
CREATE TABLESPACE MMARTINDEX
DATAFILE '/db02/oracle/rdbms9i/data/mmartindex.ora' SIZE 75M;
Or For Locally Managed extents:
CREATE TABLESPACE MMARTINDEX
DATAFILE '/db02/oracle/rdbms9i/data/mmartindex.ora' SIZE 75M
EXTENT MANAGEMENT LOCAL SEGMENT SPACE MANAGEMENT AUTO;
5. Create a temporary tablespace.
For example:
CREATE TEMPORARY TABLESPACE MMTEMP TEMPFILE
'/db03/oracle/rdbms9i/data/mmarttemp.ora' SIZE 50M;
Or For Locally Managed extents:
CREATE TEMPORARY TABLESPACE MMTEMP TEMPFILE
'/db03/oracle/rdbms9i/data/mmarttemp.ora' SIZE 50M
EXTENT MANAGEMENT LOCAL UNIFORM SIZE 1M;
Note: For more details about syntax and options regarding tablespace creation, see the appropriate Oracle documentation.

How to Install and Configure an Oracle Mart
Chapter 2: Install and Configure an Oracle Mart 29
6. Create an Oracle user with DBA privileges for use by the CA ERwin Data Modeler Workgroup Edition Installer or designated schema owner.
Assign the data tablespace to this user as the default tablespace, and the temporary tablespace as the temporary tablespace to the user.
For example:
CREATE USER STEVE IDENTIFIED BY STEVE
DEFAULT TABLESPACE MyMart
TEMPORARY TABLESPACE MMTEMP
QUOTA UNLIMITED ON MyMart
QUOTA UNLIMITED ON MMARTINDEX;
7. Create the CA ERwin Data Modeler Workgroup Edition Installer role.
The following example is the role that the Oracle user requires to install CA ERwin Data Modeler Workgroup Edition.
CREATE ROLE MMINSTALL;
8. Grant the Oracle privileges to the Installer role.
The following example shows the Oracle privileges that the CA ERwin Data Modeler Workgroup Edition Installer must install on Oracle. For the last command, log in as sys with the sysdba role in the user-name or the command will fail.
grant create sequence to MMINSTALL;
grant create table to MMINSTALL;
grant create view to MMINSTALL;
grant drop public synonym to MMINSTALL;
grant create public synonym to MMINSTALL;
grant create procedure to MMINSTALL;
grant select on dba_data_files to MMINSTALL;
9. Create the CA ERwin Data Modeler Workgroup Edition User role.
For example:
CREATE ROLE MMUSER;
When you select this role as the CA ERwin Data Modeler Workgroup Edition User role during Step 4 of the installation procedure, the Setup program generates grant statements. These statements grant the object level privileges to this role.
10. Grant the create session Oracle privilege to the User role.
For example:
grant create session to MMUSER;
Note: To use the database, an Oracle user needs only the create session privilege.

How to Install and Configure an Oracle Mart
30 Release Notes
11. Grant the CA ERwin Data Modeler Workgroup Edition User role to the Installer role.
For example:
grant MMUSER to MMINSTALL;
12. Select the CA ERwin Data Modeler Workgroup Edition tablespaces and User role.
When prompted for tablespace and role information, select the Workgroup Edition data tablespace, the Workgroup Edition index tablespace, and the Workgroup Edition User role (the role created in Step 9).
Oracle SQL Commands
If a graphical DBMS access tool is not available, you can use Oracle SQL commands through SQL*DBA or SQL*Plus.
Example: Create a tablespace using the CREATE TABLESPACE command
CREATE TABLESPACE mm_data /* The tablespace name. */
DATAFILE ‘C:\ORANT\DATABASE\mmdata.dat‘ᾉ/* The data file name. */
SIZE integer_value K or M or G /* The data file size */
DEFAULT STORAGE ( /* The default storage parameters */
INITIAL integer_value K or M or G /* The initial extent size */
NEXT integer_value K or M or G /* The next extent size */
PCTINCREASE integer_value /* The percent to grow extents */
MINEXTENTS integer_value /* The minimum number of extents */
MAXEXTENTS integer_value /* The maximum number of extents */
);
Example: Create an Oracle user using the CREATE USER command
CREATE USER mm_user_1 /* The user id name */
IDENIFIED BY password /* The user password */
DEAFULT TABLESPACE tablespace_name /* The user’s default tablespace */
TEMPORARY TABLESPACE tablespace_name /* The user’s temporary tablespace */
QUOTA unlimited_or_integer_K_M_G ON tablespace_name /* The user’s quota on a
tablespace */
;
Example: Grant user privileges using the GRANT command
GRANT role_or_privilege_name
TO user_or_role
;

How to Install and Configure an Oracle Mart
Chapter 2: Install and Configure an Oracle Mart 31
Install CA ERwin Mart Server
The Mart Server and Mart Admin war files are deployed on a Web server. You can either use an existing web server, or install the web server through the CA ERwin MartServer r9.6 Installation Wizard. You must install CA ERwin Mart Server and configure it regardless of whether you use Mart Server as a Windows service.
Note: Ensure that you have reviewed the Install a Mart or Upgrade a Mart topic before proceeding.
Follow these steps:
1. Do one of the following tasks:
■ Insert the installation DVD and select Mart Server Installation.
■ Download the CAEDMMS96.exe file from the online CA Technologies product page and run it.
The CA ERwin MartServer r9.6 Installation Wizard appears.
2. Go through the wizard steps to install CA ERwin Mart Server.
Depending on the options you select, CA ERwin Mart Server and/or Java Runtime Environment (JRE) and Tomcat are installed.
Note: If Java (any version) is already available in the computer and the environment variable JRE_HOME is set, the installer overwrites JRE_HOME with the new Java path. The JRE version that is shipped with the installer is 1.8. If a Tomcat web server is already installed in the computer and the environment variable CATALINA_HOME is set, the installer replaces CATALINA_HOME with the new path.
3. From the Windows Start menu, click All Programs, CA, ERwin, ERwin Mart Server r9.6, Configure MartServer.
The CA ERwin Mart Configuration dialog appears.
Configure the CA ERwin Mart Server
1. Complete the following fields in the Mart Server tab:
Database Type
Specifies the database server type.
Port No.
Specifies the port number of the database server.
Server Name
Specifies the name of the database server where you have installed the Mart database. For example, suppose that you are using SQL Server 2008 as the Mart database. Enter the name of the computer where SQL Server 2008 is installed.

How to Install and Configure an Oracle Mart
32 Release Notes
Instance Name
Specifies the name of the database instance.
Database Name
Specifies the name of the Mart database.
Note: If you are installing the Mart for the first time, use a new database. Do not use an existing database that was created for r7.3 through r8.2.9 Mart. If you are upgrading the Mart from any earlier release of r9 series to the latest release, use the corresponding Mart database.
User Name
Specifies the user name to connect to the Mart database. Enter the name of a user that is authenticated by the Mart database.
Password
Specifies the password to connect to the Mart database.
Note: The following fields--Domain Controller Name, Domain/User Name, and Password are required only if you are using the Active Directory authentication. You can use the Active Directory authentication to initialize the Mart and to log in to CA ERwin Mart Administrator.
Domain Controller Name
Specifies the fully qualified name of the Active Directory Server (Domain Controller). Enter the name in the following format:
LDAP://server/distinguished-name
Example: ldap://mktgna:3268/dc=abc, dc=com
Here, mktgna is the server name. You can provide either the name of the server or the IP address. 3268 is the port number to which the server listens.
dc=abc, dc=com is the distinguished-name. The distinguished name is the full path of the object.
Note: If you do not know the Domain Controller Name, use the Nltest command or talk to your System Administrator.
Domain/User Name
Specifies the domain name and user name in the <domain name>/<user name> format.
Password
Specifies the password of the domain user.

How to Install and Configure an Oracle Mart
Chapter 2: Install and Configure an Oracle Mart 33
Configure CA ERwin Mart Administrator
1. Enter the following information in the Mart Administrator tab:
Server Name
Specifies the name of the computer where the Web Server is present. For example, if you are using Tomcat, enter the name of the computer where Tomcat is installed.
Default: localhost
Port Number
Specifies the port number on which the Web Server is running.
Default: 18170
Application Name
Specifies the application name with which the Web Server is identified.
Default: MartServer
Transport Layer Security
Specifies if you want to connect to the Mart through a secured connection (SSL). Select this check box if you have implemented SSL.
Hosting Server
Specifies that you want to use the IIS web server to connect to the Mart. Select this check box only if you have configured IIS.
2. Click Configure.
The CA ERwin Mart Administrator and the Mart Server are configured.
More information:
Configure IIS Web Server (see page 127) Implement SSL for IIS (see page 129)

How to Install and Configure an Oracle Mart
34 Release Notes
Enable SSL for Tomcat
SSL enables you to access the Mart through a secured connection. You can enable SSL for Tomcat--the default web server, regardless of whether you are installing the Mart for the first time, or you are upgrading it from any earlier release of r9 series.
Follow these steps:
1. If the Mart Server service is running, stop it. From the Windows Start menu, click All Programs, CA, ERwin, ERwin Mart Server r9.6, Stop MartServer Service to stop the web server.
2. From the Windows Start menu, click All Programs, CA, ERwin, ERwin Mart Server r9.6, Enable SSL for Tomcat Webserver.
SSL is enabled for Tomcat and a security certificate is created. You must install this security certificate on all the computers from where you want to access the Mart.
3. From the Windows Start menu, click All Programs, CA, ERwin, ERwin Mart Server r9.6, Configure MartServer.
The CA ERwin Mart Configuration dialog appears.
4. Go to the Mart Administrator tab and select the Transport Layer Security check box.
5. From the Windows Start menu, click All Programs, CA, ERwin, ERwin Mart Server r9.6, Start Mart Server Service.
6. From the Windows Start menu, click All Programs, CA, ERwin, ERwin Mart Server r9.6, CA ERwin Mart Administrator r9.6.
The CA ERwin Mart Administrator home page appears and displays HTTPS in the address bar. If a certificate error appears, click Proceed Anyway to begin the session.
Important! If you want to connect to an SSL enabled Mart through API or the Mart Upgrade utility, you must first install the security certificate on the corresponding computer. Install the certificate through the data modeling tool. If you do not install the security certificate, the Mart Upgrade utility and the API will not be able to connect to the SSL enabled Mart.
Disable SSL and Access the Mart Through a Normal Connection
You can disable SSL at any time and access the Mart through a normal connection.
Follow these steps:
1. If the Mart Server Service is running, stop it. From the Windows Start menu, click All Programs, CA, ERwin, ERwin Mart Server r9.6, Stop Mart Server Service.
2. From the Windows Start menu, click All Programs, CA, ERwin, ERwin Mart Server r9.6, Disable SSL.
3. From the Windows Start menu, click All Programs, CA, ERwin, ERwin Mart Server r9.6, Configure MartServer.

How to Install and Configure an Oracle Mart
Chapter 2: Install and Configure an Oracle Mart 35
The CA ERwin Mart Configuration dialog appears.
4. Go to the Mart Administrator tab and clear the Transport Layer Security check box.
5. From the Windows Start menu, click All Programs, CA, ERwin, ERwin Mart Server r9.6, Start Mart Server Service.
6. From the Windows Start menu, click All Programs, CA, ERwin, ERwin Mart Server r9.6, CA ERwin Mart Administrator r9.6.
The CA ERwin Mart Administrator home page appears and displays HTTP in the address bar.
Use Mart Server as a Windows Service
The current version of the Mart provides two ways to start the web server that hosts Mart Server:
■ Start the web server manually.
■ Use a Windows service to start the web server.
For example, if you have used Tomcat as the web server to host Mart Server, you can start Tomcat in two ways:
■ Start Tomcat through the startup.bat file or through a shortcut to this file.
■ Use a Windows service to start Tomcat.
The benefits of using a Windows service to start a web server are as follows:
■ Any user with administrative privileges on a computer can start the Windows service, whereas, only designated users can start a web server manually.
■ A Windows service runs regardless of whether a user has logged in. A manually-started web server shuts down when the user who started it logs out.
Follow these steps:
1. From the Windows Start menu, click All Programs, CA, ERwin, ERwin Mart Server r9.6, Create MartServer Service to create the MartServer Windows service.
Creating the service is a one-time task. After the service is created, you only have to start and stop the service.
2. From the Windows Start menu, click All Programs, CA, ERwin, ERwin Mart Server r9.6, Start MartServer Service to start the web server.

How to Install and Configure an Oracle Mart
36 Release Notes
Initialize an Oracle Mart
When you access the Mart database through CA ERwin Mart Administrator for the first time, you must initialize the database. You can initialize the database using a database authenticated user or a Windows-authenticated user.
Note: Before you proceed, verify that you have installed a DBMS, created the Mart database and run the initial queries. If the Mart is already initialized, the Login page appears.
When you open CA ERwin Mart Administrator for the first time, the Initialize Mart web page appears.
Follow these steps:
1. If you are using MartServer as a Windows service, help ensure that the service is started. If not, from the Windows Start menu, click All Programs, CA, ERwin, ERwin Mart Server r9.6, Start Mart Server to start the Mart Server.
A Windows command prompt window appears and indicates when the server starts.
2. From the Windows Start menu, click All Programs, CA, ERwin, ERwin Mart Server r9.6, CA ERwin Mart Administrator r9.6.
CA ERwin Mart Administrator opens in your default browser.
3. Complete the following fields:
Username
Defines the user name with which you want to access the Mart. If you are using a Windows-authenticated user, enter the name in the <domain name>/<user name> format.
Password
Defines the password for the user name.
Confirm Password
Confirms the password that you entered in the previous field.
Email Address
Defines the email address for the user account that you are creating.
Mart Role
Defines the role of the user for the Mart.

How to Install and Configure an Oracle Mart
Chapter 2: Install and Configure an Oracle Mart 37
Table Tablespace
Defines the table tablespace in which the Mart tables are created.
Index Tablespace
Defines the index tablespace in which the Mart indexes are created.
4. Click Initialize.
The user name is added as an administrator of Mart, Mart is initialized, and the Login web page appears. Initializing is a one-time task. After Mart is initialized, the user who initialized must log in first. Later, any other user who wants to use CA ERwin Mart Administrator can log in.
Note: The user name that is entered here is an application level user and not a database user. Remember the password that you have entered here, because without the password you cannot log in to CA ERwin Mart Administrator for the first time.

How to Install and Configure an Oracle Mart
38 Release Notes
Log In to CA ERwin Mart Administrator and Configure Settings
After the Mart is initialized, the user who initialized must log in first. When you log in to Mart for the first time, configure it per the requirements of your organization. You can configure the following settings:
■ Default profile for the model creator
■ Use default password
■ Email notification
Follow these steps:
1. From the Windows Start menu, click All Programs, CA, ERwin, ERwin Mart Server r9.6, CA ERwin Mart Administrator r9.6.
The CA ERwin Mart Administrator home page appears. If you have implemented SSL, HTTPS appears in the address bar.
2. Use the credentials with which you initialized the Mart and log in.
3. Click Settings.
4. Complete the following fields:
Default profile for model creator
Specifies the profile that is assigned to a user on a model. This profile is assigned whenever a user creates a model and saves it to Mart for the first time. The user inherits the permissions of the default profile selected here on the model that is saved. For example, suppose that User1 is assigned with Modeler profile and the System Administrator selects Architect as the default profile for model creator. If User1 creates Model1 and saves it to Mart, for Model1, User1 inherits the permissions of Architect. Now, suppose that the System Administrator selects Viewer as the default profile for model creator, and suppose that User1 creates Model2 and saves it to Mart. For Model2, User1 inherits the permissions of Viewer.
Use Default Password
Specifies the default password that you want to use for new users and for resetting passwords, in the absence of an SMTP server for emails.
Note: Select this option only if you do not have an SMTP server that is configured for emails.
SMTP host name
Specifies the name of the SMTP host. Enter the name in the mail.domain.com format. Notification emails are sent from this server.
Port number
Specifies the port number of the SMTP server. The default port number is 25. If your company is using an alternate port number for the mail server, specify that port number.

How to Install and Configure an Oracle Mart
Chapter 2: Install and Configure an Oracle Mart 39
Authenticate
Specifies whether transactions with the SMTP server are authenticated. Select the check box to authenticate.
User name
Specifies the user name to authenticate the SMTP server. Select the Authenticate check box to enable authentication.
Password
Specifies the password to authenticate the SMTP server. Select the Authenticate check box to enable authentication.
Administrator email
Specifies the email ID of the Mart administrator. Notifications to Mart users are sent from this ID.
No-reply email from
Specifies the email ID from which administrative emails such as the password reset email are sent.
5. Click Save.
Mart options are configured.
You have installed and configured CA ERwin DM Mart.
Use a Pluggable Database
This information applies to Oracle 12c.
You can use the pluggable database concept of Oracle 12c and create multiple Marts of the same Mart release in a single Oracle instance. For example, you can create two pluggable databases erwin_test and erwin_production in an Oracle global database erwin. You can configure these databases with the Mart Server one after the other and connect to one of them at a time.
Follow these steps to use multiple pluggable databases:
1. Create multiple pluggable databases, for example, erwin_test and erwin_production.
2. Install CA ERwin Mart Server for the first pluggable database, for example, erwin_test.
3. Initialize the Mart for the first pluggable database, erwin_test. For more information on how to initialize the Mart, see the Initialize an Oracle Mart (see page 36) topic.
4. Log in to the Mart and create the models that you want to store in the test Mart.

How to Install and Configure an Oracle Mart
40 Release Notes
5. To use the second pluggable database, follow these steps:
a. Stop the Mart server or the Mart server service.
b. Repeat Steps 1, 2, and 3 for the second pluggable database, erwin_production.
c. Start the Mart server or the Mart server service.
d. Log in to the Mart and create the models as required.
Create a Pluggable Database
You can use the pluggable database concept in Oracle 12c and create multiple Marts of the same Mart release.
Follow these steps:
1. Create a pluggable database in Oracle 12c.
For example, provide the Global Database Name as erwin and the Pluggable Database Name as erwin_test.
Note: For more information on how to create a pluggable database, see the Oracle documentation.
2. Run the following script on the computer where Oracle 12c is installed:
DROP TABLESPACE MMDATA INCLUDING CONTENTS AND DATAFILES CASCADE CONSTRAINTS;
DROP TABLESPACE MMINDEX INCLUDING CONTENTS AND DATAFILES CASCADE CONSTRAINTS;
DROP TABLESPACE marttemp INCLUDING CONTENTS AND DATAFILES CASCADE CONSTRAINTS;
ALTER SESSION SET CONTAINER=erwin_test;
CREATE TABLESPACE MMDATA datafile 'c:\r9mart2\MMDATA.dbf' size 300m autoextend
on;
CREATE TABLESPACE MMINDEX datafile 'c:\r9mart2\MMINDEX.dbf' size 300m autoextend
on;
CREATE TEMPORARY TABLESPACE marttemp tempfile 'c:\r9mart2\tempdata.dbf' size
300m autoextend on;

How to Install and Configure an Oracle Mart
Chapter 2: Install and Configure an Oracle Mart 41
DROP USER MMADMIN CASCADE;
CREATE USER MMADMIN IDENTIFIED BY MMADMIN DEFAULT TABLESPACE MMDATA TEMPORARY
TABLESPACE MARTTEMP QUOTA UNLIMITED ON MMDATA QUOTA UNLIMITED ON MMINDEX;
DROP ROLE MMINSTALL;
CREATE ROLE MMINSTALL;
GRANT CREATE SEQUENCE TO MMINSTALL;
GRANT CREATE TABLE TO MMINSTALL;
GRANT CREATE VIEW TO MMINSTALL;
GRANT DROP PUBLIC SYNONYM TO MMINSTALL;
GRANT CREATE PUBLIC SYNONYM TO MMINSTALL;
GRANT CREATE PROCEDURE TO MMINSTALL;
DROP ROLE MMUSER;
CREATE ROLE MMUSER;
GRANT CREATE SESSION TO MMUSER;
GRANT MMUSER TO MMINSTALL;
GRANT MMINSTALL TO MMADMIN;
GRANT DBA TO MMADMIN;
Install CA ERwin Mart Server with a Pluggable Database
The procedure to install CA ERwin Mart Server for a pluggable database is same as the procedure for a normal database. This topic describes only those fields that need different values for a pluggable database. For more information on how to configure the CA ERwin Mart Server, see the Install CA ERwin Mart Server (see page 31) topic.

How to Upgrade any r9 Series Mart to the Current Version
42 Release Notes
The following fields on the Configure the CA ERwin Mart Server dialog need different values:
Server Name
Specifies the name of the database server where you have installed the Mart database. Enter the name of the computer where Oracle 12c is installed and the pluggable database erwin_test is created.
Database Name
Specifies the name of the pluggable Mart database. For example, erwin_test.
User Name
Specifies the user name to connect to the Mart database. Enter mmadmin or any other user account that you have created when you ran the script.
Password
Specifies the password to connect to the Mart database. Enter mmadmin or any other password that you have created when you ran the script.
How to Upgrade any r9 Series Mart to the Current Version
If you are using any earlier release of r9 series and you want to upgrade it to the latest release, upgrade the Mart Server and the Mart database. The Mart server program is upgraded, so you must implement the upgraded software.
Important! The current Mart is designed to work with only the current version of CA ERwin Data Modeler. If you try to connect the current Mart with an older version CA ERwin Data Modeler such as r9.0.0, it may corrupt the Mart and cause unexpected behavior.

How to Upgrade any r9 Series Mart to the Current Version
Chapter 2: Install and Configure an Oracle Mart 43
The following diagram illustrates how System Administrators can upgrade a Mart from any earlier release of r9 series to the latest release:
Complete the following tasks to upgrade a Mart of any earlier release of r9 series to the latest release:
1. Review the prerequisites. (see page 43)
2. Upgrade the Mart Server (see page 44).
3. Configure the Mart Server (see page 44).
4. Restart the Mart Server service. (see page 47)
5. Log In to CA ERwin Web Admin (see page 48).
Review the Prerequisites
Review the following prerequisites before you start the upgrade process:
If the Mart database is an Oracle database, the default tablespaces that were used for initializing the any earlier release of r9 series Mart are available for the latest release.

How to Upgrade any r9 Series Mart to the Current Version
44 Release Notes
Upgrade the Mart Server
If you are upgrading a Mart from any earlier release of r9 series to the latest release, upgrade the Mart Server.
Note: See the Install a Mart or Upgrade a Mart topic before proceeding.
Follow these steps:
1. If you are running MartServer as a Windows service, stop the service.
Note: If you upgrade the Mart Server without stopping the service, Mart Server may not start after you complete the upgrade process.
2. Download and run the CAEDMMS96.exe file from the CA Support site.
The CA ERwin Mart Server r9.6.0 Install Shield Wizard dialog appears.
3. Follow the wizard.
The Mart Server is upgraded.
4. Restart your computer.
Configure the Mart Server
To connect to the latest Mart, you must configure the Mart Server. Use the same database that you have used for the r9.0.0 Mart (or any earlier release of r9 series Mart).
Note: See the Upgrade Considerations topic before proceeding.

How to Upgrade any r9 Series Mart to the Current Version
Chapter 2: Install and Configure an Oracle Mart 45
Follow these steps:
1. From the Windows Start menu, click All Programs, CA, ERwin, ERwin Mart Server r9.6, Configure MartServer.
The CA ERwin Mart Configuration dialog appears.
Configure the CA ERwin Mart Server
1. Complete the following fields in the Mart Server tab:
Database Type
Specifies the database server type.
Port No.
Specifies the port number of the database server.
Server Name
Specifies the name of the database server where you have installed the Mart database. For example, suppose that you are using SQL Server 2008 as the Mart database. Enter the name of the computer where SQL Server 2008 is installed.
Instance Name
Specifies the name of the database instance.
Database Name
Specifies the name of the Mart database.
Note: If you are installing the Mart for the first time, use a new database. Do not use an existing database that was created for r7.3 through r8.2.9 Mart. If you are upgrading the Mart from any earlier release of r9 series to the latest release, use the corresponding Mart database.
User Name
Specifies the user name to connect to the Mart database. Enter the name of a user that is authenticated by the Mart database.

How to Upgrade any r9 Series Mart to the Current Version
46 Release Notes
Password
Specifies the password to connect to the Mart database.
Note: The following fields--Domain Controller Name, Domain/User Name, and Password are required only if you are using the Active Directory authentication. You can use the Active Directory authentication to initialize the Mart and to log in to CA ERwin Mart Administrator.
Domain Controller Name
Specifies the fully qualified name of the Active Directory Server (Domain Controller). Enter the name in the following format:
LDAP://server/distinguished-name
Example: ldap://mktgna:3268/dc=abc, dc=com
Here, mktgna is the server name. You can provide either the name of the server or the IP address. 3268 is the port number to which the server listens.
dc=abc, dc=com is the distinguished-name. The distinguished name is the full path of the object.
Note: If you do not know the Domain Controller Name, use the Nltest command or talk to your System Administrator.
Domain/User Name
Specifies the domain name and user name in the <domain name>/<user name> format.
Password
Specifies the password of the domain user.
Configure CA ERwin Mart Administrator
1. Enter the following information in the Mart Administrator tab:
Server Name
Specifies the name of the computer where the Web Server is present. For example, if you are using Tomcat, enter the name of the computer where Tomcat is installed.
Default: localhost
Port Number
Specifies the port number on which the Web Server is running.
Default: 18170

How to Upgrade any r9 Series Mart to the Current Version
Chapter 2: Install and Configure an Oracle Mart 47
Application Name
Specifies the application name with which the Web Server is identified.
Default: MartServer
Transport Layer Security
Specifies if you want to connect to the Mart through a secured connection (SSL). Select this check box if you have implemented SSL.
Hosting Server
Specifies that you want to use the IIS web server to connect to the Mart. Select this check box only if you have configured IIS.
2. Click Configure.
The CA ERwin Mart Administrator and the Mart Server are configured.
Restart the Mart Server Service
When you modify the details of the Mart Server and Mart Administration programs, restart the Mart Server service.
Follow these steps:
1. From the Windows Start menu, click All Programs, CA, ERwin, ERwin Mart Server r9.6, Stop MartServer Service to stop the Mart Server service.
2. From the Windows Start menu, click All Programs, CA, ERwin, ERwin Mart Server r9.6, Start MartServer Service to start the Mart Server service.

How to Upgrade any r9 Series Mart to the Current Version
48 Release Notes
Log In to CA ERwin Mart Administrator
Log in to CA ERwin Mart Administrator to verify if you have successfully upgraded the Mart Server from any earlier release of r9 series to the latest release.
Follow these steps:
1. From the Windows Start menu, click All Programs, CA, ERwin, ERwin Mart Server r9.6, CA ERwin Mart Administrator r9.6.
The CA ERwin Mart Administrator log in page appears. If you have implemented SSL, HTTPS appears in the address bar.
2. Use the credentials with which you initialized the Mart and log in.
The CA ERwin Mart Administrator home page appears.
The models that are created in any earlier release of r9 series are upgraded when a user connects to the latest release Mart and opens the models.

Change the Mart Database Server
Chapter 2: Install and Configure an Oracle Mart 49
Change the Mart Database Server
Sometimes, you may change the server on which the Mart database is installed, or you may restore the Mart database with a new name. When there is a change the server name or database name, reconfigure the MartServer.
Follow these steps:
1. Back up your Mart database.
2. Restore the database on the designated server.
3. If you use the same computer for Mart Server and restore the database in a different name, include the new database name in the CA ERwin Mart Configuration dialog.
From the Windows Start menu, open the CA ERwin Mart Configuration dialog. In the Mart Server tab, Database Name field, enter the new name with which the database is restored. Enter the current user name and password to access the database. If wrong information is provided here, you may be able to install the Mart, but you cannot log in and cannot use it.
4. If you use a different computer for Mart Server and restore the database in the same name, install the Mart Server on the new computer.
Use the Install CA ERwin Mart Server procedure and install the Mart Server. In the Mart Server tab, Server Name field, enter the name of the new server where the database is restored. Enter the current user name and password to access the database. If wrong information is provided here, you may be able to install the Mart, but you cannot log in and cannot use it.
5. Stop the MartServer service and start it again.
6. From the Windows Start menu, click All Programs, CA, ERwin, ERwin Mart Server r9.6, CA ERwin Mart Administrator r9.6.
Enter the credentials of the Mart administrator and log in.
Troubleshooting
This section explains the errors that you can encounter while installing and configuring Mart, and how you can troubleshoot them.
Note: The Mart Server log files are available in the following location:
Windows XP: {user.home}/Local Settings/Application Data/CA/ERwin Mart
Server/logs/application.log
Windows 7: {user.home}/AppData/Local/CA/ERwin Mart Server/logs/application.log

Troubleshooting
50 Release Notes
Port out of range
Symptom:
Whenever I connect to the web server, I get the following error message:
java.lang.IllegalArgumentException: port out of range 80821.
Solution:
Type the correct port number in the Configure CA ERwin Mart Administrator’s Server dialog and then restart your web server.
Call failed on the server
Symptom:
When I try to connect to the Mart server, I get the following error:
500 The call failed on the server; see server log for details
Solution:
The probable reasons for this error could be one of the following reasons:
■ The server name is not correct.
■ The application name is not correct. By default, the application name is MartServer and it is case-sensitive.
Type the correct server name and application name in the CA ERwin Mart Administrator’s Server dialog and the Configure MartServer Details dialog. Restart the web server.

Troubleshooting
Chapter 2: Install and Configure an Oracle Mart 51
Application Internal Error
Symptom:
When I try to connect to the database, I get the following error:
Application Internal Error
Solution
You get this error when the MartServer application is unable to connect to the required database. The following reasons are probable for this error:
■ The database details that are provided in the Configure MartServer Details dialog are incorrect.
■ The username and the password for the database are incorrect.
■ The database is not present.
■ The port number for the database is incorrect.
■ The network is down.
Ensure that you enter the correct details of your database in the Mart Server tab of the CA ERwin Mart Configuration dialog.
ORA-12514 TNS listener does not currently know of service requested in connect descriptor
Symptom:
When I try to open the CA ERwin Mart Administrator page, I get the Application Internal Error. The Tomcat windows shows the following error message:
ORA-12514, TNS:listener does not currently know of service requested in connect
descriptor
Solution:
Use a fully qualified instance name when starting the Mart Server.

Troubleshooting
52 Release Notes
Mart already exists. Specify another database name
Symptom:
When I try to connect to the Mart, I get the following error message:
An earlier mart is already present in the database you are trying to initialize. This
process can not be continued. Please specify another database name to continue.
Solution:
You get this error when you connect to an old Mart that you have used for CA ERwin DM Release r7 series, r8 series, or Beta release of any r9 series release.
Create a database and provide its details in the Configure MartServer Details dialog.
Initialize page is not loading in Internet Explorer
Symptom:
When I type the URL to initialize my Mart in Internet Explorer, the Initialize Mart page is taking a long time to load.
Solution:
The Initialize Mart page does not load because the Active Scripting option in Internet Explorer is disabled.
To enable Active Scripting, follow these steps:
1. In Internet Explorer, click Tools, Internet Options.
2. In the Security tab, click the Custom Level button.
The Security Settings – Local Intranet Zone window opens.
3. From the list of options, locate Scripting, Active Scripting, and select Enable. Click OK.
4. Restart Internet Explorer and enter the URL to initialize Mart.
The Mart Initialize page opens.

Troubleshooting
Chapter 2: Install and Configure an Oracle Mart 53
The Tomcat server is not starting properly. The Configure button is disabled.
Symptom:
My administrator has given me the Administrator rights and when I start the Tomcat server, I get a series of errors. Also, I cannot click the Configure button in the configuration dialog because it is disabled.
Solution:
Right-click Start Server, and click Run as Administrator.
The Tomcat server starts without any error, and the configuration button is enabled.
A connection with the server could not be established
Symptom:
When I try to connect to the web server from CA ERwin Data Modeler, I get the following error message:
A connection with the server could not be established
Solution:
Verify that you have provided the correct port number and then reconnect to the web server.
The server name or address could not be resolved
Symptom:
When I try to connect to the web server from CA ERwin Data Modeler, I get the following error message:
The server name or address could not be resolved
Solution:
Verify that the server name where the web server is installed is correct and then reconnect to the server.
Note: If CA ERwin Data Modeler and the web server are installed on the same computer, you can give the server name as localhost. Suppose that CA ERwin Data Modeler and the web server are installed on different computers. The server name is the name of the computer where the web server is installed.

Troubleshooting
54 Release Notes
Invalid user ID or password
Symptom:
When I try to connect to the server, I get the following error message:
Invalid user ID or password. Please try again to login.
Solution:
Type the correct user name and password.
Note: The user must be an application level user and not a database user.
Error 12029
Symptom:
When I connect to the web server, I get the following error message:
Error 12029
Solution:
Restart the web server.
Unable to load the web page from my web browser
Symptom:
When I type the URL in Internet Explorer or Google Chrome to connect to the web server, I get the following error messages:
For Internet Explorer
Internet Explorer cannot display the webpage
For Google Chrome
Oops! Google Chrome could not connect to localhost:18170
Solution:
Restart the web server.

Troubleshooting
Chapter 2: Install and Configure an Oracle Mart 55
Test connection failed
Symptom:
When I use the Mart Upgrade utility on a 64-bit computer and upgrade a r7.3 through r8.2.9 Mart to r9.0.0 through r9.6.0 Mart, I get the following message:
Test connection failed
Solution:
CA ERwin DM is a 32-bit application. When you try to upgrade to r9.0.0 through r9.6.0 Mart on a 64-bit computer, the COM components do not work.
Follow these steps:
1. Paste the code included at the bottom of this topic to a Notepad file and name it as 64_Bit_Upgrade.reg. Note down the folder where you have created this file.

Troubleshooting
56 Release Notes
2. After installing CA ERwin DM version 9.0.0 through 9.6.0, right-click 64_Bit_Upgrade.reg and select Merge.
3. From the Windows Start menu, go to Run and type the following commands to re-register the EAL components:
regsvr32.exe "<Install Dir>\CA\ERwin Data Modeler r9\EAL.dll"
regsvr32.exe "<Install Dir>\CA\ERwin Data Modeler r9\
Upgrade\R8_Binaries\EAL.dll".
4. Right-click 64_Bit_Upgrade.reg and select Merge again.
You can now upgrade to version 9.0.0 through 9.6.0 Mart on a 64-bit computer.
64_Bit_Upgrade.reg
Copy the following code and paste it to a new Notepad file:
Windows Registry Editor Version 5.00
[HKEY_CLASSES_ROOT\Wow6432Node\CLSID\{9527D0BA-ED75-4b0e-BF4B-E35565DE9852}]
@="CA ERwin Data Modeler Script Client API"
"AppID"="{9527D0BA-ED75-4b0e-BF4B-E35565DE9852}"
[HKEY_CLASSES_ROOT\Wow6432Node\AppID\{9527D0BA-ED75-4b0e-BF4B-E35565DE9852}]
"DllSurrogate"=""
[HKEY_CLASSES_ROOT\Wow6432Node\CLSID\{40FDB0E6-D772-455d-B1C8-83CE79445403}]
@="CA ERwin Data Modeler Script Client API Property Bag"
"AppID"="{40FDB0E6-D772-455d-B1C8-83CE79445403}"
[HKEY_CLASSES_ROOT\Wow6432Node\AppID\{40FDB0E6-D772-455d-B1C8-83CE79445403}]
"DllSurrogate"=""
[HKEY_CLASSES_ROOT\Wow6432Node\CLSID\{6774E2C3-06E9-4943-A8D4-E3007AB1F42E}]
@="CA ERwin Data Modeler Script Client API"
"AppID"="{6774E2C3-06E9-4943-A8D4-E3007AB1F42E}"
[HKEY_CLASSES_ROOT\Wow6432Node\AppID\{6774E2C3-06E9-4943-A8D4-E3007AB1F42E}]
"DllSurrogate"=""
[HKEY_CLASSES_ROOT\Wow6432Node\CLSID\{7D7B1602-9832-4ac6-A224-F0092FAF0D7E}]
@="CA ERwin Data Modeler Script Client API Property Bag"
"APPID"="{7D7B1602-9832-4ac6-A224-F0092FAF0D7E}"

Troubleshooting
Chapter 2: Install and Configure an Oracle Mart 57
[HKEY_CLASSES_ROOT\Wow6432Node\AppID\{7D7B1602-9832-4ac6-A224-F0092FAF0D7E}]
"DllSurrogate"=""
[HKEY_LOCAL_MACHINE\SOFTWARE\Classes\AppID\{9527D0BA-ED75-4b0e-BF4B-E35565DE9852}
]
[HKEY_LOCAL_MACHINE\SOFTWARE\Classes\AppID\{40FDB0E6-D772-455d-B1C8-83CE79445403}
]
[HKEY_LOCAL_MACHINE\SOFTWARE\Classes\AppID\{6774E2C3-06E9-4943-A8D4-E3007AB1F42E}
]
[HKEY_LOCAL_MACHINE\SOFTWARE\Classes\AppID\{7D7B1602-9832-4ac6-A224-F0092FAF0D7E}
]
Internet Explorer Redirects to a Different Link
Symptom:
Suppose that I install CA ERwin Mart Server on a fresh machine. If I enable the SSL option and I invoke CA ERwin Mart Administrator, Internet Explorer redirects the page to res://ieframe.dll//.
Solution:
Internet Explorer versions 8 through 10 have a security enhancement that blocks the following types of sites:
■ Sites that have self-signed certificates
■ Sites that have self-signed certificates where the certificate does not match the URL
Follow any of these steps:
■ Install the certificate in the Trusted Root Certification Authorities store.
■ Add the site to trusted sites.
■ Set the Internet Explorer Security level to Medium Low.

Troubleshooting
58 Release Notes
I have a very long Windows user name and I cannot log in to the Mart through CA ERwin Data Modeler
Symptom:
I have added a very long Windows user name similar to "Magdalena.Chalamalasetti" using the Mart Administrator. When the user tries to log in to the Mart through CA ERwin Data Modeler, the name is truncated to "US\Magdalena.Chalamas" and the user cannot log in.
Solution:
The name is truncated due to a limitation with Windows. The Windows API returns the legacy user name that is limited to 20 characters. If the length of a user name exceeds 20 characters, for example, "US\Magdalena.Chalamalasetti", the name is displayed as "US\Magdalena.Chalamas" in the Connect to Mart dialog.
You can resolve this in one of the following ways:
■ Type the first 20 characters of the user name when you add the user as a Windows User, in the Mart Administrator. For example, instead of typing "US\Magdalena.Chalamalasetti", type "US\Magdalena.Chalamalas".
■ Use a Windows Group instead of the user's domain name. Using your Windows domain controller software, add the user to a Windows Group, and then add the group as a User Group in the Mart Administrator. For more information about how to add a User Group, see CA ERwin Data Modeler r9 Workgroup Edition: Support for Directory Services video.

Chapter 3: Install and Configure a SQL Server Mart 59
Chapter 3: Install and Configure a SQL Server Mart
This section describes how you can install and configure a Mart on a SQL Server database.
This section contains the following topics:
How to Install and Configure a SQL Server Mart (see page 60) How to Upgrade any r9 Series Mart to the Current Version (see page 76) Change the Mart Database Server (see page 83) Troubleshooting (see page 83)

How to Install and Configure a SQL Server Mart
60 Release Notes
How to Install and Configure a SQL Server Mart
In the previous versions, CA ERwin Data Modeler connected to the Mart server directly. Now, CA ERwin Data Modeler connects to the Mart server through a web server.
The Mart comprises the following components:
Database
Stores the user data for the Workgroup Edition. You can use a Microsoft SQL Server 2005, 2008, 2012, or 2014 database for the Mart database. You must use a new database and not an existing database that was created for an older version of the data modeling tool.
Note: CA ERwin Data Modeler does not support creating a database in a Server Cluster environment.
Applications
Includes a web-based component named CA ERwin Mart Administrator that helps you manage the Mart through a web console.
Web server
Hosts CA ERwin Mart Administrator. You can use a web server of your choice. If you have not installed a web server, use the ERwin Mart Server option and install Tomcat.
If you are using the Workgroup Edition, you must install and configure CA ERwin Mart Administrator.
The following diagram illustrates how to install and configure a Mart:

How to Install and Configure a SQL Server Mart
Chapter 3: Install and Configure a SQL Server Mart 61
Complete the following steps in the same order to install and configure the Mart:
1. Review the prerequisites for a SQL Server Mart (see page 64).
2. Create a SQL Server Database (see page 67).
3. Install CA ERwin Mart Server. (see page 68)
4. Use MartServer as a Windows Service.
5. Initialize a SQL Server Mart. (see page 74)
6. Log in to CA ERwin Mart Administrator and configure settings.

How to Install and Configure a SQL Server Mart
62 Release Notes
Mart Architecture
In the previous versions, CA ERwin DM connected to the Mart database through the database client software. Now, the application connects to the Mart database through a web server. The database client software is no longer required. The web server includes a web-based administration console—CA ERwin Mart Administrator. If you are using the Workgroup Edition, you must install and configure CA ERwin Mart Administrator.
Database
Stores the user data for the Workgroup Edition. You can use a Microsoft SQL Server 2005, 2008, 2012, or 2014 database for the Mart database. You must use a new database and not an existing database that was created for an older version of the data modeling tool.
Applications
Includes a web-based component named CA ERwin Mart Administrator that helps you manage the Mart through a web console.
Web server
Hosts CA ERwin Mart Administrator. You can use a web server of your choice. If you have not installed a web server, use the ERwin Mart Server option and install Tomcat.
The following diagram shows the new architecture:

How to Install and Configure a SQL Server Mart
Chapter 3: Install and Configure a SQL Server Mart 63
The new architecture has the following benefits:
■ Separate logical and physical users: In the previous versions, Mart (or Model Manager) users required database level privileges to access the Mart functionality. The Mart database administrators added or deleted users in the Mart database. This approach is changed now. The logical users are separated from physical users, so Mart Administrators can create the Mart users without creating the corresponding database users.
■ Authentication through Active Directory services: Earlier, if you wanted to provide access to a user group, you added each user individually. Now, because of the new architecture, you can use the Active Directory services and can provide access to the group. Anyone who is part of the group gets access.
■ Mart administration outside CA ERwin Data Modeler: In the previous versions, Mart Administrators used CA ERwin Data Modeler for administrative activities such as managing permissions. This required non-modelers to know how to use CA ERwin Data Modeler. In the new architecture, the administration component is built on a separate layer on top of CA ERwin Data Modeler and is hosted on a web server. Mart Administrators can access CA ERwin Web Admin from any computer and can perform administrative activities through a web console.
Install a Mart or Upgrade a Mart?
Use the following guidelines to determine if you must install a Mart or upgrade a Mart:
■ If you are new to CA ERwin Data Modeler and have purchased the current version of Workgroup Edition, then install the current version of the Mart. Use the How to Install and Configure a Mart procedure that is appropriate for your Mart database.
■ If you have any earlier release of r9 series Mart, then upgrade the Mart to the current version. Use the How to Upgrade any r9 Series Mart to the Current Version procedure to upgrade your Mart. The models that are created in any earlier release of r9 series are upgraded when a user connects to the current version Mart and opens the models.
■ If you have an existing Mart and the version is r7.3 through r8.2.9, install the current version Mart. Use the How to Install and Configure a Mart procedure that is appropriate for your Mart database. After installing the Mart, use the Upgrade Mart utility to upgrade the Mart models from r7.3 through r8.2.9 to the current version.
How to Install and Configure a SQL Server Mart
64 Release Notes
Review the Prerequisites for a SQL Server Mart
Before you install the Mart components, help ensure that the minimum system requirements that are outlined in this topic are met.
You can use any of the following combinations to install CA ERwin Data Modeler, the Mart database, and the MartServer application:
■ Install CA ERwin Data Modeler, the Mart database, and the MartServer application on the same computer.
■ Install CA ERwin Data Modeler, the Mart database, and the MartServer application on different computers.
■ Install CA ERwin Data Modeler and the Mart database on one computer, and install the MartServer application on a different computer.
■ Install CA ERwin Data Modeler on one computer, and install the Mart database and the MartServer application on a different computer.
Help ensure that you always install the MartServer application on the Windows operating system.
System requirements to install the MartServer application
Hardware requirements (based on physical hardware performance, not a virtual environment):
■ 2 GHZ or higher dual core processor
■ 4 GB RAM (8 GB or more for large marts)
■ 4 GB of disk space or more as required to support your specific mart

How to Install and Configure a SQL Server Mart
Chapter 3: Install and Configure a SQL Server Mart 65
Operating system:
■ Microsoft Windows Vista
■ Microsoft Windows Server 2008 SP2
■ Microsoft Windows Server 2003 SP2
■ Microsoft Windows 7
■ Microsoft Windows 8
■ Microsoft Windows 2012
■ Microsoft Windows XP SP3: As Microsoft has dropped support for Windows XP, CA ERwin Data Modeler will no longer be tested for compatibility with that operating environment. Should you encounter any problem(s) using CA ERwin Data Modeler you should first verify that the problem(s) encountered are not related to an unsupported operating environment before reporting the problem(s) to CA.
Note: CA ERwin Data Modeler is a 32-bit application and is fully compatible with 64-bit operating systems, except for the following known issues:
■ 64-bit database drivers and clients will not work with the application. The workaround is to use 32-bit database drivers and clients in the 64-bit operating system environment.
■ Running the CA ERwin API in a 64-bit environment requires some changes to the workstation registry. For more information about changing the registry, see the CA ERwin Data Modeler WE Implementation and Administration Guide.
■ Microsoft .NET Framework 3.5
■ All current Microsoft Windows critical updates are applied
Database:
■ The Mart Server can use a standalone or can share an existing database server for a Microsoft SQL Server 2005, 2008, 2012, or 2014 database.
■ The SQL Server 2005, 2008, 2012, and 2014 TRUSTWORTHY database property is no longer required for the mart. After you install this product, you can optionally reset this property to OFF.
■ The database user account that is used to configure the Mart must have the dba_owner role assigned.
■ (Optional) To use the Korean language, use the Korean_wansung_CI_AS character set. Select the character set while creating the Mart database (in the Collation field). For more information, see the SQL Server documentation.
CA ERwin Mart Administrator web client:
■ Supported browsers:
– Microsoft Internet Explorer 8® or newer
– Mozilla Firefox® v.9.0 or newer

How to Install and Configure a SQL Server Mart
66 Release Notes
– Google Chrome 14 or newer
– Apple Safari 5 or newer
■ Adobe Flash plug-in version 8 or newer for the respective browser
Other requirements
Help ensure that the following additional requirements are met:
■ If you want to use Microsoft IIS as the web server, you have configured it.
■ The DBMS is installed and prepared for creating the Mart Database.
■ The Mart database is created. At least one user with administrator privileges is present.
■ If you want to add Windows Group users as Mart users, you have the Active Directory Server details.
Note: You can add Windows Group users as normal Mart users, but not the Mart administrator. A Mart administrator must be a database-authenticated user.
Important disclaimer notice on all requirements
1. The requirements that are mentioned previously define the minimum requirements which permit the application to run with reasonable performance based on a small business use case scenario. The actual requirements for an enterprise-wide use case based on larger models and configurations require significantly greater resources to obtain acceptable performance.
2. These requirements are based on actual physical hardware (no virtual environment) and the following assumptions:
■ Minimal to no network overhead (both the database and application servers are locally installed)
■ Vendor's default install of the current version of their software (with all current service or fix packs)
■ No other applications sharing the defined hardware configuration (for example, a “clean” machine)
Any other hardware/software configurations are acceptable as long as they provide the same (or better) performance characteristics identified.

How to Install and Configure a SQL Server Mart
Chapter 3: Install and Configure a SQL Server Mart 67
Create a SQL Server Database
The following tasks must be performed by the DBA and system administrator responsible for installing CA ERwin Data Modeler Workgroup Edition on a Microsoft SQL Server DBMS:
1. Use a graphical user interface (GUI) tool, ISQL (all versions), SQL Administrator, or Enterprise Manager to create the CA ERwin Data Modeler Workgroup Edition database. If a GUI tool is not available, you can use ISQL to type in the appropriate commands manually.
Note: CA ERwin Data Modeler does not support creating a database in a Server Cluster environment.
Your database should meet the following criteria:
■ The initial size of the database file should be set to 60 MB.
■ The initial size of the transaction log file should be set to 50 MB.
■ Set the maximum file size to unrestricted file growth for both files (recommended, but not required).
■ Increase the Set Auto grow file by 10 percent (recommended, but not required).
The new database is owned by the user who created it.
Set the Truncate Log on Checkpoint option and have the server generate checkpoints frequently. By selecting this option, the log is emptied periodically and should not fill up and cause rollbacks.
Note: For best performance ensure that separate devices are used to store the data and the transaction log.
2. Verify tempdb size.
Significant temporary space is required for installation and use. The temporary segments need at least 16 MB of available space. You should also increase available space as the number of concurrent users increase.
Microsoft SQL Server 2005 Permissions
For a SQL Server 2005 Mart, you must have the bulkadmin permission designated. The ability to do bulk inserts (which the public permission permitted previously) is no longer part of the public permission. As the administrator, you explicitly define this permission. Assign the bulkadmin permission to the physical user that connects to the database. If you do not define the permission, when you create a mart using a SQL Server 2005 database, and save it, an error appears.

How to Install and Configure a SQL Server Mart
68 Release Notes
Specify Use of Foreign Characters With Microsoft SQL Server 2005
For Microsoft SQL Server 2005, 2008, and 2012, modify your registry settings to have certain foreign language characters in your models recognized.
Follow these steps:
1. Click Run on the Start menu.
2. Enter regedit.
The Registry Editor opens.
3. Verify or add the following registry entry:
[HKEY_LOCAL_MACHINE\SOFTWARE\Microsoft\MSSQLServer\Client\DB-Lib]
"AutoAnsiToOem"="ON"
"UseIntlSettings"="ON"
4. Click File, Exit.
Your configuration is set to recognize foreign language characters in your models.
Install CA ERwin Mart Server
The Mart Server and Mart Admin war files are deployed on a Web server. You can either use an existing web server, or install the web server through the CA ERwin MartServer r9.6 Installation Wizard. You must install CA ERwin Mart Server and configure it regardless of whether you use Mart Server as a Windows service.
Note: Ensure that you have reviewed the Install a Mart or Upgrade a Mart topic before proceeding.
Follow these steps:
1. Do one of the following tasks:
■ Insert the installation DVD and select Mart Server Installation.
■ Download the CAEDMMS96.exe file from the online CA Technologies product page and run it.
The CA ERwin MartServer r9.6 Installation Wizard appears.

How to Install and Configure a SQL Server Mart
Chapter 3: Install and Configure a SQL Server Mart 69
2. Go through the wizard steps to install CA ERwin Mart Server.
Depending on the options you select, CA ERwin Mart Server and/or Java Runtime Environment (JRE) and Tomcat are installed.
Note: If Java (any version) is already available in the computer and the environment variable JRE_HOME is set, the installer overwrites JRE_HOME with the new Java path. The JRE version that is shipped with the installer is 1.8. If a Tomcat web server is already installed in the computer and the environment variable CATALINA_HOME is set, the installer replaces CATALINA_HOME with the new path.
3. From the Windows Start menu, click All Programs, CA, ERwin, ERwin Mart Server r9.6, Configure MartServer.
The CA ERwin Mart Configuration dialog appears.
Configure the CA ERwin Mart Server
1. Complete the following fields in the Mart Server tab:
Database Type
Specifies the database server type.
Port No.
Specifies the port number of the database server.
Server Name
Specifies the name of the database server where you have installed the Mart database. For example, suppose that you are using SQL Server 2008 as the Mart database. Enter the name of the computer where SQL Server 2008 is installed.
Instance Name
Specifies the name of the database instance.
Database Name
Specifies the name of the Mart database.
Note: If you are installing the Mart for the first time, use a new database. Do not use an existing database that was created for r7.3 through r8.2.9 Mart. If you are upgrading the Mart from any earlier release of r9 series to the latest release, use the corresponding Mart database.
User Name
Specifies the user name to connect to the Mart database. Enter the name of a user that is authenticated by the Mart database.

How to Install and Configure a SQL Server Mart
70 Release Notes
Password
Specifies the password to connect to the Mart database.
Note: The following fields--Domain Controller Name, Domain/User Name, and Password are required only if you are using the Active Directory authentication. You can use the Active Directory authentication to initialize the Mart and to log in to CA ERwin Mart Administrator.
Domain Controller Name
Specifies the fully qualified name of the Active Directory Server (Domain Controller). Enter the name in the following format:
LDAP://server/distinguished-name
Example: ldap://mktgna:3268/dc=abc, dc=com
Here, mktgna is the server name. You can provide either the name of the server or the IP address. 3268 is the port number to which the server listens.
dc=abc, dc=com is the distinguished-name. The distinguished name is the full path of the object.
Note: If you do not know the Domain Controller Name, use the Nltest command or talk to your System Administrator.
Domain/User Name
Specifies the domain name and user name in the <domain name>/<user name> format.
Password
Specifies the password of the domain user.
Configure CA ERwin Mart Administrator
1. Enter the following information in the Mart Administrator tab:
Server Name
Specifies the name of the computer where the Web Server is present. For example, if you are using Tomcat, enter the name of the computer where Tomcat is installed.
Default: localhost
Port Number
Specifies the port number on which the Web Server is running.
Default: 18170

How to Install and Configure a SQL Server Mart
Chapter 3: Install and Configure a SQL Server Mart 71
Application Name
Specifies the application name with which the Web Server is identified.
Default: MartServer
Transport Layer Security
Specifies if you want to connect to the Mart through a secured connection (SSL). Select this check box if you have implemented SSL.
Hosting Server
Specifies that you want to use the IIS web server to connect to the Mart. Select this check box only if you have configured IIS.
2. Click Configure.
The CA ERwin Mart Administrator and the Mart Server are configured.
More information:
Configure IIS Web Server (see page 127) Implement SSL for IIS (see page 129)

How to Install and Configure a SQL Server Mart
72 Release Notes
Enable SSL for Tomcat
SSL enables you to access the Mart through a secured connection. You can enable SSL for Tomcat--the default web server, regardless of whether you are installing the Mart for the first time, or you are upgrading it from any earlier release of r9 series.
Follow these steps:
1. If the Mart Server service is running, stop it. From the Windows Start menu, click All Programs, CA, ERwin, ERwin Mart Server r9.6, Stop MartServer Service to stop the web server.
2. From the Windows Start menu, click All Programs, CA, ERwin, ERwin Mart Server r9.6, Enable SSL for Tomcat Webserver.
SSL is enabled for Tomcat and a security certificate is created. You must install this security certificate on all the computers from where you want to access the Mart.
3. From the Windows Start menu, click All Programs, CA, ERwin, ERwin Mart Server r9.6, Configure MartServer.
The CA ERwin Mart Configuration dialog appears.
4. Go to the Mart Administrator tab and select the Transport Layer Security check box.
5. From the Windows Start menu, click All Programs, CA, ERwin, ERwin Mart Server r9.6, Start Mart Server Service.
6. From the Windows Start menu, click All Programs, CA, ERwin, ERwin Mart Server r9.6, CA ERwin Mart Administrator r9.6.
The CA ERwin Mart Administrator home page appears and displays HTTPS in the address bar. If a certificate error appears, click Proceed Anyway to begin the session.
Important! If you want to connect to an SSL enabled Mart through API or the Mart Upgrade utility, you must first install the security certificate on the corresponding computer. Install the certificate through the data modeling tool. If you do not install the security certificate, the Mart Upgrade utility and the API will not be able to connect to the SSL enabled Mart.
Disable SSL and Access the Mart Through a Normal Connection
You can disable SSL at any time and access the Mart through a normal connection.
Follow these steps:
1. If the Mart Server Service is running, stop it. From the Windows Start menu, click All Programs, CA, ERwin, ERwin Mart Server r9.6, Stop Mart Server Service.
2. From the Windows Start menu, click All Programs, CA, ERwin, ERwin Mart Server r9.6, Disable SSL.
3. From the Windows Start menu, click All Programs, CA, ERwin, ERwin Mart Server r9.6, Configure MartServer.

How to Install and Configure a SQL Server Mart
Chapter 3: Install and Configure a SQL Server Mart 73
The CA ERwin Mart Configuration dialog appears.
4. Go to the Mart Administrator tab and clear the Transport Layer Security check box.
5. From the Windows Start menu, click All Programs, CA, ERwin, ERwin Mart Server r9.6, Start Mart Server Service.
6. From the Windows Start menu, click All Programs, CA, ERwin, ERwin Mart Server r9.6, CA ERwin Mart Administrator r9.6.
The CA ERwin Mart Administrator home page appears and displays HTTP in the address bar.
Use Mart Server as a Windows Service
The current version of the Mart provides two ways to start the web server that hosts Mart Server:
■ Start the web server manually.
■ Use a Windows service to start the web server.
For example, if you have used Tomcat as the web server to host Mart Server, you can start Tomcat in two ways:
■ Start Tomcat through the startup.bat file or through a shortcut to this file.
■ Use a Windows service to start Tomcat.
The benefits of using a Windows service to start a web server are as follows:
■ Any user with administrative privileges on a computer can start the Windows service, whereas, only designated users can start a web server manually.
■ A Windows service runs regardless of whether a user has logged in. A manually-started web server shuts down when the user who started it logs out.
Follow these steps:
1. From the Windows Start menu, click All Programs, CA, ERwin, ERwin Mart Server r9.6, Create MartServer Service to create the MartServer Windows service.
Creating the service is a one-time task. After the service is created, you only have to start and stop the service.
2. From the Windows Start menu, click All Programs, CA, ERwin, ERwin Mart Server r9.6, Start MartServer Service to start the web server.

How to Install and Configure a SQL Server Mart
74 Release Notes
Initialize a SQL Server Mart
When you access the Mart database through CA ERwin Mart Administrator for the first time, you must initialize the database. You can initialize the database using a database authenticated user or a Windows authenticated user.
Note: Before you proceed, verify that you have installed a DBMS, created the Mart database and run the initial queries. If the Mart is already initialized, the Login page appears.
Follow these steps:
1. If you are using MartServer as a Windows service, help ensure that the service is started. If not, from the Windows Start menu, click All Programs, CA, ERwin, ERwin Mart Server r9.6, Start Mart Server to start the Mart Server.
A Windows command prompt window appears and indicates when the server starts.
2. From the Windows Start menu, click All Programs, CA, ERwin, ERwin Mart Server r9.6, CA ERwin Mart Administrator r9.6.
CA ERwin Mart Administrator opens in your default browser.
3. Complete the following fields:
Username
Defines the user name with which you want to access the Mart. If you are using a Windows-authenticated user, enter the name in the <domain name>/<user name> format.
Password
Defines the password for the user name.
Confirm Password
Confirms the password that you entered in the previous field.
Email Address
Defines the email address for the user account that you are creating.
4. Click Initialize.
The user name is added as an administrator of Mart, Mart is initialized, and the Login web page appears. Initializing is a one-time task. After Mart is initialized, the user who initialized must log in first. Later, any other user who wants to use CA ERwin Mart Administrator can log in.
Note: The user name that is entered here is an application level user and not a database user. Remember the password that you have entered here, because without the password you cannot log in to CA ERwin Mart Administrator for the first time.

How to Install and Configure a SQL Server Mart
Chapter 3: Install and Configure a SQL Server Mart 75
Log In to CA ERwin Mart Administrator and Configure Settings
After the Mart is initialized, the user who initialized must log in first. When you log in to Mart for the first time, configure it per the requirements of your organization. You can configure the following settings:
■ Default profile for the model creator
■ Use default password
■ Email notification
Follow these steps:
1. From the Windows Start menu, click All Programs, CA, ERwin, ERwin Mart Server r9.6, CA ERwin Mart Administrator r9.6.
The CA ERwin Mart Administrator home page appears. If you have implemented SSL, HTTPS appears in the address bar.
2. Use the credentials with which you initialized the Mart and log in.
3. Click Settings.
4. Complete the following fields:
Default profile for model creator
Specifies the profile that is assigned to a user on a model. This profile is assigned whenever a user creates a model and saves it to Mart for the first time. The user inherits the permissions of the default profile selected here on the model that is saved. For example, suppose that User1 is assigned with Modeler profile and the System Administrator selects Architect as the default profile for model creator. If User1 creates Model1 and saves it to Mart, for Model1, User1 inherits the permissions of Architect. Now, suppose that the System Administrator selects Viewer as the default profile for model creator, and suppose that User1 creates Model2 and saves it to Mart. For Model2, User1 inherits the permissions of Viewer.
Use Default Password
Specifies the default password that you want to use for new users and for resetting passwords, in the absence of an SMTP server for emails.
Note: Select this option only if you do not have an SMTP server that is configured for emails.
SMTP host name
Specifies the name of the SMTP host. Enter the name in the mail.domain.com format. Notification emails are sent from this server.
Port number
Specifies the port number of the SMTP server. The default port number is 25. If your company is using an alternate port number for the mail server, specify that port number.

How to Upgrade any r9 Series Mart to the Current Version
76 Release Notes
Authenticate
Specifies whether transactions with the SMTP server are authenticated. Select the check box to authenticate.
User name
Specifies the user name to authenticate the SMTP server. Select the Authenticate check box to enable authentication.
Password
Specifies the password to authenticate the SMTP server. Select the Authenticate check box to enable authentication.
Administrator email
Specifies the email ID of the Mart administrator. Notifications to Mart users are sent from this ID.
No-reply email from
Specifies the email ID from which administrative emails such as the password reset email are sent.
5. Click Save.
Mart options are configured.
You have installed and configured CA ERwin DM Mart.
How to Upgrade any r9 Series Mart to the Current Version
If you are using any earlier release of r9 series and you want to upgrade it to the latest release, upgrade the Mart Server and the Mart database. The Mart server program is upgraded, so you must implement the upgraded software.
Important! The current Mart is designed to work with only the current version of CA ERwin Data Modeler. If you try to connect the current Mart with an older version CA ERwin Data Modeler such as r9.0.0, it may corrupt the Mart and cause unexpected behavior.

How to Upgrade any r9 Series Mart to the Current Version
Chapter 3: Install and Configure a SQL Server Mart 77
The following diagram illustrates how System Administrators can upgrade a Mart from any earlier release of r9 series to the latest release:
Complete the following tasks to upgrade a Mart of any earlier release of r9 series to the latest release:
1. Review the prerequisites. (see page 43)
2. Upgrade the Mart Server (see page 44).
3. Configure the Mart Server (see page 44).
4. Restart the Mart Server service. (see page 47)
5. Log In to CA ERwin Web Admin (see page 48).
Review the Prerequisites
Review the following prerequisites before you start the upgrade process:
If the Mart database is an Oracle database, the default tablespaces that were used for initializing the any earlier release of r9 series Mart are available for the latest release.

How to Upgrade any r9 Series Mart to the Current Version
78 Release Notes
Upgrade the Mart Server
If you are upgrading a Mart from any earlier release of r9 series to the latest release, upgrade the Mart Server.
Note: See the Install a Mart or Upgrade a Mart topic before proceeding.
Follow these steps:
1. If you are running MartServer as a Windows service, stop the service.
Note: If you upgrade the Mart Server without stopping the service, Mart Server may not start after you complete the upgrade process.
2. Download and run the CAEDMMS96.exe file from the CA Support site.
The CA ERwin Mart Server r9.6.0 Install Shield Wizard dialog appears.
3. Follow the wizard.
The Mart Server is upgraded.
4. Restart your computer.
Configure the Mart Server
To connect to the latest Mart, you must configure the Mart Server. Use the same database that you have used for the r9.0.0 Mart (or any earlier release of r9 series Mart).
Note: See the Upgrade Considerations topic before proceeding.

How to Upgrade any r9 Series Mart to the Current Version
Chapter 3: Install and Configure a SQL Server Mart 79
Follow these steps:
1. From the Windows Start menu, click All Programs, CA, ERwin, ERwin Mart Server r9.6, Configure MartServer.
The CA ERwin Mart Configuration dialog appears.
Configure the CA ERwin Mart Server
1. Complete the following fields in the Mart Server tab:
Database Type
Specifies the database server type.
Port No.
Specifies the port number of the database server.
Server Name
Specifies the name of the database server where you have installed the Mart database. For example, suppose that you are using SQL Server 2008 as the Mart database. Enter the name of the computer where SQL Server 2008 is installed.
Instance Name
Specifies the name of the database instance.
Database Name
Specifies the name of the Mart database.
Note: If you are installing the Mart for the first time, use a new database. Do not use an existing database that was created for r7.3 through r8.2.9 Mart. If you are upgrading the Mart from any earlier release of r9 series to the latest release, use the corresponding Mart database.
User Name
Specifies the user name to connect to the Mart database. Enter the name of a user that is authenticated by the Mart database.

How to Upgrade any r9 Series Mart to the Current Version
80 Release Notes
Password
Specifies the password to connect to the Mart database.
Note: The following fields--Domain Controller Name, Domain/User Name, and Password are required only if you are using the Active Directory authentication. You can use the Active Directory authentication to initialize the Mart and to log in to CA ERwin Mart Administrator.
Domain Controller Name
Specifies the fully qualified name of the Active Directory Server (Domain Controller). Enter the name in the following format:
LDAP://server/distinguished-name
Example: ldap://mktgna:3268/dc=abc, dc=com
Here, mktgna is the server name. You can provide either the name of the server or the IP address. 3268 is the port number to which the server listens.
dc=abc, dc=com is the distinguished-name. The distinguished name is the full path of the object.
Note: If you do not know the Domain Controller Name, use the Nltest command or talk to your System Administrator.
Domain/User Name
Specifies the domain name and user name in the <domain name>/<user name> format.
Password
Specifies the password of the domain user.
Configure CA ERwin Mart Administrator
1. Enter the following information in the Mart Administrator tab:
Server Name
Specifies the name of the computer where the Web Server is present. For example, if you are using Tomcat, enter the name of the computer where Tomcat is installed.
Default: localhost
Port Number
Specifies the port number on which the Web Server is running.
Default: 18170

How to Upgrade any r9 Series Mart to the Current Version
Chapter 3: Install and Configure a SQL Server Mart 81
Application Name
Specifies the application name with which the Web Server is identified.
Default: MartServer
Transport Layer Security
Specifies if you want to connect to the Mart through a secured connection (SSL). Select this check box if you have implemented SSL.
Hosting Server
Specifies that you want to use the IIS web server to connect to the Mart. Select this check box only if you have configured IIS.
2. Click Configure.
The CA ERwin Mart Administrator and the Mart Server are configured.
Restart the Mart Server Service
When you modify the details of the Mart Server and Mart Administration programs, restart the Mart Server service.
Follow these steps:
1. From the Windows Start menu, click All Programs, CA, ERwin, ERwin Mart Server r9.6, Stop MartServer Service to stop the Mart Server service.
2. From the Windows Start menu, click All Programs, CA, ERwin, ERwin Mart Server r9.6, Start MartServer Service to start the Mart Server service.

How to Upgrade any r9 Series Mart to the Current Version
82 Release Notes
Log In to CA ERwin Mart Administrator
Log in to CA ERwin Mart Administrator to verify if you have successfully upgraded the Mart Server from any earlier release of r9 series to the latest release.
Follow these steps:
1. From the Windows Start menu, click All Programs, CA, ERwin, ERwin Mart Server r9.6, CA ERwin Mart Administrator r9.6.
The CA ERwin Mart Administrator log in page appears. If you have implemented SSL, HTTPS appears in the address bar.
2. Use the credentials with which you initialized the Mart and log in.
The CA ERwin Mart Administrator home page appears.
The models that are created in any earlier release of r9 series are upgraded when a user connects to the latest release Mart and opens the models.

Change the Mart Database Server
Chapter 3: Install and Configure a SQL Server Mart 83
Change the Mart Database Server
Sometimes, you may change the server on which the Mart database is installed, or you may restore the Mart database with a new name. When there is a change the server name or database name, reconfigure the MartServer.
Follow these steps:
1. Back up your Mart database.
2. Restore the database on the designated server.
3. If you use the same computer for Mart Server and restore the database in a different name, include the new database name in the CA ERwin Mart Configuration dialog.
From the Windows Start menu, open the CA ERwin Mart Configuration dialog. In the Mart Server tab, Database Name field, enter the new name with which the database is restored. Enter the current user name and password to access the database. If wrong information is provided here, you may be able to install the Mart, but you cannot log in and cannot use it.
4. If you use a different computer for Mart Server and restore the database in the same name, install the Mart Server on the new computer.
Use the Install CA ERwin Mart Server procedure and install the Mart Server. In the Mart Server tab, Server Name field, enter the name of the new server where the database is restored. Enter the current user name and password to access the database. If wrong information is provided here, you may be able to install the Mart, but you cannot log in and cannot use it.
5. Stop the MartServer service and start it again.
6. From the Windows Start menu, click All Programs, CA, ERwin, ERwin Mart Server r9.6, CA ERwin Mart Administrator r9.6.
Enter the credentials of the Mart administrator and log in.
Troubleshooting
This section explains the errors that you can encounter while installing and configuring Mart, and how you can troubleshoot them.
Note: The Mart Server log files are available in the following location:
Windows XP: {user.home}/Local Settings/Application Data/CA/ERwin Mart
Server/logs/application.log
Windows 7: {user.home}/AppData/Local/CA/ERwin Mart Server/logs/application.log
Troubleshooting
84 Release Notes
Port out of range
Symptom:
Whenever I connect to the web server, I get the following error message:
java.lang.IllegalArgumentException: port out of range 80821.
Solution:
Type the correct port number in the Configure CA ERwin Mart Administrator’s Server dialog and then restart your web server.
Call failed on the server
Symptom:
When I try to connect to the Mart server, I get the following error:
500 The call failed on the server; see server log for details
Solution:
The probable reasons for this error could be one of the following reasons:
■ The server name is not correct.
■ The application name is not correct. By default, the application name is MartServer and it is case-sensitive.
Type the correct server name and application name in the CA ERwin Mart Administrator’s Server dialog and the Configure MartServer Details dialog. Restart the web server.

Troubleshooting
Chapter 3: Install and Configure a SQL Server Mart 85
Application Internal Error
Symptom:
When I try to connect to the database, I get the following error:
Application Internal Error
Solution
You get this error when the MartServer application is unable to connect to the required database. The following reasons are probable for this error:
■ The database details that are provided in the Configure MartServer Details dialog are incorrect.
■ The username and the password for the database are incorrect.
■ The database is not present.
■ The port number for the database is incorrect.
■ The network is down.
Ensure that you enter the correct details of your database in the Mart Server tab of the CA ERwin Mart Configuration dialog.
Mart already exists. Specify another database name
Symptom:
When I try to connect to the Mart, I get the following error message:
An earlier mart is already present in the database you are trying to initialize. This
process can not be continued. Please specify another database name to continue.
Solution:
You get this error when you connect to an old Mart that you have used for CA ERwin DM Release r7 series, r8 series, or Beta release of any r9 series release.
Create a database and provide its details in the Configure MartServer Details dialog.

Troubleshooting
86 Release Notes
Initialize page is not loading in Internet Explorer
Symptom:
When I type the URL to initialize my Mart in Internet Explorer, the Initialize Mart page is taking a long time to load.
Solution:
The Initialize Mart page does not load because the Active Scripting option in Internet Explorer is disabled.
To enable Active Scripting, follow these steps:
1. In Internet Explorer, click Tools, Internet Options.
2. In the Security tab, click the Custom Level button.
The Security Settings – Local Intranet Zone window opens.
3. From the list of options, locate Scripting, Active Scripting, and select Enable. Click OK.
4. Restart Internet Explorer and enter the URL to initialize Mart.
The Mart Initialize page opens.
The Tomcat server is not starting properly. The Configure button is disabled.
Symptom:
My administrator has given me the Administrator rights and when I start the Tomcat server, I get a series of errors. Also, I cannot click the Configure button in the configuration dialog because it is disabled.
Solution:
Right-click Start Server, and click Run as Administrator.
The Tomcat server starts without any error, and the configuration button is enabled.

Troubleshooting
Chapter 3: Install and Configure a SQL Server Mart 87
A connection with the server could not be established
Symptom:
When I try to connect to the web server from CA ERwin Data Modeler, I get the following error message:
A connection with the server could not be established
Solution:
Verify that you have provided the correct port number and then reconnect to the web server.
The server name or address could not be resolved
Symptom:
When I try to connect to the web server from CA ERwin Data Modeler, I get the following error message:
The server name or address could not be resolved
Solution:
Verify that the server name where the web server is installed is correct and then reconnect to the server.
Note: If CA ERwin Data Modeler and the web server are installed on the same computer, you can give the server name as localhost. Suppose that CA ERwin Data Modeler and the web server are installed on different computers. The server name is the name of the computer where the web server is installed.
Invalid user ID or password
Symptom:
When I try to connect to the server, I get the following error message:
Invalid user ID or password. Please try again to login.
Solution:
Type the correct user name and password.
Note: The user must be an application level user and not a database user.

Troubleshooting
88 Release Notes
Error 12029
Symptom:
When I connect to the web server, I get the following error message:
Error 12029
Solution:
Restart the web server.
Unable to load the web page from my web browser
Symptom:
When I type the URL in Internet Explorer or Google Chrome to connect to the web server, I get the following error messages:
For Internet Explorer
Internet Explorer cannot display the webpage
For Google Chrome
Oops! Google Chrome could not connect to localhost:18170
Solution:
Restart the web server.
Test connection failed
Symptom:
When I use the Mart Upgrade utility on a 64-bit computer and upgrade a r7.3 through r8.2.9 Mart to r9.0.0 through r9.6.0 Mart, I get the following message:
Test connection failed
Solution:
CA ERwin DM is a 32-bit application. When you try to upgrade to r9.0.0 through r9.6.0 Mart on a 64-bit computer, the COM components do not work.
Follow these steps:
1. Paste the code included at the bottom of this topic to a Notepad file and name it as 64_Bit_Upgrade.reg. Note down the folder where you have created this file.

Troubleshooting
Chapter 3: Install and Configure a SQL Server Mart 89
2. After installing CA ERwin DM version 9.0.0 through 9.6.0, right-click 64_Bit_Upgrade.reg and select Merge.
3. From the Windows Start menu, go to Run and type the following commands to re-register the EAL components:
regsvr32.exe "<Install Dir>\CA\ERwin Data Modeler r9\EAL.dll"
regsvr32.exe "<Install Dir>\CA\ERwin Data Modeler r9\
Upgrade\R8_Binaries\EAL.dll".
4. Right-click 64_Bit_Upgrade.reg and select Merge again.
You can now upgrade to version 9.0.0 through 9.6.0 Mart on a 64-bit computer.
64_Bit_Upgrade.reg
Copy the following code and paste it to a new Notepad file:
Windows Registry Editor Version 5.00
[HKEY_CLASSES_ROOT\Wow6432Node\CLSID\{9527D0BA-ED75-4b0e-BF4B-E35565DE9852}]
@="CA ERwin Data Modeler Script Client API"
"AppID"="{9527D0BA-ED75-4b0e-BF4B-E35565DE9852}"
[HKEY_CLASSES_ROOT\Wow6432Node\AppID\{9527D0BA-ED75-4b0e-BF4B-E35565DE9852}]
"DllSurrogate"=""
[HKEY_CLASSES_ROOT\Wow6432Node\CLSID\{40FDB0E6-D772-455d-B1C8-83CE79445403}]
@="CA ERwin Data Modeler Script Client API Property Bag"
"AppID"="{40FDB0E6-D772-455d-B1C8-83CE79445403}"
[HKEY_CLASSES_ROOT\Wow6432Node\AppID\{40FDB0E6-D772-455d-B1C8-83CE79445403}]
"DllSurrogate"=""
[HKEY_CLASSES_ROOT\Wow6432Node\CLSID\{6774E2C3-06E9-4943-A8D4-E3007AB1F42E}]
@="CA ERwin Data Modeler Script Client API"
"AppID"="{6774E2C3-06E9-4943-A8D4-E3007AB1F42E}"
[HKEY_CLASSES_ROOT\Wow6432Node\AppID\{6774E2C3-06E9-4943-A8D4-E3007AB1F42E}]
"DllSurrogate"=""
[HKEY_CLASSES_ROOT\Wow6432Node\CLSID\{7D7B1602-9832-4ac6-A224-F0092FAF0D7E}]
@="CA ERwin Data Modeler Script Client API Property Bag"
"APPID"="{7D7B1602-9832-4ac6-A224-F0092FAF0D7E}"

Troubleshooting
90 Release Notes
[HKEY_CLASSES_ROOT\Wow6432Node\AppID\{7D7B1602-9832-4ac6-A224-F0092FAF0D7E}]
"DllSurrogate"=""
[HKEY_LOCAL_MACHINE\SOFTWARE\Classes\AppID\{9527D0BA-ED75-4b0e-BF4B-E35565DE9852}
]
[HKEY_LOCAL_MACHINE\SOFTWARE\Classes\AppID\{40FDB0E6-D772-455d-B1C8-83CE79445403}
]
[HKEY_LOCAL_MACHINE\SOFTWARE\Classes\AppID\{6774E2C3-06E9-4943-A8D4-E3007AB1F42E}
]
[HKEY_LOCAL_MACHINE\SOFTWARE\Classes\AppID\{7D7B1602-9832-4ac6-A224-F0092FAF0D7E}
]
Internet Explorer Redirects to a Different Link
Symptom:
Suppose that I install CA ERwin Mart Server on a fresh machine. If I enable the SSL option and I invoke CA ERwin Mart Administrator, Internet Explorer redirects the page to res://ieframe.dll//.
Solution:
Internet Explorer versions 8 through 10 have a security enhancement that blocks the following types of sites:
■ Sites that have self-signed certificates
■ Sites that have self-signed certificates where the certificate does not match the URL
Follow any of these steps:
■ Install the certificate in the Trusted Root Certification Authorities store.
■ Add the site to trusted sites.
■ Set the Internet Explorer Security level to Medium Low.
Chinese characters are replaced with question marks
Symptom:
I type Chinese characters in the Version Description dialog in CA ERwin Mart Administrator. If I open CA ERwin Data Modeler and go to the Catalog Manager window, I see that the Chinese characters are replaced with ????.

Troubleshooting
Chapter 3: Install and Configure a SQL Server Mart 91
Solution:
Follow these steps:
1. Select Chinese for the Format, Location, and Locale fields in the computer where you have installed CA ERwin Data Modeler, Mart server, and Mart database. (You can access these settings through the Control Panel.)
2. Open the Database Properties dialog for the Mart database and verify the value for the Collation field.
3. If the value is other than SQL_Latin1_General_CP1_CI_AS, create a database and assign this value for Collation. Initialize the Mart again.
I have a very long Windows user name and I cannot log in to the Mart through CA ERwin Data Modeler
Symptom:
I have added a very long Windows user name similar to "Magdalena.Chalamalasetti" using the Mart Administrator. When the user tries to log in to the Mart through CA ERwin Data Modeler, the name is truncated to "US\Magdalena.Chalamas" and the user cannot log in.
Solution:
The name is truncated due to a limitation with Windows. The Windows API returns the legacy user name that is limited to 20 characters. If the length of a user name exceeds 20 characters, for example, "US\Magdalena.Chalamalasetti", the name is displayed as "US\Magdalena.Chalamas" in the Connect to Mart dialog.
You can resolve this in one of the following ways:
■ Type the first 20 characters of the user name when you add the user as a Windows User, in the Mart Administrator. For example, instead of typing "US\Magdalena.Chalamalasetti", type "US\Magdalena.Chalamalas".
■ Use a Windows Group instead of the user's domain name. Using your Windows domain controller software, add the user to a Windows Group, and then add the group as a User Group in the Mart Administrator. For more information about how to add a User Group, see CA ERwin Data Modeler r9 Workgroup Edition: Support for Directory Services video.


Chapter 4: Install and Configure a Sybase Mart 93
Chapter 4: Install and Configure a Sybase Mart
This section describes how you can install and configure a Mart on a Sybase database.
This section contains the following topics:
How to Install and Configure a Sybase Mart (see page 93) How to Upgrade any r9 Series Mart to the Current Version (see page 109) Change the Mart Database Server (see page 116) Troubleshooting (see page 116)
How to Install and Configure a Sybase Mart
In the previous versions, CA ERwin DM connected to the Mart database through the database client software. Now, the application connects to the Mart database through a web server. The database client software is no longer required.
The Mart comprises the following components:
Database
Stores the user data for the Workgroup Edition. You can use a Sybase Adaptive Server Enterprise 15.0 through 15.7 and SAP Adaptive Server Enterprise 16 database for the Mart database. You must use a new database and not an existing database that was created for an older version of the data modeling tool.
Applications
Includes a web-based component named CA ERwin Mart Administrator that helps you manage the Mart through a web console.
Web server
Hosts CA ERwin Mart Administrator. You can use a web server of your choice. If you have not installed a web server, use the ERwin Mart Server option and install Tomcat.
If you are using the Workgroup Edition, you must install and configure CA ERwin Mart Administrator.

How to Install and Configure a Sybase Mart
94 Release Notes
The following diagram illustrates how to install and configure Mart:
Complete the following steps to install and configure a Mart:
1. Review the prerequisites for a Sybase Mart (see page 97).
2. Create a Sybase Database (see page 100).
3. Install CA ERwin Mart Server (see page 68).
4. Use MartServer as a Windows Service. (see page 35)
5. Initialize Mart.
6. Log in to CA ERwin Mart Administrator and configure settings (see page 38).
How to Install and Configure a Sybase Mart
Chapter 4: Install and Configure a Sybase Mart 95
Complete the following steps to upgrade a Mart from any earlier release of r9 series to the latest release:
1. Review the Prerequisites (see page 43)
2. Upgrade the Mart Server (see page 44)
3. Configure the Mart Server (see page 44)
4. Restart the Mart Server (see page 47)
5. Log In to CA ERwin Web Admin (see page 48)
Mart Architecture
In the previous versions, CA ERwin DM connected to the Mart database through the database client software. Now, the application connects to the Mart database through a web server. The database client software is no longer required. The web server includes a web-based administration console—CA ERwin Mart Administrator. If you are using the Workgroup Edition, you must install and configure CA ERwin Mart Administrator.
The Mart comprises the following components:
Database
Stores the user data for the Workgroup Edition. You can use a Sybase Adaptive Server 15.0 through 15.7 and SAP Adaptive Server Enterprise 16 database for the Mart database. You must use a new database and not an existing database that was created for an older version of the data modeling tool.
Applications
Includes a web-based component named CA ERwin Mart Administrator that helps you manage the Mart through a web console.
Web server
Hosts CA ERwin Mart Administrator. You can use a web server of your choice. If you have not installed a web server, use the ERwin Mart Server option and install Tomcat.
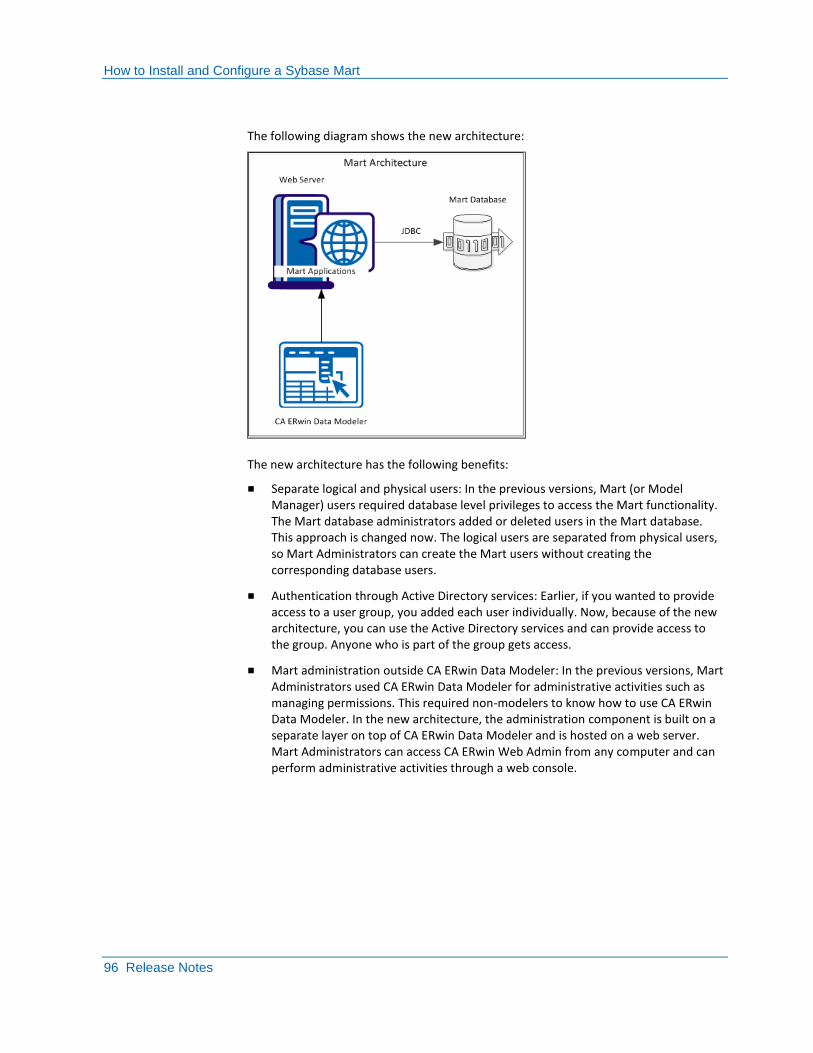
How to Install and Configure a Sybase Mart
96 Release Notes
The following diagram shows the new architecture:
The new architecture has the following benefits:
■ Separate logical and physical users: In the previous versions, Mart (or Model Manager) users required database level privileges to access the Mart functionality. The Mart database administrators added or deleted users in the Mart database. This approach is changed now. The logical users are separated from physical users, so Mart Administrators can create the Mart users without creating the corresponding database users.
■ Authentication through Active Directory services: Earlier, if you wanted to provide access to a user group, you added each user individually. Now, because of the new architecture, you can use the Active Directory services and can provide access to the group. Anyone who is part of the group gets access.
■ Mart administration outside CA ERwin Data Modeler: In the previous versions, Mart Administrators used CA ERwin Data Modeler for administrative activities such as managing permissions. This required non-modelers to know how to use CA ERwin Data Modeler. In the new architecture, the administration component is built on a separate layer on top of CA ERwin Data Modeler and is hosted on a web server. Mart Administrators can access CA ERwin Web Admin from any computer and can perform administrative activities through a web console.

How to Install and Configure a Sybase Mart
Chapter 4: Install and Configure a Sybase Mart 97
Install a Mart or Upgrade a Mart?
Use the following guidelines to determine if you must install a Mart or upgrade a Mart:
■ If you are new to CA ERwin Data Modeler and have purchased the current version of Workgroup Edition, then install the current version of the Mart. Use the How to Install and Configure a Mart procedure that is appropriate for your Mart database.
■ If you have any earlier release of r9 series Mart, then upgrade the Mart to the current version. Use the How to Upgrade any r9 Series Mart to the Current Version procedure to upgrade your Mart. The models that are created in any earlier release of r9 series are upgraded when a user connects to the current version Mart and opens the models.
■ If you have an existing Mart and the version is r7.3 through r8.2.9, install the current version Mart. Use the How to Install and Configure a Mart procedure that is appropriate for your Mart database. After installing the Mart, use the Upgrade Mart utility to upgrade the Mart models from r7.3 through r8.2.9 to the current version.
Review the Prerequisites for a Sybase Mart
Before you install the Mart components, help ensure that the minimum system requirements that are outlined in this topic are met.
You can use any of the following combinations to install CA ERwin Data Modeler, the Mart database, and the MartServer application:
■ Install CA ERwin Data Modeler, the Mart database, and the MartServer application on the same computer.
■ Install CA ERwin Data Modeler, the Mart database, and the MartServer application on different computers.
■ Install CA ERwin Data Modeler and the Mart database on one computer, and install the MartServer application on a different computer.
■ Install CA ERwin Data Modeler on one computer, and install the Mart database and the MartServer application on a different computer.
Help ensure that you always install the MartServer application on the Windows operating system.
System requirements to install the MartServer application
Hardware requirements (based on physical hardware performance, not a virtual environment):
■ 2 GHZ or higher dual core processor
■ 4 GB RAM (8 GB or more for large marts)
■ 4 GB of disk space or more as required to support your specific mart

How to Install and Configure a Sybase Mart
98 Release Notes
Operating system:
■ Microsoft Windows Vista
■ Microsoft Windows Server 2008 SP2
■ Microsoft Windows Server 2003 SP2
■ Microsoft Windows 7
■ Microsoft Windows 8
■ Microsoft Windows 2012
■ Microsoft Windows XP SP3: As Microsoft has dropped support for Windows XP, CA ERwin Data Modeler will no longer be tested for compatibility with that operating environment. Should you encounter any problem(s) using CA ERwin Data Modeler you should first verify that the problem(s) encountered are not related to an unsupported operating environment before reporting the problem(s) to CA.
Note: CA ERwin Data Modeler is a 32-bit application and is fully compatible with 64-bit operating systems, except for the following known issues:
■ 64-bit database drivers and clients will not work with the application. The workaround is to use 32-bit database drivers and clients in the 64-bit operating system environment.
■ Running the CA ERwin API in a 64-bit environment requires some changes to the workstation registry. For more information about changing the registry, see the CA ERwin Data Modeler WE Implementation and Administration Guide.
■ Microsoft .NET Framework 3.5
■ All current Microsoft Windows critical updates are applied
Database:
■ The Mart Server can use a standalone or can share an existing database server for a Sybase Adaptive Server Enterprise 15.0 through 15.7 and SAP Adaptive Server Enterprise 16 database.
■ The dbo role is necessary only during the installation or upgrade. You can revoke the dbo role for the installer after the installation or upgrade is complete.
(Optional) To use the Korean language, configure the server manually to use Cp949, Utf8, or eucksc character set. These character sets apply to a 64-bit Windows 7 computer running the Korean language pack. When you configure the server, help ensure that you perform the following tasks:
1. Add the language and set it as default.
2. Select the character set and set it as default.
Note: PC (MS) Korean stands for cp949 character set. Extended Unix Code for KSC-5601 stands for eucksc character set. Unicode 3.1 UTF-8 Character Set stands for utf8 character set.
3. Select the default sort order.

How to Install and Configure a Sybase Mart
Chapter 4: Install and Configure a Sybase Mart 99
For more information, see the Sybase documentation. Create the Mart database after you perform the tasks that are mentioned earlier.
CA ERwin Mart Administrator web client:
■ Supported browsers:
– Microsoft Internet Explorer 8® or newer
– Mozilla Firefox® v.9.0 or newer
– Google Chrome 14 or newer
– Apple Safari 5 or newer
■ Adobe Flash plug-in version 8 or newer for the respective browser
Other requirements
Help ensure that the following additional requirements are met:
■ If you want to use Microsoft IIS as the web server, you have configured it.
■ The DBMS is installed and prepared for creating the Mart Database.
■ The Mart database is created. At least one user with administrator privileges is present.
■ If you want to add Windows Group users as Mart users, you have the Active Directory Server details.
Note: You can add Windows Group users as normal Mart users, but not the Mart administrator. A Mart administrator must be a database-authenticated user.
Important disclaimer notice on all requirements
1. The requirements that are mentioned previously define the minimum requirements which permit the application to run with reasonable performance based on a small business use case scenario. The actual requirements for an enterprise-wide use case based on larger models and configurations require significantly greater resources to obtain acceptable performance.
2. These requirements are based on actual physical hardware (no virtual environment) and the following assumptions:
■ Minimal to no network overhead (both the database and application servers are locally installed)
■ Vendor's default install of the current version of their software (with all current service or fix packs)
■ No other applications sharing the defined hardware configuration (for example, a “clean” machine)
Any other hardware/software configurations are acceptable as long as they provide the same (or better) performance characteristics identified.

How to Install and Configure a Sybase Mart
100 Release Notes
Create a Sybase Database
The DBA and the system administrator responsible for installing the software on a Sybase database management system perform the following tasks:
1. Use a graphical user interface (GUI) tool, ISQL (all versions), SQL Administrator, Sybase Central Java, or Enterprise Manager to create the mart database. If a GUI tool is not available, use ISQL to type the appropriate commands manually.
Your database must meet the following criteria:
■ The size of the data device you create determines the size of the database. The minimum database size is 32 MB so there has to be at least one device that is 32 MB. Create the data device on a different disk (and disk controller) than the transaction log.
■ For optimum performance, verify that separate devices are used to store the data and the transaction log. For example, you can increase performance by creating a 50-MB data device and a 25-MB log device. A minimum of 40 MB of disk space (data and log) is required.
2. Verify the Stored Procedure Cache.
Set the Stored Procedure Cache size to at least 8 MB. Setting it higher improves performance, especially when many users are accessing the server concurrently. Setting it lower results in fatal errors and rollbacks when the Stored Procedure Cache size is exceeded.
Note: The installation creates more than 100 stored procedures. The client invokes these stored procedures to control changes to the data in the database.
3. Verify tempdb size.
Significant temporary space is required for installation and use. The temporary segments need at least 16 MB of available space. Increase the available space as the number of concurrent users increase.
4. Verify the memory allocated to the database server.
Allocate at least 32 MB of RAM to the database server. The amount of RAM allocated is ideally half of the available RAM on the server.

How to Install and Configure a Sybase Mart
Chapter 4: Install and Configure a Sybase Mart 101
Transact-SQL Commands
If a graphical DBMS access tool is not available, you can use Transact-SQL commands through ISQL.
Example: Create a device using the Transact-SQL DISK INIT command through ISQL
DISK INIT NAME = 'mmdata', /* The logical name. */
PHYSNAME = 'C:\SQL\DATA\mmdata.dat', /* The physical name. */
VDEVNO = 1<= virtual_device_number => 255
/* System dependent. */
SIZE = number_of_2K_blocks /* 1024 here is 2MB!!! */
[, VSTART = virtual_address, /* Optional */
CNTRLTYPE = controller_number] /* Optional */
Example: Create a database using the Transact-SQL CREATE DATABASE command through ISQL
CREATE DATABASE mmmaster
[ON {DEFAULT | database_device} [= size_in_megabytes] /* The device created in #1.
*/
[, database_device [= size_in_megabytes]]...] /* A database can span devices. */
[LOG ON database device [= size_in_megabytes>] /* Separate log device. */
[, database device [= size_in_megabytes]]...] /* A transaction log can span devices.
*/
Example: Add logins to the database with the sp_addlogin and sp_adduser commands using Transact-SQL through ISQL
sp_addlogin login_id [, passwd [, defdb [, deflanguage]]]
sp_adduser login_id [, username [, grpname]]
After you execute these commands, the DBA can alias an existing login as the Database Owner (dbo) or change the dbo to an existing login using sp_changedbowner. Use ISQL to execute the following:
sp_changedbowner login_id [,true]

How to Install and Configure a Sybase Mart
102 Release Notes
Install CA ERwin Mart Server
The Mart Server and Mart Admin war files are deployed on a Web server. You can either use an existing web server, or install the web server through the CA ERwin MartServer r9.6 Installation Wizard. You must install CA ERwin Mart Server and configure it regardless of whether you use Mart Server as a Windows service.
Note: Ensure that you have reviewed the Install a Mart or Upgrade a Mart topic before proceeding.
Follow these steps:
1. Do one of the following tasks:
■ Insert the installation DVD and select Mart Server Installation.
■ Download the CAEDMMS96.exe file from the online CA Technologies product page and run it.
The CA ERwin MartServer r9.6 Installation Wizard appears.
2. Go through the wizard steps to install CA ERwin Mart Server.
Depending on the options you select, CA ERwin Mart Server and/or Java Runtime Environment (JRE) and Tomcat are installed.
Note: If Java (any version) is already available in the computer and the environment variable JRE_HOME is set, the installer overwrites JRE_HOME with the new Java path. The JRE version that is shipped with the installer is 1.8. If a Tomcat web server is already installed in the computer and the environment variable CATALINA_HOME is set, the installer replaces CATALINA_HOME with the new path.
3. From the Windows Start menu, click All Programs, CA, ERwin, ERwin Mart Server r9.6, Configure MartServer.
The CA ERwin Mart Configuration dialog appears.
Configure the CA ERwin Mart Server
1. Complete the following fields in the Mart Server tab:
Database Type
Specifies the database server type.
Port No.
Specifies the port number of the database server.
Server Name
Specifies the name of the database server where you have installed the Mart database. For example, suppose that you are using SQL Server 2008 as the Mart database. Enter the name of the computer where SQL Server 2008 is installed.

How to Install and Configure a Sybase Mart
Chapter 4: Install and Configure a Sybase Mart 103
Instance Name
Specifies the name of the database instance.
Database Name
Specifies the name of the Mart database.
Note: If you are installing the Mart for the first time, use a new database. Do not use an existing database that was created for r7.3 through r8.2.9 Mart. If you are upgrading the Mart from any earlier release of r9 series to the latest release, use the corresponding Mart database.
User Name
Specifies the user name to connect to the Mart database. Enter the name of a user that is authenticated by the Mart database.
Password
Specifies the password to connect to the Mart database.
Note: The following fields--Domain Controller Name, Domain/User Name, and Password are required only if you are using the Active Directory authentication. You can use the Active Directory authentication to initialize the Mart and to log in to CA ERwin Mart Administrator.
Domain Controller Name
Specifies the fully qualified name of the Active Directory Server (Domain Controller). Enter the name in the following format:
LDAP://server/distinguished-name
Example: ldap://mktgna:3268/dc=abc, dc=com
Here, mktgna is the server name. You can provide either the name of the server or the IP address. 3268 is the port number to which the server listens.
dc=abc, dc=com is the distinguished-name. The distinguished name is the full path of the object.
Note: If you do not know the Domain Controller Name, use the Nltest command or talk to your System Administrator.
Domain/User Name
Specifies the domain name and user name in the <domain name>/<user name> format.
Password
Specifies the password of the domain user.

How to Install and Configure a Sybase Mart
104 Release Notes
Configure CA ERwin Mart Administrator
1. Enter the following information in the Mart Administrator tab:
Server Name
Specifies the name of the computer where the Web Server is present. For example, if you are using Tomcat, enter the name of the computer where Tomcat is installed.
Default: localhost
Port Number
Specifies the port number on which the Web Server is running.
Default: 18170
Application Name
Specifies the application name with which the Web Server is identified.
Default: MartServer
Transport Layer Security
Specifies if you want to connect to the Mart through a secured connection (SSL). Select this check box if you have implemented SSL.
Hosting Server
Specifies that you want to use the IIS web server to connect to the Mart. Select this check box only if you have configured IIS.
2. Click Configure.
The CA ERwin Mart Administrator and the Mart Server are configured.
More information:
Configure IIS Web Server (see page 127) Implement SSL for IIS (see page 129)

How to Install and Configure a Sybase Mart
Chapter 4: Install and Configure a Sybase Mart 105
Enable SSL for Tomcat
SSL enables you to access the Mart through a secured connection. You can enable SSL for Tomcat--the default web server, regardless of whether you are installing the Mart for the first time, or you are upgrading it from any earlier release of r9 series.
Follow these steps:
1. If the Mart Server service is running, stop it. From the Windows Start menu, click All Programs, CA, ERwin, ERwin Mart Server r9.6, Stop MartServer Service to stop the web server.
2. From the Windows Start menu, click All Programs, CA, ERwin, ERwin Mart Server r9.6, Enable SSL for Tomcat Webserver.
SSL is enabled for Tomcat and a security certificate is created. You must install this security certificate on all the computers from where you want to access the Mart.
3. From the Windows Start menu, click All Programs, CA, ERwin, ERwin Mart Server r9.6, Configure MartServer.
The CA ERwin Mart Configuration dialog appears.
4. Go to the Mart Administrator tab and select the Transport Layer Security check box.
5. From the Windows Start menu, click All Programs, CA, ERwin, ERwin Mart Server r9.6, Start Mart Server Service.
6. From the Windows Start menu, click All Programs, CA, ERwin, ERwin Mart Server r9.6, CA ERwin Mart Administrator r9.6.
The CA ERwin Mart Administrator home page appears and displays HTTPS in the address bar. If a certificate error appears, click Proceed Anyway to begin the session.
Important! If you want to connect to an SSL enabled Mart through API or the Mart Upgrade utility, you must first install the security certificate on the corresponding computer. Install the certificate through the data modeling tool. If you do not install the security certificate, the Mart Upgrade utility and the API will not be able to connect to the SSL enabled Mart.
Disable SSL and Access the Mart Through a Normal Connection
You can disable SSL at any time and access the Mart through a normal connection.
Follow these steps:
1. If the Mart Server Service is running, stop it. From the Windows Start menu, click All Programs, CA, ERwin, ERwin Mart Server r9.6, Stop Mart Server Service.
2. From the Windows Start menu, click All Programs, CA, ERwin, ERwin Mart Server r9.6, Disable SSL.
3. From the Windows Start menu, click All Programs, CA, ERwin, ERwin Mart Server r9.6, Configure MartServer.

How to Install and Configure a Sybase Mart
106 Release Notes
The CA ERwin Mart Configuration dialog appears.
4. Go to the Mart Administrator tab and clear the Transport Layer Security check box.
5. From the Windows Start menu, click All Programs, CA, ERwin, ERwin Mart Server r9.6, Start Mart Server Service.
6. From the Windows Start menu, click All Programs, CA, ERwin, ERwin Mart Server r9.6, CA ERwin Mart Administrator r9.6.
The CA ERwin Mart Administrator home page appears and displays HTTP in the address bar.
Use Mart Server as a Windows Service
The current version of the Mart provides two ways to start the web server that hosts Mart Server:
■ Start the web server manually.
■ Use a Windows service to start the web server.
For example, if you have used Tomcat as the web server to host Mart Server, you can start Tomcat in two ways:
■ Start Tomcat through the startup.bat file or through a shortcut to this file.
■ Use a Windows service to start Tomcat.
The benefits of using a Windows service to start a web server are as follows:
■ Any user with administrative privileges on a computer can start the Windows service, whereas, only designated users can start a web server manually.
■ A Windows service runs regardless of whether a user has logged in. A manually-started web server shuts down when the user who started it logs out.
Follow these steps:
1. From the Windows Start menu, click All Programs, CA, ERwin, ERwin Mart Server r9.6, Create MartServer Service to create the MartServer Windows service.
Creating the service is a one-time task. After the service is created, you only have to start and stop the service.
2. From the Windows Start menu, click All Programs, CA, ERwin, ERwin Mart Server r9.6, Start MartServer Service to start the web server.

How to Install and Configure a Sybase Mart
Chapter 4: Install and Configure a Sybase Mart 107
Initialize a Sybase Mart
When you access the Mart database through CA ERwin Mart Administrator for the first time, you must initialize the database. You can initialize the database using a database authenticated user or a Windows authenticated user.
Note: Before you proceed, verify that you have installed a DBMS, created the Mart database and run the initial queries. If the Mart is already initialized, the Login page appears.
Follow these steps:
1. If you are using MartServer as a Windows service, help ensure that the service is started. If not, from the Windows Start menu, click All Programs, CA, ERwin, ERwin Mart Server r9.6, Start Mart Server to start the Mart Server.
A Windows command prompt window appears and indicates when the server starts.
2. From the Windows Start menu, click All Programs, CA, ERwin, ERwin Mart Server r9.6, CA ERwin Mart Administrator r9.6.
CA ERwin Mart Administrator opens in your default browser.
3. Complete the following fields:
Username
Defines the user name with which you want to access the Mart. If you are using a Windows-authenticated user, enter the name in the <domain name>/<user name> format.
Password
Defines the password for the user name.
Confirm Password
Confirms the password that you entered in the previous field.
Email Address
Defines the email address for the user account that you are creating.
4. Click Initialize.
The user name is added as an administrator of Mart, Mart is initialized, and the Login web page appears. Initializing is a one-time task. After Mart is initialized, the user who initialized must log in first. Later, any other user who wants to use CA ERwin Mart Administrator can log in.
Note: The user name that is entered here is an application level user and not a database user. Remember the password that you have entered here, because without the password you cannot log in to CA ERwin Mart Administrator for the first time.

How to Install and Configure a Sybase Mart
108 Release Notes
Log In to CA ERwin Mart Administrator and Configure Settings
After the Mart is initialized, the user who initialized must log in first. When you log in to Mart for the first time, configure it per the requirements of your organization. You can configure the following settings:
■ Default profile for the model creator
■ Use default password
■ Email notification
Follow these steps:
1. From the Windows Start menu, click All Programs, CA, ERwin, ERwin Mart Server r9.6, CA ERwin Mart Administrator r9.6.
The CA ERwin Mart Administrator home page appears. If you have implemented SSL, HTTPS appears in the address bar.
2. Use the credentials with which you initialized the Mart and log in.
3. Click Settings.
4. Complete the following fields:
Default profile for model creator
Specifies the profile that is assigned to a user on a model. This profile is assigned whenever a user creates a model and saves it to Mart for the first time. The user inherits the permissions of the default profile selected here on the model that is saved. For example, suppose that User1 is assigned with Modeler profile and the System Administrator selects Architect as the default profile for model creator. If User1 creates Model1 and saves it to Mart, for Model1, User1 inherits the permissions of Architect. Now, suppose that the System Administrator selects Viewer as the default profile for model creator, and suppose that User1 creates Model2 and saves it to Mart. For Model2, User1 inherits the permissions of Viewer.
Use Default Password
Specifies the default password that you want to use for new users and for resetting passwords, in the absence of an SMTP server for emails.
Note: Select this option only if you do not have an SMTP server that is configured for emails.
SMTP host name
Specifies the name of the SMTP host. Enter the name in the mail.domain.com format. Notification emails are sent from this server.
Port number
Specifies the port number of the SMTP server. The default port number is 25. If your company is using an alternate port number for the mail server, specify that port number.

How to Upgrade any r9 Series Mart to the Current Version
Chapter 4: Install and Configure a Sybase Mart 109
Authenticate
Specifies whether transactions with the SMTP server are authenticated. Select the check box to authenticate.
User name
Specifies the user name to authenticate the SMTP server. Select the Authenticate check box to enable authentication.
Password
Specifies the password to authenticate the SMTP server. Select the Authenticate check box to enable authentication.
Administrator email
Specifies the email ID of the Mart administrator. Notifications to Mart users are sent from this ID.
No-reply email from
Specifies the email ID from which administrative emails such as the password reset email are sent.
5. Click Save.
Mart options are configured.
You have installed and configured CA ERwin DM Mart.
How to Upgrade any r9 Series Mart to the Current Version
If you are using any earlier release of r9 series and you want to upgrade it to the latest release, upgrade the Mart Server and the Mart database. The Mart server program is upgraded, so you must implement the upgraded software.
Important! The current Mart is designed to work with only the current version of CA ERwin Data Modeler. If you try to connect the current Mart with an older version CA ERwin Data Modeler such as r9.0.0, it may corrupt the Mart and cause unexpected behavior.

How to Upgrade any r9 Series Mart to the Current Version
110 Release Notes
The following diagram illustrates how System Administrators can upgrade a Mart from any earlier release of r9 series to the latest release:
Complete the following tasks to upgrade a Mart of any earlier release of r9 series to the latest release:
1. Review the prerequisites. (see page 43)
2. Upgrade the Mart Server (see page 44).
3. Configure the Mart Server (see page 44).
4. Restart the Mart Server service. (see page 47)
5. Log In to CA ERwin Web Admin (see page 48).
Review the Prerequisites
Review the following prerequisites before you start the upgrade process:
If the Mart database is an Oracle database, the default tablespaces that were used for initializing the any earlier release of r9 series Mart are available for the latest release.

How to Upgrade any r9 Series Mart to the Current Version
Chapter 4: Install and Configure a Sybase Mart 111
Upgrade the Mart Server
If you are upgrading a Mart from any earlier release of r9 series to the latest release, upgrade the Mart Server.
Note: See the Install a Mart or Upgrade a Mart topic before proceeding.
Follow these steps:
1. If you are running MartServer as a Windows service, stop the service.
Note: If you upgrade the Mart Server without stopping the service, Mart Server may not start after you complete the upgrade process.
2. Download and run the CAEDMMS96.exe file from the CA Support site.
The CA ERwin Mart Server r9.6.0 Install Shield Wizard dialog appears.
3. Follow the wizard.
The Mart Server is upgraded.
4. Restart your computer.
Configure the Mart Server
To connect to the latest Mart, you must configure the Mart Server. Use the same database that you have used for the r9.0.0 Mart (or any earlier release of r9 series Mart).
Note: See the Upgrade Considerations topic before proceeding.

How to Upgrade any r9 Series Mart to the Current Version
112 Release Notes
Follow these steps:
1. From the Windows Start menu, click All Programs, CA, ERwin, ERwin Mart Server r9.6, Configure MartServer.
The CA ERwin Mart Configuration dialog appears.
Configure the CA ERwin Mart Server
1. Complete the following fields in the Mart Server tab:
Database Type
Specifies the database server type.
Port No.
Specifies the port number of the database server.
Server Name
Specifies the name of the database server where you have installed the Mart database. For example, suppose that you are using SQL Server 2008 as the Mart database. Enter the name of the computer where SQL Server 2008 is installed.
Instance Name
Specifies the name of the database instance.
Database Name
Specifies the name of the Mart database.
Note: If you are installing the Mart for the first time, use a new database. Do not use an existing database that was created for r7.3 through r8.2.9 Mart. If you are upgrading the Mart from any earlier release of r9 series to the latest release, use the corresponding Mart database.
User Name
Specifies the user name to connect to the Mart database. Enter the name of a user that is authenticated by the Mart database.

How to Upgrade any r9 Series Mart to the Current Version
Chapter 4: Install and Configure a Sybase Mart 113
Password
Specifies the password to connect to the Mart database.
Note: The following fields--Domain Controller Name, Domain/User Name, and Password are required only if you are using the Active Directory authentication. You can use the Active Directory authentication to initialize the Mart and to log in to CA ERwin Mart Administrator.
Domain Controller Name
Specifies the fully qualified name of the Active Directory Server (Domain Controller). Enter the name in the following format:
LDAP://server/distinguished-name
Example: ldap://mktgna:3268/dc=abc, dc=com
Here, mktgna is the server name. You can provide either the name of the server or the IP address. 3268 is the port number to which the server listens.
dc=abc, dc=com is the distinguished-name. The distinguished name is the full path of the object.
Note: If you do not know the Domain Controller Name, use the Nltest command or talk to your System Administrator.
Domain/User Name
Specifies the domain name and user name in the <domain name>/<user name> format.
Password
Specifies the password of the domain user.
Configure CA ERwin Mart Administrator
1. Enter the following information in the Mart Administrator tab:
Server Name
Specifies the name of the computer where the Web Server is present. For example, if you are using Tomcat, enter the name of the computer where Tomcat is installed.
Default: localhost
Port Number
Specifies the port number on which the Web Server is running.
Default: 18170

How to Upgrade any r9 Series Mart to the Current Version
114 Release Notes
Application Name
Specifies the application name with which the Web Server is identified.
Default: MartServer
Transport Layer Security
Specifies if you want to connect to the Mart through a secured connection (SSL). Select this check box if you have implemented SSL.
Hosting Server
Specifies that you want to use the IIS web server to connect to the Mart. Select this check box only if you have configured IIS.
2. Click Configure.
The CA ERwin Mart Administrator and the Mart Server are configured.
Restart the Mart Server Service
When you modify the details of the Mart Server and Mart Administration programs, restart the Mart Server service.
Follow these steps:
1. From the Windows Start menu, click All Programs, CA, ERwin, ERwin Mart Server r9.6, Stop MartServer Service to stop the Mart Server service.
2. From the Windows Start menu, click All Programs, CA, ERwin, ERwin Mart Server r9.6, Start MartServer Service to start the Mart Server service.
How to Upgrade any r9 Series Mart to the Current Version
Chapter 4: Install and Configure a Sybase Mart 115
Log In to CA ERwin Mart Administrator
Log in to CA ERwin Mart Administrator to verify if you have successfully upgraded the Mart Server from any earlier release of r9 series to the latest release.
Follow these steps:
1. From the Windows Start menu, click All Programs, CA, ERwin, ERwin Mart Server r9.6, CA ERwin Mart Administrator r9.6.
The CA ERwin Mart Administrator log in page appears. If you have implemented SSL, HTTPS appears in the address bar.
2. Use the credentials with which you initialized the Mart and log in.
The CA ERwin Mart Administrator home page appears.
The models that are created in any earlier release of r9 series are upgraded when a user connects to the latest release Mart and opens the models.

Change the Mart Database Server
116 Release Notes
Change the Mart Database Server
Sometimes, you may change the server on which the Mart database is installed, or you may restore the Mart database with a new name. When there is a change the server name or database name, reconfigure the MartServer.
Follow these steps:
1. Back up your Mart database.
2. Restore the database on the designated server.
3. If you use the same computer for Mart Server and restore the database in a different name, include the new database name in the CA ERwin Mart Configuration dialog.
From the Windows Start menu, open the CA ERwin Mart Configuration dialog. In the Mart Server tab, Database Name field, enter the new name with which the database is restored. Enter the current user name and password to access the database. If wrong information is provided here, you may be able to install the Mart, but you cannot log in and cannot use it.
4. If you use a different computer for Mart Server and restore the database in the same name, install the Mart Server on the new computer.
Use the Install CA ERwin Mart Server procedure and install the Mart Server. In the Mart Server tab, Server Name field, enter the name of the new server where the database is restored. Enter the current user name and password to access the database. If wrong information is provided here, you may be able to install the Mart, but you cannot log in and cannot use it.
5. Stop the MartServer service and start it again.
6. From the Windows Start menu, click All Programs, CA, ERwin, ERwin Mart Server r9.6, CA ERwin Mart Administrator r9.6.
Enter the credentials of the Mart administrator and log in.
Troubleshooting
This section explains the errors that you can encounter while installing and configuring Mart, and how you can troubleshoot them.
Note: The Mart Server log files are available in the following location:
Windows XP: {user.home}/Local Settings/Application Data/CA/ERwin Mart
Server/logs/application.log
Windows 7: {user.home}/AppData/Local/CA/ERwin Mart Server/logs/application.log

Troubleshooting
Chapter 4: Install and Configure a Sybase Mart 117
Port out of range
Symptom:
Whenever I connect to the web server, I get the following error message:
java.lang.IllegalArgumentException: port out of range 80821.
Solution:
Type the correct port number in the Configure CA ERwin Mart Administrator’s Server dialog and then restart your web server.
Call failed on the server
Symptom:
When I try to connect to the Mart server, I get the following error:
500 The call failed on the server; see server log for details
Solution:
The probable reasons for this error could be one of the following reasons:
■ The server name is not correct.
■ The application name is not correct. By default, the application name is MartServer and it is case-sensitive.
Type the correct server name and application name in the CA ERwin Mart Administrator’s Server dialog and the Configure MartServer Details dialog. Restart the web server.

Troubleshooting
118 Release Notes
Application Internal Error
Symptom:
When I try to connect to the database, I get the following error:
Application Internal Error
Solution
You get this error when the MartServer application is unable to connect to the required database. The following reasons are probable for this error:
■ The database details that are provided in the Configure MartServer Details dialog are incorrect.
■ The username and the password for the database are incorrect.
■ The database is not present.
■ The port number for the database is incorrect.
■ The network is down.
Ensure that you enter the correct details of your database in the Mart Server tab of the CA ERwin Mart Configuration dialog.
ORA-12514 TNS listener does not currently know of service requested in connect descriptor
Symptom:
When I try to open the CA ERwin Mart Administrator page, I get the Application Internal Error. The Tomcat windows shows the following error message:
ORA-12514, TNS:listener does not currently know of service requested in connect
descriptor
Solution:
Use a fully qualified instance name when starting the Mart Server.

Troubleshooting
Chapter 4: Install and Configure a Sybase Mart 119
Mart already exists. Specify another database name
Symptom:
When I try to connect to the Mart, I get the following error message:
An earlier mart is already present in the database you are trying to initialize. This
process can not be continued. Please specify another database name to continue.
Solution:
You get this error when you connect to an old Mart that you have used for CA ERwin DM Release r7 series, r8 series, or Beta release of any r9 series release.
Create a database and provide its details in the Configure MartServer Details dialog.
Initialize page is not loading in Internet Explorer
Symptom:
When I type the URL to initialize my Mart in Internet Explorer, the Initialize Mart page is taking a long time to load.
Solution:
The Initialize Mart page does not load because the Active Scripting option in Internet Explorer is disabled.
To enable Active Scripting, follow these steps:
1. In Internet Explorer, click Tools, Internet Options.
2. In the Security tab, click the Custom Level button.
The Security Settings – Local Intranet Zone window opens.
3. From the list of options, locate Scripting, Active Scripting, and select Enable. Click OK.
4. Restart Internet Explorer and enter the URL to initialize Mart.
The Mart Initialize page opens.

Troubleshooting
120 Release Notes
The Tomcat server is not starting properly. The Configure button is disabled.
Symptom:
My administrator has given me the Administrator rights and when I start the Tomcat server, I get a series of errors. Also, I cannot click the Configure button in the configuration dialog because it is disabled.
Solution:
Right-click Start Server, and click Run as Administrator.
The Tomcat server starts without any error, and the configuration button is enabled.
A connection with the server could not be established
Symptom:
When I try to connect to the web server from CA ERwin Data Modeler, I get the following error message:
A connection with the server could not be established
Solution:
Verify that you have provided the correct port number and then reconnect to the web server.
The server name or address could not be resolved
Symptom:
When I try to connect to the web server from CA ERwin Data Modeler, I get the following error message:
The server name or address could not be resolved
Solution:
Verify that the server name where the web server is installed is correct and then reconnect to the server.
Note: If CA ERwin Data Modeler and the web server are installed on the same computer, you can give the server name as localhost. Suppose that CA ERwin Data Modeler and the web server are installed on different computers. The server name is the name of the computer where the web server is installed.

Troubleshooting
Chapter 4: Install and Configure a Sybase Mart 121
Invalid user ID or password
Symptom:
When I try to connect to the server, I get the following error message:
Invalid user ID or password. Please try again to login.
Solution:
Type the correct user name and password.
Note: The user must be an application level user and not a database user.
Error 12029
Symptom:
When I connect to the web server, I get the following error message:
Error 12029
Solution:
Restart the web server.
Unable to load the web page from my web browser
Symptom:
When I type the URL in Internet Explorer or Google Chrome to connect to the web server, I get the following error messages:
For Internet Explorer
Internet Explorer cannot display the webpage
For Google Chrome
Oops! Google Chrome could not connect to localhost:18170
Solution:
Restart the web server.

Troubleshooting
122 Release Notes
Test connection failed
Symptom:
When I use the Mart Upgrade utility on a 64-bit computer and upgrade a r7.3 through r8.2.9 Mart to r9.0.0 through r9.6.0 Mart, I get the following message:
Test connection failed
Solution:
CA ERwin DM is a 32-bit application. When you try to upgrade to r9.0.0 through r9.6.0 Mart on a 64-bit computer, the COM components do not work.
Follow these steps:
1. Paste the code included at the bottom of this topic to a Notepad file and name it as 64_Bit_Upgrade.reg. Note down the folder where you have created this file.

Troubleshooting
Chapter 4: Install and Configure a Sybase Mart 123
2. After installing CA ERwin DM version 9.0.0 through 9.6.0, right-click 64_Bit_Upgrade.reg and select Merge.
3. From the Windows Start menu, go to Run and type the following commands to re-register the EAL components:
regsvr32.exe "<Install Dir>\CA\ERwin Data Modeler r9\EAL.dll"
regsvr32.exe "<Install Dir>\CA\ERwin Data Modeler r9\
Upgrade\R8_Binaries\EAL.dll".
4. Right-click 64_Bit_Upgrade.reg and select Merge again.
You can now upgrade to version 9.0.0 through 9.6.0 Mart on a 64-bit computer.
64_Bit_Upgrade.reg
Copy the following code and paste it to a new Notepad file:
Windows Registry Editor Version 5.00
[HKEY_CLASSES_ROOT\Wow6432Node\CLSID\{9527D0BA-ED75-4b0e-BF4B-E35565DE9852}]
@="CA ERwin Data Modeler Script Client API"
"AppID"="{9527D0BA-ED75-4b0e-BF4B-E35565DE9852}"
[HKEY_CLASSES_ROOT\Wow6432Node\AppID\{9527D0BA-ED75-4b0e-BF4B-E35565DE9852}]
"DllSurrogate"=""
[HKEY_CLASSES_ROOT\Wow6432Node\CLSID\{40FDB0E6-D772-455d-B1C8-83CE79445403}]
@="CA ERwin Data Modeler Script Client API Property Bag"
"AppID"="{40FDB0E6-D772-455d-B1C8-83CE79445403}"
[HKEY_CLASSES_ROOT\Wow6432Node\AppID\{40FDB0E6-D772-455d-B1C8-83CE79445403}]
"DllSurrogate"=""
[HKEY_CLASSES_ROOT\Wow6432Node\CLSID\{6774E2C3-06E9-4943-A8D4-E3007AB1F42E}]
@="CA ERwin Data Modeler Script Client API"
"AppID"="{6774E2C3-06E9-4943-A8D4-E3007AB1F42E}"
[HKEY_CLASSES_ROOT\Wow6432Node\AppID\{6774E2C3-06E9-4943-A8D4-E3007AB1F42E}]
"DllSurrogate"=""
[HKEY_CLASSES_ROOT\Wow6432Node\CLSID\{7D7B1602-9832-4ac6-A224-F0092FAF0D7E}]
@="CA ERwin Data Modeler Script Client API Property Bag"
"APPID"="{7D7B1602-9832-4ac6-A224-F0092FAF0D7E}"

Troubleshooting
124 Release Notes
[HKEY_CLASSES_ROOT\Wow6432Node\AppID\{7D7B1602-9832-4ac6-A224-F0092FAF0D7E}]
"DllSurrogate"=""
[HKEY_LOCAL_MACHINE\SOFTWARE\Classes\AppID\{9527D0BA-ED75-4b0e-BF4B-E35565DE9852}
]
[HKEY_LOCAL_MACHINE\SOFTWARE\Classes\AppID\{40FDB0E6-D772-455d-B1C8-83CE79445403}
]
[HKEY_LOCAL_MACHINE\SOFTWARE\Classes\AppID\{6774E2C3-06E9-4943-A8D4-E3007AB1F42E}
]
[HKEY_LOCAL_MACHINE\SOFTWARE\Classes\AppID\{7D7B1602-9832-4ac6-A224-F0092FAF0D7E}
]
Internet Explorer Redirects to a Different Link
Symptom:
Suppose that I install CA ERwin Mart Server on a fresh machine. If I enable the SSL option and I invoke CA ERwin Mart Administrator, Internet Explorer redirects the page to res://ieframe.dll//.
Solution:
Internet Explorer versions 8 through 10 have a security enhancement that blocks the following types of sites:
■ Sites that have self-signed certificates
■ Sites that have self-signed certificates where the certificate does not match the URL
Follow any of these steps:
■ Install the certificate in the Trusted Root Certification Authorities store.
■ Add the site to trusted sites.
■ Set the Internet Explorer Security level to Medium Low.

Troubleshooting
Chapter 5: Create a Customized Security Message 125
I have a very long Windows user name and I cannot log in to the Mart through CA ERwin Data Modeler
Symptom:
I have added a very long Windows user name similar to "Magdalena.Chalamalasetti" using the Mart Administrator. When the user tries to log in to the Mart through CA ERwin Data Modeler, the name is truncated to "US\Magdalena.Chalamas" and the user cannot log in.
Solution:
The name is truncated due to a limitation with Windows. The Windows API returns the legacy user name that is limited to 20 characters. If the length of a user name exceeds 20 characters, for example, "US\Magdalena.Chalamalasetti", the name is displayed as "US\Magdalena.Chalamas" in the Connect to Mart dialog.
You can resolve this in one of the following ways:
■ Type the first 20 characters of the user name when you add the user as a Windows User, in the Mart Administrator. For example, instead of typing "US\Magdalena.Chalamalasetti", type "US\Magdalena.Chalamalas".
■ Use a Windows Group instead of the user's domain name. Using your Windows domain controller software, add the user to a Windows Group, and then add the group as a User Group in the Mart Administrator. For more information about how to add a User Group, see CA ERwin Data Modeler r9 Workgroup Edition: Support for Directory Services video.
Chapter 5: Create a Customized Security Message
As the administrator, you can add a custom message on the Connect to Mart dialog. The message appears whenever one of the client applications (CA ERwin Data Modeler or CA ERwin Data Modeler Navigator Edition) connects to the mart. The message appears after your connection to the desired mart is authenticated and before the connection dialog closes.

Troubleshooting
126 Release Notes
Follow these steps:
1. After you install and configure the Mart, locate and open the privacy.message file.
If you are using the default web server Tomcat, the file is available in the following folder:
<installation folder>\ERwin Mart Server r9\Tomcat\Webapps\Mart Server\WEB-INF
2. Type the message that you want to display and save the file.
The message can be up to 2000 characters long, anything beyond 2000 characters is not displayed. Insert line-breaks manually after every 80 characters, for the message to display properly. If there are no manual line-breaks, Windows automatically inserts line-breaks in the security message. These line-breaks are based on the specific version of Windows you use.
3. From the Windows Start menu, click All Programs, CA, ERwin, ERwin Mart Server r9.6, Stop MartServer Service to stop the web server.
4. From the Windows Start menu, click All Programs, CA, ERwin, ERwin Mart Server r9.6, Start MartServer Service to start the web server again.
When a user connects to the Mart the next time, the security message is displayed.
To suppress the security message, open the privacy.message file and delete the contents. Do not delete the file.
Chapter 6: Prepare to Use IIS with Mart
If you want to use Microsoft Internet Information Services (IIS) as the web server, configure it before deploying Mart Server.

Configure IIS Web Server
Chapter 6: Prepare to Use IIS with Mart 127
Configure IIS Web Server
The Mart Server is built using Java technology. Therefore, if you want to connect to Mart through IIS, configure IIS to use the JK ISAPI redirector plugin. Using this plugin, IIS sends servlet and JSP requests to Tomcat.
Note: This procedure describes how to configure IIS 6.0 for Microsoft Windows Server® Enterprise 2008. For more information about configuring other versions of IIS for other operating systems, see the respective vendor documentation.
Follow these steps:
1. Help ensure that Tomcat is working properly. Open a browser and type the following in the Address bar:
http://<servername>:18170/MartAdmin
The default Tomcat home page appears. <servername> is the name of the computer where you have installed Tomcat. 18170 is the default port number where Tomcat is running. If you are using a different port number, use that port number here. In addition, help ensure that the port number you are using is included in the server.xml file. Typically, the server.xml file is available in the <Tomcat_Home>/conf folder.
2. Install IIS.
For more information about how to install IIS on Windows Server 2008, see Microsoft documentation.
3. Create a folder, for example Native_IIS on the computer where you have installed IIS. Download the isapi_redirect.dll file for Windows from the Apache Tomcat website and copy to Native_IIS. If the name of the DLL file is not isapi_redirect.dll, rename it.
4. Create the workers.properties, isapi_redirect.properties, uniworkers.properties, uriworkermap.properties, and isapi_redirect.reg files in the Native_IIS folder.
Note: See the Appendix for sample workers.properties, uniworkers.properties, isapi_redirect.reg, isapi_redirect.properties, and uriworkermap.properties files.
5. Create a folder named Logs under Native_IIS. Create two empty files— isapi.log and isapi_redirect.log under Logs.
6. Go to the Native_IIS folder, right-click the isapi_redirect.reg file, and click Merge.
7. Click Yes on the message.
The registry file is updated.
8. Follow these steps and create an IIS filter for the DLL placed in Step 5:
a. From the Windows Start menu, click Run, and then type inetmgr.
The Internet Information Services (IIS) Manager window opens.
b. Click the computer name and expand Sites.

Configure IIS Web Server
128 Release Notes
c. Right-click Default WebSite and select Add Virtual Directory.
The Add Virtual Directory dialog appears.
d. Enter jakarta for Alias. Enter the path for the isapi_redirect.dll file in the Physical Path field and click OK.
e. Click Default Web Site.
f. Double-click ISAPI filters and click Add under Action.
g. Enter Tomcat for Filter name. Enter the path for the isapi_redirect.dll file in the Executables field.
h. Click OK and the new ISAPI filter is added.
i. Click Default Web Site and then double-click Handler Mappings.
j. Click Edit Features and Permissions.
The Edit Features and Permissions dialog opens.
k. Select Execute and then click OK.
l. Click the computer name and then double-click ISAPI and CGI Restrictions.
m. Click Add under Actions.
n. Select the path for the isapi_redirect.dll file in the ISAPI or CGI Path field.
o. Select Allow extension path to execute and then click OK.
9. Restart the IIS web server.
10. Stop the MartServer service and start it again.
Note: See the Appendix for sample workers.properties, uniworkers.properties, isapi_redirect.reg, isapi_redirect.properties, and uriworkermap.properties files.

Implement SSL for IIS
Chapter 7: Mart Server Log Files 129
Implement SSL for IIS
If you have deployed Mart Server on IIS, you can implement SSL on IIS. SSL lets you access the Mart through a secured connection.
Note: This procedure describes how to enable SSL for IIS 6.0. If you are using a different version of IIS, see the relevant document on the Microsoft website for more information about installing IIS.
Follow these steps:
1. Open Internet Information Services (IIS) Manager.
2. Double-click Server Certificates and then click Create Self-Signed Certificate.
3. Enter a name for the certificate and click OK.
4. Right-click Default Web Site and click Edit Bindings.
5. Click Add and select https in the Type drop-down menu.
6. Select the certificate name that you have added in the SSL Certificate drop-down menu and click OK.
7. Select Default Web Site and then double-click SSL Settings.
8. Select the Require SSL check box and click Apply.
9. Restart IIS and then restart Tomcat.
Note: If the validity of the certificate expires, create another certificate.
Chapter 7: Mart Server Log Files
Mart Server can now generate log files when there are errors. You can configure how the log is generated. For more information about how to configure logging, see the CA ERwin Mart Administrator Help.
Chapter 8: Documentation Formats and Deliverables

Implement SSL for IIS
130 Release Notes
The following documents are provided for Mart Server:
Deliverable Name Format Provided
CA ERwin Mart Administrator Online Help HTML
Release Notes HTML and PDF
Copyright © 2022 FDOKUMEN