EC-Earth: A seamless Earth-system prediction approach in action
Upload
khangminh22Category
view
3download
0
ENVIRONMENTAL CLASS CURRICULUM
Adrienne Katner, DEnv., Louisiana State University Health, New Orleans, LA, 2019
A high school level curriculum to introduce students to environmental health issues and science.
1
Table of Contents Lesson Plan Topic Page Curriculum Outline ...................................................................................................................................... 2 Introduction ................................................................................................................................................ 6 Flint Water Crisis ......................................................................................................................................... 8 Lead and Hazard Assessment .................................................................................................................... 10 Lead Toxicology ......................................................................................................................................... 12 Microsoft Excel Walk Through .................................................................................................................. 14 Lead Intervention ...................................................................................................................................... 17 Water Contaminants and Treatment ........................................................................................................ 22 Water Filters .............................................................................................................................................. 25 NSF International and Bottled Water ....................................................................................................... 27 Water Regulation and NRDC ..................................................................................................................... 29 Government and Policy ............................................................................................................................. 31 Environmental Justice ............................................................................................................................... 35 Ethics in Environmental Health ................................................................................................................. 40 Risk Assessment ........................................................................................................................................ 44 IEUBK Model ............................................................................................................................................. 46 Health Communication ............................................................................................................................. 48 Final Project .............................................................................................................................................. 50

2
CURRICULUM OUTLINE Lesson Lesson Goal Activities Material Needs
Introduction Students will be introduced to environmental health, environmental hazards, and the role of environmental health professionals. TOTAL TIME: 1 hour
Toxic Release Inventory (TRI) Analysis Activity
TRI Analysis activity
Computers
Flint Water Crisis Give thorough background and sequence of events involved in Flint Water Crisis and introduce students to public health emergency situations and government responsibility to prevent such situations. TOTAL TIME: 1 hour 50 minutes
Testing Lead In Water
Flint Water Crisis Case Study Note Activity
Lead in water test kit (can be found at most hardware stores: $ 13.99)
Lead and Hazard Assessment
Introduce students to lead and teach them how to properly assess lead hazards based on different exposure routes. TOTAL TIME: 1 hour 30 minutes
How to check a lead service line activity (Demo)
Lead paint demo activity
LSL Demo:
Key or screwdriver
Refrigerator magnet Lead paint Demo:
Lead check sticks: 8 swabs per pack, 6 packs: (Amazon: $122-145)
Different objects that contain lead (ex: paint surfaces in classroom, metals etc.)
Lead Toxicology Students will have an understanding of lead toxicology and will have the skills to use national models to track lead poisoning trends. TOTAL TIME: 1 hour and 15 minutes
Environmental Public Health Tracking Activity
Computers
Excel Walk Through
Introduce students to Excel software and data presentation; teach students to present scientific data in a tangible and professional format. TOTAL TIME: 50 minutes
Thanksgiving Dinner Shopping Activity
Pivot Table Activity
Computers with excel application
Tape
Thanksgiving price list
Student instruction sheet
Assignment rubric
Lead Intervention
Introduce students to an overview of common interventions employed in combatting lead effects with a focus on nutrition interventions. TOTAL TIME: 1 hour 30 minutes
Nutrition Tag
My plate
Nutrition tag
Ropes, cones or anything that can create a boundary
Lead blocker identification tags
MyPlate activity
Cochrane report
Computers
Water Contaminants and Treatment
Students will be able to identify the potential hazards and threats of water contaminants; students will know where to acquire information for local water quality; introduce students to water treatment processes and practices. TOTAL TIME: 2 hours 30 minutes
Flocculation test activity
Corrosion test activity
Flocculation test
Alum ($3.44-6.00)
Container for collecting water (ex: buckets)
Two 250 mL beakers (Walmart: $2.50/each)
Corrosion test
Two 250 mL beakers (Walmart: $2.50/each)
Distilled water (Target: $0.89)
3
Lesson Lesson Goal Activities Material Needs 2 crumpled pieces of
aluminum foil (Walmart: $2.77)
NaCI/table salt ($ 1.48-5.00)
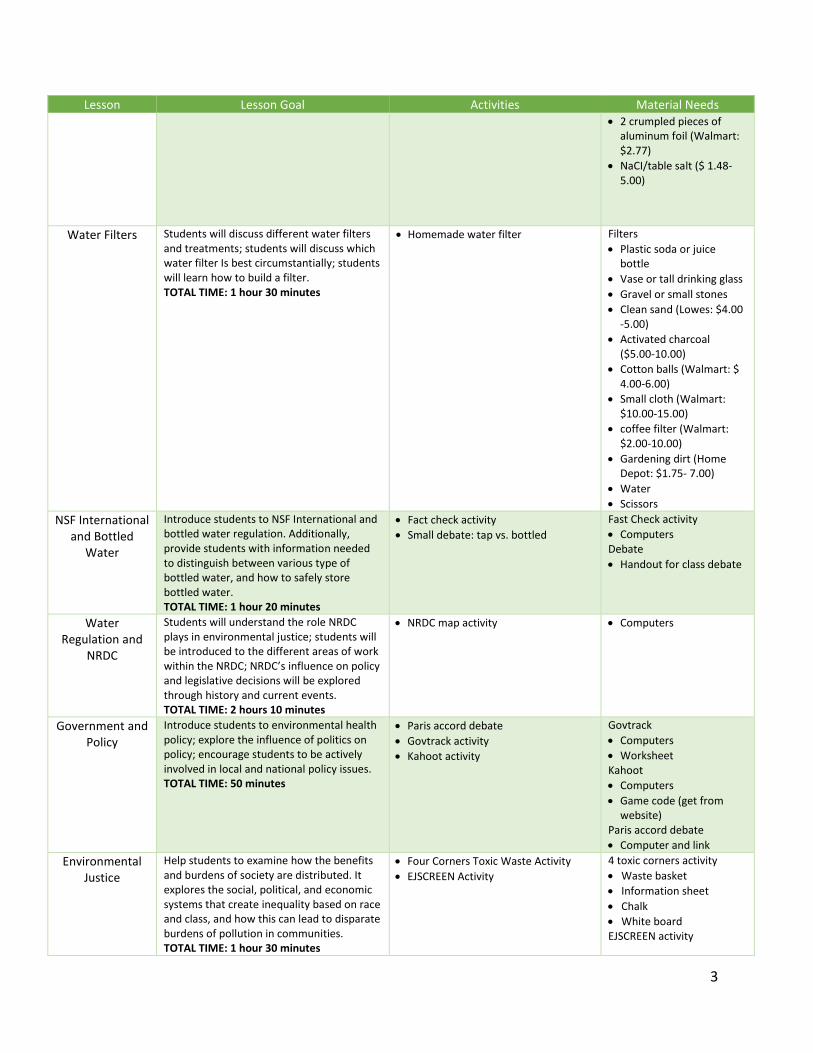
Water Filters Students will discuss different water filters and treatments; students will discuss which water filter Is best circumstantially; students will learn how to build a filter. TOTAL TIME: 1 hour 30 minutes
Homemade water filter Filters
Plastic soda or juice bottle
Vase or tall drinking glass
Gravel or small stones
Clean sand (Lowes: $4.00 -5.00)
Activated charcoal ($5.00-10.00)
Cotton balls (Walmart: $ 4.00-6.00)
Small cloth (Walmart: $10.00-15.00)
coffee filter (Walmart: $2.00-10.00)
Gardening dirt (Home Depot: $1.75- 7.00)
Water
Scissors
NSF International and Bottled
Water
Introduce students to NSF International and bottled water regulation. Additionally, provide students with information needed to distinguish between various type of bottled water, and how to safely store bottled water. TOTAL TIME: 1 hour 20 minutes
Fact check activity
Small debate: tap vs. bottled
Fast Check activity
Computers Debate
Handout for class debate
Water Regulation and
NRDC
Students will understand the role NRDC plays in environmental justice; students will be introduced to the different areas of work within the NRDC; NRDC’s influence on policy and legislative decisions will be explored through history and current events. TOTAL TIME: 2 hours 10 minutes
NRDC map activity Computers
Government and Policy
Introduce students to environmental health policy; explore the influence of politics on policy; encourage students to be actively involved in local and national policy issues. TOTAL TIME: 50 minutes
Paris accord debate
Govtrack activity
Kahoot activity
Govtrack
Computers
Worksheet Kahoot
Computers
Game code (get from website)
Paris accord debate
Computer and link
Environmental Justice
Help students to examine how the benefits and burdens of society are distributed. It explores the social, political, and economic systems that create inequality based on race and class, and how this can lead to disparate burdens of pollution in communities. TOTAL TIME: 1 hour 30 minutes
Four Corners Toxic Waste Activity
EJSCREEN Activity
4 toxic corners activity
Waste basket
Information sheet
Chalk
White board EJSCREEN activity
4
Lesson Lesson Goal Activities Material Needs Computers
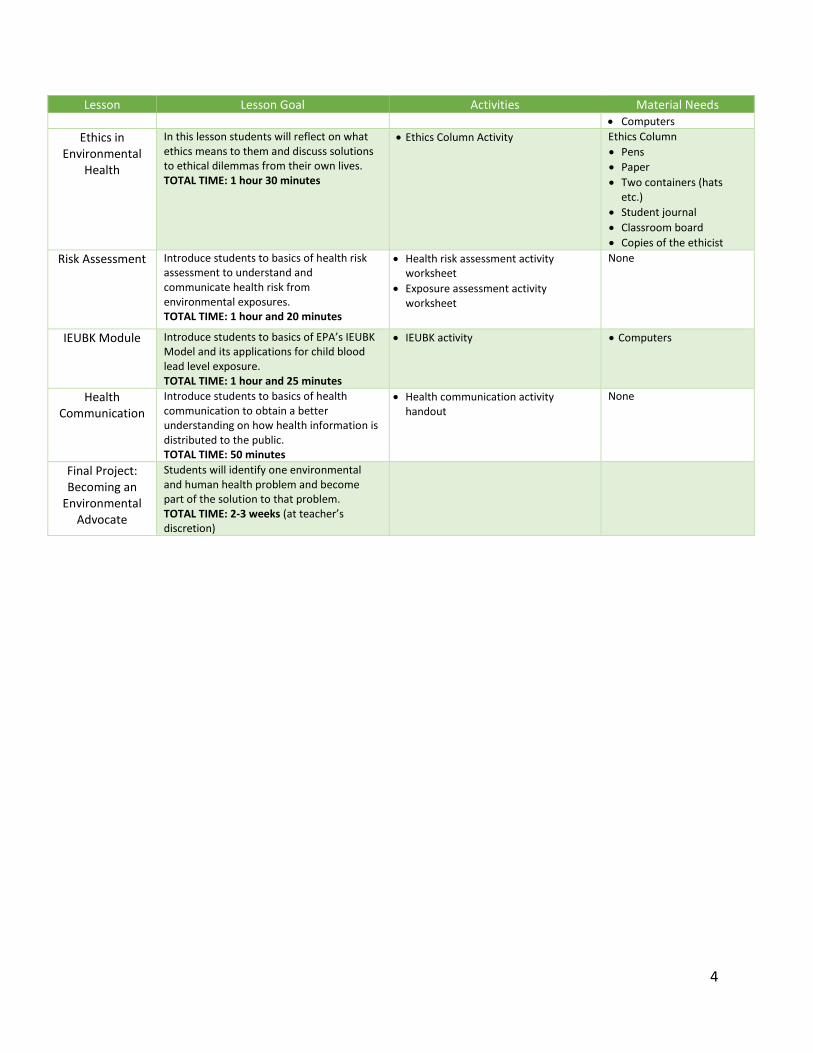
Ethics in Environmental
Health
In this lesson students will reflect on what ethics means to them and discuss solutions to ethical dilemmas from their own lives. TOTAL TIME: 1 hour 30 minutes
Ethics Column Activity Ethics Column
Pens
Paper
Two containers (hats etc.)
Student journal
Classroom board
Copies of the ethicist
Risk Assessment Introduce students to basics of health risk assessment to understand and communicate health risk from environmental exposures. TOTAL TIME: 1 hour and 20 minutes
Health risk assessment activity worksheet
Exposure assessment activity worksheet
None
IEUBK Module Introduce students to basics of EPA’s IEUBK Model and its applications for child blood lead level exposure. TOTAL TIME: 1 hour and 25 minutes
IEUBK activity Computers
Health Communication
Introduce students to basics of health communication to obtain a better understanding on how health information is distributed to the public. TOTAL TIME: 50 minutes
Health communication activity handout
None
Final Project: Becoming an
Environmental Advocate
Students will identify one environmental and human health problem and become part of the solution to that problem. TOTAL TIME: 2-3 weeks (at teacher’s discretion)
5
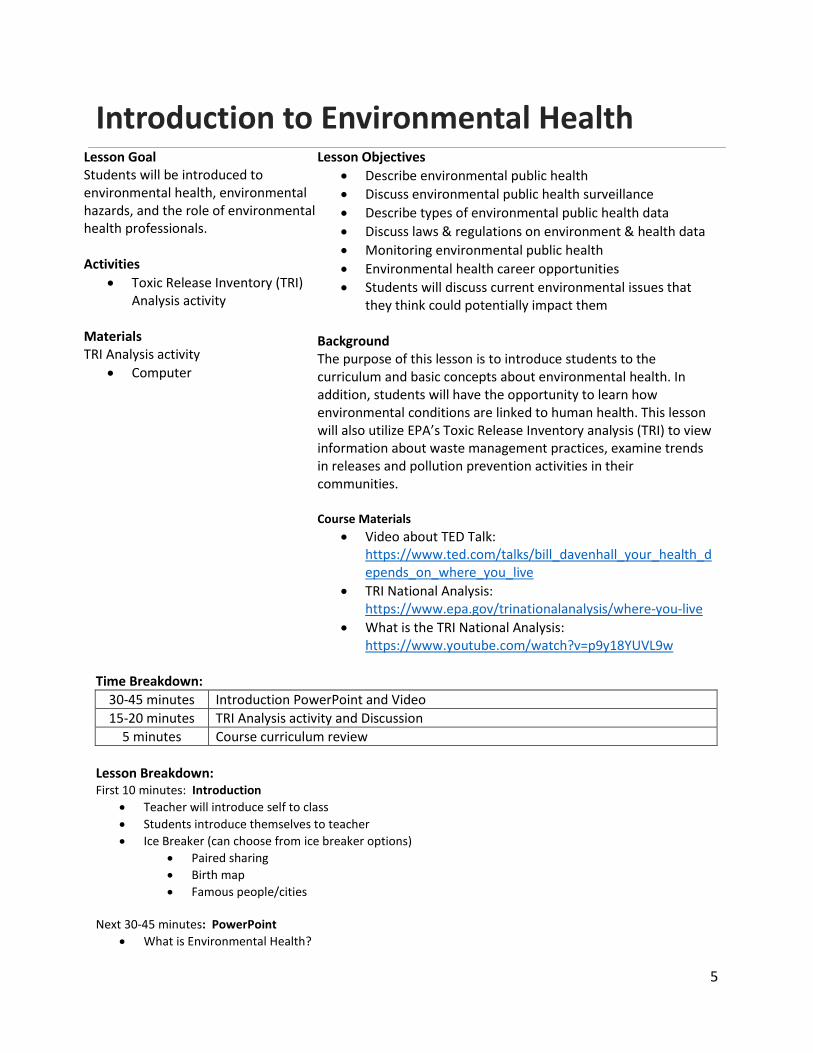
Introduction to Environmental Health Lesson Goal Students will be introduced to environmental health, environmental hazards, and the role of environmental health professionals. Activities
Toxic Release Inventory (TRI) Analysis activity
Materials TRI Analysis activity
Computer
Lesson Objectives
Describe environmental public health
Discuss environmental public health surveillance
Describe types of environmental public health data
Discuss laws & regulations on environment & health data
Monitoring environmental public health
Environmental health career opportunities
Students will discuss current environmental issues that they think could potentially impact them
Background The purpose of this lesson is to introduce students to the curriculum and basic concepts about environmental health. In addition, students will have the opportunity to learn how environmental conditions are linked to human health. This lesson will also utilize EPA’s Toxic Release Inventory analysis (TRI) to view information about waste management practices, examine trends in releases and pollution prevention activities in their communities. Course Materials
Video about TED Talk: https://www.ted.com/talks/bill_davenhall_your_health_depends_on_where_you_live
TRI National Analysis: https://www.epa.gov/trinationalanalysis/where-you-live
What is the TRI National Analysis: https://www.youtube.com/watch?v=p9y18YUVL9w
Time Breakdown:
30-45 minutes Introduction PowerPoint and Video
15-20 minutes TRI Analysis activity and Discussion
5 minutes Course curriculum review
Lesson Breakdown: First 10 minutes: Introduction
Teacher will introduce self to class
Students introduce themselves to teacher
Ice Breaker (can choose from ice breaker options)
Paired sharing
Birth map
Famous people/cities Next 30-45 minutes: PowerPoint
What is Environmental Health?
6
Ted Talk about Environmental Health and location (found under course materials)
Role of the Environment in public health
Example: Erin Brockovich story
What are Environmental Hazards?
Health Effects
Important Factors
The impact of the environment on individuals is affected
Risk or toxicology
Exposure
Demographics and socio economic status
Why is understanding the environment-health connection important?
Emerging Issues
What do Environmental Health Professionals Do? Next 15-20 minutes:
Watch the “What is the TRI National Analysis?” YouTube video
Open the TRI National Analysis website. Explore the “Data to display” and talk about differences throughout the country.
Click on your state and view the factsheet. Discuss.
Type in your zip code and view the factsheet. Discuss.
Discussion: o What environmental issues do you think should be the biggest concern in our country and
world? o Which ones are you most concerned about? o Which ones do you think affect you the most?
Next 5 minutes: Curriculum
Go over topics that will be covered during the school year in the class
Flint
Lead
Risk assessment
Water contaminants
Water regulations
Environmental Justice and ethics Water sample collection
Health Communication Homework Assignment:
Have students bring an old water bill statement from home in preparation for the Flint Water Crisis Lesson.
7
Flint Water Crisis
Lesson Goal Give thorough background and sequence of events involved in Flint Water Crisis and introduce students to public health emergency situations and government responsibility to prevent such situations. TOTAL TIME: 1 hour 50 minutes Activities
Testing for Lead in Water
Flint Water Crisis Case Study Note Activity
Materials
Lead in water test kit (can be found at most hardware stores): $13.99
Lesson Objectives
Discuss the health effects of lead in Flint water sources
Discuss the government’s role during the Flint water crisis and introduce current regulations for water such as SDWA and LCR
Educate students on sequence of events from beginning to present situation in Flint, MI
Identify violations of set regulations and how violations led to water crisis
Introduce environmental justice and public health ethics a. Government response to residents b. Identify disadvantaged populations
Background The main focus of this lecture is to give students background on the Flint Water Crisis and how it was allowed to happen. Who was involved? How did it get this far? The lesson will also walk through the various violations and students can discuss where the blame could potentially be placed. Students will test water samples for lead as their main activity. Course Materials
Flint Water Crisis Case Study Worksheet
Summary video: https://www.cnn.com/videos/us/2016/01/21/flint-michigan-water-crisis-ganim-dnt-ac.cnn
Time Breakdown:
5 minutes Open class with question
10 minutes Water lead test experiment
30 minutes Flint lecture on background and health effects
10 minutes Discussion; HW assignment 1: Flint Timeline
10 minutes Ask students to discuss chosen timeline event
30 minutes Flint lecture on violations and current issues
15 minutes Discussion; Assign homework 2
Lesson Breakdown:
Open class with question Question: What do you know about Flint Water crisis? When/how did you get this information? Short discussion to gauge student knowledge
Water lead test experiment Ask students to collect water samples
One cup from a water fountain
8
One cup from a bathroom sink One cup from student’s personal water bottle if possible
Use lead in water kits (can purchase from a hardware store) and follow experiment protocol to test levels of lead in each water sample
Can perform this activity in groups as the teacher sees fit. PowerPoint lecture
Timeline of events and health effects Handout Flint Water Crisis Case Study notes sheet to fill out during video and
PowerPoint Discussion
Go over key points for hand out completion Assign homework
Homework 1: Give students timeline of events for Flint and ask students to choose a moment from timeline. Student must describe the decision/action made at that time and discuss what influence/outcome it had in the crisis. Student must also put themselves in Flint and discuss how they would've responded as a public health professional or resident of Flint.
SECOND CLASS PERIOD:
Opening Class Discussion Ask 3 students to present their homework. Try to get a student that picked a moment
from beginning, middle, and end PowerPoint lecture
Regulations, violations, government involvement and community response Ask students to continue filling out Flint Water Crisis Case Study notes sheet during
PowerPoint presentation Discussion
Go over key points for hand out completion Assign Homework
Homework 2: Students may choose any level of government to address a letter to in regards to the Flint Water Crisis. Students may also choose to write from a resident perspective or a public health advisor. Instruct students to address the problem, note what mistakes chosen level of government made, and include a suggestion to help resolve the public health crisis (regulation revision, alternative interventions, financial planning etc.).
9
Lead and Hazard Assessment Lesson Goal Introduce students to lead and teach them how to properly assess lead hazards based on different exposure routes. TOTAL TIME: 1.5 hours Activities
Identify objects containing lead
How to ID a lead service line (LSL)
How to ID lead paint
Materials For LSL Demo:
key or screwdriver
refrigerator magnet
lead pipe, galvanized steel pipe,
copper pipe For Lead Paint Demo:
lead check sticks
different objects containing lead: copper statues, fishing weights, Christmas tree lights, bullets
Lesson Objectives
Students should have an understanding of the results they obtained from previous lecture
Have an understanding of the history of lead use and lead requirements
Have an understanding of the movement of lead in the environment
Be able to identify a lead service line in their home
Be able to use a lead check stick to identify lead in paint or other metal objects Background The main focus of this lecture is to teach students about lead and how to identify lead in their environment. Students will learn about different forms of lead, where it can be found in their environment, and the different properties of lead. There is a brief video included that covers the history of lead use, with slides to follow covering the history of lead based paint, lead in gasoline, and toxicology. Activities will teach students easy ways to identify lead in their homes so that students can properly protect themselves and their families from possible hazards. Course Materials
Video about the History of Lead: https://www.youtube.com/watch?v=CM1u29BeqC0
Lead objects clip art/Student Handouts
How to ID lead service line: https://apps.npr.org/find-lead-pipes-in-your-home/en/#intro
Time Breakdown:
15 minutes Review material from previous lecture /Video on Lead
45 minutes
What is Lead?
Brief History
Lead in the Environment
30 minutes How to ID a lead service line/ How to ID Lead Paint
Lesson Breakdown:
Review material from previous lecture
Hand out “Lead Video Organizer” to students. This can be found in the Lead and Hazard Assessment folder.
Instruct students to fill in worksheet as they watch the video
Play the video (link included under course materials and can be found in PowerPoint)
Hand out “Lecture Student Organizer”. This can be found in the Lead and Hazard Assessment folder. Have students fill this worksheet out as you work through slides.
Begin PowerPoint.
When you get to Slide 5:
10
o Have students break into groups of 3 or 4. Hand out cut outs of pictures of objects that may contain lead and objects that definitely don’t contain lead. Have students separate pictures into objects that contain lead and those that don’t. Give students around 5 minutes to complete. Have one representative from each group explain their choices. Tell students which ones have lead and which ones do not as they move through these.
o These cut outs can be found in the Lead and Hazard Assessment folder under “Lead Sort Activity”
When you get to Slide 6: o Open up discussion to students:
Looking at graphic, identify ways that you are potentially exposed to lead. Give students a few minutes to write ideas down, then ask for students to volunteer their ideas.
Slide 17: o “How to check for a lead service line” Activity o Follow instructions on PowerPoint
Slide 23: o “Lead Paint Hazard Assessment” Activity
Using lead check sticks, have students test different objects that may contain lead, paint on the walls of the classroom, different metals.
Homework Assignment o Can do one of the two:
Check your water service line for a lead service line and report findings to the class
Using a lead check stick, test an object in your home that could contain lead and report findings back to the class
11
Lead Toxicology
Lesson Goal Students will have an understanding of lead toxicology and will have the skills to use national models to track lead poisoning trends. TOTAL TIME: 1 hour and 15 minutes Activities
Environmental Public Health Tracking Activity
Materials
Computers for students
Lesson Objectives
Students will be able to explain to peers possible lead exposures in home
Students will be able to explain the toxicology of lead at a basic level
Students will have an understanding of the health effects of lead
Students will be able to use an EPH tracking model to collect data
Background The main focus of this lecture is to teach students about lead toxicology. Students will learn about exposure, toxicity, acceptable levels of lead, and the biologic fate of lead. Along with that, students will learn about the health effects of lead, particularly low dose health effects in children and adults, developmental and reproductive effects, and signs and symptoms of lead poisoning. Students will use a tracking model to observe childhood lead poisoning rates and analyze this data in a later activity. Course Materials
Tracking Model: https://ephtracking.cdc.gov/DataExplorer/index.html?c=6&i=-1&m=-1
Time Breakdown:
15 minutes Discuss previous lesson, review homework
30 minutes
Worksheet and Video
Lead Toxicology
Health Effects
30 minutes EPHT Activity
Lesson Breakdown:
Start with the slides
Last slide is an intro to the CDC's Environmental Public Health Tracking Model or EPHT model.
Using EPHT Model:
Once everyone has been able to access the website, you will work through an example
The purpose of this activity is for the students to collect data
12
First Step
Choose Childhood Lead Poison (this will remain constant for everyone)
Choose Age of Housing
Choose Number of homes built before 1950
Choose National by State
Click Go
Second Step:
Click “select data” in the second view screen
Choose Childhood Lead Poisoning
Choose Age of Housing
Choose Number of Homes built between 1950 and 1979
Choose National by State
Click Go Students should understand that there should only be one thing that changes when they are deciding on the parameters to measure. Assignment:
o Explore lead in relation to sociodemographic, housing indicators and other variables o Export the data you want to explore

13
Excel and Data Presentation Lesson Goal Students will be introduced to MS Excel software and data presentation techniques. They will learn to present scientific data in a tangible and professional format using MS Excel. TOTAL TIME: 1.5 hours Activities
Thanksgiving dinner shopping activity
Materials
Computers with Excel application
Thanksgiving price list
Student Instruction sheet
Assignment Rubric
Lesson Objectives
Introduce students to Excel software and data presentation
Define uses and applications of data presentation in Excel
Understand basic elements of charts, tables, and graphs
Understand the similarities and differences of charts, tables, and graphs
Differentiate the applicability of charts, tables, and graphs when presenting data
Construct a chart with appropriate data labels for scientific data presentation
Background In this lesson plan students will learn the basic review of excel toolbars, buttons, function, cursors, tables, and how to utilize Excel as a tool for manipulating and managing data. In addition, students will practice using excel functions through creating a spreadsheet and chart comparing thanksgiving dinner prices for two stores. Lastly, students will practice making pivot tables to build a unique list of values and create summary tables. Course Materials
Examples of how to do the activity “ Thanksgiving dinner shopping activity”; http://oakdome.com/k5/lesson-plans/excel/excel-thanksgivng-dinner-shopping-list.php
Time Breakdown:
20 Minutes
Data Presentation: Charts, Tables, and Graphs
Pie Chart, Column Chart, and Line Chart
Bar Chart, Area Chart, and Scatter Plot
30 Minutes Creating a Chart
Pivot Tables
50 Minutes Thanksgiving Dinner Activity
Lesson Breakdown: 20 minutes
Data Presentation: Charts, Tables and Graphs o Pie chart
Pie of pie chart Bar of pie chart
o Column Chart Clustered column chart Stacked column chart
o Line Chart Stacked line chart 100% stacked line chart
14
o Bar Chart Stacked bar chart 100% stacked line chart
o Area Chart Stacked area chart 100% stacked area chart
o Scatter plots 30 minutes
Creating a Chart o Change chart type o Switch row/column o Chart Title o Legend position o Data labels
Pivot Tables o Insert a Pivot Table o Drag Fields o Sort and Filter o Change Summary Calculation o Two-dimensional Pivot Table
Thanksgiving Dinner Activity
Students create a spreadsheet and chart comparing Thanksgiving dinner prices for two stores. Students choose the same 6 or 7 items from each store to compare. Students create their spreadsheet using prices from the Thanksgiving price list. Students may also use local newspaper store ads if available. Students format the numbers with dollar signs and use a formula (SUM) to calculate total costs. Students create a chart illustrating their expenses.
Thanksgiving Dinner Price List ( can be found on drop box ) o How to use this file:
Download and print this file for students to use. You could go paperless by downloading and opening this file in a pdf reader and projecting it onto your whiteboard or by sharing it digitally for students to reference.
Students use this list to choose items to create their spreadsheet and chart. Students create their spreadsheet using the list of their chosen items and prices.
Thanksgiving Dinner Spreadsheet Finished Example (can be found on drop box) o How to use this file:
Download and open this file in Microsoft Excel or a compatible spreadsheet application. Use this example to illustrate to students how to enter their title, merge and center the title, and how to change the font, font size, and font color. Demonstrate how to enter data and format the number values with $ dollar signs. Demonstrate how to select the data in columns A and B, and create a chart using that selection.
Demonstrate how to format the chart bar colors, and how to resize and position the chart so that everything fits on a single printable page. Demonstrate how to use "print preview" to check the appearance and layout prior to printing the page.
References Oakdome: http://oakdome.com/k5/lesson-plans/excel/excel-thanksgiving-dinner-shopping-list.php
15
Lead Intervention Lesson Goal In this lesson students will explore the common interventions employed in combatting lead effects with a focus on nutrition intervention. TOTAL TIME: 1 hour 30 minutes Activities
Nutrition Tag ( optional)
My Plate Materials Nutrition Tag Activity:
Lead Blocker Tag Identification Cards
Cones or rope to mark boundaries
My Plate Activity:
Cochrane report “ Household Interventions for Poisoning Domestic Lead Exposure”
Computer access
Lesson Objectives
Identify exogenous and endogenous exposures to lead
Identify common interventions used
Understand distribution of lead in body
Introduce students to overview of calcium
Introduce students to overview of iron
Understand the health effects of lead
Model how lead absorption can be reduced with certain nutrients
Present case-study to students
Go over two assignments Background In this lesson, students will first be provided with a general overview of the issues around lead poisoning in order to become more aware of the dangers and effects it has on the human body. Students will then explore common lead prevention methods that can be utilized by them and their parents. For example, it is important to keep lead-based paint in good condition and free of dust. If you plan to renovate, make sure you use a Lead-safe Certified contractor who follows lead-safe work practices. Additionally, students will learn how eating a balanced healthy diet, containing vitamin C, calcium, and iron can help minimize lead absorption in the body. Course Materials
Cochrane report “ Household Interventions for Poisoning Domestic Lead Exposure http://www.cochrane.org/CD006047/BEHAV_household-interventions-preventing-domestic-lead-exposure-children
Time Breakdown:
10 Minutes
Exogenous and Endogenous exposures to lead
Prevention is key! examples
Common Interventions
30 Minutes
Distribution of Lead
Calcium
Iron
50 Minutes
Fighting Lead with Healthy Foods case-study
Conclusion: Activities
16
Lesson Breakdown:
PowerPoint 10 minutes
Exposure to lead o Exogenous examples o Endogenous examples
Prevention is key!
o Examples
Common interventions o Removing source o Medical intervention o Cognitive interventions o Nutrition interventions
30 minutes
Distribution of lead o Biological fate of lead o Bone-to-blood mobilization of lead
Calcium
o Function in body o Requirements o Sources o Calcium and lead o CDC recommendation for children
Iron o Function in body o Requirements o Sources o Iron and lead o CDC recommendation for children
10 minutes
Fight lead with healthy foods o Case-study on Flint, Michigan
Conclusion with one of the assignments:
1. Cochrane report (possibly at the beginning of the lecture) a. Apply your nutrition knowledge! Assignment
2. Nutrition Tag
17
Nutrition Tag
1. Students will be modeling how certain nutrients (iron, vitamin C, and calcium) can minimize the absorption of lead by playing a game of tag.
2. Mark off the boundaries of a field. Use a large playing area, but clearly state the boundaries to the students. Cut out tag identification cards. Laminate if you wish them to be permanent.
3. Depending on your class size and size of field, select two students to be “it.” The “it” students represent lead. (Note: if you have a small class size, only select one student. If you have a very large class size (over 35, you may select three students to be it). Give the students who are “it” the appropriate tag identification card.
4. The rest of the students will represent themselves (i.e.: children). For the first round, all students will be able to move freely across the playing field. On the second round, give each student an identification card. Each students will receive a card telling them what to do as they move across the field. This card will tell students what they had to eat that day. Children with a not-so-healthy item (i.e.: pizza, cookies, soda) must perform the task on their card while moving across the field.
5. Have students gather on one end of the marked boundary. Explain that the 2 “it” students are lead trying to tag the other students to “contaminate” them. The it students will position themselves halfway between the start and finish areas
6. In Round 1, on your mark, students may move freely across the field. In round 2, students must perform the instructions written on their card as written (i.e.: pausing every 3 steps). The “it” students will try to tag as many students as they can. Once a student has crossed the boundary line at the other end of the field, he or she is safe and cannot be tagged. Students who are tagged must line up along the edge of the playing field.
7. At the end of the first round, ask the students how many students were contaminated by the lead. Remember or write down this number. Do the same for each subsequent round. Compare this number with the number of students tagged during Rounds 2 & 3.
8. For Round 3, any students who were tagged but had a lead blocker card (a star in the upper right corner of their card), may re-enter the starting line. This means that the item he/she had eaten was a lead blocker. Any students who were tagged, but did not have a lead blocker sit out. This means that those students absorbed the lead when they were tagged. Students who were not tagged also go back to the starting line.
9. Perform Round 3 as in previous rounds. 10. After the round is complete, observe which students were tagged, and how many where along
the sidelines.
Wrap Up Questions 1. Which students were easier to tag? The students with the healthy diets or the students with the
not-so-healthy diets? Why? 2. What did the task the not-so-healthy students had to do represent? 3. What food/drinks are high in iron, calcium, and vitamin C? How would these help protect you
from lead poisoning? 4. How can we prevent lead from entering our homes and schools?
18
My Plate Activity
I. Reading Assignment Read Cochrane report on “Household Interventions for Preventing Domestic Lead Exposures” found here: http://www.cochrane.org/CD006047/BEHAV_household-interventions-preventing-domestic-lead-exposure-children
Be prepared to discuss in class.
II. Apply your nutrition knowledge! In class, you were introduced to nutrition’s role in impacting lead absorption. You were also introduced to a case-study video on Flint, Michigan titled “Fighting lead with Healthy Diets”. You are to form groups of 3’s and come up with a nutritious meal plan based on the nutrients we spoke of.
1. Follow MyPlate guidelines. 2. Come up with a meal plan with breakfast, lunch and dinner, and make room for snacks. 3. Highlight the items that contain iron and calcium.
You can use the following hand-out as a reference of items that contain the nutrients: https://wicworks.fns.usda.gov/wicworks/Sharing_Center/KYlead.pdf References EPA Lesson plan "Lead Blocker". https://www.epa.gov/sites/production/files/documents/leadblockers.pdf
19
Water Contaminants and Treatments Lesson Goal Students will analyze the relationship between humans and the earth’s resource through, evaluating the interrelationship between humans and water quality and quantity. Students will also be introduced to water treatment processes and practices. TOTAL TIME: 2 hours 30 minutes Activities
Flocculation test activity
Corrosion test activity Materials Flocculation test activity
Alum ($3.44-$6.00)
Container for collecting water (buckets)
Two 250mL beakers ($2.50/each at Walmart)
View link under course materials “flocculation test experiment”
Corrosion test
Two 250 mL beakers ($ 2.50 a piece at Walmart)
Distilled water ($.89 at Target)
2 crumpled pieces of aluminum foil ($2.77 at Walmart)
View attached document in folder on drop box for material list.
Lesson Objectives
Work in groups to collect water contaminate data
Communicate public health hazards of different water contaminants
Distinguish the differences between point source and non-point sources
Students will understand the importance of proper water treatment and how it protects the public’s health
Discuss environmental monitoring and lab analysis
Identify the impacts of corrosion control in water treatment
Background Through visual presentation, students will learn about different water contaminant groups, health hazards each pose and their Maximum contamination level (MCL’S). Students will also utilize the SDWIS website to find their drinking water supplier and view its violations and enforcement history. Students will proceed to conduct a flocculation test to determine coagulant dosage in water treatment. In addition, students will conduct a corrosion test and compare samples of corroded and un-corroded metals such as iron, aluminum, copper, zinc, silver and magnesium. Course Materials
Video about Flocculation: https://www.khanacademy.org/partner-content/mit-k12/mit-k12-materials/v/flocculation
SDWIS website: https://www3.epa.gov/enviro/facts/sdwis/search.html
Flocculation test experiment: https://www.teachengineering.org/activities/view/usf_flocculant_activity01
Time Breakdown:
30 minutes Water contaminates lecture
20 minutes SDWIS website and Activity
40 minutes Flocculation and or Corrosion test
30 minutes Water Treatment Lecture
10 minutes DC water case study
15 minutes Discussion table
15 minutes Venn diagram comparing Flint and DC
5 minutes HW assignment
20
Lesson Breakdown: Open class with question
Ask students to list what water contaminants they are aware of Short discussion to determine students’ knowledge
PowerPoint Lecture Brief description of different contaminant groups and health hazards each pose, MCLs
SDWIS website View SDWIS website with students and complete activity
Flocculation and Corrosion test Flocculation experiment directions on website link above; corrosion experiment
directions in dropbox Set up 6 stations, 3 stations per experiment Put students in groups of 4-5 and have them spend 10 minutes at each experiments and
then switch sides to other experiment Students should answer questions on experiment worksheets during experiments (Both experiments can be conducted at the same time or just one)
PowerPoint lecture Corrosion control process, what and how treatment works, water delivery
DC water case study Hand out short article on DC treatment switch and lead increase from corrosiveness
Discussion table Separate board into 5 major parts: what happened, who did it hurt/affect, how did
public health respond, why did this happen, what should have happened Discuss DC article and have students participate in competing table
Field Trip to water treatment facility?
Homework assignment Students should research countries with poor water quality and choose one country to write
one page paper that includes: health disparities due to poor water quality, what has caused these conditions, and recommendations for treatment if country acquired the ability to implement water treatment
21
Water Filters Lesson Goal Introduce students to water filters and treatments. TOTAL TIME: 1hr Activities
Homemade water filter Materials Homemade Water Filter:
plastic soda or juice bottle
vase or tall drinking glass
gravel or small stones
clean sand
activated charcoal
cotton balls, small cloth, coffee filter
gardening dirt
water
scissor
Lesson Objectives
Understand various water filters and treatments
Recognize which water filters are best used in different circumstances
Learn to build a small-scale filter Background The main focus of this lecture is to teach students about water filters and treatments. Moreover, students will learn about various types of water filters, as well as different forms of filtration. Lastly, students will be instructing on how to make their own homemade water filters. Course Materials
Video demonstrations:
NSF Water Treatment Systems Certification Process, Types of Filters: http://www.nsf.org/consumer-resources/what-is-nsf-certification/water-filters-treatment-certification/water-treatment-systems-certification
Osmosis Illustration: https://www.youtube.com/watch?v=sdiJtDRJQEc
Reverse osmosis: https://www.culliganwater.com/all-about-water/
Ion Exchange System: https://www.behance.net/gallery/7922569/Water-Filter-Animations
Kit Reference Video" : https://www.youtube.com/watch?v=vrAtyF4D67Q
Time Breakdown:
15 minutes Water Filters and Treatments
15 minutes
How do filters work?
Which filter do you need?
30 minutes Homemade Water Filter
Lesson Breakdown:
Slide 2, Class discussion: o What is a filter? o Are all filters the same? o Why or why not?
22
Slide 3, Water Filters and Treatments o Watch video on slide show about water treatment and filters o List the different types of filters mentioned in the video. o List the different factors that may determine the kind of filter or water system that suits
a person’s needs. o How do we know our water supply is safe?
Slide 7, Reverse Osmosis Filter System o Watch videos on osmosis and reverse osmosis
Slide 8, Ion Exchange System o Watch video on Ion Exchange
Slide 18, Begin Water Filter activity

23
NSF International and Bottled Water Lesson Goal Introduce students to NSF International and bottled water regulation. Additionally, provide students with information needed to distinguish between various type of bottled water, and how to safely store bottled water. TOTAL TIME: 1 hour, 20 minutes. Activities
Fact Check Activity, an interactive classroom activity on bottled water regulation and storage.
Small debate, tap v. bottled water.
Materials
Computers for bottled water activity
Handout for class debate
Lesson Objectives
Understand the role of independent testing labs and regulators in ensuring bottled water quality.
Be able to distinguish between different types of bottled water based on its origins and production.
Learn how to appropriately store bottled water.
Learn about the pros and cons of bottled and tap water.
Background The purpose of this lecture is to introduce students to bottled water—how it is regulated, proper maintenance, as well as the pros and cons associated with its production. These concepts will be reinforced through in-class activities that will allow students to test their preexisting knowledge and teach them how to identify bottled water that has been certified by independent labs. Additionally, students will engage in a small debate concerning tap water v. bottled water. Course Materials
NSF website: : http://www.nsf.org/about-nsf/
NSF Bottled Water Tips: http://www.nsf.org/consumer-resources/health-and-safety-tips/bottled-water-tips
NSF Certified Products and Systems: http://www.nsf.org/certified-products-systems
Time Breakdown:
5 minutes Open discussion: How do we gauge the safeness of consumer products we use, eat, and drink?
40 minutes
What is NSF International?
What is the NSF Mark?
Bottled water: Types of bottled water, Fact Check Activity, Bottled Water Activity
35 minutes Debate: Bottled water v. Tap water
Lesson Breakdown: Begin Power point Slide 3: Open discussion- How we determine the safeness of the products that we use, eat, or drink?
Questions that may prompt conversation:
What are consumer goods?
What are some standards that we use as a nation to ensure that products like food and water are safe? (EPA, FDA, etc.)
Has anyone heard of NSF International?
24
Slide 7: Transition from talking about NSF International to bottled water, one of the world's most popular consumer products. Slide 8: Have students identify the types of bottled water they purchase. Additionally, have students state factors that may make the various types of water shown on the slide different from one another. Slides 9-20: Fact Check Activity. Each Fact Check consists of two slides, one will contain a question and the other an answer to the question previously proposed. During this portion of the lecture allow students to talk about what they think the answers to each of the questions are before revealing the provided answers. Slide 21: Bottled Water Activity: During this portion of the lecture allow students to break up into teams of 3-4 to research which bottled water brands have been certified by NSF International. (Instructions on how to do this may be found in the slide notes) Each group's answers should be recorded on a sheet of paper. This should take approximately 15 minutes. Slide 22: After students have looked up each brand reveal the correct answers and allow students to discuss their initial reactions. Slide 23: Debate- Tap v. Bottled Water (Which is the best option?) In this last portion of the lecture students will get the chance to talk about some of the pros and cons of bottled water. Format of the debate: (~15 mins) Break students into 2 teams, allow teams to discuss and answer questions on handout (~10 mins) Give each team 3 minutes to present their argument. Between each presentation allow the opposing team to ask questions for CLARITY only. (~10 mins) Allow teams to address their opponent’s arguments and answer questions that may come up. (~5 mins) Conclusion: Who would switch sides knowing all this information, and why? What are some of the benefits of bottled water? What are some of the downfalls of bottled water?
25
Water Regulation & National Resources Defense Council
Lesson Goal Students will understand the role NRDC plays in environmental justice and be introduced to the different areas of work within the NRDC. NRDC’s influence on policy and legislative decisions will be explored through history and current events. TOTAL TIME: 2 hours 10 minutes Activities
NRDC map activity Materials NRDC map activity
Computer
Lesson Objectives Discuss actions that have been taken by the NRDC to influence
policy decisions
Explore NRDC’s role in the Flint water crisis
Work in partners to research lead exceedance levels using NRDC interactive map
Develop a risk management and communication plan for selected community from NRDC map and present to class
Background The main focus of this lecture is to teach students about water regulations and about stakeholders who play a part in protecting water sources. Students will also learn about the NRDC and how they conduct research to create informed policy. Students will use the NRDC interactive map to explore lead problems across America and create a policy brief. The policy brief will be accompanied by a physical representation of a public announcement in an effort to demonstrate risk communication. Course Materials
NRDC Interactive Map : https://www.nrdc.org/resources/whats-your-water-flint-and-beyond
Time Breakdown:
30 minutes Brief background and intro of NRDC
20 minutes NRDC video clip
20 minutes NRDC lecture
30 minutes Demonstration of NRDC interactive map
10 minutes Partner pairing and research
15 minutes Assignment Presentations
15 minutes Discussion on effective risk communication
5 minutes HW assignment ( have students complete NRDC assignment at home if need be)
Lesson Breakdown:
Begin class with PowerPoint lecture, streaming the video after the first slide Finish lecture and teach remaining slides Use link under course material to access the NRDC interactive map
o Show students how to gather information from the site using the example in the lecture NRDC Assignment
o Assign partners or allow students to choose partners o Students should be given time to familiarize themselves with the interactive map o Instructions:
26
Pick a community from the map with lead exceedance levels Collect all data and information from the interactive map site Students are encouraged to do extra research of the community using other
resources as well Together students must decide who will play the role of a lawyer in the NRDC
and who will play the role as an activist for the NRDC Each pair must create a one-page policy brief and a public announcement to the
community (PR via flier, pamphlet, poster, commercial, social media, etc.) Students will be given 5-10 minutes the following class period to present their
work Risk communication
o After each presentation have class evaluate what was effective about media used for announcements and why
o Have class give feedback as to why policy may or may not pass and which stakeholders would be most supportive
27
Government and Policy Lesson Goal In this lesson students will explore the influence of politics on environmental
policy. TOTAL TIME: 1 hour 50 minutes Activities
Paris Accord Agreement Debate
Govtrack Activity(homework assignment)
Kahoot Activity
Materials Paris Accord Debate Activity:
Links to websites which can be accessed in course materials
Govtrack Activity:
Govtrack assignment sheet
Computer access Kahoot Activity:
Internet Access
Lesson Objectives Define environmental health policy
Discus current environmental health policy issues
Identify the basis of policies and policy actors
Differentiate between a bill, laws, statue, rule , regulation, and ordinance
Understand the role of the EPA and major environmental statues related to water
Identify local environmental policy issues and learn how to take action
Learn how to use Govtracks to follow current policies
Analyze the Paris Accord Agreement
Background The main focus of this lecture is to teach the ways in which problems are identified and addressed through policy. In addition, students will learn about the rational – comprehensive model of policy formation and the steps involved in using it. Further, explore the role the EPA plays in environmental policy and regulation. Lastly, the assignment will engage students in interactive activities that will allude to the cost and benefits involved in policy making.
Course Materials Kahoot (teacher): https://play.kahoot.it/#/?quizId=1c456190-c7c8-
4b6b-b445-2a3401e2522a&playId=62b4e2de-8b5f-4736-94a0-9ca61c7cf4e6
Kahoot ( Student): https://kahoot.it
2017 Presidential Candidate’s outlook on environmental/climate issues : http://pbseduelectioncentral.com/interactive-map
Video about the Brief History of Environmental Justice: https://www.youtube.com/watch?v=30xLg2HHg8Q
Video: “Can Paris produce a climate change deal that sticks?” https://www.pbs.org/newshour/show/paris-climate-talks-enter-next-phase-but-political-roadblocks-remain
Tenets of the Paris Climate Agreement: https://ec.europa.eu/clima/policies/international/negotiations/paris_en
TIMELINE
20 Minutes
Kahoot Activity
Policy and Environmental Health
Right to Clean Environment?
Foundations of Policy
20 Minutes
U.S. Civics
EPA and Water
15 Minutes
Major Environmental Statutes
National and Local Focus
Paris Accord Debate
Introduction to Govtrack (Homework assignment)

28
Kahoot Activity As a warm-up, use this interactive Kahoot survey to allow students to share their preliminary views on environmental policy. The teacher should go on his or her computer and select the “Player vs. Player” mode. Each student will require a smartphone, laptop or computer and should go to the Kahoot website and enter the Game PIN that will appear on the teacher’s screen. It is the teacher’s responsibility to click to the next question once each student has answered. [If you do not wish to have students play the game on their devices, then ask the following questions: 1. Do you believe that climate change is caused by human activities? 2. Do you believe that the U.S. government should invest in renewable energy sources? 3. Should the government prioritize environmental protections or economic growth?
Lesson Plan 15 minutes
Policy and Environmental Health o Environmental Health Policy o Current Environmental Health Policy Issues
Local, state, national, and global
Right to Clean Environment? o U.S. Constitution
Foundations of Policy o Basis of Policies o Policy Actors
20 minutes
U.S. Civics o Definitions: Bills, Law/Legislation, Statutes, Rules & Regulations, and Ordinances o Branches of U.S. Government: Legislative, Executive, and Judicial o The “Revolving Door” o Law and Rule Making Processes
EPA and Water o Federal Administrative Agencies o EPA
Popular environmental health topics Water
15 minutes
Major Environmental Statutes o Safe Drinking Water Act (SDWA) o Lead and Copper Rule (LCR) o Reduction of Lead in Drinking Water Act
National and Local Focus o Healthy Homes and Lead Poisoning Prevention Program o NOLA Unleaded
Introduction to Govtrack o Follow a current environmental health policy
29
Paris Accord Debate Have students complete the following:
1. Visit the PBS Election Central website’s interactive map and click on “Candidates & Issues” on the bottom right of the screen. Read the section entitled “Environmental/Climate” to become familiarized with both sides of the issue.
2. View the three remaining candidates’ quotes on the environment by selecting their names in the “Environmental/Climate” section. Does the candidate you support share your views?
3. Debate environmental policy with your classmates in a Socratic Seminar (group discussion focusing on thoughtful and respectful responses in which the teacher only interjects to facilitate the conversation) using the following questions:
Learn more about the challenges that surrounded the talks using the PBS News Hour video story: ‘Can Paris produce a climate change deal that sticks?’ Read the tenets of the Paris Climate Agreement found here. 1. What parts of the agreement are most important? 2. Are there any parts that are not important? 3. What are some of the costs and benefits involved? 4. Are there any aspects that you would change?
Govtrack Activity After diving into the complexity and inner-workings of government and environmental health policy, it’s time to do some policy research. At the end of the lesson, we introduced ‘Govtrack,’ which is a website used to monitor the status of proposed bills in Congress. Read about any bill or resolution on a relevant environmental topic of your choice, and draft a report (no longer than 1 page) summarizing the specifics of the selected legislation. Before our next lesson, 5 student volunteers will be required to share their findings (~2 minutes) with the class. Questions that should be answered in your research:
- What the bill is called - Who sponsored it (Name, House/Senate, State, and Party) - What is calls for - Dig a little deeper online to see what opponents and proponents say about it
o Industry officials o Advocates o Politicians o Public, tribes, etc. (any relevant stakeholder)
- The status of the bill - Govtrack’s prognosis - Your thoughts
Govtrack: https://www.govtrack.us/
30
Environmental Justice Lesson Goal Help students to examine how the benefits and burdens of society are distributed. It explores the social, political, and economic systems that create inequality based on race and class, and how this can lead to disparate burdens of pollution in communities. TOTAL TIME: 1.5 hours Activities
Four Corners Toxic Waste Activity
EJSCREEN Map Activity (Optional Homework Assignment)
Materials Four Corners Toxic Waste Activity:
Waste basket (as the metaphor for toxic waste)
Two to three copies of the worksheets for each of the five groups
Chalk/white board to record the vote
EJSCREEN Map Activity:
EJSCREEN assignment Sheet
Computer access
Lesson Objectives
Define environmental justice, equity, and health
Identify the 4 characteristics of a classic Environmental Justice Community
Understand the Environmental Protection Agency’s (EPA) role in environmental justice and environmental stewardship.
Learn how to use the EJ Screen: Environmental Justice Screening and Mapping Tool.
Identify environmental justice cases and communities in Louisiana
Explain why people may not participate in decision making
List ways to encourage communities to participate in decision-making and make their voices heard
Background The main focus of this lecture is to give an introduction to the principles and concepts of Environmental Justice and community voice and power. There is a video that gives a brief synopsis of the history of environmental justice, with slides that cover the characteristics of EJ communities, the (EPA) Environmental Protection Agency’s environmental justice mandate, and the role ethics plays in science. Students will engage in an interactive exercise that will help them to examine how the benefits and burdens of society are distributed. As well as learn about the importance of community activism. Course Materials
Video about the Brief History of Environmental Justice: https://www.youtube.com/watch?v=30xLg2HHg8Q
Time Breakdown:
30-40 minutes Four Corners Toxic Waste Activity
50 minutes
Video on Environmental Justice History
Environmental Justice PowerPoint
Ethics and Environment Justice Summary
31
Lesson Breakdown: Four Corners Toxic Waste Management Activity Suggested Preparation for the Facilitator/ Teacher
Divide the room into groups of five. (We usually have them count 1, 2, 3, 4, 5 around the room so that participants are not with their friends). Send groups 1-4 to the four corners of the room. Group 5 is the toxic waste management team, who makes the final decision about where the toxic waste will go.
Tell the whole group that they represent specific communities. You are the owner of a waste management company and you are holding a public meeting to help decide where toxic (contaminated) waste should go.
Place the toxic waste basket in a prominent place and tell them it’s full of contaminated waste that can cause cancer, chronic diseases, and get into the environment through the soils, air, water, etc.
Hand out community descriptions to each group (below).
Community 2 is secretly designated as the “vulnerable” community that has not been given the opportunity to vote. You will need to talk with them and make sure they understand their instructions and that they should not speak until given a sign that is it okay to talk (e.g., touching your earlobe).
Be sure to wander around to each group and answer questions, etc.
Use a chalk/white board to record responses and votes.
Toxic Waste Placement Meeting (Instructions to class) Prompt: (Give two copies of the prompt to each group)
1. I am the Manager of Waste Management Development Company and we would like to truck a container of extremely toxic waste to one of the communities in the room (meant to represent a city/county/state).
2. The toxic waste must go to ONE of the communities in this room. It cannot go anywhere else. It cannot be split up.
3. By the end of the discussion, you will have to cast ONE vote per community deciding where the toxic waste will go. Our toxic waste managers will make the final decision.
4. This exercise occurs in six parts:
Section 1: Community Descriptions( 5-10 minutes) You have five minutes to discuss your community and make up what you want about it. (I have given you a little bit of information about your community in your community sheets that I have passed out). Then be prepared to tell the other communities in the room the following:
1. What is the name of your community (make up a name)? 2. Given the data in your tables is this community high, middle, or low in terms of:
1. a) Income 2. b) Race/ethnicity 3. c) Speaking other languages than English
32
4. d) Levels of pollution 5. e) Green space 6. f) Health
3. Where do you think this community fits in terms of how much decision-making power it has (high, medium, low)?
Section 2: Tell the room who you are (3 minutes each) Pick one or two people from your group to describe your community. Do not just read off the information that I have given you, be more descriptive.
Section 3: Who gets the toxic waste? (3 minutes) You have just heard about the other communities in the room. It is now time to come to a consensus about where you want the toxic waste to go. Your community gets ONE vote.
Section 4: Come back and cast your vote (5-10 minutes) Pick someone in your community to explain: Pick someone in your community to explain
Cast your vote on which community should get the toxic waste
Give your reasoning Section 5: Waste managers (Group 5): final decision What is your final decision based on what you read and heard?
Section 6: Discussion(15-20 minute) Depending on the audience, there is a list of questions that the facilitator can ask participants. Below is a set of questions that can be asked:
To Communities 1, 3, 4 1. What do you think happened? 2. Why did it happen? 3. Why did the vote go the way it went? 4. If Groups 1,3, and 4 did NOT vote for the “vulnerable” community, do you think this is what
would happen in real life? Why or why not?
Waste Managers 1. Why did you make this decision?
“Vulnerable” Community( Community 2) Give community 2 signal that they can talk now(e.g., raise your hand)
a. Tell us who you are. Describe your community. b. How did your feel when you were not able to talk? c. What were you experiencing (mentally, physically)? d. How do you think it affected you to not be able to speak up( individually and your
community)? e. Was it fair? f. What are situations in real life where people might not be able to speak up?
Environmental Justice/racism 1. What was wrong with this meeting? 2. What might you do to change the meeting (e.g., interpreters; set up meeting at an
appropriate time and place that all constituents can attend; have an “expert” in attendance to explain the contamination problem, etc.)?
3. How might you address the problem that communities with EJ concerns are currently living in contaminated areas with more environmental burdens than environmental goods?
33
4. Review the Environmental Justice definition. Does it make sense? What are the main criteria of the definition? Note: It is worth spending a few minutes working through this definition and how it relates to this example.
5. Think about some (current and past) events where some people are able to vote or not and how it affects what they are able to do with the rest of their lives (having been in prison, identity cards, voting, etc.).
Video and PowerPoint:
Play video( link can be found under course materials)
Environmental Justice defined o Fair treatment & Meaningful Involvement
Environmental Justice Communities o Louisiana Ranking
EPA, Environmental Justice, and Environmental Stewardship o EJ 2020 Action Agenda o EJSCREEN
Environmental indicators Demographics indicators EJ Indexes
o Environmental Stewardship
Environmental Justice Cases/Communities in Louisiana o Mossville o Isle de jeans Charles o Bayou Corne Sinkhole o New Orleans: Claiborne Ave & Siting of I-10
St. Joseph, LA Case Study o Contaminated drinking water and drinking water violations o Community-drive campaign and White House Petition o Independent investigation, impact, and declaration of emergency o St. Joseph update
Ethics: What’s is the role of the Scientist o Advocate vs. scientist o Troublemaker scientists
Crossing the Imaginary Line o Rebuttal o Questions to ask oneself
Ethics and Environmental Justice Summary o Achieving environmental justice
Homework Assignment: EJSCREEN Map Activity
Administer a copy of the EJSCREEN Map Activity to each student to take home. o Have students report their findings to the class.
References Just health action website: http://justhealthaction.org/wp-content/uploads/2010/05/JHA-Lesson-Plan-2-Whose-Backyard-rev.pdf
34
Ethics Lesson Goal In this lesson students will reflect on what ethics means to them, read letters to “The Ethicist” in The New York Times, and discuss solutions to ethical dilemmas from their own lives. TOTAL TIME: 1.5 hours Activities
Ethics Column Activity Materials Ethics Column Activity:
Pens/pencils
Paper
Student journal
Two containers
Classroom board
Copies of the “The Ethicist: No Edit”
Lesson Objectives
Explore and examine their own code of ethics by writing and talking about ethical dilemmas from their own lives.
Read ethical dilemmas from classmates’ lives and discuss the ethical dilemmas in the these situations in small groups.
Write their own “Ethicist” column in response to their classmates’ questions.
Background In this lesson plan students will read and discuss Randy Cohen’s ethics response column “ The Ethicist: No Edit” and examine ethical issues raised by the anonymous letters. The activity will give student the opportunity to engage in ethical reflection through creating their own ethics advice column. Course Materials
Article “The Ethicist: No Edit” //www.nytimes.com/learning/teachers/featured_articles/20070716
If article does not work type in the name “The Ethicist: No Edit” into google search to access it.
Time Breakdown:
10 minutes Warmup
60 minutes Discussion of Reading
Ethics Column Activity
15 minutes Wrap Up
Lesson Breakdown: Warm Up
Write the following prompt on the board prior to class: “Describe a time when you had an ethical or moral dilemma. What did you choose to do, and why? Do you consider your choice to be an ethical one? Why or why not?”
1. Allow students several minutes to respond, and then have them share what they have written. What types of ethical and/or moral dilemmas do kids or teenagers face most often? What influences people to act according to a code of ethics? What influences people to act against this code? Where did students learn their code of ethics? Does everyone agree about what is ethical and what is not? Why might people disagree?
35
Ethics Column Activity
As a class, read and discuss the article “The Ethicist: No Edit” First provide students with a copy of the readers’ questions without Randy Cohen’s responses. Read the first question as a class focusing on the following questions:
1. What reason does the unnamed teacher give for not editing his/her students’ application essays?
2. For what reasons do other teachers decide to edit their students’ application essays? 3. Which stance do you think is the most ethical? 4. Which stance do you think is the most helpful to students in the short and long run? 5. How would you answer this teacher’s question?
Once they have answered these questions, have the class read Mr. Cohen’s response, focusing on the following questions:
1. Do you agree with the Ethicist’s answer? Why or why not? 2. What is the difference between “hands-on” tactics such as “editing or proofreading”
and “guiding students toward producing first-rate work that is their own”? 3. What forms of writing guidance does Mr. Cohen endorse? 4. In what ways have teachers helped you become better writers?
Read the second question from the column focusing on the following questions: 1. What dilemma is “Name Withheld, Michigan” facing? 2. Why is this a question of ethics? 3. How would you answer this person’s question?
Once they have answered these questions, have the class read Mr. Cohen’s response focusing on the following questions:
1. What does Mr. Cohen advocate as the ethical response to this dilemma? b. Do you agree with his advice?
2. Do you think that students in your class have a similar code of ethics to Randy Cohen? Why or why not?
Brainstorm o Inform your students that they will be writing their own ethics column for the school
newspaper and that they will be responding to questions from their classmates. o To begin, create a brainstorm list on the classroom board and label it “Virtues Possessed
by an Ethical Person.” Have students offer characteristics that would be exhibited by an ethical person as you note them on the board. You may need to give a few examples to begin discussion (e.g., honesty, fairness, trustworthiness, reliability, responsibility, etc.). Explain to students that people may have differences of opinion about whether or not certain virtues should always be associated with ethical people. To illustrate this, ask students if an ethical person should always, under all circumstances, tell the truth. Is there a time when it stops being ethical to remain loyal to a friend? Is it always ethical to obey an authority figure? Why or why not?
36
Draft Questions o Once students have completed this brainstorm, have them to look at the list and come
up with a question from their own lives, or the life of a friend or family member that they believe to contain an ethical dilemma.
o Instruct your students to draft a question to which they would feel comfortable having their classmates respond. If any students have difficulty coming up with a question, have them take a second look at the “Virtues Possessed by an Ethical Person” list on the board and think about an aspect of their lives or the life of a friend or family member that has dealt with questions of honesty, reliability, trustworthiness or any of the other virtues listed. Have they thought about lying to a teacher, family member, friend or boss? Have they ever considered not doing something that others were relying on them to do?
Divide Class Into Smaller Groups o Once students have composed their questions, divide the class in half. Provide two
containers (e.g., hats, small bags, or bowls), one for each half of the class, and have each half put its questions into the given container.
o Next, instruct the halves to switch containers and have each student to remove one question from the container. Within each half of the class, have students split into smaller groups of three to five students each. Then, have students read their given questions to their group mates. Remind the class that there may be differences of opinion within groups and they should be respectful of each other’s ideas. For each question, groups should discuss the following questions:
1) What is the question of ethics here? 2) What makes it an ethical dilemma? 3) What do you think is the most ethical advice to give to this person? Why? 4) Is there more than one response to this question that could be considered
ethical? Why or why not? 5) What virtues would be displayed by this person if they chose to act ethically in this
situation? Wrap Up Discussion
Once each group has discussed all of its questions, have the class reconvene for a wrap-up discussion.
o After writing and discussing these questions, what role do they think ethics plays in their lives?
o How often are they faced with ethical dilemmas? o In general, do they consider themselves to be ethical? o Is it as important to make ethical decisions about everyday matters as it is to be ethical
about more serious issues (e.g., health, safety, or wellbeing)? Why or why not?
In a future class, students should share their responses and, as a group, vote on one to send to the school newspaper for publication, or to Randy Cohen at The New York Times. Queries to Mr. Cohen may be addressed to: [email protected] or The Ethicist, The New York Times Magazine, 229 West 43rd Street, New York, N.Y. 10036. Be sure to include a daytime phone number.
Reference: Kavanagh, Sarah, and Andrea Perelman. "The Good, the Bad and "The Ethicist". The Learning Network: The New York Times, 16. July.2007. Web. 4. June. 2018
37
Risk Assessment Lesson Goal Introduce students to basics of health risk assessment in order to better understand and communicate health risks from environmental exposures. TOTAL TIME: 1 hour 20 minutes Activities
Health Risk worksheet
Exposure Assessment worksheet
Materials
None.
Lesson Objectives
Understanding that risk assessment is a process in which information is analyzed to determine if an environmental hazard might cause harm to exposed persons and ecosystems
Understanding the basics of health risk assessment paradigm and how it helps you understand and communicate health risk from environmental exposures
Provide examples of health risk assessment during presentation and in-class assignment
Unit conversions necessary for lead health-based risk assessments
Background The main focus of this lecture is to teach students the basics of health risk assessment. Students will learn how to perform unit conversions necessary for risk assessment through an in-class assignment. This will help students understand how information is analyzed to determine potential environmental hazards. Course Materials
Health Risk and Exposure Assessment worksheet Time Breakdown:
30 minutes Health Risk Power point
30 minutes
Health Risk worksheet
20 minutes Exposure Assessment worksheet
Lesson breakdown: 30 minutes:
Components of Risk Assessment
Basic unit conversions o Worksheet will have more detailed examples of conversions and there will be questions
Briefly go through components of risk assessment (hazard identification, dose-response assessment, risk exposure, and exposure assessment)
Questions for ADD/LADD are a little more difficult and hints are provided for help 30 minutes:
Handout the worksheets (Lecture 6 worksheet and Personal Data sheet) and allow students to work in groups
Students will bring home the Personal Data sheet to be completed before Lecture 9
After everyone is done, or near done, go over the answers with Lecture 6 Answer key
38
20 minutes:
Allow students to write on chalkboard for comparison of lead exposures
Students will tabulate data on board and on an excel sheet
Make graphs/tables and hand to the class for each student to mark where their exposure are compared to the class. Take home assignment: (In preparation of EPA IEUBK Model lecture)
Students will keep a diary to record drinking water intake (Personal Data worksheet) o Give students a log sheet with more than one measurement of water amount to
practice their unit conversion
Also, record family members as well (use another copy of the sheet)
Measurements to record on log: volume consumed per day
39
EPA's IEUK Model and Exposure Assessment
Lesson Goal Introduce students to basics of EPA's IEUBK Model and it applications for child blood lead level exposure Activities
IEUBK activity Materials
computer
Lesson Objectives
Be able to download, navigate, and use EPA's IEUBK Model to get a potential BBL
Evaluate BLL using IEUBK model and exposure data to derive estimates of childhood BLL
Understand data and models estimates about EPA IEUBK's Model
Understand potential health impacts of modeled BLLs
Be able to discuss implications of results to peers, teachers, and families
Background The main focus of this portion of the lecture is to teach students how to use EPA's IEUBK model. Students will also use this model to estimate childhood BLL. Course Materials Video about IEUBK: https://www.youtube.com/watch?v=jver1TZ5_ac&feature=youtu.be
Time Breakdown:
15 minutes Power point
30 minutes IEUBK Parameter Setup Worksheet
40 minutes IEUBK lecture worksheet
Lesson Breakdown: 15 minutes
Brief introduction to EPA’s IEUBK Model o Discuss underlying assumptions upon which model is based
Run through 2 examples of varying exposure assumptions (high lead levels vs. low lead levels and water intake differences)
Demonstrate to class how varying exposure assumptions (water intake) can impact BLLs
Explain each input value and how the value was derived
Ask students what interpretation means for each example 30 minutes
Go through the worksheet “IEUBK Parameter setup” together as a class
Allows students to practice with made up scenarios on EPA IEUBK’s Model with IEUBK parameter setup worksheet as a guide
Give assistance to class when needed
40
40 minutes
Input their collected values from the health risk handout (Personal Data sheet) into the IEUBK model and work on IEUBK lecture worksheet
Go over answers for IEUBK lecture worksheet towards the end of class
41
Health Communication Lesson Goal Introduce students to basics of health communication to obtain a better understanding of how health information is distributed to the public TOTAL TIME: 50 minutes Activities
Health communication handout Materials
none
Lesson Objectives
Understand the Healthy People 2020 goal: Health Communication and Health Information Technology goal.
Identify the various levels at which health communication occur using the social ecological model.
Identify the types and characteristics of effective health communication.
Recognize steps to creating effective health communication strategies
Understand the concept of health literacy and digital divide
Background The main focus of this lecture is to teach students about health communication. Students will learn about the various levels of health communication and learn the steps needed to create effective health communication. Course Materials
Sources for social ecological model: https://www.acha.org/HealthyCampus/Implement/Ecological_Model/HealthyCampus/Ecological_Model.aspx?hkey=f5defc87-662e-4373-8402-baf78d569c78
Time Breakdown:
15 minutes Healthy People 2020 Introduction Where Health Communication occurs Hand out- Communicating effects of lead in drinking water at each level.
20minutes
Types of Health Communication
Characteristics of Effective Health Communication
Steps to create Effective Health Communication
15 minutes Health literacy and Digital divide Conclusion: Assignment and assign homework
Lesson Breakdown: 15 minutes
Introduction question: Why is health communication important?
Healthy People (HP) 2020 o Goal o Objective
Discussion points:
42
o What is the importance of having such a goal in the HP 2020? o What other objectives do you think should go under the goal?
Where Health Communication Occurs? o Different levels
Hand-out– Communicating effects of lead in drinking water at each level 20 minutes
Types of Health Communication
Characteristics of Effective Health Communication
Steps to create Effective Health Communication 15 minutes
Health Literacy and Digital divide o What is it? o Why does it exist? o Factors influencing?
Discussion points: o Can you provide an example of each (of the factors affecting health literacy)? o What other factors contribute to the digital divide?
Assignment: Leaders, tell us about lead! Homework: Read LCR report and answer questions.

43
Final Project Overview Becoming an Environmental Advocate For this project you will identify one environmental and human health problem and become part of the solution to that problem. There will be 3 parts to this project. First you will educate others in the community about the issue you have chosen to tackle. Second, you will develop and implement a plan to help solve the problem. Third, you will collect and analyze data to determine if your efforts were successful. If you were not successful, you will discuss what you could do differently to increase success. Essential Questions How can one individual influence change? How can your local actions affect the global environment? How can accountability toward the environment affect sustainability? How can education and collaboration affect environmental stewardship? Final Product
1. Education Materials and resources used to educate and solve problem. a. OR Policy recommendations b. OR Intervention and intervention plan
2. Project plan – identifies the problem to be solved and proposes ideas on how to solve the problem and data that could be collected.
3. Project report. Report should include a brief description of your project and analysis of the effectiveness of your project. In this description you should address how the local actions affect a global environment. You should include all data you collected and analysis of that data. You should also discuss if this project had an impact on the way you will live your life (ex. Has your sense of responsibility changed toward environmental and human health? )
4. Presentation to the class summarizing your project and what you have learned.
Timeline
Date Material Due
Week of March 12th – Exam week
Project proposal due at end of class. Your proposal should include a description of the problem you plan to address, an outline of how you will address the problem and the data you plan to collect.
Week of April 9th Status report outlining work done and data collected on your project.
Week of April 30th Report and project presentation due.
Copyright © 2022 FDOKUMEN