Energy Sector Asset Management - NCCoE - NIST
83
NIST SPECIAL PUBLICATION 1800-23C Energy Sector Asset Management For Electric Utilities, Oil & Gas Industry Volume C: How-To Guides James McCarthy Glen Joy National Cybersecurity Center of Excellence Information Technology Laboratory Lauren Acierto Jason Kuruvilla Titilayo Ogunyale Nikolas Urlaub John Wiltberger Devin Wynne The MITRE Corporation McLean, Virginia September 2019 DRAFT This publication is available free of charge from https://www.nccoe.nist.gov/projects/use-cases/energy-sector/asset-management
-
Upload
khangminh22 -
Category
Documents
-
view
1 -
download
0
Transcript of Energy Sector Asset Management - NCCoE - NIST

NIST SPECIAL PUBLICATION 1800-23C
Energy Sector Asset Management For Electric Utilities, Oil & Gas Industry Volume C: How-To Guides James McCarthy Glen Joy National Cybersecurity Center of Excellence Information Technology Laboratory Lauren Acierto Jason Kuruvilla Titilayo Ogunyale Nikolas Urlaub John Wiltberger Devin Wynne The MITRE Corporation McLean, Virginia September 2019 DRAFT This publication is available free of charge from https://www.nccoe.nist.gov/projects/use-cases/energy-sector/asset-management

DRAFT
NIST SP 1800-23C: Energy Sector Asset Management i
DISCLAIMER Certain commercial entities, equipment, products, or materials may be identified by name or company logo or other insignia in order to acknowledge their participation in this collaboration or to describe an experimental procedure or concept adequately. Such identification is not intended to imply special status or relationship with NIST or recommendation or endorsement by NIST or NCCoE; neither is it intended to imply that the entities, equipment, products, or materials are necessarily the best available for the purpose.
National Institute of Standards and Technology Special Publication 1800-23C, Natl. Inst. Stand. Technol. Spec. Publ. 1800-23C, 76 pages, (September 2019), CODEN: NSPUE2
FEEDBACK You can improve this guide by contributing feedback. As you review and adopt this solution for your own organization, we ask you and your colleagues to share your experience and advice with us.
Comments on this publication may be submitted to: [email protected].
Public comment period: September 23, 2019 through November 25, 2019
All comments are subject to release under the Freedom of Information Act.
National Cybersecurity Center of Excellence National Institute of Standards and Technology
100 Bureau Drive Mailstop 2002
Gaithersburg, MD 20899 Email: [email protected]

DRAFT
NIST SP 1800-23C: Energy Sector Asset Management ii
NATIONAL CYBERSECURITY CENTER OF EXCELLENCE 1
The National Cybersecurity Center of Excellence (NCCoE), a part of the National Institute of Standards 2 and Technology (NIST), is a collaborative hub where industry organizations, government agencies, and 3 academic institutions work together to address businesses’ most pressing cybersecurity issues. This 4 public-private partnership enables the creation of practical cybersecurity solutions for specific 5 industries, as well as for broad, cross-sector technology challenges. Through consortia under 6 Cooperative Research and Development Agreements (CRADAs), including technology partners—from 7 Fortune 50 market leaders to smaller companies specializing in information technology security—the 8 NCCoE applies standards and best practices to develop modular, easily adaptable example cybersecurity 9 solutions using commercially available technology. The NCCoE documents these example solutions in 10 the NIST Special Publication 1800 series, which maps capabilities to the NIST Cybersecurity Framework 11 and details the steps needed for another entity to re-create the example solution. The NCCoE was 12 established in 2012 by NIST in partnership with the State of Maryland and Montgomery County, 13 Maryland. 14
To learn more about the NCCoE, visit https://www.nccoe.nist.gov/. To learn more about NIST, visit 15 https://www.nist.gov. 16
NIST CYBERSECURITY PRACTICE GUIDES 17
NIST Cybersecurity Practice Guides (Special Publication 1800 series) target specific cybersecurity 18 challenges in the public and private sectors. They are practical, user-friendly guides that facilitate the 19 adoption of standards-based approaches to cybersecurity. They show members of the information 20 security community how to implement example solutions that help them align more easily with relevant 21 standards and best practices, and provide users with the materials lists, configuration files, and other 22 information they need to implement a similar approach. 23
The documents in this series describe example implementations of cybersecurity practices that 24 businesses and other organizations may voluntarily adopt. These documents do not describe regulations 25 or mandatory practices, nor do they carry statutory authority. 26
ABSTRACT 27
Industrial control systems (ICS) compose a core part of our nation’s critical infrastructure. Energy sector 28 companies rely on ICS to generate, transmit, and distribute power and to drill, produce, refine, and 29 transport oil and natural gas. Given the wide variety of ICS assets, such as programmable logic 30 controllers and intelligent electronic devices, that provide command and control information on 31 operational technology (OT) networks, it is essential to protect these devices to maintain continuity of 32 operations. These assets must be monitored and managed to reduce the risk of a cyber attack on 33 ICS-networked environments. Having an accurate OT asset inventory is a critical component of an 34 overall cybersecurity strategy. 35
DRAFT
NIST SP 1800-23C: Energy Sector Asset Management iii
The NCCoE at NIST is responding to the energy sector’s request for an automated OT asset management 36 solution. To remain fully operational, energy sector entities should be able to effectively identify, 37 control, and monitor their OT assets. This document provides guidance on how to enhance OT asset 38 management practices, by leveraging capabilities that may already exist in an energy organization’s 39 operating environment as well as by implementing new capabilities. 40
KEYWORDS 41
energy sector asset management; ESAM; ICS; industrial control system; malicious actor; monitoring; 42 operational technology; OT; SCADA; supervisory control and data acquisition 43
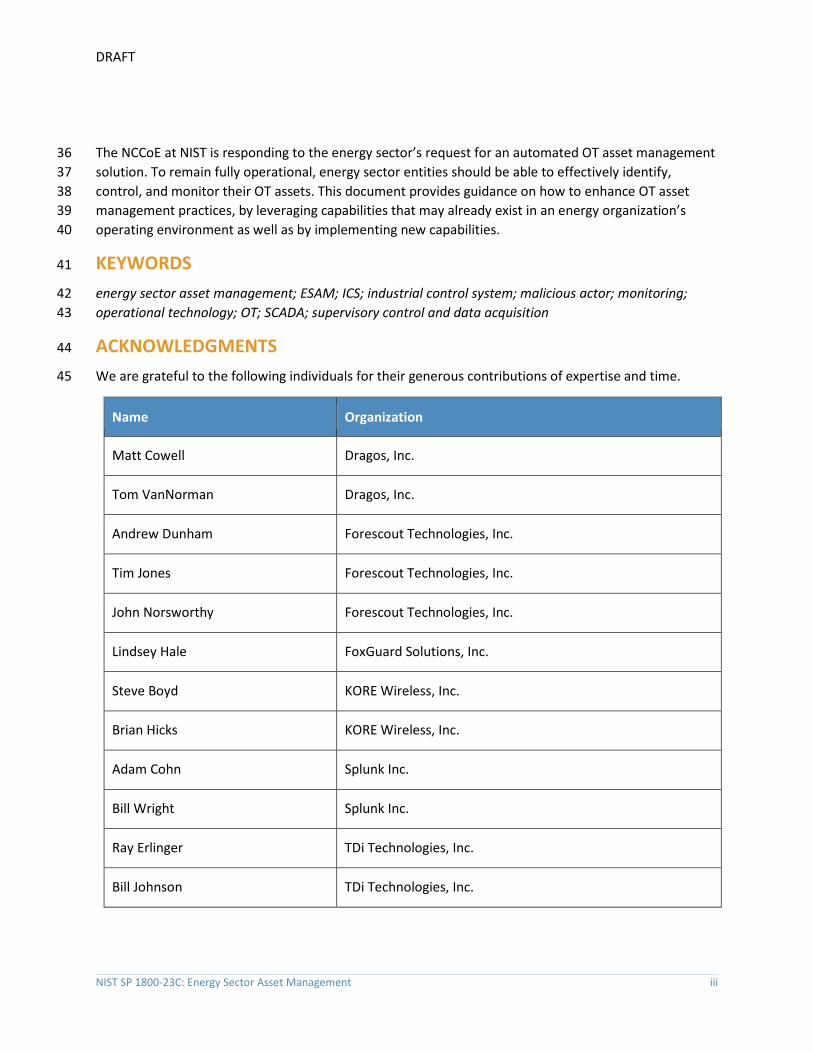
ACKNOWLEDGMENTS 44
We are grateful to the following individuals for their generous contributions of expertise and time. 45
Name Organization
Matt Cowell Dragos, Inc.
Tom VanNorman Dragos, Inc.
Andrew Dunham Forescout Technologies, Inc.
Tim Jones Forescout Technologies, Inc.
John Norsworthy Forescout Technologies, Inc.
Lindsey Hale FoxGuard Solutions, Inc.
Steve Boyd KORE Wireless, Inc.
Brian Hicks KORE Wireless, Inc.
Adam Cohn Splunk Inc.
Bill Wright Splunk Inc.
Ray Erlinger TDi Technologies, Inc.
Bill Johnson TDi Technologies, Inc.

DRAFT
NIST SP 1800-23C: Energy Sector Asset Management iv
Name Organization
Samantha Pelletier TDi Technologies, Inc.
Gabe Authier Tripwire, Inc.
Steven Sletten Tripwire, Inc.
Jim Wachhaus Tripwire, Inc.
The Technology Partners/Collaborators who participated in this build submitted their capabilities in 46 response to a notice in the Federal Register. Respondents with relevant capabilities or product 47 components were invited to sign a Cooperative Research and Development Agreement (CRADA) with 48 NIST, allowing them to participate in a consortium to build this example solution. We worked with: 49
Technology Partner/Collaborator Build Involvement
Dragos, Inc. Dragos Platform v1.5
Forescout Technologies, Inc. ForeScout CounterACT v8.0.1
FoxGuard Solutions, Inc. FoxGuard Solutions Patch and Update Management Program v1
KORE Wireless Group, Inc. KORE Wireless Cellular Connectivity with Cellular Gateway v2.0
Splunk, Inc. Splunk Enterprise v7.1.3
TDi Technologies, Inc. TDi Technologies ConsoleWorks v5.2-0u1
Tripwire, Inc. Tripwire Industrial Visibility v3.2.1

DRAFT
NIST SP 1800-23C: Energy Sector Asset Management v
Contents 50
1 Introduction ......................................................................................... 1 51
1.1 Practice Guide Structure ............................................................................................... 1 52
1.2 Build Overview .............................................................................................................. 2 53
1.3 Typographic Conventions .............................................................................................. 4 54
1.4 Logical Architecture Summary ...................................................................................... 4 55
2 Product Installation Guides .................................................................. 4 56
2.1 ConsoleWorks ................................................................................................................ 4 57
2.1.1 ConsoleWorks Configurations at the NCCoE ................................................................ 5 58
2.2 Forescout CounterACT ................................................................................................ 30 59
2.2.1 CounterACT Enterprise Manager Configuration ......................................................... 31 60
2.2.2 CounterACT Appliance Configuration ......................................................................... 42 61
2.3 Dragos Platform ........................................................................................................... 43 62
2.3.1 Dragos Sitestore Configuration ................................................................................... 43 63
2.3.2 Dragos Midpoint Sensor ............................................................................................. 45 64
2.3.3 Dragos Splunk Integration .......................................................................................... 45 65
2.4 FoxGuard Patch and Update Management Program .................................................. 47 66
2.4.1 Patch Report ............................................................................................................... 47 67
2.5 Kore Wireless ............................................................................................................... 54 68
2.5.1 Bridge Configuration ................................................................................................... 55 69
2.5.2 Virtual Private Network Configuration ....................................................................... 56 70
2.6 pfSense VPN ................................................................................................................ 58 71
2.6.1 Plano and UMD VPN Configuration ............................................................................ 58 72
2.7 Splunk .......................................................................................................................... 58 73
2.7.1 Splunk Enterprise Configuration ................................................................................. 59 74
2.8 Tripwire Industrial Visibility ......................................................................................... 61 75
2.8.1 Tripwire Industrial Visibility Configuration UMD ........................................................ 62 76
2.8.2 Tripwire Industrial Visibility Configuration Plano ....................................................... 68 77

DRAFT
NIST SP 1800-23C: Energy Sector Asset Management vi
2.8.3 Tripwire Industrial Visibility Configuration National Cybersecurity Center of 78 Excellence ................................................................................................................... 69 79
Appendix A List of Acronyms .................................................................. 76 80
List of Figures 81
Figure 1-1 High-Level Topology ...........................................................................................................3 82
Figure 2-1 Update Availability Summary ........................................................................................... 48 83
Figure 2-2 Device Update Availability Details-1 ................................................................................. 49 84
Figure 2-3 Device Update Availability Details-2 ................................................................................. 50 85
Figure 2-4 Device Update Availability Details-3 ................................................................................. 51 86
Figure 2-5 Device Update Availability Details-4 ................................................................................. 52 87
Figure 2-6 Device Update Availability Details-5 ................................................................................. 53 88
Figure 2-7 Patch Evidence Documentation ........................................................................................ 54 89
List of Tables 90
Table 2-1 Dragos Required Files ........................................................................................................ 44 91

NIST SP 1800-23C: Energy Sector Asset Management 1
1 Introduction 92
The following volumes of this guide show information technology (IT) professionals and security 93 engineers how we implemented this example solution. We cover all of the products employed in this 94 reference design. We do not re-create the product manufacturers’ documentation, which is presumed 95 to be widely available. Rather, these volumes show how we incorporated the products together in our 96 environment. 97
Note: These are not comprehensive tutorials. There are many possible service and security configurations 98 for these products that are out of scope for this reference design. 99
1.1 Practice Guide Structure 100
This National Institute of Standards and Technology (NIST) Cybersecurity Practice Guide demonstrates a 101 standards-based reference design and provides users with the information they need to replicate this 102 asset management solution in the energy sector. This reference design is modular and can be deployed 103 in whole or in part. 104
This guide contains three volumes: 105
NIST SP 1800-23A: Executive Summary 106
NIST SP 1800-23B: Approach, Architecture, and Security Characteristics – what we built and why 107
NIST SP 1800-23C: How-To Guides – instructions for building the example solution (you are 108 here) 109
Depending on your role in your organization, you might use this guide in different ways: 110
Senior IT executives, including chief information security and technology officers, will be interested in 111 the Executive Summary, NIST SP 1800-23A, which describes the following topics: 112
challenges that enterprises face in operational technology (OT) asset management 113
example solution built at the NCCoE 114
benefits of adopting the example solution 115
Technology or security program managers who are concerned with how to identify, understand, assess, 116 and mitigate risk will be interested in NIST SP 1800-23B, which describes what we did and why. The 117 following sections will be of particular interest: 118
Section 3.4, Risk Assessment, provides a description of the risk analysis we performed. 119
Section 3.4.4, Security Control Map, maps the security characteristics of this example solution to 120 cybersecurity standards and best practices. 121

DRAFT
NIST SP 1800-23C: Energy Sector Asset Management 2
You might share the Executive Summary, NIST SP 1800-23A, with your leadership team members to help 122 them understand the importance of adopting a standards-based solution to strengthen their OT asset 123 management practices, by leveraging capabilities that may already exist within their operating 124 environment or by implementing new capabilities. 125
IT professionals who want to implement an approach like this will find this whole practice guide useful. 126 You can use this How-To portion of the guide, NIST SP 1800-23C, to replicate all or parts of the build 127 created in our lab. This How-To portion of the guide provides specific product installation, configuration, 128 and integration instructions for implementing the example solution. We do not recreate the product 129 manufacturers’ documentation, which is generally widely available. Rather, we show how we 130 incorporated the products together in our environment to create an example solution. 131
This guide assumes that IT professionals have experience implementing security products within the 132 enterprise. While we have used a suite of commercial products to address this challenge, this guide does 133 not endorse these particular products. Your organization can adopt this solution or one that adheres to 134 these guidelines in whole, or you can use this guide as a starting point for tailoring and implementing 135 parts of the energy sector asset management (ESAM) solution. Your organization’s security experts 136 should identify the products that will best integrate with your existing tools and IT system infrastructure. 137 We hope that you will seek products that are congruent with applicable standards and best practices. 138 Volume B, Section 3.5, Technologies, lists the products that we used and maps them to the 139 cybersecurity controls provided by this reference solution. 140
A NIST Cybersecurity Practice Guide does not describe “the” solution, but a possible solution. This is a 141 draft guide. We seek feedback on its contents and welcome your input. Comments, suggestions, and 142 success stories will improve subsequent versions of this guide. Please contribute your thoughts to 143 [email protected]. 144
Acronyms used in figures can be found in the List of Acronyms appendix. 145
1.2 Build Overview 146
The example solution fulfills the need for an automated asset inventory. This example solution allows 147 devices to be identified in multiple ways, depending on the needs of the organization. The architecture 148 is intended as one solution. 149
The example solution makes use of two “remote” sites, while the National Cybersecurity Center of 150 Excellence (NCCoE) serves as the enterprise location as shown in Figure 1-1 below. Having a central 151 enterprise location provides flexibility to add multiple sites as well as the ability to collect all data in one 152 place. 153

DRAFT
NIST SP 1800-23C: Energy Sector Asset Management 3
Figure 1-1 High-Level Topology 154
155
Different components in the build are installed at each location. However, some components preexist, 156 including the OT assets, networks, routers, and protocol converters. This guide will describe the 157 installation and configuration details of the components installed at each site but not preexisting 158 components. A detailed topology and description of each site can be found in Volume B, Section 4.2, 159 Example Solution. 160

DRAFT
NIST SP 1800-23C: Energy Sector Asset Management 4
1.3 Typographic Conventions 161
The following table presents typographic conventions used in this volume. 162
Typeface/Symbol Meaning Example
Italics file names and path names; references to documents that are not hyperlinks; new terms; and placeholders
For language use and style guidance, see the NCCoE Style Guide.
Bold names of menus, options, command buttons, and fields
Choose File > Edit.
Monospace command-line input, onscreen computer output, sample code examples, and status codes
mkdir
Monospace Bold command-line user input contrasted with computer output
service sshd start
blue text link to other parts of the document, a web URL, or an email address
All publications from NIST’s NCCoE are available at https://www.nccoe.nist.gov.
1.4 Logical Architecture Summary 163
A logical architecture summary can be found in Volume B of this practice guide, Section 4.1, Architecture 164 Description. 165
2 Product Installation Guides 166
This section of the practice guide contains detailed instructions for installing and configuring all of the 167 products, where applicable, used to build an instance of the example solution. 168
2.1 ConsoleWorks 169
ConsoleWorks performs as a data collection server and a data analysis server. The data collection server 170 is located at the University of Maryland (UMD) and reads data from a steam meter via protocol 171 converters. The data analysis server resides at the NCCoE and normalizes data collected from security 172 information and event management (SIEM) software, for processing by the patch analysis and reporting 173 tool. 174

DRAFT
NIST SP 1800-23C: Energy Sector Asset Management 5
2.1.1 ConsoleWorks Configurations at the NCCoE 175
The following subsections document the software, hardware/virtual machine (VM), and network 176 configurations for the ConsoleWorks server at the NCCoE. 177
2.1.1.1 VM Configuration 178
The ConsoleWorks VM is given the following resources: 179
CentOS 7.5 180
Central processing unit (CPU) cores 181
100 gigabyte (GB) hard disk 182
10 GB random access memory (RAM) 183
1 network interface controller/card (NIC) 184
2.1.1.2 Network Configuration 185
Dynamic Host Configuration Protocol (DHCP): disabled 186
Internet protocol version (IPv)6: ignore 187
IPv4: Manual 188
IPv4 address: 10.100.100.6 189
Netmask: 255.255.255.0 190
2.1.1.3 Installation 191
1. Download the installation kit from the http://support.tditechnologies.com website. A username and 192 password are required, so contact TDi Support at [email protected] to request them. 193
2. Create a directory to contain the ConsoleWorks installation files: #mkdir temp/conworks 194
3. Run the following command: # yum local install consoleworkssssl-<version>_x86_64.rpm 195
4. Extract the provided compressed license script to /tmp/conworks. 196
5. Run the script from the extracted zip file. 197
6. Start ConsoleWorks with the following command: # /opt/ConsoleWorks/bin/cw_start default 198

DRAFT
NIST SP 1800-23C: Energy Sector Asset Management 6
7. Connect to the Console at https://10.100.100.6:5176. Log in using the default credentials.199
200
8. Fill in the details for Registration. Click Register Online. Click Save.201
202

DRAFT
NIST SP 1800-23C: Energy Sector Asset Management 7
9. Create a new user. Navigate on the left to Users > Add. 203
204
10. Enter the Name and Password. Select Add.205
206

DRAFT
NIST SP 1800-23C: Energy Sector Asset Management 8
11. Add CONSOLE_MANAGER as a selected profile, as shown in the screenshot below. Select OK.207
208
12. Click Save. 209
2.1.1.4 Configuration 210
ConsoleWorks provides the scripts to normalize data, for processing by FoxGuard Patch and Update 211 Management Program (PUMP). The script provided is in extensible markup language (XML) format. 212
1. Import the provided XML file at Admin > Database Management > XML Imports > Import.213
214

DRAFT
NIST SP 1800-23C: Energy Sector Asset Management 9
2. Click Choose Files. Locate the provided XML file. Select Next.215
216
3. Select Next. The import is complete.217
218

DRAFT
NIST SP 1800-23C: Energy Sector Asset Management 10
4. Open the baseline configuration at Tools > Baseline Configurations > View. Select Edit.219
220
5. Under Processors, select the scan, and click Edit.221
222
6. Under Collection, update the path to match where Splunk saves the inventory, as shown in the 223 screenshot. 224
// TODO: Change path to parent directory of CSV data file 225

DRAFT
NIST SP 1800-23C: Energy Sector Asset Management 11
runSetup("cd /opt/splunk/var/run/splunk/csv"); 226
// Read the newest file in the directory 227
runCommand("cat \`ls -t | head -1\`", "Forescout_Information", 5); 228
229
7. Under Reduction, enter the following script, as shown in the screenshot below. 230
231

DRAFT
NIST SP 1800-23C: Energy Sector Asset Management 12
include("UTIL"); 232
include("UTIL_CUSTOM_FILE"); 233
include("UTIL_JSON"); 234
///////////////////////////////////////////////////////////////////////////////235 ////////////////////////// 236
// Massage the header 237
function correctHeader(str) { 238
return((/[\w\-\ ]*type\b/i.test(str)) ?"ApplicationType" 239
: (/\bip[\w\-\ ]*/i.test(str)) ?"IPAddress" 240
: (/\bmac[\w\-\ ]*/i.test(str)) ?"MACAddress" 241
: (/\bmodel[\w\-\ ]*/i.test(str)) ?"ModelNumber" 242
: (/\bpart[\w\-\ ]*/i.test(str)) ?"PartNumber" 243
: (/\basset.?id\b/i.test(str)) ?"PK" 244
: (/\bproduct[\w\-\ ]*/i.test(str))?"ProductName" 245
: (/\bserial[\w\-\ ]*/i.test(str)) ?"SerialNumber" 246
: (/\bvendor/i.test(String(str))) ?"VendorName" 247
: (/version/i.test(String(str))) ?"VersionName" 248
: String(str).replace(/[\W\_]+/g, " 249 ").camelSpaced().toCapCase().replace(/\ +/g, "")); 250
} 251
///////////////////////////////////////////////////////////////////////////////252 ////////////////////////// 253
// ref: http://stackoverflow.com/a/1293163/2343 254
function CSVToArray(strData, strDelimiter) { 255
// Check to see if the delimiter is defined. If not, then default to comma. 256
strDelimiter=(typeof strDelimiter!='undefined')?strDelimiter:","; 257
// Create a regular expression to parse the CSV values. 258
// Delimiters Quoted fields 259 Standard fields. 260
var objPattern=new 261 RegExp(("(\\"+strDelimiter+"|\\r?\\n|\\r|^)(?:\"([^\"]*(?:\"\"[^\"]*)*)\"|([^\"262 \\"+strDelimiter+"\\r\\n]*))"), "gi"); 263
// Create an array to hold our data. Give the array a default empty first row. 264

DRAFT
NIST SP 1800-23C: Energy Sector Asset Management 13
var arrData=[[]]; 265
// Create an array to hold our individual pattern matching groups. 266
var arrMatches=null; 267
// Keep looping over the regular expression matches until we can no longer 268 find a match. 269
while(arrMatches=objPattern.exec(strData)) { 270
// Get the delimiter that was found. 271
var strMatchedDelimiter=arrMatches[1]; 272
// Check to see if the given delimiter has a length (is not the start of 273 string) and if it matches field delimiter. 274
// If it does not, then we know that this delimiter is a row delimiter. 275
if(strMatchedDelimiter.length && strMatchedDelimiter!==strDelimiter) { 276
// Since we have reached a new row of data, add an empty row to our data 277 array. 278
arrData.push([]); 279
} 280
var strMatchedValue; 281
// Now that we have our delimiter out of the way, let's check to see which 282 kind of value we captured (quoted or unquoted). 283
if(arrMatches[2]) { 284
// We found a quoted value. When we capture this value, unescape any 285 double quotes. 286
//strMatchedValue=arrMatches[2].replace(new RegExp( "\"\"", "g" ), "\""); 287
strMatchedValue=arrMatches[2].replace(/\"{2}/g, '"'); 288
} else { 289
// We found a non-quoted value. 290
strMatchedValue=arrMatches[3]; 291
} 292
// Now that we have our value string, let's add it to the data array. 293
arrData[arrData.length-1].push(strMatchedValue); 294
} 295
// Return the parsed data. 296
DRAFT
NIST SP 1800-23C: Energy Sector Asset Management 14
return(arrData); 297
} 298
///////////////////////////////////////////////////////////////////////////////299 ////////////////////////// 300
function procCSV(csv) { 301
// Convert string to YYYYMMDD_HHMMSS for readability 302
var outputDir="/FOXGUARD/"+(now.slice(0,8)); 303
var outputFile=""+outputDir+"/"+(now.slice(8,14)); 304
var result=[]; 305
// Default of negative feedback 306
var tracker=false; 307
if(typeof csv!='undefined' && csv.length>0) { 308
try { 309
var lines=CSVToArray(csv); 310
lines.shift(); 311
if(lines.length>1) { 312
try { 313
// Header names 314
var props=lines[0]; 315
if(props.length>0) { 316
// Massage header names 317
for(var k=0;k<props.length;k++) { 318
if(props[k].length>0) { 319
props[k]=correctHeader(props[k]); 320
} 321
} 322
for(i=1;i<lines.length;i++) { 323
var j=lines[i]; 324
if(j.length>0) { 325
var obj={ 326
"ApplicationType": "Firmware", 327

DRAFT
NIST SP 1800-23C: Energy Sector Asset Management 15
"ModelNumber": "unspecified", 328
"PartNumber": "unspecified", 329
"PK": "unspecified", 330
"ProductName": "unspecified", 331
"SerialNumber": "unspecified", 332
"VendorName": "unspecified", 333
"VersionName": "unspecified" 334
}; 335
336 if(String(ServerConfig.getList()[0].conwrksinvo).split("/")[3]!="default") { 337
338 obj.Site=String(ServerConfig.getList()[0].conwrksinvo).split("/")[3]; 339
} 340
for(var k=0;k<props.length;k++) { 341
if(Boolean(j[k]) && j[k]!="-") { 342
switch(props[k]) { 343
case "IPAddress": 344
345 //obj.IPAddress=(rEIPv4.test(j[k]))?j[k].match(rEIPv4)[1]:(rEIPv6.test(j[k]))?j[k].346 match(rEIPv6)[1]:"unspecified"; 347
break; 348
case "MACAddress": 349
350 //obj.MACAddress=(rEMAC.test(j[k]))?j[k].match(rEMAC)[1]:"unspecified"; 351
break; 352
case "OperatingSystem": 353
obj.ApplicationType="Operating System"; 354
obj.OperatingSystem=j[k]; 355
obj.ProductName=j[k]; 356
break; 357
case "VendorName": 358
if(obj.VendorName=="unspecified") { 359

DRAFT
NIST SP 1800-23C: Energy Sector Asset Management 16
obj.VendorName=j[k]; 360
} 361
break; 362
case "VersionName": 363
obj.VersionName=j[k]; 364
if(rESEL.test(j[k])) { 365
obj.ModelNumber=j[k].match(rESEL)[1]; 366
obj.VendorName="Schweitzer"; 367
} 368
break; 369
default: 370
obj[props[k]]=j[k]; 371
break; 372
} 373
} 374
} 375
if(obj.hasOwnProperty('OperatingSystem')) { 376
obj.OperatingSystemVersion=obj.VersionName; 377
//delete obj.VersionName; 378
} 379
for(var p in obj) { 380
// These are required properties 381
if(["ProductName", "VendorName", "VersionName"].indexOf(p)<0) { 382
// Not a required property, and no useful data, get rid of it! 383
if(Boolean(obj[p])==false || obj[p]=="unspecified") { 384
delete obj[p]; 385
} 386
} 387
} 388
result.push({ 389

DRAFT
NIST SP 1800-23C: Energy Sector Asset Management 17
"AssetIdentifiers": obj, 390
"FUI": null 391
}); 392
} 393
} 394
try { 395
setReduction("Forescout_Information", JSON.stringify(result, null, 2)); 396
makeDirectory(""+outputDir); 397
// File for FoxGuard 398
setCustomFileContents(""+outputFile+".txt", JSON.stringify(result, 399 null, 2)); 400
// Copy of original input 401
//setCustomFileContents(""+outputFile+".csv", csv); 402
// If everything goes great, return with positive feedback 403
tracker=true; 404
} catch(ex) { 405
print("ERROR: "+ex); 406
} 407
} else { 408
print("ERROR: Missing header data"); 409
} 410
} catch(ex) { 411
print("ERROR: "+ex); 412
} 413
} else { 414
print("ERROR: Going to need more data than this"); 415
} 416
} catch(ex) { 417
print("ERROR: "+ex); 418
} 419
} else { 420

DRAFT
NIST SP 1800-23C: Energy Sector Asset Management 18
print("ERROR: We got nothing!"); 421
} 422
return(tracker); 423
} 424
///////////////////////////////////////////////////////////////////////////////////425 ////////////////////// 426
// value for TZ offset 427
var d=0; 428
try { 429
d=new Date().getTimezoneOffset(); 430
} catch(ex) { 431
print("ERROR: "+ex); 432
} 433
// Create string of YYYYMMDDHHMMSS 434
var now=String(new Date(Date.now()-(d*60000)).toJSON()).replace(/\D/g, 435 "").slice(0,14); 436
// IPv4 437
var rEIPv4=/\b((?:(?:25[0-5]|2[0-4][0-9]|1[0-9][0-9]|[1-9]?[0-9])\.){3}(?:25[0-438 5]|2[0-4][0-9]|1[0-9][0-9]|[1-9]?[0-9]))\b/; 439
// IPv6 440
var rEIPv6=/\b([\da-fA-F]{1,4}(?:\:[\da-fA-F]{0,4}){2,6}[\da-fA-F]{1,4})\b/; 441
// MAC 442
var rEMAC=/\b((?:[\da-fA-F]{2}\:){5}[\da-fA-F]{2})\b/; 443
// SEL 444
var rESEL=/\b(SEL-.+)-R/; 445
try { 446
procCSV(getOutput("Forescout_Information")); 447
} catch(ex) { 448
print("ERROR: "+ex); 449
} 450
8. Select Save. 451

DRAFT
NIST SP 1800-23C: Energy Sector Asset Management 19
9. Navigate to Consoles > Add. 452
10. Enter a name and connection details for the Splunk server. Select Save. 453
454
11. Navigate to Tools > Schedule. Click Add. 455
12. Name the schedule. Set the time to run at an acceptable interval (this build set the interval to 456 repeat daily). Under CONSOLES + BASELINES, click Add. 457
458
DRAFT
NIST SP 1800-23C: Energy Sector Asset Management 20
13. Select the previously created Splunk console and the imported baseline configuration. Click the 459 arrow. Click OK. 460
461 14. Click Save. 462
463
2.1.1.5 ConsoleWorks Configurations UMD 464
The following subsections document the software, hardware/VM, and network configurations for the 465 ConsoleWorks server at UMD. 466
2.1.1.6 VM Configuration 467
The UMD ConsoleWorks VM is given the following resources: 468
Windows Server 2016 469

DRAFT
NIST SP 1800-23C: Energy Sector Asset Management 21
2 CPU cores 470
100 GB hard Disks 471
12 GB RAM 472
2 NIC 473
2.1.1.7 Network Configuration 474
Network Configuration (Interface 1): 475
DHCP: disabled 476
IPv6: ignore 477
IPv4: Manual 478
IPv4 address: 10.100.1.6 479
Netmask: 255.255.255.0 480
Network Configuration (Interface 2): 481
DHCP: disabled 482
IPv6: ignore 483
IPv4: Manual 484
IPv4 address: 172.16.2.82 485
Netmask: 255.255.255.248 486
2.1.1.8 Installation 487
1. Download the installation kit from the http://support.tditechnologies.com website. A username and 488 password are required, so contact TDi Support at [email protected] to request them. 489
2. Run the installer cw_server_<version>.exe. 490
3. Download the Splunk universal forwarder installer from the 491 https://www.splunk.com/en_us/download/universal-forwarder.html website. A username and 492 password are required. An account can be created on the Splunk website. 493
4. Use the splunkforwarder-<version>-x64-release.msi installer to install the Splunk Universal 494 Forwarder on the machine running the ConsoleWorks. 495

DRAFT
NIST SP 1800-23C: Energy Sector Asset Management 22
5. Connect to the Console at https://10.100.1.6:5176. Log in using the default credentials.496
497 6. Fill in the details for Registration. Click Register Online. Click Save.498
499

DRAFT
NIST SP 1800-23C: Energy Sector Asset Management 23
7. Create a new user. Navigate on left to Users > Add. 500
501 8. Enter the name and password. Select Add.502
. 503

DRAFT
NIST SP 1800-23C: Energy Sector Asset Management 24
9. Add CONSOLE_MANAGER as a selected profile, as shown in the screenshot below. Select OK. 504
505
10. Click Save. 506
2.1.1.9 Configuration 507
ConsoleWorks provides the scripts to query the Modbus server. The script provided is in XML format. 508
1. Navigate to Consoles > Add. 509
2. Enter a name and connection details that will be used to connect to the Obvius data acquisition 510 server. Select Save. 511
512

DRAFT
NIST SP 1800-23C: Energy Sector Asset Management 25
3. Navigate to Admin > Database Management > XML Imports > Import. 513
514
4. Select Upload a file, then click Next. 515
516
5. Click Browse, then find the XML file. 517
518
6. Click Next. ConsoleWorks will import the two CWScripts: UTIL_MODBUS and UTIL_MODBUS_GE. 519
520
7. Navigate to Tools > Schedule. Click Add. 521

DRAFT
NIST SP 1800-23C: Energy Sector Asset Management 26
522
8. Name the schedule. Set the time to run at an acceptable interval, then save.523
524

DRAFT
NIST SP 1800-23C: Energy Sector Asset Management 27
9. Navigate to Tools > Baseline Configurations > Add. 525
526
10. Name the baseline, and set the Profile to CONSOLE_MANAGER. 527
528

DRAFT
NIST SP 1800-23C: Energy Sector Asset Management 28
11. Create a Processor to collect the information from the OBVIUS server. Click Add under Processors.529
530
12. Name the Processor, then click the highlighted button. Enter the text that follows, then click Save.531
532
include("UTIL_MODBUS"); 533 include("UTIL_MODBUS_GE"); 534
// Config 535 sections=[ 536 {name:"Product Information", fields:[ 537 {addr:288, num:1, format:"F001", name:"Gal Total", functionName: 538 readHoldingRegisters}, 539 {addr:289, num:1, format:"F001", name:"Flow Rate", functionName: 540 readHoldingRegisters}, 541 ]} 542 ]; 543

DRAFT
NIST SP 1800-23C: Energy Sector Asset Management 29
var port=502; 544 var unit=95; 545
// Execute 546 var server=console.port; 547
for(var s=0;s<sections.length;s++) { 548 setOutput(sections[s].name, formatGEOutput(modbusConnection(server, port, unit, 549 sections[s].fields))); 550 log("SPLUNK",formatGEOutput(modbusConnection(server, port, unit, 551 sections[s].fields))); 552 } 553
13. Return the Baseline Configuration, then under CONSOLE + SCHEDULES, select Add. 554
555
14. Under Console, select OBVIUS, and select MODBUS, then click >.556
557

DRAFT
NIST SP 1800-23C: Energy Sector Asset Management 30
15. Create the SPLUNK console to log the collected Modbus registers at Console > Add.558
559
16. Name the Console, and set the connector to Chain Session, the log type to Governed, and the Log 560 Directory to the below location: 561
C:\Program Files\SplunkUniversalForwarder\log\splunk 562
17. Navigate to C:\Program Files\SplunkUniversalForwarder\etc\system\local\ 563
18. Add the following lines to the outputs.conf file: 564
[tcpout:default-autolb-group] 565
server = 10.100.200.101:9997 566
[tcpout-server://10.100.200.101:9997] 567
19. Add the following lines to the inputs.conf file: 568
[monitor://$SPLUNK_HOME\var\log\splunk\SPLUNK.LOG*] 569
index = modbus 570
2.2 Forescout CounterACT 571
Forescout CounterACT is used as a data collection and inventory tool. The CounterACT appliance actively 572 collects data from the ICS lab in Plano, Texas. The appliance reports back to the CounterACT Enterprise 573 Manager on the enterprise network in Rockville, Maryland. Once installed, the appliance is configured 574 and managed through the enterprise manager. 575

DRAFT
NIST SP 1800-23C: Energy Sector Asset Management 31
Forescout CounterACT can be deployed on virtual or physical appliances. For virtualized environments, 576 VMware ESXi, Microsoft Hyper-V, and KVM hypervisors are supported. Large networks that require 577 multiple physical or virtual appliances can be centrally managed by the Enterprise Manager. 578
https://www.forescout.com/platform/specifications/#virtual-appliance 579
Note: Some network-related information has been redacted. 580
2.2.1 CounterACT Enterprise Manager Configuration 581
2.2.1.1 VM Configuration 582
The CounterACT Enterprise Manager is configured as follows: 583
Red Hat Enterprise Linux 7 584
CPU cores 585
16 GB of RAM 586
200 GB of storage 587
1 NIC 588
2.2.1.2 Network 589
Network Configuration (Interface 1): 590
IPv4: Manual 591
IPv6: disabled 592
IPv4 address: 10.100.100.33 593
Netmask: 255.255.255.0 594
Gateway: 10.100.100.1 595
2.2.1.3 Installation 596
To install CounterACT Enterprise Manager, refer to the installation guide available at 597 https://www.forescout.com/company/resources/forescout-installation-guide-8-1/. 598
2.2.1.4 Configuration 599
The following steps contain configuration instructions for scanning devices at the Plano location. For 600 additional CounterACT configuration details, refer to the administration guide at 601 https://www.forescout.com/wp-content/uploads/2018/11/counteract-administration-guide-8.0.1.pdf. 602

DRAFT
NIST SP 1800-23C: Energy Sector Asset Management 32
The CounterACT Enterprise Manager and CounterACT Appliance can be managed through the 603 CounterACT console. Complete the following steps to install the console on a Windows desktop: 604
1. Download the executable from a Forescout portal. 605
2. Select the CounterACT Console Setup file. The CounterACT Console software download screen 606 opens. 607
608
3. Select the download link required, and save the EXE file. 609
4. Select and run the file to begin the installation. The Setup Wizard opens. Select Next.610
611

DRAFT
NIST SP 1800-23C: Energy Sector Asset Management 33
5. Use the default installation directory. Click Next.612
613
6. Click Next. 614
7. The installation begins. When completed, click Finish.615
616

DRAFT
NIST SP 1800-23C: Energy Sector Asset Management 34
8. Connect to the Enterprise Manager with the Console and the password used during the CounterACT 617 Enterprise Manager installation. 618
619
9. Select the gear icon in the top right of console.620
621
DRAFT
NIST SP 1800-23C: Energy Sector Asset Management 35
10. Select Add. 622
623
11. Enter the internet protocol (IP) address of the appliance, and the admin password used in setup. 624
12. Select OK. 625
626
DRAFT
NIST SP 1800-23C: Energy Sector Asset Management 36
13. Highlight the new appliance, and select License.627
628
14. Enter the required information. Select Submit. 629
630

DRAFT
NIST SP 1800-23C: Energy Sector Asset Management 37
15. Select OK. 631
632
2.2.1.4.1 Appliance Interfaces Configurations 633 1. Under Options, highlight the appliance, and select Edit.634
635

DRAFT
NIST SP 1800-23C: Energy Sector Asset Management 38
2. Select the Channels tab. 636
637
3. Under Channel, select Add. 638
639
4. Use the drop-down to select the interface listening on a switched port analyzer (SPAN) switch for 640 both Monitor and Response. Select OK. 641
642

DRAFT
NIST SP 1800-23C: Energy Sector Asset Management 39
5. Under Tools, select Segment Manager. 643
644
6. Select the + to add and name two segments called In_Scope and Out_Scope. Click OK. These will 645 indicate which IP range should be scanned and which should not be scanned. 646
647

DRAFT
NIST SP 1800-23C: Energy Sector Asset Management 40
7. Select the plus icon again to add two subsegments shown in the screenshot below. Click OK. 648
649
8. Highlight the tdi segment. Click Add to add the range of IP addresses to scan. Click OK.650
651
9. Repeat for the plano_out segment for IP address to not scan. Click OK. 652
2.2.1.4.2 Upload Network Scan Policies 653
Forescout network scan policies are prewritten and delivered as an XML file. 654

DRAFT
NIST SP 1800-23C: Energy Sector Asset Management 41
1. First, create a folder to house the polices. From the Enterprise Manager Console, select the Policy 655 tab. 656
2. Select the plus icon to create a new folder. 657
658
3. Name the folder. Click OK. 659
4. Select the import policy icon. 660
661
5. Select … to locate the XML file. 662
663
6. Select the XML file. 664
7. Select OK. 665
8. Repeat Steps 27–30 for each XML policy file. 666
9. Select Start. Select Apply to start and apply the changes. 667
2.2.1.4.3 Splunk Integration 668 To complete Forescout Integration with Splunk, follow Forescout documentation found at 669 https://www.forescout.com/platform/forescout-app-guide-splunk-2-7-0 and 670 https://www.forescout.com/company/resources/extended-module-for-splunk-configuration-guide-2-8/. 671
DRAFT
NIST SP 1800-23C: Energy Sector Asset Management 42
2.2.1.4.4 Schedule Reporting 672 1. From the Enterprise Manager Console, select the ellipsis next to Policy. Select Reports. 673
674
2. Log in using the same credentials as the Enterprise Manager Console. 675
3. Select Reports. 676
4. Select Add. 677
678
5. Select the Asset Inventory template. Click Next. 679
6. Name the report. Select the All IPs toggle. 680
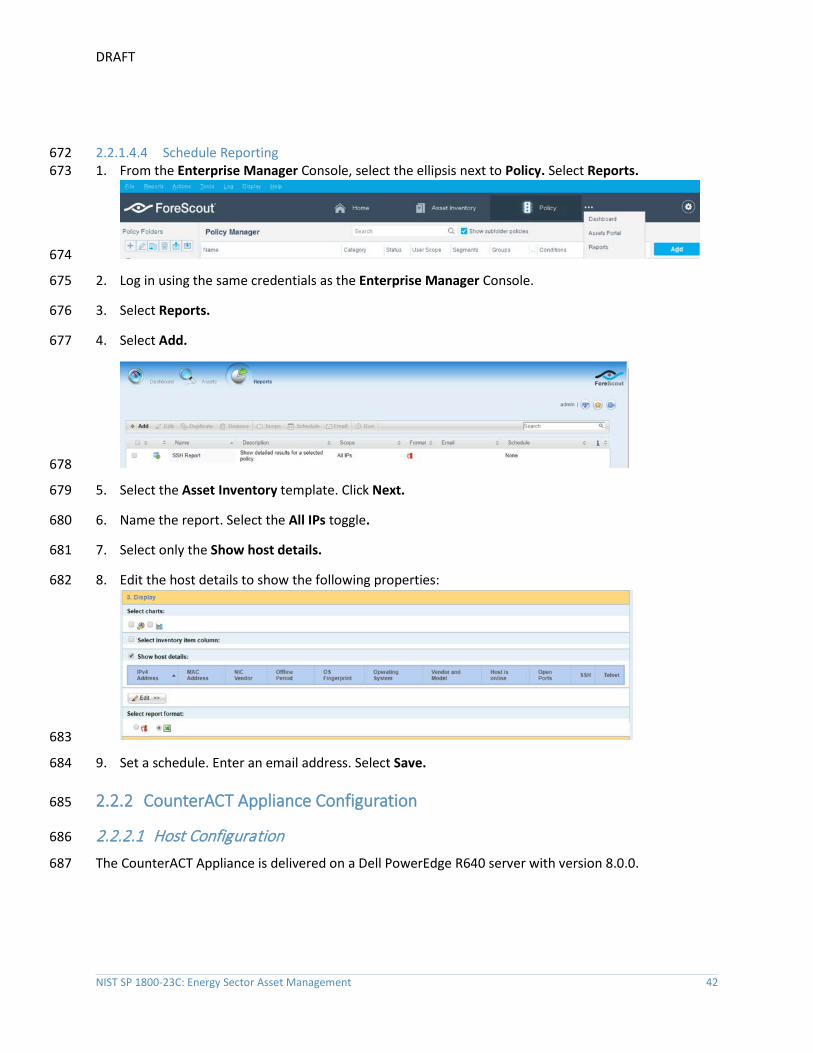
7. Select only the Show host details. 681
8. Edit the host details to show the following properties: 682
683
9. Set a schedule. Enter an email address. Select Save. 684
2.2.2 CounterACT Appliance Configuration 685
2.2.2.1 Host Configuration 686
The CounterACT Appliance is delivered on a Dell PowerEdge R640 server with version 8.0.0. 687

DRAFT
NIST SP 1800-23C: Energy Sector Asset Management 43
2.2.2.2 Network 688
Network Configuration (Interface 1): 689
IPv4: Manual 690
IPv6: disabled 691
IPv4 address: 10.172.8.38 692
Netmask: 255.255.255.0 693
Gateway: 10.172.8.1 694
2.2.2.3 Installation 695
To install the CounterACT Appliance, follow the installation steps found at 696 https://www.forescout.com/wp-content/uploads/2018/10/CounterACT_Installation_Guide_8.0.1.pdf. 697
2.2.2.4 Configuration 698
After the CounterACT Appliance is installed, follow the steps outlined in Section 2.2.1, to connect the 699 appliance to the enterprise manager and complete the configuration. 700
2.3 Dragos Platform 701
The Dragos Platform is an industrial control system cybersecurity-monitoring platform based around 702 threat-behavior analytics. It is being used in this build to provide asset discovery and monitoring. A 703 Dragos Sitestore is installed at the NCCoE enterprise site, and a midpoint sensor is installed at the Plano 704 site. The Dragos sensor is managed by the site store. 705
2.3.1 Dragos Sitestore Configuration 706
In the example implementation, Dragos Sitestore is deployed as a pre-built appliance from the vendor. 707 The appliance was still configured with parameters necessary for our environment. Connect to the 708 Dragos appliance by navigating the web browser to https://<IP address>. 709
2.3.1.1 Host Configuration 710
The Dragos Platform is delivered to the customer, preconfigured for the environment. The NCCoE 711 received a Dell server utilizing iDRAC for virtualization. On the iDRAC server, VMware ESXi was installed 712 and utilized for creating the server. 713
The VMs created to house the product have the following specifications: 714
Operating system (OS) Version: CentOS 7 (64-bit) 715
CPU: 48 cores 716

DRAFT
NIST SP 1800-23C: Energy Sector Asset Management 44
Memory: 192 GB 717
Hard disc drive (HDD) 1: 200 GB 718
HDD 2: 10 terabytes (TB) 719
2.3.1.2 Network 720
Networking for the device included a single network within ESXi to which the VM was connected. The 721 Dell iDRAC server housing the Dragos Sitestore Puppet Server was connected to the ESAM network with 722 the following IP addresses: 723
iDRAC: 10.100.200.6 724
ESXi: 10.100.200.7 725
Dragos Sitestore Puppet: 10.100.200.8 726
2.3.1.3 Installation 727
Installation began with setting up a VM. Utilizing the specifications in Section 2.3.1.1, Host 728 Configuration, a VM was created for the Sitestore/Puppet server. Then the product ISO was added to 729 the CD/DVD Drive 1 location (DragosCustom-2019-06-18-CentOS-7-x86_64-Everything-1810.iso). 730
1. Power on the VM, and open a console. The Dragos installation screen will start, allowing options to 731 be selected for installation type. 732
2. With the Dell R730 server used for the NCCoE, select Install Dragos Sitestore Kickstart. The installer 733 automatically installs the Dragos Platform without interaction from the user. 734
2.3.1.4 Configuration 735
Once the installation has completed, the Sitestore will be configured with the needed files listed in Table 736 2-1. 737
Table 2-1 Dragos Required Files 738
Dragos Files
sitestore-orchestration-1.5.1.1-1.noarch.rpm.gpg midpoint-images-1.5.1.1-1.x86_64.rpm.gpg
midpoint-configs-1.5.1.1-1.x86_64.rpm.gpg midpoint-manager-1.1.2-1.el7.x86_64.rpm.gpg
midpoint-1.5.1.1-1.x86_64.rpm.gpg mms-cli-1.1.0-1.x86_64.rpm.gpg
upgrade-1.5.1-3.tar.gz.gpg containerd.io-1.2.0-3.el7.x86_64.rpm
container-selinux-2.68-1.el7.noarch.rpm docker-ce-18.09.0-3.el7.x86_64.rpm
docker-ce-cli-18.09.0-3.el7.x86_64.rpm 1. Upload these files to the Sitestore VM in /var/opt/releases/. 739

DRAFT
NIST SP 1800-23C: Energy Sector Asset Management 45
2. Change directory to /var/opt/releases/ and run the command gpg --decrypt-file *.gpg. Enter 740 the password supplied from Dragos for the installation. This will create all the files required for the 741 installation. 742
3. Change directory to /root/ and, as root user, run ./puppet_server_setup.sh 743
2.3.2 Dragos Midpoint Sensor 744
Dragos Midpoint Sensor is also deployed as a pre-built appliance from the vendor. Options for the 745 midpoint sensor consist of configurations for small, medium, and large deployments. The appliance is 746 configured with parameters necessary for our environment. The Dragos Midpoint Sensor can be 747 managed from the Sitestore. 748
2.3.2.1 Network 749
The midpoint sensor has multiple interfaces. One interface will collect traffic via SPAN port. Another will 750 serve as the management interface to communicate with the device. 751
Dragos Midpoint Sensor Management Interface: 752
DHCP: disabled 753
IPv6: ignore 754
IPv4: Manual 755
IPv4 address: 10.172.6.10 756
Netmask: 255.255.255.0 757
2.3.2.2 Configuration 758
After the midpoint sensor is deployed and listening on the correct interface, the midpoint sensor can 759 connect back to the Sitestore for further configurations. 760
2.3.3 Dragos Splunk Integration 761
The Dragos Splunk application allows data integration from the Dragos Sitestore into the Splunk 762 dashboard. This allows Splunk to aggregate data from Dragos and other products into a central location 763 for analyst visualization. This process assumes the reader has downloaded the Dragos Splunk application 764 from https://splunkbase.splunk.com/app/4601/. 765
1. To begin, log in to the Splunk instance, and select the gear icon on the top left of the screen next to 766 Apps, to configure the applications. 767
2. On the top right of the screen, select Install app from the file. 768

DRAFT
NIST SP 1800-23C: Energy Sector Asset Management 46
3. Follow the on-screen instructions to upload the downloaded application. 769
4. Restart Splunk (either prompted by the installation process or self-directed). 770
5. From the Splunk Settings menu on the top right, select the Data Inputs option. 771
6. Select Add New under Local Inputs for a transmission control protocol (TCP) listener. (User 772 datagram protocol [UDP] is not recommended, because it will cut off longer messages.) 773
7. Set the port to the one that you want to transfer data on. (NCCoE build used 10514.) 774
8. Select Next to configure the Input Settings. 775
9. Choose dragos_alert as the source type. 776
10. Set the App Context to Dragos Splunk App. 777
11. Set the Index to dragos_alerts. (Create a new index if it does not exist.) 778
12. Click Submit. 779
Once this process is completed, Splunk is ready to receive data from Dragos. The following instructions 780 will be for configuring the Dragos Sitestore for sending information to Splunk: 781
1. Navigate to the Servers tab at https://<sitestore>/syslog/app/#/servers. 782
2. Click + Add Server to create a new server. 783
3. Configure the connection information to point to the Splunk server configured previously. 784
4. Set the following options: 785
a. Protocol: TCP 786
b. Message Format: RFC 5424 Modern Syslog 787
c. Message Delimiter: Use newline delimiter for TCP and transport layer security (TLS) streams. 788
5. Click NEXT: SET TEMPLATE. 789
6. Set the following value (must be on one line for Splunk to properly process) as Message: 790
{ "app": "dragos:platform", "body": "${content}", "category": "${summary}", 791 "created_at": "#{createdAt}", "dest": "${dest_asset_ip}", 792 "dest_dragos_id": "${dest_asset_id}", "dest_host": 793 "${dest_asset_hostname}", "dest_ip": "${dest_asset_ip}", "dest_mac": 794 "${dest_asset_mac}", "dest_name": "${dest_asset_domain}", 795 "dragos_detection_quad": "${detection_quad}", "dragos_detector_id": 796 "${detector_id}", "dvc": "${asset_ip}", "dvc_dragos_id": 797 "${dest_asset_id}", "dvc_host": "${dest_asset_hostname}", "dvc_ip": 798 "${asset_ip}", "dvc_mac": "${dest_asset_mac}", "dvc_name": 799

DRAFT
NIST SP 1800-23C: Energy Sector Asset Management 47
"${dest_asset_domain}", "id": "${id}", "ids_type": "network", 800 "occurred_at": "#{occurredAt}", "severity_id": "${severity}", 801 "signature": "${source}", "src": "${src_asset_ip}", "src_dragos_id": 802 "${src_asset_id}", "src_host": "${src_asset_hostname}", "src_ip": 803 "${src_asset_ip}", "src_mac": "${src_asset_mac}", "src_name": 804 "${src_asset_domain}", "subject": "${type}", "type": "alert", 805 "vendor_product": "Dragos Platform" } 806
7. Select Save. 807
2.4 FoxGuard Patch and Update Management Program 808
The solution utilizes the FoxGuard PUMP to provide patch availability and vulnerability notifications for 809 identified assets. For this build, ConsoleWorks collects asset data from Splunk then converts that data 810 into the JavaScript object notation (JSON) format required for PUMP. The resulting JSON file includes 811 asset information such as vendor, product, and version, as well as serial and model information about 812 devices from the asset inventory. Asset data often contains critical details. However, PUMP does not 813 require sensitive data, such as asset location and IP address. The file is encrypted and provided to the 814 PUMP team via secure delivery. FoxGuard’s preferred method of file transfer is secure file transfer 815 protocol and does not require direct access to an entities network. 816
Once the asset data is received, the FoxGuard team analyzes the file for completeness. Any missing data, 817 such as a serial number, version, or access to private patch data, is collected during the onboarding 818 process with the end user. The final report is provided back to ConsoleWorks in a JSON file format and 819 includes available patches and vulnerability notifications for each device. The data is then ingested back 820 into Splunk for viewing and reporting. Reports are also available outside of the ConsoleWorks 821 integration in portable document format (PDF) and comma separated value (CSV) format. 822
PUMP is a service managed by the FoxGuard team. The patch availability and vulnerability notification 823 report does not require an installation. See Section 2.1 for configuring ConsoleWorks to automatically 824 create the required JSON input file for the integration described in this guide. 825
2.4.1 Patch Report 826
Below are screenshots from the final patch report for this build. 827

DRAFT
NIST SP 1800-23C: Energy Sector Asset Management 48
Figure 2-1 Update Availability Summary 828
829
830

DRAFT
NIST SP 1800-23C: Energy Sector Asset Management 49
Figure 2-2 Device Update Availability Details-1 831
832

DRAFT
NIST SP 1800-23C: Energy Sector Asset Management 50
Figure 2-3 Device Update Availability Details-2 833
834

DRAFT
NIST SP 1800-23C: Energy Sector Asset Management 51
Figure 2-4 Device Update Availability Details-3 835
836

DRAFT
NIST SP 1800-23C: Energy Sector Asset Management 52
Figure 2-5 Device Update Availability Details-4 837
838

DRAFT
NIST SP 1800-23C: Energy Sector Asset Management 53
Figure 2-6 Device Update Availability Details-5 839
840

DRAFT
NIST SP 1800-23C: Energy Sector Asset Management 54
Figure 2-7 Patch Evidence Documentation 841
842
843
2.5 Kore Wireless 844
This solution leverages a Kore Wireless virtual private network (VPN) to provide secure remote access to 845 remote assets. In this case, the remote asset is an Obvius A8812 Data Acquisition Server that provides 846 access to data from a Yokogawa flow meter. 847
Note: Some network information is excluded for security. 848

DRAFT
NIST SP 1800-23C: Energy Sector Asset Management 55
2.5.1 Bridge Configuration 849
2.5.1.1 Installation 850
1. Connect the MultiConnect eCell Ethernet port to the Ethernet port on the Obvius A8812 Data 851 Acquisition Server. 852
2. Connect the Obvius A8812 RS485 to the multidrop Modbus network with the remote steam meter 853 asset. 854
2.5.1.2 Network 855
1. Set Obvius A8812 to DHCP. 856
a. Navigate the IP address of the Obvius A8812. Default is 192.168.40.50. 857
b. Open the Networking drop-down menu, and select Setup. 858
c. Check the Use DHCP to automatically assign IP Address checkbox. 859
860
2. Set MultiConnect eCell to Auto-detect Dialup profiles. 861
a. Navigate the IP address of the MultiConnect eCell. Default is 192.168.40.50. 862
b. Open the WAN menu. 863

DRAFT
NIST SP 1800-23C: Energy Sector Asset Management 56
c. Set the Dial-up Profile to Auto-detection.864
865
2.5.2 Virtual Private Network Configuration 866
1. Navigate to VPN > IPsec in pfsense. 867
868
2. Click the Add P1 button. 869
3. Set Remote Gateway. 870
4. Set Authentication Method to Mutual PSK. 871
5. Set Pre-Shared Key. 872
6. Set Encryption Algorithm settings: 873

DRAFT
NIST SP 1800-23C: Energy Sector Asset Management 57
a. Algorithm: AES 874
b. Key Length: 256 bits 875
c. Hash: SHA256 876
d. Diffie-Hellman Group: 2 (1024 bit)877
878
7. Return to VPN > IPsec. 879
8. Click the Add P2 button. 880
9. Set Local Network to 172.16.2.80/29. 881
10. Set Remote Network. 882
11. Set Protocol to ESP. 883
12. Set Encryption Algorithm to AE 256 bits. 884

DRAFT
NIST SP 1800-23C: Energy Sector Asset Management 58
13. Set Hash Algorithm to SHA256.885
886
2.6 pfSense VPN 887
pfSense is an open-source firewall/router used to create both site-to-site VPN tunnels. The following 888 configuration file can be used to upload all configurations to the enterprise location edge router. Both 889 the UMD and Plano edge routers are excluded for security purposes. 890
2.6.1 Plano and UMD VPN Configuration 891
To configure a site-to-site OpenVPN connection, refer to 892 https://docs.netgate.com/pfsense/en/latest/vpn/openvpn/index.html. 893
2.7 Splunk 894
Splunk is a security information and event management (SIEM) system that allows collecting and parsing 895 logs and data from multiple systems. 896

DRAFT
NIST SP 1800-23C: Energy Sector Asset Management 59
2.7.1 Splunk Enterprise Configuration 897
2.7.1.1 VM Configuration 898
The Splunk VM is configured as follows: 899
Ubuntu Mate 16.04.2 900
2 CPU cores 901
10 GB of RAM 902
2 TB of storage 903
1 NIC 904
2.7.1.2 Network 905
Network Configuration (Interface 1): 906
IPv4: Manual 907
IPv6: disabled 908
IPv4 address: 10.100.200.101 909
Netmask: 255.255.255.0 910
Gateway: 10.100.200.1 911
2.7.1.3 Installation 912
Note: A Splunk account will be needed to download Splunk Enterprise. The account is free and can be 913 set up at https://www.splunk.com/page/sign_up. 914
Download Splunk Enterprise from https://www.splunk.com/en_us/download/splunk-enterprise.html. 915 This build uses Version 7.1.3. Splunk can be installed on Windows, Linux, Solaris, and Mac OS X. Each of 916 these installation instructions is provided at 917 http://docs.splunk.com/Documentation/Splunk/7.1.3/Installation/Beforeyouinstall. 918
2.7.1.4 Universal Forwarder 919
To install the universal forwarder, refer to documentation found at 920 https://docs.splunk.com/Documentation/Forwarder/7.3.1/Forwarder/Installtheuniversalforwardersoft921 ware. 922
Refer to each individual product to configure the universal forwarder or another means of integration 923 with Splunk. 924

DRAFT
NIST SP 1800-23C: Energy Sector Asset Management 60
2.7.1.5 Reports and Alerts 925
If desired, lookup tables can be used to cross-check automated detections with human knowledge of a 926 device. Some properties are cross-checked with human knowledge at both the UMD and Plano sites. 927 Patch information from PUMP also uses a lookup table to cross-check results with devices. To upload 928 lookup tables: 929
1. Log in to Splunk. 930
2. Go to Settings > Lookups. 931
3. Select + Add New under Lookup table files.932
933
4. Choose Search as the Destination App. 934
5. Browse for the CSV file. Name the Lookup file. Select Save. 935
The UMD lookup CSV file contains the following fields: 936
Asset Id,IP,Device,Platform 937
The Plano lookup CSV file contains the following fields: 938
Asset Id,IP,Vendor,Product Name,Serial Number,Version 939
Once integrations are complete, the following Splunk queries will create the desired reports: 940
2.7.1.5.1 Asset Report for Both Sites 941 index=_* OR index=* sourcetype=CTD_csv | table asset_id site_id name_ ip_ mac_ type_ 942 vendor_ criticality_ risk_level is_ghost | sort site_id | where isnum(asset_id) 943
2.7.1.5.2 Asset Report for UMD 944 index=_* OR index=* sourcetype=CTD_csv | where isnum(asset_id) | table asset_id 945 site_id name_ ip_ mac_ type_ vendor_ criticality_ risk_level is_ghost Device Platform 946 | sort site_id | search ip_=206.189.122* | lookup umd_lookup.csv "Asset Id" AS 947 asset_id OUTPUT "Device" AS Device, Platform AS Platform 948
2.7.1.5.3 Asset Report for Plano (Static) 949 index=_* OR index=* sourcetype=CTD_csv | where isnum(asset_id) | table asset_id 950 site_id name_ ip_ mac_ type_ vendor_ criticality_ risk_level is_ghost Serial_Number 951 Version | sort site_id | search ip_=10.172.6* | lookup plano_lookup.csv "Asset Id" AS 952 asset_id OUTPUT "Serial Number" AS Serial_Number, Version AS Version 953

DRAFT
NIST SP 1800-23C: Energy Sector Asset Management 61
2.7.1.5.4 Asset Report for Plano (Dynamic) 954 index=forescout 955
|table ip mac "host_properties.nmap_banner7{}.value" nbthost 956 "host_properties.nmap_def_fp5{}.value" "host_properties.user_def_fp{}.value" 957 "host_properties.server_session{}.value" 958
|stats 959 values(mac),values("host_properties.nmap_banner7{}.value"),values(nbthost),values("hos960 t_properties.nmap_def_fp5{}.value"),values("host_properties.user_def_fp{}.value"),valu961 es("host_properties.server_session{}.value") by ip 962
|rename values(mac) as mac_address, values(host_properties.nmap_banner7{}.value) as 963 ports_and_services, values(nbthost) as hostname, 964 values(host_properties.nmap_def_fp5{}.value) as device_footprints, 965 values(host_properties.user_def_fp{}.value) as device_footprints2, 966 values(host_properties.server_session{}.value) as server_session_properties 967
2.7.1.5.5 UMD Steam Meter Data 968 index=modbus |rex "CWScript BCM:(?<name>.\w+)" | rex field=_raw "Flow Rate : 969 (?<flowRate>.*)" | rex field=_raw "Gal Total : (?<GalTotal>.*)" | transaction 970 maxspan=30s | table name _time flowRate GalTotal 971
2.7.1.5.6 UMD Device Data Calls 972 (index=* OR index=_*) (index=main host="10.100.100.111" NOT "cs2=UP") | table shost 973 src smac dhost dst dmac cs6 cs3 cs7 cs8 msg 974
2.7.1.5.7 Patch Report for FoxGuard PUMP 975 index=test sourcetype="csv" | lookup plano_lookup.csv "Asset Id" AS Asset_Id OUTPUT 976 "Serial Number" AS Serial_Number, Version AS Version | table Asset_Id IP Mac Vendor 977 "Operating System" Serial_Number Version Criticality Protocols | join IP type=left 978 [search index=test sourcetype=CTD_csv_report] | fields "Asset Id" IP Mac Vendor 979 "Operating System" Serial_Number Version | where isnotnull(Serial_Number) OR 980 isnotnull(Version) | sort IP | outputcsv patchreport.csv 981
2.8 Tripwire Industrial Visibility 982
Tripwire Industrial Visibility is used to passively scan the industrial control environments at both the 983 College Park and Plano locations in the build. Tripwire Industrial Visibility builds a baseline of assets and 984 network traffic between those assets then alerts on anomalous activity. Logs and alerts are reported up 985 to the SIEM. 986
Tripwire Industrial Visibility is installed at three locations: Plano, Texas (TDi); UMD; and the NCCoE. This 987 section describes how to deploy Tripwire Industrial Visibility 3.0.0. 988
Tripwire Industrial Visibility taps into OT network communication by listening through the SPAN port of 989 routers and switches connected to the network segment, opening data packets, and interpreting 990 protocols without disrupting normal operations. 991

DRAFT
NIST SP 1800-23C: Energy Sector Asset Management 62
By reading network traffic, it isolates all assets on the network and maps the flow of traffic between 992 them. This data is then used to create graphical network maps. 993
2.8.1 Tripwire Industrial Visibility Configuration UMD 994
The following subsections document the software, hardware/VM, and network configurations for the 995 Tripwire Industrial Visibility servers. 996
2.8.1.1 VM Configuration 997
The Tripwire Industrial Visibility VM was given the following resources: 998
CentOS 7.5 999
4 CPU cores 1000
100 GB hard disk 1001
32 GB RAM 1002
2 NICs 1003
2.8.1.2 Network Configuration 1004
Network Configuration: 1005
DHCP: disabled 1006
IPv6: ignore 1007
IPv4: Manual 1008
IPv4 address: 10.100.100.111 1009
Netmask: 255.255.255.0 1010
Gateway: 10.100.100.1 1011
2.8.1.3 Installation 1012
Tripwire supplied the Tripwire Industrial Visibility as an ISO installer. To configure TIV, use the ISO 1013 installer for each instance at Plano, UMD, and the NCCoE. Tripwire Industrial Visibility is configured in a 1014 sensor-server architecture. Plano and UMD instances act as sensors, and the NCCoE instance is the 1015 central server. 1016
To begin installation, mount the provided image to the VM, and complete the following steps: 1017

DRAFT
NIST SP 1800-23C: Energy Sector Asset Management 63
1. From the boot menu, select Install Continuous Threat Detection. 1018
1019
2. When the system is up, navigate to the configurator tool by using a browser. 1020
1021
2.8.1.4 Configuration 1022
Configure the Tripwire Industrial Visibility sensors. 1023
1. Connect to the configuration tool by entering the following URL into the browser: 1024 https://10.100.100.11:5001. 1025
2. Enter the default credentials. 1026
3. On the Configuration tab, the system will need to be initialized. Select Bootstrap Sensor (for Plan 1027 and UMD sites). 1028

DRAFT
NIST SP 1800-23C: Energy Sector Asset Management 64
1029
4. Enter the details and License Key. Select Apply. 1030
1031
5. Set the Sniffer Interface on the Configuration tab. Select the interfaced used as the SPAN port. 1032 Select Apply. 1033

DRAFT
NIST SP 1800-23C: Energy Sector Asset Management 65
1034
6. Under Networks, select Save Caps and Detect Known Threats for the appropriate interface.1035
1036
7. Next, Join the Sensor to the Sensor Server. Set up the Central Server in Section 2.8.3 before 1037 completing these steps. 1038
8. Select Join Central, from the Configuration tab. 1039
1040
9. Name the Sensor, and enter the IP address of the Central Server. Enter the Bootstrap password 1041 found on the Central Server. Select Join. 1042

DRAFT
NIST SP 1800-23C: Energy Sector Asset Management 66
1043
10. Connect to the continuous threat detection (CTD) Dashboard: https://10.100.1.17:5000. 1044
The system is started in Training Mode. After an acceptable amount of time passes, place the system in 1045 Operational Mode. This build used one month as the training period. 1046
1. Select the hamburger icon in the top left corner. 1047
1048
2. Scroll down to select Configuration. 1049
1050

DRAFT
NIST SP 1800-23C: Energy Sector Asset Management 67
3. Select System Management. 1051
4. Select the System Mode tab. Click Enter Operational Mode. Note: The screen will show Enter 1052 Training Mode, if the system is already in Operational Mode. 1053
1054
5. Select the Subnets tab. Click Add Tag.1055
1056
6. Name a new Tag, and add the description. Select OK. 1057
1058
7. Click Add Subnet. Enter the Subnet that the assets are on and the previously created TAG. Select 1059 OK. 1060

DRAFT
NIST SP 1800-23C: Energy Sector Asset Management 68
1061
8. Repeat Steps 16 and 17 for multiple subnets. 1062
2.8.2 Tripwire Industrial Visibility Configuration Plano 1063
The following subsections document the software, hardware/VM, and network configurations for the 1064 Tripwire Industrial Visibility servers. 1065
2.8.2.1 VM Configuration 1066
The Tripwire Industrial Visibility VM was given the following resources: 1067
CentOS 7.5 1068
1 CPU Core 1069
8 GB RAM 1070
200 GB hard disk 1071
3 NICs 1072
2.8.2.2 Network Configuration 1073
Network Configuration: 1074
DHCP: disabled 1075
IPv6: ignore 1076
IPv4: Manual 1077
IPv4 address: 10.100.100.111 1078
Netmask: 255.255.255.0 1079
Gateway: 10.100.100.1 1080
2.8.2.3 Installation 1081
Repeat steps in Section 2.8.1.3. 1082

DRAFT
NIST SP 1800-23C: Energy Sector Asset Management 69
2.8.2.4 Configurations 1083
Repeat steps in Section 2.8.1.4. 1084
2.8.3 Tripwire Industrial Visibility Configuration National Cybersecurity Center of 1085 Excellence 1086
Tripwire Industrial Visibility at the NCCoE serves as the central server. 1087
2.8.3.1 VM Configuration 1088
The Tripwire Industrial Visibility VM was given the following resources: 1089
CentOS 7.5 1090
4 CPU cores 1091
80 GB hard disk 1092
32 GB RAM 1093
1 NIC 1094
2.8.3.2 Network Configuration 1095
Network Configuration: 1096
DHCP: disabled 1097
IPv6: ignore 1098
IPv4: Manual 1099
IPv4 address: 10.100.100.111 1100
Netmask: 255.255.255.0 1101
Gateway: 10.100.100.1 1102
2.8.3.3 Installation 1103
Repeat steps in Section 2.8.1.3. 1104
2.8.3.4 Configurations 1105
Repeat Steps 1–4 in Section 2.8.1.4. 1106
In Step 3, select Bootstrap Central. 1107
To complete the configuration: set up syslog, schedule a report, and install the Claroty application on 1108 Splunk. 1109

DRAFT
NIST SP 1800-23C: Energy Sector Asset Management 70
1. Connect to the CTD Dashboard: https://10.100.100.1111:5000. 1110
2. Select the hamburger menu in the top left corner. 1111
1112
3. Scroll down to select Configuration. 1113
1114
4. Select Syslog. Select Add.1115
1116
5. Uncheck Local. Do not Select a Site. 1117

DRAFT
NIST SP 1800-23C: Energy Sector Asset Management 71
1118
6. Select Alerts for the Log Level. Enter the IP address for the Splunk server under Server. Enter Port 1119 515 and Protocol UDP. Select all boxes under Category and all boxes under Type. Leave the System 1120 URL and the Message Format as the default.1121
1122
7. Select Save. 1123
8. Select Add to add another. 1124
9. Select Baselines under Message Contents. 1125

DRAFT
NIST SP 1800-23C: Energy Sector Asset Management 72
1126
10. Enter the Splunk IP for Server, Port 515, and Protocol UDP. Leave System URL as the default. Click 1127 Save. 1128
1129
11. Select Add to add another. 1130
12. Select EVENTS for Message Contents. Enter the Splunk IP for Server, Port 515, and Protocol UDP. 1131 Leave the System URL as default. 1132

DRAFT
NIST SP 1800-23C: Energy Sector Asset Management 73
1133
13. Click Save. 1134
14. To configure Asset Reporting, select Assets from the hamburger menu.1135
1136
15. From the Assets list, select the report icon in the menu bar, to schedule a report.1137
1138

DRAFT
NIST SP 1800-23C: Energy Sector Asset Management 74
16. Name the report, and select CSV as the Format. Enter a recipient to receive and download the 1139 report. Schedule the report to run at an acceptable interval. This build scheduled the report to run 1140 daily. Click Create. 1141
1142
2.8.3.5 Tripwire Splunk Integration 1143
To integrate Tripwire with Splunk, install the Claroty Continuous Detection Application for Splunk. 1144 Additionally, install the Splunk Universal Forwarder to forward the CSV report. 1145
1. Download the Claroty Continuous Detection Application for Splunk from 1146 https://splunkbase.splunk.com/app/4529/. 1147
2. Log in to Splunk. 1148
3. On the Apps menu, click Manage Apps. 1149
4. Click Install app from file. 1150
5. In the Upload app window, click Choose File. 1151
6. Locate the downloaded .tar.gz file, and then click Open or Choose. 1152
7. Click Upload. 1153
8. Click Restart Splunk, and then confirm the restart. 1154
9. To install Splunk Universal Forwarder, follow the steps in Section 2.7.1.4. 1155
10. Place the following text in the /opt/splunkforwarder/etc/system/local/outputs.conf file: 1156

DRAFT
NIST SP 1800-23C: Energy Sector Asset Management 75
[tcpout] 1157 defaultGroup = default-autolb-group 1158 [tcpout:default-autolb-group] 1159 Server = 10.100.200.101:9997 1160 [tcpout-server://10.100.200.101:9997] 1161
11. Place the following text in the /opt/splunkforwarder/etc/system/local/deploymentclient.conf file: 1162
12. [target-broker:deploymentserver] 1163
13. targetURI = 10.100.200.101:8089 1164
14. Log in to Splunk. Go to Settings > Data Inputs > Files & Directories. 1165
15. Select New Remote File & Directory. 1166
16. Select the host on which the forwarder is installed. Name the Server Class. Click Next. 1167
17. Input the CSV file to monitor, i.e., /home/esam/attachments/report.csv. 1168
18. Select Next. 1169
19. Select Review. 1170
20. Select Submit. 1171

NIST SP 1800-23C: Energy Sector Asset Management 76
Appendix A List of Acronyms 1172
CSV Comma Separated Value CPU Central Processing Unit CTD Continuous Threat Detection DHCP Dynamic Host Configuration Protocol DVD Digital Versatile Disc ESAM Energy Sector Asset Management ESP Encapsulating Security Payload GB Gigabyte HDD Hard Disk Drive IP Internet Protocol IPv Internet Protocol version ISO Optical Disc Image IT Information Technology NCCoE National Cybersecurity Center of Excellence NIC Network Interface Controller/Card NIST National Institute of Standards and Technology OS Operating System OT Operational Technology PUMP Patch and Update Management Program RAM Random Access Memory SIEM Security Information and Event Management SPAN Switched Port Analyzer TB Terabyte TCP Transmission Control Protocol TLS Transport Layer Security UDP User Datagram Protocol UMD University of Maryland VM Virtual Machine VPN Virtual Private Network XML Extensible Markup Language