EMC NetWorker Module for Microsoft for SQL VDI User Guide ...
236
EMC NetWorker Module for Microsoft for SQL VDI Version 9.1 User Guide 302-003-214 REV 02
-
Upload
khangminh22 -
Category
Documents
-
view
3 -
download
0
Transcript of EMC NetWorker Module for Microsoft for SQL VDI User Guide ...

EMC NetWorker Module for Microsoft forSQL VDIVersion 9.1
User Guide302-003-214
REV 02

Copyright © 2007-2017 Dell Inc. or its subsidiaries. All rights reserved.
Published February 2017
Dell believes the information in this publication is accurate as of its publication date. The information is subject to change without notice.
THE INFORMATION IN THIS PUBLICATION IS PROVIDED “AS-IS.“ DELL MAKES NO REPRESENTATIONS OR WARRANTIES OF ANY KIND
WITH RESPECT TO THE INFORMATION IN THIS PUBLICATION, AND SPECIFICALLY DISCLAIMS IMPLIED WARRANTIES OF
MERCHANTABILITY OR FITNESS FOR A PARTICULAR PURPOSE. USE, COPYING, AND DISTRIBUTION OF ANY DELL SOFTWARE DESCRIBED
IN THIS PUBLICATION REQUIRES AN APPLICABLE SOFTWARE LICENSE.
Dell, EMC, and other trademarks are trademarks of Dell Inc. or its subsidiaries. Other trademarks may be the property of their respective owners.
Published in the USA.
EMC CorporationHopkinton, Massachusetts 01748-91031-508-435-1000 In North America 1-866-464-7381www.EMC.com
2 EMC NetWorker Module for Microsoft for SQL VDI 9.1 User Guide

7
9
11
Introduction 15Using NMM with Virtual Device Interface API............................................. 16NMM 9.1 compatibility with NetWorker 8.2.3 or later servers .................... 18NMM backup and recovery workflow..........................................................19
Traditional backup workflow (stand-alone backup over a storagenode)............................................................................................. 19Federated backup workflow (AlwaysOn Availability Groupconfiguration)................................................................................20Recovery workflow........................................................................ 21Cluster support..............................................................................23
Using NMM in a SQL VDI environment....................................................... 24Supported Windows Server and SQL Server versions................... 24Migrating from VSS solution to VDI solution for SQL Server dataprotection......................................................................................24Microsoft SQL Server Always On Availability Group feature .........25SQL Client Direct to AFTD or DD devices...................................... 26Microsoft SQL Server named log marks........................................ 26Named and default instances of SQL Server..................................27Multi-stream Data Domain Boost................................................... 27Database consistency checks........................................................ 28Improved SQL savegroup notifications.......................................... 29Microsoft hybrid cloud environments............................................ 30Optional SQL Server log gap detection..........................................30Supported special characters in database names for NMM backupand recovery ................................................................................. 31Transparent data encryption..........................................................32Setting the MAXTRANSFERSIZE environment variable................ 33
Access privileges for backup and recovery................................................. 34Assigning SQL server and database roles for backup and recoveryoperations..................................................................................... 35Assigning Windows user privileges for backup and recoveryoperations......................................................................................36
SQL Server backups...................................................................................38Types of supported backups..........................................................38Setting backup levels.....................................................................39
SQL Server recovery.................................................................................. 44Types of supported recovery......................................................... 44Recovery modes............................................................................45Recovery time............................................................................... 46Recovery window restrictions........................................................46
Figures
Tables
Preface
Chapter 1
CONTENTS
EMC NetWorker Module for Microsoft for SQL VDI 9.1 User Guide 3

The recovery process.................................................................... 47Error logs for backup and recovery.............................................................47
Graphical User Interfaces 49User interfaces for backup and recovery....................................................50NetWorker User for SQL Server GUI.......................................................... 51
Views............................................................................................. 51Display conventions for SQL data types........................................ 53Marking semantics and restrictions............................................... 54Fake objects.................................................................................. 54
NMM Microsoft SQL Server Management Studio plugin GUI.....................55Views.............................................................................................55
Manual Backups 57Manual backup overview............................................................................ 58Performing manual backups....................................................................... 58
Performing manual backups from the NMM SSMS plugin GUI...... 59Performing manual backups from the NetWorker User for SQLServer GUI.....................................................................................63
Performing copy-only backups................................................................... 68Specifying a retention policy for manual backups....................................... 68
Scheduled Backups 71Overview of scheduled backup................................................................... 72Excluding incompatible databases in backups............................................. 72Configuring scheduled backups.................................................................. 73
Setting up backup levels................................................................ 74Configuring a client resource......................................................... 75Setting data protection policies..................................................... 84
Federated Backup and Recovery 91Overview of federated backups..................................................................92
Backup settings............................................................................. 92Performing federated backups................................................................... 93
Configuring a client resource for federated backups with the ClientBackup Configuration wizard.........................................................94Configuring a client resource for federated backups manually withthe Client Properties dialog box.....................................................94
Monitoring federated backups ...................................................................98Configuring Always On Availability Group database recovery..................... 99
Configuring a normal recovery.......................................................99Configuring a copy restore........................................................... 108Configuring a named instance recovery.........................................111Configuring a verify-only restore.................................................. 112Configuring a piecemeal restore....................................................112
Data Recovery 115Overview................................................................................................... 116Prerequisites..............................................................................................116Performing a recovery from the NMM SSMS plugin GUI........................... 117Performing a recovery from the NetWorker User for SQL Server GUI...... 123
Recovering the SQL Server data.................................................. 124
Chapter 2
Chapter 3
Chapter 4
Chapter 5
Chapter 6
CONTENTS
4 EMC NetWorker Module for Microsoft for SQL VDI 9.1 User Guide

Setting up the recovery................................................................124Viewing the required volumes.......................................................139Setting the restore properties...................................................... 140Starting the recovery....................................................................151
Recovering federated backups.................................................................. 151Performing SQL Server 2012 or later recovery..........................................152
Performing SQL Server 2012 or later recovery when an Always OnAvailability Group is configured on a SQL Server instance ordatabase...................................................................................... 153
Performing flat file recovery..................................................................... 157Setting the browse time............................................................................ 157
Specifying the browse time through the NetWorker User for SQLServer Restore window ............................................................... 157Specifying the browse time through the command prompt..........159
Granular-Level Recovery 161Overview...................................................................................................162Considerations.......................................................................................... 162Performing GLR through the NMM SSMS plugin GUI...............................165Unmounting backups after performing GLR.............................................. 169
Using the Mount system tray icon................................................169Troubleshooting GLR................................................................................ 170
Cluster Servers Backup and Recovery 173Prerequisites............................................................................................. 174Configuring scheduled backups for SQL Server clusters........................... 174
Configuring backups for a SQL Server cluster with the ClientBackup Configuration wizard........................................................174NetWorker Administration GUI.....................................................180
Performing manual backups and recovery.................................................182Backing up and restoring data through the NetWorker User for SQLServer GUI................................................................................... 182Backing up and restoring data through the command prompt...... 182
Striped Backup and Recovery 185Overview of striped backups..................................................................... 186Performance considerations..................................................................... 186Performing striped backups...................................................................... 187Performing striped recovery..................................................................... 188
Optimal striped recovery operations............................................ 188Fail-safe striped recovery operations........................................... 188
Disaster Recovery 191Overview of disaster recovery...................................................................192Disaster recovery features........................................................................ 192Performing disaster recovery.................................................................... 194
When not to reinstall the SQL Server........................................... 194Recovering a damaged primary disk............................................. 194Recovering a damaged binary disk............................................... 195Recovering SQL Server and NetWorker server............................ 197Recovering the SQL Server without reinstalling the SQL Server..198Recovering the SQL Server..........................................................199
Chapter 7
Chapter 8
Chapter 9
Chapter 10
CONTENTS
EMC NetWorker Module for Microsoft for SQL VDI 9.1 User Guide 5

Bare-Metal Recovery 201Planning bare-metal recovery...................................................................202
Overview..................................................................................... 202System requirements...................................................................202Protecting an environment before a disaster............................... 204BMR by using NetWorker and NMM........................................... 205
SQL Server in a cluster environment........................................................ 206Backing up a SQL Server for BMR by using the VDI technology..206Performing BMR of a SQL Server cluster....................................208
SQL Server in a stand-alone environment................................................. 210Backing up a SQL Server for BMR............................................... 210Performing BMR of a standalone SQL Server.............................. 212
Command Prompt 213Overview of the command prompt............................................................ 214Using the nsrsqlsv command.....................................................................214
Command syntax for nsrsqlsv...................................................... 215Command options for nsrsqlsv..................................................... 216
Using the nsrsqlrc command.................................................................... 220Command syntax for nsrsqlrc...................................................... 220Command options for nsrsqlrc......................................................221Sample recovery command lines..................................................229
Using the nwmssql command................................................................... 230Command options for nwmssql....................................................230
Backup and recovery command syntax for SQL Server data.................... 230Syntax for a named instance configuration.................................. 231Syntax for names containing a period, backslash, or colon.......... 232
Chapter 11
Chapter 12
CONTENTS
6 EMC NetWorker Module for Microsoft for SQL VDI 9.1 User Guide

VDI backup process between NMM and SQL Server................................................... 17VDI recovery process between NMM and SQL Server................................................ 18Traditional backup workflow.......................................................................................20Federated backup workflow........................................................................................ 21Traditional recovery workflow.................................................................................... 22Message showing DBCC was successful.................................................................... 29Example of SQL savegroup notification...................................................................... 30Backup window........................................................................................................... 51Restore Operation window......................................................................................... 52Change Server window...............................................................................................52Select SQL Instance window...................................................................................... 53Marking a fake object................................................................................................. 54The EMC NetWorker window in the NMM SMSS plugin GUI .................................... 55EMC NetWorker Backup General page.......................................................................59EMC NetWorker Backup Options page....................................................................... 61EMC NetWorker Backup Monitor page...................................................................... 63The Backup window with a hierarchical list of SQL Server data objects..................... 64The General tab in the Backup Options dialog box......................................................65Properties dialog box.................................................................................................. 67Starting the Client Configuration Wizard.................................................................... 76Specify Client Information page..................................................................................77Specify Backup Configuration Type page................................................................... 78Specify the Backup Options page...............................................................................80Viewing clients in the Protection tab...........................................................................81Create Policy window.................................................................................................85Creating a workflow for the policy..............................................................................86Specifying action information in the Policy Action wizard...........................................87Adding a group to a policy from the Protection pane..................................................88Specifying workflow and client in the Create Group window...................................... 89Successful AG backup messages................................................................................98Failed AG backup messages........................................................................................99Restore window........................................................................................................ 100Properties dialog box—General tab.......................................................................... 100Specify the Standby Undo File dialog box.................................................................. 101Properties dialog box—Files tab............................................................................... 102Specify the File Destination dialog box......................................................................103Properties dialog box—Restore Time tab................................................................. 104Select the SQL Server dialog box..............................................................................108NetWorker User for SQL Server dialog box...............................................................109Restore window......................................................................................................... 110Properties dialog box................................................................................................. 110Restore window..........................................................................................................111Restore (Verify Only) dialog box................................................................................112Restore (Piecemeal) dialog box................................................................................. 113Restore Options dialog box........................................................................................ 114EMC NetWorker dialog box—Database Restore tab General page............................ 118EMC NetWorker dialog box—Database Restore Files/Filegroups page..................... 119EMC NetWorker dialog box—Database Restore Options page................................. 120EMC NetWorker dialog box—Database Restore Monitor page................................. 123Restore window........................................................................................................ 125Properties dialog box—General tab.......................................................................... 126Specify the Standby Undo File dialog box................................................................. 127Properties dialog box—Files tab............................................................................... 128
1234567891011121314151617181920212223242526272829303132333435363738394041424344454647484950515253
FIGURES
EMC NetWorker Module for Microsoft for SQL VDI 9.1 User Guide 7

Specify the File Destination dialog box...................................................................... 129Properties dialog box—Restore Time tab................................................................. 130Select the SQL Server dialog box..............................................................................134NetWorker User for SQL Server dialog box...............................................................135Restore window........................................................................................................ 135Properties dialog box.................................................................................................136Restore window.........................................................................................................137Restore (Verify Only) dialog box............................................................................... 138Restore (Piecemeal) dialog box.................................................................................138Restore Options dialog box....................................................................................... 139Properties dialog box................................................................................................. 141Properties dialog box.................................................................................................143Specify the File Destination dialog box......................................................................145Read File Configuration dialog box............................................................................ 146Point in time restore dialog box................................................................................. 149Backed-up availability group databases displayed in the NetWorker User for SQLServer page...............................................................................................................152Remove Database from Availability Group dialog box................................................ 154Change Browse Time window................................................................................... 154Restore Status window............................................................................................. 155Add Database to Availability Group window - Select Initial Data Synchronization view................................................................................................................................. 155Add Database to Availability Group window - Validation view....................................156Join to Availability Group menu item......................................................................... 156Change Browse Time dialog box................................................................................157Specify Browse Time dialog box................................................................................158EMC NetWorker dialog box—Table Restore General page....................................... 166EMC NetWorker dialog box—Table Restore Options page....................................... 167EMC NetWorker dialog box—Table Restore Monitor page....................................... 168Mount system tray menu.......................................................................................... 169Mount Details window............................................................................................... 170Starting the Client Configuration Wizard...................................................................175Specify Client Information page................................................................................ 176Specify Backup Configuration Type page.................................................................. 177Specify the Backup Options page..............................................................................179Viewing clients in the Protection tab.........................................................................180SQL Server Properties dialog box............................................................................. 210
54555657585960616263646566676869
70717273
747576777879808182838485868788
FIGURES
8 EMC NetWorker Module for Microsoft for SQL VDI 9.1 User Guide

Revision history...........................................................................................................12Style conventions........................................................................................................13Supported special characters in database names........................................................ 31Access privileges required for backup and recovery operations..................................34Required server roles for backup and recovery operations......................................... 35Required database roles for backup and recovery operations.....................................35Backup levels in NMM for SQL VDI backups...............................................................39Backup levels for SQL Server data............................................................................. 40Full backup every 1 to 2 weeks................................................................................... 40Logs-only backup after a full backup...........................................................................41Backup level advantages and disadvantages............................................................... 41Creating additional backup levels with data objects....................................................42Backup level promotion process ................................................................................ 42Types of recovery for SQL Server VDI .......................................................................44Recovery modes ........................................................................................................45Program and log file names without debug logging enabled........................................48Program and log file names with debug logging enabled.............................................48Where to start backup operations.............................................................................. 50Where to start recovery operations............................................................................ 51SQL Server storage hierarchy display conventions.....................................................53Tasks for configuring SQL Server VDI backups ..........................................................73Backup levels for SQL Server data............................................................................. 74Save sets....................................................................................................................82Application Information field values............................................................................ 83Save Sets................................................................................................................... 95Application Information field values............................................................................ 96Modify the destination for the files in list options......................................................103Fields on the General tab of the Restore Options dialog box..................................... 106Advanced recovery options........................................................................................121Modify the destination for the files in list options......................................................129Fields on the General tab of the Restore Options dialog box..................................... 132Advanced recovery options....................................................................................... 150Guidelines for fail-safe striped recovery....................................................................189Disaster recovery features........................................................................................ 192Rebuilding SQL Server system databases................................................................. 194Rebuilding SQL Server system databases................................................................. 196Rebuilding SQL Server system databases................................................................. 197Rebuilding SQL Server system databases................................................................. 198Rebuilding SQL Server system databases.................................................................209Rebuilding SQL Server system databases................................................................. 212Command options for nsrsqlsv ................................................................................. 216Command options for nsrqlrc ................................................................................... 221Command options for the nwmssql command.......................................................... 230Command syntax for SQL Server data...................................................................... 231Command syntax for names containing a period.......................................................233Command syntax for names containing a backslash................................................. 233Command syntax for names containing a colon........................................................ 234Command syntax for names containing periods, back slashes, and colons................234
123456789101112131415161718192021222324252627282930313233343536373839404142434445464748
TABLES
EMC NetWorker Module for Microsoft for SQL VDI 9.1 User Guide 9

TABLES
10 EMC NetWorker Module for Microsoft for SQL VDI 9.1 User Guide

Preface
As part of an effort to improve its product lines, EMC periodically releases revisions ofits software and hardware. Therefore, some functions described in this documentmight not be supported by all versions of the software or hardware currently in use.The product release notes provide the most up-to-date information on productfeatures.
Contact your EMC technical support professional if a product does not functioncorrectly or does not function as described in this document.
Note
This document was accurate at publication time. Go to EMC Online Support (https://support.emc.com) to ensure that you are using the latest version of this document.
PurposeThis guide contains information about using the NetWorker Module for Microsoft(NMM) Release 9.1 software to back up and recover SQL Server using the VirtualDevice Interface (VDI) technology.
Note
The EMC NetWorker Module for Microsoft Administration Guide supplements the backupand recovery procedures described in this guide and must be referred to whenperforming application-specific tasks. Ensure to download a copy of the EMCNetWorker Module for Microsoft Administration Guide from EMC Online Support(https://support.emc.com) before using this guide.
AudienceThis guide is part of the NetWorker Module for Microsoft documentation set and isintended for use by system administrators during the setup and maintenance of theproduct. Readers should be familiar with the following technologies used in backupand recovery:
l EMC NetWorker software
l Microsoft Virtual Device Interface (VDI) technology
EMC NetWorker Module for Microsoft for SQL VDI 9.1 User Guide 11

Revision historyThe following table presents the revision history of this document.
Table 1 Revision history
Revision Date Description
02 February 22, 2017 Second release of this document for EMC NetWorkerModule for Microsoft release 9.1. The following changesare included:
l Changes are made throughout this document toimprove organization and readability.
l Added procedures for assigning SQL Server anddatabase roles, and Windows user privilegesrequired for backup and recovery operations to the"Introduction" chapter.
l Added Windows Server 2016 to the list of serverssupported by EMC ItemPoint™ for Microsoft SQLServer in the "Granular-Level Recovery" chapter.
01 December 22,2016
First release of this document for EMC NetWorkerModule for Microsoft release 9.1. The following changesare made:
l The following chapters are added:
n "Bare-Metal Recovery"
n "Granular-Level Recovery"
l Information is added about the following newfeatures in NMM 9.1:
n Enabling automatic backup promotion after arecovery model is changed from simple to full orbulk logged.
n Support for SQL 2016.A note about the SQL Server 2016 StretchDatabase feature is added to the section"Microsoft hybrid cloud environments."
n Granular-level recovery
n File-level recovery
n NMM SQL Server Management Studio pluginGUI changes:
– Performing backup and restore operationsof multiple databases
– Filtering databases by Always On AvailabilityGroup
– A new warning message when instant fileinitialization is not enabled
– A new Table Restore tab for granular levelrecovery operations
Preface
12 EMC NetWorker Module for Microsoft for SQL VDI 9.1 User Guide

Table 1 Revision history (continued)
Revision Date Description
– Cached settings
– Filtering database files by file group
l The "Striped Backup and Recovery" chapter isupdated with restore parallelism changes.
Related documentationThe NMM documentation set includes the following publications:
l EMC NetWorker Module for Microsoft Release Notes
l EMC NetWorker Module for Microsoft Administration Guide
l EMC NetWorker Module for Microsoft Installation Guide
l EMC NetWorker Module for Microsoft for SQL and SharePoint VSS User Guide
l EMC NetWorker Module for Microsoft for SQL VDI User Guide
l EMC NetWorker Module for Microsoft for Exchange VSS User Guide
l EMC NetWorker Module for Microsoft for Hyper-V VSS User Guide
l EMC ItemPoint for Microsoft SharePoint Server User Guide
l EMC ItemPoint for Microsoft Exchange Server User Guide
l EMC ItemPoint for Microsoft SQL Server User Guide
l EMC NetWorker documentation set
Special notice conventions that are used in this documentEMC uses the following conventions for special notices:
NOTICE
Identifies content that warns of potential business or data loss.
Note
Contains information that is incidental, but not essential, to the topic.
Typographical conventionsEMC uses the following type style conventions in this document:
Table 2 Style conventions
Bold Used for names of interface elements, such as names of buttons,fields, tab names, and menu paths (what the user specifically selectsor clicks)
Italic Used for full titles of publications that are referenced in text
Monospace Used for:
l System code
l System output, such as an error message or script
l Pathnames, file names, prompts, and syntax
Preface
EMC NetWorker Module for Microsoft for SQL VDI 9.1 User Guide 13

Table 2 Style conventions (continued)
l Commands and options
Monospace italic Used for variables
Monospace bold Used for user input
[ ] Square brackets enclose optional values
| Vertical bar indicates alternate selections - the bar means “or”
{ } Braces enclose content that the user must specify, such as x or y orz
... Ellipses indicate non-essential information that is omitted from theexample
Where to get helpEMC support, product, and licensing information can be obtained as follows:
Product informationFor documentation, release notes, software updates, or information about EMCproducts, go to EMC Online Support at https://support.emc.com.
Technical supportGo to EMC Online Support and click Service Center. Several options for contactingEMC Technical Support appear on the site. Note that to open a service request, youmust have a valid support agreement. Contact your EMC sales representative fordetails about obtaining a valid support agreement or with questions about youraccount.
Online communitiesGo to the EMC Community Network at https://community.emc.com for peercontacts, conversations, and content on product support and solutions. Interactivelyengage online with customers, partners, and certified professionals for all EMCproducts.
Your commentsYour suggestions help to improve the accuracy, organization, and overall quality of theuser publications. Send your opinions of this document to [email protected].
Preface
14 EMC NetWorker Module for Microsoft for SQL VDI 9.1 User Guide

CHAPTER 1
Introduction
This chapter includes the following sections:
l Using NMM with Virtual Device Interface API.................................................... 16l NMM 9.1 compatibility with NetWorker 8.2.3 or later servers ........................... 18l NMM backup and recovery workflow................................................................. 19l Using NMM in a SQL VDI environment...............................................................24l Access privileges for backup and recovery.........................................................34l SQL Server backups...........................................................................................38l SQL Server recovery..........................................................................................44l Error logs for backup and recovery.................................................................... 47
Introduction 15

Using NMM with Virtual Device Interface APIYou can use the EMC
® NetWorker
® Module for Microsoft (NMM) software to back up
and recover Microsoft SQL Server data. NMM uses Virtual Device Interface (VDI), anAPI that Microsoft SQL Server provides, to integrate with the SQL Server and enablethe NetWorker software to back up and recover SQL Server data.
When you install NMM, you can run the System Configuration Checker from theInstallation wizard. It is recommended that you run the System Configuration Checkerto ensure that the setup is correctly configured for backup and recovery. The EMCNetWorker Module for Microsoft Installation Guide provides details.
Note
If you are a NetWorker Module for SQL Server (NMSQL) user and are migrating toNMM VDI, perform a full backup of the SQL Server data after you install NMM VDI.NMM VDI cannot recover SQL snapshot data backed up with NMSQL.
The following figure describes the backup process that takes place between NMM andthe SQL Server using VDI:
1. The user starts the backup process with NMM.
2. The backup command is sent to the SQL Server. This interaction is performedthrough the VDI API.
3. NMM reads the data from SQL Server and stores it on the NetWorker server.
4. NMM sends the backup status to the NetWorker Server and notifies the userwhen the backup is complete.
Introduction
16 EMC NetWorker Module for Microsoft for SQL VDI 9.1 User Guide

Figure 1 VDI backup process between NMM and SQL Server
The following figure describes the recovery process that takes place between NMMand the SQL Server using VDI:
1. The user starts the recovery process with NMM.
2. The restore command is sent to the SQL Server. This interaction is performedthrough the VDI API.
3. NMM reads the data from the NetWorker server and passes the data to the SQLServer using VDI.
4. NMM notifies the user when the recovery is complete.
Introduction
Using NMM with Virtual Device Interface API 17

Figure 2 VDI recovery process between NMM and SQL Server
NMM 9.1 compatibility with NetWorker 8.2.3 or laterservers
NMM supports backup and recovery with NetWorker client version 9.1 and NetWorker8.2.x server.
The EMC NetWorker Module for Microsoft Installation Guide version 9.1 contains theNMM support matrix for NetWorker server and client versions. Refer to the individualNMM release sections of the EMC NetWorker Online Software Compatibility Matrix at http://compatibilityguide.emc.com:8080/CompGuideApp/ for more details.
Note the following limitations when you configure NMM backup and recovery with aNMM 9.1 client and a NetWorker 8.2.3 server or later:
l Dedicated Storage Node—NetWorker 8.2.x server does not support NetWorkerstorage node 9.1. As a result, you cannot configure a dedicated storage node whenyou use NetWorker 9.1 client with NetWorker 8.2.x server.
l Volume affinity—NetWorker 8.2.x server does not support the volume affinityfeature. NetWorker server 9.0 and later support the volume affinity feature. ForNMM Exchange and Hyper-V, if the same volume or a volume from the same DataDomain device and taken from a prior backup cannot be obtained, an incremental-level backup is promoted to level full.
l Backup levels—NetWorker 8.2.x server uses NetWorker server 8.x backup-leveldefinitions, and it does not support the NetWorker server version 9.0 and laterbackup levels.
Introduction
18 EMC NetWorker Module for Microsoft for SQL VDI 9.1 User Guide

NMM backup and recovery workflowThis section provides information about backup, recovery, and cluster environments.
Traditional backup workflow (stand-alone backup over a storage node)During a backup in a traditional environment, processes interact between theNetWorker client (that is, NMM), the NetWorker server, and the SQL Server.
During a traditional backup, the backup starts from the nsrsqlsv program, which isstarted by using one of the following:
l Command prompt
l Microsoft SQL Server Management Studio GUI
l NetWorker User for SQL Server GUI
The following process occurs in a traditional backup:
1. The nsrd program starts the backup nsrworkflow on the NetWorker server.
2. The nsrworkflow starts the savegrp program.
3. The savegrp program runs the NMM backup command (nsrsqlsv) on theclient instead of performing a standard NetWorker save.
4. The nsrsqlsv program passes the backup data from SQL Server to theNetWorker server through an X-Open Backup Services application programminginterface (XBSA).
The NetWorker server schedules and performs all storage management tasks.
The following figure shows the traditional backup workflow.
Introduction
NMM backup and recovery workflow 19

Figure 3 Traditional backup workflow
The EMC NetWorker Administration Guide provides information about the NetWorkerservices and operations.
Federated backup workflow (AlwaysOn Availability Group configuration)During a federated backup, processes interact between the NetWorker client (that is,NMM), the NetWorker server, and the SQL Server.
Note
NMM supports federated backups of any SQL Server with support for AlwaysOnAvailability Groups (SQL Server 2012 and later).
The backup starts from the nsrsqlsv program, which is started by using one of thefollowing:
l Command promptl Microsoft SQL Server Management Studio GUIl NetWorker User for SQL Server GUI
The following process occurs during a federated backup:
1. The NetWorker server starts the nsrsqlsv program in the active node of theWindows cluster (called the coordinator process).
2. The coordinator process queries the SQL Server and detects the BackupPreference and priority from the Availability group, and starts the worker processon the detected preferred node.
3. The backup is configured with and stored under the Windows cluster name on theAvailability Group.
Introduction
20 EMC NetWorker Module for Microsoft for SQL VDI 9.1 User Guide

The following figure shows the federated backup workflow.
Figure 4 Federated backup workflow
Note
The coordinator process always goes through the nsrjobd service to start theworker process on the secondary nodes to ensure that the NetWorker server andnsrjobd can communicate with secondary nodes.
Recovery workflowDuring a traditional recovery operation that uses a storage node without the ClientDirect feature, process interactions occur between the NetWorker client (that is,NMM), the NetWorker server, and the SQL Server.
The following process occurs in a traditional recovery operation:
1. The nsrsqlrc program starts the recovery.
2. The NetWorker XBSA API translates the object names that NMM requests into aformat that NetWorker understands and forwards the translated object names tothe NetWorker server nsrd service.
3. The nsrmmd media service, contacts the nsrmmdbd service to search theNetWorker server’s media database for the volumes that contain the requestedobjects.
4. After the media is mounted, the nsrmmd program sends the data through theNetWorker XBSA API to nsrsqlrc, which then sends data to the SQL Server.
The following figure shows the traditional recovery workflow.
Introduction
Recovery workflow 21

Figure 5 Traditional recovery workflow
NMM recovery interactions with the SQL ServerWhen a SQL instance-level recovery occurs, NMM stops and starts the SQL Serverand dependent services.
When you want to recover the SQL Server system database types like master andmsdb, the nsrsqlrc program automatically stops and restarts the SQL Serverservices appropriately, as follows:
1. Before the recovery process begins, NMM stops the SQL Server and otherdependent services.When the SQL Server Analysis Services (SSAS) is running, it might use the onlyavailable database connection if the SQL Server is in a single-user mode. Stop theAnalysis Services before restoring the master database.
2. NMM starts the SQL Server in single-user mode.
3. NMM performs the recovery.
4. After the recovery process finishes, NMM waits for the SQL Server to shut down.
5. For stand-alone and cluster environments, NMM restarts the SSAS.
When you recover a master database, there can be timing issues related to stoppingand starting of services. If you are recovering a master database, it is recommendedthat before you start the recovery, you manually stop all SQL Server services exceptfor the SQL Server.
Introduction
22 EMC NetWorker Module for Microsoft for SQL VDI 9.1 User Guide

Cluster supportNMM can back up or recover data from an SQL server that is running as a SQL virtualserver in a Windows Server Failover Cluster (WSFC). The SQL Server instance that isrunning in this configuration is called Failover Cluster Instance (FCI).
NMM requires the SQL virtual server name so it can perform the following tasks:
l Connect to the SQL Server instance.
l Accept data from or deliver data to the SQL Server in the cluster, and to initializethe SQL Server VDI.
l Create entries in the NetWorker client file index.
NMM creates index entries under the virtual server name in the NetWorker client fileindex.
Note
Backup and recovery of SQL Server data in a cluster with NMM requires ClusterClient Connection licenses on the NetWorker server host. A separate Cluster ClientConnection license is required for each node in the cluster.
NMM detects SQL Server instancesNMM automatically detects all the SQL Servers in a WSFC, including the SQL virtualservers.
NMM detects the SQL Servers only on the active nodes, whenever the followingconditions occur:
l The NetWorker User for SQL Server GUI is started.
l The EMC NetWorker window in the NMM Microsoft SQL Server ManagementStudio (NMM SSMS) plugin GUI is opened.
l The Select SQL Instance option is selected.
l A backup or recovery is started.
Named instances in failover cluster configurationsNMM provides failover cluster support by using the multiple instance featuresprovided in the SQL Server. In a failover configuration, the SQL virtual servers run aseither default instances or as named instances. Only one default instance of a SQLvirtual server can be installed. Additional SQL virtual servers might be installed asnamed instances, where each instance name must be unique within the cluster.
Multiple named instances are supported as SQL virtual servers in a clusterconfiguration. The number of instances that are supported depends on the SQLServer version that is used in the setup. The EMC NetWorker Module for MicrosoftInstallation Guide and the Microsoft SQL Server documentation provide moreinformation.
Each named SQL virtual server instance has the following qualities:
l A unique IP address, network name, and instance name
l Datafile files that are installed on a clustered drive that belongs to the samecluster group as the associated virtual server for that named instance
Active and passive cluster configurationsWhen the NetWorker User for SQL Server GUI or the NMM SSMS plugin GUI isstarted on the active node, NMM automatically uses the SQL virtual server as the
Introduction
Cluster support 23

client name. The client name is used for reading or writing to the NetWorker mediadatabase and client file index. The NetWorker User for SQL Server GUI or the NMMSSMS plugin GUI can be used only on the active node.
When you use the command line interface, use the nsrsqlsv -A <SQL virtualserver> backup command when the target database is a SQL cluster.
If the SQL Server fails over to the secondary cluster node and the NetWorker User forSQL Server program is started on the secondary node, NMM automatically uses theSQL virtual server name. The NMM SSMS plugin GUI shows all active clusters thatare running on the host in the SQl Server Instance list.
If one SQL virtual server is running on each physical node in the cluster, an active oractive cluster configuration exists, and the following events occur:
l If no failover occurs and each SQL virtual server is running on a different physicalnode, NMM automatically communicates with the SQL virtual server that isrunning on the same physical node.
l The Select SQL Instance option from the Operation menu on the NetWorkerUser for SQL Server GUI is disabled.
However, if one of the physical cluster nodes goes offline (for example, if a failoveroccurs) and both SQL virtual servers are running on the same physical cluster nodewhen the NetWorker User for SQL Server GUI is started, the Select SQL Instancedialog box appears. The Select SQL Instance dialog box lists the SQL Serverinstances. After you select an instance from the Select SQL Instance dialog box,NMM tries to validate the instance as a NetWorker client.
Using NMM in a SQL VDI environmentThis section provides information about using NMM in a SQL VDI environment.
Supported Windows Server and SQL Server versionsThe EMC NetWorker Online Software Compatibility Matrix at http://compatibilityguide.emc.com:8080/CompGuideApp/ provides the most up-to-dateinformation about supported Windows Server and SQL Server versions.
Migrating from VSS solution to VDI solution for SQL Server data protectionReview this section if you are using an NMM version earlier than NMM 2.4 to recoverSQL Server data with VSS technology and want to use NMM 8.2 or later to back upand recover SQL Server data with VDI technology.
l If you are using NetWorker 8.2.x server with NMM 9.1 client, in the Backup GroupProperties window, clear the Snapshot option.
l Assign a backup schedule to the backup.
l In the Client Properties dialog box for each client resource:
n In the Backup Command field, type nsrsqlsv. For SQL virtual server in acluster environment, specify nsrsqlsv -A SQL virtual server.
n Leave the Application Information field empty.
n Change the save set to MSSQL: for SQL default instance-level backup orMSSQL:dbname for database-level backup on a SQL default instance.
Introduction
24 EMC NetWorker Module for Microsoft for SQL VDI 9.1 User Guide

Microsoft SQL Server Always On Availability Group featureNMM supports the Always On Availability Group feature with SQL Server 2012 orlater, which allow multiple replicas of a database.
The Microsoft website describes the Always On Availability Group feature in SQLServer 2012 or later and provides detailed information about how to configure thesetup for this support. This feature allows multiple replicas of a database.
An availability group is a logical group of databases that has the Always On capability.An availability group is failed over to other nodes as a group, meaning that all thedatabases that are part of the availability group are failed over together during afailover.
An availability replica hosts each set of availability databases.
Two types of availability replicas exist:
l A single primary replica, which hosts the primary databases.
l One or more secondary replicas, each of which hosts a set of secondary databasesand serves as a potential failover target for the availability group. You canconfigure the following number of secondary replicas depending on the SQLServer version:
n One to four secondary replicas for SQL Server 2012.
n One to eight secondary replicas for SQL Server 2014 or later.
The secondary replicas can be configured in either synchronous or asynchronousmode.
Consider the following points when you use Always On Availability Groups with NMM:
l To back up secondary replicas with NMM, set the Readable Secondary Replicasconfiguration option to “Yes” on each database. Enable this option for both theprimary and secondary replicas. This option allows NMM to connect to thesecondary replica to gather information about the secondary replica (for example,database file location, which can be different from the other replicas).
l To recover an Always On Availability Group database, suspend replication beforeyou recover the database. You can use either the NMM Microsoft SQL ServerManagement Studio plugin GUI or the T-SQL query window for this task.
It is recommended that you back up an Always On Availability Group with a federatedbackup workflow, and that you use the Windows cluster name as the client name.
Always On Availability Group failover cluster instance supportNMM supports Always On Availability Groups over two normal SQL clusters. Thisconfiguration protects data with both SQL cluster instance-level failover andavailability group database-level failover.
Note
When you configure a federated backup of an Availability Group that is configuredwith multiple SQL server instances and one of these instances is a failover clusterinstance, use the Client Properties dialog box to configure the backup. This situationexists when there is a SQL virtual server instance in the cluster. This configuration isnot available from the Client Backup Configuration wizard. See the Federated Backupand Recovery chapter for more information about configuring an availability groupover two SQL clusters.
Introduction
Microsoft SQL Server Always On Availability Group feature 25

SQL Client Direct to AFTD or DD devicesThe NetWorker client software enables clients with network access to Advanced FileType Device (AFTD) or Data Domain devices to send their backup data directly to thedevices. This functionality uses the Client Direct feature to allow the client to bypassthe NetWorker storage node.
The Client Direct feature is enabled by default, but it can be disabled on each client byclearing the Client Direct attribute on the client resource in NMC. When a ClientDirect backup is not performed, a traditional storage node backup is performedinstead.
The nsrsqlsv.raw backup log displays details about the Client Direct activity forthe SQL Server.
Microsoft SQL Server named log marksMicrosoft SQL Server enables enhanced point-in-time restore operations because itallows named log marks to be specified during transactions.
Database applications create named log marks when transactions are performed. Themarks enable you to access to specific transaction points in a database transaction logbackup. NMM allows you to select a named log mark during a restore operation andrestores to the beginning or end of a named log mark during a database restoreoperation. Restoring data through named log marks is an improvement over point-in-time restore because the time that is associated with restoring to a specifictransaction can be more accurately determined.
When a named log mark is created in the SQL Server database, the log mark time issaved to the millisecond. However, NetWorker’s time format, which is used to specifypoint-in-time restore, supports granularity only to the second. If log marks withduplicate names are created within a second of each other, NMM restores to the mostrecently named log mark.
Managing SQL Server database transaction logsNMM provides implicit management of the SQL Server database transaction logs.
Implicit management uses SQL database transaction log backups to manage log space.This management can occur when:
l A backup schedule is implemented that is level logs only.
l You run the nsrsqlsv command with the -l txnlog option.
Note
If you are using NetWorker server 8.2.x, the backup level is incremental and the -lincr option is used with the nsrsqlsv command.
Prevent log overflowIn Windows, prevent database logs from overflowing available log space by creating analert in the SQL Server Performance Monitor. The alert forces a log to backup onlywhen the database’s log space reaches a certain capacity (for example, 80% full). Analert is a user-defined response to a SQL Server event. Backups truncate the logs andclear disk space.
Introduction
26 EMC NetWorker Module for Microsoft for SQL VDI 9.1 User Guide

Named and default instances of SQL ServerNMM supports backup and recovery of named and default instances.
NMM supports recovery from the SQL Server default instance or named instances byusing a copy restore to any instance of a SQL Server. This support includes recoveryoperations when the destination server is different from the source.
Each named instance has a unique instance name in the following format:
computerName\instanceName
where:
l computerName is the network name of the computer.
l instanceName is the logical name of the named instance.
Note
When naming a SQL database or an instance, select unique names. The following listprovides examples of poor database name choices:
l The name that the SQL Server uses to identify itself (MSSQL:).
l Names of SQL instances that you have installed.
Use the following syntax to specify a SQL stand-alone named instance of SQL Serverat a command prompt:
MSSQL$Standalone_Named_Instance:[dbName ...][.fgName ...][.fileName ...]
An entry of MSSQL: for the Save Set attribute during the client resource configurationyields a backup of all databases for the default instance.
When running multiple instances, the nsrsqlsv and nsrsqlrc commands supportspecification of only one instance at a time. If save sets for more than one instance arespecified, the backup or restore operation fails.
Index entries for stand-alone named instances are created by using the local host onwhich the instance is running. Index entries for clustered named instances are createdwith the SQL virtual server name. To differentiate backups for the default instanceand named instances, the index name has been extended to logically partition theindex for a client.
All running named instances, except clustered instances and the default instance, aremaintained in the client file index directory. This named instance directory is createdat the end of each traditional backup. Run the nsrinfo command after a backup toverify that this directory was created. For example, type:
%SystemDrive% nsrinfo -V -L -n mssql client_name
Multi-stream Data Domain BoostNMM supports multi-stream backups for a SQL Server to a Data Domain device. Thissupport leverages the Data Domain Boost feature. SQL Server multi-stream backups
Introduction
Named and default instances of SQL Server 27

over Data Domain Boost enhance the performance by running the backups muchfaster.
Database consistency checksNMM can provide database consistency checks (DBCC) before a backup operation isperformed.
A DBCC examines all tables in the database to detect whether index and data pagesare correctly linked and indexes are in proper-sorted order. A DBCC also checks thatpointers are consistent and that the data information on each page and page offsetsare reasonable. It helps recognize problems early, which prevents problem escalationand possible data loss.
Note
DBCC can be performed for database-level, multiple database-level, and instance-level save sets on cluster and stand-alone configurations. For federatedconfigurations, DBCC can be performed for database-level save set, but DBCC cannotbe performed for Always On Group level backups.
You can configure a DBCC through the following methods:
l For manual backups—From the NMM Microsoft SQL Server Management Studio(SSMS) plugin GUI, in the EMC NetWorker window. The topic Performing manualbackups from the NMM SSMS plugin GUI on page 59 provides moreinformation.
l For manual backups—From the NetWorker User for SQL Server GUI:
n On the Database Properties page, select the Perform DBCC consistencychecks option by right-clicking a database in the Backup page.
n In the Backup options window, on the General tab, select the Perform DBCCconsistency checks option.The topic Performing manual backups from the NetWorker User for SQLServer GUI on page 63 provides more information.
l For scheduled and federated backups—In the NetWorker Management Console, inthe Client Properties dialog box for the SQL Server host client resource:
n In the Application Information field, typeNSR_CONSISTENCY_CHECKS=database1,datbase2 where database1 anddatabase2 are the database names for which you want to run a consistencycheck, for example: NSR_CONSISTENCY_CHECKS=testdb3,CopyOfDB010,test4Ensure that there are no spaces between the database names. For example,NSR_CONSISTENCY_CHECKS=testdb3, CopyOfDB010,test4 is incorrect.
n To specify that you want to run a consistency check on all the databases in aninstance, in the Application Information field, typeNSR_CONSISTENCY_CHECKS=ALL.
l In the Client Backup Configuration wizard, select Perform DBCC consistencycheck when you configure the client resource, and then select one of thefollowing:
n To perform DBCC for all the databases in an instance, select All.
n To perform DBCC for specific databases in an instance, specify the databasesfor which you want to run the DBCC checks.
l From the command prompt, type the nsrsqlsv command with the variousbackup command options as follows:
Introduction
28 EMC NetWorker Module for Microsoft for SQL VDI 9.1 User Guide

n To perform DBCC checks for databases in an instance, type the commandoption -j testdb3,CopyOfDB010,test4.Where testdb3, CopyOfDB010, and test4 are the names of the databases in theinstance. Ensure that there are no spaces between the database names. Forexample, using testdb3, CopyOfDB010,test4 is incorrect.
n To perform DBCC checks for all the databases in an instance, type thecommand option -j ALL.
If the DBCC runs successfully for a database, a message appears in the NMM logs orbackup output page.
Figure 6 Message showing DBCC was successful
If DBCC for a database fails, the failure status appears as part of the policynotification and the database backup is omitted. The DBCC failure is reported in theNMM logs or backup output page.
Improved SQL savegroup notificationsA notification provides information about events that occur in the NetWorker andNMM environments. By default, the NetWorker server sends notifications to log filesthat are located in the install_dir\applogs directory.
In previous NMM releases, when SQL Server instance-level backups of the MSSQL:and MSSQL$INSTANCE NAME: were performed, the complete information of backupsuccess or failure was not displayed in the NetWorker Server savegroup notifications.
NMM now supports SQL savegroup notifications that list the backup success orfailure and provides important details about any failure.
The following figure shows an example of SQL savegroup notification.
Introduction
Improved SQL savegroup notifications 29

Figure 7 Example of SQL savegroup notification
Microsoft hybrid cloud environmentsNMM supports SQL Server 2014 and later VDI backups and recoveries in Microsofthybrid cloud environments.
NMM supports stand-alone, and federated backup workflows for both private andhybrid cloud environments.
Backup and recovery operations in a cloud environment are only supported for onsitedatabases. The onsite backup workflow is the same as the SQL Server 2012 or laterAlways On Availability Group workflow.
Note
NMM does not support backup and recovery of SQL Server data directly from thehybrid cloud. If you are using the SQL Server 2016 Stretch Database feature, ensurethe data that you must back up and recover is onsite, otherwise the operation fails.
Optional SQL Server log gap detectionNMM supports SQL Server log gap detection during logs-only backups. This feature isnot supported with full or incremental backups.
The NMM software automatically checks the SQL Server history and the NetWorkerServer backup history for a database to find the log gap from a previous logs-onlybackup.
You can toggle log gap detection off by using one of the following methods:
l When you configure a manual backup with the NMM Microsoft SQL ServerManagement Studio plugin GUI, in the EMC NetWorker window, on the Restoretab, in the Options page, select Turn off log gap detection.
Introduction
30 EMC NetWorker Module for Microsoft for SQL VDI 9.1 User Guide

l When you configure a scheduled backup with the Client Backup Configurationwizard, on the Backup Options page, select Turn off log gap detection duringincremental backup.
l When you configure a scheduled backup with the Client Properties dialog box, inthe Apps & Modules tab, in the Application Information field, typeNSR_SKIP_LOGGAP_DETECTION=TRUE. The default value is FALSE, which enableslog gap detection.
If log gap detection is disabled when you configure a client resource, a message islogged in the NSRSQLSV.RAW backup module log file.
The Manual Backups chapter and the Scheduled Backups chapter provide moreinformation about disabling log gap detection.
Considerations for disabling log gap detectionConsider the following before disabling log gap detection:
l Perform a full backup before using disabling log gap detection. The SQL Serverdatabase administrator must perform the full backup.
l Backup promotion does not occur when you disable log gap detection, unless youare backing up a master database or msdb.
l If you are using NetWorker 8.2.x server with NMM 9.1 client, SQL Server log gapdetection is supported during level-incremental backups.
Supported special characters in database names for NMM backup andrecovery
The following table lists the special characters that may be used in SQL Serverdatabase names when performing backup and recovery in stand-alone, cluster, AlwaysOn Availability Group, and federated configurations.
Table 3 Supported special characters in database names
Special characters Stand-alone and clusterconfigurations(Database-level andInstance-level backup andrecovery)
Always On AvailabilityGroup and federatedconfigurations(availability group levelbackup and recovery)
~ Tilde Successful Successful
- Hyphen Successful Successful
! Exclamation mark Successful Successful
{ Open curlybracket
Successful Successful
% Percentage Successful Successful
} Close curlybracket
Successful Successful
) Close parenthesis Successful Successful
( Open parenthesis Successful Successful
` Accent grave Successful Successful
@ At the rate Successful Successful
Introduction
Supported special characters in database names for NMM backup and recovery 31

Table 3 Supported special characters in database names (continued)
Special characters Stand-alone and clusterconfigurations(Database-level andInstance-level backup andrecovery)
Always On AvailabilityGroup and federatedconfigurations(availability group levelbackup and recovery)
# Hash Successful Fails
Note
Hash is an availability groupidentifier.
_ Underscore Successful Successful
& Ampersand Successful Successful
^ Caret Successful Successful
. Period Successful Successful
\ Backslash Successful Successful
' Apostrophe Successful
Note
Backup and recoveryoperations are successful butwarnings are displayed whenperforming recovery.
Successful
Note
Backup and recoveryoperations are successful butwarnings are displayed whenperforming recovery.
$ Dollar Fails
Note
Dollar is a SQL instanceidentifier.
Fails
Note
Dollar is a SQL instanceidentifier.
: Colon Fails
Note
Colon is a database nameidentifier.
Fails
Note
Colon is a database nameidentifier.
Transparent data encryptionMicrosoft SQL transparent data encryption (TDE) is a feature that performs realtimeI/O encryption and decryption of the data and log files.
TDE uses a database encryption key (DEK), which is stored in the database bootrecord for availability during recovery. Encryption of the database file is performed atthe page level. The pages in an encrypted database are encrypted before they arewritten to disk and decrypted when read into memory. When using this feature,ensure that the certificate and private key are backed up with the encrypted data.
Introduction
32 EMC NetWorker Module for Microsoft for SQL VDI 9.1 User Guide

Microsoft SQL Server 2008 and later introduce the TDE database-level encryptionfeature. This feature provides protection for the entire database at rest, withoutaffecting existing applications. NMM supports SQL data encryption at the cell level, atthe full database level by using TDE, or at the file-level with encryption optionsprovided by Microsoft.
The Microsoft SQL Server product documentation provides more information aboutTDE, enabling data encryption, and protecting the encryption keys.
Note
When enabling TDE, back up the certificate and the private key associated with thecertificate. If the certificate becomes unavailable or if the database is restored onanother server, backups of both the certificate and the private key must be availableto open the database.
Setting the MAXTRANSFERSIZE environment variableMAXTRANSFERSIZE is a data transfer option that specifies the largest unit of transferin bytes to be used between SQL Server and the backup media or VDI backupapplication. This option applies to both backup and recovery operations.
The MAXTRANSFERSIZE value is set through the NSR_VDI_MAXTRANSFERSIZEenvironment variable. Setting the NSR_VDI_MAXTRANSFERSIZE variable determinesthe MAXTRANSFERSIZE value as follows:
MAXTRANSFERSIZE= 1024 x NSR_VDI_MAXTRANSFERSIZE
The valid values of the NSR_VDI_MAXTRANSFERSIZE variable range from 64 to4096. The resulting values of the MAXTRANSFERSIZE variable range from 65,536bytes to 4,194,304 bytes.
Use the following procedure to change the MAXTRANSFERSIZE from the default valueof 4,194,304 bytes.
Procedure
1. Open Control Panel > System.
2. Click Advanced system settings.
The System Properties window opens.
3. Click Environment Variables...
The Environment Variables window opens.
4. In the User variables section, perform one of the following:
l If an NSR_VDI_MAXTRANSFERSIZE variable is not listed, click New tocreate and define the NSR_VDI_MAXTRANSFERSIZE variable.
l If an NSR_VDI_MAXTRANSFERSIZE variable is listed, click Edit to edit thevariable.
5. Click OK.
Results
After this parameter is set in the registry, subsequent NMM backups use the registrysetting. For SQL cluster environments, set the key on all cluster nodes where backupsmight run.
Introduction
Setting the MAXTRANSFERSIZE environment variable 33

Access privileges for backup and recoveryReview the privileges that are required to perform SQL Server backup and recoveryoperations with NMM.
NMM for SQL Server VDI requires that the user starting backup and recoveryoperations is assigned certain privileges from the SQL Server, the Windowsapplication host, and the NetWorker server. These privileges are required for bothscheduled and manual backups:
l For manual backups, the user starting the backup must be granted these roles.
l For scheduled backups, the Remote user who is assigned to the client resourcemust be granted these roles.
Note
For mirroring environments, the user account must have privileges to both the primarymirror and the mirroring partner.
Table 4 Access privileges required for backup and recovery operations
SQL Server user roles Windows user groups NetWorker user roles
Assign the user to the following serverroles with the SQL Server StudioManagement (SSMS) GUI:
l sysadmin
l dbcreator
l public
Assign the user to the followingdatabase roles with the SSMS GUI:
l db_backupoperator
l db_owner
l public
Assigning SQL server and database rolesfor backup and recovery operations onpage 35 provides more information.
Assign the user to the following usergroups on the Windows application host:
l Local Backup Operators
l Domain Users
l Remote Desktop Users
Assigning Windows user privileges forbackup and recovery operations on page36 provides more information.
Assign the user to the following role withthe NetWorker Administration GUI:
l Operators
The "Configuring NetWorker privileges"section in the EMC NetWorker Module forMicrosoft Administration Guide providesmore information about assigningNetWorker User roles.
Note
To enable user access for NMM when User Access Control (UAC) is used, grant theWindows "Log on as a batch job" privilege to the remote user that performs NMMoperations. This privilege allows the user to log in with a privileged security token. Togrant the "Log on as a batch job" privilege, perform the following steps:
1. Open the Local Security Policy (secpol.msc) on the client.
2. Go to Local Policies > User Rights Assignment.
3. Verify that the Windows user or associated group has the Log on as a batch jobprivilege.
Introduction
34 EMC NetWorker Module for Microsoft for SQL VDI 9.1 User Guide

Assigning SQL server and database roles for backup and recovery operationsAssign the required privileges on the SQL Server to perform SQL Server backup andrecovery operations with NMM.
Before you begin
A user account must exist on the SQL Server.
Procedure
1. Launch the SQL Server Management Studio.
2. In the Connect to Server window, specify the details for the SQL Server thatyou want to backup and recover. Ensure that you select WindowsAuthentication.
3. From the Object Explorer pane, expand the folder for the SQL Server that youwant to backup and recover, then expand the Security folder, and then expandthe Logins folder.
4. Right-click the name of the user that you want to assign backup and recoveryprivileges to, and then click Properties.
The Login Properties window appears. Fixed database roles that are assignedin this window grant the user privileges to perform T-SQL queries. TheMicrosoft documentation provides more information about required privilegesfor T-SQL queries.
5. On the Server Roles page, select server roles as required.
The following table describes the server roles that are required for backup andrecovery operations.
Table 5 Required server roles for backup and recovery operations
Operation Required server role
Backup l sysadmin
l public
Restore l sysadmin
l dbcreator
l public
6. On the User Mapping page, select the required database roles for theoperations that you want the user to perform.
The following table describes the database roles that are required for backupand recovery operations.
Table 6 Required database roles for backup and recovery operations
Operation Required database role
Backup l db_backupoperator
l db_owner
Introduction
Assigning SQL server and database roles for backup and recovery operations 35

Table 6 Required database roles for backup and recovery operations (continued)
Operation Required database role
l public
Restore l db_owner
l public
7. (Optional) Select additional database roles as required.
l Select db_denydatareader to prevent the user from reading the databasedata.
l Select db_denydatawriter to prevent the user from modifying databasedata.This restriction includes denying the user the ability to perform UPDATE orDELETE T-SQL queries.
8. Click OK.
Assigning Windows user privileges for backup and recovery operationsAssign the required user privileges on the Windows application host to perform SQLServer backup and recovery operations with NMM.
There are two types of users of which access privileges can be modified:
l Local UserThis type of user is used for standalone server and Always On Availability Groupdatabases.
l Domain UserThis type of user is used for Always On Availability Group and Failover ClusterInstance databases.
Assign user privileges to a Local UserLocal User privileges are modified using the Local Users and Groups window.
Procedure
1. On the SQL Server that you want to back up and recover, click Start >Programs > Administrative Tools > Computer Management > Local Usersand Groups.
2. In the left pane, under Local Users and Groups (Local), perform one of thefollowing action sequences.
l To assign privileges to an existing user, use the following steps:
a. Click Users.
b. From the list of Local Users, right-click the user, and then clickProperties.
l To assign privileges to a new user, use the following steps:
a. Select and right-click Users, and then click New User.
b. In the New User window, specify the details for the new user, and thenclick Create.The user appears in the list of Local Users in the Users folder.
Introduction
36 EMC NetWorker Module for Microsoft for SQL VDI 9.1 User Guide

c. Right-click the newly created user, and then click Properties.
The User Properties window appears.
3. On the Member Of tab, add the user to the Backup Operators user group, andthen click Apply.
4. Click OK.
Assign user privileges to a Domain UserDomain User privileges are modified using the Active Directory Users andComputers window.
Procedure
1. On the SQL Server that you want to back up and recover, click Start >Programs > Administrative Tools > Active Directory Users and Computers.
2. In the left pane, under Active Directory Users and Computers, expand theActive Directory domain name, and then perform one of the following actionsequences.
l To assign privileges to an existing user, use the following steps:
a. Click Users.
b. from the list of Active Directory users, right-click the user, and then clickProperties.
l To assign privileges to a new user, use the following steps:
a. Select and right-click Users, and then click New > User.The New Object - User window appears.
b. In the New Object - User window, select the Active Directory domain forthe account and specify the details for the new user, and then click Next.The user appears in the list of Active Directory users in the Users folder.
c. Right-click the newly created user, and then click Properties.
The User Properties window appears.
3. On the Member Of tab, add the user to the Backup Operators user group, andthen click Apply.
4. Click OK.
5. On the SQL Server, click Start > Control Panel > User Accounts.
6. On the User Accounts page, click User Accounts.
7. On the Make changes to your user account page, click Manage UserAccounts.
The User Accounts window appears.
8. On the Users tab, click Add.
9. In the Add a user dialog box, type the username and Active Directory domainname, and then click Next.
10. Under What level of access do you want to grant this user?, selectStandard.
Introduction
Assigning Windows user privileges for backup and recovery operations 37

SQL Server backupsThis section introduces NMM as a tool to back up an SQL Server.
Types of supported backupsNMM supports manual, scheduled, and federated backups of the SQL Server.
l Manual or traditional backup—NMM supports traditional backups, which are oftenreferred to as manual backups. A traditional backup of SQL data can be performedat any time and is independent of any scheduled backup.NMM supports traditional backup of the following items:
n Database
n File
n File group
n Filestream data
n Transaction log
Also, the SQL Server supports the creation of file group differential, filedifferential, and copy-only backups.
A file group differential backup can reduce both media requirements and recoverytime because data is stored across more than one disk or disk partition, sorecovery time is reduced. A differential backup can substitute for any logs-onlybackups performed between the full and differential backups. A full backup mustbe performed first.
Note
NMM can recover a full backup of SQL Server data (including files and file groups)that were created with NMSQL. However, NMM cannot recover snapshot(PowerSnap based) backups that were created with NMSQL.
l Scheduled backup—The most reliable way of protecting SQL data is to ensurethat backups of the SQL Server are run at regular intervals, that is, scheduledbackups. Scheduled backups ensure that all SQL Server data, including theNetWorker server’s client indexes and bootstrap file, is automatically saved. If adisaster occurs, the client indexes and bootstrap file are vital for restoring data tothe SQL Server.
l Federated backup—NMM supports SQL Server 2012 or later federated backupfunctionality for SQL Server 2012 AlwaysOn databases.
Note
Due to SQL Server behavior, the following limitations apply to SQL Server backups:
l Only full backups (including copy-only full backups) are supported for simplerecovery model databases.
l Copy-only backups of databases, files, or file groups are supported only when theyrun on secondary SQL Server replicas.
l Differential backups are not supported on secondary SQL Server replicas in anAlways On Availability Group configuration.
Introduction
38 EMC NetWorker Module for Microsoft for SQL VDI 9.1 User Guide

Backup levelsNMM supports three levels of backup.
Table 7 Backup levels in NMM for SQL VDI backups
Backup levels Description
Full Entire database backup, including all file groups or files in thedatabase.
Logs-only backup A logs-only backup that corresponds to a SQL Server transaction logbackup. A log file backup cannot be used to recover a database. A logfile backup is used after a database recovery to restore the databaseto the point of the original failure.
Note
The logs only backup option appears in the NetWorker ManagementConsole. When using the command prompt to perform a logs-onlybackup, use the txnlogs -l command.
Cumulativeincremental
A cumulative incremental backup captures all changes since the lastfull backup.
Note
NetWorker 8.2.x defines backup levels differently than NMM 9.1. If you are usingNetWorker 8.2.x server with the NMM 9.1 client, refer to the EMC NetWorker Modulefor Microsoft for SQL VDI User Guide version 8.2 SP1 for information about backuplevels.
Setting backup levelsNMM enables you to specify backup levels to logs only, cumulative incremental, andfull.
The availability of a backup level depends on the type of data selected for backup andany SQL Server settings on those objects, as listed in the following table.
Note
NetWorker 8.2.x defines backup levels differently than NMM 9.1. If you are usingNetWorker 8.2.x server with the NMM 9.1 client, refer to the EMC NetWorker Modulefor Microsoft for SQL VDI User Guide version 8.2 SP1 for information about backuplevels.
Introduction
Setting backup levels 39

Table 8 Backup levels for SQL Server data
SQL Server dataobjects
Supported SQL Server backup levels
Full Cumulativeincremental
Logs only
All databases of SQLdefault or namedinstances
Yes Yes Yes
Specified databases Yes Yes Yes
All filegroups inspecified databases
Yes Yes Not applicable
Filestream data inspecified databases
Yes Yes Yes
Specified filegroups inspecified database
Yes Yes Not applicable
Specified files infilegroups in specifieddatabases
Yes Yes Not applicable
When you perform a logs-only backup for SQL Server data objects, ensure that theSQL Server database options are correctly configured. The Microsoft SQL Serverdocumentation provides more information. Individual items are subject to promotion.
Example strategies for backing up SQL Server dataThis section describes example strategies for backing up SQL Server data.
Example 1 Backup strategy one
If the SQL Server manages a significant amount of data, schedule a backup of thedatabases every 1 to 2 weeks, as shown in the following table.
Table 9 Full backup every 1 to 2 weeks
Fri Sat Sun Mon Tues Wed Thurs
Full Logs-only Logs-only Logs-only Logs-only Cumulativeincremental
Logs-only
Logs-only Logs-only Logs-only Cumulativeincremental
Logs-only Logs-only Logs-only
Full Repeat
Example 2 Backup strategy two
Another backup strategy is to schedule logs-only backups on several successive daysimmediately following a full backup, as shown in the following table. This schedulebacks up all data that has changed since the previous logs-only backup.
Introduction
40 EMC NetWorker Module for Microsoft for SQL VDI 9.1 User Guide

Example 2 Backup strategy two (continued)
A level 1 cumulative incremental backup can also be scheduled after several days oflogs-only backups. This schedule backs up all data since the previous full backup.
NOTICE
If a database is read-only, perform a full backup of the database. A read-only databasecannot be restored from an existing transaction log backup.
Table 10 Logs-only backup after a full backup
Fri Sat Sun Mon Tues Wed Thurs
Full Logs-only Logs-only Logs-only Cumulativeincremental
Logs-only Logs-only
Repeat
Using backup levelsBecause it is not practical or efficient to run full backups every day, you can specifydifferent backup levels for scheduled backups. Limiting the frequency of full backupscan decrease server load while ensuring complete data protection.
Differences between backup levelsThe following table outlines the differences between backup levels.
Table 11 Backup level advantages and disadvantages
Backup level Advantages Disadvantages
Full Fastest restore time. l Slow backup.
l Increases load on client, server,and network.
l Uses the most volume space.
Logs only l Faster backup time than a fullbackup.
l Decreases the load on server anduses the least volume of space.
l Enables point-in-time restore.
l Slow restore.
l Data can spread across multiplevolumes.
l Multiple transaction logs canspread across multiple volumes.
Cumulativeincremental
l Faster backup time than a fullbackup.
l Captures all changes since thelast full backup.
Generally more time-consuming thana logs-only backup (depending on thebackup schedule strategy).
Combining data objects to create backup levelsNMM enables the selection of SQL Server data objects in various combinations tocreate scheduled backups of different levels, as shown in the following table.
Introduction
Setting backup levels 41

Table 12 Creating additional backup levels with data objects
Backup level Database objects
Full database To create a level full database backup of the selecteddatabases and their transaction log files, select one or moredatabases.
Full file or file group To create a level full file or file group backup of the selectedfiles or file group, but not their transaction logs, select oneor more files or one or more filegroups.
Database logs only To create a database logs only level backup of only the logsonly for the selected database, select one or moredatabases.
The SQL database must be previously configured to enablelogs only backups.
Database cumulativeincremental (level 1)
To create a database level cumulative incremental backup ofonly the changes that are made to the selected databasessince the last full level backup was created, select one ormore databases.
File or file group cumulativeincremental
To create a file or file group level cumulative incrementalbackup, select one or more files or one or more filegroups.This backup only includes the changes that are made to theselected files or filegroups since the last full level backup.
Promoting backup levelsGuidelines for Microsoft SQL Server best practices indicate that a full databasebackup should be the first step in implementing a recovery strategy for a database. Inadhering to these guidelines, NMM supports backup level promotion. Backup levelpromotion is based on data on the NetWorker server. The following table explainswhat prompts a promotion.
Note
NMM does not support promoting the following backups to different backup levels:
l Copy only backups
l Backups of a secondary SQL Server node in an AG
Table 13 Backup level promotion process
Item Requestedlevel
Level ofpromoted
Reason
Database Cumulativeincremental
Full Database full backup does not exist.
Logs only Full l The database model is changed fromsimple to full, or bulk logged.
Introduction
42 EMC NetWorker Module for Microsoft for SQL VDI 9.1 User Guide

Table 13 Backup level promotion process (continued)
Item Requestedlevel
Level ofpromoted
Reason
Note
For the backup to be promoted in thisscenario, theIGNORE_RECOVERY_MODEL_CHANGEApplication Information attribute must beset to FALSE.
l Database full backup does not exist.
l Database names are "master" or "msdb."
l The last backup on the database was noperformed by using NMM.
l A log gap is detected.
l The last backup of the database wastaken with a different saveset.
l The mirror partner has a more recentbackup.
l Transaction log backup types are notsupported for simple recovery modeldatabases.
l Database is in emergency mode. Refer tothe Microsoft SQL Server Books Onlinefor more information.
File/Filegroup Full Database full Full backup of the entire database does notexist.
Databases consist of files and groups thatcontain files. The default configuration is aprimary file group with the main datafile.Elaborate database configurations can containmore filegroups; each with more files. If a filegroup or file level backup is specified and a fulldatabase backup is not on record, the filegroup or file backup is promoted to adatabase full backup.
Cumulativeincremental
Database full Full backup of the entire database does notexist.
Logs only FullFile or file group logs only backups are notsupported.
Introduction
Setting backup levels 43

SQL Server recoveryThis section introduces NMM as a tool to recover an Microsoft SQL Server.
Types of supported recoveryThis section lists the types of supported recovery for SQL Server VDI.
NOTICE
NMM supports recovery of a SQL Server 2012 or later database only after the AlwaysOn Availability Group replication has been removed for the corresponding database.
The following table lists the types of recovery for SQL Server VDI in NMM.
Table 14 Types of recovery for SQL Server VDI
Type of recovery When used Description
Traditional recovery For data that was backed upby traditional backup, NMMsupports traditional recovery.
Data recovery from atraditional backup can beperformed:
l At any time with NMM.
l By running NMM recovercommand (nsrsqlrc)
from the commandprompt.
Traditional recoveryoperations recover files,file groups, databases,and transaction logbackups.
Normal recovery NMM uses the normal restoretype as the default.
The normal restore typerestores:
l The entire set of datathat is associated withone or more SQL Serverbackups, including full,logs only, and cumulativeincremental backups.
l A file, file group, or adatabase to the databaseoriginally backed up.
l Level full, level 1(cumulative incremental),and level logs onlybackups in the orderrequired by SQL Server. NMM can back up andrestore specified files andfile groups. Also, a single
Introduction
44 EMC NetWorker Module for Microsoft for SQL VDI 9.1 User Guide

Table 14 Types of recovery for SQL Server VDI (continued)
Type of recovery When used Description
file group, or multiple filegroups or files, can berestored from a fulldatabase backup.
Copy recovery A copy recovery is anoperation in which data isrecovered to a SQL Serverhost other than the one fromwhich it was backed up. Acopy restore from and to thesame SQL Server instancecan also be done.
The copy recovery typecreates a copy of a databaseby restoring a SQL Serverdatabase to a new location, orwith a new database name.The copy recovery typemakes it easy to duplicate adatabase that was previouslybacked up. You can only marka single item for thisoperation. Also, you can copya system database, but youcannot overwrite it.
NMM does not support copyrecovery of filestreamdatabases.
Recovery modesTo recover a database, you must specify a recovery mode. A recovery mode instructsthe SQL Server how to interact with the database after the recovery operationcompletes. For instance, recovery modes can leave the database in an intermediatestate, so additional transaction logs can be applied.
The following table shows how the recovery modes correspond to SQL Serverdatabase restore options.
Table 15 Recovery modes
Types of recovery mode Description
Normal The normal restore mode instructs SQLServer to leave the database in an operationalstate after the restore completes. This statethen enables database reads and writes. Thenormal restore mode is the default modeNMM uses when restoring a database.
No-recovery The no-recovery restore mode activates theSQL Server NORECOVERY database restoreoption for the last stage that was restored.The no-recovery restore mode places thedatabase in a state that cannot be loadedafter the restore, but it is still able to processadditional transaction log restore operations.
Introduction
Recovery modes 45

Table 15 Recovery modes (continued)
Types of recovery mode Description
Standby The standby restore mode activates the SQLServer STANDBY database restore option forthe last stage that is restored, which forcesthe database to be in a read-only statebetween transaction log restore operations.The standby restore mode provides an undofile for SQL Server to use when rolling backthe transactions.
Online SQL Server provides the ability to perform arestore operation while a SQL Serverdatabase is active. The database is completelyoffline only while the primary file group isbeing restored. After the primary file group isrestored, the database can be brought onlinewhile the rest of the file groups are beingrestored, and then only the data that is beingrestored is unavailable. The rest of thedatabase remains available during this type ofrestore. Earlier versions of SQL Server requirethat you bring a database offline before yourestore the database.
Recovery timeBackups can be recovered to a specific time. The recovery time controls which backupdata should be reinstated when a database is recovered. The recovery time alsocontrols the portions of a logs only backup that must be recovered when NMM isinstructed to discard transactions that are performed after a particular time.
The default or current recovery time for each database comes from the create time ofthe marked item. By default, the most recent backup is recovered. If the most recentbackup is logs only level or 1, dependent backups are recovered first. User-specifiedrecovery times can restore older backup versions or perform point-in-time recoveryoperations. For example, a point-in-time recovery is specified by using a recovery timethat is earlier than the create time of the transaction log backup, but later than thecreate time of the previous backup.
NMM provides three methods for recovering to a specific time:
l Database backup versions
l Point-in-time recovery of a transaction log (level logs only) backup
l Recovering to a named log mark
Recovery window restrictionsIn the Recovery window, the rules for marking an item are based on the selectedrestore type. The normal restore type does not restrict marking in any way. Allrestorable objects (file, file group, filestream data, database) can be marked. Whenthe copy restore type is chosen, only one database object can be marked. Marking the
Introduction
46 EMC NetWorker Module for Microsoft for SQL VDI 9.1 User Guide

root SQL Server item is not permitted, the file groups and files of the selecteddatabase are automatically marked and restored as part of the full database restore.
The recovery processA recovery uses the following process.
1. NMM recovers the most recent full backup, and then recovers the most recentdifferential (level 1) backup (if any).If a full database backup is removed from the NetWorker server, and anincremental backup is tried, the recovery fails. NMM checks the SQL Serverinstance to determine if a full database backup was performed, but does not verifyif a full backup still exists on the NetWorker server.
2. NMM recovers all the transaction log backups that ran after the most recentdifferential backup (or that ran after the last full backup, if there was nodifferential backup). To correctly recover uncommitted transactions, the SQLServer NORECOVERY mode is specified for all intermediate transaction logs.The recovery of the final transaction log specifies the restore mode if STANDBY orNORECOVERY is selected. The default selection is Normal.
For example, if you selected a restore mode of NORECOVERY, that specificationappears in the output for a database restore as follows:
nsrsqlrc -s NetWorker_server_name my_database
nsrsqlrc: Restoring database my_database...nsrsqlrc: RESTORE database my_database FROMvirtual_device='BSMSQL' WITH norecovery, statsnsrsqlrc: RESTORE database my_database fromvirtual_device='BSMSQL' WITH norecovery (differential)nsrsqlrc: RESTORE transaction my_database FROMvirtual_device='BSMSQL' WITH norecoverynsrsqlrc: RESTORE transaction my_database FROMvirtual_device='BSMSQL' WITH norecoveryReceived 1.0 MB 4 files from NSR server
Database file relocation restrictionsNMM imposes the following restrictions on database file relocation:
l Only database backups can be relocated. Individual file and file group backupscannot be relocated without relocating the database that contains those files.
l If the configuration of a database has changed since the most recent, level fulldatabase back up was created, you cannot relocate the database. Configurationchanges include the deletion or addition of files, file groups, or transaction logfiles.
l A system database might not be the destination database of a relocation.
l The relocation fails if the destination does not have sufficient space to create adatabase.
Error logs for backup and recoveryTo help you diagnose problems, certain information is written to an application-specific log file during backup and restore operations.
The following types of information are available:
l Software configuration information
Introduction
The recovery process 47

l Operation parameters
l Operation status and error messages
Application logs are generated for the nsrsqlsv.exe and nsrsqlrc.exeprograms, and are created in the nsr\applogs folder on the SQL Server host. NMMlogs are cumulative and are appended each time the nsrsqlsv.exe ornsrsqlrc.exe programs run. Debug logs are generated each time thensrsqlsv.exe or nsrsqlrc.exe programs are run with debug logging enabled. Alog is truncated when disk space is exhausted. The following tables cross-referencethe program and log file names.
Table 16 Program and log file names without debug logging enabled
Program Log file
nsrsqlsv.exe nsrsqlsv.log
nsrsqlrc.exe nsrsqlrc.log
Table 17 Program and log file names with debug logging enabled
Program Log file
nsrsqlsv.exe nsrsqlsv_<timestamp>.<processid>.log
nsrsqlrc.exe nsrsqlrc_<timestamp>.<processid>.log
The logging capabilities of nsrsqlsv and nsrsqlrc are not cluster-aware. For bothclustered and nonclustered configurations, the logs are stored on a local disk.
Introduction
48 EMC NetWorker Module for Microsoft for SQL VDI 9.1 User Guide

CHAPTER 2
Graphical User Interfaces
This chapter includes the following sections:
l User interfaces for backup and recovery........................................................... 50l NetWorker User for SQL Server GUI..................................................................51l NMM Microsoft SQL Server Management Studio plugin GUI............................ 55
Graphical User Interfaces 49

User interfaces for backup and recoveryThis section describes the graphical user interfaces (GUIs) where you can performbackup and recovery operations.
l The NetWorker Administration GUI on the NetWorker server—Start NMC on theNetWorker server and open the NetWorker Administration GUI to configure,perform, monitor, and report on scheduled backups.
l NetWorker User for SQL Server GUI—On the host where NMM is installed, selectStart > Programs > NetWorker Modules > NetWorker User for SQL Server tostart the NetWorker User for SQL Server GUI. The NetWorker User for SQLServer GUI has specific views, display conventions, and marking semantics andrestrictions that you can use to perform manual backup and recovery operations.
l EMC NetWorker window in the NMM Microsoft SQL Server Management Studioplugin GUI—Start the NMM Microsoft SQL Server Management Studio (NMMSSMS) plugin GUI to view the EMC NetWorker window. You can use the EMCNetWorker window to perform manual backup and recovery operations.
The following table summarizes the locations from which you can start backupoperations, and the backup levels that are supported for each interface.
Table 18 Where to start backup operations
Backup type Backupstarted from
Available backup levels
Full txnlog Diff
Scheduled The NetWorkerAdministrationGUI on theNetWorkerserver
Yes Yes Yes
Manual Commandprompt on theSQL Server,which is theclient
Yes Yes Yes
NetWorker Userfor SQL ServerGUI
Yes No No
In the NMMSSMS plugin
GUI, in the EMCNetWorkerwindow
Yes Yes Yes
The following table summarizes the locations from which you can start recoveryoperations.
Graphical User Interfaces
50 EMC NetWorker Module for Microsoft for SQL VDI 9.1 User Guide

Table 19 Where to start recovery operations
Recovery type Recovery started from
Full NetWorker User for SQL Server GUI
In the NMM SSMS plugin GUI, in the EMCNetWorker window
NetWorker User for SQL Server GUIThis section provides information on the various views in the NetWorker User for SQLServer GUI, display conventions for SQL data types, marking semantics andrestrictions, and fake objects.
Note
Support for the NetWorker User for SQL Server GUI is deprecated in NMM 9.1. It isrecommended that you use the NMM SQL Server Management Studio plugin GUI forall manual backup and recovery operations.
ViewsThe NetWorker User for SQL Server GUI has four windows.
l Backup—All backups are performed from the Backup window. Select thedatabase that must be backed up, and either right-click or select Options >Backup Options to view the Backup Options window.The following figure shows the Backup window.
Figure 8 Backup window
l Restore Operation—Normal, copy, or piecemeal restores are performed from the
Restore Operation window. Select the icon to view the Restore Operationwindow.The Restore Operation window is shown in the following figure.
Graphical User Interfaces
NetWorker User for SQL Server GUI 51

Figure 9 Restore Operation window
l Change Server—You can choose the NetWorker server from the choices
available from this window. Select the icon to view the Change Serverwindow.The Change Server window is shown in the following figure.
Figure 10 Change Server window
l Select SQL Instance—This window allows you to select the SQL instances that
you want to work with. Select the icon to view the Select SQL Instancewindow.The Select SQL Instance window is shown in the following figure.
Graphical User Interfaces
52 EMC NetWorker Module for Microsoft for SQL VDI 9.1 User Guide

Figure 11 Select SQL Instance window
Display conventions for SQL data typesThe NetWorker User for SQL Server GUI uses specific data item names, textcharacteristics, and icons to distinguish the variable qualities of SQL Server data.
The following table outlines these conventions.
Table 20 SQL Server storage hierarchy display conventions
Icon Data item Description
SQL Server l Root of the storage hierarchy
l Signifies all SQL Server databases on thehost
Database l Descendant of root
l Signifies a database
l Might contain file groups
File group l Descendant of a database
l Signifies a database file group orfilestream data
l Might contain files
Fake file group Signifies that the file group cannot beselected for backup
File l Descendant of a file group
l Signifies a database file
Fake file Signifies that the file cannot be selected forbackup
Graphical User Interfaces
Display conventions for SQL data types 53

Marking semantics and restrictionsTo support browsing capabilities, the NetWorker User for SQL Server GUI imposescertain semantics and restrictions on how items can be marked.
Whether an item can be marked depends on that item's predecessors anddescendants mark status. Depending on what is marked, message dialog boxes mightprovide additional information on the current marks and the type of operation.
The NetWorker User for SQL Server GUI enables the following mark and unmarkoperations:
l Mark a single file, file group, or database.
l Mark multiple, heterogeneous items.
l Mark an item when any of that item’s surrounding items are already marked.
l Mark or unmark all SQL Server data by right-clicking the root item and selectingMark All Databases or Unmark All Databases from the shortcut menu.
l Unmark all databases from the SQL Server root.
The NetWorker User for SQL Server GUI includes the following restrictions:
l You cannot mark an item if any of the predecessors or descendants are alreadymarked except in the SQL Server root.
l When a database is marked, all the item’s descendants are not automaticallymarked.
l When a file group is marked, all the files are not automatically marked.
Fake objectsNMM enables you to browse file groups and files that are contained in a database.However, the software can display data items that are unavailable for backup orrestore operations. These items are referred to as fake objects.
When a file or file group exists in the SQL Server storage hierarchy, but SQL Serversettings on the database prevent its backup, the item displays in the Backup windowwith the fake file group or fake file convention. If you try to mark a fake object, anerror dialog box appears.
The following figure shows the error message for a fake object.
Figure 12 Marking a fake object
Graphical User Interfaces
54 EMC NetWorker Module for Microsoft for SQL VDI 9.1 User Guide

NMM Microsoft SQL Server Management Studio plugin GUIYou can use the NMM Microsoft SQL Server Management Studio (SSMS) plugin GUIto perform manual backup and recovery operations.
Perform backup and recovery operations through the EMC NetWorker window, withthe Backup, Database Restore, and optional Table Restore tabs in the EMCNetWorker window. To use this feature, select the NMM SSMS Plugin GUI optionduring NMM installation. To enable the Table Restore tab, select the SQL GranularRecovery option whenever you install NMM.
ViewsThe EMC NetWorker window in the NMM SMSS plugin GUI has two main tabs and athird optional tab with multiple pages in each.
Figure 13 The EMC NetWorker window in the NMM SMSS plugin GUI
Backup tabIn the EMC NetWorker window, click the Backup tab to see the following pageswhich must be used to perform backup operations:
l General
Graphical User Interfaces
NMM Microsoft SQL Server Management Studio plugin GUI 55

l Options
l Monitor
Database Restore tabIn the EMC NetWorker window, click the Database Restore tab to see the followingpages which must be used to perform recovery operations:
l General
l Files/Filegroups
l Options
l Monitor
Table Restore tabIf you installed the SQL Granular Recovery functionality, from the EMC NetWorkerBackup window select the Table Restore tab to see the following pages which mustbe used to perform table-level recovery:
l General
l Options
l Monitor
Graphical User Interfaces
56 EMC NetWorker Module for Microsoft for SQL VDI 9.1 User Guide

CHAPTER 3
Manual Backups
This chapter includes the following sections:
l Manual backup overview....................................................................................58l Performing manual backups...............................................................................58l Performing copy-only backups...........................................................................68l Specifying a retention policy for manual backups...............................................68
Manual Backups 57
Manual backup overviewYou can start a manual backup of SQL data at any time. A manual (unscheduled)backup can be started immediately.
Manual backups are generally performed under special circumstances, such as NMMsetup.
Before performing a manual backup, ensure that the user starting the backup isassigned the required user privileges as defined in the section Access privileges forbackup and recovery.
The following combinations of data objects can be backed up manually with NMM:
l The entire SQL Server storage hierarchy
l One or more entire databases
l One or more file groups
l One or more files in a file group
l A heterogeneous collection of files, file groups, and databases
l Transaction log backups
Note
Filestream data, which are stored in SQL Server 2008 or later databases, is displayedin the backup window as a single file group folder without subordinate objects.
The storage hierarchy is defined as the database storage components the SQL ServerStorage Engine exposes to third-party backup vendors. The storage componentsinclude files, file groups, databases, and transaction logs.
When performing a manual full backup of a file or file group, also perform a databaselogs-only level backup to maintain the validity of the transaction log. You can performlogs-only backups only through the NMM Microsoft SQL Server Management Studioplugin GUI, in the EMC NetWorker window.
Note
Manual backups of SQL data do not back up the client indexes and bootstrap file. Ifyou are using NetWorker 8.2.x server with NMM 9.1, follow the instructions providedin the "Backing up client indexes and a bootstrap file" section of the EMC NetWorkerModule for Microsoft for SQL VDI Release User Guide version 8.2 SP1 to back up theclient indexes and bootstrap file. NetWorker server 9.0 and later have a built-inprotection policy to back up the client indexes and bootstrap file.
Performing manual backupsThere are multiple methods available to perform manual backups of SQL Server data.
To perform a manual backup, use one of the following methods:
l NMM SSMS plugin GUI—In the EMC NetWorker window, use the Backup tab toperform a manual backup. Performing manual backups from the NMM SSMSplugin GUI on page 59 provides details.
l NetWorker User for SQL Server GUI—You can start a manual backup from theNetWorker User for SQL Server GUI. Performing manual backups from theNetWorker User for SQL Server GUI on page 63 provides details.
Manual Backups
58 EMC NetWorker Module for Microsoft for SQL VDI 9.1 User Guide

l The nsrsqlsv command—In the command prompt, use the nsrsqlsvcommand. Command Prompt on page 213 provides command syntax.
Performing manual backups from the NMM SSMS plugin GUIIt is recommended that you use the NMM SQL Server Management Studio (SSMS)plugin GUI to perform SQL Server VDI manual backup operations.
In the EMC NetWorker window, the Script view is available in each page. Click Scriptto generate a command prompt equivalent script, which you can use to create a .batfile to perform scheduled backups, automation, and other tasks.
Procedure
1. In the SQL Server Management Studio, select the SQL Server instance that youwant to manually back up and open the EMC NetWorker window.
2. In the EMC NetWorker window, on the Backup tab, under Select a page, clickGeneral.
The General page appears.Figure 14 EMC NetWorker Backup General page
3. Under Source, make the following selections:
a. In the SQL Server Instance field, select the SQL Server instance that youwant to back up.
Manual Backups
Performing manual backups from the NMM SSMS plugin GUI 59

b. In the Database Filter list, filter the databases by selecting one of thefollowing:
l Select Non AAG Databases to show all databases that are not part of anAlways On Availability Group (AG).
l Select the name of an AG to show all databases that are within that AG.
The list is populated with databases available for backup. If an AG is selectedfrom the list, under Connections, the Cluster and the Backup Preferenceappear.
c. Select one or more databases that you want to back up.
d. In the Backup type list, select the backup type.
Note
The backup levels are the same regardless of the version of the NetWorkerserver you are using.
e. (Optional) To perform a copy-only backup, select Copy-only backup.
A copy-only backup backs up the SQL server without interrupting theexisting backup schedule or log chain.
4. Under Destination, make the following selections:
a. In the NetWorker Server list, select the destination NetWorker Server forthe backup.
You can select a NetWorker server from the available list. Click Update toforce an update of the list of available NetWorker servers.
b. In the Debug level box, select the level of troubleshooting information to besent to the backup status window during the backup operation.
Levels range 0–9, with 0 representing no information and 9 representing themost amount of information.
5. To specify additional backup options, under Select a page, click Options.
The Options page appears.
Manual Backups
60 EMC NetWorker Module for Microsoft for SQL VDI 9.1 User Guide

Figure 15 EMC NetWorker Backup Options page
6. (Optional) Under Reliability, select the following options as required:
l To perform a thorough check of the entire database before the backup isperformed, select Perform DBCC consistency check.
l To perform a checksum operation with the backup and save the informationto the backup media, select Perform checksum before writing to media.Another checksum is performed before a restore to ensure that it matchesthe backup.A checksum detects a partial backup or restore state. The SQL Serververifies the checksum by calculating a local result and comparing the localvalue with the stored value.
l To continue with backup and recovery even if errors are discovered duringthe checksum, select Continue on error.
7. (Optional) Under Stripes, select the following options as required:
a. To enable the SQL Striped feature, select Create a striped backup.
b. In the Stripes box, type or select the number of stripes to use during thebackup.
NMM supports a maximum of 32 stripes. However, the number of stripescannot exceed the value set for NetWorker client parallelism.
Manual Backups
Performing manual backups from the NMM SSMS plugin GUI 61

The section Striped Backup and Recovery provides more information aboutstriping.
8. (Optional) Under Pool, select the following options as required:
a. To select the pool where the backup is stored, select Select backup pool.
b. From the Full backup pool list, select the pool that you want to back up to.
The pools that are listed are populated from the NetWorker server.
9. (Optional) Under Deduplication, select the following options as required:
a. To enable deduplication for the backup, select Deduplication.
b. To use a Data Domain device to store the backup, select Data Domain.
10. (Optional) Under Others, select the following options as required:
Note
It is recommended that no form of encryption or compression be used with DataDomain because these reduce the deduplication ratio.
l To back up the data with AES encryption, select Use Encryption.Data is encrypted with the default or current pass phrase which is providedby the NetWorker Server. If the NetWorker Server has a different passphrase at recovery time, you must specify the pass phrase that was used atthe time of backup. The EMC NetWorker Administration Guide providescomplete information about AES encryption, and setting the pass phrase.
l To apply XBSA compression to all marked databases before the backup datais written to the storage device, select Compress the backup contentusing NetWorker.In the same manual backup, you cannot back up some databases withcompression and others without.
Compressing data for a backup generates less network traffic and uses lessbackup media space, but it consumes additional CPU resources. Most tapedevices perform compression, which makes software compressionunnecessary.
l To compress the backup using SQL Server, select Compress the backupcontent using SQL Server.The Microsoft SQL Server product documentation provides moreinformation.
l To disable log gap detection functionality during the logs-only backup, selectTurn off log gap detection.This action improves the backup performance because the extra process ofdetecting the log gap is removed. However, backup promotion does notoccur when log gap detection is skipped, unless you are backing up a masterdatabase or msdb.
l To apply advanced options to the backup operation, in the Advancedoptions field, type or select advanced options.To specify the total number of IO buffers that can be used during a backupoperation, use the BUFFERCOUNT advanced option. The syntax is as follows:
BUFFERCOUNT=number_of_IO_buffers
11. To start the backup, click Run.
Manual Backups
62 EMC NetWorker Module for Microsoft for SQL VDI 9.1 User Guide

Results
The backup operation runs.To view the status of the backup operation, open the Monitor page.
Figure 16 EMC NetWorker Backup Monitor page
Performing manual backups from the NetWorker User for SQL Server GUIThe Backup window of the NetWorker User for SQL Server GUI displays data that isavailable for backup based on the SQL Server database settings. The SQL databaseitems that cannot be backed up are not displayed in the Backup window.
Before you begin
Before starting a backup, ensure that a labeled media volume is mounted in the backupdevice because otherwise a backup cannot run. The volume should be labeled for thevolume pool where the backup is to be directed. If there is no volume in the backupdevice when a backup is started, no messages appear in the Backup Status windowand the backup waits for operator intervention.
The SQL database items include, but are not limited to, databases in the followingstates:
l Standby
l Recovering
Manual Backups
Performing manual backups from the NetWorker User for SQL Server GUI 63

l Suspect
l Offline
l Not recovered
l Loading
l Pre-recovery
l Restoring
l Recovery pending
l Single user with active user connections
You must complete the required steps to perform a manual backup.
Procedure
1. From the Start menu, select Programs > EMC NetWorker > NetWorker Userfor SQL Server.
If multiple instances of SQL Server are active on the computer, the Select SQLInstance dialog box appears.
2. Select the SQL Server instance for NMM backup, and then click OK.
The NetWorker User for SQL Server GUI connects to the selected SQL Serverinstance and the main window appears.
3. To select a NetWorker server other than the server that was specified duringthe NMM installation, from the toolbar, click Select NetWorker Server.
The Change Server dialog box appears.
4. Select a NetWorker server from the list, and then click OK.
5. To select the SQL Server data to back up, from the Operation menu, selectBackup.
The Backup window displays a hierarchical list of SQL Server data objects thatare available for backup. The NetWorker User for SQL Server GUI alwaysperforms a full backup for the SQL Server data.
Figure 17 The Backup window with a hierarchical list of SQL Server data objects
6. In the left pane, expand an object. The descendants of the object are listed inthe right pane.
Manual Backups
64 EMC NetWorker Module for Microsoft for SQL VDI 9.1 User Guide

7. Mark one or more objects for backup. Some SQL Server data items are visible inthe Backup window, but they cannot be marked. If certain database options areset, the SQL Server prohibits a file or file group backup. These unavailableobjects appear grayed out to distinguish them from objects that are available toback up.
8. In the Backup Options dialog box, select the required attributes before startingthe backup.
Figure 18 The General tab in the Backup Options dialog box
The selected attributes are applied to each marked object for all backupoperations that are performed until the NetWorker User for SQL Server GUI isclosed. Selected pools, however, are stored in the registry and persist from onesession to another. If a field is not selected, the default option is used.
9. (Optional) To perform a copy-only backup, select Copy-only backup.
A copy-only backup backs up the SQL server without interrupting the existingbackup schedule or log chain.
10. (Optional) To apply XBSA compression to all marked databases before thebackup data is written to the storage device, select Compress the backupcontent (using NetWorker). In the same manual backup, you cannot back upsome databases with compression and others without.
Compressing data for a backup generates less network traffic and uses lessbackup media space, but it consumes additional CPU resources. Most tapedevices perform compression, which makes software compression unnecessary.
11. (Optional) To create a striped backup by using the SQL Striped feature, selectCreate a striped backup . If you select this option, the Stripes box is enabled.
In the Stripes box, type or select the number of stripes to use during thebackup operation. The topic Striped Backup and Recovery provides moreinformation about striping.
Manual Backups
Performing manual backups from the NetWorker User for SQL Server GUI 65

NMM supports a maximum of 32 stripes. However, the number of stripescannot exceed the value set for NetWorker client parallelism.
12. (Optional) To run a database consistency check (DBCC) on a database, selectPerform DBCC consistency checks.
If the DBCC check fails, the database backup is skipped and backup status ofthe protection group appears as failed. This process ensures that all backed-updatabases are suitable for recovery.
13. (Optional) To view the list of media volume pools for storing the backupcontents, select Use pools for media management.
This option applies only to manual backup operations performed from theNetWorker User for SQL Server program or from a command prompt. If thisattribute is checked, the Full Backup Pool list and the Log File Pool list areenabled.
14. (Optional) To select volume pools, select Use pools for media management.
15. (Optional) Select a pool from the Full backup pool list to store full SQL Serverbackups, including databases and file groups.
16. (Optional) To store transaction log or differential (level 1) SQL Server backups,select a pool from the Log file pool list.
The pool names in the Full backup pool list or Log file pool list were createdwith the NMC and stored in the operating system registry.
17. (Optional) To define the level of troubleshoot information to be sent to thebackup status window during the backup operation, select the Select debuglevel. Levels range from 1 to 9, with 1 representing the least amount ofinformation.
18. (Optional) To specify that data is backed up with AES encryption, select Useencryption.
Data is encrypted with the default or current pass phrase which is provided bythe NetWorker Server. If the NetWorker Server has a different pass phrase atrecovery time, specify the pass phrase that was used at the time of backup.
The EMC NetWorker Administration Guide provides detailed information aboutAES encryption and setting the pass phrase.
Note
It is recommended that no form of encryption or compression be used with DataDomain because these reduce the deduplication ratio.
19. (Optional) To specify deduplication, in the Deduplication area, select either ofthe following:
l None—If data deduplication is not required.
l Data Domain backup—To enable client-side Data Domain Boostdeduplication backups.
20. (Optional) To add advanced SQL options for the backup, in the Advancedoptions field, type the required option. The only advanced backup option that iscurrently supported is the BUFFERCOUNT option. This option specifies the totalnumber of IO buffers that can be used during a backup operation. The syntax isas follows:
BUFFERCOUNT=number_of_IO_buffers
Manual Backups
66 EMC NetWorker Module for Microsoft for SQL VDI 9.1 User Guide

21. Click OK to close the Backup Options window.
Before starting the backup operation, you must set the backup properties foreach marked database. If a property is not specified, the default is used. Afterthe backup operation completes and the Backup window closes, the propertyvalues revert to the default options.
22. In the Backup window, select one or more databases to set the backupproperties, and then right-click the marked databases. Select Properties fromthe shortcut menu.
The Properties dialog box appears.
Figure 19 Properties dialog box
23. (Optional) In the Log Maintenance area, to truncate the transaction logsbefore backup, select Truncate content before performing backup.
24. (Optional) To perform a checksum operation with the backup and save theinformation to the backup media, select Perform checksum before writing tomedia. Another checksum is performed before a restore to ensure that theinformation matches the backup.
A checksum is detects a fragmented backup or restore state. NMM verifies thechecksum by calculating a local result and comparing it with the stored value. Ifthe values do not match, you can choose to continue the backup or restoreoperation.
25. (Optional) Select Continue on checksum error if you want to continue withback up and restore operations when errors are detected.
26. (Optional) Select Perform DBCC consistency checks.
If the database consistency check (DBCC) fails, the database backup is omittedand the group backup status appears as failed. This feature ensures that allbacked up databases are suitable for recovery.
27. Click OK.
28. From the File menu, select Start Backup.
Results
The backup operation starts.
Manual Backups
Performing manual backups from the NetWorker User for SQL Server GUI 67

From the NMC, in the Backup Status window, you can monitor the backup statusmessages.
After the backup is finished, a Backup Completed message appears. The amount oftime that is required to back up a database depends on database size, network traffic,server load, and tape positioning.
From the File menu, click End Backup to cancel a backup operation.
Performing copy-only backupsYou can take a manual SQL Server copy-only backup at any time without affecting thebackup schedule or log chain. You can perform copy-only backups at the full or logs-only backup level.
Copy-only backups are not promoted to a different backup level, which allows otherbackups to run without disrupting the backup chain.
Copy-only full backups are not considered level full backups during promotion. Havinga copy-only full backup does not prevent subsequent backups from being promoted toa full backup.
You can perform copy-only backups on an SQL NetWorker server using one of thefollowing methods:
l NMM SSMS plugin GUI—In the EMC NetWorker window, on the Backup tab, onthe General page, select Copy-only.
l NetWorker User for SQL Server GUI—In the Backup Options window, on theGeneral tab, select Copy-only.
l Command prompt—From the command prompt, use the NSR_COPY_ONLY=TRUEflag with the nsrsqlsv command, for example:nsrsqlsv -s server_name -l full -a NSR_COPY_ONLY=TRUE"MSSQL:database_name"
Note
SQL Server behavior enforces the following limitations to copy-only backups:
l Only full backups (including copy-only full backups) are supported for simplerecovery model databases.
l Copy-only backups of databases, files, or file groups are supported only when thebackup runs on secondary SQL Server replicas.
Specifying a retention policy for manual backupsA retention policy defines the length of time that a backup or clone save set isretained and browsable.
Note
NetWorker 8.2.x uses separate policies for browse and retention. Refer to the EMCNetWorker Module for Microsoft for SQL VDI User Guide version 8.2 SP1 for informationon the browse and retention policies for NetWorker 8.2.x.
If you specify a retention policy with a manual backup from the command prompt, theretention policy takes effect for all the save sets in the manual backup. To specify a
Manual Backups
68 EMC NetWorker Module for Microsoft for SQL VDI 9.1 User Guide

retention policy with a manual backup at the command prompt, type the followingcommand:
nsrsqlsv -yThe retention policy value must be typed in time and date formats accepted by thensr_getdate program.
The EMC NetWorker Command Reference Guide or the UNIX man pages provide moreinformation about the nsr_getdate program. Refer to the "Command Prompt"chapter for information about using the nsrsqlsv command for manual backups.
If you do not specify a retention policy for a manual backup, the save sets in a manualbackup adopt the browse policy of the client resource. If multiple client resourcesexist for the NetWorker host, the client resource with the longest retention policy isadopted. However, if a retention policy is set up for the media pool to which thebackup is directed, the retention policy is the longer of either:
l The client resource retention policy
l The media pool retention policy
The EMC NetWorker Administration Guide provides more information about retentionpolicies.
Manual Backups
Specifying a retention policy for manual backups 69

Manual Backups
70 EMC NetWorker Module for Microsoft for SQL VDI 9.1 User Guide

CHAPTER 4
Scheduled Backups
This chapter includes the following sections:
l Overview of scheduled backup...........................................................................72l Excluding incompatible databases in backups.....................................................72l Configuring scheduled backups..........................................................................73
Scheduled Backups 71

Overview of scheduled backupThe most reliable way to protect SQL Server data is to schedule backups of the SQLServer at regular intervals. Scheduled backups ensure that all SQL Server data isautomatically saved.
Scheduled backups can be set for backup levels full, logs only, or cumulativeincremental, and they can be configured to run at any time.
Ensure that the following prerequisites are met before you perform scheduledbackups:
l The NetWorker interface displays diagnostic attributes. In the Administrationwindow, click View > Diagnostic Mode.
l When backing up filestream data, in the SQL Server Configuration Manager, onthe Properties page of the SQL Server instance, select Allow Remote ClientsAccess to Filestream Data. This action is a requirement for backups to besuccessful. The SQL Server documentation provides details about the SQL ServerConfiguration Manager.
Review the EMC NetWorker Administration Guide before reviewing the information inthis chapter.
Excluding incompatible databases in backupsIf you schedule a backup of a client with the MSSQL: save set or named instance saveset, and if any of the databases in the protection group are incompatible, thescheduled backup fails.
Note
Incompatible databases are silently omitted during manual (non-scheduled) backupsthat are started from NMM on the client computer.
A database that is in any of the following states causes a scheduled backup to failbecause the database is part of a previously configured backup:
l Standby
l Mirror copy
l Recovering
l Restoring
l Recovery Pending
l Suspect
l Offline
l Not recovered
l Loading
l Prerecovery
Definitive results about incompatible databases are available in the daemon.raw fileon the NetWorker server and in the nsrsqlsv.raw file on the client computer.Examples of error messages listed in the daemon.log file after a backup failure:
l Database 'Acme' cannot be opened because it is offline.
Scheduled Backups
72 EMC NetWorker Module for Microsoft for SQL VDI 9.1 User Guide

l Processing Acme failed, the item will be skipped.l Database 'Acme' is in warm-standby state (set by executing
RESTORE WITH STANDBY) and cannot be backed up until theentire load sequence is completed.
l Processing Acme failed, the item will be skipped.To exclude databases that are not in a state that can be backed up, perform either ofthe following steps during client resource configuration:
l In the Client Backup Configuration wizard on the Specify the Backups Optionspage, select Skip databases that are in an incompatible state.
l In the NetWorker Administrator GUI, in the Client Properties dialog box, in theApplication Information field, type NSR_SKIP_NON_BACKUPABLE_STATE_DB=TRUE.
Configuring scheduled backupsTo configure a client resource, you must set up backup levels, configure a clientresource, and then assign data protection policies.
All the procedures that are described in the following table must be performed on aNetWorker server through the NetWorker Administration GUI. Review the EMCNetWorker Administration Guide for details.
Table 21 Tasks for configuring SQL Server VDI backups
Tasks Considerations
Setting up backup levels The availability of a backup level depends onthe type of data that are selected for backupand any SQL Server settings on those objects.You can specify any of the following backuplevels:
l Full
l Logs-only
l Cumulative incremental
Configuring a client resource You can use either of the following methodsto configure the client resource:
l Client Backup Configuration wizard
l Client Properties dialog box
Setting data protection policies To set up the required data protectionpolicies, complete the following tasks:
l Create a protection group—The type ofgroup that you create depends on theactions that you plan to perform for thegroup.
l Create a policy—When you create apolicy, you specify the name andnotification settings for the policy.
l Within the policy, create a workflow—When you create a workflow, you specify
Scheduled Backups
Configuring scheduled backups 73

Table 21 Tasks for configuring SQL Server VDI backups (continued)
Tasks Considerations
the name of the workflow, the schedulefor running the workflow, notificationsettings for the workflow, and theprotection group to which the workflowapplies.
l Create one or more actions for theworkflow.
The EMC NetWorker Administration Guideprovides more information about dataprotection policies.
Setting up backup levelsYou can specify backup levels other than database full, database cumulativeincremental, and database logs only.
The availability of a backup level depends on the type of data that are selected forbackup and any SQL Server settings on those objects, as listed in the following table.
Table 22 Backup levels for SQL Server data
SQL Server dataobjects
Supported SQL Server backup levels
Full Cumulativeincremental
Logs only
All databases of SQLdefault or namedinstances
Yes Yes Yes
Specified databases Yes Yes Yes
All file groups inspecified databases
Yes Yes N/A
Filestream data inspecified databases
Yes Yes Yes
Specified file groupsin specified database
Yes Yes N/A
Specified files in filegroups in specifieddatabases
Yes Yes N/A
For SQL Server data objects for which logs only backup can be performed, ensurethat the SQL Server database options are correctly configured. The Microsoft SQLServer documentation provides more information. Individual items are subject topromotion.
Scheduled Backups
74 EMC NetWorker Module for Microsoft for SQL VDI 9.1 User Guide

Configuring a client resourceUse NMC to configure each SQL Server host that is to be backed up as a NetWorkerclient resource. Multiple SQL Server databases that exist on the same SQL Serverhost can be configured as separate NetWorker client resources.
By default, the system account that is the nsrexecd service account does not havethe system administrator (sysadmin) role for the SQL server. Therefore, when youconfigure a client resource, you must set the username and password of a Windowsaccount that can backup the SQL server. The required privileges are explained in thesection Access privileges for backup and recovery.
Configuring a client resource with the Client Backup Configuration wizardYou must complete the required steps to configure a client resource with the Client
Backup Configuration wizard. Click the question mark icon at the lower left ofeach page of the Client Backup Configuration wizard for details about each field onthe page.
Note
If you are using NetWorker server 8.2.3 or later and NMM 9.1:
l Configure a regular NetWorker backup group instead of configuring a dataprotection policy. Do not enable the Snapshot option.
l For the Client Backup Configuration wizard to function correctly, ensure that JRE8 is installed on the system where NMC is used. While the NMC for NetWorker8.2.3 and later is compiled with JRE 7, the NMM 9.1 Java plugin for NMC iscompiled with JRE 8.
l The procedure to create a client resource is different between NetWorer server8.2.3 and NetWorker server 9.1. Follow the procedure provided in the EMCNetWorker Module for Microsoft for SQL VDI User Guide version 8.2 SP1 when youare using NetWorker server 8.2.3 or later.
Procedure
1. In the NetWorker Administration window, click the Protection tab.
2. In the expanded left pane, right-click Clients and select New Client Wizard.
Scheduled Backups
Configuring a client resource 75

Figure 20 Starting the Client Configuration Wizard
The Client Backup Configuration window opens to the Specify ClientInformation page.
3. On the Specify Client Information page, specify the following information:
l In the Client Name field, type the fully qualified domain name (FQDN) of theNetWorker client computer.
l In the Comment field, type a description for the client resource.
l In the Tag field, type one or more tags to identify this client resource for thecreation of dynamic client groups for data protection policies. Dynamic clientgroups automatically generate a list of clients for a data protection policythat is based on the tags assigned to the client and group.
l In the Group field, select the group that was previously created for therequired backup type.
l In the Type area, select Traditional.
Scheduled Backups
76 EMC NetWorker Module for Microsoft for SQL VDI 9.1 User Guide

Figure 21 Specify Client Information page
4. Click Next.
5. On the Specify Backup Configuration Type page, specify the followinginformation:
l In the Client Operating System field, the client operating system that isused during the configuration setup is automatically displayed.
l In the NetWorker Version field, the NetWorker version that is used duringthe configuration setup is automatically displayed.
l From the Available Application list, select SQL Server.
l Do not select Enable NetWorker Snapshot Management on the selectedapplication.
Scheduled Backups
Configuring a client resource 77

Figure 22 Specify Backup Configuration Type page
6. Click Next.
7. On the Select the NetWorker Client Properties page, specify the followinginformation:
l In the Priority field, select the priority level.
l In the Parallelism field, select the level of parallelism.
l In the Remote Access field, type the required attributes.During the client resource configuration, you can control client recoveraccess with the attributes in the Remote Access field. The Remote Accessattribute displays a list of the users that can recover save sets for a client.Depending on the level of security that the files require, add or remove usernames.
l In the Data Domain Interface field, select the device type from the list.
l In the Block Based Backup field, leave this option clear. This feature is notsupported for SQL Server VDI.
l The Client Direct field, selected by default, enables the client to bypass thestorage node and send backup data directly to the storage device.
Note
To use the default NetWorker Client settings, do not update the options thatare provided on the page.
8. Click Next.
9. On the Select the Backup Objects page, from the prepopulated list, select theSQL Server instance at root level or individual databases for backup.
Scheduled Backups
78 EMC NetWorker Module for Microsoft for SQL VDI 9.1 User Guide

Note
Do not select databases from two or separate instances for backup. Also,databases that are in offline, restoring, or loading state are unavailable forselection.
10. Click Next.
11. On the Specify the Virtual Server Credentials page, in the Remote UserName and Password fields, type the login information for a Windows accountthat can backup the SQL server.
Note
Before performing this step, ensure that the User Account Control for WindowsServer 2008 R2 is disabled for administrators. Access privileges for backup andrecovery provides details.
12. Click Next.
The Specify the Backup Options page appears.
13. (Optional) On the Specify the Backup Options page, select the followingoptional settings as required:
l Select NetWorker compression to use NetWorker compression during thebackup.
l Select 256-bit AES software encryption to use 256-bit AES softwareencryption.
l Select SQL Server compression if you are using SQL Server 2008 or later.
l Select Perform checksum before writing to media if you are using SQLserver 2005, and then, if required, select Continue to backup even onchecksum error.
l Select Do not truncate log contents when backing up transaction logswhen you are backing up transaction logs for a SQL server 2005.
l Select Skip simple databases during incremental backup when you areperforming instance-level backup.Simple databases are omitted when this option is selected. If this option isnot selected when you perform database-level backup, simple databases areincluded and the simple recovery model database is promoted to full backup.
l Select Turn off log gap detection during incremental backup to disablelog gap detection during a logs-only backup. Disabling log gap detectionimproves the backup performance because the work of detecting the loggap is removed. However, backup promotion does not occur when log gapdetection is skipped, unless you are backing up a master database or msdb.
l Select Skip databases that are in an incompatible state—Select to skipdatabases that are not compatible for backup.
l In the DBCC Consistency Check Options area, select the appropriateoptions:
n Select Select all databases to run database consistency checks (DBCC)on all of the databases. If the DBCC check fails, the database backup isskipped and backup status of the group appears as failed. This actionensures that all backed-up databases are suitable for recovery. Thisoption is available with SQL Server 2005 or later instances.
Scheduled Backups
Configuring a client resource 79

n In the Databases box, select specific databases for the DBCC check.
l In the Striping Options area, specify striping options:
a. To enable striping during a backup, select Enable Striping.
b. In the Specify the number of stripes field, type or select the number ofstripes.
Figure 23 Specify the Backup Options page
14. Click Next.
The Client Configuration Summary page appears.
15. On the Client Configuration Summary page, check to ensure that theconfiguration choices are correct. Click Back to make changes, or click Createto configure the client resources.
The Check Results page appears.
16. On the Check Results page, review the messages to ensure that the client wassuccessfully created. You should see the following message:
Successfully added new client "client_name"
17. Click Finish to exit the wizard.
After you finish
Open the NetWorker Administration GUI to the Protection tab. Click Clients in theexpanded left pane and ensure that the newly created client is listed.
Scheduled Backups
80 EMC NetWorker Module for Microsoft for SQL VDI 9.1 User Guide

Figure 24 Viewing clients in the Protection tab
Note
To make updates to an existing client resource, right-click the client resource andselect Client Backup Configuration > Modify Client Wizard.
Configuring a client resource manually with the Client Properties dialog boxYou must complete the required steps to create a SQL VDI client resource. The EMCNetWorker Administration Guide and the EMC NetWorker Module for MicrosoftAdministration Guide provide details about data protection policy. Review theinformation in these guides before manually creating the client resources.
Note
If you are using NetWorker server 8.2.3 and later and NMM 9.1:
l Configure a regular NetWorker backup group instead of configuring a dataprotection policy. Do not enable the Snapshot option.
l The procedure to create a client resource is different between NetWorer server8.2.x and NetWorker server 9.1. Follow the procedure provided in the EMCNetWorker Module for Microsoft for SQL VDI User Guide version 8.2 SP1 when youare using NetWorker server 8.2.x.
Click the question mark icon at the lower left of each page for details about eachfield in the page.
Procedure
1. In the Administration window, click Protection.
2. In the expanded left pane, select Clients.
3. From the File menu, select New.
4. On the General tab:
l In the Name field, type the fully qualified domain name (FQDN) of the SQLServer’s hostname. If you create multiple client resources for the same SQLServer, use the same name for each.
Scheduled Backups
Configuring a client resource 81

l In the Comment field, type a description. If you create multiple clientresources for the same NetWorker client host computer, use this attributeto differentiate each resource's purpose.
l In the Tag field, type one or more tags to identify this client resource fordynamic client groups in data protection policies.
l Leave the Block based backup option clear. This feature is not supportedfor SQL Server VDI.
l From the Directive list, select an option. Directives are resources thatcontains special instructions that control how the NetWorker serverprocesses files and directories during backup.
l The Backup type field displays the SQL Server.
l In the Save Set field, specify the components to be backed up as listed inthe following table.
Table 23 Save sets
Save set Description
All The All save set appears in the Save Set field by default.
MSSQL: Typing only MSSQL: yields a backup of all databases on the
SQL Server host or SQL default instance.
MSSQL$<SQL namedinstance>:
Specifying the named instance with MSSQL: yields a backup
of the specified SQL named instance.
MSSQL$<SQL namedinstance>:dbName
Specifying the database name along with the named instancealong with MSSQL: yields a backup of the database of the
specified SQL named instance.
MSSQL:dbName1[MSSQL:dbName2MSSQL:dbName3 ...]
Specifying the database names with MSSQL: yields a backup
of the specified databases from SQL default instance.
l Select the appropriate option in the Protection group list field.
5. On the Apps & Modules tab:
l In the Remote user and Password fields respectively:
n For SQL Server 2012 or later, type the remote username and password inthe Remote User and Password fields. To enable NMM to back up theSQL Server virtual server or a mirrored server, type the username for aWindows user account that has SQL Server administrator privileges.
n For other SQL Server versions, leave the fields empty.
l In the Backup command field, type the nsrsqlsv command and anynecessary command options.
l For Application Information field, type the required value:
Scheduled Backups
82 EMC NetWorker Module for Microsoft for SQL VDI 9.1 User Guide

Table 24 Application Information field values
Values Default and valid values
ENABLE_GLR n TRUE (Default): Enables granular-level recovery (GLR)
capable backups.
n FALSE: Prevents the backup from being GLR-capable.
This setting is useful if you are using technology that isnot supported for GLR (such as compression, encryption,or tape-type devices) and want to avoid error messages inthe operation logs.
IGNORE_RECOVERY_MODEL_CHANGE
n TRUE (Default): Specifies to ignore any change to the
database recovery model.
n FALSE: Specifies to check for any change made to the
database model. This setting enables logs-only backuppromotion to level-full after the database recovery modelis changed from simple to full, or bulk-logged.
NSR_SKIP_SIMPLE_DB n TRUE: Omits simple databases from the backup.
n FALSE (Default): Includes simple databases in the backup.
If required, the logs-only backup request is promoted tofull.
The NSR_SKIP_SIMPLE_DB variable is applicable only toSQL instance-level backups and does not affect database-level backups.
NSR_SKIP_NON_BACKUPABLE_STATE_DB
n TRUE: Omits databases that are in not in a state to be
backed up from the backup operation. The savegroupreports success for the SQL instance level backups.
n FALSE (Default): Includes databases that are in not in a
state to be backed up from the backup operation. Thebackup of these databases fail and the savegroup reportsfailure of the SQL instance level backups.
NSR_SKIP_LOGGAP_DETECTION
n TRUE: Disables log gap detection. This setting can
improve backup performance because the extra work ofdetecting the log gap is removed. However, backuppromotion does not occur when log gap detection isskipped, unless you are backing up a master database ormsdb.Log gap detection is skipped for every database in theSQL instance when this setting is specified along with theSQL instance level save set MSSQL: or MSSQL$<Instance Name>:.
Similarly, the log gap detection functionality is skippedonly for specified databases when theNSR_SKIP_LOGGAP_DETECTION=TRUE application flag
is specified with the database level save set MSSQL:database name or MSSQL$instance name:database name.
Scheduled Backups
Configuring a client resource 83

Table 24 Application Information field values (continued)
Values Default and valid values
n FALSE (Default): Enables log gap detection.
l Select None in Proxy Backup.
6. On the Globals (1 of 2) tab, complete fields, as required. The alias names arelisted automatically in the Aliases field.
7. On the Globals (2 of 2) tab, in the Remote Access field, type the user IDs orhostnames of other clients.
This field grants copy restore type permissions, which enables the named hoststo access the NetWorker server and receive directed recover data. If this fieldis empty, only administrators and users who are logged in to the SQL Serverhost have access.
For mirroring, this should be the same user account and password that you usedto set up the mirroring relationship. If multiple accounts have been set up, onlyone must be specified. According to Microsoft SQL documentation, a domainaccount must be used to set up the mirroring relationship.
8. Click OK.
Setting data protection policies
Note
NetWorker 8.2.x does not use data protection policies. If you are using NetWorkerserver 8.2.3 or later and NMM 9.1, follow the steps provided in the EMC NetWorkerModule for Microsoft for SQL VDI User Guide version 8.2 SP1 to configure a NetWorkerGroup.
Complete the following tasks to set data protection policies for scheduled backups:
l Create a protection policy
l Create a workflow
l Create an action
l Create a protection group
Creating a policyPolicies provide an organizational container for the workflows, actions, and groupsthat support and define the backup, management, and system maintenance actionsthat you want to perform.
Procedure
1. Open the NetWorker Administration GUI. From the Protection tab, right-clickPolicies from the expanded left pane, and then click New.
The Create Policy window appears.
2. In the Name field, type a name for the policy.
Scheduled Backups
84 EMC NetWorker Module for Microsoft for SQL VDI 9.1 User Guide

Figure 25 Create Policy window
3. Click OK.
Results
The policy is created and the NetWorker Administration GUI opens to the page for thenewly created policy.
After you finish
Add workflows, actions, and protection groups to the policy.
Creating a workflowWorkflows define the start time for a series of actions, the frequency in which theactions run, the order of actions in a sequence, and the protection group to which theworkflow applies.
Before you begin
Create a policy.
Procedure
1. Open the NetWorker Administration GUI.
2. From the Protection tab, click the policy that you must create a workflow for.
The Policy page opens.
3. Click Create a new Workflow.
The New Workflow window opens.
4. In the Name field, type a name for the workflow and either specify theworkflow settings or accept the default settings.
Scheduled Backups
Setting data protection policies 85

Figure 26 Creating a workflow for the policy
5. Click OK.
Results
The workflow is created and the NetWorker Administration GUI opens to the page forthe newly created workflow.
Creating an action within a workflowActions are the key resources in a workflow for a data protection policy and define aspecific task, for example, a backup, clone, or snapshot.
Before you begin
Create a policy and a workflow within that policy.
Procedure
1. Open the NetWorker Administration GUI and click the Protection tab. Click thepolicy that you must create a workflow for.
2. Expand the policy in the left pane that contains the workflow you must createan action in, and click the workflow.
The Workflow page opens.
3. Click Create a new Action.
The Policy Action wizard opens.
4. On the Specify the Action Information page, in the Name field, type a namefor the action.
5. In the Comment field, type a description for the action.
6. To ensure that the action runs when the policy or workflow that contains theaction is started, select Enabled. To prevent the action from running when thepolicy or workflow that contains the action is started, clear this option.
Scheduled Backups
86 EMC NetWorker Module for Microsoft for SQL VDI 9.1 User Guide

7. From the Action Type list, select the action.
8. In the Workflow area, assign the action to a policy and workflow.
9. In the Period area, specify the backup schedule.
Note
NetWorker supports backup levels full, logs-only, and cumulative incrementalwith SQL Server VDI.
Figure 27 Specifying action information in the Policy Action wizard
10. Click Next.
11. On the Specify the Backup Options page, specify backup properties for theaction or accept the default properties, and click Next.
12. On the Specify the Advanced Options page, set the Retries field to 0, andthen click Next.
13. On the Action Configuration Summary page, ensure that the correctselections are displayed.
l If you must change any specifications, click Back.
l If you are satisfied with the summary, click Configure to create the action.
14. Review the messages on the Action Wizard Results page and ensure that theaction was successfully created.
15. Click Finish to exit the wizard.
Results
The action is created within the specified workflow and is displayed in the NetWorkerAdministration GUI, on the Workflow page.
Scheduled Backups
Setting data protection policies 87

Creating a protection groupBasic client groups define a static list of client resources for an action.
Before you begin
Create a policy, workflow, and action.
Procedure
1. Open the NetWorker Administration GUI. From the Protection pane, click thepolicy that you must create a protection group within.
The Policy page opens.
2. Click the Groups tab. Right-click within the tab, and then select New.
Figure 28 Adding a group to a policy from the Protection pane
The Create Group dialog box opens.
3. In the Name field, type a name for the group.
4. From the Group Type list, leave the default selection of Clients.
5. In the Comment field, type a description of the group.
6. Select the workflow in which to assign the group from the Policy-Workflowlist.
Scheduled Backups
88 EMC NetWorker Module for Microsoft for SQL VDI 9.1 User Guide

Figure 29 Specifying workflow and client in the Create Group window
7. Click OK.
Results
The group is created and appears in the Group tab of the policy in the NetWorkerAdministration GUI.
Scheduled Backups
Setting data protection policies 89

Scheduled Backups
90 EMC NetWorker Module for Microsoft for SQL VDI 9.1 User Guide

CHAPTER 5
Federated Backup and Recovery
This chapter includes the following sections:
l Overview of federated backups......................................................................... 92l Performing federated backups...........................................................................93l Monitoring federated backups .......................................................................... 98l Configuring Always On Availability Group database recovery.............................99
Federated Backup and Recovery 91

Overview of federated backupsThe Always On Availability Group feature of SQL Server 2012 or later enables users tokeep their databases in an availability group (AG) for high availability.
SQL Server 2012 or later uses the Windows Failover Cluster feature to provide highavailability. Also, the database administrator can set the backup priority for the AG ora database in the AG and nominate a particular replica for the backup. This featureimproves backup performance.
NMM supports federated backups, during which NMM detects the SQL Serverpreferred backup setting for the Availability Group and performs the backup at thepreferred node.
When you create the client resource for the backup, you can decide whether toperform scheduled backup or federated backup by providing the save set.
Note
Due to SQL Server behavior, the following limitations apply to SQL Server databackups in an AG:
l Backups of a secondary SQL Server replica in an AG cannot be promoted todifferent backup levels.
l Differential backups are not supported on secondary SQL Server replicas.
l Copy-only backups of databases, files, or file groups are supported only when theyare executed on secondary SQL Server replicas.
Backup settingsThe SQL Server backup preference for the Availability Group can be configuredthrough the NMM SSMS plugin GUI or the Transact-SQL command.
SQL Server 2012 or later provides the following options that determine where backupsrun for a specific AG replica:
l AUTOMATED_BACKUP_PREFERENCE—Specify any one of the following options:
n PRIMARY— Specifies that the backups will always occur on the primary replica.This option is useful if you need backup features, such as creating differentialbackups, that are not supported when backup operations run on a secondaryreplica.
n SECONDARY_ONLY— Specifies that backups will never be performed on theprimary replica. If the primary replica is the only replica that is online, thebackup will not occur.
n SECONDARY (Prefer Secondary)— Specifies that backups will not occur on asecondary replica except when the primary replica is the only replica that isonline. In that case, the backup does not occur on the primary replica. This isthe default option.
n NONE (Any replica)— Specifies that you prefer that backup jobs ignore the roleof the availability replicas when choosing the replica on which to performbackups. Note backup jobs might evaluate other factors such as backuppriority of each availability replica in combination with its operational state andconnected state.
Federated Backup and Recovery
92 EMC NetWorker Module for Microsoft for SQL VDI 9.1 User Guide

l BACKUP_PRIORITY =n—Specifies your priority for performing backups on thisreplica relative to the other replicas in the same availability group. The value is aninteger in the range of 0 - 100. These values have the following meanings:
n 0 indicates that this availability replica will never be chosen for performingbackups.This choice is useful for a remote availability replica for which you never wantbackups to fail over.
n 1 indicates the lowest priority that an availability replica could be chosen for abackup operation.If BACKUP_PRIORITY = 1, the availability replica will be chosen only if no higherpriority availability replicas are available.
n 100 indicates the highest priority that an availability replica could be chosen fora backup operation.
Follow the procedures provided in the article “Configure Backup on AvailabilityReplicas (SQL Server)” on the Microsoft MSDN website http://msdn.microsoft.com/en-us/library/hh710053.aspx to decide which replica thebackups will be run on.
Note
A backup operation fails if the secondary copy has the Readable Secondary fielddisabled for SQL Server VDI federated backups. All the primary and secondary replicasthat participate in the availability group must have the Readable Secondary featureenabled. Set the Readable Secondary field to Yes in the Availability GroupProperties > General tab.
NMM performs copy-only backups for the Always On Availability Group secondaryreplicas. These backups are considered full backups.
Performing federated backupsTo perform federated backups using NMM, you must create a client resource for theWindows cluster name from which the backup is performed and dummy clientresources for the other participating nodes in the cluster.
From the NMC, create a client resource through either of the following tools:
l The Client Backup Configuration wizard
l The Client Properties dialog box
Note
NMM supports configuring federated backups of an AG that is configured withmultiple SQL server instances, including server instances in a failover cluster. Youmust use the Client Properties dialog box to configure this type of backup.
Complete the following tasks before creating client resources:
1. Create a protection group—The type of group that you create depends on theactions that you plan to perform for the group.
2. Create a policy—When you create a policy, you specify the name and notificationsettings for the policy.
Federated Backup and Recovery
Performing federated backups 93

3. Within the policy, create a workflow—When you create a workflow, you specifythe name of the workflow, the schedule for running the workflow, notificationsettings for the workflow, and the protection group to which the workflow applies.
4. Create one or more actions for the workflow.
The EMC NetWorker Administration Guide provides information about data protectionpolicies.
Configuring a client resource for federated backups with the Client BackupConfiguration wizard
The Client Backup Configuration wizard simplifies configuring client resources for SQLServer 2012 or later scheduled backups in a Windows cluster environment by creatingdummy client resources for the participating cluster nodes
The EMC NetWorker Administration Guide and the EMC NetWorker Module for MicrosoftAdministration Guide provide details about data protection policies. Review theinformation in these guides before creating the client resources.
To use the Client Backup Configuration wizard in a federated environment, ensurethat the active node of the Windows cluster contains a SQL Server 2012 or laterinstance.
Follow the steps that are provided in the "Scheduled Backups" chapter to run theClient Backup Configuration wizard.
Note
If you are using NetWorker server 8.2.3 or later and NMM 9.1:
l Configure a regular NetWorker backup group instead of configuring a dataprotection policy. Do not enable the Snapshot option.
l For the Client Backup Configuration wizard to function correctly, ensure that JRE8 is installed on the system where NMC is used. While NetWorker ManagementConsole (NMC) for NetWorker 8.2.x is compiled with JRE 7, the NMC ClientBackup Configuration wizard for NMM 9.1 is compiled with JRE 8 and requiresJRE 8 to run properly.
l The procedure to create a client resource is different between NetWorker server8.2.x and NetWorker server 9.1. Follow the procedure provided in the "By usingthe Client Backup Configuration wizard" section in the EMC NetWorker Module forMicrosoft for SQL VDI User Guide version 8.2 SP1 when you are using NetWorkerserver 8.2.x.
Configuring a client resource for federated backups manually with the ClientProperties dialog box
When you create client resources manually, ensure that a client resource is created forWindows cluster name and that dummy client resources are created for the otherparticipating nodes in the cluster. If you do not create dummy clients for each of thenodes in the cluster, the backup fails. Do not assign a group for the dummy clients.
Federated Backup and Recovery
94 EMC NetWorker Module for Microsoft for SQL VDI 9.1 User Guide

Note
If you are using NetWorker server 8.2.3 and later and NMM 9.1:
l Configure a regular NetWorker backup group instead of configuring a dataprotection policy. Do not enable the Snapshot option.
l The procedure to create a client resource is different between NetWorer server8.2.x and NetWorker server 9.1. Follow the procedure provided in the EMCNetWorker Module for Microsoft for SQL VDI User Guide version 8.2 SP1 when youare using NetWorker server 8.2.x.
Click the question mark icon at the lower left of each page for details about eachfield in the page.
Procedure
1. In the Administration window, click Protection.
2. Expand the left pane, and then select Clients.
3. From the File menu, select New.
4. Click the General tab.
5. In the Name field, the Windows Server cluster name appears.
6. In the Comment field, type a description.
If you are creating multiple client resources for the same NetWorker client hostcomputer, use this field to differentiate the purpose of each resource.
7. In the Retention Policy field, select a retention policy from the list.
The retention policy determines the time period during which the rolled-overdata is available.
8. Select the Scheduled Backups field.
9. In the Save Set field, specify the components to be backed up.
Follow the examples provided in the following table.
Table 25 Save Sets
Save set Description
MSSQL#AG1 Always On Availability Group that refers tothe SQL default instance
MSSQL#AG1:Database1 Always On Availability Group that refers tothe SQL default instance
MSSQL$NamedInstance#AG2 Always On Availability Group that refers tothe SQL named instance
MSSQL$NamedInstance#AG2:Database2 Always On Availability Group that refers tothe SQL named instance
Federated Backup and Recovery
Configuring a client resource for federated backups manually with the Client Properties dialog box 95

Note
When nodes within an availability group (AG) reside on SQL server instanceswith different names, any instance name can be used. NMM will automaticallydetect the AG that resides on the instance name.
10. In the Protection group list field, select the appropriate option.
If client resources for the same NMM host are added to different backupgroups, ensure that the Start Time field for each backup group is spaced suchthat the backups for the host’s client resources do not overlap.
11. In the Schedule field, select a backup schedule.
12. Click the Apps & Modules tab.
13. In the Remote user and Password fields, for SQL Server 2012 or later, type thelogin information for a Windows user account that has SQL Serveradministrator privileges.
14. In the Backup command field, type the following command:
nsrsqlsv.exe
15. In the Application Information field, type the required value:
Table 26 Application Information field values
Values Default and valid values
ENABLE_GLR l TRUE (Default): Enables granular-level recovery (GLR)
capable backups.
l FALSE: Prevents the backup from being GLR-capable.
This setting is useful if you are using technology that isnot supported for GLR (such as compression, encryption,or tape-type devices) and want to avoid error messages inthe operation logs.
IGNORE_RECOVERY_MODEL_CHANGE
l TRUE (Default): Specifies to ignore any change to the
database recovery model.
l FALSE: Specifies to check for any change made to the
database model. This setting enables logs-only backuppromotion to level-full after the database recovery modelis changed from simple to full, or bulk-logged.
NSR_SKIP_SIMPLE_DB l TRUE: Omits simple databases from the backup.
l FALSE (Default): Includes simple databases in the backup.
If required, the logs-only backup request is promoted tofull.
The NSR_SKIP_SIMPLE_DB variable is applicable only toSQL instance-level backups and does not affect database-level backups.
Federated Backup and Recovery
96 EMC NetWorker Module for Microsoft for SQL VDI 9.1 User Guide

Table 26 Application Information field values (continued)
Values Default and valid values
NSR_SKIP_NON_BACKUPABLE_STATE_DB
l TRUE: Omits databases that are in not in a state to be
backed up from the backup operation. The savegroupreports success for the SQL instance level backups.
l FALSE (Default): Includes databases that are in not in a
state to be backed up from the backup operation. Thebackup of these databases fail and the savegroup reportsfailure of the SQL instance level backups.
NSR_SKIP_LOGGAP_DETECTION
l TRUE: Disables log gap detection. This setting can
improve backup performance because the extra work ofdetecting the log gap is removed. However, backuppromotion does not occur when log gap detection isskipped, unless you are backing up a master database ormsdb.Log gap detection is skipped for every database in theSQL instance when this setting is specified along with theSQL instance level save set MSSQL: or MSSQL$<Instance Name>:.
Similarly, the log gap detection functionality is skippedonly for specified databases when theNSR_SKIP_LOGGAP_DETECTION=TRUE application flag
is specified with the database level save set MSSQL:database name or MSSQL$instance name:database name.
l FALSE (Default): Enables log gap detection.
16. Under Deduplication, select Data Domain backup, for data deduplication byusing a Data Domain device.
17. Click the Globals (1 of 2) tab.
18. In the Remote Access field, type the user IDs or hostnames of other clients.This grants copy restore type permission to the hosts, which enables the namedhosts to access the NetWorker server and receive directed recover data. If thisfield is empty, only administrators and users who are logged in to the SQLServer host have access.
19. In the Aliases field, type all known aliases for the SQL Server host as in thefollowing example:
mars mars.emc.comInclude both the DNS short name and long name for the SQL Server host.
20. Click OK.
21. Run the backup from the savegroup.
Federated Backup and Recovery
Configuring a client resource for federated backups manually with the Client Properties dialog box 97

Monitoring federated backupsDuring a federated backup of an availability group (AG), you can check for statusmessages in the NetWorker Administration GUI.
The NetWorker server reports the successful and failed database backups in an AG.To monitor the success of a federated backup, use the following procedure:
Procedure
1. From the NMC, open the NetWorker Administration GUI.
2. Click the Monitoring tab.
3. Right-click a backup in the Policies pane, and then select Show Details.
The Show Messages window appears.
Results
The Show Messages window displays successful and failed backup reports.Figure 30 Successful AG backup messages
Federated Backup and Recovery
98 EMC NetWorker Module for Microsoft for SQL VDI 9.1 User Guide

Figure 31 Failed AG backup messages
Configuring Always On Availability Group database recoveryNMM supports recovery of a SQL Server 2012 or later database. For databases thatare configured with Always On configuration, the replication must be broken torecover the database.
You can perform federated recovery of a SQL Server database with one of thefollowing user interfaces:
l The NMM Microsoft SQL Server Management Studio (SSMS) plugin GUI
l The NetWorker User for SQL Server GUI
The Data Recovery chapter provides detailed instructions about using both interfacesfor recovery operations. The following procedures provide instructions for recoveryscenarios using the NetWorker User for SQL Server GUI.
Configuring a normal recoveryProcedure
1. From the Restore Operation dialog box, select Normal, and then clickContinue.
The Restore window appears and lists the databases that can be restored.
Federated Backup and Recovery
Configuring Always On Availability Group database recovery 99

Figure 32 Restore window
2. On the Restore window, select one or more databases to recover.
3. Right-click each marked database and select Properties to configure additionalsettings.
The Properties dialog box appears. Available options and actions depend on theversion of SQL Server that is to be restored and the selected recovery type.
Figure 33 Properties dialog box—General tab
4. Select Backup the active portion of the transaction log before restoring thedatabase.
This option is selected by default for a Normal restore, and NMM tries thetransaction log backup by using the NO_TRUNCATE and NORECOVERY SQLkeywords. The recovery operation continues regardless of whether thetransaction log backup succeeds or fails.
There is no log backup in Simple mode. If the option to back up the log isselected, a full backup of the log is performed on the database that is to berecovered.
The most common reason for recovering databases is to restore from operatorerrors, which are recorded in the transaction log. If you recover the databasewithout applying the transaction log, you lose the information since the lastbackup. If you apply the entire transaction log you recorrupt the database.
Federated Backup and Recovery
100 EMC NetWorker Module for Microsoft for SQL VDI 9.1 User Guide

Point-in-time recovery data can be recovered to the time of the error minusapproximately 1 second, assuming that the database is functional enough tocomplete the final transaction log backup. If Specify a Restore Time on theRestore Time tab is selected, the backup continues, but the latest transactionsthat are captured in the active transaction log backup are not restored.
5. In the Perform the restore using this recovery mode area, select one of thefollowing for recovery:
l Normal mode—Instruct the SQL Server to leave the database in operationalstate after the restore. This is the default mode.
l No Recovery mode—Activates the SQL Server NORECOVERY databaserestore option for the last stage restored. This mode places the database ina state that cannot be loaded after the restore. However, the database canstill process additional transaction log restore operations.
l Standby mode—Enables the Standby Undo File Name, which specifies anundo file for SQL Server to use when rolling back the transactions.
By default, the Standby mode field displays a default file name and path:
%DriveLetter:\default_path\default_dbNameundo.ldfwhere:
default_pathis the default SQL Server backup path obtained from the SQLServer registry.
default_dbName is the name of the database backup that is selected for therestore.
Specify another name and path for the standby undo file through thefollowing steps:
a. Type a valid name and path in the Standby mode field, or click theellipses button.The Specify the Standby Undo File dialog box appears.
Figure 34 Specify the Standby Undo File dialog box
b. In the File Location text box, type a path or browse the file system treeand highlight a file.
c. In the File Name text box, type a file name or browse the file system treeand highlight an existing file.
d. Click OK.
Federated Backup and Recovery
Configuring a normal recovery 101

6. (Optional) In the Properties dialog box, select Perform checksum beforereading from media option to perform a checksum operation before a restoreto ensure that it matches the backup.
NMM verifies the checksum by calculating a local result and comparing it withthe stored value. If the values do not match, you can choose to continue therestore operation by selecting Continue on checksum error.
7. Select the Files tab.
Figure 35 Properties dialog box—Files tab
Consider the following:
l The Database to restore field displays the database that is selected for therestore operation and cannot be modified.
l The Name for restored database field specifies the name for the restoreddatabase and cannot be modified.
8. (Optional) Select Overwrite the existing database . The SQL Server createsthe specified database and its related files, even if another database with thesame name exists. In such a case, the existing database is deleted.
The Overwrite the existing database operation includes the WITH REPLACESQL keyword in the restore sequence, which restores files over existing files ofthe same name and location.
9. (Optional) If you are performing a normal, copy, or verify restore operation, theMark the filegroups to restore area displays the file groups of the selecteddatabase. These file groups cannot be changed. If you are performing any othertype of restore operation, select the file groups and files that you want torestore.
The selected set of file groups is copied to the Modify the destination for thefiles in list, which displays the options for restoring the database files. You canfilter the files that are visible in the list. The following table describes theoptions in the Mark the filegroups to restore list:
Federated Backup and Recovery
102 EMC NetWorker Module for Microsoft for SQL VDI 9.1 User Guide

The following Modify the destination for the files in table that follows the listof the same name, displays the SQL Server files, which are associated with thedatabase that is to be restored, with their locations.. When you perform anormal restore, this table displays the current name and destination based onthe SQL Server physical file name and logical location for the restored file.Filestream data is displayed as a folder with no subordinate objects.
Table 27 Modify the destination for the files in list options
Views Description
All files All the files for the database, includingtransaction log files
All log files Only the transaction log files
All datafiles Only datafiles
File group name Only datafiles for a specific file group
Drive letter All files that are on a particular drive at thetime the backup occurred, even if those fileshave since been relocated to a different drive
10. (Optional) To modify the destination, perform one of the following actions:
l Double-click a file in the Modify the destination for the files in table todisplay the Specify the file destination dialog box.
l Click a file in the list, and then click Destination.The Specify the File Destination dialog box appears.
Figure 36 Specify the File Destination dialog box
Consider the following:
Federated Backup and Recovery
Configuring a normal recovery 103

n In the Source file name field, the file that is selected in the File andDestination lists appears. This text cannot be modified. When multiplefiles are selected, this text box is empty.
n In the Source location field, the location and the file that is selected inthe File and destination list appears. This information cannot bemodified. When multiple files are selected, the location of the firstselected file in the list is displayed.
11. (Optional) To change the destination location, in the Destination location field,type a path name or browse the file system tree and highlight a directory or file.
The Destination location field displays the file system location for the restoredfile. When multiple files are selected, the default SQL data path is opened, but itis not selected. Type a pathname, or browse the file system tree and highlight adirectory or file to change the location.
12. (Optional) In the Destination file name field, to change the file name, type anew name or browse the file system tree and highlight a file.
The Destination file name field displays the name of the file that is selected inthe File and Destination table. When multiple files are selected, the field isempty
13. To return to the Files tab, click OK.
14. Click the Restore Time tab.
Figure 37 Properties dialog box—Restore Time tab
The Restore Time tab enables you to select a backup version and modify therestore date and time. The default selection for the restore is listed in the
Federated Backup and Recovery
104 EMC NetWorker Module for Microsoft for SQL VDI 9.1 User Guide

Backup versions table. When a point-in-time restore is performed, the restoreprocedure reinstates only transactions from the backup version that occurredbefore the specified restore date and time.
You can change the backup version or transaction time. The point-in-time for arestore can be changed only for logs-only backups. Unless the last backup timeis specifically selected by the user, the active log backup option is set bydefault.
15. Select Specify a restore time to schedule the recovery.
On the General tab, if you selected Backup the active portion of thetransaction log before restoring the database and select Specify a restoretime, but do not specify the point-in-time in the transaction log, the latesttransactions that are captured in the active transaction log backup are notrestored.
The latest transactions that are captured in the active transaction log backupare restored to the specified point-in-time only if it is specified in thetransaction log.
16. (Optional) To specify a time to perform a point-in-time restore, click Point-in-Time.
The restore time indicates the data from which the marked backup version isreinstated during the restore and when to stop restoring transactions. ThePoint-in-Time button is available only when the logs-only backup, or the latestbackup (regardless of whether it is full, level logs-only or level cumulativeincremental) is marked in the Backup Versions table. If a full or differentialbackup is marked but is not the latest backup, an error message appears.
Specify a Time to perform a point-in-time restore displays the date and timefor the backup that is marked. Only one backup version can be selected andmarked.
17. To perform the restore, select By using a named log mark. This field is enabledonly when log marks exist for the selected database backup.
When you select By using a named log mark, Restore to the End of the LogMark and Restore to the Beginning of the Log Mark are enabled.
18. Select one of the following options:
l Select Restore to the End of the Log Mark to restore the backup and stopimmediately after the named log mark. This type of restore includes thenamed transaction in the restore.
l Select Restore to the Beginning of the Log Mark option to restore thebackup and stop immediately before the named log mark. This type ofrestore excludes the named transaction.
19. Use the Log Mark table field to specify a log mark to use for the restore.Double-click a log mark or select a log mark in the list and click the Markbutton.
20. When you are finished making selections, click OK.
21. To define additional restore options, from the Options menu, select RestoreOptions.
The Restore Options dialog box appears.
Federated Backup and Recovery
Configuring a normal recovery 105

22. On the General tab, select the following options as required.
The following table describes the options that are available in the RestoreOptions dialog box
Table 28 Fields on the General tab of the Restore Options dialog box
Field name Describe
Automatically overwrite any database markedfor restore
Select this field to overwrite the markeddatabases. This action restores the databaseby using the WITH_OVERWRITE SQLkeyword.
Detect available tape sessions prior torestoring a striped backup
The support for this field is deprecated andthis field will be removed from NMM in futurereleases. In NMM 9.1 and later, this fieldshould always be selected if any backups arebeing restored from tape type devices.Selecting this field does not affect theperformance of restore operations from disktype devices.
Select a debug level Selecting a troubleshooting level issues thecommand line –D n option, where n is an
integer value between 1 and 9. When thetroubleshooting level is selected, thetroubleshooting information appears in the
Backup or Restore status window, and alsoin the log files. This information can be usefulin diagnosing problems.
If you specify troubleshooting level logging,watch the size of the NMM log files. The filesare at:
installpath\nsr\applogs
where installpath is typically C:\ProgramFiles\EMC NetWorker and can grow very
large. Log files with troubleshoot output canbe deleted (or archived).
Disable log mark display Select this option to disable the potentiallytime-consuming retrieval of log markinformation. This option can be selected whenlog marks will not be used for most restoreoperations, particularly if the client file indexis large. This setting persists across multipleinvocations of the user interface. When logmark display is disabled, the log mark in the
backup will not be displayed in the RestoreTime tab.
When this option is selected, the log mark
information is not displayed in the RestoreTime tab of the Restore Properties dialog
Federated Backup and Recovery
106 EMC NetWorker Module for Microsoft for SQL VDI 9.1 User Guide

Table 28 Fields on the General tab of the Restore Options dialog box (continued)
Field name Describe
box. When it is not selected, the informationis displayed.
Transaction log backup before restore Select this option to perform a transaction logbackup before the restore operation starts.With supported SQL Servers, transaction logbackups are required before restoringdatabases. Transaction log backups ensurethat the database can be restored to the mostrecent point-in-time possible. This option isselected by default.
When the Transaction log backup beforerestore option is not selected, the Back Upthe Active Portion of the TransactionLog Before Restoring the Databaseoption (selected by default) is enabled in the
Properties dialog box.
You can choose not to back up the
transaction log by selecting No for Restorewith overwrite in the precautionarymessage box. This option replaces theexisting database by using the T-SQLcommand with the WITHREPLACE flag.
Selecting No for Restore with overwriteimproves performance in cases where thedatabase is too damaged to perform thetransaction log backup or it is known that thetransaction log is not of interest.
Alternate decryption pass phrase Select this option to specify a pass phrase forAES encryption other than the default orcurrent phrase used by the NetWorker server.If data was backed up using AES encryptionand an alternate pass phrase, (and the originalpass phrase is no longer current), that phrasemust be specified to decrypt data during therestore. If multiple pass phrases are required,they must be specified at the command line.The EMC NetWorker Administration Guideprovides complete information about AESencryption, and setting the pass phrase.
Advanced options In the Advanced options field, type therequired advanced recovery options. Thefollowing options are available:
l BUFFERCOUNT=number_of_IO_buffersThis option specifies the total number ofIO buffers that can used during a recoveryoperation.
Federated Backup and Recovery
Configuring a normal recovery 107

Table 28 Fields on the General tab of the Restore Options dialog box (continued)
Field name Describe
l KEEP_CDCThis option enables change data capture(CDC) recovery.
l KEEP_REPLICATIONThis option preserves the replication whenit recovers a published database. Thisoption is required if a database wasreplicated when the backup was created.
If you are specifying multiple advancedoptions each argument must be separated bya comma.
23. Click OK.
24. In the toolbar of the Restore window, click the play button to start the restore.
After you finish
Monitor the status of the restore in the Restore Status window.
Configuring a copy restoreWhen you perform a copy restore of databases in an SQL instance to a folder in a newlocation, ensure that you add Everyone to the folder security settings, and provide allpermissions to the folder. You must complete these actions for all users who havelogged in with or without Domain Admin credentials when they perform copy restoreoperations.
Procedure
1. In the Restore Operation dialog box, select Copy, and then click Continue.
The Select the SQL Server dialog box appears.
Figure 38 Select the SQL Server dialog box
Federated Backup and Recovery
108 EMC NetWorker Module for Microsoft for SQL VDI 9.1 User Guide

2. Select the appropriate source for the backup:
l To use the database backup from the SQL Server that is currentlyconnected to the NMM client, select The current SQL Server Instance .The name of the current NetWorker client host appears.
l To choose a different SQL Server host from the existing database backups,select A NetWorker SQL Server client.
3. Click Continue.
4. Specify the destination host and an appropriate user account or group in the listof NetWorker administrators on the NetWorker server (or remote access) toselect other client hosts as the source of a copy restore.
If either of the following situations apply to the selected NetWorker client, anew dialog box appears:
l A backup exists.
l A named instance directory in the index.This dialog box enables you to select the source from default and namedinstances.
5. Select either the SQL Server default instance or an SQL Server namedinstance, and then click Continue. After choosing a SQL instance, all databasebackups are listed.
A CopyOf prefix is added in front of the database (and database file) names onlyif a database by the same name exists on the target system. This is not the casefor copy restore between systems or between instances of SQL Server (or ifthe original database has been removed). In these cases, the default databaseand file names are the same as the original names.
If backups for the SQL default or other named instance were not performed, orthe backups are no longer available, an error message appears.
Figure 39 NetWorker User for SQL Server dialog box
6. Select a SQL instance.
The Restore window lists the databases that can be restored.
Federated Backup and Recovery
Configuring a copy restore 109

Figure 40 Restore window
7. From the left pane, select one database to recover.
For copy restore, you can mark only one database object. Files and file groupsof the selected database are not visible in the browse window because theyrequire a database backup. The files and file groups can be viewed andconfigured in the Files tab of the Properties dialog box.
8. Right-click the marked database and select Properties.
Note
For copy restore, specify the restore properties before starting the restore.Otherwise, the restore fails to start.
The Properties dialog box with the General tab appears.
9. In the Properties dialog box, click the Files tab.
Figure 41 Properties dialog box
When you restore a copy of a database, you can overwrite an existing databaseor create one:
l To create a database, in the Name for restored database field, type aname. The default name is CopyOfSelectedDB.
l If you want to overwrite an existing database, from the Name for restoreddatabase field, select a name, and then select Overwrite the existingdatabase.
Check the generated file names. After changing the name of the databasefrom CopyOfAcme Sales back to Acme Sales by using overwrite, removethe CopyOf prefix from the associated file names. Default names are
Federated Backup and Recovery
110 EMC NetWorker Module for Microsoft for SQL VDI 9.1 User Guide

generated when the dialog box is first displayed. Any database name editsare not propagated to the database file names. Make these changesmanually.
10. In the Properties dialog box, click the Restore Time tab.
11. After configuring the properties, click OK.
These settings are maintained until the restore operation starts.
12. In the toolbar of the Restore dialog box, click the play button to start therestore.
After you finish
On the Restore Status page, monitor the status of the restore operation.
Configuring a named instance recoveryIf a default instance and a named instance are available on a client computer, after abackup is performed with NMM, a copy restore is available for all three instances.
If a default instance is uninstalled, a copy restore from the default instance is availablebecause the instance is still listed in the client file index for the most recently namedinstance directory. If a more recent backup is performed of any of the instances afterthe default instance is uninstalled, a recovery will not be possible. A new namedinstance directory is created that excludes the default instance.
The solution is to reinstall the removed named instance and run another backup. Thisaction restores the directory information and provides complete functionality for thedefault instance.
Figure 42 Restore window
Perform the following steps to view and select restore items:
Procedure
1. In the left pane of the Restore window, expand any item to view a list ofavailable data items.
The descendants of the item are displayed in the right pane.
2. In the left pane, select the items that you want to restore.
If the copy restore type is selected, only one database object can be marked.Files and file groups of the selected database are not visible in the browsewindow, and require a database backup. The files and file groups are available inthe Properties dialog box.
3. After the restore is set up, start the operation. Starting the recovery on page151 provides more information.
Federated Backup and Recovery
Configuring a named instance recovery 111

Configuring a verify-only restoreThe verify-only option verifies that a database can be restored and that the media thatholds the data is available.
Procedure
1. From the Restore Operation dialog box, select Verify Only, and then clickContinue.
The Restore window lists the databases that can be restored.
Figure 43 Restore (Verify Only) dialog box
2. In the left pane, select one or more databases from the list.
3. (Optional) To specify additional options in the Restore Options dialog box,right-click the parent server.
4. Click OK.
5. In the toolbar of the Restore dialog box, click the play button to start therestore operation.
You can monitor the status of the restore in the Restore Status window.
Configuring a piecemeal restoreSelect the piecemeal restore option to restore SQL Server databases (EnterpriseEdition). Types of supported recovery provides detailed descriptions.
Procedure
1. In the Restore Operation dialog box, select Piecemeal, and then clickContinue.
The Restore page appears.
Federated Backup and Recovery
112 EMC NetWorker Module for Microsoft for SQL VDI 9.1 User Guide

Figure 44 Restore (Piecemeal) dialog box
2. In the left pane, select a database from the list.
Only one database object can be marked for a piecemeal restore operation. Filesand file groups of the selected database are not visible in the browse window.These operations require a database backup. The files and file groups can beviewed and configured in the Properties dialog box, in the Files tab.
3. (Optional) To specify additional options in the Restore Options dialog box,right-click the parent server.
4. Click OK.
5. Right-click the database and select Properties.
In piecemeal restore operations, you must specify the restore properties beforestarting the restore. Otherwise, the restore fails to start.
The Properties dialog box appears.
6. On the General tab, select a name from the Name for restored database field,and then select Overwrite the existing database.
Piecemeal restore operations overwrite a database when they restore to thesame location.
7. In the Properties dialog box, click the Restore Time tab.
8. When you are finished configuring properties, click OK.
For piecemeal restore, if you redisplay the Properties dialog box before startingthe restore operation, the following settings in the Properties dialog box arereset:
l Marked files and file groups of the selected database
l Name for restored database option (on the Files tab)
l Backup the active portion of the transaction log before restoring thedatabase checkbox (on the General tab)If you return to the Properties dialog box, a message appears.
Federated Backup and Recovery
Configuring a piecemeal restore 113

Figure 45 Restore Options dialog box
9. To start the restore operation, in the toolbar of the Restore dialog box, clickthe play button.
Results
Piecemeal restore is iterative. You can continue to restore additional file groups insubsequent operations. Previously restored file groups are not available for selectionunless you specify New Piecemeal.
Federated Backup and Recovery
114 EMC NetWorker Module for Microsoft for SQL VDI 9.1 User Guide

CHAPTER 6
Data Recovery
This chapter includes the following sections:
l Overview........................................................................................................... 116l Prerequisites..................................................................................................... 116l Performing a recovery from the NMM SSMS plugin GUI.................................. 117l Performing a recovery from the NetWorker User for SQL Server GUI..............123l Recovering federated backups.......................................................................... 151l Performing SQL Server 2012 or later recovery................................................. 152l Performing flat file recovery............................................................................. 157l Setting the browse time................................................................................... 157
Data Recovery 115

OverviewYou can recover SQL Server data through one of the following tools:
l NetWorker User for SQL Server GUI
l NMM SQL Server Management Studio (SSMS) plugin GUI
l The nsrsqlrc command
Note
Consider the following limitations:
l You cannot recover SQL Server data with the NMC.
l You cannot recover data that was backed up by third-party vendors.
l You cannot select SQL Server Always On Availability Group (AG) databases in theNetWorker User for SQL Server GUI or the NMM SSMS plugin GUI for recovery.All AG databases are unavailable.
PrerequisitesReview the prerequisites in this section before performing a recovery.
l Ensure that the user that is performing the recovery is assigned the requiredprivileges, as defined in the section Access privileges for backup and recovery.
l Read the SQL Server product documentation to understand the limitations thatare associated with recovery types on the various SQL Server versions.
l Ensure that the NetWorker server software is running on the host and theNetWorker Remote Exec Service is started on the SQL Server host.
l Ensure that no applications or services are waiting for or trying to log in to theSQL instance because restoring the SQL master database requires a restart of theSQL instance in single user mode followed by logging in to that instance. Singleuser mode allows only one administrator to log in.
l Wait for any database backups to finish. SQL Server will not restore a databasewhile another database backup is in progress.
l Wait for any SQL Server startups to finish before starting a restore operation.
l Review the ERRORLOG file to determine if a database is being recovered, or searchthe ERRORLOG file for the Recovery complete string.If the nsrsqlrc program starts while the SQL Server is recovering databases, thefollowing error message appears:
Could not find database ID. Database may not be activatedyet or may be in transition.
l Ensure that all database users are logged off the database. A restore fails if otherusers try to use the database during the restore operation.
Data Recovery
116 EMC NetWorker Module for Microsoft for SQL VDI 9.1 User Guide

Note
For the supported SQL Server versions, if the primary file group is not underrestore, the online (piecemeal) restore functionality allows users to access adatabase while a backup or restore operation is in progress.
l Ensure that the SQL Server filestream feature is enabled on the recovery instancewhen you are recovering filestream data of SQL Server 2008 or later.
l Ensure that the primary file group is part of each piecemeal restore.SQL Server Enterprise Edition databases consisting of multiple file groups that canbe restored in stages with piecemeal restore. The database remains offline duringthe restore process. Piecemeal restore is a multistage process that restores adatabase to itself or to another location. The initial stage must include the primaryfile group and optionally other file groups. After the primary file group is restored,you can bring the database online and continue restoring the remaining file groupsin subsequent stages.
Performing a recovery from the NMM SSMS plugin GUIIt is recommended that you use the NMM SQL Server Management Studio (SSMS)plugin GUI to perform SQL Server VDI recovery operations.
In the EMC NetWorker window, the Script view is available in each page. Click Scriptto generate the command prompt equivalent script. You can use the script to createa .bat file to perform scheduled backups, automation, and other tasks.
You cannot perform the following types of recovery from the EMC NetWorkerwindow in the NMM SSMS plugin GUI:
l Copy recovery
l Piecemeal recovery
Procedure
1. In the SQL Server Management Studio, select the SQL Server instance that youwant to recover, and then open the EMC NetWorker window.
2. In the EMC NetWorker window, on the Database Restore tab, under Select apage, click General.
The General page appears.
Data Recovery
Performing a recovery from the NMM SSMS plugin GUI 117

Figure 46 EMC NetWorker dialog box—Database Restore tab General page
Loading icons appear while the information from the last recovery is beingloaded. While loading, you can specify other recovery settings. Once theinformation is loaded, NMM populates all of the fields under Sources. To clearthe saved settings, click the Clear Cache button.
3. Under Sources, make the following selections:
a. From the NetWorker Server list, select the server that contains the backup.
Click Update to update the list of available NetWorker servers.
The SQL Server Instance list is refreshed after you select the NetWorkerserver.
b. From the SQL Server Host list, select the client that contains the backup.
c. From theSQL Server Instance list, select the server instance that containsthe backup.
Available backups are populated in the database list.
d. From the database list, select one or more databases for recovery.
4. Under Destination, choose the location where the backup is restored to:
l To perform a recovery directly to the database, select Restore to SQLServer, and then specify the destination:
a. From the Instance list, select the SQL Server instance.
Data Recovery
118 EMC NetWorker Module for Microsoft for SQL VDI 9.1 User Guide

Note
If an availability group resides on multiple SQL Server instances, use thesame SQL Server instance name that was specified when you configuredthe backup.
b. From the Database list, select the database where the backup will berecovered to.
l To perform a flat-file recovery, select Restore backups as files, and then inthe Folder field, specify the destination for the files.
5. Under Restore, perform the following steps:
a. Specify the browse time through one of the following methods:
l From the Browse time list, select a time.
l Click Show versions, and then select a time.
The table is populated with the savesets in the SQL database instance thatare available for recovery. The number of available backup versions appearsin the bottom bar.
b. From the table, select the saveset that you must recover.
6. To specify optional file settings, under Select a page, click Files/Filegroups.
The Files/Filegroups page appears.
Figure 47 EMC NetWorker dialog box—Database Restore Files/Filegroups page
Data Recovery
Performing a recovery from the NMM SSMS plugin GUI 119

7. (Optional) To filter the list of available database files by file group, underFilegroup options, select a file group from the Select Filegroup to restore list.
To list all available files, select All files from the list.
8. (Optional) To recover files to a different location, select a relocation option:
l To relocate all datafiles to one folder and the log file to another folder, selectRelocate all files to folder.Click the buttons on the right of Data file folder and Log file folder tospecify the destination paths of the datafiles and the log file respectively.
l To relocate individual file paths, select Relocate specific files to folder.
a. In the Source folder field, type the location path for the datafiles.
b. In the Destination folder field, type the destination path. The files arerecovered to this location.
c. Click Update.
Repeat these steps to relocate multiple file paths during a recovery.
9. To specify additional recovery options, under Select a page, click Options.
The Options page appears.
Figure 48 EMC NetWorker dialog box—Database Restore Options page
10. (Optional) Under Restore Options, select the following options as required:
Data Recovery
120 EMC NetWorker Module for Microsoft for SQL VDI 9.1 User Guide

l To instruct the SQL Server to create the specified database and its relatedfiles, even if another database exists with the same name, select Overwritethe existing database.If another database exists with the same name, that database is deleted.
l To specify a recovery state, in the Recovery state field, select one of thefollowing options:
n To instruct the SQL Server to leave the database in operational stateafter the restore, select Normal mode.Normal is the default mode.
n To activate the SQL Server NORECOVERY database restore option forthe last stage restored, select No Recovery mode.This mode places the database in a state that cannot be loaded after therestore. However, the database can still process additional transactionlog restore operations.
n To enable the standby undo file feature for SQL Server to use whenrolling back the transaction, select Standby mode.
l If the recovery is in standby mode, from the Standby File field, browse andselect an undo file.
l To select the level of information recorded in the logs that you can use fortroubleshooting recovery issues, select Select a debug level, and thenselect the troubleshooting level. Levels range 0-9, with 0 representing noinformation and 1 representing the least amount of information.
l To specify a timeframe for flat-file recovery, select Specify a start time forrestore, and then select a date and time.The date and time that is selected in this field is the start time for therestore period, and the end time is the time selected on the General page,from the Browse time list.
l To provide an alternate pass phrase, select Specify alternate decryptionpass phrase.If the NMC pass phrase is unavailable, then the alternate pass phrase isused.
l To specify advanced recovery options, in the Advanced options field, selector type advanced recovery options . Separate multiple entries with a comma,for example:BUFFERCOUNT=2, KEEP_CDC, KEEP_REPLICATIONNMM supports the following advanced recovery options:
Table 29 Advanced recovery options
Recovery option Description
BUFFERCOUNT=number_of_IO_buffers
This option specifies the total number of IObuffers that can be used during recovery.
KEEP_CDC This option enables change data capture(CDC) recovery.When restoring a database with CDCenabled, the recover operation worksdifferently depending on the recoverydestination.
Use the to KEEP_CDC option to:
Data Recovery
Performing a recovery from the NMM SSMS plugin GUI 121
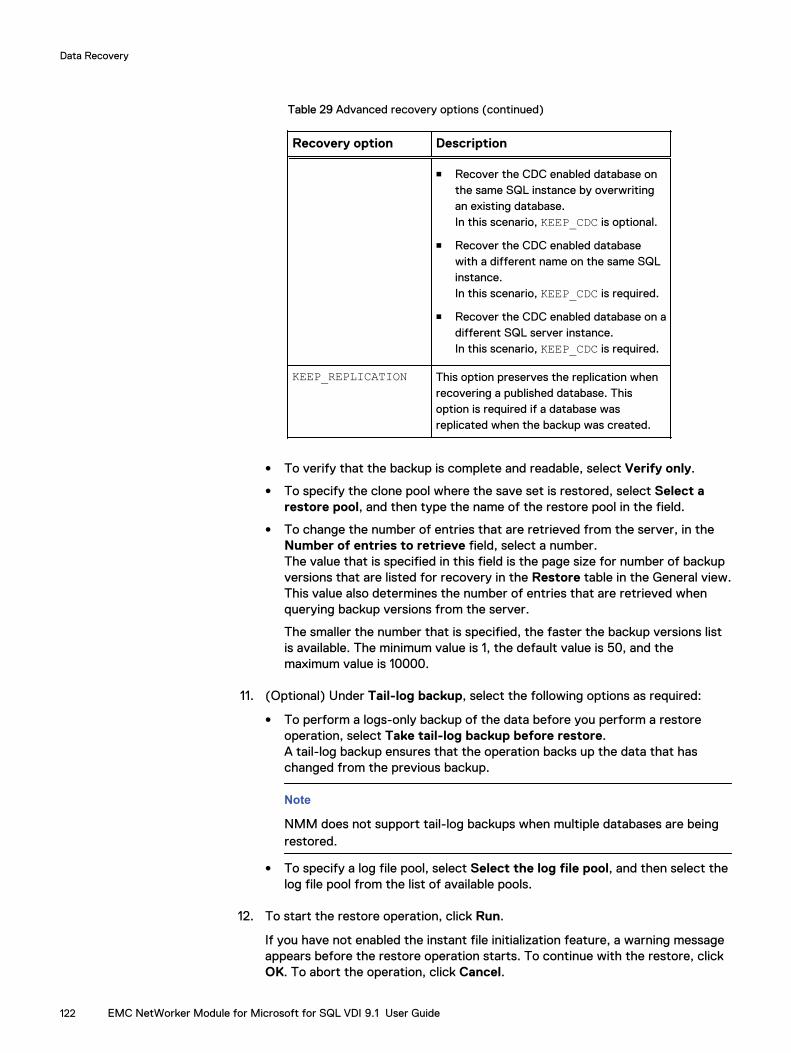
Table 29 Advanced recovery options (continued)
Recovery option Description
n Recover the CDC enabled database onthe same SQL instance by overwritingan existing database.In this scenario, KEEP_CDC is optional.
n Recover the CDC enabled databasewith a different name on the same SQLinstance.In this scenario, KEEP_CDC is required.
n Recover the CDC enabled database on adifferent SQL server instance.In this scenario, KEEP_CDC is required.
KEEP_REPLICATION This option preserves the replication whenrecovering a published database. Thisoption is required if a database wasreplicated when the backup was created.
l To verify that the backup is complete and readable, select Verify only.
l To specify the clone pool where the save set is restored, select Select arestore pool, and then type the name of the restore pool in the field.
l To change the number of entries that are retrieved from the server, in theNumber of entries to retrieve field, select a number.The value that is specified in this field is the page size for number of backupversions that are listed for recovery in the Restore table in the General view.This value also determines the number of entries that are retrieved whenquerying backup versions from the server.
The smaller the number that is specified, the faster the backup versions listis available. The minimum value is 1, the default value is 50, and themaximum value is 10000.
11. (Optional) Under Tail-log backup, select the following options as required:
l To perform a logs-only backup of the data before you perform a restoreoperation, select Take tail-log backup before restore.A tail-log backup ensures that the operation backs up the data that haschanged from the previous backup.
Note
NMM does not support tail-log backups when multiple databases are beingrestored.
l To specify a log file pool, select Select the log file pool, and then select thelog file pool from the list of available pools.
12. To start the restore operation, click Run.
If you have not enabled the instant file initialization feature, a warning messageappears before the restore operation starts. To continue with the restore, clickOK. To abort the operation, click Cancel.
Data Recovery
122 EMC NetWorker Module for Microsoft for SQL VDI 9.1 User Guide

See Microsoft documentation for details on enabling the database instant fileinitialization feature on the SQL Server.
Results
The restore operation runs.To view the status of the restore operation, open the Monitor page.
Figure 49 EMC NetWorker dialog box—Database Restore Monitor page
Note
If you do not have the instant file initialization feature enabled, the following warningmessage will appear in the output:
Instant file initialization is not enabled, please enable this feture for improved restore performance.
However, the restore operation will continue.
Performing a recovery from the NetWorker User for SQLServer GUI
The Restore window displays the database objects that are available for recovery.
Based on the selected recovery type, the Restore window restricts the marking ofdatabase objects:
Data Recovery
Performing a recovery from the NetWorker User for SQL Server GUI 123

l For the normal restore type, the marking of database objects is not restricted.
l For the copy restore type, only database objects can be marked.
The amount of time that a database takes to recover depends on the followingvariables:
l Amount of data
l Network traffic
l Server load
l Backup volume availability
l Tape positioning
After recovery is complete, the completion time appears in the Restore Statuswindow.
Note the following considerations before you start a recovery operation from theNetWorker User for SQL Server GUI:
l If the backup volume with the databases is loaded at a storage node (backupdevice) local to the NetWorker server, the restore continues. If the restore doesnot begin, it is possible that either the wrong volume or no volume is mounted inthe backup device.
l In the Files tab, you must select Overwrite the Existing Database in thefollowing scenarios:
n When you restore an incompatible database by using the name of an existingdatabase.
n When you restore from a media failure where one or more database files werelost.
Recovering the SQL Server dataUse the following procedures to recover SQL Server data through the NetWorkerUser for SQL Server GUI.
You must recover SQL Server databases in the correct order.
Setting up the recoveryComplete the following steps to set up the recovery.
Note
While you set up a recovery in the NetWorker User for SQL Server GUI, you canrestrict the number of backups that are displayed on the Change Browse Time page,Database Properties page, and the Filegroup Properties page. If you apply thisrestriction, the selected browsing list loads faster.
Procedure
1. Open the NetWorker User for SQL Server GUI.
If multiple SQL Server instances are active on the computer, the Select SQLInstance dialog box opens before the main window.
2. Select the SQL Server for recovery, then click OK.
3. Click the Select NetWorker Server button on the toolbar to select aNetWorker server other than the default server.
Data Recovery
124 EMC NetWorker Module for Microsoft for SQL VDI 9.1 User Guide

The Change Server dialog box opens.
4. Select a NetWorker server from the list, then click OK.
5. In the main window of the NetWorker User for SQL Server interface, performone of the following steps to open the Restore Operation dialog box:
l From the toolbar, click Restore.
l From the Operation menu, click Restore, and then click Normal or Copy (ifrunning SQL Server Enterprise Edition).
The Restore Operation dialog box appears.
Configuring a normal recoveryProcedure
1. From the Restore Operation dialog box, select Normal, and then clickContinue.
The Restore window appears and lists the databases that can be restored.
Figure 50 Restore window
2. On the Restore window, select one or more databases to recover.
3. Right-click each marked database and select Properties to configure additionalsettings.
The Properties dialog box appears. Available options and actions depend on theversion of SQL Server that is to be restored and the selected recovery type.
Data Recovery
Setting up the recovery 125

Figure 51 Properties dialog box—General tab
4. Select Backup the active portion of the transaction log before restoring thedatabase.
This option is selected by default for a Normal restore, and NMM tries thetransaction log backup by using the NO_TRUNCATE and NORECOVERY SQLkeywords. The recovery operation continues regardless of whether thetransaction log backup succeeds or fails.
There is no log backup in Simple mode. If the option to back up the log isselected, a full backup of the log is performed on the database that is to berecovered.
The most common reason for recovering databases is to restore from operatorerrors, which are recorded in the transaction log. If you recover the databasewithout applying the transaction log, you lose the information since the lastbackup. If you apply the entire transaction log you recorrupt the database.Point-in-time recovery data can be recovered to the time of the error minusapproximately 1 second, assuming that the database is functional enough tocomplete the final transaction log backup. If Specify a Restore Time on theRestore Time tab is selected, the backup continues, but the latest transactionsthat are captured in the active transaction log backup are not restored.
5. In the Perform the restore using this recovery mode area, select one of thefollowing for recovery:
l Normal mode—Instruct the SQL Server to leave the database in operationalstate after the restore. This is the default mode.
l No Recovery mode—Activates the SQL Server NORECOVERY databaserestore option for the last stage restored. This mode places the database ina state that cannot be loaded after the restore. However, the database canstill process additional transaction log restore operations.
Data Recovery
126 EMC NetWorker Module for Microsoft for SQL VDI 9.1 User Guide

l Standby mode—Enables the Standby Undo File Name, which specifies anundo file for SQL Server to use when rolling back the transactions.
By default, the Standby mode field displays a default file name and path:
%DriveLetter:\default_path\default_dbNameundo.ldfwhere:
default_pathis the default SQL Server backup path obtained from the SQLServer registry.
default_dbName is the name of the database backup that is selected for therestore.
Specify another name and path for the standby undo file through thefollowing steps:
a. Type a valid name and path in the Standby mode field, or click theellipses button.The Specify the Standby Undo File dialog box appears.
Figure 52 Specify the Standby Undo File dialog box
b. In the File Location text box, type a path or browse the file system treeand highlight a file.
c. In the File Name text box, type a file name or browse the file system treeand highlight an existing file.
d. Click OK.
6. (Optional) In the Properties dialog box, select Perform checksum beforereading from media option to perform a checksum operation before a restoreto ensure that it matches the backup.
NMM verifies the checksum by calculating a local result and comparing it withthe stored value. If the values do not match, you can choose to continue therestore operation by selecting Continue on checksum error.
7. Select the Files tab.
Data Recovery
Setting up the recovery 127

Figure 53 Properties dialog box—Files tab
Consider the following:
l The Database to restore field displays the database that is selected for therestore operation and cannot be modified.
l The Name for restored database field specifies the name for the restoreddatabase and cannot be modified.
8. (Optional) Select Overwrite the existing database . The SQL Server createsthe specified database and its related files, even if another database with thesame name exists. In such a case, the existing database is deleted.
The Overwrite the existing database operation includes the WITH REPLACESQL keyword in the restore sequence, which restores files over existing files ofthe same name and location.
9. (Optional) If you are performing a normal, copy, or verify restore operation, theMark the filegroups to restore area displays the file groups of the selecteddatabase. These file groups cannot be changed. If you are performing any othertype of restore operation, select the file groups and files that you want torestore.
The selected set of file groups is copied to the Modify the destination for thefiles in list, which displays the options for restoring the database files. You canfilter the files that are visible in the list. The following table describes theoptions in the Mark the filegroups to restore list:
The following Modify the destination for the files in table that follows the listof the same name, displays the SQL Server files, which are associated with thedatabase that is to be restored, with their locations.. When you perform anormal restore, this table displays the current name and destination based onthe SQL Server physical file name and logical location for the restored file.Filestream data is displayed as a folder with no subordinate objects.
Data Recovery
128 EMC NetWorker Module for Microsoft for SQL VDI 9.1 User Guide

Table 30 Modify the destination for the files in list options
Views Description
All files All the files for the database, includingtransaction log files
All log files Only the transaction log files
All datafiles Only datafiles
File group name Only datafiles for a specific file group
Drive letter All files that are on a particular drive at thetime the backup occurred, even if those fileshave since been relocated to a different drive
10. (Optional) To modify the destination, perform one of the following actions:
l Double-click a file in the Modify the destination for the files in table todisplay the Specify the file destination dialog box.
l Click a file in the list, and then click Destination.The Specify the File Destination dialog box appears.
Figure 54 Specify the File Destination dialog box
Consider the following:
n In the Source file name field, the file that is selected in the File andDestination lists appears. This text cannot be modified. When multiplefiles are selected, this text box is empty.
n In the Source location field, the location and the file that is selected inthe File and destination list appears. This information cannot be
Data Recovery
Setting up the recovery 129

modified. When multiple files are selected, the location of the firstselected file in the list is displayed.
11. (Optional) To change the destination location, in the Destination location field,type a path name or browse the file system tree and highlight a directory or file.
The Destination location field displays the file system location for the restoredfile. When multiple files are selected, the default SQL data path is opened, but itis not selected. Type a pathname, or browse the file system tree and highlight adirectory or file to change the location.
12. (Optional) In the Destination file name field, to change the file name, type anew name or browse the file system tree and highlight a file.
The Destination file name field displays the name of the file that is selected inthe File and Destination table. When multiple files are selected, the field isempty
13. To return to the Files tab, click OK.
14. Click the Restore Time tab.
Figure 55 Properties dialog box—Restore Time tab
The Restore Time tab enables you to select a backup version and modify therestore date and time. The default selection for the restore is listed in theBackup versions table. When a point-in-time restore is performed, the restoreprocedure reinstates only transactions from the backup version that occurredbefore the specified restore date and time.
You can change the backup version or transaction time. The point-in-time for arestore can be changed only for logs-only backups. Unless the last backup time
Data Recovery
130 EMC NetWorker Module for Microsoft for SQL VDI 9.1 User Guide

is specifically selected by the user, the active log backup option is set bydefault.
15. Select Specify a restore time to schedule the recovery.
On the General tab, if you selected Backup the active portion of thetransaction log before restoring the database and select Specify a restoretime, but do not specify the point-in-time in the transaction log, the latesttransactions that are captured in the active transaction log backup are notrestored.
The latest transactions that are captured in the active transaction log backupare restored to the specified point-in-time only if it is specified in thetransaction log.
16. (Optional) To specify a time to perform a point-in-time restore, click Point-in-Time.
The restore time indicates the data from which the marked backup version isreinstated during the restore and when to stop restoring transactions. ThePoint-in-Time button is available only when the logs-only backup, or the latestbackup (regardless of whether it is full, level logs-only or level cumulativeincremental) is marked in the Backup Versions table. If a full or differentialbackup is marked but is not the latest backup, an error message appears.
Specify a Time to perform a point-in-time restore displays the date and timefor the backup that is marked. Only one backup version can be selected andmarked.
17. To perform the restore, select By using a named log mark. This field is enabledonly when log marks exist for the selected database backup.
When you select By using a named log mark, Restore to the End of the LogMark and Restore to the Beginning of the Log Mark are enabled.
18. Select one of the following options:
l Select Restore to the End of the Log Mark to restore the backup and stopimmediately after the named log mark. This type of restore includes thenamed transaction in the restore.
l Select Restore to the Beginning of the Log Mark option to restore thebackup and stop immediately before the named log mark. This type ofrestore excludes the named transaction.
19. Use the Log Mark table field to specify a log mark to use for the restore.Double-click a log mark or select a log mark in the list and click the Markbutton.
20. When you are finished making selections, click OK.
21. To define additional restore options, from the Options menu, select RestoreOptions.
The Restore Options dialog box appears.
22. On the General tab, select the following options as required.
The following table describes the options that are available in the RestoreOptions dialog box
Data Recovery
Setting up the recovery 131

Table 31 Fields on the General tab of the Restore Options dialog box
Field name Describe
Automatically overwrite any database markedfor restore
Select this field to overwrite the markeddatabases. This action restores the databaseby using the WITH_OVERWRITE SQLkeyword.
Detect available tape sessions prior torestoring a striped backup
The support for this field is deprecated andthis field will be removed from NMM in futurereleases. In NMM 9.1 and later, this fieldshould always be selected if any backups arebeing restored from tape type devices.Selecting this field does not affect theperformance of restore operations from disktype devices.
Select a debug level Selecting a troubleshooting level issues thecommand line –D n option, where n is an
integer value between 1 and 9. When thetroubleshooting level is selected, thetroubleshooting information appears in the
Backup or Restore status window, and alsoin the log files. This information can be usefulin diagnosing problems.
If you specify troubleshooting level logging,watch the size of the NMM log files. The filesare at:
installpath\nsr\applogs
where installpath is typically C:\ProgramFiles\EMC NetWorker and can grow very
large. Log files with troubleshoot output canbe deleted (or archived).
Disable log mark display Select this option to disable the potentiallytime-consuming retrieval of log markinformation. This option can be selected whenlog marks will not be used for most restoreoperations, particularly if the client file indexis large. This setting persists across multipleinvocations of the user interface. When logmark display is disabled, the log mark in the
backup will not be displayed in the RestoreTime tab.
When this option is selected, the log mark
information is not displayed in the RestoreTime tab of the Restore Properties dialogbox. When it is not selected, the informationis displayed.
Transaction log backup before restore Select this option to perform a transaction logbackup before the restore operation starts.
Data Recovery
132 EMC NetWorker Module for Microsoft for SQL VDI 9.1 User Guide

Table 31 Fields on the General tab of the Restore Options dialog box (continued)
Field name Describe
With supported SQL Servers, transaction logbackups are required before restoringdatabases. Transaction log backups ensurethat the database can be restored to the mostrecent point-in-time possible. This option isselected by default.
When the Transaction log backup beforerestore option is not selected, the Back Upthe Active Portion of the TransactionLog Before Restoring the Databaseoption (selected by default) is enabled in the
Properties dialog box.
You can choose not to back up the
transaction log by selecting No for Restorewith overwrite in the precautionarymessage box. This option replaces theexisting database by using the T-SQLcommand with the WITHREPLACE flag.
Selecting No for Restore with overwriteimproves performance in cases where thedatabase is too damaged to perform thetransaction log backup or it is known that thetransaction log is not of interest.
Alternate decryption pass phrase Select this option to specify a pass phrase forAES encryption other than the default orcurrent phrase used by the NetWorker server.If data was backed up using AES encryptionand an alternate pass phrase, (and the originalpass phrase is no longer current), that phrasemust be specified to decrypt data during therestore. If multiple pass phrases are required,they must be specified at the command line.The EMC NetWorker Administration Guideprovides complete information about AESencryption, and setting the pass phrase.
Advanced options In the Advanced options field, type therequired advanced recovery options. Thefollowing options are available:
l BUFFERCOUNT=number_of_IO_buffersThis option specifies the total number ofIO buffers that can used during a recoveryoperation.
l KEEP_CDCThis option enables change data capture(CDC) recovery.
l KEEP_REPLICATION
Data Recovery
Setting up the recovery 133

Table 31 Fields on the General tab of the Restore Options dialog box (continued)
Field name Describe
This option preserves the replication whenit recovers a published database. Thisoption is required if a database wasreplicated when the backup was created.
If you are specifying multiple advancedoptions each argument must be separated bya comma.
23. Click OK.
24. In the toolbar of the Restore window, click the play button to start the restore.
After you finish
Monitor the status of the restore in the Restore Status window.
Configuring a copy restore
When you perform a copy restore of databases in an SQL instance to a folder in a newlocation, ensure that you add Everyone to the folder security settings, and provide allpermissions to the folder. You must complete these actions for all users who havelogged in with or without Domain Admin credentials when they perform copy restoreoperations.
Procedure
1. In the Restore Operation dialog box, select Copy, and then click Continue.
The Select the SQL Server dialog box appears.
Figure 56 Select the SQL Server dialog box
2. Select the appropriate source for the backup:
l To use the database backup from the SQL Server that is currentlyconnected to the NMM client, select The current SQL Server Instance .The name of the current NetWorker client host appears.
Data Recovery
134 EMC NetWorker Module for Microsoft for SQL VDI 9.1 User Guide

l To choose a different SQL Server host from the existing database backups,select A NetWorker SQL Server client.
3. Click Continue.
4. Specify the destination host and an appropriate user account or group in the listof NetWorker administrators on the NetWorker server (or remote access) toselect other client hosts as the source of a copy restore.
If either of the following situations apply to the selected NetWorker client, anew dialog box appears:
l A backup exists.
l A named instance directory in the index.This dialog box enables you to select the source from default and namedinstances.
5. Select either the SQL Server default instance or an SQL Server namedinstance, and then click Continue. After choosing a SQL instance, all databasebackups are listed.
A CopyOf prefix is added in front of the database (and database file) names onlyif a database by the same name exists on the target system. This is not the casefor copy restore between systems or between instances of SQL Server (or ifthe original database has been removed). In these cases, the default databaseand file names are the same as the original names.
If backups for the SQL default or other named instance were not performed, orthe backups are no longer available, an error message appears.
Figure 57 NetWorker User for SQL Server dialog box
6. Select a SQL instance.
The Restore window lists the databases that can be restored.
Figure 58 Restore window
7. From the left pane, select one database to recover.
Data Recovery
Setting up the recovery 135
For copy restore, you can mark only one database object. Files and file groupsof the selected database are not visible in the browse window because theyrequire a database backup. The files and file groups can be viewed andconfigured in the Files tab of the Properties dialog box.
8. Right-click the marked database and select Properties.
Note
For copy restore, specify the restore properties before starting the restore.Otherwise, the restore fails to start.
The Properties dialog box with the General tab appears.
9. In the Properties dialog box, click the Files tab.
Figure 59 Properties dialog box
When you restore a copy of a database, you can overwrite an existing databaseor create one:
l To create a database, in the Name for restored database field, type aname. The default name is CopyOfSelectedDB.
l If you want to overwrite an existing database, from the Name for restoreddatabase field, select a name, and then select Overwrite the existingdatabase.
Check the generated file names. After changing the name of the databasefrom CopyOfAcme Sales back to Acme Sales by using overwrite, removethe CopyOf prefix from the associated file names. Default names aregenerated when the dialog box is first displayed. Any database name editsare not propagated to the database file names. Make these changesmanually.
10. In the Properties dialog box, click the Restore Time tab.
11. After configuring the properties, click OK.
These settings are maintained until the restore operation starts.
12. In the toolbar of the Restore dialog box, click the play button to start therestore.
After you finish
On the Restore Status page, monitor the status of the restore operation.
Data Recovery
136 EMC NetWorker Module for Microsoft for SQL VDI 9.1 User Guide

Configuring a named instance recoveryIf a default instance and a named instance are available on a client computer, after abackup is performed with NMM, a copy restore is available for all three instances.
If a default instance is uninstalled, a copy restore from the default instance is availablebecause the instance is still listed in the client file index for the most recently namedinstance directory. If a more recent backup is performed of any of the instances afterthe default instance is uninstalled, a recovery will not be possible. A new namedinstance directory is created that excludes the default instance.
The solution is to reinstall the removed named instance and run another backup. Thisaction restores the directory information and provides complete functionality for thedefault instance.
Figure 60 Restore window
Perform the following steps to view and select restore items:
Procedure
1. In the left pane of the Restore window, expand any item to view a list ofavailable data items.
The descendants of the item are displayed in the right pane.
2. In the left pane, select the items that you want to restore.
If the copy restore type is selected, only one database object can be marked.Files and file groups of the selected database are not visible in the browsewindow, and require a database backup. The files and file groups are available inthe Properties dialog box.
3. After the restore is set up, start the operation. Starting the recovery on page151 provides more information.
Configuring a verify-only restoreThe verify-only option verifies that a database can be restored and that the media thatholds the data is available.
Procedure
1. From the Restore Operation dialog box, select Verify Only, and then clickContinue.
The Restore window lists the databases that can be restored.
Data Recovery
Setting up the recovery 137

Figure 61 Restore (Verify Only) dialog box
2. In the left pane, select one or more databases from the list.
3. (Optional) To specify additional options in the Restore Options dialog box,right-click the parent server.
4. Click OK.
5. In the toolbar of the Restore dialog box, click the play button to start therestore operation.
You can monitor the status of the restore in the Restore Status window.
Configuring a piecemeal restore
Select the piecemeal restore option to restore SQL Server databases (EnterpriseEdition). Types of supported recovery provides detailed descriptions.
Procedure
1. In the Restore Operation dialog box, select Piecemeal, and then clickContinue.
The Restore page appears.
Figure 62 Restore (Piecemeal) dialog box
2. In the left pane, select a database from the list.
Only one database object can be marked for a piecemeal restore operation. Filesand file groups of the selected database are not visible in the browse window.
Data Recovery
138 EMC NetWorker Module for Microsoft for SQL VDI 9.1 User Guide

These operations require a database backup. The files and file groups can beviewed and configured in the Properties dialog box, in the Files tab.
3. (Optional) To specify additional options in the Restore Options dialog box,right-click the parent server.
4. Click OK.
5. Right-click the database and select Properties.
In piecemeal restore operations, you must specify the restore properties beforestarting the restore. Otherwise, the restore fails to start.
The Properties dialog box appears.
6. On the General tab, select a name from the Name for restored database field,and then select Overwrite the existing database.
Piecemeal restore operations overwrite a database when they restore to thesame location.
7. In the Properties dialog box, click the Restore Time tab.
8. When you are finished configuring properties, click OK.
For piecemeal restore, if you redisplay the Properties dialog box before startingthe restore operation, the following settings in the Properties dialog box arereset:
l Marked files and file groups of the selected database
l Name for restored database option (on the Files tab)
l Backup the active portion of the transaction log before restoring thedatabase checkbox (on the General tab)If you return to the Properties dialog box, a message appears.
Figure 63 Restore Options dialog box
9. To start the restore operation, in the toolbar of the Restore dialog box, clickthe play button.
Results
Piecemeal restore is iterative. You can continue to restore additional file groups insubsequent operations. Previously restored file groups are not available for selectionunless you specify New Piecemeal.
Viewing the required volumesAfter you select the databases to restore, you can view the backup volumes thatcontain the databases.
To check the backup volumes that contain the databases, do one of the following:
l Click View > Required Volumes
Data Recovery
Viewing the required volumes 139

l From the toolbar, select Required Volumes.
Ensure that the necessary backup volumes are mounted in the NetWorker server'sstorage device.
If a required backup volume is not mounted, do one of the following:
l Contact the NetWorker administrator and request that the volume be mounted.
l Wait for the NetWorker software to prompt the administrator to mount thevolume.
Setting the restore propertiesYou must complete the required steps to set the restore properties for a file, filegroup, or database.
Procedure
1. Open the NetWorker User for SQL Server GUI.
2. Right-click the database item, and select Properties.
3. Complete the Properties dialog box.
4. Click OK.
Results
All properties are context-sensitive, based on the version of SQL Server that isrunning and the selected restore type.
Preferences that are specified for these properties are used for the current restoreoperation. When a preference is not set, the default is used. After the restorecompletes, and the Restore window closes, the property settings revert to theNetWorker User for SQL Server defaults.
Note
If you select the copy restore type, you must specify the restore properties beforestarting the restore. Otherwise, the restore fails to start.
Setting database restore propertiesThe information in this section applies to normal and copy restore types.
You must complete the required steps to set database restore properties.
Procedure
1. Open the NetWorker User for SQL Server GUI.
2. In the Restore window, select a database.
3. Right-click the database and select Properties.
The Properties dialog box appears.
Data Recovery
140 EMC NetWorker Module for Microsoft for SQL VDI 9.1 User Guide

Figure 64 Properties dialog box
4. On the General tab, indicate whether to back up the active portion of thetransaction.
When Backup the active portion of the transaction log before restoring thedatabase is selected, the transaction log backup starts with the NORECOVERYkeyword. The restore operation continues regardless of whether the transactionlog backup succeeds or fails.
Specify a point-in-time restore within the transaction log backup. This optionapplies to all SQL Server restores and addresses database failure if one occursafter the last scheduled logs-only backup.
By backing up the active portion of the log before the restore, you can specify arestore for time of failure.
5. To specify a point-in-time restore, select the Restore Time tab, and makeentries as appropriate.
Point-in-time restore can use a full, logs only, or cumulative incrementalbackup, if the selected backup is a logs backup and/or the latest backup.
6. Specify a recovery mode to use for the restore:
l Normal mode—Instructs the SQL Server to leave the database inoperational state after the restore. This is the default mode.
l No Recovery mode—Activates the SQL Server NORECOVERY databaserestore option for the last stage restored. This mode places the database ina state that cannot be loaded after the restore. However, the database canstill process additional transaction log restore operations.
l Standby mode—Enables the Standby Undo File Name option, whichspecifies an undo file for SQL Server to use when rolling back the
Data Recovery
Setting the restore properties 141

transactions. By default, this field displays a default file name and path asfollows:%DriveLetter:\default_path\default_dbNameundo.ldfwhere default_path is the default SQL Server backup path that is obtainedfrom the SQL Server registry, and default_dbName is the name of thedatabase backup selected for the restore.
7. Select Checksum and Continue with error.
If checksums are not calculated for the backup, specifying them for the restorecauses the restore operation to fail.
Specifying an undo file nameYou must complete the required steps to specify the undo file name.
Procedure
1. In the Standby Undo File Name field, type a name
2. Click the ellipses (. . .) button.
3. In the dialog box that appears, select a file from the file system tree.
4. Specify the required values for the following fields:
l The File Location field—In the File Location field, type a path or browsethe file system tree and highlight a file name to specify the path for thestandby undo file.
l The The File Name field—In the File Name field, type a file name or browsethe file system tree and highlight a file name to specify the name for thesandy undo file.
5. Click OK.
View file or file group restore propertiesThe file and file group restore properties in the Properties dialog box are provided forinformational purposes only. SQL Server dictates the settings for these properties.They cannot be configured.
The properties in the Properties dialog box apply to one file or a file group for anormal restore type operation.
Note
These file and file group restore properties are not available for copy restore typeoperation.
You must complete the required steps to view the restore properties for a file or filegroup.
Procedure
1. From either pane of the Restore window, select a file or file group, and thenright-click.
2. From the list, select Properties.
The Properties dialog box appears. Properties differ depending on the versionof SQL Server.
Data Recovery
142 EMC NetWorker Module for Microsoft for SQL VDI 9.1 User Guide

Figure 65 Properties dialog box
3. Select Backup the active portion of the transaction log file to back up theactive portion of the transaction log before the restore operation is performed.
The log is applied to the file group or file to ensure it is consistent with the restof the database. The SQL Server requires the transaction log when it restoresdamaged or lost datafiles. The NetWorker User for SQL Server tries to performa transaction log backup for SQL Server non-Enterprise Editions or Primary filegroup. The backup uses the NO_TRUNCATE and NO_RECOVERY SQL keywords.
For files that belong to secondary file groups and secondary file groups restorefor SQL Server Enterprise Editions, the restore workflow requires that you firstrestore the file group and then take a backup of the active portion of thetransaction log.
If a file or file group is restored with the NetWorker User for SQL Serverprogram, the transaction log backups occur automatically. It is recommendedthat you use the NetWorker User for SQL Server for this type of restoreoperation.
4. Select Overwrite the existing file with the restored file to force the SQLServer to ignore errors that are caused by nonexistent files, which are a resultof media failure. When you select this option, the recovery operation uses theWITH REPLACE SQL keyword in the restore sequence. The file or file group isrestored to the exact location (drive and pathname) as the location on thesource host from which the data was backed up.
5. The Backup versions table lists the date and time of all the backups that areavailable for the restore operation.
Selecting file groups to restoreUse the Properties dialog box to select a file group to restore. For normal and copyrestore, the tab is labeled Files.
You must complete the required steps to select file groups to restore.
Data Recovery
Setting the restore properties 143

Procedure
1. In the Properties dialog box, click Files.
If the fields in this dialog box are empty, review the file configurationinformation. Specifying Read File Configuration properties provides details.
The Database to restore field displays the name of the database (on secondarystorage) that is selected for the restore operation. This field is informationalonly.
2. The Name for restored database field specifies the name for the restoreddatabase:
l If you are performing a normal restore, this field displays the name of theselected database is disabled.
l If you are performing a copy restore, CopyOf is appended to the sourcedatabase name and to all associated datafiles and log files.
In the Name for restored database field, type a new name in the field orselect a name from the list to specify a different name. The name mustcomply with SQL Server naming conventions.
If you specify a different name, the data and log files retain the defaultname, as shown in the File and Destination area. For example, if you selectcopy restore when you want to restore a database named Project to adatabase named Test, the data and log file names retain the values ofCopyOfProject_Data.MDF or CopyOfProject_Log.LDF. You mustchange the data and log file names.
When the Name for restored database field is set to the name of anexisting database and you click Apply or OK, the Overwrite the existingdatabase field is enabled. For example, when the two databases areincompatible, the name of the existing database is used for the restored one.
3. Select the Overwrite the existing database field for the SQL Server to createthe specified database and its related files, even if another database exists withthe same name. In such a case, the existing database is deleted.
This field causes the WITH REPLACE SQL keyword to be included in the restoresequence. The WITH REPLACE keyword restores files over existing files of thesame name and location.
4. Select or clear the file groups to restore. If you are performing a normal or copyrestore, this field displays the file groups of the selected database. The set offile groups that is marked in this field is copied to the Modify the destinationfor the files in list:
l Modify the destination for the files in lists the different views for thedatabase files that will be restored, and it enables the files that are visible inthe File and Destination table to be filtered.
l The File column of the File and Destination table lists SQL Server logicalfile names. The Destination column lists physical file name and locations.The files that are listed in this table are associated to the database that ismarked for the restore operation.
l If you are performing a normal restore, the File and Destination tabledisplays the current name and destination based on the SQL Server physicalfile name and logical location for the restored file.
Data Recovery
144 EMC NetWorker Module for Microsoft for SQL VDI 9.1 User Guide

l If you are performing a copy restore, the File and Destination table displaysa default name and destination based on the SQL Server physical file nameand logical location for the restored file.The default location for the datafiles and log files is in the data path of thedefault SQL Server installation directory. If this directory is on the systemdrive, provide enough disk space for the database files, or specify anotherlocation that has sufficient space.
You cannot edit the File and Destination table. You can, however, modifythe destination location.
5. To modify the destination, perform do one of the following actions:
l Double-click a file to display the Specify the file destination dialog box.Then follow the instructions in the next section.
l Click a file, and then click Destination to display the Specify the filedestination dialog box. Then follow the instructions in the next section.
Specify the restored file’s destination and file nameSpecify the destination locations for the restored files in the Specify the FileDestination dialog box.
Figure 66 Specify the File Destination dialog box
Note that the following fields provide information and cannot be modified:
l The Source file name field displays the file that is currently selected in the Fileand Destination lists. When multiple files are selected, this field is empty.
l The Source location field displays the file system location and the file that iscurrently selected in the File and Destination lists. When multiple files are selected,this field contains the file system location of the first selected file in the File andDestination table.
Modify the following fields as required:
Data Recovery
Setting the restore properties 145

l The Destination location field displays the file system location for the restoredfile. When multiple files are selected, the default SQL data path is open, but it isnot selected.To modify this field, type a pathname or browse the file system tree and highlighta directory or file. When a directory is highlighted, its path appears in theDestination Location field. If a file is highlighted, the directory for the highlightedfile appears.
l The Destination file name field, by default, lists the name of the file that iscurrently selected in the File and Destination table. When multiple files areselected, the field is empty.In the Destination file name field, type a new name or browse the file system treeand highlight a file to modify this field. When a file is highlighted, the file nameappears in the Destination file name field.
Note
Default file names are generated when the dialog box first appears. Verify that thefile names are correct. Verification is particularly important after you change thedatabase name.
Specifying Read File Configuration propertiesSome of the data that populates the fields on the Files tab of the Properties dialogbox is obtained from new file-configuration metadata objects that are created in theclient file index.
You must complete the required steps to specify Read File Configuration properties.
Procedure
1. Open the Properties dialog box for a marked database item that has no file-configuration metadata in the client file index. Load this information from thesave set media.
The Read File Configuration dialog box appears.
Figure 67 Read File Configuration dialog box
2. Select one of the following buttons:
l To read the file configuration from the save set media in the background,select Read the file configuration from save set media. A messageappears. When this process finishes, the Properties dialog box appears, andthe File and Destination table display valid data.
Data Recovery
146 EMC NetWorker Module for Microsoft for SQL VDI 9.1 User Guide

To cancel the reading process, click Cancel. If you cancel from the Readingdialog box, the Properties dialog box appears, but the File and Destinationtable is empty.
l To skip the process of reading the file configuration, select Skip reading thefile configuration . If you select this button, the Properties dialog boxappears, but the File and Destination table is empty.
Setting Restore Time propertiesThe Restore Time properties support selecting of a backup version and changing therestore date and time. When a point-in-time restore is performed, the restoreprocedure reinstates transactions only from the backup version that occurred beforethe specified restore date and time.
Complete the following steps to set restore time properties:
Procedure
1. In the Properties dialog box, select Restore Time.
2. On the General tab, select Back up the active portion of the transaction log,and then Specify a Restore Time.
Not the transactions in the transaction log backup exist in the restoreddatabase. Only data up to the point-in-time restore operation appear.
You can specify a point-in-time restore for between the last scheduled full,logs-only, or cumulative incremental backup and the current time. Thetransaction log is backed up as the initial portion of the restore operation and, ifthe transaction log backup is successful, the log is also restored.
3. Select Specify a Restore Time to enable the restore time controls, and thenSpecify a Restore Time to enable the restore time controls.
4. Select Using a specific backup version to enable the Specify a time toperform a point-in-time restore field.
The Specify a time to perform a point-in-time restore field indicates whatdata from the marked backup version is reinstated during the restore, and whatto stop restoring transactions. If a backup is the most recent or a logs-onlybackup, this field can be modified for a backup that is selected in the BackupVersions table.
5. Click Point-in-Time to modify the content in the Specify a time to perform apoint-in-time restore field.
The Point-in-Time button is enabled if:
l A logs-only backup is selected in the Backup Versions table.
l The Backup the active portion of the transaction log before restoringthe database option is selected on the General tab for the latest backup(full, cumulative incremental, or logs-only). If the marked backup is not themost recent backup, clicking this button displays an error message.
The Backup Versions table displays the following information:
l Size—The size of the backup.
l Type—The backup type, including “full” for full backups, “inc” for logs-onlybackups, and “1” for cumulative incremental backups.
l Method—The traditional recovery method creates the backup that is to berestored.
Data Recovery
Setting the restore properties 147

l Backup Time—The date and time in seconds, when the backup wascreated.
6. Select By using a named log mark to perform the restore. If log marks are notused, you can disable the display of this information.
This field has the following characteristics:
l Can use a maximum of 1024-log marks.
l Is enabled only when log marks exist for the selected database backup.When this field is selected, the Restore to the End of the Log Mark andthe Restore to the Beginning of the Log Mark buttons are enabled.
7. Specify which type of named log mark restores to perform by selecting one ofthe following:
l To restore the backup and stop it immediately after the named log mark,select Restore to the End of the Log Mark. This type of restore includesthe named transaction in the restore.
l To restore the backup and stop it immediately before the named log mark,select Restore to the Beginning of the Log Mark. This type of restoreexcludes the named transaction.
8. Use the Log Mark table field to specify the log mark to use for the restore.Only one-log mark is selected. The following columns appear in the Log Marktable:
l Log mark—The name of the transaction log mark.
l Date Modified—The date and time, in milliseconds, on which the namedtransaction log mark was created.
l Description—Any information about the log mark that was typed when thetransaction was performed.
9. To select a log mark, perform one of the following actions:
l Double-click any log mark in the table.
l Click any log mark in the list, and then click Mark.A check mark appears next to the log mark name. You can mark only one logmark name at a time.
Setting point-in-time restore propertiesSpecify a date and time for the SQL point-in-time restore in the Point-in-TimeRestore dialog box.
Ensure that the date and time are within a time frame spanned by the transaction logbackup that was marked in the Backup Versions table. The create time of thetransaction log backup defines the upper time frame limit.
For a normal restore, if a transaction log backup has been specified as part of therestore, the upper limit is the current time. The lower time frame limit is the createtime of the first full backup of the database.
You must complete the required steps to set point-in-time restore properties.
Procedure
1. Click Restore Time.
2. Select Specify a restore time.
3. Click Using a specific backup version.
Data Recovery
148 EMC NetWorker Module for Microsoft for SQL VDI 9.1 User Guide

4. Click Point-in-time.
The Point in time restore dialog box appears.
Figure 68 Point in time restore dialog box
5. In the Date field, specify the restore time date for the marked backup version.The syntax for this text box is mm/dd/yyyy.
To modify the date, type a date by using the syntax or click the arrow to displaythe Calendar. In the Calendar, click a date. Use the Previous Month and NextMonth buttons to change from the current month.
The restore time date must be within the range of transaction dates in theselected backup version. If a transaction log backup has been specified as partof the normal restore operation then the upper limit is today's date.
6. In the Time field, specify the restore time for the marked backup version. Thesyntax for this text box is hh:mm:ss.
To modify the time, type or select a time.
The restore time must be within the range of transaction times in the markedbackup version. If a transaction log backup has been specified as part of therestore operation, the upper limit is the current time.
Note
A point-in-time restore is successful only when the times on the NetWorkerserver and NMM client are synchronized.
Setting advanced restore optionsNMM supports advanced restore options in the NetWorker User for SQL Server GUI.
The following table describes the advanced recovery options that NMM supports.
Data Recovery
Setting the restore properties 149

Table 32 Advanced recovery options
Recovery option Description
BUFFERCOUNT=number_of_IO_buffers This option specifies the total number of IObuffers that can be used during recovery.
KEEP_CDC This option enables change data capture(CDC) recovery.When restoring a database with CDC enabled,the recover operation works differentlydepending on the recovery destination.
Use the to KEEP_CDC option to:
l Recover the CDC enabled database onthe same SQL instance by overwriting anexisting database.In this scenario, KEEP_CDC is optional.
l Recover the CDC enabled database with adifferent name on the same SQL instance.In this scenario, KEEP_CDC is required.
l Recover the CDC enabled database on adifferent SQL server instance.In this scenario, KEEP_CDC is required.
KEEP_REPLICATION This option preserves the replication whenrecovering a published database. This optionis required if a database was replicated whenthe backup was created.
Use the following procedure to set advanced restore options in the NetWorker Userfor SQL Server GUI.
Procedure
1. On the Restore page, select the database that requires advanced recoveryoptions.
2. From the Options menu, select Restore Options.
The Restore Options window appears.
3. In the Advanced options field, type the required advanced recovery options.
Follow the syntax described in the Advanced restore options table. Separatemultiple entries with a comma. For example:BUFFERCOUNT=2, KEEP_CDC, KEEP_REPLICATION
4. Click OK.
Results
The recovery options that are specified in the Advanced options field are applied tothe marked database.
Data Recovery
150 EMC NetWorker Module for Microsoft for SQL VDI 9.1 User Guide

Starting the recoveryDuring the restore operation, the Restore Status window displays progress messagesfor each restored database.
If the backup volume containing the databases is loaded at a storage node (backupdevice) local to the NetWorker server, the restore proceeds. If the restore does notbegin, it is possible that either the wrong volume or no volume is mounted in thebackup device.
When you restore an incompatible database by using the name of an existing databaseor when you restore from a media failure where one or more database files were lost,on the Files tab, select Overwrite the Existing Database.
To display the Files tab, right-click the database item and select Properties.
After the restore is finished, the restore completion time is listed in the RestoreStatus window.
Note
If you do not have the instant file initialization feature enabled, the following warningmessage will appear in the output:
Please ensure that instant file initialization is enabled on the destination SQL Server instance for improved restore performance.
However, the restore operation will continue. See Microsoft documentation for detailson enabling the database instant file initialization feature on the SQL Server.
Recovering federated backupsProcedure
1. On the primary replica server, break the Always On replication for the AlwaysOn database by typing the following command in NMM SQL ServerManagement Studio (SSMS) plugin GUI query window:
ALTER AVAILABILITY GROUP group_name REMOVE DATABASEdatabase_name
2. In the NetWorker User for SQL Server GUI, select Operation > SelectNetWorker SQL Server Client.
The Select the SQL Server dialog box appears.
3. In the Select the SQL Server dialog box, select the Windows cluster namefrom the list, and then click Continue.
The Select the SQL Server Instance dialog box appears.
4. In the Select the SQL Server Instance dialog box, select the instance (defaultor named) where the availability group databases are created, and then clickContinue.
Note
If an availability group resides on multiple SQL Server instances, use the sameSQL Server instance name that was specified when you configured the backup.
Data Recovery
Starting the recovery 151

5. Browse the backed-up availability group databases.
Figure 69 Backed-up availability group databases displayed in the NetWorker User for SQLServer page
6. Select the availability group database and perform a recovery.
In the dialog box that appears, click Yes to run a full backup.
Note
A full backup is performed as part of the recovery process when SQL VDIfederated recovery is started.
7. On the secondary replica server, to rejoin the Always On database to theAvailability Group:
a. In the NMM SSMS plugin GUI, locate and expand Availability Group to viewthe Always On database.
b. Right-click Always On database and select Join Availability Group.
8. Ensure that both primary and secondary copies of Always On database areonline.
NOTICE
Do not create a client resource using the Always On Availability Group virtualname when you perform a backup because the backup will fail.
Performing SQL Server 2012 or later recoveryPerform the steps in this section for SQL Server 2012 or later instance-level anddatabase-level recovery with the NetWorker User for SQL Server GUI.
Note
You can also use the NMM SQL Server Management Studio (SSMS) plugin GUI toperform federated recovery of SQL Server 2012 and later. Refer to the section Performing a recovery from the NMM SSMS plugin GUI on page 117 for instructions.
For SQL Server 2012 or later instance-level and database-level recovery, ensure to:
1. Perform a full backup of the instance or Always On database.
2. On the primary replica server, break the Always On replication for the Always Ondatabase by typing the following command in NMM SSMS plugin GUI T-SQLquery window:ALTER AVAILABILITY GROUP group_name REMOVE DATABASE database_name
3. On the secondary replica server, delete the Always On database, which is inrestoring mode.
Data Recovery
152 EMC NetWorker Module for Microsoft for SQL VDI 9.1 User Guide

Complete the following steps to perform instance-level recovery.
1. On the primary replica server:
Note
For database-level restores of Always On databases, do not complete step a torecover all the system databases.
a. Recover all the system databases.
b. Recover all the user databases or just Always On databases, as required.
2. On the secondary replica server, recover the same Always On database using theNo Recovery option in Normal Restore under database properties.
3. On the primary replica server, to rejoin the Always On database to the AvailabilityGroup.
a. Right-click the Availability Group and select Add Database.
b. In the dialog box that appears, select the database and click Next.
c. In the dialog box that appears, specify the shared location and click Next.
4. Connect to the instance, and then click Finish.
Performing SQL Server 2012 or later recovery when an Always On AvailabilityGroup is configured on a SQL Server instance or database
This section provides instructions on how to restore an Always On Availability Groupthat includes both primary and secondary database replicas.
Note
Ensure that you have full and incremental backups of the SQL Server instance orAlways On database.
Procedure
1. On the primary replica server, break the Always On replication for the AlwaysOn database using the following steps:
a. From the SQL Server Management Studio (SSMS) GUI, from the ObjectExplorer pane, expand the primary replica server.
b. Select the availability group, and then expand Availability Databases.
c. From the Object Explorer pane, select the Always On database that youwant to recover.
d. Right-click the selected database, and then click Remove Database fromAvailability Group.
The Remove Database from Availability Group dialog box appears.
Data Recovery
Performing SQL Server 2012 or later recovery when an Always On Availability Group is configured on a SQL Server instance
or database 153

Figure 70 Remove Database from Availability Group dialog box
e. In the Remove Database from Availability Group dialog box, verify that thedatabase you want to recover is listed, and then click OK to break theAlways On replication.
2. Open the NetWorker User for SQL Server GUI, and then from the NormalRestore page, recover the Always On database with default settings.
3. Select the database backup that you want to restore and which browse timeyou must change.
Note
Ensure that you have selected an incremental backup. This procedure does notwork with full backups.
Figure 71 Change Browse Time window
Data Recovery
154 EMC NetWorker Module for Microsoft for SQL VDI 9.1 User Guide

4. Click OK.
The Restore Option dialog box appears.
5. Click Yes.
The restore operation is completed on the primary server. The following figureshows the output for a successful restore operation
Figure 72 Restore Status window
6. Configure recovery of the same Always On database on the secondary replicaserver. From the Normal Restore page, under database properties, ensure thatyou select NoRecovery and Overwrite the existing database.
Note
The browse time must be the same as the one you selected for the restoreoperation on the primary node.
7. From the NMM SSMS plugin GUI on the primary replica server, in the AddDatabase to Availability Group window, select Join only to rejoin the AlwaysOn database to the Availability Group.
Figure 73 Add Database to Availability Group window - Select Initial Data Synchronizationview
8. Click Next.
The Validation page appears.
Data Recovery
Performing SQL Server 2012 or later recovery when an Always On Availability Group is configured on a SQL Server instance
or database 155

Figure 74 Add Database to Availability Group window - Validation view
9. Click Next.
The Summary page appears.
10. Click Finish.
The Results page appears.
11. To join the Always On database to the availability group, from the SSMS GUI onthe secondary replica server, in the Object Explorer pane, right-click theAlways On database, and then click Join to Availability Group.
Figure 75 Join to Availability Group menu item
Data Recovery
156 EMC NetWorker Module for Microsoft for SQL VDI 9.1 User Guide

Performing flat file recoveryWhen you perform a flat file recovery, NMM writes the backup to files instead ofdirectly to the SQL database. This feature allows you to restore the recovery files laterwithout access to the network by using the standard T-SQL file restore command.
You can perform flat file recovery with either of the following tools:
l The NMM SSMS plugin GUITo perform flat file recovery through the NMM SSMS plugin GUI, select theRestore backups as files option from the General view of the Database Restoretab.
The section Performing a recovery from the NMM SSMS plugin GUI on page 117provides detailed instructions for configuring a recovery with the NMM SSMSGUI.
l The nsrsqlrc commandUse the -a option with the nsrsqlrc command to start a flat file recoveryoperation.
Specify the following variables with the -a option:
n FLAT_FILE_RECOVERY=TRUEn FLAT_FILE_RECOVERY_DIR=<destination_directory>n (Optional) RESTORE_START_TIME=start_dateThe section Command options for nsrsqlrc provides more information about usingthe -a option with the nsrsqlrc command.
Setting the browse timeYou can specify the browse time through the NetWorker User for SQL Server Restorewindow or the command prompt.
Specifying the browse time through the NetWorker User for SQL ServerRestore window
In the NetWorker User for SQL Server Restore window, you can browse the onlineindex and mark a database backup version that you want to restore.
The browse time controls which backup data is viewable in the Restore window. Youcan modify the browse time to display backup versions for a different restore time byselecting Change Browse Time from the View menu. However, the browse timecannot change to a point:
l Earlier than the first backup.
l Later than the most recent backup.
An invalid time entry results in an error message.
Procedure
1. From the View menu, select Change Browse Time.
The Change Browse Time dialog box appears.
Figure 76 Change Browse Time dialog box
Data Recovery
Performing flat file recovery 157

2. In the Change Browse Time dialog box, by default, the Specify a browse time,or end time, is set to the current time and the start time is set to 14 days prior.Select this field to enable the Browse Time button.
3. To change the end time of the backups that are listed for browsing, clickBrowse Time.
The Specify Browse Time dialog box opens.Figure 77 Specify Browse Time dialog box
4. Select a date and time from the Date and Time lists.
5. Click OK.
The dialog box closes and the Specify a browse time field in the ChangeBrowse Time dialog box appears with the new date and time. The backupversion list is also updated. The start time is set to 14 days before the browsetime that you select.
6. By default, the Select a backup version to change browse time field marksthe current browse time in the backup version list. Select this field to enable thebackup version list and Mark button. The backup version list displays the knownbackup version times, which correspond to save times of the root browsedirectory. The root browse directory is created whenever a SQL Server backupis performed.
Data Recovery
158 EMC NetWorker Module for Microsoft for SQL VDI 9.1 User Guide

7. To select a new browse time, do one of the following:
l Double-click a backup time in the list, and then click OK.
l Select a backup time in the list, click Mark, and then click OK.The Specify a Browse Time field is updated to reflect the new setting.When you change the browse time, previous selections in the Restorewindow are discarded. All file, file group, or database property settings arelost.
Specifying the browse time through the command promptAfter you set the end time with the Select Time button, you can modify the range ofbrowsing backup versions with the nwmssql.exe -b <n_days> command from thecommand prompt, where the start time is n days prior to the end time set with theSelect Time button.
For example, if nwmssql.exe -b 30 is used and the end time in the GUI is set to"6/10/2015 16:50:00", all the backups up to 30 days from the end time are displayedon the Change Browse Time dialog box.
Data Recovery
Specifying the browse time through the command prompt 159

Data Recovery
160 EMC NetWorker Module for Microsoft for SQL VDI 9.1 User Guide

CHAPTER 7
Granular-Level Recovery
This chapter includes the following sections:
l Overview.......................................................................................................... 162l Considerations..................................................................................................162l Performing GLR through the NMM SSMS plugin GUI...................................... 165l Unmounting backups after performing GLR......................................................169l Troubleshooting GLR........................................................................................ 170
Granular-Level Recovery 161

OverviewNMM supports granular-level recovery (GLR) for backups of SQL Server created withNMM and SQL VDI.
GLR enables you to recover specific items from a single backup without having torestore the entire backup. By using GLR with SQL Server, you can recover individualtables to the production database. This feature reduces the space requirements onlocal system storage during a restore operation. Depending on the size of the contentdatabase, GLR may also reduce recovery time.
NMM SQL GLR requires GLR enabled backups. NMM SQL GLR enabled backups areenabled by default for NMM 9.1 and later. GLR enabled backups perform additionalinline processing during a backup operation, and store additional metadata on the saveset backup records. GLR enabled backups are not supported for direct backups totape devices.
NMM SQL GLR is managed from the Table Restore tab in the NMM SSMS plug-inGUI. The Table Restore tab allows you to select the database and backup version forGLR. The Table Restore tab constructs a list of save sets that are contained in theselected backup version. NMM uses a mount service and the NetWorker Virtual FileSystem (NWFS) to mount all save sets in the selected SQL backup version. TheNWFS exposes the save sets as SQL native backup files on a virtual file system on theNMM client.
After the Table Restore tab mounts all save sets as a virtual file system, EMCItemPoint™ for Microsoft SQL Server launches. EMC ItemPoint reads the NWFS andpresents the database and tables that are contained in the backup, enabling you torestore SQL tables to the production database. Once GLR is performed through EMCItemPoint and the program is exited, the NMM SSMS plugin GUI unmounts thebackup.
The NMM SSMS plugin GUI mounts SQL backups as NWFS by using a mount service.The mount service enables lifecycle management of the mount. While a backup ismounted, the mount service system tray icon appears. You can use the tray icon toinspect the mount path, extend the mount time, and unmount the backup.
ConsiderationsEMC ItemPoint environmental requirementsBefore using EMC ItemPoint for Microsoft SQL Server, consider the followingenvironmental requirements:
l EMC ItemPoint requires Microsoft .NET Framework version 4.5
l EMC ItemPoint supports the 64-bit versions of the following operating systems:
n Windows Server 2016
n Windows Server 2008
n Windows Server 2008 R2
n Windows Server 2012
n Windows Server 2012 R2
n Windows 7
n Windows 8
l EMC ItemPoint can connect to SQL Server 2005 and later as source and targetservers.
Granular-Level Recovery
162 EMC NetWorker Module for Microsoft for SQL VDI 9.1 User Guide

l EMC ItemPoint supports the following Microsoft Azure source data:
n Local backups of Microsoft Azure
n Downloaded copies of database files
n Downloaded copies of backup files
Note
SQL Server data that is hosted in the Microsoft Azure cloud is not available assource data. Move or copy the data to a local folder before using EMC ItemPointfor Microsoft SQL Server.
l EMC ItemPoint supports the following Microsoft Azure target servers:
n SQL Server data files in Microsoft Azure
n SQL Server virtual machines in Microsoft Azure
n SQL database in Microsoft Azure
l SQL Server database objects other than tables, rows, and columns (such assystem tables, stored procedures, triggers, primary and foreign keys, and CLR) arenot supported and do not appear in the EMC ItemPoint for Microsoft SQL Serverinterface.
l EMC ItemPoint does not fully support the following column (data) types:
Note
These column types appear in the Source List as either <UNSUPPORTED> orbinary and are copied as binary.
n CLR UDT (User Defined Type)
n Cursor
n Date, DateTimeOffset, DateTime2, Time
n Geography, Geometry
n Hierarchyld
n TimeStamp/RowVersion
l EMC ItemPoint does not support the following column (data) types:
n COLUMN_SET column
Note
While sparse columns that are defined by COLUMN_SET column appear in theSource List, tables containing this column cannot be copied.
n Filestream
Note
Tables containing Filestream columns cannot be accessed.
Note
For virtual environments, virtual operation of tape devices may have restrictions thatare imposed by virtual operating systems.
The EMC ItemPoint for Microsoft SQL Server User Guide provides the details aboutusing EMC ItemPoint to perform GLR of SQL backups.
Granular-Level Recovery
Considerations 163

Installation requirementsTo use the SQL GLR feature, you must select the following options from the NMMInstallation Options page while installing NMM:
l The SQL GLR optionThis option installs the following required components for GLR:
n The Eldos CBFS driver
n The NMM mount service
n The NetWorker virtual file system (NWFS) plugin
n EMC ItemPoint for SQL Server
l The SQL SSMS plugin optionThis option is required because SQL GLR is managed and initiated through theTable Restore tab in the NMM Microsoft SQL Server Management Studio (SSMS)plugin GUI.
The EMC NetWorker Module for Microsoft Installation Guide provides more information.
Backup considerationsSQL GLR requires backups that are created with NMM 9.1 or later. No additionalconfiguration is required for GLR-compatible backups as GLR is enabled by default forbackups that are taken with NMM 9.1 or later. Backups that are taken with olderversions of NMM are not GLR enabled. Backups that use the NetWorker AESencryption or NetWorker compression technology are not supported for GLR.
Before performing SQL GLR, the backups must be available on one or more AFTDs orData Domain devices. Client Direct must be enabled for the volumes containing thesave sets to be restored in order for the mount operation to succeed. If a Client Directsession cannot be established, the mount operation fails.
If the backup is on a device that is not AFTD or Data Domain, the backup must becloned to an AFTD or Data Domain device before you can perform a GLR operation. Inthis scenario, it is also required to set the recovery pool in the registry. Contact EMCsupport for details.
The default creation of SQL GLR enabled backups does not affect backup workflow.For example, if you are performing a type of backup that is not supported for GLR, thebackup completes successfully. However, if a backup is not GLR capable, NMM writeswarning messages to the operational logs. If these warning messages impact groupcompletion statuses, disable GLR backups by typing ENABLE_GLR=NO in the applicationinformation field of the client resource.
The following backup types are not supported for SQL table level recovery:
l Logs only backups
l Columnstore indexes
Note
Tables with a columnstore index cannot be accessed.
l File level and file group backups
Note
Memory-Optimized tables cannot be accessed.
NMM SSMS plugin considerationsEMC ItemPoint for SQL Server requires administrative privileges, and as a result theNMM SSMS plugin must be started with a user account that has administrativeprivileges.
Granular-Level Recovery
164 EMC NetWorker Module for Microsoft for SQL VDI 9.1 User Guide

The Table Restore tab may display backup versions that are not GLR enabled. Themount operation fails if any of the save sets in the selected backup version are notGLR capable. The VFS log file contains details of the cause of failure.
NMM allows only one backup mount to be active at a time. This restriction is built-into the NMM SMSS plugin GUI workflow. While a mount is active, the Table Restoretab is blocked for use until the EMC ItemPoint for SQL Server GUI is closed.
Mount considerationsThe maximum number of recovery sessions the NWFS process (nwfs.exe) uses whilemounting a backup is 31 sessions. If NetWorker server parallelism is set and the valueis less than 31, the NWFS process uses the parallelism value.
If the number of open recover sessions causes any operational problems with theNetWorker Server, it is possible to reduce the number of recover sessions bymodifying the client parallelism registry setting. Contact EMC support for details.
Large database considerationsSQL table level restore can be inappropriate for large databases for scenarios where alarge amount of data has been committed to the database before to the backup.
The committed data is represented as outstanding transactions when there are SQLServer full and incremental backups on the database. When you perform tablerestores, EMC ItemPoint must load all the outstanding transactions that are present ina backup. To load large databases, EMC ItemPoint requires a few hours to read thedata because of suboptimal Virtual File System performance.
This problem occurs while EMC ItemPoint is loading the database, and EMC ItemPointmay appear to stop responding while reading the backup.
If you observe this problem, an alternative to using SQL table level recovery is torestore the backup as flat files to a server where you have enough space, and the useEMC ItemPoint with the files on the local disk.
Recovery considerationsConsider the following EMC ItemPoint for Microsoft SQL Server recovery limitations:
l Referential integrity, indexes, and permissions are not restored.l When restoring tables with TimeStamp columns, the TimeStamp column is not
preserved. The value is the time of the restoration for that row. This is the normalbehavior for TimeStamp columns.
l Restoring tables with identity columns does not preserve the value of the identitycolumn. The restored table follows the rules of the identity column on the targettable.For example, if the source table has three rows with identity values of 1, 3, 5, oncerestored, the target has values of 1, 2, 3 because this behavior is the normalbehavior of identity columns.
Performing GLR through the NMM SSMS plugin GUIYou can perform granular-level recovery through the NMM SSMS plugin GUI, in theEMC NetWorker window, from the Table Restore tab.
Note
The Table Restore tab is only visible in the NMM SSMS plugin GUI if the SQL GLRoption is selected during NMM installation.
The Table Restore tab is used to mount the backup in the NetWorker virtual filesystem so that it is available for granular-level recovery using the EMC ItemPoint GUI.
Granular-Level Recovery
Performing GLR through the NMM SSMS plugin GUI 165

Procedure
1. In the SQL Server Management Studio, select the SQL Server instance that youwant to recover, and then open the EMC NetWorker window.
2. In the EMC NetWorker window, on the Table Restore tab, under Select apage, click General.
The General page appears.Figure 78 EMC NetWorker dialog box—Table Restore General page
3. Select the NetWorker server where the backup is located from the NetWorkerServer list.
Use the Update button to update the list of available NetWorker servers.
The SQL Server Instance list is refreshed after you select the NetWorkerserver.
4. From the SQL Server Host list, select the client that contains the backup.
5. From the SQL Server Instance list, select the server instance that contains thebackup.
6. From the Database list, select the database.
7. Specify the browse time by using one of the following options:
l Use the Browse time list.
l Click Show versions and choose the browse date and time.
Granular-Level Recovery
166 EMC NetWorker Module for Microsoft for SQL VDI 9.1 User Guide

The table is populated with the save sets in the SQL database instance that areavailable for recovery. The number of available backup versions appears in thebottom bar.
8. From the table, select the save set that contains the items for granular-levelrecovery.
Note
Database file group, file level, and logs only backups are not supported for GLR.
9. To specify additional granular-level recovery options, under Select a page, clickOptions.
The Options page appears.
Figure 79 EMC NetWorker dialog box—Table Restore Options page
10. (Optional) Under Mount Options, modify the following settings as required:
l Edit the Mount Folder field to change the location where database ismounted as files. The default mount path is the registry key folder that isspecified during installation.
l Edit the Mount Expires field to change the amount of time that the backupremains mounted. The default setting is 8 hours, and the maximum setting is24 hours.Valid mount expiration values are 2, 4, 8, 16, and 24 hours.
Granular-Level Recovery
Performing GLR through the NMM SSMS plugin GUI 167

11. (Optional) Under Others, select Select a debug level if required.
Use this option to select the level of information recorded in the logs which canbe used in troubleshooting recovery issues. Levels range 0-9, with 0representing no information and 9 representing the most amount ofinformation.
12. To mount the selected backup, click Run.
After clicking Run, EMC ItemPoint for Microsoft SQL Server opens and theNMM SSMS plugin GUI switches to the Monitor page. The NMM SSMS pluginGUI is disabled until GLR is complete with EMC ItemPoint. The Monitor pageprovides messages about the status of the mount operation.
Figure 80 EMC NetWorker dialog box—Table Restore Monitor page
13. Perform granular-level recovery of the mounted database through the EMCItemPoint for Microsoft SQL Server software.
The EMC ItemPoint for Microsoft SQL Server User Guide provides instructionsabout performing granular-level recovery.
Granular-Level Recovery
168 EMC NetWorker Module for Microsoft for SQL VDI 9.1 User Guide

Unmounting backups after performing GLRAfter performing GLR using EMC ItemPoint for Microsoft SQL Server, the backupmust be unmounted from the virtual drive.
For standard restore operations, the backup is unmounted in the NMM SSMS pluginGUI after the restore is completed and EMC ItemPoint is closed.If the NMM SSMS plugin GUI cannot unmount the backup:
l You can manually unmount the backup by right-clicking the Mount system trayicon and clicking Unmount Backups.
l The backup is unmounted based on the timeout setting specified in the Optionsview. The default timeout period for a mounted backup is 8 hours.
Using the Mount system tray iconThe Mount system tray icon appears when a backup is mounted.
Click the Mount system tray icon to choose from a menu of available actions.
Figure 81 Mount system tray menu
The following actions are available through the Mount system tray icon:
l Unmount Backups—Unmount a backup.
l Mount Details—View mount details.
l Extend Timeout—Extend the period for which the backup is mounted.The mount timeout can be extended by 2, 4, 8, 16, or 24 hours.
Granular-Level Recovery
Unmounting backups after performing GLR 169

Figure 82 Mount Details window
Troubleshooting GLRView the log files to troubleshoot GLR, which are by default located at C:\ProgramFiles\EMC NetWorker\nsr\applogs. Set a higher debug level in the Optionsview of the NMM SSMS plugin GUI for more detailed logs for troubleshooting.
This section contains solutions to common problems.
SQL GLR failing to establish a Client Direct sessionClient Direct is required for NMM SQL GLR. Ensure that Client Direct is enabledbefore continuing with GLR.
To verify that a Client Direct session is established, use the following steps:
1. Validate that the NetWorker device is enabled for Client Direct.This verification must only be performed for AFTD devices. Data Domain isautomatically enabled for Client Direct. The EMC NetWorker Administration Guideprovides more information about Client Direct.
2. Validate that the client has name resolutions for the systems.If Data Domain is being used, ensure that the client has name resolution for theData Domain device. If an AFTD storage node is being used, ensure that the clienthas name resolution for the storage node.
3. Check the application logs directory in the NetWorker Virtual File System (NWFS)log file, nwfs.raw, and look for messages confirming that a Client Direct sessionwas established.
l The message "Performing Direct File Access Restore" confirmsthat a Client Direct session is successfully established.
l The message "Could not establish a client direct recoversession for saveset '<saveset_ID>', exiting" indicates that aClient Direct session could not be established.
Cannot enable a Client Direct session and GLR failing as a resultClient Direct is required for GLR. However, if you cannot enable Client Direct foreither policy or technical reasons, use the following workaround to allow GLR tocontinue without Client Direct.
1. Create a folder and name it "debug" in the \nsr\ directory, if the folder does notalready exist.
Granular-Level Recovery
170 EMC NetWorker Module for Microsoft for SQL VDI 9.1 User Guide

2. Within the "debug" folder, create an empty file and name it "nodirectfile" with nofile name extension.You may be required to create the "nodirectfile" file from a DOS Shell commandline.
Note
This workaround disables Client Direct for all client operations, including subsequentbackups. This workaround is against NMM best practices and you may run intotimeout and other restore issues if you do not enable Client Direct.
"Saveset '<saveset_ID>' is not GLR capable"This error message is logged in the nwfs.raw file when the save set you are trying toperform GLR on is not GLR capable. TheConsiderations on page 162 section providesinformation on supported backup types.
Table Restore tab does not appear in the NMM SSMS plugin GUIIf the Table Restore tab is not visible in the EMC NetWorker window of the NMMSSMS plugin GUI, verify that EMC ItemPoint is installed in Programs and Features. Toinstall EMC ItemPoint, the SQL GLR option must be selected while installing orchanging installation of NMM with the Install Wizard.
The original backup device is not availableIf the original backup device is unavailable, you can restore from a clone pool.NetWorker virtual file system (NWFS) supports restoring from a specific clone pool bysetting the STORAGENODE registry key under HKEY_LOCAL_MACHINE\SOFTWARE\Legato\NetWorker\NWFSLarge databases cause slow loading timesEMC ItemPoint may appear to stop responding while reading a backup of a very largedatabase. The time for EMC ItemPoint to read this data from the backups may takehours because of suboptimal Virtual File System performance.
If this issue occurs, perform a SQL flat file restore of the same backup to a server withenough space, and then use EMC ItemPoint on the files on the local disk.
The Considerations on page 162 section provides more information.
Granular-Level Recovery
Troubleshooting GLR 171

Granular-Level Recovery
172 EMC NetWorker Module for Microsoft for SQL VDI 9.1 User Guide

CHAPTER 8
Cluster Servers Backup and Recovery
This chapter includes the following sections:
l Prerequisites.....................................................................................................174l Configuring scheduled backups for SQL Server clusters...................................174l Performing manual backups and recovery........................................................ 182
Cluster Servers Backup and Recovery 173

PrerequisitesBefore you perform scheduled database backups with a SQL virtual server in a clusterenvironment, you must meet several prerequisites.
l Create a NetWorker client that is configured for database backups for each SQLvirtual server that you want to protect.
l Configure the NetWorker client to either:
n Back up all databases with MSSQL:.
n Back up specific databases with MSSQL:User_Database.Add more databases to an existing NetWorker client or create a new databaseclient when additional databases are added to an existing NetWorker client or anew database client is created.
l Specify virtual servers by typing the following command at the command prompt:–A SQL_virtual_serverUse the fully qualified domain name for the client configuration and the –A optionto specify the SQL virtual server, as in the following example:
nsrsqlsv -sservername -ASQL_virtual_server
Configuring scheduled backups for SQL Server clustersTo perform a scheduled backup for a SQL Server cluster with NMM, you must createclient resources for the participating nodes in the cluster.
To create the client resources, you can use one of the following tools:
l The Client Backup Configuration wizard
l The NMC NetWorker Administration GUI
By default, the nsrexecd system service account does not have the sysadmin rolefor the SQL server. When you configure the client resource in NMC, in the Remoteusername and Password fields, specify a Windows username and password that has asystem administrator role on the SQL Server and an administrator role on the client.Assign a remote user with the required privileges as defined in Access privileges forbackup and recovery.
Configuring backups for a SQL Server cluster with the Client BackupConfiguration wizard
The procedure for configuring a client resource for a SQL Server cluster with theClient Backup Configuration wizard similar to the procedure provided in the ScheduledBackup chapter.
When you configure a client resource for a SQL Server cluster, remember thefollowing points:
l Do not use a short name alias for a virtual server node that is not registered on theNetWorker server with a fully qualified domain client name.
l Select the SQL Server cluster instance or individual databases for backup. Do notselect databases from two instances for backup. Databases that are in offline,restoring, or loading state are unavailable for selection.
Cluster Servers Backup and Recovery
174 EMC NetWorker Module for Microsoft for SQL VDI 9.1 User Guide

Configuring a client resource with the Client Backup Configuration wizardYou must complete the required steps to configure a client resource with the Client
Backup Configuration wizard. Click the question mark icon at the lower left ofeach page of the Client Backup Configuration wizard for details about each field onthe page.
Note
If you are using NetWorker server 8.2.3 or later and NMM 9.1:
l Configure a regular NetWorker backup group instead of configuring a dataprotection policy. Do not enable the Snapshot option.
l For the Client Backup Configuration wizard to function correctly, ensure that JRE8 is installed on the system where NMC is used. While the NMC for NetWorker8.2.3 and later is compiled with JRE 7, the NMM 9.1 Java plugin for NMC iscompiled with JRE 8.
l The procedure to create a client resource is different between NetWorer server8.2.3 and NetWorker server 9.1. Follow the procedure provided in the EMCNetWorker Module for Microsoft for SQL VDI User Guide version 8.2 SP1 when youare using NetWorker server 8.2.3 or later.
Procedure
1. In the NetWorker Administration window, click the Protection tab.
2. In the expanded left pane, right-click Clients and select New Client Wizard.
Figure 83 Starting the Client Configuration Wizard
The Client Backup Configuration window opens to the Specify ClientInformation page.
3. On the Specify Client Information page, specify the following information:
l In the Client Name field, type the fully qualified domain name (FQDN) of theNetWorker client computer.
l In the Comment field, type a description for the client resource.
Cluster Servers Backup and Recovery
Configuring backups for a SQL Server cluster with the Client Backup Configuration wizard 175

l In the Tag field, type one or more tags to identify this client resource for thecreation of dynamic client groups for data protection policies. Dynamic clientgroups automatically generate a list of clients for a data protection policythat is based on the tags assigned to the client and group.
l In the Group field, select the group that was previously created for therequired backup type.
l In the Type area, select Traditional.
Figure 84 Specify Client Information page
4. Click Next.
5. On the Specify Backup Configuration Type page, specify the followinginformation:
l In the Client Operating System field, the client operating system that isused during the configuration setup is automatically displayed.
l In the NetWorker Version field, the NetWorker version that is used duringthe configuration setup is automatically displayed.
l From the Available Application list, select SQL Server.
l Do not select Enable NetWorker Snapshot Management on the selectedapplication.
Cluster Servers Backup and Recovery
176 EMC NetWorker Module for Microsoft for SQL VDI 9.1 User Guide

Figure 85 Specify Backup Configuration Type page
6. Click Next.
7. On the Select the NetWorker Client Properties page, specify the followinginformation:
l In the Priority field, select the priority level.
l In the Parallelism field, select the level of parallelism.
l In the Remote Access field, type the required attributes.During the client resource configuration, you can control client recoveraccess with the attributes in the Remote Access field. The Remote Accessattribute displays a list of the users that can recover save sets for a client.Depending on the level of security that the files require, add or remove usernames.
l In the Data Domain Interface field, select the device type from the list.
l In the Block Based Backup field, leave this option clear. This feature is notsupported for SQL Server VDI.
l The Client Direct field, selected by default, enables the client to bypass thestorage node and send backup data directly to the storage device.
Note
To use the default NetWorker Client settings, do not update the options thatare provided on the page.
8. Click Next.
9. On the Select the Backup Objects page, from the prepopulated list, select theSQL Server instance at root level or individual databases for backup.
Cluster Servers Backup and Recovery
Configuring backups for a SQL Server cluster with the Client Backup Configuration wizard 177

Note
Do not select databases from two or separate instances for backup. Also,databases that are in offline, restoring, or loading state are unavailable forselection.
10. Click Next.
11. On the Specify the Virtual Server Credentials page, in the Remote UserName and Password fields, type the login information for a Windows accountthat can backup the SQL server.
Note
Before performing this step, ensure that the User Account Control for WindowsServer 2008 R2 is disabled for administrators. Access privileges for backup andrecovery provides details.
12. Click Next.
The Specify the Backup Options page appears.
13. (Optional) On the Specify the Backup Options page, select the followingoptional settings as required:
l Select NetWorker compression to use NetWorker compression during thebackup.
l Select 256-bit AES software encryption to use 256-bit AES softwareencryption.
l Select SQL Server compression if you are using SQL Server 2008 or later.
l Select Perform checksum before writing to media if you are using SQLserver 2005, and then, if required, select Continue to backup even onchecksum error.
l Select Do not truncate log contents when backing up transaction logswhen you are backing up transaction logs for a SQL server 2005.
l Select Skip simple databases during incremental backup when you areperforming instance-level backup.Simple databases are omitted when this option is selected. If this option isnot selected when you perform database-level backup, simple databases areincluded and the simple recovery model database is promoted to full backup.
l Select Turn off log gap detection during incremental backup to disablelog gap detection during a logs-only backup. Disabling log gap detectionimproves the backup performance because the work of detecting the loggap is removed. However, backup promotion does not occur when log gapdetection is skipped, unless you are backing up a master database or msdb.
l Select Skip databases that are in an incompatible state—Select to skipdatabases that are not compatible for backup.
l In the DBCC Consistency Check Options area, select the appropriateoptions:
n Select Select all databases to run database consistency checks (DBCC)on all of the databases. If the DBCC check fails, the database backup isskipped and backup status of the group appears as failed. This actionensures that all backed-up databases are suitable for recovery. Thisoption is available with SQL Server 2005 or later instances.
Cluster Servers Backup and Recovery
178 EMC NetWorker Module for Microsoft for SQL VDI 9.1 User Guide

n In the Databases box, select specific databases for the DBCC check.
l In the Striping Options area, specify striping options:
a. To enable striping during a backup, select Enable Striping.
b. In the Specify the number of stripes field, type or select the number ofstripes.
Figure 86 Specify the Backup Options page
14. Click Next.
The Client Configuration Summary page appears.
15. On the Client Configuration Summary page, check to ensure that theconfiguration choices are correct. Click Back to make changes, or click Createto configure the client resources.
The Check Results page appears.
16. On the Check Results page, review the messages to ensure that the client wassuccessfully created. You should see the following message:
Successfully added new client "client_name"
17. Click Finish to exit the wizard.
After you finish
Open the NetWorker Administration GUI to the Protection tab. Click Clients in theexpanded left pane and ensure that the newly created client is listed.
Cluster Servers Backup and Recovery
Configuring backups for a SQL Server cluster with the Client Backup Configuration wizard 179

Figure 87 Viewing clients in the Protection tab
Note
To make updates to an existing client resource, right-click the client resource andselect Client Backup Configuration > Modify Client Wizard.
NetWorker Administration GUIYou must complete the required steps to configure scheduled backups through theNetWorker Administration GUI.
The EMC NetWorker Administration Guide provides detailed instructions on configuringNetWorker server resources.
Creating a data protection policy for the cluster
The EMC NetWorker Administration Guide and the EMC NetWorker Module for MicrosoftAdministration Guide provide details about data protection policies. Review theinformation in these guides before you create the client resources.
Note
If you are using NetWorker server 8.2.3 or later with NMM 9.1, refer to the EMCNetWorker Module for Microsoft for SQL VDI User Guide version 8.2 SP1 for informationabout configuring group resources.
Creating client resources for each cluster nodeWhen you create client resources, edit the client resource for each physical node ofthe cluster. In the NetWorker Administration GUI, in the left pane, select Clients, andthen in the right pane, right-click to create a new resource.
On the General tab, in the Name field, type the fully qualified domain name for thecluster node name. For example:
wash-2k.belred.emc.com
Cluster Servers Backup and Recovery
180 EMC NetWorker Module for Microsoft for SQL VDI 9.1 User Guide

Creating client resources for a virtual serverYou must create client resources for each virtual server in the cluster.
Procedure
1. Open the NetWorker Management Console.
The NMC Enterprise window appears.
2. Right-click the server and select Launch Application.
The NetWorker Administration GUI appears.
3. In the NetWorker Administration GUI, click Protection.
4. In the left pane, select Clients.
5. From the File menu, select New.
6. Click the General tab.
7. In the Name field of the client resource, type the short name for the SQL virtualserver without the domain specification. This field should contain the name ofthe virtual server, not a node name.
8. On the Apps & Modules tab (for NetWorker), in the Backup command field,type the nsrsqlsv command with the necessary options.
For virtual server backups, the -A SQL_virtual_server_name commandoption is required.
9. On the Globals (2 of 2) tab, in the Remote Access field, add entries similar tothe following one to grant access to all physical nodes in the cluster.
RemoteUser@physicalnode_hostname
where:
l RemoteUser is the account under which the backup will run.
l physicalnode_hostname is the fully qualified domain name of the physicalnode.
The Remote Access field enables the NMM server to access the cluster nodeto authenticate the computer (on which the virtual server is running) as anNMM client before any backup or restore operation begins. Follow this step foreach virtual server client resource in the cluster.
10. On the Apps & Modules tab, in the User Name and Password fields, add theusername and password, respectively, for a Windows user account that hasboth SQL Server administrator privileges and Windows administrator privileges.The User Name and Password fields enable NMM to back up the SQL Servervirtual server. Follow these steps for each virtual server Client resource in thecluster.
11. Use NMC to start the backup group manually, or wait for the next scheduledbackup to occur.
Cluster Servers Backup and Recovery
NetWorker Administration GUI 181

Performing manual backups and recoveryA manual backup or restore operation can run only from the active host in the cluster.You can use either the NetWorker User for SQL Server GUI, the NMM SSMS pluginGUI, or the command prompt.
For the backup or restore operation to succeed, ensure that the user who starts theoperation is assigned the required privileges. The section Access privileges for backupand recovery provides details.
Backing up and restoring data through the NetWorker User for SQL ServerGUI
Complete the required steps to start a manual backup or restore operation in aMicrosoft cluster.
1. Open the NetWorker User for SQL Server GUI.The Select SQL Instance dialog box appears.
2. Select the SQL Server instance for a backup or restore operation.
3. Configure and run the backup or restore operation as you would on a stand-aloneserver. For instructions, see the following tasks:
l Performing manual backups from the NMM SSMS plugin GUI on page 59
l Performing a recovery from the NMM SSMS plugin GUI on page 117
Backing up and restoring data through the command promptThe Windows account that you use to run the nsrsqlsv or nsrsqlrc commandsmust have WSFC administrator privileges. To determine which accounts have WSFCadministrator privileges, refer to the WSFC online help. If the Windows account doesnot have WSFC administrator privileges, NMM cannot communicate with WSFC andthe various WSFC cluster resources, including the SQL Server virtual servers.
At the command prompt, type one of the following commands to start a manualbackup or restore operation:
l To back up data, type nsrsqlsvl To restore data, type nsrsqlrcFor example, to back up a SQL virtual server database, type the following:
nsrsqlsv -A SQL_virtual_server_name -c SQL_virtual_server_name-sNetWorker_server_name MSSQL:dbName
where:
l SQL_virtual_server_name is the virtual server name when the SQL Server isconfigured to run in a WSFC cluster.
l NetWorker_server_name is the NetWorker server that is designated for thebackup.
l dbName is the name of the SQL Server database that is to be backed up.
Specifying -A SQL_virtual_server_name starts the following actions:
l Contacts the SQL virtual server.
Cluster Servers Backup and Recovery
182 EMC NetWorker Module for Microsoft for SQL VDI 9.1 User Guide

l Creates save set entries under SQL_virtual_server_name in the NetWorker clientindex.
Cluster Servers Backup and Recovery
Backing up and restoring data through the command prompt 183

Cluster Servers Backup and Recovery
184 EMC NetWorker Module for Microsoft for SQL VDI 9.1 User Guide

CHAPTER 9
Striped Backup and Recovery
This chapter includes the following sections:
l Overview of striped backups............................................................................ 186l Performance considerations............................................................................. 186l Performing striped backups.............................................................................. 187l Performing striped recovery............................................................................. 188
Striped Backup and Recovery 185

Overview of striped backupsNMM supports the use of multiple stripes for backing up and restoring SQL Serverdata. Stripes are one or more data streams that are extracted in parallel from adatabase and written in parallel to multiple media devices, such as tape drives. WithNMM, striping can yield a significant performance advantage when a large amount ofdata is backed up and recovered with multiple tape drives.
Although the SQL Server supports 64 stripes, NMM supports only 32 stripes. Thisrestriction applies to the NetWorker User for SQL Server program and the nsrsqlsvand nsrsqlrc commands.
When you perform striped backup and recovery operations, ensure that you assign therequired user privileges. Read Access privileges for backup and recovery for moreinformation.
Before a striped backup begins, you must set the Parallelism field in the Set UpServer dialog box in NMC to at least one more than the number of stripes that thebackup will use. For example, if you want to use three stripes, specify a value of fouror more for the parallelism.
The total number of save streams (SS), which is the data and save set informationthat is being written to a storage volume during a backup, is the product of clientparallelism (P) multiplied by the number of stripes (S), that is, SS = P X S.
NMM supports interleaving for backing up multiple clients to a single backup device.Interleaving writes multiple stripes to the same volume. Recovering interleavedbackups can require substantial recovery time. When restoring an entire interleavedbackup, one stripe is recovered at a time. This recovery method requires multiplepasses over the same areas on the backup medium. When you recover data throughan interleaved backup, recover each client’s backup separately.
You can specify striping from the following locations:
l In the NetWorker User for SQL Server GUI, start in the Backup Options dialogbox.
l The NetWorker Administration GUI for a scheduled backup.
l The Windows client host command prompt.For example, type:
nsrsqlsv.exe -s server_name -c client_name -l full -S n"MSSQL:db_name"
where:
n Lowercase -s specifies the NetWorker server name.
n Uppercase -S with n specifies the number of stripes.
Performance considerationsReview the following suggestions in this section to improve striped backupperformance.
l In the NetWorker Administration GU, in the Create Device or Edit Device dialogbox, configure target sessions for the NetWorker devices that are performing thestriped backup.Always specify one session per device when using striping. This configurationeliminates interleaving, yielding the best backup performance on the client host.
Striped Backup and Recovery
186 EMC NetWorker Module for Microsoft for SQL VDI 9.1 User Guide

l Keep the following criteria in mind when you allot a separate backup device (suchas a tape drive) for each strip in the backup or recovery operation:
n Use a different NetWorker server for the backup and the recovery operationsthat is unrelated to the SQL Server.
n Use a dedicated storage node for the striped backups.
l NMM automatically recovers data using the same number of stripes that werespecified for the backup.For best recovery performance, ensure that the same number of devices that areused for the backup are available at recovery time.
l Configure the computer to run the following components:
n NetWorker client as a NetWorker storage node
n NMM
n SQL Server
Note
The NetWorker server cannot be installed on the same host as the NMM clientsoftware.
Performing striped backupsNMM supports manual and scheduled backup striping.
You must complete the required steps to perform a manual striped backup from theSQL Server host, which is a NetWorker client.
l Open the NetWorker User for SQL Server GUI:
1. From the Operation menu, select Backup.
2. Select an item to back up.
3. From the Options menu, select Backup Options.
4. In the Backup Options dialog box, select Create a Striped Backup.
5. From the Stripes list, select the number of stripes.
l From the Windows command prompt, specify the -S option with the nsrsqlsvcommand. For example, at the command prompt, type:
nsrsqlsv.exe -s server_name -c client_name -l full -S n"MSSQL:db_name"
where n specifies the number of stripes you want to use, for example, -S3.
l From the NetWorker Administration GUI:
1. Click Protection.
2. In the expanded left pane, click Clients.
3. In the right pane, right-click the client, and then select Modify ClientProperties.
4. On the Apps & Modules tab, append -Sn to the nsrsqlsv command, where nis the number of stripes to use.
Striped Backup and Recovery
Performing striped backups 187

5. Click OK.
Performing striped recoveryNMM performs striped recovery optimizations so striped recoveries proceed asquickly as possible.
Parallelism is the number of simultaneous data streams during a restore operation.Changing parallelism affects the volume of data that host can process at the sametime to reduce restore times and optimize performance.
NMM 9.0 and earlier releases treat every backup device as a tape device whendetermining parallelism during a restore of striped backups. NMM version 9.0.1 andlater distinguishes between disk type and tape type devices. For disk type devices,NMM performs recovery operations with as many parallel streams as the NetWorkerServer allows. For tape type devices, the parallelism value is limited to the number oftape devices where each stripe resides.
Refer to the EMC NetWorker Administration Guide for details on the device parallelismthat can be specified on the NetWorker Server.
Optimal striped recovery operationsStriped recovery assumes, by default, that enough NetWorker tape sessions areavailable to enable the striped recovery to proceed without blocking.
NMM then assumes the following:
l For tape devices, each stripe was written to a different volume during backup.Interleaving was not used during the striped backup.
l The same number of devices are available during both backup and restoreoperations. No device has failed since the backup.
l All devices that are used for backup are available. No other client sessions areassigned to the devices.
If the configuration meets all of these requirements, NMM restores the stripedrecovery. Backup data is delivered to the SQL Server when each tape session isestablished. This method provides the highest performance and lowest restore time.
Fail-safe striped recovery operationsIf a striped backup is interleaved or if fewer tape sessions are available at the time ofrecovery than during backup, because of a failed or busy device, a fail-safe stripedrecovery is necessary.
NMM contacts the NetWorker server with the list of striped save sets to determinethe available number of tape sessions before it starts striped recovery. If the numberof tape sessions is smaller than the number of striped save sets, NMM uses a fail-safestriped recovery algorithm. The algorithm that NMM selects depends on the SQLServer version.
The following table provides guidelines for determining when to activate the fail-safestriped recovery algorithm.
Striped Backup and Recovery
188 EMC NetWorker Module for Microsoft for SQL VDI 9.1 User Guide

Table 33 Guidelines for fail-safe striped recovery
If Then
The backup was interleaved Use NMC to determine if a second mountrequest has occurred for a volume that isalready assigned tape sessions.
Fewer devices are available Use NMC to determine if a device has beendeactivated or is performing an operation foranother client.
About fail-safe striped recoveryWhen you enable a fail-safe striped recovery for a SQL Server client, additionalconfiguration settings are recommended so the recovery can proceed at maximumthroughput.
NMM takes advantage of the SQL Server VDI removable pipes feature. This featureallows third-party backup vendor products to recover a striped backup from fewerdevices. However, NMM cannot accurately determine how many tape sessions theNetWorker server can assign. The NetWorker server does not support stripedrecoveries by default. Therefore, only one tape session is available to recover thestriped save sets before the detection phase.
The SQL Server VDI removable pipes function allows a third-party backup vendor tostart as many stripe recovery threads as there are tape sessions available. Otherwise,the recovery stops responding.
NOTICE
Because enabling striped recoveries on the NetWorker server might cause file systemrecoveries to fail, do not use this recovery method as a permanent solution.
Performing fail-safe striped recoveryThe procedure in this section applies to normal and copy restore types.
You must complete the required steps to enable a fail-safe striped recovery.
Procedure
1. Open the NetWorker User for SQL Server GUI.
2. On the Restore page, in the left pane, mark the root item.
3. From the Options menu, select Restore Options.
4. Select the Detect available tape sessions prior to restoring a striped backupfield.
This field is deprecated and this field will be removed from NMM in futurereleases. In NMM 9.1 and later, this field should always be selected if anybackups are being restored from tape type devices. Selecting this field does notaffect the performance of restore operations from disk type devices.
5. (Optional) Enable striped recoveries on the NetWorker server by creating thefile striped_recovery in the \nsr\debug directory on the NetWorker server.
Striped Backup and Recovery
Fail-safe striped recovery operations 189

NOTICE
You do not need to restart the NetWorker services to activate this setting.
6. From the NetWorker User for SQL Server GUI or from the command prompt,start the restore operation.
7. If the volumes with the striped recovery are not managed by an autochanger,monitor events in NMC.
When a media wait event occurs, load the volume.
Striped Backup and Recovery
190 EMC NetWorker Module for Microsoft for SQL VDI 9.1 User Guide

CHAPTER 10
Disaster Recovery
This chapter includes the following sections:
l Overview of disaster recovery.......................................................................... 192l Disaster recovery features................................................................................192l Performing disaster recovery........................................................................... 194
Disaster Recovery 191

Overview of disaster recoveryThe examples that follow provide general principles and procedures for recoveringdata.
Before beginning a SQL Server disaster recovery, review the following:
l EMC NetWorker Server Disaster Recovery and Availability Best Practices Guide
l EMC NetWorker Release Notes
l Microsoft SQL Server Books Online
To rebuild system databases for SQL Servers with the command prompt, refer to theinformation provided at the following link: http://msdn.microsoft.com/en-us/library/ms144259(v=sql.100).aspx
Note
The SQL Server databases must be recovered in the correct order. Follow thedatabase recovery steps in the Data Recovery chapter.
Disaster recovery featuresNMM provides the disaster recovery features listed in this section.
Table 34 Disaster recovery features
Disaster recovery features Descriptions
System database restore automation Certain system databases require SQL Serverservice control, including the master and themsdb databases. NMM automates the control
of these services as follows:
l For the master database, the SQL Serverrestarts in single-user mode as requiredby the SQL Server.
l For the msdb database, the SQL Agent
shuts down to close the connections tothe msdb database.
Note
NMM does not support snapshot backups orrecoveries of the SQL Server masterdatabase. Recover from a traditional backupof the master system database during adisaster recovery.
Database restore order When you recover a complete backup of alldatabases or when you recover certainsystem databases, the recovery must occur ina specific order. If system databases arepresent in the recovery list, NMM ensures
Disaster Recovery
192 EMC NetWorker Module for Microsoft for SQL VDI 9.1 User Guide

Table 34 Disaster recovery features (continued)
Disaster recovery features Descriptions
that the recovery order follows SQL Serverprocedures as follows:
1. The master database is always recoveredfirst. This order ensures that metadatapresent in the master database is correctfor all subsequent restored databases.
2. The msdb database is always recovered
after the master database and before allother databases. This sequence ensuresthat scheduling and other system datapresent in the msdb database are correct
for all subsequent restored databases.
3. The model database is always recoveredafter the master and the msdb databases
and before all other databases. Thissequence ensures that the databaseconfiguration is correct for all subsequentdatabases.
SQL Server startup complete detection When the SQL Server is started, a databasestartup process is also started. The SQLServer enables user connections while thestartup process is running. However, if thestartup process is interrupted by a databaseRESTORE query, any database that has not
yet started is marked as suspect. When theinterruption occurs, subsequent restores ofthe msdb database fail. Subsequent recovery
of any user database might also fail unless the
Overwrite the Existing Database field is
specified in the Properties dialog box.NMM waits for the SQL Server to completethe database startup process for all databasesbefore starting a recovery. NMM waits for therecovery of the master database to complete.This wait process enables a proper restore ofthe msdb database and user databases
following a SQL Server startup.
Always use the -f option with the nsrsqlrccommand for a recovery that follows a SQLServer startup.
Overwriting capability Use the Files tab in the Properties dialogbox of the NetWorker User for SQL ServerGUI to specify that you want to overwrite alldatabases during a restore operation.NMM does not handle all dependent services.When recovering application services, suchMetadata or Replication services, as well as
Disaster Recovery
Disaster recovery features 193

Table 34 Disaster recovery features (continued)
Disaster recovery features Descriptions
the databases on which these servicesdepend, the services must be manually shutdown.
NMM does not ensure that all connections toa database are closed before it recovers adatabase as required by the SQL Server. Suchopen connections must be manually closed.The Microsoft SQL Server documentationprovides more information.
Performing disaster recoveryIf NMM binary files or SQL Server binary files are damaged or lost, follow theinstructions that are provided in this section.
The EMC NetWorker Server Disaster Recovery and Availability Best Practices Guideprovides more information about using NetWorker for disaster recovery.
When not to reinstall the SQL ServerDuring a disaster recovery of a SQL Server, you must not install the SQL Server incertain cases.
Do not reinstall the SQL Server if any of the following conditions exist:
l A recent NetWorker backup of the ALL save set exists.
l The SQL Server was installed before the ALL save set backup was performed.
l The SQL Server backups for all of the SQL Server databases exist.
If a SQL Server is installed and then the ALL backup is performed, critical stateinformation for the SQL Server is backed up as part of the ALL save set. When theALL save set contains the critical state information for the SQL Server and backupsfor all of the SQL Server databases exist, you can recover the SQL Server by restoringthe ALL save set and the SQL Server databases.
Recovering a damaged primary diskProcedure
1. Shut down the SQL Server.
2. Rebuild the databases on the SQL Server. Information about rebuilding variousSQL Servers is available on the Microsoft MSDN website.
Table 35 Rebuilding SQL Server system databases
SQL Server version Microsoft article
SQL Server 2016 https://msdn.microsoft.com/en-us/library/dd207003(v=sql.130).aspx
Disaster Recovery
194 EMC NetWorker Module for Microsoft for SQL VDI 9.1 User Guide

Table 35 Rebuilding SQL Server system databases (continued)
SQL Server version Microsoft article
SQL Server 2014 https://msdn.microsoft.com/en-us/library/dd207003(v=sql.120).aspx
SQL Server 2012 https://msdn.microsoft.com/en-us/library/dd207003(v=sql.110).aspx
SQL Server 2008 R2
SQL Server 2008
https://msdn.microsoft.com/en-us/library/dd207003(v=sql.100).aspx
SQL Server 2005 http://msdn.microsoft.com/en-us/library/ms144259(v=sql.90).aspx
3. Restart the SQL Server.
4. In the NetWorker User for SQL Server GUI, select Replace to recover the SQLServer master database and the msdb database.
5. Recover the other SQL application databases.
Note
You can run steps 4 and 5 as a single operation:From a command prompt, type the following command: nsrsqlrc -s... -f MSSQL:
6. Complete disaster recovery through the NetWorker User for SQL Server GUI:
a. Click Restore.
b. Select Normal, and then click Continue.
The Restore (Normal) window appears.
c. Right-click the SQL Server root and select Mark All Databases.
d. From the Options menu, select Restore Options.
The Restore Options dialog box appears.
e. Click Automatically Overwrite Any Database Marked for Restore, andthen click OK.
f. Click Start.
Recovering a damaged binary diskProcedure
1. Shut down the SQL Server.
2. Recover the ALL save set.
Disaster Recovery
Recovering a damaged binary disk 195

Note
When the ALL save set contains the critical state information for the SQLServer and backups for all of the SQL Server databases exist, you can recoverthe SQL Server by restoring the ALL save set and the SQL Server databases.
3. Restart the computer.
4. Shut down the SQL Server.
5. Rebuild the databases on the SQL Server. Information about rebuilding variousSQL Servers is available on the Microsoft MSDN website.
Table 36 Rebuilding SQL Server system databases
SQL Server version Microsoft article
SQL Server 2016 https://msdn.microsoft.com/en-us/library/dd207003(v=sql.130).aspx
SQL Server 2014 https://msdn.microsoft.com/en-us/library/dd207003(v=sql.120).aspx
SQL Server 2012 https://msdn.microsoft.com/en-us/library/dd207003(v=sql.110).aspx
SQL Server 2008 R2
SQL Server 2008
https://msdn.microsoft.com/en-us/library/dd207003(v=sql.100).aspx
SQL Server 2005 http://msdn.microsoft.com/en-us/library/ms144259(v=sql.90).aspx
6. Start the recovery in the NetWorker User for SQL Server GUI. Select Replaceto recover the SQL Server master database and the msdb database.
7. Recover the other SQL application databases.
Note
You can run steps 6 and 7 as a single operation:From a command prompt, type the following command: nsrsqlrc -s... -f MSSQL:
8. Complete disaster recovery through the NetWorker User for SQL Server GUI:
a. Click Restore.
b. Select Normal, and then click Continue.
The Restore (Normal) window appears.
c. Right-click the SQL Server root and select Mark All Databases.
d. From the Options menu, select Restore Options.
The Restore Options dialog box appears.
e. Click Automatically Overwrite Any Database Marked for Restore, andthen click OK.
Disaster Recovery
196 EMC NetWorker Module for Microsoft for SQL VDI 9.1 User Guide

f. Click Start.
Recovering SQL Server and NetWorker serverComplete the required steps if the disks with the SQL Server binaries and theNetWorker online indexes (the nsr file system) or the SQL Server data are damaged.
Procedure
1. Recover the NetWorker binaries and online indexes. The EMC NetWorker ServerDisaster Recovery and Availability Best Practices Guide provides details.
2. Reinstall NetWorker:
l If the computer that failed is the NetWorker server, reinstall the NetWorkerserver.
l If the computer that failed is a NetWorker client, reinstall the NetWorkerclient.
3. Recover the ALL save set.
Note
When the ALL save set contains the critical state information for the SQLServer and backups for all of the SQL Server databases exist, you can recoverthe SQL Server by restoring the ALL save set and the SQL Server databases.
4. Restart the computer.
5. Shut down the SQL Server services if they are running.
6. Rebuild the databases on the SQL Server. Information about rebuilding variousSQL Servers is available on the Microsoft MSDN website.
Table 37 Rebuilding SQL Server system databases
SQL Server version Microsoft article
SQL Server 2016 https://msdn.microsoft.com/en-us/library/dd207003(v=sql.130).aspx
SQL Server 2014 https://msdn.microsoft.com/en-us/library/dd207003(v=sql.120).aspx
SQL Server 2012 https://msdn.microsoft.com/en-us/library/dd207003(v=sql.110).aspx
SQL Server 2008 R2
SQL Server 2008
https://msdn.microsoft.com/en-us/library/dd207003(v=sql.100).aspx
SQL Server 2005 http://msdn.microsoft.com/en-us/library/ms144259(v=sql.90).aspx
7. Restart the SQL Server.
8. In the NetWorker User for SQL Server GUI, select Replace to restore the SQLServer master database and the msdb database.
9. Recover the other SQL application databases.
Disaster Recovery
Recovering SQL Server and NetWorker server 197

Note
You can run steps 8 and 9 as a single operation:From a command prompt, type the following command: nsrsqlrc -s... -f MSSQL:
10. Complete disaster recovery through the NetWorker User for SQL Server GUI:
a. Click Restore.
b. Select Normal, and then click Continue.
The Restore (Normal) window appears.
c. Right-click the SQL Server root and select Mark All Databases.
d. From the Options menu, select Restore Options.
The Restore Options dialog box appears.
e. Click Automatically Overwrite Any Database Marked for Restore, andthen click OK.
f. Click Start.
Recovering the SQL Server without reinstalling the SQL ServerIf a SQL Server is installed and then the ALL backup is performed, critical stateinformation for the SQL Server is backed up as part of the ALL save set. When theALL save set contains the critical state information for the SQL Server and backupsfor all of the SQL Server databases exist, you can recover the SQL Server by restoringthe ALL save set and the SQL Server databases.
Procedure
1. Reinstall the operating system.
2. Reinstall NetWorker:
l If the computer that failed is the NetWorker server, reinstall the NetWorkerserver.
l If the computer that failed is a NetWorker client, reinstall the NetWorkerclient.
3. Recover the ALL save set.
4. Restart the computer.
5. Shut down the SQL Server.
6. Rebuild the databases on the SQL Server. Information about rebuilding variousSQL Servers is available on the Microsoft MSDN website.
Table 38 Rebuilding SQL Server system databases
SQL Server version Microsoft article
SQL Server 2016 https://msdn.microsoft.com/en-us/library/dd207003(v=sql.130).aspx
SQL Server 2014 https://msdn.microsoft.com/en-us/library/dd207003(v=sql.120).aspx
Disaster Recovery
198 EMC NetWorker Module for Microsoft for SQL VDI 9.1 User Guide

Table 38 Rebuilding SQL Server system databases (continued)
SQL Server version Microsoft article
SQL Server 2012 https://msdn.microsoft.com/en-us/library/dd207003(v=sql.110).aspx
SQL Server 2008 R2
SQL Server 2008
https://msdn.microsoft.com/en-us/library/dd207003(v=sql.100).aspx
SQL Server 2005 http://msdn.microsoft.com/en-us/library/ms144259(v=sql.90).aspx
7. Restart the SQL Server.
8. In the NetWorker User for SQL Server GUI, select Replace to restore the SQLServer master database and the msdb database.
9. Recover the other SQL application databases. Recover the SQL Server to themost recent backup.
Note
To run steps 8 and 9 as a single operation from the command line, type thefollowing command:
nsrsqlrc -s... -f MSSQL:
For information about how you can install various SQL Server versions from thecommand prompt, visit http://msdn.microsoft.com/en-us/library/ms144259(v=sql.100).aspx. Use the Other Versions list at the top of the page toview information for a particular SQL version.
10. Complete disaster recovery through the NetWorker User for SQL Server GUI:
a. Click Restore.
b. Select Normal, and then click Continue.
The Restore (Normal) window appears.
c. Right-click the SQL Server root and select Mark All Databases.
d. From the Options menu, select Restore Options.
The Restore Options dialog box appears.
e. Click Automatically Overwrite Any Database Marked for Restore, andthen click OK.
f. Click Start.
Recovering the SQL ServerUse the following procedure to recover the SQL Server.
Procedure
1. Reinstall the operating system.
Disaster Recovery
Recovering the SQL Server 199

2. Reinstall NetWorker:
l If the computer that failed is the NetWorker server, reinstall the NetWorkerserver.
l If the computer that failed is a NetWorker client, reinstall the NetWorkerclient.
3. Recover or reinstall the SQL Server software.
Do not reinstall the SQL Server if any of the following conditions apply:
l A recent NetWorker backup of the ALL save set exists.
l The SQL Server was installed before the ALL save set backup wasperformed.
l The SQL Server backups for all of the SQL Server databases exist.
4. Start the SQL Server.
5. When recovery is started, in the NetWorker User for SQL Server GUI, selectReplace to restore the SQL Server master database and the msdb database.
6. Recover the other SQL application databases.
Note
To run steps 5 and 6 as a single operation from the command line, type thefollowing command:
nsrsqlrc -s... -f MSSQL:
7. Complete disaster recovery through the NetWorker User for SQL Server GUI:
a. Click Restore.
b. Select Normal, and then click Continue.
The Restore (Normal) window appears.
c. Right-click the SQL Server root and select Mark All Databases.
d. From the Options menu, select Restore Options.
The Restore Options dialog box appears.
e. Click Automatically Overwrite Any Database Marked for Restore, andthen click OK.
f. Click Start.
Disaster Recovery
200 EMC NetWorker Module for Microsoft for SQL VDI 9.1 User Guide

CHAPTER 11
Bare-Metal Recovery
This chapter includes the following sections:
l Planning bare-metal recovery.......................................................................... 202l SQL Server in a cluster environment................................................................206l SQL Server in a stand-alone environment.........................................................210
Bare-Metal Recovery 201

Planning bare-metal recoveryThis section provides an overview of the Windows bare-metal recovery (BMR)solution and considerations when planning a BMR.
OverviewBare-metal recovery (BMR) is a technique in the field of data recovery and restorationwhere the backed up data is available in a form that allows you to restore a systemfrom bare metal, that is, without any requirements as to previously installed softwareor operating system.
Typically, the backed up data includes the necessary operating system, applications,and data components to rebuild or restore the backed up system to an entirelyseparate piece of hardware. The hardware receiving the restore should have a similarconfiguration as that of the hardware that was the source of the backup.
The basic BMR is the process of bringing up a server after a disaster and ensuring thatthe system recovers with the operating system, the applications, and the data as theywere at the time of the failure.
Restoring a server to the exact configuration that it had at the time of its destructioncan be a difficult task. When this restoration is performed to another hardware, it canadd to the complexity of the process and can be time-consuming. Windows BMRsolution provides a flexible and reliable method of restoring a server after a disaster.
System requirementsThe following sections list requirements to perform Windows BMR. However, the EMCNetWorker Online Software Compatibility Matrix at http://compatibilityguide.emc.com:8080/CompGuideApp/ provides the latest information about the system requirementsto perform Windows BMR by using NMM.
Supported operating systems
The EMC NetWorker Online Software Compatibility Matrix at http://compatibilityguide.emc.com:8080/CompGuideApp/ provides information about theoperating systems and versions that NMM supports.
Supported Microsoft applications
The EMC NetWorker Online Software Compatibility Matrix at http://compatibilityguide.emc.com:8080/CompGuideApp/ provides information about theMicrosoft applications and versions that NMM supports.
NetWorker software version requirements
The EMC NetWorker Online Software Compatibility Matrix at http://compatibilityguide.emc.com:8080/CompGuideApp/ provides information about theNetWorker software versions that NMM supports.
Use the NetWorker Windows BMR 32-bit ISO image to recover an x86 operatingsystem on either an x86 or x64 computer.
Use the NetWorker Windows BMR 64-bit ISO image to recover only an x64 operatingsystem on an x64 computer.
Bare-Metal Recovery
202 EMC NetWorker Module for Microsoft for SQL VDI 9.1 User Guide

Microsoft BMR requirementsPerform BMR recoveries to the same or similar hardware, and physical to virtualenvironment.
The following Microsoft KB article provides the requirements to perform a BMR tosimilar hardware:
http://support.microsoft.com/kb/249694
CPU requirements
l The operating system architecture and the processor architecture must match.
l Basic Input/Output System (BIOS) or Unified Extensible Firmware Interface(UEFI) must match.
l You can treat AMD or Intel processors as being the same if they follow the samearchitecture. You can recover the operating system backup of an AMD x64computer to an Intel x64 computer. The process is reversible.
l You can restore the backup of an x86 operating system version only to an x86processor computer.
l You can restore the backup of an x64 operating system version only to an x64processor computer.
Hard disk requirements
l The disk or RAID drivers that are used in the old system must be compatible withthe disk or RAID controllers in the new system.
l For each critical disk on the BMR target system, the startup hard disk capacity onthe new system must be greater than or equal to the capacity on the old system.BMR fails if the capacity is smaller by even a single byte.
l Windows BMR supports IDE, SATA, or SCSI hard disks. You can perform thebackup on one type of hard disk and recover on another type. For example, SAS toSATA is supported.
l You must restore the backup to the same logical disk numbers as on the originalserver. You cannot use different logical disk numbers on the target system torecover the critical volumes such as the operating system volume.
l Ensure that the RAID setup on the destination computer does not interfere withthe disk order of the hard disks.
NIC driver requirementsTo use different Network Interface Card (NIC) after a Windows BMR recovery, installnew NIC drivers that match the NIC in the new computer after Windows starts on thenew server.
Critical and noncritical volume requirements
l Windows BMR backs up only critical volumes, and can be used for offline disasterrecovery. Use the NetWorker client to back up the non-critical volumes.
Bare-Metal Recovery
System requirements 203

Note
NetWorker considers only system volume as a critical volume. If you have installeda Microsoft application on a drive other than the system drive, the drive is notconsidered as critical. On Windows Server 2008 R2, a volume is critical if aMicrosoft application has installed a Windows service on it, but on WindowsServer 2012, a volume that has a Windows application service installed is notcritical.
l To make a volume critical on Windows Server 2012, set the value of the HKLM\System\CurrentControlSet\Control\SystemWriter\ReportWin32ServicesNonSystemState registry key to 0. This ensures thatBMR includes the Microsoft application binaries, and the volume on which they areinstalled is marked as critical.
System Reserved Partition requirementsEnsure that System Reserved Partition (SRP) is online before you perform a BMRbackup. Otherwise, the backup fails and displays the following error messages:
84687:save: Unable to get volume information of file system '\\?\Volume{245204f6-5ff7-11e2-a3ac-806e6f6e6963}\': The deviceis not ready. (Win32 error 0x15). VSS OTHER: ERROR: VSS failedto process snapshot: The shadow copy provider had an unexpectederror while trying to process the specified operation. (VSSerror 0x8004230f)90108:save: Unable to save the SYSTEM STATE save sets: cannotcreate the snapshot.86024:save: Error occured while saving disaster recovery savesets.If SRP is offline, perform the following steps to bring it online:
1. In the WinPE command prompt, type diskpart and press Enter.
2. Run the following command to display the list of volumes:DISKPART> list volume
3. Run the following command to select the volume that is offline:DISKPART> select <volume_name>
4. Run the following command to bring the selected volume online:DISKPART> online volume
Protecting an environment before a disasterTo prepare for disaster recovery, back up application data and other necessary files.
Procedure
1. Use NetWorker client to back up non-application data.
The EMC NetWorker Administration Guide provides details about using theNetWorker client to backup non-application files.
2. If you use a NetWorker server earlier than 9.0.x, create a NetWorker groupwithout enabling the Snapshot option. Otherwise, create a policy.
3. Create a NetWorker client resource, and assign it to the group that you createdin step 2.
Bare-Metal Recovery
204 EMC NetWorker Module for Microsoft for SQL VDI 9.1 User Guide

4. Configure the NetWorker client resource by typing ALL in the Save set field,and clearing the Backup command and Application information fields.
5. Perform a backup.
6. Use NMM to perform a full backup of application data.
The NMM application specific user guides, available from EMC Online Support,provide details about how to perform a full backup.
BMR by using NetWorker and NMMPerform Windows file system backup and recovery by using the NetWorker client, andapplication-specific backup and recovery by using NMM.
Note
Specific information about how to backup and recover Microsoft applications in NMM9.1 is provided in application-specific user guides.
NetWorker disaster recovery provides an automated BMR solution by using theWindows ASR writer and other VSS writers to identify critical volumes that arerequired to perform a disaster recovery on a disabled system. BMR is performedoffline, that is, when the Windows operating system is inactive. This avoids thenecessity to manually reinstall Windows, and the problems that occur when operatingsystem files are being restored to an active Windows system.
NMM 9.1 is compatible with the NetWorker 9.1 client, which provides a true BMRcapability for Windows Server 2012 R2, Windows Server 2012, Windows Server 2008R2, and Windows Server 2008. This capability is built into the NetWorker client andprovides BMR support to the same or similar hardware. For Windows BMR, you shoulddownload the ISO recovery boot image file from EMC Online Support (https://support.emc.com). The ISO image provides a wizard that allows you to format disks,recover Windows critical volumes from backup, and restart the server to bring it backonline.
To support a NetWorker Windows BMR recovery, download the Windows BMR imagefrom EMC Online Support (https://support.emc.com). This download enables you tocreate a bootable Windows BMR ISO that contains NetWorker binaries and a wizard,which controls the recovery process.
The "Windows Bare Metal Recovery to Physical or Virtual Computers" section in theEMC NetWorker Administration Guide provides detailed information about how to usethe NetWorker Windows BMR image to perform a BMR recovery on protected hostsand VMware virtual machines.
NOTICE
For all the Microsoft applications, after performing Windows disaster recovery andrestarting the system, check all the disk and volume configurations. Usually, the disksand volumes appear as on the original system. However, it is possible, especially in BMR scenarios, that the volume or disk signaturesdo not match the original ones, and the non-critical volumes or disks are offline andnot mounted. Use the Microsoft Disk Manager to bring the volumes and disks online,and then restart the system for drive letter reassignments. Assign the same driveletters that existed before the BMR. Non-critical volumes that the mount pointsaccess might have a similar issue.
Bare-Metal Recovery
BMR by using NetWorker and NMM 205

SQL Server in a cluster environmentThis section provides the bare-metal recovery (BMR) backup and recoveryprocedures for SQL Server by using the VDI technology in a cluster environment.
Backing up a SQL Server for BMR by using the VDI technologyConfigure a SQL Server client resource to back up SQL Server for BMR by using theVDI technology.
Creating client resources by using the NetWorker Client Backup Configuration WizardCreate separate client resources to back up the application data and the file systemdata. The client resource for the file system data must include the ALL save set.
The section Configuring a client resource by using the Client Backup Configurationwizard provides information about how to create a client resource to back up theapplication data.
The "Creating a client resource with the Client Backup Configuration Wizard" sectionin the EMC NetWorker Administration Guide provides information about how to create aclient resource to back up the file system data.
Creating client resources by using the Client Properties dialog boxCreate separate client resources to backup the application data and the file systemdata. The client resource for the file system data must include the ALL save set.
This procedure uses the following sample SQL Server configuration:
l You have installed SQL Server on cluster volume P:\.
l The cluster quorum drive is E:\.
l You have clustered all the drives except the C:\ drive in the cluster.
Procedure
1. In the Administration view of the NetWorker Management Console, create apolicy, a workflow, a group, and an action for SQL Server.
The Data Protection Policies chapter in the EMC NetWorker Administration Guideprovides information.
2. To back up the ALL save set on the active node, create a client resource:
a. In the NetWorker Administrator window, click Protection.
b. In the expanded left panel, right-click Clients and select New.
The Create Client dialog box appears.
c. In the Name field, type the name for the active node.
d. Click OK.
3. In the right panel, right-click the client resource and select Modify ClientProperties.
4. In the Client Properties dialog box:
a. On the General tab:
Bare-Metal Recovery
206 EMC NetWorker Module for Microsoft for SQL VDI 9.1 User Guide

l In the Group list, select the group that you created in step 1.
l In the Save set field, type ALL.
b. Specify other fields according to the requirements.
c. Click OK.
5. Perform the backup.
Ensure that the backup successfully completes.
6. Perform step 2 through step 5 for the passive node.
7. To back up the ALL save set (quorum drive), create a client resource with theWindows cluster name:
a. In the NetWorker Administrator window, click Protection.
b. In the expanded left panel, right-click Clients and select New.
The Create Client dialog box appears.
c. In the Name field, type the name for the Windows cluster.
d. Click OK.
8. In the right panel, right-click the client resource and select Modify ClientProperties.
9. In the Client Properties dialog box:
a. On the General tab:
l In the Group list, select the group that you created in step 1.
l In the Save set field, type ALL.
b. Specify other fields according to the requirements.
c. Click OK.
10. Perform the backup.
Ensure that the backup successfully completes.
11. To back up the ALL save set (SQL cluster drives), create a client resource withSQL virtual name:
a. In the NetWorker Administrator window, click Protection.
b. In the expanded left panel, right-click Clients and select New.
The Create Client dialog box appears.
c. In the Name field, type the SQL virtual name.
d. Click OK.
12. In the right panel, right-click the client resource and select Modify ClientProperties.
13. Perform step 9 and step 10.
14. To back up the SQL application data, create a client resource with SQL virtualname:
a. In the NetWorker Administrator window, click Protection.
Bare-Metal Recovery
Backing up a SQL Server for BMR by using the VDI technology 207

b. In the expanded left panel, right-click Clients and select New.
The Create Client dialog box appears.
c. In the Name field, type the SQL virtual name.
d. Click OK.
15. In the right panel, right-click the client resource and select Modify ClientProperties.
16. In the Client Properties dialog box:
a. On the General tab:
l In the Group list, select the group that you created in step 1.
l In the Save set field, type MSSQL: if the SQL instance is either thedefault instance or a named instance in the cluster.
b. On the Apps & Modules tab, in the Backup command field, type nsrsqlsv.
c. Specify other fields according to the requirements.
d. Click OK.
17. Create dummy client resources for the physical nodes of the cluster.
18. Perform the backup.
Ensure that the backup successfully completes.
Performing BMR of a SQL Server clusterThe BMR process recovers C: drive only. It does not recover the SQL data, thequorum and SQL cluster drives, and the system databases such as master, msdb, andmodel.
Procedure
1. Separately recover the active and passive nodes by performing the proceduresthat the "Performing a Windows BMR recovery to physical or virtualcomputers" section in the EMC NetWorker Administration Guide describes.
2. Recover the cluster quorum database:
a. After you have started the active and passive nodes, ensure that the clusterdisks are online on the active node in the Disk Management Console of theWindows GUI.
b. Add the quorum drive to Failover Cluster Management of the ClusterConfiguration UI.
c. Select the storage node in Failover Cluster Management and ensure that thequorum disk is online.
d. On the SQL Server active node, start the NetWorker User program.
e. Click Recover.
f. In the Source Client dialog box, select the source client with the Windowscluster name, and click OK.
g. In the Destination Client dialog box, select the destination client with theactive node name, and click OK.
Bare-Metal Recovery
208 EMC NetWorker Module for Microsoft for SQL VDI 9.1 User Guide

h. Select the quorum drive and recover the drive.
3. Recover the SQL cluster drives:
a. Add the SQL drives to Failover Cluster Management of the ClusterConfiguration UI.
b. Ensure that the disk is online.
c. Configure the drive mount points between the drives so that the mountpoints are the same as the mount points during the backup.
d. On the SQL Server active node, start the NetWorker User program.
e. Click Recover.
f. In the Source Client dialog box, select the source client with the SQL virtualname and click OK.
g. In the Destination Client dialog box, select the destination client with theactive node name and click OK.
h. Select all the SQL cluster drives and recover the drives.
4. Build the msdb and model databases:
a. Start the physical nodes of the cluster.
b. Ensure that you have the SQL Server installation software on the activenode.
c. In the software, go to the folder where the SETUP file exists and run thefollowing command:
Setup/QUIET/ACTION=REBUILDDATABASE/INSTANCENAME=SQL Serverinstance name/SQLSYSADMINACCOUNTS=Domain\administratorusername/IAcceptSQLServerLicenseTerms
Refer to Microsoft documentation for information about how to rebuild the SQLServer system databases:
Table 39 Rebuilding SQL Server system databases
SQL Server version Microsoft article
SQL Server 2016 https://msdn.microsoft.com/en-us/library/dd207003(v=sql.130).aspx
SQL Server 2014 https://msdn.microsoft.com/en-us/library/dd207003(v=sql.120).aspx
SQL Server 2012 https://msdn.microsoft.com/en-us/library/dd207003(v=sql.110).aspx
SQL Server 2008 R2
SQL Server 2008
https://msdn.microsoft.com/en-us/library/dd207003(v=sql.100).aspx
SQL Server 2005 http://msdn.microsoft.com/en-us/library/ms144259(v=sql.90).aspx
5. In the Failover Cluster Management window of the Cluster Configuration UI,perform the following steps:
Bare-Metal Recovery
Performing BMR of a SQL Server cluster 209

a. Open the SQL Server Properties dialog box.
Figure 88 SQL Server Properties dialog box
b. On the Dependencies tab, add all the SQL Server dependencies that youmust bring online before you bring the SQL Server online. For example, addany dependent cluster disk.
c. Bring the SQL virtual resources online.
d. Bring the SQL Server online.
e. Perform the failover and ensure that the failover is successful.
6. Restore the databases by using the NetWorker User for SQL Server program:
a. Start the NetWorker User for SQL Server program, and connect to the SQLvirtual server instance.
b. Browse the backed up databases.
c. Select the databases and restore the databases.
SQL Server in a stand-alone environmentThis section provides the BMR backup and recovery procedures for SQL Server in astand-alone environment.
Backing up a SQL Server for BMRConfigure a SQL Server client resource to back up SQL Server for BMR.
Creating client resources by using the NetWorker Client Backup Configuration WizardCreate separate client resources to back up the application data and the file systemdata. The client resource for the file system data must include the ALL save set.
The section "Configuring a client resource by using the Client Backup Configurationwizard" provides information about how to create a client resource to back up theapplication data.
Bare-Metal Recovery
210 EMC NetWorker Module for Microsoft for SQL VDI 9.1 User Guide

The "Creating a client resource with the Client Backup Configuration Wizard" sectionin the EMC NetWorker Administration Guide provides information about how to create aclient resource to back up the file system data.
Creating client resources by using the Client Properties dialog boxTo back up the application data and the file system data, create separate clientresources. The client resource for the file system data must include the ALL save set.
Procedure
1. In the Administration view of the NetWorker Management Console, create apolicy, a workflow, a group, and an action for Active Directory.
The Data Protection Policies chapter in the EMC NetWorker Administration Guideprovides information.
2. To back up the ALL save set, create a client resource:
a. In the NetWorker Administrator window, click Protection.
b. In the expanded left panel, right-click Clients and select New.
The Create Client dialog box appears.
c. In the Name field, type the name of the client resource.
d. Click OK.
3. In the right panel, right-click the client resource and select Modify ClientProperties.
4. In the Client Properties dialog box:
a. On the General tab:
l In the Group list, select the group that you have created in step 1.
l In the Save set field, type ALL.
b. On the Apps & Modules tab, ensure that the Backup command andApplication information fields are clear.
c. Specify other fields according to the requirements.
d. Click OK.
5. Perform the backup.
Ensure that the backup successfully completes.
6. To back up the MSSQL: save set, create a client resource:
Perform step a to step d of step 2.
7. In the right panel, right-click the client resource and select Modify ClientProperties.
8. In the Client Properties dialog box:
a. On the General tab:
l In the Group list, select the group that you have created in step 1.
l In the Save set field, type the name of the SQL Server instance thatcontains the databases you must restore:
Bare-Metal Recovery
Backing up a SQL Server for BMR 211
n MSSQL: for the default SQL Server instance.
n MSSQL$<named_instance> for a named SQL Server instance.
b. On the Apps & Modules tab, in the Backup command field, type nsrsqlsv.
c. Specify other fields according to the requirements.
d. Click OK.
9. Perform the backup.
Ensure that the backup successfully completes.
Performing BMR of a standalone SQL ServerThe BMR process recovers only the C: drive. It does not recover the SQL data or thesystem databases, such as master, msdb, and model.
Procedure
1. Perform the procedures that the "Performing a Windows BMR recovery tophysical or virtual computers" section in the EMC NetWorker AdministrationGuide describes.
2. Rebuild the SQL Server system databases.
Refer to Microsoft documentation for information about how to rebuild the SQLServer system databases:
Table 40 Rebuilding SQL Server system databases
SQL Server version Microsoft article
SQL Server 2016 https://msdn.microsoft.com/en-us/library/dd207003(v=sql.130).aspx
SQL Server 2014 https://msdn.microsoft.com/en-us/library/dd207003(v=sql.120).aspx
SQL Server 2012 https://msdn.microsoft.com/en-us/library/dd207003(v=sql.110).aspx
SQL Server 2008 R2
SQL Server 2008
https://msdn.microsoft.com/en-us/library/dd207003(v=sql.100).aspx
SQL Server 2005 http://msdn.microsoft.com/en-us/library/ms144259(v=sql.90).aspx
3. Restore the databases by using the NetWorker User for SQL Server GUI:
a. Start the NetWorker User for SQL Server program, and connect to the SQLserver instance.
b. Browse the backed up databases.
c. Select the databases and restore the databases.
Bare-Metal Recovery
212 EMC NetWorker Module for Microsoft for SQL VDI 9.1 User Guide

CHAPTER 12
Command Prompt
This chapter includes the following sections:
l Overview of the command prompt....................................................................214l Using the nsrsqlsv command............................................................................ 214l Using the nsrsqlrc command............................................................................ 220l Using the nwmssql command...........................................................................230l Backup and recovery command syntax for SQL Server data............................230
Command Prompt 213

Overview of the command promptYou can use the command prompt for backup and recovery.
The following commands are used to perform backup and recovery:
l nsrsqlsv backs up the specified SQL Server data objects.
l nsrsqlrc recovers the specified SQL Server data objects.
l nwmssql starts the GUI.
Before you use the backup and recovery commands, review the followingrequirements:
l Ensure that the user account that initiates the backup or recovery is assigned therequired privileges, as defined in Access privileges for backup and recovery.
Note
When using the nsrsqlsv and nsrsqlrc commands, the Windows login accountmust be granted the SQL Server system administrator role.
l Ensure that each command option is either lowercase or uppercase and,frequently both the cases of a letter are in the set of command options. Case isvery important when specifying command-line flags.For example, -c specifies the NetWorker client name, while -C specifiescompression of the backup data.
l Ensure that you use correct spacing. Depending on the command option, thespace separator between an option and its corresponding argument can beoptional, required, or not allowed.For example, both of the following expressions are valid:
-l backup_level-lbackup_levelThe following expression is invalid because a space is not allowed between the +argument and log_mark_name:
-M + log_mark_namel Ensure that you use brackets ([ ]) to denote the optional portions of a command.
When starting an actual backup or recovery operation, do not include brackets.
l Ensure that data items follow all other command options and parameters at thecommand prompt.
Using the nsrsqlsv commandThe nsrsqlsv command is used to back up SQL Server data objects, which consistof files, file groups, and databases.
To start a backup, specify the nsrsqlsv command and its options in the BackupCommand field in the NetWorker Administration GUI or from a Windows commandprompt.
Procedure
1. Open the NetWorker Administration GUI.
2. Click Protection.
Command Prompt
214 EMC NetWorker Module for Microsoft for SQL VDI 9.1 User Guide

3. In the expanded left pane, click Clients.
4. In the right pane, right-click the client, and select Modify Client Properties.
5. In the Client Properties dialog box, on the Apps & Modules tab, in the BackupCommand field, type the nsrsqlsv command and any required options.
6. Click OK.
Note
The -b and -l command options are valid only for manual backups that arestarted from a Windows command prompt on a client host. Do not use either ofthese options when configuring a scheduled backup in the NetWorkerAdministration GUI.
Command syntax for nsrsqlsvThe nsrsqlsv command syntax is:
nsrsqlsv [-CGjqRTvkuHXZ][-s networker_server][-N name][-b pool][-g group][-S count][-l level][-m masquerade][-U username][-P password][[-A virtual-server] | [-c client]][-f aes][-w browse][-y retention][-O "Option1, Option2, Option3"][-a Deduplication backup=yes] [-a Deduplication node=Avamar Node Name][-a Deduplication client name=client] [-a Device interface=datadomain][-f aes][-y retention][-j database names][-z federated backup options]
Command Prompt
Command syntax for nsrsqlsv 215

Command options for nsrsqlsvThis section provides the list of options available for the nsrsqlsv command.
Table 41 Command options for nsrsqlsv
Commandoptions
Descriptions
-a Specifies whether data deduplication should be set with Data Domain orAvamar.
-A Specifies the virtual server name when a SQL Server is configured to run inan MSCS cluster. The "Cluster Servers Backup and Recovery" chapterprovides more information.
-b Assigns a destination pool for a save set. Specifying -b pool_nameoverrides all other pool-selection criteria either that is either provided by the
NetWorker client or specified in the Backup Options dialog box of theNetWorker User for SQL Server GUI. The pool must be created with acorresponding label template before a command that includes the -b option
runs.
-c Specifies the NetWorker client name for which the SQL Server data is to bebacked up.
-C Specifies compression of the backup data before the NetWorker client sendsthe data to the NetWorker server.
-f aes Enables the NetWorker server to back up data using AES encryption.
-g Specifies the save group. The NetWorker server and the savegrp command
use the group parameter to select the media pool.
-G Specifies a NO_LOG transaction log backup before backing up the database.
This command option is valid only for level full backups.
This option is deprecated in SQL Server 2008 or later.
-h Excludes a database from the backup.
For example:
nsrsqlsv -s bv-customer.belred.emc.com -h master -hmodel MSSQL:
Note
This option is not supported for federated backups.
-H Specifies the NORECOVERY option when backing up transaction logs. This
option leaves the database in Restoring state.
-I Specifies a text file that lists multiple SQL Server save sets. The -I option
can also be specified with the nsrsqlsv command for the BackupCommand field in the NetWorker Administration GUI.
-k Performs checksum before writing to media.
Command Prompt
216 EMC NetWorker Module for Microsoft for SQL VDI 9.1 User Guide

Table 41 Command options for nsrsqlsv (continued)
Commandoptions
Descriptions
-j Performs a database consistency check (DBCC) before the backup isperformed.For example, -j testdb3,CopyOfDB010,test4 runs a consistency check
for databases testdb3, CopyOfDB010, and test4.
-l Specifies the backup level. The following values are valid:
l Full
l Level 1
l txnlogThe "Combining data objects to create backup levels" section providesmore information about which backup levels are supported for variousSQL Server data objects. The -l option is valid only for manual backups that are initiated from a
Windows command prompt on a client host. For scheduled backups, set
the backup level in the Set Level dialog box of the schedule resource inthe NetWorker Administration GUI. Do not use the -l option when you
start a backup in the NetWorker Administration GUI.
Sample outputs for each of the three different levels of backups follow:
l Full backup of the database to a specified NetWorker server:
nsrsqlsv -s server -c client -b poolname -l fulldbname
nsrsqlsv -s swraj -c SQL2012RC1Named -b Sub9VDI -lfull 5
43708:(pid 6004):Start time: Sat Jan 28 09:07:42201243621:(pid 6004):Computer Name: SQL2012-NODE3User Name: AdministratorNSR_BACKUP_LEVEL: full;NSR_CLIENT: SQL2012RC1Named.joy.com;NSR_DATA_VOLUME_POOL: Sub9VDI;NSR_LOG_VOLUME_POOL: Sub9VDI;NSR_SAVESET_NAME: "MSSQL:5";NSR_SERVER: Swraj.joy.com;37994:(pid 6004):Backing up 5...4690:(pid 6004):BACKUP database [5] TOvirtual_device='EMC#4018d580-f511-4457-abc3-a62c4c3f0ff9' WITH name=N'EMCNWMSQL'53085:(pid 6004):Backing up of 5 succeeded.nsrsqlsv: MSSQL: 5 level=full, 2261 KB 00:00:021 file(s)43709:(pid 6004):Stop time: Sat Jan 28 09:07:492012
l Cumulation incremental backup:
nsrsqlsv -s NetWorker_server_name -l diff my_database
Command Prompt
Command options for nsrsqlsv 217

Table 41 Command options for nsrsqlsv (continued)
Commandoptions
Descriptions
nsrsqlsv: Backing up my_database...nsrsqlsv: BACKUP database my_database TOvirtual_device='BSMSQL' WITH differential, statsnsrsqlsv: my_database level=diff, 719 KB00:00:05 1 file(s)
l Logs-only backup:
nsrsqlsv -s NetWorker_server_name -l txnlogmy_database
nsrsqlsv: Backing up my_database...nsrsqlsv: BACKUP log my_database TOvirtual_device =’BSMSQL’nsrsqlsv: my_database level=txnlog, 61 MB00:00:05 1 file(s)At least one SQL Server data item (file, file group, or database) must bespecified, and the data items and list of data objects must follow all othercommand options and parameters at the command prompt.
-N Specifies the symbolic name of the save set. By default, the most commonprefix of the path arguments is used as the save set name.
-O This option specifies advanced backup options. The syntax is as follows:
-O "Option1, Option2, Option3"
The only advanced backup option currently supported is the BUFFERCOUNToption. This option specifies the total number of IO buffers that can be usedduring a backup operation. For example:
nsrsqlsv -s NetWorker_server_name -O"BUFFERCOUNT=number_of_IO_buffers"
-P Specifies the SQL Server user password. When the -U user name command
option is specified, the password command option must also be provided, asfollows:
nsrsqlsv -s NetWorker_server_name -U username -Ppassword MSSQL:
Use the SQL Server username and password to log in to SQL Server withSQL server authentication.
-q Displays nsrsqlsv messages in quiet mode; only summary information and
error messages appear.
-R Specifies the NO_TRUNCATE option when backing up transaction logs.
-s Specifies the NetWorker server to use for the backup operation.
-S Backs up the specified data items using n stripes.
Command Prompt
218 EMC NetWorker Module for Microsoft for SQL VDI 9.1 User Guide

Table 41 Command options for nsrsqlsv (continued)
Commandoptions
Descriptions
To use backup and recovery striping successfully, see the stripingconfiguration described in Striped Backup and Recovery.
-T Performs a TRUNCATE_ONLY transaction log backup before backing up the
database and is valid for only full backups.
This flag is deprecated in SQL Server 2008 or later.
-u Continues the backup even in the event of a checksum error.
-U Specifies the SQL Server username. When this command option is specified,the -P password command option must also be provided, as follows:
nsrsqlsv -s NetWorker_server_name -U username-P passwordMSSQL:
Use the SQL Server username and password to log in to SQL Server withSQL server authentication.
-v Displays the nsrsqlsv command messages in verbose mode, providing
detailed information about the progress of the backup operation.
-X Indicates that SQL Server internal backup compression is used.
-y Specifies the retention period of the backup. The value must be typed in timeand date formats accepted by the nsr_getdate program. The EMC
NetWorker Command Reference Guide or the UNIX man pages provide moreinformation about the nsr_getdate program.
-Z Applies to the backup of up databases for a SQL Server 2005, and is usuallyused in the online recovery scenario from the command prompt. The -Zoption specifies that the logs-only (transaction log) backup after recovery isnot promoted to full backup. Without the -Z option, the backup is promoted
to full.
-z Performs a federated backup. Use the following options with the -z option:
l -z FEDERATED_SLAVE=trueThis option denotes that the process is SQL Federated secondaryprocess.
l -z FEDINDEX_NAME =SQL instance name under which thebackups are browsableFor example, MSSQL or MSSQL$InstanceName
l -z FEDCLIENT_NAME =Windows cluster client name
For example, cluster federated backups.
Command Prompt
Command options for nsrsqlsv 219

Note
To perform an incremental backup from the command prompt on the NetWorker clientfor a database, use the following command:
nsrsqlsv.exe -s win-2k8179.sharepoint.com -m WIN-FED-3 -a device interface=device interface -a device interface data domain -a Data Domain interface=IP -b Default -l incr -q -z FEDERATED_SLAVE=true -z FEDINDEX_NAME=MSSQL -z FEDCLIENT_NAME=cluster_fed -N MSSQL#DUKEAG_TEST:DUKETESTDB MSSQL:DUKETESTDB
To avoid the promotion to full of an incremental backup when performing a fullavailability group (AG) level backup, use the following command:
nsrsqlsv.exe -s win-2k8179.sharepoint.com -m WIN-FED-3 -a device interface=device interface-a device interface data domain -a Data Domain interface=IP -b Default -l incr -q -z FEDERATED_SLAVE=true -z FEDINDEX_NAME=MSSQL -z FEDCLIENT_NAME=cluster_fed -N MSSQL#DUKEAG_TEST: MSSQL:DUKETESTDB
When you avoid the promotion of a full AG level backup,MSSQL#DUKEAG_TEST:DUKETESTDB MSSQL:DUKETESTDB is changed toMSSQL#DUKEAG_TEST: MSSQL:DUKETESTDB.
Using the nsrsqlrc commandThe nsrsqlrc command recovers specified SQL Server data (files, file groups, anddatabases) from the NetWorker server.
To start a recovery operation, specify the nsrsqlrc command and any of its optionsat a Windows command prompt.
Note
If you do not have the instant file initialization feature enabled, the following warningmessage will appear in the output:Please ensure that instant file initialization is enabled onthe destination SQL Server instance for improved restoreperformance.However, the restore operation will continue. See Microsoft documentation for detailson enabling the database instant file initialization feature on the SQL Server.
Command syntax for nsrsqlrcThis section contains the command syntax for the nsrsqlrc command.
nsrsqlrc [-fjqVku] [-$ instance_name]
[-A virtual_server_name][-a "RESTORE_START_TIME=T1" -t "T2" -a "FLAT_FILE_RECOVERY=TRUE" -a"FLAT_FILE_RECOVERY_DIR=<directory>"][-b pool_name][-c client_name][-d MSSQL:destination_dbName][-e pass_phrase]
Command Prompt
220 EMC NetWorker Module for Microsoft for SQL VDI 9.1 User Guide

[-C file=path,file2=path2,...][-M [+|-]log_mark_name][-H "'source_path';'destination_path'"][-O "Option1, Option2, Option3"][-R fgName1,fgName2,...][-t date][-s NetWorker_server_name][-S normal|standby:undo_file|norecover][-U username][-P password][-V MSSQL:dbName][-z][MSSQL: dbname dbname.fgName dbName.fgName.filename ...]
Command options for nsrsqlrcThis section provides the list of options available for the nsrsqlrc command.
Table 42 Command options for nsrqlrc
Commandoptions
Descriptions
-$ Specifies a named SQL Server instance as the source of the copyrecovery. The syntax is:
-$ MSSQL$instance_name:
where:
l -$ specifies a named instance instead of the default instance as the
source for the copy recovery.
l $instance_name is the name of the instance to use.
The following example copies the Sales database from the SQL Serverprod-sql, instance Venus, to the SQL Server test-sql, instance Mars:
nsrsqlrc -s nw_server.company.com
-c prod-sql. company.com
-d MSSQL$MARS:
-$ MSSQL$VENUS:
-C ” ‘Sales ‘=’D:\Program Files\Microsoft SQL Server\MSSQL.1\MSSQL\Data\Sales.mdf',
'Sales_log'='D:\Program Files\Microsoft SQL Server\MSSQL.1\MSSQL\Data\Sales_log.ldf'"
-t "Fri Dec 01 08:01:19 2006"
"MSSQL$VENUS:Sales"
If the -$ switch is used and no instance is named, for example "-$MSSQL:", or the -$ switch is omitted, the default instance is used.
-a Specifies flat file recovery options.The syntax is:
Command Prompt
Command options for nsrsqlrc 221

Table 42 Command options for nsrqlrc (continued)
Commandoptions
Descriptions
nsrsqlrc -a "RESTORE_START_TIME=start_date" -t"end_date" -a "FLAT_FILE_RECOVERY=TRUE" -a"FLAT_FILE_RECOVERY_DIR=<destination_directory>"The FLAT_FILE_RECOVERY=TRUE variable specifies that the recovery is
written to files instead of restoring directly to the databases.
The FLAT_FILE_RECOVERY_DIR specifies the directory where the
recovery files are saved.
The start date and end date specifies the time range for flat file recovery.Applicable backups within the time range are recovered. If theRESTORE_START_TIME variable is not defined, required backups from the
last level full backup until the -t time are recovered.
If the last backup within the time range is a level differential backup, thenall incremental backups in the time range are not recovered. In thisscenario, only full and differential backups are recovered to file.
Note
Follow the nsr_getdate command syntax guidelines when formatting the
dates. See the EMC NetWorker Command Reference Guide for details on thensr_getdate command syntax.
-A Specifies the virtual server name when the SQL Server is configured to runas a clustered service in an MSCS cluster.
-b Specifies the clone pool where the save set is restored from.
-c Specifies the NetWorker client name from which the SQL Server data is tobe recovered.
-C Copies the database that is being restored to either the same SQL Serveror a different SQL Server. This option can be used for normal, copy, andpartial restores. Use the relocation list to specify new locations forrecovered database files. The relocation list is composed of pairs of logicaldatabase file names and fully qualified domain database file namerelocation paths. Specify the relocation list only when you restore adatabase. Each file name and relocation path is joined by the equal sign(=), and pairs are delimited in the list by commas.
The syntax is:
["][’] file[’]=[’]path[’],[’] file2[’]=[’]path2[’],...["]
For example, to copy the Project database from a client host that is namedClientHost1 to a different location on ClientHost1, specify the relocationlist for the database files, but do not include the client hostname commandoption:
nsrsqlrc -s NetWorker_server_name
-d MSSQL:CopyOfProject
Command Prompt
222 EMC NetWorker Module for Microsoft for SQL VDI 9.1 User Guide

Table 42 Command options for nsrqlrc (continued)
Commandoptions
Descriptions
-C Project_Data=C:\Relocation\Path\Project_Data.mdF,
Project_Data2=C:\Relocation\Path\Project_Data2.ndF,...,
Project_Log=C:\Relocation\Path\Project_Log.ldFMSSQL:Project
The relocation list must be enclosed by double quotation marks to allow forspaces in the relocation elements and pathnames. A logical file name orrelocation path must be enclosed by single quotation marks to also allowfor spaces. If a file name or path contains a single quotation mark, precedethe single quote with another single quotation mark to prevent the NMMfrom parsing the single quotation mark as a delimiter, for example:
nsrsqlrc -s NetWorker_server_name
-d MSSQL:CopyOfProject
-C File’=C:\Relocate Dir\Path\,
=’C:\Relocate Dir\Path\’,...,
’=C:\Relocate Dir\Path\’’" MSSQL:Project
When no relocation list is specified, NMM reads the source database filenames and location from the client index metadata or the backup. Thisinformation is used to generate a default list by relocating all files to thedefault SQL data path for the target SQL Server. The file names areguaranteed to be unique, but sufficient disk space is not ensured.
To relocate an entire file path, see the table entry for the -H option. You
cannot use the -C option with -H.
-d Performs a copy operation. The copy operation recovers SQL Server datafrom a client host to another database name on the same client host. Thesyntax is:
nsrsqlrc -s NetWorker_server_name -C client_name -d
MSSQL:destination_dbname MSSQL:source_dbname
where:
l destination_dbname is the name of the SQL database to which thesource database is to be recovered.
l source_dbname is the name of the SQL database to restore.
When no relocation list is specified, NMM reads the source database filenames and location from the client index metadata or the backup. Thisinformation is used to generate a default list by relocating all files to thedefault SQL data path for the target SQL Server. The file names areguaranteed to be unique, but it is not guaranteed that there will besufficient disk space.
Command Prompt
Command options for nsrsqlrc 223

Table 42 Command options for nsrqlrc (continued)
Commandoptions
Descriptions
When -C, -M, -R, or -d are used, the list of data items can include only
one database. The list of data items must follow all other command optionsand parameters at the command prompt.
-e Enables the use of an alternate pass phrase with AES encryption whenrecovering data.
-f Performs a recovery operation by replacing the target database with thesource. This option recovers a source database to an existing, incompatibledatabase of the same name on the target host. This option is also used torecover damaged files.
-H Relocates file paths and all files contained in a path to a different locationduring a restore operation. The syntax for using this option is:
nsrsqlrc -s networker_server_name -c client_name -H "'source_path';'destination_path'" -t "MM/DD/YYHH:MM:SS" -S restore_mode "MSSQL:source_database"
For example, if the testdb1 database has four datafiles that are in the C:\datapath source path and you want to relocate the database to the D:\datapath destination path, type the following:
nsrsqlrc -s networkerserver -c client -H "'C:\datapath';'D:\datapath'" -t "11/11/2015 10:30:57" -Snormal "MSSQL$SQLSERVER2012:testdb1"
The -H command option can be used to relocate multiple file paths in the
same command line. For example:
nsrsqlrc -s networkerserver -c client -H " 'C:\datapath1';'D:\datapath2','E:\datapath3';'F:\datapath4','G:\datapath5';'H:\datapath6' " -t"11/11/2015 10:30:57" -S normal "MSSQL$SQLSERVER2012:testdb1"
The -H option is supported on standard and redirected restores, which
includes the following:
l Normal restore—Same server and same instance.
l Different instance restore—Same server and different instance.
l Restore to different database file.
l Different server restore.
To relocate individual files, see the table entry for the -C option. You
cannot use the -C option with -H.
-j Performs a database consistency check between the backed-up SQLServer data and the recovered SQL Server data.
-k Perform checksum before reading from media.
Command Prompt
224 EMC NetWorker Module for Microsoft for SQL VDI 9.1 User Guide

Table 42 Command options for nsrqlrc (continued)
Commandoptions
Descriptions
-M Performs a SQL Server data recovery of the named transaction that isspecified in log_mark_name (for SQL Server 2005 only).
The way the mark name is prefixed determines how the data is recovered:
l When the mark name is prefixed with a plus sign (+), the data is
recovered to and includes the named transaction.
l When the mark name is prefixed with a minus sign (-), the data is
recovered up to the named transaction.
The log_mark_name should immediately follow the plus (+) or minus (-)
symbol. The use of a space separator is not allowed. The default is the plussign.
For example, to recover the SQL data and include the named transactiontransaction_mark, type the following command:
nsrsqlrc -sNetWorker_server_name -M +transaction_markMSSQL:dbName
To recover the SQL data only to the named transactiontransaction_mark, type the following command:
nsrsqlrc -s NetWorker_server_name -M -transaction_markMSSQL:dbName
Specify only one SQL Server database, followed by all the other commandoptions and parameters at the command prompt.
-O This option specifies advanced recovery options. The syntax is as follows:
-O "Option1, Option2, Option3"
The following advanced options are available:
l BUFFERCOUNT=number_of_IO_buffers
This option specifies the total number of IO buffers that can be usedduring a recovery operation.
l KEEP_CDC
This option enables change data capture (CDC) recovery.
l KEEP_REPLICATION
This option preserves the replication when you recover a publisheddatabase. This option is required if a database was replicated when thebackup was created.
If specifying multiple options, separate each argument with a comma. Forexample:
nsrsqlrc -sNetWorker_server_name -O "BUFFERCOUNT=2,KEEP_CDC, KEEP_REPLICATION" MSSQL:dbName
Command Prompt
Command options for nsrsqlrc 225

Table 42 Command options for nsrqlrc (continued)
Commandoptions
Descriptions
-P Specifies the SQL Server user password. When the -U username command
option is specified, the password command option must also be provided,as follows:
nsrsqlrc -s NetWorker_server_name -U username -Ppassword MSSQL:
Use the SQL Server username and password to log in to the SQL Serverwith SQL server authentication.
-q Displays nsrsqlrc messages in quiet mode, which provides minimal
information about the progress of the recovery operation, including errormessages.
-R Performs a partial database recovery or a piecemeal recovery of thespecified file groups. This command option is not available with otherversions of SQL Server. The partial database recovery operation restoresspecific file groups from a single full SQL Server database backup. Add thefile groups to the -R command option in a list, with items separated by
commas. Use the -C parameter, and specify all files for the database. The
-d option is also required:nsrsqlrc -s NetWorker_server_name-R ["][’]fgName[’],[’]fgName2[’],[’]...[’]["]-C Project_Data=C:\Relocation\Path\Project_Data.mdF,Project_Data2=C:\Relocation\Path\Project_Data2.ndF,..., Project_Log=C:\Relocation\Path\Project_Log.ldF MSSQL:Project-d MSSQL:PartOfProjectMSSQL:Project
where:
l fgName,... are the names of the file groups to restore. Consider thefollowing points when you list file groups to restore:
n To allow spaces between file group names, enclose the list of filegroup names within double quotes.
n Within file group names, enclose each file group name within singlequotes.
n If a file group name contains a single quote, precede the singlequote with another single quote to prevent the NetWorker clientfrom parsing the single quote as a delimiter.
For example, to accommodate for the space in file group A, thespace after the first comma, and the single quote in file group A’,use the following syntax:
-R "’Filegroup A’, ’Filegroup A’’’"
When an empty relocation list is supplied, use the following syntax:
-R ""l Project is the name of the SQL database to restore.
Command Prompt
226 EMC NetWorker Module for Microsoft for SQL VDI 9.1 User Guide

Table 42 Command options for nsrqlrc (continued)
Commandoptions
Descriptions
l PartOfProject is the name of the SQL database to which the sourcedatabase is to be recovered.
NMM recovers only the primary file group.
When -C, -M, -R, or -d are used, the list of data objects can include only
one database. The list of data objects must follow all other commandoptions and parameters at the command prompt.
-s Specifies the NetWorker server to use for the recovery operation.
-S Performs the recovery operation according to the specified databaserestore mode of normal, standby, or no recovery. The syntax is:
nsrsqlrc -s NetWorker_server_name -ddestination_dbName-S
normal | "standby:undo_file" | norecoverMSSQL:source_dbName
where:
l destination_dbName is the name of the SQL database to which thesource database is to be restored.
l source_dbName is the name of the SQL database to restore.
The recovery modes are as follows:
l The normal recovery mode recovers the database in normal,operational mode.
l The standby recovery mode activates the SQL Server STANDBYoption, which forces the database to be in a read-only state betweentransaction log recovery operations.
l The no-recovery recovery mode activates the SQL Server NORECOVERoption, which places the database in an unloadable state after therecovery. The database can still process additional transaction logrecovery operations.For example, to recover the Project database in normal, operationalmode to a new database named NewProjectName, type the followingcommand:
nsrsqlrc -s NetWorker_server_name -S normal
-d MSSQL: NewProjectName MSSQL:Project
To recover the database in standby mode, the standby parameter mustbe immediately followed by a colon, and the standby undo file locationand file name must be specified. If a file name or location contains aspace, enclose the file name or location within double quotes, forexample:
nsrsqlrc -s NetWorker_server_name
-S"standby:C:\temp\undo filename"
Command Prompt
Command options for nsrsqlrc 227

Table 42 Command options for nsrqlrc (continued)
Commandoptions
Descriptions
-d MSSQL:NewProjectName MSSQL:Project
-t Recovers the SQL Server data on a specified date. If the date of a backupversion is before or is equivalent to the specified date, the backup versionis recovered. Follow the nsr_getdate command syntax guidelines when
you format the date. See the EMC NetWorker Command Reference Guidefor details on the nsr_getdate command syntax.
For example:
nsrsqlrc -s networker_server_name -c client_name -t"MM/DD/YY HH:MM:SS" -S restore_mode"MSSQL:source_database"
To avoid adversely affecting the database, do not use the -t option if you
are restoring a file or file group.
-u Continues the recovery even if a checksum error occurs.
-U Specifies the SQL Server username. When the username command optionis specified, the -P password command option must also be provided, for
example:
nsrsqlrc -s NetWorker_server_name -U username -Ppassword MSSQL:
Use the SQL Server username and password to log in to SQL Server withSQL server authentication.
-V Verifies the SQL Server database that is selected for the recovery. The -Vcommand option verifies only that the selected database backup is suitablefor restoring, the backup is not recovered. The syntax is:
nsrsqlrc -s NetWorker_server_name -V MSSQL:dbName
-z Enables implementation of a recovery plan in independent command lineoperations. Normally NMM builds the recovery plan, ensuring that all therequired backups are available and that they run in the proper order andwith the proper options. The –z option removes NMM safety checks.
This option is used in more complex recoveries. The following examplecommands use the following backup history:
savetime 1:00 – full
savetime 2:00 – txnlog
savetime 3:00 – txnlog
To recover multiple backups and restore a database in a single command,type the following command:
nsrsqlrc ... -t “savetime 3:00” ...
This command recovers the entire recovery chain, from the first fullbackup to the last logs-only backup.
Command Prompt
228 EMC NetWorker Module for Microsoft for SQL VDI 9.1 User Guide

Table 42 Command options for nsrqlrc (continued)
Commandoptions
Descriptions
To recover this recovery chain and restore a database in a series ofindependent commands, type:
nsrsqlrc ... -z -S norecovery -t “savetime 1:00” ...
nsrsqlrc ... -z -S norecovery -t “savetime 2:00” ...
nsrsqlrc ... -z -S normal -t “savetime 3:00” ...
These three commands recover each backup individually.
The -z option disables building the recovery plan and recovers only the
specified backup. This command is required for all except the first (full)recovery command.
Use the –S norecovery option with the -z option to prepare the
database for more restores. This command is required for all except thelast recovery command. The final command recovers the last logs-onlybackup and brings the database online.
Note
A point-in-time restore within the final txnlog can be specified by
replacing the save time. For instance, in the previous example, you canreplace 3:00 with 2:45.
The database is not available for general use until after the final recoverycompletes. Any missing, incorrect, or out-of-order save times result in SQLServer reporting errors.
Sample recovery command linesIn an active mirror session, the NetWorker User for SQL Server GUI prevents apiecemeal recovery of the principal database to a different location. However, you canperform a piecemeal recovery from the command prompt.
The following lines provide sample commands for a piecemeal recovery of the primaryfile group (mdf & ldf) and file group "a" (ndf) of AcmeBank to the new databaseAcmeOnline:
nsrsqlrc-s "bv-v-cgd2.belred.legato.com"-c "bv-v-cgd2.belred.legato.com"-$ "MSSQL$THREE:"-R "'PRIMARY','a'"-d "MSSQL$THREE:AcmeOnline"-C "'AcmeBank'='E:\Data\AcmeOnline.mdf','AcmeBank_log'='E:\Data\AcmeOnline_log.ldf','AcmeBank1'='E:\Data\AcmeOnline1.ndf'"-t "Wed Sep 14 13:31:46 2005""MSSQL$THREE:AcmeBank"
Command Prompt
Sample recovery command lines 229

NOTICE
The AcmeOnline database name and file locations are different from AcmeBank.
Using the nwmssql commandThe nwmssql command starts the NetWorker User for SQL Server GUI.
To run the NetWorker User for SQL Server GUI from the Windows Start menu,clickPrograms > EMC NetWorker > NetWorker User for SQL Server.
To create a desktop shortcut, go to the <install_path>\nsr\bin directory anddrag the nwmssql.exe file to your desktop while pressing the [Ctrl] key.
Command options for nwmssqlThis section provides the list of options available for the nwmssql command.
Table 43 Command options for the nwmssql command
Command options for nwmssql Description
-s Specifies the NetWorker server to use.
-t Diagnoses the current backup or recoverycommand issued by NMM. The NetWorkerUser for SQL Server GUI displays the fullbackup or recovery command in the operationstatus window, but the GUI does not run thebackup or restore operation.
-b Limits the browse time to what is mentionedin the -b command option.
Backup and recovery command syntax for SQL Server dataUse the additional command syntax that is shown in the following table to back up orrestore SQL Server data with the nsrsqlsv and nsrsqlrc backup and recoverycommands.
Type the following NetWorker commands with the SQL Server data syntax for eitherscheduled or manual backups:
l Scheduled backup—In the NetWorker Administration GUI, type the command inthe Backup Command field of the Create Client or Modify Client dialog box.
l Manual backup—Type the command at the Windows command prompt on theNetWorker server or client.Specify at least one SQL Server data item (file, file group, or database) for amanual backup or restore operation.
You can specify more than one data object and can combine different types of data.You must specify the SQL data objects with the syntax shown in the following table.
Command Prompt
230 EMC NetWorker Module for Microsoft for SQL VDI 9.1 User Guide

Table 44 Command syntax for SQL Server data
SQL Server data Syntax for SQL Server data objects
All databases in the SQL Server storagehierarchy (optional)
MSSQL:
Typing MSSQL: yields an instance-levelbackup of all databases on the SQL Serverhost.
Specified databases MSSQL:dbName
or
[MSSQL:dbName MSSQL:dbName2 ...]
All file groups in specified databases MSSQL:dbName
or
[MSSQL:dbName. MSSQL:dbName2 ...]
Specified file groups in specified database MSSQL:dbName.fgName
or
[MSSQL:dbName.fgNameMSSQL:dbName.fgName2MSSQL:dbName2.fgNameMSSQL:dbName2.fgName2 ...]
Specified files in specified file groups inspecified databases
MSSQL:dbName.fgName.filename
or
[MSSQL:dbName.fgName.filenameMSSQL:dbName.fgName2.filenameMSSQL:dbName2.fgName.filenameMSSQL:dbName2.fgName2.filename ...]
Specifying MSSQL before each data object name is optional and does not affect theexpression or the resulting operation. However, when MSSQL is specified, it must befollowed by a colon (:).
For example, the following two commands are equivalent:
nsrsqlsv -s NetWorker_server_name dbName.fgNamensrsqlsv -s NetWorker_server_name MSSQL:dbName.fgName
In a nonclustered, named instance configuration, MSSQL$ is required, followed by theinstance name and a colon. For example:
nsrsqlsv -s NetWorker_server_name MSSQL$instanceName:dbName.fgName
Syntax for a named instance configurationWhen a configuration contains nonclustered named instances of the SQL Server, youmust specify the name of the instance before the data.
MSSQL$instanceName:[dbName ...] [.fgName ...] [.fileName ...]
Command Prompt
Syntax for a named instance configuration 231

Note
The nsrsqlsv and nsrsqlrc commands support specification of only a singleinstance. If save sets for more than one instance are specified, the backup fails. Thensrsqlrc command supports mixing instances for a copy restore operation.
Example 3 Back up all databases in an instance
To back up all the databases for instanceOne, type the following:
nsrsqlsv -s NetWorker_server_name MSSQL$instanceOne:
Example 4 Recover several file groups in an instance
To recover several file groups for instanceTwo, type the following:
nsrsqlrc -s NetWorker_server_nameMSSQL$instanceTwo:dbName.fgNameMSSQL$instanceTwo:dbName.fgName2
Example 5 Using clustered instance SQL Server virtual server names with -A or -c
Instead of using clustered named instances in this syntax, use clustered instance SQLServer virtual server names with -A or -c options, as shown in the following command:
nsrsqlsv -s NetWorker_server_name -A SQL_virtual_server_DNS_nameSQL_virtual_server_DNS_nameMSSQL”nsrsqlsv -s NetWorker_server_name -cSQL_virtual_server_DNS_nameMSSQL:
where:
l NetWorker_server_name is the hostname of the NetWorker server.
l SQL_virtual_server_DNS_name is the Domain Name System (DNS) name for theSQL Server virtual server.
Create a client resource under the SQL Server virtual server DNS name.
For scheduled backups of a SQL Server virtual server client, you do not need tospecify the -A or -c option with the SQL Server virtual server name. The savegrpprocess automatically specifies the virtual server name to the nsrsqlsv process byusing the -m option.
Syntax for names containing a period, backslash, or colonNMM provides command line syntax that enables you to back up and recover filenames, file groups, and databases containing a period (.), backslash (\), or colon (:).
Command Prompt
232 EMC NetWorker Module for Microsoft for SQL VDI 9.1 User Guide

By typing a backslash before the period or backslash, the nsrsqlsv and nsrsqlrccommands interpret the period or backslash as a literal character.
The tables in this section list the syntax for file names, file groups, and databasescontaining a period, backslash, colon, or any combination of the three.
The following notes apply to the information in the tables:
l The syntax that is shown in the right column applies to both the nsrsqlsv andnsrsqlrc commands.
l The notation MSSQL: is optional only for the nsrsqlsv command.
l A single period (.) continues to delimit SQL identifiers.
l The syntax also applies to named instances.
l The backslash period (\.) character sequence replaces each literal period in theSQL identifier.
l The double backslash (\\) character sequence replaces each literal backslash inthe SQL identifier.
Table 45 Command syntax for names containing a period
Name visible from SQL utilities Equivalent command-line syntax
SQL database named MyDatabase.COM MSSQL:MyDatabase\.COM
MSSQL$MyInstance:MyDatabase\.COM
SQL file group named MyFileGroup.2 for theSQL database named MyDatabase.COM
MyDatabase\.COM.MyFileGroup\.2
MSSQL:MyDatabase\.COM.MyFileGroup\.2
MSSQL$MyInstance:MyDatabase\.COM.MyFileGroup\.2
SQL file named MyFile.2, which is a memberof the SQL file group named MyFileGroup.2for the SQL database namedMyDatabase.COM
MyDatabase\.COM.MyFileGroup\.2.MyFile\.2
MSSQL:MyDatabase\.COM.MyFileGroup\.2.MyFile\.2
MSSQL$MyInstance:MyDatabase\.COM.MyFileGroup\.2.MyFile\.2
Table 46 Command syntax for names containing a backslash
Name visible from SQL utilities Equivalent command-line syntax
The SQL database named MyDatabase\COM MyDatabase\\COM
MSSQL:MyDatabase\\COM
MSSQL$MyInstance:MyDatabase\\COM
The SQL file group named MyFileGroup\2 forthe SQL database named MyDatabase\COM
MyDatabase\\COM.MyFileGroup\\2
MyDatabase\.COM.MyFileGroup\.2
Command Prompt
Syntax for names containing a period, backslash, or colon 233

Table 46 Command syntax for names containing a backslash (continued)
Name visible from SQL utilities Equivalent command-line syntax
MSSQL$MyInstance:MyDatabase\\COM.MyFileGroup\\2
The SQL file named MyFile\2, which is amember of the SQL file group namedMyFileGroup\2 for the SQL database namedMyDatabase\COM
MyDatabase\\COM.MyFileGroup\\2.MyFile\\2
MSSQL:MyDatabase\\COM.MyFileGroup\\2.MyFile\\2
MSSQL$MyInstance:MyDatabase\.COM.MyFileGroup\.2.MyFile\\2
The SQL database named MyDatabase\COM MyDatabase\\COM
MSSQL:MyDatabase\\COM
MSSQL$MyInstance:MyDatabase\\COM
Table 47 Command syntax for names containing a colon
Name visible from SQL utilities Equivalent command-line syntax
SQL database named MyDatabase:COM MyDatabase:COM
MSSQL:MyDatabase:COM
MSSQL$MyInstance:MyDatabase:COM
SQL file group named MyFileGroup:2 for theSQL database named MyDatabase:COM
MyDatabase:COM.MyFileGroup:2
MSSQL:MyDatabase:COM.MyFileGroup:2
MSSQL$MyInstance:MyDatabase:COM.MyFileGroup:2
SQL file named MyFile:2, which is a memberof the SQL file group named MyFileGroup:2for the SQL database namedMyDatabase:COM
MyDatabase:COM.MyFileGroup:2.MyFile:2
MSSQL:MyDatabase:COM.MyFileGroup:2.MyFile:2
MSSQL$MyInstance:MyDatabase:COM.MyFileGroup:2.MyFile:2
Table 48 Command syntax for names containing periods, back slashes, and colons
Name visible from SQL utilities Equivalent command-line syntax
SQL file group named My/FileGroup.2 for theSQL database named My:Database.COM
My:Database\.COM.My\\FileGroup\.2
Command Prompt
234 EMC NetWorker Module for Microsoft for SQL VDI 9.1 User Guide

Table 48 Command syntax for names containing periods, back slashes, and colons
Name visible from SQL utilities Equivalent command-line syntax
MSSQL: My:Database \.COM.My\\FileGroup\.2
MSSQL$MyInstance: My:Database\.COM.My\\FileGroup\.2
Command Prompt
Syntax for names containing a period, backslash, or colon 235

Command Prompt
236 EMC NetWorker Module for Microsoft for SQL VDI 9.1 User Guide