
EMC® InputAccel® Installation Guide
218
EMC ® InputAccel ® Version 6.0 Service Pack 1 Installation Guide P/N 300-009-144 A01 EMC Corporation Corporate Headquarters Hopkinton, MA 01748-9103 1-508-435-1000 www.EMC.com
-
Upload
khangminh22 -
Category
Documents
-
view
1 -
download
0
Transcript of EMC® InputAccel® Installation Guide

EMC® InputAccel®Version 6.0 Service Pack 1
Installation Guide
P/N 300-009-144 A01
EMC CorporationCorporate Headquarters
Hopkinton, MA 01748-91031-508-435-1000www.EMC.com

Copyright© 2009 EMC Corporation. All rights reserved.
Published June, 2009
EMC believes the information in this publication is accurate as of its publication date. The information is subject to changewithout notice.
THE INFORMATION IN THIS PUBLICATION IS PROVIDED "AS-IS." EMC CORPORATIONMAKES NO REPRESENTATIONSOR WARRANTIES OF ANY KINDWITH RESPECT TO THE INFORMATION IN THIS PUBLICATION, AND SPECIFICALLYDISCLAIMS IMPLIED WARRANTIES OF MERCHANTABILITY OR FITNESS FOR A PARTICULAR PURPOSE.
Use, copying, and distribution of any EMC software described in this publication requires an applicable software license.
For the most up-to-date listing of EMC product names, see EMC Corporation Trademarks on EMC.com.
All other trademarks used herein are the property of their respective owners.

Table of Contents
Chapter 1 InputAccel overview ..................................................................................... 9
Chapter 2 System requirements and recommendations .............................................. 11Database server requirements............................................................................ 11InputAccel Server requirements ........................................................................ 13InputAccel web components and ClickOnce host requirements ........................... 15Client workstation requirements........................................................................ 17Common requirements for all client modules ................................................. 17Module-specific requirements ....................................................................... 19
Scanning workstation requirements ................................................................... 23
Chapter 3 Installation planning .................................................................................... 25General considerations...................................................................................... 25Locale considerations.................................................................................... 27Performance and throughput ........................................................................ 28Database server considerations.................................................................. 28InputAccel Server considerations............................................................... 30Administration Console host system considerations ................................... 31ClickOnce host system considerations........................................................ 31InputAccel Remoting server considerations................................................ 32Web Services subsystem considerations ..................................................... 32Client machine considerations ................................................................... 33Best practices for running modules as services........................................ 34
Scalability .................................................................................................... 35InputAccel Server scalability ..................................................................... 35Client scalability ....................................................................................... 36
Security ....................................................................................................... 37Running InputAccel in a hardened environment ........................................ 41Running InputAccel with minimumWindows permissions......................... 41
Installing InputAccel across multiple domains................................................ 44Installing InputAccel in a workgroup............................................................. 44High availability and failover ........................................................................ 45High availability best practices .................................................................. 46
Disaster planning ......................................................................................... 47Creating an InputAccel disaster continuation plan ...................................... 47Disaster recovery considerations................................................................ 48Implementing a disaster continuation system ............................................. 48Managing a disaster continuation system ................................................... 50
Deployment ................................................................................................. 50Licensing and activation................................................................................ 51ScaleServer licensing................................................................................. 52Licensing for use in a Microsoft cluster ...................................................... 53Licensing for disaster recovery .................................................................. 53
Compatibility ............................................................................................... 54Sample configurations ...................................................................................... 55Development/demonstration installation........................................................ 55
3

Table of Contents
Small production installation......................................................................... 56Medium distributed production installation ................................................... 57High availability production installation ........................................................ 58Distributed volume installation ..................................................................... 60Enterprise installation ................................................................................... 61
Chapter 4 Installing InputAccel .................................................................................... 63Installing InputAccel on a single machine .......................................................... 63Installing the InputAccel Database................................................................. 65Creating a SQL Server user account with minimum permissionsto access the InputAccel Database.............................................................. 66
Installing the InputAccel Server..................................................................... 67Installing the Administration Console............................................................ 69Configuring Administration Console on Windows XP ................................ 71
Activating and licensing InputAccel .............................................................. 73Installing the InputAccel Client Components ................................................. 73Downloading ISIS scanner drivers ............................................................. 75Registering the SLDRegistration executable................................................ 75
Setting the UI language of InputAccel components ......................................... 76Specifying default UI language settings...................................................... 77Summary of the options for overriding the default UI language................... 78Procedures to override the UI language ..................................................... 79
Installing InputAccel in a production environment ............................................. 81Additional installation and configuration options ............................................... 83Installing multiple instances of InputAccel Servers ......................................... 84Configuring multiple InputAccel Servers as a ScaleServer group ..................... 85Installing the InputAccel Server in a clustered environment ............................ 87Installing InputAccel Servers into an Active/Passive MSCS Cluster .............. 88Preparing the InputAccel Server resource group for anActive/Passive cluster environment........................................................ 88Installing the InputAccel Server on both cluster nodes in anActive/Passive cluster ........................................................................... 90Adding the InputAccel Server generic service resource to theInputAccel Server Group in an Active/Passive cluster ............................. 91Activating the InputAccel Server in an Active/Passive cluster .................. 92
Installing InputAccel Servers into an Active/Active MSCS cluster ................ 93Preparing the InputAccel Server resource groups for anActive/Active cluster............................................................................. 93Installing the InputAccel Server on both Active/Active clusternodes................................................................................................... 95Adding the InputAccel Server generic service resource toeach IA Server Group in an Active/Active cluster.................................... 97Activating and licensing the InputAccel Server in anActive/Active cluster............................................................................. 98
Setting up the Input Management Console in an MSCS cluster .................... 99Installing InputAccel Remoting ................................................................... 101Configuring InputAccel Remoting on Windows XP .................................. 103
Deploying modules with the ClickOnce Deployment Utility.......................... 104Unattended installations ............................................................................. 108Understanding installation command line arguments ............................... 109Command line considerations ................................................................. 110Installing InputAccel from a command line .............................................. 111Automating unattended installations ....................................................... 111Modifying unattended installations ......................................................... 112
Manually registering a client module to run as a service................................ 113Unregistering client modules that are registered as services ...................... 115
Installing additional components..................................................................... 116
4

Table of Contents
Installing InputAccel Reports Designer ........................................................ 116Installing EMC Captiva Input Management Console..................................... 116Installing the Connector for eCopy ShareScan .............................................. 117
Chapter 5 Upgrading InputAccel ............................................................................... 119Upgrade planning .......................................................................................... 119Upgrade paths ........................................................................................... 120Understanding compatibility between InputAccel components ..................... 120Understanding locale considerations before planning the upgrade ................ 122Identifying irreplaceable files ...................................................................... 122Automatic backup during upgrade .............................................................. 126Identifying new system requirements .......................................................... 127Understanding the upgrade process ............................................................ 127InputAccel Database ............................................................................... 128InputAccel Server(s) ............................................................................... 128Administration Console .......................................................................... 129Licenses, activation files, and security keys............................................... 129InputAccel Clients .................................................................................. 130New client modules ................................................................................ 134
Permissions................................................................................................ 135Performing pre-production testing and acceptance ....................................... 136Scheduling upgrade phases......................................................................... 136Incorporating new system functionality ....................................................... 137
Upgrading from InputAccel 5.2.3 and 5.3.x to InputAccel 6.0 SP1 ...................... 138Upgrading from InputAccel 6.0 to InputAccel 6.0 SP1 ....................................... 139Upgrade procedures ....................................................................................... 141Upgrading the InputAccel Database ............................................................ 141Upgrading the InputAccel Server ................................................................ 142Rolling back to a previously installed version of the InputAccelServer .................................................................................................... 143
Upgrading the Administration Console ....................................................... 144Installing the Backward Compatibility Pack ................................................. 145Upgrading client modules........................................................................... 146Rolling back to a previous InputAccel Client version ................................ 146
Upgrading ClickOnce deployed applications................................................ 147Installing new functionality......................................................................... 148Assigning InputAccel permissions ............................................................... 148Upgrading existing processes and customizations ........................................ 149Upgrading Audit Extensions ....................................................................... 149Upgrading custom Scan Callback functionality............................................. 150Upgrading Index validation functionality..................................................... 151
Sample upgrade scenarios ............................................................................... 151Sample scenario: Simple upgrade from InputAccel 5.2.3 or 5.3.x .................... 151Sample scenario: Upgrade from InputAccel 5.3 while usingmodules from version 5.3 ............................................................................ 153
Chapter 6 Modifying, repairing, and uninstalling InputAccel ..................................... 157Modifying an InputAccel installation ............................................................... 157Repairing an InputAccel installation ................................................................ 158Removing an InputAccel installation ............................................................... 158
Chapter 7 Troubleshooting ........................................................................................ 159Installation failures ......................................................................................... 159Installation errors ....................................................................................... 160Command-line installation failures .............................................................. 161
5

Table of Contents
Syntax errors .......................................................................................... 161Common command-line installation errors .............................................. 161
Third-party component issues ......................................................................... 163Post-installation issues .................................................................................... 163Database issues .......................................................................................... 164ScaleServer issues ....................................................................................... 165Other issues ............................................................................................... 166
Appendix A Prerequisite software installed by the InputAccel setup program ............. 169Prerequisite software installed with the InputAccel Database ............................ 169Prerequisite software installed with the InputAccel Server ................................ 169Prerequisite software installed with InputAccel Web Components ..................... 170Prerequisite software installed with the InputAccel client modules .................... 170
Appendix B InputAccel client modules ......................................................................... 171
Appendix C Languages supported ............................................................................... 177
Appendix D Ports used ................................................................................................. 179
Appendix E Running the Create Database Utility ......................................................... 181Running the Create Database Utility in silent mode .......................................... 181Create Database Utility command-line examples .......................................... 182
Appendix F Command line arguments for installing InputAccel ................................. 183Supported InstallShield switches ..................................................................... 183Supported MSI switches.................................................................................. 184Supported Windows Installer properties .......................................................... 184InputAccel installer properties and feature names............................................ 185InputAccel Database installer properties ...................................................... 185InputAccel Database installer command-line examples ............................. 187
InputAccel Server Components installer properties ...................................... 188InputAccel Server installation features ..................................................... 195InputAccel Server installer command-line examples ................................. 195
InputAccel web components installer properties........................................... 199InputAccel web components installer command-line examples.................. 201
InputAccel Client installer properties........................................................... 203InputAccel Client installation features ..................................................... 206InputAccel Client installer command-line examples.................................. 208
Installing the Backward Compatibility Pack from a command line ................. 209
6

Table of Contents
List of Tables
Table 1. Database server requirements................................................................................ 11Table 2. InputAccel Server requirements ............................................................................ 13Table 3. InputAccel web components and ClickOnce host requirements ............................... 15Table 4. Common client module requirements .................................................................... 17Table 5. Module–specific requirements............................................................................... 19Table 6. Development or demonstration installation............................................................ 64Table 7. Globalization and UI language settings for InputAccel components ......................... 76Table 8. InputAccel installation command line arguments ................................................. 109Table 9. InputAccel core components and InputAccel clients compatibility ......................... 121Table 10. Irreplaceable InputAccel Files and Data ............................................................... 123Table 11. Client module upgrade issues ............................................................................. 130Table 12. InputAccel modules............................................................................................ 172Table 13. Ports used .......................................................................................................... 179Table 14. Supported InstallShield switches ......................................................................... 183Table 15. Supported Windows Installer properties .............................................................. 184Table 16. Supported InputAccel Database installer properties.............................................. 186Table 17. Supported InputAccel Server installer properties.................................................. 188Table 18. Supported InputAccel Web component installer properties ................................... 199Table 19. Supported InputAccel Client installer properties .................................................. 204
7

Table of Contents
8

Chapter 1InputAccel overview
This guide explains how to install an InputAccel document capture system. This section providesa quick overview intended for those who will actually install InputAccel. For a comprehensivedescription of how InputAccel works, refer to the System Overview Guide.
InputAccel is a client/server document capture system that can capture documents from scanners, faxservers, email servers, and file systems, as well as from third-party systems by using web services.InputAccel is optimized for capturing documents, not storing them for long term access. Typically,documents remain in an InputAccel system for a few hours to a few days, until they are exportedto a content repository or other back-end system. The speed and capacity of processing, memory,and disk storage systems for InputAccel Servers should take into consideration the short-term lifecycle of captured documents.
InputAccel is modular and scalable; therefore, installation complexity depends on the capabilitiesselected by your organization. Various system configuration examples are provided in Sampleconfigurations, page 55. Different InputAccel components have different hardware and softwarerequirement, as explained in detail in Chapter 2, System requirements and recommendations.All installations require an InputAccel Database hosted by Microsoft SQL Server, as well as anAdministration Console web application installed on a server running Microsoft Internet InformationServices (IIS).
Installing InputAccel requires you to proceed logically through several phases. The followingis a brief list of general installation steps. For detailed installation planning, refer to Chapter 3,Installation planning.• Database: Install one instance of the InputAccel Database on a machine running Microsoft SQLServer.
• InputAccel Server: Install at least one instance, possibly more for a ScaleServer or clusterconfiguration.
• Administration Console: This component is hosted by IIS and is required to perform InputAccelsystem administration. Install one instance.
• InputAccel Remoting: Hosted by IIS and required to support remote users connecting to theInputAccel system over the Internet. Install one instance only if you are supporting operatorswho will be connecting from a remote location over the Internet.
• InputAccel clients: Install specific client modules on attended and unattended workstations.Install multiple instances of modules that have been identified as potential bottlenecks. Mostunattended modules may optionally run as services. Certain attended modules may be deployedby ClickOnce and configured to connect by HTTP.
9

InputAccel overview
• InputAccel Web Services subsystem: Install if using InputAccel as a web services provider orrequester.
• ClickOnce deployment: Hosted IIS or available through a file share. Deploy certain attendedmodules to local or remote users. Installed as part of the client installation phase. Configureafter installation is complete.
Related Topics —
Chapter 2, System requirements and recommendationsChapter 3, Installation planningChapter 5, Upgrading InputAccel
10
Chapter 2System requirements andrecommendations
This chapter includes the following sections outlining the system requirements and recommendationsfor running various InputAccel components:
• Database server requirements, page 11
• InputAccel Server requirements, page 13
• InputAccel web components and ClickOnce host requirements, page 15
• Client workstation requirements, page 17
• Scanning workstation requirements, page 23
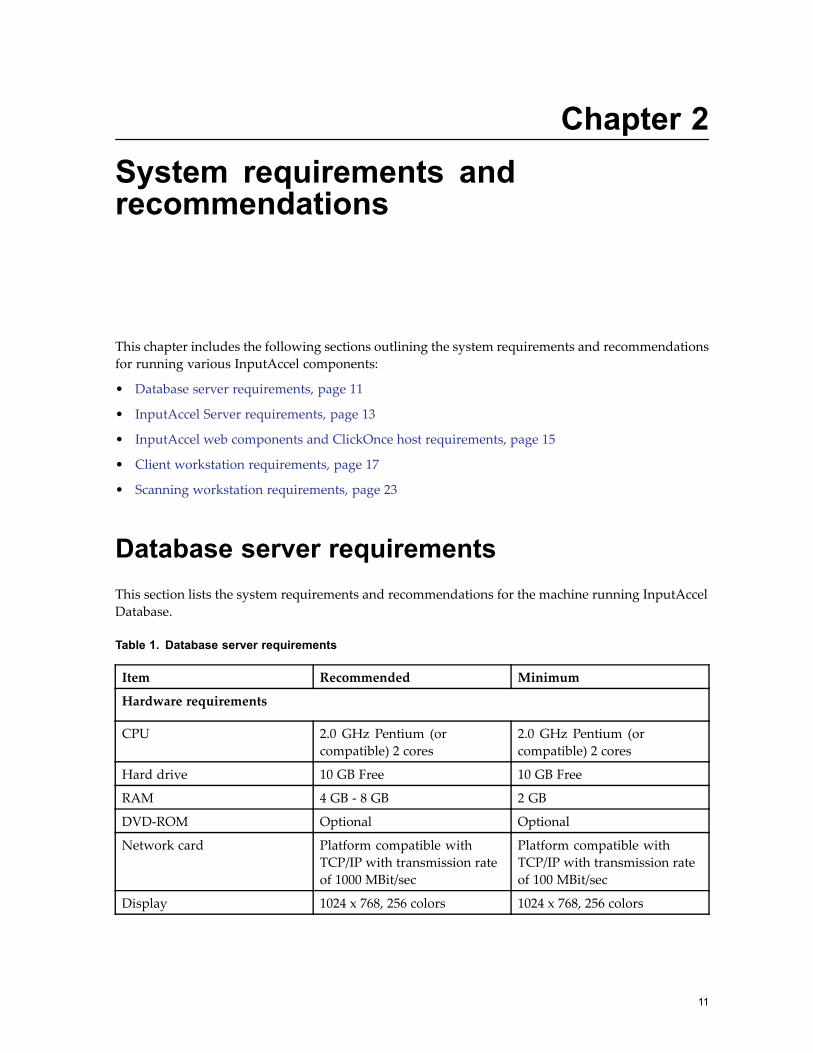
Database server requirementsThis section lists the system requirements and recommendations for the machine running InputAccelDatabase.
Table 1. Database server requirements
Item Recommended Minimum
Hardware requirements
CPU 2.0 GHz Pentium (orcompatible) 2 cores
2.0 GHz Pentium (orcompatible) 2 cores
Hard drive 10 GB Free 10 GB Free
RAM 4 GB - 8 GB 2 GB
DVD-ROM Optional Optional
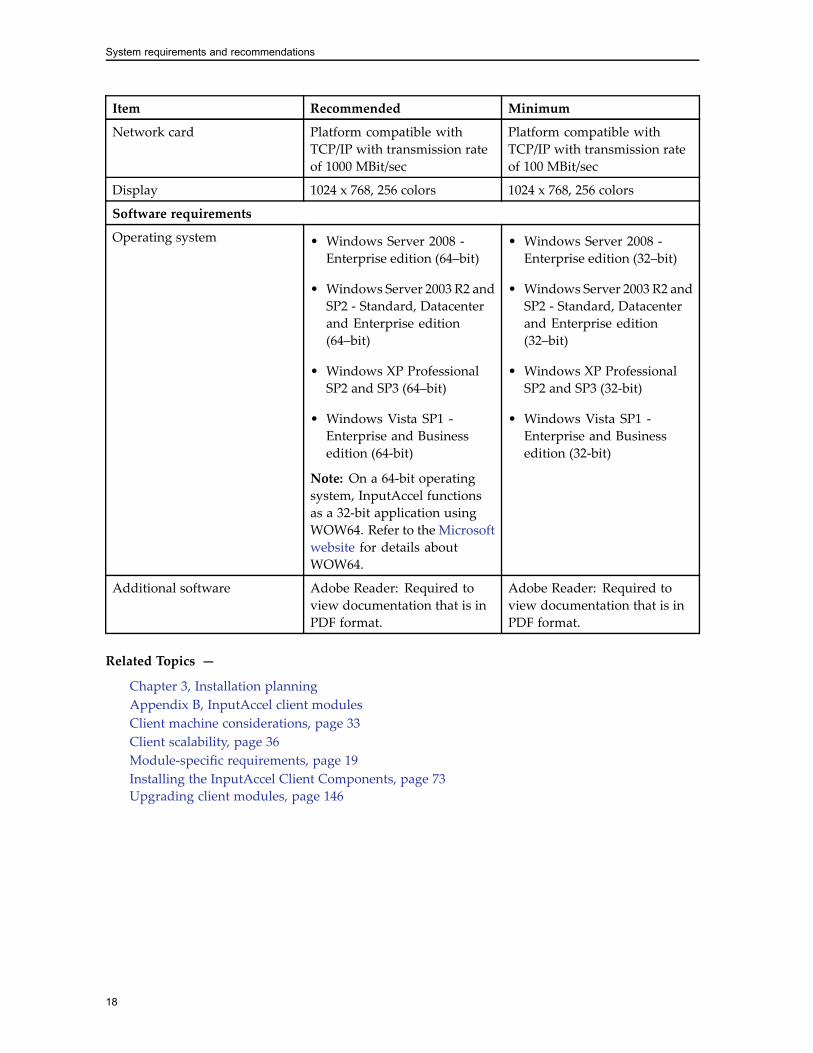
Network card Platform compatible withTCP/IP with transmission rateof 1000 MBit/sec
Platform compatible withTCP/IP with transmission rateof 100 MBit/sec
Display 1024 x 768, 256 colors 1024 x 768, 256 colors
11
System requirements and recommendations
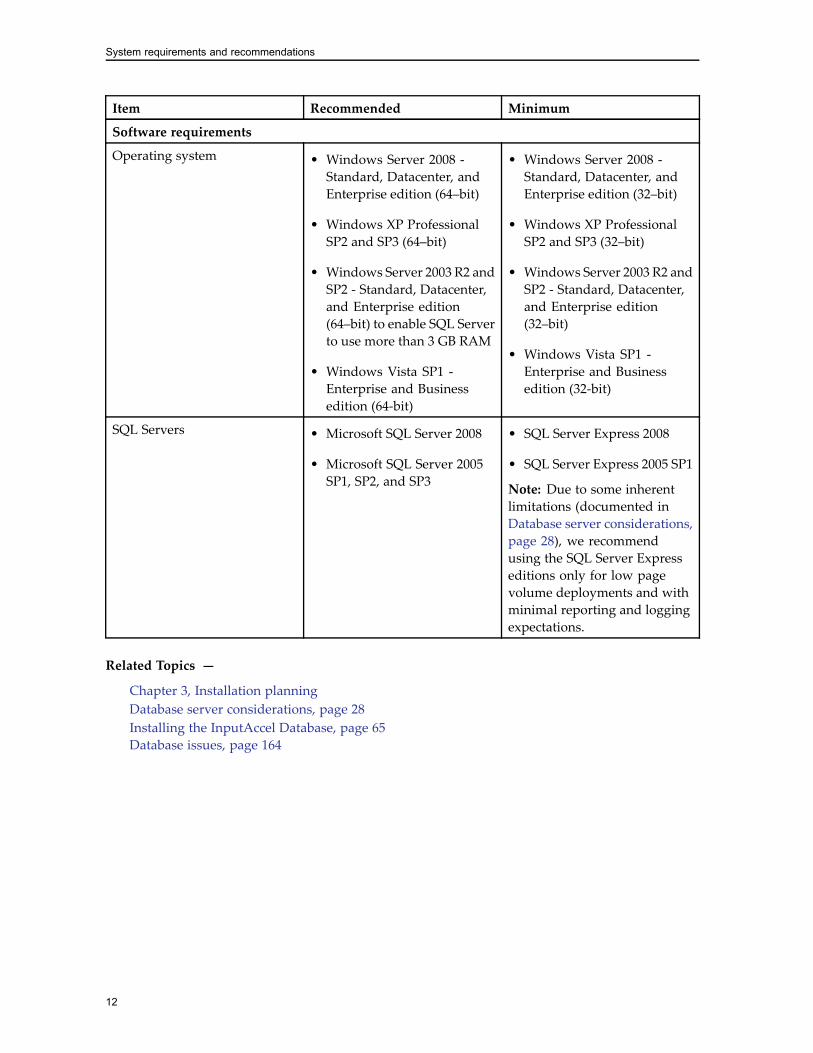
Item Recommended Minimum
Software requirements
Operating system • Windows Server 2008 -Standard, Datacenter, andEnterprise edition (64–bit)
• Windows XP ProfessionalSP2 and SP3 (64–bit)
• Windows Server 2003 R2 andSP2 - Standard, Datacenter,and Enterprise edition(64–bit) to enable SQL Serverto use more than 3 GB RAM
• Windows Vista SP1 -Enterprise and Businessedition (64-bit)
• Windows Server 2008 -Standard, Datacenter, andEnterprise edition (32–bit)
• Windows XP ProfessionalSP2 and SP3 (32–bit)
• Windows Server 2003 R2 andSP2 - Standard, Datacenter,and Enterprise edition(32–bit)
• Windows Vista SP1 -Enterprise and Businessedition (32-bit)
SQL Servers • Microsoft SQL Server 2008
• Microsoft SQL Server 2005SP1, SP2, and SP3
• SQL Server Express 2008
• SQL Server Express 2005 SP1
Note: Due to some inherentlimitations (documented inDatabase server considerations,page 28), we recommendusing the SQL Server Expresseditions only for low pagevolume deployments and withminimal reporting and loggingexpectations.
Related Topics —
Chapter 3, Installation planningDatabase server considerations, page 28Installing the InputAccel Database, page 65Database issues, page 164
12
System requirements and recommendations
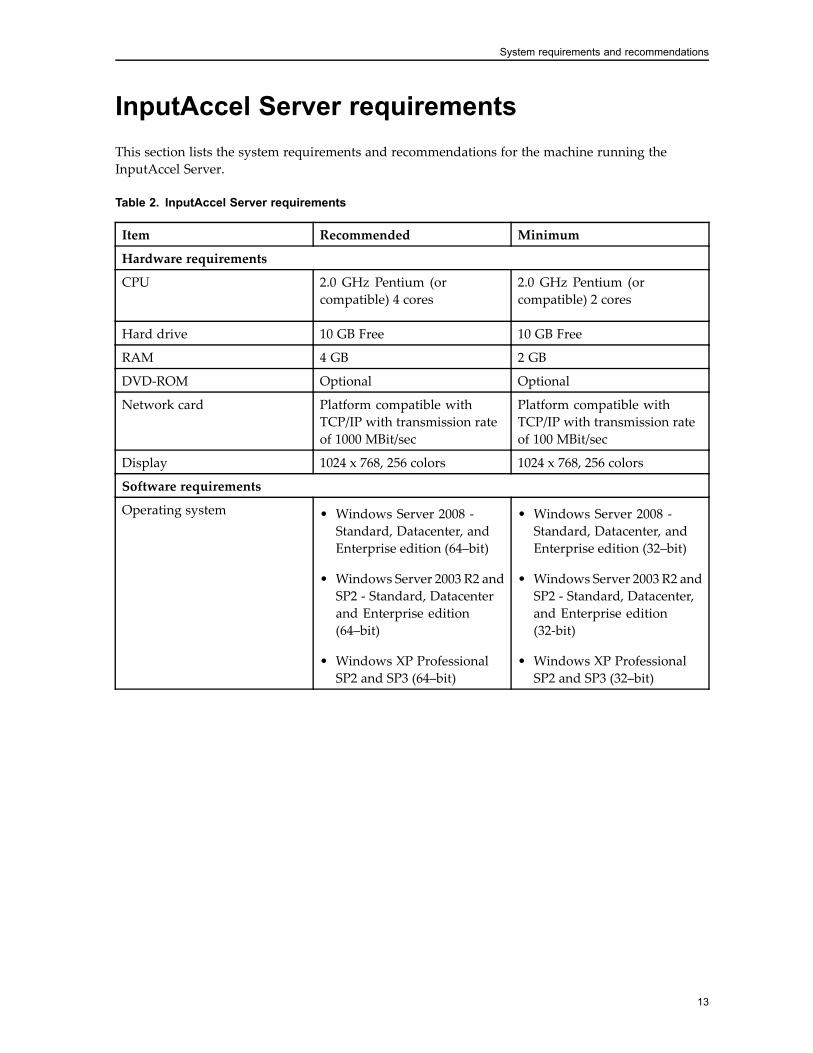
InputAccel Server requirementsThis section lists the system requirements and recommendations for the machine running theInputAccel Server.
Table 2. InputAccel Server requirements
Item Recommended Minimum
Hardware requirements
CPU 2.0 GHz Pentium (orcompatible) 4 cores
2.0 GHz Pentium (orcompatible) 2 cores
Hard drive 10 GB Free 10 GB Free
RAM 4 GB 2 GB
DVD-ROM Optional Optional
Network card Platform compatible withTCP/IP with transmission rateof 1000 MBit/sec
Platform compatible withTCP/IP with transmission rateof 100 MBit/sec
Display 1024 x 768, 256 colors 1024 x 768, 256 colors
Software requirements
Operating system • Windows Server 2008 -Standard, Datacenter, andEnterprise edition (64–bit)
• Windows Server 2003 R2 andSP2 - Standard, Datacenterand Enterprise edition(64–bit)
• Windows XP ProfessionalSP2 and SP3 (64–bit)
• Windows Server 2008 -Standard, Datacenter, andEnterprise edition (32–bit)
• Windows Server 2003 R2 andSP2 - Standard, Datacenter,and Enterprise edition(32-bit)
• Windows XP ProfessionalSP2 and SP3 (32–bit)
13

System requirements and recommendations
Item Recommended Minimum
Operating system (continued) • Windows Vista SP1 -Enterprise and Businessedition (64-bit)
Note:• The Federal InformationProcessing Standard(FIPS) provides the bestpractices for implementingcryptographic software.The InputAccel Server isdesigned to operate withMicrosoft operating systemsthat use FIPS-compliantalgorithms for encryption,hashing, and signing.
• The Enterprise edition isrequired for setting upInputAccel Server in aclustered environment.
• 64-bit edition is required toenable InputAccel Server touse up to 4 GB RAM
• On a 64-bit operating system,InputAccel functions as a32-bit application usingWOW64. Refer to theMicrosoft website for detailsabout WOW64.
• Windows Vista SP1 -Enterprise and Businessedition (32-bit)
Note: The Federal InformationProcessing Standard (FIPS)provides the best practices forimplementing cryptographicsoftware. The InputAccelServer is designed tooperate with Microsoftoperating systems that useFIPS-compliant algorithmsfor encryption, hashing, andsigning.
Additional software Adobe Reader: Required toview documentation that is inPDF format.
Adobe Reader: Required toview documentation that is inPDF format.
Related Topics —
InputAccel Server considerations, page 30InputAccel Server scalability, page 35Installing the InputAccel Server, page 67Upgrading the InputAccel Server, page 142ScaleServer issues, page 165
14

System requirements and recommendations
InputAccel web components and ClickOncehost requirementsThis section lists the system requirements and recommendations for the machine running theInputAccel web components and the machine hosting the ClickOnce packages. InputAccel webcomponents include Administration Console and InputAccel Remoting.
Caution: Administration Console and InputAccel Remoting must not be installed on the samemachine.
Table 3. InputAccel web components and ClickOnce host requirements
Item Recommended Minimum
Hardware requirements
CPU 2.0 GHz Pentium 2.0 GHz Pentium (or compatible)
Hard drive 2 GB Free 2 GB Free
RAM 1 GB 512 MB
DVD-ROM Optional Optional
Network card Platform compatible with TCP/IPwith transmission rate of 1000MBit/sec
Platform compatible with TCP/IPwith transmission rate of 100MBit/sec
Display 1024 x 768, 256 colors 1024 x 768, 256 colors
Software requirements
Operating system • Windows Server 2008 - Standard,Datacenter, and Enterpriseedition (64–bit)
• Windows Server 2003 R2 andSP2 - Standard, Datacenter andEnterprise edition (64–bit)
• Windows XP Professional SP2and SP3 (64–bit)
• Windows Vista SP1 - Enterpriseand Business edition (64-bit)
Note: On a 64–bit operating system,InputAccel functions as a 32-bitapplication using WOW64. Referto the Microsoft website for detailsabout WOW64.
• Windows Server 2008 - Standard,Datacenter, and Enterpriseedition (32–bit)
• Windows Server 2003 R2 andSP2 - Standard, Datacenter andEnterprise edition (32–bit)
• Windows XP Professional SP2and SP3 (32–bit)
• Windows Vista SP1 - Enterpriseand Business edition (32-bit)
15
System requirements and recommendations
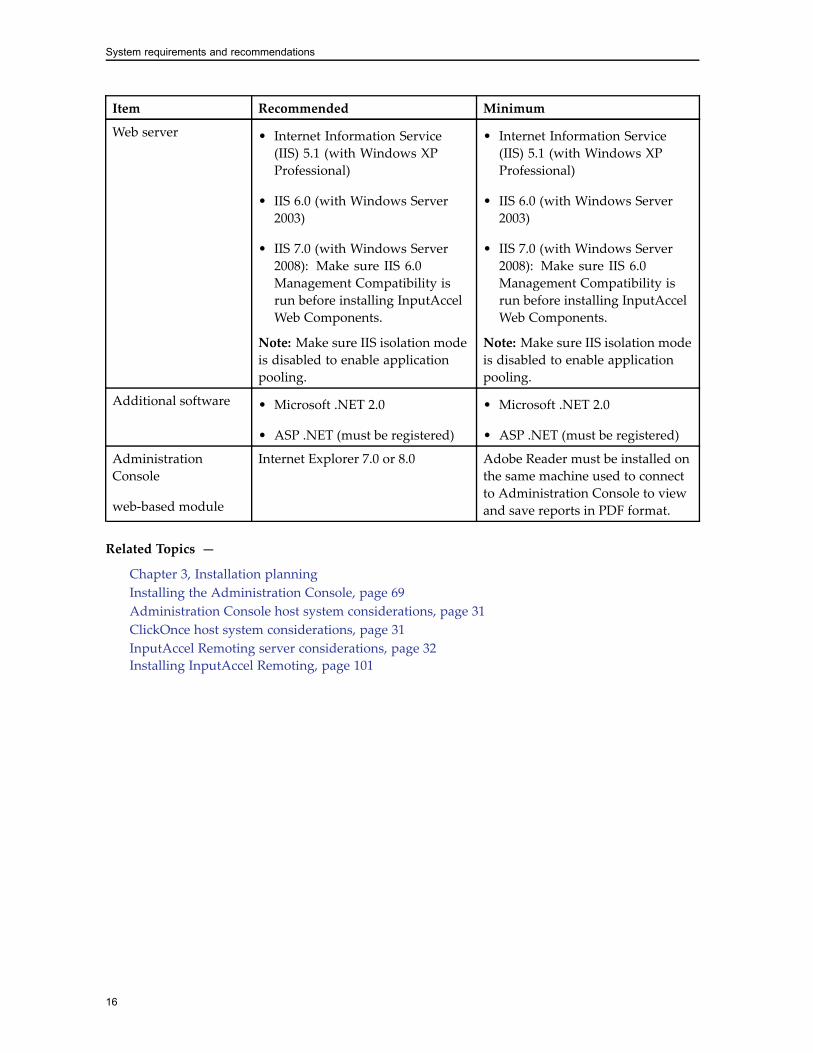
Item Recommended Minimum
Web server • Internet Information Service(IIS) 5.1 (with Windows XPProfessional)
• IIS 6.0 (with Windows Server2003)
• IIS 7.0 (with Windows Server2008): Make sure IIS 6.0Management Compatibility isrun before installing InputAccelWeb Components.
Note: Make sure IIS isolation modeis disabled to enable applicationpooling.
• Internet Information Service(IIS) 5.1 (with Windows XPProfessional)
• IIS 6.0 (with Windows Server2003)
• IIS 7.0 (with Windows Server2008): Make sure IIS 6.0Management Compatibility isrun before installing InputAccelWeb Components.
Note: Make sure IIS isolation modeis disabled to enable applicationpooling.
Additional software • Microsoft .NET 2.0
• ASP .NET (must be registered)
• Microsoft .NET 2.0
• ASP .NET (must be registered)
AdministrationConsole
web-based module
Internet Explorer 7.0 or 8.0 Adobe Reader must be installed onthe same machine used to connectto Administration Console to viewand save reports in PDF format.
Related Topics —
Chapter 3, Installation planningInstalling the Administration Console, page 69Administration Console host system considerations, page 31ClickOnce host system considerations, page 31InputAccel Remoting server considerations, page 32Installing InputAccel Remoting, page 101
16

System requirements and recommendations
Client workstation requirementsThis section lists the hardware and software requirements and recommendations that are commonfor all client machines running InputAccel client modules. It also lists specific requirements forspecific InputAccel client modules.
Topics in this section include:• Common requirements for all client modules, page 17
• Module-specific requirements, page 19
Common requirements for all client modules
This section lists the common system requirements for all InputAccel client modules.
Table 4. Common client module requirements
Item Recommended Minimum
Hardware requirements
CPU CPU-intensive tasks such asscanning, image enhancement,and optical characterrecognition:
• 2.0 GHz Pentium (orcompatible), 2 cores.
Less CPU-intensive taskssuch as exporting, indexing,image quality assurance, dataverification and validation, andInputAccel administration:• 2.0 GHz Pentium or(compatible).
2.0 GHz Pentium (orcompatible)
Hard drive 2 GB free 2 GB free
RAM • Windows Server 2008: 3 GB
• Windows Server 2003: 3 GB
• Windows XP Professional: 1GB
• Windows Vista: 3 GB
• Windows Server 2008: 2 GB
• Windows Server 2003: 2 GB
• Windows XP Professional:512 MB
• Windows Vista: 2 GB
DVD-ROM Optional Optional
17
System requirements and recommendations
Item Recommended Minimum
Network card Platform compatible withTCP/IP with transmission rateof 1000 MBit/sec
Platform compatible withTCP/IP with transmission rateof 100 MBit/sec
Display 1024 x 768, 256 colors 1024 x 768, 256 colors
Software requirements
Operating system • Windows Server 2008 -Enterprise edition (64–bit)
• Windows Server 2003 R2 andSP2 - Standard, Datacenterand Enterprise edition(64–bit)
• Windows XP ProfessionalSP2 and SP3 (64–bit)
• Windows Vista SP1 -Enterprise and Businessedition (64-bit)
Note: On a 64-bit operatingsystem, InputAccel functionsas a 32-bit application usingWOW64. Refer to the Microsoftwebsite for details aboutWOW64.
• Windows Server 2008 -Enterprise edition (32–bit)
• Windows Server 2003 R2 andSP2 - Standard, Datacenterand Enterprise edition(32–bit)
• Windows XP ProfessionalSP2 and SP3 (32-bit)
• Windows Vista SP1 -Enterprise and Businessedition (32-bit)
Additional software Adobe Reader: Required toview documentation that is inPDF format.
Adobe Reader: Required toview documentation that is inPDF format.
Related Topics —
Chapter 3, Installation planningAppendix B, InputAccel client modulesClient machine considerations, page 33Client scalability, page 36Module-specific requirements, page 19Installing the InputAccel Client Components, page 73Upgrading client modules, page 146
18

System requirements and recommendations
Module-specific requirements
This section lists the additional requirements for specific InputAccel client modules. Theserequirements and the Common requirements for all client modules, page 17 are required beforeinstalling these client modules.
Table 5. Module–specific requirements
Module MicrosoftInternetExplorer
Additional requirements
ApplicationXtender Export - EMC ApplicationXtender 5.3, 5.4, or 6.0
Note: AppXtender Workflow Manager 6.0 andAppXtender Workflow 6.0 have not been testedand are not supported for this release.
Archive Export - • SAP ERP Central Component (ECC) 5.0
• ECC 6.0 / NetWeaver 7.0
Documentum AdvancedExport
- • Content Server 5.3 SP1-6, 6.0 SP1, 6.5, or 6.5 SP1
• Documentum Foundation Classes (DFC) 5.3 SP5,6.0 SP1, 6.5, or 6.5 SP1 run time environments:— If using DFC 6.0 SP1, DFC 6.5, or DFC 6.5SP1, install the corresponding DFC hotfix touse the Use windows login option duringDocumentum Advanced Export setup.
— DFC uses the C:\Documentum directoryto store client data. The Documentumadministrator must grant write permissionsfor this directory to Documentum AdvancedExport operators.
— DFC creates a unique “dmcl” directorywhere the module or client-side script isrunning. Members of non-administratorgroups need write permissions to thisdirectory and its subdirectories. Without thispermission, DFC will not work correctly.The Documentum administrator must grantmodule operators write permissions to eachinstance of the dmcl directory.
• Microsoft Visual Studio 2005 (recommended towrite scripts)
ECM Web Services ImporterConfiguration
6.0 IIS 6.0 with support for ASP pages enabled
eCopy Connector - eCopy ShareScan 4.2 or 4.1
19

System requirements and recommendations
Module MicrosoftInternetExplorer
Additional requirements
FileNet Content ManagerExport
- • FileNet P8 Content Manager3.5, 4.0.1, or 4.5
• FileNet Enterprise Manager
Note: Verify the compatible FileNet EnterpriseManager version with IBM or FileNet support.
FileNet Panagon IS/CS Export - Requires one of the following:• FileNet Panagon Content Services 5.4 or 5.5
• FileNet Panagon Image Services 4.0.5
Global 360 Export - • Execute360 EX 10.0
• Global 360 Enterprise EX renamed to Execute3609.2.1
IBM CSSAP Export - DB2 Content Manager CommonStore for SAP 8.3
IBM CMIP-390 Export - DB2 Content Manager ImagePlus for Z/OS (OS/390)3.1
IBM CM Advanced Export - Requires one of the following:• DB2 Content Manager for z/OS 8.3 SP 5, 8.4.1
• DB2 Content Manager for z/OS 8.3 client with8.4 server
• DB2 Content Manager for iSeries 5.3
IndexPlus 7.0 and 8.0 • Microsoft Visual Studio 2005 (recommended towrite scripts)
• Adobe Reader: To view PDF files in the ImageView pane
• Microsoft Excel: To view XLS files in the ImageView pane
The ODBC functions that are accessed through theLegacyValidation script are compatible with thedatabases listed for the ODBC Export module.
MS SharePoint Export - Requires one of the following:• SharePoint Portal Server 2003 SP1-3
• Office SharePoint Server 2007
NuanceOCR - Append \Client\binnt\Nuance_ engine\ tothe PATH environment system variable.
20
System requirements and recommendations
Module MicrosoftInternetExplorer
Additional requirements
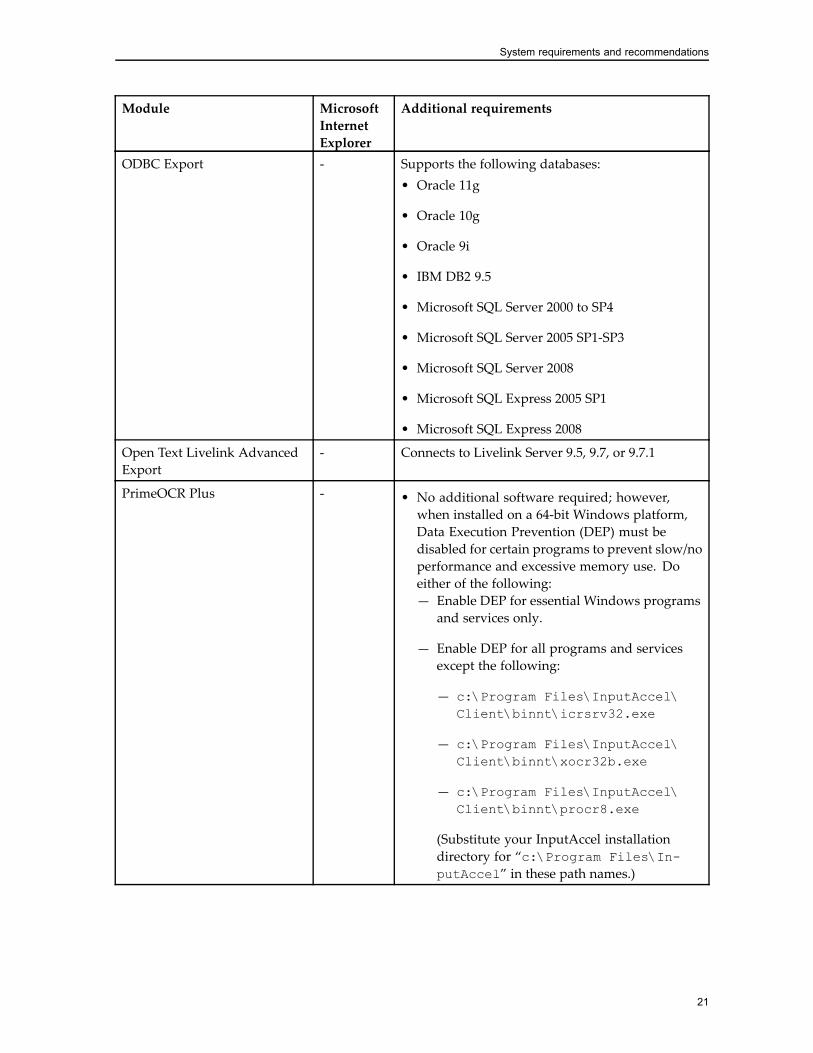
ODBC Export - Supports the following databases:• Oracle 11g
• Oracle 10g
• Oracle 9i
• IBM DB2 9.5
• Microsoft SQL Server 2000 to SP4
• Microsoft SQL Server 2005 SP1-SP3
• Microsoft SQL Server 2008
• Microsoft SQL Express 2005 SP1
• Microsoft SQL Express 2008
Open Text Livelink AdvancedExport
- Connects to Livelink Server 9.5, 9.7, or 9.7.1
PrimeOCR Plus - • No additional software required; however,when installed on a 64-bit Windows platform,Data Execution Prevention (DEP) must bedisabled for certain programs to prevent slow/noperformance and excessive memory use. Doeither of the following:— Enable DEP for essential Windows programsand services only.
— Enable DEP for all programs and servicesexcept the following:
— c:\Program Files\InputAccel\Client\binnt\icrsrv32.exe
— c:\Program Files\InputAccel\Client\binnt\xocr32b.exe
— c:\Program Files\InputAccel\Client\binnt\procr8.exe
(Substitute your InputAccel installationdirectory for “c:\Program Files\In-putAccel” in these path names.)
21

System requirements and recommendations
Module MicrosoftInternetExplorer
Additional requirements
PrimeOCR Plus (continued) - • When running PrimeOCR Plus as a service,the Network Service account must haveread/write permissions to the path C:\ProgramFiles\InputAccel\client\binnt\.
RescanPlus 7.0 and 8.0 • Microsoft Visual Studio 2005 (recommended towrite scripts)
• Adobe Reader: To view PDF files in the ImageView pane
• Microsoft Excel: To view XLS files in the ImageView pane
ScanPlus 7.0 and 8.0 • Microsoft Visual Studio 2005 (recommended towrite scripts)
• Adobe Reader: To view PDF files in the ImageView pane
• Microsoft Excel: To view XLS files in the ImageView pane
Script Engine - Microsoft Visual Studio 2005 (recommended towrite scripts)
Values to XML 6.0, 7.0, and8.0
-
Related Topics —
Chapter 3, Installation planningCommon requirements for all client modules, page 17Appendix B, InputAccel client modulesInstalling the InputAccel Client Components, page 73Upgrading client modules, page 146
22

System requirements and recommendations
Scanning workstation requirementsIn addition to the standard software and hardware required for all InputAccel client modules, thereare additional system requirements for a scanning workstation. The throughput of the scanningdevice that is used with InputAccel should be taken into account when matching it to the hostScanPlus client. We recommend that you use these guidelines for minimum hardware requirementsfor the system.
Note: For information about supported scanners and SCSI adapters, refer towww.scannerdrivers.com.
ISIS Driver Level Throughput (IPM,images per minute)
Minimum PentiumCPU
Minimum RAM
Level 1 Up to 20 IPM (binary) 300 MHz 64 MB
Level 1 Up to 20 IPM (color) 450 MHz 96 MB
Level 2 Up to 50 IPM (binary) 300 MHz 64 MB
Level 2 Up to 50 IPM (color) 900 MHz 128 MB
Level 3 Up to 100 IPM (binary) 450 MHz 64 MB
Level 3 Up to 100 IPM (color) 1.2 GHz 256 MB
Level 4 Up to 100 IPM (binary) 600 MHz 96 MB
Level 4 Up to 100 IPM (color) 2.4 GHz 512 MB
Related Topics —
Chapter 3, Installation planningCommon requirements for all client modules, page 17
23

System requirements and recommendations
24

Chapter 3Installation planning
Performing a successful InputAccel installation depends on having a good installation plan. Thereare several topics to consider before installing InputAccel. Topics in this section include:• General considerations, page 25
• Sample configurations, page 55
General considerationsWhen planning an enterprise InputAccel installation, you need to plan carefully and consider severaldifferent kinds of issues: hardware, software, locale, networking, security, system availability,backup, recovery, and more. The following table summarizes many of these issues and directs youto more information.
Item Planning activity
Localeconsiderations
Carefully consider the locale and codepage requirements of all InputAccelcomponents. Especially important in a distributed capture system. (Localeconsiderations, page 27)
Performance An enterprise document capture system should be able to keep up not only withthe data coming into the system, but also the data being processed through thesystem. (Performance and throughput, page 28.)
Scalability Decide whether to install the entire system at once or start with a small system andthen expand. InputAccel supports both server and client scalability. (Scalability,page 35.)
Security Carefully consider your security implementation. Your plan should cover thesecurity providers relative to local and remote administrators, local and remoteoperators, the SQL Server that hosts the InputAccel Database, and security withinIIS and Internet Explorer. (Security, page 37.)
Networkconfiguration
Determine how InputAccel will fit into your network topology. InputAccel canbe deployed to a single domain, multiple domains, or to a single, standalonemachine. (Installing InputAccel across multiple domains, page 44.)
25
Installation planning
Item Planning activity
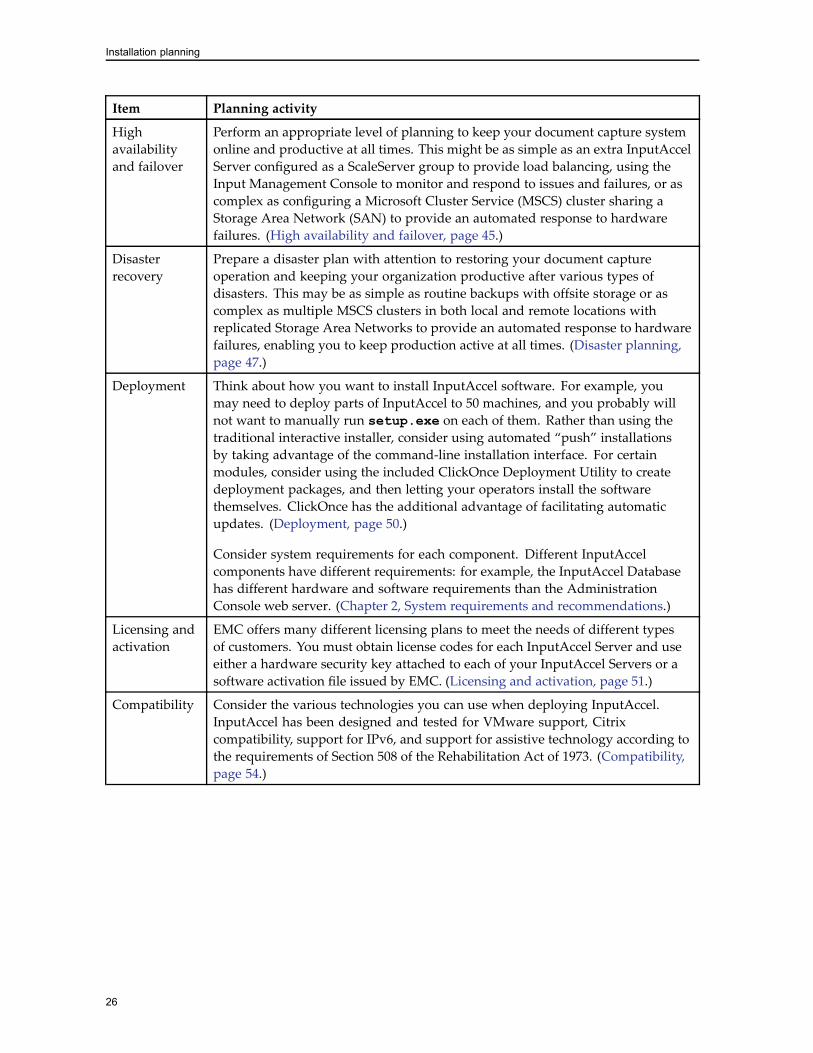
Highavailabilityand failover
Perform an appropriate level of planning to keep your document capture systemonline and productive at all times. This might be as simple as an extra InputAccelServer configured as a ScaleServer group to provide load balancing, using theInput Management Console to monitor and respond to issues and failures, or ascomplex as configuring a Microsoft Cluster Service (MSCS) cluster sharing aStorage Area Network (SAN) to provide an automated response to hardwarefailures. (High availability and failover, page 45.)
Disasterrecovery
Prepare a disaster plan with attention to restoring your document captureoperation and keeping your organization productive after various types ofdisasters. This may be as simple as routine backups with offsite storage or ascomplex as multiple MSCS clusters in both local and remote locations withreplicated Storage Area Networks to provide an automated response to hardwarefailures, enabling you to keep production active at all times. (Disaster planning,page 47.)
Deployment Think about how you want to install InputAccel software. For example, youmay need to deploy parts of InputAccel to 50 machines, and you probably willnot want to manually run setup.exe on each of them. Rather than using thetraditional interactive installer, consider using automated “push” installationsby taking advantage of the command-line installation interface. For certainmodules, consider using the included ClickOnce Deployment Utility to createdeployment packages, and then letting your operators install the softwarethemselves. ClickOnce has the additional advantage of facilitating automaticupdates. (Deployment, page 50.)
Consider system requirements for each component. Different InputAccelcomponents have different requirements: for example, the InputAccel Databasehas different hardware and software requirements than the AdministrationConsole web server. (Chapter 2, System requirements and recommendations.)
Licensing andactivation
EMC offers many different licensing plans to meet the needs of different typesof customers. You must obtain license codes for each InputAccel Server and useeither a hardware security key attached to each of your InputAccel Servers or asoftware activation file issued by EMC. (Licensing and activation, page 51.)
Compatibility Consider the various technologies you can use when deploying InputAccel.InputAccel has been designed and tested for VMware support, Citrixcompatibility, support for IPv6, and support for assistive technology according tothe requirements of Section 508 of the Rehabilitation Act of 1973. (Compatibility,page 54.)
26

Installation planning
Locale considerations
InputAccel supports multiple languages, including English. For InputAccel to function correctly, it isnecessary to configure locale, globalization, and codepage settings appropriately:• InputAccel supports English, French, Spanish, Italian, German, Brazilian Portuguese (Windowscodepage 1252), and Russian (Windows codepage 1251) locales. Refer to Appendix C, Languagessupported for a list of languages supported in InputAccel, their language codes, and locale IDs.
• Locale settings include the country and region settings, globalization settings represent theformatting of items such as currency symbols, separator characters, date formats, and so on.Codepage specifies the specific set of characters to support the languages supported by thecodepage. Locale, globalization, and codepage settings are specified in the Regional and LanguageOptions of the Windows Control Panel. Always make sure locale specified is supported by theWindows codepage selected.
• The user’s locale, globalization, and codepage settings specified on all InputAccel Servers andInputAccel client machines, including the Administration Console web server, must be identical.If the settings do not match, the InputAccel client or Administration Console will not connect tothe InputAccel Server.
• Locale and globalization settings are per-user and codepage settings are per machine. Eachuser, including any built-in system users that may be used to run modules as services, mustindividually set their locale to match the settings of the InputAccel Server(s) to which they connect.
• For the user interface language and globalization settings (formatting of date, currency symbols,and so on) to display correctly, the locale, globalization settings, and language settings must be setaccurately in the Regional and Language Options of the Windows Control Panel.
Related Topics —
Specifying default UI language settings, page 77Procedures to override the UI language, page 79
27

Installation planning
Performance and throughput
Maximizing performance and throughput are key objectives when designing an InputAccel system.Many factors affect performance and throughput, but at the top of the list are the server processors,their disk systems, and the network to which they connect. This is the InputAccel infrastructure. Ifyou correctly plan the infrastructure for your InputAccel installation, you can take advantage of themodularity of InputAccel.
This modularity enables you to adjust the InputAccel configuration to meet your actual productionneeds after observing the system in production mode for a period of time. You can add moremodules, more workstations, more InputAccel Servers, and more operators as needed until youmeet your production goals.
To maximize the performance and throughput at all points in your InputAccel system, you shouldconsider each of the following components individually:
• Database server considerations, page 28.
• InputAccel Server considerations, page 30.
• Administration Console host system considerations, page 31.
• ClickOnce host system considerations, page 31.
• InputAccel Remoting server considerations, page 32.
• Web Services subsystem considerations, page 32.
• Client machine considerations, page 33.
Database server considerations
The machine that hosts the InputAccel Database must service queries and store batch and task datafrom each InputAccel Server, each client module, and each running instance of the AdministrationConsole. In addition, it must process every transaction related to reporting and logging, and storethese results until they are purged, either by a manual or scheduled job.
In high volume environments, install the InputAccel Database server on a fast multi-CPU machinewith as much RAM as its operating system will support. Consider using a 64-bit operating system toprovide access to additional memory. (32-bit Windows limits usable memory to 3 GB.)
Depending on your batch volume and on the logging and reporting rules you have enabled,InputAccel Database storage requirements can become very large. High throughput becomes criticalto maintaining production volumes. Choose the latest high-speed technology from among availabledisk storage systems. The network connection between the InputAccel Server and the InputAccelDatabase must have high bandwidth (I GB per second) and low latency. For the InputAccel Databasedata directory, configure multiple identical disk drives in a RAID configuration to achieve therequired reliability and failure protection. Use trusted and reliable disk drives with high performanceand high capacity ratings. Connect the drives to disk controllers that provide hardware-level supportfor RAID 0+1. (RAID 0+1 is recommended, RAID 0 is also acceptable, and the minimum requirementis for RAID 5.) In addition, the disk drives should have on-board disk caching of at least 32 MB,write-back caching (write to RAM), read-ahead optimization, and battery backup for the on-board
28

Installation planning
cache. Disk controllers that are integrated into motherboards typically do not provide the features,performance, or reliability that an enterprise platform demands.
Note:• Make sure that the SQL Server that hosts the InputAccel Database has sufficient connectionsavailable to accommodate your InputAccel system. Every InputAccel Server, AdministrationConsole web server, each client module, and each web service instance consumes one connection.
• In a typical deployment, only a small amount of processing time is consumed interacting with theInputAccel Server and clients. Reports that issue complex queries put a much greater load onthe database. An InputAccel installation has only one InputAccel Database instance; therefore,to increase database performance, you must increase the performance of the server that hoststhe InputAccel Database. You cannot increase performance by adding more instances of theInputAccel Database.
• Multiple, separate InputAccel systems must each have their own InputAccel Database. If yourSQL Server has the necessary performance, then multiple InputAccel Databases (each with adifferent name) can be installed on a single instance of SQL Server.
• The machine hosting the InputAccel Database should have the highest-speed network connectionavailable to ensure maximum throughput.
• The amount of data written to the InputAccel Database is related to the amount of logging andreporting that has been configured. Enabling Audit Logging causes the InputAccel system towrite a lot of data to the InputAccel Database. Enabling Reporting writes even more data.
• SQL Server Express does not accept connections over the TCP/IP protocol by default. It isrequired to enable TCP/IP connections before installing the InputAccel Database. In SQL ServerConfiguration Manager, SQL Server Express must be configured to allow TCP/IP protocol accessover port 1433. You must enable TCP/IP protocol for each IP address used by the system, makesure that TCP Port field is blank, and then restart the SQL Server Express service. Not configuringthe SQL Server Express to allow for TCP/IP access may lead to connection errors.
• Microsoft SQL Server Express editions must only be used in low page volume deployments withminimal reporting and logging expectations due to the following limitations:— Databases are limited to a maximum of 4 GB. When the database reaches this size, you mustmanually purge batches and other data before you can continue to use InputAccel.
— SQL Server Express does not support configuration for failover or high availability.
— SQL Server Express supports the use of 1 GB of RAM, and utilizes one CPU If your machinehas multiple CPUs, SQL Server Express will use only one from those available.
— SQL Server Express creates a named instance by default. This can be changed during the SQLServer Express installation, if preferred. If it is not changed to an unnamed instance, you mustspecify the instance name in all database connection strings.
— SQL Server Management Studio Express is not automatically installed with all versions of SQLServer Express, but it is available as a separate installation from Microsoft.
Related Topics —
Chapter 3, Installation planningDatabase server requirements, page 11Installing the InputAccel Database, page 65Database issues, page 164
29

Installation planning
InputAccel Server considerations
Each InputAccel Server in your enterprise stores multiple copies of every image it processes - one ormore for every module step that creates an output image. (ScanPlus can create multiple images perpage scanned when used with MultiStream scanners, and IndexPlus can be configured to outputmultiple images per input image.) Image data requires more time to read and write and more diskspace to store than typical text data. Use high-speed dual or quad-core machines with 32- or 64-bitoperating systems. More available memory enables the InputAccel Server to handle higher volumesmore efficiently. For this reason, even though the InputAccel Server is a 32-bit application, westrongly recommend installing it under 64-bit Windows where it can access the full 32-bit memoryspace (4 GB). (Under 32-bit Windows, maximum memory is limited to 3 GB, no matter how muchphysical memory is available.)
Use the same performance considerations as for the InputAccel Database (described in Databaseserver considerations, page 28) for selecting a network connection and a disk system for theInputAccel Server data directory (C:\IAS by default). Also, do not locate the InputAccel Server datadirectory and the Windows paging file on the same physical disk drive.
Note: The InputAccel Server fully supports locating its main directory structure on an NTFS filesystem, and uses the built-in NTFS security system (access control lists) to implement its ownsecurity. Alternatively, the InputAccel Server main directory can be located on a non-NTFS filesystem, such as is used in many Network Attached Storage (NAS) and Storage Area Network (SAN)devices. However, when installed on a non-NTFS file system, ACL-based security is not supported.
Another option for improving performance is to install multiple InputAccel server instances asdescribed in Installing multiple instances of InputAccel Servers, page 84. Each InputAccel Serverinstance should have 4 GB RAM and should have its data directory on a separate disk drive.
Be aware that even though the InputAccel Server will run under a VMware ESX server, doing so willdegrade the InputAccel Server performance by approximately 20%.
Caution: The machine name of the InputAccel Server must not be longer than 15 characters;otherwise, client machines will be unable to connect.
Related Topics —
InputAccel Server requirements, page 13Installing the InputAccel Server, page 67Upgrading the InputAccel Server, page 142ScaleServer issues, page 165
30
Installation planning
Administration Console host system considerations
The Administration Console is hosted by Microsoft Internet Information Services (IIS) and has aminimal performance impact. Unless the system that hosts the Administration Console is beingshared with other InputAccel components, no special performance or throughput considerations arerequired for this machine.
Note:• Be sure that IIS isolation mode is disabled. This enables the use of the IIS application pool.
• Be sure to specify a unique port in the Administration Console setup program. The AdministrationConsole setup program checks for other ports already used by IIS; however, it does not checkother applications for port conflicts. If another application is using the port, the AdministrationConsole will not be accessible.The Administration Console and InputAccel Remoting must be installed on separate machines.
Related Topics —
InputAccel web components and ClickOnce host requirements, page 15Installing the Administration Console, page 69
ClickOnce host system considerations
Several InputAccel client modules can be distributed by using Microsoft ClickOnce deploymenttechnology. ClickOnce can be accomplished either by deploying applications from a file share orfrom an IIS web server. In either case, installations are relatively infrequent and have minimalperformance impact. Unless the system that hosts ClickOnce is being shared with other InputAccelcomponents that have special needs, no special performance or throughput considerations arerequired for this machine.
Before deploying modules using ClickOnce, we strongly recommend that you have ClickOncepublishing skills or at minimum an understanding of ClickOnce technology. Be sure to read thearticles about ClickOnce technology available on the Microsoft MSDN website.
Note:• You cannot specify command-line parameters (such as -department) when a module isdeployed by ClickOnce from a file share, because the shortcut icon that is created does notreference an actual module that can accept command-line arguments. If operators must specifydepartments or other command-line arguments when starting modules, you must deploy themodules from an IIS web server.
• Due to the way ClickOnce-deployed modules are registered, they are unable to write completemodule information to the Windows Event Log. Therefore, message descriptions in the Event Logwill not exactly match messages displayed in the Administration Console.
Related Topics —
Chapter 3, Installation planningInstalling the Administration Console, page 69InputAccel web components and ClickOnce host requirements, page 15Installing InputAccel Remoting, page 101
31

Installation planning
InputAccel Remoting server considerations
If you want to use distributed client workstations that do not have direct access to your InputAccelnetwork, you can set up an InputAccel Remoting server. This server enables remote clientworkstations to use the Internet to connect and authenticate with an InputAccel system.
Note:• You can publish ClickOnce modules on any server configured according to Microsoft ClickOncerequirements. As an option, consider ClickOnce publishing under the InputAccel Remotingwebsite. To do so, install an InputAccel Remoting website first, and then create a ClickOnceweb directory under it.
• Be sure to specify a unique port in the InputAccel Remoting setup program. The InputAccelRemoting setup program checks for other ports already used by IIS; however, it does not checkother applications for port conflicts. If another application is using the port, the InputAccelRemoting service will not be accessible.
• Be aware that logging into a remote module that is connecting through the InputAccel Remotinghost will take considerably longer than modules that are logging in locally, because in addition toauthenticating and authorizing the user, the module also downloads configuration information,client side scripts, and a list of batches.
Caution: We strongly advise you to disable application pool worker process recycling for the IISserver that is hosting InputAccel Remoting. By default, recycling is enabled and set to 29 hours.Remote users will be disconnected from the InputAccel system and potentially lose data if theIIS instance that hosts InputAccel Remoting recycles its worker processes.
Related Topics —
Chapter 3, Installation planningInstalling the Administration Console, page 69InputAccel web components and ClickOnce host requirements, page 15Installing InputAccel Remoting, page 101
Web Services subsystem considerations
If you are planning to use the InputAccel Web Services subsystem, consider setting up one or morededicated Web Services Hosting servers. Depending on your needs, a single server may be adequate;however, many enterprises have a need to handle both internal and external web service requests andresponses, and so you may want to have one instance of Web Services Hosting openly accessible fromthe local network and another instance accessible from the Internet through a firewall.
A single instance of Web Services Coordinator handles requests from all instances of Web ServicesHosting. The Web Services Coordinator communicates directly with the InputAccel Database,and should therefore be installed on a secure server with a high-speed network connection to theInputAccel Database host machine. Depending on the required performance of the Web Servicessubsystem, the Web Services Coordinator may share the same machine as the internal-facing WebServices Hosting instance or may require a separate, dedicated machine.
32

Installation planning
Note: Although you may install multiple instances of Web Services Hosting, this component doesvery little processing. Typically the only reason to install multiple instances is to separate internalfrom external request/response traffic. In any case, an InputAccel system may have only one WebServices Coordinator instance.
Before attempting to use the Web Services Input be sure that the Web Services Hosting and WebServices Coordinator services are started. Before attempting to use the Web Services Output, be surethat the Web Services Hosting service is started.
Related Topics —
Chapter 3, Installation planningInputAccel Remoting server considerations, page 32Installing InputAccel Remoting, page 101
Client machine considerations
InputAccel has operator-attended client modules and unattended client modules. The InputAccelclient setup program supports installation of any combination of InputAccel modules on a singlemachine. Use the information in Chapter 2, System requirements and recommendations, to configureyour client machines.
The network connection between the InputAccel Server and the client modules must have highbandwidth (I GB per second) and low latency.
Typically, operator-attended modules should be installed on an as-needed basis. For example, ifscanning operators only scan pages and never do indexing, then only install the ScanPlus moduleon their workstations. In cases where one operator performs multiple functions, install all neededmodules on that workstation.
Unattended modules are configured and run continuously in a “wait for task” mode, processing taskswhenever they are received from the InputAccel Servers. Unattended modules are server-gradeapplications that should be installed on IT-managed servers and, if supported, run as Windowsservices. (Refer to Table 12, page 172 for a list of modules that run in unattended mode and that run asservices.) For unattendedmodules that are run as services, no operator intervention is required. Whenrunning modules as services, you can choose to run them under a user account or a machine account.
To achieve optimum throughput without wasting available processing power, consider that somemodules require relatively little processing power while others require a lot of processing power.
Export modules typically use minimal amounts of processing power and only process tasksintermittently. Multiple modules of this type may be hosted by a single processor without creatinga bottleneck. On the other hand, page recognition and image enhancement modules can use allavailable processing power over extended periods and still may not keep up with the number of tasksbeing generated for them. Modules of this type typically should have dedicated processors and, insome cases, multiple instances of a module may be needed, each running on a separate processor. Forexample, to perform full-page optical character recognition on every page you capture, you mustinstall enough instances of the selected OCR module to keep up with this workload.
33
Installation planning
To determine the actual number of instances required for your particular needs, you must observethe system in typical production operation, find the bottlenecks, and add module instances until thethroughput is satisfactory. This process is known as client balancing and is accomplished by bringingone module instance on line at a time until the average number of new tasks being generated for themodule is less than the number of tasks being processed by all module instances.
Note: When performing client balancing, it may not be necessary to install multiple module instanceson separate physical machines. For example, if you are using high-performance, multiprocessormachine systems, you may be able to install multiple instances of a page recognition or imageprocessingmodule on onemachine. Or youmay be able to install a combination of processor-intensivemodules and non-processor-intensive modules on one machine. Table 12, page 172 provides a list ofmodules that can run as services as well as modules for which multiple instances can be configured torun as services on a single machine. Manually registering a client module to run as a service, page113 explains how to configure modules that have already been installed to run as services.
Related Topics —
Best practices for running modules as services, page 34Appendix B, InputAccel client modulesCommon requirements for all client modules, page 17
Best practices for running modules as services
When configuring modules to run as services, you can choose to run a module under a user accountor under the built-in Network Service account. After configuring the module’s “run-as” account, youmust assign module permissions to the account by using the Administration Console.
Running modules as services under a user accountIf you choose to run the module under a user account, you must supply the user name, password,and domain of this user. If you choose to install modules as services from the client setup program,you can specify credentials at that time.
Note: All modules that are installed at one time are configured to use the same credentials.
• Use the Administration Console to assign permissions to the user account or to the group to whichthe user account belongs.
Running modules as services under the built-in Network Service accountIf you choose to run the module under the Network Service machine account:• During client module installation: Select Use the built-in Network Service account in theInputAccel Services Accounts pane of the client setup program.
• After client module installation: Specify the Network Service account in the Login tab of theWindows Service Control Manager Properties window.
• Use the Administration Console to assign permissions to the machine account. The way you dothis depends on whether you are running InputAccel in a normal production configuration or ona single machine as a development or demonstration system.
— If you are running InputAccel in a normal production configuration, assign permissions inthe Administration Console to the machine name that is running the module(s) as a NetworkService. To simplify permissions management, consider creating a group containing the
34

Installation planning
names of all of the machines running modules as services, and then select that group toassign permissions.
— If you are running InputAccel in a development or demonstration configuration, where allcomponents are installed on a single machine, assign permissions in the AdministrationConsole to the Network Service account. To do this, select the Include built-in securityprincipals checkbox in the Select User or Group window
For modules that support multiple service instances (as listed in Table 12, page 172), considerinstalling multiple instances on a single, multi-core machine to achieve client balancing as needed.For modules that do not support multiple service instances, consider running multiple instances inseparate virtual machines on the same physical, multi-core machine.
Related Topics —
Appendix B, InputAccel client modulesCommon requirements for all client modules, page 17Installing the InputAccel Client Components, page 73
Scalability
The modularity that is built into InputAccel enables customers to configure and reconfigure theirInputAccel system to meet their changing needs. Both server and client subsystems of InputAccel aremodular and scalable.
Topics in this section include:• InputAccel Server scalability, page 35
• Client scalability, page 36
InputAccel Server scalability
When your document capture workload exceeds the capabilities of a single InputAccel Server, youcan scale up your system by adding more InputAccel Servers and creating a ScaleServer group. AScaleServer group combines multiple InputAccel Servers into a single information capture system.Both attended and unattended modules can connect to the servers in a ScaleServer group, afterwhich they can receive and process tasks from all connected servers. In addition to expanding theworkload capacity over a single InputAccel Server, ScaleServer groups can also help to ensure thatyour client modules and their operators spend less idle time waiting for new tasks to arrive. Youcan adjust the number of client modules and InputAccel Servers to achieve the required balance ofthroughput. The ideal scenario is to have enough server capacity to process as many incomingbatches as necessary while having enough client capacity to keep up with, but not exceed, the taskprocessing requirements of the workload.
Most modules are ScaleServer compatible and therefore can connect to all InputAccel Servers inthe group simultaneously. Modules that are not ScaleServer compatible can connect to any oneInputAccel Server in the ScaleServer group at a time. (Modules cannot connect to multiple arbitraryInputAccel Servers— they can only connect to multiple servers that have been configured together asa ScaleServer group.) For a list of ScaleServer compatible modules, refer to Table 12, page 172.
35
Installation planning
Additional InputAccel Servers can be added to a ScaleServer group when your InputAccel system isinitially configured or at any later time. For more information on managing and licensing ScaleServergroups, refer to the Using Administration Console section in the Administration Guide. Forinstructions on installing a ScaleServer group, refer to Configuring multiple InputAccel Servers as aScaleServer group, page 85.
Note: A ScaleServer group is not a redundant or failover system. ScaleServer technology providesdata and process sharing as well as load balancing capabilities; it does not provide data redundancy.
The InputAccel Server is also scalable by virtue of its side-by-side installation capability. If you areusing high-end server hardware with multiple cores/multiple CPUs, you can take advantage of theadditional processing power by installing multiple side-by-side instances of the InputAccel Server.This configuration enables better parallel execution of batches when running on multi-processormachines. The actual performance benefit depends on your task load and the types of tasks youare processing.
Side-by-side installation also enables multiple instances of the InputAccel Server to be installed in anActive/Active MSCS Cluster, as explained in High availability and failover, page 45.
Related Topics —
InputAccel Server requirements, page 13Installing the InputAccel Server, page 67Upgrading the InputAccel Server, page 142ScaleServer issues, page 165
Client scalability
InputAccel client modules process tasks sent to them from the InputAccel Server(s). A task is a unit ofwork whose size is determined by the design of the process being used, and may be a single page,multiple pages, an entire document, or an entire batch (perhaps thousands of pages). The design ofInputAccel enables multiple modules to simultaneously process different tasks from all in-processbatches. This means that production bottlenecks caused by slow modules can be resolved by addingmore machines running those modules. There are several factors to consider when planning thenumber of each module required:
• The volume of incoming paper that must be processed. For example, a high-speed scanner with askilled operator may be able to scan 20,000 pages per shift, but you may need to process 200,000pages per 24-hour period. InputAccel enables you to install as many ScanPlus (and RescanPlus)workstations as required to handle your workload.
• The amount of processing power the module needs. For example, an OCR module requires muchmore time to process a task (recognize a page of text) than an export module requires to exportthe same page of text. InputAccel enables you to add as many OCR modules as necessary tokeep up with the system workload.
• The amount of time an operator requires to process a task. For example, manual indexinginvolving many fields that must be manually keyed by an operator takes more time than simpleindexing tasks. Also, operator skill and other external factors affect the time required to processeach task. InputAccel enables you to add as many IndexPlus workstations as needed to keep upwith the indexing workload.
36
Installation planning
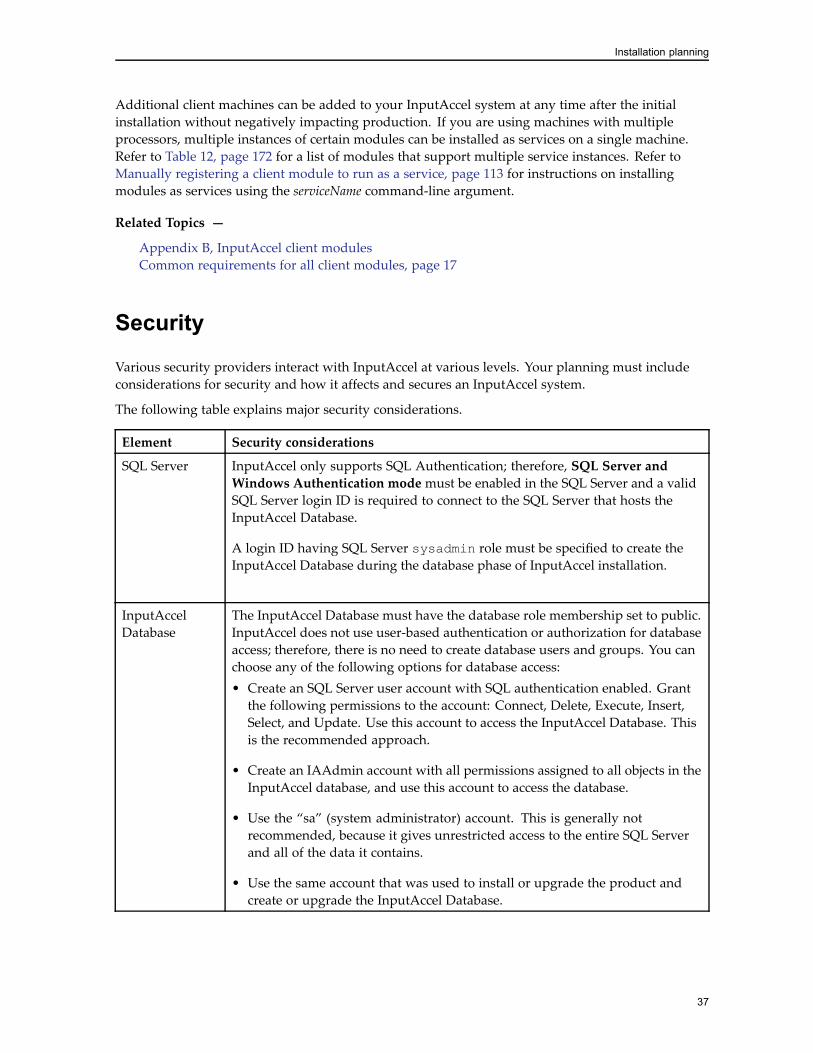
Additional client machines can be added to your InputAccel system at any time after the initialinstallation without negatively impacting production. If you are using machines with multipleprocessors, multiple instances of certain modules can be installed as services on a single machine.Refer to Table 12, page 172 for a list of modules that support multiple service instances. Refer toManually registering a client module to run as a service, page 113 for instructions on installingmodules as services using the serviceName command-line argument.
Related Topics —
Appendix B, InputAccel client modulesCommon requirements for all client modules, page 17
Security
Various security providers interact with InputAccel at various levels. Your planning must includeconsiderations for security and how it affects and secures an InputAccel system.
The following table explains major security considerations.
Element Security considerations
SQL Server InputAccel only supports SQL Authentication; therefore, SQL Server andWindows Authentication modemust be enabled in the SQL Server and a validSQL Server login ID is required to connect to the SQL Server that hosts theInputAccel Database.
A login ID having SQL Server sysadmin role must be specified to create theInputAccel Database during the database phase of InputAccel installation.
InputAccelDatabase
The InputAccel Database must have the database role membership set to public.InputAccel does not use user-based authentication or authorization for databaseaccess; therefore, there is no need to create database users and groups. You canchoose any of the following options for database access:• Create an SQL Server user account with SQL authentication enabled. Grantthe following permissions to the account: Connect, Delete, Execute, Insert,Select, and Update. Use this account to access the InputAccel Database. Thisis the recommended approach.
• Create an IAAdmin account with all permissions assigned to all objects in theInputAccel database, and use this account to access the database.
• Use the “sa” (system administrator) account. This is generally notrecommended, because it gives unrestricted access to the entire SQL Serverand all of the data it contains.
• Use the same account that was used to install or upgrade the product andcreate or upgrade the InputAccel Database.
37

Installation planning
Element Security considerations
InputAccelServer
The Federal Information Processing Standard (FIPS) provides the best practicesfor implementing cryptographic software. The InputAccel Server is designed tooperate with Microsoft operating systems that use FIPS-compliant algorithmsfor encryption, hashing, and signing.
User accounts Consider using matching Windows user groups and InputAccel permissionsroles for your users to simplify permissions control. By default, the IIS MachineAdministrators user is assigned all InputAccel permissions. A member of theIIS Machine Administrators group must create a new role for the InputAcceladministrator, and usually will grant all permissions to that role, and then addat least one member to it — the user designated as the InputAccel administrator.
Caution: Remove the IIS Machine Administrators account as soon asyou set up the required accounts for accessing InputAccel. Leaving thisaccount active enables anyone with local access to the machine to log in asan InputAccel Administrator.
Consider creating an “InputAccel Supervisors” role with members havingspecific Administration Console permissions and full permissions to runclient modules, and an “InputAccel Operators” role with members having noAdministration Console permissions but full permissions to run client modules.Depending on your security requirements, you could break down these rolesinto additional roles with finer divisions of permissions and/or members.
InputAccel requires that user accounts have passwords. Blank passwords arenot supported in any scenario, even on a single-machine installation.
Passwords must not contain “@” symbols because this symbol is used as adelimiter in InputAccel command line arguments.
Servers and client modules running as services can be configured to run under aspecific user account or a built-in machine account.
As with most software applications, the user installing InputAccel componentsmust be a member of the machine’s local Administrators group.
In addition to user credentials and Windows permissions, all InputAccelmodules require that users be assigned to roles to which necessary permissionshave been granted. These InputAccel security roles are managed throughthe Administration Console. For more information, refer to the UsingAdministration Console section of the Administration Guide.
38

Installation planning
Element Security considerations
Authentication InputAccel uses Microsoft Windows user accounts for authentication andauthorization. Except when installed on a single machine for development ordemonstration purposes, these user accounts must be domain accounts and mayuse any of the authentication security providers used by Windows: NTLM,Kerberos, or Negotiate.
In a multiple-domain environment, you must create trusts between the differentdomains so that cross-domain authentication can succeed. The minimum trustrelationship required is “Nontransitive One-Way External Trust” from thedomain with clients that need to authenticate to the domain that has serverswhich must perform the authentication.
Client privileges Client software may run under individual domain user accounts or themachine account Network Service. Access can be controlled by settingthe permissions for these accounts, and can be further controlled by usingInputAccel user roles and further refined by employing InputAccel ACLs.User roles and ACLs are managed in the Administration Console. In addition,InputAccel licensing globally restricts which components can be run and howmany components can connect to an InputAccel Server at one time.
Webcomponents
• The following components are hosted by IIS, which should be configured touse Secure Sockets Layer (SSL) to ensure user credentials and data traffic areencrypted between the hosts and their clients:— Administration Console
— ClickOnce deployment
— InputAccel Remoting
— ECM Web Services Importer
• Access to these components is controlled by several security providers,including the web server that is hosting the component, Windowsuser permissions (ACLs), InputAccel licensing, and AdministrationConsole-assigned user roles.
• Security settings for IIS 7.0 require enabling of these role services securitysettings:— Basic Authentication
— Windows Authentication
— IIS Client Certificate Mapping Authentication
39

Installation planning
Element Security considerations
Firewalls The InputAccel Database, InputAccel Servers, InputAccel client modules, WebServices subsystem, Administration Console host, and InputAccel Remotinghost must all communicate with one another freely over specific ports.
Corporate firewalls must be configured to forward network traffic on the specificports which these components require. Personal firewalls must also supportcommunication in and out of the machine they are protecting and must beconfigured to pass network traffic on the required ports.
The customer is responsible for configuring firewall software in a compatiblemanner, as follows:
• Ensuring that all InputAccel components (InputAccel Servers, AdministrationConsole, all directly-connected client modules, and the InputAccel Remotingserver, if used) can communicate with the InputAccel Database. Firewallsin the path of the SQL Server that hosts the InputAccel Database must beconfigured to pass network traffic on the TCP port 1433.
Note: Clients connecting through HTTP using InputAccel Remoting are anexception — they do not typically need firewall configuration.
• Web Services Coordinator receives calls from Web Services Hosting through.NET Remoting on TCP port 40571. The Web Services Input modules receivecalls from Web Services Coordinator through .NET Remoting on TCPport 12007 by default. The Administration Console also communicateswith Web Services Coordinator using TCP port 12007. Any firewall in thecommunication path among these components must be configured to passnetwork traffic on these ports.
• Ensuring that the InputAccel client modules are able to communicate withthe InputAccel Servers and the InputAccel Remoting server, if used. Thisrequires that any firewall between the client modules and the InputAccelServers be configured to pass network traffic on the required port (port 10099,by default). The InputAccel Server setup program offers to automaticallyconfigure Windows Firewall as needed; however, the customer is responsiblefor configuring any other third-party firewall.
Note: When installing an InputAccel Server, you can change the porton which it listens for network traffic. The default port is 10099. Tospecify a different port, you must use the command-line installationproperty IAS-INSTANCEn_PORT_NUMBER described in InputAccel ServerComponents installer properties, page 188. You must configure each clientworkstation to communicate on the same port as your InputAccel Server.You can do this interactively or by using the IASERVERPORT installationproperty during client installation.
• Ensuring that HTTP traffic for the specified Administration Console port(port 80, by default) is not blocked by firewall configuration.
40

Installation planning
Element Security considerations
Remote access Remote access to InputAccel is facilitated by the InputAccel Remotingcomponent, which establishes a proxy server hosted by IIS. This componentshould be installed only if your operators need to connect to the InputAccelServer from remote locations over the Internet.
Other security considerations include:• Running InputAccel in a hardened environment, page 41
• Running InputAccel with minimum Windows permissions, page 41
Running InputAccel in a hardened environment
Microsoft publishes documentation about running its server products in a secure, or hardened,environment. Hardening machines means establishing security policies, applying all of the latestoperating system security patches, disabling unneeded services, enabling firewalls, blocking unusedports, and all the other details of configuring an IT infrastructure to block unwanted access.
InputAccel is intended to run in a hardened environment and has been tested with some commonbut not all possible hardened configurations and components.
Related Topics —
Chapter 1, InputAccel overviewChapter 3, Installation planning
Running InputAccel with minimum Windows permissions
Good security practice includes setting up machines to run their applications with the minimumpossible permissions. The following are the minimumWindows permissions required for InputAccelcomponents:
• InputAccel Database:— User: An SQL Server user account with SQL authentication enabled and these permissionsenabled: Connect, Delete, Execute, Insert, Select, and Update.
• InputAccel Servers:
— User: Must be a part of the Administrators group on the local machine.
— Directories: Must have Read/Write access to the IAS data directory (c:\IAS bydefault) and to c:\Documents and Settings\All Users\Application
41

Installation planning
Data\EMC\InputAccel. Must have Read access to the IAS installation directory(c:\Program Files\InputAccel\Server\Server, by default).
• Administration Console:— User: The “run as” account for the Administration Console must be a member of theAdministrators group on each of the InputAccel Server machines, as well as a member of theIIS_WPG group on the machine hosting the Administration Console.
— Users of Administration Console: On the Administration Console web server, add a group ofusers that will access Administration Console. Grant the “Access this machine from network”local security setting to the group. Also, make sure that the group is not denied network accessto the Administration Console web server by ensuring the group is not associated with the“Deny access to this machine from the network” security setting.
— Directories: Must have Read/Write access to c:\Windows\Microsoft.NET\Framework\v2.0.50727\Temporary ASP.NET Files and to theAdministrationConsole directory and its subdirectories (located inC:\Inetpub\wwwroot\AdministrationConsole, by default).
• All modules:
— User: Client machines must be a member of the local Users group. All users must have Readaccess to the InputAccel Server (IAS) data directory (c:\IAS by default) on each of theInputAccel Servers. In addition, modules that create batches (for example: ScanPlus, EmailImport, WS Input) need Write access to the same folder.
— Directories:— Non-Vista operating system: Must have Read/Write access to c:\Documents and
Settings\All Users\Application Data\EMC\InputAccel\settings.ini
— Vista operating system: Must have Read/Write access toc:\ProgramData\EMC\InputAccel\settings.ini
— All operating systems: Modules not listed as “New in InputAccel 6.0” in Table 12, page 172must have Read/Write access to c:\Windows\win.ini.
— Registry: Must have Read/Write access to the Registry to enable the logging library to reportperformance counter information. Without this access, modules will run but will not reportperformance data.
42

Installation planning
• All modules listed as “New in InputAccel 6.0” in Table 12, page 172:— User: Client machines must be member of the local Users group. “Run as” users that haveaccess to the network.
To use command-line arguments to install, remove, or change service settings, the user mustbe a member of the Administrators group. The account that is assigned to the service throughthe command line is automatically granted the “Service Logon” right.
— Directories: Must have Read access to the .NET config directory and to other commonWindows directories such as c:\Windows\System32.
• All ClickOnce modules:
— User: Client machines must be part of the local Users group. To install ClickOnce prerequisites,the user must be a member of the Administrators group.
• ScanPlus and Image Divider modules:
— Directories: Must have Read/Write access to the system Temp directory.
• Multi-Directory Watch:
— User: Must run as a named user (not a machine or built-in user). This user must haveadministrative rights.
— Directories: Must have Read access to watched directories. Must have Write access to watcheddirectories if the files they contain are to be moved or deleted after they are imported.
• Email Import:
— Directories: Must have Read/Write access to the directory to which emails will be copied.
• Documentum Advanced Export:
— Directories: Must have Read/Write access to the Documentum user directory(c:\Documentum, by default) and to the system Temp directory.
• Web Services Hosting:
— User: Named user account. Running under an account with administrative rights simplifiesconfiguration.
— Ports: If run under a non-Administrator account, the Administrator should reserve the portsused by the Hosting service for the named user to establish HTTP connections on those ports.Use the PortReserve.exe command-line utility located in the Client\binnt directory ofthe InputAccel installation directory to reserve these ports.
• ClickOnce Deployment Utility (CODU):— User: To write deployment packages to a web host, the user must be a member of theAdministrators group on the target web server machine.
— Directories: Must have write permissions for the directory where the deployment packageswill be written.
Related Topics —
Chapter 1, InputAccel overviewChapter 3, Installation planning
43

Installation planning
Installing InputAccel across multiple domains
The InputAccel setup program is optimized for deploying the servers and clients within a singledomain. In this environment, the setup program performs most or all of the required configurationautomatically. However, InputAccel also works in a multi-domain environments.
In a multi-domain environment, you must configure your network to create trusts between theaffected domains. Every time InputAccel performs a cross-machine communication, a security checkis made. These security checks must succeed in order for the system to function properly.
The minimum cross-domain trust relationship required is “Nontransitive One-Way External Trust”from the domain with clients that want to authenticate to the domain that has servers who need toperform the authentication. Creating these trusts is an IT responsibility that uses operating systemtools, and is beyond the scope of this guide.
The relevant access rights for these trusts are as follows:
• Any user who logs into an InputAccel Server must have the “Windows Login” privilege onthe machine hosting the InputAccel Server.
• Any user who logs into the Administration Console must have the “Windows Login” privilege onthe machine that hosts the Administration Console web server.
To assign users or groups from other domains to InputAccel security roles, either the account underwhich the Administration Console runs must have the privileges necessary to browse the otherdomains, or the users from the other domain must be added to Windows groups in the domainwhere the InputAccel system is running.
Related Topics —
Running InputAccel with minimum Windows permissions, page 41Installing InputAccel in a workgroup, page 44
Installing InputAccel in a workgroup
Installing InputAccel in a workgroup is supported only in a development or demonstration system;that is, when all components are installed on a single machine. A machine in a Microsoft Windowsworkgroup must maintain its own list of users and groups, because it does not use the central securitydatabase of a domain. A “local user” is a user that has a security account on the local machine.Even though it is running on a single machine, InputAccel still requires users to log in with a validMicrosoft Windows user name and password. Blank passwords are not allowed. Refer to InstallingInputAccel on a single machine, page 63 for detailed instructions.
Note: When logging into InputAccel from a client module or from the Administration Console, youmust specify a domain. If you have installed InputAccel on a single machine without a domaincontroller, specify “.” or “localhost” in the Domain field of the Login window.
Related Topics —
Running InputAccel with minimum Windows permissions, page 41Installing InputAccel across multiple domains, page 44
44
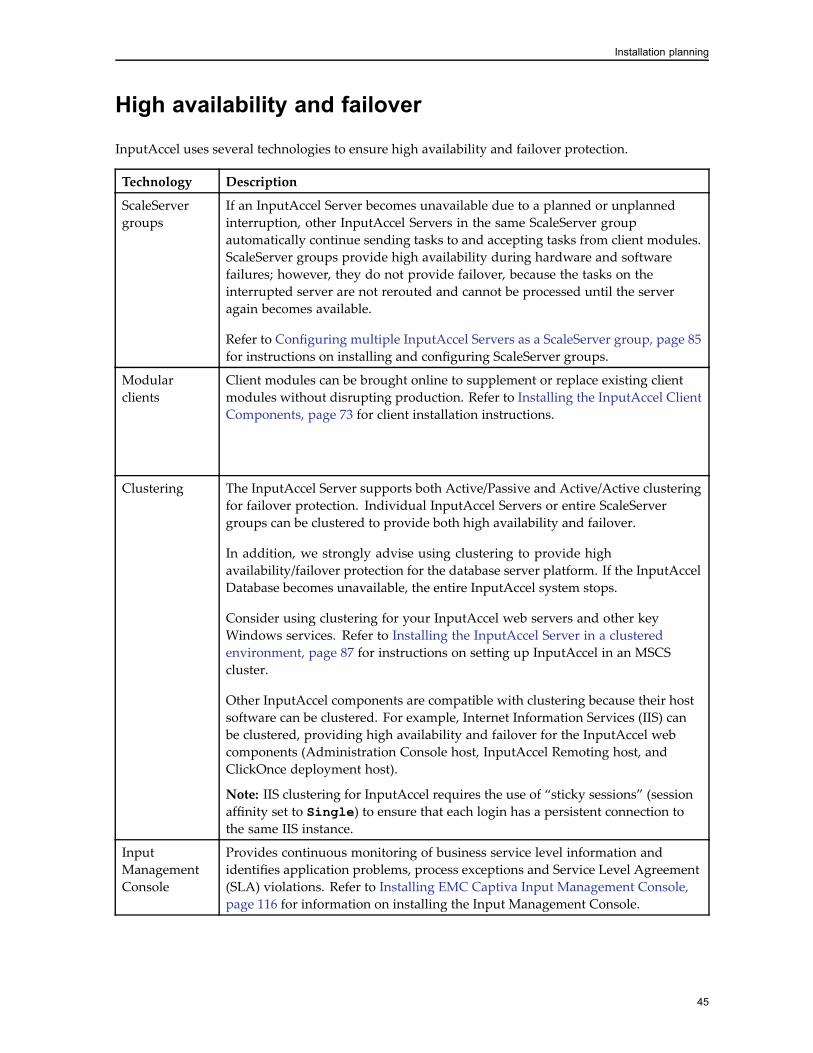
Installation planning
High availability and failover
InputAccel uses several technologies to ensure high availability and failover protection.
Technology Description
ScaleServergroups
If an InputAccel Server becomes unavailable due to a planned or unplannedinterruption, other InputAccel Servers in the same ScaleServer groupautomatically continue sending tasks to and accepting tasks from client modules.ScaleServer groups provide high availability during hardware and softwarefailures; however, they do not provide failover, because the tasks on theinterrupted server are not rerouted and cannot be processed until the serveragain becomes available.
Refer to Configuring multiple InputAccel Servers as a ScaleServer group, page 85for instructions on installing and configuring ScaleServer groups.
Modularclients
Client modules can be brought online to supplement or replace existing clientmodules without disrupting production. Refer to Installing the InputAccel ClientComponents, page 73 for client installation instructions.
Clustering The InputAccel Server supports both Active/Passive and Active/Active clusteringfor failover protection. Individual InputAccel Servers or entire ScaleServergroups can be clustered to provide both high availability and failover.
In addition, we strongly advise using clustering to provide highavailability/failover protection for the database server platform. If the InputAccelDatabase becomes unavailable, the entire InputAccel system stops.
Consider using clustering for your InputAccel web servers and other keyWindows services. Refer to Installing the InputAccel Server in a clusteredenvironment, page 87 for instructions on setting up InputAccel in an MSCScluster.
Other InputAccel components are compatible with clustering because their hostsoftware can be clustered. For example, Internet Information Services (IIS) canbe clustered, providing high availability and failover for the InputAccel webcomponents (Administration Console host, InputAccel Remoting host, andClickOnce deployment host).
Note: IIS clustering for InputAccel requires the use of “sticky sessions” (sessionaffinity set to Single) to ensure that each login has a persistent connection tothe same IIS instance.
InputManagementConsole
Provides continuous monitoring of business service level information andidentifies application problems, process exceptions and Service Level Agreement(SLA) violations. Refer to Installing EMC Captiva Input Management Console,page 116 for information on installing the Input Management Console.
45

Installation planning
Technology Description
Generalconsiderations
Part of high availability includes choosing components and best practicesdesigned to deal with faults. Examples include:
• High-performance RAID arrays for data storage redundancy and hot-swapcapabilities.
• Datacenter style rack mount or blade server hardware for key systemcomponents with redundant power supplies and other enterprise-levelfeatures.
• Battery backup/power protection systems to keep your systems running or toperform an orderly shutdown in the event of a power outage.
• Remote monitoring and tuning software, such as the Input ManagementConsole.
• VMware VMotion in lieu of clustering, enabling you to move virtual machinesfrom one host to another in the event of a system failure.
• Offsite storage for short term, rotating backup of paper that has been scannedin addition to media containing backups of irreplaceable files.
High availability best practices
In addition to the high availability and failover mechanisms designed into InputAccel, werecommend the following best practices for other critical system components when InputAccel isused in mission-critical applications:• At a minimum, connect the InputAccel Server machine and the InputAccel Database machine toan uninterruptible power supply.
• Configure your SQL Server for high availability by setting up database mirroring and/orclustering. Refer to Microsoft recommendations for advice and instructions.
• Configure your InputAccel Servers for high availability by using ScaleServer groups andconfiguring them in an Active/Passive or Active/Active MSCS cluster. Refer to Configuringmultiple InputAccel Servers as a ScaleServer group, page 85 and Installing the InputAccel Serverin a clustered environment, page 87 for instructions.
• Run unattended client modules as services and configure those services for high availability byenabling automatic restart on failure. Refer to Manually registering a client module to run as aservice, page 113 for the necessary settings.
• Configure the Administration Console web server for high availability. Refer to Microsoft IIS highavailability best practices for recommendations and instructions.
Related Topics —
Implementing a disaster continuation system, page 48Managing a disaster continuation system, page 50
46

Installation planning
Disaster planning
Disaster planning is important for any business-critical application. The extent to which you planfor disaster and disaster recovery depends on your needs, your budget, and the importance of yourdocument capture system to the continuation of your business. At one end of the spectrum isplanning for routine backups of critical data, perhaps with offsite storage. At the other end of thespectrum, you might consider having multiple Microsoft Cluster Service (MSCS) clusters in both localand remote locations, each with its own Storage Area Network (SAN), with automatic, real-time SANreplication. Some common themes of disaster planning and recovery include:
• Determining what to do in case your current production facility cannot function in any way.
• Planning for continuing production at another facility, possibly using equipment that is notin your possession today.
• Devising a way to redirect new work to the substitute production site.
• Arranging to re-process a certain quantity of work that may be lost in the event of a disaster.
• Planning for training of additional or replacement personnel to help carry out your plan.
• Periodically testing your disaster recovery plan to ensure everything will function as neededin the event of a disaster.
EMC offers disaster recovery pricing that provides licensing and activation for periodic testing andone-time use of a disaster continuation system.
Topics in this section include:• Creating an InputAccel disaster continuation plan, page 47
• Disaster recovery considerations, page 48
• Implementing a disaster continuation system, page 48
• Managing a disaster continuation system, page 50
Creating an InputAccel disaster continuation plan
Disaster recovery planning should include a written plan describing exactly how to restore InputAccelproduction after a disastrous event. When writing your plan, consider the following questions:
• Who are the key personnel responsible for rebuilding the InputAccel system and restoringproduction?
• Who will act in your place?
• Where will the documentation be kept?
• Who will provide backup for key team members that may be unavailable?
• How will you train replacement or temporary workers?
• How long will it take you to restore full production throughput?
• What will happen if you need to relocate your department to another location?
47

Installation planning
Disaster recovery considerations
Disaster recovery can encompass much more than simple backups and redundancy. If you areplanning to put in place a simple backup plan, you should consider making both local and off-sitebackups of the following critical components:• Directory trees from each of your InputAccel Server IAS directories
• InputAccel Database from SQL Server
• Scanner drivers
• License files
• Patches
• Custom server and client software (from your own developers or EMC Consulting)
• Custom client desktop shortcuts
• Client side script source code
• Client win.ini and settings.ini files
Table 10, page 123 provides a detailed list of files that should be backed up together with their defaultlocations on server and client machines.
Related Topics —
Disaster planning, page 47Implementing a disaster continuation system, page 48Managing a disaster continuation system, page 50Installing the InputAccel Server in a clustered environment, page 87
Implementing a disaster continuation system
Rather than planning to manually archive and store your InputAccel data for disaster recovery,consider an automated disaster continuation system.• Install InputAccel Servers and SQL Server in an active/active MSCS cluster, where one clusterserver is remotely located.
• Use real-time replication to keep the storage system of the remote cluster server constantlysynchronized with the storage system of the local system.
• Install InputAccel client software to handle the necessary disaster continuation production volume(or to handle a portion of your normal daily production, if needed).
With a replicated system, the only backup and archival tasks you need to think about are thoserelated to custom source code for script files. When patches or custom software are used, be sure todeploy them to all locations, so that each site has identical functionality.
48

Installation planning
With a disaster continuation system, the remote site (Passive InputAccel Server 2a) is always ready totake over production from the local site. When daily production is performed at both sites, the localsite (Passive InputAccel Server 1b) is always ready to take over production from the remote site.
Related Topics —
Disaster planning, page 47Disaster recovery considerations, page 48Managing a disaster continuation system, page 50Installing the InputAccel Server in a clustered environment, page 87
49
Installation planning
Managing a disaster continuation system
If you deploy a replicated disaster continuation system using MSCS clusters, you now have anadditional consideration: how to manage the system. For example, you need to knowwhen a problemcauses a passive node to take over for a failed active node and you may want to automatically redirecthow documents are routed. You may want ScanPlus, Multi-Directory Watch, Email Import, or WebServices Input to automatically route new batches to the currently-active node of your cluster, sothat no manual reconfiguration is necessary.
The Input Management Console can perform this function when it is also installed in an MSCScluster, ensuring that Service Level Agreements (SLAs) are enforced and that there is no single pointof failure. In addition to performing automatic redirection, the Input Management Console canperform load balancing of work among the set of clustered InputAccel Servers. For more information,refer to Installing the InputAccel Server in a clustered environment, page 87.
Related Topics —
Disaster planning, page 47Disaster recovery considerations, page 48Implementing a disaster continuation system, page 48Installing the InputAccel Server in a clustered environment, page 87
Deployment
InputAccel can be deployed in a variety of ways to meet the needs of various types of customers:
• Standard local installation by running setup.exe from the local installation media or from anetwork share.
Note: If you are running setup.exe from a network location, then you may see a WindowsOpen File – Security Warning window prompting you to run the program or cancel. To installInputAccel, click Run. To disable this message, edit the Internet Explorer security settings andlower the security level for the Local Intranet zone.
• Remote/automated installation using a “push” installation tool and command-line setupparameters. Refer to Unattended installations, page 108 for detailed command-line setup options.
• ClickOnce installation of selected modules: ScanPlus, RescanPlus, and IndexPlus. These arethe main attended (user-interactive) modules within the InputAccel system. When selectingClickOnce, consider whether to deploy your installation packages from a network file share ora web server. Make sure your users have the necessary permissions to access the deploymentlocation. Then use the ClickOnce Deployment Utility, included in the InputAccel clientinstallation, to create installer packages and deploy them for both local and remote use.
50

Installation planning
ClickOnce enables you to deploy and update applications with an absolute minimum of userinteraction. Refer to Deploying modules with the ClickOnce Deployment Utility, page 104 forinstructions on setting up and deploying ClickOnce installation packages.
Note: InputAccel installs performance counters that enable administrators to monitor moduleperformance by using the Performance snap-in of the Microsoft Management Console. Be awarethat performance counters do not work for modules that have been installed by ClickOncedeployment.
Related Topics —
Development/demonstration installation, page 55Small production installation, page 56Medium distributed production installation, page 57High availability production installation, page 58Distributed volume installation, page 60Enterprise installation, page 61
Licensing and activation
InputAccel uses a server-based licensing system that enables EMC as well as third-party moduledevelopers to regulate how their software is used in an InputAccel installation. Licenses are installedon each of your InputAccel Servers. When a client module connects, the InputAccel Server checks fora valid license before letting the module operate.
License codes are uniquely keyed to the Server ID that the InputAccel Server retrieves from itssecurity key. Each license code specifies a single module and regulates how many copies of themodule can concurrently connect to the InputAccel Server, how many pages the module is allowed toprocess, how long the license is allowed to work, and what extra features are enabled.
The InputAccel Server can use either a hardware security key or an InputAccel activation file. Bothtypes of security keys control the licensing of the InputAccel system. If you are using hardwaresecurity keys, be aware that both parallel port and USB versions are available.
If you are using activation files, be aware that each InputAccel Server requires a one-time Internetactivation step. You perform the activation step in the Server Activations pane of the AdministrationConsole, where you can link directly to the EMC Captiva Activation Portal. You can also access theActivation Portal by using your web browser to go to http://activation.captivasoftware.com
At the Activation Portal, you can do any of the following:• Immediately obtain a new activation code for a new installation.
• Immediately obtain a new activation code after a hardware, software, or configuration change.
• Immediately obtain an Enter By extension.
• Initiate a Server ID migration when moving an InputAccel Server to a different machine.
• Request conversion from using a hardware security key to a software activation file.
51

Installation planning
Note: You must use activation file (software) security keys with side-by-side InputAccel Serverinstallations. Side-by-side configurations are not compatible with hardware security keys. Formore information on side-by-side installations, refer to Installing multiple instances of InputAccelServers, page 84.
To install and manage license codes, and to activate InputAccel Servers using activation files, use theAdministration Console. You will typically receive a file from EMC containing all of your licensecodes, which you can import to your InputAccel Server in a single step. You can also manually typelicense codes one at a time. For more information on licensing and activation, refer to the UsingAdministration Console section in the Administration Guide.
Topics on licensing and activation include:• ScaleServer licensing, page 52
• Licensing for use in a Microsoft cluster, page 53
• Licensing for disaster recovery, page 53
ScaleServer licensing
InputAccel licensing for ScaleServer enables multiple InputAccel Servers to be configured so that allmodules can connect to them. ScaleServer groups are defined and managed in the AdministrationConsole. Each InputAccel Server that is to be a part of a ScaleServer group must have license codesthat enable it to participate in the group and to enable the client modules to connect to the group.
The InputAccel Servers within a ScaleServer group share page count licenses to facilitate loadbalancing.
A ScaleServer license is included with certain levels of InputAccel licensing and is an availableoption in other license levels. Contact your account manager if you are unsure about the featuresincluded with your license.
Example —• Server 1 and Server 2 are each licensed to process 50,000 pages/day, for a total ScaleServer capacityof 100,000 pages/day.
• 3 hours before the end of the day, Server 1 has reached its 50,000 page limit, but Server 2 hasprocessed only 25,000 pages.
• Server 1 automatically transfers from the Server 2 license enough page capacity to continueworking either until the end of the day or until 100,000 pages have been processed by theInputAccel system in that day.
This is a simple example, but the logic applies to more complex scenarios, where you may have 8InputAccel Servers in a ScaleServer group, all having different remaining daily page counts.
For instructions on setting up ScaleServer groups and managing licenses, refer to the UsingAdministration Console section in the Administration Guide.
Related Topics —
Licensing for use in a Microsoft cluster, page 53Licensing for disaster recovery, page 53
52

Installation planning
Licensing for use in a Microsoft cluster
InputAccel licensing for clustering enables multiple InputAccel Servers to be configured in an MSCSActive/Passive or Active/Active cluster. A standard InputAccel Server license does not enable theserver to run as part of a cluster.
For detailed information on configuring multiple InputAccel Server instances in an MSCS cluster,refer to Installing the InputAccel Server in a clustered environment, page 87. For instructionson installing and managing licenses, refer to the Using Administration Console section in theAdministration Guide.
Related Topics —
Licensing for disaster recovery, page 53Activating the InputAccel Server in an Active/Passive cluster, page 92Activating and licensing the InputAccel Server in an Active/Active cluster, page 98.
Licensing for disaster recovery
Certain levels of InputAccel licensing include licenses for implementing, testing, and using a disasterrecovery system. If you are unsure about whether your licensing level includes a disaster recoverysystem, contact your account manager. For information on setting up a disaster recovery system,refer to Disaster planning, page 47. For instructions on installing and managing licenses, refer to theUsing Administration Console section in the Administration Guide.
Related Topics —
ScaleServer licensing, page 52Licensing for use in a Microsoft cluster, page 53
53
Installation planning
Compatibility
InputAccel is compatible with the following:• VMware support: InputAccel can be run within the following VMware products:
— VMware Workstation version 6.0.4 or 6.0.5 (when running a 32-bit operating system)
— VMware Workstation version 6.0.5 (when running a 64-bit operating system)
— VMware Workstation version 6.5 or 6.5.1
— VMware Server 1.0 or 2.0
— VMware ESX Server 3.0.1 or 3.5
— VMware VMotion (enabling VMotion is transparent to InputAccel components)
• Citrix support: InputAccel client components are compatible with the following Citrix products:
— Citrix MetaFrame Presentation Server 4.0 or 4.5
— XenApp 4.5 or 5.0
— Citrix Web Interface 3.0
Typically customers use Citrix to host IndexPlus for a large group of index operators.
• IPv6: InputAccel supports Internet Protocol version 6 (IPv6).— InputAccel Servers: IPv6 is supported on Windows Server 2003. (IPv6 protocol must beinstalled for Windows Server 2003.)
— InputAccel client modules: IPv6 is natively supported under Windows Vista. IPv6 issupported on Windows Server 2003 and Windows XP with SP2. (IPv6 protocol must beinstalled for Windows Server 2003 and Windows XP.)
Additional information for installing the IPv6 protocol for Windows Server 2003 and Windows XPcan be found at Microsoft’s TechNet website.
Note: When installing the Administration Console in an IPv6 environment, do not specify aspecific IP address. You must select (All Unassigned) in the IP address to use for this web sitefield in the InputAccel Web Components setup window.
• Section 508: InputAccel adheres to Section 508 of the Disabilities Act. For additional informationon compliance standards, you can request the InputAccel 6.0 Voluntary Product AccessibilityTemplate (VPAT) through EMC Support Services.
• The Federal Information Processing Standard (FIPS) provides the best practices for implementingcryptographic software. The InputAccel Server is designed to operate with Microsoft operatingsystems that use FIPS-compliant algorithms for encryption, hashing, and signing.
Related Topics —
Chapter 2, System requirements and recommendationsChapter 3, Installation planningChapter 5, Upgrading InputAccel
54

Installation planning
Sample configurationsYou can install InputAccel by following different installation models. Topics in this section describethe following installation scenarios:• Development/demonstration installation, page 55
• Small production installation, page 56
• Medium distributed production installation, page 57
• High availability production installation, page 58
• Distributed volume installation, page 60
• Enterprise installation, page 61
Development/demonstration installation
This configuration is typically used for customer demonstrations or development of processes andcustom modules, and must not be used in a production environment. In this configuration, allcomponents run on a single machine. This could require a large amount of RAM depending on thenumber of client modules that are running, the amount of work in the system, and the size of theInputAccel Database. As for all server products, it is best to avoid paging in the system and insteadconfiguring the server components to restrict how much RAM they use to avoid over-committingsystem resources.
The single machine installation scenario is discussed in detail in Installing InputAccel on a singlemachine, page 63.
Related Topics —
Chapter 2, System requirements and recommendationsChapter 3, Installation planning
55
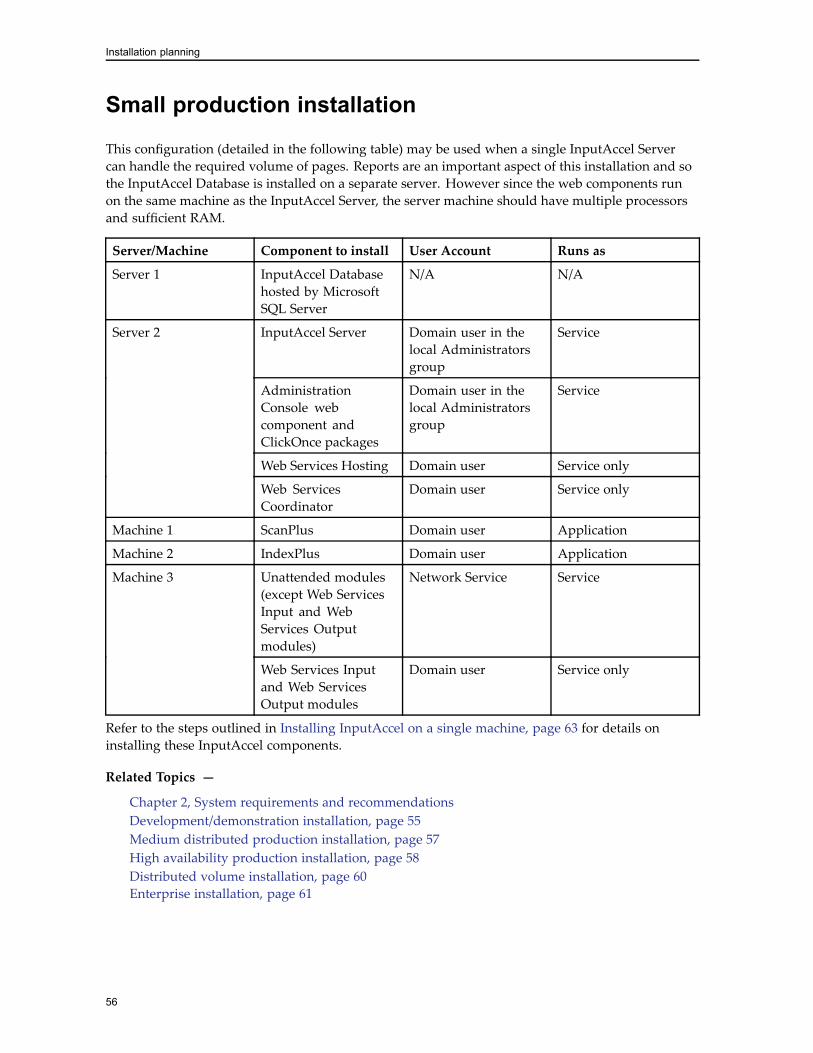
Installation planning
Small production installation
This configuration (detailed in the following table) may be used when a single InputAccel Servercan handle the required volume of pages. Reports are an important aspect of this installation and sothe InputAccel Database is installed on a separate server. However since the web components runon the same machine as the InputAccel Server, the server machine should have multiple processorsand sufficient RAM.
Server/Machine Component to install User Account Runs as
Server 1 InputAccel Databasehosted by MicrosoftSQL Server
N/A N/A
InputAccel Server Domain user in thelocal Administratorsgroup
Service
AdministrationConsole webcomponent andClickOnce packages
Domain user in thelocal Administratorsgroup
Service
Web Services Hosting Domain user Service only
Server 2
Web ServicesCoordinator
Domain user Service only
Machine 1 ScanPlus Domain user Application
Machine 2 IndexPlus Domain user Application
Unattended modules(except Web ServicesInput and WebServices Outputmodules)
Network Service ServiceMachine 3
Web Services Inputand Web ServicesOutput modules
Domain user Service only
Refer to the steps outlined in Installing InputAccel on a single machine, page 63 for details oninstalling these InputAccel components.
Related Topics —
Chapter 2, System requirements and recommendationsDevelopment/demonstration installation, page 55Medium distributed production installation, page 57High availability production installation, page 58Distributed volume installation, page 60Enterprise installation, page 61
56
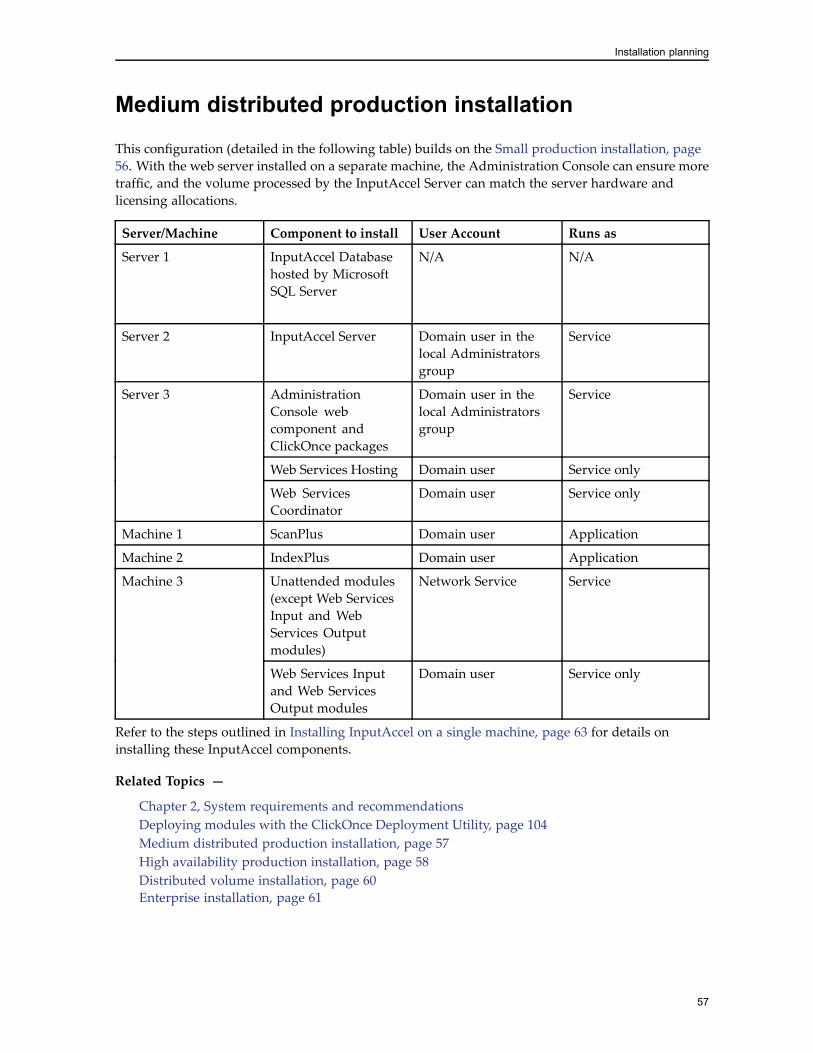
Installation planning
Medium distributed production installation
This configuration (detailed in the following table) builds on the Small production installation, page56. With the web server installed on a separate machine, the Administration Console can ensure moretraffic, and the volume processed by the InputAccel Server can match the server hardware andlicensing allocations.
Server/Machine Component to install User Account Runs as
Server 1 InputAccel Databasehosted by MicrosoftSQL Server
N/A N/A
Server 2 InputAccel Server Domain user in thelocal Administratorsgroup
Service
AdministrationConsole webcomponent andClickOnce packages
Domain user in thelocal Administratorsgroup
Service
Web Services Hosting Domain user Service only
Server 3
Web ServicesCoordinator
Domain user Service only
Machine 1 ScanPlus Domain user Application
Machine 2 IndexPlus Domain user Application
Unattended modules(except Web ServicesInput and WebServices Outputmodules)
Network Service ServiceMachine 3
Web Services Inputand Web ServicesOutput modules
Domain user Service only
Refer to the steps outlined in Installing InputAccel on a single machine, page 63 for details oninstalling these InputAccel components.
Related Topics —
Chapter 2, System requirements and recommendationsDeploying modules with the ClickOnce Deployment Utility, page 104Medium distributed production installation, page 57High availability production installation, page 58Distributed volume installation, page 60Enterprise installation, page 61
57

Installation planning
High availability production installation
This configuration (detailed in the following table) builds on the medium distributed departmentalproduction installation. It adds high availability for the InputAccel Server. Multiple InputAccelServers are configured as a ScaleServer group in an Active/Active cluster.
Note: Multiple virtual servers can be created on a cluster node. These configurations do not specifyhow the virtual servers must be configured. This configuration is just as valid without the clustersbeing created and so also represents the large departmental production installation.
Server/Machine Component to install User Account Runs as
Server 1 InputAccel Databasehosted by MicrosoftSQL Server. SQLServer should beclustered for highavailability and itshould use RAID 0+1for data redundancy
N/A N/A
Server 2a Two InputAccelServers installedin a side-by-sideinstallation, clusteredwith MicrosoftActive/Activeclustering andconfigured as aScaleServer groupwith Server 2b
Domain user in thelocal Administratorsgroup
Service
Server 2b Two InputAccelServers installedin a side-by-sideinstallation, clusteredwith MicrosoftActive/Activeclustering andconfigured as aScaleServer groupwith Server 2a
Domain user in thelocal Administratorsgroup
Service
AdministrationConsole webcomponent andClickOnce packages
Domain user in thelocal Administratorsgroup
Service
Web Services Hosting Domain user Service
Server 3
Web ServicesCoordinator
Domain user Service
Machine 1 ScanPlus Domain user Application
58

Installation planning
Machine 2 IndexPlus Domain user Application
Unattended modules(except Web ServicesInput and WebServices Outputmodules)
Network Service ServiceMachine 3
Web Services Inputand Web ServicesOutput modules
Domain user Service only
Refer to the steps outlined in Installing InputAccel on a single machine, page 63 for details oninstalling these InputAccel components. Installing InputAccel Servers on a single machine in aside-by-side installation model is covered in Installing multiple instances of InputAccel Servers,page 84. To install the InputAccel Server in a clustered environment, refer to InputAccel Serverin a clustered environment.
Related Topics —
Chapter 2, System requirements and recommendationsInstalling multiple instances of InputAccel Servers, page 84Configuring multiple InputAccel Servers as a ScaleServer group, page 85Installing the InputAccel Server in a clustered environment, page 87Installing InputAccel Remoting, page 101Deploying modules with the ClickOnce Deployment Utility, page 104
59

Installation planning
Distributed volume installation
This configuration (detailed in the following table) may be used for high capture volumes. It buildson the Large Departmental Installation adding more server capacity and distributed client modulesbut does not include high availability. This configuration can be expanded to include more serversfor higher volumes.
Server/Machine Component to install User Account Runs as
Server 1 InputAccel Databasehosted by MicrosoftSQL Server
N/A N/A
Server 2, 3, 4, and 5 Two instances ofInputAccel Serverinstalled side-by-sideon each machine andthen configuredtogether as aScaleServer group
Domain user in thelocal Administratorsgroup
Service
AdministrationConsole webcomponent andClickOnce packages
Domain user in thelocal Administratorsgroup
Service
Web Services Hosting Domain user Service
Server 3
Web ServicesCoordinator
Domain user Service
Machine 1 ScanPlus Domain user Application
Machine 2 IndexPlus Domain user Application
Unattended modules(except Web ServicesInput and WebServices Outputmodules)
Network Service ServiceMachine 3
Web Services Inputand Web ServicesOutput modules
Domain user Service only
Refer to the steps outlined in Installing InputAccel on a single machine, page 63 for details oninstalling these InputAccel components.
To install the InputAccel Server in a side-by-side installation, refer to Installing multiple instances ofthe InputAccel Server. Refer to Configuring multiple InputAccel Servers as a ScaleServer group, page85 for steps to configure the InputAccel Servers as a ScaleServer group.
Related Topics —
Chapter 2, System requirements and recommendationsConfiguring multiple InputAccel Servers as a ScaleServer group, page 85Deploying modules with the ClickOnce Deployment Utility, page 104
60

Installation planning
Enterprise installation
This installation represents a typical enterprise installation where data comes from several sourcesand not just a scanner. This is a specialization of the Large Departmental Installation. This installationscenario provides various options for installing the InputAccel Server and the client modules to use.
The enterprise installation scenario is discussed in detail in Installing InputAccel in a productionenvironment, page 81.
Related Topics —
Chapter 2, System requirements and recommendationsChapter 3, Installation planningAdditional installation and configuration options, page 83
61

Installation planning
62

Chapter 4Installing InputAccel
This section explains how to install InputAccel for the first time.
Topics on installing InputAccel include:• Installing InputAccel on a single machine, page 63
• Installing InputAccel in a production environment, page 81
• Additional installation and configuration options, page 83
• Installing additional components, page 116
Installing InputAccel on a single machineThis section describes an InputAccel installation where all InputAccel components are installed on asingle machine. Typically, a single machine deployment is used for development, demonstration,and low volume production.
This configuration could require a large amount of RAM depending on the number of client modulesthat are running, the amount of work in the system, and the working set of the database. Servercomponents can be configured to restrict how much RAM is used to avoid over-committing systemresources. For example, the InputAccel Server can both limit its RAM usage and the number ofbatches it has loaded at once. SQL Server can be configured to limit how much RAM it uses.
63

Installing InputAccel
The following table summarizes the configuration for a single machine installation:
Table 6. Development or demonstration installation
Machine Component to install User Account
InputAccel Database hosted byMicrosoft SQL Server
N/A
InputAccel Server Domain user in the localAdministrators group
Administration Console webserver
Domain user in the localAdministrators group
Unattended InputAccel Clientmodules
Network Service or domainuser
Machine 1
Attended InputAccel Clientmodules
Domain user
To install InputAccel on a single machine:
1. Make sure your machine(s) meet the system requirements detailed in Chapter 2, Systemrequirements and recommendations.
2. Make sure the locale and codepage settings are specified as detailed in Locale considerations,page 27.
3. Install the InputAccel Database Components.
4. Create a SQL Server user account with minimum permissions to access the InputAccel Database.
5. Install the InputAccel Server Components.
6. Install the Administration Console from the InputAccel Web Components.
7. Activate the InputAccel Server and install the InputAccel licenses.
8. Install the InputAccel Client Components.
9. Set the UI language for InputAccel components.
64

Installing InputAccel
Installing the InputAccel Database
InputAccel uses a Microsoft SQL Server database to store information such as configuration settingsand batch data. This installation creates the InputAccel Database.
Before you can install the InputAccel Database components, you must obtain and install your owncopy of Microsoft SQL Server to host the database. Microsoft SQL Server must be configured withthe following settings:• You must have a user account that is part of the SQL Server sysadmin role.
• You must be a member of the local Administrators on the machine from which you arerunning the setup program.
• SQL Server must be configured to allow TCP/IP protocol access over port 1433. In most Enterpriseeditions, TCP/IP protocol is enabled by default; in other editions (for example, SQL Server Express2005 SP1), it may be disabled by default. Configure SQL Server Express in the SQL ServerConfiguration Manager to allow TCP/IP protocol access over port 1433. You must enable TCP/IPprotocol for each IP address used by the system, make sure that TCP Port field is blank, and thenrestart the SQL Server Express service. Not configuring the SQL Server Express to allow forTCP/IP access may lead to connection errors when installing the InputAccel Database.
• You must enable SQL Server and Windows Authentication mode in Microsoft SQL ServerManagement Studio, and then restart the SQL Server service.
Note: The InputAccel Database supports installation on a case sensitive SQL Server. The InputAccelDatabase, however, is case insensitive. This means that upper and lower case characters are notdifferentiated and instead are treated the same way when performing searches or using the reportsfunctionality in InputAccel.
Refer to the Chapter 2, System requirements and recommendations for information about thesupported versions of SQL Server.
Note: Microsoft SQL Server Express editions may only be used in low page volume deploymentswith minimal reporting and logging expectations.
To install the InputAccel Database:
1. Start the InputAccel setup program from the installation media. If the setup program does notstart automatically after a few seconds, or if you are running the installation from a local disk ornetwork share, open the file autorun.exe to begin.
2. From the InputAccel Products menu, select Install Products.
3. From the Installation Choicesmenu, select Step 1 - Install the InputAccel Database.
4. If you are prompted to install prerequisite applications, click Install. The prerequisite softwarefor the InputAccel Database is installed. Click Next.
5. Accept the license agreement and click Continue.
6. In the Destination Folder window, click Next to install the Create Database Utility and scripts tothe default destination folder or click Change to select a new location.
7. In the Configure InputAccel Database window, select the Create InputAccel Database option,specify the login credentials for the SQL Server, and then click Next. InputAccel only supportsSQL Authentication, which means a SQL Server login ID is required to connect to a SQL Server.An account with the sysadmin role must be used when creating the InputAccel Database.
65
Installing InputAccel
Note:• If the Create the InputAccel Database checkbox is selected, the local Database Server, SQLServer Port, and Database name must be specified. (The default SQL Server port is 1433. Forall versions of SQL Server versions, including the Express editions, make sure TCP/IP isenabled and a port is set before InputAccel Database installation.)
• If you are using a named instance for the SQL Server, be sure to specify the Database Serverin the format, [machine_name]\[instance_name]. For SQL Server Express, the defaultinstance name is SQLExpress.
• If the Copy Script Only option is selected, the CreateDB executable and scripts are copiedto the target machine but the InputAccel Database is not created. The CreateDB executablemust be manually run to create the database.
8. Click Install and then click Finish.
9. To verify that you have successfully installed the InputAccel Database, run SQL ServerManagement Studio, and expand the Databases folder in the Object Explorer pane. TheInputAccel Database should appear in the list of databases.
10. Create a new user account for SQL Server and set permissions for this user account to usethe InputAccel Database. For instructions, refer to Creating a SQL Server user account withminimum permissions to access the InputAccel Database, page 66.
Related Topics —
Database server requirements, page 11Database server considerations, page 28Chapter 3, Installation planningDatabase issues, page 164
Creating a SQL Server user account with minimum permissions toaccess the InputAccel Database
Before installing the InputAccel Server and Web components, a SQL Server user account withrestricted access must be created. This user account must be specified for the DAL registrationduring the InputAccel Server and InputAccel Web Components installation. At no time should asystem administration login ID be used in production environments for DAL registration. Using anaccount with full permissions is a security risk.
The new SQL Server user account must be configured with the following:• Set the user account to use SQL Server authentication.
• Set the Default database to the InputAccel Database.
• Map the user account to the InputAccel Database and set the database role membership to public.
66
Installing InputAccel
• Grant the following permissions to the InputAccel Database:
— Connect
— Delete
— Execute
— Insert
— Select
— Update
Related Topics —
Database server requirements, page 11Database server considerations, page 28Chapter 3, Installation planningInstalling the InputAccel Database, page 65Database issues, page 164
Installing the InputAccel Server
The InputAccel Server is an open integration platform that manages and controls the documentcapture process by routing document pages along with processing instructions to the appropriateclient modules.
Caution: The machine name of the InputAccel Server must not be longer than 15 characters;otherwise, client machines will be unable to connect.
This procedure installs the InputAccel Server, sample process files, and documentation.
To install the InputAccel Server:
1. Start the InputAccel setup program from the installation media. If the setup program does notstart automatically after a few seconds, or if you are running the installation from a local disk ornetwork share, open the file autorun.exe to begin.
2. From the InputAccel Products menu, select Install Products.
3. From the Installation Choicesmenu, select Step 2 - Install the InputAccel Server.
4. If you are prompted to install prerequisite applications, click Install. The prerequisite softwarefor the InputAccel Server is installed.
5. Remove the USB security key, if used, and then click Continue and then click Next.
6. Accept the license agreement and click Continue.
67

Installing InputAccel
7. Select one of the following setup types, and then click Next:• Typical: Performs the default installation on the default C:\ drive.
• Custom: Enables you to select the features and the drive to install the InputAccel Serverapplication files (InputAccel program files) and the InputAccel Server data files (InputAcceldata files).
8. In the InputAccel Service Accountswindow, select one of the following to specify a user accountwhen logging in to the InputAccel Server:• Use the built-in Local System account: Uses the credentials for the local machine’s Windowsaccount.
• Specify a user account: Uses the credentials entered in the Username, Password, andDomain fields.
9. Select Automatically start the “InputAccel Server” service when the system starts if you wantthe InputAccel Server to be started as a service automatically when the system starts, and thenclick Next.
10. In the Data Access Layer Registrationwindow, specify the login credentials for connecting to theSQL Server. This is the SQL Server user account created that provides permissions to access theInputAccel Database. Click Next.
Note: By default, Register the Data Access Layer with the InputAccel database is selected andthe local database server, default SQL Server port 1433, and Database name are specified.
11. If the Windows Firewall is running and enabled, the Configure Windows Firewall windowdisplays. By default, Let setup configure the Windows Firewall is selected. This optionconfigures the Windows Firewall to pass network traffic on the necessary ports. Clear thecheckbox if you want to configure the firewall manually.
12. Click Next.
13. If the machine on which you are installing the InputAccel Server belongs to a domain, theAdministration Console User window is displayed. In the Username and Domain fields, enterthe name and domain name of the account that will host the Administration Console, clickNext,and then click Install. The Administration Console user account created through the installerwill have Administrator privileges.
Note: If the Administration Console user account credentials is not provided during InputAccelServer installation, then the user account under which the Administration Console service mustrun needs to be added manually to the Administrators group on the InputAccel Servermachine.
14. By default, Start the InputAccel Server service when setup completes is selected. Clear thecheckbox if you want to start the InputAccel Server service manually when setup completes.
15. Click Next.
68

Installing InputAccel
16. Click Finish. If used, install your USB security key.
17. To verify that the InputAccel Server has been successfully installed, open the Microsoft Serviceswindow (click Start > Programs > Administrative Tools > Services) and start the InputAccelServer service.
Related Topics —
InputAccel Server requirements, page 13InputAccel Server considerations, page 30InputAccel Server scalability, page 35Upgrading the InputAccel Server, page 142
Installing the Administration Console
The InputAccel Web Components setup program installs the Administration Console. TheAdministration Console module is a web-based module that monitors and administers an InputAccelsystem.
This component can also install InputAccel Remoting features, which enable remote client modulesto access the InputAccel Server and InputAccel Database, but the Administration Console andInputAccel Remoting cannot be installed on the same machine. For information on installingInputAccel Remoting, refer to Installing InputAccel Remoting, page 101.
Note:• If installing on a machine running IIS 7.0 (with Windows Server 2008), make sure you first run IIS6.0 Management Compatibility before installing Administration Console.
• If installing on a machine running Windows XP, make sure that IIS 5.1 is installed before youinstall Administration Console.
• Make sure the IIS isolation mode is disabled on the machine hosting the Administration Console.
To install the Administration Console:
1. Start the InputAccel setup program from the installation media. If the setup program does notstart automatically after a few seconds, or if you are running the installation from a local disk ornetwork share, open the file autorun.exe to begin.
2. From the InputAccel Products menu, select Install Products.
3. From the Installation Choicesmenu, select Step 3 – Install the InputAccel Web Components.
4. If you are prompted to install prerequisite applications, click Install. The prerequisite softwarefor InputAccel Web Components is installed. Click Next.
5. Accept the license agreement and click Continue.
6. Select Administration Console as the feature to install, and then click Next.
Note: The Administration Console and InputAccel Remoting features cannot be installed on thesame machine because they are incompatible.
7. ClickNext to install to the default destination directories or click Change to select a new location.
69

Installing InputAccel
8. In the Data Access Layer Registration window, specify the login credentials for connecting tothe SQL Server, and then click Next.
Note: By default, Register the Data Access Layer with the InputAccel database is selected andthe local database server, default SQL Server Port 1433, and Database name are specified.
9. In the InputAccel Web Site User Accountwindow, provide the login credentials for the Windowsuser account that will run the InputAccel Web Components website. Use a user or machineaccount meets the requirements of your organization’s security policy and then click Next.
10. In the InputAccel Web Components window:
a. Provide the InputAccel web site description.
b. From the IP address to use for this web site list, select the appropriate IP address.
c. In the TCP port this web site should use field, enter the port number you want to assign tothe website, and then click Next. Be sure to mark down the IP address and port assignmentfor the Administration Console you are installing. You will need this information to test yourinstallation in subsequent steps.
Note: By default, Administration Console and ECMWeb Services Importer both use port80. If you are installing ECMWeb Services Importer on the same machine, make sure thatAdministration Console does not use port 80.
11. If the port you selected is already in use, the TCP Port Conflict window displays. Disable thewebsite currently assigned to the port and click Next.
12. Click Install and then click Finish. The installer creates a Startmenu shortcut to AdministrationConsole on the machine where Administration Console is installed.
13. If Administration Console is installed on a machine running Windows XP, then configure the webserver manually as detailed in Configuring Administration Console on Windows XP, page 71.
14. Verify the installation:
a. Start Internet Explorer and browse to the URL of the Administration Console server.Typically, this is similar to “http://<hostname>:<port_number>” (The hostname andport number are established when the Administration Console web components is installed.)
Note: To use an IP address rather than a hostname in the Administration Console URL, youmust add the IP address to the list of valid sites in your Local Intranet zone.
b. Type the credentials of the user logging into the Administration Console.
Note: You can specify a localhost or a period (.) in the Domain field to indicate a user fromthe local machine.
c. Click Logon. The Administration Console window displays in a browser.
Note:• If the Administration Console user account credentials were not provided during InputAccelServer installation, then the user account under which the Administration Console service isrunning must be added manually to the Administrators group on the InputAccel Servermachine. In order to secure access to the Administration Console, IIS should be configured touse SSL.
70

Installing InputAccel
• In production environment, use the Administration Console to create roles and grant permissionsto users of the InputAccel system.
Related Topics —
InputAccel web components and ClickOnce host requirements, page 15Administration Console host system considerations, page 31
Configuring Administration Console on Windows XP
If Administration Console is installed on a machine running Windows XP, then the web servermust be configured manually.
To configure Administration Console on Windows XP
1. Configure ASP.NET to run under the specific user account. This enables Administration Consoleto access the network.
a. Open the machine.config file on the machine where IIS 5.1 is installed. By default, thelocation is C:\WINDOWS\Microsoft.NET\Framework\v2.0.5.727\CONFIG. This filecontains a processModel section with information similar to:<processModel
enable="true"timeout="Infinite"idleTimeout="Infinite"shutdownTimeout="0:00:05"requestLimit="Infinite"requestQueueLimit="5000"restartQueueLimit="10"memoryLimit="60"webGarden="false"cpuMask="0xffffffff"userName="it\machine"password="AutoGenerate"logLevel="Errors"clientConnectedCheck="0:00:05"comAuthenticationLevel="Connect"comImpersonationLevel="Impersonate"responseDeadlockInterval="00:03:00"maxWorkerThreads="20"maxIoThreads="20"
>
Note: The userNamemust be in the format of “<Domain>\<User Name>” where <Domain>must be replaced with the domain name of the user and <User Name>must be replaced withthe Administration Console user’s user name. The domain name and user name must also bethe same as provided during Administration Console installation.
b. In the processModel section, change the userName and password attributes to thelogin credentials provided in the InputAccel Web Site User Account window during theAdministration Console installation.The processModel section may list a single line similar to <processModelautoConfig="true">. In this situation, replace the line with the processModel sectiondetailed in the previous step and then change the userName and password attributes.
71

Installing InputAccel
c. Optional. These steps are required to set an encrypted user name and password in themachine.config file for security reasons.
i. Download the aspnet_setreg.exe utility from http://support.microsoft.com/kb/329290 to your local drive.
ii. In the command window, type this command and press Enter:<install_location_aspnet_setreg.exe>>aspnet_setreg.exe -k:SOFTWARE\MY_SECURE_APP\identity-u:<yourdomainname>\<username>" -p:"<password>"
Replace:• <install_folder_aspnet_setreg.exe> with the location of aspnet_setreg.exe:c:\Tools, for example
• <yourdomainname> with the domain of the user: it, for example
• <username> with the name of the user: machine, for example
• <password> with the user password: AutoGenerate, for example
Using these parameters, an example of the command isc:\Tools>aspnet_setreg.exe -k:SOFTWARE\MY_SECURE_APP\identity-u:it\machine" -p:"AutoGenerate"
This command encrypts the user name and password attributes, and stores the attributesin the registry keys.
iii. This command generates output similar to the following:userName="registry:HKLM\SOFTWARE\MY_SECURE_APP\identity\ASPNET_SETREG,userName"
password="registry:HKLM\SOFTWARE\MY_SECURE_APP\identity\ASPNET_SETREG,password"
Copy these lines and replace the userName and password lines of the <processmodel>section in the machine.config file.
d. Save the machine.config file.
e. Open a command window and type the iisreset command to restart IIS.
2. Configure IIS 5.1 for the Administration Console.
a. Navigate to Control Panel >Administrative Tools and double-click Internet InformationServices.
b. In the Internet Information Services window, expand local computer >Web Sites > DefaultWeb Site.
c. Right-click AdministrationConsole and select Properties to display theAdministrationConsole Properties window.
d. On the Directory tab, make sure the Script source access checkbox is selected and thenclick Create. The Application Settings area is populated with information that definesAdministration Console as an IIS web-based application by the directory structure in which itis located. Do not make any changes to this section.
e. On the Directory Security tab, click Edit in the Anonymous access and authenticationcontrol area. The Authentication Methods window displays.
72
Installing InputAccel
f. Clear the Anonymous access checkbox and select the Integrated Windows authenticationcheckbox. Click OK.
g. On the ASP.NET tab, verify that 2.0.50727 is selected for the ASP.NET version. Click OK.
h. Select local computer >Web Sites >Default Web Site. Right-click and select Start to start theAdministration Console web site.
Related Topics —
Administration Console host system considerations, page 31ClickOnce host system considerations, page 31InputAccel Remoting server considerations, page 32Installing the Administration Console, page 69Configuring InputAccel Remoting on Windows XP, page 103
Activating and licensing InputAccel
After installing the InputAccel Server, install your security key or activation file, install your licenses,and begin the activation process.
Refer to the Using Administration Console section of the Administration Guide for instructionson security keys and licenses and activating your InputAccel Servers. You may proceed to installInputAccel and start using it for a limited time while waiting for a response to your activation request.
Related Topics —
ScaleServer licensing, page 52Licensing for use in a Microsoft cluster, page 53Licensing for disaster recovery, page 53Activating the InputAccel Server in an Active/Passive cluster, page 92Activating and licensing the InputAccel Server in an Active/Active cluster, page 98.
Installing the InputAccel Client Components
InputAccel Client modules are software modules that perform specific information capture taskssuch as scanning images, enhancing images, performing OCR, indexing data, or exporting imagesand data. InputAccel also supports third-party InputAccel certified modules. All modules runningon client workstations use TCP/IP to connect to the InputAccel Server.
This procedure installs InputAccel client modules and the following additional features:• Process Developer
• InputAccel Scripting Libraries
• Web services modules and components
• Sample images
Note: Before client modules can be run in production mode, the users that run the Client modules(or groups to which these users belong) must be assigned appropriate permissions through the
73

Installing InputAccel
Administration Console. Otherwise, users will be unable to log in and process tasks. Refer to theUsing Administration Console section of the Administration Guide for additional information.
To install InputAccel Client components:
1. Start the InputAccel setup program from the installation media. If the setup program does notstart automatically after a few seconds, or if you are running the installation from a local disk ornetwork share, open the file autorun.exe to begin.
2. From the InputAccel Products menu, select Install Products.
3. From the Installation Choicesmenu, select Step 4 – Install the InputAccel Client Components.
4. If you are prompted to install prerequisite applications, click Install. The prerequisite softwarefor the client modules is installed. Click Next.
5. Accept the license agreement and then click Continue.
6. Select one of the following setup types, and then click Next:• Complete: Installs all InputAccel client features
• Custom: Enables you to select the features to install
7. If you select features that require third-party software that is not already installed on the system,theMinimum Feature Requirements window displays and those modules are not installed.After the required third-party software is installed, you can run the InputAccel client installeragain to install the appropriate modules. Click Next to continue.
8. The Required Third-party Software window displays if third-party software that is requiredto run the client modules is not already installed. Click Next to continue. The specified clientmodules are installed, but will not run until the required third-party software is installed.
9. Click Next to install to the default destination directory or click Change to select a new location.
10. Select one of the following to specify a user account to use when logging in to the InputAccelServer:• Use the built-in Network Service account: Uses the credentials for the local machine’sWindows Network Service account
• Specify a user account: Uses the credentials specified
11. Select Install services for all selected modules that can run as services to install the InputAccelclient modules as services.
12. Select Automatically start all services when the system starts if you want the InputAccel clientmodules to be started as a service automatically when the system starts, and then clickNext.
13. In the InputAccel Server Connection Information window, specify the Server name andServer port of the InputAccel Server to connect to. By default, Try to contact the server duringthis installation is selected. This option enables the setup program to attempt to establish aconnection with the InputAccel Server. Click Next.
14. If the connection succeeds, click Next. If the attempt fails, verify that the InputAccel Serverservice is started.
15. Click Install and then Finish.
16. If prompted to restart Windows, click Yes.
74
Installing InputAccel
17. Verify that the InputAccel Server service is started on the machine where the InputAccel Server isinstalled.
18. Verify that the InputAccel client modules have been installed successfully, start a client moduleby clicking Start > Programs > InputAccel and then selecting the module. The module loginwindow displays.
19. Type your InputAccel Server login credentials, and then click OK.
Related Topics —
Module-specific requirements, page 19Client workstation requirements, page 17Chapter 3, Installation planningClient machine considerations, page 33Client scalability, page 36Upgrading client modules, page 146Appendix B, InputAccel client modules
Downloading ISIS scanner drivers
Attended client modules, ScanPlus and RescanPlus require scanner drivers. ScanPlus and RescanPlusoperators can download ISIS scanner drivers from the Powerlinkwebsite (http://powerlink.EMC.com).The Powerlink website provides access to https://EMC.subscribenet.com/control/dctm/index, whichprovides a complete listing of the ISIS drivers available for download.
Related Topics —
Client workstation requirements, page 17Scanning workstation requirements, page 23
Registering the SLDRegistration executable
The Archive Export client module connects to and populates an SAP System with administrative dataand content. The SAP System Landscape Directory (SLD) contains information about installed SAPcomponents in a central repository. This information facilitates the maintenance of complex SAPsystem landscapes. To connect to the SLD and provide details of the SAP System used with ArchiveExport, run the SLDRegistration.exe executable from the InputAccel\client\binntdirectory and register information about the Host, Port, and user credentials of the SAP System.
Related Topics —
Client workstation requirements, page 17Installing the InputAccel Client Components, page 73
75

Installing InputAccel
Setting the UI language of InputAccel components
After successful installation of InputAccel, you may want to set the user interface (UI) languagefor the various InputAccel components. Depending on the InputAccel component, the default UIlanguage is determined by the user’s regional settings or language of the operating system. Thedefault UI language can be overridden so that the user interface is displayed in a language otherthan the default UI language.
Refer to Appendix C, Languages supported for a list of languages supported in InputAccel, theirlanguage codes, and locale IDs.
Note:• Performance counters are installed on the InputAccel Server machine and are available in thelanguage of the operating system where they are installed or English.
• Windows Event Log typically displays event logs in the language of the operating system wherethey are viewed.
This table summarizes how to set the default globalization settings and UI language, and the optionsto override the default UI language for each InputAccel component:
Table 7. Globalization and UI language settings for InputAccel components
InputAccelcomponent
Globalization settings(e.g. date, number,currency formatting)determined by
Default UI languagedetermined by
Default UI languageoverridden by
InputAccel Server User’s regional settings User’s regional settings Specifying the UIlanguage in the:
• Win.ini file
• Setscan.ini file
Client modulesavailable in theInputAccel 5.2 and5.3.x (Modules notlisted as “New inInputAccel 6.0” inTable 12, page 172)
User’s regional settings User’s regional settings Specifying the UIlanguage in the:
• Win.ini file
• Setscan.ini file
76

Installing InputAccel
InputAccelcomponent
Globalization settings(e.g. date, number,currency formatting)determined by
Default UI languagedetermined by
Default UI languageoverridden by
Client modules newin InputAccel 6.0(Modules listed as“New in InputAccel6.0” in Table 12, page172)
Regional settings ofthe operating system
Language of theoperating system
Specifying the UIlanguage through:
• Command lineargument
• settings.ini file
• Setscan.ini file
• Multilingual UserInterface (MUI)Pack
Topics in this section include:• Specifying default UI language settings, page 77
• Summary of the options for overriding the default UI language, page 78
• Procedures to override the UI language, page 79
Specifying default UI language settings
The procedure for setting the default UI language differs for client modules available prior toInputAccel 6.0 and for client modules new in InputAccel 6.0.
To specify the default UI language for InputAccel Server and for client modulesavailable prior to InputAccel 6.0:
This procedure applies to setting the default UI language on a machine running Windows XPoperating system.
1. Run the Control Panel on the machine running the InputAccel Server or any client moduleavailable prior to InputAccel 6.0. (Modules not listed as “New in InputAccel 6.0” in Table 12,page 172)
2. Double-click Regional and Language Options.
3. On the Regional Options tab, select a locale to set the default UI language and control the formatof date, number, currency, and so on. The Samples area displays the formatting based on thelocale selected. Click Customize to make changes.
4. On the Advanced tab, select a language drop-down list box. Choose from the Appendix C,Languages supported in InputAccel. This sets the codepage that the InputAccel Server andclient modules will use. It must be an appropriate codepage for the locale set in the RegionalOptions tab. Typically, the locale specified in the Regional Options tab and language specifiedon the Advanced tab must match.
77

Installing InputAccel
5. On the Advanced tab, select the Default user account settings checkbox. This ensures thatthe changed settings apply for all accounts that are used to run the InputAccel Server or clientmodules as a service.
To specify the default UI language for client modules new in InputAccel 6.0:
Client modules new in InputAccel 6.0 (modules listed as “New in InputAccel 6.0” in Table 12, page172) use the language of the operating system as the default UI language. These modules use thelocale set on the Regional Options tab (Control Panel > Regional and Language Options) to controlthe format of date, number, currency, and so on.
The default UI language settings for the InputAccel Server and client modules can be overriden. Referto Summary of the options for overriding the default UI language, page 78 for details.
Summary of the options for overriding the default UI language
The default UI language for the InputAccel Server or client modules can be overriden as summarizedin this section.
Note: This section summarizes the various options available to override the default UI language ofvarious InputAccel components. Steps for each override option is described in Procedures to overridethe UI language, page 79
For the InputAccel Server, the default UI language can be overriden by: —• win.ini file if setscan.ini file does not specify the UI language.
• User’s regional settings, if the above is specified.
For modules introduced in 6.0, the default UI language can be overriden by: —• Command line argument, if specified.
• settings.ini file, if the command line argument for language is not specified.
• setscan.ini file, if the command line argument and settings.ini do not specify the UIlanguage.
• MUI pack setting for language, if the command line argument, settings.ini, andsetscan.ini do not specify the UI language.
• Language of the operating system, if none of the above is specified.
For modules available prior to InputAccel 6.0 versions, the default UI language can be overridenby: —• win.ini file, if specified.
• setscan.ini file, if the win.ini file does not specify the UI language.
• User’s regional settings, if none of the above is specified.
78

Installing InputAccel
Procedures to override the UI language
This section details the steps involved in overriding the default UI language of the InputAccelServer and client modules.
Prerequisites for successfully overriding the default UI language:• Make sure new UI language is supported by the Windows codepage specified in the Advancedtab of the Regional and Language Options window of the Windows Control Panel.
• Make sure the Regional Options tab lists the appropriate locale. This is required to display thecorrect format of date, number, currency, and so on.
Specifying a command line argument to set the UI language:
1. On the client machine where a module new in InputAccel 6.0 is installed, add the followingparameter to the command line arguments used to start the module:-language:<languagecode>
where <language code> represents a language code for the languages supported in InputAccel.Examples (where the ScanPlus module is installed at the default location):• "C:\Program Files\InputAccel\Client\binnt\QuickModuleHost.exe"
-modulename:Emc.InputAccel.Scan -language:en-us (Starts the ScanPlus modulewith the UI language set to English-United States)
• "C:\Program Files\InputAccel\Client\binnt\QuickModuleHost.exe"-modulename:Emc.InputAccel.Scan -language:pt-br (Starts the ScanPlus modulewith the UI language set to Portuguese-Brazil)
• "C:\Program Files\InputAccel\Client\binnt\QuickModuleHost.exe" -modulename:Emc.InputAccel.Scan-login:honor\johndoe,password99@Baltimore1;bermuda -language:pt (Startsthe ScanPlus module for production connecting to InputAccel Servers “Baltimore1” and“bermuda” with the domain name “honor”, the user name “johndoe”, the password“password99”, and the UI language set to Portuguese.
Specifying the UI language in the settings.ini file:
1. On the client machine where a module new in InputAccel 6.0 is installed, open thesettings.ini file. The default location is c:\Documents and Settings\AllUsers\Application Data\EMC\InputAccel.
2. In the [INPUTACCEL] section, specify the UI language in the format:language=<languagecode>
where <language code> represents a language code for the languages supported in InputAccel.Examples:• language=en-us (to set the UI language to English-United States)
• language=pt-br (to set the UI language to Portuguese-Brazil)
• language=pt (to set the UI language to Portuguese)
79

Installing InputAccel
Specifying the UI language in the setscan.ini file:
1. On the machine where the InputAccel Server or any InputAccel client module is installed, openthe setscan.ini file. The default location is c:\windows.
2. In the [OPTIONS] section, specify the UI language in the format:iLanguage=<Locale ID>
where <Locale ID> represents the locale ID for the languages supported in InputAccel.Examples:• iLanguage=1033 (to set the UI language to English-United States)
• iLanguage=1046 (to set the UI language to Portuguese-Brazil)
Specifying the UI language in the win.ini file:
1. On the machine where the InputAccel Server or a client module available prior to InputAccel 6.0version is installed, open the win.ini file. The default location is c:\windows.
2. In the [INPUTACCEL] section, specify the UI language in the format:Locale=<Locale ID>
where <Locale ID> represents the locale ID for the languages supported in InputAccel.Examples:• Locale=1033 (to set the UI language to English-United States)
• Locale=1046 (to set the UI language to Portuguese-Brazil)
Specifying the UI language using the Windows MUI Pack:
MUI Pack is available in the English version of Windows XP Professional and Windows 2000 familyof operating systems. MUI Pack will not install on non-English versions of the operating system.Refer to Microsoft documentation on how to install the MUI Pack.
Note: This procedure assumes you are running the English version of the Windows XP operatingsystem and have installed the MUI Pack.
1. Run the Control Panel on the machine running the any client module new in InputAccel 6.0.(Modules listed as “New in InputAccel 6.0” in Table 12, page 172)
2. Double-click Regional and Language Options.
3. On the Languages tab, select the required language from the Language used in menus anddialogs list box.
Related Topics —
Appendix C, Languages supportedTable 12, page 172
80
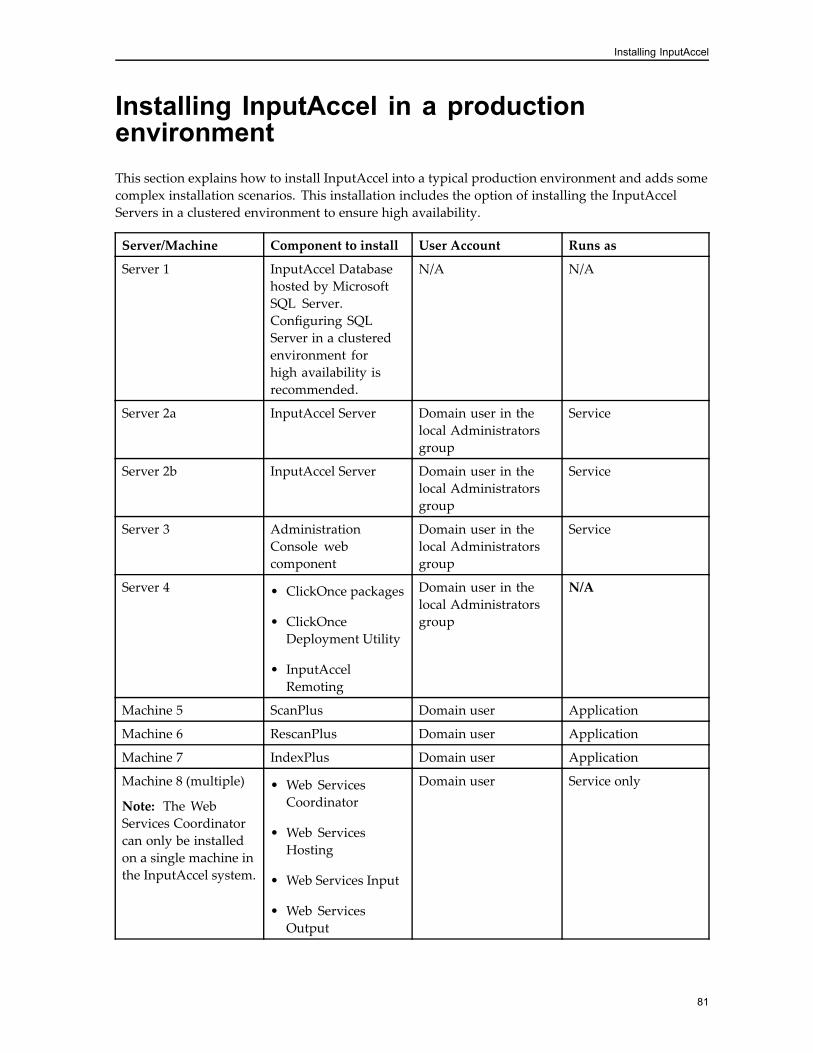
Installing InputAccel
Installing InputAccel in a productionenvironmentThis section explains how to install InputAccel into a typical production environment and adds somecomplex installation scenarios. This installation includes the option of installing the InputAccelServers in a clustered environment to ensure high availability.
Server/Machine Component to install User Account Runs as
Server 1 InputAccel Databasehosted by MicrosoftSQL Server.Configuring SQLServer in a clusteredenvironment forhigh availability isrecommended.
N/A N/A
Server 2a InputAccel Server Domain user in thelocal Administratorsgroup
Service
Server 2b InputAccel Server Domain user in thelocal Administratorsgroup
Service
Server 3 AdministrationConsole webcomponent
Domain user in thelocal Administratorsgroup
Service
Server 4 • ClickOnce packages
• ClickOnceDeployment Utility
• InputAccelRemoting
Domain user in thelocal Administratorsgroup
N/A
Machine 5 ScanPlus Domain user Application
Machine 6 RescanPlus Domain user Application
Machine 7 IndexPlus Domain user Application
Machine 8 (multiple)
Note: The WebServices Coordinatorcan only be installedon a single machine inthe InputAccel system.
• Web ServicesCoordinator
• Web ServicesHosting
• Web Services Input
• Web ServicesOutput
Domain user Service only
81

Installing InputAccel
Server/Machine Component to install User Account Runs as
Machine 9 • Image Enhancement
• NuanceOCR
Network Service Service
Machine 10 DocumentumAdvanced Export
Network Service Service
Machine 11 • Multi
• Image Divider
Network Service Service
Machine 12 Multi-Directory Watch Network Service Service
Machine 13 Email Import Network Service Service
Machine 14 (multiple) Other unattendedclient modules
Network Service Service
To install InputAccel in a typical production environment:
1. Make sure your servers and machines meet the system requirements outlined in Chapter 2,System requirements and recommendations.
2. Install InputAccel Database on Server 1. Refer to Installing the InputAccel Database, page 65 forinstructions on installing the InputAccel Database.
3. Install the InputAccel Server. You have the following options:• Install the InputAccel Server on a single machine, Server 2. Refer to Installing the InputAccelServer, page 67 for instructions.
• Install multiple instances of the InputAccel Server on a single machine, Server 2. Refer toInstalling multiple instances of the InputAccel Server for instructions.
• Install the InputAccel Server on multiple machines, Server 2a and Server 2b, and optionallyconfigure them as a ScaleServer group.
• Install the InputAccel Servers in a clustered environment and then configure them as aScaleServer group. Refer to Installing the InputAccel Server in a clustered environment forinstructions on installing InputAccel Servers in an Active/Passive or Active/Active clusteredenvironment.
4. (Optional) Configure the InputAccel Servers as a ScaleServer group. Refer to Configuringmultiple InputAccel Servers as a ScaleServer group, page 85 for instructions.
5. Install the Administration Console web component on a web server, Server 3. Refer to Installingthe Administration Console, page 69 for instructions.
6. Install attended client modules, ScanPlus, IndexPlus, and RescanPlus as applications on eachmachine designated for these modules according to the installation plan. Refer to Installing theInputAccel Client Components, page 73 for instructions.
Note: The ScanPlus, RescanPlus, and IndexPlus modules may optionally be deployed using theClickOnce Deployment Utility. Users can then download these modules through a web server ornetwork file share. Refer to step 7 for instructions.
82

Installing InputAccel
7. (Optional. This step is required only if ScanPlus, RescanPlus, and IndexPlus are deployed usingthe ClickOnce Deployment Utility). Install ScanPlus ClickOnce Package, RescanPlus ClickOncePackage, and IndexPlus ClickOnce Package. Follow the same steps involved in installing clientmodules. Also, deploy the ClickOnce packages on a web server or network file share by runningthe ClickOnce Deployment Utility on the same machine.
8. (Optional. This step is required only if the client modules must access the InputAccel Serverremotely.) Install the InputAccel Remoting web component on a Server 4 running in thenetwork’s demilitarized zone (DMZ) to enable access from the Internet. Refer to InstallingInputAccel Remoting, page 101 for instructions.
Note: Administration Console and InputAccel Remoting must be installed on separate servers.
9. Install the Web Services Coordinator, Web Services Hosting, Web Services Input, and WebServices Output client modules on a separate machine.
10. Install the other unattended client modules as services on each machine designated for thesemodules according to the installation plan.
Note: For a list of client modules that can be run in unattended mode, refer to Table 12, page 172.
11. (Optional) Set the UI language for the different InputAccel components.
12. Run the Administration Console from any machine on the network to configure the Web ServicesCoordinator and Web Services Hosting components. Refer to the Using Administration Consolesection in the Administration Guide for details.
Additional installation and configurationoptionsThis section discusses additional installation and configuration options for the InputAccel system.Topics in this section include:• Installing multiple instances of InputAccel Servers, page 84
• Configuring multiple InputAccel Servers as a ScaleServer group, page 85
• Installing the InputAccel Server in a clustered environment, page 87
• Installing InputAccel Remoting, page 101
• Deploying modules with the ClickOnce Deployment Utility, page 104
• Unattended installations, page 108
• Manually registering a client module to run as a service, page 113
83
Installing InputAccel
Installing multiple instances of InputAccel Servers
Multiple instances of the InputAccel Server can be installed on the same machine (also called aside-by-side installation). A maximum of eight instances of InputAccel Server can be installed;although in typical installations, one InputAccel Server per four cores is optimal. Variations in howsystems are configured, the types of hardware used, and customer-specific batch processing needsmake each situation unique, requiring experimentation to find the best balance between number ofprocessors per instance of the InputAccel Server.
Performance benefits of side-by-side installation include:• Each InputAccel Server instance runs its VBA engine within its server process, enabling betterparallel execution of batches when running on multi-processor machines.
• Enables InputAccel to be installed in an Active/Active clustered environment.
Note:• Side-by-side installation is required when installing the InputAccel Server in an Active/Activeclustered environment.
• Side-by-side InputAccel Server installations are not compatible with a hardware security key.
• ScaleServer groups normally provide some degree of business continuation in the event of aserver failure. However, if all members of a ScaleServer group are installed on the same physicalmachine, then a single point of failure will take out the whole system. So, do not install allmembers of a ScaleServer group on a single machine if the intent is to ensure high availability.
To install multiple instances of InputAccel Servers:
1. From the Installation Choices menu of the InputAccel setup program, select Step 2 – Installthe InputAccel Server. Click Next.
2. From the Custom Setup window, select features that you want to install, and then click Next.To install multiple instances of the InputAccel Server, make sure that the InputAccel Serverfeature is selected.
3. Select the number of InputAccel Server instances to install, and then click Next.
4. For each instance, click Change to specify a unique location for data files for each InputAccelServer, and then click Next.
Note: Each instance must be installed on its own directory. EMC recommends that the specifieddirectories be on separate physical hard disks and the directories reside on an NTFS partition.
5. Specify whether the server instances will be used in an Active/Active clustered configuration.
6. In the TCP/IP Settings window:• If multiple instances of the InputAccel Server will be used in a clustered configuration, specifythe IP address and Port for each server instance. To simplify client module connections, werecommend using the default port for all server instances.
• If multiple instances of the InputAccel Server will not be used in a clustered configuration,specify a unique Port for each server instance.
7. The InputAccel Service Accountswindow displays, prompting the user for the run-as credentialsto use for new instances being installed. Click Next. Specify whether you want the InputAccelServer to be started as a service automatically when the system starts.
84
Installing InputAccel
8. Click Install and then click Finish to complete the installation.
Note:• If you choose to start the InputAccel Server as a service automatically when the system starts,the setup program configures only the first InputAccel Server instance to automatically start.All other instances of the InputAccel Server are configured to run as services but are notconfigured to start automatically. You may use the Service Control Manager to configurethese additional instances to start automatically.
• If you have installed multiple instances of the InputAccel Server in an Active/Active clusteredconfiguration, you will not be able to run both of them on the same node at the same time.You must run both the InputAccel Servers on separate nodes until after you have licensedthem. If you attempt to run both servers on the same node at the same time, one of them willnot start (due to a lack of a server license containing feature code S) and the cluster serviceswill automatically move the resources for that server to the other node and start it up there.
9. Activate and license all instances of the InputAccel Servers installed.
10. To verify that multiple instances of the InputAccel Server are installed correctly:
a. Start any module in production mode.
b. When logging on, specify one of the InputAccel Servers and make sure the module connects.
c. Repeat these steps for each InputAccel Server instance.
Related Topics —
InputAccel Server requirements, page 13InputAccel Server considerations, page 30InputAccel Server scalability, page 35Upgrading the InputAccel Server, page 142
Configuring multiple InputAccel Servers as aScaleServer group
A ScaleServer group of InputAccel Servers consists of 2 to 8 individual InputAccel Servers connectedto the same network, and licensed and configured to work together as a single information capturesystem. The installation process for each InputAccel Server is the same as when installing a singleInputAccel Server.
ScaleServer technology uses a combination of licensing, server configuration parameters, andtechnology in the InputAccel Servers themselves. To configure a ScaleServer group, you must obtaina server license that enables the ScaleServer technology. Refer to the Administration Guide to learnmore about the licensing feature codes for ScaleServer groups.
Note: InputAccel client modules cannot connect to multiple independent InputAccel Servers - theycan only connect to multiple servers that have been configured together as a ScaleServer group. For alist of client modules that are ScaleServer compatible, refer to Table 12, page 172.
85

Installing InputAccel
To configure a ScaleServer group:
1. Install the required hardware and software on each InputAccel Server machine. Refer to Chapter2, System requirements and recommendations for details.
2. Install the InputAccel Server software on each server machine.
3. Install the Administration Console web component on a web server.
4. Run the Administration Console module and do the following to configure the ScaleServer group:
a. For each installed InputAccel Server, be sure to install and activate the Activation File (CAFfile) or attach the hardware security key.
b. Install valid ScaleServer licenses/feature codes on each InputAccel Server that is to be partof the ScaleServer group.
Note: Feature codes are established when the InputAccel Server license codes are installed.For details on server feature codes, refer to the Administration Guide.
c. Specify a ScaleServer group name and add a list of InputAccel Servers in the group.
d. Configure the same set of users on all InputAccel Servers in the ScaleServer group.Refer to the Using Administration Console section in the Administration Guide for informationon activating InputAccel Servers, installing license codes, adding users and groups, andspecifying a ScaleServer group.
Note: When users running client modules connect to a ScaleServer group, they must specify theInputAccel Server machine name, and not “localhost” or an IP address.
5. To verify that the ScaleServer group is functioning correctly:
a. Start a ScaleServer-compatible module in production mode. Refer to Table 12, page 172 for alist of modules that are ScaleServer-compatible.
b. When logging on, select the Connect to server group checkbox.
c. Run the Administration Console and verify that the client module is logged into allservers in the ScaleServer group. Refer to the Using Administration Console section in theAdministration Guide for details.
Related Topics —
InputAccel Server requirements, page 13InputAccel Server considerations, page 30InputAccel Server scalability, page 35High availability and failover, page 45Upgrading the InputAccel Server, page 142ScaleServer issues, page 165
86

Installing InputAccel
Installing the InputAccel Server in a clusteredenvironment
This section explains how to install InputAccel within a Microsoft Cluster Server (MSCS) cluster ofWindows servers. For InputAccel to function correctly in an MSCS environment, the InputAccelServer and the EMC Captiva Input Management Console (if used) must be configured.
InputAccel works with Microsoft Windows Server 2003 in a cluster configuration. EMC CaptivaInput Management Console v.3.1 and later also supports this cluster configuration.
InputAccel can be installed in an Active/Passive cluster configuration and Active/Active clusterconfiguration.
Note: InputAccel has been tested on an MSCS cluster of two nodes. Other configurations maywork, but are not officially supported.
For more information about Microsoft Cluster Server, refer to the Microsoft Cluster Server GeneralQuestions on the Microsoft website.
Administrators must run theMSCS Cluster Administrator for all cluster configuration tasks, includingdefining each virtual server and its failover/failback rules. Refer to Microsoft documentation for moreinformation on the MSCS Cluster Administrator.
System prerequisitesBefore configuring InputAccel Server in a Microsoft server cluster, you must make sure yourenvironment meets the following prerequisites:• Microsoft Distributed Transaction Coordinator (MSDTC) must be installed and DistributedTransaction Coordinator (DTC) access must be enabled.
• Windows Server (Enterprise edition) must be set up in a clustering configuration on multiple(minimum of two) separate hardware platforms.
• The Microsoft Server Cluster must include a Storage Area Network (SAN) device.
Requirements of the cluster environment:• Create a cluster environment according to Microsoft best practices. Refer to the Microsoft websiteto find resources relating to server clusters.
• All machines are members of the same domain.
• Two identically configured node machines are running an Enterprise edition of a supportedWindows Server Operating System.
• The cluster service is run under a dedicated domain user account and this account is a member ofthe local Administrators group on each cluster node.
• There is a default Cluster Group containing at least the following three cluster resources: ClusterIP address, Cluster Name, and Quorum drive.
• The resources in the Cluster Group can be successfully moved between nodes of the cluster.
87

Installing InputAccel
• (For Active/Passive cluster environment only.) A second resource group containing just thephysical disk resource is dedicated to the InputAccel Server as the data drive. By default, whenthe cluster is created, this drive is put into a resource group named Group 0.
• (For Active/Active cluster environment only.) Two additional resource groups, each containinga physical disk resource that is dedicated to the InputAccel Server as the data drive for thatresource group.
Topics in this section include:• Installing InputAccel Servers into an Active/Passive MSCS Cluster, page 88
• Installing InputAccel Servers into an Active/Active MSCS cluster, page 93
Installing InputAccel Servers into an Active/Passive MSCS Cluster
Installing InputAccel Servers into an Active/Passive MSCS Cluster environment involves thefollowing steps:1. Setting up the cluster environment as detailed in Requirements of the cluster environment.
2. Preparing the InputAccel Server resource group for an Active/Passive cluster environment,page 88.
3. Installing the InputAccel Server on both cluster nodes in an Active/Passive cluster, page 90.
4. Adding the InputAccel Server generic service resource to the InputAccel Server Group in anActive/Passive cluster, page 91.
5. Activating the InputAccel Server in an Active/Passive cluster, page 92.
Preparing the InputAccel Server resource group for an Active/Passive clusterenvironment
Using MSCS Cluster Administrator, define the cluster resources for InputAccel running in a cluster.
Before proceeding with installing InputAccel into the cluster, ensure that the initial clusterconfiguration looks like the one below. This procedure assumes the cluster environment consists of asmall drive Q: for the quorum disk, and a drive R: for the InputAccel Server data disk.
[Cluster Group]• Cluster IP Address
• Cluster Network Name
• Cluster Physical Disk (Quorum Q:)
[Group 0]• Physical Disk (R:)
88

Installing InputAccel
To prepare the InputAccel Server resource group for an Active/Passive clusterenvironment:
1. In the Cluster Administrator window, rename Group 0 to something more descriptive, like“InputAccel Server Group”. This is the group name that will be used in this procedure.
2. In the left pane, select InputAccel Server Group, right-click and select New > Resource to add anIP address resource.
3. Enter a Name and Description for the IP address resource.
4. From the Resource Type list box, select IP Address.
5. From the Group list box, select InputAccel Server Group, and then click Next.
6. In the Possible owners list box, verify that both cluster nodes are listed as possible owners,and then click Next.
7. In the Dependencies window, click Next.
8. In the TCP/IP Address Parameters window, type the unique static IP address for the InputAccelServer, verify the proposed subnet mask is correct, verify the network is Public, verify that EnableNetBIOS for this address is selected, and then click Finish.
9. Click OK to confirm that the resource has been created.
10. Right-click the InputAccel Server IP Address resource, and then select Bring Online. Verify thatthe resource goes into an online state.
11. In the left pane, right-click InputAccel Server Group, and then select New > Resource to add aNetwork Name resource.
12. Type a Name and Description for the resource.
13. In the Resource Type list box, select Network Name.
14. In the Group list box, verify that the InputAccel Server Group is already selected, and thenclick Next.
15. In the Possible Owners list box, verify that both cluster nodes are listed as possible owners,and then click Next.
16. In the Dependencies window, add the InputAccel Server IP Address as a resource dependency,and then click Next. The Network Name Parameters window is displayed.
17. In the Name field, type the network name for the InputAccel Server (the name which clientmodules use to connect) such as IASERVER, and select DNS Registration Must Succeed andEnable Kerberos Authentication, and then click Finish.
18. Click OK to confirm that the resource has been created.
19. Right-click the InputAccel Server Network Name resource, and then click Bring Online.
20. Verify the resource goes into an online state.The cluster nodes are now created. InputAccel Server can be installed on both cluster nodes.
Related Topics —
Disaster planning, page 47Licensing for use in a Microsoft cluster, page 53Licensing for disaster recovery, page 53
89

Installing InputAccel
Installing the InputAccel Server on both cluster nodes in an Active/Passivecluster
Before installing the InputAccel Server, ensure all the Cluster Group and InputAccel Server Groupresources can be successfully moved between nodes.
To install the InputAccel Server on both cluster nodes:
1. Prepare the InputAccel Server resource group for an Active/Passive cluster environment.
2. In Cluster Administrator, right-click Cluster Group, and then clickMove Group.
3. Verify that the Cluster Group resources are now owned by the other node (NODE2) and thatthey are all online.
4. Right-click the InputAccel Server Group, and then clickMove Group.
5. Verify that all resources in this group are now owned by the other node (NODE2) and thatthey are all online.
6. Repeat steps 2 through 5 to move the Cluster Group and InputAccel Server Group resourcesback to the first node (NODE1) and verify that they all come online.
7. Begin installation of the InputAccel Server on the first node (the node that is currently the ownerof all the InputAccel Server Group resources).
8. Run the InputAccel Server installer and begin server installation according to the installationinstructions, making exceptions to the default installation process as described below:
a. In Setup Type, select Custom installation, and then click Next.
b. In Side by Side Setup, do not change the default of the first server instance, and then clickNext.
c. In Destination Folder for Server application files, type the name of a directory on the localboot drive, such as the default C:\Program Files\InputAccel\Server\.
d. In Data Files Destination for Server data files, change the drive letter to match the letter ofthe physical disk resource that is in your InputAccel Server Group, such as R:\IAS\.
e. In InputAccel Service Accounts, do not change the default of the Use the same settingsfor all services checkbox.
f. For Run all services with the following credentials, select Specify a user account and type adomain user account that is a member of the local Administrators group on the machine onwhich InputAccel Server is installed.
g. In Start Services Automatically, select No, then click Next.
h. When the installation wizard is complete, clear the Start the InputAccel Server service whensetup completes checkbox, and click Next, then click Finish.
9. In Cluster Administrator, right-click InputAccel Server Group, and then selectMove Group tomove all InputAccel Server Group resources to the second node (NODE2).
10. Verify that all resources in this group are now owned by the second node (NODE2) and thatthey are all online.
11. Install the InputAccel Server. On the physical machine of the second node, launch the InputAccelServer installer and begin server installation again.
90

Installing InputAccel
12. Repeat steps 7 and 8. Specify the same Data Files Destination for Server data files (R:\IAS\ forexample) as for the first node and use the same domain user account for running the InputAccelServer services as on the first node. Be sure this user account is part of the local Administratorsgroup on the second node.
Related Topics —
Disaster planning, page 47Licensing for use in a Microsoft cluster, page 53Licensing for disaster recovery, page 53Installing InputAccel Servers into an Active/Active MSCS cluster, page 93
Adding the InputAccel Server generic service resource to the InputAccelServer Group in an Active/Passive cluster
Adding the InputAccel Server as a generic service resource to the InputAccel Server Group completesthe installation of the InputAccel Server in the cluster.
To add the InputAccel Server generic service resources to the InputAccel ServerGroup:
1. Prepare the InputAccel Server resource group for an Active/Passive cluster environment.
2. Install the InputAccel Server on both cluster nodes in an Active/Passive cluster.
3. Run Cluster Administrator on one of the two cluster nodes.
4. Right-click the InputAccel Server Group, and then select New > Resource.
5. Type a Name and Description for the resource.
6. From the Resource Type list box, select Generic Service.
7. In the Group list box, verify that InputAccel Server Group is already selected and click Next.
8. In the Possible Owners list box, verify that both cluster nodes are listed as possible ownersand click Next.
9. In theDependencieswindow, add the physical disk (for example, Disk R) and IA Server NetworkName resource dependencies, and then click Next.
10. In the Service Name field, type InputAccel.
11. Select the Use Network Name for computer name checkbox, and then click Next.
12. In the Registry Replication window, click Finish.
13. Click OK to confirm that the resource has been created.
14. Right-click the InputAccel Server Service, and then select Bring Online.
15. Verify the resource goes into an online state.The InputAccel Server is now installed in an Active/Passive cluster environment. The next stepis to activate and license the server.
91

Installing InputAccel
Activating the InputAccel Server in an Active/Passive cluster
To activate and license the InputAccel Servers in an Active/Passive cluster, the InputAccel Server mustbe activated twice; once for each node in the cluster. To activate the InputAccel Server, you mustinstall the two activation files (CAF) supplied by EMC.
To activate and license the InputAccel Server:
1. Install the Administration Console on a separate web server, using the InputAccel WebComponents installer.
2. Run Administration Console.
3. From the navigation panel, select Licensing/Security, and then select View All ServerActivations. The Server Activations pane displays the InputAccel Server name using thenetwork name defined in the cluster.
4. Select this server, and then Browse to the location and name of the CAF file, and then click OKto install it. After you have installed the CAF file, the status on the Server Activations pagechanges to “Initial Grace Period”.
5. Select the InputAccel Server, and then click Activate Server. The Activate Server windowdisplays prompting you for the activation key. Write down the Server Serial Number and ProfileID displayed in this window and then click Cancel.
6. Run Cluster Administrator to switch to the other node.
7. Right-click the InputAccel Server Group, and then clickMove Group. Verify that all theresources come online again on the other node.
8. Run Administration Console and navigate to the Server Activations page. Notice that theactivation status has now changed to “MSCS Cluster Grace” and the Profile ID is different than itwas on the other node, but the Server ID and Server name have not changed.
9. Select the InputAccel Server name, and then click Activate Server. Write down the Server SerialNumber and Profile ID.
10. Select the Online InputAccel Server Activation link, or go to http://activation.captivasoftware.com and request activation keys for both the Profile IDs. Submit both the Profile IDs, each withthe same Server Serial Number.
11. When you receive the activation keys from EMC, you can activate the InputAccel Server for eachnode. Run Administration Console and navigate to the Server Activations page.
12. Select the Server name, and click Activate Server. The Activate Server window displays.
13. Type the activation key for the first InputAccel Server Profile ID, and then click OK. The Statecolumn for the server displays “Activated”.
14. Run Cluster Administrator to switch to the other node.
15. Right-click the InputAccel Server Group, and then clickMove Group. Verify that all theresources come online again on the other node.
16. Run Administration Console and navigate to the Server Activations page.
17. Repeat steps 12 and 13 to activate the second InputAccel Server Profile ID.
92
Installing InputAccel
18. Once the InputAccel Server has been fully activated on each cluster node, move the InputAccelServer Group between the nodes and verify in Administration Console that the State columndisplays “Activated” state for both nodes.
The InputAccel Server is now ready to use in an Active/Passive cluster.
Related Topics —
Disaster planning, page 47Licensing for use in a Microsoft cluster, page 53Licensing for disaster recovery, page 53Installing InputAccel Servers into an Active/Active MSCS cluster, page 93
Installing InputAccel Servers into an Active/Active MSCS cluster
Installing InputAccel Servers into an Active/Active MSCS Cluster environment involves the followingsteps:1. Setting up the cluster environment as detailed in Requirements of the cluster environment.
2. Preparing the InputAccel Server resource groups for an Active/Active cluster, page 93.
3. Installing the InputAccel Server on both Active/Active cluster nodes, page 95.
4. Adding the InputAccel Server generic service resource to each IA Server Group in anActive/Active cluster, page 97.
5. Activating and licensing the InputAccel Server in an Active/Active cluster, page 98.
Preparing the InputAccel Server resource groups for an Active/Active cluster
Using MSCS Cluster Administrator, define the cluster resources for InputAccel running in a cluster.
Before proceeding with installing InputAccel into the cluster, ensure that the initial clusterconfiguration looks like the one below. This procedure assumes the cluster environment consists of asmall drive Q: for the quorum disk, and drive R: and drive S: for the two InputAccel Server data disks.
[Cluster Group]• Cluster IP Address
• Cluster Network Name
• Cluster Physical Disk (Quorum Q:)
[Group 0]• Physical Disk (R:)
[Group 1]• Physical Disk (S:)
93

Installing InputAccel
To prepare the InputAccel Server resource groups:
1. In the Cluster Administrator window, rename Group 0 to something more descriptive, like“IAServer1 Group” and Group 1 to “IAServer2 Group”.
2. Right-click IAServer1 Group, and then select New > Resource to add an IP address resourceto the InputAccel Server1 Group.
3. Type a Name and Description for the IP address resource.
4. In the Resource Type list box, select IP Address.
5. In the Group list box, verify that IAServer1 Group is already selected, and then click Next.
6. In the Possible Owners window, verify that both cluster nodes are listed as possible owners,and then click Next.
7. In the Dependencies window, click Next.
8. In the TCP/IP Address Parameters window, type the unique static IP address for IAServer1Group, verify that the specified subnet mask is correct, verify the network is Public, verify thatthe Enable NetBIOS for this address checkbox is selected, and then click Finish.
9. Click OK to confirm that the resource has been created.
10. Right-click the IAServer1 Group IP Address resource, and then select Bring Online. Verify theresource goes into an online state.
11. Right-click the IAServer1 Group, and then select New > Resource to add a network nameto IAServer1 Group.
12. Type a Name and Description for the network name.
13. In the Resource Type list box, select Network Name.
14. In the Group list box, verify that InputAccel Server1 Group is already selected, and then clickNext.
15. In the Possible Owners window, verify that both cluster nodes are listed as possible owners,and then click Next.
16. In the Dependencies window, add the IAServer1 Group IP Address as a resource dependency,and then click Next.
17. In the Name field, type the network name for the IAServer1 Group (the name which clientmodules use to connect) such as IASERVER1.
18. Select both the DNS Registration Must Succeed and Enable Kerberos Authenticationcheckboxes, and then click Finish.
19. Click OK to confirm that the resource has been created.
20. Right-click the IAServer1 Group Network Name resource, and then select Bring Online. Verifythat the resource goes into an online state.
94

Installing InputAccel
21. Repeat steps 2 through 20 for the IAServer2 Group and give the resources names that indicatethey are for the second InputAccel Server.
The cluster nodes are now created. InputAccel Server can be installed on both cluster nodes.
Related Topics —
Disaster planning, page 47Licensing for use in a Microsoft cluster, page 53Licensing for disaster recovery, page 53Installing InputAccel Servers into an Active/Passive MSCS Cluster, page 88
Installing the InputAccel Server on both Active/Active cluster nodes
Before installing the InputAccel Servers, make sure that all the Cluster Group and IAServer Group(1 and 2) resources can be successfully moved between nodes.
To install the InputAccel Servers on both cluster nodes:
1. Prepare the InputAccel Server resource groups for an Active/Active cluster.
2. Run Cluster Administrator, right-click Cluster Group, and then selectMove Group. Verify thatthe Cluster Group resources are owned by the other node ( NODE2) and that they are all online.
3. Right-click IAServer1 Group, and then clickMove Group.
4. Verify that all resources in this group are now owned by the other node ( NODE2) and they areall online.
5. Right-click IAServer2 Group, and then selectMove Group.
6. Verify that all resources in this group are now owned by the other node ( NODE2) and they areall online.
7. Repeat the steps above to move all the groups (Cluster Group, IAServer1 Group, and IAServer2Group) resources back to the first node (NODE1) and verify they all come online.
8. Begin installation of the InputAccel Server on the first node (the one that is currently the ownerof all the IAServer1 Group and IAServer2 Group resources).
9. Run the InputAccel Server installer and begin server installation according to the installationinstructions, making exceptions to the default installation process as described below.
a. In Setup Type, select Custom installation and click Next.
b. In Side by Side Setup, choose to install two InputAccel Server instances and click Next.
Note: For Active/Active cluster, it is essential to install two InputAccel Server instanceson each node.
c. In Destination Folder for Server application files, specify a directory on the local boot drive,such as the default C:\Program Files\InputAccel\Server\.
d. In Data Files Destination for Server data files, change the drive letter for the first InputAccelServer to match the drive letter of the physical disk resource that is in the IAServer1 Group,such as R:\IAS\.
95

Installing InputAccel
e. In the same Data Files Destination window, change the drive letter and path for the secondInputAccel Server to match the drive letter of the physical disk resource that is in theIAServer2 Group, such as S:\IAS\.
Note: It is essential that the two InputAccel Server instances configured on this node usedifferent physical disks for their respective server data file directories (for example, IASdirectory).
f. In InputAccel Service Accounts, under Run all services with the following credentials,click Specify a user account and enter a domain user account that is a member of the localAdministrators group on the machine where the InputAccel Server is installed. Clear theAutomatically start services when the system starts checkbox.
Note: It is important that none of the InputAccel Server services installed are allowed to startup after installation, nor should any of the services be configured to autostart for subsequentreboots of the machine.
10. When the installation wizard is complete, clear the Start the InputAccel Server service whensetup completes checkbox, click Next, then click Finish.
11. When complete, this installation should have created two newWindows services, all of which areset for manual startup, and none of which is currently started.
12. In Cluster Administrator, right-click IAServer1 Group, and then clickMove Group to move allIAServer1 Group and IAServer2 Group resources to the second node.
13. Move the IAServer2 Group to the second node in the same way.
14. Verify that all resources in both groups are now owned by the second node (for example,NODE2) and they are all online.
15. On the physical machine of the second node, launch the InputAccel Server installer and beginserver installation again to install the InputAccel Servers on the second node.
16. Repeat these steps for the second node.
Related Topics —
Disaster planning, page 47Licensing for use in a Microsoft cluster, page 53Licensing for disaster recovery, page 53Installing InputAccel Servers into an Active/Passive MSCS Cluster, page 88
96

Installing InputAccel
Adding the InputAccel Server generic service resource to each IA ServerGroup in an Active/Active cluster
Adding the InputAccel Server as a generic resource to each IA Server Group completes the installationof the InputAccel Server in the cluster.
To add the InputAccel Server generic service resource to each IA Server Group:
1. Prepare the InputAccel Server resource groups for an Active/Active cluster.
2. Install the InputAccel Server on both nodes as detailed in Installing the InputAccel Server onboth Active/Active cluster nodes.
3. Run Cluster Administrator on either node to configure IA Server1 Group resources.
4. Right-click IAServer1 Group, and then select New > Resource.
5. Type a Name and Description for the new resource.
6. In the Resource Type list box, select Generic Service.
7. In the Group list box, verify that IAServer1 Group is already selected and click Next.
8. In the Possible Owners window, verify that both cluster nodes are listed as possible ownersand click Next.
9. In the Dependencies window, add the physical disk (for example, Disk R:) and IA Server1Network Name resource dependencies, and then click Next.
10. In the Service Name field, enter a service name, for example, InputAccel.
11. Select the Use Network Name for computer name checkbox and click Next.
12. In Registry Replication window, click Finish.
13. Click OK to confirm that the resource has been created.
14. Right-click the IAServer1 Group service, and then click Bring Online.
15. Verify that the resource goes into an online state.
16. Right-click on the IAServer1 Group service again, and then clickMove Group.
17. Verify that all the IAServer1 Group resources move to the first node and are online.
18. Repeat steps 3 through 17 to configure IAServer2 Group resources.
19. Right-click the IAServer2 Group service, and then click Bring Online.
20. Verify that the IAServer2 Group service successfully comes online on Node 2.
Caution: Until the InputAccel Servers are licensed, you will not be able to run both of themon the same node at the same time. You must run both the InputAccel Servers on separatenodes until after you have licensed them. If you attempt to run both servers on the samenode at the same time, one of them will not start (due to a lack of a server license containingfeature code S) and the cluster services will automatically move the resources for that serverto the other node and start it up there.
97

Installing InputAccel
21. Right-click IAServer1 Group and select Properties to set the Preferred node for each InputAccelServer group. The purpose of using an Active/Active cluster is to have just one InputAccel Serverrun on each cluster node, and only have two InputAccel Servers running on the same node in theevent that one of the nodes fails. Setting a preferred owner for each of the InputAccel Serversensures that, by default, the InputAccel Servers do not run on the same node.
22. On the General tab, clickModify.
23. In theModify Preferred Owners window, click NODE1 and move it over to the Preferredowners column, then click OK.
24. Repeat the previous step with the IAServer2 Group and set its Preferred owner value toNODE2.The InputAccel Server is now installed in an Active/Active cluster environment. The next step is toactivate and license the server.
Related Topics —
Disaster planning, page 47Licensing for use in a Microsoft cluster, page 53Licensing for disaster recovery, page 53Installing InputAccel Servers into an Active/Passive MSCS Cluster, page 88
Activating and licensing the InputAccel Server in an Active/Active cluster
To activate and license the InputAccel Server in Active/Active cluster, you must activate theInputAccel Server twice, once for each node in the cluster using the two Activation IDs you receivedfrom EMC.
To activate and license the InputAccel Server:
1. Install the Administration Console on a separate web server, using the InputAccel WebComponents installer.
2. Run Administration Console.
3. From the navigation panel, select Licensing / Security, and then select View Server Activations.The Server Activations pane displays both InputAccel Servers listed with their networknames followed by their service names, for instance IASERVER1 (InputAccel) and IASERVER2(InputAccel2). The Server ID is 0 on both of them, and the state is “Not Activated”.
4. On the Server Activations pane, select the first server ( IASERVER1 for example) and Browse tothe location of the cluster CAF file intended for the first server, and select the CAF file.
Note: A CAF file that is not intended for a cluster cannot be installed in a cluster environment.
5. Repeat the previous step for the second server. Both InputAccel Servers display an activationstate of “Initial Grace Period.”
Note: You cannot use the same CAF file for both servers.
To activate the servers, you need four Profile IDs and two Server IDs for the two InputAccelServers in the cluster. To obtain these Profile IDs, each InputAccel Server must be run on eachclustered node, as the Profile ID is different on each node.
6. Run the Cluster Administrator and start IASERVER1 on Node 1 and IASERVER2 on Node 2.
98
Installing InputAccel
7. Run Administration Console and navigate to the Server Activations page.
8. Select IASERVER1, and then click Activate Server. Write down the Server Serial Number andProfile ID. Repeat for IASERVER2.
9. Use Cluster Administrator to move each InputAccel Server to the other node. Now repeat steps7–8 and obtain the second set of Serial Numbers and Profile IDs.
10. In the Server Activations page in Administration Console, select the Online InputAccel ServerActivation link, or go to http://activation.captivasoftware.com and request activation keys for thefour Profile IDs. For each profile ID, provide the Server Serial Number.
11. When you receive the activation keys from EMC, you can activate the InputAccel Server for eachnode. Run Administration Console and navigate to the Server Activations page.
12. Select the Server name, and click Activate Server. The Activate Server window displays.
13. Type the activation key for the first InputAccel Server Profile ID, and then click OK. The Statecolumn for the server displays “Activated”.
14. Repeat steps 12–13 for the second InputAccel Server.
15. Run Cluster Administrator to move each InputAccel Server to the other node.
16. Repeat steps 10–14 to activate the InputAccel Servers on the other node.
17. Now use the Cluster Administrator to move the InputAccel Server groups to the other nodeagain and verify that they remain activated in Administration Console. Also move the InputAccelServer groups so that both servers are running on Node 1, verify they are activated, then moveboth groups to Node 2, and verify again they are activated.
The installation of two InputAccel Servers into an Active/Active cluster is complete.
Related Topics —
Disaster planning, page 47Licensing for use in a Microsoft cluster, page 53Licensing for disaster recovery, page 53Installing InputAccel Servers into an Active/Passive MSCS Cluster, page 88
Setting up the Input Management Console in an MSCS cluster
This section explains how to set up the Input Management Console in a clustered server configuration.This configuration is used to monitor and control an InputAccel Server that has also been configuredin an MSCS cluster.
Note: Refer to the Input Management Console documentation for the system requirements to installthe product.
PrerequisitesBefore configuring the Input Management Console in an MSCS environment, make sure the clusterenvironment meets the following prerequisites:• Microsoft Distributed Transaction Coordinator (MSDTC) is installed and DTC access is enabledbefore the cluster is configured.
99

Installing InputAccel
• Windows Server 2003 is set up in a clustering configuration on multiple (at least two) separatehardware platforms. IIS must be installed and running on each of these platforms, and mustbe configured to enable ASP. In addition, set the necessary permissions on the web folders foreach of these nodes.
• The Microsoft Server Cluster must include a Storage Area Network (SAN) device. When InputManagement Console is installed, its database (usually Microsoft Access) must be installed onthe SAN.
To install and configure the EMC Captiva Input Management Console:
1. Obtain a valid Input Management Console license from VSR Networks.
2. Run the EMCCaptiva InputManagement Console setup program from the InputAccel installationmenu to install Input Management Console on each node of the Microsoft Cluster Server.
3. When setup completes, create the necessary database (Microsoft Access, by default) on the SAN.
4. Configure the database connectivity for the Input Management Console to use the database youcreated on the SAN.
5. Configure the Cluster Application Wizard to enable the InputAccel and Input ManagementConsole to work in the clustered environment:
a. Run Cluster Administrator. Connect to the cluster hosting the InputAccel Server.
b. Click Configure Application to run the Cluster Application Wizard.
c. In the Select Or Create A Virtual Server panel, select Use an existing virtual server, thenclick Next.
d. In the Create Application Cluster Resource panel, click Yes, create a cluster resource for myapplication now, then click Next.
e. In the Application Resource Type panel, select Generic Service in the Resource Type field,then click Next.
f. In the Application Resource Name And Description panel, type a Name and Description.
g. Select Advanced Properties and navigate to the Dependencies tab. ClickModify. TheModify Dependencies window displays.
h. Under Available Resources, select the Cluster Name, SAN drive(s), InputAccel Server, andthe MSDTC Resource. Then move these selections to the Dependencies column.
i. Click OK. The Cluster Application Wizard populates the Resource Dependencies area of theAdvanced Resource Properties window. Click OK.
j. In the Generic Service Parameters panel, type RevMonSvc.
k. In the Registry Replication panel, click Next.
l. In the Completing Application Wizard panel, click Finish.
6. Run the Input Management Console InputAccel wizard to complete the configuration.
a. Start the Input Management Console and either create a new monitor or view an existingmonitor.
b. Select File > Run Setup Wizards to display the Resource Function Setup Wizardswindow.
c. Select InputAccel Wizard from the list of wizards, then click OK.
100
Installing InputAccel
d. In theWeb Server field, type the MSCS cluster name used for the web server and InputAccelServer.
Note: The web server and InputAccel Server both must be running on an MSCS clusteredserver.
e. In the InputAccel Server field, type the user name in the format Username.
Note:• If you receive permissions errors when you start the Reveille monitor service,then double-click the object causing the error and type the login credentials asDomainName\Username in the Username field, then type the password. Repeat asnecessary on multiple objects in the monitor.
• You may need to change the logon parameters for the Reveille monitor service.
The Input Management Console is now installed and configured for use with InputAccel ina clustered environment.
Note: Input Management Console requires the IASYSMON license within InputAccel licensing toenable Input Management Console to connect to the InputAccel Server. Contact your accountmanager to obtain the appropriate license.
Related Topics —
Installing InputAccel Servers into an Active/Passive MSCS Cluster, page 88Installing InputAccel Servers into an Active/Active MSCS cluster, page 93Installing EMC Captiva Input Management Console, page 116
Installing InputAccel Remoting
The InputAccel Remoting web component must be installed on a web server if client modules need toaccess the InputAccel Server remotely over an HTTP connection.
Note:• If installing on a machine running IIS 7.0 (with Windows Server 2008), make sure you first run IIS6.0 Management Compatibility before installing InputAccel Remoting.
• If installing on a machine running Windows XP), make sure that IIS 5.1 is installed before youinstall InputAccel Remoting.
To install InputAccel Remoting:
1. From the Installation Choices menu of the InputAccel setup program, select Step 4 – Installthe InputAccel Web Components.
2. If you are prompted to install prerequisite applications, click Install. The prerequisite softwarefor InputAccel Web Components is installed.
3. Click Next.
4. In the License Agreement window, select I accept the terms in the license agreement, andthen click Continue.
101

Installing InputAccel
5. In the Custom Setup window, select InputAccel Remoting as the feature to install, and thenclick Next.
Note: The Administration Console and InputAccel Remoting features are incompatible andcannot be installed on the same machine.
6. In the Destination Folder window, click Next to install to the default destination directories.Otherwise, click Change to select a new location.
7. In the Data Access Layer Registration window, enter the Login ID and Password credentialsfor connecting to the SQL Server, and then click Next. By default, Register the Data AccessLayer with the InputAccel database is selected and the local Database server on Port 1433, andInputAccel Database are specified.
8. In the InputAccel Web Site User Account window, specify the Username, Password, andDomain credentials for the Windows user account that will run the InputAccel Web Componentswebsite.
9. In the InputAccel Web Components window, specify the following:
a. In the InputAccel web site description field, enter a description for the web componentswebsite.
b. From the IP address to use for this web site list, select the appropriate IP address.
c. In the TCP port this web site should use field, enter the port number and then click Next.
Note: If the selected port is already in use, the TCP Port Conflict window displays. Todisable the website currently assigned to the port, select Stop the web site. It will no longerbe available unless you reconfigure it.
10. In the InputAccel Server Connection Information window, specify the Server name and Serverport of the InputAccel Server to which the InputAccel Remoting component must connect. ClickNext.
11. In the InputAccel remote Access window, specify a virtual web directory. This directory is usedto enable client modules access to the InputAccel Server and the InputAccel Database. ClickNext.
12. Click Install and then click Finish.
13. If InputAccel Remoting is installed on a machine running Windows XP, then configure the webserver manually as detailed in Configuring InputAccel Remoting on Windows XP, page 103.
14. To verify that InputAccel Remoting is installed correctly:
a. Start ScanPlus, RescanPlus, or IndexPlus in production mode.
b. Specify the URL of the InputAccel Remoting server in the Server name field.
c. Confirm that the module connects to the InputAccel system.
Related Topics —
Chapter 3, Installation planningInputAccel Remoting server considerations, page 32Installing the Administration Console, page 69
102

Installing InputAccel
Configuring InputAccel Remoting on Windows XP
If InputAccel Remoting is installed on a machine running Windows XP, then the web server must beconfigured manually.
To configure InputAccel Remoting on Windows XP:
1. Navigate to Control Panel >Administrative Tools and double-click Internet InformationServices.
2. In the Internet Information Services window, expand local computer >Web Sites > DefaultWeb Site.
3. Right-click InputAccelRemoting and select Properties to display the InputAccelRemotingProperties window.
4. On the Directory tab, make sure the Script source access checkbox is selected and then clickCreate. The Application Settings area is populated with information that defines InputAccelRemoting as an IIS web-based application by the directory structure in which it is located. Do notmake any changes to this section.
5. On the Directory Security tab, click Edit in the Anonymous access and authentication controlarea. The Authentication Methods window displays.
6. Select the Anonymous access checkbox and click OK.
7. On the ASP.NET tab, verify that 2.0.50727 is selected for the ASP.NET version. Click OK.
8. Select local computer >Web Sites > Default Web Site. Right-click and select Start.
Related Topics —
InputAccel Remoting server considerations, page 32Configuring Administration Console on Windows XP, page 71
103

Installing InputAccel
Deploying modules with the ClickOnce DeploymentUtility
InputAccel includes these web-deployable client modules: ScanPlus, RescanPlus, and IndexPlus.InputAccel also includes a ClickOnce Deployment Utility that provides administrators with analternate (and optional) method to deploy these modules. The utility copies the necessary programsand application files to the customer’s web server or network file share based on the customer’sspecific environment. Depending on the parameters set by the administrator, prerequisite software isinstalled on the client workstation during deployment, and updates are automatically downloadedand installed as necessary. This enables administrators to install and maintain software for users indistributed locations.
Prerequisites• You must acquire a valid SSL certificate in .PFX format for the application that is deployed usingthe ClickOnce Deployment Utility. Administrators can use any authorized Signing Authority(VeriSign, for instance) for acquiring the SSL certificate.
• You must have ClickOnce publishing skills and ClickOnce technology know-how before choosinga ClickOnce deployment strategy.
• If the ClickOnce application is to be deployed to a website and downloaded using a URL, usethe IIS Manager snap-in feature of the Microsoft Management Console to configure the webserver as follows for each installation package:
— For each installation package you want to deploy via ClickOnce, create a virtual directoryunder the InputAccel Web Components website. (Each installation package must have itsown virtual directory.)
— For each of the virtual directories created, set the Virtual Directory Access Permissions to“Read”, “Run Scripts (such as ASP)”, and “Write”. Do not enable “Execute” permissions.
— For each of the virtual directories created, configure the Security settings so that the connectinguser (for example, the Internet Guest Account user) has Read, Write, and Modify permissionsset to “Allow.”
— Under IIS Web Service Extensions, change the WebDAV Service Extension Status field from“Prohibited” to “Allowed”.
To deploy modules with the ClickOnce utility:
1. Install the ScanPlus ClickOnce Package, RescanPlus ClickOnce Package, and IndexPlus ClickOncePackage from the client installer. (You must run the ClickOnce Deployment Utility on themachine where the packages have been installed.)
2. Select Start > Programs > InputAccel > ClickOnce Deployment Utility to run the ClickOnceDeployment Utility. The Deploy InputAccel Application window displays.
3. Select an application to deploy, set other basic deployment parameters, and supply a URL whereapplication support can be obtained:
a. Select Application from the navigation panel. The Application Options pane displays.
b. Select the ClickOnce application to deploy from the Select an application to deploy list box.
104

Installing InputAccel
c. Under Provide application deployment options, select the options appropriate for thedeployment. Also, accept the default values for the options selected or provide the valuesapplicable:• Publish version: Version of the deployed application.
• Publisher: Name of the organization deploying the module.
• Product: The name of the deployed module.
Support URL: The URL where support information for the module resides. The defaultlocation is http://www.emc.com/captiva
4. Set parameters for deployment, such as the URL for the application, installation location, andwhether users access the application only online or only through the application’s URL:
a. Select Deployment from the navigation panel to display the Deployment Options pane.
b. Under General deployment options, select the options appropriate for the deployment.Also, accept the default values for the options selected or provide the values applicable:• Application URL: The URL or network file share that will be used to access the ClickOnceapplication. The URL should not include the deployment manifest name. For example,if the URL is set to http://server for the ScanPlus application, the ClickOnce utilitywrites http://server/ScanPlus.application to the deployment manifest.
• Installation URL: The URL or network file share where the application files are copied. Ifthis parameter is not specified, the files are copied to the Application URL.
• Use a “.deploy” file name extension: Select to add a “.deploy” extension to applicationfiles. This value is set to Yes by default.
• Allow URL parameters to be passed to the application: Select to enable query stringsto be passed to the application. This parameter is set to Yes by default. This parameterensures that the deployed application (accessed by the application URL) can be run byusers in setup mode.
Caution: Setting this parameter to No prevents the application from running insetup mode or passing login information.
c. Under Choose installation mode, select the options appropriate for the installation of theapplication. Also, accept the default values for the options selected or provide the valuesapplicable:• The application is only available online: Select to make the application available fromthe location specified in the Application URL field.
• The application should be installed locally: Select to make the application available fromthe Windows Start menu. The application can then be uninstalled from the WindowsControl Panel.
105

Installing InputAccel
5. (Optional) Specify options that determine how often the module checks for updates, the locationwhere updates can be obtained, and the base version of the application to use when checkingfor available updates:
Note:• Automatic updates can only be scheduled for local installations.
• If the automatic update feature is enabled, the ClickOnce application will periodically readits deployment manifest file to check for updates. If an update is available, the new versionof the application is downloaded.
a. Select Update from the navigation panel. The Update Options pane displays.
Note: The Update Options pane is available only when an application is deployed locally. Ifthe installation mode is set to The application is only available online on the DeploymentOptions pane, a warning note displays aModify deployment options... link. Click this linkto return to the Deployment Options pane. Select The application should be installedlocally option to enable the Update Options pane.
b. From the Update Options pane, select the options appropriate for the deployment.• The application should check for updates: Select to ensure that the application checksfor updates based on the frequency and version specified.
• Choose when the application should check for updates: Select the appropriate option sothe module checks for updates either before or after starting.
• Choose how often the application should check for updates: Specify how often themodule should check for updates.
• Specify URL from which the application updates should be downloaded: Type the URLwhere the application resides and where updates can be obtained.
• Specify a minimum required version for the application which can updated: Specifya base version of the application to be used for updates.
6. (Optional) Create a bootstrap installation program for installing prerequisites required by themodule being deployed. This is selected by default. This enables automatic installation ofmodule prerequisites (.NET Framework 2.0 SP1, MDAC 2.8, and Visual C Runtime) as partof the deployment process:
a. Select Prerequisites from the navigation panel. The Prerequisites and Bootstrap Optionspane displays.
b. Select the options appropriate for the deployment:• Create setup program to install prerequisite components: Select to create a bootstrapinstallation program that installs prerequisite components as part of the deploymentprocess.
• Specify the install location for prerequisites: Select a location where the prerequisitecomponents reside. This location may be a vendor’s website, the same location as theapplication being deployed, or any other accessible location. To specify a URL or file path,select the Download prerequisites from this location option, and type a valid path inthe associated field.
106

Installing InputAccel
Note:• Administrative access may be needed for users to install prerequisites.
• If the client machine does not have Visual C Runtime installed, the module fails to connectto the InputAccel Server.
7. Specify how the application should sign the deployment manifest. Signing can be done from apassword protected file, or from a stored certificate, and can be associated with a timestamp toreduce issues that might be encountered if a certificate used for signing has expired.
a. Select Signing from the navigation panel. The Deployment Manifest Signing Optionspane displays.
b. Under Choose how to sign the deployment manifest area, select from the following options:• Sign the deployment manifest with this certificate file
— In the File field, type the file name and location for the certificate file, or click theBrowse button to browse to the correct file.
— In the Password field, type the password for the certificate file, if necessary.
• Sign the deployment manifest with a stored certificate:
— In the Certificate: field, type the name and path of the stored certificate, or click theSelect button to select a certificate stored on the local system.
c. In the Timestamp URL: field, type the URL of a supported time stamping service to populatethe certificate with a current time and date during the publishing process. When a publishedapplication’s certificate expires, the time stamp service can be called upon by the client toverify whether the application was signed while the certificate was still valid, enabling theexpired certificate to remain in use.
8. If the ClickOnce application is deployed to a website and downloaded using a URL, be sure thenecessary prerequisites and permissions have been configured as explained under Prerequisites.
9. Click the Deploy button to deploy the selected application with the selected settings.
10. Provide the URLs, IP addresses, or Share name of the deployment that users need to installthe applications.
11. To verify that the ClickOnce modules are deployed correctly, click the link provided in theDeployment successfully finished window.If the deployment fails, the ClickOnce Deployment Utility displays a message indicating theerror that occurred. The three most likely errors are due to incorrect configuration of itemslisted in Prerequisites:• (401) Unauthorized: This error will occur if the virtual directory permissions are not setcorrectly.
• (404) Not Found: This error will occur if the virtual directory properties grant the user fullExecute permissions. Change the permissions to Execute Scripts Only.
• (501) Not Implemented: This error will occur if the WebDAVWeb Service Extension is not setto “Allowed.”
Related Topics —
ClickOnce host system considerations, page 31Installing InputAccel Remoting, page 101
107

Installing InputAccel
Unattended installations
The InputAccel installers enable you to perform unattended and silent installations of InputAccel.Unattended installations are performed without user interaction during its progress. It also enablesusers to perform remote installations of InputAccel. A silent installation does not display messages orwindows during its progress. A command line is used to specify the InputAccel features to install andthe configuration settings. The command line consists of variables known as “installer properties”which define the features to install and the configuration of the installation. The installer propertiesare simple key/value pairs specified by PROPERTY=VALUE syntax.
Install InputAccel components in the following order when you perform a silent installation:1. InputAccel Database
2. InputAccel Server
3. InputAccel Web Components
4. InputAccel Client Components
Refer to the Command line instructions section for examples of command lines that silently installInputAccel.
This section includes the following topics:• Understanding installation command line arguments, page 109
• Command line considerations, page 110
• Installing InputAccel from a command line, page 111
• Automating unattended installations, page 111
• Modifying unattended installations, page 112
108

Installing InputAccel
Understanding installation command line arguments
The following command line arguments are required when installing InputAccel features inunattended or silent mode:
Table 8. InputAccel installation command line arguments
Argument Description
Setup.exe Use the Setup.exe located on the installation media. in thefollowing directories to access the directory where the InputAccelMicrosoft Installer (MSI) files reside:• Databases\setup.exe: Installs the SQL database used forstoring configuration settings, batch data, and information forlogging and reporting purposes.
• Server\setup.exe: Installs the InputAccel Server.
• Clients\setup.exe: Installs the InputAccel client modules.
• WebComponents\setup.exe: Installs Administration Consoleand InputAccel Remoting.
/s InstallShield argument that executes a silent setup.
/v InstallShield argument that passes command line options andvalues of public properties to msiexec.exe.
The entire MSI argument line must be enclosed in quotesimmediately following the /v switch. For example, enable loggingof installer messages to the file c:\temp\logfile.txt asfollows:
setup.exe /v"/l*v "c:\temp\logfile.txt""
x/v is an InstallShield argument and the /l*v are msiexec.exearguments. Include the “*” wildcard parameter (encompasses allparameters except the verbose parameter) along with the v, orverbose, parameter, to create a detailed log of the installation.
/l InstallShield argument that creates a log file that can be used totroubleshoot installation issues.
Msiexec.exe arguments Specifies an installer action: For example:• /i: Install.
• /f: Repair.
• /x: Remove.
Note: The /i argument is the default and does not need to bespecified.
109
Installing InputAccel
Argument Description
Windows Installer properties Specifies an installer action.
Features to install Installs the specified InputAccel features. For example, thefollowing command line installs an InputAccel Server:
setup.exe /s /v"/qn ADDLOCAL="ALL" SERVER_INSTANCES="1"IA_SERVICES_RUNAS_LOCAL_SYSTEM="1" /promptrestart"
Related Topics —
Supported InstallShield switches, page 183Supported MSI switches, page 184Supported Windows Installer properties, page 184
Command line considerations
There are some important issues to consider when installing InputAccel from a command line.
Escape charactersWhen creating the installation command line, some installer properties and characters must beescaped for the installation to succeed.
Any property containing a space must have escaped double-quotes. For example:
INSTALLDIR=\"c:\Program Files\InputAccel\Client\"
or
IA_SERVICES_RUNAS_USER_ACCT=\" CORP\My Login\"
Another issue to consider are characters that require “escaping” by the Windows command prompt.The ampersand (&) symbol must be escaped using a caret (^) character. For example:
SCANNERNAME=\"Canon DR-4580U ^& DR-5580U\"
Maximum lengthThe maximum number of characters that can be passed is 1066. If more characters are passed in,setup.exe launches and then quits.
Related Topics —
InputAccel installer properties and feature names, page 185Command-line installation failures, page 161
110

Installing InputAccel
Installing InputAccel from a command line
Use the InstallShield and Windows Installer command line arguments to create instructions to installInputAccel software:
To install InputAccel from a command line:
1. From the Command Prompt or Start > Run, browse to setup.exe in the installation programdirectory, which includes the Clients, Databases, Server, andWebComponents directories.
2. Type a customized installation command in one line to add, modify, repair or remove InputAccelfeatures. For example, to install one InputAccel Server type:setup.exe /s /v"/qn ADDLOCAL="ALL" SERVER_INSTANCES="1" IA_SERVICES_RUNAS_LOCAL_SYSTEM="1" /promptrestart"
Note: You can also automatically install InputAccel features by using a batch file that contains silentinstallation command line instructions.
Related Topics —
Command-line installation failures, page 161Supported InstallShield switches, page 183Supported MSI switches, page 184Supported Windows Installer properties, page 184InputAccel installer properties and feature names, page 185
Automating unattended installations
You can specify multiple installation command lines in a batch file to automate an unattendedinstallation. The following example shows three commands contained within one batch file thatgenerate a log file://Begin contents of irr_sp1.bat batch file//Install Service Pack 1 and write log filesetup.exe /s /v"/qn ADDLOCAL="ALL" IA_SERVICES_RUNAS_LOCAL_SYSTEM="1" /l*v"C:\logs\sp1_install.log""
//Remove COPY features and write a log filesetup.exe /v"/qn REMOVE=COPY /l*v "C:\logs\sp1_remove.log""
//Repair features and write log filesetup.exe /v"/qn /fvomus /l*v "C:\logs\sp1_repair.log""//End contents of irr_sp1.bat batch file
• The first command line argument installs the entire InputAccel Clients directory.
• The second command line argument removes selected features of the installation.
• The third command line argument repairs the features removed by the second process.
Related Topics —
Command-line installation failures, page 161Supported Windows Installer properties, page 184InputAccel installer properties and feature names, page 185
111

Installing InputAccel
Modifying unattended installations
From the directory location of the base InputAccel MSI files, you can modify unattended installationsby:• Adding features and modules: To add a feature or a list of features, use the ADDLOCAL property.For example, to add the base process (IAP) files, the command line is:
setup.exe /v"/qn ADDLOCAL=BASE_IAP_FILES /l*v "C:\logs\modify.log""
Refer to the examples detailed in the Supported InputAccel feature properties and names section.
• Removing features and modules: Use the REMOVE property to remove a feature or a list offeatures. After removing features, repair the installation. The following example removes theCOPY module and creates a log file of the procedure:
setup.exe /v"/qn REMOVE=COPY /l*v "C:\logs\remove.log""
Use the /x Install Shield switch to remove the Clients, Databases, Server, orWebComponentsdirectories. For example, from a Command Prompt window, navigate to the Clients directoryon the InputAccel installation media. At the command prompt, type the following command lineto remove the Clients directory and write a log to the specified directory:
setup.exe /v"/qn /x /l*v "C:\logs\remove.log""
Note: Use the Administration Console module to remove an InputAccel Server from a ScaleServergroup before removing the server. Refer to the Using Administration Console section in theAdministration Guide for additional information.
• Repairing an InputAccel installation: Use the /f MSI switch to repair an installation. Thefollowing command line example repairs the features you removed:
setup.exe /v"/qn /fvomus /l*v "C:\logs\sp1_repair.log""
Related Topics —
Supported InstallShield switches, page 183Supported MSI switches, page 184Supported Windows Installer properties, page 184InputAccel installer properties and feature names, page 185Command-line installation failures, page 161
112

Installing InputAccel
Manually registering a client module to run as a service
InputAccel client modules that can run as services are installed as services by default.
Client modules may need to be installed manually as services in the following circumstances:• The client module was installed as an application during the installation process.
• The modules were uninstalled as services in order to change the login parameters.
Not all modules can be run as services. For a list of client modules that can be run as services, referto Table 12, page 172.
To manually register a client module to run as a service:
1. Open a command window on the machine where the client module is installed.
2. In the command window, switch to the directory where the module executable files are installed.By default, this is C:\Program Files\InputAccel\Client\binnt. Alternatively, use fullpath names for each file name specified in the following commands.
3. Enter one of the following commands, according to the type of module you are configuring.This is the same command line you would enter to run the module, but with the -installargument appended:• Modules that are listed as “New in version 6.0” in Table 12, page 172, except custom exporters:
quickmodulehost.exe -modulename:modulename-login:username,password@servername -install[:serviceName]
• Export modules that are listed as “New in version 6.0” in Table 12, page 172 (includingDocumentum Advanced Export):
quickmodulehost.exe -modulename:modulename-login:username,password@servername-loginex[:username,password@repository] -install[:serviceName]
• Modules that are not listed as “New in version 6.0” in Table 12, page 172:
modulename.exe -login:username,password@servername -install
where:• modulename is the full module name. In the case of modules that are “new in version 6.0,”
modulename includes the namespace; for example, Emc.InputAccel.ImageDivider. Donot include the .dll extension of the module namespace. In the case of DocumentumAdvanced Export, the full modulename is DocumentumAdvancedExport. For other modules,modulename is the executable name of the module; for example, iaeximg.
• -login:username,password@servername are the credentials to use to log into theInputAccel Server. For security reasons, we recommend that you do not specify an actualuser name and password in the command line because doing so also stores these items aclear text in the registry. Instead, use the run-as account specified in the Log On tab of theWindows Service Control Manager window. To do this, specify * for the username,passwordargument; for example ...-login:*@servername... servername is the name of machine hostingthe InputAccel Server to which the module should connect when running as a service. Thetopic Best practices for running modules as services, page 34 provides more information onhow to configure modules to run as services.
113

Installing InputAccel
• serviceName is the name by which the service is registered and listed in the Service ControlManger. Omit this argument to register the service using its default module name. Specifyingthis parameter enables you to run multiple instances of the same module, each as a separateservice. Not supported for modules that are not listed as “New in version 6.0” in Table 12,page 172.
• -loginex:username,password@repository are the credentials used by a custom exportmodule to log into a third-party repository.
Note:• Registering a module as a service from the command line configures the module to run as aservice; it does not install or run the module.
• Registering a module as a service when it is already registered overwrites itspreviously-registered properties with the new properties specified.
• Only modules listed as “New in version 6.0” in Table 12, page 172 support the serviceNameattribute. When specified, this argument enables you to configure multiple instances of asingle module to run as a service, each under its own service name. When a module isregistered as a service, parameters such as a user name or account name can be specified. Ifthe service is reregistered, the newly specified parameters, or default parameters if none arespecified, overwrite existing ones. To register another instance of a client module as a serviceon the same machine, ensure that you run the command with a unique serviceName toavoid overwriting the previously installed service.
• To configure a module that has been registered as a service for high availability, be sure toappropriately configure the Recovery tab in the Windows Service Control Manager. TheInputAccel client setup program does this automatically when it registers a module as aservice; however, you must configure this option when manually registering a moduleas a service. To match the configuration used by the client setup program configure thefollowing settings:— First failure list: select Restart the Service
— Second failure list: select Restart the Service
— Subsequent failures list: select Restart the Service
— Reset fail count after field: Enter 1 days
— Restart service after field: Enter 1 minutes
Caution: When configuring a module to run as a service, do not enable Allow service tointeract with desktop. When a module runs as a service, it suppresses its user interface anddoes not run properly when configured to interact with the desktop.
Related Topics —
Module-specific requirements, page 19Chapter 3, Installation planningClient machine considerations, page 33Client scalability, page 36Installing the InputAccel Client Components, page 73Upgrading client modules, page 146Appendix B, InputAccel client modules
114
Installing InputAccel
Unregistering client modules that are registered as services
InputAccel client modules that are registered as services may be unregistered.
To unregister a client module that is registered as a service:
1. Open the command window on the machine where the client module is registered as a service.
2. In the command window, switch to the directory where the module executable files are installed.By default, this is C:\Program Files\InputAccel\Client\binnt. Alternatively, use fullpath names for each file name specified in the following commands.
3. Enter one of the following commands, according to the type of module you are configuring.This is the same command line you would enter to run the module, but with the -uninstallargument appended:• Modules that are listed as “New in version 6.0” in Table 12, page 172:
quickmodulehost.exe -modulename:modulename -uninstall[:serviceName]
• Modules that are not listed as “New in version 6.0” in Table 12, page 172:
modulename.exe -uninstall
where:• modulename is the full module name. In the case modules that are “New in version 6.0”,
modulename includes the namespace; for example, Emc.InputAccel.ImageDivider. Donot include the .dll extension of the module namespace. In the case of DocumentumAdvanced Export, the full modulename is DocumentumAdvancedExport. In the case oftraditional executable modules, modulename is the executable name of the module; forexample, iaeximg.
• serviceName is the name by which the service was registered. Omit this argument if theservice was registered under its default service name.
After the module is unregistered as a service, it can continue to run as an application. (Exceptions:the Web Services subsystem including Web Services Coordinator, Web Services Hosting, andthe Web Services Input and Web Services Output modules can only run as services, not asapplications.)
Note: Uninstalling a client module that was installed as a service only unregisters the service. It doesnot the remove application.
Related Topics —
Module-specific requirements, page 19Chapter 3, Installation planningClient machine considerations, page 33Installing the InputAccel Client Components, page 73Upgrading client modules, page 146Appendix B, InputAccel client modules
115

Installing InputAccel
Installing additional componentsThe InputAccel setup program enables you to install the following additional components:• Installing InputAccel Reports Designer, page 116
• Installing EMC Captiva Input Management Console, page 116
• Installing the Connector for eCopy ShareScan, page 117
Installing InputAccel Reports Designer
The InputAccel Reports Designer setup program installs Crystal Reports 2008. This software canbe used to design custom reports to view InputAccel statistics. Each purchased InputAccel Serverincludes a full version of the Reports Designer, and this license key is provided by your accountmanager. The InputAccel setup program includes a 30-day demonstration product key. If youalready own a Crystal Reports license, you can enter your own product key. By accepting the EULA,you can install only one copy of this program per licensed copy of the InputAccel Server.
To install InputAccel Reports Designer:
1. Start the InputAccel setup program from the installation media by opening the file autorun.exe.
2. From the InputAccel Products menu, select Install Products.
3. From the Additional Productsmenu, select InputAccel Reports Designer.
4. Follow the instructions in the installation wizard to complete the installation.
Installing EMC Captiva Input Management Console
EMC Captiva Input Management Console enables users to monitor the health and performance ofInputAccel and other content management systems and components. The setup program comes witha 30-day trial version, unless you have a corporate key and license code for Input ManagementConsole.
Note:• Obtain a valid license from VSR Networks to successfully install Input Management Console.
• Refer to the Input Management Console documentation for the system requirements to installthe product.
116

Installing InputAccel
To install EMC Captiva Input Management Console:
1. Start the InputAccel setup program from the installation media. If the disc menu does not appearautomatically after a few seconds, or if you are running the installation from a local disk ornetwork share, open the file autorun.exe to begin.
2. From the InputAccel Products menu, select Install Products.
3. From the Additional Productsmenu, select EMC Captiva Input Management Console.
4. Follow the instructions in the installation wizard to complete the installation.
Note: Input Management Console requires the IASYSMON license within InputAccel licensing toenable Input Management Console to connect to the InputAccel Server. Contact your accountmanager to obtain the appropriate license.
Related Topics —
Setting up the Input Management Console in an MSCS cluster, page 99Installing InputAccel Reports Designer, page 116
Installing the Connector for eCopy ShareScan
This section explains how to install the Connector for eCopy ShareScan.
PrerequisitesInstall InputAccel and eCopy ShareScan before installing the eCopy Connector.
To install the Connector for eCopy ShareScan:
1. Start the InputAccel setup program from the installation media. If the disc menu does not appearautomatically after a few seconds, or if you are running the installation from a local disk ornetwork share, open the file autorun.exe to begin.
2. From the InputAccel Products menu, select Install Products.
3. From the Additional Productsmenu, select InputAccel Connector for eCopy ShareScan. ClickNext
4. Click Install in the Ready to Install the Program window and then click Finish. The Connectorfor eCopy ShareScan is installed.
Note: Instructions on how to configure connector profiles are available in the InputAccelConnector for eCopy ShareScan User Guide.
117

Installing InputAccel
118
Chapter 5Upgrading InputAccel
This section explains how to upgrade from InputAccel versions 5.2.3, 5.3.x, and 6.0 to InputAccel 6.0Service Pack 1 (InputAccel 6.0 SP1).
Topics in this section include:• Upgrade planning, page 119
• Sample upgrade scenarios, page 151
Upgrade planningUpgrading InputAccel requires careful planning and execution. This section explains how to planfor an upgrade.
To upgrade from any other version, you must first upgrade to one of these versions; alternatively,perform a new installation as explained in Chapter 4, Installing InputAccel.
Upgrade planning includes the following:• Understanding the valid upgrade paths (Upgrade paths, page 120)
• Understanding the compatibility between the various InputAccel components (Understandingcompatibility between InputAccel components, page 120).
• Understanding the locale considerations before planning an upgrade (Understanding localeconsiderations before planning the upgrade, page 122).
• Identifying irreplaceable files to archive (Identifying irreplaceable files, page 122).
• Identifying new system requirements and obtaining new equipment as needed (Identifyingnew system requirements, page 127).
• Understanding the upgrade process (Understanding the upgrade process, page 127).
• Granting permissions to users so they can use the upgraded system (Permissions, page 135).
• Performing pre-production testing and acceptance (Performing pre-production testing andacceptance, page 136).
• Scheduling upgrade phases (Scheduling upgrade phases, page 136).
• Incorporating new capabilities (Incorporating new system functionality, page 137).
119

Upgrading InputAccel
Upgrade paths
InputAccel version 6.0 SP1 can be upgraded from the following versions:• InputAccel 5.2.3
• InputAccel 5.3
• InputAccel 5.3 SP2 (previously InputAccel 5.3.2)
• InputAccel 5.3 SP3 (previously InputAccel 5.3.3
• InputAccel 6.0
Note: In the upgrade sections, all upgradeable InputAccel 5.3 versions are referred to as InputAccel5.3.x versions.
Related Topics —
Identifying new system requirements, page 127Understanding the upgrade process, page 127Understanding compatibility between InputAccel components, page 120
Understanding compatibility between InputAccelcomponents
Before planning an upgrade, it is important to understand the version compatibility between variousInputAccel components. The InputAccel core components and InputAccel clients compatibility tablein this section provides compatibility information related to the various InputAccel components andcan help plan an upgrade scenario for your specific environment.
Note:• The InputAccel Database, InputAccel Server, and InputAccel Web Components must all be thesame version. You cannot mix versions for these core components. To upgrade to InputAccel 6.0SP1, these three components must be installed or upgraded to InputAccel 6.0 SP1.
• When upgrading to InputAccel 6.0 SP1, the InputAccel Database, InputAccel Server, andInputAccel Web Components must all be upgraded, one after the other, in the same order. Rollingupgrades are not supported.
• Web Service components installed on an InputAccel system must be the same version. Forexample, you cannot run WS Coordinator 6.0 and WS Input 6.0 SP1 on the same InputAccelsystem. Therefore, when upgrading client modules, make sure all web services components onthe InputAccel system are upgraded to InputAccel 6.0 SP1. These client components include: WSInput, WS Output, WS Coordinator, and WS Hosting.
• All client modules (including modules deployed using the ClickOnce Deployment Utility) on asingle machine must be the same version. Client modules of InputAccel 6.0 and client modules ofInputAccel 6.0 SP1 cannot be run together on the same machine.
120

Upgrading InputAccel
• The InputAccel 6.0 SP1 Backward Compatibility Pack (BCP) enables you to use the existing clientmodules, processes, batches, values, and customizations with the upgraded InputAccel Server andInputAccel Database. The BCP for client modules can be used if your current release is InputAccel5.2.3, InputAccel 5.3.x, or if you have InputAccel 6.0 BCP for client modules installed. The BCPfor client modules applies to only those client modules that were included in releases prior toInputAccel 6.0 (modules that are not listed as “New in InputAccel 6.0” in Table 12, page 172). TheInputAccel BCP for client modules does not apply if your current version of client modules isInputAccel 6.0. Client modules in InputAccel 6.0 can work with the upgraded core componentswithout any change – the client modules will be available only in the English language. To haveaccess to the localized client modules, they must be upgraded to InputAccel 6.0 SP1.
• Refer to Understanding locale considerations before planning the upgrade, page 122 to understandthe locale, globalization, and codepage settings required before planning an upgrade.
Table 9. InputAccel core components and InputAccel clients compatibility
InputAccelServer,InputAccelDatabase, andInputAccel Webcomponentsversion
InputAccel clientversion
Compatible Supports Englishlocale
Supportsnon-Englishlocales
6.0 6.0 SP1 No - -
6.0 SP1 5.2.3 or 5.3.xwithout 6.0 SP1BCP
No - -
6.0 SP1 5.2.3 with 6.0 BCP
or 5.3.x with 6.0BCP
Yes Yes No
6.0 SP1 5.2.3 with 6.0 SP1BCP
or 5.3.x with 6.0SP1 BCP
Yes Yes Yes. But only ifthe locales aresupported bothin InputAccel6.0 SP1 andInputAccel 5.2.3or 5.3.x clientversions.
6.0 SP1 6.0 Yes Yes No
6.0 SP1 6.0 SP1 Yes Yes Yes
121

Upgrading InputAccel
Understanding locale considerations before planningthe upgrade
• The user’s locale, globalization, and codepage settings specified on all InputAccel Servers andInputAccel client machines, including the Administration Console web server, must be identical.If the settings do not match, the InputAccel client or Administration Console will not connect tothe InputAccel Server. Refer to Locale considerations, page 27 to understand additional localeconsiderations.
• InputAccel 6.0 supports English locale settings only. InputAccel 6.0 client modules cannot connectto a 6.0 SP1 InputAccel Server if the InputAccel Server is installed on a locale other than English.
• InputAccel 6.0 supports English locale settings only. If you want to upgrade the InputAccel Serverand configure it in a locale other than English, then you must upgrade all client components toInputAccel 6.0 SP1.
• If your InputAccel 5.2.3 or 5.3.x deployment supports any of the languages currently supportedin InputAccel 6.0 SP1, then the same languages will be supported if your client modules areupgraded to InputAccel 6.0 SP1. Make sure that the InputAccel Server machine and the clientmodule machines have identical locale, globalization, and codepage settings.
Caution: If your InputAccel 5.2.3 or 5.3.x deployment supports an Asian language, then anupgrade to InputAccel 6.0 SP1 is not supported.
Related Topics —
Upgrade paths, page 120Understanding compatibility between InputAccel components, page 120Identifying new system requirements, page 127Understanding the upgrade process, page 127
Identifying irreplaceable files
Certain files should be archived before you perform any upgrades. Creating an archive is importantin case you:• Need to re-implement custom index validation code after upgrading.
• Need to roll back your InputAccel system to the previous version.
• Want to preserve previously-customized processes in case you need to roll back your InputAccelinstallation.
• Want to preserve special patches and module customizations in case you need to roll back yourInputAccel installation.
The upgrade process automatically backs up certain key files and settings on servers and clientmachines, but making your own offline archive is always a good idea. Make copies of the followingfiles and data, and store them in a safe place.
122

Upgrading
InputAccel
Table 10. Irreplaceable InputAccel Files and Data
Data Type Host location Default File Location Notes
Activation files InputAccelServers
\ias\activation\*.* Files used by software security key activation(.caf) files. Retain these files in case reactivationbecomes necessary. Identify each activation fileaccording to the server from which it was archived.
ModuleDefinition Files
ProcessDeveloperworkstation(s)
\program files\inputaccel\client\src\ipp\*.mdf\
program files\inputaccel\client\pcf\*.mdf
Your developers or EMC Consulting may havecustomized your .mdf files. Retain these files forfuture maintenance.
IntegratedProcessFlowProject sourcefiles
ProcessDeveloperworkstation(s)
\program files\inputaccel\client\src\ipp\*.ipp
Your developers or EMC Consulting may havecreated or customized your .ipp files. Retainthese files for future maintenance.
Index validationsource code andbinary files
Developmentsystem andIndex moduleworkstations
\program files\inputaccel\client\src\iaidxval\*.*
For customers upgrading from InputAccel 5.2.3or 5.3.x, your developers or EMC Consultingmay have created custom index validation andpopulation code. Retain these files for futuremaintenance.
If using customized validation code, retain thecompiled .dll files for continued use with theIndex module until you are able to implement thepreferred behavior with client-side scripting.
123

Upgrading
InputAccel
Data Type Host location Default File Location Notes
win.ini Client machines \<windows>\win.ini Contains an [InputAccel] section for tuningmodule behavior. May have been customized ona client-by-client basis; therefore, identify eachwin.ini file according to the client machine fromwhich it was archived. This file contains settingsfor modules that were included in InputAccel 5.2.3and 5.3.x releases (modules that are not listed as“New in InputAccel 6.0” in Table 12, page 172).
settings.ini Client machines Windows XP: C:\Documents andSettings\All Users\ApplicationData\EMC\InputAccel\Settings.ini
Windows Vista: C:\ProgramData\EMC\InputAccel\Settings.ini
Contains settings for tuning module behavior.May have been customized on a client-by-clientbasis; therefore, identify each settings.ini fileaccording to the client machine from which it wasarchived. This file contains settings for modulesthat are new as of the InputAccel version 6.0 release(modules that are listed as “New in InputAccel6.0” in Table 12, page 172).
Batches andstage files
InputAccelServers
\ias\batches\*.* All in-process data (images, intermediate files,and other batch data). Each InputAccel Serverhas a unique set of batches; therefore, identifyeach data set according to the server from which itwas archived. Be aware that there may be a largeamount of data.
Processes InputAccelServers
\ias\process\*.iap Compiled versions of .ipp files that are used indaily production. They are typically based oncustomized source files. All InputAccel Serverswithin a ScaleServer group should contain anidentical set of processes; therefore, archiving asingle server should be sufficient.
124

Upgrading
InputAccel
Data Type Host location Default File Location Notes
Supplementalmoduleconfigurationfiles
InputAccelServers
\ias\modules\*.* Some client modules store shared configurationfiles such as templates, reference images, or otherdata files in this location. Check each server todetermine if multiple archives are necessary.
Registryparameters
InputAccelServers
HKEY_LOCAL_MACHINE\SYSTEM\CurrentControlSet\Services\InputAccel\Parameters
You or EMC Consulting may have modifiedserver registry values to tune performance. Checkeach server to determine if multiple archives arenecessary.
Global serverdatabase
InputAccelServers
\ias\values.idx For customers upgrading from InputAccel 5.2.3or 5.3.x. The \ias\values.idx contains licensedata, user module preferences, and process/batchsecurity settings. This data is automaticallymigrated into the InputAccel Database when eachInputAccel Server is upgraded; however, this filewill be needed if you roll back to InputAccel 5.2.3or 5.3.x. Each InputAccel Server has a uniquevalues.idx file; therefore, identify each fileaccording to the server from which it was archived.
125

Upgrading InputAccel
Automatic backup during upgrade
For users upgrading from InputAccel 5.2.3 and 5.3.x. When you upgrade your InputAccel Serverand client workstations, the setup programs automatically create backup directories containingcopies of key files so that you can restore to the previous version. You should maintain these backupdirectories until you are certain that your updated system is functioning as expected and that there isno possibility that you will want to return to the previous version.
For users upgrading from InputAccel 6.0: The InputAccel 6.0 files are automatically replaced with thenew InputAccel 6.0 SP1 files.
Location Automatic backup directory Contents
c:\Program Files\InputAccel\Server
$InputAccelServer5.2.3$
$InputAccelServer5.3.0$
$InputAccelServer5.3.2$
$InputAccelServer5.3.3$
Files necessary to restorethe previous version of theInputAccel Server, includingvalues.idx and importantregistry keys.
c:\Program Files\InputAccel\Server
backup Files that were used in previousversions of InputAccel to restorea previous version of InputAccelServer files.
c:\Program Files\InputAccel\Client
$InputAccelClient5.2.3$
$InputAccelClient5.3.0$
$InputAccelClient5.3.2$
$InputAccelClient5.3.3$
Files necessary to restorethe previous version of theInputAccel client installation asit existed on the machine priorto upgrade. Included are thecontents of the src directorycontaining all process source files(.ipp) and module definition files(.mdf).
c:\Program Files\InputAccel\Client
backup Files that were used in previousversions of InputAccel to restorea previous version of InputAccelclient files.
Related Topics —
Upgrade paths, page 120Understanding compatibility between InputAccel components, page 120Identifying new system requirements, page 127Understanding the upgrade process, page 127
126
Upgrading InputAccel
Identifying new system requirements
Each existing InputAccel component has new system requirements and some new components havebeen added. In some cases, the hardware and software hosting your current InputAccel systemmay not be suitable for InputAccel 6.0 SP1. Carefully check the information in Chapter 2, Systemrequirements and recommendations to be sure you are upgrading on supported platforms.
Related Topics —
Identifying irreplaceable files, page 122Understanding the upgrade process, page 127Performing pre-production testing and acceptance, page 136Scheduling upgrade phases, page 136Incorporating new system functionality, page 137Upgrading from InputAccel 5.2.3 and 5.3.x to InputAccel 6.0 SP1, page 138
Understanding the upgrade process
When upgrading to InputAccel 6.0 SP1, you must install/upgrade the following components inthis order:1. InputAccel Database hosted by Microsoft SQL Server (InputAccel Database, page 128)
2. InputAccel Server(s) (InputAccel Server(s), page 128)
3. Administration Console web server hosted by Microsoft IIS (Administration Console, page 129)
4. New security keys, licenses, and activation files (Licenses, activation files, and security keys,page 129)
5. Backward Compatibility Pack, to continue using your existing InputAccel 5.2.3 or 5.3.x clientmodules without performing a full InputAccel client installation/upgrade (InputAccel Clients,page 130)
6. Upgraded client modules (InputAccel Clients, page 130)
7. New client modules (New client modules, page 134)
127
Upgrading InputAccel
InputAccel Database
InputAccel versions 5.2.3 and 5.3.x used various file system mechanisms to store settings, values,states, log data, and other system information. InputAccel 6.0 introduced a centralized databasehosted by Microsoft SQL Server. With the exception of development and demonstration systems, theInputAccel Database should be installed on a dedicated server that meets or exceeds the performancecriteria to keep the InputAccel system at peak production capacity. System requirements andrecommendations for the InputAccel Database host system can be found in Database serverrequirements, page 11. Users of InputAccel versions 5.2.3 and 5.3.x must install the InputAccelDatabase and users upgrading from InputAccel 6.0 must upgrade their version of the InputAccelDatabase.
Related Topics —
Database server requirements, page 11Installing the InputAccel Database, page 65Database issues, page 164
InputAccel Server(s)
For users of InputAccel versions 5.2.3 and 5.3.x, InputAccel Server software is redesigned to workwith the InputAccel Database, and has new system requirements. InputAccel Server machines mustbe upgraded according to the system requirements listed in InputAccel Server requirements, page 13.
For all upgrade scenarios, if you have configured multiple InputAccel Servers as a ScaleServer group,the ScaleServer group is maintained during the upgrade procedure. You need only upgrade eachInputAccel Server, and then confirm that it is configured as needed by using the AdministrationConsole. Refer to the Using Administration Console section in the Administration Guide for details.
Note:• You must upgrade all InputAccel Servers in the ScaleServer group at one time – you cannot mixInputAccel Server 6.0 SP1 and previous version InputAccel Servers in your configuration.
• When upgrading a ScaleServer group, if the setup program detects that theWindowsManagementInstrumentation service is running, it displays a message indicating that WMI will be stoppedbefore proceeding. You must allow the setup program to stop WMI to upgrade a ScaleServergroup. After the upgrade completes, the setup program restarts the WMI service.
• The machine name of the InputAccel Server must not be longer than 15 characters; otherwise,client machines will be unable to connect.
Caution: When upgrading a ScaleServer group that has one or more InputAccel Serversinstalled on the same machine as the SQL Server, you must stop all SQL Server instances andclose all Service Control Manager windows before starting the upgrade.
Related Topics —
InputAccel Server considerations, page 30InputAccel Server scalability, page 35Installing the InputAccel Server, page 67
128

Upgrading InputAccel
Administration Console
For users of InputAccel versions 5.2.3 and 5.3.x, the Administration Console replaces theAdministrator module. Unlike the Administrator module, which is a standalone application,the Administration Console is a web application hosted by a web server. Users must install theAdministration Console on a web server that meets the system requirements listed in InputAccel webcomponents and ClickOnce host requirements, page 15. Users upgrading from InputAccel 6.0 mustupgrade to Administration Console 6.0 SP1. Administrators access the Administration Console byusing the web browser on their machine from any location that can access the hosting web server.
Note: You must use the Administration Console to ensure that you can perform all administrativetasks successfully. Although the Administrator module from previous version of InputAccel maycontinue to work for some administrative tasks, it does not support the new features and capabilitiesof InputAccel version 6.0 SP1. For example, you must use the Administration Console to defineInputAccel roles and permissions and to take advantage of the reporting and logging functionality.
Related Topics —
Administration Console host system considerations, page 31ClickOnce host system considerations, page 31InputAccel Remoting server considerations, page 32Installing the Administration Console, page 69Installing InputAccel Remoting, page 101
Licenses, activation files, and security keys
InputAccel uses the same licensing mechanism as previous versions. Your licensing mechanismmay use a hardware security key (USB or parallel), or a software security key (.caf file). You maycontinue to use your hardware security key from a previous release, but must obtain and install newlicenses and new activation codes after upgrading. If, as part of the upgrade process, your InputAccelServer is added to a new domain, you must obtain a new activation code.
The process for activating InputAccel Servers is provided in the Using Administration Consolesection of the Administration Guide.
Note: You must use a software security key (.caf file) if you are performing a side-by-sideinstallation of multiple InputAccel Servers on a single machine. Hardware security keys areincompatible with side-by-side installations.
Related Topics —
ScaleServer licensing, page 52Licensing for use in a Microsoft cluster, page 53Licensing for disaster recovery, page 53
129

Upgrading InputAccel
InputAccel Clients
For users of InputAccel versions 5.2.3 and 5.3.x, InputAccel version 6.0 SP1 includes most of the clientmodules from these releases, updated to work with the new system architecture. If you are not readyto upgrade all of your client modules, or if you are using custom modules that were designed for aprevious version, you can continue to use the existing client modules by installing the InputAccelBackward Compatibility Pack on each client workstation. The Backward Compatibility Pack installsthe necessary foundation and client software to communicate with the new InputAccel Database andInputAccel Server. You then can upgrade to the InputAccel 6.0 SP1 client modules at any later time.
For users of InputAccel 6.0 with the 6.0 BCP installed: The 6.0 BCP client modules will continue towork with the upgraded components (English only). Perform a client upgrade or install the 6.0 SP1BCP to have access to the localized functionality.
For users of InputAccel 6.0 with the 6.0 client modules installed: The BCP for client modules does notapply in this scenario. The 6.0 client modules will continue to work with the upgraded components(English only). Perform a client upgrade to have access to the localized functionality.
For users of 5.2.3 and 5.3.x, InputAccel 6.0 SP1 also provides new client modules and replacementsfor some of the client modules from your releases. The following table lists modules that requirespecial upgrade considerations. These considerations only apply if your client modules are ofInputAccel 5.2.3 and 5.3.x.
Table 11. Client module upgrade issues
Module Upgrade issue
Dispatcher for InputAccelversion 5.0 upgrades toDispatcher for InputAccelversion 6.0 SP1
After the upgrade completes, only the new modules reside onthe machine. The Dispatcher project file (DPP) is automaticallyupgraded to the new version (when you open it for the first timein the new version) and is no longer supported by the earlierversion. For this reason, you cannot continue to use workstationsfrom an earlier version with workstations upgraded to the newversion. (You must upgrade all your Dispatcher for InputAccelworkstations at the same time.)
Index upgrades to IndexPlus After the upgrade completes, both the Index and IndexPlusmodules reside on the workstation. Continue to use the oldermodule while preparing to use the new module. Preparing to usethe new module requires that you:• Obtain and install a license for the IndexPlus module.
• Revise your processes (.ipp files) to include the new moduleand its .mdf file.
• Check and update the IA Values you are using in your processesto match the IA Values declared in the new module’s .mdf file.
• Compile and install the new processes, and then set upIndexPlus module steps as required, redefining your indexfields, index zones, and other configuration details.
130

Upgrading InputAccel
Module Upgrade issue
Index upgrades to IndexPlus(continued)
• Write client-side script code to handle any custom behaviorspreferred, including validation and population functionality thatmay have been implemented with the Index module by usingone of the validation .dll files. If preferred, you can continueto use the standard validation methods in iaidxv32.dllfrom previous versions by using the included client-side script,LegacyValidation to call them; however, you cannot use acustomized version of iaidxv32.dll.
Note: InputAccel no longer includes the source code for thevalidation library, iaidxv32.dll. If you have used the sourcecode provided in a previous release to customize validationand population behavior, you can continue to use it only bycontinuing to use the Index module from the correspondingprevious release.
Documentum Server Exportupgrades to DocumentumAdvanced Export
After the upgrade completes, only the new module resides on themachine. The new module has the same Module ID as the moduleit replaces. The same .mdf file, processes, and batches can be used.However, after upgrading the module, the Documentum logincredentials are not retained. This means that existing batches andprocesses will not connect to the Documentum server. Therefore:• When running the module as an application, you must specifythe Documentum login credentials again by running the modulein setup mode.
• When running the module as a service, you must specify the-loginex parameter when configuring the service instance.Command line parameters are explained in the DocumentumAdvanced Export guide.
To use new features and new IA Values in the module, use ProcessDeveloper to open the .ipp file, change the included .mdf tonew one supplied with Documentum Advanced Export, and thenrecompile and reinstall the modified process. You must then set upthe module steps in the resulting processes and batches.
The new module has different options for handling errors. Whenthe InputAccel Server starts up for the first time, it upgrades allbatches that contain steps of Documentum Server Export to use thean appropriate new option. In particular:• The options Continue current task and keep accepting tasksand Continue current task, then stop accepting tasks are bothchanged to Automatically abort entire task.
131

Upgrading InputAccel
Module Upgrade issue
PrimeOCR upgrades toPrimeOCR Plus
After the upgrade completes, only the new module resides on themachine. The new module has the same Module ID as the moduleit replaces. The same .mdf file, processes, and batches can be used.To use new features and new IA Values in the module, use ProcessDeveloper to open the .ipp file, change the included .mdf, andthen recompile and reinstall the modified process. You then mustset up the module steps in the resulting processes and batches.
Scan upgrades to ScanPlus
Rescan upgrades toRescanPlus
After the upgrade completes, both the Scan and ScanPlus modules(or Rescan and RescanPlus modules) reside on the workstation.Continue to use the old module while preparing to use the newmodule. Preparing to use the new module requires that you:• Obtain and install a license for the ScanPlus and RescanPlusmodules.
• Revise your processes (.ipp files) to include the new moduleand its .mdf file.
• Check and update the IA Values you are using in your processesto match the IA Values declared in the new module’s .mdf file.
• Compile and install the new processes, and then set upScanPlus/RescanPlus module steps as required for each process.
• Write client-side script code to handle any custom behaviorspreferred, including those that may have been implementedwith Scan Callback functionality in the Scan module.
ScanSoft OCR upgrades toNuanceOCR
After the upgrade completes, only the new module resides on themachine. The new module has the same Module ID as the moduleit replaces. The same .mdf file, processes, and batches can be used.To use new features and new IA Values in the module, use ProcessDeveloper to open the .ipp file, change the included .mdf, andthen recompile and reinstall the modified process. You then mustset up the module steps in the resulting processes and batches.
Documentum Server Export
Excel Graphing
IBM Content Manager Export
iManage WorkSite ServerExport
Automatic Quality Assurance
These modules are not included with InputAccel 6.0 SP1. If youinstalled these modules from an earlier release, you may continueto use them by upgrading the client workstation components ofthe machine on which they are installed. You may do this eitherby running the client setup program or by installing the BackwardCompatibility Pack. Either of these options performs the necessaryclient upgrade procedure.
Note: Documentum Server Export has been replaced byDocumentum Advanced Export and IBM Content Manager Exporthas been replaced by IBM CM Advanced Export.
132

Upgrading InputAccel
Module Upgrade issue
Custom modules and processcode
InputAccel Server 6.0 SP1 handles IA Values in a way that is,in certain specific cases, incompatible with previous versions.The specific cases have to do with changes made for Unicodecompatibility and affects the way binary values are interpreted.During an upgrade, the InputAccel Server automaticallyreconfigures existing batches for EMC-branded modules. It doesthis when it initially starts after the upgrade is complete. It cando this because it has a list of all binary IA Values used by allEMC-branded modules.
The automated upgrade process correctly upgrades batches thatuse only EMC-branded modules. However, processes and custommodules present three potential issues:
• Batches that were created in a previous release and use custommodules may fail when you attempt to complete them afterupgrading, if those custom modules read or write binary IAValues. You must complete and clear all such batches prior toupgrading.
• Processes that use such a custom module are not automaticallyconverted by the InputAccel Server during an upgrade. Processcode should be reviewed to ensure that is does incorrectly copya binary IA value to another IA Value.
• Custom modules may not handle binary values correctlyaccording to the requirements of InputAccel 6.0. These modulesshould be reviewed to ensure that they follow proper datahandling rules: always use IAValueGetBinary( ) to readvalues that are written by IAValueSetBinary( ) and alwaysuse IAValueGetAscii( ) to read values that are written byIAValueSetAscii( ).
Table 12, page 172, identifies key characteristics of each InputAccel module, including whether it runsin attended mode and unattended mode, whether it is ScaleServer compatible, whether it can run as aservice, and whether it features a client-side scripting interface.
Related Topics —
Client workstation requirements, page 17Module-specific requirements, page 19Client machine considerations, page 33Client scalability, page 36Upgrading client modules, page 146
133

Upgrading InputAccel
New client modules
This section applies to users of InputAccel 5.2.3 and 5.3.x. After upgrading your existing clientworkstations, you may want to install new client modules. These modules may be installed onexisting client machines or on new machines. To install a module on an existing client machine, youmust run the client setup program and choose theModify option, then select the module(s) to install.Before you can choose theModify option, you must complete the upgrade. The upgrade processproceeds automatically when the client setup program determines that the installed version is olderthan the current version.
InputAccel includes the following new modules that are not automatically installed as part of theupgrade process:
• Web Services Input: Imports images and data from third-party data providers using web servicesinterconnectivity standards. Refer to the Web Services Guide for more information.
• Web Services Output: Exports images and data from InputAccel to third party data consumersusing web services interconnectivity standards. Refer to the Web Services Guide for moreinformation.
• Email Import: Imports images and data from email and email attachments into an InputAccelsystem. Refer to the Email Import Guide for more information.
• Image Divider: Splits files containing multi-page images into separate single-page files. Refer tothe Image Divider Guide for more information.
• Script Engine: Runs client-sides scripts between other module steps. Refer to the Client ScriptEngine Guide for more information.
• Multi-Directory Watch: Watches specified directories for new files, and then automatically createsbatches and imports the files.
Note: When you install new client modules on a machine that has the Backward CompatibilityPack installed, the client setup program detects and removes the Backward Compatibility Packbefore upgrading existing components to the current version. When this process completes, all clientcomponents on the machine have been updated. If you want to install additional components, runthe client setup program again. Doing so displays the ProgramMaintenance window where you canmodify, repair, or delete your installation. ChooseModify to select new client modules to install.
Related Topics —
Client workstation requirements, page 17Module-specific requirements, page 19Client machine considerations, page 33Client scalability, page 36Upgrading client modules, page 146Appendix B, InputAccel client modules
134

Upgrading InputAccel
Permissions
New for users of InputAccel 5.2.3 and 5.3.x, only users who have been granted the properpermissions can access InputAccel or any of its modules. For configuration purposes, the IIS MachineAdministrator group for the machine hosting the Administration Console is granted all InputAccelpermissions. All other users must be explicitly granted permissions before they can use thesystem. A user belonging to the IIS Machine Administrator group should first create an InputAccelAdministrator role and grant all permissions to that role, and then add at least one person — thedesignated InputAccel administrator – to that role.
Caution: After designating at least one InputAccel Administrator, you should deactivate the IISMachine Administrator group to protect this InputAccel from unauthorized use. Otherwise,any user who logs into this machine has unrestricted access to your InputAccel system.
Note: Permissions for sample processes are overwritten when upgrading the InputAccel Server.When the upgrade installs new sample processes with the same file names as sample processes fromprevious versions, the new version resets process permissions to their default values (Read/Writepermission assigned to the group “Everyone”). Use the Administration Console to assign newACLs to processes. For instructions, refer to the Using Administration Console section of theAdministration Guide.
The InputAccel administrator should then define additional user roles (and possibly additionalAdministrator roles) and assign appropriate users to each of those roles. The minimum InputAccelpermissions needed to run a module in production mode include:• Server.Login
• Server.Read.Module.Data
• Server.Write.Module.Data
• System.BatchRead
• System.BatchModify
• System.ProcessRead
Some modules require additional permissions to function, and certain specific tasks (other thanprocessing batches) require their own permissions. Refer to the Using Administration Console sectionof the Administration Guide for more information about permissions and user roles.
Related Topics —
Security, page 37Understanding the upgrade process, page 127Scheduling upgrade phases, page 136
135

Upgrading InputAccel
Performing pre-production testing and acceptance
If possible, upgrade your InputAccel test environment first. Follow all the recommended upgradesteps. Install new functionality as needed. Integrate replacement modules, such as ScanPlus andIndexPlus, and update their processes, settings, and custom behaviors. Then run acceptance testsusing typical documents.
Proceed to the next step in the plan only when you achieve the expected results from the test upgrade.
Related Topics —
Identifying irreplaceable files, page 122Understanding the upgrade process, page 127Upgrading from InputAccel 5.2.3 and 5.3.x to InputAccel 6.0 SP1, page 138
Scheduling upgrade phases
After completing upgrade testing and acceptance, carefully schedule each phase of your productionsystem upgrade. Consider each of the following recommendations:• Determine which components you will upgrade in each phase.
• Locate all installation media for your current InputAccel system prior to beginning the upgrade.You will need these items if unexpected upgrade issues require you to roll back your upgrade tothe previous version.
• Choose the best day of the week to upgrade, so that you can take advantage of both productionand non-production time.
For example, if your production normally operates five days per week, consider upgrading thenight before the last production day of the week. You then will have a full day of production loadfollowed by two days of non-production, allowing time to resolve any issues.
• Shut down InputAccel immediately before the upgrade and make a backup copy of the \IASdirectory tree. This creates a snapshot of the system state immediately before you upgrade.
• If you encounter major issues during your upgrade, contact EMC Support before you decide toabort the upgrade process.
Related Topics —
Identifying irreplaceable files, page 122Understanding the upgrade process, page 127Incorporating new system functionality, page 137Upgrading from InputAccel 5.2.3 and 5.3.x to InputAccel 6.0 SP1, page 138
136

Upgrading InputAccel
Incorporating new system functionality
For users of InputAccel 5.2.3 and 5.3.x, InputAccel includes new system functionality that you maywant to use after upgrading your system. This new functionality includes:• IndexPlus index families: Consider consolidating your existing processes by using index familiesto display different sets of index fields based on the type of document. If you are currentlymaintaining multiple processes only to accommodate different sets of index fields, you can nowcombine those processes into one. For more information, refer to the IndexPlus Guide.
• ClickOnce deployment of ScanPlus, RescanPlus, and IndexPlus: Prepare a ClickOnce deploymentpackage for each module and install it on a file share or web server as explained in Deployingmodules with the ClickOnce Deployment Utility, page 104.
• InputAccel Remoting, enabling remote modules to connect through the Internet to a proxy server:Set up the InputAccel Remoting server as explained in Installing the Administration Console,page 69.
• Client-side scripting: Several modules now have client-side scripting capabilities, and the newScript Engine module can be included in a process specifically to run scripts between othermodule steps. Scripts can be triggered by module or by task events, and in the case of theIndexPlus module, by field events (enabling validation and population functionality). For moreinformation, refer to the Client Scripting Guide, and the Understanding Client-side Scriptingsection and the Programming Reference section in each module’s documentation.
• Web Services subsystem: Web Services components are installed as part of the client setup. Beforethe Web Services Input module can be used, the Web Services Coordinator and Web ServicesHosting services must be started and must be configured in theWeb Services window of theAdministration Console. Refer to the Using Administration Console section of the AdministrationGuide for instructions.
Related Topics —
Identifying irreplaceable files, page 122Understanding the upgrade process, page 127Scheduling upgrade phases, page 136Upgrading from InputAccel 5.2.3 and 5.3.x to InputAccel 6.0 SP1, page 138
137

Upgrading InputAccel
Upgrading from InputAccel 5.2.3 and 5.3.x toInputAccel 6.0 SP1The InputAccel Server and InputAccel client modules from version 5.2.3 and 5.3.x can be upgradedto InputAccel 6.0 SP1. The upgrade only affects the existing features that are installed on the user’smachine. New features that are part of the InputAccel 6.0 SP1 release must be installed separately.
Note: Uninstalling the upgraded package removes InputAccel entirely from the system and doesnot restore to the earlier version of the product.
To upgrade from InputAccel 5.2.3 and 5.3.x to InputAccel 6.0 SP1:
1. Complete and clear all batches that are in process. This is especially important for batches thatuse custom modules if those custom modules read or write binary IA Values. You must completeand clear all such batches prior to upgrading.
2. Stop all client modules first and then stop all instances of the InputAccel Server .
3. Archive irreplaceable files and data. Refer to Identifying irreplaceable files, page 122 for adetailed list of the files and data that must be archived.
4. Install the InputAccel Database. Refer to Installing the InputAccel Database, page 65 forinstructions.
5. Upgrade the InputAccel Server. Refer to Upgrading the InputAccel Server, page 142 forinstructions.
6. Install the Administration Console web component. Refer to Installing the AdministrationConsole, page 69 for instructions.
7. Upgrade the client modules. Choose from the following options:• Install the Backward Compatibility Pack on client workstations to use the current installedversions of InputAccel client modules with the upgraded architecture. Refer to Installing theBackward Compatibility Pack, page 145 for instructions.
• Upgrade currently installed versions of InputAccel client modules. Refer to Upgrading clientmodules, page 146 for instructions.
These steps upgrade the previous installation of InputAccel to the latest version. The followingsteps add new functionality and ensure that all customizations made to the previous version ofInputAccel are carried over to the upgraded version.
8. Modify the installation to install additional client modules. To install additional functionality,the client components installed on the machine must first be upgraded to InputAccel 6.0 clientmodules. Refer to Installing new functionality, page 148 for instructions.
9. Assign permissions to users of the upgraded modules or new modules. Refer to AssigningInputAccel permissions, page 148 for instructions.
10. Upgrade existing processes and customizations. This step applies to modules that are replaced aspart of the upgrade. Refer to Upgrading existing processes and customizations, page 149 for a listof modules that are replaced and the steps involved in upgrading existing processes.
11. Upgrade the Audit Extensions package. Refer to Upgrading Audit Extensions, page 149 forinstructions.
138

Upgrading InputAccel
12. (Only if the Scan module is upgraded to ScanPlus or the Rescan module is upgraded toRescanPlus): Use the client scripting functionality in ScanPlus or RescanPlus to upgrade thecustom Scan Callback functionality. Refer to Upgrading custom Scan Callback functionality,page 150 for further details.
13. (Only if the Index module is upgraded to IndexPlus): Upgrade the IndexValidation DLL toimplement Legacy Validation functionality. Refer to Upgrading Index validation functionality,page 151 for additional details.
14. Set the UI language for the various InputAccel components. Refer to Setting the UI languageof InputAccel components, page 76 for detailed information.
Related Topics —
Identifying new system requirements, page 127Understanding the upgrade process, page 127Understanding compatibility between InputAccel components, page 120Upgrade paths, page 120Upgrading from InputAccel 6.0 to InputAccel 6.0 SP1, page 139
Upgrading from InputAccel 6.0 to InputAccel6.0 SP1The InputAccel Database, InputAccel Server, InputAccel Web Components, and InputAccel clientmodules from InputAccel 6.0 can be upgraded to InputAccel 6.0 SP1. If you do plan to upgrade, thenthe InputAccel Database, InputAccel Server, and InputAccel Web Components must all be upgradedto 6.0 SP1. The upgrade only affects the existing features that are installed on the user’s machine.New features that are part of the InputAccel 6.0 SP1 release must be installed separately.
Note: Uninstalling the upgraded package removes InputAccel entirely from the system and doesnot restore to the earlier version of the product.
To upgrade from InputAccel 6.0 to InputAccel 6.0 SP1:
1. Complete and clear all batches that are in process. This is especially important for batches thatuse custom modules if those custom modules read or write binary IA Values. You must completeand clear all such batches prior to upgrading.
2. Stop all client modules that are run as applications and services.
3. Stop the Administration Console web server.
4. Stop all instances of the InputAccel Server(s).
5. Archive irreplaceable files and data. Refer to Identifying irreplaceable files, page 122 for adetailed list of the files and data that must be archived.
6. Upgrade the InputAccel Database. Refer to Upgrading the InputAccel Database, page 141 forinstructions.
7. Upgrade the InputAccel Server. Refer to Upgrading the InputAccel Server, page 142 forinstructions.
139

Upgrading InputAccel
8. Upgrade the Administration Console web component. Refer to Upgrading the AdministrationConsole, page 144 for instructions.
9. Optionally upgrade the InputAccel Remoting Server.
10. Optionally upgrade the client modules. Choose from the following options:• If your current installation has the 6.0 BCP for client modules installed, these client moduleswill work with the upgraded InputAccel components, but will not include the localizedfunctionality. To have access to the localized functionality, you must either install the 6.0 SP1Backward Compatibility Pack on client workstations or upgrade currently installed versionsof InputAccel client modules.
• If your current installation has the 6.0 client modules installed, these client modules will workwith the upgraded InputAccel components, but will not include the localized functionality.To have access to the localized functionality, you must upgrade currently installed versions ofInputAccel client modules.
Depending on the upgrade option you choose, refer to Installing the Backward CompatibilityPack, page 145 or Upgrading client modules, page 146 for instructions.
Note: Web Service components installed on an InputAccel system must be the same version.Therefore, when upgrading client modules, make sure all web services components on theInputAccel system are upgraded to InputAccel 6.0 SP1. These client components include: WSInput, WS Output, WS Coordinator, and WS Hosting.
These steps upgrade the previous installation of InputAccel to the latest version. The followingsteps add new functionality and ensure that all customizations made to the previous version ofInputAccel are carried over to the upgraded version.
11. Modify the installation to install additional client modules. To install additional functionality, theclient components installed on the machine must first be upgraded to InputAccel 6.0 SP1 clientmodules. Refer to Installing new functionality, page 148 for instructions.
12. Set the UI language for the various InputAccel components. Refer to Setting the UI languageof InputAccel components, page 76 for detailed information.
13. Assign permissions to users of the upgraded modules or new modules. Refer to AssigningInputAccel permissions, page 148 for instructions.
Related Topics —
Identifying new system requirements, page 127Understanding the upgrade process, page 127Understanding compatibility between InputAccel components, page 120Upgrade paths, page 120Upgrading from InputAccel 5.2.3 and 5.3.x to InputAccel 6.0 SP1, page 138
140

Upgrading InputAccel
Upgrade proceduresThis sections describes the procedures to upgrade each InputAccel component. Topics in thissection include:• Upgrading the InputAccel Database, page 141
• Upgrading the InputAccel Server, page 142
• Upgrading the Administration Console, page 144
• Installing the Backward Compatibility Pack, page 145
• Upgrading client modules, page 146
• Upgrading ClickOnce deployed applications, page 147
Upgrading the InputAccel Database
Upgrading the InputAccel Database involves replacing the current version of the InputAccelDatabase with the new version. This procedure is applicable for users upgrading from InputAccel 6.0to InputAccel 6.0 SP1. This procedure does not apply for users upgrading from version 5.2.3 and5.3.x – they must install the InputAccel Database using instructions in Installing the InputAccelDatabase, page 65.
Caution: Before attempting an upgrade of the InputAccel Database on the productionenvironment, we recommend that you create a backup of the InputAccel Database and copythe backup to a separate development or test environment and then test the upgrade steps. Ifthe database fails to upgrade, restore the original backup into the development environment,identify and resolve the errors, and attempt to upgrade again. After a successful upgrade on thedevelopment environment, perform the upgrade on the production environment.
To upgrade the InputAccel Database:
1. Create a backup of the InputAccel Database and copy the backup to a separate developmentor test environment.
2. Shut down all client modules and then the Administration Console web server and theInputAccel Remoting Server.
3. Shut down all InputAccel Servers connected to the InputAccel Database.
4. Log off any other applications running against the database
5. Log in to the account that has been assigned the sysadmin Server Role.
6. Migrate the InputAccel Database to the SINGLE_USER mode.
7. From the Installation Choices menu of the InputAccel setup program, select Step 1 – Installthe InputAccel Database.
8. A message displays, verifying that the database components installed on the machine must beupgraded to the latest version. Click Yes to upgrade.
141
Upgrading InputAccel
9. If you are prompted to install prerequisite applications, click Install. The prerequisite softwarefor the InputAccel Database is installed. Click Next.
10. Accept the license agreement and click Continue.
11. In the Destination Folder window, click Next to install the Create Database Utility and scripts tothe default destination folder or click Change to select a new location.
12. In the Configure InputAccel Databasewindow, select the Upgrade InputAccel Database option,specify the login credentials for the SQL Server, and then click Next.
13. If the specified database exists, a message displays to confirm the upgrade. Click Yes.
14. Click Install and then click Finish.
15. Migrate the InputAccel Database to MULTI_USER mode.
16. Remove the db_owner role membership from the msdb system database and the InputAccelDatabase.
17. Create an SQL user account with minimum permissions to access the InputAccel Database.
Upgrading the InputAccel Server
Upgrading the InputAccel Server involves replacing current versions of the InputAccel Server(s) inthe system with the new version. This procedure is applicable for all upgrade scenarios.
To upgrade the InputAccel Server:
1. Install (for users of InputAccel 5.2.3 and 5.3.x) or upgrade (for users of InputAccel 6.0) theInputAccel Database before upgrading the InputAccel Server.
2. Make sure the machine meets the InputAccel Server requirements as outlined in Chapter 2,System requirements and recommendations.
3. Record the version numbers of the InputAccel Servers in the system. The version number isdisplayed in the Properties window of the InputAccel Server executable. The version numbermay be needed if the server upgrade is to be rolled back.
4. Disconnect all client modules. Use the Administrator or Supervisor module to view theInputAccel Server Connection list and then disconnect all client modules.
5. Stop the InputAccel Servers running in the system. If the InputAccel Server is running as aservice, then stop the service.
6. From the Installation Choicesmenu of the InputAccel setup program, select Step 2 – Install theInputAccel Server.
142
Upgrading InputAccel
7. Upgrade the InputAccel Server(s). Refer to Installing the InputAccel Server, page 67 forinstructions.
Note: These notes apply for users upgrading InputAccel Server 5.2.3 and 5.3.x:
• After an upgrade from 5.2.3 and 5.3.x, the existing batches and processes on the InputAccelServer get renumbered. While the batches and processes get renumbered, you may experiencewarning messages when you restart the InputAccel Server. These messages are expected andbenign. The warning messages stop when all existing batches and processes are renumbered.
• The services file is no longer used to store the TCP/IP port location for the InputAccel Server.When upgrading the InputAccel Server, the services file is parsed to locate the TCP/IP portused for the previous version of the InputAccel Server, and if found, the port is updated.
8. Activate the InputAccel Server and install new license codes.
Related topics —
InputAccel Server considerations, page 30InputAccel Server scalability, page 35Installing the InputAccel Server, page 67ScaleServer issues, page 165
Rolling back to a previously installed version of the InputAccelServer
In some situations, you may want to remove an upgraded InputAccel Server and revert to apreviously installed version of InputAccel Server. This involves completely removing the InputAccelServer and all previous versions from the system while leaving the InputAccel files and data intactand then reinstalling the earlier version.
To roll back to a previously installed version of the InputAccel Server:
1. Remove the InputAccel Server from a ScaleServer group.
2. Ensure client modules are compatible with the earlier InputAccel Server. If you have upgradedthe InputAccel client modules, then roll back these client modules to versions that are compatiblewith the earlier InputAccel Server.
3. Stop the InputAccel Server.
4. Uninstall the latest InputAccel Server.
5. Uninstall remaining InputAccel Servers from earlier installations.
6. Reinstall the earlier InputAccel Server version as well as patches and service packs.
7. (Only for users upgrading from InputAccel 5.2.3 and 5.3.x) The Server setup program createsa backup directory named $InputAccelServer<previous_version>$ inside the currentinstallation directory. Copy the Server directory from the backup directory.
143
Upgrading InputAccel
8. (Only for users upgrading from InputAccel 5.2.3 and 5.3.x) Restore original registry settings. AInputAccelServerRegistryBackup_<current_date>.reg file is created to back upthe registry values in the backup directory where <current_date> is the actual date of theupgrade. Double-click the REG file to restore original settings.
Note:• There may be multiple copies of this file if you have installed InputAccel Server more thanonce. Ensure you select the correct one.
• Use REGEDIT.EXE to restore the InputAccel Server registry parameters to the indicatedvalue. Find these registry keys in HKEY_LOCAL_MACHINE\SYSTEM\CurrentControlSet\Services\InputAccel\Parameters.
9. Restart the InputAccel Server.
Related Topics —
Upgrading the InputAccel Server, page 142InputAccel Server considerations, page 30InputAccel Server scalability, page 35Installing the InputAccel Server, page 67ScaleServer issues, page 165
Upgrading the Administration Console
You can upgrade to the latest version of Administration Console after you have upgraded theInputAccel Database and the InputAccel Server. This procedure is applicable for users upgradingfrom InputAccel 6.0 to InputAccel 6.0 SP1. This procedure does not apply for users upgrading fromversion 5.2.3 and 5.3.x – they must install the Administration Console using instructions in Installingthe Administration Console, page 69.
To upgrade Administration Console:
1. Log in as a user with administrative rights.
2. Make sure the InputAccel Database and the InputAccel Server is upgraded to InputAccel 6.0 SP1.
3. Stop all InputAccel software running on the machine you are upgrading.
4. From the Installation Choices menu of the InputAccel setup program, select Step 3 – Installthe InputAccel Web Components.
5. A message displays, verifying that the client components installed on the machine must beupgraded to the latest version. Click Yes to upgrade.
144

Upgrading InputAccel
Installing the Backward Compatibility Pack
You can continue to use the existing InputAccel 5.2.3 or 5.3.x client modules, processes, batches,values, and customizations with the upgraded InputAccel Server and InputAccel Database, but onlyif you install the Backward Compatibility Pack. Do not install the Backward Compatibility Pack if youdo not plan to continue using modules from your existing installation.
The InputAccel 6.0 SP1 Backward Compatibility Pack (BCP) can be used if your current release isInputAccel 5.2.3 or InputAccel 5.3.x, or if your current release has InputAccel 6.0 BCP for clientmodules installed. The BCP for client modules applies to only those client modules that wereincluded in releases prior to InputAccel 6.0 (modules that are not listed as “New in InputAccel6.0” in Table 12, page 172).
Note: The Backward Compatibility Pack does not apply for client modules from version 6.0. Clientmodules from version 6.0 can connect to the upgraded InputAccel Server without any changes. Referto Understanding compatibility between InputAccel components, page 120 for more information.
Caution: Client modules on the system where you run the Backward Compatibility Pack areno longer compatible with the previous version of the InputAccel Server. Uninstalling theBackward Compatibility Pack restores the client modules to their previous state and can be usedwith the previous version of the InputAccel Server.
To install the Backward Compatibility Pack:
1. On each client workstation that will run modules from the InputAccel 5.2.3 or 5.3.x installation,log in as a user with administrative rights.
2. Stop all InputAccel modules that are running, including any modules running as services.
3. From the InputAccel setup program, select InputAccel Backward Compatibility Pack underAdditional Products.The existing version of client modules on the system where you run the Backward CompatibilityPack will now work with the InputAccel Server 6.0 SP1.
Related Topics —
Client workstation requirements, page 17Module-specific requirements, page 19Appendix B, InputAccel client modules
145

Upgrading InputAccel
Upgrading client modules
For users upgrading from InputAccel 5.2.3 and 5.3.x: You can upgrade to the latest version ofInputAccel client modules at any time after installing the InputAccel Database, upgrading theInputAccel Server, and installing the Administration Console.
For users upgrading from InputAccel 6.0: You can upgrade to the latest version of InputAccel clientmodules at any time after upgrading the InputAccel Database, upgrading the InputAccel Server, andupgrading the Administration Console.
To upgrade InputAccel client modules:
1. Log in as a user with administrative rights.
2. Make sure the InputAccel Database, InputAccel Server, and the Administration Console are atInputAccel version 6.0 SP1.
3. Stop all InputAccel software (server and client software) running on the machine you areupgrading.
4. From the Installation Choicesmenu, select Step 4 – Install the InputAccel Client Components.
5. A message displays, verifying that the client components installed on the machine must beupgraded to the latest version. Click Yes to upgrade.
6. Upgrade client modules using Step 10 - Step 17 of the Installing the InputAccel ClientComponents, page 73.
Related Topics —
Client workstation requirements, page 17Client machine considerations, page 33
Rolling back to a previous InputAccel Client version
Rolling back to a previous InputAccel client version removes the latest installation of the InputAccelclient modules and reverts to a previously installed version of the InputAccel client modules.
To roll back to a previously installed client version:
1. Stop and close all InputAccel client modules that are running on the workstation you areupgrading.
2. Back up InputAccel client data.
3. Uninstall the InputAccel client modules.
4. Reinstall earlier InputAccel client software, patches, and service packs.
Related Topics —
Module-specific requirements, page 19Appendix B, InputAccel client modules
146
Upgrading InputAccel
Upgrading ClickOnce deployed applications
This section applies to users upgrading from InputAccel 6.0. Applications deployed using theClickOnce Deployment Utility must be upgraded so that remote users accessing the applicationsget the latest upgraded software. Users will have access to the upgraded software only if theprevious version of the application was deployed with the Automatic Update feature enabled. If theClickOnce applications are not upgraded, then certain compatibility restrictions apply as detailed inUnderstanding compatibility between InputAccel components, page 120.
To upgrade ClickOnce deployed applications:
1. Install the upgraded ScanPlus ClickOnce Package, RescanPlus ClickOnce Package, and IndexPlusClickOnce Package. Refer to Upgrading client modules, page 146 for instructions.
2. Select Start > Programs > InputAccel > ClickOnce Deployment Utility to run the ClickOnceDeployment Utility. The Deploy InputAccel Application window displays.
3. Follow the instructions in Deploying modules with the ClickOnce Deployment Utility, page 104)to deploy the applications using the ClickOnce Deployment Utility. Make sure the Publishversion is set to a version greater than the version specified in the previously deployedapplication.
Note:• If the application was initially deployed with the Automatic Update option enabled and theupgraded application is deployed to the same location as its previous version, then the modulechecks for an upgraded version, and the user can upgrade the module with a single click.
• If the upgraded application is deployed to a different location than its previous version, the usercan have access to the upgraded application by clicking the new deployment location.
Related Topics —
Client workstation requirements, page 17Client machine considerations, page 33Client scalability, page 36Module-specific requirements, page 19Upgrading client modules, page 146Appendix B, InputAccel client modules
147

Upgrading InputAccel
Installing new functionality
After performing an upgrade, run the installer again to install new functionality.
To install new functionality:
1. Run the InputAccel setup program and select Install Products.
2. Select the InputAccel component to install and then click Next. The Program Maintenancewindow displays.
3. Select theModify option and then click Next. The Custom Setup window displays. The leftpane of the window displays the features of the component selected. Expand the feature toview its sub-features.
4. Click the down arrow situated next to the feature name and select from the options displayed toinstall additional functionality and then click Next, Next, and then Install.New functionality is now installed.
Related Topics —
Identifying irreplaceable files, page 122Understanding the upgrade process, page 127Scheduling upgrade phases, page 136Incorporating new system functionality, page 137Upgrading from InputAccel 5.2.3 and 5.3.x to InputAccel 6.0 SP1, page 138Permissions, page 135
Assigning InputAccel permissions
This section applies to users upgrading from InputAccel 5.2.3 or 5.3.x. After installing theAdministration Console and upgrading client modules, permissions must be assigned to enableusers to run the modules.
To assign InputAccel permissions, refer to the Using Administration Console section of theAdministrators Guide.
Note: To initially assign permissions, you must be a member of the Administrators group on theAdministration Console host machine. Use the Administration Console to create a new InputAccelAdministrators role and then add the user designated as the InputAccel administrator to thisInputAccel Administrators role. The InputAccel administrator can then create additional roles, eachwith appropriate user permissions, and assign users to those roles.
Related Topics —
Identifying irreplaceable files, page 122Understanding the upgrade process, page 127Security, page 37Permissions, page 135
148

Upgrading InputAccel
Upgrading existing processes and customizations
This section applies to users upgrading from InputAccel 5.2.3 or 5.3.x. After you have upgraded theclient modules, you must upgrade existing processes and customizations for replaced modules.Replaced client modules include:
• Replaced modules that require processes and customizations to be upgraded
— ScanPlus (replaces Scan)
— RescanPlus (replaces Rescan)
— IndexPlus (replaces Index)
• Replaced modules for which upgrading processes and customizations is recommended
— PrimeOCR Plus for InputAccel (replaces PrimeOCR for InputAccel)
— NuanceOCR (replaces ScanSoft OCR)
— Documentum Advanced Export (replaces Documentum Server Export)
To upgrade existing processes and customizations
1. Open the IPP process file in Process Developer.
2. Include the new MDF file.
3. (Only for ScanPlus, RescanPlus, and IndexPlus modules): Rewrite the IPP to include the newexecutable names.
4. Recompile and reinstall the IPPs using Process Developer.
5. Run these modules in setup mode. Refer to the module specific Guide for information onrunning the module in setup mode.
Related Topics —
Identifying irreplaceable files, page 122Understanding the upgrade process, page 127
Upgrading Audit Extensions
This section applies to users upgrading from InputAccel 5.2.3 or 5.3.x. Audit Extensions are stillsupported, but no longer installed for this release. The InputAccel Server now logs data to theInputAccel Database. InputAccel also includes new reporting and logging functionality which can beconfigured through Administration Console.
To upgrade audit extensions:
1. Navigate to the InputAccel\client\binnt directory.
2. Double-click dalconfig.exe to run the utility for database settings.
3. Select Legacy Audit Database from Data Source ID.
149
Upgrading InputAccel
4. In the Data Source (Server) field, enter the machine name of the machine that hosts the SQLdatabase from the previous version of InputAccel.
5. In the Catalog field, enter the name of the database from the previous version of InputAccel.
6. Enter the User and Password credentials to connect to the database from the previous version.
7. Click Test Connection to test the connection to the previous connection and then clickDone.
Note: Beginning with InputAccel version 6.0, the Audit Extensions logs all IAValueSet events,those that occur inside modules and those that occur in the process (IAP) code between module steps.The stored procedures that handle these events do not allow a NULL or empty User Name andModule Name value; therefore, these events substitute the following for these values in the caseswhere there is no User Name or Module Name value to store:
• User Name is substituted with Process Name, or if empty, the word “Server”.
• Module Name is substituted with the current module step name, or if empty, the word “IAP”.
Related Topics —
Database server requirements, page 11Installing the InputAccel Database, page 65Database issues, page 164Appendix E, Running the Create Database Utility
Upgrading custom Scan Callback functionality
This section applies to users upgrading from InputAccel 5.2.3 or 5.3.x. The ScanPlus and RescanPlusmodules do not support the Scan Callback DLL functionality. So, if you upgraded to the new ScanPlusor RescanPlus module and you had custom functionality implemented using the Scan Callback DLL,you must use ScanPlus and RescanPlus client-side scripting to implement custom functionality. Referto the Client Scripting Guide and the Programming Reference section of the ScanPlus Guide and theRescanPlus Guide for further information on using and implementing client-side scripts.
Related Topics —
Upgrading client modules, page 146Appendix B, InputAccel client modules
150

Upgrading InputAccel
Upgrading Index validation functionality
This section applies to users upgrading from InputAccel 5.2.3 or 5.3.x. The IndexPlus module doesnot directly support the Index Validation DLL functionality that you may have used with the Indexmodule. So, if you upgraded to the new IndexPlus module, and you had validation and populationfunctionality implemented using the Index Validation DLL, you must use IndexPlus client-sidescripting to implement similar functionality. A sample script, LegacyValidation available inclient\src\scripts\samples\IndexPlus\LegacyValidation.dll and included with theIndexPlus module, enables you to continue using the Index Validation DLL by mapping field eventsin IndexPlus to the functions in the Index Validation DLL.
Note: InputAccel no longer includes the source code for the validation library, iaidxv32.dll.If you have used the source code provided in a previous release to customize validation andpopulation behavior, you can continue to use it only by continuing to use the Index module fromthe corresponding previous release.
Refer to the Client Scripting Guide and the Programming Reference sections of the IndexPlus Guidefor further information on using and implementing client-side scripts.
Related Topics —
Upgrading client modules, page 146Appendix B, InputAccel client modules
Sample upgrade scenariosUpgrading InputAccel requires thoughtful planning and careful execution. This section providesupgrade scenarios for typical situations to help you understand the considerations unique to yourenvironment.• Sample scenario: Simple upgrade from InputAccel 5.2.3 or 5.3.x, page 151
• Sample scenario: Upgrade from InputAccel 5.3 while using modules from version 5.3, page 153
Sample scenario: Simple upgrade from InputAccel5.2.3 or 5.3.x
This scenario is a straightforward upgrade from InputAccel version 5.3 with the followingcharacteristics:• One or more InputAccel Servers.
• One or more Scan workstations and one or more Index workstations.
• No custom modules and no special customizations by the customer or EMC Consulting.
• No use of modules from the previous version of InputAccel. Only new modules are used afterupgrading.
151

Upgrading InputAccel
• The following modules are not used:— Watch
— Excel Graphing
— Automatic Quality Assurance
— IBM Content Manager Export
— iManage WorkSite Server Export
— Administrator Module
— Supervisor Module
• No new functionality is used (such as Script Engine, Web Services, ClickOnce deployment, orInputAccel Remoting).
To upgrade this InputAccel system:
1. Archive irreplaceable system files in the event that you need to roll back to version 5.3. Refer toIdentifying irreplaceable files, page 122.
2. Install the InputAccel Database on a new server. Refer to Installing the InputAccel Database,page 65.
3. Disconnect all client modules and stop all InputAccel Servers.
4. Run the InputAccel Server setup program on each server to automatically upgrade thiscomponent. When finished, make sure the InputAccel Server service is started. Refer toUpgrading the InputAccel Server, page 142.
5. Install the Administration Console and then install your new license codes and, if applicable,activate the product. Refer to Installing the Administration Console, page 69.
6. Run the InputAccel Client setup program on each client machine to automatically upgrade theinstalled components. Be sure to include the machine(s) on which you run Process Developer.Refer to Upgrading client modules, page 146.Note the following:• Make sure the user’s locale and code page settings are identical on the machines hosting theInputAccel Servers, Administration Console web server, and client modules.
• When you upgrade your Scan and Rescan workstations, the setup program installs theScanPlus and RescanPlus modules, leaving the Scan module or Rescan module from theprevious version in place. If needed, you can continue to use the Scan or Rescan module untilyou are ready to upgrade your processes. You must upgrade your processes and set up theScanPlus and RescanPlus module steps before using the new modules. In addition, anycustom Scan Callback functionality must be re-implemented by using client-side scripting.
• When you upgrade your Index workstations, the setup program installs the IndexPlusmodule, leaving the Index module from the previous version in place. If needed, youcan continue to use the Index module until you are ready to upgrade your processes andworkflow. You must upgrade your processes and set up the IndexPlus module steps(including all index fields, index zones, default values, and population and validationbehavior) before using the new module.
• When you upgrade your other client machines, a new version of the module is installed.Although the new version of the module may have additional capabilities, it continues to
152
Upgrading InputAccel
function without changes in your current processes and batches. This is true even thoughsome of the modules have new names:
— Documentum Server Export is updated to Documentum Advanced Export
— PrimeOCR for InputAccel is updated to PrimeOCR Plus for InputAccel
— ScanSoft OCR is updated to NuanceOCR
As you begin production with the upgraded system, consider using the Scan and Index modules fromthe previous version. As time allows, upgrade your processes to use the new ScanPlus and IndexPlusmodules and the new features of PrimeOCR Plus, NuanceOCR, and Documentum Advanced Export.Also consider consolidating your processes by using the new index families feature of IndexPlus.
Using the new modules to their full potential requires upgrading your process source files (IPPs) toinclude the new module executables and corresponding Module Definition Files (MDFs), compilingand reinstalling the resulting production processes (IAPs) on your InputAccel Server, and then settingup each module step appropriately. For detailed instructions, refer to the Process Developer Guideand to the Designing section in each module’s guide.
Related Topics —
Identifying irreplaceable files, page 122Understanding the upgrade process, page 127Scheduling upgrade phases, page 136Upgrading from InputAccel 5.2.3 and 5.3.x to InputAccel 6.0 SP1, page 138
Sample scenario: Upgrade from InputAccel 5.3 whileusing modules from version 5.3
This scenario upgrades from InputAccel version 5.3 while continuing to use modules from theprevious version. This scenario is similar to the previous scenario, but has the following additionalcharacteristics:• Existing functionality is needed from any or all of the following modules from the previousversion:— Excel Graphing
— Automatic Quality Assurance
— IBM Content Manager Export
— iManage WorkSite Server Export
• New functionality is needed from any or all of the following new components:
— ClickOnce deployment
— InputAccel Remoting
153

Upgrading InputAccel
— Web Services
— Script Engine
To upgrade this InputAccel system:
1. Perform steps 1-5 in the previous procedure.
2. For each client machine where you want to continue to use modules from the previous InputAccelversion, run the main InputAccel setup program, and select InputAccel Backward CompatibilityPack. Refer to Installing the Backward Compatibility Pack, page 145.
Note:• Make sure the user’s locale and code page settings are identical on the machines hosting theInputAccel Servers, Administration Console web server, and client modules.
• If you want to install new modules and retain modules from a previous release on the sameclient machine, you may do so with certain exceptions. To configure a machine in this way, donot install the Backward Compatibility Pack. Instead, upgrade the machine using the clientsetup program. This installs the necessary components to enable the old module to functionwithin the new InputAccel system and also upgrades any modules that are already installedwith their new versions, if applicable.
When detected by the client setup program, the modules listed in the following table areautomatically replaced with the corresponding updated modules. Each of the new modulescontinues to function in your existing processes and batches in the same manner as the oldmodule. However, each of these modules has new features that can only be used if you updateyour processes to include the new Module Definition File (.mdf), and then recompile andreinstall the processes.• If the client setup program detects the Documentum Server Export module, it replaces it withthe Documentum Advanced Export module. However, the new module continues to functionin place of the Documentum Server Export module using your existing processes and setup.
• If the client setup program detects the PrimeOCR module, it replaces it with the PrimeOCRPlus module. However, the new module continues to function using your existing processesand setup.
• If the client setup program detects the ScanSoft OCR module, it replaces it with theNuanceOCR module. The new module continues to function in place of ScanSoft OCR usingyour existing processes and setup.
Detected module Replaced with
Documentum Server Export Documentum Advanced Export
PrimeOCR PrimeOCR Plus
ScanSoft OCR NuanceOCR
3. For each client machine you want to upgrade to the new modules, run the client setup programto automatically upgrade the installed components. Be sure to include the machine(s) on whichyou run Process Developer. Refer to Upgrading client modules, page 146.
154

Upgrading InputAccel
4. To install new functionality on an existing client machine, run the client setup program again(after upgrading) to display the Program Maintenance window. Then select theModifyoption and click Next. In the Custom Setup window, select the components to install. Refer toModifying an InputAccel installation, page 157.
5. To install new functionality on an existing client machine, run the client setup program. ChooseModify, then click Next to display the Custom Setup window and select the components toinstall. Refer to Installing the InputAccel Client Components, page 73.
6. For new non-client functionality (such as ClickOnce deployment and InputAccel Remoting), referto the appropriate section of this guide for installation instructions.
7. Edit or create new processes to use the new client functionality you have added, and thencompile and install them on your InputAccel Servers. Refer to the Process Developer Guide fordetailed instructions.
Related Topics —
Identifying irreplaceable files, page 122Understanding the upgrade process, page 127Scheduling upgrade phases, page 136Upgrading from InputAccel 5.2.3 and 5.3.x to InputAccel 6.0 SP1, page 138
155

Upgrading InputAccel
156
Chapter 6Modifying, repairing, and uninstallingInputAccel
An InputAccel 6.0 SP1 installation can be modified, repaired, or uninstalled. Topics in this sectioninclude:• Modifying an InputAccel installation, page 157
• Repairing an InputAccel installation, page 158
• Removing an InputAccel installation, page 158
Modifying an InputAccel installationThe current installation of InputAccel can be modified. Modifying the installation lets you installfeatures that are not currently installed and remove features that were installed.
To modify an InputAccel installation:
1. Stop the InputAccel component that you want to modify. For instance, stop the InputAccel Serveror the client module that you want to modify.
2. Run the InputAccel setup program and select Install Products.
3. Select the InputAccel component to modify and then click Next. The Program Maintenancewindow displays.
4. Select theModify option and then click Next. The Custom Setup window displays. The leftpane of the window displays the features of the component selected. Expand the feature toview its sub-features.
5. Click the down arrow situated before the feature name and select from the options displayed tomodify the installation of the selected feature and then click Next, Next, and then Install.The InputAccel installation is modified.
Related Topics —
Repairing an InputAccel installation, page 158Removing an InputAccel installation, page 158
157

Modifying, repairing, and uninstalling InputAccel
Repairing an InputAccel installationThe InputAccel installation repair functionality is useful if you have removed a feature or if theprogram becomes corrupted.
To repair the InputAccel Server after removing a feature, you must use the same InputAccelServer.msi file you used to install the original server. To repair an InputAccel Client installationafter removing selected modules or an entire service pack you must use the same InputAccelClient.msi file you used to install the original system.
To repair InputAccel installations:
1. Stop the InputAccel component that you want to repair. For instance, stop the InputAccel Serveror the client module that you want to repair.
2. Run the InputAccel setup program and select Install Products.
3. Select the InputAccel component to repair and then click Next. The Program Maintenancewindow displays.
4. Select the Repair option and then click Next. The Ready to Repair the Program windowdisplays. Click Install.
Removing an InputAccel installationInstalled InputAccel components can be removed. When you remove a component, the entirecomponent is removed from the machine. For instance, removing the client installation removesall the client modules installed on the machine.
To remove InputAccel installations:
1. Stop the service for the InputAccel component that you want to remove. For instance, stop theInputAccel Server service before removing the InputAccel Server.
2. (Applicable when removing the InputAccel Server) From the Administration Console module,navigate to the Servers pane and delete the InputAccel Server that you want to remove.
3. Run the InputAccel setup program on the machine where you want to remove the componentand select Install Products.
4. Select the InputAccel component to remove and then click Next. The Program Maintenancewindow displays.
5. Select the Remove option and then click Next. The Remove the Program window displays. ClickRemove. The InputAccel component is removed completely from the machine.
158

Chapter 7Troubleshooting
This section provides information to help you troubleshoot installation problems. Topics in thissection include:• Installation failures, page 159
• Installation errors, page 160
• Third-party component issues, page 163
• Post-installation issues, page 163
Installation failuresWhen an InputAccel component fails to install correctly, the setup program performs a rollbackoperation and returns the machine to the state it was in prior to starting the installation.Troubleshooting this type of installation issue requires examination of setup program log files.However, setup program log files are not generated by default. To generate a log file, you must enablelogging when starting the setup program by including a command-line parameter of /l.
For example, you could start the client setup program (or any of the other setup programs) by typingthe following in a command prompt window:
setup.exe /v"/l*v logfilename"
where
/v passes the part of the command line enclosed in quotes to the Microsoft installer package.
/l*v enables verbose logging.
logfilename is the path and file name to which to write the log data.
This command line starts the setup program and writes detailed information to the specifiedfile. After the installation completes (or fails and rolls back), you can examine the log file to helpdetermine the cause of the problem.
Note: Wait until the setup program closes before opening the log file to ensure that all log entrieshave been written to the file.
A log file created in this manner is a simple text file that can be opened with any text editor. Thelog file can become quite large (20 MB or more) depending on the particular setup program andthe specified logging level.
159

Troubleshooting
Setup programs write entries to the log file as events occur. In some cases, one error might lead toanother. It is important to find the first error in the chain in order to properly troubleshoot an issue.
Both errors and non-error information may be written to the log file. A return value of 3 indicates anerror or failure entry in the log. You can save time by searching for the string “return value 3”. Thefollowing log entry is an example of a failure:Action ended 14:04:40: InstallFinalize. Return value 3.
This message in this example is not an actual error, but an indication of where the error occurred. Thepreceding lines in the log file indicate the problem. Most installation errors are written to the logwith a specific error code and, when available, an error message. These errors often provide enoughinformation to enable you to resolve the issue. If not, a setup program log file will help your customersupport representative quickly evaluate the problem.
Topics in this section include:• Installation errors, page 160
• Command-line installation failures, page 161
Installation errors
Errors during installation are problems that do not cause the setup program to perform a rollbackoperation. Most can be corrected and then the installation completed. The following table listscommon installation errors.
Problem Possible cause
While installing any component, the setupprogram indicates that you have supplied aninvalid password when in fact the password iscorrect.
An authentication problem occurs when the useris logged into a machine without the necessaryaccess rights to query the Windows domain.This happens when both of the followingconditions are true:• The user is logged into a local user accountwhile running the setup program.
• The credentials causing the authenticationfailure are domain credentials.
160

Troubleshooting
Command-line installation failures
Command-line installation failures include:• Syntax errors, page 161
• Common command-line installation errors, page 161
Syntax errors
Unattended installations, page 108 explains how to install InputAccel from command-lineinstructions. When using this method, the command line can become very long due to the number ofInputAccel features and options. It is easy to make mistakes in the command-line syntax, resultingin installation failure.
Many command-line errors occur because the command line contains syntax errors or incompleteinformation. The command line contains a series of variables known as “installer properties,” whichdefine the features to install and the configuration of the installation. For example, you can specifycommand-line parameters for SQL Server to enable the setup program to connect to the InputAccelDatabase.
Installer properties are key/value pairs specified in a PROPERTY=VALUE syntax. Some propertiesrequire their values to be encapsulated in quotes (" "). For example:
setup.exe /s /v"/qn ADDLOCAL="ALL""
Note that every open quote character must have a matching close quote character. This exampleshows one quoted parameter correctly nested within another quoted parameter. A common error isto omit or misplace one or more quote marks.
The best way to troubleshoot command line installation issues is to examine the setup program logfiles, as explained in Installation failures, page 159.
Common command-line installation errors
The following table lists some of the more common errors that customers experience when runningsetup programs from the command line.
Problem Possible cause
Installation does not occur silently — the userinterface displays and waits for a response.
A space character was typed between /v andthe first open quote symbol.
The message “Please go to the ControlPanel to install and configuresystem components” is displayed.
The setup command was not executed from thedirectory containing the setup.exe program.
161

Troubleshooting
Problem Possible cause
Windows restarts automatically after setupcompletes.
If the setup program determined that a restartwas necessary to complete the installation, itperforms an automatic restart. This behavior canbe changed by including one of the followingrestart options:
/norestart: Do not restart after setupcompletes.
/promptrestart: Prompt the user to restart ifnecessary.
/forcerestart: Always restart after setupcompletes, regardless of whether the setupprogram determines that a restart is necessary.
(For users upgrading from InputAccel 5.2.3 and5.3.x) Client installation requires 1024 x 768display resolution.
Regardless of whether you are running modulesas applications or as services, and regardless ofwhether you are installing on a physical machineor in a VMware image, your client machine musthave its screen resolution set to a minimum of1024 x 768. If set to a lower resolution, the setupprogram will not allow you to proceed.
Installation does not occur. The command line exceeds the maximumallowable length of 1066 characters. You canverify this problem by observing the WindowsTaskManager and noting that the setup programstarts and then exits before installation occurs.
Miscellaneous installation errors. Syntax issues can cause various errors whenattempting a command-line installation. Notethe following rules:• Properties containing spacesmust be enclosedin quotation marks that have been escapedwith a backslash character (\"). Example:
INSTALLDIR=\"c:\Program
Files\InputAccel\Client\"
• Properties containing the reserved characters\, &, |, >, <, and ^ must escape thosecharacters with a caret character (^).Example:
SCANNERNAME=\"Canon DR-4580U ^&
DR-5580U\"
162

Troubleshooting
Third-party component issuesCertain InputAccel client modules rely on third-party components provided by the company thatproduces the application to which they connect. There are two categories of modules with this issue:those that will not install without the required third-party components, and those that will install, butnot run, without the required third-party components.
• Modules that will not install until third-party components are installed
— ApplicationXtender Export
— ECMWeb Services Importer (Requires IIS 5.1 or 6.0 with support for ASP pages enabled. IISmust be running to enable installation of this module.)
— IBM CM Advanced Export
• Modules that install but will not run until third-party components are installed
— Documentum Advanced Export
— FileNet Panagon IS/CS Export
— Global 360 Export
— IBM CMIP-390 Export
— IBM CMIP-390 Index
— IBM CSSAP Export
— ODBC Export
— Open Text Livelink Advanced Export
— Values to XML
For a detailed list of additional software requirements for client modules, refer to Module-specificrequirements, page 19.
Post-installation issuesThis section provides troubleshooting tips for issues that can occur after a successful installation,including:• Database issues, page 164
• ScaleServer issues, page 165
• Other issues, page 166
163

Troubleshooting
Database issues
The InputAccel Database is a required component of an InputAccel system that resides in an instanceof Microsoft SQL Server. SQL Server must be configured to enable the InputAccel system to connectand communicate with the InputAccel Database. Following are some common problems that canoccur.
Problem Possible cause
InputAccel Database setup programcannot create the InputAccel Database.
1. SQL Server is not running. On the SQL Serverhost machine, use the Windows Service ControlManager to locate the SQL Server service and makesure it is started.
2. Inadequate SQL Server permissions. DuringInputAccel Database setup, the account specified tocreate the InputAccel Database must be assignedthe sysadmin Server Role. Typically, you wouldenable the “sa” (system administrator) account loginand assign it a password within SQL Server andthen specify this account to install the InputAccelDatabase.
InputAccel components cannot connectto SQL Server.
1. TCP/IP protocol is disabled within SQL Server.Consult the SQL Server documentation forinstructions on enabling the TCP/IP protocol.Restart the SQL Server service after changing thissetting.
2. The SQL Server is not listening on the expectedport. (The default SQL Server port is 1433. Thesemay have been changed during SQL Serverconfiguration.) Specify the correct port in theconnection information during InputAccel setup.
164
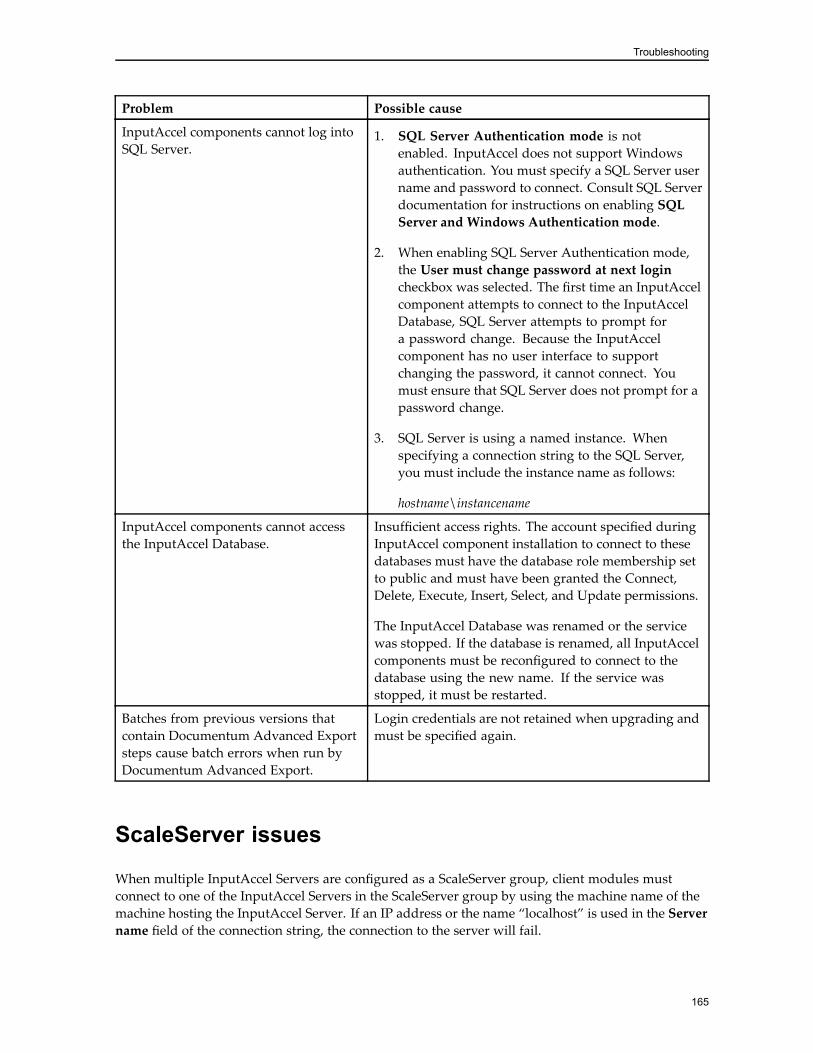
Troubleshooting
Problem Possible cause
InputAccel components cannot log intoSQL Server.
1. SQL Server Authentication mode is notenabled. InputAccel does not support Windowsauthentication. You must specify a SQL Server username and password to connect. Consult SQL Serverdocumentation for instructions on enabling SQLServer and Windows Authentication mode.
2. When enabling SQL Server Authentication mode,the User must change password at next logincheckbox was selected. The first time an InputAccelcomponent attempts to connect to the InputAccelDatabase, SQL Server attempts to prompt fora password change. Because the InputAccelcomponent has no user interface to supportchanging the password, it cannot connect. Youmust ensure that SQL Server does not prompt for apassword change.
3. SQL Server is using a named instance. Whenspecifying a connection string to the SQL Server,you must include the instance name as follows:
hostname\instancename
InputAccel components cannot accessthe InputAccel Database.
Insufficient access rights. The account specified duringInputAccel component installation to connect to thesedatabases must have the database role membership setto public and must have been granted the Connect,Delete, Execute, Insert, Select, and Update permissions.
The InputAccel Database was renamed or the servicewas stopped. If the database is renamed, all InputAccelcomponents must be reconfigured to connect to thedatabase using the new name. If the service wasstopped, it must be restarted.
Batches from previous versions thatcontain Documentum Advanced Exportsteps cause batch errors when run byDocumentum Advanced Export.
Login credentials are not retained when upgrading andmust be specified again.
ScaleServer issues
When multiple InputAccel Servers are configured as a ScaleServer group, client modules mustconnect to one of the InputAccel Servers in the ScaleServer group by using the machine name of themachine hosting the InputAccel Server. If an IP address or the name “localhost” is used in the Servername field of the connection string, the connection to the server will fail.
165
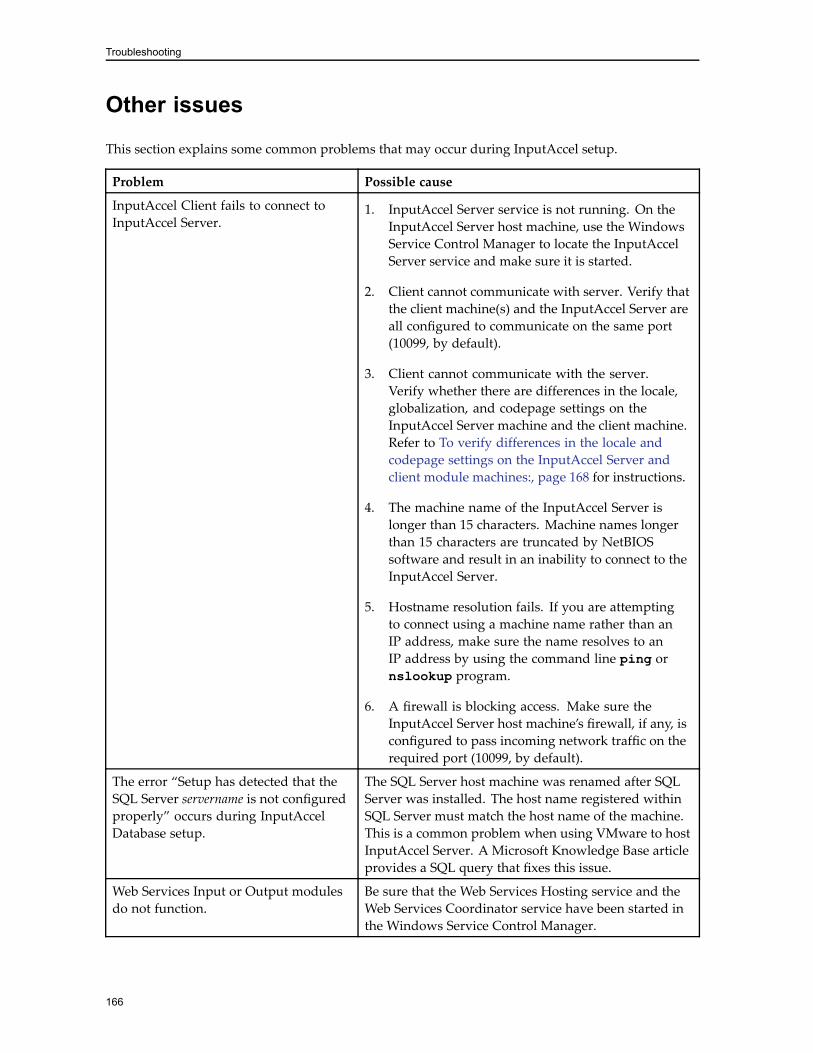
Troubleshooting
Other issues
This section explains some common problems that may occur during InputAccel setup.
Problem Possible cause
InputAccel Client fails to connect toInputAccel Server.
1. InputAccel Server service is not running. On theInputAccel Server host machine, use the WindowsService Control Manager to locate the InputAccelServer service and make sure it is started.
2. Client cannot communicate with server. Verify thatthe client machine(s) and the InputAccel Server areall configured to communicate on the same port(10099, by default).
3. Client cannot communicate with the server.Verify whether there are differences in the locale,globalization, and codepage settings on theInputAccel Server machine and the client machine.Refer to To verify differences in the locale andcodepage settings on the InputAccel Server andclient module machines:, page 168 for instructions.
4. The machine name of the InputAccel Server islonger than 15 characters. Machine names longerthan 15 characters are truncated by NetBIOSsoftware and result in an inability to connect to theInputAccel Server.
5. Hostname resolution fails. If you are attemptingto connect using a machine name rather than anIP address, make sure the name resolves to anIP address by using the command line ping ornslookup program.
6. A firewall is blocking access. Make sure theInputAccel Server host machine’s firewall, if any, isconfigured to pass incoming network traffic on therequired port (10099, by default).
The error “Setup has detected that theSQL Server servername is not configuredproperly” occurs during InputAccelDatabase setup.
The SQL Server host machine was renamed after SQLServer was installed. The host name registered withinSQL Server must match the host name of the machine.This is a common problem when using VMware to hostInputAccel Server. A Microsoft Knowledge Base articleprovides a SQL query that fixes this issue.
Web Services Input or Output modulesdo not function.
Be sure that the Web Services Hosting service and theWeb Services Coordinator service have been started inthe Windows Service Control Manager.
166

Troubleshooting
Problem Possible cause
Remote modules exhibit a long delaywhen logging into the InputAccelRemoting server.
Be aware that logging into a remote module that isconnecting through the InputAccel Remoting host takesconsiderably longer than modules that are loggingin locally, because in addition to authenticating andauthorizing the user, the module also downloadsconfiguration information, client-side scripts, and a listof batches.
Cannot specify -department (or othercommand-line arguments) when startinga ClickOnce-deployed module.
Command-line arguments are not supported whenClickOnce packages are deployed from a fileshare. You must deploy modules from a URL tospecify command-line arguments. Furthermore, thecommand-line arguments have a different syntax whenspecified as part of a URL. This syntax is explained inthe Understanding Command Line Arguments topic ineach applicable module guide.
When using IPv6, the AdministrationConsole does not run when you haveentered its URL in Internet Explorer.
When the Administration Console web component wasinstalled, a specific IP address was specified in the IPaddress to use for this web site field. To fix the issue,uninstall and reinstall the Administration Console webcomponent, and this time specify (All Unassigned) inthis field.
When running Administration Console,the “Failed to access IIS metabase” errordisplays.
One reason could be that when IIS was installed,the rights of the ASPNET user was not set correctly.To fix the issue, open a command window onthe web server and run the following command:C:\WINDOWS\Microsoft.NET\Framework\v2.0.50727>aspnet_regiis -i
The CAF file cannot be selected toactivate the InputAccel Server becausethe Activate Server and Browse buttonsare disabled in the Server Activationspane in Administration Console.
IIS, on the machine hosting the Administration Console,is configured in isolation mode. To fix the issue, disableIIS isolation mode to enable application pooling.
PrimeOCR Plus runs slowly andeventually runs out of memory or doesnot process pages at all (64-bit platformsonly).
On 64-bit Windows platforms, PrimeOCR Plus must runwith Data Execution Prevention disabled, as explainedin Table 5, page 19.
In some cases, a notebook machine thatdoes not have a parallel port encountersa STOP error (displays a blue screenwith an error message and shuts down)after being undocked from a dockingstation that has a parallel port (whenthe notebook machine is running theInputAccel Server).
The Sentinel driver that is installed for use with aparallel port hardware security key is causing the issue,even though you may not be using a parallel portsecurity key. To prevent this problem, use WindowsDevice Manager to disable the Sentinel driver in allhardware profiles. The Sentinel driver can be foundunder “Non-Plug And Play Drivers.”
167

Troubleshooting
To verify differences in the locale and codepage settings on the InputAccel Serverand client module machines:
1. On the machine where a client module is installed, open the settings.ini file.The default location is c:\Documents and Settings\All Users\ApplicationData\EMC\InputAccel.
2. In the [INPUTACCEL] section, add IAClientDebug=1 to activate the client debug file.
3. Run the client module. If it fails to connect to the InputAccel Server, open the iaclient.log filelocated at the root of the master drive (default location: c:\). This file contains a section Beginclient locale settings with all client module settings. Search for the diff string. The sectioncontaining the diff string lists the server settings that are different from the client module settings.Verify whether there are differences in the locale and codepage settings on the InputAccel Servermachine and the client module machine.
4. If there are differences, make changes to locale, globalization, and codepage settings in theRegional and Language Options of the Windows Control Panel so that these settings on theInputAccel Server machine and client machine are identical.
168
Appendix A
Prerequisite software installed by theInputAccel setup program
The InputAccel setup program installs prerequisite software if the software is not already installed.The prerequisite software varies depending on the InputAccel component that is installed. Thissection lists the prerequisite software installed for each InputAccel component.
Note: Depending on the language of the operating system and the presence of MUI packs, multiplelanguage versions of some of the prerequisite files are installed on the target machine.
Prerequisite software installed with theInputAccel Database• SQL Server 2005 Backward Compatibility
• Microsoft Windows Installer 3.1
Prerequisite software installed with theInputAccel ServerThe following prerequisite software is installed with the InputAccel Server:• Microsoft .NET Framework 2.0 SP 1
• Microsoft Visual Basic for Applications Core
• Microsoft Visual JSharp .NET v2.0 Redistributable
• Microsoft Windows Installer 3.1
169

Prerequisite software installed by the InputAccel setup program
Prerequisite software installed with InputAccelWeb Components• Crystal Reports for .NET Framework 2.0
• Microsoft .NET Framework 2.0 SP 1
• Microsoft Visual JSharp .NET v2.0 Redistributable
• Microsoft Windows Installer 3.1
• Microsoft WSE 3.0
Prerequisite software installed with theInputAccel client modules• Microsoft .NET Framework 1.1
• Microsoft .NET Framework 2.0 SP 1
• Microsoft Visual Basic for Applications Core
• Microsoft Visual JSharp .NET v2.0 Redistributable
• Microsoft Windows Installer 3.1
170

Appendix B
InputAccel client modules
The following table lists all InputAccel client modules and their capabilities.
Note: The client setup program installs additional applications that are not client modules. Thisincludes the following applications:• Process Developer
• Web Services Coordinator
• Web Services Hosting
171

InputAccelclientm
odules
Table 12. InputAccel modules
Module name Executable name New inversion6.0
Scale-Server-compati-ble
Runs inattendedmode
Runs inunat-tendedmode
Can run asservice
Multipleserviceinstances
Client-sidescriptingsupport
ApplicationXtenderExport
exax.exe - - N/A -
Archive Export exsapal.exe - - N/A -
Auto Annotate iastamp.exe - - - N/A -
Copy iacopy.exe - - - N/A -
DLL Viewer pixloadd.exe - - - - N/A -
DocumentumAdvanced Export
Documentu-mAdvancedEx-port.dll
ECM Web ServicesImporter
- - - N/A -
ECM WebServices ImporterConfiguration
- - - - - N/A -
Email Import EmailImport.exe
- - - -
FileNet ContentManager Export
exfncm.exe - - N/A -
FileNet PanagonIS/CS Export
iaxfnet2.exe - - - N/A -
File System Export exfile.exe - - - N/A -
172

InputAccelclientm
odules
Module name Executable name New inversion6.0
Scale-Server-compati-ble
Runs inattendedmode
Runs inunat-tendedmode
Can run asservice
Multipleserviceinstances
Client-sidescriptingsupport
Global 360 Exportformerly knownas eiStream WMSExport
iaexwnt.exe - - - N/A -
IBM CM AdvancedExport
exicm.exe - - -
IBM CMIP-390Export
iaexfaf.exe - - N/A -
IBM CMIP-390Index
iafafidx.exe - - N/A -
IBM CSSAP Export excssap.exe - - N/A -
Image iaimage.exe - - -
Image Divider ImageDivider.dll
ImageEnhancement
iaipi.exe - - -
Image Export iaeximg.exe - - -
Image QualityAssurance
iaiqa.exe - - - - - -
IndexPlus IndexPlus.dll - - -
Index Export iaexidx.exe - - - -
MS SharePointExport
exshrpt2.exe - - - -
173
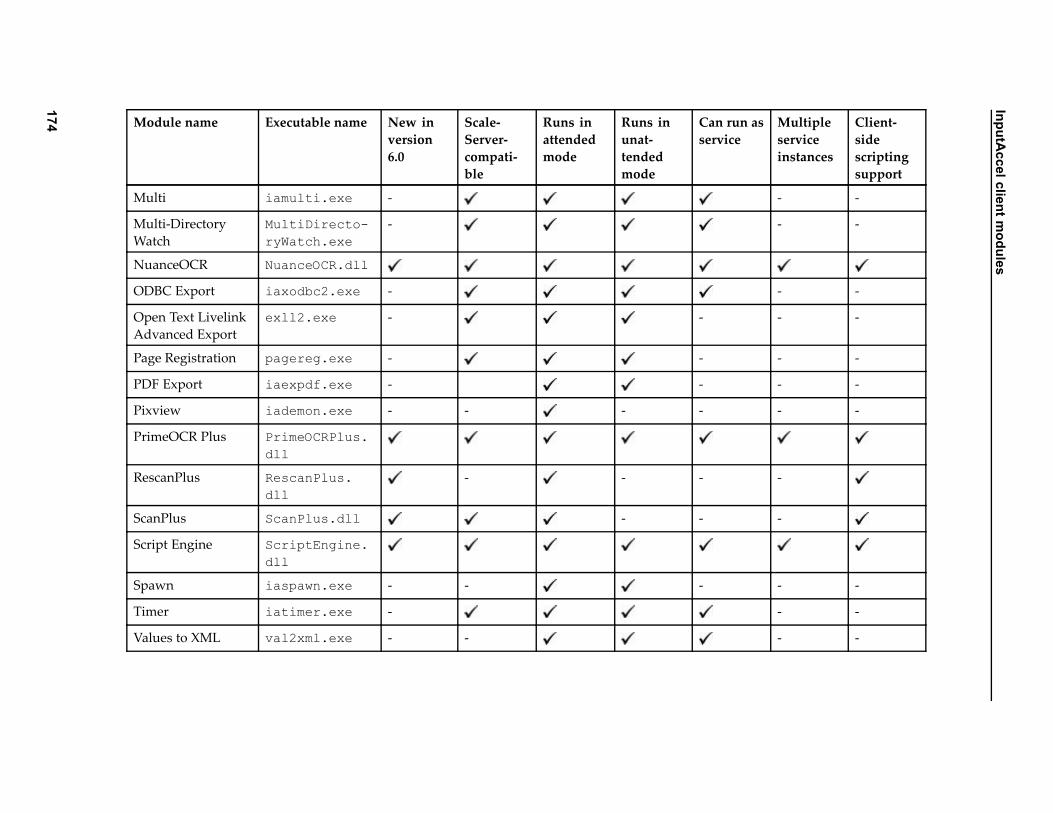
InputAccelclientm
odules
Module name Executable name New inversion6.0
Scale-Server-compati-ble
Runs inattendedmode
Runs inunat-tendedmode
Can run asservice
Multipleserviceinstances
Client-sidescriptingsupport
Multi iamulti.exe - - -
Multi-DirectoryWatch
MultiDirecto-ryWatch.exe
- - -
NuanceOCR NuanceOCR.dll
ODBC Export iaxodbc2.exe - - -
Open Text LivelinkAdvanced Export
exll2.exe - - - -
Page Registration pagereg.exe - - - -
PDF Export iaexpdf.exe - - - -
Pixview iademon.exe - - - - - -
PrimeOCR Plus PrimeOCRPlus.dll
RescanPlus RescanPlus.dll
- - - -
ScanPlus ScanPlus.dll - - -
Script Engine ScriptEngine.dll
Spawn iaspawn.exe - - - - -
Timer iatimer.exe - - -
Values to XML val2xml.exe - - - -
174

InputAccelclientm
odules
Module name Executable name New inversion6.0
Scale-Server-compati-ble
Runs inattendedmode
Runs inunat-tendedmode
Can run asservice
Multipleserviceinstances
Client-sidescriptingsupport
Web Services Input WebSer-vicesIn-put.dll
- -
Web ServicesOutput
WebService-sOutput.dll
- -
175

InputAccelclientm
odules
176

Appendix C
Languages supported
InputAccel supports the following languages:
Language Windows codepage Language code Locale ID (LCID)
English (United States) 1252 en-us 1033
French (France) 1252 fr-fr 1036
German (Germany) 1252 de-de 1031
Italian (Italy) 1252 it-it 1040
Portuguese (Brazil) 1252 pt-br 1046
Russian (RussianFederation)
1251 ru-ru 1049
Spanish (Spain) 1252 es-es 1034
177

Languages supported
178

Appendix D
Ports used
The following table lists the ports used by the various components of the InputAccel application.
Table 13. Ports used
Port Used for
1433 The SQL Server default port.
40571 The TCP port that enables Web Services Coordinator to receive calls from WebServices Hosting through .NET Remoting.
12007 The TCP port that enables Administration Console to communicate with WebServices Coordinator.
10099 The default TCP port that enables InputAccel client modules to communicatewith the InputAccel Servers and the InputAccel Remoting server, if used. Thiscan be changed during installation and may be different for each InputAccelServer in a side-by-side installation.
80 The following may be changed during installation of these components:• The Administration Console default port for web browser connections.
• The InputAccel Remoting default port for client connections.
179

Ports used
180

Appendix E
Running the Create Database Utility
The Create Database Utility creates a SQL Server database. By default, the InputAccel Databasesetup program creates the InputAccel Database automatically. Use the Create Database Utility inthe following circumstances:• You disabled the default setting to create the InputAccel Database when running the InputAccelDatabase setup program.
• You have been directed by support personnel to update your InputAccel Database with scriptsprovided to you.
To run the Create Database Utility:
1. From the Startmenu, click Programs > InputAccel > Create Database Utility.
2. From the Server list, type or select the name of the SQL Server on which you want to create theInputAccel database. If your SQL Server is using a named instance, append the instance namein this field, separated by a backslash (“\”).
3. In the Database field, type the name of the database that you want to create.
4. Under Authentication Mode, type the login credentials for the SQL Server.
5. In the Path to database scripts field, type the root path to the list.txt file, whichspecifies all of the SQL scripts that need to be executed. Alternatively, click Browse tonavigate to list.txt. The default installation scripts are installed in C:\ProgramFiles\InputAccel\Databases\DBScripts. The top-level lists.txt file also can befound here.
6. Select the Update existing database checkbox to update the InputAccel Database for a patch orupgrade. If you are creating the database for the first time, clear the checkbox.
7. Click OK to save your settings, run the utility, and exit.
Running the Create Database Utility in silentmodeThe following command-line arguments must be issued in the order listed below to create theInputAccel SQL database and successfully perform the SQL Server validation:
181

Running the Create Database Utility
Order Command line argument Description
1 CreateDbConsole Required. Runs the Create Database Utility.
2 DBServer Required. Name of the SQL Database Server.
3 DBName Required. Name of the database that you want to createand populate with database scripts.
4 DBUserID Required. User name for the SQL Server login screen, thedatabase account, and the scripts to be executed.
5 DBPassword Required. Password for the specified user name.
6 DBScriptDir Required. Root path to the list.txt file, whichspecifies all of the SQL scripts that need to be executed.
Create Database Utility command-line examples
The following is a sample command-line that would create the database on a server called jsmith. Itspecifies a username of “sa” (system administrator) and a password of “pwd”:
CreateDbConsole jsmith IADB sa pwd C:\EIM\Emc.InputAccel\Data.Databases\
182
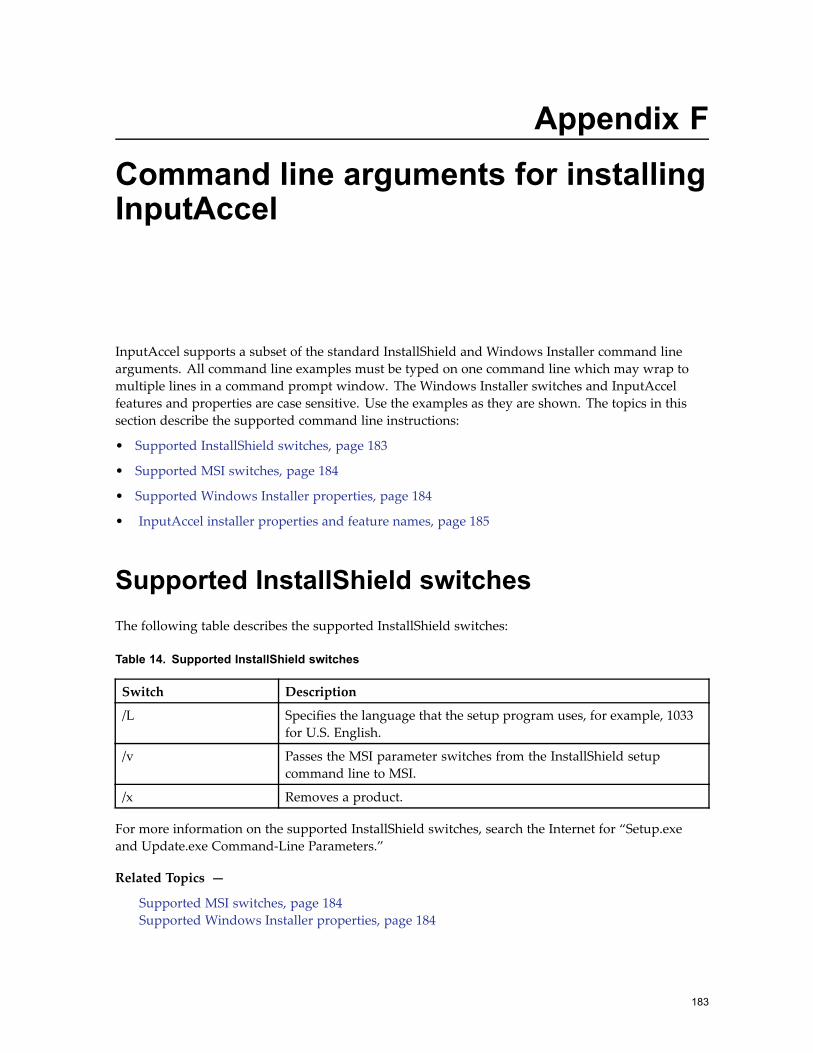
Appendix F
Command line arguments for installingInputAccel
InputAccel supports a subset of the standard InstallShield and Windows Installer command linearguments. All command line examples must be typed on one command line which may wrap tomultiple lines in a command prompt window. The Windows Installer switches and InputAccelfeatures and properties are case sensitive. Use the examples as they are shown. The topics in thissection describe the supported command line instructions:
• Supported InstallShield switches, page 183
• Supported MSI switches, page 184
• Supported Windows Installer properties, page 184
• InputAccel installer properties and feature names, page 185
Supported InstallShield switchesThe following table describes the supported InstallShield switches:
Table 14. Supported InstallShield switches
Switch Description
/L Specifies the language that the setup program uses, for example, 1033for U.S. English.
/v Passes the MSI parameter switches from the InstallShield setupcommand line to MSI.
/x Removes a product.
For more information on the supported InstallShield switches, search the Internet for “Setup.exeand Update.exe Command-Line Parameters.”
Related Topics —
Supported MSI switches, page 184Supported Windows Installer properties, page 184
183
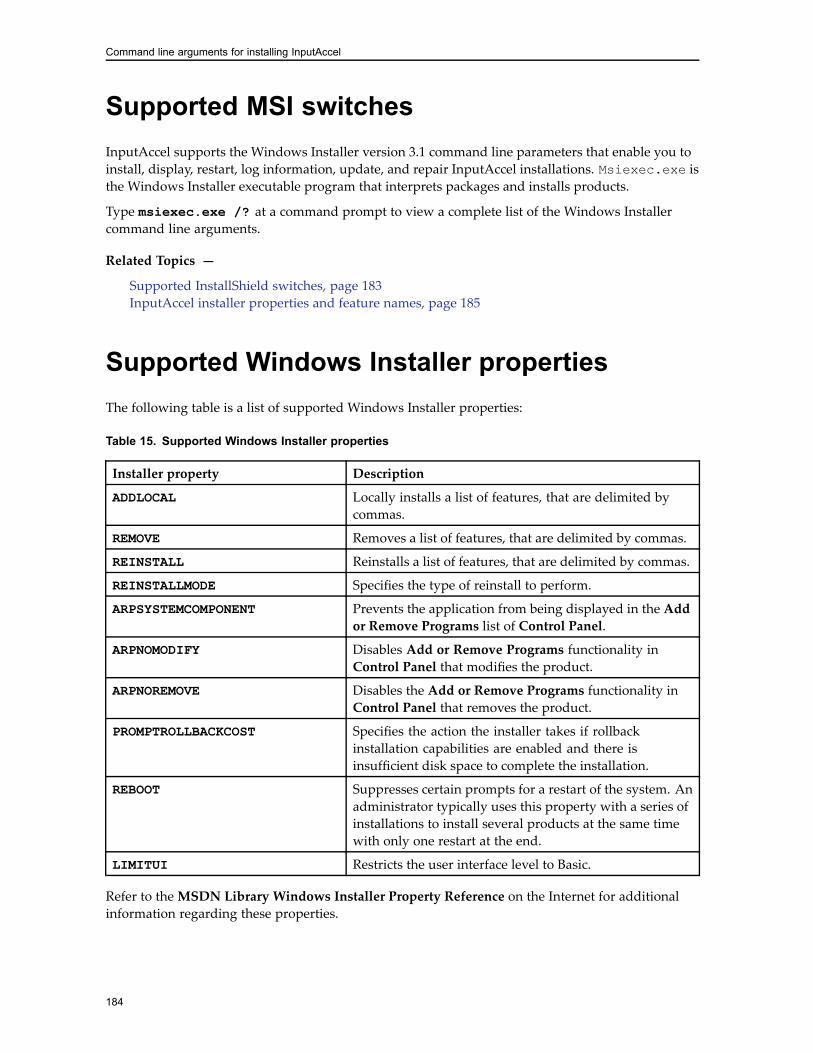
Command line arguments for installing InputAccel
Supported MSI switchesInputAccel supports the Windows Installer version 3.1 command line parameters that enable you toinstall, display, restart, log information, update, and repair InputAccel installations. Msiexec.exe isthe Windows Installer executable program that interprets packages and installs products.
Type msiexec.exe /? at a command prompt to view a complete list of the Windows Installercommand line arguments.
Related Topics —
Supported InstallShield switches, page 183InputAccel installer properties and feature names, page 185
Supported Windows Installer propertiesThe following table is a list of supported Windows Installer properties:
Table 15. Supported Windows Installer properties
Installer property Description
ADDLOCAL Locally installs a list of features, that are delimited bycommas.
REMOVE Removes a list of features, that are delimited by commas.
REINSTALL Reinstalls a list of features, that are delimited by commas.
REINSTALLMODE Specifies the type of reinstall to perform.
ARPSYSTEMCOMPONENT Prevents the application from being displayed in the Addor Remove Programs list of Control Panel.
ARPNOMODIFY Disables Add or Remove Programs functionality inControl Panel that modifies the product.
ARPNOREMOVE Disables the Add or Remove Programs functionality inControl Panel that removes the product.
PROMPTROLLBACKCOST Specifies the action the installer takes if rollbackinstallation capabilities are enabled and there isinsufficient disk space to complete the installation.
REBOOT Suppresses certain prompts for a restart of the system. Anadministrator typically uses this property with a series ofinstallations to install several products at the same timewith only one restart at the end.
LIMITUI Restricts the user interface level to Basic.
Refer to theMSDN Library Windows Installer Property Reference on the Internet for additionalinformation regarding these properties.
184

Command line arguments for installing InputAccel
InputAccel installer properties and featurenamesTo perform a silent installation, use InstallShield and MSI command line parameters in conjunctionwith the InputAccel feature names and properties. You perform silent installations on the appropriateworkstations to create the InputAccel Databases, InputAccel Server, InputAccel client modules, andInputAccel Web Components, which include the Administration Console and the Web Servicescomponents. The topics in this section describe installer properties and feature names:• InputAccel Database installer properties, page 185
• InputAccel Server Components installer properties, page 188
• InputAccel web components installer properties, page 199
• InputAccel Client installer properties, page 203
• Installing the Backward Compatibility Pack from a command line, page 209
InputAccel Database installer properties
You can install the InputAccel Database in unattended mode using command line arguments. Forexample:
setup.exe /s /v"/qn property=value /promptrestart"
where “property = value” is a list of installer properties to be passed into the setup program.
At a minimum you must specify the ADDLOCAL property. For example:
setup.exe /s /v"/qn ADDLOCAL="ALL" /promptrestart"
CreateDbConsole.exe only runs when the CREATE_DATABASE installer property is set to a valueof 1. This is the default value. In addition, the following installer properties must be specified:• SQL Server name
• SQL Server port
• SQL Server username
• SQL Server password
• Database name
The CreateDbConsole.exe application must not be run in interactive mode during an unattended(or silent) installation.
The SQL Server port has a default value of 1433. This means that if this installer property is notpassed in, 1433 is used.
Note:• Microsoft .NET 2.0 Service Pack 1 is required to enable purging capabilities
• SQL Server validation is not possible during a silent installation. It is the responsibility of the userto pass the correct information to CreateDbConsole.exe.
185

Command line arguments for installing InputAccel
The following table lists the installer properties that can be specified when installing the InputAccelDatabase:
Table 16. Supported InputAccel Database installer properties
Installer property Value Description
ADDLOCAL Features to install A comma delimited list of the features toinstall. Since there is only one feature in thiscomponent to install, users should specifyALL.
CREATE_DATABASE 0/1/2 • 0: Do not install the InputAccel database.Only the database scripts are installed.
• 1: Install the InputAccel database.
• 2: Upgrade the InputAccel database.
A default value of 1 is used when thisproperty is not specified.
DB_SERVER Hostname Hostname of the SQL Server. You can use(local) or localhost if you want to use thelocally installed SQL Server.
DB_PORT TCP port number This is the TCP port on which the SQL Serverlistens for connections.
The default value is 1433.
DB_NAME Database name The name of the configuration SQL database.
The database name has the followingrestrictions:• The database name can have a maximumof 122 characters.
• The database name can only contain thecharacters 0-9, A-Z, an underscore, $, #, @and must begin with a number, a letter, oran underscore.
A default value of “IADB” is used if thisproperty is not specified.
DB_USER SQL user name The name of the SQL Server user name toconnect to SQL Server.
DB_PASS SQL password The password for the SQL Server that theuser specified in the DB_USER property.
186

Command line arguments for installing InputAccel
InputAccel Database installer command-line examples
• The following command line silently installs CreateDB.exe, CreateDbConsole.exe, and thedatabase scripts into the default installation directory. Note that in this example, the installer doesnot run CreateDbConsole.exe.
setup.exe /s /v"/qn ADDLOCAL=ALL CREATE_DATABASE=0 /promptrestart"
• The following command line installs CreateDB.exe, CreateDbConsole.exe, and the databasescripts into the directory specified by INSTALLDIR. Note that in this example, the installer doesnot run CreateDbConsole.exe.
setup.exe /s /v"/qn ADDLOCAL=ALL INSTALLDIR=\"c:\ProgramFiles\InputAccel\Databases\" CREATE_DATABASE=0 /promptrestart"
• The following command installs CreateDB.exe, CreateDbConsole.exe, and the databasescripts into the default installation directory. CreateDbConsole.exe is executed to install theInputAccel Database on the locally installed SQL Server which listens for connections on thedefault port of 1433. The default InputAccel Database name is used.
setup.exe /s /v"/qn ADDLOCAL=ALL DB_SERVER="(local)" DB_USER="sa"DB_PASS="password" /promptrestart"
• The following command line installs CreateDB.exe,CreateDbConsole.exe, and the databasescripts into the directory specified by INSTALLDIR. CreateDbConsole.exe is executed toinstall the InputAccel database to the locally installed SQL Server, which listens for connections onthe non-default port of 3999. The default InputAccel database name is used.
setup.exe /s /v"/qn ADDLOCAL=ALL INSTALLDIR=\"c:\ProgramFiles\InputAccel\Databases\" CREATE_DATABASE=1 DB_SERVER="(local)"DB_PORT=3999 DB_USER=sa DB_PASS=password /promptrestart"
• The following command line installs CreateDB.exe,CreateDbConsole.exe, and the databasescripts into the directory specified by INSTALLDIR. CreateDbConsole.exe is executed toinstall the InputAccel database to the remote SQL Server named “CORP-SQL” which listens forconnections on the default port of 1433. The default InputAccel database name is used.
setup.exe /s /v"/qn ADDLOCAL=ALL INSTALLDIR=\"c:\ProgramFiles\InputAccel\Databases\" CREATE_DATABASE=1 DB_SERVER=CORP-SQLDB_USER=sa DB_PASS=password /promptrestart"
Related Topics —
InputAccel Server Components installer properties, page 188InputAccel Client installer properties, page 203InputAccel web components installer properties, page 199Installing the Backward Compatibility Pack from a command line, page 209
187

Command line arguments for installing InputAccel
InputAccel Server Components installer properties
You can install the InputAccel Server in unattended mode using command line arguments. Forexample:
setup.exe /s /v"/qn property=value /promptrestart"
where “property = value” is a list of installer properties to be passed into the setup program.
At a minimum, you must specify the ADDLOCAL and IA_SERVICES_RUNAS_LOCAL_SYSTEMproperties. For example:
setup.exe /s /v"/qn ADDLOCAL="ALL" IA_SERVICES_RUNAS_LOCAL_SYSTEM="1"/promptrestart"
Note:• The root directories for each InputAccel Server must be specified when more than one instance isbeing installed. Each root directory must be unique and should be on its own hard disk drive.The properties for these instances are IAS1_ROOT_DIR, IAS2_ROOT_DIR, IAS3_ROOT_DIR,and so forth.
• The character limit on setup command line length is 1066 characters.
The following table lists the installer properties that can be specified when installing the InputAccelServer.
Table 17. Supported InputAccel Server installer properties
Installer property Value Description
ADDLOCAL Features toinstall
Features to install. The following features areavailable:• IASERVER: InputAccel Server
• BASE_IAP_FILES: Standard and compiledInputAccel process files.
• SERVER_DOCS: Documentation to assistwith the installation process.
INSTALLDIR Path The destination directory for the applicationfiles.
A default value of %ProgramFiles%\In-putAccel\Server is used when thisproperty is not specified.
188

Command line arguments for installing InputAccel
Installer property Value Description
SERVER_INSTANCES 1 - 8 The number of InputAccel Server instancesto install.
A default value of 1 is usedwhen this propertyis not specified.
REGISTER_DATABASE 0/1 • 0: Do not perform DAL registration for theInputAccel Database.
• 1: Perform DAL registration for theInputAccel Database.
A default value of 1 is usedwhen this propertyis not specified.
DB_SERVER Hostname Hostname or machine name of the SQLServer. You can use (local) or localhost if youwant to use the locally installed SQL Server.
DB_PORT TCP port The TCP port number to use to connect to theSQL Server.
A default value of 1433 is used when thisproperty is not specified.
DB_NAME Database name The name of the InputAccel Database. Adefault value of “IADB” is used if thisproperty is not specified.
DB_USER SQL user name The name of the SQL Server user namerequired to connect to the SQL Server.
DB_PASS SQL password The password of the SQL Server user specifiedin the DB_USER property.
AC_MACHINE_USER_NAME
Username The user account specified as the Run as userfor the Administration Console. This propertyis only valid when the InputAccel Server isinstalled on machines that are members of aWindows domain.
AC_MACHINE_DOMAIN_NAME
Domain name The domain name of the user account specifiedas the Run as user for the AdministrationConsole. This property is only valid when theInputAccel Server is installed on machinesthat are members of a Windows domain.
189

Command line arguments for installing InputAccel
Installer property Value Description
CONFIGURE_WINDOWS_FIREWALL
0/1 This property is only valid when theMicrosoftWindows Firewall is running and enabled.• 0: Do not make configuration changes tothe Windows Firewall.
• 1: Allow setup to configure the WindowsFirewall. This is the default setting whenthe property is not passed in.
IAS_SERVICES_AUTOSTART
0/1 Automatically starts the InputAccel Serverservice for the first instance when Windowsstarts.• 0: Manual. Do not start automatically.
• 1: Automatically start the InputAccelServer service for the first instance whenWindows starts. The default value is 1unless otherwise specified.
IAS1_ROOT_DIR Path The destination directory for the rootdirectory used by InputAccel Server instance1. A default path ofWINDRIVE\IAS is usedwhen this property is not specified. Forexample, the path is C:\IAS when Windowsis installed on the C: drive.
Caution: The path length must not begreater than 109 characters and cannotbe the same as the root directory for anyother InputAccel Server instance.
IAS2_ROOT_DIR Path The destination directory for the root directoryused by InputAccel Server instance 2. Thisvalue is only used when the installer propertySERVER_INSTANCES is equal to or greaterthan 2.
Caution: The path length must not begreater than 109 characters and cannotbe the same as the root directory for anyother InputAccel Server instance.
190

Command line arguments for installing InputAccel
Installer property Value Description
IAS3_ROOT_DIR Path The destination directory for the root directoryused by InputAccel Server instance 3. Thisvalue is only used when the installer propertySERVER_INSTANCES is equal to or greaterthan 3.
Caution: The path length must not begreater than 109 characters and cannotbe the same as the root directory for anyother InputAccel Server instance.
IAS4_ROOT_DIR Path The destination directory for the root directoryused by InputAccel Server instance 4. Thisvalue is only used when the installer propertySERVER_INSTANCES is equal to or greaterthan 4.
Caution: The path length must not begreater than 109 characters and cannotbe the same as the root directory for anyother InputAccel Server instance.
IAS5_ROOT_DIR Path The destination directory for the root directoryused by InputAccel Server instance 5. Thisvalue is only used when the installer propertySERVER_INSTANCES is equal to or greaterthan 5.
Caution: The path length must not begreater than 109 characters and cannotbe the same as the root directory for anyother InputAccel Server instance.
IAS6_ROOT_DIR Path The destination directory for the root directoryused by InputAccel Server instance 6. Thisvalue is only used when the installer propertySERVER_INSTANCES is equal to or greaterthan 6.
Caution: The path length must not begreater than 109 characters and cannotbe the same as the root directory for anyother InputAccel Server instance.
191
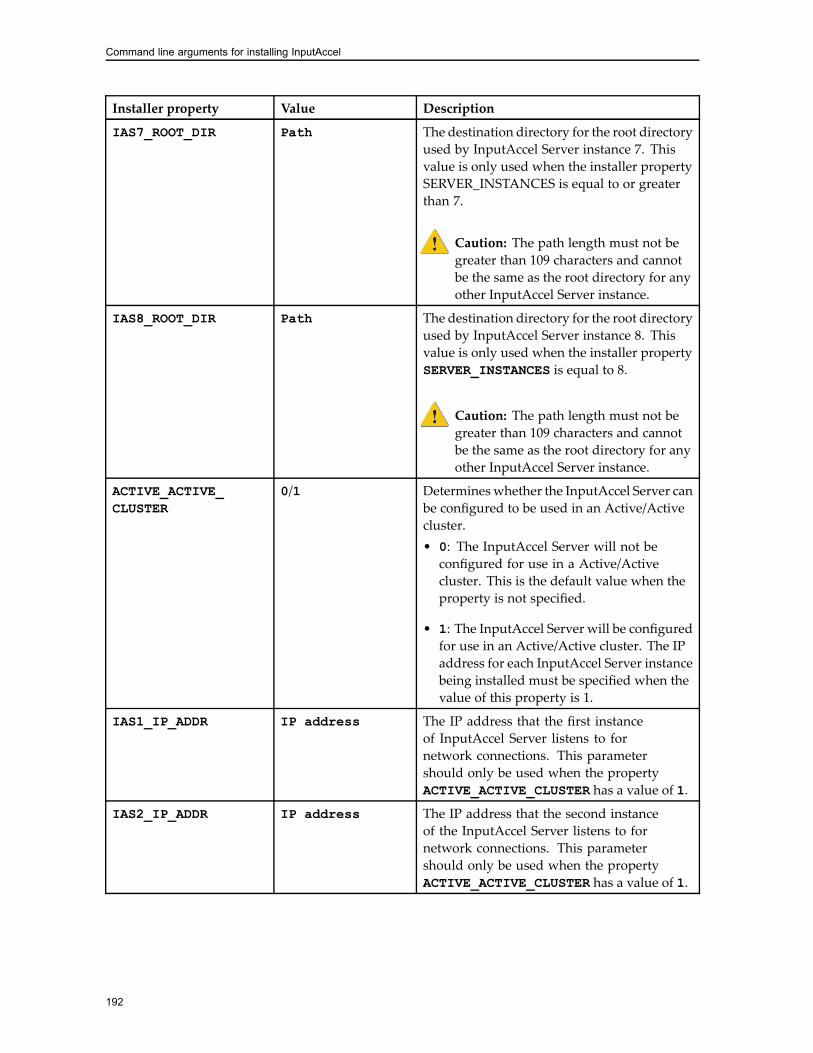
Command line arguments for installing InputAccel
Installer property Value Description
IAS7_ROOT_DIR Path The destination directory for the root directoryused by InputAccel Server instance 7. Thisvalue is only used when the installer propertySERVER_INSTANCES is equal to or greaterthan 7.
Caution: The path length must not begreater than 109 characters and cannotbe the same as the root directory for anyother InputAccel Server instance.
IAS8_ROOT_DIR Path The destination directory for the root directoryused by InputAccel Server instance 8. Thisvalue is only used when the installer propertySERVER_INSTANCES is equal to 8.
Caution: The path length must not begreater than 109 characters and cannotbe the same as the root directory for anyother InputAccel Server instance.
ACTIVE_ACTIVE_CLUSTER
0/1 Determineswhether the InputAccel Server canbe configured to be used in an Active/Activecluster.• 0: The InputAccel Server will not beconfigured for use in a Active/Activecluster. This is the default value when theproperty is not specified.
• 1: The InputAccel Server will be configuredfor use in an Active/Active cluster. The IPaddress for each InputAccel Server instancebeing installed must be specified when thevalue of this property is 1.
IAS1_IP_ADDR IP address The IP address that the first instanceof InputAccel Server listens to fornetwork connections. This parametershould only be used when the propertyACTIVE_ACTIVE_CLUSTER has a value of 1.
IAS2_IP_ADDR IP address The IP address that the second instanceof the InputAccel Server listens to fornetwork connections. This parametershould only be used when the propertyACTIVE_ACTIVE_CLUSTER has a value of 1.
192

Command line arguments for installing InputAccel
Installer property Value Description
IAS3_IP_ADDR IP address The IP address that the third instanceof the InputAccel Server listens to fornetwork connections. This parametershould only be used when the propertyACTIVE_ACTIVE_CLUSTER has a value of 1.
IAS4_IP_ADDR IP address The IP address that the fourth instanceof the InputAccel Server listens to fornetwork connections. This parametershould only be used when the propertyACTIVE_ACTIVE_CLUSTER has a value of 1.
IAS5_IP_ADDR IP address The IP address that the fifth instanceof the InputAccel Server listens to fornetwork connections. This parametershould only be used when the propertyACTIVE_ACTIVE_CLUSTER has a value of 1.
IAS6_IP_ADDR IP address The IP address that the sixth instanceof the InputAccel Server listens to fornetwork connections. This parametershould only be used when the propertyACTIVE_ACTIVE_CLUSTER has a value of 1.
IAS7_IP_ADDR IP address The IP address that the seventh instanceof the InputAccel Server listens to fornetwork connections. This parametershould only be used when the propertyACTIVE_ACTIVE_CLUSTER has a value of 1.
IAS8_IP_ADDR IP address The IP address that the eighth instanceof the InputAccel Server listens to fornetwork connections. This parametershould only be used when the propertyACTIVE_ACTIVE_CLUSTER has a value of 1.
IAS1_TCP_PORT TCP port InputAccel Server instance 1 listens to thespecified TCP port number. The default valueis 10099 when this value is not specified.
IAS2_TCP_PORT TCP port InputAccel Server instance 2 listens to thespecified TCP port number. The default valueis 10099 when this value is not specified.
IAS3_TCP_PORT TCP port InputAccel Server instance 3 listens to thespecified TCP port number. The default valueis 10099 when this value is not specified.
IAS4_TCP_PORT TCP port InputAccel Server instance 4 listens to thespecified TCP port number. The default valueis 10099 when this value is not specified.
193
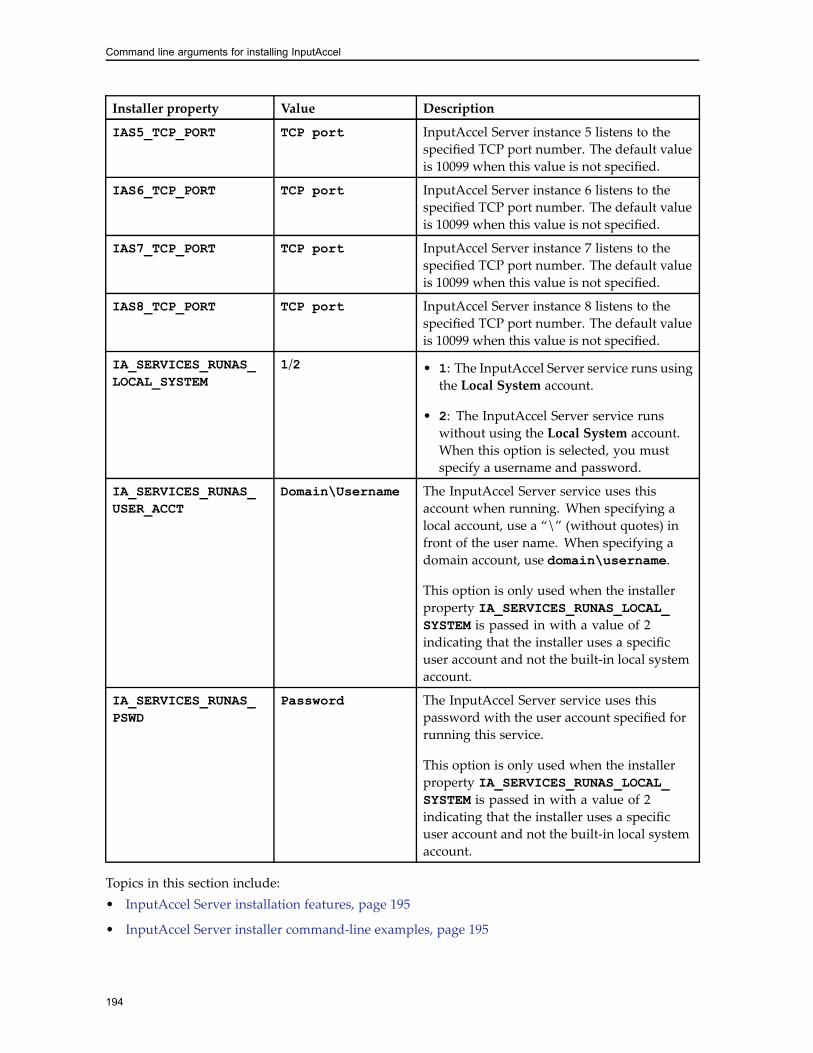
Command line arguments for installing InputAccel
Installer property Value Description
IAS5_TCP_PORT TCP port InputAccel Server instance 5 listens to thespecified TCP port number. The default valueis 10099 when this value is not specified.
IAS6_TCP_PORT TCP port InputAccel Server instance 6 listens to thespecified TCP port number. The default valueis 10099 when this value is not specified.
IAS7_TCP_PORT TCP port InputAccel Server instance 7 listens to thespecified TCP port number. The default valueis 10099 when this value is not specified.
IAS8_TCP_PORT TCP port InputAccel Server instance 8 listens to thespecified TCP port number. The default valueis 10099 when this value is not specified.
IA_SERVICES_RUNAS_LOCAL_SYSTEM
1/2 • 1: The InputAccel Server service runs usingthe Local System account.
• 2: The InputAccel Server service runswithout using the Local System account.When this option is selected, you mustspecify a username and password.
IA_SERVICES_RUNAS_USER_ACCT
Domain\Username The InputAccel Server service uses thisaccount when running. When specifying alocal account, use a “\” (without quotes) infront of the user name. When specifying adomain account, use domain\username.
This option is only used when the installerproperty IA_SERVICES_RUNAS_LOCAL_SYSTEM is passed in with a value of 2indicating that the installer uses a specificuser account and not the built-in local systemaccount.
IA_SERVICES_RUNAS_PSWD
Password The InputAccel Server service uses thispassword with the user account specified forrunning this service.
This option is only used when the installerproperty IA_SERVICES_RUNAS_LOCAL_SYSTEM is passed in with a value of 2indicating that the installer uses a specificuser account and not the built-in local systemaccount.
Topics in this section include:• InputAccel Server installation features, page 195
• InputAccel Server installer command-line examples, page 195
194

Command line arguments for installing InputAccel
InputAccel Server installation featuresNote: Multiple features can be specified by delimiting each feature with a comma.
The following are supported feature names that can be specified when installing the InputAccelServer:
Feature name Description
IASERVER Installs the InputAccel Server sub-features that manageall client module activity and acts as the repository for allInputAccel batches, processes and other data.
BASE_IAP_FILES Installs the standard InputAccel process files (IAP)only. These files are installed to a default location of[WindowsVolume]\IAS.
SERVER_DOCS: Installs documentation to assist with the installation process.
Related Topics —
InputAccel Server Components installer properties, page 188InputAccel Server installer command-line examples, page 195
InputAccel Server installer command-line examples
• The following command installs one instance of the InputAccel Server into the default installationdirectory. The service is installed and runs under the built-in Local System account. It does notperform DAL registration. The system automatically restarts if a reboot is required.
setup.exe /s /v"/qn ADDLOCAL="ALL" IA_SERVICES_RUNAS_LOCAL_SYSTEM=1REGISTER_DATABASE=0"
• The following command installs one instance of the InputAccel Server into the directory specifiedby INSTALLDIR. The service is installed and runs under the built-in Local System account. Theinstaller performs DAL registration against the InputAccel Database on the SQL Server installedon the same machine, which listens for connections on the default port of 1433. The defaultInputAccel Database name is used. The system does not restart even when a reboot is required.
setup.exe /s /v"/qn ADDLOCAL="ALL" INSTALLDIR=\"c:\ProgramFiles\InputAccel\Server\" IA_SERVICES_RUNAS_LOCAL_SYSTEM=1DB_SERVER="(local)" DB_USER="sa" DB_PASS="password" /norestart"
• This command installs one instance of the InputAccel Server into the directory specifiedby INSTALLDIR. The root directory for the InputAccel Server instance is specified byIAS1_ROOT_DIR. The service is installed and runs under the built-in Local System account.The installer performs DAL registration against the InputAccel Database on the SQL Serverinstalled on the same machine, which listens for connections on the default port of 1433. The useris prompted to restart Windows if a reboot is required.
setup.exe /s /v"/qn ADDLOCAL="ALL" INSTALLDIR=\"c:\ProgramFiles\InputAccel\Server\" IAS1_ROOT_DIR=\"C:\IADataFiles\"IA_SERVICES_RUNAS_LOCAL_SYSTEM="1" DB_SERVER="(local)" DB_USER="sa"DB_PASS="password" /promptrestart"
195

Command line arguments for installing InputAccel
• This command installs one instance of the InputAccel Server into the directory specified byINSTALLDIR. The service is installed and runs under the built-in Local System account. It doesnot configure the Windows Firewall (if it is installed and running). The installer performs DALregistration against the InputAccel Database on the SQL Server installed on the same machine,which listens for connections on the default port of 1433. The system automatically restarts ifa reboot is required.
setup.exe /s /v"/qn ADDLOCAL="ALL" INSTALLDIR=\"c:\ProgramFiles\InputAccel\Server\" IA_SERVICES_RUNAS_LOCAL_SYSTEM=1CONFIGURE_WINDOWS_FIREWALL=0 DB_SERVER="(local)" DB_USER="sa"DB_PASS="password""
• This command installs four instances of the InputAccel Server into the directory specified byINSTALLDIR. All four instances of the InputAccel service use the local Administrator useraccount (which has a password of “password”) as the run-as credentials. The root directory foreach InputAccel Server instance is specified by the properties IASn_ROOT_DIR, where n is thenumber of the specific instance. The TCP port used by each InputAccel Server instance is specifiedby the properties IASn_TCP_PORT, where n is the number of the specific instance. The installerperforms DAL registration against the InputAccel Database on the SQL Server installed on thesame machine, which listens for connections on the default port of 1433. The system automaticallyrestarts if a reboot is required.
setup.exe /s /v"/qn ADDLOCAL="ALL" INSTALLDIR=\"c:\ProgramFiles\InputAccel\Server\" SERVER_INSTANCES=4 IAS1_ROOT_DIR=\"C:\IADataFiles\" IAS2_ROOT_DIR=\"E:\IADataFiles\" IAS3_ROOT_DIR=\"F:\IADataFiles\" IAS4_ROOT_DIR=\"G:\IADataFiles\" IAS1_TCP_PORT=10099IAS2_TCP_PORT=10100 IAS3_TCP_PORT=10101 IAS4_TCP_PORT=10102 IA_SERVICES_RUNAS_LOCAL_SYSTEM=2 IA_SERVICES_RUNAS_USER_ACCT=".\Administrator"IA_SERVICES_RUNAS_PSWD="password" DB_SERVER="(local)" DB_USER="sa"DB_PASS="password""
• This command installs all eight instances of the InputAccel Server into the directory specified byINSTALLDIR. All eight instances of the InputAccel service use the built-in Local System accountas the run-as credentials. The root directory for each InputAccel Server instance is specified by theproperties IASn_ROOT_DIR, where n is the number of the specific instance. The TCP port used byeach InputAccel Server instance is specified by the properties IASn_TCP_PORT, where n is thenumber of the specific instance. The installer performs DAL registration against the InputAccelDatabase on the SQL Server installed on the same machine, which listens for connections on thedefault port of 1433. The default InputAccel Database name is used. The system automaticallyrestarts if a reboot is required.
setup.exe /s /v"/qn ADDLOCAL="ALL" INSTALLDIR=\"c:\ProgramFiles\InputAccel\Server\" SERVER_INSTANCES="8" IAS1_ROOT_DIR=\"C:\IADataFiles\" IAS2_ROOT_DIR=\"E:\IADataFiles\" IAS3_ROOT_DIR=\"F:\IADataFiles\" IAS4_ROOT_DIR=\"G:\IADataFiles\"IAS5_ROOT_DIR=\"H:\IADataFiles\" IAS6_ROOT_DIR=\"I:\IADataFiles\"IAS7_ROOT_DIR=\"J:\IADataFiles\" IAS8_ROOT_DIR=\"K:\IADataFiles\"IAS1_TCP_PORT=10099 IAS2_TCP_PORT=10100 IAS3_TCP_PORT=10101IAS4_TCP_PORT=10102 IAS5_TCP_PORT=10103 IAS6_TCP_PORT=10104IAS7_TCP_PORT=10105 IAS8_TCP_PORT=10106 IA_SERVICES_RUNAS_LOCAL_SYSTEM=1DB_SERVER="(local)" DB_USER="sa" DB_PASS="password""
196

Command line arguments for installing InputAccel
• This command installs one instance of the InputAccel Server into the default installation directory.The InputAccel Server service uses the local Administrator user account (which has a passwordof “password”) as the run-as credentials. The installer performs DAL registration against theInputAccel Database on the SQL Server installed on a different machine (CORP-SQL), whichlistens for connections on the default port of 1433. The default InputAccel Database name is used.The system automatically restarts if a reboot is required.
setup.exe /s /v"/qn ADDLOCAL="ALL" IA_SERVICES_RUNAS_LOCAL_SYSTEM=2IA_SERVICES_RUNAS_USER_ACCT=".\Administrator" IA_SERVICES_RUNAS_PSWD="password" DB_SERVER="CORP-SQL" DB_USER="sa" DB_PASS="password""
• This command installs one instance of the InputAccel Server into the default installation directory.The InputAccel Server service uses the local Administrator user account (which has a passwordof “password”) as the run-as credentials. The username and domain name of the user accountrunning the Administration Console (the InputAccel Web Components website) are passed in,which is the user account CORP\CorpServices. The root directory for the InputAccel Serverinstance is specified by IAS1_ROOT_DIR. The installer performs DAL registration against theInputAccel Database on the SQL Server installed on a different machine (CORP-SQL), whichlistens for connections on the default port of 1433. The default InputAccel Database name is used.The system automatically restarts if a reboot is required.
setup.exe /s /v"/qn ADDLOCAL="ALL" IAS1_ROOT_DIR=\"C:\IADataFiles\"IA_SERVICES_RUNAS_LOCAL_SYSTEM=2 IA_SERVICES_RUNAS_USER_ACCT=".\Administrator" IA_SERVICES_RUNAS_PSWD="password" AC_MACHINE_USER_NAME="CorpServices" AC_MACHINE_DOMAIN_NAME="CORP" DB_SERVER="CORP-SQL"DB_USER="sa" DB_PASS="password""
• This command installs eight instances of the InputAccel Server into the directory specified byINSTALLDIR. All eight instances of the InputAccel service use the built-in Local System accountas the run-as credentials. The root directory for each InputAccel Server instance is specified by theproperties IASn_ROOT_DIR, where n is the number of the specific instance. The TCP port used byeach InputAccel Server instance is specified by the properties IASn_TCP_PORT, where n is thenumber of the specific instance. The installer performs DAL registration against the InputAccelDatabase on the SQL Server installed on a different machine (CORP-SQL), which listens forconnections on the default port of 1433. The default InputAccel Database name is used. Thesystem automatically restarts if a reboot is required.
setup.exe /s /v"/qn ADDLOCAL="ALL" INSTALLDIR=\"c:\ProgramFiles\InputAccel\Server\" SERVER_INSTANCES=8 IAS1_ROOT_DIR=\"C:\IADataFiles\" IAS2_ROOT_DIR=\"E:\IADataFiles\" IAS3_ROOT_DIR=\"F:\IADataFiles\" IAS4_ROOT_DIR=\"G:\IADataFiles\"IAS5_ROOT_DIR=\"H:\IADataFiles\" IAS6_ROOT_DIR=\"I:\IADataFiles\"IAS7_ROOT_DIR=\"J:\IADataFiles\" IAS8_ROOT_DIR=\"K:\IADataFiles\"IAS1_TCP_PORT=10099 IAS2_TCP_PORT=10100 IAS3_TCP_PORT=10101IAS4_TCP_PORT=10102 IAS5_TCP_PORT=10103 IAS6_TCP_PORT=10104IAS7_TCP_PORT=10105 IAS8_TCP_PORT=10106 IA_SERVICES_RUNAS_LOCAL_SYSTEM=1DB_SERVER="CORP-SQL" DB_USER="sa" DB_PASS="password""
• This command installs eight instances of the InputAccel Server into the directory specified byINSTALLDIR. All eight instances of the InputAccel service use the local Administrator useraccount (which has a password of “password”) as the run-as credentials. The root directoryfor each InputAccel Server instance is specified by the properties IASn_ROOT_DIR, where n isthe number of the specific instance. The TCP port used by each InputAccel Server instance is
197

Command line arguments for installing InputAccel
specified by the properties IASn_TCP_PORT, where n is the number of the specific instance. Theinstaller performs DAL registration against the InputAccel Database on the SQL Server installedon a different machine (CORP-SQL), which listens for connections on the NON-default port of3999. The NON-default InputAccel Database name is CORP_IADB. The system automaticallyrestarts if a reboot is required.
setup.exe /s /v"/qn ADDLOCAL="ALL" INSTALLDIR=\"c:\ProgramFiles\InputAccel\Server\" SERVER_INSTANCES=8 IAS1_ROOT_DIR=\"C:\IADataFiles\" IAS2_ROOT_DIR=\"E:\IADataFiles\" IAS3_ROOT_DIR=\"F:\IADataFiles\" IAS4_ROOT_DIR=\"G:\IADataFiles\"IAS5_ROOT_DIR=\"H:\IADataFiles\" IAS6_ROOT_DIR=\"I:\IADataFiles\"IAS7_ROOT_DIR=\"J:\IADataFiles\" IAS8_ROOT_DIR=\"K:\IADataFiles\"IAS1_TCP_PORT=10099 IAS2_TCP_PORT=10100 IAS3_TCP_PORT=10101IAS4_TCP_PORT=10102 IAS5_TCP_PORT=10103 IAS6_TCP_PORT=10104IAS7_TCP_PORT=10105 IAS8_TCP_PORT=10106 IA_SERVICES_RUNAS_LOCAL_SYSTEM=2IA_SERVICES_RUNAS_USER_ACCT=".\Administrator" IA_SERVICES_RUNAS_PSWD="password" DB_SERVER="CORP-SQL" DB_PORT=3999 DB_NAME="CORP_IADB"DB_USER="sa" DB_PASS="password""
• This command installs eight instances of the InputAccel Server into the directory specifiedby INSTALLDIR. This installation is configured to use a Microsoft Active/Active Cluster. Alleight instances of the InputAccel service use the local Administrator user account (which has apassword of “password”) as the run-as credentials. The root directory for each InputAccel Serverinstance is specified by the properties IASn_ROOT_DIR, where n is the number of the specificinstance. The TCP port used by each InputAccel Server instance is specified by the propertiesIASn_TCP_PORT, where n is the number of the specific instance. The IP address used by eachInputAccel Server instance is specified by the properties IASn_IP_ADDR, where n is the numberof the specific instance. The installer performs DAL registration against the InputAccel Databaseon the SQL Server installed on a different machine (CORP-SQL), which listens for connections onthe default port of 1433. The NON-default InputAccel database name is CORP_IADB. The systemautomatically restarts if a reboot is required.
setup.exe /s /v"/qn ADDLOCAL=ALL SERVER_INSTANCES=8 IAS1_ROOT_DIR=\"C:\IADataFiles\" IAS2_ROOT_DIR=\"E:\IADataFiles\"IAS3_ROOT_DIR=\"F:\IADataFiles\" IAS4_ROOT_DIR=\"G:\IADataFiles\"IAS5_ROOT_DIR=\"H:\IADataFiles\" IAS6_ROOT_DIR=\"I:\IADataFiles\"IAS7_ROOT_DIR=\"J:\IADataFiles\" IAS8_ROOT_DIR=\"K:\IADataFiles\"IA_SERVICES_AUTOSTART=1 IA_SERVICES_RUNAS_LOCAL_SYSTEM=2 IA_SERVICES_RUNAS_USER_ACCT=".\Administrator" IA_SERVICES_RUNAS_PSWD="password"ACTIVE_ACTIVE_CLUSTER=1 IAS1_IP_ADDR=10.0.0.99 IAS1_TCP_PORT=10099IAS2_IP_ADDR=10.0.0.100 IAS2_TCP_PORT=10100 IAS3_IP_ADDR=10.0.0.101IAS3_TCP_PORT=10101 IAS4_IP_ADDR=10.0.0.102 IAS4_TCP_PORT=10102IAS5_IP_ADDR=10.0.0.103 IAS5_TCP_PORT=10103 IAS6_IP_ADDR=10.0.0.104IAS6_TCP_PORT=10104 IAS7_IP_ADDR=10.0.0.105 IAS7_TCP_PORT=10105IAS8_IP_ADDR=10.0.0.106 IAS8_TCP_PORT=10106 DB_SERVER=CORP-SQLDB_NAME=CORP_IADB DB_USER="sa" DB_PASS="password""
• This command installs only the sample process files (IAP) to the C:\IAS directory.
setup.exe /s /v"/qn ADDLOCAL=BASE_IAP_FILES"
198
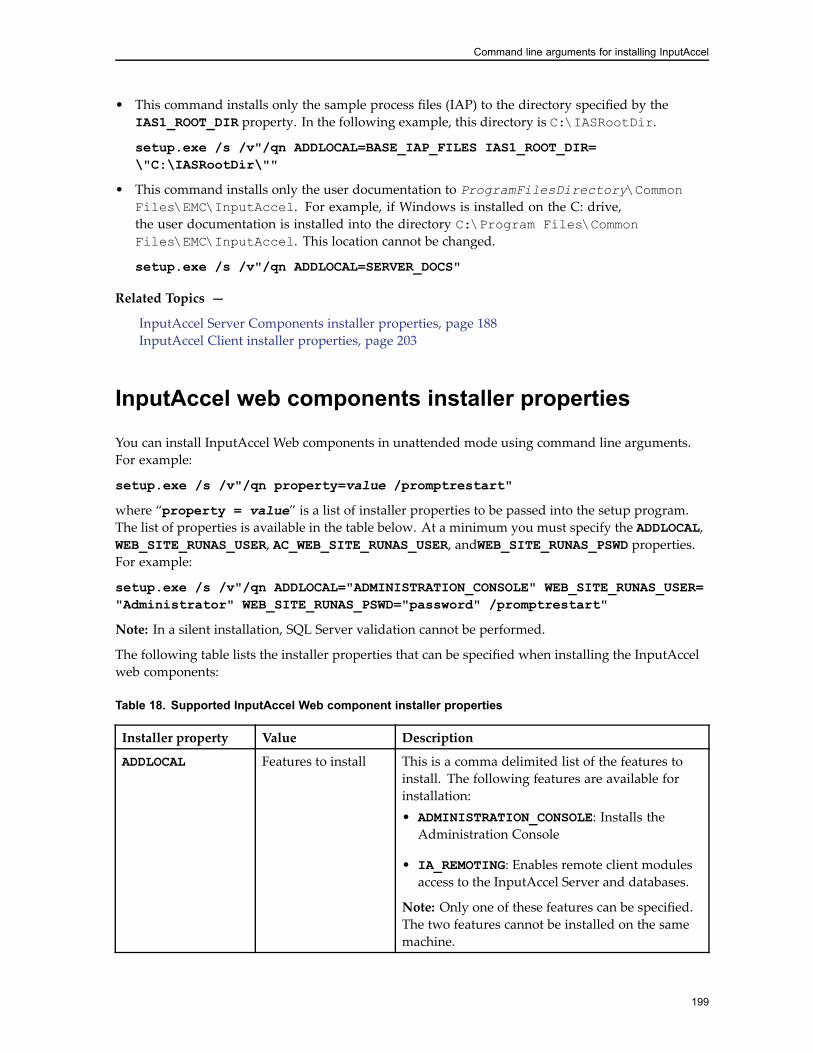
Command line arguments for installing InputAccel
• This command installs only the sample process files (IAP) to the directory specified by theIAS1_ROOT_DIR property. In the following example, this directory is C:\IASRootDir.
setup.exe /s /v"/qn ADDLOCAL=BASE_IAP_FILES IAS1_ROOT_DIR=\"C:\IASRootDir\""
• This command installs only the user documentation to ProgramFilesDirectory\CommonFiles\EMC\InputAccel. For example, if Windows is installed on the C: drive,the user documentation is installed into the directory C:\Program Files\CommonFiles\EMC\InputAccel. This location cannot be changed.
setup.exe /s /v"/qn ADDLOCAL=SERVER_DOCS"
Related Topics —
InputAccel Server Components installer properties, page 188InputAccel Client installer properties, page 203
InputAccel web components installer properties
You can install InputAccel Web components in unattended mode using command line arguments.For example:
setup.exe /s /v"/qn property=value /promptrestart"
where “property = value” is a list of installer properties to be passed into the setup program.The list of properties is available in the table below. At a minimum you must specify the ADDLOCAL,WEB_SITE_RUNAS_USER, AC_WEB_SITE_RUNAS_USER, andWEB_SITE_RUNAS_PSWD properties.For example:
setup.exe /s /v"/qn ADDLOCAL="ADMINISTRATION_CONSOLE" WEB_SITE_RUNAS_USER="Administrator" WEB_SITE_RUNAS_PSWD="password" /promptrestart"
Note: In a silent installation, SQL Server validation cannot be performed.
The following table lists the installer properties that can be specified when installing the InputAccelweb components:
Table 18. Supported InputAccel Web component installer properties
Installer property Value Description
ADDLOCAL Features to install This is a comma delimited list of the features toinstall. The following features are available forinstallation:• ADMINISTRATION_CONSOLE: Installs theAdministration Console
• IA_REMOTING: Enables remote client modulesaccess to the InputAccel Server and databases.
Note: Only one of these features can be specified.The two features cannot be installed on the samemachine.
199

Command line arguments for installing InputAccel
Installer property Value Description
REGISTER_DATABASE
0/1 • 0: Do not perform DAL registration for theInputAccel Database.
• 1: Perform DAL registration for the InputAccelDatabase.
A default value of 1 is used when this property isnot specified.
DB_SERVER Hostname Hostname or machine name of the SQL Server. Youcan use (local) or localhost if you want to use thelocally installed SQL Server.
DB_PORT TCP port The TCP port to use to connect to SQL Server. Adefault value of 1433 is used if this property is notspecified.
DB_NAME Database The name of the InputAccel database.
A default value of “IADB” is used if this propertyis not specified.
DB_USER SQL user name The name of the SQL Server user to use forconnecting to SQL Server.
DB_PASS SQL password The password of the SQL Server user specified inthe DB_USER property.
WEB_SITE_DESCRIPTION
Website description This is the description of the InputAccel WebComponents IIS website. The default value“InputAccel Web Components” is used when thisproperty is not specified.
WEB_SITE_IP_ADDRESS
IP address This is the IP address the InputAccel WebComponents IIS website should listen to foravailable connections. The default value of “ (AllUnassigned)” is used when this property is notspecified.
WEB_SITE_TCP_PORT
TCP port This is the TCP port on which the InputAccel WebComponents IIS website listens for connections.The default value of 80 is used when this propertyis not specified. The InputAccel Web Componentswebsite will not function properly if the specifiedTCP port is in use by an existing IIS website. Forexample, the built-in IIS Default website.
WEB_SITE_RUNAS_USER
Username The user account under which the InputAccel WebComponents run.
Note: This is a required property. The silentinstallation quits if this property is not passed inthe command line argument.
200

Command line arguments for installing InputAccel
Installer property Value Description
WEB_SITE_RUNAS_PSWD
Password The password of the user account specified in theinstaller property WEB_SITE_RUNAS_USER. Donot specify this value if the user account has a blankpassword.
WEB_SITE_RUNAS_DOMAIN
Domain name The domain the user account specified in theinstaller property WEB_SITE_RUNAS_USER. Donot specify this value if the user is a local user andnot a domain user.
INPUT_ACCEL_SERVER_NAME
Hostname or IPaddress
The hostname or IP address of the InputAccelServer to which the IIS Client Remoting featureconnects. This property is only used whenthe feature IA_REMOTING is specified for theADDLOCAL property.
INPUT_ACCEL_SERVER_PORT
TCP port The TCP port of the InputAccel Server towhich the IIS Client Remoting feature connects. Adefault value of 10099 is used when this propertyis not specified. This value must be a numberfrom 1 to 65535. This property is only used whenthe feature IA_REMOTING is specified for theADDLOCAL property.
IA_REMOTING_VIRTUAL_DIR_NAME
Virtual directoryname
The name of the virtual directory used byInputAccel Remoting. This name must be specifiedin the URL used by remote InputAccel clientsto connect to the InputAccel Server throughInputAccel Remoting.
This section includes the following topic:• InputAccel web components installer properties, page 199
InputAccel web components installer command-line examples
• This command installs the Administration Console. DAL registration is not performed. TheInputAccel Web Components website runs under the local Administrator account which has apassword of “password”. The system automatically restarts if a reboot is required.
setup.exe /s /v"/qn ADDLOCAL=" ADMINISTRATION_CONSOLE" REGISTER_DATABASE=0 WEB_SITE_RUNAS_USER="Administrator" WEB_SITE_RUNAS_PSWD="password""
201

Command line arguments for installing InputAccel
• This command installs the Administration Console. The InputAccel Web Components websiteruns under the local Administrator account which has a password of “password”. The installerperforms DAL registration against the InputAccel Database on the SQL Server installed on thesame machine, which listens for connections on the default port of 1433. The default InputAccelDatabase name is used. The system does not restart even when a reboot is required.
setup.exe /s /v"/qn ADDLOCAL="ADMINISTRATION_CONSOLE" DB_SERVER="(local)" DB_USER="sa" DB_PASS="password" WEB_SITE_RUNAS_USER="Administrator" WEB_SITE_RUNAS_PSWD="password" /norestart"
• This command installs the Administration Console to run on TCP port 8080. The InputAccelWeb Components website runs under the local Administrator account which has a password of“password”. The installer performs DAL registration against the InputAccel Database on the SQLServer installed on the same machine, which listens for connections on the default port of 1433.The default InputAccel Database name is used. The system automatically restarts if a reboot isrequired.
setup.exe /s /v"/qn ADDLOCAL="ADMINISTRATION_CONSOLE" DB_SERVER="(local)" DB_USER="sa" DB_PASS="password" WEB_SITE_TCP_PORT=8080WEB_SITE_RUNAS_USER="Administrator" WEB_SITE_RUNAS_PSWD="password""
• This command installs the Administration Console to run on TCP port 8080. It performs DALregistration against the InputAccel Database on the SQL Server installed on the same machinewhich listens for connections on the NON-default port of 2000. The default InputAccel Databasename is used. The InputAccel Web Components website runs under the domain user accountCORP\CorpServices which has a password of “password”.
setup.exe /s /v"/qn ADDLOCAL="ADMINISTRATION_CONSOLE" DB_SERVER="(local)" DB_PORT=2000 DB_USER="sa" DB_PASS="password"WEB_SITE_TCP_PORT=8080 WEB_SITE_RUNAS_USER="CorpServices"WEB_SITE_RUNAS_PSWD="password" WEB_SITE_RUNAS_DOMAIN="CORP""
• This command installs the Administration Console. The InputAccel Web Components websiteruns under the local Administrator account which has a password of “password”. The installerperforms DAL registration against the InputAccel Database on the SQL Server installed on thesame machine, which listens for connections on the default port of 1433. A custom InputAccelDatabase name, CORP_IADB, is used. The system automatically restarts if a reboot is required.
setup.exe /s /v"/qn ADDLOCAL="ADMINISTRATION_CONSOLE" DB_SERVER="(local)" DB_USER="sa" DB_PASS="password" DB_NAME="CORP_IADB"WEB_SITE_RUNAS_USER="Administrator" WEB_SITE_RUNAS_PSWD="password""
• This command installs the Administration Console. The installer performs DAL registrationagainst the InputAccel Database on the SQL Server installed on the same machine, which listensfor connections on the default port of 1433. The default InputAccel Database name is used. TheInputAccel Web Components website runs under the domain user account CORP\CorpServiceswhich has a password of “password”. The system automatically restarts if a reboot is required.
setup.exe /s /v"/qn ADDLOCAL="ADMINISTRATION_CONSOLE" DB_SERVER="(local)" DB_USER="sa" DB_PASS="password" WEB_SITE_RUNAS_USER="CorpServices" WEB_SITE_RUNAS_PSWD="password" WEB_SITE_RUNAS_DOMAIN="CORP""
202

Command line arguments for installing InputAccel
• This command installs InputAccel Remoting. The installer performs DAL registration against theInputAccel Database on the SQL Server installed on a different machine, CORP-SQLSERVER,which listens for connections on the default port of 1433. The default InputAccel Database nameis used. InputAccel Remoting is configured to connect to the InputAccel Server running on adifferent machine, IA-PRODUCTION. The InputAccel Web Components website runs under thelocal Administrator account which has a password of “password”. The system automaticallyrestarts if a reboot is required.
setup.exe /s /v"/qn ADDLOCAL="IA_REMOTING" DB_SRVR="(local)"DB_SERVER="CORP-SQLSERVER" DB_USER="sa" DB_PASS="password" INPUT_ACCEL_SERVER_NAME="IA-PRODUCTION" WEB_SITE_RUNAS_USER="Administrator"WEB_SITE_RUNAS_PSWD="password""
Related Topics —
Installing the Administration Console, page 69InputAccel web components installer properties, page 199
InputAccel Client installer properties
You can install the InputAccel Client components in unattended mode using command linearguments. For example:
setup.exe /s /v"/qn property=value /promptrestart"
where “property = value” is a list of installer properties to be passed into the setup program.
At a minimum, you must specify the ADDLOCAL=ALL and IA_SERVICES_RUNAS_NAMED_ACCTproperty. For example:
setup.exe /s /v"/qn ADDLOCAL="ALL" IA_SERVICES_RUNAS_NAMED_ACCT=0/promptrestart"
Note: Installing Documentum Advanced Export in unattended or silent mode does not check thatthe required Documentum software has been installed. In addition, the DFC PIA program does notget installed when the installation runs silently.
203
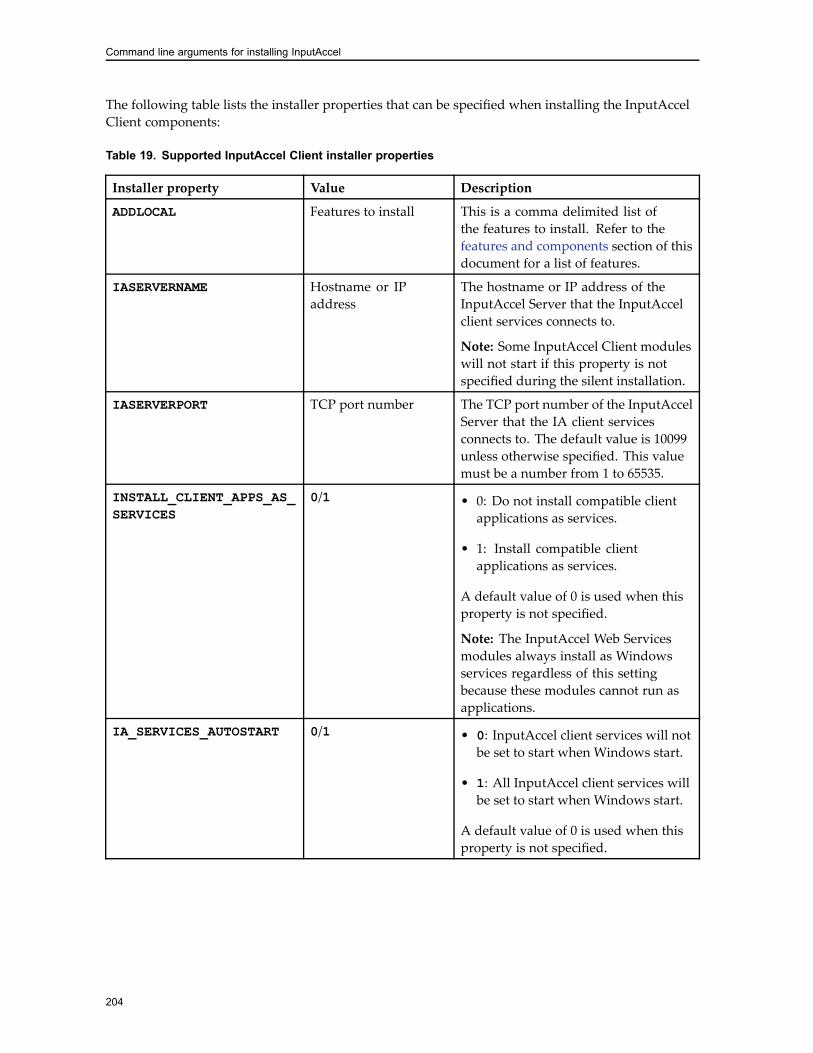
Command line arguments for installing InputAccel
The following table lists the installer properties that can be specified when installing the InputAccelClient components:
Table 19. Supported InputAccel Client installer properties
Installer property Value Description
ADDLOCAL Features to install This is a comma delimited list ofthe features to install. Refer to thefeatures and components section of thisdocument for a list of features.
IASERVERNAME Hostname or IPaddress
The hostname or IP address of theInputAccel Server that the InputAccelclient services connects to.
Note: Some InputAccel Client moduleswill not start if this property is notspecified during the silent installation.
IASERVERPORT TCP port number The TCP port number of the InputAccelServer that the IA client servicesconnects to. The default value is 10099unless otherwise specified. This valuemust be a number from 1 to 65535.
INSTALL_CLIENT_APPS_AS_SERVICES
0/1 • 0: Do not install compatible clientapplications as services.
• 1: Install compatible clientapplications as services.
A default value of 0 is used when thisproperty is not specified.
Note: The InputAccel Web Servicesmodules always install as Windowsservices regardless of this settingbecause these modules cannot run asapplications.
IA_SERVICES_AUTOSTART 0/1 • 0: InputAccel client services will notbe set to start when Windows start.
• 1: All InputAccel client services willbe set to start when Windows start.
A default value of 0 is used when thisproperty is not specified.
204

Command line arguments for installing InputAccel
Installer property Value Description
IA_SERVICES_RUNAS_NAMED_ACCT
0/1 • 0: All InputAccel client services runusing the Network Service account.
• 1: All InputAccel client servicesnot run using the Network Serviceaccount. When this option isselected, you must specify ausername and password.
The properties IA_SERVICES_RUNAS_USER_ACCT andIA_SERVICES_RUNAS_PSWDmust bespecified when the value 1 is passed in.
A default value of 1 is used when thisproperty is not specified.
IA_SERVICES_RUNAS_USER_ACCT
Domain\Username All InputAccel client services use thisaccount to run the services. Whenspecifying a local account, use a “.\”(without quotes) in front of the username. When specifying a domainaccount, use domain\username. Thisoption is only used when the servicesare set to run as the user account andnot the Network Service account.
IA_SERVICES_RUNAS_PSWD Password All InputAccel client services usethis password with the user accountspecified for running the services. Thisoption is only used when the servicesare set to run as the user account andnot the Network Service account.
SKIP_SCANNER_INSTALL 0/1 • 0: Installs a scanner driver duringthe installation.
• 1: Skip the installation of a scannerdriver.
A default value of 0 is used when thisinstaller property is not specified.
SCANNERNAME Driver The nameof the scanner driver to install.The available drivers can be found in the\Clients\drivers\DRIVRMAP.TXTfile on the InputAccel installationmedia.
205

Command line arguments for installing InputAccel
Topics in this section include:• InputAccel Client installation features, page 206
• InputAccel Client installer command-line examples, page 208
InputAccel Client installation features
Each feature listed in this table can be used to install its component during a silent installation byspecifying its name as the ADDLOCAL property. You can specify more than one feature to installby separating the feature names with commas.
The following are supported feature names that can be specified when installing the InputAccelServer:
Feature name Installs
P_DOCUMENTATION User guides and other relevant InputAccel documentation
PDEV Process Developer which enables administrators to design,debug, compile, and install InputAccel processes
SCRIPTING_LIBRARIES Libraries and documentation used for writing custom clientside scripts
PROCESS_FILES Sample InputAccel process files (IAP) that can be modifiedwith the Process Developer
SCRIPTING_LIBRARIES Libraries and documentation used for writing custom clientside scripts
LL2_EXPORT Open Text Livelink Advanced Export module
SHRPNT2_EXPORT MS SharePoint Export module
FAF_EXPORT IBM CMIP-390 Export module
ICM_EXPORT IBM CM Advanced Export module
CMNSTORE_EXPORT IBM CSSAP Export module
WANGNT_EXPORT Global 360 Export module
SAPAL_EXPORT Archive Export module
FILENET_EXPORT FileNet Panagon IS/CS Export module
FNCM_EXPORT FileNet Content Manager Export module
AX_EXPORT ApplicationXtender Export module
DCTM_ADVANCED_EXPORT Documentum Advanced Export module
FILE_EXPORT File System Export module
INDEX_EXPORT Index Export module
IMAGE_EXPORT Image Export module
ODBC_EXPORT ODBC Export module
PDF_EXPORT PDF Export module
206

Command line arguments for installing InputAccel
Feature name Installs
VAL2XML Values to XML module
IPI Image Enhancement module
IQA Image Quality Assurance module
PAGEREG Page Registration module
IMAGE_DIVIDER Image Divider module
STAMP Auto Annotate module
FAF_INDEX_ IBM CMIP-390 Index module
INDEX_APPLICATION IndexPlus module
INDEX_CLICKONCE ClickOnce deployable package of IndexPlus
NUANCE_OCR NuanceOCR module
PRIME_OCR PrimeOCR Plus module
TEST_IMAGES Sample test images
PATCH_CODE_IMAGES Sample Patch code II, III, and T pages that users can print andthen use when scanning batches
COPY Copy module
MULTI Multi module
TIMER Timer module
IMAGE Image module
SPAWN Spawn module
PIXVIEW Pixview module
SCRIPT_ENGINE Script Engine module
EMAIL_IMPORT Email Import module
MULTIDIRECTORY_WATCH Multi-Directory Watch module
SCAN_APPLICATION ScanPlus module
SCAN_CLICKONCE ClickOnce deployable package of the ScanPlus module
RESCAN_APPLICATION RescanPlus module
RESCAN_CLICKONCE ClickOnce deployable package of the RescanPlus module
ECM_IMPORTER ECM Web Services Importer module
WEB_SERVICES_COORDINATOR Web Services Coordinator component
WEB_SERVICES_HOSTING Web Services Hosting component
WEB_SERVICES_INPUT Web Services Input module
WEB_SERVICES_OUTPUT Web Services Output module
Related Topics —
InputAccel Client installer command-line examples, page 208InputAccel Client installer properties, page 203
207

Command line arguments for installing InputAccel
InputAccel Client installer command-line examples
• This command installs all client components into the directory specified by INSTALLDIR. TheInputAccel services are installed and are using the built-in Windows Network Service account asthe run-as user account. The installed InputAccelclient services connect to the InputAccel ServerPROD-IASERVER when started. The services do not start automatically when Windows starts.The system does not restart after installation even when a reboot is required.
setup.exe /s /v"/qn ADDLOCAL="ALL" INSTALLDIR=\"c:\ProgramFiles\InputAccel\Client\" INSTALL_CLIENT_APPS_AS_SERVICES=1IA_SERVICES_RUNAS_NAMED_ACCT=0 IASERVERNAME="PROD-IASERVER" /norestart"
• This command installs all client components into the default installation directory. The InputAccelservices are installed and are using the built-in Windows Network Service account as therun-as user account. The installed InputAccel client services connect to the InputAccel ServerPROD-IASERVER when started. The services start automatically when Windows starts. Thesystem automatically restarts after installation if a reboot is required.
setup.exe /s /v"/qn ADDLOCAL="ALL" IA_SERVICES_AUTOSTART=1INSTALL_CLIENT_APPS_AS_SERVICES=1 IA_SERVICES_RUNAS_NAMED_ACCT=0IASERVERNAME="PROD-IASERVER" IASERVERNAME="PROD-IASERVER"
• This command installs all client components into the default installation directory. The InputAccelservices are installed and use a specific Windows user account as the run-as user account. Theinstalled InputAccel client services connect to the InputAccel Server PROD-IASERVER whenstarted. The services start automatically when Windows starts. The system does not restartafter installation even if a reboot is required.
setup.exe /s /v"/qn ADDLOCAL="ALL" IA_SERVICES_AUTOSTART=1INSTALL_CLIENT_APPS_AS_SERVICES=1 IA_SERVICES_RUNAS_NAMED_ACCT=1IASERVERNAME="PROD-IASERVER" IA_SERVICES_RUNAS_USER_ACCT=".\Administrator" IA_SERVICES_RUNAS_PSWD="password" /norestart"
• This command installs ScanPlus into the default installation directory. The scanner driver CanonDR-4580U is installed during the installation. The system automatically restarts if a reboot isrequired.
setup.exe /s /v"/qn ADDLOCAL="SCAN_APPLICATION" SCANNERNAME=\"CanonDR-4580U\""
• This command installs IndexPlus into the default installation directory. The system automaticallyrestarts if a reboot is required.
setup.exe /s /v"/qn ADDLOCAL="INDEX_APPLICATION""
Related Topics —
InputAccel Client installation features, page 206InputAccel Client installer command-line examples, page 208
208

Command line arguments for installing InputAccel
Installing the Backward Compatibility Pack from acommand line
The following command line enables InputAccel client modules version 5.2.3 or 5.3.0 to run in anInputAccel 6.0 environment:
To run the Backward Compatibility Pack:
1. Open a Command Prompt window.
2. At the command prompt, navigate to the DLLOnly subdirectory of the installation media.
3. Type setup.exe /s /v"/qn".
Related Topics —
Upgrading client modules, page 146Appendix B, InputAccel client modules
209

Command line arguments for installing InputAccel
210

Index
64-bit recommendations, 28, 30
Aaccessibility, 26ACL, 39
security considerations, 30activating, 51
after upgrading with a newdomain, 129
and side-by-side installation, 52considerations, 26file, 51InputAccel Server, 73portal, 51upgrade considerations, 129
Active/Active cluster, 93activating the InputAccel Server in, 98preparing the InputAccel Server
resource groups for, 93Active/Passive cluster, 88
activating the InputAccel Server in, 92preparing the InputAccel Server
resource group for, 88Administration Console, 129
and InputAccel Remoting, 31and security, 39host system considerations, 31installing, 69operating system, 15port, 31port assignment, 70specifying the domain on a single
machine installation, 44application pool worker process
recycling, 32ApplicationXtender Export, system
requirements, 19Archive Export, system requirements, 19attended modules, 33Audit Extensions, upgrading, 149
Audit Logging, 29authentication, 39automatic
backup during upgrade, 126
BBackward Compatibility Pack, 134
command-line installation, 209installing, 145
balancing client workstations, 34, 36best practices
for cluster configuration, 87for high availability, 46for running modules as services, 34
CCitrix, 26, 54ClickOnce
and command-line arguments, 31and InputAccel Remoting, 32and performance counters, 51and security, 39deploying modules with, 104deployment prerequisites, 104Deployment Utility, 104host system considerations, 31operating system, 15SSL certificate requirement, 104system requirements, 15
client modulesand high availability, 45command-line examples, 208installer properties, 203, 206installing, 73permissions, 73table of, 172upgrade considerations, 130upgrading, 146
client privileges, 39
211

Index
client workstationbalancing, 34, 36machine considerations, 33operating system, 18system requirements and
recommendations, 17client-side scripting, 137clustering
Active/Active, 93Active/Passive, 88and high availability/failover, 45for disaster continuation, 47installing InputAccel Server for, 87licensing, 53setting up the Input Management
Console, 99CODU. See ClickOnce Deployment Utilitycommand-line arguments
and ClickOnce deployment, 31Backward Compatibility Pack, 209client module installer properties, 203InputAccel Database installer
properties, 185InputAccel installer properties and
feature names, 185InputAccel Server installer
properties, 188InputAccel web components installer
properties, 199InstallShield switches, 183/l, 109MSI switches, 184msiexec.exe, 109/s, 109serviceName, 114setup.exe, 109/v, 109Windows Installer properties, 184
command-line arguments for installingInputAccel, 109 to 110list of, 183
common system requirements for all clientmodules, 17
compatibilityCitrix, 54IPv6, 54Section 508 compliance, 54VMotion, 54VMware, 54
configuration
IIS application pool, 32configuring
ScaleServer group, 85considerations
activating, 26Audit Logging, 29deployment, 26disaster continuation, 26, 48failover, 26high availability, 26licensing, 26network configuration, 25performance, 25scalability, 25
Create Database Utility, 181command-line examples, 182silent mode, 181
Crystal Reports, 116customization
upgrading, 149
DData Execution Prevention, 21data sharing, 36database
Create Database Utility, 181operating system, 12server considerations, 28
database serversystem requirements, 11
demonstration installation, 44, 55DEP. See Data Execution Preventiondeploying
InputAccel, 26, 50deployment
considerations, 26development installation, 44, 55disaster continuation
and the Input ManagementConsole, 50
considerations, 26, 48creating a plan, 47implementing a system, 48licensing, 53managing, 50planning, 47
distributed volume production typicalinstallation scenario, 60
212
Index
Documentum Advanced Export, systemrequirements, 19
Documentum Server Export upgrade, 131domain
and activation codes, 129installing InputAccel in a
workgroup, 44multiple, 39, 44troubleshooting, 160
dongle. See security key
EECM Web Services Importer
and security, 39system requirements, 19
Email Import, 134EMC Captiva Activation Portal, 51EMC Captiva Input Management Console.
See Input Management Consoleenterprise production typical installation
scenario, 61escape characters for command-line
setup, 110
Ffailover, 45
clustering, 45considerations, 26general considerations, 46Input Management Console, 45
FileNetContent Manager Export, system
requirements, 20Panagon IS/CS Export, system
requirements, 20firewall
and Web Services, 32configuring, 40ports to open, 40troubleshooting, 166
Ggeneral considerations
high availability/failover, 46installation, 25
Global 360 Export, system requirements, 20
Hhardened environment, 41high availability, 45
best practices, 46clustering, 45considerations, 26general considerations, 46Input Management Console, 45modular clients, 45ScaleServer group, 45typical production installation
scenario, 58
Iiaidxv32.dll, 151IASYSMON license for Input Management
Console, 117IBM
CM Advanced Export, systemrequirements, 20
CMIP-390 Export, systemrequirements,, 20
CSSAP Export, systemrequirements, 20
identifying system requirements forupgrading, 127
IISclustering and session affinity, 45configuration, 32disabling Machine Administrators
account, 38Image Divider, 134IMC. See Input Management ConsoleIndex module upgrade, 130 to 131Index Validation DLL, upgrading, 151IndexPlus, system requirements, 20Input Management Console
and disaster continuation, 50clustered server configuration, 99high availability/failover, 45IASYSMON license, 117installing, 116
InputAccel, 185activating, 73deploying, 26installing, 63installing a production system, 81installing on a single machine, 63Internet access, 32
213

Index
licensing, 73list of ports used by, 179modules table, 172upgrading, 119, 138 to 139
InputAccel Databaseinstaller command-line examples, 187installer properties, 185installing, 65security, 37upgrade considerations, 128
InputAccel Remotingand Administration Console, 31and ClickOnce, 32and security, 39, 41host system considerations, 32installing, 101operating system, 15port assignment, 32
InputAccel Serveractivating, 73activating in an Active/Active
cluster, 98activating in an Active/Passive
cluster, 92installation features, 195installer command-line examples, 195installer properties, 188installing, 67installing in a cluster, 87installing multiple instances of, 84operating system, 13scalability, 35server considerations, 30system requirements and
recommendations, 13upgrade considerations, 128upgrading, 142
InputAccel web componentsinstaller command-line examples, 201installer properties, 199
installationlocale considerations, 27maximum length of command line, 110troubleshooting command-line
errors, 161troubleshooting command-line
failures, 161troubleshooting database issues, 164troubleshooting errors, 160troubleshooting failures, 159
troubleshooting other issues, 166troubleshooting ScaleServer issues, 165troubleshooting syntax errors, 161troubleshooting third-party component
issues, 163installation planning
Administration Console hostsystem, 31
ClickOnce host system, 31client scalability, 36client workstation considerations, 33compatibility, 54configuring multiple domains, 44database server, 28deployment, 50development/demonstration
system, 44disaster continuation, 47failover, 45hardened environment, 41high availability (HA), 45InputAccel Remoting, 32InputAccel Server, 30InputAccel Server scalability, 35licensing and activation, 51minimumWindows permissions, 41performance and throughput, 28running modules as services, 34sample configurations, 55scalability, 35security, 37Web Services subsystem, 32workgroup installation, 44
installer properties and feature names, 185installing, 73
Administration Console, 69automating silent installations, 111automating unattended
installations, 111Backward Compatibility Pack, 145clients, 73command-line arguments, 109command-line arguments, list of, 183command-line considerations, 110command-line escape characters, 110Crystal Reports, 116Input Management Console, 116InputAccel, 63InputAccel Database, 65InputAccel Remoting, 101
214

Index
InputAccel Server, 67InputAccel Servers in a clustered
environment, 87modules as services, 113multiple instances of InputAccel
Servers, 84new functionality after upgrading, 148on a single machine, 63planning for, 25Process Developer, 73production system, 81Reports Designer, 116silent installations, 108unattended, 108Web Services subsystem, 73
installing planninggeneral considerations, 25
InstallShield switches, 183Internet access to InputAccel, 32IPv6
support for, 54irreplaceable files, preserving during
upgrade, 122ISIS scanner drivers, 23
L/l command-line argument, 109licensing, 51
clustering, 53considerations, 26disaster recovery, 53InputAccel, 73ScaleServer, 52upgrade considerations, 129
load balancing, 36locale considerations, 27localhost, 44
Mmaximum length of installer command
line, 110medium distributed production typical
installation scenario, 57minimum
cross-domain trust relationship, 44permissions, 41
modifyingan InputAccel installation, 157
unattended installations, 112modules
attended, 33multiple service instances, 35, 114running as service, 34table of, 172unattended, 33unregistering a service instance, 115
MS SharePoint Export, systemrequirements, 20
MSCS cluster. See clusteringMSI switches, 184msiexec.exe, 109Multi-Directory Watch, 134multiple
domains, 44service instances, 35, 114
NNAS, 30network
configuration considerations, 25NTFS recommendations, 30
OODBC Export, system requirements, 21Open Text Livelink Advanced Export,
system requirements, 21operating system
Administration Console, 15ClickOnce host, 15client workstations, 18database, 12InputAccel Remoting host, 15InputAccel Server, 13
overview, 9
Ppage count sharing in a ScaleServer
group, 52performance, 28
considerations, 25performance counters and ClickOnce
deployment, 51permissions
assigning after upgrading, 148assigning to client modules, 73minimum, 41
215

Index
upgrade considerations, 135planning
installation, 25upgrading, 119
portsAdministration Console, 31, 70and firewalls, 40InputAccel Remoting, 32SQL Server, 66table of, 179
pre-production testing and acceptance afterupgrading, 136
PrimeOCR Plus, system requirements, 21PrimeOCR upgrade, 132process
sharing, 36upgrading, 149
Process Developer, installing, 73
Rrecommendations, 11
64-bit, 28, 30disaster recovery implementation, 48NAS, 30NTFS, 30RAID, 28SAN, 30
removing an InputAccel installation, 158repairing an InputAccel installation, 158Reports Designer, installing, 116requirements, system, 11Rescan module upgrade, 132RescanPlus, system requirements, 22rolling back
client workstations, 146InputAccel Server, 143
running InputAccel with minimumWindows permissions, 41
S/s command-line argument, 109sample
configurations, 55images, 73images, installing, 73scripting libraries, 73
SAN, 30and automatic real-time replication, 47
scalability, 35client modules, 36considerations, 25InputAccel Server, 35
ScaleServer group, 35and load balancing, 36and process sharing, 36compatibility, 35configuring, 85high availability, 45licensing, 52page count sharing, 52troubleshooting issues, 165
Scan Callback DLL, upgrading, 150Scan module upgrade, 132scanner drivers, 23scanning workstation system
requirements, 23ScanPlus, system requirements, 22ScanSoft OCR upgrade, 132Script Engine, 134, 137
system requirements, 22scripting libraries, installing, 73SCSI adapter, 23Section 508, 26, 54security, 37
ACL, 39Administration Console, 39authentication, 39ClickOnce, 39client privileges, 39considerations, 25disabling the IIS Machine
Administrators account, 38ECMWeb Services Importer, 39firewalls, 40hardened environment, 41InputAccel Database, 37InputAccel Remoting, 39, 41list of ports used by InputAccel, 179SQL Server, 37user accounts, 38user roles, 39web components, 39
security key, 51and side-by-side installation, 52upgrade considerations, 129
serviceName argument, 114services
installing modules to run as, 113
216

Index
multiple instances, 35, 114running modules as, 34unregistering modules running as, 115
session affinity (“sticky sessions”) for IISclustering, 45
setting UI language, 76setup.exe, 109side-by-side installations, 59, 84
and port assignments, 179and scalability, 36and security keys, 52, 129
silent installation, 108small production typical installation
scenario, 56SQL Server
port assignment, 66system requirements, 11
SSL certificatefor use with ClickOnce
deployment, 104sticky sessions (IIS clustering), 45system requirements
ApplicationXtender Export, 19Archive Export, 19ClickOnce host, 15client workstation, 17common for all client modules, 17database server, 11Documentum Advanced Export, 19ECMWeb Services Importer, 19FileNet Content Manager Export, 20FileNet Panagon IS/CS Export, 20Global 360 Export, 20IBM CM Advanced Export, 20IBM CMIP-390 Export, 20IBM CSSAP Export, 20IndexPlus, 20InputAccel Server, 13module-specific, 19MS SharePoint Export, 20ODBC Export, 21Open Text Livelink Advanced
Export, 21PrimeOCR Plus, 21RescanPlus, 22scanning workstation, 23ScanPlus, 22Script Engine, 22Values to XML, 22web components, 15
system requirements andrecommendations, 11
Tthroughput, 28troubleshooting, 159
command-line installation errors, 161command-line installation failures, 161database issues, 164domain authentication problems, 160firewalls, 166installation errors, 160installation failures, 159other issues, 166ScaleServer issues, 165setting the UI language, 76syntax errors, 161third-party component issues, 163
UUI language
setting, 76unattended installation, 108
automating, 111modifying, 112
unattended modules, 33upgrade planning, 119
Administration Console, 129and permissions, 135automatic backup, 126Backward Compatibility Pack, 134client modules, 130considerations, 129Documentum Server Export, 132Documentum Server Export to
Documentum AdvancedExport, 131
Excel Graphing utility, 132IBM Content Manager Export, 132identifying irreplaceable files, 122identifying new system
requirements, 127iManage WorkSite Server Export, 132incorporating new system
functionality, 137Index to IndexPlus, 130 to 131InputAccel Database, 128InputAccel Servers, 128
217

Index
licenses, activation files, and securitykeys, 129
new client modules, 134performing pre-production testing and
acceptance, 136PrimeOCR to PrimeOCR Plus, 132Rescan to RescanPlus, 132Scan to ScanPlus, 132Scansoft OCR to NuanceOCR, 132scheduling upgrade phases, 136understanding the upgrade
process, 127upgrading
assigning InputAccel permissions, 148Audit Extensions, 149client modules, 146custom Scan Callback
functionality, 150exiting processes and
customizations, 149index validation functionality, 151InputAccel, 119, 138 to 139InputAccel Server, 142installing new functionality, 148rolling back to a previous InputAccel
Client version, 146rolling back to a previous InputAccel
Server version, 143sample upgrade scenarios, 151using the Backward Compatibility
Pack, 145
user account, 38user roles, 39
V/v command-line argument, 109Values to XML, system requirements, 22VMware, 26
and high availability/failover, 46support for, 54VMotion, 54
Voluntary Product AccessibilityTemplate, 54
Wweb components
and security, 39system requirements and
recommendations, 15Web Services
Coordinator, 32Hosting, 32Input module, 134Output module, 134subsystem, 137subsystem, considerations, 32subsystem, installing, 73
Windows Installer properties, 184worker process recycling, 32workgroup, installing InputAccel in, 44
218