FlexiFinancials® Installation Guide - Nichole Delehant
85
FlexiFinancials® Installation Guide
-
Upload
khangminh22 -
Category
Documents
-
view
1 -
download
0
Transcript of FlexiFinancials® Installation Guide - Nichole Delehant

FlexiFinancials® Installation Guide


Copyright notice
The information and contents of this document and any notes or handouts, if any (together "Document"), contain valuable trade secrets and proprietary information, and are not to be disseminated, reproduced, printed, translated or transmitted in any form, in whole or in part, without the prior written consent of FlexiSoftware, Inc. Unauthorized use may result in civil damages and/or criminal penalties.
The information or contents contained in the Document may change without notice. Descriptions of functionality and features, and illustrations appearing in the Document are representative of the state of this product at the time of printing and the type of information that is likely to appear on the screen, respectively. Some features and functionality, and some screens may have changed since publication, however. Companies, names and data within the Document are fictitious and for illustrative purposes unless otherwise specified.
Accounting Solutions that Power Business™; Flexi®; Flexi® Logo; Flexi FDW; Flexi Openaccess®; Flexi Software®; Flexi Software® Logo; Flexi.com®; FlexiAssets®; FlexiControl®; FlexiDB™; FlexiDesigner®; FlexiFinancials®; Flexi Fire™; FlexiImport/Export™; FlexiInternational®; FlexiLedger®; FlexiPayables®; FlexiPortal®; FlexiProjects®; FlexiPurchasing®; FlexiReceivables®; FlexiSignOn®; FlexiSmart®; FlexiSmartClient®; FlexiVision™; FlexiWorkflow™; and Powered By Flexi™ are trademarks or registered trademarks of FlexiInternational® Software, Inc. All rights reserved. All other trademarks and registered trademarks are the property of their respective holders.
©1994 FlexiInternational®; ©1998 Flexi®; ©2007 Flexi Software® are registered Trademarks of FlexiInternational® Software, Inc. All rights reserved.

Table of Contents
Chapter 1 Client Applications Deployment Options ........................................ 1-1
Chapter 2 Establishing a FlexiFinancials Database ........................................ 2-1
Chapter 3 INI Files and User Specific Settings ............................................... 3-1
Chapter 4 Installing Files ................................................................................ 4-1
Chapter 5 Index .............................................................................................. 5-1

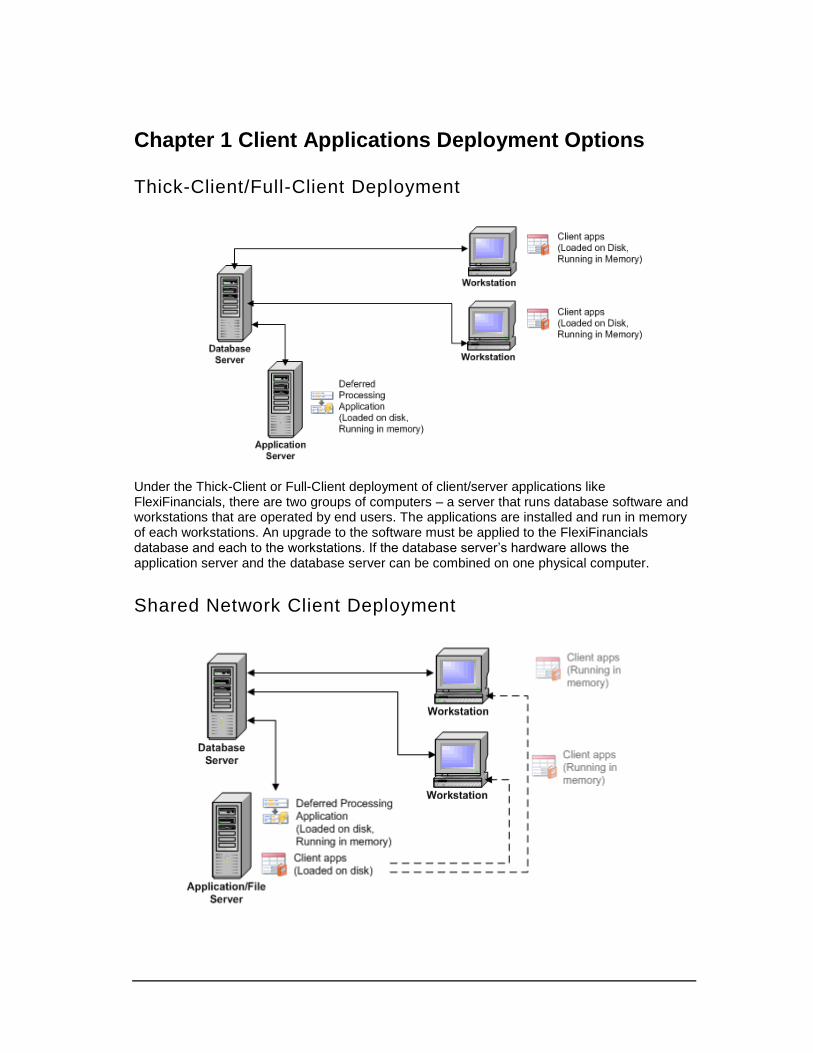
Chapter 1 Client Applications Deployment Options
Thick-Client/Full-Client Deployment
Under the Thick-Client or Full-Client deployment of client/server applications like FlexiFinancials, there are two groups of computers – a server that runs database software and workstations that are operated by end users. The applications are installed and run in memory of each workstations. An upgrade to the software must be applied to the FlexiFinancials database and each to the workstations. If the database server’s hardware allows the application server and the database server can be combined on one physical computer.
Shared Network Client Deployment
1-2 FlexiFinancials® Installation Guide
Version 5.3.0
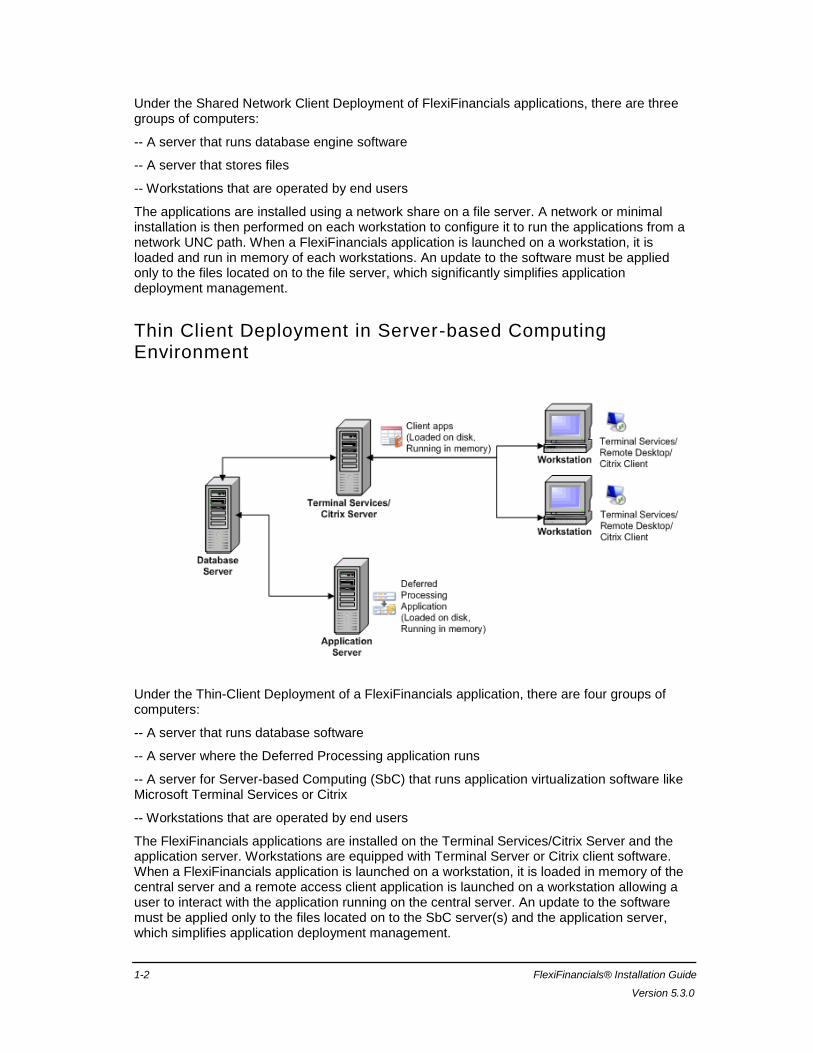
Under the Shared Network Client Deployment of FlexiFinancials applications, there are three groups of computers:
-- A server that runs database engine software
-- A server that stores files
-- Workstations that are operated by end users
The applications are installed using a network share on a file server. A network or minimal installation is then performed on each workstation to configure it to run the applications from a network UNC path. When a FlexiFinancials application is launched on a workstation, it is loaded and run in memory of each workstations. An update to the software must be applied only to the files located on to the file server, which significantly simplifies application deployment management.
Thin Client Deployment in Server-based Computing Environment
Under the Thin-Client Deployment of a FlexiFinancials application, there are four groups of computers:
-- A server that runs database software
-- A server where the Deferred Processing application runs
-- A server for Server-based Computing (SbC) that runs application virtualization software like Microsoft Terminal Services or Citrix
-- Workstations that are operated by end users
The FlexiFinancials applications are installed on the Terminal Services/Citrix Server and the application server. Workstations are equipped with Terminal Server or Citrix client software. When a FlexiFinancials application is launched on a workstation, it is loaded in memory of the central server and a remote access client application is launched on a workstation allowing a user to interact with the application running on the central server. An update to the software must be applied only to the files located on to the SbC server(s) and the application server, which simplifies application deployment management.
Chapter 1 -- Client Applications Deployment Options 1-3
June 2011
The Thin-Client deployment configuration may also have a file server component described in the Shared Network Installation section above. This is particularly helpful if there is a farm of SbC servers. In this case the FlexiFinancials files will be physically deployed to a File/Application Server and SbC servers will load and run these files in memory. This approach simplifies management of SbC server farms as it relates to the FlexiFinancials applications.
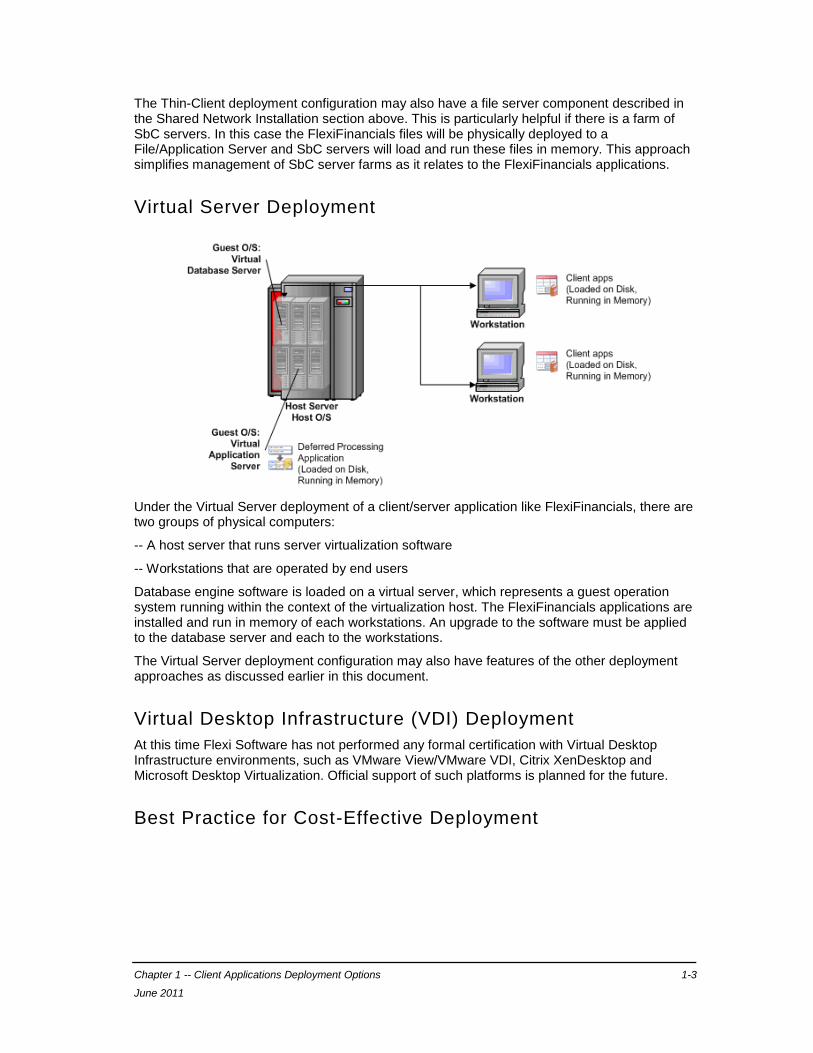
Virtual Server Deployment
Under the Virtual Server deployment of a client/server application like FlexiFinancials, there are two groups of physical computers:
-- A host server that runs server virtualization software
-- Workstations that are operated by end users
Database engine software is loaded on a virtual server, which represents a guest operation system running within the context of the virtualization host. The FlexiFinancials applications are installed and run in memory of each workstations. An upgrade to the software must be applied to the database server and each to the workstations.
The Virtual Server deployment configuration may also have features of the other deployment approaches as discussed earlier in this document.
Virtual Desktop Infrastructure (VDI) Deployment
At this time Flexi Software has not performed any formal certification with Virtual Desktop Infrastructure environments, such as VMware View/VMware VDI, Citrix XenDesktop and Microsoft Desktop Virtualization. Official support of such platforms is planned for the future.
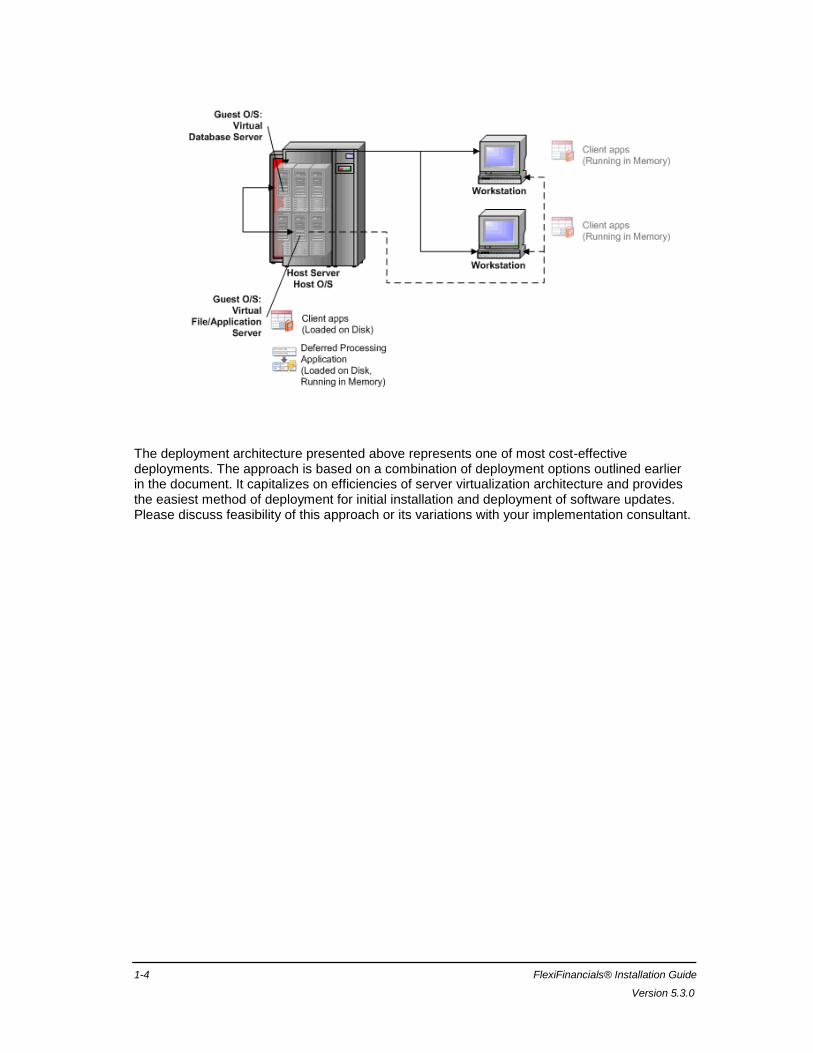
Best Practice for Cost-Effective Deployment
1-4 FlexiFinancials® Installation Guide
Version 5.3.0
The deployment architecture presented above represents one of most cost-effective deployments. The approach is based on a combination of deployment options outlined earlier in the document. It capitalizes on efficiencies of server virtualization architecture and provides the easiest method of deployment for initial installation and deployment of software updates. Please discuss feasibility of this approach or its variations with your implementation consultant.
Chapter 2 Establishing a FlexiFinancials Database
Establishing a FlexiFinancials Database
This section covers new implementation of the software. If you are upgrading from a prior version of the software, refer to the FlexiFinancials Upgrade Guide for further instructions.
After you install FlexiFinancials, you are ready to establish a FlexiFinancials Database by:
--Creating and initializing the FlexiFinancials database
--Installing the Database Creation Utility
--Creating the Financial Processing Set
Terminology
This topic refers to the terms and acronyms that may be unfamiliar to you. These include:
FDP
Files with an FDP extension contain the Flexi Database Procedures that establish database tables, install triggers and set up stored procedures.
Processing Set
A processing set is an assemblage of application data with a single focus. Typically, a processing set includes data provided by multiple applications. Concurrently, a single application can contribute data to multiple processing sets.
Creating and Initializing the Flexi Database
Create a database using the same server and db naming convention. Test the connections between the client and server in the opening phase of installation.
2-2 FlexiFinancials® Installation Guide
Version 5.3.0
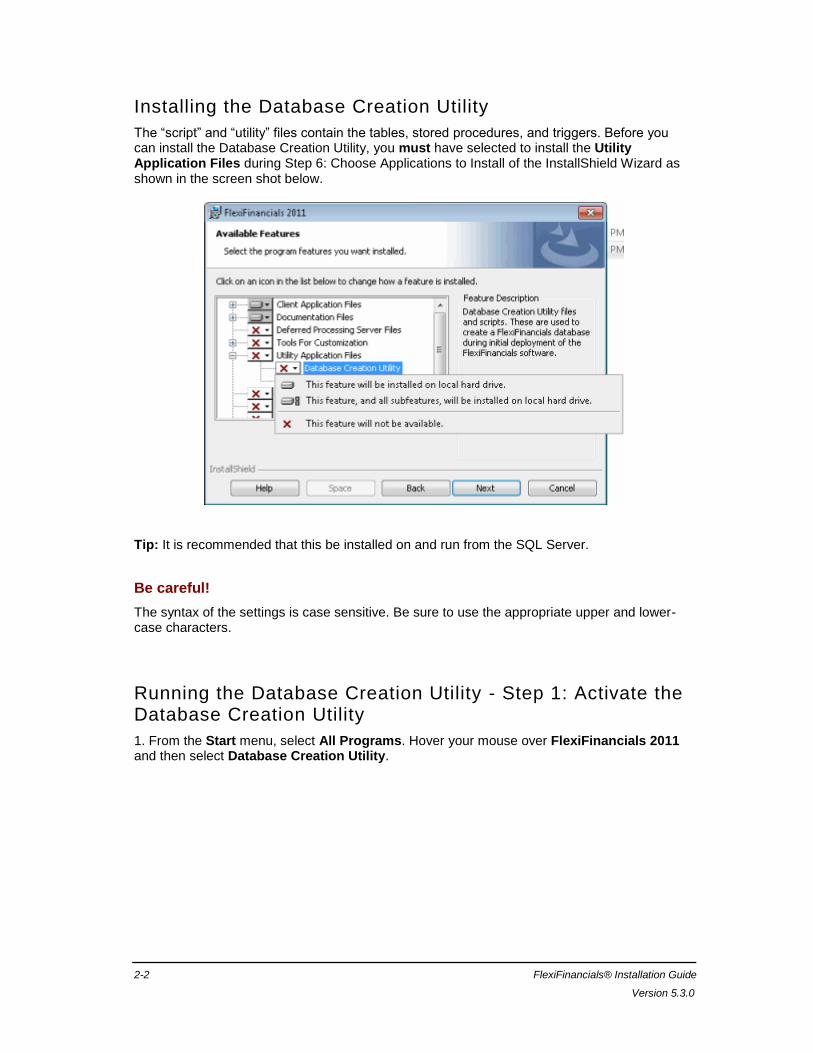
Installing the Database Creation Utility
The ―script‖ and ―utility‖ files contain the tables, stored procedures, and triggers. Before you can install the Database Creation Utility, you must have selected to install the Utility Application Files during Step 6: Choose Applications to Install of the InstallShield Wizard as shown in the screen shot below.
Tip: It is recommended that this be installed on and run from the SQL Server.
Be careful!
The syntax of the settings is case sensitive. Be sure to use the appropriate upper and lower-case characters.
Running the Database Creation Utility - Step 1: Activate the Database Creation Utility
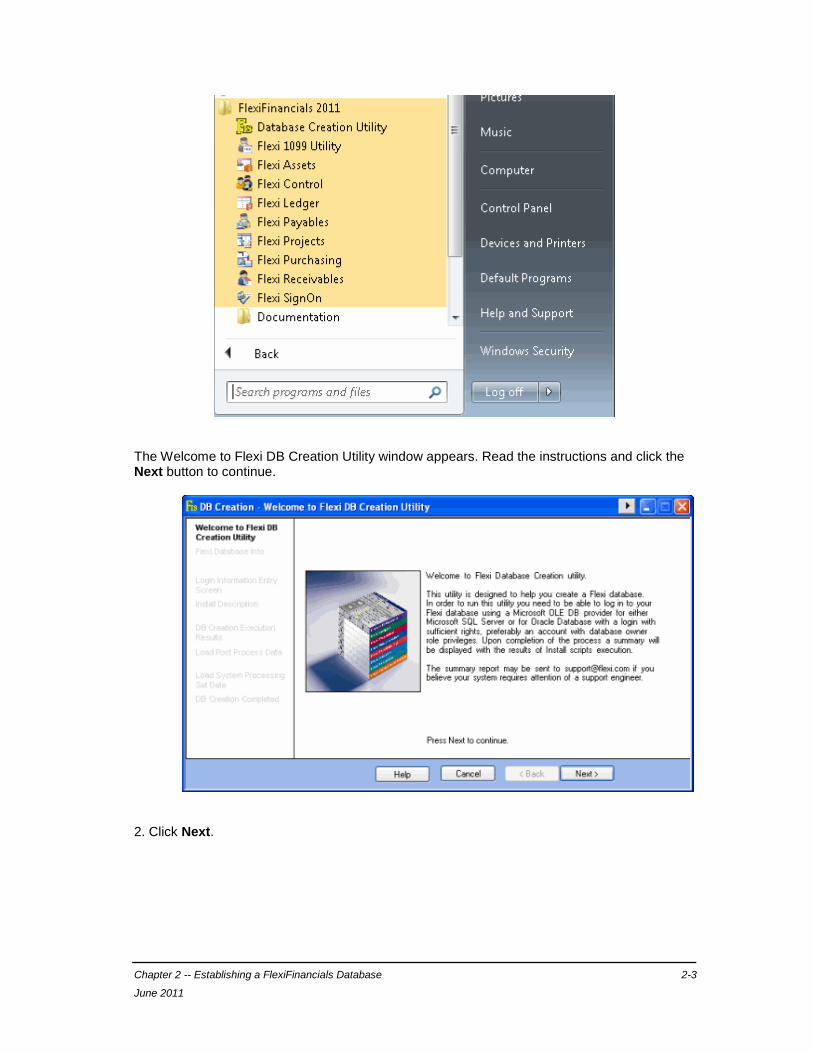
1. From the Start menu, select All Programs. Hover your mouse over FlexiFinancials 2011 and then select Database Creation Utility.
Chapter 2 -- Establishing a FlexiFinancials Database 2-3
June 2011
The Welcome to Flexi DB Creation Utility window appears. Read the instructions and click the Next button to continue.
2. Click Next.
2-4 FlexiFinancials® Installation Guide
Version 5.3.0
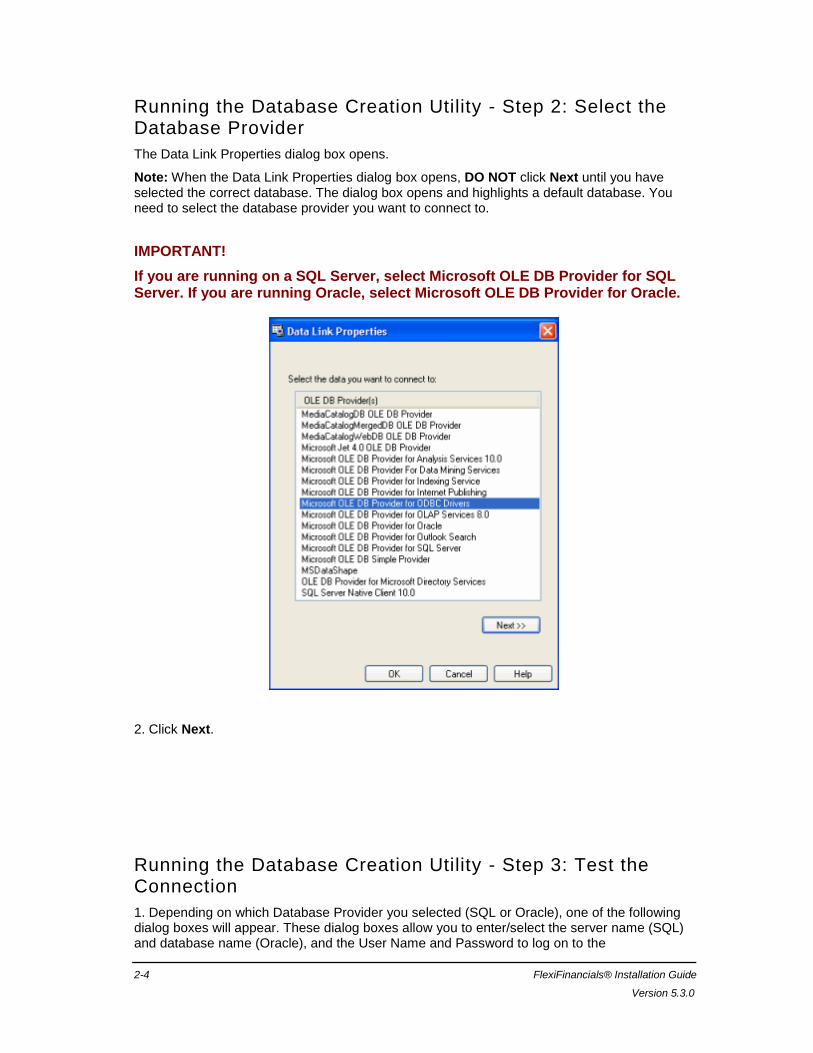
Running the Database Creation Utility - Step 2: Select the Database Provider
The Data Link Properties dialog box opens.
Note: When the Data Link Properties dialog box opens, DO NOT click Next until you have selected the correct database. The dialog box opens and highlights a default database. You need to select the database provider you want to connect to.
IMPORTANT!
If you are running on a SQL Server, select Microsoft OLE DB Provider for SQL Server. If you are running Oracle, select Microsoft OLE DB Provider for Oracle.
2. Click Next.
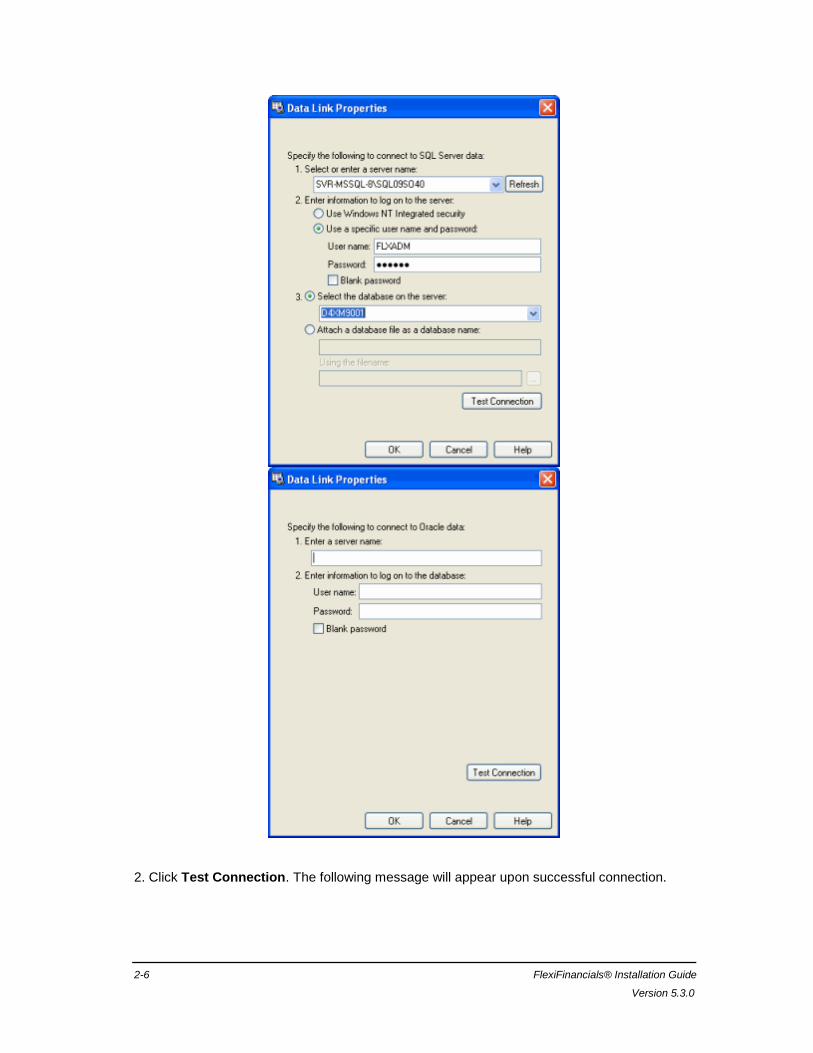
Running the Database Creation Utility - Step 3: Test the Connection
1. Depending on which Database Provider you selected (SQL or Oracle), one of the following dialog boxes will appear. These dialog boxes allow you to enter/select the server name (SQL) and database name (Oracle), and the User Name and Password to log on to the
Chapter 2 -- Establishing a FlexiFinancials Database 2-5
June 2011
server/database. You are then able to test the connection to the database. If you select Use Windows NT Integrated security, the Database Creation Utility will use your Windows login credentials to authenticate and log you on to the server. No other User Name or Password is required.
Notes:
-- For users connecting to a SQL Server – if the server name does not appear in the drop-down list, click Refresh and then select the server name from the drop-down list. You will also need to select the database on the server for which the credentials are valid.
-- For users connecting to an Oracle database, you will need to enter the net service name of an entry in the tnsnames.ora file for the database that is being migrated.
2-6 FlexiFinancials® Installation Guide
Version 5.3.0
2. Click Test Connection. The following message will appear upon successful connection.
Chapter 2 -- Establishing a FlexiFinancials Database 2-7
June 2011
3. Click OK and then click OK on the Data Link Properties dialog box.
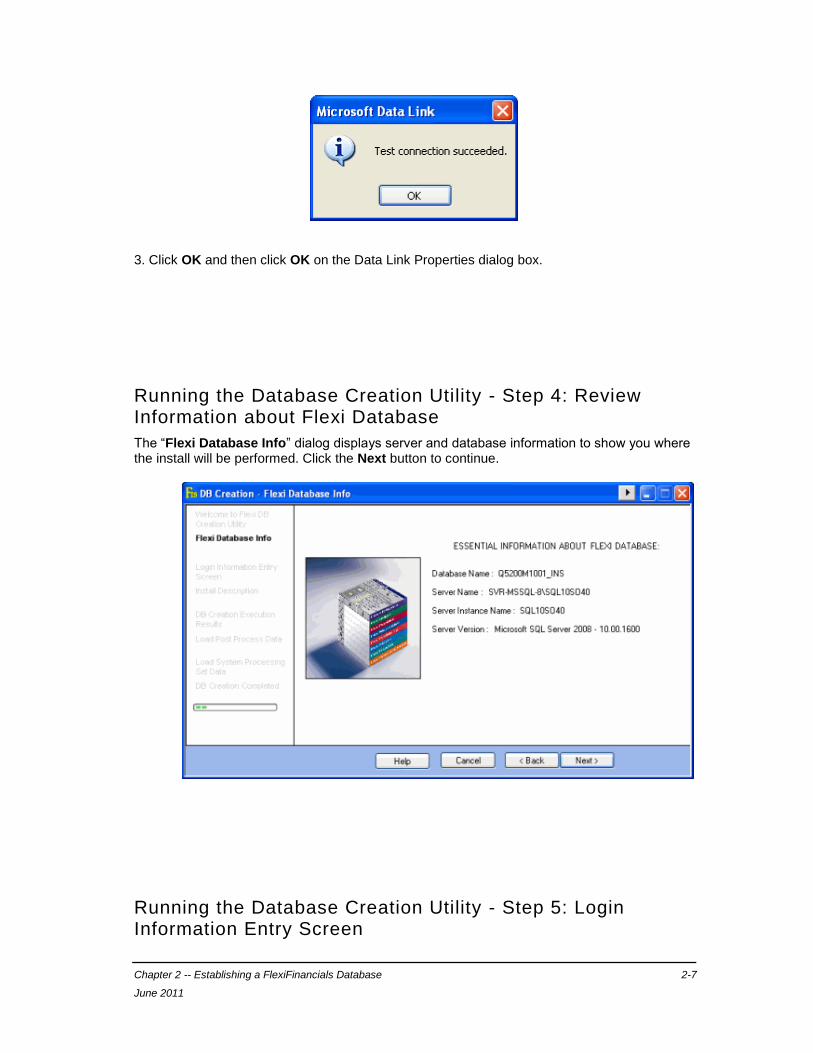
Running the Database Creation Utility - Step 4: Review Information about Flexi Database
The ―Flexi Database Info‖ dialog displays server and database information to show you where the install will be performed. Click the Next button to continue.
Running the Database Creation Utility - Step 5: Login Information Entry Screen

2-8 FlexiFinancials® Installation Guide
Version 5.3.0
Prior to running the install scripts, the system administrator may need to work with and modify databases. The system administrator can either enter a Login ID and Password or use their Windows login credentials to authenticate and log on to the server.
If using a Login ID and Password, use the SA login and associated password for MS SQL, and the SYS login and associated password for Oracle.
Click Next to continue.
Running the Database Creation Utility - Step 6: Review Install Description
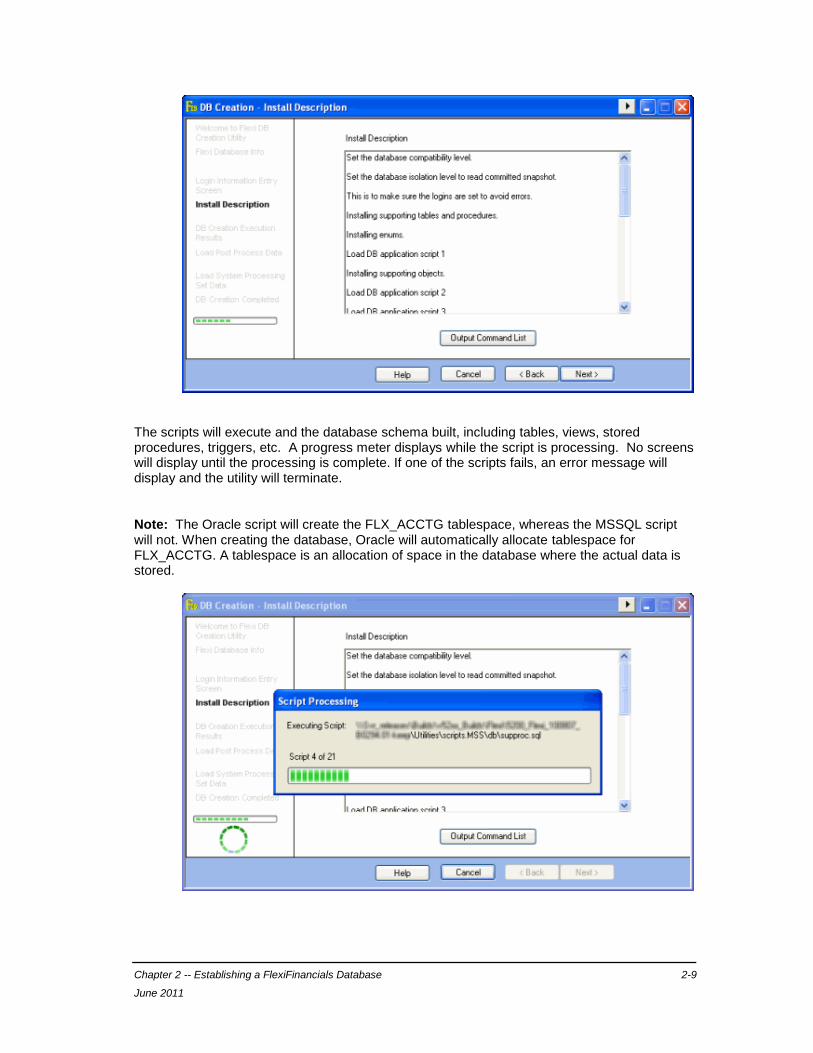
The Install Description dialog displays which install scripts are going to be executed and in what order. If you want to save the output to a file, click Output Command List to open the Save As dialog box. Otherwise, click Next to continue.
Chapter 2 -- Establishing a FlexiFinancials Database 2-9
June 2011
The scripts will execute and the database schema built, including tables, views, stored procedures, triggers, etc. A progress meter displays while the script is processing. No screens will display until the processing is complete. If one of the scripts fails, an error message will display and the utility will terminate.
Note: The Oracle script will create the FLX_ACCTG tablespace, whereas the MSSQL script will not. When creating the database, Oracle will automatically allocate tablespace for FLX_ACCTG. A tablespace is an allocation of space in the database where the actual data is stored.
2-10 FlexiFinancials® Installation Guide
Version 5.3.0
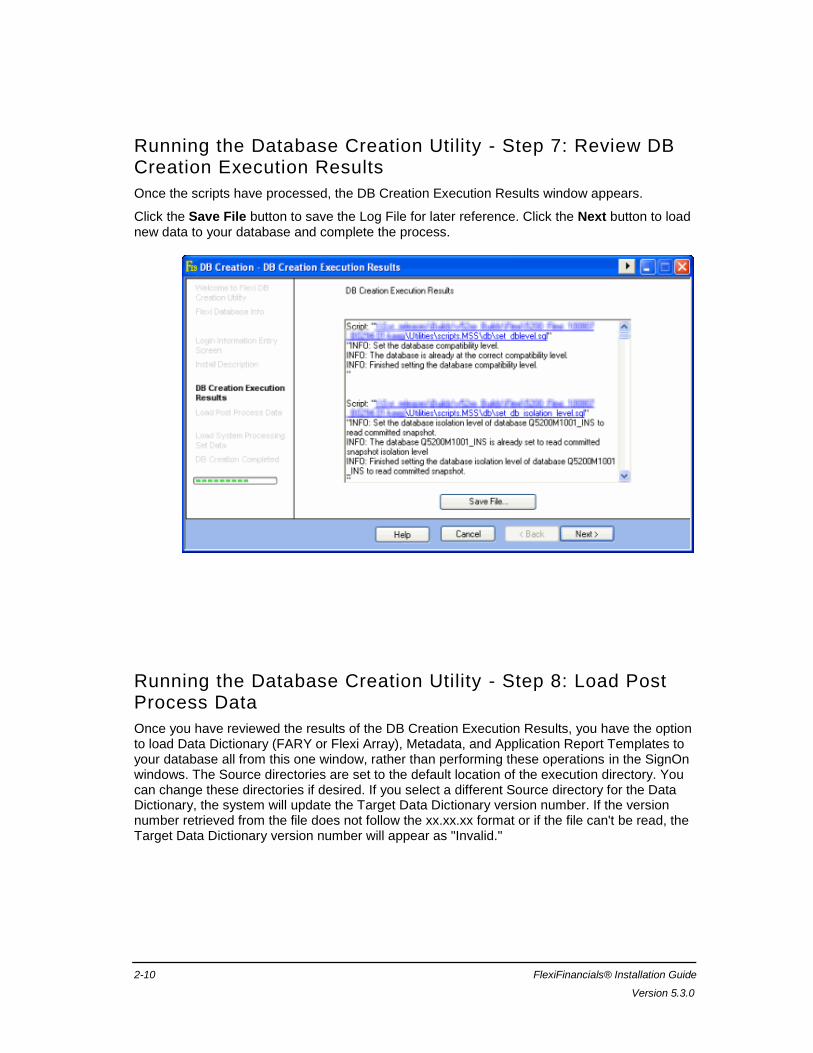
Running the Database Creation Utility - Step 7: Review DB Creation Execution Results
Once the scripts have processed, the DB Creation Execution Results window appears.
Click the Save File button to save the Log File for later reference. Click the Next button to load new data to your database and complete the process.
Running the Database Creation Utility - Step 8: Load Post Process Data
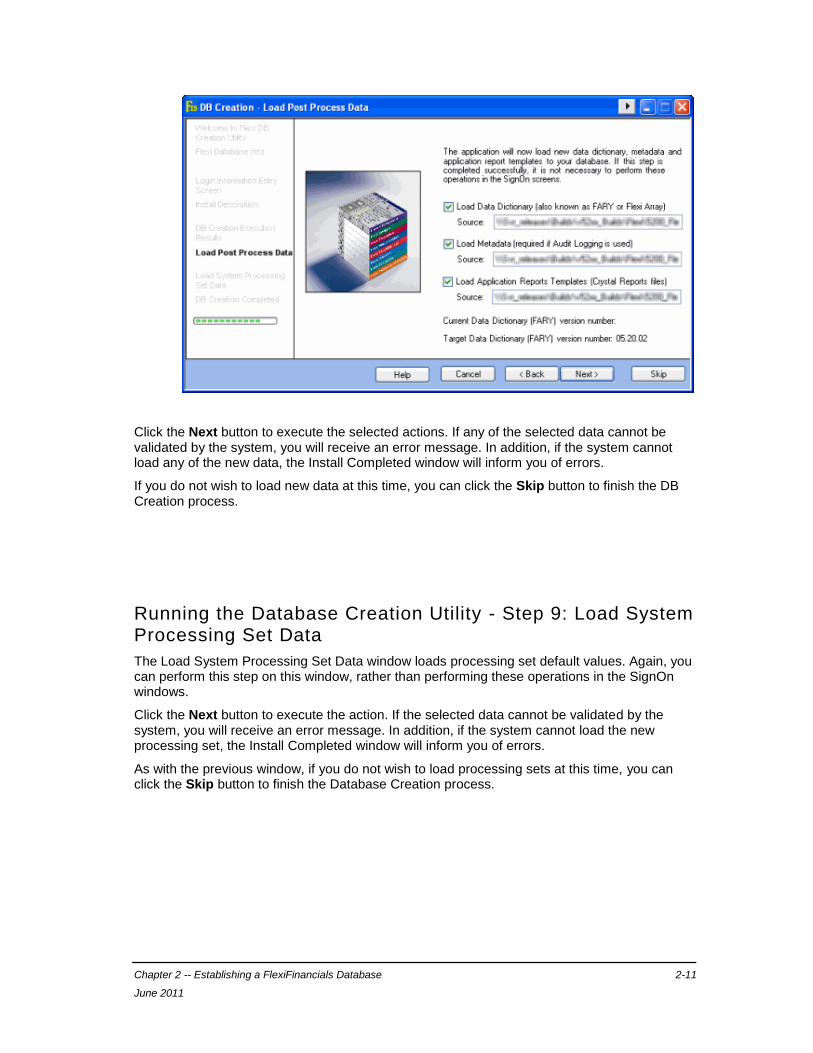
Once you have reviewed the results of the DB Creation Execution Results, you have the option to load Data Dictionary (FARY or Flexi Array), Metadata, and Application Report Templates to your database all from this one window, rather than performing these operations in the SignOn windows. The Source directories are set to the default location of the execution directory. You can change these directories if desired. If you select a different Source directory for the Data Dictionary, the system will update the Target Data Dictionary version number. If the version number retrieved from the file does not follow the xx.xx.xx format or if the file can't be read, the Target Data Dictionary version number will appear as "Invalid."
Chapter 2 -- Establishing a FlexiFinancials Database 2-11
June 2011
Click the Next button to execute the selected actions. If any of the selected data cannot be validated by the system, you will receive an error message. In addition, if the system cannot load any of the new data, the Install Completed window will inform you of errors.
If you do not wish to load new data at this time, you can click the Skip button to finish the DB Creation process.
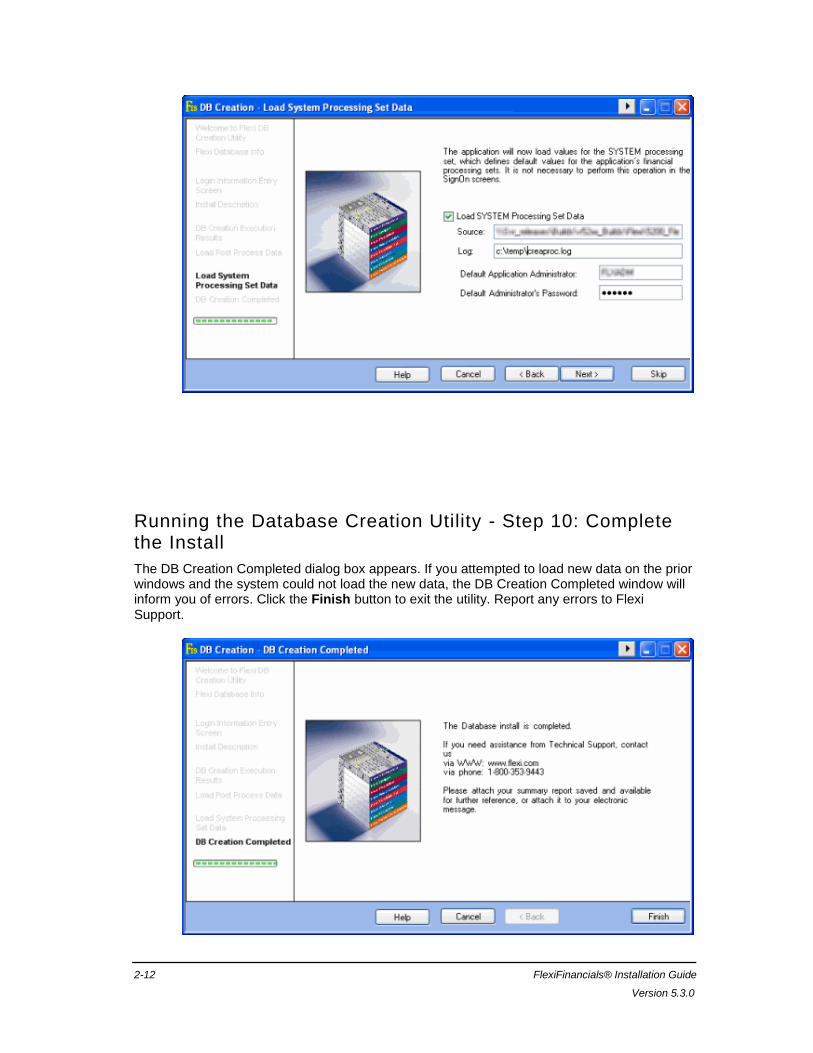
Running the Database Creation Utility - Step 9: Load System Processing Set Data
The Load System Processing Set Data window loads processing set default values. Again, you can perform this step on this window, rather than performing these operations in the SignOn windows.
Click the Next button to execute the action. If the selected data cannot be validated by the system, you will receive an error message. In addition, if the system cannot load the new processing set, the Install Completed window will inform you of errors.
As with the previous window, if you do not wish to load processing sets at this time, you can click the Skip button to finish the Database Creation process.
2-12 FlexiFinancials® Installation Guide
Version 5.3.0
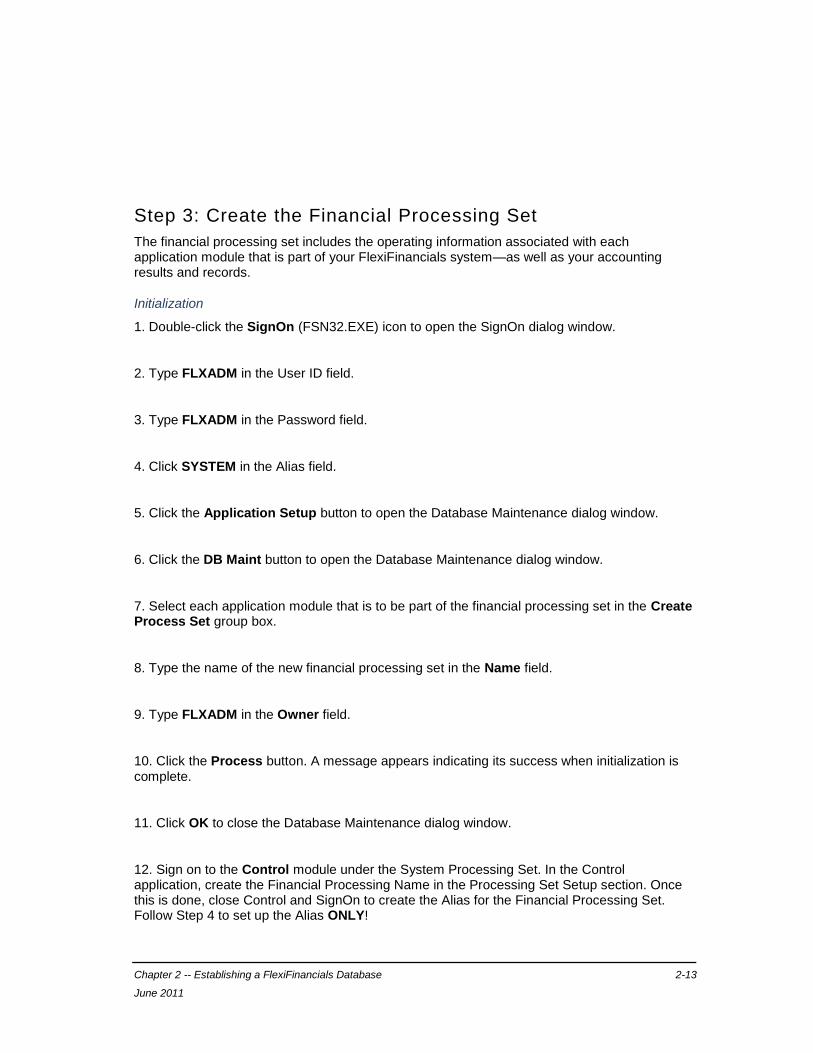
Running the Database Creation Utility - Step 10: Complete the Install
The DB Creation Completed dialog box appears. If you attempted to load new data on the prior windows and the system could not load the new data, the DB Creation Completed window will inform you of errors. Click the Finish button to exit the utility. Report any errors to Flexi Support.
Chapter 2 -- Establishing a FlexiFinancials Database 2-13
June 2011
Step 3: Create the Financial Processing Set
The financial processing set includes the operating information associated with each application module that is part of your FlexiFinancials system—as well as your accounting results and records.
Initialization
1. Double-click the SignOn (FSN32.EXE) icon to open the SignOn dialog window.
2. Type FLXADM in the User ID field.
3. Type FLXADM in the Password field.
4. Click SYSTEM in the Alias field.
5. Click the Application Setup button to open the Database Maintenance dialog window.
6. Click the DB Maint button to open the Database Maintenance dialog window.
7. Select each application module that is to be part of the financial processing set in the Create Process Set group box.
8. Type the name of the new financial processing set in the Name field.
9. Type FLXADM in the Owner field.
10. Click the Process button. A message appears indicating its success when initialization is complete.
11. Click OK to close the Database Maintenance dialog window.
12. Sign on to the Control module under the System Processing Set. In the Control application, create the Financial Processing Name in the Processing Set Setup section. Once this is done, close Control and SignOn to create the Alias for the Financial Processing Set. Follow Step 4 to set up the Alias ONLY!
2-14 FlexiFinancials® Installation Guide
Version 5.3.0
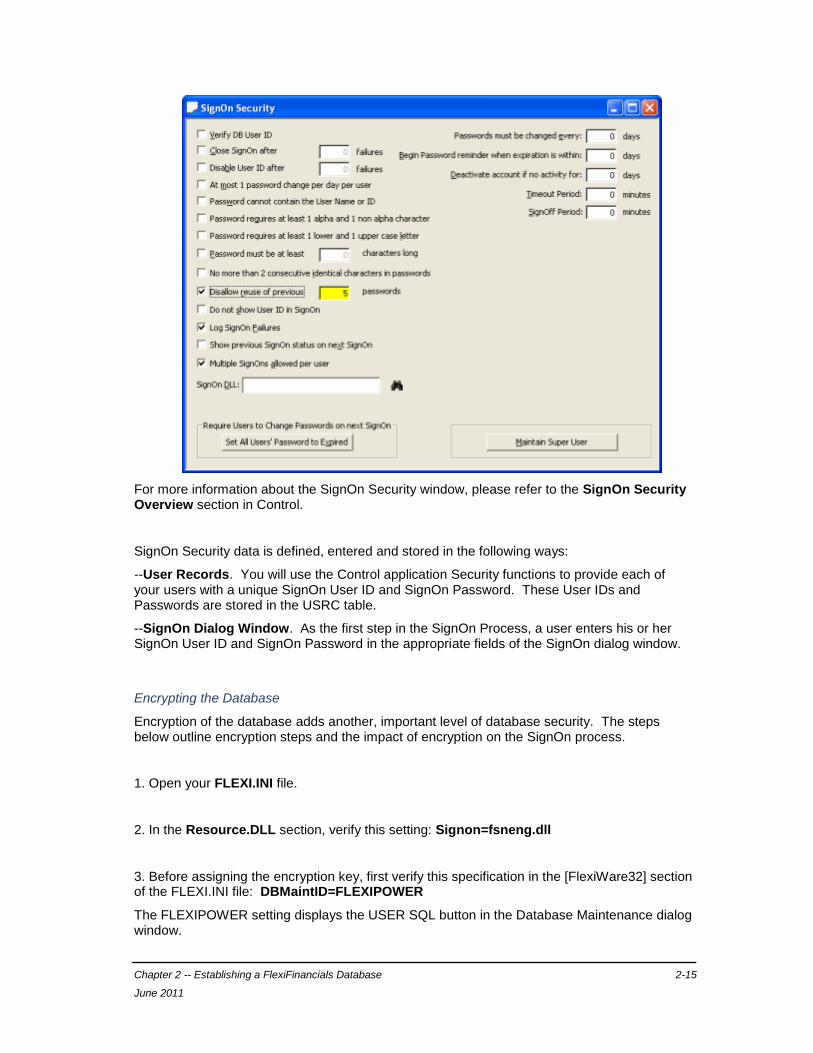
SignOn Security
The SignOn application starts before any other Control application to be sure that only authorized users can work with the database and use the appropriate Control applications.
The public database connection provides users with the necessary access through the front-end GUI of an application. SignOn fails if there is no FLXPUBLIC. When FLXPUBLIC exists, everyone accesses the database through an application's GUI, and performs just those tasks assigned to the group or groups to which their User ID belongs.
The Verify DB User ID check box on the SignOn Security window requires two identical IDs and passwords to increase security by having two functions maintain identical names and passwords. This method does not allow direct access to the database, controls front-end access with the system's group and task features, and has the maximum security.
Chapter 2 -- Establishing a FlexiFinancials Database 2-15
June 2011
For more information about the SignOn Security window, please refer to the SignOn Security Overview section in Control.
SignOn Security data is defined, entered and stored in the following ways:
--User Records. You will use the Control application Security functions to provide each of your users with a unique SignOn User ID and SignOn Password. These User IDs and Passwords are stored in the USRC table.
--SignOn Dialog Window. As the first step in the SignOn Process, a user enters his or her SignOn User ID and SignOn Password in the appropriate fields of the SignOn dialog window.
Encrypting the Database
Encryption of the database adds another, important level of database security. The steps below outline encryption steps and the impact of encryption on the SignOn process.
1. Open your FLEXI.INI file.
2. In the Resource.DLL section, verify this setting: Signon=fsneng.dll
3. Before assigning the encryption key, first verify this specification in the [FlexiWare32] section of the FLEXI.INI file: DBMaintID=FLEXIPOWER
The FLEXIPOWER setting displays the USER SQL button in the Database Maintenance dialog window.
2-16 FlexiFinancials® Installation Guide
Version 5.3.0
4. Start SignOn or the Control application to open the SignOn dialog window.
5. Complete the User ID, Password and Processing Set fields of the SignOn dialog window, and then select the DB Maint button to open the Database Maintenance dialog window.
6. Select the User SQL button to open the Run User SQL dialog window.
7. Type the following in the Enter SQL Command area:
ENCRYPT FLEXI DB K=<encryption key>
8. Click the OK button on the Run User SQL dialog window to initiate the encryption process. This encrypts all passwords in the SYTB and USRC tables, and displays status and completion messages in the SQL Messages area.
Chapter 3 INI Files and User Specific Settings
INI Files and User Specific Settings
The Installing Files section examined the procedures to define INI file specifications. This topic looks more closely at the nature and settings of the various INI files that use these specifications.
FlexiFinancials applications use INI files that contain the system's initialization settings, or how the system behaves once launched. There is a separate FLEXI.INI file for each user, which is stored on the user's PC. User-specific settings are set up in Control.
Batch Server and Database Server
The Server Name that you enter may or may not be the same as the Server Name specified in a user's FLEXI.INI file. It may be different if the Batch server is on the Database server — it should be whatever is needed to connect to the local database.
The FLEXI.INI file for the Batch Sever is copied when loading the server application files (Installing Files). .
The server's FLEXI.INI file should reside in the directory containing the FBTC32 files. Applications will look first in this directory when searching for .INI settings and then in:
1. Directory (specified in the FLEXI_INI_FILES environment variable)
2. The current directory.
3. The Windows directory.
INI Files and INI Data Groups
Open a FLEXI.INI file using the Open command with File Manager, Explorer, or a text editor, such as Notepad or WordPad.
You can open an flxglobal.in1 file the same way as you open a FLEXI.INI, but flxglobal.in1 files cannot be maintained on each user's local hard disk. Use the INI Data Groups dialog window in the Control application to maintain an application's INI file for a group and/or an individual. You copy an application's INI settings into a large text box. Members of an INI Data group all use the same application INI settings. Select System, INI Groups to open the INI Data Groups dialog window in the Control application. Administrators may also create personal INI Data for an individual user (Select the INI Data button in the Users dialog window).
3-2 FlexiFinancials® Installation Guide
Version 5.3.0
Group INI data specifies users who are part of a group and an application's INI file settings so that an INI file does not have to be stored and maintained on each user's PC for each application. The Group INI data is stored in the STKN table. Starting an application reads the INI information from tables for that processing set's INI Data Group, unless it is overridden by Personal INI data for a specific User ID. See Chapter 6 for information about Personal INI data.
Note: INI Data Groups are not required. The system has default INI settings that it uses. These INI Data Groups are intended to allow clients to override the system defaults with their custom preferences.
The folder that has the application files also has a master IN1 file - flxglobal.in1, which contains the master parameter settings of each application's INI files.
It is recommended that Administrators use Notepad to open the master IN1 file for an application. Then copy and paste the IN1 file from Notepad into the Edit Processing Set INI Data dialog box instead of typing all of the application's INI file settings. Edit the IN1 to specify the settings that you want. This leaves a valid master copy on the server and avoids makes typographical errors while entering the settings.
Personal INI Data
Personal INI data, like group INI data, specifies an application's INI file settings so that the INI file does not have to be stored on a user's PC. Personal INI data is stored in the STKN table. Starting an application reads the INI information stored in the STKN table for either a user or a user's group.
Personal INI data overrides the INI data of any group to which it belongs. It is recommended that Group INI Data dialog box be copied to the Create or Edit User INI Data dialog box, and then edited for an individual.
The Create or Edit User INI Data dialog window in Control is a large text entry box that has basic text editing capabilities. Open the Edit Processing Set INI Data dialog to copy and paste the group INI data here. You must use the keyboard shortcuts (Ctrl+C to copy and Ctrl+V to paste) to do this. Edit the user's INI data to meet that person's exceptions to the Group INI Data.
Global Settings - flxglobal.in1
Until recently, FlexiFinancials contained several IN1 master templates for each application; e.g., fgl000.in1, fap000.in1, etc. Each master template held the INI settings for the associated application. To improve efficiency and reduce duplicate, obsolete, or redundant settings, all application IN1 files have been consolidated into a single IN1 file: flxglobal.in1. It is now easier to manage IN1 application settings.
The flxglobal.IN1 file is the master file that is comprised of global settings for the application that everyone will use. It basically defines system behavior for users assigned to an INI data
Chapter 3 -- INI Files and User Specific Settings 3-3
June 2011
group. Once the behavior is identified and a group is created, simply copy the settings you need from the flxglobal.in1, modify the values, and assign users to an INI group.
FlexiFinancials applications use INI files. There is a separate FLEXI.INI file for each user, which is stored on the user's PC. User-specific settings are set up in Control.
The flxglobal.in1 file is divided into the following sections:
Global Color Settings for Data Entry Fields
Spreadsheet Default Settings
Spreadsheet Column Order Settings
General Ledger Application Configuration Settings
Accounts Payable Application Configuration Settings
Accounts Receivable Application Configuration Settings
General Fixed Assets Application Configuration Settings
Copy flxglobal.in1 settings to INI Data Groups
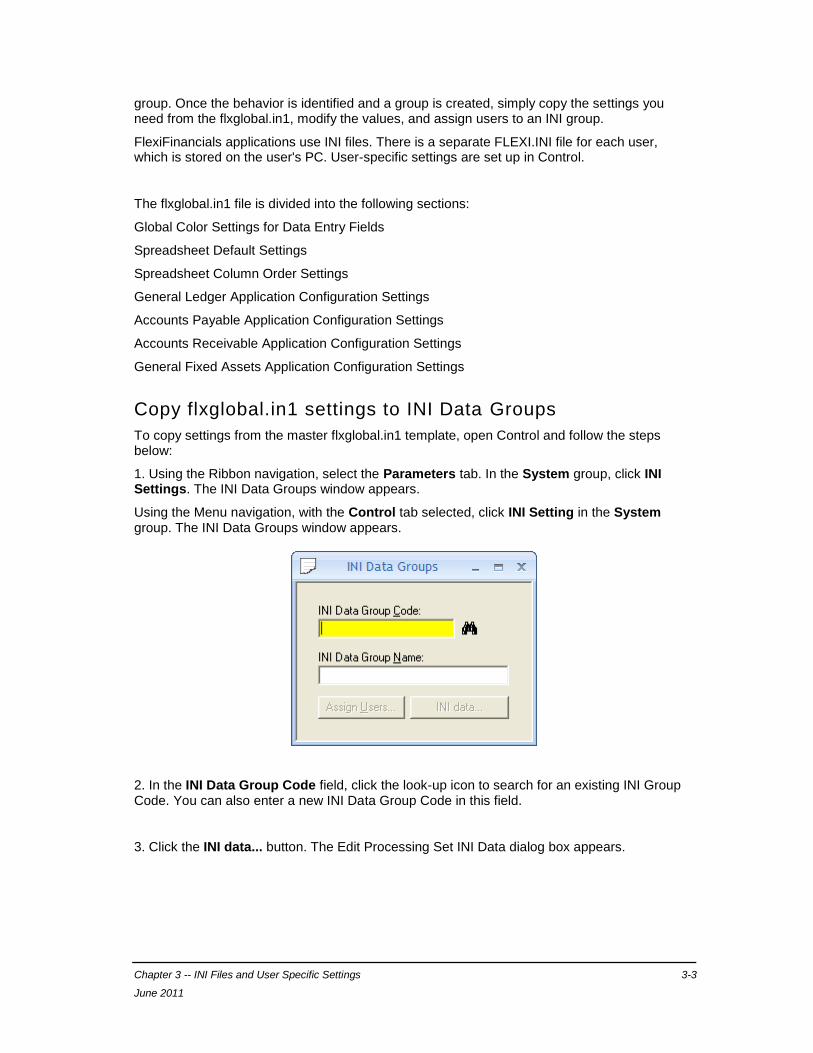
To copy settings from the master flxglobal.in1 template, open Control and follow the steps below:
1. Using the Ribbon navigation, select the Parameters tab. In the System group, click INI Settings. The INI Data Groups window appears.
Using the Menu navigation, with the Control tab selected, click INI Setting in the System group. The INI Data Groups window appears.
2. In the INI Data Group Code field, click the look-up icon to search for an existing INI Group Code. You can also enter a new INI Data Group Code in this field.
3. Click the INI data... button. The Edit Processing Set INI Data dialog box appears.
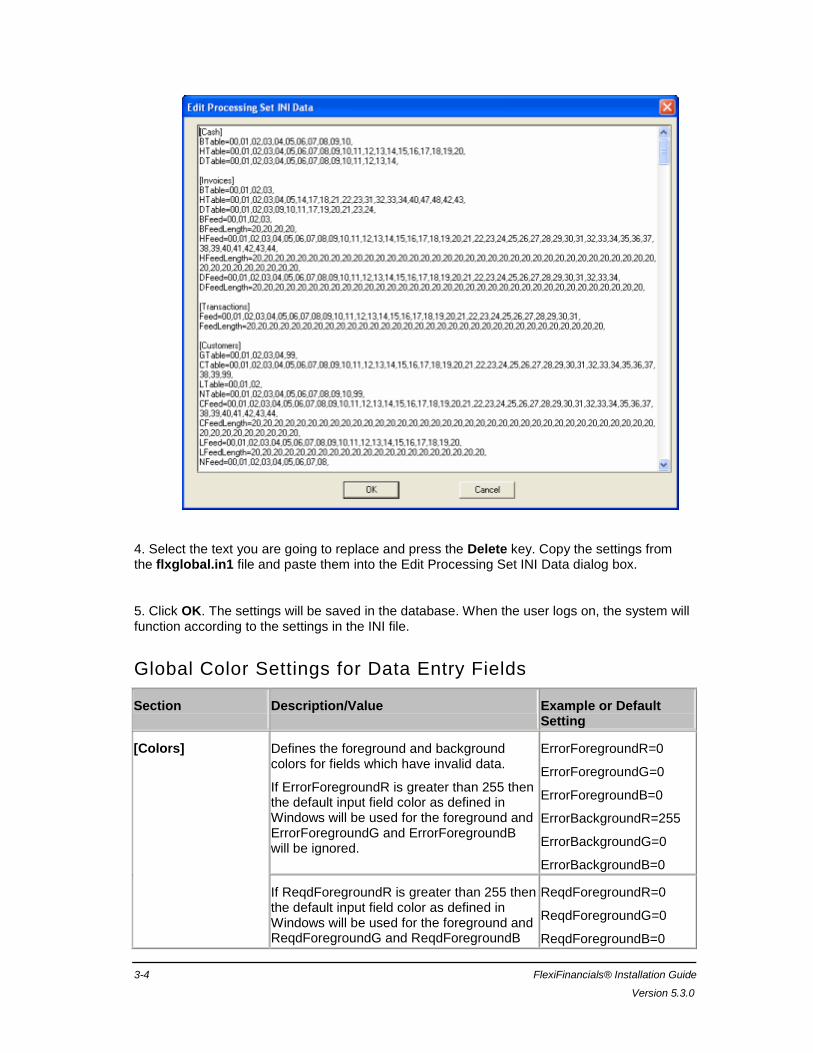
3-4 FlexiFinancials® Installation Guide
Version 5.3.0
4. Select the text you are going to replace and press the Delete key. Copy the settings from the flxglobal.in1 file and paste them into the Edit Processing Set INI Data dialog box.
5. Click OK. The settings will be saved in the database. When the user logs on, the system will function according to the settings in the INI file.
Global Color Settings for Data Entry Fields
Section Description/Value Example or Default Setting
[Colors] Defines the foreground and background colors for fields which have invalid data.
If ErrorForegroundR is greater than 255 then the default input field color as defined in Windows will be used for the foreground and ErrorForegroundG and ErrorForegroundB will be ignored.
ErrorForegroundR=0
ErrorForegroundG=0
ErrorForegroundB=0
ErrorBackgroundR=255
ErrorBackgroundG=0
ErrorBackgroundB=0
If ReqdForegroundR is greater than 255 then the default input field color as defined in Windows will be used for the foreground and ReqdForegroundG and ReqdForegroundB
ReqdForegroundR=0
ReqdForegroundG=0
ReqdForegroundB=0

Chapter 3 -- INI Files and User Specific Settings 3-5
June 2011
will be ignored ReqdBackgroundR=255
ReqdBackgroundG=255
ReqdBackgroundB=0
Spreadsheet Default Settings
Section Description/Value Example or Default Setting
[Defaults] Sets the initial number of rows for a new spreadsheet
Minimum value is 20
SpreadInitialRows=500
Used by the ::Spreadsheet function to add more rows
Minimum value is 20
SpreadAddRows=500
Sets the default increment value for adding more rows
Minimum value is 20
SpreadMoreRows=500
[FlexiInternational] Internal use 0 means don't show screen IDs, 1 means do show screen IDs
ShowScreenIDs = 0
Spreadsheet Column Order Settings
Section Description/Value Example or Default Setting
[SpreadColOrder] Add an entry for each column you want to reposition
Entry format is column name=column index
Prefix order with H to hide the column
example:
<columnName>=<index>…
General Ledger Application Configuration Settings
Journal Entry Default Values
Flexiware Default Values
Ledger Default Values
Structure Inquiry Results (fglp603)
Journal Summary Default Values
Account Maintenance Dialog (fgl210)
3-6 FlexiFinancials® Installation Guide
Version 5.3.0
Journal Review Default Values
Journal Import Default Values
Journal Entry (fglp405) Default Values
Section/Setting Description/Value Example or Default Setting
[JnlEntry]
FillInDesc No = (Default) Journal Detail Description is blank unless entered by user
Account = Journal Detail Description is filled in with Account Descriptions
Cannot be manually overridden by user
AccountEditable = Journal Detail Description is filled in with Account Descriptions
Can be manually overridden by user
Header = Journal Detail Description is filled in with Journal Description
Can be manually overridden by user
FillInDesc=No
HideSubLedger No = Default, Yes = Hide the SubLedger Field on the Screen
HideSubLedger=No
AcctDescRequired Require the Account description column on the journal details screen
No = default, Yes = require that this field have a value
AcctDescRequired=No
Chapter 3 -- INI Files and User Specific Settings 3-7
June 2011
LinesChanged
MaxLines
LinesChanged and MaxLines are used together to optimize the saving of detail items lines.
Default is 10
If the number of detail lines > Maxlines, the code will attempt to optimize the delete of supporting table values to speed up the saving of journal details.
1) If number of detail lines > Maxline , then the check below is made to check if optimization should be done.
2) If the number or rows of detail which have changed divided by the number of detail lines < the number of lines which have been modified / 100, then optimization of deleting of details is performed.
Adjust these values when the saving of large number of detail lines becomes too time consuming.
LinesChanged=10
MaxLines=10
Flexiware Default Values
Section Description/Value Example or Default Setting
[Flexiware32] 1 = default value, this validates the element values as user tabs through accounts
0 = this setting disables validation of elements for accounts at the element level
AccountCodeElementValidation=1
3-8 FlexiFinancials® Installation Guide
Version 5.3.0
Ledger Default Values
Section/Setting Description/Value Example or Default Setting
[Ledger]
WantTree 0 = default value, displays spreadsheet posting account select
1 = displays posting account select with trees
WantTree=0
DefaultDate Tran date on journal header is prefilled with signon date
YES = default, prefill date, No = date is not prefilled
DefaultDate=YES
Structure Inquiry Results (fglp603)
Section/Setting Description/Value Example or Default Setting
[StructureInq]
ShowNoDataMessage True = (Default) Show no data message box for query 1-4
False = Suppress message box for query 1-4
ShowNoDataMessage=True
Journal Summary Default Values
Section/Setting Description/Value Example or Default Setting
[JournalSummary]
ProjAfterAccount Journal Summary Inquiry (fglp608), Option to control the column location of the project and subproject fields of the account.
Note the UseProj of Posting Definition controls if project and subproject are displayed.
This option controls if the project and subproject fields are displayed before the account or after the subledgerfield.
False (Default) places project and
ProjAfterAccount=False
Chapter 3 -- INI Files and User Specific Settings 3-9
June 2011
subproject before the account.
True places the project and subproject after the subledger field.
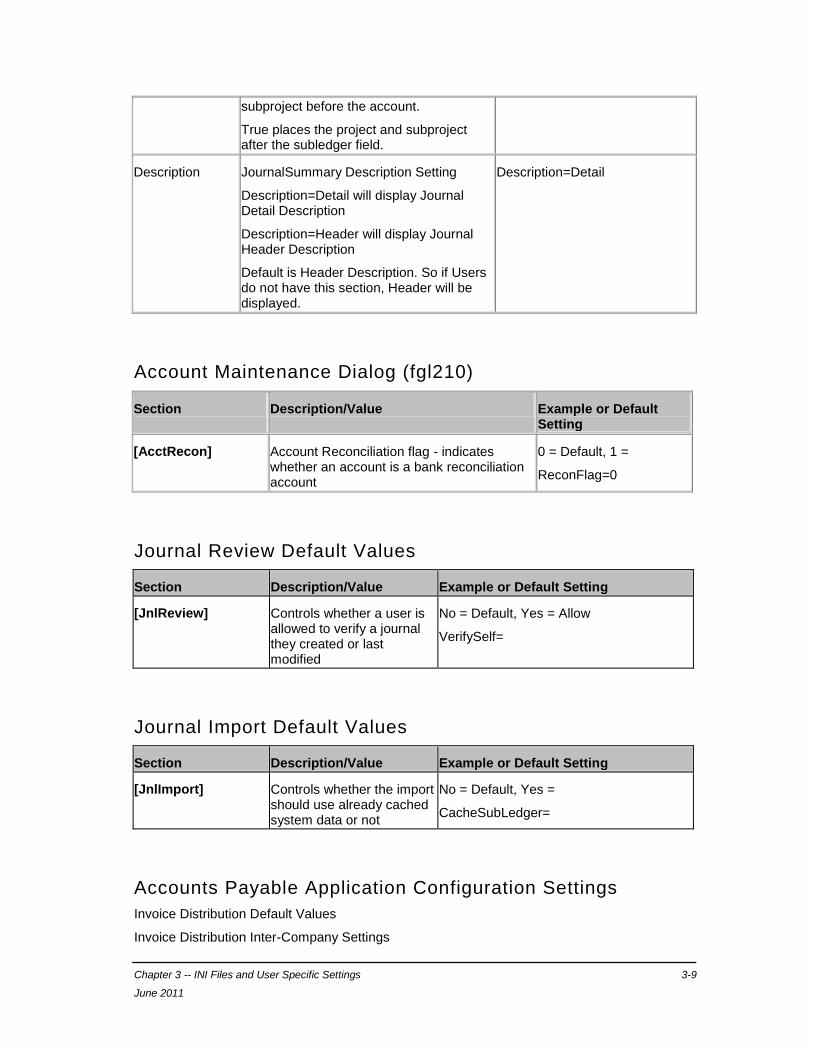
Description JournalSummary Description Setting
Description=Detail will display Journal Detail Description
Description=Header will display Journal Header Description
Default is Header Description. So if Users do not have this section, Header will be displayed.
Description=Detail
Account Maintenance Dialog (fgl210)
Section Description/Value Example or Default Setting
[AcctRecon] Account Reconciliation flag - indicates whether an account is a bank reconciliation account
0 = Default, 1 =
ReconFlag=0
Journal Review Default Values
Section Description/Value Example or Default Setting
[JnlReview] Controls whether a user is allowed to verify a journal they created or last modified
No = Default, Yes = Allow
VerifySelf=
Journal Import Default Values
Section Description/Value Example or Default Setting
[JnlImport] Controls whether the import should use already cached system data or not
No = Default, Yes =
CacheSubLedger=
Accounts Payable Application Configuration Settings
Invoice Distribution Default Values
Invoice Distribution Inter-Company Settings
3-10 FlexiFinancials® Installation Guide
Version 5.3.0
Rapid Vendor Screen Default Values
Payment Selection Screen Default Values
Invoice Adjustment Options
Batch Process/Review Screen Default Values
Payment Selection Screen Default Values - Partial Payments
Invoice Entry Screens Default Values
Void Check Maintenance Dialog Default Values
Payment Production Default Settings
Spreadsheet Default Settings - Payables
Base Invoice/Bottom Line Default Settings
Default Settings for Tax Calculations (Vertex)
Default Settings for Vertex
Check Printing Default Settings
Multi-Vendor Search Dialog Default Values
User Definition Document Default Values
Check Gard Printing Default Values
Invoice Distribution Default Values
Section/Setting Description/Value
Example or Default Setting
[417]
UseSubledg Flag to determine if we use a subledger (fapp417)
0 = Not used (default), 1 = subledger used
UseSubledge=0
DefaultTheCompanyCodeToTheDistributionLine
Flag to determine the default company code used (flxss)
0 = Use the default company code (default)
1 = Set the company code to all zeroes
DefaultTheCompanyCodeToTheDistributionLine=0
Chapter 3 -- INI Files and User Specific Settings 3-11
June 2011
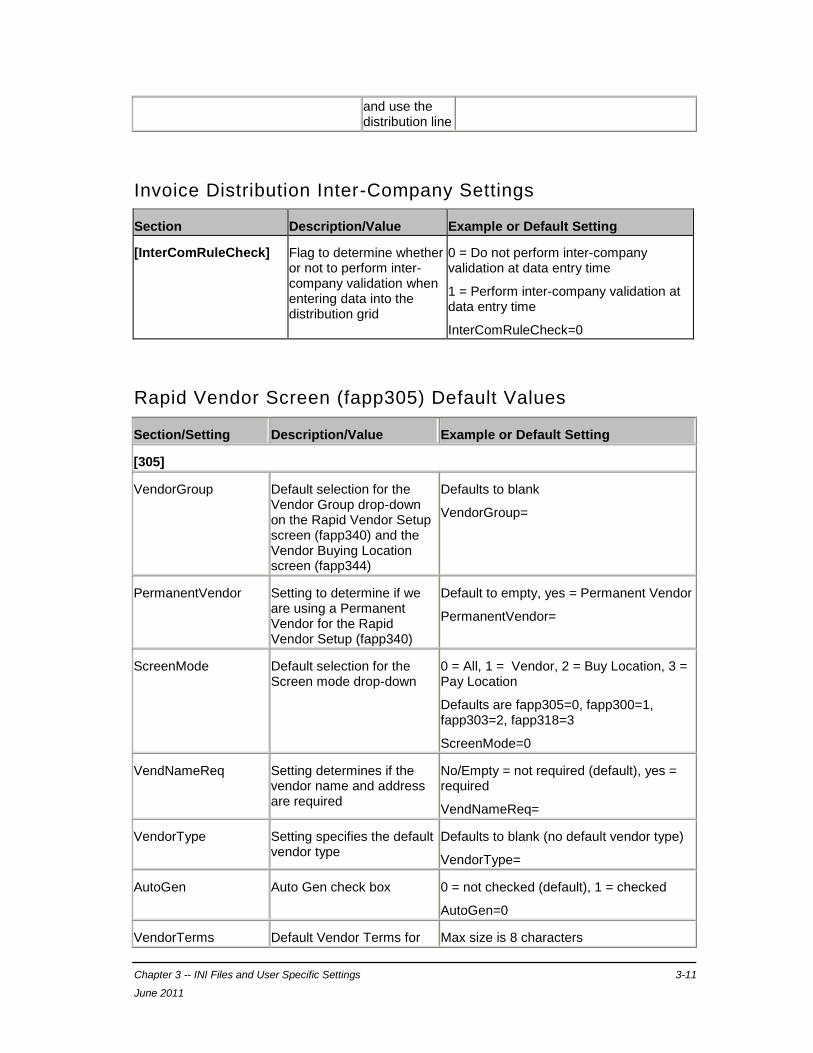
and use the distribution line
Invoice Distribution Inter-Company Settings
Section Description/Value Example or Default Setting
[InterComRuleCheck] Flag to determine whether or not to perform inter-company validation when entering data into the distribution grid
0 = Do not perform inter-company validation at data entry time
1 = Perform inter-company validation at data entry time
InterComRuleCheck=0
Rapid Vendor Screen (fapp305) Default Values
Section/Setting Description/Value Example or Default Setting
[305]
VendorGroup Default selection for the Vendor Group drop-down on the Rapid Vendor Setup screen (fapp340) and the Vendor Buying Location screen (fapp344)
Defaults to blank
VendorGroup=
PermanentVendor Setting to determine if we are using a Permanent Vendor for the Rapid Vendor Setup (fapp340)
Default to empty, yes = Permanent Vendor
PermanentVendor=
ScreenMode Default selection for the Screen mode drop-down
0 = All, 1 = Vendor, 2 = Buy Location, 3 = Pay Location
Defaults are fapp305=0, fapp300=1, fapp303=2, fapp318=3
ScreenMode=0
VendNameReq Setting determines if the vendor name and address are required
No/Empty = not required (default), yes = required
VendNameReq=
VendorType Setting specifies the default vendor type
Defaults to blank (no default vendor type)
VendorType=
AutoGen Auto Gen check box 0 = not checked (default), 1 = checked
AutoGen=0
VendorTerms Default Vendor Terms for Max size is 8 characters
3-12 FlexiFinancials® Installation Guide
Version 5.3.0
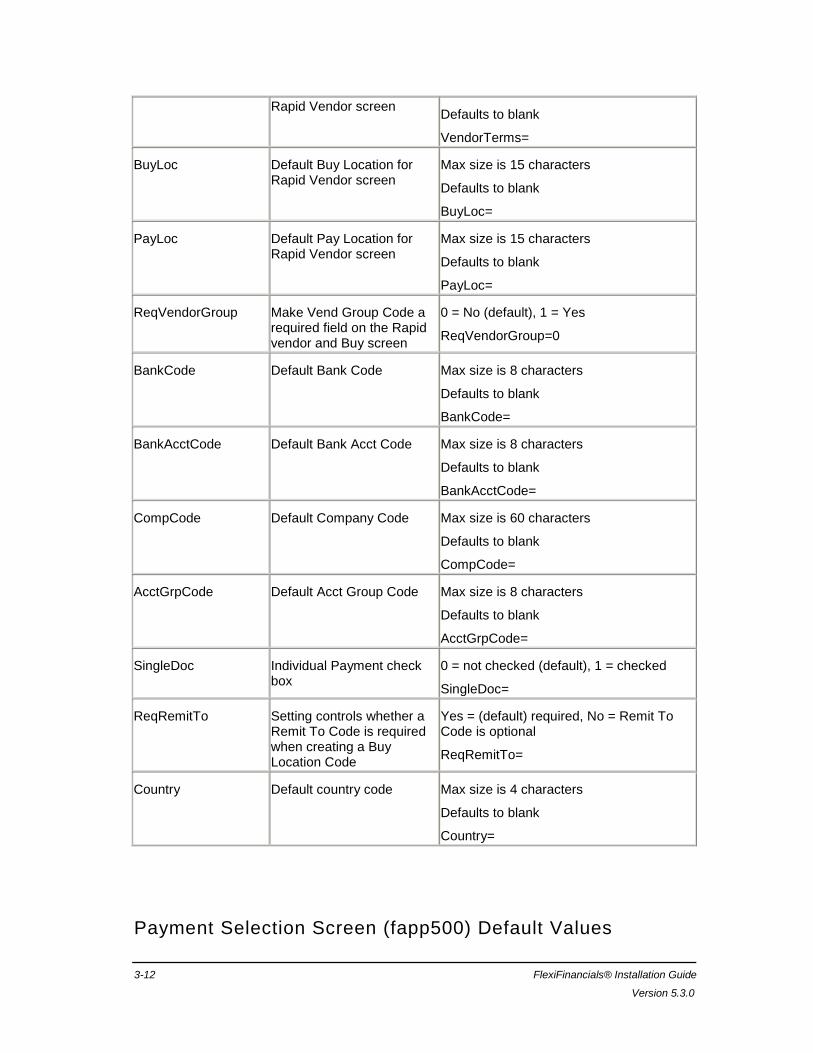
Rapid Vendor screen Defaults to blank
VendorTerms=
BuyLoc Default Buy Location for Rapid Vendor screen
Max size is 15 characters
Defaults to blank
BuyLoc=
PayLoc Default Pay Location for Rapid Vendor screen
Max size is 15 characters
Defaults to blank
PayLoc=
ReqVendorGroup Make Vend Group Code a required field on the Rapid vendor and Buy screen
0 = No (default), 1 = Yes
ReqVendorGroup=0
BankCode Default Bank Code Max size is 8 characters
Defaults to blank
BankCode=
BankAcctCode Default Bank Acct Code Max size is 8 characters
Defaults to blank
BankAcctCode=
CompCode Default Company Code Max size is 60 characters
Defaults to blank
CompCode=
AcctGrpCode Default Acct Group Code Max size is 8 characters
Defaults to blank
AcctGrpCode=
SingleDoc Individual Payment check box
0 = not checked (default), 1 = checked
SingleDoc=
ReqRemitTo Setting controls whether a Remit To Code is required when creating a Buy Location Code
Yes = (default) required, No = Remit To Code is optional
ReqRemitTo=
Country Default country code Max size is 4 characters
Defaults to blank
Country=
Payment Selection Screen (fapp500) Default Values
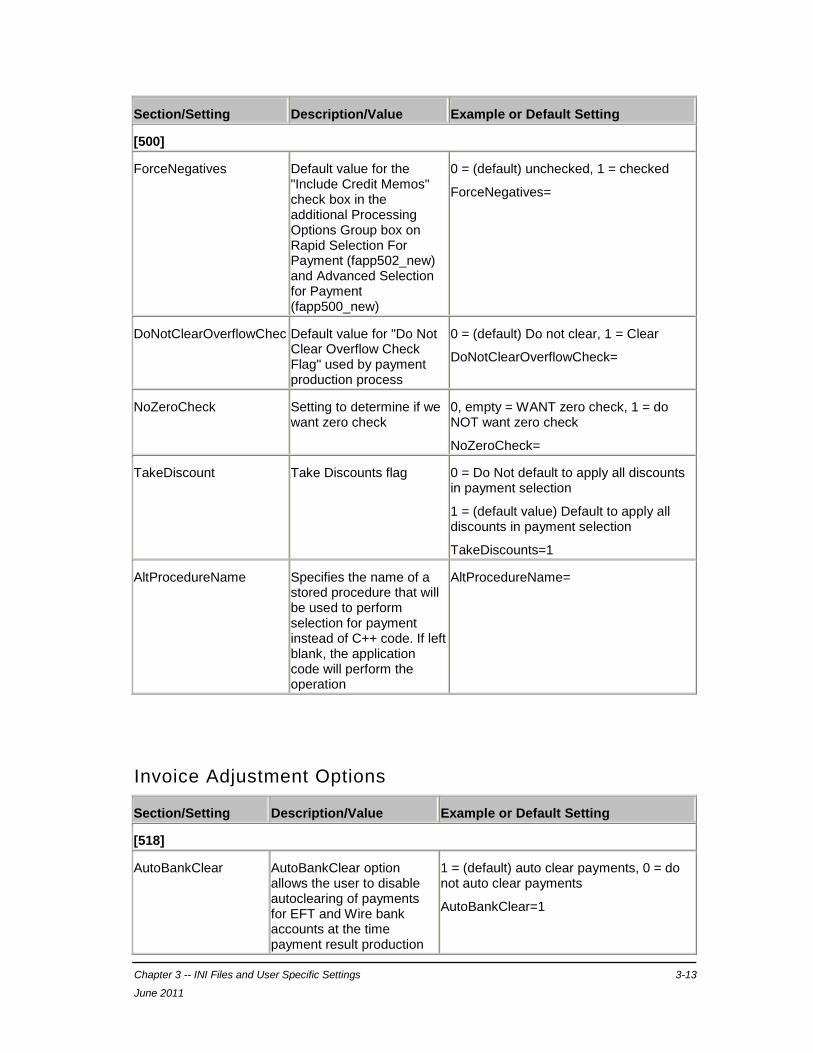
Chapter 3 -- INI Files and User Specific Settings 3-13
June 2011
Section/Setting Description/Value Example or Default Setting
[500]
ForceNegatives Default value for the "Include Credit Memos" check box in the additional Processing Options Group box on Rapid Selection For Payment (fapp502_new) and Advanced Selection for Payment (fapp500_new)
0 = (default) unchecked, 1 = checked
ForceNegatives=
DoNotClearOverflowChec Default value for "Do Not Clear Overflow Check Flag" used by payment production process
0 = (default) Do not clear, 1 = Clear
DoNotClearOverflowCheck=
NoZeroCheck Setting to determine if we want zero check
0, empty = WANT zero check, 1 = do NOT want zero check
NoZeroCheck=
TakeDiscount Take Discounts flag 0 = Do Not default to apply all discounts in payment selection
1 = (default value) Default to apply all discounts in payment selection
TakeDiscounts=1
AltProcedureName Specifies the name of a stored procedure that will be used to perform selection for payment instead of C++ code. If left blank, the application code will perform the operation
AltProcedureName=
Invoice Adjustment Options
Section/Setting Description/Value Example or Default Setting
[518]
AutoBankClear AutoBankClear option allows the user to disable autoclearing of payments for EFT and Wire bank accounts at the time payment result production
1 = (default) auto clear payments, 0 = do not auto clear payments
AutoBankClear=1
3-14 FlexiFinancials® Installation Guide
Version 5.3.0
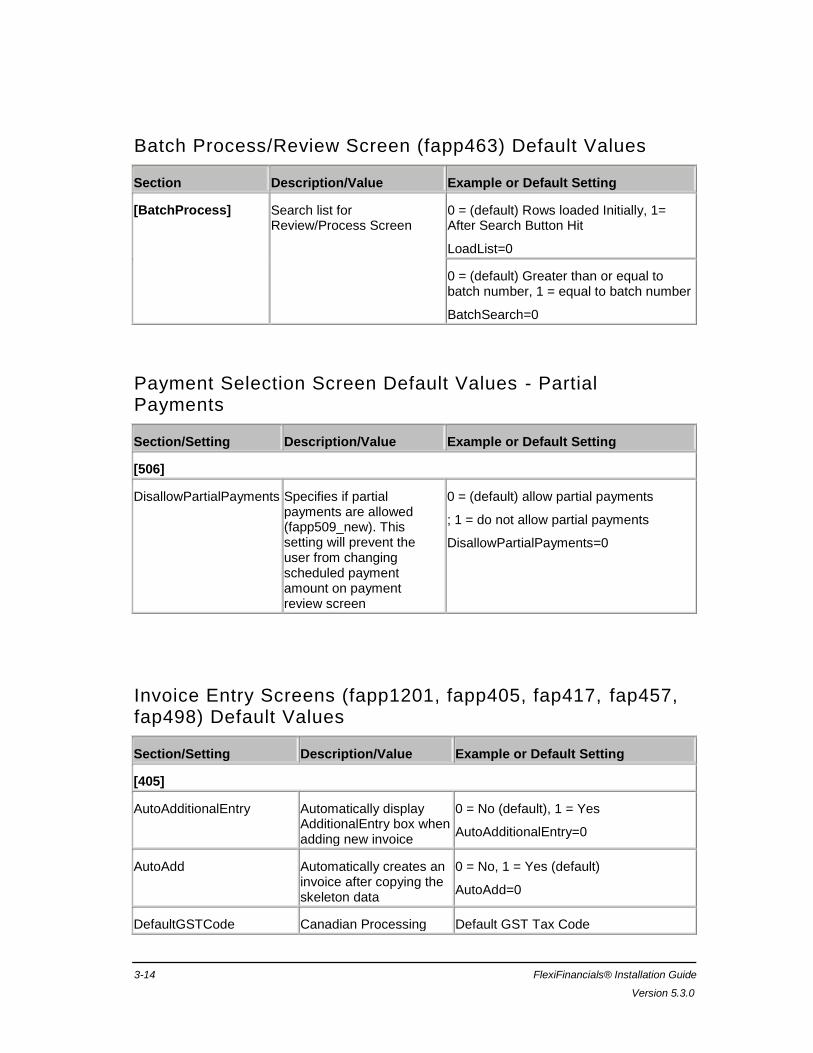
Batch Process/Review Screen (fapp463) Default Values
Section Description/Value Example or Default Setting
[BatchProcess]
Search list for Review/Process Screen
0 = (default) Rows loaded Initially, 1= After Search Button Hit
LoadList=0
0 = (default) Greater than or equal to batch number, 1 = equal to batch number
BatchSearch=0
Payment Selection Screen Default Values - Partial Payments
Section/Setting Description/Value Example or Default Setting
[506]
DisallowPartialPayments Specifies if partial payments are allowed (fapp509_new). This setting will prevent the user from changing scheduled payment amount on payment review screen
0 = (default) allow partial payments
; 1 = do not allow partial payments
DisallowPartialPayments=0
Invoice Entry Screens (fapp1201, fapp405, fap417, fap457, fap498) Default Values
Section/Setting Description/Value Example or Default Setting
[405]
AutoAdditionalEntry Automatically display AdditionalEntry box when adding new invoice
0 = No (default), 1 = Yes
AutoAdditionalEntry=0
AutoAdd Automatically creates an invoice after copying the skeleton data
0 = No, 1 = Yes (default)
AutoAdd=0
DefaultGSTCode Canadian Processing Default GST Tax Code
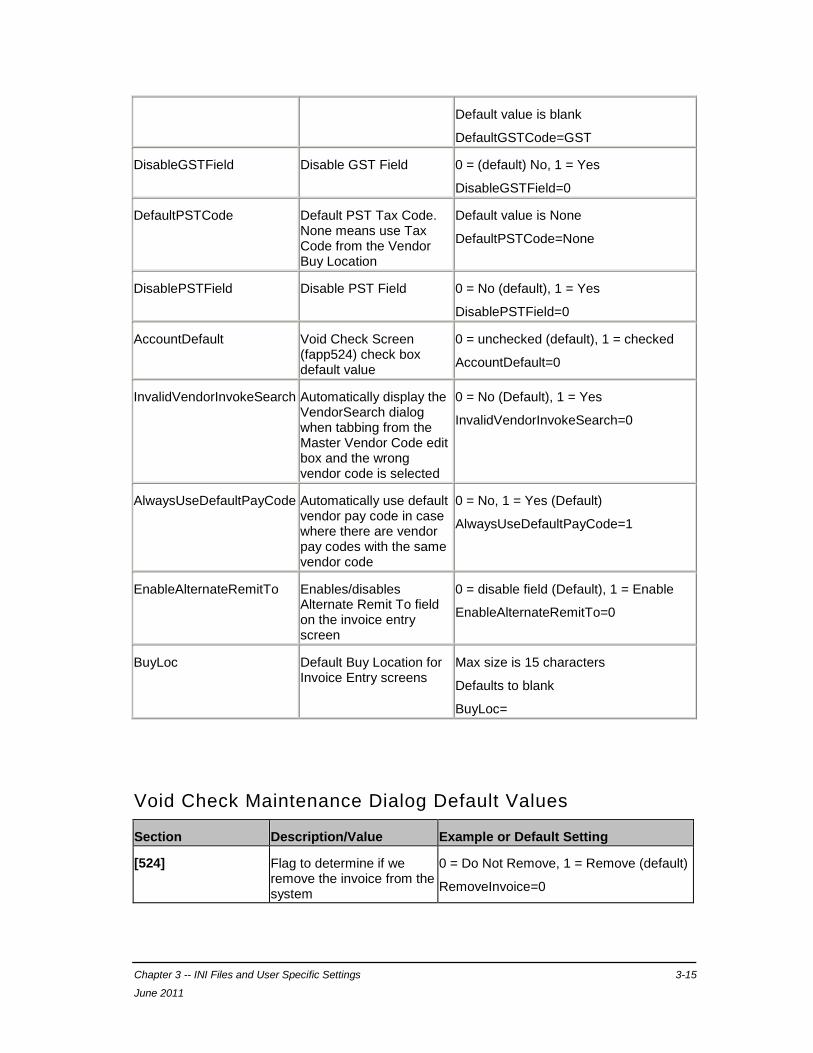
Chapter 3 -- INI Files and User Specific Settings 3-15
June 2011
Default value is blank
DefaultGSTCode=GST
DisableGSTField Disable GST Field 0 = (default) No, 1 = Yes
DisableGSTField=0
DefaultPSTCode Default PST Tax Code. None means use Tax Code from the Vendor Buy Location
Default value is None
DefaultPSTCode=None
DisablePSTField Disable PST Field 0 = No (default), 1 = Yes
DisablePSTField=0
AccountDefault Void Check Screen (fapp524) check box default value
0 = unchecked (default), 1 = checked
AccountDefault=0
InvalidVendorInvokeSearch Automatically display the VendorSearch dialog when tabbing from the Master Vendor Code edit box and the wrong vendor code is selected
0 = No (Default), 1 = Yes
InvalidVendorInvokeSearch=0
AlwaysUseDefaultPayCode Automatically use default vendor pay code in case where there are vendor pay codes with the same vendor code
0 = No, 1 = Yes (Default)
AlwaysUseDefaultPayCode=1
EnableAlternateRemitTo Enables/disables Alternate Remit To field on the invoice entry screen
0 = disable field (Default), 1 = Enable
EnableAlternateRemitTo=0
BuyLoc Default Buy Location for Invoice Entry screens
Max size is 15 characters
Defaults to blank
BuyLoc=
Void Check Maintenance Dialog Default Values
Section Description/Value Example or Default Setting
[524] Flag to determine if we remove the invoice from the system
0 = Do Not Remove, 1 = Remove (default)
RemoveInvoice=0

3-16 FlexiFinancials® Installation Guide
Version 5.3.0
Payment Production Default Settings
Section/Setting Description/Value Example or Default Setting
[PaymentProduction]
PayPath Path For Export Files (default is blank)
PayPath=c:\
Spreadsheet Default Settings - Payables
Section Description/Value Example or Default Setting
[SpreadSheet] Default value for spreadsheet mode check box
0 = Unchecked; 1 = Checked (default)
SpreadSheetMode=1
Base Invoice/Bottom Line Default Settings
Section Description/Value Example or Default Setting
[BottomLine] Timer interval, in minutes Default is 0
TimeInterval = 1
Default Settings for Tax Calculations (Vertex)
Section Description/Value Example or Default Setting
[Taxes] Flag to control whether we automatically calculate taxes
"No" = (default) do NOT calculate, "Yes" = calculate
AutoTax=No
Default Settings for Vertex
Section Description/Value Example or Default Setting
[100] Flag to contol whether we capitalize fixed asset VAT and require tax accrual
0 = (default) no, 1 = yes
CapitalizeFixedAssetVAT=0
Chapter 3 -- INI Files and User Specific Settings 3-17
June 2011
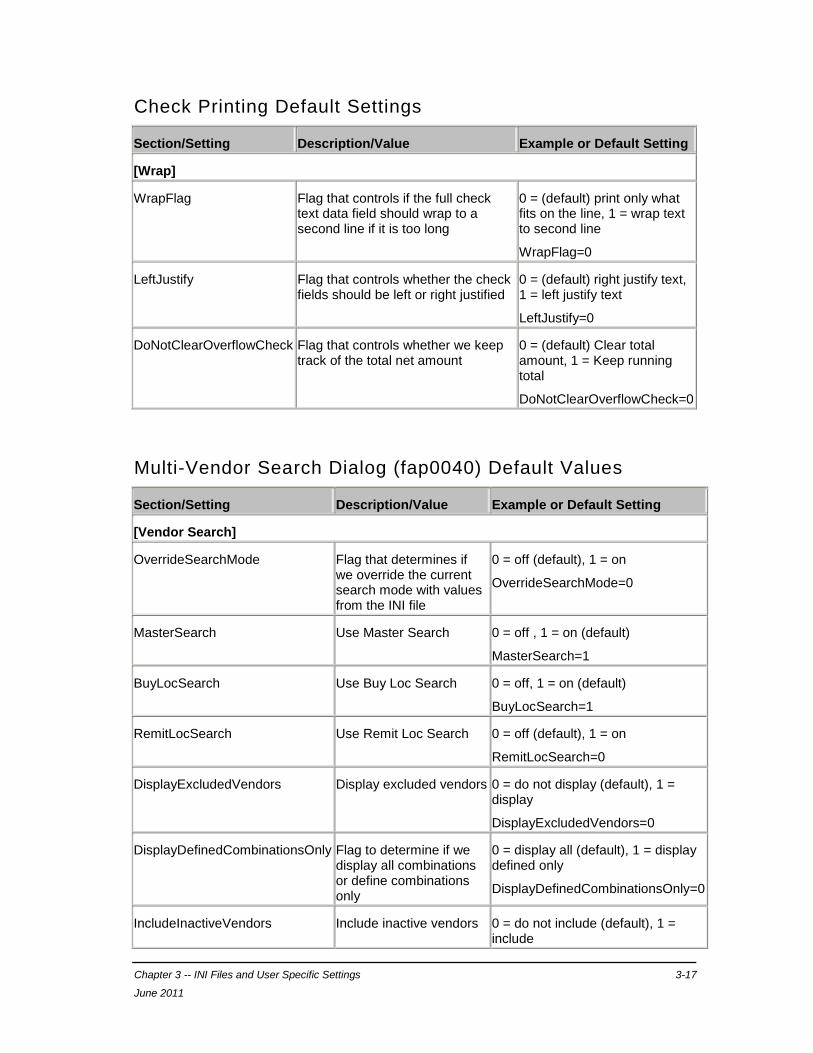
Check Printing Default Settings
Section/Setting Description/Value Example or Default Setting
[Wrap]
WrapFlag Flag that controls if the full check text data field should wrap to a second line if it is too long
0 = (default) print only what fits on the line, 1 = wrap text to second line
WrapFlag=0
LeftJustify Flag that controls whether the check fields should be left or right justified
0 = (default) right justify text, 1 = left justify text
LeftJustify=0
DoNotClearOverflowCheck Flag that controls whether we keep track of the total net amount
0 = (default) Clear total amount, 1 = Keep running total
DoNotClearOverflowCheck=0
Multi-Vendor Search Dialog (fap0040) Default Values
Section/Setting Description/Value Example or Default Setting
[Vendor Search]
OverrideSearchMode Flag that determines if we override the current search mode with values from the INI file
0 = off (default), 1 = on
OverrideSearchMode=0
MasterSearch Use Master Search 0 = off , 1 = on (default)
MasterSearch=1
BuyLocSearch Use Buy Loc Search 0 = off, 1 = on (default)
BuyLocSearch=1
RemitLocSearch Use Remit Loc Search 0 = off (default), 1 = on
RemitLocSearch=0
DisplayExcludedVendors Display excluded vendors 0 = do not display (default), 1 = display
DisplayExcludedVendors=0
DisplayDefinedCombinationsOnly Flag to determine if we display all combinations or define combinations only
0 = display all (default), 1 = display defined only
DisplayDefinedCombinationsOnly=0
IncludeInactiveVendors Include inactive vendors 0 = do not include (default), 1 = include
3-18 FlexiFinancials® Installation Guide
Version 5.3.0
IncludeInactiveVendors=0
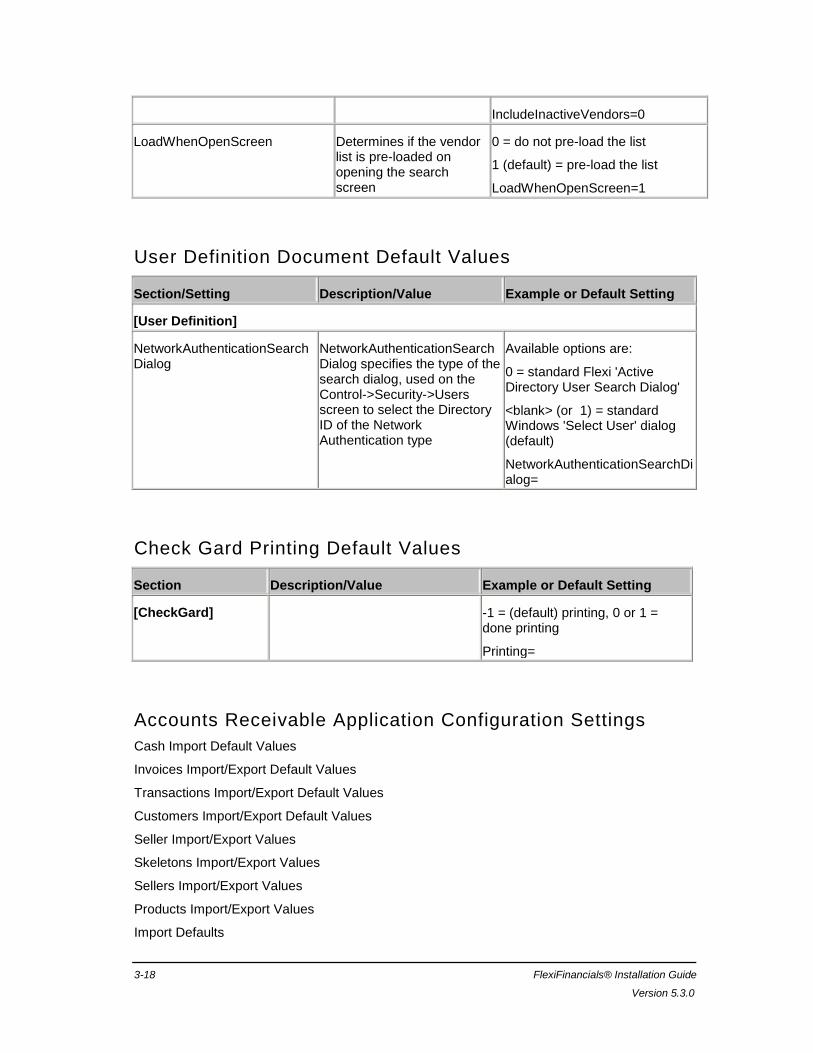
LoadWhenOpenScreen Determines if the vendor list is pre-loaded on opening the search screen
0 = do not pre-load the list
1 (default) = pre-load the list
LoadWhenOpenScreen=1
User Definition Document Default Values
Section/Setting Description/Value Example or Default Setting
[User Definition]
NetworkAuthenticationSearchDialog
NetworkAuthenticationSearchDialog specifies the type of the search dialog, used on the Control->Security->Users screen to select the Directory ID of the Network Authentication type
Available options are:
0 = standard Flexi 'Active Directory User Search Dialog'
<blank> (or 1) = standard Windows 'Select User' dialog (default)
NetworkAuthenticationSearchDialog=
Check Gard Printing Default Values
Section Description/Value Example or Default Setting
[CheckGard] -1 = (default) printing, 0 or 1 = done printing
Printing=
Accounts Receivable Application Configuration Settings
Cash Import Default Values
Invoices Import/Export Default Values
Transactions Import/Export Default Values
Customers Import/Export Default Values
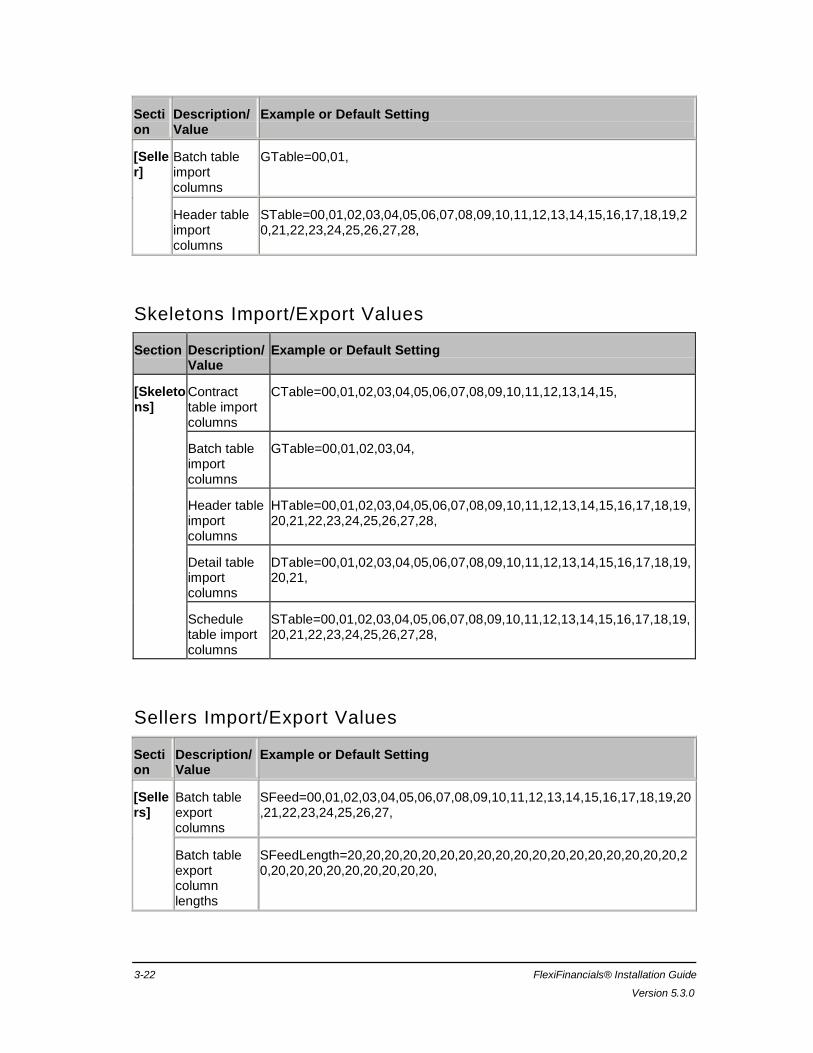
Seller Import/Export Values
Skeletons Import/Export Values
Sellers Import/Export Values
Products Import/Export Values
Import Defaults
Chapter 3 -- INI Files and User Specific Settings 3-19
June 2011
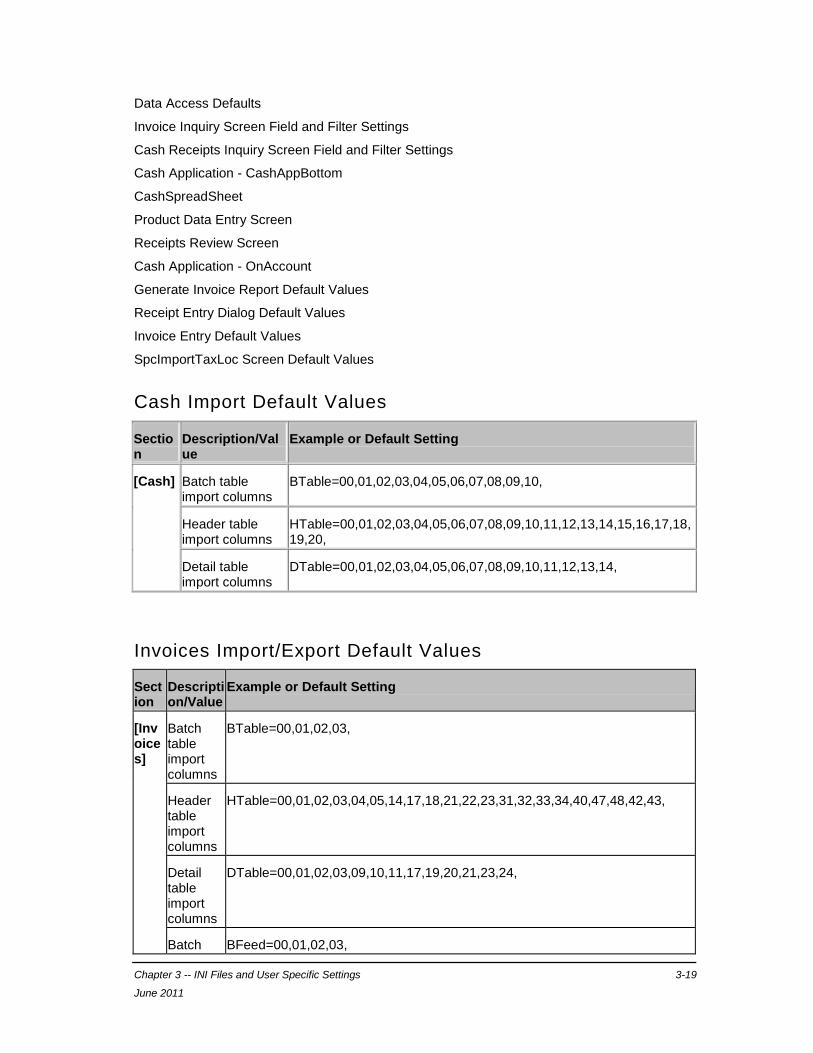
Data Access Defaults
Invoice Inquiry Screen Field and Filter Settings
Cash Receipts Inquiry Screen Field and Filter Settings
Cash Application - CashAppBottom
CashSpreadSheet
Product Data Entry Screen
Receipts Review Screen
Cash Application - OnAccount
Generate Invoice Report Default Values
Receipt Entry Dialog Default Values
Invoice Entry Default Values
SpcImportTaxLoc Screen Default Values
Cash Import Default Values
Section
Description/Value
Example or Default Setting
[Cash] Batch table import columns
BTable=00,01,02,03,04,05,06,07,08,09,10,
Header table import columns
HTable=00,01,02,03,04,05,06,07,08,09,10,11,12,13,14,15,16,17,18,19,20,
Detail table import columns
DTable=00,01,02,03,04,05,06,07,08,09,10,11,12,13,14,
Invoices Import/Export Default Values
Section
Description/Value
Example or Default Setting
[Invoices]
Batch table import columns
BTable=00,01,02,03,
Header table import columns
HTable=00,01,02,03,04,05,14,17,18,21,22,23,31,32,33,34,40,47,48,42,43,
Detail table import columns
DTable=00,01,02,03,09,10,11,17,19,20,21,23,24,
Batch BFeed=00,01,02,03,
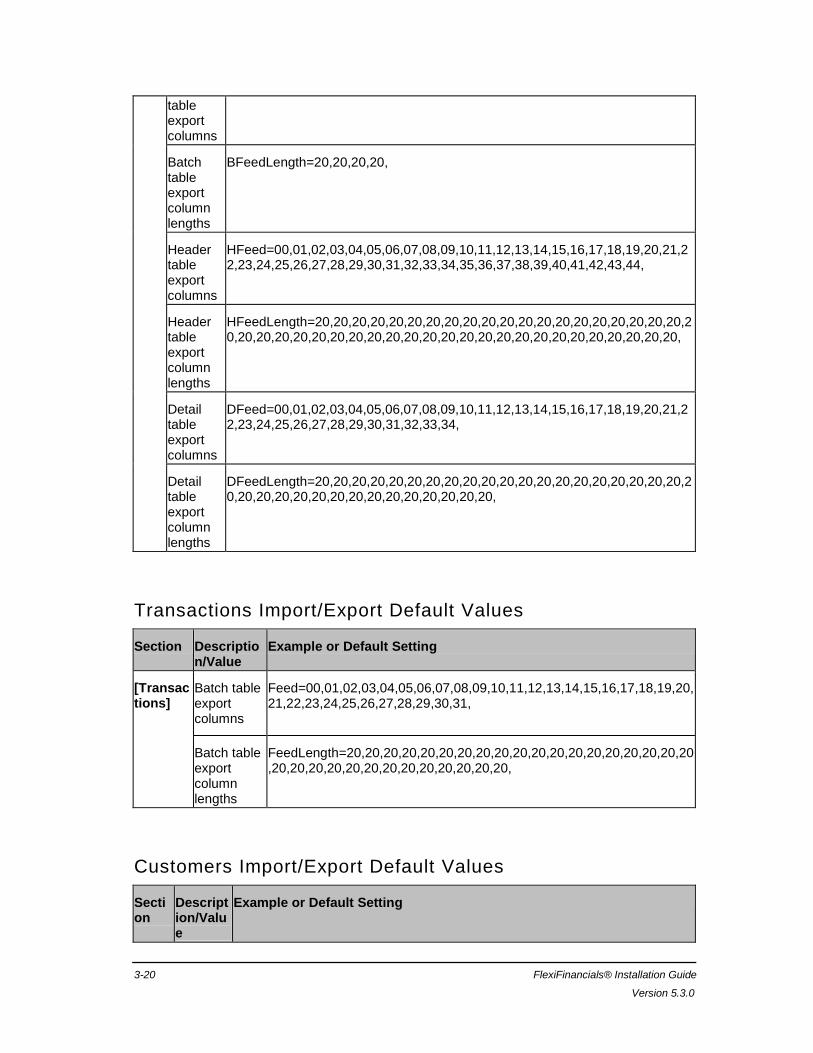
3-20 FlexiFinancials® Installation Guide
Version 5.3.0
table export columns
Batch table export column lengths
BFeedLength=20,20,20,20,
Header table export columns
HFeed=00,01,02,03,04,05,06,07,08,09,10,11,12,13,14,15,16,17,18,19,20,21,22,23,24,25,26,27,28,29,30,31,32,33,34,35,36,37,38,39,40,41,42,43,44,
Header table export column lengths
HFeedLength=20,20,20,20,20,20,20,20,20,20,20,20,20,20,20,20,20,20,20,20,20,20,20,20,20,20,20,20,20,20,20,20,20,20,20,20,20,20,20,20,20,20,20,20,20,
Detail table export columns
DFeed=00,01,02,03,04,05,06,07,08,09,10,11,12,13,14,15,16,17,18,19,20,21,22,23,24,25,26,27,28,29,30,31,32,33,34,
Detail table export column lengths
DFeedLength=20,20,20,20,20,20,20,20,20,20,20,20,20,20,20,20,20,20,20,20,20,20,20,20,20,20,20,20,20,20,20,20,20,20,20,
Transactions Import/Export Default Values
Section Description/Value
Example or Default Setting
[Transactions]
Batch table export columns
Feed=00,01,02,03,04,05,06,07,08,09,10,11,12,13,14,15,16,17,18,19,20,21,22,23,24,25,26,27,28,29,30,31,
Batch table export column lengths
FeedLength=20,20,20,20,20,20,20,20,20,20,20,20,20,20,20,20,20,20,20,20,20,20,20,20,20,20,20,20,20,20,20,20,
Customers Import/Export Default Values
Section
Description/Value
Example or Default Setting
Chapter 3 -- INI Files and User Specific Settings 3-21
June 2011
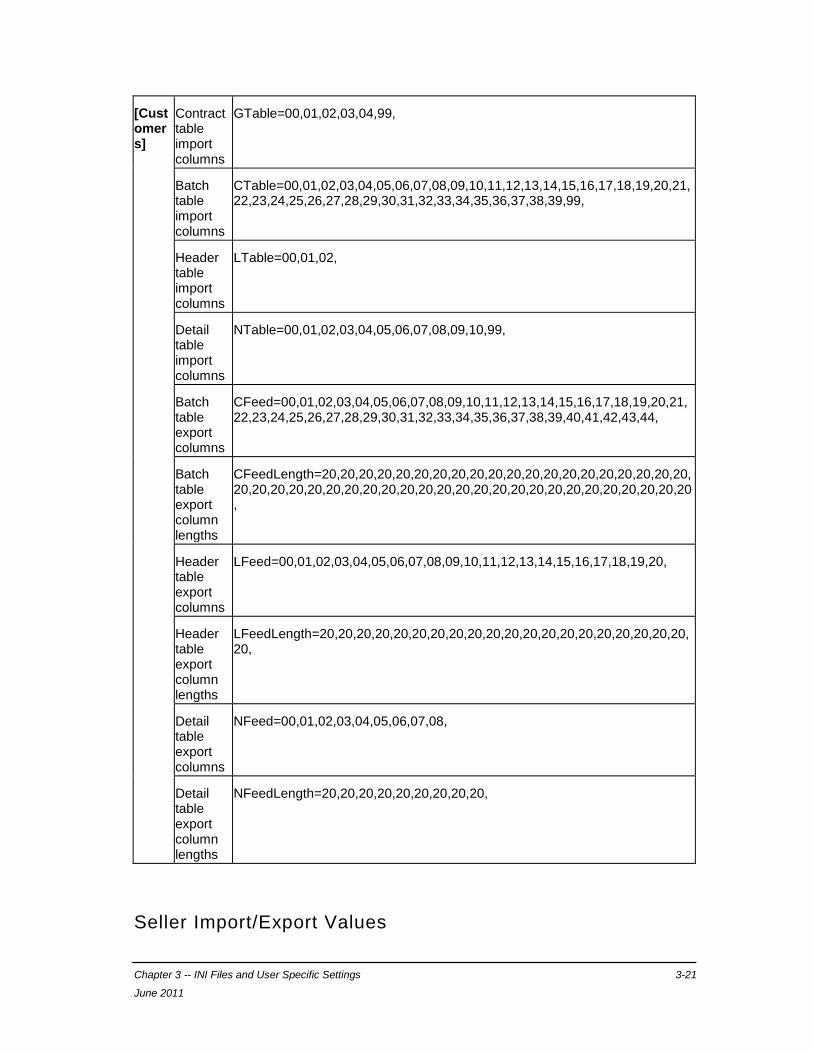
[Customers]
Contract table import columns
GTable=00,01,02,03,04,99,
Batch table import columns
CTable=00,01,02,03,04,05,06,07,08,09,10,11,12,13,14,15,16,17,18,19,20,21,22,23,24,25,26,27,28,29,30,31,32,33,34,35,36,37,38,39,99,
Header table import columns
LTable=00,01,02,
Detail table import columns
NTable=00,01,02,03,04,05,06,07,08,09,10,99,
Batch table export columns
CFeed=00,01,02,03,04,05,06,07,08,09,10,11,12,13,14,15,16,17,18,19,20,21,22,23,24,25,26,27,28,29,30,31,32,33,34,35,36,37,38,39,40,41,42,43,44,
Batch table export column lengths
CFeedLength=20,20,20,20,20,20,20,20,20,20,20,20,20,20,20,20,20,20,20,20,20,20,20,20,20,20,20,20,20,20,20,20,20,20,20,20,20,20,20,20,20,20,20,20,20,
Header table export columns
LFeed=00,01,02,03,04,05,06,07,08,09,10,11,12,13,14,15,16,17,18,19,20,
Header table export column lengths
LFeedLength=20,20,20,20,20,20,20,20,20,20,20,20,20,20,20,20,20,20,20,20,20,
Detail table export columns
NFeed=00,01,02,03,04,05,06,07,08,
Detail table export column lengths
NFeedLength=20,20,20,20,20,20,20,20,20,
Seller Import/Export Values
3-22 FlexiFinancials® Installation Guide
Version 5.3.0
Section
Description/Value
Example or Default Setting
[Seller]
Batch table import columns
GTable=00,01,
Header table import columns
STable=00,01,02,03,04,05,06,07,08,09,10,11,12,13,14,15,16,17,18,19,20,21,22,23,24,25,26,27,28,
Skeletons Import/Export Values
Section Description/Value
Example or Default Setting
[Skeletons]
Contract table import columns
CTable=00,01,02,03,04,05,06,07,08,09,10,11,12,13,14,15,
Batch table import columns
GTable=00,01,02,03,04,
Header table import columns
HTable=00,01,02,03,04,05,06,07,08,09,10,11,12,13,14,15,16,17,18,19,20,21,22,23,24,25,26,27,28,
Detail table import columns
DTable=00,01,02,03,04,05,06,07,08,09,10,11,12,13,14,15,16,17,18,19,20,21,
Schedule table import columns
STable=00,01,02,03,04,05,06,07,08,09,10,11,12,13,14,15,16,17,18,19,20,21,22,23,24,25,26,27,28,
Sellers Import/Export Values
Section
Description/Value
Example or Default Setting
[Sellers]
Batch table export columns
SFeed=00,01,02,03,04,05,06,07,08,09,10,11,12,13,14,15,16,17,18,19,20,21,22,23,24,25,26,27,
Batch table export column lengths
SFeedLength=20,20,20,20,20,20,20,20,20,20,20,20,20,20,20,20,20,20,20,20,20,20,20,20,20,20,20,20,

Chapter 3 -- INI Files and User Specific Settings 3-23
June 2011
Products Import/Export Values
Section Description/Value Example or Default Setting
[Products] Batch table export columns
PFeed=00,01,02,03,04,05,06,07,08,09,10,11,12,13,
Batch table export column lengths
PFeedLength=20,20,20,20,20,20,20,20,20,20,20,20,20,20,
Import Defaults
Section Description/Value Example or Default Setting
[Import] Flag to determine if we use transactions for the import
"No" = (default) use transactions, "Yes" = no transactions, cache tables
CacheTables=No
Data Access Defaults
Section/Setting Description/Value Example or Default Setting
[DataAccess]
RetrieveCount Number of database rows to retrieve each time
Default value is 15
RetrieveCount=15
Invoice Inquiry Screen Field and Filter Settings
Section/Setting Description/Value Example or Default Setting
[Invoice Inquiry]
Field and Filter counts
Field Count, default is -1
Filter Count, default is -1
Field key entries Field key entries use the format: Field<N>Key where <N> is the key for the database column
Default value for the key is blank.
Field entries Field entries use the format: Field<N>_<P> where <N> is the field index and <P> is the property index
Field properties map Field properties map as follows:
3-24 FlexiFinancials® Installation Guide
Version 5.3.0
1 = Internal name/key (string)
2 = Resource ID for field label
3 = Field Length
4 = Field Type:
0 = unknown
1 = currency
2 = editable text
3 = date
4 = float
5 = integer
6 = float with 4 decimal places
5 = Order By Flag, 0 = (default) not used, 1 = order by this field
6 = Sort direction, 0 = (default) ascending, 1 = descending
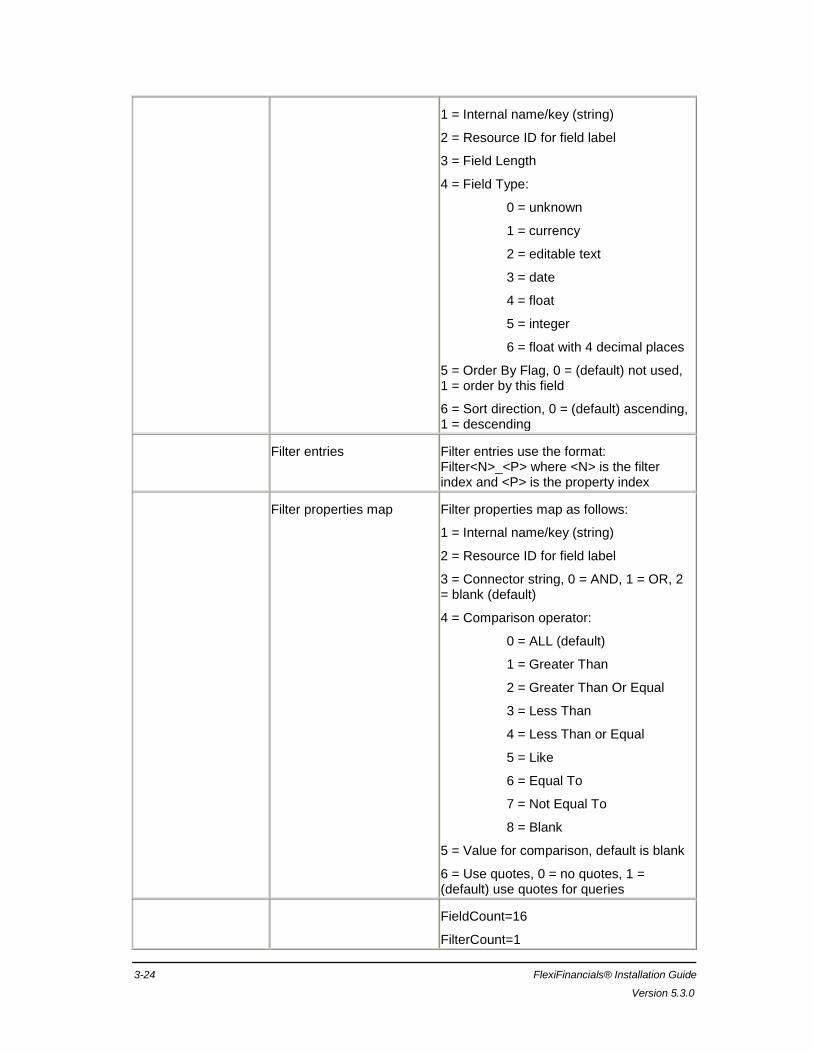
Filter entries Filter entries use the format: Filter<N>_<P> where <N> is the filter index and <P> is the property index
Filter properties map Filter properties map as follows:
1 = Internal name/key (string)
2 = Resource ID for field label
3 = Connector string, 0 = AND, 1 = OR, 2 = blank (default)
4 = Comparison operator:
0 = ALL (default)
1 = Greater Than
2 = Greater Than Or Equal
3 = Less Than
4 = Less Than or Equal
5 = Like
6 = Equal To
7 = Not Equal To
8 = Blank
5 = Value for comparison, default is blank
6 = Use quotes, 0 = no quotes, 1 = (default) use quotes for queries
FieldCount=16
FilterCount=1
Chapter 3 -- INI Files and User Specific Settings 3-25
June 2011
Field1_1=Invoice ID
Field1_2=INV_ID
Field1_3=15
Field1_4=2
Field1_5=1
Field1_6=0
Field2_1=Invoice Batch ID
Field2_2=INV_BATCH_ID
Field2_3=15
Field2_4=2
Field2_5=0
Field2_6=
Field3_1=Customer ID
Field3_2=CUST_ID
Field3_3=15
Field3_4=2
Field3_5=0
Field3_6=
Field4_1=Ship To ID
Field4_2=SHIP_TO_ID
Field4_3=15
Field4_4=2
Field4_5=0
Field4_6=
Field5_1=Invoice Date
Field5_2=INV_DATE
Field5_3=10
Field5_4=3
Field5_5=0
Field5_6=
Field6_1=Invoice Due Date
Field6_2=INV_DU_DATE
Field6_3=10
Field6_4=3
Field6_5=0
Field6_6=
3-26 FlexiFinancials® Installation Guide
Version 5.3.0
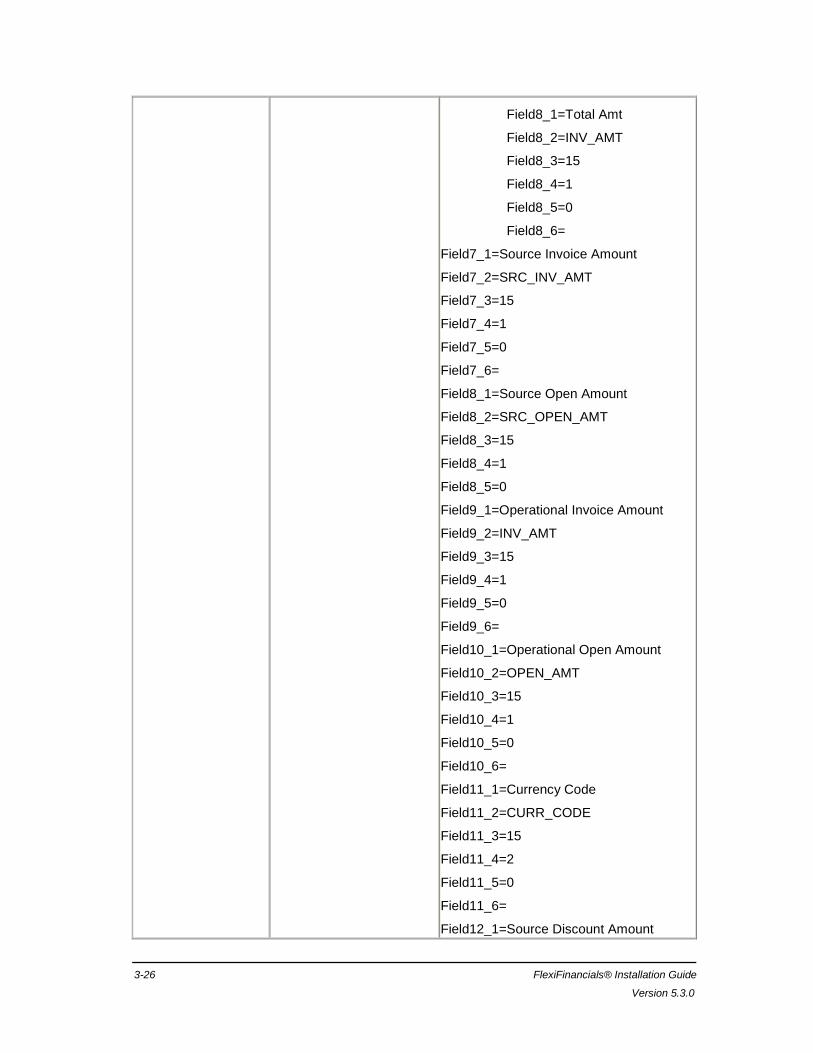
Field8_1=Total Amt
Field8_2=INV_AMT
Field8_3=15
Field8_4=1
Field8_5=0
Field8_6=
Field7_1=Source Invoice Amount
Field7_2=SRC_INV_AMT
Field7_3=15
Field7_4=1
Field7_5=0
Field7_6=
Field8_1=Source Open Amount
Field8_2=SRC_OPEN_AMT
Field8_3=15
Field8_4=1
Field8_5=0
Field9_1=Operational Invoice Amount
Field9_2=INV_AMT
Field9_3=15
Field9_4=1
Field9_5=0
Field9_6=
Field10_1=Operational Open Amount
Field10_2=OPEN_AMT
Field10_3=15
Field10_4=1
Field10_5=0
Field10_6=
Field11_1=Currency Code
Field11_2=CURR_CODE
Field11_3=15
Field11_4=2
Field11_5=0
Field11_6=
Field12_1=Source Discount Amount

Chapter 3 -- INI Files and User Specific Settings 3-27
June 2011
Field12_2=SRC_DISC_AMT
Field12_3=15
Field12_4=1
Field12_5=0
Field12_6=
Field13_1=Operational Discount Amount
Field13_2=DISC_AMT
Field13_3=15
Field13_4=1
Field13_5=0
Field13_6=
Field14_1=Discount Due Date
Field14_2=DISC_DU_DATE
Field14_3=10
Field14_4=3
Field14_5=0
Field14_6=
Field15_1=Special Handling Message
Field15_2=SPEC_HNDL_MSG
Field15_3=30
Field15_4=1
Field15_5=0
Field15_6=
Field16_1=Reversed
Field16_2=REVERSED_FLAG
Field16_3=10
Field16_4=2
Field16_5=0
Field16_6=
Filter1_1=Cust ID
Filter1_2=CUST_ID
Filter1_3=2
Filter1_4=5
Filter1_5=%
Filter1_6=1
Field1Key=0
3-28 FlexiFinancials® Installation Guide
Version 5.3.0
Field2Key=1
Field3Key=2
Field4Key=4
Field5Key=17
Field6Key=38
Field7Key=47
Field8Key=48
Field9Key=21
Field10Key=22
Field11Key=23
Field12Key=34
Field13Key=35
Field14Key=36
Field15Key=41
Field16Key=50
Filter1Key=
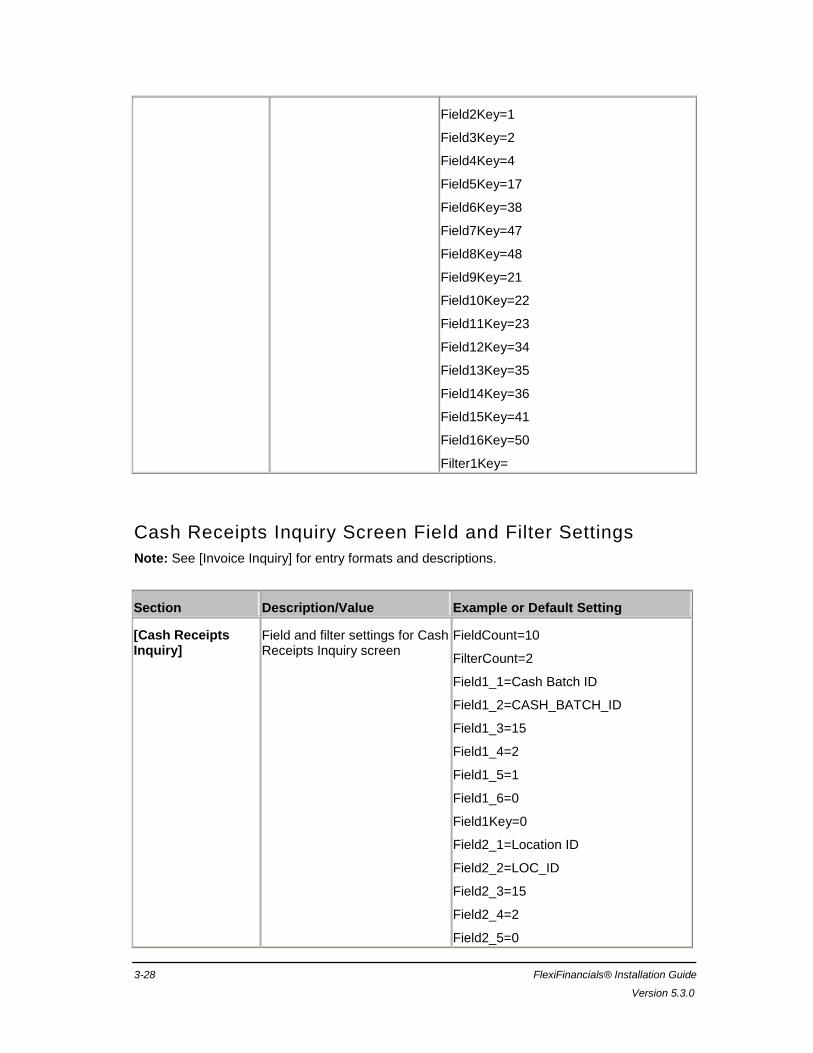
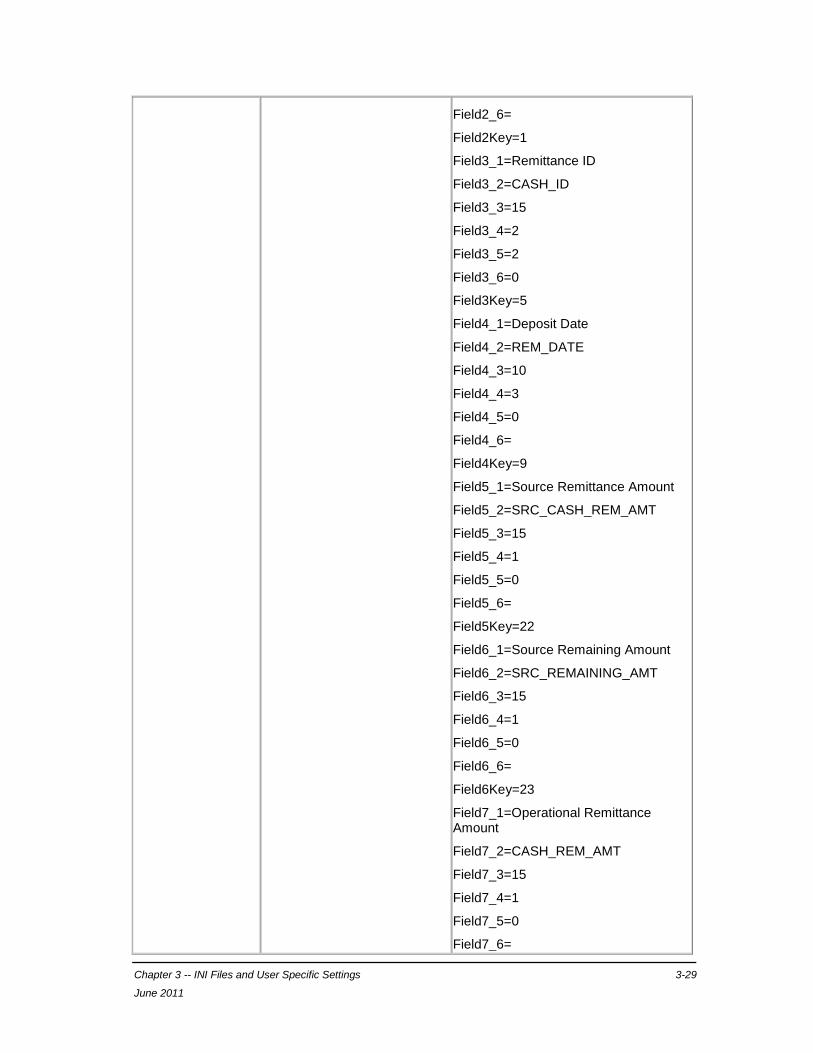
Cash Receipts Inquiry Screen Field and Filter Settings
Note: See [Invoice Inquiry] for entry formats and descriptions.
Section Description/Value Example or Default Setting
[Cash Receipts Inquiry]
Field and filter settings for Cash Receipts Inquiry screen
FieldCount=10
FilterCount=2
Field1_1=Cash Batch ID
Field1_2=CASH_BATCH_ID
Field1_3=15
Field1_4=2
Field1_5=1
Field1_6=0
Field1Key=0
Field2_1=Location ID
Field2_2=LOC_ID
Field2_3=15
Field2_4=2
Field2_5=0
Chapter 3 -- INI Files and User Specific Settings 3-29
June 2011
Field2_6=
Field2Key=1
Field3_1=Remittance ID
Field3_2=CASH_ID
Field3_3=15
Field3_4=2
Field3_5=2
Field3_6=0
Field3Key=5
Field4_1=Deposit Date
Field4_2=REM_DATE
Field4_3=10
Field4_4=3
Field4_5=0
Field4_6=
Field4Key=9
Field5_1=Source Remittance Amount
Field5_2=SRC_CASH_REM_AMT
Field5_3=15
Field5_4=1
Field5_5=0
Field5_6=
Field5Key=22
Field6_1=Source Remaining Amount
Field6_2=SRC_REMAINING_AMT
Field6_3=15
Field6_4=1
Field6_5=0
Field6_6=
Field6Key=23
Field7_1=Operational Remittance Amount
Field7_2=CASH_REM_AMT
Field7_3=15
Field7_4=1
Field7_5=0
Field7_6=
3-30 FlexiFinancials® Installation Guide
Version 5.3.0
Field7Key=8
Field8_1=Operational Remaining Amount
Field8_2=REMAINING_AMT
Field8_3=15
Field8_4=1
Field8_5=0
Field8_6=
Field8Key=10
Field9_1=Currency Code
Field9_2=CURR_CODE
Field9_3=15
Field9_4=2
Field9_5=0
Field9_6=
Field9Key=13
Field10_1=Reversed
Field10_2=REVERSED_FLAG
Field10_3=10
Field10_4=2
Field10_5=0
Field10_6=
Field10Key=24
Filter1_1=Cash Batch ID
Filter1_2=CASH_BATCH_ID
Filter1_3=2
Filter1_4=5
Filter1_5=%
Filter1_6=1
Filter1Key=
Filter2_1=Remittance ID
Filter2_2=CASH_ID
Filter2_3=0
Filter2_4=5
Filter2_5=%
Filter2_6=1
Filter2Key=
Chapter 3 -- INI Files and User Specific Settings 3-31
June 2011
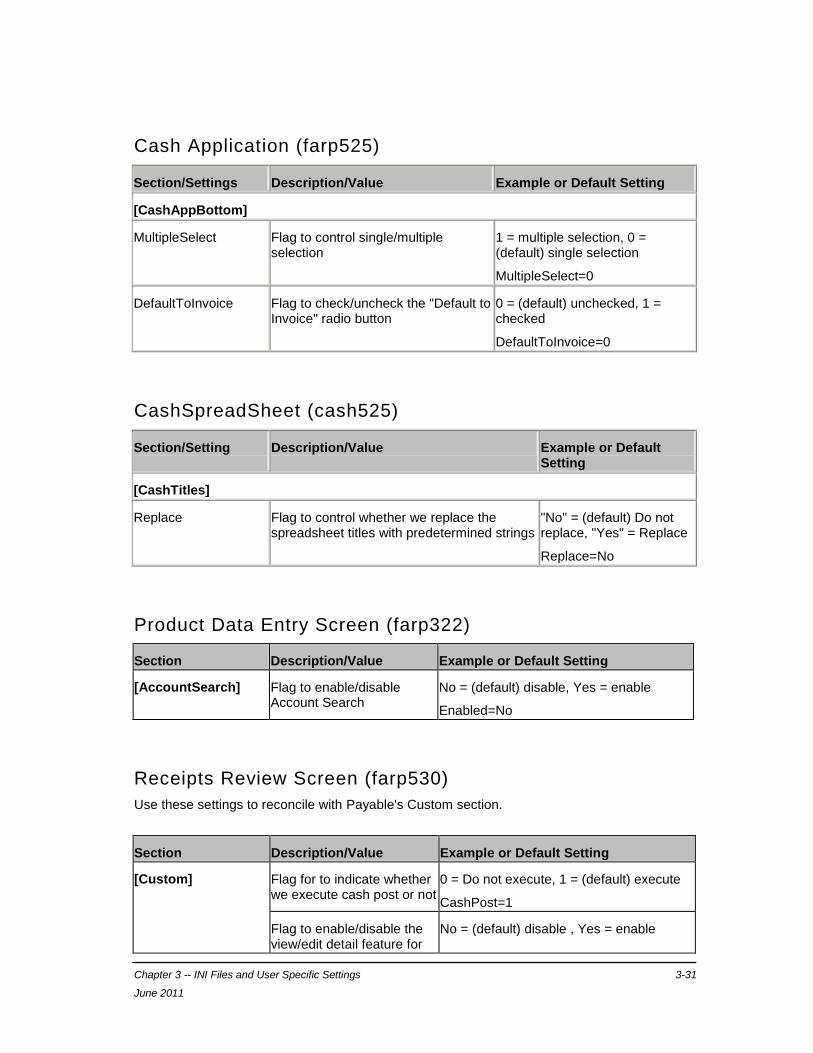
Cash Application (farp525)
Section/Settings Description/Value Example or Default Setting
[CashAppBottom]
MultipleSelect Flag to control single/multiple selection
1 = multiple selection, 0 = (default) single selection
MultipleSelect=0
DefaultToInvoice Flag to check/uncheck the "Default to Invoice" radio button
0 = (default) unchecked, 1 = checked
DefaultToInvoice=0
CashSpreadSheet (cash525)
Section/Setting Description/Value Example or Default Setting
[CashTitles]
Replace Flag to control whether we replace the spreadsheet titles with predetermined strings
"No" = (default) Do not replace, "Yes" = Replace
Replace=No
Product Data Entry Screen (farp322)
Section Description/Value Example or Default Setting
[AccountSearch] Flag to enable/disable Account Search
No = (default) disable, Yes = enable
Enabled=No
Receipts Review Screen (farp530)
Use these settings to reconcile with Payable's Custom section.
Section Description/Value Example or Default Setting
[Custom] Flag for to indicate whether we execute cash post or not
0 = Do not execute, 1 = (default) execute
CashPost=1
Flag to enable/disable the view/edit detail feature for
No = (default) disable , Yes = enable
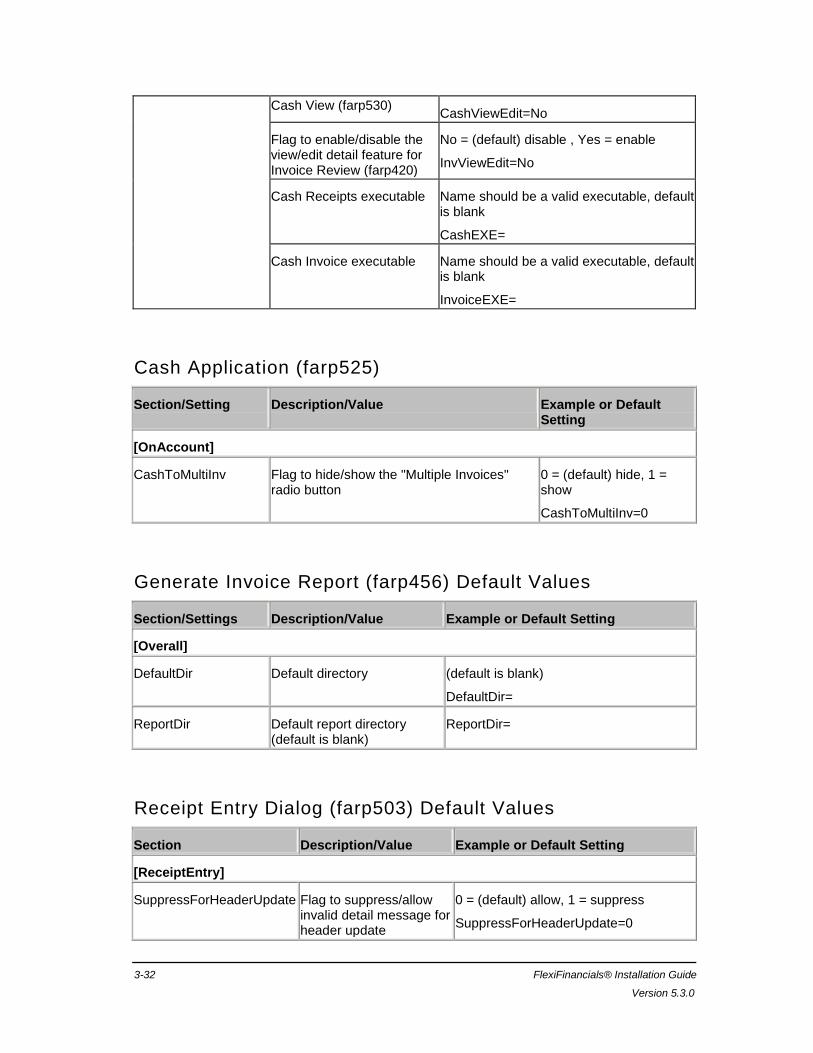
3-32 FlexiFinancials® Installation Guide
Version 5.3.0
Cash View (farp530) CashViewEdit=No
Flag to enable/disable the view/edit detail feature for Invoice Review (farp420)
No = (default) disable , Yes = enable
InvViewEdit=No
Cash Receipts executable Name should be a valid executable, default is blank
CashEXE=
Cash Invoice executable Name should be a valid executable, default is blank
InvoiceEXE=
Cash Application (farp525)
Section/Setting Description/Value Example or Default Setting
[OnAccount]
CashToMultiInv Flag to hide/show the "Multiple Invoices" radio button
0 = (default) hide, 1 = show
CashToMultiInv=0
Generate Invoice Report (farp456) Default Values
Section/Settings Description/Value Example or Default Setting
[Overall]
DefaultDir Default directory (default is blank)
DefaultDir=
ReportDir Default report directory (default is blank)
ReportDir=
Receipt Entry Dialog (farp503) Default Values
Section Description/Value Example or Default Setting
[ReceiptEntry]
SuppressForHeaderUpdate Flag to suppress/allow invalid detail message for header update
0 = (default) allow, 1 = suppress
SuppressForHeaderUpdate=0
Chapter 3 -- INI Files and User Specific Settings 3-33
June 2011
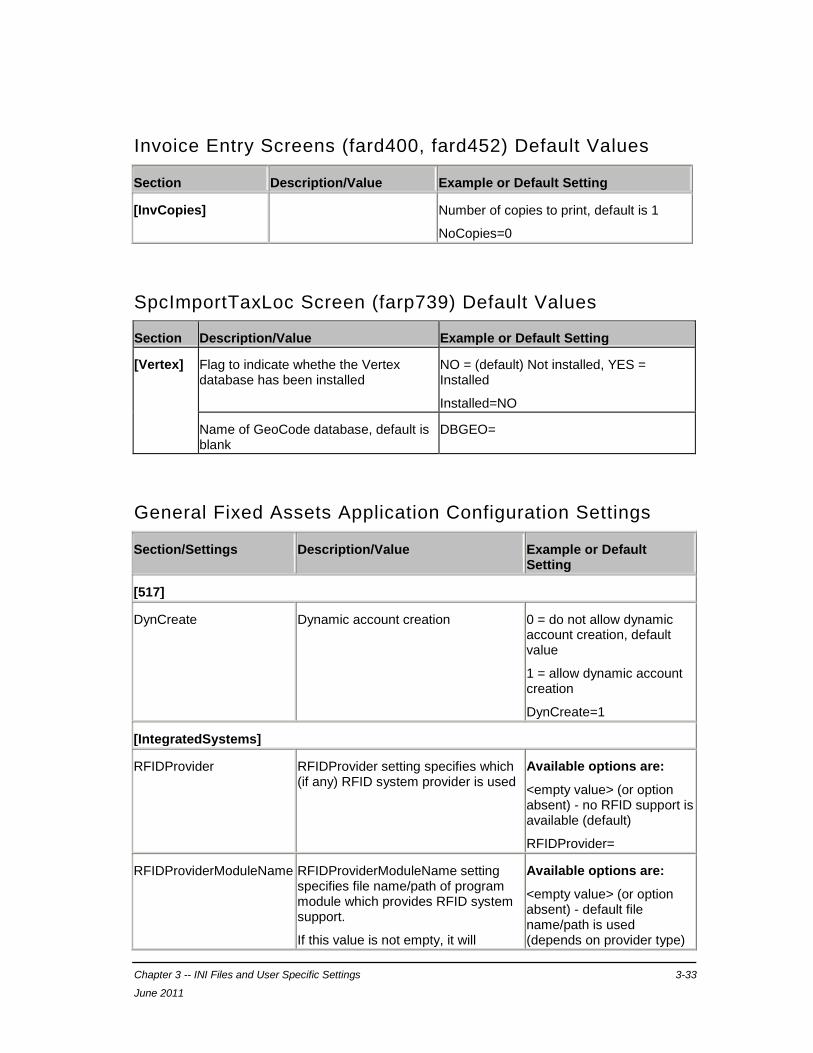
Invoice Entry Screens (fard400, fard452) Default Values
Section Description/Value Example or Default Setting
[InvCopies] Number of copies to print, default is 1
NoCopies=0
SpcImportTaxLoc Screen (farp739) Default Values
Section Description/Value Example or Default Setting
[Vertex] Flag to indicate whethe the Vertex database has been installed
NO = (default) Not installed, YES = Installed
Installed=NO
Name of GeoCode database, default is blank
DBGEO=
General Fixed Assets Application Configuration Settings
Section/Settings Description/Value Example or Default Setting
[517]
DynCreate Dynamic account creation 0 = do not allow dynamic account creation, default value
1 = allow dynamic account creation
DynCreate=1
[IntegratedSystems]
RFIDProvider RFIDProvider setting specifies which (if any) RFID system provider is used
Available options are:
<empty value> (or option absent) - no RFID support is available (default)
RFIDProvider=
RFIDProviderModuleName RFIDProviderModuleName setting specifies file name/path of program module which provides RFID system support.
If this value is not empty, it will
Available options are:
<empty value> (or option absent) - default file name/path is used (depends on provider type)
3-34 FlexiFinancials® Installation Guide
Version 5.3.0
override the value retrieved from the registry or other places for location and name of the DLL.
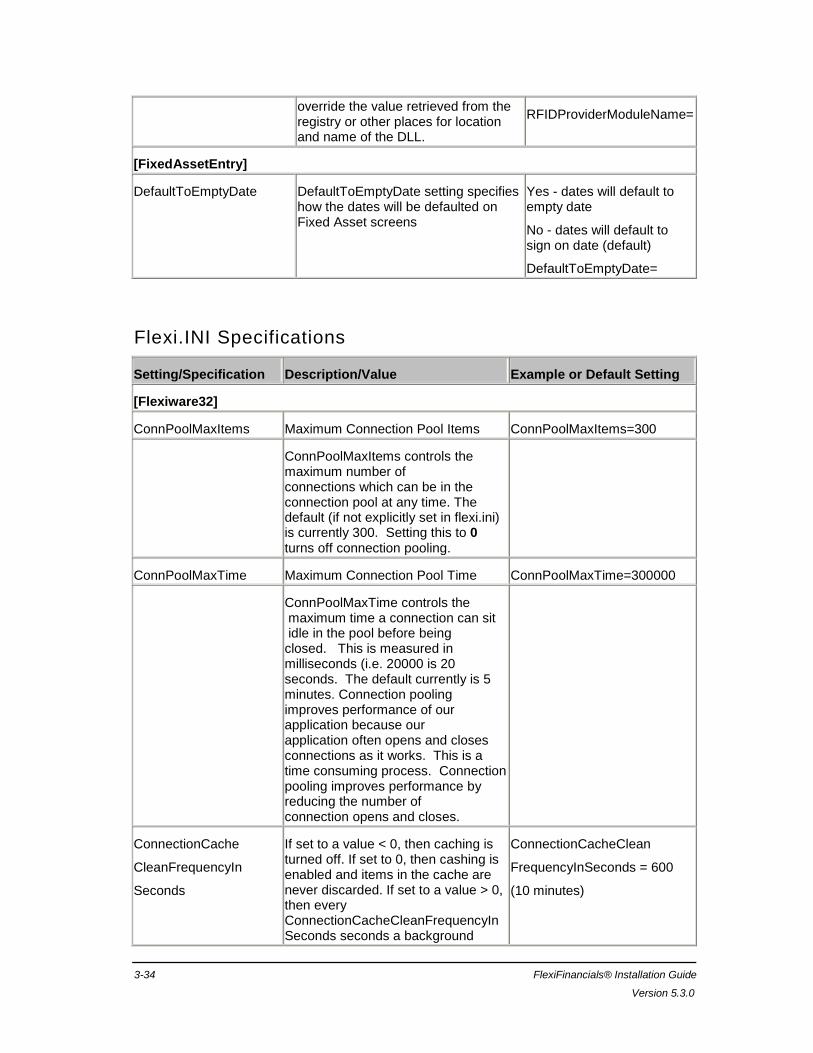
RFIDProviderModuleName=
[FixedAssetEntry]
DefaultToEmptyDate DefaultToEmptyDate setting specifies how the dates will be defaulted on Fixed Asset screens
Yes - dates will default to empty date
No - dates will default to sign on date (default)
DefaultToEmptyDate=
Flexi.INI Specifications
Setting/Specification Description/Value Example or Default Setting
[Flexiware32]
ConnPoolMaxItems Maximum Connection Pool Items ConnPoolMaxItems=300
ConnPoolMaxItems controls the maximum number of connections which can be in the connection pool at any time. The default (if not explicitly set in flexi.ini) is currently 300. Setting this to 0 turns off connection pooling.
ConnPoolMaxTime Maximum Connection Pool Time ConnPoolMaxTime=300000
ConnPoolMaxTime controls the maximum time a connection can sit idle in the pool before being closed. This is measured in milliseconds (i.e. 20000 is 20 seconds. The default currently is 5 minutes. Connection pooling improves performance of our application because our application often opens and closes connections as it works. This is a time consuming process. Connection pooling improves performance by reducing the number of connection opens and closes.
ConnectionCache
CleanFrequencyIn
Seconds
If set to a value < 0, then caching is turned off. If set to 0, then cashing is enabled and items in the cache are never discarded. If set to a value > 0, then every ConnectionCacheCleanFrequencyInSeconds seconds a background
ConnectionCacheClean
FrequencyInSeconds = 600
(10 minutes)
Chapter 3 -- INI Files and User Specific Settings 3-35
June 2011
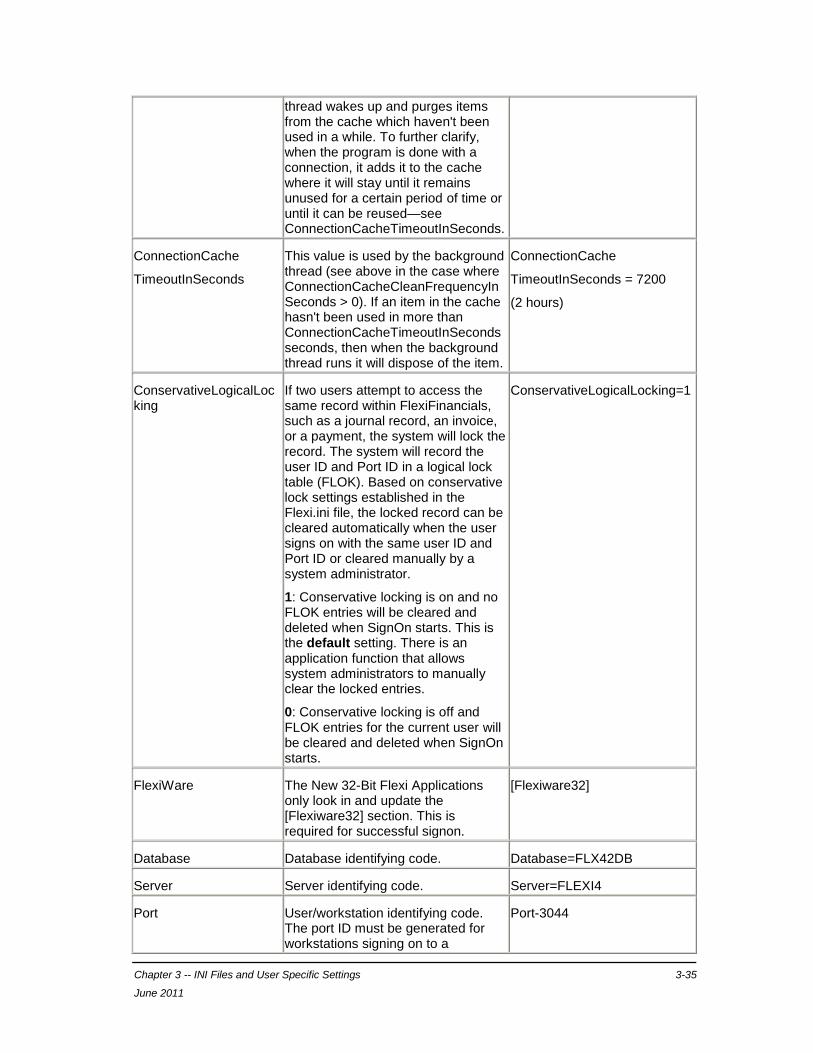
thread wakes up and purges items from the cache which haven't been used in a while. To further clarify, when the program is done with a connection, it adds it to the cache where it will stay until it remains unused for a certain period of time or until it can be reused—see ConnectionCacheTimeoutInSeconds.
ConnectionCache
TimeoutInSeconds
This value is used by the background thread (see above in the case where ConnectionCacheCleanFrequencyInSeconds > 0). If an item in the cache hasn't been used in more than ConnectionCacheTimeoutInSeconds seconds, then when the background thread runs it will dispose of the item.
ConnectionCache
TimeoutInSeconds = 7200
(2 hours)
ConservativeLogicalLocking
If two users attempt to access the same record within FlexiFinancials, such as a journal record, an invoice, or a payment, the system will lock the record. The system will record the user ID and Port ID in a logical lock table (FLOK). Based on conservative lock settings established in the Flexi.ini file, the locked record can be cleared automatically when the user signs on with the same user ID and Port ID or cleared manually by a system administrator.
1: Conservative locking is on and no FLOK entries will be cleared and deleted when SignOn starts. This is the default setting. There is an application function that allows system administrators to manually clear the locked entries.
0: Conservative locking is off and FLOK entries for the current user will be cleared and deleted when SignOn starts.
ConservativeLogicalLocking=1
FlexiWare The New 32-Bit Flexi Applications only look in and update the [Flexiware32] section. This is required for successful signon.
[Flexiware32]
Database Database identifying code. Database=FLX42DB
Server Server identifying code. Server=FLEXI4
Port User/workstation identifying code. The port ID must be generated for workstations signing on to a
Port-3044
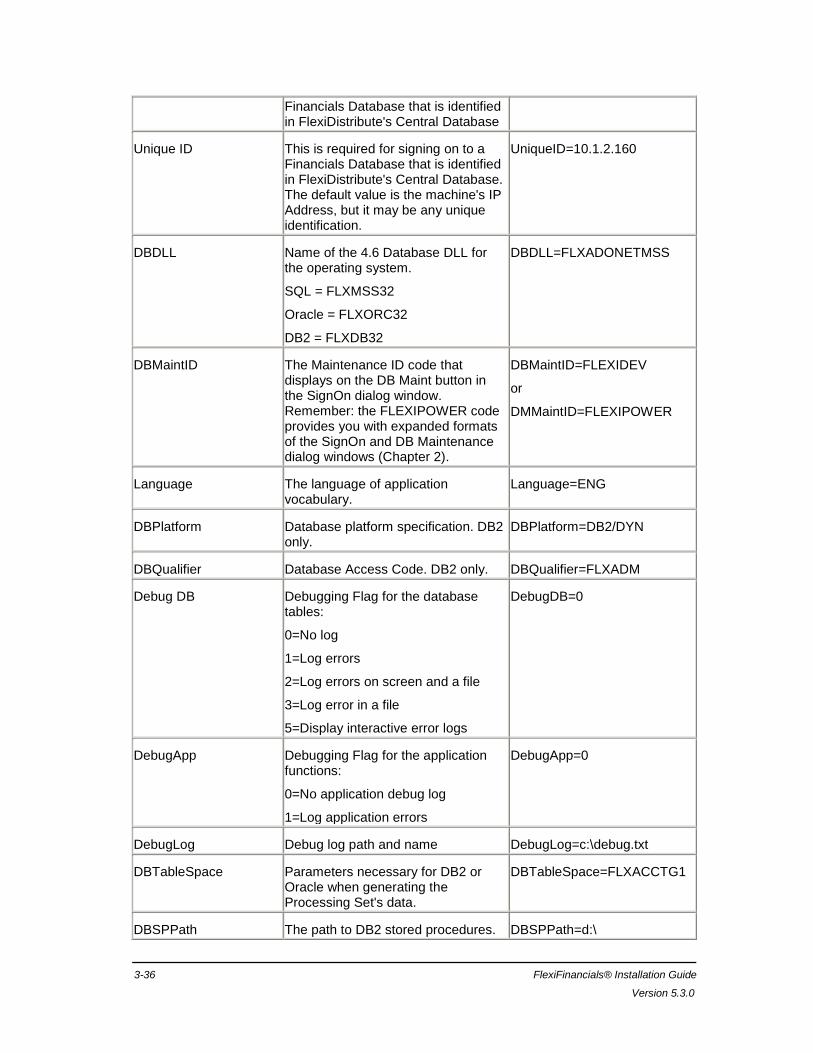
3-36 FlexiFinancials® Installation Guide
Version 5.3.0
Financials Database that is identified in FlexiDistribute's Central Database
Unique ID This is required for signing on to a Financials Database that is identified in FlexiDistribute's Central Database. The default value is the machine's IP Address, but it may be any unique identification.
UniqueID=10.1.2.160
DBDLL Name of the 4.6 Database DLL for the operating system.
SQL = FLXMSS32
Oracle = FLXORC32
DB2 = FLXDB32
DBDLL=FLXADONETMSS
DBMaintID The Maintenance ID code that displays on the DB Maint button in the SignOn dialog window. Remember: the FLEXIPOWER code provides you with expanded formats of the SignOn and DB Maintenance dialog windows (Chapter 2).
DBMaintID=FLEXIDEV
or
DMMaintID=FLEXIPOWER
Language The language of application vocabulary.
Language=ENG
DBPlatform Database platform specification. DB2 only.
DBPlatform=DB2/DYN
DBQualifier Database Access Code. DB2 only. DBQualifier=FLXADM
Debug DB Debugging Flag for the database tables:
0=No log
1=Log errors
2=Log errors on screen and a file
3=Log error in a file
5=Display interactive error logs
DebugDB=0
DebugApp Debugging Flag for the application functions:
0=No application debug log
1=Log application errors
DebugApp=0
DebugLog Debug log path and name DebugLog=c:\debug.txt
DBTableSpace Parameters necessary for DB2 or Oracle when generating the Processing Set's data.
DBTableSpace=FLXACCTG1
DBSPPath The path to DB2 stored procedures. DBSPPath=d:\

Chapter 3 -- INI Files and User Specific Settings 3-37
June 2011
DBSPLib Designates the DB2 library of stored procedures.
DBSPLib=
FlxRoot This is the location of the FLXSTRNG.TXT file (drive mapping, server, and directories), which has the system error messages, report headings, and report messages. This setting must specify the location of this file for many reports to run, only if the FLXSTRNG.TXT file is not in the same folder as the application code. This setting is not required if all of the code is stored in the bin directory.
Copy the FLXSTRNG.TXT file to your local hard disk and update the setting to reflect the local drive and path if you experience problems with this setting pointing to a network drive.
FlxRootFlxRoot=l:\srv01\flx43\bin
Or=C:\WINNT
Setting/Specification Description/Value Example or Default Setting
[Display]
FrameDisplayMode Allow user to choose "ribbon" or "menu" display
FrameDisplayMode=ribbon
[Keyboard]
AcceleratorSet Allow user to choose "default" or "legacy" keyboard accelerators. The differences are:
AcceleratorSet=default
Key Legacy Default
Ctrl-A Add Row Save As
Ctrl-H Change Row
Select
Ctrl-S Select Save
[FlexiDBExport]
FlxExportRoot FlxExportRoot=C:\temp\
FlexExportRoot FlexExportRoot=C:\Program Files\Flexi\
[Printer]
// true or false(default) // true or false(default)
3-38 FlexiFinancials® Installation Guide
Version 5.3.0
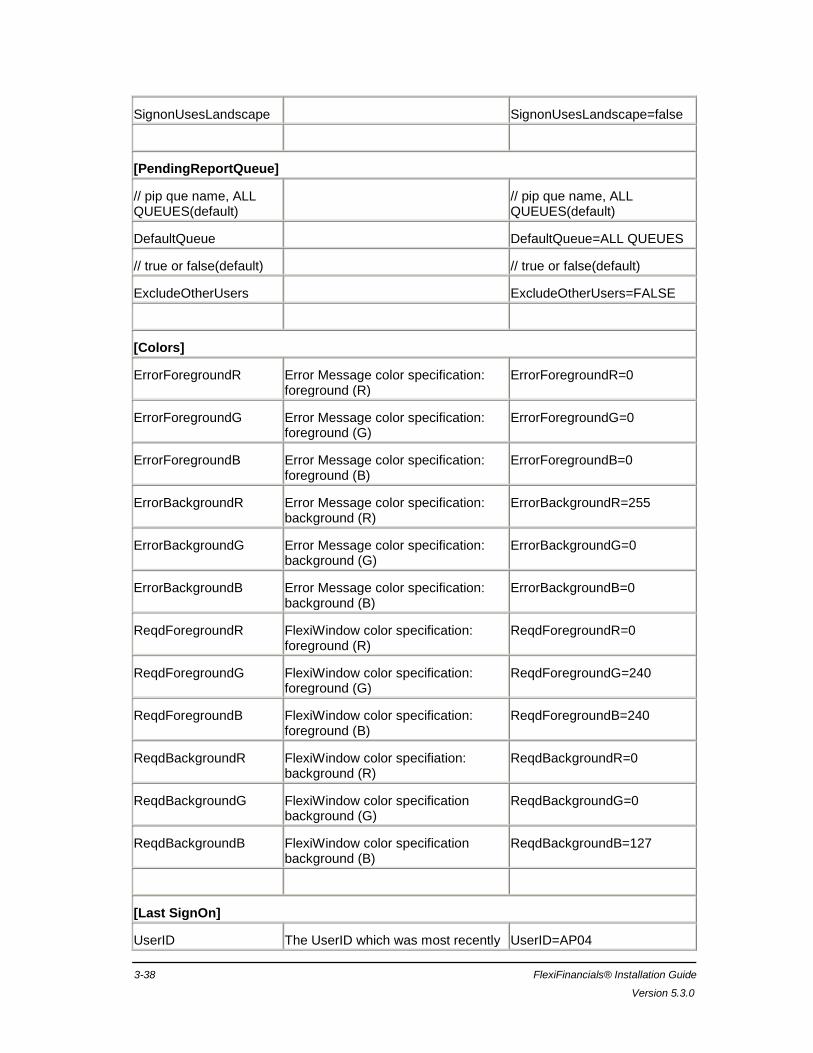
SignonUsesLandscape SignonUsesLandscape=false
[PendingReportQueue]
// pip que name, ALL QUEUES(default)
// pip que name, ALL QUEUES(default)
DefaultQueue DefaultQueue=ALL QUEUES
// true or false(default) // true or false(default)
ExcludeOtherUsers ExcludeOtherUsers=FALSE
[Colors]
ErrorForegroundR Error Message color specification: foreground (R)
ErrorForegroundR=0
ErrorForegroundG Error Message color specification: foreground (G)
ErrorForegroundG=0
ErrorForegroundB Error Message color specification: foreground (B)
ErrorForegroundB=0
ErrorBackgroundR Error Message color specification: background (R)
ErrorBackgroundR=255
ErrorBackgroundG Error Message color specification: background (G)
ErrorBackgroundG=0
ErrorBackgroundB Error Message color specification: background (B)
ErrorBackgroundB=0
ReqdForegroundR FlexiWindow color specification: foreground (R)
ReqdForegroundR=0
ReqdForegroundG FlexiWindow color specification: foreground (G)
ReqdForegroundG=240
ReqdForegroundB FlexiWindow color specification: foreground (B)
ReqdForegroundB=240
ReqdBackgroundR FlexiWindow color specifiation: background (R)
ReqdBackgroundR=0
ReqdBackgroundG FlexiWindow color specification background (G)
ReqdBackgroundG=0
ReqdBackgroundB FlexiWindow color specification background (B)
ReqdBackgroundB=127
[Last SignOn]
UserID The UserID which was most recently UserID=AP04
Chapter 3 -- INI Files and User Specific Settings 3-39
June 2011
entered from this Port.
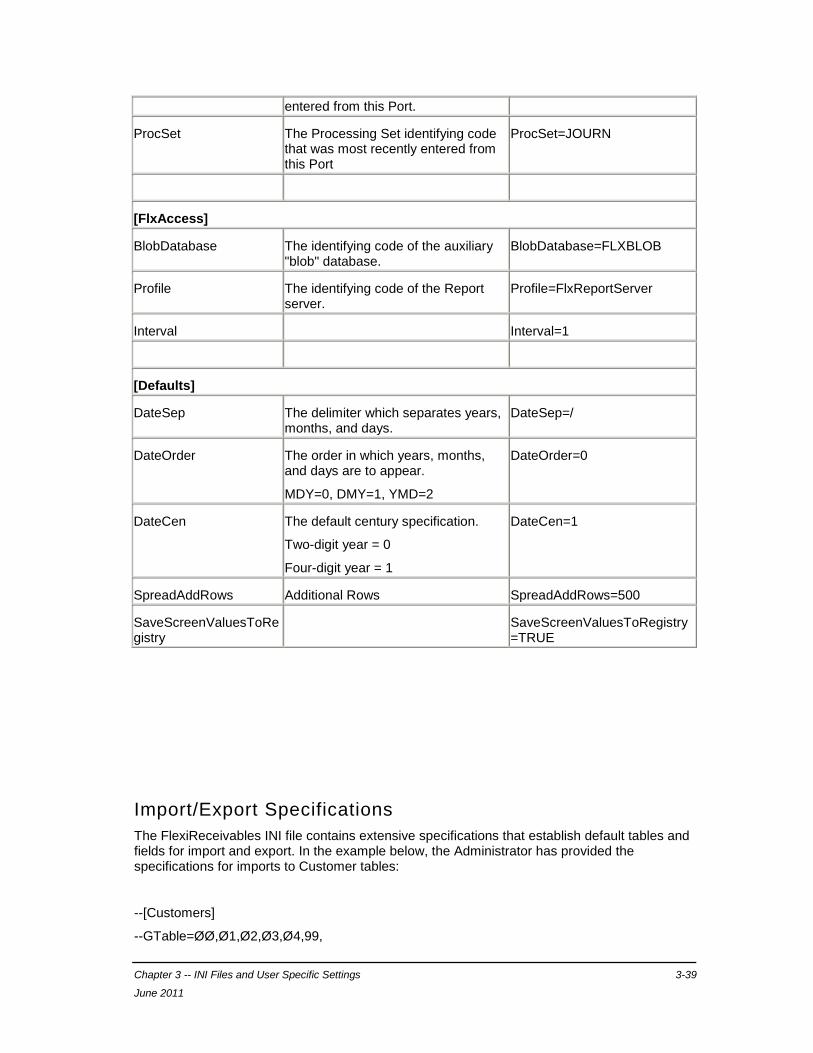
ProcSet The Processing Set identifying code that was most recently entered from this Port
ProcSet=JOURN
[FlxAccess]
BlobDatabase The identifying code of the auxiliary "blob" database.
BlobDatabase=FLXBLOB
Profile The identifying code of the Report server.
Profile=FlxReportServer
Interval Interval=1
[Defaults]
DateSep The delimiter which separates years, months, and days.
DateSep=/
DateOrder The order in which years, months, and days are to appear.
MDY=0, DMY=1, YMD=2
DateOrder=0
DateCen The default century specification.
Two-digit year = 0
Four-digit year = 1
DateCen=1
SpreadAddRows Additional Rows SpreadAddRows=500
SaveScreenValuesToRegistry
SaveScreenValuesToRegistry=TRUE
Import/Export Specifications
The FlexiReceivables INI file contains extensive specifications that establish default tables and fields for import and export. In the example below, the Administrator has provided the specifications for imports to Customer tables:
--[Customers]
--GTable=ØØ,Ø1,Ø2,Ø3,Ø4,99,
3-40 FlexiFinancials® Installation Guide
Version 5.3.0
--CTable=ØØ,Ø1,Ø2,Ø3,Ø4,Ø5,Ø6,Ø7,Ø8,Ø9,1Ø,11,12,13,14,15,16,17,18,19,2Ø,21,22, 23,24, 25,26, 27,28,29,3Ø,31,32,33,34,35,36,37,38,39,99,
--LTable=ØØ,Ø1,Ø2,
--NTable=ØØ,Ø1,Ø2,Ø3,Ø4,Ø5,Ø6,Ø7,Ø8,Ø9,1Ø,99,
--CFeed=ØØ,Ø1,Ø2,Ø3,Ø4,Ø5,Ø6,Ø7,Ø8,Ø9,1Ø,11,12,13,14,15,16,17,18,19,2Ø,21,22 23,24,25,26,27,28,29,3Ø,31,32,33,34,35,36,37,38,39,4Ø,41,42,43,44,
--CFeedLength=2Ø,2Ø,2Ø,2Ø,2Ø,2Ø,2Ø,2Ø,2Ø,2Ø,2Ø,2Ø,2Ø,2Ø,2Ø,2Ø,2Ø,2Ø,2Ø,2Ø, 2Ø,2Ø,2Ø,2Ø,2Ø,2Ø,2Ø,2Ø,2Ø,2Ø,2Ø,2Ø,2Ø,2Ø,2Ø,2Ø,2Ø,2Ø,2Ø,2Ø,2Ø,2Ø,2Ø,2Ø,2Ø,
--LFeed=ØØ,Ø1,Ø2,Ø3,Ø4,Ø5,Ø6,Ø7,Ø8,Ø9,1Ø,11,12,13,14,15,16,17,18,19,2Ø,
--LFeedLength=2Ø,2Ø,2Ø,2Ø,2Ø,2Ø,2Ø,2Ø,2Ø,2Ø,2Ø,2Ø,2Ø,2Ø,2Ø,2Ø,2Ø,2Ø,2Ø,2Ø,2Ø,
--NFeed=ØØ,Ø1,Ø2,Ø3,Ø4,Ø5,Ø6,Ø7,Ø8,
--NFeedLength=2Ø,2Ø,2Ø,2Ø,2Ø,2Ø,2Ø,2Ø,2Ø,
The FlexiReceivables INI file holds import/export defaults for these categories:
Cash Seller Invoice Inquiry
Invoices Skeletons Cash Receipts Inquiry
Transactions Sellers Cash Detail Inquiry
Customers Products
Tip: Be sure to include the [Import] section in your FAR32.INI file to decrease the time it takes to import data.
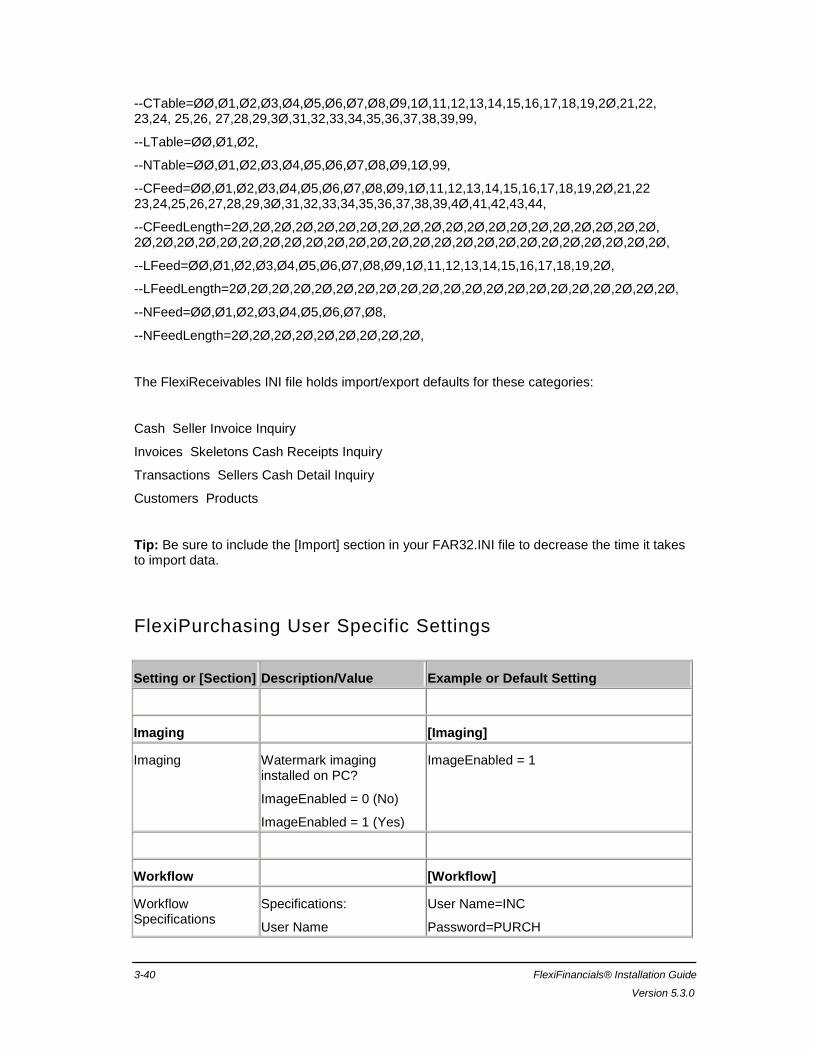
FlexiPurchasing User Specific Settings
Setting or [Section] Description/Value Example or Default Setting
Imaging [Imaging]
Imaging Watermark imaging installed on PC?
ImageEnabled = 0 (No)
ImageEnabled = 1 (Yes)
ImageEnabled = 1
Workflow [Workflow]
Workflow Specifications
Specifications:
User Name
User Name=INC
Password=PURCH

Chapter 3 -- INI Files and User Specific Settings 3-41
June 2011
Password
Database Name
Database Server
Object Server
DatabaseName=FYI
DatabaseServer=SVR011
ObjectServer=X05U011
PO WorkFlow Settings for the Purchasing WorkFlow process.
ClassID-PO WORKFLOW
FolderName=PO_F
RouteName=DEVELOPMENT_ROUTE
PO Requisitions WorkFlow
Settings for the Requisitions process.
ClassID=PO REQ WORKFLOW
FolderName=PO REQ_FLDR
RouteName=DEVELOPMENT_ROUTE
Accounting [Accounting]
This setting is required for cash-based accounting, and entry when an item is received into inventory.
The default setting is 1, and defaults to "1" if the setting is not there. This setting is also read generates a journal and used by Inventory Management.
InventoryReceiving = 0 (No)
InventoryReceiving = 1 (Yes)
InventoryReading=1
FlexiInternational Screen IDs
[FlexiInternational]
Screen IDs Display the screen IDs in the title bar of most PO dialog windows.
ShowScreenIds or ShowScreenIDs
0 = Do not display the screen IDs in the title bar. This is the default setting and is used if this section and setting are not in the PO INI Data group.
1 = Display the screen IDs
ShowScreenIds = 1
or
ShowScreenIDs = 1
3-42 FlexiFinancials® Installation Guide
Version 5.3.0
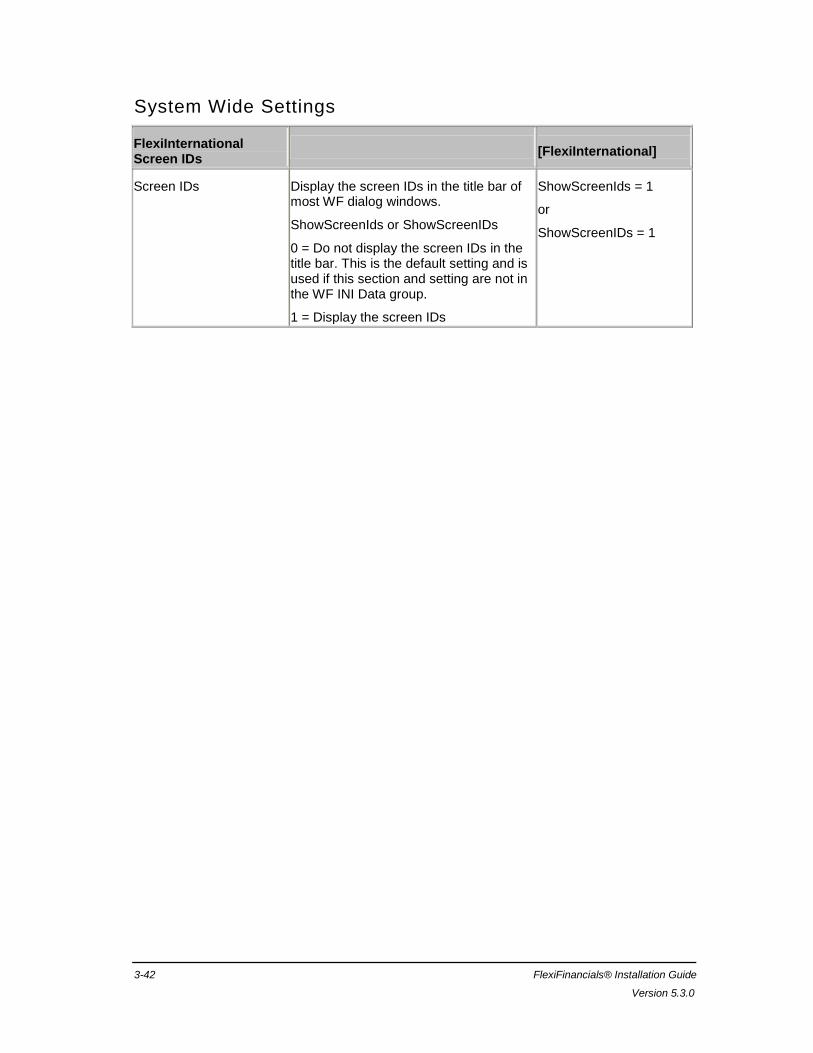
System Wide Settings
FlexiInternational Screen IDs
[FlexiInternational]
Screen IDs Display the screen IDs in the title bar of most WF dialog windows.
ShowScreenIds or ShowScreenIDs
0 = Do not display the screen IDs in the title bar. This is the default setting and is used if this section and setting are not in the WF INI Data group.
1 = Display the screen IDs
ShowScreenIds = 1
or
ShowScreenIDs = 1
Chapter 4 Installing Files
Pre-Requisites
WebServices Installation under Windows Server 2008
The WebServices install requires "IIS 6 Management Compatibility" to be installed within IIS7. If "IIS 6 Management Compatibility" is not installed then the WebServices install will fail with a very brief error message. Details for installing "IIS 6 Management Compatibility" within IIS7 can be found at this Microsoft web page
http://technet.microsoft.com/en-us/library/bb397374.aspx
WebServices Installation under Windows Server 2003 64-bit
In order for WebServices to run successfully under Windows Server 2008 64bit, ASP.NET 2.0 needs to be running in 32-bit mode. Details for setting ASP.NET 2.0 to run in 32-bit mode can be found at this Microsoft web page
http://support.microsoft.com/kb/894435
Note: Under MS Vista, as well as Windows XP, many file locations are protected for security reasons; and, as a result, files cannot be written to them unless the logged-in user has administrator privileges. Commonly, the root directory of the C drive (C:\), as well as the Windows folder (C:\Windows) and Windows sub folders, are protected. This means that if the logged-in user does not have administrator permissions, the write operation will fail when that user attempts to write a file to these locations. It is recommended that, when setting output folder locations, the user set up a newly created folder while being logged in under his or her username.
In response to the higher level of security the newer operating systems have, the applications have been modified to write error or log files that are encountered during import processing out to the same folder from which the import file was read and processed. This means that if the import file was located in C:\ImportFiles\data.ffl, the error file would be written to C:\ImportFiles\data.err and the log file to C:\ImportFiles\data.log.
Users who have administrator privileges can still write files to the protected locations; however, it is not encouraged.
Support and Training
If you encounter problems or need technical support of any kind, please contact FlexiSoftware's technical support or customer support staff at:
1-800-FLEXI-HELP
(1-800-353-9443)
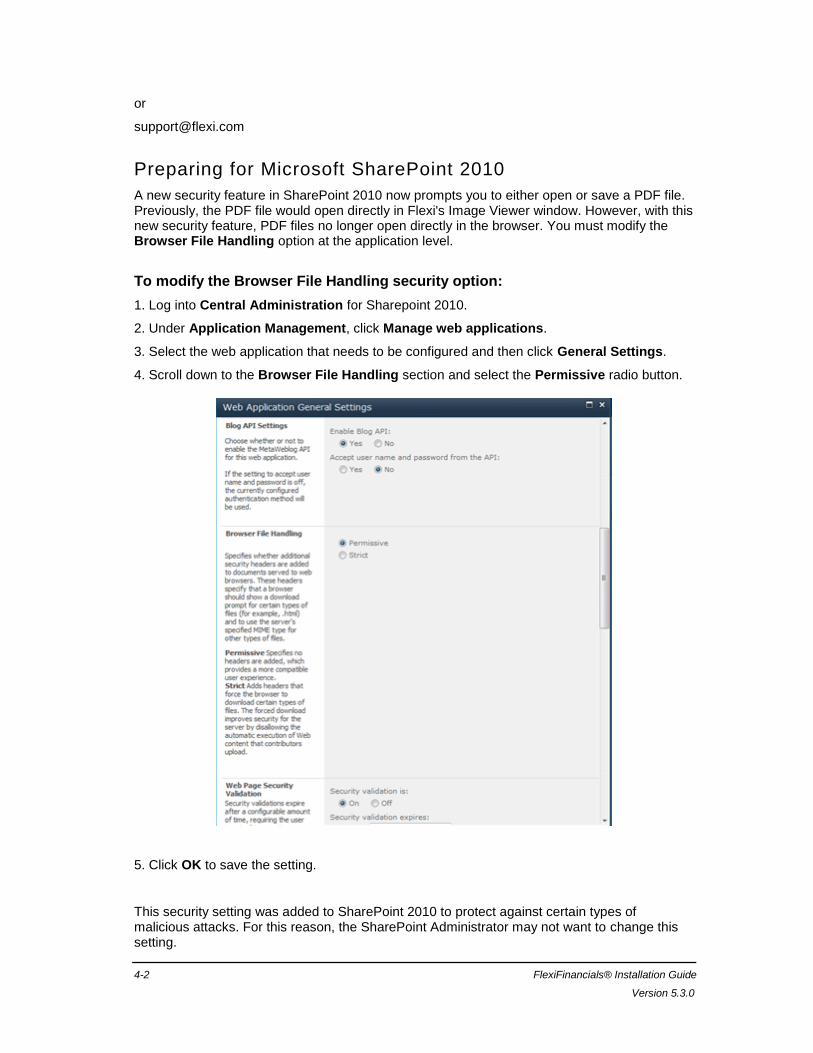
4-2 FlexiFinancials® Installation Guide
Version 5.3.0
or
Preparing for Microsoft SharePoint 2010
A new security feature in SharePoint 2010 now prompts you to either open or save a PDF file. Previously, the PDF file would open directly in Flexi's Image Viewer window. However, with this new security feature, PDF files no longer open directly in the browser. You must modify the Browser File Handling option at the application level.
To modify the Browser File Handling security option:
1. Log into Central Administration for Sharepoint 2010.
2. Under Application Management, click Manage web applications.
3. Select the web application that needs to be configured and then click General Settings.
4. Scroll down to the Browser File Handling section and select the Permissive radio button.
5. Click OK to save the setting.
This security setting was added to SharePoint 2010 to protect against certain types of malicious attacks. For this reason, the SharePoint Administrator may not want to change this setting.
Chapter 4 -- Installing Files 4-3
June 2011
Flexi uses an embedded browser in the Image Viewer window to view PDF files. The Image Viewer window can be accessed by clicking the View button in the Imaging group on windows, such as the Invoice Inquiry window in Payables.
FlexiSoftware CD ROM
All Flexi code comes to you on a specially prepared CD ROM.
Each CD ROM contains the latest edition of the software applicable to your configuration.
Navigation Techniques
The Database Creation Utility walks you through a series of screens so that you can easily provide the information necessary to execute the installation on your database(s).
Most screens display important messages, ask for information, and require a decision. The Database Creation Utility's messages are instructions, comments and, occasionally, warnings.
Use a screen's data entry fields to provide the utility with the data it needs to proceed.
Use the three action buttons to:
--Go to the previous screen (<Back).
--Go to the next screen (Next>).
--Exit the Database Creation Utility (Cancel).
Silent Installation of Client Applications
Silent mode is when an Administrator records the steps of the Installation Wizard into a "playback" or "response" file. The installation can then be invoked on other computers via a command line script or other system command, like Windows logon script, with the response file. The installation will perform actions as recorded by the Administrator without prompting a user for any clicks or other actions.
For the Administrator to record the response file:
1. Launch the Install via the command line with the following parameters, which opens the Install in a GUI:
<InstallationPackageFile>.exe /v"RSS=ENABLED"
For example: FlexiFinancials2011.exe /v"RSS=ENABLED"

4-4 FlexiFinancials® Installation Guide
Version 5.3.0
2. Enter the SignOn alias information and select the appropriate features you desire.
Upon completion of the Install, a response.xml should generate in C:\Windows.
Note: Verify that you are running as the Administrator and that your system security settings allow writing to the windows folder.
Note the listing of files and directories that are installed based on the selected features.
For the Administrator to launch a silent installation on another workstation:
1. Copy the response.xml file created during the initial installation to a location where it can be accessed from a client computer. For example: c:\ (drive of a local computer).
2. Launch the installation in silent mode using the response.xml from above by issuing the following command line statement:
<InstallationPackageFile>.exe /v"RSS_PATH=\"C:\\"" /v"RSS_FILE=response.xml" /S /v/qn
For example: FlexiFinancials2011.exe /v"RSS_PATH=\"C:\\"" /v"RSS_FILE=response.xml" /S /v/qn
Note: In the example above, "C:\" is the path and "response.xml" is the response file.
InstallShield Wizard
The InstallShield Wizard copies the files to the hard disk of a computer. It is series of ten steps, and each one has a dialog window. Except for the opening and closing dialog windows, each allows you to move forward to the next step, or back to the previous one.
Important: Please make sure you have a backup of your previous application files before running this installation. Multiple versions of Flexi applications may co-exist on a single workstation if installed in two separate directories. However, only one set of applications may be executed at any time.
The install process utilizes the latest InstallShield Software and Microsoft Installer Services. There are significant changes which completely alter the install process from previous releases. The InstallShield Wizard will guide you through the process. The following steps will help to explain each screen and installation options.
* Alert! Be sure to close all application programs running on your computer before beginning the InstallShield Wizard Process.
InstallShield Wizard - Step 1: Start the InstallShield Wizard
Opens the CD ROM drive and begins the functions of the InstallShield Wizard. If the application will be used through Citrix or Terminal Services, the install process has to run from Control Panel - Add/Remove programs.
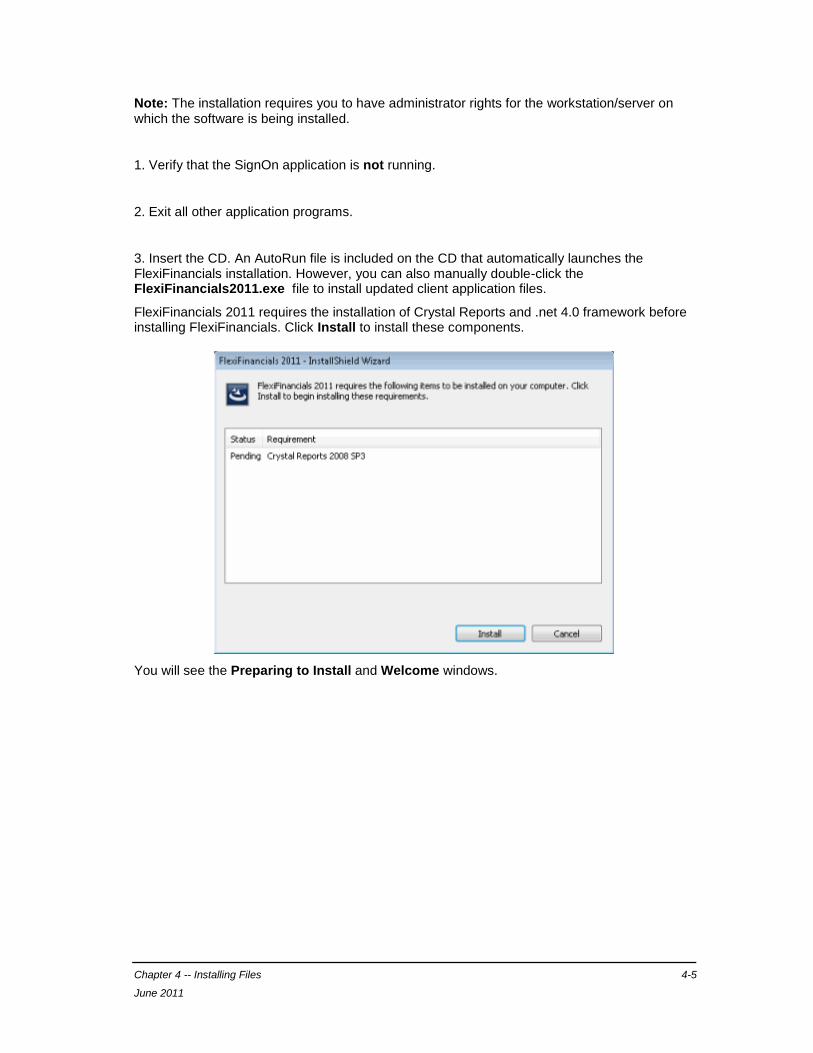
Chapter 4 -- Installing Files 4-5
June 2011
Note: The installation requires you to have administrator rights for the workstation/server on which the software is being installed.
1. Verify that the SignOn application is not running.
2. Exit all other application programs.
3. Insert the CD. An AutoRun file is included on the CD that automatically launches the FlexiFinancials installation. However, you can also manually double-click the FlexiFinancials2011.exe file to install updated client application files.
FlexiFinancials 2011 requires the installation of Crystal Reports and .net 4.0 framework before installing FlexiFinancials. Click Install to install these components.
You will see the Preparing to Install and Welcome windows.
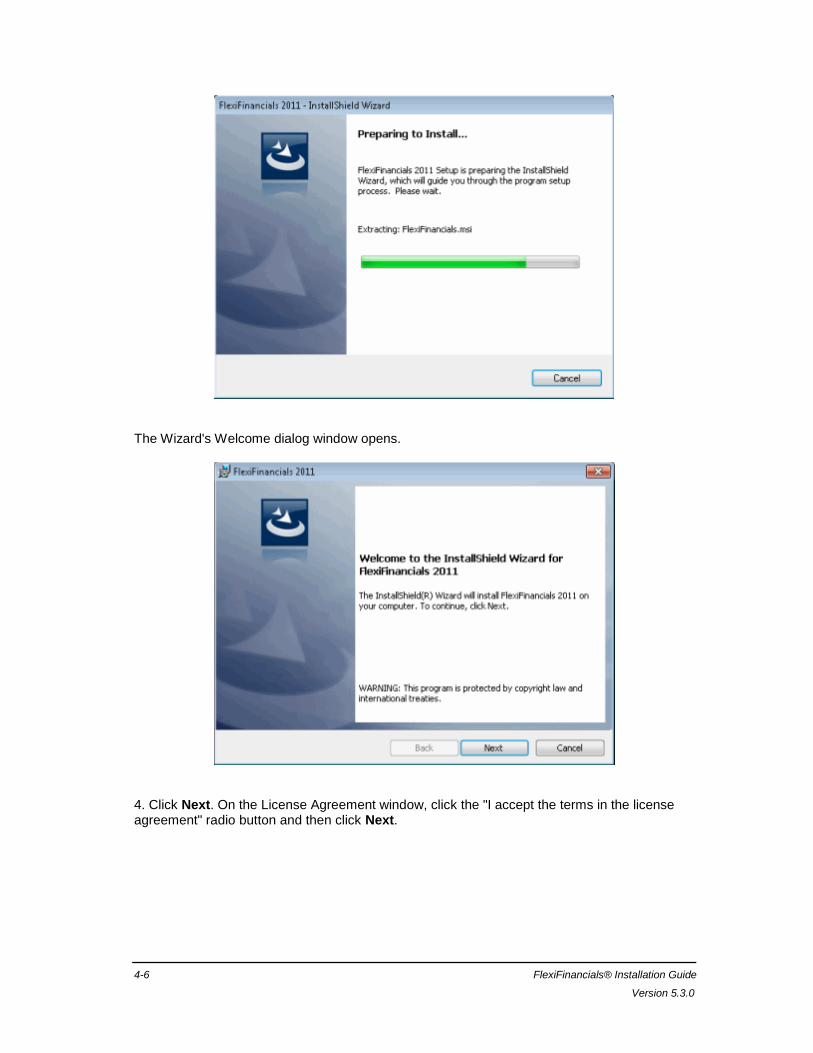
4-6 FlexiFinancials® Installation Guide
Version 5.3.0
The Wizard's Welcome dialog window opens.
4. Click Next. On the License Agreement window, click the "I accept the terms in the license agreement" radio button and then click Next.
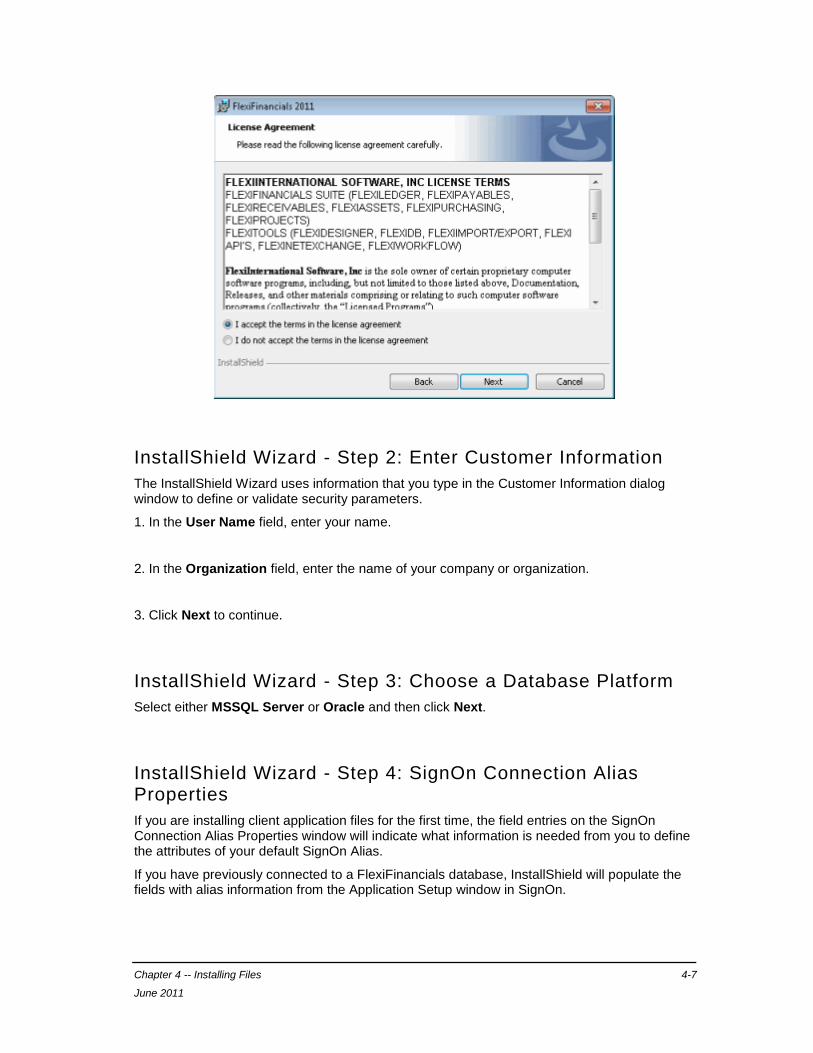
Chapter 4 -- Installing Files 4-7
June 2011
InstallShield Wizard - Step 2: Enter Customer Information
The InstallShield Wizard uses information that you type in the Customer Information dialog window to define or validate security parameters.
1. In the User Name field, enter your name.
2. In the Organization field, enter the name of your company or organization.
3. Click Next to continue.
InstallShield Wizard - Step 3: Choose a Database Platform
Select either MSSQL Server or Oracle and then click Next.
InstallShield Wizard - Step 4: SignOn Connection Alias Properties
If you are installing client application files for the first time, the field entries on the SignOn Connection Alias Properties window will indicate what information is needed from you to define the attributes of your default SignOn Alias.
If you have previously connected to a FlexiFinancials database, InstallShield will populate the fields with alias information from the Application Setup window in SignOn.
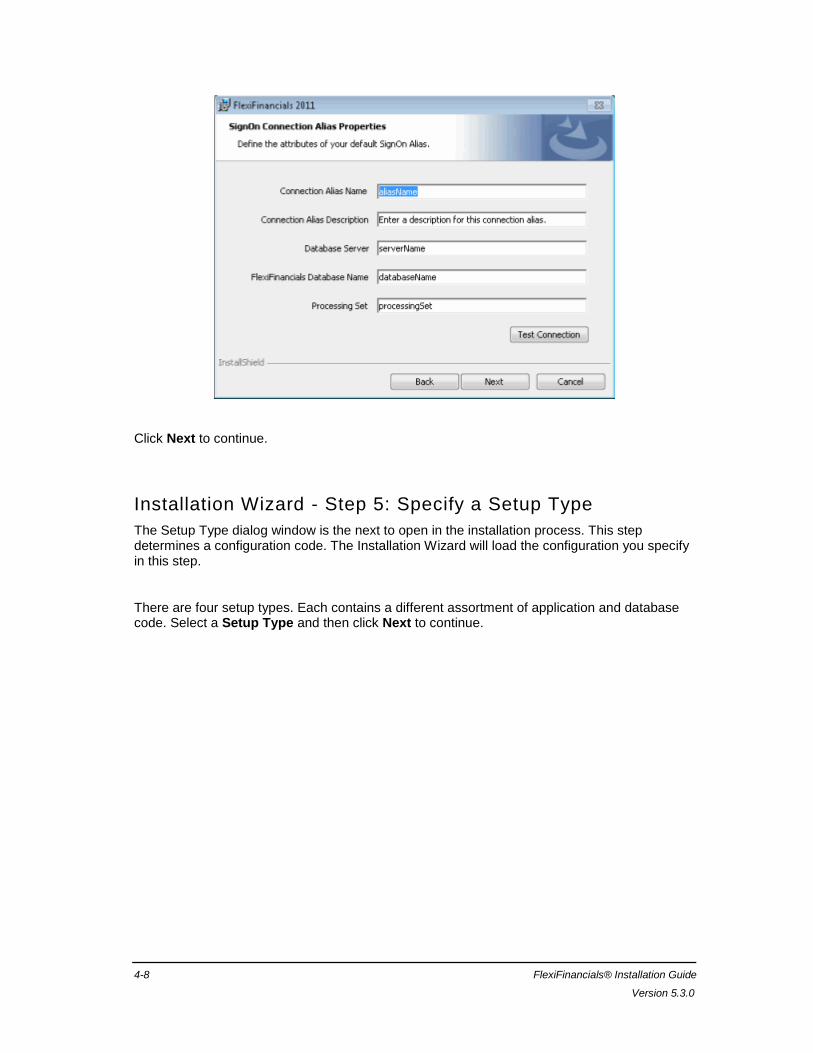
4-8 FlexiFinancials® Installation Guide
Version 5.3.0
Click Next to continue.
Installation Wizard - Step 5: Specify a Setup Type
The Setup Type dialog window is the next to open in the installation process. This step determines a configuration code. The Installation Wizard will load the configuration you specify in this step.
There are four setup types. Each contains a different assortment of application and database code. Select a Setup Type and then click Next to continue.
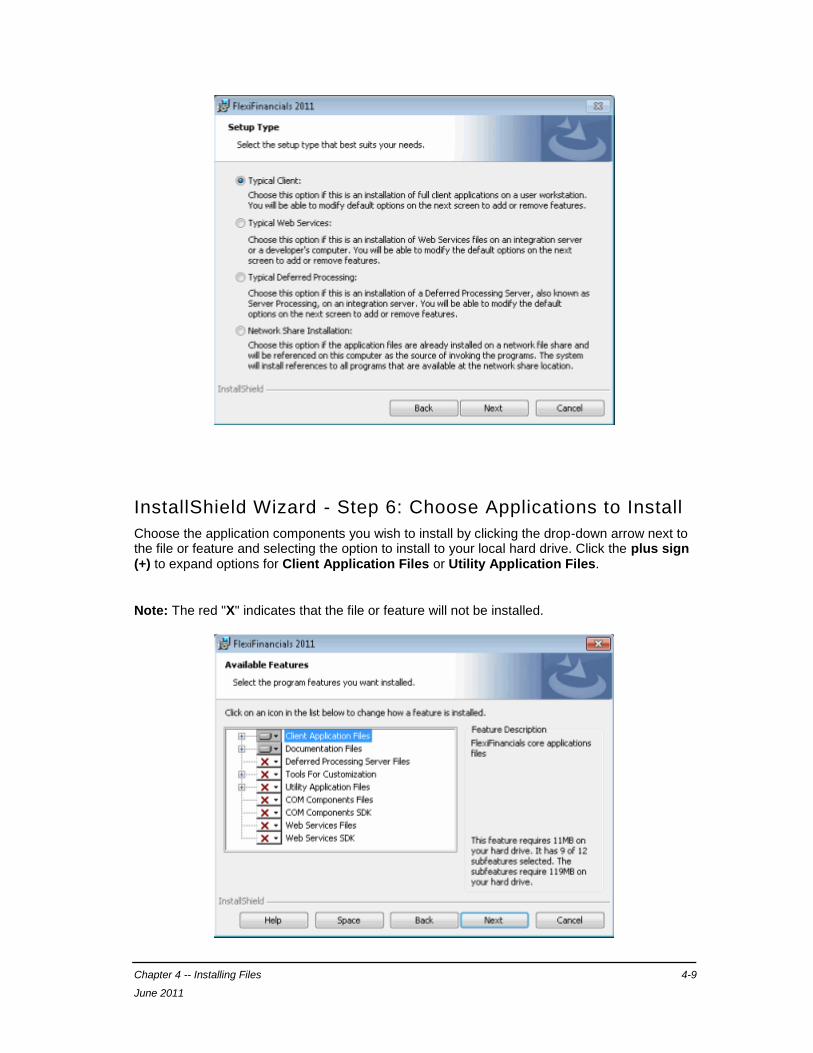
Chapter 4 -- Installing Files 4-9
June 2011
InstallShield Wizard - Step 6: Choose Applications to Install
Choose the application components you wish to install by clicking the drop-down arrow next to the file or feature and selecting the option to install to your local hard drive. Click the plus sign (+) to expand options for Client Application Files or Utility Application Files.
Note: The red "X" indicates that the file or feature will not be installed.
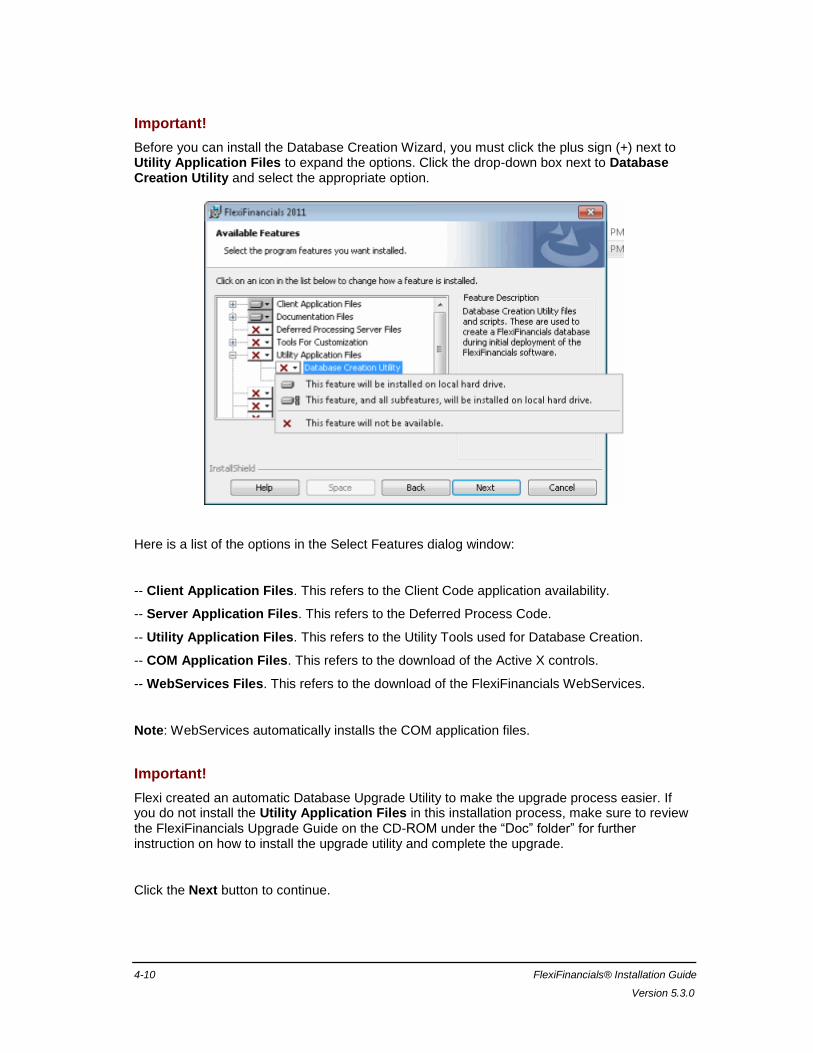
4-10 FlexiFinancials® Installation Guide
Version 5.3.0
Important!
Before you can install the Database Creation Wizard, you must click the plus sign (+) next to Utility Application Files to expand the options. Click the drop-down box next to Database Creation Utility and select the appropriate option.
Here is a list of the options in the Select Features dialog window:
-- Client Application Files. This refers to the Client Code application availability.
-- Server Application Files. This refers to the Deferred Process Code.
-- Utility Application Files. This refers to the Utility Tools used for Database Creation.
-- COM Application Files. This refers to the download of the Active X controls.
-- WebServices Files. This refers to the download of the FlexiFinancials WebServices.
Note: WebServices automatically installs the COM application files.
Important!
Flexi created an automatic Database Upgrade Utility to make the upgrade process easier. If you do not install the Utility Application Files in this installation process, make sure to review the FlexiFinancials Upgrade Guide on the CD-ROM under the ―Doc‖ folder‖ for further instruction on how to install the upgrade utility and complete the upgrade.
Click the Next button to continue.
Chapter 4 -- Installing Files 4-11
June 2011
InstallShield Wizard - Step 7: Choose a Destination Folder
This step specifies where your code is stored - where the application files will be installed.
The Destination Folder window looks similar to the following if you have specified one of the Server Setup Types or a full installation of a Client Setup Type. Here you are given the option to specify the name of the shortcut folder. After you complete the install, shortcuts are created under the folder name you've specified. The default folder name is "FlexiFinancials 2011." The advantage of this field is you get to pick the name of the folder that the shortcuts are installed under in the Start menu. For example, if your company is installing multiple versions of FlexiFinancials side-by-side for testing purposes, you may want to give the shortcut folder a more meaningful name to keep different versions separate and identifiable.
1. Click OK if the destination directory is correct.
OR
Click the Change button to open the Choose Folder dialog window.
2. In the Look in field, click the drop-down arrow to browse to a local drive or a network drive. You can also use the folder icons to the right of this field to move up a folder level or create a new folder.
3. The folders for a drive appear underneath the Look in field. Select a folder name or type a new Folder name directly into the Folder name field. Click OK to return to the Choose Destination Location dialog window.
4. Click Next.
InstallShield Wizard - Step 8: Install FlexiFinancials
You are now ready to begin installing the FlexiFinancials applications. Click the Install button.
A progress indicator displays the status of the installation.
Installation Wizard - Step 9: Conclude the Installation Process
Click the Finish button to close the InstallShield Wizard after the code has been loaded.


Chapter 5 Index
1
100 ....................................................... 3-16
4
405 ....................................................... 3-14
417 ....................................................... 3-10
5
500 ....................................................... 3-12
506 ....................................................... 3-14
517 ....................................................... 3-33
518 ....................................................... 3-13
524 ....................................................... 3-15
A
Account Maintenance Dialog ................. 3-9
Account Reconciliation .......................... 3-9
Accounts Payable Application Configuration Settings ....................... 3-9
Accounts Receivable Application Configuration Settings ..................... 3-18
AccountSearch .................................... 3-31
AcctRecon ............................................. 3-9
AutoBankClear ..................................... 3-13
B
Base Invoice/Bottom Line Default Settings ......................................................... 3-16
Batch Process/Review Screen Default Values .............................................. 3-14
Batch Table Export ..................... 3-20, 3-22
Batch Table Import ............ 3-19, 3-21, 3-22
BatchProcess ....................................... 3-14
Best Practice for Cost-Effective Deployment ....................................... 1-3
BottomLine ........................................... 3-16
C
Cash..................................................... 3-19
Cash Application ......................... 3-31, 3-32
Cash Import Default Values ................. 3-19
Cash Receipts ..................................... 3-31
Cash Receipts Inquiry .......................... 3-28
Cash Receipts Inquiry Screen Field and Filter Settings ................................... 3-28
Cash Spreadsheet ............................... 3-31
Cash525 ............................................... 3-31
CashAppBottom ................................... 3-31
CashTitles ............................................ 3-31
CD ROM ................................................ 4-3
Check Gard Printing Default Values .... 3-18
Check Printing Default Settings ........... 3-17
Color Settings ........................................ 3-4
Colors ..................................................... 3-4
Contract Table Import .......................... 3-22
Creating and Initializing the Flexi Database ........................................................... 2-1
Creating the Financial Processing Set . 2-13
Custom ................................................. 3-31
Customers ............................................ 3-20
Customers Import/Export Default Values 3-20
D
Data Access Defaults........................... 3-23
DataAccess .......................................... 3-23
Default Settings for Tax Calculations ... 3-16
Default Settings for Vertex ................... 3-16
Defaults .................................................. 3-5
Detail Table Import ...................... 3-19, 3-22
Dynamic Account Creation .................. 3-33
E
EFT ...................................................... 3-13
Establishing a FlexiFinancials Database 2-1
Export ................................................... 3-16
F
fap0040 ................................................ 3-17
fap417 .................................................. 3-14
fap498 .................................................. 3-14
fapp1201 .............................................. 3-14
fapp305 ................................................ 3-11
fapp340 ................................................ 3-11
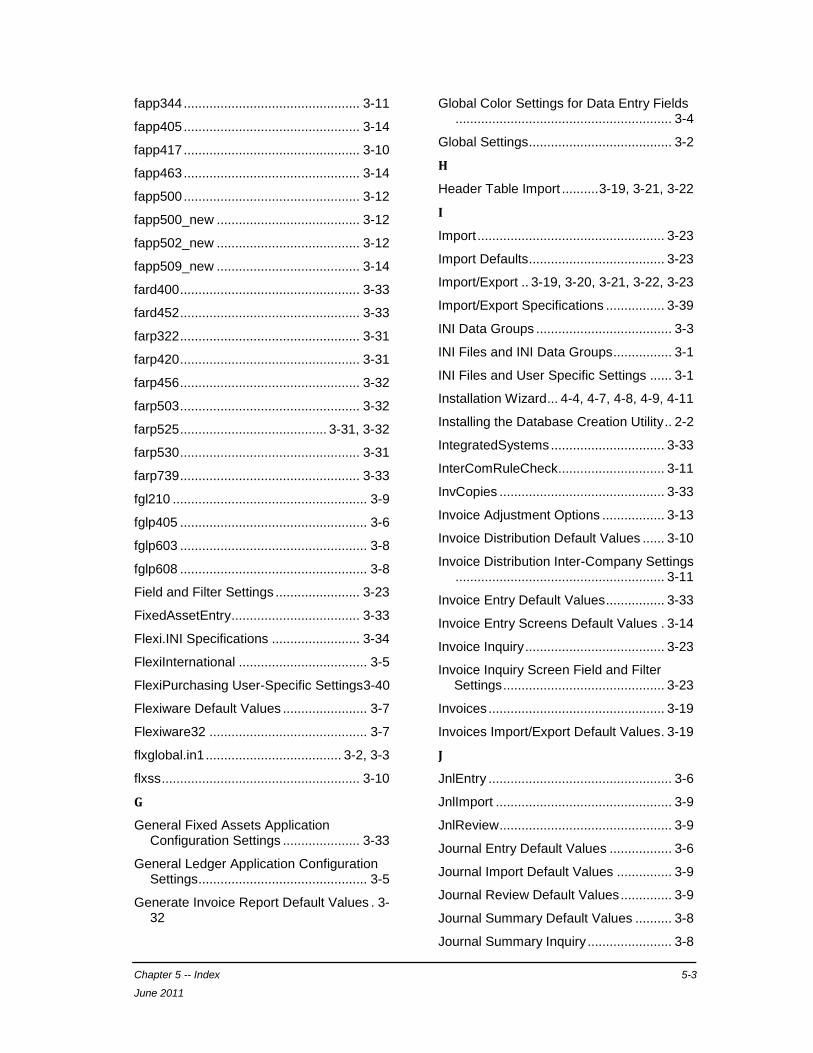
Chapter 5 -- Index 5-3
June 2011
fapp344 ................................................ 3-11
fapp405 ................................................ 3-14
fapp417 ................................................ 3-10
fapp463 ................................................ 3-14
fapp500 ................................................ 3-12
fapp500_new ....................................... 3-12
fapp502_new ....................................... 3-12
fapp509_new ....................................... 3-14
fard400 ................................................. 3-33
fard452 ................................................. 3-33
farp322 ................................................. 3-31
farp420 ................................................. 3-31
farp456 ................................................. 3-32
farp503 ................................................. 3-32
farp525 ........................................ 3-31, 3-32
farp530 ................................................. 3-31
farp739 ................................................. 3-33
fgl210 ..................................................... 3-9
fglp405 ................................................... 3-6
fglp603 ................................................... 3-8
fglp608 ................................................... 3-8
Field and Filter Settings ....................... 3-23
FixedAssetEntry ................................... 3-33
Flexi.INI Specifications ........................ 3-34
FlexiInternational ................................... 3-5
FlexiPurchasing User-Specific Settings3-40
Flexiware Default Values ....................... 3-7
Flexiware32 ........................................... 3-7
flxglobal.in1 ..................................... 3-2, 3-3
flxss ...................................................... 3-10
G
General Fixed Assets Application Configuration Settings ..................... 3-33
General Ledger Application Configuration Settings .............................................. 3-5
Generate Invoice Report Default Values . 3-32
Global Color Settings for Data Entry Fields ........................................................... 3-4
Global Settings ....................................... 3-2
H
Header Table Import .......... 3-19, 3-21, 3-22
I
Import ................................................... 3-23
Import Defaults ..................................... 3-23
Import/Export .. 3-19, 3-20, 3-21, 3-22, 3-23
Import/Export Specifications ................ 3-39
INI Data Groups ..................................... 3-3
INI Files and INI Data Groups ................ 3-1
INI Files and User Specific Settings ...... 3-1
Installation Wizard ... 4-4, 4-7, 4-8, 4-9, 4-11
Installing the Database Creation Utility .. 2-2
IntegratedSystems ............................... 3-33
InterComRuleCheck ............................. 3-11
InvCopies ............................................. 3-33
Invoice Adjustment Options ................. 3-13
Invoice Distribution Default Values ...... 3-10
Invoice Distribution Inter-Company Settings ......................................................... 3-11
Invoice Entry Default Values ................ 3-33
Invoice Entry Screens Default Values . 3-14
Invoice Inquiry ...................................... 3-23
Invoice Inquiry Screen Field and Filter Settings ............................................ 3-23
Invoices ................................................ 3-19
Invoices Import/Export Default Values . 3-19
J
JnlEntry .................................................. 3-6
JnlImport ................................................ 3-9
JnlReview ............................................... 3-9
Journal Entry Default Values ................. 3-6
Journal Import Default Values ............... 3-9
Journal Review Default Values .............. 3-9
Journal Summary Default Values .......... 3-8
Journal Summary Inquiry ....................... 3-8
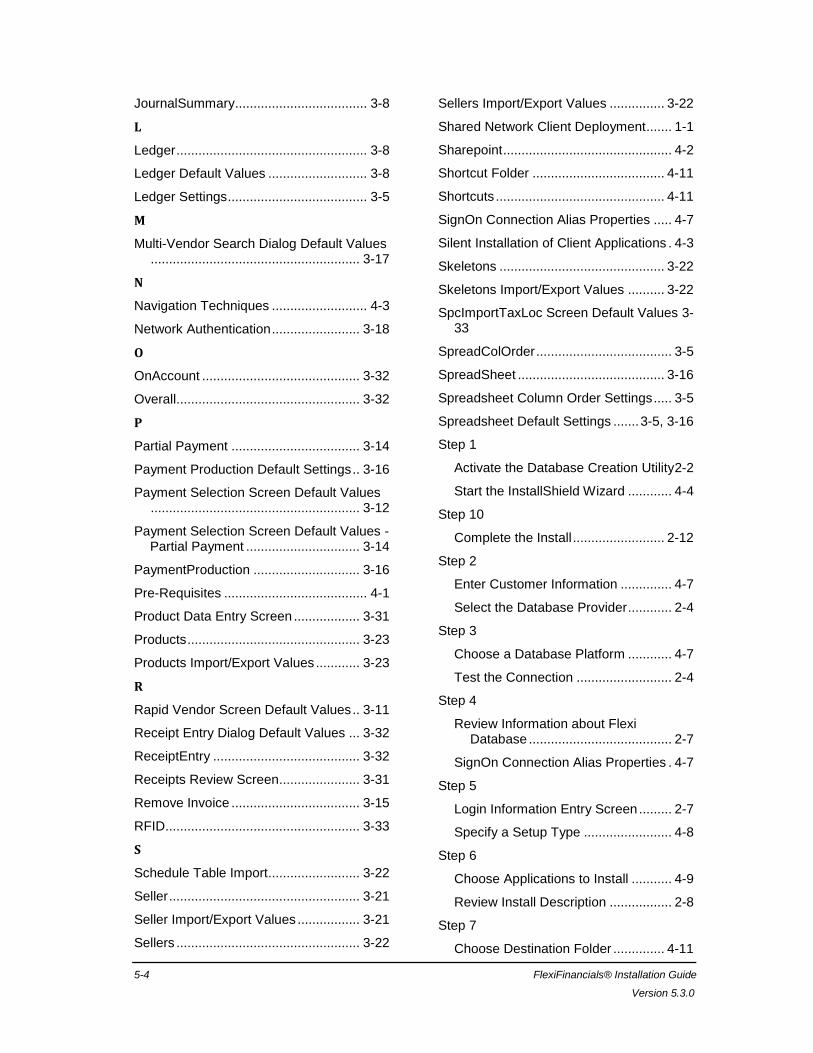
5-4 FlexiFinancials® Installation Guide
Version 5.3.0
JournalSummary .................................... 3-8
L
Ledger .................................................... 3-8
Ledger Default Values ........................... 3-8
Ledger Settings ...................................... 3-5
M
Multi-Vendor Search Dialog Default Values ......................................................... 3-17
N
Navigation Techniques .......................... 4-3
Network Authentication ........................ 3-18
O
OnAccount ........................................... 3-32
Overall.................................................. 3-32
P
Partial Payment ................................... 3-14
Payment Production Default Settings .. 3-16
Payment Selection Screen Default Values ......................................................... 3-12
Payment Selection Screen Default Values - Partial Payment ............................... 3-14
PaymentProduction ............................. 3-16
Pre-Requisites ....................................... 4-1
Product Data Entry Screen .................. 3-31
Products ............................................... 3-23
Products Import/Export Values ............ 3-23
R
Rapid Vendor Screen Default Values .. 3-11
Receipt Entry Dialog Default Values ... 3-32
ReceiptEntry ........................................ 3-32
Receipts Review Screen...................... 3-31
Remove Invoice ................................... 3-15
RFID ..................................................... 3-33
S
Schedule Table Import ......................... 3-22
Seller .................................................... 3-21
Seller Import/Export Values ................. 3-21
Sellers .................................................. 3-22
Sellers Import/Export Values ............... 3-22
Shared Network Client Deployment ....... 1-1
Sharepoint .............................................. 4-2
Shortcut Folder .................................... 4-11
Shortcuts .............................................. 4-11
SignOn Connection Alias Properties ..... 4-7
Silent Installation of Client Applications . 4-3
Skeletons ............................................. 3-22
Skeletons Import/Export Values .......... 3-22
SpcImportTaxLoc Screen Default Values 3-33
SpreadColOrder ..................................... 3-5
SpreadSheet ........................................ 3-16
Spreadsheet Column Order Settings ..... 3-5
Spreadsheet Default Settings ....... 3-5, 3-16
Step 1
Activate the Database Creation Utility 2-2
Start the InstallShield Wizard ............ 4-4
Step 10
Complete the Install ......................... 2-12
Step 2
Enter Customer Information .............. 4-7
Select the Database Provider ............ 2-4
Step 3
Choose a Database Platform ............ 4-7
Test the Connection .......................... 2-4
Step 4
Review Information about Flexi Database ....................................... 2-7
SignOn Connection Alias Properties . 4-7
Step 5
Login Information Entry Screen ......... 2-7
Specify a Setup Type ........................ 4-8
Step 6
Choose Applications to Install ........... 4-9
Review Install Description ................. 2-8
Step 7
Choose Destination Folder .............. 4-11
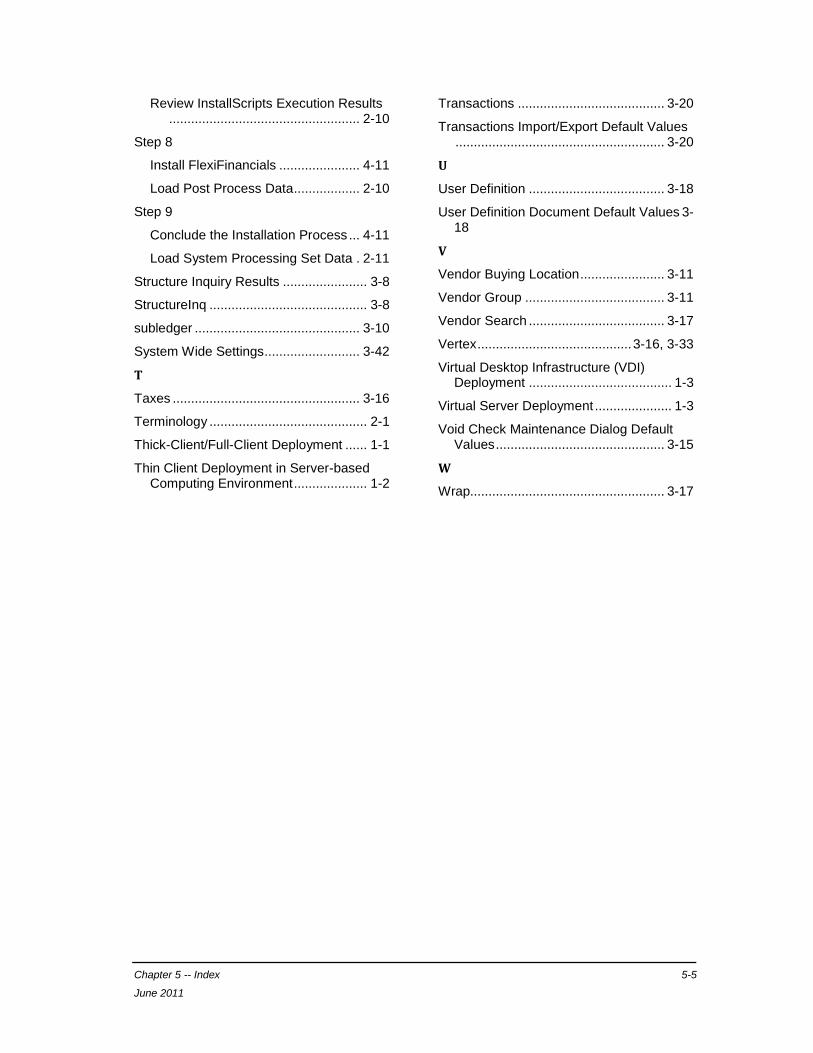
Chapter 5 -- Index 5-5
June 2011
Review InstallScripts Execution Results .................................................... 2-10
Step 8
Install FlexiFinancials ...................... 4-11
Load Post Process Data .................. 2-10
Step 9
Conclude the Installation Process ... 4-11
Load System Processing Set Data . 2-11
Structure Inquiry Results ....................... 3-8
StructureInq ........................................... 3-8
subledger ............................................. 3-10
System Wide Settings .......................... 3-42
T
Taxes ................................................... 3-16
Terminology ........................................... 2-1
Thick-Client/Full-Client Deployment ...... 1-1
Thin Client Deployment in Server-based Computing Environment .................... 1-2
Transactions ........................................ 3-20
Transactions Import/Export Default Values ......................................................... 3-20
U
User Definition ..................................... 3-18
User Definition Document Default Values 3-18
V
Vendor Buying Location ....................... 3-11
Vendor Group ...................................... 3-11
Vendor Search ..................................... 3-17
Vertex .......................................... 3-16, 3-33
Virtual Desktop Infrastructure (VDI) Deployment ....................................... 1-3
Virtual Server Deployment ..................... 1-3
Void Check Maintenance Dialog Default Values .............................................. 3-15
W
Wrap..................................................... 3-17