Oracle® Forms Recognition Installation Guide 10g Release 3 ...
43
Oracle ® Forms Recognition Installation Guide 10g Release 3 (10.1.3.5.0) October 2009
-
Upload
khangminh22 -
Category
Documents
-
view
0 -
download
0
Transcript of Oracle® Forms Recognition Installation Guide 10g Release 3 ...

Oracle® Forms Recognition
Installation Guide 10g Release 3 (10.1.3.5.0) October 2009
Oracle Forms Recognition Installation Guide
10g Release 3 (10.1.3.5.0)
Copyright © 2009, Oracle and/or its affiliates. All rights reserved.
This software and related documentation are provided under a license agreement containing restrictions on use and disclosure and are protected by intellectual property laws. Except as expressly permitted in your license agreement or allowed by law, you may not use, copy, reproduce, translate, broadcast, modify, license, transmit, distribute, exhibit, perform, publish, or display any part, in any form, or by any means. Reverse engineering, disassembly, or decompilation of this software, unless required by law for interoperability, is prohibited.
The information contained herein is subject to change without notice and is not warranted to be error-free. If you find any errors, please report them to us in writing.
If this software or related documentation is delivered to the U.S. Government or anyone licensing it on behalf of the U.S. Government, the following notice is applicable:
U.S. GOVERNMENT RIGHTS Programs, software, databases, and related documentation and technical data delivered to U.S. Government customers are "commercial computer software" or "commercial technical data" pursuant to the applicable Federal Acquisition Regulation and agency-specific supplemental regulations. As such, the use, duplication, disclosure, modification, and adaptation shall be subject to the restrictions and license terms set forth in the applicable Government contract, and, to the extent applicable by the terms of the Government contract, the additional rights set forth in FAR 52.227-19, Commercial Computer Software License (December 2007). Oracle USA, Inc., 500 Oracle Parkway, Redwood City, CA 94065.
This software is developed for general use in a variety of information management applications. It is not developed or intended for use in any inherently dangerous applications, including applications which may create a risk of personal injury. If you use this software in dangerous applications, then you shall be responsible to take all appropriate fail-safe, backup, redundancy, and other measures to ensure the safe use of this software. Oracle Corporation and its affiliates disclaim any liability for any damages caused by use of this software in dangerous applications.
Oracle is a registered trademark of Oracle Corporation and/or its affiliates. Other names may be trademarks of their respective owners.
This software and documentation may provide access to or information on content, products, and services from third parties. Oracle Corporation and its affiliates are not responsible for and expressly disclaim all warranties of any kind with respect to third-party content, products, and services. Oracle Corporation and its affiliates will not be responsible for any loss, costs, or damages incurred due to your access to or use of third-party content, products, or services.

Table of Contents
Oracle Forms Recognition Installation Guide i
Contents CONTENTS ...................................................................................................................... ICHAPTER 1 ABOUT ORACLE FORMS RECOGNITION ................................................. 1CHAPTER 2 SYSTEM REQUIREMENTS ......................................................................... 22.1 Operating Systems ........................................................................................................ 22.2 Hardware Requirements ................................................................................................ 22.2.1. Minimum Requirements .............................................................................................................2
CHAPTER 3 PLATFORM REQUIREMENTS .................................................................... 33.1 Network Infrastructure ................................................................................................... 33.2 Core Hardware and Software Configuration .................................................................. 33.3 Infrastructure Constraints .............................................................................................. 53.3.1. OCR Performance ......................................................................................................................53.3.2. Firewalls .....................................................................................................................................53.4 RTS Remote Administration MMC ................................................................................. 53.5 Security ......................................................................................................................... 63.6 Access to Project Data .................................................................................................. 73.7 Supported OS Platforms ................................................................................................ 73.8 Domains and Trust Relationships .................................................................................. 83.8.1. Windows NT Domain Trust ........................................................................................................83.8.2. Windows 2000 Domain Trust .....................................................................................................93.8.3. Windows 2003 Trust ..................................................................................................................93.8.3.1. Transitive Trusts ...............................................................................................................................................................93.8.3.2. Explicit Trusts ...................................................................................................................................................................93.8.3.3. Shortcut Trusts .................................................................................................................................................................93.8.3.4. Cross-Forest Trusts ...................................................................................................................................................... 10
3.9 Configuring the Network Infrastructure for Oracle Forms Recognition ......................... 103.9.1. Setup Domain Trusts .............................................................................................................. 103.9.2. Windows 2000/2003 Domains ................................................................................................ 113.10 Accounts and File Access Security .............................................................................. 123.10.1. Granting Access to Project Data ............................................................................................. 13
CHAPTER 4 INSTALLING ORACLE FORMS RECOGNITION ....................................... 154.1 Before Installing Oracle Forms Recognition ................................................................. 154.1.1. Installation Checklist ............................................................................................................... 154.1.2. Password Protection ............................................................................................................... 164.2 Installing Oracle Forms Recognition ............................................................................ 164.2.1. Selecting Custom Installation .................................................................................................. 174.2.2. Finishing Typical and Custom Installations ............................................................................. 184.3 Installing Oracle Forms Recognition in a Workgroup Configuration ............................. 194.4 Installing Oracle Forms Recognition in Standalone Mode ............................................ 204.5 Installing Oracle Forms Recognition in a Novell Netware Environment ........................ 204.5.1. Overview ................................................................................................................................. 204.5.2. Performing the Installation ...................................................................................................... 224.6 Checking the Installation .............................................................................................. 224.7 Removing Oracle Forms Recognition Version 10.1.3.5.0 ............................................. 224.8 Repairing an Oracle Forms Recognition Version 10.1.3.5.0 Installation ....................... 234.9 Adding or Removing Version 10.1.3.5.0 Components ................................................. 234.10 Silent Installations ........................................................................................................ 244.10.1. Silent Install.ini ........................................................................................................................ 244.10.2. Automated Distribution of Service Updates on Verifier Workstations ..................................... 25

Table of Contents
Oracle Forms Recognition Installation Guide ii
CHAPTER 5 CONFIGURING RUNTIME COMPONENTS ............................................... 265.1 Configuring the Runtime Service Manager .................................................................. 265.2 Configuring the RTS RemoteAdmin MMC Snap-in ...................................................... 285.3 Configuring E-mail Import ............................................................................................ 305.4 Advanced Logging ....................................................................................................... 305.4.1. System Resource Logging ...................................................................................................... 305.4.2. Crash / Failure Logging ........................................................................................................... 31
CHAPTER 6 AUTO-UPDATE OF ORACLE FORMS RECOGNITION VERIFIER & RUNTIME SERVER SOFTWARE VERSIONS ..................................................................................... 336.1 Description .................................................................................................................. 336.1.1. How the Automatic Update Works .......................................................................................... 336.1.2. Configuring Auto Update in Oracle Forms Recognition Setup ............................................... 356.1.3. Manual Configuration of the Auto Update Function ................................................................ 366.1.3.1. Editing the “AutoInstall.bat” Batch File ........................................................................................................................ 366.1.3.2. Change Shortcuts ......................................................................................................................................................... 36
6.2 Usage .......................................................................................................................... 37
CHAPTER 7 ENABLING ADDITIONAL OCR ENGINE LANGUAGES ........................... 38INDEX ................................................................................................................... 39

Chapter 1 About
Oracle Forms Recognition Installation Guide 1
Chapter 1 About Oracle Forms Recognition Oracle Forms Recognition is a product suite by Oracle, Inc., for automatically processing incoming documents. In principle, Oracle Forms Recognition works with any document that is electronically available. This includes scanned images, faxes, e-mails, and files. Oracle Forms Recognition automatically classifies these documents and extracts meaningful information from them.
Oracle Forms Recognition uses a trainable, self-learning algorithm that minimizes user definition and intervention tasks.
Within the Oracle Forms Recognition suite, Oracle Forms Recognition Designer enables you to customize the automatic processing of incoming documents: which document classes are relevant in your enterprise, which information is to be extracted from the classified documents. All custom settings are saved in an Oracle Forms Recognition project file.
To process large volumes of documents, Oracle Forms Recognition organizes documents into batches, which are defined in the Oracle Forms Recognition project file. The project files and stored settings are automatically forwarded to Oracle Forms Recognition Runtime Server for production processing.
Oracle Forms Recognition Runtime Server runs unattended as a server process in the background. Several mechanisms ensure that the system is stable – meaning that it can automatically recover from most error situations. Multiple instances of Oracle Forms Recognition Runtime Server can be started simultaneously in a network or on a single machine. These instances cooperate and allow for optimal load distribution.
Batches that cannot be automatically processed in their entirety by Oracle Forms Recognition Runtime Server are forwarded to the quality assurance application Oracle Forms Recognition Verifier for manual correction.

Chapter 2 System Requirements
Oracle Forms Recognition Installation Guide 2
Chapter 2 System Requirements 2.1 Operating Systems
Using Oracle Forms Recognition requires a complete and successful installation of the software on a server or workstation running one of the following operating systems:
• Microsoft Windows Server 2008 Standard or Enterprise Edition. • Microsoft Windows Server 2003 Standard or Enterprise Edition. • Microsoft Windows 2000 Server or Professional with Service Pack 4 or
later. • Microsoft Windows XP Professional Service Pack 1. • Microsoft Windows Vista
2.2 Hardware Requirements 2.2.1. Minimum Requirements
The minimum hardware requirements are:
• 1GHz Pentium processor, 3.8 GHz recommended. • Minimum required memory is 512 MB RAM, 1 GB RAM recommended.
For larger projects with more than 20 classes, 2 GB RAM is recom-mended.
• 200 MB free disk space for the program and associated image files, 40 GB recommended.
The speed of document processing is governed by the processor performance. Oracle Forms Recognition will run on multi-processor systems.
To store document data, additional disk space has to be provided. Persistent storage of TIFF images requires approximately 70 KB per page.
In addition, approximately 100 KB per document for temporarily storing the WorkDocs with OCR results.
If PDF file generation is enabled, another 100 KB per page is temporarily required.
Chapter 3 Platform Requirements
Oracle Forms Recognition Installation Guide 3
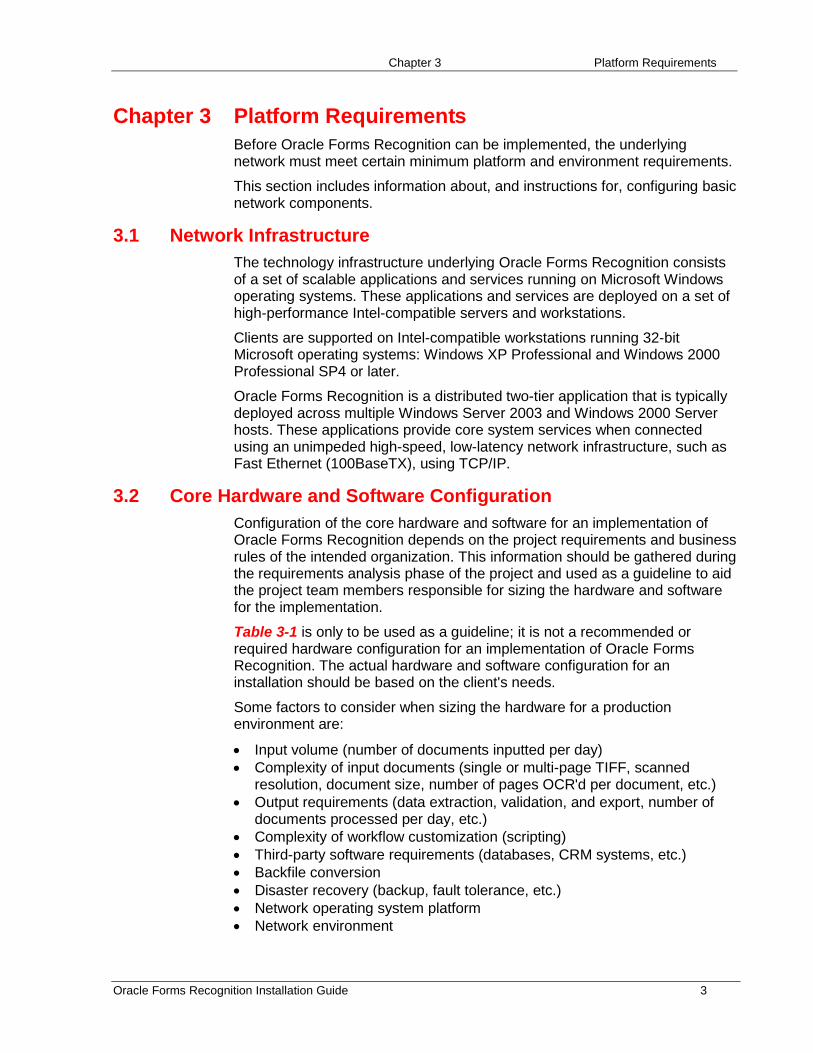
Chapter 3 Platform Requirements Before Oracle Forms Recognition can be implemented, the underlying network must meet certain minimum platform and environment requirements.
This section includes information about, and instructions for, configuring basic network components.
3.1 Network Infrastructure The technology infrastructure underlying Oracle Forms Recognition consists of a set of scalable applications and services running on Microsoft Windows operating systems. These applications and services are deployed on a set of high-performance Intel-compatible servers and workstations.
Clients are supported on Intel-compatible workstations running 32-bit Microsoft operating systems: Windows XP Professional and Windows 2000 Professional SP4 or later.
Oracle Forms Recognition is a distributed two-tier application that is typically deployed across multiple Windows Server 2003 and Windows 2000 Server hosts. These applications provide core system services when connected using an unimpeded high-speed, low-latency network infrastructure, such as Fast Ethernet (100BaseTX), using TCP/IP.
3.2 Core Hardware and Software Configuration Configuration of the core hardware and software for an implementation of Oracle Forms Recognition depends on the project requirements and business rules of the intended organization. This information should be gathered during the requirements analysis phase of the project and used as a guideline to aid the project team members responsible for sizing the hardware and software for the implementation.
Table 3-1 is only to be used as a guideline; it is not a recommended or required hardware configuration for an implementation of Oracle Forms Recognition. The actual hardware and software configuration for an installation should be based on the client's needs.
Some factors to consider when sizing the hardware for a production environment are:
• Input volume (number of documents inputted per day) • Complexity of input documents (single or multi-page TIFF, scanned
resolution, document size, number of pages OCR'd per document, etc.) • Output requirements (data extraction, validation, and export, number of
documents processed per day, etc.) • Complexity of workflow customization (scripting) • Third-party software requirements (databases, CRM systems, etc.) • Backfile conversion • Disaster recovery (backup, fault tolerance, etc.) • Network operating system platform • Network environment

Chapter 3 Platform Requirements
Oracle Forms Recognition Installation Guide 4
• Room for growth (increased in input/output and other system requirements)
Based on lab testing, the server hardware specified below is capable of processing approximately 11,000 documents per day using a project with the following characteristics:
• Single-page TIFF documents • Document resolution of 300 dpi • Average TIFF size of approximately 28K • Average WorkDoc size of approximately 21KB • Minimum data extraction and validation (four fields, simple table) • Project size of less than 5 MB and less than 10 classes
Machine Role Hardware Software Needed Oracle Forms Recognition Server (Primary) Project File (.SDP) Batch Directory Stores Images Workdocs Input Directory Learn Set
Xeon Class, 2.4 GHz CPU 2 GB RAM Three or more 36 GB (40 GB recommended) + Hot Swappable hard drive RAID Controller (for fault tolerance)
Windows Server 2003 or Windows 2000 Server with the latest service pack Oracle Forms Recognition Version 10.1.3.5.0
Oracle Forms Recognition RTS Performs OCR Classification Data Extraction Export System Clean-up
Dual Xeon Class, 2.8 GHz CPU 2 GB RAM (1 GB minimum) 40 GB hard drive
Windows Server 2003 or Windows 2000 Server with the latest service pack Oracle Forms Recognition Version 10.1.3.5.0
Oracle Forms Recognition Designer Project Design Class Training
Pentium IV Class, 2.4 GHz CPU (2.8 GHz recom-mended) 1 GB RAM 10 GB hard drive (20 GB hard drive recommended)
Windows XP Professional, or Windows 2000 Professional SP4 or later Oracle Forms Recognition Designer Version 10.1.3.5.0
Oracle Forms Recognition Verifier, Advanced Verifier & Learn Set Manager Data Verification
Pentium Class, 2.4 GHz CPU (2.8 GHz recommended) 1 GB RAM 20 GB hard drive (10 GB minimum)
Windows XP Professional, or Windows 2000 Professional SP4 or later Oracle Forms Recognition Verifier Version 10.1.3.5.0
Oracle Forms Recognition Remote Admin RTS Remote Administration
Pentium Class, 2.4 GHz CPU (2.8 GHz recommended) 1 GB RAM 10 GB hard drive
Windows XP Professional, or Windows 2000 Professional SP4 or later Oracle Forms Recognition Version 10.1.3.5.0 RTS Remote Admin MMC Snap-in
Table 3-1: Recommended Configuration
Remote administration can be performed on any Oracle Forms Recognition server; a dedicated machine is not required.
Disk space requirement is implementation dependent; variables such as document complexity, scanned resolution, and document volume help determine the amount of disk space for a project. For example, persistent storage of TIFF images requires approximately 70 KB per page. In addition, approximately 100 KB per document are required to temporarily store WorkDocs with OCR results. If PDF file generation is enabled, another 100 KB per page are temporarily required.

Chapter 3 Platform Requirements
Oracle Forms Recognition Installation Guide 5
3.3 Infrastructure Constraints Oracle Forms Recognition has been fully tested and is certified to work in most LAN environments. By adhering to the following infrastructure constraints, you can ensure a smooth implementation of the product suite.
3.3.1. OCR Performance OCR is a processor-intensive task. To maximize OCR performance, we recommend that only one RTS OCR instance be active per CPU on a production server. Although it is possible to run multiple RTS OCR instances on a single CPU, doing so may impair the performance of OCR and the overall system.
3.3.2. Firewalls Oracle Forms Recognition is designed to work in a non-encapsulated LAN environment. A non-encapsulated LAN, in this context, is a LAN segment free of impediments such as firewalls and other traffic-filtering devices.
The current version does not support multi-site network environments in which some users of the Oracle Forms Recognition system are located inside a firewall, while the resources hosting the product suite are located on the other side of the firewall. With multi-site network environments, it is the responsibility of the customer’s IT personnel to ensure that an unobstructed communication path exists between the user community and host system.
3.4 RTS Remote Administration MMC You can remotely administer Oracle Forms Recognition Runtime Server, meaning that you can centrally manage multiple Runtime Servers from a single workstation on the network using a management console snap-in called the RTS Remote Administration MMC.
However, to use the RTS Remote Administration MMC snap-in, the administrator workstation must either reside on the same LAN segment as the RTS server services to be centrally administered or, in the case of a subnetted network, a name resolution system must be in place to allow clients on one subnet to locate resources on another subnet.
Remote Administration by MMC requires one free configurable port number. The default port is 50607.
The Windows service Oracle Forms Recognition Service Manager must be running in order to be able to connect by MMC to the Runtime Server service. Once the service is running, it is possible to start and stop each Runtime Server instance separately.
As long as the configured port is available in any TCP/IP network (or Internet across firewalls) and the main service is running, the MMC can be used to configure and maintain the Runtime Server instances.

Chapter 3 Platform Requirements
Oracle Forms Recognition Installation Guide 6
3.5 Security Oracle Forms Recognition does not provide application-level security implementation. Instead, the product relies on integrated Windows file system security built into the underlying operating system. Oracle Forms Recognition uses operating system files (.sdp, .dat, .wdc, .sdb, etc.) to store all application and project data. A combination of shared and NTFS permissions are used to protect application data.
NTFS file and folder permissions are used to control the type of access that a user, group, or application has to folders and files. This includes everything from reading the contents of a folder or a file to modifying a folder's contents and/or executing individual files. There are five basic NTFS file and six folder permissions:
File Permission Access Granted
Read Allows the user or group to read the file and view its attributes, ownership, and the permissions set.
Write Allows the user or group to overwrite the file, change its attributes, view its ownership, and view the permissions set.
Read and Execute
Allows the user or group to run and execute the application. In addition, the user can perform all duties allowed by the Read permission.
Modify (CHANGE)
Allows the user or group to modify and delete a file including perform all of the actions permitted by the Read, Write, and Read and Execute NTFS file permissions.
Full Control Allows the user or group to change the permission set on a file, take ownership of the file, and perform actions permitted by all of the other NTFS file permissions.
Table 3-2: NT File Permissions File Permission Access Granted Read Allows the user or group to view the files, folders, and subfolders of the
parent folder. It also allows the viewing of the folder attributes, ownership, and permissions.
Write Allows the user or group to create new files and folders within the parent folder, view folder ownership and permissions, and change folder attributes.
List Folder Content
Allows the user or group to view the files and subfolders contained within the folder.
Read and Execute
Allows the user or group to navigate through all files and subfolders, and to perform all actions allowed by the Read and List Folder Contents permissions.
Modify (CHANGE)
Allows the user to delete the folder and perform all activities included in the Write and Read & Execute NTFS folder permissions.
Full Control Allows the user or group to change permissions on the folder, take ownership of it, and perform all activities included in all other permissions.
Table 3-3: NTFS Folder Permissions
The difference between NTFS file and folder permissions is the “List Folder Contents NTFS” folder permission. NTFS folder permissions enable system administrators to limit a user's ability to browse through a tree of folders and files. This is useful for securing a specific directory such as an application directory. A user must know the name and location of a file to read or execute it when this permission is applied to its parent folder. However, in an Oracle Forms Recognition environment, client applications in the product suite, instead of Windows Explorer, are used to process project data. The intent of

Chapter 3 Platform Requirements
Oracle Forms Recognition Installation Guide 7
file and folder permissions is to minimize the probability of accidental or malicious data destruction.
Shared permissions serve purposes similar to NTFS permissions: They help protect files from unauthorized access. If you are a member of the Administrators or Power Users group, you can share folders on a local computer so that users on other computers can access those folders over the network. By assigning shared folder permissions to any shared folder, you can restrict or allow access to those folders over the network. Use NTFS folder permissions if the shared folder is located on an NTFS drive. NTFS permissions are effective on the local computer and over the network.
Please see Section 3.5 for details on how to configure file system security for an installation of Oracle Forms Recognition.
3.6 Access to Project Data Oracle Forms Recognition uses a hierarchical file structure to store project-related data. The project directory is at the highest level of this structure.
Figure 3-1: Project Directory.
All Oracle Forms Recognition components (including services, applications, and users) need appropriate access rights to the project directory and all of its subfolders.
See Section 3.9 for details on how to enable access to project data.
3.7 Supported OS Platforms Oracle Forms Recognition is available only for Windows operating systems. All Oracle Forms Recognition components are supported on Windows 2000 Professional, Windows 2000 Server, Windows XP Professional, and Windows Server 2003.

Chapter 3 Platform Requirements
Oracle Forms Recognition Installation Guide 8
3.8 Domains and Trust Relationships The Windows domain model plays a significant role in providing access to, and ensuring the security of, application data in an Oracle Forms Recognition environment. A trust is a logical relationship between Windows domains to allow pass-through authentication. In the Trust, a trusting domain honors the login authentications of a trusted domain. User accounts and global groups defined in a trusted domain can be given rights and permissions to resources in a trusting domain, even though the user accounts or groups do not exist in the trusting domain’s security context.
This logical relationship extends the single-logon process inherent in Windows domains, whereby users are authenticated once and given discretionary access for the duration of the session to those resources for which they have been granted permissions. However, users must logon to a domain that is part of the trust, not their local workstation, to take advantage of this seamless integration between Windows domains.
This section examines trust relationships in a multi-domain implementation and its effect on Oracle Forms Recognition.
3.8.1. Windows NT Domain Trust By default, trust under Windows NT is one way. In other words, if domainA trusts domainB (meaning that users in domainB can access resources in domainA to which they have been granted permissions), it does not follow that domainB trusts domainA.
If an implementation of Oracle Forms Recognition transcends domains (users and resources are spread across multiple domains,) an appropriate trust relationship must exist between the domains.
For example, if a multi-domain installation of Oracle Forms Recognition has its batch root directory in domainA and a Verifier workstation in domainB, the following conditions must be met before a Verifier user in domainB can access the batch root directory in domainA:
• At least a one-way trust relationship must exist between domainA and domainB, whereby domainA trusts domainB.
• The Verifier user in domainB must be granted appropriate file access permission to the project directory and all of its sub-folders in domainA.
It is the responsibility of customer’s IT personnel to ensure that these requirements are met.

Chapter 3 Platform Requirements
Oracle Forms Recognition Installation Guide 9
3.8.2. Windows 2000 Domain Trust Trust under Windows 2000 is more robust than that of its predecessor. By default, all domain trusts in a Windows 2000 forest are two-way transitive. A forest is a collection of one or more Windows 2000 domains sharing the same schema and global catalog. A schema is a description of the object classes and attributes stored in the Active Directory. A global catalog is a repository containing a replica of every object in Active Directory, but with the minimum attributes needed to locate an object in a search. For example, a user’s first and last name are replicas of a user object in the Active Directory.
The first Windows 2000 domain created in a forest is called the forest root domain (parent). Thereafter, when a new child domain is created in the same DNS name space, a two-way transitive trust is automatically established between the new child domain and the parent domain.
In a two-way trust between domainA and domainB, domainA trusts domainB and domainB trusts domainA. Therefore, authentication requests can be passed between the two domains in both directions. As a result, when implementing Oracle Forms Recognition in a native multi-domain Windows 2000 environment using default trust settings, users only need appropriate file access permissions to the project and batch root directory.
However, in a mixed-mode Windows NT/Windows 2000 domain environment or a native multi-domain Windows 2000 environments in which the default trust settings have been altered (explicitly defined), the conditions for multi-Windows NT domains apply.
3.8.3. Windows 2003 Trust Trusts in Windows Server 2003 are an extension of the Windows 2000 trusts model. They can be grouped into the following four categories:
• Transitive • Explicit • Shortcut • Cross-Forest
3.8.3.1. Transitive Trusts Transitive trusts are two-way trusts that are automatically established between Active Directory domains in the same forest. For example, given three domains A, B, and C; if domain A trusts domain B, and domain B trusts domain C, then domain A also trusts domain C.
3.8.3.2. Explicit Trusts Explicit trusts, as the name implies, are trusts that are manually defined between domains to provide authentication for users or processes that require access to resources that exist in another domain. Such a trust can be one or two-way, depending on the implementation requirements.
3.8.3.3. Shortcut Trusts A shortcut trust is an explicit trust defined between two domains, in a do-main tree with multiple sub-domains that are many layers deep, to reduce the

Chapter 3 Platform Requirements
Oracle Forms Recognition Installation Guide 10
number of hops (domains) that must be traversed to satisfy an authentication request. For example, if domainA trusts domainB, and domainB trusts domainC, then it follows that domain A also trusts domain C.
This means that users in domainA can request access to resources in domainC to which they have been granted permissions. However, authentication for a resource request made from domainA to domainC must pass through domainB, because the trusts from domainA to domainC flow through domainB. A shortcut trust can be established between domainA and domainC to speed up the authentication request by eliminating the hop (domain B).
3.8.3.4. Cross-Forest Trusts Cross-Forest trusts are basically two-way transitive trusts established between two separate Active Directory forests for the purpose of allowing the flow of data between the two forests.
For example, company Funtoys, Inc. (DNS namespace funtoys.com) recently acquired CoolToys, Inc. (DNS namespace cooltoys.com). Both companies use Windows Server 2003 Active Directory to run their networks. For strategic reasons, the new management decides to keep the IT infrastructure of the two organizations separate. However, they would like to have the capability of accessing data across the two Active Directory forests. Once the physical links are in place, a Cross-Forest trust can be established between the two Active Directory forests to facilitate access to resources in both directions.
3.9 Configuring the Network Infrastructure for Oracle Forms Recognition
This section provides detailed procedures for preparing a customer’s environment for the installation of Oracle Forms Recognition.
3.9.1. Setup Domain Trusts This section only applies to implementations of Oracle Forms Recognition in multi-domain Windows network environment – either the user accounts are in one domain and the Oracle Forms Recognition resources in another or both user accounts and Oracle Forms Recognition resources are spread over multiple domains. If your installation uses a Windows Single Domain Model (all user accounts and resources are in the same Windows domain,) skip to Section 3.10.

Chapter 3 Platform Requirements
Oracle Forms Recognition Installation Guide 11
3.9.2. Windows 2000/2003 Domains Windows 2000/2003 uses the Active Directory service to maintain information on all of logical objects that are part of a Windows 2000/2003 domain. Active Directory provides an integrated utility that enables system administrators to manage domains and trusts. Under Windows 2000/2003, trust relationships are managed using the Active Directory Domains and Trust MMC snap-in. This utility can be found under the Administrative Tools program group. You must have administrative privileges in the domain to use this utility.
This section pertains to Windows 2000/2003 domains in which the default trusts settings have been explicitly defined, and to mixed-mode Windows NT/Windows 2000 implementations.
Allow the system to generate the trust password internally by leaving those fields blank.
To set up a trust relationship between two domains:
1) Launch Active Directory Domains and Trusts from the Administrative Tools program group on a Domain Controller in the domain to be trusted.
Figure 3-2: Active Directory Domains and Trusts
2) In the Active Directory Domains and Trusts window, right-click a domain that will be part of the trust relationship and select Properties.
Figure 3-3: Domain Properties dialog box.
3) In the domain properties dialog box, press the Trusts tab. 4) Under Domains that trust this domain, click Add. The Add Trusting
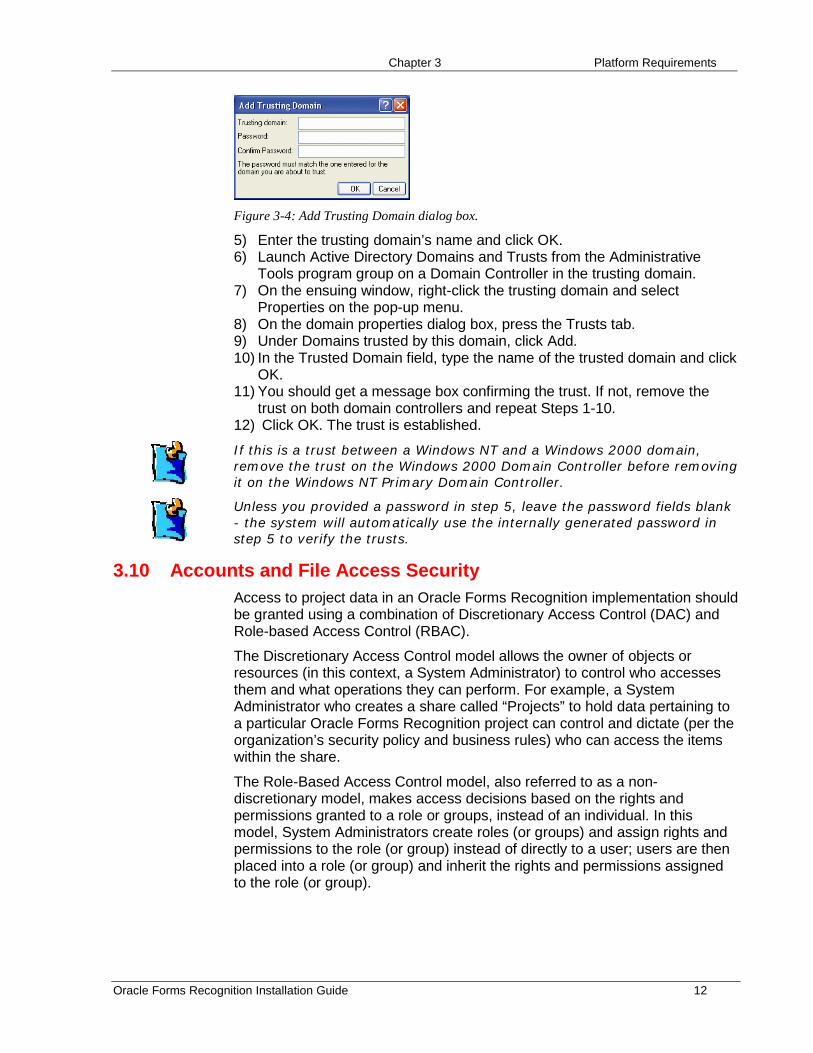
Domain dialog box appears.
Chapter 3 Platform Requirements
Oracle Forms Recognition Installation Guide 12
Figure 3-4: Add Trusting Domain dialog box.
5) Enter the trusting domain’s name and click OK. 6) Launch Active Directory Domains and Trusts from the Administrative
Tools program group on a Domain Controller in the trusting domain. 7) On the ensuing window, right-click the trusting domain and select
Properties on the pop-up menu. 8) On the domain properties dialog box, press the Trusts tab. 9) Under Domains trusted by this domain, click Add. 10) In the Trusted Domain field, type the name of the trusted domain and click
OK. 11) You should get a message box confirming the trust. If not, remove the
trust on both domain controllers and repeat Steps 1-10. 12) Click OK. The trust is established.
If this is a trust between a Windows NT and a Windows 2000 domain, remove the trust on the Windows 2000 Domain Controller before removing it on the Windows NT Primary Domain Controller.
Unless you provided a password in step 5, leave the password fields blank - the system will automatically use the internally generated password in step 5 to verify the trusts.
3.10 Accounts and File Access Security Access to project data in an Oracle Forms Recognition implementation should be granted using a combination of Discretionary Access Control (DAC) and Role-based Access Control (RBAC).
The Discretionary Access Control model allows the owner of objects or resources (in this context, a System Administrator) to control who accesses them and what operations they can perform. For example, a System Administrator who creates a share called “Projects” to hold data pertaining to a particular Oracle Forms Recognition project can control and dictate (per the organization’s security policy and business rules) who can access the items within the share.
The Role-Based Access Control model, also referred to as a non-discretionary model, makes access decisions based on the rights and permissions granted to a role or groups, instead of an individual. In this model, System Administrators create roles (or groups) and assign rights and permissions to the role (or group) instead of directly to a user; users are then placed into a role (or group) and inherit the rights and permissions assigned to the role (or group).
Chapter 3 Platform Requirements
Oracle Forms Recognition Installation Guide 13
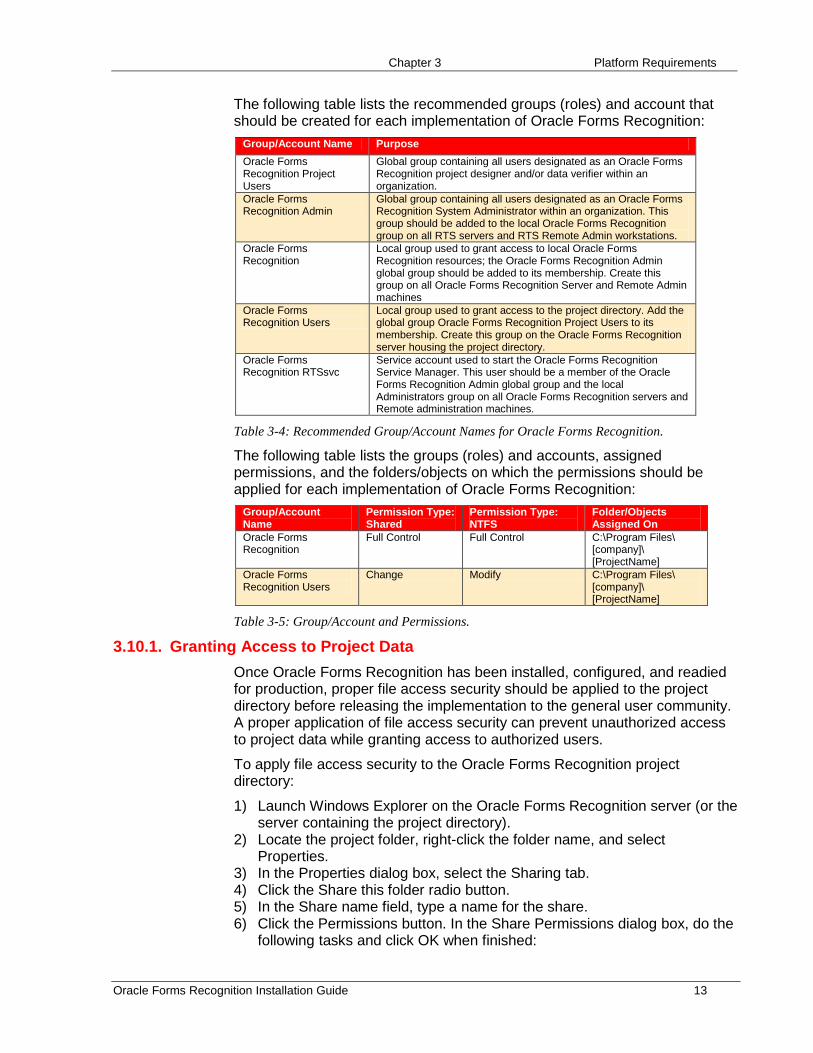
The following table lists the recommended groups (roles) and account that should be created for each implementation of Oracle Forms Recognition:
Group/Account Name Purpose Oracle Forms Recognition Project Users
Global group containing all users designated as an Oracle Forms Recognition project designer and/or data verifier within an organization.
Oracle Forms Recognition Admin
Global group containing all users designated as an Oracle Forms Recognition System Administrator within an organization. This group should be added to the local Oracle Forms Recognition group on all RTS servers and RTS Remote Admin workstations.
Oracle Forms Recognition
Local group used to grant access to local Oracle Forms Recognition resources; the Oracle Forms Recognition Admin global group should be added to its membership. Create this group on all Oracle Forms Recognition Server and Remote Admin machines
Oracle Forms Recognition Users
Local group used to grant access to the project directory. Add the global group Oracle Forms Recognition Project Users to its membership. Create this group on the Oracle Forms Recognition server housing the project directory.
Oracle Forms Recognition RTSsvc
Service account used to start the Oracle Forms Recognition Service Manager. This user should be a member of the Oracle Forms Recognition Admin global group and the local Administrators group on all Oracle Forms Recognition servers and Remote administration machines.
Table 3-4: Recommended Group/Account Names for Oracle Forms Recognition.
The following table lists the groups (roles) and accounts, assigned permissions, and the folders/objects on which the permissions should be applied for each implementation of Oracle Forms Recognition:
Group/Account Name
Permission Type: Shared
Permission Type: NTFS
Folder/Objects Assigned On
Oracle Forms Recognition
Full Control Full Control C:\Program Files\ [company]\ [ProjectName]
Oracle Forms Recognition Users
Change Modify C:\Program Files\ [company]\ [ProjectName]
Table 3-5: Group/Account and Permissions.
3.10.1. Granting Access to Project Data Once Oracle Forms Recognition has been installed, configured, and readied for production, proper file access security should be applied to the project directory before releasing the implementation to the general user community. A proper application of file access security can prevent unauthorized access to project data while granting access to authorized users.
To apply file access security to the Oracle Forms Recognition project directory:
1) Launch Windows Explorer on the Oracle Forms Recognition server (or the server containing the project directory).
2) Locate the project folder, right-click the folder name, and select Properties.
3) In the Properties dialog box, select the Sharing tab. 4) Click the Share this folder radio button. 5) In the Share name field, type a name for the share. 6) Click the Permissions button. In the Share Permissions dialog box, do the
following tasks and click OK when finished:

Chapter 3 Platform Requirements
Oracle Forms Recognition Installation Guide 14
- Add the local Oracle Forms Recognition group with Full Control permission
- Add the local Oracle Forms Recognition Users group with Change permission
- Add the local Administrators group with Full Control permissions - Remove the Everyone group
7) Click on the Security tab. 8) Do the following tasks and click OK when finished:
- Add the local Oracle Forms Recognition group with Full Control permission
- Add the local Oracle Forms Recognition Users group with Change permission
- Add the local Administrators group with Full Control permissions - Remove the Everyone group
The Oracle Forms Recognition and Oracle Forms Recognition Users groups are local groups. The Oracle Forms Recognition local group should be created on all Oracle Forms Recognition servers and Remote Admin machines; the Oracle Forms Recognition Users local group is only required on the Oracle Forms Recognition server storing the project data. For an explanation of these groups, see Section.
Chapter 4 Installing
Oracle Forms Recognition Installation Guide 15
Chapter 4 Installing Oracle Forms Recognition When you are ready to install Oracle Forms Recognition with Supervised Learning, there are several steps you should take to ensure that the install-lation goes smoothly. This section includes information about the following:
• Before installing Oracle Forms Recognition • Backward compatibility with other Brainware applications • Installing Oracle Forms Recognition Version 10.1.3.5.0 in standalone
mode • Installing Oracle Forms Recognition Version 10.1.3.5.0 • Checking the installation • Uninstalling Oracle Forms Recognition Version 10.1.3.5.0 • Repairing an installation of Oracle Forms Recognition Version 10.1.3.5.0 • Adding or removing product components
4.1 Before Installing Oracle Forms Recognition Before starting the installation, make sure that you have local administrator rights on the target machine. During the installation, a number of DLLs will be copied to the Windows system directory and registered with the operating system. This process requires administrative privileges and access to the Windows registry.
• .\Install contains the setup executables of the Oracle Forms Recognition product suite.
• .\Install\doc contains Oracle Forms Recognition product documentation.
4.1.1. Installation Checklist The checklist below is designed to help you install and configure Oracle Forms Recognition in your environment.
If you are installing Oracle Forms Recognition in a standalone mode (a non-network test or demo installation,) do only the steps outlined in Section 4.2 and skip the rest of the installation checklist.
Read Chapter 3. If following the Microsoft recommended resource rights assignment model,
create the users and groups discussed in the Platform Requirements section (Section 3.10) and create the groups and users discussed in Table 3-4. Otherwise, create a single user and specify that user wherever users and groups are requested.
Install Oracle Forms Recognition with Supervised Learning Version 10.1.3.5.0. (Section 4.2)
Configure the Runtime Components. Configure the Runtime Service Manager (Section 5.1) Start the Runtime Service Manager. Configure the RTS RemoteAdmin MMC snap-in (Section 5.2) Test the installation (Please see the Oracle Forms Recognition Runtime
Server User Guide.) Configure project settings for an instance. Process a batch (minimum workflow steps: OCR, Classification, and
Extraction)

Chapter 4 Installing
Oracle Forms Recognition Installation Guide 16
4.1.2. Password Protection All previously created projects will be password-protected when they are opened in Version 10.1.3.5.0. The default user name is Administrator, with no password. As the project administrator, your first task should be to establish project-level security. For more information, please refer to the Oracle Forms Recognition Designer User’s Guide.
4.2 Installing Oracle Forms Recognition To install Oracle Forms Recognition:
1) Run setup.exe. 2) English and German are the supported installation languages. The
installer gets its language settings from the regional settings of the operat-ing system. It defaults to English if a language other than English or Ger-man is detected.
3) Click Next to continue. 4) Select the installation type: Complete or Custom
Complete: installs the most common options: Oracle Forms Recognition Designer, Runtime Server, and Verifier. OCR Engines: FineReader 8, Kadmos, Kadmos4, Recognita, and Cleqs Barcode. Default Folder: SystemDrive:\Program Files\Oracle. Default Program Group: Oracle Forms Recognition. Custom: Enables you to select to install only the components you will use.
Figure 4-1: Setup Type selections in installation.
5) Select the Installation Folder by pressing the Browse button in the Setup Type box. The default is <systemdriveletter>:\program files\Oracle\<Application directory>. or in the Choose Folder dialog box, enter the path for the installation folder or browse the desired folder in the Directories pane, then click OK.
6) Click Next. Go on to Section 4.2.2
Chapter 4 Installing
Oracle Forms Recognition Installation Guide 17
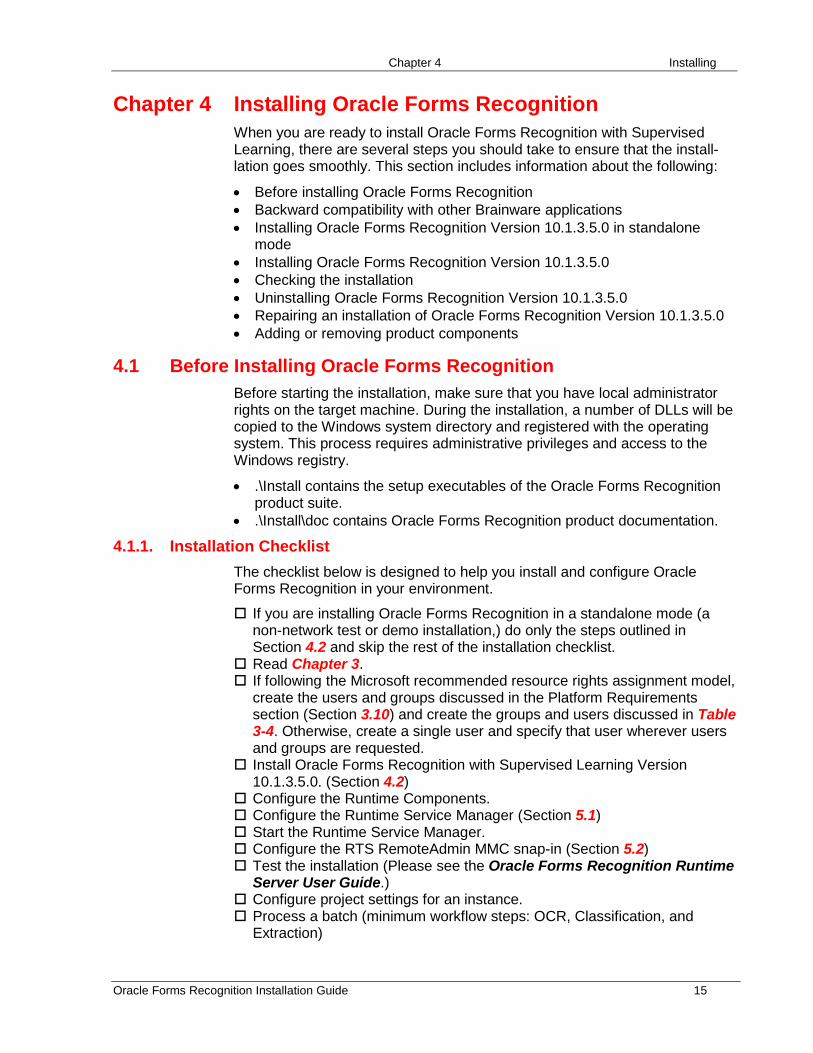
4.2.1. Selecting Custom Installation If you selected Custom on the Setup Type screen, you must select applications and other components.
Figure 4-2: Select or deselect applications and components.
For a custom installation:
1) In the Select Features dialog box, select the desired applications. 2) In the OCR components list, you can select the optional components used
for Barcode recognition and Handprint OCR. Only components selected during the installation will be available. However, you can always add more components later. (Please see Section 4.9).
3) Click Next.
If you intend to use the Oracle Forms Recognition Demo project included on the product CD, or project design using FineReader 4, be sure to select FineReader OCR Engine (4).
Optional components Cleqs Barcode Engine: Reads handwritten and machine-printed data and barcode
information FineReader8 OCR Engine:
Converts paper-based or scanned images into editable text. Supports English, German, Italian, French, and Spanish. The FineReader 8 engine is protected by ABBYY’s software protection mechanism. See the Product Licensing Guide for details on how license this component.
Kadmos OCR Engine: Used for handwriting recognition. Kadmos4 OCR Engine: Used for handwriting recognition. Recognita Engine: Supports 75 languages and more than 100 scanner models.
Table 4-1: List of available OCR components

Chapter 4 Installing
Oracle Forms Recognition Installation Guide 18
4.2.2. Finishing Typical and Custom Installations To finish either a typical or custom installation:
1) In the Select Program Folder screen, select an existing program folder or a new folder for the Oracle Forms Recognition program icons. The default setting is Oracle\Forms Recognition.
Figure 4-3: Select Program Folder dialog
2) Click Next. 3) Verify that the selected components are listed on the Start Copying Files
dialog box.
Figure 4-4: Start Copying Files dialog box
4) Click Next. 5) After installing all system components, a Setup Status Report box
appears. 6) Click Next. The Setup Complete box displays. 7) Click Finish to complete the installation. 8) Confirm your selections to finish the installation. The setup creates sev-
eral subdirectories below the installation directory: - \Components\Cairo contains the Brainware base components for
imaging and recognition. There is one subdirectory for each supported language and several subdirectories with third party libraries: Accusoft, Cleqs Barcode, FineReader, Kadmos, Recognita, INSO, and LDF in a complete installation. This directory also contains the license file.

Chapter 4 Installing
Oracle Forms Recognition Installation Guide 19
- \Components\Cedar contains the base components for document analysis. There is one subdirectory for each supported language and a subdirectory with a third party library, FindLink.
- \Projects\Demo Contains demo projects. There is a DemoX subfolder for each of these (where X is the project number).
- \Oracle Forms Recognition contains the Oracle Forms Recognition Designer executable DstDsr.exe, the Oracle Forms Recognition Runtime Server executable DstSvc.exe, and the Oracle Forms Recognition Verifier executable DstVer.exe. It also contains the settings files. In addition, there is one subdirectory for each supported language.
- \Oracle Forms Recognition\Bin\Log contains the log files of Oracle Forms Recognition Runtime Server.
4.3 Installing Oracle Forms Recognition in a Workgroup Configuration
A Windows Workgroup, also referred to as Peer-to-Peer networking, is a network implementation of Windows-based operating systems (clients and servers) in which there is no central security authority (domain controller) responsible for user authentication or a central repository (such as Active Directory) for locating network resources.
In such a network, each machine is responsible for securing its resources, and users needing access to a resource located on a machine must have an account defined on that machine. Windows Workgroup networking should only be used when you want to set up communication between a limited number of computers (less than 10) and the machines are not members of a Windows domain.
However, for an implementation of Oracle Forms Recognition in corporate network environments that are standardized on network operating systems (servers) other than Windows – Novell Netware – a Windows Workgroup setup may be the only choice. To install Oracle Forms Recognition in Windows Workgroup, perform the following steps (you must be logged on as an administrator):
1) Create a user with the same name on each Oracle Forms Recognition machine. This does not apply to machines that will be used only as a Designer or Verifier workstation. Oracle recommends OracleFormsRecognitionRTSsvc as the user name.
2) Add the above user to the local Administrators group on each Oracle Forms Recognition server.
3) Install Oracle Forms Recognition on each machine by following the steps in Section 4.2.
4) Configure and start the Runtime Service Manager by performing the steps in Section 5.1 on each machine, with the following exception: Wherever a domain user is requested, add the user created in step 1 above.
5) Configure the RTS Remote Administration MMC snap-in by performing the steps in Section 5.2 on each machine.
6) Configure project settings on each machine and test the instance created in Step 5 above. You should (at a minimum) test the OCR, Classification,

Chapter 4 Installing
Oracle Forms Recognition Installation Guide 20
and Extraction workflow steps. For more information on how to configure project settings for an Oracle Forms Recognition RTS instance, see the Oracle Forms Recognition Runtime Server User’s Guide.
7) Once you have successfully tested each machine, test remote communication by adding a remote machine to the local MMC snap-in of one your servers. You can accomplish this by performing a subset of the steps (Steps 4 through 7) in Section 5.2.
8) You should be able to administer the RTS instances (start, stop, change batch states, etc.) of the remote machine from the MMC snap-in of the local machine on which it was added.
4.4 Installing Oracle Forms Recognition in Standalone Mode Oracle Forms Recognition can be deployed in a standalone mode. However, this implementation method is intended for test and demonstration purposes only. It should NOT be used in a production environment. Deployment of Oracle Forms Recognition in Standalone mode for production purposes would be deemed unsupported by Oracle.
In this setup, all Oracle Forms Recognition components (applications, RTS, Remote Admin MMC snap-in, etc.) are installed and intended to be used on a single machine. Additionally, the integrated machine is not part of a Windows domain or is not intended to communicate with Oracle Forms Recognition RTS instances running on other machine(s) in a network environment.
Using this setup, almost all of the configuration constraints (Windows domain, Users and Groups, etc.) can be ignored.
To install Oracle Forms Recognition in a standalone mode:
1) Install Oracle Forms Recognition Version 10.1.3.5.0 by following the steps in Section 4.3.
2) Configure the RTS Remote Administration MMC snap-in by following the steps in Section 5.2 with one exception: In Step 6 of the procedure outlined, type LocalHost instead of the server name.
3) Configure project settings and test the instance created in step 4 above. You should (at a minimum) test the OCR, Classification, and Extraction workflow steps. For more information on how to configure project settings for an Oracle Forms Recognition RTS instance, please see the Oracle Forms Recognition Runtime Server User’s Guide.
4.5 Installing Oracle Forms Recognition in a Novell Netware Environment
4.5.1. Overview The implementation of Oracle Forms Recognition in a network environment that is standardized on the Novell Netware network operating system is somewhat similar to a Windows Workgroup implementation.
If the project data (project directory) resides on a Netware server or the Oracle Forms Recognition workflow exports to a directory on a Netware server, there needs to be a software solution that provides communication between the Oracle Forms Recognition machine and the Netware server. The table below lists the available software choices, depending on the Windows

Chapter 4 Installing
Oracle Forms Recognition Installation Guide 21
operating system platform that Oracle Forms Recognition is running on, that can be deployed to enable the Oracle Forms Recognition servers access to data stored on a Netware server.
Windows 2000 Server/Professional
Windows XP and Server 2003
Client Service for Netware (CSNW) X Gateway Service for Netware (GSNW) X Novell Client for Windows X X Native File Access for Windows (NFA) X X
Table 4-2: Software to Access Data on Netware Server
• Client Service for Netware (CSNW) is a client application from Microsoft that enables machines running a Windows operating system to connect to resources (files, print queues, etc.) on a Novell Netware server as though the Windows machines were Novell clients. Client Services for Netware uses NWLink IPX/SPX, Microsoft's implementation of the Novell IPX/SPX communication protocol, to communicate with a Novell server. One disadvantage (from an administrative perspective) of using CSNW is that it must be installed on each Windows-based client machine that needs access to a Novell Netware server.
• Gateway Service for Netware (GSNW) is another Microsoft application that can be installed on the Windows platform to enable access to resources on a Novell server. GSNW differs from CSNW in two ways: - Gateway Service for Netware is only available on the Windows server
platforms; it can be installed on Windows 2000 Server, but not Win-dows Server 2003.
- Once deployed on a Windows server, the server becomes a gateway through which other Windows machines can access Novell Netware resources. It presents shared Novell Netware resources as though they were Windows resources. That is, other Windows clients on the network do not need special software to access the Netware resources to which they have been granted access; they simply need to connect to the gateway machine.
• Novell Client for Windows is a client software from Novell that can be installed on a Windows-based machine to enable access to Novell Net-ware resources in a mixed Windows and Netware network environment. It performs all of the functions of CSNW and provides additional advance Novell specific functionalities not found in CSNW.
• Native File Access for Windows, part of the native file access suite of protocols from Novell, is a Novell Netware server-based software that enables Windows based machines to access Novell Netware resources without the need to install any client software on the Windows side. Native File Access for Windows uses the Common Internet File System (CIFS) to give Windows-based clients the impression that they are browsing resources located on a Windows server. Depending on the version of Novell Netware, NFA may not be installed by default on the Novell server but as an add-on.
Although any of the software solutions discussed above can be used to provide Oracle Forms Recognition users and services access to resources located on a Novell Netware server, it is up to the IT personnel of the environment in which Oracle Forms Recognition is being deployed to select

Chapter 4 Installing
Oracle Forms Recognition Installation Guide 22
the method by which they'll make Novell resources available to the implementation team. The organization's IT department will be responsible for installing any client software required, testing connectivity to the exposed Novell resources, and troubleshooting any connectivity or communication issues that may arise.
4.5.2. Performing the Installation To install Oracle Forms Recognition in a mixed Novell/Windows environment:
1) Decide on how Novell Netware resources will be made available to Oracle Forms Recognition users and services.
2) Installed and configured any required client or server software. 3) Test connectivity to the Novell Netware resources 4) Follow the steps for installing Oracle Forms Recognition in a Windows
Workgroup
4.6 Checking the Installation The installation was successful if Oracle Forms Recognition runs without errors.
To check for the correct installation of components:
1) Open the installation directory 2) Open \Components\Tools. 3) Run SCBLibVersion.exe. 4) From the menu, select View>Components General Info. This displays a
list of installed components: 5) Check the list for
- Completeness of components - Homogeneity of build numbers - Installation paths
6) All components Cro*.dll, Cdr*.dll and Bwe*.dll should have been registered automatically during the installation. If some of them seem to be missing, try to register them manually via invoking of RegCro.bat, RegCdr.bat and BweReg.bat Windows batch files available in .\Components\Cairo, .\Components\Cedar and .\Components\Bwe directories correspondingly.
If the automatic registration didn’t work, try to register manually using the program regsvr32.exe from the Windows system directory.
If this doesn’t help either, create a copy of the components list using the command File>Save to file in the Component Version Info dialog box. Submit an error report, the components list, and the log files located in the ...\ Oracle\ Forms Recognition\Bin\Log folder to Brainware customer support.
4.7 Removing Oracle Forms Recognition Version 10.1.3.5.0 Oracle Forms Recognition can be uninstalled using the Windows Control Panel’s Add/ Remove functionality. To remove previous versions of Oracle Forms Recognition:
1) Click Start>Settings>Control Panel. 2) Launch the Add/Remove Program wizard.

Chapter 4 Installing
Oracle Forms Recognition Installation Guide 23
3) On the Currently Installed Programs list, select Oracle Forms Recognition V10.1.3.5.0.
4) Click Change/Remove. 5) On the Setup dialog box, select Remove. 6) Follow the on-screen instructions.
4.8 Repairing an Oracle Forms Recognition Version 10.1.3.5.0 Installation
The Oracle Forms Recognition installer may be used to repair a copy of Oracle Forms Recognition that has stopped working properly. Factors that could cause an installation to malfunction include:
• Accidental deletion of application files • Missing registry entries • Corrupted application files • Malicious attacks on a machine housing Oracle Forms Recognition
To repair Oracle Forms Recognition:
1) Select Start>Settings>Control Panel. 2) Select Add/Remove Program. 3) In the Currently Installed Programs list on the Add/Remove Programs
dialog box, select Oracle Forms Recognition v 10.1.3.5.0. 4) Click the Change/Remove button. 5) On the Setup dialog box, select Repair and follow the online instructions. 6) Click Next. 7) Reinstall all program components installed by the previous setup. 8) Click Finish when setup completes.
4.9 Adding or Removing Version 10.1.3.5.0 Components Oracle Forms Recognition is a product suite consisting of the following applications:
• Oracle Forms Recognition Runtime Server • Oracle Forms Recognition Designer • Oracle Forms Recognition Verifier
The Oracle Forms Recognition deployment utility, Setup.exe, uses a modular approach that enables you to add or remove applications from a machine.
To modify an existing Oracle Forms Recognition installation:
1) Select Start>Settings>Control Panel. 2) Select Add/Remove Program. The Add/Remove Programs dialog box
appears. 3) In the Currently Installed Programs list, select Oracle Forms Recognition v
10.1.3.5.0.

Chapter 4 Installing
Oracle Forms Recognition Installation Guide 24
4) Click the Change/Remove button. 5) On the Setup dialog box, select Modify and click Next. 6) In the Select Components dialog box, select or clear the desired compo-
nents. 7) Click Next. Setup adds (if checked) or removes (if unchecked) the com-
ponents. 8) Click Finish when setup completes.
4.10 Silent Installations A Silent Install mode is provided for situations where the same configuration of Oracle Forms Recognition is to be installed on several machines, for example, on Verifier workstations. The use of a configuration file removes the necessity to go through the installation dialog on each machine.
4.10.1. Silent Install.ini The configuration settings for the silent installation are read from the “Silent Install.ini” file in the Oracle Forms Recognition installation directory. The directory contains an example file which must be edited before performing a silent installation.
The file contains four sections – General, Applications, OCR Engines, and Additional. All sections and entries are mandatory.
Name Description [General] Determines how and where Oracle Forms Recognition
is to be installed. Path = Indicates where the application should be installed. The
pathname should not have a final backslash. Example: Path = C:\Program Files\your company name
MoveComponentsIfRequired = If an older version of the application is installed, this indicates whether to use the existing component folder or whether to move the old components into the new directory prior to installation. 0: Use existing component folder. 1: Move components to the new path.
CreateDeskTopIcons = 0: Don’t create desktop shortcuts. 1: Create desktop shortcuts.
[Applications] Defines which applications are to be installed. Note that it is permissible to skip all applications if, for example, only the extraction components are to be installed.
Designer = 0: Skip installation of the Designer application. 1: Install the Designer application.
Verifier = 0: Skip installation of the Verifier application. 1: Install the Verifier application.
Runtime Service = 0: Skip installation of the Runtime Server application. 1: Install the Runtime Server application.
[OCR Engines] Defines which OCR engines are to be installed. It is permissible to skip all the engines.
FineReader8 = 0: Skip installation of ABBYY FineReader 8. 1: Install ABBYY FineReader 8.
Kadmos = 0: Skip installation of Kadmos engine. 1: Install Kadmos engine.
Kadmos4 = 0: Skip installation of Kadmos4 engine. 1: Install Kadmos4 engine.
Recognita = 0: Skip installation of Recognita engine. 1: Install Recognita engine.
Chapter 4 Installing
Oracle Forms Recognition Installation Guide 25
Cleqs = 0: Skip installation of Cleqs engine. 1: Install Cleqs engine.
[Additional] Additional files to install. Demo Files = 0: Skip installation of the demo project files.
1: Install demo project files.
Table 4-3: Options for "silent install.ini"
An example "Silent Install.ini" INI-file is available in the root setup directory. Example: [General] Path = C:\Programme\Document Processing Services MoveComponentsIfRequired = 1 CreateDeskTopIcons = 1 [Applications] Designer = 1 Verifier = 1 Runtime Service = 1 [OCR Engines] FineReader8 = 1 Kadmos = 0 Kadmos4 = 1 Recognita = 1 Cleqs = 1 [Additional] Demo Files = 1
4.10.2. Automated Distribution of Service Updates on Verifier Workstations Silent Installation can also be used to install service packs and service updates automatically on Verifier workstations when updates become available in a pre-defined network folder by running a batch file with the following content:
Call “Silently Install Latest Service Update.bat” Call “C:\Program Files\[WL SCN]\[WL PN]\DstVer.exe”
Chapter 56 Auto Update
Oracle Forms Recognition Installation Guide 26
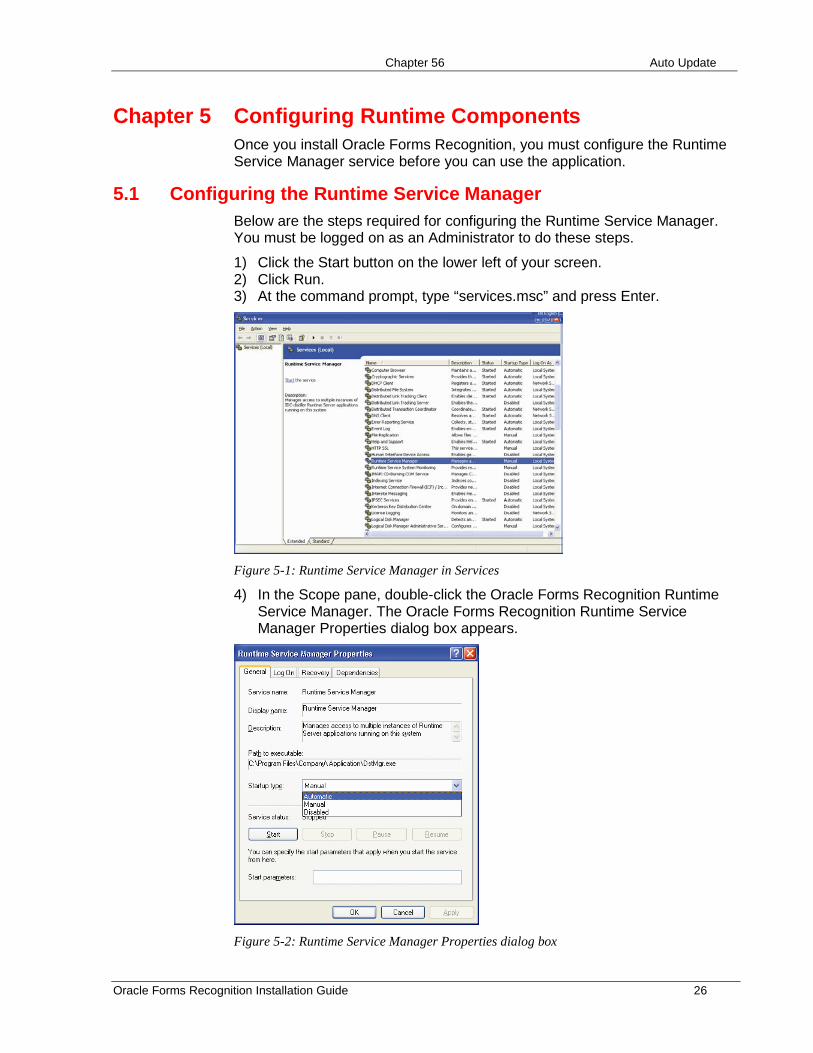
Chapter 5 Configuring Runtime Components Once you install Oracle Forms Recognition, you must configure the Runtime Service Manager service before you can use the application.
5.1 Configuring the Runtime Service Manager Below are the steps required for configuring the Runtime Service Manager. You must be logged on as an Administrator to do these steps.
1) Click the Start button on the lower left of your screen. 2) Click Run. 3) At the command prompt, type “services.msc” and press Enter.
Figure 5-1: Runtime Service Manager in Services
4) In the Scope pane, double-click the Oracle Forms Recognition Runtime Service Manager. The Oracle Forms Recognition Runtime Service Manager Properties dialog box appears.
Figure 5-2: Runtime Service Manager Properties dialog box

Chapter 56 Auto Update
Oracle Forms Recognition Installation Guide 27
5) On the General tab, under Startup type, select Automatic from the drop-down list.
6) Select the Log On tab.
Figure 5-3: Log on tab for Runtime Service Manager Properties dialog box
7) Under Log on as, select the This account radio button. 8) Click the Browse button. 9) Find and add the domain user with appropriate and sufficient for Oracle
Forms Recognition processing network access rights (e.g., OracleFormsRecognitionRTSsvc) and click OK.
10) Type the domain password for the user in the fields provided. 11) Click OK and close the Computer Management MMC.
Chapter 56 Auto Update
Oracle Forms Recognition Installation Guide 28
5.2 Configuring the RTS RemoteAdmin MMC Snap-in The installation of Oracle Forms Recognition creates a default console, called Oracle Forms Recognition Service Manager, that you can use to configure the Oracle Forms Recognition RTS RemoteAdmin MMC snap-in.
Very Important! Before configuring the RemoteAdmin MMC snap-in, ensure that the Runtime Service Manager service is started. Unless the service has been started, the MMC will not connect to the machine.
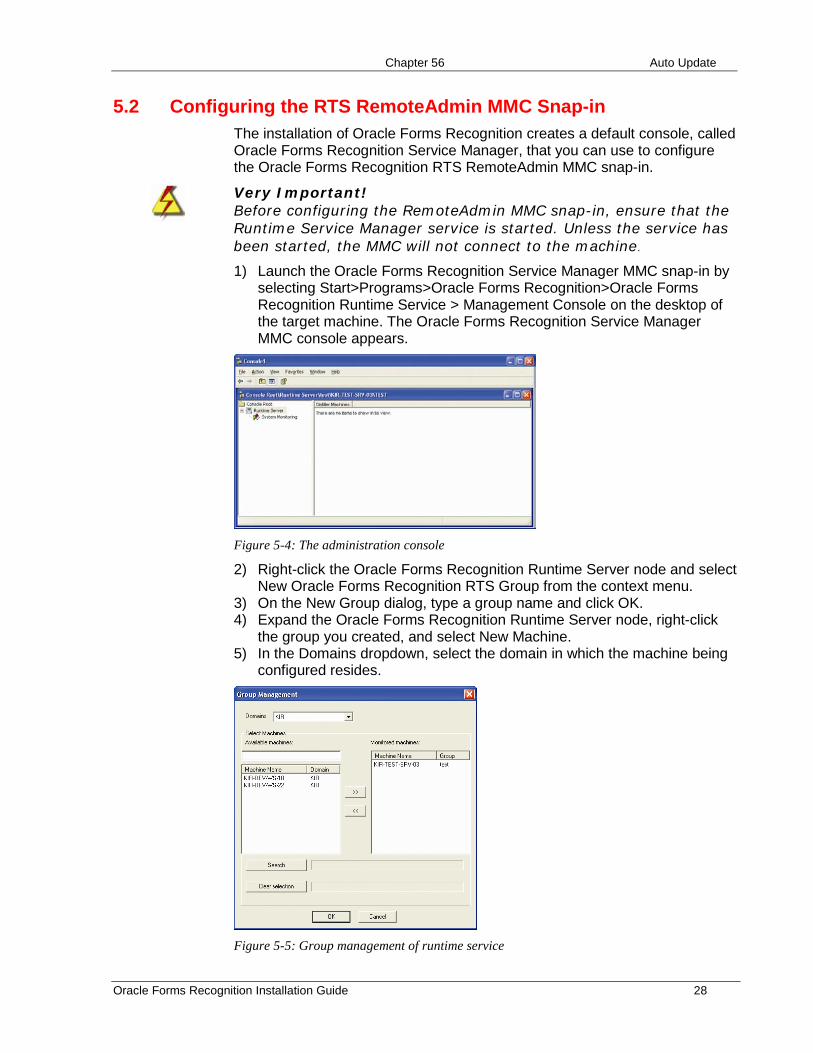
1) Launch the Oracle Forms Recognition Service Manager MMC snap-in by selecting Start>Programs>Oracle Forms Recognition>Oracle Forms Recognition Runtime Service > Management Console on the desktop of the target machine. The Oracle Forms Recognition Service Manager MMC console appears.
Figure 5-4: The administration console
2) Right-click the Oracle Forms Recognition Runtime Server node and select New Oracle Forms Recognition RTS Group from the context menu.
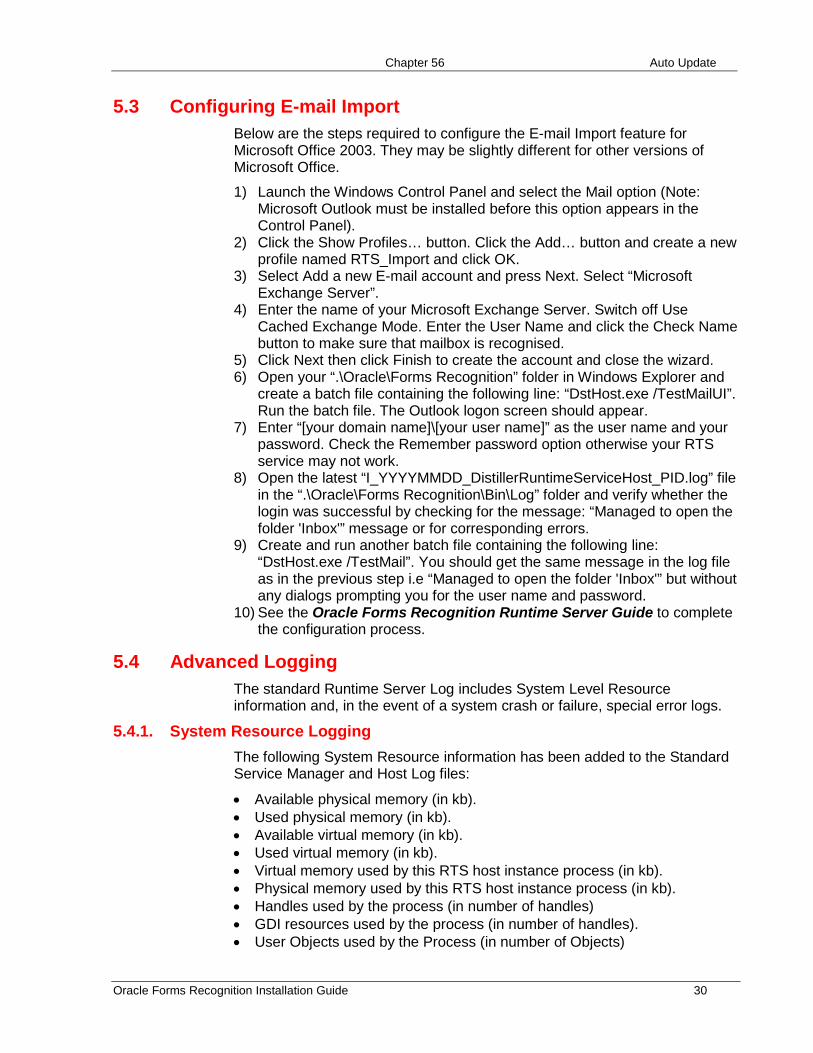
3) On the New Group dialog, type a group name and click OK. 4) Expand the Oracle Forms Recognition Runtime Server node, right-click
the group you created, and select New Machine. 5) In the Domains dropdown, select the domain in which the machine being
configured resides.
Figure 5-5: Group management of runtime service

Chapter 56 Auto Update
Oracle Forms Recognition Installation Guide 29
6) On the Group Management dialog box, type the name of the Oracle Forms Recognition server and click OK.
Figure 5-6: Administration console with added machine
7) Right-click on the machine name, select license, and set the license path. 8) Right-click on the machine name and select New>RTS Instance 9) On the New RTS Instance dialog, type the instance name and click OK.
The configuration for RTS RemoteAdmin MMC snap-in should look like the example in Figure 5-7.
Figure 5-7: Administration console with instance
See Also For information on how to configure project settings for an Oracle Forms Recognition instance, see the Oracle Forms Recognition Runtime Server User’s Guide.
Chapter 56 Auto Update
Oracle Forms Recognition Installation Guide 30
5.3 Configuring E-mail Import Below are the steps required to configure the E-mail Import feature for Microsoft Office 2003. They may be slightly different for other versions of Microsoft Office.
1) Launch the Windows Control Panel and select the Mail option (Note: Microsoft Outlook must be installed before this option appears in the Control Panel).
2) Click the Show Profiles… button. Click the Add… button and create a new profile named RTS_Import and click OK.
3) Select Add a new E-mail account and press Next. Select “Microsoft Exchange Server”.
4) Enter the name of your Microsoft Exchange Server. Switch off Use Cached Exchange Mode. Enter the User Name and click the Check Name button to make sure that mailbox is recognised.
5) Click Next then click Finish to create the account and close the wizard. 6) Open your “.\Oracle\Forms Recognition” folder in Windows Explorer and
create a batch file containing the following line: “DstHost.exe /TestMailUI”. Run the batch file. The Outlook logon screen should appear.
7) Enter “[your domain name]\[your user name]” as the user name and your password. Check the Remember password option otherwise your RTS service may not work.
8) Open the latest “I_YYYYMMDD_DistillerRuntimeServiceHost_PID.log” file in the “.\Oracle\Forms Recognition\Bin\Log” folder and verify whether the login was successful by checking for the message: “Managed to open the folder 'Inbox'” message or for corresponding errors.
9) Create and run another batch file containing the following line: “DstHost.exe /TestMail”. You should get the same message in the log file as in the previous step i.e “Managed to open the folder 'Inbox'” but without any dialogs prompting you for the user name and password.
10) See the Oracle Forms Recognition Runtime Server Guide to complete the configuration process.
5.4 Advanced Logging The standard Runtime Server Log includes System Level Resource information and, in the event of a system crash or failure, special error logs.
5.4.1. System Resource Logging The following System Resource information has been added to the Standard Service Manager and Host Log files:
• Available physical memory (in kb). • Used physical memory (in kb). • Available virtual memory (in kb). • Used virtual memory (in kb). • Virtual memory used by this RTS host instance process (in kb). • Physical memory used by this RTS host instance process (in kb). • Handles used by the process (in number of handles) • GDI resources used by the process (in number of handles). • User Objects used by the Process (in number of Objects)

Chapter 56 Auto Update
Oracle Forms Recognition Installation Guide 31
These values are written to the Standard Service Manager:
• [Application directory]\Log\S_yyyymmdd.log For example: C:\Program files\Oracle\Forms Recognition\Bin\Log\S_20070521.log
and the Host Log files:
• [Application directory]\Log\H_<instance name>_yyyymmdd.log For example: C:\Program files\Oracle\Forms Recognition\Bin\Log\H_Test_20070521.log
using the following format: LoggingLevel | Date | Time | ErrorNumber | ProcessId | UsedPhysicalMemory/AvailablePhysicalMemory | UsedVirtualMemory/AvailableVirtualMemory | UsedVirtualMemoryByThisHost/UsedPhysicalMemoryByThisHost | ProcessHandles | GDIResources/UserObjects| Message | ServerName
For example,
[Info] | August 03, 2005 | 15:46:47 | 010 | 1804 | 330564k/193172k | 366240k/911160k | 12176k/15388k | 183 | 43/59 | Check batches for further processing | W2K-MQUIJANO
5.4.2. Crash / Failure Logging In the case of a System or Application Crash or Failure an additional error log file will be created with a format:
Err_<Process ID>_yyyymmdd.log
This will log crashes under the following circumstances.
• Import Crashes - The log file will have stack information specific to the status of the system when the crash/failure occurred.
• OCR Engine Crashes - The log file will have an "ReadZone" entry for the specific OCR engine for which the crash occurred and stack information specific to the status of the system when the crash/failure occurred.
• Classification Engine Crashes - The log file will have an "Classify" entry for the specific Classification engine for which the crash occurred, the specific Class name where the crash occurs, and stack information specific to the status of the system when the crash/failure occurred.
• Extraction Engine Crashes - The log file will have an "EvalZone" entry for the specific Extraction engine for which the crash occurred, the field where the crash occurs, and stack information specific to the status of the system when the crash/failure occurred.
• Export crashes - The log file will have an "StepExport" and stack information specific to the status of the system when the crash/failure occurred.
• Clean-up crashes - The log file will have an "ProcessDocumentsCleanUp" and stack information specific to the status of the system when the crash/ failure occurred.

Chapter 56 Auto Update
Oracle Forms Recognition Installation Guide 32
• Script Events - The name of the script event, the kind of sheet, which could be project level or a certain class, and, For script events on field level, the field name will added to the crash/failure log.

Chapter 56 Auto Update
Oracle Forms Recognition Installation Guide 33
Chapter 6 Auto-Update of Oracle Forms Recognition Verifier & Runtime Server Software Versions
6.1 Description 6.1.1. How the Automatic Update Works
The auto update feature allows the administrator to update automatically Oracle Forms Recognition software versions with latest available service updates on different workstations, where Oracle Forms Recognition applications are running. For this purpose it is required to set up a “Shared Network Folder” where the new service updates are to be placed.
The workstations have to have sufficient file access permissions to access this shared directory.
Furthermore, a “Local Update Folder“ has to exist for each workstation, where automatic updates are to be configured. Via this directory, the system is going to check which software builds had been already installed.
There are three files to be copied to the “Shared Network Folder“ to enable automatic updates:

Chapter 56 Auto Update
Oracle Forms Recognition Installation Guide 34
• One system file (called “Build Level” file for further reference) identifies the build level of the service update to deploy automatically (for example, “B4117.installed“)
• The service update to deploy automatically. (It is recommended to define a unique name associated with execution of service update installations, for example “Setup.exe“.)
• One batch file for execution of the service update in Silent Mode ("InstallRemote.bat“).
When starting the Verifier (or Designer/RTS applications) the batch file will check whether the same “Build Level” file located in the “Shared Network Folder” is already available in the “Local Update Folder“.
1. If this is not the case, the "InstallRemote.bat" is going to be invoked. After completion of the silent installation, the “Build Level” file from the "Shared Network Folder" is going to be copied to the "Local Update Folder" directory. And, finally, the Verifier (or the other desired application) is going to be started.
2. In case the same “Build Level” file is already available in the “Local Update Folder“, the silent update step is going to be skipped and only the launching of the application is going to take place.
3. In order to auto-update the Runtime Server (RTS) software version, the RTS service has to be stopped first. It is recommended to apply this operation when the RTS is not loaded with the document processing activities. For this purpose the Windows "Winat" function can be used, which can be configured to:
• Stop the RTS service at the specific desired time (e.g., via usage of the "Stop RTS running as NT Service.bat" from the application directory of Oracle Forms Recognition).
• Start the auto-update feature (the file "AutoInstall.bat" from the Oracle Forms Recognition application directory contains all required instructions). Note that enclosed file paths have to be adjusted manually.
• Start the RTS service at the desired time (e.g., via usage of the "Start RTS as NT Service.bat" from the application directory of Oracle Forms Recognition).
The used batch files are going to be created during the full setup installation of Oracle Forms Recognition. In case the Auto Update feature was not configured during the installation, the used file paths have to be entered/adjusted in the following batch files (after the installation): “StartIfNotInstalled.bat“, “AutoInstall.bat“. In order to enable the auto update feature for the Verifier and Designer applications, they have to be started via the corresponding “DstVer_AutoUpdate.bat" (or “DstDsr_AutoUpdate.bat") from the Oracle Forms Recognition application directory.

Chapter 56 Auto Update
Oracle Forms Recognition Installation Guide 35
6.1.2. Configuring Auto Update in Oracle Forms Recognition Setup During the Oracle Forms Recognition 10.1.3.5.0 installation, the setup will show a dialog box for configuring of the Auto Update feature:
In order to configure the auto update during the installation, the “Shared Network Folder“ path has to be known before launching Oracle Forms Recognition setup. The administrator can also activate the automatic update for Verifier and/or Designer applications using the corresponding “Designer” and “Verifier” check-box controls available in the dialog (by default, both are deactivated).
The options have the following implication:
Activation of “Designer” and/or “Verifier” options: The program shortcuts do not call the corresponding application directly any longer. Instead they use the generated (by the setup) batch files “DstDsr_AutoUpdate.bat“ and/or “DstVer_AutoUpdate.bat“ correspondingly. Note: these options can be activated only if the entered “Shared Network Folder“ path is valid.
Entering of the “Shared Network Folder“ path: The setup will use this path when generating the batch files for auto update function (see 6.1.1How the Automatic Update Works above).
Chapter 56 Auto Update
Oracle Forms Recognition Installation Guide 36
6.1.3. Manual Configuration of the Auto Update Function In case the Auto Update feature was not properly configured during the Oracle Forms Recognition 10.1.3.5.0 installation (for example, due to the reason that exact location of the “Shared Network Folder” was unknown at the point of the installation), it is still possible to configure it manually afterwards. The following steps are going to be required.
6.1.3.1. Editing the “AutoInstall.bat” Batch File The path “Shared Network Folder” has to be entered in the “AutoInstall.bat“. For this purpose, edit the “AutoInstall.bat“ batch file using, e.g., Windows Notepad application (right mouse click on the “AutoInstall.bat“ file in Windows Explorer, select “Edit” menu item). @echo off REM ========================================================================================================= REM This Batch file checks the Shared Network Install folder ("SHAREDNETFOLDER" variable) for available REM software service updates. REM Please adjust the "SHAREDNETFOLDER" variable with your network path, where new service updates are REM going to be placed for automatic installation by Verifier and/or Runtime Service workstations. REM REM Example: \Your File ServerYour Oracle Forms Recognition Service Update Share REM REM "ACTIVEDIR" variable: Location of this batch file (generated automatically by the Oracle Forms Recognition setup). REM REM (c) 2009 Oracle, Inc. REM ========================================================================================================= SET SHAREDNETFOLDER ="\\YourNetworkInstallServerName\YourInstallShareName" SET ACTIVEDIR ="C:\Programme\Oracle\Forms Recognition" IF EXIST %SHAREDNETFOLDER %\*.installed GOTO NEW_SU echo no.updates.available.root GOTO END :NEW_SU CD %SHAREDNETFOLDER % for %%1 in (*.installed) do Call %ACTIVEDIR %\StartIfNotInstalled %%1 %SHAREDNETFOLDER % %ACTIVEDIR % CD %ACTIVEDIR % :END
Change the content of the variable “SHAREDNETWORKFOLDER“ to the network location of the new service updates that is going to be used as the master location of the software setups for Auto Update feature.
6.1.3.2. Change Shortcuts The shortcuts used to start Designer and/or Verifier applications (available in Windows Start menu and/or on the desktop) invoke the corresponding programs directly, in case the Auto Update function was not configured during the setup.
In order to adjust this, replace the target file “DstDsr.exe“ (or “DstVer.exe“ for the Verifier application’s shortcut) with the batch file DstDsr_AutoUpdate.bat“ (or “DstVer_AutoUpdate.bat“) in the Properties of the corresponding

Chapter 56 Auto Update
Oracle Forms Recognition Installation Guide 37
application’s shortcut (use right mouse click on the shortcut and select the “Properties” menu item).
6.2 Usage The Auto Update feature can be used for automation of the Oracle Forms Recognition installation process and can save time in administration efforts to deploy each next software update on, e.g., 100 different, production, development, and testing workstations and servers where Oracle Forms Recognition is running.
Fehler! Verweisquelle konnte nicht gefunden werden. Enabling Additional OCR Engine Languages
Oracle Forms Recognition Installation Guide 38
Chapter 7 Enabling Additional OCR Engine Languages Oracle Forms Recognition supports many OCR engine languages. English, French, German, Spanish, and Italian are enabled by default, but for some OCR engines you can request additional recognition languages at Oracle.
Oracle will confirm that the requested language is effectively supported by the desired OCR engine and will deliver special custom language files in this case. For example, in order to enable Russian language for FineReader8 OCR engine, the following sequence of steps is supposed to be applied:
1) Exit all Oracle Forms Recognition applications. 2) On the Oracle Forms Recognition servers, stop the Oracle Forms
Recognition Runtime Server services. 3) Copy the custom language file(s) received from Oracle to the .\Langfile
sub-folder on your local system. 4) Copy the language file to the folder:
.\Forms Recognition\Components\Cairo\Finereader8 on all configured Oracle Forms Recognition machines.
5) Restart the Oracle Forms Recognition Runtime Server services. 6) Restart the client application.
Index
Oracle Forms Recognition Installation Guide 39
Index Account/Group Names
Recommended, 13 Adding
Oracle Forms Recognition components, 23 Cairo, 18 Cedar, 19 Checking
Installation, 22 Checklist
Installation, 15 Common Internet File System, 21 Configuration
Core Hardware and Sofware, 3 Hardware sizing, 3
CSNW, 21 DAC, 12 DCOM, 4 Directory contents, 18 Discretionary Access Control, 12 Discretionary Access Control Model, 12 DLLs, 15 Domain Trusts
Setting up, 10 Domains, 8
Windows 2000 setup, 11
Windows NT, 8 Executables, 19 Firewall, 5 Firewalls, 5 Gateway Service for Netware, 21 Hardware
Minimum and Recommended Requirements, 2 IPX/SPX Protocol, 21 Languages
Enabling, 38 Log, 19 Monitoring
Event properties, 31 Native File Access for Windows, 21
Network Infrastructure, 3 Novell, 19, 20, 21, 22 Novell Client for Windows, 21 NTFS, 6, 7 OCR Performance
Maximizing, 5 Operating Systems, 2 Optional Components
Installing, 17 PDF generation, 2 Peer-to-Peer networking, 19 RBAC, 12 Registration problems, 22 Removing
Oracle Forms Recognition components, 23 Repairing
The installation, 23 Requirements
Hardware, 2 Role-based Access Control, 12 Role-Based Access Control Model, 12 RTS Remote Administration MMC, 5 Runtime Service Manager
Configuring, 26 Shared Permissions, 7 Standalone Implementations
Installing, 20 Trusts, 8 Uninstalling
Version 4. 0, 22 Windows NT, 9, 11, 12 Windows Server 2000, 2, 3, 4, 21 Windows Server 2003, 2, 3, 4, 9, 21 Windows Server 2003 Active Directory, 10 Windows Server 2008, 2 Windows Vista, 2 Windows Workgroup, 19 Windows XP, 2, 4 Wndows XP, 3