EFI Euro 1 - Aim Technologies
6
-
Upload
khangminh22 -
Category
Documents
-
view
0 -
download
0
Transcript of EFI Euro 1 - Aim Technologies

AB
Typewritten Text
AB
Typewritten Text
AB
Typewritten Text
AB
Typewritten Text
AB
Typewritten Text
AB
Typewritten Text
AB
Typewritten Text
AB
Typewritten Text
EFI Euro 1
AB
Typewritten Text
AB
Typewritten Text
AB
Typewritten Text
AB
Typewritten Text
AB
Typewritten Text
AB
Typewritten Text
AB
Typewritten Text
AB
Typewritten Text
AB
Typewritten Text
AB
Typewritten Text
Release 1.03
AB
Typewritten Text
AiM Infotech
AB
Typewritten Text
AB
Typewritten Text
AB
Typewritten Text
AB
Typewritten Text
AB
Typewritten Text
AB
Typewritten Text
AB
Typewritten Text
AB
Typewritten Text
AB
Typewritten Text
AB
Typewritten Text
AB
Typewritten Text
AB
Typewritten Text
AB
Typewritten Text
AB
Typewritten Text
AB
Typewritten Text
AB
Typewritten Text
AB
Typewritten Text
AB
Typewritten Text
AB
Typewritten Text
AB
Typewritten Text
AB
Typewritten Text
AB
Typewritten Text
AB
Typewritten Text

1
This tutorial explains how to connect AiM devices to EFI Euro 1 ECU.
1 Recommended check
Before connecting EFI Euro 1 ECU to AiM devices two checks are strongly recommended.
• Hardware check: all AiM devices feature a 120 Ohm resistor integrated in the logger (MXL Strada/ Pista/Pro05) or mounted on the device harness (SoloDL, EVO4, ECU Bridge). Your network should be equipped with another 120 Ohm resistor. In case you find a third resistor, please remove it.
• Firmware check: according to their firmware version, EFI Euro 1 ECU may be compatible or not with AiM devices. In detail:
o ECU with firmware version 200-299: not compatible o ECU with firmware version 300-379: firmware upgrading needed – contact EFI dealer o ECU with firmware version 380-399: compatible o ECU with firmware version 400 onwards software setup needed – see below
Please note: always ensure that your AiM device is upgraded to the latest available firmware version checking www.aim-sportline.com download area, firmware section.
2
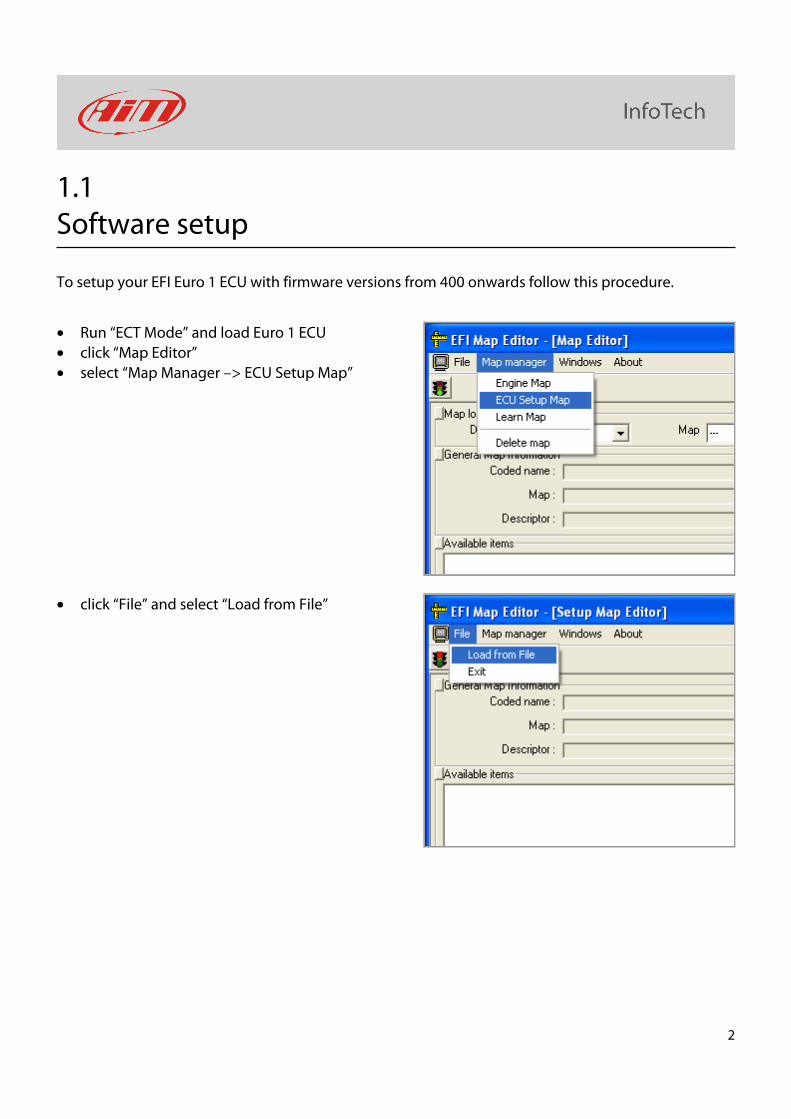
1.1 Software setup
To setup your EFI Euro 1 ECU with firmware versions from 400 onwards follow this procedure.
• Run “ECT Mode” and load Euro 1 ECU
• click “Map Editor”
• select “Map Manager –> ECU Setup Map”
• click “File” and select “Load from File”

3
• select “.ECF” file
• select “.CDS” file
• the map is loaded
• the page shows a long list of options: select “System Setup – Data Export”
“Data export” table is loaded. Available options are:
• 0 = disable
• 1 = standard
• 2 = extended – type this one
4
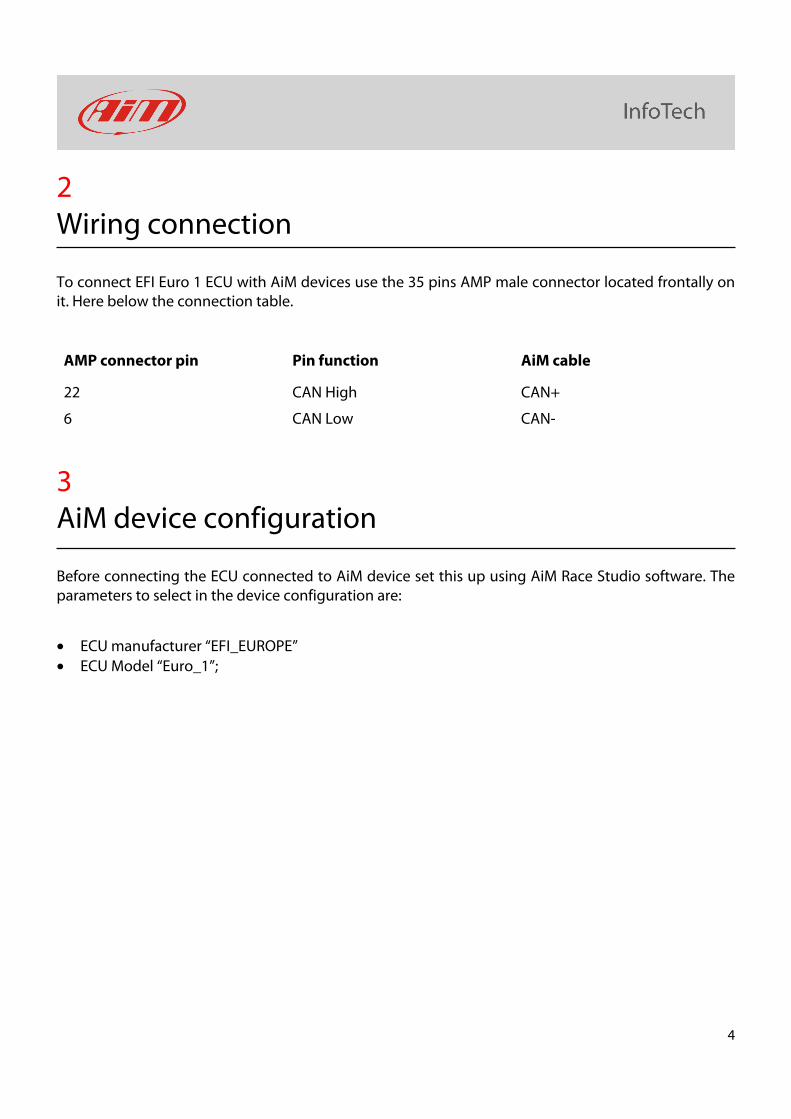
2 Wiring connection
To connect EFI Euro 1 ECU with AiM devices use the 35 pins AMP male connector located frontally on it. Here below the connection table.
AMP connector pin Pin function AiM cable
22 CAN High CAN+
6 CAN Low CAN-
3 AiM device configuration
Before connecting the ECU connected to AiM device set this up using AiM Race Studio software. The parameters to select in the device configuration are:
• ECU manufacturer “EFI_EUROPE”
• ECU Model “Euro_1”;

5
4 Available channels
Channels received by AiM loggers connected to "EFI" "Euro_1" protocol are:
ID CHANNEL NAME FUNCTION
ECU_1 EFI_RPM RPM
ECU_2 EFI_TPS Throttle position
ECU_3 EFI_DFARF Throttle position derivative
ECU_4 EFI_MAP Manifold air pressure
ECU_5 EFI_BARO Barometric pressure
ECU_6 EFI_ARR_TRANS Fuel enrichment multiplier on throttle position transient
ECU_7 EFI_SPEED Vehicle speed
ECU_8 EFI_VBATT Battery supply
ECU_13 EFI_TEROGBASE Injection table – injection time
ECU_14 EFI_TEROG Real injection time
ECU_15 EFI_TEROG12 Injection time of cylinder 1-2
ECU_16 EFI_TEROG34 injection time of cylinder 3-4
ECU_17 EFI_SABASE Ignition table - spark advance
ECU_18 EFI_SA Real spark advance
ECU_19 EFI_SA1 Spark advance 1
ECU_20 EFI_SA2 Spark advance 2
ECU_21 EFI_NTK1 Lambda value 1
ECU_22 EFI_FCCLAT Auto mapping flag
ECU_23 EFI_KFUELLEARN Fuel correction coefficient for auto mapping
ECU_24 EFI_CLC1 Clutch 1
ECU_31 EFI_TH2O Engine coolant temperature
ECU_32 EFI_TAIR Intake air temperature