eBusiness Web Services Installation and Reference Guide
63
Sage 100 2016 eBusiness Web Services Installation and Reference Guide
-
Upload
khangminh22 -
Category
Documents
-
view
0 -
download
0
Transcript of eBusiness Web Services Installation and Reference Guide
SeIG
age 100 2016Business Web Services
nstallation and Reference uide
This is a publication of Sage Software, Inc.
Version 2016
Copyright © 2015 Sage Software, Inc. All rights reserved.
Sage, the Sage logos, and the Sage product and service names mentioned herein are registered trademarks or trademarks of Sage Software, Inc., or its affiliated entities. All other trademarks are the property of their respective owners.
Business Objects® and the Business Objects logo, BusinessObjects®, and Crystal Reports® are trademarks or registered trademarks of Business Objects Software Ltd. in the United Sates and in other countries. Business Objects is an SAP company.
Microsoft® and Microsoft SQL Server® are either registered trademarks or trademarks of the Microsoft Corporation in the United States and/or in other countries.
The names of all other products and services are property of their respective owners.
Your use of this document and the Sage product(s) described herein is governed by the terms and conditions of the Sage End User License Agreement ("EULA") or other agreement that is provided with or included in the Sage product. Nothing in this document supplements, modifies or amends those terms and conditions. Except as expressly stated in those terms and conditions, the information in this document is provided by Sage "AS IS" and Sage disclaims all express, implied or statutory warranties of any kind, including but not limited to the warranties of merchantability, fitness for a particular purpose or of non-infringement. No implied license is granted to you under any Sage intellectual property or trade secret right. Sage reserves the right to revise, supplement or remove information in this document at any time without notice to you or others.
Sage End User License: http://na.sage.com/sage-na/eula
7/7/15
Contents
Chapter 1 — Introduction 1Overview of eBusiness Web Services 1How to Use This Installation Guide 2
Graphic Conventions 2Text Conventions 3
Chapter 2 — Getting Started 4Installing eBusiness Web Services 5
Uninstalling eBusiness Web Services 5
Chapter 3 — Programming with eBusiness Web Services 6Web Services Description Language (WSDL) 6
Using SOAP Efficiently with eBusiness Web Services 7
Date and Time Values 8
Credit Card Processing 9
UDFs and Development Partner Fields 10
Sage eBusiness Web Services Configuration Utility 11
Manage Entry Points 14Error Handling 14
Quick Start 17
Visual Studio 2008 (Other than Smart Device Projects) 17C# Example 19VB.Net Example 21
Visual Studio 2003 or Later (Including Smart Device Projects) 23C# Example 24VB.Net example 26
Java using NetBeans IDE 28Java Example 28
PHP 5 31PHP 5 Example 31
Chapter 4 — Administration 33Security and Encryption 33
System Configuration Setup 34Company Maintenance Setup 34User Maintenance Setup 35
Error Logging 35
Object Cache 35
Permissions 36
Appendix A — APIs 37
GetContractInformation 37
GetDiagnosticInformation 37
GetSalesOrder 38
GetNextSalesOrderNo 39
GetSalesOrderTemplate 39
eBusiness Web Services Installation and Reference Guide i

Contents...........................................................................................................................................................................................
PreviewSalesOrder 40
CreateSalesOrder 41
UpdateSalesOrder 42
DeleteSalesOrder 43
GetCustomer 44
GetNextCustomerNo 45
CreateCustomer 46
UpdateCustomer 47
DeleteCustomer 48
GetCustomerContact 48
CreateCustomerContact 49
UpdateCustomerContact 50
DeleteCustomerContact 51
AddCreditCardToVault 52
PreAuthorizeCreditCard 53
Appendix B — Troubleshooting 54
Downloading WSDL - Wrong Host Name 54
Setting SSL Host Headers 54Internet Information Services 6 54Internet Information Services 7 56
Downloading WSDL - XSD not Available 56
Error 404 with Internet Information Services (IIS) version 6 57
Could Not Load Type "System.ServiceModel.Activation.HttpModule" in IIS 7 58
General Errors 58
eBusiness Web Services Installation and Reference Guide ii
Chapter 1
IntroductionChapter 1Overview of eBusiness Web Services
eBusiness Web Services is a SOAP based programming interface that provides read, create, update, and delete functionality for the Sage 100 sales order, customer, and customer contact entities. eBusiness Web Services is built using Windows Communication Foundation and runs in Internet Information Services (IIS).
The services can be consumed by any development environment that supports SOAP, WSDL, and HTTPS. There is no specific language or operating system requirement for client applications written to consume eBusiness Web Services.
Some popular environments that can consume the services are:
Visual Studio .NET 2003 or later using C# or VB.NET
NetBeans IDE 6.5 or later using Java with JAX-WS
PHP using the built-in SoapClient class
eBusiness Web Services is ideal for applications that run across the Internet, such as ecommerce solutions. The services are used with the HTTPS protocol. This provides a secure and reliable method of communication.
eBusiness Web Services Installation and Reference Guide 1

_____________________________________________________________________________________________
How to Use This Installation Guide
How to Use This Installation Guide
This installation guide discusses the installation and configuration used by the eBusiness Web Services module. Refer to this installation guide when setting up the eBusiness Web Services module for the first time or when making changes to your network (such as changing Internet Service Providers [ISPs] or moving the software to another server).
For a complete list of system requirements, refer to the Supported Platform Matrix. To access the matrix, see article ID 47649 in the Sage Knowledgebase at support.na.sage.com.
Graphic Conventions
The following icons are used throughout this manual to indicate different types of information.
NOTE This manual is written for the experienced Microsoft Internet Information Services (IIS) Administrator. Knowledge of this area is required.
The NOTE symbol is followed by additional information about a topic.
The WARNING symbol is followed by information to help you avoid costly mistakes.
eBusiness Web Services Installation and Reference Guide 2
_____________________________________________________________________________________________
How to Use This Installation Guide
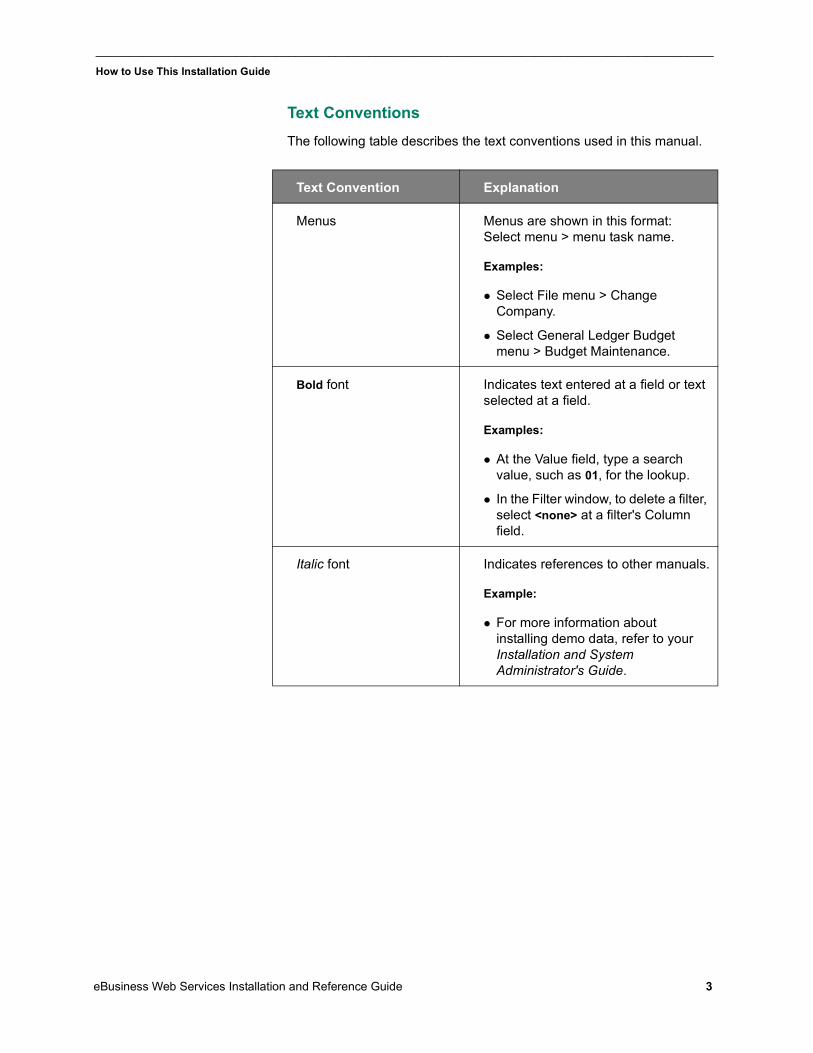
Text Conventions
The following table describes the text conventions used in this manual.
Text Convention Explanation
Menus Menus are shown in this format: Select menu > menu task name.
Examples:
Select File menu > Change Company.
Select General Ledger Budget menu > Budget Maintenance.
Bold font Indicates text entered at a field or text selected at a field.
Examples:
At the Value field, type a search value, such as 01, for the lookup.
In the Filter window, to delete a filter, select <none> at a filter's Column field.
Italic font Indicates references to other manuals.
Example:
For more information about installing demo data, refer to your Installation and System Administrator's Guide.
eBusiness Web Services Installation and Reference Guide 3

Chapter 2
Getting StartedChapter 2This chapter covers the installation process for eBusiness Web Services. For installation information regarding the Sage 100 software, refer to your applicable Installation and System Administrator’s Guide. For information on the specific operating system requirements, see the Supported Platform Matrix on the Support page on the Sage Customer Portal at: https://customers.sagenorthamerica.com
The eBusiness Web Services installation process is more complicated than standard modules. Every effort has been made to make this process as simple as possible; however, before you start, you must know some important information about your network configuration.
eBusiness Web Services must be installed on the same machine where your Sage 100 installation resides. Internet Information Services (IIS) must be installed before installing eBusiness Web Services.
The installation process consists of the following
1 Install a server certificate for Internet Information Services.
IIS 6:http://www.microsoft.com/technet/prodtechnol/WindowsServer2003/Library/IIS/89c7ef2f-f7d6-483c-8b08-ae0c6584dd4d.mspx
IIS 7:http://technet.microsoft.com/en-us/library/cc732230(WS.10).aspx
IIS 8:IIS 8-specific documentation was unavailable when this guide was published. See the information available for IIS 7: http://technet.microsoft.com/en-us/library/cc732230(WS.10).aspx
2 Ensure that the .NET Framework 4.0 is installed.
3 Enable required extensions and features.
IIS 6: Allow the ASP.NET v4.0.30319 Web Service Extension through Internet Information Services Manager
IIS 7: No additional steps are required
IIS 8: Install the .NET Framework 4.5 WCF Services HTTP Activation feature from Add Roles and Features
4 Install eBusiness Web Services.
5 Enable Web Services for the system.
6 Enable Web Services for the company.
7 Enable Web Services for the user.
eBusiness Web Services Installation and Reference Guide 4
_____________________________________________________________________________________________
Installing eBusiness Web Services
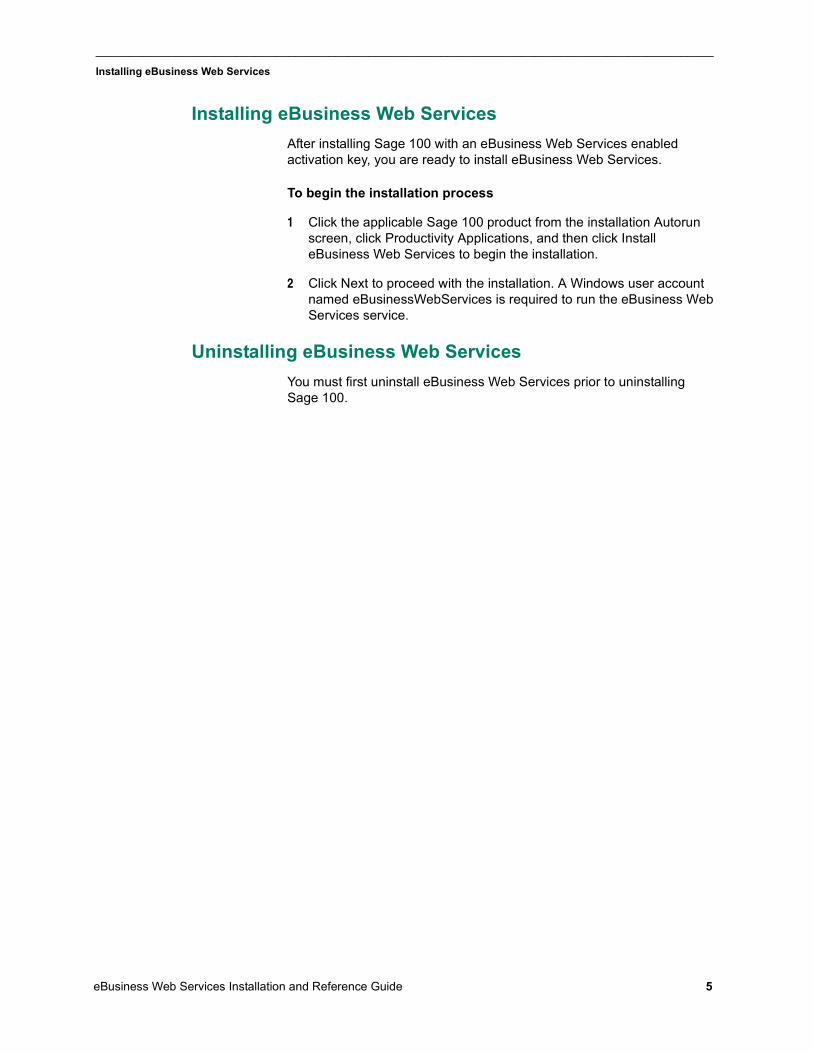
Installing eBusiness Web Services
After installing Sage 100 with an eBusiness Web Services enabled activation key, you are ready to install eBusiness Web Services.
To begin the installation process
1 Click the applicable Sage 100 product from the installation Autorun screen, click Productivity Applications, and then click Install eBusiness Web Services to begin the installation.
2 Click Next to proceed with the installation. A Windows user account named eBusinessWebServices is required to run the eBusiness Web Services service.
Uninstalling eBusiness Web Services
You must first uninstall eBusiness Web Services prior to uninstalling Sage 100.
eBusiness Web Services Installation and Reference Guide 5
Chapter 3
Programming with eBusiness Web ServicesChapter 3eBusiness Web Services provides a platform independent programming interface. Any programming language in any development environment and operating system that has support for SOAP, WSDL, and HTTPS can be used to call eBusiness Web Services.
How a particular environment invokes the web services operations from a programming perspective, is not defined by web services; therefore, we cannot document how to call eBusiness Web Services from all possible development environments. For examples of calling eBusiness Web Services from some popular environments, See Quick Start on page 17.
All eBusiness Web Services operations are stateless and atomic. An operation either completes successfully or does not complete at all. For example, if a network connection is dropped during the CreateSalesOrder operation, and a sales order has been partially transmitted, the operation will not create a partial sales order; it will not create a sales order at all.
eBusiness Web Services operations must be called from a SOAP client. How the client is created depends on the development platform, but all clients must point to the URL where eBusiness Web Services resides.
eBusiness Web Services operations utilize SOAP faults when they error. The development environment for the client application determines how to capture and handle the faults. Most environments require that SOAP faults be handled by catching exceptions through the use of try/catch blocks.
For instructions on creating a SOAP client and for examples of how to use try/catch blocks for some popular development environments, See Quick Start on page 17.
Web Services Description Language (WSDL)
eBusiness Web Services uses the WSDL standard to describe the services it provides. The use of WSDL allows a programmer to point to the URL where eBusiness Web Services resides and begin programming against the web services. The programmer does not need to concern themselves with forming proper SOAP/XML requests when using a development platform capable of consuming WSDL.
eBusiness Web Services provides two sets of WSDL:
Full: Targeted for Microsoft Visual Studio Service Reference (sometimes referred to as a WCF client).
Basic: Targeted for all other environments, including Microsoft Visual Studio's Web Reference, Java's JAX-WS client, and PHP’s integrated SoapClient.
eBusiness Web Services Installation and Reference Guide 6
_____________________________________________________________________________________________
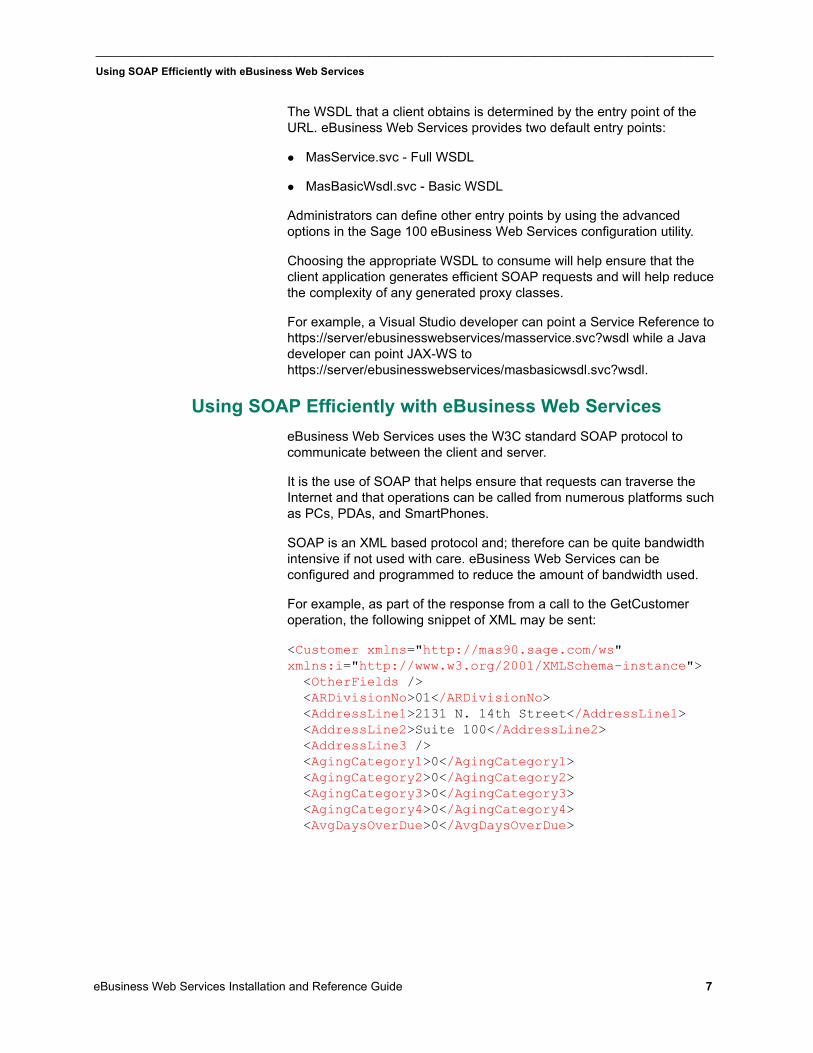
Using SOAP Efficiently with eBusiness Web Services
The WSDL that a client obtains is determined by the entry point of the URL. eBusiness Web Services provides two default entry points:
MasService.svc - Full WSDL
MasBasicWsdl.svc - Basic WSDL
Administrators can define other entry points by using the advanced options in the Sage 100 eBusiness Web Services configuration utility.
Choosing the appropriate WSDL to consume will help ensure that the client application generates efficient SOAP requests and will help reduce the complexity of any generated proxy classes.
For example, a Visual Studio developer can point a Service Reference to https://server/ebusinesswebservices/masservice.svc?wsdl while a Java developer can point JAX-WS to https://server/ebusinesswebservices/masbasicwsdl.svc?wsdl.
Using SOAP Efficiently with eBusiness Web Services
eBusiness Web Services uses the W3C standard SOAP protocol to communicate between the client and server.
It is the use of SOAP that helps ensure that requests can traverse the Internet and that operations can be called from numerous platforms such as PCs, PDAs, and SmartPhones.
SOAP is an XML based protocol and; therefore can be quite bandwidth intensive if not used with care. eBusiness Web Services can be configured and programmed to reduce the amount of bandwidth used.
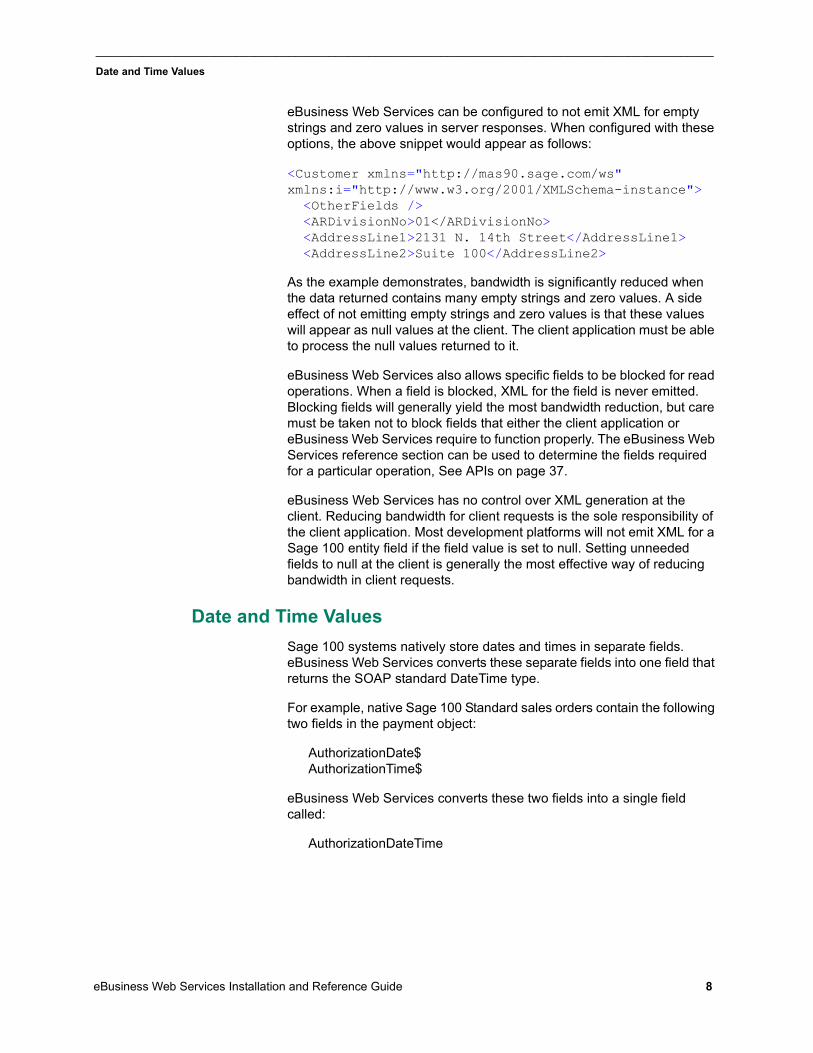
For example, as part of the response from a call to the GetCustomer operation, the following snippet of XML may be sent:
<Customer xmlns="http://mas90.sage.com/ws" xmlns:i="http://www.w3.org/2001/XMLSchema-instance"> <OtherFields /> <ARDivisionNo>01</ARDivisionNo> <AddressLine1>2131 N. 14th Street</AddressLine1> <AddressLine2>Suite 100</AddressLine2> <AddressLine3 /> <AgingCategory1>0</AgingCategory1> <AgingCategory2>0</AgingCategory2> <AgingCategory3>0</AgingCategory3> <AgingCategory4>0</AgingCategory4> <AvgDaysOverDue>0</AvgDaysOverDue>
eBusiness Web Services Installation and Reference Guide 7
_____________________________________________________________________________________________
Date and Time Values
eBusiness Web Services can be configured to not emit XML for empty strings and zero values in server responses. When configured with these options, the above snippet would appear as follows:
<Customer xmlns="http://mas90.sage.com/ws" xmlns:i="http://www.w3.org/2001/XMLSchema-instance"> <OtherFields /> <ARDivisionNo>01</ARDivisionNo> <AddressLine1>2131 N. 14th Street</AddressLine1> <AddressLine2>Suite 100</AddressLine2>
As the example demonstrates, bandwidth is significantly reduced when the data returned contains many empty strings and zero values. A side effect of not emitting empty strings and zero values is that these values will appear as null values at the client. The client application must be able to process the null values returned to it.
eBusiness Web Services also allows specific fields to be blocked for read operations. When a field is blocked, XML for the field is never emitted. Blocking fields will generally yield the most bandwidth reduction, but care must be taken not to block fields that either the client application or eBusiness Web Services require to function properly. The eBusiness Web Services reference section can be used to determine the fields required for a particular operation, See APIs on page 37.
eBusiness Web Services has no control over XML generation at the client. Reducing bandwidth for client requests is the sole responsibility of the client application. Most development platforms will not emit XML for a Sage 100 entity field if the field value is set to null. Setting unneeded fields to null at the client is generally the most effective way of reducing bandwidth in client requests.
Date and Time Values
Sage 100 systems natively store dates and times in separate fields. eBusiness Web Services converts these separate fields into one field that returns the SOAP standard DateTime type.
For example, native Sage 100 Standard sales orders contain the following two fields in the payment object:
AuthorizationDate$AuthorizationTime$
eBusiness Web Services converts these two fields into a single field called:
AuthorizationDateTime
eBusiness Web Services Installation and Reference Guide 8
_____________________________________________________________________________________________
Credit Card Processing
Some native data in Sage 100 systems have only a date component. For example, the sales order OrderDate$ field has no corresponding time field. Sage 100 will still return these fields as a DateTime type, but will distinguish date-only fields from date-time fields by omitting "Time" from the field name. In the case of OrderDate$, eBusiness Web Services exposes this field as OrderDate rather than OrderDateTime.
When a date and time is blank in Sage 100, null will be returned by eBusiness Web Services when the date and time are read through a Get operation.
Update and Create operations treat null values as "not set"; eBusiness Web Services performs no operation at all for a field when it is null. Setting a DateTime value to null during an Update operation will not set the Sage 100 date and time to blank. Instead, a special NullDateTime value must be used. This value can be obtained by calling the GetContractInformation operation. This value is constant and only needs to be obtained once by the client application.
Credit Card Processing
Credit card processing has changed significantly from previous version of eBusiness Web Services. It no longer allows eBusiness Web Services to enter a credit card number and CVV code directly into the SalesOrder contract because it no longer contains these fields. Instead, the SalesOrder contract contains a CreditCardGUID field that corresponds to a credit card number stored in the Sage Exchange Vault. In addition, the Payments collection of the SalesOrder contract contains CreditCardTransactionID and CreditCardAuthorizationNo fields that relate to a pre-authorization performed on a credit card.
The AddCreditCardToVault operation adds a credit card number and expiration date to the Sage Exchange Vault. This method will return a credit card GUID that should be stored by the calling application for future use. For more information, see AddCreditCardToVault on page 52.
A PreAuthorizeCreditCard operation explicitly pre-authorizes a credit card by the calling application. This call must be used to process a credit card using a CVV code. The operation will return a PreAuthorizationResult contract that contains the fields CreditCardTransactionID and CreditCardAuthorizationNo. The values in these fields, along with the credit card GUID obtained from AddCreditCardToVault , may be set in the Payments collection of the SalesOrder contract submitted to the CreateSalesOrder or UpdateSalesOrder operation to attach the pre-authorization to the sales order for an eventual completion of payment in Sage 100. For more information, see PreAuthorizeCreditCard on page 53.
As a security feature, credit card numbers and CVV codes are never returned by eBusiness Web Services.
eBusiness Web Services Installation and Reference Guide 9
_____________________________________________________________________________________________
UDFs and Development Partner Fields
UDFs and Development Partner Fields
UDFs and Development Partner fields are not exposed by default. UDFs can be automatically exposed by setting the AutoExposeUDFs option to Yes in eBusiness Web Services - Advanced Settings. UDFs and Development Partner fields can also be selectively exposed by adding them to the eBusiness Web Services - Advanced Settings Additional Fields tab. Development Partner fields cannot be automatically exposed; they must always be defined in the Additional Fields tab.
Both UDFs and Development Partner fields are exposed in the OtherFields collection of an entity. OtherFields contains a collection of Field objects. The Field object contains two fields:
MasFieldName: The name of the UDF or Development Partner Field (for example, "UDF_NICKNAME$")
Value: The value of the UDF. Value is always a string type, even when the native type for the field in the Sage 100 system is numeric.
To read a field, the OtherFields collection must be iterated through and MasFieldName compared against the desired field name before reading the Value field. Do not to assume that a particular field will always be at the same index position in the collection.
To change a field value for an Update operation, the OtherFields collection must be iterated through and MasFieldName must be compared against the appropriate field name before setting the field's Value field. The appropriate field may not be found if it has been explicitly blocked for read access in the advanced configuration settings. If this is the case, and write access is allowed for the field, a new Field object must be added to the OtherFields collection with MasFieldName and Value set to their appropriate values.
To set a field value during a Create operation using an entity instantiated at the client, a new Field object must be added to the OtherFields collection with MasFieldName and Value set to their appropriate values. The OtherFields collection will also need to be instantiated using the appropriate collection type for the platform.
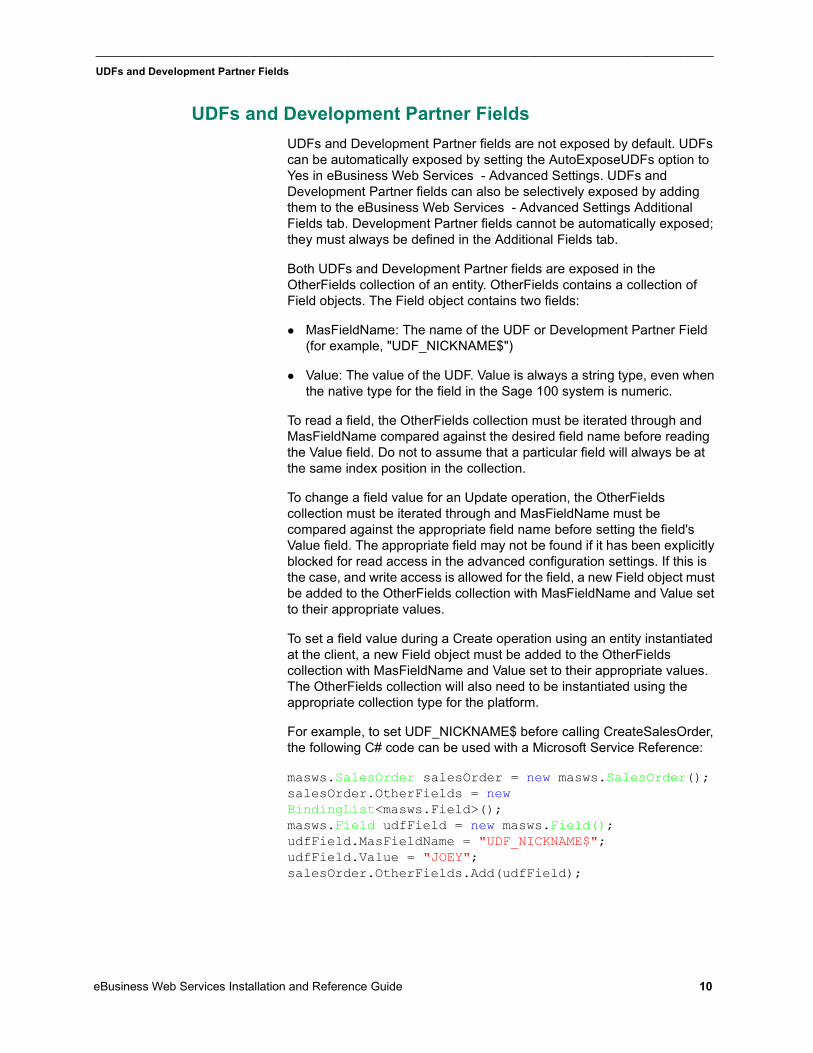
For example, to set UDF_NICKNAME$ before calling CreateSalesOrder, the following C# code can be used with a Microsoft Service Reference:
masws.SalesOrder salesOrder = new masws.SalesOrder();salesOrder.OtherFields = new BindingList<masws.Field>();masws.Field udfField = new masws.Field();udfField.MasFieldName = "UDF_NICKNAME$";udfField.Value = "JOEY";salesOrder.OtherFields.Add(udfField);
eBusiness Web Services Installation and Reference Guide 10

_____________________________________________________________________________________________
Sage eBusiness Web Services Configuration Utility
Sage eBusiness Web Services Configuration Utility
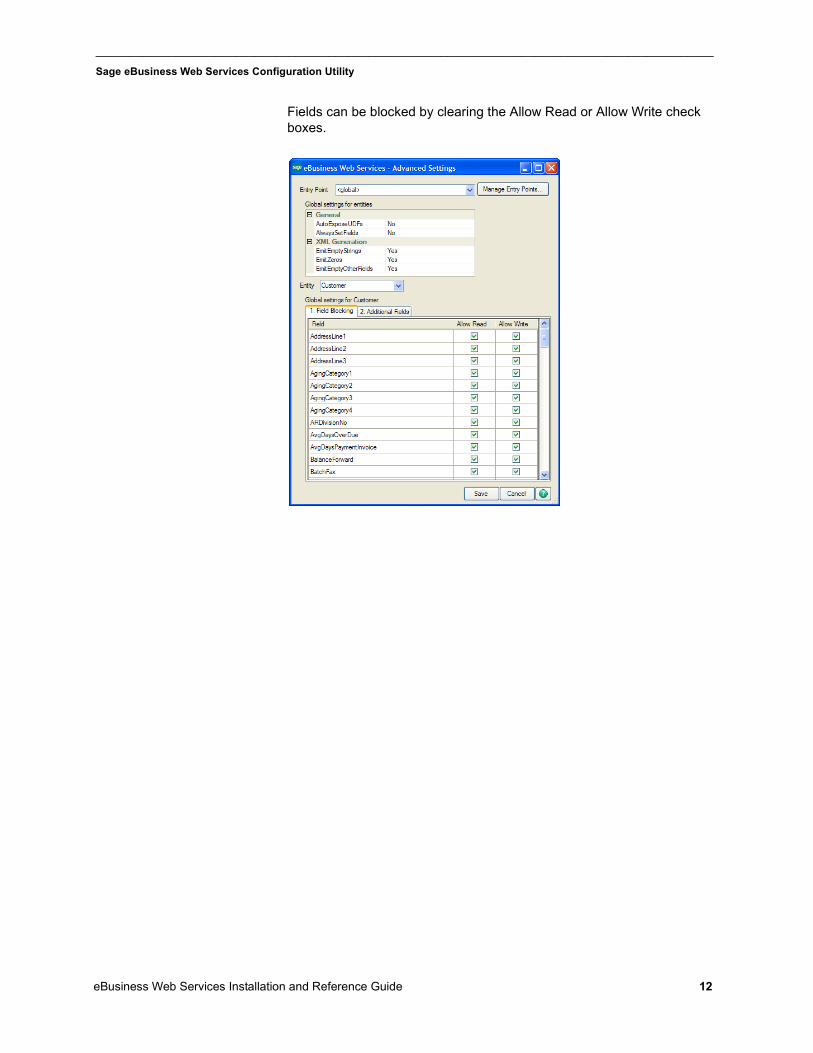
Use the Sage 100 eBusiness Web Services configuration utility to further define your settings for eBusiness Web Services.
Click Advanced on the Sage 100 eBusiness Web Services window to access eBusiness Web Services - Advanced Settings. Use the advanced settings in this window to modify settings for specific entry points and entities.
eBusiness Web Services Installation and Reference Guide 11
_____________________________________________________________________________________________
Sage eBusiness Web Services Configuration Utility
Fields can be blocked by clearing the Allow Read or Allow Write check boxes.
eBusiness Web Services Installation and Reference Guide 12
_____________________________________________________________________________________________
Sage eBusiness Web Services Configuration Utility
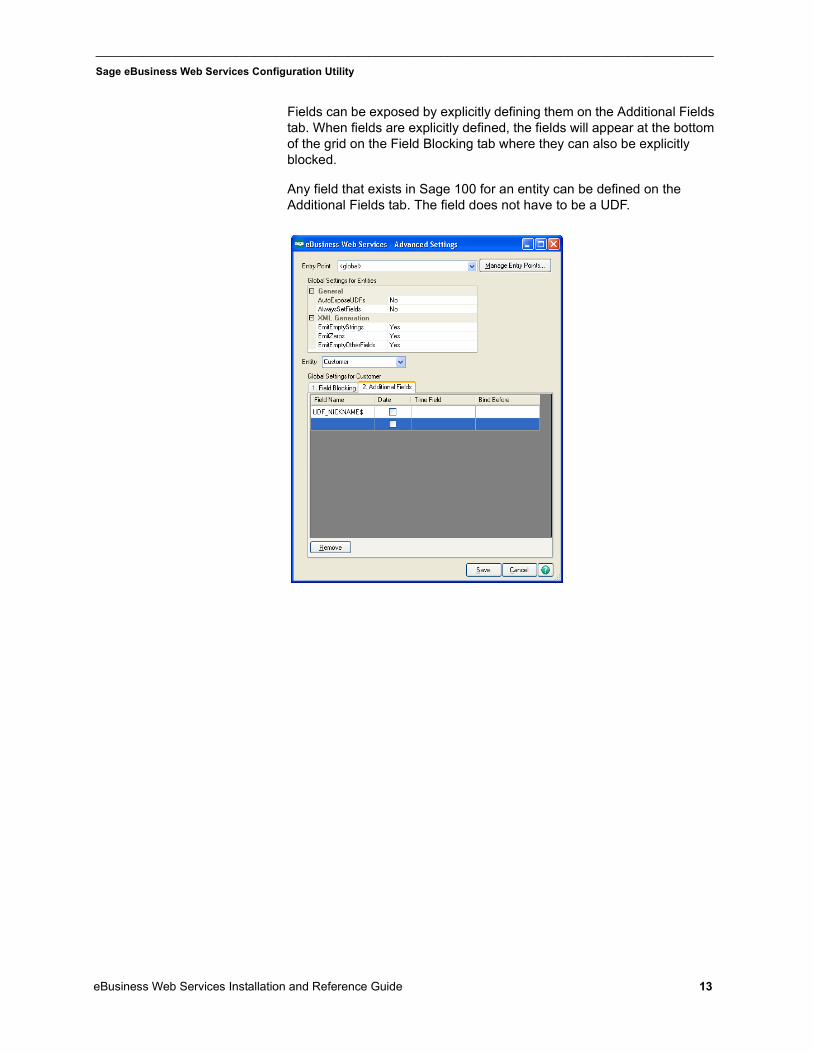
Fields can be exposed by explicitly defining them on the Additional Fields tab. When fields are explicitly defined, the fields will appear at the bottom of the grid on the Field Blocking tab where they can also be explicitly blocked.
Any field that exists in Sage 100 for an entity can be defined on the Additional Fields tab. The field does not have to be a UDF.
eBusiness Web Services Installation and Reference Guide 13
_____________________________________________________________________________________________
Error Handling
Manage Entry Points
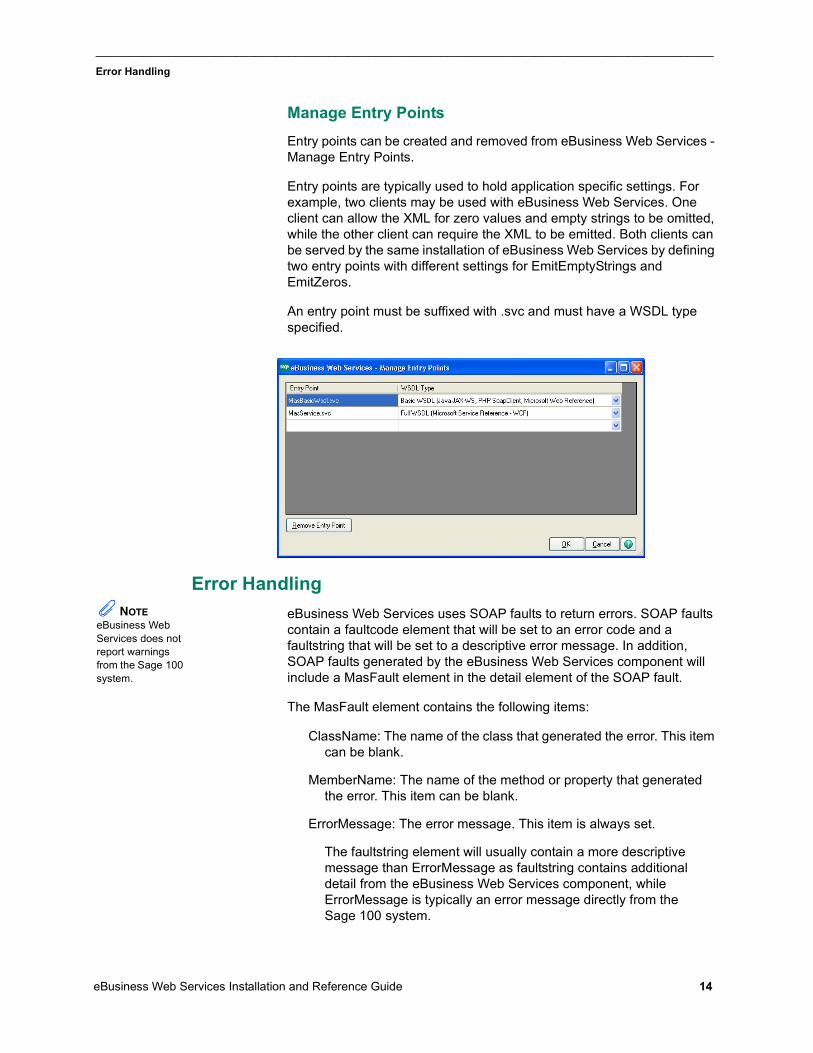
Entry points can be created and removed from eBusiness Web Services - Manage Entry Points.
Entry points are typically used to hold application specific settings. For example, two clients may be used with eBusiness Web Services. One client can allow the XML for zero values and empty strings to be omitted, while the other client can require the XML to be emitted. Both clients can be served by the same installation of eBusiness Web Services by defining two entry points with different settings for EmitEmptyStrings and EmitZeros.
An entry point must be suffixed with .svc and must have a WSDL type specified.
Error Handling
eBusiness Web Services uses SOAP faults to return errors. SOAP faults contain a faultcode element that will be set to an error code and a faultstring that will be set to a descriptive error message. In addition, SOAP faults generated by the eBusiness Web Services component will include a MasFault element in the detail element of the SOAP fault.
The MasFault element contains the following items:
ClassName: The name of the class that generated the error. This item can be blank.
MemberName: The name of the method or property that generated the error. This item can be blank.
ErrorMessage: The error message. This item is always set.
The faultstring element will usually contain a more descriptive message than ErrorMessage as faultstring contains additional detail from the eBusiness Web Services component, while ErrorMessage is typically an error message directly from the Sage 100 system.
NOTE eBusiness Web Services does not report warnings from the Sage 100 system.
eBusiness Web Services Installation and Reference Guide 14
_____________________________________________________________________________________________
Error Handling
ErrorCode: The error code. This item is always set. Both ErrorCode and faultcode will contain the same error code.
Most languages handle SOAP faults through the use of try/catch blocks.
For examples of how to catch eBusiness Web Services SOAP faults for some popular development environments, See Quick Start on page 17.
The following error codes are specific to eBusiness Web Services
WS_AlreadyExists"Record already exists."
This error occurs when a create method is called and the record being created already exists. This error can generally be ignored if it is received while retrying a timed out create request as it indicates that the previous call was successful.
WS_EventLog"Could not write to Windows event log."
All eBusiness Web Services errors are written to the server's Windows Event Log. This error occurs when eBusiness Web Services is unable to write to the Windows Event Log. This is an abnormal condition that may be caused by a permissions or installation issue.
WS_Exception"An exception occurred."
This error occurs when an unexpected exception occurs while executing an eBusiness Web Services method. The exception detail is not returned by eBusiness Web Services for security reasons. The exception detail can be viewed in the Windows Event Log on the server hosting eBusiness Web Services.
WS_FieldMissing"The {Business Object} field {Field Name} does not exist in this record."
This error occurs when the record contained in the Sage 100 system does not contain the same schema as defined in eBusiness Web Services. This error will occur when an invalid additional field is defined using the Sage 100 eBusiness Web Services configuration utility. The error may also occur when data is corrupted in the Sage 100 system.
WS_FieldNotAllowed"Field does not exist or is blocked."
This error occurs when a blocked field is written to or when a field does not exist.
eBusiness Web Services Installation and Reference Guide 15
_____________________________________________________________________________________________
Error Handling
WS_HaveSession"Session already exists."
This is an eBusiness Web Services internal error and represents an abnormal condition. Report the error to Sage 100 Customer Support.
WS_NullValue"Value is null."
This error occurs when a required value, such as a key value, is not set.
WS_Unknown"Unknown error."
This error occurs when eBusiness Web Services is unable to obtain an error code from the Sage 100 system. This error represents an abnormal condition. Report the error to Sage 100 Customer Support.
WS_PreAuthFailed"Could not pre-authorize credit card."
This error occurs when the PreAuthorizeCreditCard operation fails.
The following are common error codes that are not specific to eBusiness Web Services
CI_NoKey"Record does not exist."
This error occurs when the record for a get or update operation does not exist.
SY_InvalidPassword"The user logon or password does not match or the user logon is not enabled for web services."or"Blank passwords cannot be used with web services."
This error occurs when the logon credentials for the Sage 100 system are incorrect. This error will occur when the user name does not exist, the password is incorrect, or the user name is not enabled for web services.
SY_NoAccess"You are not authorized to perform this action."
This error occurs when the logon does not have proper rights in the Sage 100 system role security to perform an operation. For information on the rights required to perform an operation, See APIs on page 37.
eBusiness Web Services Installation and Reference Guide 16
_____________________________________________________________________________________________
Quick Start
This error may also occur when either the Sage 100 system or company is not enabled for web services. When this occurs, the SOAP faultstring will be:
"Web services are not enabled for the system."or"Web services are not enabled for this company."
The ErrorMessage under MasFault will remain:
"You are not authorized to perform this action."
SY_UserLocked"This user account has been locked. See your system administrator."
This error occurs when the user account has the locked flag set in the Sage 100 system.
For a complete list of Sage 100 error codes, refer to the Technical Reference and Support Guide (TRSG) available on the Support page on the Sage Customer Portal at: https://customers.sagenorthamerica.com
Quick Start
This section is designed to get you started with eBusiness Web Services quickly and easily. This section assumes that eBusiness Web Services has been installed with the default settings.
The following code examples are available on the Sage 100 installation program in the Documents\eBusiness Web Services Examples folder.
Visual Studio 2008 (Other than Smart Device Projects)
1 Create a new project.
2 From the menu, choose Project/Add Service Reference.
If Add Service Reference is not listed on the menu, you may be developing a Smart Device application or using an older version of Visual Studio. eBusiness Web Services can still be used if Add Web Reference is available. For more information, See Visual Studio 2003 or Later (Including Smart Device Projects) on page 23.
3 At the Address field, enter: https://<servername>/ebusinesswebservices/masservice.svc?wsdl
4 Click Go. MasService will appear in the Services section.
eBusiness Web Services Installation and Reference Guide 17
_____________________________________________________________________________________________
Quick Start
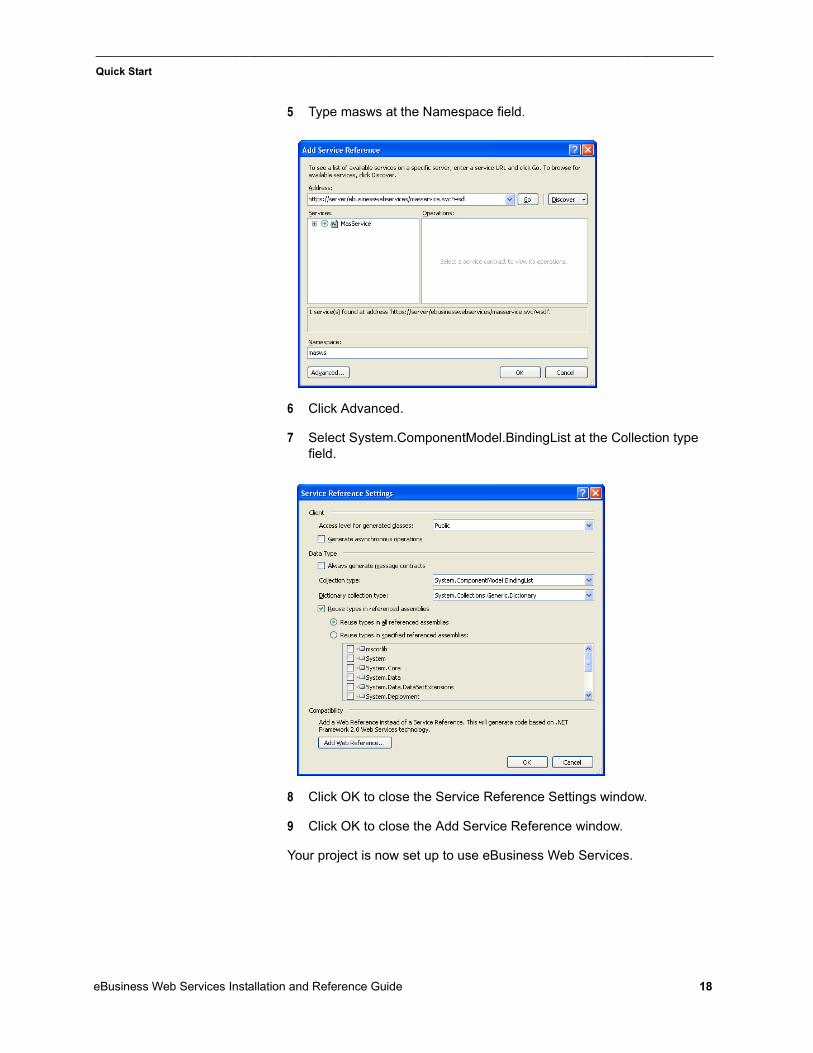
5 Type masws at the Namespace field.
6 Click Advanced.
7 Select System.ComponentModel.BindingList at the Collection type field.
8 Click OK to close the Service Reference Settings window.
9 Click OK to close the Add Service Reference window.
Your project is now set up to use eBusiness Web Services.
eBusiness Web Services Installation and Reference Guide 18
_____________________________________________________________________________________________
Quick Start
C# Example
// An example of how to create a sales order using ABC demo data
public void CreateSalesOrder()
{
// Create a sales order object
masws.SalesOrder salesOrder = new masws.SalesOrder();
// Create the lines collection for the sales order
salesOrder.Lines = new BindingList<masws.SalesOrderLine>();
// Set the customer information for the sales order
salesOrder.ARDivisionNo = "01";
salesOrder.CustomerNo = "ABF";
// Create a sales order line object
masws.SalesOrderLine salesOrderLine = new masws.SalesOrderLine();
// Set the line information
salesOrderLine.ItemCode = "1001-HON-H252";
salesOrderLine.QuantityOrdered = 1;
// Add the line to the sales order
salesOrder.Lines.Add(salesOrderLine);
// Create a logon object
masws.Logon logon = new masws.Logon();
// Set the username and password to be used for Sage 100 Web Services
logon.Username = "webservices";
logon.Password = "password";
// Create a string with the company code to use
string companyCode = "ABC";
// Use try/catch blocks to catch any errors
try
{
eBusiness Web Services Installation and Reference Guide 19
_____________________________________________________________________________________________
Quick Start
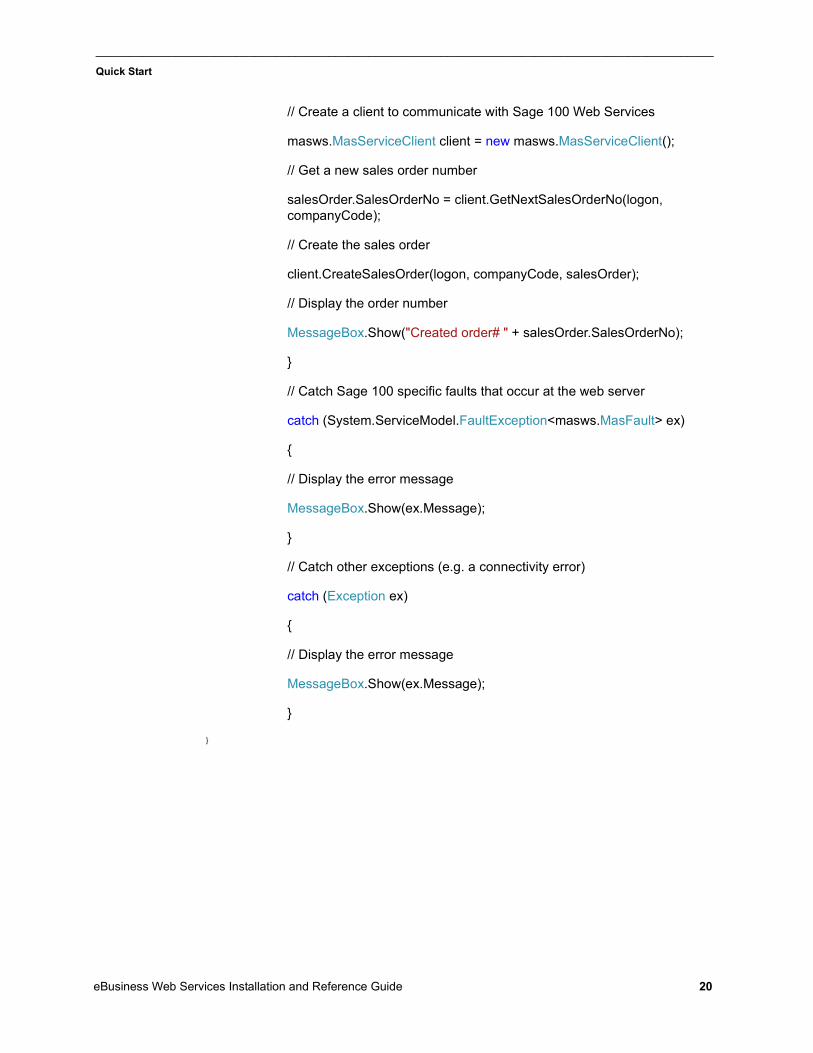
// Create a client to communicate with Sage 100 Web Services
masws.MasServiceClient client = new masws.MasServiceClient();
// Get a new sales order number
salesOrder.SalesOrderNo = client.GetNextSalesOrderNo(logon, companyCode);
// Create the sales order
client.CreateSalesOrder(logon, companyCode, salesOrder);
// Display the order number
MessageBox.Show("Created order# " + salesOrder.SalesOrderNo);
}
// Catch Sage 100 specific faults that occur at the web server
catch (System.ServiceModel.FaultException<masws.MasFault> ex)
{
// Display the error message
MessageBox.Show(ex.Message);
}
// Catch other exceptions (e.g. a connectivity error)
catch (Exception ex)
{
// Display the error message
MessageBox.Show(ex.Message);
}
}
eBusiness Web Services Installation and Reference Guide 20
_____________________________________________________________________________________________
Quick Start
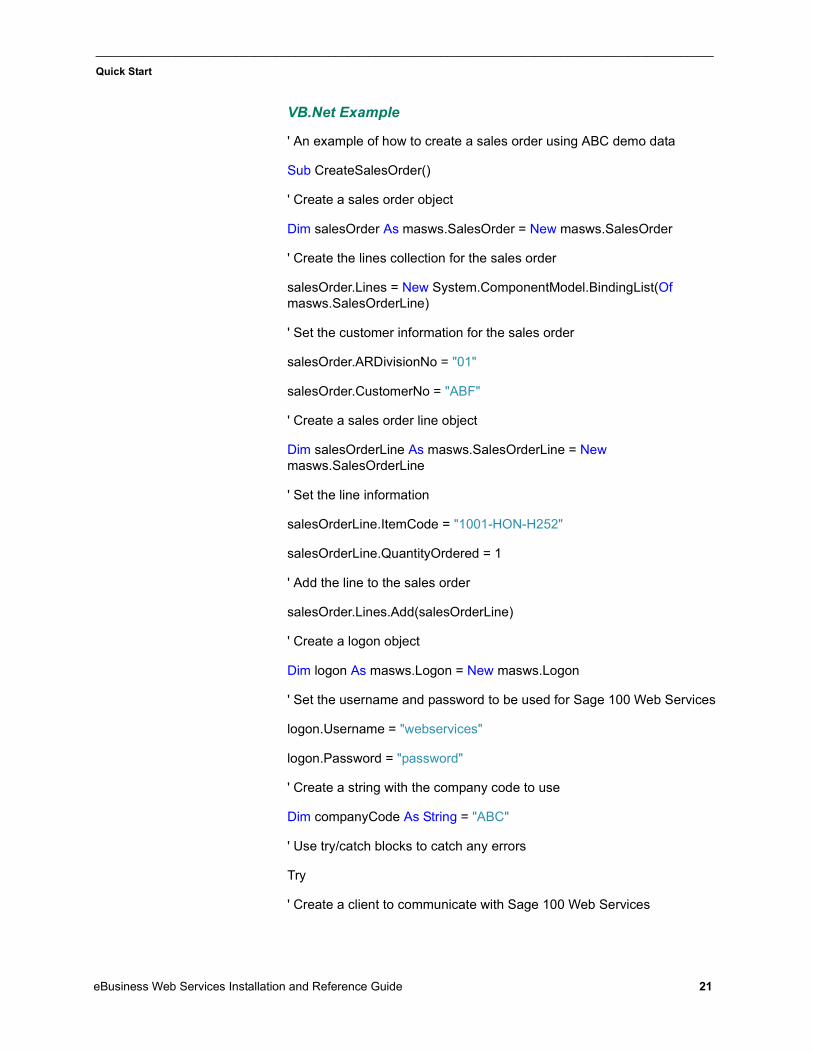
VB.Net Example
' An example of how to create a sales order using ABC demo data
Sub CreateSalesOrder()
' Create a sales order object
Dim salesOrder As masws.SalesOrder = New masws.SalesOrder
' Create the lines collection for the sales order
salesOrder.Lines = New System.ComponentModel.BindingList(Of masws.SalesOrderLine)
' Set the customer information for the sales order
salesOrder.ARDivisionNo = "01"
salesOrder.CustomerNo = "ABF"
' Create a sales order line object
Dim salesOrderLine As masws.SalesOrderLine = New masws.SalesOrderLine
' Set the line information
salesOrderLine.ItemCode = "1001-HON-H252"
salesOrderLine.QuantityOrdered = 1
' Add the line to the sales order
salesOrder.Lines.Add(salesOrderLine)
' Create a logon object
Dim logon As masws.Logon = New masws.Logon
' Set the username and password to be used for Sage 100 Web Services
logon.Username = "webservices"
logon.Password = "password"
' Create a string with the company code to use
Dim companyCode As String = "ABC"
' Use try/catch blocks to catch any errors
Try
' Create a client to communicate with Sage 100 Web Services
eBusiness Web Services Installation and Reference Guide 21
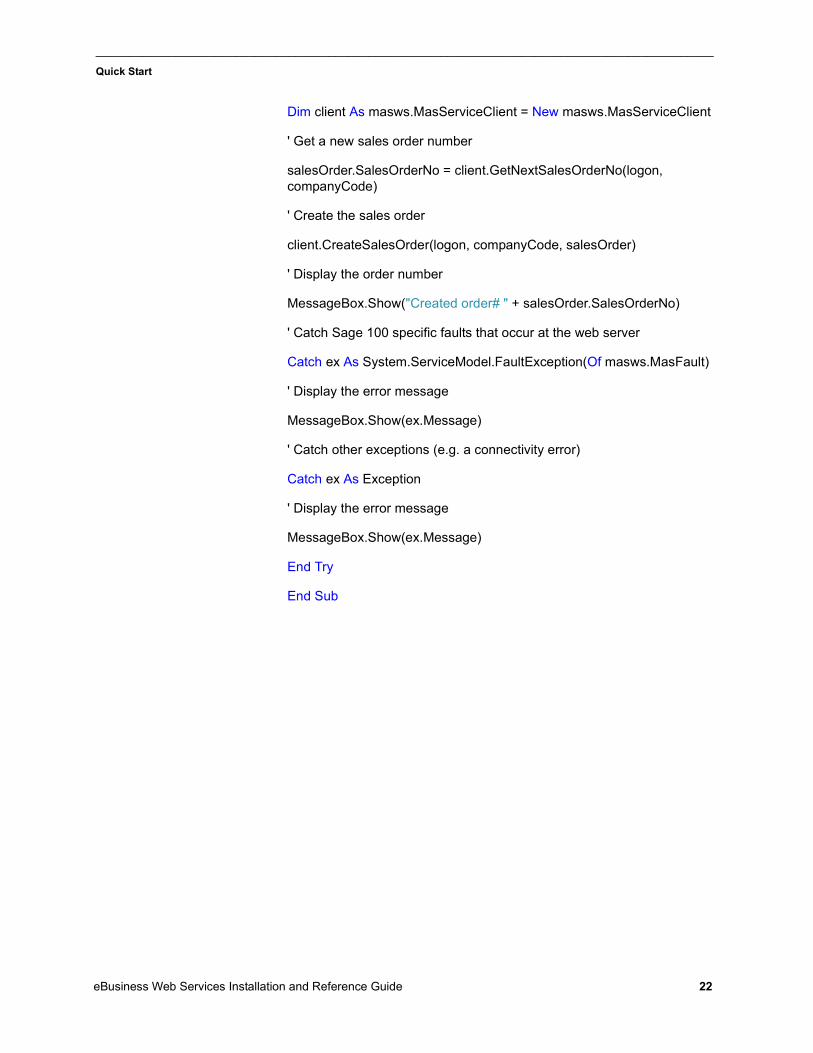
_____________________________________________________________________________________________
Quick Start
Dim client As masws.MasServiceClient = New masws.MasServiceClient
' Get a new sales order number
salesOrder.SalesOrderNo = client.GetNextSalesOrderNo(logon, companyCode)
' Create the sales order
client.CreateSalesOrder(logon, companyCode, salesOrder)
' Display the order number
MessageBox.Show("Created order# " + salesOrder.SalesOrderNo)
' Catch Sage 100 specific faults that occur at the web server
Catch ex As System.ServiceModel.FaultException(Of masws.MasFault)
' Display the error message
MessageBox.Show(ex.Message)
' Catch other exceptions (e.g. a connectivity error)
Catch ex As Exception
' Display the error message
MessageBox.Show(ex.Message)
End Try
End Sub
eBusiness Web Services Installation and Reference Guide 22
_____________________________________________________________________________________________
Quick Start
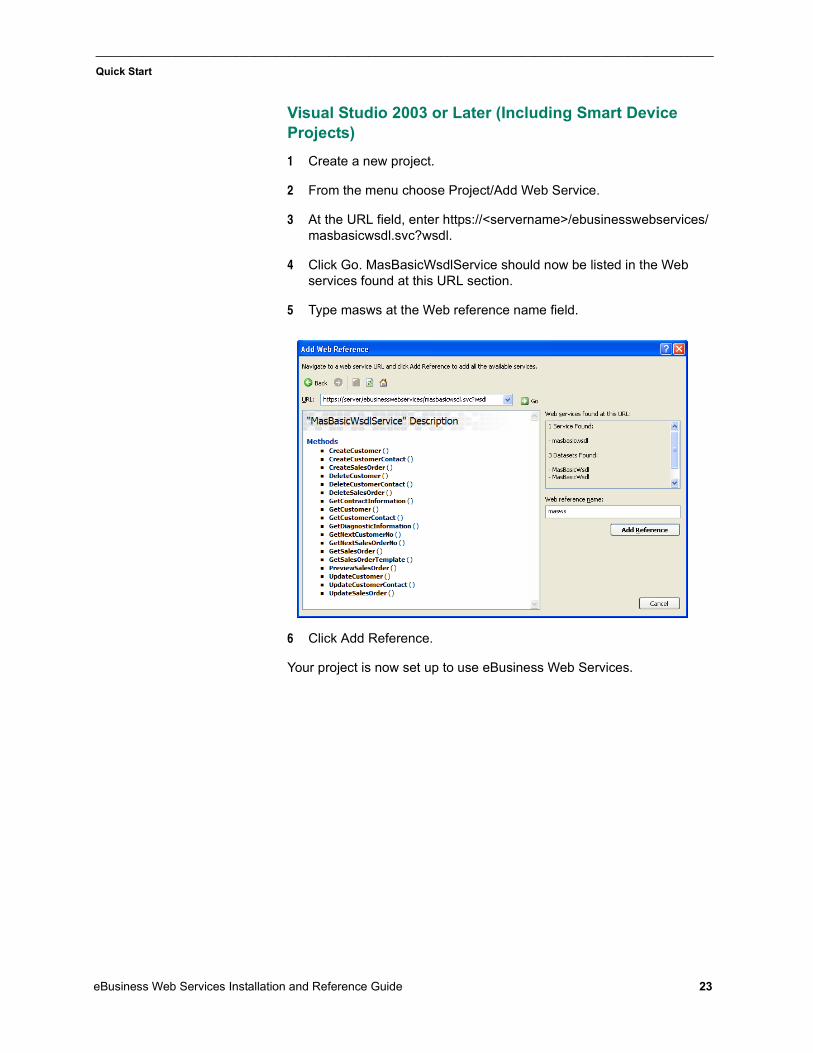
Visual Studio 2003 or Later (Including Smart Device Projects)
1 Create a new project.
2 From the menu choose Project/Add Web Service.
3 At the URL field, enter https://<servername>/ebusinesswebservices/masbasicwsdl.svc?wsdl.
4 Click Go. MasBasicWsdlService should now be listed in the Web services found at this URL section.
5 Type masws at the Web reference name field.
6 Click Add Reference.
Your project is now set up to use eBusiness Web Services.
eBusiness Web Services Installation and Reference Guide 23
_____________________________________________________________________________________________
Quick Start
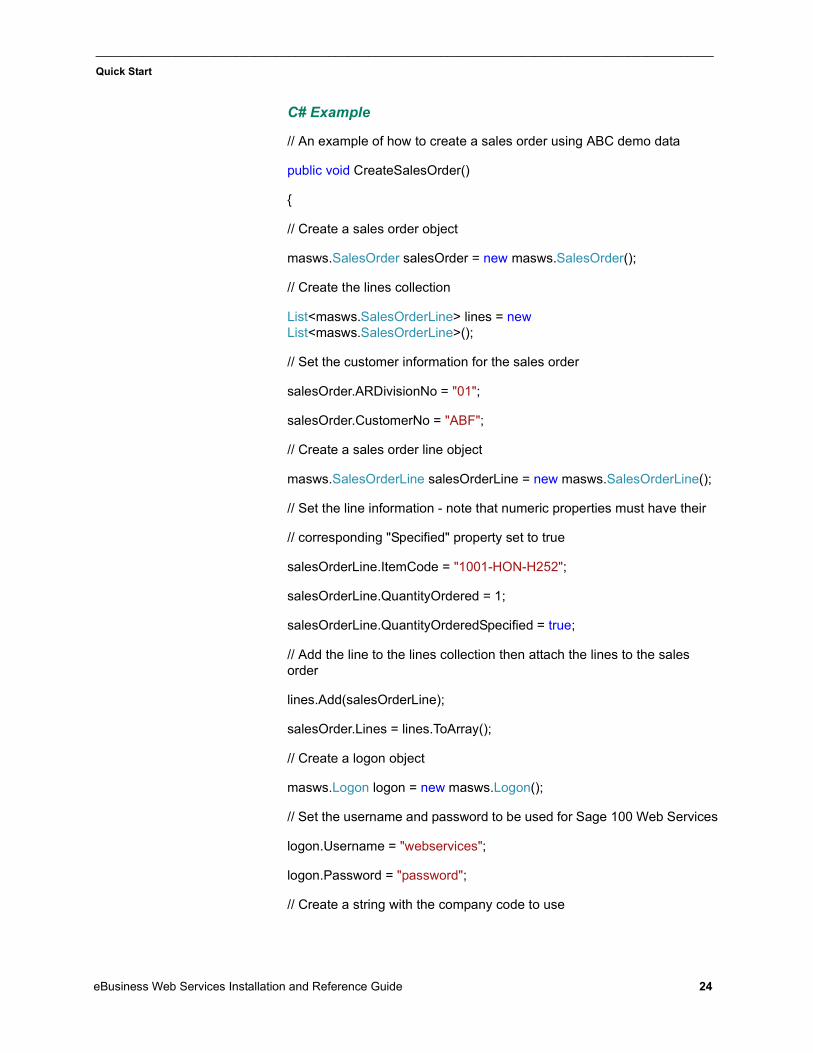
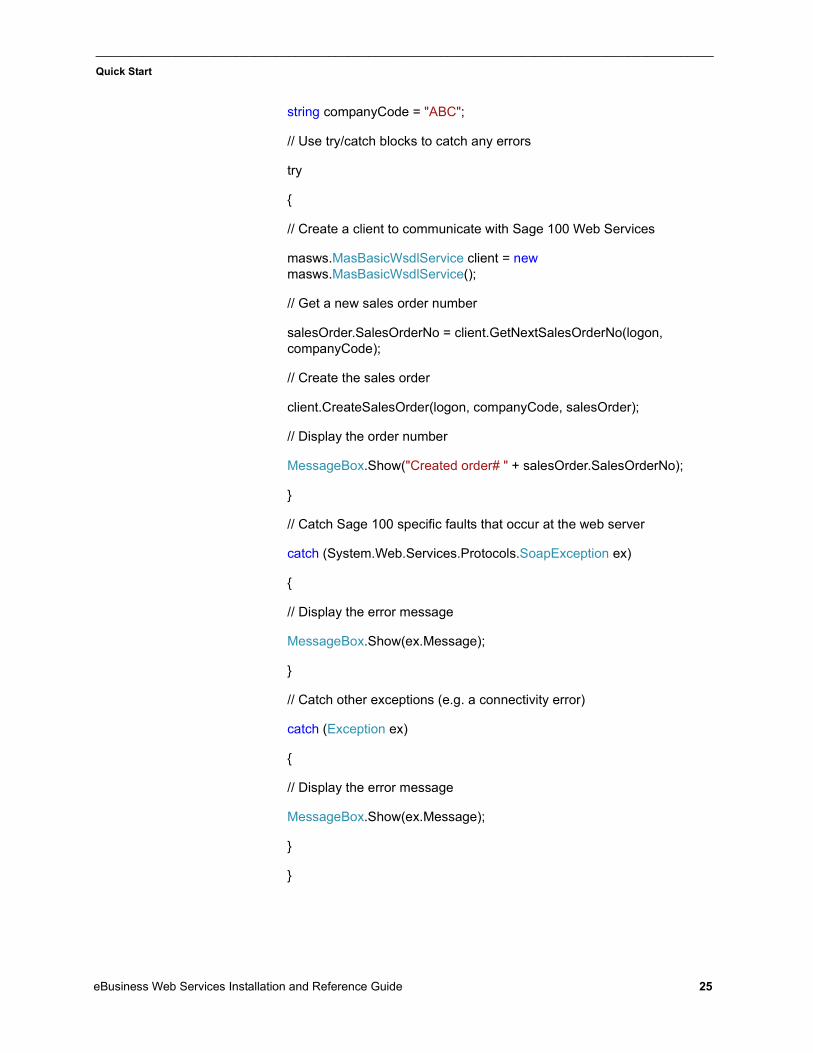
C# Example
// An example of how to create a sales order using ABC demo data
public void CreateSalesOrder()
{
// Create a sales order object
masws.SalesOrder salesOrder = new masws.SalesOrder();
// Create the lines collection
List<masws.SalesOrderLine> lines = new List<masws.SalesOrderLine>();
// Set the customer information for the sales order
salesOrder.ARDivisionNo = "01";
salesOrder.CustomerNo = "ABF";
// Create a sales order line object
masws.SalesOrderLine salesOrderLine = new masws.SalesOrderLine();
// Set the line information - note that numeric properties must have their
// corresponding "Specified" property set to true
salesOrderLine.ItemCode = "1001-HON-H252";
salesOrderLine.QuantityOrdered = 1;
salesOrderLine.QuantityOrderedSpecified = true;
// Add the line to the lines collection then attach the lines to the sales order
lines.Add(salesOrderLine);
salesOrder.Lines = lines.ToArray();
// Create a logon object
masws.Logon logon = new masws.Logon();
// Set the username and password to be used for Sage 100 Web Services
logon.Username = "webservices";
logon.Password = "password";
// Create a string with the company code to use
eBusiness Web Services Installation and Reference Guide 24
_____________________________________________________________________________________________
Quick Start
string companyCode = "ABC";
// Use try/catch blocks to catch any errors
try
{
// Create a client to communicate with Sage 100 Web Services
masws.MasBasicWsdlService client = new masws.MasBasicWsdlService();
// Get a new sales order number
salesOrder.SalesOrderNo = client.GetNextSalesOrderNo(logon, companyCode);
// Create the sales order
client.CreateSalesOrder(logon, companyCode, salesOrder);
// Display the order number
MessageBox.Show("Created order# " + salesOrder.SalesOrderNo);
}
// Catch Sage 100 specific faults that occur at the web server
catch (System.Web.Services.Protocols.SoapException ex)
{
// Display the error message
MessageBox.Show(ex.Message);
}
// Catch other exceptions (e.g. a connectivity error)
catch (Exception ex)
{
// Display the error message
MessageBox.Show(ex.Message);
}
}
eBusiness Web Services Installation and Reference Guide 25
_____________________________________________________________________________________________
Quick Start
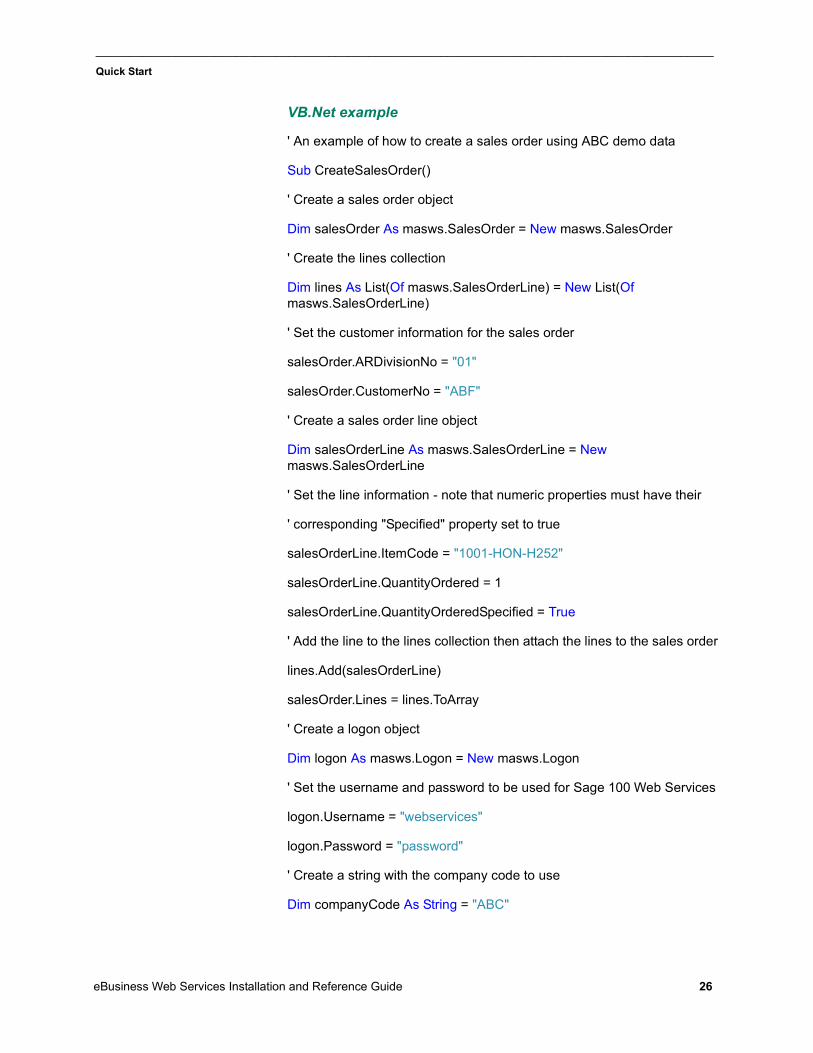
VB.Net example
' An example of how to create a sales order using ABC demo data
Sub CreateSalesOrder()
' Create a sales order object
Dim salesOrder As masws.SalesOrder = New masws.SalesOrder
' Create the lines collection
Dim lines As List(Of masws.SalesOrderLine) = New List(Of masws.SalesOrderLine)
' Set the customer information for the sales order
salesOrder.ARDivisionNo = "01"
salesOrder.CustomerNo = "ABF"
' Create a sales order line object
Dim salesOrderLine As masws.SalesOrderLine = New masws.SalesOrderLine
' Set the line information - note that numeric properties must have their
' corresponding "Specified" property set to true
salesOrderLine.ItemCode = "1001-HON-H252"
salesOrderLine.QuantityOrdered = 1
salesOrderLine.QuantityOrderedSpecified = True
' Add the line to the lines collection then attach the lines to the sales order
lines.Add(salesOrderLine)
salesOrder.Lines = lines.ToArray
' Create a logon object
Dim logon As masws.Logon = New masws.Logon
' Set the username and password to be used for Sage 100 Web Services
logon.Username = "webservices"
logon.Password = "password"
' Create a string with the company code to use
Dim companyCode As String = "ABC"
eBusiness Web Services Installation and Reference Guide 26
_____________________________________________________________________________________________
Quick Start
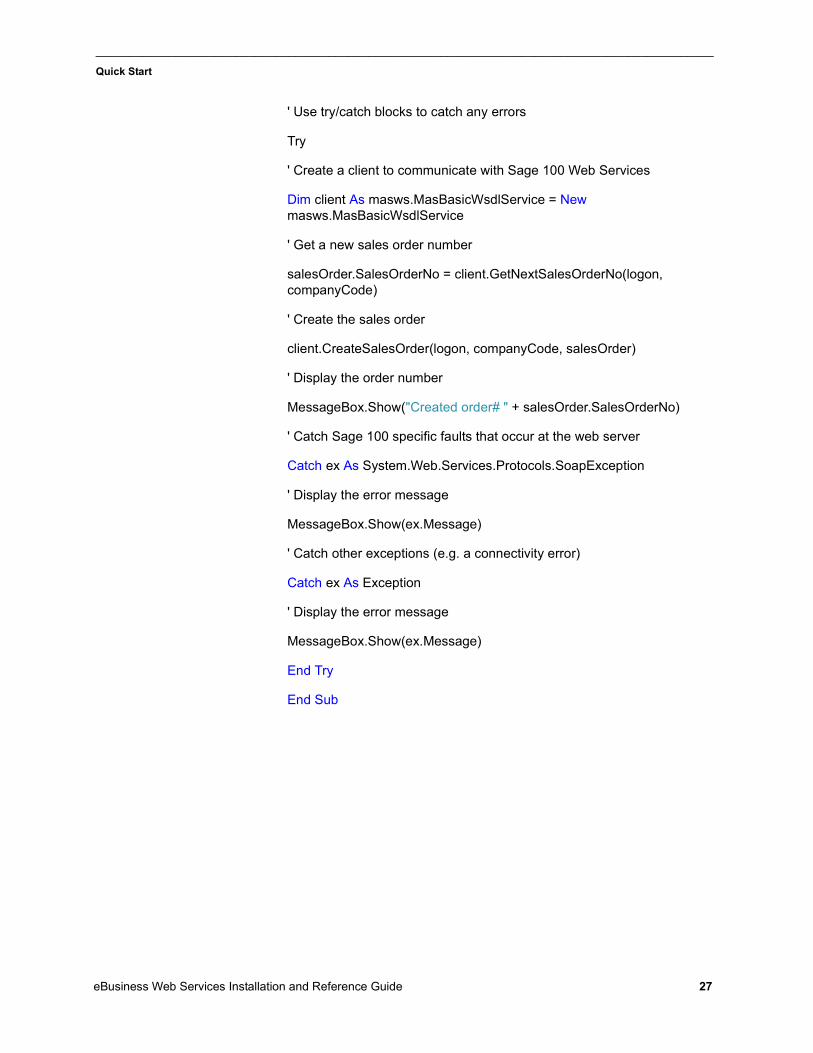
' Use try/catch blocks to catch any errors
Try
' Create a client to communicate with Sage 100 Web Services
Dim client As masws.MasBasicWsdlService = New masws.MasBasicWsdlService
' Get a new sales order number
salesOrder.SalesOrderNo = client.GetNextSalesOrderNo(logon, companyCode)
' Create the sales order
client.CreateSalesOrder(logon, companyCode, salesOrder)
' Display the order number
MessageBox.Show("Created order# " + salesOrder.SalesOrderNo)
' Catch Sage 100 specific faults that occur at the web server
Catch ex As System.Web.Services.Protocols.SoapException
' Display the error message
MessageBox.Show(ex.Message)
' Catch other exceptions (e.g. a connectivity error)
Catch ex As Exception
' Display the error message
MessageBox.Show(ex.Message)
End Try
End Sub
eBusiness Web Services Installation and Reference Guide 27
_____________________________________________________________________________________________
Quick Start
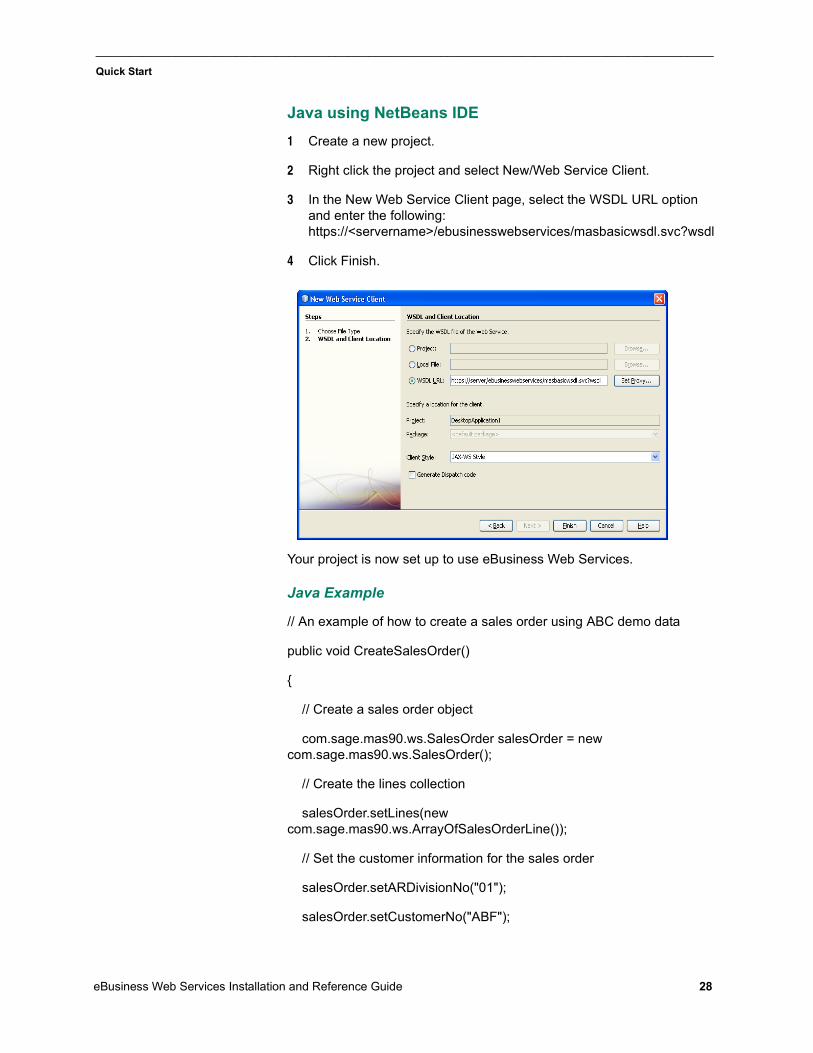
Java using NetBeans IDE
1 Create a new project.
2 Right click the project and select New/Web Service Client.
3 In the New Web Service Client page, select the WSDL URL option and enter the following: https://<servername>/ebusinesswebservices/masbasicwsdl.svc?wsdl
4 Click Finish.
Your project is now set up to use eBusiness Web Services.
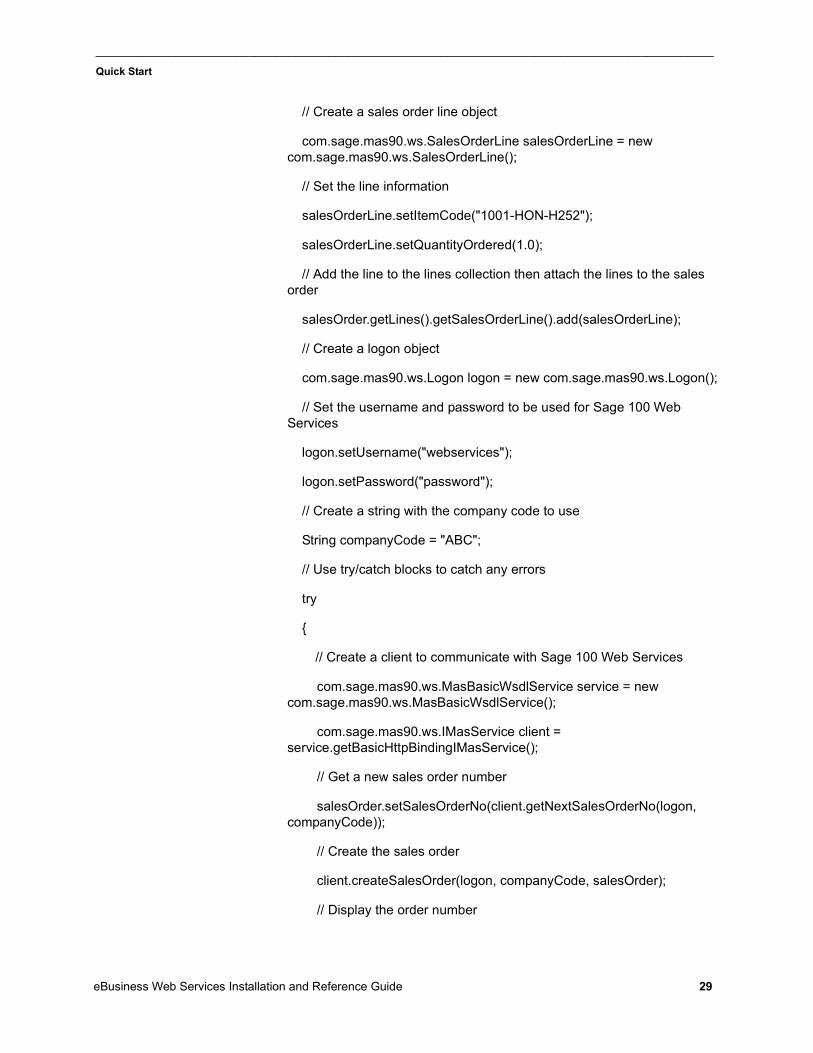
Java Example
// An example of how to create a sales order using ABC demo data
public void CreateSalesOrder()
{
// Create a sales order object
com.sage.mas90.ws.SalesOrder salesOrder = new com.sage.mas90.ws.SalesOrder();
// Create the lines collection
salesOrder.setLines(new com.sage.mas90.ws.ArrayOfSalesOrderLine());
// Set the customer information for the sales order
salesOrder.setARDivisionNo("01");
salesOrder.setCustomerNo("ABF");
eBusiness Web Services Installation and Reference Guide 28
_____________________________________________________________________________________________
Quick Start
// Create a sales order line object
com.sage.mas90.ws.SalesOrderLine salesOrderLine = new com.sage.mas90.ws.SalesOrderLine();
// Set the line information
salesOrderLine.setItemCode("1001-HON-H252");
salesOrderLine.setQuantityOrdered(1.0);
// Add the line to the lines collection then attach the lines to the sales order
salesOrder.getLines().getSalesOrderLine().add(salesOrderLine);
// Create a logon object
com.sage.mas90.ws.Logon logon = new com.sage.mas90.ws.Logon();
// Set the username and password to be used for Sage 100 Web Services
logon.setUsername("webservices");
logon.setPassword("password");
// Create a string with the company code to use
String companyCode = "ABC";
// Use try/catch blocks to catch any errors
try
{
// Create a client to communicate with Sage 100 Web Services
com.sage.mas90.ws.MasBasicWsdlService service = new com.sage.mas90.ws.MasBasicWsdlService();
com.sage.mas90.ws.IMasService client = service.getBasicHttpBindingIMasService();
// Get a new sales order number
salesOrder.setSalesOrderNo(client.getNextSalesOrderNo(logon, companyCode));
// Create the sales order
client.createSalesOrder(logon, companyCode, salesOrder);
// Display the order number
eBusiness Web Services Installation and Reference Guide 29
_____________________________________________________________________________________________
Quick Start
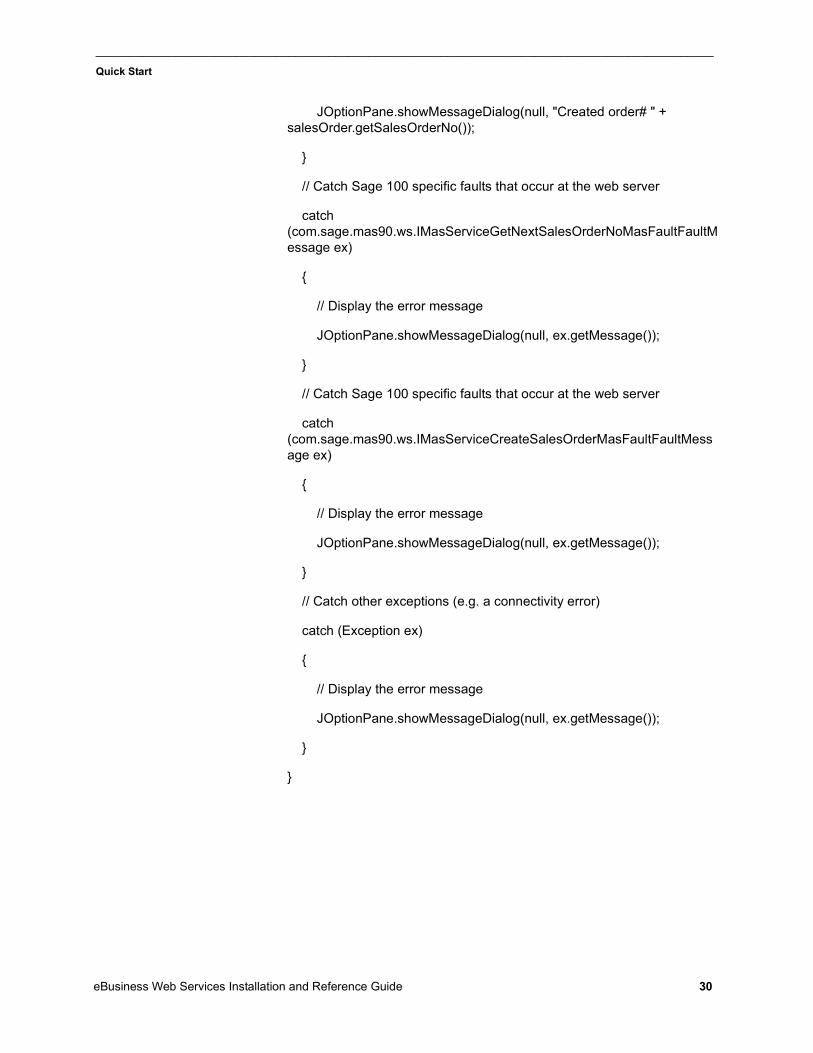
JOptionPane.showMessageDialog(null, "Created order# " + salesOrder.getSalesOrderNo());
}
// Catch Sage 100 specific faults that occur at the web server
catch (com.sage.mas90.ws.IMasServiceGetNextSalesOrderNoMasFaultFaultMessage ex)
{
// Display the error message
JOptionPane.showMessageDialog(null, ex.getMessage());
}
// Catch Sage 100 specific faults that occur at the web server
catch (com.sage.mas90.ws.IMasServiceCreateSalesOrderMasFaultFaultMessage ex)
{
// Display the error message
JOptionPane.showMessageDialog(null, ex.getMessage());
}
// Catch other exceptions (e.g. a connectivity error)
catch (Exception ex)
{
// Display the error message
JOptionPane.showMessageDialog(null, ex.getMessage());
}
}
eBusiness Web Services Installation and Reference Guide 30
_____________________________________________________________________________________________
Quick Start
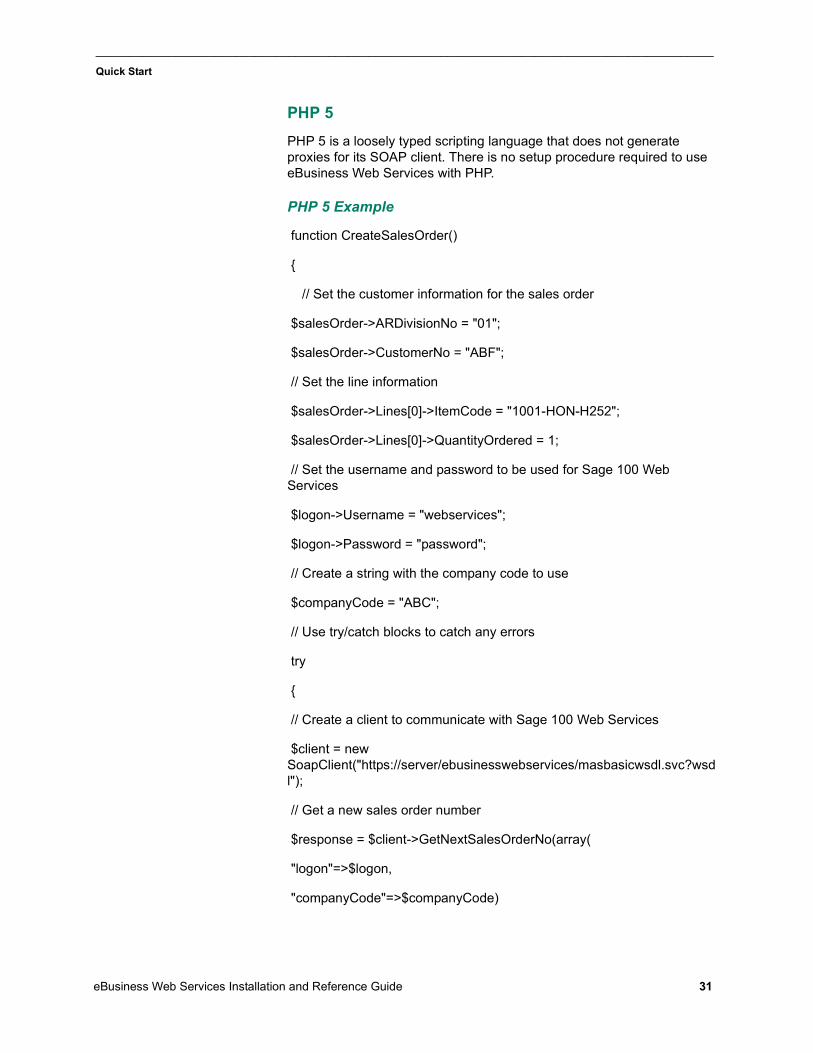
PHP 5
PHP 5 is a loosely typed scripting language that does not generate proxies for its SOAP client. There is no setup procedure required to use eBusiness Web Services with PHP.
PHP 5 Example
function CreateSalesOrder()
{
// Set the customer information for the sales order
$salesOrder->ARDivisionNo = "01";
$salesOrder->CustomerNo = "ABF";
// Set the line information
$salesOrder->Lines[0]->ItemCode = "1001-HON-H252";
$salesOrder->Lines[0]->QuantityOrdered = 1;
// Set the username and password to be used for Sage 100 Web Services
$logon->Username = "webservices";
$logon->Password = "password";
// Create a string with the company code to use
$companyCode = "ABC";
// Use try/catch blocks to catch any errors
try
{
// Create a client to communicate with Sage 100 Web Services
$client = new SoapClient("https://server/ebusinesswebservices/masbasicwsdl.svc?wsdl");
// Get a new sales order number
$response = $client->GetNextSalesOrderNo(array(
"logon"=>$logon,
"companyCode"=>$companyCode)
eBusiness Web Services Installation and Reference Guide 31
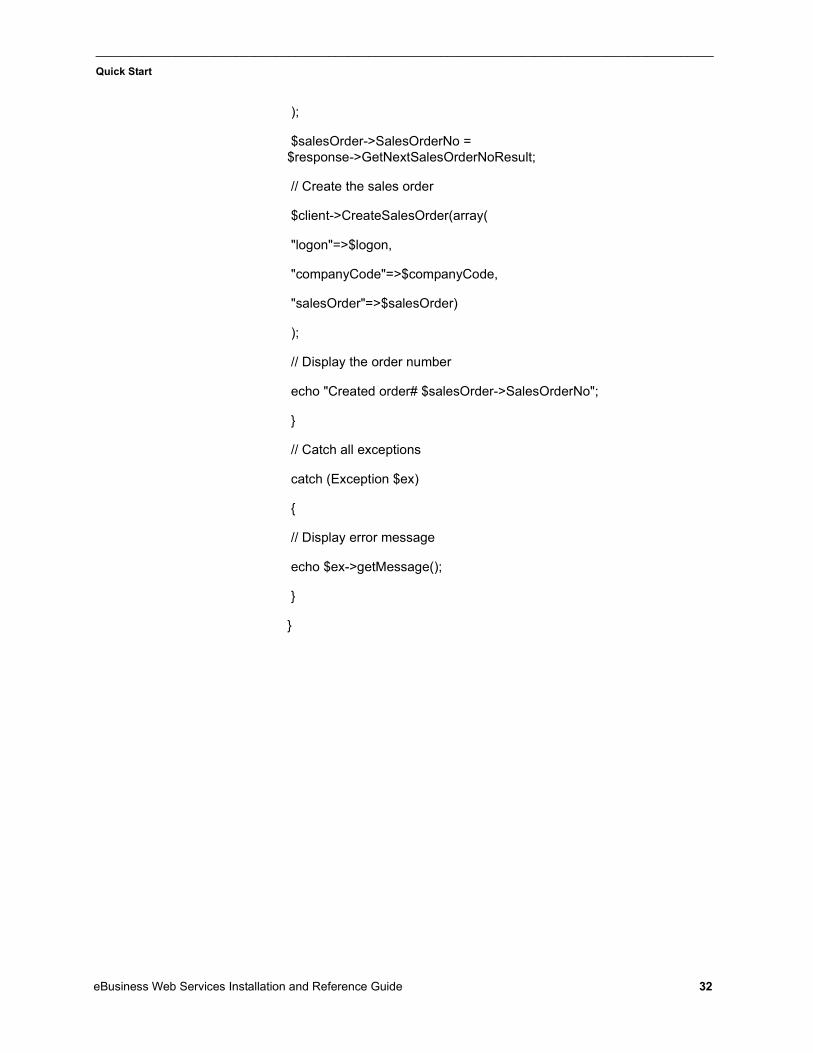
_____________________________________________________________________________________________
Quick Start
);
$salesOrder->SalesOrderNo = $response->GetNextSalesOrderNoResult;
// Create the sales order
$client->CreateSalesOrder(array(
"logon"=>$logon,
"companyCode"=>$companyCode,
"salesOrder"=>$salesOrder)
);
// Display the order number
echo "Created order# $salesOrder->SalesOrderNo";
}
// Catch all exceptions
catch (Exception $ex)
{
// Display error message
echo $ex->getMessage();
}
}
eBusiness Web Services Installation and Reference Guide 32
Chapter 4
AdministrationChapter 4Security and Encryption
eBusiness Web Services must be used with SSL encryption to be secure. The URL for eBusiness Web Services will start with https:// if SSL is being used. Sage 100 eBusiness Web Services should never be used without SSL encryption.
Access to the Sage 100 system from eBusiness Web Services is controlled at three levels:
System
Company
User
eBusiness Web Services works with Sage 100 role-based security. eBusiness Web Services calls are treated as maintenance actions (Create, Modify, Remove, or View) in the context of role-based security.
To determine which tasks must be enabled for a particular web services method, See APIs on page 37.
For example, to allow creation of a new customer, in Library Master Role Maintenance, click the Tasks tab and select Accounts Receivable > Maintenance/Data Entry > Customer Maintenance > Create.
eBusiness Web Services Installation and Reference Guide 33
_____________________________________________________________________________________________
Security and Encryption
System Configuration Setup
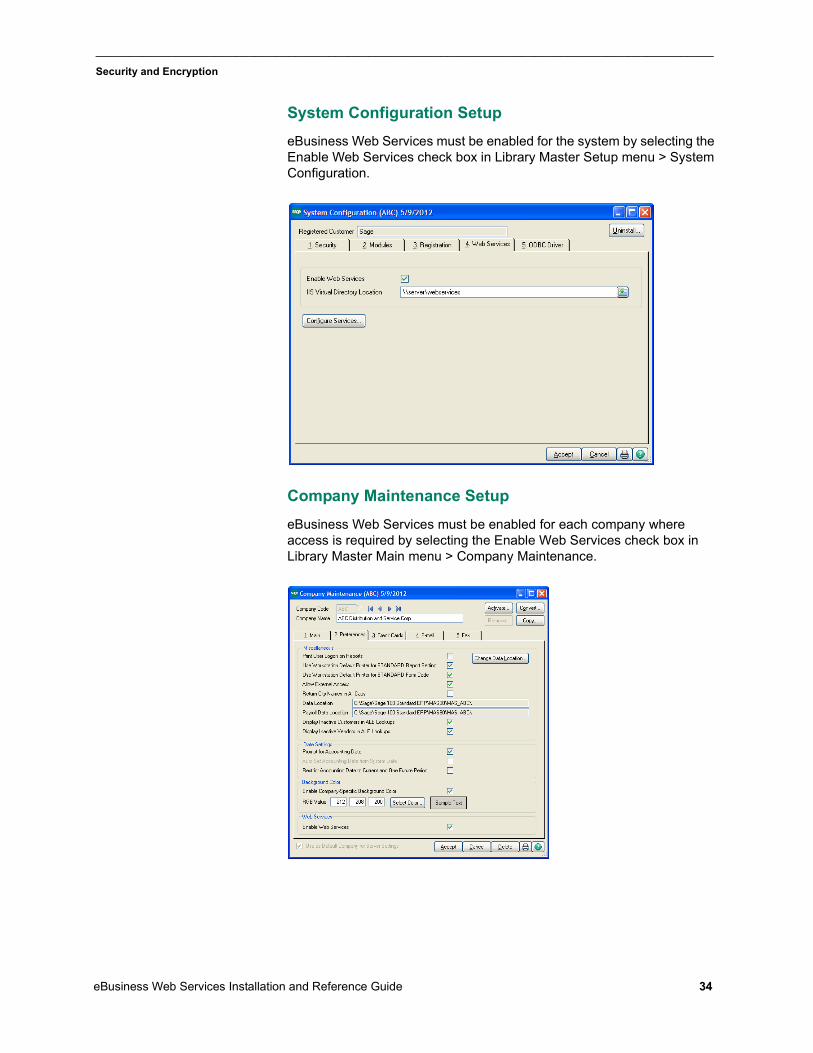
eBusiness Web Services must be enabled for the system by selecting the Enable Web Services check box in Library Master Setup menu > System Configuration.
Company Maintenance Setup
eBusiness Web Services must be enabled for each company where access is required by selecting the Enable Web Services check box in Library Master Main menu > Company Maintenance.
eBusiness Web Services Installation and Reference Guide 34
_____________________________________________________________________________________________
Error Logging
User Maintenance Setup
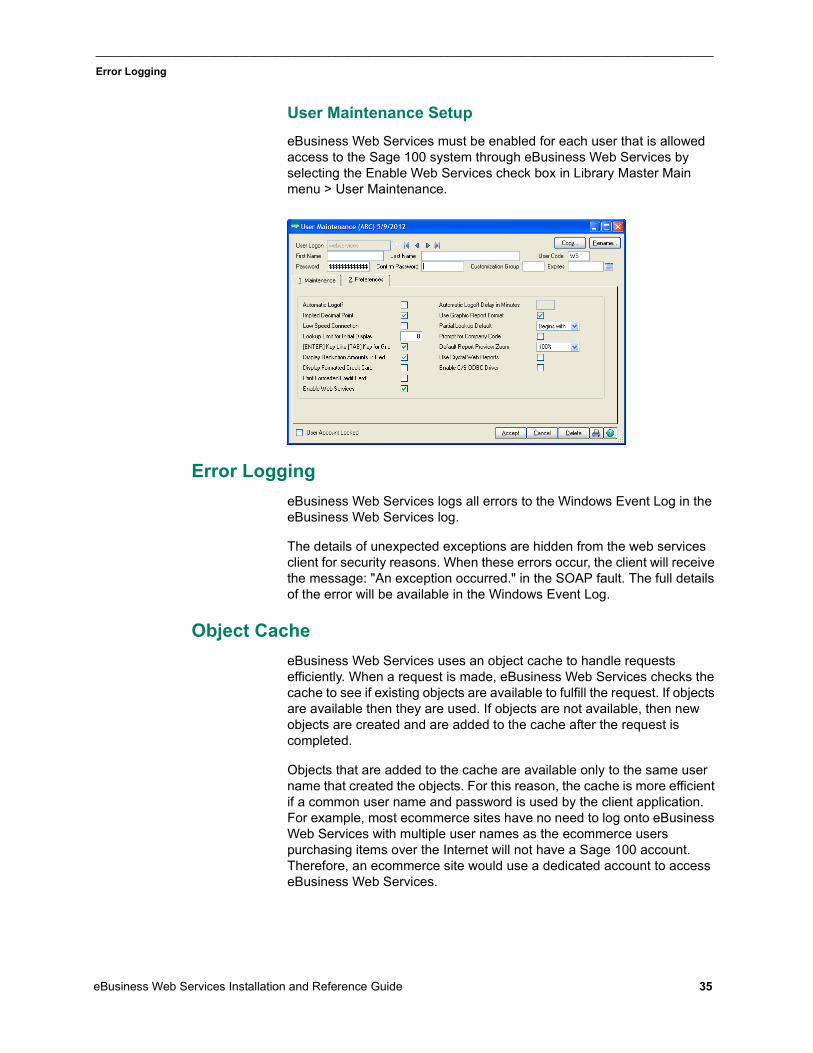
eBusiness Web Services must be enabled for each user that is allowed access to the Sage 100 system through eBusiness Web Services by selecting the Enable Web Services check box in Library Master Main menu > User Maintenance.
Error Logging
eBusiness Web Services logs all errors to the Windows Event Log in the eBusiness Web Services log.
The details of unexpected exceptions are hidden from the web services client for security reasons. When these errors occur, the client will receive the message: "An exception occurred." in the SOAP fault. The full details of the error will be available in the Windows Event Log.
Object Cache
eBusiness Web Services uses an object cache to handle requests efficiently. When a request is made, eBusiness Web Services checks the cache to see if existing objects are available to fulfill the request. If objects are available then they are used. If objects are not available, then new objects are created and are added to the cache after the request is completed.
Objects that are added to the cache are available only to the same user name that created the objects. For this reason, the cache is more efficient if a common user name and password is used by the client application. For example, most ecommerce sites have no need to log onto eBusiness Web Services with multiple user names as the ecommerce users purchasing items over the Internet will not have a Sage 100 account. Therefore, an ecommerce site would use a dedicated account to access eBusiness Web Services.
eBusiness Web Services Installation and Reference Guide 35
_____________________________________________________________________________________________
Permissions
Certain maintenance operations in the Sage 100 products, such as adding a UDF, require exclusive use of the Sage 100 data files. Due to the use of caching, eBusiness Web Services can have data files open even if there is no activity. The eBusiness Web Services application pool should be stopped through Internet Information Services Manager before running operations that require exclusive use of the Sage 100 data files. Stopping the application pool will clear the cache and reject incoming web services requests that could interfere with the maintenance operations.
Permissions
eBusiness Web Services runs in the context of the eBusinessWebServices user account. The eBusinessWebServices user account requires permissions to the Sage 100 application and the files that the Sage 100 application accesses. The eBusiness Web Services installer will attempt to set these permissions; however, permissions may need to be set manually under certain circumstances such as when a new alternate directory is created.
The eBusinessWebServices user account must have the following permissions set:
Full Control of the MAS90 base directory
Full Control of all alternate directories that will be accessed from eBusiness Web Services
Read & Execute permissions for the Program Files\Common Files\Sage\Common Components folder
Read & Execute permissions of the eBusiness Web Services installation folder
List Folder, Read Data, and Delete permissions for the Windows\Temp folder
eBusiness Web Services Installation and Reference Guide 36
Appendix A
APIsAppendix AGetContractInformation
Parameters
None
Return Value
Type: ContractInfomationGeneral information about the web services contracts.
Remarks
The returned value contains three fields:
ContractVersion: This field returns an integer value that represents the version of the eBusiness Web Services operations and data contracts.
A client application can use ContractVersion to determine if it is compatible with the instance of eBusiness Web Services it is connected to without the need to download the complete WSDL.
Newer versions of eBusiness Web Services will generally be backwards compatible with clients designed for older versions of eBusiness Web Services.
Our goal is to maintain backwards compatibility; however, design considerations may cause incompatibles to arise from time to time.
AssemblyVersion: This field returns a string that represents the version of the eBusiness Web Services assembly.
NullDateTime: The value from this field can be used to explicitly set an entity's DateTime field to blank.
GetDiagnosticInformation
Parameters
None
Return Value
Type: DiagnosticInformationStatistical data that may aid in diagnosing performance issues, etc.
eBusiness Web Services Installation and Reference Guide 37
_____________________________________________________________________________________________
GetSalesOrder
Remarks
This method is for use by Sage 100 Customer Support as a diagnostic tool and is not intended to be called by applications.
Remote access to this method is turned off by default. Remote access to this method should only be enabled when requested by a Sage 100 Customer Support representative. Remote access can be enabled using the Sage 100 eBusiness Web Services configuration utility.
GetSalesOrder
Parameters
logon
Type: LogonThe user name and password to be used for the operation
companyCode
Type: stringThe company from which to obtain the sales order
salesOrderNo
Type: stringThe number of the sales order to retrieve
Return Value
Type: SalesOrderThe requested sales order
Remarks
The returned value may be modified and used with the UpdateSalesOrder operation. For more information, See UpdateSalesOrder on page 42.
For information on the structure and data contained in the SalesOrder type, refer to SO_SalesOrderHeader and SO_SalesOrderDetail in File Layouts and Program Information.
Security Requirements
In Library Master Role Maintenance, click the Tasks tab and select Sales Order > Maintenance/Data Entry > Sales Order Entry > View.
eBusiness Web Services Installation and Reference Guide 38
_____________________________________________________________________________________________
GetNextSalesOrderNo
GetNextSalesOrderNo
Parameters
logon
Type: LogonThe user name and password to be used for the operation
companyCode
Type: stringThe company from which to obtain the next sales order number
Return Value
Type: stringThe next sales order number
Remarks
The returned value can be used to set the SalesOrderNo field of a SalesOrder object before calling CreateSalesOrder.
Each call to GetNextSalesOrderNo will return a new sales order number for the specified company regardless of whether the number from a previous call has been used or not.
Security Requirements
In Library Master Role Maintenance, click the Tasks tab and select Sales Order > Maintenance/Data Entry > Sales Order Entry > Create.
GetSalesOrderTemplate
Parameters
logon
Type: LogonThe user name and password to be used for the operation
companyCode
Type: stringThe company from which to obtain the sales order template
arDivisionNo
Type: stringThe division number of the customer
eBusiness Web Services Installation and Reference Guide 39
_____________________________________________________________________________________________
PreviewSalesOrder
customerNo
Type: stringThe customer number to use for the template
Return Value
Type: SalesOrderAn empty sales order with the default customer information set
Remarks
This operation retrieves default customer information that can be used for display on a data entry form. Sales order fields that are blank or zero in the Sage 100 system are returned as null in order to reduce network traffic.
The sales order returned from this operation can be modified and used for the CreateSalesOrder operation; however, it is generally more efficient to create a new SalesOrder object to pass to CreateSalesOrder.
For information on the structure and data contained in the SalesOrder type, refer to SO_SalesOrderHeader and SO_SalesOrderDetail in File Layouts and Program Information.
Security Requirements
In Library Master Role Maintenance, click the Tasks tab and select Sales Order > Maintenance/Data Entry > Sales Order Entry. Select Create and View.
PreviewSalesOrder
Parameters
logon
Type: LogonThe user name and password to be used for the operation
companyCode
Type: stringThe company from which to preview the sales order
salesOrder
Type: SalesOrderThe sales order to preview
eBusiness Web Services Installation and Reference Guide 40
_____________________________________________________________________________________________
CreateSalesOrder
Return Value
Type: SalesOrderA sales order that includes the default values and totals that would be committed if the submitted sales order was passed to the CreateSalesOrder operation
Remarks
This operation allows a sales order to be previewed before being submitted to the CreateSalesOrder operation. For example, it would be appropriate for an ecommerce application to call PreviewSalesOrder and display the order totals to the end user before final checkout.
The sales order returned by this operation is not intended to be passed to the CreateSalesOrder operation. Read-only fields can be set on the returned value. This will cause an error if submitted to the CreateSalesOrder operation.
For information on the structure and data contained in the SalesOrder type, refer to SO_SalesOrderHeader and SO_SalesOrderDetail in File Layouts and Program Information.
Security Requirements
In Library Master Role Maintenance, click the Tasks tab and select Sales Order > Maintenance/Data Entry > Sales Order Entry. Select Create and View or Modify and View.
CreateSalesOrder
Parameters
logon
Type: LogonThe user name and password to be used for the operation
companyCode
Type: stringThe company in which to create the sales order
salesOrder
Type: SalesOrderThe sales order to create
eBusiness Web Services Installation and Reference Guide 41
_____________________________________________________________________________________________
UpdateSalesOrder
Return Value
None
Remarks
This operation creates a sales order in the Sage 100 system. The SalesOrderNo field of salesOrder must be set to create a sales order. The GetNextSalesOrderNo operation can be used to obtain a sales order number.
Network connectivity issues can cause errors with web services. When this occurs, it can be difficult to determine if the call completed successfully, failed, or never made it to the server.
When a connectivity error occurs with this operation, such as a timeout error, CreateSalesOrder should be called again with the same sales order. It is important that the value for SalesOrderNo remain the same as in the first call. If the previous call to CreateSalesOrder completed successfully, the new call will error out and MasFault will have ErrorCode set to WS_AlreadyExists. This error can be ignored as it indicates the previous call successfully created the sales order. For more information, See Error Handling on page 14.
For information on the structure and data contained in the SalesOrder type, refer to SO_SalesOrderHeader and SO_SalesOrderDetail in File Layouts and Program Information.
Security Requirements
In Library Master Role Maintenance, click the Tasks tab and select Sales Order > Maintenance/Data Entry > Sales Order Entry > Create.
UpdateSalesOrder
Parameters
logon
Type: LogonThe user name and password to be used for the operation
companyCode
Type: stringThe company from which to update the sales order
salesOrder
Type: SalesOrderThe sales order to update
eBusiness Web Services Installation and Reference Guide 42
_____________________________________________________________________________________________
DeleteSalesOrder
Return Value
None
Remarks
This operation updates a sales order in the Sage 100 system.
A sales order must first be obtained from the GetSalesOrder operation. This sales order can then be modified and passed to the UpdateSalesOrder operation.
The SalesOrderNo field of salesOrder determines which Sage 100 sales order is updated. SalesOrderNo must not be modified after the call to GetSalesOrder.
Do not modify the LineKey field of any of the SalesOrderLine objects contained in the Lines collection of salesOrder. The LineKey field is an advisory field that is used to determine lines that have been updated, inserted, or deleted from the sales order. Modifying the LineKey field will result in inefficiencies with the UpdateSalesOrder operation.
"Allow Read" should remain enabled for the LineKey field of the SalesOrderLine entity when using the advanced settings of the Sage Web Services Configuration utility.
For information on the structure and data contained in the SalesOrder type, refer to SO_SalesOrderHeader and SO_SalesOrderDetail in File Layouts and Program Information.
Security Requirements
In Library Master Role Maintenance, click the Tasks tab and select Sales Order > Maintenance/Data Entry > Sales Order Entry > Modify.
DeleteSalesOrder
Parameters
logon
Type: LogonThe user name and password to be used for the operation
companyCode
Type: stringThe company from which to delete the sales order
salesOrderNo
Type: stringThe sales order to delete
eBusiness Web Services Installation and Reference Guide 43
_____________________________________________________________________________________________
GetCustomer
Return Value
None
Remarks
This operation deletes the specified sales order from the Sage 100 system.
Security Requirements
In Library Master Role Maintenance, click the Tasks tab and select Sales Order > Maintenance/Data Entry > Sales Order Entry > Remove.
GetCustomer
Parameters
logon
Type: LogonThe user name and password to be used for the operation
companyCode
Type: stringThe company from which to obtain the customer
arDivisionNo
Type: stringThe division number of the customer
customerNo
Type: stringThe customer number to use for the template
Return Value
Type: CustomerThe requested customer
Remarks
The returned value can be modified and used with the UpdateCustomer operation. For more information, See UpdateCustomer on page 47.
For information on the structure and data contained in the Customer type, refer to AR_Customer in File Layouts and Program Information.
eBusiness Web Services Installation and Reference Guide 44
_____________________________________________________________________________________________
GetNextCustomerNo
Security Requirements
In Library Master Role Maintenance, click the Tasks tab and select Accounts Receivable > Maintenance/Data Entry > Customer Maintenance > View.
GetNextCustomerNo
Parameters
logon
Type: LogonThe user name and password to be used for the operation
companyCode
Type: stringThe company from which to obtain the next customer number
Return Value
Type: stringThe next customer number
Remarks
The returned value can be used to set the CustomerNo field of a Customer object before calling CreateCustomer.
Each call to GetNextCustomerNo will return a new customer number for the specified company regardless of whether the number from a previous call has been used or not.
Security Requirements
In Library Master Role Maintenance, click the Tasks tab and select Accounts Receivable > Maintenance/Data Entry > Customer Maintenance > Create.
eBusiness Web Services Installation and Reference Guide 45
_____________________________________________________________________________________________
CreateCustomer
CreateCustomer
Parameters
logon
Type: LogonThe user name and password to be used for the operation
companyCode
Type: stringThe company in which to create the customer
customer
Type: CustomerThe customer to create
Return Value
None
Remarks
This operation creates a customer in the Sage 100 system.
The ARDivisionNo and CustomerNo fields must be set to create a customer. The GetNextCustomerNo operation can be used to obtain a customer number.
Network connectivity issues can cause errors with web services. When this occurs, it can be difficult to determine if the call completed successfully, failed, or never made it to the server.
When a connectivity error occurs with this operation, such as a timeout error, CreateCustomer should be called again with the same customer. It is important that the values for ARDivisionNo and CustomerNo remain the same as in the first call. If the previous call to CreateCustomer completed successfully, the new call will error out and MasFault will have ErrorCode set to WS_AlreadyExists. This error can be ignored as it indicates the previous call successfully created the customer. For more information, See Error Handling on page 14.
For information on the structure and data contained in the Customer type, refer to AR_Customer in File Layouts and Program Information.
Security Requirements
In Library Master Role Maintenance, click the Tasks tab and select Accounts Receivable > Maintenance/Data Entry > Customer Maintenance > Create.
eBusiness Web Services Installation and Reference Guide 46
_____________________________________________________________________________________________
UpdateCustomer
UpdateCustomer
Parameters
logon
Type: LogonThe user name and password to be used for the operation
companyCode
Type: stringThe company from which to update the customer
customer
Type: CustomerThe customer to update
Return Value
None
Remarks
This operation updates a customer in the Sage 100 system.
A customer must first be obtained from the GetCustomer operation. This customer can then be modified and passed to the UpdateCustomer operation.
The ARDivisionNo and CustomerNo fields determine which Sage 100 customer is updated. ARDivisionNo and CustomerNo must not be modified after the call to GetCustomer.
For information on the structure and data contained in the Customer type, refer to AR_Customer in File Layouts and Program Information.
Security Requirements
In Library Master Role Maintenance, click the Tasks tab and select Accounts Receivable > Maintenance/Data Entry > Customer Maintenance > Modify.
eBusiness Web Services Installation and Reference Guide 47
_____________________________________________________________________________________________
DeleteCustomer
DeleteCustomer
Parameters
logon
Type: LogonThe user name and password to be used for the operation
companyCode
Type: stringThe company from which to delete the customer
arDivisionNo
Type: stringThe division number of the customer
customerNo
Type: stringThe customer number to delete
Return Value
None
Remarks
This operation deletes a customer in the Sage 100 system.
Security Requirements
In Library Master Role Maintenance, click the Tasks tab and select Accounts Receivable > Maintenance/Data Entry > Customer Maintenance > Remove.
GetCustomerContact
Parameters
logon
Type: LogonThe user name and password to be used for the operation
companyCode
Type: stringThe company from which to obtain the customer contact
eBusiness Web Services Installation and Reference Guide 48
_____________________________________________________________________________________________
CreateCustomerContact
arDivisionNo
Type: stringThe division number of the customer
customerNo
Type: stringThe customer number of the contact
contactCode
Type: stringThe contact code
Return Value
Type: CustomerContactThe requested customer contact
Remarks
The customer contact returned can be modified and used with the UpdateCustomerContact operation. For more information, See UpdateCustomerContact on page 50.
For information on the structure and data contained in the CustomerContact type, refer to AR_CustomerContact in File Layouts and Program Information.
Security Requirements
In Library Master Role Maintenance, click the Tasks tab and select Accounts Receivable > Maintenance/Data Entry > Customer Maintenance > View.
CreateCustomerContact
Parameters
logon
Type: LogonThe user name and password to be used for the operation
companyCode
Type: stringThe company in which to create the customer contact
eBusiness Web Services Installation and Reference Guide 49
_____________________________________________________________________________________________
UpdateCustomerContact
customerContact
Type: CustomerContactThe customer contact to create
Return Value
None
Remarks
This operation creates a customer contact in the Sage 100 system.
The ARDivisionNo, CustomerNo, and ContactCode fields of customerContact must be set to create a customer contact.
Network connectivity issues can cause errors with web services. When this occurs, it can be difficult to determine if the call completed successfully, failed, or never made it to the server.
When a connectivity error occurs with this operation, such as a timeout error, CreateCustomerContact should be called again with the same customer contact. It is important that the values for ARDivisionNo, CustomerNo, and ContactCode remain the same as in the first call. If the previous call to CreateCustomerContact completed successfully, the new call will error out and MasFault will have ErrorCode set to "WS_AlreadyExists". This error can be ignored as it indicates the previous call successfully created the customer contact. For more information, See Error Handling on page 14.
For information on the structure and data contained in the CustomerContact type, refer to AR_CustomerContact in File Layouts and Program Information.
Security Requirements
In Library Master Role Maintenance, click the Tasks tab and select Accounts Receivable > Maintenance/Data Entry > Customer Maintenance > Create.
UpdateCustomerContact
Parameters
logon
Type: LogonThe user name and password to be used for the operation
companyCode
Type: stringThe company from which to update the customer contact
eBusiness Web Services Installation and Reference Guide 50
_____________________________________________________________________________________________
DeleteCustomerContact
customerContact
Type: CustomerContactThe customer contact to update
Return Value
None
Remarks
This operation updates a customer contact in the Sage 100 system.
A customer contact must first be obtained from the GetCustomerContact operation. This customer contact can then be modified and passed to the UpdateCustomerContact operation.
The ARDivisionNo, CustomerNo, and ContactCode fields of customerContact determine which Sage 100 customer contact is updated. ARDivisionNo, CustomerNo, and ContactCode must not be modified after the call to GetCustomerContact.
For information on the structure and data contained in the CustomerContact type, refer to AR_CustomerContact in File Layouts and Program Information.
Security Requirements
In Library Master Role Maintenance, click the Tasks tab and select Accounts Receivable > Maintenance/Data Entry > Customer Maintenance > Modify.
DeleteCustomerContact
Parameters
logon
Type: LogonThe user name and password to be used for the operation
companyCode
Type: stringThe company in which to delete the customer contact
arDivisionNo
Type: stringThe division number of the customer
eBusiness Web Services Installation and Reference Guide 51

_____________________________________________________________________________________________
AddCreditCardToVault
customerNo
Type: stringThe customer number of the customer contact
contactCode
Type: stringThe customer contact to delete
Return Value
None
Remarks
This operation deletes a customer contact in the Sage 100 system.
Security Requirements
In Library Master Role Maintenance, click the Tasks tab and select Accounts Receivable > Maintenance/Data Entry > Customer Maintenance > Remove.
AddCreditCardToVault
Parameters
logon
Type: LogonThe user name and password to be used for the operation
companyCode
Type: stringThe company from which to add the credit card data to the vault
paymentType
Type: stringThe payment type used for the credit card
creditCardData
Type: stringThe credit card number and expiration date formatted as follows:nnnnnnnnnnnnnnnn|mmyy
Return Value
Type: stringA GUID that can be used in future calls to PreAuthorizeCreditCard
eBusiness Web Services Installation and Reference Guide 52
_____________________________________________________________________________________________
PreAuthorizeCreditCard
Remarks
This operation adds a credit card number and expiration date to the Sage Exchange secure vault and returns a unique identifier that can be used in future calls to PreAuthorizeCreditCard and is also placed in the SalesOrder contract for various sales order operations.
The following is an example of data that should be passed into the creditCardData parameter:4111111111111111|0616
Note that the pipe character is used to separate the credit card number from the expiration date.
PreAuthorizeCreditCard
Parameters
logon
Type: LogonThe user name and password to be used for the operation
companyCode
Type: stringThe company from which to add the credit card data to the vault
paymentType
Type: stringThe payment type used for the credit card
preAuthorizationData
Type: PreAuthorizationDataA contract that contains the credit card information necessary to process a pre-authorization
Return Value
Type: PreAuthorizationResultA contract that contains CreditCardTransactionID and CreditCardAuthorizationNo fields that may be placed in the Payment collection of the SalesOrder contract for use in sales order operations
Remarks
Many fields for the PreAuthorizationData contract are optional and may be left as null.
The required fields are CreditCardGUID and Amount. An exception will be thrown if the pre-authorization fails.
eBusiness Web Services Installation and Reference Guide 53
Appendix B
TroubleshootingAppendix BDownloading WSDL - Wrong Host Name
WSDL contains URLs that link to schema information that describes eBusiness Web Services. Internet Information Services uses the full computer name of the server hosting eBusiness Web Services as the host name in these URLs. When the full computer name does not match the common name on the SSL certificate, or when the full computer name is not accessible from the internet, WSDL will fail to download.
This issue can be diagnosed by checking the host name returned by Internet Information Services. Point a browser to https://<host name>/<virtual directory>/<entry point>.
For example:https://www.sage.com/ebusinesswebservices/masservice.svc
An informational page is displayed that contains a line similar to the following:
svcutil.exe https://www.sage.com/eBusinessWebServices/MasService.svc?wsdl
When the host name on the informational page’s URL is incorrect, the issue can be resolved by changing the full computer name of the server hosting eBusiness Web Services. If the full computer name cannot be changed, then SSL host headers can be used to resolve the issue.
Setting SSL Host Headers
The SSL host headers for Internet Information Services 8 can be set through the Bindings settings for the web site using Internet Information Services Manager. Internet Information Services version 6 and 7 do not allow SSL host headers to be set from the Internet Information Services Manager; therefore, special steps must be performed.
Internet Information Services 6
SSL host headers may be set by using the Metabase Explorer provided with the IIS 6.0 Resource Kit Tools which can be downloaded from the following location:
http://www.microsoft.com/downloads/details.aspx?familyid=56FC92EE-A71A-4C73-B628-ADE629C89499&displaylang=en
WARNING Setting SSL host headers prevents the affected web site from being accessed through other host names.
eBusiness Web Services Installation and Reference Guide 54
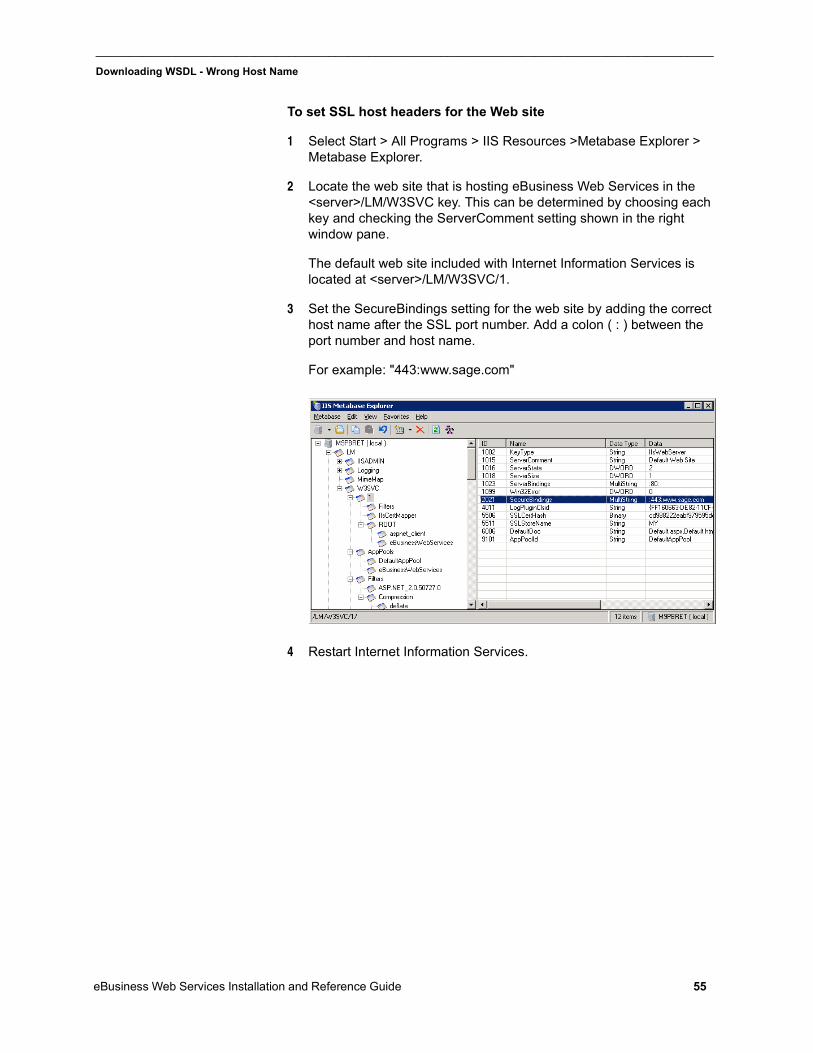
_____________________________________________________________________________________________
Downloading WSDL - Wrong Host Name
To set SSL host headers for the Web site
1 Select Start > All Programs > IIS Resources >Metabase Explorer > Metabase Explorer.
2 Locate the web site that is hosting eBusiness Web Services in the <server>/LM/W3SVC key. This can be determined by choosing each key and checking the ServerComment setting shown in the right window pane.
The default web site included with Internet Information Services is located at <server>/LM/W3SVC/1.
3 Set the SecureBindings setting for the web site by adding the correct host name after the SSL port number. Add a colon ( : ) between the port number and host name.
For example: "443:www.sage.com"
4 Restart Internet Information Services.
eBusiness Web Services Installation and Reference Guide 55
_____________________________________________________________________________________________
Downloading WSDL - XSD not Available
Internet Information Services 7
SSL host headers may be set by using notepad to edit applicationHost.config located in %windir%\System32\inetsrv\config. A backup copy of the applicationHost.config should be made before editing.
To set SSL host headers for the web site
1 Set the bindingInformation attribute for the web site’s https protocol by adding the proper host name after the SSL port number. Add a colon ( : ) between the port number and host name.
For example:
<site name="Default Web Site" id="1"> <application path="/"> <virtualDirectory path="/" physicalPath="%SystemDrive%\inetpub\wwwroot" /> </application> <application path="/eBusinessWebServices" applicationPool="eBusinessWebServices" enabledProtocols="https"> <virtualDirectory path="/" physicalPath="C:\Sage\eBusiness Web Services" /> </application> <bindings> <binding protocol="http" bindingInformation="*:80:" /> <binding protocol="https" bindingInformation="*:443:www.sage.com" /> </bindings></site>
Downloading WSDL - XSD not Available
The WSDL download can fail while downloading an XSD file.
To diagnose this issue
1 Verify that the issue is not a wrong host name. For more information, see Downloading WSDL - Wrong Host Name on page 54.
2 Verify that the main WSDL page can be read by pointing a browser to:https://<host name>/<virtual directory>/<entry point>?wsdl
For example:https://www.sage.com/ebusinesswebservices/masservice.svc?wsdl
NOTE Microsoft Internet Information Services (IIS) version 7 does not require a restart when this change is made.
eBusiness Web Services Installation and Reference Guide 56
_____________________________________________________________________________________________
Error 404 with Internet Information Services (IIS) version 6
3 Verify that the XSD fails to display by pointing a browser to:https://<host name>/<virtual directory>/<entry point>?xsd=xsd0
For example:https://www.sage.com/ebusinesswebservices/masservice.svc?xsd=xsd0
If all three items above are true, restart Internet Information Services. If the issue still occurs, change the permissions for the %windir%\Temp directory to Full Control for the eBusiness Web Services user account, and restart Internet Information Services.
Error 404 with Internet Information Services (IIS) version 6
Under certain conditions, when eBusiness Web Services is installed in Internet Information Services version 6, web services calls may fail and the entry point will display an error 404 when accessed from a browser. For example:https://www.sage.com/ebusinesswebservices/masservice.svc
To correct the error 404
1 Ensure that the ASP.NET v4.0.30319 web service extension is set to Allowed.
Allow the ASP.NET v4.0.30319 Web Service Extension through Internet Information Services Manager.
2 If the ASP.NET v4.0.30319 web services extension is not listed, install it by running the following command from the command prompt:
%windir%\Microsoft.NET\Framework\v4.0.30319\aspnet_regiis -i
3 Restart Internet Information Services after issuing the above command.
4 Verify that the ASP.NET v4.0.30319 is the ASP.NET version specified for the eBusiness Web Services application.
In Internet Information Services Manager, right-click the eBusiness Web Services virtual directory, click Properties, and then click the ASP.NET tab.
eBusiness Web Services Installation and Reference Guide 57
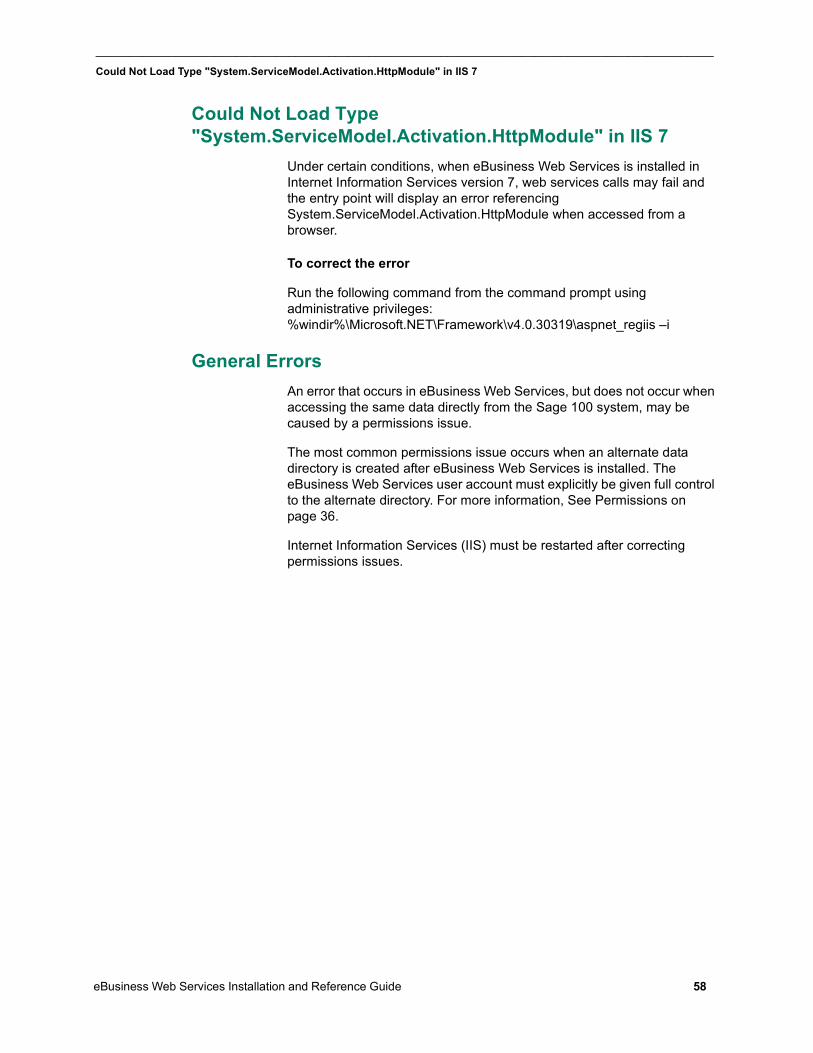
_____________________________________________________________________________________________
Could Not Load Type "System.ServiceModel.Activation.HttpModule" in IIS 7
Could Not Load Type "System.ServiceModel.Activation.HttpModule" in IIS 7
Under certain conditions, when eBusiness Web Services is installed in Internet Information Services version 7, web services calls may fail and the entry point will display an error referencing System.ServiceModel.Activation.HttpModule when accessed from a browser.
To correct the error
Run the following command from the command prompt using administrative privileges:%windir%\Microsoft.NET\Framework\v4.0.30319\aspnet_regiis –i
General Errors
An error that occurs in eBusiness Web Services, but does not occur when accessing the same data directly from the Sage 100 system, may be caused by a permissions issue.
The most common permissions issue occurs when an alternate data directory is created after eBusiness Web Services is installed. The eBusiness Web Services user account must explicitly be given full control to the alternate directory. For more information, See Permissions on page 36.
Internet Information Services (IIS) must be restarted after correcting permissions issues.
eBusiness Web Services Installation and Reference Guide 58
Index
Aadministration security, encryption 33Advanced SettingsMD fields 10UDFs 10
APIAddCreditCardToVault 52CreateCustomer 46CreateCustomerContact 49CreateSalesOrder 41DeleteCustomer 48DeleteCustomerContact 51DeleteSalesOrder 43GetContractInformation 37GetCustomer 44GetCustomerContact 48GetDiagnosticInformation 37GetNextCustomerNo 45GetNextSalesOrderNo 39GetSalesOrder 38GetSalesOrderTemplate 39PreAuthorizeCreditCard 53PreviewSalesOrder 40UpdateCustomer 47UpdateCustomerContact 50UpdateSalesOrder 42
Ccache, object cache 35Company Maintenance, setup 34configuration,setup 33credit cards
decryption 9encryption 9processing 9
EeBusiness Web Services
advanced settings 11configuration utility 11date conversion 8installing 5manage entry points 14time conversion 8uninstalling 5
entry point, default 7error handling, eBusiness Web Services 15error messages
general 58in IIS 6 57in IIS 7 58
Iinstall guide
graphic conventions 2how to use 2text conventions 3
eBusiness Web Services Installation and Reference Guide
installingeBusiness Web Services 5user account 5
JJava example 28
Llog, error logging 35
Ppermissions, user account 36PHP5 example 31protocols, SOAP 7
Ssetup
company maintenance 34system configuration 34user maintenance 35
SSLencryption 33security 33
standard language, WSDL 6System Configuration, setup 34
Ttroubleshooting 54
Uuninstalling, eBusiness Web Services 5User Maintenance, setup 35
VVisual Studios 2003 examples
C# 24VB.Net 26
Visual Studios 2008 examplesC# 19VB.Net 21
WWSDL
types 6wrong host name 54XSD 56
XXSD, WSDL 56