Download PDF - Thycotic Documentation
140
Documentation - Account Lifecycle Manager - 1.0.0
-
Upload
khangminh22 -
Category
Documents
-
view
0 -
download
0
Transcript of Download PDF - Thycotic Documentation

Documentation - Account Lifecycle Manager - 1.0.0


Table of Contents
Introduction to Account Lifecycle Manager 8
Product 8
Key Features 8
Role-Based Access Controls 8
Workflow Templates 8
Service Account Discovery 8
Example Workflow 8
Get Started 10
ALM Initial Setup Task List 10
System Requirements 11
Thycotic One accounts 11
Browser Compatibility 11
Thycotic Secret Server 11
Active Directory Installation 11
ALM Engine Windows Service 11
Setup the ALM Engine Service 12
ALM Engine Service Requirements 12
Required Ports 12
ALM Engine Installation 12
ALM Engine Configuration Website Tool 12
ALM Engine Logon Account Configuration in AD 13
Additional ALM Engine Logon Account Information 13
ALM Engine Logs 13
View Full Versions of ALM Engine Logs 14
LDAPS 14
ALM Engine: Troubleshooting 14
See Also 14
Integrate ALM with Active Directory 15
Domain Synchronization 15
Sync Users 15
Notes 15
Active Directory Account Discovery Tool 17
Integrate ALM with Amazon Web Services (AWS) 18
Setting Permissions for AWS 19
Integrate Group Managed Service Accounts 22
Overview: 22
Requirements: 22
Parameters: 22
Integrations 23
Start Using ALM 24
http://www.thycotic.com 3

ALM Objects 25
Users 25
Roles 25
Account Owner 25
Requestor 25
Approver 25
System Administrator 25
Custom Roles 25
Groups 26
Workflow Templates 26
Custom Roles 27
Permissions 27
Features to Which Permissions Apply 27
Example Custom Roles Setup 29
Events, Notifications, and Recipients 32
At End of Lifecycle (AEOL) Actions 34
Review 34
Disable 34
Expire 35
Delete 35
ALM End-of-Lifecycle Account Disposition Logic for Option Availability, Account Status, and UserReview Actions
37
Account Status when EOL Reached Systematically 37
User Actions on Review EOL 37
User Actions on Disable EOL 38
User Actions on Delete EOL 38
User Actions on Expire EOL 39
AD Account Expiration Dates 41
Computing’s Midnight Conundrum 41
ALM Storage of Dates 43
Integrations 44
Integrate ALM with Azure Active Directory 45
Optional: Use these steps to enable 49
Integrate Google Cloud Platform 50
Integrate with AWS Secrets Manager 51
Integrate ALM with Secret Server 52
Integrate ALM with DevOps Secrets Vault 54
Integrate ALM with Third Party Vaults 55
Integrate with Azure Key Vault 55
Integrate with AWS Secrets Manager 55
Integrate with HashiCorp Vault 55
ServiceNow Integration 56
Download the Thycotic ALM ServiceNow App: 56
Install the Thycotic ALM ServiceNow App: 57
http://www.thycotic.com 4

Thycotic ALM ServiceNow App Roles: 60
Thycotic ALM ServiceNow App Configuration 60
SIEM Integration 63
Creating a SIEM Integration 63
Deleting a SIEM Integration 65
ALM Administration 66
Users, Groups, and Roles 67
Users 68
Thycotic One accounts 68
Creating ALM Users 68
Managing Users 69
Change Display Name 70
Enable/Disable User 70
Add User email 70
Add/Remove User Groups 70
Add/Remove User Roles 71
Link an Active Directory Account 72
Groups 73
Creating Groups 73
Managing Groups 74
Enable/Disable Group 74
Add/Remove Users 75
To add Users to the Group 76
To remove Users from the Group 76
Add/Remove Roles 77
To Add Roles to the Group 77
To Remove Roles from the Group 78
Create and Manage Roles 79
Default Roles Provided by ALM 79
Create Custom Roles 79
Manage Roles 80
Change Role Permissions 80
Enable/Disable Role 81
Automatically Apply to new Users 81
Add or Remove Users 81
Add Role to Groups 81
Build Workflow Templates 82
Overview 82
Creating and Managing Workflows 82
Create a Workflow 82
Managing Workflow Templates 84
Workflow Template Versioning 85
Alert Settings 86
Email Templates 86
http://www.thycotic.com 5

Webhooks 86
Creating a Webhook 86
Webhook Authorization 87
Account Migration 89
Calibrating the ALM Engine 93
Requesting A Service Account 94
Displaying Requests 94
Withdrawing a Request 94
Approving or Denying a Request 95
Review New Requests 95
Approve/Deny Requests 95
Reports 96
Installation Steps 98
Prerequisites 98
Additional Requirements 98
Docker Configuration 99
Installation 100
Change to that directory. 100
Download and Install the Script: 100
Domain name 100
SSL/TLS Configuration 100
Database Configuration 100
Admin User 100
Authentication Configuration 101
Email Configuration 101
Finishing Setup and Adding Licenses 102
Navigate to Licensing page 102
Supported Authentication Methods 103
Azure AD Open ID Connect 104
Create a New App Registration 104
Configure OIDC URLs 106
Create Client Secret 109
Configure Auth0 Open ID Connect (OIDC) 114
Create An Application in Auth0 114
Copy Domain/Client ID/Client Secret 115
Configure Settings 116
Thycotic One Open ID Connect (OIDC) Configuration 118
Select a Team 118
Create a New Organization 118
Configure OIDC Credentials 120
Service Account Discovery Tool 123
Prerequisites 123
Ports 126
http://www.thycotic.com 6

Walkthrough 126
Domain Credentials 126
Scan Settings 127
Discovering Accounts 128
Results 129
FAQ 129
Release Notes 131
Account Lifecycle Manager: Change Log 131
References 137
SLAs and Related Operational Considerations 138
Business Continuity 138
Disaster Recovery 138
Confidentiality 138
Data-at-rest 138
Data-in-Transit 138
Client Authentication 138
Integrity: Code Signing 138
General Data Protection Rule (GDPR) 139
SOC II 140
http://www.thycotic.com 7

Introduction to Account Lifecycle Manager
Product
Account Lifecycle Manager (ALM) controls the creation, management, and decommissioning of Active Directory Service Accounts running onyour organization's network. ALM reduces Service Account sprawl and increases security by enforcing governance and creating accountabilityusing role-based permissions. Depending on a user's role, they can request, approve, provision, manage, and retire service accounts.
Key Features
Role-Based Access Controls
ALM manages Service Accounts by assigning each account to a User within your organization. ALM uses four Roles to define Userpermissions and determine accountability. A User's Role determines how they interact with ALM and Service Accounts.
Account Owner- All ALM Users are given the Account Owner Role. Account Owners can read and update managed accounts assignedto them.
System Administrator- A System Administrator has full access to ALM's configuration and management. They can create and manageUsers, Roles, Groups, and Workflows.
Requestor- Requestors can request the provisioning of new service accounts.
Approver- Approvers review requests for new service accounts and approve or deny their provisioning.
Note: ALM roles are distinct from Active Directory Roles. They do not overlap.
Workflow Templates
The System Administrator can create templates that guide how Service Accounts in your organization are approved and monitored.Templates determine the approval process, review intervals, notification options, and end-of-lifecycle action for Service Accounts.
Service Account Discovery
ALM protects your network by controlling newly created privileged accounts. However, you may already have unmanaged Service Accountsrunning on your network. Using Service Account Discovery, you can scan your network to identify Service Accounts that are active andunmanaged. Using ALM, you can then assign these accounts to Users within your organization or remove the accounts entirely.
Example Workflow
1. The System Administrator installs ALM on your network according to your organization's policies.
They create users and assign them Roles.
They create a workflow template that determines the provisioning process.
2. A User with the Requester Role logs into ALM and asks that a Service Account be created.
3. ALM notifies a User with the Approver Role that a request has been made.
4. The Approver logs into ALM and approves or denies the request.
If the request is denied, the Approver provides a reason for the denial. ALM notifies the Requester of the denial and the reason.
If the request is approved, ALM creates a proxy for the requested Service Account within Active Directory. The ALM proxy and theActive Directory account will share the same name. ALM will then notify the Requester that the account has been approved andprovisioned.
5. Once a service account has been provisioned, ALM monitors the account throughout its lifecycle.
http://www.thycotic.com 8

The workflow template determines the renewal and retirement timeline for the account.ALM will send notifications for upcoming lifecycle events to the selected Users.ALM logs each step for easy auditing.
http://www.thycotic.com 9
Get Started
ALM Initial Setup Task List
Getting started with ALM requires these tasks:
1. Make sure your network meets the System Requirements.2. Set up an ALM Engine.3. Integrate with Active Directory and/or Azure Active Directory.4. Integrate with Other Applications such as Secret Server and/or DevOps Secrets Vault.
http://www.thycotic.com 10

System Requirements
Successful use of ALM requires that your organization’s IT infrastructure meet several criteria.
Thycotic One accounts
Each member of your organization who will use ALM must have a Thycotic One account. These free accounts provide authentication toThycotic’s cloud services, including ALM.
To open a Thycotic One account, visit Thycotic One.
The email a User submits when signing up for Thycotic One will be the email they must provide later when obtaining an ALM User account.
Browser Compatibility
Google ChromeMozilla Firefox
Thycotic Secret Server
ALM uses Secret Server to store credentials for the accounts it creates in Active Directory. This removes security risks long associated withstorage of the temporary credentials for new AD accounts.
If you are not using Secret Server Cloud, your Secret Server version must be Version 10.2.000018 or later with the Secret Server Platinum orPro license. Secret Server’s web services must be running.
Instructions related to Secret Server requirements appear in Integrate ALM with Secret Server.
Active Directory Installation
An Active Directory Domain Controller on Windows Server 2012 or later or Azure AD Domain Services.
A User account privileged to create Active Directory accounts. ALM will authenticate into AD as an account with permission to createother AD accounts.
For details on integration with Active Directory, see Integrate ALM with Active Directory.
ALM Engine Windows Service
The ALM Engine is a Windows Service that runs on a machine in your organization’s environment.
The ALM Engine Windows Service runs on your organization’s hardware. It manages interactions between the ALM cloud service and yourActive Directory installation. It also supports ALM’s integration with your organization’s Secret Server instance.
See Setup the ALM Engine Service for details.
http://www.thycotic.com 11

Setup the ALM Engine Service
The ALM Engine is a Windows Service that runs on your organization’s hardware. It manages interactions between the ALM cloud service andyour Active Directory installation. It also supports ALM’s integration with your organization’s Secret Server instance.
ALM Engine Service Requirements
The ALM Engine Windows service must:
be able to reach your domain controller over LDAPSrun on a domain controller or domain-joined machine, with
Windows Server 2012 or later, andMicrosoft .NET 4.7.1 or later installed
run as a non-domain joined computers automatically using Network Service as the service account, OR as an AD account with ADpermissions to:
create, delete, and manage User accountsreset User passwords and force next-logon password changesread all User informationmodify the membership of a Group
Required Ports
The ALM Engine will communicate to *.accountlifecyclecloud.com over port 443
Note: ALM Engine will communicate through port 5671 to the below Urls for each region
Region URL Port
US East thycotic-enza-prod-eastus-sb01.servicebus.windows.net 5671
AU Cen thycotic-enza-prod-auscen-sb01.servicebus.windows.net 5671
CAN Cen thycotic-enza-prod-cac-sb01.servicebus.windows.net 5671
EU West thycotic-enza-prod-westeuro-sb01.servicebus.windows.net 5671
ALM Engine Installation
To install a new ALM Engine, go to the ALM Engine section of ALM. Use Download Installer to obtain the installer files.
Copy the installer to the computer that will host the ALM Engine. Unzip the file and run:
install.cmd
Follow the prompts until the installation finishes.
NOTE: The activation token for the ALM Engine will last 8 hours. If the engine needs to be reinstalled, a new token will need to beobtained.
ALM Engine Configuration Website Tool
On successful installation of an ALM Engine on a machine, the ALM Engine Configuration Website Tool (hosted locally on the ALMEngine machine) will automatically load.
To manually access the address is: localhost:14568The website will provide an interface and toolset for these tasks:
configuring the Vaultsetting up the External Domain (Active Directory)creating ALM Engine Pools
http://www.thycotic.com 12

ALM Engine Logon Account Configuration in AD
Change the logon account for the Thycotic ALM Engine to an AD account with the following AD permissions.
Table: ALM Engine AD Service Account Permissions
AD Object Permissions for ALM Engine
Organizational Unit list contents
read all properties
create User objects
delete User objects
User list contents
read all properties
change password
reset password
write all properties
Groups list contents
read all properties
write member
To change the logon account:
1. Run services.msc to open the Services Control Manager.2. Find Thycotic ALM Engine, right-click, and select Properties.3. In the Properties panel, select Log On.4. Select This account:5. Supply the AD account name for the ALM Engine service and the account credentials. Click OK.6. Restart the ALM Engine service by right clicking Thycotic ALM Engine and selecting Restart.7. Back in ALM, the new ALM Engine will appear in the Unassigned ALM Engines section.8. Click the ALM Engine, assign it to a pool, and click Activate.
Additional ALM Engine Logon Account Information
The ALM Engine’s AD Service Account requires several machine-specific permissions. The installer sets these permissions, so you will notneed to perform these steps as part of your initial ALM setup. However, take note that if the service account changes, you may need to reapplythese permissions:
Local Security or Domain Policy: “Log on as a service”Registry: Full Control on Computer\HKLM\SOFTWARE\Thycotic Software Ltd
File System: C:\ProgramData\Thycotic Software Ltd
ALM Engine Logs
Admins can view ALM Engine error messages and sync information in the ALM Engine Log, available in ALM under Audit > ALM EngineLogs. This is an abbreviated log; the ALM Engine does not send all log messages back to ALM.
http://www.thycotic.com 13

View Full Versions of ALM Engine Logs
Use these steps to view the full logs on the machine hosting the ALM Engine service:
1. Log into the machine where the ALM Engine is located.2. From root, navigate to: ProgramData > Thycotic Software Ltd > ALMEngine > packages > Thycotic Provision3. Locate the appsettings.json file.4. Open appsettings.json with Notepad or other suitable text editor.5. Under the Serilog section, you will see MinimumLevel, and below that, Default : Information6. Change that to Default : Verbose7. Save the file.8. Open Services9. Restart the ALM Engine service.
LDAPS
ALM requires LDAPS for AD integration, with reliance on port 636; the port number is not configurable.
ALM Engine: Troubleshooting
If the ALM Engine does not run properly, review its operation logs for clues. If you cannot resolve the problem, contact Thycotic for support.
See Also
See Also the ALM Engine Calibration Tool section of the ALM Administration article.
http://www.thycotic.com 14

Integrate ALM with Active Directory
Use these steps to integrate ALM with Active Directory:
Navigate to External Domains > Add Domain.
Enter the Name of your Active Directory domain.
Add the domain to ALM.
After you create the Active Directory domain in ALM, you must assign it to an ALM Engine Pool:
Browse to the ALM Engine Pools section.
Select the intended ALM Engine Pool and choose Manage Pool.
Use Assign and select the Active Directory domain to assign to the pool.
Once you assign the AD domain to an ALM Engine Pool, you start synchronization by managing the External Domain.
To perform an ad-hoc synchronization of a specific Domain, go to the Manage tab of the Domain, use the Actions button, and select Sync.
the Users, Groups, Organizational Units, Attributes, and Managed Accounts of the Domain will all be synced
depending on the Domain size, synchronizing may take up to 15 minutes
Domain Synchronization
You can set the interval that ALM automatically syncs and schedule on-demand syncs.
Note: ALM checks for synchronization requests at the top of each hour. Syncs should be scheduled for the start of the next hour orthey will not start until the following day. Example: If it is 9:30, the soonest a sync can be scheduled is 10:00. If a sync werescheduled at 9:30 for 9:45, ALM Would not sync until 9:45 the following day.
Sync Users
Within a Domain, you can identify to ALM selected AD Groups and their Child Groups that should have their Users synced to ALM and thenkept in sync. This tool directly applies to the task of importing existing AD user accounts into ALM for governance.
Users within selected Groups and Child Groups will automatically receive the Account Owner Role because like all Users in ALM they willbelong to the Everyone Group. Once initially synced, Users may be added to other ALM Groups and assigned additional Roles.
Use these steps to enable Sync Users:
1. Navigate to the Domains page2. Select the Domain to Sync Users.3. On the Manage tab of of the Domains detail page,
1. Click Actions2. Select Edit3. In the lower half of the Manage tab, locate the Sync Users tool.
4. Set the Enable Sync toggle to Yes5. Scroll or search from the Available Groups table to locate the Domain’s Groups to sync with ALM.6. Click the green + (plus) icon to the right of the Group to place it in the Synchronized Groups table on the right.7. To finalize the configuration, return to Actions at the top of the page and click Save.
Notes
You can disable this sync at any time.You can control the sync schedule using the Sync this domain feature on the Manage tab of the Domains detail page.Be mindful of the number of users your selections will cause to be synced into ALM, as subscription limits apply to how many users comeinto ALM via this feature.
Navigate to the Subscription page of ALM to view subscription consumption figures.
http://www.thycotic.com 15

Active Directory Account Discovery Tool
The AD Account Discovery Tool allows System Administrators to select any or all service Accounts within a specific domain and import them toALM, where they can be managed by associating them with Workflow Templates and assigning Owners.
Located under Administration > Account Discovery, the tool presents a simple four-step process for bringing AD service Accounts under ALMmanagement.
Be sure to familiarize yourself with the limitations on these steps before you begin this process.
select the domainlimit: you can select only one domain at a time; to analyze multiple domains, you must separately apply the Discovery Tool to eachdomain
select Accounts within the domainnote: Accounts must be selected from Organizational Units; you can select Accounts from multiple OUs
assign the selected Accounts to a Workflow Templatelimit: you will only have the option to assign all of the selected Accounts to one Workflow Template
assign Users and Groups as Owners of the Accountslimit: in assigning Users and Groups to be the Account Owners, you will be assigning all of the Accounts you selected to be ownedby each User and Group you select here
http://www.thycotic.com 17

Integrate ALM with Amazon Web Services (AWS)
Use these steps to integrate ALM with AWS Directory:
Navigate to External Domains > Add Domain.
Enter the Name of your AWS domain.
Add the domain to ALM.
After you create the AWS domain in ALM, you must assign it to an ALM Engine Pool:
Browse to the ALM Engine Pools section.
Select the intended ALM Engine Pool and choose Manage Pool.
Use Assign and select the AWS domain to assign to the pool.
Once you assign the AWS domain to an ALM Engine Pool, you start synchronization by managing the External Domain.
To perform an ad-hoc synchronization of a specific Domain, go to the Manage tab of the Domain, use the Actions button, and select Sync.
http://www.thycotic.com 18

Setting Permissions for AWS
Use these steps to integrate ALM with Amazon Web Services Identity and Access Management.
1. Launch a Windows EC2 instance in AWS.
2. Create a new IAM Role with the permissions shown on the Permissions tab below, or use JSON as shown. Note that the Resourcescan be set to all (*).
3. Assign the new role to the EC2 instance.
4. Install the ALM Engine on the EC2 instance.
5. Assign the ALM Engine to a domain and pool in ALM.
http://www.thycotic.com 19

{ "Version": "2012-10-17", "Statement": [ { "Sid": "VisualEditor0", "Effect": "Allow", "Action": [ "iam:ListPolicies", "iam:DeleteAccessKey", "iam:AttachUserPolicy", "iam:DeleteUser", "iam:CreateUser", "iam:TagUser", "iam:CreateAccessKey", "iam:CreateLoginProfile", "iam:RemoveUserFromGroup", "iam:AddUserToGroup", "iam:ListGroupsForUser", "iam:ListAttachedUserPolicies", "iam:ListUsers", "iam:ListAttachedGroupPolicies", "iam:ListGroups", "iam:GetUser", "iam:DetachUserPolicy", "iam:GetLoginProfile", "iam:DeleteLoginProfile",
http://www.thycotic.com 20

Integrate Group Managed Service Accounts
Overview:
Group Managed Service Accounts (gMSAs) provide automatic password and simplified service principal name (SPN) management to multipleservers.
ALM supports the provisioning and lifecycle management of gMSAs. This is achieved when Group Managed Service Account is selectedas the Account Type when the System Administrator is creating a Workflow Template.
Requirements:
RSAT needs to be installed on the engine machineUse Powershell and run script: Install-WindowsFeature RSAT-AD-PowerShellUse GUI and Enable RSAT through Turn Windows Features on or off
Microsoft Active Directory prerequisites and one-time preparation, see Microsoft documentation
Parameters:
Certain Parameters are set by default and others by the attributes list in a workflow template.
PrincipalsAllowedToDelegateToAccount - Set by the Users and Groups selected in the template.KerberosEncryptionType - Accepted values (None, DES, RC4, AES128, AES256). Only one is allowed.ServicePrincipalNames - Accepts a comma-separated list of service principal names. This has to be unique for each request.
http://www.thycotic.com 22

Integrations
Continue setup by integrating with other services/applications that your organization will use.
ALM Supports Integrations with:
Azure AD
Secret Server
DevOps Secret Vault
ServiceNow
SIEM Services
http://www.thycotic.com 23

Start Using ALM
Once you have installed the ALM engine and integrated with both Secret Server and Active Directory, you are ready to begin using ALM.Administration will walk you through creating users, groups, and workflows in ALM.
http://www.thycotic.com 24

ALM Objects
ALM relies on four objects to govern Service Accounts: Users, Roles, Groups, and Workflow Templates.
Users
An ALM User object is a proxy for either a User account or a service account that is stored in Active Directory.
When the ALM User object is a proxy for an Active Directory User account, you will perform ALM operations on the ALM proxy purely tocontrol what a person authenticated as that AD User account can do within ALM.
When the ALM User object is a proxy for an Active Directory service account, you will perform ALM operations on the ALM proxy todeliver lifecycle management of the proxied AD service account.
When you use ALM to create an ALM User object as a proxy for an Active Directory service account that does not yet exist in ActiveDirectory, ALM will create the service account in Active Directory.
After this initial creation of a service account in Active Directory, ALM operations performed on ALM proxies for AD accounts usually donot directly affect the AD accounts as stored in Active Directory, although there are obvious exceptions such as when an account isdisabled.
Roles
An ALM Role defines the privileges that the User has in ALM and the tasks that the User can perform.
ALM Roles have nothing to do with Active Directory Roles and should not be confused with them.
Thycotic provisions ALM with several Roles already set up—Account Owner, Requester, Approver, and System Administrator—and for mostorganizations these will suffice for initial operations.
Account Owner
All users automatically have the Account Owner Role. The Account Owner Role is also fixed to the built-in Everyone Group that contains allusers in ALM.
This Role provides entry level features and permissions sufficient for a User to read and update managed accounts assigned to them.
Requestor
Users with the Requestor Role can request the provisioning of new service accounts. Requesters begin each Request by selecting a WorkflowTemplate which determines the lifecycle of the account and the approval process.
Approver
ALM delivers Requests to Approvers according to the workflow and approval steps specified by the template. An Approver receives notices ofaccount Requests and approves or denies each Request according to the chosen workflow. Some workflows will require multiple Approvers.
On approval, ALM provisions the account and designates the Requestor as the first owner.
System Administrator
This Role holds all privileges. Organizations use this all-powerful Role to perform initial customer configurations of Account Lifecycle Manager.A System Administrator can provision Users, integrate ALM with external systems, set up ALM Engines, and create Workflow Templates.
Because the System Administrator Role is so highly privileged, its use carries risk of accidental macro-scale changes to your ALMconfiguration. As a best practice, use the System Administrator Role only for tasks that require its privileges, and when done with those tasks,log out and resume use of less privileged Roles.
Custom Roles
http://www.thycotic.com 25
Once familiar with ALM, you may decide to use the Custom Roles feature to create Roles that support specific business needs.
Example: A custom Auditor Role configured with privileges required to view ALM’s Audit Logs but otherwise lacking the full range ofprivileges given to a System Administrator.
Groups
An ALM Group object defines Groups of ALM User objects that have something in common with each other, such as access to a resource.
ALM Groups have nothing to do with Active Directory Groups and should not be confused with them.
Workflow Templates
An ALM Workflow Template defines a workflow applicable to Requests made in ALM for provisioning in Active Directory of a serviceaccount of a particular type.
The Workflow Template defines the information that must be provided with the Request, the approval steps that must be completed for theRequest to be granted, and who has approval authority at each step.
Requests for some kinds of service accounts may require just one step, approved by only one person. Requests for other kinds of serviceaccounts may require multiple steps and Approvals by more than one person at some or all of the approval steps.
Workflow templates also control the selection of BEOL (before end of lifecycle) and AEOL (at end of lifecycle) Notifications ALM sends,when it sends them, and to whom, plus what options the Notifications will offer for managing the service account.
http://www.thycotic.com 26

Custom Roles
ALM System Administrators can create Custom Roles. To define Custom Roles, you review a list of ALM features paired with the permissionspotentially applicable to each feature.
Roles differ from one another in the specific permissions assigned to them in relation to each ALM feature.
A Custom Role is a Role you create to meet your specific business needs when the built-in Roles will not suffice.
Once you have set the per-feature permissions for a Role, you add Users or Groups (or both) to the Role, thereby granting the Role’spermissions to those Users, and to Users who belong to those Groups.
As with the built-in Roles, you can:
edit the name of the Custom Roleenable or disable the Custom Roleenable or disable automatic addition of new Users to the Custom Roleadd or remove Users from the Custom Roleadd or remove Groups from the Custom Role
Permissions
Permissions control what actions Users can take within ALM. Distinct permissions within ALM include:
Create allows creation of the object for which you grant the permission
Read allows passive use of a feature, such as to read (view) a list of objects or view an object’s details
Update: allows changes to the object for which you grant the permission, for example, update a Managed Account
Delete: allows a User to delete the object for which you grant the permission
Manage: gives additional, administrative access to the object to which it applies, for which the User must already have non-administrativeprivileges
As an example, Users with Manage permission on Managed Account feature would give access to all the Managed Accounts.
Features to Which Permissions Apply
In defining a Custom Role, you specify the permissions the Custom Role holds in relation to specific ALM features. The features subject toaccess control via permissions include:
API Token: Access to the API Token feature allows a User to view, create, and manage API Tokens. These enable the User to obtain Bearertokens, required by ALM for further processing.
Audit: ALM logs most events, including User actions, system events, and remote worker activity. Audit permissions allow a User to view theselogs.
Configuration: A User with Configuration permissions can define the System Administrator’s email address.
Directory-Service: With Directory Service permissions, a User can configure ALM’s integration with the organization's directory servicesprovider—its External Domain:
Presently ALM supports only one External Domain, that being Active Directory.For Active Directory, additional settings include AD Groups, Users, Group Mappings, and OUs.
Email Notification: ALM provides several broadly applicable Email Notification Categories. Email Notifications inform Users and Groups ofUsers about events affecting objects with which they have a connection—for example, the User is named in the governing Workflow Templateas the Approver for a step in the workflow.
Group: Groups are collections of Users. You use Groups to more efficiently apply the same management activities to more than one User atonce. You can assign Groups to Approval Steps just as you would an individual User; likewise, you can assign Account Ownership to a Group.
http://www.thycotic.com 27

Managed Account: A Managed Account is an AD Service Account created and managed through ALM.
Note: Read permission provides visibility to only accounts owned by the User. The Manage permission provides visibility of all managedaccounts. In order to see all accounts the Read and Manage permission must be applied to the same Custom Role.
Provision Template: With Provision Template permissions, Users can create Workflow Templates to govern the approval process for ADservice accounts.
Provision Template Workflow: Provision Template Workflow permissions allow a User to set a Workflow Template’s Approval Steps. SettingApproval Steps involves designating which Users and Groups must approve the provisioning of a requested service account, and in what order—the workflow.
Provision Approval: To be designated as an Approver for Approval Steps set in a Workflow Template, a User must have permissions forProvision Approval. This gives access to ALM’s Approvals section, which lists Requests waiting for an Approver’s review and gives access toall Request details.
ALM Engine: A User must have ALM Engine permissions to download the installer for the ALM Engine Windows Service. This permission alsoenables the User to view in ALM the list of installed ALM Engines and assign ALM Engines to ALM Engine Pools.
Role: The Roles permission enables a User to create Custom Roles and assign Users to them. It also allows the User to add Users to thestandard Account Owner, Requester, Approver, and System Administrator Roles.
User: Users with permissions to the User feature can add, remove, or update User accounts, including to designate whether a User is anApprover or Requester.
Vault: With Vault permissions, a User can configure and manage ALM’s connection to your organization’s Thycotic Secret Server.
Webhook: Webhooks provide a framework for connecting ALM to external services. With Webhooks permissions, a User can create customwebhooks.
The Example Custom Roles Setup article details permissions for a broadly useful Custom Roles setup.
http://www.thycotic.com 28

Example Custom Roles Setup
Table: Permissions for an Example Custom Roles Setup
Features Description Read Create Update Delete Manage
provision-request
access to AccountRequests
Provision Provision Provision
visibility and access to allRequests (used in conjunctionwith Read, Create, Update, Deletepermissions)
same asforDelete
ProvisionStates
ProvisionState
ProvisionTags
access toRequestarea in UI
managed-account
access to ManagedAccounts (accountsprovisioned through theproduct)
ManagedAccounts
ManagedAccounts
Managed Accounts
visibility and access to allManaged Accounts (used inconjunction with Read, Create,Update, Delete permissions)
same asforDelete
access toManagedAccountsarea in UI
provision-approval
access to RequestApprovals
ProvisionApproval
ProvisionApproval
Provision Approval
visibility and access to allApprovals (used in conjunctionwith Read, Create, Update, Deletepermissions)
same asforDelete
access toApprovalarea in UI
provision-template
access to AccountTemplates
Template Template Templateaccess to Template Workflow areain UI
same asforDelete
allows Approval of TemplateWorkflows
provision-template-workflow
access to AccountTemplate Workflows
TemplateWorkflow
TemplateWorkflow
Template Workflowaccess to Template Workflow areain UI
same asforDelete
allows Approval of Templates
group access to Groups Groups Groups Groups access to Groups area in UIsame asforDelete
http://www.thycotic.com 29

Features Description Read Create Update Delete Manage
manage Group Users (used inconjunction with Read, Create,Update, Delete permissions)
manage Group Roles (used inconjunction with Read, Create,Update, Delete permissions)
user access to Users Users Users Users access to Users area in UIsame asforDelete
User Emails User Emails User Emails Trigger verification email
manage User Groups (used inconjunction with Read, Create,Update, Delete permissions)
manage User Roles (used inconjunction with Read, Create,Update, Delete permissions)
role access to Roles Roles Roles Roles access to Roles area in UIsame asforDelete
RolePermissions
RolePermissions
Role Permissionsmanage Role Permissions (usedin conjunction with Read, Create,Update, Delete permissions)
manage Role Users (used inconjunction with Read, Create,Update, Delete permissions)
manage Role Groups (used inconjunction with Read, Create,Update, Delete permissions)
alm-engine access to ALM Engines ALM Engine ALM Engine ALM Engine access to ALM Engine area in UIsame asforDelete
ALM EnginePools
ALM EnginePools
ALM Engine Poolstest connectivity to ALM Enginesand Pools
audit access to Audits Audits n/a n/a n/a n/a
access toAudits areain UI
directory-service
access to all thingsrelated toLDAP/AD/DirectoryServices
ExternalDomain
same as forRead
same as for Readaccess to Directory Servicesareas in UI
same asforDelete
http://www.thycotic.com 30

Features Description Read Create Update Delete Manage
ExternalGroups
ExternalUsers
ExternalUser GroupMapping
ExternalOUs
vault access to VaultsIntegrations(SecretServer)
Integrations(SecretServer)
Integrations (SecretServer)
access to Integrations area in UIsame asforDelete
IntegrationTemplates
api-token access to API Tokens API Tokens API Tokens
API Tokens (onlyupdates to thedescription andenable/disableallowed)
API Tokens n/a
configurationaccess to systemconfiguration settings
n/a Configuration Configuration Configuration n/a
settings currentlyavailable:
AdminEmail - (ForSAP) Email address forthe Send Feedback link
email-notification
access to EmailNotification Templates
EmailNotification
n/a Email Notification n/a n/a
webhook access to Webhooks Webhooks Webhooks Webhooks Webhooks n/a
http://www.thycotic.com 31

Events, Notifications, and Recipients
To request that a new AD service account be provisioned, a Requester selects the Workflow Template applicable to the type of service accountbeing requested, provides the information required by that Workflow Template, and submits the Request.
From there, the Request must pass through each of the Approval Steps specified by the Workflow Template. As this happens, ALM keepsprocess participants informed by sending Notifications. If the Request wins approval, the service account will be provisioned.
Provisioning marks the beginning of the account’s lifecycle—the period of time it remains active, during which it will be tracked according to thespecifications in the Workflow Template against which it was provisioned.
For example, the template might specify that the account should expire in one year; or, that it requires renewal after six months. ALMsends notifications timed in relation to these settings—if an account requires renewal at six months, ALM notifies the account owner inadvance of the six-month mark. Within ALM, the account owner has the option to approve or deny account renewal.
ALM provides for varied and strongly granular lifecycle event tracking and notification activities, as in the following table.
Table: Account Lifecycle Manager Events, Notifications, and Recipients
Object Event Description Email Notification Recipients
TemplateWorkflow needsapproval
The template's workflow needs approval. System Administrators
Published A template has been published.None, by default; Allow for SystemAdministrators
Unpublished A template has been unpublishedNone, by default; Allow for SystemAdministrators
De-activated A template has been de-activated.None, by default; Allow for SystemAdministrators
Request SubmittedA Requester asks that an account beprovisioned.
None
Step requires approval Kick off a step of approval Approvers for step
Approved All the approval steps have been approved Requester
Rejected Requester
Queued forprovisioning
None
Provisioned Requester
Provisioning failed Requester
ManagedAccount
Ownership Changed Account Owners
Requires Renewal Account Owners
http://www.thycotic.com 32

Closely related to these notifications, ALM At End of Lifecycle Actions (EOLAs) define the actions Account Owners can take when an accountexpires, for example, they can renew the account. Similarly, BEOLs refers to Before End of Lifecycle Actions, the steps Account Owners cantake when an account nears its expiration date.
http://www.thycotic.com 33

At End of Lifecycle (AEOL) Actions
Account Lifecycle Manager allows a System Administrator to define in a Workflow Template the At End of Lifecycle actions (AEOLs) that willapply to accounts provisioned against that Workflow Template. The Template also controls the schedule and pacing of Notifications to be sentby ALM as the End of Lifecycle date approaches, and the parties who will receive the Notifications.
When an account comes up for review at or near the end of its lifecycle, ALM sends Notifications to the Users or Groups designated in theWorkflow Template and as scheduled in that Template.
The actions ALM allows reviewers to take correspond to the At End of Lifecycle actions specified by the Workflow Template. These mayinclude:
ReviewDisableExpireDelete
Review
An account provisioned with an AEOL action of Review will not be curtailed in any way with passage of the End of Lifecycle date. The Reviewaction serves simply to document a User’s acknowledgement that the account remains necessary.
Reviewers of an account that has Review as the AEOL action have three choices:
Renew
Before the Renewal Date set in the applicable Workflow Template, the Renew option is unavailable. Beginning on the Renewal Date,the Renew option is available.
Selecting Renew extends the account’s lifecycle until the next Review, based on the Review Interval set in the Workflow Template. Therenewal period will start at UTC 00:00. On renewal of the Account, the Renew option will become unavailable until the next review date.
Disable
The Disable option will disable the account in ALM and in Active Directory. Once selected, this option is replaced by a choice toEnable, allowing the User to re-enable the account as needed.
Delete Account and Secret
The Delete Account and Secret option will delete the account and any associated secrets. Selecting this option requires the User toconfirm (or cancel) the action.
Disable
An account provisioned with an AEOL action of Disable will be disabled in Active Directory at the End of Lifecycle, unless the Account OwnerRenews the account prior to the End of Lifecycle date.
Reviewers of an account that has Disable as the AEOL action have three choices:
Renew
Before the Renewal Date set in the applicable Workflow Template, the Renew option is unavailable. Beginning on the Renewal Date,the Renew options is available.
Selecting Renew will extend the account’s lifecycle until the next Review, based on the Review Interval set in the WorkflowTemplate.The renewal period will start at UTC 00:00. On renewal of the account, the Renew option will again be unavailable until thenext Review Date.
Disable
The Disable option will disable the account in ALM and in Active Directory. Once selected, this option is replaced by a choice toEnable, allowing the User to re-enable the account as needed.
http://www.thycotic.com 34

Delete Account and Secret
The Delete Account and Secret option will delete the account and any associated secrets. Selecting this option requires the User to confirm(or cancel) the action.
Expire
For an account provisioned with an AEOL action of Expire, ALM sets the Expiration Date in Active Directory such that AD will disable theaccount at the End of Lifecycle date unless the Account Owner renews the account prior to that date.
Accordingly, the first option likely to become available to the Account Owner who will review the Account is the option to Submit for Approvalto Renew, offered by a Notification sometime in advance of the End of Lifecycle date so that the Account can be renewed before it wouldotherwise expire.
A System Administrator who configures a Workflow Template with Expire as the End of Lifecycle Action must decide how far in advanceof the End of Lifecycle date to set the Renewal Date, bearing in mind that the Approval to Renew process duplicates the entire originalapproval process.The Renewal Date set by the Administrator controls the timing of initial Notifications to the Account Owner.
Account Owners reviewing an account that has Expire as the AEOL action have three choices:
Submit for Approval to Renew
Before the Renewal Date set in the applicable Workflow Template, this choice will not be available. Beginning on the Renewal Date, thisaction is available to the Account Owner.
Choosing to renew initiates the Approval Steps specified in the associated Workflow Template and replaces the selection to Submit forApproval to Renew with an Approvals in Process notation.
If Approval is denied, the notation switches back to Submit for Approval to Renew and remains that way until and after the Accountexpires.If the Approval is granted, the Approvals in Process notation is removed, and the account is renewed for the renewal period definedat UTC 00:00. The Submit for Approval to Renew option remains unavailable until the next Renewal Date.
Disable
The Disable option will disable the account in ALM and in Active Directory. Once selected, this option is replaced by a choice toEnable, allowing the User to re-enable the account as needed.
Delete Account and Secret
The Delete Account and Secret option will delete the account and any associated secrets. Selecting this option requires the User toconfirm (or cancel) the action.
Delete
An account provisioned with an AEOL action of Delete will be disabled (not actually deleted) at the End of Lifecycle date, unless the AccountOwner renews the account prior to that date.
Reviewers of an account that has Delete as the AEOL action have three (sometimes four) choices:
Disable
The Disable option will disable the account in ALM and in Active Directory. Once selected, this option is replaced by a choice toEnable, allowing the User to re-enable the account as needed.
Delete Account and Secret
The Delete Account and Secret option will delete the account and any associated secrets. Selecting this option requires the User toconfirm (or cancel) the action.
Clone As New Request
http://www.thycotic.com 35

Option for bringing a Deleted account back online and active. Performing this option generates a new Request that goes through theApproval process in accordance with the Workflow Template the account was provisioned against.
See the End-of-Lifecycle Account Disposition Logic article for details on the logic of options availability vs. account status and reviewactions.
http://www.thycotic.com 36

ALM End-of-Lifecycle Account Disposition Logic for Option Availability, AccountStatus, and User Review Actions
Table: ALM End-of-Lifecycle Account Disposition Logic
S.No.
Options tobe
AvailableReview BEOL
ReviewAEOL
Disable BEOLDisableAEOL
DeleteBEOL
DeleteAEOL
Expire BEOLExpireAEOL
1 Renewnonfunctional or Yes (basedon the Notifications set inthe Workflow Template)
Yes
Yes (based on theNotifications set inthe WorkflowTemplate)
Yes
2 Disable Yes Yes Yes Yes Yes
3 Enable Yes
4DeleteAccount &Secret
Yes Yes Yes Yes Yes Yes Yes
5Submit forApprovalto Renew
Yes (based onthe Notificationsset in theWorkflowTemplate)
Yes
6Clone asNewRequest
Yes Yes Yes Yes Yes Yes Yes Yes Yes
Account Status when EOL Reached Systematically
S.No.
AccountStatus
ReviewBEOL
ReviewAEOL
DisableBEOL
DisableAEOL
DeleteBEOL
Delete AEOLExpireBEOL
Expire AEOL
1 Active Yes Yes Yes Yes Yes
2 Disabled Yes
3 Deleted Yes
4 Expired Yes
5 Renewingapplies on use of the Cloneas New Request option
applies on use of the Submit forApproval to Renew option
User Actions on Review EOL
S.No.
options tobe
DisplayedReview BEOL Account Status Review AEOL Account Status
http://www.thycotic.com 37

S.No.
options tobe
DisplayedReview BEOL Account Status Review AEOL Account Status
1 Renew a) unavailable Active Enabled Active
b) Yes (based on theNotifications set in the WorkflowTemplate)
2 Disable a) Yes a) Active a) Yes a) Active
b) on use, makes Enable optionavailable
b) using the Disable optionchanges the Status to Disabled
b) on use,enables theEnable option
b) using the Enable or Renewoption changes the Status toActive
c) using the Enable optionchanges the Status to Active
c) using the Enable optionchanges the Status to Active
3DeleteAccount &Secret
a) Yes a) Active a) Yes a) Active
b) on use, requires Clone asNew Request option toreinstate account
b) using the Delete Account &Secret option changes the Statusto Deleted
User Actions on Disable EOL
S.No.
optionsto be
DisplayedReview BEOL Account Status Review AEOL Account Status
1 Renew unavailable Active a) Yes Active
b) on use, updates EOL basedon lifecycle duration andmakes option unavailable
2 Disable a) unavailable a) Active No
b) Yes (based on theNotifications set in theWorkflow Template)
b) using the Disable optionchanges the Status toDisabled
3DeleteAccount& Secret
a) Yes a) Active a) Yes a) Active
b) on use, enables theClone as New Requestoption to reinstate account
b) using the DeleteAccount & Secret optionchanges the status toDeleted
b) on use, requires Clone asNew Request option toreinstate account
b) using the DeleteAccount & Secret optionchanges the status toDeleted
User Actions on Delete EOL
http://www.thycotic.com 38

S.No.
optionsto be
DisplayedReview BEOL Account Status
ReviewAEOL
Account Status
1 Disable a) Yes a) Active No Deleted
b) on use, enablesthe Enable option
b) using the Disable optionchanges the Status toDisabled
c) using the Enable optionchanges the Status toActive
2DeleteAccount& Secret
on use, enablesthe Clone asNew Requestoption
a) Deleted No Deleted
b) using the DeleteAccount & Secret optionchanges the Status toDeleted
3Clone asNewRequest
Yes a) Deleted
b) Using the Clone as New Request generates a newRequest for Approval in a Submitted Status
c) No other requests with the same name on the same domaincan be submitted until the submitted request is rejected or theaccount created from an approved request is deleted.
User Actions on Expire EOL
S.No.
options to beDisplayed
Review BEOL Account Status Review AEOL Account Status
1 Disable a) Yes a) Active a) Yes Expired
b) on use,enables theEnable option
b) using the Disable option changesthe Status to Disabled
b) on use,enables theEnable option
c) using the Enable option changesthe Status to Active
2DeleteAccount &Secret
a) Yes a) Active No Expired
b) using the Delete Account &Secret option changes the Status toDeleted
http://www.thycotic.com 39

S.No.
options to beDisplayed
Review BEOL Account Status Review AEOL Account Status
3Submit forApproval toRenew
Yes a) Expired
b) using the Submit for Approval toRenew option changes the Status toRenewing
c) on provisioning of the account, theStatus changes to Active
http://www.thycotic.com 40

AD Account Expiration Dates
When working with account expiration dates in Active Directory, you may notice that Active Directory accounts do not always expire when itseems they should. This issue, which is external to ALM, traces back to a purely abstract linguistics problem that has confounded the softwareindustry from its earliest days.
In the case of Active Directory, the problem shows up in the convoluted relationship between Active Directory’s Account expires entry (on theAccount tab of AD’s Account Properties dialog) and its accountExpires attribute (visible on the Attribute Editor tab).
In a typical environment, Account expires and accountExpires may appear to be out of sync. As an example, in the illustration above TheAccount expires entry indicates that the account should expire at the “End of” the day entered on the Account tab, while accountExpiresshows the account expiring at 8:00 PM the following day.
Computing’s Midnight Conundrum
As a representation of time, the word “midnight” denotes the instant marking the end of one day and the beginning of the next. Conceptually, aninstant has a duration of zero, but our time keeping systems depend on units defined as intervals of time: seconds, minutes, and hours.
We can tidily represent the instant that begins a new day as 00:00, or more traditionally, as 12:00 AM, but we have no similarly tidy wayto represent the instant that ends a day.
The time of 11:59:59 leaves one second on the clock, so it cannot be used to denote the end of a day. Using 12:00 to denote the end ofthe day and 00:00 to denote the beginning would be sensible, but culture is not always sensible; by tradition, 12:00 belongs to the newday it begins, hence the notation 12:00 AM.
This leaves no commonly recognized way for software to symbolically represent the instant (“the time of day”) that marks the end of a day. Withno other option, Active Directory encodes the “End of” day entry as 12:00 AM the next day. While logically equivalent to the end of the day, byformal definition 12:00 AM is no part of the day just ended; it is part of the morning of the day just beginning. If you set the “End of” day entry to aWednesday, the time value recorded, when strictly interpreted, evaluates as Thursday.
http://www.thycotic.com 41

In Active Directory, the accountExpires attribute is defined as 12:00 AM UTC of the day after the last full day that the account was active.When Active Directory applies this definition to the incorrect, already-one-day-forward entry in the Account expires field, it kicks the value ofthe accountExpires attribute out 24 hours past what would be correct. Finally, in rendering that 12:00 AM UTC value in the UI, ActiveDirectory considers the local time zone.
In the illustrated example, it works out like this:
The Account expires field’s “End of” day entry shows June 30. For want of a way to denote the last instant of June 30, this records as12:00 AM UTC July 1.
The accountExpires attribute, being defined as 12:00 AM UTC of the day after the last full day the account was active, accordinglycalculates to 12:00 AM UTC July 2.
In displaying 12:00 AM UTC July 2 as the accountExpires attribute value, Active Directory adjusts for the time zone context; in theexample, with the context being Eastern Daylight Time, this works out to 8:00 PM July 1.
In the final outcome, the entries do not align, creating a substantial time window for an account to remain active beyond the end of the day it issupposed to expire.
Efforts by Microsoft to fix this issue face challenges having nothing to do with the technical aspects, such as the imperative to remaininteroperable with the world’s installed base of software, and the risk that by correcting a problem you will break all the workarounds to theproblem, causing widespread problems for your customers and other software vendors. For these and many other reasons, peculiarities relatedto account expiration persist in Active Directory.
If you would like to learn more about this longstanding, solutions-resistant issue, visit Richard Mueller’s classic treatment of the topic:
Account Expiration Article by Richard Mueller
http://www.thycotic.com 42
ALM Storage of Dates
Dates and times at rest in the cloud (that is, in ALM storage) are UTC time.
When you work within the ALM UI, ALM handles the interpretation of UTC to local time for display in the ALM UI, and back to UTC for storagewhen you update a date and time via the ALM UI.
If you should happen to work directly with the API, note that a call that returns a date and time will return it in UTC.
Likewise, when working directly with the API, any date and time information you provide should be in UTC.
http://www.thycotic.com 43

Integrations
In addition to Active Directory & Group Managed Service Accounts, ALM Supports Integrations with:
Azure AD
Secret Server
DevOps Secret Vault
Third Party Vaults
ServiceNow
SIEM Services
Google Cloud Platform
http://www.thycotic.com 44

Integrate ALM with Azure Active Directory
Use these steps to integrate ALM with Azure Active Directory:
1. Open a browser and navigate to the Azure Active Directory admin center.
2. Select Azure Active Directory in the left-hand navigation, then select App registrations under Manage.
3. Select New registration. On the Register an application page, set the values as follows.
Set Name: (Thycotic ALM)
Set Supported account types to: Accounts in this organizational directory only – (Single tenant)
Leave Redirect URI empty.
http://www.thycotic.com 45

4. Select Register. On the Thycotic ALM App Registration page, copy the value of the Application (client) ID and (tenant) ID.
5. Select the Add a Redirect URI link. On the Redirect URIs page, locate the Add Platform and select (Mobile and desktop applications)section. Select the https://login.microsoftonline.com/common/oauth2/nativeclient URI. Click Configure.
http://www.thycotic.com 46

6. Locate the Default client type section and change the Treat application as a public client toggle to Yes, then choose Save.
7. Select Certificates and secrets
Click new client secret and name whatever (ALM)
Copy the client secret for later
http://www.thycotic.com 47

8. Select API Permissions in the Left Nav
Select Add Permissions
Select Microsoft Graph
Add the following permission options:
Delegated PermissionsDirectory.AccessAsuser.All
Application PermissionsDomain.ReadWrite.AllGroup.Read.AllGroup.ReadWrite.AllGroup.SelectedUser.Read.AllUser.ReadWrite.AllRoleManagement.Read.AllRoleManagement.Read.DirectoryRoleManagement.ReadWrite.Directory
http://www.thycotic.com 48

9. Select Grant admin consent
10. Switch over to ALM
navigate to IntegrationsSelect Domains from listSelect Add DomainEnter a Name for the DomainFrom the Domain Type dropdown, select Azure Active DirectorySelect Edit from the Actions menuOptional Enable and configure domain synchronizationEnter the client, secret, and tenant ID in the created Azure AD DomainSelect Save from the Actions menu
Optional: Use these steps to enable
in ALM, navigate to the Domains pageselect a Domain for which you want Sync enabledon the Manage tab of of the Domains detail page,
use the Actions buttonselect Editlocate the Sync tool (in the lower half of the Manage tab)
set the Enable Sync toggle to YesSet the desired sync frequency Review your work. To commit the configuration, return to the Actions button at the top of the page andselect Save.
http://www.thycotic.com 49

Integrate Google Cloud Platform
Use these steps to integrate the Google Cloud Platform:
1. Launch a Windows Google Compute Instance in GCP and note the Service Account associated with the instance.
2. Create a new IAM Role for ALM Provisioning. The role needs to be created at the organization level if multiple projects will be used forprovisioning accounts. If not, then the role can be created in a single project.Define the following permissions on the Permissions tab:
iam.roles.listiam.serviceAccountKeys.createiam.serviceAccountKeys.deleteiam.serviceAccountKeys.getiam.serviceAccountKeys.listiam.serviceAccounts.createiam.serviceAccounts.deleteiam.serviceAccounts.disableiam.serviceAccounts.enableiam.serviceAccounts.getiam.serviceAccounts.getIamPolicyiam.serviceAccounts.listiam.serviceAccounts.setIamPolicyiam.serviceAccounts.undeleteiam.serviceAccounts.updateresourcemanager.organizations.getresourcemanager.organizations.getresourcemanager.organizations.getIamPolicyresourcemanager.organizations.setIamPolicyresourcemanager.projects.getresourcemanager.projects.getIamPolicyresourcemanager.projects.listresourcemanager.projects.setIamPolicy
3. At the Organization or Project level, assign the Google Compute Instance Service Account to the ALM Provisioning role created.
ALM will sync all Service Accounts, Roles, Organizations, and Projects that it has access to. To exclude certain Organizations andProjects from sync, explicitly deny the ALM Role access to them.
4. Install a certificate on the Windows Google Compute Instance for the Service Account.
1. Find the Service Account for the engine machine and generate a PK12 access key.2. Install the access key on the Windows Google Compute Instance in the Trusted Root Certificate folder.3. The Service Account (Active Directory Account or Network Service) used to run the ALM Engine Service needs to be able to access
the certificate locally.
5. Enable Domain Wide Delegation for the Service Account used by the ALM Engine to perform requests:
1. The scopes required are: https://www.googleapis.com/auth/admin.directory.domain.readonlyhttps://www.googleapis.com/auth/admin.directory.group.readonly https://www.googleapis.com/auth/admin.directory.user.readonly
2. Enable Admin SDK API (https://developers.google.com/admin-sdk/?hl=en_US).3. When creating the GCP IAM Domain in the ALM UI, specify the email of the GCP Admin user to impersonate. The Admin user must
have logged into GCP at least one time and accepted the terms and conditions.
6. Install the ALM Engine on the Google Compute Instance.
7. Assign the ALM Engine to a Google Cloud Domain and pool in ALM.
8. Set the Admin email account on the ALM Domain.
9. Sync the ALM Domain.
http://www.thycotic.com 50

Integrate with AWS Secrets Manager
Integration with AWS Secrets Manager requires running an ALM Engine on an EC2 instance.
1. Launch a Windows EC2 instance in AWS.2. Create a new IAM Role and attach the policy SecretsManagerReadWrite.3. Assign the new role to the EC2 instance.4. Install the ALM Engine on the EC2 instance.
http://www.thycotic.com 51

Integrate ALM with Secret Server
ALM integrates with Secret Server for storage and management of account credentials, connecting to Secret Server through the ALM Engineservice, which uses the Secret Server Rest API. If you use an on-premises installation of Secret Server, the version must be 10.2.000018 orlater.
Because Account Lifecycle Manager works with Secret Server through Secret Server’s web services, you must enable those services on yourSecret Server instance.
Use these steps to enable the Secret Server web services:
Log in to Secret Server as an Administrator and navigate to Admin > Configuration.On the General tab, under Application Settings, find the entry for Enable Webservices.If the entry displays as No, you must change it.
Use the Edit button found below the settings to reveal controls for making changes.Set the toggle box for Enable Webservices to active.Use the Save button below the settings to save the change.
You must also set up a Secret Server account for ALM that has privileges to:
view folders accessible to ALM Userscreate Secrets in those foldersview Secret Template permissions
To integrate ALM with Secret Server, use these steps:
In ALM, navigate to Integrations and select Create Vault.Use the drop-down to select the Template type.Enter your organization’s Secret Server Instance Name, Secret Server URL, and the Account Username and Password for theSecret Server account that will run this integration.
Thycotic recommends creating a Secret Server Application Account with the minimum permissions.
You must use a template with the following fields, and you must not add new required fields to the template:
domainUsernamepassword
http://www.thycotic.com 52

Integrate ALM with DevOps Secrets Vault
ALM integrates with Thycotic’s DevOps Secrets Vault (DSV) for storage and management of Account credentials.
Use these steps to integrate ALM with DevOps Secrets Vault:
in ALM, navigate to Vaults and select Create Vaulta modal pane will appear; open its Template drop-down and select Thycotic DevOps Secrets Vaultuse Next to confirm that selection; then fill in the information it requires:
the Thycotic DevOps Secrets Vault Display Name entry is the vault label in ALM that distinguishes it from other vaultsthe DevOps Secrets Vault URL specifies the URL of your DevOps Secrets Vault instancethe ClientID records the Client ID of your DevOps Secrets Vault instancethe ClientSecret is the password for your ClientID
use Save to confirm your entries
Once you have added it, you can select DevOps Secrets Vault as a vault option when creating Workflow Templates.
Requests made based on Workflow Templates that have a DevOps Secrets Vault will use DevOps Secrets Vault for the storage andmanagement of Account credentials.
http://www.thycotic.com 54

Integrate ALM with Third Party Vaults
ALM integrates with Azure Key Vault and AWS Secrets Manager for storage and management of Account credentials.
Integrate with Azure Key Vault
Use these steps to integrate ALM with Azure Key Vault:
In ALM, navigate to Integrations on the left-hand menu and click Vaults.Click Create Vault in the upper right-hand corner.On the Add Vault Modal, select Azure Key Vault from the Template drop-down menu. Click Next.Fill in the required fields:
Azure Key Vault Display Name is the name that will display for the vault in ALM.Azure Key Vault URL is the location of the vault.ClientID is the login name for the vault.ClientSecret is the password for the vault.TenantID is the tenant name of your Azure account.
Click Save.
Once added, you can select Azure Key Vault as a vault option when creating Workflow Templates. Accounts created from that template will useAzure Key Vault for the storage and management of account credentials.
Integrate with AWS Secrets Manager
Use these steps to integrate ALM with AWS Secrets Manager:
In ALM, navigate to Integrations on the left-hand menu and click Vaults.Click Create Vault in the upper right-hand corner.On the Add Vault Modal, select AWS Secrets Manager from the Template drop-down menu. Click Next.Fill in the required fields:
AWS Secrets Manager Display Name is the name that will display for the vault in ALM.AWS Secrets Manager URL is the location of the vault.Access Key ID is the login name for the vault.Secret Access Key is the password for the vault.
Click Save.
Once added, you can select AWS Secrets Manager as a vault option when creating Workflow Templates. Accounts created from that templatewill use AWS Secrets Manager for the storage and management of account credentials.
Integrate with HashiCorp Vault
ALM currently supports HashiCorp Vault with token-based authentication and the key/value Secrets Engine.
Use these steps to integrate ALM with HashiCorp Vault:
In ALM, navigate to Integrations on the left-hand menu and click Vaults.Click Create Vault in the upper right-hand corner.On the Add Vault Modal, select HashiCorp Vault from the Template drop-down menu. Click Next.Fill in the required fields:
HashiCorp Vault Display Name is the name that will display for the vault in ALM.HashiCorp Vault URL is the location of the vault.Vault Connection Token is the authentication token provided in the HashiCorp UI.
Click Save.
Once added, you can select HashiCorp Vault as a vault option when creating Workflow Templates. Accounts created from that template willuse HashiCorp Vault for the storage and management of account credentials.
http://www.thycotic.com 55

ServiceNow Integration
ServiceNow delivers popular IT service management solutions. Organizations that employ both Account Lifecycle Manager and ServiceNow ITService Management can benefit from an integrated workflow.
As much of other IT management operations are handled in ServiceNow by organizations, now too can the ALM Workflow! This includes theability in ServiceNow to:
Submit a Request using an ALM Workflow TemplatesView Request statusesView and Approve/Deny Requests for assigned Approvers
Download the Thycotic ALM ServiceNow App:
1. Log into the ServiceNow Developer Share portal by browsing to https://developer.servicenow.com/connect.do#!/share, and then sign in.
2. In the “Search Share Projects” field, enter “Thycotic”. Thycotic Account Lifecycle Manager should appear in the results. Click the name toview details.
3. Click the Download button. This should start the download of the app, in the form of an XML file.
http://www.thycotic.com 56

Install the Thycotic ALM ServiceNow App:
1. Log in to your instance as a user with the admin role.
2. In the navigation menu, go to System Update Sets > Retrieved Update Set.
http://www.thycotic.com 57

3. Click Import Update Set from XML under the Related Links section.
4. Click Browse..
Find and Open the XML file that was previously downloaded.
Click Upload.
Thycotic Account Lifecycle Manager should now appear in the list of Retrieved Update Sets records.
5. Click Thycotic Account Lifecycle Manager under the Name column to open up the record.
6. Click Preview Update Set. An Update Set Preview dialog will appears. Click Close when it is finished.
http://www.thycotic.com 58

7. Click Commit Update Set. An Update Set Commit dialog will appear. Click Close when it is finished.
http://www.thycotic.com 59

8. Done! The app should now be installed in the ServiceNow instance.
Reload ServiceNow in your browser.Thycotic Account Lifecycle Manager should now be available in the navigation menu.
Thycotic ALM ServiceNow App Roles:
In order to access the Thycotic ALM app within ServiceNow, a user must have the admin role or be assigned one of the following roles:
Role Name Role Description
alm_admin(x_450483_alm_poc.alm_admin)
Provides a user with the ability to create and modify the Configuration for ALM. The Configurationdetermines which ALM instance ServiceNow will connect to and which credentials are used.
alm_approver(x_450483_alm_poc.alm_approver)
Provides a user with the ability to view and approve any ALM request that requires ServiceNowapproval.
Thycotic ALM ServiceNow App Configuration
1. Sign into your ALM instance as a user with the System Administrator role.
2. Navigate to Integrations > ServiceNow
http://www.thycotic.com 60

3. Click Enable.
4. Copy the Client ID and Client Secret that are provided.
5. Sign into your ServiceNow instance as user with the alm_admin role.
http://www.thycotic.com 61

6. Navigate to Thycotic Account Lifecycle Manager > ALM Configuration.
7. Click the New button.
8. In the new ALM Configuration record, provide:
URL for your ALM instanceAPI Client Id and API Client Secret that were given in previous stepsClick the Connect button.
9. A message should appear indicating that the “Connection succeeded”. If you receive an error, please double-check the values that wereentered.
10. Done! Once the connection has been set up successfully, ServiceNow will be ready to receive requests from ALM.
http://www.thycotic.com 62

SIEM Integration
ALM supports integration with security information and event management (SIEM) tools. The following is a list of events that can be sent toSIEM:
Event Description
Account Owner Changed A managed account has had an owner added or removed.
Account Provisioned An account was successfully provisioned.
Account Requires Renewal An account is up for renewal.
Account Secret ID Changed An account's secret ID was changed.
End of Life Notification An account's End of Life action will be taken in a number of days.
External Groups Disabled Some groups in the domain were disabled in ALM during the last domain sync.
New External User Accounts have been added since the last sync and are not being managed by ALM.
New Synced User Sent a new user welcome email.
Provision Approval Step Changed A provision step requires approval.
Provision State Changed A request failed to provision.
Provision Template State Changed A provision template was updated to a new state.
Remote Worker Integration Access Error A remote worker cannot access the configured domain.
Request State Changed The state of a request has changed.
User Disabled by AD User Sync The last Active Directory Sync disabled a number of users.
Any Audit Record All audits are sent to SIEM.
Creating a SIEM Integration
To create a new integration:
1. Click Integrations on the left-hand navigation menu and select SIEM.
2. Click Create SIEM Integration in the top right-hand corner to bring up the Add SIEM Integration window.
http://www.thycotic.com 63

3. Enter a Name for the integration.
4. Choose an Engine Pool for the integration.
5. Enter the Server URL where ALM will send data.
6. Click Add to bring up the Manage SIEM Integration page.
7. On the Manage SIEM Integration page, click Edit to change the values for each section.
Note: The Port and Protocol automatically fill with default values. Make sure to change the values to match your serversettings. The Output Type defaults to Syslog. It can be changed to JSON or CEF.
8. Set the Enabled toggle to Yes to activate the SIEM integration.
9. When the integration is configured, click Test SIEM Integration in the upper right-hand corner. Clicking will immediately send ALM datato your chosen server.
http://www.thycotic.com 64

Deleting a SIEM Integration
Any of the currently configured SEIM integrations, listed on the Integrations > SIEM page, can be deleted. To refine the list of currentlyconfigured integrations, use the Search field to locate a specific configuration. Use the Filters drop-down to restrict the list to All, Disabled, orEnabled configurations, as well as a specified Search Term.
To delete an existing SIEM configuration:
1. Click the SIEM configuration to be deleted.2. At the Manage SIEM Integration page, click Delete. A message indicating that the configuration has been deleted is displayed.
http://www.thycotic.com 65

ALM Administration
This section covers the following administrative topics.
Create and manage groups, roles, and users.Create and manage workflows.Calibrate the ALM engine.Migrate AccountsConfigure Alert Settings such as Email Templates and Webhooks.
http://www.thycotic.com 66

Users, Groups, and Roles
Account Lifecycle Manager uses Users, Groups, and Roles to assign permissions.
You can
Create and manage users.Create and manage roles.Create and manage groups.
http://www.thycotic.com 67

Users
Thycotic One accounts
Users log into ALM using their Thycotic One account. New Users can create an account at Thycotic One.
Creating ALM Users
To create a new ALM User
1. On the left-hand navigation menu, open the PERSONNEL drop-down and click Users.
2. In the upper right-hand corner, click Create User. The Add user window appears.
3. Enter a Display Name and Email for the new user. Checking the Trigger verification email box will send the new User an emailalerting them of the new account and asking them to verify their login before use.
4. Click next to continue to the Groups window.
http://www.thycotic.com 68

5. Check the boxes of the Groups the new User belongs. By default, all Users belong to the Everyone group. Click next to continue to theRoles window.
6. Check the boxes next to the Roles to give the new User.
Note: Users automatically inherit Roles from the Groups they are assigned.
7. Click Save to create the User. Click Save and add another to create the User and then start the process over to create another newUser.
Managing Users
http://www.thycotic.com 69

Clicking on a User's Display Name from the User List will bring up the management page. You can edit a User's Roles, Groups, emailand display name from the Manage User page.
Change Display Name
Click Edit to the right of the User's name to change their Display Name.
Enter the new name in the Edit Display Name window. Click Update for the change to take effect.
Enable/Disable User
Use the green toggle switch to Enable and Disable the User account. Disabling the account will revoke the user's access within ALM.You can return the User's permissions by clicking Enable.
Add User email
Select the Emails tab. Click Add email to assign the User an additional address. Notifications for this User will be delivered to all listedaddresses.
Add/Remove User Groups
Groups can be added/removed from the Groups tab at the top of the screen.
To add a Group
Click Add group to bring up a list of available groups.
http://www.thycotic.com 70

Check the boxes next to the new Group(s) for the User and click Add.
To remove a User from a Group
On the right side of the Group name row, click Remove.
Add/Remove User Roles
Roles can be added/removed from the Roles tab at the top of the screen. The Roles that the User has are listed in the Role row.
To add a User Role
Click Add role to bring up a list of available Roles.
Check the boxes next to the new Role(s) for the User and click Add.
To remove a User Role
On the right hand side of the Role name row, click Remove.
http://www.thycotic.com 71

Link an Active Directory Account
To link the User to an AD Account
On the right side of the Linked AD Account row, click Locate AD Account to bring up the Set AD Account window.
Select a domain from the drop-down list and click Set to link the User's ALM and AD accounts.
http://www.thycotic.com 72

Groups
Groups define privileges for categories of Users. Using Groups, you can assign the same Roles and permissions to multiple Users.
note: ALM Groups do not correspond to Active Directory Groups.
Creating Groups
1. Using the left-hand navigation menu, click PERSONNEL and then click Groups to open the Groups page.
2. In the upper right-hand corner, click Create Group. The Add group window appears.
3. Enter a Name for the new Group and click Next.
4. On the Group Membership window, choose the Users to add to the group by checking the box next to each name.
http://www.thycotic.com 73

5. Click Save to create the Group. Click Save and add another to create the group and restart the process for another new Group.
Managing Groups
To manage a group, click the Group name on the Groups page.
From the Manage Groups page, you can enable/disable the Group, add/remove Users, and add/remove Roles.
Enable/Disable Group
Enabling a group will give the Group's permissions to Users in the Group. Groups are enabled by default.
Disabling a group will remove the permissions Users are given from membership in the Group. Disabling will not disable the Users, only theirpermissions from the Group.
http://www.thycotic.com 74

To enable a Group, click the green switch so the dot points to Yes.
To disable a group
Click the green switch so the dot points to No.If the Group is attached to a Workflow Template, you will be given the option to replace the Group in the Workflow. Check the boxnext to the Group that will replace the Group you are disabling.
Click disable.
Add/Remove Users
To manage Users within the Group, click the Users tab next to Manage Group.
http://www.thycotic.com 75
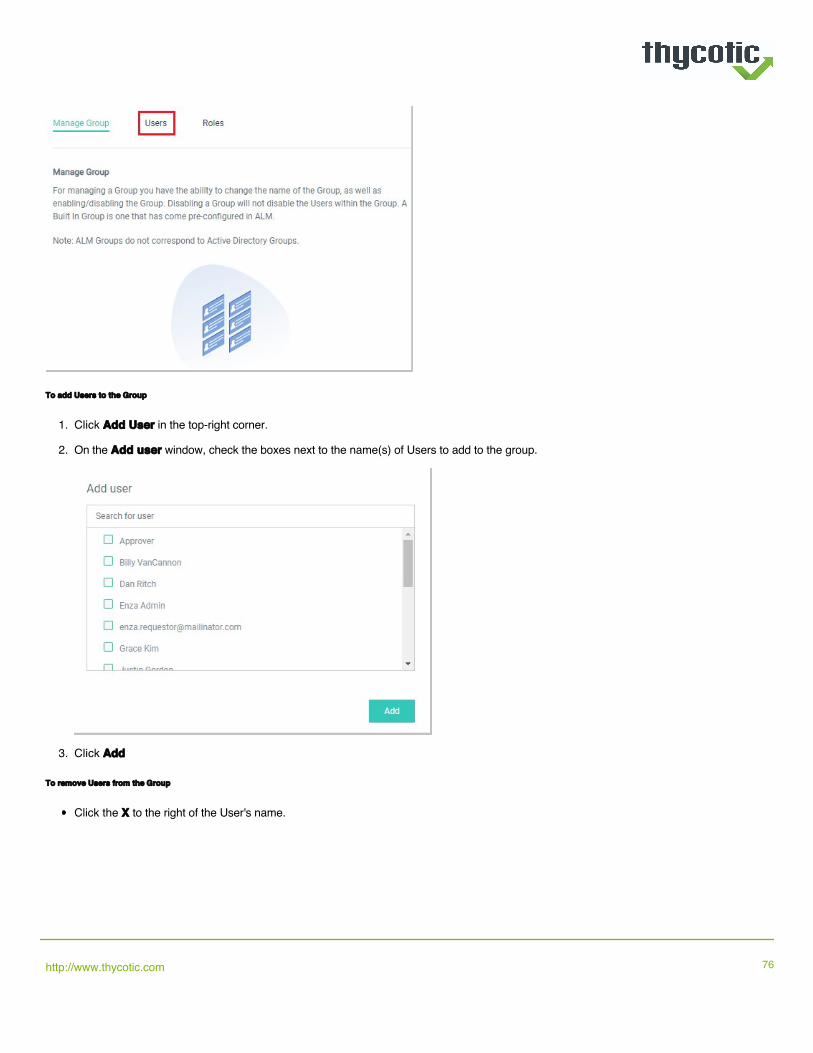
To add Users to the Group
1. Click Add User in the top-right corner.
2. On the Add user window, check the boxes next to the name(s) of Users to add to the group.
3. Click Add
To remove Users from the Group
Click the X to the right of the User's name.
http://www.thycotic.com 76

Add/Remove Roles
To manage Roles within the Group, click the Roles tab next to Manage Group.
To Add Roles to the Group
1. Click Add Role in the top-right corner.
2. On the Add role window, check the boxes next to the Role(s) to give to the Users in the Group.
http://www.thycotic.com 77

3. Click Add.
To Remove Roles from the Group
Click the X to the right of the Role.
http://www.thycotic.com 78

Create and Manage Roles
Roles control privileges within ALM. To access the Role page, click Personnel in the left-hand menu and then click Roles.
Default Roles Provided by ALM
ALM supplies several default Roles, as in the following table, that your organization may find adequate or may use as models for its own Rolesdevelopment.
Note: Like ALM Groups, ALM Roles do not overlap with roles in Active Directory or other directory systems.
Default ALM Role Permissions
Account Owner Read managed Account
Update managed Account
Provision Requester Request a new Account
Provision Approver Approve Requests
System Administrator Authorize all Role types
Create Workflow Templates
Set up ALM Engines
Perform ALM Integration with Active Directory
Perform ALM Integration with Secret Server
Create Custom Roles
You can create custom Roles to further control access within ALM. To create a new Role
1. Click Create Role in the upper right-hand corner of the Role page.
2. Enter a Name for the new Role and click Add to bring up the Manage Role page.
3. Click Add to bring up the Manage Role page.
4. From the Manage Role page, select the Permissions tab. Assign permissions to the Role by checking the boxes next to the privilegesthe Role should have within ALM. Settings will update as you check the boxes. You will not need to click apply or save.
5. Select the Users tab and click Add user to bring up a list of available Users. Check the boxes next to the Users to assign to the Role andclick Add.
http://www.thycotic.com 79

6. On the Groups tab, click Add group to bring up a list of available Groups. Check the boxes next to the Groups that should include theRole and click Add.
Manage Roles
Open the Role Management page by clicking on the name of the Role to be managed.
Note: If you cannot find the Role you wish to manage, you may be viewing only enabled Roles. To filter Roles byAll/Enabled/Disabled, click the Status drop-down and select the correct option.
Change Role Permissions
On the Permissions tab, assign permissions to the Role by checking the boxes next to the privileges the Role should have within ALM.
http://www.thycotic.com 80

Settings will update as you check the boxes. You will not need to click apply or save.
Enable/Disable Role
Use the toggle on the right side of the screen to enable/disable the Role. Disabling will not delete the Role. Enabling the role willrestore permissions to the Users with this role.
Automatically Apply to new Users
Enabling Automatically apply to new users will assign this Role to all newly created Users. If you choose this option, make sure thatthe permissions you give this Role are limited.
Add or Remove Users
To add Users to Role
1. Click the Users tab.2. Click Add Users to bring up the Add user window.3. Check the boxes next to the Users to be added to the Role.4. Click add to confirm.5. Remove Users by clicking the X to the right of the Username and confirming.
Add Role to Groups
To add a Role to Groups
1. Click the Groups tab.2. Click Add Groups to bring up the Add group window.3. Check the boxes next to the Groups to be added to the Role.4. Click add to confirm.5. Remove Groups by clicking the X to the right of the Username and confirming.
http://www.thycotic.com 81

Build Workflow Templates
Workflows in ALM define the approval processes for Service Accounts. Once a Template is completed and published, Requestors can useALM to request that a Service Account be created.
Overview
ALM supplies a straightforward, Roles-driven workflow system to support your oversight of new AD account creation, review, and eventualrenewal or retirement.
ALM represents your approval processes as Workflow Templates. Each template defines the approval process for a particular service accountkind or category as defined by your organization.
ALM’s workflow system follows a simple, linear process from template definition through account Requests and Approvals.
Creating and Managing Workflows
Create and manage Workflows from the Workflow Templates page. Click Administration in the left-hand menu and click WorkflowTemplates.
Create a Workflow
Use this procedure to create the Workflow Templates necessary to support your organization’s use cases. You must have the SystemAdministrator Role to perform this procedure, and you must have already connected ALM to your Secrets Vault.
Click Create Template in the upper right hand corner to bring up the Workflow Template Wizard
1. Template Setup
http://www.thycotic.com 82

1. Give the Template a name and select the Account Type from the drop-down menu. The Account Type should correspond to thedirectory service that will be used for this Template.
2. Select an End of Lifecycle Action. Later in the wizard, you will choose the time interval for these actions to take effect.
1. Review- a notification will be sent to the User reminding them that the Service Account is active. ALM will not change theService Account at this point. Users are given the following options
Renew- extends the account's lifecycle until the next Review date. The renewal period starts at UTC 00:00.Disable- deactivates the account in ALM and AD. The User can re-enable the account.Delete Account and Secret- removes the Service Account.
2. Disable- the Service Account will be automatically disabled unless it is Renewed by the Account Owner. Users are given thefollowing options
Renew- extends the account's lifecycle until the next Review date. The renewal period starts at UTC 00:00.Disable- deactivates the account in ALM and AD. The User can re-enable the account.Delete Account and Secret- removes the Service Account.
3. Expire- the Service Account will be automatically deactivated, but it can still be reactivated be repeating the Approvalprocess. Users are given the following options
Submit for Approval to Renew- the Account is submitted again to the Approvers. If approved, the account is renewed.If denied, the account will expire.Disable- deactivates the account in ALM and AD. The User can re-enable the account.Delete Account and Secret- removes the Service Account.
4. Delete- the Service Account is disabled, and cannot be renewed. Users are given the following options
Disable- deactivates the account in ALM and AD.Delete Account and Secret- removes the Service Account.Clone as New Request- generates a new request identical to the provisioned account. The User then completes thenew request and submits for approval.
3. The Terms of Service should reflect your organization's guidelines for the use of new Service Accounts. The Requestor of the newaccount must agree to the terms you set before the account is provisioned.
4. Enter the Purpose for the Workflow. The purpose will be provided to Users when they request a new account, so they know whichtemplate to choose for their request.
5. Click Save + Next.
2. Secrets Vault1. For System, choose the Secrets Vault to use for Accounts on this Template. The Type of Vault should populate automatically
based on your selection.2. For Template, choose the directory type associated with the workflow.3. Click Select Folders and choose where the secrets for this workflow will be stored. Checking Allow Folder Override will let the
Requestor choose folders within the selected index to store the account's secrets.4. Click Save + Next.
3. Active Directory1. Choosing a Name Prefix is optional, but it is highly recommended that you use a prefix if your organization has a large number of
Service Accounts. Using prefixes will make organizing large numbers of accounts easier.2. Defining Name Regex is also optional. Setting regex will force Requestors to follow specific naming conventions when using this
http://www.thycotic.com 83

Template. You can input any limiting pattern using .NET native regex.3. Select the Active Directory Server that Service Accounts on the template will use.4. For OU Distinguished Name, click select and choose the Organization Unit(s) that Service Accounts will belong to. Click add.5. Toggling Allow Choosing Sub-OUs to Yes will allow the Requester to choose a sub-ou within the folder you have designated.
Toggling to No will restrict the Requester to only the OU you have designated.6. Use the drop-down menu to select the Attributes for the Service Accounts. You have the option to Require each attribute or mark it
as Read-only. Click the plus to add the attribute. Edit the attribute using the pencil icon, or remove it by clicking the red X.7. Selecting Groups will limit access to this template to Users in the selected Group. Use the drop-down menu to find the Group and
click the plus. You may add multiple Groups.
4. Ownership Configuration1. Toggling Allow Group Ownership to Yes will allow the newly created account to be shared among multiple owners without
restrictions.2. Toggling Allow Group Ownership to No will bring up additional ownership options.
Toggling Requester Only Owner to Yes will restrict ownership of new accounts to only the Requester. Toggling to No willallow other users to have ownership of the account.Set the number of Minimum Owners and Maximum Owners for new accounts using this template.
5. Account Lifecycle1. The Review/Expire Period Options section shows the lifecycle length options that will be available to the Requestor when they
request a new account. You can customize the options by editing the number field and selecting Day(s) or Year(s). Click the plusto add the option.
2. Enable re-approval before end of lifecycle will allow the Account Owner to request a renewal of the account before the chosendate of Review/Expiration. Use the arrows to set the re-approval time period.
3. Check Send notification when renewal is available to automatically notify the Account Owner when re-approval is available.4. You can have the renewal notification resent at intervals. Check send reminder to owner and use the arrows to set the interval
that ALM will send notifications.5. You can also have more frequent reminders sent. Check Send urgent notifications and use the arrows to set an hourly interval to
send reminders and the number of days before the end-of-lifecycle to begin sending the hourly reminders.6. Check Include system administrators to have ALM send the reminder to the Account Owner and the System Admin.7. To stop reminders automatically, check Stop sending notifications and use the arrows to select the number of days after the start
of notifications to stop sending.
6. Approval Flow1. Toggling Hide Approver Names From Requesters to Yes will restrict users requesting a new account from seeing who in the
organization can approve their request.2. The Approval Flow will dictate which approvals are required before the account is provisioned.3. Click Add to add a step to the Approval Flow.4. From the Actions drop-down list, select a User or Group of Users that can Approve new Accounts using this template.5. In the Require at least box, use the arrows to change the number of approvers needed from the list of Users/Groups.6. You can add another step to change the number of approvals needed from separate Groups or Users by clicking Add Step from the
Actions drop-down.7. Click Publish to finish creating the template. Once a Template is Published, it cannot be edited further without first being
unpublished.
Note: Requiring approval from one, specific individual can create a bottleneck. To avoid creating a bottleneck, Thycoticrecommends choosing a Group of managers and requiring two approvers.
Managing Workflow Templates
http://www.thycotic.com 84

Review and make changes to a Workflow Template by clicking on the Template Name to bring up the Template page.
From this page you can
Edit Draft Workflow Templates- Before a Template is published, you can edit the Template Setup, Secrets Vault, Active Directory,Account Lifecycle, and Approval Flow. Published Templates must be unpublished before they are edited.
Unpublish Workflow Template- Open the Template and click Unpublish in the upper right-hand corner. You can now edit the Templateand republish it when you are finished.
Disable Workflow Template- Click Disable in the upper right-hand corner. Requestors will no longer be able to select this Templatewhen requesting a new Service Account.
Workflow Template Versioning
Workflow Template Versioning allows System Administrators to update a published Workflow without needing to disable or unpublish theTemplate.
To create a new version of an existing Workflow Template
1. Open the Template and select Create New Version.2. ALM will prompt for confirmation that the System Administrator wants to create a new version of the Workflow Template.3. When a new version of a Workflow Template is published, all new Account Requests will use the newest Template version.4. All accounts previously provisioned to prior versions will remain associated to the version they were provisioned against.
Users with permissions to access Workflow Templates will be able to view the specification of previous versions for change tracking. TheManaged Accounts view will display which version of a Workflow Template the account is provisioned against.
http://www.thycotic.com 85

Alert Settings
Email Templates
Administrators and Users with Email Template Permissions can modify and enable/disable emails that are generated and sent automaticallyby ALM. To modify an Email Template:
1. Navigate to Alert Settings and click Email Templates. The Templates are named after the event in ALM that will trigger the Email.2. Click the name of the Template to bring up the Manage Email Template page. From here you can:
Change the Subject line of the Email.Change the Body of the Email. Use the Parameters variables to customize the message. You can add the Parameters by retypingthem or clicking insert.
3. Enable or Disable the Email using the toggle.4. Click Save when you are finished.
Webhooks
ALM allows Administrators and Users with Webhook Permissions to set up custom integrations using webhooks.
Creating a Webhook
To create a webhook:
1. Navigate to Alert Settings and click Webhooks.
2. In the upper right-hand corner, click Create Webhook to bring up the Add Webhook window.
3. Enter a description of the webhook.
4. Choose the Event within ALM that will trigger the webhook.
5. Click Save to bring up the Manage Webhook page.
6. On the Manage Webhook page, enter the complete Callback URL. The Message Body shows the data that will be sent to the URL.
7. Set the Enabled toggle to Yes to activate the webhook. Leave the toggle on No to keep the webhook inactive. It can be enabled laterfrom this page.
8. (Optional) Once you have enabled the webhook, the Test Webhook button will appear in the upper right-hand corner. Click TestWebhook to send a test call to the callback URL.
http://www.thycotic.com 86

9. (Optional) Add Authorization to the webhook by clicking Edit and selecting the corresponding authorization from the drop-down. Youcan also adjust the authorization header for the callback url of the webhook. If you have not previously configured WebhookAuthorization, see the section below. If needed, you can save the webhook and return later to add authorization.
10. Click Save to create the webhook.
11. Once the webhook is created and enabled, you can view its usage details from the Webhook History tab at the top of the page.
Webhook Authorization
You can enable Webhook authentication using Webhook Authorization. To create a new Webhook Authorization:
1. From the left-hand navigation menu, click Webhook Authorizations.
2. In the top-right corner, click Create Webhook Authorization.
3. Enter a Name and select an Authentication Type. ALM currently supports Basic and OAuth authentication. Click Save to bring up theManage Webhook Authorization page.
http://www.thycotic.com 87

4. On the Manage Webhook Authorization page, enter:
The URL of the authentication server.The Content Type of the message.The Token Map that points to the location of the authentication token within the server response.The Authentication ID and Authentication Secret that will log in to the authentication server.
5. Message Body displays the contents of the authorization message. Use insert to add tags from Authentication ID and AuthenticationSecret to the body. You can create lines in the message by clicking Add Value. Remove a value by clicking the minus (-) to the right ofthe value field.
6. When you are finished with each section, click Submit. Each section is saved automatically after submission.
http://www.thycotic.com 88

Account Migration
Using the Account Migration Wizard, administrators can move existing accounts to different workflow templates or between different versionsof a template.
Migrating accounts from one workflow template to another may be desired when workflow templates have a version change. Administrators canalso add additional attributes to be updated in Active Directory/Azure AD during this migration. Administrators can specify attribute values toupdate in Active Directory/Azure AD or leave the values blank so they inherit the values present in Active Directory/Azure AD.
NOTE: Only accounts that are active and before their end-of-lifecycle can be migrated.
1. Type & Domain.
1. From the Account Type drop-down menu, choose from Active Directory, Azure Active Directory, or Group Managed ServiceAccount.
2. From the Domain drop-down menu, select the Domain accounts will be migrated from. Accounts cannot be migrated betweendomains.
3. Click Next in the upper right-hand corner.
2. Assign Template.
1. At the Workflow drop-down, select the available accounts to be migrated from. If the workflow is associated with a vault, onlymanaged accounts with secrets in the same vault can be migrated to the selected template.
2. The selection for Review Interval determines when an accounts end of lifecycle will occur. Choosing a date in the past will causethe accounts to expire as of midnight (00:00) UTC.
3. Enable Keep Current Date to leave each migrated account with it's current End of Life date.4. Enabling Reassign OU moves any selected account from its currently assigned Organizational Unit (OU) to the OU specified by
the selected workflow. If the workflow allows for child OUs to be selected, a specific child OU can be selected as the new OU for theaccounts to be migrated.
5. Choose Reassign Secret Folder to limit the selection of accounts in the next step to only those accounts that have a secretassociated with them. (This option is only available when Secret Server is used as the vault.)
6. Click Next in the upper right-hand corner.
3. Select Accounts
http://www.thycotic.com 89

1. Choose the accounts to be migrated by clicking the check box to the left of the account name, or enable the check box next to theSearch bar to select all accounts.
2. Use the Search field to display all accounts that match the search criteria. Use the Filter drop-down to restrict the list of accounts tospecific End of Lifecycle account types, Workflows, or accounts created on a specific date.
3. Click Next in the upper right-hand corner.
4. Set Attributes
1. The list of available accounts are displayed in the Accounts panel on the left of the page. Select an account to populate itsassociated attributes. Select Update All to display attributes from all accounts.
Note: For Update All operations, any attributes shared between accounts will be updated in bulk for all accounts.Additionally, attributes not present in an account will be added; attributes no longer defined in the migrated template willno longer appear.
http://www.thycotic.com 90
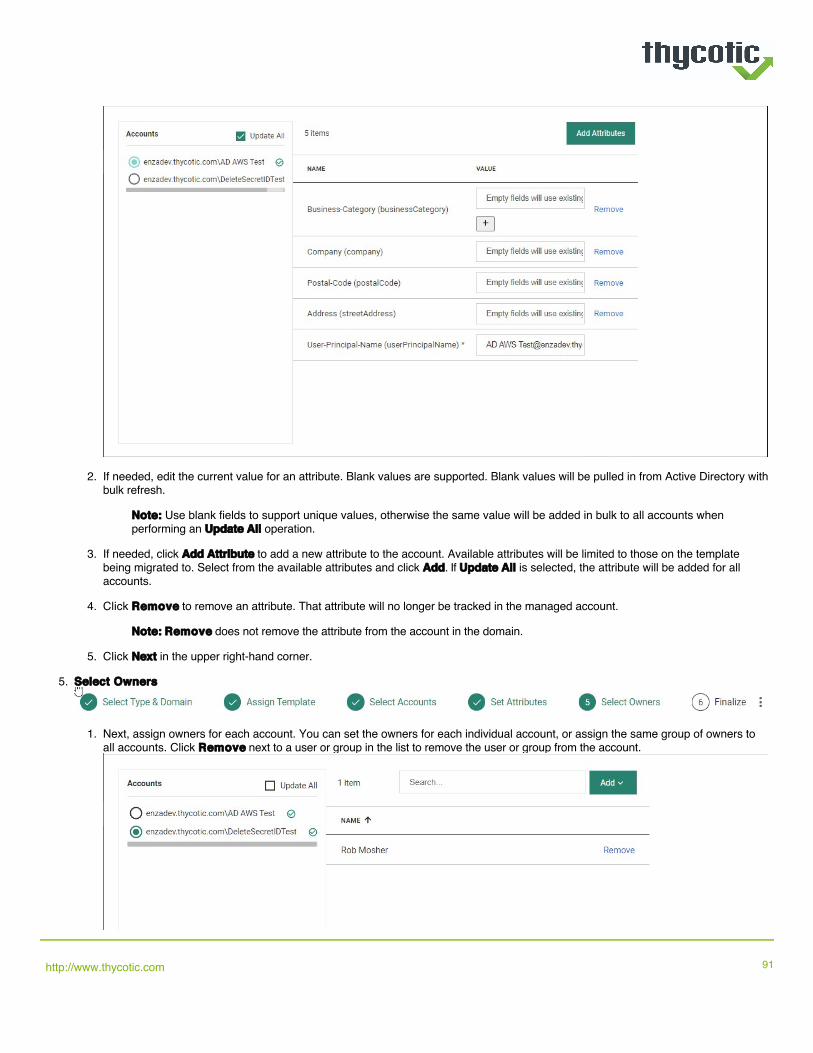
2. If needed, edit the current value for an attribute. Blank values are supported. Blank values will be pulled in from Active Directory withbulk refresh.
Note: Use blank fields to support unique values, otherwise the same value will be added in bulk to all accounts whenperforming an Update All operation.
3. If needed, click Add Attribute to add a new attribute to the account. Available attributes will be limited to those on the templatebeing migrated to. Select from the available attributes and click Add. If Update All is selected, the attribute will be added for allaccounts.
4. Click Remove to remove an attribute. That attribute will no longer be tracked in the managed account.
Note: Remove does not remove the attribute from the account in the domain.
5. Click Next in the upper right-hand corner.
5. Select Owners
1. Next, assign owners for each account. You can set the owners for each individual account, or assign the same group of owners toall accounts. Click Remove next to a user or group in the list to remove the user or group from the account.
http://www.thycotic.com 91

To add a user or group, click Add and select either Add Users or Add Groups. When prompted, select the users or groups to addas owners and click Add.
2. Click Next in the upper right-hand corner.
6. Finalize
1. Review the domain name, workflow template, review interval, lifecycle end date, accounts, and owners. Change information byclicking on the previous steps. Make sure to click Next on any updated fields.
2. Once you have verified that the information is correct, click Complete to finalize the wizard and move the accounts.
http://www.thycotic.com 92
Calibrating the ALM Engine
To use the ALM Engine Calibration tool:
1. Go to the Vaults page.2. Select the Vault for which you need an active ALM Engine connection to be established.3. On the Vault Details page, go to the ALM Engines tab.4. Click Calibration.
This will queue a ALM Engine Calibration Job and prompt a modal dialog stating:
ALM Engine Calibration started, this may take several minutes to complete.
The ALM Engine Calibration Job connects with the ALM Engines, tasking each one to authenticate with the Secret Server Vault you selected.The Calibration Job keeps track of which ALM Engines successfully authenticate to the Vault, creating a list of ALM Engines known to haveaccess to that Secret Server.
That list populates a table on the ALM Engines tab of the Vault Details page.ALM Engines that did not authenticate will not appear on the list.If no ALM Engine authenticated, the Vault Details page will indicate that “No ALM Engines calibrated to integration.”
An ALM Engines Calibration Job runs as part of any Scheduled Sync for a Vault, with the list of successfully authenticating ALM Enginesupdating on completion of the sync job.
http://www.thycotic.com 93

Requesting A Service Account
1. On the left-hand menu, click ACCOUNTS and then click Requests.
2. Click Create Request in the upper right-hand corner to open the New Request window.
3. Select the Workflow template that matches the Service Account you are requesting from the drop-down menu. If the Template containsTerms of Service, you must check the box acknowledging that you have read and agreed to the terms. Click Next.
4. Supply an Account Name and click Submit.
Note: If the Administrator has enabled regex on the workflow template, then the name you choose must conform to the setparameters.
5. These fields will populate automatically: Account Type, Service Account, Workflow, End-of-Lifecycle Action, Vault Name, Active DirectoryServer, OU Distinguished Name, Group, and Account Owners. These fields cannot be changed.
6. Choose an End-of-Life Interval from the drop-down menu. At the end of the interval period, ALM will automatically perform the listed End-of-Lifecycle action. The intervals listed were made available by the creator of the Workflow Template.
7. Supply a Justification/Reason for the creation of the account. The Approvers will be given this information.
8. Supply an Account Description of the Service Account that you are requesting.
9. In the Active Directory Attributes rows, provide any values that are required.
10. Review the Approval Steps at the bottom of the page. It displays a list of Approvers available and the number required.
11. At the top of the page, click Submit. Your request will be sent to the Approvers for review. You can also Save the Draft to complete itlater or Delete the Request.
Displaying Requests
Existing requests that are in a Draft, Submitted, or Rejected state are displayed on the Requests page by default.
Click Filters to access the Filters modal and modify the display for any of the available filter parameters.
Withdrawing a Request
To withdraw a request:
Navigate to the Requests page and click on the request.Click Delete Request and click OK to confirm.
http://www.thycotic.com 94
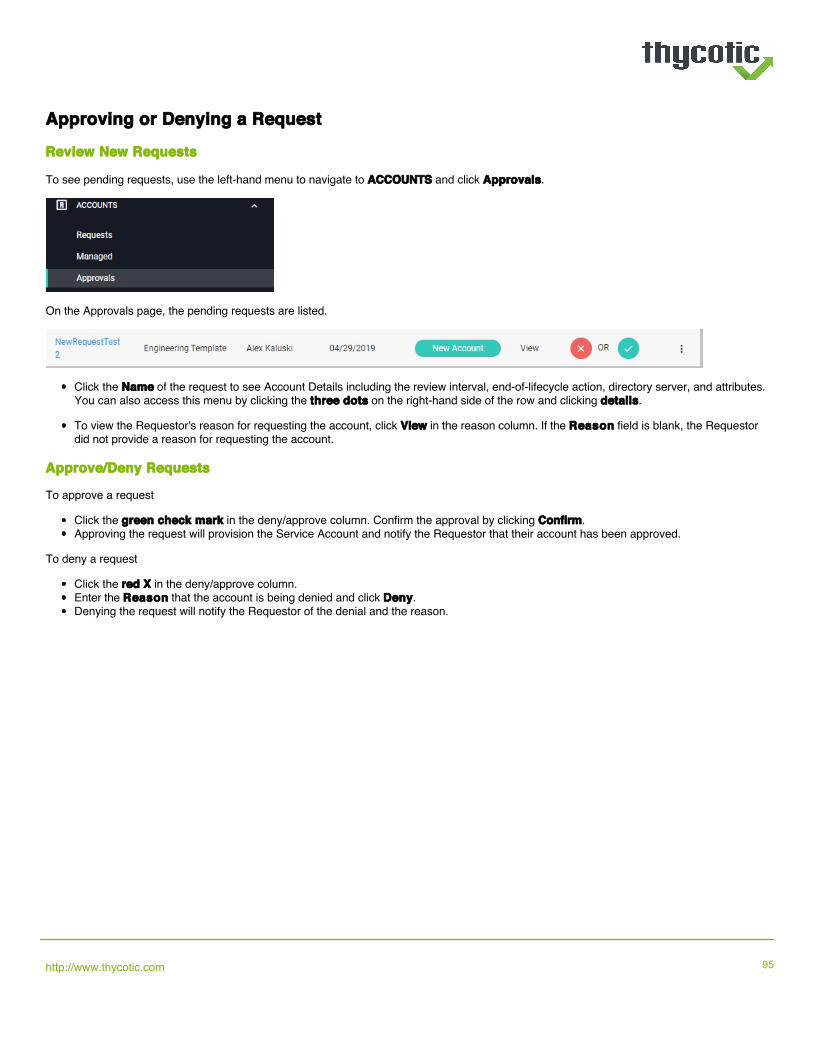
Approving or Denying a Request
Review New Requests
To see pending requests, use the left-hand menu to navigate to ACCOUNTS and click Approvals.
On the Approvals page, the pending requests are listed.
Click the Name of the request to see Account Details including the review interval, end-of-lifecycle action, directory server, and attributes.You can also access this menu by clicking the three dots on the right-hand side of the row and clicking details.
To view the Requestor's reason for requesting the account, click View in the reason column. If the Reason field is blank, the Requestordid not provide a reason for requesting the account.
Approve/Deny Requests
To approve a request
Click the green check mark in the deny/approve column. Confirm the approval by clicking Confirm.Approving the request will provision the Service Account and notify the Requestor that their account has been approved.
To deny a request
Click the red X in the deny/approve column.Enter the Reason that the account is being denied and click Deny.Denying the request will notify the Requestor of the denial and the reason.
http://www.thycotic.com 95

Reports
The ALM application provides a set of predefined reports, each of which runs an associated built-in SQL query to produce easy displayedresults.
Report Description
Accounts Created OverTime
This report provides a list of all accounts created in the application.
Accounts Missing SecretAny managed accounts that are missing secrets (Secret Server, Azure Key Vault or AWS Secrets Manager)are presented.
All Managed AccountsThis report lists accounts specific to a Workflow Template (with a secondary sort applied alphabetically foreach template).
Expiring Accounts Any account that have an Expiration Date will appear in this report.
Orphaned AccountsAny account that does not have at least one active User or Group assigned as an Account Owner are listed inthis report.
1. On the left-hand menu, click Reports.
2. Click the entry that corresponds to the desired report. The results from the query are displayed on the reports screen. The example belowshows an Accounts Missing Secret report.
http://www.thycotic.com 96

3. Use the options available in the Filters modal to tailor the display of accounts presented in the report.
http://www.thycotic.com 97

Installation Steps
1. Make sure that you meet the System Requirements listed below.2. Configure Docker.3. Install ALM.4. Finish and Add Licenses.
Prerequisites
The following are required to install the self-hosted version of ALM:
1. Linux Machine
NOTE: Tested against the following - Ubuntu 16.04, Ubuntu 18.04, Debian 9, Debian 10, CentOS 8.2, Fedora 32.
2. DockerManages the images and containers used by ALM.Installation Instructions : https://docs.docker.com/get-docker/
3. Docker ComposeThis is required for ALM’s installation script to manage the local orchestration of services.Installation instructions: https://docs.docker.com/compose/install/
4. Port ConfigurationAfter installation, the docker containers will require the following ports to be available on the host system:
TCP/80, if LetsEncrypt certificate management is enabled.TCP/443 for the web UI.
Additional Requirements
During installation and configuration, you will need to know the following ahead of time:
Domain (Example: alm.thycotic.com)Site where ALM will accessible to users through a web browser.
SSL/TLS Certificate for the domainCan be managed automatically using LetsEncrypt, as an option.Or a certificate and chain can be provided manually during setup.
Open ID Connect (OIDC) credentialsALM uses OIDC for user authentication.This can be configured through Azure Active Directory or Thycotic One.
SMTP credentials (optional) - Allows ALM to send email notifications to users. If you choose to not use SMTP, put in any values for thequestions and please understand email notifications will not be sent in ALM. This can be re-configured in the future by running ./alm.sh
install, this will initiate the install process again but exclude initial user configuration.
http://www.thycotic.com 98

Docker Configuration
Once Docker has been installed, add your user to the docker group. This allows the ALM setup script to run docker commands without sudo:
sudo groupadd dockersudo gpasswd -a $USER dockersudo service docker restart
NOTE: Log out and back in for the change to take effect.
http://www.thycotic.com 99

Installation
Create a directory to store the ALM data.
mkdir ~/alm
NOTE: This directory will contain configuration files for ALM. Permissions should be set to only necessary users. (e.g. the accountthat installed ALM, an account used for running backups, etc.)
Change to that directory.
cd ~/alm
Download and Install the Script:
curl https://alc-cdn01.azureedge.net/scripts/alm.sh -o alm.sh && chmod +x alm.sh && ./alm.sh install
Domain name
What domain name will users use to access ALM?
To use LetsEncrypt, you’ll need a domain name that points to your public IP, and ports 80 and 443 forwarded from your router to the local IP ofthe machine that is running ALM.
SSL/TLS Configuration
--- SSL/TLS Configuration ---ALM requires a SSL/TLS certificate to ensure that all web communication is secure.ALM can be configured to use LetsEncrypt to automatically create and manage the certificate.Or you may provide your own.
Would you like to use LetsEncrypt to generate an SSL/TLS certificate for docker.enzadev.com? [y/n]:
y will pull the certbot container and attempt to get a certificate for the domain entered in the previous step. The acquired certificates will be under ./almdata/letsencrypt
n will wait for you to copy the certificate (named <DOMAIN>.crt, e.g. example.alm.com.crt) and private key (named <DOMAIN>.key, e.g. example.alm.com.key) to the same folder as the install script. It will move them to the ./almdata/ssl directory as part of the install.
Database Configuration
--- Database Configuration ---ALM needs to set up a SQL Server database to store its data.You can use your own SQL Server instance to host the database, or you may choose to have a SQL Server Express instance set up automatically as a container.
Do you want to automatically set up your database in a SQL Express container? [y/n]:
y will generate credentials and move on to the next step
n will prompt you for the connection info for SQL Server.
Enter the connection info for your SQL Server: Server: Database: User ID: Password:
Admin User
--- Admin User ---ALM requires at least one admin user. We will configure the first admin user as partof the installation process. This admin user will also receive email alerts regardingLetsEncrypt certificate expirations.
http://www.thycotic.com 100

Initial User Display Name: Initial User Email:
These are the values that will be used for the initial admin account. Make sure you use an account that can log into the OIDC instance below.
Authentication Configuration
--- Authentication Configuration ---ALM requires an OpenID Connect (OIDC) provider for user authentication. Please providethe credentials to your preferred OIDC provider.OIDC Authority URL: OIDC Client ID: OIDC Client Secret:
NOTE: The domain you use will need to be configured as a reply url in whatever OIDC provider you use, or you will get an “invalidreply url” error when you try to log in.
Email Configuration
--- Email Configuration ---ALM uses SMTP to send email notifications to users. Please provide the SMTP credentialsto your preferred provider.Server: Port: Use SSL?:Use Credentials?:(If yes, then:) Domain: User Name: Password:
NOTE: Use these settings to connect to an SMTP server. These do not need to be valid to complete the install.
http://www.thycotic.com 101

Finishing Setup and Adding Licenses
Once the setup is complete, browse to your ALM instance using the chosen domain name.
When running in Self Hosted mode, ALM requires license keys to add more than one user and one ALM Engine.
Navigate to Licensing page
1. Open Administration > Configuration in the left navigation menu2. Click the License tab3. Enter the license Name and Key
NOTE: Users and engines are licensed separately, so two licenses will need to be entered.
4. Once this step setup is complete, you will now have ability to add multiple users and ALM Engines depending on the allowances of thelicense.
http://www.thycotic.com 102

Supported Authentication Methods
ALM on-prem currently supports authentication through:
Auth0Azure AD Open ID ConnectThycotic One Open ID Connect
http://www.thycotic.com 103

Azure AD Open ID Connect
To configure Azure AD OIDC with ALM:
Create a New App Registration
1. Navigate to portal.azure.com and then Azure Active Directory.
2. In the left-hand navigation panel, select App registrations.
http://www.thycotic.com 104

3. On the top of the App registration page, click +New registration.
4. On the Register an application page, provide:
1. Name- the name you would like for ALM. (Example: ALM On-Prem)2. Supported account types- choose single tenant (default).
http://www.thycotic.com 105

3. Redirect URI- set the drop-down to Web and provide the sign-in URL for your ALM instance.
5. Click register. You will be taken to the newly created App registration page.
6. On the registration page, take note of the Application (client) ID value. This will be used for the OIDC Client ID value during ALMsetup.
Configure OIDC URLs
http://www.thycotic.com 106

1. On the top of the registration page, click Endpoints. The endpoints dialogue will open.
2. Copy the OpenID Connect metadata document value, but omit the v2.0/well-known/openid-configuration portion of the URL. This willbe the OIDC Authority URL.
3. Close the Endpoints dialogue.
4. On the left-hand navigation menu, click Authentication. The Platform configurations panel will open.
http://www.thycotic.com 107

5. Under Web, click Add URI.
6. Enter https://YOUR_ALM_DOMAIN/signout-callback-oidc.
http://www.thycotic.com 108

7. On the top of the panel, click Save.
Create Client Secret
1. In the left-hand navigation menu, click Certificates & secrets. The Certificates & secrets panel will open.
http://www.thycotic.com 109

2. Under Client secrets, click New client secret.
http://www.thycotic.com 110

3. On the Add a client secret dialog, choose:
1. A description. (Example: ALM OIDC Credentials)2. An expiration date. When this secret expires, ALM will need to be reconfigured with manually with a new secret.
4. Click Add to save the new client secret.
http://www.thycotic.com 111

5. The new secret will now be displayed in the Client secrets section of the Certificates & secrets page.
6. Click the Copy to clipboard icon and store the secret value. It will be used as the OIDC Client Secret during ALM setup.
http://www.thycotic.com 112

7. The OpenID connect configuration for Azure AD is now ready for use with ALM.
http://www.thycotic.com 113

Configure Auth0 Open ID Connect (OIDC)
Create An Application in Auth0
The Auth0 application will allow for authentication with ALM.
1. Sign into Auth0 or create an account.
2. Navigate to Applications
3. Click Create Application.
Provide a Name.Under Choose an application type select Regular Web.Click Create.
http://www.thycotic.com 114

Copy Domain/Client ID/Client Secret
After the application is created, find and copy the values that will be needed during the ALM setup.
1. Select the Settings tab.
2. Under Basic Information, make note of the following:
Domain- This will be the OIDC Authority URL value during setup.Client IDClient Secret
http://www.thycotic.com 115

While in the Settings section, configure the settings that are specific to your self-hosted instance.
1. Scroll down to the Applications URIs section and fill out the following fields
Application Login URI - https//{{your ALM Domain}}
Allowed Callback URLs - https://{{your ALM Domain}}/signin-oidc,https://{{your ALM Domain}}/signout-callback-oidc
Allowed Logout URLs - https://{{your ALM Domain}}/authentication/logout
2. Scroll to the bottom of the page and click Save Changes.
http://www.thycotic.com 117

Thycotic One Open ID Connect (OIDC) Configuration
To configure Thycotic One OIDC authentication for use with ALM:
Select a Team
1. Navigate to portal.thycotic.com
2. On the top menu, click Manage and then Teams.
3. If there are no existing teams, create one by clicking +New. Give the Team a name and click Save Changes.
Create a New Organization
1. To the right of the team name, click Organizations.
http://www.thycotic.com 118

2. On the organizations page click +New.
3. From the drop-down, select the Thycotic One region that you would like to use.
4. On the organization preferences page, you can configure the following options:
http://www.thycotic.com 119

1. The Name of the organization.2. The Thycotic One Connection Region.3. The lockout attempt count. This will determine the number of failed logins before a user is locked out.4. The minimum password strength. This will determine the complexity of passwords that users must use for logging in.5. The Two-Factor Login Policies. Leaving the drop-downs at No Preference will allow users to choose their two-factor method.
5. Once your configuration is complete, click Save.
Configure OIDC Credentials
1. On the organizations page, click Credentials next to the organization you created.
http://www.thycotic.com 120

2. Click +New.
3. Complete the Organization Credential form:
1. Give the credential a name.2. The Post-Login redirect URIs should be: https://YOUR_ALM_DOMAIN/signin-oidc3. The Post-Logout Redirect URIs should be: https://YOUR_ALM_DOMAIN/signout-callback-oidc
NOTE: Be sure to save the Endpoint, Client Id, and Client Secret. You will need these values when performing ALM Self-Hosted setup.
http://www.thycotic.com 121

1. Click Save.
4. OpenID Connect configuration for Thycotic One is now complete and ready for use with ALM.
http://www.thycotic.com 122

Service Account Discovery Tool
This free tool helps assess the level of risk associated with your inventory of service accounts in AD by connecting to Windows machinesacross your network and scanning for local and service account usage.
To download the tool visit the Free IT Tool section of the Thycotic website.
Prerequisites
The Service Account Discovery Tool supports Windows 7, 8, 8.1, and 10.
The machine on which it executes must have Microsoft’s .NET Framework 4.5.1 or higher.
In order to scan for service accounts, the account entered must be a domain account that is in the Administrators Group on the target machines.Using a domain admin account to run the tool will often be sufficient for scanning your network.
These steps will ensure the account has the appropriate privileges to run a successful scan.
Open the Group Policy editor for your domain policy.
Go to Computer Configuration > Preferences > Control Panel Settings.
Right-click Local Users and Groups and select New > Local Group.
Leave the Action value set as Update.
For Group name: use the drop-down menu to select Administrators (Built-in).
http://www.thycotic.com 123

Click Add… and search for the account you will use for Discovery scanning.
Click OK to save your changes. The next time the Group policy updates across your environment, the Discovery Account will be part ofthe Local Administrators Group.
For the best security, configure Group Policy to limit the logon privileges of that account:
In the Group Policy editor for your domain policy, go to Computer Configuration > Policies > Windows Settings > Security Settings> Local Policies > User Rights Assignment.
http://www.thycotic.com 124

Add your Discovery account to the Deny log on locally and Deny log on through Remote Desktop Services policies at right.
http://www.thycotic.com 125

Optional: make sure that the account is not part of the Remote Desktop Users Group.
Ports
The Discovery scan makes use of several ports to connect to the target Windows machines to scan them for local and service account usage.
Traffic Type Ports Used
RPC Dynamic Port Range 1025-5000, 49152-65535
Microsoft DS 445
epmap 135
The RPC Dynamic Port ranges are a range of ports utilized by Microsoft’s Remote Procedure Callback (RPC) functionality. This port rangevaries by operating system. For Windows Server 2008 or greater, this port range is 49,152 to 65,535. This entire port range must be open forRPC technology to work.
Walkthrough
After downloading the Discovery Tool, unzip it and run ThycoticServiceAccountRiskSnapshotAnalyzer.exe or, if you prefer, rename theexecutable file to something easier to type, and then run it.
Domain Credentials
The scanner will first prompt for credentials and the fully-qualified domain name (FQDN) of the domain you would like to scan. Use thecredentials you configured earlier.
These will be used for scanning, but the scanner tool does not save them for subsequent use.
http://www.thycotic.com 126

When you have provided the credentials, use the Next control to proceed.
If the scanner cannot reach the domain or the credentials are not valid, it will state that it cannot connect to the domain with suppliedcredentials.
In that case, check your credentials or use different credentials.
Scan Settings
The scanner allows you to choose whether to discover accounts across the entire domain or only accounts in a specific OU. Scanning aspecific OU will limit the number of computers the tool investigates.
http://www.thycotic.com 127

Discovering Accounts
Before you start the scan, review the number of computers the discovery tool retrieved from Active Directory based on what OU or domain youchose to scan. If the numbers seem ballpark, click Start Scan. If you think the number of computers to be scanned seems improbably high,consult your IT support staff for guidance.
While the scan runs, you will see the number of computers scanned progress. You can stop the scan at any point and generate the reportsbased off of the accounts discovered so far.
The time to complete the scan will vary based on network latency, the number of machines, and how many machines actually exist. Testing ina large environment resulted in a scan of approximately 1,000 Windows machines in slightly under an hour.
http://www.thycotic.com 128

Results
Once the scan completes, you can generate the Executive Summary report and the detailed CSV reports. Just enter a company name and clickGenerate Reports.
The reports will be created in the folder you select. They consist of two files.
File Description
ThycoticServiceAccountRiskSnapshot.html Summary report of findings
ThycoticServiceAccountRiskSnapshot.pdf Summary report of findings
FAQ
Q: Why doesn’t the inventory report show results for all machines in my domain?
A: If there were any issues connecting to a machine, such as network connectivity, insufficient permissions, or closed ports, the machine willnot show up in the results. You can investigate the scan log located in the tool folder’s log subfolder, which will contain errors for machines thatcouldn’t be scanned.
Q: How long will it take to scan my domain?
A: The time to discover accounts will vary depending on network latency and number of machines that respond. A test environment ofapproximately 1,000 Windows machines took 50 minutes. We recommend testing out your scan first on a smaller OU to get a sense of time andresults before scanning a larger OU or your full domain.
Q: The PDF report has inconsistent margins or page breaks.
A: Some display drivers or screen resolutions can cause these PDF defects. Run the scan from a different machine or use the HTML version.The HTML file contains the same information as the PDF.
Q: Where can I download the free tool?
http://www.thycotic.com 129

A: The Service Account Discovery Tool, along with other Free IT Tools, can be found on the Thycotic website here
http://www.thycotic.com 130

Release Notes
As a cloud application updates become available to all Users as they occur—the current version is always the only version available. Thycoticperiodically updates Account Lifecycle Manager to introduce additional features and provide fixes and improvements.
This article tracks those changes to ALM.
Account Lifecycle Manager: Change Log
Update Notes
January2022
improvement: Overall performance improvements of the application through various backend enhancement and fixes.
improvement: Usability improvement, providing an increased data range display for managed account history. The data rangeis configurable to meet individual business needs. Default: 90 days, min/max setting: Today/Show All.
fix: Corrected an issue where the account URL on an email template incorrectly showed all managed accounts.
December2021
feature: Added the ability to sort and filter Managed Accounts by Workflow Template. Additionally, a Report displaying allManaged accounts is now added.
improvement: Updated the User page to allow unlinking an Active Directory or Azure Active Directory domain from an ALMUser.
fix: Validation no longer fails when attributes are defined as read-only on the template.
fix: An issue is resolved for accounts not renewing when the account name is set incorrectly through the API. This affectedaccounts with an updated name in the format [email protected].
fix: When defining a Workflow Template for SAP, folders now display correctly.
fix: An issue with the Renew button not being enabled immediately after an end of lifecycle event is addressed.
November2021
feature: Google Cloud Platform Service Account Provisioning is now available in ALM. This gives ALM the ability to managethe lifecycle around GCP IAM service accounts, as well as assign roles and permissions.
improvement: A Delete button is added that allows the user to delete an existing SIEM configuration.
improvement: The Webhook URL field and Webhook Authorizations URL field no longer require HTTPS validation,however, the URL field cannot be blank.
fix: A nightly automated task is set to find any account that is stuck in the Retrying status and attempt to place it back into theappropriate actionable state. A bug existed in this logic that was accepting "Retrying" as an actionable state. This is fixed.
fix: The Accounts Missing Secrets report now only reports Managed accounts missing secrets.
fix: A bug was introduced that caused the nightly refresh of managed accounts to fail. This refresh updates ALM to match theEnabled/Lockout (where applicable) states, as well as account attributes that are being tracked by ALM to reflect the valuespresent on the domain where the managed account resides. This is resolved with Patch 3.9.1 and the nightly refreshes arenow working as expected.
http://www.thycotic.com 131

Update Notes
October2021
improvement: Using the Account Migration Wizard, the ability to update Active directory attributes directly on the accounts inAD is now available. Administrators can also move existing accounts to different workflow templates or between differentversions of a template.
improvement: When accounts are added via Discovery, administrators receive email alerts.
improvement: When authenticating to AWS Secrets Manager using an EC2 instance, ALM does not need to store thecredentials as Authentication is handled directly in AWS.
improvement: The Description field on Account Requests has been renamed to Account Description and is now required.The Justification/Reason field is no longer displayed for a Managed Account.
fix: Request rejected for accounts with longer than 20 characters in the name. This issue is resolved.
fix: Managed accounts now allow editing the secret after account creation.
September2021
improvement: AWS IAM Account Provisioning adds the ability to provision and manage AWS Identity and AccessManagement (IAM) accounts and groups in ALM. Additionally, the ability to sync Users, Groups and Policies is available.
fix: Users are now able delete a managed account when they have the sys admin role directly or via group membership.
fix: When working with Managed Accounts, users no longer remain in the Retrying Status.
fix: The Audits page no longer generates an API error.
August2021
improvement: Workflow Groups can now be assigned from the Groups page.
improvement: Added the ability to customize recipients for email templates.
improvement: Domains can now be permanently deleted.
fix: When saving a domain/vault sync, the time will now save correctly as UTC.
fix: A rare bug preventing LDAP synced accounts from being deleted or disabled is resolved.
fix: RegEx validation now prevents space characters from being added to the end of account names.
July 2021 improvement: Account Request forms now show the email addresses associated with the requester's ALM account.
improvement: On the Workflow Templates page, deprecated templates are now filtered by default.
improvement: On the users page, the role tab editing workflow is updated.
fix: On requests, a default secret folder is no longer selected in the case of folder override or multiple selected folders.
fix: Approvals now function as intended with ServiceNow authentication.
fix: A rare bug causing an "Access Denied" pop-up on the Approvals page has been resolved.
http://www.thycotic.com 132

Update Notes
June 2021Release 2
improvement: ALM now supports the latest version of SNOW (Paris).
fix: Fixed small, non-critical bugs for enhanced performance and user experience.
June 2021Release 1
improvement: Updated Account Lifecycle Managers UI framework for an improved look and feel in the application.
feature: ALM now supports Azure AD role sync.
May 2021 feature: ALM now integrates with HashiCorp Vault.
April 2021 improvement: Minor enhancements and improvements.
March2021
feature: ALM now integrates with Azure Key Vault and AWS Secrets Manager.
improvement: UI updates throughout ALM.
February2021
feature: The Account Migration page allows administrators to change the workflow template, review interval, lifecycle end date,and owners of an existing service account.
improvement: Workflow templates include the option to hide the names of approvers from requesters.
improvement: Workflow templates include the option to allow a requester to choose sub-organization units within a designatedfolder.
improvement: Webhooks can now be tested from the Webhook Management page.
January2021
feature: The SIEM integrations page allows administrators to integrate ALM with SIEM applications.
improvement: Updated UI for webhook authorization, workflow templates, account discovery, and custom HTTP headers.
improvement: Administrators can specify the maximum number of service account owners when creating a template.
December2020
feature: The webhook authorization page allows administrators and users with webhook permissions to add authentication towebhooks.
improvement: Administrators and users with webhook permissions can add custom HTTP headers to webhooks.
improvement: When creating or editing an Active Directory template, administrators can restrict users from changingpasswords.
improvement: When creating a workflow template, administrators can define a regex check on Service Account names.
improvement: When a Secret Server vault sync is run, ALM will search for managed accounts without a SecretID.
http://www.thycotic.com 133

Update Notes
November2020
improvement: Updated UI for managing Roles in ALM.
improvement: Account rejection explanation appears on the Request details page.
improvement: Requestors can specify a reason for requesting an account renewal.
fix: The configuration tab on a Managed Account now updates and reloads automatically after updating a SecretID.
October2020
First general availability release of ALM Self-Hosted.
September2020
feature: ServiceNow Requests - ALM’s ServiceNow integration will now support submitting ALM Requests via ServiceNow.This update presents the opportunity for users of ALM and ServiceNow to handle both the Requests and Approval processdirectly within ServiceNow. Requests can be made for Active Directory and AzureAD accounts. Note: Customers that alreadyhave the ALM ServiceNow application installed in ServiceNow must update to latest version.
feature: AzureAD Group Synchronization - ALM now has the ability select AzureAD Groups from a connected Azure Domainand have them synchronized with ALM. This allows the users to leverage existing AzureAD accounts for establishing theuserbase for ALM. Any changes made in AzureAD for Groups enabled in the synchronization will automatically updated inALM, upon the completion of the determined synchronization schedule.
August2020
feature: Inbox - Provides in-app notifications within ALM. Inbox is comprised of three categories of notifications which allows auser to see notifications relevant to their Role and Accounts within ALM.
feature: ALM Engine Local Account Support - Support for the ALM Engine to allow for a local machine account to run theservice.
feature: Orphaned Accounts - Set of controls to prevent accounts going without at least one active User or Group assigned asAccount Owner.
July 2020feature: Managed Account Dependencies - Ability for ALM to display the dependencies associated with managed accounts.This is pulled from the Secret Server secret into ALM during the Vault sync.
feature: Vault Sync - : Sync functionality updated to allow ad-hoc sync of the vault, as well as enable dependencysynchronization.
improvement: Tool tips and assisting text added to UI to support aspects of gMSA Workflow Template configuration in ALM.
improvement: Dashboard page updated to provide more room for widgets.
June 2020feature: Group Managed Service Accounts (gMSA) Support - A group Managed Service Account (gMSA) provides the samefunctionality within the domain but also extends that functionality over multiple servers. ALM adds support in the form of theability to control the lifecycle of gMSA’s.
improvement: Reason Column on Approvals Table - Approvers are provided the account request reason directly in theApprovals table, for easier access and expedited review.
http://www.thycotic.com 134

Update Notes
improvement: Renewal Status in Managed detail screen - To make it easier for Account Owners to view renewal requeststatus, a link is added in the Account Status row for the ability to navigate from the Managed Account detail page to the requestfor further detail.
May 2020beta feature: ServiceNow Integration - Ability to reject an ALM Request in ServiceNow. Note: New version of ServiceNow ALMapp must be installed.
improvement: Added the ability to select rows to be displayed in any table in ALM.
April 2020beta feature: ServiceNow Integration - Provides a integration to from ALM, to ServiceNow, for reviewing and approvingrequests made in ALM.
feature: EOL OU Retirement - For the use case of keeping Organization Units (OUs) organized and manageable, this featureoffers the option to select which OU an account is sent to when ALM disables the account at the end of its determined lifecycle.
improvement: Webhook History - A tab in UI of the Webhooks pages allows Administrators and Users with the necessarypermissions to view the activity history of a given webhook.
March2020
feature: Azure Active Directory Support - ALM extends its directory service support to include Azure AD. This allows ALM tomanage accounts located in Azure AD
feature: Onboarding Assistance - Users that are synced into ALM from Active Directory will receive an automated email toassist with onboarding the user to ALM.
February2020
improvement: Left navigation menu styling update.
improvement: Update to the design and layout of the Group detail pages.
fix: ALM Engine UI configurator tool now launches after the ALM Engine installer finishes.
January2020
feature: ALM Engine Configuration launches a local webpage upon completion of the ALM Engine installer. The tool assistswith testing the setup.
improvement: General application performance enhancements. Enhancements to the Audit log load time.
improvement: Update to the Managed Account feature which allows a permission set to allow Users with an assigned CustomRole to see all Managed Accounts in ALM.
December2019
improvement: increased Secret Server support with DSV is now a vault option for managed accounts
improvement: syncing features improved via consolidation of formerly separate syncs to run as a single operation
improvement: new tool allows selection of a specific AD Group for its AD Accounts to be imported and then synced on aschedule
improvement: new built-in ALM Group “Everyone” includes all ALM Users; applies new built-in Role of “Account Owner” that
http://www.thycotic.com 135

Update Notes
lets users see their assigned accounts
improvement: the Remote Worker renamed ALM Engine for clarity; beta features previewed in November continue to beavailable in December as they mature
improvement: new UI detailing on Left Panel Wizards and certain detail pages creates more context and helps customersnavigate
November2019
improvement: the Active Directory Account Discovery tool now supports New Account Notification to help ensure all ADaccounts benefit from ALM governance tools
improvement: new ALM Engine Calibration feature automates the determination of what ALM Engines have access to whatVaults and AD farms
improvement: tabbed interface for Vault Details page brings improved usability
a beta tool: a new tool for ALM Engine Configuration, intended to streamline the processes related to setting up ALM Engines,is accessible in this update
October2019
improvement: new Active Directory Account Discovery tool supports bringing any or all service accounts under themanagement of ALM
improvement: System Administrators can select the frequency at which domains automatically sync with ALM, plus commit on-demand sync
improvement: Workflow Templates let System Administrators define account name prefixes to conform accounts provisionedby ALM to naming conventions
improvement: better audit logging performance helps organizations with high audit log volumes
improvement: enhanced external AD sync performance benefits organizations with larger AD installations
improvement: improved table designs: new row hover highlighting, more obvious labeling when column sorting is available,and stationary header row during scrolling
improvement: the design of ALM modules appears more uniform across the application
improvement: icons used within ALM feature more effective designs
improvement: the Workflow Template Wizard has an improved visual design
August2019
first General Availability release
http://www.thycotic.com 136

References
API documentation portalGDPRSLAsSOC2
http://www.thycotic.com 137

SLAs and Related Operational Considerations
Account Lifecycle Manager offers a 99.9% Uptime SLA based on the Azure uptime SLAs of its component products and services.
Business Continuity
Every 5 to 10 minutes, ALM backs up transaction logs to local storage. This supports a Recovery Point Objective (RPO) of ten minutes.
Every hour, ALM backs up transaction logs to a geographically redundant location, supporting an RPO of 1 hour.
ALM also creates differential backups approximately every 12 hours, and full database backups approximately every 24 hours.
Disaster Recovery
The failure of an entire Azure Region would cause complete loss of access to Thycotic’s cloud entities located in the failed region for anindefinite, ongoing time.
To recover from such, Thycotic would rebuild an ALM instance in another Azure region. The target for rebuilding and connecting to thegeographically redundant database is 12 hours, although Thycotic cannot guarantee that target.
Confidentiality
Data-at-rest
ALM encrypts some critical data, including requests, audits, Secret Server connection information, and any other stored credentials such as APITokens.
Encryption transparently applies to all data stored in the Azure SQL Server databases. This includes application audit logging. ALM does notencrypt the ALM Engine logs.
Data-in-Transit
ALM establishes HTTPS connections in conformance with TLS 1.2 protocols. This includes API and ALM Engine connections.
Client Authentication
Authentication proceeds using OIDC to Thycotic One.
Integrity: Code Signing
Code signing applies to the ALM Engine software, which is downloaded to the customer’s premises to coordinate interactions among ALM andthe customer’s Active Directory and Secret Server resources.
http://www.thycotic.com 138

General Data Protection Rule (GDPR)
ALM requires certain Personally Identifiable Information (PII) to identify each User’s account. This includes the User’s name, email address,and password, these being the minimum necessary for authentication.
ALM tracks IP addresses to support access auditing.
Only select, trusted employees of Thycotic can access customer data and decrypt it, and only by a controlled process that generates an audittrail inaccessible to those employees. This serves the interests of Users without compromising their privacy and control.
In GDPR terms, Thycotic customers are the data controllers, and Thycotic is the data processor.
Each ALM customer entirely controls their Users, their User Roles, and the access to data by their Users, according to the policies of thecustomer organization. ALM logs activity so the customer can monitor access and changes to the Secrets, Users, and Roles, all according tothe customer’s policies.
Thycotic conducts a Privacy Impact Assessment (PIA) annually to verify continued conformance to GDPR principles.
http://www.thycotic.com 139
SOC II
Thycotic offers its customers a SOC II Type II Annual Report documenting two rounds of checks. A third party creates the report as anindependent assessment of Thycotic’s control environment.
The SOC II report, issued annually in accordance with the AICPA’s AT Section 101 (Attest Engagements) and based on the AICPA’s TrustServices Criteria, addresses the Security, Availability, and Confidentiality criteria.
http://www.thycotic.com 140