Doing Business on Facebook - The Mini Missing Manual
71
E. A. Vander Veer Doing Business on Facebook
-
Upload
independent -
Category
Documents
-
view
0 -
download
0
Transcript of Doing Business on Facebook - The Mini Missing Manual
E. A. Vander Veer
Doing Business on
Doing Business on Facebook: The Mini Missing Manualby E.A. Vander Veer
Copyright © 2010 O’Reilly Media, Inc. All rights reserved.
Published by O’Reilly Media, Inc., 1005 Gravenstein Highway North, Sebastopol, CA 95472.
O’Reilly Media books may be purchased for educational, business, or sales promotional use. Online editions are also available for most titles: safari.oreilly.com. For more information, contact our corporate/institutional sales department: 800-998-9938 or [email protected].
June 2010: First Edition.
The Missing Manual is a registered trademark of O’Reilly Media, Inc. The Missing Manual logo, and “The book that should have been in the box” are trademarks of O’Reilly Media, Inc. Many of the designations used by manufacturers and sellers to distinguish their products are claimed as trademarks. Where those designations appear in this book, and O’Reilly Media is aware of a trademark claim, the designations are capitalized.
While every precaution has been taken in the preparation of this book, the publisher assumes no responsibility for errors or omissions, or for damages resulting from the use of the information contained in it.
ISBN: 9781449382247
Dow
nlo
ad fro
m W
ow
! eBook
<w
ww
.wow
ebook.
com
>
Table of Contents
Introduction........................................................................................v
Chapter.1:.Hiring.and.Getting.Hired................................................ 1Recruiting New Hires .....................................................................................................................1
Creating a Recruitment Page ................................................................................................2Using Facebook Groups ........................................................................................................3Paid Advertising ......................................................................................................................4Posting a Marketplace Ad .....................................................................................................5Working with a Recruiting Firm ............................................................................................6Searching for Prospects .........................................................................................................7Announcing an Opening to Your Friends............................................................................9
Vetting Prospects ..........................................................................................................................11Looking for a Job ..........................................................................................................................13
Turning Your Profile into a Resumé ...................................................................................13Using the Marketplace .........................................................................................................14Networking ............................................................................................................................ 17
Chapter.2:.Collaborating.on.Projects.via.Facebook......................19Keeping in Touch ..........................................................................................................................19
Sending Messages ................................................................................................................21Setting up Meetings .............................................................................................................21Exchanging Ideas ..................................................................................................................23Creating and Subscribing to Notes ....................................................................................24
Exchanging Files ...........................................................................................................................25Sharing Pictures ....................................................................................................................26Creating and Filling a Picture Album .................................................................................27Editing Your Album ..............................................................................................................31Viewing Your Album ............................................................................................................33Restricting Access to Your Albums .....................................................................................34Tagging (Labeling) Your Pictures ........................................................................................35Sharing Links (and Other Items) ........................................................................................37
Keeping Up-to-Date with Feeds .................................................................................................40
Chapter.3:.Advertising.on.Facebook.............................................. 43Facebook Pages: Profiles for Bands, Brands, and More .........................................................44
How Pages Work ..................................................................................................................46Creating a Page.....................................................................................................................47Liking Pages ..........................................................................................................................49
Social Ads (Targeted Announcements) .....................................................................................51Creating and Running a Social Ad .....................................................................................52
Connect Facebook to Your Website with Widgets ...................................................................59High-Dollar Options .....................................................................................................................62
Colophon.......................................................................................... 65
Introduction
Facebook has grown up a lot since its early days as a site where college kids could connect. Now, everyone from your nephew to your boss to your neighbor is likely on Facebook. And the site isn’t just a place to goof off and learn the latest gossip: It’s a great place to network, collaborate on projects, and promote your business.
In Chapter 1 of this Mini Missing Manual, you’ll learn how to hunt for a job on Facebook—or use it to help fill a job opening. Chapter 2 covers the various ways the site can help keep your team on track by exchanging files, sharing info, and more. And Chapter 3 explains all your options for advertising on Facebook, from the free to the super spendy.
Tip: To learn more about the ins and outs of Facebook, check out Facebook: The Missing Manual, Second Edition, from which this Mini Missing Manual was adapted.
Dow
nlo
ad fro
m W
ow
! eBook
<w
ww
.wow
ebook.
com
>


Chapter 1
In real life, people hire and fire based on info they get through the grapevine—in other words, through their social networks: “You’re looking for a programmer? My brother-in-law’s the best program-mer on the planet! Here’s his number.” Or, “They’re hiring down at my gym. You should throw them a resumé.”
Because Facebook’s whole raison d’être is social networking, it should come as no surprise that the site can be a big help in job searches. This chapter shows you how to work the job pool from both angles: If you’re looking for an employee or intern, you can use Facebook to recruit and vet prospects. If you’re job hunting, you can use it to research jobs and make connections with people who might help you get hired.
Recruiting New Hires
Facebook’s recruiting options range from free to pricey. Deciding up front who you want to target (recent college grads with specific degrees? Seasoned employees at rival firms? Anyone in the greater tri-state area with a pulse?) can help you choose the best options for your particular situation.
Hiring and Getting Hired
2
Doing Business on FaceBook: The Mini Missing Manual
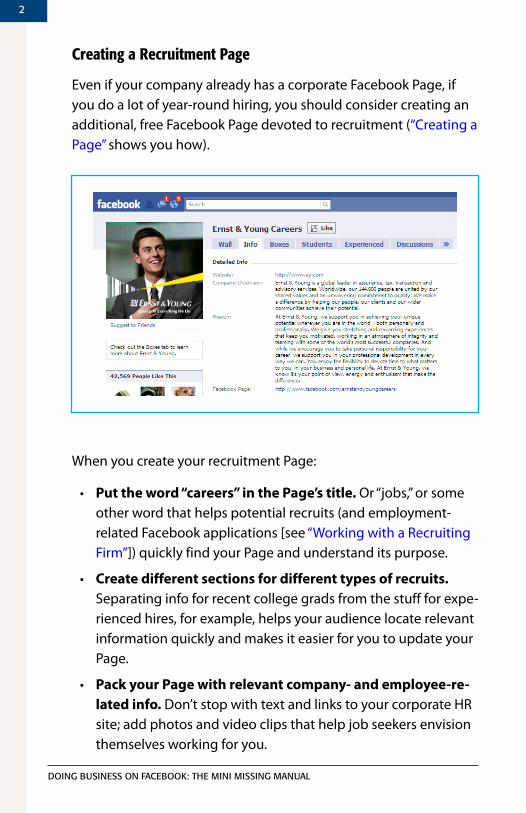
Creating.a.Recruitment.Page
Even if your company already has a corporate Facebook Page, if you do a lot of year-round hiring, you should consider creating an additional, free Facebook Page devoted to recruitment (“Creating a Page” shows you how).
When you create your recruitment Page:
• Put the word “careers” in the Page’s title. Or “jobs,” or some other word that helps potential recruits (and employment-related Facebook applications [see “Working with a Recruiting Firm”]) quickly find your Page and understand its purpose.
• Create different sections for different types of recruits. Separating info for recent college grads from the stuff for expe-rienced hires, for example, helps your audience locate relevant information quickly and makes it easier for you to update your Page.
• Pack your Page with relevant company- and employee-re-lated info. Don’t stop with text and links to your corporate HR site; add photos and video clips that help job seekers envision themselves working for you.
3
Doing Business on FaceBook: The Mini Missing Manual
• Do things on your Page frequently. Each time you post a job, schedule an event such as a hiring fair, or take some other ac-tion on your Page, would-be recruits who’ve “liked” your Page (see “Liking Pages”) get instant notification.
Tip: if you’re looking to fill a niche position, you may find it worth your while to troll the comments visitors leave on your Facebook Page’s wall or discussion section and email folks who look like potential hires.
Using.Facebook.Groups
There’s a fair amount of overlap between Facebook Pages and groups. The difference? The point of a group is to get people to participate and chat among themselves. Pages, on the other hand, can be set up to be more like a traditional web page, with informa-tion flowing primarily one direction—from the Page administrator to interested readers (called fans in Facebook speak). In addition, groups let you send emails directly to interested recruits, whereas Pages automatically send notifications of the actions you take on your Page and let you send mass updates (emails earmarked as Facebook “updates”) instead of regular emails. You have finer control over who gets to join a group than you do over who gets to become a fan of your Page, too. All of this means groups are great for specific categories of potential recruits (for example, folks inter-ested in a certain type of position like customer service or sales), and creating a personalized, “club” atmosphere
To create a group, head to your Home page by clicking the word “facebook” at the top left of any Facebook screen. Then, on the left side of your Home page, click Groups. (If you don’t see the Groups link, try clicking the word “More” to expand the left-hand menus.) On the page that appears, click the “Create a Group” button and fill in the form that appears, describing your company and the kinds of positions you need to fill.
4
Doing Business on FaceBook: The Mini Missing Manual
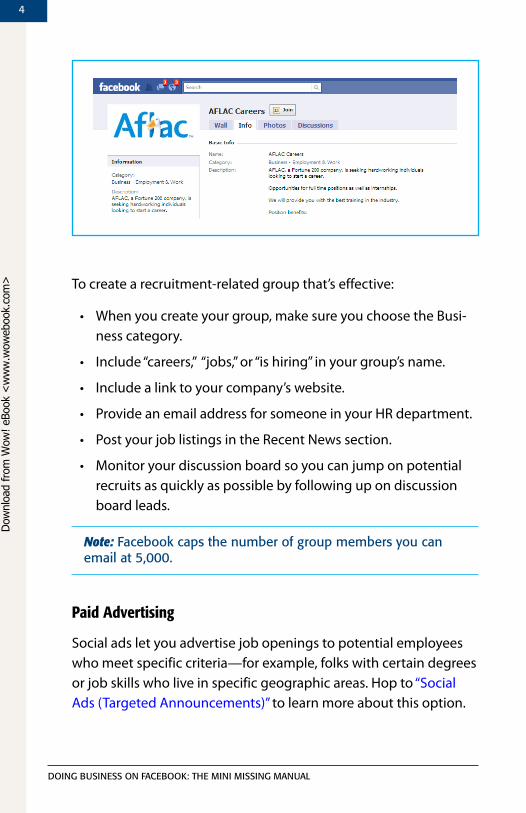
To create a recruitment-related group that’s effective:
• When you create your group, make sure you choose the Busi-ness category.
• Include “careers,” “jobs,” or “is hiring” in your group’s name.
• Include a link to your company’s website.
• Provide an email address for someone in your HR department.
• Post your job listings in the Recent News section.
• Monitor your discussion board so you can jump on potential recruits as quickly as possible by following up on discussion board leads.
Note: Facebook caps the number of group members you can email at 5,000.
Paid.Advertising
Social ads let you advertise job openings to potential employees who meet specific criteria—for example, folks with certain degrees or job skills who live in specific geographic areas. Hop to “Social Ads (Targeted Announcements)” to learn more about this option.
Dow
nlo
ad fro
m W
ow
! eBook
<w
ww
.wow
ebook.
com
>
5
Doing Business on FaceBook: The Mini Missing Manual
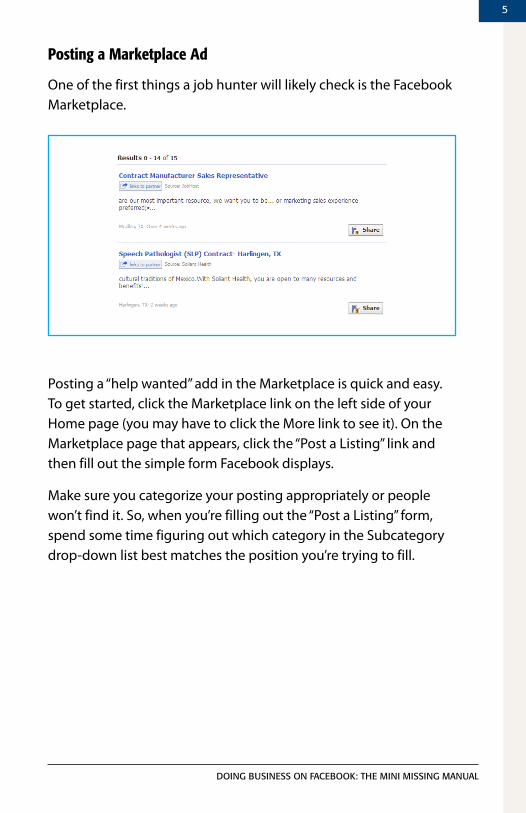
Posting.a.Marketplace.Ad
One of the first things a job hunter will likely check is the Facebook Marketplace.
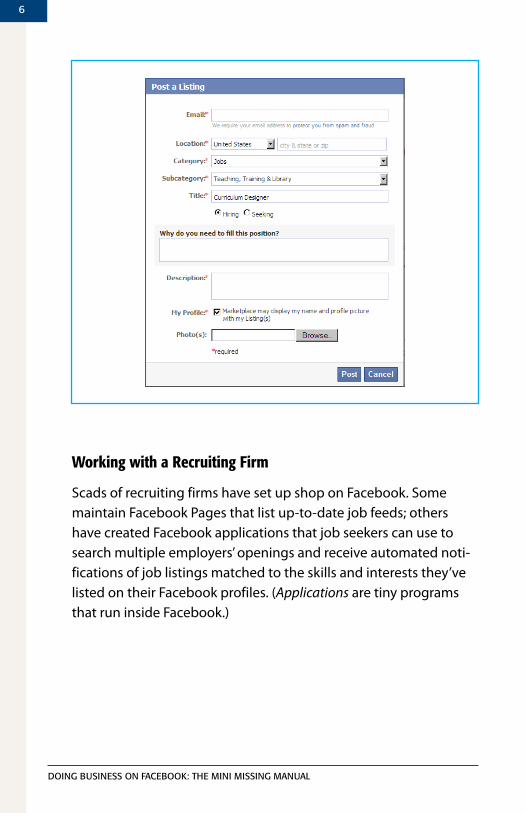
Posting a “help wanted” add in the Marketplace is quick and easy. To get started, click the Marketplace link on the left side of your Home page (you may have to click the More link to see it). On the Marketplace page that appears, click the “Post a Listing” link and then fill out the simple form Facebook displays.
Make sure you categorize your posting appropriately or people won’t find it. So, when you’re filling out the “Post a Listing” form, spend some time figuring out which category in the Subcategory drop-down list best matches the position you’re trying to fill.
6
Doing Business on FaceBook: The Mini Missing Manual
Working.with.a.Recruiting.Firm
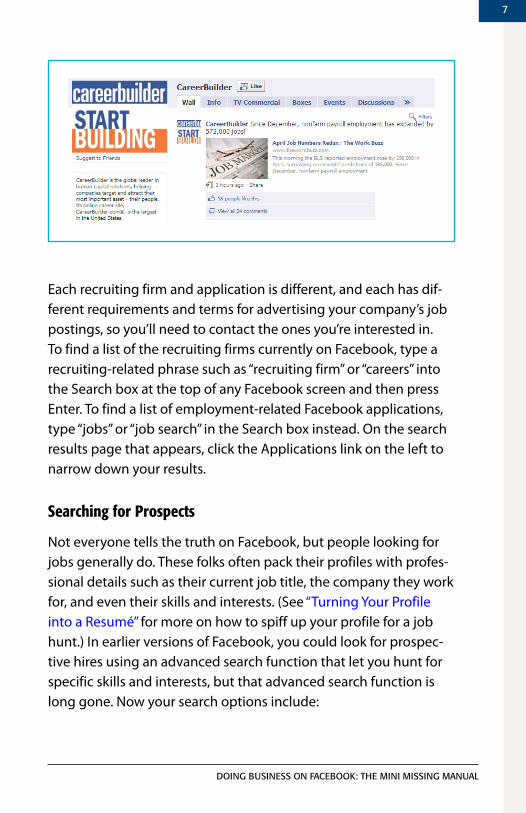
Scads of recruiting firms have set up shop on Facebook. Some maintain Facebook Pages that list up-to-date job feeds; others have created Facebook applications that job seekers can use to search multiple employers’ openings and receive automated noti-fications of job listings matched to the skills and interests they’ve listed on their Facebook profiles. (Applications are tiny programs that run inside Facebook.)
7
Doing Business on FaceBook: The Mini Missing Manual
Each recruiting firm and application is different, and each has dif-ferent requirements and terms for advertising your company’s job postings, so you’ll need to contact the ones you’re interested in. To find a list of the recruiting firms currently on Facebook, type a recruiting-related phrase such as “recruiting firm” or “careers” into the Search box at the top of any Facebook screen and then press Enter. To find a list of employment-related Facebook applications, type “jobs” or “job search” in the Search box instead. On the search results page that appears, click the Applications link on the left to narrow down your results.
Searching.for.Prospects
Not everyone tells the truth on Facebook, but people looking for jobs generally do. These folks often pack their profiles with profes-sional details such as their current job title, the company they work for, and even their skills and interests. (See “Turning Your Profile into a Resumé” for more on how to spiff up your profile for a job hunt.) In earlier versions of Facebook, you could look for prospec-tive hires using an advanced search function that let you hunt for specific skills and interests, but that advanced search function is long gone. Now your search options include:
8
Doing Business on FaceBook: The Mini Missing Manual
• Working with one of the recruiting firms on Facebook that searches members’ profiles for you—for a fee.
• Installing and using a Facebook application, such as Advanced Search 2.0, that has sophistocated search features.
• Using a stripped-down version of the original Facebook search feature.
Tip: To search for potential recruits who currently work for an-other company, point your browser to www.facebook.com/srch.php. in the “search by company” section, type in the company’s name, and then click “search for coworkers”.
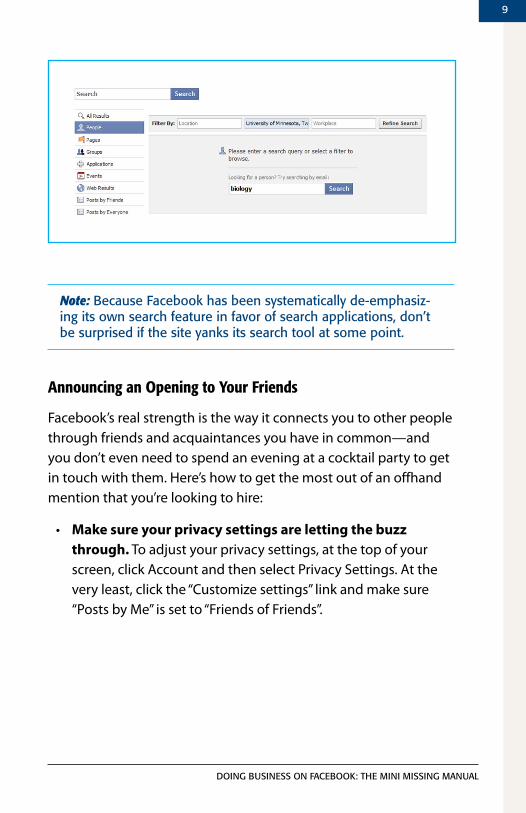
Recruiting firms and Facebook search applications find member profiles in various ways. Searching using Facebook’s built-in search tool is relatively straightforward, but won’t return as targeted a list of prospects as the first two approaches listed above. To use Face-book’s built-in search tool:
1. Point your browser to www.facebook.com/search.
2. Click the People link on the left side of the page.
3. In the Filter By section, type a location, school, or work-place in the appropriate field; then enter a specific skill, degree, or activity in the box in the middle of the screen and click Search.
4. Comb through the results, check out the most promising people’s profiles, and contact the folks you’re interested in.
Dow
nlo
ad fro
m W
ow
! eBook
<w
ww
.wow
ebook.
com
>
9
Doing Business on FaceBook: The Mini Missing Manual
Note: Because Facebook has been systematically de-emphasiz-ing its own search feature in favor of search applications, don’t be surprised if the site yanks its search tool at some point.
Announcing.an.Opening.to.Your.Friends
Facebook’s real strength is the way it connects you to other people through friends and acquaintances you have in common—and you don’t even need to spend an evening at a cocktail party to get in touch with them. Here’s how to get the most out of an offhand mention that you’re looking to hire:
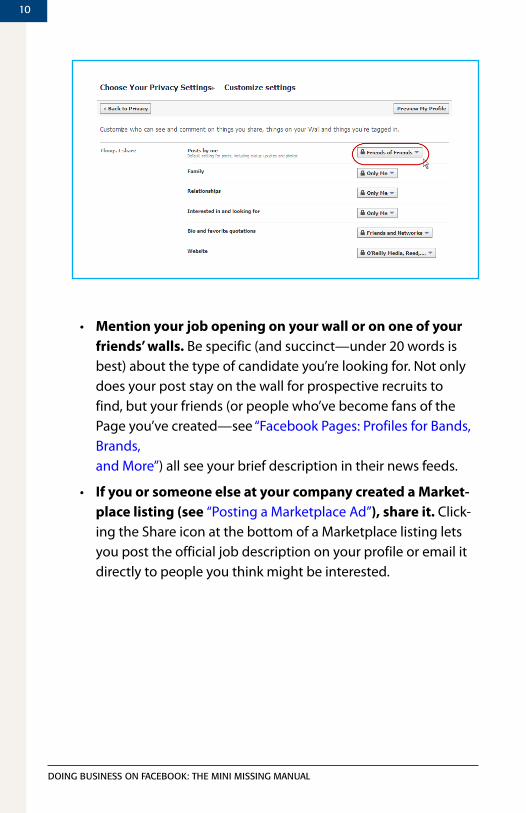
• Make sure your privacy settings are letting the buzz through. To adjust your privacy settings, at the top of your screen, click Account and then select Privacy Settings. At the very least, click the “Customize settings” link and make sure “Posts by Me” is set to “Friends of Friends”.
10
Doing Business on FaceBook: The Mini Missing Manual
• Mention your job opening on your wall or on one of your friends’ walls. Be specific (and succinct—under 20 words is best) about the type of candidate you’re looking for. Not only does your post stay on the wall for prospective recruits to find, but your friends (or people who’ve become fans of the Page you’ve created—see “Facebook Pages: Profiles for Bands, Brands, and More”) all see your brief description in their news feeds.
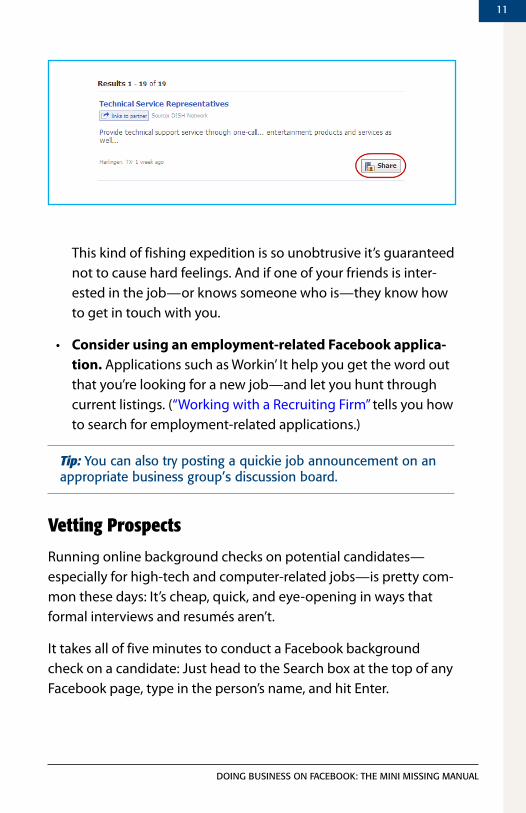
• If you or someone else at your company created a Market-place listing (see “Posting a Marketplace Ad”), share it. Click-ing the Share icon at the bottom of a Marketplace listing lets you post the official job description on your profile or email it directly to people you think might be interested.
11
Doing Business on FaceBook: The Mini Missing Manual
This kind of fishing expedition is so unobtrusive it’s guaranteed not to cause hard feelings. And if one of your friends is inter-ested in the job—or knows someone who is—they know how to get in touch with you.
• Consider using an employment-related Facebook applica-tion. Applications such as Workin’ It help you get the word out that you’re looking for a new job—and let you hunt through current listings. (“Working with a Recruiting Firm” tells you how to search for employment-related applications.)
Tip: You can also try posting a quickie job announcement on an appropriate business group’s discussion board.
Vetting Prospects
Running online background checks on potential candidates— especially for high-tech and computer-related jobs—is pretty com-mon these days: It’s cheap, quick, and eye-opening in ways that formal interviews and resumés aren’t.
It takes all of five minutes to conduct a Facebook background check on a candidate: Just head to the Search box at the top of any Facebook page, type in the person’s name, and hit Enter.
12
Doing Business on FaceBook: The Mini Missing Manual
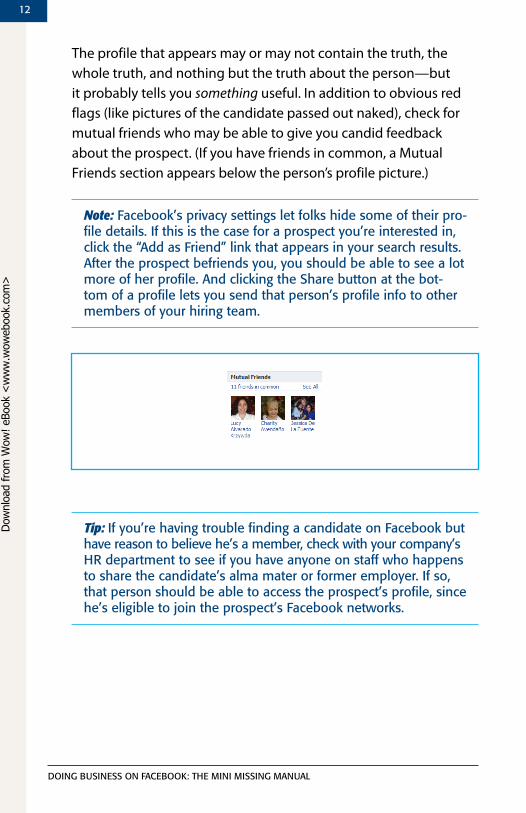
The profile that appears may or may not contain the truth, the whole truth, and nothing but the truth about the person—but it probably tells you something useful. In addition to obvious red flags (like pictures of the candidate passed out naked), check for mutual friends who may be able to give you candid feedback about the prospect. (If you have friends in common, a Mutual Friends section appears below the person’s profile picture.)
Note: Facebook’s privacy settings let folks hide some of their pro-file details. if this is the case for a prospect you’re interested in, click the “add as Friend” link that appears in your search results. after the prospect befriends you, you should be able to see a lot more of her profile. and clicking the share button at the bot-tom of a profile lets you send that person’s profile info to other members of your hiring team.
Tip: if you’re having trouble finding a candidate on Facebook but have reason to believe he’s a member, check with your company’s hR department to see if you have anyone on staff who happens to share the candidate’s alma mater or former employer. if so, that person should be able to access the prospect’s profile, since he’s eligible to join the prospect’s Facebook networks.
Dow
nlo
ad fro
m W
ow
! eBook
<w
ww
.wow
ebook.
com
>
13
Doing Business on FaceBook: The Mini Missing Manual
Looking for a Job
Facebook is a terrific tool for anyone searching for a gig. Not only can you use your profile as a combination multimedia resumé/portfolio, but you can also use Facebook to network and tap into your friends’ expertise and contacts. Read on to learn how.
Note: a quick search of Facebook’s application Directory (http://www.facebook.com/apps/directory.php) for “jobs” and “employ-ment” yields dozens of Facebook applications designed to help you land gainful employment.
Turning.Your.Profile.into.a.Resumé
If you’re serious about making Facebook part of your job hunt, the first thing to do is assume that every potential hiring manager can see your whole profile, and build (or clean up) your profile accord-ingly. You don’t want your dream job to slip through your fingers because of a stupid comment, a way-too-candid photo, or mem-bership in a group that celebrates illegal activities, for example. Maybe you mean it all as a joke, but that doesn’t matter: If you have an unprofessional profile, a hiring manager will take one look at it and see, at the very least, poor judgment and a total lack of understanding of how the Web works.
Note: While Facebook gives you several ways to hide profile info, you can’t trust that the information will stay hidden.
Here are some ways to spiff up your profile to help you land a job:
• Edit your Profile info. At the top of any Facebook page, click Profile, and then click the Info tab near the top of the screen. Fill out the Education and Work sections completely, using all the industry buzzwords you can in the Description field. Also, describe your job-related skills in the Activities and Interests
14
Doing Business on FaceBook: The Mini Missing Manual
section. Because these fields are easy for potential employers to search, pack them with descriptions of your technical abili-ties and interpersonal skills.
• Do work-related stuff on Facebook. Post regular, impressive notes that relate to your current job or job-related interests; start work-related groups; hold work-related events; upload samples of your work such as reports, slideshows, video or au-dio clips, photos, or applications you’ve written; and befriend as many industry movers and shakers as you can.
• Present yourself professionally. Keep the silly astrology and zombie applications to a minimum, choose your friends carefully, and don’t write anything on anybody’s wall that you wouldn’t feel comfortable writing on a whiteboard at work.
• Don’t assume that potential employers won’t be able to access your networks or profile. In all probability, they can and will.
Using.the.Marketplace
Facebook hopes its Marketplace will become the go-to place for jobs (and sofas, and roommates, and all the other transactions that make up day-to-day life). The Marketplace is much beefier than it was just a year ago, but it’s still a little skimpy on bona fide job listings, so sites like www.monster.com and www.craigslist.org prob-ably aren’t feeling particularly threatened just yet. Still, it’s worth spending some time checking out the Marketplace. At the very least:
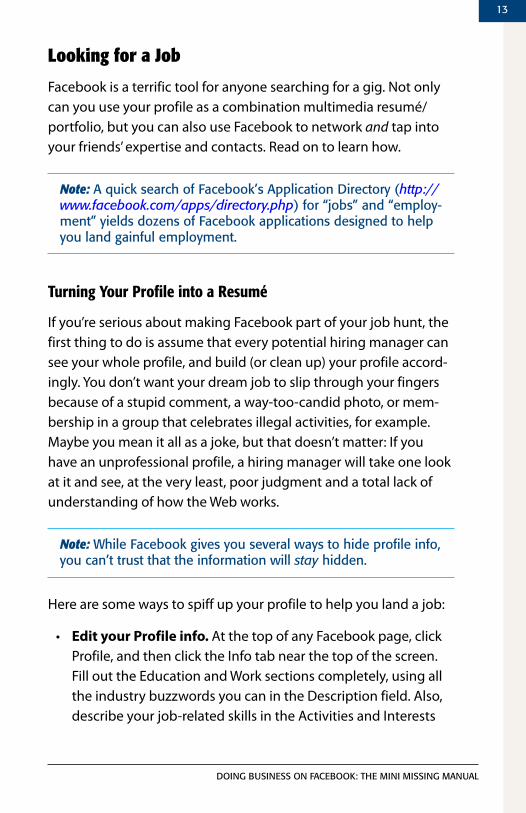
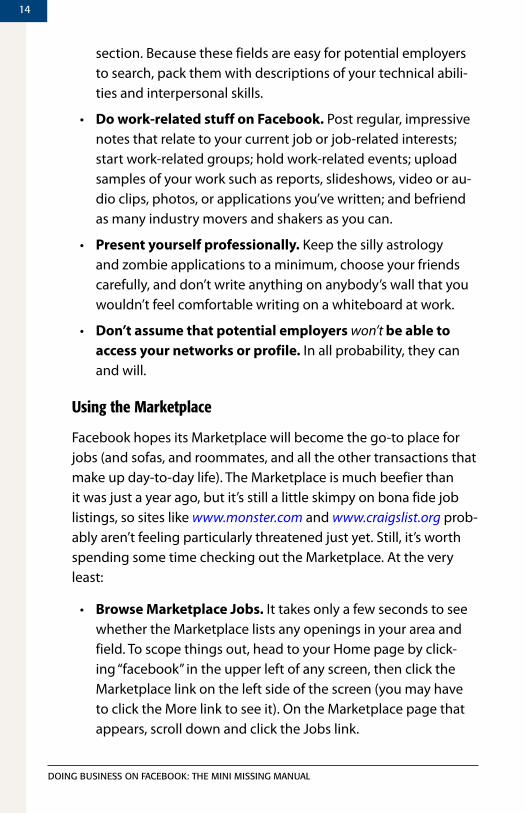
• Browse Marketplace Jobs. It takes only a few seconds to see whether the Marketplace lists any openings in your area and field. To scope things out, head to your Home page by click-ing “facebook” in the upper left of any screen, then click the Marketplace link on the left side of the screen (you may have to click the More link to see it). On the Marketplace page that appears, scroll down and click the Jobs link.
15
Doing Business on FaceBook: The Mini Missing Manual
The Jobs page that appears displays a bunch of listings. To see only specific types of jobs, head to the left side of the page and click the subcategory you’re interested in.
Note: You can browse—and search—jobs in other cities. here’s how: on the main Marketplace page (www.facebook.com/mar-ketplace), click the second search box—the one that says “within X miles of [your town]”. Then, in the “location settings” dialog box that appears, head to the city field and start typing a city’s name. When Facebook’s list of suggestions pops up, choose a city, and then click the submit button. now, when you browse or search for jobs, Facebook browses or hunts in that new location.
16
Doing Business on FaceBook: The Mini Missing Manual
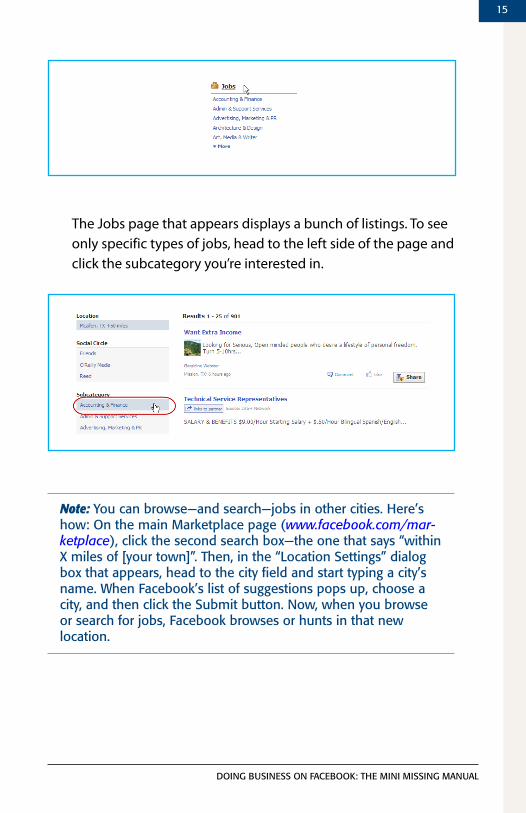
• Search Marketplace Jobs. If you know precisely what you’re after—a specific job title, location, or company, for example—you can get quicker results by searching Marketplace than by browsing it. To search Marketplace jobs, type the job you’re looking for in the “Find...” field and then click the Search button to see listings that match your criteria.
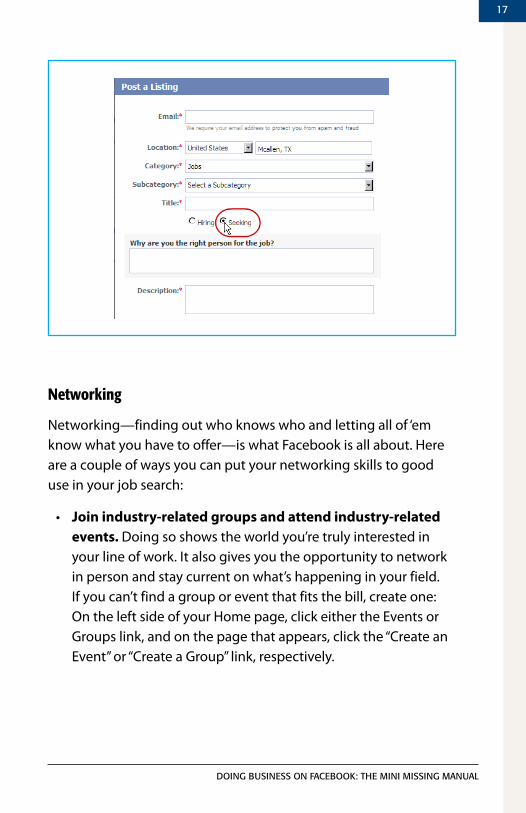
• Post a “Looking for Work” ad. While it’s probably not the quickest route to a new gig, creating a “Here are my qualifica-tions and what I’m looking for” listing in Marketplace couldn’t hurt—and it’s easy to do: On any Marketplace page, click the “Post a Listing” link at the top of the screen. Up pops the Post a Listing dialog box. Choose Jobs from the Category drop-down menu, the appropriate specialty from the Subcategory drop-down menu, and turn on the Seeking radio button. Then fill out the rest of the dialog box and click Post to create your listing.
Tip: include as many job-specific keywords as you can in the Description field to help potential employers find you (especially if your skills are unique). and now is not the time to be modest: Trumpet your strengths—in a professional way, of course—in the “Why are you the right person for the job?” field.
Dow
nlo
ad fro
m W
ow
! eBook
<w
ww
.wow
ebook.
com
>
17
Doing Business on FaceBook: The Mini Missing Manual
Networking
Networking—finding out who knows who and letting all of ‘em know what you have to offer—is what Facebook is all about. Here are a couple of ways you can put your networking skills to good use in your job search:
• Join industry-related groups and attend industry-related events. Doing so shows the world you’re truly interested in your line of work. It also gives you the opportunity to network in person and stay current on what’s happening in your field. If you can’t find a group or event that fits the bill, create one: On the left side of your Home page, click either the Events or Groups link, and on the page that appears, click the “Create an Event” or “Create a Group” link, respectively.
18
Doing Business on FaceBook: The Mini Missing Manual
Tip: To see the groups your friends are members of, click the groups link on the left side of your home page. When you do, Facebook displays a Friends’ groups link just below the groups link; click this new link to see what groups your friends are in-volved in. To see the events your friends are attending, click the events link on the left side of your home page, then click the Friends’ events link that appears below it.
• Let your friends know you’re looking. Instead of just sending private messages, consider tweaking your privacy settings and then writing a brief note on your wall or in your status about the kind of job you want. (To tweak your privacy settings so that your message reaches as many folks as possible, head to the top of any page, click Account, then Privacy Settings, then “Customize settings”; finally, change the “Posts by Me” setting to “Everyone”).
Chapter 2
Expensive groupware, workflow management tools, and other collaboration programs have been around for quite a while. With its open-door policy and privacy concerns, Facebook is certainly no replacement for a dedicated, bulletproof collaboration program like Lotus Domino or Novell Groupwise. But you might find that some of Facebook’s tools are handy—and free—ways to help your team get work done quickly. This chapter gives Facebook’s mes-saging and subscription tools a decidedly business spin. You’ll see how to use them to keep team members, coworkers, and clients in the loop—and projects on track.
Keeping in Touch
The same Facebook features that let you and your friends “talk” online—messaging, events, groups, and notes—can help you keep up to date with coworkers, clients, and customers.
The features themselves work the same way whether you’re inter-acting with your old college roommate or your boss. But there are a few things you need to keep in mind when you’re using these features for work:
Collaborating on Projects via Facebook
20
Doing Business on FaceBook: The Mini Missing Manual
• Professionalism. Email did more to lower professional com-munication standards than casual Friday ever did. And now that everyone’s finally used to emoticons, here comes Face-book, a site so hip, hot, and happening—and easy to use—that it doesn’t just encourage you to be informal; it practi-cally orders you to. The thing is, you never know who might view your Facebook exploits, even if you’re scrupulous about privacy. So, instead of thinking of Facebook as an employee lunchroom, think of it as a meeting that the big brass might drop in on at any time. Keep personal info, off-color jokes, and “just for fun” applications to a bare minimum.
• Privacy. If you’re using Facebook for business, you’ll want to scale back on the notifications the site sends out about your activities. That way your boss won’t get barraged with details of, say, your love life. In particular, you want to adjust your privacy settings (at the top of any page, click Settings, then Privacy Settings).
Tip: You may want to create a business-related Friend List and then add folks like your boss, coworkers, and clients to it. Doing so helps make customizing your privacy settings easy, because you don’t have to tell Facebook the name of each business contact every time you tweak a privacy setting—you can just give Facebook the list name. To make a list, at the top of any Facebook screen, click account, then click edit Friends. on the left side of the page that appears, click the all connections link. Then click the create new list button. after you create the list, you can click account, then Privacy settings, and then “custom-ize settings”. click the button that appears to the right of each setting, choose customize, and then, from the “These people” menu, select specific People and type in the name of your list.
• Security. Be careful not to discuss anything mission-critical on Facebook, and don’t post confidential company documents of any kind. And because you can’t be sure that information you give the site won’t get out, you may even want to keep mum about things like your work phone number and travel itinerary.
Dow
nlo
ad fro
m W
ow
! eBook
<w
ww
.wow
ebook.
com
>
21
Doing Business on FaceBook: The Mini Missing Manual
Sending.Messages
Whether you’re an employee working in a cubicle farm or a free-lancer working from home, you’ve probably already got an email program. So, why use Facebook to send and receive messages? Two reasons:
• It’s super easy. If your coworkers and clients are on Facebook, sending them a message takes only one click—whether you want to invite them to an impromptu meeting, comment on a document or website one of them posted, or share a video clip. (Thank the “Send [somebody] a Message”, Share, and other click-to-contact links scattered around the site.)
• It helps you organize your correspondence. If your team uses Facebook to collaborate on a project, Facebook’s messag-ing feature helps you keep project-specific correspondence separate from your other work-related email.
To get started messaging, at the top of any Facebook screen, click the icon that looks like two speech bubbles (it’s between the word “facebook” and the Search box). In the menu that appears, click “Send a New Message”, See All Messages, or click on a message you’ve received to view the full text.
Setting.up.Meetings
Intranets (private websites that only company employees can access) are great for lining up in-house meetings, but Facebook events are a handy way to organize get-togethers that involve a mix of coworkers and “civilians” such as clients, potential clients, suppliers, and former employees.
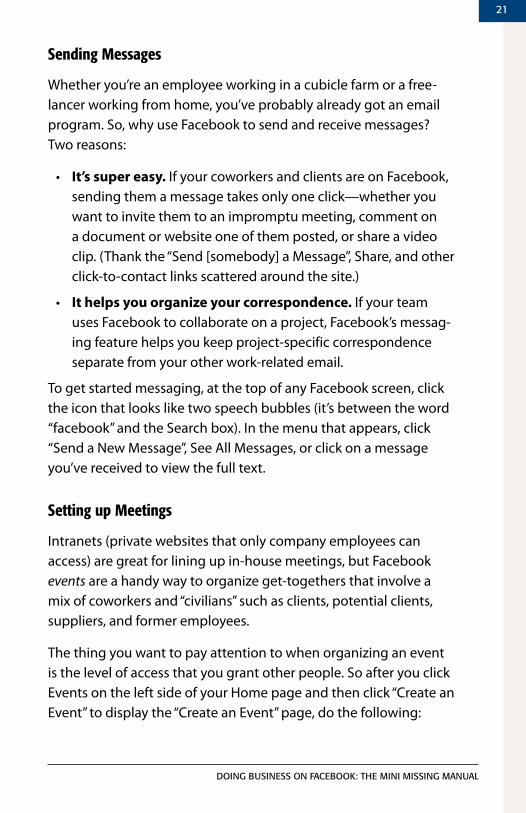
The thing you want to pay attention to when organizing an event is the level of access that you grant other people. So after you click Events on the left side of your Home page and then click “Create an Event” to display the “Create an Event” page, do the following:
22
Doing Business on FaceBook: The Mini Missing Manual
• Turn off the “Anyone can view and RSVP (public event)” checkbox. Doing so keeps details of your event out of non-attendees’ searches and news feeds. If you don’t want anyone to know who’s attending the meeting—say it’s a sales meeting and you don’t want your attendees to get together without you before you’ve had a chance to give your official pitch—turn off the “Show the guest list on the event page” checkbox, too.
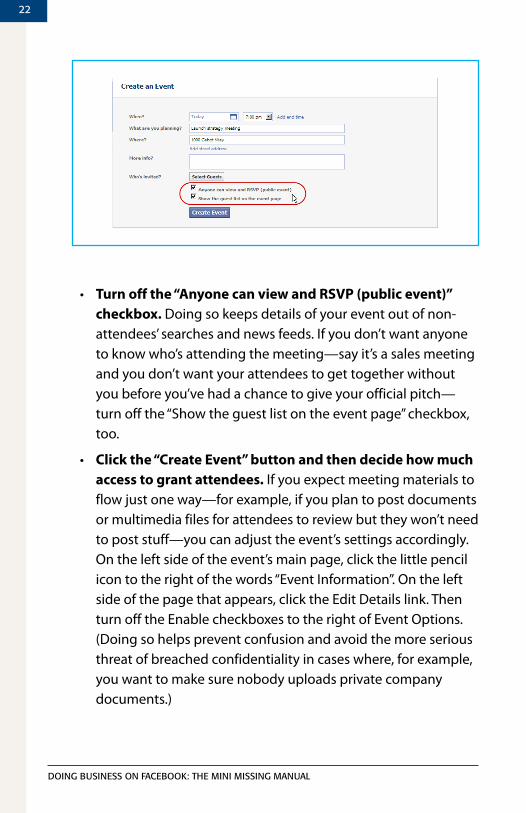
• Click the “Create Event” button and then decide how much access to grant attendees. If you expect meeting materials to flow just one way—for example, if you plan to post documents or multimedia files for attendees to review but they won’t need to post stuff—you can adjust the event’s settings accordingly. On the left side of the event’s main page, click the little pencil icon to the right of the words “Event Information”. On the left side of the page that appears, click the Edit Details link. Then turn off the Enable checkboxes to the right of Event Options. (Doing so helps prevent confusion and avoid the more serious threat of breached confidentiality in cases where, for example, you want to make sure nobody uploads private company documents.)
23
Doing Business on FaceBook: The Mini Missing Manual
Exchanging.Ideas
Facebook groups—collections of people with shared interests—are terrific for:
• User groups and other customer-oriented information exchanges. You get to combine your company logo with Facebook’s groovy collaboration features (such as a moderated discussion board, the ability to exchange files, and one-click messaging to all group members) to build or maintain interest in your company and products—for free!
24
Doing Business on FaceBook: The Mini Missing Manual
• Team discussions. If your company doesn’t have an intranet and is relying instead on email for team discussions, you’re going to love Facebook groups. Using groups is a lot easier than dealing with mile-long “me too” replies and CC lists—and groups give people a single place to go for updates and file exchanges. Just be sure you restrict your group to your com-pany’s network and make your group secret to keep group details out of the hands of riffraff (meaning anybody who’s not a confirmed team member).
To get started creating a group for your company, click the Groups link on the left side of your Home page (you may need to click the More link to see it). On the page that appears, click the Create a New Group button and fill in the info Facebook asks for. Don’t for-get to select your company from the Network drop-down menu.
Creating.and.Subscribing.to.Notes
Facebook notes are basically blog entries people can subscribe to. You could use plain old email to send your team multimedia docu-ments like project milestones, ongoing customer service requests, or meeting minutes. But using Facebook notes instead gives team
25
Doing Business on FaceBook: The Mini Missing Manual
members the best of both worlds: Web feeds that alert them every time you post a new document, and a single, easily-accessible archive of everything you’ve posted.
To use notes:
• Create a special friend list that includes all your team members (the Tip on page 20 explains how).
• Adjust your notes settings. On the “Privacy Settings – Cus-tomize settings” page, zip to the “Posts by Me” setting and choose Customize, then select Specific People and type in the name of your friend list.
• Write your first note. On the left side of your Home page, click the Notes link (you may have to click the More link to see it) and, on the page that appears, click the “Write a Note” button.
• Have your team members subscribe to your notes. Ask each of them go to any of your notes and, near the top of the screen, click the “[Your Name]’s Notes” link. Then, on the right-hand side of the page that appears, they should find the “Subscribe to these Notes” section, and click the “[Your Name]’s Notes” link. Finally, on the page that appears, they need to click Subscribe Now.
Exchanging Files
It doesn’t matter whether you’re talking team meetings, sales conferences, or product launches: All business interactions gener-ate documents. Brochures, diagrams, attendee lists, action items, reports, recommendations, flow charts—the list goes on and on. Fortunately, one of the things Facebook excels at is letting you exchange documents painlessly and privately.
Note: Privacy, of course, is relative. no free site will ever guard your data as carefully as you would. The bottom line: Don’t use Facebook to send confidential info.
Dow
nlo
ad fro
m W
ow
! eBook
<w
ww
.wow
ebook.
com
>
26
Doing Business on FaceBook: The Mini Missing Manual
Facebook’s built-in Photos application lets you upload and share image files with your coworkers. And the built-in Links application lets you share just about anything else, from audio and video clips to files and documents stored on the Web. Read on to learn how.
Sharing.Pictures
You can use Facebook’s Photos application to upload and share image files. The files you upload have to be in one of these three Internet-friendly formats: .jpg, .png (with some restrictions that are explained in the next section), or .gif (but not animated .gifs).
Tip: if you’re not sure what format a picture file is in, here’s how to find out: Find the file on your computer and right-click it (or ctrl-click it on a Mac); then select Properties (get info on a Mac) from the pop-up menu that appears. The info box you see lists the file’s format.
On Facebook, you organize your picture files by grouping them into albums. You can limit access to each album so that only certain team members can see it, and you can even tag individual pictures within the album. (Tagging is a way of associating one or more team members with the picture, which is useful for establishing and tracking accountability. For example, you can tag a picture of a features list so that each list item is associated with the person responsible for developing it.)
Note: albums aren’t the only way to share pictures. in addition to your profile picture, Facebook lets you add pictures to groups, events, and notes. But using the Photos application’s albums is your best bet when you want to keep project- or team-related photos, drawings, sketches, or screenshots in one place.
27
Doing Business on FaceBook: The Mini Missing Manual
Creating.and.Filling.a.Picture.Album
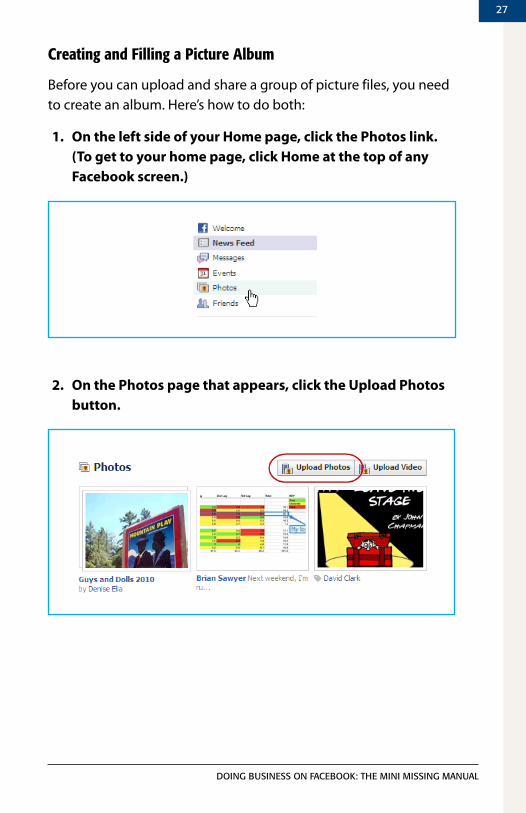
Before you can upload and share a group of picture files, you need to create an album. Here’s how to do both:
1. On the left side of your Home page, click the Photos link. (To get to your home page, click Home at the top of any Facebook screen.)
2. On the Photos page that appears, click the Upload Photos button.
28
Doing Business on FaceBook: The Mini Missing Manual
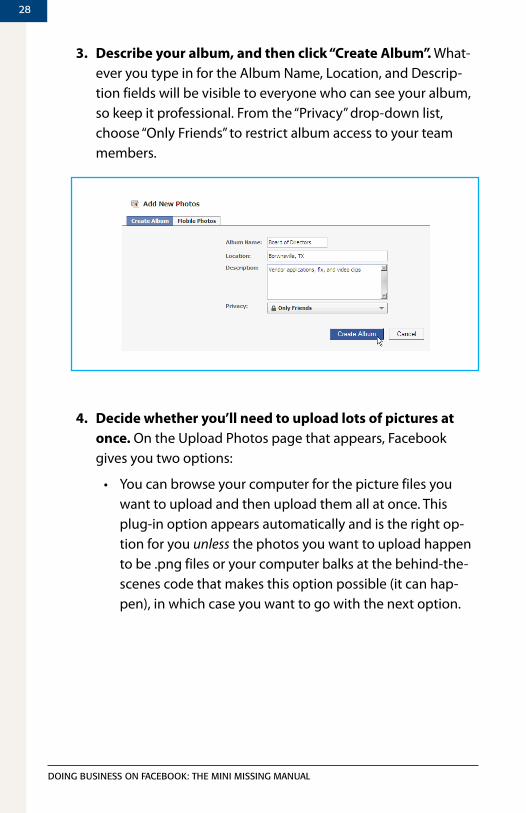
3. Describe your album, and then click “Create Album”. What-ever you type in for the Album Name, Location, and Descrip-tion fields will be visible to everyone who can see your album, so keep it professional. From the “Privacy” drop-down list, choose “Only Friends” to restrict album access to your team members.
4. Decide whether you’ll need to upload lots of pictures at once. On the Upload Photos page that appears, Facebook gives you two options:
• You can browse your computer for the picture files you want to upload and then upload them all at once. This plug-in option appears automatically and is the right op-tion for you unless the photos you want to upload happen to be .png files or your computer balks at the behind-the-scenes code that makes this option possible (it can hap-pen), in which case you want to go with the next option.
29
Doing Business on FaceBook: The Mini Missing Manual
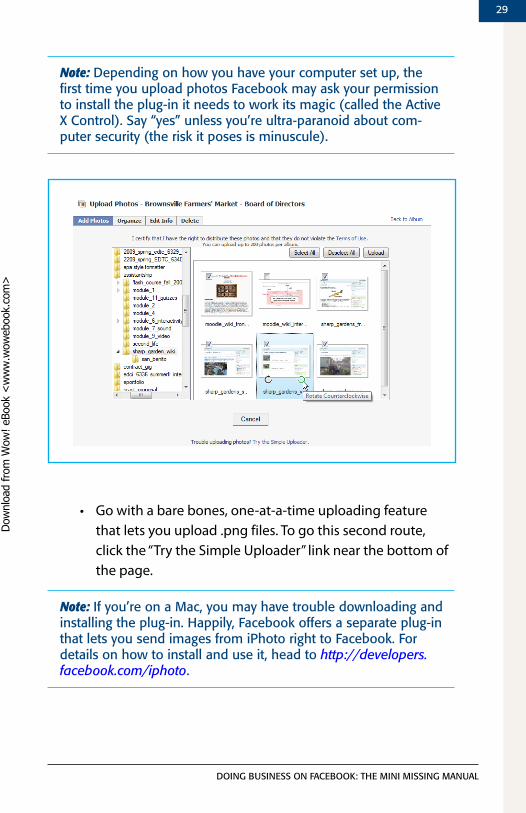
Note: Depending on how you have your computer set up, the first time you upload photos Facebook may ask your permission to install the plug-in it needs to work its magic (called the active X control). say “yes” unless you’re ultra-paranoid about com-puter security (the risk it poses is minuscule).
• Go with a bare bones, one-at-a-time uploading feature that lets you upload .png files. To go this second route, click the “Try the Simple Uploader” link near the bottom of the page.
Note: if you’re on a Mac, you may have trouble downloading and installing the plug-in. happily, Facebook offers a separate plug-in that lets you send images from iPhoto right to Facebook. For details on how to install and use it, head to http://developers.facebook.com/iphoto.
Dow
nlo
ad fro
m W
ow
! eBook
<w
ww
.wow
ebook.
com
>
30
Doing Business on FaceBook: The Mini Missing Manual
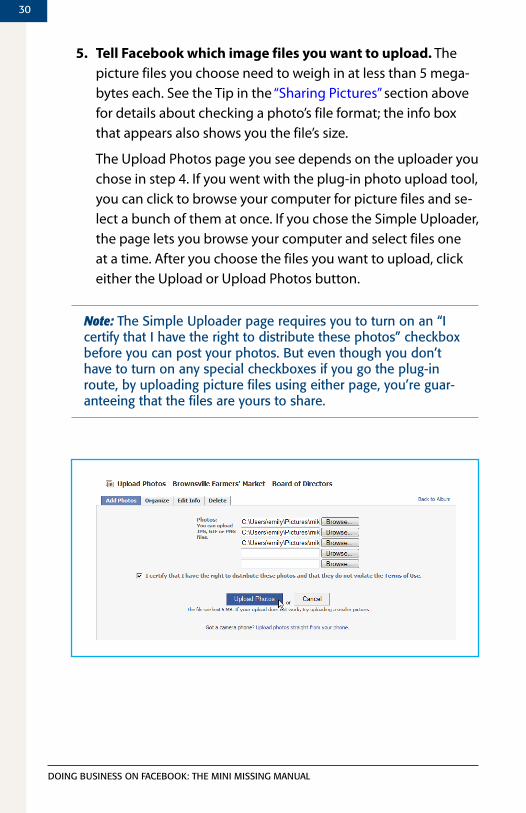
5. Tell Facebook which image files you want to upload. The picture files you choose need to weigh in at less than 5 mega-bytes each. See the Tip in the “Sharing Pictures” section above for details about checking a photo’s file format; the info box that appears also shows you the file’s size.
The Upload Photos page you see depends on the uploader you chose in step 4. If you went with the plug-in photo upload tool, you can click to browse your computer for picture files and se-lect a bunch of them at once. If you chose the Simple Uploader, the page lets you browse your computer and select files one at a time. After you choose the files you want to upload, click either the Upload or Upload Photos button.
Note: The simple uploader page requires you to turn on an “i certify that i have the right to distribute these photos” checkbox before you can post your photos. But even though you don’t have to turn on any special checkboxes if you go the plug-in route, by uploading picture files using either page, you’re guar-anteeing that the files are yours to share.
31
Doing Business on FaceBook: The Mini Missing Manual
Tip: Facebook lets you stuff up to 200 pictures into a single album. if you need to share more, no problem: simply create another album. Facebook doesn’t place a limit on the number of albums you can create (which is why, according to some accounts, Facebook stores more photos than any other photo-sharing site).
As soon as Facebook finishes uploading your photos, it asks if you want to publish them right away (“Publish Now”) or wait (“Skip”). Chances are you want to sort through your photos, add a few captions, and make a few other changes before you let folks peek at your album, so click Skip and then make the adjustments you want, as explained in the next section.
Editing.Your.Album
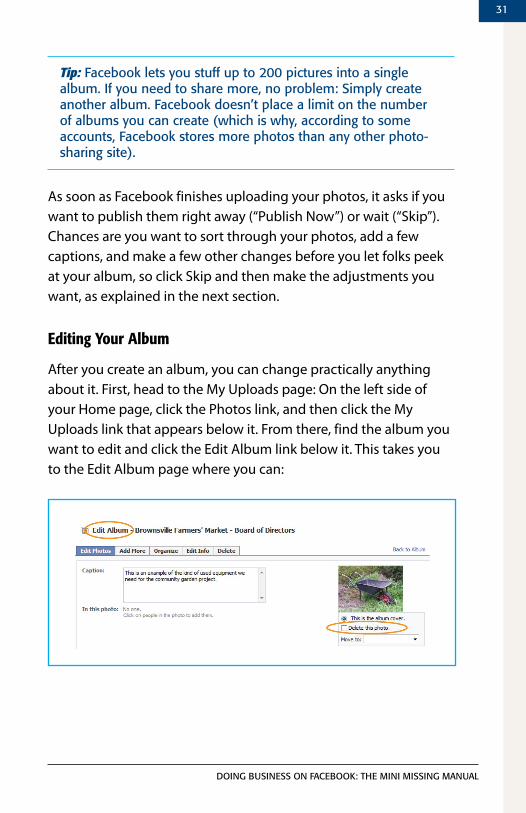
After you create an album, you can change practically anything about it. First, head to the My Uploads page: On the left side of your Home page, click the Photos link, and then click the My Uploads link that appears below it. From there, find the album you want to edit and click the Edit Album link below it. This takes you to the Edit Album page where you can:
32
Doing Business on FaceBook: The Mini Missing Manual
• Add more pictures. Click the Add More tab and then, on the Upload Photos page that appears, follow the same steps you used to upload your first batch of picture files (explained in the last section).
• Delete pictures. Scroll to the picture you want to delete and turn on the “Delete this photo” checkbox below it. (To delete multiple pictures, turn on each picture’s checkbox.) Then head to the bottom of the page and click the Save Changes button.
Tip: To delete a whole album, click the Delete tab on the main edit album page.
• Reorder your pictures. Click the Organize tab and, on the page that appears, either drag the pictures into the order you want them, or click the Reverse Order button (which moves pictures A, B, and C so C shows up first, then B, then A). When you finish, click the Save Changes button.
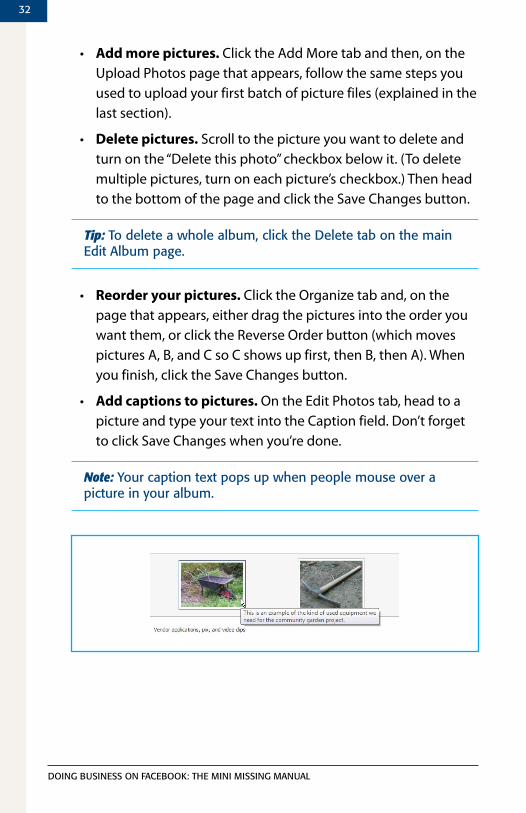
• Add captions to pictures. On the Edit Photos tab, head to a picture and type your text into the Caption field. Don’t forget to click Save Changes when you’re done.
Note: Your caption text pops up when people mouse over a picture in your album.
33
Doing Business on FaceBook: The Mini Missing Manual
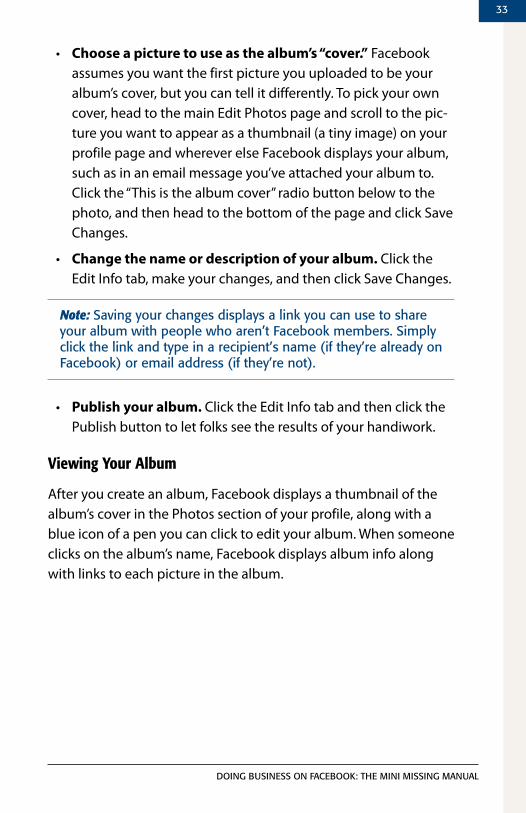
• Choose a picture to use as the album’s “cover.” Facebook assumes you want the first picture you uploaded to be your album’s cover, but you can tell it differently. To pick your own cover, head to the main Edit Photos page and scroll to the pic-ture you want to appear as a thumbnail (a tiny image) on your profile page and wherever else Facebook displays your album, such as in an email message you’ve attached your album to. Click the “This is the album cover” radio button below to the photo, and then head to the bottom of the page and click Save Changes.
• Change the name or description of your album. Click the Edit Info tab, make your changes, and then click Save Changes.
Note: saving your changes displays a link you can use to share your album with people who aren’t Facebook members. simply click the link and type in a recipient’s name (if they’re already on Facebook) or email address (if they’re not).
• Publish your album. Click the Edit Info tab and then click the Publish button to let folks see the results of your handiwork.
Viewing.Your.Album
After you create an album, Facebook displays a thumbnail of the album’s cover in the Photos section of your profile, along with a blue icon of a pen you can click to edit your album. When someone clicks on the album’s name, Facebook displays album info along with links to each picture in the album.
34
Doing Business on FaceBook: The Mini Missing Manual
Note: everyone who can see your full profile can see your photos, but folks who can see your photos can’t necessarily see your profile. That’s because Facebook lets you set access to your profile and to your albums separately.
Restricting.Access.to.Your.Albums
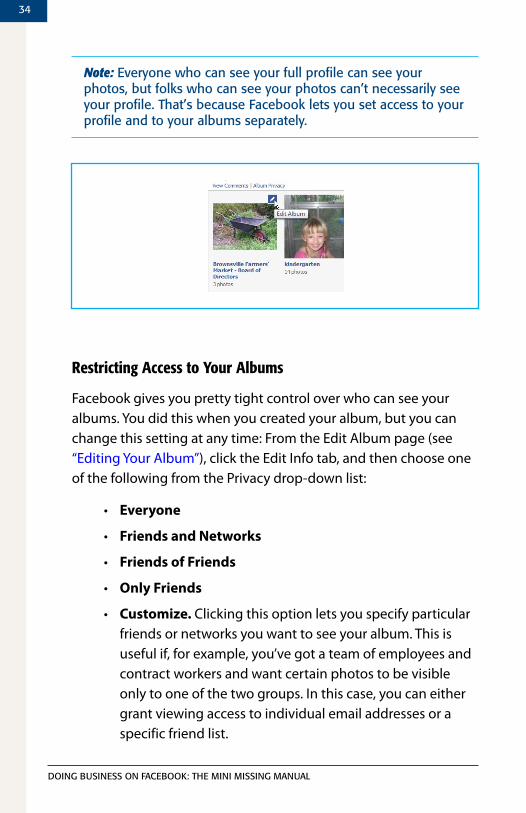
Facebook gives you pretty tight control over who can see your albums. You did this when you created your album, but you can change this setting at any time: From the Edit Album page (see “Editing Your Album”), click the Edit Info tab, and then choose one of the following from the Privacy drop-down list:
• Everyone
• Friends and Networks
• Friends of Friends
• Only Friends
• Customize. Clicking this option lets you specify particular friends or networks you want to see your album. This is useful if, for example, you’ve got a team of employees and contract workers and want certain photos to be visible only to one of the two groups. In this case, you can either grant viewing access to individual email addresses or a specific friend list.
35
Doing Business on FaceBook: The Mini Missing Manual
Tagging.(Labeling).Your.Pictures
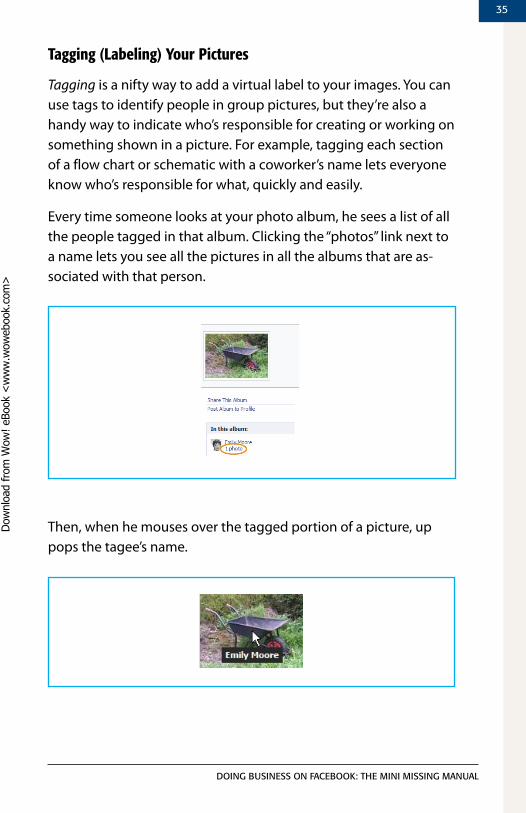
Tagging is a nifty way to add a virtual label to your images. You can use tags to identify people in group pictures, but they’re also a handy way to indicate who’s responsible for creating or working on something shown in a picture. For example, tagging each section of a flow chart or schematic with a coworker’s name lets everyone know who’s responsible for what, quickly and easily.
Every time someone looks at your photo album, he sees a list of all the people tagged in that album. Clicking the “photos” link next to a name lets you see all the pictures in all the albums that are as-sociated with that person.
Then, when he mouses over the tagged portion of a picture, up pops the tagee’s name.
Dow
nlo
ad fro
m W
ow
! eBook
<w
ww
.wow
ebook.
com
>
36
Doing Business on FaceBook: The Mini Missing Manual
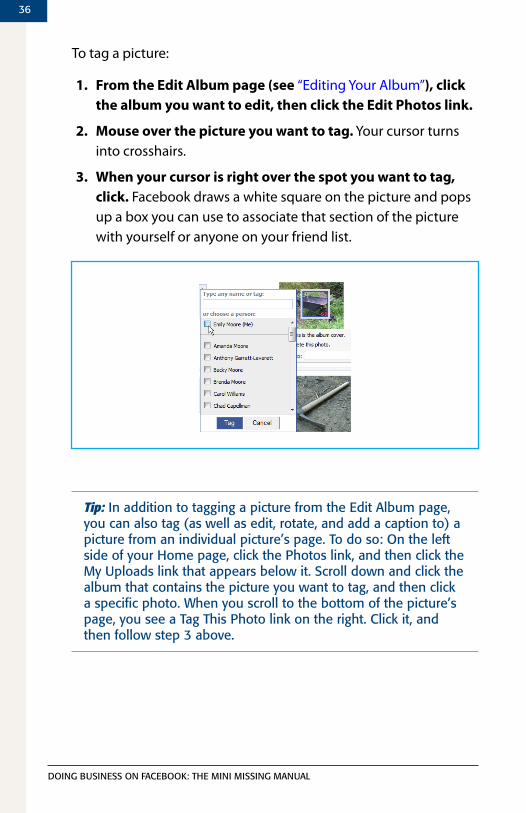
To tag a picture:
1. From the Edit Album page (see “Editing Your Album”), click the album you want to edit, then click the Edit Photos link.
2. Mouse over the picture you want to tag. Your cursor turns into crosshairs.
3. When your cursor is right over the spot you want to tag, click. Facebook draws a white square on the picture and pops up a box you can use to associate that section of the picture with yourself or anyone on your friend list.
Tip: in addition to tagging a picture from the edit album page, you can also tag (as well as edit, rotate, and add a caption to) a picture from an individual picture’s page. To do so: on the left side of your home page, click the Photos link, and then click the My uploads link that appears below it. scroll down and click the album that contains the picture you want to tag, and then click a specific photo. When you scroll to the bottom of the picture’s page, you see a Tag This Photo link on the right. click it, and then follow step 3 above.
37
Doing Business on FaceBook: The Mini Missing Manual
Sharing.Links.(and.Other.Items)
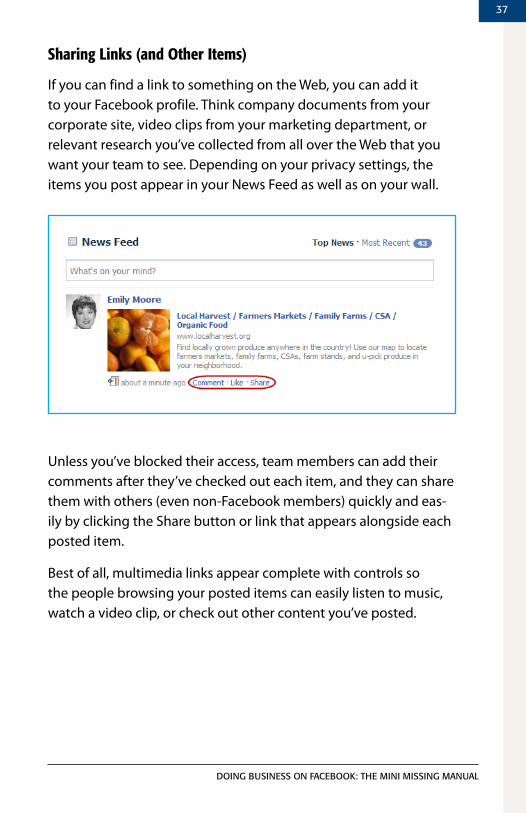
If you can find a link to something on the Web, you can add it to your Facebook profile. Think company documents from your corporate site, video clips from your marketing department, or relevant research you’ve collected from all over the Web that you want your team to see. Depending on your privacy settings, the items you post appear in your News Feed as well as on your wall.
Unless you’ve blocked their access, team members can add their comments after they’ve checked out each item, and they can share them with others (even non-Facebook members) quickly and eas-ily by clicking the Share button or link that appears alongside each posted item.
Best of all, multimedia links appear complete with controls so the people browsing your posted items can easily listen to music, watch a video clip, or check out other content you’ve posted.
38
Doing Business on FaceBook: The Mini Missing Manual
To share something:
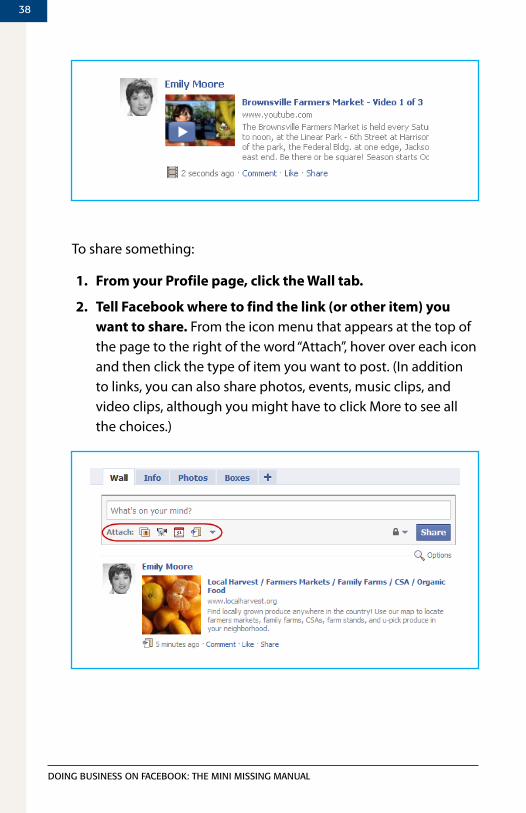
1. From your Profile page, click the Wall tab.
2. Tell Facebook where to find the link (or other item) you want to share. From the icon menu that appears at the top of the page to the right of the word “Attach”, hover over each icon and then click the type of item you want to post. (In addition to links, you can also share photos, events, music clips, and video clips, although you might have to click More to see all the choices.)
39
Doing Business on FaceBook: The Mini Missing Manual
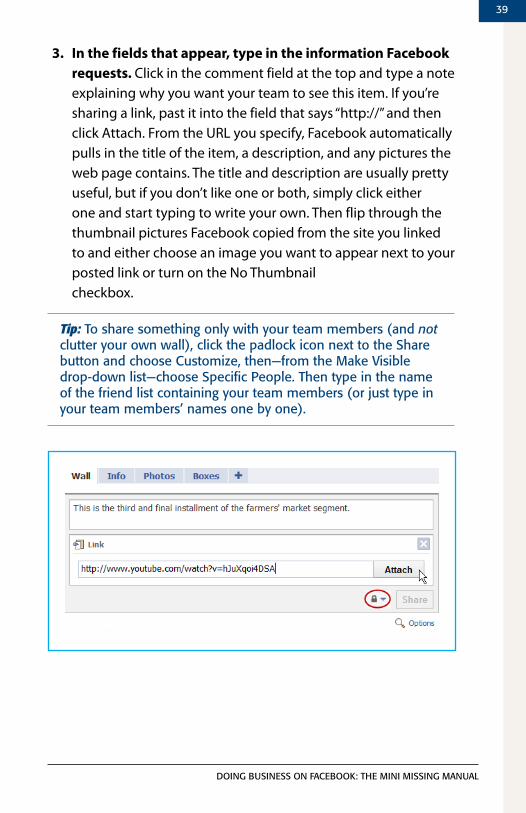
3. In the fields that appear, type in the information Facebook requests. Click in the comment field at the top and type a note explaining why you want your team to see this item. If you’re sharing a link, past it into the field that says “http://” and then click Attach. From the URL you specify, Facebook automatically pulls in the title of the item, a description, and any pictures the web page contains. The title and description are usually pretty useful, but if you don’t like one or both, simply click either one and start typing to write your own. Then flip through the thumbnail pictures Facebook copied from the site you linked to and either choose an image you want to appear next to your posted link or turn on the No Thumbnail checkbox.
Tip: To share something only with your team members (and not clutter your own wall), click the padlock icon next to the share button and choose customize, then—from the Make Visible drop-down list—choose specific People. Then type in the name of the friend list containing your team members (or just type in your team members’ names one by one).
40
Doing Business on FaceBook: The Mini Missing Manual
4. Click Share. The item appears on your wall (unless you clicked the Options link and told Facebook otherwise). In addition, de-pending on your privacy settings, news of your newly posted item may also appear in your friends’ News Feeds.
Tip: To delete an item you’ve posted, head to your wall, mouse over the item, and then click the Remove button on its right.
Keeping Up-to-Date with Feeds
One of the best arguments for using Facebook on the job is notifi-cations, messages telling you that something involving you hap-pened on the site. For example, when one of your team members updates a report, you get a notification; when another one weighs in on a discussion, you get a notification, and so on. Notifications make your life easier by automating one of the hardest things about keeping projects on track: keeping team members apprised of each others’ actions and of project milestones. And you can cus-tomize these automated messages to an amazing degree. Here’s how to make sure you’re notified of just the important stuff:
Note: Facebook doesn’t let you completely control the notifi-cation process. stuff you’re not interested in is bound to get through occasionally.
1. Decide which team member activities you want Facebook to share with the group (like “Posts by Me”). To change your settings, at the top right of any Facebook page, click Account, then Privacy Settings. Then click “Customize settings” and adjust your settings to control which of your activities your team members get notified about. Finally, to ensure consistent notifications among team members, tell your team members how to adjust their settings.
41
Doing Business on FaceBook: The Mini Missing Manual
2. Tell Facebook which team members you want to keep the closest eye on. Facebook has the last word on which stories (newsy tidbits) appear in the News Feed section of your Home page, but you can influence its selections. To do so: At the top of your Home page (click the “Home” link at the top of any page to get to it), click Most Recent. Then scroll down to the bottom of the feed and click the Edit Options link. In the News Feed Settings box that appears, type a team member’s name in the Show More box, and then click Save.
3. Tell Facebook which activities involving you you want to be notified about. Facebook can keep track of just about any-thing anybody does on the site that involves you. For example, you can tell Facebook to email you when a team member re-plies to one of your posts on a discussion board or comments on a note or photo you’ve posted. At the top of any Facebook page, click Account, then Account Settings, and then click the Notifications tab and make any tweaks you want.
Tip: notifications are a great way to keep current with your proj-ect if you travel a lot and have email access but can’t log into Facebook.
Dow
nlo
ad fro
m W
ow
! eBook
<w
ww
.wow
ebook.
com
>

Chapter 3
In Facebook’s early days, “advertising” meant college students look-ing to sell their old textbooks or find new roommates. But now that the site is open to the public and has a few hundred million mem-bers, things have changed. Facebook’s ability to comb through gazillions of personal details at a practically unheard-of level of granularity (“Show me all the conservative male college students who live in Portland, have mobile phones, and enjoy watching vintage Bugs Bunny reruns”) and tap directly into each member’s circle of friends is an advertiser’s dream come true.
These days, big companies with big ad budgets are placing ads on Facebook. As the site has grown, marketing strategies have changed, too, from simple network-targeted banner ads to social ads, which mine members’ personal details and friend lists to hawk products. This chapter explores your options for advertising on Facebook, which range from free to affordable to don’t even think about it.
Advertising on Facebook
44
Doing Business on FaceBook: The Mini Missing Manual
Note: if you’ve been away from Facebook for a while and are wondering what happened to the polls you used to be able to conduct on the site, they’re gone—the built-in ones, anyway. Fortunately, if you’re dying to set up a poll, several third-party Facebook applications have your back. To find the latest polling applications: in the search box at the top of any Facebook page, type “poll”, click the little magnifying-glass icon to the right of the search box, and then click the applications link on the left side of the results page to see a list of polling applications.
Facebook Pages: Profiles for Bands, Brands, and More
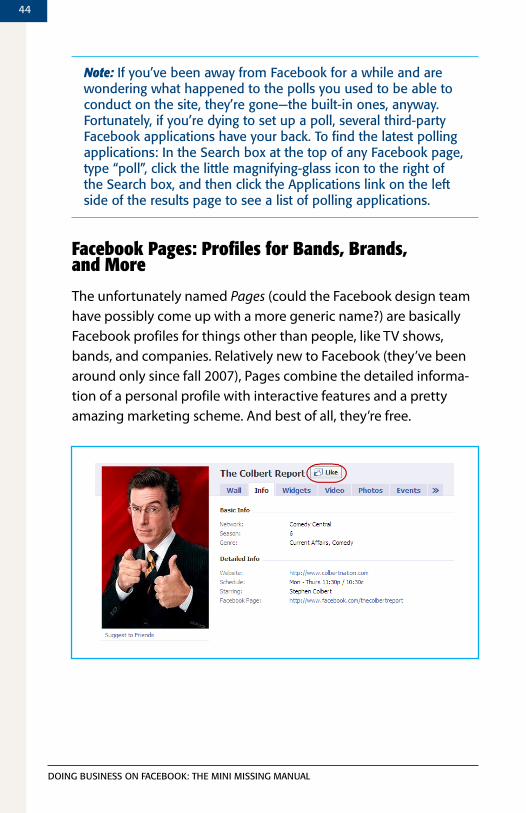
The unfortunately named Pages (could the Facebook design team have possibly come up with a more generic name?) are basically Facebook profiles for things other than people, like TV shows, bands, and companies. Relatively new to Facebook (they’ve been around only since fall 2007), Pages combine the detailed informa-tion of a personal profile with interactive features and a pretty amazing marketing scheme. And best of all, they’re free.
45
Doing Business on FaceBook: The Mini Missing Manual
Geared toward freelancers, business owners, musicians, politicians, nonprofits, and other small- to large-sized organizations, Pages:
• Are tailored to meet your needs. For example, say you set up a band Page (you’ll learn how in a moment). Your Page auto-matically comes with the standard discussion board, wall, and photo album features. But wait, there’s more: It also includes sections for posting video clips and listing upcoming events, and a built-in music player so people can check out your tunes.
• Aren’t subject to the 5,000-member limit Facebook places on groups. Pages can have an unlimited number of fans.
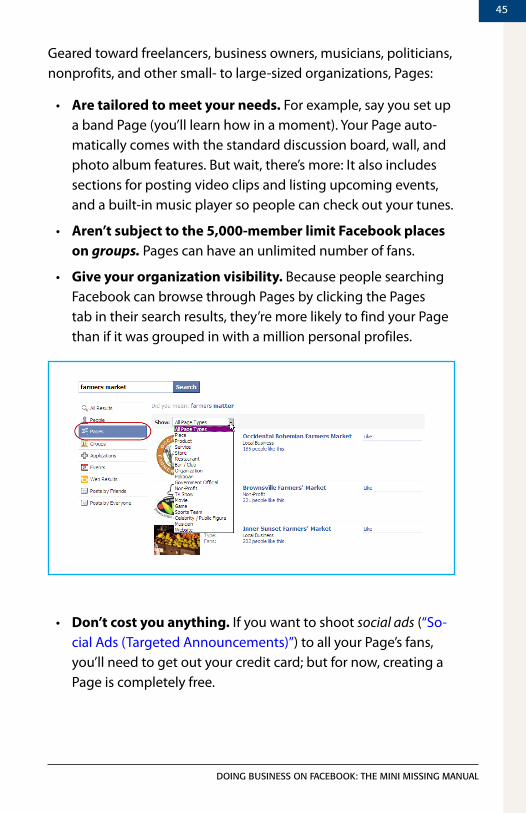
• Give your organization visibility. Because people searching Facebook can browse through Pages by clicking the Pages tab in their search results, they’re more likely to find your Page than if it was grouped in with a million personal profiles.
• Don’t cost you anything. If you want to shoot social ads (“So-cial Ads (Targeted Announcements)”) to all your Page’s fans, you’ll need to get out your credit card; but for now, creating a Page is completely free.
46
Doing Business on FaceBook: The Mini Missing Manual
How.Pages.Work
Word of mouth is an effective marketing scheme offline, and it works online, too. When a Facebook member surfs to a Page—by searching, browsing, or following a link he finds on another Face-book member’s profile—and likes what he sees, he “likes” the Page (see “Liking Pages”), and then all kinds of interesting things hap-pen:
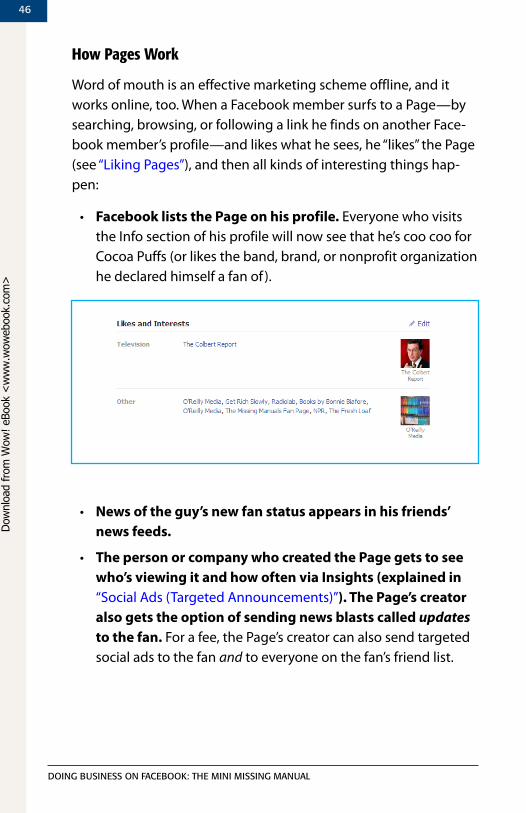
• Facebook lists the Page on his profile. Everyone who visits the Info section of his profile will now see that he’s coo coo for Cocoa Puffs (or likes the band, brand, or nonprofit organization he declared himself a fan of ).
• News of the guy’s new fan status appears in his friends’ news feeds.
• The person or company who created the Page gets to see who’s viewing it and how often via Insights (explained in “Social Ads (Targeted Announcements)”). The Page’s creator also gets the option of sending news blasts called updates to the fan. For a fee, the Page’s creator can also send targeted social ads to the fan and to everyone on the fan’s friend list.
Dow
nlo
ad fro
m W
ow
! eBook
<w
ww
.wow
ebook.
com
>
47
Doing Business on FaceBook: The Mini Missing Manual
Creating.a.Page
Here’s how to create a free Facebook Page for your business, band, or nonprofit:
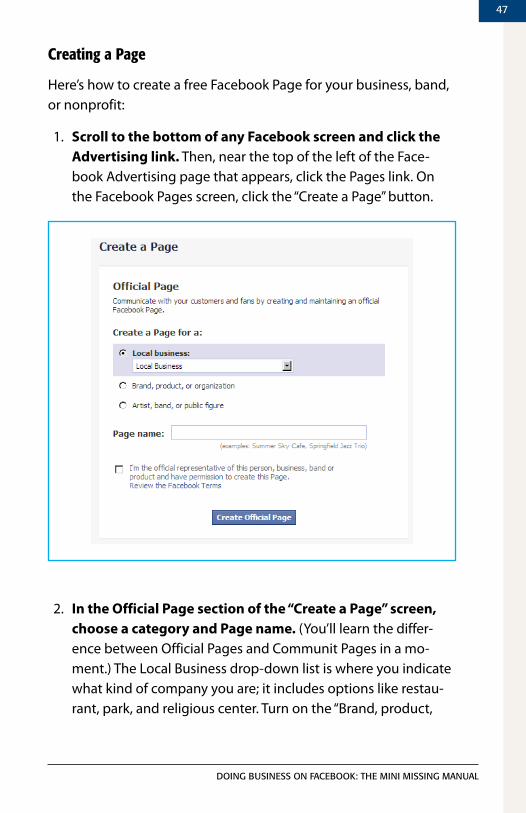
1. Scroll to the bottom of any Facebook screen and click the Advertising link. Then, near the top of the left of the Face-book Advertising page that appears, click the Pages link. On the Facebook Pages screen, click the “Create a Page” button.
2. In the Official Page section of the “Create a Page” screen, choose a category and Page name. (You’ll learn the differ-ence between Official Pages and Communit Pages in a mo-ment.) The Local Business drop-down list is where you indicate what kind of company you are; it includes options like restau-rant, park, and religious center. Turn on the “Brand, product,
48
Doing Business on FaceBook: The Mini Missing Manual
or organization” radio button if you’re selling products such as pharmaceuticals or food, or if you’re in a business with a na-tional reach such as travel or communications. Turning on the “Artist, band, or public figure” radio button gives you freelance options such as writer, politician, and athlete. After you’ve picked the appropriate category and given your Page a name, turn on the “I’m the official representative...” checkbox and then click the Create Official Page button.
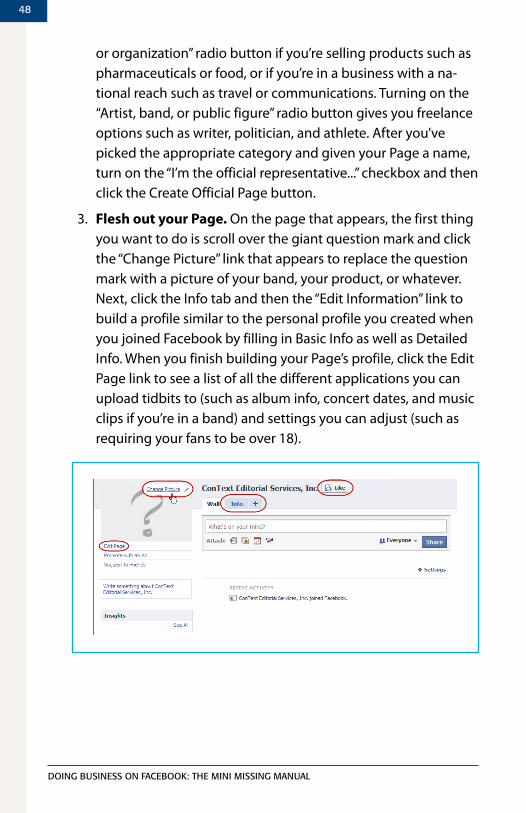
3. Flesh out your Page. On the page that appears, the first thing you want to do is scroll over the giant question mark and click the “Change Picture” link that appears to replace the question mark with a picture of your band, your product, or whatever. Next, click the Info tab and then the “Edit Information” link to build a profile similar to the personal profile you created when you joined Facebook by filling in Basic Info as well as Detailed Info. When you finish building your Page’s profile, click the Edit Page link to see a list of all the different applications you can upload tidbits to (such as album info, concert dates, and music clips if you’re in a band) and settings you can adjust (such as requiring your fans to be over 18).
49
Doing Business on FaceBook: The Mini Missing Manual
Tip: clicking the “+” icon lets you fancy-up your page with sec-tions for events, photos, and more.
Now that you’ve got a Page up, you might want to spend some money to make sure it gets noticed. Surprise! Facebook makes spending money easy. On the left side of your Page, click the “Pro-mote with an Ad” link. Make sure you also check out “Social Ads (Targeted Announcements)” to learn how to add social actions to your Page.
Note: Facebook recently introduced community Pages, which are a subset of regular Pages (a.k.a. official Pages). community Pages are for general topics like cooking, movie genres, and cities. When such a Page becomes popular enough, Facebook takes it over and links it to the Wikipedia entry about that topic. if you’re a fan of that community Page (see the next section), you’ll start seeing items related to it showing up in your news Feed on your home page. Because of that, it’s a good idea to only become a fan of community Pages you’re really interested in so your new Feed doesn’t fill up with stuff you don’t care about.
Liking.Pages
Similar to wearing name-brand clothes and rooting for your favor-ite sports team, liking a Page (becoming a fan of it) tells people in your social circle what you’re into and what’s important to you.
Tip: after you create your own Page, people can declare their liking for it using the steps below.
50
Doing Business on FaceBook: The Mini Missing Manual
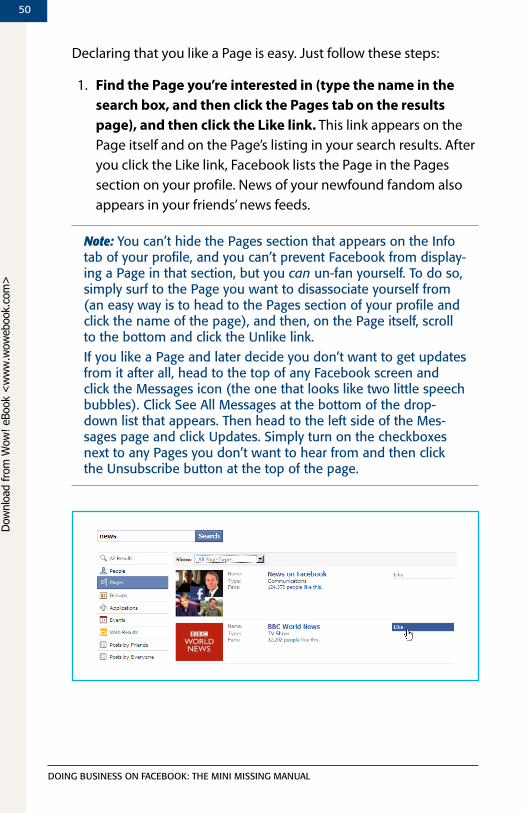
Declaring that you like a Page is easy. Just follow these steps:
1. Find the Page you’re interested in (type the name in the search box, and then click the Pages tab on the results page), and then click the Like link. This link appears on the Page itself and on the Page’s listing in your search results. After you click the Like link, Facebook lists the Page in the Pages section on your profile. News of your newfound fandom also appears in your friends’ news feeds.
Note: You can’t hide the Pages section that appears on the info tab of your profile, and you can’t prevent Facebook from display-ing a Page in that section, but you can un-fan yourself. To do so, simply surf to the Page you want to disassociate yourself from (an easy way is to head to the Pages section of your profile and click the name of the page), and then, on the Page itself, scroll to the bottom and click the unlike link.if you like a Page and later decide you don’t want to get updates from it after all, head to the top of any Facebook screen and click the Messages icon (the one that looks like two little speech bubbles). click see all Messages at the bottom of the drop-down list that appears. Then head to the left side of the Mes-sages page and click updates. simply turn on the checkboxes next to any Pages you don’t want to hear from and then click the unsubscribe button at the top of the page.
Dow
nlo
ad fro
m W
ow
! eBook
<w
ww
.wow
ebook.
com
>
51
Doing Business on FaceBook: The Mini Missing Manual
Social Ads (Targeted Announcements)
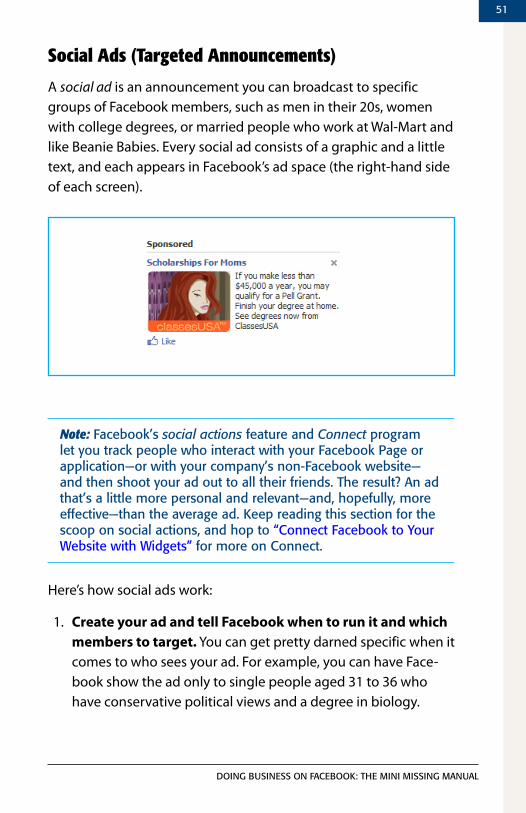
A social ad is an announcement you can broadcast to specific groups of Facebook members, such as men in their 20s, women with college degrees, or married people who work at Wal-Mart and like Beanie Babies. Every social ad consists of a graphic and a little text, and each appears in Facebook’s ad space (the right-hand side of each screen).
Note: Facebook’s social actions feature and Connect program let you track people who interact with your Facebook Page or application—or with your company’s non-Facebook website—and then shoot your ad out to all their friends. The result? an ad that’s a little more personal and relevant—and, hopefully, more effective—than the average ad. keep reading this section for the scoop on social actions, and hop to “connect Facebook to Your Website with Widgets” for more on connect.
Here’s how social ads work:
1. Create your ad and tell Facebook when to run it and which members to target. You can get pretty darned specific when it comes to who sees your ad. For example, you can have Face-book show the ad only to single people aged 31 to 36 who have conservative political views and a degree in biology.
52
Doing Business on FaceBook: The Mini Missing Manual
2. Pay for the ad. The amount you pay depends on how long you want your ad to run and how many people you want to see it.
3. Optionally, you can tie your social ad to social actions, which are the things people do on your Facebook Page or on your company’s website. If you’ve already created a Face-book Page (see “Creating a Page”) or already have a website, you can combine your ad with the “news” headline that some-one’s friend just became a fan, for example.
4. Facebook runs your ad. Depending on factors like how much money you coughed up and how many other ads Facebook has in the hopper, your ad appears either on peoples’ Home pages or on other Facebook pages in the space reserved for ads (the right-hand side of each screen).
5. Get feedback that helps you assess your ad’s effectiveness. Facebook’s Insights program generates charts that show you the kind of response your ad is getting (the next section shows an example). If you know how to analyze them (they’re pretty straightforward), these charts can help you figure out whether your ad is working or whether you need to tweak it. You get to use Insights for free when you purchase a social ad.
Tip: You also get to use insights if you create a free Facebook Page (see “creating a Page”).
Creating.and.Running.a.Social.Ad
If you’ve got a graphic and a couple lines of copy, creating a social ad is nearly as easy as creating a Marketplace ad (“Posting a Mar-ketplace Ad”). Expect to spend somewhere between $5 and $50 per day, depending on who you want to reach and how long you want your ad to run.
53
Doing Business on FaceBook: The Mini Missing Manual
Tip: Before you even think about creating a social ad, check out Facebook’s advertising guidelines (www.facebook.com/ad_guidelines.php), which lay out rules for the kind of content your ad can contain, the kind of website you’re allowed to drive traffic to, and more. (You also get a chance to review Facebook’s advertising guidelines and its advertising Terms and conditions when you place an ad.)
Here’s how to create and run a social ad:
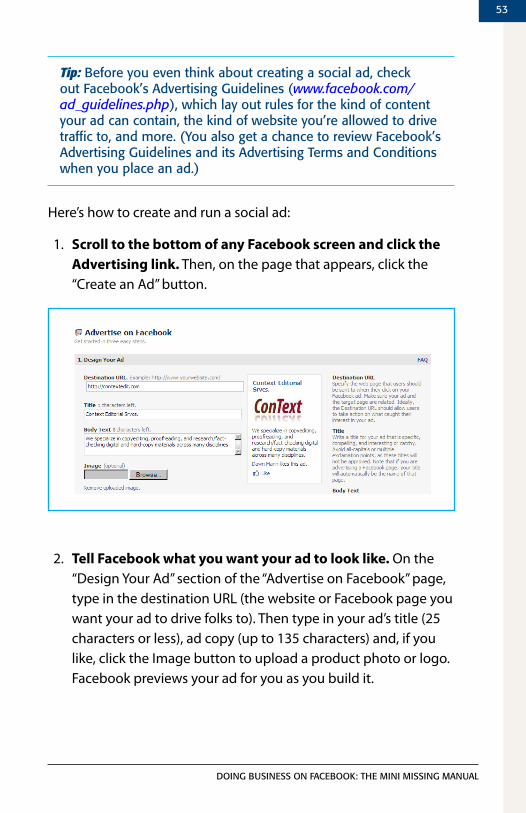
1. Scroll to the bottom of any Facebook screen and click the Advertising link. Then, on the page that appears, click the “Create an Ad” button.
2. Tell Facebook what you want your ad to look like. On the “Design Your Ad” section of the “Advertise on Facebook” page, type in the destination URL (the website or Facebook page you want your ad to drive folks to). Then type in your ad’s title (25 characters or less), ad copy (up to 135 characters) and, if you like, click the Image button to upload a product photo or logo. Facebook previews your ad for you as you build it.
54
Doing Business on FaceBook: The Mini Missing Manual
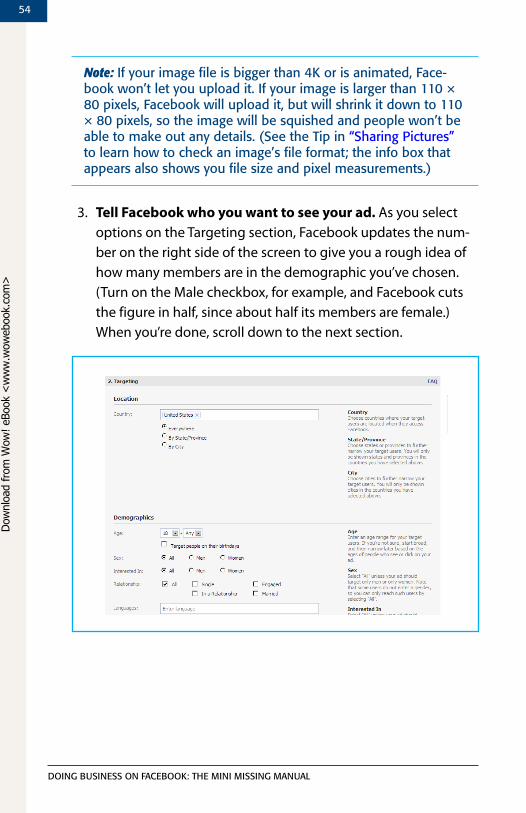
Note: if your image file is bigger than 4k or is animated, Face-book won’t let you upload it. if your image is larger than 110 × 80 pixels, Facebook will upload it, but will shrink it down to 110 × 80 pixels, so the image will be squished and people won’t be able to make out any details. (see the Tip in “sharing Pictures” to learn how to check an image’s file format; the info box that appears also shows you file size and pixel measurements.)
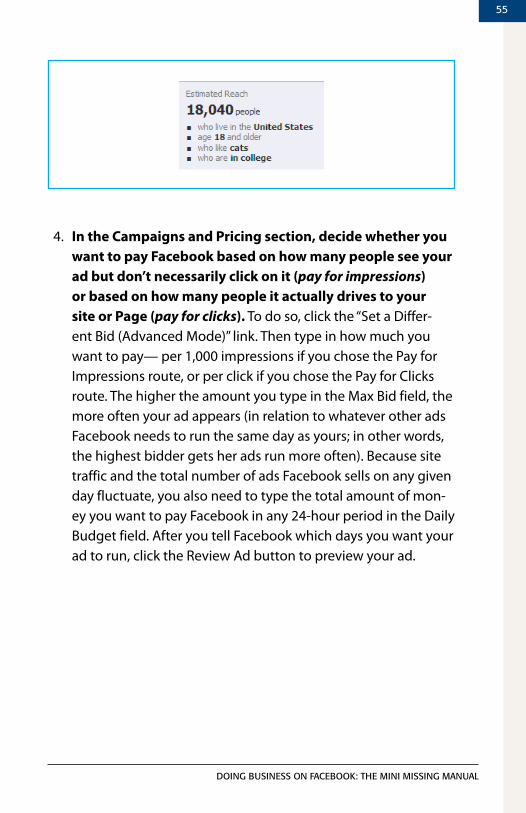
3. Tell Facebook who you want to see your ad. As you select options on the Targeting section, Facebook updates the num-ber on the right side of the screen to give you a rough idea of how many members are in the demographic you’ve chosen. (Turn on the Male checkbox, for example, and Facebook cuts the figure in half, since about half its members are female.) When you’re done, scroll down to the next section.
Dow
nlo
ad fro
m W
ow
! eBook
<w
ww
.wow
ebook.
com
>
55
Doing Business on FaceBook: The Mini Missing Manual
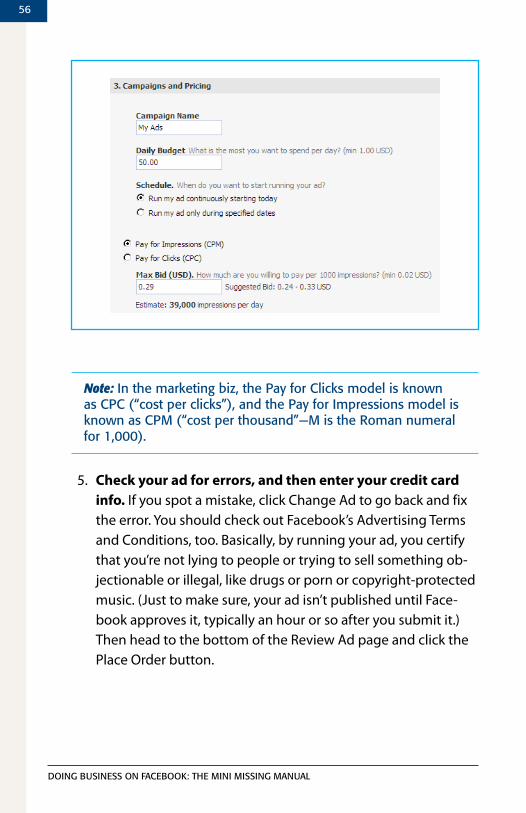
4. In the Campaigns and Pricing section, decide whether you want to pay Facebook based on how many people see your ad but don’t necessarily click on it (pay for impressions) or based on how many people it actually drives to your site or Page (pay for clicks). To do so, click the “Set a Differ-ent Bid (Advanced Mode)” link. Then type in how much you want to pay— per 1,000 impressions if you chose the Pay for Impressions route, or per click if you chose the Pay for Clicks route. The higher the amount you type in the Max Bid field, the more often your ad appears (in relation to whatever other ads Facebook needs to run the same day as yours; in other words, the highest bidder gets her ads run more often). Because site traffic and the total number of ads Facebook sells on any given day fluctuate, you also need to type the total amount of mon-ey you want to pay Facebook in any 24-hour period in the Daily Budget field. After you tell Facebook which days you want your ad to run, click the Review Ad button to preview your ad.
56
Doing Business on FaceBook: The Mini Missing Manual
Note: in the marketing biz, the Pay for clicks model is known as cPc (“cost per clicks”), and the Pay for impressions model is known as cPM (“cost per thousand”—M is the Roman numeral for 1,000).
5. Check your ad for errors, and then enter your credit card info. If you spot a mistake, click Change Ad to go back and fix the error. You should check out Facebook’s Advertising Terms and Conditions, too. Basically, by running your ad, you certify that you’re not lying to people or trying to sell something ob-jectionable or illegal, like drugs or porn or copyright-protected music. (Just to make sure, your ad isn’t published until Face-book approves it, typically an hour or so after you submit it.) Then head to the bottom of the Review Ad page and click the Place Order button.
57
Doing Business on FaceBook: The Mini Missing Manual
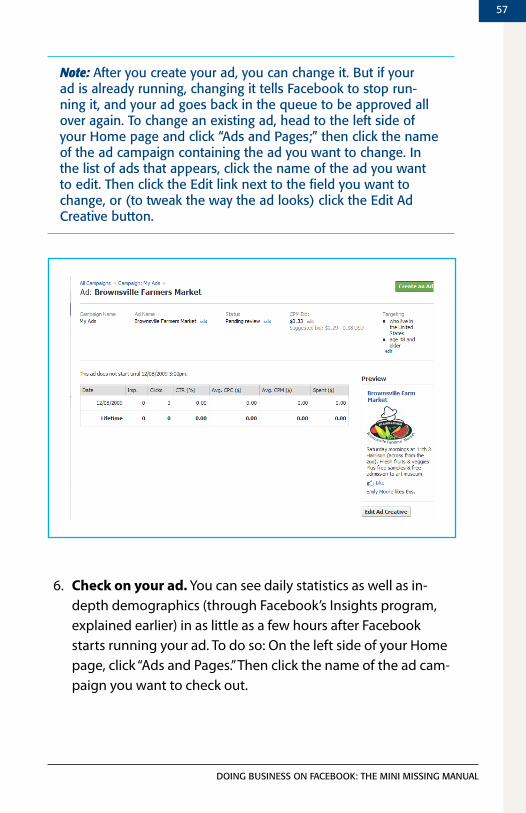
Note: after you create your ad, you can change it. But if your ad is already running, changing it tells Facebook to stop run-ning it, and your ad goes back in the queue to be approved all over again. To change an existing ad, head to the left side of your home page and click “ads and Pages;” then click the name of the ad campaign containing the ad you want to change. in the list of ads that appears, click the name of the ad you want to edit. Then click the edit link next to the field you want to change, or (to tweak the way the ad looks) click the edit ad creative button.
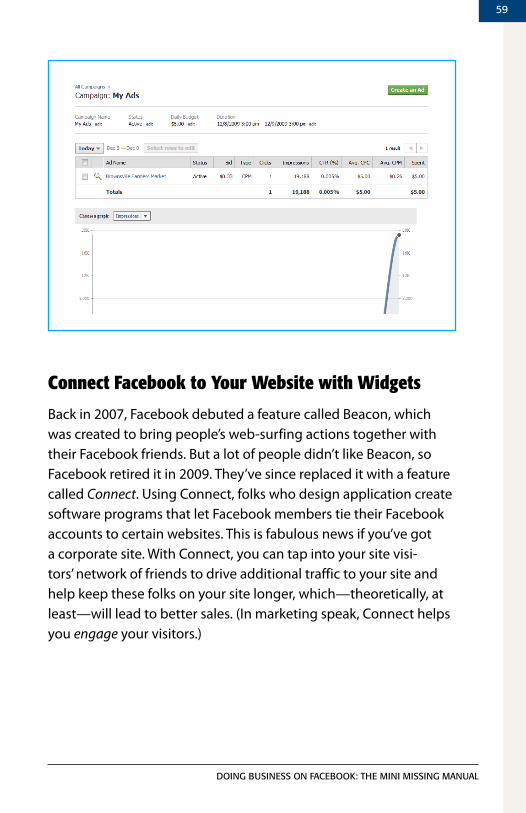
6. Check on your ad. You can see daily statistics as well as in-depth demographics (through Facebook’s Insights program, explained earlier) in as little as a few hours after Facebook starts running your ad. To do so: On the left side of your Home page, click “Ads and Pages.” Then click the name of the ad cam-paign you want to check out.
58
Doing Business on FaceBook: The Mini Missing Manual
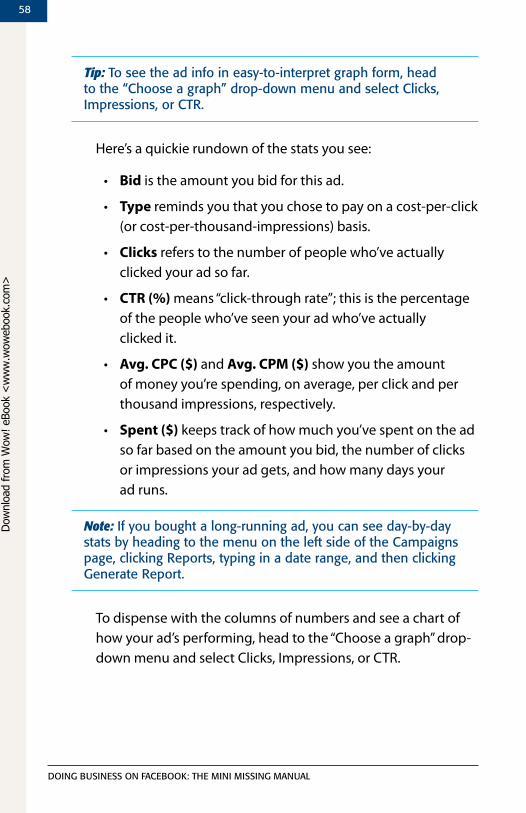
Tip: To see the ad info in easy-to-interpret graph form, head to the “choose a graph” drop-down menu and select clicks, impressions, or cTR.
Here’s a quickie rundown of the stats you see:
• Bid is the amount you bid for this ad.
• Type reminds you that you chose to pay on a cost-per-click (or cost-per-thousand-impressions) basis.
• Clicks refers to the number of people who’ve actually clicked your ad so far.
• CTR (%) means “click-through rate”; this is the percentage of the people who’ve seen your ad who’ve actually clicked it.
• Avg. CPC ($) and Avg. CPM ($) show you the amount of money you’re spending, on average, per click and per thousand impressions, respectively.
• Spent ($) keeps track of how much you’ve spent on the ad so far based on the amount you bid, the number of clicks or impressions your ad gets, and how many days your ad runs.
Note: if you bought a long-running ad, you can see day-by-day stats by heading to the menu on the left side of the campaigns page, clicking Reports, typing in a date range, and then clicking generate Report.
To dispense with the columns of numbers and see a chart of how your ad’s performing, head to the “Choose a graph” drop-down menu and select Clicks, Impressions, or CTR.
Dow
nlo
ad fro
m W
ow
! eBook
<w
ww
.wow
ebook.
com
>
59
Doing Business on FaceBook: The Mini Missing Manual
Connect Facebook to Your Website with Widgets
Back in 2007, Facebook debuted a feature called Beacon, which was created to bring people’s web-surfing actions together with their Facebook friends. But a lot of people didn’t like Beacon, so Facebook retired it in 2009. They’ve since replaced it with a feature called Connect. Using Connect, folks who design application create software programs that let Facebook members tie their Facebook accounts to certain websites. This is fabulous news if you’ve got a corporate site. With Connect, you can tap into your site visi-tors’ network of friends to drive additional traffic to your site and help keep these folks on your site longer, which—theoretically, at least—will lead to better sales. (In marketing speak, Connect helps you engage your visitors.)
60
Doing Business on FaceBook: The Mini Missing Manual
Connect comes in two flavors:
• Quick-and-dirty Connect-based programs, a.k.a. widgets, such as Share buttons and Fan Boxes. These pre-built widgets are so simple to use that even folks with little to no program-ming experience can add them to their webpages. You’ll learn how to add a widget to your web page below in a moment.
• Guidelines (technically, application programming interfaces and specifications) that webmasters and other programmer-types can use to build their own widgets or even more com-plicated programs for exchanging website visitor info with Facebook info. This option isn’t for the average joe; you want to leave it to programming professionals, as explained at the end of this chapter.
To add a widget to your website:
1. Point your Web browser to www.facebook.com/facebook-widgets.
61
Doing Business on FaceBook: The Mini Missing Manual
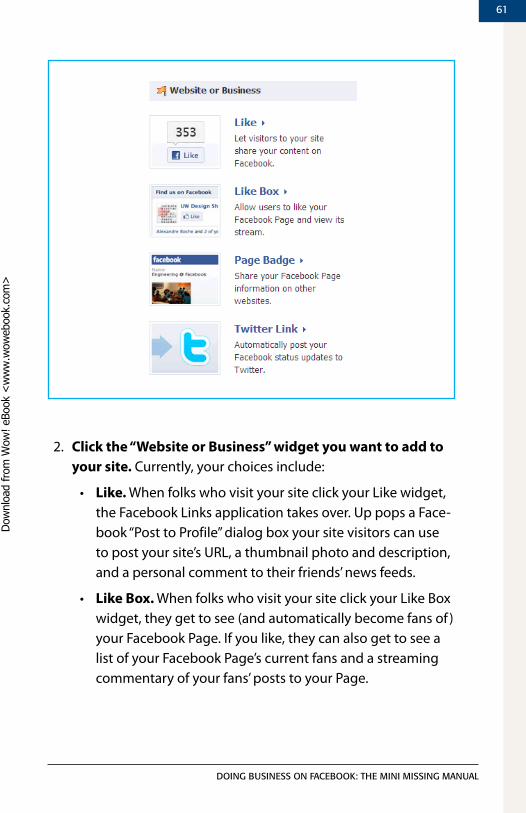
2. Click the “Website or Business” widget you want to add to your site. Currently, your choices include:
• Like. When folks who visit your site click your Like widget, the Facebook Links application takes over. Up pops a Face-book “Post to Profile” dialog box your site visitors can use to post your site’s URL, a thumbnail photo and description, and a personal comment to their friends’ news feeds.
• Like Box. When folks who visit your site click your Like Box widget, they get to see (and automatically become fans of ) your Facebook Page. If you like, they can also get to see a list of your Facebook Page’s current fans and a streaming commentary of your fans’ posts to your Page.
Dow
nlo
ad fro
m W
ow
! eBook
<w
ww
.wow
ebook.
com
>
62
Doing Business on FaceBook: The Mini Missing Manual
• Page Badge. After you add it to your Facebook Page, this widget appears as a thumbnail of your Page. No instant “fanning” here, a la the Like Box; instead, clicking your web-site’s Page Badge whisks your site visitors to your Facebook Page, where they can become fans or otherwise interact with your Page.
• Twitter Link. This widget is a little different than the oth-ers: It’s not something you add to your website. Instead, it’s a short set of steps that let you connect your Facebook Page to a Twitter account. After you follow the steps, every time you update your Facebook Page, the updates simulta-neously go out to your Twitter followers.
Note: There are a handful of additional, developer-targeted widgets, including one that lets your site visitors add comments (and then turn around and share these comments with her Facebook friends). These widgets require a bit more tech-savvy than cutting and pasting, though. You can find a list of them in the Developers section of www.facebook.com/facebook-widgets.
3. Follow the instructions that appear to add a line or three of HTML code to a page of your website. Depending on the widget you choose and what kind of website you’ve got, you may have to cut-and-paste HTML code directly into your web page’s source file. (The process is a bit easier if you’re dropping a Like Box widget into a blog hosted by Blogger or Typepad.) Don’t worry: The widgets were designed to be as simple to add as possible, and Facebook’s instructions give you all the details.
High-Dollar Options
Facebook’s free and inexpensive Pages, widgets, and social ads are great for small businesses and freelancers. But companies with a little more dough to throw around can choose from even more advertising options.
63
Doing Business on FaceBook: The Mini Missing Manual
Connect is a customizable feature that does for regular websites what social actions (“Social Ads (Targeted Announcements)”) do for Facebook Pages. Connect lets you offer your site visitors the option to (what else?) connect with your site, and after they give their go-ahead, their Facebook profiles and friend lists are available to you to use as you wish. For example, if you sell music CDs on your website, you might want to serve up different display ads to the folks whose Facebook profiles mark them as jazz hounds vs. the ones whose profiles list classical compositions.
The connection works the other way, too—from your site to Facebook. Not only can you link your site directly to your Facebook Page; you can also incorporate the actions your visitors take on your website into customized “stories” (ads) that Facebook then shoots out to the news feeds of your site visitors’ Facebook friends.
Note: Facebook’s earlier stab at a program to link Facebook to the wider Web, called Beacon, stirred up quite a bit of contro-versy thanks to the surprise some Facebook members felt when they realized their web-surfing exploits were being posted to their nearest and dearest Facebook friends. While there’s a lot of overlap between connect and Beacon, one difference is that with connect, Facebook members have to choose to connect to your website. You can’t gather people’s Facebook profile infor-mation using connect, use it without their knowledge or permis-sion, and then claim it’s okay because you gave them a chance to opt out. (You wouldn’t dream of doing this anyway, though, because you’re a nice person.)
Unless you’re talking about one of the simple pre-built widgets Facebook makes available (“Connect Facebook to Your Website with Widgets”), adding Connect to your website takes some do-ing. First, you have to register your website as a Connect applica-tion. Then, you either have to use pre-built HTML code snippets (if you’re going with one of Facebook’s developer widgets) or
64
Doing Business on FaceBook: The Mini Missing Manual
write your own HTML code from scratch based on the Connect guidelines. Facebook doesn’t charge for any of these activities, but depending on what you have in mind, you may have to pay your website developers a pretty penny to get the Connect-enabled version of your website up and running. To see what’s involved, head to http://developers.facebook.com/connect.php.
Note: Don’t be surprised if Facebook’s advertising policies and procedures change in the near future. as this book goes to press, Facebook is working with the nielsen ratings people to investigate how folks respond to ads on Facebook and, by extension, how to make ads more effective. For the latest on Facebook’s advertising options, get in touch with their sales team: www.facebook.com/business/contact.php.
Dow
nlo
ad fro
m W
ow
! eBook
<w
ww
.wow
ebook.
com
>
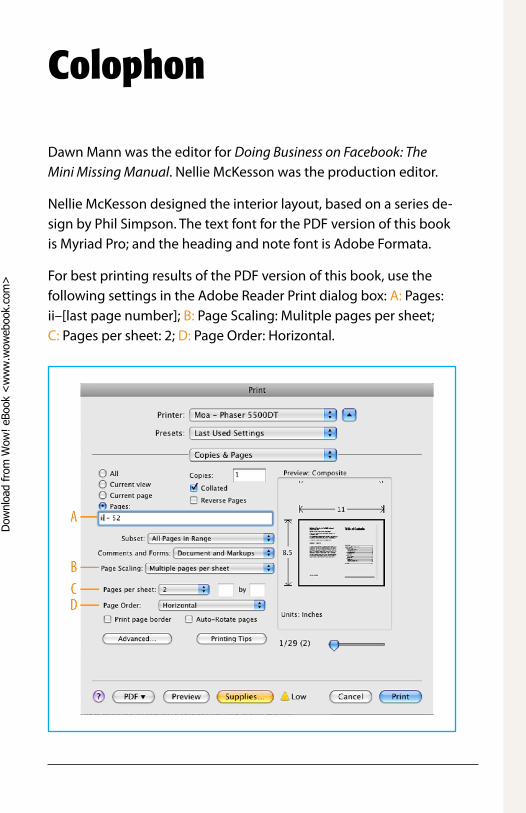
Colophon
Dawn Mann was the editor for Doing Business on Facebook: The Mini Missing Manual. Nellie McKesson was the production editor.
Nellie McKesson designed the interior layout, based on a series de-sign by Phil Simpson. The text font for the PDF version of this book is Myriad Pro; and the heading and note font is Adobe Formata.
For best printing results of the PDF version of this book, use the following settings in the Adobe Reader Print dialog box: A: Pages: ii–[last page number]; B: Page Scaling: Mulitple pages per sheet; C: Pages per sheet: 2; D: Page Order: Horizontal.
Dow
nlo
ad fro
m W
ow
! eBook
<w
ww
.wow
ebook.
com
>