Discovery and Credentials (Version 8.12.0) - Docs ...
125
'LVFRYHU\ DQG &UHGHQWLDOV 6/ YHUVLRQ
-
Upload
khangminh22 -
Category
Documents
-
view
1 -
download
0
Transcript of Discovery and Credentials (Version 8.12.0) - Docs ...

Discovery and CredentialsSL1 version 8.12.0

Table of Contents
Introduction 1Terminology 2Who Should Read This Manual? 2Requirements 2
Credentials 3What Are Credentials? 5Viewing Information about Credentials 6
Filtering the List of Credentials 7Defining One or More SNMP Credentials for Initial Discovery 8Defining Credentials 9Defining an SNMP Credential 10Defining a Database Credential 12Monitoring Informix Databases 15Defining a SOAP/XML Host Credential 15Defining an LDAP/AD Credential 19Defining a Basic/Snippet Credential 22Defining an SSH/Key Credential 24Defining a PowerShell Credential 26Testing a Credential 29ScienceLogic Default Credential Tests 30
AWS Credential Test 30Azure Credential Test 30Basic/Snippet Credential Test 31Database Credential Test 31PowerShell Credential Test 31SNMP Credential Test 32SOAP/XML Credential Test 32SoftLayer Credential Test 32SSH/Key Credential Test 32VMware Credential Test 33
Specifying Credentials During Initial Discovery 33Defining the Primary and Secondary Credentials for a Single Device 34Defining the Credentials for a Specific Device/Dynamic Application Pair 37Specifying Credentials in a Device Template 39How the ScienceLogic Platform Uses Credentials During Discovery 39Aligning One or More Organizations With a Credential 39
Default Organizations Aligned with a Credential 41Editing the Organizations Aligned with a Credential 42Restricted Credentials in the Discovery Session Editor Page 44
Editing a Credential 44Deleting a Credential 45
Discovery 46What Happens During Discovery? 48
What Happens During Discovery when the SL1 agent is Installed? 50What is a Dynamic Application? 50
How Does the ScienceLogic Platform Align Dynamic Applications During Discovery? 51Before You Run Discovery 52System Settings that Affect Discovery 53Device Settings that Affect Auto-Discovery and Re-Discovery 57Duplicate IP Addresses and Duplicate MAC Addresses During Discovery 58

Duplicate MAC Addresses for Component Devices 60Prerequisites for Discovering Devices on the Devices Page 62Adding Devices Using Universal or Guided Discovery 62Adding Devices Using Guided Discovery 67Working with Discovery Sessions 75Running a Classic Discovery Session 75Creating a New Classic Discovery Session with the Save As Button 82Viewing Information about a Classic Discovery Session 83Editing a Classic Discovery Session 86Scheduling a Classic Discovery Session 86
Viewing the Schedule Manager 87Defining a Scheduled or Recurring Discovery Session 88Enabling or Disabling One or More Scheduled Discovery Sessions 90Deleting One or More Scheduled Discovery Sessions 91
Manually Re-Running Discovery for a Dynamic Application 91Manually Re-Running Discovery for a Device 93Viewing Information about Classic Discovery 94Managing MAC Vendor Records 95
Viewing the List of MAC Vendor Records 95Filtering the List of MAC Vendor Records 96Editing the Virtual Setting for MAC Vendor Records 97
Troubleshooting Discovery 97Checking Network Security 98Debugging the Discovery Processes 98Checking Communication between Data Collectors and the Database Server 100
How File Systems are Hidden During Discovery 101Collection 103
What is Collection? 104Collection Processes 104
Managing Credential Tests 106Viewing Information About Credential Tests 107
Filtering the List of Credential Tests 108Running a Credential Test from the Credential Test Management Page 109Creating a Credential Test 110Editing a Credential Test 112Deleting Credential Tests 112Available Step Functions 112
ping 112nmap_udp 113nmap_tcp 113nslookup_forward 114nslookup 114dynapp_execute 115snmp_getnext 115ssh_request 115db_query 116curl 116aws_connect 117aws_service_scan 118nmap_aws 118nslookup_aws 119ping_aws 120

Introduction
Chapter
1Introduction
Overview
This chapter provides an overview of discovery, collection, and credentials in SL1.
Use the following menu options to navigate the SL1 user interface:
l To view a pop-out list of menu options, click the menu icon ( ).
l To view a page containing all of the menu options, click the Advanced menu icon ( ).
This chapter includes the following topics:
Terminology 2
Who Should Read This Manual? 2
Requirements 2
1
1

2
Terminology
The following terms explain the key concepts used with discovery:
l Discovery is the tool that automatically discovers devices in your network. You supply the discovery tool with arange or list of IP addresses, and the discovery tool determines if a device exists at each IP address. For eachdevice the discovery tool "discovers", the discovery tool can collect a list of open ports, DNS information, SSLcertificates, a list of network interfaces, device classes to align with the device, and basic SNMP informationabout the device. The discovery tool also determines which (if any) Dynamic Applications to align with thedevice. If the discovery tool finds Dynamic Applications to align with the device, the discovery tool triggerscollection from the device, using each aligned Dynamic Application.
SL1 also uses discovery to update information about an already-discovered device and to add newinformation about an already-discovered device.
NOTE: Discovery collects a very specific set of information for each discovered device. Data that is notretrieved by discovery is retrieved by collection.
l Collection is the tool that retrieves policy-based information and Dynamic Application-based informationfrom a device. After a device is discovered, you can define monitoring policies for that device in SL1. Forexample, if you define a policy to monitor a system process, the collection tool retrieves that information.
l Credentials are access profiles (usually username, password, and any additional information required foraccess) that allow SL1 to retrieve information from devices and from software applications on devices.Discovery uses SNMP credentials to retrieve SNMP information from each discovered device. DynamicApplications use credentials to retrieve SNMP information, database information, SOAP information, XMLinformation, and LDAP and AD information. SL1 also includes a type of credential called "Basic/Snippet" thatis not bound to a specific authentication protocol. You can use this type of credential for Dynamic Applicationsof type "WMI", of type "snippet", and when defining system backups. Another type of credential allowsDynamic Applications of type "Snippet" to use SSH to communicate with a remote device.
Who Should Read This Manual?
This manual is intended for users who are responsible for provisioning devices in SL1.
Requirements
To perform the troubleshooting steps in this manual, you must be allowed root-level access to SL1 appliances froma shell session.
Introduction

Credentials
Chapter
2Credentials
Overview
This chapter defines credentials and how they are used in SL1.
Use the following menu options to navigate the SL1 user interface:
l To view a pop-out list of menu options, click the menu icon ( ).
l To view a page containing all of the menu options, click the Advanced menu icon ( ).
This chapter includes the following topics:
What Are Credentials? 5
Viewing Information about Credentials 6
Defining One or More SNMP Credentials for Initial Discovery 8
Defining Credentials 9
Defining an SNMP Credential 10
Defining a Database Credential 12
Monitoring Informix Databases 15
Defining a SOAP/XML Host Credential 15
Defining an LDAP/AD Credential 19
Defining a Basic/Snippet Credential 22
Defining an SSH/Key Credential 24
Defining a PowerShell Credential 26
Testing a Credential 29
3
2

4
ScienceLogic Default Credential Tests 30
Specifying Credentials During Initial Discovery 33
Defining the Primary and Secondary Credentials for a Single Device 34
Defining the Credentials for a Specific Device/Dynamic Application Pair 37
Specifying Credentials in a Device Template 39
How the ScienceLogic PlatformUses Credentials During Discovery 39
Aligning One or More OrganizationsWith a Credential 39
Editing a Credential 44
Deleting a Credential 45
Credentials

Credentials
What Are Credentials?
Credentials are access profiles (usually username, password, and any additional information required for access)that allow SL1 to retrieve information from devices and from software applications on devices.
l Discovery uses SNMP credentials to retrieve SNMP information during initial discovery and nightly auto-discovery. If SL1 can connect to a device with an SNMP credential, SL1 deems that device "manageable" inSL1.
l Dynamic Applications use credentials to retrieve SNMP information, database information,SOAP information, XML information, XSLT information, and WMI information.
l Proxied Web Services use SOAP/XML Host credentials to pass authentication information to external webservices.
l SL1 includes a type of credential called "Basic/Snippet" that is not bound to a specific authentication protocol.You can use this type of credential for Dynamic Applications of type "WMI", of type "snippet", and whendefining system backups. "Basic/Snippet" credentials can also be used for monitoring Windows devices usingPowerShell.
l SL1 includes a type of credential that allows SL1 to communicate with an LDAP or Active Directory system.For details on integrating SL1 with LDAP or Active Directory, see the manual Using Active Directory andLDAP.
l SL1 includes a type of credential that allows Dynamic Applications of type "Snippet" to use SSH tocommunicate with a remote device. To use these Dynamic Applications, you must define an SSH credential.
l SL1 includes a type of credential that allows Dynamic Applications to retrieve data from Windows devices. Ifyou align a Dynamic Application for PowerShell with a PowerShell credential, SL1 assumes that you want touse its built-in agentless transport to communicate with Windows devices.
If necessary, a single device can use multiple credentials. If more than one agent or application is running on thedevice, each agent or application can be associated with its own credential. During discovery, SL1 will use theappropriate credential for each agent.
For example, suppose you want SL1 to discover a device that supports SNMP v2. To retrieve SNMP data from thatdevice, SL1 must use a valid SNMP v2 read-only community string. So we would first go to the device and definethe SNMP read-only community string. Then we would return to SL1 and create a credential in the SL1 system,using that community string. This new credential would allow discovery to retrieve SNMP data from the device.
Now suppose this same device also includes a MySQL database. Suppose you want SL1 to use a DynamicApplication to monitor that database. To retrieve data from the database, SL1 must use a valid username andpassword for that database. So we would first go to the device that hosts the MySQL database and create adatabase username and database password for SL1 to use. Then we would return to SL1 and create a credentialin the SL1 system. The credential would include the database username and database password for the MySQLdatabase. This credential would allow the Dynamic Application to retrieve data about the MySQL database.
5
2

6
Viewing Information about Credentials
The Credential Management page allows you to view a list of all ScienceLogic credentials. From this page, youcan also create new credentials and editing existing credentials.
TIP: To sort the list of credentials, click on a column heading. The list will be sorted by the column value, inascending order. To sort by descending order, click the column heading again. The Last Edited columnsorts by descending order on the first click; to sort by ascending order, click the column heading again.
For each credential, the page displays:
l Profile Name. Name of the credential.
l Organization. If you have an account of type "User" and are a member of only one ScienceLogicorganization, this field will not appear in the Credential Management page. The CredentialManagement page will display only credentials that are aligned with your organization. For all other users,this column specifies the organization(s) aligned with the credential. Possible values are all orgs, multipleorgs, a single organization name, or none. For details, see the section Aligning One or MoreOrganizations with a Credential.
l ROUse. Specifies the number of devices that SL1 can retrieve read-only information from, using thecredential.
l RWUse. Specifies the number of devices that SL1 can both read from and write to, using the credential.
l DAUse. Specifies the number of Dynamic Applications aligned with this credential.
Credentials

Credentials
l Type. Type of credential. Possible types are SNMP, Database, SOAP/XML, LDAP/AD, Basic/Snippet,SSH/Key, and PowerShell.
l Credential User. Username associated with the credential.
l Host. Hostname or IP address that SL1 will use the credential to communicate with.
l Port. Port used by the credential to communicate with the external device or application.
l Timeout. Time, in milliseconds, after which SL1 will stop trying to communicate with the external device orapplication.
l ID. Unique numeric ID, automatically assigned by SL1 to each credential.
l Last Edited. Date and time the credential was created or last edited.
l Edited By. ScienceLogic user who created or last edited the credential.
Filtering the List of Credent ials
To filter the list of credentials in the Credential Management page, use the search fields at the top of eachcolumn. The search fields are find-as-you-type filters; as you type, the page is filtered to match the text in thesearch field, including partial matches. Text matches are not case-sensitive. Additionally, you can use the followingspecial characters in each filter:
l , (comma). Specifies an "or" operation. For example:
"dell, micro" would match all values that contain the string "dell" OR the string "micro".
l & (ampersand). Specifies an "and" operation. For example:
"dell & micro" would match all values that contain the string "dell" AND the string "micro".
l ! (exclamation mark). Specifies a "not" operation. For example:
"!dell" would match all values that do not contain the string "dell".
l ^ (caret mark). Specifies "starts with." For example:
"^micro" would match all strings that start with "micro", like "microsoft".
"^" will include all rows that have a value in the column.
"!^" will include all rows that have no value in the column.
7
2

8
l $ (dollar sign). Specifies "ends with." For example:
"$ware" would match all strings that end with "ware", like "VMware".
"$" will include all rows that have a value in the column.
"!$" will include all rows that have no value in the column.
l min-max. Matches numeric values only. Specifies any value between the minimum value and the maximumvalue, including the minimum and the maximum. For example:
"1-5" would match 1, 2, 3, 4, and 5.
l - (dash). Matches numeric values only. A "half open" range. Specifies values including the minimum andgreater or including the maximum and lesser. For example:
"1-" matches 1 and greater, so it would match 1, 2, 6, 345, etc.
"-5" matches 5 and less, so it would match 5, 3, 1, 0, etc.
l > (greater than). Matches numeric values only. Specifies any value "greater than." For example:
">7" would match all values greater than 7.
l < (less than). Matches numeric values only. Specifies any value "less than." For example:
"<12" would match all values less than 12.
l >= (greater than or equal to). Matches numeric values only. Specifies any value "greater than or equal to."For example:
"=>7" would match all values 7 and greater.
l <= (less than or equal to). Matches numeric values only. Specifies any value "less than or equal to." Forexample:
"=<12" would match all values 12 and less.
l = (equal). Matches numeric values only. For numeric values, allows you to match a negative value. Forexample:
"=-5 " would match "-5" instead of being evaluated as the "half open range" as described above.
Defining One or More SNMP Credentials for Initial Discovery
Before running discovery, you must first define credentials for the devices and applications in the network to bemanaged. You must either define or note the credentials on the device to be managed, and then you must definematching credentials in SL1.
To create credentials for initial discovery, you must first:
Credentials

Credentials
1. Determine which devices or IP ranges you want to discover.
2. Determine which of these devices support SNMP.
3. Determine the SNMP community string or SNMP credentials for each device that supports SNMP.
NOTE: If you do not know which devices in your network support SNMP, consult your system administrator. Insome cases, you might also need to consult your system administrator about enabling SNMP, anddefining SNMP community strings or SNMP credentials on these devices. For advice and details onconfiguring SNMP on your devices, see the manualsMonitoring Cisco Unified Communications,Monitoring Video Endpoints,Monitoring VMWare,Monitoring Windows Devices, andMonitoring Linux and Solaris Devices.
4. In SL1, define one or more SNMP credentials to use during discovery. These credentials should match thoseSNMP community strings and SNMP credentials that already exist in your network.
5. Initially, discovery uses only SNMP credentials. However, when SL1 collects data specified in DynamicApplications, SL1 can use other types of credentials.
If necessary, a single device can use multiple credentials. If more than one agent or application is running on thedevice, each agent or application can be associated with its own credential. During discovery, SL1 will use theappropriate credential for each agent.
Defining Credentials
To define a credential in SL1:
1. Collect the information you need to create each credential (usually username and password).
2. Go to the Credential Management page (System > Manage > Credentials).
3. In the Credential Management page, click the [Create]menu. Select the type of credential you want tocreate. Your choices are:
l SNMP Credential
l Database Credential
l SOAP/XML Host Credential
l LDAP/AD Credential
l Basic/Snippet Credential
l SSH/Key Credential
l PowerShell Credential
4. The Credential Editormodal page appears. In this page, you can define the new credential. The followingsections explain how to create each type of credential.
5. Click the [Save] button to save the new credential.
9
2

10
Defining an SNMP Credential
SNMP Credentials (called "community strings" in earlier versions of SNMP) allow SL1 to access SNMP data on amanaged device. SL1 uses SNMP credentials to perform discovery, run auto-discovery, and gather informationfrom SNMP Dynamic Applications.
To create an SNMP credential:
1. Go to the Credential Management page (System > Manage > Credentials).
2. Click the [Actions] button and selectCreate SNMP Credential. The Credential Editor page appears.
Credentials

Credentials
3. Supply values in the following fields:
l Profile Name. Name of the credential. Can be any combination of alphanumeric characters. Thisfield is required.
l SNMP Version. SNMP version. Choices are SNMP V1, SNMP V2, and SNMP V3. The default valueis SNMP V2. This field is required.
l Port. The port SL1 will use to communicate with the external device or application. The default valueis 161. This field is required.
l Timeout (ms). Time, in milliseconds, after which SL1 will stop trying to communicate with the SNMPdevice. The default value is 1500. This field is required.
l Retries. Number of times SL1 will try to authenticate and communicate with the external device. Thedefault value is 1. This field is required.
SNMP V1/V2 Settings
These fields appear if you selected SNMP V1 or SNMP V2 in the SNMP Version field. Otherwise, thesefields are grayed out.
l SNMP Community (Read Only). The SNMP community string (password) required for read-onlyaccess of SNMP data on the remote device or application. For SNMP V1 and SNMP V2 credentials,you must supply a community string, either in this field or in the SNMP Community (Read/Write)field.
l SNMP Community (Read/Write). The SNMP community string (password) required for read andwrite access of SNMP data on the remote device or application. For SNMP V1 and SNMP V2credentials, you must supply a community string, either in this field or in the SNMP Community (ReadOnly) field.
SNMP V3 Settings
These fields appear if you selected SNMP V3 in the SNMP Version field. Otherwise, these fields are grayedout.
l Security Name. Name for SNMP authentication. This field is required.
l Security Passphrase. Password to authenticate the credential. This value must contain at least 8characters. This value is required if you use a Security Level that includes authentication.
l Authentication Protocol. Select an authentication algorithm for the credential. Choices are MD5 orSHA. The default value isMD5. This field is required.
l Security Level. Specifies the combination of security features for the credentials. This field is required.Choices are:
o No Authentication / No Encryption.
o Authentication Only. This is the default value.
o Authentication and Encryption.
l SNMP v3 Engine ID. The unique engine ID for the SNMP agent you want to communicate with.(SNMPv3 authentication and encryption keys are generated based on the associated passwords and
11
2

12
the engine ID.) This field is optional.
l Context Name. A context is a mechanism within SNMPv3 (and AgentX) that allows you to useparallel versions of the same MIB objects. For example, one version of a MIB might be associated withSNMP Version 2 and another version of the same MIB might be associated with SNMP Version 3. ForSNMP Version 3, specify the context name in this field. This field is optional.
l Privacy Protocol. The privacy service encryption and decryption algorithm. Choices are DES or AES.The default value is DES. This field is required.
l Privacy Protocol Passphrase. Privacy password for the credential. This field is optional.
4. Click the [Save] button to save the new SNMP credential.
5. Repeat steps 1-4 for each SNMP-enabled device in your network that you want to monitor with SL1.
NOTE: When you define a SNMP Credential, SL1 automatically aligns the credential with all organizations ofwhich you are a member.
Defining a Database Credential
Database Credentials allow SL1 to access data on a database on a managed device. SL1 uses databasecredentials when collecting data for Database Dynamic Applications.
To define a database credential:
1. Collect the information you need to create each credential (usually username and password).
2. Go to the Credential Management page (System > Manage > Credentials).
Credentials

Credentials
3. In the Credential Management page, click the [Actions]menu. Select Create Database Credential.
4. The Credential Editormodal page appears. In this page, you can define the new database credential. Todefine the new credential, supply values in the following fields:
Basic Settings
l Profile Name. Name of the credential. Can be any combination of alphanumeric characters. Thisfield is required.
l DB Type. Type of database that will be accessed with the credential. Select from a list of databasessupported by SL1. This field is required.
NOTE: For information about monitoring Informix databases, see theMonitoring Informix Databasessection.
l DB Name. Name of the database that will be accessed with the credential.
l DB User. Username associated with a valid account on the database.
l Password. Password associated with a valid account on the database.
l Hostname/IP. Hostname or IP address where the database resides. This field is required.
o You can an include the variable %D in this field. SL1 will replace the variable with the IP address ofthe current device (device that is currently using the credential).
o You can include the variable %N in this field. SL1 will replace the variable with the hostname of thecurrent device (device that is currently using the credential). If SL1 cannot determine the hostname,SL1 will replace the variable with the primary management IP address for the current device.
13
2

14
NOTE: To use the localhost, in the Hostname/IP field, enter the IP address 127.0.0.1. The credential will notwork if you enter the string localhost in the Hostname/IP field.
l Port. Port number associated with the database you want to access with this credential. This field isrequired.
o ForDB Type ofMySQL, the default value is 3306.
o ForDB Type ofMS SQL Server, the default value is 1433.
o ForDB Type ofOracle and SQLNet, the default value is 1521.
o ForDB Type of PostgreSQL, the default value is 5432.
o ForDB Type of IBM DB2, the default value is 523.
o ForDB Type of Sybase ASE, the default value is 4100.
o ForDB Type of Informix, see the 9088 section.
o ForDB Type of Ingress, the default value is 1572.
NOTE: SL1's Database Servers include a MySQL database running on port 7706. Data Collectors andMessage Collectors include a MySQL database running on port 7707.
Oracle Settings
These fields appear if you selectedOracle & *SQLNet in the DB Type field. Otherwise, these fields aregrayed out.
l Oracle Connect Type. Specifies the method SL1 should use to connect to the Oracle database. Thechoices are:
o Oracle System Identifier (SID)
o Oracle Real Application Clusters (SERVICE)
o Oracle Server Direct Connection (SERVER)
NOTE: In Oracle 11g, the "Oracle Server Direct Connection" option is deprecated. If you select this OracleConnect Type for an Oracle 11g database, you must edit the file listener.ora and add the line"DEFAULT_SERVICE_LISTENER=<SID>", where <SID> is the SID value.
l SID (if required). Enter the value for the Oracle Connect Type (either Oracle SID, Oracle RAC, orOracle Server) selected in theOracle Connect Type field.
5. Click the [Save] button to save the new database credential.
6. Repeat steps 1-5 for each database credential in your network.
Credentials

Credentials
NOTE: When you define a Database Credential, the credential will automatically be aligned with theorganization(s) you are a member of. To learn more about credentials and organizations, see thesection Aligning OrganizationsWith a Credential in this chapter.
Monitoring Informix Databases
For SL1 to connect to an Informix database:
l The Informix database server must have a DRDA listener configured on a separate port than the currentlistener(s).
l The DRDA listener must be configured to share data with other listeners using a DBSERVERALIASES entry inthe server's onconfig file.
l For servers that host multiple databases, multiple DRDA listeners are required with different port assignments.
For example Informix configuration files, please contact ScienceLogic Support.
Defining a SOAP/XML Host Credential
SOAP/XML credentials allow SL1 to access a web server on a managed device. SOAP/XML credentials are usedin several places in SL1, including:
l With Dynamic Applications of type "SOAP".
l With Dynamic Applications of type "XML".
l With Dynamic Applications of type "XSLT".
l With Dynamic Applications of type "snippet". The snippet code must define the authentication protocol.Dynamic Applications of type "snippet" can use any type of credential.
l When defining a proxied web service.
NOTE: For instructions on how to create a SOAP/XML credential for a proxied web service, see theWebProxiesmanual.
To define a SOAP/XML credential:
1. Collect the information you need to create each credential (usually username and password).
15
2

16
2. Go to the Credential Management page (System > Manage > Credentials).
3. In the Credential Management page, click the [Actions]menu. Select Create SOAP/XML HostCredential.
4. The Credential Editormodal page appears. In this page, you can define the new SOAP/XML credential. Todefine the new credential, supply values in the following fields:
Basic Settings
l Profile Name. Name of the credential. Can be any combination of alphanumeric characters.
Credentials

Credentials
l Content Encoding. Tells the SOAP server or XML data-store how the content is encoded, so theSOAP server or XML data-store knows how to decode the message. Select the encoding that isappropriate for your request and response. If you are creating a credential to use with a proxied webservice, you can accept the default value in this field; the proxied web service does not use this value.
l Method. HTTP method to use to exchange credential data from the managed device. Choices areGET or POST. If you are creating a credential to use with a proxied web service, you can accept thedefault value in this field; the proxied web service does not use this value.
NOTE: Typically, Dynamic Applications of type "XML" use GET methods. Dynamic Applications of type"SOAP" and of type "XSLT" use POST methods.
l HTTP Version. Version of HTTP to use. Choices are 1.0 or 1.1. If you are creating a credential to usewith a proxied web service, you can accept the default value in this field; the proxied web service doesnot use this value.
l URL. Address of the SOAP server, HTML document, or XML document. Should be of the format:
https://IP address:port/full path to desired SOAP, HTML, or XML document
o You can include the variable %D in this field. SL1 will replace the variable with the IP address of thecurrent device (device that is currently using the credential).
NOTE: For component devices, SL1 will replace %D with the IP address of the root device.
o You can include the variable %N in this field. SL1 will replace the variable with the hostname of thecurrent device (device that is currently using the credential). If SL1 cannot determine the hostname,SL1 will replace the variable with the primary management IP address for the current device.
o If you are creating a credential to use with a proxied web service, you can enter any valid URL in thisfield. The proxied web service does not use this value, but the Credential Editor page requires avalue in this field.
l HTTP Auth User. Username with which to log in to the web server. If you will use this credential with aproxied web service, you can include one or more of the following variables in this field:
o %u. The username of the user currently logged in to the Administration Portal or All-In-OneAppliance.
o %e. Email address of the user currently logged in to the Administration Portal or All-In-OneAppliance.
l HTTP Auth Password. Password with which to access the web server. If you use this credential with aproxied web service, you can include the following variable in this field:
o %p. The password of the user currently logged in to the Administration Portal or All-In-OneAppliance.
17
2

18
NOTE: You can use the %e, %p, and %u substitution variables only in credentials that will be aligned with aproxied web service. You cannot use these substitution variables in credentials that will be alignedwith a Dynamic Application.
l Timeout (seconds). Time, in seconds, after which SL1 will stop trying to communicate with the webserver. If you are creating a credential to use with a proxied web service, you can accept the defaultvalue in this field; the proxied web service does not use this value.
Proxy Settings
This pane displays optional fields. If you use a proxy server in front of the SOAP server(s) or XML data-store(s) you want to communicate with, enter values in these fields.
l Hostname/IP. The host name or IP address of the proxy server.
l Port. Port on the proxy server to which you will connect.
l User. Username to use to access the proxy server.
l Password. Password to use to access the proxy server.
cURLOptions
l You can include the cURL command and various options in your credential. The list of cURL optionslists all the options you can include in your credential. To include a cURL option in the credential,select it and then select the right-arrow icon. You can then supply arguments in the field to the left ofthe option.
l For more information on cURL commands, see the cURL manpage athttp://curl.haxx.se/docs/manpage.html.
SOAPOptions
These fields are optional. When a SOAP/XML credential is aligned with a SOAP or XSLT DynamicApplication, the requests defined in the Dynamic Application can use the values defined in these fields. Touse a value defined in one of these fields, the request must include the substitution character associatedwith that value. For example, suppose a Dynamic Application request includes the XML tag <high_value=%1>. Suppose you specified "100" in the Embed Value [%1] field in the credential aligned withthat Dynamic Application. The request will be sent with the XML tag <high_value=100>.
l Embedded Password [%P]. Specifies a password value to include in a request. The value defined inthis field is substituted in to the %P substitution character. The value will be encrypted in the request,will be masked in the Credential Editor, and will be stored in an encrypted form in the database.
l Embed Value %1. The value defined in this field is substituted in to the %1 substitution character.
l Embed Value %2. The value defined in this field is substituted in to the %2 substitution character.
l Embed Value %3. The value defined in this field is substituted in to the %3 substitution character.
l Embed Value %4. The value defined in this field is substituted in to the %4 substitution character.
Credentials

Credentials
HTTP Headers
l If you require custom HTTP headers to communicate with the SOAP server, you can build the customheader here.
l If you are using this credential with a proxied web service, you can include one or more of thefollowing variables in your custom HTTP headers:
o %u. The username of the user currently logged in to the Administration Portal or All-In-OneAppliance.
o %e. Email address of the user currently logged in to the Administration Portal or All-In-OneAppliance.
o %p. The password of the user currently logged in to the Administration Portal or All-In-OneAppliance.
NOTE: You can use the %e, %p, and %u substitution variables only in credentials that will be aligned with aproxied web service. You cannot use these substitution variables in credentials that will be alignedwith a Dynamic Application.
5. Click the [Save] button to save the new SOAP/XML credential.
6. Repeat steps 1-5 for each SOAP/XML credential in your network.
NOTE: When you define a SOAP/XML Credential, the credential will automatically be aligned with theorganization(s) you are a member of. To learn more about credentials and organizations, see thesection Aligning OrganizationsWith a Credential in this chapter.
Defining an LDAP/AD Credential
LDAP or Active Directory credentials allow SL1 to access data on an LDAP server or an Active Directory server.
Authentication is the method by which SL1 determines if a user can access the SL1 system. For user accounts thatare to be authenticated with LDAP or Active Directory, SL1 uses the LDAP or Active Directory credential to establishcommunication with the LDAP or Active Directory server. SL1 will then query the Active Directory or the LDAPserver to determine if the username and password are legitimate and accurate.
Additionally, SL1 can automatically create accounts for one or more LDAP or Active Directory users. SL1 uses theLDAP or Active Directory credential to communicate with Active Directory or the LDAP server and:
l Determine if the username and password are legitimate and accurate.
l Gather information to populate fields in the user's automatically-created account.
For details on using Active Directory or LDAP for authentication, see the manual Using Active Directory andLDAP.
19
2

20
To define an LDAP/AD credential:
1. Collect the information you need to create each credential (usually username and password).
2. Go to the Credential Management page (System > Manage > Credentials).
3. In the Credential Management page, click the [Actions]menu. Select Create LDAP/AD Credential.
4. The Credential Editormodal page appears. In this page, you can define the new LDAP/AD Credential. Todefine the new credential, supply values in the following fields:
Basic Settings
l Profile Name. Name of the credential. Can be any combination of alphanumeric characters.
l LDAP Type. Specifies the "flavor" or LDAP running on the directory server. Choices are LDAP or ActiveDirectory.
l Hostname/IP. Hostname or IP address of the LDAP or Active Directory server.
l Port. Port number on the LDAP or Active Directory server to which SL1 will send requests.
l Secure. Specifies whether you are using LDAP over SSL.
Credentials

Credentials
l RDN (Bind DN / bind user). Bind DN. The bind DN is a user on the LDAP or Active Directory serverwho is permitted to search the directory within the specified search base.
o In many LDAP or AD configurations, each user has read-access to his/her own account. Therefore,you might find it most useful to include the %u variable in this field. When an LDAP or AD user logsin to SL1, SL1 stores the username in the %u variable. SL1 then uses the %u variable to build thebind DN, uses the bind DN to communicate with the LDAP or AD server, and then authenticatesthe current user.
o An example entry in the RDN field might be:
uid=%u, ou=People, dc=sciencelogic, dc=com
This creates a DN using the current login name as the uid.
o You can also include the %d variable in this field. The %d variable represents the name of the LDAPdomain, as specified in the LDAP Domain field.
NOTE: If you have configured SL1 to automatically create accounts when a user logs in with an LDAP/ADusername, you must include the %u variable in the RDN field.
l LDAP Domain. If your LDAP or Active Directory configuration includes multiple domains, specify thedomain components to bind to in this field. For example, you could specify:
dc=reston, dc=sciencelogic, dc=com.
This would bind to the sub-domain "reston", in the domain "sciencelogic", in the domain "com".
l Bind Password. Password that allows access to the LDAP or Active Directory server. In most cases,when you specify a bind password in a credential, you are creating a "write" credential (that is, acredential that allows SL1 to make changes to the LDAP or AD server).
21
2

22
l User Search Base. In this field, you specify the area in the directory where users to be authenticatedreside, using RDN notation. For example, if you want to authenticate five users from the ou called"people", you could specify the RDN that includes that ou.
ou=People, dc=sciencelogic, dc=com.
This would allow SL1 to authenticate users in the ou called "people." In the User Search Scopefield, you can specify whether SL1 should also authenticate all users in any ou underneath "people".
l User Search Scope. In this field, you specify whether SL1 should search only the directory specified inUser Search Base or whether SL1 should search the directory specified in User Search Base and allits child branches. Choice are:
o Subtree. SL1 should search the directory specified in User Search Base and also search all its childbranches.
o One Level. SL1 should search only the directory specified in User Search Base.
5. Click the [Save] button to save the new LDAP/AD credential.
6. Repeat steps 1-5 for each LDAP/AD credential in your network.
NOTE: When you define an LDAP/AD Credential, the credential will automatically be aligned with theorganization(s) you are a member of. To learn more about credentials and organizations, see thesection Aligning OrganizationsWith a Credential.
Defining a Basic/Snippet Credential
NOTE: Dynamic Applications of type "snippet" are not required to use only the Basic/Snippet Credential. InDynamic Applications of type "snippet", the snippet code must define the authentication protocol.Therefore, Dynamic Applications of type "snippet" can use any type of credential.
Basic/Snippet credentials define standard authentication parameters, but are not tied to a specific authenticationprotocol. Basic/Snippet credentials are used in several places in SL1, including:
l With Dynamic Applications of type "snippet". The snippet code must define the authentication protocol.
l With Dynamic Applications of type "WMI" . The authentication protocol is specific to WMI and is specifiedby SL1 when the Dynamic Application is executed. To access WMI information on a Windows server, ensurethat the Username you specify is allowed access to the server and to the WMI namespace.
l With Dynamic Applications of type "PowerShell". For information about configuring your environment forPowerShell collection, see theMonitoring Windows Systemsmanual.
l When defining external backups. The authentication protocol is defined in the Backup Managementpage (System > Settings > Backup).
Credentials

Credentials
To define a Basic/Snippet credential:
1. Collect the information you need to create each credential (usually username and password).
2. Go to the Credential Management page (System > Manage > Credentials).
3. In the Credential Management page, click the [Actions]menu. Select Create Basic/SnippetCredential.
4. The Credential Editormodal page appears. In this page, you can define the new Basic/Snippet credential.To define the new credential, supply values in the following fields:
l Credential Name. Name of the credential. Can be any combination of alphanumeric characters.This field is required.
l Hostname/IP. Hostname or IP address of the device from which you want to retrieve data. This field isrequired.
o You can include the variable %D in this field. SL1 will replace the variable with the IP address of thecurrent device (device that is currently using the credential).
o You can include the variable %N in this field. SL1 will replace the variable with the hostname of thecurrent device (device that is currently using the credential). If SL1 cannot determine the hostname,SL1 will replace the variable with the primary management IP address for the current device.
23
2

24
l Port. Port number associated with the data you want to retrieve. This field is required.
l Timeout (ms). Time, in milliseconds, after which SL1 will stop trying to communicate with theauthenticating server.
l Username. Username for a user account on the device.
l Password. Password for a user account on the device.
5. Click the [Save] button to save the new Basic/Snippet credential.
6. Repeat steps 1-5 for each Basic/Snippet credential in your network.
NOTE: When you define a Basic/Snippet credential, the credential will automatically be aligned with theorganization(s) you are a member of. To learn more about credentials and organizations, see thesection Aligning OrganizationsWith a Credential.
Defining an SSH/Key Credential
Secure Shell (SSH) is a network protocol that enables users to securely access a command-line shell on a remotecomputer or server over an unsecured network. SSH provides strong encryption and authentication capabilities,making it an ideal method for securely administering commands or transferring data between a client and server.
To make SSH even more secure, you can use SSH keys instead of a simple password to log into a server. SSH keysconsist of two long strings of characters, called a public/private key pair, that are much less susceptible thanpasswords are to brute force attacks. The public key is placed on the server you want to access, while the privatekey resides on the client. When you use SSH to log into the server from the client, the key pair is used toauthenticate the session.
In SL1, some Dynamic Applications of type "Snippet" use SSH to communicate with a remote device. To use theseDynamic Applications, you must define an SSH credential. This credential specifies the hostname or IP address ofthe system you want to monitor, the port number used to access that system, and the private key used forauthentication.
NOTE: Consult the documentation associated with the PowerPack that contains the Dynamic Application oftype "Snippet" to find detailed directions on configuring the remote device and generating a privatekey for SL1 to use.
To define an SSH/Key credential:
1. Collect the information you need to create each credential (usually username and password).
Credentials

Credentials
2. Go to the Credential Management page (System > Manage > Credentials).
3. In the Credential Management page, click the [Actions]menu. Select Create SSH/Key Credential.
4. The Credential Editormodal page appears. In this page, you can define the new SSH/Key credential. Todefine the new credential, supply values in the following fields:
l Credential Name. Name of the credential. Can be any combination of alphanumeric characters.
l Hostname/IP. Hostname or IP address of the device from which you want to retrieve data.
o You can include the variable %D in this field. SL1 will replace the variable with the IP address of thecurrent device (device that is currently using the credential).
o You can include the variable %N in this field. SL1 will replace the variable with hostname of thecurrent device (device that is currently using the credential). If SL1 cannot determine the hostname,SL1 will replace the variable with the primary, management IP address for the current device.
25
2

26
l Port. Port number associated with the data you want to retrieve.
NOTE: The default TCP port for SSH servers is 22.
l Timeout (ms). Time, in milliseconds, after which SL1 will stop trying to communicate with theauthenticating server.
l Username. Username for an SSH or user account on the device to be monitored.
l Password. Password for an SSH user account on the device to be monitored.
l Private Key (PEM Format). Enter the SSH private key that you want SL1 to use, in PEM format.
5. Click the [Save] button to save the new SSH/Key credential.
6. Repeat steps 1-5 for each SSH/Key credential in your network.
NOTE: When you define a SSH/Key credential, the credential will automatically be aligned with theorganization(s) you are a member of. To learn more about credentials and organizations, see thesection Aligning OrganizationsWith a Credential.
Defining a PowerShell Credential
Dynamic Applications can include PowerShell commands that collect data from Windows devices. If you want touse SL1's built-in transport agent (that is, run "agentless" on the Windows device), you can align a PowerShellcredential with those Dynamic Applications.
NOTE: Consult theMonitoring Windows andWMI and PowerShell Dynamic Application Developmentmanuals to find detailed directions on configuring the Windows devices for agentless communicationand on configuring a proxy server.
To define a PowerShell credential in SL1:
1. Collect the information you need to create the credential:
l The username and password for a user on the Windows device.
l If the user is an Active Directory account, the hostname or IP address of the Active Directory server andthe domain.
l Whether an encrypted connection should be used.
l If you are using a Windows Management Proxy, the hostname or IP address of the proxy server.
2. Go to the Credential Management page (System > Manage > Credentials).
Credentials

Credentials
3. In the Credential Management page, click the [Actions]menu. Select Create PowerShell Credential.
4. The Credential Editor page appears, where you can define the following fields:
l Profile Name. Name of the credential. Can be any combination of alphanumeric characters.
27
2

28
l Hostname/IP. Hostname or IP address of the device from which you want to retrieve data.
o You can include the variable %D in this field. SL1 will replace the variable with the IP address of thedevice that is currently using the credential.
o You can include the variable %N in this field. SL1 will replace the variable with the hostname of thedevice that is currently using the credential. If SL1 cannot determine the hostname, SL1 will replacethe variable with the primary, management IP address for the current device.
o You can include the prefixHOST orWSMAN before the variable %D in this field if the device youwant to monitor uses a service principal name (for example, "HOST://%D" or "WSMAN://%D").SL1 will use the WinRM service HOST or WSMan instead of HTTP and replace the variable withthe IP address of the device that is currently using the credential.
l Username. Username for an account on the Windows device to be monitored or on the proxy server.
NOTE: The user should not include the domain name prefix in the username for Active Directory accounts.For example, use "em7admin" instead of "MSDOMAIN\em7admin".
l Encrypted. Select whether SL1 will communicate with the device using an encrypted connection.Choices are:
o yes. When communicating with the Windows server, SL1 will use a local user account withauthentication of type "Basic Auth". You must then use HTTPS and can use a Microsoft Certificate ora self-signed certificate.
o no. When communicating with the Windows server, SL1 will not encrypt the connection.
l Port. The port number used by the WinRM service on the Windows device. This field is automaticallypopulated with the default port based on the value you selected in the Encrypted field.
l Account Type. Type of authentication for the username and password in this credential. Choices are:
o Active Directory. On the Windows device, Active Directory will authenticate the username andpassword in this credential.
o Local. Local security on the Windows device will authenticate the username and password in thiscredential.
l Timeout (ms). Time, in milliseconds, after which SL1 will stop trying to collect data from theauthenticating server. For collection to be successful, SL1 must connect to the authenticating server,execute the PowerShell command, and receive a response within the amount of time specified in thisfield.
l Password. Password for the account on the Windows device to be monitored or on the proxy server.
l PowerShell Proxy Hostname/IP. If you use a proxy server in front of the Windows devices you want tocommunicate with, enter the fully-qualified domain name or the IP address of the proxy server in thisfield.
l Active Directory Hostname/IP. If you selected Active Directory in the Account Type field, specify thehostname or IP address of the Active Directory server that will authenticate the credential.
Credentials

Credentials
l Domain. If you selected Active Directory in the Account Type field, specify the domain where themonitored Windows device resides.
5. To save the credential, click the [Save] button. To clear the values you set, click the [Reset] button.
Testing a Credential
You can test a credential from the Credential Management page using a predefined credential test. For moreinformation about creating and managing credential tests, see theManaging Credential Tests chapter.
To run a credential test from the Credential Management page:
1. Go to the Credential Management page (System > Manage > Credentials).
2. Click the [Actions]menu, and then select Test Credential. The Credential Testermodal page appears:
3. Supply values in the following fields:
l Test Type. Select a credential test to run. This list includes the ScienceLogic Default CredentialTests, credential tests included in any PowerPacks that have been optionally installed on your system,and credential tests that users have created on your system.
l Credential. Select the credential to test. This drop-down list includes only credentials that you haveaccess to that can be tested using the selected credential test.
l Hostname/IP. Enter a hostname or IP address that will be used during the test. For example, if youare testing an SNMP credential, the hostname/IP address you supply will be used to perform a testSNMP request.
l Collector. Select the All-In-One Appliance or Data Collector that will run the test.
4. Click the [Run Test] button to run the credential test. The Test Credentialwindow appears:
The Test Credentialwindow displays a log entry for each step in the credential test. The steps performedare different for each credential test. The log entry for each step includes the following information:
29
2

30
l Step. The name of the step.
l Description. A description of the action performed during the step.
l Log Message. The result of the step for this execution of the credential test.
l Status. Whether the result of this step indicates the credential and/or the network environment isconfigured correctly (Passed) or incorrectly (Failed).
l Step Tip. Mouse over the question mark icon ( ) to display the tip text. The tip text recommends whatto do to change the credential and/or the network environment if the step has a status of "Failed".
5. Optionally, you can click the [Execute Discovery Session] button to run a discovery session using theCredential, Hostname/IP, and Collector you selected in the Credential Testermodal page.
ScienceLogic Default Credential Tests
This section describes the credential tests supplied by ScienceLogic in the default installation.
AWS Credential Test
The AWS Credential Test can be used to test a SOAP/XML credential for monitoring AWS using the DynamicApplications in the Amazon Web Services PowerPack. The AWS Credential Test performs the following steps:
l Test Reachability. Performs an ICMP ping request to the URL for the EC2 service in the region specified inthe credential. If a region is not specified in the credential, the us-east-1 region is used.
l Test Port Availability. Performs an NMAP request to TCP port 443 on the URL for the EC2 service in theregion specified in the credential. If a region is not specified in the credential, the us-east-1 region is used.
l Test Name Resolution. Performs an nslookup request on the URL for the EC2 service in the region specifiedin the credential. If a region is not specified in the credential, the us-east-1 region is used.
l Make connection to AWS account. Attempts to connect to the AWS service using the account specified inthe credential.
l Scan AWS services. Verifies that the account specified in the credential has access to the services.
Azure Credent ial Test
The Azure Credential Test can be used to test a SOAP/XML credential for monitoring Microsoft Azure using theDynamic Applications in the Microsoft: Azure PowerPack. The Azure Credential Test performs the following steps:
l Test Port Availability. Performs an NMAP request to TCP port 443 on management.azure.com.
l Test Name Resolution. Performs an nslookup request on management.azure.com.
l Make connection to Azure account. Attempts to connect to the Azure service using the account specifiedin the credential.
l Make Azure Active Directory Request. Verifies that the account specified in the credential has thepermissions required to discover the Azure account.
Credentials

Credentials
Basic/Snippet Credent ial Test
The Basic/Snippet Credential Test can be used to test a Basic/Snippet credential for connectivity. TheBasic/Snippet Credential Test performs the following steps:
l Test Reachability. Performs an ICMP ping request to the host specified in the credential.
l Test Port Availability. Performs an NMAP request to the TCP port specified in the credential on the hostspecified in the credential.
l Test Name Resolution. Performs an nslookup request on the host specified in the credential.
Database Credential Test
The Database Credential Test can be used to test a Database credential for connectivity. The Database CredentialTest performs the following steps:
l Test Reachability. Performs an ICMP ping request to the host specified in the credential.
l Test Port Availability. Performs an NMAP request to the TCP port specified in the credential on the hostspecified in the credential.
l Test Name Resolution. Performs an nslookup request on the host specified in the credential.
l Make DB Connection. Attempts to make a database connection using the credential and executes thequery "SELECT 1;".
l Verify Table Existance. Attempts to make a database connection using the credential and executes thequery "SELECT * FROM master.system_settings_core;".
PowerShell Credent ial Test
The PowerShell Credential Test can be used to test a PowerShell credential for connectivity. The PowerShellCredential Test performs the following steps:
l Test Reachability. Performs an ICMP ping request to the host specified in the credential.
l Test Port Availability. Performs an NMAP request to the TCP port specified in the credential on the hostspecified in the credential.
l Test Name Resolution. Performs an nslookup request on the host specified in the credential.
l Test Kerberos. If the credential does not specify local authentication, attempts to acquire a kerberos ticketusing the credential.
l Test WinRM Connection. Attempts a WinRM connection using the credential.
l Execute PowerShell Cmdlet. Attempts to execute the 'Get-WmiObject Win32_Process | Select Name'PowerShell Cmdlet using the credential.
31
2

32
SNMP Credential Test
The SNMP Credential Test can be used to test an SNMP credential for connectivity. The SNMP Credential Testperforms the following steps:
l Test Reachability. Performs an ICMP ping request to the host specified in the credential.
l Test Port Availability. Performs an NMAP request to the UDP port specified in the credential on the hostspecified in the credential.
l Test SNMP Availability. Attempts an SNMP getnext request to .1.3.6.1 using the credential.
SOAP/XML Credential Test
The SOAP/XML Credential Test can be used to test a SOAP/XML credential for connectivity. The SOAP/XMLCredential Test performs the following steps:
l Test Reachability. Performs an ICMP ping request to the host specified in the credential.
l Test Port Availability. Performs an NMAP request to the TCP port specified in the credential on the hostspecified in the credential.
l Test Name Resolution. Performs an nslookup request on the host specified in the credential.
l Make cURL Request. Attempts to make a cURL request connection using the credential.
l Verify Content. Attempts to make a cURL request connection using the credential and verifies whether"discovery_session" appears in the response.
SoftLayer Credent ial Test
The SoftLayer Credential Test can be used to test a SOAP/XML credential for monitoring SoftLayer using theDynamic Applications in the SoftLayer: Cloud PowerPack. The SoftLayer Credential Test performs the followingsteps:
l Test Reachability. Performs an ICMP ping request to api.softlayer.com.
l Test Port Availability. Performs an NMAP request to TCP port 443 on api.softlayer.com.
l Test Name Resolution. Performs an nslookup request on api.softlayer.com.
l Make connection to SoftLayer account. Attempts to connect to the Softlayer Account endpoint using theaccount specified in the credential.
l Query SoftLayer Resource. Performs a getDatacenters request to the Softlayer Location endpoint using theaccount specified in the credential.
SSH/Key Credent ial Test
The SSH/Key Credential Test can be used to test a SSH/Key credential for connectivity. The SSH/Key CredentialTest performs the following steps:
Credentials

Credentials
l Test Reachability. Performs an ICMP ping request to the host specified in the credential.
l Test Port Availability. Performs an NMAP request to the TCP port specified in the credential on the hostspecified in the credential. If no port is specified in the credential, port 22 is used.
l Test Name Resolution. Performs an nslookup request on the host specified in the credential.
l Make SSH Connection. Attempts to make an SSH connection using the credential.
l Execute Command via SSH. Attempts to make an SSH connection using the credential and executes thecommand "ping localhost -c1".
VMware Credential Test
The VMware Credential Test can be used to test a SOAP/XML credential for monitoring VMware using theDynamic Applications in the VMware: vSphere Base Pack PowerPack. The VMware Credential Test performs thefollowing steps:
l Test Reachability. Attempts to reach the vCenter server using ICMP.
l Attempt VMware Connection. Attempts to connect to the VMware service using the account specified inthe credential.
Specifying Credentials During Initial Discovery
Discovery is the process by which SL1 discovers what types of hardware and applications exist on the network andthen retrieves data from the discovered hardware and applications.
Before running discovery, you must:
l Determine the SNMP credentials for the devices and applications in your network. Define correlatingcredentials in SL1, to allow discovery to retrieve as much information as possible.
l If you want SL1 to immediately start collecting data from devices using Dynamic Applications, you should alsodefine any additional credentials required for those Dynamic Applications. For example, if you want SL1 toimmediately start monitoring all MySQL databases in your network, you should define credentials that allowSL1 to communicate with each MySQL database in your network. During discovery, SL1 will determinewhich devices can be monitored with a Dynamic Application for MySQL. After discovery, SL1 will use thedatabase credential to collect data about each MySQL database in your network.
Use the previous sections to define credentials for your network.
When you run discovery, you must specify one or more of these credentials to use. The more credentials you alignwith a discovery session, the more access SL1 will have to devices and their data during discovery.
To specify credentials during initial discovery:
1. Go to the Discovery Control Panel page (System > Manage >Classic Discovery).
2. In the Discovery Control Panel page, click the [Create] button.
3. In the Discovery Session Editor page, supply values in each field.
33
2

34
4. In the SNMP Credentials field and in theOther Credentials field, you can select one or more credentials touse during discovery. In these fields, you should see a list of all credentials in SL1.
5. When trying to communicate with discovered hardware and applications, SL1 will look at the list of selectedcredentials and use the appropriate credential to get permission to access data on the external system.
NOTE: During discovery, SL1 tries each SNMP credential specified in the discovery session on eachdiscovered device, to determine if SL1 can collect SNMP details from the device. Later in thediscovery session, during alignment of Dynamic Applications, discovery again tries each SNMPcredential specified in the discovery session. If one of the SNMP credentials times out three timeswithout any response, discovery will stop trying to use that SNMP credential to align SNMP DynamicApplications. Note that "no response" means that a device did not respond at all. Note that if a devicereports that "no OID was found" or "the end of the OID tree was reached", these are considered alegitimate response and would not cause SL1 to abandon the credential.
Defining the Primary and Secondary Credentials for a SingleDevice
You can define multiple credentials for a single device. This allows SL1 to align multiple agents and applicationsfor a single device. For example, SL1 might use an SNMP credential to discover hardware information about adevice and a database credential to retrieve information about the database on the same device.
Credentials

Credentials
To define primary and secondary credentials for a single device:
NOTE: When defining primary and secondary credentials for a device, you will see only the credentialsaligned to organizations you are a member of. If a primary or secondary credential has already beendefined on the device, and is aligned to an organization you are not a member of, the credential willbe restricted.
1. Go to the DeviceManager page (Devices > Device Manager).
2. In the DeviceManager page, find the device you want to edit. Click its wrench icon ( ).
3. The Device Properties page is displayed.
4. In the Device Properties page, you can select two SNMP credentials in the fields SNMP Read and SNMPWrite.
35
2

36
5. To select a second credential (either of type SNMP or of another type), click the [Actions]menu. SelectSecondary Credentials.
6. The Secondary Credentials modal page appears. In the Secondary Credentials modal page, you canselect one or more credentials to associate with the device. To add a secondary credential to a device,highlight an entry in the list of credentials. To select multiple credentials, hold down the <CTRL> key andselect the entries by left-clicking with your mouse.
Credentials

Credentials
7. During discovery (either nightly, manual, or associated with device policies), SL1 will first try the primarycredentials for the device and then will try the secondary credentials.
8. Click the [Save] button to save the change to the device.
Defining the Credentials for a Specif ic Device/DynamicApplication Pair
After a device has been discovered by SL1 and one or more Dynamic Applications have been aligned with thedevice, you can manually assign the credential to use for each Dynamic Application.
The manually assigned credential will be used by SL1 only for this specific Dynamic Application associated with thisspecific device. For all other devices, SL1 will use the default credential associated with each device, or will usethe credential defined in the Dynamic Application Collections page for each device.
To manually associate a credential with a Dynamic Application aligned to a device:
1. Go to the DeviceManager page (Devices > Device Manager).
2. In the DeviceManager page, find the device for which you want to define a credential. Click its wrench icon( ).
3. In the Device Administration panel, click the [Collections] tab.
4. In the Dynamic Application Collections page, find the Dynamic Application you want to define a credentialfor. Select its checkbox ( ). To apply a credential to multiple Dynamic Applications, select the checkbox foreach Dynamic Application.
37
2

38
5. From the Select Action drop-down list, select the credential from the list of all credentials that you areallowed to use, and then click the [Go] button.
NOTE: Your organization membership(s) might affect the list of credentials you can see in the SelectAction drop-down list.
NOTE: If this Dynamic Application has already been aligned with a credential to which you do nothave access, the Credential column will display the value Restricted Credential. If you alignthe Dynamic Application with a different credential, you will not be able to re-align the devicewith the Restricted Credential.
6. The selected Dynamic Applications will now use the manually selected credential when collecting data fromthis device. You should see your change reflected in the Credential column in the Dynamic ApplicationCollections page.
Credentials

Credentials
Specifying Credentials in a Device Template
You can specify the primary SNMP credentials in a device template. Then, when you use the device template tocreate a new device or when you apply the device template to a device group, the primary credentials areautomatically applied to each device and appear in the Device Properties page, in the SNMP Read field.
If you include a device template during discovery or re-discovery, SL1 will discover devices first and then apply thedevice template to each discovered device. During discovery, SL1 automatically assigns a default SNMPcredential to each discovered device (that is not a pingable device) and then applies the device template.
CAUTION: If you include a primary SNMP credential in a device template and then apply that devicetemplate during discovery, you might overwrite the default SNMP credential assigned by SL1. Insome cases, this could prevent SL1 from communicating further with the device.
For more details on device templates and device groups, see the manual Device Groups and DeviceTemplates.
How the ScienceLogic Platform Uses Credentials DuringDiscovery
During initial discovery, nightly discovery, discovery associated with device policies, and any manually triggereddiscovery, SL1 uses credentials in the following order:
1. For devices that have not yet been discovered, SL1 uses the credentials supplied in the Discovery SessionEditor page to collect both SNMP data and Dynamic Application data.
2. For devices that have already been discovered at least once, SL1 uses the SNMP credentials specified inthe Device Properties page.
3. For devices that have already been discovered at least once, SL1 uses the secondary credentials defined inthe Device Properties page if the primary credentials don't work.
4. For devices that have already been discovered at least once, SL1 will use the credentials defined in theDynamic Application Collections page for specific Dynamic Applications.
Aligning One or More Organizations With a Credential
To support multi-tenancy, SL1 allows you to align each credential with one, multiple or all organizations in SL1.You can also align a credential with no organizations.
When you align an organization with a credential, you control who can view details about the credential, who canview the name of the credential, and who can apply the credential in SL1.
39
2
40
NOTE: When you align an organization with a credential, you are restricting only the users who can view andassign the credential. You are not restricting the devices and actions that can be associated with thecredential. For example, you can align a credential only with the organization "Operations" but assignthe credential to a device in the "Finance" organization.
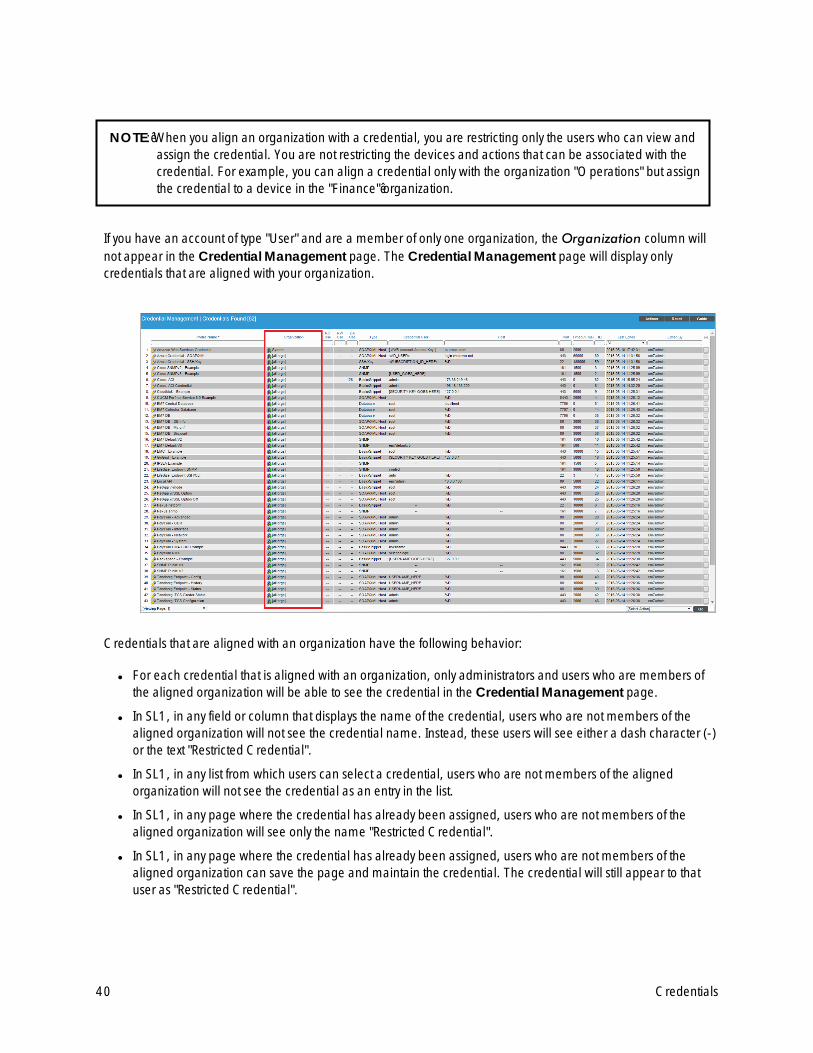
If you have an account of type "User" and are a member of only one organization, theOrganization column willnot appear in the Credential Management page. The Credential Management page will display onlycredentials that are aligned with your organization.
Credentials that are aligned with an organization have the following behavior:
l For each credential that is aligned with an organization, only administrators and users who are members ofthe aligned organization will be able to see the credential in the Credential Management page.
l In SL1, in any field or column that displays the name of the credential, users who are not members of thealigned organization will not see the credential name. Instead, these users will see either a dash character (-)or the text "Restricted Credential".
l In SL1, in any list from which users can select a credential, users who are not members of the alignedorganization will not see the credential as an entry in the list.
l In SL1, in any page where the credential has already been assigned, users who are not members of thealigned organization will see only the name "Restricted Credential".
l In SL1, in any page where the credential has already been assigned, users who are not members of thealigned organization can save the page and maintain the credential. The credential will still appear to thatuser as "Restricted Credential".
Credentials

Credentials
l In SL1, in any page where the credential has already been assigned, users who are not members of thealigned organization can change the credential to a credential aligned with their organization(s). However,those users cannot change the credential again and re-assign the "Restricted Credential". The entry for"Restricted Credential" is removed from the list of possible credentials.
To understand the behavior of a credential aligned with an organization, consider the following example:
l Suppose you have a user account of type "Administrator". Suppose you create an SNMP credential called"ops_cred". Suppose you align that credential with the organization "Operations".
l In the Credential Management page, only administrators and users who are members of the organization"Operations" will be able to see the credential "ops_cred" in SL1.
l In SL1, in any field or column that displays the name of the credential (for example, in the SNMP Credentialcolumn in the DeviceManager page), users who are not members of the organization "Operations" will notsee the "ops_cred" name displayed. Instead, these users will see either a dash character (-) or the text"Restricted Credential".
l In SL1, in any list from which users can select a credential (for example, in the SNMP Read field, in theDevice Properties page), users who are not members of the organization "Operations" will not see the "ops_cred" credential as an entry in the field.
l In SL1, in any page where the credential "ops_cred" has already been assigned, users who are not membersof the organization "Operations" will see only the name "Restricted Credential".
l In SL1, in any page where the credential "ops_cred" has already been assigned (for example, in the SNMPRead field, in the Device Properties page), users who are not members of the organization "Operations"can save the page and maintain the "ops_cred" credential. The credential will still appear to that user as"Restricted Credential".
l In SL1, in any page where the credential "ops_cred" has already been assigned, (for example, in the SNMPRead field, in the Device Properties page), users who are not members of the organization "Operations"can change the credential to a credential aligned with their organization. However, that user cannot changethe credential again and re-assign the "Restricted Credential". The entry for "Restricted Credential" isremoved from the list of possible credentials.
Default Organizat ions Aligned with a Credential
When you create a new credential, SL1 automatically aligns the credential with all your organizations. Forexample:
Account TypeOrganization(s) Aligned with the
ScienceLogic AccountDefault Organizations Aligned
with Credential
Administrator All All
User Primary Organization= NOC
Additional Organization Memberships= All organizations
All
41
2

42
Account TypeOrganization(s) Aligned with the
ScienceLogic AccountDefault Organizations Aligned
with Credential
User Primary Organization= NOC
Additional Organization Memberships= Sales
NOC, Sales
User Primary Organization= NOC
Additional Organization Memberships= None
NOC
After you save the credential, you can edit the organization(s) aligned with the credential.
Edit ing the Organizat ions Aligned with a Credential
After a credential has been created, you change the default organizations aligned with a credential. To edit theorganization alignment on a credential:
1. Go to the Credential Management page (System > Manage > Credentials).
2. In the Credential Management page, find the credential for which you want to edit the organization. In theOrganization column, click its org icon ( ).
Credentials

Credentials
3. The Align Organizations modal page appears. In this page, provide values in the following fields:
l Credential Availability. Specifies whether you want to align all organizations with the credentials ormanually select one, multiple, or no organizations to align with the credential. Choices are:
o Aligned Organizations Only. Selecting this option will make the Aligned Organizations paneavailable. You can select one or multiple organizations to be aligned with the credential.
o System (All Organizations). This option is only available if you are a system administrator or amember of all organizations in SL1. All organizations will be aligned with the credential. If anotherorganization is created, it will be aligned to the credential, by default.
NOTE: The Credential Availability field appears only for users who are Administrators and users who aremembers of all organizations.
l Aligned Organizations. Displays a list of all organizations to which you belong. Select one, multiple,or no organizations to align with the credential.
o To select a single organization, highlight it and left-click.
o To unselect a single organization, highlight it and left-click.
o To select multiple organizations, hold down the CTRL key and select the entries by left-clicking.
o To unselect multiple organizations, hold down the CTRL key and select the entries by left-clicking.
NOTE: Only users who are Administrators and users who are members of all organizations can unselect allorganizations in the Aligned Organizations list.
43
2

44
4. To save the new organization alignment, click the [Save] button.
Restric ted Credentials in the Discovery Session Editor Page
The Discovery Session Editor page allows you to select multiple credentials to align with a discovery session.
In the SNMP Credentials field and theOther Credentials field, the Discovery Session Editor page mightinclude credentials that have been aligned with one or more organizations. If one of these credentials has beenpreviously selected, users who are not members of the aligned organization(s) will see "Restricted Credential"appear in the SNMP Credentials field or theOther Credentials field.
If multiple aligned credentials have been previously selected for a discovery session, users who are not membersof the aligned organization(s) will see only a single "Restricted Credential entry appear in the SNMP Credentialsfield or theOther Credentials field. This single entry of Restricted Credential represents all restricted credentials. Ifa user who is not a member of the aligned organization(s) removes the entry Restricted Credential from thediscovery session, all restricted credentials are removed. That user cannot change the credential again and re-assign Restricted Credential. The entry for Restricted Credential is removed from the list of possible credentials.
Editing a Credential
The Credential Management page allows you to edit credentials from SL1. To do so:
1. Go to the Credential Management page (System > Manage > Credentials).
2. In the Credential Management page, click the wrench icon ( ) for the credential you want to edit.
3. The Credential Editormodal page will appear.
Credentials

Credentials
4. After editing the fields in the Credential Editor, click the [Save] button. If you want to save your changes as anew credential, click the [Save As] button.
Deleting a Credential
The Credential Management page allows you to delete one or more credentials from SL1. To do so:
NOTE: You cannot delete a credential until all aligned devices, Dynamic Applications, proxied web services,backup settings, LDAP/AD settings, and discovery sessions that use the credential are aligned withanother credential.
1. Go to the Credential Management page (System > Manage > Credentials).
2. In the Credential Management page, select the checkbox for each credential you want to delete.
3. Go to the Select Actionsmenu (in the lower right). SelectDELETE Credential Policy. Click the [Go] button.
4. The selected credentials will be deleted.
45
2

Discovery
Chapter
3Discovery
Overview
This chapter describes how to use discovery in SL1 to find devices on your network. You can use the [AddDevices] button on the Devices page to start a discovery process, or you can run a "Classic Discovery" from theDiscovery Control Panel page (System > Customize > Classic Discovery).
Use the following menu options to navigate the SL1 user interface:
l To view a pop-out list of menu options, click the menu icon ( ).
l To view a page containing all of the menu options, click the Advanced menu icon ( ).
This chapter includes the following topics:
What Happens During Discovery? 48
What is a Dynamic Application? 50
Before You Run Discovery 52
System Settings that Affect Discovery 53
Device Settings that Affect Auto-Discovery and Re-Discovery 57
Duplicate IP Addresses and Duplicate MAC Addresses During Discovery 58
Duplicate MAC Addresses for Component Devices 60
Prerequisites for Discovering Devices on the Devices Page 62
Adding Devices Using Universal or Guided Discovery 62
Adding Devices Using Guided Discovery 67
Working with Discovery Sessions 75
Running a Classic Discovery Session 75
46
3

47
Creating a New Classic Discovery Session with the Save As Button 82
Viewing Information about a Classic Discovery Session 83
Editing a Classic Discovery Session 86
Scheduling a Classic Discovery Session 86
Manually Re-Running Discovery for a Dynamic Application 91
Manually Re-Running Discovery for a Device 93
Viewing Information about Classic Discovery 94
Managing MAC Vendor Records 95
Troubleshooting Discovery 97
How File Systems are Hidden During Discovery 101
Discovery

Discovery
What is Discovery?
Discovery is the tool that automatically finds all the hardware-based devices, hardware components, and softwareapplications in your network. You must provide the discovery tool with a range or list of IP addresses and/or a list offully-qualified domain names (hostnames), and the discovery tool determines if a device, hardware component, orsoftware application exists at each IP address. For each device, hardware component, or software application thediscovery tool "discovers", the discovery tool can collect a list of open ports, DNS information, SSL certificates, list ofnetwork interfaces, device classes to align with the device, topology information, and basic SNMP informationabout the device.
The discovery tool also determines which (if any) Dynamic Applications to align with the device. If the discovery toolfinds Dynamic Applications to align with the device, the discovery tool triggers collection for each aligned DynamicApplication.
SL1 also uses discovery to update existing information about a device and to add to existing information about adevice. This type of discovery is called auto-discovery. For each existing device, SL1 automatically runs auto-discovery every night, to keep device data up-to-date.
You can manually trigger discovery at any time and update the data for one device or multiple devices.
What Happens During Discovery?
Discovery is executed:
l During the initial discovery of network devices and applications. This is called initial discovery.
l Automatically runs once a day to update the data on each discovered device. This is called auto-discovery.
l On demand, when a user manually asks SL1 to rediscover a group of IP addresses or a list of fully-qualifieddomain names, rediscover a single device, or rediscover all devices to find those that should align with aselected Dynamic Application. This is called re-discovery.
48
3

49
Discovery uses the following processes:
l Discovery: Auto (discover_iprange.py). This process examines one or more IP addresses or fully-qualifieddomain names and determines which IP addresses or fully-qualified domain names are aligned with adevice. For each device, this process retrieves basic information about the device.
l Discovery: Detail (discover_detail.py). This process is triggered by the Discovery: Auto process andretrieves details about each discovered device.
l Discovery: Dynamic App (discover_app.py). This process is triggered manually from the DynamicApplications Manager page and checks all existing devices against the selected Dynamic Application.
l Discovery: Nightly Update (discover_update.py). SL1 runs this process each night for already discovereddevices. This process updates the information collected during initial discovery.
During discovery of an IP address range (the Discovery: Auto process), SL1 does the following:
1. Performs a DNS lookup to determine the IP address for each fully-qualified domain name supplied in thediscovery session. These IP addresses are added to the list of IP addresses supplied in the discovery session.
2. Pings each IP address to determine which are in use.
3. Based on the settings in the discovery session, runs nmap on each IP address to determine which are in useand which ports are open.
4. Searches DNS records to determine the fully qualified domain name at each IP address in range.
5. Tries each selected credential on each IP address to determine if each device is manageable (supportsSNMP) or will be a device of type "pingable".
6. For devices that support SNMP, retrieves a system description, SysObject ID, system uptime, system contact,system name, and system location.
7. Assigns a device class to each device.
8. For devices that can be managed (supports SNMP or if non-SNMP discovery is enabled), assigns a deviceID, device name, a primary IP address for use in SL1, and a primary credential.
For each device discovered by the Discovery: Auto process, the Discovery: Detail process does the following:
1. If interface discovery is enabled, finds all network interfaces for devices that support SNMP.
2. If the discovery scan level is set to Initial Population of Apps or higher, SL1 checks each discovered device(both those that support SNMP and those that don't) against the list of already-defined Dynamic Applications.SL1 searches each discovered device to find "discovery objects" and aligns devices with the appropriateDynamic Application(s). For details about Dynamic Applications and discovery objects, see the section in thischapter on How Does the ScienceLogic Platform Align Dynamic Applications During Discovery?.
3. If the discovery scan level is set toDiscover SSL Certificates or higher, checks for SSL certificates on port 443(HTTPS).
4. If the discovery scan level is set toDiscover Open Ports, Advanced Port Discovery, or Deep Discovery, SL1performs a port scan using the settings appropriate for the scan level to determine the open ports for thedevice.
Immediately after the initial discovery session is completed, SL1 will use the aligned Dynamic Applications to collectadditional data from devices. (For more information about this process, see the chapter on Collection in thismanual.)
Discovery

Discovery
What Happens During Discovery when the SL1 agent is Installed?
If a device is monitored using the agent and is discovered as a SNMP or pingable device using the Discovery tool,the following default data collection methods, data display settings, and monitoring policies are applied duringdiscovery:
l The method SL1 uses to monitor availability of the device is determined by the first method of discovery:
o If the agent is installed and creates a device record before the device is discovered as an SNMP orpingable device, availability is based on whether the agent is reporting data to SL1.
o If the device is discovered as an SNMP or pingable device before the agent is installed, availability isbased on the method used to discover the device (SNMP, ICMP, or TCP).
l For Linux devices, the [TCP/UDP Ports] tab in the Device Reports panel will display open ports detected bythe agent and open ports detected by the discovery process (using the NMAP command).
l The [Processes] tab in the Device Reports panel will display running processes detected by the agent andprocesses collected using SNMP.
l Port monitoring policies specify whether the policy will be executed using the agent or by a Data Collectorusing NMAP.
l Process monitoring policies are always executed using the agent.
l Data precedence settings specify whether Dynamic Applications that use data collected by the agent orDynamic Applications that poll devices for data are used to represent CPU and memory utilization fordevices.
For more information about configuring data precedence settings on the agent, or about monitoring ports,processes, and device availability with the agent, see the Monitoring with the SL1 agentmanual.
What is a Dynamic Application?
Dynamic Applications are the customizable policies that tell SL1 what data to collect from devices andapplications. For example, suppose you want to monitor a MySQL database running on a device in your network.Suppose you want to know how many insert operations are performed on the MySQL database. You can create oredit a Dynamic Application that monitors inserts. Every five minutes (for example), SL1 could check the number ofinsert operations performed on the MySQL database. SL1 can use the retrieved data to trigger events and/or tocreate performance reports.
SL1 includes Dynamic Applications for the most common hardware and software. You can customize these defaultDynamic Applications to suit your environment. You can also create custom Dynamic Applications.
Dynamic Applications in SL1 support a variety of protocols to ensure that SL1 can always communicate with thedevices and applications in your network and retrieve information from them. Dynamic Applications can use thefollowing protocols to communicate with devices:
l SNMP
50
3

51
l SQL
l XML
l SOAP
l XSLT (uses SOAP and XSLT to convert XML data to a new format)
l WMI (Windows Management Instrumentation), including WMI and WBEM
l Windows PowerShell
l Custom Python applications (called "snippets") for proprietary or more complex data retrieval
How Does the ScienceLogic Plat form Align Dynamic Applicat ionsDuring Discovery?
Most Dynamic Applications include a discovery object. A discovery object enables SL1 to determine which devicesto align with a Dynamic Application.
During discovery, SL1:
1. Searches the list of Dynamic Applications.
2. If a Dynamic Application includes a discovery object, SL1 adds that Dynamic Application to the list of DynamicApplications to try to align during discovery.
3. For each Dynamic Application that includes a discovery object, SL1 checks the current discovery session foran appropriate credential. For example, for each database Dynamic Application, SL1 would look for one ormore database credentials that have been selected for the discovery session.
4. For each discovered device, both those that support SNMP and those that don't, discovery tries to determinewhich Dynamic Applications to align. For each discovered device, SL1 tries to align each DynamicApplication in the list of Dynamic Applications to try during discovery. For each Dynamic Application in the list,SL1 tries to connect to each device with each of the appropriate credentials (until SL1 finds a workingcredential) and then tries to find the discovery object. If SL1 is able to connect to a device with one of thecredentials and can then retrieve the discovery object, SL1 will align the Dynamic Application with thedevice.
NOTE: SL1 also includes more sophisticated logic that allows you to define multiple discovery objects,validate the value of the discovery object, and to align the Dynamic Application if a discovery object isnot available. However, the most common use of a discovery object is as described above (discoveryobject exists).
5. If discovery aligns a Dynamic Application with a device, immediately after discovery completes SL1 will startthe first collection from that device using the aligned Dynamic Application. This step is not performed forDynamic Applications that meet all of the following three criteria:
l Has a collection frequency of 1 minute, 2 minutes, 3 minutes or 5 minutes.
l Does not have component mapping enabled (does not discover component devices).
l Is aligned with a component device.
Discovery
Discovery
NOTE: During discovery, SL1 tries each SNMP credential specified in the discovery session on eachdiscovered device, to determine if SL1 can collect SNMP details from the device. Later in thediscovery session, during alignment of Dynamic Applications, discovery again tries each SNMPcredential specified in the discovery session. If one of the SNMP credentials times out three timeswithout any response, discovery will stop trying to use that SNMP credential to align SNMP DynamicApplications. Note that "no response" means that a device did not respond at all. Note that if a devicereports that "no OID was found" or "the end of the OID tree was reached", these are considered alegitimate response and would not cause SL1 to abandon the credential.
For details on Dynamic Applications, see the appropriate manual for each type of Dynamic Application.
Before You Run Discovery
To make your initial discovery session as productive as possible, you might want to perform these configurationtasks before running discovery:
l Determine the SNMP credentials for the devices and applications in your network. Define correlatingcredentials in SL1, to allow discovery to retrieve as much information as possible.
l If you want SL1 to immediately start collecting data from devices using Dynamic Applications, you shouldmake sure that each of those Dynamic Applications includes a discovery object.
l If you want SL1 to immediately start collecting data from devices using Dynamic Applications, you should alsodefine any additional credentials required for those Dynamic Applications. For example, if you want SL1 toimmediately start monitoring all MySQL databases in your network, you should define credentials that allowSL1 to communicate with each MySQL database in your network. During discovery, SL1 will determinewhich devices can be monitored with a Dynamic Application for MySQL. After discovery, SL1 will use thedatabase credential to collect data about each MySQL database in your network.
l Defining the global Behavior Settings that affect discovery and auto-discovery. For a description of theBehavior Settings that affect discovery, see the section Behavior Settings that Affect Discovery. For adetailed description of all the Behavior Settings, see the manual System Administration.
l Define one or more organizations. During discovery, all discovered devices will be placed into a singleorganization. If you do not define an organization, SL1 will place all devices in the System organization.However, you can later assign one or more devices to another organization after discovery.
l If you want to perform bulk configuration of discovered devices by using device groups, device templates, orboth, you should define device groups and device templates before performing discovery. However, you canapply device groups, device templates or both to one or more devices after initial discovery. For details ondevice groups and device templates, see the manual Device Groups and Device Templates.
52
3

53
System Settings that Affect Discovery
Some of the parameters in the Behavior Settings page affect discovery functionality (discovery, auto-discovery,and re-discovery) in SL1.
NOTE: You can define global parameters for auto-discovery in this page, but you can always override thoseparameters on a per-device basis by editing the device settings in a device'sDevice Properties page.For details on configuring a device, see the manual Device Management.
To define or edit the settings that affect discovery in the Behavior Settings page:
1. Go to the Behavior Settings page (System > Settings > Behavior).
2. In the Behavior Settings page, edit the values in one or more of the following fields:
l Ping & Poll Timeout (Msec.). This field specifies the number of milliseconds the discovery tool willwait for a response after pinging a device. After the specified number of milliseconds have elapsedwithout a response, the poll will timeout. The choices are from 100 to 5000 milliseconds.
Discovery

Discovery
l SNMP Poll Timeout (Msec.). This field specifies the number of milliseconds the discovery tool willwait for a response after sending an SNMP query to a device. After the specified number ofmilliseconds have elapsed without a response, the SNMP poll will timeout. The choices are from 100to 5000 milliseconds.
l SNMP Failure Retries. This field specifies the number of times the discovery tool will try tocommunicate with a device after a timeout or failure. After that number of times has been met, thediscovery tool will not retry unless the user manually restarts the discovery process. The choices are 0–6.
l DHCP Community Strings. SNMP "read only" community string, to use during discovery. This isrequired only if DHCP servers and devices use a different SNMP community string than other devicesin the network. If the community string specified in the Discovery Control Panel (System > Manage>Classic Discovery) page does not work for DHCP devices, SL1 will automatically use the communitystring specified in this field.
l NFS Detection Disable. If selected, this checkbox prevents SL1 from monitoring and reporting onNFS "shared" hard drives. SL1 will monitor and report only on local hard drives.
l Port Polling Type. Specifies how SL1 should poll devices to discover open ports. The choices are:
o Half Open. Uses a faster TCP/IP connection method and does not appear on device's logs.
o Full Connect. Uses the standard TCP/IP connection to detect open ports.
l Initial Discovery Scan Level. Specifies the data to be gathered during the initial discovery session.The options are:
NOTE: You can override this setting for a single discovery session in the Discovery Session Editormodalpage.
o 0. Model Device Only. Discovery tool will discover if device is up and running and if so, collect themake and model of the device. SL1 will then generate a device ID for the device, so it can bemanaged by SL1.
o 1. Initial Population of Apps. Discovery tool will search for Dynamic Applications to associate withthe device. Discovery tool will attempt to collect data for the aligned Dynamic Applications.Discovery will also perform 0. Model Device Only discovery.
o 2. Discover SSL Certificates. Discovery tool will search for SSL certificates and retrieve SSL data.Discovery tool will also perform 1. Initial Population of Apps and 0. Model Device Only.
o 3. Discover Open Ports. Discovery tool will search for open ports. Discovery tool will also perform 2.Discover SSL Certificates, 1. Initial Population of Apps, and 0. Model Device Only.
NOTE: If your system includes a firewall and you select 3. Discover Open Ports, discovery might be blockedand/or might be taxing to your network.
54
3

55
o 4. Advanced Port Discovery. Discovery tool will search for open ports, using a faster TCP/IPconnection method. Discovery tool will also perform 2. Discover SSL Certificates, 1. InitialPopulation of Apps, and 0. Model Device Only.
NOTE: If your system includes a firewall and you select 4. Advanced Port Discovery, some auto-discovereddevices might remain in a pending state (purple icon) for some time after discovery. These deviceswill achieve a healthy status, but this might take several hours.
o 5. Deep Discovery. Discovery tool will use nmap to retrieve operating system name and version.Discovery will also scan for services running on each open port and can use this information tomatch devices to device classes. Discovery tool will search for open ports, using a faster TCP/IPconnection method. Discovery tool will also perform 2. Discover SSL Certificates, 1. InitialPopulation of Apps, and 0. Model Device Only.
NOTE: For devices that don't support SNMP, option 5. Deep Discovery allows you to discover devices thatdon't support SNMP and then align those devices with a device class other than "pingable".
CAUTION:Option 5. Deep Discovery is compute-intensive and might significantly tax your network if used asthe default setting. ScienceLogic recommends that you use this option on a per-discovery basis byselecting it in the Discovery Session Editor page.
l Rediscovery Scan Level (Nightly). Specifies the data to be gathered/updated each night during auto-discovery. The auto-discovery process will find any changes to previously discovered devices and willalso find any new devices added to the network. The options are the same as for Initial DiscoveryScan Level.
l Discovery Scan Throttle. Specifies the amount of time a discovery process should pause betweeneach IP address or hostname in a discovery session. (You specify the list of IP addresses or hostnamesfor a discovery session in the IP Address/Hostname Discovery List field in the Discovery SessionEditor page.) Pausing discovery processes between IP addresses or hostnames spreads the amount ofnetwork traffic generated by discovery over a longer period of time. The choices are:
o Disabled. Discovery processes will not pause.
o 1000Msec to 10000Msec. A discovery process will pause for a random amount of time betweenhalf the selected value and the selected value.
Discovery

Discovery
l Port Scan All IPs. Specifies whether SL1 should scan all IP addresses on a device for open ports. Thechoices are:
NOTE: You can override this setting for a single discovery session in the Discovery SessionEditormodal page.
o 0. Disabled. SL1 will scan only the primary IP address (the one used to communicate with SL1) foropen ports.
o 1. Enabled. SL1 will scan all discovered IP addresses for open ports.
l Port Scan Timeout. Length of time, in milliseconds, after which SL1 should stop trying to scan anIP address for open ports and begin scanning the next IP address (if applicable). Choices are between60,000 and 1,800,000 milliseconds.
NOTE: You can override this setting for a single discovery session in the Discovery SessionEditormodal page.
l Hostname Precedence. Specifies which name SL1 will use for each discovered device. Choices are:
o 0. SNMP System Name. Use the device name specified in the device's MIB.
o 1. DNS Reverse Lookup. Use the device name specified in the device's reverse-lookup record.
l DNS Hostnames. Specifies which DNS name SL1 will use for each discovered device. Choices are:
o 0. Strip Device Name. SL1 will use the DNS hostname as the device name for each device.
o 1. Use Full Domain Name (FQD). SL1 will use the fully-qualified domain name as the devicename for each device.
3. Click the [Save] button to save changes in this page.
56
3

57
Device Settings that Affect Auto-Discovery and Re-Discovery
For each discovered device, the following settings in the Device Properties page affect how auto-discovery andrediscovery behaves for that device. These settings override any global settings defined in the Behavior Settingspage (System > Settings > Behavior).
l SNMP Read Only. The community string for read-only access to SNMP information on the device. Thecommunity string is a password that allows SL1 to gather information from the device.
l SNMPWrite. The community string for read-and-write access to SNMP information on the device. Thecommunity string is a password that allows SL1 to gather information from the device and send information tothe device.
l Availability Port. Specifies the protocol and specific port SL1 should monitor to determine if the device isavailable. The list of ports will contain all the ports discovered by SL1. The data collected from this port will beused in device availability reports.
l Latency Port. Specifies the protocol and specific port SL1 should monitor to determine latency for the device.The list of ports will contain all the ports discovered by SL1. The data collected from this port will be used indevice latency reports.
Discovery

Discovery
l Collection State. Specifies (among other things) if the device will be automatically updated each night withSL1's auto-discovery tool. To edit this field, select one of the following from the drop-down list:
o Enabled. Device will be polled by the auto-discovery tool.
o Disabled. Device will not be polled by the auto-discovery tool.
o Maintenance. Manually turn off polling for the device. Until you unselect this checkbox and select theEnabled checkbox, the device will not be polled by the auto-discovery tool. Note that Service Actionand System Action (part of service policies) will not be executed while the device is inMaintenancestate.
l Collector Group. Specifies which collector group will gather data from the device. You can select from a listof available collector groups.
l Coll. Type. Specifies how SL1 should perform auto-discovery. The choices are:
o Standard. SL1 will perform auto-discovery of each device based on the device's IP address. Thismethod is appropriate for devices using standard DNS.
o DHCP. SL1 will perform auto-discovery of each device based on the device's MAC address. Thismethod is appropriate for devices using DHCP.
l Daily Port Scans. This checkbox specifies whether or not you want SL1 to perform a daily scan of the devicefor open ports.
l Auto-Update. This checkbox specifies whether or not you want SL1 to perform auto-discovery of the deviceand update records with changes to the device. If this field is unchecked, SL1 will not perform auto-discovery.Changes to the device, including newly opened ports, will not be recorded by SL1.
l Scan All IPs. If the device uses multiple IP Addresses, SL1 will scan for open ports on all IPs during auto-discovery.
l Dynamic Discovery. If selected, SL1 will automatically assign the appropriate Dynamic Applications to thedevice during auto-discovery.
l Preserve Hostname. If selected, the name of the device in SL1 will remain the same, even if the name ofthe actual device is changed. If unselected, the name for the device will be updated if the name of the actualdevice is changed.
l Disable Asset Update. If selected, during nightly auto-discovery, SL1 will not update the asset recordassociated with the device. For the single device, this checkbox overrides any settings defined in the AssetAutomation page (System > Settings > Assets).
Duplicate IP Addresses and Duplicate MAC Addresses DuringDiscovery
NOTE: Component devices are discovered using Dynamic Applications instead of using a discovery session.The description in this section does not apply to component devices. For details on how SL1 handlesduplicate MAC addresses for component devices, see the section Duplicate MAC Addresses forComponent Devices.
58
3

59
During discovery, SL1 compares the IP addresses and MAC addresses of a newly discovered device with the IPaddresses and MAC addresses of devices that have already been discovered to ensure that devices are notduplicated and IP conflicts do not occur. There are three possible outcomes of this comparison:
l The newly discovered device is considered a duplicate of an existing device and the information collectedduring discovery is used to update that existing device record.
l The newly discovered device is not a duplicate of an existing device and the information collected duringdiscovery is used to create a new device record.
l The newly discovered device could be considered a duplicate of an existing device. SL1 does notautomatically use the information collected during discovery to either create or update a device record. TheDiscovery Session Logs page includes an option for a user to manually create a new device record usingthe information collected during discovery.
NOTE: If SL1 discovers an existing MAC address that is not is part of a range of MAC addresses that aremarked as "virtual", it will be considered a duplicate of an existing device, regardless of its collectorgroup.
Each managed device in SL1 can have three types of IP addresses:
l Admin Primary. This is the IP address that SL1 uses to communicate with a device. This IP address is alwaysa primary address and cannot be demoted to a secondary address. Within a single Collector Group, devicescannot have duplicate Admin Primary IP addresses.
l Primary. One or more IP addresses that SL1 uses to match incoming log messages (traps and syslogmessages) with a device. You can define a primary IP address in the Device Properties page for a device.
l Secondary. SL1 gathers information about this IP address, but does not use this IP address to matchincoming messages (traps and syslog messages) with a device. You can define a secondary IP address in theDevice Properties page for a device.
If any of the following conditions are true, the newly discovered device is considered a duplicate of an existingdevice and the information collected during discovery is used to update that existing device record:
l The primary IP address of the newly discovered device is not unique to the Collector Group that discoveredthe device.
l The primary IP address of the newly discovered device is not unique within the system and the primary IPaddress is in a public address space.
l A secondary IP address of the newly discovered device is not unique within the system and that secondary IPaddress is in a public address space.
If any of the following conditions are true, the newly discovered device could be considered a duplicate of anexisting device. SL1 does not automatically use the information collected during discovery to either create orupdate a device record. The Discovery Session Logs page includes an option for a user to manually create anew device record using the information collected during discovery:
l The primary IP address of the newly discovered device is unique within the system; the secondary IPaddresses associated with the newly discovered device are either unique within the system or are in a private
Discovery

Discovery
address space; and the MAC addresses associated with the device match the MAC addresses associatedwith an existing device.
l The primary IP address of the newly discovered device is not unique within the system; the primary IP addressis in a private address space; the secondary IP addresses associated with the newly discovered device areeither unique within the system or are in a private address space; and the MAC addresses associated with thedevice match the MAC addresses associated with an existing device.
l The primary IP address of the newly discovered device is not unique within the system; the primary IP addressis in a private address space; and no secondary IP address information has been discovered for the device.
l The primary IP address of the newly discovered device is not unique within the system; the primary IP addressis in a private address space; the secondary IP addresses associated with the newly discovered device areeither unique within the system or are in a private address space; and no MAC address information has beendiscovered for the device.
NOTE: For more information about configuring virtual MAC addresses, see the sectionManagingMAC Vendor Records.
Duplicate MAC Addresses for Component Devices
SL1 handles duplicate MACs for component devices differently than duplicate MACs for physical devices. When acomponent device is assigned a MAC address, SL1 does not enforce uniqueness and will allow a componentdevice to be created with the same MAC address as existing physical devices and/or existing component devices.
Unlike how SL1 discovers physical devices, SL1 uses Dynamic Applications to retrieve data from a managementdevice and "discover" each entity managed by that management device as a component device. SL1 then usesthat retrieved data to create a device for each managed entity. In some cases, the managed entities are nested. InSL1, physical devices are identified by IP address and MAC address. In SL1, component devices are identified by adevice name, a unique identifier, and a device class. A Dynamic Application that creates component devices canassign a MAC address to each component device, but is not required to.
l In SL1, a managed entity is called a component device. A component device is an entity that runs under thecontrol of a physical management device.
l In SL1, the root device is the physical device that manages one or more component devices.
l In SL1, a parent device is a device that has associated entities modeled as component devices. A parentdevice can be either a root device or another component device.
For example, in a Cisco UCS system, SL1 might discover a physical server that hosts the UCS manager. Thisphysical server is the root device. SL1 might discover a chassis on the root device. The chassis is a componentdevice. The chassis is a child device to the physical server. SL1 might also discover a blade as a componentdevice that is part of the chassis. The blade is a child device to the chassis. The chassis is the parent device.
SL1 does not automatically combine new component devices with any existing device record using the MACaddress of the new component device. A component device can be combined with an existing device recordunder the following conditions:
60
3

61
l Dynamic Applications that create component devices can assign a globally unique identifier (GUID) to eachcomponent device. When SL1 performs collection for a Dynamic Application, and the Dynamic Applicationincludes a collection object with a GUID component identifier, SL1 compares the collected values for thatcollection object with all GUID values for all component devices discovered in the system. If a newly collectedvalue matches a GUID value for an existing component device, the device from which SL1 collected the newvalue will become the parent of the existing component device. The existing component device will nolonger be associated with its previous parent device. No new component device will be created.
l You can merge a physical device and a component device. You can do this in the [Actions]menu in theDevice Properties page (Devices> Device Manager > wrench icon) for either the physical device or thecomponent device. When you merge a physical device and a component device, the device record for thecomponent device is no longer displayed in the user interface; the device record for the physical device isdisplayed in user interface pages that previously displayed the component device. For example, the physicaldevice is displayed in lieu of the component device in the Device Components page and the ComponentMap page. All existing and future data for both devices will be associated with the physical device. You canunmerge a component device from a physical device in the [Actions]menu in the Device Properties pagefor the physical device (Devices> Device Manager > wrench icon).
Discovery

Discovery
Prerequisites for Discovering Devices on the Devices Page
To discover all of the devices on your network:
1. Make a note of the range of IP addresses used on your network. If your device does not have an IP address,make a note of the name of the root device. If you need help, ask your network administrator.
2. An Organization must exist in SL1 for the new devices. If you need to create an Organization go tothe Organizations page (Registry > Accounts > Organizations).
3. A Collector Group must exist in SL1 that can reach the target device using a valid network path for theneeded protocol. For example, UDP 161 for SNMP and general ICMP traffic for Ping. If you don’t know whatCollector Group to use, consult an SL1Architecture diagram or ask your SL1 System Administrator. You canaccess collector information on the Collector Group Management page (System > Settings > CollectorGroups).
4. You must create or use an existing credential in the classic user interface. You can access credentialinformation on the Credential Management page (System > Manage > Credentials). Because credentialproblems are the most common cause for discovery failure, you can test any credential that you create on theCredential Tests page (System > Customize > Credential Tests).
5. Similarly, if you want to use a device template with a discovery session, you must use an existing template inSL1. You can access device templates on the Configuration Templates page (Devices > Templates).
6. The Grant All user needs to be used to access new discovery workflow, as the SYS_SETTINGS_LICENSES_PAGE and SYS_SETTINGS_CUGS_PAGE access keys are needed to get collector or collector groupinformation. For more information, see the Access Keys page (System > Manage > Access Keys).
Adding Devices Using Universal or Guided Discovery
On the Devices page, you can add or "discover" new devices for monitoring in SL1. You add devices by creating adiscovery session, which searches for devices on the network you specify.
You can use the Universal Discovery Framework process in SL1 that guides you through a variety of existingdiscovery types in additional to traditional SNMP discovery. This process lets you pick a discovery type based on thetype of devices you want to monitor.
NOTE: The following procedure uses Amazon Web Services as an example of the discovery type. Some stepsand fields might vary depending on the discovery type.
62
3

63
To run a guided or Universal Discovery:
1. On the Devices page, click the [Add Devices] button. The Select page appears:
Discovery

Discovery
2. Select a discovery type for the devices you want to discover, such as Amazon Web Services. Additionalinformation about the requirements for device discovery appears in the General Information pane to theright.
NOTE: If you want to do a more general discovery, you can select one of the options in theOther ways toadd devices pane, such asUnguided Network Discovery. For more information, see AddingDevices Using Unguided Discovery.
3. Click [Select]. The firstCreate Guided Discovery Session page displays the following list of requirementsfor Discovery (in this example, the requirements are for Amazon Web Services):
l The name of the root device
l The credentials you need to access the API
4. Click [Next]. The secondCreate Guided Discovery Session page appears.
5. Complete the following fields:
l Name. Type a unique name for this discovery session. This name is displayed in the list of discoverysessions on the Discovery Sessions page (Devices > Discovery Sessions).
l Description. Type a short description of the discovery session. You can use the text in this descriptionto search for the discovery session on the Discovery Sessions page. Optional.
l Select the organization to add discovered devices to. Select the name of the organization to whichyou want to add the discovered devices.
64
3

65
6. Click [Next]. The Credentials page of the Create Guided Discovery Session page appears:
Discovery
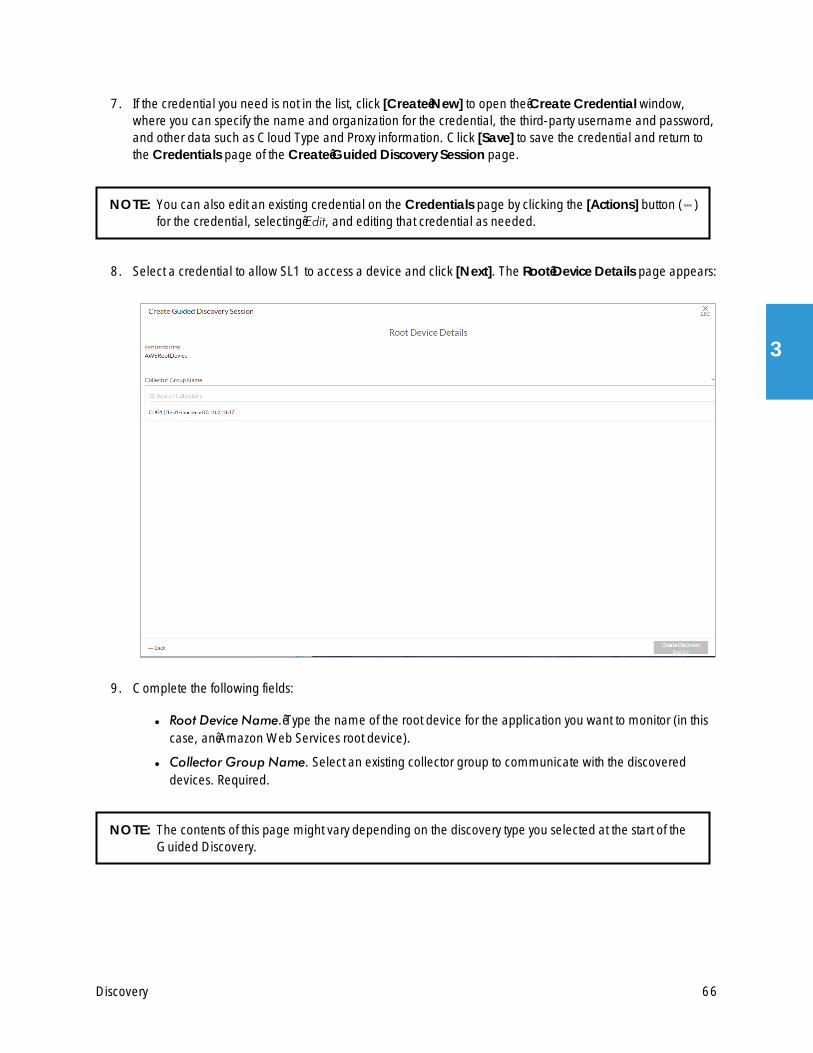
Discovery
7. If the credential you need is not in the list, click [Create New] to open the Create Credentialwindow,where you can specify the name and organization for the credential, the third-party username and password,and other data such as Cloud Type and Proxy information. Click [Save] to save the credential and return tothe Credentials page of the Create Guided Discovery Session page.
NOTE: You can also edit an existing credential on the Credentials page by clicking the [Actions] button ( )for the credential, selecting Edit, and editing that credential as needed.
8. Select a credential to allow SL1 to access a device and click [Next]. The Root Device Details page appears:
9. Complete the following fields:
l Root Device Name. Type the name of the root device for the application you want to monitor (in thiscase, an Amazon Web Services root device).
l Collector Group Name. Select an existing collector group to communicate with the discovereddevices. Required.
NOTE: The contents of this page might vary depending on the discovery type you selected at the start of theGuided Discovery.
66
3

67
10. Click the [Create Discovery Session] button. A summary of the new discovery session appears on this page.
11. Click [Close]. The Discovery Sessions page (Devices > Discovery Sessions) displays the new discoverysession.
Adding Devices Using Guided Discovery
Instead of running a Universal Discovery for a specific discovery type, you can run an "unguided" discovery to find arange of devices using core credentials such as SNMP, Database, SOAP/XML, Basic/Snippet, SSH/Key, orPowerShell credentials.
To run an unguided discovery:
1. On the Devices page, click the [Add Devices] button. The Select page appears:
Discovery

Discovery
2. Click the [Unguided Network Discovery] button. Additional information about the requirements fordiscovery appears in the General Information pane to the right.
3. Click [Select]. The Add Devices page appears:
4. Complete the following fields:
l Name. Type a unique name for this discovery session. This name is displayed in the list of discoverysessions on the [Discovery Sessions] tab.
l Description. Type a short description of the discovery session. You can use the text in this descriptionto search for the discovery session on the [Discovery Sessions] tab. Optional.
l Select the organization to add discovered devices to. Select the name of the organization to whichyou want to add the discovered devices.
3. Click [Next]. The Credentials page of the Add Devices wizard appears:
68
3

69
4. Select one or more SNMP credentials to allow SL1 to access a device's SNMP data and click [Next]. TheDiscovery Session Details page of the Add Devices wizard appears:
5. Complete the following fields:
l List of IPs/Hostnames. Provide a list of IP addresses, hostnames, or fully-qualified domain names forSL1 to scan during discovery. You can also click the [Upload File] button to upload a comma-separated list of IPs. This field is required. In this field, you can enter a combination of one or more ofthe following:
o One or more single IPv4 addresses separated by commas and a new line. Each IP address must bein standard IP notation and cannot exceed 15 characters. For example, "10.20.30.1,10.20.30.2, 10.20."
o One or more ranges of IPv4 addresses with "-" (dash) characters between the beginning of therange and the end of the range. Separate each range with a comma. For example, "10.20.30.1 –10.20.30.254".
o One or more IP address ranges in IPv4 CIDR notation. Separate each item in the list with a comma.For example, "192.168.168.0/24".
o One or more ranges of IPv6 addresses with "-" (dash) characters between the beginning of therange and the end of the range. Separate each range with a comma. For example,"2001:DB8:0:0:0:0:0:0-2001:DB8:0:0:0:0:0:0003".
o One or more IP address ranges in IPv6 CIDR notation. Separate each item in the list with a comma.For example, "2001:DB8:0:0:0:0:0:0/117".
o One or more hostnames (fully-qualified domain names). Separate each item in the list with acomma.
Discovery

Discovery
l Which collector will monitor these devices?. Select an existing collector to monitor the discovereddevices. Required.
l Run after save. Select this option to run this discovery session as soon as you click [Save and Close].
l Advanced options. Click the down arrow icon ( ) to access additional discovery options.
In the Advanced options section, complete the following fields as needed:
o Initial Scan Level. For this discovery session only, specifies the data to be gathered during theinitial discovery session. The options are:
n System Default (recommended). Use the value defined in the Behavior Settings page (System> Settings > Behavior) in the classic user interface of SL1.
n 1. Model Device Only. Discovery will discover if the device is up and running and if so, collectthe make and model of the device. SL1 will then generate a device ID for the device so it canbe managed by SL1.
n 2. Initial Population of Apps. Discovery will search for Dynamic Applications to associate withthe device. The discovery tool will attempt to collect data for the aligned Dynamic Applications.Discovery will later retrieve full sets of data from each Dynamic Application. Discovery will alsoperform 1. Model Device Only discovery.
n 3. Discover SSL Certificates. Discovery will search for SSL certificates and retrieve SSL data.Discovery will also perform 2. Initial Population of Apps and 1. Model Device Only.
n 4. Discover Open Ports. Discovery will search for open ports. Discovery will also perform 3.Discover SSL Certificates, 2. Initial Population of Apps, and 1. Model Device Only.
NOTE: If your system includes a firewall and you select 4. Discover Open Ports, discovery might be blockedand/or might be taxing to your network.
n 5. Advanced Port Discovery. Discovery will search for open ports, using a faster TCP/IPconnection method. Discovery will also perform 3. Discover SSL Certificates, 2. InitialPopulation of Apps, and 1. Model Device Only.
NOTE: If your system includes a firewall and you select 5. Advanced Port Discovery, some devices mightremain in a pending state (purple icon) for some time after discovery. These devices will achieve ahealthy status, but this might take several hours.
n 6. Deep Discovery. Discovery will use nmap to retrieve the operating system name andversion. Discovery will also scan for services running on each open port and can use thisinformation to match devices to device classes. Discovery will search for open ports, using afaster TCP/IP connection method. Discovery will also perform 3. Discover SSL Certificates, 2.Initial Population of Apps, and 1. Model Device Only.
70
3

71
NOTE: For devices that don't support SNMP, option 6. Deep Discovery allows you to discover devices thatdon't support SNMP and then align those devices with a device class other than "pingable". Note thatoption 6. Deep Discovery is compute-intensive.
o Scan Throttle. Specifies the amount of time a discovery process should pause between eachspecified IP address (specified in the IP Address/Hostname Discovery List field). Pausingdiscovery processes between IP addresses spreads the amount of network traffic generated bydiscovery over a longer period of time. The choices are:
n System Default (recommended). Use the value defined in the Behavior Settings page (System> Settings > Behavior) in the classic user interface for SL1.
n Disabled. Discovery processes will not pause.
n 1000Msec to 10000Msec. A discovery process will pause for a random amount of timebetween half the selected value and the selected value.
o Port Scan All IPs. For the initial discovery session only, specifies whether SL1 should scan all IPaddresses on a device for open ports. The choices are:
n System Default (recommended). Use the value defined in the Behavior Settings page (System> Settings > Behavior) in the classic user interface for SL1.
n Enabled. SL1 will scan all discovered IP addresses for open ports.
n Disabled. SL1 will scan only the primary IP address (the one used to communicate with SL1) foropen ports.
o Port Scan Timeout. For the initial discovery session only, specifies the length of time, inmilliseconds, after which SL1 should stop trying to scan an IP address for open ports and beginscanning the next IP address (if applicable). Choices are:
n System Default (recommended). Use the value defined in the Behavior Settings page (System> Settings > Behavior).
n Choices between 60 to 1,800 seconds.
o Scan Ports. Specify a list of ports to scan, separated by colons (:). The default is 21:22:25:80:136.
o Interface Inventory Timeout (ms). Specifies the maximum amount of time that the discoveryprocesses will spend polling a device for the list of interfaces. After the specified time, SL1 will stoppolling the device, will not model the device, and will continue with discovery. The default value is600,000 ms (10 minutes).
n During the execution of this discovery session, SL1 uses the value in this field first. If you deletethe default values and do not specify another value in this field, SL1 uses the value in theGlobal Threshold Settings page (System > Settings > Thresholds).
Discovery

Discovery
n If you specify a value in this field and do not apply a device template to this discovery session,the Interface Inventory Timeout setting in the Device Thresholds page (Registry > Devices> Device Manager > wrench icon > Thresholds) is set to this value for each discovereddevice. If there is no device template applied to the discovery session and no value is suppliedin this field, SL1 uses the value in the Global Threshold Settings page (System > Settings >Thresholds).
o MaximumAllowed Interfaces. Specifies the maximum number of interfaces per devices. If adevice exceeds this number of interfaces, SL1 will stop scanning the device, will not model thedevice, and will continue with discovery. The default value is 10,000.
n During the execution of this discovery session, SL1 uses the value in this field first. If you deletethe default values and do not specify another value in this field, SL1 uses the value in theGlobal Threshold Settings page.
n If you specify a value in this field and do not apply a device template to this discovery session,theMaximumAllowed Interfaces setting in the Device Thresholds page is set to this valuefor each discovered device. If there is no device template applied to the discovery session andno value is supplied in this field, SL1 uses the value in the Global Threshold Settings page.
o Bypass Interface Inventory. Specifies whether or not the discovery session should discovernetwork interfaces.
n Selected. SL1 will not attempt to discover interfaces for each device in the discovery session.For each discovered device, the Bypass Interface Inventory checkbox on the DeviceInvestigator [Settings] tab will be selected.
n Not Selected. SL1 will attempt to discover network interfaces, using the Interface InventoryTimeout value andMaximumAllowed Interfaces value.
o Discover Non-SNMP. Specifies whether or not SL1 should discover devices that don't respond toSNMP requests.
n Selected. SL1 will discover devices that don't respond to the SNMP credentials selected in theSNMP Credentials field. These devices will be discovered as "pingable" devices.
n Not Selected. SL1 will not discover devices that don't respond to the SNMP credentials selectedin the SNMP Credentials fields.
o Model Devices. Determines whether or not the devices that are discovered with this discoverysession can be managed through SL1. Choices are:
n Enabled. When a device is modeled, SL1 creates a device ID for the device; you can thenaccess the device through the DeviceManager page and manage the device in SL1.
n Disabled. If a device is not modeled, you cannot access the device through the DeviceManager page, and you cannot manage the device in SL1. However, each discovereddevice will still appear in the Discovery Session logs. For each discovered device, the discoverylogs will display the IP address and device class for the device. This option is useful whenperforming an initial discovery of your network, to determine which devices you want to monitor
72
3

73
and manage with SL1. For the amount of time specified in the Device Model Cache TTL (h)field, a user can manually model the device from the Discovery Session window.
o Enable DHCP. Specifies whether or not the specified range of IPs and hostnames use DHCP.
n Selected. SL1 will perform a DNS lookup for the device during discovery and each time SL1retrieves information from the device.
n Not Selected. SL1 will perform normal discovery.
o Device Model Cache TTL (h). Amount of time, in hours, that SL1 stores information about devicesthat are discovered but not modeled, either because theModel Devices option is not enabled orbecause SL1 cannot determine whether a duplicate device already exists. The cached data can beused to manually model the device from the Discovery Session window.
o Log All. Specifies whether or not the discovery session should use verbose logging. When youselect verbose logging, SL1 logs details about each IP address or hostname specified in the IPAddress/Hostname Discovery List field, even if the results are "No device found at this address."
n Selected. This discovery session will use verbose logging.
n Not Selected. This discovery session will not use verbose logging.
o Apply Device Template. As SL1 discovers a device in the IP discovery list, that device is configuredwith the selected device template. You can select from a list of all device templates in SL1. Formore information on device templates, see the manual on Device Groups and DeviceTemplates.
Discovery

Discovery
6. Click [Save and Close] to save the discovery session. The Discovery Sessions page (Devices > DiscoverySessions) displays the new discovery session.
7. If you selected the Run after save option on this page, the discovery session runs, and the Discovery Logspage displays any relevant log messages. If the discovery session locates and adds any devices, theDiscovery Logs page includes a link to the Device Investigator page for the discovered device:
74
3

75
Working with Discovery Sessions
The Discovery Sessions page (Devices > Discovery Sessions) displays a list of all the existing discovery sessions,which are previous attempts to add devices using discovery:
On this page you can click the [Actions] button ( ) for a session and select one of the following actions:
l Edit. Run the Add Device wizard again so you can make changes to the selected discovery session.
l Delete. Delete the selected discovery session. You do not get a confirmation window after you click Delete;the session is immediately deleted.
l Start. Run the selected discovery session again. The Discovery Logs page appears when discoverycompletes.
l Show Logs. The Discovery Logs page for the selected discovery session displays data about the most recentrun of a discovery session.
Running a Classic Discovery Session
To perform a discovery session for one IP address, multiple IP addresses, or a range of IP addresses on the ClassicDiscovery page:
Discovery

Discovery
NOTE: To discover all the devices in your network, you must first know the range of IP addresses used in yournetwork. If you need help, ask your network administrator.
1. Go to the Discovery Control Panel page (System > Customize > Classic Discovery).
2. In the Discovery Control Panel, click the [Actions] button. The Discovery Session Editor page appears:
3. Supply values in the following fields:
l Name. Type a name for the discovery session. This name is displayed in the list of discovery sessionsin the Discovery Control Panel page.
l Description. Optionally, type a description of the discovery session.
76
3

77
l IP Address/Hostname Discovery List. Provide a list of IP addresses or fully-qualified domain namesfor SL1 to scan during discovery. In this field, you can enter a combination of one or more of thefollowing:
NOTE: Instead of manually entering a list of IP addresses and hostnames, you can upload a file that containsthe list of IP addresses and hostnames. See the description of the Upload File field.
o One or more single IPv4 addresses separated by commas. Each IP address must be in standard IPnotation and cannot exceed 15 characters. For example, "10.20.30.1, 10.20.30.2,10.20.30.3".
o One or more ranges of IPv4 addresses with "-" (dash) characters between the beginning of therange and the end of the range. Separate each range with a comma. For example, "10.20.30.1 –10.20.30.254".
o One or more IP address ranges in IPv4 CIDR notation. Separate each item in the list with a comma.For example, "192.168.168.0/24".
o One or more ranges of IPv6 addresses with "-" (dash) characters between the beginning of therange and the end of the range. Separate each range with a comma. For example,"2001:DB8:0:0:0:0:0:0-2001:DB8:0:0:0:0:0:0003".
o One or more IP address ranges in IPv6 CIDR notation. Separate each item in the list with a comma.For example, "2001:DB8:0:0:0:0:0:0/117".
o One or more hostnames (fully-qualified domain names). Separate each item in the list with acomma.
NOTE: The following types of notation are not supported: IPv4 netmask with comma notation (e.g.,192.168.168.0,24); a list of single IPv6 addresses, separated by comma.
NOTE: SL1 will display an error if your discovery session exceeds the maximum size for optimumperformance. SL1 will display a warning message if your discovery session includes 100 or moreIP addresses. The warning message will tell you that discovery with more than 100 IP addresses might"take a long time to discover".
l Upload File. Instead of manually entering a list of IP addresses and hostnames in theIP Address/Hostname Discovery List field, you can upload a file that contains a list of IP addressesand hostnames. The IP addresses and hostnames in the file must be in a format that is allowed for theIP Address/Hostname Discovery List field. Each address or range of addresses in the file must beseparated by a newline character instead of a comma. You can browse to the file and then select it.After uploading the file, the IP Address/Hostname Discovery List field will display the IP addressesand hostnames from the file.
l SNMP Credentials. A community string that allows SL1 to access a device's SNMP data. SNMPcredentials are defined in the Credential Management page (System > Manage > Credentials). If
Discovery

Discovery
you want to retrieve SNMP data from one or more devices, you must select one or more workingSNMP credentials in this field. You can select multiple credentials from this field. SL1 will try eachselected credential when discovering devices and retrieving device data.
l Other Credentials. A username and password pair (among other fields) that allows SL1 to access adevice's database data, SOAP data, XML data, WMI data, WBEM data, or data that is monitored witha Snippet Dynamic Application. These credentials are defined in the Credential Management page(System > Manage > Credentials). You can select multiple credentials from this field. SL1 will tryeach selected credential when searching for Dynamic Applications to align with each discovereddevice.
NOTE: You can use the field at the top of the SNMP Credentials field and theOther Credentials field tofilter the list of credentials. If you enter an alpha-numeric string in the field, the SNMP Credentialsfield or theOther Credentials field will include only credentials that match the string.
NOTE: Your organization membership(s) might affect the list of credentials you can see in theSNMP Credentials field and theOther Credentials field.
l Initial Scan Level. For this discovery session only, specifies the data to be gathered during the initialdiscovery session. The options are:
o System Default (recommended). Use the value defined in the Behavior Settings page (System >Settings > Behavior).
o 0. Model Device Only. Discovery will discover if the device is up and running and if so, collect themake and model of the device. SL1 will then generate a device ID for the device so it can bemanaged by SL1.
o 1. Initial Population of Apps. Discovery will search for Dynamic Applications to associate with thedevice. The discovery tool will attempt to collect data for the aligned Dynamic Applications.Discovery will later retrieve full sets of data from each Dynamic Application. Discovery will alsoperform 0. Model Device Only discovery.
o 2. Discover SSL Certificates. Discovery will search for SSL certificates and retrieve SSL data.Discovery will also perform 1. Initial Population of Apps and 0. Model Device Only.
o 3. Discover Open Ports. Discovery will search for open ports. Discovery will also perform 2.Discover SSL Certificates, 1. Initial Population of Apps, and 0. Model Device Only.
NOTE: If your system includes a firewall and you select 3. Discover Open Ports, discovery might be blockedand/or might be taxing to your network.
o 4. Advanced Port Discovery. Discovery will search for open ports, using a faster TCP/IP connectionmethod. Discovery will also perform 2. Discover SSL Certificates, 1. Initial Population of Apps, and0. Model Device Only.
78
3

79
NOTE: If your system includes a firewall and you select 4. Advanced Port Discovery, some devices mightremain in a pending state (purple icon) for some time after discovery. These devices will achieve ahealthy status, but this might take several hours.
o 5. Deep Discovery. Discovery will use nmap to retrieve the operating system name and version.Discovery will also scan for services running on each open port and can use this information tomatch devices to device classes. Discovery will search for open ports, using a faster TCP/IPconnection method. Discovery will also perform 2. Discover SSL Certificates, 1. Initial Population ofApps, and 0. Model Device Only.
NOTE: For devices that don't support SNMP, option 5. Deep Discovery allows you to discover devices thatdon't support SNMP and then align those devices with a device class other than "pingable". Note thatoption 5. Deep Discovery is compute-intensive.
l Scan Throttle. Specifies the amount of time a discovery process should pause between eachspecified IP address (specified in the IP Address/Hostname Discovery List field). Pausing discoveryprocesses between IP addresses spreads the amount of network traffic generated by discovery over alonger period of time. The choices are:
o System Default (recommended). Use the value defined in the Behavior Settings page (System >Settings > Behavior).
o Disabled. Discovery processes will not pause.
o 1000Msec to 10000Msec. A discovery process will pause for a random amount of time betweenhalf the selected value and the selected value.
l Port Scan All IPs. For the initial discovery session only, specifies whether SL1 should scan all IPaddresses on a device for open ports. The choices are:
o System Default (recommended). Use the value defined in the Behavior Settings page (System >Settings > Behavior).
o 0. Disabled. SL1 will scan only the primary IP address (the one used to communicate with SL1) foropen ports.
o 1. Enabled. SL1 will scan all discovered IP addresses for open ports.
l Port Scan Timeout. For the initial discovery session only, specifies the length of time, in milliseconds,after which SL1 should stop trying to scan an IP address for open ports and begin scanning the next IPaddress (if applicable). Choices are:
o System Default (recommended). Use the value defined in the Behavior Settings page (System >Settings > Behavior).
o Choices between 60,000 to 1,800,000 milliseconds.
Discovery

Discovery
l Detection Method & Port. During discovery, SL1 will scan the list of ports selected in this field todetermine if the range of devices is up and running and which ports are open on each discovereddevice. If a device does not respond to SNMP or ICMP, SL1 uses an open port to collect availabilitydata for that device. If you are not sure which ports are used by the range of devices, select the entryDefault Method. SL1 will check ICMP (ping), FTP, SSH, Telnet, SMTP, and HTTP ports.
NOTE: You can use the field at the top of the Detection Method & Port field to filter the list of ports. If youenter an alpha-numeric string in the field, the Detection Method & Port field will include only portsthat match the string.
l Interface Inventory Timeout (ms). Specifies the maximum amount of time that the discoveryprocesses will spend polling a device for the list of interfaces. After the specified time, SL1 will stoppolling the device, will not model the device, and will continue with discovery. The default value is600,000 ms (10 minutes).
o During the execution of this discovery session, SL1 uses the value in this field first. If you delete thedefault values and do not specify another value in this field, SL1 uses the value in the GlobalThreshold Settings page (System > Settings > Thresholds).
o If you specify a value in this field and do not apply a device template to this discovery session, theInterface Inventory Timeout setting in the Device Thresholds page (Registry > Devices >Device Manager > wrench icon > Thresholds) is set to this value for each discovered device. Ifthere is no device template applied to the discovery session and no value is supplied in this field,SL1 uses the value in the Global Threshold Settings page (System > Settings > Thresholds).
l MaximumAllowed Interfaces. Specifies the maximum number of interfaces per devices. If a deviceexceeds this number of interfaces, SL1 will stop scanning the device, will not model the device, andwill continue with discovery. The default value is 10,000.
o During the execution of this discovery session, SL1 uses the value in this field first. If you delete thedefault values and do not specify another value in this field, SL1 uses the value in the GlobalThreshold Settings page.
o If you specify a value in this field and do not apply a device template to this discovery session, theMaximumAllowed Interfaces setting in the Device Thresholds page is set to this value for eachdiscovered device. If there is no device template applied to the discovery session and no value issupplied in this field, SL1 uses the value in the Global Threshold Settings page.
l Bypass Interface Inventory. Specifies whether or not the discovery session should discover networkinterfaces.
o Selected. SL1 will not attempt to discover interfaces for each device in the discovery session. Foreach discovered device, the Bypass Interface Inventory checkbox in the Device Properties pagewill be selected.
o Not Selected. SL1 will attempt to discover network interfaces, using the Interface InventoryTimeout value andMaximumAllowed Interfaces value.
80
3

81
NOTE: If a device has already been discovered and then is rediscovered through the Discovery SessionEditor page, the Bypass Interface Inventory. checkbox in the Device Properties page will retain itsprevious value, regardless of what is selected in the Discovery Session Editor page.
l Discover Non-SNMPDevices. Specifies whether or not SL1 should discover devices that don'trespond to SNMP requests.
o Selected. SL1 will discover devices that don't respond to the SNMP credentials selected in theSNMP Credentials field. These devices will be discovered as "pingable" devices.
o Not Selected. SL1 will not discover devices that don't respond to the SNMP credentials selected inthe SNMP Credentials fields.
l Model Devices. Determines whether or not the devices that are discovered with this discovery sessioncan be managed through SL1. Choices are:
o Enabled. When a device is modeled, SL1 creates a device ID for the device; you can then accessthe device through the DeviceManager page and manage the device in SL1.
o Disabled. If a device is not modeled, you cannot access the device through the DeviceManagerpage, and you cannot manage the device in SL1. However, each discovered device will stillappear in the Discovery Session logs. For each discovered device, the discovery logs will displaythe IP address and device class for the device. This option is useful when performing an initialdiscovery of your network, to determine which devices you want to monitor and manage with SL1.For the amount of time specified in the Device Model Cache TTL (h) field, a user can manuallymodel the device from the Discovery Session window.
l DHCP. Specifies whether or not the specified range of IPs and hostnames use DHCP.
o Selected. SL1 will perform a DNS lookup for the device during discovery and each time SL1retrieves information from the device.
o Not Selected. SL1 will perform normal discovery.
l Device Model Cache TTL (h). Amount of time, in hours, that SL1 stores information about devicesthat are discovered but not modeled, either because theModel Devices option is not enabled orbecause SL1 cannot determine whether a duplicate device already exists. The cached data can beused to manually model the device from the Discovery Session window.
l Collection Server PID. This field contains a list of all Data Collectors on the network. Select the DataCollector that is local or closet to the devices to be discovered.
o For SL1 appliances, only the name of the appliance will appear in this field.
NOTE: After initial discovery, each device will use the collector group that contains this Data Collector forcollection and rediscovery.
Discovery

Discovery
l Organization. This field contains a list of all organizations defined in SL1. Devices discovered duringthe discovery session will be assigned to the selected organization.
NOTE: Make sure you have the desired organization created and selected before running the discoveryprocess. This field assigns all devices and networks in the specified IP range to a single organization.However, you can later assign individual devices and networks to different organizations.
l Add Devices to Device Group(s). When SL1 discovers a device in the IP discovery list, that device isadded to each selected device group. You can select one or more device groups from a list of devicegroups in SL1 that have "Discovery" selected in the Visibility field. For more information on devicegroups, see the manual on Device Groups and Device Templates.
NOTE: You can use the field at the top of the Add Devices to Device Group(s) field to filter the list of devicegroups. If you enter an alpha-numeric string in the field, the Add Devices to Device Group(s) fieldwill include only device groups that match the string.
l Apply Device Template. As SL1 discovers a device in the IP discovery list, that device is configuredwith the selected device template. You can select from a list of all device templates in SL1. For moreinformation on device templates, see the manual on Device Groups and Device Templates.
l Log All. Specifies whether or not the discovery session should use verbose logging. When you selectverbose logging, SL1 logs details about each IP address or hostname specified in the IPAddress/Hostname Discovery List field, even if the results are "No device found at this address."
o Selected. This discovery session will use verbose logging.
o Not Selected. This discovery session will not use verbose logging.
4. Click the [Save] button to save the discovery session. Close the Discovery Session Editor page.
5. In the Discovery Control Panel page, click the [Reset] button. The new discovery session will appear in theSession Register pane.
6. To launch the new discovery session, click itsQueue this Session icon ( ).
7. If no other discovery sessions are currently running, the session will be executed immediately. If anotherdiscovery session is currently running, your discovery session will be queued for execution.
Creating a New Classic Discovery Session with the Save AsButton
You can edit an existing discovery session, make one or more changes, and then save the edited discovery sessionas a new session. The previous session still exists, unedited. To do this:
1. In the Discovery Control Panelpage (System > Manage >Classic Discovery), in theSession Registrypane, find the discovery session you want to edit. Click its wrench icon ( ).
82
3

83
2. The Discovery Session Editor page appears.
3. In the Discovery Session Editor page, you can edit one or more values listed in the Running a DiscoverySession section.
4. Click the [Save As] button to save the discovery session as a new session. The new session appears in theDiscovery Control Panelpage (System > Manage >Classic Discovery).
Viewing Information about a Classic Discovery Session
The Session Register pane in the Discovery Control Panel (System > Manage >Classic Discovery) pagedisplays information about all discovery sessions defined in SL1.
TIP: To sort the list of discovery sessions, click on a column heading. The list will be sorted by the columnvalue, in ascending order. To sort by descending order, click the column heading again. The Last Editcolumn sorts by descending order on the first click; to sort by ascending order, click the column headingagain.
For each session, the Session Register displays:
l Session Name. Name of the discovery session. This field is optional.
l IP/Hostname List. The range of IP addresses and/or hostnames for SL1 to scan during discovery. This fieldcan contain a combination of one or more of the following:
o One or more single IPv4 addresses separated by commas. Each IP address must be in standard IPnotation and cannot exceed 15 characters. For example, "10.20.30.1, 10.20.30.2, 10.20.30.3".
Discovery

Discovery
o One or more ranges of IPv4 addresses with "-" (dash) characters between the beginning of the rangeand the end of the range. Separate each range with a comma. For example, "10.20.30.1 –10.20.30.254".
o One or more IP address ranges in IPv4 CIDR notation. Separate each item in the list with a comma.For example, "192.168.168.0/24".
o One or more ranges of IPv6 addresses with "-" (dash) characters between the beginning of the rangeand the end of the range. Separate each range with a comma. For example,"2001:DB8:0:0:0:0:0:0-2001:DB8:0:0:0:0:0:0003".
o One or more IP address ranges in IPv6 CIDR notation. Separate each item in the list with a comma.For example, "2001:DB8:0:0:0:0:0:0/117".
o One or more fully-qualified domain names or hostnames.
NOTE: The following types of notation are not supported: IPv4 netmask with comma notation (192.168.168.0,24); a list of single IPv6 addresses, separated by comma.
l Collector. Data Collector used for the discovery session.
l Organization. The organization to which devices discovered during the discovery session will be assigned.
l Pings. This field specifies whether or not SL1 should discover devices that don't respond to the selectedSNMP credentials. The possible values are:
o Yes. SL1 will discover devices that don't respond to the SNMP credentials selected in the SNMPCredentials field for the discovery session. These devices will be discovered as "pingable" devices.
o No. SL1 will not discover devices that don't respond to the SNMP credentials selected in the SNMPCredentials field for this discovery session.
l Rediscovery. Specifies whether or not SL1 is scheduled to run this discovery session, and if so, the frequencyand time specified in the schedule.
l User Edit. Name of user who created or last edited the discovery session.
l Last Edit. Date and time discovery session was created or last edited.
To filter the list of discovery sessions in the Session Register, use the search fields at the top of each column. Thesearch fields are find-as-you-type filters; as you type, the page is filtered to match the text in the search field,including partial matches. Text matches are not case-sensitive. Additionally, you can use the following specialcharacters in each filter:
l , (comma). Specifies an "or" operation. For example:
"dell, micro" would match all values that contain the string "dell" OR the string "micro".
l & (ampersand). Specifies an "and" operation. For example:
"dell & micro" would match all values that contain the string "dell" AND the string "micro".
l ! (exclamation mark). Specifies a "not" operation. For example:
84
3

85
"!dell" would match all values that do not contain the string "dell".
l ^ (caret mark). Specifies "starts with." For example:
"^micro" would match all strings that start with "micro", like "microsoft".
"^" will include all rows that have a value in the column.
"!^" will include all rows that have no value in the column.
l $ (dollar sign). Specifies "ends with." For example:
"$ware" would match all strings that end with "ware", like "VMware".
"$" will include all rows that have a value in the column.
"!$" will include all rows that have no value in the column.
l min-max. Matches numeric values only. Specifies any value between the minimum value and the maximumvalue, including the minimum and the maximum. For example:
"1-5" would match 1, 2, 3, 4, and 5.
l - (dash). Matches numeric values only. A "half open" range. Specifies values including the minimum andgreater or including the maximum and lesser. For example:
"1-" matches 1 and greater, so it would match 1, 2, 6, 345, etc.
"-5" matches 5 and less, so it would match 5, 3, 1, 0, etc.
l > (greater than). Matches numeric values only. Specifies any value "greater than." For example:
">7" would match all values greater than 7.
l < (less than). Matches numeric values only. Specifies any value "less than." For example:
"<12" would match all values less than 12.
l >= (greater than or equal to). Matches numeric values only. Specifies any value "greater than or equal to."For example:
"=>7" would match all values 7 and greater.
l <= (less than or equal to). Matches numeric values only. Specifies any value "less than or equal to." Forexample:
"=<12" would match all values 12 and less.
l = (equal). Matches numeric values only. For numeric values, allows you to match a negative value. Forexample:
"=-5 " would match "-5" instead of being evaluated as the "half open range" as described above.
Discovery

Discovery
Editing a Classic Discovery Session
You can edit the parameters of a discovery session in the Discovery Control Panel page. To do this:
1. Go to the Discovery Control Panel page (System > Manage >Classic Discovery).
2. Find the discovery session you want to edit. Click its wrench icon ( ).
3. The Discovery Session Editor page appears with the values from the previous discovery session. You canedit any of the fields described in the section Running a Discovery Session.
4. Click the [Save] button to save your changes. To save the edited discovery session as a new session (theprevious session will still exist), click the [Save As] button. Close the Discovery Session Editor page.
5. To manually run discovery using the edited session, find the edited session in the Session Register pane andclick itsQueue this Session icon ( ). If no other discovery sessions are currently running, the session will beexecuted immediately. If another discovery session is currently running, your discovery session will be queuedfor execution.
Scheduling a Classic Discovery Session
You can schedule one-time and recurring re-execution of a selected discovery session. You can use the ScheduleManager page (System > Manage > Classic Discovery > calendar icon) to:
l Specify regularly recurring discovery of a specific IP range. This is helpful when you want to monitor an IPrange where new devices are frequently added.
l Specify one-time re-discovery of a specific IP range. This is helpful when you are aware of hardware orsoftware changes within that IP range that you want SL1 to monitor.
NOTE: Scheduled re-execution of a discovery session is slightly different than SL1's automatic, nightlyrediscovery. Nightly rediscovery is applied only to already discovered devices and uses the policiesand configuration applied to each device. Re-execution of a discovery session can discover newdevices within an IP range and uses only the settings specified in the Discovery Control Panel page.
NOTE: You can also view and manage all scheduled processes from the ScheduleManager page (Registry> Schedules > Schedule Manager). For more information, see the System Administration manual.
86
3

87
Viewing the Schedule Manager
The ScheduleManager page (System > Manage > Classic Discovery > calendar icon) displays the followinginformation about each scheduled or recurring discovery session:
l Schedule Summary. Displays the name assigned to the scheduled process.
l Schedule Description. Displays a description of the scheduled process.
l Event ID. Displays a unique, numeric ID for the scheduled process. SL1 automatically created this ID foreach scheduled process.
l sch id. Displays a unique, numeric ID for the schedule. SL1 automatically created this ID for each schedule.
l Context. Displays the area of SL1 upon which the schedule works.
l Timezone. Displays the time zone associated with the scheduled process.
l Start Time. Displays the date and time at which the scheduled process will begin.
l Duration. Displays the duration, in minutes, which the scheduled process occurs.
l Recurrence Interval. If applicable, displays the interval at which the scheduled process recurs.
l End Date. If applicable, displays the date and time on which the scheduled process will recur.
l Last Run. If applicable, displays the date and time the scheduled process most recently ran.
l Owner. Displays the username of the owner of the scheduled process.
l Organization. Displays the organization to which the scheduled process is assigned.
l Visibility. Displays the visibility level for the scheduled process. Possible values are "Private", "Organization",or "World".
l Enabled. Specifies if the scheduled process is enabled. Possible values are "Yes" or "No".
To edit a scheduled or recurring discovery session, click its wrench icon ( ) and update the discovery session asneeded on the Schedule Editormodal page. (For more information, see the section Defining a Scheduled orRecurring Discovery Session.)
Discovery

Discovery
Defining a Scheduled or Recurring Discovery Session
You can schedule a discovery session in SL1 from the ScheduleManager page. SL1 will automatically run thediscovery session at the scheduled time.
To define a scheduled or recurring discovery session:
1. Go to the ScheduleManager page (System > Manage > Classic Discovery > calendar icon).
2. Click [Create]. The Schedule Editormodal page appears.
3. On the Schedule Editormodal page, make entries in the following fields:
Basic Settings
l Schedule Name. Type a name for the scheduled process.
l Schedule Type. Indicates the scheduled process type (such as Tickets, Reports, or Devices).
l Visibility. Select the visibility for the scheduled process. You can select one of the following:
o Private. The scheduled process is visible only to the owner selected in theOwner field.
o Organization. The scheduled process is visible only to the organization selected in theOrganization field.
o World. The scheduled process is visible to all users.
l Organization. Select the organization to which you want to assign the scheduled process.
l Owner. Select the owner of the scheduled process. The default value is the username of the user whocreated the scheduled process.
l Description. Type a description of the scheduled process.
88
3

89
Time Settings
l Start Time. Click in the field and select the date and time you want the scheduled process to start.
l Time Zone. Select the region or time zone for the scheduled start time.
NOTE: If you want SL1 to automatically adjust for daylight savings time (if applicable), then you must select anamed region (such as America/New York) in the Time Zone field. If you select a specific time zone(such as EST) or a specific time offset (such asGMT-5), then SL1 will not automatically adjust fordaylight savings time.
l Recurrence. Select whether you want the scheduled process to occur once or on a recurring basis.You can select one of the following:
o None. The scheduled process occurs only once.
o By Interval. The scheduled process recurs at a specific interval.
If you select By Interval, the following additional fields appear:
l Interval. In the first field, enter a number representing the frequency of the scheduled process, thenselect the time interval in the second field. Choices are Minutes, Hours, Days,Weeks, orMonths. Forexample:
o If you specify "6 Hours", then the scheduled process recurs every six hours from the time listed in theStart Date field.
o If you specify "10 Days", then the scheduled process recurs every 10 days from the date listed in theStart Date field.
o If you specify "2 Weeks", then the scheduled process recurs every two weeks, on the same day ofthe week as the Start Date.
o If you specify "3 Months" the ticket recurs every three months, on the same day of the month as theStart Date.
l Recur Until. Specifies when the scheduled process stops recurring. You can select one of thefollowing:
o No Limit. The scheduled process recurs indefinitely until it is disabled.
o Specified Date. The scheduled process recurs until a specific date and time. If you select SpecifiedDate, you must enter a date and time in the Last Recurrence field.
l Last Recurrence. Click in the field and select the date and time you want the scheduled process tostop recurring.
4. Click [Save].
Discovery

Discovery
Enabling or Disabling One or More Scheduled Discovery Sessions
You can enable or disable one or more scheduled or recurring discovery sessions from the ScheduleManagerpage (System > Manage > Classic Discovery > calendar icon). To do this:
1. Go to the ScheduleManager page (System > Manage > Classic Discovery > calendar icon).
2. Select the checkbox icon for each scheduled process you want to enable or disable.
3. Click the Select Action menu and choose Enable Schedules or Disable Schedules.
4. Click the [Go] button.
90
3

91
Delet ing One or More Scheduled Discovery Sessions
You can delete one or more scheduled or recurring discovery sessions from the ScheduleManager page (System> Manage > Discovery > calendar icon). To do this:
1. Go to the ScheduleManager page (System > Manage > Classic Discovery > calendar icon).
2. Select the checkbox icon for each scheduled process you want to delete.
3. Click the Select Action menu and choose Delete Schedules.
4. Click the [Go] button.
Manually Re-Running Discovery for a Dynamic Application
From the Dynamic Applications Manager page, you can manually run the Dynamic Application alignmentportion of discovery for all existing devices in the system. That is, you can ask SL1 to check each DynamicApplication and each existing device and align each device with each appropriate Dynamic Application.
For each Dynamic Application you select for re-discovery, SL1 tries to connect to each existing device using thecredentials already aligned with each device. If SL1 is able to connect to a device with one of the credentials andcan then retrieve the discovery object associated with the Dynamic Application, SL1 will align the DynamicApplication with the device.
To manually run discovery for a single Dynamic Application:
1. Go to the Dynamic Applications Manager page (System > Manage > Dynamic Applications).
Discovery

Discovery
2. In the Dynamic Applications Manager page, find the Dynamic Application you want to use for network-wide discovery. Click its lightning bolt icon ( ).
3. If no other discovery tasks are currently running, SL1 will immediately perform discovery of the entire network,using the selected Dynamic Application.
4. If other discovery tasks are currently running, SL1 will add the request to the discovery queue.
To manually run discovery for multiple Dynamic Applications:
1. Go to the Dynamic Applications Manager page (System > Manage > Dynamic Applications).
2. In the Dynamic Applications Manager page, find the Dynamic Applications you want to use for network-wide discovery. Select the checkbox for each Dynamic Application.
3. In the Select Actionsmenu (in the lower right of the page), selectDISCOVER Applications.
4. Click the [Go] button.
92
3

93
5. If no other discovery tasks are currently running, SL1 will immediately perform discovery of the entire network,using the selected Dynamic Application.
6. If other discovery tasks are currently running, SL1 will add the request to the discovery queue.
Manually Re-Running Discovery for a Device
You can manually re-discover a device, using the settings and configuration in the Device Properties page for thedevice.
Remember that the credentials and settings defined in the Device Properties page override:
l Settings in the Behavior Settings page (System > Settings > Behavior).
l Credentials and settings in the Discovery Control Panel page () from the initial discovery of the device.
SL1 will update the device with the data from the discovery session. The discovery session does not change,overwrite, or affect the existing, historical data associated with the device.
To re-discover a device:
1. Go to the DeviceManager page (Devices > Device Manager).
2. In the DeviceManager page, find the device you want to re-discover. Click its wrench icon ( ).
3. In the Device Properties page, click the Rediscover icon ( ).
4. If no other discovery tasks are currently running, SL1 will immediately perform discovery of the selecteddevice.
Discovery

Discovery
5. If other discovery tasks are currently running, SL1 will add the request to the discovery queue.
Viewing Information about Classic Discovery
To view information about a discovery session that has already run:
1. Go to the Discovery Control Panel page (System > Manage >Classic Discovery).
2. In the Discovery Control Panel page, in the Session Register, find the discovery session you are interestedin. Click its magnifying glass icon ( ).
3. The Discovery Session modal page appears. This page provides details on the discovery session.
4. The Discovery Session page includes an entry for each action performed during the discovery session. Eachentry in the Discovery Session page contains:
l Date Time. Date and time the action was executed.
l Discovery Log Message. When applicable, starts with the IP address of the discovered device. Alsoincludes a description of the action that was executed by the discovery session.
NOTE: If you did not select Auto-Update in the Device Properties page for one or more devices, when thediscovery process tries to discover one of those devices, the log will display the message "Auto-Updateis disabled and prevents discovery from updating any device properties."
l Class Type. The device class for each discovered device. SL1 will determine the device class for eachdevice, even if a device will not be modeled by SL1.
94
3
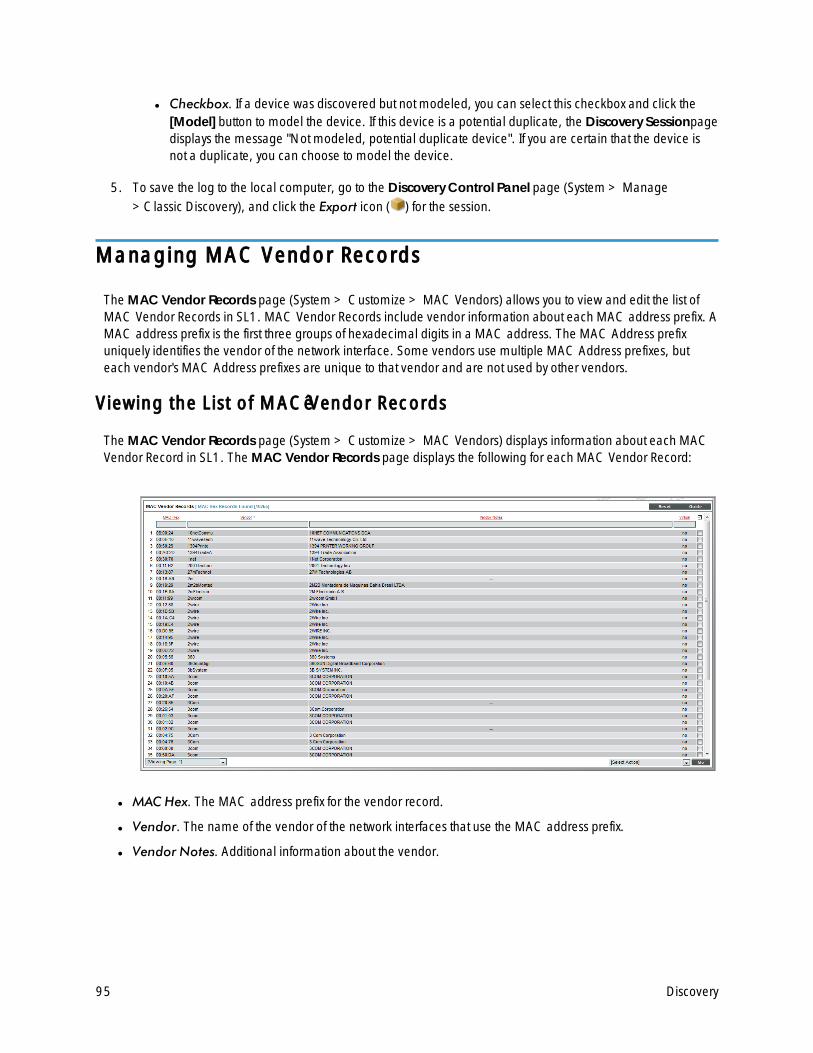
95
l Checkbox. If a device was discovered but not modeled, you can select this checkbox and click the[Model] button to model the device. If this device is a potential duplicate, the Discovery Sessionpagedisplays the message "Not modeled, potential duplicate device". If you are certain that the device isnot a duplicate, you can choose to model the device.
5. To save the log to the local computer, go to the Discovery Control Panel page (System > Manage>Classic Discovery), and click the Export icon ( ) for the session.
Managing MAC Vendor Records
TheMAC Vendor Records page (System > Customize > MAC Vendors) allows you to view and edit the list ofMAC Vendor Records in SL1. MAC Vendor Records include vendor information about each MAC address prefix. AMAC address prefix is the first three groups of hexadecimal digits in a MAC address. The MAC Address prefixuniquely identifies the vendor of the network interface. Some vendors use multiple MAC Address prefixes, buteach vendor's MAC Address prefixes are unique to that vendor and are not used by other vendors.
Viewing the List of MAC Vendor Records
TheMAC Vendor Records page (System > Customize > MAC Vendors) displays information about each MACVendor Record in SL1. TheMAC Vendor Records page displays the following for each MAC Vendor Record:
l MAC Hex. The MAC address prefix for the vendor record.
l Vendor. The name of the vendor of the network interfaces that use the MAC address prefix.
l Vendor Notes. Additional information about the vendor.
Discovery

Discovery
l Virtual. Indicates whether the vendor associated with this MAC address prefix allows the same MAC addressto be re-used on multiple devices:
o Yes. The vendor allows the same MAC address to be re-used on multiple devices. If a new interface isdiscovered during nightly discovery and that interface has a MAC address with this prefix that is alreadyassociated with an interface record in the system, SL1 will create a new interface record for the newlydiscovered interface.
o No. The vendor does not allow the same MAC address to be re-used on multiple devices. If a newinterface is discovered during nightly discovery and that interface has a MAC address with this prefixthat is already associated with an interface record in the system, SL1 will NOT create a new interfacerecord for the newly discovered interface.
Filtering the List of MAC Vendor Records
TheMAC Vendor Records page includes four filters, in the top row in the list of MAC Vendor Records. You canspecify one or more parameters to filter the display of MAC Vendor Records. Only MAC Vendor Records that meetall the filter criteria will be displayed in theMAC Vendor Records page.
You can filter by one or more of the following parameters. The list of MAC Vendor Records is dynamically updatedas you select each filter.
l For each filter, you must enter text to match against. SL1 will search for MAC Vendor Records that match thetext, including partial matches. Text matches are not case sensitive. You can use the following specialcharacters in each filter:
o , (comma). Specifies an "or" operation. For example:
"dell, micro" would match all values that contain the string "dell" OR the string "micro".
o ! (exclamation mark). Specifies a "not" operation. For example:
"!dell" would match all values that do not contain the string "dell".
l MAC Hex. You can enter text to match, including special characters, and theMAC Vendor Records pagewill display only MAC Vendor Records that have a matching prefix.
l Vendor. You can enter text to match, including special characters, and theMAC Vendor Records page willdisplay only MAC Vendor Records that have a matching vendor name.
l Vendor Notes. You can enter text to match, including special characters, and theMAC Vendor Recordspage will display only MAC Vendor Records that have a matching vendor note.
l Virtual. You can enter text to match, including special characters, and theMAC Vendor Records page willdisplay only MAC Vendor Records that have a matching virtual setting.
96
3

97
Edit ing the Virtual Set t ing for MAC Vendor Records
TheMAC Vendor Records page contains a drop-down field in the lower right called Select Action. This fieldallows you to apply an action to multiple MAC Vendor Records simultaneously.
To apply an action to multiple MAC Vendor Records:
1. Go to theMAC Vendor Records page (System > Customize > MAC Vendors).
2. In theMAC Vendor Records page, select the checkbox for each MAC Vendor Record you want to apply theaction to. To select all checkboxes for all MAC Vendor Records, select the red checkbox ( ) at the top of thepage.
3. In the Select Action drop-down list, select one of the following actions:
l Set Virtual Flag To: Yes. Sets the virtual setting for the Mac Vendor Record to "yes".
l Set Virtual Flag To: No. Sets the virtual setting for the Mac Vendor Record to "no".
4. Click the [Go] button to apply the selected action to the selected MAC Vendor Records.
Troubleshooting Discovery
If discovery is not working as you expected, you can try these troubleshooting steps to try to fix any problems. Ifproblems persist, please contact ScienceLogic Customer Care.
Discovery

Discovery
Checking Network Security
Your network security and network configuration can prevent SL1 from communicating with each device in yournetwork. To ensure that discovery can access each device in your network, check the following:
l To discover a device as a "pingable" device, SL1 must be able to either:
o Ping the device (access through ICMP).
o Access at least one of the ports selected in the Discovery Control Panel page.
l To discover a device as "manageable" (that is, the device supports SNMP), SL1 must be able to access theUDP port defined in the working SNMP credential for that device.
l On each DNS server(s) for your network, SL1 must access UDP port 53.
l If there are firewalls between the Data Collectors and devices to be monitored, make sure that the firewallsare configured to allow SL1 access to those devices.
Debugging the Discovery Processes
When you debug a process, you tell SL1 to use verbose logging for that process. You can then view the log file toview detailed log files. If discovery is not performing as you would expect, you might find it helpful to debug one ormore of the discovery processes.
In general:
l If SL1 is not discovering one or more devices that you know exist, debug the process Discovery: Auto.
l If SL1 is discovering devices but not retrieving the appropriate information, debug the process Discovery:Detail.
l If SL1 is not aligning Dynamic Applications with devices during discovery, debug the process Discovery:Dynamic App.
WARNING: ScienceLogic recommends that you enable the debug option only while troubleshooting aproblem and that you immediately turn off debugging when you have completedtroubleshooting. Don't leave the debug option enabled during normal operation of SL1. Whenyou turn on debugging, SL1 will run significantly more slowly.
To enable the debug option for a discovery process:
1. Go to the Process Manager page (System > Settings > Admin Processes).
98
3

99
2. In the Process Manager page, find the process you want to debug and click its wrench icon ( ).
3. The Process Editormodal page appears.
4. Edit the following field:
l Debug Mode. Enables or disables debugging information for a process. Select Enabled.
5. Click the [Reset] button.
6. Go to the Discovery Control Panel page (System > Manage >Classic Discovery) and run the discoverysession again.
7. Log in to the console of the SL1 appliance where the process is running. Alternately, you can use SSH to opena shell session on the SL1 appliance. In most cases, you will log in as "root".
l If you are using a SL1 system, log in to the current SL1 appliance.
l If you are using a distributed SL1 system, log in to the Data Collector associated with the discoverysession.
Discovery
Discovery
NOTE: For details on enabling and using SSH with SL1, information about root access, and instructions onmaking root access secure, see the manual Security.
TIP: To view a list of IP addresses for all SL1 appliances in your network, go to the ApplianceManager page(System > Settings > Appliances).
8. Navigate to the directory /data/logs. View the file silo.log. The most recent entries will be posted at the endof the file.
9. After you have finished troubleshooting the process, remember to disable debugging.
Checking Communicat ion between Data Collectors and the DatabaseServer
For distributed SL1 systems, discovery can fail if the Data Collectors and the Database Server cannot communicatewith each other.
To check communication between the Database Server and a Data Collector:
1. Log in to the console of the SL1 appliance where the process is running. Alternately, you can use SSH to opena shell session on the SL1 appliance. Log in as em7admin.
l If you are using a SL1 system, log in to the current SL1 appliance.
l If you are using a distributed SL1 system, log in to the Database Server.
TIP: To view a list of IP addresses for all SL1 appliances in your network, go to the ApplianceManager page(System > Settings > Appliances).
NOTE: For details on enabling and using SSH, see the manual Security.
2. From the command line, enter the following:
silo_mysql -P 7707 -h <IP address of the Data Collection Server associated withthe discovery session> -u root -p
You will be prompted to enter the MySQL root password.
3. If you can successfully execute this command from the Database Server, this means that the Database Serveris successfully communicating with the Data Collector.
100
3

101
4. If you cannot successfully execute this command from the Database Server:
l Go to the ApplianceManager page (System > Settings > Appliances) and ensure that the settingsfor the Database Server and the Data Collector server are correct.
l Ensure that a network firewall is not preventing the Database Server and the Data Collector fromcommunicating with each other.
l Log in to the console of the Data Collector. Alternately, you can use SSH to open a shell session on theData Collector. Log in as em7admin. To ensure that MySQL is running on the Data Collector, enterthe following at the command line:
silo_mysqladmin -u root -p status
You will be prompted for the password.
o If the database is running, the command will return statistics about the database.
o If the database is not running, the command will return an error message. To restart the database,enter the following at the command line:
sudo service em7_db_start
How File Systems are Hidden During Discovery
When you hide a file system, SL1 stops collecting information about the file system. When you hide a file system:
l SL1 does not generate events about the file system.
l SL1 does not monitor the file system for thresholds (defined in the Device Thresholds andGlobalThreshold Settings pages).
l SL1 does not include the file system in the Device Summary page.
l SL1 does not include the file system in file system reports in the Device Performance page.
The following rules are applied during discovery to automatically hide file systems:
l If theNFS Detection Disablecheckbox is selected in the Behavior Settings page (System > Settings >Behavior), NFS file systems are automatically hidden during discovery.
l File systems of type "iso9660" are automatically hidden during discovery.
l File systems for which the storage size is not reported or the storage size is less than 1024 KB areautomatically hidden during discovery.
l File systems of type "Other" are automatically hidden during discovery.
Discovery

Discovery
NOTE: If the type of a discovered file system changes, the auto-hide rules are re-applied to that file system.For example, suppose a Windows drive letter is initially discovered as a removable disk and auto-hidden. If that drive-letter is later re-used for a fixed drive, this change will cause the file system to beautomatically un-hidden.
To manually hide one or more file systems:
1. Go to the Device Hardware page (Devices > Hardware).
2. Filter the list to display onlyComp Type of "file system".
3. Select the checkbox for one or more file systems you would like to hide.
4. From the Select Actions field (in the lower right), selectHide File Systems.
5. Click the [Go] button.
6. Each selected file system will be hidden in SL1.
To manually unhide one or more file systems:
1. Go to the Device Hardware page (Devices > Hardware).
2. Filter the list to display onlyComp Type of "file system".
3. Select the checkbox for one or more file systems you would like to unhide.
4. From the Select Actions field (in the lower right), select Unhide File Systems.
5. Click the [Go] button.
6. SL1 will resume collection for each selected file system and will include each selected file system in theDevice Summary andDevice Performance pages.
102
3

Collection
Chapter
4Collection
Overview
This chapter describes collection and collection processes in SL1.
Use the following menu options to navigate the SL1 user interface:
l To view a pop-out list of menu options, click the menu icon ( ).
l To view a page containing all of the menu options, click the Advanced menu icon ( ).
This chapter includes the following topics:
What is Collection? 104
Collection Processes 104
103
4

104
What is Collection?
Collection is the tool that retrieves policy-based information and Dynamic Application-based information from adevice. After a device is discovered, you can define monitoring policies for that device in SL1. For example, if youdefine a policy to monitor a system process, the collection tool retrieves that information.
l Dynamic Applications use collection processes to collect data.
l Monitoring Policies for devices also trigger collection. These polices include:
o Domain Name Policies
o Email Round-Trip policies
o SOAP/XML Transaction policies
o System Process Policies
o TCP/IP Port Policies
o Web Content Policies
o Windows Services Policies
l SL1 automatically collects the following about each managed device:
o Device availability and device latency
o Network topology
o File system information, if available
o A list of open ports
o Bandwidth usage
l The SL1 agent automatically collects the following about each device on which it is installed:
o Device availability
o Device performance and configuration metrics
o A list of open ports
o Log information
o System processes
Collection Processes
Unlike discovery, collection tasks run at scheduled intervals throughout the day. Collection tasks collect the types ofdata described below. The interval specified is the default interval and can be modified.
l Device availability and device latency (based on the port through which SL1 communicates), every fiveminutes.
Collection

Collection
l CDP relationships between devices, every two hours.
l LLDP relationships between devices, every two hours.
l Critical device availability (if enabled, based on ping to specified port), every 5 seconds, 30 seconds, 60seconds or 120 seconds (defined by user).
l Critical port availability (if enabled, based on ping to specified port), every 5 seconds, 30 seconds, 60seconds or 120 seconds (defined by user).
l DNS availability based on DNS-monitoring policies, every five minutes.
l Data specified in Dynamic Applications. Collection tasks retrieve data from each aligned device, at thefrequency specified in the Dynamic Application.
l Email round-trip statistics based on Email-monitoring policies, every five minutes.
l File system information, every five minutes.
l File system inventory, every two hours.
l Bandwidth usage on managed interfaces, every minute, 5 minutes, 10 minutes, 15 minutes, 30 minutes,60 minutes, or 120 minutes (defined by user).
l Layer-3 relationships between devices, every two hours.
l List of all discovered system processes on all discovered devices, every two hours.
l Availability of system processes based on process-monitoring policies, every five minutes.
l List of all discovered Windows services on all discovered devices, every two hours.
l Availability of Windows services based on service-monitoring policies, every five minutes.
l Events for inclusion in RSS feed, every 10 minutes.
l SNMP details for each discovered device, every five minutes.
l Availability of ports based on port-monitoring policies, every five minutes.
l Layer-2 relationships between devices, every hour.
l Virtual machine relationships between devices, every hour.
l Availability of web content based on web content-monitoring policies, every five minutes.
l Web-transaction statistics based on a SOAP/XML-monitoring policy, every five minutes.
l If the SL1 agent is installed, SL1 collects a list of all processes running on a device, every five minutes.
For details on collection processes, go to the Process Manager page (System > Settings > Admin Processes) andlook for processes with names that start with "Data Collection".
105
4

Managing Credential Tests
Chapter
5Managing Credential Tests
Overview
Credential Tests define a series of steps that SL1 can execute on-demand to validate whether a credential worksas expected. This chapter describes how to manage existing credential tests and create new credential tests. Forinformation about executing a credential test, see the Credentials chapter.
Credential Tests can be included in PowerPacks. For information about including a credential test in a PowerPack,see the PowerPacksmanual.
Use the following menu options to navigate the SL1 user interface:
l To view a pop-out list of menu options, click the menu icon ( ).
l To view a page containing all of the menu options, click the Advanced menu icon ( ).
This chapter includes the following topics:
Viewing Information About Credential Tests 107
Running a Credential Test from the Credential Test Management Page 109
Creating a Credential Test 110
Editing a Credential Test 112
Deleting Credential Tests 112
Available Step Functions 112
106
5

107
Viewing Information About Credential Tests
The Credential Test Management page allows you to view a list of all credential tests. From this page, you canalso create, edit, run, and delete credential tests.
TIP: To sort the list of credential tests, click on a column heading. The list will be sorted by the column value, inascending order. To sort by descending order, click the column heading again. The Last Edited columnsorts by descending order on the first click; to sort by ascending order, click the column heading again.
For each credential test, the page displays:
l Test Name. Name of the credential test.
l Type. The type of credential that can be tested using this credential test. Possible types are SNMP, Database,SOAP/XML, LDAP/AD, Basic/Snippet, SSH/Key, and Powershell.
l PowerPack. The PowerPack that contains the credential test.
l ID. Unique numeric ID, automatically assigned by SL1 to each credential test.
l Last Edited. Date and time the credential test was created or last edited.
l Edited By. The username of the user who created or last edited the credential test.
Managing Credential Tests

Managing Credential Tests
Filtering the List of Credent ial Tests
To filter the list of credentials in the Credential Test Management page, use the search fields at the top of eachcolumn. The search fields are find-as-you-type filters; as you type, the page is filtered to match the text in thesearch field, including partial matches. Text matches are not case-sensitive. Additionally, you can use the followingspecial characters in each filter:
l , (comma). Specifies an "or" operation. For example:
"dell, micro" would match all values that contain the string "dell" OR the string "micro".
l & (ampersand). Specifies an "and" operation. For example:
"dell & micro" would match all values that contain the string "dell" AND the string "micro".
l ! (exclamation mark). Specifies a "not" operation. For example:
"!dell" would match all values that do not contain the string "dell".
l ^ (caret mark). Specifies "starts with." For example:
"^micro" would match all strings that start with "micro", like "microsoft".
"^" will include all rows that have a value in the column.
"!^" will include all rows that have no value in the column.
l $ (dollar sign). Specifies "ends with." For example:
"$ware" would match all strings that end with "ware", like "VMware".
"$" will include all rows that have a value in the column.
"!$" will include all rows that have no value in the column.
l min-max. Matches numeric values only. Specifies any value between the minimum value and the maximumvalue, including the minimum and the maximum. For example:
"1-5" would match 1, 2, 3, 4, and 5.
l - (dash). Matches numeric values only. A "half open" range. Specifies values including the minimum andgreater or including the maximum and lesser. For example:
"1-" matches 1 and greater, so it would match 1, 2, 6, 345, etc.
"-5" matches 5 and less, so it would match 5, 3, 1, 0, etc.
l > (greater than). Matches numeric values only. Specifies any value "greater than." For example:
">7" would match all values greater than 7.
108
5

109
l < (less than). Matches numeric values only. Specifies any value "less than." For example:
"<12" would match all values less than 12.
l >= (greater than or equal to). Matches numeric values only. Specifies any value "greater than or equal to."For example:
"=>7" would match all values 7 and greater.
l <= (less than or equal to). Matches numeric values only. Specifies any value "less than or equal to." Forexample:
"=<12" would match all values 12 and less.
l = (equal). Matches numeric values only. For numeric values, allows you to match a negative value. Forexample:
"=-5 " would match "-5" instead of being evaluated as the "half open range" as described above.
Running a Credential Test from the Credential TestManagement Page
The Credential Test Management page allows you to run a credential test to validate that a credential works asexpected. To do so:
1. Go to the Credential Test Management page (System > Customize > Credential Tests).
2. Find the credential test that you want to run and click its lightning bolt icon ( ). The Credential Testermodal page appears:
3. Supply values in the following fields:
l Test Type. This field is pre-populated with the credential test you selected.
l Credential. Select the credential to test. This drop-down list includes only credentials that you haveaccess to that can be tested using the selected credential test.
l Hostname/IP. Enter a hostname or IP address that will be used during the test. For example, if youare testing an SNMP credential, the hostname/IP address you supply will be used to perform a testSNMP request.
Managing Credential Tests

Managing Credential Tests
l Collector. Select which All-In-One Appliance or Data Collector will run the test from the drop-downlist.
4. Click the [Run Test] button to run the credential test. The Test Credentialwindow appears:
The Test Credentialwindow displays a log entry for each step in the credential test. The steps performedare different for each credential test. The log entry for each step includes the following information:
l Step. The name of the step.
l Description. A description of the action performed during the step.
l Log Message. The result of the step for this execution of the credential test.
l Status. Whether the result of this step indicates the credential and/or the network environment isconfigured correctly (Passed) or incorrectly (Failed).
l Step Tip. Mouse over the question mark icon ( ) to display the tip text. The tip text recommends whatto do to change the credential and/or the network environment if the step has a status of "Failed".
5. Optionally, you can click the [Execute Discovery Session] button to run a discovery session using theCredential, Hostname/IP, and Collector you selected in the Credential Testermodal page.
Creating a Credential Test
The Credential Test Management page allows you to create a new credential test. To do so:
1. Go to the Credential Test Management page (System > Customize > Credential Tests).
2. Click the [Create] button. The Add Credential Testmodal page appears:
110
5

111
3. Supply values in the following fields:
l Test Name. Enter a name for the credential test.
l Credential Type. Select the type of credential that can be used with this test. Possible types areSNMP, Database, SOAP/XML, LDAP/AD, Basic/Snippet, SSH/Key, and PowerShell.
l Execution Environment. Select the execution environment to which you want to align the credentialtest. An execution environment contains the supporting modules, code, scripts, directories, and files(packaged in ScienceLogic Libraries) for the credential test. An execution environment includes itsown installation directories, doesn’t share libraries with other environments, and allows granularcontrol of dependencies, versions, and permissions. The default execution environment is "EM7Credential Tests". For more information, see the ScienceLogic Librariesmanual.
l Steps. Enter the JSON structure that defines how each step in the credential test will be executed. TheJSON structure must specify an array (square-bracket notation) of objects (curly-braces notation). Eachobject in the list defines a step to be executed by the credential test. The object for a step must includethe following keys:
o name. The name of the step. This text will be displayed in the Step column in the credential testresults.
o description. A description of the step. This text will be displayed in the Description column inthe credential test results.
o pass_message. The log message to display when the success criteria of the specified functionare met. To use the output from a function in the log message, you can include substitutions inthis field.
o fail_message. The log message to display when the success criteria of the specified functionare not met. To use the output from a function in the log message, you can include substitutionsin this field.
o step_tip. Information for the user to troubleshoot their credential if this step fails. This text will bedisplayed if the user hovers over the information icon ( ) in the credential test results.
o function. The name of the function that will be called by SL1 to execute the step. For a list ofavailable functions, see the Available Step Functions section.
For step functions that accept additional arguments, add an additional key/value pair in the object forthat step to specify additional arguments.
The pass_message and fail_message can include substitutions. Substitutions are specified using thefollowing format:
%([Return Value Name])s
Where [Return Value Name] is the name of the return value you want to substitute in to the pass_message and fail_message. For example, the ping function returns the latency in milliseconds in thevariable "result". Suppose your step uses the ping function with the following pass_message:
Latency is %(result)s ms
Managing Credential Tests

Managing Credential Tests
Suppose that when a user runs the credential test, the ping function returns "10" in the variable"result". The following log message is displayed to the user:
Latency is 10 ms
4. Click the [Save] button to save your changes to the credential test.
Editing a Credential Test
The Credential Test Management page allows you to edit an existing credential test. To do so:
1. Go to the Credential Test Management page (System > Customize > Credential Tests).
2. Find the credential test that you want to edit and click its wrench icon ( ). The Edit_Credential_Testmodalpage appears.
3. Edit one or more parameters for the credential test. For a description of each field, see the Creating aCredential Test section.
4. Click the [Save] button to save your changes to the credential test.
Deleting Credential Tests
The Credential Test Management page allows you to delete one or more credential tests from SL1. To do so:
1. Go to the Credential Test Management page (System > Customize > Credential Tests).
2. Select the checkbox for each credential test you want to delete.
3. Click the Select Actionsmenu (in the lower right) and selectDELETE Credential Test, then click the [Go]button.
4. In the pop-up window that appears, click [OK]. The selected credential tests will be deleted.
Available Step Functions
ping
This function executes the following ping command using the provided IP address or hostname:
sudo /bin/ping -c1 [IP address/Hostname]
l Success/Failure Criteria. Successful if a response is received.
l Arguments. None.
l Return values on success:
112
5

113
o success. Returns True.
o result. Returns the response time, in ms.
l Return values on failure:
o success. Returns False.
nmap_udp
This function executes the following nmap command using the provided IP address or hostname and the port inthe provided credential:
sudo /usr/bin/nmap -sU -p [port][IP address/Hostname]
l Success/Failure Criteria. Successful if the NMAP command returns "open" or "open|filtered" as the state ofthe port.
l Arguments. None.
l Return values on success:
o port. Returns the port number from the credential.
o success. Returns True.
o result. Returns the state of the port from the NMAP output.
l Return values on failure:
o port. Returns the port number from the credential or "Undefined" if no port is specified in thecredential.
o success. Returns False.
o result. Returns the state of the port from the NMAP output.
nmap_tcp
This function executes the following nmap command using the provided IP address or hostname and the port inthe provided credential:
sudo /usr/bin/nmap -P0 -p [port][IP address/Hostname]
l Success/Failure Criteria. Successful if the NMAP command returns "open" or "open|filtered" as the state ofthe port.
l Arguments. None.
l Return values on success:
o port. Returns the port number from the credential.
o success. Returns True.
o result. Returns the state of the port from the NMAP output.
l Return values on failure:
Managing Credential Tests

Managing Credential Tests
o port. Returns the port number from the credential or "Undefined" if no port is specified in thecredential.
o success. Returns False.
o result. Returns the state of the port from the NMAP output.
nslookup_forward
This function executes the nslookup command-line utility using the provided hostname.
l Success/Failure Criteria. Successful if the forward lookup returns one or more results.
l Arguments. None.
l Return values on success:
o success. Returns True.
o result. Returns a string in the following format: Forward returned [number] result[s]
l Return values on failure:
o success. Returns False.
o result. Returns "Forward Failed".
nslookup
If the user provides a hostname, this function:
1. Executes the nslookup command-line utility using the provided hostname.
2. Executes the nslookup command-line utility using the IP address returned by the first nslookup command.
If the user provides an IP address, this function:
1. Executes the nslookup command-line utility using the provided IP address.
2. Executes the nslookup command-line utility using the hostname returned by the first nslookup command.
l Success/Failure Criteria. Successful if both the forward and reverse lookups return one or more results.
l Arguments. None.
l Return values on success:
o success. Returns True.
o result. Returns a string in the following format: [direction] returned [number] result[s], [direction]returned [number] result[s]
l Return values on failure:
o success. Returns False.
o result. Returns a string in one of the following formats:
114
5

115
n [direction] failed, [direction] returned [number] result[s]
n [direction] returned [number] result[s], [direction] failed
n [direction] failed, [direction] failed
dynapp_execute
This function performs collection of a specified Dynamic Application using the credential and IP/hostnameprovided by the user.
l Success/Failure Criteria. Successful if Dynamic Application collection is successful.
l Arguments. One of the following arguments is required. If both are specified, only app_id is used:
o app_id. Integer. The ID of the Dynamic Application to execute.
o app_guid. String. The GUID of the Dynamic Application to execute.
l Return values on success:
o success. Returns True.
l Return values on failure:
o success. Returns False.
snmp_getnext
This function executes an SNMP getnext request on .1.3.6.1 using the credential and IP/hostname provided bythe user. This function works only with SNMP credentials.
l Success/Failure Criteria. Successful if a value is returned by the getnext request.
l Arguments. None.
l Return values on success:
o success. Returns True.
o result. Returns the value returned by the request (typically the System Name).
l Return values on failure:
o success. Returns False.
ssh_request
This function attempts to make an SSH connection using the following values:
l The IP address/hostname from the provided Credential. The host to use for the SSH connection.
l The SSH Key from the provided SSH/Key Credential. The private key to use for the SSH connection.
l The Username from the provided Credential. The username for the SSH connection.
l The Password from the provided Credential. The password for the SSH connection.
Managing Credential Tests

Managing Credential Tests
l The Port from the provided Credential. The port for the SSH connection. If no port is supplied, port 22 isused.
l The command argument supplied to the function. The command that is executed using theSSH connection. If the command argument is not supplied, no command is executed.
If the connection is successful and the command argument is supplied to the function, the function executes thecommand specified in the command argument.
l Success/Failure Criteria. If a command is not specified in the arguments, successful if an SSH connection isestablished. If a command is specified in the arguments, successful if the an SSH connection is establishedand the command returns an exit code of 0.
l Arguments. The following argument is optional:
o command. String. SSH command to execute.
l Return values on success:
o success. Returns True.
l Return values on failure:
o success. Returns False.
o result. Returns an error message.
db_query
This function attempts to make a database connection and execute a query using the credential and IP/hostnameprovided by the user. This function works only with Database credentials.
l Success/Failure Criteria. Successful if the database query returns rows.
l Arguments. The following argument is optional:
o query. String. Database query to execute. If no query is supplied, "SELECT 1;" is executed.
l Return values on success:
o success. Returns True.
l Return values on failure:
o success. Returns False.
o result. Returns an error message.
curl
This function executes a cURL request using the credential and IP/hostname provided by the user. Optionally, thisfunction can perform an expression match on the returned content. This function works only with SOAP/XMLcredentials.
116
5

117
l Success/Failure Criteria. If match text is not specified in the arguments, successful if the cURL requestreturns an HTTP status code that does not begin with a 4 or 5. If match text is specified in the arguments,successful if the cURL request returns an HTTP status code that does not begin with a 4 or 5 and the suppliedexpression match is included in the response.
l Arguments. The following argument is optional:
o match_text. String. Text to match to the response.
l Return values on success:
o success. Returns True.
o result. Returns one of the following:
n If no match text is specified, the string "HTTP [Status Code]" is returned.
n If match text is specified, the string "Match text found" is returned.
l Return values on failure:
o success. Returns False.
o result. Returns one of the following:
n If no match text is specified and the HTTP request returned a 400-series or 500-series statuscode, the string "HTTP [Status Code]" is returned.
n If match text is specified and the HTTP request was successful, the string "Match text not found"is returned.
n If an error is encountered executing the cURL request, an error message is returned.
aws_connect
Using the boto3 library, this function creates an IAM client object using the following values:
l Username from the provided credential. Used as the AWS Access Key ID.
l Password from the provided credential. Used as the AWS Secret Access Key.
l %1 value from the provided SOAP/XML Credential. Used as the AWS region. If the region is not suppliedin the credential, "us-east-1" is used.
After creating the object, the function calls the get_user() request using the object.
l Success/Failure Criteria. Successful if the get_user() request is successful.
l Arguments. None
l Return values on success:
o success. Returns True.
l Return values on failure:
o success. Returns False.
o result. Returns an error message.
Managing Credential Tests

Managing Credential Tests
aws_service_scan
Using the boto3 library, this function creates an AWS session object using the following values:
l Username from the provided credential. Used as the AWS Access Key ID.
l Password from the provided credential. Used as the AWS Secret Access Key.
l %1 value from the provided SOAP/XML Credential. Used as the AWS region. If the region is not suppliedin the credential, "us-east-1" is used.
After creating the object, the function iterates through the list of services specified in the expected_servicesargument. For each expected_services argument, the function attempts to connect to the service using the AWSsession object.
l Success/Failure Criteria. Successful if the connection to every service in the expected_services argumentwas successful.
l Arguments. The following argument is required:
o expected_services. Specify a list of service names. The service names must match the possible servicenames returned by the get_available_resources() function for an AWS session object.
l Return values on success:
o success. Returns True.
l Return values on failure:
o success. Returns False.
o result. Returns one of the following:
n If a client error occurs creating the AWS session object, returns an error message.
n If the AWS session object was created successfully, returns the following string: "cannot accessthe following services: [comma-separated list of failed services]"
nmap_aws
This function performs a port scan of port 443 on the URL of a specific AWS service and region. The function usesthe following values to build the URL:
l %1 value from the provided SOAP/XML Credential. Used as the AWS region. If the region is not suppliedin the credential, "us-east-1" is used.
l The service argument supplied to the function. Used as the AWS service. If the service argument is notsupplied, "ec2" is used.
For services that do not use regions, this function executes the following nmap command:
sudo /usr/bin/nmap -P0 -p 443 [service].[region].amazonaws.com
For services that use regions, this function executes the following nmap command:
sudo /usr/bin/nmap -P0 -p 443 [service].amazonaws.com
118
5

119
l Success/Failure Criteria. Successful if the NMAP command returns "open" or "open|filtered" as the state ofthe port.
l Arguments. The following argument is optional:
o service. The service to use in the URL. If the service argument is not supplied, "ec2" is used.
l Return values on success:
o port. Returns "443".
o success. Returns True.
o result. Returns the state of the port from the NMAP output.
l Return values on failure:
o port. Returns "443".
o success. Returns False.
o result. Returns the state of the port from the NMAP output.
nslookup_aws
This function executes the nslookup command-line utility URL of a specific AWS service and region. The functionuses the following values to build the URL:
l %1 value form the provided SOAP/XML Credential. Used as the AWS region. If the region is not suppliedin the credential, "us-east-1" is used.
l The service argument supplied to the function. Used as the AWS service. If the service argument is notsupplied, "ec2" is used.
For services that do not use regions, the URL is in the following format:
[service].[region].amazonaws.com
For services that use regions, the URL is in the following format:
[service].amazonaws.com
l Success/Failure Criteria. Successful if the forward lookup returns one or more results.
l Arguments. The following argument is optional:
o service. The service to use in the URL. If the service argument is not supplied, "ec2" is used.
l Return values on success:
o success. Returns True.
o result. Returns a string in the following format: Forward returned [number] result[s]
l Return values on failure:
Managing Credential Tests

Managing Credential Tests
o success. Returns False.
o result. Returns "Forward Failed".
ping_aws
This function executes a ping command to the URL of a specific AWS service and region. The function uses thefollowing values to build the URL:
l %1 value form the provided SOAP/XML Credential. Used as the AWS region. If the region is not suppliedin the credential, "us-east-1" is used.
l The service argument supplied to the function. Used as the AWS service. If the service argument is notsupplied, "ec2" is used.
For services that do not use regions, the ping command is in the following format:
sudo /bin/ping -c1 [service].[region].amazonaws.com
For services that use regions, the ping command is in the following format:
sudo /bin/ping -c1 [service].amazonaws.com
l Success/Failure Criteria. Successful if a response is received.
l Arguments. The following argument is optional:
o service. The service to use in the URL. If the service argument is not supplied, "ec2" is used.
l Return values on success:
o success. Returns True.
o result. Returns the response time, in ms.
l Return values on failure:
o success. Returns False.
120
5

© 2003 - 2019, ScienceLogic, Inc.
All rights reserved.
LIMITATION OF LIABILITY AND GENERAL DISCLAIMER
ALL INFORMATION AVAILABLE IN THIS GUIDE IS PROVIDED "AS IS," WITHOUT WARRANTY OF ANYKIND, EITHER EXPRESS OR IMPLIED. SCIENCELOGIC™ AND ITS SUPPLIERS DISCLAIM ALL WARRANTIES,EXPRESS OR IMPLIED, INCLUDING, BUT NOT LIMITED TO, THE IMPLIED WARRANTIES OFMERCHANTABILITY, FITNESS FOR A PARTICULAR PURPOSE OR NON-INFRINGEMENT.
Although ScienceLogic™ has attempted to provide accurate information on this Site, information on this Sitemay contain inadvertent technical inaccuracies or typographical errors, and ScienceLogic™ assumes noresponsibility for the accuracy of the information. Information may be changed or updated without notice.ScienceLogic™ may also make improvements and / or changes in the products or services described in thisSite at any time without notice.
Copyrights and Trademarks
ScienceLogic, the ScienceLogic logo, and EM7 are trademarks of ScienceLogic, Inc. in the United States,other countries, or both.
Below is a list of trademarks and service marks that should be credited to ScienceLogic, Inc. The ® and ™symbols reflect the trademark registration status in the U.S. Patent and Trademark Office and may not beappropriate for materials to be distributed outside the United States.
l ScienceLogic™l EM7™ and em7™l Simplify IT™l Dynamic Application™l Relational Infrastructure Management™
The absence of a product or service name, slogan or logo from this list does not constitute a waiver ofScienceLogic’s trademark or other intellectual property rights concerning that name, slogan, or logo.
Please note that laws concerning use of trademarks or product names vary by country. Always consult alocal attorney for additional guidance.
Other
If any provision of this agreement shall be unlawful, void, or for any reason unenforceable, then thatprovision shall be deemed severable from this agreement and shall not affect the validity and enforceabilityof any remaining provisions. This is the entire agreement between the parties relating to the matterscontained herein.
In the U.S. and other jurisdictions, trademark owners have a duty to police the use of their marks. Therefore,if you become aware of any improper use of ScienceLogic Trademarks, including infringement orcounterfeiting by third parties, report them to Science Logic’s legal department immediately. Report as muchdetail as possible about the misuse, including the name of the party, contact information, and copies orphotographs of the potential misuse to: [email protected]

800-SCI-LOGIC (1-800-724-5644)
International: +1-703-354-1010