Dimensions for z/OS Guide - ADM Help Centers
248
Dimensions CM Dimensions for z/OS Guide
-
Upload
khangminh22 -
Category
Documents
-
view
2 -
download
0
Transcript of Dimensions for z/OS Guide - ADM Help Centers

Dimensions CMDimensions for z/OS Guide

Copyright © 2001–2022 Micro Focus or one of its affiliates.
The only warranties for products and services of Micro Focus and its affiliates and licensors (“Micro Focus”) are set forth in the express warranty statements accompanying such products and services. Nothing herein should be construed as constituting an additional warranty. Micro Focus shall not be liable for technical or editorial errors or omissions contained herein. The information contained herein is subject to change without notice.
Contains Confidential Information. Except as specifically indicated otherwise, a valid license is required for possession, use or copying. Consistent with FAR 12.211 and 12.212, Commercial Computer Software, Computer Software Documentation, and Technical Data for Commercial Items are licensed to the U.S. Government under vendor's standard commercial license.
Product version: 14.6
Last updated: June 22, 2022

Dimensions for z/OS Guide 3
Table of Contents
Chapter 1 Introduction . . . . . . . . . . . . . . . . . . . . . . . . 11Getting Started. . . . . . . . . . . . . . . . . . . . . . . . . . . . . . . . 12Overview of Dimensions for z/OS . . . . . . . . . . . . . . . . . . . 12Item Libraries. . . . . . . . . . . . . . . . . . . . . . . . . . . . . . . . . 13User Files on z/OS Mainframes . . . . . . . . . . . . . . . . . . . . . 13UNIX Systems Services . . . . . . . . . . . . . . . . . . . . . . . . . . 14Moving Files Between Platforms . . . . . . . . . . . . . . . . . . . . 15Codepage Conversion . . . . . . . . . . . . . . . . . . . . . . . . . . . 16Upload Rules for z/OS Files . . . . . . . . . . . . . . . . . . . . . . . 17Using z/OS Mainframe Node Names . . . . . . . . . . . . . . . . . 17Browsing MVS Deployment Areas in Dimensions Clients . . . 18Streams on the Mainframe. . . . . . . . . . . . . . . . . . . . . . . . 18
Chapter 2 Installing Dimensions for z/OS . . . . . . . . . . . . 19Installation Prerequisites . . . . . . . . . . . . . . . . . . . . . . . . . 20
Resource Requirements . . . . . . . . . . . . . . . . . . . . . . 20Software Prerequisites . . . . . . . . . . . . . . . . . . . . . . . 20System Prerequisites . . . . . . . . . . . . . . . . . . . . . . . . 21
Licensing Dimensions for z/OS . . . . . . . . . . . . . . . . . . . . . 23Preserving Existing Installations . . . . . . . . . . . . . . . . . . . . 23Installation Roadmap . . . . . . . . . . . . . . . . . . . . . . . . . . . 25Step A Preparing the Installation . . . . . . . . . . . . . . . . . . . 26
Step A-1 Unpacking and Moving the Distribution . . . . . 26Step A-2 Expanding to Intermediate Format . . . . . . . . 29Step A-3 Constructing System Libraries . . . . . . . . . . . 30
Step B Setting Up Security for a Dimensions for z/OS Listener 32Overview of Security . . . . . . . . . . . . . . . . . . . . . . . . 32Step B-1 Setting Up RACF/USS Security . . . . . . . . . . . 38
Step C Setting Up an Instance of Dimensions for z/OS . . . . 41Overview of Setup . . . . . . . . . . . . . . . . . . . . . . . . . . 41Step C-1 Customizing Variables in theInstallation Template Job . . . . . . . . . . . . . . . . . . . . . 43

4 Dimensions® CM
Table of Contents
Step C-2 Running the Templated Installation Process . . 53Step C-3 Setting Up Instance Security . . . . . . . . . . . . . 53Step C-4 Starting the Local Metadata Server . . . . . . . . 54Step C-5 Starting the z/OS Instance . . . . . . . . . . . . . . 54Step C-6 Setting Up Mainframe Network Nodes . . . . . . 55Step C-7 Verifying the Installation of the Instance . . . . 60
Step D Installing the ISPF Client for an Instance . . . . . . . . . 62Step D-1 Setting Up the ISPF Client for an Instance . . . 62Step D-2 Verifying the ISPF Installation . . . . . . . . . . . . 65
Optional Installation Steps . . . . . . . . . . . . . . . . . . . . . . . . 66Installing the Watcher SVC Exit. . . . . . . . . . . . . . . . . . 66Customizing Variables in the DimensionsConfiguration File . . . . . . . . . . . . . . . . . . . . . . . . . . . 68Setting Up the Scripting Interface . . . . . . . . . . . . . . . . 76
MVS Listener Memory Check . . . . . . . . . . . . . . . . . . . . . . . 77
Chapter 3 ISPF Client Quick Start Tutorial. . . . . . . . . . . . 79Introduction . . . . . . . . . . . . . . . . . . . . . . . . . . . . . . . . . . 79Prerequisites . . . . . . . . . . . . . . . . . . . . . . . . . . . . . . . . . . 79Exercise 1 Log In to Dimensions . . . . . . . . . . . . . . . . . . . . 80Exercise 2 Take a Quick Tour of the Menus . . . . . . . . . . . . . 84Exercise 3 Create a New Project and Directory . . . . . . . . . . 86Exercise 4 Set the Project and Project Root. . . . . . . . . . . . . 87Exercise 5 Change Directories . . . . . . . . . . . . . . . . . . . . . . 89Exercise 6 Create a New Item . . . . . . . . . . . . . . . . . . . . . . 89Exercise 7 Browse the Item. . . . . . . . . . . . . . . . . . . . . . . . 91Exercise 8 Check Out the Item . . . . . . . . . . . . . . . . . . . . . 92Exercise 9 Undo the Check Out . . . . . . . . . . . . . . . . . . . . . 94Exercise 10 Action the Item . . . . . . . . . . . . . . . . . . . . . . . 94Exercise 11 Display Help Panels. . . . . . . . . . . . . . . . . . . . . 95Exercise 12 Log Off from Dimensions . . . . . . . . . . . . . . . . . 96Summary . . . . . . . . . . . . . . . . . . . . . . . . . . . . . . . . . . . . 96
Chapter 4 Operating a Dimensions Instance . . . . . . . . . . 97Starting a Dimensions Instance . . . . . . . . . . . . . . . . . . . . . 98Stopping a Dimensions Instance . . . . . . . . . . . . . . . . . . . . 98Viewing OMVS Processes from SDSF . . . . . . . . . . . . . . . . . 98Altering Message Handling in your Dimensions Listener . . . . 98

Table of Contents
Dimensions for z/OS Guide 5
Started Tasks . . . . . . . . . . . . . . . . . . . . . . . . . . . . . 99
Chapter 5 Using the ISPF Client . . . . . . . . . . . . . . . . . . 101Logging In to the ISPF Client . . . . . . . . . . . . . . . . . . . . . . 102
Profiles . . . . . . . . . . . . . . . . . . . . . . . . . . . . . . . . . . 102Password Retention . . . . . . . . . . . . . . . . . . . . . . . . . 102
About the ISPF Client Main Panel . . . . . . . . . . . . . . . . . . . 103About the Main Panel Display. . . . . . . . . . . . . . . . . . . 103Configuring the Main Panel Display. . . . . . . . . . . . . . . 104Expanding Directories . . . . . . . . . . . . . . . . . . . . . . . . 105Displaying all Item Revisions . . . . . . . . . . . . . . . . . . . 106Viewing Item History . . . . . . . . . . . . . . . . . . . . . . . . 106Setting Preferences . . . . . . . . . . . . . . . . . . . . . . . . . 106Displaying the ISPF Client Version Number . . . . . . . . . 107
Invoking Help. . . . . . . . . . . . . . . . . . . . . . . . . . . . . . . . . 107Keyboard Shortcuts in Help Topics . . . . . . . . . . . . . . . 108
Setting the Project Root and the Current Project . . . . . . . . 108Performing Actions on Items . . . . . . . . . . . . . . . . . . . . . . 108
Checking Out Items . . . . . . . . . . . . . . . . . . . . . . . . . 110Checking In Items . . . . . . . . . . . . . . . . . . . . . . . . . . 111Undoing a Check Out . . . . . . . . . . . . . . . . . . . . . . . . 111Browsing Items . . . . . . . . . . . . . . . . . . . . . . . . . . . . 111Getting (Fetching) Items. . . . . . . . . . . . . . . . . . . . . . 111Comparing Items . . . . . . . . . . . . . . . . . . . . . . . . . . . 112Editing Items . . . . . . . . . . . . . . . . . . . . . . . . . . . . . . 112Updating Items . . . . . . . . . . . . . . . . . . . . . . . . . . . . 113Actioning Items . . . . . . . . . . . . . . . . . . . . . . . . . . . . 113Deleting an Item . . . . . . . . . . . . . . . . . . . . . . . . . . . 113Deploying an Item . . . . . . . . . . . . . . . . . . . . . . . . . . 113
Performing Actions on Groups of Items . . . . . . . . . . . . . . . 114Creating Items . . . . . . . . . . . . . . . . . . . . . . . . . . . . . . . . 115Browsing and Printing Requests . . . . . . . . . . . . . . . . . . . . 115Building . . . . . . . . . . . . . . . . . . . . . . . . . . . . . . . . . . . . . 115
Building Items . . . . . . . . . . . . . . . . . . . . . . . . . . . . . 117Building Projects . . . . . . . . . . . . . . . . . . . . . . . . . . . 117Building Requests. . . . . . . . . . . . . . . . . . . . . . . . . . . 117Building Baselines . . . . . . . . . . . . . . . . . . . . . . . . . . 118Impacted Targets . . . . . . . . . . . . . . . . . . . . . . . . . . . 120
6 Dimensions® CM
Table of Contents
Entering Dimensions Commands . . . . . . . . . . . . . . . . . . . . 120Repeating Recently Used Commands . . . . . . . . . . . . . . 121Using the History List. . . . . . . . . . . . . . . . . . . . . . . . . 121
Processing Commands in Batch Mode. . . . . . . . . . . . . . . . . 122Logging In to a Remote Node . . . . . . . . . . . . . . . . . . . . . . 123Changing Passwords . . . . . . . . . . . . . . . . . . . . . . . . . . . . 124Browsing the Command Log File . . . . . . . . . . . . . . . . . . . . 124Entering TSO Commands . . . . . . . . . . . . . . . . . . . . . . . . . 124Logging Off from the ISPF Client . . . . . . . . . . . . . . . . . . . . 124
Chapter 6 Using the Batch Interface . . . . . . . . . . . . . . . 125Overview . . . . . . . . . . . . . . . . . . . . . . . . . . . . . . . . . . . . 126DD Names . . . . . . . . . . . . . . . . . . . . . . . . . . . . . . . . . . . 127
LOGIN . . . . . . . . . . . . . . . . . . . . . . . . . . . . . . . . . . . 127COMMAND and SYSIN . . . . . . . . . . . . . . . . . . . . . . . . 127SYSPRINT. . . . . . . . . . . . . . . . . . . . . . . . . . . . . . . . . 128SYSOUT . . . . . . . . . . . . . . . . . . . . . . . . . . . . . . . . . . 128
Return Codes . . . . . . . . . . . . . . . . . . . . . . . . . . . . . . . . . 129Securing Passwords . . . . . . . . . . . . . . . . . . . . . . . . . . . . . 129Example JCL Jobstream . . . . . . . . . . . . . . . . . . . . . . . . . . 129Using the Batch Interface Interactively. . . . . . . . . . . . . . . . 132
Chapter 7 Using the Command-Line Client on USS . . . . . . 133Using the Command-Line Client. . . . . . . . . . . . . . . . . . . . . 134Invoking Help . . . . . . . . . . . . . . . . . . . . . . . . . . . . . . . . . 135
Chapter 8 Customizing and Extending the ISPF Client . . . . 137Introduction . . . . . . . . . . . . . . . . . . . . . . . . . . . . . . . . . . 138ISPF Client Extensions . . . . . . . . . . . . . . . . . . . . . . . . . . . 138
MDFRLOG. . . . . . . . . . . . . . . . . . . . . . . . . . . . . . . . . 138MDFRCMPR. . . . . . . . . . . . . . . . . . . . . . . . . . . . . . . . 140MDFRTMP. . . . . . . . . . . . . . . . . . . . . . . . . . . . . . . . . 141MDFRSFF . . . . . . . . . . . . . . . . . . . . . . . . . . . . . . . . . 142MDFRVIEW . . . . . . . . . . . . . . . . . . . . . . . . . . . . . . . . 144Client Executable Components . . . . . . . . . . . . . . . . . . 144
API Interface. . . . . . . . . . . . . . . . . . . . . . . . . . . . . . . . . . 149Main Header File . . . . . . . . . . . . . . . . . . . . . . . . . . . . 149ISPF Variables. . . . . . . . . . . . . . . . . . . . . . . . . . . . . . 149

Table of Contents
Dimensions for z/OS Guide 7
API Common Structures . . . . . . . . . . . . . . . . . . . . . . 152General Functions . . . . . . . . . . . . . . . . . . . . . . . . . . 155Log File Functions. . . . . . . . . . . . . . . . . . . . . . . . . . . 158
Source Code Library . . . . . . . . . . . . . . . . . . . . . . . . . . . . 162MDTCNAV . . . . . . . . . . . . . . . . . . . . . . . . . . . . . . . . 164MDTCNEW. . . . . . . . . . . . . . . . . . . . . . . . . . . . . . . . 165MDFCCMPR . . . . . . . . . . . . . . . . . . . . . . . . . . . . . . . 174MDTJCOMP . . . . . . . . . . . . . . . . . . . . . . . . . . . . . . . 183MDTJLINK . . . . . . . . . . . . . . . . . . . . . . . . . . . . . . . . 183MDFRCMPR . . . . . . . . . . . . . . . . . . . . . . . . . . . . . . . 184MDFRLOG . . . . . . . . . . . . . . . . . . . . . . . . . . . . . . . . 184MDFRTMP . . . . . . . . . . . . . . . . . . . . . . . . . . . . . . . . 184MDFRSFF. . . . . . . . . . . . . . . . . . . . . . . . . . . . . . . . . 184MDFDUSR . . . . . . . . . . . . . . . . . . . . . . . . . . . . . . . . 185MDTHDIM . . . . . . . . . . . . . . . . . . . . . . . . . . . . . . . . 185MDTMUSR . . . . . . . . . . . . . . . . . . . . . . . . . . . . . . . . 191MDTPUSR . . . . . . . . . . . . . . . . . . . . . . . . . . . . . . . . 191MDFDUSR . . . . . . . . . . . . . . . . . . . . . . . . . . . . . . . . 193
Chapter 9 Tips, Troubleshooting, and Restrictions . . . . . . 195Tips. . . . . . . . . . . . . . . . . . . . . . . . . . . . . . . . . . . . . . . . 196
Mapping Project Directories to Partitioned Data Sets . . 196About the /tmp Directory . . . . . . . . . . . . . . . . . . . . . 196About the Local Metadata VSAM Data Set . . . . . . . . . . 197
ISPF Client Troubleshooting . . . . . . . . . . . . . . . . . . . . . . . 197Problems Displaying Panels when Startingthe ISPF Client. . . . . . . . . . . . . . . . . . . . . . . . . . . . . 197
Dimensions Listener Troubleshooting . . . . . . . . . . . . . . . . 198MVS Listener Start Up Diagnostics . . . . . . . . . . . . . . . 198Problems with UNIX Access . . . . . . . . . . . . . . . . . . . . 200Problems Switching User IDs . . . . . . . . . . . . . . . . . . . 200Configuring z/OS Mainframe Network Nodes Correctly . 201Problems with Codepages . . . . . . . . . . . . . . . . . . . . . 201Problems with Server Codepages . . . . . . . . . . . . . . . . 201Interpreting ISPF Statistics . . . . . . . . . . . . . . . . . . . . 202Configuring Auto-Allocation . . . . . . . . . . . . . . . . . . . . 202Setting up Tracing . . . . . . . . . . . . . . . . . . . . . . . . . . 203Problems with Licensing . . . . . . . . . . . . . . . . . . . . . . 203

8 Dimensions® CM
Table of Contents
Started Tasks . . . . . . . . . . . . . . . . . . . . . . . . . . . . . . 204SVC Exit. . . . . . . . . . . . . . . . . . . . . . . . . . . . . . . . . . 205Memory Usage . . . . . . . . . . . . . . . . . . . . . . . . . . . . . 205
Restrictions . . . . . . . . . . . . . . . . . . . . . . . . . . . . . . . . . . . 206Unsupported Dimensions Commands. . . . . . . . . . . . . . 206
Appendix A Temporary Data Sets . . . . . . . . . . . . . . . . . . 207
Appendix B Supplementary Resources . . . . . . . . . . . . . . . 209Advent . . . . . . . . . . . . . . . . . . . . . . . . . . . . . . . . . . . . . . 210Disassembler. . . . . . . . . . . . . . . . . . . . . . . . . . . . . . . . . . 210Examples . . . . . . . . . . . . . . . . . . . . . . . . . . . . . . . . . . . . 211
Appendix C Solving Codepage Translation Errors . . . . . . . . 213Introduction . . . . . . . . . . . . . . . . . . . . . . . . . . . . . . . . . . 214Problem Definition . . . . . . . . . . . . . . . . . . . . . . . . . . . . . . 214
Special Characters. . . . . . . . . . . . . . . . . . . . . . . . . . . 215Diagnosing the Problem . . . . . . . . . . . . . . . . . . . . . . . . . . 216Customizing Codepage Translation. . . . . . . . . . . . . . . . . . . 217
Overriding Individual Character Translations. . . . . . . . . 217Changing Locale . . . . . . . . . . . . . . . . . . . . . . . . . . . . 218
Appendix D Setting Up Dimensions Metadata . . . . . . . . . . . 219Introduction . . . . . . . . . . . . . . . . . . . . . . . . . . . . . . . . . . 220Hierarchical Systems . . . . . . . . . . . . . . . . . . . . . . . . . . . . 220MVS Systems . . . . . . . . . . . . . . . . . . . . . . . . . . . . . . . . . 221
Appendix E The Local Metadata Server . . . . . . . . . . . . . . . 223Introduction . . . . . . . . . . . . . . . . . . . . . . . . . . . . . . . . . . 224
Improvements to LMDS . . . . . . . . . . . . . . . . . . . . . . . 224Installation . . . . . . . . . . . . . . . . . . . . . . . . . . . . . . . . . . . 225Operation . . . . . . . . . . . . . . . . . . . . . . . . . . . . . . . . . . . . 226MDHLMDRV Syntax . . . . . . . . . . . . . . . . . . . . . . . . . . . . . 227
Appendix F Viewing USS SYSLOG Messages. . . . . . . . . . . . 231
Appendix G MVS DDNAME Caching . . . . . . . . . . . . . . . . . . 233Overview . . . . . . . . . . . . . . . . . . . . . . . . . . . . . . . . . . . . 234

Table of Contents
Dimensions for z/OS Guide 9
Dimensions Configuration Symbols . . . . . . . . . . . . . . . . . . 234DM_MVS_DDC_DISABLE . . . . . . . . . . . . . . . . . . . . . . 234DM_MVS_DDC_TRACE . . . . . . . . . . . . . . . . . . . . . . . 234DM_MVS_DDC_VOLUME_FILTER . . . . . . . . . . . . . . . . 235DM_MVS_DDC_LOGIC . . . . . . . . . . . . . . . . . . . . . . . 235DM_MVS_DDC_BPXWDYN . . . . . . . . . . . . . . . . . . . . . 237
Wildcard Patterns . . . . . . . . . . . . . . . . . . . . . . . . . . . . . . 237Data Set Selection Expression . . . . . . . . . . . . . . . . . . . . . 238
Strings . . . . . . . . . . . . . . . . . . . . . . . . . . . . . . . . . . 239Numbers . . . . . . . . . . . . . . . . . . . . . . . . . . . . . . . . . 239Operators . . . . . . . . . . . . . . . . . . . . . . . . . . . . . . . . 240Variables. . . . . . . . . . . . . . . . . . . . . . . . . . . . . . . . . 241Example Logic File . . . . . . . . . . . . . . . . . . . . . . . . . . 243
Appendix H Enabling SSL Support on the z/OS Listener . . . . 245Introduction . . . . . . . . . . . . . . . . . . . . . . . . . . . . . . . . . . 246Enabling SSL Support . . . . . . . . . . . . . . . . . . . . . . . . . . . 246

10 Dimensions® CM
Table of Contents

Dimensions for z/OS Guide 11
Chapter 1Introduction
Getting Started 12Overview of Dimensions for z/OS 12Item Libraries 13User Files on z/OS Mainframes 13UNIX Systems Services 14Moving Files Between Platforms 15Codepage Conversion 16Upload Rules for z/OS Files 17Using z/OS Mainframe Node Names 17Browsing MVS Deployment Areas in Dimensions Clients 18Streams on the Mainframe 18
NOTE The term z/OS used in this document refers to the z/OS V1R5 or later operating system.

12 Dimensions® CM
Getting StartedIf you are new to Dimensions for z/OS, the "ISPF Client Quick Start Tutorial" on page 79 explains how to get started with the ISPF client.
Overview of Dimensions for z/OSDimensions for z/OS enables mainframe hardware to participate in a Dimensions network in the following ways:
Dimensions for z/OS as a Dimensions remote node
Any Dimensions client requesting an action on a user file, either as a source or destination, can refer to a file on a z/OS host using the Dimensions remote node syntax.
You can also run batch jobs on a node, after applying symbols to templates or USS scripts. Can also submit builds on both MVS and USS, and collect outputs.
Dimensions for z/OS as a Dimensions item library server
An item store, managed by a Dimensions CM server, can be physically held on a z/OS host machine. Item libraries are stored on HFS, which is a feature of UNIX Systems Services (USS). HFS provides a robust storage mechanism and is consistent with other Dimensions platforms. For more details about USS see page 14.
Dimensions for z/OS clients
The following clients are available for Dimensions for z/OS:
• ISPF client: an interactive client running in the TSO/ISPF environment that supports most Dimensions functions. For details see page 101.
• A batch interface for processing Dimensions commands. For details see page 125.
• dmcli: the UNIX command-line client, available on USS, that is equivalent in functionally to the command-line client on other platforms. The USS command prompt is also referred to as the 'OMVS shell'. For details, see page 133.

Dimensions for z/OS Guide 13
Item LibrariesDimensions stores the physical items that belong to your projects in item libraries on a z/OS mainframe or any other platform supported by Dimensions. For information about defining item libraries see the Dimensions CM online help.
User Files on z/OS MainframesWhen you get or check out an item from an item library, Dimensions for z/OS copies the item to a user file in a location that you specify. Dimensions for z/OS supports the following file types for user files on z/OS mainframes:
Members of partitioned data sets (PDS), with limitations.
Members of extended partitioned data sets (PDSE).
Individual Queued Sequential Access Method (QSAM) data sets (also known as sequential files or flat files).
Files stored in the UNIX System Services Hierarchical File System.
The following z/OS record formats are supported:
Fixed
Variable and undefined lengths
Blocked and unblocked records
When you are working in a group environment that is sharing data sets, Micro Focus recommends that all PDS type data sets be allocated as PDSEs.
There are a number of problems with PDSs, including:
Multiple user write access.
Locking issues in the same system and across systems.
Handling when the PDS cannot accommodate more data and needs compressing.

14 Dimensions® CM
Dimensions uses the standard IBM ISPF ENQs to serialize access to members for reading and writing, however no attempt is made to use RESERVE to lock the whole data set on write operations. Heavy simultaneous use of a single PDS for write may therefore fail.
UNIX Systems ServicesIBM mainframes running z/OS provide a POSIX-compliant UNIX environment, usually called UNIX Systems Services (USS). Applications running under z/OS using USS have full UNIX functionality but can also access all traditional MVS-style resources such as libraries and the Job Execution System (JES).
UNIX System Services uses the following file systems:
Hierarchical File System (HFS): this is the original file system from IBM.
zFS file system: an alternative file system from IBM supplied in later versions of the operating system. You can use zFS interchangeably with HFS.
Dimensions for z/OS utilizes USS to enable you to use standard format UNIX item libraries stored with directories in a mainframe's UNIX file systems.
The Dimensions listener running under USS has the following main advantages:
The Dimensions DTK functions are available for user-defined extensions on z/OS. For more details, see page 137.
MVS data sets can be created dynamically, including PDS and PDSEs, to contain fetched items.
Security is improved, with the server process switching to the target user's identity for operations, allowing full participation in a RACF security environment.

Dimensions for z/OS Guide 15
You can use both the HFS file system and MVS data sets. You can maintain deployment areas on z/OS in the UNIX and MVS file systems, in synch with items in the Dimensions repository, and migrate items between stages automatically as the status of items is changed in Dimensions.
Secure mechanisms for initiating controlled builds are available which allow different security from that of the user originating the build.
Moving Files Between PlatformsWhen you create a new item you must correctly assign its type. If you assign the type TEXT, Dimensions uses code-pages to convert the data as you move it between platforms. If you assign any type that implies that the data is binary, such as an executable file, Dimensions does not attempt to code-page convert the data.
When you move items between platforms you need to ensure that the files do not lose their integrity and that the original and target locations have consistent codepages. For example, if you move an item from a z/OS mainframe to Windows and then back to the mainframe, the codepage for the mainframe connection has to be similar for both actions.
You can move all file types to z/OS user areas even if there are no compatible applications on z/OS that can edit them. For example, you might move a file if you were using z/OS as an intermediate storage location for a finished item, such as a JPEG image that forms part of a web-based application that will be rendered in a browser.
Items created on Windows or UNIX contain variable-length records, each delimited by carriage-return and line-feed (CRLF) characters (on Windows), or a line-feed (LF) character (on UNIX). When you store these items in Dimensions, the Dimensions repository stores them with the maximum record length as 'unset'. The repository also saves other attributes that are needed when the item is stored on z/OS. Actual values are set to defaults when the file is written, although you must ensure that records are not truncated. You can extract the item to a user file on z/OS with a fixed or variable record format, provided that none of the records are longer than the maximum record length set for the user file.

16 Dimensions® CM
Codepage ConversionA codepage defines the method of encoding characters. The page encompasses the ways characters are encoded on different platforms (EBCDIC on z/OS, and various flavors of ASCII on Windows and UNIX) and the differences between human languages. Every item in Dimensions has a codepage associated with it, defined for the connection between the database server and the logical node from which the user file was last checked in or created. You can define connections in the Network Administration window of the Administration Console, or use the Network Administration command-line interface, see the Administration Guide for details. You can override the default codepage for a connection when you check in an item, update an item, or get or check out an item.
A single Dimensions listener can handle several different connections with different EBCDIC code pages using the logical node naming. This is useful in large environments servicing several different language communities with different character set requirements. Care needs to be taken to ensure that compatible subsets of the character sets are used in this sort of environment.
When Dimensions moves text files between platforms, it performs any necessary codepage conversion between EBCDIC and ASCII, but does not convert between different ASCII codepages. When Dimensions moves binary files between platforms, no conversion is performed.
When you first create an item, Dimensions stores it in the item library using the codepage associated with the connection between the item's location and the Dimensions server. Subsequently, Dimensions only performs codepage conversion when items are checked out or fetched, not when they are checked in or updated. Therefore it is possible for different revisions of an item to be stored using different codepages. For example, if you create an item from a user file on z/OS, it will be stored in EBCDIC (as long as you do not override the codepage for the logical node). If you then check out the item to a PC, it is converted to ASCII during the move. If you subsequently check in the item, Dimensions stores the new revision in ASCII.
For more information about codepages and translation, see the file codepage.txt located in the following locations on Dimensions servers:
Windows: %DM_ROOT%codepage
UNIX: $DM_ROOT%codepage
Dimensions for z/OS Guide 17
For information about using variables to control how codepages are converted, see page 213.
Upload Rules for z/OS FilesUpload rules map file name patterns to Dimensions file formats and item types. These rules determine whether files that match a certain file name pattern can be added to the database using a Dimensions client or an IDE. Upload rules must exist in the base database before you can start adding files.
You can use the upload rules window in the Administration Console to specify rules that determine which z/OS files can be added to the Dimensions database and which files should be excluded, for example:
%.CBL
The behavior of upload rules varies depending on the server platform type. If your server is UNIX you need to specify case-sensitive upload rules. For full details about using upload rules see the Dimensions CM online help.
Using z/OS Mainframe Node NamesWhen using a z/OS listener, you must specify a logical node with related connection details that define protocols, codepages, and the target file system type. In the examples below, <USS logical node name> is a logical node defined for a physical z/OS listener with a UNIX style file system. <MVS node name> refers to a logical node defined for a physical z/OS listener with an MVS file system.
In a Dimensions client, use the following syntax when writing to z/OS mainframe nodes:
USS node: <USS logical node name>::/<path and filename>For example: DEV-USS::/tmp/prog.c
MVS node: <MVS node name>::<member name>For example: DEV-MVS::USER.SOURCE.COBOL(PROG)

18 Dimensions® CM
Browsing MVS Deployment Areas in Dimensions Clients
You can browse MVS deployment areas in the Dimensions CM web and desktop clients. For details, see the Dimensions CM online help.
Streams on the MainframeDimensions streams are not currently supported on the mainframe.

Dimensions for z/OS Guide 19
Chapter 2Installing Dimensions for z/OS
Installation Prerequisites 20Licensing Dimensions for z/OS 23Preserving Existing Installations 23Installation Roadmap 25Step A Preparing the Installation 26Step B Setting Up Security for a Dimensions for z/OS Listener 32Step C Setting Up an Instance of Dimensions for z/OS 41Step D Installing the ISPF Client for an Instance 62Optional Installation Steps 66MVS Listener Memory Check 77
NOTE This document and all the supplied examples assume that you are installing the code for Dimensions for z/OS to MDH.V1460.* and that you are installing an instance to MDH.<instance>.*. If you install to different names, you must adjust these values.

20 Dimensions® CM
Installation PrerequisitesThis section describes the prerequisites for installing Dimensions for z/OS in your mainframe environment.
Resource RequirementsBefore installing Dimensions for z/OS check the following z/OS resource requirements:
7000 tracks of 3390 DASD on the MVS file system for the code install.
5 MB of disk for each Dimensions instance although exact requirements can vary based on configuration options.
10 MB of USS space for the USS file structures (not including space required for item libraries).
Up to 25,000 tracks might be needed during the retrieval and unpacking of the distribution.
Software PrerequisitesBefore installing Dimensions for z/OS check the following software requirements:
A Dimensions CM server has been installed and is running. For details see the installation guides for Windows or UNIX. Dimensions for z/OS is not currently a server platform.
License Manager has been installed, is running and is connected to the Dimensions CM server.
You have a valid Dimensions for z/OS license. For details about licenses, see the Dimensions CM online help. For details about licensing Dimensions for z/OS, see page 23.
You have a supported z/OS operating system installed on your machine.
Language Environment is required at the corresponding level for each base operating system.

Dimensions for z/OS Guide 21
The z/OS USS environment is configured and is usable. A file system suitable for creating instance files is available and mounted.
System PrerequisitesBefore installing Dimensions for z/OS check the following system requirements:
TCP/IP is configured and running on the z/OS platform. DNS look up should also be available. Use the TSO PING command to ping the following:
• The Dimensions server, by name or TCP/IP address, from the z/OS TSO/ISPF command line.
• The z/OS node from a Dimensions server shell.
If you have a fire wall, check that there are open ports for the Dimensions instances.
You can communicate with a local metadata server.
You have defined an HLQ called DMSYS, or equivalent, as a valid HLQ, preferably a user ID or RACF group. Associated master catalog aliases and RACF profiles have been established so that data sets can be created under this profile. This profile holds the initial unpacked distribution. You may need to establish SMS definitions for this HLQ.
You have defined the HLQ MDH, or equivalent, and created suitable aliases. This HLQ is used for the base code installation. The data sets should be protected by a RACF profile that typically has Universal Access Authority (UACC) READ access, but may be more restricted depending on your specific requirements.
NOTE It is now possible to install to an HLQ that consists of multiple qualifiers, for example, PRODUCT.MDH.
22 Dimensions® CM
Either DMSYS or another user ID exists that can be used as the user ID under which the Dimensions listener runs. The user ID should have an UID = 0 in their OMVS segment, access to SUPERUSER, and READ access to:
• BPX.SUPERUSER in the class FACILITY.
• The RACF resource BPX.DAEMON.
After installation is complete you should restrict access to this user ID, although it needs to be available when creating instances.
The user accounts for Dimensions users have UNIX System Services (USS) access. That is, OMVS segments associated with the RACF user IDs with valid UIDs, GIDs, and home directories. You must have write access to the home directories. Dimensions does not explicitly use the home directories, but they are required to complete a valid UNIX environment.
The standard IBM utility BPXWDYN has been installed into a library on the link list. If BPXWDYN is not installed you can download it free from the IBM website:
http://www-1.ibm.com/servers/eserver/zseries/zos/unix/bpxa1ty2.html
If you are loading modules into the Extended Link Pack Area (ELPA), you may need to alter the system IPL (Initial Program Load) parameters. Use of this option is required for production systems.
Review the definition of CSA in the system parameter file IEASYSnn. The parameter is in the following format:
CSA=(low,high)
where high defines the maximum amount of 'above the line CSA' (ECSA) this system can use. If you install Dimensions into LPA it requires at least 140 MB of storage above the line (ECSA). For more details about CSA, see the z/OS VIR3.0 MVS Initialization and Tuning Reference.
Micro Focus assumes that RACF is being used for security in the z/OS environment. Dimensions for z/OS may work with alternative security managers if they are fully compliant with IBM's SAF (Security Access Facility), and provide equivalent functionality when managing the USS environment.

Dimensions for z/OS Guide 23
Licensing Dimensions for z/OSDimensions for z/OS uses License Manager to manage licensing. License Manager uses a text data license file that includes the 'ZOS' designator. 'ZOS' controls how many LPARs (mainframe logical partitions) a Dimensions listener is allowed to be started on simultaneously. You can run as many Dimensions listeners as required on a single LPAR and only one license is consumed.
The Dimensions listener needs a proxy server for the License Manager. The proxy is a Dimensions server running on a distributed platform. The default port number is 671. You must change the default port number if your listener is running on another port.
When a mainframe listener starts it contacts a remote Dimensions listener. The remote listener checks out a license that has the 'ZOS' designator from License Manager.
For details about using License Manager, see the Administration Guide.
Preserving Existing InstallationsDimensions installations are performed in three phases:
1 Obtaining and unpacking the distribution.
2 Installing the code base.
3 Installing the instance.
The code base installation is different for each release of the product, and is never altered by the installation except by patches.
The instance installation creates a listener and a local metadata server. Instances use a specific code base, which you can alter after the instance is installed. You can have multiple instances for a specific code base to allow for test installations, multiple instances across a Sysplex, or for contingency reasons.
When you install Dimensions for z/OS, it installs the code base by default to a new set of data sets named MDH.V1460.*. This installation does not

24 Dimensions® CM
overwrite any previous installation. However, when you install an instance, it overwrites any previous instance of the same name.
To keep your configuration for previous instance installations:
1 Rename the data sets PARM and TEMPLATE.
2 Rename the PROCLIB member(s) used to start the instance.
3 On the USS side use the mv command to rename the USS instance directory to a saved or backup name.
4 Perform the new instance install.
5 Reconcile the variables that you customized in the old Dimensions configuration file with the new files.

Dimensions for z/OS Guide 25
Installation RoadmapThe following table lists all of the steps in the Dimensions for z/OS installation roadmap:
Step A Preparing the InstallationStep A-1 Unpacking and Moving the Distribution 26Step A-2 Expanding to Intermediate Format 29Step A-3 Constructing System Libraries 30Step B Setting up RACF/USS Security for a Dimensions for z/OS
Listener Overview of Security 32Step B-1 Setting Up RACF/USS Security 38Step C Setting up an Instance of Dimensions for z/OSOverview of Setup 41Step C-1 Customizing Variables in the Installation Template Job 43Step C-2 Running the Templated Installation Process 53Step C-3 Setting Up Instance Security 53Step C-4 Starting the Local Metadata Server 54Step C-5 Starting the z/OS Instance 54Step C-6 Setting Up Mainframe Network Nodes 55Step C-7 Verifying the Installation of the Instance 60Step D Installing the ISPF client for an InstanceStep D-1 Setting Up the ISPF Client for an Instance 62Step D-2 Verifying the ISPF Installation 65Optional Installation StepsInstalling the Watcher SVC Exit 66Customizing Variables in the Dimensions Configuration File 68Setting Up the Scripting Interface 76

26 Dimensions® CM
Step A Preparing the Installation
Step A-1 Unpacking and Moving the DistributionThis step describes how to obtain the Dimensions CM for z/OS distribution, unpack it to a directory on a Windows machine, and move it to your MVS system.
To unpack and move the distribution:
1 Obtain the Dimensions CM for z/OS distribution from the Support website.
2 On a Windows machine, unzip the file to a suitable directory and open the root folder that is created.
3 Double-click the installer file. The Dimensions CM for z/OS install wizard opens.
4 (Optional) Open the readme file.
5 Accept the License Agreement.
6 To specify the folder where the distribution will be unpacked on your machine, click Change, navigate to the folder, select it, and click OK.
7 Review the installation settings and click Install.
8 Click Finish.
9 Verify that the following files have been unpacked to your installation directory:
• Dimensions-<MDHnnnn>-DMnnnn-GA-XPACKGE-XMIT (or similar)
This is the distribution for Dimensions for z/OS where:
• <MDHnnnn> is the internal version number for the distribution.
NOTE The Dimensions CM for z/OS installer is separate from the Windows and UNIX installers.

Dimensions for z/OS Guide 27
• DMnnnn is the external version number of the Dimensions for z/OS release.
• Dimensions-<MDHnnnn>-DMnnnn-GA-MDHJSTRT.jcl (or similar)
This is a piece of JCL that you can use to move the distribution to an MVS system and expand the distribution to an intermediate format. This JCL includes a dummy step that can retrieve the main distribution. Edit the JCL and follow the instructions inside.
• readme_zos.html
This is the readme file for this distribution.
• sdk_ispf_client_help.zip
This is a Zip archive containing web-based help for the ISPF SDK. Extract the contents of the archive to any directory that you choose. After you have extracted the archive, to open the help double click index.html at the root of the folder ISPF Client SDK Help.
The next steps show you how to move the first two files to your MVS system.
10 On your Windows machine use the following FTP steps to move the JCL to your MVS system:
ftp <hostname><userid><password>asciicd 'userid.MISC.JCL'put Dimensions-<MDHnnnn>-DMnnnn-MDHJSTRT.jcl MDHJSTRTquit
where:

28 Dimensions® CM
• <hostname> is the DNS name of your MVS system or its numeric IP address.
• ascii specifies that the JCL will be translated from ASCII to EBCDIC.
• cd specifies an MVS data set, typically a PDSE, where the job stream will be placed.
11 On your Windows machine use the following FTP steps to move the distribution to your MVS system:
ftp <hostname><userid><password>binaryquote site blksize=3120 unit=sysdaquote site ucount=10 recfm=fb lrecl=80quote site cy prim=250 sec=250put Dimensions-<MDHnnnn>-DMnnnn-XPACKGE-XMIT
'<USERID>.DOWNLOAD.<MDHnnnn>.XMIT'quit
where <hostname> is the DNS name of your MVS system or its numeric IP address.
NOTE You can also use the following methods to move the distribution manually to MVS:
IND$FILE
The first step in MDHJSTRT.jcl. This step is inoperative unless you customize it. You need an FTP server holding your distribution for this step to work.

Dimensions for z/OS Guide 29
Step A-2 Expanding to Intermediate FormatThis step describes how to expand the distribution to intermediate format. This step is performed by MDHJSTRT.jcl (which you transferred in step A-1 from Windows).
To expand to intermediate format:
1 You need a user ID to hold the distribution. The default is DMSYS (the Dimensions administration user ID). This user ID needs to be an HLQ for the jobs to run unaltered. However, any user ID can be used, provided it has the required authorities.
You may need to create an alias from the master catalog to a user catalog for any HLQs you are going to use. You will require authority to the master catalog. This activity may have to be performed by a separate group, for example, DASD administration.
2 Tailor the job MDHJSTRT before running it. For details see the instructions in the job.
3 Submit the job and check that all steps have executed as expected. The job assumes standard catalogue mechanisms work.
After this process completes successfully you will have two data sets on the MVS file system called:
<HLQ>.DOWNLOAD.A
<HLQ>.MDHnnnn.F1.SAMPLES
Only the MDHJUPNS job in the library <HLQ>.MDHnnnn.F1.SAMPLES is required (see the next step).
NOTE Step 301 may return 8, however this is not an error.

30 Dimensions® CM
Step A-3 Constructing System LibrariesThis step describes how to construct the system libraries that are required to run Dimensions for z/OS.
To construct system libraries:
1 Edit the data set <HLQ>.MDHnnnn.F1.SAMPLES and modify the member called MDHJUPNS. Instructions about modifying this job are contained inside it.
2 Run the job MDHJUPNS, check the output, and correct as required. Repeat until the installation is correct.
When you have finished there will be a set of data sets called MDH.V1460.** (or similar) on your system (see the manifest list below). These data sets contain everything you require to set up multiple Dimensions instances. You will need to copy some members and modify them but you should leave the contents of MDH.V1460.** unchanged.
Manifest Listing of Data Sets
After the job MDHJUPNS has run the following data sets will be on your system:
Main distribution
MDH.V1460.MDHCLIB
MDH.V1460.MDHCNTL
MDH.V1460.MDHLLIB
MDH.V1460.MDHLLPA
MDH.V1460.MDHMENU
MDH.V1460.MDHPARM
MDH.V1460.MDHPENU
NOTE
Newer releases have a different middle-level qualifier to allow you to load different versions of Dimensions simultaneously.
Step UPNS40x may return 8, however this is not an error.

Dimensions for z/OS Guide 31
MDH.V1460.MDHRLIB
MDH.V1460.MDHSAMP
MDH.V1460.MDHTAR
MDH.V1460.MDHTPLT
MDH.V1460.SMDHSID
Supplementary materials
MDH.V1460.SUPP.ADVENT.C
MDH.V1460.SUPP.ADVENT.CLIST
MDH.V1460.SUPP.ADVENT.CNTL
MDH.V1460.SUPP.ADVENT.CONTROL
MDH.V1460.SUPP.ADVENT.H
MDH.V1460.SUPP.ADVENT.SYSLIN
MDH.V1460.SUPP.ADVENT.TGT
MDH.V1460.SUPP.ADVENT.XML
MDH.V1460.SUPP.DISASS.ASM
MDH.V1460.SUPP.DISASS.CNTL
MDH.V1460.SUPP.DISASS.SYSLIN
MDH.V1460.SUPP.DISASS.TGT
MDH.V1460.SUPP.EXAMPLES.BAT
MDH.V1460.SUPP.EXAMPLES.CNTL
MDH.V1460.SUPP.SDK.C
MDH.V1460.SUPP.SDK.CNTL
MDH.V1460.SUPP.SDK.H
MDH.V1460.SUPP.SDK.ISPMLIB
MDH.V1460.SUPP.SDK.ISPPLIB
MDH.V1460.SUPP.SDK.LINK

32 Dimensions® CM
Step B Setting Up Security for a Dimensions for z/OS Listener
This section describes how to set up RACF/USS security for your Dimensions for z/OS listener.
Overview of SecurityThe Dimensions listener is a complex set of programs that run as an MVS started task, but under that started task run as a series of dubbed USS address spaces. The security environment is also complex. Incoming requests for services from network users cause the initiation of library server components (MDHLLBSV) that run as the individual user. The parent tasks MDHLLSNR and MDHLPOOL run as a specific authorized user ID with UID=0. This is the Dimensions execution user ID, which by default is DMSYS. The Dimensions Execution user ID has the authority to change the user ID to a user’s own user ID when starting a library server for a specific user.
A library server is also started when using USS to hold product item libraries. This library server executes as the Dimensions Execution user ID. However, when defining a new item library, the user DMSYS is used by default to create the item library container.
The instructions provided for this installation are for RACF. If you are using alternate products consult the documentation or the vendor for details on how to establish a security environment equivalent to the RACF environment recommended by Micro Focus.
There are several possible scenarios that you can use to run Dimensions. These are discussed in the relevant IBM publications described below:

Dimensions for z/OS Guide 33
Topic Document Section
Introduction z/OS UNIX System Services Planning, GA22-7800-05 18.3
An unsatisfactory security environment
z/OS UNIX System Services Planning, GA22-7800-05Note:If the BPX.SERVER (or BPX.DAEMON) FACILITY class is not defined, your system has UNIX-level security and the system is less secure. This level of security is for installations where super user authority has been granted to system programmers. These individuals already have permission to access critical MVS data sets such as PARMLIB, PROCLIB, and LINKLIB. These system programmers have total authority over a system. Server programs that run with super user authority can issue a pthread_security_np() service to change the MVS identity of a thread. To establish UNIX-level security assign a UID of 0 to the superuser, and assign a UID of 0 to the user ID used for running server programs, for example, DATASRVR. Do not define FACILITY BPX.DAEMON or BPX.SERVER.
18.3.1
Recommended security environment
z/OS UNIX System Services Planning, GA22-7800-05Notes:If BPX.SERVER (or BPX.DAEMON) FACILITY class is defined, your system has z/OS UNIX-level security and the system is more secure than a traditional UNIX system. This level of security is for customers with very strict security requirements who need super users to maintain the file system but do not want these users to have the authority to change their identities to access existing MVS resources. To do this, follow the additional steps described in Defining servers to use thread-level security in topic 18.4.
18.3.4
Example z/OS UNIX System Services Planning, GA22-7800-05 18.4.1
NOTE IBM document details such as document name and section number may vary between z/OS releases.

34 Dimensions® CM
Environment Checks
When Dimensions for z/OS components (the listener or pool) start they perform the following system configuration checks on the environment:
Check access to specified RACF resources that you can configure in the MDHTDCFG member for the instance.
Check program control status that is performed by querying a specific offset in a specific control block in the operating system.
Check appropriate levels of access to all levels of the path that is configured for your instance.
Check that the USS time, adjust by the DMMVSTZ variable in the Dimensions configuration file, is consistent with the MVS time.
Check that there is sufficient region for the process to run in normal operation.
These checks provide a fast way of determining if a change to your environment has disabled your listener, and also help to create a proper security environment. Micro Focus recommends leaving these checks on.
The following variables control these environment checks:
DM_MVS_START_CHK_RACF
DM_MVS_START_CHK_DIRTY
DM_MVS_START_CHK_PATH
NOTE
Some of the scenarios described above are less secure than others but may be applicable to your organization. Micro Focus only tests with the recommended scenario, other security arrangements are at the customer's discretion and risk.
The Dimensions execution user ID that is used when the started task for an instance is initiated is specified by the use of a resource in the RACF class STARTED. Specifically, you need to execute the following command to define the relationship between the instance proc and the user ID:
RDEF STARTED intance.instance STDATA(USER(execution userid))

Dimensions for z/OS Guide 35
DM_MVS_START_CHK_CONSOLE
DM_MVS_START_CHK_LOG
DM_MVS_START_ABEND_DIRTY
DM_MAX_LOCAL_TIME_DIFFERENTIAL
DM_MVS_START_QUIET
For details about setting these variables, see page 68.
Program Controlled Libraries
The list of libraries that needs to be program controlled depends on:
The z/OS level.
The maintenance applied to the Language Environment and other libraries.
The Dimensions release.
The naming conventions applied by the system programmers who have installed your z/OS system.
Different libraries are required and will change in the future therefore IBM has amended RACF to issue a more meaningful message to indicate which library was contaminating a clean environment.
Examine the following data set names when you are checking for Program Control (the names may not be the same on all sites):
Library Description
MDH.V1460.MDHLLIB Main programs for Dimensions
MDH.V1460.MDHLLPA DLLs for Dimensions
CEE.SCEERUN Language Environment runtime library
CEE.SCEERUN2 Language Environment runtime library
CBC.SCLBDLL Code required to support the template library classes
CBC.SCLBDLL2 Code required to support the template library classes

36 Dimensions® CM
Detailed Environment Checking
Micro Focus provides a utility, MDHLCKSM, that checks that your security environment is correct and helps you to locate and fix environmental problems. Install MDHLCKSM in the same libraries as the product. MDHLCKSM will try to switch users and should fail in the same way but with more control.
Submit the following JCL in a security environment that starts the job as USER-A and tries to switch to USER-B (your RACF administrator may need to give your user ID access to the profile USER-A.SUBMIT in class SURROGAT or equivalent if you cannot log in as USER-A):
//jobname JOB 'TEST ENVIRONMNT',MSGCLASS=X,REGION=0M,// USER=USER-A//*//MDHLCKSM EXEC PGM=MDHLCKSM,REGION=64M,// PARM='POSIX(ON)/debugsetup'//STEPLIB DD DISP=SHR,DSN=MDH.V1460.MDHLLIB// DD DISP=SHR,DSN=MDH.V1460.MDHLLPA//SYSIN DD DUMMY//SYSPRINT DD SYSOUT=*//INPUT DD DATA,DLM=ZZ# log to console by uncommenting the line below#CONSOLE## 1 - user ID to switch to#========================## (leave a blank line to not switch at all)#user-b## 2 - passwd for above user#=========================## (leave a blank line to not switch at all)#passwrd### 3 - USS test file#=========================## code this to test file creation# access from child# (leave a blank line to not test)#/tmp/a.txt#

Dimensions for z/OS Guide 37
# 4 - MVS test file, as above.#=========================### code this to test file creation# access from child# (leave a blank line to not test)#foo.bar.file## 5 - exec test program to execcute#=========================## use /path/to/uss/program## This should be pointing at the# symlink to the dmchksum program:## /<dimension-home>/prog/dmchksum## (leave a blank line to not test)# ## 6 - racf facility checks#=========================##<-----> 8 bytes RACF Class name# <-----------------------------> resource nameFACILITYBPX.DAEMONFACILITYBPX.SUPERUSERFACILITYBPX.FILEATTR.PROGCTLZZ//*

38 Dimensions® CM
Step B-1 Setting Up RACF/USS SecurityThis step describes how to setup RACF/USS security and to make the programs in the following libraries program controlled:
MDH.V1460.MDHLLPA
MDH.V1460.MDHLLIB
To setup RACF/USS security:
1 If your system does not have the class PROGRAM activated you may need to activate it using the following TSO command:
SETR CLASSACT(PROGRAM)
2 Add the program control profile using the following TSO commands:
RDEF/RALT PROGRAM * ADDMEM('MDH.V1460.MDHLLPA'/*/NOPADCHK) UACC(READ)
RDEF/RALT PROGRAM * ADDMEM('MDH.V1460.MDHLLIB'/*/NOPADCHK) UACC(READ)
where the asterisk before NOPADCHK is used for SMS controlled catalogued data sets. Use a VOLSER if the libraries are not under SMS control.
Use RALT to add more libraries to the '*' profile.
Use RADD to add the '*' profile.
3 Use the TSO ISRFIND command to locate the following DLLs:
COLLCOMPLEXIOCIOSTREAM
To make all of these DLLs program controlled use the following TSO command:
RALT PROGRAM * ADDMEM('<dataset to contain program-controlled members>'/*/NOPADCHK)

Dimensions for z/OS Guide 39
An alternate method is to add each DLL separately using the RDEF command and to specify UACC(READ):
RDEF PROGRAM <program> ADDMEM('SYS.SCLBDLL'/*/NOPADCHK) UACC(READ)
where <program> is COLL, COMPLEX, IOC, or, IOSTREAM
4 Refresh the RACF profiles using the following TSO command:
SETR WHEN(PROGRAM) REFRESH
5 If you want programs such as MDFLISPF loaded as READONLY, issue the following console command to authorize the data sets MDH.V1460.MDHLLIB and MDH.V1460.MDHLLPA:
setprog apf,add,dsn=MDH.V1460.MDHLLIB,SMSsetprog apf,add,dsn=MDH.V1460.MDHLLPA,SMS
where * is any SMS controlled catalogued data set of the specified user. Use a VOLSER if the libraries are not under SMS control.
NOTE These DLLs are shipped by IBM and might be in CBC.SCLBDLL or CBC.SCLBDLL2, though the location may be different on your system.
NOTE Program control is described in the z/OS UNIX System Service Bookshelf, in particular in the z/OS Security Server RACF Security Administrator's Guide.
NOTE
This configuration change will not survive an IPL and should be made permanent by the system programmer. You may use an automation tool to issue the required MVS commands after the IPL has nearly completed.
If you are going to run Dimensions Build using the SBEM (Secondary Build Execution Monitor) you need to perform this step so that the SBEM can execute authorized programs such as TSO.

40 Dimensions® CM
The Relationship between the SBEM and MDHLCOMP
If you have authorized the library MDH.V1460.MDHLLPA or loaded the contents of MDHLLPA into ELPA, you need to either authorize the library MDH.V1460.MDHLLIB, or the programs MDHLLSBEM and MDHLCOMP both need to be relinked AC(0). If you do not do this, the SBEM, which is part of Dimensions Build, will fail with a message saying that MDHLCOMP cannot be loaded. Micro Focus recommends authorizing MDH.V1460.MDHLLIB. This will enable the SBEM to run authorized programs, although you can control which users can do this via a separate RACF resource in the class FACILITY. For details about the Dimensions Build utilities including the SBEM and its security environment, see appendices C and D in the Dimensions Build online help.

Dimensions for z/OS Guide 41
Step C Setting Up an Instance of Dimensions for z/OS
Overview of SetupAn instance of Dimensions for z/OS is a listener running on a specific port with a Dimensions configuration file MDH.iiii.MDHPARM(MDHTDCFG), a collection of support data for the ISPF client, the batch client, and possibly a local metadata server. You can define multiple instances, for example:
To run test instances next to a production instance.
In an environment where multiple LPARs are using Dimensions.
At any time on a specific LPAR there may be a principal instance. The principal instance differs from other instances in that its DLLs and other heavily used modules are typically taken from the ELPA (Extended Link Pack Area). This method significantly improves Dimensions performance as the clients share code with each other, and with the listeners and batch components. Shared memory is counted as system overhead not as user code. Secondary instances using the same code base can also use ELPA.
Dimensions runs mainly in the MVS native file system.
Templated Installation
The templated installation is a method for using a template to set up an instance of Dimensions for z/OS. The template is a file containing variables that you can configure. When you run the template it is processed by the templating engine and produces instance data sets containing all the information that is required to successfully run an instance of Dimensions for z/OS. The instance includes a library of templates.
T
NOTE The userid used to run a templated install must have UID(0).
IMPORTANT! A templated instance installation is the only supported method of installing a listener instance.

42 Dimensions® CM
There are three types of variables that you can configure in the template:
Global variables
Global variables specify parameters such as the Dimensions version number and the high, intermediate, and low level qualifiers used to install the code.
Instance variables
Instance variables specify parameters such as the port number, instance name, SVC number, and the PROC for starting the Dimensions listener.
Metadata variables and local controls
Dimensions uses local metadata to support local operations such as auditing and build areas. Metadata is information about the objects in the local file systems that relates to a single Dimensions server. For more details see Appendix D, "Setting Up Dimensions Metadata" on page 219.
The templated installation can optionally create your metadata data set. You also have the option to manage local metadata via a local metadata server, which can be created by the templated installation.
The next step explains how to configure the variables.
CAUTION! If you re-run the templated installation all the custom settings that you have made since the last installation will be lost.
NOTE The templated installation assumes that the code is located in MDH.V1460.**. If you have relocated or renamed the location of the release you must rename it in the following variables in the template job:
DMCDHLQ
DMCDILQ

Dimensions for z/OS Guide 43
Step C-1 Customizing Variables in theInstallation Template JobThis step describes how to configure the global, instance, and metadata variables in the installation template job.
To customize variables in the installation template job:
1 Copy the JCL from MDH.V1460.MDHCNTL(MDHJINTT) to a private or temporary data set.
2 Open the JCL for editing.
3 Use the guidelines in the table below to customize the variables:
Variable name Details
DMINHLQ Type: Global
Default: MDH
Description: Specifies the high level qualifier of the parameter files for this instance. This qualifier does not have to be the same as the code base HLQ specified in the variable DMCDHLQ.
DMVER Type: Global
Default: 1452
Description: Specifies the version number of the Dimensions release. Do not change this value.
DMCDHLQ Type: Global
Default: MDH
Description: Specifies the high level qualifier where the code is installed.
DMCDILQ Type: Global
Default: V%DMVER
Description: Specifies the intermediate and low level qualifiers where the code is installed (from the end of the HLQ to the last qualifier). For example:
<DMCDHLQ>.<DMCDILQ>.MDHLLIB<DMCDHLQ>.<DMCDILQ>.MDHLLPA
(Sheet 1 of 8)

44 Dimensions® CM
Note: In the templated installation the variables DMVER, DMCDHLQ, and DMCDILQ are each defined twice. Their definitions must match functionally. The syntax used for these definitions differs as the interpreting tools are different (JES, templater, etc.).
DMCDLPA Type: Global
Values YES or NO
Default: NO
Description: Set this variable to YES if the modules in MDHLLPA are installed into ELPA prior to any instance starting. This process improves performance, reduces session starting times, and dramatically reduces the memory usage of Dimensions.For a principal instance, you must add the contents of MDH.V1460.MDHLLPA to ELPA. In MDH.V1460.MDHCNTL(MDHJALPA) there is a sample job that performs this function. You need to perform this job, or an equivalent, on every IPL. However, it is not possible to define the MDH.V1460.MDHLLPA library as part of the ELPA concatenation as the library is a PDSE, and PDSE functionality is not available when the system starts up. Therefore, add this command to the startup scripts after the main MVS facilities have started.If you are installing Dimensions for demonstration purposes do not add the DLLs to the LPA and use DMCDLPA=NO.Micro Focus recommends that you have a comprehensive understanding of the mechanisms that MVS uses to locate programs or load modules. For details see the IBM z/OS V1R3.0 Assembler Services Guide, section 4.6.1.1.3.
DMINPORT Type: Instance
Default: 671
Description: Specifies the port number this instance will listen on. Must be unique to this instance of Dimensions.
Variable name Details
(Sheet 2 of 8)

Dimensions for z/OS Guide 45
DMINST Type: Instance
Default: MDHPROD
Description: Specifies the instance name and is used for:
The name the operator uses to start and stop the instance.
Part of the name for the configuration data set.
The last part of the path on USS for the installation.
Must be all upper case on MVS and lowercase on USS.
DMINILQ Type: Instance
Default: %DMINST.
Description: Specifies the rest of the qualifiers used to prefix for the instance. The instance name is used by default.
DMINPATH Type: Instance
Default: /microfocus/dimensions
Description: Specifies the first portion of the path used for the USS side of the instance. The rest of the path is constructed from the instance name. In a sysplex this path, or at least the path used for DM_TEMP. should be on a shared HFS structure available across all members.The path %DMINPATH./%DMINST. is the location on the USS file system where the instance USS files are placed. This directory may not be a mount point. You can make %DMINPATH a mount point but using the instance path as a mount point will cause MDHJINTT to fail.
DMINSVCNO Type: Instance
Default: 244
Description: Specifies an SVC number. An SVC is required if you are installing ChangeMan Builder.
Variable name Details
(Sheet 3 of 8)
46 Dimensions® CM
DMOMHLQ Type: Instance
Default: OOM.V1010
Description: Specifies the qualifier where ChangeMan Builder for z/OS is installed.
DMOMSRV Type: Instance
Default: http://<URL of knowledge base server>:58080
Description: Specifies the URL of the ChangeMan Builder knowledge base server.Note: this control is deprecated in Dimensions 12.x.
DMINCPSERVER Type: Instance
Default: 819
Description: Specifies special character mapping for various codesets. You do not usually need to modify this variable.
DMINCPMAINFRAME Type: Instance
Default: 1047
Description: Specifies special character mapping for various codesets. You do not usually need to modify this variable unless your mainframe is in a non-US locale, for example, France or Germany.
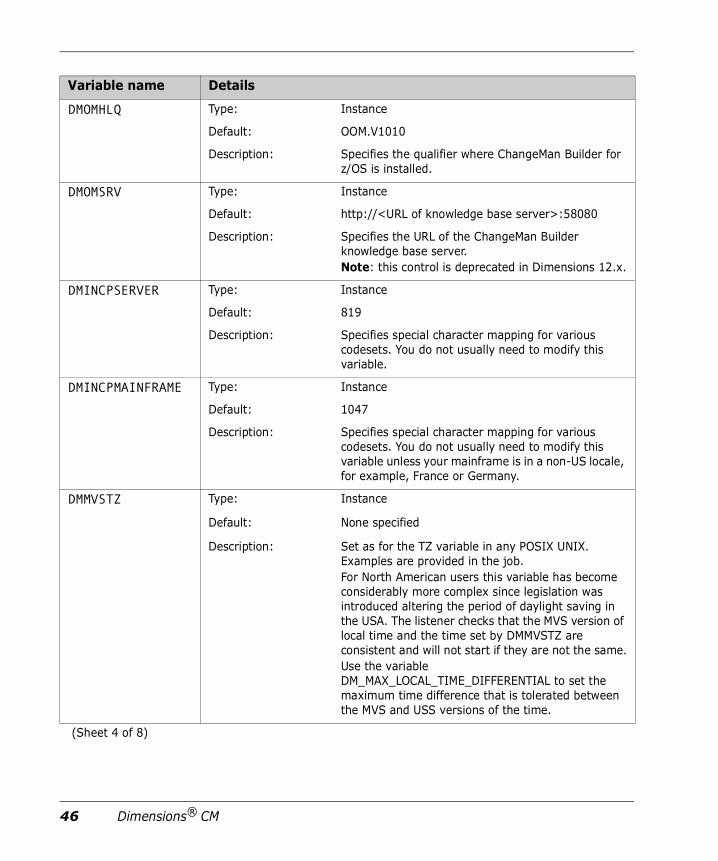
DMMVSTZ Type: Instance
Default: None specified
Description: Set as for the TZ variable in any POSIX UNIX. Examples are provided in the job.For North American users this variable has become considerably more complex since legislation was introduced altering the period of daylight saving in the USA. The listener checks that the MVS version of local time and the time set by DMMVSTZ are consistent and will not start if they are not the same.Use the variable DM_MAX_LOCAL_TIME_DIFFERENTIAL to set the maximum time difference that is tolerated between the MVS and USS versions of the time.
Variable name Details
(Sheet 4 of 8)

Dimensions for z/OS Guide 47
DMINLCSRV Type: Instance
Default: <DNS name of dimensions server>:671
Description: Specifies the DNS name and port number of your distributed Dimensions server. You can use an IP address if DNS services are not available. This server will proxy license requests.
DM_MAX_LOCAL_TIME_DIFFERENTIAL
Type: Instance
Default: 2 seconds
Description: When starting an MVS Dimensions listener, this variable specifies the maximum time difference (in seconds) that is tolerated between the MVS and USS versions of the time. These values can differ in the following situations:
TZ is mis-configured for daylight saving. The difference is typically about 3600 secs.
A manual process in some hardware configurations when setting the MVS time. The difference is typically a few seconds.
NOTES
If the actual time difference exceeds the permitted time difference, the listener will not start without manual intervention. This is important if an error in the configuration means a mismatch has occurred over daylight saving changes, or if an operator has repeated an IPL on a partition and misread the time.
Modest differences in the times can result in processing errors. For example, the date and time is used when performing 'need to recompile' checks and the system might decide that an item does not need to be recompiled.
Adjusting the acceptable tolerance is accompanied by a certain degree of risk. You need to trade off the cost of getting the system date/times adjusted to accord more exactly with each other against the risks of introducing a problem.
Variable name Details
(Sheet 5 of 8)
48 Dimensions® CM
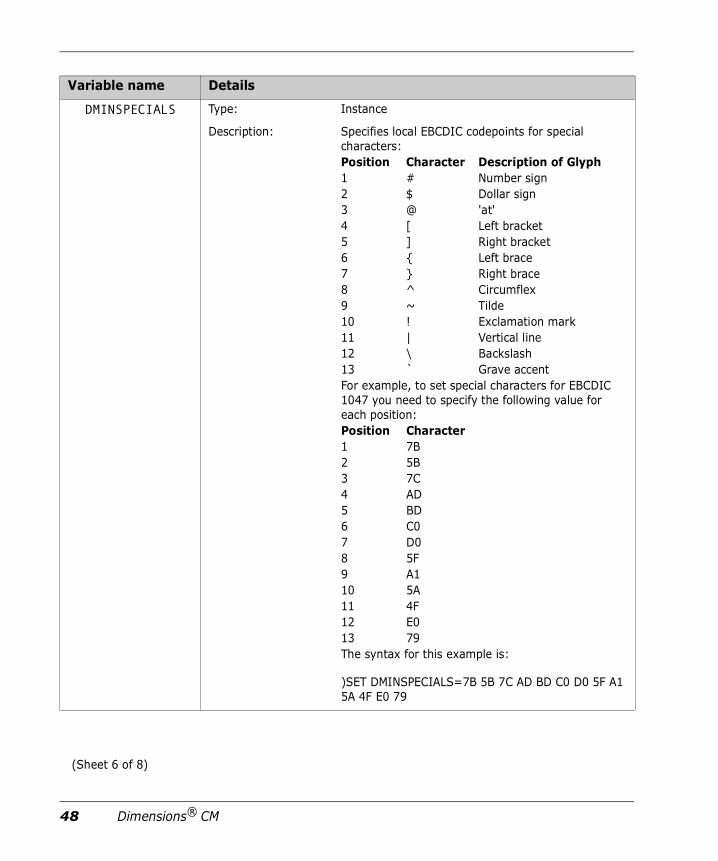
DMINSPECIALS Type: Instance
Description: Specifies local EBCDIC codepoints for special characters:Position Character Description of Glyph1 # Number sign2 $ Dollar sign3 @ 'at'4 [ Left bracket5 ] Right bracket6 { Left brace 7 } Right brace 8 ^ Circumflex 9 ~ Tilde 10 ! Exclamation mark 11 | Vertical line 12 \ Backslash 13 ` Grave accent For example, to set special characters for EBCDIC 1047 you need to specify the following value for each position:Position Character1 7B2 5B3 7C4 AD5 BD6 C07 D08 5F9 A110 5A11 4F12 E013 79The syntax for this example is:
)SET DMINSPECIALS=7B 5B 7C AD BD C0 D0 5F A1 5A 4F E0 79
Variable name Details
(Sheet 6 of 8)

Dimensions for z/OS Guide 49
DMLOCSRVPORT Type: Metadata
Values: Port number (integer)
Default: 4524
Description: Specifies the port that the local metadata server uses.
DMLOCSRVHOST Type: Metadata
Values: IP address (IPv4) or DNS name.
Default: localhost
Description: Specifies the name of the LPAR where the local metadata server is running.Note: Do not leave this as localhost if your installation runs a sysplex as jobs might start as any member of the sysplex.
DMPRCLIB Type: Instance
Default: USER.PROCLIB
Description: Specifies where a PROC for starting the Dimensions listener is installed.Note: You organization may have installation standards about where procedures for started tasks go on your system. If you do not have authority to update these procedures, you need to direct this part of the installation to a private library.
DMMTMAK Type: Metadata
Values: YES or NO
Default: NO
Description: Specifies if the metadata container is to be rebuilt. There are two ways that you can define metadata:
Separate local metadata for each instance.
A global local metadata file for the whole installation.
If you set DMMTMAK to YES the existing metadata container defined by DMMTDSN is deleted and rebuilt. If you set DMMTMAK to NO the container for local metadata is not rebuilt.
Variable name Details
(Sheet 7 of 8)

50 Dimensions® CM
DMMTGLOB Type: Metadata
Values: YES or NO
Default: NO
Description: Specifies if global local metadata will be used.Notes:
The values of the variables DMMTDSN, DMMTMAJ, and DMMTMIN are automatically set according to the value that you specify for DMMTGLOB. However you can modify these variables if required.
An instance metadata data set is appropriate for test or demonstration environments.
Global metadata is appropriate where you are setting up your production z/OS listener.
DMMVSP Type: Metadata
Values: Name of PROC for local metadata server.
Default: MDHDnnnn where nnnn is the LMDS port.
Description: This value names the PROC used to start and stop the local metadata server. For details see "The Local Metadata Server" on page 223.
Variable name Details
(Sheet 8 of 8)

Dimensions for z/OS Guide 51
Matching Global Variables
The following variables in the JCL and SYSIN template must match:
//SETS SET DMVER and )SET DMVER
//SETS SET DMCDHLQ and )SET DMCDHLQ
//SETS SET DMCDILQ and )SET DMCDILQ
//SETS SET DMINHLQ and )SET MDH
The example below illustrates the locations in the template of the variables that must match:

52 Dimensions® CM

Dimensions for z/OS Guide 53
Step C-2 Running the Templated Installation ProcessRun the template job MDHJINTT from your private or temporary data set and check the return codes. The code 0 implies that the template ran successfully and the instance was installed.
Step C-3 Setting Up Instance SecurityThis step describes how to setup security for your installation of Dimensions for z/OS.
To set up security:
1 Check that there is a FACILITY BPX.DAEMON object in your RACF database. The listener Dimensions execution user ID must be authorized (READ) to this profile.
2 The started task for the listener needs to have the current Dimensions execution user ID assigned by the operating system when the task is started. There are standard mechanisms to do this with MVS, the easiest being to use a resource that identifies the PROC in the class STARTED. To use this mechanism issue the following command:
RDEF STARTED procname.procname STDATA(USER(userid) TRUSTED(NO))
where:
• procname is the name of the Dimensions instance you are starting.
• userid is the Dimensions system USERID.
3 Issue the following command:
SETR REFRESH RACLIST(STARTED)

54 Dimensions® CM
Step C-4 Starting the Local Metadata ServerTo start a Dimensions metadata server:
S <metadata server name>
Step C-5 Starting the z/OS InstanceTo start a Dimensions instance issue the following command at a console:
S <instance procname>
On startup messages are issued to the job log of the starting process. Other messages are issued to SYSLOG for the sub-tasks. These messages do not appear in any job log and might not appear if you have suppressed ROUTCDE 11 messages to SYSLOG. Inspect these messages carefully on the first start up as they indicate where problems have been encountered. Typical problems include:
Not connecting to a Dimensions server to get a license.
Security problems with the program controlled environment.
Security problems on the USS side. You can control routing codes for messages in the MDHTDCFG member of the instance. You can also have the listener only report error conditions at start up, which considerably reduces the volume of console messages.

Dimensions for z/OS Guide 55
Step C-6 Setting Up Mainframe Network NodesThis step describes how to use the Dimensions Administration Console to create the following network node definitions for a z/OS mainframe:
A physical network node for the USS side of your z/OS mainframe where the Dimensions listener resides (see below).
A logical network node and connection for the USS file system (see page 57).
A logical network node and connection for the MVS file system (see page 59).
To setup a physical z/OS mainframe network node:
1 In the Dimensions Administration Console, under Distributed Development, click Network Administration. In the Network Administration window click the Network Nodes tab.
2 Click New and select Physical Network Node.
3 In the New Physical Node dialog box do the following:
• For Physical Node Name type the physical name of yourz/OS mainframe machine.
• From the Operating System list select UNIX.
• From the Contact list optionally select a contact name.
• For Description optionally enter a description of this node, for example, USS physical node for <machine name>.
4 Click OK. The new physical network node appears in the list of nodes in the navigation area.
NOTE You can also use dmcli, the Dimensions CM command-line client, to setup network nodes. For details see the Network Administration section of the Administration Guide.

56 Dimensions® CM
5 To assign a network object to the physical node, in the navigation area click the physical network node you have just created. In the content area, in the Network Object section, click Add New Object.
The Assign Node Object dialog box appears.
6 From the Network Object Name list do one of the following:
• Select an existing network object. The other fields in the dialog box are automatically populated.
• To define a new object, in the Network Object Name field type a name or port number. This object can be a named port such as pcms_sdp, or a port number such as 671. Do the following:
• For Description optionally type a description of the network object.
• For Process optionally type the network object process name.
• From the Protocol list select a network protocol.
7 Click OK to assign the network object to the node.

Dimensions for z/OS Guide 57
To setup a logical z/OS mainframe network node and connection for the USS file system:
1 In the Dimensions Administration Console, in the Network Administration window, click the Network Nodes tab.
2 Click New and select Logical Network Node.
3 In the New Logical Node dialog box do the following:
• For Logical Node Name type a unique name for this logical node.
• From the Physical Node list select the physical mainframe node that you defined previously.
• For Description optionally enter a description of this node, for example, USS logical node for <machine name>.
4 Click OK. The new logical network node appears in the list of nodes in the navigation area.
5 Click the Node Connections tab and click New. The Register Client Server Connection dialog box appears.
After
NOTE The diagram below illustrates a correctly configured node connection between a server and a logical USS node with a listener running on port 671.

58 Dimensions® CM
6 From the Client Node list select the client node that requires access to the server node.
7 From the Server Node list select the physical mainframe node that you defined previously.
8 From the Server Logical Node list select the USS logical node that you defined above in step 3.
9 From the Protocol list select a network protocol.
10 From the Network Object list select the network port that the mainframe is listening on.
11 From the File System list select OS.
12 From the Code Set list select the code set your mainframe uses to encode characters. If you are not sure which code set to use, consult your systems administrator.
13 Click OK. The node connection for the USS file system is added to the list of connections in the navigation area.

Dimensions for z/OS Guide 59
To setup a logical z/OS mainframe network node and connection for the MVS file system:
1 In the Dimensions Administration Console, in the Network Administration window, click the Network Nodes tab.
2 Click New and select Logical Network Node.
3 In the New Logical Node dialog box do the following:
• For Logical Node Name type a unique name for this logical node.
• From the Physical Node list select the physical mainframe node that you defined previously.
• For Description optionally enter a description of this node, for example, MVS logical node for <machine name>.
4 Click OK. The new logical network node appears in the list of nodes in the navigation area.
5 Click the Node Connections tab and click New. The Register Client Server Connection dialog box appears
After
NOTE The diagram below illustrates a correctly configured node connection between a server and a logical MVS node with a listener running on port 1010.

60 Dimensions® CM
6 From the Client Node list select the client node that requires access to the server node.
7 From the Server Node list select the physical mainframe node that you defined previously.
8 From the Server Logical Node list select the MVS logical node that you defined above in step 3.
9 From the Protocol list select a network protocol.
10 From the Network Object list select the network port that the mainframe is listening on.
11 From the File System list select MVS.
12 From the Code Set list select the code set your mainframe uses to encode characters. If you are not sure which code set to use, consult your systems administrator.
13 Click OK. The node connection for the MVS file system is added to the list of connections in the navigation area.
Step C-7 Verifying the Installation of the InstanceThe procedures below describe how to verify the installation of your Dimensions instance.
To verify the installation of the instance:
1 Start the instance as described in "Operating a Dimensions Instance" on page 97.
2 If you need to receive system messages start the syslog daemon. For details see page 231.
3 Follow the other procedures below to verify that the Dimensions for z/OS listener can communicate correctly with a Dimensions server.
To log in to an MVS node from desktop client:
1 On a Windows machine log in to Dimensions via the desktop client.
2 From the File menu choose Remote Node Log In. The Remote Node Log In dialog box appears.

Dimensions for z/OS Guide 61
3 From Physical Node list choose an MVS logical node or click Add and type the name of an MVS node.
4 For User ID type a user ID for an MVS node.
5 For Password type the password for the user ID.
6 Click Login. If you used an invalid user ID and password combination the following message is displayed in the Console window:
Error: User authentication failed
To fetch data from an MVS node to a Dimensions project:
1 On a Windows machine log in to Dimensions via the desktop client.
2 From the File menu choose New and select Item. The New Item dialog box appears.
3 Select Create Item using specified workfile/folder and type <MVS logical node name>::dataset(new)
4 From the Item Type list select SRC.
5 From the Item list choose TEXT.
6 Click the Advanced tab.
7 In the Filename field change the filename of the item to a Windows style format.
8 Click Create. An MVS style item should be created in Dimensions, which you can then browse in desktop client.
NOTE If you execute an AUTH command against a physical node name, you are connected on the same port that the server is using. If you have another listener instance running on MVS on that port, you may get a false positive. Therefore, always use logical node names for authentication.

62 Dimensions® CM
Step D Installing the ISPF Client for an Instance
Step D-1 Setting Up the ISPF Client for an InstanceThis step describes how to set up your Dimensions for z/OS client as part of your ISPF environment.
The ISPF client enables you to access Dimensions from the TSO/ISPF environment. You can install the ISPF client for each instance of Dimensions. When the ISPF client is running it uses a specific instance of Dimensions. You can manage which instance to use from the invocation of the client.
The ISPF client normally runs POSIX(OFF) and this enables you to open multiple ISPF client screens simultaneously.
The ISPF client is closely tied to the related Dimensions listener instance and has the following characteristics:
Shares DLLs with the Dimensions listener and accesses the MDHTDCFG member for symbols defined as part of instance configuration.
Has the same environment structure defined by MDH.iiii.MDHPARM(MDHTDIMV).
Shares the file MDH.iiii.MDHPARM(MDHTSVCE).
To run the ISPF client you need to establish load libraries from which to load the programs. You cannot use LIBDEF but must do one of the following:
Include the MDHLLIB and MDHLLPA libraries in the linklist.
Modify the TSO LOGON proc to allocate the load libraries via STEPLIB.
Use the supplied ISPF CLIST to start ISPF:
ex 'MDH.iiii.PARM(MDHCISPF)'

Dimensions for z/OS Guide 63
In the example above, the script 'MDH.iiii.MDHPARM(MDHCISPF)' executes after the allocations are made by ISPFPROC. If this method is not supported by your environment, exit from ISPF and run the allocation CLIST/REXX at the TSO READY prompt. However, in such an environment you should use the static allocation method.
After you have started ISPF you can add a selection that invokes the ISPF client. You can do this in a number of ways and an example is provided in the CLIST MDFCSDIM. A tailored revision of this CLIST is constructed by the templated install and is placed into:
MDH.iiii.PARM(MDHCSDIM)
To use this CLIST from a panel copy it to an ISPF common library. Alternatively, panels can invoke it by naming its full name in the PARM library.
To support multiple instances running on a simple code base you will need to customize MDH.iiii.PARM(MDHCSDIM).
NOTE
If the MDHLLPA library is in the LPA it is automatically available to all programs for loading modules. You should omit it from the linklist or the logon proc.
MVS system programmers can perform these tasks differently in accordance with accepted installation standards.

64 Dimensions® CM
Linking to the Client from a Panel
If you have a suitable execution environment (your DLLs are not loaded into ELPA and you have added your MDHLLPA library for the code base to the search order for this TSO session), you can embed the following code example into an existing or new ISPF selection menu:
In the )BODY section of the panel add the following:
%opt - Start Dimensions ISPF Client
In the )PROC section of the panel, in the &ZSEL=TRANS(TRUNC(&ZCMD,'.') statement, add the following:
opt,'CMD(EX ''insthlq.instilq.PARM(MDHCSDIM)'' + ''POSIX(OFF)'')'
and replace insthlq and instilq with the appropriate values from your instance installation.
ISPF Tables Services
In the ISPF panels, Dimensions uses ISPF table services to save log in information. For ISPF table services to work properly you must allocate a table data set (PDSE, FB=80) to DD ISPTABL and ISPTLIB. This allocation is performed automatically by MDFCSDIM.
ISPTABL is used when a table write is issued and can only contain a single data set in its allocation. ISPTLIB is used when a table read is performed and can contain multiple data sets in its allocation. It is important that the first data set for the ISPTLIB concatenation is the same as that used for ISPTABL.
Each Dimensions user must have a table library allocated, preferably their own personal data set. MDFCSDIM automatically creates a table library. For details see the z/OS ISPF Dialog Developer's Guide and Reference in the z/OS ISPF Online Product Library Bookshelf.

Dimensions for z/OS Guide 65
ISPF Quick Start
To use Dimensions for z/OS immediately after using the templated install process to install your instance, do the following:
1 Exit to the Ready prompt.
2 Enter:
EX 'MDH.iiii.PARM(MDHCISPF)'
3 To start the ISPF client for your instance choose option 6 and enter:
EX 'MDH.iiii.PARM(MDHCSDIM)'
Step D-2 Verifying the ISPF InstallationThis step describes how to verify the ISPF installation and test the ISPF environment you have set up.
To verify the ISPF installation:
1 If you have used the sample TSO MDFPMENU panel, use the debug option at the top right to initiate a TSO trace.
2 Choose the instance you are testing and enter the ISPF client. The log in panel should appear.
3 Type your log in details. If you are running the listener on a different port to the one used by the server, add the port number to the Server field, for example:
<server DNS name>[:port number]
NOTE The first time you use the debug option it may be preceded by allocation messages.

66 Dimensions® CM
4 Press Enter. If DNS look up is successful, the ISPF client does the following:
• Searches its network administration structures for the Dimensions logical node that you specified.
• Attempts to connect to the logical node using the mainframe log in details that you specified.
• Queries and displays the project in ISPF client.
To log out of ISPF client press <END>, type 'Y', and press Enter.
Optional Installation Steps
Installing the Watcher SVC ExitThe Watcher SVC Exit provides a general method of examining SVC calls and is used by the z/OS build agent for dependency monitoring.
IMPORTANT! In 14.x this SVC has changed and should be reinstalled. It is compatible with earlier versions of Dimensions. If you do not make this change some error conditions may not be detected.
The program MDHLWTSV is a type 4 SVC that uses SVC screening to permit determination of dependencies. You must install MDHLWTSV according to the rules for installing a type 4 SVC. For more details of these rules see the following IBM documents:
MVS Initialization and Tuning Guide (document number SA22-7591)
MVS Initialization and Tuning Reference (document number SA22-7592)
NOTE Watcher SVC Exit is only required if you are using Dimensions Build.

Dimensions for z/OS Guide 67
To install SVC exit:
1 Review and run the JCL member MDHJSVCI contained in MDH.V1460.MDHCNTL. MDHJSVCI copies MDHLWTSV from MDH.V1460.MDHLLIB to an LPA library that you specify. MDHJSVCI also copies and renames the member MDHTSVSN to IEASVCSN in a PARMLIB that you specify.
2 The SVC parameter file has a single line that is similar to the following:
SVCPARM 244,REPLACE,TYPE(4),EPNAME(MDHLWTSV)
To activate the file you need to alter the IEASYSnn member used by the installation for IPL-ing the LPAR so that it points at the members. Do the following:
Replace
SVC=(n1,n2...)
with
SVC=(n1, n2...,SN)
in
IEASYSqq
3 Use of the SVC is controlled by a RACF resource. Issue the following TSO command to create the resource SERENA.WATCH.SVC in the class FACILITY:
RDEF FACILITY SERENA.WATCH.SVC UACC(NONE)
4 Schedule an IPL (CLPA) of the LPAR.
5 Issue the following TSO command to grant authorized users of Dimensions Build READ permission to this resource:
PE SERENA.WATCH.SVC ID(<id>) ACCESS(READ) CLASS(FACILITY)
where <id> specifies the credentials used by users and groups for Dimensions deployment areas, or to build in private work areas.
After this command is issued, issue the following command to refresh the RACLIST(FACILITY) profile:
SETR REFRESH RACLIST(FACILITY)

68 Dimensions® CM
Customizing Variables in the DimensionsConfiguration File
This optional step describes how to customize the Dimensions for z/OS variables in the Dimensions configuration file. You can use variables to control:
System settings
Start up tests
Start up messages
MVS-based node connections
Codepage conversion
Automatic creation of data sets
To customize configuration variables:
1 Open the Dimensions configuration file for editing. The file is located in the following data set:
MDH.V1460.MDHPARM(MDHTDCFG)
You can also edit the file from the following locations (where it is called dm.cfg):
• (Windows): %DM_ROOT%
• (UNIX): $DM_ROOT
NOTE You can run the instance with the default variables. To change the default variables follow the instructions below.
NOTE
The variables have no effect on the USS side of the listener.
To enable a variable, type YES. To disabled a variable, comment it out using hash # as the comment character, or type NO.

Dimensions for z/OS Guide 69
2 Use the guidelines in the table below to customize the variables.
NOTE Variables of the type Automatic creation of data sets control how data sets are created. You can change the values in these variables and specify other keywords such as UNIT() and VOLSER(). For more details about the keywords that you can use see the TSO ALLOC command.
Variable name Details
DM_SKIP_SERVER_CRED_CHECK Type: System setting
Description: When explicit AUTH information is absent this variable removes attempts by a server to log in to a remote node using its own user ID and password.
DM_MVS_RESTART_ON_ERROR Type: System setting
Description: Restarts the pool after an unexpected crash. This may cause problems with dumps and logs produced on MVS, especially on an unattended system. The default behavior does not restart the process.
DM_MVS_TZ Type: System setting
Description: Controls time zone handling in the Dimensions libsrv processes (MDHLLBSV). Should be set to the same string that a normal UNIX TZ variable is set to. For information about the strings that are permitted in this variable see your UNIX documentation.
Example The following example specifies that a mainframe runs in Pacific Standard Time (PST) in the winter and in Pacific Daylight saving Time (PDT) in the summer:DM_MVS_TZ PST08PDT07
(Sheet 1 of 8)

70 Dimensions® CM
DM_MVS_START_CHK_DIRTY Type: Start up test
Default: YES
Description: Enables a dirty address space check. Checks the dirty bit 0x40000000 in word at offset 0x116 in the current TCB. The check fails if this bit is set.
DM_MVS_START_CHK_PATH Type: Start up test
Default: YES
Description: Checks that all levels of the path specified by DM_ROOT exist and are accessible.
DM_MVS_START_CHK_RACF Type: Start up test
Defaults: FACILITYBPX.DAEMON,FACILITYBPX.SUPERUSER
Description: Checks that the current address space has READ access to the specified resource in the specified class. The listener will not start if these classes are not available to the user ID. This symbol is a comma separated list of fields. Each field is an eight character class name and the resource name in that class. If class name is shorter than eight characters use spaces.
DM_MVS_START_ABEND_DIRTY Type: Start up test
Default: <userid>
Description: If a dirty address space is detected at start-up the user ID that you specify is used to test user ID switching. This causes a RACF error message, and possibly an ABEND, to appear on the console with details of the module or data set that has caused the problem. This information can help you solve problems and find libraries that are not program controlled. If you do not use this symbol the listener behavior is unchanged.
Variable name Details
(Sheet 2 of 8)

Dimensions for z/OS Guide 71
DM_MVS_START_CHK_CONSOLE Type: Start up message
Default: YES
Description: Issues WTO messages to the console.
DM_MVS_START_CHK_LOG Type: Start up message
Default: /tmp/startuptext.log
Description: Logs start up messages to the specified USS file.
DM_MVS_TRACE Type: MVS-based node connection
Default: YES
Description: Causes a trace of the MVS data set handling logic to be recorded in the SDP trace log.Note: To be used with the assistance of Micro Focus support.
DM_MVS_DETAIL_TRACE Type MVS-based node connection
Default: YES
Description: Causes a very detailed trace of the MVS data set handling logic to be recorded in the SDP trace log.
DM_MVS_TIMINGS Type MVS-based node connection
Default: YES
Description: Causes timings from MVS to be recorded in the SDP trace log.
DM_EVENT_TRACE Type: MVS-based node connection
Description: Logs detailed RPC events.Note: To be used with the assistance of Micro Focus support.
Variable name Details
(Sheet 3 of 8)

72 Dimensions® CM
DM_MVS_CREATE_DATASETS Type: MVS-based node connection
Default: YES
Description: Allows data sets, including PDSs, to be automatically created when you perform a get operation to a data set that does not exist. If you do not use this option you must pre-allocate the data sets.
DM_MVS_CREATE_USE_BLKSIZE Type: MVS-based node connection
Default: YES
Description: Causes a BLKSIZE value to be inserted in the data set creation call. If not, the system will be allowed to choose the optimal value.
DM_MVS_CREATE_ISPF_STATS Type: MVS-based node connection
Default: YES
Description: Causes ISPF statistics in PDS members to be fabricated if they do not already exist in the object being extracted from Dimensions.
DM_MVS_DELETE_TEMP Type: MVS-based node connection
Default: YES
Description: Allows the temporary files created during normal operation to be automatically deleted.
DM_MVS_REJECT_USERS Type: MVS-based node connection
Default: <userid1> <userid2>
Description: Prevents the specified user IDs from logging in to the mainframe node. Normally used to prevent the Dimensions systems ID being used by a Dimensions client to log in to a mainframe node. Enter the user IDs in upper case and separate multiple user IDs with single spaces.
Variable name Details
(Sheet 4 of 8)

Dimensions for z/OS Guide 73
DM_MVS_CODEPAGE_SERVERDM_MVS_CODEPAGE_MAINFRAME
Type: Codepage conversion
Defaults: DM_MVS_CODEPAGE_SERVER 819DM_MVS_CODEPAGE_MAINFRAME 1047
Description: When a command is sent from a Dimensions for z/OS client to a server, for the command to be understood the client must convert it to the ASCII codepage of the server. For example, if you assign the following codepage numbers:DM_MVS_CODEPAGE_SERVER 819 DM_MVS_CODEPAGE_MAINFRAME1047then all Dimensions for z/OS clients—dmcli on USS, ISPF client on MVS, and MDFLCMD (batch)—will use a mapping from 1047 (EBCDIC) to 819 (ASCII) when converting command strings sent to a server.You only need to perform this customization when command strings contain national characters.For more information see page 213.
DM_MVS_CREATE_SPEC_SPC Type: Automatic creation of data sets
Default: cyl space(1,1)
Description: Use when a SPACE specification is required.
DM_MVS_CREATE_SPEC_PDS Type: Automatic creation of data sets
Default: dir(5) dsorg(po)
Description: Use when a PDS is created. Supplies any extra characteristics, such as directory blocks.
DM_MVS_CREATE_SPEC_PDSE Type: Automatic creation of data sets
Default: dsntype (library)
Description: Use when a PDSE is created. Supplies any extra SMS fields that are required.
Variable name Details
(Sheet 5 of 8)

74 Dimensions® CM
DM_MVS_CREATE_DEFAULT_PDSE Type: Automatic creation of data sets
Default: 1
Description: Causes container files that are created to be PDSEs rather than PDSs.
DM_MVS_CREATE_DEFAULT_TEXT Type: Automatic creation of data sets
Default: FB(80)
Description: Supplies a default DCB (Device Control Block) to any text format files that are created. This variable has the syntax RECFM(LRECL,BLKSIZE) although you can omit blksize.
DM_MVS_CREATE_DEFAULT_BIN Type: Automatic creation of data sets
Default: FB(80)
Description: Supplies a default DCB to any binary format files that are created. This variable has the syntax RECFM(LRECL,BLKSIZE) although you can omit blksize.
Variable name Details
(Sheet 6 of 8)
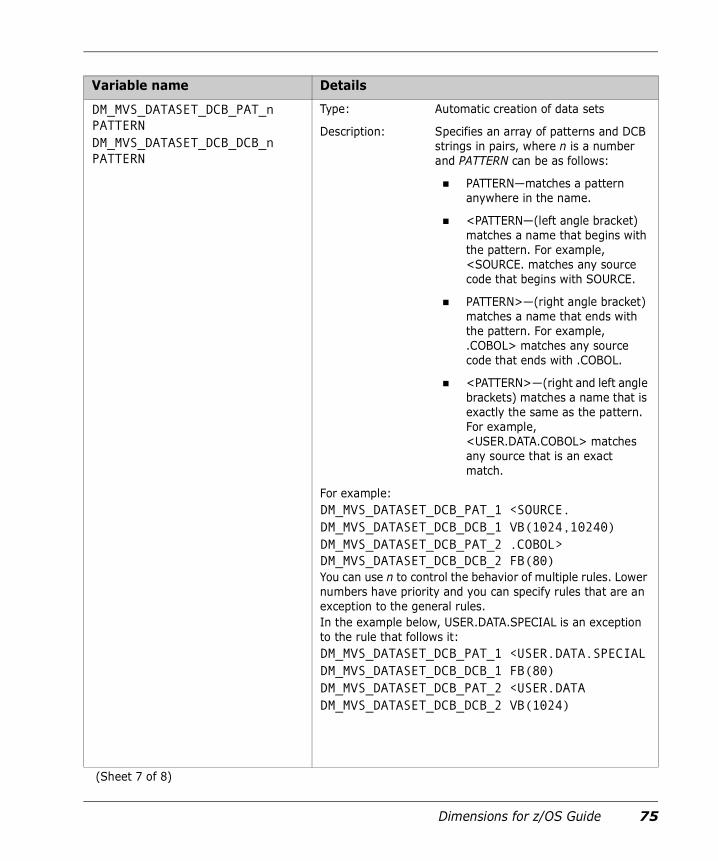
Dimensions for z/OS Guide 75
DM_MVS_DATASET_DCB_PAT_n PATTERNDM_MVS_DATASET_DCB_DCB_n PATTERN
Type: Automatic creation of data sets
Description: Specifies an array of patterns and DCB strings in pairs, where n is a number and PATTERN can be as follows:
PATTERN—matches a pattern anywhere in the name.
<PATTERN—(left angle bracket) matches a name that begins with the pattern. For example, <SOURCE. matches any source code that begins with SOURCE.
PATTERN>—(right angle bracket) matches a name that ends with the pattern. For example, .COBOL> matches any source code that ends with .COBOL.
<PATTERN>—(right and left angle brackets) matches a name that is exactly the same as the pattern. For example, <USER.DATA.COBOL> matches any source that is an exact match.
For example:DM_MVS_DATASET_DCB_PAT_1 <SOURCE.DM_MVS_DATASET_DCB_DCB_1 VB(1024,10240)DM_MVS_DATASET_DCB_PAT_2 .COBOL>DM_MVS_DATASET_DCB_DCB_2 FB(80) You can use n to control the behavior of multiple rules. Lower numbers have priority and you can specify rules that are an exception to the general rules.In the example below, USER.DATA.SPECIAL is an exception to the rule that follows it:DM_MVS_DATASET_DCB_PAT_1 <USER.DATA.SPECIALDM_MVS_DATASET_DCB_DCB_1 FB(80)DM_MVS_DATASET_DCB_PAT_2 <USER.DATADM_MVS_DATASET_DCB_DCB_2 VB(1024)
Variable name Details
(Sheet 7 of 8)

76 Dimensions® CM
Setting Up the Scripting InterfaceThis optional step describes how to setup dmpmcli for use with Dimensions for z/OS.
dmpmcli is a scripting interface shell that provides a set of Java classes that expose Dimensions components via a simple and consistent object model. For more details see the Dimensions CM online help.
To set up dmpmcli:
1 Edit dmpmcli in the directory prog and set the correct DM_ROOT and Java installation path.
2 Edit %DM_ROOT%/AdminConsole/classes/merant/adm/dimensions/Dimensions.properties and specify values for your local environment.
DM_MVS_START_QUIET Type: Instance
Default: NO
Description: Turns off mainframe agent messages during startup apart from exceptions.
DM_MAX_LOCAL_TIME_DIFFERENTIAL
Type: Instance
Default: 1
Description: The number of seconds by which USS local time can differ from MVS local time.
Variable name Details
(Sheet 8 of 8)
NOTE dmpmcli is not certified or supported on Dimensions for z/OS and is supplied as is as a courtesy to customers. Java™ 2 Runtime Environment Standard Edition version 1.4.2 or higher is required to run dmpmcli.

Dimensions for z/OS Guide 77
3 Use FTP, or a similar application, to upload the following files in binary from the server installation directory %DM_ROOT%/AdminConsole/lib:
• commons-logging-api.jar
• darius.jar
• dmnet.jar
• js.jar
• servlet.jar
• xerces.jar
MVS Listener Memory CheckAt startup the MVS listener checks the virtual storage limits that are available to it. This check depends on the getrlimit call using the RLIMIT_AS sub-function.
The following MDHTDCFG variables are used with this check:
DMCDLPA (set to YES or NO): specifies if the listener is using ELPA.
DM_LISTENER_REGION_ELPA: used if DMCDLPA is set to Y.
Default: 40M
DM_LISTENER_REGION_STEPLIB: used if DMCDLPA is set to N.
Default: 75M
The getrlimit call returns a maximum limit (the hard limit) which is usually 2147483647, but might be lower. The call also returns a soft limit, which is typically related to the REGION specified for the user id, or is coded in all the usual places. This second limit is compared with the recommendation, and the message MDHVFS4200045W is issued if the recommended size is greater than the soft limit reported by getrlimit.
The message MDHVFS4200045W has the following format:
MDHVFS4200045W Available memory is insufficient - recommend <m1> but have <m2>/<m3>

78 Dimensions® CM
Where:
<m1> is the quantity of memory defined by the appropriate variable (DM_LISTENER_REGION_ELPA or DM_LISTENER_REGION_STEPLIB) obtained from the default or from the MDHTDCFG setting.
<m2> is the hard limit reported by getrlimit.
<m3> is the soft limit reported by getrlimit.
If this message is displayed you can:
Increase the region for this STC.
Alter MDHDCDFG settings for the related variable.
Micro Focus recommends that you perform the first of the above steps and that you run a production z/OS listener with the variable DMCDLPA set to YES as this greatly reduces the memory usage of Dimensions.
If you code a lower limit in MDHTDCFG the listener may not work correctly. However, for some remote functions it is possible that the default limit will also be insufficient and will need to be increased. To maximise the chance of everything working correctly you should code REGION=0M and permit the address space user(s) access to be as large an address space size necessary.

Dimensions for z/OS Guide 79
Chapter 3ISPF Client Quick Start Tutorial
IntroductionThis quick start tutorial shows you how to get started with the Dimensions for z/OS ISPF client. The tutorial has the following exercises:
PrerequisitesBefore you start the tutorial check the following prerequisites:
You have installed, configured, licensed, and started a Dimensions server. For details see the Installation Guide.
You have installed and licensed Dimensions for z/OS on a mainframe machine. For detail see page 19.
You have setup the following Dimensions network nodes:
Log In to Dimensions 80Take a Quick Tour of the Menus 84Create a New Project and Directory 86Set the Project and Project Root 87Change Directories 89Create a New Item 89Browse the Item 91Check Out the Item 92Undo the Check Out 94Action the Item 94Display Help Panels 95Log Off from Dimensions 96

80 Dimensions® CM
• A physical network node for the z/OS machine where the Dimensions listener resides.
• A logical network node and connection for the MVS file system.
For details about setting up mainframe nodes see page 55.
Exercise 1 Log In to DimensionsIn this exercise you will log in to the Dimensions for z/OS ISPF client.
To log in to Dimensions:
1 Start a mainframe TSO session.
2 In the ISPF Primary Option Menu enter the option number allocated to Dimensions and press Enter. The Dimensions ISPF client log in panel opens.
3 Enter your log in information (ask your Dimensions administrator for details), for example:
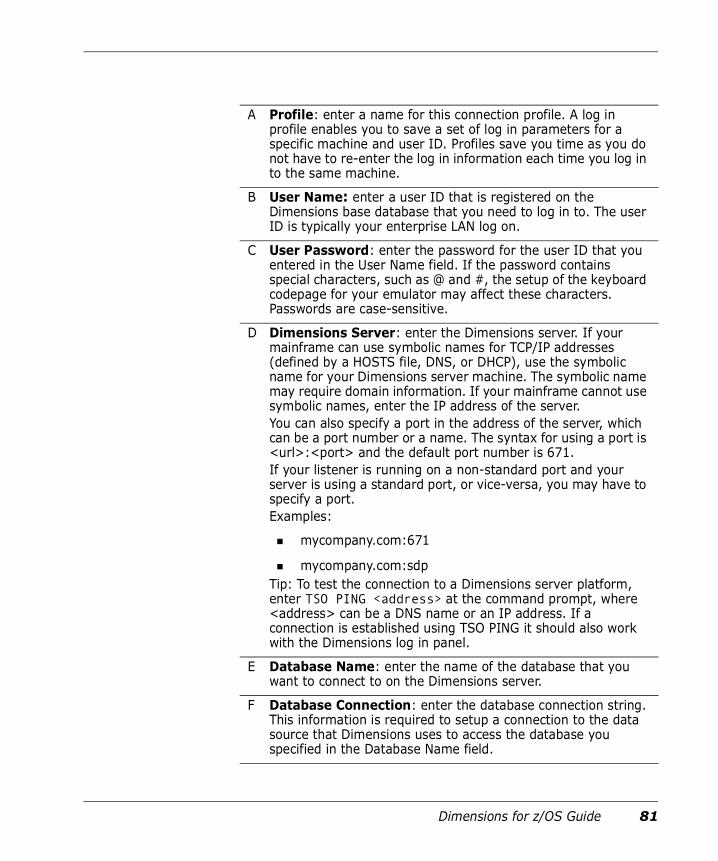
Dimensions for z/OS Guide 81
A Profile: enter a name for this connection profile. A log in profile enables you to save a set of log in parameters for a specific machine and user ID. Profiles save you time as you do not have to re-enter the log in information each time you log in to the same machine.
B
User Name: enter a user ID that is registered on the Dimensions base database that you need to log in to. The user ID is typically your enterprise LAN log on.
C User Password: enter the password for the user ID that you entered in the User Name field. If the password contains special characters, such as @ and #, the setup of the keyboard codepage for your emulator may affect these characters. Passwords are case-sensitive.
D Dimensions Server: enter the Dimensions server. If your mainframe can use symbolic names for TCP/IP addresses (defined by a HOSTS file, DNS, or DHCP), use the symbolic name for your Dimensions server machine. The symbolic name may require domain information. If your mainframe cannot use symbolic names, enter the IP address of the server.You can also specify a port in the address of the server, which can be a port number or a name. The syntax for using a port is <url>:<port> and the default port number is 671.If your listener is running on a non-standard port and your server is using a standard port, or vice-versa, you may have to specify a port.Examples:
mycompany.com:671
mycompany.com:sdpTip: To test the connection to a Dimensions server platform, enter TSO PING <address> at the command prompt, where <address> can be a DNS name or an IP address. If a connection is established using TSO PING it should also work with the Dimensions log in panel.
E Database Name: enter the name of the database that you want to connect to on the Dimensions server.
F Database Connection: enter the database connection string. This information is required to setup a connection to the data source that Dimensions uses to access the database you specified in the Database Name field.

82 Dimensions® CM
4 Press Enter. You can monitor the progress of the log in script in the top right corner of the panel.
After you have log in successfully the ISPF client main panel is displayed and looks similar to this:
G Node Name: enter the Dimensions logical network node, on the MVS side, of the actual machine or LPAR that you are currently logged into under TSO. This logical node must be defined in the Dimensions database (ask your Dimensions administrator for the correct name). Do not use the DNS name for the machine you are logged into. This may appear to log in successfully but will cause errors when you attempt Dimensions operations.If no Dimensions listener is running on your LPAR, but there is a listener on a different LPAR in the SYSPLEX that shares the DASD storage and catalog that you are using, you can specify that listener's logical MVS network node name. You do not need TSO/ISPF access to that LPAR.
H User ID: enter the z/OS user ID for the machine you are currently logged into under TSO.
I User Password: enter the password for the user ID you entered in the User ID field. The case of the password may be important depending on how your security system is set up. To use national characters, such as @ and #, the emulator codepage must be correct.

Dimensions for z/OS Guide 83
A Menu bar
B TSO command line prompt
C Connection status
D Project details
E List of sub-directories and files in the current directory. Directories and sub-directories and are identified by a plus sign '+' to the left of the directory name.

84 Dimensions® CM
Exercise 2 Take a Quick Tour of the MenusIn this exercise you will take a quick tour of the ISPF client menu items not covered by this tutorial.
To take a quick tour of the menus:
1 Click the File menu. The File menu has the following options:
• Node Login: enables you to log in to a remote node.
• Change password: enables you to change the password for a user ID on a specific mainframe node.
• Browse Log: enables you to browse the Dimensions ISPF client log file.
• Logoff/Exit: enables you to log off the ISPF client.
2 Click the Item menu. The Item menu has the following options:
Apart from the Create option all the other options enable you to perform group actions on multiple items that you have selected. For details see page 114.

Dimensions for z/OS Guide 85
3 Click the Commands menu. The Commands menu has the following options:
• Browse Request: enables you to send a request to a temporary data set, invoke the ISPF Editor, and print the document.
• Batch commands: enables you to specify a data set containing Dimensions commands and process them in batch mode.
• Set Project Root: enables you to specify the project root for the current project.
4 Click the Build menu. The Build menu has the following options:
The Build menu enables you to build the current project, a request, or a baseline. For details about build see page 115.
5 Click the Settings menu. The Settings menu has the following options:
• Preferences: enables you to set preferences for the ISPF client.
• Current View: enables you to configure the display of the ISPF client main panel.

86 Dimensions® CM
6 Click the Help menu. The Help menu has the following options:
• Using Help: explains how to use the panel and field level help.
• About: displays information about the current version of the ISPF client.
7 Press <END> to close the Help menu.
Exercise 3 Create a New Project and DirectoryIn this exercise you will use the Command Entry panel to enter Dimensions commands to:
Create a new project.
And add a directory to the new project.
To create a new project and directory:
1 From the Commands menu select Command Entry. The Command Entry panel is displayed.
2 In the Dimensions command field enter the command to create a new project called DEVELOPMENT:
DWS "PAYROLL:DEVELOPMENT" /DESCRIPTION="Project for tutorial"
NOTE You must enter commands exactly as they appear below. See also the Command-Line Reference.

Dimensions for z/OS Guide 87
3 Press Enter. The message 'Executing' is displayed in the top right corner. After the command has finished executing the Dimensions Command Log panel is displayed.
4 To close the Dimensions Command Log panel and return to the Command Entry panel press <END>.
5 In the Dimensions command field enter the following command to create a new directory called ASM in the project DEVELOPMENT:
CWSD ASM /WORKSET=PAYROLL:DEVELOPMENT
6 Press Enter. The message 'Executing' is displayed in the top right corner. After the command has finished executing the Dimensions Command Log panel is displayed.
7 To close the Dimensions Command Log panel and return to the Command Entry panel press <END>.
8 To return to the ISPF client main panel press <END>.
Exercise 4 Set the Project and Project RootIn this exercise you will set the current project to DEVELOPMENT and set the project root.
To set the project and project root:
1 From the Commands menu select Set Current Project. The Set Current Project panel is displayed.
2 In the Project field enter '/' and press Enter. The Project Selection pop-up panel is displayed. Enter 's' next to DEVELOPMENT and press Enter. The Project Selection pop-up panel closes.
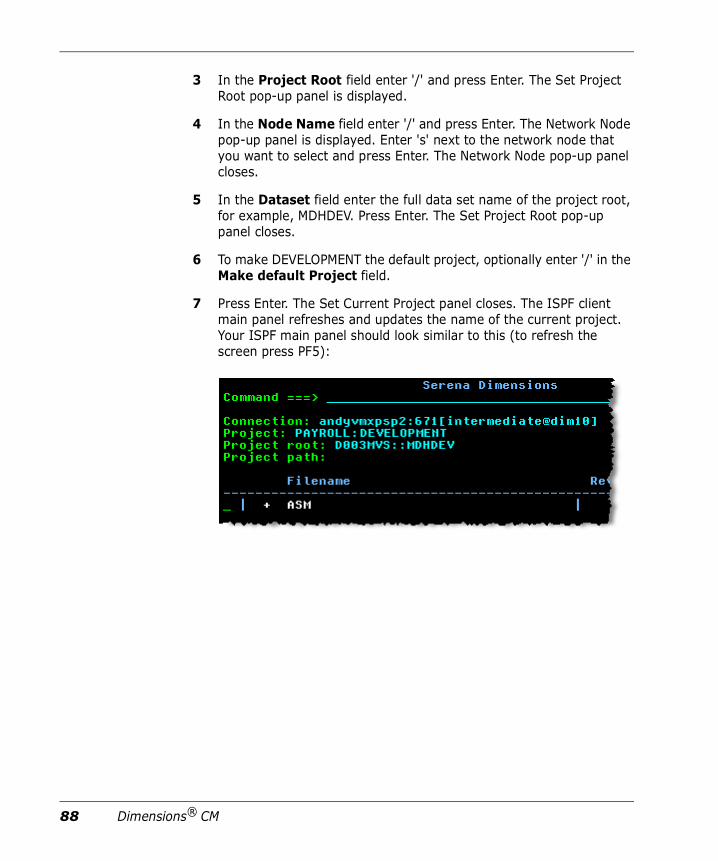
88 Dimensions® CM
3 In the Project Root field enter '/' and press Enter. The Set Project Root pop-up panel is displayed.
4 In the Node Name field enter '/' and press Enter. The Network Node pop-up panel is displayed. Enter 's' next to the network node that you want to select and press Enter. The Network Node pop-up panel closes.
5 In the Dataset field enter the full data set name of the project root, for example, MDHDEV. Press Enter. The Set Project Root pop-up panel closes.
6 To make DEVELOPMENT the default project, optionally enter '/' in the Make default Project field.
7 Press Enter. The Set Current Project panel closes. The ISPF client main panel refreshes and updates the name of the current project. Your ISPF main panel should look similar to this (to refresh the screen press PF5):

Dimensions for z/OS Guide 89
Exercise 5 Change DirectoriesIn this exercise you will change directory to the ASM sub-directory that you created earlier.
To change directories:
1 In the ISPF client main panel enter 's' next to ASM. The symbol '+' to the left of ASM denotes that it is a directory.
2 Press Enter. The ISPF client refreshes and displays the contents of the directory (which is currently empty). The Project Path field displays the current project path.
Exercise 6 Create a New ItemIn this exercise you will create a new mainframe item and add it to the Dimensions database. The item that you will add is an ASM source file for the Disassembler product that ships with Dimensions for z/OS.
To create a new item:
1 From the Item menu select Create. The Create Item panel is displayed.
2 To keep the source file in the work area, in the Keep copy in user area field enter '/'.
3 In the Dataset name field enter the name of the data set containing the item that you are going to add to Dimensions:
NOTE You can only use the ISPF client Create Item panel to create mainframe items.

90 Dimensions® CM
'MDH.V1010.SUPP.DISASS.ASM(MDOARBLD)'
4 To automatically populate the fields in the panel with default values, press F5.
5 In the Comments field enter ASM source.
Before you create the item your Create Item panel should look like this:
6 Press Enter. After the item is created the following message is displayed in the top right corner of the ISPF client main panel:
Item Create Successful

Dimensions for z/OS Guide 91
7 Press <END> and press PF5 to refresh the display. The ISPF client displays the new item.
Exercise 7 Browse the ItemIn this exercise you will browse the item that you created in the previous exercise.
To browse the item:
1 In the ISPF client main panel enter '/' next to MDOARBLD and press Enter. The Dimensions Item Actions pop-up is displayed.
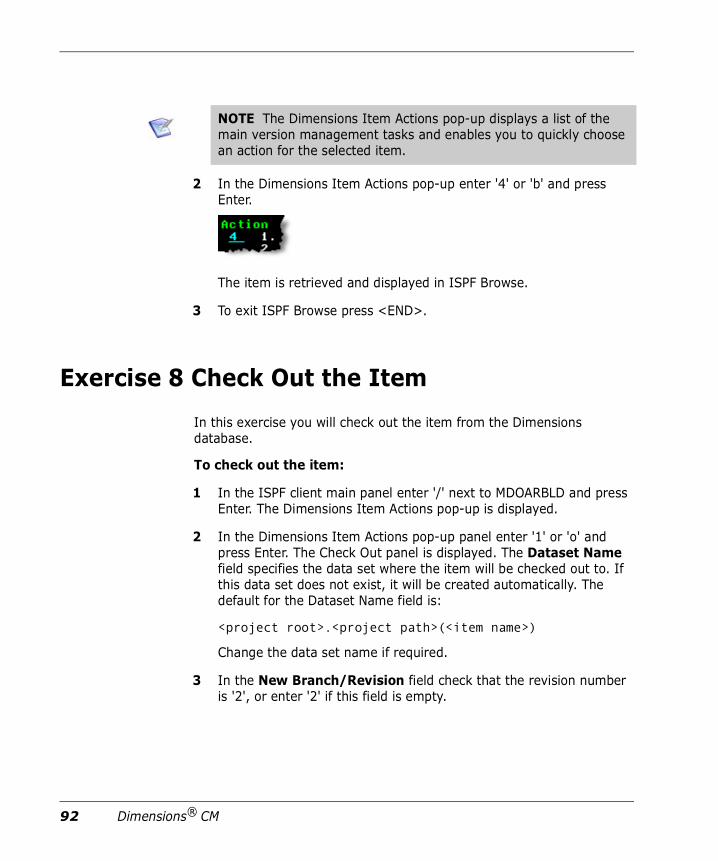
92 Dimensions® CM
2 In the Dimensions Item Actions pop-up enter '4' or 'b' and press Enter.
The item is retrieved and displayed in ISPF Browse.
3 To exit ISPF Browse press <END>.
Exercise 8 Check Out the ItemIn this exercise you will check out the item from the Dimensions database.
To check out the item:
1 In the ISPF client main panel enter '/' next to MDOARBLD and press Enter. The Dimensions Item Actions pop-up is displayed.
2 In the Dimensions Item Actions pop-up panel enter '1' or 'o' and press Enter. The Check Out panel is displayed. The Dataset Name field specifies the data set where the item will be checked out to. If this data set does not exist, it will be created automatically. The default for the Dataset Name field is:
<project root>.<project path>(<item name>)
Change the data set name if required.
3 In the New Branch/Revision field check that the revision number is '2', or enter '2' if this field is empty.
NOTE The Dimensions Item Actions pop-up displays a list of the main version management tasks and enables you to quickly choose an action for the selected item.

Dimensions for z/OS Guide 93
4 To optionally relate a request to the item, in the Request(s) field enter '/' and press Enter. In the Request Selection pop-up enter 's' next to each request that you want to relate to this item.
Press Enter to close the Request Selection pop-up.
5 Press Enter. The item is retrieved to the data set that you specified and the following message is displayed in the top right corner of the ISPF client main panel:
Item Fetch Successful
6 Press PF5 to refresh the display. An 'x' is displayed to the left of MDOARBLD to indicate that it is checked out. The Revision column displays the latest version number of the item.

94 Dimensions® CM
Exercise 9 Undo the Check OutIn this exercise you will undo the check out of the item you just checked in.
To undo the check out:
1 In the ISPF client main panel enter '/' next to MDOARBLD and press Enter. In the Item Actions pop-up panel enter '3' or 'x' and press Enter. The Undo Check Out panel is displayed.
2 Press Enter. The item retrieval is canceled, the item is unlocked, and the revision number that was created during the check out is released.
3 Press PF5 to refresh the display. The 'x' indicating that MDOARBLD is checked out is cleared.
Exercise 10 Action the ItemIn this exercise you will action the item you created earlier.
To action the item:
1 In the ISPF client main panel enter '/' next to MDOARBLD and press Enter. In the Item Actions pop-up panel enter '9' or 'a' and press Enter. The Action Item panel is displayed.
2 To specify the status to which the item will be actioned, in the Next Status field enter '/' and press Enter.

Dimensions for z/OS Guide 95
3 In the Item Status pop-up panel enter 's' next to UNIT TESTED and press Enter.
The Item Status pop-up panel closes.
4 Press Enter. After the action is successfully executed the status of MDOARBLD changes to UNIT TESTED.
Exercise 11 Display Help PanelsThe ISPF client has two types of help panels:
Panel level help panel: describes the general functionality of the ISPF panel that is currently open.
Field level help pop-up: describes the functionality of a specific field.
To display help panels for the Create Item panel:
1 From the Item menu select Create Item. The Create Item panel is displayed.
2 To display panel level help place the cursor anywhere that is not a field, for example on an empty area of the panel, and press F1. The Create Item help panel is displayed. Press <END> to close the help panel.
3 To display a field level help pop-up place the cursor on a field, for example the Project field, and press F1. The Project Field help pop-up is displayed. Press <END> to close the help panel.
4 Press <END> to exit the Create Item panel.

96 Dimensions® CM
Exercise 12 Log Off from DimensionsIn this exercise you will log off from Dimensions and exit the ISPF client.
To log off from Dimensions:
1 From the File menu select Logoff/Exit.
2 In the Exit Confirmation panel enter 'y', and press Enter. Your ISPF session ends and the ISPF Primary Option Menu is displayed.
SummaryThis quick start tutorial showed you how to:
Log in to Dimensions
Create a new project and directory
Set the project and project root
Change directories
Create a new item
Browse an item
Check out an item
Undo a check out
Action an item
Display help panels
Log off from Dimensions

Dimensions for z/OS Guide 97
Chapter 4Operating a Dimensions Instance
Starting a Dimensions Instance 98Stopping a Dimensions Instance 98Viewing OMVS Processes from SDSF 98Altering Message Handling in your Dimensions Listener 98

98 Dimensions® CM
Starting a Dimensions InstanceIf your local metadata server is defined per instance, you need to start it first using the following command:
S <instance local meta data server proc>
To start a Dimensions instance issue the following command at a console:
S <instance proc>
Stopping a Dimensions InstanceTo stop a Dimensions instance issue the following command at a console:
p <instance>
If your local metadata server is defined per instance you may also want to stop it.
Viewing OMVS Processes from SDSFTo view USS processes from SDSF use the ps command. By noting the ASID/ASIDX you can cross reference this to the DA display of active address spaces. To cancel a process that is not functioning properly type c next to its row.
Altering Message Handling in your Dimensions Listener
In the MDHTDCFG member there are settings that allow the installation to vary the ROUTCDE used for messages by severity. These settings apply to all the subtasks started by the listener as well as the parent task. If your installation suppresses ROUTCDE 11 messages to SYSLOG

Dimensions for z/OS Guide 99
you can override the default ROUTECDE so that you can see these messages.
Started TasksUser listener tasks run under the user ID of the starting user. These listener tasks are started when an AUTH is performed to the tertiary node, and are stopped when the client disconnects or the connection times out. To shut down all portions of the listener you may need to disconnect all clients.

100 Dimensions® CM

Dimensions for z/OS Guide 101
Chapter 5Using the ISPF Client
Logging In to the ISPF Client 102About the ISPF Client Main Panel 103Invoking Help 107Setting the Project Root and the Current Project 108Performing Actions on Items 108Performing Actions on Groups of Items 114Creating Items 115Browsing and Printing Requests 115Building 115Entering Dimensions Commands 120Processing Commands in Batch Mode 122Logging In to a Remote Node 123Changing Passwords 124Browsing the Command Log File 124Entering TSO Commands 124Logging Off from the ISPF Client 124
NOTE This chapter describes the general functionality of the main panels in the ISPF client. To read a full description of each panel and the privileges required to perform actions, see the ISPF panel online help. For details about invoking help, see page 107.

102 Dimensions® CM
Logging In to the ISPF ClientFor details about logging in to the ISPF client see the first exercise in the ISPF Client Quick Start Tutorial on page 80.
ProfilesBefore logging in you can use the Load Profile panel to select or delete an existing connection profile. The functionality of the panel is similar to the Profile field in the desktop client log in window. You can also use the Login panel to create a new profile.
A log in profile enables you to save a set of log in parameters for a specific machine and user ID. Profiles save you time as you do not have to re-enter the log in information each time you log in to the same machine. You can create multiple profiles and delete profiles that are redundant.
For details about creating, selecting, and deleting profiles, see the help topics for the Login panel and the Login Profile panel.
Password RetentionPasswords, including remote log in passwords, are only retained for a calendar day. For example, if you successfully log in to the ISPF client, log off, and then want to log in again in the same calendar day, press the Enter key when you are in the log in panel to automatically log in. The password fields will appear to be empty but the information is retained. After the calendar day changes you have to re-enter your passwords and perform node authentications again.
NOTE Your login data is used for temporary data sets and required by activities such as Browse or Compare. However, if you are retrieving a file from another node, or working with a user file on a different node, you will be prompted for your username and password (where required). For information about password retention see below.
NOTE You can access the Load Profile panel only from the Login panel.

Dimensions for z/OS Guide 103
About the ISPF Client Main PanelThe ISPF client main panel is where you perform activities such as:
Navigate through projects and directories.
Perform actions on items and groups of items.
Execute Dimensions commands.
Execute TSO commands.
Configure settings.
Invoke help.
Build items, projects and baselines.
Log off from Dimensions.
About the Main Panel DisplayThe ISPF client main panel displays the following information:
The current connection status (the same information that is displayed in the desktop client status bar).
The current Dimensions project.
The current project root.
The current project path.
A list of the sub-directories and files in the directory where you are currently located. Directories and sub-directories and are identified by a plus sign '+' to the left of the directory name. For each file the following information is displayed:
• The revision number of the item.
• The current status of the item.
• The date the file was last modified.
• The user ID of the last person to modify or check out the file.
• The deployment stage ID of the item.
• The item specification (the compound field that identifies the item in a Dimensions database).

104 Dimensions® CM
The illustration below shows a typical ISPF client main panel:
Configuring the Main Panel DisplayUse the Settings panel to configure the main panel display including:
The columns that are displayed in the main panel, their width, and the order in which they appear.
The automatic refresh of the main panel after any of the following commands have been processed:
• Check in
• Check out
• Edit
• Update
A Menu bar
B TSO command line prompt
C Current connection status
D Current project details
E List of sub-directories and files in the current directory

Dimensions for z/OS Guide 105
• Action
• Deploy
If you enter multiple commands the refresh is performed after all the commands have been processed. Refresh is not performed if you execute commands from the Command Entry panel.
The display of all revisions for all items.
The number of pages that are buffered.
To open the panel from the Settings menu choose Current View.
Expanding DirectoriesTo expand a directory, type 's' in the column to the left of the directory name or place the cursor in the column and press Enter. The contents of the main panel are replaced with the contents of the directory that you selected. To go back up a level press <END>.
To view all the information in a panel do the following:
To scroll down press F8.
To scroll up press F7.
To scroll right press F11.
To scroll left press F10.
To close a panel press <END>.
NOTE To manually refresh the main panel press PF5 at any time.

106 Dimensions® CM
Displaying all Item RevisionsTo display all revisions for all items in a directory, not just the current revision, type expand at the command prompt and press Enter. To only display the current item revisions, type expand off at the command prompt and press Enter. You can expand all item revisions by default in the Settings panel.
Viewing Item HistoryTo view all the revisions of a single item type 'H' (History) next to the item and press Enter. The main panel is refreshed and only displays the revision history of that item. To view all the items in the directory press <END>.
Setting PreferencesUse the Preferences panel to:
Save your log in information in your profiles. A log in profile enables you to save a set of log in parameters for a specific machine and user ID. Profiles save you time as you do not have to re-enter the log in information each time you log in to the same machine.Default: N (off)
Create a log file for each session. Default: N (off)
Refresh the log file for each session. To erase the log and start a new one for each session enter '/' in the 'Refresh Log' sub-option. If you leave this field blank the log data is appended to the current log. If you are not creating a log file for each session this option has no effect. Default: N (off)
Turn off the 'Delete Confirmation' panel when you delete items. You will not be asked for confirmation, which can lead to accidental loss of data.
Use the current user's TSO PREFIX as the high level qualifier for all data set allocations.

Dimensions for z/OS Guide 107
Use the local project root for the current session instead of the server project root.
Use the current project root and the current directory when formatting data set names.
To open the panel from the Settings menu choose Preferences.
Displaying the ISPF Client Version NumberTo display the version number of your ISPF client, from the Help menu choose About.
Invoking HelpThe ISPF client has two types of help panels:
Panel level help panel: describes the general functionality of the ISPF panel that is currently open. To display panel level help place the cursor anywhere that is not a field, for example on an empty area of the panel, and press F1. To close the help panel press <END>.
Field level help pop-up: describes the functionality of a specific field. To display a pop-up help topic, move the cursor to the field and press F1. To close a pop-up press <END>.
A To display panel level help place the cursor anywhere that is not a field and press F1.
B To display field-level help move the cursor to a field and press F1.

108 Dimensions® CM
Keyboard Shortcuts in Help TopicsUse the following keyboard shortcuts to move through help topics:
Setting the Project Root and the Current Project
Use the Set Project Root panel to set the root of the current project. To open the panel from the Commands menu choose Set Project Root.
Use the Set Current Project panel to change to a different product and project. You can also use the panel to set the project root and make the project the default. To open the panel, from the Commands menu choose Set Current Project.
Performing Actions on ItemsTo perform an action on an item move the cursor to the column to the left of the item and do one of the following:
Type one of these letters and press Enter:
Action Shortcut
Scroll down a topic (if More: + is displayed in the top right corner).
F11
Scroll up a topic. F10
Close a topic <END>
Action Letter See page
Check out an item O 110
Check in an item I 111
Undo check out X 111
Browse an item B 111

Dimensions for z/OS Guide 109
For example:
The actions listed above are the default actions assigned in the ISPF panels. For details about building your own extensions see page 137 or check with your Dimensions for z/OS system administrator.
Type a forward slash ('/') and press Enter. The Dimensions Item Actions pop-up panel opens and displays a list of all the actions that are available for that item. Type the action's number or letter and press Enter. For example:
Get an item (Fetch) G 111
Compare items C 112
Edit an item E 112
Update an item U 113
Action an item A 113
Delete an item D 113
History H 106
Deploy P 113
Build an item M 115
Impacted targets T 120
Action Letter See page
NOTE The Build and Impacted actions are only available if the current project has a build configuration associated with it.

110 Dimensions® CM
Checking Out ItemsUse the Check Out panel to check an item out of Dimensions to a target data set that you specify. In the panel you can also:
Associate the item with a request.
Automatically overwrite the item in the target data set.
Enter additional qualifiers in the Options field. The qualifiers are appended to the command line constructed from the other entries on this panel.
In the ISPF client main panel an 'x' is displayed to the left of items that are checked out.
1. To open the Dimensions Item Actions pop-up panel for an item, type a forward slash and press Enter.
2. To perform an action, type the action's letter or number and press Enter.

Dimensions for z/OS Guide 111
Checking In ItemsUse the Check In panel to check an item in to Dimensions from a source data set that you specify. In the panel you can also:
Specify if you want to keep a copy of the item in your user area.
Perform an automatic Get on the item after check in.
Enter additional qualifiers in the Options field. The qualifiers are appended to the command line constructed from the other entries on this panel.
Undoing a Check OutUse the Undo Check Out panel to cancel the check out of an item. The item is unlocked, and the revision number that was created during check out is released. You can also enter additional qualifiers in the Options field. The qualifiers are appended to the command line constructed from the other entries on this panel.
Browsing ItemsUse the Browse option to view the contents of an item. A get (fetch) operation is performed on the item, which is sent to the scratch data set, and the ISPF Editor is invoked in Browse mode. No validation is performed to check that the item is browse enabled and that its properties (record, length, organization etc.) match those of the scratch data set.
Getting (Fetching) ItemsUse the Get Item panel to fetch an item and copy it to a data set that you specify. In the panel you can also:
Specify if you want to expand substitution variables.
NOTE The Item Specification field and the Source/Target Data Set Name path are populated by default on most panels. The path is based on the project root, current project directory, and the filename of the selected item.

112 Dimensions® CM
Automatically overwrite the item in the target data set.
Enter additional qualifiers in the Options field. The qualifiers are appended to the command line constructed from the other entries on this panel.
Comparing ItemsUse the Compare Items panel to compare two versions of an item.
The Base Item Specification field is the base object for the comparison.
The Revision Item Specification field is a previous version of the item that you want to compare to the base object. The item can exist in a data set on the system, or in Dimensions.
The items are retrieved to a temporary data set and a browse tool invoked by default on the results. The browse tool is invoked via a CLIST that you can customize to allow you to choose your preferred utility (the default is SuperC). Consult your system administrator for information about changing the default compare utility.
Editing ItemsUse the Edit Item panel to edit an item. When you select an item for editing you can optionally specify a revision number and select requests to which it will be related. The item is then retrieved to a temporary data set and displayed in the ISPF edit utility.
Operationally, Edit Item is the equivalent of Check Out Item, followed by local editing of a temporary file, and Check In Item.
Items are not revised in the Dimensions database when:
You did not save the changes in ISPF edit (the Edit Item panel is not displayed and the item is not revised).
NOTE The ISPF client does not support complex merges such as merging projects (use the desktop client or the web client). However, you can use an external merge tool and hook it into the ISPF interface (consult your system administrator).

Dimensions for z/OS Guide 113
You terminate the Edit Item panel by pressing END or CANCEL (the item is not returned to the Dimensions database).
Updating ItemsUse the Update Item panel to create a new revision of an item and check it in without checking out and editing the existing item. For example, you can add an item not previously in Dimensions as a new revision of an existing item. The Source Dataset fields specify the source of the new revision. You can also associate the item with a request.
Actioning ItemsUse the Action Item panel to action an item to a different lifecycle state. In the panel you can also:
Specify if you want to build the item after it is actioned.
Enter additional qualifiers in the Options field. The qualifiers are appended to the command line constructed from the other entries on this panel.
Deleting an ItemUse the Delete Item panel to delete an item revision and remove it from the Dimensions repository. You cannot delete a revision that is being used by other objects. For example, you cannot delete a revision that has been included in a release or archive baseline.
Deploying an ItemUse the Deploy Item panel to move an item to another stage in the Global Stage Lifecycle (GLS). Optionally, you can also choose to start a build after the deployment has completed. The Global Stage Lifecycle is the lifecycle that items follow that controls which versions of the items are included in the configurations and builds of a project. Item revisions are moved to the next stage in this lifecycle when they have reached the appropriate stage of approval (a process called 'deployment'). If any deployment areas are associated with the stage the item files are copied to those areas when the items are deployed to the stage.

114 Dimensions® CM
Performing Actions on Groups of ItemsYou can perform the following actions on a group of items that you have selected:
Check in
Check out
Undo check out
Get
Action
Delete
Update
Deploy
To perform an action on a group of items:
1 Enter 's' next to each item that you want to select. Press Enter. An 's' is displayed to the left of item that is selected.
2 From the Item menu select a group action and press Enter. The group panel is displayed for the action that you selected. The Selected Items field lists the items that you selected.
3 Populate the fields in the panel as required and press Enter to execute the action.
4 To unselect the items in the ISPF client main panel, enter 's' next to each item and press Enter.

Dimensions for z/OS Guide 115
Creating ItemsUse the Create Item panel to add a new item to a Dimensions repository. You must have a role that enables you to action an item from its initial lifecycle state to a new state. If the Product Manager has assigned the $ORIGINATOR role to the first transition in the lifecycle for this item type, any Dimensions user that has a role on the design part that owns the new item can create an item.
To open the panel, from the Item menu choose Create.
Browsing and Printing RequestsUse the Browse/Print Requests panel to select, or enter, the ID of a request, retrieve it to a temporary data set, invoke the ISPF Editor in read-only mode, and print the request. You can also enter additional qualifiers in the Options field.
To open the panel from the Commands menu choose Browse Request.
BuildingThe ISPF client enables you to build items, projects, requests, and baselines. Builds are managed by Dimensions Build, a build management, execution, and monitoring tool that is part of Dimensions CM.
You can optionally capture build outputs and check them automatically into Dimensions. This functionality is referred to as a closed-loop build.
NOTE
Micro Focus recommends using a plain text format for requests on mainframes.
Request attachments are not retrieved to mainframes. If you require attachments, use the desktop client or the web client.

116 Dimensions® CM
When you capture build outputs you can optionally select the requests that the outputs will be related to.
For information about using the build panels see the panel help.
For information about configuring and using Dimensions Build see the Dimensions Build online help. This document also contains an MVS build tutorial.
For information about running builds from the command-line client see the Command-Line Reference.
Configuration Pop-up
For the Build Item, Build Project, and, Build Request panels the Configuration pop-up shows the latest checked in versions of the build configurations in the following format:
<build configuration name>;<version>
For example, if you have two versions of the build configuration build_test that are checked in, build_test;1 and build_test;2, the list displays:
build_test;2

Dimensions for z/OS Guide 117
Building ItemsYou can only build an item if the Dimensions project to which it belongs has one or more build configurations. To open the Build Item panel enter 'm' next to the item and press Enter.
The Configuration pop-up in the Build Item panel only displays build configurations:
That are associated with the current Dimensions project.
Where the items that you selected have affected targets.
In the example above Build_configuration_1 contains Item_1 that affects Target_1 and is displayed in the Build Configuration list. However, Build_configuration_2 is not displayed as the item it contains does not affect any targets.
Building ProjectsYou can only build a Dimensions project if it is has one or more build configurations. To open the Build Projects panel, from the Build menu choose Current Project.
Building RequestsYou can only build a request if the Dimensions project to which it belongs has one or more build configurations. This feature is useful when you want to build all the items related to a specific request.

118 Dimensions® CM
The Build Request panel enables you to include requests that have a child relationship to the request you are building.
In the example above, if you select the Include item(s) from related child requests check box all the items will be built. If you do not select the check box only Item_1 will be built.
The Configuration pop-up only displays build configurations:
That are associated with the current Dimensions project.
Where the items in the requests have affected targets.
In the example above the Configuration pop-up displays Build_configuration_1 because Item_1 in Request_1 has an affected target. Build_configuration_2 is not displayed because Item_2 in Request_2 does not have an affected target.
Building BaselinesYou can only build a baseline if it was created against a Dimensions project that has one or more build configurations.
Build configuration versions with the prefix '*' were checked in when the baseline was created against the Dimensions project. These are the latest versions of the build configurations at the time the baseline was

Dimensions for z/OS Guide 119
created. Build configuration versions without the prefix '*' were created after the baseline was captured for the project.
In the example above the Configuration pop-up displays the following configurations:
*Build_configuration1;1
Build_configuration1;2
*Build_configuration2;4
Build_configuration3;1
In the Build Work Area pop-up work areas above the divider are areas set up for the build configuration that you have selected and you have access to. Work areas below the divider are all other areas to which you have access.

120 Dimensions® CM
In the example above the Build Work Area list displays the following work areas:
WA_1WA_2----WA_3WA_4
Impacted TargetsThe Impacted Targets option displays the build target(s) affected by an item that you select. This is useful when you want to check what targets will be built before you launch a build. To display a list of impacted targets enter 't' next to the item and press Enter.
Entering Dimensions CommandsUse the Command Entry panel to enter Dimensions commands. No validation is performed by the ISPF interface and all command output is written to the scratch data set and log file. After a command has been executed, ISPF Browse is invoked on the scratch data set member, allowing you to browse the command output.
To open the Command Entry panel, from the Commands menu choose Command Entry. To enter a command, place the cursor in the Dimensions command field and enter the command syntax exactly as described in the Command-Line Reference. Dimensions executes the command immediately after you press the Enter key. Any information output by the command is written to a temporary data set and written to
NOTE You can only build a baseline in a work area.

Dimensions for z/OS Guide 121
the command log file that you optionally specified in the Settings panel (see page 106).
Repeating Recently Used CommandsThe area at the bottom of the Command Entry panel lists the ten most recently used commands. To repeat a command, place the cursor on the command and press Enter. The command is copied to the Dimensions command field. Edit the command (if required) and press Enter to execute it.
Using the History ListThe Command Entry panel allows you to control the commands that are displayed in the recently used commands list. From the List menu in the Command Entry panel choose one of the following options:
Update On: saves commands in history and displays them in the recently used commands list.
Update Off: does not save commands in history.
NOTE Do not enter a SCWS command as this will invalidate the view being displayed in the ISPF interface. Use the Set Current Project panel to change the current project. If you do enter a SCWS command, press F5 (refresh) when you return to the ISPF main panel. For more details about changing projects, see page 108.
For a list of commands that are not currently supported by the ISPF client see page 206 or open the help topic for the Command Entry panel.
NOTE An asterisk (*) to the left of the menu item indicates which option is currently active.

122 Dimensions® CM
For example, assume the following scenario:
1 Update is switched on.
2 The following commands are entered:
• EI
• RI
3 Update is switched off.
4 The following commands are entered:
• CRB
• DI
5 Update is switched back on.
6 The following command is entered:
• DIFF
The recently used commands list will look like this:
=> EI
=> RI
=> DIFF
Processing Commands in Batch ModeUse the Batch Command Input panel to specify a data set containing Dimensions commands and process them in batch mode. You can also specify an alternative log file data set where you want Dimensions to write the results of each command that it executes. If you leave this field blank the results are written to the temporary log file.
After you press Enter the ISPF client executes each command in order, writes the results to a temporary data set, and displays the data set in ISPF Browse. The results conclude with a summary of the commands executed.
To open the panel from the Commands menu choose Batch Commands.

Dimensions for z/OS Guide 123
An alternative method of running Dimensions commands in batch mode is to use the batch interface, for details see page 125.
Logging In to a Remote NodeUse the Remote Login panel to log in to a Dimensions remote node. To open the panel from the File menu choose Node Login.
An alternative method of logging in to a remote node is to submit an AUTH command at the command line. The AUTH command enables you to perform tertiary node access to items located on a remote node. All communication across the network of this sensitive information is encrypted. However, for the reasons detailed below, Micro Focus strongly recommends that you use the Remote Login panel:
You do not need to check that parameters are spelled correctly.
You are automatically prompted to change your password when required.
Password information is protected (it is not displayed).
You can log in to multiple nodes by changing field values in the Remote Login panel.
If your log in parameters are saved (see "Password Retention" on page 102), Dimensions saves all remote node authentications performed through the Remote Login panel, and re-executes them next time you log in. However, if you use AUTH commands, you have to resubmit the information every time you log in. The AUTH command is described in the Command-Line Reference.
NOTE If you attempt to get, or check out, an item from a remote node before logging in to the node, Dimensions automatically displays the Remote Login panel and populates the Node Information field with the host name.

124 Dimensions® CM
Changing PasswordsUse the Change Password panel to change the password for a user ID on a mainframe node. To open the panel from the File menu choose Change Password.
This facility is not available for non-mainframe nodes or from the Dimensions log in panel.
Browsing the Command Log FileUse the Browse option to display the current log file in ISPF Browse. To open the log file from the File menu choose Browse Log.
Entering TSO CommandsMost ISPF client panels have a Command prompt in the top left corner where you can enter TSO commands.
Logging Off from the ISPF ClientTo log off from the ISPF client from the File menu choose Log Off/Exit.

Dimensions for z/OS Guide 125
Chapter 6Using the Batch Interface
Overview 126DD Names 127Return Codes 129Securing Passwords 129Example JCL Jobstream 129Using the Batch Interface Interactively 132

126 Dimensions® CM
OverviewMDFLCMD is the Dimensions for z/OS batch interface. The following diagram illustrates how MDFLCMD integrates into the general environment:
Use the following methods to process Dimensions commands in batches:
Specify the commands in a JCL jobstream, REXX exec, or TSO session.
Create a data set to contain the commands.
Use a combination of in-stream commands and data sets.
The mainframe node information is not required when you use MDFLCMD. However, if the batch job refers to any tertiary nodes, including the mainframe that you are logged in to, you must include an AUTH command in the batch script. This AUTH command can be held separately from the rest of the commands to protect the LOGIN details, see page 132 for details.
An alternative method of running Dimensions commands in batch mode is to use the ISPF Batch Command Input panel. See page 122 for details.

Dimensions for z/OS Guide 127
DD Names
LOGINThe LOGIN member is optional. Sequence numbers are ignored, and only information in columns 1 through 72 is used. LOGIN contains information structured as follows:
/switch value value value
You can spread this structure over as many lines as required. Values are concatenated and spaces are ignored.
The following switches are available:
COMMAND and SYSINYou must use either COMMAND or SYSIN. Do not use sequence numbers in these records.
You can expand commands over multiple lines by placing a hyphen '-' on the end of a line, up to a maximum of 1000 bytes.
If the DDNAME COMMAND is present, commands are expected to come from this data set. Otherwise, DDNAME SYSIN is used for commands.
Switch Description
/CERTIFICATE Specifies a one-time digital certificate.
/DBNAME Specifies a database name.
/DBPASS Specifies a database password.
/DSN Specifies a database connection string.
/HOST Specifies a host name.
/PASS Specifies the password for the user ID.
/USER Specifies the user ID for an account on the Dimensions database server.

128 Dimensions® CM
The first six records of this stream must contain log in information if the LOGIN DDNAME has not been used for logging in. You must specify the log in information exactly as follows (the order is important and information that you omit must be on blank lines):
Dimensions user ID
Dimensions password for the user ID
Dimensions base database name
Dimensions base database password (usually blank)
Dimensions database data source
DNS name of the Dimensions Server machine and, optionally, a semi-colon followed by a port number. For example: dmserver:8088
See the examples below for more details.
SYSPRINTThis stream holds the commands entered and their results. At the end of the stream, a summary of executed commands is sent to SYSPRINT, for example:
Command Execution Summary7 commands processed5 completed successfully1 completed with error(s)1 user authentication failure(s)
SYSOUTSome messages, particularly from the LE runtime library, may be produced on SYSOUT.

Dimensions for z/OS Guide 129
Return CodesWhen a batch job ends it reports the following information:
Securing PasswordsTo maintain the integrity of log in information, Micro Focus recommends that you keep your log in IDs and passwords in data sets protected by your site's mainframe security system. These data sets can then be concatenated with the commands data sets via the SYSIN DD or allocated to the LOGIN DD name.
Example JCL JobstreamThe following example is a JCL jobstream that invokes Dimensions and runs commands:
Code Description
0 Successful completion.
4 Successful connection but command errors were encountered.
12 Successful connection but one or more authorizations to remote nodes failed; command errors may have occurred as well.
16 Connection failure.
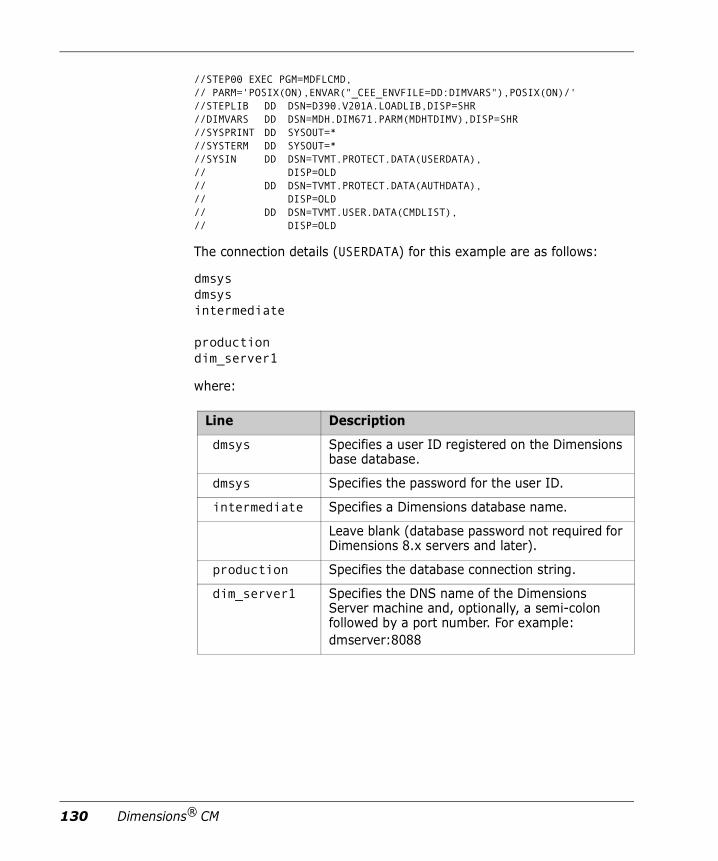
130 Dimensions® CM
//STEP00 EXEC PGM=MDFLCMD,// PARM='POSIX(ON),ENVAR("_CEE_ENVFILE=DD:DIMVARS"),POSIX(ON)/'//STEPLIB DD DSN=D390.V201A.LOADLIB,DISP=SHR//DIMVARS DD DSN=MDH.DIM671.PARM(MDHTDIMV),DISP=SHR//SYSPRINT DD SYSOUT=*//SYSTERM DD SYSOUT=*//SYSIN DD DSN=TVMT.PROTECT.DATA(USERDATA),// DISP=OLD// DD DSN=TVMT.PROTECT.DATA(AUTHDATA),// DISP=OLD// DD DSN=TVMT.USER.DATA(CMDLIST),// DISP=OLD
The connection details (USERDATA) for this example are as follows:
dmsysdmsysintermediate
productiondim_server1
where:
Line Description
dmsys Specifies a user ID registered on the Dimensions base database.
dmsys Specifies the password for the user ID.
intermediate Specifies a Dimensions database name.
Leave blank (database password not required for Dimensions 8.x servers and later).
production Specifies the database connection string.
dim_server1 Specifies the DNS name of the Dimensions Server machine and, optionally, a semi-colon followed by a port number. For example:dmserver:8088

Dimensions for z/OS Guide 131
The AUTH data set command (AUTHDATA) is as follows:
AUTH /network_node=unix_node /user=dmsys /password=dmsys
The following example uses the COMMAND and LOGIN DDs:
//MTROTHX JOB 'MTROTHX',NOTIFY=&SYSUID,CLASS=A,MSGCLASS=H//STEP00 EXEC PGM=MDFLCMD, // PARM='POSIX(ON),ENVAR("_CEE_ENVFILE=DD:DIMVARS")/' //*STEPLIB DD DSN=MTROTH.V912.LOAD, //* DISP=SHR //STEPLIB DD DSN=MDH.V910.MDHLLIB, // DISP=SHR // DD DSN=MDH.V910.MDHLLPA, // DISP=SHR //DIMVARS DD DSN=MDH.DIM671.PARM(MDHTDIMV), // DISP=SHR //SYSOUT DD SYSOUT=* //SYSPRINT DD SYSOUT=* //SYSTERM DD SYSOUT=* //LOGIN DD DSN=MTROTH.WORK.PCMS(LOGIN), // DISP=SHR //COMMAND DD DSN=MTROTH.WORK.PCMS(CMDLIST), // DISP=SHR //*
LOGIN contains a tokenized list of login attributes, for example:
/user dmsys /pass dmsys /dbname intermediate /dsn dim9 /host 192.168.1.142
COMMAND DD contains the Dimensions commands to execute, for example: SCWSLWSD /ITEMS /RECURSIVE

132 Dimensions® CM
Using the Batch Interface InteractivelyTo use the batch interface in the context of a TSO session, issue TSO commands to:
1 Allocate COMMAND or SYSIN to pass commands. This may be your TSO terminal or an existing member or members.
/* terminates a terminal input.
2 Allocate LOGIN to your security credentials data set.
3 Allocate all the other data sets as shown "Example JCL Jobstream" on page 129.
4 Execute the batch interface using the TSO CALL command:
CALL *(MDFLCMD)
5 Pass Dimensions commands into COMMAND or SYSIN.

Dimensions for z/OS Guide 133
Chapter 7Using the Command-Line Client on USS
Using the Command-Line Client 134Invoking Help 135

134 Dimensions® CM
Using the Command-Line ClientThe Dimensions command-line client, dmcli, is available on USS and is equivalent in functionally to that available on other platforms. On z/OS systems there is no interactive login box, and you must enter your login parameters at the command-line prompt. Consequently, the -con <connection> option does not work.
For information about issuing Dimensions commands in a TSO session, see page 124.
To use the Dimensions command line client on USS:
1 At your USS prompt, enter:
dmcli-user <user-id>-pass <user-password> -host <server-name>-dbname <database name> -dsn <dsn-name>
where:
2 Enter commands at the Dimensions client command prompt. For full details about using the command-line client and the commands see the Command-Line Reference.
Parameter Description
-user <user-id> A user ID that is registered on the Dimensions base database that you want to log in to.
-pass <user-password> The password for the user ID.
-host <server-name> The host name of the Dimensions server.
-dbname <database name> The name of the database that you want to connect to on the Dimensions server.
-dsn <dsn-name> The database connection string.
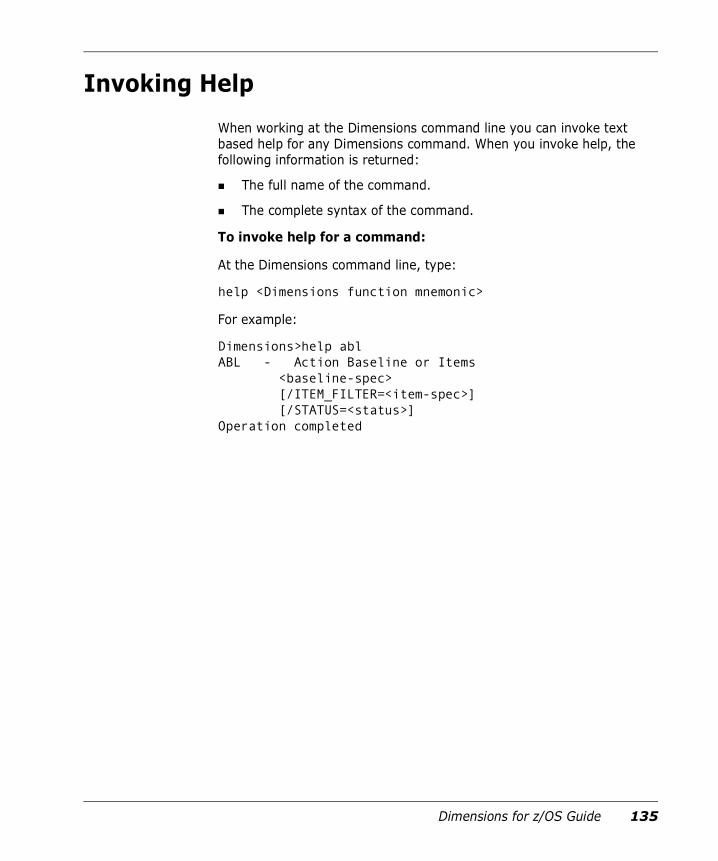
Dimensions for z/OS Guide 135
Invoking HelpWhen working at the Dimensions command line you can invoke text based help for any Dimensions command. When you invoke help, the following information is returned:
The full name of the command.
The complete syntax of the command.
To invoke help for a command:
At the Dimensions command line, type:
help <Dimensions function mnemonic>
For example:
Dimensions>help ablABL - Action Baseline or Items <baseline-spec> [/ITEM_FILTER=<item-spec>] [/STATUS=<status>]Operation completed

136 Dimensions® CM

Dimensions for z/OS Guide 137
Chapter 8Customizing and Extending the ISPF Client
Introduction 138ISPF Client Extensions 138API Interface 149Source Code Library 162

138 Dimensions® CM
IntroductionThe purpose of this SDK is to describe some of the user customizable and extendable features of the Dimensions for z/OS ISPF client.
This SDK assumes that you are familiar with the IBM C development environment and the aspects of developing ISPF applications. Please refer to the IBM documentation for more information about these topics.
There are links in this SDK to example source code that ships with the product. Although Micro Focus makes every effort to update the source accompanying this documentation, it is recommended that you refer to the installation directories on the z/OS itself before performing any actual coding changes.
ISPF Client Extensions
MDFRLOGMDFRLOG is a REXX script that is called during initialization and termination of the ISPF client. The purpose of MDFRLOG is to manage the log file used by the client. The example below is for a MDFRLOG REXX:
NOTE This SDK is also available as web-based help. For details about installing the help see "Step A-1 Unpacking and Moving the Distribution" on page 26.

Dimensions for z/OS Guide 139
/* REXX*/arg currFuncif currFunc= 'INIT' then /* Log file initialization */ do /*Determine log file name */ dsn = "'"userid()".dim390.logfile'" /* Save log file name in shared pool */ LOGFILE = dsn ADDRESS ISPEXEC "VPUT (LOGFILE) SHARED" /* Allocate file name if it doesn't exist */ if sysdsn(dsn)'OK' then do "alloc da("dsn") recfm(v b) lrecl(256) dsorg(ps) ", "space(5,10) cylinders" end endelse /* Log file termination */ do /* The following code could be used to delete the log file */ /* when execution completes */ /* ADDRESS ISPEXEC "VGET (LOGFILE) SHARED" */ /* "delete "LOGFILE */ endreturn
When MDFRLOG is invoked, it is passed a single function parameter that indicates the current activity that needs to be performed. This parameter has one of the following values:
INIT (Initialization): Indicates that the client is in the process of starting. At a minimum, processing must ensure the log file is allocated (vb, lrecl=256 is recommended) and that the name of the log file is stored in the SHARED pool variable LOGFILE. The ISPF client gets the value of LOGFILE and uses the name contained in it to perform logging.
TERM (Termination): Indicates that the client is in the process of closing. Any clean-up of the log file should be performed. Optional operations include deleting the log file or versioning it for saving client activity history.
The operating system searches the SYSEXEC DD for REXX scripts to execute, therefore each user has the ability to use their own version of MDFRLOG by adding it to the search path. Apart from the minimum requirements outlined above, any REXX code/functions can be utilized in this script file.

140 Dimensions® CM
MDFRCMPRMDFRCMPR is a REXX script that is called by the ISPF client when you invoke the client's compare feature. The purpose of MDFRCMPR is to start a mainframe compare tool using the data sets passed into it. The example below is a MDFRCMPR REXX:
/* REXX*/arg DSN1 DSN2"%SUPERC OLDFILE("DSN1") NEWFILE("DSN2") BROWSE"return
When you invoke MDFRCMPR it is passed the two data sets to be compared. The ISPF client will have already retrieved the selected members into these data sets. The REXX then invokes the compare tool of choice and, optionally, browses the results. When the execution of MDFRCMPR is complete and control is returned to the client, any temporary data sets are deleted.
The default Dimensions for z/OS installation uses a CLIST named SUPERC that invokes the SUPERC utility for comparison and then starts ISPF browse on the resulting data set. However, if your site uses a different compare tool, MDFRCMPR can be modified to perform any processing necessary to invoke your compare tool.
The operating system searches the SYSEXEC DD for REXX scripts to execute, therefore each user has the ability to use their own version of MDFRCMPR by adding it to the search path.

Dimensions for z/OS Guide 141
MDFRTMPMDFRTMP is a REXX script that is called by the ISPF client when an operation involving a temporary data set is involved. The purpose of MDFRTMP is to provide the name of the temporary data set to be used for the operation. Dimensions allocates the data set with the proper DCB attributes so you only need to provide the names that are required.
/* REXX */arg midLevel
/* Determine temp file name */if LENGTH(midLevel) > 0 then dsn = userid()".SRNA."midLevel".T"||, RANDOM(1000,9999)||RANDOM(100,999)||".TMP"else dsn = userid()||".SRNA.T"||RANDOM(1000,9999)||RANDOM(100,999)||".TMP"/* Save log file name in shared pool */TMPDSN = dsnADDRESS ISPEXEC "VPUT (TMPDSN) SHARED"return
When you invoke MDFRTMP it is passed the mid-level qualifier for the data set, which is an indication of the type of operation being performed (BROWSE, EDIT, etc.). By default you can optionally use this mid-level qualifier in the data set name.
The temporary data set name should be constructed using your sites standards and returned in the SHARED pool variable TMPDSN.

142 Dimensions® CM
MDFRSFFMDFRSFF is a REXX script that is called by the ISPF client when an operation involving a file is involved. The purpose of MDFRSFF is to provide the name of the file to be used based on the filename as it resides in Dimensions.
Since you can perform the operation to any Dimensions network node on any operating system, this routine must be able to formulate the filename for any operating system.
/* REXX *//* (C) Serena 2006 *//* This exit is used by the Serena Dimensions ISPF client *//* to perform name mangling between the Dimensions *//* project filename and the MVS filesystem. */
ADDRESS ISPEXEC
/* Get project root file system */"VGET PRJRNFS SHARED"
/* Get project root operating system */"VGET PRJRNOS SHARED"
/* Get current name mangling function */"VGET RXFUNC SHARED"
/* Get project root user area */"VGET UAREA PROFILE"
/* Get project root navigation path */"VGET PRJPATH SHARED"
/* Get setting on using full workset directories for MVS */"VGET WSETDIRS PROFILE"
/* Set name mangling to MVS for local file operations */if RXFUNC = 1 then PRJRNFS = "MVS"
/* Open selected items table */"TBOPEN DSELLST WRITE"
/* Position pointer to top of table */"TBTOP DSELLST"
/* Move to first record */"TBSKIP DSELLST"
do while rc = 0 if PRJRNFS = "MVS" then /* MVS style file system */ do /* Determine if file extension */ x = pos(".", TSFILE)
if x > 0 then /* If file extension, turn in dataset LLQ */ do if x > 8 then y = 9 else

Dimensions for z/OS Guide 143
y = x
TEMPFILE = left(TSFILE, (y - 1)) TEMPTYPE = right(TSFILE, length(TSFILE) - x)
TSTFILE = TEMPTYPE"("TEMPFILE")" end else /* No file extension, use current dir as LLQ */ do if WSETDIRS <> 'Y' then do if length(PRJPATH) > 0 then /* Project dir exists */ do /* Determine if separator present */ x = lastpos(".", PRJPATH)
if x > 0 then /* Separator exists */ TEMPTYPE = right(PRJPATH, length(PRJPATH) - x) else /* No directory separator */ TEMPTYPE = PRJPATH end else TEMPTYPE = "" end else TEMPTYPE = ""
if length(TEMPTYPE) > 0 then TSTFILE = TEMPTYPE"("TSFILE")" else TSTFILE = TSFILE end end else /* Non-MVS style file system */ do TSTFILE = TSFILE end
/* Save target file name */ "TBPUT DSELLST"
/* Move to next record */ "TBSKIP DSELLST"end
/* Close selected items table */"TBCLOSE DSELLST"
return
When you invoke MDFRSFF it is not passed any parameters. However, it can use variables from the SHARED and PROFILE pools to get information about what is going on in the ISPF client. Using this information, it can then formulate the target filename for the given operation.
Since group operations are supported, the routine should loop through the DSELLST table and process each record. The full contents of this table are described on page 151. Place the calculated target filename in the TSTFILE variable and update the table record.

144 Dimensions® CM
When return is received from the REXX, the client combines the project root directory with the filename(s) from this table to formulate the source/target location for the file operation being executed.
MDFRVIEWMDFRVIEW is a REXX script that you can modify to control the ISPF service that is called when a user selects ‘B’ (Browse) next to an item in a project list, for example, Browse, View, or a 3rd party tool.
The only input parameter is DSN1, which is the fully qualified data set name to perform the operation on. Any return code from the REXX routine is ignored by the ISPF client.
/* REXX *//* This exit is used by the Serena Dimensions ISPF client *//* to perform a browse/view of a dataset for various *//* item operations. */
arg DSN1
ADDRESS ISPEXEC
"VIEW DATASET("DSN1")"
return
Client Executable ComponentsThe Dimensions for z/OS ISPF client is comprised of the following executable components:
MDFLISPF: The main client executable that contains mostly ISPF panel logic.
MDFLCMD: Dimensions for z/OS batch client that you can use from JCL to process Dimensions commands.
MDFDEXT: Client SDK features documented here.
MDFDUSR: Customer built extension DLL that contains all user extension functions.
To add functionality to the client see the three areas of logic described below.

Dimensions for z/OS Guide 145
User Interface
The first thing to decide when you are extending the client is how the users will invoke your function. If the function you are providing does not require an item to be selected from the Dimensions database, add it as a menu item to the main panel. However, if you are providing an item function, adding an action code may be a better choice.
The following panels may be of interest when you are adding functionality to the client:
The panels uses the following ISPF fields to communicate user data back to the client:
DACTION: a single character field that indicates the action to be performed on the item. The value in this field typically indicates an action to be performed on the selected item (Action, Check In, Check Out, etc.). There should be one field for each line item displayed on the panel.
DIMNAV: a multi-character field that indicates a global action to be performed. The value in this field typically indicates a navigation function that needs to occur (Log display, Command Entry display, etc.). This field contains a single value and is acted on immediately by the client, overriding any values in DACTION.
Converting Action Codes to a DIMNAV String
When the client regains control from the main panel it first checks the value of DIMNAV. If DIMNAV is blank, it begins checking for action codes
Panel ID Description
MDFPTREE Main ISPF display
MDFPIAS1 Item action selection (without build options)
MDFPIAS2 Item action selection
IMPORTANT! Do not change the default/reserved action codes on the MDFPIAS panels. You can rearrange the numbering as long as you change the IF logic in the PROC section to set the alpha action codes properly. However, if you change the default/reserved alpha codes, the client will stop working for the actions selected from this panel.

146 Dimensions® CM
entered next to Dimensions items displayed on the screen. When an action code is found, it compares the value to the default and reserved codes.
The default and reserved action codes are:
If the action code entered by the user cannot be found in the list above the extension function ProcessUSelect() is called to verify the code against the custom codes that have been added by the customer. ProcessUSelect() has two parameters:
A single character action code (char)
A pointer to the DIMNAV field (char *)
Action Code Description
/ Action pop-up
S Expand a directory, or 'toggle on' the selected attribute for a file
O Check out an item
I Check in an item
X Undo an item check out
B Browse an item
G Get an item
C Compare an item
E Edit an item
U Update an item
D Delete an item
M Build an item
A Action an item
H History of an item
P Deploy an item
T Impacted targets of an item
NOTE ProcessUSelect() is defined in MDTCNAV and must always be present in the MDFDUSR DLL.

Dimensions for z/OS Guide 147
The main function of ProcessUSelect() is to verify the incoming action code and set the return value DIMNAV accordingly. If the action code is supported by the extension DLL, set DIMNAV to a navigation string that will be recognized later by the extension DLL. If the action code cannot be found, leave DIMNAV blank. See the next section for details about DIMNAV reserved values.
In the MDTCNAV shipped with the client there is a commented out example of checking for a 'Z' action code and setting the DIMNAV field to the appropriate string value to invoke the Create Item panel.
Invoking Functions Based on a DIMNAV String
After an action code has been converted to a string value (if necessary), the ISPF client will begin processing each function. The following are reserved strings/functions:
DIMNAV String Description
LOGOFF Log off and exit client
BRWITM Browse item
GETITM Get item panel
CHKOUT Check out item panel
CHKIN Check in item panel
UCHKOUT Undo item check out panel
RLOGIN Remote login panel
COMPARE Compare panel
BCHGDOC Browse change doc panel
COMMAND Command entry panel
BATCH Batch command panel
LOG Display log file
CHGWKSET Change project panel
SET01 General settings panel
UPDITM Update item
EDITITM Edit item
DELITM Delete item

148 Dimensions® CM
If the current value of DIMNAV cannot be found in the list above, the user function ProcessUPanels() is called to process the request. ProcessUPanels() has two parameters:
• A pointer to the current session info structure (SESSION_INFO *)
• A pointer to the DIMNAV field (char *)
In the MDTCNAV shipped with the client there is a commented out example of checking for 'USRNEW' in the DIMNAV field and calling the CreateItem() function. CreateItem() is defined in MDTCNEW. See this SDK documentation for information about the structures, variables, and functions used in CreateItem() that is available to any functions that you write.
BLDITM Build item
ACTITM Action item
ABOUT About the ISPF client
NEWITM New/create item
AFFTGTS Impacted targets of item
DEPITM Deploy item
BLDR Build request
BLDBL Build baseline
CHGPSW Change password
CHGWSRT Change project root
BLDPRJ Build project
SET02 Main panel settings
DIMNAV String Description
NOTE ProcessUPanels() is defined in MDTCNAV and must always be present in the MDFDUSR DLL.

Dimensions for z/OS Guide 149
API Interface
Main Header FileThe main header file for the ISPF client is MDTHDIM. Include this file in any C sources that access SDK functions and features. The header file includes:
Common #defines
Structures used by the client and API functions
#defines for ISPF variables used by the client
ISPF VariablesThere are a number of ISPF variables that are used by the client. In general variables that store information during the current client session are stored in the SHARED pool. Variables which need to be saved from session to session are stored in the PROFILE pool. For each variable, you will find a #define for the variable name and a #define for the variable length.
For example:
#define PROF_CREATE_LOG "MAKELOG "#define PROF_CREATE_LOG_SIZE 1
In the example above, 'PROF_' indicates that this variable exists in the PROFILE pool. Defined variables which start with 'SHR_' exist in the SHARED pool.
The following pool variables are used by the client:
#Define Name Size Pool Format Description
PROF_AUTO_EXPAND PROF_AUTO_EXPAND_SIZE P CHAR Expand all item revisions on main panel (Y/N).
PROF_CREATE_LOG PROF_CREATE_LOG_SIZE P CHAR Create log file during session (Y/N).

150 Dimensions® CM
PROF_LOCAL_ROOT PROF_LOCAL_ROOT_SIZE P CHAR Reset server project root with local root (Y/N).
PROF_PERSONAL_PATH PROF_PERSONAL_PATH_SIZE P CHAR Use personal search path on DEVELOPMENT builds (Y/N).
PROF_UAREA PROF_UAREA_SIZE P BINSTR Current user area entered on Change Project panel.
PROF_USE_TSO_PREFIX PROF_USE_TSO_PREFIX_SIZE P CHAR Use TSO Prefix (Y/N).
PROF_PROJECT_DIRS PROF_PROJECR_DIRS_SIZE P CHAR Attach project directory paths on filenames (Y/N).
SHR_LOGFILE SHR_LOGFILE_SIZE S CHAR Log data set name (set by MDFRLOG REXX during startup).
SHR_NODENAME SHR_NODENAME_SIZE S BINSTR Node name entered on the login panel.
SHR_PROJECT SHR_PROJECT_SIZE S BINSTR Current project name associated with project.
SHR_PROJECT_UID 4 S FIXED Project UID.
SHR_ROOTPATH SHR_ROOTPATH_SIZE S BINSTR Root path as calculated using the UAREA and the current directory in the project.
SHR_PRJ_RNODE_NAME SHR_PRJ_RNODE_NAME_SIZE S BINSTR Node name entered on project root.
SHR_PRJ_RNODE_OS SHR_PRJ_RNODE_OS_SIZE S BINSTR Project root node OS type.
SHR_PRJ_RNODE_FS SHR_PRJ_RNODE_FS_SIZE S BINSTR Project root node file system.
SHR_PROJECT_DEPLOY_MODEL
SHR_PROJECT_DEPLOY_MODEL_SIZE
S CHAR Deployment model currently being used by the project.
#Define Name Size Pool Format Description

Dimensions for z/OS Guide 151
Information about the currently selected item(s) is stored in an ISPF table called 'DSELLST'. A user defined panel can utilize 'DSELLST' to perform processing on the currently selected item in the ISPF client.
The table name is #defined as TBL_SELECTED_ITEMS.
DSELLST Table Variables
The #defines for the 'DSELLST' table variables are as follows:
SHR_SERVER_NAME SHR_SERVER_NAME_SIZE S BINSTR Server name used on the current connection.
SHR_WORKSET_UID 4 S FIXED Project UID.
SHR_BUILDABLE SHR_BUILDABLE_SIZE S CHAR Current project is buildable.
SHR_TEMPDSN_NAME SHR_TEMPDSN_NAME_SIZE S BINSTR Temporary data set name.
SHR_WSPATH SHR_WSPATH_SIZE S BINSTR Current project root.
#Define Name Size Pool Format Description
#Define Name Size Format Description
TBL_ITEM_STAGE TBL_ITEM_STAGE_SIZE BINSTR Selected item stage
TBL_ITEM_DATE TBL_ITEM_DATE_SIZE BINSTR Selected item date
TBL_ITEM_TGT_FILE TBL_ITEM_TGT_FILE_SIZE BINSTR Selected item target filename
TBL_ITEM_FILE TBL_ITEM_FILE_SIZE BINSTR Selected item file
TBL_ITEM_INITIALS TBL_ITEM_INITIALS_SIZE BINSTR Selected item initials
TBL_ITEM_REVISION TBL_ITEM_REVISION_SIZE BINSTR Selected item revision
TBL_ITEM_SPEC TBL_ITEM_SPEC_SIZE BINSTR Selected item specification
TBL_ITEM_STATUS TBL_ITEM_STATUS_SIZE BINSTR Selected item status
TBL_ITEM_UID 4 FIXED Selected item UID

152 Dimensions® CM
API Common StructuresThe following sections describe the common structures used by the APIs.
ITEM_INFO
Purpose
The item information structure contains information about the currently selected item and is typically used by the GetSelectedItem() function.
Declaration
typedef struct { char iSpec[TBL_ITEM_SPEC_SIZE]; char iFile[TBL_ITEM_FILE_SIZE]; char iDate[TBL_ITEM_DATE_SIZE]; char iInitials[TBL_ITEM_INITIALS_SIZE]; char iRevision[TBL_ITEM_REVISION_SIZE]; char iStatus[TBL_ITEM_STATUS_SIZE]; char iStage[TBL_ITEM_STAGE_SIZE]; char iTgtFile[TBL_ITEM_TGT_FILE_SIZE]; long iID;} ITEM_INFO;
Field Descriptions
iSpec: item specification
iFile: item file name
iDate: item modified date
iInitials: item modified initials
iRevision: item revision
iStatus: item status
iID: item UID
iStage: item stage
iTgtFile: item target filename

Dimensions for z/OS Guide 153
SESSION_INFO
Purpose
The session information structure contains common data that is required by any panel or action routine running within the client. For this reason, any user defined functions that you write should be passed a handle to this structure. You will receive a handle to this structure in the call to ProcessUPanels().
Declaration
typedef struct{ int hConnect; void *hLogfile; char nav[NAV_SIZE];} SESSION_INFO;
Field Descriptions
hConnect: a handle to the current Dimensions database connection. Is initialized when the client connects to the server in the Login panel. Generally you should not change the value of this variable. However, it is needed for any APIs that communicate with the Dimensions server.
hLogFile: a handle to the currently open log file. Only contains a value if the user has turned on logging in the Settings panel. This value is set by OpenCmdLog() and is needed for any calls to other log file APIs.
nav: a navigation field to pass back to the calling function. Contains the contents of DIMNAV when the user has selected to jump from one panel to another. If the user presses End on your panel, nav should be left blank. For example, if your panel was displayed and the user selected Command Entry from the Commands menu, you should set nav to the contents of DIMNAV (which should contain 'COMMAND') and your function should terminate. When the core client code gets control from your function it checks the value of this field and provides the proper navigation to the requested function.

154 Dimensions® CM
SITEM_SPEC
Purpose
The item specification structure is used by the ParseItemSpec() function to store item specification information.
Declaration
typedef struct{ char fullItemSpec[SITEM_FULLSPEC_SIZE]; char productId[SITEM_PRODUCT_SIZE]; char itemId[SITEM_ID_SIZE]; char variant[SITEM_VARIANT_SIZE]; char itemType[SITEM_TYPE_SIZE]; char revision[SITEM_REVISION_SIZE];} SITEM_SPEC;
Field Descriptions
fullItemSpec: full item specification (productID + itemId + variant + itemType + revision)
productId: item product ID
itemId: item ID
variant: item variant
itemType: item type
revision: item revision

Dimensions for z/OS Guide 155
General FunctionsThe following sections describe functions that enable you to work with ISPF and Dimensions features.
strlenb()
Purpose
This function returns the length of a blank padded string.
Prototype
long strlenb(char *searchString, long maxLen);
Parameters
searchString: blank padded string to determine length of.
maxLen: maximum length of string pointed to by searchString.
Return Codes
None.
Comments
This function can be found in many standard C libraries. However, it is not currently in the standard IBM C library.
B2N()
Purpose
This function converts a blank padded string to a null terminated string (and removes all trailing blanks).
Prototype
void B2N(char *blankStr,
long maxBlankStr,
char *nullStr,
long maxNullStr);

156 Dimensions® CM
Parameters
blankStr: blank delimited string to be converted.
maxBlankStr: maximum length of blank string.
nullStr: buffer to contain null terminated string.
maxNullStr: size of string buffer pointed to by nullStr.
Return Codes
None.
Comments
None.
N2B()
Purpose
This function converts a null terminated string to a blank padded string and adds any necessary trailing blanks.
Prototype
void N2B(char *nullStr, char *blankStr, long maxBlankStr);
Parameters
nullStr: buffer to contain null terminated string.
blankStr: blank delimited string to be converted.
maxBlankStr: maximum length of blank string.
Return Codes
None.
Comments
None.

Dimensions for z/OS Guide 157
GetSelectedItem()
Purpose
This function gets the requested item from the selected item table.
Prototype
long GetSelectedItem(long recNum, ITEM_INFO *itemInfo);
Parameters
recNum: numeric number of selected item record to retrieve. Item numbering starts at 1.
itemInfo: pointer to item information structure to be filled in by this function.
Return Codes
GET_ITEM_OK: requested item retrieved successfully.
GET_ITEM_ERROR: requested item could not be found.
Comments
When you are processing multiple items the easiest way to retrieve each item is within a loop that increments recNum for each successive call to GetSelectedItem() until GET_ITEM_ERROR is returned.
ParseItemSpec()
Purpose
This function parses a full item specification into its respective pieces or puts the pieces together into the full item specification.
Prototype
void ParseItemSpec(SITEM_SPEC *itemSpec);
Parameters
itemSpec: SITEM_SPEC structure with item specification details. Initializes the structure with the full item specification or the item specification pieces. The function uses this information to fill in the blank structure variables.

158 Dimensions® CM
Return Codes
None.
Comments
None.
Log File FunctionsThe log file functions help simplify the log file operations performed by the client.
OpenCmdLog()
Purpose
This function opens a command log file.
Prototype
long OpenCmdLog(void **logFile, char *fileName, long fileNameSize, bool refreshLog, bool systemLog, char *banner);
Parameters
logFile: a returned file handle to open the log file.
fileName: the name of the log file to open. If blank, the file name will be loaded with the value of SHR_LOGFILE from the SHARED pool and an open will be attempted.
fileNameSize: the length of the incoming filename field.
refreshLog: a TRUE/FALSE value indicating whether the log file should be blanked/refreshed upon open. If TRUE, the log file will be opened for output and any previous contents will be deleted. If FALSE, the log file will be opened for APPEND and all previous contents will be retained.

Dimensions for z/OS Guide 159
systemLog: a TRUE/FALSE value indicating whether the log file is the system log. A FALSE indicates that the log file is a temporary log file used for a short-term operation.
banner: (optional) a text string to print in the open log message.
Return Codes
LOG_FILE_OK: open was successful.
LOG_FILENAME_NOT_FOUND: file name could not be found.
LOG_FILE_OPEN_ERROR: file could not be opened.
Comments
None.
CloseCmdLog()
Purpose
This function closes a handle to a currently open command log.
Prototype
void CloseCmdLog(void **logFile), char *filename, bool deleteLog, bool systemLog);
Parameters
logFile: a handle to a currently open log file.
fileName: the name of the log file to open. If blank the file name will be loaded with the value of SHR_LOGFILE from the SHARED pool and an open will be attempted.
deleteLog: deletes the log file after close
systemLog: a TRUE/FALSE value indicating whether the log file is the system log. A FALSE indicates that the log file is a temporary log file used for a short-term operation.
Return Codes
None.

160 Dimensions® CM
Comments
None.
FlushCmdLog()
Purpose
This function flushes the output buffer for a currently open log file. A buffer flush will cause all output to be physically written to the disk.
Prototype
long FlushCmdLog(void **logFile, char *logFilename);
Parameters
logFile: a handle to the currently open log file.
logFilename: the name of the log file to refresh.
Return Codes
LOG_FILE_OK: reopen was successful.
LOG_FILENAME_NOT_FOUND: file name could not be found.
LOG_FILE_OPEN_ERROR: file could not be opened.
Comments
None.
WriteCmdLog()
Purpose
This function writes a string to a currently open command log.
Prototype
void WriteCmdLog(void *logFile, char *outputLine, int blankLines);

Dimensions for z/OS Guide 161
Parameters
logFile: a handle to a currently open log file.
outputLine: a null terminated string to write to a log file.
blankLines: the number of blank lines to write before the output string.
Return Codes
None.
Comments
None.

162 Dimensions® CM
Source Code LibraryThe source code library contains the key components of the Dimensions for z/OS SDK. The list below is divided into component types, some of which have cross-references to example source code.
NOTE For the latest version of the SDK check the installation data sets for the actual source members.
Source Code TypeComponent Type Description
C Source MDTCNAV Source code for user DLL that contains ProcessUSelect() and ProcessUPanels() functions. See the example on page 164.
MDTCNEW Source for sample Create Item panel. This example demonstrates how to implement a new panel in the ISPF client using some of the features provided by this SDK. See the example on page 165.
CLIST Scripts (CLIST)
MDFCCMPR Script used by the client compare feature to invoke SuperC and display results in ISPF Browse. With the default client installation this CLIST is invoked by the REXX MDFRCMPR. See the example on page 174.
JCL streams (CNTL) MDTJCOMP Example compile JCL for IBM C compiler. See the example on page 183.
MDTJLINK Example link JCL for IBM C DLL. See the example on page 183.
REXX Scripts (EXEC) MDFRCMPR Script used by the client compare feature to invoke a compare utility. With the default client installation this REXX invokes the CLIST MDFCCMPR. See the example on page 140.
MDFRTMP Script that is called to calculate a temporary data set name. See the example on page 141.
MDFRSFF Script that is called to calculate the target/source file name for an item operation. See the example on page 142.
REXX Scripts (EXEC) MDFRLOG Script called by the client for log file management during startup and shutdown. See the example on page 138.

Dimensions for z/OS Guide 163
Header Files (H) MDTHUSR Header file that contains entry points and items of interest for the user DLL. See the example on page 185.
MDTHDIM Header file that contains entry points and defines for the SDK functions. See the example on page 185.
Import Libraries (IMP)
MDFDUSR Import library created during the link of the user DLL.
MDFDEXT Import library needed to build a user DLL using the SDK functions.
Messages (ISPMLIB) MDTM01 ISPF message file containing messages used by Create Item example. See the example on page 191.
Panels (ISPPLIB) MDTPUSR ISPF panel file for Create Item example. See the example on page 191.
Link Decks (LINK) MDFDUSR Example link deck for user DLL. Demonstrates how to use an import library to access the SDK functions. See the example on page 193.
DLLs/Load Libraries (LOADLIB)
MDFDEXT DLL that contains all the SDK functions.
MDFDUSR DLL that contains any user implemented extensions to the ISPF client.
Source Code TypeComponent Type Description

164 Dimensions® CM
MDTCNAV/*------------------------------------------------------------------*//* Copyright (C) 2004 SERENA Software, Inc. All Rights Reserved. *//*------------------------------------------------------------------*/
#pragma export(ProcessUSelect)#pragma export(ProcessUPanels)
/*------------------------------------------------------------------*//* Includes *//*------------------------------------------------------------------*/#include "mdthdim.h"#include "mdthusr.h"
/*------------------------------------------------------------------*//* ProcessUSelect: Convert customer selections to navigation field *//* equivalent. *//*------------------------------------------------------------------*/void ProcessUSelect(char action, char *DIMNAV){ /* Process action code */ switch (action) { /* Example for setting navigation field *//* case 'Z': strcpy(DIMNAV, "USRNEW"); */
break; default: break; }}
/*------------------------------------------------------------------*//* ProcessUPanels: Display customer panels based on navigation *//* field. *//*------------------------------------------------------------------*/void ProcessUPanels(SESSION_INFO *sessionInfo, char *DIMNAV){ long rc = 0;
/* Perform navigation to selected panel *//*if (strcmp(DIMNAV, "USRNEW") == 0) rc = DisplayCreate(sessionInfo); */
return;}

Dimensions for z/OS Guide 165
MDTCNEW /*------------------------------------------------------------------*//* Copyright (C) 2006 Serena Software, Inc. All rights reserved. *//*------------------------------------------------------------------*/
/*------------------------------------------------------------------*//* Header Files *//*------------------------------------------------------------------*/#include <stdio.h>#include "mdthdim.h"#include "pcms_api.h"#include "clientapi.h"
/*------------------------------------------------------------------*//* Defines *//*------------------------------------------------------------------*/#define SOURCE_SIZE 9#define SOURCE_DSN_SIZE 61#define ITMDESC_SIZE 58#define ITMFMT_SIZE 10#define OWNPART_SIZE 58#define PRODUCT_SIZE 11#define ID_SIZE 60#define VARIANT_SIZE 34#define TYPE_SIZE 11#define REVISION_SIZE 34#define ITMSPC_SIZE 56#define WORKDIR_SIZE 60#define WORKFILE_SIZE 60#define OPTIONS_SIZE 69#define COMMENT_SIZE 69#define LIBFILE_SIZE 69#define SVRERR_SIZE 75
/*------------------------------------------------------------------*//* DisplayCreate: Process item create panel. *//*------------------------------------------------------------------*/long DisplayCreate(SESSION_INFO *sessionInfo){ long cmdRC; char csrPos[9]; char dComment[COMMENT_SIZE]; int dcpConnect; char dGet[2]; long diffLoc = 0; long dispRC = 0; char dId[ID_SIZE]; char dItemSpec[ITMSPC_SIZE]; char dItemDesc[ITMDESC_SIZE]; char dItemFile[LIBFILE_SIZE]; char dItemFmt[ITMFMT_SIZE];

166 Dimensions® CM
char dKeep[2]; char dOptions[OPTIONS_SIZE]; char dOwnPart[OWNPART_SIZE]; char dProduct[PRODUCT_SIZE]; char dRevision[REVISION_SIZE]; char dSDSN[SOURCE_DSN_SIZE]; char dSGroup[SOURCE_SIZE]; char dSMember[SOURCE_SIZE]; char dSProject[SOURCE_SIZE]; char dSType[SOURCE_SIZE]; char dType[TYPE_SIZE]; char dVariant[VARIANT_SIZE]; char dWSDir[WORKDIR_SIZE]; char dWSFile[WORKFILE_SIZE]; char execCmd[500]; bool firstTime = TRUE; SITEM_SPEC itemSpec; void *logFile; long mainRC = PANEL_NO_ACTION; char nodeName[SHR_NODENAME_SIZE]; char *outputData; long parmLen; long rc; char svrErr[SVRERR_SIZE]; FILE *tempFile; char *tempLoc; char *tempPtr; char *varList ="(DCISP DCISG DCIST DCISM DCISRCE DCIKEEP DCIGET DCISRCE DITMDSC ""DITMFMT DODP DTI DTISP DTISI DTISV DTIST DTISR DTITMSPC DWSDIR ""DWSFILE DITMFILE DCIOPTS DCOMMENT) "; char workArea[128]; char workFileArea[128]; char DIMNAV[NAV_SIZE];
/* Set error processing */ rc = ISPLINK("CONTROL ", "ERRORS ", "CANCEL ");
/* Initialization */ memset(workFileArea, 0x00, sizeof(workFileArea)); memset(nodeName, 0x00, SHR_NODENAME_SIZE);
memset(dComment, 0x00, COMMENT_SIZE); memset(dItemSpec, 0x00, ITMSPC_SIZE); memset(dItemFile, 0x00, LIBFILE_SIZE); memset(dWSDir, 0x00, WORKDIR_SIZE); memset(dWSFile, 0x00, WORKFILE_SIZE); memset(dOwnPart, 0x00, OWNPART_SIZE); memset(dItemFmt, 0x00, ITMFMT_SIZE); memset(dItemDesc, 0x00, ITMDESC_SIZE); memset(dId, 0x00, ID_SIZE); memset(dOptions, 0x00, OPTIONS_SIZE); memset(dProduct, 0x00, PRODUCT_SIZE);

Dimensions for z/OS Guide 167
memset(dRevision, 0x00, REVISION_SIZE); memset(dType, 0x00, TYPE_SIZE); memset(dVariant, 0x00, VARIANT_SIZE); memset(dSProject, 0x00, SOURCE_SIZE); memset(dSGroup, 0x00, SOURCE_SIZE); memset(dSType, 0x00, SOURCE_SIZE); memset(dSMember, 0x00, SOURCE_SIZE); memset(dSDSN, 0x00, SOURCE_DSN_SIZE); memset(DIMNAV, 0x00, NAV_SIZE); memset(csrPos, 0x00, 9);
logFile = sessionInfo->hLogfile; dcpConnect = sessionInfo->hConnect;
/* Get node name from profile */ rc = ISPLINK("VDEFINE ", SHR_NODENAME, nodeName, "BINSTR ", SHR_NODENAME_SIZE); rc = ISPLINK("VGET ", SHR_NODENAME, "SHARED "); rc = ISPLINK("VDELETE ", SHR_NODENAME);
while(dispRC != 8) { /* Give ISPF addressability to variables */ rc = ISPLINK("VDEFINE ", "DCISP ", dSProject, "BINSTR ", SOURCE_SIZE); rc = ISPLINK("VDEFINE ", "DCISG ", dSGroup, "BINSTR ", SOURCE_SIZE); rc = ISPLINK("VDEFINE ", "DCIST ", dSType, "BINSTR ", SOURCE_SIZE); rc = ISPLINK("VDEFINE ", "DCISM ", dSMember, "BINSTR ", SOURCE_SIZE); rc = ISPLINK("VDEFINE ", "DCISRCE ", dSDSN, "BINSTR ", SOURCE_DSN_SIZE);
rc = ISPLINK("VDEFINE ", "DITMDSC ", dItemDesc, "BINSTR ", ITMDESC_SIZE); rc = ISPLINK("VDEFINE ", "DITMFMT ", dItemFmt, "BINSTR ", ITMFMT_SIZE); rc = ISPLINK("VDEFINE ", "DODP ", dOwnPart, "BINSTR ", OWNPART_SIZE);
rc = ISPLINK("VDEFINE ", "DCIKEEP ", dKeep, "BINSTR ", 2); rc = ISPLINK("VDEFINE ", "DCIGET ", dGet, "BINSTR ", 2);
rc = ISPLINK("VDEFINE ", "DTISP ", dProduct, "BINSTR ", PRODUCT_SIZE); rc = ISPLINK("VDEFINE ", "DTISI ", dId, "BINSTR ", ID_SIZE); rc = ISPLINK("VDEFINE ", "DTISV ", dVariant, "BINSTR ", VARIANT_SIZE); rc = ISPLINK("VDEFINE ", "DTIST ", dType, "BINSTR ", TYPE_SIZE); rc = ISPLINK("VDEFINE ", "DTISR ", dRevision, "BINSTR ",

168 Dimensions® CM
REVISION_SIZE); rc = ISPLINK("VDEFINE ", "DITMSPC ", dItemSpec, "BINSTR ", ITMSPC_SIZE);
rc = ISPLINK("VDEFINE ", "DWSDIR ", dWSDir, "BINSTR ", WORKDIR_SIZE); rc = ISPLINK("VDEFINE ", "DWSFILE ", dWSFile, "BINSTR ", WORKFILE_SIZE); rc = ISPLINK("VDEFINE ", "DITMFILE", dItemFile, "BINSTR ", LIBFILE_SIZE);
rc = ISPLINK("VDEFINE ", "DCIOPTS ", dOptions, "BINSTR ", OPTIONS_SIZE); rc = ISPLINK("VDEFINE ", "DCOMMENT", dComment, "BINSTR ", COMMENT_SIZE);
rc = ISPLINK("VDEFINE ", "SVRERR ", svrErr, "BINSTR ", SVRERR_SIZE); rc = ISPLINK("VDEFINE ", "DIMNAV ", DIMNAV, "BINSTR ", NAV_SIZE); rc = ISPLINK("VDEFINE ", "CSRPOS ", csrPos, "BINSTR ", 9);
/* Retrieve variables from profile */ rc = ISPLINK("VGET ", varList, "PROFILE ");
/* Add panel defaults first time */ if (firstTime) { firstTime = FALSE; }
/* Initialize cursor position */ if (strlen(dSDSN)) strcpy(csrPos, "DCISRCE"); else strcpy(csrPos, "DCISP");
/* Display panel */ dispRC = ISPLINK("DISPLAY ", "MDTPUSR ");
if (strlen(DIMNAV)) { dispRC = 8; strcpy(sessionInfo->nav, DIMNAV); }
if (dispRC != 8) { /* Retrieve variables from profile */ rc = ISPLINK("VPUT ", varList, "PROFILE ");
/* Move fields from screen */ strcpy(itemSpec.productId, dProduct); strcpy(itemSpec.itemId, dId);

Dimensions for z/OS Guide 169
strcpy(itemSpec.variant, dVariant); strcpy(itemSpec.itemType, dType); strcpy(itemSpec.revision, dRevision); strcpy(itemSpec.fullItemSpec, dItemSpec);
ParseItemSpec(&itemSpec);
if (!strlen(itemSpec.productId)) { if (strlen(dItemSpec)) strcpy(csrPos, "DITMSPC"); else strcpy(csrPos, "DTISP");
rc = ISPLINK("SETMSG ", "MDTM012 "); } else { /* Format source file name */ if (strlen(dSDSN)) strcpy(workFileArea, dSDSN); else { if (strlen(dSMember)) sprintf(workFileArea, "%s.%s.%s(%s)", dSProject, dSGroup, dSType, dSMember); else sprintf(workFileArea, "%s.%s.%s", dSProject, dSGroup, dSType); }
if (dSDSN[0] == '\'') { tempPtr = dSDSN; tempPtr = tempPtr + 1; strcpy(workFileArea, tempPtr); tempPtr = strchr(workFileArea, '\''); if (tempPtr) *tempPtr = 0x00; }
/* Format command for execution */ memset(execCmd, 0x00, sizeof(execCmd)); strcpy(execCmd, "CI ");
/* Item Spec */ if (itemSpec.fullItemSpec[0] == '\"') strcat(execCmd, itemSpec.fullItemSpec); else { strcat(execCmd, "\""); strcat(execCmd, itemSpec.fullItemSpec); strcat(execCmd, "\"");

170 Dimensions® CM
}
/* Design Part */ strcat(execCmd, " /PART=\""); strcat(execCmd, dOwnPart); strcat(execCmd, "\"");
/* Item Description */ if (strlen(dItemDesc)) { strcat(execCmd, " /DESCRIPTION=\""); strcat(execCmd, dItemDesc); strcat(execCmd, "\""); }
/* Library Filename */ if (strlen(dItemFile)) { strcat(execCmd, " /FILENAME=\""); strcat(execCmd, dItemFile); strcat(execCmd, "\""); }
/* Item Format */ if (strlen(dItemFmt)) { strcat(execCmd, " /FORMAT=\""); strcat(execCmd, dItemFmt); strcat(execCmd, "\""); }
/* Comment */ if (strlen(dComment)) { strcat(execCmd, " /COMMENT=\""); strcat(execCmd, dComment); strcat(execCmd, "\""); }
/* User Filename */ strcat(execCmd, " /USER_FILENAME=\"");
tempPtr = strpbrk(workFileArea, "::"); if (tempPtr) { strcat(execCmd, workFileArea); } else { strcat(execCmd, nodeName); strcat(execCmd, "::"); strcat(execCmd, workFileArea); }

Dimensions for z/OS Guide 171
strcat(execCmd, "\"");
/* Workset Filename */ if (strlen(dWSDir) || strlen(dWSFile)) { strcat(execCmd, " /WS_FILENAME=\""); if (strlen(dWSDir)) { strcat(execCmd, dWSDir); if (dWSDir[strlen(dWSDir) - 1] != '\\' && dWSDir[strlen(dWSDir) - 1] != '/') { tempPtr = strpbrk(dWSDir, "\\"); if (tempPtr) strcat(execCmd, "\\"); else strcat(execCmd, "/"); } }
strcat(execCmd, dWSFile); strcat(execCmd, "\""); }
/* Keep copy in user area */ if (strcmp(dKeep, "/") == 0) strcat(execCmd, " /KEEP");
/* Options */ if (strlen(dOptions)) { strcat(execCmd, " "); strcat(execCmd, dOptions); }
/* Displaying information message */ rc = ISPLINK("CONTROL ", "DISPLAY ", "LOCK "); rc = ISPLINK("SETMSG ", "MDTM013 "); rc = ISPLINK("DISPLAY ", "MDTPUSR ");
/* Execute command */ cmdRC = PcmsClntApiExecCommand(dcpConnect, execCmd);
outputData = NULL; rc = PcmsClntApiGetLastErrorEx(dcpConnect, &outputData);
/* Write information command log *//* WriteCmdLog(logFile, "Create Item Request Initiated...", 1); memset(workArea, 0x00, sizeof(workArea));

172 Dimensions® CM
sprintf(workArea, "New item: %s", itemSpec.fullItemSpec); WriteCmdLog(logFile, workArea, 0);
sprintf(workArea, " from: \"%s\"", workFileArea); WriteCmdLog(logFile, workArea, 0); */
WriteCmdLog(logFile, execCmd, 1);
if (strlen(outputData) > 0) { CheckOutputData(outputData); WriteCmdLog(logFile, outputData, 0); }
/* Free output buffer */ if (outputData != NULL) free(outputData);
if (cmdRC == PCMS_OK) { /* Set panel return value */ mainRC = PANEL_CMD_PROCESSED;
if (strcmp(dGet, "/") == 0) { /* Displaying information message */ rc = ISPLINK("CONTROL ", "DISPLAY ", "LOCK "); rc = ISPLINK("SETMSG ", "MDTM014 "); rc = ISPLINK("DISPLAY ", "MDTPUSR ");
/* Format command for execution */ memset(execCmd, 0x00, sizeof(execCmd)); strcpy(execCmd, "FI ");
if (itemSpec.fullItemSpec[0] == '\"') strcat(execCmd, itemSpec.fullItemSpec); else { strcat(execCmd, "\""); strcat(execCmd, itemSpec.fullItemSpec); strcat(execCmd, "\""); }
strcat(execCmd, " /USER_FILENAME="); strcat(execCmd, "\"");
tempPtr = strpbrk(workFileArea, "::"); if (tempPtr) { strcat(execCmd, workFileArea); }

Dimensions for z/OS Guide 173
else { strcat(execCmd, nodeName); strcat(execCmd, "::"); strcat(execCmd, workFileArea); }
strcat(execCmd, "\""); strcat(execCmd, " /OVERWRITE");
/* Execute command */ cmdRC = PcmsClntApiExecCommand(dcpConnect, execCmd);
outputData = NULL; rc = PcmsClntApiGetLastErrorEx(dcpConnect, &outputData);
/* Write information command log */ WriteCmdLog(logFile, "Fetch Request Initiated...", 1); memset(workArea, 0x00, sizeof(workArea));
strcpy(workArea, "Retrieving item: "); strcat(workArea, itemSpec.fullItemSpec); WriteCmdLog(logFile, workArea, 0);
strcpy(workArea, " to: "); strcat(workArea, "\""); strcat(workArea, workFileArea); strcat(workArea, "\""); WriteCmdLog(logFile, workArea, 0);
if (strlen(outputData) > 0) { CheckOutputData(outputData); WriteCmdLog(logFile, outputData, 0); }
/* Free output buffer */ if (outputData != NULL) free(outputData); }
/* Set completion message */ rc = ISPLINK("SETMSG ", "MDTM010 "); } else { memset(svrErr, 0x00, SVRERR_SIZE); strncpy(svrErr, outputData, SVRERR_SIZE - 1); WriteCmdLog(logFile, "Operation Aborted.", 0); rc = ISPLINK("SETMSG ", "MDTM011 "); }

174 Dimensions® CM
} } }
/* Remove ISPF addressability */ rc = ISPLINK("VDELETE ", varList); rc = ISPLINK("VDELETE ", "(SVRERR CSRPOS DIMNAV) ");
return(mainRC);}
MDFCCMPR PROC 0 NEWFILE(DUMMY) OLDFILE(DUMMY) OUTDD(DUMMY) + DELDD(DUMMY) SYSIN(DUMMY) LISTING(DELTA) CTYPE(LINE) + PROCESS() UID(&SYSPREF.) BROWSE DEBUG PLIB + LIB(SYS1.SISPLPA(ISRSUPC)) /* FOR PRIVATE LIB. OR OUTSIDE ISPF (INSTALLER MUST */ /* MODIFY THE LIB PARAMETER.) */ /*************************************************************/ /* */ /* CLIST NAME : ISRSCLST (SUPERC LINE COMMAND VERSION) */ /* */ /* DESCRIPTION: */ /* */ /* ISRSCLST IS A SAMPLE "LINE COMMAND" CLIST THAT */ /* DEMONSTRATES MOST OF THE CAPABILITY OF SUPERC COMPARE */ /* PROGRAM. IT HAS LIMITED ERROR RECOVERY AND ERROR */ /* DIAGNOSTIC CAPABILITIES. FURTHER, CERTAIN SUPERC */ /* FUNCTIONS ARE NOT SUPPORTED (E.G. APNDLST AND */ /* APNDUPD). */ /* */ /* THIS CLIST HAS BEEN DEVELOPED FOR EXECUTION IN AN */ /* ISPF/PDF ENVIRONMENT. HOWEVER, THERE IS SOME */ /* ADDITIONAL LOGIC (TSO/E R2 DEPENDENT AND A "PLIB" */ /* PARAMETER) THAT WILL ALLOW THE USER TO EXECUTE THE */ /* CLIST OUTSIDE ISPF AND FROM A PRIVATE LIBRARY. */ /* */ /* */ /*************************************************************/ CONTROL NOMSG NOLIST NOCONLIST NOFLUSH /* SET &DEBUG = DEBUG */ IF &DEBUG = DEBUG THEN + CONTROL MSG LIST CONLIST SYMLIST SET &RETCC = 0 FREE FI(NEWDD,ISRS,SYSIN,OUTDD,DELDD) IF &NEWFILE = DUMMY THEN + SET &NEWFILE = IF &OLDFILE = DUMMY THEN + SET &OLDFILE =

Dimensions for z/OS Guide 175
/*************************************************************/ /* SET UP ERROR EXIT BEFORE FOR NEWFILE VERIFICATION. */ /*************************************************************/ NEWDD1:ERROR + DO ERROR OFF IF &NEWFILE ^= THEN + WRITE ** INVALID DATASET NAME/MEMBER OR BUSY: &NEWFILE IF &FIRST = THEN + DO SET &FIRST = DONE IF &UID ^= THEN + DO WRITE + USE FULLY QUALIFIED DATASET NAME WITHOUT QUOTES OR "." + FOR USER PREFIX. WRITE + * EXAMPLE: &UID..SUPERC.NEWIN AND .SUPERC.NEWIN + ARE EQUIVALENT. END ELSE WRITE + * USE FULLY QUALIFIED NAME WITHOUT QUOTES. END SET &NEWFILE = WRITENR NEW FILE :&STR() READ SET &NEWFILE = &SYSDVAL IF &STR('&NEWFILE') = 'EXIT' | &STR('&NEWFILE') = '' THEN + GOTO EXIT ELSE GOTO NEWDD1 END /*************************************************************/ /* VERIFY/ALLOCATE NEWFILE. */ /*************************************************************/ IF &NEWFILE ^= THEN + DO IF &SUBSTR(1:1,&NEWFILE) = . THEN + SET &NEWFILE = &UID.&NEWFILE END CONTROL NOMSG ALLOC FI(NEWDD) DA('&NEWFILE') SHR REUSE IF &SUBSTR(&LENGTH(&NEWFILE):&LENGTH(&NEWFILE),&NEWFILE) = ) + THEN + DO
/***********************************************************/ /* INSURE NEWFILE IS SEQUENTIAL AND IF PO- MEMBER EXITS */ /***********************************************************/ ALLOC FI(ISRS) DA('&NEWFILE') REUSE SHR OPENFILE ISRS CLOSFILE ISRS FREE FI(ISRS) END
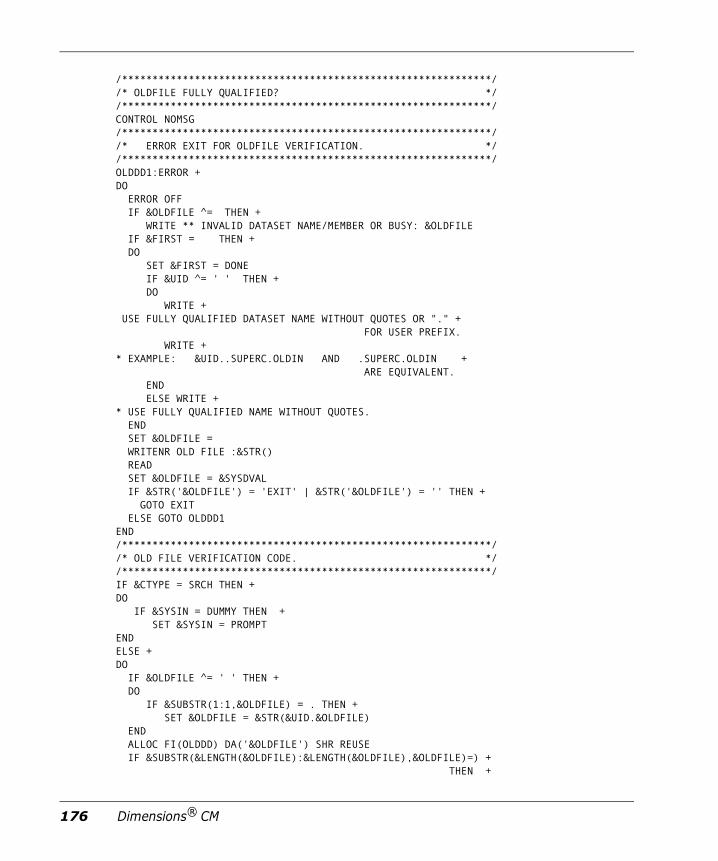
176 Dimensions® CM
/*************************************************************/ /* OLDFILE FULLY QUALIFIED? */ /*************************************************************/ CONTROL NOMSG /*************************************************************/ /* ERROR EXIT FOR OLDFILE VERIFICATION. */ /*************************************************************/ OLDDD1:ERROR + DO ERROR OFF IF &OLDFILE ^= THEN + WRITE ** INVALID DATASET NAME/MEMBER OR BUSY: &OLDFILE IF &FIRST = THEN + DO SET &FIRST = DONE IF &UID ^= ' ' THEN + DO WRITE + USE FULLY QUALIFIED DATASET NAME WITHOUT QUOTES OR "." + FOR USER PREFIX. WRITE + * EXAMPLE: &UID..SUPERC.OLDIN AND .SUPERC.OLDIN + ARE EQUIVALENT. END ELSE WRITE + * USE FULLY QUALIFIED NAME WITHOUT QUOTES. END SET &OLDFILE = WRITENR OLD FILE :&STR() READ SET &OLDFILE = &SYSDVAL IF &STR('&OLDFILE') = 'EXIT' | &STR('&OLDFILE') = '' THEN + GOTO EXIT ELSE GOTO OLDDD1 END /*************************************************************/ /* OLD FILE VERIFICATION CODE. */ /*************************************************************/ IF &CTYPE = SRCH THEN + DO IF &SYSIN = DUMMY THEN + SET &SYSIN = PROMPT END ELSE + DO IF &OLDFILE ^= ' ' THEN + DO IF &SUBSTR(1:1,&OLDFILE) = . THEN + SET &OLDFILE = &STR(&UID.&OLDFILE) END ALLOC FI(OLDDD) DA('&OLDFILE') SHR REUSE IF &SUBSTR(&LENGTH(&OLDFILE):&LENGTH(&OLDFILE),&OLDFILE)=) + THEN +

Dimensions for z/OS Guide 177
DO ALLOC FI(ISRS) DA('&OLDFILE') REUSE SHR OPENFILE ISRS CLOSFILE ISRS FREE FI(ISRS) END END ERROR OFF /*************************************************************/ /* VERIFICATION/ALLOCATION OF LISTING DSN. */ /*************************************************************/ OUTDD1: + IF &OUTDD = DUMMY THEN + DO SET OUTDD = &UID..SUPERC.LIST IF &UID = ' ' THEN + SET OUTDD = &SYSUID..SUPERC.LIST END ELSE IF &SUBSTR(1:1,&OUTDD) = . THEN + SET &OUTDD = &STR(&UID.&OUTDD) CONTROL NOMSG FREE DA('&OUTDD') ERROR + DO ERROR OFF SET &PO = &SUBSTR(&LENGTH(&OUTDD)-1:&LENGTH(&OUTDD)-1,&OUTDD) IF &PO = ) THEN + SET &DIRM = &STR(DIR(5) DSORG(PO)) ELSE + SET &DIRM = &STR(RELEASE DSORG(PS)) ALLOC FI(OUTDD) DA('&OUTDD') SPACE (50 100) BLKSIZE(3325) + REUSE NEW &DIRM IF &LASTCC = 0 THEN + GOTO SYSIN1 ELSE + DO WRITE ** INVALID DATASET NAME/MEMBER OR BUSY: &OUTDD IF &FIRST = THEN + DO SET &FIRST = DONE IF &UID ^= ' ' THEN + DO WRITE + USE FULLY QUALIFIED DATASET NAME WITHOUT QUOTES OR "." + FOR USER PREFIX. WRITE + * EXAMPLE: &UID..SUPERC.LIST AND .SUPERC.LIST + ARE EQUIVALENT. END ELSE WRITE + * USE FULLY QUALIFIED NAME WITHOUT QUOTES. END SET &OUTDD =

178 Dimensions® CM
WRITENR LISTING FILE :&STR() READ SET &OUTDD = &SYSDVAL IF &STR('&OUTDD') = 'EXIT' | &STR('&OUTDD') = '' THEN + GOTO EXIT ELSE + GOTO OUTDD1 END END ALLOC FI(OUTDD) DA('&OUTDD') OLD REUSE /* ALLOC. AS OLD.*/ /*************************************************************/ /* STATEMENTS (SYSIN) DATA SET. */ /*************************************************************/ ERROR OFF SYSIN1: + IF &STR(&SYSIN) ^= DUMMY THEN + DO IF &STR(&SYSIN) ^= &STR(PROMPT) THEN + DO /*********************************************************/ /* SYSIN DSN ERROR RECOVERY. */ /*********************************************************/ ERROR + DO WRITE ** INVALID DATASET NAME/MEMBER OR BUSY: &SYSIN IF &FIRST = THEN + DO SET &FIRST = DONE IF &UID ^= ' ' THEN + DO WRITE + USE FULLY QUALIFIED DATASET NAME WITHOUT QUOTES OR "." + FOR USER PREFIX. WRITE + * EXAMPLE: &UID..SUPERC.STMTS AND .SUPERC.STMTS + ARE EQUIVALENT. END ELSE WRITE + * USE FULLY QUALIFIED NAME WITHOUT QUOTES. END SET &SYSIN = ERROR OFF WRITENR SYSIN FILE :&STR() READ SET &SYSIN = &SYSDVAL IF &STR('&SYSIN') = 'EXIT' | &STR('&SYSIN') = '' THEN + GOTO EXIT ELSE + GOTO SYSIN1 /* RECYCLE FOR ERROR CASE */ END CONT3: + IF &SUBSTR(1:1,&SYSIN) = . THEN + SET &SYSIN = &STR(&UID.&SYSIN)
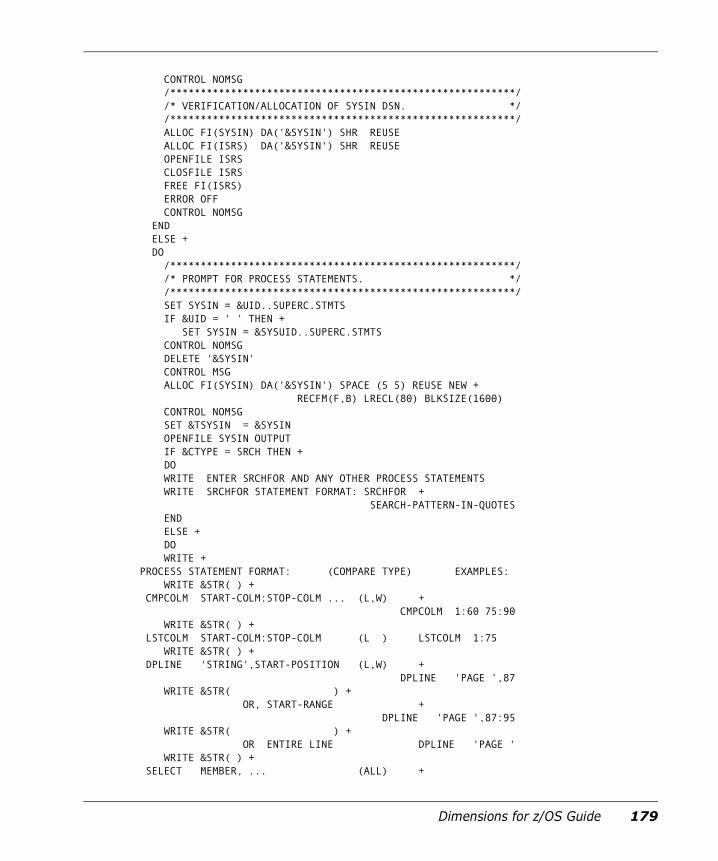
Dimensions for z/OS Guide 179
CONTROL NOMSG /*********************************************************/ /* VERIFICATION/ALLOCATION OF SYSIN DSN. */ /*********************************************************/ ALLOC FI(SYSIN) DA('&SYSIN') SHR REUSE ALLOC FI(ISRS) DA('&SYSIN') SHR REUSE OPENFILE ISRS CLOSFILE ISRS FREE FI(ISRS) ERROR OFF CONTROL NOMSG END ELSE + DO /*********************************************************/ /* PROMPT FOR PROCESS STATEMENTS. */ /*********************************************************/ SET SYSIN = &UID..SUPERC.STMTS IF &UID = ' ' THEN + SET SYSIN = &SYSUID..SUPERC.STMTS CONTROL NOMSG DELETE '&SYSIN' CONTROL MSG ALLOC FI(SYSIN) DA('&SYSIN') SPACE (5 5) REUSE NEW + RECFM(F,B) LRECL(80) BLKSIZE(1600) CONTROL NOMSG SET &TSYSIN = &SYSIN OPENFILE SYSIN OUTPUT IF &CTYPE = SRCH THEN + DO WRITE ENTER SRCHFOR AND ANY OTHER PROCESS STATEMENTS WRITE SRCHFOR STATEMENT FORMAT: SRCHFOR + SEARCH-PATTERN-IN-QUOTES END ELSE + DO WRITE + PROCESS STATEMENT FORMAT: (COMPARE TYPE) EXAMPLES: WRITE &STR( ) + CMPCOLM START-COLM:STOP-COLM ... (L,W) + CMPCOLM 1:60 75:90 WRITE &STR( ) + LSTCOLM START-COLM:STOP-COLM (L ) LSTCOLM 1:75 WRITE &STR( ) + DPLINE 'STRING',START-POSITION (L,W) + DPLINE 'PAGE ',87 WRITE &STR( ) + OR, START-RANGE + DPLINE 'PAGE ',87:95 WRITE &STR( ) + OR ENTIRE LINE DPLINE 'PAGE ' WRITE &STR( ) + SELECT MEMBER, ... (ALL) +
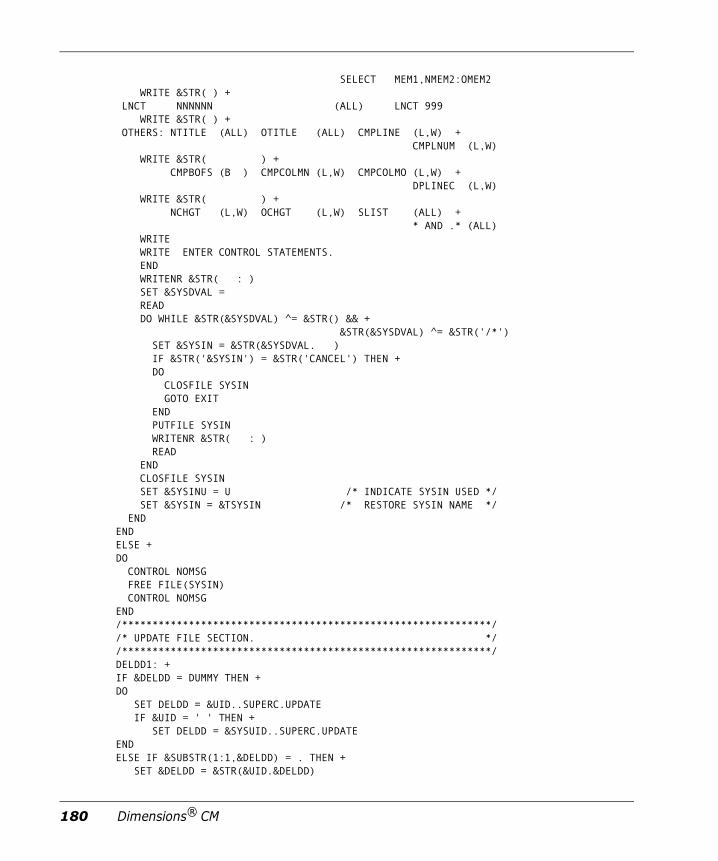
180 Dimensions® CM
SELECT MEM1,NMEM2:OMEM2 WRITE &STR( ) + LNCT NNNNNN (ALL) LNCT 999 WRITE &STR( ) + OTHERS: NTITLE (ALL) OTITLE (ALL) CMPLINE (L,W) + CMPLNUM (L,W) WRITE &STR( ) + CMPBOFS (B ) CMPCOLMN (L,W) CMPCOLMO (L,W) + DPLINEC (L,W) WRITE &STR( ) + NCHGT (L,W) OCHGT (L,W) SLIST (ALL) + * AND .* (ALL) WRITE WRITE ENTER CONTROL STATEMENTS. END WRITENR &STR( : ) SET &SYSDVAL = READ DO WHILE &STR(&SYSDVAL) ^= &STR() && + &STR(&SYSDVAL) ^= &STR('/*') SET &SYSIN = &STR(&SYSDVAL. ) IF &STR('&SYSIN') = &STR('CANCEL') THEN + DO CLOSFILE SYSIN GOTO EXIT END PUTFILE SYSIN WRITENR &STR( : ) READ END CLOSFILE SYSIN SET &SYSINU = U /* INDICATE SYSIN USED */ SET &SYSIN = &TSYSIN /* RESTORE SYSIN NAME */ END END ELSE + DO CONTROL NOMSG FREE FILE(SYSIN) CONTROL NOMSG END /*************************************************************/ /* UPDATE FILE SECTION. */ /*************************************************************/ DELDD1: + IF &DELDD = DUMMY THEN + DO SET DELDD = &UID..SUPERC.UPDATE IF &UID = ' ' THEN + SET DELDD = &SYSUID..SUPERC.UPDATE END ELSE IF &SUBSTR(1:1,&DELDD) = . THEN + SET &DELDD = &STR(&UID.&DELDD)

Dimensions for z/OS Guide 181
CONTROL NOMSG FREE DA('&DELDD') ERROR + DO ERROR OFF /* CHECK FOR PO DATASET SPECIFICATION */ SET &PO=&SUBSTR(&LENGTH(&DELDD)-1:&LENGTH(&DELDD)-1,&DELDD) IF &PO = ) THEN + SET &DIRM = DIR(5) ELSE + SET &DIRM = &STR(RELEASE DSORG(PS)) ALLOC FI(DELDD) DA('&DELDD') SPACE (15 30) BLKSIZE(1600) + REUSE NEW &DIRM IF &LASTCC = 0 THEN + GOTO INVOKE1 ELSE + DO WRITE ** INVALID DATASET NAME/MEMBER OR BUSY: &DELDD IF &FIRST = THEN + DO SET &FIRST = DONE IF &UID ^= ' ' THEN + DO WRITE + USE FULLY QUALIFIED DATASET NAME WITHOUT QUOTES OR "." + FOR USER PREFIX. WRITE + * EXAMPLE: &UID..SUPERC.UPDATE AND .SUPERC.UPDATE + ARE EQUIVALENT. END ELSE WRITE + * USE FULLY QUALIFIED NAME WITHOUT QUOTES. END SET &DELDD = WRITENR UPDATE FILE :&STR() READ SET &DELDD = &SYSDVAL IF &STR('&DELDD') = 'EXIT' | &STR('&DELDD') = '' THEN + GOTO EXIT ELSE + GOTO DELDD1 END END ALLOC FI(DELDD) DA('&DELDD') OLD REUSE /* ALLOC. OLD. */ INVOKE1: + ERROR OFF /*************************************************************/ /* INVOKE SUPERC. */ /*************************************************************/ /* WRITE *** SUPERC INVOKED */ IF &LISTING ^= OVSUM && &LISTING ^= DELTA && + &LISTING ^= LONG && &LISTING ^= CHNG && + &LISTING ^= NOLIST THEN +

182 Dimensions® CM
SET LISTING = DELTA IF &SYSISPF = ACTIVE && &PLIB = THEN + DO /**********************************************************/ /* ASSUME ISPF IS ACTIVE AND USER DOESN'T HAVE SUPERC IN */ /* A PRIVATE LIBRARY. */ /**********************************************************/ ISPEXEC SELECT PGM(ISRSUPC) + PARM(&LISTING.L,&CTYPE.CMP,&PROCESS.) SET &RETCC = &LASTCC END ELSE + DO /**********************************************************/ /* OUTSIDE OF ISPF AND/OR PRIVATE SUPERC LOAD LIBRARY USE */ /* "CALL" INSTEAD OF "ISPEXEC SELECT." */ /**********************************************************/ CALL '&LIB' '&LISTING.L,&CTYPE.CMP,&PROCESS.' SET &RETCC = &LASTCC END /* WRITE *** SUPERC RETURN CODE = &RETCC *** */ CONTROL NOMSG FREE DA('&OUTDD') FREE FI(NEWDD OLDDD DELDD OUTDD ISRS) /*************************************************************/ /* BROWSE LISTING (IF IN ISPF INVIRONMENT) */ /* ASSUMES TO E/ R2 OR BETTER SYSTEM. */ /*************************************************************/ IF &SYSISPF = ACTIVE THEN + DO IF &BROWSE = BROWSE THEN + ISPEXEC BROWSE DATASET('&OUTDD') END EXIT: + EXIT CODE(&RETCC)

Dimensions for z/OS Guide 183
MDTJCOMP //USERIDC JOB (USERID),CLASS=A,MSGCLASS=Z,NOTIFY=&SYSUID,// MSGLEVEL=(1,1)//*--------------------------------------------------------------------//* IBMC COMPILE//*--------------------------------------------------------------------//MEMSET SET MEMBER=MDTCNAV//CC EXEC PGM=CCNDRVR,REGION=0M,PARM='/ OPTF(DD:COPTS)'//STEPLIB DD DSNAME=CEE.SCEERUN,DISP=SHR// DD DSNAME=CBC.SCCNCMP,DISP=SHR//SYSLIN DD DSN=<INSTALL>.SDK.OBJ(&MEMBER),DISP=OLD//SYSIN DD DSN=<INSTALL>.SDK.C(&MEMBER),DISP=SHR//SYSCPRT DD DSN=<INSTALL>.SDK.LIST(&MEMBER),DISP=SHR//COPTS DD *SO,OBJ,LO,EXPO,RENT,SHOW,LIS,SSCOMM,DLL,DEFINE(_NO_INLINING),LSEARCH(/<uss-instance-root>/lib, //'<INSTALL>.SDK.H')/*//*
MDTJLINK //USERIDL JOB 'LINK',NOTIFY=&SYSUID,CLASS=A,MSGCLASS=Z, 00010001// REGION=0K 00020000//LKED EXEC PGM=HEWL, 00030000// PARM='CALL,DYNAM=DLL,CASE=MIXED,COMPAT=PM3,MAP,RENT,AMODE=31' 00050000//SYSLMOD DD DSNAME=<INSTALL>.SDK.LOAD(MDFDUSR),DISP=SHR 00112001//SYSDEFSD DD DSNAME=<INSTALL>.SDK.IMP(MDFDUSR),DISP=SHR 00113002//SYSLIB DD DSNAME=CEE.SCEELKED,DISP=SHR 00120000// DD DSNAME=SYS1.CSSLIB,DISP=SHR 00120100// DD DSNAME=TCPIP.SEZACMTX,DISP=SHR 00121000// DD DSNAME=ISP.SISPLOAD,DISP=SHR 00122000//SYSLIN DD DSNAME=<INSTALL>.SDK.LINK(MDFDUSR),DISP=SHR 00130002//AAAOBJ DD DSNAME=<INSTALL>.SDK.OBJ,DISP=SHR 00140002//IMPOBJ DD DSNAME=<INSTALL>.SDK.IMP,DISP=SHR 00160002//SYSPRINT DD SYSOUT=* 00800000//SYSUT1 DD UNIT=SYSDA,SPACE=(TRK,(10,10)) 00840000//SYSIN DD DUMMY 00850000

184 Dimensions® CM
MDFRCMPRSee the example on page 140.
MDFRLOGSee the example on page 138.
MDFRTMPSee the example on page page 141.
MDFRSFFSee the example on page page 142.
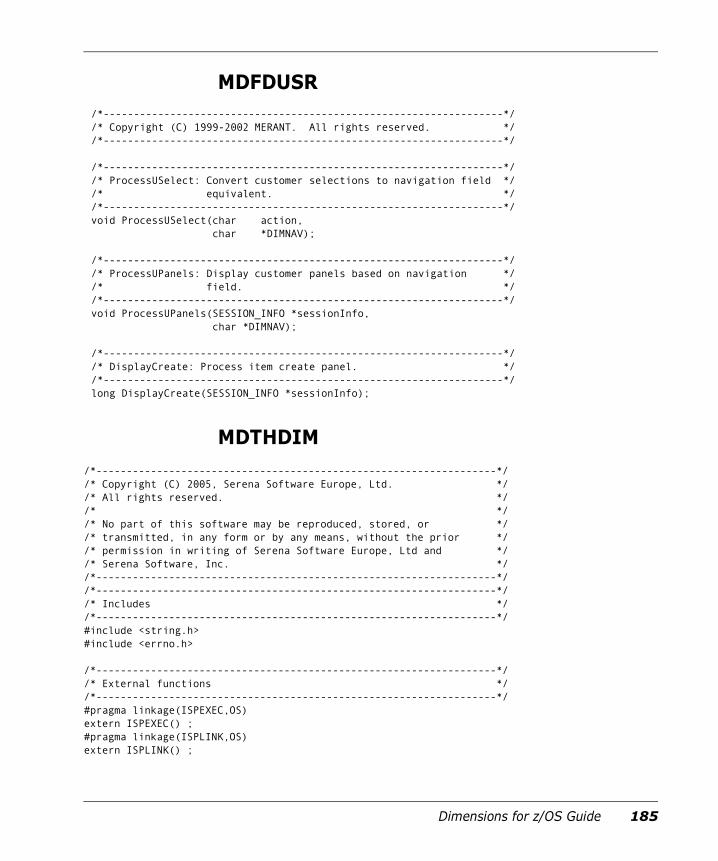
Dimensions for z/OS Guide 185
MDFDUSR/*------------------------------------------------------------------*//* Copyright (C) 1999-2002 MERANT. All rights reserved. *//*------------------------------------------------------------------*/
/*------------------------------------------------------------------*//* ProcessUSelect: Convert customer selections to navigation field *//* equivalent. *//*------------------------------------------------------------------*/void ProcessUSelect(char action, char *DIMNAV);
/*------------------------------------------------------------------*//* ProcessUPanels: Display customer panels based on navigation *//* field. *//*------------------------------------------------------------------*/void ProcessUPanels(SESSION_INFO *sessionInfo, char *DIMNAV);
/*------------------------------------------------------------------*//* DisplayCreate: Process item create panel. *//*------------------------------------------------------------------*/long DisplayCreate(SESSION_INFO *sessionInfo);
MDTHDIM/*------------------------------------------------------------------*//* Copyright (C) 2005, Serena Software Europe, Ltd. *//* All rights reserved. *//* *//* No part of this software may be reproduced, stored, or *//* transmitted, in any form or by any means, without the prior *//* permission in writing of Serena Software Europe, Ltd and *//* Serena Software, Inc. *//*------------------------------------------------------------------*//*------------------------------------------------------------------*//* Includes *//*------------------------------------------------------------------*/#include <string.h>#include <errno.h>
/*------------------------------------------------------------------*//* External functions *//*------------------------------------------------------------------*/#pragma linkage(ISPEXEC,OS)extern ISPEXEC() ;#pragma linkage(ISPLINK,OS)extern ISPLINK() ;

186 Dimensions® CM
/*------------------------------------------------------------------*//* Defines *//*------------------------------------------------------------------*/#ifndef TRUE#define TRUE 1#endif
#ifndef FALSE#define FALSE 0#endif
#ifndef bool#define bool long#endif
/* Selected Items Table */#define TBL_SELECTED_ITEMS "DSELLST "
/* Selected item(s) - item spec */#define TBL_ITEM_SPEC "TSSPEC "#define TBL_ITEM_SPEC_SIZE 301/* Selected item(s) - item file name */#define TBL_ITEM_FILE "TSFILE "#define TBL_ITEM_FILE_SIZE 1025/* Selected item(s) - item date */#define TBL_ITEM_DATE "TSDATE "#define TBL_ITEM_DATE_SIZE 26/* Selected item(s) - item initials */#define TBL_ITEM_INITIALS "TSINIT "#define TBL_ITEM_INITIALS_SIZE 26/* Selected item(s) - item status */#define TBL_ITEM_STATUS "TSSTAT "#define TBL_ITEM_STATUS_SIZE 26/* Selected item(s) - item stage */#define TBL_ITEM_STAGE "TSSTAGE "#define TBL_ITEM_STAGE_SIZE 128/* Selected item(s) - item revision */#define TBL_ITEM_REVISION "TSREV "#define TBL_ITEM_REVISION_SIZE 129/* Selected item(s) - item uid */#define TBL_ITEM_UID "TSUID "/* Selected item(s) - target item file name */#define TBL_ITEM_TGT_FILE "TSTFILE "#define TBL_ITEM_TGT_FILE_SIZE 129
/* Settings - auto-expand revisions */#define PROF_AUTO_EXPAND "AUTOEXPD"#define PROF_AUTO_EXPAND_SIZE 1/* Settings - use TSO prefix on datasets */#define PROF_USE_TSO_PREFIX "AUTOPRFX"#define PROF_USE_TSO_PREFIX_SIZE 1/* Settings - create log */

Dimensions for z/OS Guide 187
#define PROF_CREATE_LOG "MAKELOG "#define PROF_CREATE_LOG_SIZE 1/* Settings - use local project root */#define PROF_LOCAL_ROOT "LOCLROOT"#define PROF_LOCAL_ROOT_SIZE 1/* Settings - use project directories in dataset names */#define PROF_PROJECT_DIRS "WSETDIRS"#define PROF_PROJECT_DIRS_SIZE 1/* Current user path */#define PROF_UAREA "UAREA "#define PROF_UAREA_SIZE 51/* Is project buildable? Y/N */#define SHR_BUILDABLE "PRJBLD "#define SHR_BUILDABLE_SIZE 1/* Current node name entered on Login panel */#define SHR_NODENAME "NODENAME "#define SHR_NODENAME_SIZE 21/* Current project root */#define SHR_ROOTPATH "ROOTPATH "#define SHR_ROOTPATH_SIZE 128/* Current log file name */#define SHR_LOGFILE "LOGFILE "#define SHR_LOGFILE_SIZE 80/* Temporary DSN name */#define SHR_TEMPDSN_NAME "TMPDSN "#define SHR_TEMPDSN_NAME_SIZE 128/* Current project */#define SHR_PROJECT "CURRPRJ "#define SHR_PROJECT_SIZE 65/* Current project - deployment model */#define SHR_PROJECT_DEPLOY_MODEL "CURRDPLM "#define SHR_PROJECT_DEPLOY_MODEL_SIZE 1#define PROJECT_DEPLOY_AUTO 'A'#define PROJECT_DEPLOY_MANUAL 'M'/* Current project - uid */#define SHR_PROJECT_UID "CURRPRJI "/* Current project directory */#define SHR_PRJ_PATH "PRJPATH "#define SHR_PRJ_PATH_SIZE 128/* Current project root node */#define SHR_PRJ_RNODE_NAME "PRJRNNME "#define SHR_PRJ_RNODE_NAME_SIZE 257/* Current project root node OS */#define SHR_PRJ_RNODE_OS "PRJRNOS "#define SHR_PRJ_RNODE_OS_SIZE 5/* Current project root node OS */#define SHR_PRJ_RNODE_FS "PRJRNFS "#define SHR_PRJ_RNODE_FS_SIZE 21/* Current server name */#define SHR_SERVER_NAME "SVRNAME "#define SHR_SERVER_NAME_SIZE 257/* Current REXX function */

188 Dimensions® CM
#define SHR_REXX_FUNCNO "RXFUNC "
/*------------------------------------------------------------------*//* Structures *//*------------------------------------------------------------------*//*------------------------------*//* Current session info *//*------------------------------*/#define NAV_SIZE 20typedef struct{ int hConnect; /* Current connection handle */ void *hLogfile; /* Current log file handle */ char nav[NAV_SIZE]; /* navigation string */} SESSION_INFO;
/*------------------------------*//* Panel Defines *//*------------------------------*/#define PANEL_CMD_PROCESSED 0#define PANEL_NO_ACTION 1#define PANEL_ERROR 2
/*------------------------------------------------------------------*//* Determines end of a string in a buffer area by searching for *//* non-blank characters. Source string is not changed. *//*------------------------------------------------------------------*/long strlenb(char *searchString, /* Source string to search */ long maxLen); /* Maximum string length */
/*------------------------------------------------------------------*//* Convert blank padded field to null terminated. *//*------------------------------------------------------------------*/void B2N(char *blankStr, /* ptr to space str */ long maxBlankStr, /* blank string max length */ char *nullStr, /* ptr to null str */ long maxNullStr); /* null str max length */
/*------------------------------------------------------------------*//* Convert null terminated to blank padded field. *//*------------------------------------------------------------------*/void N2B(char *nullStr, /* ptr to null str */ char *blankStr, /* ptr to space str */ long maxBlankStr); /* max space string */
/*------------------------------------------------------------------*//* Parse item specification into different parts *//*------------------------------------------------------------------*//*------------------------------*//* Defines *//*------------------------------*/#define SITEM_FULLSPEC_SIZE 300

Dimensions for z/OS Guide 189
#define SITEM_PRODUCT_SIZE 11#define SITEM_ID_SIZE 129#define SITEM_VARIANT_SIZE 65#define SITEM_TYPE_SIZE 11#define SITEM_REVISION_SIZE 65
/*------------------------------*//* Structures *//*------------------------------*/typedef struct{ char fullItemSpec[SITEM_FULLSPEC_SIZE]; char productId[SITEM_PRODUCT_SIZE]; char itemId[SITEM_ID_SIZE]; char variant[SITEM_VARIANT_SIZE]; char itemType[SITEM_TYPE_SIZE]; char revision[SITEM_REVISION_SIZE];} SITEM_SPEC;
/*------------------------------*//* Prototypes *//*------------------------------*/void ParseItemSpec(SITEM_SPEC *itemSpec);
/*------------------------------------------------------------------*//* Open command log *//*------------------------------------------------------------------*//*------------------------------*//* Defines *//*------------------------------*/#define LOG_FILE_OK 0#define LOG_FILENAME_NOT_FOUND 1#define LOG_FILE_OPEN_ERROR 2#define LOG_FILENAME_EMPTY 3
/*------------------------------*//* Prototypes *//*------------------------------*/long OpenCmdLog(void **logFile, /* handle to log file */ char *fileName, /* log filename */ long fileNameSize, /* log filename size */ bool refreshLog, /* refresh log on open */ bool systemLog, /* use system log */ char *banner); /* Open log file banner */
/*------------------------------------------------------------------*//* Close command log *//*------------------------------------------------------------------*/void CloseCmdLog(void **logFile, /* handle to log file */ char *fileName, /* log file name - del only */ bool deleteLog, /* delete log file */ bool systemLog); /* use system log */

190 Dimensions® CM
/*------------------------------------------------------------------*//* Flush command log buffer - force buffer write *//*------------------------------------------------------------------*/long FlushCmdLog(void **logFile, /* handle to log file */ char *logFilename); /* log filename */
/*------------------------------------------------------------------*//* Write line to command log *//*------------------------------------------------------------------*/void WriteCmdLog(void *logFile, /* handle to log file */ char *outputLine, /* string to write */ int blankLines); /* # blank lines to insert */
/*------------------------------------------------------------------*//* GetSelectedItem: Get item from selected item(s) table *//*------------------------------------------------------------------*//*------------------------------*//* Structures *//*------------------------------*/typedef struct{ char iSpec[TBL_ITEM_SPEC_SIZE]; char iFile[TBL_ITEM_FILE_SIZE]; char iDate[TBL_ITEM_DATE_SIZE]; char iInitials[TBL_ITEM_INITIALS_SIZE]; char iRevision[TBL_ITEM_REVISION_SIZE]; char iStatus[TBL_ITEM_STATUS_SIZE]; char iStage[TBL_ITEM_STAGE_SIZE]; char iTgtFile[TBL_ITEM_TGT_FILE_SIZE]; long iID;} ITEM_INFO;
/*------------------------------*//* Defines *//*------------------------------*/#define GET_ITEM_OK 0#define GET_ITEM_ERROR 1
/*------------------------------*//* Prototypes *//*------------------------------*/long GetSelectedItem(long recNum, /* record number */ ITEM_INFO *itemInfo); /* item info struct */
/*------------------------------------------------------------------*//* UpdateSelectedItem: Get item from selected item(s) table *//*------------------------------------------------------------------*/long UpdateSelectedItem(long recNum, /* record number */ ITEM_INFO *itemInfo); /* item info struct */

Dimensions for z/OS Guide 191
MDTMUSRMDTM010 'Item Create Successful' .ALARM=YES'Item was created successfully in Dimensions.'
MDTM011 'Item Create Error' .ALARM=YES'&SVRERR'
MDTPUSR)ATTR DEFAULT() FORMAT(MIX) /* Dimensions - User Example */ /*-------------------------------------------------------------------*/ /* Copyright (C) 2004 SERENA Software, Inc. All Rights Reserved. */ /*-------------------------------------------------------------------*/ 04 TYPE(ABSL) GE(ON) /* PROT/TEXT/BLUE/LOW */ 08 TYPE(ET) /* PROT/TEXT/TURQ/HIGH */ 0A TYPE(NT) SKIP(ON) /* PROT/TEXT/GREEN/LOW */ 0B TYPE(SAC) SKIP(ON) /* PROT/TEXT/WHITE/LOW */ 0C TYPE(AB) /* ACTION BAR */ 26 TYPE(NEF) PADC(USER) /* UNPROT/IN/TURQ/LOW */ 27 AREA(SCRL) EXTEND(ON) /* SCROLLABLE AREA DEF. */ 28 TYPE(NEF) PADC(USER) CAPS(ON) /* UNPROT/IN/TURQ/LOW */ 30 TYPE(INPUT) INTENS(NON) HILITE(USCORE) PADC(USER) CAPS(OFF) /* UNPROT/IN/HIDDEN */)ABC DESC('File') MNEM(1) PDC DESC('Exit') MNEM(1) ACTION RUN(EXIT))ABCINIT .ZVARS=ZDFILE &ZDFILE = ' ')ABC DESC('Commands') MNEM(1) PDC DESC('Browse Change Doc') MNEM(1) ACTION RUN(ZDBCHG) PDC DESC('Command Entry') MNEM(1) ACTION RUN(ZDCMD) PDC DESC('Batch Commands') MNEM(1) ACTION RUN(ZDBCMD) PDC DESC('Node Login') MNEM(1) ACTION RUN(ZDRLOGIN) PDC DESC('Browse Log') MNEM(1) ACTION RUN(ZDBLOG) PDC DESC('Set Current Workset') MNEM(1) ACTION RUN(ZDCHGSET))ABCINIT .ZVARS=ZDITEM &ZDITEM = ' ')ABC DESC('Help') MNEM(1) PDC DESC('Using Dimensions Agent Help') MNEM(1) ACTION RUN(TUTOR) PARM('MDFHHLP'))ABCINIT .ZVARS=ZDHELP &ZDHELP = ' ')BODY CMD(ZCMD)Õ File Commands HelpÕÜ------------------------------------------------------------------------------ÕÜ Create Item ÕÕCommand ===>ZCMD ÕSAREA39 )AREA SAREA39ÜSource Dataset Enter "/" to select optionÕ Project . . . ´DCISP Õ Z Keep copy in user areaÕ Group . . . ´DCISG Õ Z Automatic GetÕ Type . . . . ´DCIST ÕÕ Member . . . ´DCISM Õ

192 Dimensions® CM
ÜORÕ Dataset name .´DCISRCE ÕÕ Item description .DITMDSC ÕÕ Item format . . .DITMFMT ÕÕ Owning design part .DODP ÕÕÜItem SpecificationÕ Product Id . . DTISP ÕÕ Item Id . . . DTISI ÕÕ Variant . . . DTISV ÕÕ Item type . . DTIST ÕÕ Revision. . . DTISR ÕÜORÕ Item specification .DTITMSPC ÕÕÜWorksetÕ Directory . . DWSDIR ÕÕ Filename . . DWSFILE ÕÕ Library filename .DITMFILE ÕÕÕOptions .DCIOPTS ÕÕÕComment .DCOMMENT ÕÕ)INIT &ZCMD = ' ' .ZVARS = '(DCIKEEP DCIGET)' &DIMNAV = ' ' .CURSOR = &CSRPOS .HELP = 'DIMH014')PROC &CSRFIELD = .CURSOR VER(&DKEEP,LIST,/) VER(&DGET,LIST,/) IF (&ZCMD = 'ZDBCMD') &ZCMD = ' ' &DIMNAV = 'BATCH' VPUT (DIMNAV) PROFILE IF (&ZCMD = 'ZDCMD') &ZCMD = ' ' &DIMNAV = 'COMMAND' VPUT (DIMNAV) PROFILE IF (&ZCMD = 'ZDCHGSET') &ZCMD = ' ' &DIMNAV = 'CHGWKSET' VPUT (DIMNAV) PROFILE IF (&ZCMD = 'ZDRLOGIN') &ZCMD = ' ' &DIMNAV = 'RLOGIN' VPUT (DIMNAV) PROFILE IF (&ZCMD = 'ZDBCHG') &ZCMD = ' ' &DIMNAV = 'BCHGDOC' VPUT (DIMNAV) PROFILE IF (&ZCMD = 'ZDBLOG') &ZCMD = ' ' &DIMNAV = 'LOG' VPUT (DIMNAV) PROFILE IF (&DIMNAV EQ '') VER(&DKEEP,LIST,/) VER(&DGET,LIST,/) VER(&DODP,NB)

Dimensions for z/OS Guide 193
IF (&DSOURCE = '') VER(&DSP,NB) VER(&DSG,NB) VER(&DST,NB) IF (&DSM NE '') VER(&DSM,NAME))HELP FIELD(DSP) PANEL(MDFF1401) FIELD(DSG) PANEL(MDFF1402) FIELD(DST) PANEL(MDFF1403) FIELD(DSM) PANEL(MDFF1404) FIELD(DSOURCE) PANEL(MDFF1405) FIELD(DISP) PANEL(MDFF1406) FIELD(DISI) PANEL(MDFF1407) FIELD(DISV) PANEL(MDFF1408) FIELD(DIST) PANEL(MDFF1409) FIELD(DISR) PANEL(MDFF1410) FIELD(DITMSPC) PANEL(MDFF1411) FIELD(DOPTIONS) PANEL(MDFF1412) FIELD(DKEEP) PANEL(MDFF1413) FIELD(DGET) PANEL(MDFFKEEP) FIELD(DCOMMENT) PANEL(MDFFCOM))END
MDFDUSR INCLUDE AAAOBJ(MDTCNAV) INCLUDE IMPOBJ(MDFDEXT) INCLUDE IMPOBJ(CLNTAPI) NAME MDFDUSR(R)

194 Dimensions® CM

Dimensions for z/OS Guide 195
Chapter 9Tips, Troubleshooting, and Restrictions
Tips 196ISPF Client Troubleshooting 197Dimensions Listener Troubleshooting 198Restrictions 206

196 Dimensions® CM
Tips
Mapping Project Directories to Partitioned Data SetsThe directory structure in the client-server world is hierarchical. Mainframes use libraries (PDSE or PDS) rather than directory structures. Libraries contain members, which are analogous to files stored in directories on Windows or UNIX. This tip explains how to correctly map Dimensions files and projects to data set members on z/OS machines.
On your z/OS machine, point your project directory to:
<Dimensions>::<MFIJS>.DEMO
where:
<Dimensions> is the logical node name for your mainframe.
<MFIJS> is your own uid.
If your Dimensions server routing is set correctly, the project file names should be displayed in the mainframe PDS style. For example, if you have a source file called FOO in a directory called COBOL, Dimensions sets the default user filename to:
MFIJS.DEMO.COBOL(FOO)
About the /tmp DirectoryThe /tmp directory is used by Dimensions mainly for temporary working storage for load modules. The space required is dependent on the number and size of modules. To allow a large number of users to perform builds and deployments in parallel at least 500 MB are required in a live system. Use standard UNIX best practices to monitor and administer this space and check that it is does not exceed 70% capacity under full load. There are facilities in BPXPRMnn (see MVS Systems Initialization and
NOTE If you require a more elaborate directory structure, you may need to set your project to Dimensions390:MFIJS and emulate the other naming levels as sub-directories within the project directory structure.

Dimensions for z/OS Guide 197
Tuning) that allow z/OS to warn the operator if /tmp or any other UNIX file system is becoming full.
About the Local Metadata VSAM Data SetThe metadata file contains Dimensions server metadata for items as they are moved between remote nodes and the Dimensions server. This local metadata helps to optimize network resources as it contains information that is utilized by local operations and reduces connections to the server.
ISPF Client Troubleshooting
Problems Displaying Panels when Startingthe ISPF ClientDepending on how your session allocations are setup, the easiest way to search for allocation and search path problems is to use the ISRFIND utility supplied by IBM. Use ISRFIND to search allocation data dictionaries (DD) for member names and see where they are located in a DD concatenation. ISRFIND may not work if you are using LIBDEFs to dynamically add the Dimensions libraries.
For example, if you install a new Dimensions z/OS mainframe patch release in the MERDIM.GA8.D8030.* data sets, the current production installation is MERDIM.GA8.*. Your session allocations are done in a log in procedure that should place the D8030 data sets before the GA8 data sets in the search order.
To determine whether the search paths are setup properly, you can execute a LISTA ST command or use ISRFIND. You can execute both these tools from option 6 in the ISPF client, or from the command line using TSO commands.
With ISRFIND you can, for example, enter ISPPLIB for the DD name and press Enter. ISRFIND will list the current data sets on the ISPPLIB DD so that you can verify whether they are in the right order. You can also specify a member name that you want to search for, and ISRFIND will display the data sets where it is located. This enables you to check whether a member exists in an unexpected data set, and may explain version problems.

198 Dimensions® CM
Dimensions Listener Troubleshooting
MVS Listener Start Up DiagnosticsThe Dimensions configuration file contains the following variables that control listener start up diagnostics:
DM_MVS_START_CHK_CONSOLE
DM_MVS_START_CHK_LOG
DM_MVS_START_CHK_PATH
DM_MVS_START_CHK_RACF
DM_MVS_START_CHK_DIRTY
DM_MVS_START_ABEND_DIRTY
For full details about these variables and how to set them see "Customizing Variables in the Dimensions Configuration File" on page 68.
Example Message Output
+MDH1001I Checking RACF CLASS=FACILITY RES=BPX.DAEMON +MDH1003I OK : RACF access confirmed +MDH1001I Checking RACF CLASS=FACILITY RES=BPX.SUPERUSER +MDH1003I OK : RACF access confirmed +MDH1008I checking path /d/run/mdhd1010/prog +MDH1009I - GOOD - Path exists (F_OK) +MDH1011I - GOOD - Path is readable (R_OK) +MDH1013I - GOOD - Path is executable (X_OK) +MDH1015I - Unix Permission Word (stat) is 0x010001ed +MDH1008I checking path /d/run/mdhd1010/msg +MDH1009I - GOOD - Path exists (F_OK) +MDH1011I - GOOD - Path is readable (R_OK) +MDH1013I - GOOD - Path is executable (X_OK) +MDH1015I - Unix Permission Word (stat) is 0x010001ed +MDH1008I checking path /d/run/mdhd1010/codepage +MDH1009I - GOOD - Path exists (F_OK) +MDH1011I - GOOD - Path is readable (R_OK) +MDH1013I - GOOD - Path is executable (X_OK) +MDH1015I - Unix Permission Word (stat) is 0x010001ed +MDH1008I checking path /d/run/mdhd1010 +MDH1009I - GOOD - Path exists (F_OK)

Dimensions for z/OS Guide 199
+MDH1011I - GOOD - Path is readable (R_OK) +MDH1013I - GOOD - Path is executable (X_OK) +MDH1015I - Unix Permission Word (stat) is 0x010001ed +MDH1008I checking path /d/run +MDH1009I - GOOD - Path exists (F_OK) +MDH1011I - GOOD - Path is readable (R_OK) +MDH1013I - GOOD - Path is executable (X_OK) +MDH1015I - Unix Permission Word (stat) is 0x010001ff +MDH1008I checking path /d +MDH1009I - GOOD - Path exists (F_OK) +MDH1011I - GOOD - Path is readable (R_OK) +MDH1013I - GOOD - Path is executable (X_OK) +MDH1015I - Unix Permission Word (stat) is 0x050001ff +MDH1008I checking path / +MDH1009I - GOOD - Path exists (F_OK) +MDH1011I - GOOD - Path is readable (R_OK) +MDH1013I - GOOD - Path is executable (X_OK) +MDH1015I - Unix Permission Word (stat) is 0x010001ed +MDH1004I Checking the DIRTY bit at offset 0x116 from TCB +MDH1005I This byte contains 80 +MDH1007I This is OK +MDH77003I Initializing console handler +MDH77004I Console Command Listener Started +MDH16SL0001I P67764332 T428106624 Starting pool manager
Example Message from Dirty Address Space
The example below is from a first failed run with only DM_MVS_START_CHK_DIRTY defined:
MDH1020I To find the problem module, re-run withMDH1021I DM_MVS_START_ABEND_DIRTY defined in dm.cfg
The example below is from a second run after defining DM_MVS_START_ABEND_DIRTY:
MDH1017I Dimensions will not be able to switch useridsMDH1018I Check the system log for a RACF ICH420I messageMDH1018I or a BPXP015I message from HFS, which couldMDH1019I explain what module caused the problemMDH1018I Trying a switch to DMSYS now:
For more information see the IBM book manager documentation for the above two messages (ICH420I and BPXP015I).

200 Dimensions® CM
Problems with UNIX AccessProblems can be caused by unusual UNIX environments. The best way to eliminate these issues is outside of Dimensions:
1 Log in to a Telnet session (not 3270).
2 Check that you have an assigned home directory (~).
3 Check that you can cd to this directory, and create a file:cd ~cat >test.txtdata^d
The following messages show home directories that cannot be reached:
fileystem fullfilesystem read-onlydirectory permissions wrong
4 Check that you can write a file into the /tmp directory.
5 Log in as DMSYS and check that you can use the files you created in /tmp and '~'.
6 When you execute the ls command, check the files have your unique RACF assigned UID, marking them as your files.
Problems Switching User IDsWhen the Dimensions listener can not spawn a library server in a particular user ID, look in the system log (the LOG option in SDSF). You may see some RACF messages about the program controlled environment being dirty. Use the extattr command in the <DM_ROOT>/prog directory to solve this problem.
Pay attention to the full output of the UNIX ps command from a super user. Try to get a single USS based listener working before trying the JCL started task or running multiple Listeners.

Dimensions for z/OS Guide 201
Configuring z/OS Mainframe Network Nodes CorrectlyMany problems can occur if remote z/OS nodes are not defined correctly. You require the following node definitions:
A physical node representing the machine (DNS name).
A logical node for use with MVS.
A logical node for use with USS.
All three nodes require a UNIX or OS operating system, not MVS.
The MVS logical node requires an MVS file system.
For full details about setting up z/OS mainframe network nodes, see page 55.
When testing a remote node use the desktop client to perform a FETCH (GET) of a Dimensions item to <logical::path>. Micro Focus does not recommend using a physical node name when you are testing.
Problems with CodepagesMainframe are more sensitive to codepage issues as they do not natively use ASCII derived data.
Check that you only use binary data when it really is binary. If you have a valid connection to a mainframe node, but files appear incorrectly, this may be the cause of the problem.
You cannot browse a binary file on a mainframe in the desktop client.
Problems with Server CodepagesIf you get the message "codepage 0000xxxx.TAB could not be found" the server does not know its own codepage and is using zero instead. Create two fake codepage files in the <DM_ROOT>/codepage directory on the Dimensions server. The filenames in this directory are in HEX, with the 'from' and 'to' codepages using four hex digits each. Copy the codepage file you want to use to one where the server component is zero.

202 Dimensions® CM
For example, if you are using EBCIDIC page 1047 on a mainframe, and ANSI 819 on the PC, do the following:
cd codepagecopy 04170333.TAB 00000333.TABcopy 03330417.TAB 03330000.TAB.
For more information about codepages and how they are used in Dimensions, see the following file:
%DM_ROOT%/codepage/codepage.txt
Interpreting ISPF StatisticsWhen you fetch a file from Dimensions into a PDS member, ISPF statistics are created for it. The modification date/time of this date is taken from the file system statistics against the item-store item (the date that the physical file being stored was changed). Depending on what columns you have visible in the desktop client, this may differ from the Last update date (which shows meta-changes such as a status change)
A detailed MVS trace of the ISPF statistics creation process is available if you are still having trouble, see page 203.
Configuring Auto-AllocationIf you mainly use mainframe code that you need to compile on a mainframe set DM_MVS_CREATE_DEFAULT_TEXT to FB(80). The auto-allocation feature when you extract to a non-existing PDS will work in your favour. However, if you try to fetch an item wider than 80 you will get an error. Otherwise, define the default to be wider or VB (such as VB(1000)).
The problem of the data being too wide for the default occurs when you browse an item from the ISPF client. It creates a default data set that is FB(80) by default, which will not work if the data is actually wider than this. The message FETCH FAILED occurs.

Dimensions for z/OS Guide 203
Setting up TracingFor MVS problems the best trace is obtained by setting DM_MVS_TRACE in the mainframe configuration member MDHTDCFG. This trace appears in /tmp with a name beginning with pt. You can set the tracing variables in MDHTDCFG on both the remote node and the server using these symbols:
DM_MVS_TRACE yes
DM_MVS_DETAIL_TRACE yes
DM_EVENT_TRACE on
DM_SDP_TRACE <directory>
Collects a detailed trace of many aspects of the listener.
On the Dimensions server you can also get a trace by adding a -trace line to the listener.dat start up file used by the server. –trace enables the 'poollogger', which traces the interaction of dmlsnr, dmpool, and dmlibsrv by creating a log for each one. This only affects the startup of Dimensions and library servers.
Traffic tracing can also provide very useful diagnostic information. The standard utility tcpdump should be installed on your Dimensions server (for UNIX sytems). For Windows servers Ethereal with pCap is an alternative.
Problems with LicensingWhen you start the listener, if it stops immediately and reports the error Remote license check failed there are usually two main causes:
The license file is invalid for Dimensions for z/OS.
The listener cannot find the Dimensions license server.
After checking that you are licensed for Dimensions zOS, do the following:

204 Dimensions® CM
1 Verify that the proper steps were followed during installation. In particular check that the security setup has been performed.
2 Verify that the mainframe configuration member MDHTDCFG contains the proper value for REMOTE_LICENSE_SERVER.
3 Verify that you can ping the server from the mainframe. If your installation is using a port other than 671, check that the server name is followed by :<port number>. For example:
REMOTE_LICENSE_SERVER prod_server:1500
4 Verify that the environment is being established properly for the listener to run. Typically the member MDHTDMIV is used to set up the proper paths for the listener installation. Check that MDHTDCFG is being found so that the correct license server is used.
5 Verify that the Dimensions service is installed and running on the server. The easiest way to verify is to connect the desktop client to the same server the listener is trying to contact.
6 If your system has a firewall, check that the proper ports are open for both inbound and outbound traffic.
Started TasksThe number of tasks that get started for a user depends on what the user is trying to do. A task on the mainframe is started in each of the following instances:
Desktop or web client session: The only time a mainframe task is started is if the user authorizes to a mainframe node, or sends and retrieves a file from that node (check in, get, etc.). However, a user can authorize a node that starts an instance on that node but then never use it. If the user works inside Dimensions but does not authorizes to a remote node, an instance will not get started. The listener shuts down if a connection timeout occurs or the user closes the application.
The ISPF client requires a listener instance to be started at log in to send/receive temporary files while the user performs general operations such as browse and edit. For each client session a mainframe listener instance is started using the login credentials provided by the user. The listener shuts down if a connection timeout occurs or the user closes the application.
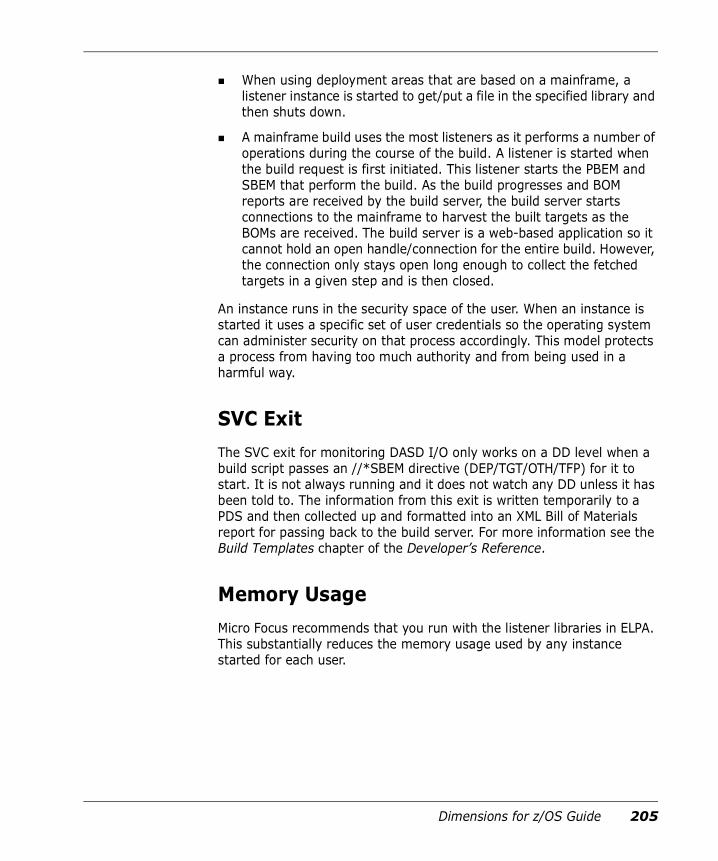
Dimensions for z/OS Guide 205
When using deployment areas that are based on a mainframe, a listener instance is started to get/put a file in the specified library and then shuts down.
A mainframe build uses the most listeners as it performs a number of operations during the course of the build. A listener is started when the build request is first initiated. This listener starts the PBEM and SBEM that perform the build. As the build progresses and BOM reports are received by the build server, the build server starts connections to the mainframe to harvest the built targets as the BOMs are received. The build server is a web-based application so it cannot hold an open handle/connection for the entire build. However, the connection only stays open long enough to collect the fetched targets in a given step and is then closed.
An instance runs in the security space of the user. When an instance is started it uses a specific set of user credentials so the operating system can administer security on that process accordingly. This model protects a process from having too much authority and from being used in a harmful way.
SVC ExitThe SVC exit for monitoring DASD I/O only works on a DD level when a build script passes an //*SBEM directive (DEP/TGT/OTH/TFP) for it to start. It is not always running and it does not watch any DD unless it has been told to. The information from this exit is written temporarily to a PDS and then collected up and formatted into an XML Bill of Materials report for passing back to the build server. For more information see the Build Templates chapter of the Developer’s Reference.
Memory UsageMicro Focus recommends that you run with the listener libraries in ELPA. This substantially reduces the memory usage used by any instance started for each user.

206 Dimensions® CM
Restrictions
Unsupported Dimensions CommandsThe following Dimensions commands are not supported by Dimensions for z/OS:
Command Description
BI Browse items (available from an ISPF panel, but not the command entry field).
BC Browse or print requests—request attachments are not retrieved to mainframes. If you require attachments, use the desktop client or the web client.
CMP Compare structures.
EDI Edit item.
EXIT Exit Dimensions.
MI Merge items.
PRCS RCS-like front end.
PSCCS SCCS-like front end.
RCI Report current items.
RCP Report current parts.
RDS Report design structure.
RPCP Report product plan.
UC Update request. Unsupported if either the /ADD_DESCRIPTION or /EDIT_ACTION_DESCRIPTION qualifier is specified; otherwise, supported.

Dimensions for z/OS Guide 207
Appendix ATemporary Data Sets
Temporary data sets created by the ISPF client have the following naming convention:
<userid>.SRNA.<BROWSE/EDIT/CMDLOG.T<unique number>.M<unique qualifier>.TMP
For example: MERMJT.SRNA.BROWSE.T5758.M135973.TMP
In the above pattern, the ID of the user currently logged in is used. However, you can allocate data sets to their TSO prefix by enabling the 'Use TSO prefix for all data set allocations' option in the Settings panel. If you enable this option, the high level qualifier for data sets will be the current user's TSO PREFIX. The current prefix is displayed in the ISPF main panel:
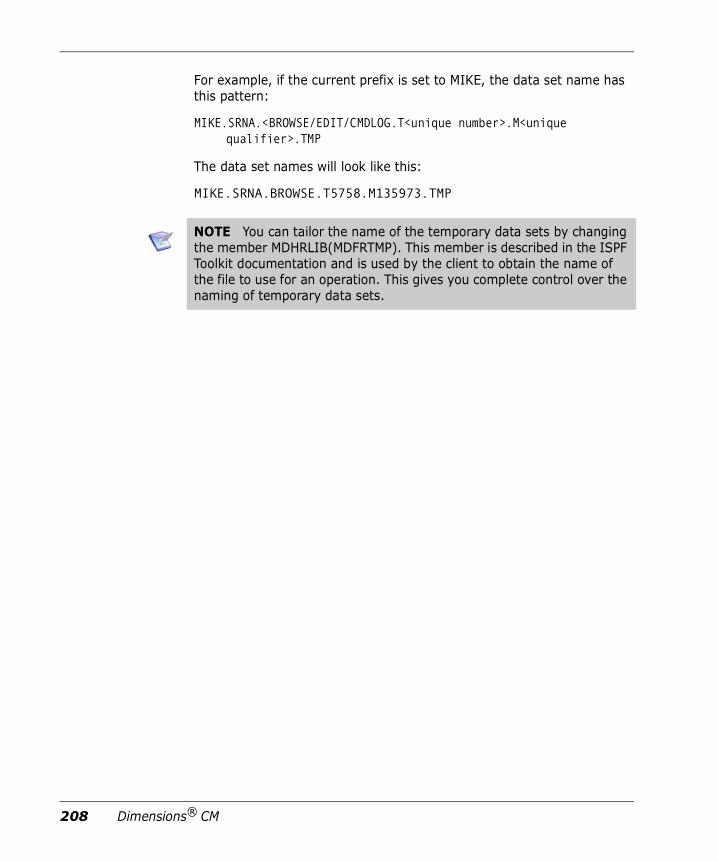
208 Dimensions® CM
For example, if the current prefix is set to MIKE, the data set name has this pattern:
MIKE.SRNA.<BROWSE/EDIT/CMDLOG.T<unique number>.M<unique qualifier>.TMP
The data set names will look like this:
MIKE.SRNA.BROWSE.T5758.M135973.TMP
NOTE You can tailor the name of the temporary data sets by changing the member MDHRLIB(MDFRTMP). This member is described in the ISPF Toolkit documentation and is used by the client to obtain the name of the file to use for an operation. This gives you complete control over the naming of temporary data sets.

Dimensions for z/OS Guide 209
Appendix BSupplementary Resources
Advent 210Disassembler 210Examples 211
NOTE Micro Focus asserts no ownership over any of the supplementary resources and they are supplied 'as is' with no warranty of any kind.

210 Dimensions® CM
AdventADVENT is a port of the Adventure program and is supplied as an example application for training and demonstration. The resources are located in:
MDH.V1460.SUPP.ADVENT.*
Advent comprises several C source modules that compile to two programs. A start up CLIST is also supplied. The program MDOLPREC0 builds an 'h' file that you will require when compiling other modules. See the MDOJCADV JCL stream for details about running MDOLPREC0. To enable the game to work properly, you may need to run MDOLPRECD to create MDOHTEXT, and then recompile those modules that use MDOHTEXT.
TGT files are included to enable you to build the application in ChangeMan Builder for Dimensions.
DisassemblerDisassembler, available for download from CBTTape.org at http://www.cbttape.org, is supplied as an example disassembler suite. The application has been slightly modified and the modules renamed. The resources are located in:
MDH.V1460.SUPP.DISASS.*
A JCL stream, MDOJDIS, shows how you can use Disassembler to disassemble itself. The JCL stream also shows you how to run the check program to verify that the resulting module is the same:
MDOLRSRC: disassembles a CSECT.
MDOLRCHK: verifies that the assembly matches the original module.
TGT files are included to enable you to build the application in ChangeMan Builder for Dimensions.

Dimensions for z/OS Guide 211
ExamplesThe examples located in MDH.V1460.SUPP.EXAMPLES.* include:
MDHBADVN: a Windows CMD file that you can use to install the Advent sample application into a Dimensions database, and set up a build in ChangeMan Builder for Dimensions. The member contains instructions about set up and usage.
MDHJBTPL: sample JCL for running the templater in test mode outside Dimensions.
MDHJMDRV: sample JCL for displaying and editing Dimensions metadata.

212 Dimensions® CM

Dimensions for z/OS Guide 213
Appendix CSolving Codepage Translation Errors
Introduction 214Problem Definition 214Diagnosing the Problem 216Customizing Codepage Translation 217

214 Dimensions® CM
IntroductionThis appendix describes how to solve codepage translation errors.
Problem DefinitionDimensions server codepage settings affect the translation of the contents of data files and the recording (tagging) of codepages in item library. Mainframe settings affect the command lines sent between the mainframe and the Dimensions server. For example, assume that you have the following connections defined in Dimensions:
A server to mainframe connection using codepage 1141.
A server to server connection using codepage 819.
Also, assume that the following variables are defined in the Dimensions mainframe configuration file, MDHTDCFG:
DM_MVS_CODEPAGE_SERVER 819
DM_MVS_CODEPAGE_MAINFRAME 1141
Using the above settings, the Dimensions for z/OS listener translates commands it sends to the server from codepage 1141 to codepage 819. However, Dimensions source code uses codepage 1047, and because some characters are in different positions in 1047, there are errors in the translation. Therefore, in the example above, you need to use codepage 1141. The problem is not with the translation but with the EBCDIC data that is presented for translation.
Dimensions for z/OS Guide 215
Special CharactersThe following special characters can move in different versions of EBCDIC:
You can customize the behavior of the special characters to match local requirements by mapping them individually to codepoints. The default behavior uses the Language Environment (LE) and C language locale concept. The locale is queried to obtain the usual encoding for the special characters on the local machine. Because the locale is "hidden" in the setup of the mainframe, Micro Focus provides facilities to enable you to check what is happening, and to override the behavior manually.
DescriptionSpecial Character
Number #
Dollar $
'at' @
Left bracket ]
Right bracket [
Left brace }
Right brace {
Circumflex ˆ
Tilde ~
Exclamation mark !
Vertical line |
Backslash /
Grave `

216 Dimensions® CM
Diagnosing the ProblemTo check what is happening, run the DMCHKSUM utility:
cd <dimensions-instance>. ./dmprofiledmchecksum debugcodepage
You can also run dmchksum directly from JCL:
//CKSM EXEC PGM=MDHLCKSM, //PARM=('POSIX(ON),ENVAR("_CEE_ENVFILE=DD:DV")/debugcodepage')//STEPLIB DD DSN=MDH.V9000.MDHLLIB,DISP=SHR // DD DSN=MDH.V9000.MDHLLPA,DISP=SHR //DV DD DSN=MDH.<instance>.PARM(MDHTDIMV),DISP=SHR //CEEPRINT DD SYSOUT=* //SYSOUT DD SYSOUT=* //SYSPRINT DD SYSOUT=*
Review the output of this report. Section 3, Special characters mapped from cp-819, describes what default translation should occur to the special characters based on the codepage specified in the Dimensions configuration file variables DM_MVS_CODEPAGE_SERVER and DM_MVS_CODEPAGE_MAINFRAME.
Section 4 contains an input and output string that shows what is happening to the special characters. There is a problem only if this display indicates that the output characters are not what you require.
Use the MDHLCKSM utility to fine tune codepage handling without the overhead of running Dimensions. However, to obtain a detailed trace of mainframe to server translation traffic, use the following variable in the Dimensions configuration file PARM(MDHTDCFG):
DM_MVS_DEBUG_CODEPAGEY
The data is written to the HFS /tmp directory in files called codepage-*.log. The log details the data buffer contents before and after EBCDIC to ANSI translation when data is passed from the z/OS listener to the Dimensions server.
NOTE DM_MVS_DEBUG_CODEPAGE has a large overhead therefore Micro Focus recommends not leaving it enabled for long periods.

Dimensions for z/OS Guide 217
Customizing Codepage TranslationIf the translation of the special characters is not correct use one of the following solutions.
Overriding Individual Character TranslationsYou can control the codepage translation with the environment variable DM_MVS_SPECIAL_CHARS. If you set this variable to a sequence of 13 hex numbers (space delimited), the numbers will be used as the codepoints for the translation, in the character order listed on page 215. The MDHDCKSM utility outputs a shell command that sets DM_MVS_SPECIAL_CHARS to the correct values for the default environment. For example:
export DM_MVS_SPECIAL_CHARS="7B 5B B5 63 FC 43 DC 5F 59 4F BB EC 79 "
Modify this command as required.
There are two places where you can place the variable DM_MVS_SPECIAL_CHARS, and for each the syntax is slightly different.
UNIX Operations
To enable the DM_MVS_SPECIAL_CHARS variable to exist for commands invoked from UNIX, issue the following command:
export DM_MVS_SPECIAL_CHARS="7B 5B B5 63 FC 43 DC 5F 59 4F BB EC 79 "
Check the result by using the env command to display the environment. To allow DM_MVS_SPECIAL_CHARS to be defined along with other Dimensions symbols, place the export command in the shell script dmprofile.

218 Dimensions® CM
MVS Batch and ISPF Operations
The environment space is created for the batch interface and the ISPF client from the file MDHTDIMV that is located in <instance>.PARM(MDHTDIMV). MDHTDIMV is usually pointed at directly by the JCL running the required program. For example:
//prog EXEC PGM=prog, // PARM=('POSIX(ON),ENVAR("_CEE_ENVFILE=DD:DV")/')//STEPLIB DD DSN=MDH.V9000.MDHLLIB,DISP=SHR // DD DSN=MDH.V9000.MDHLLPA,DISP=SHR //DV DD DSN=MDH.<instance>.PARM(MDHTDIMV),DISP=SHR
Edit DIMV to add the definition of DM_MVS_SPECIAL_CHARS. In this case the syntax is different and there are no quotes and no export command.
DM_MVS_SPECIAL_CHARS=7B 5B B5 63 FC 43 DC 5F 59 4F BB EC 79
If you use this environment variable setup, you should be able to re-run the MDHLCKSM utility and verify the changed behavior. When it is working properly, restart Dimensions.
Changing LocaleYou may be able to switch to a different locale for the Dimensions sessions, or your site default. Micro Focus does not recommend this solution as it may affect more than just Dimensions behavior. For more information refer to the IBM Bookmanager and look for the locale section keyword "LC_SYNTAX".
NOTE If the environment variable DM_MVS_SPECIAL_CHARS is defined it always takes priority over changing locale.

Dimensions for z/OS Guide 219
Appendix DSetting Up Dimensions Metadata
Introduction 220Hierarchical Systems 220MVS Systems 221
220 Dimensions® CM
IntroductionDimensions uses local metadata to support local operations such as auditing and build areas. Metadata is information about the objects in the local file systems that relates to a single Dimensions server. If you have multiple Dimensions z/OS listeners, use one of the following methods to set up metadata:
Per instance: Define separate metadata stores and use each one with a specific listener.
Global: Use the single metadata store for all listeners.
The first method gives better performance and may be useful in test scenarios. For both methods, objects for which you are storing metadata must be unique to one server, otherwise the behavior may be unpredictable. Micro Focus does not recommend multiple metadata files.
The design of the metadata is platform specific.
Hierarchical SystemsOn hierarchical systems such as UNIX, Windows, Linux and USS, every build area directory, and all build area sub-directories, contain a directory called .metadata. Each .metadata directory mirrors the contents of its parent sub-directory, and contains a metadata file for every fetched file in the sub-directory. For example, for the following file on a UNIX system:
/u/user/unittest/cobol/prog1.cob
the corresponding metadata file is located in:
/u/user/unittest/cobol/.metadata/prog1.cob
Files in .metadata directories only contain metadata, and the file extension names have no significance.

Dimensions for z/OS Guide 221
The following metadata is recorded:
Dimensions Unique Identifier (UID)
Item spec
Time stamp
File version
MD5 checksum
On hierarchical systems metadata is recorded silently and you do not have to perform any actions. However, if you operate a single object from multiple servers, unexpected results may occur.
MVS SystemsOn MVS systems, metadata is stored in a central repository that is a VSAM KSDS (Key Sequence Data Set) data set. The information stored is the same as on hierarchical systems, keyed on the local filename.
Access to the metadata store is serialized via an ENQ name using the following environment variables:
DM_META_LOCK_MAJOR: major name for a protecting ENQ.
Default: SERENA
DM_META_LOCK_MINOR: minor name for a protecting ENQ.
Default: MTABASE

222 Dimensions® CM

Dimensions for z/OS Guide 223
Appendix EThe Local Metadata Server
Introduction 224Installation 225Operation 226MDHLMDRV Syntax 227

224 Dimensions® CM
IntroductionThe local metadata server (LMDS) is a required Dimensions for z/OS component that:
Provides a mechanism for high speed shared access to VSAM files containing all the local metadata for MVS file system objects.
Is implemented as a TCP/IP server comprising a single address space for all metadata consumers for one or more metadata files.
Handles any number of metadata files concurrently, however services will slow if there are many files.
Use /s lmdsproc to start the server and /p lmdsproc to stop it.
Improvements to LMDSIn Dimensions CM 12.2.2 and later there are changes to the way that LMDS is used with Dimensions listeners, specifically:
Remote area scanning is significantly faster, particularly when selecting metadata.
The LMDS and Dimensions agent for z/OS need to be at the same level for 12.2.2 or later. You cannot use an earlier level LMDS to manage a local metadata file for a 12.2.2 or later agent, and vice versa. However, the internal file format has not changed, and there is no required conversion process.

Dimensions for z/OS Guide 225
Installation
The local metadata server consists of:
A program called MDHLMSRV that you need to start and run as a started task or batch job.
An enhanced syntax delivered by MDHLMDRV that allows control functions to be carried out against the local metadata server.
Additional syntax that you can use when specifying the location of the local metadata. The parameter file MDHTDIMV contains variables that define the location of the local metadata file for the instance, which can be shared across the whole installation. If you use the local metadata server, you alter the local metadata specification in MDHTDIMV as follows:
DM_META_DATASET=+dataset@server:port
where:
• ’dataset’ is a name such as MDH.SYSTEM.MTABASE.
• ’server’ is either an IP address in numeric format or a DNS name (the numeric format is faster), which can address a single LPAR on which your local metadata server is running.
• ’port’ is a spare TCP/IP port for the server to use.
The data set name and ENQ/DEQ details are passed to the server for it to use when a local metadata client initializes the local metadata handle. ENQs are used to protect the VSAM data set from other updaters.
The program MDHLMSRV is delivered as a load module in MDH.V1460.MDHLLPA and also uses DLLs stored in MDH.V1460.MDHLLPA. If you are installing Dimensions for z/OS for production use you must add the appropriate libraries to the ELPA to reduce system overheads. The local metadata server shares some functions with this library.
NOTE You can use the templated installation process to construct the required local metadata support. For details see page 41.

226 Dimensions® CM
OperationTo start the local metadata server put the following sample JCL in the procedure library or use the PROC constructed by the templated installation process:
//MDHMSRV PROC //* //* -t n controls tracing.//* n is a decimal number but its bits control the//* tracing features. //* 1 => communications trace//* 2 => storage trace//* 4 => application trace//* Trace is only produced if the MDHTRACE DDNAME//* is uncommented. Add the options together for //* to combine them.//*//STEP100 EXEC PGM=MDHLMSRV, // PARM='ENVAR("_CEE_ENVFILE=DD:DV")/-t 0 -p <port>' //STEPLIB DD DISP=SHR,DSN=MDH.V1460.MDHLLIB // DD DISP=SHR,DSN=MDH.V1460.MDHLLPA //DV DD DISP=SHR,DSN=MDH.instance.PARM(MDHTDIMV) //MDHPRINT DD SYSOUT=* //*MDHTRACE DD SYSOUT=* // PEND
NOTE
Replace <port> with your port number for this service. The port number must be different to the one that you use for your Dimensions listener.
You must use DDNAME DV for the Dimensions DIMVARs data if you want to use /P to stop your server.
You should create a RACF STARTED resource for your PROC that establishes a new security environment for this process, for example:
RDEF STARTED MDHJMSRV.MDHJMSRV STDATA(USERID(user) TRUSTED(NO))
You can secure the local metadata data set so that ordinary users do not have access to it. The only user ID that requires access to the local metadata data set is the one used to start it.

Dimensions for z/OS Guide 227
MDHLMDRV SyntaxThe MDHLMDRV program has extended syntax for controlling the metadata server, for example, to cancel it or close it correctly. Run the MDHLMDRV program, connect to the server, and use the special commands detailed below.
NOTE You can continue lines using '-' as the indicator. Lines ending with this indicator have the '-' removed and the next line, after stripping leading spaces, is logically appended to the current command.
Command Parameters Description
-- Comment operator
* Comment operator
// Comment operator
# Comment operator
ABEND Do an ABEND (z/OS only).
BULKDEL //mask[(memmask)] Delete matching the metadata collection from the LMDS controlled database.
CLOSE Destroy the session and disconnect from LMDS.
DELREC //filename [OPT|NOOPT] Delete a metadata collection.
DESTROY Destroy the current metadata collection.
DISPLAY Display the current saved metadata collection.
ENDLOOP End of loop.
EXIT Exit program.
GET //filename [DIFF| NODIFF] Get the metadata and save the values.
GETST //filename Get structure.
GR //filename Get raw metadata from disk and dump in HEX format with IDs and lengths.
HELP
LOOP Start of a repeated loop.

228 Dimensions® CM
NOTE A copy operation can be effected by:
GET //filename(member)
(Optional) SET tag value
…
PUT //newfilename(member2)
The physical file is not copied.
NEW Create a new metadata collection.
OPEN [-t n] Create a session and connect to LMDS. Use -t to set (hex) tracing options. The connection fails silently and is retried on the next operation. Trace goes to the log file.
PUT //filename Put metadata using the saved values to a file.
QUIT Exit the program.
REPORT Request a report from the LMDS about connected databases and users. This is written to LMDS MDHPRINT.
SCAN //mask [(memmask)] [KEYONLY | ALL [ NODISPLAY ] ]
Search the database controlled by LMDS for matching objects.
SET tag value Specify a new value for a specific tag in the metadata collection. For example, to replace the current value of the tag ’fileversion’:SET fileversion 2
SLEEP n Wait n seconds.
SMO ON/OFF Set member option.
STOPDB Ask LMDS to shut down using a specific database.
STOPSRVR Ask LMDS to initiate close down. When all connected databases have disconnected the server closes down.
Command Parameters Description

Dimensions for z/OS Guide 229
You can use the following sample JCL when running MDHLMDRV:
//RUN EXEC PGM=MDHLMDRV, // PARM='ENVAR("_CEE_ENVFILE=DD:DV")/DD:I DD:P DD:T' //STEPLIB DD DISP=SHR,DSN=MDH.V1460.MDHLLIB //* If you have loaded the necessary DLLs into the LPA you //* can comment out the next line with impunity // DD DISP=SHR,DSN=MDH.V1460.MDHLLPA //* Environment variables for the instance are here - this //* specifies the metadata dataset and the major and minor locks //DV DD DISP=SHR,DSN=MDH.MDHD2204.PARM(MDHTDIMV) //* Output from commands goes here... //P DD SYSOUT=* //* trace of activity goes here //T DD SYSOUT=* //* command stream is here //I DD * -- -- Start the metadata session -- OPEN -t 0 report stopdb stopsrvr CLOSE /*
You can use the /P command to stop the LMDS server. The LMDS server invokes MDHLMDRV using a special form of the input commands equivalent to the following JCL:
//RUN EXEC PGM=MDHLMDRV, // PARM='ENVAR("_CEE_ENVFILE=DD:DV")/-stopserver' //STEPLIB DD DISP=SHR,DSN=MDH.V1460.MDHLLIB //* If you have loaded the necessary DLLs into the LPA you //* can comment out the next line with impunity // DD DISP=SHR,DSN=MDH.V1460.MDHLLPA //* Environment variables for the instance are here - this //* specifies the metadata dataset and the major and minor locks //DV DD DISP=SHR,DSN=MDH.MDHD2204.PARM(MDHTDIMV) //* Output from commands goes here... //MDHPRINT DD SYSOUT=* //* trace of activity goes here //MDHTRACE DD SYSOUT=*

230 Dimensions® CM

Dimensions for z/OS Guide 231
Appendix FViewing USS SYSLOG Messages
This appendix explains how to view USS SYSLOG messages. This facility is less important in Dimensions 14.2 (and later versions) compared to previous Dimensions releases as most messages are now issued via WTO. However it may be easier to use the method described below.
To view USS SYSLOG messages:
1 Create a file called /etc/syslog.conf that contains the line *.* /dev/console.
2 Create a PROC for SYSLOGD, see the example below. Check there is a userid called syslogd and create one if it does not exist.
//SYSLOGD PROC//*//* Start z/os USS system logger//*//SYSLOGD EXEC PGM=SYSLOGD,REGION=30M,TIME=NOLIMIT,// PARM='POSIX(ON),ALL31(ON)/-f /etc/syslog.conf'//SYSOUT DD SYSOUT=*//SYSPRINT DD SYSOUT=*//SYSERR DD SYSOUT=*//CEEDUMP DD SYSOUT=*//SYSIN DD SYSOUT=*// PEND
3 Create a RACF profile to control the execution userid of the new PROC:
RDEF STARTED SYSLOGD.SYSLOGDUACC(NONE)STDATA(USER(SYSLOGD)TRUSTED(NO))

232 Dimensions® CM
4 Allow SYSLOGD super user and daemon:
PE BPX.SUPERUSER CLASS(FACILITY) ID(SYSLOGD) ACCESS(READ)
PE BPX.DAEMON CLASS(FACILITY) ID(SYSLOGD) ACCESS(READ)
5 Start the PROC:
/S SYSLOGD
If PROC exits immediately it has started a daemon, which you can see running via the SDSF primary command ps.
For more details USS SYSLOG messages see z/OS VIR3.0 UNIX System Services Planning, chapter 26.8.1, in the z/OS VIR3.0 UNIX System Services Bookshelf.
Dimensions for z/OS Guide 233
Appendix GMVS DDNAME Caching
Overview 234Dimensions Configuration Symbols 234Wildcard Patterns 237Data Set Selection Expression 238

234 Dimensions® CM
OverviewThe DDNAME caching feature is a z/OS only performance enhancement that optimizes repeated use of the same data set, file, or container object in the same application.
To get the most out of this enhancement you need to add new parameters to the Dimensions configuration file. You should also be familiar with diagnostic procedures that can help you to solve problems, for example, specifying which data sets are cached, how they are cached, and checking that they have been cached.
Dimensions Configuration SymbolsThis section describes the symbols that you need to define in the Dimensions configuration file. The file is located in the following data set:
MDH.V1020.MDHPARM(MDHTDCFG)
DM_MVS_DDC_DISABLEA global override that turns off all caching.
DM_MVS_DDC_TRACECreates one trace file per process in the directory defined by the symbol DM_TMP. Specify one of the following trace levels (higher numbers generate more diagnostics data):
1: Only key events are traced, for example, a data set is cached.
3: Generates a function trace.
4: Generates extra information about data set DCB characteristics obtained from the catalog.
5: Generates additional tracing of the expression evaluator.
9: Generates detailed cache tracking.
Dimensions for z/OS Guide 235
When you initially set up DDNAME caching, use DM_MVS_DDC_TRACE to confirm that the data sets that you expect are actually being cached. This will reveal any logic errors in the selection expressions, or any other errors.
DM_MVS_DDC_VOLUME_FILTERTo increase speed, the DCB characteristics of all data sets are obtained directly from the catalog. This is only possible if the data set is on disk, and not migrated using DFHSM. In this situation, the code recognizes a disk volume that indicates that HSM has migrated the data set. This parameter allows you to change the naming convention that is used.
If you set this parameter there will better handling of migrated data sets. The initial allocation when the data set is still on tape occurs the same as when DDNAME caching is disabled. The presence of this optimization does not change the pattern in which data sets get recalled or not. The original caller of the file ’open’ command can elect to abort the request without a recall being issued, and DDNAME caching does not interfere.
For example:
DM_MVS_DDC_VOLUME_FILTER MIG*
This indicates that any volume label beginning with MIG is to be treated as migrated.
For details of the pattern matching features of this field, see "Wildcard Patterns" on page 237.
DM_MVS_DDC_LOGICThe main form of caching is DDNAME caching where the allocation of a container PDS is only performed once, and subsequent operations, including those that use different member names to the original request, re-use the allocated DDNAME. This results in the data set being allocated for the life of the main program. Examples of a main program are the z/OS library server process (per user log in), and the PBEM (Primary Build Execution Monitor) build engine (MDHLPBEM).
Micro Focus does not recommend that you enable caching on every data set as this may produce conflicts with other processes that need

236 Dimensions® CM
exclusive control of the data set. Instead, use the facility described below to control the data sets that are cached and those that are not.
The Dimensions configuration variable DM_MVS_DDC_LOGIC names a file that contains the data sets that you want to cache. This parameter normally names a member in the PARM data set of the Dimensions instance. For example:
DM_MVS_DDC_LOGIC //'MDH.MDHD1013.PARM(MDHTDDC)'
For details about writing this file see "Data Set Selection Expression" on page 238.
An additional level of caching is provided for specifically targeted data sets. These are cached in main memory when they are first used and are retrieved from memory as required. This additional level of caching is ideal for small, frequently used data sets that never change, for example, build templates that are repeatedly re-used by the PBEM as each target is processed. Caching this type of data set in memory substantially improves performance.
You can code a list of these parameters suffixed with a number starting with 1. Each entry in the list names a container whose members should be cached in memory. The containers can be MVS style data sets or HFS style directories, allowing the optimization to work when the template library resides on HFS in a UNIX like structure.
The values are actually patterns, for details see "Wildcard Patterns" on page 237.
Examples:
DM_MVS_DDC_MEMORY_PATTERN_1 MDH.*.TEMPLATEDM_MVS_DDC_MEMORY_PATTERN_2 USER.TEST.TEMP*DM_MVS_DDC_MEMORY_PATTERN_3 /u/user/mytemplates/*DM_MVS_DDC_MEMORY_PATTERN_4 /u/user/test/this-directory
DDNAME caching can still be enabled for the same data sets, in which case the initial read into memory will use the cached DDNAME, making it slightly faster.
Accidentally enabling caching on a data set may cause confusion. Edits to a member will be completely ignored once the member has been initially cached in memory.

Dimensions for z/OS Guide 237
Members are only read into memory when they are first used. Consequently, this functionality is suitable for use on very large PDSs where only a few active members are used.
DM_MVS_DDC_BPXWDYNThis symbol causes all data set allocations to be performed using the method used in Dimensions 10.1.1 and earlier. Only use this symbol when instructed to do so by Support.
Wildcard PatternsThis section describes how to use pattern matching.
The same type of patterns are found in:
The DM_MVS_DDC_VOLUME_FILTER parameter.
The DM_MVS_DDC_MEMORY_PATTERN parameter.
The second argument to the "LIKE" keyword in the logic expression language (see "Operators" on page 240).
The patterns are modeled on DOS rather than UNIX. The two special characters are:
* (any number of characters).
? (an individual character).
When you expand using the "*" pattern, neither UNIX style slashes ’/’ or MVS style dots ’.’ are special. In other words, an asterisk ’*’ in the middle of a data set can match multiple qualifiers and multiple levels in a UNIX path.
Examples:
USER.TEST.COBOL: this is an exact match.
USER.*: matches any data sets beginning with ’USER’.
U*: matches any data sets that have an HLQ beginning with ’U’.
USER.*.TEMPLATE: matches the user's template libraries.

238 Dimensions® CM
USER.*.TEMP*: multiple use of ’*’ is allowed.
USER.*.T?MPLATE: allows any single character after ’T’.
US?R.*.T?M*: matches USER.TOMTOM.DATA.
/user/subdir*: matches directories beginning with ’subdir’ and their contents.
/user/subdir/*: forces ’subdir’ to be a complete directory name and matches its contents.
Data Set Selection ExpressionIn the file named by the parameter DM_MVS_DDC_LOGIC there is an expression that enables the DDNAME caching logic to determine if a given data set should be cached or not. This file is in a free format and is case insensitive. You can insert blanks, tabs, and new lines and store it in HFS or MVS. If the file is in an F style MVS data set, line numbers should be removed automatically, but only from the last 8 bytes of the line. If your editor preferences put them anywhere else, or you use VB data sets with line numbers, you should remove them manually. Use the ISPF editor UNNUM command.
Various symbols or variables are exposed to the expression and you can use them to specify whether to cache a data set. The expression has full support for brackets, to any depth, and logical combinations (AND, OR, NOT).
The following sections specify the variables that the expression language supports.

Dimensions for z/OS Guide 239
StringsYou can delimit strings with either double or single quotes.
Examples:
"Hello World"
'Goodbye Cruel World'
"My data set"
You can also put a literal quote into a string using backslash:
'Aministrator\'s data set'
Numbers Only whole integers are supported and you enter then directly.
Examples:
1234
80

240 Dimensions® CM
OperatorsOperators act on arguments to produce a result. Most are Boolean and return a true or false result. The integer 0 (zero) is false and all other numbers are true.
The following table lists the valid operators, some have multiple ways that they can be spelled. Normal English operator precedence occurs. If you are in any doubt, use brackets ’()’ to make sure that the order of evaluation is correct. The quantitative operators (such as ’>’) require numeric arguments.
Operator Description Example
==,=,EQ Equals i_lrecl == 80s_recfm == "FB"
!=,<>,NE Not equals i_lrecl <> 80s_recfm != "FB"
>=,GE,GTE Greater than or equal to i_lrecl >= 80
<=,LE,LTE Less than or equal to I_lrecl <= 80
>,GT Greater than I_lrecl > 90
<,LT Less than I_lrecl < 80
~,LIKE,MATCHES Wildcard pattern match s_recfm like "F*"s_volume like "A?12*"
!,NOT Not, negates the expression on the right."!" is a movable character in EBCDIC, use NOT instead.
! ( i_lrecl == 80 and s_recfm == "FB" )
&&,&,AND AND (join two expressions if they are both true).
( i_lrecl == 80 ) and ( s_recfm == "FB" )
||,|,OR OR (join two expressions if either are true).
( i_lrecl == 80 ) or ( s_recfm == "FB" )
(,) Brackets ( ( s_hlq = "MDH" ) and ( ( i_lrecl == 80 ) or ( s_recfm == "FB" ) ) )

Dimensions for z/OS Guide 241
VariablesVarious variables are exposed to the expression. Integer values have the prefix ’i_’ and string values have the prefix ’s_’.
Variable Description Example
s_dataset Specifies the data set name of the container. MVS only (not HFS) and does not have any decoration (slashes or quotes). Is fully qualified and has the userid as the HLQ if relevant.
( s_dataset == "MDH.MDHD1011.PARM" )( s_dataset LIKE "MDH.*" )
s_volume Specifies the volume label that the data set resides on. You can use this variable to exclude special data sets from caching if they are all stored on similarly named volumes.
! ( s_volume LIKE "SYS*" )
s_hlq Specifies the HLQ (High Level Qualifier) that is the left part of the data set name.Note: Using s_hlq is quicker than using s_dataset (s_dataset like "MDH.*").
s_hlq == "MDH"
s_llq Specifies the LLQ (Low Level Qualifier) that is the left part of the data set name.Note: Using s_llq is quicker than using s_dataset (s_dataset like "*.TEMPLATE").
s_llq == "TEMPLATE"
s_recfm Specifies the record format as a single string in the usual JCL style. Possible values are F,V,U,FB,VB,FBA,VBA,FBS,VBS,FA,VA,FS,and VS.
s_recfm == "FB".s_recfm like "*A"
i_f True if the data set has FIXED length records.
i_f and i_lrecl==80
i_v True if the data set has VARIABLE length records.
i_v and i_lrecl==80

242 Dimensions® CM
i_u True if the data set has UNDEFINED records.Note: This is a good condition for a LOAD module. Dimensions does not support RECFM=U for anything other than LRECL=0 LOAD modules.
i_u and i_lrecl==0
i_b True if the records are BLOCKED.
i_f and i_b
i_s True if the records are SPANNED (VB) or SHORT (FB).
i_f and i_b and i_s
i_a True if the records have ASA characters.
i_a
i_m True if the records have the MACHINE type.
i_m
i_lrecl The numeric LRECL of the data set.
i_lrecl == 80
i_blksize The numeric blocksize of the data set.
I_blksize > i_lrecl
i_pdse True if the container is a PDSE rather than a PDS.
s_context A context string. Is currently unused, but in future releases may contain a string indicating that special logic is required. In the future, a different caching strategy may be required for different parts of the product.
(s_context = "BUILD")&&(// other build conditions for caching)
)||(
( s_context = "LISTENER")&&(// other listener conditions for caching)
)
Variable Description Example

Dimensions for z/OS Guide 243
Example Logic File// this is a comment line, like C++//// (
// we want all template data sets(
( s_llq == "TEMPLATE" || s_llq == "TPL" )and( l_lrecl == 80 and s_recfm = "FB" )
)||// well take anything in our special build area(
( s_dataset like "some.build.*"))||// we don't want load modules, unless they are in a particular area(
( i_u&&(
( s_dataset like "some.*" )Or ( s_dataset like "some.thing.else.*" ))
)) // load modules
) // end expression

244 Dimensions® CM

Dimensions for z/OS Guide 245
Appendix HEnabling SSL Support on the z/OS Listener
Introduction 246Enabling SSL Support 246
246 Dimensions® CM
IntroductionThis appendix describes how to enable SSL (Secure Socket Layer) support on the z/OS listener. You need administrator rights on a Dimensions server machine on Windows or UNIX, as well as administrator rights to Dimensions for z/OS.
Enabling SSL SupportTo enable SSL support:
1 Choose a password for SSL and make a note of it, you will need it later in this procedure.
2 On z/OS, add the following to PARM(MDHTLSNR):
-ssl-ssl_password $$DMSECURE$$
3 On z/OS, in HFS $DM_ROOT, create a directory called ’CA’.
4 On a server, create the following registry.dat file as follows:
cd $DM_ROOT/dfsmv registry.dat registry.dat-olddmpasswd -ssl_password -add -pwd your-password
5 Transfer dfs/registry.dat from the server to z/OS in ASCII (text mode)
6 Verify that the following variable and value pair exists in the Dimensions configuration file PARM(MDHTDCFG) on z/OS:
DM_DFS %DM_ROOT%dfs
7 Restore the server's original registry:
cd $DM_ROOT/dfsrm registry.datmv registry.dat-old registry.dat

Dimensions for z/OS Guide 247
8 On the server use the following commands to create the certificate files. You will need openssl at a matching level (0.9.8). These commands are interactive and will prompt you for information. Where required, use the SSL password that you created.
openssl req [-config openssl.cnf] -newkey rsa:512 -sha1 -keyout serverkey.pem -out serverreq.pem
openssl x509 -req -in serverreq.pem -sha1 -extensions v3_ca -signkey serverkey.pem -out servercert.pem
cat servercert.pem serverkey.pem > server.pem
openssl x509 -subject -issuer -noout -in server.pem
openssl dhparam -check -text -5 512 -out dh512.pem
openssl dhparam -check -text -5 1024 -out dh1024.pem
9 Transfer the following files via FTP to the CA directory in ASCII (text mode)
put server.pem $DM_ROOT/CAput dh512.pem $DM_ROOT/CAput dh1024.pem $DM_ROOT/CA

248 Dimensions® CM