Diagnostic Thoracocentesis - NC State College of Veterinary ...
41
Diagnostic Thoracocentesis Bernie Hansen DVM MS North Carolina State University – College of Veterinary Medicine Diagnostic thoracocentesis is indicated in any animal with increased respiratory effort (or signs of respiratory distress) and reduced breath sounds. This should be done BEFORE attempting to obtain thoracic radiographs. In contrast to abdominocentesis, a single attempt at aspiration with a small needle is a very sensitive test for pleural space disease. If air or fluid is discovered with this procedure in an animal with respiratory difficulty, you should immediately proceed to therapeutic thoracocentesis. Materials needed: 3 ml syringe with a 22 ga 1” needle (25 ga 5/8” is OK for thin cats). Procedure: Position the animal in whatever position it is most comfortable – do not stress it by forcing it to lie in lateral recumbency! For most animals this will mean doing the procedure with the animal standing or in sternal recumbency. Try to avoid letting it sit during the procedure, as this will make it more difficult to identify landmarks. If you suspect pneumothorax, you will want to aspirate the ‘highest’ accessible portion of the chest at around the 7 th or 8 th interspace. For an animal standing or in sternal recumbency, this will usually be at the junction of the dorsal and middle thirds of the chest wall at that interspace. Don’t go too high up – the muscles of the spinal system get too thick near the top. If the animal prefers to lie in lateral recumbency, aspirate at the ‘highest’ part of the chest at those same interspaces. If you suspect that fluid is in the pleural space, go in at the junction of the middle and ventral thirds, near the costachondral junction. If for some reason an animal with pleural fluid seems to prefer to lie on its side, try to get it into sternal recumbency first, since fluid will gravitate to the lowest part of the chest. If time permits, clip the hair and clean the skin at the proper location. However, if time is short, don’t worry about it – this procedure is similar to performing cystocentesis, and a stainless steel needle is unlikely to drag significant contamination through the skin. For demonstration purposes, the figures here show a cadaver in lateral recumbency, with the hair clipped and each rib marked with an overlay of red ink.
-
Upload
khangminh22 -
Category
Documents
-
view
1 -
download
0
Transcript of Diagnostic Thoracocentesis - NC State College of Veterinary ...

Diagnostic Thoracocentesis Bernie Hansen DVM MS
North Carolina State University – College of Veterinary Medicine Diagnostic thoracocentesis is indicated in any animal with increased respiratory effort (or signs of respiratory distress) and reduced breath sounds. This should be done BEFORE attempting to obtain thoracic radiographs. In contrast to abdominocentesis, a single attempt at aspiration with a small needle is a very sensitive test for pleural space disease. If air or fluid is discovered with this procedure in an animal with respiratory difficulty, you should immediately proceed to therapeutic thoracocentesis. Materials needed: 3 ml syringe with a 22 ga 1” needle (25 ga 5/8” is OK for thin cats). Procedure: Position the animal in whatever position it is most comfortable – do not stress it by forcing it to lie in lateral recumbency! For most animals this will mean doing the procedure with the animal standing or in sternal recumbency. Try to avoid letting it sit during the procedure, as this will make it more difficult to identify landmarks. If you suspect pneumothorax, you will want to aspirate the ‘highest’ accessible portion of the chest at around the 7th or 8th interspace. For an animal standing or in sternal recumbency, this will usually be at the junction of the dorsal and middle thirds of the chest wall at that interspace. Don’t go too high up – the muscles of the spinal system get too thick near the top. If the animal prefers to lie in lateral recumbency, aspirate at the ‘highest’ part of the chest at those same interspaces. If you suspect that fluid is in the pleural space, go in at the junction of the middle and ventral thirds, near the costachondral junction. If for some reason an animal with pleural fluid seems to prefer to lie on its side, try to get it into sternal recumbency first, since fluid will gravitate to the lowest part of the chest. If time permits, clip the hair and clean the skin at the proper location. However, if time is short, don’t worry about it – this procedure is similar to performing cystocentesis, and a stainless steel needle is unlikely to drag significant contamination through the skin. For demonstration purposes, the figures here show a cadaver in lateral recumbency, with the hair clipped and each rib marked with an overlay of red ink.

Palpate the 13th rib, and then the 12th interspace immediately in front of it. ‘Walk’ your fingers cranialy from one interspace to the next, counting 11-10-9-8-7 as you go, to identify the 7th and 8th interspaces.
Once you’ve identified the desired location, advance the needle through the skin. As soon as the needle enters the subcutaneous space, pull back on the plunger to apply 1-2 cc’s of vacuum. You should be able to feel the plunger tugging against your fingers. Never release this vacuum as you advance the needle! You need it there to alert you the instant you enter the pleural space.
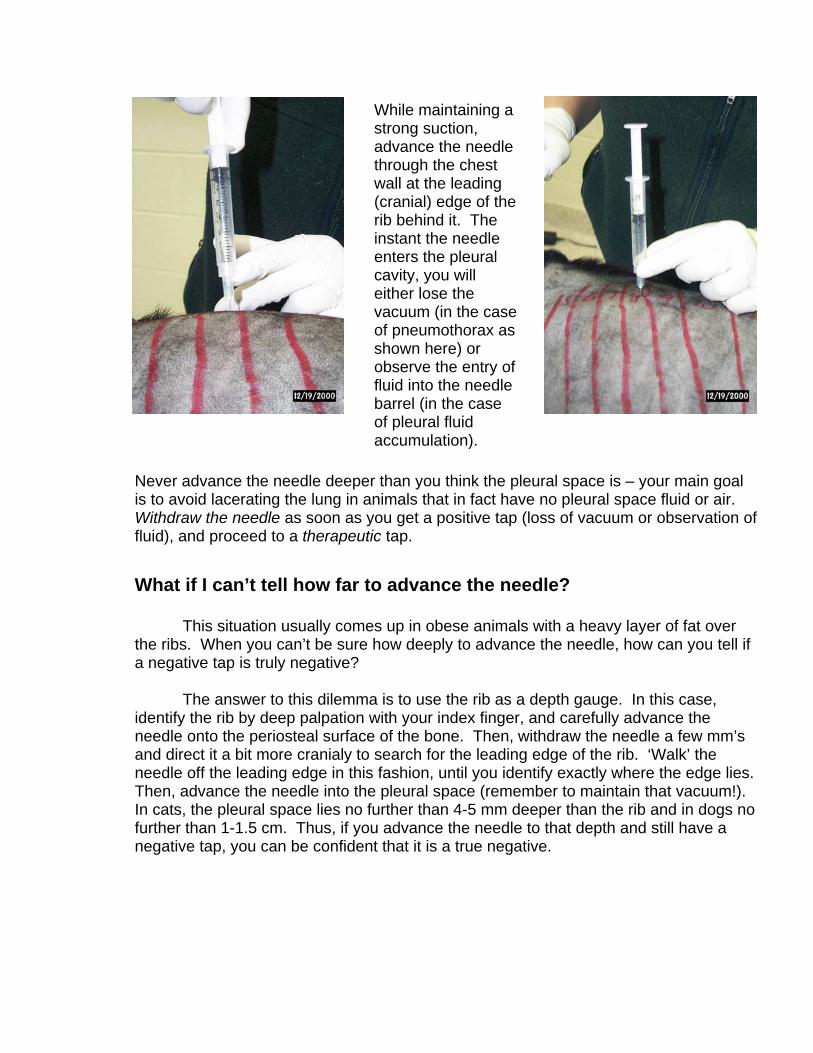
What if I can’t tell how far to advance the needle? This situation usually comes up in obese animals with a heavy layer of fat over the ribs. When you can’t be sure how deeply to advance the needle, how can you tell if a negative tap is truly negative? The answer to this dilemma is to use the rib as a depth gauge. In this case, identify the rib by deep palpation with your index finger, and carefully advance the needle onto the periosteal surface of the bone. Then, withdraw the needle a few mm’s and direct it a bit more cranialy to search for the leading edge of the rib. ‘Walk’ the needle off the leading edge in this fashion, until you identify exactly where the edge lies. Then, advance the needle into the pleural space (remember to maintain that vacuum!). In cats, the pleural space lies no further than 4-5 mm deeper than the rib and in dogs no further than 1-1.5 cm. Thus, if you advance the needle to that depth and still have a negative tap, you can be confident that it is a true negative.
Never advance the needle deeper than you think the pleural space is – your main goal is to avoid lacerating the lung in animals that in fact have no pleural space fluid or air. Withdraw the needle as soon as you get a positive tap (loss of vacuum or observation of fluid), and proceed to a therapeutic tap.
While maintaining a strong suction, advance the needle through the chest wall at the leading (cranial) edge of the rib behind it. The instant the needle enters the pleural cavity, you will either lose the vacuum (in the case of pneumothorax as shown here) or observe the entry of fluid into the needle barrel (in the case of pleural fluid accumulation).
Female Dog Urinary Catheterization 1 of 6
Placement of an indwelling urinary catheter in female dogs
Bernie Hansen DVM MS
North Carolina State University – College of Veterinary Medicine
Materials Needed 2% lidocaine for injection in a 1-3 ml slip-Luer syringe, no needle Clippers Clean exam gloves Cotton balls on a paper tray ½ soaked with antiseptic soap ½ soaked with water 2% lidocaine lubricant Diluted povidone-iodine solution in a 1-3 ml slip-Luer syringe, no needle 1” waterproof white tape Speculum: Sterilized otoscope, anoscope, or other cone-shaped device Catheter: appropriate size Foley with stylet
Foley catheters come with a plastic stylet that may be too flimsy to allow placement in the dog. If desired, this stylet may be replaced with a length of orthopaedic wire that has been previously cut to an appropriate length and autoclaved.
3-6 ml syringe filled with air Catheter adapter piece Collection system 1-1.5” 22 gauge injection needle 00 or 000 monofilament nylon suture Bandaging material to secure collection system Technique: Clean exam gloves are worn throughout the procedure with a change of gloves when ready to insert the speculum
1. Gently advance the slip-Luer syringe (not a loc-Luer style) into the vestibule, pinch the labia around it to form a seal, and Infuse a sufficient quantity of 2% lidocaine to fill the vestibule and vagina.

Female Dog Urinary Catheterization 2 of 6
2. Clip the hair from the vulva and perineum. Use the antiseptic-soaked cotton balls to gently scrub the skin, labia, and vestibule; allow wet contact with the soap for 3 minutes.
3. Remove all soap with cotton balls soaked in water; use these cotton balls to remove all soap from the vestibule.
4. Using the same technique as used
for the lidocaine, infuse the vagina with the povidone-iodine solution.
5. Generously lubricate the speculum
with 2% lidocaine lubricant and open the sterile catheter. If using a separate stylet, lubricate it and insert it fully into the catheter.
6. The procedure is performed with the dog standing or in lateral recumbency, whichever she prefers. Do NOT drape the rear limbs over the edge of the exam table.
7. Grasp the ventral tip of the vulva and gently advance the speculum cone into the vestibule. Direct it dorsally toward the anus; once it reaches the brim of the pelvis (caudal aspect of the pubis), orient the speculum more horizontally and advance it as far cranial as practical and comfortable. If the dog objects at any step, remove the speculum and wait 3-5 minutes while the 2% lidocaine lubricant provides extra anesthesia. If desired, infuse some additional lubricant into the vestibule while you wait.
Female Dog Urinary Catheterization 3 of 6
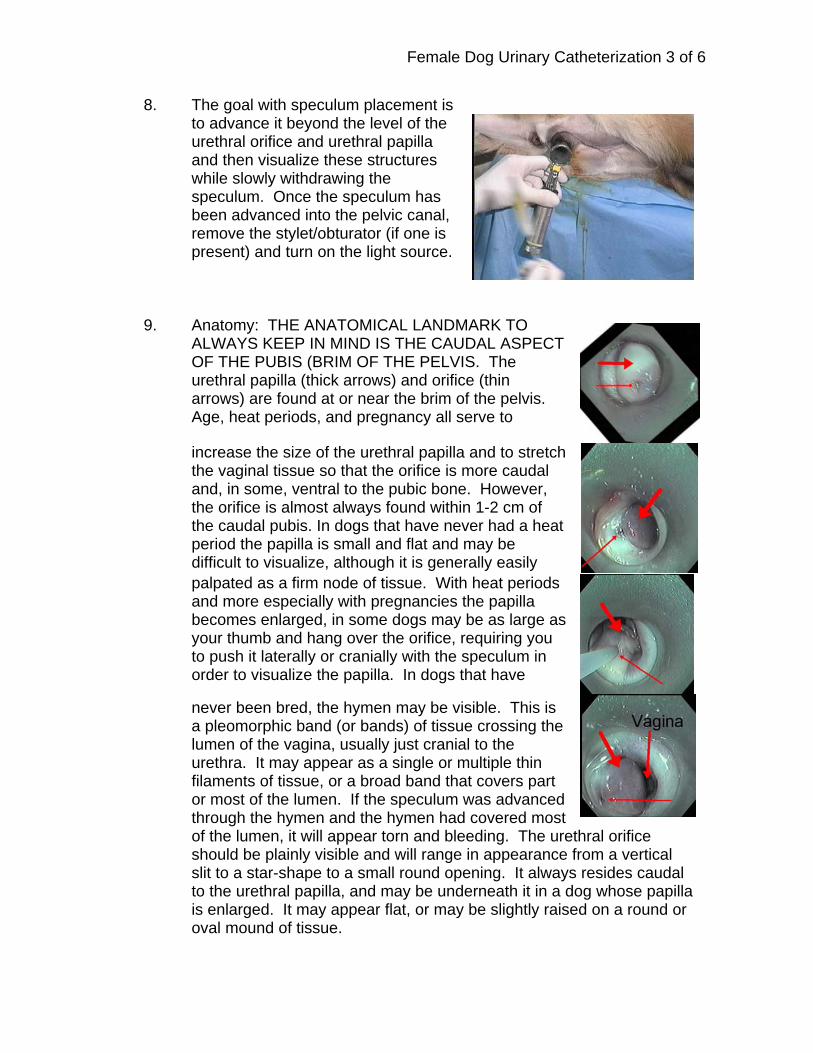
8. The goal with speculum placement is to advance it beyond the level of the urethral orifice and urethral papilla and then visualize these structures while slowly withdrawing the speculum. Once the speculum has been advanced into the pelvic canal, remove the stylet/obturator (if one is present) and turn on the light source.
9. Anatomy: THE ANATOMICAL LANDMARK TO ALWAYS KEEP IN MIND IS THE CAUDAL ASPECT OF THE PUBIS (BRIM OF THE PELVIS. The urethral papilla (thick arrows) and orifice (thin arrows) are found at or near the brim of the pelvis. Age, heat periods, and pregnancy all serve to
increase the size of the urethral papilla and to stretch the vaginal tissue so that the orifice is more caudal and, in some, ventral to the pubic bone. However, the orifice is almost always found within 1-2 cm of the caudal pubis. In dogs that have never had a heat period the papilla is small and flat and may be difficult to visualize, although it is generally easily palpated as a firm node of tissue. With heat periods and more especially with pregnancies the papilla becomes enlarged, in some dogs may be as large as your thumb and hang over the orifice, requiring you to push it laterally or cranially with the speculum in order to visualize the papilla. In dogs that have
never been bred, the hymen may be visible. This is a pleomorphic band (or bands) of tissue crossing the lumen of the vagina, usually just cranial to the urethra. It may appear as a single or multiple thin filaments of tissue, or a broad band that covers part or most of the lumen. If the speculum was advanced through the hymen and the hymen had covered most of the lumen, it will appear torn and bleeding. The urethral orifice should be plainly visible and will range in appearance from a vertical slit to a star-shape to a small round opening. It always resides caudal to the urethral papilla, and may be underneath it in a dog whose papilla is enlarged. It may appear flat, or may be slightly raised on a round or oval mound of tissue.
Female Dog Urinary Catheterization 4 of 6
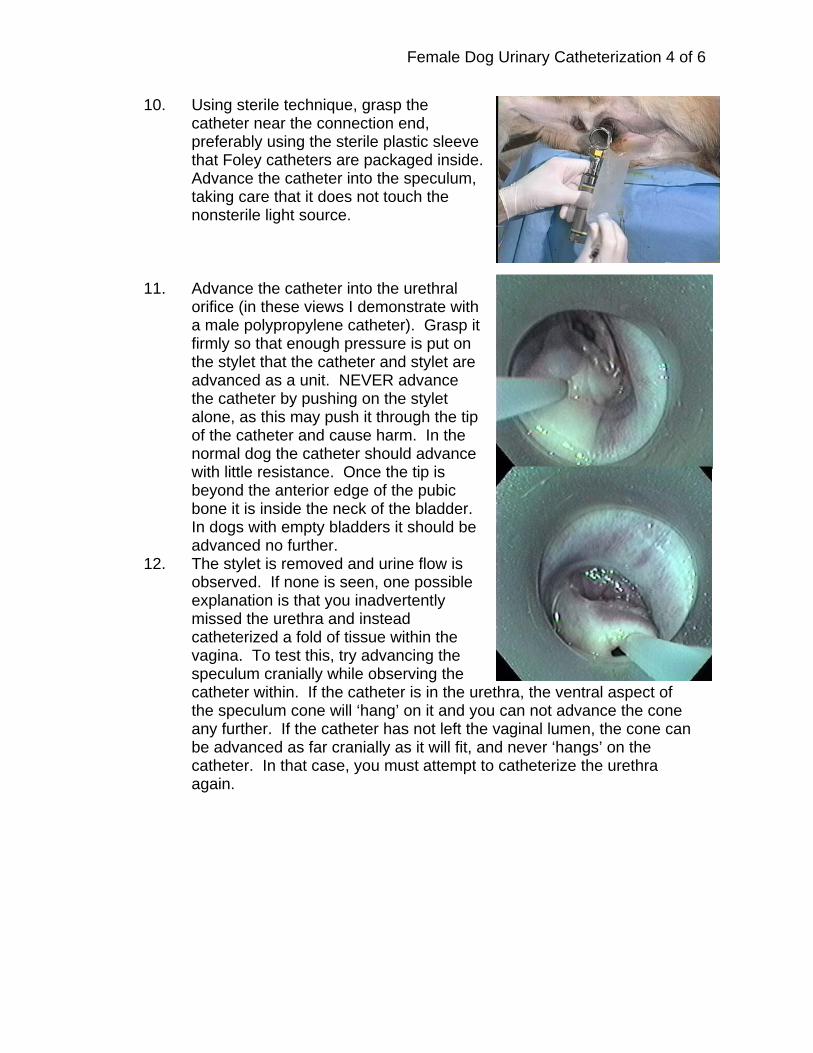
10. Using sterile technique, grasp the catheter near the connection end, preferably using the sterile plastic sleeve that Foley catheters are packaged inside. Advance the catheter into the speculum, taking care that it does not touch the nonsterile light source.
11. Advance the catheter into the urethral orifice (in these views I demonstrate with a male polypropylene catheter). Grasp it firmly so that enough pressure is put on the stylet that the catheter and stylet are advanced as a unit. NEVER advance the catheter by pushing on the stylet alone, as this may push it through the tip of the catheter and cause harm. In the normal dog the catheter should advance with little resistance. Once the tip is beyond the anterior edge of the pubic bone it is inside the neck of the bladder. In dogs with empty bladders it should be advanced no further.
12. The stylet is removed and urine flow is observed. If none is seen, one possible explanation is that you inadvertently missed the urethra and instead catheterized a fold of tissue within the vagina. To test this, try advancing the speculum cranially while observing the catheter within. If the catheter is in the urethra, the ventral aspect of the speculum cone will ‘hang’ on it and you can not advance the cone any further. If the catheter has not left the vaginal lumen, the cone can be advanced as far cranially as it will fit, and never ‘hangs’ on the catheter. In that case, you must attempt to catheterize the urethra again.
Female Dog Urinary Catheterization 5 of 6
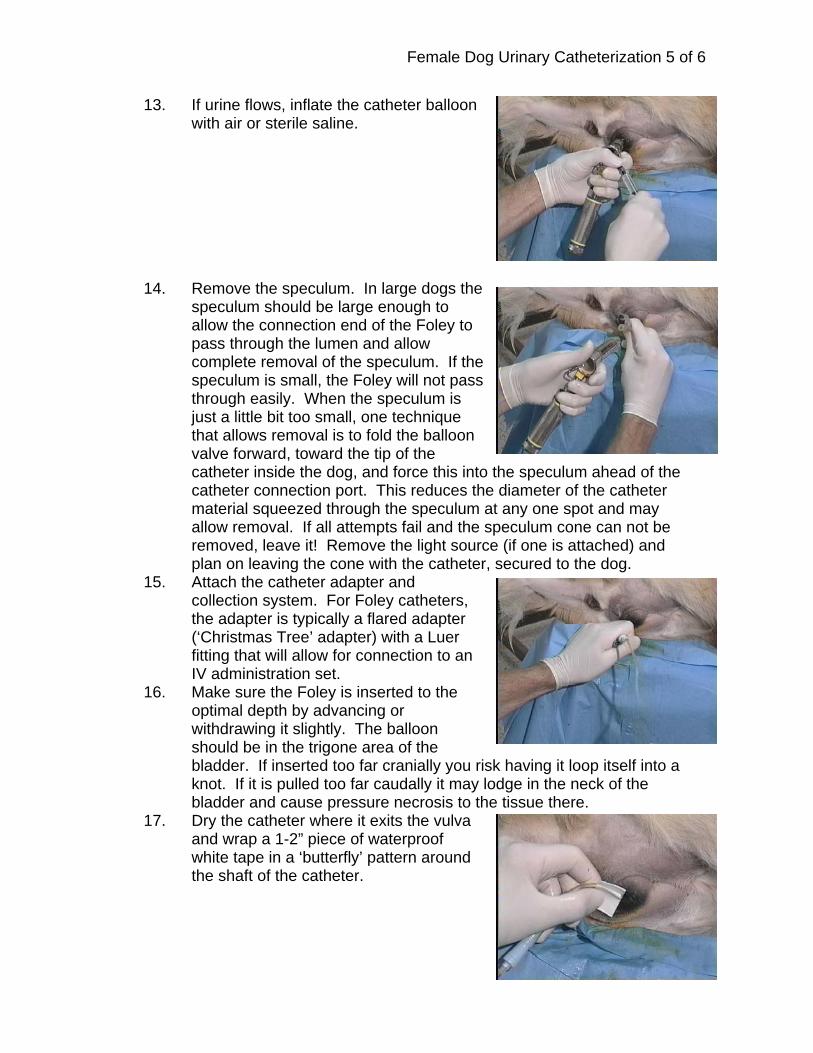
13. If urine flows, inflate the catheter balloon with air or sterile saline.
14. Remove the speculum. In large dogs the
speculum should be large enough to allow the connection end of the Foley to pass through the lumen and allow complete removal of the speculum. If the speculum is small, the Foley will not pass through easily. When the speculum is just a little bit too small, one technique that allows removal is to fold the balloon valve forward, toward the tip of the catheter inside the dog, and force this into the speculum ahead of the catheter connection port. This reduces the diameter of the catheter material squeezed through the speculum at any one spot and may allow removal. If all attempts fail and the speculum cone can not be removed, leave it! Remove the light source (if one is attached) and plan on leaving the cone with the catheter, secured to the dog.
15. Attach the catheter adapter and collection system. For Foley catheters, the adapter is typically a flared adapter (‘Christmas Tree’ adapter) with a Luer fitting that will allow for connection to an IV administration set.
16. Make sure the Foley is inserted to the optimal depth by advancing or withdrawing it slightly. The balloon should be in the trigone area of the bladder. If inserted too far cranially you risk having it loop itself into a knot. If it is pulled too far caudally it may lodge in the neck of the bladder and cause pressure necrosis to the tissue there.
17. Dry the catheter where it exits the vulva and wrap a 1-2” piece of waterproof white tape in a ‘butterfly’ pattern around the shaft of the catheter.

Female Dog Urinary Catheterization 6 of 6
18. If this tape gets wet or soiled it may lose its grip. Therefore, it is good practice to place another two strips of tape 2-6” long, longitudinally along the catheter shaft sandwiching it between the two strips. This tape ‘sandwich’ should begin at the cranial margin of the original tape butterfly, and be firmly pinched onto this tape and the catheter shaft.
19. Pass a 22 gauge, 1-1.5” injection needle through one wing of tape (and the overlying ‘sandwich’ tapes) through the perineal skin just dorsal to the vulva, then through the other wing of tape. Avoiding excess tension, complete a secure knot that snugs the tape against the vulva.
20. Secure the collection system tubing to the dog at either the tail or a rear leg, depending on anatomy and mobility. Make sure that a sufficient length of tubing is kept between this anchor site and the suture that it allows for full movement of the leg or tail without putting tension on the suture. NOT use white tape or other inelastic material to anchor directly to the tail or limb as this will form a tourniquet. Instead, use elastic tape (ElastikonTM) or a heavily padded bandage with the catheter anchored to its surface with white tape.
NASAL OXYGEN ADMINISTRATION
Bernie Hansen DVM MS North Carolina State University College of Veterinary Medicine
A nasal oxygen catheter is a convenient and inexpensive method to supply dogs and
cats with oxygen at inspired concentrations ranging from 30 - 60%. Relative contraindications for this procedure include nasal masses, rhinitis, and coagulopathy (especially severe thrombocytopenia or other causes of abnormal primary hemostasis). Use a 5 French catheter for cats, and 8 or 10 French for dogs. Materials needed:
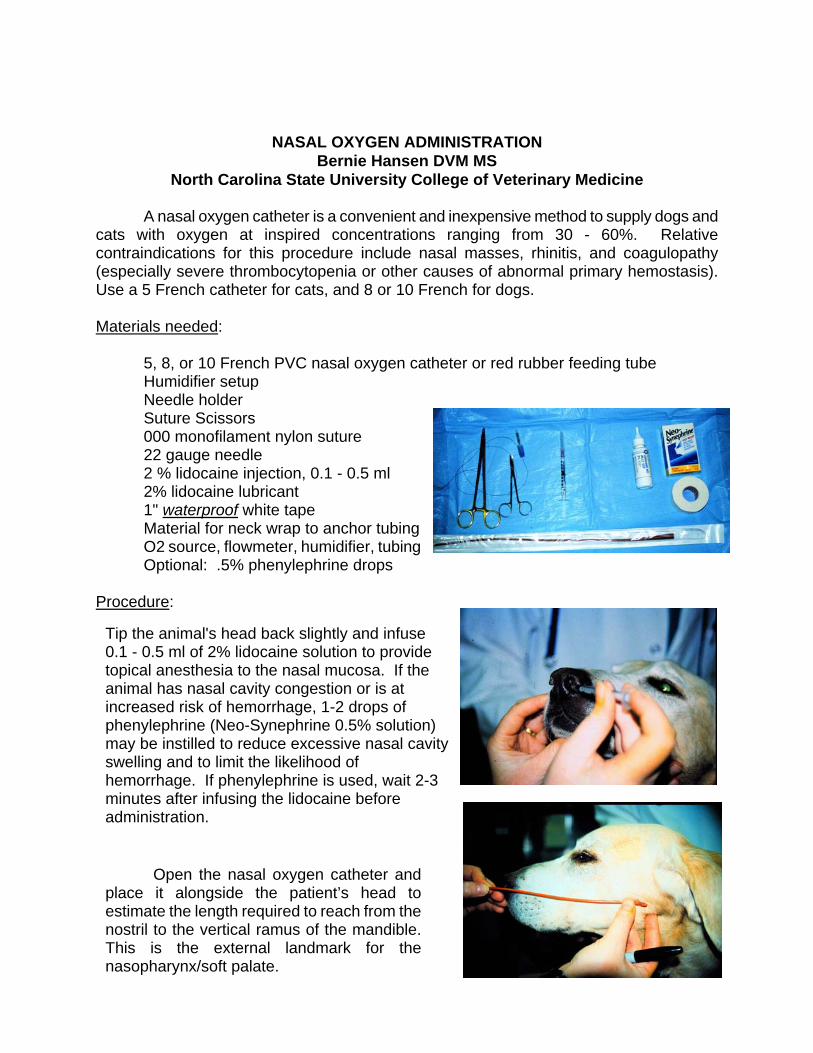
5, 8, or 10 French PVC nasal oxygen catheter or red rubber feeding tube Humidifier setup Needle holder Suture Scissors 000 monofilament nylon suture 22 gauge needle 2 % lidocaine injection, 0.1 - 0.5 ml 2% lidocaine lubricant 1" waterproof white tape Material for neck wrap to anchor tubing O2 source, flowmeter, humidifier, tubing Optional: .5% phenylephrine drops
Procedure:
Tip the animal's head back slightly and infuse 0.1 - 0.5 ml of 2% lidocaine solution to provide topical anesthesia to the nasal mucosa. If the animal has nasal cavity congestion or is at increased risk of hemorrhage, 1-2 drops of phenylephrine (Neo-Synephrine 0.5% solution) may be instilled to reduce excessive nasal cavity swelling and to limit the likelihood of hemorrhage. If phenylephrine is used, wait 2-3 minutes after infusing the lidocaine before administration.
Open the nasal oxygen catheter and place it alongside the patient’s head to estimate the length required to reach from the nostril to the vertical ramus of the mandible. This is the external landmark for the nasopharynx/soft palate.
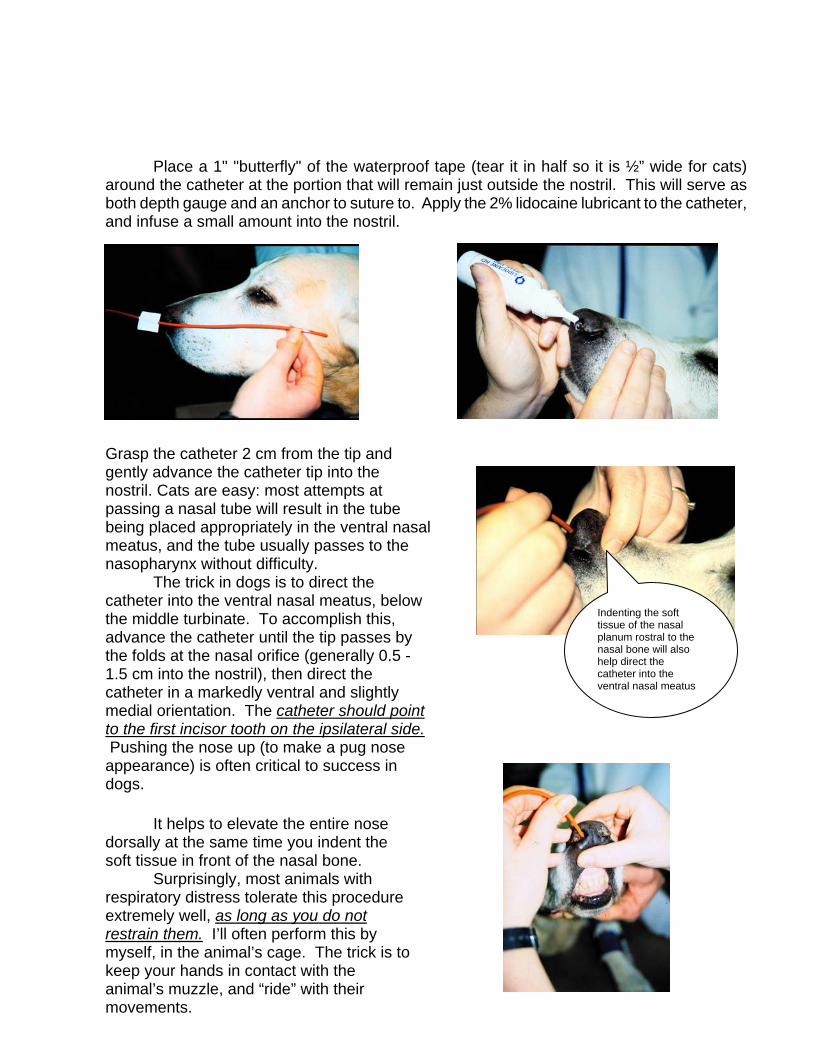
Place a 1" "butterfly" of the waterproof tape (tear it in half so it is ½” wide for cats) around the catheter at the portion that will remain just outside the nostril. This will serve as both depth gauge and an anchor to suture to. Apply the 2% lidocaine lubricant to the catheter, and infuse a small amount into the nostril.
Grasp the catheter 2 cm from the tip and gently advance the catheter tip into the nostril. Cats are easy: most attempts at passing a nasal tube will result in the tube being placed appropriately in the ventral nasal meatus, and the tube usually passes to the nasopharynx without difficulty.
The trick in dogs is to direct the catheter into the ventral nasal meatus, below the middle turbinate. To accomplish this, advance the catheter until the tip passes by the folds at the nasal orifice (generally 0.5 - 1.5 cm into the nostril), then direct the catheter in a markedly ventral and slightly medial orientation. The catheter should point to the first incisor tooth on the ipsilateral side. Pushing the nose up (to make a pug nose appearance) is often critical to success in dogs.
It helps to elevate the entire nose dorsally at the same time you indent the soft tissue in front of the nasal bone. Surprisingly, most animals with respiratory distress tolerate this procedure extremely well, as long as you do not restrain them. I’ll often perform this by myself, in the animal’s cage. The trick is to keep your hands in contact with the animal’s muzzle, and “ride” with their movements.
Indenting the soft tissue of the nasal planum rostral to the nasal bone will also help direct the catheter into the ventral nasal meatus

If the catheter is correctly placed in the ventral meatus, it will pass with slight resistance and a "grating" feel as it passes between the turbinates. If the catheter is in the dorsal meatus, it will pass with little or no resistance until it reaches the level of the medial canthus of the eye, where it will run into the ethmoid turbinate. IF THE CATHETER MEETS WITH FIRM RESISTANCE, YOU HAVE UNDOUBTEDLY PLACED IT IN THE DORSAL MEATUS. REMOVE IT AND TRY AGAIN. FORCING IT IN ANY MORE WILL PRODUCE SIGNIFICANT HEMORRHAGE FROM THE ETHMOID TURBINATE. Once in a while you will not be able to enter the ventral meatus even after 2 excellent attempts. In that case, anesthetize the opposite nostril and try that side. There is enough asymmetry between sides that you’ll usually get it into the other side on your first attempt.
Correct position in ventral nasal meatus. The catheter tip sits in the relatively large space over the soft palate.
Incorrect position in the dorsal nasal meatus. The catheter will advance to the ethmoid turbinate (roughly at the level of the medial canthus of the eye) and stop when it hits the ethmoid turbinate.
Suture as close to the nostril as possible, but stay behind the hairless skin
Once properly placed, fold the exterior portion of the catheter nearest the tape tightly under the wing of the nasal ala, and place the 22 ga needle through the leading edge of one of the tape ‘wings’. If the tape is sutured too far caudally, the tube is more likely to ‘loop’ and work its way out of the nose.
The needled then should pierce the skin under the catheter just caudal to the nasal planum (keep it as close as possible to the nasal planum [hairless skin] as possible), then the other wing of tape in one motion. Slide the free end of the suture through the needle (entering the needle bevel and exiting the needle hub), then remove the needle and tie the suture snug but NOT TIGHT.
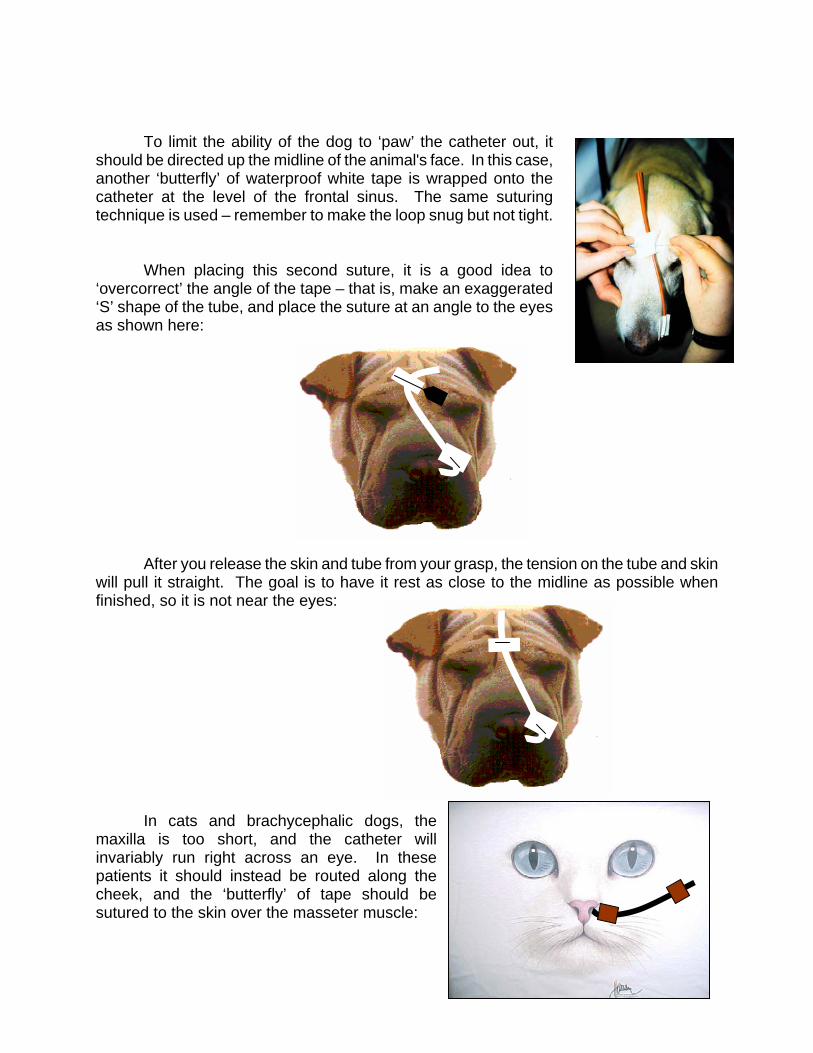
To limit the ability of the dog to ‘paw’ the catheter out, it should be directed up the midline of the animal's face. In this case, another ‘butterfly’ of waterproof white tape is wrapped onto the catheter at the level of the frontal sinus. The same suturing technique is used – remember to make the loop snug but not tight. When placing this second suture, it is a good idea to ‘overcorrect’ the angle of the tape – that is, make an exaggerated ‘S’ shape of the tube, and place the suture at an angle to the eyes as shown here: After you release the skin and tube from your grasp, the tension on the tube and skin will pull it straight. The goal is to have it rest as close to the midline as possible when finished, so it is not near the eyes:
In cats and brachycephalic dogs, the maxilla is too short, and the catheter will invariably run right across an eye. In these patients it should instead be routed along the cheek, and the ‘butterfly’ of tape should be sutured to the skin over the masseter muscle:

The oxygen hose (or the catheter itself it is long
enough) must be anchored to a neck bandage with 1" white tape, to provide a secure anchor for the hose and prevent it from pulling on the sutures. The humidifier is connected, and oxygen administered at the rate of 40 - 50 ml/kg/min to a maximum of 4-5 liters/min.
In the NCSU-VTH, we use medical-grade oxygen tubing, with adapters to connect it to the nasal tube that fits directly onto the oxygen humidifier (these products may be purchased from veterinary distributors or may be found with an Internet search engine with the key words “oxygen humidifier”). The humidifier in turn screws onto the outlet of the flowmeter. In a pinch, dry oxygen gas may be obtained off the flow meter from many gas anesthetic machines. If you do not have access to medical grade oxygen tubing, you can substitute with an IV fluid administration set + extension sets. Disconnect the hose from the anesthetic vaporizer, and spike the IV set directly into it. Make sure the connection is tight – if not, you may need to wrap a bit of waterproof white tape around the spike to increase its diameter. If you use IV administration set tubing, make sure it is clearly identified to prevent accidental (and lethal) IV administration of oxygen gas. If a 5 French nasal tube is used, the male Luer end of the administration set will fit snugly directly into the catheter as shown here. If a larger catheter is used, you will need to cut off the wider portion of
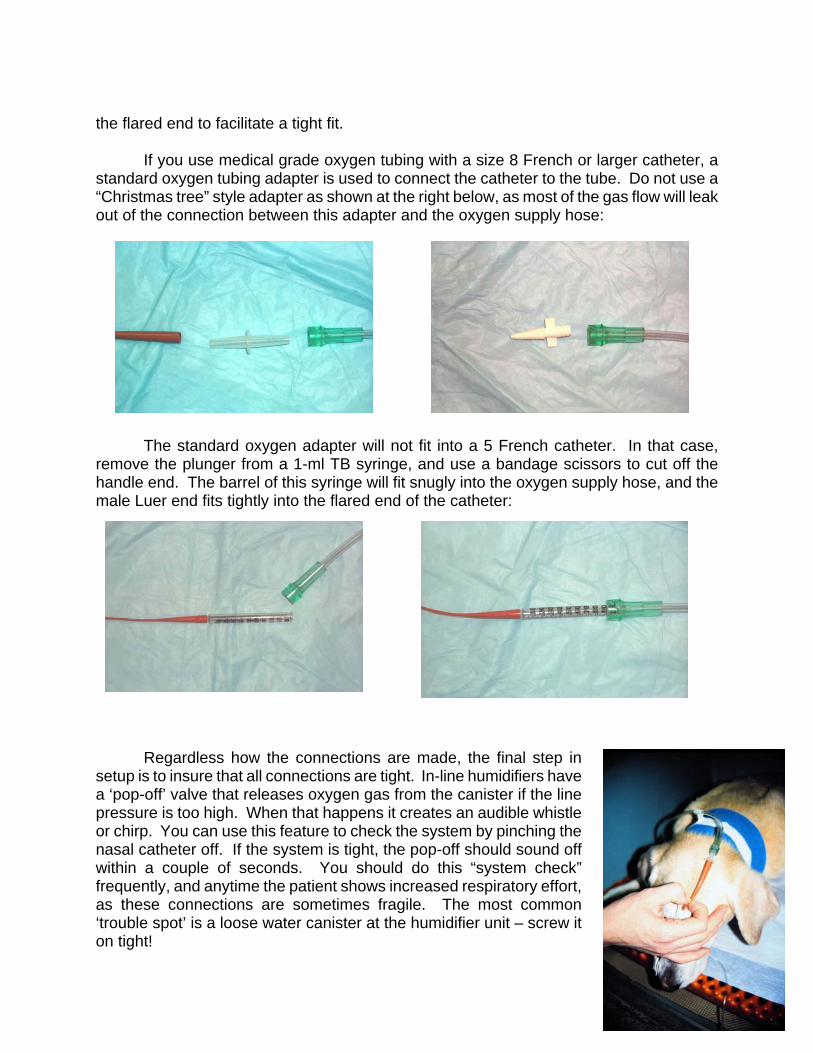
the flared end to facilitate a tight fit. If you use medical grade oxygen tubing with a size 8 French or larger catheter, a standard oxygen tubing adapter is used to connect the catheter to the tube. Do not use a “Christmas tree” style adapter as shown at the right below, as most of the gas flow will leak out of the connection between this adapter and the oxygen supply hose:
The standard oxygen adapter will not fit into a 5 French catheter. In that case,
remove the plunger from a 1-ml TB syringe, and use a bandage scissors to cut off the handle end. The barrel of this syringe will fit snugly into the oxygen supply hose, and the male Luer end fits tightly into the flared end of the catheter: Regardless how the connections are made, the final step in setup is to insure that all connections are tight. In-line humidifiers have a ‘pop-off’ valve that releases oxygen gas from the canister if the line pressure is too high. When that happens it creates an audible whistle or chirp. You can use this feature to check the system by pinching the nasal catheter off. If the system is tight, the pop-off should sound off within a couple of seconds. You should do this “system check” frequently, and anytime the patient shows increased respiratory effort, as these connections are sometimes fragile. The most common ‘trouble spot’ is a loose water canister at the humidifier unit – screw it on tight!

Maintenance: Check the following at hourly intervals:
1. Oxygen flow rate 2. Catheter position 3. Patency of the system 4. Remove the catheter and place a new one in the opposite nostril every 48-72
hours to prevent rhinitis. The physical damage from the tube, in combination with chemical irritation from leaching of plasticizers will damage the nasal mucosa. If left in place too long, bacterial overgrowth and mucosal erosion set the stage for bacteremia.
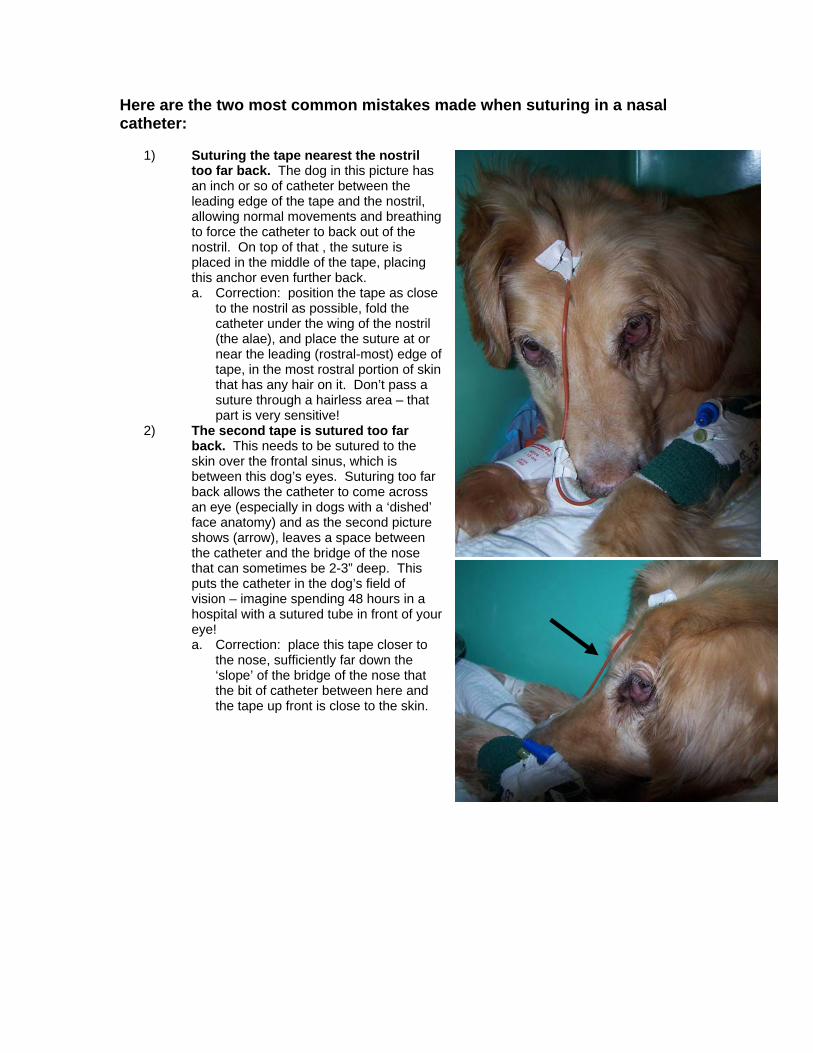
Here are the two most common mistakes made when suturing in a nasal catheter:
1) Suturing the tape nearest the nostril too far back. The dog in this picture has an inch or so of catheter between the leading edge of the tape and the nostril, allowing normal movements and breathing to force the catheter to back out of the nostril. On top of that , the suture is placed in the middle of the tape, placing this anchor even further back. a. Correction: position the tape as close
to the nostril as possible, fold the catheter under the wing of the nostril (the alae), and place the suture at or near the leading (rostral-most) edge of tape, in the most rostral portion of skin that has any hair on it. Don’t pass a suture through a hairless area – that part is very sensitive!
2) The second tape is sutured too far back. This needs to be sutured to the skin over the frontal sinus, which is between this dog’s eyes. Suturing too far back allows the catheter to come across an eye (especially in dogs with a ‘dished’ face anatomy) and as the second picture shows (arrow), leaves a space between the catheter and the bridge of the nose that can sometimes be 2-3” deep. This puts the catheter in the dog’s field of vision – imagine spending 48 hours in a hospital with a sutured tube in front of your eye! a. Correction: place this tape closer to
the nose, sufficiently far down the ‘slope’ of the bridge of the nose that the bit of catheter between here and the tape up front is close to the skin.

Placement of a Nasoesophageal or Nasogastric Tube
The “Laci” Procedure
An ICU/VTH Policy prompted by “Laci” Shera, who died of complications of an intrabronchial feeding tube
1. There will be no nasal tube feeding until the correct positioning of the tube
has been confirmed by a radiology faculty member or the on-call radiology resident.
a. Radiology will implement a 2 view exam (oblique lateral and VD or
DV) with no increase in fees relative to the current charge for a single view, provided this discounted exam is used solely for this purpose. If this 2 view exam is used for other than tube placement check, the client will be charged a full routine exam fee.
b. During off hours, the radiology resident on call will view the film
from home with no emergency fees charged, provided the request is made at a ‘reasonable hour’. Radiographs obtained during sleeping hours (10 PM – 7 AM) should be read in the morning. Those tubes will NOT be used for feeding until after that time.
c. Confirmation of proper tube positioning, or a warning that the tube
is not correctly positioned, will be provided by verbal report immediately, with a written report to follow by the next business day.
d. A diagnosis of proper placement will require that the tube is present
within the lumen of the esophagus and that the tip of the tube is located caudal to the level of the carina.
e. In the event of ‘correct tube placement’, the radiology service will
use a standardized report. The report will read: “This 2 orthogonal view exam of the thorax confirms that the tube is not in the trachea and is presumably within the esophagus with the tip located ……
f. If the tube could potentially be in the trachea, that information will
be provided on the report.
g. Tubes may be used for aspiration of esophageal or stomach contents before radiographs are obtained, but no feeding will be allowed until that study is performed.
2. All staff will be instructed to enforce a policy that any personnel involved in
tube placement will review the written guidelines (Appendix I) for tube

placement prior to performing the procedure and sign off on a checklist that remains with the patient record.
3. Animals receiving a continuous infusion of food will be maintained in the
intensive care unit.
4. Standing orders for any patient with a nasal feeding tube should include interruption of feeding if any of the following conditions are observed. Because the harm caused by an interruption of feeding is negligible and the consequences of airway contamination are disastrous, that decision should be made by anyone associated with the case and should not require prior approval. ICU staff will be expected to stop feeding if there are any concerns.
a. New onset of cough, gagging, or retching. b. Development of course crackles at auscultation c. Resting respiratory rate increase of 6 BPM d. Behavioral change suggesting anxiety
See next page for details on the procedure
Detailed Instructions
Nasoesophageal and nasogastric tubes are used to evacuate the esophagus or stomach or to provide enteral nutritional support. Although it is always important to insure proper placement of these tubes, it is especially critical when feeding a liquid diet through the tube as a misplaced tube will result in patient death! Many, perhaps most, sick animals will allow you to pass a tube into its airway without a cough or struggle, so it is imperative to use the techniques outlined here to increase the likelihood of success and to confirm correct placement with radiographs that are reviewed by a radiologist. Materials needed: Proper size tube:
Cats, dogs < 10 kg: 5 – 8 French catheter at least 12” long Medium size dogs: 8 – 12 French PVC feeding tube Medium –to-large dogs: 10 – 18 French single or double lumen tube
Appropriate size syringe (matched to the tubing adapter) Tubing extension set if indicated Cap for the tubing (Luer injection cap +/- a flared tubing adapter) 2-0 monofilament nylon suture 1” waterproof white tape .2 - .5 ml 2% lidocaine in a syringe 2% lidocaine lubricant Procedure:
1. If using a tube 12 French or smaller, mark the proper depth (see below) and place the tube in a freezer for a few minutes while prepping the patient and organizing the rest of the materials. This will stiffen the tube and make it less likely to coil or kink during insertion.
2. Determine the desired nostril, tip the patient’s nose just above horizontal, and instill enough injectable lidocaine to induce a swallow.
3. Pack a few drops of 2% lidocaine lubricant into the same nostril. 4. If the tube is to be used for esophageal decompression, create
additional fenestrations as necessary (consult an ICU clinician for guidance on the proper technique).
5. Measure the length of tubing that will need to be inserted depending on function: a. Nasogastric sump: Measure to 1” (cats) - 6” (large dogs) beyond
the 13th rib.

Indenting the soft tissue of the nasal planum rostral to the nasal bone will also help direct the catheter into the ventral nasal meatus
b. Nasoesophageal feeding: Measure to the 10th – 13th rib. c. Nasoesophageal decompression: Measure to the 10th – 13th rib or
less depending on the extent of involvement with megaesophagus. 6. Mark the proper depth site on the tube with an indelible ink marker. 7. Lubricate the tube with 2% lidocaine lubricant. 8. Grasp the catheter 2 cm from the tip
and gently advance the catheter tip into the nostril. Cats are easy: most attempts at passing a nasal tube will result in the tube being placed appropriately in the ventral nasal meatus, and the tube usually passes to the nasopharynx without difficulty. The trick in dogs is to direct the catheter into the ventral nasal meatus, below the middle turbinate. To accomplish this, advance the catheter until the tip passes by the folds at the nasal orifice (generally 0.5 - 1.5 cm into the nostril), then direct the catheter in a markedly ventral and slightly medial orientation. The catheter should point to the first incisor tooth on the ipsilateral side. Pushing the nose up (to make a “Pug nose” appearance) is often critical to success in dogs.
9. Indent the soft tissue of the nasal planum in front of the nasal bone at the same time you push the nostrils upwards. Surprisingly, most animals tolerate this procedure extremely well, as long as you do not restrain them. The trick is to keep your hands in contact with the animal’s muzzle, and “ride” with their movements.

10. If the catheter is correctly placed in the ventral meatus, it will pass with slight resistance and a "grating" feel as it passes under the middle turbinate. If the catheter is in the dorsal meatus, it will pass with little or no resistance until it reaches the level of the medial canthus of the eye, where it will run into the ethmoid turbinate. IF THE CATHETER MEETS WITH FIRM RESISTANCE, YOU HAVE UNDOUBTEDLY PLACED IT IN THE DORSAL MEATUS. REMOVE IT AND TRY AGAIN. FORCING IT IN ANY MORE WILL PRODUCE SIGNIFICANT HEMORRHAGE FROM THE ETHMOID TURBINATE. Once in a while you will not be able to enter the ventral meatus even after 2 excellent attempts. In that case, anesthetize the opposite nostril and try that side. There is usually enough asymmetry between sides that you’ll often get it into the other side on your first attempt. Correct location is noted on this saggital section:
11. Pass the tubing to the level of the vertical ramus of the mandible, then tip the patient’s nose ventrally to facilitate passage of the tube up and over the epiglottis.
12. Induce swallowing by ‘tickling’ the epiglottis with the tip of the tube, and be prepared to rapidly thrust the catheter in 1-2” during a swallow. If you can not induce a swallow with the tube, try syringing a few ml’s of water into the mouth to encourage swallowing. The patient swallow will help guide the tube into the esophagus.
13. Pass the tubing a sufficiently distance to ensure that all of the fenestrations are just within the cervical esophagus. For a feeding tube with no additional fenestrations, that usually means no more than 2” (cats)-6” (large dogs) beyond the vertical ramus of the mandible.
14. STOP at that depth and apply suction with the syringe. If the fenestrations are located within the esophagus there should be little or no air/fluid removed before achieving a vacuum. If you continually aspirate air, the tube is likely to be in the trachea.
15. If a vacuum is achieved, continue to advance the tube. 16. Open the patient’s mouth and make sure there are no signs the tube
has coiled back into the pharynx. 17. If your intention is to position the tube within the esophagus, attempt to
pass it further into the stomach and aspirate stomach contents as another way to confirm placement within the GI tract and to help rule out the possibility that the tube has folded back on itself. Once you obtain a positive aspirate, either return the fluid or evacuate the stomach (if indicated) and reposition the tube to its marked depth.
18. If the attempt to aspirate stomach contents is negative attempt a test injection of air while auscultating with a stethoscope behind the 13th rib on the left. • A difficult injection indicates that the tube has folded back on itself
and is kinked. • If there is a LOUD gurgling heard, the tube is likely within the
stomach. • A fainter gurgle usually means the tube is in the esophagus. In that
case, repeat the maneuver while watching and auscultating the cervical esophagus.
• If the tube terminates in the esophagus, an injection of air will produce an audible burp with distension of the cervical esophagus distal to the partial occlusion produced by your stethoscope.
19. Once a proper depth is identified , apply a ‘butterfly’ of the waterproof white tape at that same site. Curl the exterior portion of the tubing as tightly back on the patient’s nose as possible without kinking the tube. For 16 French and larger tubes this will require that you create a relatively large loop of exposed tubing that will need to be stabilized in a ‘sandwich’ of waterproof tape. The tubing will need to be anchored either between the eyes or to a cheek, depending on tube size and patient anatomy. Do NOT let the tube rest in the animal’s field of vision! See the instructions for “Nasal Oxygen Protocol” for options on suturing.
20. If feeding is planned, aspirate one last time to confirm that a vacuum is achieved, then obtain two views of thoracic radiographs. Hospital policy requires that a radiology faculty or resident approves positioning of the tube. a. If the tube is in an airway remove it immediately. b. If the tube is folded back on itself, remove and replace (if the
patient tolerated passage through the nose well) or partially withdraw and replace if the patient is distressed by tube passage through the nasal cavity.
c. Thoracic radiographs MUST be repeated once the tube is replaced, and a radiologist must confirm proper placement prior to using the tube for feeding.
21. Just before feeding, inject 3 – 20 ml of water to confirm an absence of gagging or coughing. For patients that are fed intermittently, do this every time you feed.
22. If the patient shows any of the following, discontinue feeding until the case is reviewed with senior faculty and the clinician responsible for that patient. a. New onset of cough, gagging, or retching b. Development of course crackles c. Resting respiratory rate increase of 6 BPM d. Behavioral change suggesting anxiety

CHECKLIST FOR FEEDING TUBE PLACEMENT
□ Tube insertion depth marked with pen or tape.
□ Nose tipped down when tube reaches the level of the vertical ramus of the mandible.
□ Induced swallow during passage into the esophagus
□ Vacuum achieved with tube not advanced past the cervical esophagus.
□ Inspect Pharynx to insure the tube is not coiled there.
□ If possible, pass the tube into the stomach and confirm that location by aspirating stomach contents.
□ Withdraw tube to desired depth and secure it.
□ Obtain 2 radiographic views and consult with the on-call radiologist
□ Final test aspiration and injection of water before initiating feeding. __________________________________ Signature __________________________________ Printed name __________________________________ Date/time
Patient label here
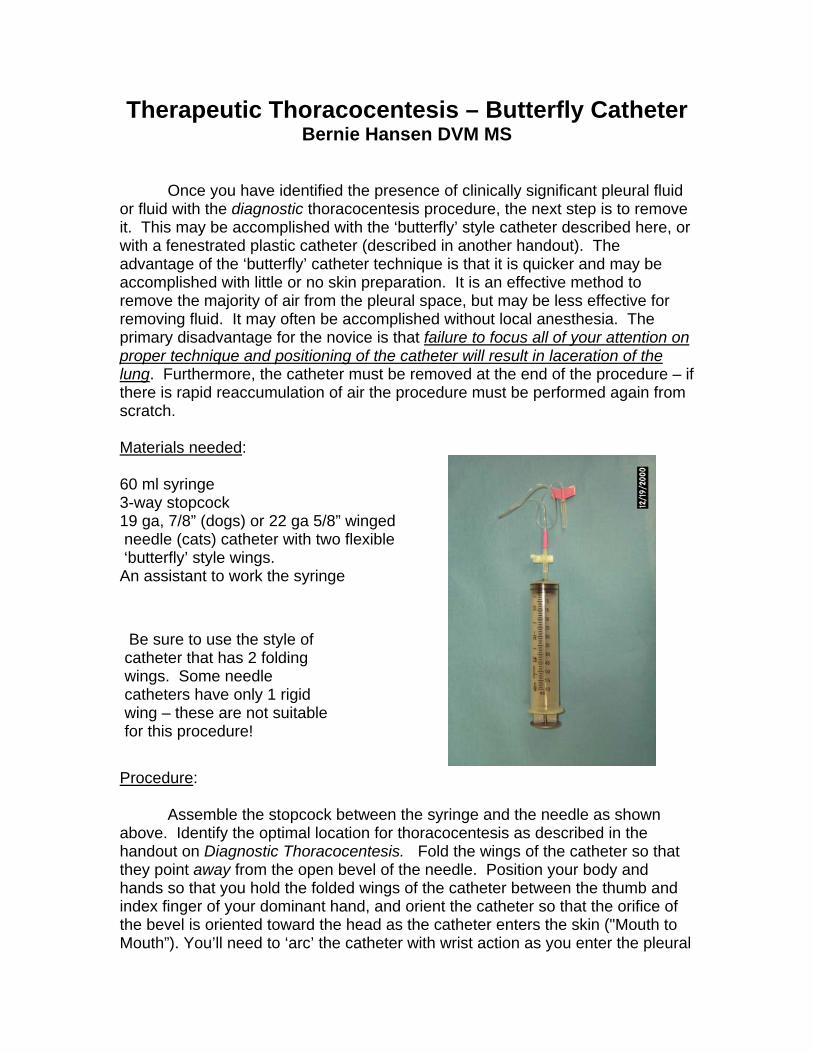
Therapeutic Thoracocentesis – Butterfly Catheter Bernie Hansen DVM MS
Once you have identified the presence of clinically significant pleural fluid or fluid with the diagnostic thoracocentesis procedure, the next step is to remove it. This may be accomplished with the ‘butterfly’ style catheter described here, or with a fenestrated plastic catheter (described in another handout). The advantage of the ‘butterfly’ catheter technique is that it is quicker and may be accomplished with little or no skin preparation. It is an effective method to remove the majority of air from the pleural space, but may be less effective for removing fluid. It may often be accomplished without local anesthesia. The primary disadvantage for the novice is that failure to focus all of your attention on proper technique and positioning of the catheter will result in laceration of the lung. Furthermore, the catheter must be removed at the end of the procedure – if there is rapid reaccumulation of air the procedure must be performed again from scratch. Materials needed: 60 ml syringe 3-way stopcock 19 ga, 7/8” (dogs) or 22 ga 5/8” winged needle (cats) catheter with two flexible ‘butterfly’ style wings. An assistant to work the syringe
Be sure to use the style of catheter that has 2 folding wings. Some needle catheters have only 1 rigid wing – these are not suitablefor this procedure!
Procedure: Assemble the stopcock between the syringe and the needle as shown above. Identify the optimal location for thoracocentesis as described in the handout on Diagnostic Thoracocentesis. Fold the wings of the catheter so that they point away from the open bevel of the needle. Position your body and hands so that you hold the folded wings of the catheter between the thumb and index finger of your dominant hand, and orient the catheter so that the orifice of the bevel is oriented toward the head as the catheter enters the skin ("Mouth to Mouth”). You’ll need to ‘arc’ the catheter with wrist action as you enter the pleural
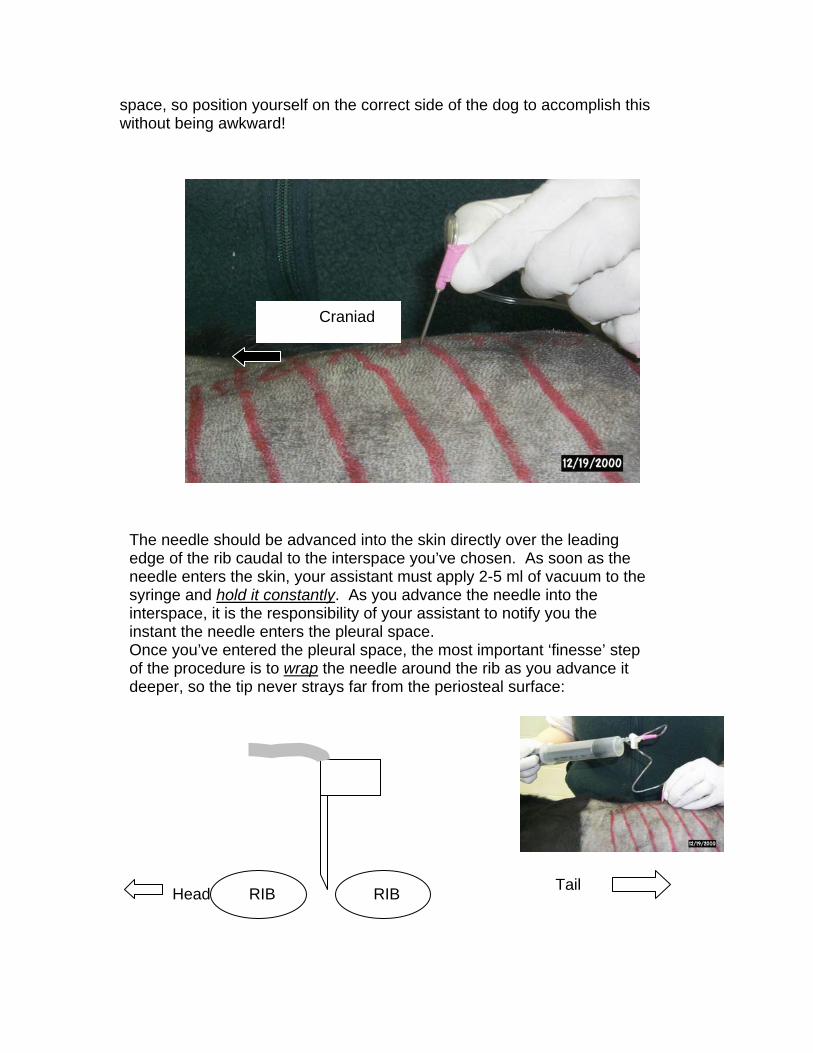
space, so position yourself on the correct side of the dog to accomplish this without being awkward!
Craniad
The needle should be advanced into the skin directly over the leading edge of the rib caudal to the interspace you’ve chosen. As soon as the needle enters the skin, your assistant must apply 2-5 ml of vacuum to the syringe and hold it constantly. As you advance the needle into the interspace, it is the responsibility of your assistant to notify you the instant the needle enters the pleural space. Once you’ve entered the pleural space, the most important ‘finesse’ step of the procedure is to wrap the needle around the rib as you advance it deeper, so the tip never strays far from the periosteal surface:
RIB Head RIB
Tail

Head RIB RIB
Tail
RIB Head RIB
As the catheter is advanced, you will actually need to lever the needle against the rib cranial to the space, and push it in a bit, to keep the needle as parallel to the chest wall as possible.
Tail
RIB Head
RIB
Tail
PUSH the needle caudally, against the caudal rib, to help keep it from coming out.
You should be able to appreciate why it is so important to have the bevel orifice facing the head – after the needle is in place, this orientation allows it to face the pleural space instead of getting smashed up against the parietal pleura of the rib.
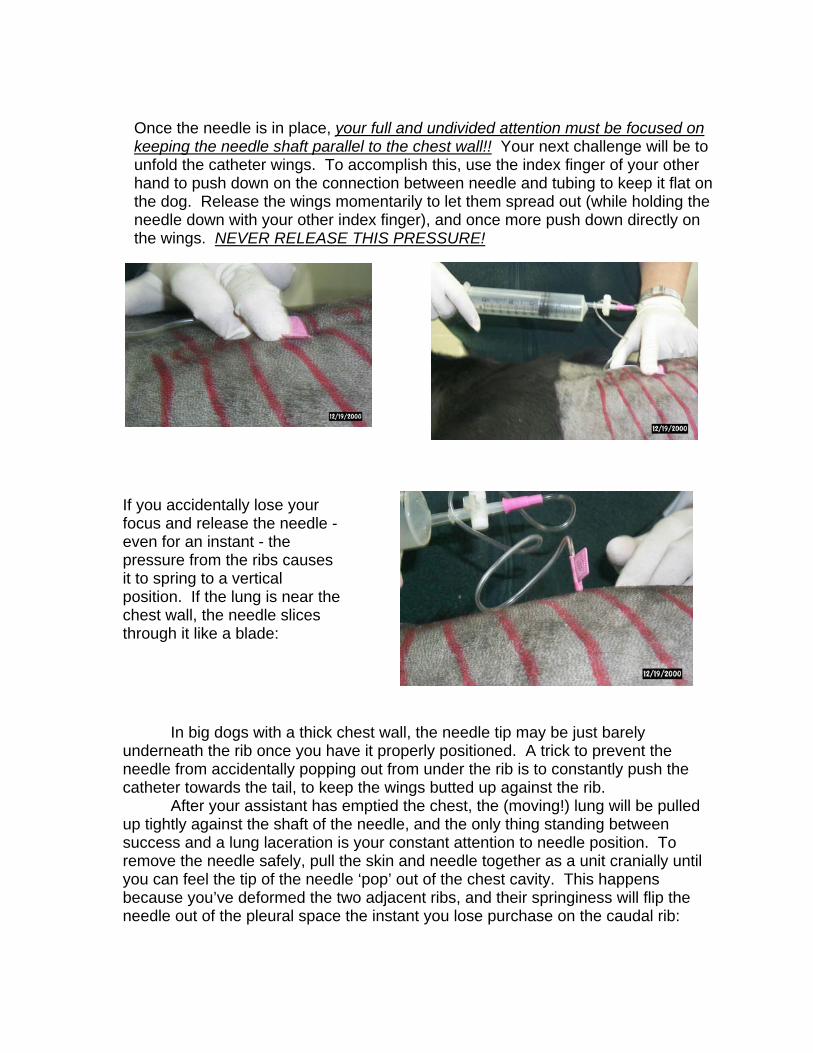
Once the needle is in place, your full and undivided attention must be focused on keeping the needle shaft parallel to the chest wall!! Your next challenge will be to unfold the catheter wings. To accomplish this, use the index finger of your other hand to push down on the connection between needle and tubing to keep it flat on the dog. Release the wings momentarily to let them spread out (while holding the needle down with your other index finger), and once more push down directly on the wings. NEVER RELEASE THIS PRESSURE!
If you accidentally lose your focus and release the needle - even for an instant - the pressure from the ribs causes it to spring to a vertical position. If the lung is near the chest wall, the needle slices through it like a blade:
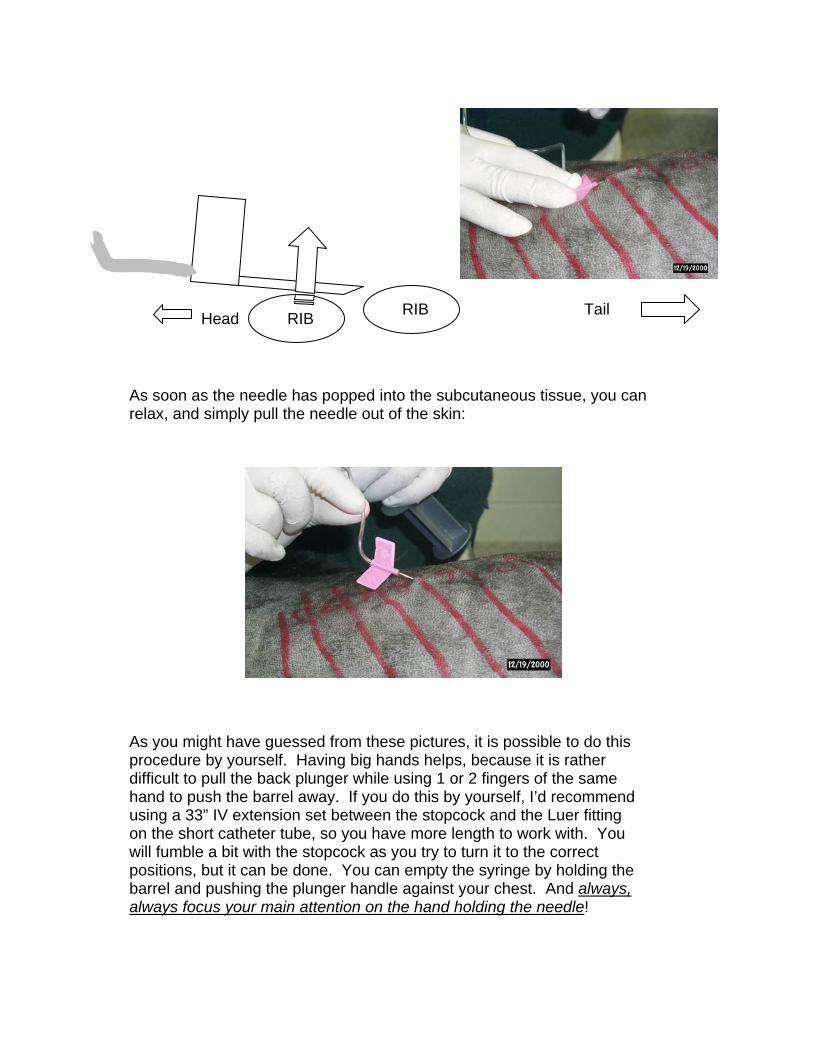
In big dogs with a thick chest wall, thunderneath the rib once you have it properneedle from accidentally popping out from catheter towards the tail, to keep the wings
After your assistant has emptied theup tightly against the shaft of the needle, asuccess and a lung laceration is your consremove the needle safely, pull the skin andyou can feel the tip of the needle ‘pop’ out because you’ve deformed the two adjacenneedle out of the pleural space the instant
e needle tip may be just barely ly positioned. A trick to prevent the under the rib is to constantly push the butted up against the rib. chest, the (moving!) lung will be pulled nd the only thing standing between tant attention to needle position. To needle together as a unit cranially until of the chest cavity. This happens t ribs, and their springiness will flip the you lose purchase on the caudal rib:
RIB Head Tail RIB
As soon as the needle has popped into the subcutaneous tissue, you can relax, and simply pull the needle out of the skin:
As you might have guessed from these pictures, it is possible to do this procedure by yourself. Having big hands helps, because it is rather difficult to pull the back plunger while using 1 or 2 fingers of the same hand to push the barrel away. If you do this by yourself, I’d recommend using a 33” IV extension set between the stopcock and the Luer fitting on the short catheter tube, so you have more length to work with. You will fumble a bit with the stopcock as you try to turn it to the correct positions, but it can be done. You can empty the syringe by holding the barrel and pushing the plunger handle against your chest. And always, always focus your main attention on the hand holding the needle!
Therapeutic Thoracocentesis 1 of 5
Therapeutic Thoracocentesis – Fenestrated Plastic Intravenous Catheter
Bernie Hansen DVM MS North Carolina State University – College of Veterinary Medicine
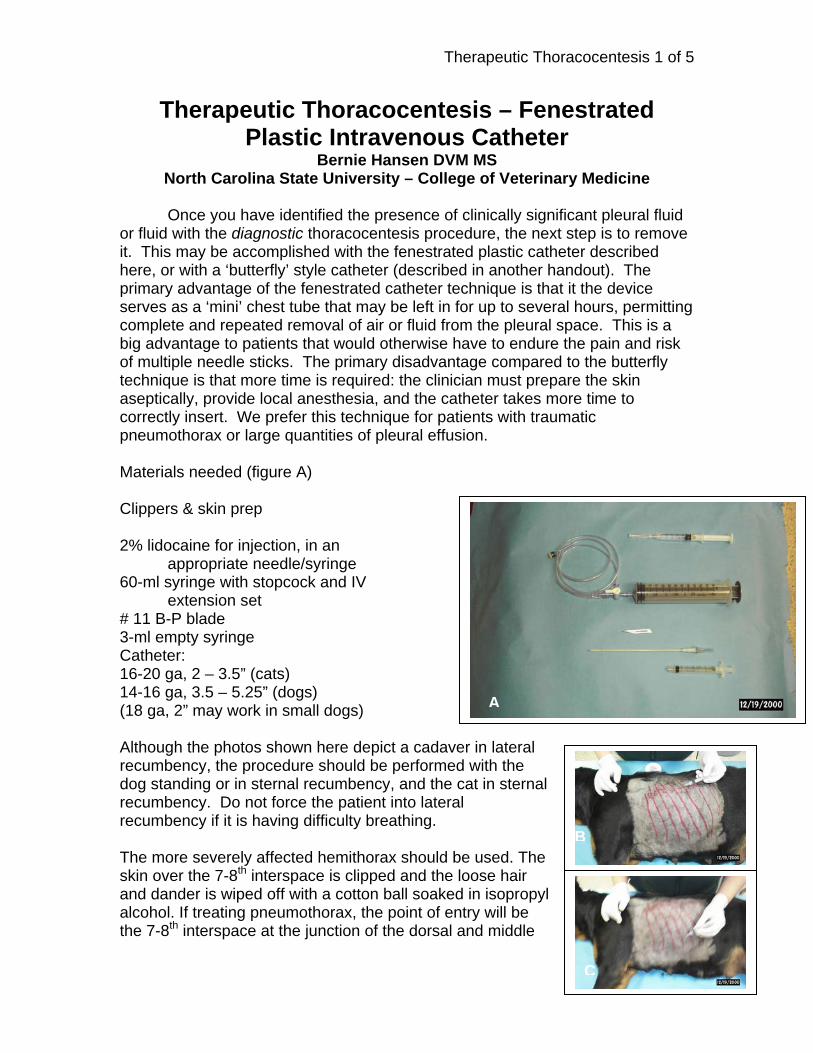
Once you have identified the presence of clinically significant pleural fluid or fluid with the diagnostic thoracocentesis procedure, the next step is to remove it. This may be accomplished with the fenestrated plastic catheter described here, or with a ‘butterfly’ style catheter (described in another handout). The primary advantage of the fenestrated catheter technique is that it the device serves as a ‘mini’ chest tube that may be left in for up to several hours, permitting complete and repeated removal of air or fluid from the pleural space. This is a big advantage to patients that would otherwise have to endure the pain and risk of multiple needle sticks. The primary disadvantage compared to the butterfly technique is that more time is required: the clinician must prepare the skin aseptically, provide local anesthesia, and the catheter takes more time to correctly insert. We prefer this technique for patients with traumatic pneumothorax or large quantities of pleural effusion. Materials needed (figure A) Clippers & skin prep 2% lidocaine for injection, in an appropriate needle/syringe 60-ml syringe with stopcock and IV
extension set # 11 B-P blade 3-ml empty syringe Catheter: 16-20 ga, 2 – 3.5” (cats) 14-16 ga, 3.5 – 5.25” (dogs) (18 ga, 2” may work in small dogs) Although the photos shown here depict a cadaverecumbency, the procedure should be performeddog standing or in sternal recumbency, and the crecumbency. Do not force the patient into laterarecumbency if it is having difficulty breathing. The more severely affected hemithorax should bskin over the 7-8th interspace is clipped and the land dander is wiped off with a cotton ball soakedalcohol. If treating pneumothorax, the point of enthe 7-8th interspace at the junction of the dorsal a
r in wat l
e uoos intry nd
A
lateral ith the in sternal
Bsed. The e hair
isopropyl will be middle
C
Therapeutic Thoracocentesis 2 of 5
Pleural air has bubbled into the syringe up to here
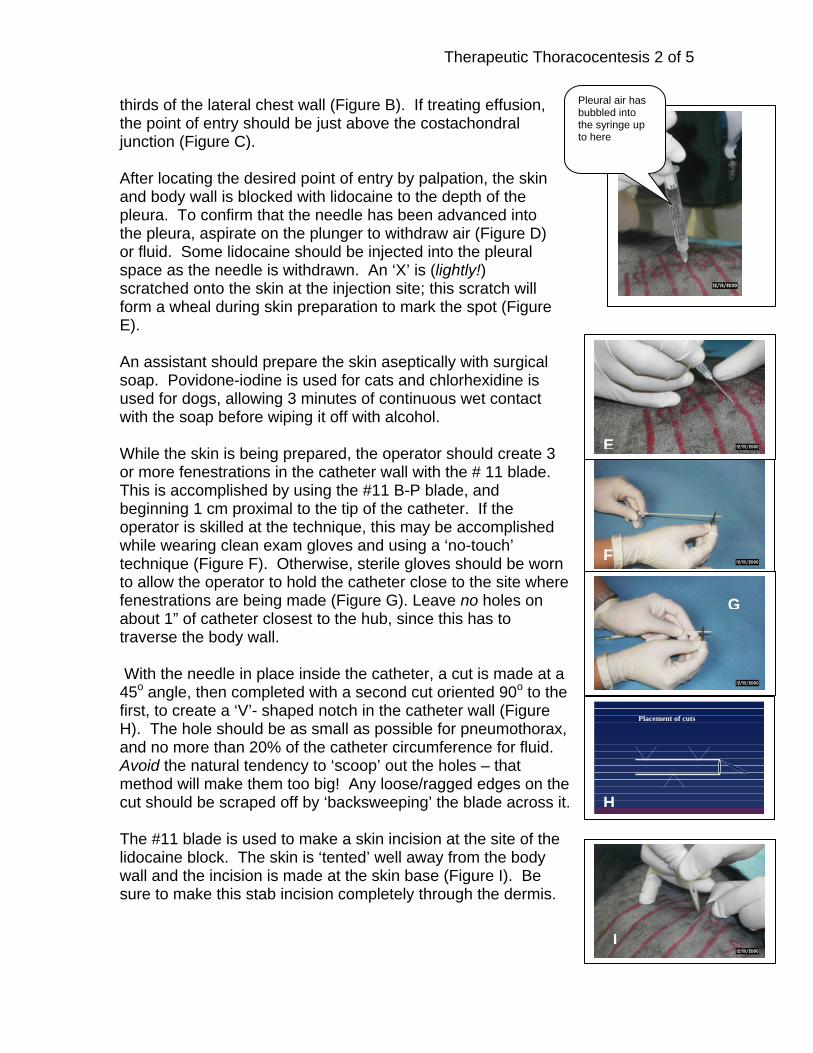
thirds of the lateral chest wall (Figure B). If treating effusion, the point of entry should be just above the costachondral junction (Figure C). After locating the desired point of entry by palpation, the skin and body wall is blocked with lidocaine to the depth of the pleura. To confirm that the needle has been advanced into the pleura, aspirate on the plunger to withdraw air (Figure D) or fluid. Some lidocaine should be injected into the pleural space as the needle is withdrawn. An ‘X’ is (lightly!) scratched onto the skin at the injection site; this scratch will form a wheal during skin preparation to mark the spot (Figure E).
E
F
An assistant should prepare the skin aseptically with surgical soap. Povidone-iodine is used for cats and chlorhexidine is used for dogs, allowing 3 minutes of continuous wet contact with the soap before wiping it off with alcohol. While the skin is being prepared, the operator should create 3 or more fenestrations in the catheter wall with the # 11 blade. This is accomplished by using the #11 B-P blade, and beginning 1 cm proximal to the tip of the catheter. If the operator is skilled at the technique, this may be accomplished while wearing clean exam gloves and using a ‘no-touch’ technique (Figure F). Otherwise, sterile gloves should be worn to allow the operator to hold the catheter close to the site where fenestrations are being made (Figure G). Leave no holes on about 1” of catheter closest to the hub, since this has to traverse the body wall. With the needle in place inside the catheter, a cut is made at a 45o angle, then completed with a second cut oriented 90o to the first, to create a ‘V’- shaped notch in the catheter wall (Figure H). The hole should be as small as possible for pneumothorax, and no more than 20% of the catheter circumference for fluid. Avoid the natural tendency to ‘scoop’ out the holes – that method will make them too big! Any loose/ragged edges on the cut should be scraped off by ‘backsweeping’ the blade across it. H The #11 blade is used to make a skin incision at the site of the lidocaine block. The skin is ‘tented’ well away from the body wall and the incision is made at the skin base (Figure I). Be sure to make this stab incision completely through the dermis.
I
D
G
Placement of cuts
Therapeutic Thoracocentesis 3 of 5
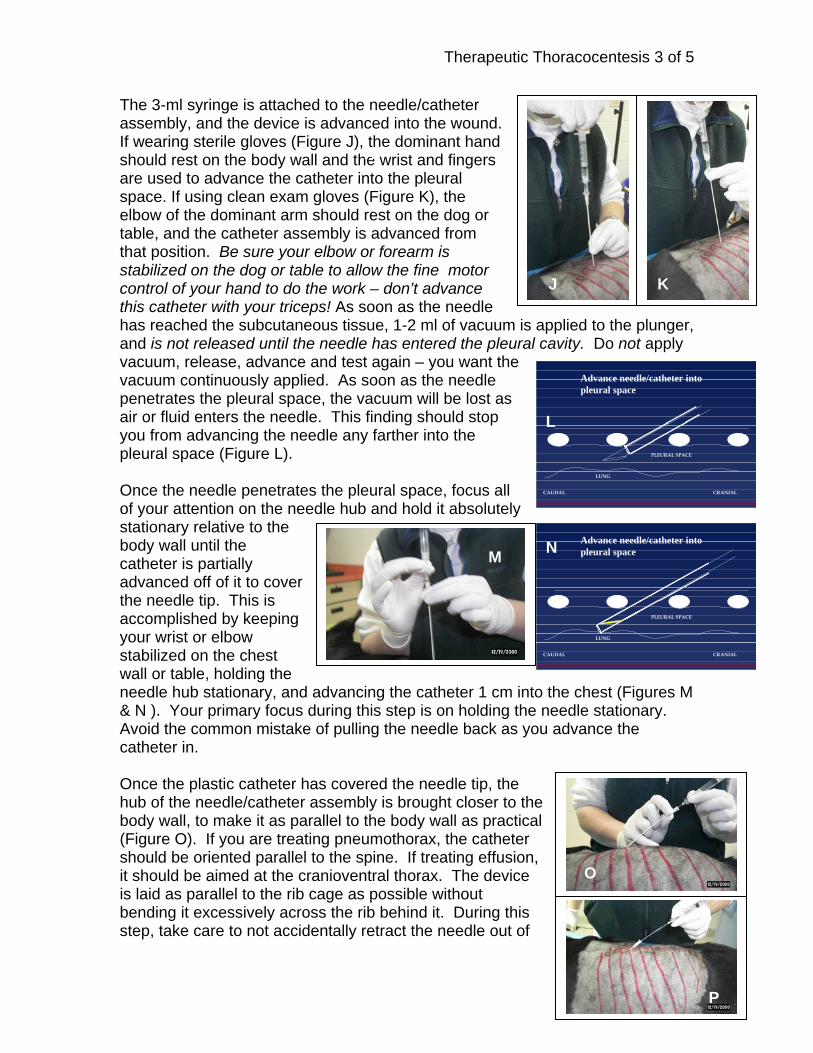
The 3-ml syringe is attached to the needle/catheter assembly, and the device is advanced into the wound. If wearing sterile gloves (Figure J), the dominant hand should rest on the body wall and the wrist and fingers are used to advance the catheter into the pleural space. If using clean exam gloves (Figure K), the elbow of the dominant arm should rest on the dog or table, and the catheter assembly is advanced from that position. Be sure your elbow or forearm is stabilized on the dog or table to allow the fine motor control of your hand to do the work – don’t advance this catheter with your triceps! As soon as the needle has reached the subcutaneous tissue, 1-2 ml of vacuum is applied to the plunger, and is not released until the needle has entered the pleural cavity. Do not apply vacuum, release, advance and test again – you want the vacuum continuously applied. As soon as the needle penetrates the pleural space, the vacuum will be lost as air or fluid enters the needle. This finding should stop you from advancing the needle any farther into the pleural space (Figure L).
J K
A
Once the needle penetrates the pleural space, focus all of your attention on the needle hub and hold it absolutely stationary relative to the body wall until the catheter is partially advanced off of it to cover the needle tip. This is accomplished by keeping your wrist or elbow stabilized on the chest wall or table, holding the needle hub stationary, and advancing the catheter 1 cm into the chest (Figures M & N ). Your primary focus during this step is on holding the needle stationary. Avoid the common mistake of pulling the needle back as you advance the catheter in.
CRANIALCAUDAL
LUNG
PLEURAL SPACE
Advance needle/catheter intopleural space
L
CRANIALCAUDAL
LUNG
PLEURAL SPACE
Advance needle/catheter intopleural spaceN M
O
P
Once the plastic catheter has covered the needle tip, the hub of the needle/catheter assembly is brought closer to the body wall, to make it as parallel to the body wall as practical (Figure O). If you are treating pneumothorax, the catheter should be oriented parallel to the spine. If treating effusion, it should be aimed at the cranioventral thorax. The device is laid as parallel to the rib cage as possible without bending it excessively across the rib behind it. During this step, take care to not accidentally retract the needle out of

Therapeutic Thoracocentesis 4 of 5
the pleural space. The needle tip must remain within the pleural space to serve as a stylet until the catheter is advanced completely into the chest (Figure P). To accomplish this, hold the needle hub stationary and advance the catheter cranially, high for air and low for fluid.
Q
After removal of the needle the extension set is connected to the catheter and the air or fluid is aspirated (Figure Q). If the catheter is to remain in place, the catheter/tubing connection is bridged with a ‘butterfly’ of 1” waterproof white tape and this is sutured to the skin (Figure R).
R The catheter may work well for several hours before it kinks too much, giving you time to stabilize the patient. If you plan to radiograph an animal with pneumothorax, be sure to position him so the catheter is at the highest aspect of the pleural space and completely empty it just before obtaining the film. For effusion, lay the animal catheter-side down and drain all the fluid out just before making the shot. What can go wrong? The most common difficulty experienced occurs during the process of advancing the catheter off the needle after penetration of the pleural space. Instead of holding the needle stationary and advancing the catheter off of it, the natural tendency for most people is to pull the two apart (Figure S). The result is that the needle will be withdrawn
from the pleural space. If the catheter tip is also accidentally withdrawn from the pleural space, when you try to advance it the catheter tip will curl into the tissues of the body wall. If you encounter substantial resistance to advancement of the catheter, remove the needle and catheter together as a unit. Do not try to advance the needle back into the catheter – it will puncture through the wall of the bent catheter tip (Figure T) and may shear it off.
T
Don’t do this!!
S
If the catheter advances into the pleural space but the needle is accidentally withdrawn, the stylet function of
U
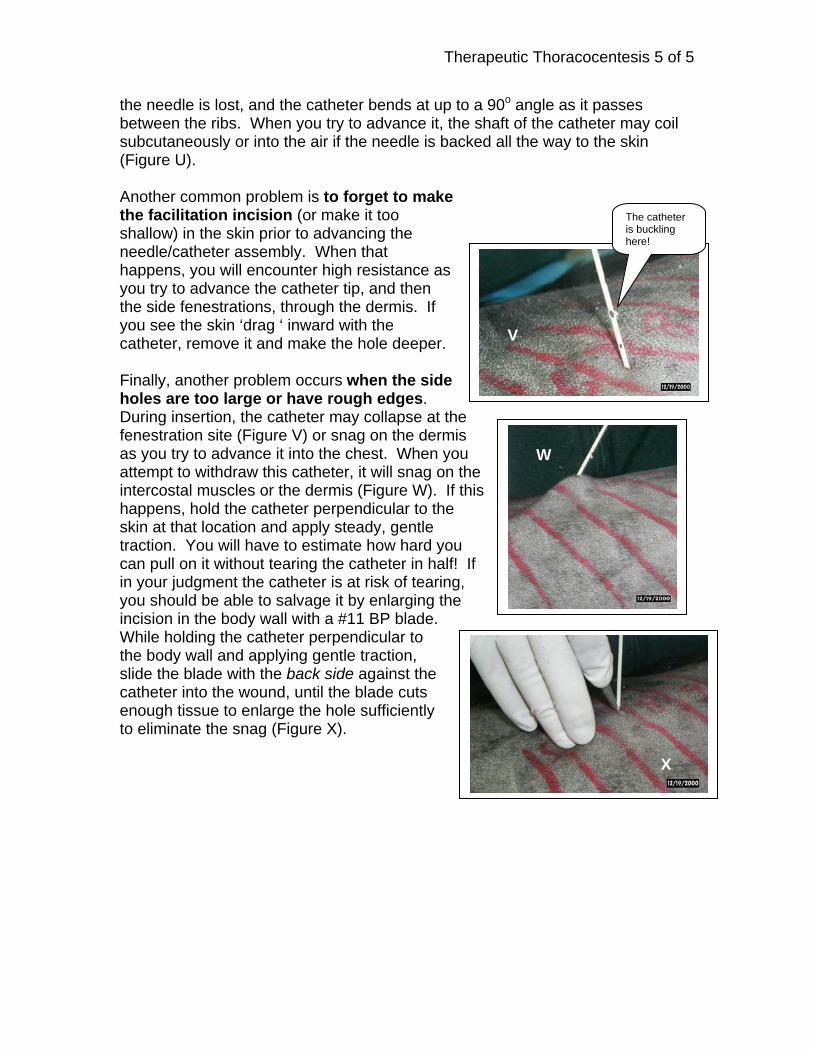
Therapeutic Thoracocentesis 5 of 5
the needle is lost, and the catheter bends at up to a 90o angle as it passes between the ribs. When you try to advance it, the shaft of the catheter may coil subcutaneously or into the air if the needle is backed all the way to the skin (Figure U). Another common problem is to forget to make the facilitation incision (or make it too shallow) in the skin prior to advancing the needle/catheter assembly. When that happens, you will encounter high resistance as you try to advance the catheter tip, and then the side fenestrations, through the dermis. If you see the skin ‘drag ‘ inward with the catheter, remove it and make the hole deeper. Finally, another problem occurs when the side holes are too large or have rough edges. During insertion, the catheter may collapse at the fenestration site (Figure V) or snag on the dermis as you try to advance it into the chest. When you attempt to withdraw this catheter, it will snag on the intercostal muscles or the dermis (Figure W). If this happens, hold the catheter perpendicular to the skin at that location and apply steady, gentle traction. You will have to estimate how hard you can pull on it without tearing the catheter in half! If in your judgment the catheter is at risk of tearing, you should be able to salvage it by enlarging the incision in the body wall with a #11 BP blade. While holding the catheter perpendicular to the body wall and applying gentle traction, slide the blade with the back side against the catheter into the wound, until the blade cuts enough tissue to enlarge the hole sufficiently to eliminate the snag (Figure X).
V
The catheter is buckling here!
T W
X

EMERGENCY VENOUS CUTDOWN Bernie Hansen DVM MS
Emergency venous access is a technique of rapid “dirty” surgical exposure of a superficial vein to allow rapid catheterization. This procedure is used following failed attempts at percutaneous catheterization or in animals with such severe circulatory collapse that attempts at percutaneous catheterization are deemed futile. For most patients in need of immediate vascular access, you should set a short defined time limit (< 5 minutes) on any attempt at percutaneous catheterization. If vascular access is not achieved within that time limit, you should proceed directly to an emergency cutdown. For most clinicians, this technique is faster and more reliable than intramedulary (bone marrow) needle placement. The major exception to this is in young cats and dogs with soft bones and very small veins. Materials: 1 - Scalpel with a #11 Bard-Parker blade 1 - 4” curved mosquito forceps (make sure the jaw tips have
no rough edges) 1 - Vein catheter introducer 1 - Large gauge over-the-needle style IV catheter (dogs) or 22 ga catheter (cats) Procedure for dogs: .
Because it is relatively large and lies under thin skin, the lateral saphenous vein is strongly preferred. If time permits, clip the hair from the area and prepare the skin. Because this procedure is routinely done in a crisis situation, there is almost never enough time available to prepare the skin fully.
Hold a scalpel handle fitted with the #11 B-P blade upside-down. Incise the skin 1-2 cm proximal to where the vein crosses the tibia at the far end of the vein, directly over the lateral aspect of the tibia. Do not incise the skin directly over the vein! Pierce the skin with the blade and advance it up the limb, keeping parallel to the vein. By simultaneously advancing the blade and lifting it away from the limb, the skin is cut through with minimal risk to underlying structures. The cut should extend to the anterior border of the Achilles tendon.
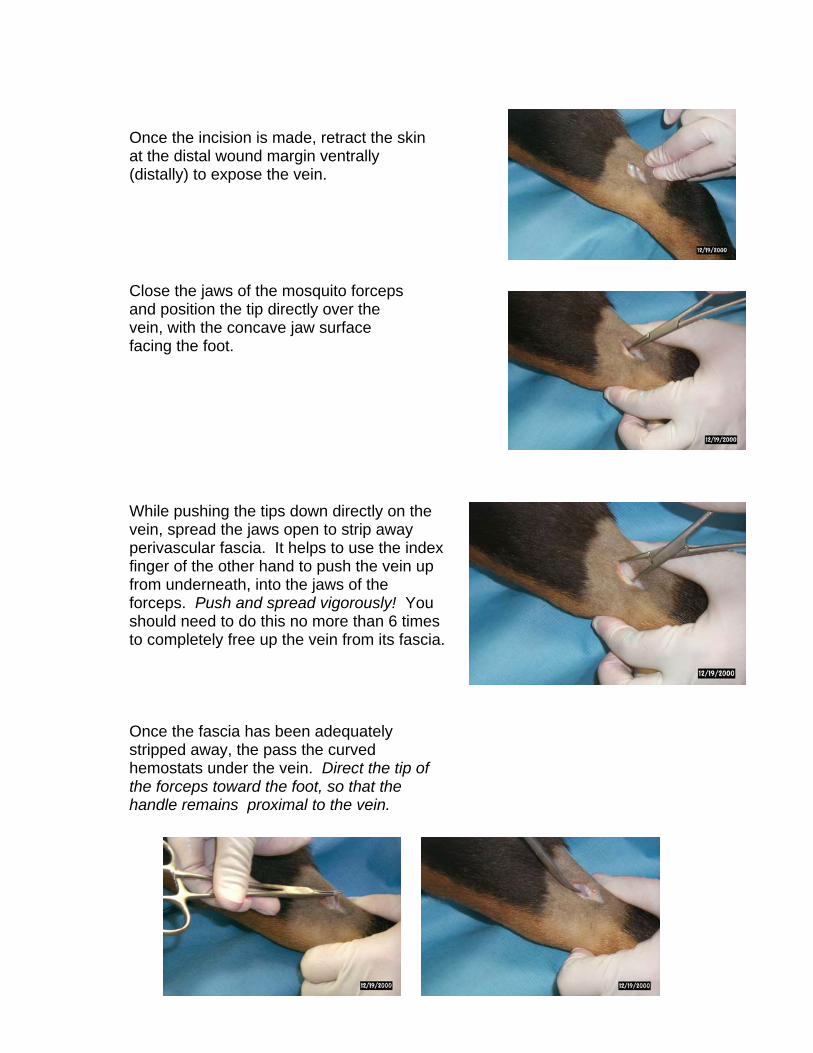
Once the incision is made, retract the skin at the distal wound margin ventrally (distally) to expose the vein.
Close the jaws of the mosquito forceps and position the tip directly over the vein, with the concave jaw surface facing the foot.
While pushing the tips down directly on the vein, spread the jaws open to strip away perivascular fascia. It helps to use the index finger of the other hand to push the vein up from underneath, into the jaws of the forceps. Push and spread vigorously! You should need to do this no more than 6 times to completely free up the vein from its fascia.
Once the fascia has been adequately
stripped away, the pass the curved hemostats under the vein. Direct the tip of the forceps toward the foot, so that the handle remains proximal to the vein.
Slide the forceps under the vein so that it is stretched out over the two handle shafts. Note that by directing the tip distally (keeping the finger holes proximal to the vein), the weight of the tip keeps the instrument from sliding out after it is released. The vein is now exteriorized, free from fascia, and occluded at top and bottom by the pressure from the handles. This will prevent bleeding during the venotomy.
Once again hold the scalpel blade upside down, and make a small venotomy incision at the distal aspect of the vein, directly over the distal hemostat handle. Penetrate the vein lumen and advance the blade proximally to make an incision slightly larger than the diameter of the catheter. Making the incision directly over the forceps handle stabilizes the vessel and gives you greater control over the depth of the wound. This will help minimize the risk of accidentally cutting through the deep aspect of the vein. If that happens, don’t worry – you can still get the vein catheterized.
Retract the catheter needle slightly out of the catheter, to pull the sharp tip within the plastic catheter. Elevate the catheter introducer straight up, away from the wound, to hold the venotomy incision open. The catheter tip is then advanced into the venotomy.
Advance the catheter introducer into the venotomy incision. If you successfully entered the vein lumen with the blade, the introducer will readily and easily advance all the way to its elbow. If you screwed up and only incised perivascular fascia, you can still advance the introducer into the incised fascia, but it is noticeably more difficult and you will not be able to visualize an obvious vessel lumen. If you accidentally cut through the deep wall of the vein, you’ll have to take care to direct the introducer into the lumen instead of through the bottom incision.
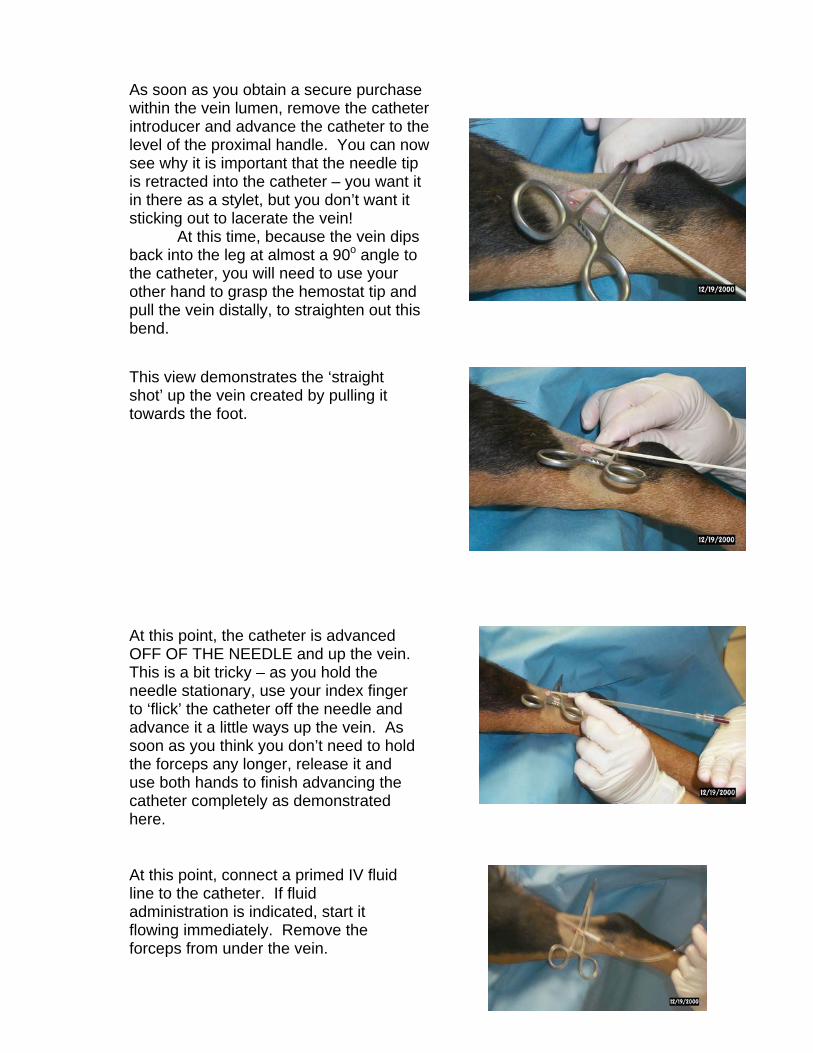
This view demonstrates the ‘straight shot’ up the vein created by pulling it towards the foot.
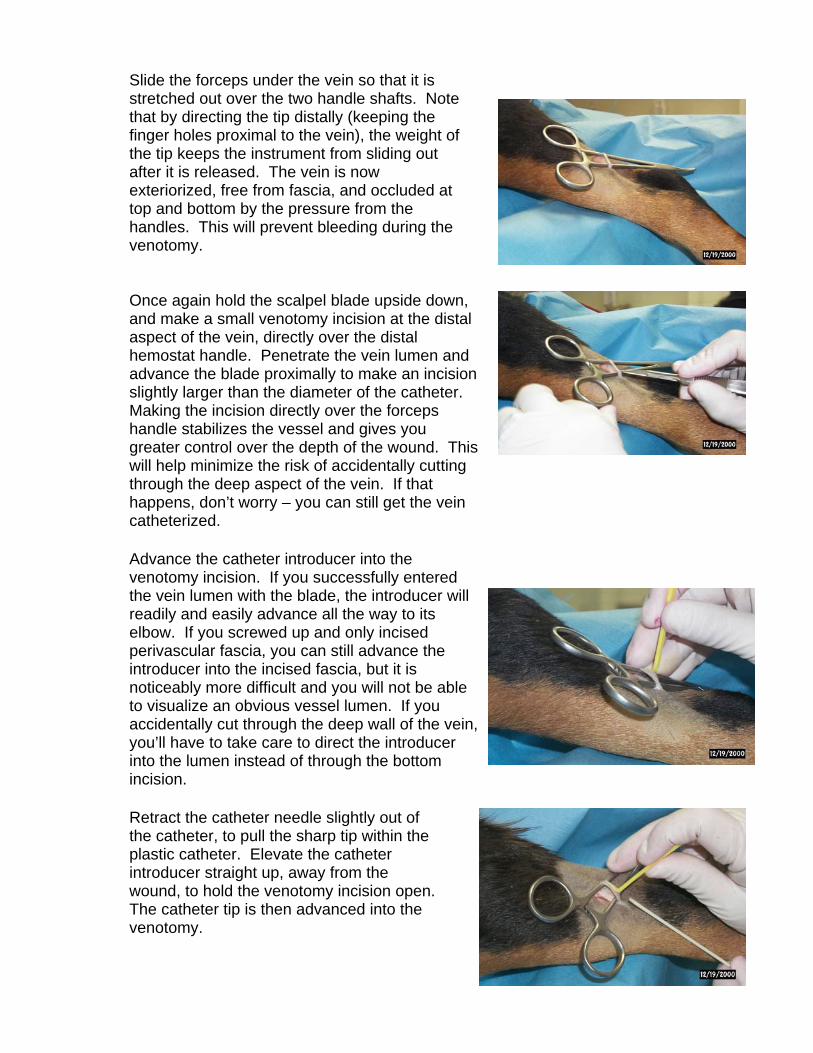
As soon as you obtain a secure purchase within the vein lumen, remove the catheter introducer and advance the catheter to the level of the proximal handle. You can now see why it is important that the needle tip is retracted into the catheter – you want it in there as a stylet, but you don’t want it sticking out to lacerate the vein! At this time, because the vein dips back into the leg at almost a 90o angle to the catheter, you will need to use your other hand to grasp the hemostat tip and pull the vein distally, to straighten out this bend.
At this point, the catheter is advanced OFF OF THE NEEDLE and up the vein. This is a bit tricky – as you hold the needle stationary, use your index finger to ‘flick’ the catheter off the needle and advance it a little ways up the vein. As soon as you think you don’t need to hold the forceps any longer, release it and use both hands to finish advancing the catheter completely as demonstrated here.
At this point, connect a primed IV fluid line to the catheter. If fluid administration is indicated, start it flowing immediately. Remove the forceps from under the vein.

Appose the wound margins over the catheter, and wrap the entire wound area snugly with waterproof white tape.
If rapid fluid administration is indicated and you do not have a large gauge IV catheter (at least 16 ga), an 8- or 10 French red rubber tube may be used as an IV catheter. The syringe end of the catheter will need to be cut down to fit on the male Luer end of the IV set snugly.
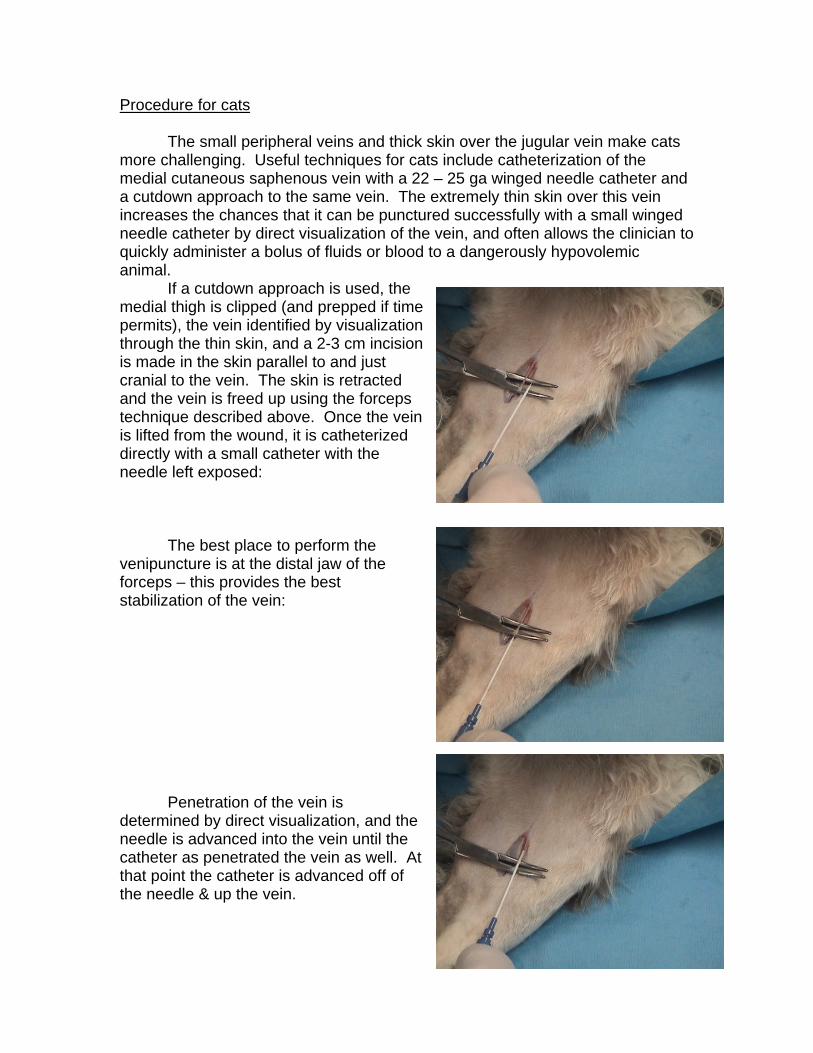
Procedure for cats The small peripheral veins and thick skin over the jugular vein make cats more challenging. Useful techniques for cats include catheterization of the medial cutaneous saphenous vein with a 22 – 25 ga winged needle catheter and a cutdown approach to the same vein. The extremely thin skin over this vein increases the chances that it can be punctured successfully with a small winged needle catheter by direct visualization of the vein, and often allows the clinician to quickly administer a bolus of fluids or blood to a dangerously hypovolemic animal. If a cutdown approach is used, the medial thigh is clipped (and prepped if time permits), the vein identified by visualization through the thin skin, and a 2-3 cm incision is made in the skin parallel to and just cranial to the vein. The skin is retracted and the vein is freed up using the forceps technique described above. Once the vein is lifted from the wound, it is catheterized directly with a small catheter with the needle left exposed: The best place to perform the venipuncture is at the distal jaw of the forceps – this provides the best stabilization of the vein: Penetration of the vein is determined by direct visualization, and the needle is advanced into the vein until the catheter as penetrated the vein as well. At that point the catheter is advanced off of the needle & up the vein.

Once the catheter is in place a fluid line is connected and the catheter hub is sutured to the skin. The skin wound should be temporarily closed with 00 or 000 suture.
Catheters inserted by cutdown are ALWAYS contaminated and must be removed as soon as possible, certainly within a few hours. Once the patient has been stabilized, the tape is removed and the wound is cleaned as you would a fresh laceration. Clip any hair away (if not done prior to the procedure), and flush the wound liberally while the catheter is still in place. Next, compress the insertion site with sterile 4x4’s and remove the catheter. Holding constant gentle pressure on the wound for several minutes after removal often allows for effective clot formation to prevent further hemorrhage. Carefully lift off the 4x4’s and watch for hemorrhage from the venotomy. If none is observed, carefully flush the wound and continue to clean it some more after the catheter is withdrawn, and close the proximal 2/3 of the incision with 00 or 000 monofilament nylon suture. Leave the distal 1/3 of the wound open to drain, and cover it with a sterile bandage. This dressing will need to be changed 2-3x/day to remove drainage and prevent secondary infection. Bandaging should not be necessary for more than a few days. If the venotomy wound was too large or a coagulopathy is present, the vessel may need to be repaired or ligated to control hemorrhage after catheter removal.