Databases and Forms
19
Databases and Forms 1. Database Forms You’ll create a form with buttons and text fields. The buttons will be used to scroll forwards and backwards through the records in a database table. You'll also add buttons to perform other common database tasks. The form you'll design will look something like this: Start a new project for this by clicking File > New Project from the NetBeans menu. When the dialogue box appears, select Java > Java Application. On step one of the dialogue box, type database_form as the Project Name. Uncheck the box at the bottom for Create Main Class. Click the Finish button to create an empty project. In the Project area on the left locate your database_form project, and right click the entry. From the menu that appears select New > JFrame Form: When the dialogue box appears: Type Workers for the Class name, and Employees as the package name.
-
Upload
independent -
Category
Documents
-
view
1 -
download
0
Transcript of Databases and Forms
Databases and Forms
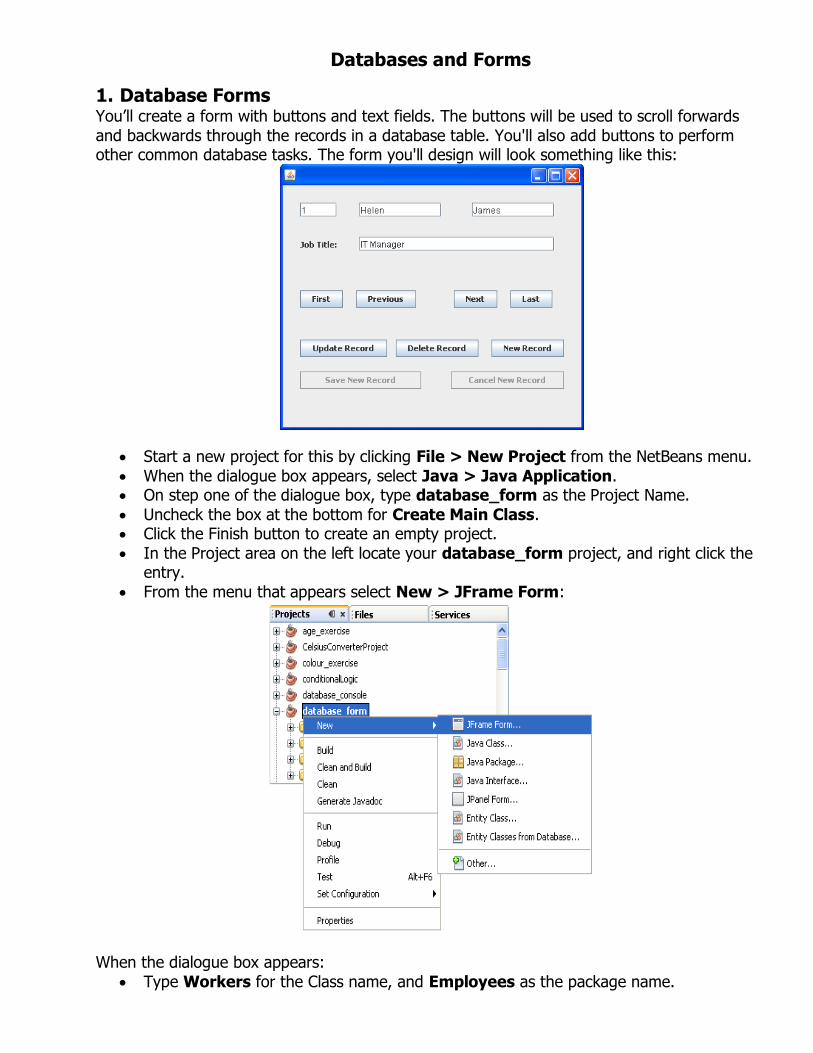
1. Database Forms You’ll create a form with buttons and text fields. The buttons will be used to scroll forwards
and backwards through the records in a database table. You'll also add buttons to perform other common database tasks. The form you'll design will look something like this:
Start a new project for this by clicking File > New Project from the NetBeans menu.
When the dialogue box appears, select Java > Java Application. On step one of the dialogue box, type database_form as the Project Name.
Uncheck the box at the bottom for Create Main Class. Click the Finish button to create an empty project.
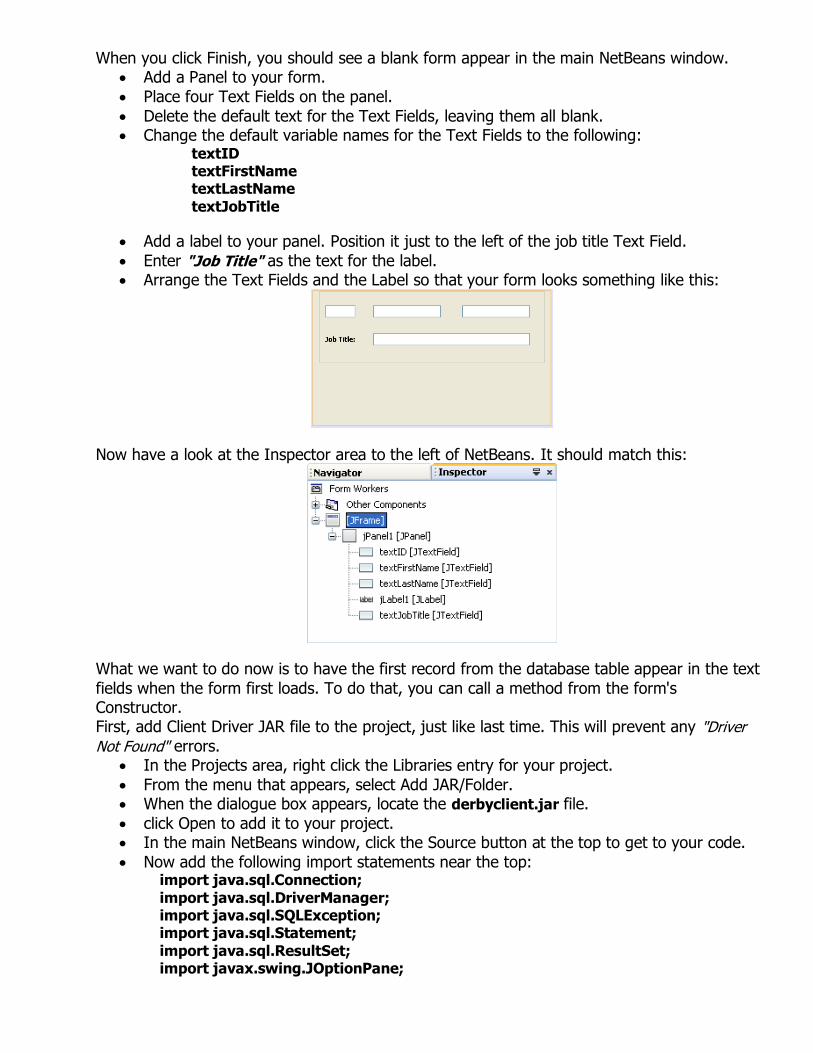
In the Project area on the left locate your database_form project, and right click the entry.
From the menu that appears select New > JFrame Form:
When the dialogue box appears:
Type Workers for the Class name, and Employees as the package name.
When you click Finish, you should see a blank form appear in the main NetBeans window. Add a Panel to your form.
Place four Text Fields on the panel.
Delete the default text for the Text Fields, leaving them all blank. Change the default variable names for the Text Fields to the following:
textID textFirstName textLastName
textJobTitle
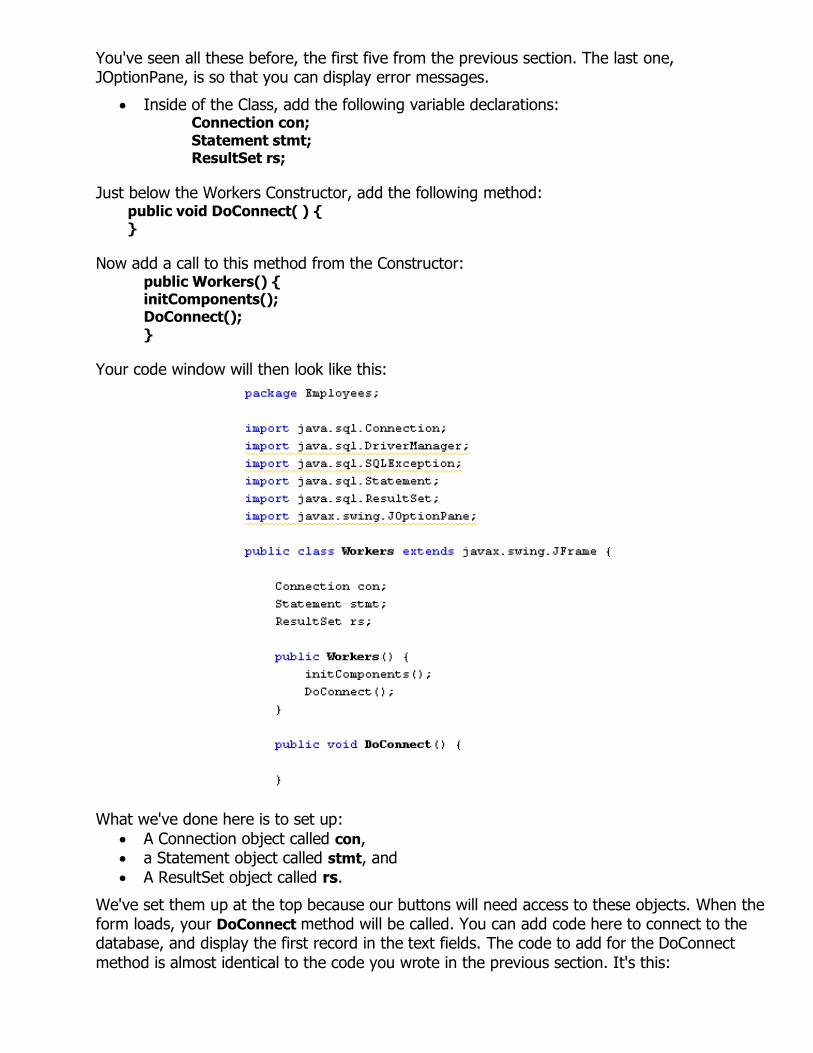
Add a label to your panel. Position it just to the left of the job title Text Field.
Enter "Job Title" as the text for the label. Arrange the Text Fields and the Label so that your form looks something like this:
Now have a look at the Inspector area to the left of NetBeans. It should match this:
What we want to do now is to have the first record from the database table appear in the text
fields when the form first loads. To do that, you can call a method from the form's Constructor. First, add Client Driver JAR file to the project, just like last time. This will prevent any "Driver
Not Found" errors. In the Projects area, right click the Libraries entry for your project.
From the menu that appears, select Add JAR/Folder. When the dialogue box appears, locate the derbyclient.jar file.
click Open to add it to your project. In the main NetBeans window, click the Source button at the top to get to your code.
Now add the following import statements near the top: import java.sql.Connection;
import java.sql.DriverManager; import java.sql.SQLException; import java.sql.Statement;
import java.sql.ResultSet; import javax.swing.JOptionPane;
You've seen all these before, the first five from the previous section. The last one, JOptionPane, is so that you can display error messages.
Inside of the Class, add the following variable declarations: Connection con;
Statement stmt; ResultSet rs;
Just below the Workers Constructor, add the following method: public void DoConnect( ) { }
Now add a call to this method from the Constructor: public Workers() { initComponents(); DoConnect();
}
Your code window will then look like this:
What we've done here is to set up:
A Connection object called con, a Statement object called stmt, and
A ResultSet object called rs.
We've set them up at the top because our buttons will need access to these objects. When the form loads, your DoConnect method will be called. You can add code here to connect to the database, and display the first record in the text fields. The code to add for the DoConnect
method is almost identical to the code you wrote in the previous section. It's this:

One line that you may not have met is this one: String id = Integer.toString( id_col );
Because the ID column is an Integer, you need to convert it to a String for the setText
method of the Text Field. We need to do this because Text Field's don't accept Integer values
directly. All the other lines in the code should be familiar to you by now. Study the code to make sure you know what's happening. Then add it to your own DoConnect method.
You can run your program now.
Make sure to start your Java DB server from the Services window.
When you run your program, you should see the first record displayed in the Text Fields:
Now that we have the first record displayed, you can add some buttons to scroll through the rest of the table data.
2. Database Scrolling Buttons
What you'll do now is to add four buttons to the form. The buttons will enable us to move
forward through the records, move back, move to the last record, and move to the first record. Add a new panel to your form.
Add four buttons to the panel. Change the variable names of the buttons to the following:
btnNext btnPrevious
btnLast btnFirst
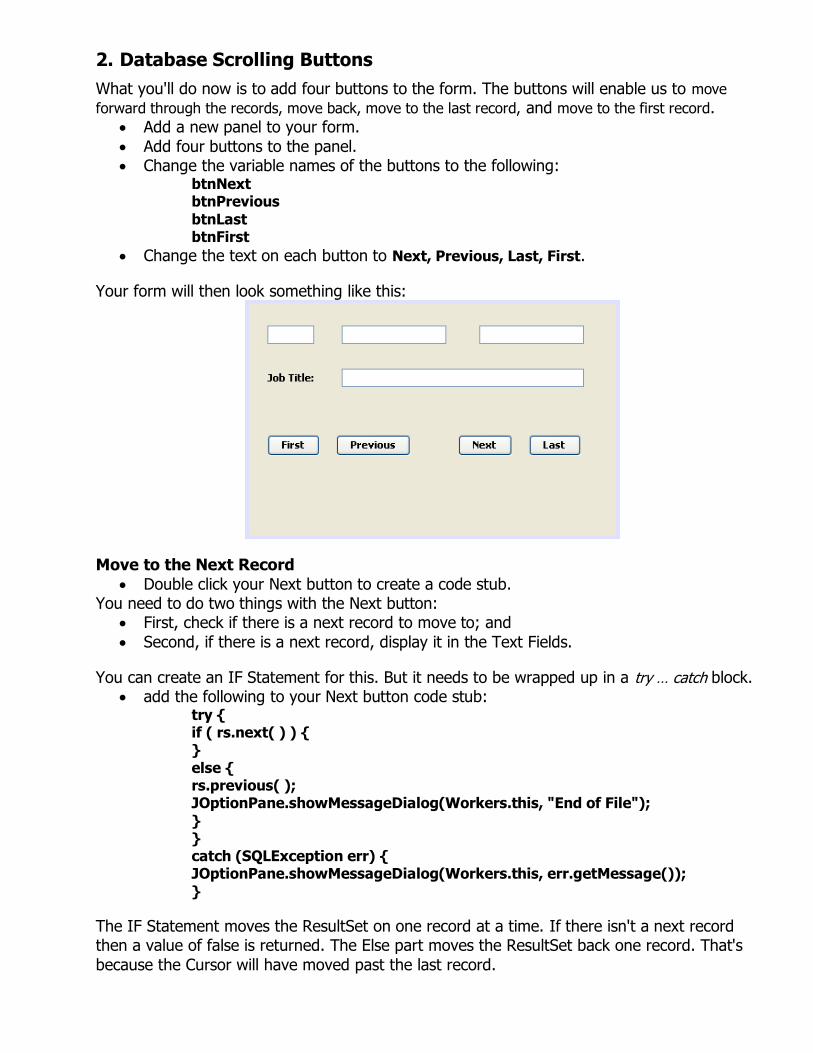
Change the text on each button to Next, Previous, Last, First.
Your form will then look something like this:
Move to the Next Record
Double click your Next button to create a code stub. You need to do two things with the Next button:
First, check if there is a next record to move to; and
Second, if there is a next record, display it in the Text Fields.
You can create an IF Statement for this. But it needs to be wrapped up in a try … catch block. add the following to your Next button code stub:
try { if ( rs.next( ) ) { }
else { rs.previous( ); JOptionPane.showMessageDialog(Workers.this, "End of File");
} } catch (SQLException err) { JOptionPane.showMessageDialog(Workers.this, err.getMessage());
}
The IF Statement moves the ResultSet on one record at a time. If there isn't a next record then a value of false is returned. The Else part moves the ResultSet back one record. That's
because the Cursor will have moved past the last record.
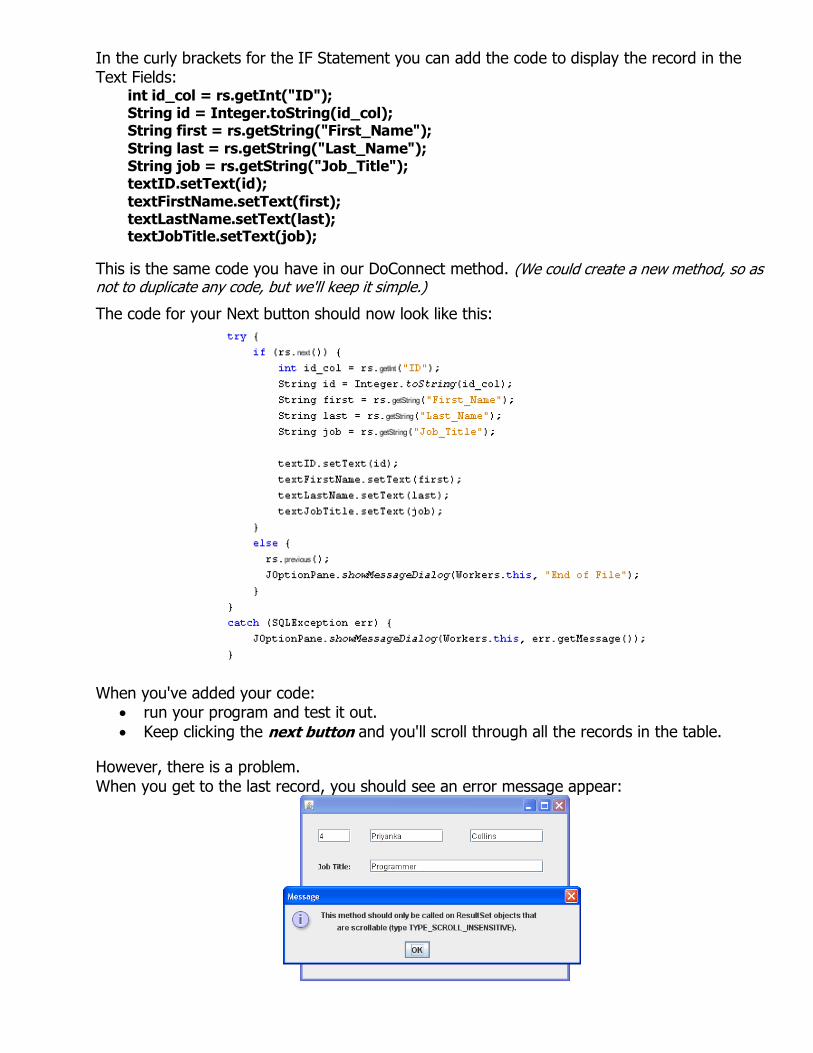
In the curly brackets for the IF Statement you can add the code to display the record in the Text Fields:
int id_col = rs.getInt("ID"); String id = Integer.toString(id_col); String first = rs.getString("First_Name");
String last = rs.getString("Last_Name"); String job = rs.getString("Job_Title"); textID.setText(id);
textFirstName.setText(first); textLastName.setText(last); textJobTitle.setText(job);
This is the same code you have in our DoConnect method. (We could create a new method, so as not to duplicate any code, but we'll keep it simple.)
The code for your Next button should now look like this:
When you've added your code: run your program and test it out.
Keep clicking the next button and you'll scroll through all the records in the table.
However, there is a problem.
When you get to the last record, you should see an error message appear:
The problem is that we've added an rs.previous line. However, we've used the default ResultSet type. As explained in the last section, this gets you a ResultSet that can only move
forward.
You can use the type suggested in the error message. Stop your program and return to your coding window.
In your DoConnect method, locate the following line: stmt = con.createStatement( );
Change it to this: stmt = con.createStatement(ResultSet.TYPE_SCROLL_INSENSITIVE, ResultSet.CONCUR_UPDATABLE );
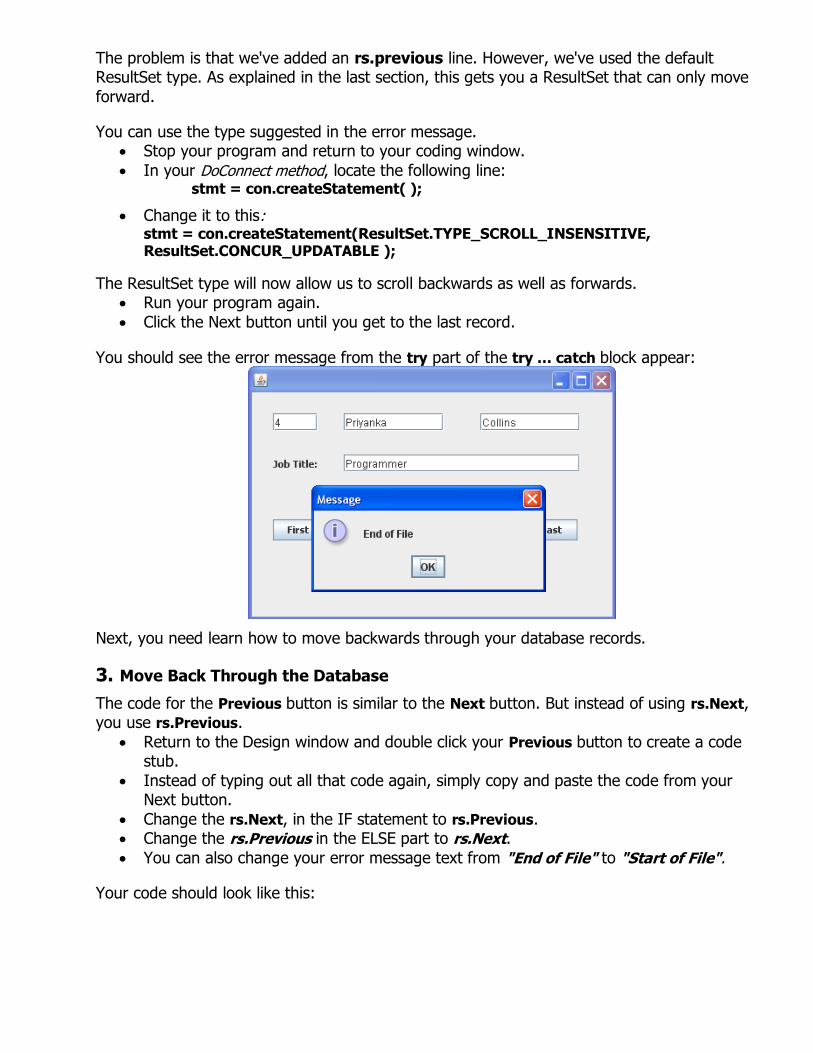
The ResultSet type will now allow us to scroll backwards as well as forwards. Run your program again.
Click the Next button until you get to the last record.
You should see the error message from the try part of the try … catch block appear:
Next, you need learn how to move backwards through your database records.
3. Move Back Through the Database
The code for the Previous button is similar to the Next button. But instead of using rs.Next, you use rs.Previous.
Return to the Design window and double click your Previous button to create a code stub.
Instead of typing out all that code again, simply copy and paste the code from your Next button.
Change the rs.Next, in the IF statement to rs.Previous. Change the rs.Previous in the ELSE part to rs.Next.
You can also change your error message text from "End of File" to "Start of File".
Your code should look like this:
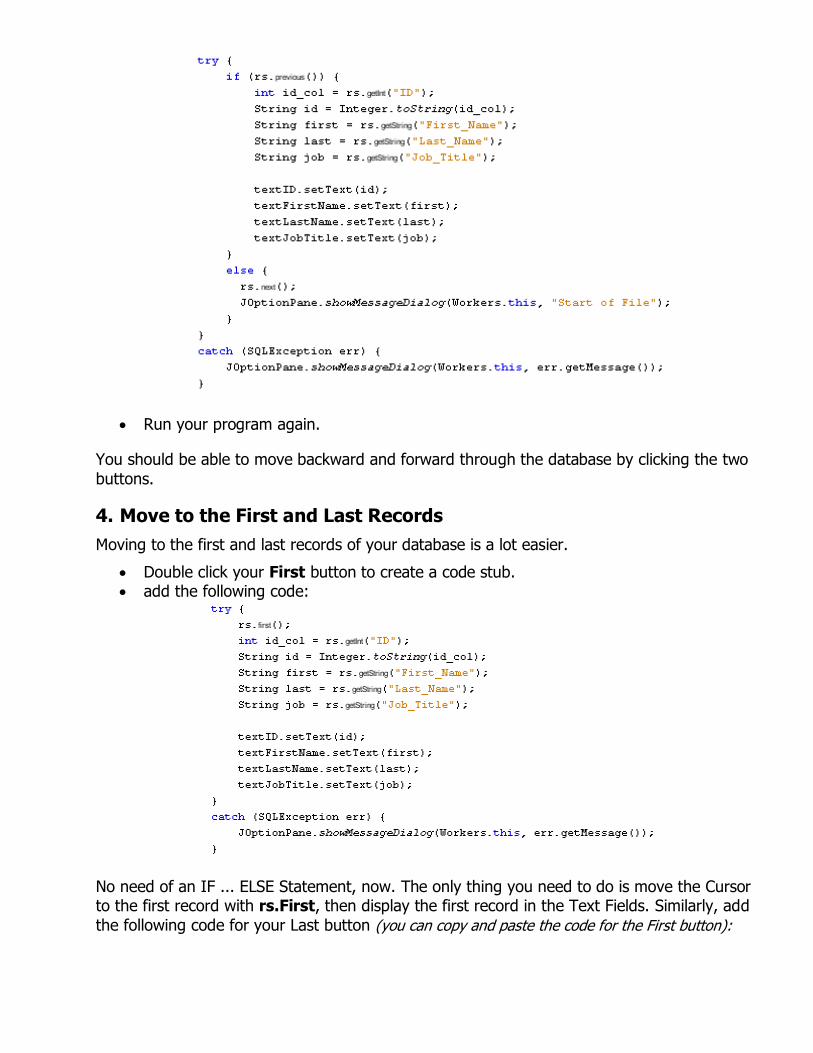
Run your program again.
You should be able to move backward and forward through the database by clicking the two
buttons.
4. Move to the First and Last Records
Moving to the first and last records of your database is a lot easier.
Double click your First button to create a code stub. add the following code:
No need of an IF ... ELSE Statement, now. The only thing you need to do is move the Cursor to the first record with rs.First, then display the first record in the Text Fields. Similarly, add
the following code for your Last button (you can copy and paste the code for the First button):
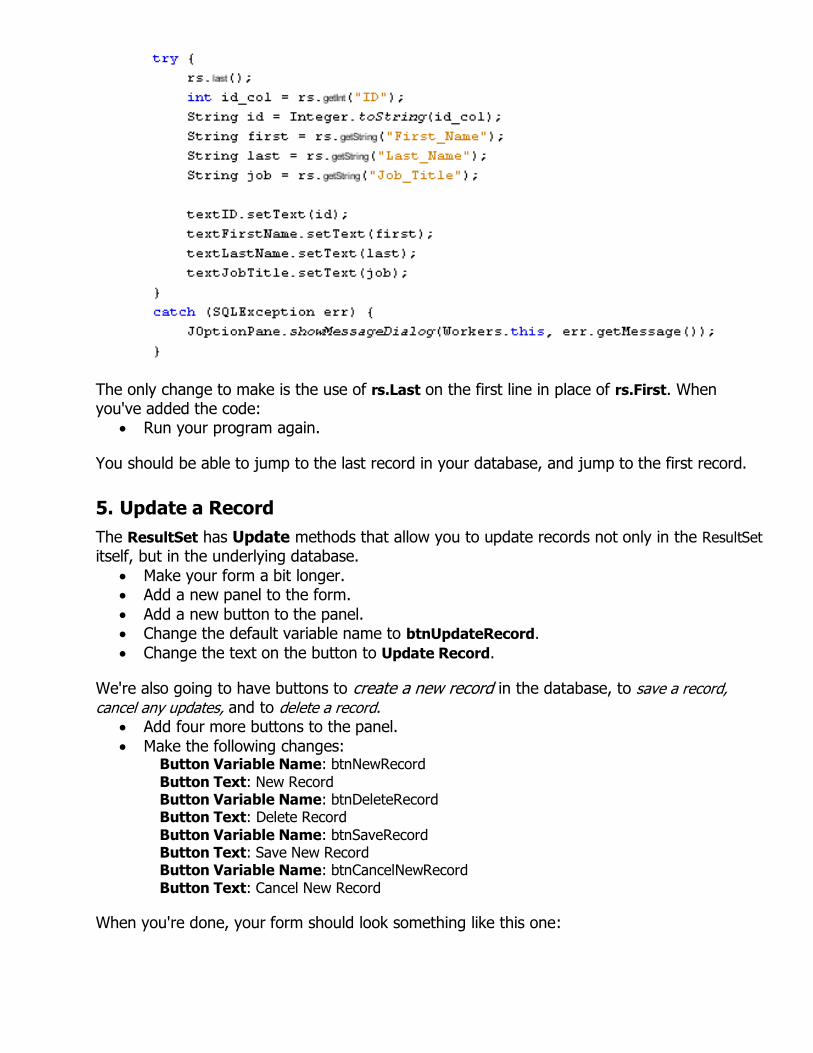
The only change to make is the use of rs.Last on the first line in place of rs.First. When you've added the code:
Run your program again.
You should be able to jump to the last record in your database, and jump to the first record.
5. Update a Record
The ResultSet has Update methods that allow you to update records not only in the ResultSet itself, but in the underlying database.
Make your form a bit longer. Add a new panel to the form.
Add a new button to the panel. Change the default variable name to btnUpdateRecord.
Change the text on the button to Update Record.
We're also going to have buttons to create a new record in the database, to save a record,
cancel any updates, and to delete a record. Add four more buttons to the panel.
Make the following changes: Button Variable Name: btnNewRecord
Button Text: New Record Button Variable Name: btnDeleteRecord Button Text: Delete Record
Button Variable Name: btnSaveRecord Button Text: Save New Record Button Variable Name: btnCancelNewRecord
Button Text: Cancel New Record
When you're done, your form should look something like this one:

Double click your Update button to create a code stub.
The first thing to do is get the text from the Text Fields: String first = textFirstName.getText( ); String last = textLastName.getText( ); String job = textJobTitle.getText( );
String ID = textID.getText( );
If we want to update an ID field, however, we need to convert the String to an Integer: int newID = Integer.parseInt( ID );
The Integer object has a method called parseInt. In between the round brackets of parseInt, you type the string that you're trying to convert.
Now that you have all the data from the Text Fields, we can call the relevant update methods of the ResultSet object:
rs.updateString( "First_Name", first );
There are quite a few different update methods to choose from. The one above uses updateString. But you need the field type from your database table here. We have three strings (First_Name, Last_Name, Job_Title) and one integer value (ID). So we
need three updateString methods and one updateInt. In between the round brackets of the update methods, you need the name of a column from your database (though this can be its Index value instead). After a comma you type the
replacement data. So, in the example above, we want to update the First_Name column and replace it with the value held in the variable called first. The update methods just update the ResultSet, however.
To commit the changes to the database, you issue an updateRow command: rs.updateRow( );
Here are all the lines of code to update the ResultSet and the database table: try { rs.updateInt( "ID", newID ); rs.updateString( "First_Name", first );
rs.updateString( "last_Name", last ); rs.updateString( "Job_Title", job ); rs.updateRow( );
JOptionPane.showMessageDialog(Workers.this, "Updated"); } catch (SQLException err) {
System.out.println(err.getMessage() ); }
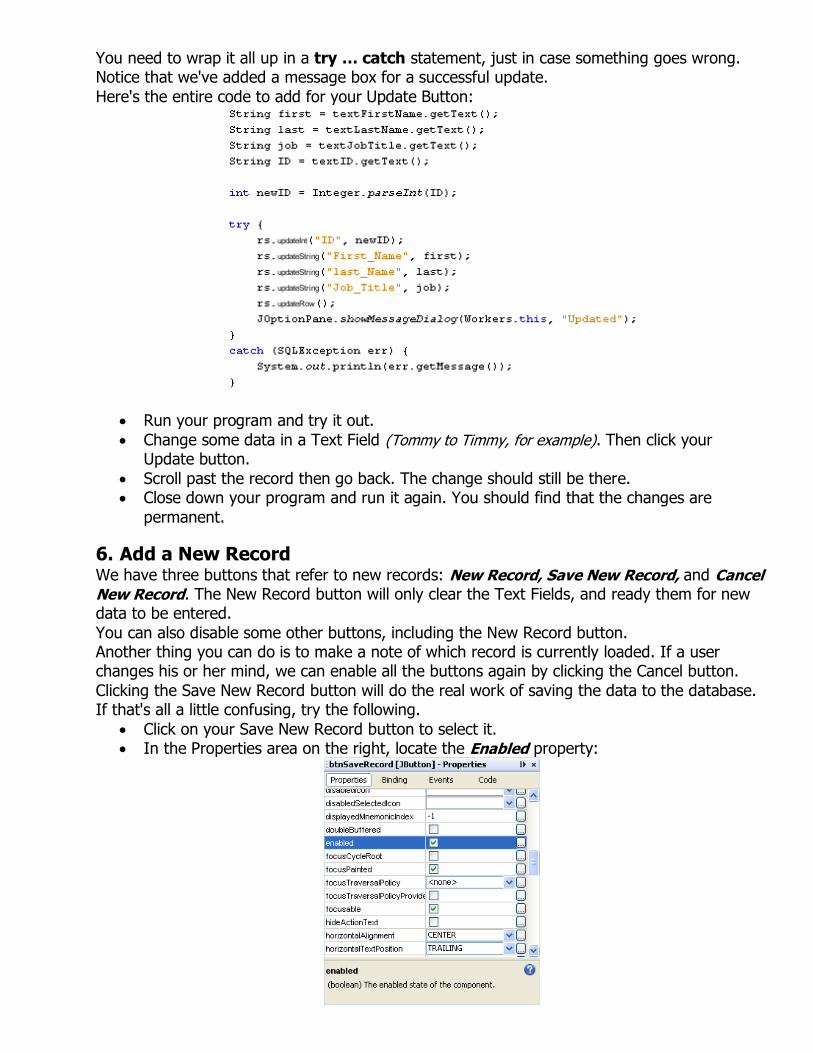
You need to wrap it all up in a try … catch statement, just in case something goes wrong. Notice that we've added a message box for a successful update.
Here's the entire code to add for your Update Button:
Run your program and try it out.
Change some data in a Text Field (Tommy to Timmy, for example). Then click your Update button.
Scroll past the record then go back. The change should still be there. Close down your program and run it again. You should find that the changes are
permanent.
6. Add a New Record
We have three buttons that refer to new records: New Record, Save New Record, and Cancel
New Record. The New Record button will only clear the Text Fields, and ready them for new data to be entered.
You can also disable some other buttons, including the New Record button. Another thing you can do is to make a note of which record is currently loaded. If a user changes his or her mind, we can enable all the buttons again by clicking the Cancel button.
Clicking the Save New Record button will do the real work of saving the data to the database. If that's all a little confusing, try the following.
Click on your Save New Record button to select it. In the Properties area on the right, locate the Enabled property:
Uncheck the box to the right of enabled. The Save New Record will be disabled.
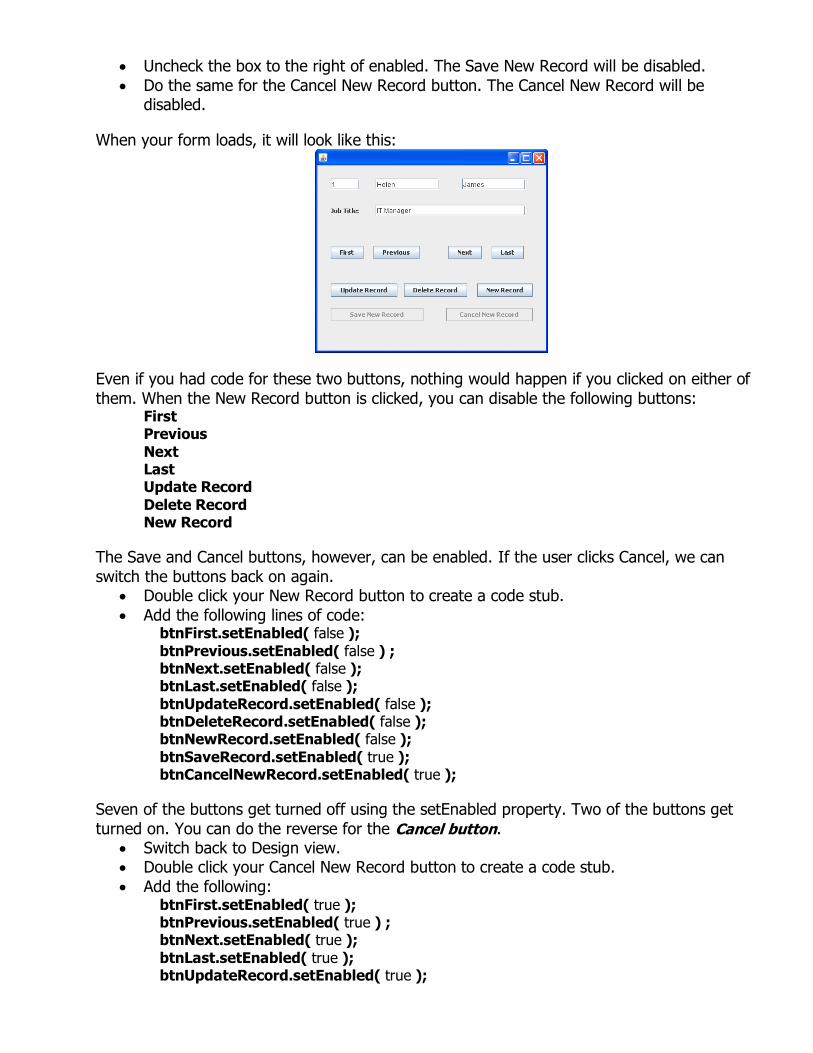
Do the same for the Cancel New Record button. The Cancel New Record will be disabled.
When your form loads, it will look like this:
Even if you had code for these two buttons, nothing would happen if you clicked on either of
them. When the New Record button is clicked, you can disable the following buttons: First Previous
Next Last Update Record
Delete Record New Record
The Save and Cancel buttons, however, can be enabled. If the user clicks Cancel, we can
switch the buttons back on again. Double click your New Record button to create a code stub.
Add the following lines of code: btnFirst.setEnabled( false );
btnPrevious.setEnabled( false ) ; btnNext.setEnabled( false ); btnLast.setEnabled( false );
btnUpdateRecord.setEnabled( false ); btnDeleteRecord.setEnabled( false ); btnNewRecord.setEnabled( false );
btnSaveRecord.setEnabled( true ); btnCancelNewRecord.setEnabled( true );
Seven of the buttons get turned off using the setEnabled property. Two of the buttons get
turned on. You can do the reverse for the Cancel button. Switch back to Design view. Double click your Cancel New Record button to create a code stub.
Add the following: btnFirst.setEnabled( true ); btnPrevious.setEnabled( true ) ; btnNext.setEnabled( true );
btnLast.setEnabled( true ); btnUpdateRecord.setEnabled( true );
btnDeleteRecord.setEnabled( true ); btnNewRecord.setEnabled( true );
btnSaveRecord.setEnabled( false ); btnCancelNewRecord.setEnabled( false );
Run your program and test it out.
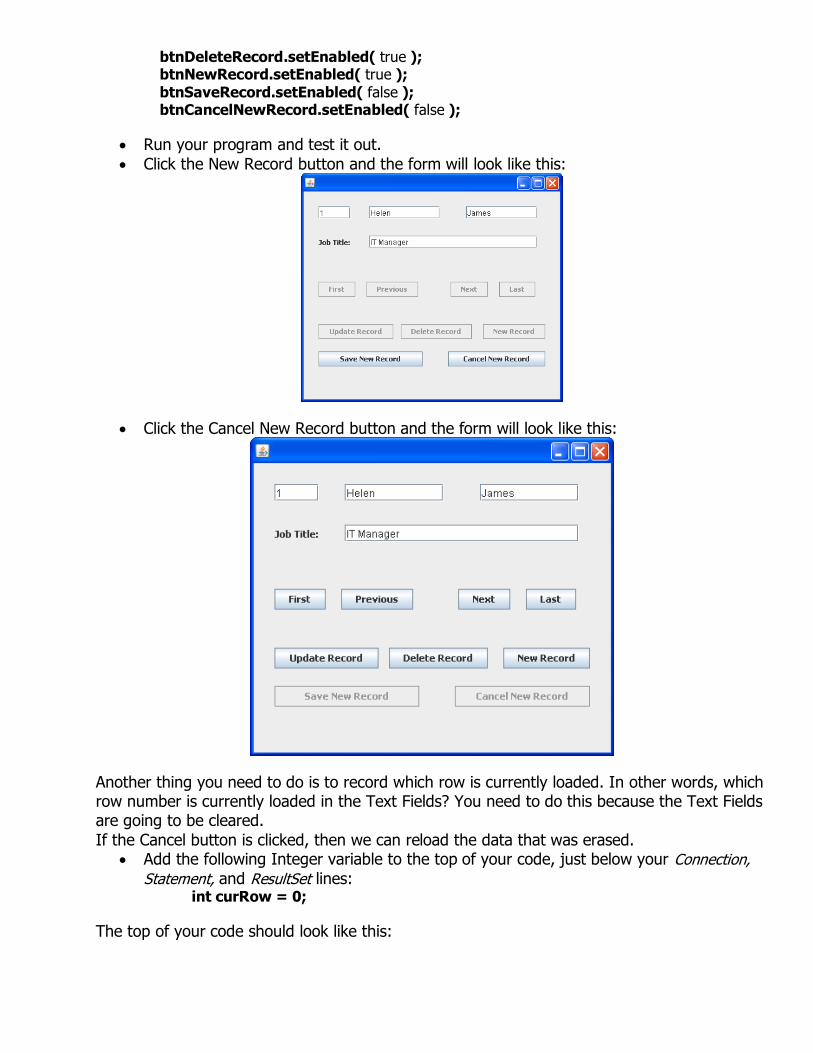
Click the New Record button and the form will look like this:
Click the Cancel New Record button and the form will look like this:
Another thing you need to do is to record which row is currently loaded. In other words, which row number is currently loaded in the Text Fields? You need to do this because the Text Fields are going to be cleared.
If the Cancel button is clicked, then we can reload the data that was erased. Add the following Integer variable to the top of your code, just below your Connection,
Statement, and ResultSet lines: int curRow = 0;
The top of your code should look like this:
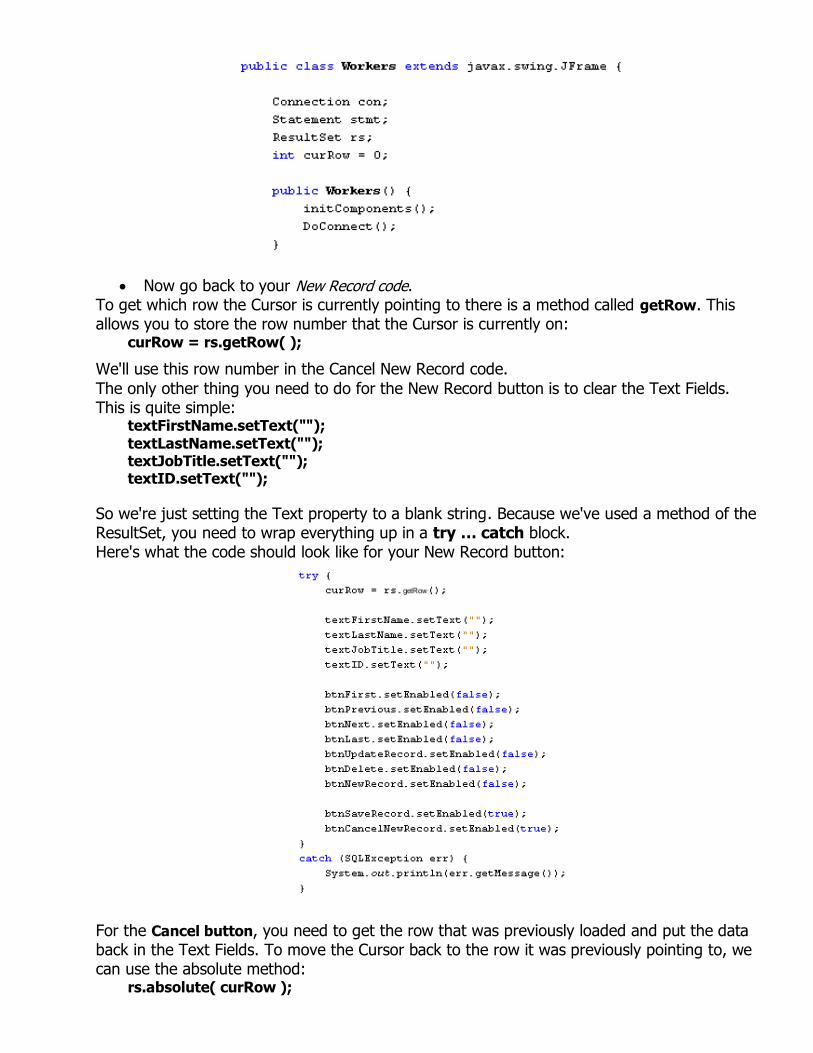
Now go back to your New Record code. To get which row the Cursor is currently pointing to there is a method called getRow. This allows you to store the row number that the Cursor is currently on:
curRow = rs.getRow( );
We'll use this row number in the Cancel New Record code.
The only other thing you need to do for the New Record button is to clear the Text Fields. This is quite simple:
textFirstName.setText("");
textLastName.setText(""); textJobTitle.setText(""); textID.setText("");
So we're just setting the Text property to a blank string. Because we've used a method of the ResultSet, you need to wrap everything up in a try … catch block. Here's what the code should look like for your New Record button:
For the Cancel button, you need to get the row that was previously loaded and put the data back in the Text Fields. To move the Cursor back to the row it was previously pointing to, we can use the absolute method:
rs.absolute( curRow );
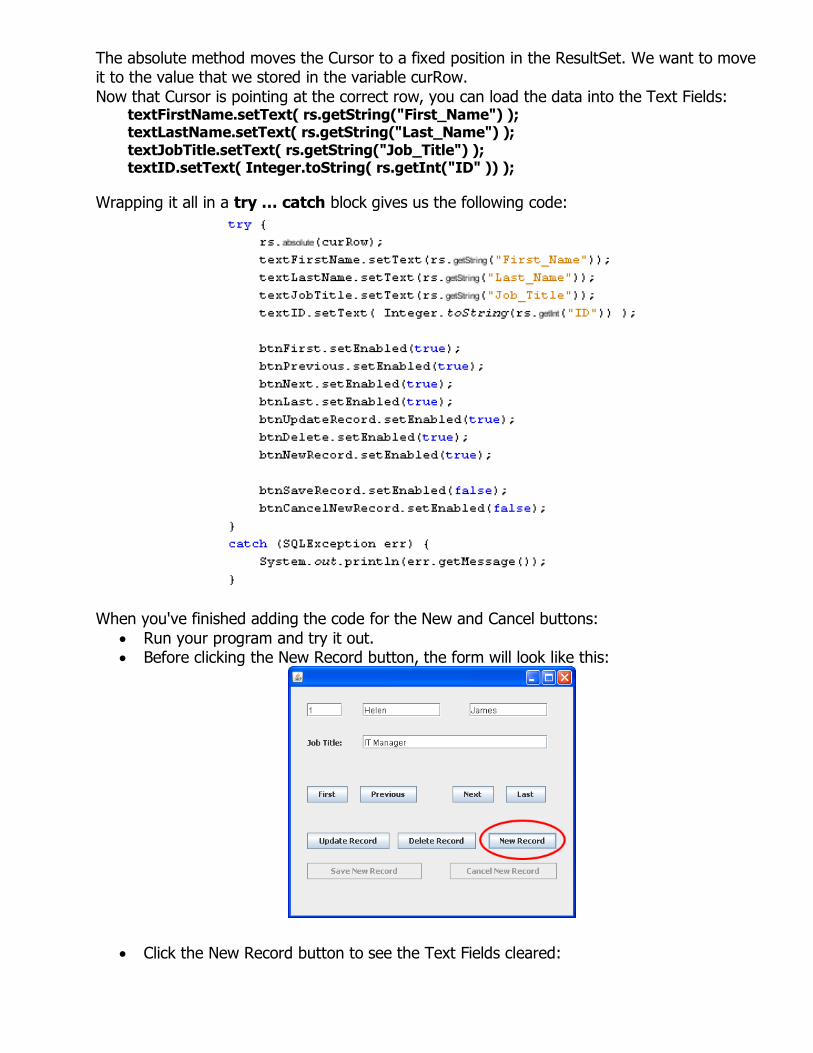
The absolute method moves the Cursor to a fixed position in the ResultSet. We want to move it to the value that we stored in the variable curRow.
Now that Cursor is pointing at the correct row, you can load the data into the Text Fields: textFirstName.setText( rs.getString("First_Name") ); textLastName.setText( rs.getString("Last_Name") );
textJobTitle.setText( rs.getString("Job_Title") ); textID.setText( Integer.toString( rs.getInt("ID" )) );
Wrapping it all in a try … catch block gives us the following code:
When you've finished adding the code for the New and Cancel buttons:
Run your program and try it out. Before clicking the New Record button, the form will look like this:
Click the New Record button to see the Text Fields cleared:
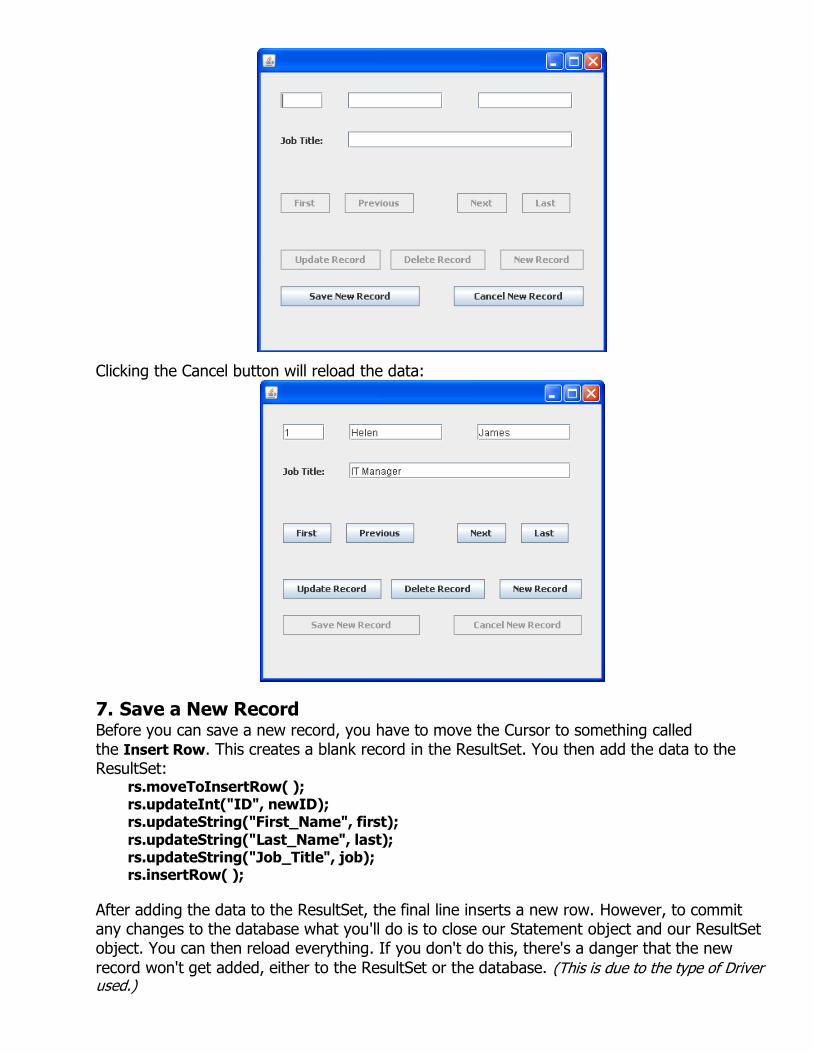
Clicking the Cancel button will reload the data:
7. Save a New Record Before you can save a new record, you have to move the Cursor to something called the Insert Row. This creates a blank record in the ResultSet. You then add the data to the ResultSet:
rs.moveToInsertRow( ); rs.updateInt("ID", newID); rs.updateString("First_Name", first);
rs.updateString("Last_Name", last); rs.updateString("Job_Title", job); rs.insertRow( );
After adding the data to the ResultSet, the final line inserts a new row. However, to commit any changes to the database what you'll do is to close our Statement object and our ResultSet object. You can then reload everything. If you don't do this, there's a danger that the new
record won't get added, either to the ResultSet or the database. (This is due to the type of Driver used.)
To close a Statement or a ResultSet, you just issue the close command: stmt.close( );
rs.close( );
The code to reload everything is the same as the code you wrote when the form first loads: stmt = con.createStatement(ResultSet.TYPE_SCROLL_SENSITIVE,
ResultSet.CONCUR_UPDATABLE); String sql = "SELECT * FROM Workers"; rs = stmt.executeQuery(sql);
rs.next( ); int id_col = rs.getInt("ID"); String id = Integer.toString(id_col);
String first2 = rs.getString("First_Name"); String last2 = rs.getString("Last_Name"); String job2 = rs.getString("Job_Title");
textID.setText(id); textFirstName.setText(first2); textLastName.setText(last2);
textJobTitle.setText(job2);
You're not doing anything different, here: just selecting all the records again and putting the first one in the Text Fields.
Here's all the code that saves a new record to the database (a lot of this code could have went into a method of its own):
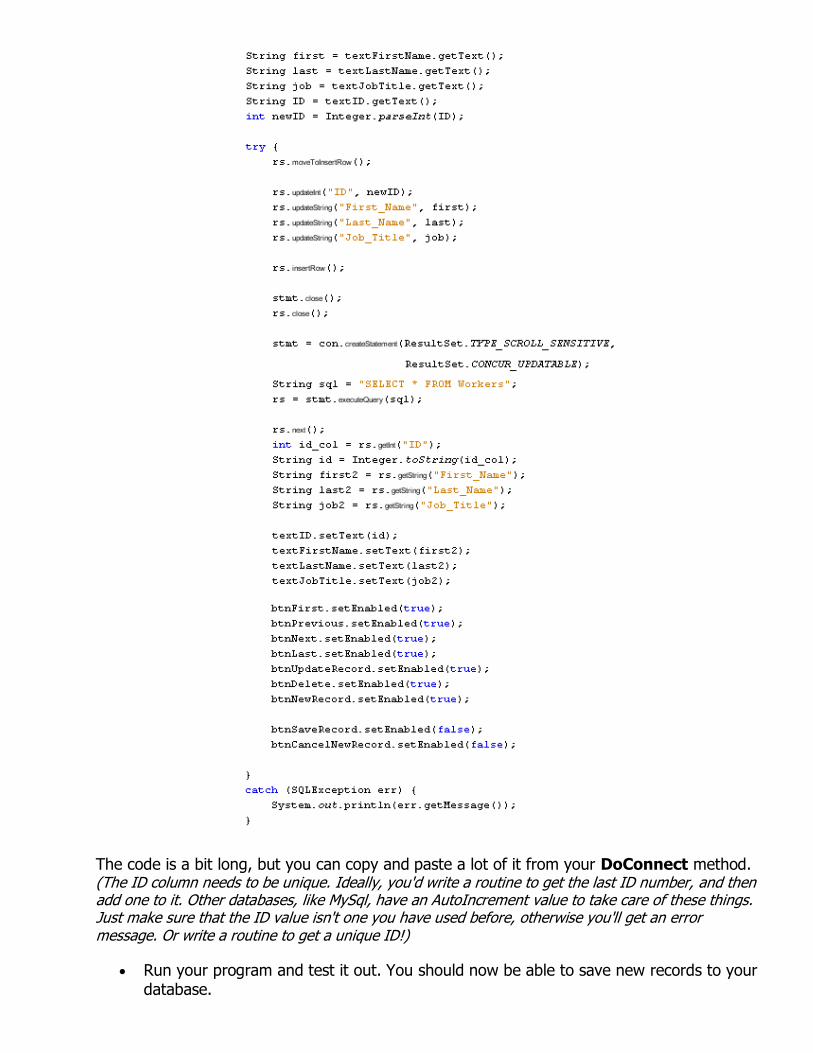
The code is a bit long, but you can copy and paste a lot of it from your DoConnect method. (The ID column needs to be unique. Ideally, you'd write a routine to get the last ID number, and then add one to it. Other databases, like MySql, have an AutoIncrement value to take care of these things. Just make sure that the ID value isn't one you have used before, otherwise you'll get an error message. Or write a routine to get a unique ID!)
Run your program and test it out. You should now be able to save new records to your database.
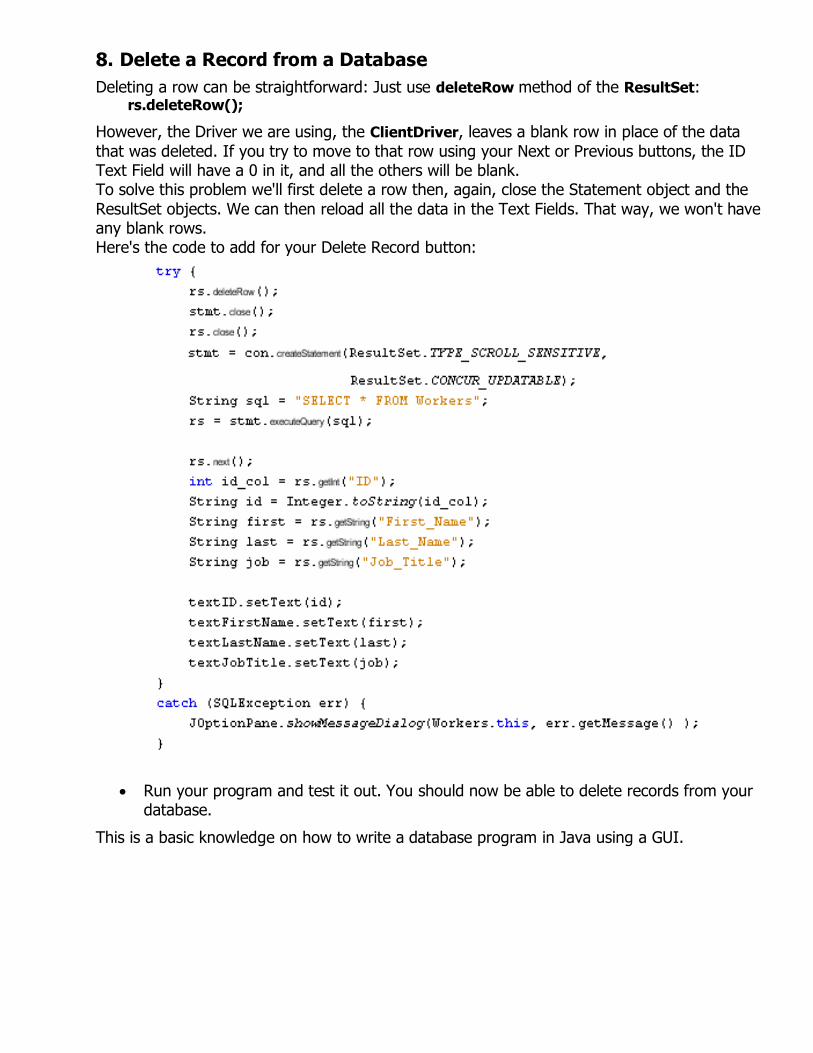
8. Delete a Record from a Database
Deleting a row can be straightforward: Just use deleteRow method of the ResultSet: rs.deleteRow();
However, the Driver we are using, the ClientDriver, leaves a blank row in place of the data
that was deleted. If you try to move to that row using your Next or Previous buttons, the ID Text Field will have a 0 in it, and all the others will be blank. To solve this problem we'll first delete a row then, again, close the Statement object and the
ResultSet objects. We can then reload all the data in the Text Fields. That way, we won't have any blank rows. Here's the code to add for your Delete Record button:
Run your program and test it out. You should now be able to delete records from your database.
This is a basic knowledge on how to write a database program in Java using a GUI.