Creator 6-manual_en - Applied Streetview
117
Creator 6 Creator 6 Pro Manual version 6.0.19 Version: 2021-07-23
-
Upload
khangminh22 -
Category
Documents
-
view
0 -
download
0
Transcript of Creator 6-manual_en - Applied Streetview

Creator 6Creator 6 Pro
Manualversion 6.0.19
Version: 2021-07-23

Index
Creator 6 7Main New Features 7Try Creator 6 for free 9
Creator 6 Pro 11
Recommended Setup 11Increase Performance 12
Projects 13Add project 13Open project 14Edit project 14Delete project 14Backup project 14Export Configuration 15More 15
Backup all 15Import backups 15Add project from configuration 15
Tours 15Show on map 15Change Serial 16Change Folder 16Move 16Copy 16Backup 16Delete 16Restore 17Add 17
Map 18Change map base layer 18
Custom map tiles 18Mapbox 19
Display 19Tours 19
© 2021 Copyright Streetview Technology GmbH Page 2 of 117

Timeline 20Select streetviews 20Deactivate and Activate 21Meta Data 22Road 22POI 23Overlay 24Level 25Keyboard shortcuts 26
Duplicate Remover 27
Imagery 30Watermarks 30Nadir Logo 32
Google Policy 33Logo 33Mask 33Add Logo to Mask 34Set Transparency 35Apply the Mask 36Result 37
Leveling and brightness 38Leveling 38Brightness 39Leveling Status 40Reset tour 40
Timeline 41
New Player 43Preferences 43
General 43Layout 43Logo 44Streetview 44Streetview navigation 45Map 45Mapbox 46
© 2021 Copyright Streetview Technology GmbH Page 3 of 117
Translations 46Preview 48Assets Visualisation 49
Publish 51Cloud 52
Sharing the player 52AWS CloudFront (CDN) 54Embed the Cloud Player into any webpage 56
Instant Player for Windows 56Apache, NGINX, IIS, clouds 57
Embed the player into any webpage 57
Cloud Player Management 58
Legacy Player 59Preferences 59Preview 65Assets Visualisation 66Publish 67
Cloud 69Instant Player 71Android 71
LAMP Player 71Embed the LAMP player into any webpage 73
Cloud Player 73AWS CloudFront (CDN) 75
Create Amazon Web Services (AWS) account 78
Second Screen 80
Tools 81Separation 81Road names from OpenStreetMap 83Direction from position 85Clamp to ground 86Camera mounted backwards 86Export Metadata 87Copy Sources 88
© 2021 Copyright Streetview Technology GmbH Page 4 of 117

Merge Players 89Deactivate missing 90Post Processing 91
Kinematika 92GNSS Post Processing 95Compare 96
AWS account 97
Preferences 98General 98Folders 98Cloud 99
Manuals 99
About 99Creator license 99krpano license 99Version 100Logs 100About this PC 100
Creator 6 PRO - Automation 101Overview 101
How did the User Interface (UI) change? 101What is covered by the automation? 101
Full Automation with the command line 102Licensing 102Mass production 102Typical Example 102
Configuration export and import 104Preferences: Skip streetview-tiles 106
Running Creator 6 (Pro) in a Cloud 107Google Cloud 107
Set Up 107Performance & Cost 109DATA handling 110
Amazon EC2 110
© 2021 Copyright Streetview Technology GmbH Page 5 of 117

Set Up 111Performance & Cost 112DATA handling 112
Microsoft Azure Cloud 114Set Up 114Performance & Cost 115DATA handling 115
Downloads 116
Support 117
© 2021 Copyright Streetview Technology GmbH Page 6 of 117

Creator 6Creator 6 is the Applied Streetview Windows program to process the footage of theApplied Streetview cameras. It is available starting January 2021. It is the successor ofCreator 5.
Creator 6 can be installed on a Windows PC for local processing, or in a cloud.In a cloud it can be accessed by Remote Desktop Connection (RDP).We tested Google Cloud, Amazon Web Services EC2 and Microsoft Azure.
Minimum requirement is a Windows 10 PC with an NVIDIA graphics card with 4GBVRAM and a Compute capability of 5.2.
We recommend the NVIDIA GeForce RTX 2060 Super graphics card with 8 GB VRAM.Or better. It costs about 400 Euro. Relevant for performance is mostly the graphic cards'amount of VRAM. The more VRAM, the better the performance.
Main New Features● New player inspired by Mapillary.com
○ Supports Mapbox.com○ Made for extremely large projects. Like a whole country.○ No database anymore.○ Works with any webserver and cloud.○ Search incl. geolocation.○ Asset visualisation and description by URL.
● Easier to customise.● Easier to integrate into websites and other already existing solutions.● Creator 6 imports projects backed-up by previous Creator 5.● Creator 5 imports project backups from new Creator 6. All Creator 6 features are
ignored.● Alternatively you can still generate the player known from Creator 5.
© 2021 Copyright Streetview Technology GmbH Page 7 of 117

Cloud PublishingCreator 6 runs on a local Windows 10 PC or in a cloud. It generates the New CloudPlayer and publishes it to the cloud with a single mouse click. The New Cloud Playerhas been designed from scratch for very large projects with millions of streetviews. Ithas never been easier to prepare for your 15 minutes of internet fame. On top of this thecost is up to 80% lower than a player hosted in a datacenter. Also there is nomaintenance for the Cloud Player.
Working with Creator 6 is really easy. As part of our Software Suite it has the samelayout as Creastor 5 and all our other programs. Everything works the same way.Everything is to be found at the same place in all our programs and even the OnlineRecording Management service.
Alternatively you can continue using Creator 5 as-is.However with the release of Creator 6 in January 2021 there will only be security fixesfor Creator 5.All new features and improvements will be added to Creator 6.In January 2022 we will stop supporting Creator 5.
Support for Creator 3 ended in January 2021.
© 2021 Copyright Streetview Technology GmbH Page 8 of 117

Try Creator 6 for freeCreator 6 will work for two weeks for free with a Demo watermark.You can install it in parallel to Creator 5. Just do not run them at the same time.
Copying projects from Creator 3 or Creator 5 to Creator 6 is really easy:
Creator 3- Backup all your projects
Project Management -> Backup all projectsorCreator 5
- Backup all your projectsProjects -> Backup all projects
Creator 6- Import the backup files
Projects -> Restore Projects
Creator 6 project backups can be re-imported into Creator 5.Changes made to projects in Creator 6 can be transferred back to Creator 5.New features added to Creator 6 will be ignored by Creator 5.
Creator 6 project backups can not be re-imported into Creator 3.
DownloadsCreator 6 manualCreator 6 program
© 2021 Copyright Streetview Technology GmbH Page 9 of 117

Cloud Player EvaluationFor evaluation the new Cloud Player works out-of-the-box.No cloud setup is needed.
Just pick a project and publish your first Cloud Player right away.For evaluation the publishing Regions are limited to EU-Frankfurt.After purchasing and switching to your own Amazon AWS account all other AWSRegions will be available to you.
Please notice Cloud Players created during evaluation can not be converted into yourown Cloud Player. You have to upload all the data again.For this please keep it small.We will delete all evaluation cloud players after 4 weeks.
© 2021 Copyright Streetview Technology GmbH Page 10 of 117

Creator 6 ProCreator 6 Pro is Creator 6 with additional features.Enabled by the Creator 6 Pro licence key.There is no need to download Creator 6 again.
Main Features- Run Creator 6 Pro by command-line for fully automated mass-production.- Export and Import of project configuration for mass-production.- Skip generation of streetview-tiles.
DownloadsThe download is the same as for Creator 6.Pro features are enabled by the Creator 6 Pro licence key.
Automation is a feature of Creator 6 Pro. It is not available in Creator 6.Automation is not available with the 2-week trial licence you get by registering for thefree trial of Creator 6.Please contact sales for a quote and a temporary licence key to test Creator 6 Pro.For the Pro features see the Automation chapter.
Recommended SetupIt is strongly recommended to create the following folders to organise your data.Mandatory foldersIn, Out, Creator 6 backups, Camera calibration files.Set these folders up in Preferences -> Folders.Camera calibration files have the .pto and .xml file extension.
Recommended foldersMasks, Logos, Export, Project configuration.Create the folders manually to keep your data organised.
© 2021 Copyright Streetview Technology GmbH Page 11 of 117

Increase PerformanceWith a NVIDIA graphics card with 8 GB VRAM you should get a performance of about240.000 streetviews and streetview-tiles in 24h.
For best performance we recommend a SSD for your data.Both local HDDs and even NAS will work fine, just not as fast.If you use HDDs, try to process from one HDD to another HDD to speed things up a bit.
We strongly recommend adding the following exclusions to Microsoft Windows Virusand thread protection.It can make Creator 6 up to three times faster.
Please deactivate any third-party virus scanners.Or apply the above settings correspondingly.
© 2021 Copyright Streetview Technology GmbH Page 12 of 117

ProjectsA list of all your Projects.
Add projectClick the ADD button in the top right corner.
Project folderSpecify the path to the project folder.
Project nameBy default the project name will be taken from the projects folder name. This can bechanged.
© 2021 Copyright Streetview Technology GmbH Page 13 of 117

Click the SAVE button in the top right corner to add the project.
Open projectClick the project name to start working on the project. By default this will open the Tourspage.
Edit project
Click the button next to the project name and then on Edit.
Project nameAdjust the project name.
Click the SAVE button in the top right corner to edit the project.
Delete project
Click the button next to the project name and then click Delete.Confirm the action.
Backup project
Click the button next to the project name and then click Backup project.to create a backup file of the selected project. Backup files are for safekeeping aproject.
© 2021 Copyright Streetview Technology GmbH Page 14 of 117

Export Configuration
Click the button next to the project name and then click Export Configuration.to create and export a configuration file of the selected project. Configuration files arefor the Creator 6 Pro Automation feature.
More
Backup allClick the Backup all menu item to create a backup of all the projects and save them tothe Creator 6 Backups folder. This should be done weekly.
Import backupsClick the Import backups menu item to import a project from a backup file. One ormany backups can be imported at a time.
Add project from configurationClick the Add project from configuration menu item to add a project from aconfiguration file. This is for the Creator 6 Pro Automation feature.
ToursA list of all the tours of a Project.
Show on mapClick the tour name to show in the Map page.© 2021 Copyright Streetview Technology GmbH Page 15 of 117

Change SerialSelect one or multiple tours.
Provide a new serial number and click the OK button.
Change FolderWhen migrating backups from one PC to another or when the project's folder is moved -select all the tours and Click CHANGE FOLDER button. Then select the new Projectfolder.If the project has tours that have been moved or copied from a different project, selecteach tour group individually and Click CHANGE FOLDER button and select the newProject folder.
MoveMoves selected tours to a different project.
CopyCopies selected tours to a different project.
BackupBackup selected tours.Source photos will not be backed up.
DeleteDeletes the selected tours from the project.Source photos are not deleted.
© 2021 Copyright Streetview Technology GmbH Page 16 of 117

RestoreClick the RESTORE button in the top right corner to import a tour backup. One or manytour backups can be imported at the same time.
AddClick the ADD button in the top right corner to add one or multiple tour folders to thisproject.E.g. when additional footage has been recorded months later.
© 2021 Copyright Streetview Technology GmbH Page 17 of 117

Map
In order to display a large amount of streetviews on the map, Creator 6 clusters nearbystreetviews together, depending on the current map zoom level.A cluster is basically a collection of streetviews.Clusters are displayed for zoom levels 0 to 19 only. Not for zoom levels 20 , 21 etc.
Change map base layer
Click the button in the top left corner to change the map base layer.Esri.WorldImagery is the default. Select a different provider from the list. Or provide your
own custom map tiles by clicking the button.
Custom map tilesThe slippy map tiles format is supported with both Google/Bing/OSM tile coordinatesand TMS.
LabelYour custom tile provider name
URLThe URL can point to either an online resource like:http://www.your-company.com/map-tiles/{z}/{x}/{y}.png
LocalA local folder or NAS drive:file://D:\folder\{z}\{x}\{y}.png
Change the bold parts of the address.
{z} is the zoom level, and {x} and {y} are the coordinates of the top left corner of the tilein web mercator projection. For the TMS format use the {-y} placeholder.
© 2021 Copyright Streetview Technology GmbH Page 18 of 117

AttributionCopyright information displayed at the bottom of the map.
MapboxMapbox is available for both the New Player and the Legacy Player.Check Mapbox section for instructions on how to add your own style.
DisplayShow or hide active and deactivated streetview icons.
Usually more footage than needed is recorded.The Duplicate Remover and the Separation tool as well as manual deactivation on themap page can be applied to reduce the number of streetviews to be published.
Activated streetviews have a white outline.Deactivated streetviews have a grey outline.
ToursShow the selected tours on the map.
© 2021 Copyright Streetview Technology GmbH Page 19 of 117

Click ALL to center the map on all the tours.Untick to hide all tours. Then tick selected tours to show only them.
TimelineOnly available when there are timelines.Show the selected timelines on the map.Click ALL to center on all the timelines.Untick to hide all timelines. Then tick selected timelines to show only them.
Select streetviewsMost of the actions like activate/deactivate, move, rotate, assign a road name or POIare performed on one or many selected streetviews.
Click a streetview to select it. A selected streetview will change its color to orange.
It's possible to select multiple streetviews by holding down the CTRL key when clickingon the streetviews.
Holding down the SHIFT key and then drag the mouse to select all the streetviews in arectangle.
© 2021 Copyright Streetview Technology GmbH Page 20 of 117

To select all the streetviews from first to last and everything in between, select the firststreetview, then while holding down the ALT key, select the last one streetview.
To deselect click anywhere on the map or press the ESC key.
Deactivate and Activate
Select the streetviews.To deactivate selected streetviews click the DEACTIVATE STREETVIEWS button.To activate selected streetviews click the ACTIVATE STREETVIEWS button.
© 2021 Copyright Streetview Technology GmbH Page 21 of 117

Meta DataCheck the metadata for a selected streetview.
This panel will only be shown if a single streetview is selected.
It is not available for clusters.
RoadEnable Show Road on Map to display the road name as a label for each streetview.
Select all streetviews with the same road nameSelect and zoom to a specific road by selecting it from the list in the panel.
© 2021 Copyright Streetview Technology GmbH Page 22 of 117

Assign a road name to a streetview(s)Select streetviews on the map to assign a road name to them.
Type the name of the road in the text box and click the UPDATE STREETVIEWSbutton.
POIEnable Show POI on Map to display the POI name as a label for each streetview.
Select all streetviews with the same POI nameSelect and zoom to a specific POI by selecting it from the list.
© 2021 Copyright Streetview Technology GmbH Page 23 of 117

Assign a POI name to streetview(s)Select streetviews to assign a POI to.
Type the name of the POI in the text box and click the UPDATE STREETVIEWS button.
If a single streetview is selected, a POI of type point will be assigned the new name.If multiple streetviews are selected, a POI of type line will be assigned the new name.
OverlayAdd a vector overlay to the map.Supported formats: KML.
Click on the clear button next to the overlay name to remove it from the map.
© 2021 Copyright Streetview Technology GmbH Page 24 of 117

LevelSelect a single streetview to open it in the Imagery pages Leveling and brightnesstab.
© 2021 Copyright Streetview Technology GmbH Page 25 of 117

Keyboard shortcuts
Mouse Move all selected streetviews
ESC Unselect all selections
CTRL + A Select all streetviews visible on the map
Click an arrow Select a streetview
Hold CTRL + click a Streetview Add a streetview to the current selection
Shift + draw rectangle Select all the streetviews in the rectangle
Hold CTRL + SHIFT + drawrectangle
Add all the streetviews in the rectangle to thecurrent selection
Hold ALT + click a Streetview Line selection. Having a streetview selected holdALT then Click a second streetview to select it andall the streetviews in between.
CTRL + L Align all selected streetviews in a straight line.
DELETE Deactivate all selected streetviews
INSERT Activate all selected streetviews
HOME Rotate all selected streetviews counterclockwise
END Rotate all selected streetviews clockwise
PG UP Go to the next streetview
PG DOWN Go to the previous streetview
Arrow keys:Up, Down, Left, Right
Scroll the map.
© 2021 Copyright Streetview Technology GmbH Page 26 of 117

Duplicate RemoverRemoves duplicate recordings from roads recorded more than once.
We recommend recording with the Distance Mode set to 5m or less. E.g. 1m.You can always deactivate excessive footage with the Separation tool after applying theDuplicate Remover. Make sure to run the Separation tool after Duplicate Remover forbest results.
Process target(Visible only when there are timelines)Process either the selected tours or process the selected timelines.
© 2021 Copyright Streetview Technology GmbH Page 27 of 117

Keep footageOlder - Provides best results for most situations.Keeps the existing, older, streetviews (blue), adds new (red) streetviews for newlyrecorded roads.
Newer - Replaces existing streetviews (blue) with newer footage (red).The overall data will be more up-to-date.Disadvantage: When driving into a dead-end road, you get the bad footage fromreversing out of it.
© 2021 Copyright Streetview Technology GmbH Page 28 of 117

Road width (m)Base setting.
Consider Altitude (m)By default the altitude is ignored when detecting duplicates.Try it when there are many bridges and tunnels.
Deactivate manually activated streetviewsBy default manually activated streetviews are not deactivated by the DuplicateRemover. Enable this option to force them to be deactivated.
StartStart removing duplicates in streetviews.Try a few times to find the optimum settings for your footage.
ResetReset all streetviews deactivated by Duplicate Remover and Separation tool.
© 2021 Copyright Streetview Technology GmbH Page 29 of 117

Imagery
WatermarksAdd watermarks to the streetview. Changes can be previewed in the Leveling andbrightness tab. During the free trial period the watermark is fixed to DEMO. It can not bechanged or removed.
Add watermarkEnable watermarks.
TextWatermark text.
FontPick a font for the watermark. The list of fonts is taken from C:\Windows\Fonts.
© 2021 Copyright Streetview Technology GmbH Page 30 of 117

SizeWatermark text size.
OpacityWatermark text opacity.
Number of watermark columnsHow many watermark columns to show. (left-right).
Number of watermark rowsHow many watermark rows to show. (up-down).
Add maskEnable to add a mask to hide the car’s rooftop.Technically it is a transparent PNG image merged to the streetview.
Mask pathPath to the mask PNG image. Create your own mask file.A Nadir logo can be added as a mask. Click Nadir logo and follow the instructions.
A sample mask can be found inC:\Program Files (x86)\Creator\masks\example-car-roof-mask.png
© 2021 Copyright Streetview Technology GmbH Page 31 of 117

Nadir LogoA Nadir Logo is the only annotation Google allows when uploading streetviews asPhotospheres to Google maps/streetview.
Add your company's logo to the Nadir (bottom) of your streetviews.In Creator 6 Player Preview it looks like this:
You have to change the value of Player - Preferences - Look down limit (degrees)from the default -50 to -90 to actually see the Nadir logo.
For your convenience change Maximum Zoom Level from default 120 to 150. This wayyou can see the result better.Change it back both when done reviewing.
© 2021 Copyright Streetview Technology GmbH Page 32 of 117

Google PolicyWhen publishing to Google Streetview with our G-Publisher program it often is desirableto add your company's logo to the Nadir (bottom) of your Streetviews.
You can not have your company’s logo displayed in the top right-hand corner of thescreen like with all the Applied Streetview players.
This is the only annotation Google allows for in its Contribution Policy:
Maps User Contributed Content Policy HelpFor 360 photos, superimposed content must be limited to either the zenith or nadir(top or bottom 25% of the equirectangular image), but cannot be present in both.
LogoHave your logo at hand.Recommended minimum size is 300 px x 300 px.Supported formats: png, jpeg, tif
Hint:Color logos will be automatically made into grayscale logos during processing. This cannot be changed.
MaskDownload and save the provided mask template to your PC.https://aplsv-new.s3.amazonaws.com/green-screen-template.jpg
© 2021 Copyright Streetview Technology GmbH Page 33 of 117

Add Logo to MaskGo to https://nadirpatch.com/logo2sphere/
1) Drop your logo image onto Logo or select it to upload.2) Drop the downloaded the green-screen-template.jpg file onto Equirectangular
projection or select it to upload.3) After upload is complete click the Create button in the top right corner.4) After the image is created click the Download button in the bottom right corner.
Download and save the pano.tif image.
© 2021 Copyright Streetview Technology GmbH Page 34 of 117

Set TransparencyOn your PC right click the pano.tif image then select Edit with Paint 3D.
In the top navigation bar Click Canvas and then enable Transparent canvas.
To save press CTRL + S then Click Image.Change Save as type to 2D PNG then click Save.
pano.png is now ready to be used as a Mask in Creator.
© 2021 Copyright Streetview Technology GmbH Page 35 of 117

Apply the MaskIn your project go to Imagery - Watermarks and activate the mask and set it to the newpano.png file.
© 2021 Copyright Streetview Technology GmbH Page 36 of 117

ResultBy default all our players are configured to not allow you to look down to see the logoyou just added.To change this, go to Player - Preferences - StreetviewChange Look Down Limit from default -50 to -90.For your convenience change Maximum Zoom Level from default 120 to 150. This wayyou can see the result better. Change back both when done reviewing.
Check what it looks like in Player - Preview:
You now can process to create the 8192 x 4096 pixel streetviews needed to upload toGoogle streetview later with our G-Publisher program.
© 2021 Copyright Streetview Technology GmbH Page 37 of 117

Leveling and brightnessAdjust for the angle between the camera on the car's rooftop and the leveling sensorinside the car.
LevelingIn a perfect world
● the camera would be mounted 100% vertical.● the leveling sensor would be mounted 100% horizontal.● both would look forward, into the exact same direction.
In the real world this does not happen.
Because of this you need to adjust for the three angles between the camera and thesensor. Use the Pitch+, Pitch- and Roll+, Roll- buttons to adjust until the streetviewlooks leveled.
© 2021 Copyright Streetview Technology GmbH Page 38 of 117

Alternatively you can directly enter numerical values into the fields on the right.
Check your findings with a few other streetviews of the same tour by entering a differentnumber into the Streetview field.
In the top right corner click the Save… button and then:
Click the Save to all tours button to save the values to all the recorded tours.
Click the Save to all tours of the same day button to save the values to all toursrecorded the same day as the current tour.
Click the Save to all tours of the same timeline button to save the values to all thetours that have the same timeline as the current tour.
If both the camera mount and the snap-in holder for the leveling sensor are keptmounted to the car all the time, you can use the same settings for all tours from manydifferent recording days.Click the Save to all tours of this project button to save the values to all tours of theproject.
LevelingIf enabled log data from the recording are applied.
Yaw, Pitch, Roll.Angles between the camera and the leveling sensor.
BrightnessBrighten shadowsEnabled automatic brightness adjustment for shadows.
Brighten shadows - StrengthAmplifies dark pixels to the threshold level. Value between 0.1 and 1. Default is 0.6.
Brighten Shadows - ThresholdThe automatic brightness adjustment will be applied to areas where average brightnessis less than the threshold. Value between 0.1 and 1. Default is 0.4.
© 2021 Copyright Streetview Technology GmbH Page 39 of 117

ExposureAdjust image exposure.0 No change5 Maximum exposure.
Default is 0.
Leveling StatusClick the Leveling Status button in the top right corner.You can see the Yaw, Pitch and Roll values of all tours at once as well as how manytours are leveled.
Reset tourClick the Reset tour button in the top right corner.Resets the values of the current tour to its defaults.
© 2021 Copyright Streetview Technology GmbH Page 40 of 117

Timeline
Record the same road or area multiple times to document change.
Create a few timeline labels, such as Older and Newer or dates like 2018 or 2019.Assign one or many tours to each timeline label.
The user will then be able to pick the labels in the player.
It looks like this:http://players.applied-streetview.com/Timeline/
After assigning all tours to timeline labels you can use the Duplicate Remover to sort outduplicates in each timeline.
Enable timelineEnable the timeline featureAddClick the Add button in the top right corner.Set a Label for the timeline and which Tours belong to this timeline then click the Savebutton in the top right corner.EditClick the button next to the timeline.Modify the Label of the timeline and which Tours belong to this timeline. Then click theSave button in the top right corner.
© 2021 Copyright Streetview Technology GmbH Page 41 of 117

DeleteClick the button next to the timeline then confirm the delete operation.
© 2021 Copyright Streetview Technology GmbH Page 42 of 117

New PlayerCreator 6 comes with new Player 2 enabled by default. Click on the Preview tab tocheck how your existing project looks with Player 2.
To use the Legacy Player, switch to it in the top right corner of the Player section.
Preferences
General
Layout
© 2021 Copyright Streetview Technology GmbH Page 43 of 117

Logo
Streetview
© 2021 Copyright Streetview Technology GmbH Page 44 of 117

Streetview navigation
Map
© 2021 Copyright Streetview Technology GmbH Page 45 of 117

MapboxIf you have your own custom data and would like to add it to the Player, Mapboxprovides an easy way to do it.
Map provider labelText for the map provider in the Player - base layer selection panel.
Style URLTo get the URL of your style, in Mapbox studio click on the Share button in the topright corner and then copy the value of Style URL field.
Access tokenTo get the URL of your style, in Mapbox studio click on the Share button in the topright corner and then copy the value of Access token field.
Map data legal noticesCustom map data legal notices
TranslationsThe defaults shown below will be used except you enter something else.
© 2021 Copyright Streetview Technology GmbH Page 46 of 117

© 2021 Copyright Streetview Technology GmbH Page 47 of 117

Preview
Press CTRL + SHIFT + H to toggle hotspot visibility.
© 2021 Copyright Streetview Technology GmbH Page 48 of 117

Assets VisualisationHave the player show your geo-referenced assets by a URL. No database is needed.
Let’s assume your company already has a list of 100.000 geo-referenced assets in adatabase.How can you link them to the 5.000 kilometers worth of streetviews you have justrecorded?Simply have your existing system generate a URL for each of your assets.
The player then will automatically open the streetview closest to the asset and look at it.https://demo3-42be868b-8dd0-4272-ab75-bbcb72cf939d.s3.eu-central-1.amazonaws.com/index.html?v_lat=50.001217&v_lng=8.651100&v_alt=128&v_label=Applied%20Streetview%3Cbr%3E%0APittlerstra%C3%9Fe%2053%3Cbr%3E%0A63225%20Langen%20%28Hessen%29%3Cbr%3E%0AGermany
© 2021 Copyright Streetview Technology GmbH Page 49 of 117

Minimum requirement is the latitude and longitude values for your asset specified byv_lat and v_lng URL query parameters.Optional parameters are v_alt - altitude and v_label - asset description. The v_labeltext must be url encoded. E.g. by https://www.urlencoder.org/ or similar websites.
For new lines use <br>. Have it URL encoded to:
© 2021 Copyright Streetview Technology GmbH Page 50 of 117

PublishBy default Creator generates all players and all data formats at once:
- Data for the Cloud Player, Instant Player and for any web-server.- All the Legacy Players (Cloud, LAMP, for Instant Player) know from Creator 5.- For G-Publisher, Photogram and Facades programs.- 8192 x 4096 pixel equirectangular streetviews for 3rd-party workflows.
Click the Start button in the top right corner to start publishing.Click the Stop button in the top right corner to stop the publishing at any time.
Create playerCreates the new player in /Output folder/player2 folder.Also creates the Legacy Player in /Output folder/player folder.
Create streetview-tilesCreate streetview-tiles from source images.This is optional for Instant Player and Photogram since they support on-demandcreation of streetview-tiles.
Create streetviewsFor G-Publisher, review and a 3rd-party workflow.
Create project backupCreate a new project backup each time publishing is started. The backup file is to befound in the /Output folder/backups folder. It does not include source images orstreetviews or streetview-tiles. Highly recommended to preserve a project's state.
Skip existing streetviewsIn case you are updating a project and reprocessing: If the streetview-tiles for a specificstreetview already exist, do not process again. Can save a lot of time.
© 2021 Copyright Streetview Technology GmbH Page 51 of 117
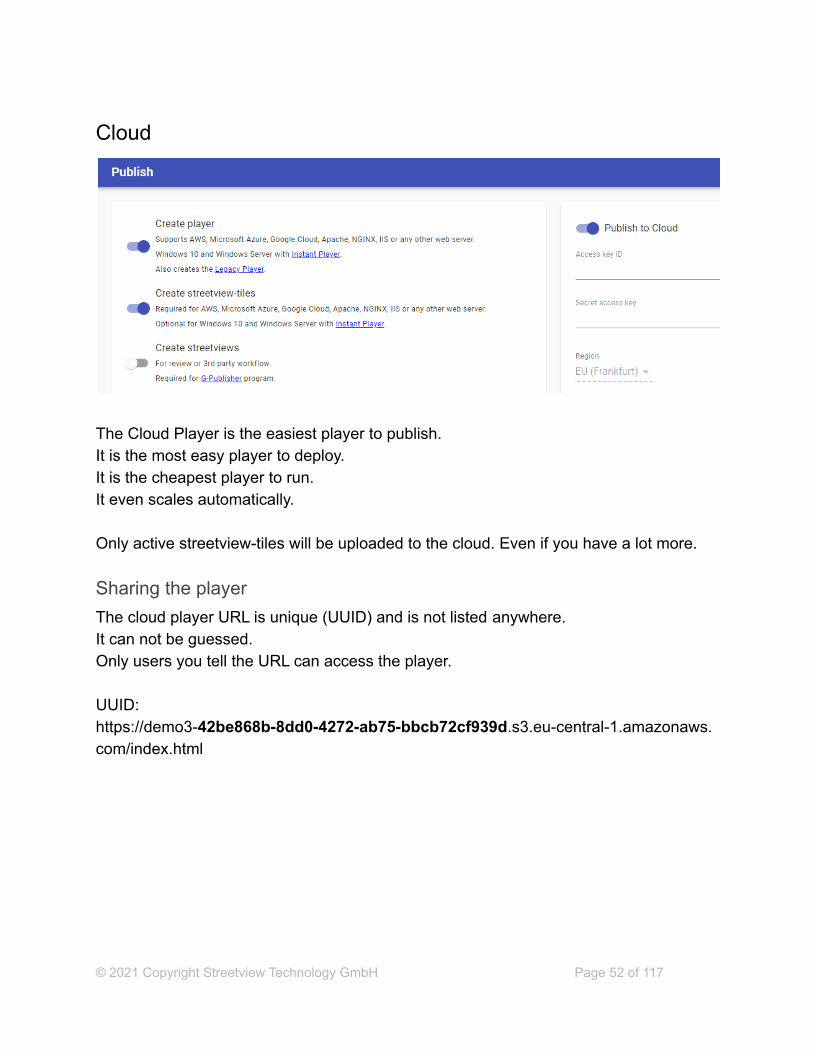
Cloud
The Cloud Player is the easiest player to publish.It is the most easy player to deploy.It is the cheapest player to run.It even scales automatically.
Only active streetview-tiles will be uploaded to the cloud. Even if you have a lot more.
Sharing the playerThe cloud player URL is unique (UUID) and is not listed anywhere.It can not be guessed.Only users you tell the URL can access the player.
UUID:https://demo3-42be868b-8dd0-4272-ab75-bbcb72cf939d.s3.eu-central-1.amazonaws.com/index.html
© 2021 Copyright Streetview Technology GmbH Page 52 of 117

During the free two-week evaluation period a setup of AWS is not necessary at all.AWS regions are limited to the EU (Frankfurt) location.
After purchasing Creator 6 more options become available:1. Access key ID and Secret access key
Follow Amazon Web Services Cloud on how to get your own AWS credentials.2. Any AWS region for publishing.
Pick the one closest to your audience.
© 2021 Copyright Streetview Technology GmbH Page 53 of 117

AWS CloudFront (CDN)If the Cloud Player is expected to
● Have a custom domain● Handle high traffic across multiple regions
It's recommended to create a CloudFront distribution.
Go to https://console.aws.amazon.com/cloudfront/home and click on CreateDistribution button.
Select the players S3 domain name in the Origin Domain Name drop-down field.Example:https://ghost-town-e6a1df59-15f6-45ea-9675-2de94703f92b.s3.eu-central-1.amazonaws.com/index.htmlSet Viewer Protocol Policy to Redirect HTTP to HTTPS.Scroll down and click the Create Distribution button.
Go to CloudFront Distributions list, and wait until the distribution is created (Statuscolumn changes to Deployed).The CDN enabled domain looks like this: d2z6fc2o2b33zp.cloudfront.net
The complete URL for the browser or for embedding:
© 2021 Copyright Streetview Technology GmbH Page 54 of 117

https://d2z6fc2o2b33zp.cloudfront.net/index.html
Hint:Please notice that it will need 24 hours for the new CloudFront Distribution to deploy towork properly. Up until then it will forward to the S3 domain name.URL query parameters like v_lat, v_lng, v_alt and v_label will start working withCloudFront once the deployment is done.
© 2021 Copyright Streetview Technology GmbH Page 55 of 117

Embed the Cloud Player into any webpageWhat it looks like on our website:http://www.applied-streetview.com
First publish the Cloud Player.Get the URL from Creator 6.
In your page, add this code:<iframe
src="https://ghost-town-d0a8e0c0-8d50-4f90-8b63-a731a4001704.s3.eu-cen
tral-1.amazonaws.com/index.html" width="100%" height="600"
frameborder="0" style="border:0" tabindex="0"></iframe>
Same player, but CloudFront CDN has been added:
<iframe src="https://d1hiuutentj66y.cloudfront.net/index.html"
width="100%" height="600" frameborder="0" style="border:0"
tabindex="0"></iframe>
Instant Player for Windows
For our Instant Player program for Windows 10 and Windows Server please see theseparate Instant Player manual.
© 2021 Copyright Streetview Technology GmbH Page 56 of 117

Apache, NGINX, IIS, cloudsThe new player from Creator 6 can be deployed to literally any web server.It is just a collection of static files (html, js, css, etc.), with no database.Copy the player2 and the streetview-tiles folders to your web server directory and thenaccess it via https://your-server.com/player2/
Of course you can rename the player2 folder on the server.
Embed the player into any webpageFirst publish the player to a webserver.
For this example, the player is installed into the Demo3 folder:https://www.your-server.com/players/Demo3/
In your page, add this code:<iframe src="https://www.your-server.com/players/Demo3/" width="100%"
height="600" frameborder="0" style="border:0" tabindex="0"></iframe>
© 2021 Copyright Streetview Technology GmbH Page 57 of 117

Cloud Player ManagementOpen Cloud playerOpens the published Cloud player URL in the browser.
Delete Cloud playerDeletes the published Cloud player from the internet and the Creator project.The same URL can not be restored.
To only delete the cloud player from the internet, and to keep the URL in the project, useAWS Account instead.
© 2021 Copyright Streetview Technology GmbH Page 58 of 117

Legacy PlayerThe player from Creator 5.Support for Mapbox.com has been added.
PreferencesCustomize the Legacy Player to your needs.Go back and forth between Preferences and Preview until you have the desired result.
General
Logo
© 2021 Copyright Streetview Technology GmbH Page 59 of 117

Components visibility
Streetview
© 2021 Copyright Streetview Technology GmbH Page 60 of 117

Image captured date format
Formatted according to the format string.See the formatting options at: https://momentjs.com/docs/#/displaying/format/
Default:Do MMMM YYYY, h:mm a
With a timezone added:Do MMMM YYYY, h:mm a, z
Map
To change the list edit the /player/player.xml file.
MapboxIf you have your own custom data and would like to add it to the Player, Mapboxprovides an easy way to do it.
© 2021 Copyright Streetview Technology GmbH Page 61 of 117

Map provider labelText for the map provider in the Player - base layer selection panel.
Style URLTo get the URL of your style, in Mapbox studio click on the Share button in the topright corner and then copy the value of Style URL field.
Access tokenTo get the URL of your style, in Mapbox studio click on the Share button in the topright corner and then copy the value of Access token field.
Map data legal noticesCustom map data legal notices
© 2021 Copyright Streetview Technology GmbH Page 62 of 117

POIPoints of Interest
Report a problem
Automatic rotation
© 2021 Copyright Streetview Technology GmbH Page 63 of 117

Automatic play
© 2021 Copyright Streetview Technology GmbH Page 64 of 117

PreviewA preview of what the Legacy Player will look like.Go back and forth between Preferences and Preview until you have the desired result.
Adjust the direction and zoom of the streetview and the area and zoom of the map.Then click the Pick the Start Streetview and Map button to save the settings as thestart-view for the player.
© 2021 Copyright Streetview Technology GmbH Page 65 of 117

Assets VisualisationHave the player show your geo-referenced assets by a URL. No database is needed.
Let’s assume your company already has a list of 100.000 geo-referenced assets in adatabase.How can you link them to the 5.000 kilometers worth of streetviews you have justrecorded?Simply have your existing system generate a URL for each of your assets.
The player then will automatically open the streetview closest to the asset and look at it.
Minimum requirement is the latitude and longitude values for your asset:https://cloud-player.applied-streetview.com/?v_lat=50.001217&v_lng=8.651070
You can also provide the altitude value:https://cloud-player.applied-streetview.com/?v_lat=50.001217&v_lng=8.651070&v_alt=140
Show extra data by adding a key/value pair:https://cloud-player.applied-streetview.com/?v_lat=50.001217&v_lng=8.651070&v_alt=129&v_Business=Applied%20Streetview
With a lot of key/values pairs:https://cloud-player.applied-streetview.com/?v_lat=50.001217&v_lng=8.651070&v_alt=129&v_Business=Applied%20Streetview&v_Address=Pittlerstrasse%2053&v_Town=Langen&v_ZIP=63225&v_State=Hessen&v_Country=Germany&v_Telephone=%2B49%2D06103%2D37%2027%20494
With a lot of key/values pairs, no Latitude & Longitude, no Altitude, but a header and ashare link:https://cloud-player.applied-streetview.com/?v_lat=50.001217&v_lng=8.651070&v_alt=129&v_Business=Applied%20Streetview&v_Address=Pittlerstrasse%2053&v_Town=Langen&v_ZIP=63225&v_State=Hessen&v_Country=Germany&v_Telephone=%2B49%2D06103%2D37%2027%20494&vl_showlatlng=no&vl_showalt=no&vl_header=Business%20List%3A&vl_showshare=yes
© 2021 Copyright Streetview Technology GmbH Page 66 of 117

You even can set a streetview, it’s heading and the and the map and zoom level to lookat an asset, in case the view from the nearest streetview is blocked:https://cloud-player.applied-streetview.com/?sv_startup_pano=camera-20180408-140357-000000010&sv_startup_heading=237.2&sv_startup_tilt=6&sv_startup_zoom=90&map_center=50.00116825162954,8.651610016822815&map_zoom=19&v_lat=50.001217&v_lng=8.651070&vl_showshare=yes
URL parameters with a special purpose:&vl_showlatlng=yes/noShow latitude and longitude values
&vl_showalt=yes/noShow altitude value
&vl_header=Custom%20HeaderShow a custom header at the top of the panel
&vl_showshare=yes/noShow the share URL at the bottom of the panel
PublishClick the Start button in the top right corner to start publishing.Click the Stop button in the top right corner to stop the publishing at any time.
The source images are made into data fit for our four players: Cloud Player, InstantPlayer program for Windows, LAMP Player for Linux, Android Player app.And our other programs: G-Publisher, Photogram and Facades.And 8192 x 4096 pixel equirectangular streetviews for 3rd-party workflows.
Windows, Linux (LAMP) and AndroidFor the players it is recommended to enable all options to create both streetviews andstreetview-tiles for flexibility. All players then can be used right away, without the need tore-process the footage for a specific player.
When processing for a specific workflow or program unnecessary formats can bedeselected to save up to 50% of the space.
© 2021 Copyright Streetview Technology GmbH Page 67 of 117

Create playerCreates the player in Output folder/player folder.
Create streetview-tilesCreate streetview-tiles from source images. This is optional for Instant Player andPhotogram since they support on-demand processing.
Create streetviewsFor G-Publisher, review and a 3rd-party workflow.
Create project backupCreate a new project backup each time publishing is started. The backup file is to befound in the Output folder/backups folder. It does not include source images orstreetviews or streetview-tiles. Highly recommended to preserve a project's state.
Skip existing streetviewsIn case you are updating a project and reprocessing: If the streetview-tiles for a specificstreetview already exist, do not process again.
© 2021 Copyright Streetview Technology GmbH Page 68 of 117

Preferences -> Advanced -> Skip streetview-tilesFor a 3rd-party workflow that only requires the 8192x 4092 pixel streetviews, and notthe streetview-tiles, the generation of the streetview-tiles can be switched off, for allprojects.Please notice that the panorama-tiles folder and empty subfolders are still created.Skipping the streetview-tiles can speed-up processing by up to 100 percent. Dependingon your specific setup.
Cloud
The Cloud Player is the easiest player to publish.It is the most easy player to deploy.
© 2021 Copyright Streetview Technology GmbH Page 69 of 117
It is the cheapest player to run.It even scales automatically.
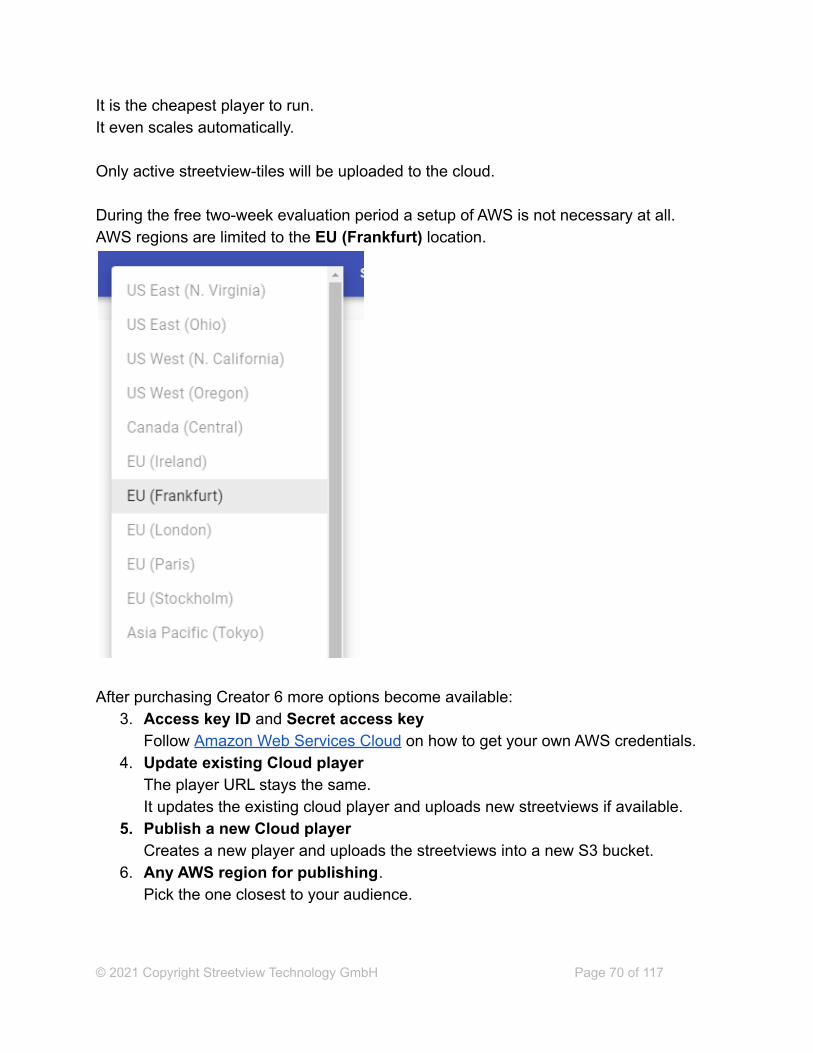
Only active streetview-tiles will be uploaded to the cloud.
During the free two-week evaluation period a setup of AWS is not necessary at all.AWS regions are limited to the EU (Frankfurt) location.
After purchasing Creator 6 more options become available:3. Access key ID and Secret access key
Follow Amazon Web Services Cloud on how to get your own AWS credentials.4. Update existing Cloud player
The player URL stays the same.It updates the existing cloud player and uploads new streetviews if available.
5. Publish a new Cloud playerCreates a new player and uploads the streetviews into a new S3 bucket.
6. Any AWS region for publishing.Pick the one closest to your audience.
© 2021 Copyright Streetview Technology GmbH Page 70 of 117

Instant PlayerSee the Instant Player manual.
AndroidSee the Android Player manual.
LAMP Player
For the LAMP stack. (Linux, Apache MySQL, php).The LAMP player has three major components: The player, the MySQL database andthe streetview tiles folder.For testing you can install all three to the same server.For production, you should install the player and the MySQL database to the sameserver, and the streetview tiles to a different server, or a cloud.An expert could install each component to its own server.
© 2021 Copyright Streetview Technology GmbH Page 71 of 117

If you have never worked with FileZilla, cPanel or phpMyAdmin, you should ask yourcompany's IT department to install the LAMP player for you.
To create your own LAMP player with Creator 6 the Create streetview-tiles optionmust be enabled. The player is generated in the player folder.Minimum steps necessary:
Let’s assume your project's name is Demo3.
Database:Create a new MySQL database on your LAMP server.Name it Demo3.Import the Demo3.sql.zip file to it.
Panorama tiles:Copy the panorama-tiles folder to your web-server.
Make the following adjustments before uploading the player to the server:
Player:Adjust the plugins\streetview\ajax\db.php file for access to your MySQL database.Fill in your own access data:$con=mysqli_connect('localhost','user','password','DBname');
Adjust the player.xml file for the panorama-tiles folder address on your web-server.
Fill in your own URL:tilespath="../panorama-tiles"
Finally copy the player folder to your web-server.
© 2021 Copyright Streetview Technology GmbH Page 72 of 117

Embed the LAMP player into any webpageWhat it looks like:https://www.applied-streetview.com/players-creator-5-vs-creator-6/#player
First publish the LAMP player to a webserver.
For this example, the player is installed into the Demo3 folder:https://www.your-server.com/players/Demo3/
In your page, add this code:<iframe src="https://www.your-server.com/players/Demo3/" width="100%"
height="600" frameborder="0" style="border:0" tabindex="0"></iframe>
Cloud PlayerGeneralOpen Cloud playerOpen the published Cloud player URL in the browser
Delete Cloud playerDelete published Cloud player
Users
Enable authentication for Cloud playerEnable the authentication feature
© 2021 Copyright Streetview Technology GmbH Page 73 of 117

Add userClick the Add user button in the top right corner.Set a Username and a Password then click the Save button in the top right corner.
EditClick the button next to the user.Modify the Username or the Password of the user. Then click the Save button in thetop right corner.
Delete
Click the button next to the user then confirm.
Note: For any modification to take effect the Cloud player needs to be republished. Torepublish go to Publish and then click the Start button in the top right corner. Whenadjusting the player itself only, the streetviews will not be uploaded again.This is fast.
StatisticsAfter the Cloud Player is published it will start collecting usage statistics.By default visits from the last 7 days are displayed.
To adjust the statistics period change the From and To fields in the top right corner.
Cloud Player uses CloudWatch Metrics to gather and display statistics.
© 2021 Copyright Streetview Technology GmbH Page 74 of 117

CloudWatch Metrics can be accessed directly with your Amazon account to createadditional custom graphs. They will not be displayed here.More information at:https://docs.aws.amazon.com/AmazonCloudWatch/latest/monitoring/graph_a_metric.html
AWS CloudFront (CDN)If the player is expected to get high traffic it's recommended to create a CloudFrontdistribution. This will increase the player performance and reduce AWS Lambda cost.
Copy the URL of the player. (Technically it is a Gateway API URL.)
Go to https://console.aws.amazon.com/cloudfront/home and click the CreateDistribution button.
Paste the URL into the Origin Domain Name field.The domain name your are pasting may not exist in the list of available domains names,this is expected.
Set Viewer Protocol Policy to Redirect HTTP to HTTPS.Set Allowed HTTP Methods to GET, HEAD, OPTIONS, PUT, POST, PATCH, DELETESet Cache and origin request settings to Use legacy cache settings
● Forward Cookies: Whitelist● Whitelist Cookies: lambdaplayerAuth● Query String Forwarding and Caching: Forward all, cache based on all● Compress Objects Automatically: Yes
© 2021 Copyright Streetview Technology GmbH Page 75 of 117

Scroll down and click the Create Distribution button.
Go to CloudFront Distributions list, and wait until the distribution is created (Statuscolumn changes to Deployed).
© 2021 Copyright Streetview Technology GmbH Page 76 of 117

The CDN enabled domain looks like this: dvbgnnizq7nyk.cloudfront.net
The complete URL for the browser or for embedding:https://dvbgnnizq7nyk.cloudfront.net/latest/
© 2021 Copyright Streetview Technology GmbH Page 77 of 117

Create Amazon Web Services (AWS) accountCreator 6 (and previous Creator 5) use Amazon Web Services (AWS) Cloud ComputingServices to publish the player to the internet.
An Access key ID and Secret access key is required for publishing.This needs to be done only once.
1. Go to https://aws.amazon.com/console/ and sign in with an existing Amazonaccount or create a new account.
2. Log in and continue tohttps://console.aws.amazon.com/iam/home?#/users$new?step=details to add anew IAM user
a. User name: creator6b. Access type: Programmatic accessc. Click Next: Permissions button
3. Select Attach existing policies directly
4. Select AdministratorAccess privileges.
© 2021 Copyright Streetview Technology GmbH Page 78 of 117

5. Click the Next: Tags button6. Click the Next: Review button. Make sure User details and Permission summary
matches the image below.
7. Click the Create user button
Copy Access key ID and Secret access key into the appropriate fields in Creator 6Process page. It is recommended to click the Download .csv button in order to savethe credentials if you ever need to enter them again.
© 2021 Copyright Streetview Technology GmbH Page 79 of 117
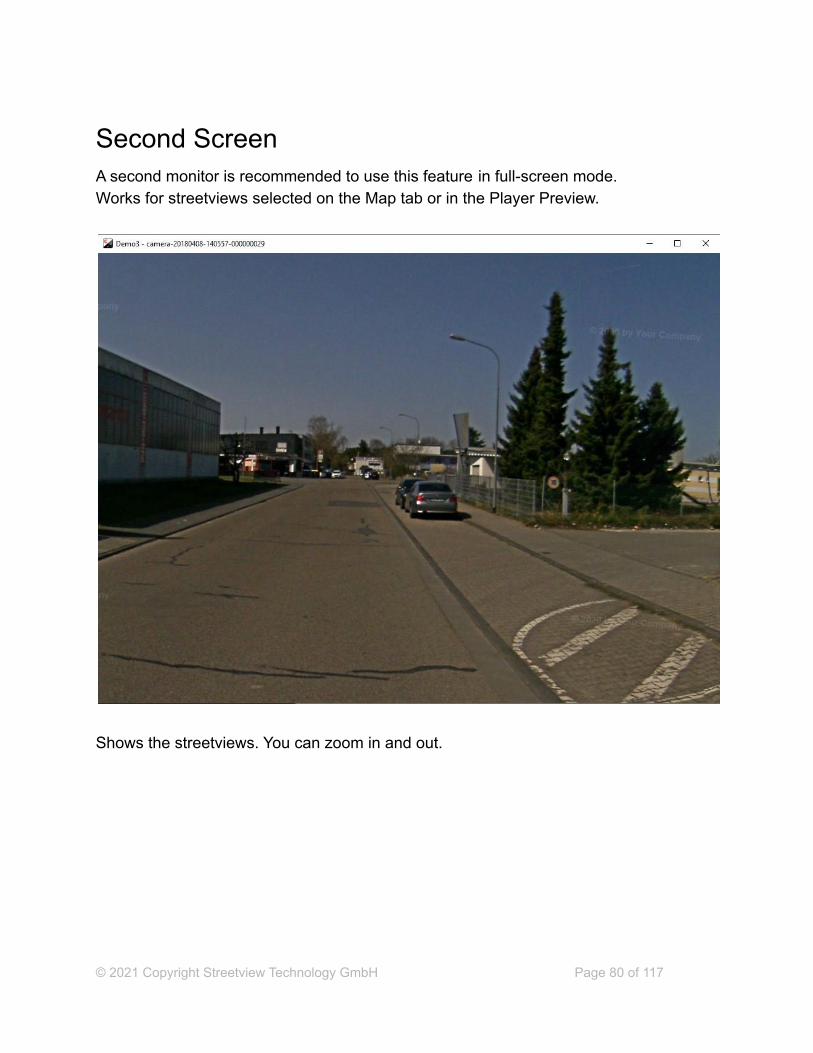
Second ScreenA second monitor is recommended to use this feature in full-screen mode.Works for streetviews selected on the Map tab or in the Player Preview.
Shows the streetviews. You can zoom in and out.
© 2021 Copyright Streetview Technology GmbH Page 80 of 117
Tools
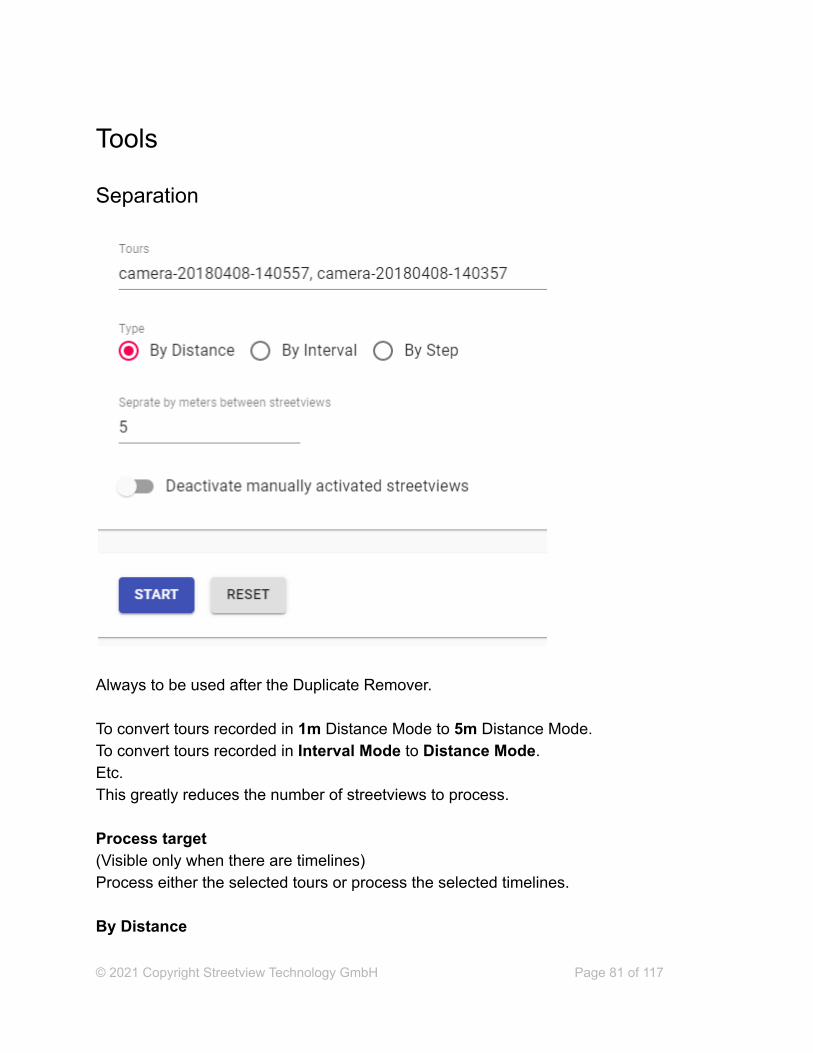
Separation
Always to be used after the Duplicate Remover.
To convert tours recorded in 1m Distance Mode to 5m Distance Mode.To convert tours recorded in Interval Mode to Distance Mode.Etc.This greatly reduces the number of streetviews to process.
Process target(Visible only when there are timelines)Process either the selected tours or process the selected timelines.
By Distance
© 2021 Copyright Streetview Technology GmbH Page 81 of 117
Separate by meters between streetviews.
By IntervalSeparate by seconds between streetviews.
By StepProcess every x-th streetview.
Deactivate manually activated streetviewsBy default manually activated streetviews are not deactivated. Enable this option toforce them to be deactivated.
StartStart separating the streetviews.Try a few times to find the optimum settings for your footage.
ResetReset all streetviews deactivated by Duplicate Remover and Separation tool.
© 2021 Copyright Streetview Technology GmbH Page 82 of 117

Road names from OpenStreetMap
Preferred languageLocal language only - "name" value of the OSM road.Custom language - "name:language" value of the OSM road.Custom language, fallback to local if not specified - If "name:language" value does notexist use "name".
For StreetviewsActivated streetviewsDeactivated streetviews
Overwrite previously assigned road names?
© 2021 Copyright Streetview Technology GmbH Page 83 of 117

If enabled streetviews with an existing road name will be skipped.
Maximum distance (m)Maximum distance to the closest road to be considered for geocoding.
StartGeocode streetviews with road names from OSM
ResetRemove all assigned road names, even those assigned manually via the Map page.
© 2021 Copyright Streetview Technology GmbH Page 84 of 117

Direction from positionIf the heading of the majority of the streetviews is not correct it's possible to calculatethe heading from the streetviews position.
Click Start to calculate the healing from position.Click Reset to revert to original values.
© 2021 Copyright Streetview Technology GmbH Page 85 of 117

Clamp to groundIf the height of streetviews is not correct it's possible to simply calculate the height. Weare using NASA Shuttle Radar Topography Mission Global 3 arc second V003 datasetfor this.
Click Start to calculate the height from the digital terrain model.Click Reset to revert to the original values.
Once Start is clicked, Creator 6 will download the digital terrain model for your projectlocation and cache them.This tool requires an active internet connection.
The size of the height-data is about 3 MB for a 1x1 degree area.The area is determined by a bounding box for all the streetviews in the Project, bothactive and deactivated.A challenge might be streetviews deactivated for wrong positions. But they still will beconsidered for the bounding box. Please move them closer to the active stretviews.
Camera mounted backwardsThis tool will fix if the camera was accidentally mounted looking backwards.Click Start to change yaw by 180 degrees. Click Start again to revert to original values.
© 2021 Copyright Streetview Technology GmbH Page 86 of 117
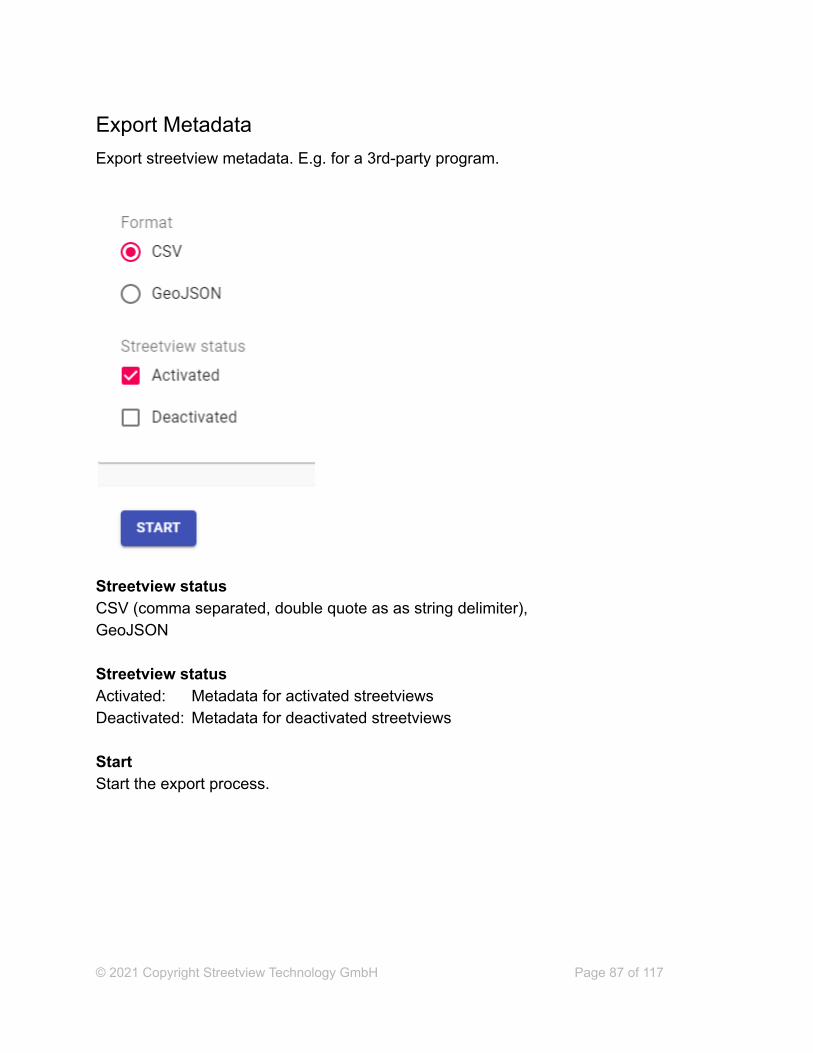
Export MetadataExport streetview metadata. E.g. for a 3rd-party program.
Streetview statusCSV (comma separated, double quote as as string delimiter),GeoJSON
Streetview statusActivated: Metadata for activated streetviewsDeactivated: Metadata for deactivated streetviews
StartStart the export process.
© 2021 Copyright Streetview Technology GmbH Page 87 of 117

Copy Sources
This tool can be used to provide data for support or to copy a part of the data only.
Tour dolders “7” always contain all data. They are not adjusted for activated ordeactivated streetviews.
Project backupAdds the Creator 6 project backup to the archive.
Folders "7" (Small archive size)Adds position data (tour folders 7) to the archive. No images.
Source photos (Large archive size)Activated - Include sources photos of the activated streetviewsDeactivated - Include sources photos of the deactivated streetviews
StartCreate the archive
© 2021 Copyright Streetview Technology GmbH Page 88 of 117

Merge Players
Players to mergeList of the available projects.Projects without a published player are disabled.Create players first in all projects you like to merge.
StartCreate the merged player in a new folder.Existing project folders are not changed.
Open Output FolderOpen the output folder of the merged player.The new folder with the merged player is always saved to the Out folder.
© 2021 Copyright Streetview Technology GmbH Page 89 of 117

Deactivate missing
If the source images of a streetview are missing, this tool will deactivate that streetviewand write the result to the log.
Click Start to calculate the healing from position.
Click Reset to revert the changes. This will also reset the changes done by Separationand Duplicate Remover!
© 2021 Copyright Streetview Technology GmbH Page 90 of 117

.
Post Processing
Post Processing is to increase the accuracy of the position data.After the recording has finished.
There are different ways to increase the accuracy and robustness of positioning data:1) Always use the OBD2 adapter cable for the car's wheeltick data.2) Use RTK by NTRIP.3) Apply Post Processing.
We recommend using all three together.Not having RTK by NTRIP is not a problem.Just use post processing.
© 2021 Copyright Streetview Technology GmbH Page 91 of 117

Kinematika
To apply post processing first process your tours log data with Advance Navigation'sKINEMATICA web based GNSS/INS post processing software to obtain the correctionfile:
https://hq.advancednavigation.com.au/kinematica/
Create an account. Log in.
Processing the first 15 minutes of recordings is free.For this you can start immediately.
Data Set Name: Enter the tour name from the Creator project.Rover file: The log.anpp file from the tours “7” folder
Click Create.
© 2021 Copyright Streetview Technology GmbH Page 92 of 117

Device ID: Spatial or Spatial Dual
Click Process.
© 2021 Copyright Streetview Technology GmbH Page 93 of 117

Wait for the processing to finish.
When done click View files and download all files from Kinematika and save them tothe tours “7” folder.
© 2021 Copyright Streetview Technology GmbH Page 94 of 117

GNSS Post Processing
Process selected tourSelect a tour from the current project.
Corrected GNSS dataSelect the PostProcessed.csv.zip obtained from KINEMATICA.You should have saved the PostProcessed.csv.zip file to the tours 7 folder.
StartApply the post processing corrections to the selected tour.This should need a few seconds only:
This replaces the existing Latitude, Longitude and Altitude values of the tour with thepost processed Latitude, Longitude and Altitude values.Accidentally doing this twice causes no harm.
© 2021 Copyright Streetview Technology GmbH Page 95 of 117

CompareThis step is optional.
You can compare the post processed tour and the original tour on the Map page.For this open the Windows File Manager and copy and past the tour folder to duplicateit.Then rename the duplicate to e.g. Original-003487-20210120-151515.On the Tours page click Add to add the renamed tour to your project.
It looks like this:
© 2021 Copyright Streetview Technology GmbH Page 96 of 117

AWS accountThis is to open or delete players published to your AWS account.It does not need a Creator project to do so.
If you delete a player from your AWS account, the Creator project still knows the URLthe player has been published too. Meaning you can re-publish to the same URL usingthe Creator project, or a backup of it.
To delete a player from both the Internet and a Creator project, use Cloud Player ->Delete Cloud Player instead.
ProjectProject name
Published dateDate and time of the upload.
OpenOpen the player URL in the browser
StatisticsDisplay visitor statistics. Only available in Legacy Player.
DeleteDelete player (incl. all streetviews) from the Amazon account.Local Creator projects will not be changed.
© 2021 Copyright Streetview Technology GmbH Page 97 of 117

Preferences
General
LanguageSet the program language.
Automatically send usage statistics and crash reports to Applied Streetview.Please help us make Creator 6 better.
FoldersIt is strongly recommended to create the following 4 folders to organise your data:In, Out, Camera calibration files, Creator 6 backups.Set the folders up in Preferences -> Folders.
Additionally you might want to consider creating two folders named masks and logos toorganise additional, optional, files.
Input folderDefault location of the recorded projects
Output folderDefault location for publishing. A subfolder with the project name is createdautomatically.
Camera calibration files folderDefault folder for your camera(s) calibration file(s). They have the .pto and .xml fileextension. First Creator 6 looks in the parent folder of a tour. Then in the Cameracalibration files folder. In case you have many cameras the right file is picked fullyautomatic. You can even mix footage from different cameras in one project.
Backup folderDefault location for saving project backups.Weekly or daily backups are recommended.
© 2021 Copyright Streetview Technology GmbH Page 98 of 117

CloudAn Access key ID and Secret access key is required for publishing.
See the Publish to the Cloud section for how to get your own AWS credentials.
ManualsOpens this Creator 6 manual.
About
Creator licenseDisplay current licence or add a new one by entering your activation key.
View Software License Agreement.
krpano licensePlayer is bundled with a demo version of krpano.To remove the krpano demo version watermark from the player a license has to bepurchased.
The krpano demo version watermark is visible in the:● Player - Preview sub-tab● Player tab● All generated players
Get a krpano license for 159 Euro from http://www.krpano.com/buy
Then get back here and click the Add activation key button.Paste your key into the field and click the OK button. You should see a confirmationmessage that the key is registered.
© 2021 Copyright Streetview Technology GmbH Page 99 of 117

VersionDisplay current version, check for updates, view release notes.
LogsOpen the newest log file or open the folder with all the logs.
About this PCDisplays information about this PC.
© 2021 Copyright Streetview Technology GmbH Page 100 of 117

Creator 6 PRO - AutomationAutomation is a feature of Creator 6 Pro. It is not available in Creator 6.Please contact sales for a quote and a temporary licence key to test Creator 6 Pro.
Overview
How did the User Interface (UI) change?Added:Preferences -> Advanced -> Skip creating streetview-tiles during PublishProjects -> PROJECTNAME -> More (3 dots) -> Export ConfigurationProjects -> More (3 dots) -> Add project from configuration
What is covered by the automation?Creation of a project.Creation of the projects tours.Loading of project and tours settings.Clicking of “Start” buttons.Close Creator 6 when processing is finished.Delete all projects.
Things not coveredOnly settings on the project and tour levels are part of the configuration.
All settings applied to a streetview are not part of the configuration for an automationworkflow.
Examples:● Position● Heading● Status (activated/deactivated)● Road name
© 2021 Copyright Streetview Technology GmbH Page 101 of 117

Full Automation with the command line
LicensingAutomation is a feature of Creator 6 Pro. It is not available in Creator 6.Automation is not available with the 2-week trial licence you get by registering for thefree trial of Creator 6.Please contact sales for a quote and a temporary licence key to test Creator 6 Pro.
Mass productionWhen running Creator 6 Pro from the Windows command line make sure that thecurrent working directory is set to the directory of the creator-next.exe file.
Typical Examplecd C:\Users\me\AppData\Local\creator6creator6.exe --actions="ImportConfiguration,DuplicateRemover,Publish,Close"--importConfiguration="S:\Downloads\Demo4-20200930-103027.project-config"--processSkipTiles=false
● --actions○ ImportConfiguration - Add a project from a configuration file and open it.
--importConfiguration must be set to the path of the configuration file.○ DuplicateRemover - Run Duplicate Remover with current project settings.○ Separation - Run Tools - Separation with current project settings.○ RoadNamesFromOsm - Run Tools - Road names from OSM with current
project settings.○ DirectionFromPosition - Run Tools - Direction from position.○ CameraMountedBackwards - Run Tools - Camera mounted backwards.○ Publish - Starts the publishing process with current project settings.○ Close - Closes Creator 6 when finished○ DeleteProjectsAndClose - Delete all projects and close Creator 6 when
finished● --importConfiguration - Specify a .project-config file created by exporting a
project configuration. This field is required for the ImportConfiguration action.● --processSkipTiles - Adjusts the value of Preferences - Advanced
Skips creating streetview-tiles during Publish. Can be true or false.
© 2021 Copyright Streetview Technology GmbH Page 102 of 117

Actions are executed in the sequence they are listed.
If any of the actions trigger an error no other actions will be executed.
Each action creates an entry in the log.Errors triggered by an action are logged too.
Each action logs a start and finish message to stdout.This allows for optional progress tracking.
© 2021 Copyright Streetview Technology GmbH Page 103 of 117

Configuration export and importThis is the workflow to duplicate your project settings.This way data is processed identically. If you press all required “Start” buttons manually.
StepsExport a configuration as template: You get a .project-config fileEdit itImport itPress all the Start buttons needed manually. Make sure not to miss a Start button.Close Creator
Export a configuration as templateIt is strongly recommended to configure a project as the template in Creator 6 first.Do not try to build a configuration file from scratch with a text editor.
Suggested workflowCreate the project.Configure it.Run it for testing.Check results.Export it:Projects -> PROJECTNAME -> More (3 dots) -> Export Configuration
Make adjustments manually to the exported configuration file.
Example configuration file:Demo4-20200930-103027.project-config
© 2021 Copyright Streetview Technology GmbH Page 104 of 117
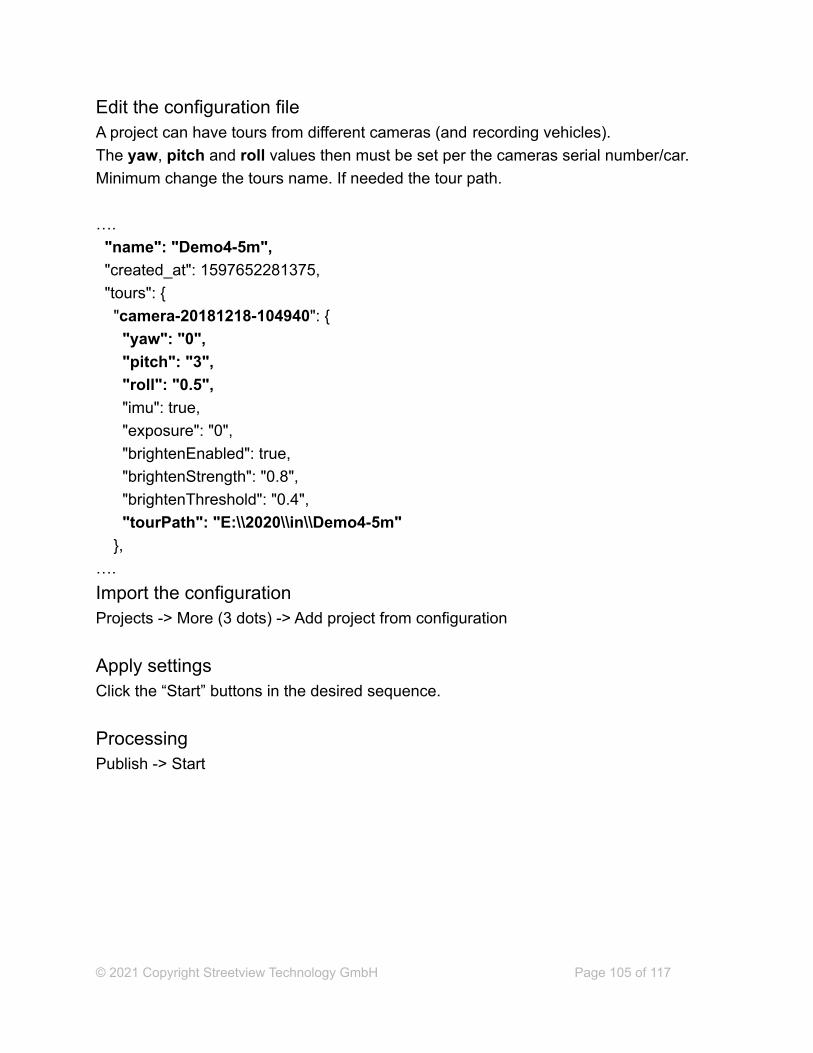
Edit the configuration fileA project can have tours from different cameras (and recording vehicles).The yaw, pitch and roll values then must be set per the cameras serial number/car.Minimum change the tours name. If needed the tour path.
…."name": "Demo4-5m","created_at": 1597652281375,"tours": {"camera-20181218-104940": {"yaw": "0","pitch": "3","roll": "0.5","imu": true,"exposure": "0","brightenEnabled": true,"brightenStrength": "0.8","brightenThreshold": "0.4","tourPath": "E:\\2020\\in\\Demo4-5m"
},….Import the configurationProjects -> More (3 dots) -> Add project from configuration
Apply settingsClick the “Start” buttons in the desired sequence.
ProcessingPublish -> Start
© 2021 Copyright Streetview Technology GmbH Page 105 of 117

Preferences: Skip streetview-tilesIn case only the 8192x 4092 pixel streetviews are needed, and not the streetview-tiles,the generation of the streetview tiles can be deactivated globally. (For all projects.)
Please notice that the panorama-tiles folder and empty subfolders are still created.Skipping the streetview-tiles can speed-up processing by up to 100 percent. Dependingon your specific setup.
© 2021 Copyright Streetview Technology GmbH Page 106 of 117

Running Creator 6 (Pro) in a Cloud
Creator 6 (Pro) can be installed on a Windows PC for local processing, or in a cloud.On the following pages we cover Google Cloud, Amazon EC2, Microsoft Azure Cloud.
When installed in a cloud Creator 6 can be accessed easily by Remote DesktopConnection (RDP).
The following NVIDIA graphic cards provided by the clouds have been tested:M60, P100, V100.
Google Cloud
Set Up1. Go to https://console.cloud.google.com/compute/instances2. Click on CREATE INSTANCE3. In Machine type click customize4. Set Cores to 8 and Memory to 8 GB5. In the GPUs section set Number of GPUs to 1 and GPU type to NVIDIA
Tesla P100 or V100. V100 is about 80% faster for creating streetview tiles.6. Click on Boot disk and select Windows Server 2019 Datacenter. Then set
Boot disk type to SSD persistent disk.7. Click Create
© 2021 Copyright Streetview Technology GmbH Page 107 of 117

After connecting to the instance:1. Download and install CUDA 10.02. Download and install Creator 6.x.x3. Exclude the in and out Creator 6 folders from Windows Security.
https://support.microsoft.com/en-us/help/4028485/windows-10-add-an-exclusion-to-windows-security
© 2021 Copyright Streetview Technology GmbH Page 108 of 117

Performance & CostFor 24 hours:8 Cores, 8 GB Memory, 1 GPU NVIDIA Tesla P100:
PerformanceStreetviews: 864,000Streetviews + tiles: 393,000
CostInstance: 53.58 USD1 Streetview + tiles: 0.00014 USD
8 Cores, 8 GB Memory, 1 GPU NVIDIA Tesla V100:
PerformanceStreetviews: 1,234,000Streetviews + Streetview tiles: 480,000
CostInstance: 76.38 USD1 Streetview + tiles: 0.00015 USD
© 2021 Copyright Streetview Technology GmbH Page 109 of 117

DATA handlingIn order to run Creator 6 cost effectively in a Google Virtual Machine you shouldset up separate instances for data-transfer and processing.
PROCESSIs a GPU instance. It is expensive.For this you want to spin it up only for the actual data processing. Spin it downwhen not using it.
DATAIs a tiny CPU instance. It is very cheap.With just 1 core, 2 GB RAM and no GPU.Use it for time-intensive data-transfer like upload and download.
1. Assuming your source images are 1 TB, create a new disk with the size of 2TB and attach it to the DATA instance.
2. Start the DATA instance, install an FTP server on it and start the datatransfer. The data transfer will need some time, and you save money byusing a cheap instance for this.
3. Stop the DATA instance, and detach your 2 TB disk.4. Attach your 2 TB disk to the PROCESS instance.5. Start the PROCESS instance and process with Creator 6 from and to the 2
TB disk.6. Stop the PROCESS instance, and attach our 2 TB disk back to the DATA
instance.7. Either download the streeview-tiles directly via FTP or upload them to Google
cloud storage. (Google enables it’s CDN by default).
© 2021 Copyright Streetview Technology GmbH Page 110 of 117

Amazon EC2
Set Up1. Go to e.g. https://eu-central-1.console.aws.amazon.com/ec22. Click on Launch Instance3. Step 1: Choose an Amazon Machine Image (AMI): Choose Microsoft
Windows Server 2019 Base4. Step 2: Choose an Instance Type: Choose p3.2xlarge - 1 x V100 GPU.5. Review and Launch
After connecting to the instance:1. Download and install CUDA 10.02. Download and install Creator 6.x.x3. Exclude the in and out Creator 6 folders from Windows Security.
https://support.microsoft.com/en-us/help/4028485/windows-10-add-an-exclusion-to-windows-security
© 2021 Copyright Streetview Technology GmbH Page 111 of 117
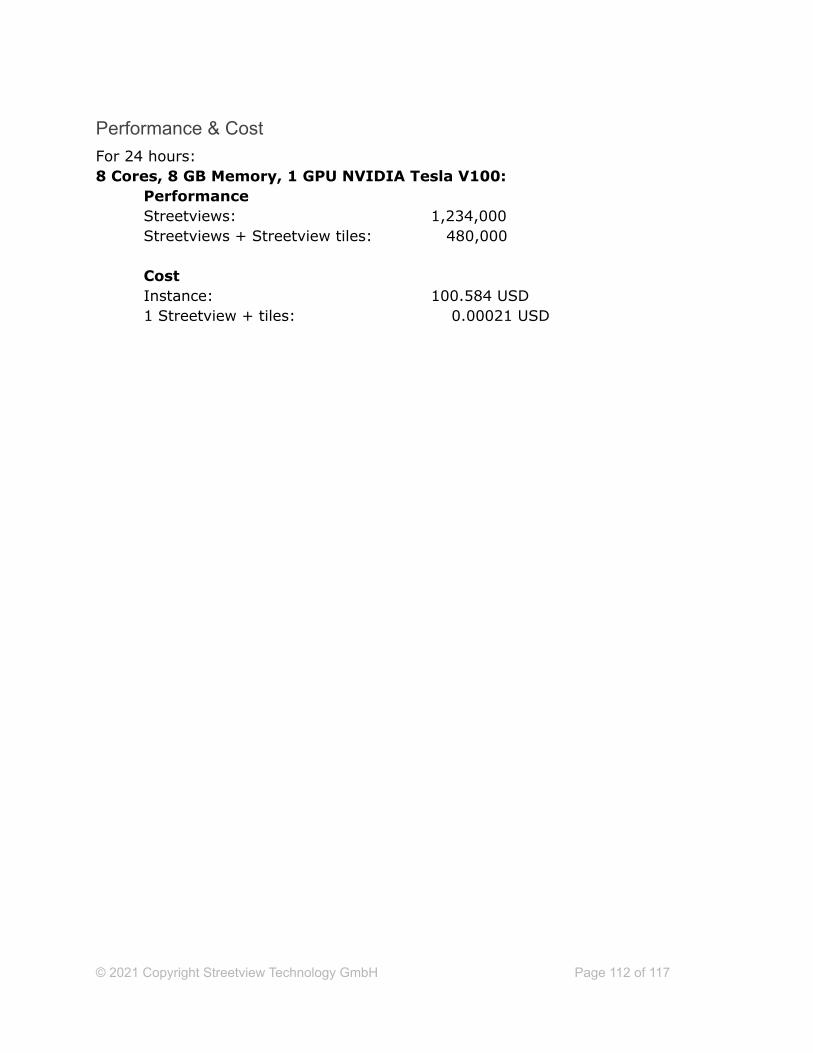
Performance & CostFor 24 hours:8 Cores, 8 GB Memory, 1 GPU NVIDIA Tesla V100:
PerformanceStreetviews: 1,234,000Streetviews + Streetview tiles: 480,000
CostInstance: 100.584 USD1 Streetview + tiles: 0.00021 USD
© 2021 Copyright Streetview Technology GmbH Page 112 of 117

DATA handlingIn order to run Creator 6 cost effectively in an Amazon Virtual Machine you shouldset up separate instances for data-transfer and processing.
PROCESSIs a GPU instance. It is expensive.Instance type: p2.xlarge or p3.2xlarge.
For this you want to spin it up only for the actual data processing.Spin it down when not using it.
DATAIs a tiny CPU instance. It is very cheap.Instance type: t2.small.Use it for time-intensive data-transfer like upload and download.
1. Assuming your source images are 1 TB, create a new disk with the size of 2TB and attach it to the DATA instance.
2. Start the DATA instance, install a FTP server on it and start the datatransfer. The data transfer will need some time, and you save money byusing a cheap instance for this.
3. Stop the DATA instance, and detach your 2 TB disk.4. Attach your 2 TB disk to the PROCESS instance.5. Start the PROCESS instance and process with Creator 6 from and to the 2
TB disk.6. Stop the PROCESS instance, and attach our 2 TB disk back to the DATA
instance.7. Either download the streeview-tiles directly via FTP or upload them to
Amazon S3.
© 2021 Copyright Streetview Technology GmbH Page 113 of 117

Microsoft Azure Cloud
Set Up1. Go to e.g.
https://portal.azure.com/#blade/HubsExtension/Resources/resourceType/Microsoft.Compute%2FVirtualMachines
2. Click on Add3. Image: Windows Server 2019 Datacenter4. Size: Standard NV65. Review + create
After connecting to the instance:1. Download and install CUDA 10.02. Download and install Creator 6.x.x3. Exclude the in and out Creator 6 folders from Windows Security.
https://support.microsoft.com/en-us/help/4028485/windows-10-add-an-exclusion-to-windows-security
© 2021 Copyright Streetview Technology GmbH Page 114 of 117

Performance & CostFor 24 hours:6 Cores, 56 GB Memory, 1 GPU NVIDIA Tesla M60:
PerformanceStreetviews: 455,000Streetviews + Streetview tiles: 176,000
CostInstance: 38.4 USD1 Streetview + tiles: 0.00021 USD
© 2021 Copyright Streetview Technology GmbH Page 115 of 117

DATA handlingIn order to run Creator 6 cost effectively in an Azure Virtual Machine you shouldset up separate instances for data-transfer and processing.
PROCESSIs a GPU instance. It is expensive.Instance type: Standard NV6.
For this you want to spin it up only for the actual data processing.Spin it down when not using it.
DATAIs a tiny CPU instance. It is very cheap.Instance type: B2s.Use it for time-intensive data-transfer like upload and download.
8. Assuming your source images are 1 TB, create a new disk with the size of 2TB and attach it to the DATA instance.
9. Start the DATA instance, install an FTP server on it and start the datatransfer. The data transfer will need some time, and you save money byusing a cheap instance for this.
10.Stop the DATA instance, and detach your 2 TB disk.11.Attach your 2 TB disk to the PROCESS instance.12.Start the PROCESS instance and process with Creator 6 from and to the 2
TB disk.13.Stop the PROCESS instance, and attach our 2 TB disk back to the DATA
instance.14.Either download the streeview-tiles directly via FTP or upload them to the
cloud.
© 2021 Copyright Streetview Technology GmbH Page 116 of 117

DownloadsCreator 6 manualCreator 6 program
SupportPlease update first.Support is provided for the newest Creator 6 release only.Maybe your problem has already been solved?
ContactSupport is available in English language.
Helpdesk: support.applied-streetview.comE-Mail: [email protected] ID: applied-streetviewPhone: +49 6103 - 37 27 494
© 2021 Copyright Streetview Technology GmbH Page 117 of 117