Creating UI Connectors - Pega Robotic Automation
30
Pega Robotic Automation CREATING UI CONNECTORS Start
-
Upload
khangminh22 -
Category
Documents
-
view
5 -
download
0
Transcript of Creating UI Connectors - Pega Robotic Automation

Pega Robotic Automation
CREATING UI CONNECTORS
Start

Notice
© 2021 Pegasystems Inc., Cambridge, MAAll rights reserved.
Trademarks
For Pegasystems Inc. trademarks and registered trademarks, all rights reserved. All other trademarks or service marks are property of their respective holders. For information about the third-party software that is delivered with the product, refer to the third-party license file on your installation media that is specific to your release.
Notices
This publication describes and/or represents products and services of Pegasystems Inc. It may contain trade secrets and proprietary information that are protected by various federal, state, and international laws, and distributed under licenses restricting their use, copying, modification, distribution, or transmittal in any form without prior written authorization of Pegasystems Inc.This publication is current as of the date of publication only. Changes to the publication may be made from time to time at the discretion of Pegasystems Inc. This publication remains the property of Pegasystems Inc. and must be returned to it upon request. This publication does not imply any commitment to offer or deliver the products or services described herein.This publication may include references to Pegasystems Inc. product features that have not been licensed by you or your company. If you have questions about whether a particular capability is included in your installation, please consult your Pegasystems Inc. services consultant.Although Pegasystems Inc. strives for accuracy in its publications, any publication may contain inaccuracies or typographical errors, as well as technical inaccuracies. Pegasystems Inc. shall not be liable for technical or editorial errors or omissions contained herein. Pegasystems Inc. may make improvements and/or changes to the publication at any time without notice.Any references in this publication to non-Pegasystems websites are provided for convenience only and do not serve as an endorsement of these websites. The materials at these websites are not part of the material for Pegasystems products, and use of those websites is at your own risk.Information concerning non-Pegasystems products was obtained from the suppliers of those products, their publications, or other publicly available sources. Address questions about non-Pegasystems products to the suppliers of those products.This publication may contain examples used in daily business operations that include the names of people, companies, products, and other third-party publications. Such examples are fictitious and any similarity to the names or other data used by an actual business enterprise or individual is coincidental.This document is the property of:Pegasystems Inc.One Rogers StreetCambridge, MA 02142-1209USAPhone: (617) 374-9600Fax: (617) 374-9620www.pega.com
Updated: February 23, 2021
Feedback
If you have suggestions or comments for how we can improve our materials, send an email [email protected].

iii
CONTENTS
1 Using the UI Connector framework
2 Support and limitations
3 Terminology
5 Exploring native control capabilities
5 Properties
6 Methods6 Testing methods
7 Events7 Testing events
8 Discovering members
9 Creating UI Connectors
10 Example C# class file
11 Example JSON file
12 Re-creating a control as the correct type
13 Implementing UI Connectors
14 Simple and complex types
16 Testing UI Connectors17 Testing properties17 Testing methods18 Using the Target Tester
19 Handling events
21 Limiting cross-process calls
22 Creating remote instances
22 Declaring native types
23 Extensions
23 Adding type extensions
24 Adding component extensions
24 Building extensions

iv
Creating UI Connectors 1
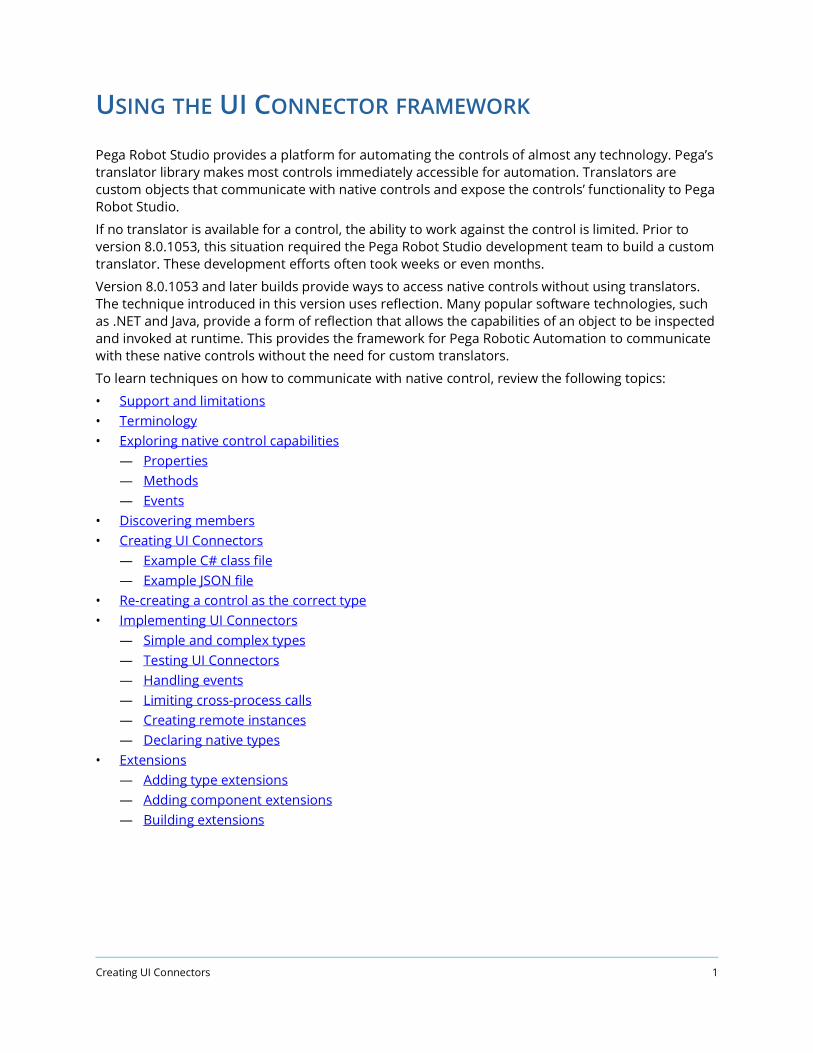
USING THE UI CONNECTOR FRAMEWORK
Pega Robot Studio provides a platform for automating the controls of almost any technology. Pega’s translator library makes most controls immediately accessible for automation. Translators are custom objects that communicate with native controls and expose the controls’ functionality to Pega Robot Studio.
If no translator is available for a control, the ability to work against the control is limited. Prior to version 8.0.1053, this situation required the Pega Robot Studio development team to build a custom translator. These development efforts often took weeks or even months.
Version 8.0.1053 and later builds provide ways to access native controls without using translators. The technique introduced in this version uses reflection. Many popular software technologies, such as .NET and Java, provide a form of reflection that allows the capabilities of an object to be inspected and invoked at runtime. This provides the framework for Pega Robotic Automation to communicate with these native controls without the need for custom translators.
To learn techniques on how to communicate with native control, review the following topics:
• Support and limitations• Terminology• Exploring native control capabilities
— Properties— Methods— Events
• Discovering members• Creating UI Connectors
— Example C# class file— Example JSON file
• Re-creating a control as the correct type• Implementing UI Connectors
— Simple and complex types— Testing UI Connectors— Handling events— Limiting cross-process calls— Creating remote instances— Declaring native types
• Extensions— Adding type extensions— Adding component extensions— Building extensions

Using the UI Connector framework | Support and limitations
Creating UI Connectors 2
Support and limitationsThe UI Connector framework in Pega Robot Studio version 8.0.1053 and later support .NET and Windows Presentation Foundation (WPF) applications.
• Version 8.0 SP1 (8.0.2003 and higher) also supports Java applications. In Java, there are the following limitations:— Only Abstract Windows Toolkit (AWT) Standard events are supported, such as Action, Focus,
and so on.— You cannot test Java Swing events in Native Control Explorer.— Font and Color are not supported as native types in Java.
• Version 19.1.73 adds support for JavaFX.• Version 19.1.76 adds limited support for ActiveX controls. In ActiveX, there are the following
limitations:— The CreateInstance method, which is supported in both .NET and Java, is not supported for
ActiveX.— Active X controls that Pega Robot Studio has translators for take priority. You cannot use the
UI Connector instead of these Robot Studio translators. - If an ActiveX control interrogates as a specific object type, then you cannot use the UI
Connector. - If an ActiveX control interrogates as a generic object type, then you can use the UI
Connector.

Creating UI Connectors 3
Using the UI Connector framework | Terminology
TerminologyBefore you create a UI Connector, it is important to understand the components involved and the terminology which is used to describe them. The following diagram shows the various components and how they relate to one another:
adapter control
Adapter controls are components displayed in Object Explorer and used by automation developers. The properties, methods, and events of these controls provide a way to interact with native controls.
native control
A native control is a control in the application that you are automating.
target
A target is an object created in the adapter that represents a native control in the application that you are automating. The lifetime of targets is synced with the lifetime of the associated native control. So as the native controls are created and destroyed, the associated targets are likewise created and destroyed.
There are many types of targets and each target represents a specific type of control. So a GridTarget knows how to get cell values, set cell values, and so on. A ListBoxTarget provides a count of items and returns the items as a list.
These targets are matched to the adapter controls. When an adapter control is invoked in an automation, the control operates on the matched target and the target brokers communication with the native control in the application you are automating.
UI Connector
Runtime process Application process
TranslatorTarget
Adaptercontrol
Nativecontrol

Using the UI Connector framework | Terminology
Creating UI Connectors 4
translator
Translators are objects that are injected into the adapter application and operate directly against the native control. Translators are designed to operate against a specific type of control. For instance the .NET DataGrid translator works against System.Windows.Forms.DataGrid or any objects that inherit from DataGrid.
UI Connector
UI Connectors are C# classes that are created and compiled into your Pega Robot Studio project. UI Connectors contain the logic for mapping the target implementation to the native control. The adapter control communicates with the UI Connector and the UI Connector uses the target to make reflective calls to the native control.
Creating UI Connectors 5
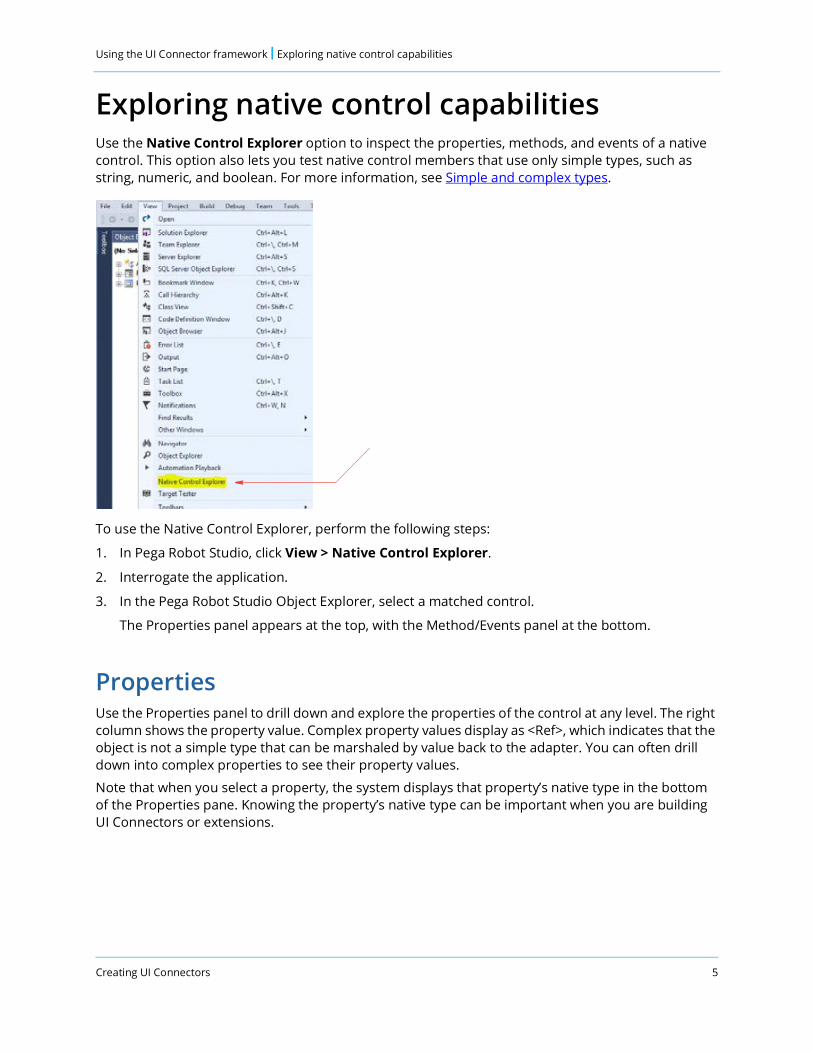
Using the UI Connector framework | Exploring native control capabilities
Exploring native control capabilitiesUse the Native Control Explorer option to inspect the properties, methods, and events of a native control. This option also lets you test native control members that use only simple types, such as string, numeric, and boolean. For more information, see Simple and complex types.
To use the Native Control Explorer, perform the following steps:
1. In Pega Robot Studio, click View > Native Control Explorer.
2. Interrogate the application.
3. In the Pega Robot Studio Object Explorer, select a matched control.
The Properties panel appears at the top, with the Method/Events panel at the bottom.
PropertiesUse the Properties panel to drill down and explore the properties of the control at any level. The right column shows the property value. Complex property values display as <Ref>, which indicates that the object is not a simple type that can be marshaled by value back to the adapter. You can often drill down into complex properties to see their property values.
Note that when you select a property, the system displays that property’s native type in the bottom of the Properties pane. Knowing the property’s native type can be important when you are building UI Connectors or extensions.

Using the UI Connector framework | Exploring native control capabilities
Creating UI Connectors 6
You can modify simple properties on the Properties panel. For instance, .NET controls have a Visible property. If you set that property to False, the control disappears from the application, which provides you with a way to test the control’s behavior when properties change.
MethodsWhen you select the root control in the Properties panel, the system shows the methods for that control on Methods tab. If you select a property at any level below the root control, the methods for that property’s native types display on the tab.
Testing methods
To test methods that only have simple parameters, perform the following steps:
1. Select a property.
2. On the Methods tab, select a method.
3. Click Test to execute the method against the live control.
Review the following example:
Note Read-only properties are not editable.

Creating UI Connectors 7
Using the UI Connector framework | Exploring native control capabilities
EventsWhen you select the root control in the Properties panel, the system shows the events for that control on Events tab. If you select a property at any level below the root control, the events for that property display on the tab.
Testing events
To test an event, perform the following steps:
1. Select a property.
2. On the Events tab, select an event.
3. Interact with the control to trigger the firing of the event.
When the event fires, it is added to the list on the right. Additionally, you can drill down to see the arguments for an event.
Using the UI Connector framework | Discovering members
Creating UI Connectors 8
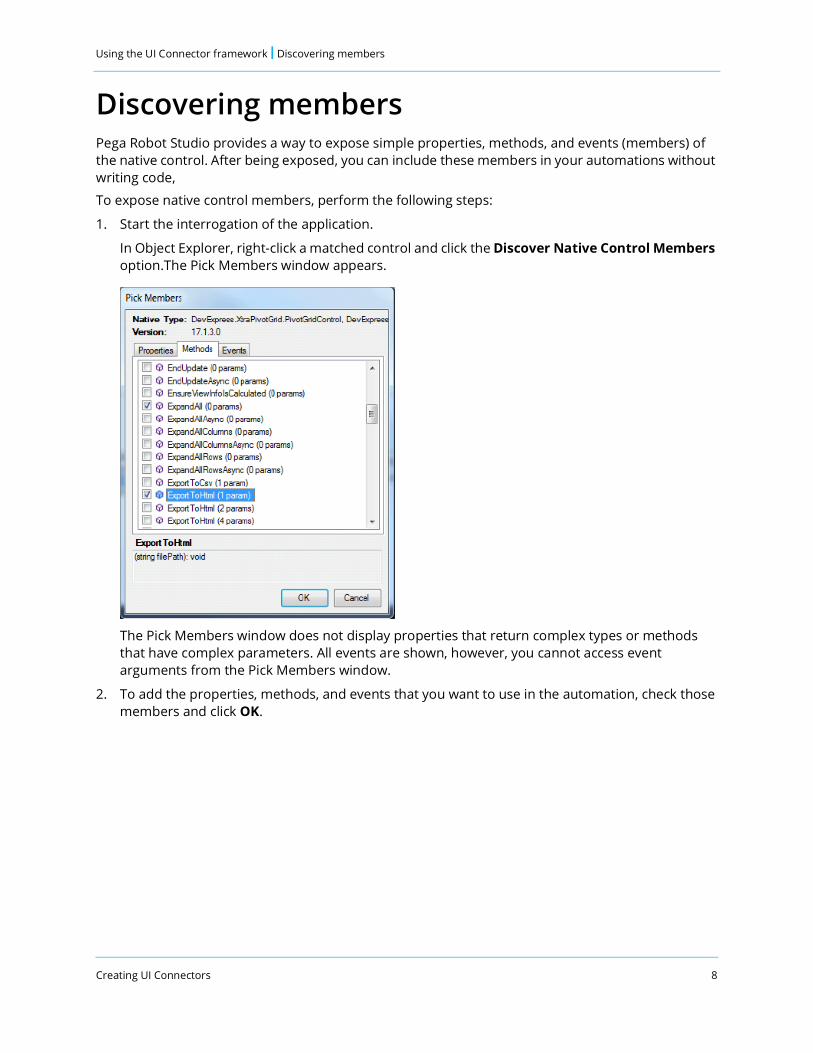
Discovering membersPega Robot Studio provides a way to expose simple properties, methods, and events (members) of the native control. After being exposed, you can include these members in your automations without writing code,
To expose native control members, perform the following steps:
1. Start the interrogation of the application.
In Object Explorer, right-click a matched control and click the Discover Native Control Members option.The Pick Members window appears.
The Pick Members window does not display properties that return complex types or methods that have complex parameters. All events are shown, however, you cannot access event arguments from the Pick Members window.
2. To add the properties, methods, and events that you want to use in the automation, check those members and click OK.

Creating UI Connectors 9
Using the UI Connector framework | Creating UI Connectors
Creating UI ConnectorsInterrogated controls that appear as base controls can be good candidates for UI Connectors. To create a UI Connector, perform the following steps:
1. Right-click a matched control.
2. Select the Create UI Connector option.
The system displays the Choose Control Target Interface window. Choose the interface that best reflects the type of control being accessed. For instance, Grids should implement IGridTarget, buttons should implement IButtonTarget, and so on.
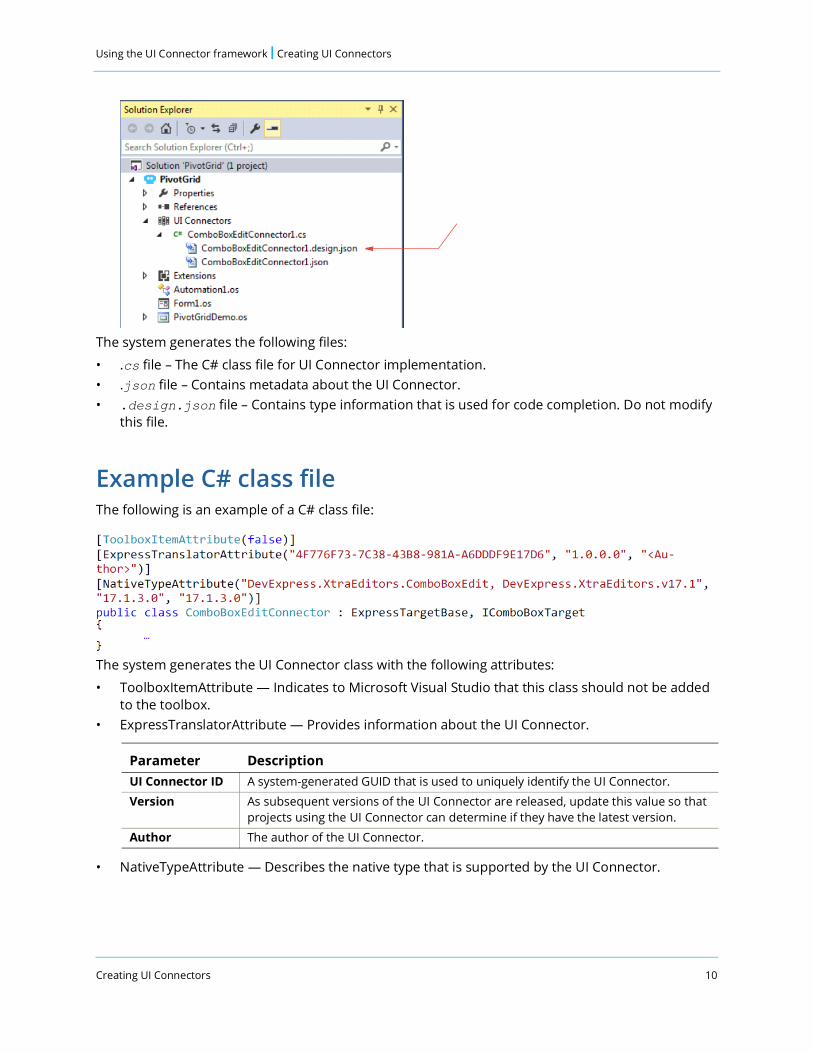
3. Select a target interface and click OK to create a C# (.cs) class file. The system uses this file to implement the UI Connector. The system generates the file, assigns to it the name of the control with Connector<#> appended, and places it in the UI Connectors folder in the Solution Explorer.
Note This option is available for .NET, Windows Presentation Foundation (WPF), and Java applications.
Using the UI Connector framework | Creating UI Connectors
Creating UI Connectors 10
The system generates the following files:
• .cs file – The C# class file for UI Connector implementation.• .json file – Contains metadata about the UI Connector.• .design.json file – Contains type information that is used for code completion. Do not modify
this file.
Example C# class fileThe following is an example of a C# class file:
The system generates the UI Connector class with the following attributes:
• ToolboxItemAttribute — Indicates to Microsoft Visual Studio that this class should not be added to the toolbox.
• ExpressTranslatorAttribute — Provides information about the UI Connector.
• NativeTypeAttribute — Describes the native type that is supported by the UI Connector.
Parameter DescriptionUI Connector ID A system-generated GUID that is used to uniquely identify the UI Connector.
Version As subsequent versions of the UI Connector are released, update this value so that projects using the UI Connector can determine if they have the latest version.
Author The author of the UI Connector.
Creating UI Connectors 11
Using the UI Connector framework | Creating UI Connectors
The following example shows support for all native control versions:[NativeTypeAttribute(“DevExpres.XtraEditors.ComboBoxEdit”, “”, “”0]
Example JSON fileThe JSON file contains the same information stored in the ExpressTranslator and NativeType attributes. This provides Pega Robot Studio with a way to learn about a UI Connector without having to parse the code.
Review the following example of a JSON file:
Parameter DescriptionNative control type name
This value is critical because it determines which native controls the UI Connector supports. The UI Connector applies to controls that inherit from this type as well. You could, however, create another UI Connector for a child class and it would take precedence because it supports a more specific implementation of the control. In .NET, this type is in this format: ‘<namespace>.<type>, <assembly>’Some libraries change the assembly name of each control version (as shown in the C# class file example). Because UI Connectors operate using reflection, a UI Connector is likely to operate against multiple versions of a control.To manage this, remove the assembly name. This indicates that the UI Connector applies to any control which has a matching type name, regardless of the assembly name.
Minimum Version
Indicates the minimum version of the native control supported by the UI Connector. Set this parameter to the lowest supported version or leave it blank to indicate that all versions prior to the maximum version are supported.
Maximum Version
Indicates the maximum version of the native control supported by the UI Connector. Set this parameter to the highest supported version or leave it blank to indicate that all versions after the minimum version are supported.
Note You must manually keep the information in this file in sync with the UI Connector attribute values.

Using the UI Connector framework | Re-creating a control as the correct type
Creating UI Connectors 12
Re-creating a control as the correct typeAt this point, the system has generated a UI Connector class, but the associated adapter control is still a base control. To re-create the control as the correct type, perform the following steps:
1. Stop interrogation.
2. Delete the control.
3. Build the project.
4. Start interrogation.
5. Re-interrogate the control.
After you complete these steps, the system creates the control based on using the target interface that you chose for the UI Connector. For example, if you chose IGridTarget, you would get a Grid control and if you chose IComboBoxTarget, you would get a ComboBox control.
Creating UI Connectors 13
Using the UI Connector framework | Implementing UI Connectors
Implementing UI ConnectorsYou can implement and test the generated UI Connector code. The UI Connector code includes a region in which the target implementation is stubbed out. The following is an example:
The generated UI Connector class inherits from ExpressTargetBase connector:
The ExpressTargetBase connector provides the NativeControl property which provides access to the native control functionality. Using the NativeControl property in code provides code completion for the properties, methods, and events that exist on the native control.
Note You get code completion in both the stand-alone and plug-in versions of Pega Robot Studio, but for best results when creating UI Connectors, use the plug-in version.

Using the UI Connector framework | Implementing UI Connectors
Creating UI Connectors 14
NativeControl is a C# dynamic object. This means that there is no compile-time type checking on NativeControl, so any well-formed property access or method invocation compiles without error even if the property or method does not exist on the native control.
If the property or method does not exist, when the line of code executes the system generates the following runtime error: ‘Unable to find Property/Method named '<name>' on class: '<Type Name>’
Simple and complex typesTo work with the NativeControl property, you need to understand the difference between simple and complex types:
• Simple types, such as int, double, bool, string, and so on, are returned by value to the UI Connector.
• Only references to complex types are returned.
The system wraps complex object references in dynamic objects and you can act on these dynamic objects, similar to how you would act on local complex objects. The following tables shows the simple types:
byte charbool Color decimal
DateTime double enumerations float
Font int long short
string uint ulong ushort

Creating UI Connectors 15
Using the UI Connector framework | Implementing UI Connectors
The following are some examples:
• Valid - A simple type returned to a strongly-typed local variable.
• Invalid – Returning complex type to strongly typed variable.
• Valid – A complex type returned to a dynamic local variable.
• Valid – A complex type returned to a local variable.
• Invalid – Pass a local complex type to a remote complex object method.
• Valid – Get a reference to the remote complex object. Pass a complex object reference to the remote method.
• Valid – Create a remote instance of a complex object. Pass a complex object reference to the remote method.

Using the UI Connector framework | Implementing UI Connectors
Creating UI Connectors 16
Testing UI ConnectorsPega Robot Studio provides the following ways to debug UI Connectors as you develop automations:
• Click Start to start automation debugging.
• Click Start C# Script Debugging to start a managed C# debugging session and test your UI Connectors.
You must choose which debugging mode is appropriate when you start the project.
For best results, make sure the target implementation is completed. You can, however, perform these steps to test each target method or property using the View > Target Tester option:
1. Start the project with the C# debugger by clicking Start C# Script Debugging .
2. In your application, go to the screen that contains the control you want to test.
3. In Pega Robot Studio, select View > Target Tester Tool.
4. Select the control you want to test in the Object Explorer.
If the Object Explorer is empty, open the adapter to select the control in the Object Explorer. The Target Tester window shows the properties and methods from the UI Connector’s target interface.
5. (Optional) Check the Show Base Control Members box to see members from the base control target class. This is only required if the UI Connector overrides a member from the base class.
Note C# debugging is available in the stand-alone version of Pega Robot Studio, but it does not support some important features, such as watch evaluation. Use the Pega Robot Studio Plug-in for the optimal C# debugging.

Creating UI Connectors 17
Using the UI Connector framework | Implementing UI Connectors
Testing properties
To test properties, perform the following steps:
1. Select a property from the member list. The Property Testing window appears.
2. Click Test Get to make sure the system can get the property.
Click Test Set to have the system perform the following tasks:— Send the value from the value editor to the property setter. — Update the property value for the live control. You can confirm the change in the adapter
application.
Testing methods
To test a method, perform the following steps:
1. Select the method. If the method has input parameters, the system displays a list of the parameters with editors above the Test button.
2. Make entries for the input parameter and click Test to invoke the method. If the method executes without errors, the system displays the following success message along with any return values:
If the method throws an exception, the system displays the following error message:
Note The Test Set button is not available for read-only properties.

Using the UI Connector framework | Implementing UI Connectors
Creating UI Connectors 18
Using the Target Tester
To debug the UI Connector code, perform the following steps:
1. Set a breakpoint on the appropriate line.
2. In Pega Robot Studio, select View > Target Tester to invoke the property or method. The debugger stops on the breakpoint.
3. Step through the code and evaluate the watches, as shown in the following example:

Creating UI Connectors 19
Using the UI Connector framework | Implementing UI Connectors
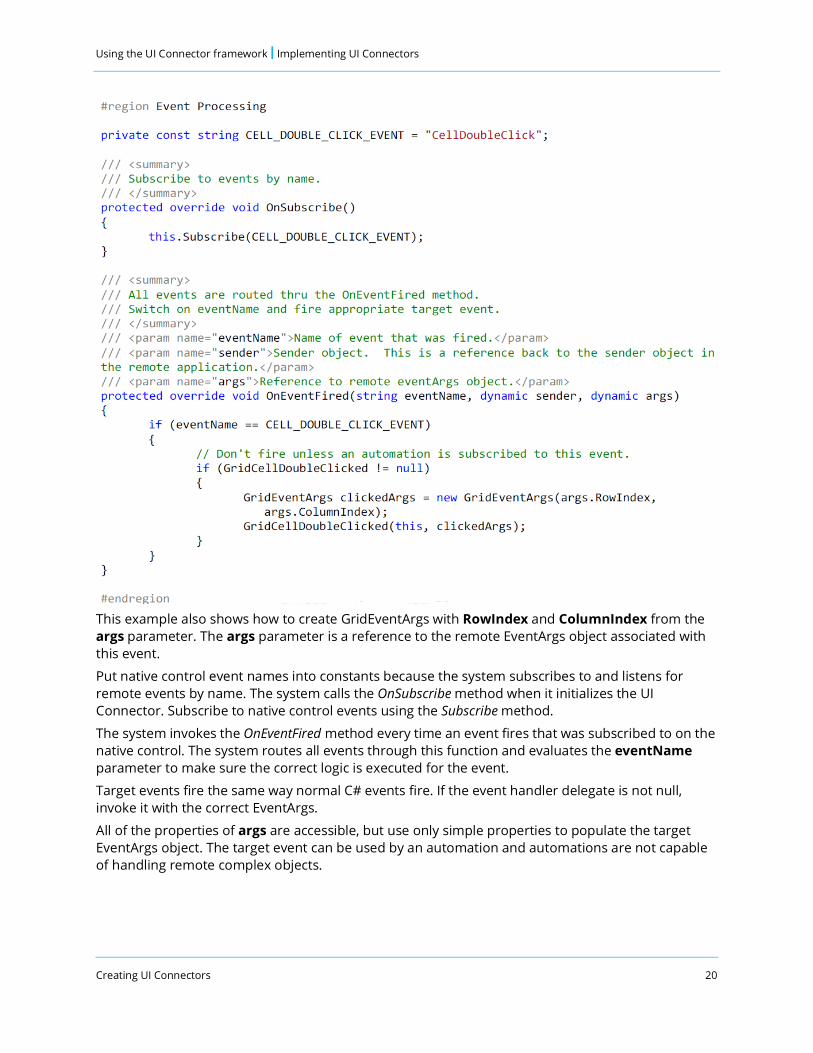
Handling eventsMany target implementations require the UI Connector to raise events. For instance, the Grid target requires the following events:
You must include events that fire at the correct time on the native control. Use the Native Control Explorer to test which events are appropriate. The Native Control Explorer tracks the events you selected and you can inspect the arguments of individual events.
Review the following example of how to implement the CellDoubleClick event on a grid:
Using the UI Connector framework | Implementing UI Connectors
Creating UI Connectors 20
This example also shows how to create GridEventArgs with RowIndex and ColumnIndex from the args parameter. The args parameter is a reference to the remote EventArgs object associated with this event.
Put native control event names into constants because the system subscribes to and listens for remote events by name. The system calls the OnSubscribe method when it initializes the UI Connector. Subscribe to native control events using the Subscribe method.
The system invokes the OnEventFired method every time an event fires that was subscribed to on the native control. The system routes all events through this function and evaluates the eventName parameter to make sure the correct logic is executed for the event.
Target events fire the same way normal C# events fire. If the event handler delegate is not null, invoke it with the correct EventArgs.
All of the properties of args are accessible, but use only simple properties to populate the target EventArgs object. The target event can be used by an automation and automations are not capable of handling remote complex objects.

Creating UI Connectors 21
Using the UI Connector framework | Implementing UI Connectors
Limiting cross-process callsUI Connectors provide an way to interact with objects in other applications using cross-process communication. Each cross-process call requires the remote application to execute code. There are ways to construct UI Connector code that limit the number of remote calls made. This is important for code that executes many times, like code that iterates over rows of a large grid to calculate a total.
It is important to understand that each property access, method invocation, or indexer access results in a call to the remote application. If a property, especially a property more than one level deep, is used multiple times in a method, it is more efficient to copy that property to a local variable. The following examples illustrate how many cross-process calls are required.
Review the following example of an inefficient process, where 15 calls are required:
Review the following example of a more efficient process, where only 7 calls are required:
Using the UI Connector framework | Implementing UI Connectors
Creating UI Connectors 22
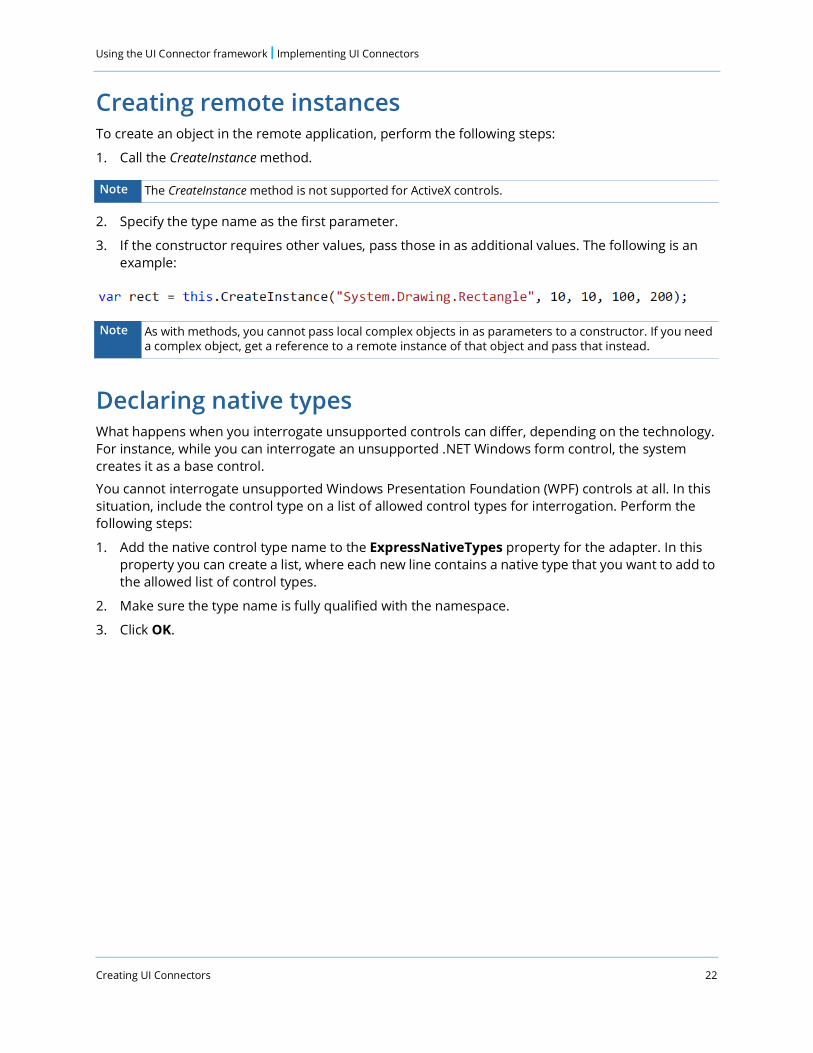
Creating remote instancesTo create an object in the remote application, perform the following steps:
1. Call the CreateInstance method.
2. Specify the type name as the first parameter.
3. If the constructor requires other values, pass those in as additional values. The following is an example:
Declaring native typesWhat happens when you interrogate unsupported controls can differ, depending on the technology. For instance, while you can interrogate an unsupported .NET Windows form control, the system creates it as a base control.
You cannot interrogate unsupported Windows Presentation Foundation (WPF) controls at all. In this situation, include the control type on a list of allowed control types for interrogation. Perform the following steps:
1. Add the native control type name to the ExpressNativeTypes property for the adapter. In this property you can create a list, where each new line contains a native type that you want to add to the allowed list of control types.
2. Make sure the type name is fully qualified with the namespace.
3. Click OK.
Note The CreateInstance method is not supported for ActiveX controls.
Note As with methods, you cannot pass local complex objects in as parameters to a constructor. If you need a complex object, get a reference to a remote instance of that object and pass that instead.

Creating UI Connectors 23
Using the UI Connector framework | Extensions
ExtensionsExtensions are similar to UI Connectors but perform a different function. Any public property, method, or event on an extension is added directly to the adapter control. Unlike UI Connectors, the control’s type does not change but you can add members to the control to extend its functionality.
Use extensions if a full target implementation is not required or if you need functionality that is not exposed by the target, such as when the native control is a grid with a useful Export method, but the Export method is not part of the IGridTarget interface. In Pega Robot Studio there are the following extensions:
• Type extensions• Control extensions
Adding type extensionsYou can add type extensions to any control. For adapter controls, the type extension is applied to all other adapter controls that are associated with the same native control type.
For example, a project can contain three grid adapter controls, two associated with DevExpressPivotGrids, and one associated with a standard .NET DataGrid. A type extension created against the first DevExpressPivorGrid would apply to the other DevExpressPivotGrid, but not to the .NET DataGrid, even though they are all adapter grid controls.
If, however, you create a type extension on a non-adapter control, like a script or automation, the system applies the extension to all controls of the same type and there is no native control type to consider.
To add a C# type extension class to the project, perform the following steps:
1. In Object Explorer, right-click the control.
2. Click the Create Type Extension option. This class is decorated with the ExtendTypeAttribute attribute. This attribute indicates the type supported by the extension.
The following is an example:
Using the UI Connector framework | Extensions
Creating UI Connectors 24
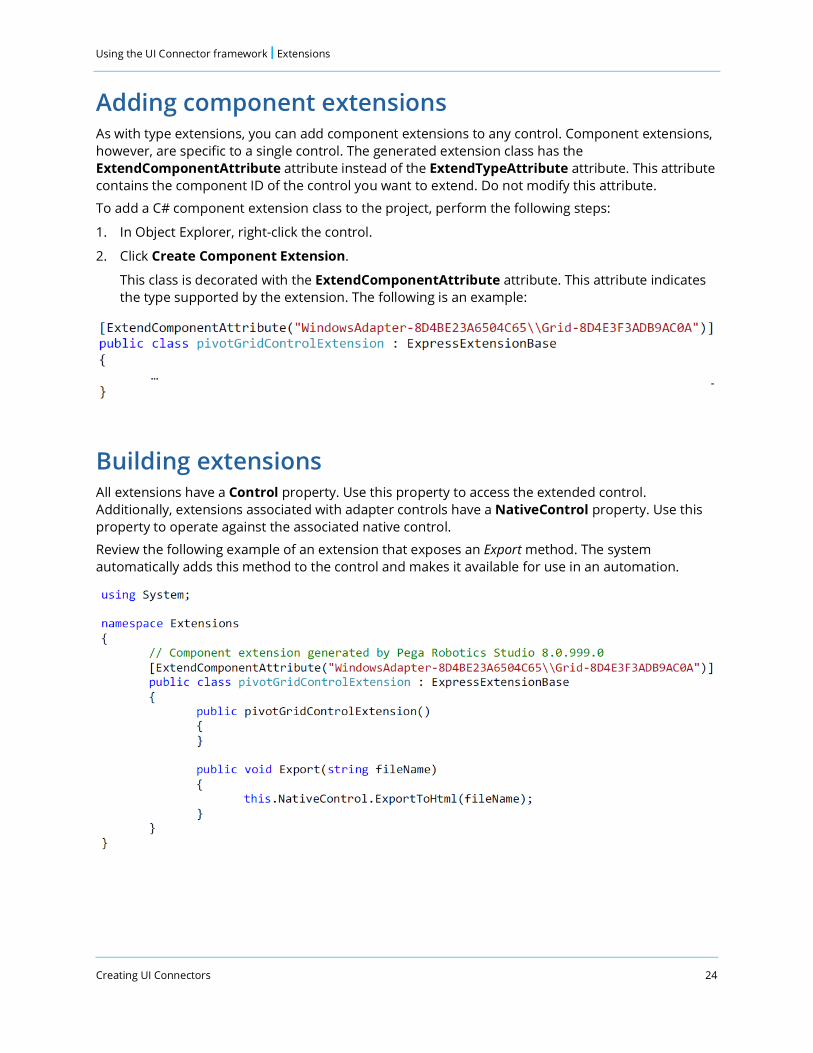
Adding component extensionsAs with type extensions, you can add component extensions to any control. Component extensions, however, are specific to a single control. The generated extension class has the ExtendComponentAttribute attribute instead of the ExtendTypeAttribute attribute. This attribute contains the component ID of the control you want to extend. Do not modify this attribute.
To add a C# component extension class to the project, perform the following steps:
1. In Object Explorer, right-click the control.
2. Click Create Component Extension.
This class is decorated with the ExtendComponentAttribute attribute. This attribute indicates the type supported by the extension. The following is an example:
Building extensionsAll extensions have a Control property. Use this property to access the extended control. Additionally, extensions associated with adapter controls have a NativeControl property. Use this property to operate against the associated native control.
Review the following example of an extension that exposes an Export method. The system automatically adds this method to the control and makes it available for use in an automation.
Creating UI Connectors 25
Using the UI Connector framework | Extensions
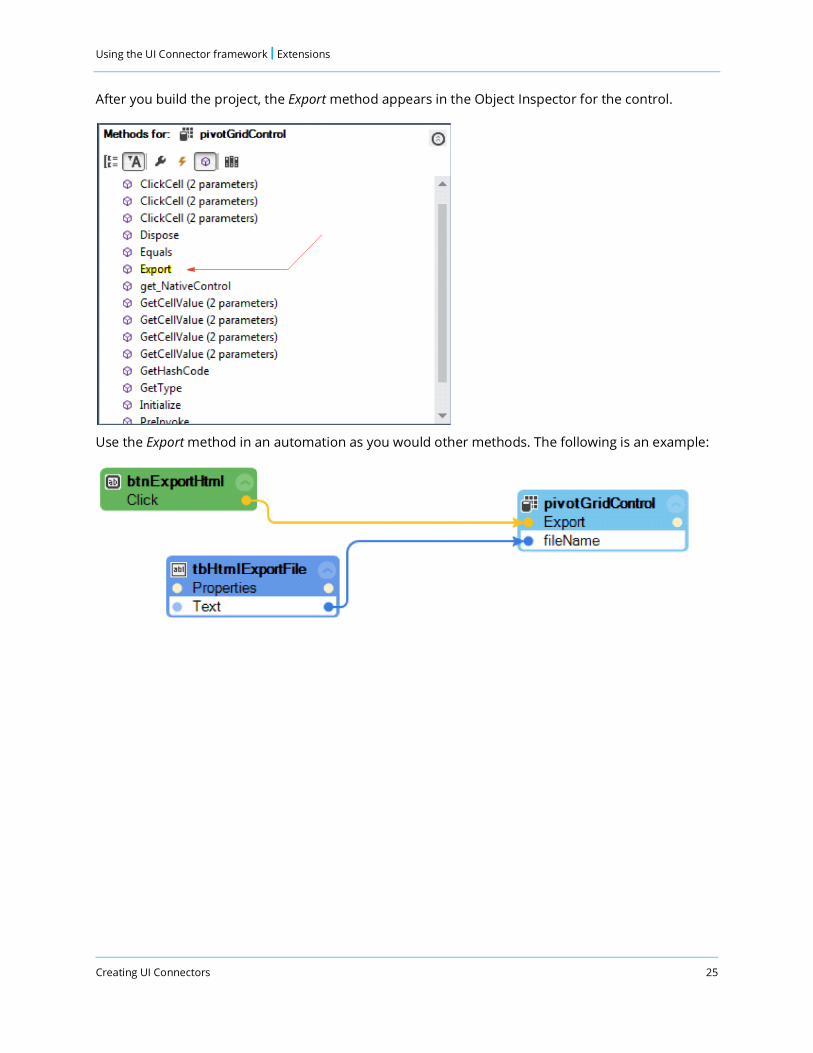
After you build the project, the Export method appears in the Object Inspector for the control.
Use the Export method in an automation as you would other methods. The following is an example:

Using the UI Connector framework | Extensions
Creating UI Connectors 26