Pega 7.1.9 Platform Update Guide
45
Pega 7.1.9 Platform Update Guide
-
Upload
khangminh22 -
Category
Documents
-
view
5 -
download
0
Transcript of Pega 7.1.9 Platform Update Guide

Pega 7.1.9 Platform Update Guide

Copyright and trademark noticesCopyright
Copyright © 2015 Pegasystems All rights reserved.
Trademarks
For Pegasystems trademarks and registered trademarks, all rights reserved. Other brand or productnames are trademarks of their respective holders.
For information about the third-party software that is delivered with the product, refer to the third-partylicense file on your installation media that is specific to your release.
Notices
This publication describes and/or represents products and services of Pegasystems It may contain tradesecrets and proprietary information that are protected by various federal, state, and international laws,and distributed under licenses restricting their use, copying, modification, distribution, or transmittal inany form without prior written authorization of Pegasystems.
This publication is current as of the date of publication only. Changes to the publication may be madefrom time to time at the discretion of Pegasystems This publication remains the property of Pegasystemsand must be returned to it upon request. This publication does not imply any commitment to offer ordeliver the products or services described herein.
This publication may include references to Pegasystems product features that have not been licensed byyou or your company. If you have questions about whether a particular capability is included in yourinstallation, please consult your Pegasystems services consultant.
Although Pegasystems strives for accuracy in its publications, any publication may contain inaccuraciesor typographical errors, as well as technical inaccuracies. Pegasystems may make improvements and/orchanges to the publication at any time.
Any references in this publication to non-Pegasystems websites are provided for convenience only and donot serve as an endorsement of these websites. The materials at these websites are not part of thematerial for Pegasystems products, and use of those websites is at your own risk.
Information concerning non-Pegasystems products was obtained from the suppliers of those products,their publications, or other publicly available sources. Address questions about non-Pegasystemsproducts to the suppliers of those products.
This publication may contain examples used in daily business operations that include the names ofpeople, companies, products, and other third-party publications. Such examples are fictitious and anysimilarity to the names or other data used by an actual business enterprise or individual is coincidental.

This information is the property of:
Pegasystems
One Rogers St.
Cambridge, MA 02142-1209
USA
Phone: (617) 374-9600
Fax: (617) 374-9620
www.pega.com
Updated: Monday, November 02, 2015

ContentsCopyright and trademark notices 1
Copyright 1
Trademarks 1
Notices 1
Using Pegasystems documentation 3
Online resources 3
Differences between updates and upgrades 3
Planning your update 5
Single and split-schema systems 5
In-place and out-of-place updates 6
Update methods 7
Product mode 7
Transport-layer encryption 7
Business Intelligence Exchange (BIX) and Pega 7 Platform product versions 8
Triggers in Pega 7.1.9 8
Update overview 8
System requirements 8
Update deployment tool 9
Application server 9
Gathering database connection information 10
Preparing the database 11
Configuring the deployment user 11
Updating multitenant systems from Pega 7.1.5 and later 11
Editing the setupDatabase.properties file 12
Common properties 13
Additional update properties 14
Editing the file 16
Manually generating and applying DDL 16
Pega 7.1.9 Update Guide 1

Applying schema changes 17
Editing setupDatabase.properties to bypass DDL generation 17
Using JCL for IBM DB2 for z/OS databases 17
Updating the PegaRULES database 20
Running the update deployment tool 20
Updating from the command line 22
Redeploying the applications for upgrades from Pega 7.1.6 and earlier 23
Cleaning up unused tables 25
Configuring a load balancer to log X-Forwarded-* (XF*) HTTP headers 26
Prerequisites 26
Appendix A: Reversing an update 28
Prerequisites 28
Limitations 28
Overview: Reversing an update 29
Reversing an update 30
Generating the reverse Create and Drop statements 31
Preparing the script to reverse an update 31
Setting the properties to reverse an update 32
Passing the arguments to reverse an update 32
Running the script to reverse an update 33
Illustrated Examples: Out-of-Place update and reverse 33
Example 1: Perform an out-of-place update 33
Example 2: Reverse an out-of-place update 41
Pega 7.1.9 Update Guide 2

Using Pegasystems documentationThis guide describes how to update an existing instance of Pega 7.1.x to the Pega 7.1.9.You must upgradesystems running versions earlier than Pega 7.1.0; see the Pega 7.1.9 Upgrade Guide for instructions.
Online resourcesThe Pega Discovery Network (PDN) at https://pdn.pega.com is Pegasystems' online documentation andinformation site. To access the latest documentation, navigate to the Support & Resources tab.
l Platform Support Guide: The Platform Support Guide lists the databases, drivers and applicationservers supported for this release. Review the Platform Support Guide before you update the Pega7 Platform to verify that your database and application servers are supported.
l Deployment guides: The PDN includes the latest installation, upgrade, and update guides.
l Release notes: Review the important information in the release notes before you continue. Pega7.1.9 introduces new features and functionality which may cause compatibility issues with yourexisting application. You may need to take certain actions before updating.
l Updated help files: Download the current prhelp.war file from the Resources & Support tab ofthe PDN, or use the online version: https://pdn.pega.com/sites/pdn.pega.com/files/help_v71/procomhelpmain.htm.
Differences between updates and upgradesAn update is a new distribution kit that contains cumulative fixes and enhancements to the product sincePega 7.1.0; it is not a full product release. In contrast, upgrades are full product releases. If you need tomove from any version prior to Pega 7.1.0, you must upgrade. To move from any Pega 7.1.x version tothe most current release, run the update. See the Pega 7 Platform Upgrade Guide for more informationabout upgrades.
The following list identifies the major differences between updates and upgrades. Contact PegasystemsGlobal Customer Support to determine if you can update, or if you need the full upgrade:
l Updates are smaller and faster than upgrades.
l Because a update distribution only contains the cumulative changes since Pega 7.1.0, thedistribution is approximately 50% smaller than a typical full upgrade distribution. Most of thedifference is due to the rules in the PRPC_Rules.jar file.
l Both the update and upgrade consist of a series of ANT targets, executed in sequence.However, the update process omits 3 ANT targets:
l ImportPreupgradeRuntime – this step is only required to run the newest engine, whichis already present on the Pega 7 Platform.
Pega 7.1.9 Update Guide 3

l UpgradeJavaSyntax - This step upgrades snippets of Java code to be compatible withthe Pega 7 Platform.
l RemapDatabaseTables – This step maps some Data-Admin-DB-Tables to PegaDATA,which is not necessary for the Pega 7 Platform.
l For smaller databases (less than 10 GB), the update process can be up to 25% faster than anupgrade, because there are fewer rules to process and fewer ANT targets to execute. Forlarger databases (greater than 100 GB), the update process is up to 10% faster, because theperformance benefits are diminished by other long-running processes. The performancevaries greatly depending on the size and structure of your database.
l Updates manage superseded hotfixes: The update process contains specialized error handlingfor superseded hotfixes. If your system contains a hotfix that is newer than the hotfix provided inthe update, the update automatically exits. Contact Pegasystems Global Customer Support if youneed to force the update.
l Many Updates can be reversed. See Appendix A: Reversing an update. You can reverse an out-of-place, split-schema update on a development system with Oracle Database, Microsoft SQLServer, or PostgreSQL. Upgrades and other updates cannot be reversed.
l Updates do not include updated help: The prhelp.war file is not included in an update. You candownload the file from the update page of the PDN or use the online version.
l Updates do not include additional products: You must upgrade if your system includes PegaWeb Mashup (formerly Internet Application Composer (IAC) or Business Intelligence Exchange(BIX).
Pega 7.1.9 Update Guide 4

Planning your updateThe Pega 7 Platform supports a run-time mode and a variety of deployment topologies that can impactthe choices you make at different stages of the update. Before beginning, read this section thoroughly.
Note: If you are making changes in your environment as part of the upgrade, do them before upgrading.
Single and split-schema systemsThere are two configuration types:
l Single schema: One schema contains all rules and data objects.
l Split schema: There are two schemas on the same database:
l a Rules Schema – contains Rules tables and associated data and objects
l a Data Schema – contains transaction data, including Work objects
Split-schemas allow you to conduct an in-place update in one environment and then migrate theupdated objects to other environments. Split-schema configurations are best practices, particularlyin critical development environments such as QA, STAGE and PROD.
The following diagram illustrates the difference between a single-schema system and a split-
Pega 7.1.9 Update Guide 5

schema system.
In-place and out-of-place updatesIn an in-place update, the existing schemas are updated, and no new schemas are created. The dataschema upgrade happens automatically during the update process. These updates require significantdowntimes because they directly modify the schemas in production.
Note: If you are performing an in-place update, do not use the Pega 7 Platform while the update isrunning.
In an out-of-place update, an offline migration rules schema is updated, while the data schema isupdated directly. The offline schema can reside either on the production database or on a secondtemporary database. These updates require significantly shorter downtimes because they modify anoffline schema, and do not update the schemas in production.
Note: An out-of-place update requires that the source and target database vendor and version areidentical.
As a best practice, use out-of-place updates for split schema systems. See the Pega 7.1.9 Upgrade Guideto familiarize yourself with the process for upgrading a split-schema system. You can follow the same
Pega 7.1.9 Update Guide 6

instructions for an update, which includes running the data schema upgrade at the end. An exception isthat the update process for split-schema uses the update deployment tool, while the upgrade processuses the Installation and Upgrade Assistant (IUA).
Update methodsYou can update the Pega 7 Platform either automatically or manually. This guide includes instructions forboth methods.
n Automatically – Use the UI-based Update deployment tool to automatically update either therulebase or the rulebase and the schema. The update deployment tool runs on any Windows, Unix,Linux, or zLinux system with Java 6 or higher.
n Manually – Configure the setupDatabase.properties file with your site-specific properties.Then run scripts to update and optionally generate DDL. If you generate DDL, have your DatabaseAdministrator apply the DDL to your schema.
An update distribution is approximately 1 GB, and up to 25% faster than running a full upgrade. Theactual deployment time is influenced by four factors:
l Database structure: The update creates database indexes for an optimal runtime performance ofthe Pega 7 Platform. The time taken to create these indexes is proportional to the size of thedatabase.
l Network: The update requires a network connection to the database, and should be run on thedatabase machine itself, or as close to the database machine on the network as possible. Do notrun the update installers on a WAN, VPN, or any high-latency network, or network with multiplehops between the update and the database.
l Database type: Total update performance can vary as much as 25%, depending on the databasetype.
l Hardware performance: Choose the highest-performing machine to run the update. Chooseenterprise-class systems with multiple CPU cores and Solid-State Drives (SSDs).
Product modeThe Pega 7 Platform includes a Multitenancy mode. The Multitenancy mode has different requirements,different run-time behaviors and different administrative procedures from other modes. Before youselect the Multitenancy mode, review the Multitenancy Administration Guide which discusses this mode indetail. It is included in your distribution package and available on the PDN.
Transport-layer encryptionPegasystems recommends that you use a strong transport-layer encryption (for example, TransportLayer Security 1.2) to secure Pega 7 Platform web applications. This requires that you create and install
Pega 7.1.9 Update Guide 7

TLS/SSL digital certificates on your web application server for the Pega 7 Platform. For moreinformation, see the documentation for your application server.
Business Intelligence Exchange (BIX) and Pega 7Platform product versionsRelease versions of the Business Intelligence Exchange (BIX) product are synchronized with releaseversions of the Pega 7 Platform. To use the BIX product once you have obtained a license, the version ofBIX must be the same as the version of the Pega 7 Platform. BIX is included in the full distribution. Seethe Pega 7.1.9 BIX User Guide for information about installing BIX.
Triggers in Pega 7.1.9Pega 7.1.9 handles triggers differently than previous versions. Triggers that reference the updates cacheand rule view tables will drop when the Pega 7 Platform opens for the first time. The Pega 7 Platform nowmaintains these tables. If you have custom triggers that only maintain these tables, do not recreate thetrigger. If you have custom triggers that depend on these tables or are defined on these tables and thesetriggers also have other logic you want to keep, contact Pegasystems Global Customer Support forinstructions on how to proceed.
Update overviewUpdating the Pega 7 Platform is a multi-step process that involves preparing your database fordeployment, updating the PegaRULES database, and then redeploying the application archives.
This guide is organized to expedite the update process. It can be summarized in the following steps thatare typically performed in sequence.
1. Prepare the database to install the update.
2. Update the PegaRULES database.
Note: In a split schema configuration, update both the rule and data schemas.
3. Redeploy the applications if you are updating from Pega versions earlier than 7.1.7.
System requirementsBefore you update, check the supported versions of your application server and database. See thePlatform Support Guide on the PDN for a list of supported versions. Ensure that your system meets theminimum requirements described in this section.
Pega 7.1.9 Update Guide 8

Update deployment tool
The minimum systems requirements to run the update deployment tool are:
n Windows or Linux operating system
n 1 GB minimum available memory
n 2 GB minimum disk space
n Java Platform, Standard Edition Development Kit (JDK). Set JAVA_HOME to the root directory of theJDK. For Java 8, you may need to remove from the PATH any references to a Java shortcut.
Note: If your system contains a hotfix or a local change that is more recent than the creation date of theupdate, the update detects this condition and exits with an error to avoid overwriting the hotfix or localchange. If this occurs, or if you experience any other unexpected behavior with the update, contactPegasystems Global Customer Support. After reviewing the hotfixes and local changes, you can chooseto install the update and overwrite the local changes. Then, if necessary, make the appropriate localchanges after installing the update.
Application server
Pegasystems recommends that you install only the Pega 7 Platform on the application server.
The application server requires:
l A Web browser — required to deploy the Pega 7 Platform applications from the Red Hat JBossManagement Console
l Oracle JDBC type 4 driver, such as ojdbc6.jar. See the Platform Support Guide for moreinformation about supported drivers.
l 1 GB minimum free disk space
Note: Allocate enough storage to accommodate debugging and other logging requirements.Configure logging to avoid writing logs to the directory that contains the application server run-time components.
Application server memory requirements
The Pega 7 Platform runs in memory on Java Virtual Machines (JVMs). This memory is called a “heap”. Ingeneral, all activity is distributed over multiple JVMs (nodes) on the application server.
l Standard suggested system heap size is 4 - 8 GB based on monitoring of memory usage and GCfrequency.
l Larger heaps may be advisable if a system is to run applications designed to allow a high numberof concurrent open tasks per session or to cache a large collection of transaction or reference data.
Pega 7.1.9 Update Guide 9

l Do not deploy the Pega 7 Platform in an environment where the heap size exceeds the vendor-specific effectiveness limit.
Oracle JDKs use a compression option to minimize the cost of large heaps. The option is labeledCompressedOOPS. Compression is effective up to 32 GB.
IBM JDKs use a compression option to minimize the cost of large heaps. The option is labeledCompressedRefs. Compression is effective up to 28 GB.
IBM JDKs use a compression option to minimize the cost of large heaps. The option is labeledCompressedRefs. Compression is effective up to 28 GB.
In current 64 bit JVMs, compression is enabled by default.
The host application server memory size must be at least 4 GB larger than the Pega 7 Platform heap size.The additional 4 GB is recommended to allow for operating system, monitoring tools, operating systemnetwork file buffering, and JVM memory size (-xmx option).
The minimum host application server memory size is 8 GB:
4 GB heap + 4 GB for native memory, operating system, and buffering
Gathering database connection informationThe connection URL depends on how you connect to the database. Obtain the following information fromyour DBA:
l Connection method: Service or SID
l Host name
l Port number
l Service or SID name
You will need to enter the connection URL as pega.jdbc.url when you configure the application server.Your connection string will be similar to the following. Replace the variables with the values for yoursystem:
jdbc:db2://server:port/database
l To connect to Oracle as a service: jdbc:oracle:thin:@//localhost:port/serviceName
l To connect to Oracle through SID: jdbc:oracle:thin:@//localhost:port:SID
l jdbc:microsoft:sqlserver://server:port;DatabaseName=database
l jdbc:db2://server:port/database
l jdbc:postgresql://server:port/database
Pega 7.1.9 Update Guide 10

Preparing the databaseTo prepare the database:
l Configure the database deployment user required to update the PegaRULES database
l Optionally generate and apply the update DDL.
Configuring the deployment userTo update the Pega 7 Platform PegaRULES database, configure a database user with sufficient privilegesto operate against the Pega 7 Platform database. The deployment user only updates the Pega 7 Platformdatabase and typically has no run-time role. For more information about run-time configuration, see thePega 7.1.9 Installation Guide.
The deployment user performs DDL operations (Create, Alter) against the following types of databaseobjects:
l Indexes
l Procedures
l Tables
l Triggers
l User-Defined Functions (UDFs)
l Views
Some organizations prefer to assign DBA (or equivalent) privileges to the deployment user for operationsagainst any Pega 7 Platform-related database objects. After updating the PegaRULES database, you candisable or delete the deployment user.
For split-schema systems, the deployment user also grants privileges to the run-time users so thatreporting and other queries that require cross-database joins work properly. You can execute grantsmanually, but it is a best practice to automatically execute grants to accommodate customer-specificdatabase configurations.
Updating multitenant systems from Pega 7.1.5 andlaterStarting with Pega 7.1.7, the multitenant architecture requires an additional column, pzTenantID. Severaltables are now tenant-qualified; updating automatically adds the multitenant column to these tables.
SQL databases do not allow the addition of a non-null column to an existing table unless the table isempty. Therefore, if the tables contain data, updating systems on those databases displays an error"Table must be empty to add column" and the update fails. For most tables, truncating the data is
Pega 7.1.9 Update Guide 11

acceptable; however, the pr_data_admin_product table includes important data. Pegasystems provides ascript to add the pzTenantID column to the pr_data_admin_product table without losing data.
To prepare the tables, follow these steps before you update. The specific steps depend on which versionof Pega 7.1.x you are updating from.
1. Log in to the data schema as the Deployment user.
2. If you are updating from Pega 7.1.7 or later, skip this step; these tables already include thepzTenantID column.If you are updating from Pega 7.1.6 or earlier, run the following commands to truncate your tables:
truncate table pc_schedule_task;truncate table pr_index_schedule_task;truncate table pr_data_mobile_appinfo;truncate table pr_data_mobile_asset;truncate table pr_data_mobile_build;truncate table pr_data_mobile_certificate;
3. For all updates, add the column to the pr_data_admin_product table without truncating the data:
a. Navigate to the AdditionalUpgradeScripts directory:
distribution_directory/scripts/AdditionalUpgradeScripts/
b. Run the script for your database:
database_mt_upgrade_tables.sql
Editing the setupDatabase.properties fileSkip this section if your deployment meets both these criteria:
l You will use the update deployment tool to update.
l You will allow the update process to automatically apply the schema changes.
If your deployment does not meet both these criteria, follow the steps in this section to edit thesetupDatabase.properties file. Follow these instructions if you plan to use the command line scripts toupdate or if you plan to use the generateddl script to generate a DDL file of schema changes. TheDeployment user should perform these actions.
The setupDatabase.properties file is used by the scripts that update the database schema and therulebase. These scripts use the setupDatabase.properties file:
Pega 7.1.9 Update Guide 12

l The script deploys the most recent version of the Pega 7 Platform.
l The generateddl.bat/sh script generates a SQL file to manually apply schema changes.
Common properties
These properties specify the settings needed to connect to the database:
l The script arguments column lists the arguments for the generateddl.bat/sh script.
l The setupDatabase.properties column lists the corresponding file property.
generateddl script argu-ment setupDatabase.properties Description
--dbType pega.database.type
Database vendortype. Enter thecorrect databasevendor:
l IBM DB2 forLinux, UNIX,andWindows:udb
l Microsoft SQLServer:mssql
l Oracle:oracledate
l PostgreSQL orEnterpriseDB: postgres
l IBM DB2 forz/OS: db2zos
--dbSchema rules.schema.name
In a single schemaenvironment setsrules schema anddata schema.
In a split-schemaenvironment, setsthe rules schemaonly.
--dbDataSchema data.schema.nameOptional: Specifiedfor a split schema
Pega 7.1.9 Update Guide 13

generateddl script argu-ment setupDatabase.properties Description
environment only.Sets the data schemafor the environment.
--mtSystem multitenant.system
Is this a MultitenantSystem? true/false
IBM DB2 forz/OS does notsupport MultitenantSystems.
--dbuser pega.jdbc.username User name of theDeployment user.
--dbpassword pega.jdbc.password
Password of theDeployment user. Ifyou plan to useencryptedpasswords, leave thisblank.
--dburl pega.jdbc.url
The Database jdbcurl. See See"Gathering databaseconnectioninformation " on page10 for moreinformation.
--driverJar pega.jdbc.driver.jar
Path and file name ofthe jdbc driver. IBMDB2 forz/OS requires fol-lowing jar files:d-b2jcc4.jar anddb2jcc_license_cisu-z.jar
--driverClass pega.jdbc.driver.class Class of the jdbcdriver
--tempdir user.temp.dir
Optional: the loc-ation of the temp dir-ectory. Set this to anyaccessible location,for example,C:\TEMP.
pega.zos.properties z/OS site specific properties file.
The full path and filename to thepega.zos.propertiesfile.
Additional update properties
The following table describes additional properties in the setupDatabase.properties file that you mayneed to edit later in the process. Do not modify these properties now.
Pega 7.1.9 Update Guide 14

Property Description
user.temp.dirThe temporary directory for theDeployment user. The default isused if this property is left blank.
pega.zos.properties z/OS site-specific properties file.
db2zos.udf.wlm Workload manager to load UDFsinto db2zos.
bypass.pega.schema
Setting this property to true willbypass the creation of the UpdateSchema and implies that theupdate DDL has already beenapplied.Leaving this property blank or set-ting it to false will generate andapply the Update Schema.
bypass.udf.generation
Generate UDF will be skipped ifthis property is set to true. Leavethis property blank if you need togenerate the UDF.
rebuild.indexes
Rebuild Database Rules Indexesafter Rules Load to improve Data-base Access Performance. It canbe executed manually by runningthe stored procedure SPPR_REBUILD_INDEXES. The defaultvalue depends on the database.The amount of time this processadds to the upgrade proceduredepends on the size of your data-base.
update.existing.applications
Specifies whether to run theupdate wizard after upgrade.Default value is false. Regardlessof the setting,update.existing.applications runsfor all upgrades of systems prior toPega 7.1.0.
Update wizard can be run fromupgrade scripts, prpcUtils, or bydirectly launching in the Pega 7Platform after upgrade.
run.ruleset.cleanup
Run RuleSet Cleanup. Generateand execute a SQL script to cleanold rulesets and their rules fromthe system. If you would like toonly generate the script, notexecute it, see cleanup.bat orcleanup.sh script.
reversal.schema.file.name Schema file name to be used forreversal
Pega 7.1.9 Update Guide 15

Editing the file
To edit the setupDatabase.properties file:
1. Open the file setupDatabase.properties for editing. This file is located in the scripts folder ofyour distribution.
2. Specify the properties for your system. For each property, add the appropriate value after theequals sign.
3. Save and close the file.
Manually generating and applying DDLSkip this section if you do not need to generate a DDL file or if you plan to use the JCL to generate aDDL file on an IBM DB2 for z/O environment.
A generateddl script is provided for Windows (generateddl.bat) and Linux (generateddl.sh) in the<PRPC_HOME>\scripts directory. This script automatically renders the platform-specific DDL andwrites the output to a file. You can then view and edit the file or directly apply it using databasemanagement tools. Both scripts work identically and accept the arguments noted in Editing thesetupDatabase.properties file.
Use the following convention:
generateddl.bat --action upgrade --arg1 [value] --arg2 [value] ..... --argn [value]
Note: You must supply the --action parameter to the script. You can also supply an --outputDirectoryparameter. If no additional arguments are passed to the script, the script defaults to the values of theproperties set in the setupDatabase.properties file.
To use the script:
1. Perform these steps as the Deployment user.
2. If you have not already done so, edit the setupDatabase.properties file. See Editing thesetupDatabase.properties file.
3. Open a command prompt and navigate to the scripts directory.
4. Type generateddl.bat or generateddl.sh passing in the required --action upgrade parameter.For example:
l Single-schema: #generateddl.bat --action upgrade --dbSchema <rules schema>
l Split-schema: #generateddl.bat --action upgrade --dbSchema <rules schema> --dbDataSchema <data schema>
Pega 7.1.9 Update Guide 16

If you do not pass another value for --outputDirectory, the script writes the output to the followingdirectory:
PRPC_HOME\schema\generated\
Note: The output directory is deleted and recreated each time the generateddl script executes. To savea copy of the DDL, rename the directory before you run the script.
Applying schema changes
Before you continue, have your DBA follow these general steps to apply the schema changes:
1. Review the DDL files in the DDL output directory. The default directory is: PRPC_HOME\schema\generated\database-type\install\udfstatements.
2. Determine the order in which the DDL files must be applied.
3. Make any needed manual changes to the files.
4. Apply the DDLs for the UDFs from the DDL output directory in the correct order.
a. Register the Java .jar file with the database.
b. Register the Java .jar file with the database.
c. Register the Java .jar file with the database.
d. Enable UDF execution for the database.
e. Register the C# .cs code files with the database.
f. Apply the CREATE FUNCTION DDL.
5. Install the UDF archive file PRPC_HOME\archives\udf\prreadstream.jar to the schema.
Editing setupDatabase.properties to bypass DDL generation
After your DBA applies the changes to your database, set the property bypass.pega.schema=true inthe setupDatabase.properties file. Then, when you run update.bat/sh, the system does not try to applya schema that is already present. Doing so would cause the update to fail.
Using JCL for IBM DB2 for z/OS databasesSkip this section if you plan to use the Installation and Upgrade Assistant or the command line scripts toupdate.
Pega 7.1.9 Update Guide 17

The Pega 7 Platform includes JCL scripts to setup the z/OS environment to run the various shell scriptsand java programs packaged with your distribution. The JCL scripts use IBM’s batch z/OS launchers forrunning Unix System Services in z/OS and JZOS (Java on z/OS).
The JCL scripts used to update IBM DB2 for z/OS are delivered in the library PEGA.DB2.JCLLIB:
<PRPC_HOME>/scripts/config/db2zos/libraries/PEGA.DB2.JCLLIB
The library includes these members:
l SETUPZOS - This member includes:
n shell script set statements to establish the fully-qualified directory paths for the Java 6 – 64Bit System
n JDBC Jar members
n IBM’s JZOS system
n JDBC connection properties
n path to the Pega 7 Platform distribution
l SITEDIRS - Contains the JCL set statements used to establish the fully qualified zFS workingdirectory, the fully qualified zFS directory to the Pega Distribution Root and the MVS fully qualifiedlibrary name of the Pega 7 Platform JCL library that contains these members.
l PU01EXP - This job expands the Pega 7 Platform distribution into the zFS directory specified bythe SITEDIRS script.
l PI01DDL - This job creates the SQL DDL statements required to upgrade the database objects.
l PI01ENV - This is the environment script for the job PI01DDL. Do not modify this script.
l PI02SQL- This job applies the SQL DLL statements generated by PI01DDL creating the necessarytables, triggers, views, indexes and stored procedures required to upgrade the Pega 7 Platformsystem.
l PI02ENV - This is the environment script for the job PI02SQL. Do not modify this script.
JCL Procedure
The JCL procedure uses a combination of both MVS libraries and zFS members.
To follow this procedure, you need a user id with OMVS access, and 5 GB of available storage.
Pega 7.1.9 Update Guide 18

1. If you have not already done so, update the DB2SiteDependent.properties file in the directory<PRPC_HOME>/scripts/config/db2zos. Add these values:
l #WLMUDF - dedicated Java-enabled Work Load Manager (WLM)
l database username - the name of the user with z/OS credentials. Enter this value in allcapital letters, or the fails.
l database password
2. FTP the Pega 7.1.9 distribution image to the z/OS server.
3. Sign into the z/OS server from an OMVS terminal.
4. Use either USS services or the ISPF panel to expand the distribution image.
5. Make your current directory the directory that contains the distribution image and run PU01EXP.
6. Allocate an MVS library to hold the 5 library members:
<Pega7_HOME>/scripts/config/db2zos/libraries/PEGA.DB2.JCLLIB
Note: Name the library PEGA.DB2.JCLLIB with the DCB attributes of FB/80/4000. Then, useISPF 3.3 to copy the file into the library as members. If you use another library name, manuallychange the library name in each member to the new name.
7. Using the ISPF editor, review and edit the members SETUPZOS and SITEDIRS one at a time,updating the file paths. The instructions for editing these members are included in the comments.Remember to save the member each time, then Submit.
Note: SETUPZOS contains DSN statements for the JCL. SITEDIRS contains pointers to membersthat the shell scripts will need. These are provided as a common place to set these values.
8. Using the ISPF editor, review and edit the members PI01DDL and PI02SQL one at a time,updating the comments by the JCL. Remember to save the member each time, then submit.
9. Run PI01DDL.
Note: This member generates the database DDL statements that will be used to create thedatabase. Review the output for accuracy.
10. Run PI02SQL to apply the DDL.
Pega 7.1.9 Update Guide 19

Updating the PegaRULES databaseYou can install the update by using one of the following methods. Each method is designed to preserveany prior customization to the database.
n Automatically – the UI-based the update deployment tool automatically updates the schemaleaving any customizations intact. See Running the update deployment tool.
n Manually – Use the update.bat/sh command-line script. See Updating from the command line.
n JCL – JCL member scripts are provided so that the schema can be generated and applied on thez/OS system itself. See Using JCL.
These methods require a JDBC connection to the database and can be run from any Windows, Unix, Linuxor zLinux computer with Java 6 or higher. The Deployment user should perform these actions.
Note: Running the update on the same machine as the database server is a best practice. Running theinstaller over a VPN, a WAN, a high-latency network, or a network with more than one hop between theinstaller and the database can slow the update process.
Running the update deployment toolThe update deployment tool is a swing-based graphical installer.
Note: Before running the tool, ensure that your system meets the update requirements.
1. If you are forcing the update due to an earlier update failure, edit the setupDatabase.propertiesfile.
a. Open the file setupDatabase.properties in the scripts folder of your distribution.
b. Add the following line anywhere in the file:
force.ml.update=true
c. Save and close the file.
2. Open the command prompt, change the directory to the root folder of the update distribution, andenter the following command to launch the installer:
# java –jar Update_Setup.jar
Note: This example assumes that the JAVA_HOME environment variable is the same as the PATHenvironment variable. If not, update the PATH environment variable with the full path to thejava.exe executable file.
Pega 7.1.9 Update Guide 20

The update deployment tool window opens, and the Pega 7 Platform installation icon appears onyour task bar.
3. Click Next. The License Agreement screen appears.
4. Scroll to read the license agreement, and click Accept to accept the agreement. The DatabaseType screen appears.
5. Select your database type and click Next. The Database Connection screen appears.
6. Specify the field values for the database connection to your Pega 7 Platform database.
Note: Some of the fields on this screen, for example, JDBC Driver Class Name and theDatabase JDBC URL, are populated with values based on the type of database you selected in theprevious step. If you edit these values and click Back to change the database type on theDatabase Type screen, you must verify, and, if necessary, edit the database connection fieldvalues when you move to the Database Connection screen. Alternatively, you can exit andrelaunch the update deployment tool, and select the correct database type on the Database Typescreen.
l JCBC Driver Class Name: Enter the JDBC driver class name.
Note: The update deployment tool populates this field with a class name based on theselected database type. If the field does not populate correctly, enter the class name or exitand relaunch the tool.
l JDBC Driver JAR File: Enter the full path to the appropriate driver file for your databasetype and version. Click Browse to select the file. For a list of supported drivers, see thePlatform Support Guide.
l Database JDBC URL: Enter the JDBC connection URL for your Pega 7 Platform database.
Note: The update deployment tool populates this field based on the selected database type.If the field does not populate correctly, edit the values.
If the connection is successful, click Next. The Schema Application Bypass screen appears.
7. Choose how to apply the database schema. By default, the update deployment tool is designed toautomatically generate and apply the schema DDL to your database. If the DDL is already definedin the database, select Bypass Automatic DDL Application.
8. Click Next. The Rulebase Load screen appears.
9. Click Start to load the PegaRULES database. Update logs appear on this screen.
Note: Loading the PegaRULES database can last for several hours, and the time taken varies
Pega 7.1.9 Update Guide 21

widely, based on network proximity to the database server. The log window may appear inactivewhen the update deployment tool is processing large files.
10. Click Exit to close the update deployment tool.
Updating from the command lineTo use the update script, configure the setupDatabase.properties file and run update.bat/sh.
1. If you have not done so already, edit the setupDatabase.properties file. See Editing thesetupDatabase.properties file.
2. Open a command prompt and navigate to the scripts directory.
3. Run update.bat/sh.
The update of the rulebase can take several hours, depending on the proximity of the database to thesystem running the script.
Note: Command line output is automatically written to a file in the <PRPC_HOME>/scripts/logsdirectory. If you encounter any errors or issues when running the script, save the contents of thisdirectory to another location before you re-run the script.
Pega 7.1.9 Update Guide 22

Redeploying the applications forupgrades from Pega 7.1.6 and earlierSkip this section if you are updating from Pega 7.1.7 or later.
Follow the instructions in this section to redeploy the applications only if you are updating from Pega7.1.6 or earlier.
Remove the existing Pega 7 Platform applications from your application server and deploy the new coreapplications that are packaged in the update distribution. Follow the procedures in the Pega 7.1.9Upgrade Guide to deploy the updated applications to your application server. The core applicationsinclude:
l prweb.war (or prpc_*.ear) for the Designer Studio
l prsysmgmt.war for the System Management Application (SMA)
l prhelp.war for the Developer Online Help Application
Note: The prhelp.war file is not included in the update distribution. Download the file from the Pega 7Platform Updates page in the Support & Resources tab: (https://pdn.pega.com/support).
1. Stop all Pega 7 Platform core applications and ensure they are not running.
2. Use your application server’s administrative utilities to remove the existing applications. Platform-specific instructions are provided below. Consult your application server documentation foradditional details.
l Redeploying on Tomcat
a. On the Tomcat Web Application Manager, find the row for each Pega 7 Platformapplication and select the Undeploy link.
b. In the webapps directory, delete any remaining Pega 7 Platform folders or WAR files.
c. Delete the contents of the work\Catalina\localhost\prweb directory.
Note: This directory may contain log files that you may wish to retain. If so, make acopy of the files before you delete them.
l Redeploying on IBM WebSphere
a. On the IBM WebSphere administrative console, navigate to Applications, and selectEnterprise Applications to see a list of the installed applications.
b. Select each of the Pega 7 Platform applications and click Uninstall.
c. When you click Uninstall on a package, IBM WebSphere empties the./installedApps/* directories. To complete the uninstall, delete the following
Pega 7.1.9 Update Guide 23

directories:
l ./config/temp/*
l ./wstemp/*
l ./temp
l Redeploying on Oracle WebLogic Server
a. Click Deployments to see the Summary of Deployments page.
b. Click Lock & Edit on the Change Center, select each application, and click Delete.
3. Delete everything in the Pega 7 Platform temporary directory. This is the directory that youspecified for the JNDI location (url/initialization/explicittempdir).
Note: Do not start the redeployed Pega 7 Platform applications while the PegaRules databaseupdate process is running in the update deployment tool.
4. Verify that any third-party or custom JAR files that you install with the Pega 7 Platform applicationare still in place in the application server. Restore any that may have been deleted when the Pega 7Platform components were redeployed.
5. Start all the applications.
6. Manually build the Elasticsearch indexes. For more information, see the Pega 7.1.9 Upgrade Guide.
Pega 7.1.9 Update Guide 24

Cleaning up unused tablesPegasystems recommends that you drop unused rules tables in the data schema after running a splitschema upgrade. If you upgraded with one database, also drop unused rules tables in the Rules schema.
1. Verify that you have the correct privileges to view and edit the Optimize Schema landing page. Setthese to true:
l ViewAndOptimizeSchema
l Dynamic System Setting (DSS) databases/AutoDBSchemaChanges
l ViewSchemaOnImport
l SchemaImport
See the PDN article How to set privileges to restrict database schema changes generated fromProcess Commander (https://pdn.pega.com/node/2103) for more information.
2. To open the optimize schema wizard, click the Designer Studio menu option > System > Database> Modify Schema.
3. Select the PegaDATA database.
4. Click view the unused tables to display a list of Pega 7 Platform tables without Class mappings.Either select the ones you want to delete and click Proceed with Changes to have Pega 7Platform drop the tables, or drop them manually in your database.
5. Repeat steps 3 and 4 for the PegaRULES database.
Pega 7.1.9 Update Guide 25

Configuring a load balancer to log X-For-warded-* (XF*) HTTP headersIn some scenarios, you may want the Pega 7 Platform to return an absolute URL (complete internetaddress of a website or a file) instead of a relative URL. With support for XF* headers, a de factostandard to identify the origin of client requests, Pega 7 Platform can dynamically formulate absoluteURLs without the need for any static configuration, when deployed behind a load balancer or reverseproxy.
Prerequisitesl Enable XF* logging on your load balancer. See the load balancer documentation for informationabout how to enable logging.
l Ensure that the web application context path of load balancer and the Pega 7 Platform is same.
Perform the following steps to log the address of Pega 7 Platform instance in XF* HTTP headers:
1. Navigate to the load balancer installation directory, and open the configuration file.
l For Apache: open the http-vhosts.conf file.
l For F5 BIG-IP: open the bigip.conf file.
2. Update the configuration file with the following XML code:
Note:The following configuration settings are for reference only. The settings specified in customheaders take precedence over the prconfig.xml file which in turn takes precedence over the settingsspecified here.
For Apache:
<VirtualHost *:80>
ServerName <your_server_name>
ProxyRequests off
<Proxy *>
Order deny,allow
Allow from all
</Proxy>
<Location "/prweb">
ProxyPass http://<your_server_name:port> /prweb/
Pega 7.1.9 Update Guide 26

</Location>
RequestHeader set X-Forwarded-Proto "http"
</VirtualHost>
For F5 BIG-IP:
when HTTP_REQUEST_SEND {
clientside {
HTTP::header insert X-Forwarded-Host [HTTP::host]
HTTP::header insert X-Forwarded-Proto http
}
}
Pega 7.1.9 Update Guide 27

Appendix A: Reversing an updateYou can roll back to a previous release after performing an out-of-place, split-schema update on a Pega7.1.9 development system with Oracle, Microsoft SQL Server, or PostgreSQL. After updating to Pega7.1.9, use the original Rules schema and run a script to reverse the Data schema.
Note: Before you start this procedure, ensure that your system meets the prerequisites, and note thelimitations.
PrerequisitesThe system supports reversing only for out-of-place, split-schema updates from Pega 7.1.x to Pega 7.1.9on development systems. Reversing an update requires the original (pre-update) Rules schema, which isavailable only if you perform an out-of-place update.
In addition, you need:
l Supported versions of:
l Windows or Linux
l Java
l Oracle, Microsoft SQL Server, or PostgreSQL
For a list of supported versions, see the Platform Support Guide.
l Appropriate read, write, and execute privileges to configure and run the scripts shipped with theupdate distribution.
l Oracle systems require SELECT_CATALOG_ROLE user permissions in addition to the standard userpermissions.
LimitationsReversing an update is not supported for:
l Multitenancy systems
l High availability systems
l Production environments
l IBM DB2 for Linux, UNIX, and Windows or DB2 for z/OS
Pega 7.1.9 Update Guide 28

l Multi-hop updates: For example,
l You can:
1. Update from Pega 7.1.5 to Pega 7.1.7.
2. Reverse the update to return Pega 7.1.5.
l You cannot:
1. Update from Pega .1.5 to Pega 7.1.6 (first hop).
2. Update again from Pega 7.1.6 to Pega 7.P.1.7 (second hop).
3. Reverse the update back to Pega 7.1.5.
Overview: Reversing an updateTo reverse an update, use the old (pre-update) Rules schema and run a command line script to reversethe Data schema and revert to the original version. The reverse.bat and reverse.sh scripts are locatedin the scripts folder of the update distribution.
During the update process, metadata pertaining to Data schema changes is captured in a file namedReverse_<timestamp>.xml, in the scripts/logs directory. This file is used by the reverse.bat orreverse.sh script to recreate the Data schema structure for the previous release. The schema changesconsist of a series of SQL Drop and Create statements, which you can generate and apply manually.
The reverse process restores database functions, procedures, triggers, and views in the Data schema.New or altered columns, constraints, indexes, and tables are left intact. The process generates a lognamed CLI-Reverse-Log-<timestamp>.log in the scripts/logs directory.
If new Data- instances (includingWork- instances) are created by using data objects modified by theupdate process, the new instances may not function properly after reversal.
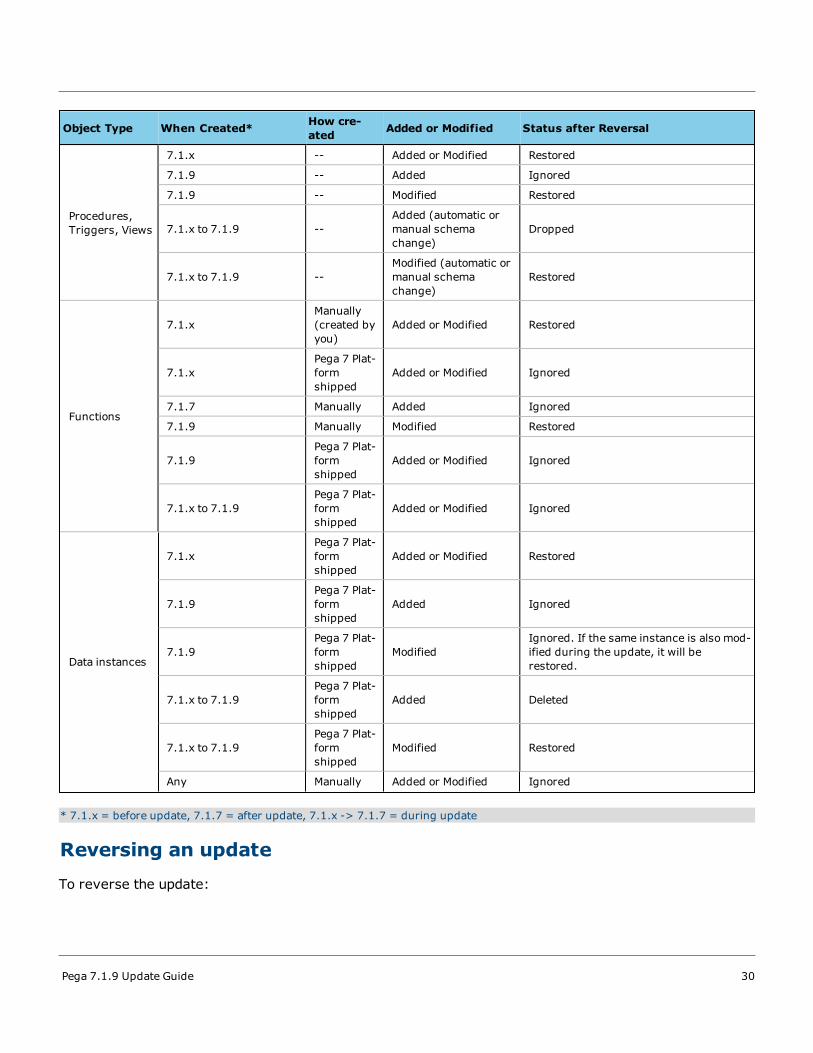
The table below describes the reverse behavior for some database objects that are either manuallyadded or modified (before or after an update), or added or modified by the product during the updateprocess.
Object Type When Created* How cre-ated Added or Modified Status after Reversal
Tables,Columns,Indexes
-- -- -- Ignored
Pega 7.1.9 Update Guide 29
Object Type When Created* How cre-ated Added or Modified Status after Reversal
Procedures,Triggers, Views
7.1.x -- Added or Modified Restored
7.1.9 -- Added Ignored
7.1.9 -- Modified Restored
7.1.x to 7.1.9 --Added (automatic ormanual schemachange)
Dropped
7.1.x to 7.1.9 --Modified (automatic ormanual schemachange)
Restored
Functions
7.1.xManually(created byyou)
Added or Modified Restored
7.1.xPega 7 Plat-formshipped
Added or Modified Ignored
7.1.7 Manually Added Ignored
7.1.9 Manually Modified Restored
7.1.9Pega 7 Plat-formshipped
Added or Modified Ignored
7.1.x to 7.1.9Pega 7 Plat-formshipped
Added or Modified Ignored
Data instances
7.1.xPega 7 Plat-formshipped
Added or Modified Restored
7.1.9Pega 7 Plat-formshipped
Added Ignored
7.1.9Pega 7 Plat-formshipped
ModifiedIgnored. If the same instance is also mod-ified during the update, it will berestored.
7.1.x to 7.1.9Pega 7 Plat-formshipped
Added Deleted
7.1.x to 7.1.9Pega 7 Plat-formshipped
Modified Restored
Any Manually Added or Modified Ignored
* 7.1.x = before update, 7.1.7 = after update, 7.1.x -> 7.1.7 = during update
Reversing an update
To reverse the update:
Pega 7.1.9 Update Guide 30

1. Generate the reverse Create and reverse Drop statements by using the generateDDL.bat orgenerateDDL.sh script.
2. Set the properties for the reverse.bat or reverse.sh script, or pass arguments to the scriptdirectly.
3. Run the reverse.bat or reverse.sh script.
Generating the reverse Create and Drop statementsTo apply the DDL for reversing the Data schema, generate the reverse Create and reverse Dropstatements by using the generateDDL.bat or generateDDL.sh script. Starting in Pega 7.1.7, thesescripts located in the scripts directory have been updated to contain a Reverse action, which createsDrop and Create scripts in the folders:
l Drop SQL
/../schema/generated/<platform>/reverse/drop/dropstatements
l Create SQL
/../schema/generated/<platform>/reverse/create/createstatements
Preparing the script to reverse an updateBefore running the reverse.bat or reverse.sh script to reverse an update, you must set the propertiesin, or pass arguments to the script in one of the following ways:
l Set the properties in the setupDatabase.properties file.
l Pass the arguments directly to the script. Arguments passed directly to the script override thesettings in the setupDatabase.properties file.
The properties or arguments include:
l The full path to the JDBC driver file
l The JDBC driver class name
l The database type
l The database connection string
l The database username and password
Note: The username must have sufficient privileges (Create, Drop) to execute schema changes inthe Data schema.
l The name of the Data schema
Pega 7.1.9 Update Guide 31

Setting the properties to reverse an update
Set the properties in the setupDatabase.properties file before running the reverse.bat orreverse.sh script to reverse an update.
The following is a sample section of the setupDatabase.properties file that shows a genericconfiguration for a PostgreSQL database:
pega.jdbc.driver.jar=C:\JDBC\postgresql-9.1-901.jdbc4.jar
pega.jdbc.driver.class=org.postgresql.Driver
pega.database.type=postgres
pega.jdbc.url=jdbc:postgresql://localhost:5432/PRPCML6S2
pega.jdbc.username=prpc
pega.jdbc.password=password
# Data schema name : Used for systems running on a Split Schema
# The value of rules.schema.name is the default value for data.schema.name
data.schema.name=data
Passing the arguments to reverse an update
Pass the arguments directly to the reverse.bat or reverse.sh script to reverse an update. Thearguments passed directly to the script override the property values in setupDatabase.properties.
Usage Example
The syntax of the reverse.bat script is incorporated in the script file:
echo reverse.bat [options...]
echo
echo Options:
echo --driverClass Your JDBC driver class (example: oracle.jdbc.OracleDriver)
echo --driverJAR Location of your JDBC JAR file
echo --dbType Database vendor type (mssql, oracledate, udb, db2zos, postgres)
echo --dbURL JDBC URL to db to be loaded
echo --dbUser Database username
echo --dbPassword Database password
echo --rulesSchema Sets the rules schema for reverse operation
Pega 7.1.9 Update Guide 32

echo --dataSchema Sets the data schema for reverse operation
echo All settings are Optional and will override properties file.
For example:
reverse.bat --dbUser prpc --dbPassword q1w2e3r4
Running the script to reverse an updateRun the reverse.bat or reverse.sh script to reverse an update.
Illustrated Examples: Out-of-Place update andreverseTwo examples illustrate and describe the process of performing an out-of-place update, followed by areverse to the original release. The examples assume the usage of a single database instance, and useautomatic DDL generation and application.
Example 1: Perform an out-of-place update
These steps assume that your system meets the following criteria as shown in the illustration:
l On the database, the existing system is running on a split-schema configuration, with a Rulesschema R and a Data schema D.
l On the application server, the existing prweb archive is deployed and configured to access theRules and Data schema.
Pega 7.1.9 Update Guide 33

1. Make a copy of the Rules schema.
a. Configure themigrateSystem.properties file in the scripts directory.
b. Run themigrate.bat or migrate.sh script.
The following illustration corresponds to the example of themigrateSystem.properties file thatfollows.
#The system where the tables/rules will be migrated from
pega.source.jdbc.driver.jar=C:\JDBC\postgresql-9.1-901.jdbc4.jar
pega.source.jdbc.driver.class=org.postgresql.Driver
pega.source.database.type=postgres
pega.source.jdbc.url=jdbc:postgresql://localhost:5432/PRPCML6S
pega.source.jdbc.username=prpc
pega.source.jdbc.password=password
#Custom connection properties
#pega.source.jdbc.custom.connection.properties=
pega.source.rules.schema=rules
#Set the following property if the source system already contains a split schema.
pega.source.data.schema=data
#The system where the tables/rules will be migrated to
pega.target.jdbc.driver.jar=C:\JDBC\postgresql-9.1-901.jdbc4.jar
pega.target.jdbc.driver.class=org.postgresql.Driver
pega.target.database.type=postgres
pega.target.jdbc.url=jdbc:postgresql://localhost:5432/PRPCML6S
pega.target.jdbc.username=prpc
Pega 7.1.9 Update Guide 34

pega.target.jdbc.password=password
#Custom connection properties
#pega.target.jdbc.custom.connection.properties=
pega.target.rules.schema=rules2
#Used to correctly schema qualify tables in stored procedures, views and triggers.
#This property is not required if migrating before performing an upgrade.
pega.target.data.schema=
################### Migrate System Properties ###################
#The directory where output from the bulk mover will be stored. This directory will be cleared whenpega.bulkmover.unload.db is run.
#This property must be set if either pega.bulkmover.unload.db or pega.bulkmover.load.db is set to true.
pega.bulkmover.directory=C:\prpcmigrate
#The location where a temporary directory will be created for use by the migrate system utilities.
pega.migrate.temp.directory=C:\prpcmigratetemp
######## The operations to be run by the utility, they will only be run if the property is set to true.
#Set to true if migrating before an upgrade and migrating to a different system. If true admin table(s)required
#for an upgrade will be migrated with the rules tables.
pega.move.admin.table=true
#Generate an xml document containing the definitions of tables in the source system. It will be found in theschema directory of the
#distribution image.
pega.clone.generate.xml=true
#Create ddl from the generated xml document. This ddl can be used to create copies of rule tables found onthe source system.
pega.clone.create.ddl=true
#Apply the generated clone ddl to the target system.
pega.clone.apply.ddl=true
#Unload the rows from the rules tables on the source system into the pega.bulkmover.directory.
pega.bulkmover.unload.db=true
#Load the rows onto the target system from the pega.bulkmover.directory.
Pega 7.1.9 Update Guide 35

pega.bulkmover.load.db=true
### The following operations should only be run when migrating upgraded rules
#Generate the rules schema objects (views, triggers, procedures, functions). The objects will be created inthe pega.target.rules.schema
#but will contain references to the pega.target.data.schema where appropriate.
pega.rules.objects.generate=false
#Apply the rules schema objects (views, triggers, procedures, functions) to pega.target.rules.schema.
pega.rules.objects.apply=false
2. Update the copy of the Rules schema.
a. Configure the setupDatabase.properties file by specifying the name of the Rules schemacopy for both the rules.schema.name and the data.schema.name properties.
b. Run the update.bat or update.sh script.
The following illustration corresponds to the example of the setupDatabase.properties file thatfollows.
pega.jdbc.driver.jar=C:\JDBC\postgresql-9.1-901.jdbc4.jar
pega.jdbc.driver.class=org.postgresql.Driver
pega.database.type=postgres
pega.jdbc.url=jdbc:postgresql://localhost:5432/PRPCML6S2
pega.jdbc.username=prpc
pega.jdbc.password=password
#Rules schema name : Used for all databases.
#The user name is used for default schema name
rules.schema.name=rules2
# Data schema name : Used for systems running on a Split Schema
Pega 7.1.9 Update Guide 36

# The value of rules.schema.name is the default value for data.schema.name
data.schema.name=rules2
3. Run the finalize process on the updated Rules schema.
a. ConfiguremigrateSystem.properties to execute this step. Note the set of properties at thebottom of the file:
l pega.move.admin.table=false
l pega.clone.generate.xml=false
l pega.clone.create.ddl=false
l pega.clone.apply.ddl=false
l pega.bulkmover.unload.db=false
l pega.bulkmover.load.db=false
l pega.rules.objects.generate=true
l pega.rules.objects.apply=true
b. Run themigrate.bat or migrate.sh script.
The following illustration corresponds to the example of themigrateSystem.properties file thatfollows.
#The system where the tables/rules will be migrated from
pega.source.jdbc.driver.jar=C:\JDBC\postgresql-9.1-901.jdbc4.jar
pega.source.jdbc.driver.class=org.postgresql.Driver
pega.source.database.type=postgres
pega.source.jdbc.url=jdbc:postgresql://localhost:5432/PRPCML6S
pega.source.jdbc.username=prpc
pega.source.jdbc.password=password
#Custom connection properties
#pega.source.jdbc.custom.connection.properties=
Pega 7.1.9 Update Guide 37

pega.source.rules.schema=rules
#Set the following property if the source system already contains a split schema.
pega.source.data.schema=data
#The system where the tables/rules will be migrated to
pega.target.jdbc.driver.jar=C:\JDBC\postgresql-9.1-901.jdbc4.jar
pega.target.jdbc.driver.class=org.postgresql.Driver
pega.target.database.type=postgres
pega.target.jdbc.url=jdbc:postgresql://localhost:5432/PRPCML6S
pega.target.jdbc.username=prpc
pega.target.jdbc.password=password
#Custom connection properties
#pega.target.jdbc.custom.connection.properties=
pega.target.rules.schema=rules2
#Used to correctly schema qualify tables in stored procedures, views and triggers.
#This property is not required if migrating before performing an upgrade.
pega.target.data.schema=
#Set this property to bypass udf generation on the target system.
pega.target.bypass.udf
#The location of the db2zos site specific properties file. Only used if the target system is a db2zosdatabase.
pega.target.zos.properties=config/db2zos/DB2SiteDependent.properties
################### Migrate System Properties ###################
#The directory where output from the bulk mover will be stored. This directory will be cleared whenpega.bulkmover.unload.db is run.
#This property must be set if either pega.bulkmover.unload.db or pega.bulkmover.load.db is set to true.
pega.bulkmover.directory=C:\prpcmigrate
Pega 7.1.9 Update Guide 38

#The location where a temporary directory will be created for use by the migrate system utilities.
pega.migrate.temp.directory=C:\prpcmigratetemp
######## The operations to be run by the utility, they will only be run if the property is set to true.
#Set to true if migrating before an upgrade and migrating to a different system. If true admin table(s)required
#for an upgrade will be migrated with the rules tables.
pega.move.admin.table=false
#Generate an xml document containing the definitions of tables in the source system. It will be found in theschema directory of the
#distribution image.
pega.clone.generate.xml=false
#Create ddl from the generated xml document. This ddl can be used to create copies of rule tables found onthe source system.
pega.clone.create.ddl=false
#Apply the generated clone ddl to the target system.
pega.clone.apply.ddl=false
#Unload the rows from the rules tables on the source system into the pega.bulkmover.directory.
pega.bulkmover.unload.db=false
#Load the rows onto the target system from the pega.bulkmover.directory.
pega.bulkmover.load.db=false
### The following operations should only be run when migrating upgraded rules
#Generate the rules schema objects (views, triggers, procedures, functions). The objects will be created inthe pega.target.rules.schema
#but will contain references to the pega.target.data.schema where appropriate.
pega.rules.objects.generate=true
#Apply the rules schema objects (views, triggers, procedures, functions) to pega.target.rules.schema.
pega.rules.objects.apply=true
4. Update the Data schema.
a. Update the setupDatabase.properties file so that the data.schema.name propertyreferences the name of your Data schema.
Pega 7.1.9 Update Guide 39

b. Run the update.bat or update.sh script by passing the --dataOnly true argument.Starting in Pega 7.1.7, this step generates a file named Reverse_<timestamp>.xml in thescripts/logs directory. A new file is generated each time the Data schema is updated.
The following illustration corresponds to the example of the setupDatabase.properties file thatfollows.
# Data schema name : Used for systems running on a Split Schema
# The value of rules.schema.name is the default value for data.schema.name
data.schema.name=data
5. Configure the application server and bring up the Pega 7 Platform.
a. Update the JNDI settings to use the newly upgraded Rules Schema.
b. Deploy the new EAR or WAR.
6. Verify the version of Pega 7 Platform. Browse to the Designer Studio login screen and verify theversion that is listed near the bottom of the screen.
Pega 7.1.9 Update Guide 40

Example 2: Reverse an out-of-place update1. Assume the following settings for your system as shown in the illustration that follows:
l On the database, the newly updated 7.1.x system is running on a split-schema configuration,with a Rules schema R and a Data schema D.
l On the application server, the newly updated 7.1.x prweb archive is deployed andconfigured to access the Rules and Data schema.
2. Roll back the Data schema.
a. On the application server:
i. Undeploy the prweb archive.
ii. Shut down the server.
b. Run the reverse.bat or reverse.sh script.
Note: The reverse script requires the file Reverse_<timestamp>.xml. If there aremultiple valid versions of this file, the reverse process exits with an error, and you must
Pega 7.1.9 Update Guide 41

specify the intended version in the reversal.schema.file.name property in thesetupDatabase.properties file.
3. Confirm that reversing the update worked correctly.
A log file named CLI-Reverse-Log-<timestamp>.log is created in the scripts\logs directory.Review this file if you encounter any issues during the reverse process.
4. Configure the application server.
a. Start the application server if it is not already running.
b. Verify that the original prweb archive is correctly configured to use the proper Rules andData schema.
c. Deploy the prweb archive.
5. Verify the version of the Pega 7 Platform. Browse to the Designer Studio login screen and verify theversion that is listed near the bottom of the screen.
Pega 7.1.9 Update Guide 42