Creating Transparency in France with Dynamo
20
AS126493-L Creating Transparency in France with Dynamo Håvard Vasshaug Snøhetta Anthony Buckley-Thorp, Flux Advanced Services + Technology Managing Partner Konrad Sobon, HOK Design Technology Specialist Thomas Trinelle, Flux.io CA Description A week after the Charlie Hebdo attacks in Paris, Norwegian architects Snøhetta were announced as the winners of the competition to design the new Le Monde headquarters in the French capital. The winning proposal aligned with the wish of both the client and the French society to counter the terrorist attack with transparency and openness—a wish recently reinforced by the election of Emmanuel Macron as the country’s new president. In this presentation, Håvard Vasshaug will show you how the Snøhetta design team used Dynamo software and Revit software to create a glass façade that will communicate transparency in a monumental way—by automating the combination of multiple layers of variations in materials, orientation, placement, size, transparency, and reflectivity, while containing both complexity and cost. The project will be a landmark in Paris. Learn how Dynamo was used at the center of the design. Speaker Håvard Vasshaug is a Design Technology Manager at Snøhetta, one of the world's most renowned design practices. Håvard has a Master of Science in Structural Engineering and uses his experience with providing Building Information Modeling BIM research, development and automation to share knowledge of digital building design solutions at Snøhetta and through his own companies. He regularly speaks about improving digital design workflows at multiple international conferences and seminars, and receives wide acclaim for his talks and classes. He writes about BIM and visual programming solutions on vasshaug.net and is a Bad Monkeys founding member. Håvard has a passion for using technological advances to design fantastic buildings, while helping others operate effectively and joyfully. Learning Objectives Learn how visual programming with Dynamo gives you powers to make Revit do what you want, including creating transparency and openness in France Learn how to make Revit talk to Grasshopper with Dynamo, Excel, and Flux Learn how to apply multiple levels of controlled randomness to Revit families Learn how to achieve yin and yang by finding the balance between art and logic
-
Upload
khangminh22 -
Category
Documents
-
view
3 -
download
0
Transcript of Creating Transparency in France with Dynamo

AS126493-L
Creating Transparency in France with Dynamo Håvard Vasshaug
Snøhetta
Anthony Buckley-Thorp, Flux Advanced Services + Technology Managing Partner
Konrad Sobon, HOK Design Technology Specialist
Thomas Trinelle, Flux.io CA
Description
A week after the Charlie Hebdo attacks in Paris, Norwegian architects Snøhetta were announced as the winners of the competition to design the new Le Monde headquarters in the French capital. The winning proposal aligned with the wish of both the client and the French society to counter the terrorist attack with transparency and openness—a wish recently reinforced by the election of Emmanuel Macron as the country’s new president. In this presentation, Håvard Vasshaug will show you how the Snøhetta design team used Dynamo software and Revit software to create a glass façade that will communicate transparency in a monumental way—by automating the combination of multiple layers of variations in materials, orientation, placement, size, transparency, and reflectivity, while containing both complexity and cost. The project will be a landmark in Paris. Learn how Dynamo was used at the center of the design.
Speaker
Håvard Vasshaug is a Design Technology Manager at Snøhetta, one of the world's most renowned design practices. Håvard has a Master of Science in Structural Engineering and uses his experience with providing Building Information Modeling BIM research, development and automation to share knowledge of digital building design solutions at Snøhetta and through his own companies. He regularly speaks about improving digital design workflows at multiple international conferences and seminars, and receives wide acclaim for his talks and classes. He writes about BIM and visual programming solutions on vasshaug.net and is a Bad Monkeys founding member. Håvard has a passion for using technological advances to design fantastic buildings, while helping others operate effectively and joyfully.
Learning Objectives
Learn how visual programming with Dynamo gives you powers to make Revit do what you want, including creating transparency and openness in France
Learn how to make Revit talk to Grasshopper with Dynamo, Excel, and Flux
Learn how to apply multiple levels of controlled randomness to Revit families
Learn how to achieve yin and yang by finding the balance between art and logic

Acknowledgements
First and foremost I want to thank the team at Snøhetta who I have been working with on the façade team: Luca Bargagli, Peter French, Rickard Jaucis, Andreas Glatzl, Markus Schwartz and Frank Kristiansen. I have truly (mostly) enjoyed every moment of it.
This work would never have been completed, at least the way it was done, without the invaluable help and contributions from the Bad Monkeys. In particular Dimitar Venkov, Andreas Dieckmann, Konrad Sobon and Julien Benoit require mentioning. Nothing is impossible with you on board.
Big thanks also to Konrad (again), Anthony Buckley-Thorp and Thomas Trinelle, who have graciously agreed to assist with in the lab. Ant and Thomas works for Flux, and should be able to help with any issues relating to that.
Final thanks to my most trusted advisor, Margarida Barbosa. I ask her about anything, and she always has valuable feedback and reflections.

Idea
By combining a limited amount of glass cut sizes, material finishes, plastic interlayers and assembly instructions in almost unlimited amounts of combinations, we have seeked to create a stunning piece of art that fulfils the client’s wish to project a sensation of transparency and dialogue to the outside, comfortable surroundings to the inside and making if affordable. We have worked extensively in the cross section between material science and digital design, physical reality and virtual space to achieve this. In this paper, you will get a glimpse in to the heart of the virtual space of the digital processes we have applied to optimize the utilization of materials in the physical space.
PHOTO CREDITS: SNØHETTA & LUXIGON

Prerequisites
Revit 2018.2
Dynamo 1.3.2
Flux account
Flux for Dynamo
Dynamo packages:
o BlackBox 2016.8.5
o Clockwork for Dynamo 1.x 1.0.3
o LunchBox for Dynamo 2017.10.4
o spring nodes 121.1.1
o SteamNodes 1.2.3
Preparations
1. Start Revit.
2. Open “Le Monde.rvt” from the lab dataset folder.
FIGURE 1 SECTION BOXED 3D VIEW OF A SMALL PART OF THE SPERICAL FACADE
3. Open Google Chrome.
4. Go to flux.io and log in with your Flux user. (If you have no user, fill in your e-mail at https://goo.gl/forms/UnPwBF2x28jrmhCC2 and let me or the lab assistants know.)
5. Open Projects
6. Open the Flux project “Le Monde AU 2017”.
7. Double-click on the key “PanelCenter.Points”.

Figure 2 Panel center points form Grasshopper
8. Click on “Raw” to observe the raw data in the key.
Figure 3 Panel center points raw view
9. Drag the key “Grid Curves” to the 3D space.

Figure 4 Combined view of panel center points and grid curves
Panel placement
10. Go to Revit and start Dynamo from the Manage tab.
11. Open a new graph.
12. Open the Flux menu in Dynamo. (If you have no Flux menu, close Revit and install Flux for Dynamo from https://flux.io/apps/.)
13. Add the nodes “Flux Project”, “Flow Control” and “Receive from Flux” to your Dynamo workspace space.
14. Change “Flow Control” to “Constantly”.
15. Connect them as follows:
16. In the node “Flux Project”, use the drop down and select the project “Le Monde AU2017”.
17. In the node “Receive from Flux”, use the drop down and select the key “PanelCenter.Points”.

18. Copy the “Receive from Flux”, and change the keys to “PanelYZ.Vector” and “PanelXY.Vector”.
19. Double-click in the Dynamo workspace to create a Code Block. In the Code Block, write the syntax: a[0]; a[1];
20. Add a Code Block with the syntax: "Angles Vertical"; "Edge Panel";
21. Add a Family Types node and select the family “_Panel: _Panel”.
22. Add a FamilyInstance.ByPoint node.
23. Connect as follows:
24. Add a FamilyInstance.SetRotation node and wire like this:

25. Add an Element.SetParameterByName and wire like this:
26. Copy/Paste the Element.SetParameterByName and wire like this:

27. Group (Ctrl+G) the 4 nodes that are writing stuff to Revit and name the Group “Edge Panels”. Ctrl+L the Group so it becomes pretty.
28. Change Dynamo to Manual run mode.
29. Copy/Paste the Group and wire/rename/add like this:

30. Run the graph.
31. All your panels are now live linked to my Grasshopper script and Excel spreadsheet and that pretty cool.
32. Once our minds are done grasping the magnitude of the situation, close the Dynamo graph (not Dynamo) and save it as “0 Panel Placement.dyn”.
Main panel pattern
33. Open the graph “1 Panel Pattern.dyn”.
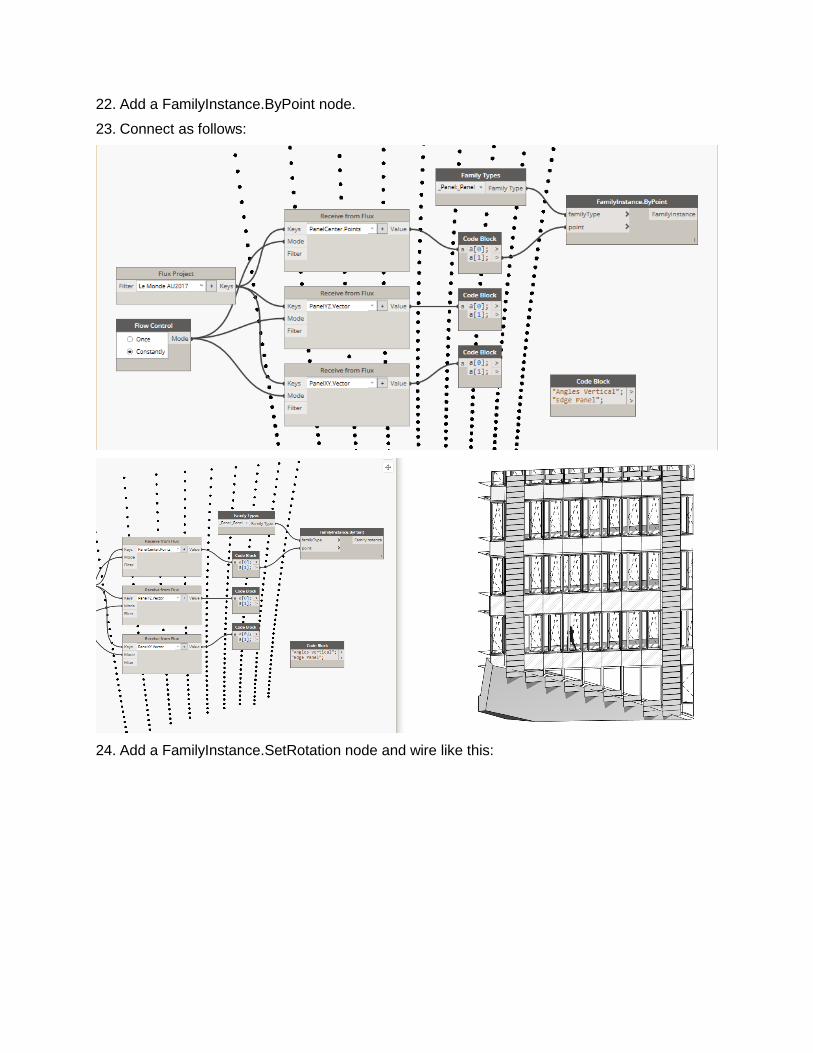
34. Zoom to the group “Create Random Pairs” and Unfreeze the node “Random Pairs”.
35. Run the graph.
36. Enable geometry preview for the nodes in the group “Display Pairs as Lines and Singletons as Points”.
37. Turn on Revit Background Preview

38. Open the Revit Sheet “001 – Unnamed”.

39. Unfreeze all the freezed nodes in the Dynamo graph, and Run.

Translucent interlayers
Cast glass
40. Open the graph “2 Cast Glass Translucent Interlayer Pattern.dyn” and Run it.

41. Unfreeze all nodes and Run.
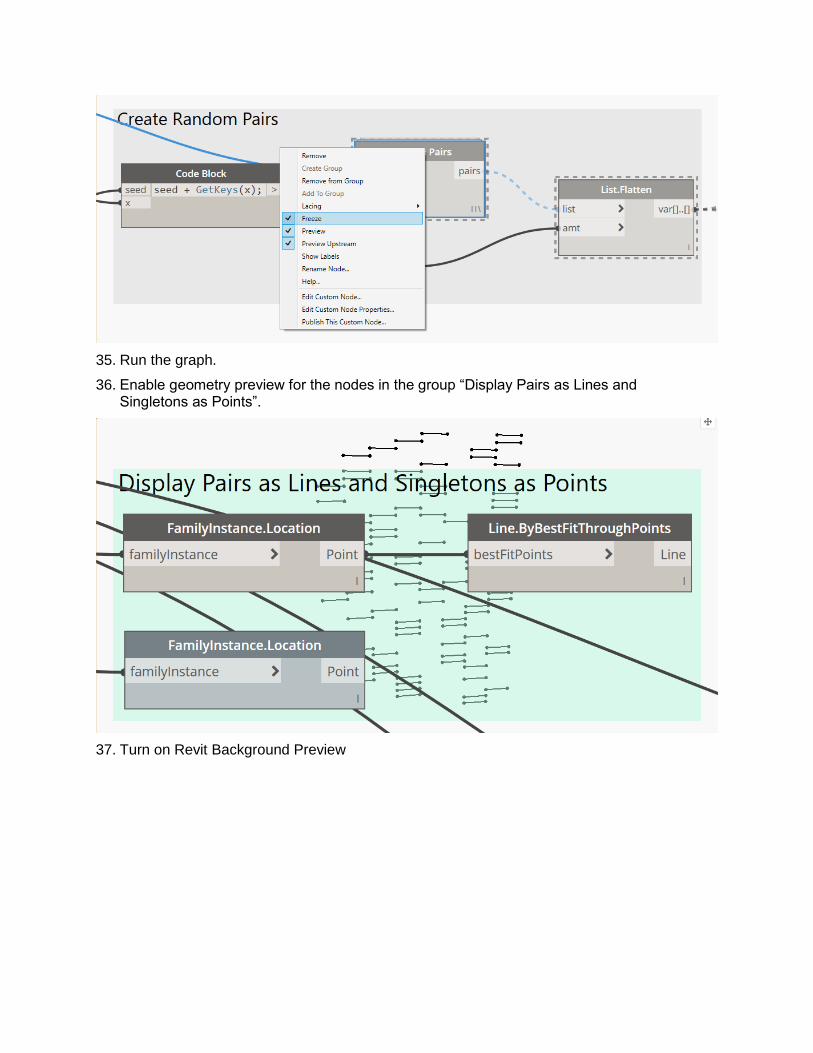
Motherplanks
42. Zoom in on the Viewport “Motherplank Opacities”.
43. Open “3 Motherplank Translucent Interlayer Pattern.dyn” and Run.

Reflectivities
44. Zoom in on the Viewport “Motherplank Reflectivities”.
45. Open and Run the graph “4 Motherplank Reflectivity.dyn”.

Edge panels
46. Zoom in on the Viewport “Edge Panels”.
47. Open the graph “5 Cut Geometry.dyn” and Run.
48. Unfreeze the node “Tool.AddVoidCut” and Run.

Epilogue
The part of the building you have created is only a small part of one of the eight facades, and the workflow you have gone through is only the last (and hopefully final) of countless iterations and revisions. I have lost count of how many times I have deleted parts of, or the entire collection of façade panels and scripts. The workflow is also not perfect; it has issues with re-running from where you finished or changed to the design rules. Setting up these scripts in Dynamo Player, for instance, is probably not cause anything other than headaches unless some serious rework is being undergone.
This workflow is to me an interesting balancing act between writing perfect eternal code and solving a one-time challenge. This is a problem that I think visual programmers have often; should I make something that I can use every day for years, a perfect elegant solution, or should I just solve the issue at hand? To me, there is no right answer to that question. On this project we ended up solving the issue at hand, but in the process creating code that I am sure both I and others will use again. A little bit of both, perhaps?
Thanks for signing up for the exercise. I hope you enjoyed it!