CREATING - Lumion
36
IMAGES CREATING ENVIRONMENT MODELS FROM DRONE Author: Pjotr van Schothorst, Lumion
-
Upload
khangminh22 -
Category
Documents
-
view
0 -
download
0
Transcript of CREATING - Lumion

IMAGES
CREATINGENVIRONMENT
MODELS FROM DRONE
Author: Pjotr van Schothorst, Lumion

CREATING ENVIRONMENT MODELS FROM DRONE IMAGES
2
Click on the link to jump to a chapter or section.
01 Introduction 0302 Photogrammetry 0403 Fly the drone 0504 Change one parameter
in the reconstruction settings 10
05 Create the 3D model 1106 Reduce the triangle count 1307 Import the 3D model
in CAD and Lumion 1608 Improve the 3D model 1908.1 Cut out unwanted parts 2108.2 Smooth uneven roads 2208.3 Remove the current
building 2409 Create distant views
with a satellite map 2510 Add vegetation 2911 Create renders 3112 Overview of time
and cost 3313 Conclusion 34
Table of Contents

CREATING ENVIRONMENT MODELS FROM DRONE IMAGES
3
When creating and rendering a 3D planned environment, there are many ways to go about it, from modeling it yourself to using features such as OpenStreetMap (OSM) in Lumion. The method you choose, however, will impact the final look and feel of the renders you’re presenting, and one method may be more suitable than another. OSM, for example, creates white blocks depicting actual building lo-cations, height and volume, but the buildings don’t show any textures and are, for that reason, not very re-alistic looking.
In this e-book, we’ll take you through one of the more interesting methods of capturing 3D environmental con-text. With only a drone, photogram-metry software and Lumion, you can create fairly accurate 3D mo-dels of the environment surround-ing a planned building location. Whether you are capturing an infra-structure asset, a planned site loca-tion or another environment, using a drone is fast and cost-effective (especially compared to some other methods).
1 | Introduction

CREATING ENVIRONMENT MODELS FROM DRONE IMAGES
4
Here are some examples of environ-mental 3D models captured with a drone:
In our previous story about drone imagery and 3D modeling, we flew our drone in an automated way across an area of 300 x 300 meters. For this topic, we are focusing on re-sidential design in a standard neigh-borhood in the Netherlands, flying the drone across an area of 40 x 40 meters. Additionally, this tutorial goes a step further to show the entirety of the workflow. Want to watch this tutori-al instead of reading? Check it out here!
2 | Photogrammetry
Photogrammetry is a technique for creating 3D models from photo-graphs. In the past, this process involved tediously marking the matching points of different photo-graphs by hand, but with the more recent generation of photogram-metry tools, the entire process of manual marking is no longer neces-sary.
CREATING ENVIRONMENT MODELS FROM DRONE IMAGES
5
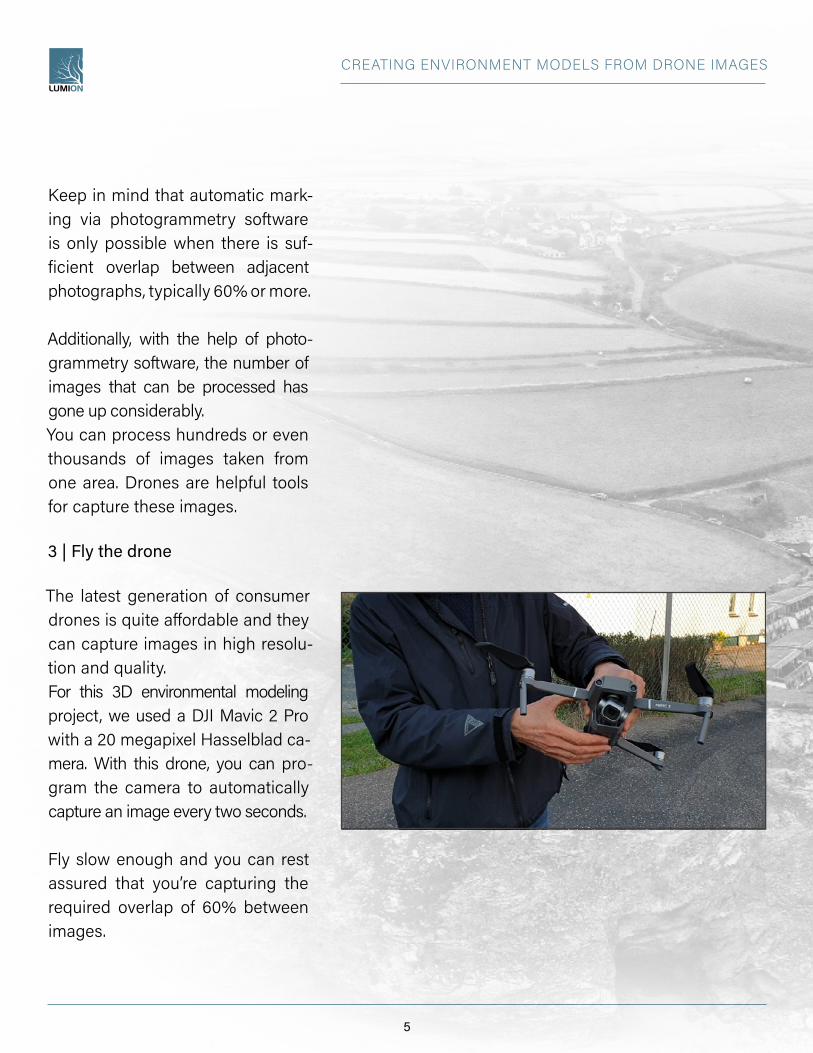
Keep in mind that automatic mark-ing via photogrammetry software is only possible when there is suf-ficient overlap between adjacent photographs, typically 60% or more.
Additionally, with the help of photo-grammetry software, the number of images that can be processed has gone up considerably. You can process hundreds or even thousands of images taken from one area. Drones are helpful tools for capture these images.
3 | Fly the drone
The latest generation of consumer drones is quite affordable and they can capture images in high resolu-tion and quality. For this 3D environmental modeling project, we used a DJI Mavic 2 Pro with a 20 megapixel Hasselblad ca-mera. With this drone, you can pro-gram the camera to automatically capture an image every two seconds.
Fly slow enough and you can rest assured that you’re capturing the required overlap of 60% between images.
CREATING ENVIRONMENT MODELS FROM DRONE IMAGES
6
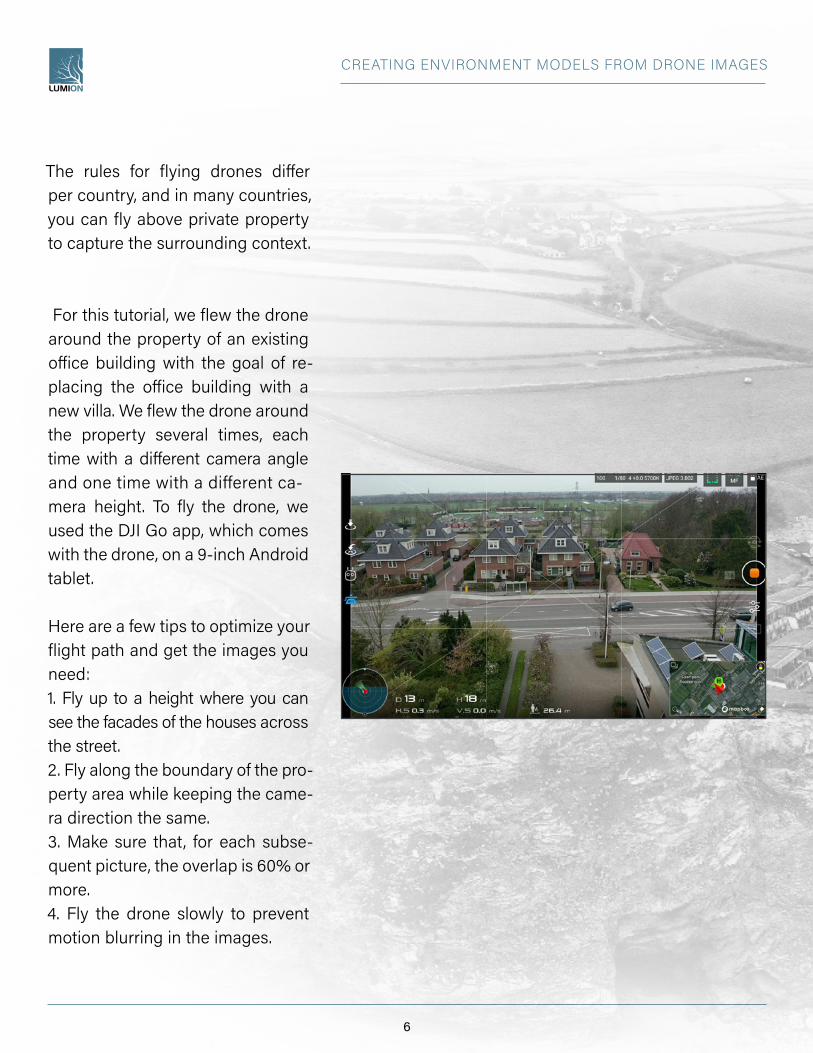
The rules for flying drones differ per country, and in many countries, you can fly above private property to capture the surrounding context.
For this tutorial, we flew the drone around the property of an existing office building with the goal of re-placing the office building with a new villa. We flew the drone around the property several times, each time with a different camera angle and one time with a different ca-mera height. To fly the drone, we used the DJI Go app, which comes with the drone, on a 9-inch Android tablet.
Here are a few tips to optimize your flight path and get the images you need:1. Fly up to a height where you can see the facades of the houses across the street. 2. Fly along the boundary of the pro-perty area while keeping the came-ra direction the same. 3. Make sure that, for each subse-quent picture, the overlap is 60% or more. 4. Fly the drone slowly to prevent motion blurring in the images.
CREATING ENVIRONMENT MODELS FROM DRONE IMAGES
7
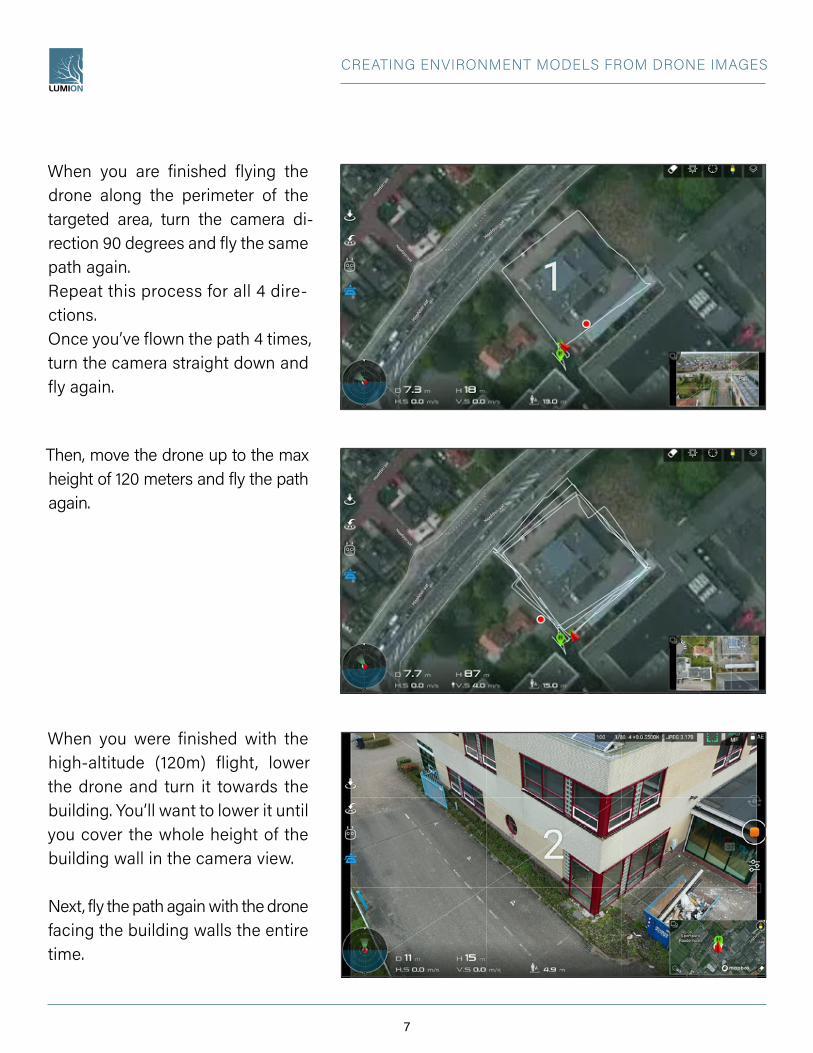
When you are finished flying the drone along the perimeter of the targeted area, turn the camera di-rection 90 degrees and fly the same path again. Repeat this process for all 4 dire-ctions.Once you’ve flown the path 4 times, turn the camera straight down and fly again.
Then, move the drone up to the max height of 120 meters and fly the path again.
When you were finished with the high-altitude (120m) flight, lower the drone and turn it towards the building. You’ll want to lower it until you cover the whole height of the building wall in the camera view.
Next, fly the path again with the drone facing the building walls the entire time.

CREATING ENVIRONMENT MODELS FROM DRONE IMAGES
8
This way, the photogrammetry soft-ware will be able to create a 3D mo-del of the current building, which can be great for showing a before-after situation in Lumion (assign the old building to a different layer in Lu-mion to easily toggle between the old building and the new villa). When you’re finished, you will have flown the drone seven times around the boundary of the terrain. Remember, each flight should cor-respond with a different camera an-gle. If you are allowed to fly the drone outside the perimeter of the tar-geted private property, then you can capture the facades of the sur-rounding houses or buildings from multiple viewing angles, which will result in a larger, higher quality 3D environment model.
To create 3D models of a larger area, such as an area of 300x300 square meters, you may need to get a license and permission to fly the drone.

CREATING ENVIRONMENT MODELS FROM DRONE IMAGES
9
Furthermore, manually flying the drone will create a whole pletho-ra of problems. To create suitable 3D models, the drone needs to fly a regular grid multiple times with different camera angles. Achieving the 60% image overlap requires an automatic, pre-programed flight path. This workflow was covered in another tutorial published last year. We used a special app on the tablet, Drone Harmony, to calcu-late the grid, fly the drone and take the pictures automatically. Here a screenshot from Drone Harmony:
In the image above, for instance, we had to cover a large area with a much taller building, and to avoid hitting the 14-floor building, we had to fly the drone at a height of 80m. Flying at such a height resulted in a 3D houses with a low level of detail and quality. As a result, the final model could be used for distant renders but not close-up shots. Here is a screenshot of the textured 3D model in RealityCapture, the photogrammetry software we used for the 3D model reconstruction.:

CREATING ENVIRONMENT MODELS FROM DRONE IMAGES
10
In our current project with the office building and the villa, we ended up taking 670 high resolution photo-graphs. The next step is to feed these photographs into RealityCapture. Please note that there are many other photogrammetry tools on the market, but we achieved the best results, in the shortest amount of time and for the lowest price with RealityCapture.
4 | Change one parameter in the reconstruction set-tings
Before we started feeding the pho-tographs into RealityCapture, there was one parameter in the settings of RealityCapture that needed to be changed from its default value — the “Large triangle removal thresh-old” needs to be set to 170. To change this parameter, go to the Reconstruction ribbon, click on Set-tings, and on the left-hand side in the “Reconstruction Settings” win-dow, go the the section “Coloring/Texturing.” Then, click on “Default unwrap pa-rameters” and set the “Large trian-gle removal threshold” to 170.
CREATING ENVIRONMENT MODELS FROM DRONE IMAGES
11
The reason for this change is that you’ll want the large triangles to be textured. Later in the process, when you cut out the main building from the 3D model and close the resulting hole, you’ll want that hole to be textured as much as possible.
5 | Create the 3D model
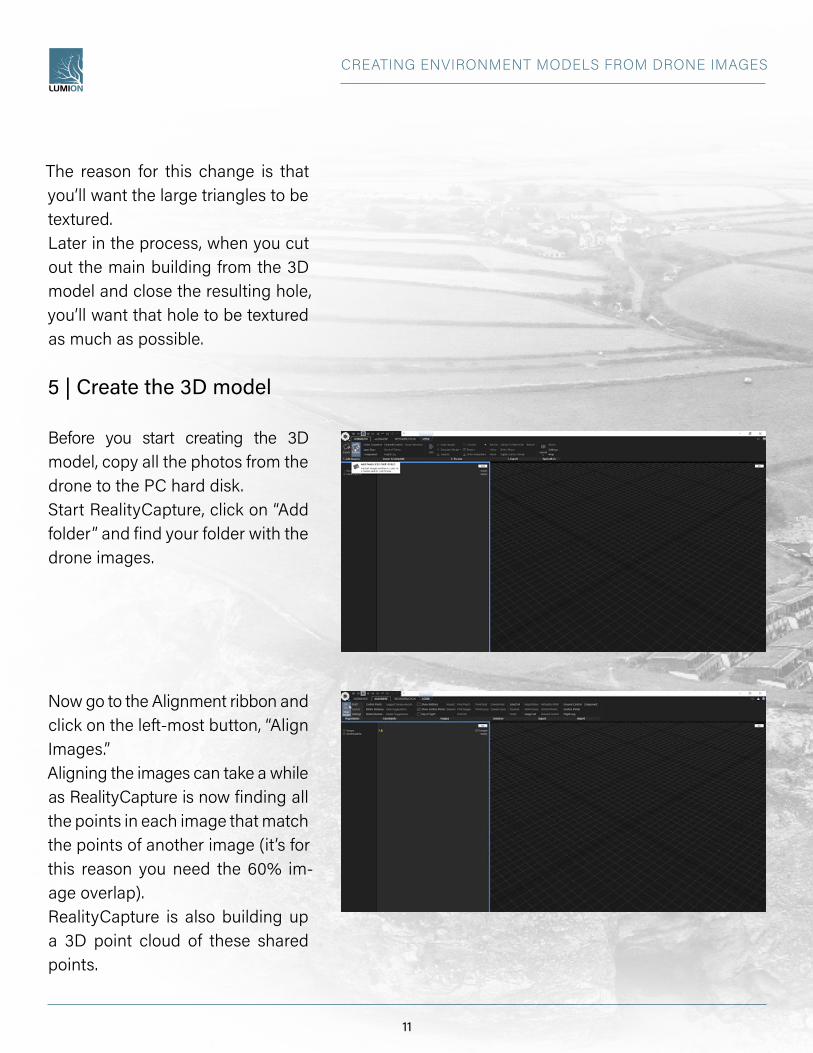
Before you start creating the 3D model, copy all the photos from the drone to the PC hard disk. Start RealityCapture, click on “Add folder” and find your folder with the drone images.
Now go to the Alignment ribbon and click on the left-most button, “Align Images.”Aligning the images can take a while as RealityCapture is now finding all the points in each image that match the points of another image (it’s for this reason you need the 60% im-age overlap). RealityCapture is also building up a 3D point cloud of these shared points.

CREATING ENVIRONMENT MODELS FROM DRONE IMAGES
12
Ideally, RealityCapture will find the match points in every image. But sometimes, like in our case, se-veral separate point clouds are cre-ated from different subsets of the images, which RealityCapture calls Components.
It is possible to still align the sepa-rate components manually, but this can be a tedious task. When the main component with the largest number of matched ima-ges covers the desired area suffi-ciently, you might as well continue with only the main component and delete the other ones. The next step is the 3D model reconstruction. Go to the third ribbon, Reconstru-ction, and click on the left-most button, Normal Detail.This process can take several hours depending on the number and the resolution of the photographs. The time it takes to reconstruct the model also depends on your PC specs. A fast processor is need-ed with plenty of memory, ideally 32GB or more. In our case, the re-construction process resulted in a model of 68.8 million triangles.
CREATING ENVIRONMENT MODELS FROM DRONE IMAGES
13
6 | Reduce the triangle count
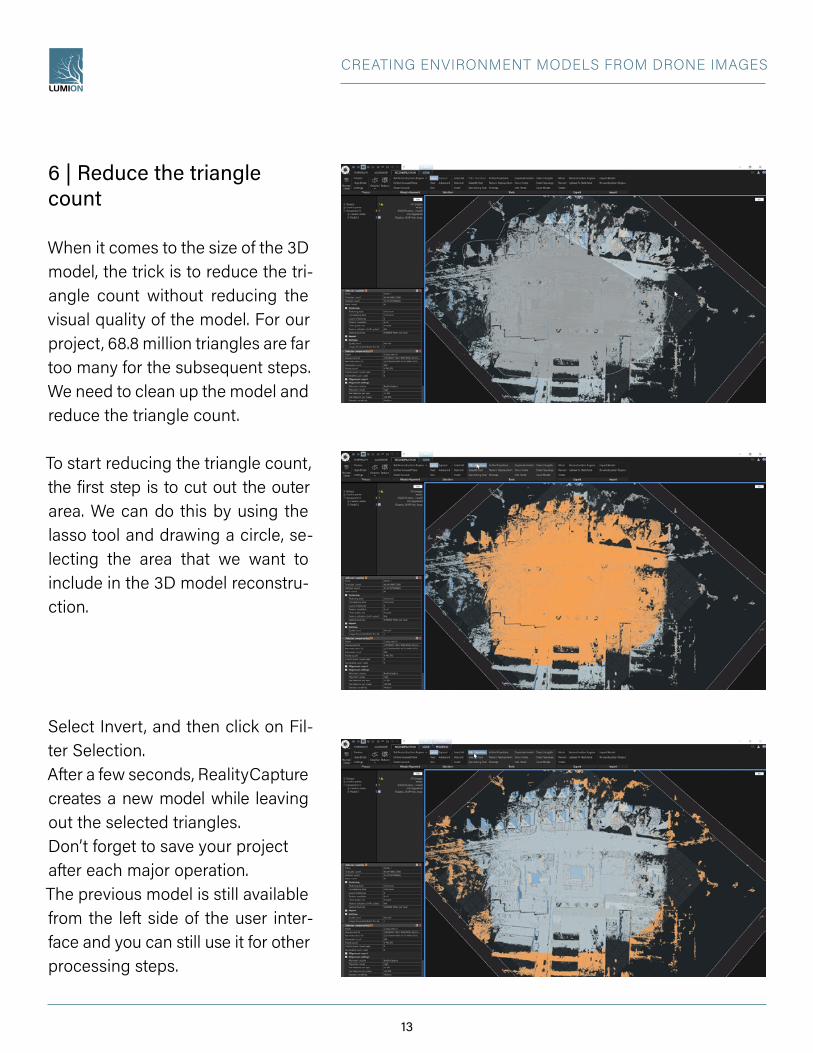
When it comes to the size of the 3D model, the trick is to reduce the tri-angle count without reducing the visual quality of the model. For our project, 68.8 million triangles are far too many for the subsequent steps. We need to clean up the model and reduce the triangle count.
To start reducing the triangle count, the first step is to cut out the outer area. We can do this by using the lasso tool and drawing a circle, se-lecting the area that we want to include in the 3D model reconstru-ction.
Select Invert, and then click on Fil-ter Selection.After a few seconds, RealityCapture creates a new model while leaving out the selected triangles. Don’t forget to save your project after each major operation. The previous model is still available from the left side of the user inter-face and you can still use it for other processing steps.
CREATING ENVIRONMENT MODELS FROM DRONE IMAGES
14
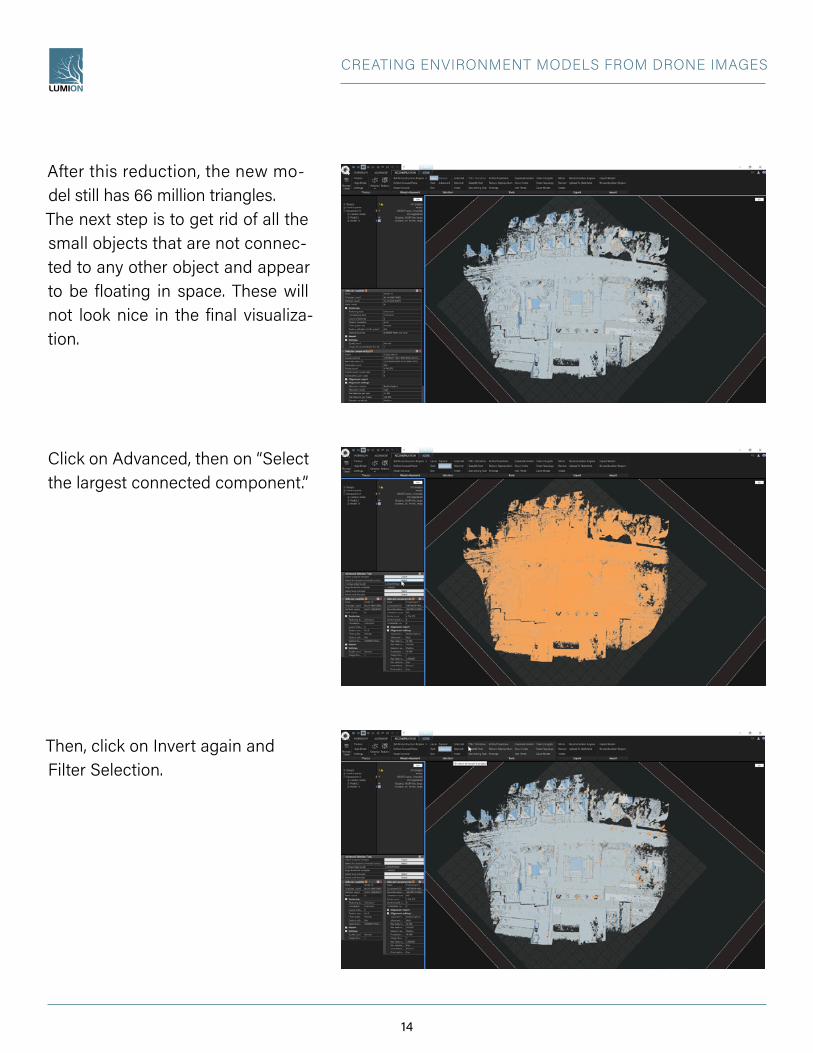
After this reduction, the new mo-del still has 66 million triangles. The next step is to get rid of all the small objects that are not connec-ted to any other object and appear to be floating in space. These will not look nice in the final visualiza-tion.
Click on Advanced, then on “Select the largest connected component.”
Then, click on Invert again and Filter Selection.

CREATING ENVIRONMENT MODELS FROM DRONE IMAGES
15
To get a first visual impression of the model in Lumion and in your CAD software, let’s make a new version of the model with just 100,000 tri-angles. Click on the Simplify Tool button of the Reconstruction ribbon. It brings up some settings in the bottom-left part of the user-interface. Set the type to Absolute and the target tri-angle count to 100,000.
Click the Simplify button. In a few seconds, RealityCapture creates a new model with just 100,000 trian-gles. You can inspect the model by selecting the Scene ribbon. Next, click on the model to select it and click on Solid and then Sweet. The Sweet display will show the tex-tured model after you’ve carried out the texturing operation.
Select the Reconstruction ribbon again and click on Texture. This can take several minutes.

CREATING ENVIRONMENT MODELS FROM DRONE IMAGES
16
To export the 3D model, click on Mesh. In the Save As Type drop-down menu, select FBX and then Save. That brings up another dialog box with some settings.
Keep the default values to create a FBX file with a single 8K-by-8K re-solution texture in PNG format.
7 | Import the 3D model in CAD and Lumion
With the optimized and cleaned file, you can now import the model into Lumion and most CAD soft-ware tools. The standard version of SketchUp, for example, does not support FBX Files, but there are several third-party plugins for it. We used the Simlab FBX Import plugin. The 100k triangle model performs smoothly in SketchUp, giving you have a first look at the environment of your design.
CREATING ENVIRONMENT MODELS FROM DRONE IMAGES
17
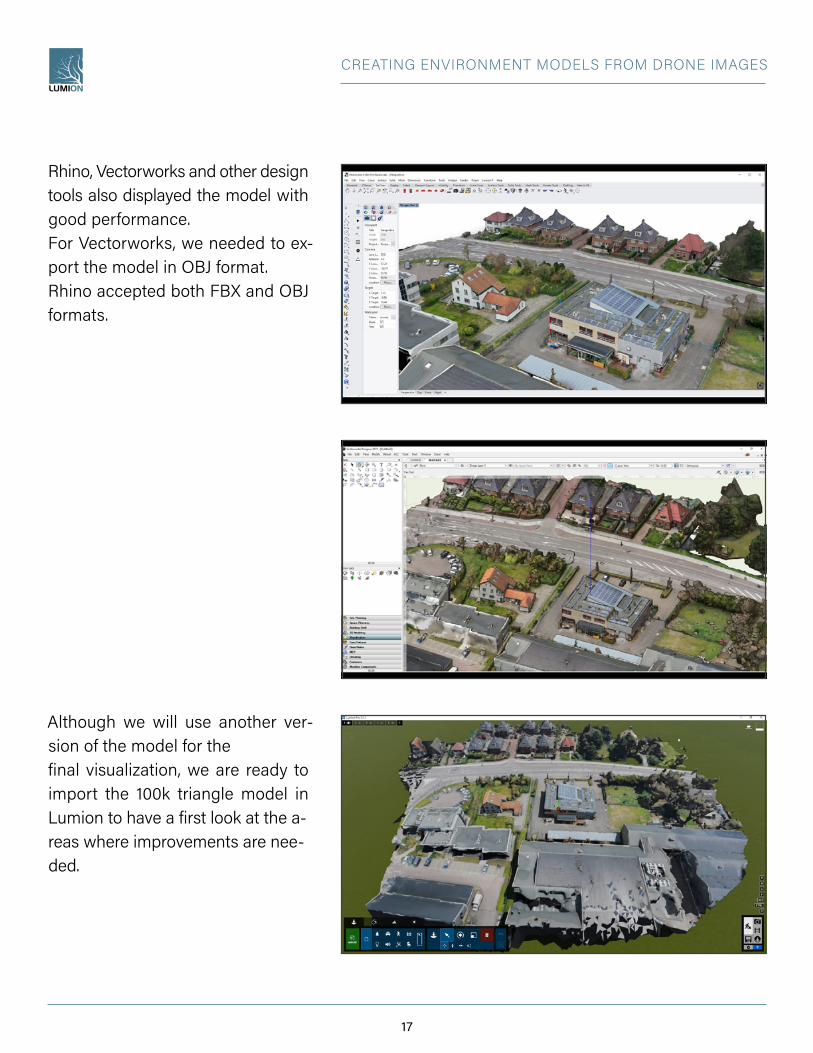
Rhino, Vectorworks and other design tools also displayed the model with good performance. For Vectorworks, we needed to ex-port the model in OBJ format. Rhino accepted both FBX and OBJ formats.
Although we will use another ver-sion of the model for the final visualization, we are ready to import the 100k triangle model in Lumion to have a first look at the a-reas where improvements are nee-ded.
CREATING ENVIRONMENT MODELS FROM DRONE IMAGES
18
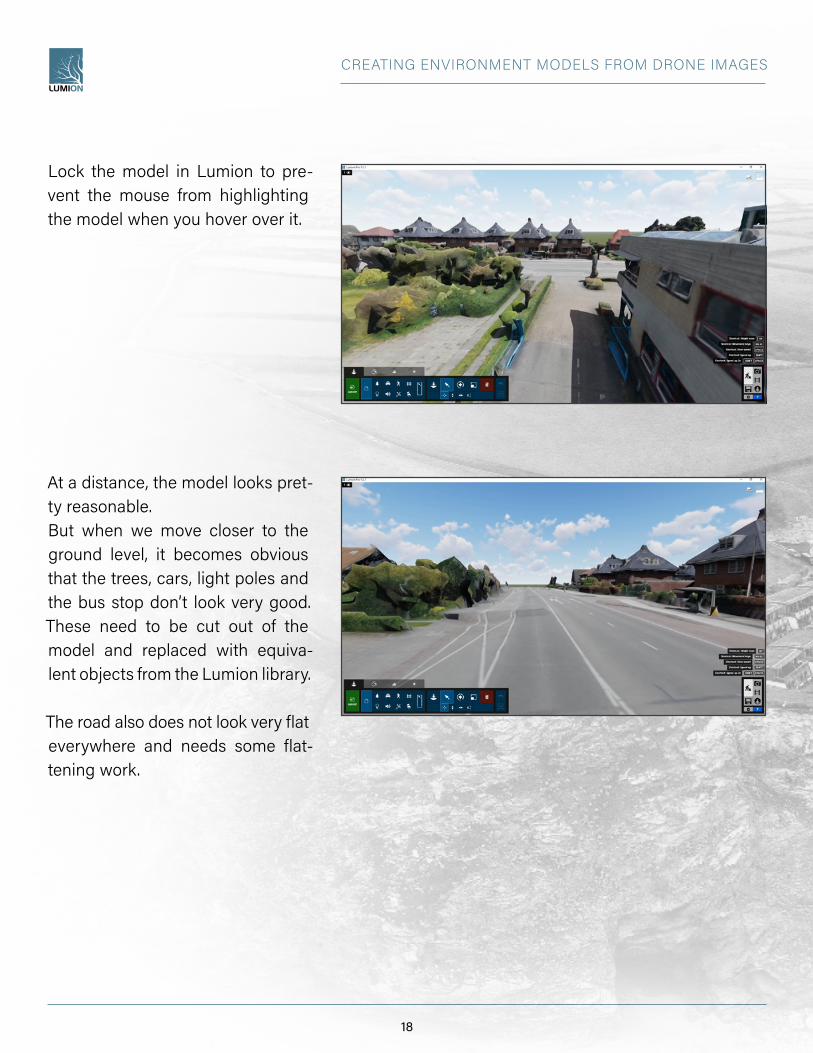
Lock the model in Lumion to pre-vent the mouse from highlighting the model when you hover over it.
At a distance, the model looks pret-ty reasonable. But when we move closer to the ground level, it becomes obvious that the trees, cars, light poles and the bus stop don’t look very good. These need to be cut out of the model and replaced with equiva-lent objects from the Lumion library.
The road also does not look very flat everywhere and needs some flat-tening work.

CREATING ENVIRONMENT MODELS FROM DRONE IMAGES
19
8 | Improve the 3D model
Melted-looking buildings. Wobbly roads. Before we can use the 3D model for professional pur-poses, we need to clean it up. To improve the 3D model, we need to return to RealityCapture.
You might not want to work on the 66 million triangle model, as it can drastically slow down your compu-ter. The 100k triangle model is, as we’ve seen, a little too simple and low quality. Therefore, let’s meet halfway and reduce the large, 66 million triangle model to 1 million triangles using the Simplify Tool of the Reconstruction tab. Set the de-sired triangle count to 1 million and click on the Simplify button.
After a few minutes, RealityCapture creates a new model with one mil-lion triangles. You can delete some of the previous models to reduce the time it takes RealityCapture to save the model.

CREATING ENVIRONMENT MODELS FROM DRONE IMAGES
20
Next, click on Clean model. This will also fill up some of the holes.
Also try the Close Holes function. Now, it’s time to texture our model.
Click on the Texture button and wait. This process can take several mi-nutes.Let’s have a closer look at the result. -Zoom in and out using the scroll wheel of the mouse.
-Pan left and right by clicking the left mouse button down and moving the mouse. -Rotate the view by keeping the right mouse button down and shift-ing the mouse.

CREATING ENVIRONMENT MODELS FROM DRONE IMAGES
21
After inspecting the model, we con-cluded that some parts look pretty nice. Many of the trees, shrubs and cars don’t look very nice and need to be cut out of the model. We can replace these items with object from the Lumion library.
8.1 | Cut out unwanted parts
You can easily cut out the smaller objects by looking at them from the top down. Select them with the lasso tool and click Filter Selec-tion. You can add to the selection by pressing down the CTRL key.
When removing the smaller ob-jects, some holes will remain. You can close the resulting holes by using a Close Hole or Clean Model operation.
Note that the texture mapping gets lost after a Close Hole or Clean Mo-del operation, but the model can be textured again at anytime. The only problem is that processing the textures can take quite a bit of time, so you probably want to make a number of changes before execu-ting the Texture function.

CREATING ENVIRONMENT MODELS FROM DRONE IMAGES
22
Sometimes you need to look from the top-down to cut out an object, while for other unwanted objects, you need to look from the side. Make sure that there are no objects behind the one you want to cut out.
You can always deselect parts of a selected area by pressing the shift key while using the lasso selection tool. This cleaning process is the most labor intensive part of the workflow and can take more than an hour.
8.2 | Smooth uneven roads
Another part of the model to improve is the unevenness of the flat areas, such as the roads. The photogrammetry software does not always make flat areas really flat. You can flatten uneven surfaces in two ways:1. Reduce the triangle count2. Smoothing. The Simplify operation has two opti-ons: Absolute and Relative. Earlier, we used Absolute to reduce the overall triangle count of the whole model. Now, let’s select an area of the road which does not ap-pear to be flat and select the Rela-tive option.

CREATING ENVIRONMENT MODELS FROM DRONE IMAGES
23
You can set the percentage of sim-plification. For instance, if we set the percentage of simplification to 30%, this means the selected area will be reduced to 30% of its origi-nal triangle number.
If the percentage is not enough, you can carry out the simplification operation another time. Next, select the area again and click on the Smoothing tool. Make sure you haven’t changed the pa-rameters on the left side of the user interface and click Smooth.For this operation, it may be useful to look at the scene in Solid mode. Click on Scene in the menu and then click anywhere on the model. You should see a few options for how you want the model to be dis-played. Click on Solid in the Scene Render section. Normally, you set this to Sweet, which shows the model with colors or textures, but in Solid view, you can see the unevenness of the road much better.
When you are finished cleaning up the model, delete all the interim models that were created in the process and save.

CREATING ENVIRONMENT MODELS FROM DRONE IMAGES
24
8.3 | Remove the current building
As the goal of this project is to ca-pture the existing environment and replace the office building with a villa, the next step is to remove the office building and fill the hole.
To save the building, go back to the previous model in RealityCapture. Select the building again, Invert the selection and Filter out the en-vironment.
When removing the building, we wanted to make sure we created a clean, precise cut. Therefore, we doubled the triangle selection. This led to differences along the edges of the hole and the separated office terrain. It is possible to make this cut-out more precise by following these steps:1. On the initial model, make the se-lection of the area that needs to be separated.2. Perform the Filter Selection opera-tion to create the hole.3. Go back to the previous, com-plete 3D model you used to create the hole.4. Press Ctrl-Z to undo the last step. This gets you back your selection.

CREATING ENVIRONMENT MODELS FROM DRONE IMAGES
25
5. Perform an Invert Selection ope-ration and then a Filter Selection operation. Now, the separated area should fit exactly in the hole.
The same steps can be used for a-reas that need to be textured with high-quality Lumion materials, such as the grass areas. You can cut them out of the model, export them as a separate model, and then im-port and texture them in Lumion with Lumion’s 3D grass material.Now, re-texture the model of the environment without the office as well as the office model. Export each one separately.
9 | Create distant views with a satellite map
Before we import the environment and the existing office building mo-dels into Lumion, there’s one more thing we need to do: create a satel-lite image on a surface object. With the satellite image, we can provide a more realistic-looking dis-tant view beyond the area we cap-tured with the drone. Fortunately, this is quite easy in Sketch-Up.

CREATING ENVIRONMENT MODELS FROM DRONE IMAGES
26
To begin, simply open a new pro-ject. Delete the human figure. Click on the small icon in the bottom-left corner to bring up a dialog box that allows you to set the geographic location of your design. Click Add location.Type in the address and click on Search. Scroll out to capture a wider area. Click on Select Region. Move the corner points to the desired spot. Click on Grab. SketchUp will creates a plain square surface with a texture map of the selected area. Right-click on the map to unlock it.
The map is now ready for importing into Lumion. In case the area around your de-sign is not flat, you can use the Oob plugin to capture the satellite map plus a 3D terrain file, which allows you to map the satellite image on the terrain.

CREATING ENVIRONMENT MODELS FROM DRONE IMAGES
27
To show this, we will use another area which has some dunes. The Oob plugin needs to start with a georeferenced terrain, so start by creating the satellite image on a flat terrain, like we saw in the pre-vious step. Click on the Oob icon to bring up its dialog box.
Select Satellite View under the drop-down button and click on Build 3D terrain. Select “High resolution Google data (beta).”
Oob will now create a 3D mesh of the area (based on Google height data) and map a Google satellite image on it.
CREATING ENVIRONMENT MODELS FROM DRONE IMAGES
28
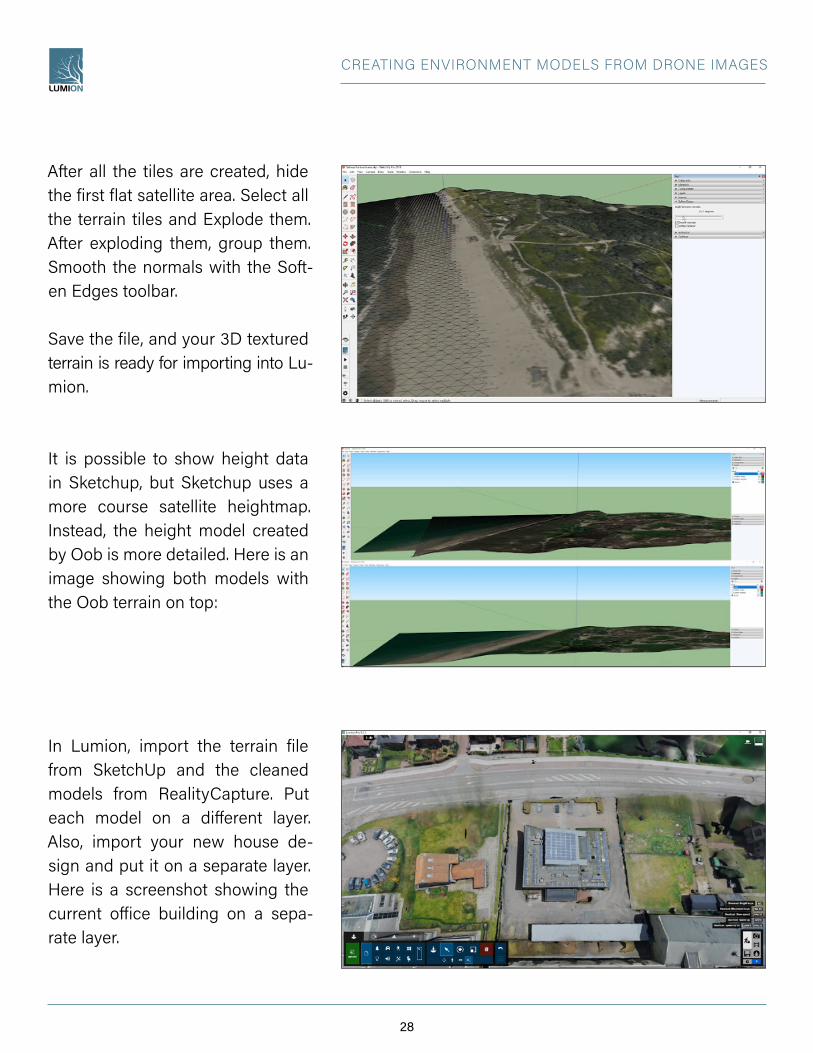
After all the tiles are created, hide the first flat satellite area. Select all the terrain tiles and Explode them. After exploding them, group them. Smooth the normals with the Soft-en Edges toolbar.
Save the file, and your 3D textured terrain is ready for importing into Lu-mion.
It is possible to show height data in Sketchup, but Sketchup uses a more course satellite heightmap. Instead, the height model created by Oob is more detailed. Here is an image showing both models with the Oob terrain on top:
In Lumion, import the terrain file from SketchUp and the cleaned models from RealityCapture. Put each model on a different layer. Also, import your new house de-sign and put it on a separate layer. Here is a screenshot showing the current office building on a sepa-rate layer.
CREATING ENVIRONMENT MODELS FROM DRONE IMAGES
29
10 | Add vegetation
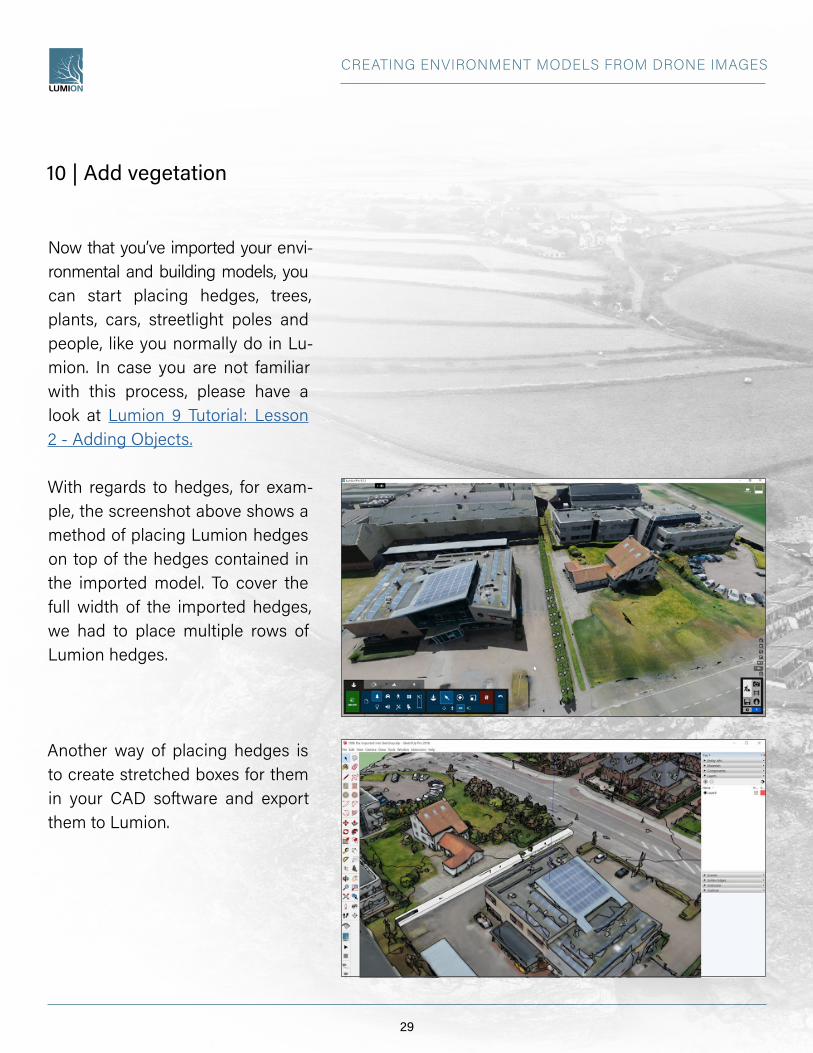
Now that you’ve imported your envi-ronmental and building models, you can start placing hedges, trees, plants, cars, streetlight poles and people, like you normally do in Lu-mion. In case you are not familiar with this process, please have a look at Lumion 9 Tutorial: Lesson 2 - Adding Objects.
With regards to hedges, for exam-ple, the screenshot above shows a method of placing Lumion hedges on top of the hedges contained in the imported model. To cover the full width of the imported hedges, we had to place multiple rows of Lumion hedges.
Another way of placing hedges is to create stretched boxes for them in your CAD software and export them to Lumion.
CREATING ENVIRONMENT MODELS FROM DRONE IMAGES
30
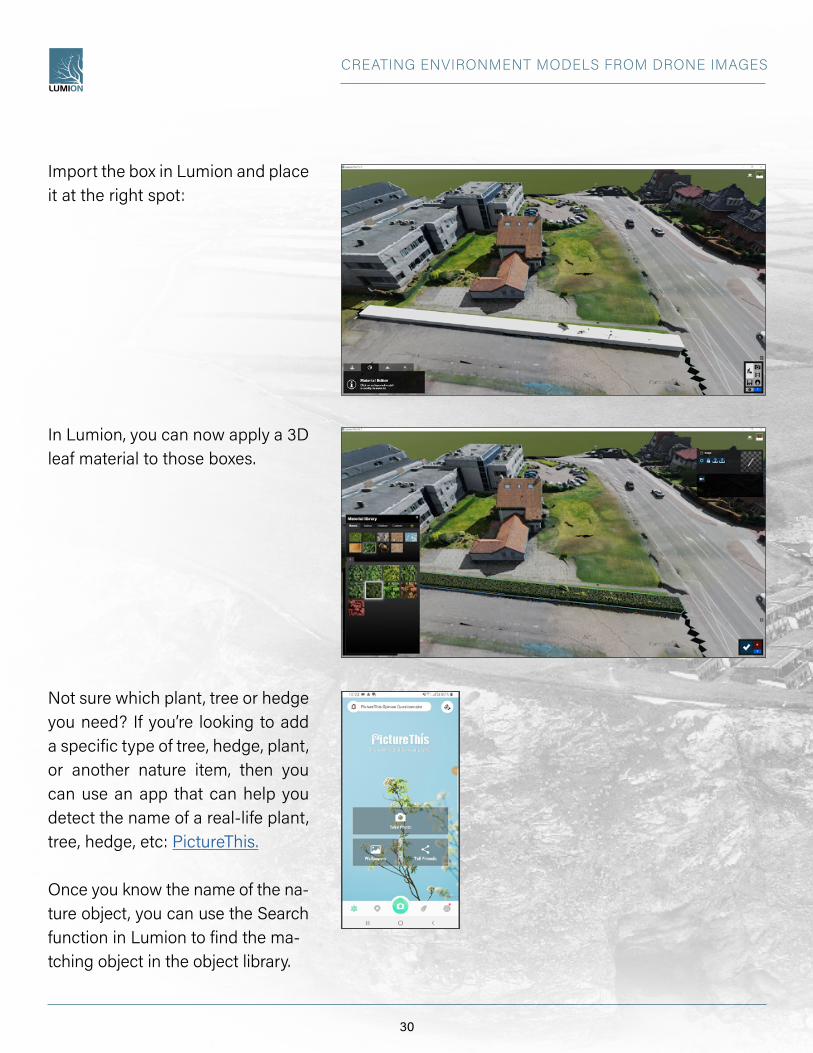
Import the box in Lumion and place it at the right spot:
In Lumion, you can now apply a 3D leaf material to those boxes.
Not sure which plant, tree or hedge you need? If you’re looking to add a specific type of tree, hedge, plant, or another nature item, then you can use an app that can help you detect the name of a real-life plant, tree, hedge, etc: PictureThis.
Once you know the name of the na-ture object, you can use the Search function in Lumion to find the ma-tching object in the object library.

CREATING ENVIRONMENT MODELS FROM DRONE IMAGES
31
11 | Create renders
Now that you’ve added vegetation and other objects to your scene, you should be ready to start rendering. Here is a screenshot of the scene we created:
And here is the same scene from a street-level view:
Finally, we created a few renders:

CREATING ENVIRONMENT MODELS FROM DRONE IMAGES
32

CREATING ENVIRONMENT MODELS FROM DRONE IMAGES
33
12 | Overview of time and cost
Here is an overview of the hours spent on this project:
Item Manual labour Processing
Taking pictures with a drone
30 minutes
Creating the first photo-grammetry model
10 minutes 2 hours
Optimizing the model in RealityCapture
2 hours 2 hours
Capturing the tree imag-es with PictureThis
1 hour
Adding trees and other objects in Lumion
3 hours
Creating images and videos in Lumion
1 hour 4 hours
TOTAL 7:40 8:00

CREATING ENVIRONMENT MODELS FROM DRONE IMAGES
34
Note that you may still be able to use your PC for other tasks while the model is processing, so it isn’t completely lost time. You can run each process in Reali-tyCapture even when the screen is minimalized.Here is an overview of the costs:
Fortunately, these costs don’t only have to be for this project. The hardware can be used for many years and numerous projects.
13 | Conclusion
Using a drone to create 3D envi-ronments can be especially useful when you’re designing a building or a home for a real-life location. Often, the client or other important parties involved with the design and construction need to see how your building design will blend into the existing environment.
Item Price
Drone (DJI Mavic 2 Pro) $1500
Additional battery, carry case, tablet holder, MicroSD card
$250
9-inch tablet $300
3-month license RealityCapture $99
TOTAL $2,149

CREATING ENVIRONMENT MODELS FROM DRONE IMAGES
35
Even with the constraints of a proj-ect, such as the permission to fly the drone, the area you need to cover, and the time you have avai-lable for a project, you can easily find several tools to turn your idea into a reality, including: the DJI Go app, Drone Harmony, RealityCapture, Sketchup, the PictureThis app, and Lumion.
For the first drone-to-3D process, you will go through a learning curve. After a few flights and some time spent processing and cleaning the model, you will be able to reduce the time needed to create the 3D environment. Even after a few at-tempts, you should be able to start creating visualizations from start to finish in one day.An alternative method, however, is to create some image composites. This is the process of combining a photo with a render of the new building (created from the same viewpoint and camera angle) in Photoshop. If all you need is just one bird’s-eye-view image of an area showing a new building, you may want to con-sider the photo composite method.
Keep in mind that this method does have some limitations when com-pared with the drone capture me-thod described in this tutorial, inclu-ding:1. More time needed per individual image.2. Less flexibility to try different viewpoints and lens angles.3. Difficult to change the sun posi-tion and weather. You need to use the sun position as it was when you made the picture, which may not be ideal for the render.4. If the old building is larger than the new one, more work is needed to delete these larger areas from the photo.5. Difficult to get the camera posi-tion and angle in Lumion exactly matching the camera position and angle of the photograph.6. Vegetation and other objects may be obstructed by the rendered new building unless you spend a lot of time cutting these parts out of the photo.7. You are dependent on the time of the year with regards to how the trees and plants look.
CREATING ENVIRONMENT MODELS FROM DRONE IMAGES
36
If you have a project during the win-ter season, for instance, your trees look much less appealing compared to the Lumion renders where you can make the trees look exactly the way you want them.8. You cannot perform shadow studies.9. Videos are almost impossible to create.
Click here if you prefer to watch a video tutorial of the entire drone-to-3D environment process.