Contents Warnings 43 - Bernette.com
64
1 Contents Safety Instructions 2 All rights reserved 4 Embroidery 6 Important Embroidery information 6 – Embroidery threads 6 – Lower threads 7 Embroidery Overview 8 Details of Embroidery module 8 Accessories 9 Optional 9 Embroidery Setup 10 Attaching the embroidery foot 10 Connecting the embroidery module 11 Removing the embroidery unit 12 Embroidery hoop 13 – Hooping the fabric 14 – Using embroidery templates 15 Attaching the embroidery hoop 16 Removing the embroidery hoop 16 Stabilizer 16 – Tear-away stabilizers 16 – Cut-away stabilizers 17 Adhesive Spray 17 – Spray starch for additional stiffening 17 Iron-on interfacing 18 – Paper-backed adhesive stabilizer 18 – Water soluble stabilizer 18 Display Explanation & Operating Functions 19 Embroidery Mode 19 Function Buttons 20 – Start/Stop button 20 – Reverse/Exit button 20 – Auto-Lock/Trace button 20 – Elongation/Resize button 20 – Double needle/Rotate button 20 – Stitch length adjustment/ Stitch forward/backward button 21 – Stitch width adjustment/ Colour forward/backward button 21 – Memory/Setup button 21 – Clear/Return button 21 – Pattern group selection/Colour setup button 21 Embroidery Selection 22 Embroidery Design types 22 – Built-in Embroidery Designs 23 – Built-in Embroidery Letters 24 – Designs from USB stick 25 Starting to embroider 26 Editing the Embroidery Design 28 – Basic setting 28 – Embroidery hoop 28 – Mirroring the Design 28 – Resizing the Design 29 – Rotating the Design 30 – Single/ Multi color 30 – Repositioning the Design 31 – Advanced settings 32 – CutWork Tool 32 – Inch/mm options 32 – Embroidery maximum speed 32 – Software version information 32 – Acoustic signal 33 – Embroidery arm return 33 Load a Design after interruption 34 BERNINA CutWork Tool* 36 – Preparation 36 – Switch from Embroidery Mode to Cutting Mode 37 – Start to Cut 38 Warnings 39 Warning functions 39 – Warning message 39 – Warning display 39 Warnings 43 – Warning sound 44 Trouble Shooting 45 Trouble shooting guide 45 Embroidery Design Overview 47 Start Screen 47 Seasons 48 Sports 52 Decoration 54 Flowers 56 Children 59 Animals 62
-
Upload
khangminh22 -
Category
Documents
-
view
1 -
download
0
Transcript of Contents Warnings 43 - Bernette.com

1
Contents
Safety Instructions 2All rights reserved 4
Embroidery 6Important Embroidery information 6 – Embroidery threads 6 – Lower threads 7
Embroidery Overview 8Details of Embroidery module 8
Accessories 9
Optional 9
Embroidery Setup 10Attaching the embroidery foot 10
Connecting the embroidery module 11
Removing the embroidery unit 12
Embroidery hoop 13 – Hooping the fabric 14 – Using embroidery templates 15
Attaching the embroidery hoop 16
Removing the embroidery hoop 16
Stabilizer 16 – Tear-away stabilizers 16 – Cut-away stabilizers 17
Adhesive Spray 17 – Spray starch for additional stiffening 17
Iron-on interfacing 18 – Paper-backed adhesive stabilizer 18 – Water soluble stabilizer 18
Display Explanation & Operating Functions 19Embroidery Mode 19
Function Buttons 20 – Start/Stop button 20 – Reverse/Exit button 20 – Auto-Lock/Trace button 20 – Elongation/Resize button 20 – Double needle/Rotate button 20 – Stitch length adjustment/ Stitch forward/backward
button 21 – Stitch width adjustment/ Colour forward/backward
button 21 – Memory/Setup button 21 – Clear/Return button 21 – Pattern group selection/Colour setup button 21
Embroidery Selection 22Embroidery Design types 22 – Built-in Embroidery Designs 23 – Built-in Embroidery Letters 24
– Designs from USB stick 25
Starting to embroider 26
Editing the Embroidery Design 28 – Basic setting 28 – Embroidery hoop 28 – Mirroring the Design 28 – Resizing the Design 29 – Rotating the Design 30 – Single/ Multi color 30 – Repositioning the Design 31 – Advanced settings 32 – CutWork Tool 32 – Inch/mm options 32 – Embroidery maximum speed 32 – Software version information 32 – Acoustic signal 33 – Embroidery arm return 33
Load a Design after interruption 34
BERNINA CutWork Tool* 36 – Preparation 36 – Switch from Embroidery Mode to Cutting Mode 37 – Start to Cut 38
Warnings 39Warning functions 39 – Warning message 39 – Warning display 39
Warnings 43
– Warning sound 44
Trouble Shooting 45Trouble shooting guide 45
Embroidery Design Overview 47Start Screen 47
Seasons 48
Sports 52
Decoration 54
Flowers 56
Children 59
Animals 62

2
Safety Instructions
IMPORTANT When using an electrical machine, basic safety precautions should always be followed, inclu-ding the following:Please read the instruction manual carefully before using this machine.Keep the instruction manual at a suitable place with the machine and hand it over if you give the machine to a third party.When the machine is not in use or left unattended, always disconnect the machine from the power supply system. Unplug it from the outlet.
DANGER!To reduce the risk of electric shock:1. Never leave the machine unattended when it is plugged in.2. Always unplug this machine from the electric outlet immediately after using and before
cleaning.3. LED RADIATION: Do not view directly with optical instruments Class.
WARNING!To reduce the risk of burns, fire, electric shock or injury to persons:1. The machine mustn’t be used by children under 8 or by people with reduced physical,
sensory or mental capabilities or if there is a lack of experience and knowledge how to operate the machine. Unless they have been given instruction concerning the use of the machine and the involved risks by a person who is responsible for their safety.
2. Do not use this machine as a toy. Close attention is necessary when this machine is used by children, near children or people with reduced sensation.
3. Use this machine only for its intended use as described in this manual. Use only acces-sories recommended by the manufacturer.
4. Children should be supervised to ensure that they do not play with the machine.5. Never operate this machine if it has a damaged cord or plug, if it is not working properly,
if it has been dropped or damaged, or dropped into water. Return the machine to the nearest authorized dealer or service centre for examination, repair, electrical or mechani-cal adjustment.
6. Never operate the machine with any air openings blocked. Keep ventilation openings of the machine and the foot control free from accumulation of lint, dust, and loose cloth.
7. Keep fingers away from all moving parts. Special care is required around the machine needle.
8. Always use the proper stitch plate. The wrong plate can cause needle 9. Do not use bent needles.10. Do not pull or push the fabric while sewing. This can result in needle breakage.

3
Safety Instruction
11. Switch the machine off (”O”) when making any adjustments in the needle area, such as threading or changing the needle, threading the bobbin, or changing the presser foot, and the like.
12. Always unplug the machine when performing cleaning or maintenance work such as replacing the sewing light or when making any other user maintenance adjustments men-tioned in the instruction manual (disconnect the power plug). Cleaning and maintenance work must not be carried out by children without supervision.
13. Never drop or insert any object into any openings.14. Use this machine only in dry and protected areas. Never operate the machine in a damp
or wet environment.15. Do not operate the machine where aerosol spray products are being used or where oxy-
gen is being administered.16. To disconnect, turn the power switch to (”O”)(off), then remove the plug from the outlet.
Do not unplug by pulling the cord, instead grasp the plug to pull it from the outlet.17. If the supply cord of the foot control is damaged, it must be replaced by the manufacturer
or an appropriate service agent or a similar qualified person in order to avoid endanger-ment.
18. Never place anything on the foot control.19. When replacing the light bulb, always use the same type.20. The machine may only be used in combination with a foot control of the type C-9000.21. The sound pressure level during normal operation is lower than 75dB(A).22. This machine is provided with double insulation (except U.S.A/Canada). Use only identical
replacement parts. See instructions for Servicing of double-insulated products.
SERVICING OF DOUBLEINSULATED PRODUCTSIn a double-insulated product, two systems of insulation are provided instead of grounding. No grounding means is provided on a double-insulated product nor should a means for grounding be added to the product. Servicing a doubleinsulated product requires extreme care and knowledge of the system and should only be done by qualified service personnel. Replace-ment parts for a double-insulated product must be identical to those parts in the product. A double insulated product is marked with the words ”DOUBLE INSULATION” or ”DOUBLE INSULATED”.
The symbol may also be marked on the product.

4
Safety Instruction
SAVE THESE INSTRUCTIONS!
Attention!
• This machine is intended for household use only. If used intensively or commercially, regular cleaning and especially attentive care is required.
• Signs of wear and tear owing to intensive or commercial use are not covered automatically, even if they occur within the warranty period. The decision on how to deal with any such cases rests with the local authorised servicing staff.
note
If the machine is stored in a cold room, it should be brought to a warm room about one hour before use.
All rights reserved
For technical and product improvement reasons, the machine’s features, parts and accessory are subject to unannounced changes and alterations at any time. The accessory included can differ from country to country.
Environmental protection
BERNINA is committed to the protection of the environment. We strive to minimize the environmental impact of our products by continuously improving product Design and our technology of manufactu-ring. Do not dispose of electrical machines as unsorted municipal waste, use separate collection facilities. Contact your local government for information regarding the collection systems available.
If electrical machines are disposed of in landfills or dumps, hazardous substances can leak into the groundwater and get into the food chain, damaging your health and well-being.
When replacing old machines with new ones, the retailer is legally obligated to take back your old machine for professional disposal free of charge.

5

6
Embroidery
Important Embroidery information
Embroidery threads
A good quality thread is essential for embroidery to avoid poor stitch formation, thread breakage, etc.
Embroidery is particularly effective if you use 40wt glossy rayon or polyester embroidery threads as upper threads. They are available in a wide range of colors for beautiful embroidery.
Polyester threadsPolyester with a brilliant sheen is a hard wearing colorfast thread and has a high tensile strength which is suitable for all types of embroidery.
Rayon threadsRayon is a soft viscose fiber with a brilliant sheen and suitable for fine, delicate embroidery, or items that will not receive excessive wear and tear.
Metallic threadsMetallic thread is a light- to medium weight thread suitable for special effects in embroidery. Reduce the speed and the upper thread tension when embroidering with metallic threads.
Embroidery needle • Correct size thread must correspond with correct size
needle. • Replace the needle regularly.
Use the vertical spool pin and attach the supplemental thread guide (optional accessory) when using metallic or specialty threads. A Metafil 130/705H-MET need is recom-mended for embroidering with metallic threads. Adjust upper thread tension and reduce the embroidery speed.
note

7
Embroidery
Lower threads
Bobbin Fill (special bobbin thread)Bobbin Fill is an especially soft and light polyester thread suit-able for bobbin thread. This special bobbin thread ensures a steady thread tension and an optimal intertwining of the upper and bobbin thread.
Darning and embroidery threadFine mercerized cotton thread which is suitable for embroider-ing on cotton.
In most cases, bobbin thread for embroidery is either white or black. Some special cases require the same thread in top and bobbin.
note

8
Embroidery Overview
Details of Embroidery module
1 Embroidery module2 Embroidery arm3 USB port4 Embroidery module release lever5 Hoop-securing lever6 Embroidery hoop attachment brackets7 Embroidery module connection8 Embroidery module connector plug
Do not touch the embroidery arm. The connector could be damaged, and it may cause malfunctions.
Do not lift up on the embroidery arm, and do not forcefully move it. It may cause malfunctions.
Do not carry the embroidery module by holding it at the release button area.
The foot control is disabled as long as the embroidery module is connected.
note

9
Embroidery Overview
Accessories
1 Simple embroidery foot2 Darning/Embroidery foot3 Embroidery hoop (L-110x170mm)
4
6
5
1 32
Optional
4 Embroidery hoop (M-100x100mm)5 Embroidery hoop (S-40x40mm)6 CutWork Tool

10
Embroidery Setup
Attaching the embroidery foot
• Raise the presser foot. • Press the black lever (a) and the foot will disengage.
• Remove the presser foot holder (c) by unscrewing (counter-clockwise) the presser foot bar attaching screw (b).
• Attach the embroidery foot to the presser foot holder bar.
• Press the embroidery foot on firmly from behind with your index finger and tighten the screw.
Turn power switch to off («O») when carrying out any of the following operations!
Attention!
note
To achieve a better sewing result when using thick material, insert the darning/embroidery foot. Adjust the thread tension if necessary.

11
Align the arrow on the plug (a) with the arrow on the machine (b).
Attention!
Embroidery Setup
Connecting the embroidery module
• Remove the sewing table to the left side.
• Move the feed dog control to lower the feed dog (b).
• Insert the embroidery module connection into the machine connection port.
• Push lightly until the module clicks into place.
• Insert the plug into the embroidery module connector of the machine.
Turn power switch to off («O») when carrying out any of the following operations!
Attention!
b
a
ba

12
Embroidery Setup
Removing the embroidery unit
• Remove the embroidery module connector plug.
• Press the embroidery module release button on the left, underneath the embroidery module and slide the module to the left to remove it.
Turn power switch to off («O») when carrying out any of the following operations!
When you finish the work, move the feed dog control to raise the feed dog (a).
Attention!
note
b
ba
a
b
ba
ab
a
ba

13
Embroidery Setup
Embroidery hoop
1 Inner hoop2 Centering ribs for embroidery template3 Center mark4 Outer hoop5 Embroidery hoop connector6 Hoop size7 Adjustment screw

14
Embroidery Setup
Hooping the fabric
• Loosen the embroidery hoop adjustment screw on the outer hoop.
• Separate the inner and outer hoop by removing the inner hoop upward.
• The fabric is hooped with the right side up. • Place the fabric with the stabilizer material on top of the
outer hoop.
• Press the inner hoop down. • Push down firmly until the inner hoop fits securely into
the outer hoop. • Align the fabric with the inner hoop (a) and the outer
hoop (b).
• Tighten the adjustment screw to secure the fabric. • Tighten the fabric by hand. • After tightening the fabric, make sure that the fabric is
stretched tautly in the hoop.

15
Embroidery Setup
Using embroidery templates
• Mark the center position of the design to be embroi-dered using a chalk pen.
• Place the embroidery template on the inner frame.
• Align the fabric with the base line of the embroidery template.
• Place the inner frame over the fabric on the outer frame and stretch the fabric.
• Remove the embroidery template.

16
Tear-away stabilizers • Excess is easily torn away. • One or more layers can be used. • Available in different weights. • For more stability, apply to the wrong side of the mate-
rial with temporary adhesive spray before hooping. • Carefully tear away excess stabilizer from the back of
the embroidery after stitching. • Designs are not skewed. • Stabilizer will remain under larger embroidered areas.
Application – For all woven materials and materials without
stretch.
Stabilizer
Embroidery Setup
Attaching the embroidery hoop
Removing the embroidery hoop
• Raise the presser foot. • Place the embroidery hoop under the presser foot. • Attach the embroidery hoop, plug the embroidery hoop
connector into the hoop securing lever from the front to the back until it clicks.
• Raise the presser foot. • Press the snap on the embroidery hoop holder down. • Pull the hoop towards you smoothly and carefully.

17
Embroidery Setup
Cut-away stabilizers • One or more layers can be used. • Available in different weights. • For more stability, apply to the wrong side of the material
with temporary adhesive spray before hooping. • Carefully cut away from the back of the embroidery after
stitching. • Designs are not skewed. • Stabilizer will remain under larger embroidered areas.
Application – For all elastic materials.
Avoid using spray adhesive next to your embroidery system. • At a distance of 25-30 cm use adhesive spray carefully. • Spray the stabilizer and adhere to the wrong side of the
material carefully smoothing material so that there are no puckers.
Application – Stretch and knitted material: to retain shape. – Smooth material: to avoid slipping of material lay-
ers. – Appliqués can be exactly positioned. – Material pieces: position material pieces on stabi-
lizer, e.g.pocket flaps. – Napped materials (i.e. velvet) that should not be
clamped in the hoop to avoid getting hoop marks. – To fix the parts to be embroidered.
Spray starch for additional stiffeningSpray starch is ideal for additional stiffening of fine, soft or loosely woven materials. • Spray the area to be embroidered • Let dry; or press gently with a warm iron if necessary • Always use an additional stabilizer such as water solu-
ble stabilizer on the wrong side of the material.
Application – Ideal for fine, loosely woven materials, e.g. batiste,
fine linen, etc.
Adhesive Spray

18
Iron-on interfacings are available in a variety of weights. Iron-on interfacings should be selected to suit the material being used. Use an iron-on interfacing which is easily removable from the material. • Iron-on interfacings are pressed (fused) to the wrong
side of the materialApplication:
– To provide body and shape for the materials onto which designs will be placed, use the appropriate stabilizer.
Paper-backed adhesive stabilizer • Place stabilizer in hoop, paper side up. • Use a pointed object (e.g. scissors) to score the paper. • Remove paper to reveal the self-adhesive surface.
– The self-adhesive surface reveals. • Position the material to be embroidered on the stabi-
lizer and smoothen the area.Application:
– Intended for delicate materials such as jersey or silk etc.
– For hard-to-hoop parts and materials.
Iron-on interfacing
Water soluble stabilizerWater soluble stabilizers look like plastic wrap. Dissolve stabi-lizer in warm water when the embroidery is complete. Water soluble stabilizers are ideal protection for materials with a thick or looped pile such as toweling. This prevents the threads from sinking into the material and prevents the mate-rial from showing through the embroidery stitches. • Place on top of the material. • Place all the layers together into the embroidery hoop. • Use adhesive spray to fix stabilizer if necessary. • For material with a pile, reinforce with additional, suit-
able stabilizer on the wrong side. • After dissolving lay the design down flat and let dry.
Application: – Ideal for toweling, velvet, bouclé etc. – Ideal for fine, sheer materials such as organdy,
batiste, etc. – For lace embroidery.
Make sure that the adhesive residue on needle, stitch plate and hook area is removed.
For lace embroidery place one or two layers of water soluble stabilizer in hoop (as the design is not embroidered on any material, only the thread embroidered design is left). Embro-idery designs must be combined with short stitches other-wise the individual designs may fall out.
note
note
Embroidery Setup

19
Display Explanation & Operating Functions
Embroidery mode display - type selection display1 Built-in Embroidery Designs2 Built-in Embroidery Letters3 Designs from USB
Embroidery Mode
1 2 3
6
7
16
4
15
14
18
5
1211109
17
13
8
This embroidery machine reads .exp format only. USB stick with up to 32GB readable / only USB 2.0 compatible.
Embroidery mode display - Built-in Embroidery letters9 Embroidery hoop size L-110*170mm10 Embroidery hoop size M-100*100mm11 Embroidery hoop size S-40*40mm
(While the hoop icon is flashing the machine is adjusting the size or the current size will change.)
12 Editing area13 Cursor14 Type mode15 Current page16 Total page17 Embroidery letters18 Letter type font
Embroidery mode display - type selection display4 Type mode5 Indication - select page up/down6 Current page7 Total pages8 Embroidery design number and design
note

20
Display Explanation & Operating Functions
Function Buttons
Start/Stop button
Reverse/Exit button
Auto-Lock/Trace button
• Press the Start/Stop button to start the machine. • Press again to stop it. The machine will move slowly at
the start of sewing. – This way you may operate the machine without foot
control.
• In Embroidery Mode press this button to return to the type selection display, the selected pattern is canceled.
• In Embroidery Mode press this button to check the extents of the embroidery area. The embroidery arm will trace the outline in a rectangle, circumscribing the selected embroidery design without stitching.
Elongation/Resize button
• In Embroidery Mode, press this button to open the resize display.
Double needle/Rotate button
• In Embroidery Mode, press this button to rotate the embroidery design.

21
Display Explanation & Operating Functions
Stitch length adjustment/ Stitch forward/back-ward button
• In Embroidery Mode, press this button to move forward or backward within the design stitch by stitch.
Stitch width adjustment/ Colour forward/back-ward button
• In Embroidery Mode, press this button to move forward or backward in the colour part.
Memory/Setup button
• In Embroidery Mode, press this button to enter the set-ting program.
Clear/Return button
• If an incorrect pattern or memory file is selected, press this button to clear it or to return to the previous dis-play.
Pattern group selection/Colour setup button
• In Embroidery Mode, press this button to set the single or multi colour for embroidery designs.

22
Embroidery Selection
Embroidery Design types
An embroidery design can be selected from the following types available.
– Built-in Embroidery Designs – Built-in Embroidery Letters – Designs from USB stick
• Use the right/ left arrow buttons to select and press the OK button.
• Select and press the OK button to enter the selected Embroidery design Group.
Built-in Embroidery Designs
There is a total of 100 designs.The designs are embroidered by changing the upper thread according to the instructions shown on the displayed.
Built-in Embroidery Letters
Choose from upper case/ lower case/special charac-ter/ number & symbol.When selecting letters or writing a word for embroidering, the display is not showing the written word but it is showing „word“ only.
Designs from USB stick
To sew the designs from the USB stick. • The design file name must not be longer than
17 items. • Always save .exp and .inf file of the Design that
Chicago 7 can read all the information cor-rectly.
• When uploading Designs from USB stick, the display is not showing the design but it is showing „usb“ only.
• The design file name may only contain follow-ing letters, signs and numbers.

23
Embroidery Selection
Built-in Embroidery Designs
• Use the arrow buttons to choose the built-in embroi-dery designs and press the OK button.
There will be 3 designs on the display. • Use the right/left arrow buttons to switch.
To move forward or back by 3 designs. • Press the up/down arrow buttons.
• Or just press the number buttons for direct selection. (E.g. No.26)
• Press the OK button to enter the editing display.
• Press the OK button to prepare embroidery. – A warning message appears reminding you to
check the embroidery hoop size. • Press the OK button to confirm and enter the embroi-
dery display. Now you can start to embroider.
On the editing display the embroidery design may be moved forward/backward & right/left, resized from 80% - 120% or rotated by pressing the respective button. For detailed description see page 29.
note

24
Embroidery Selection
Built-in Embroidery Letters
• Use the arrow button to choose the built-in Embroidery Letters and press the OK button.
• Press the arrow buttons to choose the letters. • Press the OK button to select the desired letter. • Press the clr button to delete a letter.
To move forward or back by 3 letters. • Press the up/down arrow buttons.
• Move the cursor to the icon at the lower right corner.
Switch between upper case/lower case /special character/number & symbol • Pressing the OK button.
– Upper case
– Lower case
– Special characters
– Number & symbols
• Enter some letters, e.g. Abc. • After editing, move the cursor to the icon on the right
side in the middle of the display.
• Press the OK button to enter the editing display.

25
Embroidery Selection
Designs from USB stick
The embroidery module provides a USB port to connect your USB stick.Via the USB stick you can transfer embroidery designs to the machine and the Embroidery designs can be recalled from the USB stick.
Connecting and removing from USB port • Insert the USB stick into the USB port on the left side
of the embroidery module. • To remove, carefully pull the USB stick out.
• Use the arrow buttons to choose the desired embroi-dery design and then press the OK button.
Recalling the design from USB stick • Use the arrow buttons to choose the USB icon and
press the OK button.
• Press the OK button to prepare embroidery. – A warning message appears reminding you to
check the embroidery hoop size.
• Press the OK button to confirm and enter the embroi-dery display. Now you can start to embroider.
This embroidery machine reads .exp format only. USB stick with up to 32GB readable / only USB 2.0 compatible
note
Attention!
When attaching the USB stick to the embroidery modulea message appears remaining you to wait until finish readingthe designs. After the warning message disappears, the designs can be uploaded from the USB stick.

26
Embroidery Selection
Starting to embroider
After the preparations are done, you can start embroidering.Select the embroidery thread according to the information shown on the display.When using pure .exp designs from the internet you may find the color information in their document.
• Prepare the embroidery thread, thread the needle and attach the embroidery foot.
• Lead the thread through the embroidery foot hole, and hold it lightly in your left hand.
If the thread is pulled too tightly, the needle may break or bend.
Do not allow anything to hit the arm while embroidering. The design might become distorted.
• Lower the presser foot
Attention!
note
Before pressing the Start/Stop button, press OK button and then the arrow buttons can be used to move the first stitch to desired position.
This is especially used with border embroidering.
• Press Start/Stop button to start embroidering. • After sewing 5 to 6 stitches, press the Start/Stop but-
ton again to stop the machine.

27
Embroidery Selection
• Raise the presser foot. • Cut the thread at the beginning of the stitching. • Lower the presser foot.
• Press the Start/Stop button to continue embroidering.
When the first colour is completed, the machine stops auto-matically. • The message «Raise presser foot» is displayed.
After raising, change the thread according to the information on the display.
• Re-thread with the next colour and press the OK but-ton to confirm.
• Repeat the same actions.
When the embroidery is completed, the machine stops auto-matically and this message appears. • Press the OK button to return to the design type selec-
tion display. • Press the Reverse/Exit button to return to editing dis-
play of embroidery designs.
note
To simply threading of the new thread color and for easier trim of the jumping stitches the embroidery hoop can be moved forwards by pressing the Auto-Lock/Sequence button. By pressing the Auto-Lock/Sequence button again, the embroidery hoop goes back to the correct position.

28
Embroidery Selection
Editing the Embroidery Design
Basic setting
You can edit designs to create original embroidery.After selecting the embroidery design. • Press the OK button to open the editing display.
Embroidery hoop
These icons start flashing if the design has been resized, the layout has been altered or the recommended embroidery hoop size has been changed.Embroidery hoop icons that appear in gray cannot be used.
Mirroring the Design
• Press this button to mirror the embroidery design hori-zontally. – The LCD display icon for mirror imaging of the
design appears.

29
Embroidery Selection
Resizing the Design
• Press the button to resize the embroidery design.
You can change the size of embroidery design from 80% to 120% of the original size.
When you press the button, the resizing display will open.
Use the arrow buttons to alter the size, the size will change in 5%-steps each time you press the arrow button.
• Press to enlarge the size of the design.
• Press to reduce the size of the design.
• Press the OK button to save the new size and return the editing display.
note
Not all designs are suitable to be scaled to 80%.

30
Embroidery Selection
Rotating the Design
• Press the button to rotate the embroidery design.
It will rotate 90 degrees clockwise each time when pressing the button, the angle of the design will be shown.
The icon to rotate the design appears.
Single/ Multi color
• Press the button to set the single or multi color for the embroidery design.
Multi color
Single color

31
Embroidery Selection
Repositioning the Design
• Use the arrow keys to move the design to a new posi-tion. When holding the key pressed the repositioning speed will be faster.
• With the “Trace” button you can check the position. The embroidery arm will trace the outline in a rectangle, defining the embroidery design without stitching.
• When the editing is finished, press “OK” to change from editing screen to the stitch-out screen. Press „OK“ again to confirm that the correct hoop is attached. The embroidery arm is moving, the needle is positioned at the first stitch of the design. If the first stitch has to be at an exact position, e.g. for border embroidering): Press “OK” und then use the arrow buttons to move the needle (=first stitch) to the desired position.
note
When using the “Trace” button in the stitch-out screen, the needle will move to the center of the design.
• Use “clr” to go back to the editing-screen. Make all modifications. In the editing-screen you have the pos-sibility to use “Trace” to check the outline of the design. When finished, press “OK” to switch back to the stitch-out screen

32
Embroidery Selection
Advanced settings
• Press the button to open the setup program and alter the embroidery mode settings.
• Press the button again to save the settings and leave the setup program.
In the setup program, the machine settings or function for embroidery can be customized or executed.
There are 6 functions in the program, use the arrow buttons to select the function.
CutWork Tool
The basic setting refers to the sewing needle. • The Cutwork tool can be selected via the arrow but-
tons. • • Confirm the selection with the OK button.
Inch/mm options
The default unit setting is millimeter. • You can set your machine‘s measuring unit to either
inch or millimeter by pressing the arrow buttons.
Embroidery maximum speed
The default speed setting is 600 spm. • The maximum sewing speed can be altered from 350
to 600 spm for embroidery sewing by pressing the arrow buttons.
Software version information
• The first line displays the embroidery software version and the second line displays the machine software ver-sion.

33
Embroidery Selection
Acoustic signal
The acoustic signal sound can be set on/ off by pressing the arrow buttons.
Embroidery arm return
• Press the OK button and the arm will move to the home position.
Do not return the arm with the embroidery hoop attached.
Attention!

34
Embroidery Selection
Load a Design after interruption
• Press the button to open the type selection display.
• Use the arrow buttons to choose the design from Built-in Embroidery designs or from USB stick.
• Press the OK button to confirm the selection.
• Use the arrow buttons or just press the number but-tons to select the desired design.
Make all necessary editings, i.e mirroring, resizing, rotating.

35
Embroidery Selection
Always remember all made design editings in case of any interruption to be able to continue embroidering the design.
note
• Press the OK button to prepare embroidery. – A warning message appears reminding you to
check the embroidery hoop size.
• Press the OK button to confirm and enter the embroi-dery display.
• Press the button to move the design to the last embroi-dered color.
• Press the button to move the design to the last embroi-dered stitch position.
• Lower the presser foot and press start/stop button to start to embroider.

36
Embroidery Selection
BERNINA CutWork Tool*
* The BERNINA CutWork Tool accessory is optional. It is not included with this machine.
Turn power switch to off («O») when carrying out any of the following operations.
The CutWork Tool is a very sharp accessory. Special care is required when working with this tool and keep fingers away from the sharp knife. Please consult you in CutWork book packed with the CutWork Tool accessory.
PreparationAttach the Darning/Embroidery foot • Loosen the needle clamp screw (a) to remove the
needle. • Turn the CutWork Tool between no. 1 and no. 2. • Insert the CutWork Tool with the flat side back, fully up
to the top (b). • Tighten the needle clamp screw (a) again. • Turn the CutWork Tool back to no. 1. • Attach the embroidery module
In CutWork Mode the upper thread sensor is disabled.
When a CutWork Design is selected the machine makes all necessary settings automatically.
Do NOT change the needle plate to work with CutWork.
Attention!
note
note
111

37
Embroidery Selection
Switch from Embroidery Mode to Cutting Mode
• Open the Setup program and use the arrow buttons to choose the CutWork Tool or to choose the sewing needle.
• Press the OK button to confirm.
– In Cutting Mode following display is shown.
– In Embroidery Mode following display is shown.
Depending on the selected designs, the machine is making all necessary settings automatically. • Switching from Embroidery Mode to Cutting Mode can
be made manually too.

38
Embroidery Selection
Start to Cut
Upload the CutWork Design via the USB Stick to the machine. • The display will show the CutWork Design with „Cut 1“.
• Press Start/Stop button and start to cut.
– When Cut 1 is completed, the machine stops auto-matically The message „Raise presser foot“ is dis-played
• After raising, turn the CutWork Tool according to the information on the display.
• Turn the CutWork Tool to next Cut and press the OK button to confirm.
• Repeat the same actions.
When the cutting is completed, the machine stops automati-cally and this message appears. • Press the OK button to return to the design type selec-
tion display. • Press the Reverse/Exit button to return to editing dis-
play of embroidery designs.
39
Warnings
Warning functions
Warning message Warning display
Presser foot is not lowered
This message is displayed when the Start/stop button or the needle up/down position button is pressed while the presser foot is raised.
Presser foot is not raised
This message is displayed when the embroidery module will initialize while the embroidery foot is lowered.
Bobbin winding
This message is displayed when the bobbin winder is winding the bobbin
Push the bobbin winder spindle to the left
This message is displayed when the bobbin winder spindle is still positioned to the right.
The upper thread is broken
This message is displayed when the upper thread is broken.
Please check and rethread the upper thread.
40
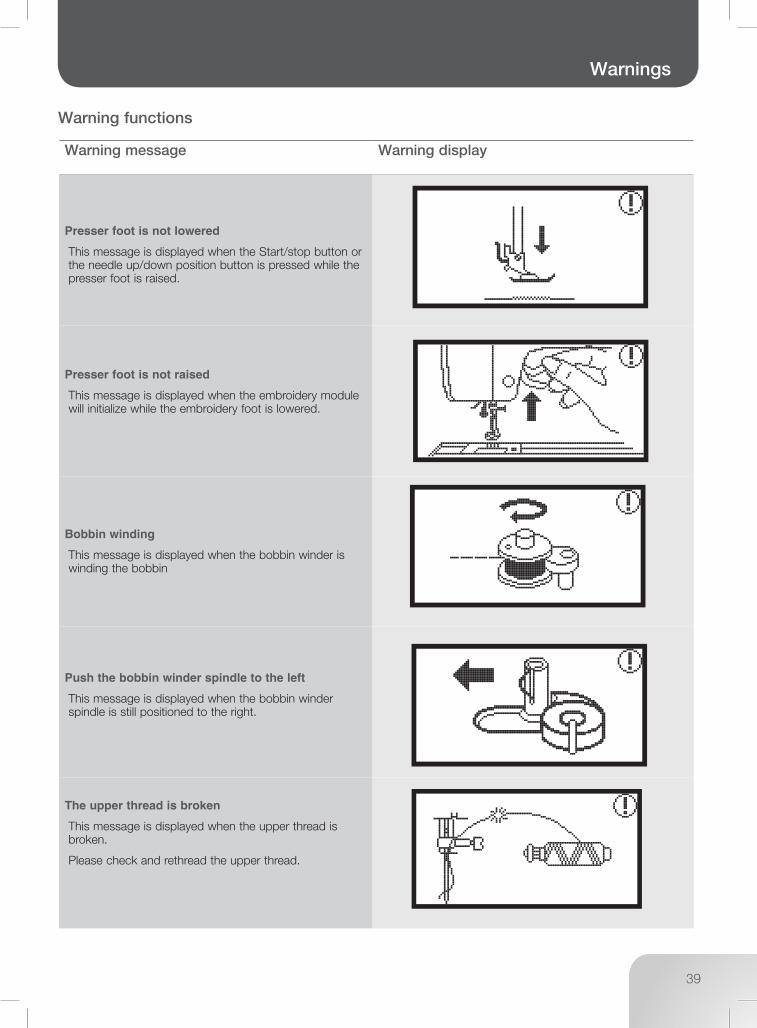
Warnings
Warning message Warning display
Bobbin thread is low
This message is displayed when the bobbin thread is running out.
BH lever is not lowered
This message is displayed when the buttonhole or darning stitch was selected and the start/stop button was pressed while the buttonhole lever is raised.
BH lever is not lifted
This message is displayed when the stitch other than the buttonhole or darning stitch was selected and the start/stop button was pressed while the buttonhole lever is down.
Remove the embroidery hoop.
This message is displayed when the embroidery module will initialize, it is reminding you to remove the embroidery hoop.
Press the OK button to confirm

41
Warnings
Warning message Warning display
Press the needle up/down position button to raise the needle.
This message is displayed when the embroidery module is attached and the power is turned on with the needle in the down position.
Delete design?
This message is displayed when the machine is in embroidery mode and you pressed the button
The embroidery design can‘t be imported.
This message is displayed either when the machine is in USB mode, the embroidery design you selected is too large to fit in the embroidery hoop (110*170mm) or it has more than 30 colours.
Check the embroidery hoop size.
This message is reminding you to check the embroidery hoop size.
Change the thread color.
This message is reminding you to change to the next color part thread.

42
Warnings
Warning message Warning display
Embroider again or choose a new design?
This message is displayed when the embroidery design is completed.
Press the buttons to choose embroider again or choose a new design.
Cannot recognize the data.
This message is displayed when the data of the selected design is defective.
It is also displayed when USB stick capacity is higher than 32GB or higher than USB 2.0.
Loading.
An embroidery design is loading.
Turn off the machine, the plug is not attached cor-rectly.
The messages are displayed when the embroidery module plug is not attached correctly.

43
Warnings
Warning message Warning display
Embroidery model is not attached correctly.
This message is displayed when the embroidery module is not attached correctly.
The arm of the embroidery module will move
This message is displayed when the embroidery module is initializing.
The sewing machine is blocked
The exclamation message means that the thread is twisted or jammed or the fabric is too thick and the hand wheel cannot move. • Please look through the «Trouble shooting guide» on
page 45-46 to resolve the problem.
This massage is displayed when the USB files are read.

44
Warnings
Warning sound
When operating correctly: 1 beep • When the memory is full with 20 units of designs:
– 3-short beeps • When operating incorrectly:
– 3-short beeps • When the sewing machine is in trouble and can‘t sew:
– 3-short beeps
It means that the thread is twisted or jammed and the hand wheel axle can‘t move. Please look through the «Trouble shooting guide» to find the solution. After the problem has been solved, the machine will continue sewing.
If the problem is still not solved, please contact your local dealer.
During sewing, if the thread get jammed inside the hook stopping the needle from moving and you continue pressing the foot control, the security switch will stop the machine completely. In order to restart the sewing machine, you will have to turn the on/off switch to the OFF position and then ON again.
note
Attention!

45
Trouble Shooting
Trouble shooting guide
Before calling for service, check the following items. If the problem can't be solved, contact the place of purchase or your nearest authorized dealer.
Problem Cause Correction Reference
The
sew
ing
mac
hine
doe
sn't
oper
ate
• The machine is not turned on. – Turn on the machine.
• The machine is not plugged in. – Connect the power line plug to the power outlet.
Em
broi
dery
m
odul
e do
es
not
mov
e • The embroidery module is not set up correctly.
– Set the embroidery module up cor-rectly.
9
• No design selected. – Select a design.20

46
Trouble Shooting
Problem Cause Correction Reference
Em
broi
dery
not
nea
tly d
one
• The thread is tangled or the bobbin case, etc., is plugged up.
– Remove the tangled thread. When the bobbin case is plugged up, clean the hook area.
• The thread tension is incorrect. – Adjust the tension of the upper thread.
• The fabric is not fully stretched in the embroidery hoop.
• The fabric is loose.
– Stretch the fabric properly in the embroidery hoop.
12
• No stabilizer material is attached. – Always use stabilizer material for embroidery with stretch fabrics, thin fabrics, fabrics with a loose weave and fabrics where stitches easily con-tract.
15
• Objects are placed near the arm or embroidery hoop.
– If the embroidery arm or embroidery hoop bumps into objects, the designs will be distoreted. Do not place objects within the range of any embroidery hoop motion.
• Material coming out of the embroidery hoop is causing problems.
– Stretch the fabric on the hoop once again so that the material coming out of the embroidery hoop does not cause problems, rotate the design and embroider.
• Heavy fabric is being embroidered, and the fabric is hanging off the table.
– If embroidery is done with the fabric hanging off the table, the embroidery module movement will be affected. Support the fabric while embroider-ing.
• The fabric is being caught. It gets jammed.
– Stop the sewing machine and arrange the fabric correctly.
• The arm was moved while the embroi-dery hoop was being removed or attached during embroidery.
– If the arm is moved during the pro-cess, the design may be distorted. Be careful when removing or attach-ing the embroidery hoop.

47
Embroidery Design Overview
Start Screen
00 - Butterfly
4‘086
71.9 mm
49.2 mm
02 - Jewel Flower
3‘741
80.8 mm
95.2 mm
04 - Parrot
16‘929
73.8 mm
129.8 mm
01 - Beach Logo
5‘622
100.4 mm
89.6 mm
03 - Night Ballon
12‘017
72.4 mm
91.8 mm
05 - Lil‘ Fish
8‘045
76.2 mm
76 mm
Colors
1 2 3 4
5
Colors
1 2
Colors
1 2 3 4
5
Colors
1 2 3 4
5 6 7 8
9 10 11 12
13
Colors
1 2 3 4
5 6 7 8
9 10 11 12
Colors
1 2 3 4
5

48
Embroidery Design Overview
06 - Hummingbird
4‘936
92.2 mm
69.8 mm
08 - Scarecrow
10‘547
77.4 mm
98.6 mm
07 - Pop Flowers
7‘637
63.4 mm
64.0 mm
09 - Happy Sun
9‘535
70.4 mm
69.7 mm
Colors
1 2 3 4
5 6
Colors
1 2 3 4
5
Colors
1 2 3 4
5
Colors
1 2 3 4
5 6 7 8
9
Seasons

49
Embroidery Design Overview
12 - Big Fireworks
7‘283
80.5 mm
126.2 mm
14 - Pumpins & Vine
11‘165
88.8 mm
66.4 mm
10 - Camping
14‘267
88.1 mm
67.5 mm
13 - Fireworks
6‘308
80.8 mm
99.0 mm
15 - Pumpkins 2
10‘441
99.8 mm
87.4 mm
11 - Shells and Starfish
8‘675
88.4 mm
69.7 mm
Colors
1 2 3 4
5 6 7 8
9 10 11 12
13 14
Colors
1 2 3 4
5 6 7 8
9
Colors
1 2 3 4
5 6 7 8
9 10
Colors
1 2 3 4
5 6 7 8
9 10 11 12
13 14 15 16
Colors
1 2 3 4
5 6 7
Colors
1 2 3 4
5 6 7 8

50
Embroidery Design Overview
18 - Pine Cones
6‘402
76.2 mm
87.2 mm
20 - Santa 1
33‘204
107.9 mm
155.1 mm
19 - Summer
16‘344
82.9 mm
103.2 mm
Colors
1 2 3 Colors
1 2 3 4
5 6 7 8
9 10 11 12
13 14 15 16
17 18 19 20
21 22 23 24
Colors
1 2 3 4
5 6 7 8
16 - Fall Corner
10‘704
101.6 mm
91.5 mm
17 - Fall Leaves
9‘881
74.0 mm
101.6 mm
Colors
1 2 3 4
5 6 7 8
9 10 11 12
Colors
1 2 3

51
Embroidery Design Overview
24 - Redwork Candy Cane
5‘090
66.0 mm
97.4 mm
26 - Breezy (Snowman)
15‘888
89.0 mm
95.2 mm
22 - Candle
8‘271
100.8 mm
113.8 mm
25 - Snowflake
4‘708
76.4 mm
76.2 mm
21 - Santa 2
7‘691
66.8 mm
102.0 mm
23 - Redwork Ornament
3‘260
98.8 mm
62.6 mm
Colors
1 2 3 4
5 6 7
Colors
1
Colors
1
Colors
1
Colors
1
Colors
1 2 3 4
5 6 7 8
9 10 11 12
13 14 15

52
Embroidery Design Overview
30 - Soccer Player
8‘050
83.6 mm
95.2 mm
32 - Blue Race Car
11‘484
98.6 mm
38.4 mm
31 - Soccer Smiley
17‘079
89.4 mm
80.4 mm
Colors
1 2 3 4
5 6 7 8
Colors
1 2 3 4
5 6 7 8
Colors
1
29 - Baseball
9‘704
127.4 mm
41.3 mm
Colors
1 2 3 4
5 6 7
28 - Golf
10‘465
94.6 mm
49.9 mm
27 - Sunrise on the Greens
10‘262
92.0 mm
49.9 mm
Colors
1 2 3 4
5 6 7 8
9
Colors
1 2 3 4
5 6 7 8
Sports

53
Embroidery Design Overview
34 - Sailing
14‘716
87.3 mm
88.5 mm
33 - Motorcycle
5‘160
89.1 mm
55.6 mm
35 - Fishing
6‘450
101.2 mm
60.8 mm
Colors
1 2 3 4
5 6 7 8
Colors
1 2 3
Colors
1
36 - Hunting
5‘158
104.8 mm
58.8 mm
Colors
1
37 - Baseball
4‘452
78.2 mm
93.4 mm
Colors
1 2
38 - Snowboarding
11‘692
82.6 mm
99.0 mm
Colors
1 2 3 4
5 6 7 8
9 10 11 12

54
Embroidery Design Overview
40 - Pop Flower 1
3‘785
50.2 mm
50.9 mm
39 - Milky Way Ellipse
7‘078
101.6 mm
41.0 mm
41 - Sewing Border
2‘455
86.5 mm
34.2 mm
Colors
1 2 3 4
5 6
Colors
1 2 3
Colors
1 2 3
42 - Heart Monogram
3‘734
98.8 mm
57.4 mm
44 - Heart Design
4‘375
65.4 mm
56.4 mm
43 - Lace Bouquet
11‘144
92.0 mm
88.9 mm
Colors
1 2 3
Colors
1 2 3 4
Colors
1 2 3
Decoration

55
Embroidery Design Overview
46 - Flowered Heart
5‘192
70.4 mm
89.0 mm
45 - Lace Heart Border
12‘428
67.0 mm
151.6 mm
47 - Fancy Gizmo Border
2‘665
98.7 mm
33.2 mm
Colors
1
Colors
1
Colors
1 2 3 4
5 6 7 8
48 - Lace Flower
7‘276
65.6 mm
98.6 mm
49 - Lace Paisley
6‘188
71.1 mm
97.9 mm
Colors
1
Colors
1

56
Embroidery Design Overview
50 - Lily
14‘243
95.4 mm
87.4 mm
52 - Flowers 3
6‘707
58.8 mm
71.9 mm
51 - Aster
8‘531
72.0 mm
89.2 mm
53 - White Daisies
15‘642
76.2 mm
268.1 mm
Colors
1 2 3 4
5
Colors
1 2 3 4
5 6
Colors
1 2 3 4
5 6
Colors
1 2 3 4
5 6 7 8
9 10
54 - Sunflower Border
4‘903
98.8 mm
21.8 mm
55 - Daisy Wreath
7‘995
86.3 mm
87.1 mm
Colors
1 2 3 Colors
1 2 3 4
5
Flowers

57
Embroidery Design Overview
56 - 3 Sunflowers
16‘592
98.6 mm
71.4 mm
58 - Magnolia & Dogwood Corner
23‘636
107.0 mm
138.8 mm
57 - 2 Roses
17‘255
71.0 mm
136.0 mm
59 - Flowers 3
3‘667
90.6 mm
126.9 mm
Colors
1 2 3 4
5 6
Colors
1 2 3 4
5 6 7 8
9
Colors
1 2 3 4
5 6 7 8
9 10 11 12
13 14 15 16
17 18 19
Colors
1 2 3 4
5 6 7 8
9 10 11 12
13
60 - Flowers
2‘442
86.0 mm
117.8 mm
61 - Grapes 1
4‘076
61.2 mm
65.4 mm
Colors
1 2 3 4
5 6
Colors
1 2 3 4
5

58
Embroidery Design Overview
62 - Strawberries
7‘984
62.6 mm
90.4 mm
64 - Boston Ivy
6‘944
85.4 mm
89.0 mm
63 - Floral Border
3‘437
98.0 mm
34.0 mm
65 - Flower Chain
4‘675
132.8 mm
49.6 mm
Colors
1 2 3 4
5 6 7 8
9
Colors
1 2
Colors
1
Colors
1 2
66 - Flower Frill
5‘977
89.6 mm
53.4 mm
67 - Floral Swag
7‘154
98.6 mm
85.4 mm
Colors
1 2 3 4
5
Colors
1 2

59
Embroidery Design Overview
68 - Edelweiss
8‘198
102.9 mm
58.5 mm
70 - Rocking Horse
6‘238
70.2 mm
74.0 mm
69 - Bouquet Applique
9‘150
91.2 mm
146.6 mm
71 - Rattle
5‘630
98.6 mm
76.4 mm
Colors
1 2 3 4
5 6 7 8
Colors
1 2 3 4
5 6
Colors
1 2 3 4
5 6
Colors
1 2 3 4
5
Children

60
Embroidery Design Overview
72 - Balloons
14‘239
88.8 mm
98 mm
74 - Grizzly
17‘306
72.8 mm
89.2 mm
76 - Pirates
21‘996
94.2 mm
98.6 mm
73 - Teddy Bear
15‘877
78.2 mm
106.4 mm
75 - 1910 Locomotive
14‘720
93.2 mm
47.2 mm
77 - Easter Girl in Flowers
18‘792
98.8 mm
78.6 mm
Colors
1 2 3 4
5 6 7 8
Colors
1 2 3 4
5 6 7 8
9 10 11
Colors
1 2 3 4
5 6 7 8
9
Colors
1 2 3 4
5 6 7 8
9 10 11 12
Colors
1 2 3 4
5 6 7 8
9 10
Colors
1 2 3 4
5 6 7 8
9 10 11

61
Embroidery Design Overview
78 - Gardening Hat
9‘629
101.8 mm
59.2 mm
80 - It's a Girl
8‘201
96.0 mm
99.6 mm
82 - Girls Rule
13‘778
98.6 mm
90.3 mm
79 - Cute Bunny
4‘502
38.4 mm
53.8 mm
81 - It‘s a Boy
7‘263
103.0 mm
84.1 mm
83 - I Love You
5‘996
99.5 mm
81.2 mm
Colors
1 2 3 4
5 6 7 8
9 10 11
Colors
1 2 3 4
5 6 7 8
9 10 11
Colors
1 2 3
Colors
1 2
Colors
1 2
Colors
1 2 3
62
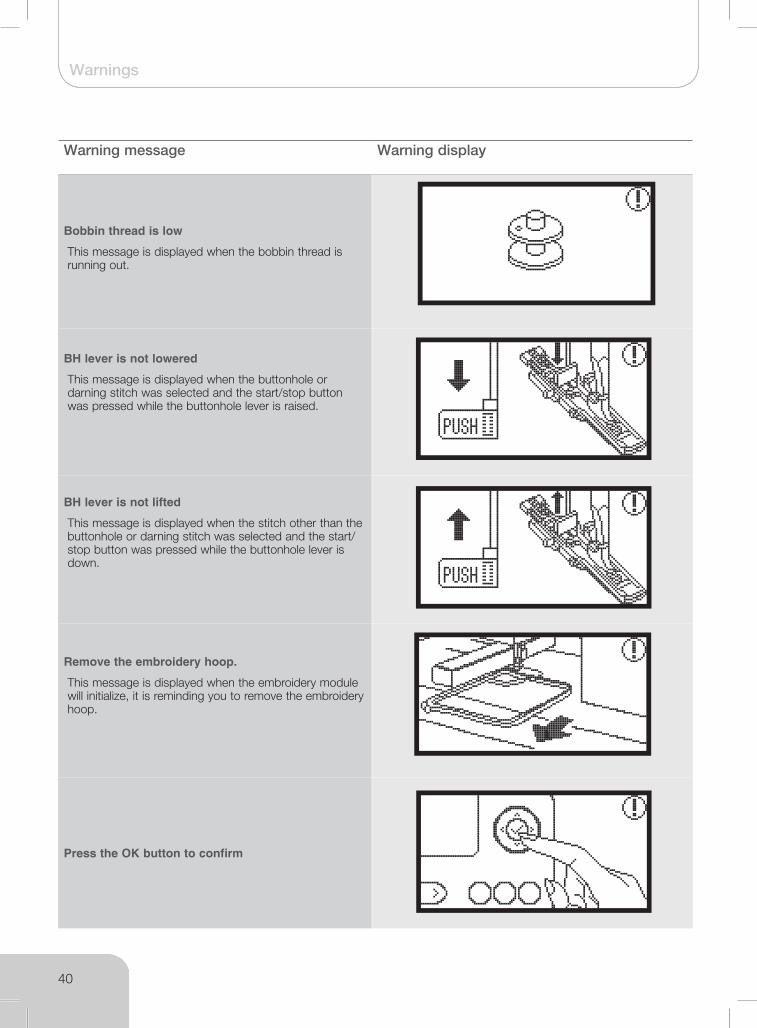
Embroidery Design Overview
84 - Moonlit Bats
6‘888
65.2 mm
51.4 mm
86 - Hummingbird 2
3‘814
71.0 mm
84.8 mm
88 - Dove
9‘595
102.8 mm
120.4 mm
85 - Dragonfly
10‘428
99.0 mm
62.4 mm
87 - Eagle
14‘401
89.0 mm
120.6 mm
89 - Zebra
11‘235
98.6 mm
74.1 mm
Colors
1 2 3 4
5 6 7 8
9 10
Colors
1 2 3 4
5 6 7 8
9 10
Colors
1 2 3 4
Colors
1
Colors
1 2
Colors
1 2 3 4
5 6
Animals

63
Embroidery Design Overview
90 - Gazelles
15‘215
90.7 mm
94.6 mm
92 - Lion
9‘140
95.0 mm
127.0 mm
94 - Deer Head
5‘733
65.6 mm
101.1 mm
91 - Giraffe
7‘008
106.0 mm
114.3 mm
93 - Buck
18‘699
88.0 mm
88.0 mm
95 - Kitty 2
1‘380
75.0 mm
68.6 mm
Colors
1 2 3 4
5 6 7 8
9
Colors
1
Colors
1
Colors
1
Colors
1
Colors
1 2 3

64
Embroidery Design Overview
96 - Wolf
23‘313
99.0 mm
77.2 mm
98 - Horse
11‘383
99.2 mm
86.8 mm
97 - Moorish Idol
18‘831
89.0 mm
85.6 mm
99 - Dragon
17‘151
68.2 mm
152.6 mm
Colors
1 2 3 4
5 6 7 8
9 10
Colors
1 2 3 4
5 6 7 8
9 10 11 12
13 14
Colors
1
Colors
1 2 3