IBM Watson Campaign Automation SMS, formerly IBM Silverpop ...
Upload
khangminh22Category
view
2download
0
CODE-1 Plus
User Guide for IBM i
Version 4.3.1
1 - CODE-1 Plus Concepts
What is CODE-1 Plus?..........................................7What is Address Standardization?........................8What is the Matching Process?...........................10Understanding the CODE-1 Plus Database........10What is CASS Certification?................................11Total Solution.......................................................18CODE-1 Plus Overview.......................................18The Interactive System........................................24Other CODE-1 Plus Programs and Modules.......26Database Expiration............................................31Screens...............................................................32Saving to an External File...................................38Online Help..........................................................38
2 - Getting Started
Getting Started After Installation.........................40Creating a CODE-1 Plus Job..............................40
3 - System-Wide Command
Entering Commands at the Command Line........46Using C1RUNJOB to Run CODE-1 Plus Jobs....46Using C1SBMJOB to Submit CODE-1 Plus
Jobs................................................................49Using the Job Import Utility.................................52
4 - Using the DatabaseFunction
What Are the Database Functions?....................59
Accessing the Database Functions Menu...........59Creating a Reduced CODE-1 Plus Database.....60Installing a CODE-1 Plus Database....................65Printing the CODE-1 Plus Database Detail
Report............................................................68Printing the CODE-1 Plus Database State Size
Reports...........................................................72Displaying Database Information........................72Changing the Default CODE-1 Plus Database
Library............................................................73Converting EWS File into CODE-1 Plus Format..74Returning to the Work With Jobs Screen............75
5 - Defining Input
Defining Your Input File.......................................77Using the Name and Address Layout Screens....78Defining Input Address and ZIP Code
Information.....................................................81Defining Urbanization Information.......................88Defining SuiteLink Processing.............................90Defining Confirmation Options and LACSLink
Processing.....................................................93Confirmation Compare Values Screen
(C1CPCF11)...................................................98Defining List Processor/Mailer Information Screen
(C1CPID60)....................................................99Defining Input File Sequence Check Information.101Defining Delivery Point Validation Processing....103Defining Additional Delivery Point Validation
Processing...................................................106Reformatting Your Input Records......................108Reformat Input Record Screen..........................108
2CODE-1 Plus User Guide for IBM i
Table of Contents

6 - Defining Output
Defining Your Output File..................................111Defining ZIP Code Location..............................114Defining ZIP Code Information..........................116Defining Carrier Route Location........................118Defining Carrier Route Information....................119Defining ZIP + 4 Add-On Locations...................120Defining ZIP + 4 Add-On Information................123Defining Standardized Address Locations........125Defining Standardized Address Information......128Defining Additional Standardized Address
Locations......................................................131Defining Address Element Locations................134Defining City and State Locations.....................136Defining City and State Information...................139Defining County and Congressional Location....141Defining Address Match Locations....................142Defining Additional Address Match Locations....147Defining Extra Data Locations...........................151Defining Normalized/COA Information
Locations......................................................152Defining Line of Travel Locations......................154Defining Delivery Point Validation Locations.....156Defining Additional Address Match Locations....159Reformat Output Record Screen.......................162
7 - Running Jobs
Component Overview........................................165Files and File Names.........................................166Exit Routines.....................................................167Limiting the Number of Records Processed......168Function Keys....................................................169Submit CODE-1 Plus Job Screen (C1CPSB01).170Submit CODE-1 Plus Job Screen 2
(C1CPSB02)................................................173Submit CODE-1 Plus Job Screen 3
(C1CPSB03)................................................177Submit CODE-1 Plus Job Screen 4
(C1CPSB04)................................................182
Submit CODE-1 Plus Job Screen 5(C1CPSB05)................................................189
Submit CODE-1 Plus Job Screen 6(C1CPSB06)................................................192
Submit CODE-1 Plus Job Screen 7(C1CPSB07) ...............................................194
Submit CODE-1 Plus Job Screen 8(C1CPSB08) ...............................................195
Submit CODE-1 Plus Job Screen 9(C1CPSB09)................................................197
8 - Geographic CodingDefinition Screens
Using the Geographic Coding DefinitionScreens........................................................200
Accessing the Geographic Coding Function.....201ZIP Code and ZIP + 4 Add-On Locations Screen
(C1CPG910)................................................202Geographic Coding Storage Screen
(C1CPG911).................................................205Additional Geographic Coding Storage Screen
(C1CPG912)................................................207Additional Geographic Coding Storage Screen
(C1CPG913)................................................209
9 - Getting Started With YourBatch Job
Introduction to Batch Jobs in CODE-1 Plus......215Finding Your Sample Name and Address File...215Analyzing the Job..............................................215What Will Be Covered in This Tutorial...............222Creating the Job................................................223Defining Your Headers and Footers..................226Specifying the Input Name/Address File Layout.228Defining Your Output Information......................232Selecting Reports to be Printed.........................243Submitting The Job...........................................245Reading Your Output Files and Reports............248
3CODE-1 Plus User Guide for IBM i
10 - Generating Reports
Understanding the CODE-1 Plus Reports.........253Report Parameter..............................................254Build Parameter.................................................255Using the IBM i Screens to Generate Reports...255Defining Defaults for Print Output......................261Address-Match Execution Statistics Report......265Control Totals Report.........................................267Execution Log....................................................269Parameter Record Listing Report......................269Analysis of Matched Records Report................269Build Report.......................................................270Coding by State Reports...................................270Coding by List Code Reports............................273Coding by 3-Digit ZIP Code Reports.................277Processing Summary Reports...........................280Delivery Point Validation Processing Summary
Report..........................................................281Delivery Point Validation Processing by List Code
Report..........................................................281Residential Delivery File Build Report...............281Residential Delivery File Build Execution Log....282National Deliverability Index (NDI) Report.........282USPS Form 3553 (CASS Summary Report).....282
11 - Getting Started WithInteractive Processing
Getting Started With the Interactive System.....285CODE-1 Plus Interactive System Screen..........288Address Matching..............................................289Database Inquiry...............................................290An Example Work Session................................294Correcting Uncoded Records............................298Interactive Screen Reference............................298Function Keys....................................................306Address Matching Screens...............................309Database Inquiry Screens.................................336Screens that Support Site Customization..........348Database Information Screen............................355Customization File Administration.....................355
Batch Uncoded Records Interface (G1CPBNC).357
12 - Using Z4CHANGE
What is the Z4CHANGE Option?......................365Using Z4CHANGE Option Processing..............366Calling Z4CHANGE From Your Own Driver......368Generating Reports for Z4CHANGEProcessing.371
13 - Using Delivery PointValidation
What is Delivery Point Validation?.....................373Using the Delivery Point Validation Database....375Activating Delivery Point Validation...................376Understanding DPV Return Information............378DPV Reports.....................................................378DPV Error Messages.........................................380What If My Mailing Generates a Seed
Violation?......................................................383
14 - Using LACSLink
What is LACSLink?...........................................385How Does LACSLink Work?.............................386How Do I Install the LACSLink Option?.............387How Do I Activate LACSLink?...........................388Understanding LACSLink Return Information.....395LACSLink Reports.............................................397What If My Mailing Generates a Seed
Violation?......................................................398
15 - Using SuiteLink
What is SuiteLink?.............................................401How Does SuiteLink Work?...............................402How do I Install the SuiteLink Option?..............403How Do I Activate SuiteLink?............................404SuiteLink Output................................................409
4CODE-1 Plus User Guide for IBM i

16 - Using Line of Travel
What is Line of Travel?......................................414Why Use Line of Travel?...................................414Accessing Line of Travel...................................415Getting Started with Line of Travel....................415Sorting Your LOT Coded Records.....................415Calling the LTO10 Subroutine...........................416Line of Travel Exit Routine (LTO60)..................422Control Totals Report.........................................427Alternate Sequence Codes...............................431
17 - Using Residential DeliveryIndicator (RDI) Processing
What is Residential Delivery File Processing?...448Using RDI Processing.......................................448Downloading the RDI File..................................448Installing the RDI File........................................448Activating the RDI Option..................................451RDI Reports.......................................................452
18 - Auxiliary File Processing
What is the Early Warning System?..................454Auxiliary File Processing and EWS...................454Building the Auxiliary File with the Early Warning
System.........................................................455AUXIL Parameter..............................................456Activating the Auxiliary File/Early Warning System
File...............................................................458Auxiliary File Reports........................................461
19 - Using PreciselyIDProcessing
What is PreciselyID Processing?......................464How Does PreciselyID Processing Work?........464Structures Containing PreciselyID Identifiers....464Installing the PreciselyID Database...................465
Activating the PreciselyID Option......................465PreciselyID Reports...........................................466
Appendix A: Glossary
5CODE-1 Plus User Guide for IBM i
1 - CODE-1 Plus Concepts
In this section
What is CODE-1 Plus?...............................................................................7What is Address Standardization?.............................................................8What is the Matching Process?................................................................10Understanding the CODE-1 Plus Database.............................................10What is CASS Certification?.....................................................................11Total Solution............................................................................................18CODE-1 Plus Overview............................................................................18The Interactive System.............................................................................24Other CODE-1 Plus Programs and Modules............................................26Database Expiration.................................................................................31Screens....................................................................................................32Saving to an External File.........................................................................38Online Help...............................................................................................38
CODE-1 Plus User Guide for IBM i
What is CODE-1 Plus?
CODE-1 Plus is an address-matching and standardization system that improves the address dataquality and deliverability of your mail to enable you to qualify for USPS postal discounts. CODE-1Plus matches input addresses to the addresses in the CODE-1 Plus database to correct your postalinformation and add additional postal information. CODE-1 Plus helps you save money by helpingyou qualify mail for USPS automation-based discounts and carrier route discounts (Line of Travelbased). You can use CODE-1 Plus to:
• Add, correct, or verify 5-digit ZIP Codes
• Correct or add the ZIP + 4 Codes
• Add Delivery Point Codes
• Add carrier route codes
• Standardize street, city, and state fields according to USPS conventions
• Validate addresses using the Delivery Point Validation (DPV) option
• Use the LACSLink option to access USPS address conversion information and convert addressesas needed
• Use the SuiteLink option to improve business addresses deliverability by adding accurate secondary(suite) information to the business addresses in your mailing list
• Determine if an address is a business or residential address using the Residential Delivery Indicator(RDI) option
• Use the PreciselyID option to provide a unique and persistent identifier to reference an addressablelocation without storing the whole address string.
• Prevent “false positives” by using the Early Warning System (EWS)
• Qualify your standard letters and flats for USPS Enhanced Carrier Route rates by using Line ofTravel.
You can perform these functions interactively (online) or in batch mode. Processing results are writtento one or more output files, depending on your specifications.
7CODE-1 Plus User Guide for IBM i
What is Address Standardization?
The USPS has established guidelines for what it calls quality addressing. Quality addressing ensuresstandardized addresses that help the USPS provide timely mail delivery. This goal becomes evenmore critical when mailers attempt to qualify for postal discounts.
A standardized address is an address that has been matched against the CODE-1 Plus databaseand formatted based on USPS addressing conventions. CODE-1 Plus uses USPS conventions toensure deliverability of your addresses. The USPS addressing conventions include guidelines for:
• Format
• Punctuation
• Address components
The first step to quality addressing is a healthy mailing list. CODE-1 Plus uses USPS addressstandardization guidelines set forth in USPS Publication 28 to correct your addresses and ensureyour mail's deliverability.
For more information on address standardization, please see Postal Addressing Standards, USPSPublication 28 athttp://pe.usps.gov/cpim/ftp/pubs/pub28/pub28.pdf. You can order this publicationfrom:
NATIONAL CUSTOMER SUPPORT CENTERMEMPHIS TN 38188-0001(800) 238-3150
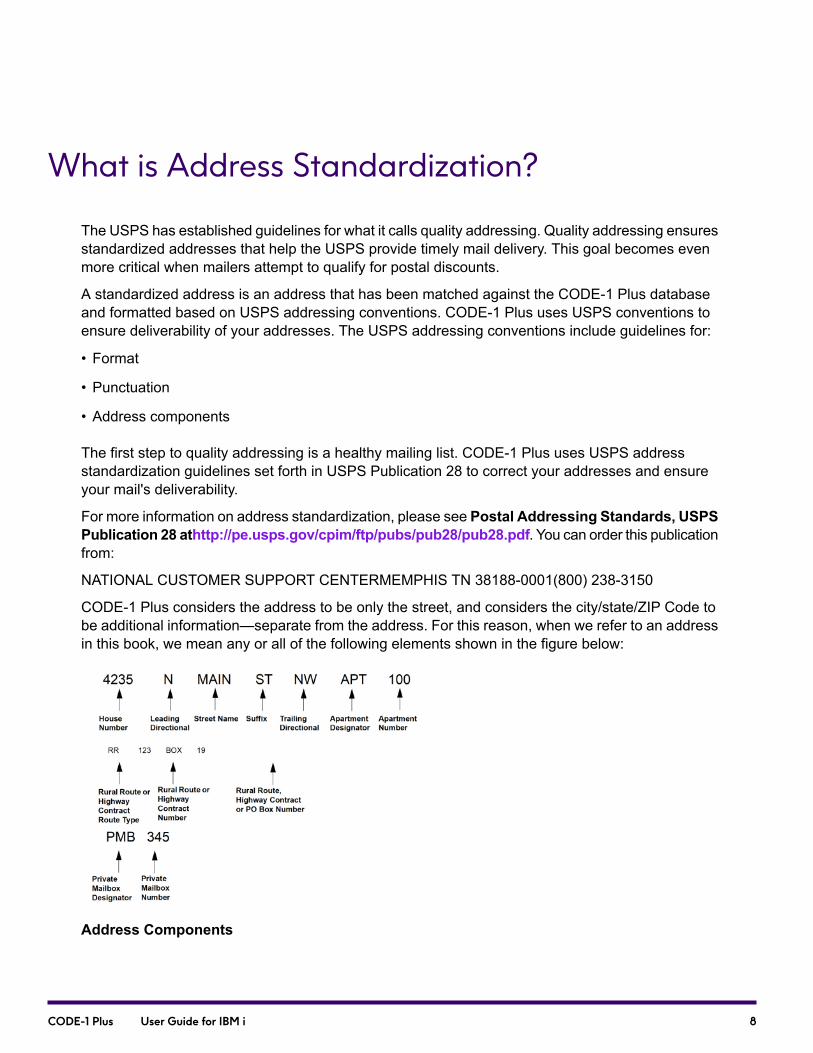
CODE-1 Plus considers the address to be only the street, and considers the city/state/ZIP Code tobe additional information—separate from the address. For this reason, when we refer to an addressin this book, we mean any or all of the following elements shown in the figure below:
Address Components
8CODE-1 Plus User Guide for IBM i
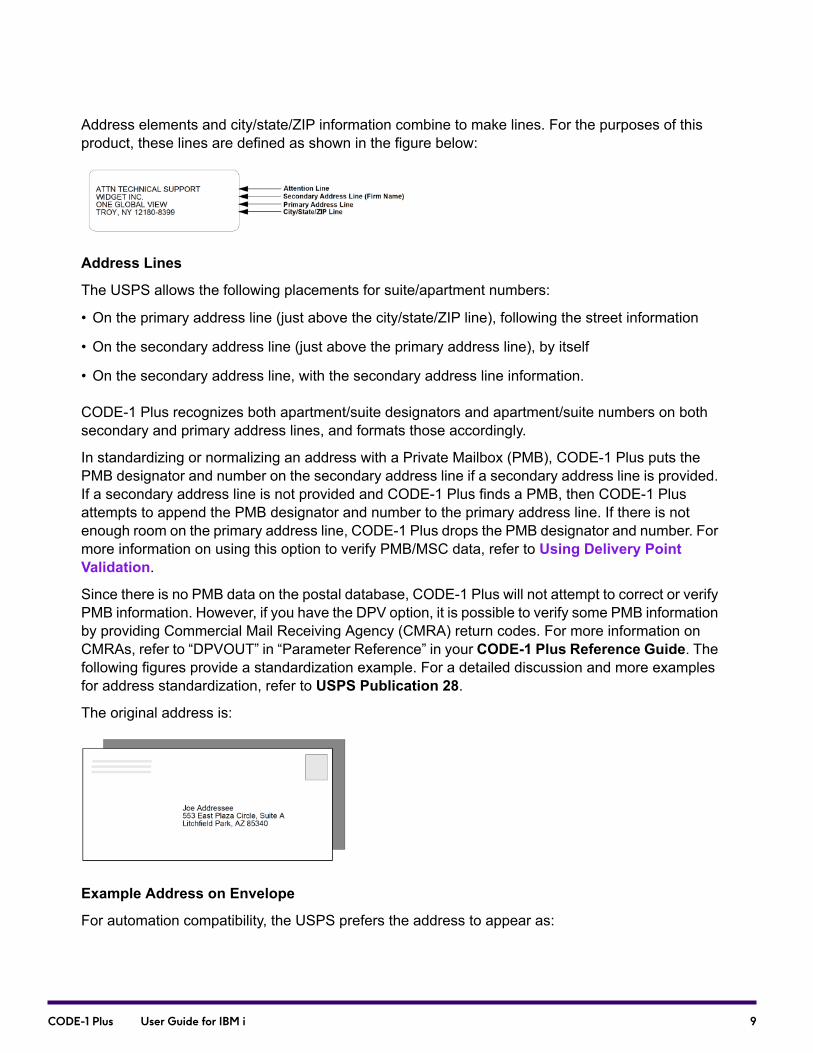
Address elements and city/state/ZIP information combine to make lines. For the purposes of thisproduct, these lines are defined as shown in the figure below:
Address Lines
The USPS allows the following placements for suite/apartment numbers:
• On the primary address line (just above the city/state/ZIP line), following the street information
• On the secondary address line (just above the primary address line), by itself
• On the secondary address line, with the secondary address line information.
CODE-1 Plus recognizes both apartment/suite designators and apartment/suite numbers on bothsecondary and primary address lines, and formats those accordingly.
In standardizing or normalizing an address with a Private Mailbox (PMB), CODE-1 Plus puts thePMB designator and number on the secondary address line if a secondary address line is provided.If a secondary address line is not provided and CODE-1 Plus finds a PMB, then CODE-1 Plusattempts to append the PMB designator and number to the primary address line. If there is notenough room on the primary address line, CODE-1 Plus drops the PMB designator and number. Formore information on using this option to verify PMB/MSC data, refer to Using Delivery PointValidation.
Since there is no PMB data on the postal database, CODE-1 Plus will not attempt to correct or verifyPMB information. However, if you have the DPV option, it is possible to verify some PMB informationby providing Commercial Mail Receiving Agency (CMRA) return codes. For more information onCMRAs, refer to “DPVOUT” in “Parameter Reference” in your CODE-1 Plus Reference Guide. Thefollowing figures provide a standardization example. For a detailed discussion and more examplesfor address standardization, refer to USPS Publication 28.
The original address is:
Example Address on Envelope
For automation compatibility, the USPS prefers the address to appear as:
9CODE-1 Plus User Guide for IBM i
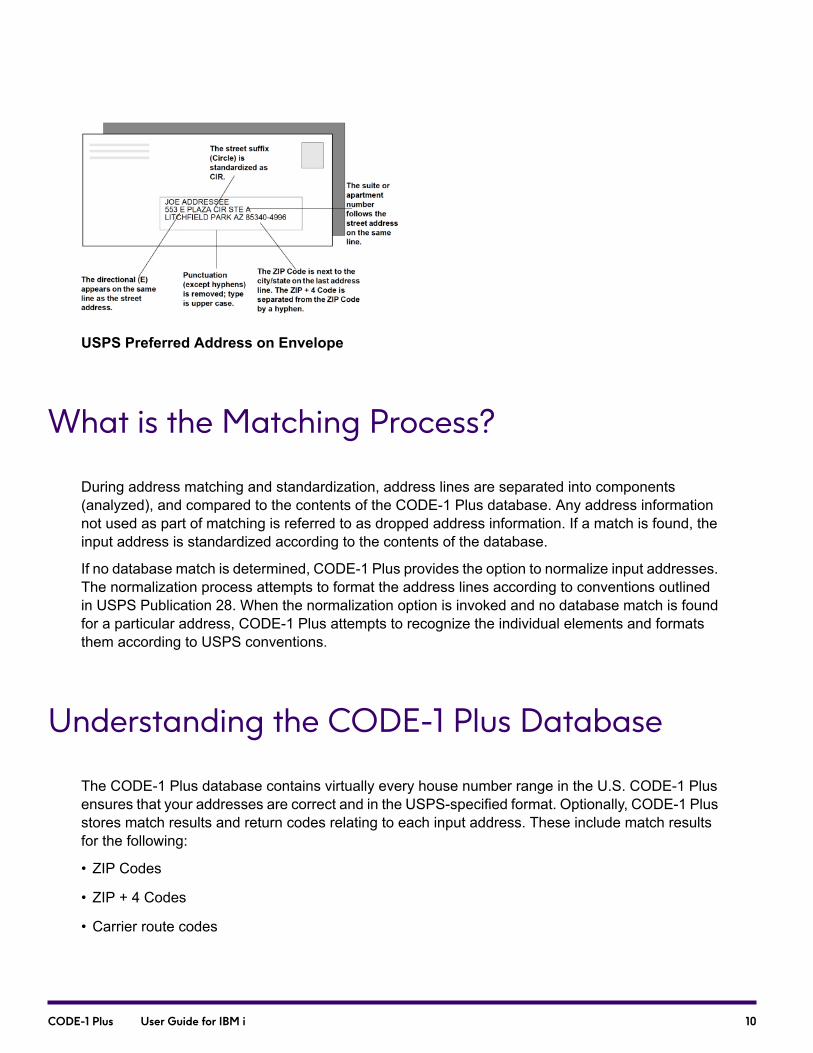
USPS Preferred Address on Envelope
What is the Matching Process?
During address matching and standardization, address lines are separated into components(analyzed), and compared to the contents of the CODE-1 Plus database. Any address informationnot used as part of matching is referred to as dropped address information. If a match is found, theinput address is standardized according to the contents of the database.
If no database match is determined, CODE-1 Plus provides the option to normalize input addresses.The normalization process attempts to format the address lines according to conventions outlinedin USPS Publication 28. When the normalization option is invoked and no database match is foundfor a particular address, CODE-1 Plus attempts to recognize the individual elements and formatsthem according to USPS conventions.
Understanding the CODE-1 Plus Database
The CODE-1 Plus database contains virtually every house number range in the U.S. CODE-1 Plusensures that your addresses are correct and in the USPS-specified format. Optionally, CODE-1 Plusstores match results and return codes relating to each input address. These include match resultsfor the following:
• ZIP Codes
• ZIP + 4 Codes
• Carrier route codes
10CODE-1 Plus User Guide for IBM i

• Standardized address line and/or elements
• City names and state abbreviations
• Normalized address lines
• Address match return codes
The return codes help you to flag errors in your input file and allow you to select or reject processedaddresses based on your job requirements.
What is CASS Certification?
The USPS Coding Accuracy Support System (CASS) measures the accuracy of address-matchingsoftware. To receive automated processing discounts, you must use software that has beenCASS-certified and registered by the vendor with the USPS. The following regulations apply:
• The address-matching software used must have been CASS-certified for the current CASS cycle.
• Coding of each file must be performed at least annually (e.g., the mailing date must be within oneyear of the coding date).
• The database used during an address-matching run must be “current.” A current database is definedby the matrix in DMM 708.
• USPS Form 3553 lists the address-matching software used to process the mailing list. This reportmust be submitted with each mailing and must represent all address lists used to generate thatmailing.
• CODE-1 Plus includes LACSLink, DPV, and SuiteLink processing. For further details regarding theoptions and requirements for CASS certification, see the USPS-issued document on CASS Cycleson the https://postalpro.usps.com/ website. CODE-1 Plus does not produce a CASS statementif LACSLink, DPV, or SuiteLink processing is turned off.
Certifying Your Configurations
If you do not use one of the configurations certified by Precisely, or if you are calling CODE-1 Plus fromyour own application, you will have to certify the configurations you are using in order to qualify formailing discount rates.
Before undertaking your own CASS certifications, serious consideration should be given to support,audit, and on-going testing for CASS. The standard maintenance and support agreement does notprovide support for clients obtaining their own certification or NCOA approval.
11CODE-1 Plus User Guide for IBM i
You can obtain support from our Professional Services Group for your own certification or NCOAapproval. Please contact your local sales or support representative for details.
Note: Your product license agreement may not permit you to obtain your own certification.Please review your software agreement for scope and use of CODE-1 Plus.
When ordering the CASS materials from the USPS, you can request:
• Stage 1 (self-measurement) media
• Stage 2 (certification test) media
• Both media
You are encouraged to order both media, and to experiment with the Stage 1 File until you aresatisfied with the results. During this process, examine the returned address elements returned byCODE-1 Plus that differ from those the USPS views as “correct.”
When you submit your Stage 2 test. the USPS will probably require you to submit the “parametersused for matching.” To satisfy this requirement, you should set up a job for CASS, and submit theparameter list produced by the job to the USPS.
Use the “CASSA1” parameter to fill in the CASS-certified company name, software name, andsoftware version if you attempt CASS certification with CODE-1 Plus (using our batch driver C1BM00)and have your company and/or software name on record with the USPS as a CASS-certified company.
Certified Configurations
USPS Form 3553 is required to include the specific configuration of the address-matching softwarethat was used in the mailing. This specific configuration must have been CASS-certified. CODE-1Plus automatically produces USPS Form 3553 when the parameters are set to a certified configuration.
Warning: If you use CODE-1 Plus with an uncertified configuration, CODE-1 Plus does not producea USPS Form 3553. It is against USPS regulations for address-matching software to produce aUSPS Form 3553 when uncertified configurations are used. If you use uncertified configurations,CODE-1 Plus generates a message telling you that the configuration is not certified, and that no formwas printed.
Precisely has CASS-certified the following configurations.
DescriptionPosition/ValueParameter
USPS record type.8-10 blankAM OUT
12CODE-1 Plus User Guide for IBM i
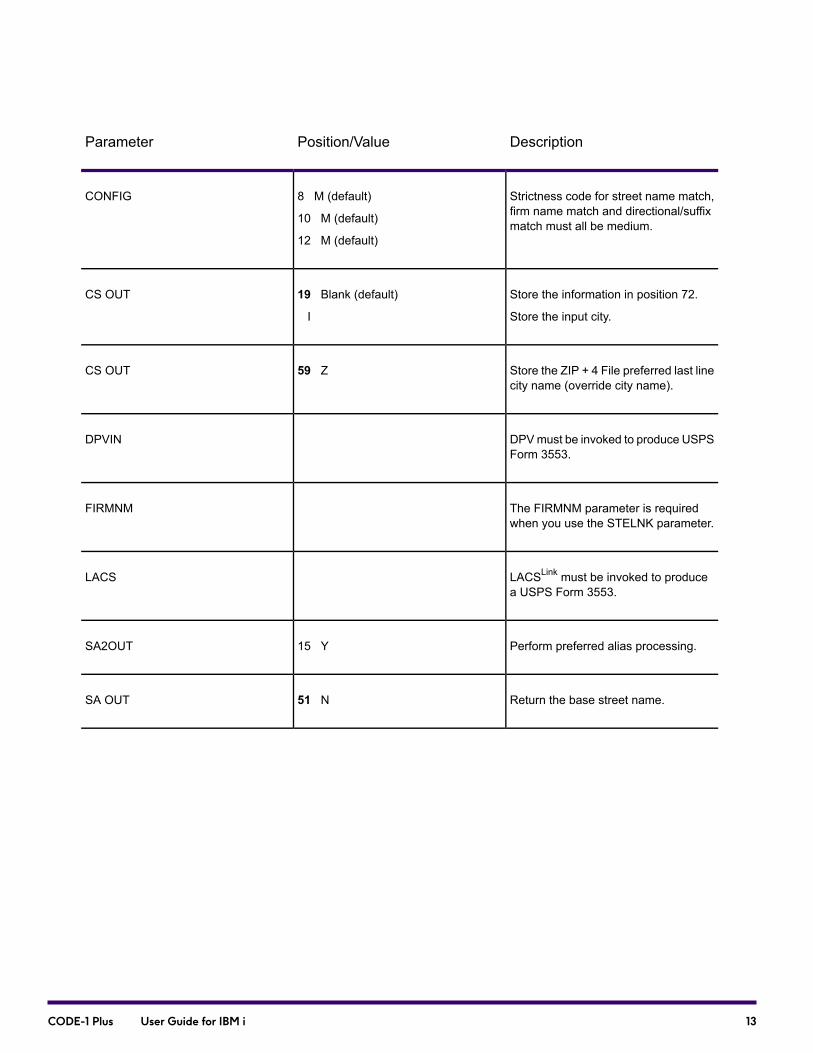
DescriptionPosition/ValueParameter
Strictness code for street name match,firm name match and directional/suffixmatch must all be medium.
8 M (default)
10 M (default)
12 M (default)
CONFIG
Store the information in position 72.
Store the input city.
19 Blank (default)
I
CS OUT
Store the ZIP + 4 File preferred last linecity name (override city name).
59 ZCS OUT
DPVmust be invoked to produce USPSForm 3553.
DPVIN
The FIRMNM parameter is requiredwhen you use the STELNK parameter.
FIRMNM
LACSLink must be invoked to producea USPS Form 3553.
LACS
Perform preferred alias processing.15 YSA2OUT
Return the base street name.51 NSA OUT
13CODE-1 Plus User Guide for IBM i
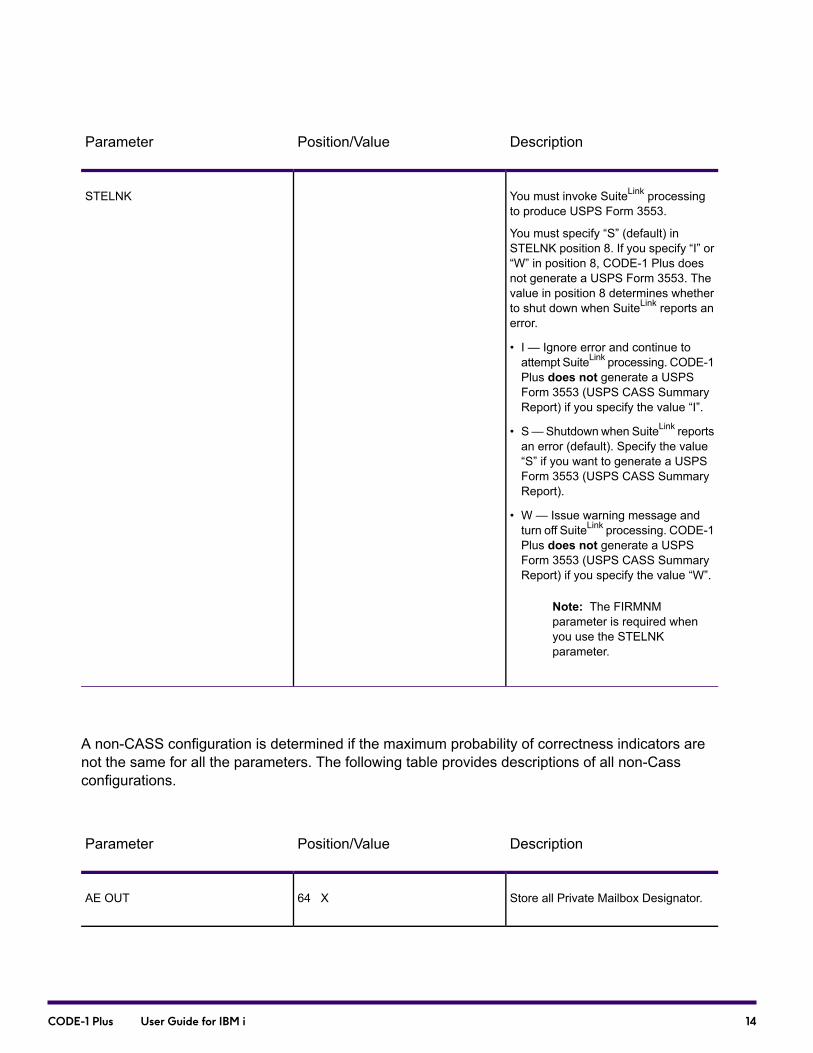
DescriptionPosition/ValueParameter
You must invoke SuiteLink processingto produce USPS Form 3553.
You must specify “S” (default) inSTELNK position 8. If you specify “I” or“W” in position 8, CODE-1 Plus doesnot generate a USPS Form 3553. Thevalue in position 8 determines whetherto shut down when SuiteLink reports anerror.
• I — Ignore error and continue toattempt SuiteLink processing. CODE-1Plus does not generate a USPSForm 3553 (USPS CASS SummaryReport) if you specify the value “I”.
• S—Shutdown when SuiteLink reportsan error (default). Specify the value“S” if you want to generate a USPSForm 3553 (USPS CASS SummaryReport).
• W — Issue warning message andturn off SuiteLink processing. CODE-1Plus does not generate a USPSForm 3553 (USPS CASS SummaryReport) if you specify the value “W”.
Note: The FIRMNMparameter is required whenyou use the STELNKparameter.
STELNK
A non-CASS configuration is determined if the maximum probability of correctness indicators arenot the same for all the parameters. The following table provides descriptions of all non-Cassconfigurations.
DescriptionPosition/ValueParameter
Store all Private Mailbox Designator.64 XAE OUT
14CODE-1 Plus User Guide for IBM i

DescriptionPosition/ValueParameter
Location for USPS record type code isspecified.
8-10AM OUT
Override expired US Postal database.1-6 BYPEXPBYPEXP
Any other combination of strictnesscodes other thanMMM (Ex. MEM, EEE,TEM, etc.).
8, 10, 12CONFIG
Accept multiple matches.14 YCONFIG
For dual address match, return a POBox match regardless of address line.
38 PCONFIG
For unique ZIP Code handling, storethe input ZIP Code.
40 XCONFIG
For PMB handling, store all privatemailbox numbers.
42 XCONFIG
For enhanced high rise alternatematching, do not attempt to match tothe base record.
44 NCONFIG
For multiple secondary componentprocessing, assign default ZIP + 4Code.
46 NCONFIG
Return vanity city names when theymost closely match input city (a CASScertified configuration will be createdbut will not be eligible for postalautomation presort discount).
49 XCONFIG
15CODE-1 Plus User Guide for IBM i
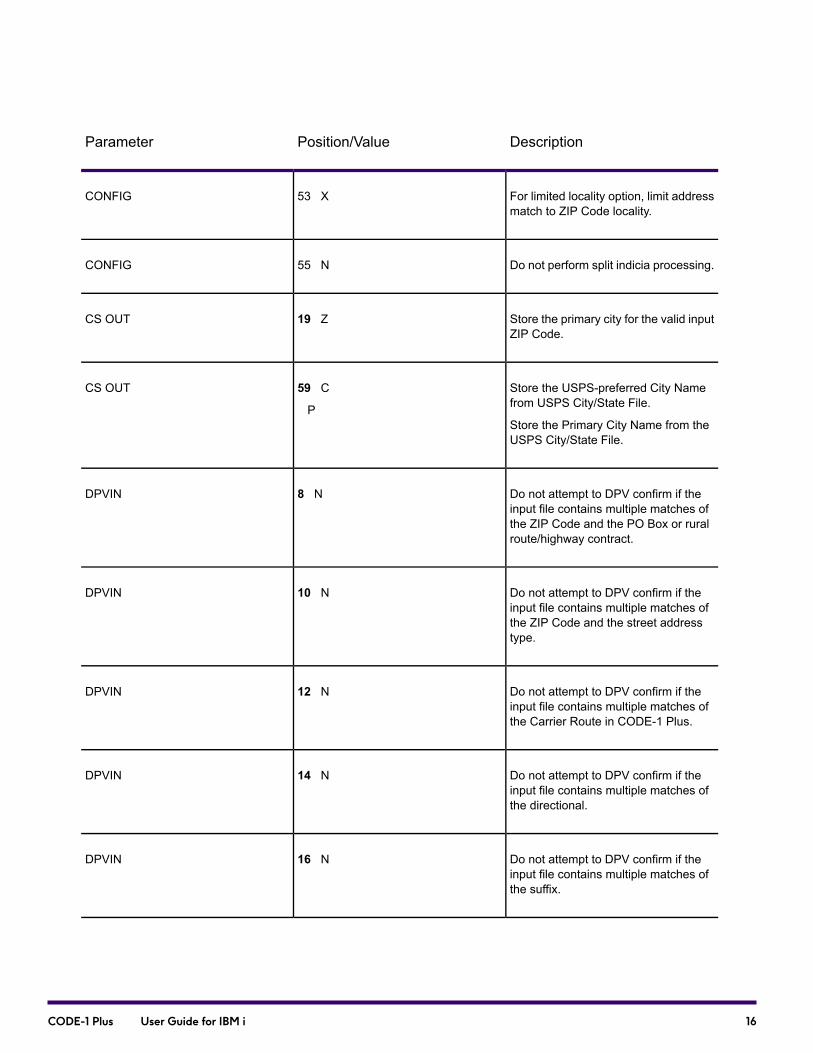
DescriptionPosition/ValueParameter
For limited locality option, limit addressmatch to ZIP Code locality.
53 XCONFIG
Do not perform split indicia processing.55 NCONFIG
Store the primary city for the valid inputZIP Code.
19 ZCS OUT
Store the USPS-preferred City Namefrom USPS City/State File.
Store the Primary City Name from theUSPS City/State File.
59 C
P
CS OUT
Do not attempt to DPV confirm if theinput file contains multiple matches ofthe ZIP Code and the PO Box or ruralroute/highway contract.
8 NDPVIN
Do not attempt to DPV confirm if theinput file contains multiple matches ofthe ZIP Code and the street addresstype.
10 NDPVIN
Do not attempt to DPV confirm if theinput file contains multiple matches ofthe Carrier Route in CODE-1 Plus.
12 NDPVIN
Do not attempt to DPV confirm if theinput file contains multiple matches ofthe directional.
14 NDPVIN
Do not attempt to DPV confirm if theinput file contains multiple matches ofthe suffix.
16 NDPVIN
16CODE-1 Plus User Guide for IBM i
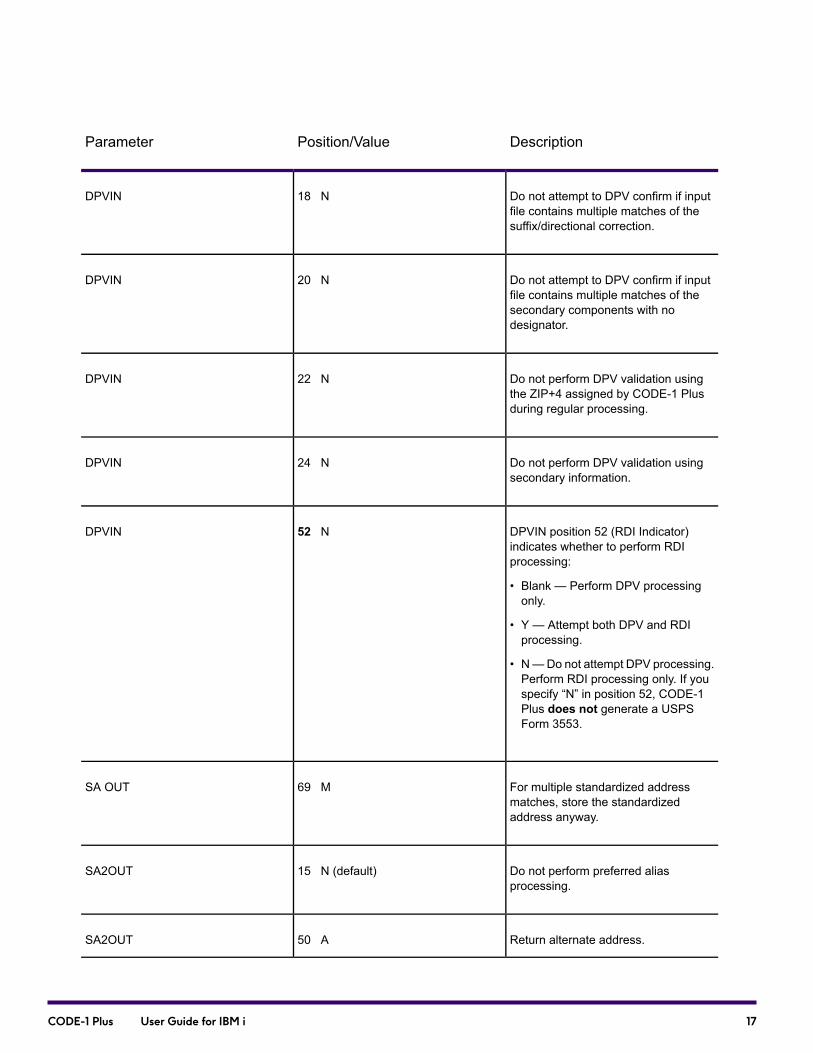
DescriptionPosition/ValueParameter
Do not attempt to DPV confirm if inputfile contains multiple matches of thesuffix/directional correction.
18 NDPVIN
Do not attempt to DPV confirm if inputfile contains multiple matches of thesecondary components with nodesignator.
20 NDPVIN
Do not perform DPV validation usingthe ZIP+4 assigned by CODE-1 Plusduring regular processing.
22 NDPVIN
Do not perform DPV validation usingsecondary information.
24 NDPVIN
DPVIN position 52 (RDI Indicator)indicates whether to perform RDIprocessing:
• Blank — Perform DPV processingonly.
• Y — Attempt both DPV and RDIprocessing.
• N—Do not attempt DPV processing.Perform RDI processing only. If youspecify “N” in position 52, CODE-1Plus does not generate a USPSForm 3553.
52 NDPVIN
For multiple standardized addressmatches, store the standardizedaddress anyway.
69 MSA OUT
Do not perform preferred aliasprocessing.
15 N (default)SA2OUT
Return alternate address.50 ASA2OUT
17CODE-1 Plus User Guide for IBM i

DescriptionPosition/ValueParameter
For unique ZIP Code handling, storethe information indicated in position 72.
66 XZ5 OUT
Total Solution
CODE-1 Plus can be used with other Precisely products as the first step to a total postal discountand list management solution. Once you have processed a file with CODE-1 Plus, you can:
• Use the CODE-1 Plus reports and return codes to determine the quality of your input file.
• Use the Precisely MailStream Plus software to obtain automation, carrier route, and additionalpresort discounts such as machinable and non-automation presort rates.
• Use MAIL360 to generate Intelligent Mail® Barcodes.
• Use Residential Delivery Indicator to help you make informed shipping decisions by identifyingwhether a delivery type is classified as residential or business (especially helpful for parcel shippersand rate analysis agents).
• Use List Conversion Plus to easily convert rented or purchased mailing lists from one format toanother more usable format.
CODE-1 Plus Overview
CODE-1 Plus is divided into a batch component and an interactive component.
Using the Batch System
The batch system enables you to:
• Process a name-and-address file
• Create, edit, and save CODE-1 Plus parameters
18CODE-1 Plus User Guide for IBM i
• Submit CODE-1 Plus jobs
• Generate output file(s)
• Generate reports
• Download and reduce the size of the CODE-1 Plus Database
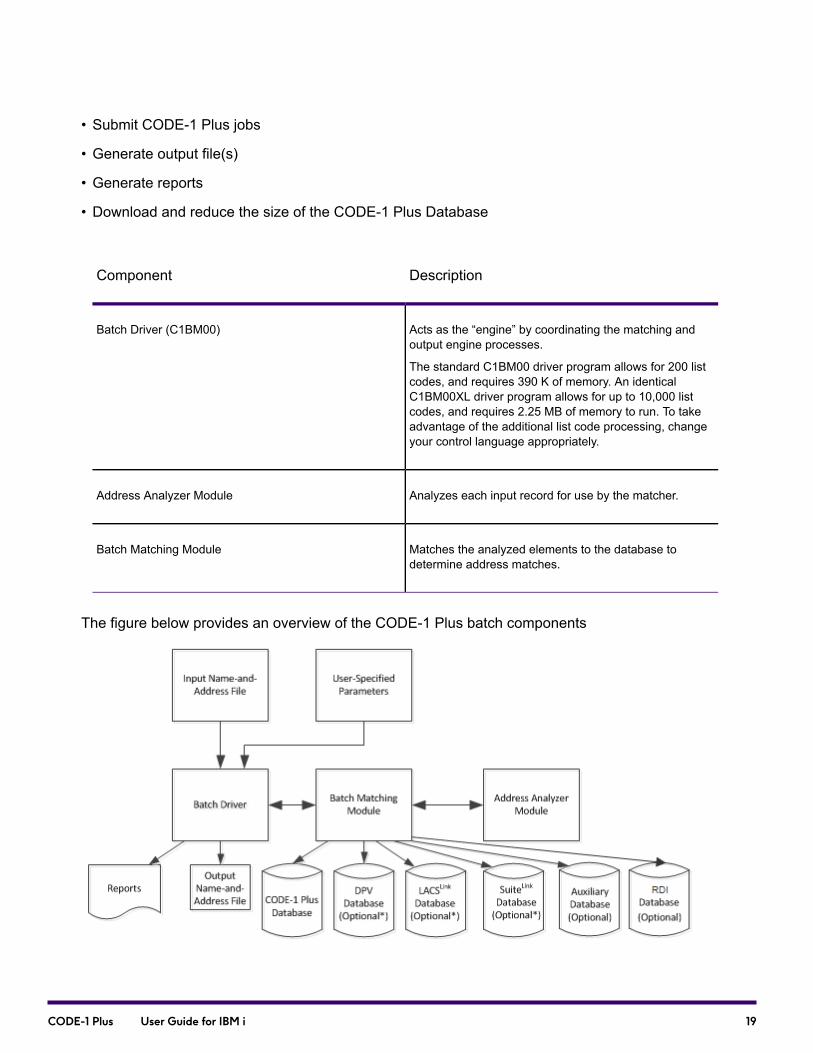
DescriptionComponent
Acts as the “engine” by coordinating the matching andoutput engine processes.
The standard C1BM00 driver program allows for 200 listcodes, and requires 390 K of memory. An identicalC1BM00XL driver program allows for up to 10,000 listcodes, and requires 2.25 MB of memory to run. To takeadvantage of the additional list code processing, changeyour control language appropriately.
Batch Driver (C1BM00)
Analyzes each input record for use by the matcher.Address Analyzer Module
Matches the analyzed elements to the database todetermine address matches.
Batch Matching Module
The figure below provides an overview of the CODE-1 Plus batch components
19CODE-1 Plus User Guide for IBM i
* Required to generate USPS Form 3553.
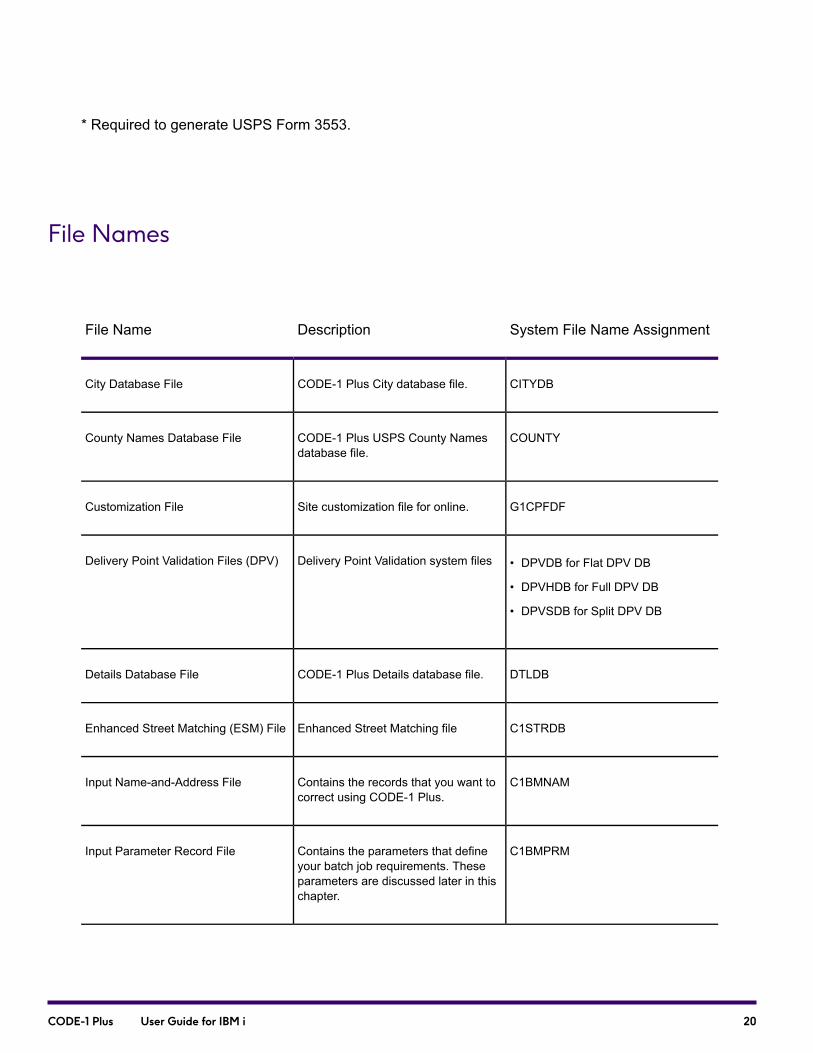
File Names
System File Name AssignmentDescriptionFile Name
CITYDBCODE-1 Plus City database file.City Database File
COUNTYCODE-1 Plus USPS County Namesdatabase file.
County Names Database File
G1CPFDFSite customization file for online.Customization File
• DPVDB for Flat DPV DB
• DPVHDB for Full DPV DB
• DPVSDB for Split DPV DB
Delivery Point Validation system filesDelivery Point Validation Files (DPV)
DTLDBCODE-1 Plus Details database file.Details Database File
C1STRDBEnhanced Street Matching fileEnhanced Street Matching (ESM) File
C1BMNAMContains the records that you want tocorrect using CODE-1 Plus.
Input Name-and-Address File
C1BMPRMContains the parameters that defineyour batch job requirements. Theseparameters are discussed later in thischapter.
Input Parameter Record File
20CODE-1 Plus User Guide for IBM i

System File Name AssignmentDescriptionFile Name
C1BMIZPContains the records with invalid ZIPCodes that did not match against theCODE-1 Plus database.
Invalid ZIP Code Unmatched OutputFile
LLKDBLACSLink database fileLACS Database File
LTMASTRCODE-1 Plus Line of Travel databasefile
Line of Travel File
LCLDBCODE-1 Plus Locality database file.Locality Database File
PRNTCASUSPS Form 3553.Output 3553
PRNTXLGContains the Execution Log.Output Execution Log File
C1BMCOKContains all the records that CODE-1Plus matched with the CODE-1 Plusdatabase and then verified andcorrected.
Output Matched Records FIle
PRNTRPTContains the CODE-1 Plus reports,including the standard ParameterRecord Listing, Control Totals, andForm 3553.
Output Reports File
C1BMSTAContains all information currentlyavailable in CODE-1 Plus generatedreports (with the exception ofpercentages).
Output Statistics File
C1BMNCOContains the records with valid U.S. ZIPCodes that did not match against theCODE-1 Plus database for somereason.
Output Unmatched Records File(Uncoded)
21CODE-1 Plus User Guide for IBM i
System File Name AssignmentDescriptionFile Name
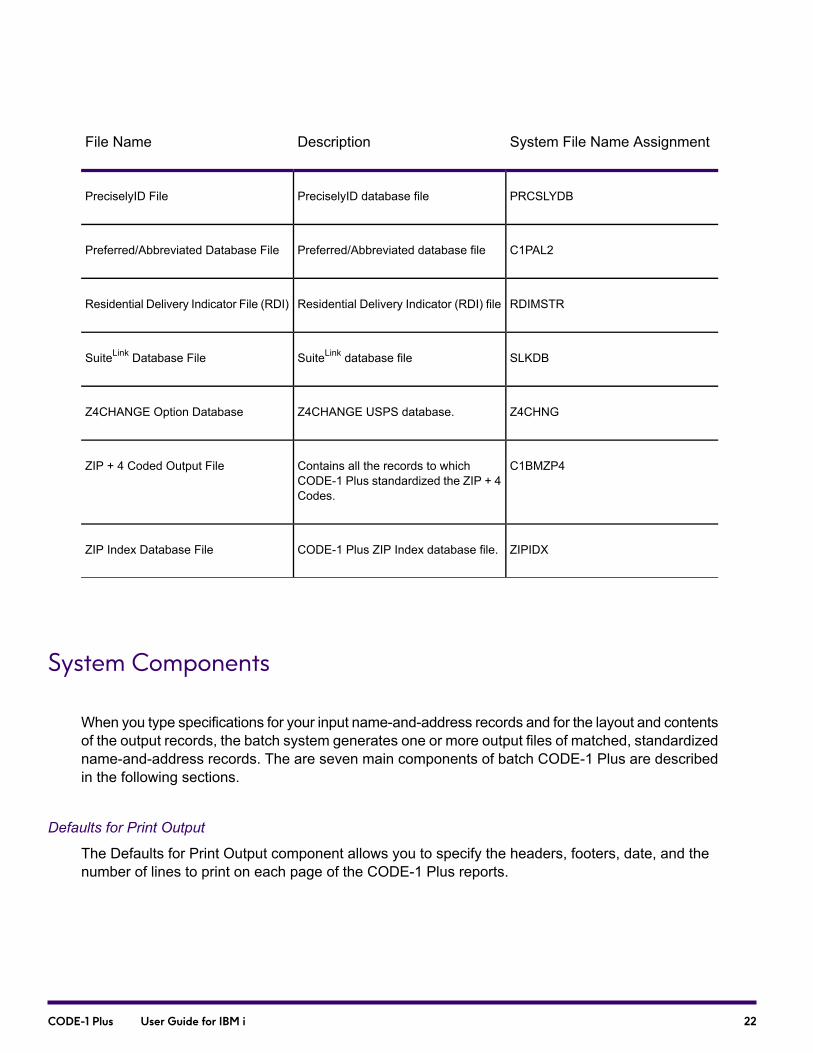
PRCSLYDBPreciselyID database filePreciselyID File
C1PAL2Preferred/Abbreviated database filePreferred/Abbreviated Database File
RDIMSTRResidential Delivery Indicator (RDI) fileResidential Delivery Indicator File (RDI)
SLKDBSuiteLink database fileSuiteLink Database File
Z4CHNGZ4CHANGE USPS database.Z4CHANGE Option Database
C1BMZP4Contains all the records to whichCODE-1 Plus standardized the ZIP + 4Codes.
ZIP + 4 Coded Output File
ZIPIDXCODE-1 Plus ZIP Index database file.ZIP Index Database File
System Components
When you type specifications for your input name-and-address records and for the layout and contentsof the output records, the batch system generates one or more output files of matched, standardizedname-and-address records. The are seven main components of batch CODE-1 Plus are describedin the following sections.
Defaults for Print Output
The Defaults for Print Output component allows you to specify the headers, footers, date, and thenumber of lines to print on each page of the CODE-1 Plus reports.
22CODE-1 Plus User Guide for IBM i
Reformat Input Record
The Reformat Input Record component allows you to rearrange the components of your input recordsbefore the record is processed. The information you identify is copied, but not removed, from itsoriginal location in the input record. This feature is useful for saving data that might otherwise beoverwritten by data returned from CODE-1 Plus. A maximum of 100 MOVE I operations can bedefined for a job. The move operations are processed one at a time, in sequence.
Name/Address File Layout
The Name/Address File Layout component allows you to specify information about the layout of thedata in the input name-and-address records.
Name/Address Record Posting
The Name/Address Record Posting component allows you to define the content and layout of youroutput records.
Reformat Output Record
The Reformat Output Record component allows you to rearrange pieces of the output record beforethe record is written to the output file. CODE-1 Plus:
• Processes the record
• Copies the record to an output record array
• Copies the entire record to a temporary work area (if requested)
• Copies data from a specific location in the work area back to a specific location in the output recordarray
• Writes the information directly to your output file (or passes the information to an output exit routine).
You can define a maximum of 100MOVEO parameters for a job. Themove operations are processedone at a time, in sequence.
Report Selection
The Report Selection component allows you to determine the CODE-1 Plus reports to print whenyou submit your job. Some reports are required and print for every job. You can select the optionalreports to print with your job.
Submit Batch Job
The Submit Batch Job component allows you to submit a job to:
23CODE-1 Plus User Guide for IBM i

• Match your input records
• Create your output records
• Generate your reports
This component allows you to limit the number of records processed during the job. Limiting thenumber of records processed during the job can be particularly useful when you want to test thespecifications you have defined for your job.
The Interactive System
The interactive system enables you to perform three functions:
• Address matching
• Database inquiry
• Site customization
Address matching, database display, and site customization components operate independently ofthe CODE-1 Plus batch driver. Use address matching as part of your own (or other vendor)applications. The figure below illustrates the relationship of the interactive CODE-1 Plus components.
24CODE-1 Plus User Guide for IBM i
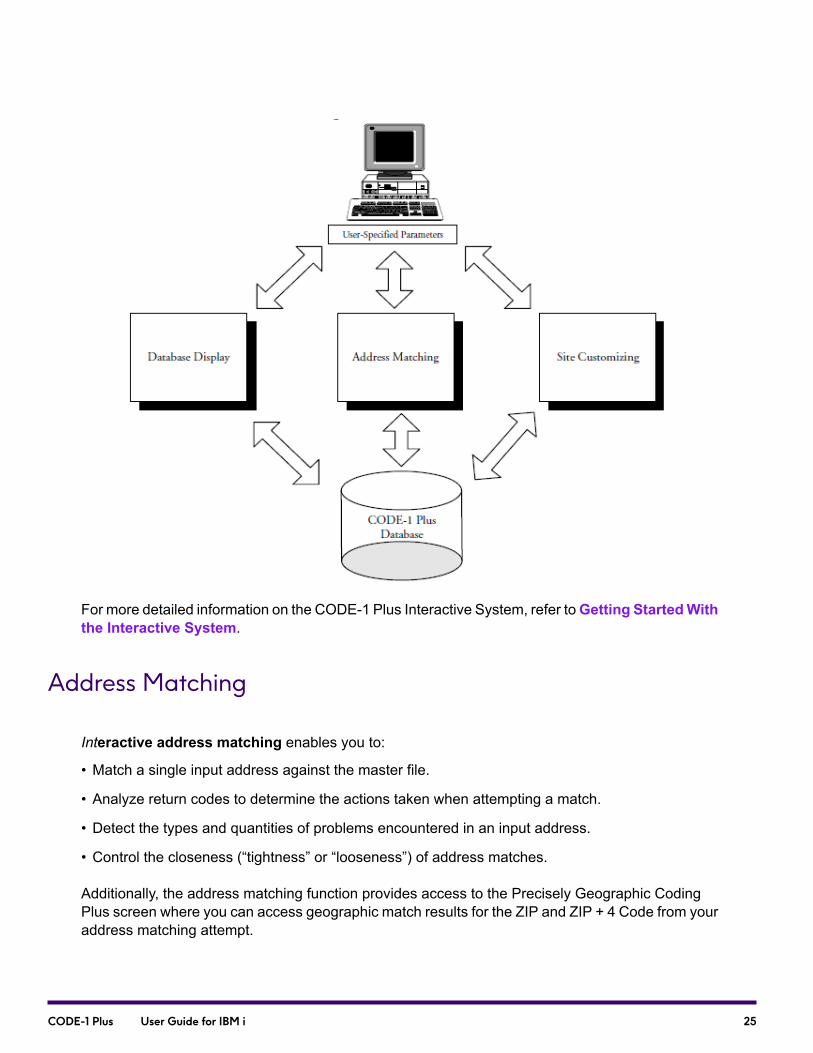
For more detailed information on the CODE-1 Plus Interactive System, refer toGetting StartedWiththe Interactive System.
Address Matching
Interactive address matching enables you to:
• Match a single input address against the master file.
• Analyze return codes to determine the actions taken when attempting a match.
• Detect the types and quantities of problems encountered in an input address.
• Control the closeness (“tightness” or “looseness”) of address matches.
Additionally, the address matching function provides access to the Precisely Geographic CodingPlus screen where you can access geographic match results for the ZIP and ZIP + 4 Code from youraddress matching attempt.
25CODE-1 Plus User Guide for IBM i

Database Inquiry
Database inquiry lets you browse the contents of the CODE-1 Plus database. Using this feature,for any city on the CODE-1 Plus database, you can display the following information:
• Street Information — Leading directional, street names, street suffixes, post-directional, and ZIPCodes.
• House Information — Even/odd house number ranges, ZIP Codes, ZIP + 4 Code ranges, carrierroutes, USPS record types, alias information, and firm names
• Firm Information — House and apartment number ranges, firm names, ZIP Codes, ZIP + 4 Codes,and carrier route codes.
• Apartment Information — Apartment number ranges, ZIP Codes, ZIP + 4 Codes, carrier routecodes, USPS record types, apartment types, and number of firms.
• ZIP Code Information — Long/short city names, state codes, and city types.
• City Information — City names, state codes, ZIP Code ranges, city type codes, urbanizationindicators, and unique ZIP indicators.
Site Customization
Site customization enables you to do the following:
• Update access passwords
• Change site-specific default values.
For more detailed information on the CODE-1 Plus Interactive System, refer toGetting StartedWithInteractive Processing.
Other CODE-1 Plus Programs and Modules
CODE-1 Plus also provides you with program modules, callable routines, and executable programsfor flexible use of CODE-1 Plus with your own applications.
26CODE-1 Plus User Guide for IBM i
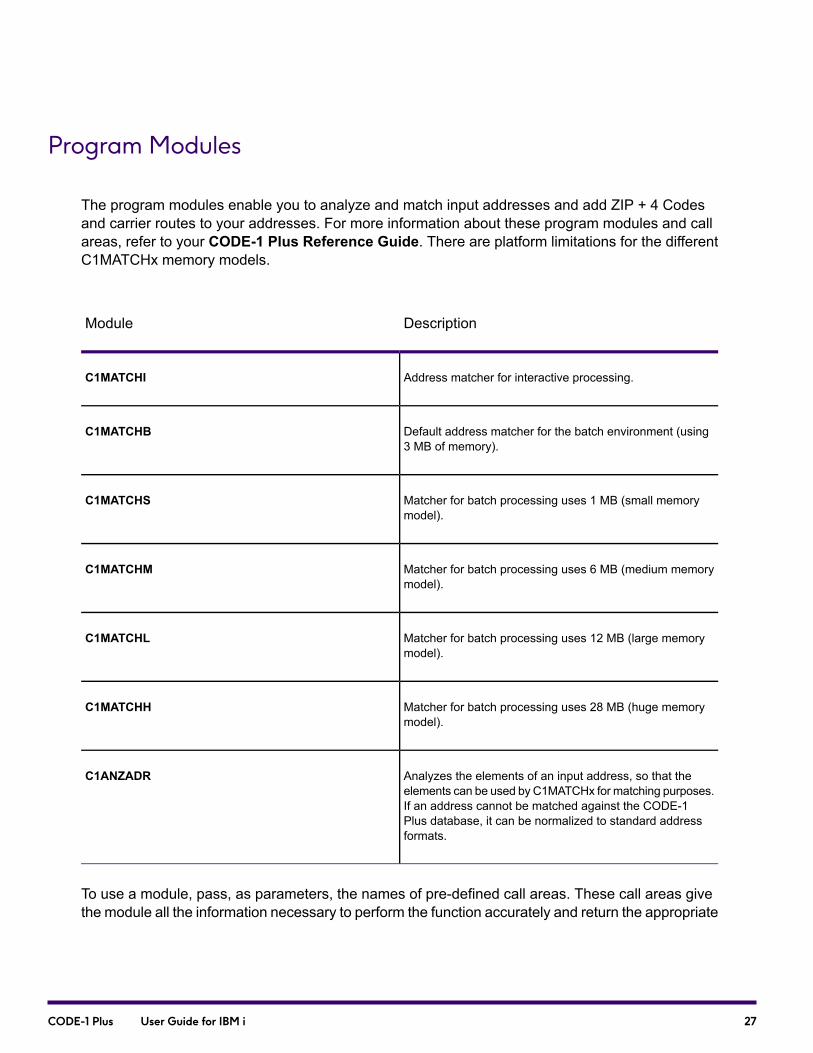
Program Modules
The program modules enable you to analyze and match input addresses and add ZIP + 4 Codesand carrier routes to your addresses. For more information about these program modules and callareas, refer to your CODE-1 Plus Reference Guide. There are platform limitations for the differentC1MATCHx memory models.
DescriptionModule
Address matcher for interactive processing.C1MATCHI
Default address matcher for the batch environment (using3 MB of memory).
C1MATCHB
Matcher for batch processing uses 1 MB (small memorymodel).
C1MATCHS
Matcher for batch processing uses 6 MB (medium memorymodel).
C1MATCHM
Matcher for batch processing uses 12 MB (large memorymodel).
C1MATCHL
Matcher for batch processing uses 28 MB (huge memorymodel).
C1MATCHH
Analyzes the elements of an input address, so that theelements can be used by C1MATCHx for matching purposes.If an address cannot be matched against the CODE-1Plus database, it can be normalized to standard addressformats.
C1ANZADR
To use a module, pass, as parameters, the names of pre-defined call areas. These call areas givethe module all the information necessary to perform the function accurately and return the appropriate
27CODE-1 Plus User Guide for IBM i
information. RPG copybooks are available in the Source member that is used in your program todefine the call areas.
Two other input call areas are available for IBM i users. G1CP has no calling parameters and accessesthe combined interactive database match/inquiry screens available from theWork with Jobs screen.G1CP1 has no calling parameters and accesses the interactive database inquiry screen in Flip modepositioned at a city name of your choice.
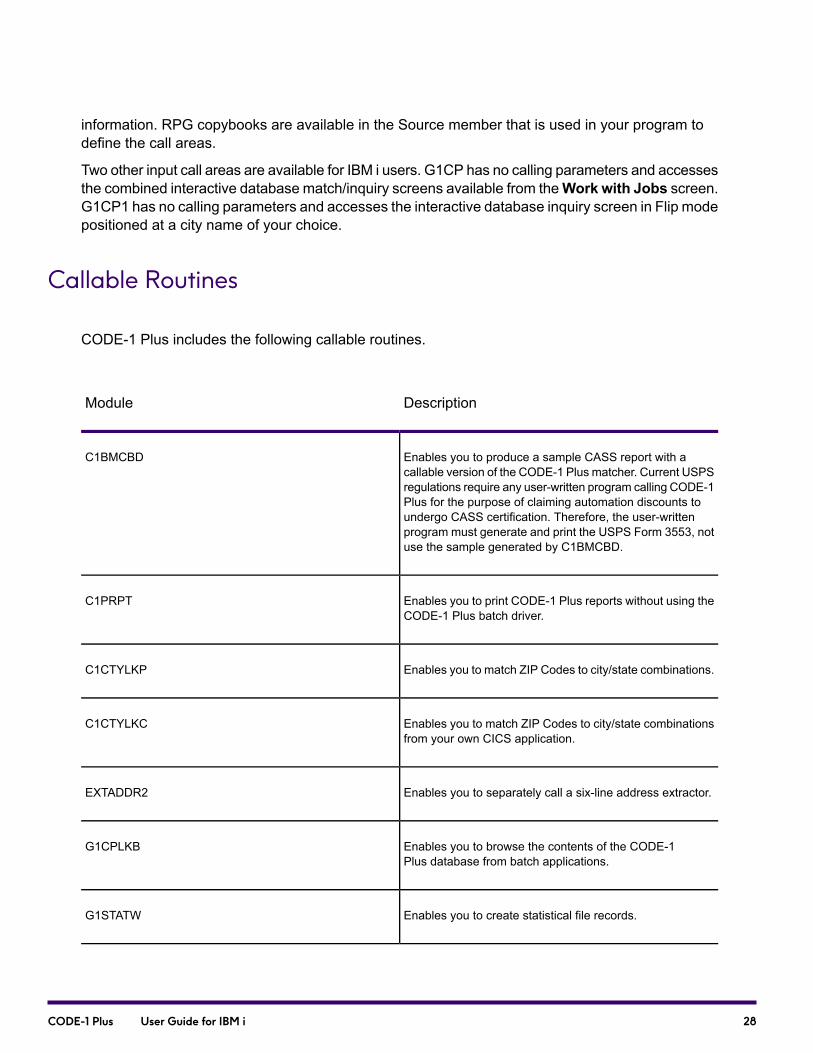
Callable Routines
CODE-1 Plus includes the following callable routines.
DescriptionModule
Enables you to produce a sample CASS report with acallable version of the CODE-1 Plus matcher. Current USPSregulations require any user-written program calling CODE-1Plus for the purpose of claiming automation discounts toundergo CASS certification. Therefore, the user-writtenprogram must generate and print the USPS Form 3553, notuse the sample generated by C1BMCBD.
C1BMCBD
Enables you to print CODE-1 Plus reports without using theCODE-1 Plus batch driver.
C1PRPT
Enables you to match ZIP Codes to city/state combinations.C1CTYLKP
Enables you to match ZIP Codes to city/state combinationsfrom your own CICS application.
C1CTYLKC
Enables you to separately call a six-line address extractor.EXTADDR2
Enables you to browse the contents of the CODE-1Plus database from batch applications.
G1CPLKB
Enables you to create statistical file records.G1STATW
28CODE-1 Plus User Guide for IBM i
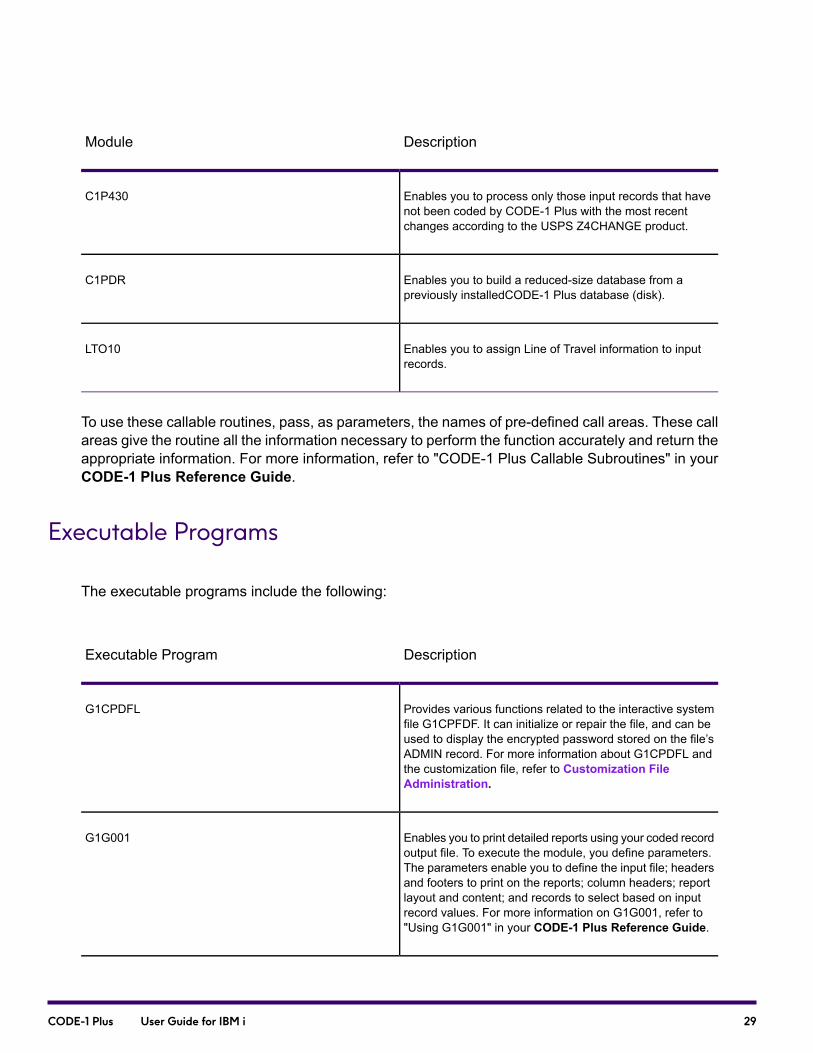
DescriptionModule
Enables you to process only those input records that havenot been coded by CODE-1 Plus with the most recentchanges according to the USPS Z4CHANGE product.
C1P430
Enables you to build a reduced-size database from apreviously installedCODE-1 Plus database (disk).
C1PDR
Enables you to assign Line of Travel information to inputrecords.
LTO10
To use these callable routines, pass, as parameters, the names of pre-defined call areas. These callareas give the routine all the information necessary to perform the function accurately and return theappropriate information. For more information, refer to "CODE-1 Plus Callable Subroutines" in yourCODE-1 Plus Reference Guide.
Executable Programs
The executable programs include the following:
DescriptionExecutable Program
Provides various functions related to the interactive systemfile G1CPFDF. It can initialize or repair the file, and can beused to display the encrypted password stored on the file’sADMIN record. For more information about G1CPDFL andthe customization file, refer to Customization FileAdministration.
G1CPDFL
Enables you to print detailed reports using your coded recordoutput file. To execute the module, you define parameters.The parameters enable you to define the input file; headersand footers to print on the reports; column headers; reportlayout and content; and records to select based on inputrecord values. For more information on G1G001, refer to"Using G1G001" in your CODE-1 Plus Reference Guide.
G1G001
29CODE-1 Plus User Guide for IBM i
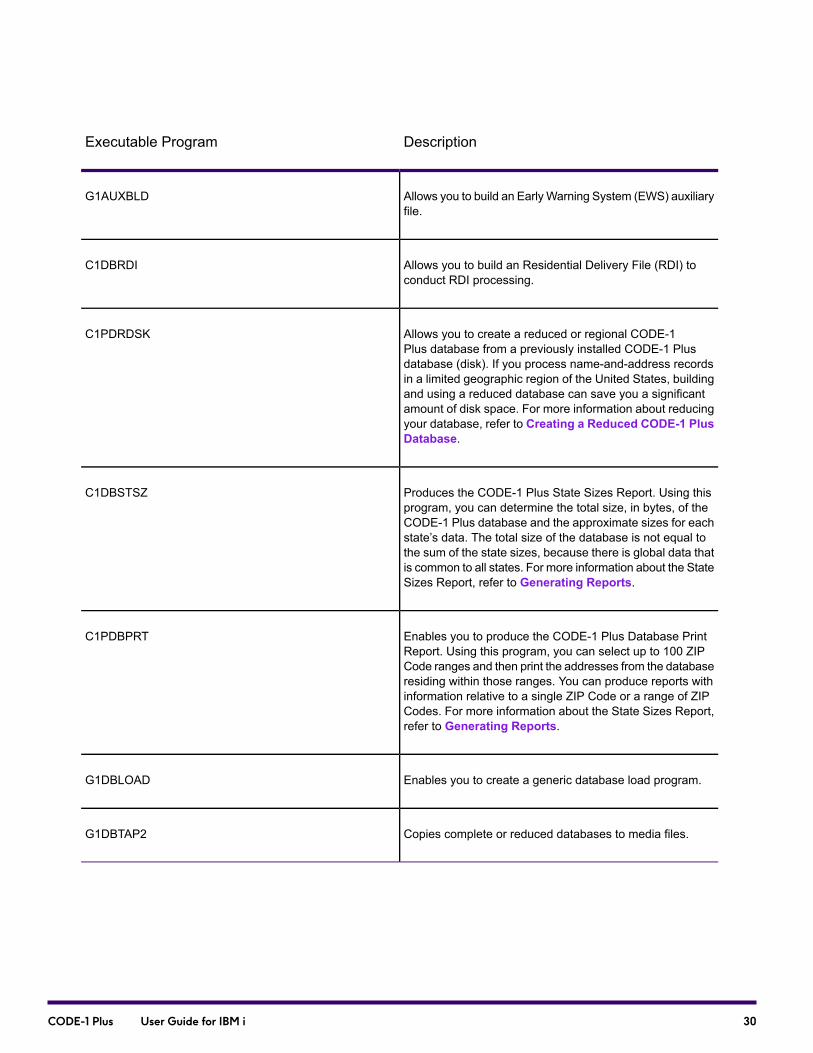
DescriptionExecutable Program
Allows you to build an EarlyWarning System (EWS) auxiliaryfile.
G1AUXBLD
Allows you to build an Residential Delivery File (RDI) toconduct RDI processing.
C1DBRDI
Allows you to create a reduced or regional CODE-1Plus database from a previously installed CODE-1 Plusdatabase (disk). If you process name-and-address recordsin a limited geographic region of the United States, buildingand using a reduced database can save you a significantamount of disk space. For more information about reducingyour database, refer to Creating a Reduced CODE-1 PlusDatabase.
C1PDRDSK
Produces the CODE-1 Plus State Sizes Report. Using thisprogram, you can determine the total size, in bytes, of theCODE-1 Plus database and the approximate sizes for eachstate’s data. The total size of the database is not equal tothe sum of the state sizes, because there is global data thatis common to all states. For more information about the StateSizes Report, refer to Generating Reports.
C1DBSTSZ
Enables you to produce the CODE-1 Plus Database PrintReport. Using this program, you can select up to 100 ZIPCode ranges and then print the addresses from the databaseresiding within those ranges. You can produce reports withinformation relative to a single ZIP Code or a range of ZIPCodes. For more information about the State Sizes Report,refer to Generating Reports.
C1PDBPRT
Enables you to create a generic database load program.G1DBLOAD
Copies complete or reduced databases to media files.G1DBTAP2
30CODE-1 Plus User Guide for IBM i
Database Expiration
The CODE-1 Plus database expires regularly in accordance with USPS regulations outlined in DMM708.When your CODE-1 Plus database is within 45 days of the expiration date, the followingmessageappears on your Parameter Record Listing Report in batch and on the CODE-1 Plus Interactivescreen:
**********************************************************************************
* WARNING: THE CODE-1 PLUS MASTER FILE WILL EXPIRE IN 36 DAYS ON MM/DD/YYYY
* CONTACT Precisely CUSTOMER SUPPORT IF ASSISTANCE IS NEEDED**********************************************************************************
If your database expires (i.e. it is not current as defined by the DMM 708 matrix), CODE-1 Plus willnot run. In batch mode, the Parameter Record Listing Report prints with the following message:
**********************************************************************************
* CODE-1 Plus Master File EXPIRED on MM/DD/YYYY**********************************************************************************
The interactive matcher ceases to function in accordance with the Domestic Mail Manual (DMM)A960matrix. The interactive system inquiry area, however, remains available even after the interactivematcher expires. In this case, the following message will be displayed on the prompt line above thefunction key descriptions:
CODE-1 PLUS DATABASE IS EXPIRED
You can, however, use the EXTEND command to bypass the expiration date in the interactive system.
You can use the BYPEXP parameter to override an expired database and run a job. However, aUSPS Form 3553 will not be produced. The following message prints.
**********************************************************************************
* USPSFORM3553SUPPRESSEDDUETOBYPASSINGDATABASEEXPIRATIONDATECHECK* **********************************************************************************
For more information on the BYPEXP parameter, refer to “Parameter Reference” in your CODE-1Plus Reference Guide.
The Delivery Point Validation (DPV) option will stop working at the end of the fourth month from therelease of the database.
If you have an expired DPV database, this message will appear:
**********************************************************************************
*DELIVERYPOINTVALIDATIONSUPPRESSEDDUETODATABASEEXPIRATIONDATECHECK*
31CODE-1 Plus User Guide for IBM i
**********************************************************************************
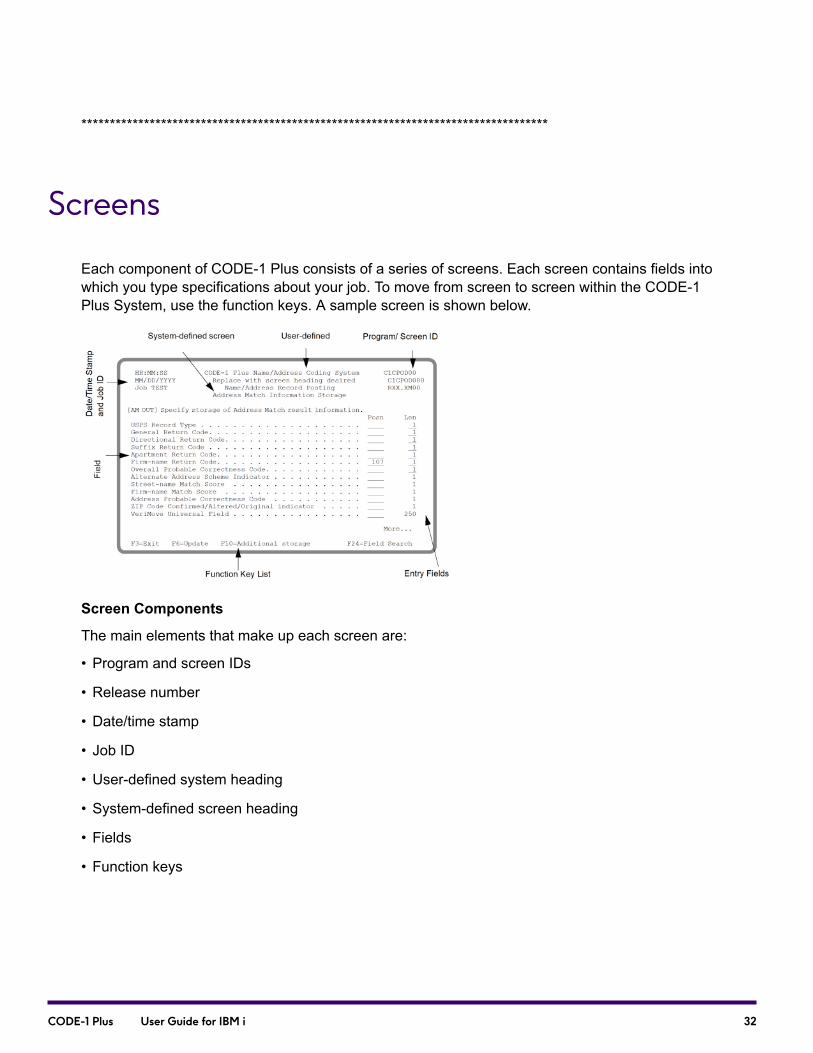
Screens
Each component of CODE-1 Plus consists of a series of screens. Each screen contains fields intowhich you type specifications about your job. To move from screen to screen within the CODE-1Plus System, use the function keys. A sample screen is shown below.
Screen Components
The main elements that make up each screen are:
• Program and screen IDs
• Release number
• Date/time stamp
• Job ID
• User-defined system heading
• System-defined screen heading
• Fields
• Function keys
32CODE-1 Plus User Guide for IBM i

Program and Screen ID
The program and screen IDs are located at the upper right of the screen. The program ID identifiesthe program for this screen. The screen ID is a unique label that identifies the screen.
Possible ValuesMeaningNameCharacter
• C1CP — Batch system
• C1IN — Databaseinstallation
Identifies what Precisely IBMi system this screen is a partof.
System ID1-4
33CODE-1 Plus User Guide for IBM i

Possible ValuesMeaningNameCharacter
• NJ — Create New Job
• CJ — Copy Job
• RJ — Rename Job
• MM — Work with Jobs(main menu)
• DS — Define and/orSubmit
• PX — Defaults for PrintOutput
• F3 — Exit Confirmation
• OD — Name /AddressRecord Posting
• ID — Name/Address FileLayout
• MI - Reformat Input Record
• MO - Reformat OutputRecord
• CF — ConfirmationCompare Values
• RP — Report Selection
• SB — Submit Batch Job
• IP — Copy from anexternal file
• OP — Copy to an externalfile
• DB— Database Functions
• DR — Create reduceddatabase
Identifies what module withinCODE-1 Plus this screen isa part of (the modules areusually the componentname).
Module ID5-6
Any 2- or 3-digit numberIdentifies the screen withinthe module.
Screen Number7-9(screen ID only)
For example, the program ID on the previous page is C1CPOD00, and the screen ID in Screens isC1CPOD080.
34CODE-1 Plus User Guide for IBM i

Note: The screen numbers are not always in sequence or continuous. For example, if thescreen ID is C1CPOD18, that does not mean that this is the 18th screen in theName/AddressRecord Posting component. Also, it does not indicate that there are 18 screens total in theName/Address Record Posting component. Numbers are used for identification only.
Release Number
The release number is at the top right corner of the screen, directly below the screen ID. This tellsyou the software release and modification level of CODE-1 Plus. In our sample screen in Figure 3,the release number is RXX.XM00.
Note: Screen examples in this book do not show the release number. This is done to avoidunnecessary updates to the documentation when there is a new release of the software andthe screens have not changed.
Date/Time Stamp
The date/time stamp, located in the upper left corner of the screen, shows you the current date andtime. In our sample screen in Figure 3, the time is HH:MM:SS and the date is shown asMM/DD/YYYY.
Note: The date/time stamp reflects the time at which the screen was “drawn,” and will notchange until you press a key that causes the screen to change. For example, if you wereinterrupted in the middle of your work, and came back to your terminal after a few minutes,the date/time stamp would not represent the current time.
Job ID
The job ID, located just below the date/time stamp in the upper left corner of the screen, uniquelyidentifies this CODE-1 Plus job. It is not unique to a specific screen; while you are working with aparticular job, that job ID is displayed on every screen. In Figure 3, our job ID is “TEST.”
Note: In our example screens throughout the rest of this book (except the tutorial), we do notshow the job IDs.
35CODE-1 Plus User Guide for IBM i

User-Defined System Heading
The user-defined system heading is always “Replace with screen heading desired” unless you changeit. The user-defined system heading is not unique to a particular screen or job — the same headingwill be displayed on each screen, regardless of the screen ID or job ID. This feature is provided sothat you may customize the CODE-1 Plus screen to contain your company's name or a slogan acrossthe top. You can enter "CN" from the Main Menu to change the User-Defined Screen Heading.
System-Defined Screen Heading
The system-defined screen heading tells the name of the specific screen that is displayed on yourmonitor. In addition to the screen heading, there is often a subheading that more uniquely identifiesthe screen. For example, all of the screens in the Name/Address Record Posting component have“Name/Address Record Posting” as the main system-defined screen heading, but only one screenhas the subheading, “Address Match Information Storage.”
Fields
Fields are underlined “blanks” on the screen for you to fill in with information. Each field is labeledwith a field name, and has space for you to type data. You enter all of the information about yourCODE-1 Plus job through fields. Some fields are optional, and some fields have default values thatare used if you leave them blank.
Note that there is complete online help for each field (with the cursor in a field, simply press F1 orHelp). On our sample screen, the first field has the name “USPS Record Type” and has space foryou to type up to a 4-digit location and a 1-character length.
Function Keys
Each screen has a specific set of function keys associated with it. These function keys allow you tomove to a different screen, save information you have typed on this screen, or perform some taskwith the data you have typed on the screen. At the bottom of each screen, you will find a list of thefunction keys that are valid on that screen. In our example in Figure 2-3, the function keys listed areF3, F6, F10, and F24.
36CODE-1 Plus User Guide for IBM i
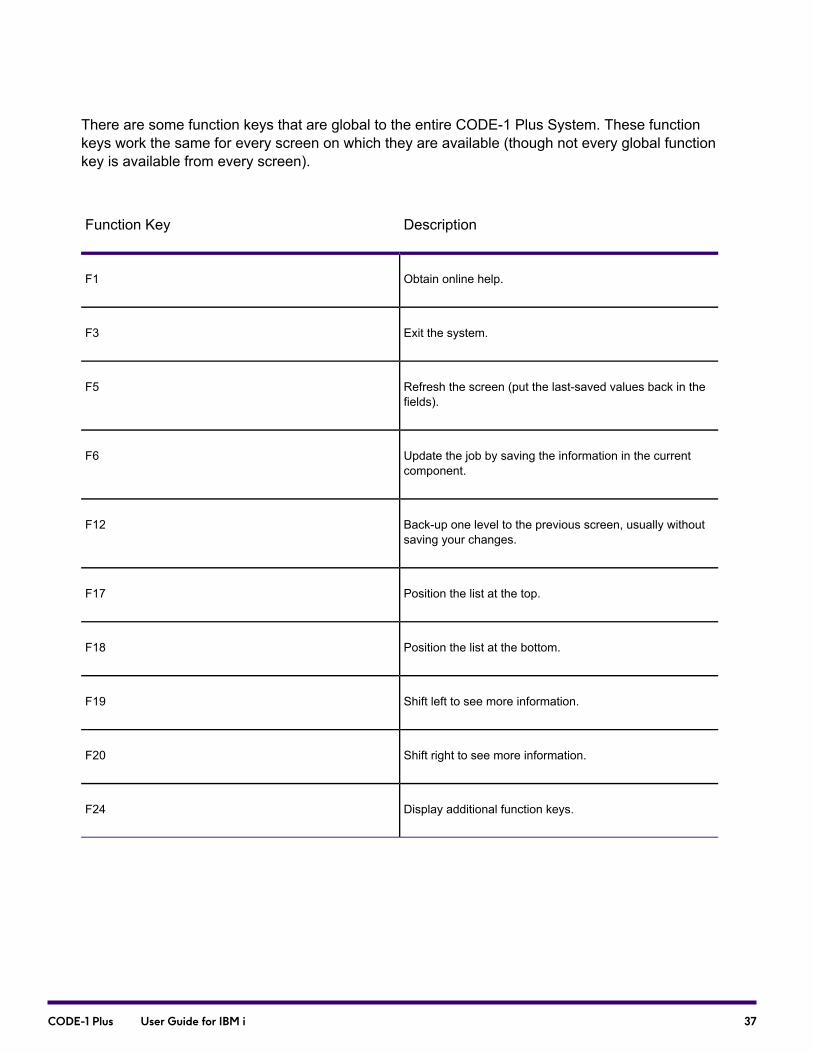
There are some function keys that are global to the entire CODE-1 Plus System. These functionkeys work the same for every screen on which they are available (though not every global functionkey is available from every screen).
DescriptionFunction Key
Obtain online help.F1
Exit the system.F3
Refresh the screen (put the last-saved values back in thefields).
F5
Update the job by saving the information in the currentcomponent.
F6
Back-up one level to the previous screen, usually withoutsaving your changes.
F12
Position the list at the top.F17
Position the list at the bottom.F18
Shift left to see more information.F19
Shift right to see more information.F20
Display additional function keys.F24
37CODE-1 Plus User Guide for IBM i
Saving to an External File
CODE-1 Plus provides you with the ability to save job data to an external file. Once you have savedthe data, you may then load the data from the file into other jobs. This is particularly useful if youhave a company standard, or a specific format for all of your company's name-and-address files.
The file you are saving to must be created before you submit the job to run. The file must be a sourcephysical file with a record length of 92.
Online Help
Each screen in CODE-1 Plus has online help available at the touch of a function key. Any time youare unsure what you are supposed to type for a particular field, or what a specific function key does,you can press F1 or your Help key. Detailed, context-sensitive information is displayed about thepurpose of the screen, the fields on the screen, and the function keys you can use from the screen.The help text will be positioned to the information about the field your cursor was on when youpressed Help or F1.
38CODE-1 Plus User Guide for IBM i
2 - Getting Started
In this section
Getting Started After Installation...............................................................40Creating a CODE-1 Plus Job....................................................................40
CODE-1 Plus User Guide for IBM i

Getting Started After Installation
This chapter provides information on the files that were installed on your system and libraries thatwere created during installation.
Creating a CODE-1 Plus Job
If you performed the standard CODE-1 Plus installation, the default product libraries are G1@@PGMS(containing global/job management utilities) and G1C1PGMS (CODE-1 Plus application files). Thefollowing menu displays when you sign on.
1. Type a 5 in the Option field. The CODE-1 PlusWork with Jobs screen (C1CPMM03) displays.
40CODE-1 Plus User Guide for IBM i

2. Press F6 to create a new job. You are prompted to type the new job ID. The job ID used cannotalready exist in the CODE-1 Plus system.
3. Type TUTOR in theNew Job ID field, and press Enter. TheCreate New Job screen (C1CPNJ01)displays.
4. Fill in the fields as shown below.
Note: In this tutorial, we use a work library called DEMO. Create this library before startingthe tutorial or specify a different library name (one that already exists on your system). Ifyou do not know a valid library to use, see your company's system administrator for help.You cannot specify a Precisely product library.
5. Page down to view the fields on the next screen. CODE-1 Plus verifies that you have filled in allfields correctly. The second Create New Job screen (C1CPNJ02) appears. We want to acceptall default values on this screen, so no action needs to be taken.
41CODE-1 Plus User Guide for IBM i
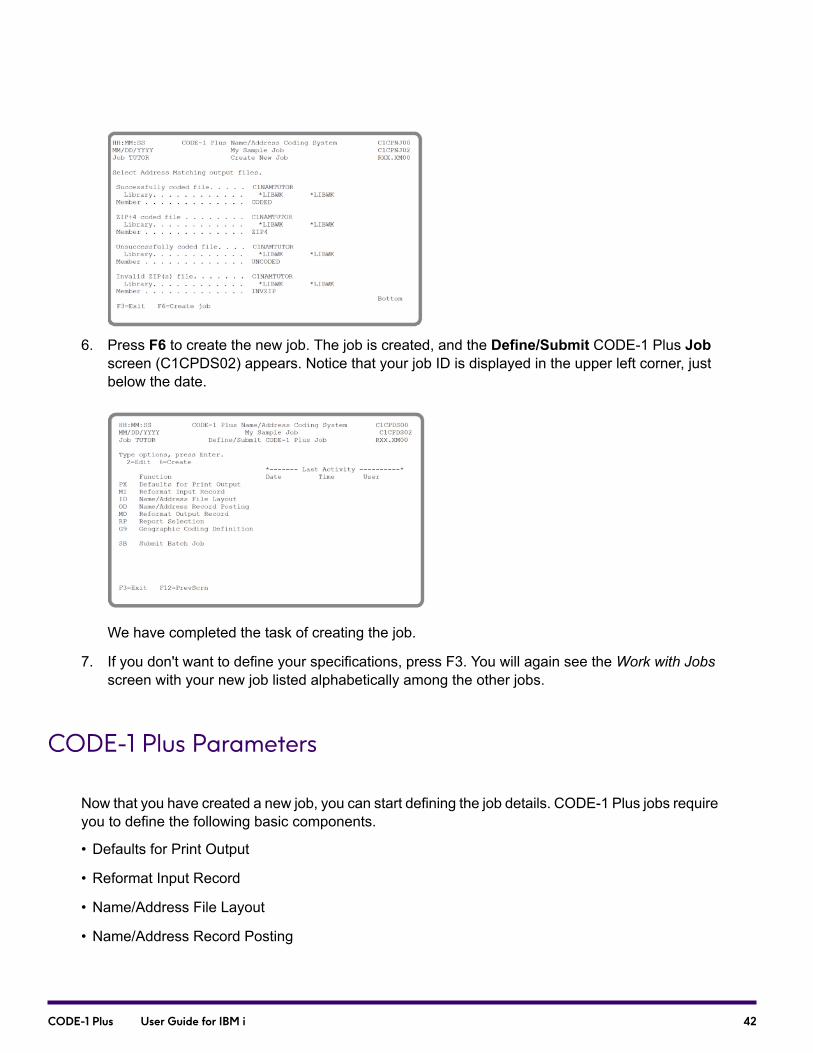
6. Press F6 to create the new job. The job is created, and the Define/Submit CODE-1 Plus Jobscreen (C1CPDS02) appears. Notice that your job ID is displayed in the upper left corner, justbelow the date.
We have completed the task of creating the job.
7. If you don't want to define your specifications, press F3. You will again see theWork with Jobsscreen with your new job listed alphabetically among the other jobs.
CODE-1 Plus Parameters
Now that you have created a new job, you can start defining the job details. CODE-1 Plus jobs requireyou to define the following basic components.
• Defaults for Print Output
• Reformat Input Record
• Name/Address File Layout
• Name/Address Record Posting
42CODE-1 Plus User Guide for IBM i

• Reformat Output Record
• Report Selection
You can access these components from the Define/Submit CODE-1 Plus Job screen (C1CPDS02).For each component you define, CODE-1 Plus stores parameter definitions to the following members.
ContentsMember
FILEDF Members
FILEDF for the CODE-1 Plus programBMPRM
Individual Parameter Members
HEADER parameter record@@PXT
Input file parameter recordsIDPRM
Output file parameter recordsODPRM
Report parameter recordsRPPRM
Reformat Input RecordMIPRM
Reformat Output RecordMOPRM
Job Files
CODE-1 Plus creates several job files in the Precisely work library each time you run a job. Thexxxxx indicates the job name.
43CODE-1 Plus User Guide for IBM i
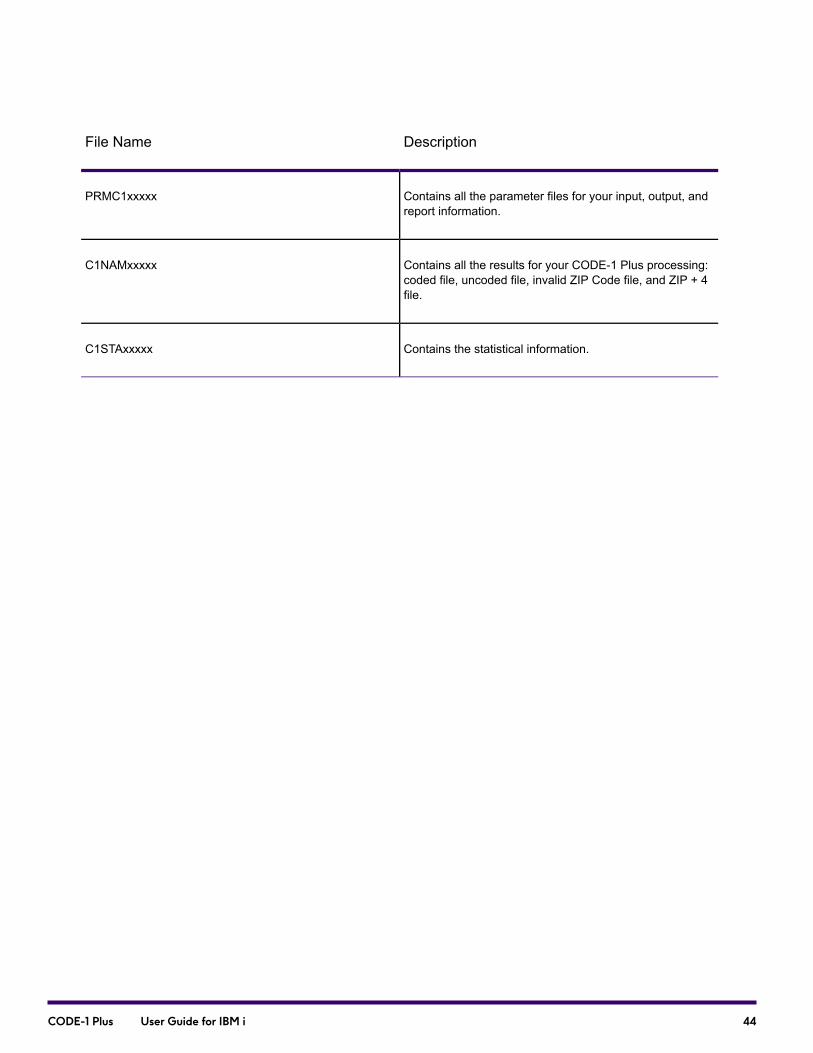
DescriptionFile Name
Contains all the parameter files for your input, output, andreport information.
PRMC1xxxxx
Contains all the results for your CODE-1 Plus processing:coded file, uncoded file, invalid ZIP Code file, and ZIP + 4file.
C1NAMxxxxx
Contains the statistical information.C1STAxxxxx
44CODE-1 Plus User Guide for IBM i

3 - System-WideCommand
In this section
Entering Commands at the Command Line.............................................46Using C1RUNJOB to Run CODE-1 Plus Jobs.........................................46Using C1SBMJOB to Submit CODE-1 Plus Jobs....................................49Using the Job Import Utility.......................................................................52
CODE-1 Plus User Guide for IBM i

Entering Commands at the Command Line
From a command line, you can enter the following commands to run or submit a CODE-1 Plus job:
• C1RUNJOB – Runs the job interactively
• C1SBMJOB – Submits the job to run in batch mode
When you enter the C1RUNJOB or C1SBMJOB commands, you have two options.
• Type the command and then press F4 for a screen prompting you for the input name/address file,library, and member, as well as processing limitations.
– Or –
• Type the command and the Job ID of the job you want to run or submit, and then press Enter torun or submit the job with the same name/address file and other parameters that you used lasttime this job was submitted.
In addition to entering these commands at the system prompt, you can include them in your controllanguage (CL) programs to run or submit several jobs in succession.
Note: For your system to recognize these commands, your library list must contain theCODE-1 Plus library (default G1C1PGMS). The libraries for other products should not be inthe library list.
Using C1RUNJOB to Run CODE-1 Plus Jobs
C1RUNJOB (CODE-1 Plus Run Job) is an optional command that executes a CODE-1 Plus job:
• Interactively
• From a command line
• From within a control language program
You can use C1RUNJOB in a job stream to run jobs in a specific order. The library list must containthe CODE-1 Plus library before C1RUNJOB can be executed using command ADDLIBLELIB(G1C1PGMS).
The C1RUNJOB command fields reflect the field values that are available through the job submissionfunction screens. The value *SAME indicates that the last values on those screens will be used.
46CODE-1 Plus User Guide for IBM i
However, the values typed on this command do not replace the values on the Submit CODE-1 PlusJob screens.
Executing C1RUNJOB Interactively
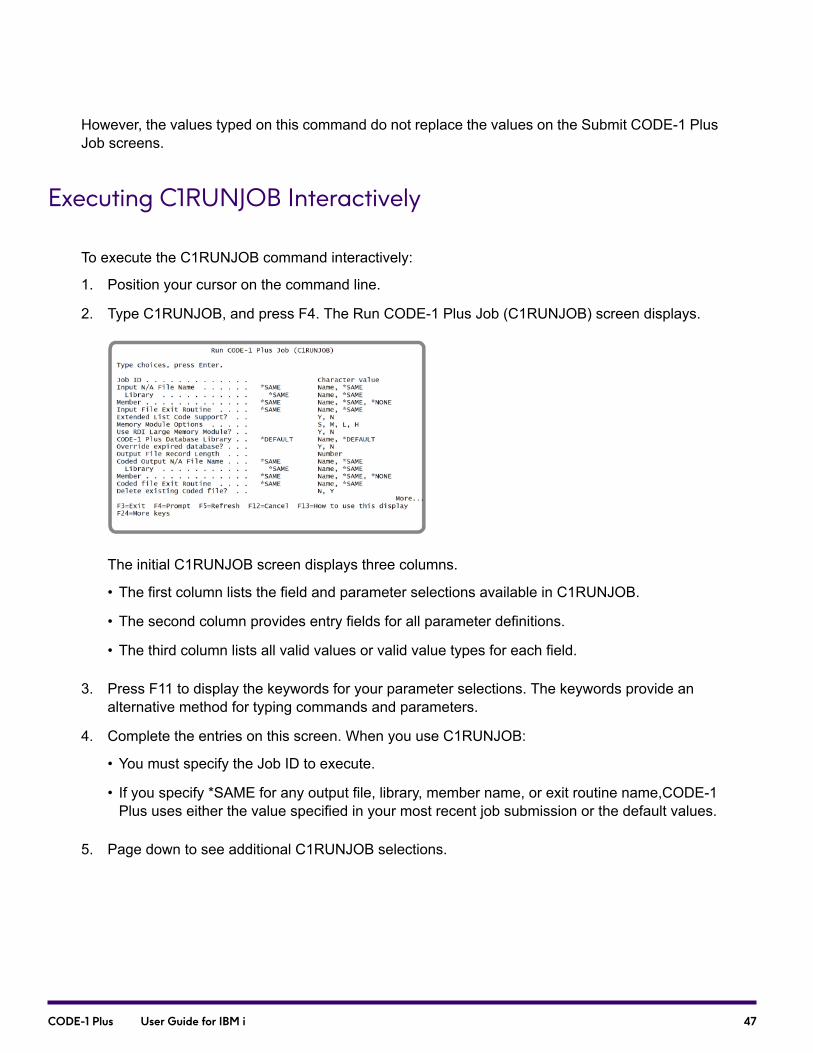
To execute the C1RUNJOB command interactively:
1. Position your cursor on the command line.
2. Type C1RUNJOB, and press F4. The Run CODE-1 Plus Job (C1RUNJOB) screen displays.
The initial C1RUNJOB screen displays three columns.
• The first column lists the field and parameter selections available in C1RUNJOB.
• The second column provides entry fields for all parameter definitions.
• The third column lists all valid values or valid value types for each field.
3. Press F11 to display the keywords for your parameter selections. The keywords provide analternative method for typing commands and parameters.
4. Complete the entries on this screen. When you use C1RUNJOB:
• You must specify the Job ID to execute.
• If you specify *SAME for any output file, library, member name, or exit routine name,CODE-1Plus uses either the value specified in your most recent job submission or the default values.
5. Page down to see additional C1RUNJOB selections.
47CODE-1 Plus User Guide for IBM i
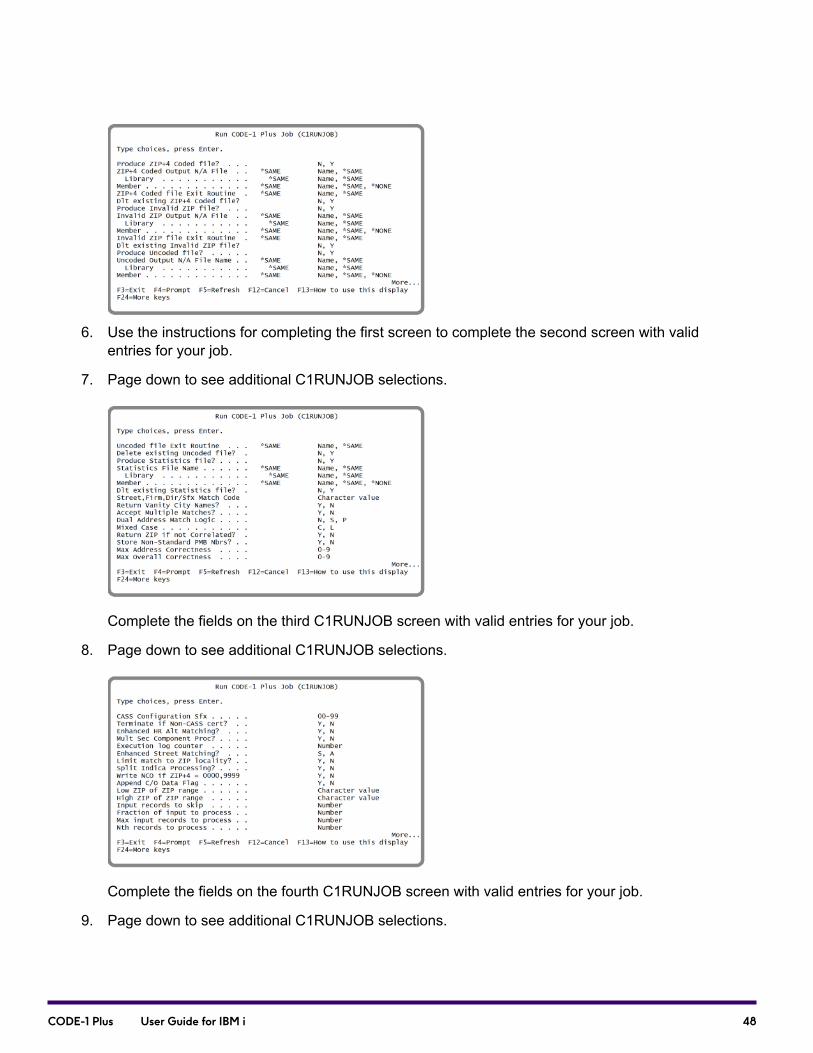
6. Use the instructions for completing the first screen to complete the second screen with validentries for your job.
7. Page down to see additional C1RUNJOB selections.
Complete the fields on the third C1RUNJOB screen with valid entries for your job.
8. Page down to see additional C1RUNJOB selections.
Complete the fields on the fourth C1RUNJOB screen with valid entries for your job.
9. Page down to see additional C1RUNJOB selections.
48CODE-1 Plus User Guide for IBM i

Complete the fields on the fifth C1RUNJOB screen with valid entries for your job.
10. Page down to see additional C1RUNJOB selections.
Complete the fields on the sixth C1RUNJOB screen with valid entries for your job.
11. Press Enter to run your job using your specified parameters.
Using C1SBMJOB to Submit CODE-1 Plus Jobs
C1SBMJOB (CODE-1 Plus Submit Job) is an optional command that submits aCODE-1 Plus job tobatch from the command line or from within a control language program. You can use C1SBMJOBin a jobstream to submit jobs in a specific order. The library list must contain the CODE-1 Plus librarybefore C1SBMJOB can be executed.
The fields on the C1SBMJOB command reflect the field values that are available through the jobsubmission function screens. The value “*SAME” indicates that the last values on those screens willbe used. The values typed on this command, however, will not replace the values on the SubmitCODE-1 Plus Job screens.
49CODE-1 Plus User Guide for IBM i
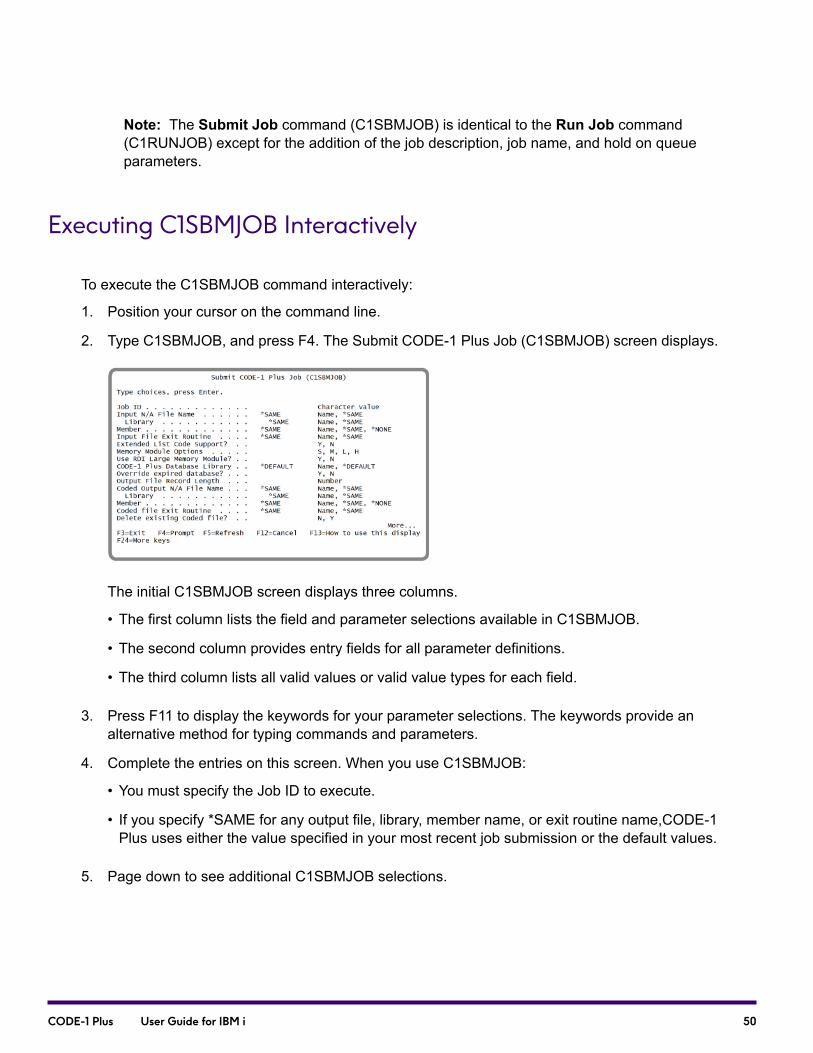
Note: The Submit Job command (C1SBMJOB) is identical to the Run Job command(C1RUNJOB) except for the addition of the job description, job name, and hold on queueparameters.
Executing C1SBMJOB Interactively
To execute the C1SBMJOB command interactively:
1. Position your cursor on the command line.
2. Type C1SBMJOB, and press F4. The Submit CODE-1 Plus Job (C1SBMJOB) screen displays.
The initial C1SBMJOB screen displays three columns.
• The first column lists the field and parameter selections available in C1SBMJOB.
• The second column provides entry fields for all parameter definitions.
• The third column lists all valid values or valid value types for each field.
3. Press F11 to display the keywords for your parameter selections. The keywords provide analternative method for typing commands and parameters.
4. Complete the entries on this screen. When you use C1SBMJOB:
• You must specify the Job ID to execute.
• If you specify *SAME for any output file, library, member name, or exit routine name,CODE-1Plus uses either the value specified in your most recent job submission or the default values.
5. Page down to see additional C1SBMJOB selections.
50CODE-1 Plus User Guide for IBM i

6. Use the instructions for completing the first screen to complete the second screen with validentries for your job.
7. Page down to see additional C1SBMJOB selections.
Complete the fields on the third C1SBMJOB screen with valid entries for your job.
8. Page down to see additional C1SBMJOB selections.
Complete the fields on the fourth C1SBMJOB screen with valid entries for your job.
9. Page down to see additional C1SBMJOB selections.
51CODE-1 Plus User Guide for IBM i
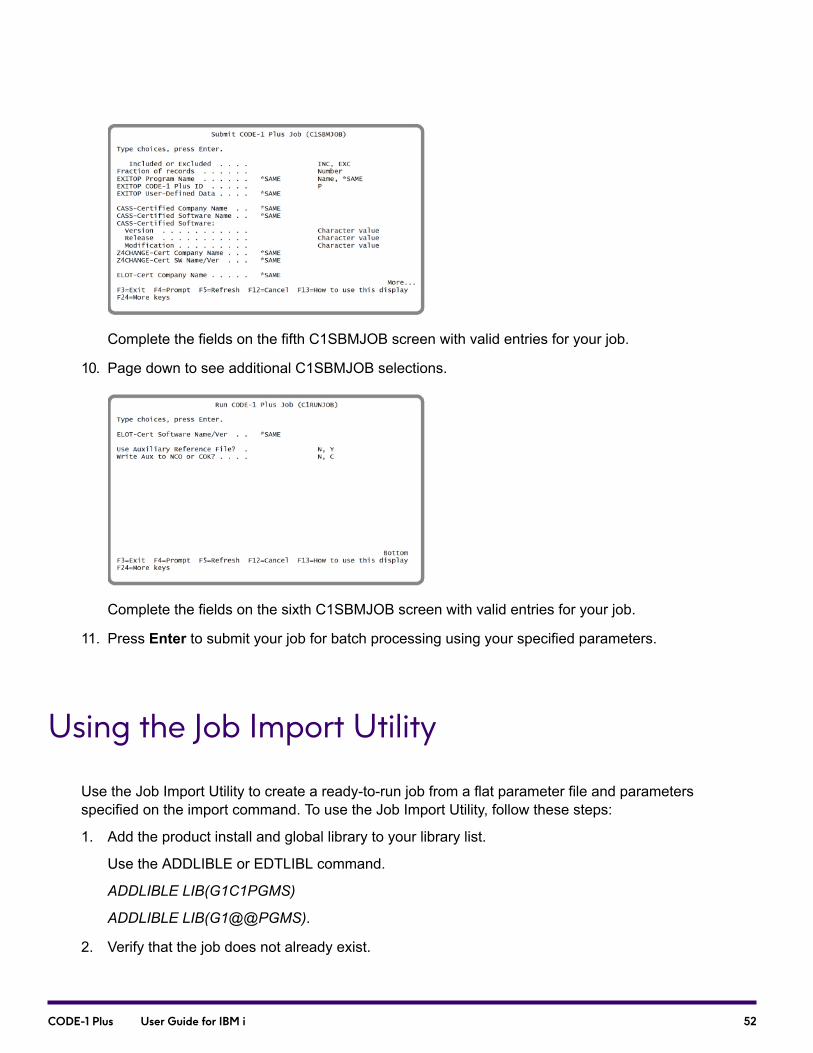
Complete the fields on the fifth C1SBMJOB screen with valid entries for your job.
10. Page down to see additional C1SBMJOB selections.
Complete the fields on the sixth C1SBMJOB screen with valid entries for your job.
11. Press Enter to submit your job for batch processing using your specified parameters.
Using the Job Import Utility
Use the Job Import Utility to create a ready-to-run job from a flat parameter file and parametersspecified on the import command. To use the Job Import Utility, follow these steps:
1. Add the product install and global library to your library list.
Use the ADDLIBLE or EDTLIBL command.
ADDLIBLE LIB(G1C1PGMS)
ADDLIBLE LIB(G1@@PGMS).
2. Verify that the job does not already exist.
52CODE-1 Plus User Guide for IBM i
a. Call G1MM01.
b. Select option 5: CODE-1 Plus Name/Address Coding System.
c. Verify that the job does not appear in the list.
3. Create a file to hold the job parameters to be imported using the create source file command:
CRTSRCPF FILE(MYLIB/PARMFILE) RCDLEN(92)
Note: The file must have a record length of 92.
You may also use an existing source file.
4. FTP the job parameters into the source file using your preferred method.
You will FTP the parameter file from the source platform (Windows or Unix, for example) into anew or existing member of the source physical file created in step 3.
Note: Some FTP clients cannot send parameters directly to a source physical file. Inthese cases, create an 80-byte file and FTP the parameter file into that file. Copy that fileto the source physical file using the CPYF command with parameter optionFMTOPT(*CVTSRC).
5. Import the job. Type IMPJOBC1P and press F4. The Import CODE-1 Plus Job (IMPJOBC1P)screen displays
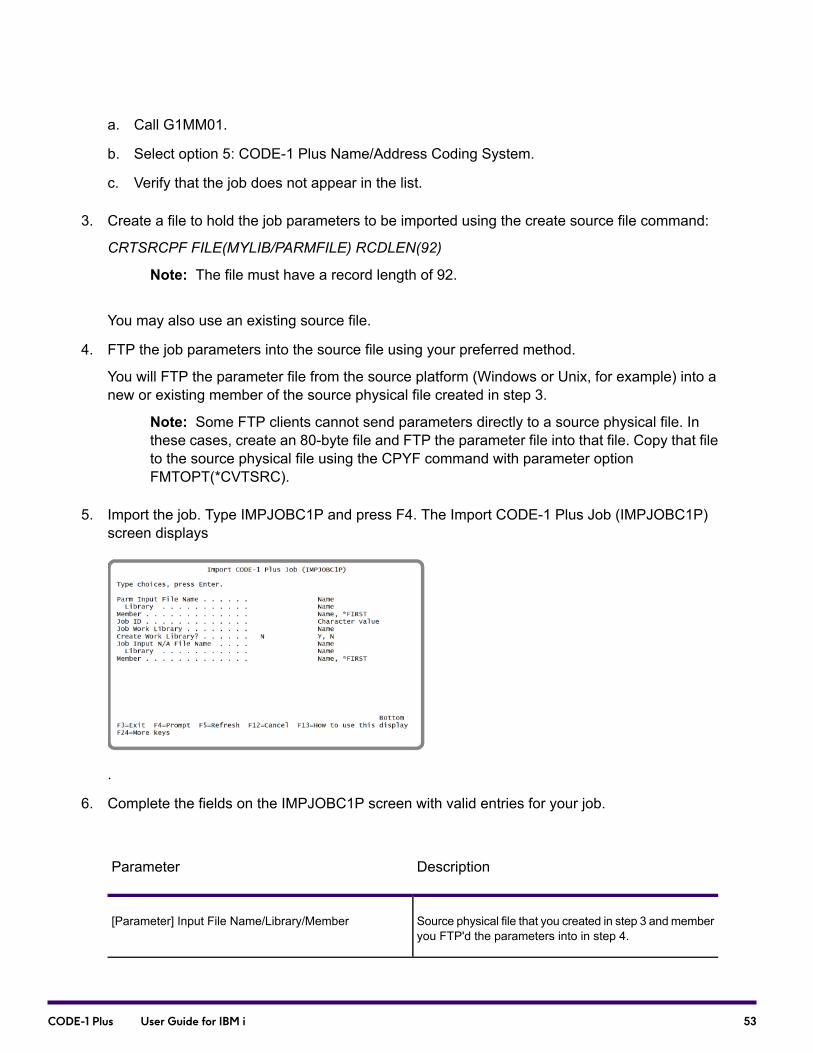
.
6. Complete the fields on the IMPJOBC1P screen with valid entries for your job.
DescriptionParameter
Source physical file that you created in step 3 andmemberyou FTP'd the parameters into in step 4.
[Parameter] Input File Name/Library/Member
53CODE-1 Plus User Guide for IBM i
DescriptionParameter
Name of the job you want to create. A Job IDmay be fromone to five characters in length. The characters may beA-Z, 0-9, or special characters $, @, #, or _. Embeddedblanks are not permitted.
Job ID
Name of the library where the IBM i parameter file will becreated (PRMC1jobid).
Job Work Library
Specify whether to create the Job Work Library if it doesnot already exist. If library does not exist but Create WorkLibrary was not specified, the program will fail withCPF9810.
Create Work Library
In the created job, this is the default input file name onthe job submission screen. Specify the input file namehere (there is no parameter to define the input file name).
Job Input N/A File Name/Library/Member
Note: Other variables on the Submit Batch Job screens (C1CPSBnn) are set to defaultvalues, including job description and output file names.
7. Verify the results.
a. Review the IBM i parm file using the WRKMBRPDM command:
WRKMBRPDM C1WORKLIB/PRMC1jobid
In this case, you would use:
WRKMBRPDM C1WORKLIB/PRMC1DEMO
b. Use option 5 to view the members
54CODE-1 Plus User Guide for IBM i

.
8. Review the following members by specifying option 5=Display.
DescriptionParameter Member
Parameters that were recognized, but not otherwiseprocessed, such as TESTIT and CHCKPT.
IGNORED
Copy of the complete list of parameters being imported,as specified in step 5
ORIGINAL
Parameters that were imported, but that do not appear inany parameter member, such as parameters that arespecified on the “Submit Batch Job” screens. For example:FILEDF, DB LIB, BYPEXP, AUXIL1, and EXITOP, andso on. The values on those parameters will appear on the“Submit Batch Job” screens.
PROCESSED
Parameters that were ignored because their names wereunrecognized.
UNKNOWN
Contain the imported, sorted-out parameters used by theapplication.
Other members
Note: Parameters that are commented out with a leading “*” (asterisk) or “* “(asterisk+space) are sorted to the appropriate member, but are not otherwise processed.
55CODE-1 Plus User Guide for IBM i

9. Run the job.
a. Verify that the job now exists and is ready to run with no modifications.
b. Start the product by calling G1MM00, or G1MM01.
c. Select option 5: CODE-1 Plus Name/Address Coding System.
d. The Last Activity displayed on the Work with Jobs screen (C1CPMM03) will show as "ImportJob".
e. On the Define/Submit CODE-1 Plus Job screen (C1CPDS02), the values listed under LastActivity indicate the date and time the job was imported, and will show user IMPJOBC1P.
Example
This example describes the steps to create a job using an existing library:
• Named DEMO
• Using the work library C1WORKLIB
• Using the product install library G1C1PGMS
• Created from parameters FTP'd into the file MYLIB/PARMFILE member PARMMBR
This example assumes the library MYLIB already exists.
1. Run the commands ADDLIBLE LIB(G1C1PGMS) and ADDLIBLE LIB(G1@@PGMS).
2. CALL G1MM01 and select option 5: CODE-1 Plus Name/Address Coding System and verifythat the job DEMO does not appear in the list.
3. Run the command:
CRTSRCPF FILE(MYLIB/PARMFILE) RCDLEN(92).
4. FTP parameters into MYLIB/PARMFILE member PARMMBR.
5. Run the IMPJOBC1P command.
6. Verify the results of the import. In this case, you would use:
WRKMBRPDM C1WORKLIB/PRMC1DEMO
Use option 5 to display the contents of the members.
7. Run the job.
a. CALL G1MM01 and select option 5: CODE-1 Plus Name/Address Coding System.
56CODE-1 Plus User Guide for IBM i

b. Use option 16 next to the job "DEMO" or use the commands C1RUNJOB or C1SBMJOB torun or submit the job. For example:
C1RUNJOB JOBID(DEMO)
.
Error Messages
IMPJOBC1P may return the following escape messages:
• IMP0100: Job already exists
• All CHKOBJ escape messages, including:
• CPF9810: Library xxxxxxxxxx not found
• CPF9801: Object xxxxxxxxxx in library xxxxxxxxxx not found (file not found)
• CPF9815: Member xxxxxxxxxx file xxxxxxxxxx in library xxxxxxxxxx not found
57CODE-1 Plus User Guide for IBM i
4 - Using the DatabaseFunction
In this section
What Are the Database Functions?.........................................................59Accessing the Database Functions Menu................................................59Creating a Reduced CODE-1 Plus Database..........................................60Installing a CODE-1 Plus Database.........................................................65Printing the CODE-1 Plus Database Detail Report..................................68Printing the CODE-1 Plus Database State Size Reports.........................72Displaying Database Information.............................................................72Changing the Default CODE-1 Plus Database Library.............................73Converting EWS File into CODE-1 Plus Format......................................74Returning to the Work With Jobs Screen.................................................75
CODE-1 Plus User Guide for IBM i

What Are the Database Functions?
CODE-1 Plus provides utilities that allow you to:
• Reduce the size of the CODE-1 Plus database
• Specify the location of the CODE-1 Plus database files
• Install a new CODE-1 Plus database
• Display CODE-1 Plus database information
• Change the default library name for CODE-1 Plus database files.
These options are available through the database functions menu — a utility that can be accessedthrough theWork with Jobs screen. CODE-1 Plus provides the following screens for working withthe database functions:
• Create Reduced Database Files
• Print CODE-1 Plus Database State Size Report
• Install CODE-1 Plus Database
• Database Functions (for changing the default library).
Accessing the Database Functions Menu
To access the Database FunctionsMenu, you need to be positioned at theWork with JobsMenu.For more details on accessing theWork with Jobs Menu, refer to the IBM i JobManagement Guide.
1. Press F20 from theWork with Jobs screen.
59CODE-1 Plus User Guide for IBM i
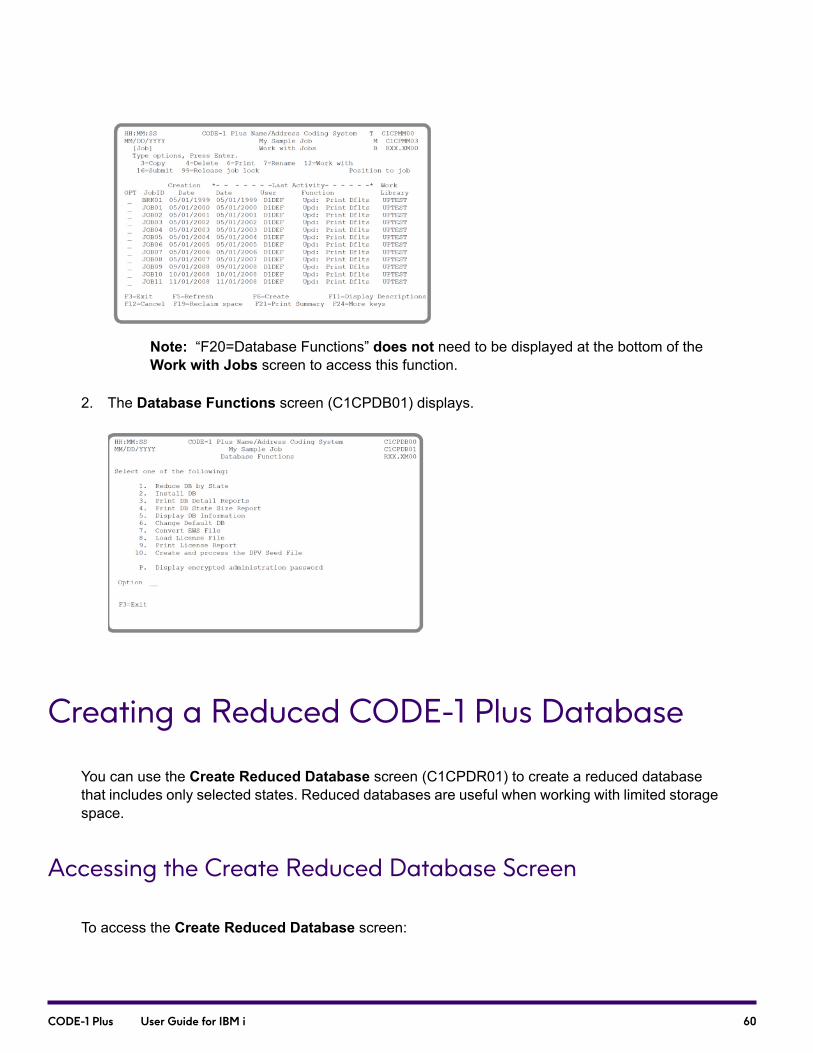
Note: “F20=Database Functions” does not need to be displayed at the bottom of theWork with Jobs screen to access this function.
2. The Database Functions screen (C1CPDB01) displays.
Creating a Reduced CODE-1 Plus Database
You can use the Create Reduced Database screen (C1CPDR01) to create a reduced databasethat includes only selected states. Reduced databases are useful when working with limited storagespace.
Accessing the Create Reduced Database Screen
To access the Create Reduced Database screen:
60CODE-1 Plus User Guide for IBM i
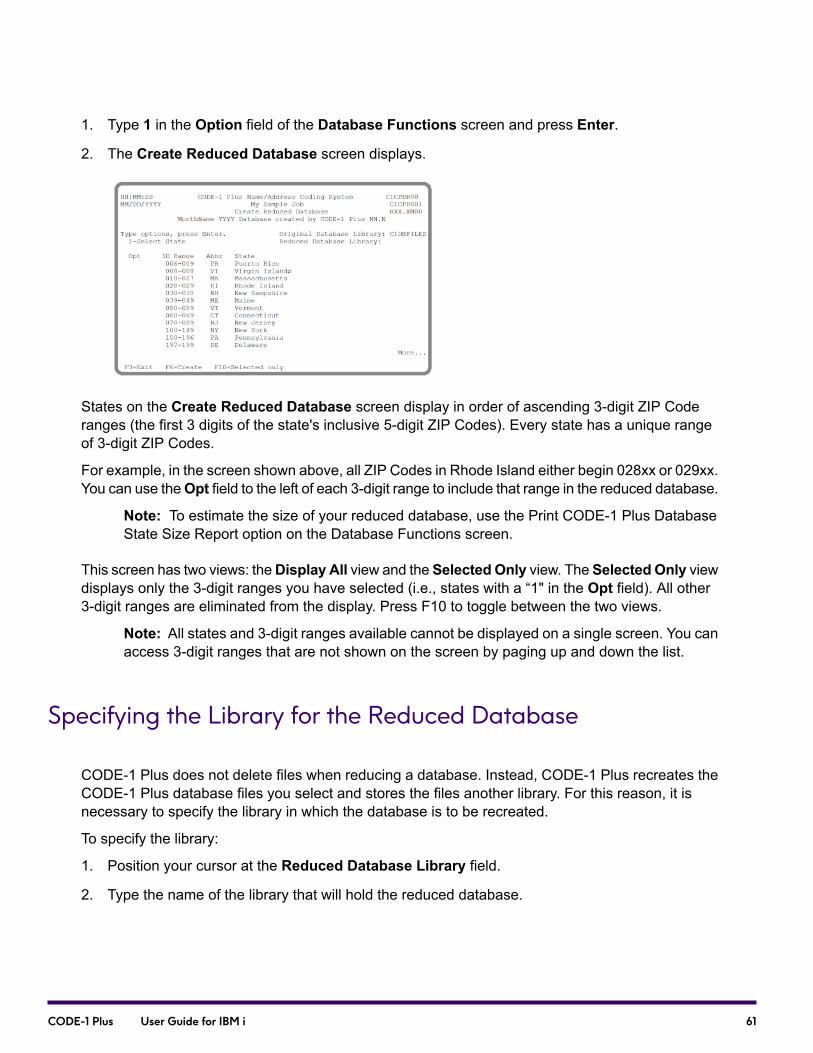
1. Type 1 in the Option field of the Database Functions screen and press Enter.
2. The Create Reduced Database screen displays.
States on the Create Reduced Database screen display in order of ascending 3-digit ZIP Coderanges (the first 3 digits of the state's inclusive 5-digit ZIP Codes). Every state has a unique rangeof 3-digit ZIP Codes.
For example, in the screen shown above, all ZIP Codes in Rhode Island either begin 028xx or 029xx.You can use theOpt field to the left of each 3-digit range to include that range in the reduced database.
Note: To estimate the size of your reduced database, use the Print CODE-1 Plus DatabaseState Size Report option on the Database Functions screen.
This screen has two views: theDisplay All view and the SelectedOnly view. The SelectedOnly viewdisplays only the 3-digit ranges you have selected (i.e., states with a “1" in the Opt field). All other3-digit ranges are eliminated from the display. Press F10 to toggle between the two views.
Note: All states and 3-digit ranges available cannot be displayed on a single screen. You canaccess 3-digit ranges that are not shown on the screen by paging up and down the list.
Specifying the Library for the Reduced Database
CODE-1 Plus does not delete files when reducing a database. Instead, CODE-1 Plus recreates theCODE-1 Plus database files you select and stores the files another library. For this reason, it isnecessary to specify the library in which the database is to be recreated.
To specify the library:
1. Position your cursor at the Reduced Database Library field.
2. Type the name of the library that will hold the reduced database.
61CODE-1 Plus User Guide for IBM i
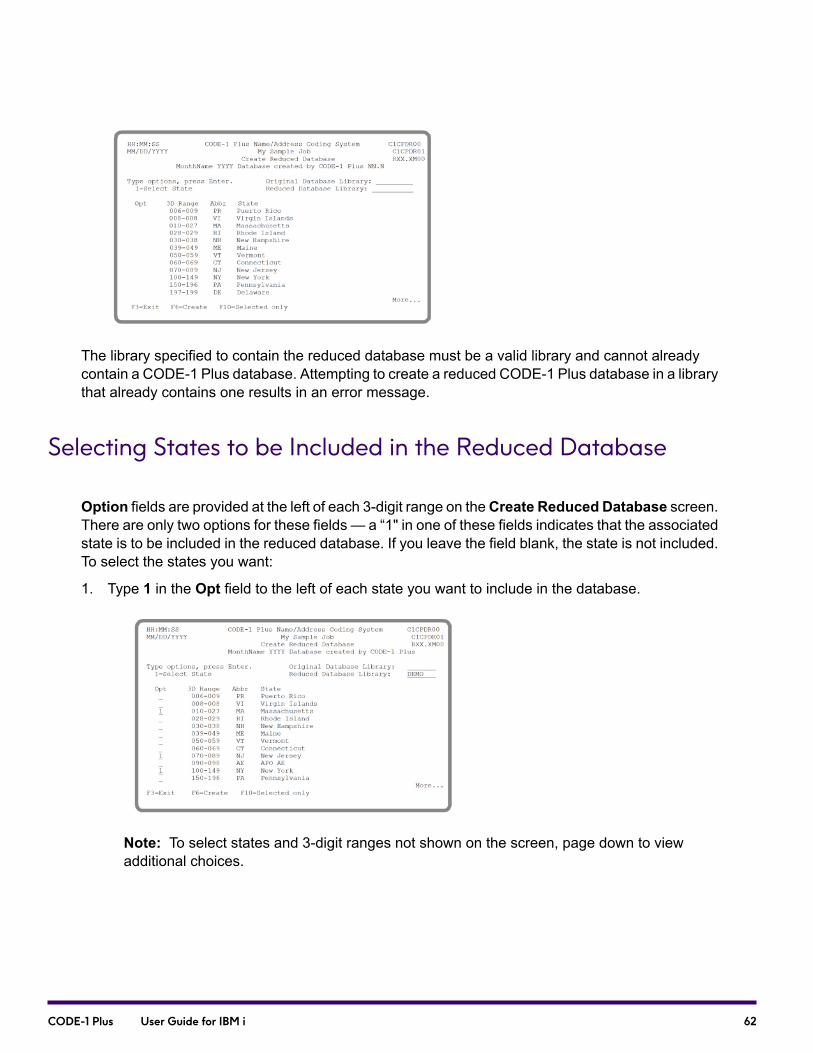
The library specified to contain the reduced database must be a valid library and cannot alreadycontain a CODE-1 Plus database. Attempting to create a reduced CODE-1 Plus database in a librarythat already contains one results in an error message.
Selecting States to be Included in the Reduced Database
Option fields are provided at the left of each 3-digit range on theCreate Reduced Database screen.There are only two options for these fields — a “1" in one of these fields indicates that the associatedstate is to be included in the reduced database. If you leave the field blank, the state is not included.To select the states you want:
1. Type 1 in the Opt field to the left of each state you want to include in the database.
Note: To select states and 3-digit ranges not shown on the screen, page down to viewadditional choices.
62CODE-1 Plus User Guide for IBM i

Viewing Your Selections and Storage Space Requirements
After indicating all states to include in the database, you may display information for only those statesand 3-digit ranges you selected.
1. To display the states and 3-digit ranges you have selected, press F10.
2. CODE-1 Plus displays only the 3-digit ranges that have a "1" in the associated Opt field. Theexample below shows the selected states from the previous page (Massachusetts, New Jersey,and New York).
Note: If no Reduced Database Library is indicated or if the library specified could not befound, an error message displays.
Changing Your Selections
You can change your selections at any time before you create the reduced database. Ranges canbe added or subtracted by using theCreate Reduced Database screen displaying all 3-digit ranges.
63CODE-1 Plus User Guide for IBM i

1. To return to a full display of 3-digit ranges from the “selected only” display, press F10 (DisplayAll) from the “selected only” display.
2. You return to the previous display.
3. To add or subtract a range from this display, type or delete a 1 in the Opt field of each rangeyou want to add or subtract.
4. Press F10 again to display the new set of selected ranges.
You can continue to add or subtract ranges in this way until you are satisfied with your selections.
Creating the Reduced Database
When you have selected all 3-digit ranges that you want, you are ready to create the reduceddatabase. To create the reduced database:
1. Press F6.
64CODE-1 Plus User Guide for IBM i

2. CODE-1 Plus recreates the records from the original database.
Installing a CODE-1 Plus Database
The database functions provide a utility to install CODE-1 Plus databases. This option allows you toinstall updated or new CODE-1 Plus databases or move existing CODE-1 Plus databases frommediato a new library. To install the CODE-1 Plus database, you must have one of the following:
• Database file that you downloaded from the website
• Media purchased from the Precisely eStore
To install a CODE-1 Plus database, follow these steps:
1. Press F20 from theWork with Jobs screen. The Database Functions screen displays.
2. Type 2 in the Option field of the Database Functions screen and press Enter.
3. The Install CODE-1 Plus Databases screen (C1INDB01) displays.
65CODE-1 Plus User Guide for IBM i
4. Complete the appropriate fields.
DescriptionField
Indicate if you wish to install the US Postal Database.
• Include ELOT—indicate if you wish to include ELOTin your database install.
• Include Enhanced Street—indicate if you wish toinclude Enhanced Street in your database install.
Install US Postal Database?
Indicate whether to reduce your US Postal Database.Reduce US Postal Database?
Indicate the DPV Database you want to install:
• Install DPV Flat DB
• Install DPV Full (Hash) DB
• Install DPV Split DB
Install DPV Database?
Indicate whether to install the LACSLink Database.Install LACSLink Database?
Indicate whether to install the SuiteLink Database.Install SuiteLink Database?
Indicate whether to install the PreciselyID Database.Install PreciselyID Database?
Indicate whether to install the Residential DeliveryIndicator (RDI) Database
Install RDI Database?
Specify the name of the library to which you want thedatabase installed. Upon initial display, the current defaultdatabase library displays. To load the database to a newlibrary, simply type over the existing library name.
Install to Library?
66CODE-1 Plus User Guide for IBM i

Installing a Database from Internet Download
To install a CODE-1 Plus database from internet download, follow these steps:
1. Press F20 from theWork with Jobs screen. The Database Functions screen displays.
2. Type 2 in the Option field of the Database Functions screen and press Enter.
3. The Install CODE-1 Plus Databases screen displays.
4. To install from an Internet download, specify "I" for Install Source. Complete the appropriatefields.
DescriptionField
Indicate if you wish to install the US Postal Database.
• Include ELOT—indicate if you wish to include ELOTin your database install.
• Include Enhanced Street—indicate if you wish toinclude Enhanced Street in your database install.
Install US Postal Database?
Indicate whether to reduce your US Postal Database.Reduce US Postal Database?
Indicate the DPV Database you want to install:
• Install DPV Flat DB
• Install DPV Full (Hash) DB
• Install DPV Split DB
Install DPV Database?
67CODE-1 Plus User Guide for IBM i

DescriptionField
Indicate whether to install the LACSLink Database.Install LACSLink Database?
Indicate whether to install the SuiteLink Database.Install SuiteLink Database?
Specify the name of the library to which you want thedatabase installed. Upon initial display, the current defaultdatabase library displays. To load the database to a newlibrary, simply type over the existing library name.
Install to Library?
If you have previously downloaded a USPostal Database or a DPV database, those existing databasesare lost once you start the IDS install process.
Printing the CODE-1 Plus Database DetailReport
You can use the CODE-1 Plus Database Detail Report to print addresses from the database. Youcan select up to 100 ZIP Code ranges and then print the addresses from the database that resideswithin those ranges. You can also generate reports for each ZIP Code within a range.
Follow these steps to print the CODE-1 Plus Database Detail Report.
1. In the CODE-1 Plus job screen, press F20 to access the Database Functions menu.
2. Select option 5, "Print CODE-1 Plus Database Detail Reports."
3. The Database Print ZIP-range selection screen (C1CPDP01) appears.
68CODE-1 Plus User Guide for IBM i

4. Complete the appropriate fields.
DescriptionField
Indicate whether to generate a City Report for each ZIPCode that falls within a range defined by the SELZIPparameter record.
• N — Do not generate City Reports.
• Y —Generate City Reports.
• Blank— Default is Y.
City Report
Indicate whether to print the Related ZIP Code Report foreach ZIP Code that falls within a range defined by theSELZIP parameter record.
• N — Do not generate Related ZIP Code Reports.
• Y — Generate Related ZIP Code Reports.
• Blank— Default is Y.
Related ZIP Code Report
Indicate whether to generate an Address Report for eachZIP Code that falls within a range defined by the SELZIPparameter record. Enter one of the following codes:
• N — Do not generate Address Reports.
• Y — Generate Address Reports.
• Blank— Default is Y.
Address Report
69CODE-1 Plus User Guide for IBM i

DescriptionField
Indicate whether to generate an Address Report in a 1-or 2-column format for each ZIP Code that falls within arange defined by the SELZIP parameter record.
• 1 — Generate Address Reports in a 1-column format.
• 2 — Generate Address Reports in a 2-column format.
• Blank— Default is 2.
Address Columns
Indicate whether to generate an Alias Report for each ZIPCode that falls within a range defined by the SELZIPparameter record. Enter one of the following codes:
• N — Do not generate Alias Reports.
• Y — Generate Alias Reports.
• Blank— Default is Y.
Alias Street
Indicate whether the City and Related ZIP Code Reportsshould begin on a new page.
• N—Print the City Report and Related ZIP Code Reportwithout starting a new page after each report.
• Y— Start printing on a new page, after printing the CityReport or the Related ZIP Code Report.
• Blank— Default is Y.
Page Eject
Specify the date to print at the top line of the first page ofeach report. Default is to print the system date.
Date
Specify the title to print on the top line of every page ofeach report. No default.
Title
Specify the number of lines to print on each page of theExecution Log or the other reports.
• Minimum is 25.
• Maximum is 225.
• Blank— Default is 60.
Lines-Per-Page
70CODE-1 Plus User Guide for IBM i

DescriptionField
Specify a code to indicate the side of the header line onwhich this text should appear:
• A — Left side of the line
• B — Right side of the line.
• Blank— No default.
Specify the text to appear at the top of each page of everyreport. No default.
Line (1, 2, 3, 4)
Specify a code to indicate the side of the footer line onwhich this text should appear:
• A — Left side of the line
• B — Right side of the line
• Blank— No default.
Specify the text to appear at the bottom of every page ofeach report. No default.
Line (1, 2, 3, 4)
Specify the lowest 5-digit ZIP Code for each ZIP Coderange. You must enter at least one ZIP Code range. Nodefault.
From
Specify the highest 5-digit ZIP Code for each ZIP Coderange. You must enter at least one ZIP Code range. Nodefault.
To
5. To print the Database Detail Report, press F6.
6. To exit without printing the report and return to the Database Functions screen, press F3.
For more information on C1PDBPRT, the callable routine that generates the CODE-1 Plus DatabasePrint Report, refer to "CODE-1 Plus Callable Subroutines" in your CODE-1 Plus Reference Guide.
71CODE-1 Plus User Guide for IBM i

Printing the CODE-1 Plus Database State SizeReports
You can use the CODE-1 Plus State Size Report to determine the total size in bytes of the CODE-1Plus database and the approximate sizes for each state’s data. The total size of the database is notequal to the sum of the state sizes, because there is global data that is common to all states. Youcan also produce this report for a database that is created by the CODE-1 Plus database reductionprocess.
To display this information about your database:
1. Type 6 in the Option field of the Database Functions screen and press Enter.
2. The Print CODE-1 Plus Database State Size Report screen (C1CPDB70) displays.
3. To print the State Size report, press F6.
4. To exit the screen without printing the report and return to the Database Functions screen,press F3.
For more information on C1DBSTSZ, the callable routine that generates the CODE-1 Plus StateSize Report, refer to "CODE-1 Plus Callable Subroutines" in your CODE-1 Plus Reference Guide.
Displaying Database Information
You can display the following information for the database that you are using:
• Date on which the database was created
72CODE-1 Plus User Guide for IBM i
• Library in which the database resides
• USPS vintage date of the database
• Expiration date of the database
• Date on which CODE-1 Plus was installed
To display this information about your database:
1. Type 7 in the Option field of the Database Functions screen and press Enter.
2. The Database Information screen (C1CPDB80) appears.
3. To exit the screen and return to the Database Functions screen, press F3.
Changing the Default CODE-1 Plus DatabaseLibrary
If you have several CODE-1 Plus databases, this option can be used to direct CODE-1 Plus to thedatabase you would like to use as the default. The default database is the one CODE-1 Plus will usefor all address matching, database display, and any other CODE-1 Plus database functions. Sinceeach database must exist in a separate library, to specify the database CODE-1 Plus should use,all that you have to do is specify the unique library in which it resides.
To change the default CODE-1 Plus database library:
1. Type 8 in the Option field of the Database Functions screen and press Enter.
2. The Database Functions Change Default Library screen (C1CPDB90) appears.
73CODE-1 Plus User Guide for IBM i
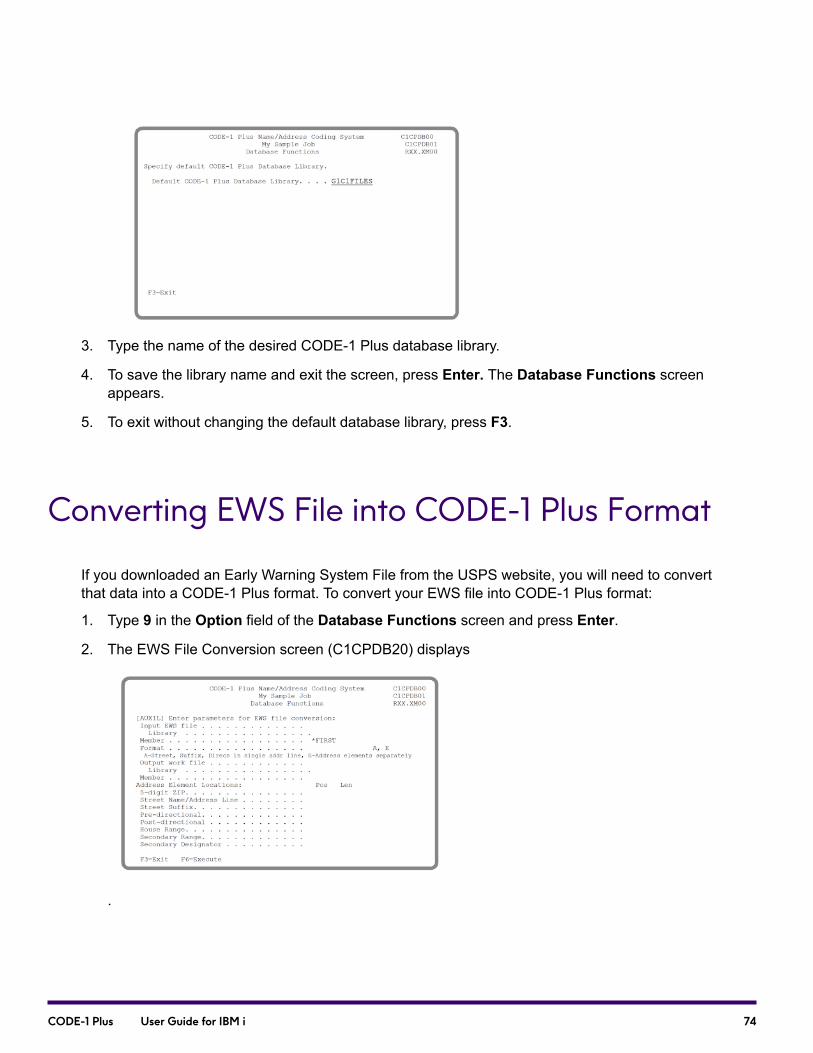
3. Type the name of the desired CODE-1 Plus database library.
4. To save the library name and exit the screen, press Enter. The Database Functions screenappears.
5. To exit without changing the default database library, press F3.
Converting EWS File into CODE-1 Plus Format
If you downloaded an Early Warning System File from the USPS website, you will need to convertthat data into a CODE-1 Plus format. To convert your EWS file into CODE-1 Plus format:
1. Type 9 in the Option field of the Database Functions screen and press Enter.
2. The EWS File Conversion screen (C1CPDB20) displays
.
74CODE-1 Plus User Guide for IBM i

3. Complete the Input EWS file field with the name of the file you created. The output file isautomatically placed in your database library.
Note: The Output work file and Address Element Locations are not changeable at thistime.
4. Press F6 to run the conversion.
5. When you return to the main menu, your file has been successfully converted. You can now usethis Auxiliary File as input to your CODE-1 Plus job by using the AUXIL1 parameter.
Returning to the Work With Jobs Screen
When you finish using the database functions, you may exit and return to theWork with Jobs screen.To exit the database functions and return to theWork With Jobs Menu:
1. Display the Database Functions screen (C1CPDB01).
2. Press F3. TheWork with Jobs screen displays.
75CODE-1 Plus User Guide for IBM i

5 - Defining Input
In this section
Defining Your Input File............................................................................77Using the Name and Address Layout Screens........................................78Defining Input Address and ZIP Code Information...................................81Defining Urbanization Information............................................................88Defining SuiteLink Processing..................................................................90Defining Confirmation Options and LACSLink Processing.......................93Confirmation Compare Values Screen (C1CPCF11)................................98Defining List Processor/Mailer Information Screen (C1CPID60)..............99Defining Input File Sequence Check Information...................................101Defining Delivery Point Validation Processing........................................103Defining Additional Delivery Point Validation Processing.......................106Reformatting Your Input Records...........................................................108Reformat Input Record Screen...............................................................108
CODE-1 Plus User Guide for IBM i
Defining Your Input File
This chapter provides information for using the IBM i screens to define information in your input fileto be used during processing of your CODE-1 Plus job.
Note: You must create your CODE-1 Plus job before using the screens described in thischapter to define your input file. For information on creating a CODE-1 Plus job, refer toCreating a CODE-1 Plus Job.
Function Keys
The following function keys are available on the Name/Address File Layout screens.
DescriptionNameFunction Key
Exit from the Name/Address File Layoutcomponent, without saving the data.
ExitF3
Move your cursor next to thecomparison value you want to edit.Press F4. The Confirmation CompareValues screen (C1CPCF20) appearsfilled in with the selected comparisonvalue information.
Edit FunctionF4
Save the data and quit from theName/Address File Layout component.
UpdateF6
Goes to the first Confirmation CompareValues screen (C1CPCF11).
Compare ValuesF10
Insert new MOVE I operation.Insert
77CODE-1 Plus User Guide for IBM i

DescriptionNameFunction Key
Move your cursor next to thecomparison value you want to delete.Press F11. The Confirmation CompareValues screen (C1CPCF20) appearsfilled in with the selected comparisonvalue information. Indicate whether todelete the selected value.
Delete at cursorF11
Moves to the first CONFRM parameterrecord in your confirmation comparevalue list.
TopF17
Moves to the last CONFRM parameterrecord in your confirmation comparevalue list.
BottomF18
Allows you to display the location andlengths of the fields in an external file.Type file name and library of externalfile.
Field SearchF24
Using the Name and Address Layout Screens
The Name and Address Layout screens allow you to define address information in your input fileincluding:
• Location, length, and format of address information in your input file
• Conditions for selecting records for processing
• Additional processing options
78CODE-1 Plus User Guide for IBM i
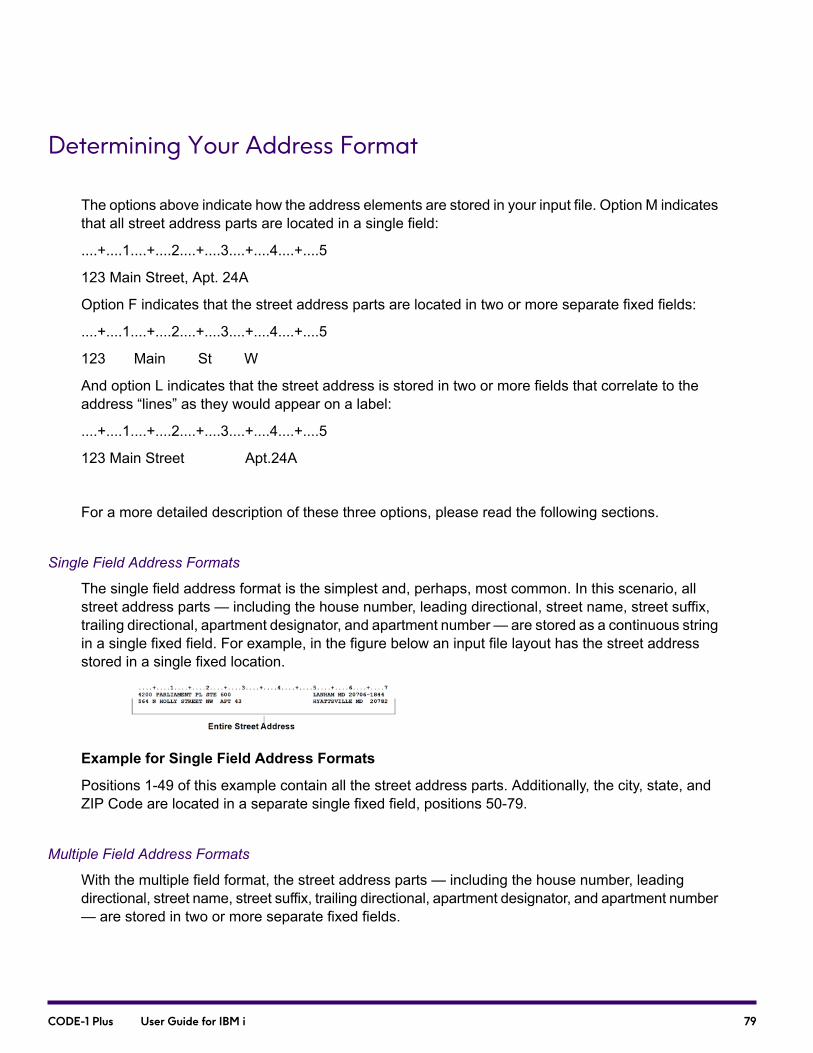
Determining Your Address Format
The options above indicate how the address elements are stored in your input file. Option M indicatesthat all street address parts are located in a single field:
....+....1....+....2....+....3....+....4....+....5
123 Main Street, Apt. 24A
Option F indicates that the street address parts are located in two or more separate fixed fields:
....+....1....+....2....+....3....+....4....+....5
123 Main St W
And option L indicates that the street address is stored in two or more fields that correlate to theaddress “lines” as they would appear on a label:
....+....1....+....2....+....3....+....4....+....5
123 Main Street Apt.24A
For a more detailed description of these three options, please read the following sections.
Single Field Address Formats
The single field address format is the simplest and, perhaps, most common. In this scenario, allstreet address parts — including the house number, leading directional, street name, street suffix,trailing directional, apartment designator, and apartment number— are stored as a continuous stringin a single fixed field. For example, in the figure below an input file layout has the street addressstored in a single fixed location.
Example for Single Field Address Formats
Positions 1-49 of this example contain all the street address parts. Additionally, the city, state, andZIP Code are located in a separate single fixed field, positions 50-79.
Multiple Field Address Formats
With the multiple field format, the street address parts — including the house number, leadingdirectional, street name, street suffix, trailing directional, apartment designator, and apartment number— are stored in two or more separate fixed fields.
79CODE-1 Plus User Guide for IBM i

When you choose this option CODE-1 Plus strings together the separate fields in the order that youdefine them, deleting all extraneous spaces to form a continuous single street address line.
For example, the figure below illustrates an input file layout that has the street address parts storedin six separate fields.
Multiple Field Address Formats
• Positions 1-6 of this example contain the house number
• Positions 7-8 contain the leading directional
• Positions 9-28 contain the street name and street suffix
• Positions 29-31 contain the trailing directional
• Positions 32-41 contain the apartment designator
• Positions 41-48 contain the apartment number.
The city and state are located in positions 50-69, and the ZIP Code is located in another separatefield, positions 75-79.
Multiple Line Address Formats
The multiple line format also has address parts stored in two or more fields on the input file. Multipleline fields correspond to the “lines” of a standard address label. For example, in the figure below theaddress label displays four lines of information.
Figure 1: Multiple Address Lines on a Label
This example is a typical label format where address line 1 contains street information and addressline 2 contains apartment information. The next figure illustrates the input file layout that correspondsto the label lines shown above.
80CODE-1 Plus User Guide for IBM i

Address Lines Corresponding to Label Example
Positions 1-29 of the input file contain the first address line of a label, and positions 30-49 containthe second address line.
Defining Input Address and ZIP CodeInformation
The Name/Address File Layout screens define the position and length of address and ZIP Codeinformation in your input file.
Defining Address and ZIP Code Locations
Use the Address and ZIP Code Locations screen (C1CPID10) to define the location of addresselements in your input file.
To access the Address and ZIP Code Locations screen:
1. From the Work With Jobs screen, use F12 to select the job for defining input. The Define/SubmitCODE-1 Plus Job screen displays.
2. Select Name/Address File Layout.
3. Use the following table to complete the fields on the Address and ZIP Code Locations screen.
DescriptionField
Location of Street Address in Input File
81CODE-1 Plus User Guide for IBM i

DescriptionField
Required. Type one of the following codes to describewhere the street address information is located in the inputrecord.
• F— Street address information is located in multiplefields. 2,3,4,5, or 6 fields.
• L— Street address information is located in multipleaddress lines. 2,3,4,5, or 6 lines (with or without cityand state).
• M— Street address information is located in a singlefield. All street address elements are stored as acontinuous string in a single fixed field.
• blank— No default.
Location Method
Required. Enter a number from 1-9999 to specify thelocation in the input record where the street addressinformation is found. As many as 6 address position fieldsmay be defined. No default.
• blank— No default.
Position
Required. Enter a number from 1-99 to specify thelength(s) in the input record of the indicated addressline(s).
• blank— No default.
Len
Location of City/State/ZIP Code in Input File
82CODE-1 Plus User Guide for IBM i
DescriptionField
Required. Location of the City, state, and ZIP Codeinformation is located in the input record.
• A — City, state, and ZIP Code found in the addresslines defined above. (The street address locationmethod must be L.)
• C — City and state found in the address lines definedabove, and place the ZIP Code in a separately specifiedposition. (The street address location method must beL.)
• M — City and state are found in a single field, with thespecified position and length. Place the ZIP Code in aseparately specified position.
• S — City, state, and ZIP Code are found in separatelyspecified positions, with separately defined lengths.
• X — City, state, and ZIP Code are found in a singlefield, with the position and length defined in the city orcity/ST fields.
• blank— No default.
Note: Options A and C are only valid here inconjunction with multiple line records. (L mustbe specified for the street address locationmethod.)
Location Method
Location of ZIP Code in Input File
Required if C, M, or S is specified as the ZIP Codelocationmethod. Enter a number from 1-9999 to specifythe starting location in the input record of the ZIP Code,when the ZIP Code is to be located separately from therest of the address. No default.
Pos
83CODE-1 Plus User Guide for IBM i
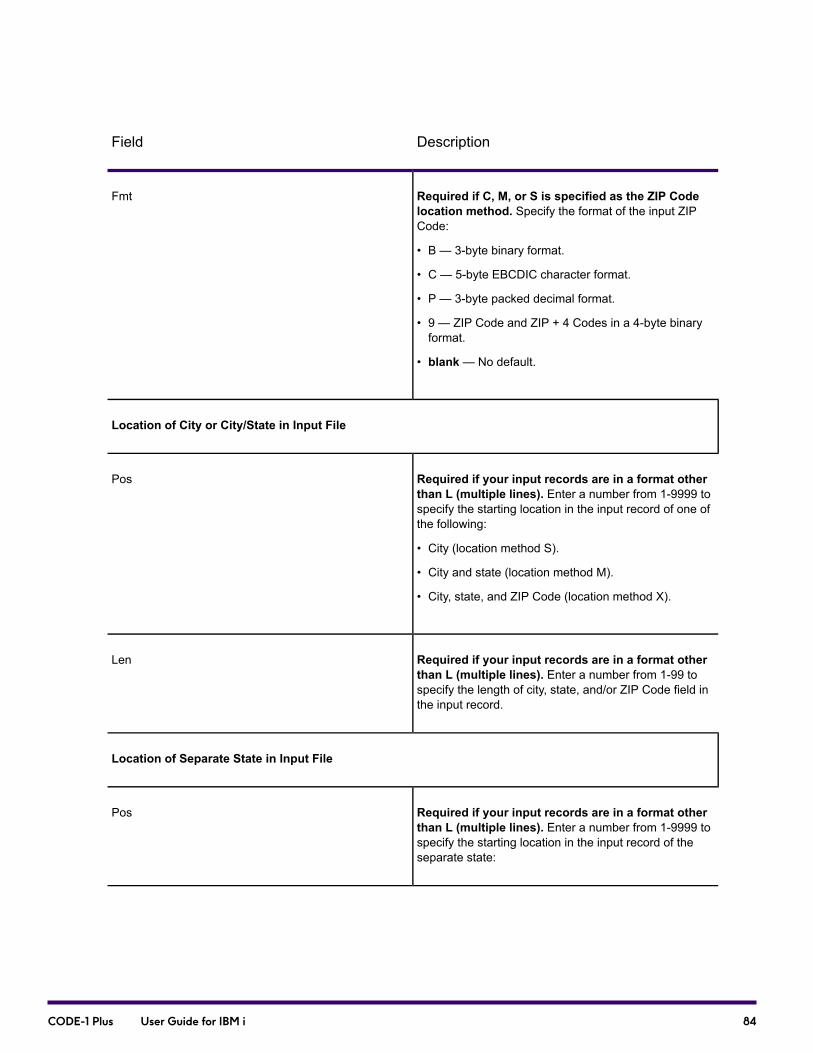
DescriptionField
Required if C, M, or S is specified as the ZIP Codelocation method. Specify the format of the input ZIPCode:
• B — 3-byte binary format.
• C — 5-byte EBCDIC character format.
• P — 3-byte packed decimal format.
• 9 — ZIP Code and ZIP + 4 Codes in a 4-byte binaryformat.
• blank— No default.
Fmt
Location of City or City/State in Input File
Required if your input records are in a format otherthan L (multiple lines). Enter a number from 1-9999 tospecify the starting location in the input record of one ofthe following:
• City (location method S).
• City and state (location method M).
• City, state, and ZIP Code (location method X).
Pos
Required if your input records are in a format otherthan L (multiple lines). Enter a number from 1-99 tospecify the length of city, state, and/or ZIP Code field inthe input record.
Len
Location of Separate State in Input File
Required if your input records are in a format otherthan L (multiple lines). Enter a number from 1-9999 tospecify the starting location in the input record of theseparate state:
Pos
84CODE-1 Plus User Guide for IBM i
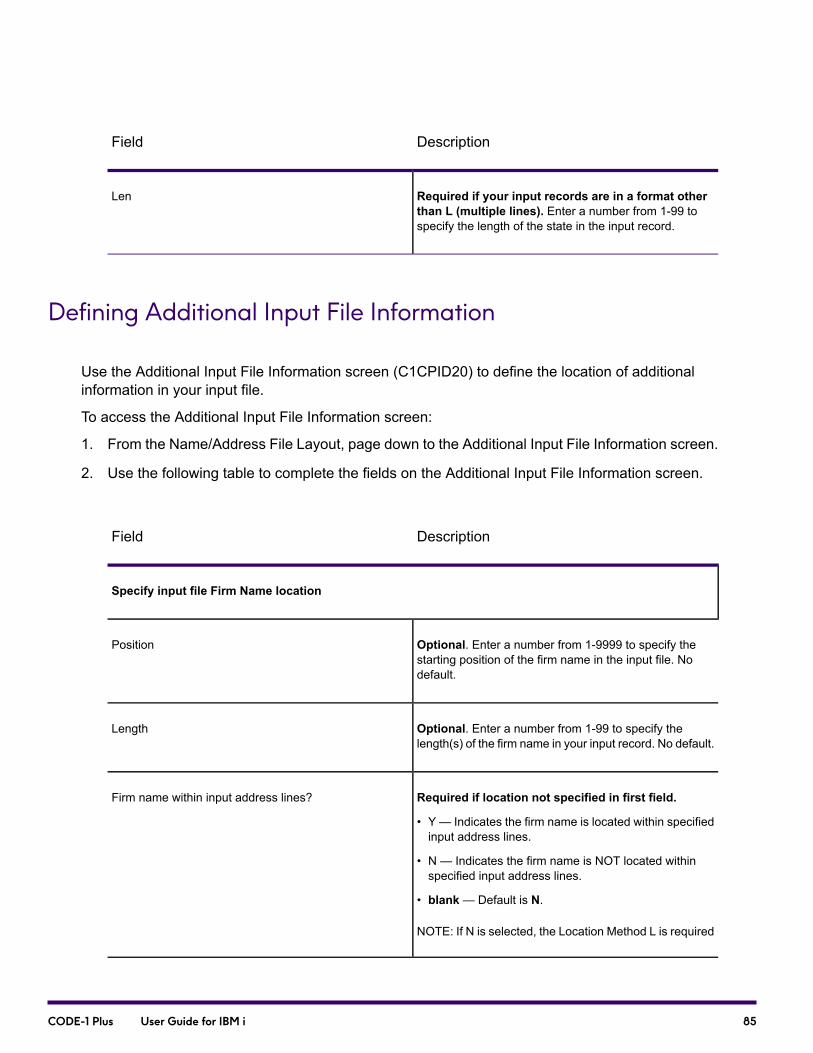
DescriptionField
Required if your input records are in a format otherthan L (multiple lines). Enter a number from 1-99 tospecify the length of the state in the input record.
Len
Defining Additional Input File Information
Use the Additional Input File Information screen (C1CPID20) to define the location of additionalinformation in your input file.
To access the Additional Input File Information screen:
1. From the Name/Address File Layout, page down to the Additional Input File Information screen.
2. Use the following table to complete the fields on the Additional Input File Information screen.
DescriptionField
Specify input file Firm Name location
Optional. Enter a number from 1-9999 to specify thestarting position of the firm name in the input file. Nodefault.
Position
Optional. Enter a number from 1-99 to specify thelength(s) of the firm name in your input record. No default.
Length
Required if location not specified in first field.
• Y — Indicates the firm name is located within specifiedinput address lines.
• N — Indicates the firm name is NOT located withinspecified input address lines.
• blank— Default is N.
NOTE: If N is selected, the Location Method L is required
Firm name within input address lines?
85CODE-1 Plus User Guide for IBM i

DescriptionField
Specify storage of output standardized Firm Name
Optional. Enter a number from 1-9999 to specify thestarting position of the standardized firm name in the inputfile. No default.
Position
Optional. Enter a number from 1-99 to specify thelength(s) of the standardized firm name in your inputrecord. No default.
Length
Optional. Code indicating what to store in cases wherethe standardized firm name was not stored, because nomatch was found.
• B — Store blanks.
• I — Store the extracted input.
• X — Store nothing.
• blank— Default is X.
Disposition for non-stored firm name
Specify storage of original ZIP Code
Optional. Enter a number from 1-9999 to specify thestarting position in the output record for storing theextracted input ZIP Code. No default.
Location to store extracted ZIP Code
Specify existing ZIP+4 and Carrier Route locations
Optional. Enter a number from 1-9999 to specify thestarting position in the input record of the original ZIP + 4Code (if present). No default.
Original ZIP + 4 Code, if desired
86CODE-1 Plus User Guide for IBM i
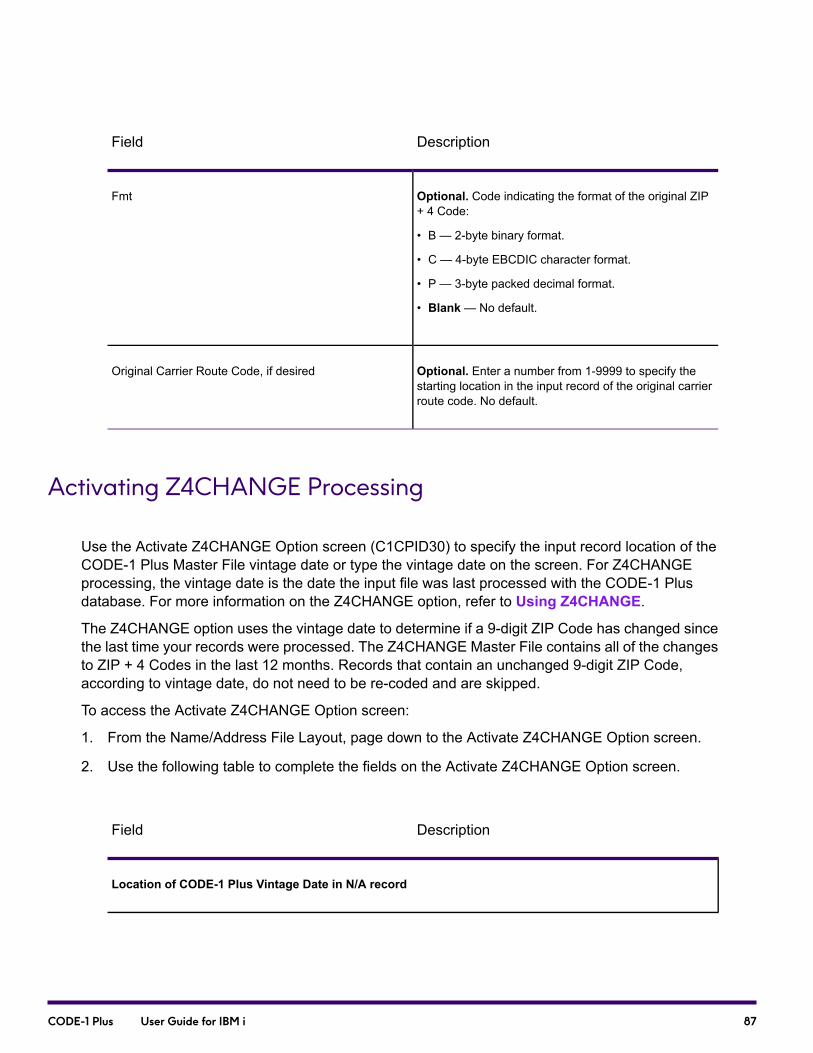
DescriptionField
Optional. Code indicating the format of the original ZIP+ 4 Code:
• B — 2-byte binary format.
• C — 4-byte EBCDIC character format.
• P — 3-byte packed decimal format.
• Blank— No default.
Fmt
Optional. Enter a number from 1-9999 to specify thestarting location in the input record of the original carrierroute code. No default.
Original Carrier Route Code, if desired
Activating Z4CHANGE Processing
Use the Activate Z4CHANGE Option screen (C1CPID30) to specify the input record location of theCODE-1 Plus Master File vintage date or type the vintage date on the screen. For Z4CHANGEprocessing, the vintage date is the date the input file was last processed with the CODE-1 Plusdatabase. For more information on the Z4CHANGE option, refer to Using Z4CHANGE.
The Z4CHANGE option uses the vintage date to determine if a 9-digit ZIP Code has changed sincethe last time your records were processed. The Z4CHANGE Master File contains all of the changesto ZIP + 4 Codes in the last 12 months. Records that contain an unchanged 9-digit ZIP Code,according to vintage date, do not need to be re-coded and are skipped.
To access the Activate Z4CHANGE Option screen:
1. From the Name/Address File Layout, page down to the Activate Z4CHANGE Option screen.
2. Use the following table to complete the fields on the Activate Z4CHANGE Option screen.
DescriptionField
Location of CODE-1 Plus Vintage Date in N/A record
87CODE-1 Plus User Guide for IBM i
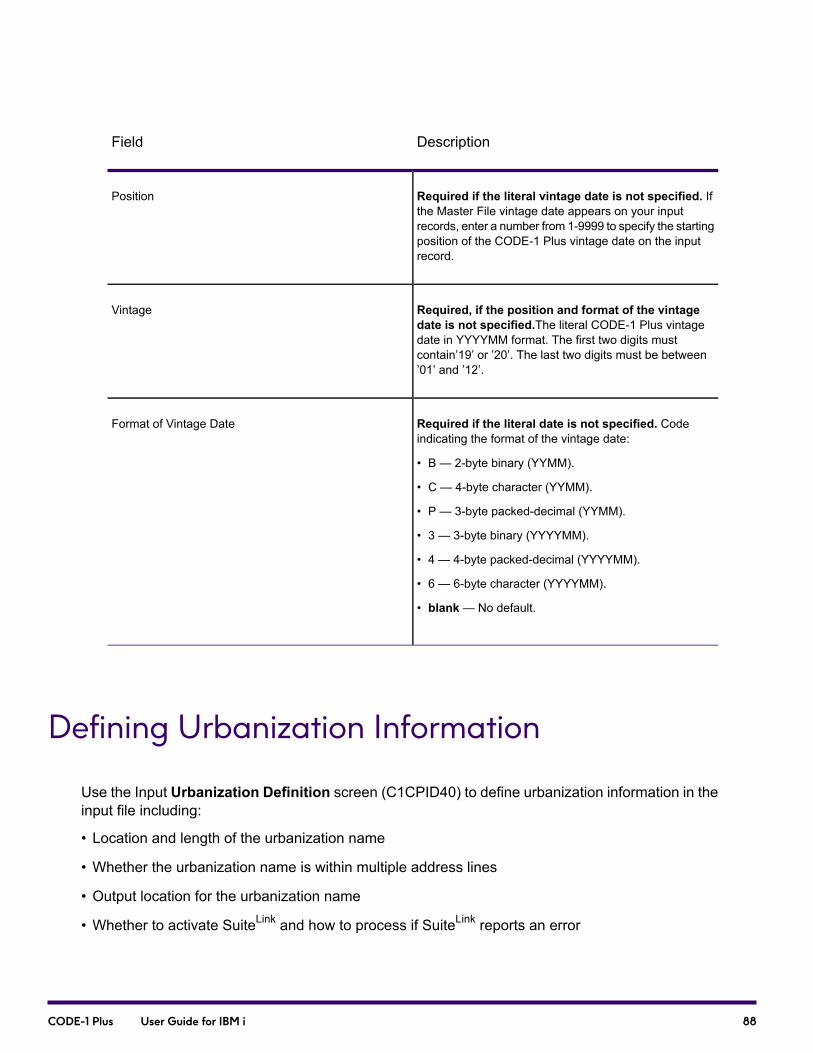
DescriptionField
Required if the literal vintage date is not specified. Ifthe Master File vintage date appears on your inputrecords, enter a number from 1-9999 to specify the startingposition of the CODE-1 Plus vintage date on the inputrecord.
Position
Required, if the position and format of the vintagedate is not specified.The literal CODE-1 Plus vintagedate in YYYYMM format. The first two digits mustcontain’19’ or ’20’. The last two digits must be between’01’ and ’12’.
Vintage
Required if the literal date is not specified. Codeindicating the format of the vintage date:
• B — 2-byte binary (YYMM).
• C — 4-byte character (YYMM).
• P — 3-byte packed-decimal (YYMM).
• 3 — 3-byte binary (YYYYMM).
• 4 — 4-byte packed-decimal (YYYYMM).
• 6 — 6-byte character (YYYYMM).
• blank— No default.
Format of Vintage Date
Defining Urbanization Information
Use the Input Urbanization Definition screen (C1CPID40) to define urbanization information in theinput file including:
• Location and length of the urbanization name
• Whether the urbanization name is within multiple address lines
• Output location for the urbanization name
• Whether to activate SuiteLink and how to process if SuiteLink reports an error
88CODE-1 Plus User Guide for IBM i
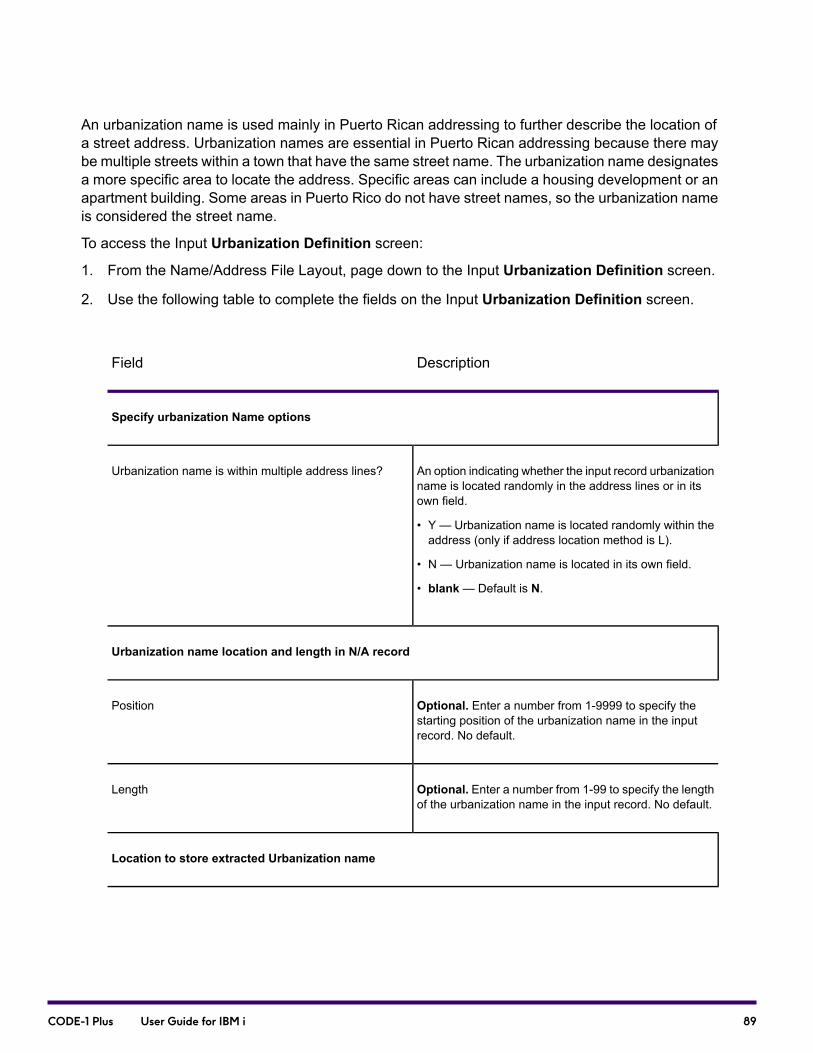
An urbanization name is used mainly in Puerto Rican addressing to further describe the location ofa street address. Urbanization names are essential in Puerto Rican addressing because there maybe multiple streets within a town that have the same street name. The urbanization name designatesa more specific area to locate the address. Specific areas can include a housing development or anapartment building. Some areas in Puerto Rico do not have street names, so the urbanization nameis considered the street name.
To access the Input Urbanization Definition screen:
1. From the Name/Address File Layout, page down to the Input Urbanization Definition screen.
2. Use the following table to complete the fields on the Input Urbanization Definition screen.
DescriptionField
Specify urbanization Name options
An option indicating whether the input record urbanizationname is located randomly in the address lines or in itsown field.
• Y — Urbanization name is located randomly within theaddress (only if address location method is L).
• N — Urbanization name is located in its own field.
• blank— Default is N.
Urbanization name is within multiple address lines?
Urbanization name location and length in N/A record
Optional. Enter a number from 1-9999 to specify thestarting position of the urbanization name in the inputrecord. No default.
Position
Optional. Enter a number from 1-99 to specify the lengthof the urbanization name in the input record. No default.
Length
Location to store extracted Urbanization name
89CODE-1 Plus User Guide for IBM i
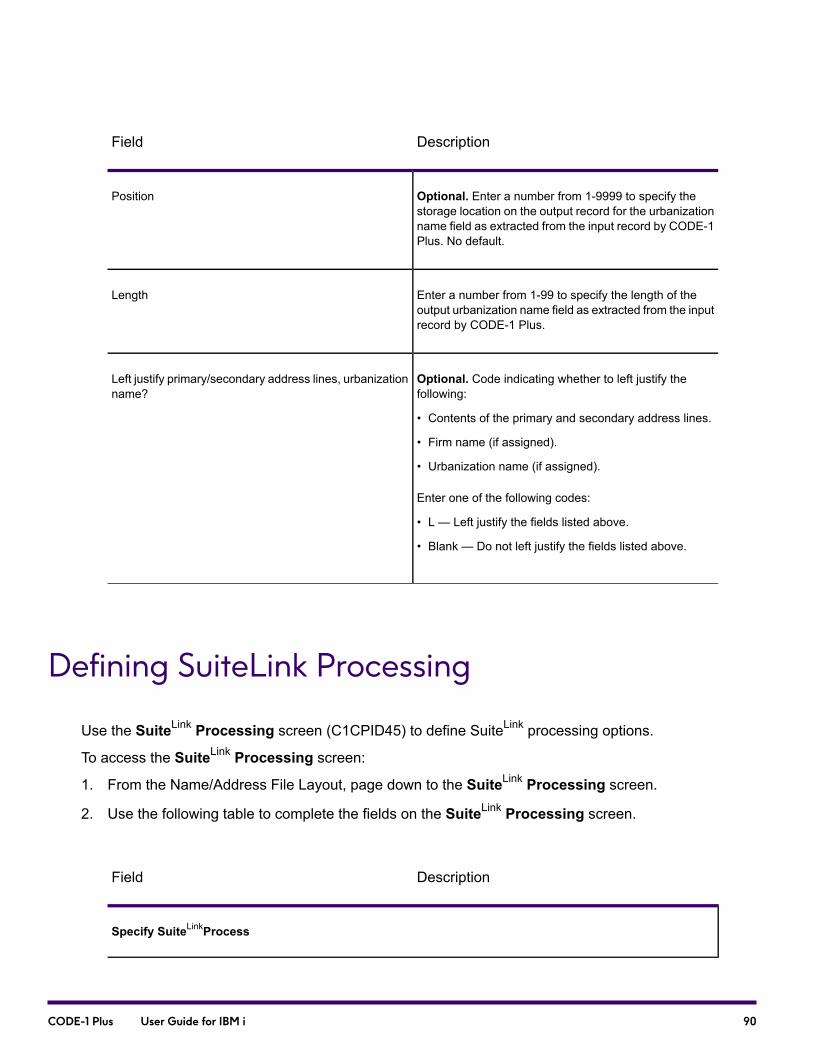
DescriptionField
Optional. Enter a number from 1-9999 to specify thestorage location on the output record for the urbanizationname field as extracted from the input record by CODE-1Plus. No default.
Position
Enter a number from 1-99 to specify the length of theoutput urbanization name field as extracted from the inputrecord by CODE-1 Plus.
Length
Optional. Code indicating whether to left justify thefollowing:
• Contents of the primary and secondary address lines.
• Firm name (if assigned).
• Urbanization name (if assigned).
Enter one of the following codes:
• L — Left justify the fields listed above.
• Blank — Do not left justify the fields listed above.
Left justify primary/secondary address lines, urbanizationname?
Defining SuiteLink Processing
Use the SuiteLink Processing screen (C1CPID45) to define SuiteLink processing options.
To access the SuiteLink Processing screen:
1. From the Name/Address File Layout, page down to the SuiteLink Processing screen.
2. Use the following table to complete the fields on the SuiteLink Processing screen.
DescriptionField
Specify SuiteLinkProcess
90CODE-1 Plus User Guide for IBM i

DescriptionField
Optional. Code indicating how to proceed ifSuiteLink reports an error:
• I — Ignore error and continue to attempt SuiteLink
processing. CODE-1 Plus does not generate a USPSForm 3553 (USPS CASS Summary Report) if youspecify the value “I”.
• S—Shutdown when SuiteLink reports an error (default).Specify the value “S” if you want to generate a USPSForm 3553 (USPS CASS Summary Report).
• W — Issue warning message and turn offSuiteLink processing. CODE-1 Plus does not generatea USPS Form 3553 (USPS CASS Summary Report) ifyou specify the value “W”.
• blank— Default is S.
SuiteLink Error Shutdown Indicator
Optional. Location for SuiteLink return code. One of thefollowing codes is stored:
• A — Business name matched.
• 00 — Business name not matched.
• Blank — No default.
Location of SuiteLink Return Code
Optional. Location for SuiteLink match code. One of thefollowing codes is stored:
• A — Matched.
• B — Not matched.
• C — Business name was all noise.
• D — Highrise default record not found.
• E — Database is expired.
• Blank — No default.
Location of SuiteLink Match Code
91CODE-1 Plus User Guide for IBM i
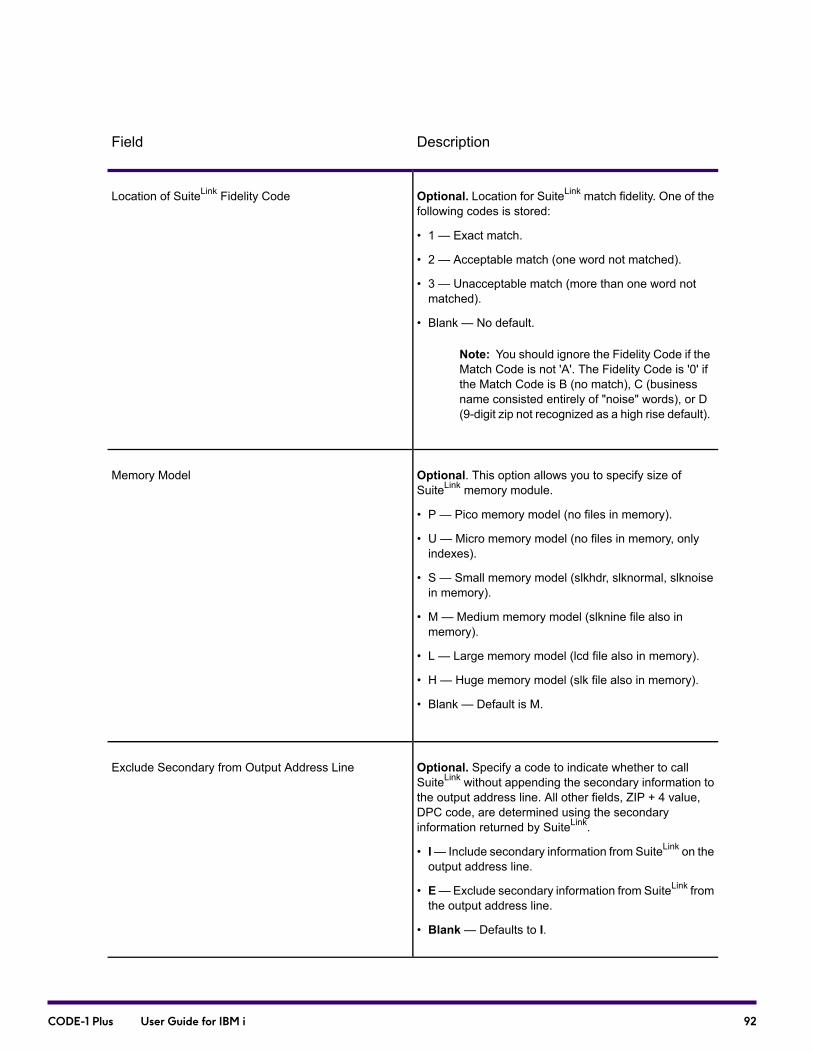
DescriptionField
Optional. Location for SuiteLink match fidelity. One of thefollowing codes is stored:
• 1 — Exact match.
• 2 — Acceptable match (one word not matched).
• 3 — Unacceptable match (more than one word notmatched).
• Blank — No default.
Note: You should ignore the Fidelity Code if theMatch Code is not 'A'. The Fidelity Code is '0' ifthe Match Code is B (no match), C (businessname consisted entirely of "noise" words), or D(9-digit zip not recognized as a high rise default).
Location of SuiteLink Fidelity Code
Optional. This option allows you to specify size ofSuiteLink memory module.
• P — Pico memory model (no files in memory).
• U — Micro memory model (no files in memory, onlyindexes).
• S — Small memory model (slkhdr, slknormal, slknoisein memory).
• M — Medium memory model (slknine file also inmemory).
• L — Large memory model (lcd file also in memory).
• H — Huge memory model (slk file also in memory).
• Blank — Default is M.
Memory Model
Optional. Specify a code to indicate whether to callSuiteLink without appending the secondary information tothe output address line. All other fields, ZIP + 4 value,DPC code, are determined using the secondaryinformation returned by SuiteLink.
• I— Include secondary information from SuiteLink on theoutput address line.
• E—Exclude secondary information from SuiteLink fromthe output address line.
• Blank— Defaults to I.
Exclude Secondary from Output Address Line
92CODE-1 Plus User Guide for IBM i
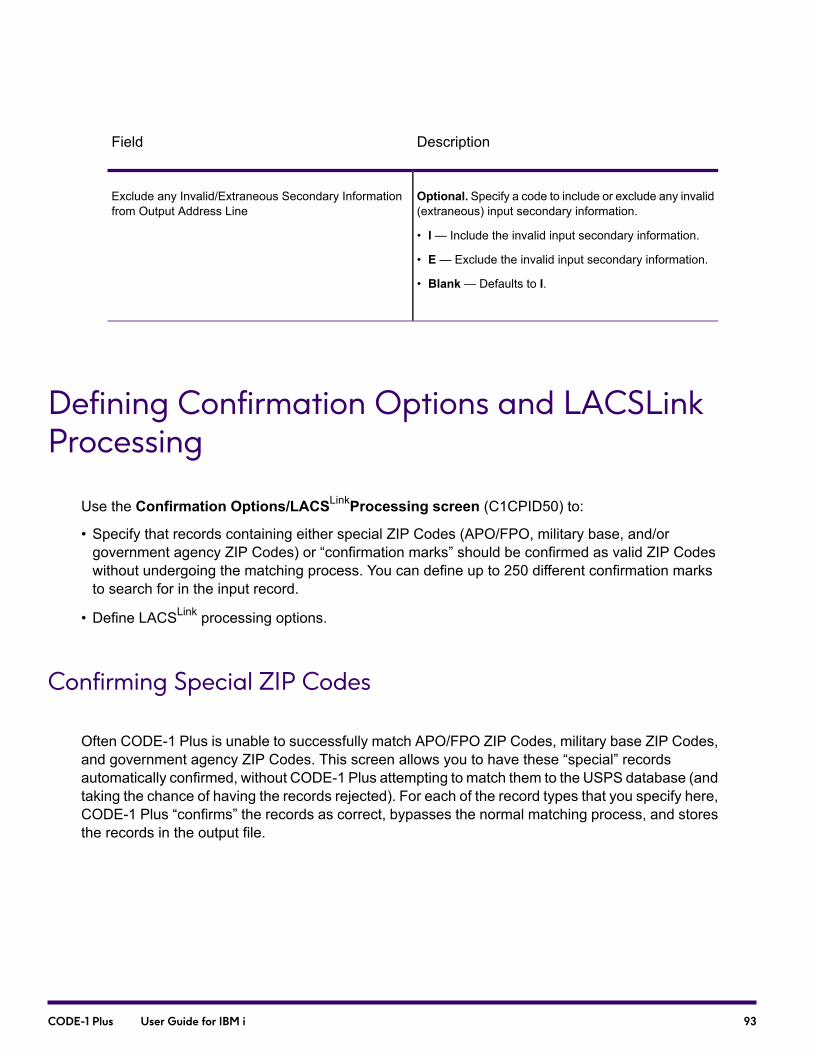
DescriptionField
Optional. Specify a code to include or exclude any invalid(extraneous) input secondary information.
• I— Include the invalid input secondary information.
• E— Exclude the invalid input secondary information.
• Blank— Defaults to I.
Exclude any Invalid/Extraneous Secondary Informationfrom Output Address Line
Defining Confirmation Options and LACSLinkProcessing
Use the Confirmation Options/LACSLinkProcessing screen (C1CPID50) to:
• Specify that records containing either special ZIP Codes (APO/FPO, military base, and/orgovernment agency ZIP Codes) or “confirmation marks” should be confirmed as valid ZIP Codeswithout undergoing the matching process. You can define up to 250 different confirmation marksto search for in the input record.
• Define LACSLink processing options.
Confirming Special ZIP Codes
Often CODE-1 Plus is unable to successfully match APO/FPO ZIP Codes, military base ZIP Codes,and government agency ZIP Codes. This screen allows you to have these “special” recordsautomatically confirmed, without CODE-1 Plus attempting to match them to the USPS database (andtaking the chance of having the records rejected). For each of the record types that you specify here,CODE-1 Plus “confirms” the records as correct, bypasses the normal matching process, and storesthe records in the output file.
93CODE-1 Plus User Guide for IBM i

Confirming Records with Confirmation Marks
Confirmation marks are values in your input record that, if equal to the value(s) specified on thisscreen (or if not equal depending on your specifications), indicate to attempt no match against theUSPS database. Instead, the record is automatically written to the output file. Using confirmationmarks in your records allows you to automatically confirm records you know are correct, even thoughCODE-1 Plus does not match them.
Example
For example, an insurance agency wants to mail solicitations to new homeowners. This agency hasa standard mailing list and has also bought lists of addresses from several builders that have justfinished new housing developments. Because the streets in these new developments are so new,the addresses have not yet been put on the USPS database.
The insurance agency merges these new lists with their standard mailing list, but first insertsconfirmation marks in the records on the builders' lists. The records are confirmed, even though theaddresses are not yet on the CODE-1 Plus database.
To define confirmation marks, on the Confirmation Options screen:
1. Specify whether to define equal to (EQ) or not equal to (NE) confirmation values.
For EQ confirmation values, if the value in the input record equals the confirmation value, theinput record is confirmed automatically. For NE confirmation values, if the value in the inputrecord does not equal the confirmation value, the input record is confirmed automatically.
2. Specify the location for the confirmation return code on the output record.
3. Press F10 to add your EQ/NE confirmation values.
The Confirmation Compare Values screen (C1CPCF11) appears.
4. To add confirmation values, press F10.
The Confirmation Compare Values screen (C1CPCF20) appears.
5. Enter the confirmation value to search for in the input record, the location on the input record ofthe value, and the length of the value.
6. To save the information, press F6.
The Confirmation Compare Values screen (C1CPCF11) appears with your new confirmationvalue. It appears as a CONFRM parameter record.
To add another value, press F10. To edit the current value, press F4. To delete the current value,press F11.
94CODE-1 Plus User Guide for IBM i

Note: You may specify up to 250 confirmation values to which the confirmation mark inthe input records are compared. If a string of blank spaces is one of the confirmationvalues, it must be the first value.
7. Once you define all the comparison values, at the Confirmation Compare Values screen(C1CPCF11), press F6.
To access the Confirmation Options/LACSLinkProcessing screen (C1CPID50):
1. From the Name/Address File Layout, page down to the ConfirmationOptions/LACSLink Processing screen.
2. Use the following table to complete the fields on theConfirmationOptions/LACSLink Processingscreen.
DescriptionField
Specify confirmation by class of ZIP Code
Optional. Code indicating whether to confirm APO/FPOZIP Codes automatically. For each record “confirmed,”no address matching is done. Confirmed records areautomatically written to the output file.
• Y — Confirm APO/FPO ZIP Codes.
• N — Process APO/FPO ZIP Codes as normal records.
• Blank— Default is N.
Confirm APO/FPO ZIP Codes
Optional. Specify a code to indicate whether or not toconfirm military base ZIP Codes automatically. For eachrecord “confirmed,” no address matching is done.Confirmed records are automatically written to the outputfile.
• Y — Confirm military base ZIP Codes.
• N — Process military base ZIP Codes as normalrecords.
• Blank — Default is N.
Confirm Military Installation ZIP Codes
95CODE-1 Plus User Guide for IBM i
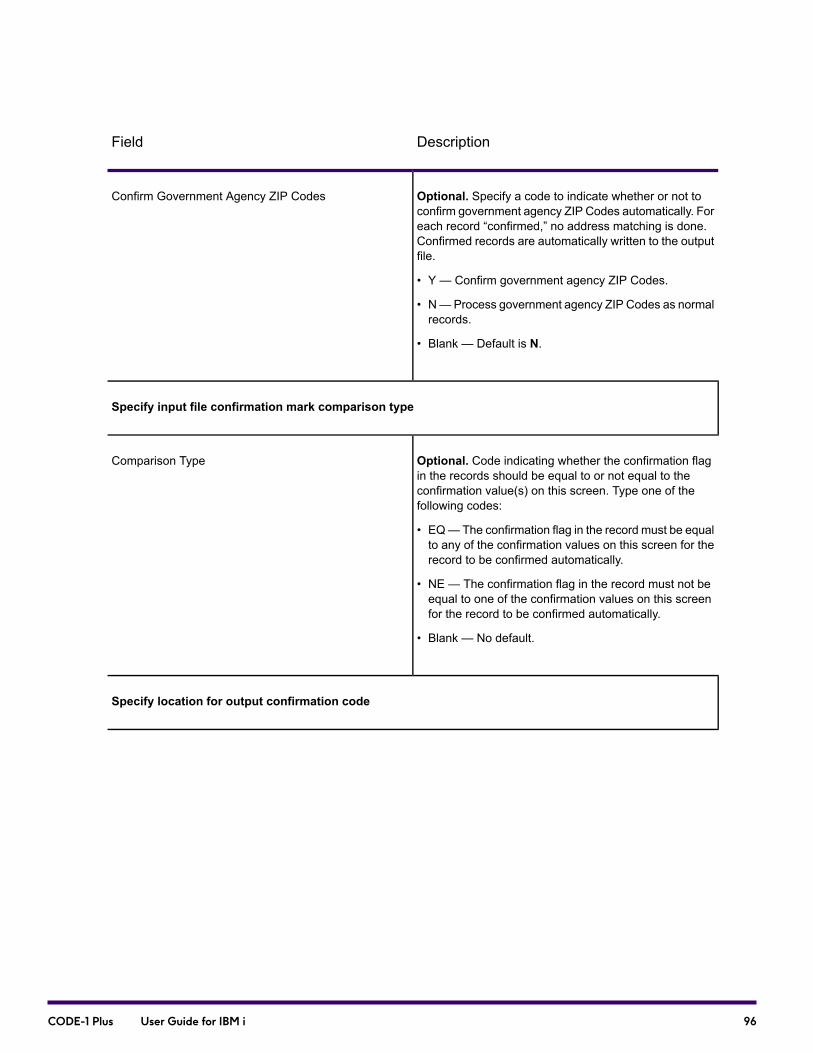
DescriptionField
Optional. Specify a code to indicate whether or not toconfirm government agency ZIP Codes automatically. Foreach record “confirmed,” no address matching is done.Confirmed records are automatically written to the outputfile.
• Y — Confirm government agency ZIP Codes.
• N—Process government agency ZIP Codes as normalrecords.
• Blank — Default is N.
Confirm Government Agency ZIP Codes
Specify input file confirmation mark comparison type
Optional. Code indicating whether the confirmation flagin the records should be equal to or not equal to theconfirmation value(s) on this screen. Type one of thefollowing codes:
• EQ—The confirmation flag in the record must be equalto any of the confirmation values on this screen for therecord to be confirmed automatically.
• NE — The confirmation flag in the record must not beequal to one of the confirmation values on this screenfor the record to be confirmed automatically.
• Blank — No default.
Comparison Type
Specify location for output confirmation code
96CODE-1 Plus User Guide for IBM i
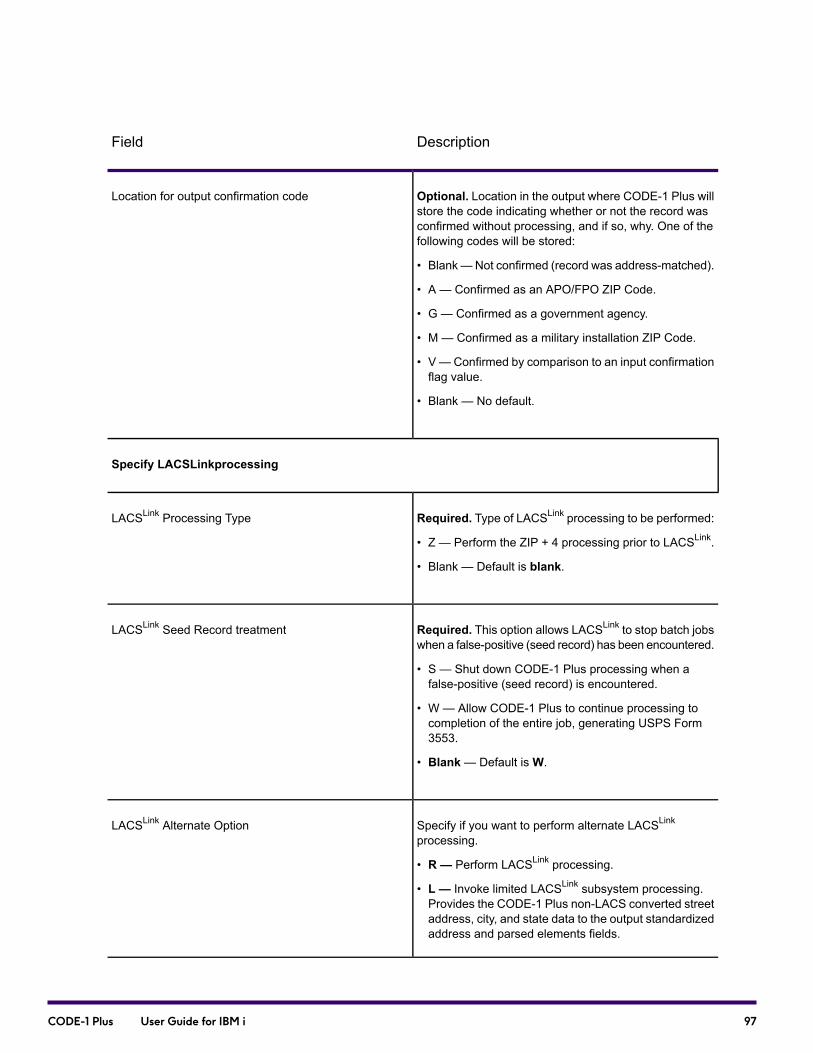
DescriptionField
Optional. Location in the output where CODE-1 Plus willstore the code indicating whether or not the record wasconfirmed without processing, and if so, why. One of thefollowing codes will be stored:
• Blank—Not confirmed (record was address-matched).
• A — Confirmed as an APO/FPO ZIP Code.
• G — Confirmed as a government agency.
• M — Confirmed as a military installation ZIP Code.
• V — Confirmed by comparison to an input confirmationflag value.
• Blank — No default.
Location for output confirmation code
Specify LACSLinkprocessing
Required. Type of LACSLink processing to be performed:
• Z — Perform the ZIP + 4 processing prior to LACSLink.
• Blank — Default is blank.
LACSLink Processing Type
Required. This option allows LACSLink to stop batch jobswhen a false-positive (seed record) has been encountered.
• S — Shut down CODE-1 Plus processing when afalse-positive (seed record) is encountered.
• W — Allow CODE-1 Plus to continue processing tocompletion of the entire job, generating USPS Form3553.
• Blank— Default isW.
LACSLink Seed Record treatment
Specify if you want to perform alternate LACSLink
processing.
• R — Perform LACSLink processing.
• L — Invoke limited LACSLink subsystem processing.Provides the CODE-1 Plus non-LACS converted streetaddress, city, and state data to the output standardizedaddress and parsed elements fields.
LACSLink Alternate Option
97CODE-1 Plus User Guide for IBM i

DescriptionField
Specify whether to produce a “99” return code for LACSseed record processing.
Y Do not produce “99” return code for LACS seed recordprocessing.
N LACS seed record processing results in “99” returncode.
Note: An “S” in “LACSLink Seed Recordtreatment” overrides this option.
LACSLink Suppress 99 Return Code
Required. Specify the memory size of the LACSLinkmodule.
• P — Pico memory model (no files in memory).
• U — Micro memory model (no files in memory, onlyindexes).
• S— Small memory model (Rv9 expansion in memory).
• M — Medium memory model.
• L — Large memory model.
• H — Huge memory model (all files in memory).
• Blank — Default is M.
Memory Model
Confirmation Compare Values Screen(C1CPCF11)
The first Confirmation Compare Values screen (C1CPCF11) is the sixth screen of the Name andAddress File Layout component. This screen allows you to view the CONFRM parameter recordsCODE-1 Plus generated based on your confirmation values. If you have defined values, this screenlists the generated CONFRM parameter records. From this screen you can add, edit, and delete avalue. You can also define up to 250 different confirmation marks for CODE-1 Plus to search for inthe input record.
Note: For instructions on defining confirmation compare values, refer to the previous sectionDefining Confirmation Options and LACSLink Processing.
98CODE-1 Plus User Guide for IBM i

If you have not defined any values yet, the second Confirmation Compare Values screen(C1CPCF20) displays.
DescriptionField
Specify compare value, location, and length
Enter 0-9, A-Z, or any other characters for the confirmationvalue. Up to 250 different values to which the confirmationflag in the input record is compared.
NOTE: You can use a blank field as the comparison valueonly if specified in the top-most field. A blank field in any ofthe other positions indicates the end of the list of values.
Compare Value
Optional. Enter a number from 1-9999 to specify the locationof the input confirmation mark in your name-and-addressfile. No default.
Position
Optional. Enter a number from 1-99 to specify the length(s)of the input confirmation mark in your name-and-addressfile. No default.
Length
Defining List Processor/Mailer InformationScreen (C1CPID60)
Use the List Processor/Mailer Information screen (C1CPID60) to define the list code and clientcode information in your input file. You can also enter the date you received your file. On this screenyou can tell CODE-1 Plus to print the name or ID of your current name-and-address input file in boxB4 of the USPS Form 3553 or to print the number of name-and-address lists you used to produceyour current mailing in box B5. You can also tell CODE-1 Plus to print the mailer’s name and addresson the USPS Form 3553 in box D2, specify a client code, and specify the date when you receivedyour input file.
99CODE-1 Plus User Guide for IBM i

List Code
The term list code comes from the practice of merging several mailing lists together, using a codeembedded in the records to identify the source list of each record. You can use this screen to designateany field of 9 bytes or less as your input list code. CODE-1 Plus has three reports that list informationabout your job, sorted by these list codes. The most common use of this option is to identify whichoriginal list the records came from. You can then use the list code reports to analyze the quality ofthe addresses on each of your original mailing lists.
To access the List Processor/Mailer Information screen (C1CPID60):
1. From the Name/Address File Layout, page down to the List Processor/Mailer Informationscreen.
2. Use the following table to complete the fields on the List Processor/Mailer Information screen.
DescriptionField Name
List Code location and length in N/A record
Optional. Enter a number from 1-999 to specify thelocation of list code in your name-and-address file. Nodefault.
Position
Optional. Enter a number from 1-9 to specify the lengthof list code in your name-and-address file. No default.
Length
Optional. Enter a number from 1-9 to specify the 1-9character Client Code. No default.
Client Code
Optional. Enter the date you received your file inYYYYMMDD format. No default.
Date Received
Optional. Enter the system date when you ran the job inMMDDCCYY format. No default.
System Date
100CODE-1 Plus User Guide for IBM i
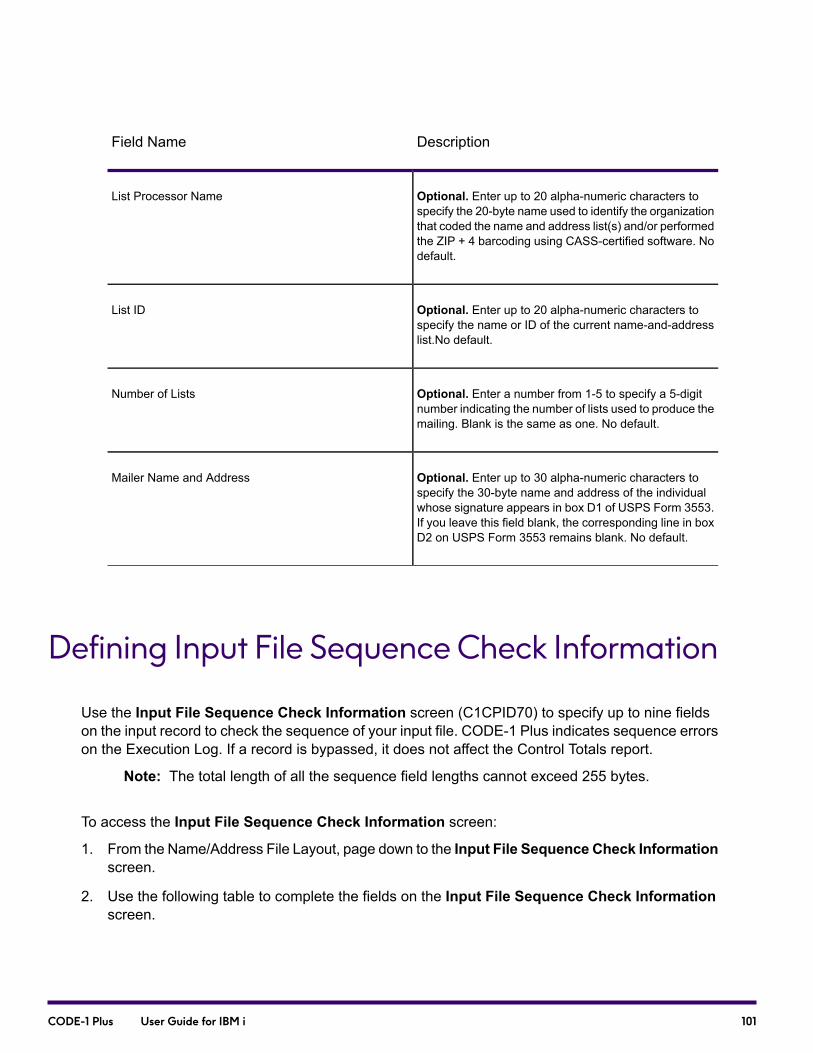
DescriptionField Name
Optional. Enter up to 20 alpha-numeric characters tospecify the 20-byte name used to identify the organizationthat coded the name and address list(s) and/or performedthe ZIP + 4 barcoding using CASS-certified software. Nodefault.
List Processor Name
Optional. Enter up to 20 alpha-numeric characters tospecify the name or ID of the current name-and-addresslist.No default.
List ID
Optional. Enter a number from 1-5 to specify a 5-digitnumber indicating the number of lists used to produce themailing. Blank is the same as one. No default.
Number of Lists
Optional. Enter up to 30 alpha-numeric characters tospecify the 30-byte name and address of the individualwhose signature appears in box D1 of USPS Form 3553.If you leave this field blank, the corresponding line in boxD2 on USPS Form 3553 remains blank. No default.
Mailer Name and Address
Defining Input File Sequence Check Information
Use the Input File Sequence Check Information screen (C1CPID70) to specify up to nine fieldson the input record to check the sequence of your input file. CODE-1 Plus indicates sequence errorson the Execution Log. If a record is bypassed, it does not affect the Control Totals report.
Note: The total length of all the sequence field lengths cannot exceed 255 bytes.
To access the Input File Sequence Check Information screen:
1. From the Name/Address File Layout, page down to the Input File Sequence Check Informationscreen.
2. Use the following table to complete the fields on the Input File Sequence Check Informationscreen.
101CODE-1 Plus User Guide for IBM i
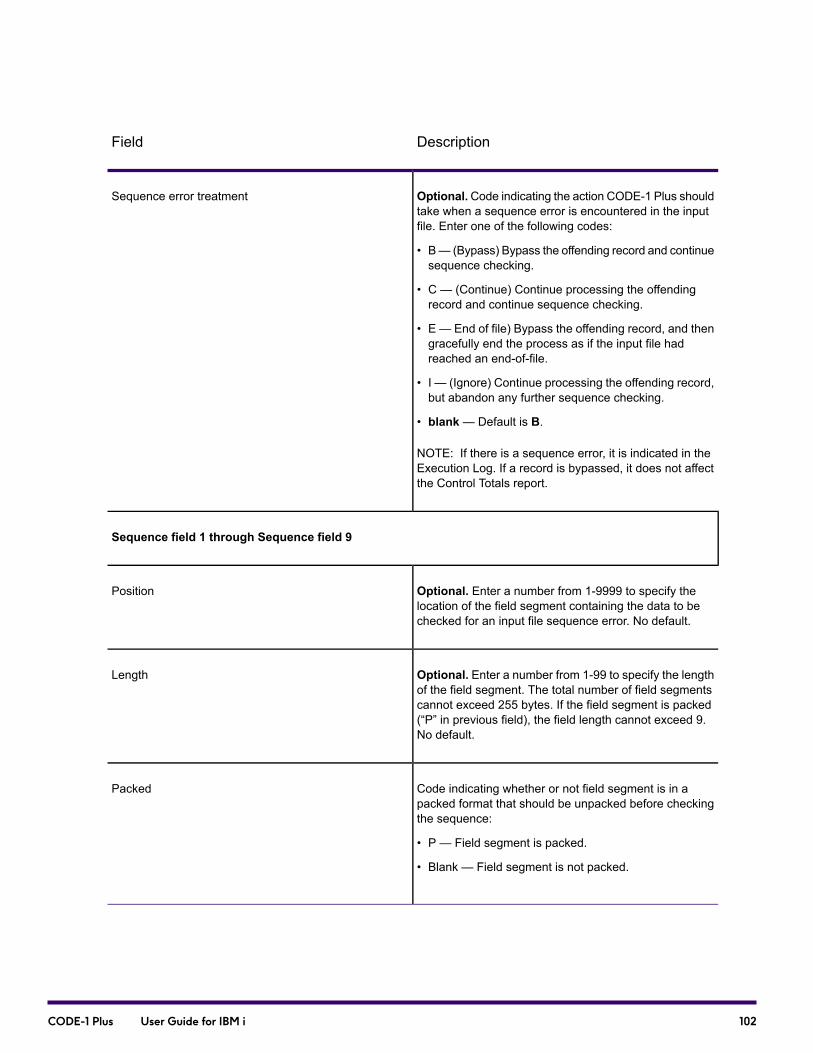
DescriptionField
Optional.Code indicating the action CODE-1 Plus shouldtake when a sequence error is encountered in the inputfile. Enter one of the following codes:
• B— (Bypass) Bypass the offending record and continuesequence checking.
• C — (Continue) Continue processing the offendingrecord and continue sequence checking.
• E — End of file) Bypass the offending record, and thengracefully end the process as if the input file hadreached an end-of-file.
• I — (Ignore) Continue processing the offending record,but abandon any further sequence checking.
• blank— Default is B.
NOTE: If there is a sequence error, it is indicated in theExecution Log. If a record is bypassed, it does not affectthe Control Totals report.
Sequence error treatment
Sequence field 1 through Sequence field 9
Optional. Enter a number from 1-9999 to specify thelocation of the field segment containing the data to bechecked for an input file sequence error. No default.
Position
Optional. Enter a number from 1-99 to specify the lengthof the field segment. The total number of field segmentscannot exceed 255 bytes. If the field segment is packed(“P” in previous field), the field length cannot exceed 9.No default.
Length
Code indicating whether or not field segment is in apacked format that should be unpacked before checkingthe sequence:
• P — Field segment is packed.
• Blank — Field segment is not packed.
Packed
102CODE-1 Plus User Guide for IBM i
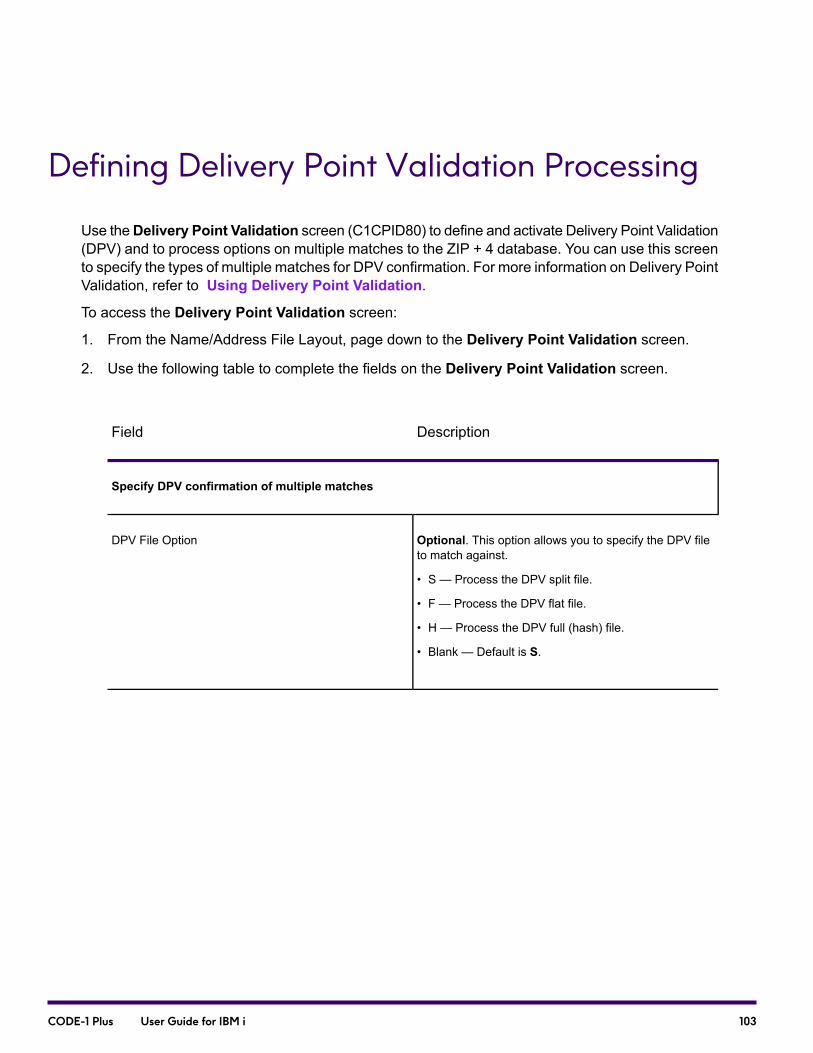
Defining Delivery Point Validation Processing
Use theDelivery Point Validation screen (C1CPID80) to define and activate Delivery Point Validation(DPV) and to process options on multiple matches to the ZIP + 4 database. You can use this screento specify the types of multiple matches for DPV confirmation. For more information on Delivery PointValidation, refer to Using Delivery Point Validation.
To access the Delivery Point Validation screen:
1. From the Name/Address File Layout, page down to the Delivery Point Validation screen.
2. Use the following table to complete the fields on the Delivery Point Validation screen.
DescriptionField
Specify DPV confirmation of multiple matches
Optional. This option allows you to specify the DPV fileto match against.
• S — Process the DPV split file.
• F — Process the DPV flat file.
• H — Process the DPV full (hash) file.
• Blank — Default is S.
DPV File Option
103CODE-1 Plus User Guide for IBM i

DescriptionField
Required. This option allows you to specify size of DPVmodule.
• Blank — DPV process will be using Medium memorymodel (default).
• P — Pico memory model (no files in memory).
• U — Micro memory model (no files in memory, onlyindexes).
• S — Small memory model (HSC and HSF in memory).
• M — Medium memory model (LCD also in memory).
• L — Large memory model (HSX also in memory).
• H — Huge memory model (all files in memory).
• Blank — DPV process uses Medium memory model.
DPV Memory Module Size Indicator
Optional. If your input file contains multiple matches ofthe ZIP Code and the PO Box or Rural Route/HighwayContract:
• Y — Yes, attempt to DPV confirm.
• N —No, do not attempt to DPV confirm.
• Blank — Default is Y.
ZIP Code and PO Box or Rural Route/Highway ContractAddress Type
Optional. If your input file contains multiple matches ofthe ZIP Code and the street address type:
• Y — Yes, attempt to DPV confirm.
• N —No, do not attempt to DPV confirm.
• Blank — Default is Y.
ZIP Code and Street Address Type
Optional. If your input file contains multiple matches ofthe Carrier Route in CODE-1 Plus:
• Y — Yes, attempt to DPV confirm.
• N —No, do not attempt to DPV confirm.
• Blank — Default is Y.
Carrier Route
104CODE-1 Plus User Guide for IBM i
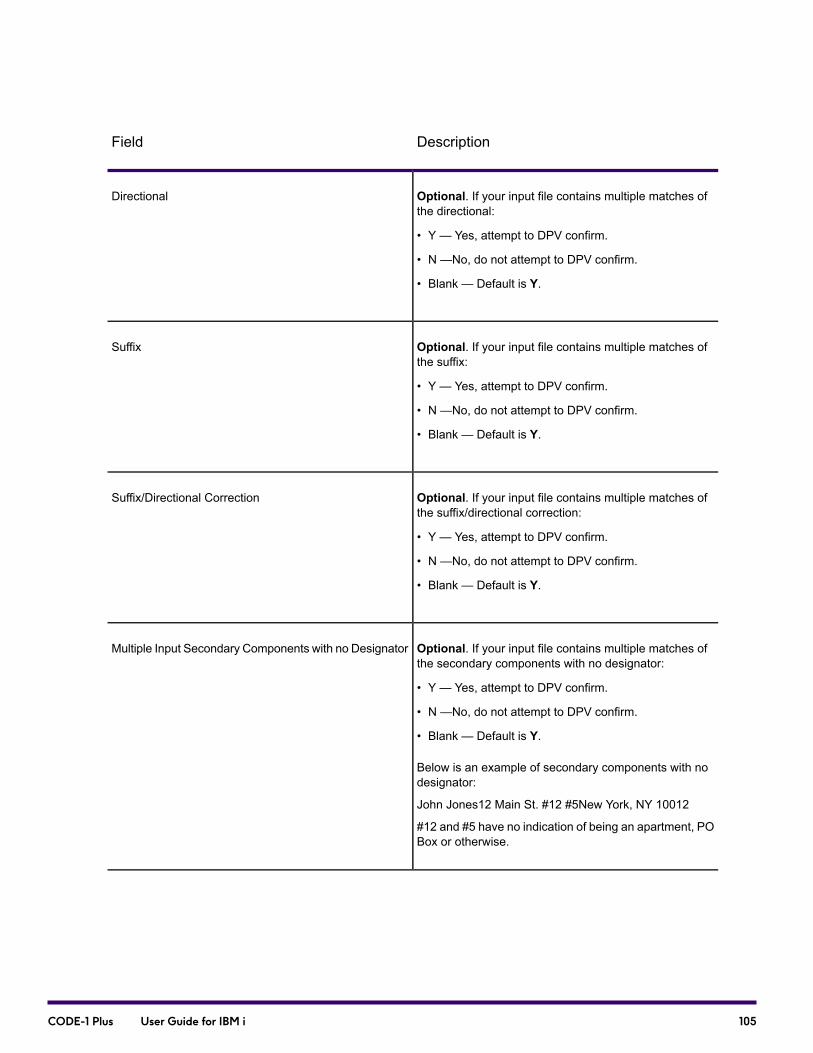
DescriptionField
Optional. If your input file contains multiple matches ofthe directional:
• Y — Yes, attempt to DPV confirm.
• N —No, do not attempt to DPV confirm.
• Blank — Default is Y.
Directional
Optional. If your input file contains multiple matches ofthe suffix:
• Y — Yes, attempt to DPV confirm.
• N —No, do not attempt to DPV confirm.
• Blank — Default is Y.
Suffix
Optional. If your input file contains multiple matches ofthe suffix/directional correction:
• Y — Yes, attempt to DPV confirm.
• N —No, do not attempt to DPV confirm.
• Blank — Default is Y.
Suffix/Directional Correction
Optional. If your input file contains multiple matches ofthe secondary components with no designator:
• Y — Yes, attempt to DPV confirm.
• N —No, do not attempt to DPV confirm.
• Blank — Default is Y.
Below is an example of secondary components with nodesignator:
John Jones12 Main St. #12 #5New York, NY 10012
#12 and #5 have no indication of being an apartment, POBox or otherwise.
Multiple Input Secondary Components with no Designator
105CODE-1 Plus User Guide for IBM i

DescriptionField
Optional. If an address has been assigned a ZIP + 4 byCODE-1 Plus during regular processing, you may selectone of the following options regarding this ZIP + 4assignment:
• Y — Yes, attempt to DPV confirm.
• N —No, do not attempt to DPV confirm.
• Blank — Default is Y.
Unique ZIP Code/Small Town Default ZIP + 4 AssignmentOption
Defining Additional Delivery Point ValidationProcessing
CODE-1 Plus includes a second Delivery Point Validation screen (C1CPID85) that allows you toactivate and define additional Delivery Point Validation (DPV) options. For more information onDelivery Point Validation, refer to Using Delivery Point Validation.
To access the second Delivery Point Validation screen:
1. From the Name/Address File Layout, page down to the Delivery Point Validation screen.
2. Use the following table to complete the fields on the Delivery Point Validation screen.
DescriptionField
Specify DPV confirmation of multiple matches
106CODE-1 Plus User Guide for IBM i

DescriptionField
Optional. Just as you can confirm that a primary addressis a deliverable address using DPV, you can confirm thesame for secondary address information. If you havesecondary address information in your input file, selectone of the following:
• Y—Yes, perform DPV validation on secondary addressinformation.
• N — No, do not perform DPV validation on secondaryaddress information.
• Blank — Default is Y.
Perform DPV Validation of Secondary Address data?
Optional. This option allows you to determine whether ornot an input address is a Commercial Mail ReceivingAgency (CMRA). Select one of the following:
• Y — Perform CMRA lookup.
• N —No, do not perform CMRA lookup.
• Blank — Default is Y.
Perform CMRA Table lookups?
Optional. This option allows you to determine whether ornot an input address is a P. O. Box street address (PBSA).Select one of the following:
• Y — Yes, perform PBSA lookup.
• N —No, do not perform PBSA lookup.
• Blank — Default is N.
Perform PBSA Lookup?
Optional. This option allows you to determine whether ornot to convert input address secondary information toPMB. Select one of the following:
• Y — Yes, convert input address secondary informationto PMB where appropriate.
• N — No, do not convert input address secondaryinformation to PMB.
• Blank — Default is N.
Convert Secondary Information to PMB?
107CODE-1 Plus User Guide for IBM i

DescriptionField
Optional. If you have the RDI processing option, selectfrom one of the following codes to indicate whether toperform RDI processing:
• D — Do DPV processing only; no RDI processing.
• R — Do RDI processing only; no DPV processing.
• B — Do both DPV and RDI processing.
• Blank — Default is D.
RDI Processing Option
Reformatting Your Input Records
This feature allows you to rearrange the components of your input records before the record isprocessed. The information you identify is copied, but not removed, from its original location in theinput record. This feature is useful for saving data that might otherwise be overwritten by data returnedfrom CODE-1 Plus. A maximum of 100 MOVE I operations can be defined for a job. The moveoperations are processed one at a time, in sequence from top.
Reformat Input Record Screen
Use the Reformat Input Record screen (C1CPMI13) to reformat the components of your inputrecords before the records are processed.
To access the Reformat Input Record screen:
1. From the Work With Jobs screen, use F12 to select the job for defining input. The Define/SubmitCODE-1 Plus Job screen displays.
2. Select Reformat Input Record.
3. Use the following table to complete the fields on the Reformat Input Record screen.
108CODE-1 Plus User Guide for IBM i

DescriptionField Name
Required. Enter 3-4 alphanumeric characters to specifythe location in the work area of the information to becopied. Optionally, you can enter one of the followingcodes to copy one of the following types of genericinformation to the target location:
• SPC — Spaces.
• X00 — Binary zeros.
• ZRO — Character zeros.
• Blank — No default.
Source Field
Required. Enter a number from 1-999 to specify the lengthof the information to be copied to the target location. Nodefault.
Length
Required. Enter a number from 1-9999 to specify thelocation in the input array to which you want the sourceinformation copied. No default.
Target Field
109CODE-1 Plus User Guide for IBM i
6 - Defining Output
In this section
Defining Your Output File.......................................................................111Defining ZIP Code Location....................................................................114Defining ZIP Code Information...............................................................116Defining Carrier Route Location.............................................................118Defining Carrier Route Information.........................................................119Defining ZIP + 4 Add-On Locations........................................................120Defining ZIP + 4 Add-On Information.....................................................123Defining Standardized Address Locations.............................................125Defining Standardized Address Information...........................................128Defining Additional Standardized Address Locations.............................131Defining Address Element Locations.....................................................134Defining City and State Locations..........................................................136Defining City and State Information........................................................139Defining County and Congressional Location........................................141Defining Address Match Locations.........................................................142Defining Additional Address Match Locations........................................147Defining Extra Data Locations................................................................151Defining Normalized/COA Information Locations...................................152Defining Line of Travel Locations...........................................................154Defining Delivery Point Validation Locations..........................................156Defining Additional Address Match Locations........................................159Reformat Output Record Screen............................................................162
CODE-1 Plus User Guide for IBM i

Defining Your Output File
This chapter provides information for using the IBM i screens to define information you want to storein your output file. This chapter includes a detailed description of each field on these screens.
Output Storage
Use the Output Storage screens to define locations and lengths of the information you want to storein your output file. The Name/Address Record Posting component provides field definitions for allresult values including:
• ZIP Code
• ZIP + 4
• Carrier route codes
• Vintage date codes
• City and state names and abbreviations
• Standardized address information
• Parsed address information
• General return codes
• Delivery Point Validation information
Note: CODE-1 Plus requires you to specify at least one output storage field in each of yourjobs. If you do not, CODE-1 Plus processing will fail.
Storage Options
In addition to defining the layout of your output file, the Name/Address Record Posting functionallows you to specify the storage conditions for your processed data. CODE-1 Plus determines arelative probability of correctness for every record. CODE-1 Plus uses this probability of correctnessto reject records that may contain inaccurate information. During processing, CODE-1 Plus sometimesdrops information from a given address in order to determine a match or more than one match fora given ZIP Code or address component.
111CODE-1 Plus User Guide for IBM i
You can use the Storage Options screens of the Name/Address Record Posting component tospecify:
• The maximum probability of correctness required for CODE-1 Plus to store a record
• Whether CODE-1 Plus stores a record if information was dropped during processing
• Whether CODE-1 Plus stores a record if there were multiple ZIP Code matches
• What to store if, due to one of the above conditions, CODE-1 Plus did not store information
Disposition Indicator
The Storage Options screens contain disposition indicator fields that determine what to store in youroutput file when you do not want to store the returned information. Some examples include:
• What to store when CODE-1 Plus finds multiple matches
• What to store when probable correctness codes are too high
• What to store when CODE-1 Plus drops information during a match attempt
When you decide not to store the returned information, you may decide to store:
• Blanks
• Nothing
• Zeros
• Information from your input file
In all cases, the default is for CODE-1 Plus to store blanks in the position you specify in your outputfile. For example, you may have decided that you did not want CODE-1 Plus to store the standardizedaddress if there was information dropped during the matching process. In that case, CODE-1 Pluslooks at the disposition indicator code you specify on the Standardized Address Storage Optionsscreen to determine whether to store blanks or nothing in the standardized address location in youroutput file.
Maximum Address Correctness
During the matching process, CODE-1 Plus assigns a “probable correctness” value to a matchedaddress. The correctness value indicates how “accurate,” on a scale of 0 to 9, CODE-1 Plus considersthe match. A probable correctness value of 0 means that the standard address has the highestprobability of being correct. A probable correctness value of 9 means that the record has whatCODE-1 Plus considers to be the lowest probability of being correct.
Note: Records with a probable address correctness code of 9 are still likely to be correct.
112CODE-1 Plus User Guide for IBM i

For each address component, CODE-1 Plus gives you the option to specify themaximum acceptableaddress correctness. If you put a value in this field, CODE-1 Plus stores the output information fora specific record only when the record's probable address correctness value is equal to or less thanyour specified maximum. In all cases, the default maximum address correctness is 9.
For example, if you type a maximum address correctness value of 5 on the ZIP Code LocationsStorage Options screen, CODE-1 Plus stores returned ZIP Codes for records with probable addresscorrectness values of 5 and lower, but does not store returned ZIP Codes for records with probableaddress correctness values of 6 and higher.
Maximum Overall Correctness
CODE-1 Plus also assigns an overall probability of correctness value to matched records. The overallcorrectness takes into account not just the address, but also the firm-name match, and whether ornot any information was dropped during the matching process. As with address correctness, theoverall correctness value indicates how “accurate,” on a scale of 0-9, CODE-1 Plus considers thematch.
Each output Storage Options screen allows you to specify a maximum acceptable overall correctnessvalue. If you specify a value in this field, CODE-1 Plus stores the output information for a specificrecord only when the record's probable overall correctness value is equal to or less than your specifiedmaximum value. In all cases, the default maximum overall correctness is 9.
For example, if you type a maximum overall correctness value of 4 on the Standardized AddressStorage Options screen, CODE-1 Plus stores standardized addresses for records with probableoverall correctness values of 4 and lower but does not store standardized addresses for records withprobable correctness values of 5 and higher.
Function Keys
The following function keys are available on the Name/Address Record Posting screens.
DescriptionNameFunction Key
Exit from the Name/Address RecordPosting component without saving data.
ExitF3
Save the data and quit from theName/Address RecordPosting component.
UpdateF6
113CODE-1 Plus User Guide for IBM i
DescriptionNameFunction Key
Allows you to display the location andlengths of the fields in an external file.Type file name and library of externalfile.
Field SearchF24
Defining ZIP Code Location
Use the ZIP Code Storage screen to define the location and format of the ZIP Code information tostore in your output file. To access the ZIP Code Storage Screen:
1. From the Work With Jobs screen (C1CPMM03), use F12 to select the job for defining output.
2. The Define/Submit CODE-1 Plus Job screen (C1CPDS02) displays. Select Name/AddressRecord Posting.
3. The ZIP Code Storage screen (C1CPOD010) displays.
4. Use the following table to complete the fields on the ZIP Code Storage screen.
DescriptionField
Specify ZIP Code Storage
114CODE-1 Plus User Guide for IBM i

DescriptionField
Optional. Enter a number from 1-9999 to specify the location in the output record to storethe 1-byte ZIP Code return code listed below.
• A — Apartment number missing or not found in database, and an apartment-level matchwas required.
• B — Insufficient (or blank) address match information.
• C — The address probable correctness or overall probable correctness was too high.
• D — Information was dropped.
• E — External match—auxiliary file processing.
• H — House/box number not found on street.
• L — The standardized address was too long.
• M — Multiple matches of equal quality were found.
• N — The ZIP Code wasn't stored because the processing requirements specified that itwas not to be stored.
• S — Street name not found in ZIP Code.
• Z — ZIP Code not found in database.
• Blank — The match attempt was successful.
No default.
Location for the ZIPCode return code
Optional. Enter a number from 1-9999 to specify the location in the output record for thestandardized ZIP Code. No default.
Location for the ZIPCode
Required if location on the output record for the ZIP Code is not zero. Format of thestandardized ZIP Code:
• C — Store the ZIP Code as a 5-byte character field.
• P — Store the ZIP Code as a 3-byte packed field.
• Blank— No default.
Format
115CODE-1 Plus User Guide for IBM i
DescriptionField
Optional. Enter a number from 1-9999 to specify the location in the output record for the1-digit code reflecting the source of the final ZIP Code.
• B — ZIP Code was not determined.
• F — Final ZIP Code determined from the finance number.
• L — New address obtained from LACS processing.
• M — Final ZIP Code determined from the ZIPMOVE database.
• Z — Original ZIP Code was retained.
Location for thesource of final ZIPCode return code
Optional. Enter a number from 1-9999 to specify the location on the output record for the P.O. Box-only ZIP Code indicator. Addresses located within a P. O. Box-only delivery zonecan only receive postal delivery through the use of a P. O. Box. No other postal deliverymethod is available for these addresses.
• Y — P. O. Box-only ZIP Code.
• Blank — Not a P. O. Box-only ZIP Code.
Location for POBox-only ZIP Codeflag
Optional. Enter a number from 1-9999 to specify the location on the output record for theValid ZIP Code flag.
• Y — Input City, State, and ZIP Code correspond.
• N — Input city, state, ZIP Code do not correspond, or is invalid.
• Blank — ZIP Code could not be determined for input address.
Location for Valid ZIPCode flag
Defining ZIP Code Information
Use the ZIP Code Storage Options screen to define the ZIP Code information to store in your outputfile. To access the ZIP Code Storage Options screen:
1. From the Name/Address Record Posting screen, page down to the ZIP Code Storage Optionsscreen (C1CPOD015).
2. Use the following table to complete the fields on the ZIP Code Storage Options screen.
116CODE-1 Plus User Guide for IBM i
DescriptionField Name
Optional. Code indicating whether the standardized ZIP Code should be stored wheninformation was dropped during the matching process.
• Y — Store the ZIP Code anyway.
• N — Do not store if information was dropped.
• Blank— Default is Y.
Store ZIP if any informationwas dropped duringstandardization?
Max Correctness for storage
Optional. Enter a number from 0-9 to specify the maximum acceptableaddress probability of correctness to store the standardized ZIP Code. Type a numberbetween 0 and 9, where 0 indicates the best case and 9 indicates the worst case.Default is 9.
Address
Optional.Enter a number from 0-9 to specify themaximum acceptable overall probabilityof correctness to store the standardized ZIP Code. Type a number between 0 and 9,where 0 indicates the best case and 9 indicates the worst case. Default is 9.
Overall
Optional. Code indicating whether the standardized ZIP Code should be stored whenmultiple ZIP Code matches were found.
• Y — Store the standardized ZIP Code anyway.
• N—Do not store the standardized ZIP Code. Instead, store the information indicatedin the Disposition field below.
• Blank— Default is N.
Store if multiple ZIP Codematches are found?
Optional. Code indicating what should be stored in cases where the standardized ZIPCode was not stored either because no match was found, or due to storage conditions.
• B — Store blanks.
• X — Store nothing.
• I — Store input ZIP Code.
• Z — Store zeros.
• Blank— Default is I.
What should be stored if aZIP is not matched or is notstored due to storageoptions above?
117CODE-1 Plus User Guide for IBM i

DescriptionField Name
Optional.Code indicating whether the Input ZIP Code should be returned if it is uniqueand does not correlate with the input city/state.
• Y — Store the information.
• N — Do not store the Input ZIP Code.
• Blank— Default is N.
Note: If Y is chosen, a non-CASS certified configuration will be created. No PS 3553Form will be generated.
Store input ZIP if it isUnique and does notcorrelate with the inputcity/state?
Defining Carrier Route Location
Use the Carrier Route Storage Screen to define the locations and lengths of the Carrier Routeinformation to store in your output file. To access the Carrier Route Storage screen:
1. From the Name/Address Record Posting screen, page down to the Carrier Route Storage screen(C1CPOD020).
2. Use the following table to complete the fields on the Carrier Route Storage screen.
DescriptionField Name
Optional. Enter a number from 1- 9999 to define the location on the output record for the1-byte carrier route return code described below.
Blank The match attempt was successful.
A Apartment number missing or not found in database, and an apartment-level match wasrequired.
B Insufficient (or blank) address match information.
H House/box number not found on street.
M Multiple matches of equal quality were found.
S Street name not found in ZIP Code.
Z ZIP Code not found in database.
No default.
Location for CarrierRoute Return Code
118CODE-1 Plus User Guide for IBM i

DescriptionField Name
Optional. Enter a number from 1-9999 to define the location on the output record for the4-byte carrier route code. No default.
Location for CarrierRoute Code
Defining Carrier Route Information
Use the Carrier Route Storage Options Screen to define the Carrier Route information to store inyour output file. To access the Carrier Route Storage Options screen:
1. From the Name/Address Record Posting screen, page down to the Carrier Route Storage Optionsscreen (C1CPOD025).
2. Use the following table to complete the fields on the Carrier Route Storage Options screen.
DescriptionField Name
Optional. Code indicating whether to store the carrier route code if information was droppedduring the matching process.
• Y — Store the carrier route code anyway.
• N — Do not store the carrier route code.
• Blank— Default is Y.
Store CRRT if anyinformation wasdropped duringstandardization?
Max Correctness for storage
Optional. Enter a number from 0-9 to specify the maximum acceptable address probability ofcorrectness to store the carrier route code. Type a number between 0 and 9, where 0 indicatesthe best case and 9 indicates the worst case. Default is 9.
Address
Optional. Enter a number from 0-9 to specify the maximum acceptable overall probability ofcorrectness to store the carrier route code. Type a number between 0 and 9, where 0 indicatesthe best case and 9 indicates the worst case. Default is 9.
Overall
119CODE-1 Plus User Guide for IBM i
DescriptionField Name
Optional. Code indicating whether the standardized the carrier route code should be storedwhen multiple carrier route code matches were found.
• Y — Store the standardized the carrier route code.
• N — Do not store the standardized the carrier route code. Instead, store the informationindicated in the “What should be stored if a CRRT is not matched or is not stored due tostorage options above?” field below.
• Blank— Default is N.
Store if multipleCRRTmatches arefound?
Optional. Code indicating whether the standardized carrier route code should be stored ifmultiple matching ZIP Codes were found.
• Y — Store the returned carrier route code.
• N — Do not store the standardized the carrier route code. Instead, store the informationindicated in the “What should be stored if a CRRT is not matched or is not stored due tostorage options above?” field below.
• Blank— Default is N.
Store if multipleZIP matches arefound?
Optional. Code indicating what should be stored in cases where the standardized carrier routecode was not stored either because no match was found, or due to storage conditions.
• B — Store blanks.
• I — Store carrier route code from the input record.
• X — Store nothing.
• Blank— Default is B.
What should bestored if a CRRT isnot matched or isnot stored due tostorage optionsabove?
Defining ZIP + 4 Add-On Locations
Use the ZIP + 4 Add-On Storage screen (C1CPOD030) to define the locations and lengths of theZIP + 4 add-on information to store in your output file. To access the ZIP + 4 Add-On Storage screen:
1. From the Name/Address Record Posting screen, page down to the ZIP + 4 Add-On Storagescreen (C1CPOD030).
2. Use the following table to complete the fields on the ZIP + 4 Add-On Storage screen.
120CODE-1 Plus User Guide for IBM i
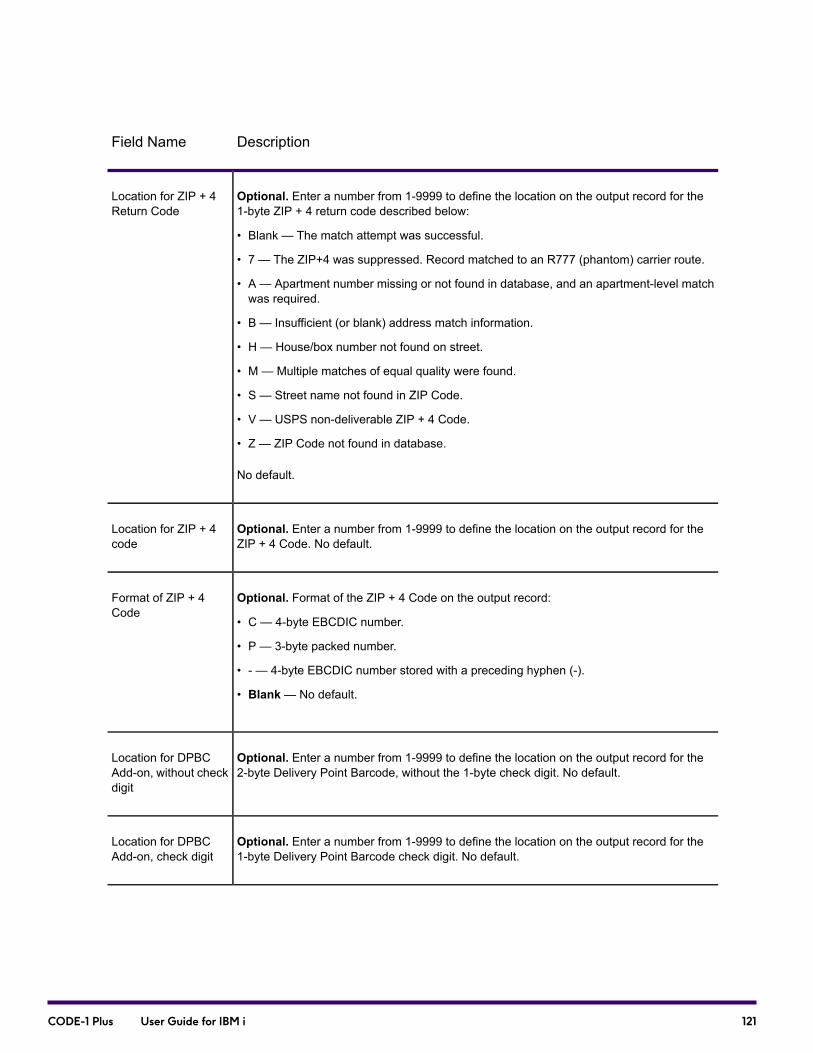
DescriptionField Name
Optional. Enter a number from 1-9999 to define the location on the output record for the1-byte ZIP + 4 return code described below:
• Blank — The match attempt was successful.
• 7 — The ZIP+4 was suppressed. Record matched to an R777 (phantom) carrier route.
• A — Apartment number missing or not found in database, and an apartment-level matchwas required.
• B — Insufficient (or blank) address match information.
• H — House/box number not found on street.
• M — Multiple matches of equal quality were found.
• S — Street name not found in ZIP Code.
• V — USPS non-deliverable ZIP + 4 Code.
• Z — ZIP Code not found in database.
No default.
Location for ZIP + 4Return Code
Optional. Enter a number from 1-9999 to define the location on the output record for theZIP + 4 Code. No default.
Location for ZIP + 4code
Optional. Format of the ZIP + 4 Code on the output record:
• C — 4-byte EBCDIC number.
• P — 3-byte packed number.
• - — 4-byte EBCDIC number stored with a preceding hyphen (-).
• Blank— No default.
Format of ZIP + 4Code
Optional. Enter a number from 1-9999 to define the location on the output record for the2-byte Delivery Point Barcode, without the 1-byte check digit. No default.
Location for DPBCAdd-on, without checkdigit
Optional. Enter a number from 1-9999 to define the location on the output record for the1-byte Delivery Point Barcode check digit. No default.
Location for DPBCAdd-on, check digit
121CODE-1 Plus User Guide for IBM i
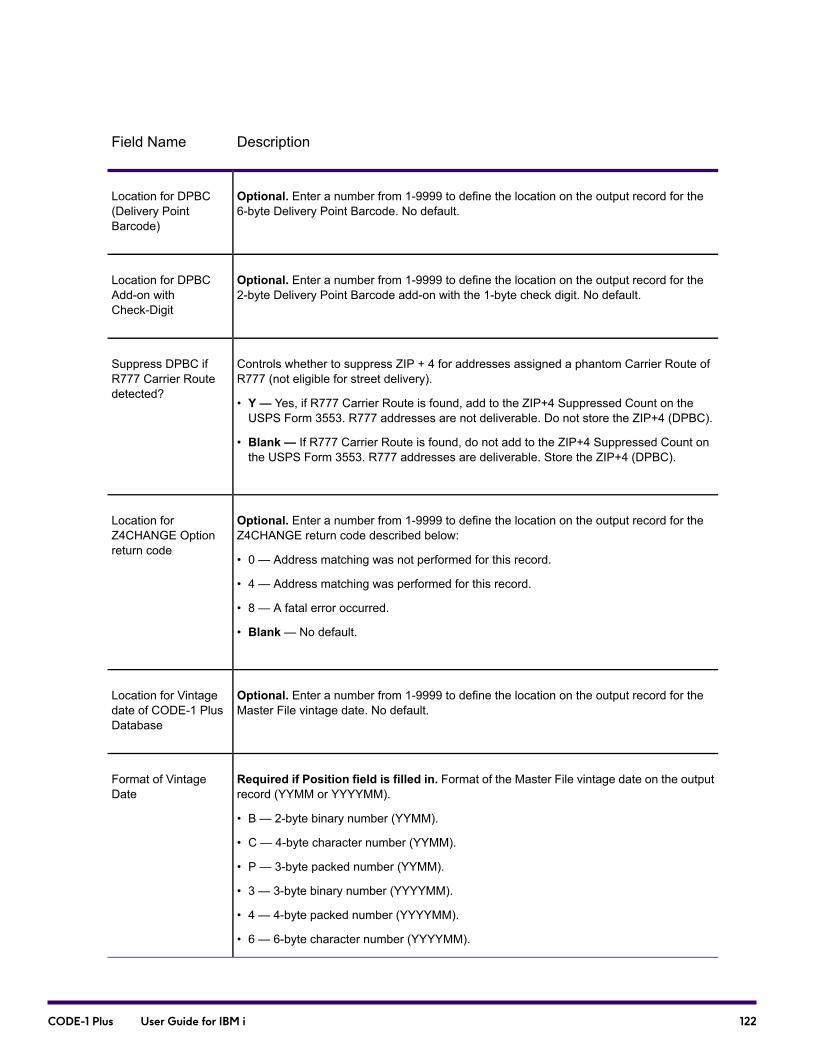
DescriptionField Name
Optional. Enter a number from 1-9999 to define the location on the output record for the6-byte Delivery Point Barcode. No default.
Location for DPBC(Delivery PointBarcode)
Optional. Enter a number from 1-9999 to define the location on the output record for the2-byte Delivery Point Barcode add-on with the 1-byte check digit. No default.
Location for DPBCAdd-on withCheck-Digit
Controls whether to suppress ZIP + 4 for addresses assigned a phantom Carrier Route ofR777 (not eligible for street delivery).
• Y — Yes, if R777 Carrier Route is found, add to the ZIP+4 Suppressed Count on theUSPS Form 3553. R777 addresses are not deliverable. Do not store the ZIP+4 (DPBC).
• Blank — If R777 Carrier Route is found, do not add to the ZIP+4 Suppressed Count onthe USPS Form 3553. R777 addresses are deliverable. Store the ZIP+4 (DPBC).
Suppress DPBC ifR777 Carrier Routedetected?
Optional. Enter a number from 1-9999 to define the location on the output record for theZ4CHANGE return code described below:
• 0 — Address matching was not performed for this record.
• 4 — Address matching was performed for this record.
• 8 — A fatal error occurred.
• Blank— No default.
Location forZ4CHANGE Optionreturn code
Optional. Enter a number from 1-9999 to define the location on the output record for theMaster File vintage date. No default.
Location for Vintagedate of CODE-1 PlusDatabase
Required if Position field is filled in. Format of the Master File vintage date on the outputrecord (YYMM or YYYYMM).
• B — 2-byte binary number (YYMM).
• C — 4-byte character number (YYMM).
• P — 3-byte packed number (YYMM).
• 3 — 3-byte binary number (YYYYMM).
• 4 — 4-byte packed number (YYYYMM).
• 6 — 6-byte character number (YYYYMM).
Format of VintageDate
122CODE-1 Plus User Guide for IBM i
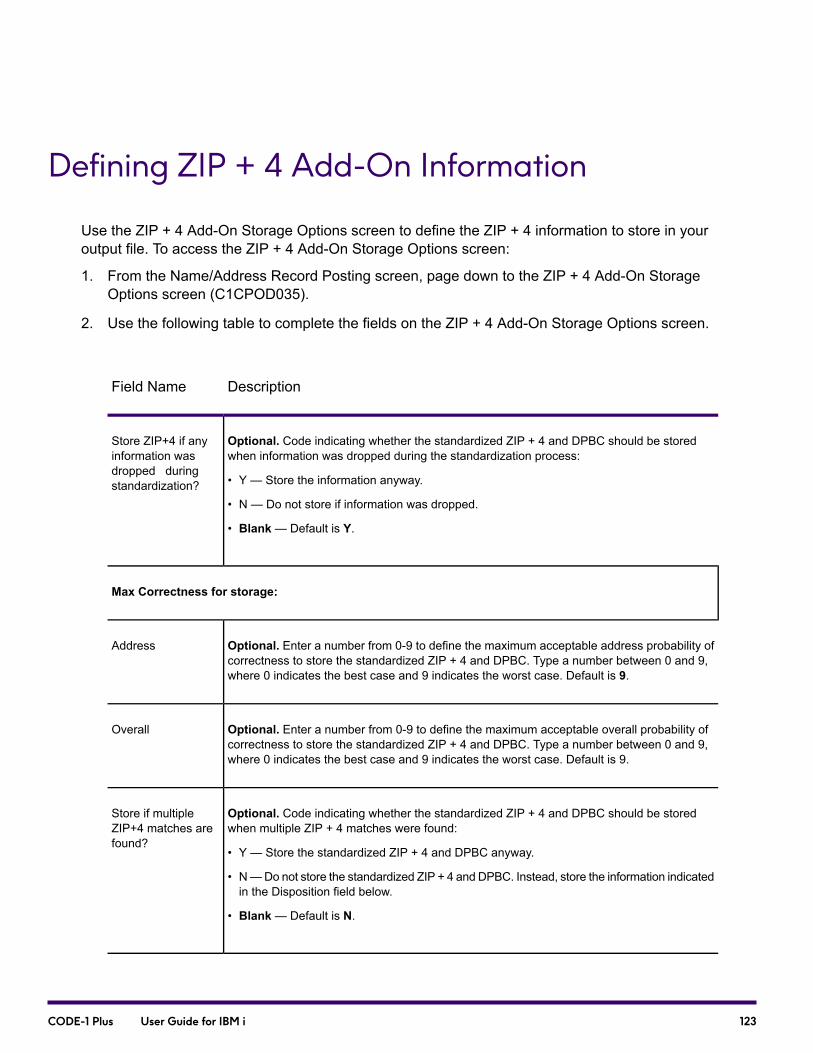
Defining ZIP + 4 Add-On Information
Use the ZIP + 4 Add-On Storage Options screen to define the ZIP + 4 information to store in youroutput file. To access the ZIP + 4 Add-On Storage Options screen:
1. From the Name/Address Record Posting screen, page down to the ZIP + 4 Add-On StorageOptions screen (C1CPOD035).
2. Use the following table to complete the fields on the ZIP + 4 Add-On Storage Options screen.
DescriptionField Name
Optional. Code indicating whether the standardized ZIP + 4 and DPBC should be storedwhen information was dropped during the standardization process:
• Y — Store the information anyway.
• N — Do not store if information was dropped.
• Blank— Default is Y.
Store ZIP+4 if anyinformation wasdropped duringstandardization?
Max Correctness for storage:
Optional. Enter a number from 0-9 to define the maximum acceptable address probability ofcorrectness to store the standardized ZIP + 4 and DPBC. Type a number between 0 and 9,where 0 indicates the best case and 9 indicates the worst case. Default is 9.
Address
Optional. Enter a number from 0-9 to define the maximum acceptable overall probability ofcorrectness to store the standardized ZIP + 4 and DPBC. Type a number between 0 and 9,where 0 indicates the best case and 9 indicates the worst case. Default is 9.
Overall
Optional. Code indicating whether the standardized ZIP + 4 and DPBC should be storedwhen multiple ZIP + 4 matches were found:
• Y — Store the standardized ZIP + 4 and DPBC anyway.
• N—Do not store the standardized ZIP + 4 and DPBC. Instead, store the information indicatedin the Disposition field below.
• Blank— Default is N.
Store if multipleZIP+4 matches arefound?
123CODE-1 Plus User Guide for IBM i
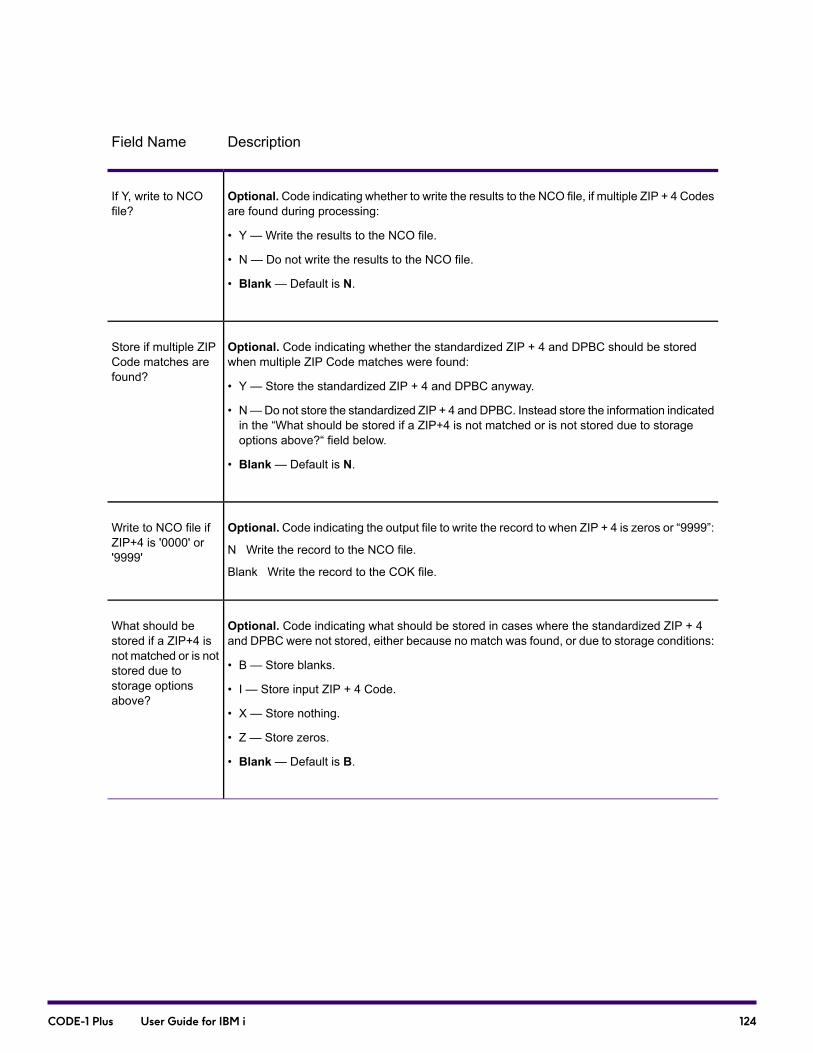
DescriptionField Name
Optional.Code indicating whether to write the results to the NCO file, if multiple ZIP + 4 Codesare found during processing:
• Y — Write the results to the NCO file.
• N — Do not write the results to the NCO file.
• Blank— Default is N.
If Y, write to NCOfile?
Optional. Code indicating whether the standardized ZIP + 4 and DPBC should be storedwhen multiple ZIP Code matches were found:
• Y — Store the standardized ZIP + 4 and DPBC anyway.
• N—Do not store the standardized ZIP + 4 and DPBC. Instead store the information indicatedin the “What should be stored if a ZIP+4 is not matched or is not stored due to storageoptions above?“ field below.
• Blank— Default is N.
Store if multiple ZIPCode matches arefound?
Optional.Code indicating the output file to write the record to when ZIP + 4 is zeros or “9999”:
N Write the record to the NCO file.
Blank Write the record to the COK file.
Write to NCO file ifZIP+4 is '0000' or'9999'
Optional. Code indicating what should be stored in cases where the standardized ZIP + 4and DPBC were not stored, either because no match was found, or due to storage conditions:
• B — Store blanks.
• I — Store input ZIP + 4 Code.
• X — Store nothing.
• Z — Store zeros.
• Blank— Default is B.
What should bestored if a ZIP+4 isnot matched or is notstored due tostorage optionsabove?
124CODE-1 Plus User Guide for IBM i
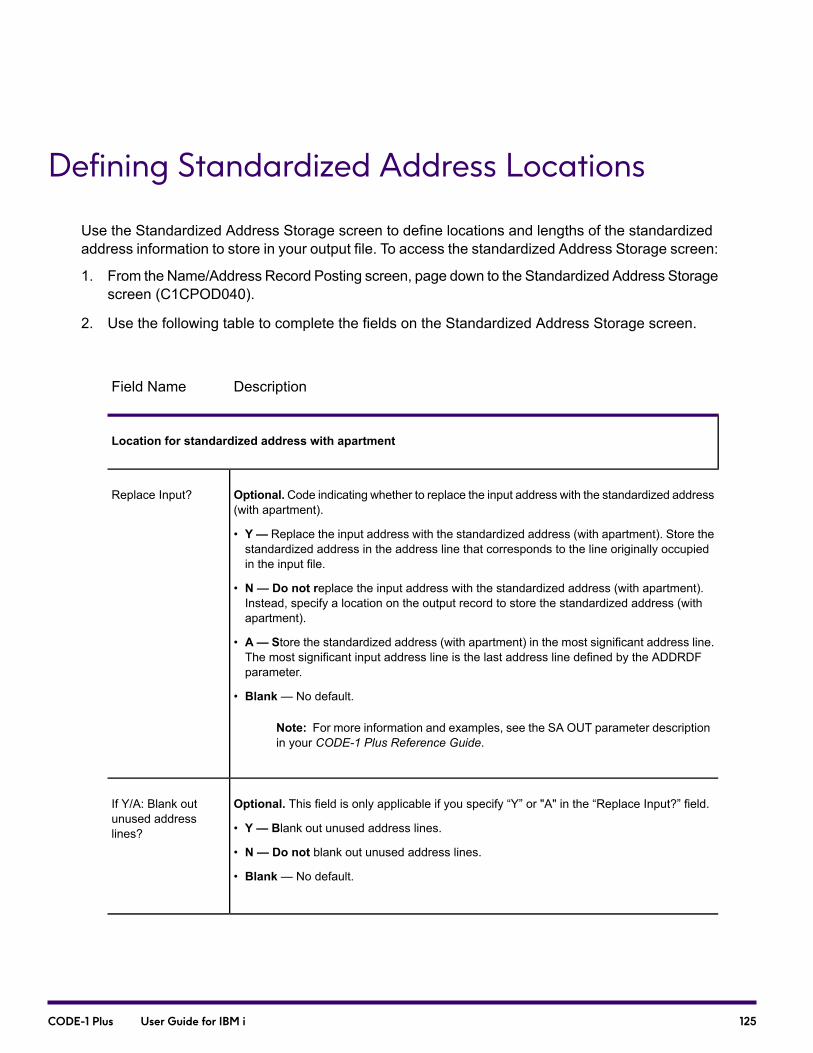
Defining Standardized Address Locations
Use the Standardized Address Storage screen to define locations and lengths of the standardizedaddress information to store in your output file. To access the standardized Address Storage screen:
1. From the Name/Address Record Posting screen, page down to the Standardized Address Storagescreen (C1CPOD040).
2. Use the following table to complete the fields on the Standardized Address Storage screen.
DescriptionField Name
Location for standardized address with apartment
Optional.Code indicating whether to replace the input address with the standardized address(with apartment).
• Y — Replace the input address with the standardized address (with apartment). Store thestandardized address in the address line that corresponds to the line originally occupiedin the input file.
• N — Do not replace the input address with the standardized address (with apartment).Instead, specify a location on the output record to store the standardized address (withapartment).
• A— Store the standardized address (with apartment) in the most significant address line.The most significant input address line is the last address line defined by the ADDRDFparameter.
• Blank— No default.
Note: For more information and examples, see the SA OUT parameter descriptionin your CODE-1 Plus Reference Guide.
Replace Input?
Optional. This field is only applicable if you specify “Y” or "A" in the “Replace Input?” field.
• Y — Blank out unused address lines.
• N — Do not blank out unused address lines.
• Blank— No default.
If Y/A: Blank outunused addresslines?
125CODE-1 Plus User Guide for IBM i

DescriptionField Name
Required. This field is only applicable if you specify "N" in the “Replace Input?” field.
• Posn— Enter a number from 1-9999 to define the starting location in the output record tostore the standardized address (with apartment). No default.
• Len— Enter a number from 1-99 to define the length in the output record for thestandardized address (with apartment). No default.
If N: Specify storagelocation
Optional. This field determines what to store in the output record if the standardized address(with apartment) is too long or no match was found for the standardized address (withapartment).
• Y — Store the input address.
• N — Do not store the input address. Store blanks in the output record.
• Blank— Default is N.
Store Input Addr if StdAddr too long or nomatch?
Location for standardized address without apartment
Optional. Enter a number from 1-9999 to define the location on the output file for thestandardized address, excluding apartment information. No default.
Posn
Optional. Enter a number from 1-99 to define the length on the output file for the standardizedaddress, excluding apartment information.
Len
Optional. Enter Y to store the standard address without apartment even if it is already storedwith apartment.
• Y — Store the standard address.
• N — Do not store the standard address.
• Blank— No default.
Replace even ifalready stored?
Location for Apt/PMB number
Optional. Enter a number from 1-9999 to define the location on the output file for thestandardized address, excluding apartment information. No default.
Posn
126CODE-1 Plus User Guide for IBM i

DescriptionField Name
Optional. Enter a number from 1-99 to define the length on the output file for the standardizedaddress, excluding apartment information. No default.
Len
Optional. Code indicating what should be stored if the Standardized Address with Apt isalready stored:
• Y — Replace. Do not store apartment information if successfully stored in standardizedaddress with apartment.
• P — Store input PMB number.
• X — Store apartment information.
• Blank— No default.
Treatment if StdAddress with Aptalready stored?
Optional. Enter a number from 1-9999 to define the location on the output record for the1-byte address return code described below:
Blank The address match attempt was successful.
A Apartment number missing or not found in database, and an apartment-level match wasrequired.
B Insufficient (or blank) address information for a match.
C The record's probable correctness was higher than the specified maximum.
D Information was dropped during the address match attempt.
H House/Box number not found on this street.
L The returned address was too long to be stored.
M Multiple matches were found.
S Street name not found in ZIP Code.
Z ZIP Code was not found on database.
Location forStandardized addressreturn code
Optional. Enter a number from 1-9999 to define the location on the output record for the1-byte code indicating the disposition of the PMB number:
A Append to standardized address.
S Secondary address input.
L Returned address was too long to be stored.
Location for PMBreturn code
127CODE-1 Plus User Guide for IBM i
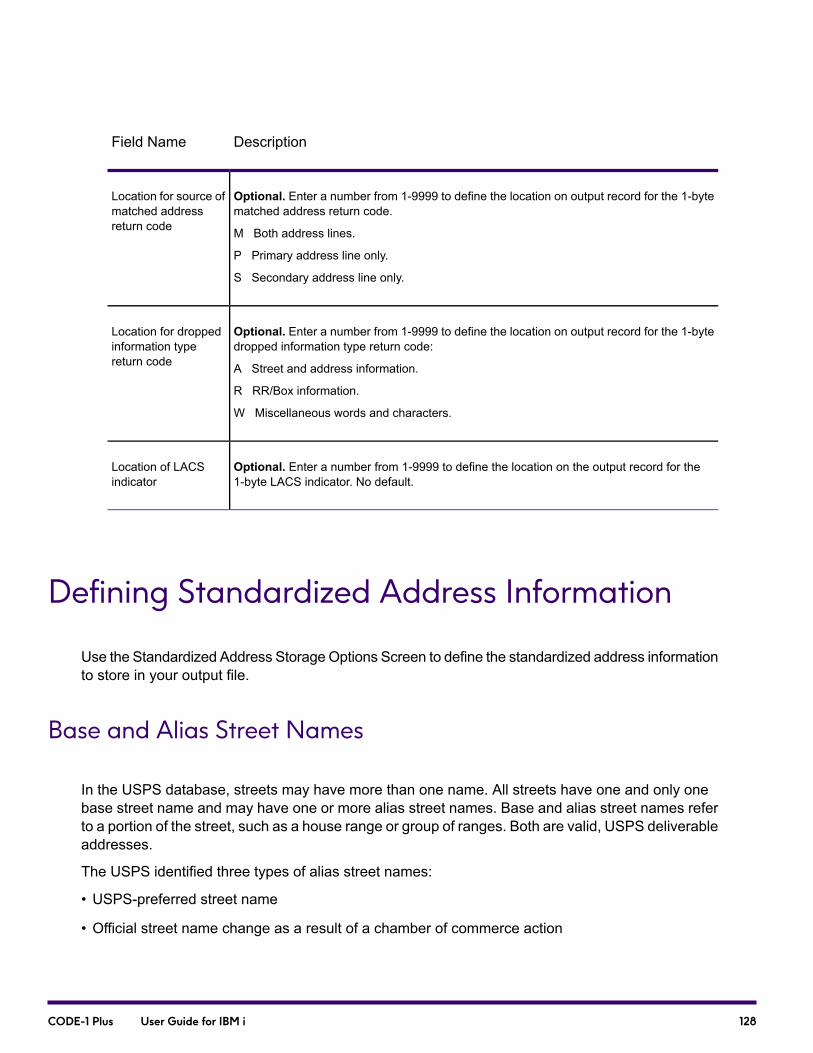
DescriptionField Name
Optional. Enter a number from 1-9999 to define the location on output record for the 1-bytematched address return code.
M Both address lines.
P Primary address line only.
S Secondary address line only.
Location for source ofmatched addressreturn code
Optional. Enter a number from 1-9999 to define the location on output record for the 1-bytedropped information type return code:
A Street and address information.
R RR/Box information.
W Miscellaneous words and characters.
Location for droppedinformation typereturn code
Optional. Enter a number from 1-9999 to define the location on the output record for the1-byte LACS indicator. No default.
Location of LACSindicator
Defining Standardized Address Information
Use the Standardized Address StorageOptions Screen to define the standardized address informationto store in your output file.
Base and Alias Street Names
In the USPS database, streets may have more than one name. All streets have one and only onebase street name and may have one or more alias street names. Base and alias street names referto a portion of the street, such as a house range or group of ranges. Both are valid, USPS deliverableaddresses.
The USPS identified three types of alias street names:
• USPS-preferred street name
• Official street name change as a result of a chamber of commerce action
128CODE-1 Plus User Guide for IBM i
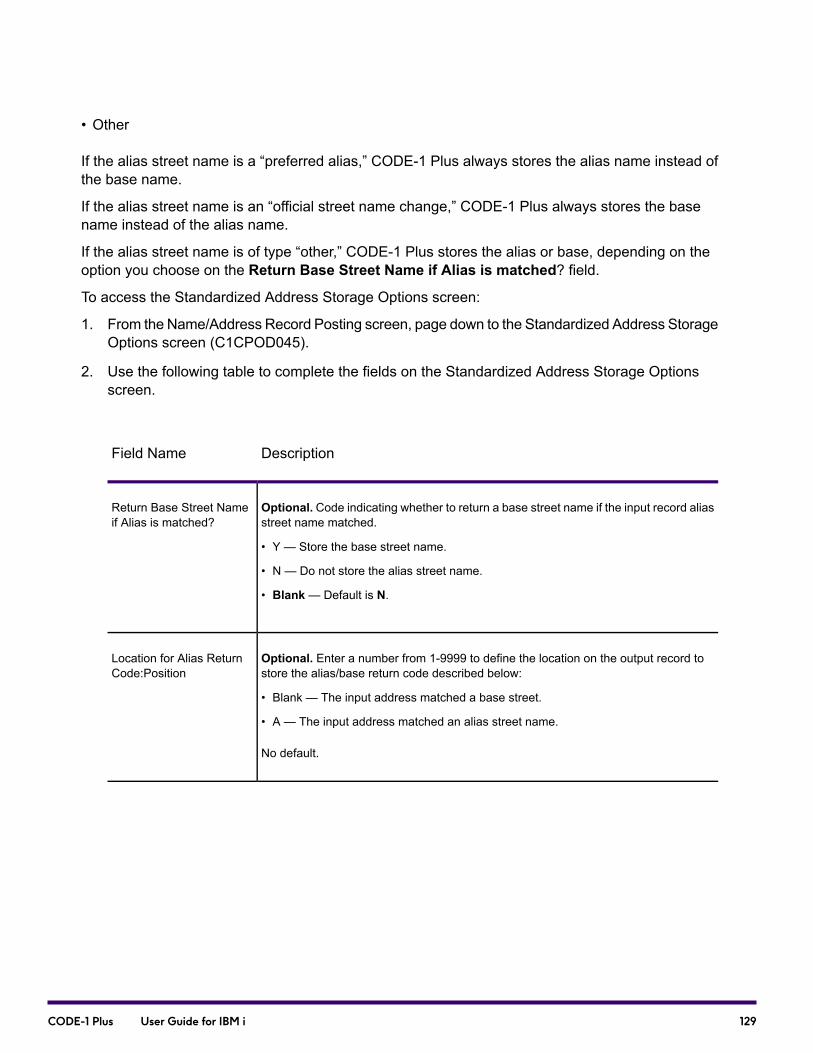
• Other
If the alias street name is a “preferred alias,” CODE-1 Plus always stores the alias name instead ofthe base name.
If the alias street name is an “official street name change,” CODE-1 Plus always stores the basename instead of the alias name.
If the alias street name is of type “other,” CODE-1 Plus stores the alias or base, depending on theoption you choose on the Return Base Street Name if Alias is matched? field.
To access the Standardized Address Storage Options screen:
1. From the Name/Address Record Posting screen, page down to the Standardized Address StorageOptions screen (C1CPOD045).
2. Use the following table to complete the fields on the Standardized Address Storage Optionsscreen.
DescriptionField Name
Optional. Code indicating whether to return a base street name if the input record aliasstreet name matched.
• Y — Store the base street name.
• N — Do not store the alias street name.
• Blank— Default is N.
Return Base Street Nameif Alias is matched?
Optional. Enter a number from 1-9999 to define the location on the output record tostore the alias/base return code described below:
• Blank — The input address matched a base street.
• A — The input address matched an alias street name.
No default.
Location for Alias ReturnCode:Position
129CODE-1 Plus User Guide for IBM i
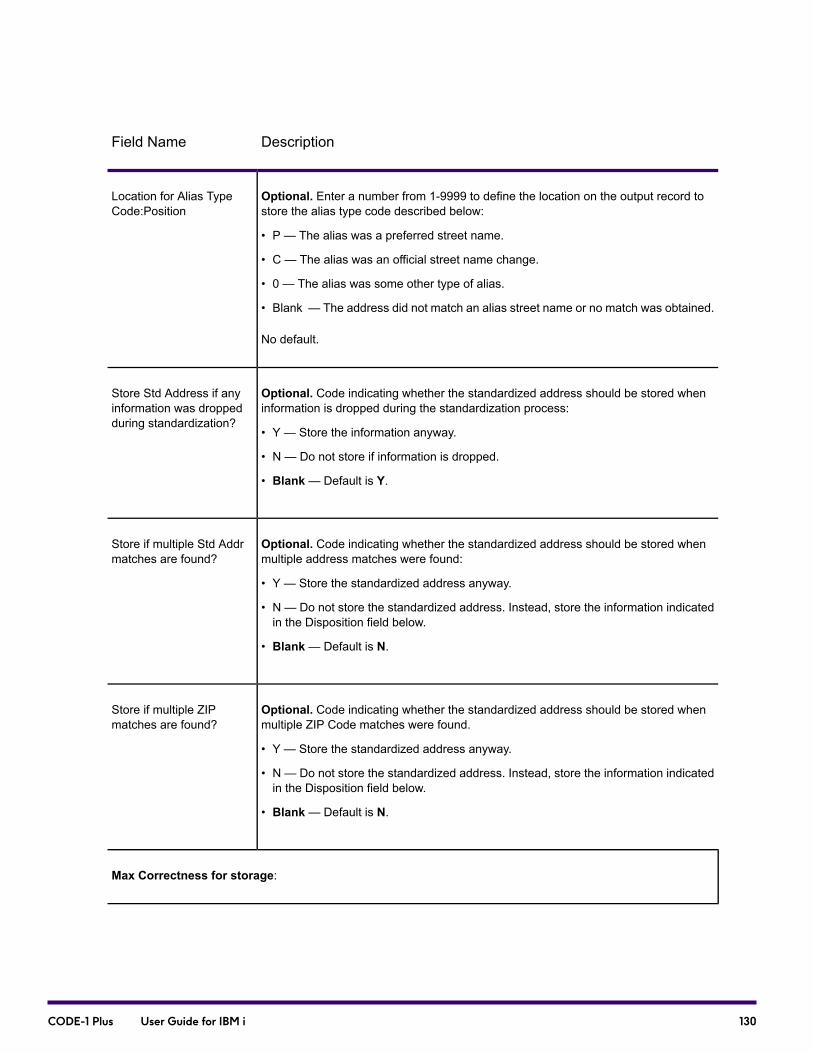
DescriptionField Name
Optional. Enter a number from 1-9999 to define the location on the output record tostore the alias type code described below:
• P — The alias was a preferred street name.
• C — The alias was an official street name change.
• 0 — The alias was some other type of alias.
• Blank — The address did not match an alias street name or no match was obtained.
No default.
Location for Alias TypeCode:Position
Optional. Code indicating whether the standardized address should be stored wheninformation is dropped during the standardization process:
• Y — Store the information anyway.
• N — Do not store if information is dropped.
• Blank— Default is Y.
Store Std Address if anyinformation was droppedduring standardization?
Optional. Code indicating whether the standardized address should be stored whenmultiple address matches were found:
• Y — Store the standardized address anyway.
• N — Do not store the standardized address. Instead, store the information indicatedin the Disposition field below.
• Blank— Default is N.
Store if multiple Std Addrmatches are found?
Optional. Code indicating whether the standardized address should be stored whenmultiple ZIP Code matches were found.
• Y — Store the standardized address anyway.
• N — Do not store the standardized address. Instead, store the information indicatedin the Disposition field below.
• Blank— Default is N.
Store if multiple ZIPmatches are found?
Max Correctness for storage:
130CODE-1 Plus User Guide for IBM i
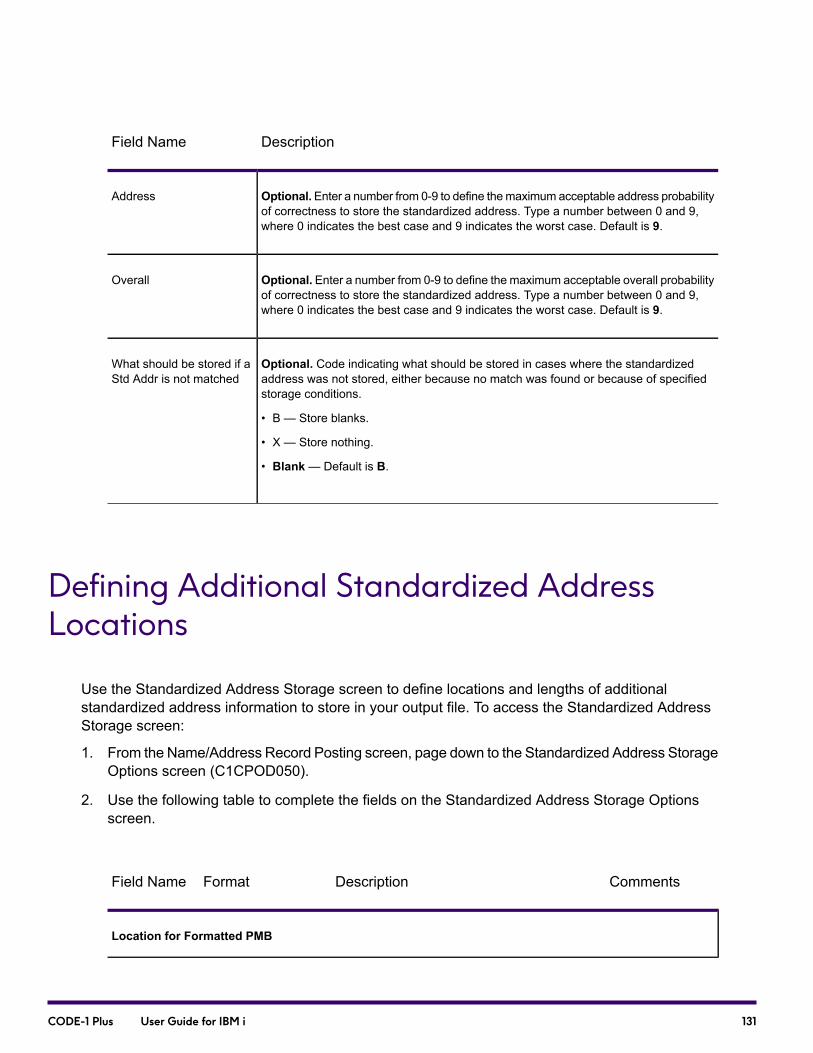
DescriptionField Name
Optional.Enter a number from 0-9 to define themaximum acceptable address probabilityof correctness to store the standardized address. Type a number between 0 and 9,where 0 indicates the best case and 9 indicates the worst case. Default is 9.
Address
Optional. Enter a number from 0-9 to define the maximum acceptable overall probabilityof correctness to store the standardized address. Type a number between 0 and 9,where 0 indicates the best case and 9 indicates the worst case. Default is 9.
Overall
Optional. Code indicating what should be stored in cases where the standardizedaddress was not stored, either because no match was found or because of specifiedstorage conditions.
• B — Store blanks.
• X — Store nothing.
• Blank— Default is B.
What should be stored if aStd Addr is not matched
Defining Additional Standardized AddressLocations
Use the Standardized Address Storage screen to define locations and lengths of additionalstandardized address information to store in your output file. To access the Standardized AddressStorage screen:
1. From the Name/Address Record Posting screen, page down to the Standardized Address StorageOptions screen (C1CPOD050).
2. Use the following table to complete the fields on the Standardized Address Storage Optionsscreen.
CommentsDescriptionFormatField Name
Location for Formatted PMB
131CODE-1 Plus User Guide for IBM i
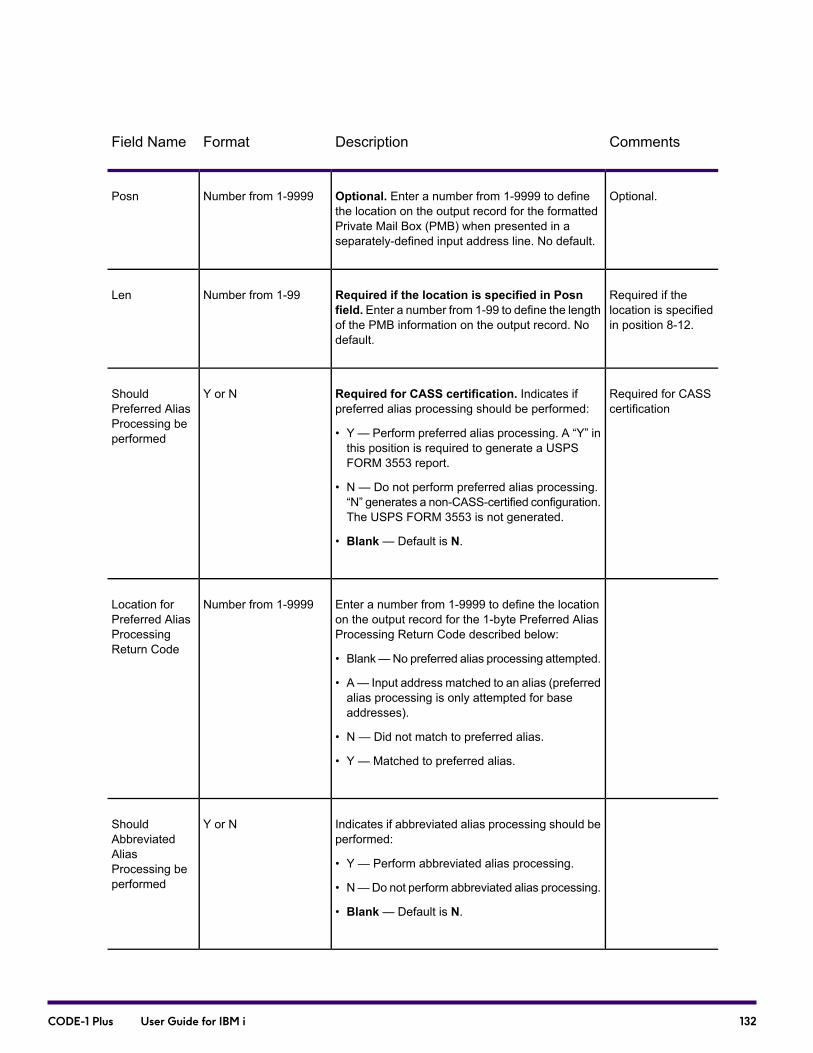
CommentsDescriptionFormatField Name
Optional.Optional. Enter a number from 1-9999 to definethe location on the output record for the formattedPrivate Mail Box (PMB) when presented in aseparately-defined input address line. No default.
Number from 1-9999Posn
Required if thelocation is specifiedin position 8-12.
Required if the location is specified in Posnfield. Enter a number from 1-99 to define the lengthof the PMB information on the output record. Nodefault.
Number from 1-99Len
Required for CASScertification
Required for CASS certification. Indicates ifpreferred alias processing should be performed:
• Y — Perform preferred alias processing. A “Y” inthis position is required to generate a USPSFORM 3553 report.
• N — Do not perform preferred alias processing.“N” generates a non-CASS-certified configuration.The USPS FORM 3553 is not generated.
• Blank— Default is N.
Y or NShouldPreferred AliasProcessing beperformed
Enter a number from 1-9999 to define the locationon the output record for the 1-byte Preferred AliasProcessing Return Code described below:
• Blank—No preferred alias processing attempted.
• A— Input address matched to an alias (preferredalias processing is only attempted for baseaddresses).
• N — Did not match to preferred alias.
• Y — Matched to preferred alias.
Number from 1-9999Location forPreferred AliasProcessingReturn Code
Indicates if abbreviated alias processing should beperformed:
• Y — Perform abbreviated alias processing.
• N—Do not perform abbreviated alias processing.
• Blank— Default is N.
Y or NShouldAbbreviatedAliasProcessing beperformed
132CODE-1 Plus User Guide for IBM i
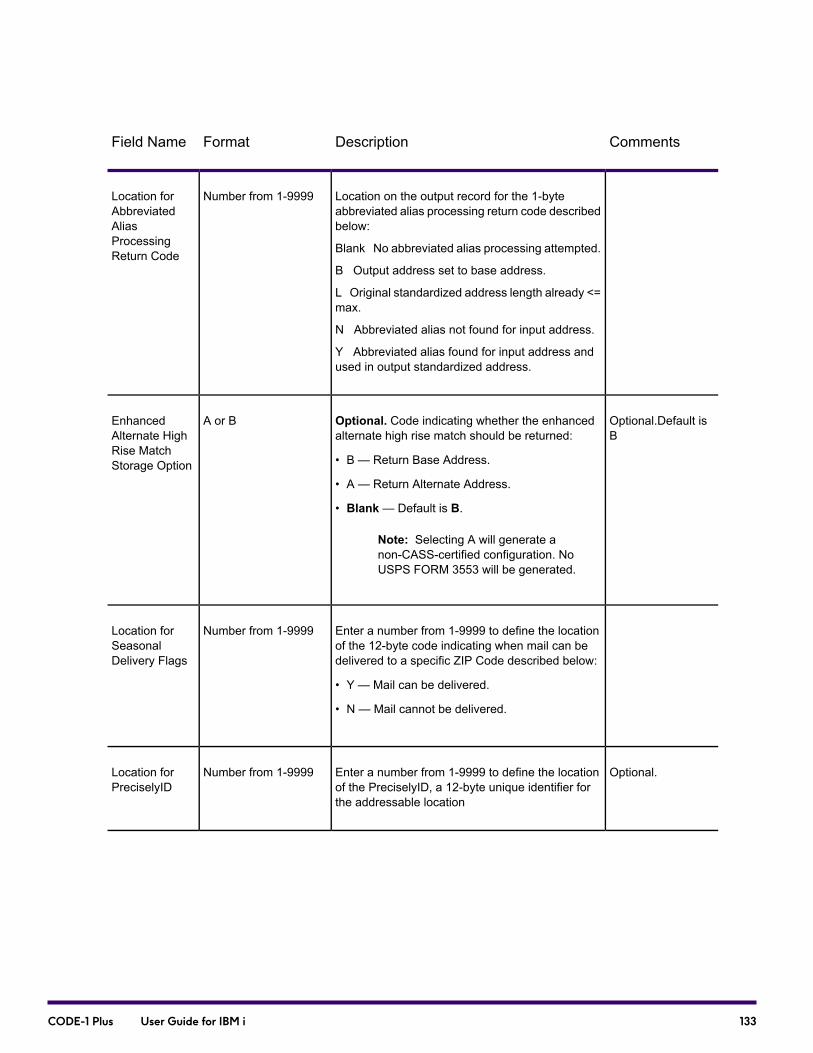
CommentsDescriptionFormatField Name
Location on the output record for the 1-byteabbreviated alias processing return code describedbelow:
Blank No abbreviated alias processing attempted.
B Output address set to base address.
L Original standardized address length already <=max.
N Abbreviated alias not found for input address.
Y Abbreviated alias found for input address andused in output standardized address.
Number from 1-9999Location forAbbreviatedAliasProcessingReturn Code
Optional.Default isB
Optional. Code indicating whether the enhancedalternate high rise match should be returned:
• B — Return Base Address.
• A — Return Alternate Address.
• Blank— Default is B.
Note: Selecting A will generate anon-CASS-certified configuration. NoUSPS FORM 3553 will be generated.
A or BEnhancedAlternate HighRise MatchStorage Option
Enter a number from 1-9999 to define the locationof the 12-byte code indicating when mail can bedelivered to a specific ZIP Code described below:
• Y — Mail can be delivered.
• N — Mail cannot be delivered.
Number from 1-9999Location forSeasonalDelivery Flags
Optional.Enter a number from 1-9999 to define the locationof the PreciselyID, a 12-byte unique identifier forthe addressable location
Number from 1-9999Location forPreciselyID
133CODE-1 Plus User Guide for IBM i
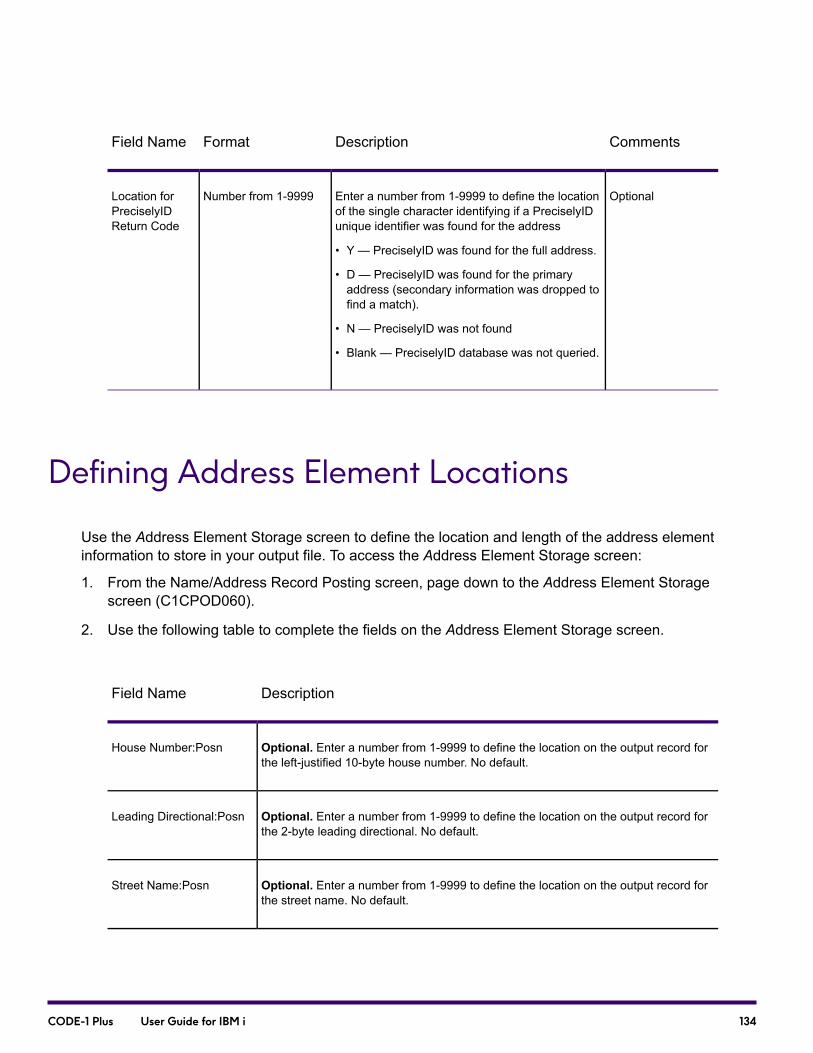
CommentsDescriptionFormatField Name
OptionalEnter a number from 1-9999 to define the locationof the single character identifying if a PreciselyIDunique identifier was found for the address
• Y — PreciselyID was found for the full address.
• D — PreciselyID was found for the primaryaddress (secondary information was dropped tofind a match).
• N — PreciselyID was not found
• Blank — PreciselyID database was not queried.
Number from 1-9999Location forPreciselyIDReturn Code
Defining Address Element Locations
Use the Address Element Storage screen to define the location and length of the address elementinformation to store in your output file. To access the Address Element Storage screen:
1. From the Name/Address Record Posting screen, page down to the Address Element Storagescreen (C1CPOD060).
2. Use the following table to complete the fields on the Address Element Storage screen.
DescriptionField Name
Optional. Enter a number from 1-9999 to define the location on the output record forthe left-justified 10-byte house number. No default.
House Number:Posn
Optional. Enter a number from 1-9999 to define the location on the output record forthe 2-byte leading directional. No default.
Leading Directional:Posn
Optional. Enter a number from 1-9999 to define the location on the output record forthe street name. No default.
Street Name:Posn
134CODE-1 Plus User Guide for IBM i
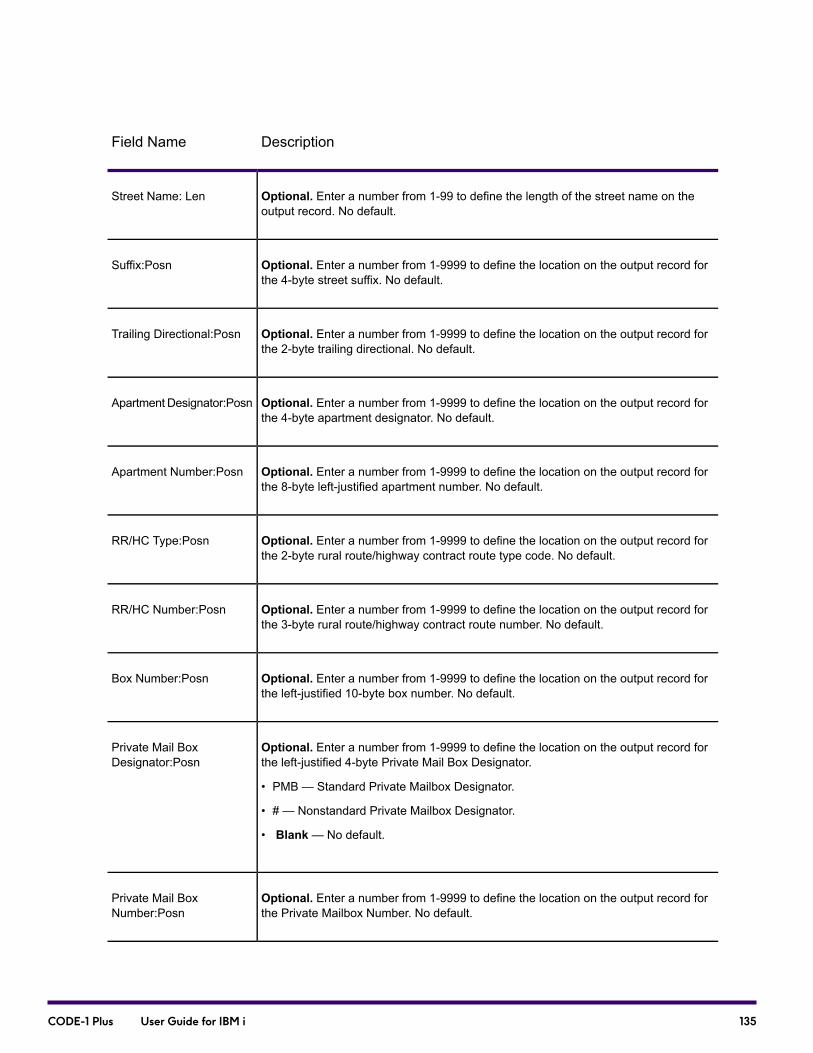
DescriptionField Name
Optional. Enter a number from 1-99 to define the length of the street name on theoutput record. No default.
Street Name: Len
Optional. Enter a number from 1-9999 to define the location on the output record forthe 4-byte street suffix. No default.
Suffix:Posn
Optional. Enter a number from 1-9999 to define the location on the output record forthe 2-byte trailing directional. No default.
Trailing Directional:Posn
Optional. Enter a number from 1-9999 to define the location on the output record forthe 4-byte apartment designator. No default.
Apartment Designator:Posn
Optional. Enter a number from 1-9999 to define the location on the output record forthe 8-byte left-justified apartment number. No default.
Apartment Number:Posn
Optional. Enter a number from 1-9999 to define the location on the output record forthe 2-byte rural route/highway contract route type code. No default.
RR/HC Type:Posn
Optional. Enter a number from 1-9999 to define the location on the output record forthe 3-byte rural route/highway contract route number. No default.
RR/HC Number:Posn
Optional. Enter a number from 1-9999 to define the location on the output record forthe left-justified 10-byte box number. No default.
Box Number:Posn
Optional. Enter a number from 1-9999 to define the location on the output record forthe left-justified 4-byte Private Mail Box Designator.
• PMB — Standard Private Mailbox Designator.
• # — Nonstandard Private Mailbox Designator.
• Blank— No default.
Private Mail BoxDesignator:Posn
Optional. Enter a number from 1-9999 to define the location on the output record forthe Private Mailbox Number. No default.
Private Mail BoxNumber:Posn
135CODE-1 Plus User Guide for IBM i

DescriptionField Name
Optional. Enter a number from 1-99 to define the length of the Private Mailbox Numberon the output record. No default.
Private Mail Box Number:Len
Optional. You can choose to store all Private Mail Box Numbers or just standard PrivateMail Box Numbers. Default is N.
NOTE: If all Private Mail Box Numbers are stored, a non-CASS certified configurationwill be created. No PS Form 3553 will be generated.
Store All Private Mail BoxNumbers?
Optional.Code indicating what should be stored in cases where standardized elementscould not be stored (because no match was found). Type one of the following codes:
• B — Store blanks.
• M — Store elements from normalized address, merging secondary address lineelements with primary address line elements, but giving precedence to the primaryaddress line elements.
• N — Store elements from normalized address.
• X — Store nothing.
• Blank— Default is B.
What should be storedwhen StandardizedAddress is not avail
Defining City and State Locations
Use the City and State Storage screen to define the location and length of the city and state informationto store in your output file. To access the City and State Storage screen:
1. From the Name/Address Record Posting screen, page down to the City and State Storage screen(C1CPOD070).
2. Use the following table to complete the fields on the City and State Storage screen.
136CODE-1 Plus User Guide for IBM i
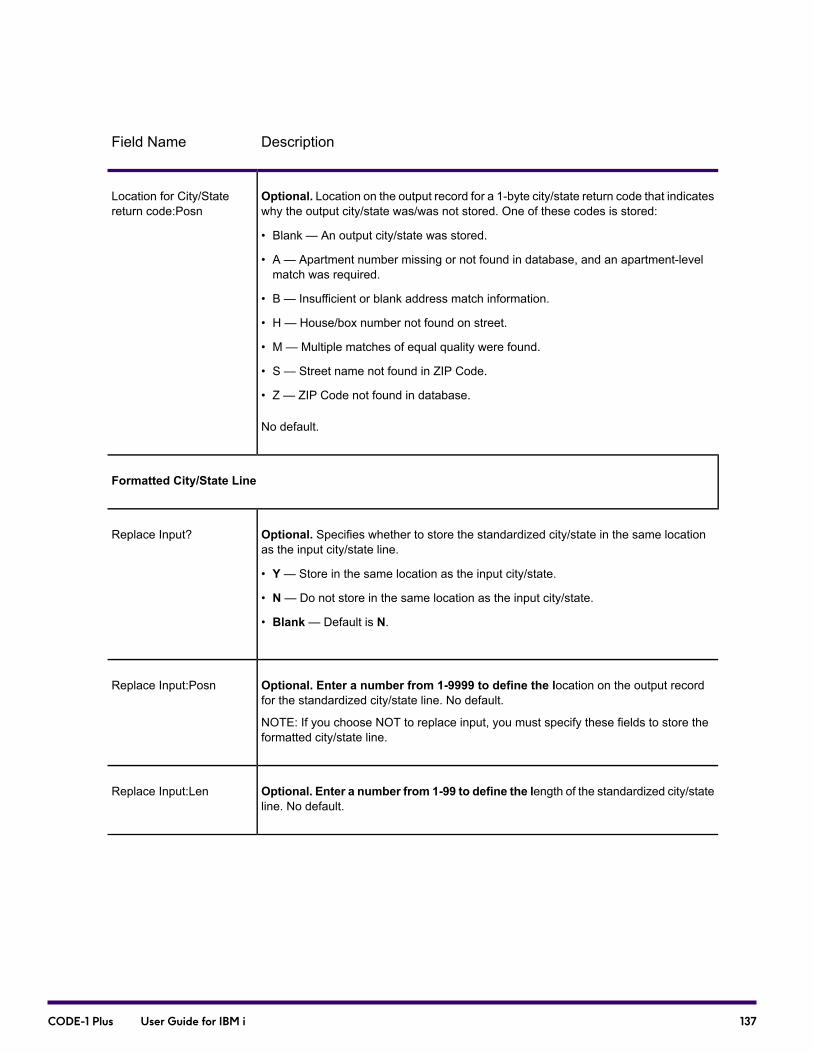
DescriptionField Name
Optional. Location on the output record for a 1-byte city/state return code that indicateswhy the output city/state was/was not stored. One of these codes is stored:
• Blank — An output city/state was stored.
• A — Apartment number missing or not found in database, and an apartment-levelmatch was required.
• B — Insufficient or blank address match information.
• H — House/box number not found on street.
• M — Multiple matches of equal quality were found.
• S — Street name not found in ZIP Code.
• Z — ZIP Code not found in database.
No default.
Location for City/Statereturn code:Posn
Formatted City/State Line
Optional. Specifies whether to store the standardized city/state in the same locationas the input city/state line.
• Y— Store in the same location as the input city/state.
• N— Do not store in the same location as the input city/state.
• Blank— Default is N.
Replace Input?
Optional. Enter a number from 1-9999 to define the location on the output recordfor the standardized city/state line. No default.
NOTE: If you choose NOT to replace input, you must specify these fields to store theformatted city/state line.
Replace Input:Posn
Optional. Enter a number from 1-99 to define the length of the standardized city/stateline. No default.
Replace Input:Len
137CODE-1 Plus User Guide for IBM i

DescriptionField Name
Optional. Format of the standardized city/state line:
• 9 — City, state, ZIP Code, and ZIP + 4 Code.
• S — City and state only.
• Z — City, state, and 5-digit ZIP Code.
• Blank— No default.
Format
Optional. Enter a number from 1-9999 to define the output location for the returnedcity name (28-character form if it fits, else short). No default.
Location for CityName:Posn
Optional. Enter a number from 1-99 to define the length of the returned city name.No default.
Location for City Name:Len
Optional. Code indicating what should be stored when no address match is found:
• I — Store the input city name.
• Z — Store the primary city for the valid input ZIP Code. If you specify "Z", CODE-1Plus does not generate a USPS Form 3553 (CASS Summary Report).
• X — Store the missing primary city and state for the valid input ZIP Code. Also, storethe locality county code for the valid input ZIP Code or valid input city/state. If youspecify "X", CODE-1 Plus does not generate a USPS Form 3553 (CASS SummaryReport).
• Blank — Store the information indicated in the "What should be stored if a City/Stateis not matched or is not stored due to storage options above?" field on the City andState Storage Options screen (C1CPOD073).
If no match is found, storecity from Input or ZIPCode?
Optional. Code indicating what should be stored when the input city name is the shortcity name.
• Y — Store input city name.
• N — Store standardized city name.
• Blank — Default is N.
Store input short cityname?
Optional. Enter a number from 1-9999 to define the output location for the13-byteshort city name. No default.
Location for City Name(short form):Posn
138CODE-1 Plus User Guide for IBM i
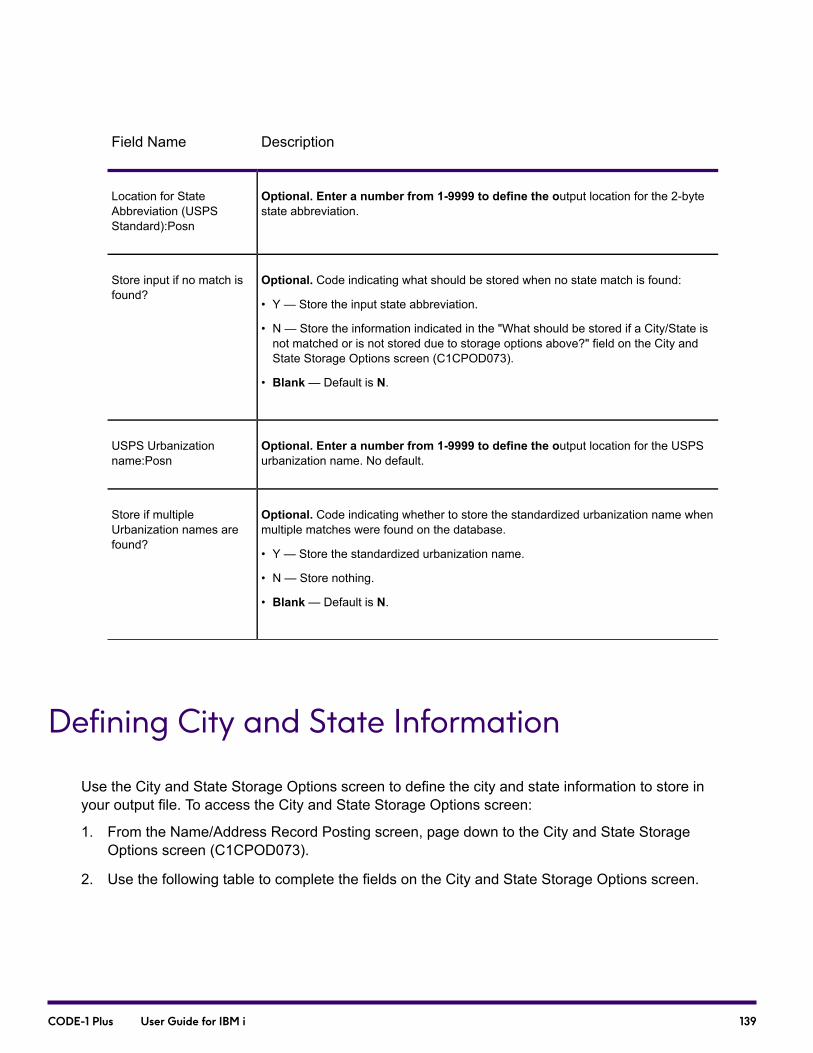
DescriptionField Name
Optional. Enter a number from 1-9999 to define the output location for the 2-bytestate abbreviation.
Location for StateAbbreviation (USPSStandard):Posn
Optional. Code indicating what should be stored when no state match is found:
• Y — Store the input state abbreviation.
• N — Store the information indicated in the "What should be stored if a City/State isnot matched or is not stored due to storage options above?" field on the City andState Storage Options screen (C1CPOD073).
• Blank— Default is N.
Store input if no match isfound?
Optional. Enter a number from 1-9999 to define the output location for the USPSurbanization name. No default.
USPS Urbanizationname:Posn
Optional. Code indicating whether to store the standardized urbanization name whenmultiple matches were found on the database.
• Y — Store the standardized urbanization name.
• N — Store nothing.
• Blank— Default is N.
Store if multipleUrbanization names arefound?
Defining City and State Information
Use the City and State Storage Options screen to define the city and state information to store inyour output file. To access the City and State Storage Options screen:
1. From the Name/Address Record Posting screen, page down to the City and State StorageOptions screen (C1CPOD073).
2. Use the following table to complete the fields on the City and State Storage Options screen.
139CODE-1 Plus User Guide for IBM i
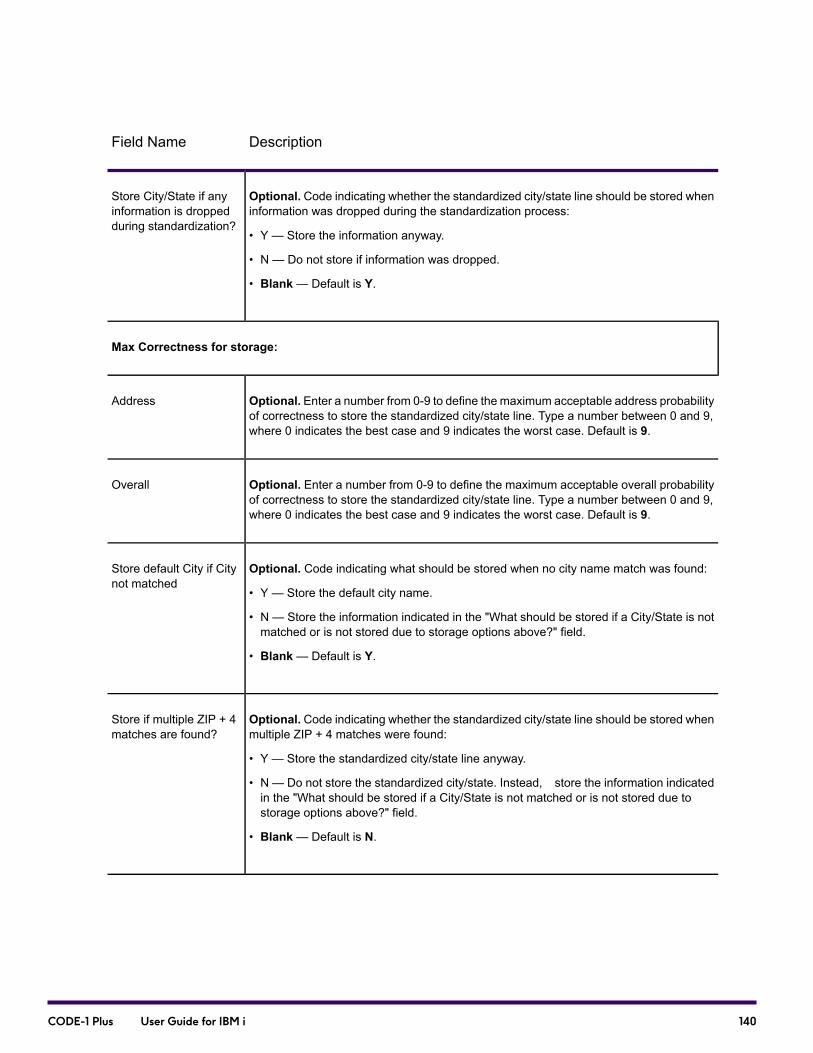
DescriptionField Name
Optional. Code indicating whether the standardized city/state line should be stored wheninformation was dropped during the standardization process:
• Y — Store the information anyway.
• N — Do not store if information was dropped.
• Blank— Default is Y.
Store City/State if anyinformation is droppedduring standardization?
Max Correctness for storage:
Optional. Enter a number from 0-9 to define the maximum acceptable address probabilityof correctness to store the standardized city/state line. Type a number between 0 and 9,where 0 indicates the best case and 9 indicates the worst case. Default is 9.
Address
Optional. Enter a number from 0-9 to define the maximum acceptable overall probabilityof correctness to store the standardized city/state line. Type a number between 0 and 9,where 0 indicates the best case and 9 indicates the worst case. Default is 9.
Overall
Optional. Code indicating what should be stored when no city name match was found:
• Y — Store the default city name.
• N — Store the information indicated in the "What should be stored if a City/State is notmatched or is not stored due to storage options above?" field.
• Blank— Default is Y.
Store default City if Citynot matched
Optional. Code indicating whether the standardized city/state line should be stored whenmultiple ZIP + 4 matches were found:
• Y — Store the standardized city/state line anyway.
• N — Do not store the standardized city/state. Instead, store the information indicatedin the "What should be stored if a City/State is not matched or is not stored due tostorage options above?" field.
• Blank— Default is N.
Store if multiple ZIP + 4matches are found?
140CODE-1 Plus User Guide for IBM i
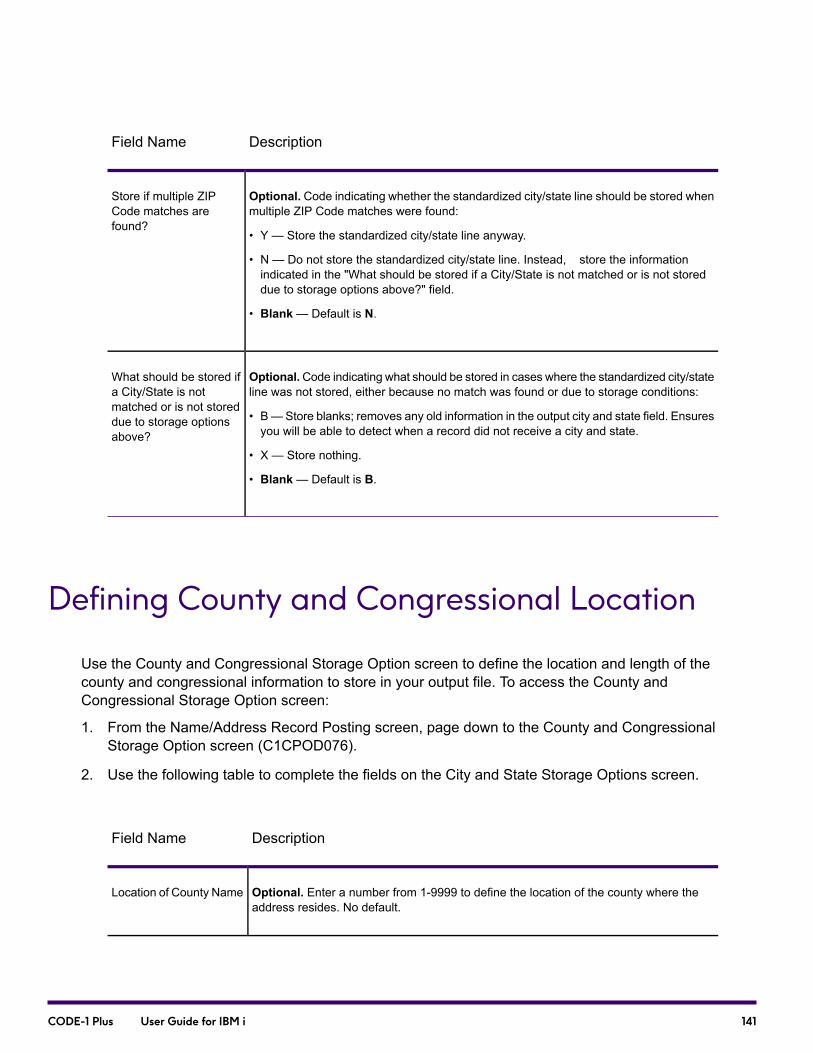
DescriptionField Name
Optional. Code indicating whether the standardized city/state line should be stored whenmultiple ZIP Code matches were found:
• Y — Store the standardized city/state line anyway.
• N — Do not store the standardized city/state line. Instead, store the informationindicated in the "What should be stored if a City/State is not matched or is not storeddue to storage options above?" field.
• Blank— Default is N.
Store if multiple ZIPCode matches arefound?
Optional.Code indicating what should be stored in cases where the standardized city/stateline was not stored, either because no match was found or due to storage conditions:
• B—Store blanks; removes any old information in the output city and state field. Ensuresyou will be able to detect when a record did not receive a city and state.
• X — Store nothing.
• Blank— Default is B.
What should be stored ifa City/State is notmatched or is not storeddue to storage optionsabove?
Defining County and Congressional Location
Use the County and Congressional Storage Option screen to define the location and length of thecounty and congressional information to store in your output file. To access the County andCongressional Storage Option screen:
1. From the Name/Address Record Posting screen, page down to the County and CongressionalStorage Option screen (C1CPOD076).
2. Use the following table to complete the fields on the City and State Storage Options screen.
DescriptionField Name
Optional. Enter a number from 1-9999 to define the location of the county where theaddress resides. No default.
Location of County Name
141CODE-1 Plus User Guide for IBM i
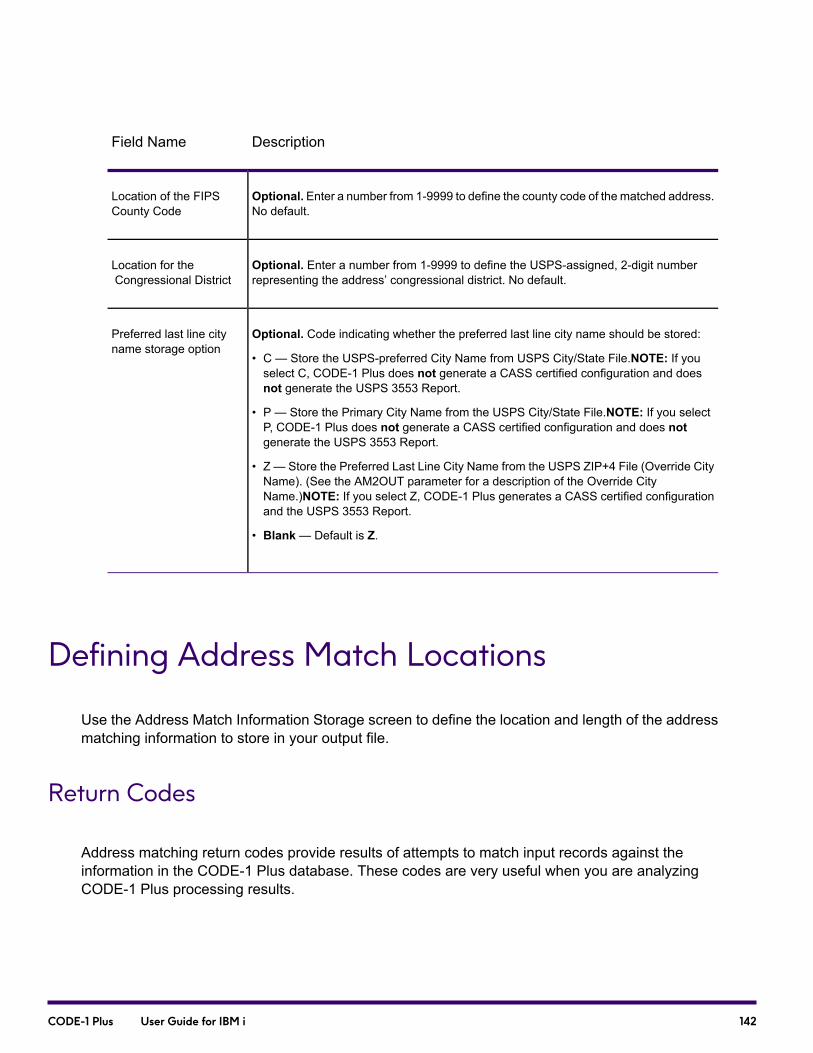
DescriptionField Name
Optional. Enter a number from 1-9999 to define the county code of the matched address.No default.
Location of the FIPSCounty Code
Optional. Enter a number from 1-9999 to define the USPS-assigned, 2-digit numberrepresenting the address’ congressional district. No default.
Location for theCongressional District
Optional. Code indicating whether the preferred last line city name should be stored:
• C — Store the USPS-preferred City Name from USPS City/State File.NOTE: If youselect C, CODE-1 Plus does not generate a CASS certified configuration and doesnot generate the USPS 3553 Report.
• P — Store the Primary City Name from the USPS City/State File.NOTE: If you selectP, CODE-1 Plus does not generate a CASS certified configuration and does notgenerate the USPS 3553 Report.
• Z — Store the Preferred Last Line City Name from the USPS ZIP+4 File (Override CityName). (See the AM2OUT parameter for a description of the Override CityName.)NOTE: If you select Z, CODE-1 Plus generates a CASS certified configurationand the USPS 3553 Report.
• Blank— Default is Z.
Preferred last line cityname storage option
Defining Address Match Locations
Use the Address Match Information Storage screen to define the location and length of the addressmatching information to store in your output file.
Return Codes
Address matching return codes provide results of attempts to match input records against theinformation in the CODE-1 Plus database. These codes are very useful when you are analyzingCODE-1 Plus processing results.
142CODE-1 Plus User Guide for IBM i
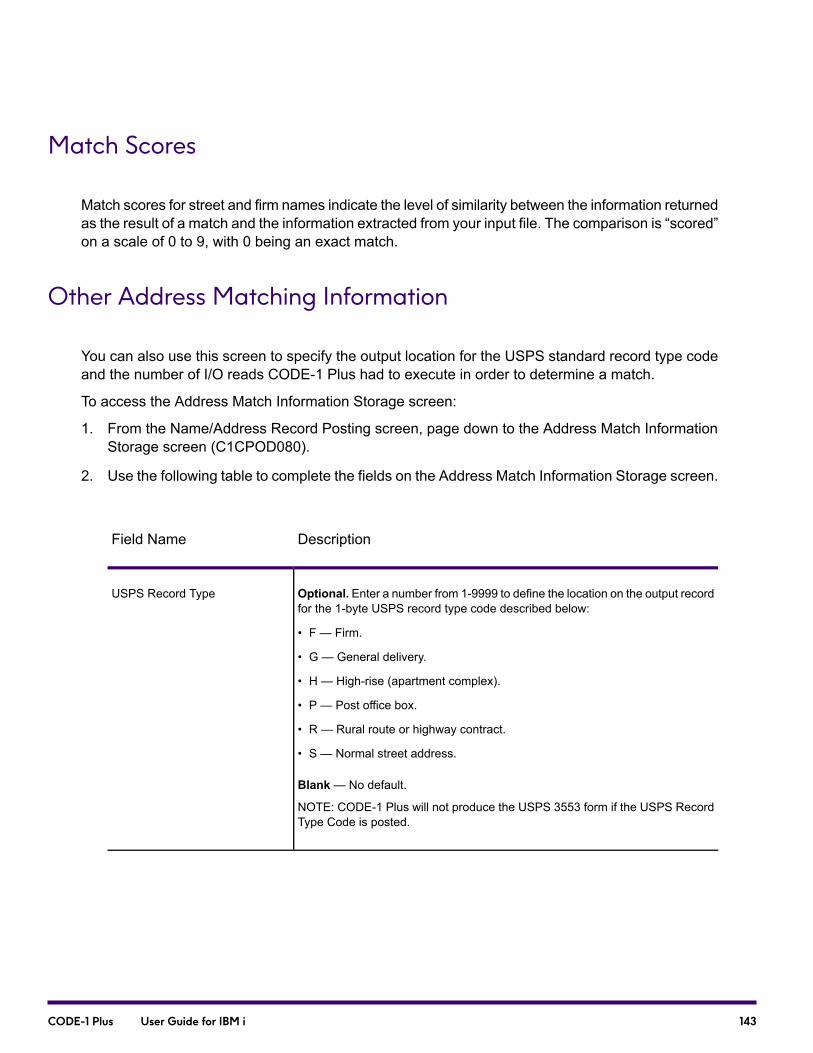
Match Scores
Match scores for street and firm names indicate the level of similarity between the information returnedas the result of a match and the information extracted from your input file. The comparison is “scored”on a scale of 0 to 9, with 0 being an exact match.
Other Address Matching Information
You can also use this screen to specify the output location for the USPS standard record type codeand the number of I/O reads CODE-1 Plus had to execute in order to determine a match.
To access the Address Match Information Storage screen:
1. From the Name/Address Record Posting screen, page down to the Address Match InformationStorage screen (C1CPOD080).
2. Use the following table to complete the fields on the Address Match Information Storage screen.
DescriptionField Name
Optional. Enter a number from 1-9999 to define the location on the output recordfor the 1-byte USPS record type code described below:
• F — Firm.
• G — General delivery.
• H — High-rise (apartment complex).
• P — Post office box.
• R — Rural route or highway contract.
• S — Normal street address.
Blank— No default.
NOTE: CODE-1 Plus will not produce the USPS 3553 form if the USPS RecordType Code is posted.
USPS Record Type
143CODE-1 Plus User Guide for IBM i

DescriptionField Name
Optional. Enter a number from 1-9999 to define the location on the output recordfor the 1-byte general return code:
• Blank — Successful address match attempt.
• A — Apartment number missing or not found in database, and anapartment-level match required.
• B — Insufficient (or blank) address information.
• F — Input firm does not match.
• H — House/box range not found on street.
• M — Multiple matches found.
• S — Street name not found in ZIP Code.
• Z — ZIP Code not found in database.
Blank— No default.
General Return Code
Optional. Enter a number from 1-9999 to define the location on the output recordfor the 1-byte directional return code described below:
• Blank — No directional match was found on database.
• D — The directional does not match the database.
• F — The complete directional does not match the database, but its firstcharacter does (for example, N vs. NW).
• N — No directional was found on the input address, but a directional waspresent on the database.
No default.
Directional Return Code
Optional. Enter a number from 1-9999 to define the location on the output recordfor the 1-byte suffix return code described below:
• Blank — No suffixed match was found.
• N — No suffix was found on the input address, but a suffix was present on thedatabase.
• S — The suffix does not match the database.
No default.
Suffix Return Code
144CODE-1 Plus User Guide for IBM i

DescriptionField Name
Optional. Enter a number from 1-9999 to define the location on the output recordfor the 1-byte apartment return code described below:
• Blank—No addressmatch or apartment (or lack thereof matches the database.
• A — The apartment does not match the database.
• N — No apartment was found on the input address, but an apartment waspresent on the database at the street address.
No default.
Apartment Return Code
Optional. Enter a number from 1-9999 to define the location on the output recordfor the 1-byte firm-name return code:
• Blank — No address match or firm-name match was found, or no firm namewas indicated in the input record.
• F — The input firm name does not match the database.
• M—A firm name was present in the input record, but there were no firm nameson the database for the matched address.
No default.
Firm-name Return Code
Optional. Enter a number from 1-9999 to define the location on the output recordfor the 1-byte overall probability of correctness:
• Blank — No match was found.
• 0 — The match is exact.
• 1-8 — The match has an intermediate probability of correctness on a slidingscale.
• 9 — The match is least likely to be correct.
No default.
Overall Probable CorrectnessCode
Optional. Enter a number from 1-9999 to define the location on the output recordfor the type of alternate address scheme to use to obtain a match:
• Blank — No alternate address scheme used.
• D — Delivery point alternate logic used.
• S — Small town default logic used.
U — Unique ZIP Code.No default.
No default.
Alternate Address SchemeIndicator
145CODE-1 Plus User Guide for IBM i

DescriptionField Name
Optional. Enter a number from 1-9999 to define the location on the output recordfor the 1-byte street-name match score.
• Blank — No match was found.
• 0 — The match is exact.
• 1-8 — The match has an intermediate probability of correctness on a slidingscale.
• 9 — The match is least likely to be correct.
No default.
Street-name Match Score
Optional. Enter a number from 1-9999 to define the location on the output recordfor the 1-byte firm-name match score.
• Blank — No match was found.
• 0 — The match is exact.
• 1-8 — The match has an intermediate probability of correctness on a slidingscale.
• 9 — The match is least likely to be correct.
No default.
Firm-name Match Score
Optional. Enter a number from 1-9999 to define the location on the output recordfor the 1-byte address probability of correctness.
• Blank — No match was found.
• 0 — The match is exact.
• 1-8 — The match has an intermediate probability of correctness on a slidingscale.
• 9 — The match is least likely to be correct.
No default.
Address Probable CorrectnessCode
146CODE-1 Plus User Guide for IBM i
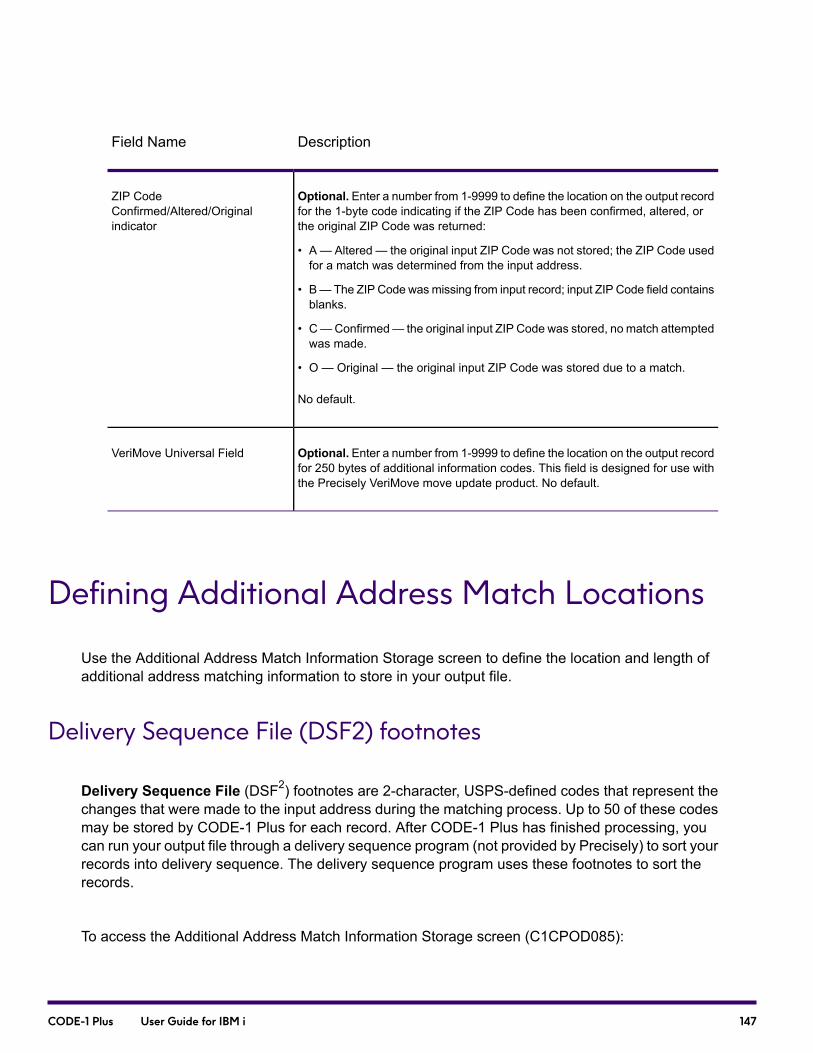
DescriptionField Name
Optional. Enter a number from 1-9999 to define the location on the output recordfor the 1-byte code indicating if the ZIP Code has been confirmed, altered, orthe original ZIP Code was returned:
• A — Altered — the original input ZIP Code was not stored; the ZIP Code usedfor a match was determined from the input address.
• B—The ZIP Code wasmissing from input record; input ZIP Code field containsblanks.
• C—Confirmed— the original input ZIP Code was stored, no match attemptedwas made.
• O — Original — the original input ZIP Code was stored due to a match.
No default.
ZIP CodeConfirmed/Altered/Originalindicator
Optional. Enter a number from 1-9999 to define the location on the output recordfor 250 bytes of additional information codes. This field is designed for use withthe Precisely VeriMove move update product. No default.
VeriMove Universal Field
Defining Additional Address Match Locations
Use the Additional Address Match Information Storage screen to define the location and length ofadditional address matching information to store in your output file.
Delivery Sequence File (DSF2) footnotes
Delivery Sequence File (DSF2) footnotes are 2-character, USPS-defined codes that represent thechanges that were made to the input address during the matching process. Up to 50 of these codesmay be stored by CODE-1 Plus for each record. After CODE-1 Plus has finished processing, youcan run your output file through a delivery sequence program (not provided by Precisely) to sort yourrecords into delivery sequence. The delivery sequence program uses these footnotes to sort therecords.
To access the Additional Address Match Information Storage screen (C1CPOD085):
147CODE-1 Plus User Guide for IBM i
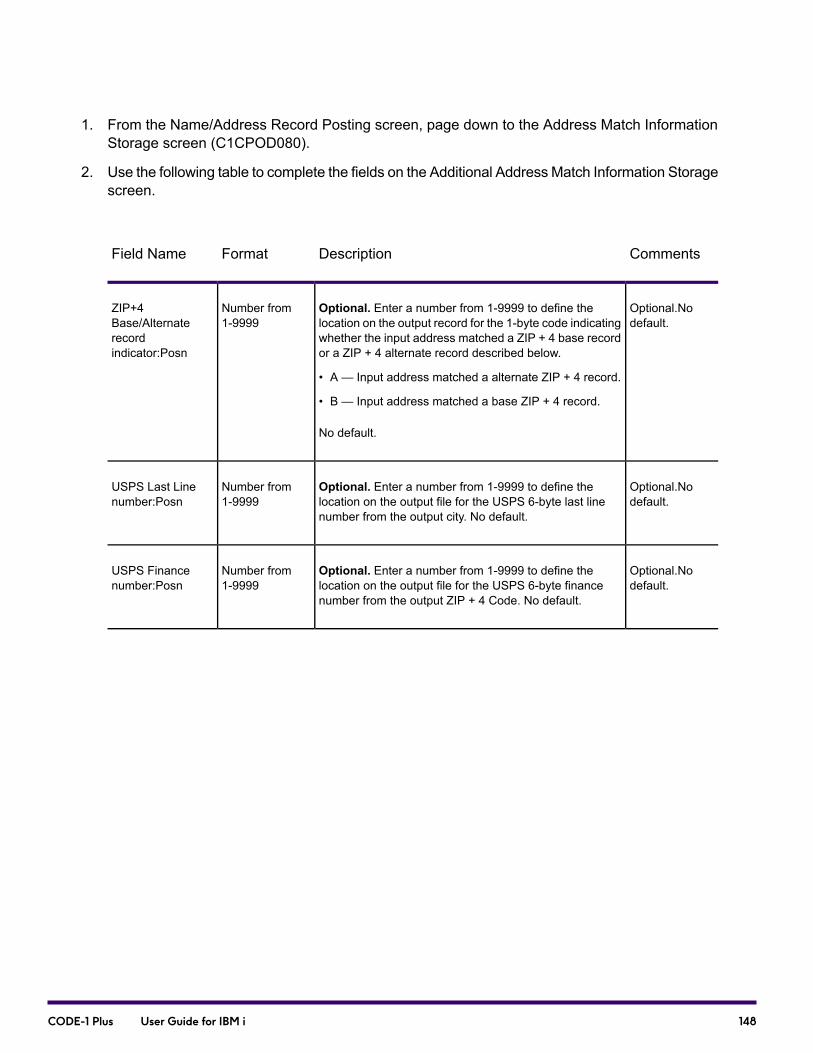
1. From the Name/Address Record Posting screen, page down to the Address Match InformationStorage screen (C1CPOD080).
2. Use the following table to complete the fields on the Additional Address Match Information Storagescreen.
CommentsDescriptionFormatField Name
Optional.Nodefault.
Optional. Enter a number from 1-9999 to define thelocation on the output record for the 1-byte code indicatingwhether the input address matched a ZIP + 4 base recordor a ZIP + 4 alternate record described below.
• A — Input address matched a alternate ZIP + 4 record.
• B — Input address matched a base ZIP + 4 record.
No default.
Number from1-9999
ZIP+4Base/Alternaterecordindicator:Posn
Optional.Nodefault.
Optional. Enter a number from 1-9999 to define thelocation on the output file for the USPS 6-byte last linenumber from the output city. No default.
Number from1-9999
USPS Last Linenumber:Posn
Optional.Nodefault.
Optional. Enter a number from 1-9999 to define thelocation on the output file for the USPS 6-byte financenumber from the output ZIP + 4 Code. No default.
Number from1-9999
USPS Financenumber:Posn
148CODE-1 Plus User Guide for IBM i
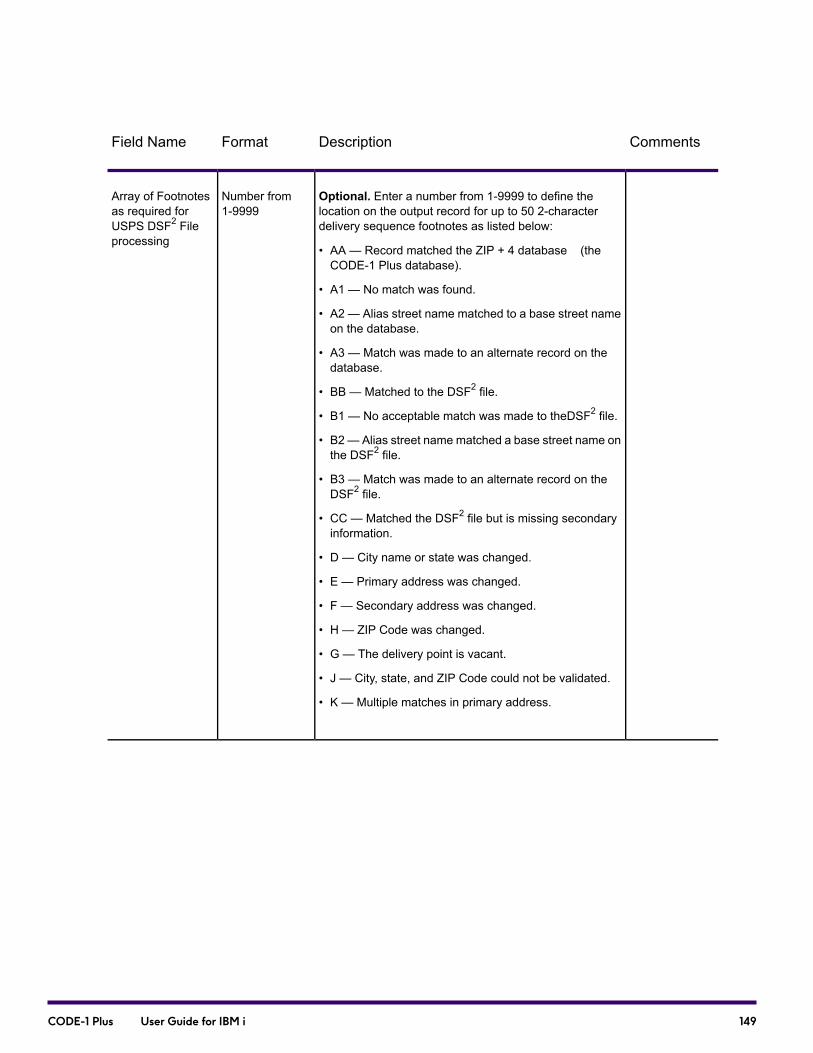
CommentsDescriptionFormatField Name
Optional. Enter a number from 1-9999 to define thelocation on the output record for up to 50 2-characterdelivery sequence footnotes as listed below:
• AA — Record matched the ZIP + 4 database (theCODE-1 Plus database).
• A1 — No match was found.
• A2 — Alias street name matched to a base street nameon the database.
• A3 — Match was made to an alternate record on thedatabase.
• BB — Matched to the DSF2 file.
• B1 — No acceptable match was made to theDSF2 file.
• B2— Alias street name matched a base street name onthe DSF2 file.
• B3 — Match was made to an alternate record on theDSF2 file.
• CC — Matched the DSF2 file but is missing secondaryinformation.
• D — City name or state was changed.
• E — Primary address was changed.
• F — Secondary address was changed.
• H — ZIP Code was changed.
• G — The delivery point is vacant.
• J — City, state, and ZIP Code could not be validated.
• K — Multiple matches in primary address.
Number from1-9999
Array of Footnotesas required forUSPS DSF2 Fileprocessing
149CODE-1 Plus User Guide for IBM i

CommentsDescriptionFormatField Name
K1 Multiple matches due to missing or incorrectdirectionals.
K2 Multiple matches due to missing or incorrect suffix.
G Delivery point is vacant.
H Input ZIP Code was changed.
I Input address could not be parsed.
J Input city, state, and ZIP Code could not be validated.
K Multiple matches were found for the primary address.
K1 Multiple matches due to missing or incorrectdirectionals.
K2 Multiple matches due to missing or incorrect suffixes.
L Multiple matches were found in the secondary address.
M1 Input street number was missing.
M2 Address was not found on the database.
M3 No such primary number.
M4 Firm name not matched.
N1 Secondary address number was missing.
N2 Secondary address number was not found on thedatabase.
P1 Rural route or highway contact box number wasmissing.
P2 Rural route or highway contact box number was notfound on the database.
Q1 P.O. Box number was missing.
Q2 P.O. Box number was not found on the database.
No default.
NOTE: CODE-1 Plus uses the entire 100-byte array,back-filling with spaces as necessary.
Array of Footnotesas required forUSPS DSF2 Fileprocessing-continued
150CODE-1 Plus User Guide for IBM i

Defining Extra Data Locations
Use the Extra Data Storage screen (C1CPOD090) to define the location and length of the additionalinput data and unmatched data to store in your output file. To access the Extra Data Storage screen:
1. From the Name/Address Record Posting screen, page down to the Extra Data Storage screen(C1CPOD090).
2. Use the following table to complete the fields on the Extra Data Storage screen.
DescriptionField Name
Optional. A1-byte character that defines the format of the extra data in the output record.
This field defines how two types of extra data display in the output record.
• Additional input data - Any information that is defined on the input address lines but is not sentto the matcher for processing is identified as additional input data.
• Unmatched data - Any information passed to the matcher that is not used in the matchingprocess is identified as unmatched data.
Enter one of the following codes:
• F - Fixed length format. Extra data will be posted “as is” in eleven output fields:
• Six 100-byte length fields will contain additional input data (information that is defined on theinput address lines but is not sent to the matcher for processing).
• Five 100-byte length fields will contain unmatched data (information passed to the matcher thatwas not used in the matching process).
• C - Concatenated format (separated by the character specified in the “For C=Concatenated,specify Field Separator” field on this screen):Additional input data (information that is defined onthe input address lines but is not sent to the matcher for processing) is concatenated and writteninto one field.
No Default.
Format of Extra Data
Optional. If you specified C (Concatenated) in the “Format of Extra Data” field, specify a characterto separate the additional input data or the extra data from the matcher (unmatched data). Defaultis semicolon “;”.
ForC=Concatenated,Specify FieldSeparator
151CODE-1 Plus User Guide for IBM i
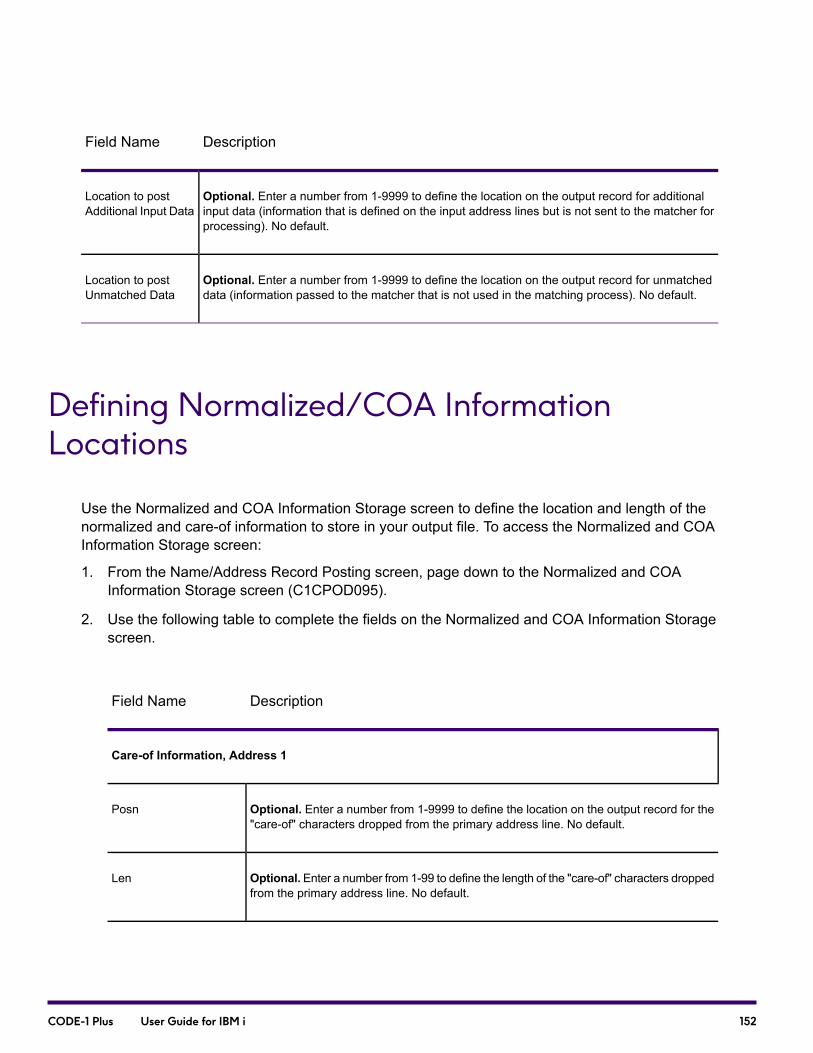
DescriptionField Name
Optional. Enter a number from 1-9999 to define the location on the output record for additionalinput data (information that is defined on the input address lines but is not sent to the matcher forprocessing). No default.
Location to postAdditional Input Data
Optional. Enter a number from 1-9999 to define the location on the output record for unmatcheddata (information passed to the matcher that is not used in the matching process). No default.
Location to postUnmatched Data
Defining Normalized/COA InformationLocations
Use the Normalized and COA Information Storage screen to define the location and length of thenormalized and care-of information to store in your output file. To access the Normalized and COAInformation Storage screen:
1. From the Name/Address Record Posting screen, page down to the Normalized and COAInformation Storage screen (C1CPOD095).
2. Use the following table to complete the fields on the Normalized and COA Information Storagescreen.
DescriptionField Name
Care-of Information, Address 1
Optional. Enter a number from 1-9999 to define the location on the output record for the"care-of" characters dropped from the primary address line. No default.
Posn
Optional.Enter a number from 1-99 to define the length of the "care-of" characters droppedfrom the primary address line. No default.
Len
152CODE-1 Plus User Guide for IBM i

DescriptionField Name
Care-of Information, Address 2
Optional. Enter a number from 1-9999 to define the location on the output record for the"care-of" characters dropped from the secondary address line. No default.
Posn
Optional.Enter a number from 1-99 to define the length of the "care-of" characters droppedfrom the secondary address line. No default.
Len
Normalized Address
Optional. Condition under which the normalized primary address line should be stored:
• A — Store for all records.
• X — Store only when standardized address is not stored.
• D — Store dropped dual address from matched address.
• Blank— Default is X.
Condition
Optional. Enter a number from 1-9999 to define the location on the output record for thenormalized primary address line. No default.
Posn
Optional. Enter a number from 1-99 to define the length of the normalized primary addressline. No default.
Len
Normalized Address 2
Optional.Condition under which the normalized secondary address line should be stored:
• A — Store for all records.
• X — Store only when standardized address is not stored.
• D— Store dropped dual address from matched address.
• Blank— Default is X.
Condition
153CODE-1 Plus User Guide for IBM i

DescriptionField Name
Optional. Enter a number from 1-9999 to define the location on the output record for thenormalized secondary address line. No default.
Posn
Optional. Enter a number from 1-99 to define the length of the normalized secondaryaddress line. No default.
Len
Optional.Code indicating whether all address types or only selected address types shouldbe normalized. The selected address types are “GENERAL DELIVERY” keywords, POBOX keywords, and RR/HC keywords.
• Y — Normalize specified address line regardless of address type.
• N — Normalize select address types otherwise return input.
• Blank— Default is Y.
Normalized All AddressTypes
Defining Line of Travel Locations
Use the Line of Travel Storage screen to define the location and length of the Line of Travel informationto store in your output file. To access the Line of Travel Storage screen.
1. From the Name/Address Record Posting screen, page down to the Line of Travel Storage screen(C1CPOD100).
2. Use the following table to complete the fields on the Line of Travel Storage screen.
154CODE-1 Plus User Guide for IBM i

DescriptionField Name
Optional. Enter a number from 1-9999 to define the location on the output record forthe 1-byte LOT return code described below:
• 9 — ZIP + 4 matched the LOT master file.
• C — Call to LOT matcher failed.
• D — Default coded. ZIP + 4 not found in the LOT master file.
• F — Master file access failure.
• V — Incompatible Master file.
• Blank — ZIP Code and/or ZIP + 4 was neither numeric nor zeros.
No default.
Location for LOT returncode
Optional. Enter a number from 1-9999 to define the location on the output record forthe 4-byte numeric portion of the Line of Travel Code. No default.
Location for Line ofTravel Code (numericportion)
Optional. Enter a number from 1-9999 to define the location on the output record forthe 1-byte alphabetic USPS sequence code. No default.
Location for Line ofTravel Code (alphabeticportion)
Optional. Enter a number from 1-9999 to define the location on the output record forthe 2-byte alternate sequence code used for sortation purposes. No default.
Location for Alternatesequence code(alphanumeric format)
Optional. Enter a number from 1-9999 to define the location on the output record forthe 1-byte alternate sequence code used for sortation purposes. No default.
Location for Alternatesequence code(hexadecimal format)
Optional. Code indicating what should be stored in cases where a LOT code was notdetermined.
• B — Store blanks.
• X — Store nothing.
• Blank— Default is B.
What should be storedif LOT Code is notavailable?
155CODE-1 Plus User Guide for IBM i
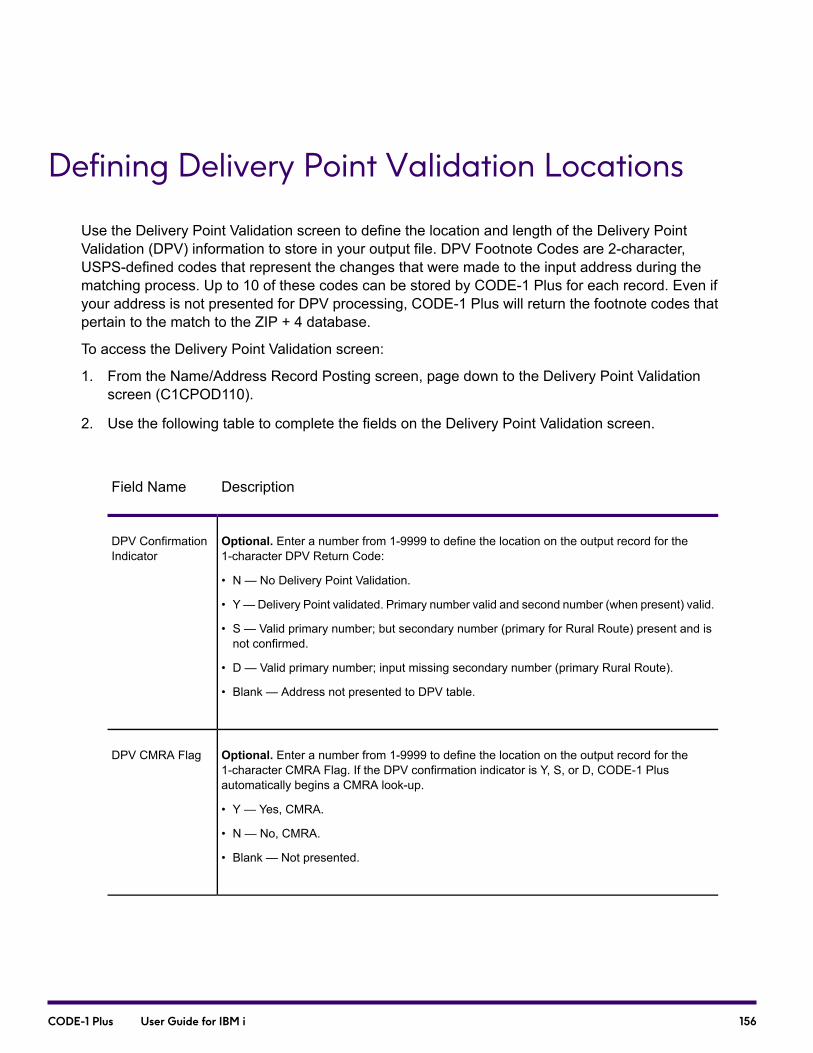
Defining Delivery Point Validation Locations
Use the Delivery Point Validation screen to define the location and length of the Delivery PointValidation (DPV) information to store in your output file. DPV Footnote Codes are 2-character,USPS-defined codes that represent the changes that were made to the input address during thematching process. Up to 10 of these codes can be stored by CODE-1 Plus for each record. Even ifyour address is not presented for DPV processing, CODE-1 Plus will return the footnote codes thatpertain to the match to the ZIP + 4 database.
To access the Delivery Point Validation screen:
1. From the Name/Address Record Posting screen, page down to the Delivery Point Validationscreen (C1CPOD110).
2. Use the following table to complete the fields on the Delivery Point Validation screen.
DescriptionField Name
Optional. Enter a number from 1-9999 to define the location on the output record for the1-character DPV Return Code:
• N — No Delivery Point Validation.
• Y—Delivery Point validated. Primary number valid and second number (when present) valid.
• S — Valid primary number; but secondary number (primary for Rural Route) present and isnot confirmed.
• D — Valid primary number; input missing secondary number (primary Rural Route).
• Blank — Address not presented to DPV table.
DPV ConfirmationIndicator
Optional. Enter a number from 1-9999 to define the location on the output record for the1-character CMRA Flag. If the DPV confirmation indicator is Y, S, or D, CODE-1 Plusautomatically begins a CMRA look-up.
• Y — Yes, CMRA.
• N — No, CMRA.
• Blank — Not presented.
DPV CMRA Flag
156CODE-1 Plus User Guide for IBM i
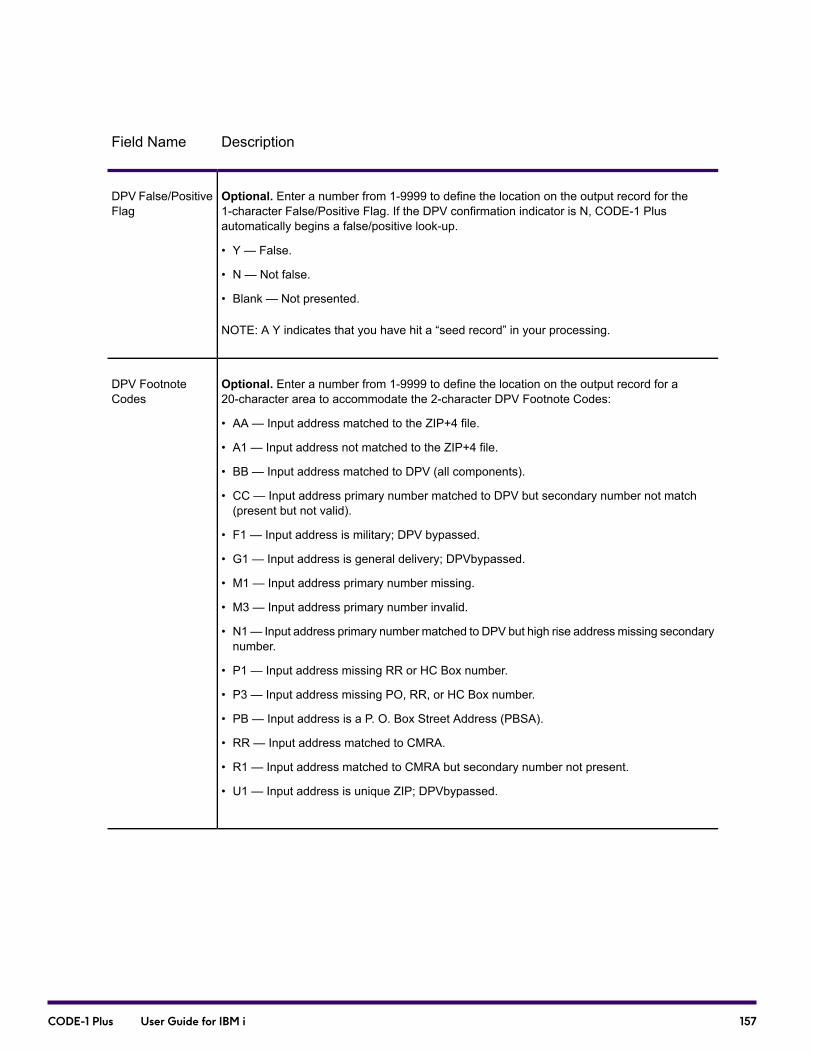
DescriptionField Name
Optional. Enter a number from 1-9999 to define the location on the output record for the1-character False/Positive Flag. If the DPV confirmation indicator is N, CODE-1 Plusautomatically begins a false/positive look-up.
• Y — False.
• N — Not false.
• Blank — Not presented.
NOTE: A Y indicates that you have hit a “seed record” in your processing.
DPV False/PositiveFlag
Optional. Enter a number from 1-9999 to define the location on the output record for a20-character area to accommodate the 2-character DPV Footnote Codes:
• AA — Input address matched to the ZIP+4 file.
• A1 — Input address not matched to the ZIP+4 file.
• BB — Input address matched to DPV (all components).
• CC — Input address primary number matched to DPV but secondary number not match(present but not valid).
• F1 — Input address is military; DPV bypassed.
• G1 — Input address is general delivery; DPVbypassed.
• M1 — Input address primary number missing.
• M3 — Input address primary number invalid.
• N1— Input address primary number matched to DPV but high rise address missing secondarynumber.
• P1 — Input address missing RR or HC Box number.
• P3 — Input address missing PO, RR, or HC Box number.
• PB — Input address is a P. O. Box Street Address (PBSA).
• RR — Input address matched to CMRA.
• R1 — Input address matched to CMRA but secondary number not present.
• U1 — Input address is unique ZIP; DPVbypassed.
DPV FootnoteCodes
157CODE-1 Plus User Guide for IBM i
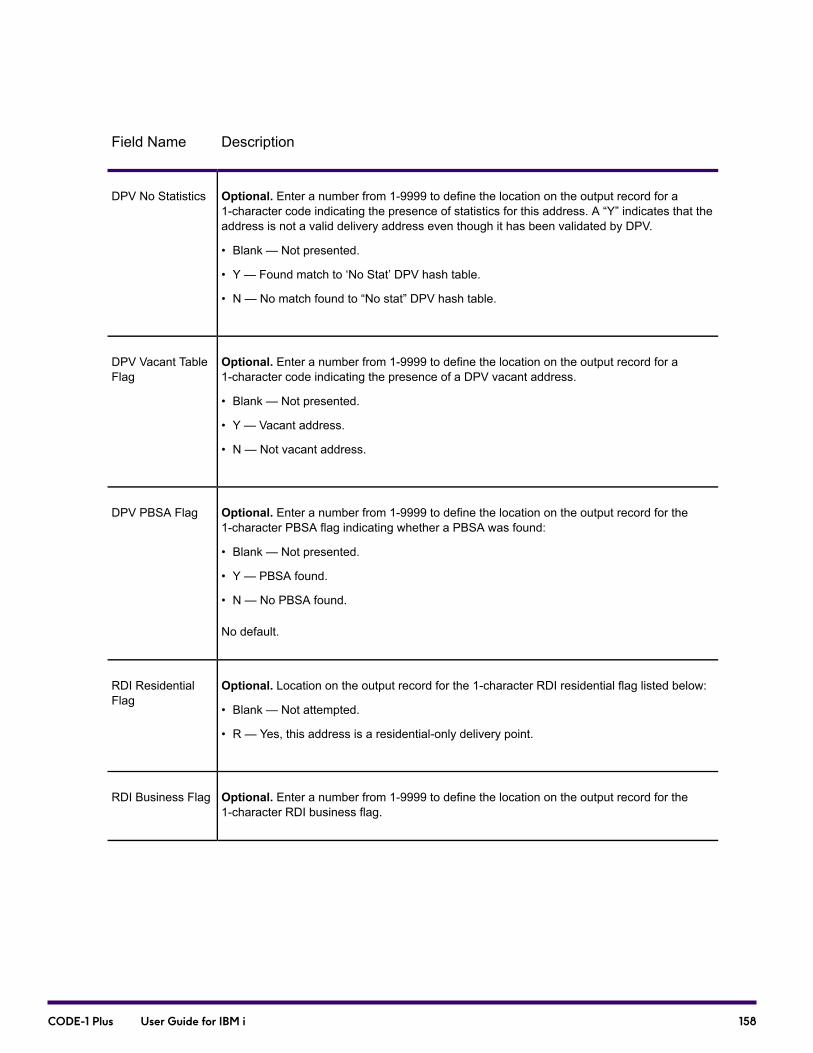
DescriptionField Name
Optional. Enter a number from 1-9999 to define the location on the output record for a1-character code indicating the presence of statistics for this address. A “Y” indicates that theaddress is not a valid delivery address even though it has been validated by DPV.
• Blank — Not presented.
• Y — Found match to ‘No Stat’ DPV hash table.
• N — No match found to “No stat” DPV hash table.
DPV No Statistics
Optional. Enter a number from 1-9999 to define the location on the output record for a1-character code indicating the presence of a DPV vacant address.
• Blank — Not presented.
• Y — Vacant address.
• N — Not vacant address.
DPV Vacant TableFlag
Optional. Enter a number from 1-9999 to define the location on the output record for the1-character PBSA flag indicating whether a PBSA was found:
• Blank — Not presented.
• Y — PBSA found.
• N — No PBSA found.
No default.
DPV PBSA Flag
Optional. Location on the output record for the 1-character RDI residential flag listed below:
• Blank — Not attempted.
• R — Yes, this address is a residential-only delivery point.
RDI ResidentialFlag
Optional. Enter a number from 1-9999 to define the location on the output record for the1-character RDI business flag.
RDI Business Flag
158CODE-1 Plus User Guide for IBM i
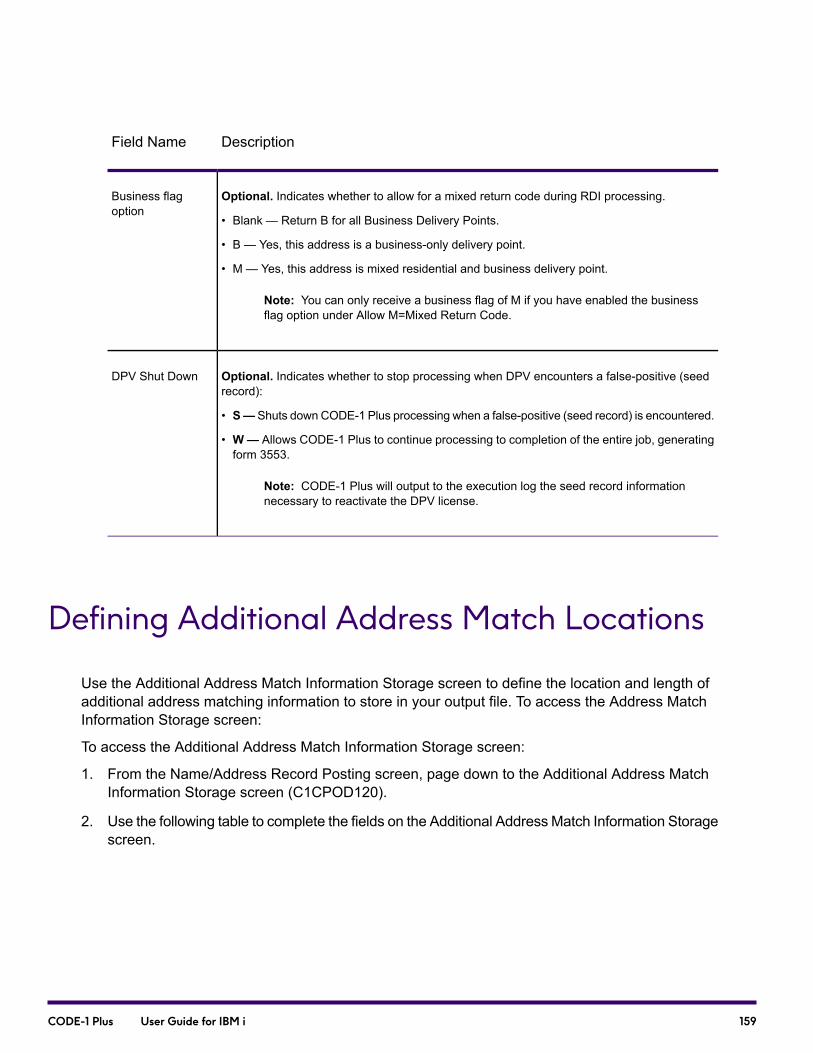
DescriptionField Name
Optional. Indicates whether to allow for a mixed return code during RDI processing.
• Blank — Return B for all Business Delivery Points.
• B — Yes, this address is a business-only delivery point.
• M — Yes, this address is mixed residential and business delivery point.
Note: You can only receive a business flag of M if you have enabled the businessflag option under Allow M=Mixed Return Code.
Business flagoption
Optional. Indicates whether to stop processing when DPV encounters a false-positive (seedrecord):
• S— Shuts down CODE-1 Plus processing when a false-positive (seed record) is encountered.
• W— Allows CODE-1 Plus to continue processing to completion of the entire job, generatingform 3553.
Note: CODE-1 Plus will output to the execution log the seed record informationnecessary to reactivate the DPV license.
DPV Shut Down
Defining Additional Address Match Locations
Use the Additional Address Match Information Storage screen to define the location and length ofadditional address matching information to store in your output file. To access the Address MatchInformation Storage screen:
To access the Additional Address Match Information Storage screen:
1. From the Name/Address Record Posting screen, page down to the Additional Address MatchInformation Storage screen (C1CPOD120).
2. Use the following table to complete the fields on the Additional Address Match Information Storagescreen.
159CODE-1 Plus User Guide for IBM i
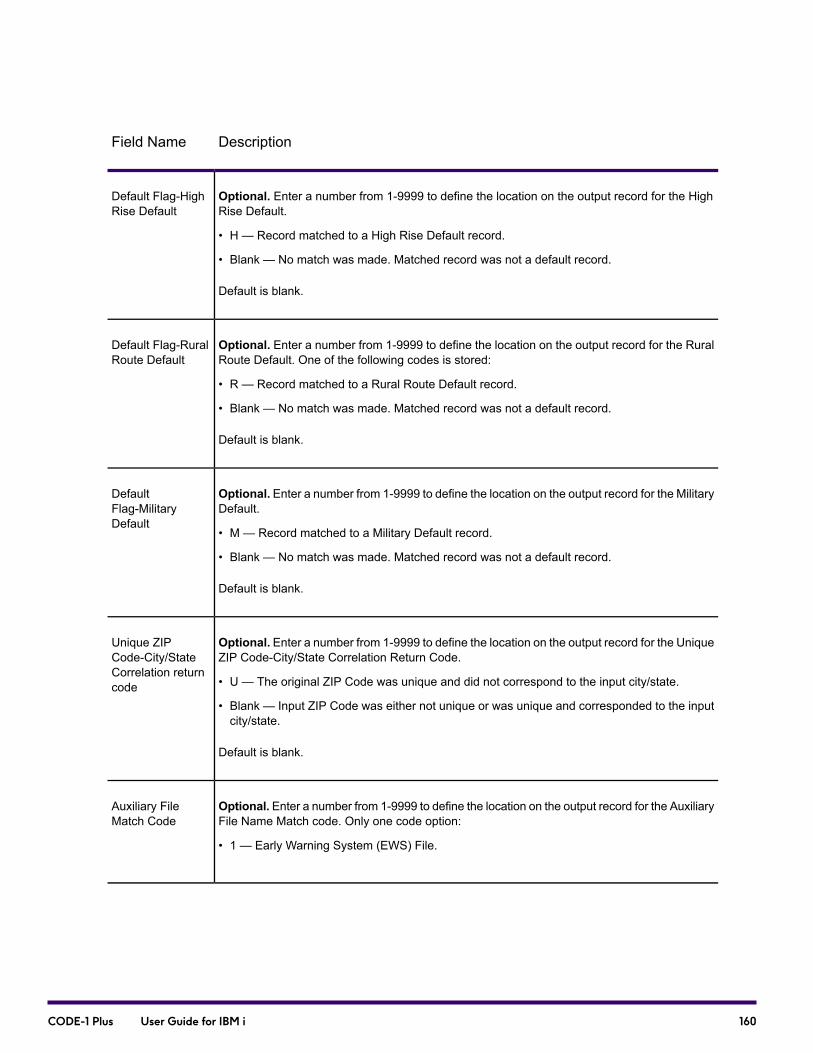
DescriptionField Name
Optional. Enter a number from 1-9999 to define the location on the output record for the HighRise Default.
• H — Record matched to a High Rise Default record.
• Blank — No match was made. Matched record was not a default record.
Default is blank.
Default Flag-HighRise Default
Optional. Enter a number from 1-9999 to define the location on the output record for the RuralRoute Default. One of the following codes is stored:
• R — Record matched to a Rural Route Default record.
• Blank — No match was made. Matched record was not a default record.
Default is blank.
Default Flag-RuralRoute Default
Optional. Enter a number from 1-9999 to define the location on the output record for the MilitaryDefault.
• M — Record matched to a Military Default record.
• Blank — No match was made. Matched record was not a default record.
Default is blank.
DefaultFlag-MilitaryDefault
Optional. Enter a number from 1-9999 to define the location on the output record for the UniqueZIP Code-City/State Correlation Return Code.
• U — The original ZIP Code was unique and did not correspond to the input city/state.
• Blank — Input ZIP Code was either not unique or was unique and corresponded to the inputcity/state.
Default is blank.
Unique ZIPCode-City/StateCorrelation returncode
Optional. Enter a number from 1-9999 to define the location on the output record for the AuxiliaryFile Name Match code. Only one code option:
• 1 — Early Warning System (EWS) File.
Auxiliary FileMatch Code
160CODE-1 Plus User Guide for IBM i

DescriptionField Name
Optional. Enter a number from 1-9999 to define the location on the output record for theSecondary Component Processing Indicator.
• Blank — No multiple secondary component logic used.
• E — Exact match.
• S — Multiple Secondary Match logic used.
SecondaryComponentProcessingIndicator
Optional. Enter a number from 1-9999 to define the location on the output record for the OverrideCity Name indicator. Override City Name refers to the city name for the Preferred Last Line Key(PLL) from the USPS ZIP + 4 File. The Default City Name refers to the city name for the PPLKey on the USPS City/State File.
• Blank — Default City Name stored.
• O — Override City Name stored.
Override CityName Indicator
Optional. Enter a number from 1-9999 to define the location on the output record for the Indicatorof Input city type.
• P — Primary city.
• S — Secondary city.
• V — Vanity city.
Override CityName Indicator
Optional. Enter a number from 1-9999 to define the location of the Indicator of military address:
• M — Indicates a military address.
Military AddressIndicator
Enter a number from 1-9999 to define the location on the output record for the Enhanced StreetMatching (ESM) indicator.
• Blank — No ESM performed.
• M — Matched using ESM.
• P — ESM performed but no match found.
Enhanced StreetMatching Indicator
161CODE-1 Plus User Guide for IBM i
DescriptionField Name
Optional. Enter a number from 1-9999 to define the location of the LACSLink process successindicator:
• Blank — No LACS processing occurred.
• A — LACS record match.
• 00 — No match.
• 01 — Found LACS record but ambiguous; multiple addresses were available.
• 02 — Found LACS record but new address failed to convert.
• 14 — Match found LACS record but wouldnot convert.
• 92 — Match with secondary information.
LACSLink ReturnCode
Optional. Enter a number from 1-9999 to define the location of the code that indicates if a tablewas matched:
• Blank — No LACS processing occurred.
• F — LACS seed violation has occurred.
• N — No match occurred or a new address would not convert at runtime.
• S — Input address contained both primary and secondary information but match occurredusing only primary information.
• Y — Full match occurred.
LACSLink Flag
Optional. Enter a number from 1-9999 to define the location for the Street Default flag:
• Blank — Record matched is not a Street Default record.
• S — Record is matched to a Street Default record.
No default.
Street DefaultIndicator
Reformat Output Record Screen
Use theReformat Output Record screen (C1CPMO13) to reformat the pieces of your output recordsbefore the record is written to the output file:
162CODE-1 Plus User Guide for IBM i
1. From theWorkWith Jobs screen, use F12 to select the job for defining output. The Define/SubmitCODE-1 Plus Job screen displays.
2. Select Reformat Output Record.
3. Use the following table to complete the fields on the Reformat Output Record screen(C1CPMO13).
DescriptionField Name
Required. Enter 3-4 alphanumeric characters to specify the location in the work area of theinformation to be copied. Optionally, you can enter one of the following codes to copy one ofthe following types of generic information to the target location:
• SPC — Spaces.
• X00 — Binary zeros.
• ZRO — Character zeros.
• Blank — No default.
Source Field
Required. Enter a number from 1-999 to specify the length of the information to be copied tothe target location. No default.
Length
Required. Enter a number from 1-9999 to specify the location in the input array to which youwant the source information copied. No default.
Target Field
163CODE-1 Plus User Guide for IBM i
7 - Running Jobs
In this section
Component Overview.............................................................................165Files and File Names..............................................................................166Exit Routines..........................................................................................167Limiting the Number of Records Processed...........................................168Function Keys.........................................................................................169Submit CODE-1 Plus Job Screen (C1CPSB01).....................................170Submit CODE-1 Plus Job Screen 2 (C1CPSB02)..................................173Submit CODE-1 Plus Job Screen 3 (C1CPSB03)..................................177Submit CODE-1 Plus Job Screen 4 (C1CPSB04)..................................182Submit CODE-1 Plus Job Screen 5 (C1CPSB05)..................................189Submit CODE-1 Plus Job Screen 6 (C1CPSB06)..................................192Submit CODE-1 Plus Job Screen 7 (C1CPSB07) .................................194Submit CODE-1 Plus Job Screen 8 (C1CPSB08) .................................195Submit CODE-1 Plus Job Screen 9 (C1CPSB09)..................................197
CODE-1 Plus User Guide for IBM i
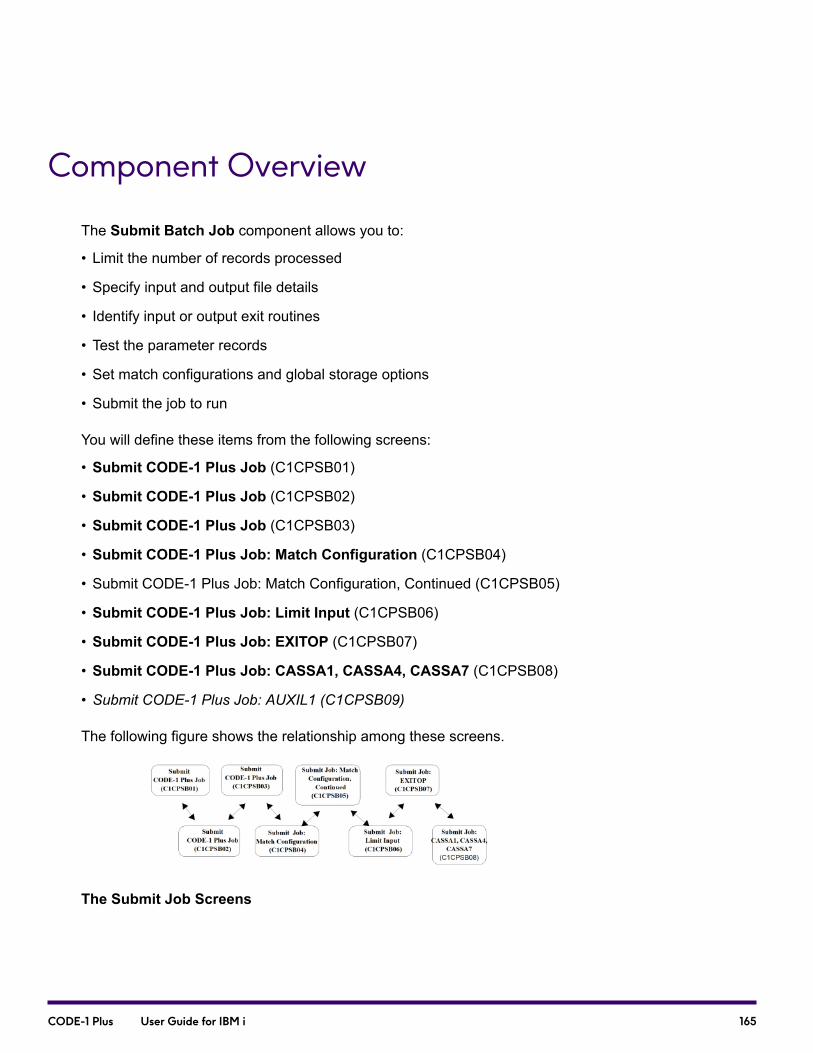
Component Overview
The Submit Batch Job component allows you to:
• Limit the number of records processed
• Specify input and output file details
• Identify input or output exit routines
• Test the parameter records
• Set match configurations and global storage options
• Submit the job to run
You will define these items from the following screens:
• Submit CODE-1 Plus Job (C1CPSB01)
• Submit CODE-1 Plus Job (C1CPSB02)
• Submit CODE-1 Plus Job (C1CPSB03)
• Submit CODE-1 Plus Job: Match Configuration (C1CPSB04)
• Submit CODE-1 Plus Job: Match Configuration, Continued (C1CPSB05)
• Submit CODE-1 Plus Job: Limit Input (C1CPSB06)
• Submit CODE-1 Plus Job: EXITOP (C1CPSB07)
• Submit CODE-1 Plus Job: CASSA1, CASSA4, CASSA7 (C1CPSB08)
• Submit CODE-1 Plus Job: AUXIL1 (C1CPSB09)
The following figure shows the relationship among these screens.
The Submit Job Screens
165CODE-1 Plus User Guide for IBM i
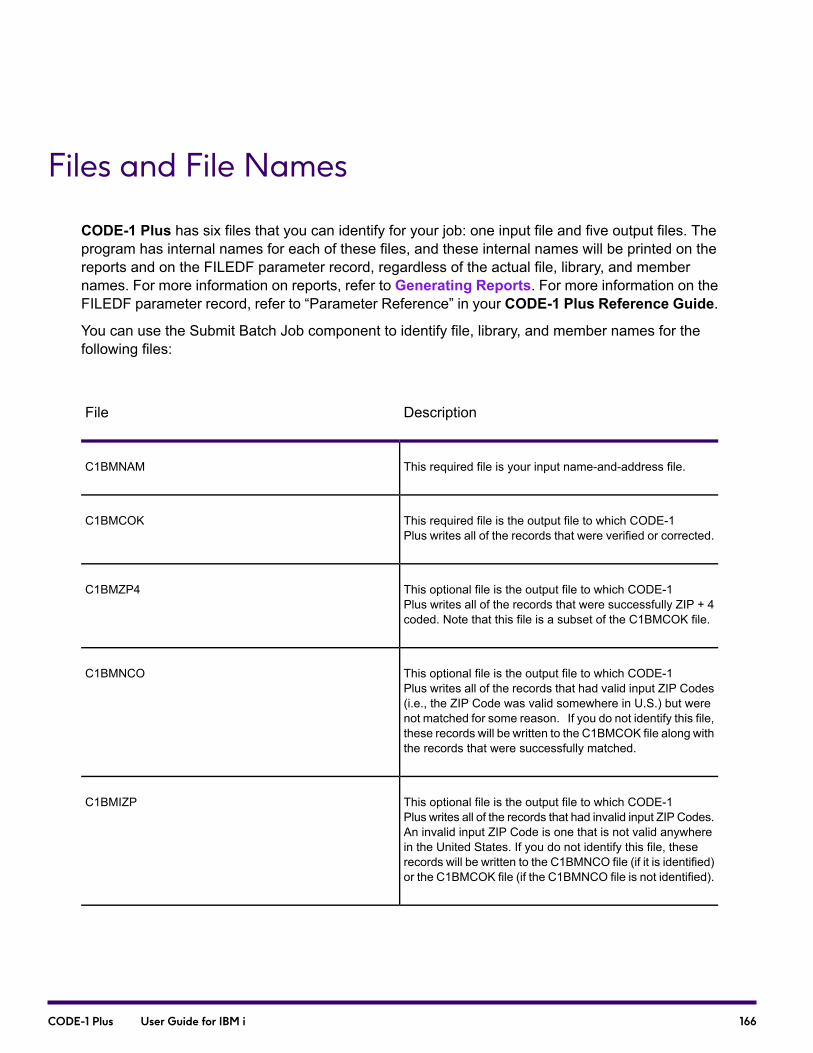
Files and File Names
CODE-1 Plus has six files that you can identify for your job: one input file and five output files. Theprogram has internal names for each of these files, and these internal names will be printed on thereports and on the FILEDF parameter record, regardless of the actual file, library, and membernames. For more information on reports, refer to Generating Reports. For more information on theFILEDF parameter record, refer to “Parameter Reference” in your CODE-1 Plus Reference Guide.
You can use the Submit Batch Job component to identify file, library, and member names for thefollowing files:
DescriptionFile
This required file is your input name-and-address file.C1BMNAM
This required file is the output file to which CODE-1Plus writes all of the records that were verified or corrected.
C1BMCOK
This optional file is the output file to which CODE-1Plus writes all of the records that were successfully ZIP + 4coded. Note that this file is a subset of the C1BMCOK file.
C1BMZP4
This optional file is the output file to which CODE-1Plus writes all of the records that had valid input ZIP Codes(i.e., the ZIP Code was valid somewhere in U.S.) but werenot matched for some reason. If you do not identify this file,these records will be written to the C1BMCOK file along withthe records that were successfully matched.
C1BMNCO
This optional file is the output file to which CODE-1Plus writes all of the records that had invalid input ZIP Codes.An invalid input ZIP Code is one that is not valid anywherein the United States. If you do not identify this file, theserecords will be written to the C1BMNCO file (if it is identified)or the C1BMCOK file (if the C1BMNCO file is not identified).
C1BMIZP
166CODE-1 Plus User Guide for IBM i

DescriptionFile
This optional file is the output file to which CODE-1 Pluswrites all of the output statistics. These records are fixedlength.
C1BMSTA
Exit Routines
The Submit Batch Job component allows you to specify the:
• Input exit routine that CODE-1 Plus should call each time it is ready to read a record from yourinput name-and-address file.
and
• Output exit routines that CODE-1 Plus should call each time it is ready to write a record to one ofyour output files.
If you are using an input exit routine, instead of reading the record, CODE-1 Plus calls your exitroutine and waits for the exit routine to pass a record back. If you are using an output exit routine,instead of writing the record to the file, CODE-1 Plus passes the record to the output exit routine.
For example, you might have an input exit routine named CODEIT that adds a special code to arecord. If you want to add that code to each record before the record is passed to CODE-1 Plus, youspecify CODEIT as the name of the exit routine. Then, every time CODE-1 Plus is ready to accepta record, it passes control to CODEIT, which reads the record, adds the code to the record, and thenpasses the record to CODE-1 Plus so that CODE-1 Plus may process that record.
When you indicate that CODE-1 Plus should call an exit routine, it will call that exit routine with thefollowing four parameters in the linkage section at each I/O request:
• PARM1: This parameter is a total of 9 bytes, and has two components, as follows:
• Bytes 1-8: The file name (C1BMNAM, C1BMCOK, C1BMNCO, C1BMIZP, or C1BMZP4).
• Byte 9: Function indicator. This byte will contain one of the following codes to tell your programwhat type of processing to perform:
• O — Open the input or output file.
• R — Read a record from the input file.
• W — Write a record to the output file.
167CODE-1 Plus User Guide for IBM i
• C — Close the input or output file.
• PARM2: This parameter is 4-digits long and packed into a 3-byte field (COBOL “PIC S9(5)COMP-3”). This parameter must be filled in by your exit routine if byte 9 of PARM1 is O or R. Whenbyte 9 of PARM1 is R, the input exit routine signals the end of the file by setting this to 0.
• PARM3: This parameter contains the output record to be passed fromCODE-1 Plus to your program(when EXITFC is W), or the input record to be passed from your program to CODE-1 Plus (whenEXITFC is R). The length of this parameter will be the length specified by the exit routine in PARM2(maximum of 9999).
• PARM4: This parameter contains the image of your FILEDF parameter record, and is 80 bytes inlength.
Limiting the Number of Records Processed
There are five ways to limit the number of records CODE-1 Plus processes:
1. Restrict processing to records with ZIP Codes that fall in a particular range
2. Skip a portion of the file before any records are selected
3. Type a cross-sectional sampling number to select a portion of the records, evenly spacedthroughout the file
4. Specify a maximum number of records to be processed; in this case, CODE-1 Plus will start atthe beginning of the file and process every record until the maximum number is reached
5. Specify a fraction of records to process or ignore.
You may use these fields in conjunction with each other. For example, you can type a number ofrecords to skip, and a maximum number of records to read, if you wanted to process the middle ofthe file, but not the beginning or the end.
Restricting the ZIP Code Range
If you choose to restrict processing to only those records within a given ZIP Code range, type a lowZIP Code and a high ZIP Code. Note that CODE-1 Plus assumes that your input file is sorted by ZIPCode. For this reason, if CODE-1 Plus encounters a record with a ZIP Code that is alphanumericallylower than the low ZIP Code you typed, that record will not be processed, and CODE-1 Plus willproceed to the next record. If, however, CODE-1 Plus encounters a record with a ZIP Code
168CODE-1 Plus User Guide for IBM i
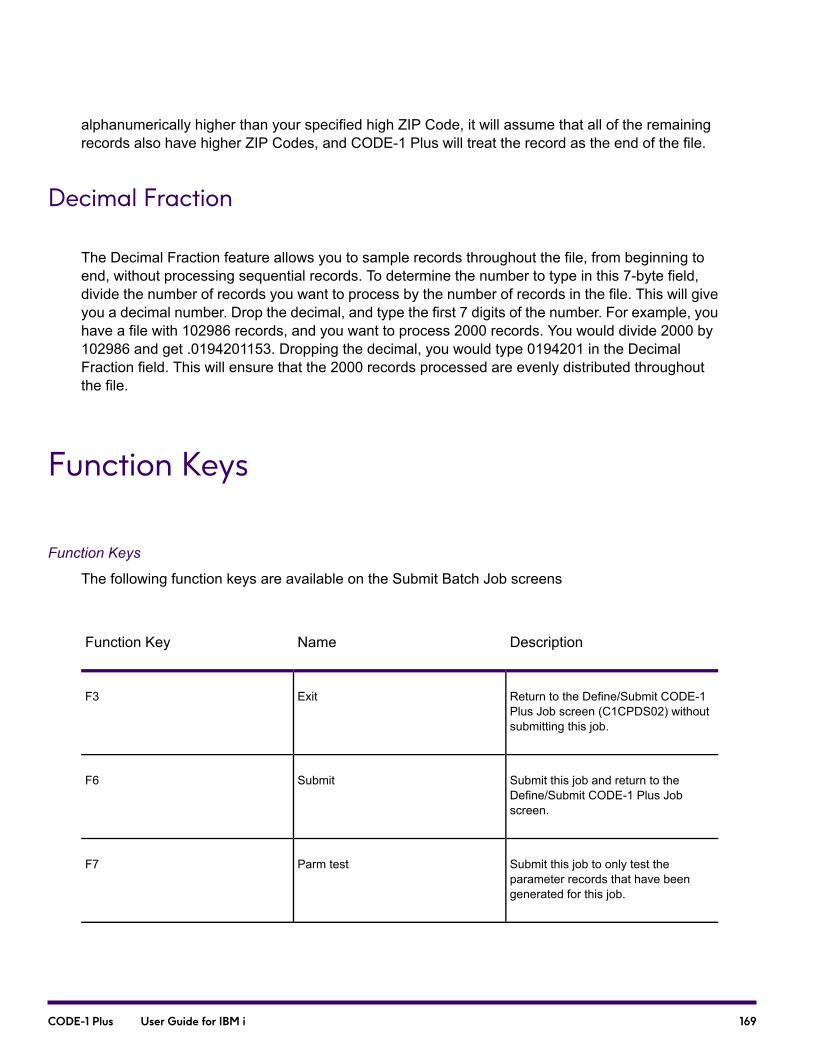
alphanumerically higher than your specified high ZIP Code, it will assume that all of the remainingrecords also have higher ZIP Codes, and CODE-1 Plus will treat the record as the end of the file.
Decimal Fraction
The Decimal Fraction feature allows you to sample records throughout the file, from beginning toend, without processing sequential records. To determine the number to type in this 7-byte field,divide the number of records you want to process by the number of records in the file. This will giveyou a decimal number. Drop the decimal, and type the first 7 digits of the number. For example, youhave a file with 102986 records, and you want to process 2000 records. You would divide 2000 by102986 and get .0194201153. Dropping the decimal, you would type 0194201 in the DecimalFraction field. This will ensure that the 2000 records processed are evenly distributed throughoutthe file.
Function Keys
Function Keys
The following function keys are available on the Submit Batch Job screens
DescriptionNameFunction Key
Return to the Define/Submit CODE-1Plus Job screen (C1CPDS02) withoutsubmitting this job.
ExitF3
Submit this job and return to theDefine/Submit CODE-1 Plus Jobscreen.
SubmitF6
Submit this job to only test theparameter records that have beengenerated for this job.
Parm testF7
169CODE-1 Plus User Guide for IBM i

DescriptionNameFunction Key
Submit the Build Report job.Run BUILD ReportF8
Submit CODE-1 Plus Job Screen (C1CPSB01)
The first Submit CODE-1 Plus Job screen, shown below, allows you to specify the inputname-and-address file to use for the job. To access this screen, choose the Submit BatchJob function from the Define/Submit CODE-1 Plus Job screen (C1CPDS02), or choose to submita job from the Work with Jobs screen (C1CPMM03).
CommentsDescriptionFormatField Name
Required if you do not use anexit routine.Default is the filename you specified on theCreate New Job screen(C1CPNJ01).
The name of the file thatcontains your inputname-and-address file.
1 to 10 characters (A-Z, 0-9,$, @, or #). First charactermust not be 0-9.
Input N/A file
170CODE-1 Plus User Guide for IBM i

CommentsDescriptionFormatField Name
Required if you don't use anexit routine.Default is thelibrary name you specified onthe Create New Job screen(C1CPNJ01).
The name of the library thatholds the inputname-and-address file.
1 to 10 characters (A-Z, 0-9,$, @, or #). First charactermust not be 0-9.
Library (Input N/A file)
Required if you don't use anexit routine.Default is themember name you specifiedon the Create NewJob screen (C1CPNJ01).
The member of the file thatholds your inputname-and-addresses.
1 to 10 characters (A-Z, 0-9,$, @, or #). First charactermust not be 0-9.
Member
Required if you don't type anInput N/A File.
The name of the input exitroutine that should be usedto pass records to CODE-1Plus.
1 to 10 characters (A-Z, 0-9,$, @, or #). First charactermust not be 0-9.
Exit Routine
Required.Default is the jobdescription you specified onthe Create New Job screen(C1CPNJ01).
The name of the file thatcontains job processingdetails that should be usedfor this job.
1 to 10 characters (A-Z, 0-9,$, @, or #). First charactermust not be 0-9.
Job description
Required. Default is thelibrary name you specified onthe Create New Job screen(C1CPNJ01).
The name of the library thatholds the job descriptionnamed above.
1 to 10 characters (A-Z, 0-9,$, @, or #). First charactermust not be 0-9.
Library (Job description)
Required.Default is acombination of the job ID andthe sequence number basedon the number of times thejob has been submitted.
The unique name of this jobas it is defined in the system.
1 to 10 characters (A-Z, 0-9,$, @, or #). First charactermust not be 0-9.
Job name
171CODE-1 Plus User Guide for IBM i

CommentsDescriptionFormatField Name
Required.Default is N.A code indicating whether ornot this job should be held onthe job queue to be releasedat a later time. Type one ofthe following codes:
Y Yes, hold the job on thejob queue.
N No, submit the jobimmediately.
Y or NHold on job queue
Required.Default is blank.You can choose the programwith a memory modelappropriate for your site.Enter one of the followingprogram names (memorymodels):
Blank Default memorymodel (3 MB).
S Small memory model (1MB).
M Medium memory model(6 MB).
L Large memory model (12MB).
H Huge memory model (28MB).
Blank, S, M, L, or HSelect Address Matchermemory model
Required if you have the RDIoption.Default is N.
If you have the RDI option,you can select whether or notyou want to use the RDILarge Memory Module foryour RDI processing:
Y Use the RDI LargeMemory Module.
N Do not use the RDI LargeMemory Module.
Y or NUse RDI Large MemoryModule (DPV040L)?
172CODE-1 Plus User Guide for IBM i
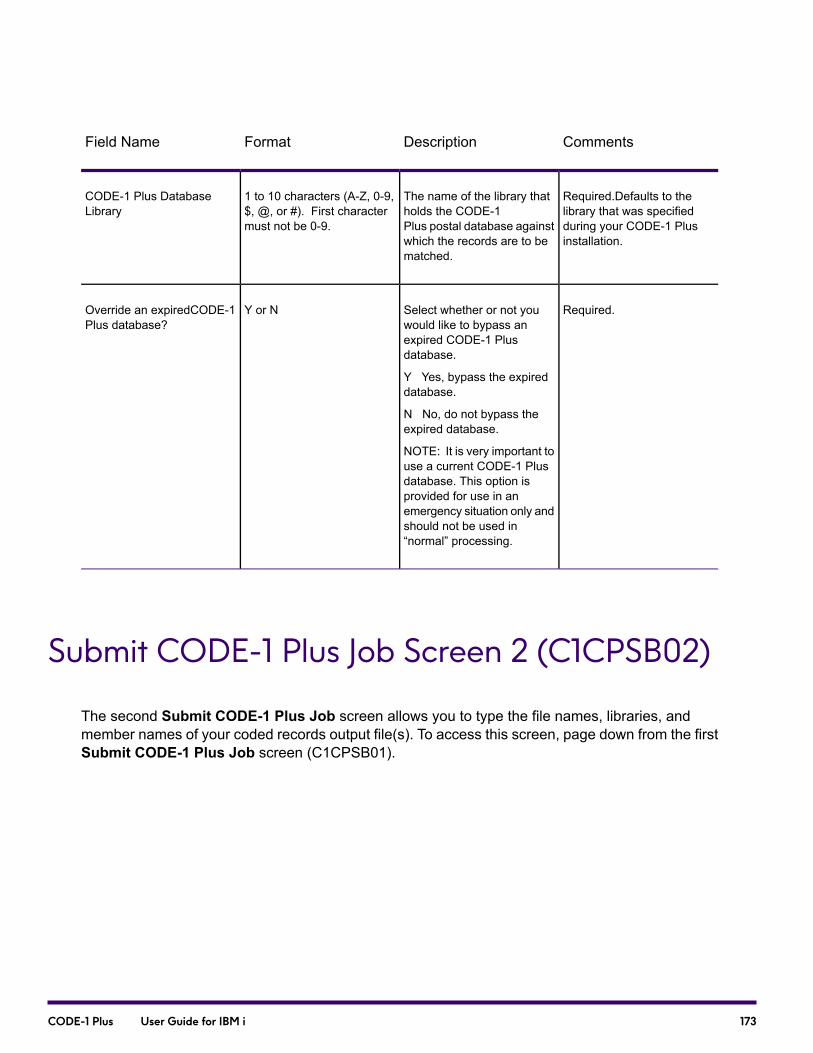
CommentsDescriptionFormatField Name
Required.Defaults to thelibrary that was specifiedduring your CODE-1 Plusinstallation.
The name of the library thatholds the CODE-1Plus postal database againstwhich the records are to bematched.
1 to 10 characters (A-Z, 0-9,$, @, or #). First charactermust not be 0-9.
CODE-1 Plus DatabaseLibrary
Required.Select whether or not youwould like to bypass anexpired CODE-1 Plusdatabase.
Y Yes, bypass the expireddatabase.
N No, do not bypass theexpired database.
NOTE: It is very important touse a current CODE-1 Plusdatabase. This option isprovided for use in anemergency situation only andshould not be used in“normal” processing.
Y or NOverride an expiredCODE-1Plus database?
Submit CODE-1 Plus Job Screen 2 (C1CPSB02)
The second Submit CODE-1 Plus Job screen allows you to type the file names, libraries, andmember names of your coded records output file(s). To access this screen, page down from the firstSubmit CODE-1 Plus Job screen (C1CPSB01).
173CODE-1 Plus User Guide for IBM i

CommentsDescriptionFormatField Name
Default is the calculatedoutput file record length.
Enter a number from 1-9999to override the calculatedrequired record length.
Number from 1-9999Override Output File RecordLength
Required if you don't use anexit routine.Default is“C1NAMjobid”
The name of the output file towhich the records that weresuccessfully matched shouldbe written.
1 to 10 characters (A-Z, 0-9,$, @, or #). First charactermust not be 0-9.
Successfully Coded outputfile
Required if you don't use anexit routine.Defaults to the“Library for Job Objects”specified at job creation.
The name of the library thatholds the Successfully Codedoutput file.
1 to 10 characters (A-Z, 0-9,$, @, or #). First charactermust not be 0-9.
Library (Successfully Codedoutput file)
Required if you don't use anexit routine.Default is“CODED”
The member of the file thatholds the Successfully Codedoutput file.
1 to 10 characters (A-Z, 0-9,$, @, or #). First charactermust not be 0-9.
Member (Successfully Codedoutput file)
Required if you don't type aname in the SuccessfullyCoded output file field.
The name of the output exitroutine to which yoursuccessfully coded recordsshould be passed.
1 to 10 characters (A-Z, 0-9,$, @, or #). First charactermust not be 0-9.
Exit Routine (SuccessfullyCoded output file)
174CODE-1 Plus User Guide for IBM i

CommentsDescriptionFormatField Name
Display only. Does not acceptentry.
Displays the required lengthof the Successfully Codedoutput file. The valuedisplayed here is based onthe output field lengths thatyou defined for the job.
Number from 1-9999Req'd Reclen (SuccessfullyCoded output file)
Display only. Does not acceptentry.
This field displays theactual record length of theSuccessfully Coded outputfile.
Number from 1-9999Existing File Reclen(Successfully Coded outputfile)
Optional.Default is N.If the required length (Req’dReclen) is not equal to theactual length (Existing FileReclen), specify the action totake:
Y Delete the output file. Ifthe Req'd Reclen value is notequal to the Existing FileReclen value, this fielddefaults to Y.
N Do not delete this file.Default is N.
Note: If the Req'dReclen value is notequal to the ExistingFile Reclen valueand you specify Nfor this field, yourjob will fail.
Y or NDelete Existing File?(Successfully Coded outputfile)
Required.Default is N.A 1-byte code indicating ifany records are to be writtento this file. Type one of thefollowing:
Y Yes, write all recordssuccessfully ZIP + 4 codedto this output file.
N No, write all recordssuccessfully ZIP + 4codedonly to the SuccessfullyCoded output file.
Y or NProduce Coded ZIP + 4output file (indicator)
175CODE-1 Plus User Guide for IBM i
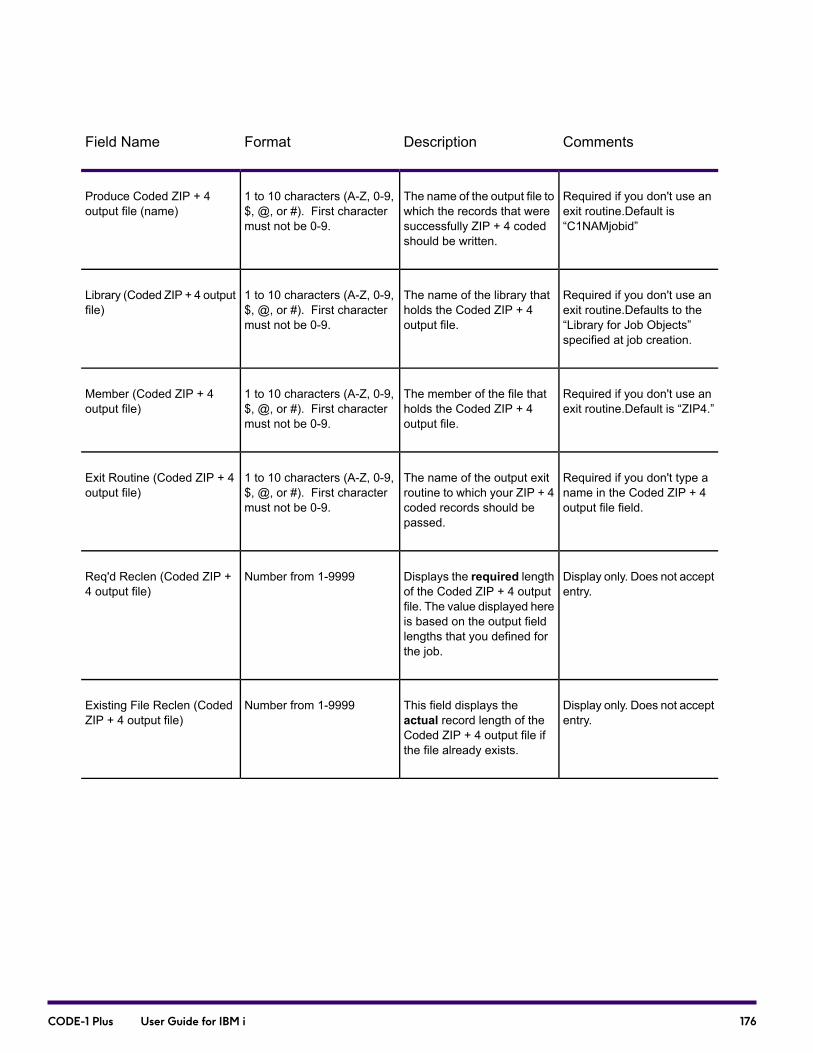
CommentsDescriptionFormatField Name
Required if you don't use anexit routine.Default is“C1NAMjobid”
The name of the output file towhich the records that weresuccessfully ZIP + 4 codedshould be written.
1 to 10 characters (A-Z, 0-9,$, @, or #). First charactermust not be 0-9.
Produce Coded ZIP + 4output file (name)
Required if you don't use anexit routine.Defaults to the“Library for Job Objects”specified at job creation.
The name of the library thatholds the Coded ZIP + 4output file.
1 to 10 characters (A-Z, 0-9,$, @, or #). First charactermust not be 0-9.
Library (Coded ZIP + 4 outputfile)
Required if you don't use anexit routine.Default is “ZIP4.”
The member of the file thatholds the Coded ZIP + 4output file.
1 to 10 characters (A-Z, 0-9,$, @, or #). First charactermust not be 0-9.
Member (Coded ZIP + 4output file)
Required if you don't type aname in the Coded ZIP + 4output file field.
The name of the output exitroutine to which your ZIP + 4coded records should bepassed.
1 to 10 characters (A-Z, 0-9,$, @, or #). First charactermust not be 0-9.
Exit Routine (Coded ZIP + 4output file)
Display only. Does not acceptentry.
Displays the required lengthof the Coded ZIP + 4 outputfile. The value displayed hereis based on the output fieldlengths that you defined forthe job.
Number from 1-9999Req'd Reclen (Coded ZIP +4 output file)
Display only. Does not acceptentry.
This field displays theactual record length of theCoded ZIP + 4 output file ifthe file already exists.
Number from 1-9999Existing File Reclen (CodedZIP + 4 output file)
176CODE-1 Plus User Guide for IBM i
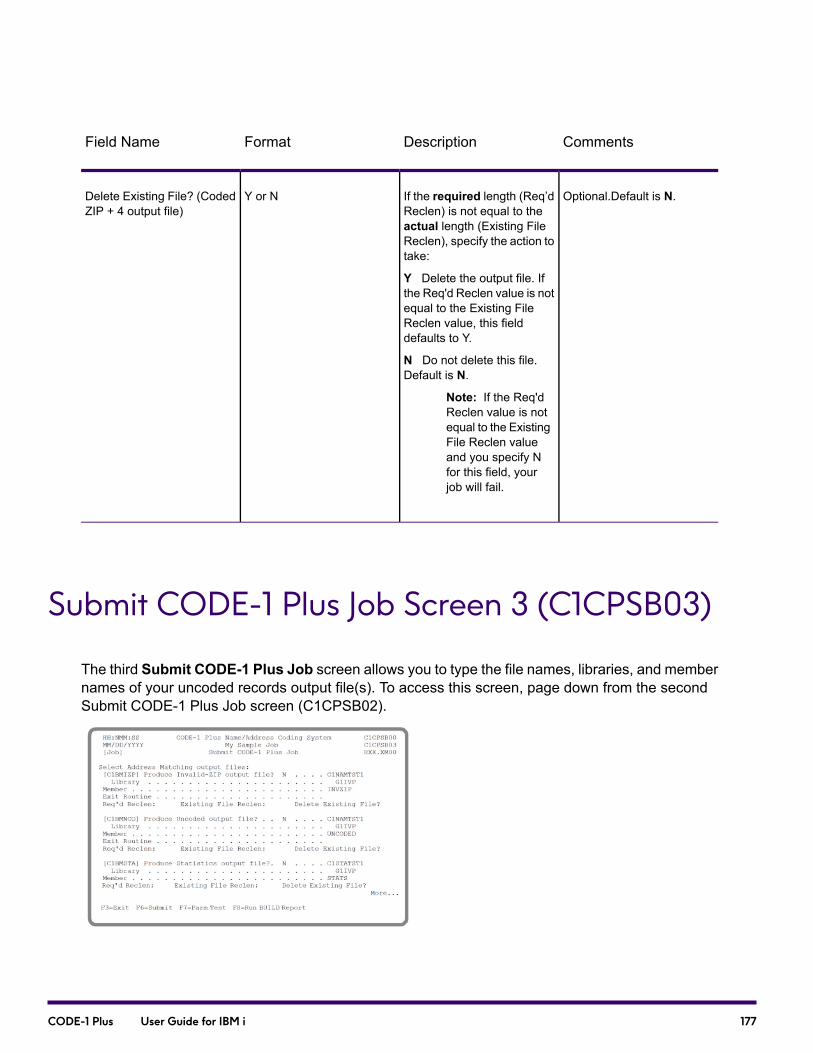
CommentsDescriptionFormatField Name
Optional.Default is N.If the required length (Req’dReclen) is not equal to theactual length (Existing FileReclen), specify the action totake:
Y Delete the output file. Ifthe Req'd Reclen value is notequal to the Existing FileReclen value, this fielddefaults to Y.
N Do not delete this file.Default is N.
Note: If the Req'dReclen value is notequal to the ExistingFile Reclen valueand you specify Nfor this field, yourjob will fail.
Y or NDelete Existing File? (CodedZIP + 4 output file)
Submit CODE-1 Plus Job Screen 3 (C1CPSB03)
The third Submit CODE-1 Plus Job screen allows you to type the file names, libraries, and membernames of your uncoded records output file(s). To access this screen, page down from the secondSubmit CODE-1 Plus Job screen (C1CPSB02).
177CODE-1 Plus User Guide for IBM i

CommentsDescriptionFormatField Name
Required.Default is N.A 1-byte code indicating ifany records are to be writtento this file. Type one of thefollowing:
Y Yes, write all records withinvalid input ZIP Codes to theInvalid-ZIP Code output file.
N No, write all records withinvalid input ZIP Codes to theUncoded output file (if one isdefine) or the SuccessfullyCoded output file (if noUncoded Records File isdefined).
Y or NProduce Invalid-ZIP Codeoutput file (indicator)
Optional. Default is“C1NAMjobid.”
The name of the output file towhich the records with invalidinput ZIP Codes should bewritten.
1 to 10 characters (A-Z, 0-9,$, @, or #). First charactermust not be 0-9.
Invalid-ZIP Code Output File(name)
Required if you indicated thatthis file is to be created, andyou don't use an exit routine.Defaults to the “Library forJob Objects” specified at jobcreation.
The name of the library thatholds the Invalid-ZIP CodeOutput File.
1 to 10 characters (A-Z, 0-9,$, @, or #). First charactermust not be 0-9.
Library (Invalid-ZIP CodeOutput File)
Required if you indicated thatthis file is to be created, andyou don't use an exit routine.Default is “INVZIP.”
The member of the file thatholds the Invalid-ZIP CodeOutput File.
1 to 10 characters (A-Z, 0-9,$, @, or #). First charactermust not be 0-9.
Member (Invalid-ZIP CodeOutput File)
Required if you indicated thatthis file is to be created, andyou didn't type an Invalid-ZIPOutput File name.
The name of the output exitroutine to which the recordswith invalid input ZIP Codesshould be passed.
1 to 10 characters (A-Z, 0-9,$, @, or #). First charactermust not be 0-9.
Exit Routine (Invalid-ZIPCode Output File)
178CODE-1 Plus User Guide for IBM i

CommentsDescriptionFormatField Name
Display only. Does not acceptentry.
Displays the required lengthof the Invalid-ZIP Codeoutput file. The valuedisplayed here is based onthe output field lengths thatyou defined for the job.
Number from 1-9999Req'd Reclen (Invalid-ZIPCode Output File)
Display only. Does not acceptentry.
This field displays theactual record length of theInvalid-ZIP Code output file ifthe file already exists.
Number from 1-9999Existing File Reclen(Invalid-ZIP Code OutputFile)
Optional.Default is N.If the required length (Req’dReclen) is not equal to theactual length (Existing FileReclen), specify the action totake:
Y Delete the output file. Ifthe Req'd Reclen value is notequal to the Existing FileReclen value, this fielddefaults to Y.
N Do not delete this file.Default is N.
Note: If the Req'dReclen value is notequal to the ExistingFile Reclen valueand you specify Nfor this field, yourjob will fail.
Y or NDelete Existing File?(Invalid-ZIP Code OutputFile)
Optional.Default is N.A 1-byte code indicating ifany records are to be writtento this file. Type one of thefollowing:
Y Yes, write all records thatcould not be matched to thisfile.
N No, write all records thatcould not be matched to theSuccessfully Coded outputfile.
Y or NProduceUncodedOutput File(indicator)
179CODE-1 Plus User Guide for IBM i
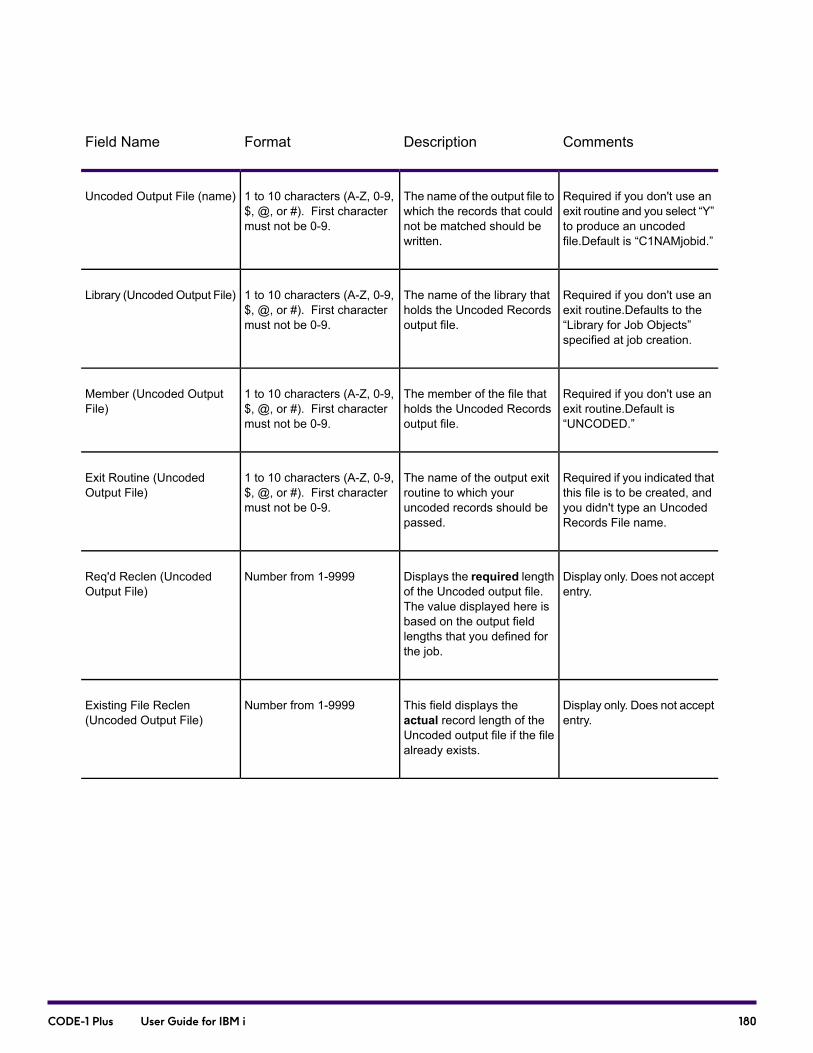
CommentsDescriptionFormatField Name
Required if you don't use anexit routine and you select “Y”to produce an uncodedfile.Default is “C1NAMjobid.”
The name of the output file towhich the records that couldnot be matched should bewritten.
1 to 10 characters (A-Z, 0-9,$, @, or #). First charactermust not be 0-9.
Uncoded Output File (name)
Required if you don't use anexit routine.Defaults to the“Library for Job Objects”specified at job creation.
The name of the library thatholds the Uncoded Recordsoutput file.
1 to 10 characters (A-Z, 0-9,$, @, or #). First charactermust not be 0-9.
Library (UncodedOutput File)
Required if you don't use anexit routine.Default is“UNCODED.”
The member of the file thatholds the Uncoded Recordsoutput file.
1 to 10 characters (A-Z, 0-9,$, @, or #). First charactermust not be 0-9.
Member (Uncoded OutputFile)
Required if you indicated thatthis file is to be created, andyou didn't type an UncodedRecords File name.
The name of the output exitroutine to which youruncoded records should bepassed.
1 to 10 characters (A-Z, 0-9,$, @, or #). First charactermust not be 0-9.
Exit Routine (UncodedOutput File)
Display only. Does not acceptentry.
Displays the required lengthof the Uncoded output file.The value displayed here isbased on the output fieldlengths that you defined forthe job.
Number from 1-9999Req'd Reclen (UncodedOutput File)
Display only. Does not acceptentry.
This field displays theactual record length of theUncoded output file if the filealready exists.
Number from 1-9999Existing File Reclen(Uncoded Output File)
180CODE-1 Plus User Guide for IBM i

CommentsDescriptionFormatField Name
Optional.Default is N.If the required length (Req’dReclen) is not equal to theactual length (Existing FileReclen), specify the action totake:
Y Delete the output file. Ifthe Req'd Reclen value is notequal to the Existing FileReclen value, this fielddefaults to Y.
N Do not delete this file.Default is N.
Note: If the Req'dReclen value is notequal to the ExistingFile Reclen valueand you specify Nfor this field, yourjob will fail.
Y or NDelete Existing File?(Uncoded Output File)
Optional.Default is N.A 1-byte code indicating if theOutput Statistics file shouldbe produced. Type one ofthe following:
Y Yes, produce this file.
N No, do not produce file.
Y or NProduce Statistics OutputFile? (indicator)
Required if you don't use anexit routine.Defaults to the“Library for Job Objects”specified at job creation.
The name of the library thatholds the Output Statisticsfile.
1 to 10 characters (A-Z, 0-9,$, @, or #). First charactermust not be 0-9.
Library (Statistics Output File)
Required if you don't use anexit routine.Default is“STATS.”
The member of the file thatholds the Output Statisticsfile.
1 to 10 characters (A-Z, 0-9,$, @, or #). First charactermust not be 0-9.
Member (Statistics OutputFile)
181CODE-1 Plus User Guide for IBM i

CommentsDescriptionFormatField Name
Display only. Does not acceptentry.
Displays the required lengthof the Statistics output file.The value displayed here isbased on the output fieldlengths that you defined forthe job.
Number from 1-9999Req'd Reclen (StatisticsOutput File)
Display only. Does not acceptentry.
This field displays theactual record length of theStatistics output file if the filealready exists.
Number from 1-9999Existing File Reclen(Statistics Output File)
Optional.Default is N.If the required length (Req’dReclen) is not equal to theactual length (Existing FileReclen), specify the action totake:
Y Delete the output file. Ifthe Req'd Reclen value is notequal to the Existing FileReclen value, this fielddefaults to Y.
N Do not delete this file.Default is N.
Note: If the Req'dReclen value is notequal to the ExistingFile Reclen valueand you specify Nfor this field, yourjob will fail.
Y or NDelete Existing File?(Statistics Output File)
Submit CODE-1 Plus Job Screen 4 (C1CPSB04)
The fourth Submit CODE-1 Plus Job screen is the Match Configuration screen. Use this screen tospecify the degree of closeness compared elements must have for CODE-1 Plus to determine anaddress match. You can also indicate other storage options for multiple matches and probability of
182CODE-1 Plus User Guide for IBM i
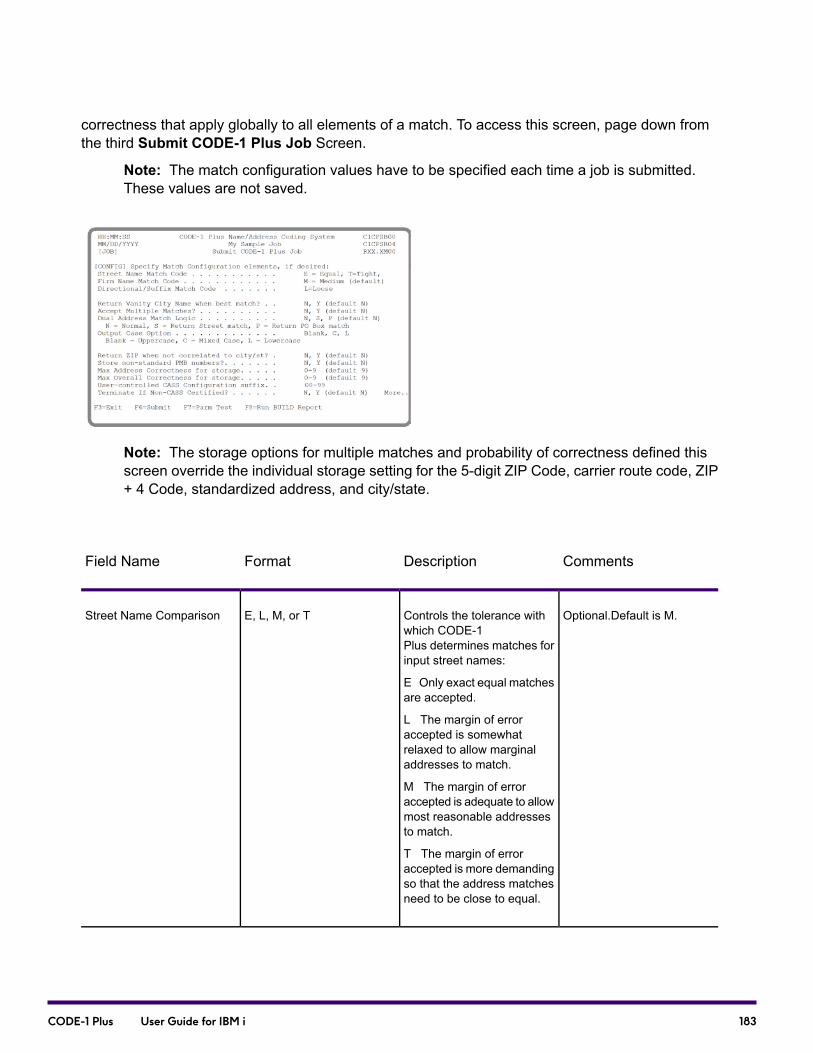
correctness that apply globally to all elements of a match. To access this screen, page down fromthe third Submit CODE-1 Plus Job Screen.
Note: The match configuration values have to be specified each time a job is submitted.These values are not saved.
Note: The storage options for multiple matches and probability of correctness defined thisscreen override the individual storage setting for the 5-digit ZIP Code, carrier route code, ZIP+ 4 Code, standardized address, and city/state.
CommentsDescriptionFormatField Name
Optional.Default is M.Controls the tolerance withwhich CODE-1Plus determines matches forinput street names:
E Only exact equal matchesare accepted.
L The margin of erroraccepted is somewhatrelaxed to allow marginaladdresses to match.
M The margin of erroraccepted is adequate to allowmost reasonable addressesto match.
T The margin of erroraccepted is more demandingso that the address matchesneed to be close to equal.
E, L, M, or TStreet Name Comparison
183CODE-1 Plus User Guide for IBM i

CommentsDescriptionFormatField Name
Optional.Default is M.Controls the tolerance withwhich CODE-1Plus determines matches forinput firm names:
E Only exact equal matchesare accepted.
L The margin of erroraccepted is somewhatrelaxed to allow marginaladdresses to match.
M The margin of erroraccepted is adequate to allowmost reasonable addressesto match.
T The margin of erroraccepted is more demandingso that the address matchesneed to be close to equal.
E, L, M, or TFirm Name Comparison
Optional.Default is M.Controls the tolerance withwhich CODE-1Plus determines matches forinput directionals andsuffixes:
E Only exact equal matchesare accepted.
L The margin of erroraccepted is somewhatrelaxed to allow marginaladdresses to match.
M The margin of erroraccepted is adequate to allowmost reasonable addressesto match.
T The margin of erroraccepted is more demandingso that the address matchesneed to be close to equal.
E, L, M, or TDirectional/Suffix Comparison
184CODE-1 Plus User Guide for IBM i
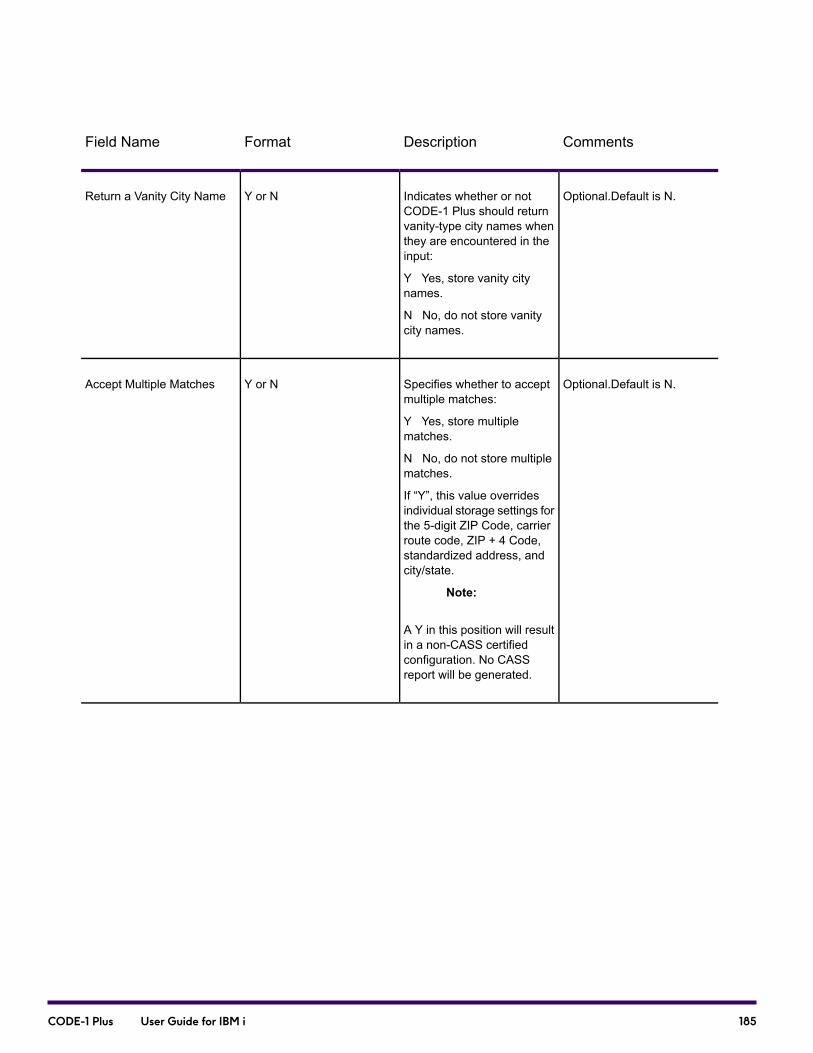
CommentsDescriptionFormatField Name
Optional.Default is N.Indicates whether or notCODE-1 Plus should returnvanity-type city names whenthey are encountered in theinput:
Y Yes, store vanity citynames.
N No, do not store vanitycity names.
Y or NReturn a Vanity City Name
Optional.Default is N.Specifies whether to acceptmultiple matches:
Y Yes, store multiplematches.
N No, do not store multiplematches.
If “Y”, this value overridesindividual storage settings forthe 5-digit ZIP Code, carrierroute code, ZIP + 4 Code,standardized address, andcity/state.
Note:
A Y in this position will resultin a non-CASS certifiedconfiguration. No CASSreport will be generated.
Y or NAccept Multiple Matches
185CODE-1 Plus User Guide for IBM i

CommentsDescriptionFormatField Name
Optional.Default is blank.Indicates how to handleaddresses with multiplenon-blank address lines ormultiple address types on thesame address line:
Blank Normal match scoringfor street address elements,input ZIP Code, matchingaddress line, and so on.
S Return a street match,regardless of the addressline.
P Return a PO Box match,regardless of the addressline.
Note:
Under normal conditions, aPO Box cannot match if thecity name and input ZIP Codeare both changed.
Note:
If S or P is selected, anon-CASS-certifiedconfiguration will begenerated.
DMM 708 states to match toa PO Box first when on thesame address line or the POBox address is the primaryaddress line.
blank, S, or PDual Address Match Logic
186CODE-1 Plus User Guide for IBM i

CommentsDescriptionFormatField Name
Optional.Default is blank.Indicating whether to returnmixed case in all addresscomponents:
Blank Matched output willbe returned in all uppercase.
C All address componentsthat contain text will bereturned in mixed case.
L All address componentsthat contain text will bereturned in lower case.
blank, C, or LMixed Case Option
Optional.Default is N.Indicating whether the InputZIP Code should be returnedwhen there is no correlationbetween the input city/stateand ZIP Code:
Y Store the Input ZIP Code.
N Do NOT store the InputZIP Code.
Note: If Y ischosen, anon-CASS certifiedconfiguration iscreated. No PSForm 3553 will begenerated.
Y or NReturn ZIP Code when notcorrelated to city/state
Optional.Default is N.Indicates whether to storenon-standard private mailboxnumbers:
Y Store ALL private mailboxnumbers.
N Store ONLY standardprivate mailbox numbers.
Note:
If Y is chosen, a non-CASScertified configuration will becreated. No USPS Form3553 is generated.
Y or NStore non-standard PMBnumbers
187CODE-1 Plus User Guide for IBM i

CommentsDescriptionFormatField Name
Optional.Default is 9.A one character codeindicating the (relative)probable correctness of theaddress match:
0 The address is most likelyto be correct.
1-8 Intermediate values.
9 The address is least likelyto be correct.
The value typed hereoverrides the individualMaximum AddressCorrectness storage settingsfor the 5-digit ZIP Code,carrier route code, ZIP + 4Code, standardized address,and city/state.
1 numeric characterMax Address Correctness forstorage
Optional.Default is 9.A one character codeindicating the (relative)probable correctness of theoverall match:
0 The match is most likelyto be correct.
1-8 Intermediate values.
9 The overall match is leastlikely to correct.
The value typed hereoverrides individual MaximumOverall Correctness storagesettings for the 5-digit ZIPCode, carrier route code, ZIP+ 4 Code, standardizedaddress, and city/state.
1 numeric characterMaximum OverallCorrectness for storage
Optional.No Default.Specifies a configurationnumber (00-99) to be usedwhen a “Configuration ID” forthe Postal Form 3553 cannotbe determined. Theconfiguration number typedhere will be appended to a“Z” for use.
1 or 2 numeric charactersUser-controlled CASSConfiguration suffix
188CODE-1 Plus User Guide for IBM i
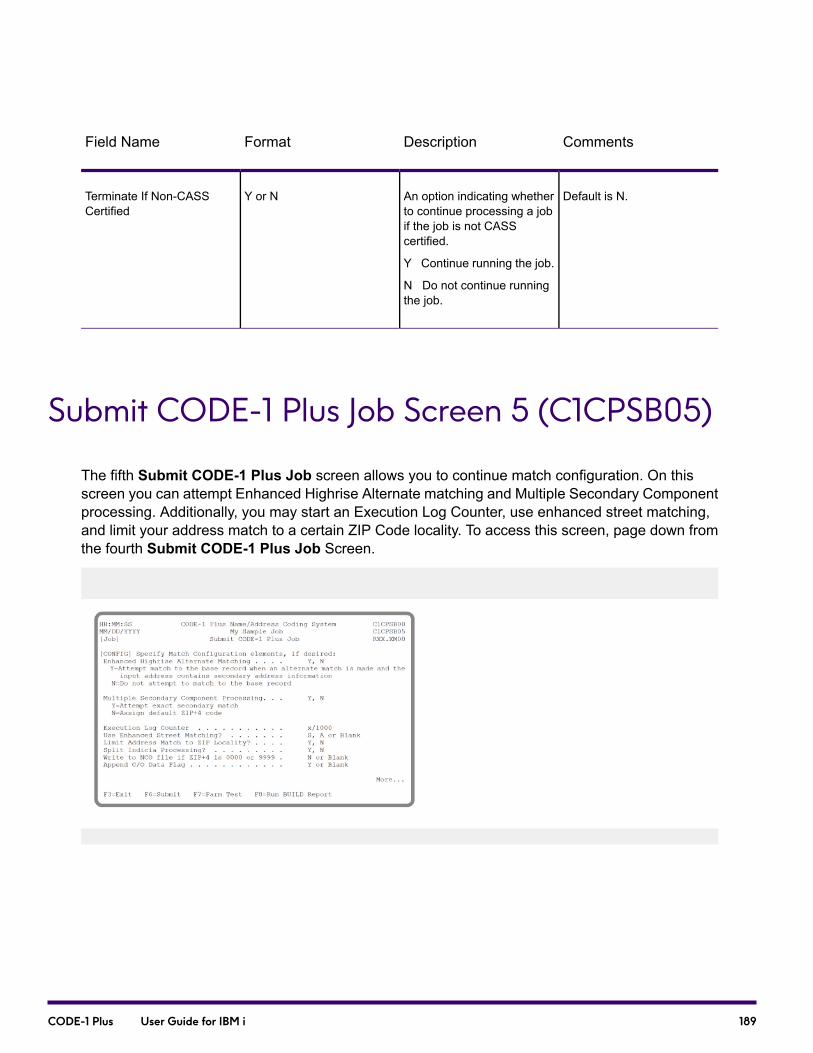
CommentsDescriptionFormatField Name
Default is N.An option indicating whetherto continue processing a jobif the job is not CASScertified.
Y Continue running the job.
N Do not continue runningthe job.
Y or NTerminate If Non-CASSCertified
Submit CODE-1 Plus Job Screen 5 (C1CPSB05)
The fifth Submit CODE-1 Plus Job screen allows you to continue match configuration. On thisscreen you can attempt Enhanced Highrise Alternate matching and Multiple Secondary Componentprocessing. Additionally, you may start an Execution Log Counter, use enhanced street matching,and limit your address match to a certain ZIP Code locality. To access this screen, page down fromthe fourth Submit CODE-1 Plus Job Screen.
189CODE-1 Plus User Guide for IBM i
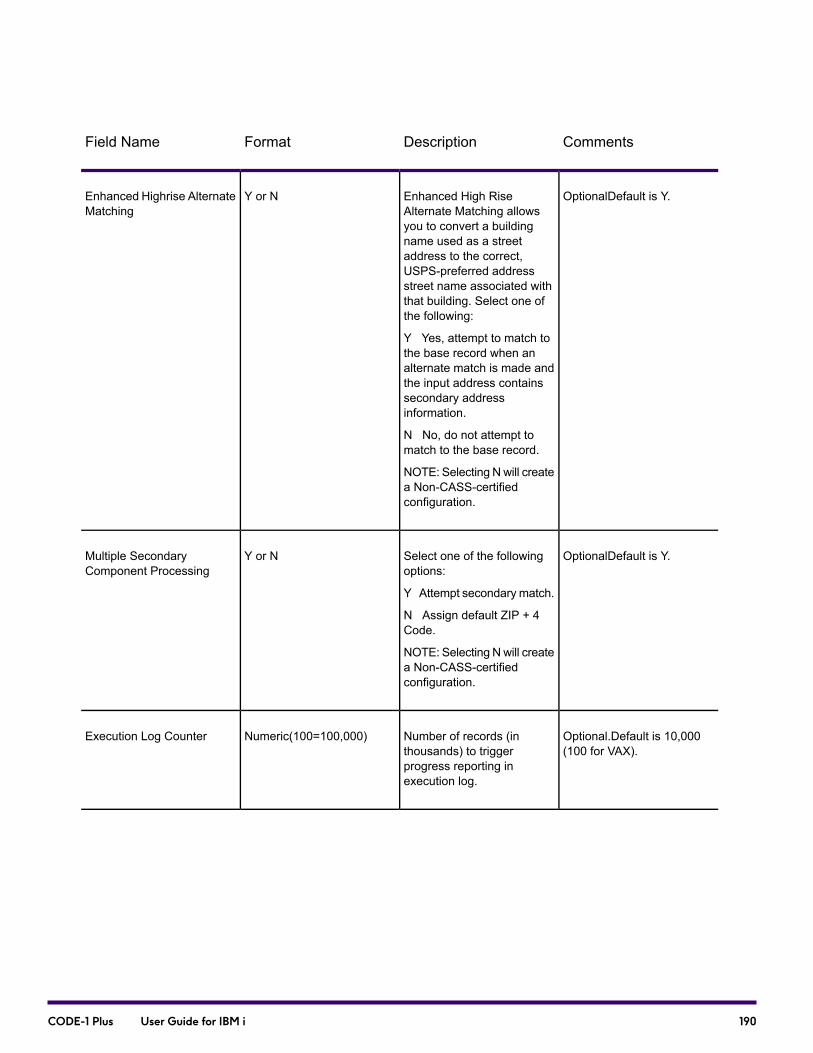
CommentsDescriptionFormatField Name
OptionalDefault is Y.Enhanced High RiseAlternate Matching allowsyou to convert a buildingname used as a streetaddress to the correct,USPS-preferred addressstreet name associated withthat building. Select one ofthe following:
Y Yes, attempt to match tothe base record when analternate match is made andthe input address containssecondary addressinformation.
N No, do not attempt tomatch to the base record.
NOTE: Selecting Nwill createa Non-CASS-certifiedconfiguration.
Y or NEnhanced Highrise AlternateMatching
OptionalDefault is Y.Select one of the followingoptions:
Y Attempt secondary match.
N Assign default ZIP + 4Code.
NOTE: Selecting Nwill createa Non-CASS-certifiedconfiguration.
Y or NMultiple SecondaryComponent Processing
Optional.Default is 10,000(100 for VAX).
Number of records (inthousands) to triggerprogress reporting inexecution log.
Numeric(100=100,000)Execution Log Counter
190CODE-1 Plus User Guide for IBM i
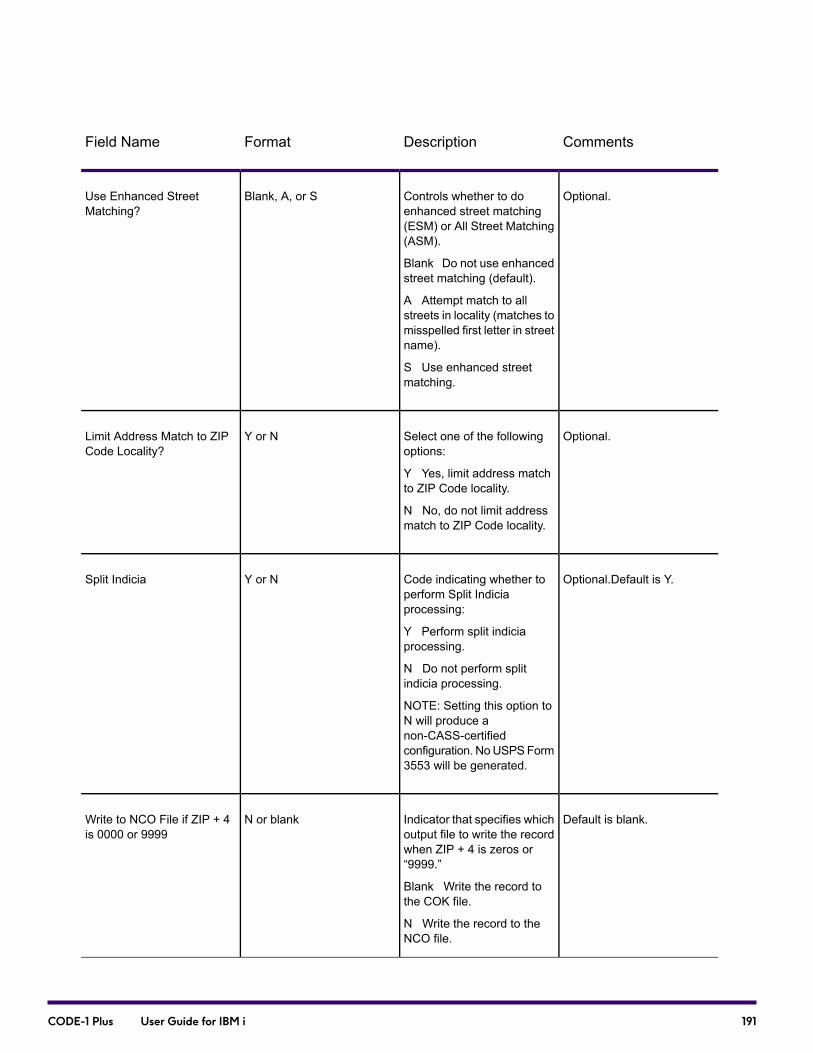
CommentsDescriptionFormatField Name
Optional.Controls whether to doenhanced street matching(ESM) or All Street Matching(ASM).
Blank Do not use enhancedstreet matching (default).
A Attempt match to allstreets in locality (matches tomisspelled first letter in streetname).
S Use enhanced streetmatching.
Blank, A, or SUse Enhanced StreetMatching?
Optional.Select one of the followingoptions:
Y Yes, limit address matchto ZIP Code locality.
N No, do not limit addressmatch to ZIP Code locality.
Y or NLimit Address Match to ZIPCode Locality?
Optional.Default is Y.Code indicating whether toperform Split Indiciaprocessing:
Y Perform split indiciaprocessing.
N Do not perform splitindicia processing.
NOTE: Setting this option toN will produce anon-CASS-certifiedconfiguration. NoUSPSForm3553 will be generated.
Y or NSplit Indicia
Default is blank.Indicator that specifies whichoutput file to write the recordwhen ZIP + 4 is zeros or“9999.”
Blank Write the record tothe COK file.
N Write the record to theNCO file.
N or blankWrite to NCO File if ZIP + 4is 0000 or 9999
191CODE-1 Plus User Guide for IBM i
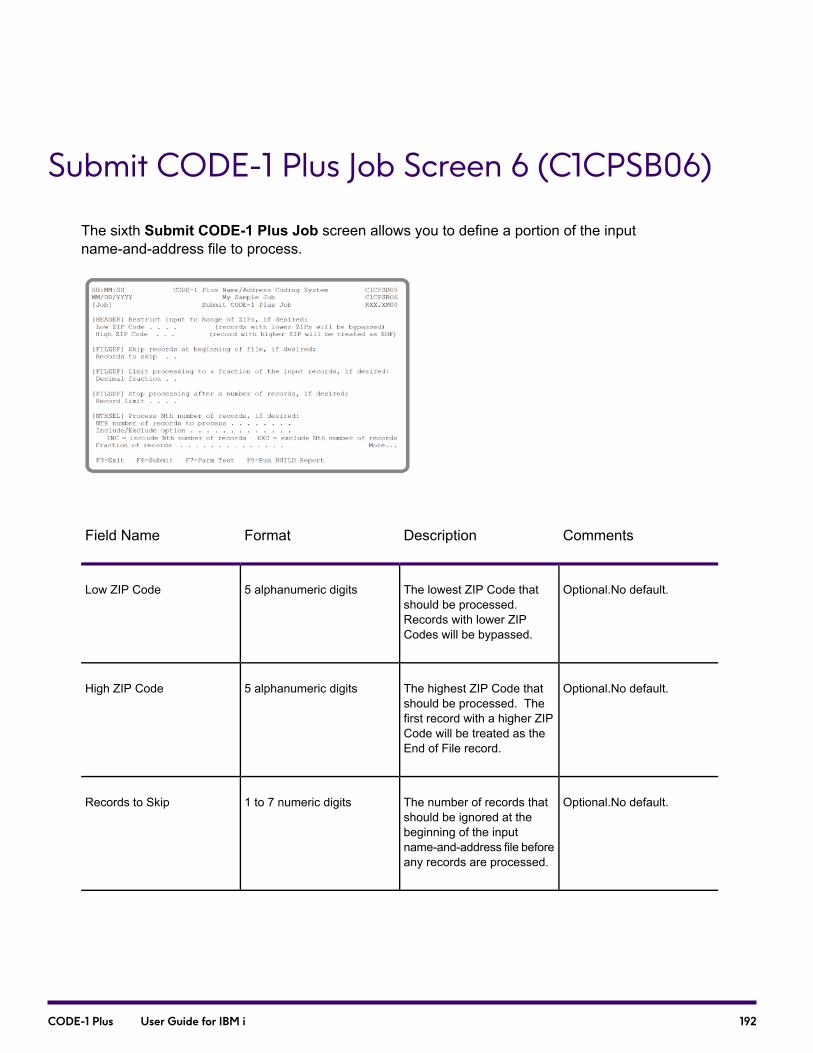
Submit CODE-1 Plus Job Screen 6 (C1CPSB06)
The sixth Submit CODE-1 Plus Job screen allows you to define a portion of the inputname-and-address file to process.
CommentsDescriptionFormatField Name
Optional.No default.The lowest ZIP Code thatshould be processed.Records with lower ZIPCodes will be bypassed.
5 alphanumeric digitsLow ZIP Code
Optional.No default.The highest ZIP Code thatshould be processed. Thefirst record with a higher ZIPCode will be treated as theEnd of File record.
5 alphanumeric digitsHigh ZIP Code
Optional.No default.The number of records thatshould be ignored at thebeginning of the inputname-and-address file beforeany records are processed.
1 to 7 numeric digitsRecords to Skip
192CODE-1 Plus User Guide for IBM i
CommentsDescriptionFormatField Name
Optional.No default.A decimal number indicatingthe portion of the records inthe file that should beprocessed. CODE-1 Plus willmultiply this decimal numberby the total number ofrecords in the file to obtainthe number of records thatshould be processed. Thoserecords selected forprocessing will be evenlydistributed throughout theinput file.
1 decimal point followed by 1to 7 numeric digits
Decimal fraction
Optional.No default.The maximum total numberof records that may beprocessed for this job.
1 to 7 numeric digitsRecord limit
Sampling Method 1 — Including or Excluding Nth Number of Input Records
Required if you do not useSampling Method 2.Nodefault.
The nth number of recordsthe you want to either includeor exclude from the inputrecords to be read.
Numeric digits from 002 to999.
Nth number of records toprocess
Required if you do not useSampling Method 2.Nodefault.
A code indicating whether toinclude or exclude thespecified nth number of inputrecords for processing:
INC Include the nth numberof input records.
EXC Exclude the nthnumber of input records.
INC or EXCInclude/Exclude Option
Sampling Method 2 — Selecting a Fraction of Input Records
193CODE-1 Plus User Guide for IBM i

CommentsDescriptionFormatField Name
Required if you do not useSampling Method 1.Nodefault.
A 7-digit positive numberspecifying the fraction of totalinput records to process. Adecimal point is impliedbefore the first digit.
A 7-byte numeric digitFraction of Records
Submit CODE-1 Plus Job Screen 7 (C1CPSB07)
The seventh Submit CODE-1 Plus Job screen allows you to specify a user exit routine for CODE-1Plus to call before writing each record to an output file.
CommentsDescriptionFormatField Name
Required.No default.Name of the exit routine thatyou want CODE-1 Plus to callbefore writing each record toan output file (or beforecalling an output exit routine).
8 charactersExit routine name
194CODE-1 Plus User Guide for IBM i

CommentsDescriptionFormatField Name
Optional.If you are going to use thisprogram with the PreciselyBarcoding Option, or theGeocoder, youmust enter “P”in this position and then usethe 2-byte file identifiers asparameter 2.
1 character, blank, or PCODE-1 Plus identifier
Optional.No default.Enter any information thatyou need CODE-1 Plus topass to your exit routine.
64 charactersUser-defined data
Submit CODE-1 Plus Job Screen 8 (C1CPSB08)
The eighth Submit CODE-1 Plus Job screen allows you to override CASS certification data.
195CODE-1 Plus User Guide for IBM i

CommentsDescriptionFormatField Name
Optional.You must fill in atleast one field.Any field notfilled in retains its currentvalue.
CASS-certified companyname as it appears on yourCASS certificate (up to 25bytes).
25 charactersCASS-Certified CompanyName
CASS-certified softwarename as it appears on yourCASS certificate (up to 30bytes).
30 charactersCASS-Certified SoftwareName
CASS-certified softwareversion number as it appearson your CASS certificate.
CASS-Certified SoftwareVersion Number:
CASS-certified softwareversion number.
1 characterCASS-Certified SoftwareVersion:
CASS-certified releasenumber.
2 charactersCASS-Certified SoftwareRelease:
CASS-certified modificationnumber.
2 charactersCASS-Certified SoftwareModification:
These two fields are optional.However, you must fill in atleast one field, or an error willoccur. Any field not filled inwill retain its current Preciselyvalue.
Z4CHANGE-certifiedcompany name as it is toappear on your USPScertificate.
25 charactersZ4CHANGE-CertifiedCompany Name
Z4CHANGE-certifiedsoftware name as it is toappear on your USPScertificate.
34 charactersZ4CHANGE-CertifiedSoftware Name
196CODE-1 Plus User Guide for IBM i

CommentsDescriptionFormatField Name
These two fields are optional.However, you must fill in atleast one field, or an error willoccur. Any field not filled inwill retain its current Preciselyvalue.
ELOT-certified companyname as is to appear on yourUSPS certificate.
25 charactersELOT-Certified CompanyName
ELOT-certified softwarename as it is to appear onyour USPS certificate.
34 charactersELOT-Certified SoftwareName
Submit CODE-1 Plus Job Screen 9 (C1CPSB09)
The ninth Submit CODE-1 Plus Job screen allows you to define your Auxiliary File. For moreinformation on Auxiliary File Processing, refer to Auxiliary File Processing.
CommentsDescriptionFormatField Name
Required.Default is Y.Choose one of the following:
Y Yes, you would like to useyour Auxiliary Reference File.
N No, you would not like touse your Auxiliary ReferenceFile.
Y or NUse Auxiliary Reference File?
197CODE-1 Plus User Guide for IBM i
CommentsDescriptionFormatField Name
OptionalDefault is N.Code indicating where towrite the auxiliary file in theoutput:
N Write record to the NCOfile.
C Write record to the COKfile.
N or CFile Location
198CODE-1 Plus User Guide for IBM i

8 - Geographic CodingDefinition Screens
In this section
Using the Geographic Coding Definition Screens..................................200Accessing the Geographic Coding Function..........................................201ZIP Code and ZIP + 4 Add-On Locations Screen (C1CPG910)............202Geographic Coding Storage Screen (C1CPG911).................................205Additional Geographic Coding Storage Screen (C1CPG912)................207Additional Geographic Coding Storage Screen (C1CPG913)................209
CODE-1 Plus User Guide for IBM i
Using the Geographic Coding Definition Screens
This chapter describes the Geographic Coding Definition screens that define input and outputlocations for geographic data. This component is only available if the Geographic Coding Plussoftware is licensed and installed on your system.
To interface with the Geographic Coding Plus, CODE-1 Plus provides the Geographic CodingDefinition screens.
DescriptionScreen
Defines locations and formats of your ZIP and ZIP + 4 Codeson your output record.
ZIP Code and ZIP + 4 Add-On Locations screen(C1CPG910)
Defines storage locations of match level and censusinformation.
Geographic Coding Storage screen (C1CPG911)
Defines storage locations of USPS state abbreviations,county names, Metropolitan Statistical Area (MSA)information, and latitude/longitude information.
Additional Geographic Coding Storage screen(C1CPG912)
The only input data that the Geographic Coding Plus requires to obtain the geographic match is theZIP Code. The location of the ZIP Code in your CODE-1 Plus output record is specified in the ZIPCode and ZIP + 4 Add-on Locations screen. Optionally, you may provide a ZIP + 4 Code for moreprecise results. Match result information from a Geographic Coding match attempt will be stored onyour CODE-1 Plus output records according to your specification on the Geographic Coding Storagescreens.
Note: Geographic Coding is performed after CODE-1 Plus completes output posting.
The following figure shows the relationship between the Geographic Coding screens in CODE-1Plus.
200CODE-1 Plus User Guide for IBM i
Geographic Coding Definition Component Overview
Accessing the Geographic Coding Function
You can access theGeographic Coding Definition screens from the Define/Submit CODE-1 PlusJob Menu. If you have installed Geographic Coding Plus, an additional option, “Geographic CodingDefinition,” appears in the Define/Submit CODE-1 Plus Job Menu.
Note: If you have not installed the Geographic Coding Plus, this option does not display.
To define geographic coding information, type the appropriate option number in the GeographicCoding Definition option field of theDefine/Submit CODE-1 Plus Job screen (option 2 to edit existinginformation or option 6 to create new geographic coding specifications)
201CODE-1 Plus User Guide for IBM i
.
ZIP Code and ZIP + 4 Add-On Locations Screen(C1CPG910)
The ZIP Code and ZIP + 4 Add-on Locations screen asks for information relating to your input ZIPand ZIP + 4 Code locations and formats.
202CODE-1 Plus User Guide for IBM i
CommentsDescriptionFormatField Name
Required if any fields to postare defined.No Default.
Specifies where in theCODE-1 Plus output recordto extract a ZIP Code to passon to Geographic CodingPlus. This can be the positionof the original ZIP Code orthe resulting ZIP Code (froma CODE-1 Plus match) inyour output record.
Number from 1-9999ZIP Code: Position on theoutput record
Required if a ZIP Codeposition is defined.Default isC.
Indicates one of the followingformats for the ZIP Code:
C ZIP Code in EBCDICcharacter format.CODE-1Plus assumes a field lengthof 5 bytes.
P ZIP Code in packeddecimal format. The assumedlength of the packed field is3.
The appropriate field lengthautomatically corresponds tothe specification typed here.
C or PFormat of ZIP Code
Optional.No Default.Specifies where in theCODE-1 Plus output recordto extract a ZIP + 4 Code topass on to GeographicCoding Plus. This can be theposition of the original ZIP +4 Code, or the resulting ZIP+ 4 (from a CODE-1Plus match) in your outputrecord.
Number from 1-9999ZIP + 4 Add-on: Position onthe output record
203CODE-1 Plus User Guide for IBM i

CommentsDescriptionFormatField Name
Required if a ZIP + 4 Add-onposition is defined.Default isC.
Indicates one of the followingformats for the ZIP + 4 Code:
C ZIP + 4 Code in EBCDICcharacter format. CODE-1Plus assumes a field lengthof 4 bytes.
P ZIP + 4 Code in packeddecimal format. The assumedlength of the packed field is3.
The appropriate field lengthautomatically corresponds tothe specification typed here.
C or PFormat of ZIP + 4 Add-on
Optional.Default is blank.The optional Rooftop functionadds another level ofaccuracy to your location anddistance calculation by usinglongitude and latitudecoordinates for a particularaddress. Type one of thefollowing codes:
Blank No rooftop access isto be attempted.
M Use the DPBC and housenumber that matched to theZIP + 4 database todetermine the rooftopanswer.
P Use the input DPBC andhouse number to determinethe rooftop answer.
B First, use the DPBC andhouse number from the ZIP+ 4 database match, andthen, if there is no ZIP + 4database match, use theinput DPBC and housenumber to determine therooftop answer.
blank, M, P, or BRooftop Access Method
Required if P or B is selectedfor Rooftop Access Method.
Location of input DPBC usedfor Rooftop Matching.
Number from 1-9999Location of Delivery Point BarCode (DPBC)
204CODE-1 Plus User Guide for IBM i

CommentsDescriptionFormatField Name
Required if P or B is selectedfor Rooftop Access Method.
Location of input HouseNumber used for RooftopMatching.
Number from 1-9999Location for House Number
Required if P or B is selectedfor Rooftop Access Method.
Length of input HouseNumber used for RooftopMatching.
Number from 1-99Length of House Number
Geographic Coding Storage Screen (C1CPG911)
The Geographic Coding Storage screen specifies the location in your output record to place thematch results from the geographic coding attempt.
Note: Census information can be stored in two ways: you can store the four results for statecode, county code, census tract, and census block group as a single 12-byte field or you candefine each field's storage position separately. You can use these options alternately or inconjunction with one another.
205CODE-1 Plus User Guide for IBM i
CommentsDescriptionFormatField Name
Optional.No Default.Instructs CODE-1 Plus toplace a level of match returncode at that position in theoutput record. One of thefollowing values will beposted:
Blank The input ZIP Codedid not match.
9 Both the input ZIP Codeand the ZIP + 4 Codematched the Master File.
5 The input ZIP Codematched, but the ZIP + 4Code did not or was notpresent.
X The Geographic CodingSystem or GeographicCoding Plus Master File datahas expired.
Number from 1-9999Return Code for level ofZIPCode match
Optional.No Default.Specifies the output locationof the Census GEOCODE.The Census GEOCODE is a12-byte field comprised of thefollowing 4 fields:
1. State Code 2bytes2. County Code 3bytes3. Census Tract 6bytes4. Block Group 1byte Total 12bytes
Number from 1-9999Census GEOCODE
Optional.No Default.Specifies the location in theCODE-1 Plus output recordwhere you want to store the2-byte FIPS state code.
Number from 1-9999FIPS State Code
Optional.No Default.Specifies the location in theCODE-1 Plus output recordwhere you want to store the3-byte FIPS county code.
Number from 1-9999FIPS County Code
206CODE-1 Plus User Guide for IBM i

CommentsDescriptionFormatField Name
Optional.No Default.Specifies the location in theCODE-1 Plus output recordwhere you want to store the6-byte census tract.
Number from 1-9999Census Tract
Optional.No Default.Specifies the location in theCODE-1 Plus output recordwhere you want to store the1-byte census block group.
Number from 1-9999Census Block Group
Additional Geographic Coding Storage Screen(C1CPG912)
The first Additional Geographic Coding Storage screen defines the location in your CODE-1 Plusoutput record to place additional match results from a geographic coding attempt.
207CODE-1 Plus User Guide for IBM i
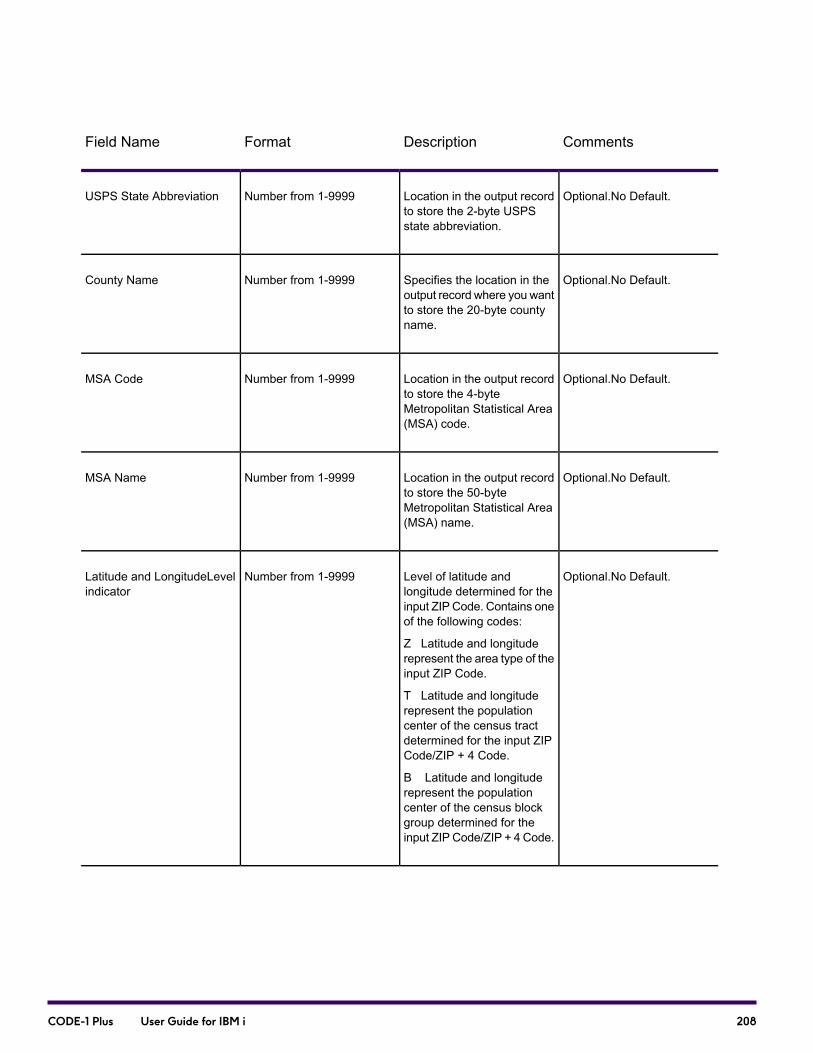
CommentsDescriptionFormatField Name
Optional.No Default.Location in the output recordto store the 2-byte USPSstate abbreviation.
Number from 1-9999USPS State Abbreviation
Optional.No Default.Specifies the location in theoutput record where you wantto store the 20-byte countyname.
Number from 1-9999County Name
Optional.No Default.Location in the output recordto store the 4-byteMetropolitan Statistical Area(MSA) code.
Number from 1-9999MSA Code
Optional.No Default.Location in the output recordto store the 50-byteMetropolitan Statistical Area(MSA) name.
Number from 1-9999MSA Name
Optional.No Default.Level of latitude andlongitude determined for theinput ZIP Code. Contains oneof the following codes:
Z Latitude and longituderepresent the area type of theinput ZIP Code.
T Latitude and longituderepresent the populationcenter of the census tractdetermined for the input ZIPCode/ZIP + 4 Code.
B Latitude and longituderepresent the populationcenter of the census blockgroup determined for theinput ZIP Code/ZIP + 4 Code.
Number from 1-9999Latitude and LongitudeLevelindicator
208CODE-1 Plus User Guide for IBM i
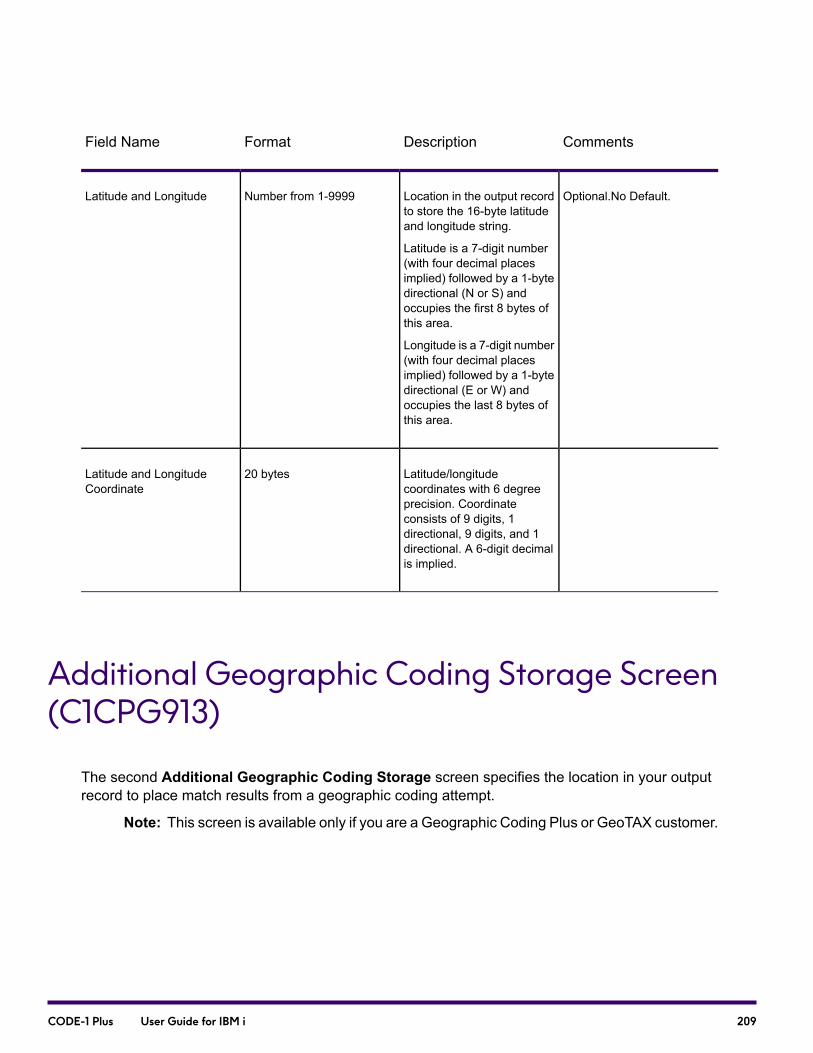
CommentsDescriptionFormatField Name
Optional.No Default.Location in the output recordto store the 16-byte latitudeand longitude string.
Latitude is a 7-digit number(with four decimal placesimplied) followed by a 1-bytedirectional (N or S) andoccupies the first 8 bytes ofthis area.
Longitude is a 7-digit number(with four decimal placesimplied) followed by a 1-bytedirectional (E or W) andoccupies the last 8 bytes ofthis area.
Number from 1-9999Latitude and Longitude
Latitude/longitudecoordinates with 6 degreeprecision. Coordinateconsists of 9 digits, 1directional, 9 digits, and 1directional. A 6-digit decimalis implied.
20 bytesLatitude and LongitudeCoordinate
Additional Geographic Coding Storage Screen(C1CPG913)
The second Additional Geographic Coding Storage screen specifies the location in your outputrecord to place match results from a geographic coding attempt.
Note: This screen is available only if you are a Geographic Coding Plus or GeoTAX customer.
209CODE-1 Plus User Guide for IBM i
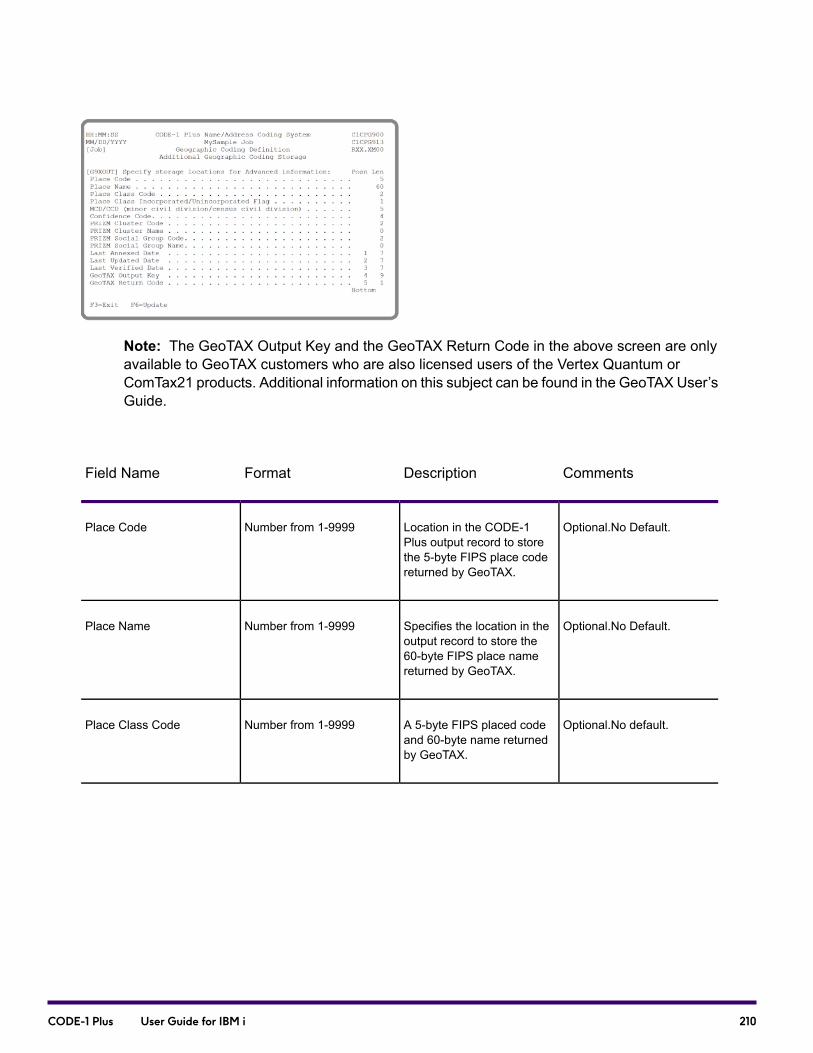
Note: The GeoTAX Output Key and the GeoTAX Return Code in the above screen are onlyavailable to GeoTAX customers who are also licensed users of the Vertex Quantum orComTax21 products. Additional information on this subject can be found in the GeoTAX User’sGuide.
CommentsDescriptionFormatField Name
Optional.No Default.Location in the CODE-1Plus output record to storethe 5-byte FIPS place codereturned by GeoTAX.
Number from 1-9999Place Code
Optional.No Default.Specifies the location in theoutput record to store the60-byte FIPS place namereturned by GeoTAX.
Number from 1-9999Place Name
Optional.No default.A 5-byte FIPS placed codeand 60-byte name returnedby GeoTAX.
Number from 1-9999Place Class Code
210CODE-1 Plus User Guide for IBM i

CommentsDescriptionFormatField Name
Optional.No default.A 1-byte code indicatingwhether a place isincorporated orunincorporated as stored inthe U.S. Department ofCommerce FIPS Place CodeRoster. One of the followingcodes is stored:
Blank Not in the roster.
I Incorporated.
O Unincorporated.
NOTE: This option isavailable for GeoTAXcustomers only.
Number from 1-9999Place ClassIncorporated/UnincorporatedFlag
Optional.No Default.Specifies the location intheCODE-1 Plus outputrecord where you want tostore the 5-byte Minor CivilDivision/Census CountyDivision (MCD/CCD) returnedby Geographic Coding Plus.
MCDs Indicates the primarypolitical or administrativedivisions of a countyrepresenting many kinds oflegal entities with a variety ofgovernmental andadministrative functions.
CCDs Are established instates where there are nolegally established MCDs.
Number from 1-9999MCD/CCD (minor civildivision/census countydivision)
Optional.No Default.Specifies the location intheCODE-1 Plus outputrecord where you want tostore the 3-digit confidencecode returned by GeographicCoding Plus.
Confidence codes representa percentage of coverage bya source within a postalgeography.
Number from 1-9999Confidence Code
211CODE-1 Plus User Guide for IBM i
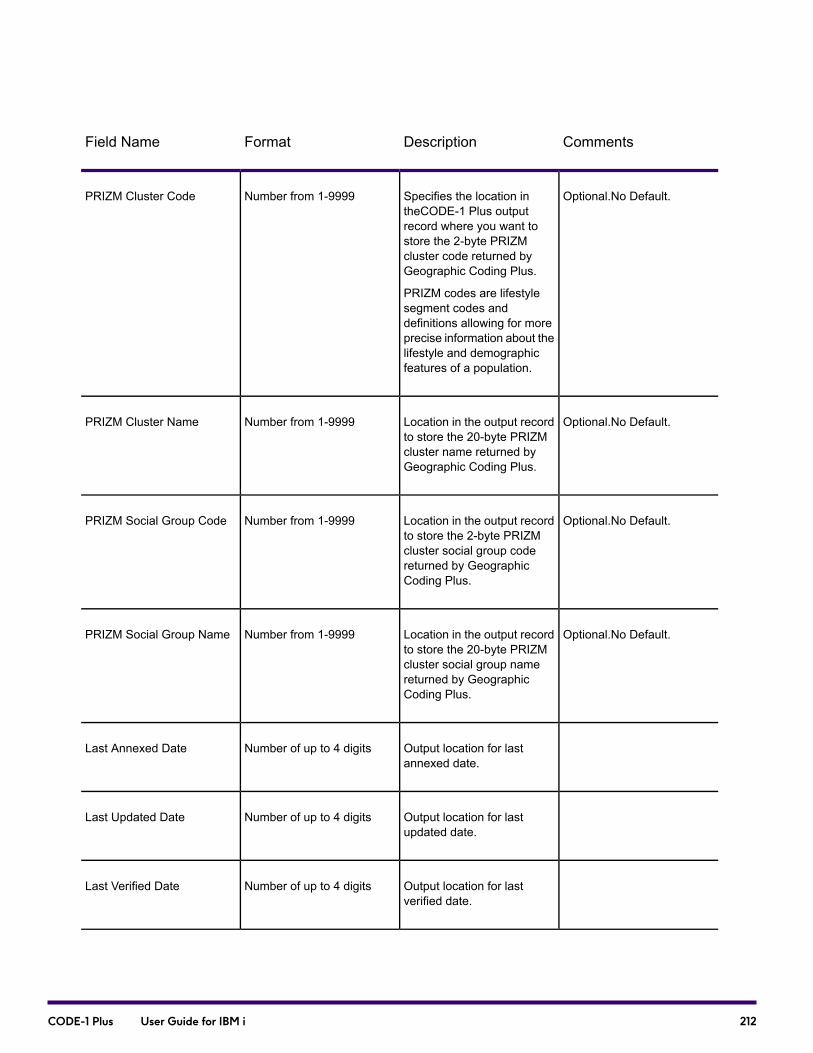
CommentsDescriptionFormatField Name
Optional.No Default.Specifies the location intheCODE-1 Plus outputrecord where you want tostore the 2-byte PRIZMcluster code returned byGeographic Coding Plus.
PRIZM codes are lifestylesegment codes anddefinitions allowing for moreprecise information about thelifestyle and demographicfeatures of a population.
Number from 1-9999PRIZM Cluster Code
Optional.No Default.Location in the output recordto store the 20-byte PRIZMcluster name returned byGeographic Coding Plus.
Number from 1-9999PRIZM Cluster Name
Optional.No Default.Location in the output recordto store the 2-byte PRIZMcluster social group codereturned by GeographicCoding Plus.
Number from 1-9999PRIZM Social Group Code
Optional.No Default.Location in the output recordto store the 20-byte PRIZMcluster social group namereturned by GeographicCoding Plus.
Number from 1-9999PRIZM Social Group Name
Output location for lastannexed date.
Number of up to 4 digitsLast Annexed Date
Output location for lastupdated date.
Number of up to 4 digitsLast Updated Date
Output location for lastverified date.
Number of up to 4 digitsLast Verified Date
212CODE-1 Plus User Guide for IBM i

CommentsDescriptionFormatField Name
Output location for GeoTAXoutput key.
Number of up to 4 digitsGeoTAX Output Key
Output location for GeoTAXreturn code:
Blank No matchingGTMASTRGeoTAX Recordfound.
E Exact match usingstate/county/place/ZIPCode/place name.
P Partial match usingstate/county/place.
A Alternate match using ZIPCode and place name.
N Record is default codedbased on valid state code.
Number of up to 4 digitsGeoTAX Return Code
213CODE-1 Plus User Guide for IBM i

9 - Getting Started WithYour Batch Job
In this section
Introduction to Batch Jobs in CODE-1 Plus...........................................215Finding Your Sample Name and Address File........................................215Analyzing the Job...................................................................................215What Will Be Covered in This Tutorial....................................................222Creating the Job.....................................................................................223Defining Your Headers and Footers.......................................................226Specifying the Input Name/Address File Layout....................................228Defining Your Output Information...........................................................232Selecting Reports to be Printed..............................................................243Submitting The Job.................................................................................245Reading Your Output Files and Reports.................................................248
CODE-1 Plus User Guide for IBM i

Introduction to Batch Jobs in CODE-1 Plus
In this chapter we will lead you through a basic CODE-1 Plus job using the sample name-and-addressfile provided with your installation. We will only be covering a few of the options available to youwhen setting up and running a CODE-1 Plus job. For any basic CODE-1 Plus job, you must:
• Define the contents of your input file
• Specify the layout of your input file
• Define the contents of your output file
• Specify the layout of your output file
On the following pages, we will create a sample job that uses CODE-1 Plus functions to standardizeaddresses, correct ZIP Codes, and add ZIP + 4 and carrier route codes to input records. This samplejob goes beyond what CODE-1 Plus requires for the most basic job and allows you to experimentwith a few options.
Finding Your Sample Name and Address File
The input file for this tutorial, C1TUTOR. is included with your installation. Before starting the tutorial,create a “demo” library where you can copy C1TUTOR and store the output files as well.
Analyzing the Job
Before you begin defining your sample job, you need to analyze the following job requirements:
• Sample input file contents and output files
• Sample input file layout
• Output file contents
• Reports to generate
• Headers and footers you want on your reports
215CODE-1 Plus User Guide for IBM i
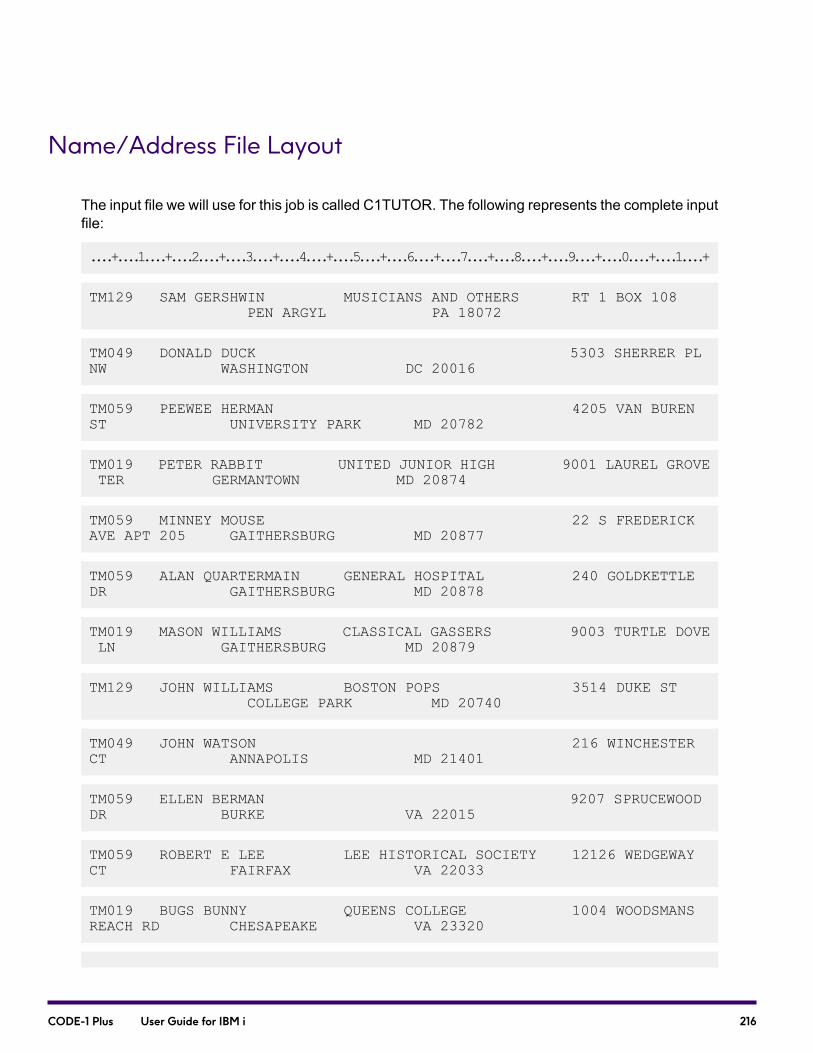
Name/Address File Layout
The input file we will use for this job is called C1TUTOR. The following represents the complete inputfile:
....+....1....+....2....+....3....+....4....+....5....+....6....+....7....+....8....+....9....+....0....+....1....+
TM129 SAM GERSHWIN MUSICIANS AND OTHERS RT 1 BOX 108PEN ARGYL PA 18072
TM049 DONALD DUCK 5303 SHERRER PLNW WASHINGTON DC 20016
TM059 PEEWEE HERMAN 4205 VAN BURENST UNIVERSITY PARK MD 20782
TM019 PETER RABBIT UNITED JUNIOR HIGH 9001 LAUREL GROVETER GERMANTOWN MD 20874
TM059 MINNEY MOUSE 22 S FREDERICKAVE APT 205 GAITHERSBURG MD 20877
TM059 ALAN QUARTERMAIN GENERAL HOSPITAL 240 GOLDKETTLEDR GAITHERSBURG MD 20878
TM019 MASON WILLIAMS CLASSICAL GASSERS 9003 TURTLE DOVELN GAITHERSBURG MD 20879
TM129 JOHN WILLIAMS BOSTON POPS 3514 DUKE STCOLLEGE PARK MD 20740
TM049 JOHN WATSON 216 WINCHESTERCT ANNAPOLIS MD 21401
TM059 ELLEN BERMAN 9207 SPRUCEWOODDR BURKE VA 22015
TM059 ROBERT E LEE LEE HISTORICAL SOCIETY 12126 WEDGEWAYCT FAIRFAX VA 22033
TM019 BUGS BUNNY QUEENS COLLEGE 1004 WOODSMANSREACH RD CHESAPEAKE VA 23320
216CODE-1 Plus User Guide for IBM i
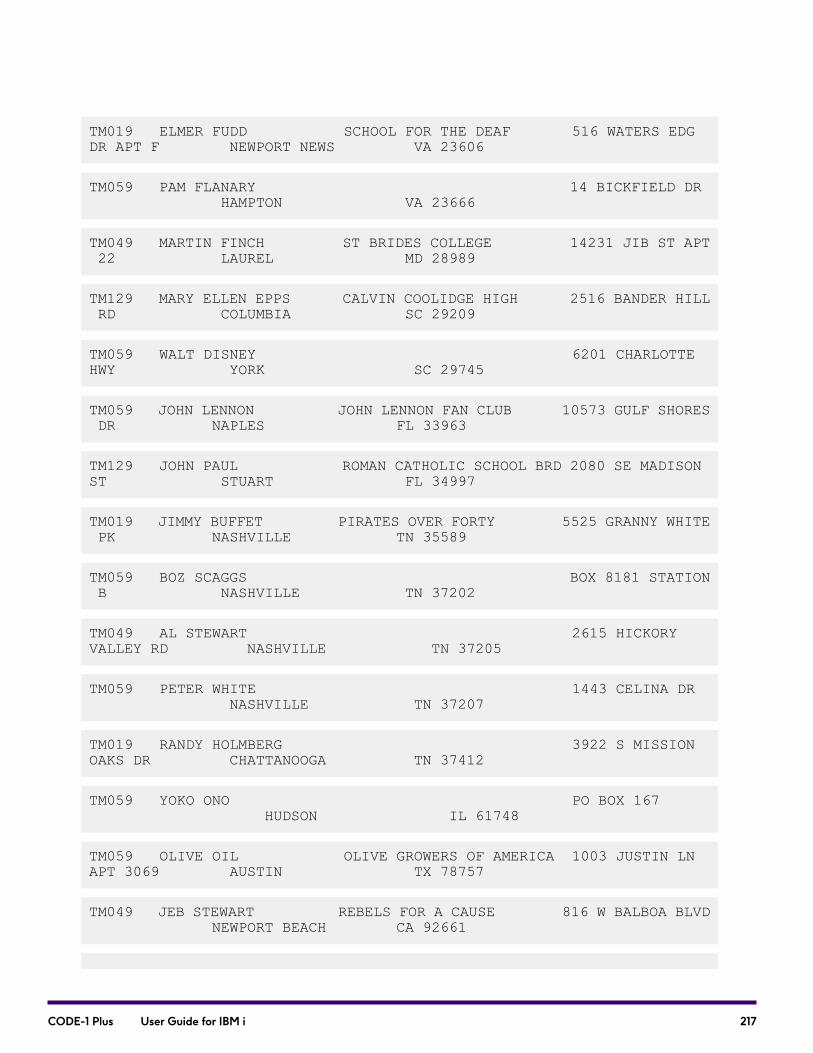
TM019 ELMER FUDD SCHOOL FOR THE DEAF 516 WATERS EDGDR APT F NEWPORT NEWS VA 23606
TM059 PAM FLANARY 14 BICKFIELD DRHAMPTON VA 23666
TM049 MARTIN FINCH ST BRIDES COLLEGE 14231 JIB ST APT22 LAUREL MD 28989
TM129 MARY ELLEN EPPS CALVIN COOLIDGE HIGH 2516 BANDER HILLRD COLUMBIA SC 29209
TM059 WALT DISNEY 6201 CHARLOTTEHWY YORK SC 29745
TM059 JOHN LENNON JOHN LENNON FAN CLUB 10573 GULF SHORESDR NAPLES FL 33963
TM129 JOHN PAUL ROMAN CATHOLIC SCHOOL BRD 2080 SE MADISONST STUART FL 34997
TM019 JIMMY BUFFET PIRATES OVER FORTY 5525 GRANNY WHITEPK NASHVILLE TN 35589
TM059 BOZ SCAGGS BOX 8181 STATIONB NASHVILLE TN 37202
TM049 AL STEWART 2615 HICKORYVALLEY RD NASHVILLE TN 37205
TM059 PETER WHITE 1443 CELINA DRNASHVILLE TN 37207
TM019 RANDY HOLMBERG 3922 S MISSIONOAKS DR CHATTANOOGA TN 37412
TM059 YOKO ONO PO BOX 167HUDSON IL 61748
TM059 OLIVE OIL OLIVE GROWERS OF AMERICA 1003 JUSTIN LNAPT 3069 AUSTIN TX 78757
TM049 JEB STEWART REBELS FOR A CAUSE 816 W BALBOA BLVDNEWPORT BEACH CA 92661
217CODE-1 Plus User Guide for IBM i

TM049 KEN MURRAY ASPENITE CORPORATION 770 MAHOGANY LNSUNNYVALE CA 94086
TM059 PETER PAN NEWFOUNDLAND PUBLIC LIBR 2226 BOXWOOD DRSAN JOSE CA 95128
TM129 GEORGE HARRISON TRAVELING WILBURIES 1113 NE BURKE PLCORVALIS OR 97330
TM059 MICKEY MOUSE 12106 SE 31ST STAPT D102 BELLEVUE WA 98005
TM059 PAUL MCCARTNEY JOHN LENNON FAN CLUB 15433 COUNTRYCLUB DR MILL CREEK WA 98012
TM059 PADDY O'NEILL ST PATRICKS MERCY HOME 5055 8TH AVE NE SEATTLE WA98105
TM049 ROBERT MONDAVI 4225 BROOKLYN AVENE APT 12 SEATTLE WA 98105
TM019 POPEYE T SAILOR 716 N 150TH STSEATTLE WA 98133
TM059 RINGO STAR JOHN LENNON FAN CLUB 8001 SANDPOINTWAY NE SEATTLE WA 98155
This mailing list contains name-and-address records that are laid out as follows:
Data ElementPosition
List Code1-5
Name9-28
Secondary Address Line30-54
Primary Address Line56-85
218CODE-1 Plus User Guide for IBM i
Data ElementPosition
City Name87-106
State108-109
ZIP Code111-115
Output Record Posting Requirements
As stated before, in this tutorial we are going to do the following things:
• Standardize the input addresses
• Correct the original ZIP Codes (if necessary)
• Add ZIP + 4 and carrier route codes to the records
• Store the output records in the same format as the input records, with the ZIP + 4 Code and carrierroute code added as follows:
Data ElementPosition
ZIP + 4 Code (stored with preceding hyphen)116-120
Carrier Route Code122-125
In addition, we want CODE-1 Plus to:
• Store the normalized address (if no match was found).
• Store the individual standardized address elements.
• Store return codes.
In your job, you will tell CODE-1 Plus to store these components as follows:
219CODE-1 Plus User Guide for IBM i
Data ElementPosition
Address Elements131-181
Normalized Address Line 1183-212
Normalized Address Line 2214-238
Return Codes240-274
Generated Reports
CODE-1 Plus produces four kinds of reports:
• ZIP + 4 Coding
• Carrier Coding
• Line of Travel Coding
• Summary
These reports can be generated by state, list code, or 3-digit ZIP Code. For our sample job, we onlywant the state reports to print.
When running a job, CODE-1 Plus automatically generates two report files: PRNTXLG and PRNTRPT.These report files contain all of the CODE-1 Plus reports that were created as the result of a jobexecution:
• PRNTXLG—This report file contains only one report, the Execution Log Report. This report isalways printed.
• PRNTRPT—This report file can contain up to 15 different reports. Four reports are output to thisfile automatically:
• Parameter Record List Report
• Control Totals Report
• Address-Match Execution Statistics Report
• USPS Form 3553 (This will only be generated for jobs run with a valid CASS configuration)
220CODE-1 Plus User Guide for IBM i
The following reports are output to this file by default. If you do not want to generate one of thesereports, you must tell CODE-1 Plus which reports not to print:
• Analysis of Matched Records Report
• ZIP + 4 Coding by State Report
• Carrier Coding by State Report
• Line of Travel Coding by State Report
• ZIP + 4 Coding by List Code Report
• Carrier Coding by List Code Report
• Line of Travel Coding by List Code Report
• ZIP + 4 Coding by 3-Digit ZIP Report
• Carrier Coding by 3-Digit ZIP Report
• Line of Travel Coding by 3-Digit ZIP Report
• Delivery Point Validation by List Code Report
• Delivery Point Validation Processing Summary Report
• Residential Delivery File Build Report
• Residential Delivery File Execution Log
• Processing Summary by State Report
• Processing Summary by 3-Digit ZIP Code
Note: The National Delivery Index (NDI) Report is not generated by default. To generate thereport, you must tell CODE-1 Plus to do so.
Report Headers and Footers
Using the Defaults for Print Output component, you define the information you want printed onyour reports:
• Headers
• Footers
• Number of lines to print on a page
For this batch job, we will have all reports print at 60 lines per page and the headers and footers willbe the following:
221CODE-1 Plus User Guide for IBM i

FooterSecondary HeaderMain Header
CODE-1 Plus User's GuideCODE-1 Plus TutorialSample Job
Performance Considerations
In order for your CODE-1 Plus job to run more efficiently, the following steps are recommended:
• Sort your input address file by ZIP Code.
• Use the memory module appropriate for your site capability.
What Will Be Covered in This Tutorial
You will perform the tasks listed below in this tutorial:
1. Create a job.
2. Define the headers and footers of your reports.
3. Define your input and output files.
4. Specify your input name-and-address record layout.
5. Specify your name-and-address record posting requirements.
6. Specify the reports you wish to generate.
7. Submit the job for processing.
8. Read the output.
Submit Batch Job
The Submit Batch component of CODE-1 Plus is where we specify the names of our input and outputfiles. Create a demo library where C1TUTOR and your output files will be sent:
222CODE-1 Plus User Guide for IBM i
• File C1TUTOR
• Library DEMO
• Member *FIRST.
For this tutorial, we will write output for up to 3 different files—one for successfully matched andcoded records, one for records with valid ZIP Codes for which an address match could not be made,and one for records with invalid ZIP Codes. For this example, we will produce three out of the fouravailable output files (we are not printing the ZIP + 4 Coded File).
By default, CODE-1 Plus will assign the following name to the file for successfully coded records:
• File C1NAMTUTOR
• Library DEMO
• Member CODED
CODE-1 Plus will assign the name of the uncoded records file as follows:
• File C1NAMTUTOR
• Library DEMO
• Member UNCODED
Finally, CODE-1 Plus will assign the name of the invalid ZIP Code output file as follows:
• File C1NAMTUTOR
• Library DEMO
• Member INVZIP
The Submit Batch component also allows you several ways to limit processing. For demonstrationpurposes, we will limit processing to only those records with ZIP Codes between 20000 and 39999.
Creating the Job
Before you do any other steps, you must first create your job. Follow the steps listed below to createa job with the job ID, TUTOR. Start from the Main Menu.
1. Type 5 in the Option field to select CODE-1 Plus, and press Enter
223CODE-1 Plus User Guide for IBM i
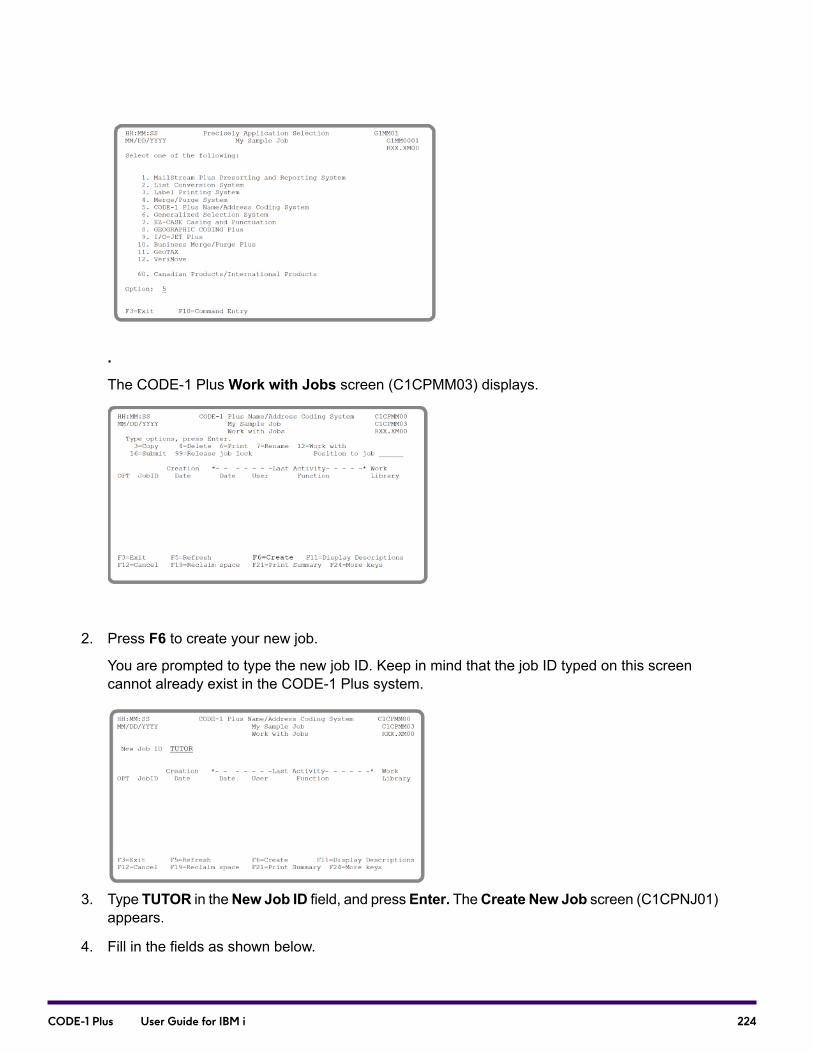
.
The CODE-1 PlusWork with Jobs screen (C1CPMM03) displays.
2. Press F6 to create your new job.
You are prompted to type the new job ID. Keep in mind that the job ID typed on this screencannot already exist in the CODE-1 Plus system.
3. Type TUTOR in theNew Job ID field, and press Enter. TheCreate New Job screen (C1CPNJ01)appears.
4. Fill in the fields as shown below.
224CODE-1 Plus User Guide for IBM i
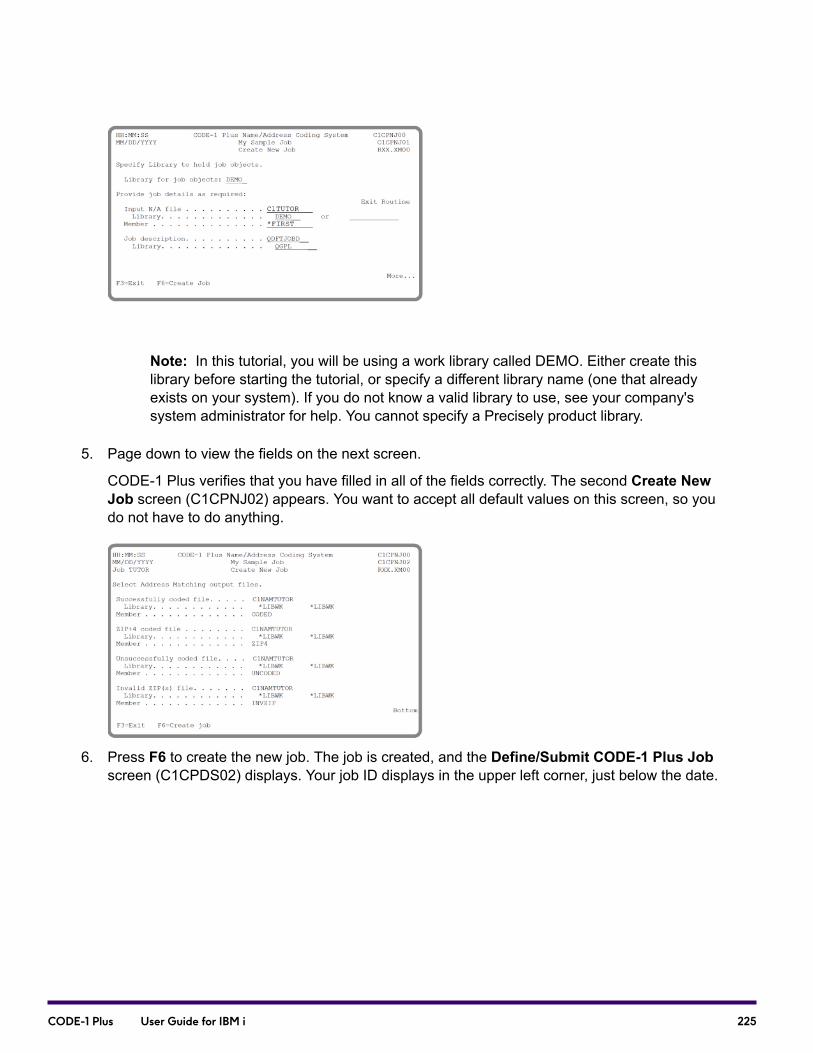
Note: In this tutorial, you will be using a work library called DEMO. Either create thislibrary before starting the tutorial, or specify a different library name (one that alreadyexists on your system). If you do not know a valid library to use, see your company'ssystem administrator for help. You cannot specify a Precisely product library.
5. Page down to view the fields on the next screen.
CODE-1 Plus verifies that you have filled in all of the fields correctly. The second Create NewJob screen (C1CPNJ02) appears. You want to accept all default values on this screen, so youdo not have to do anything.
6. Press F6 to create the new job. The job is created, and the Define/Submit CODE-1 Plus Jobscreen (C1CPDS02) displays. Your job ID displays in the upper left corner, just below the date.
225CODE-1 Plus User Guide for IBM i
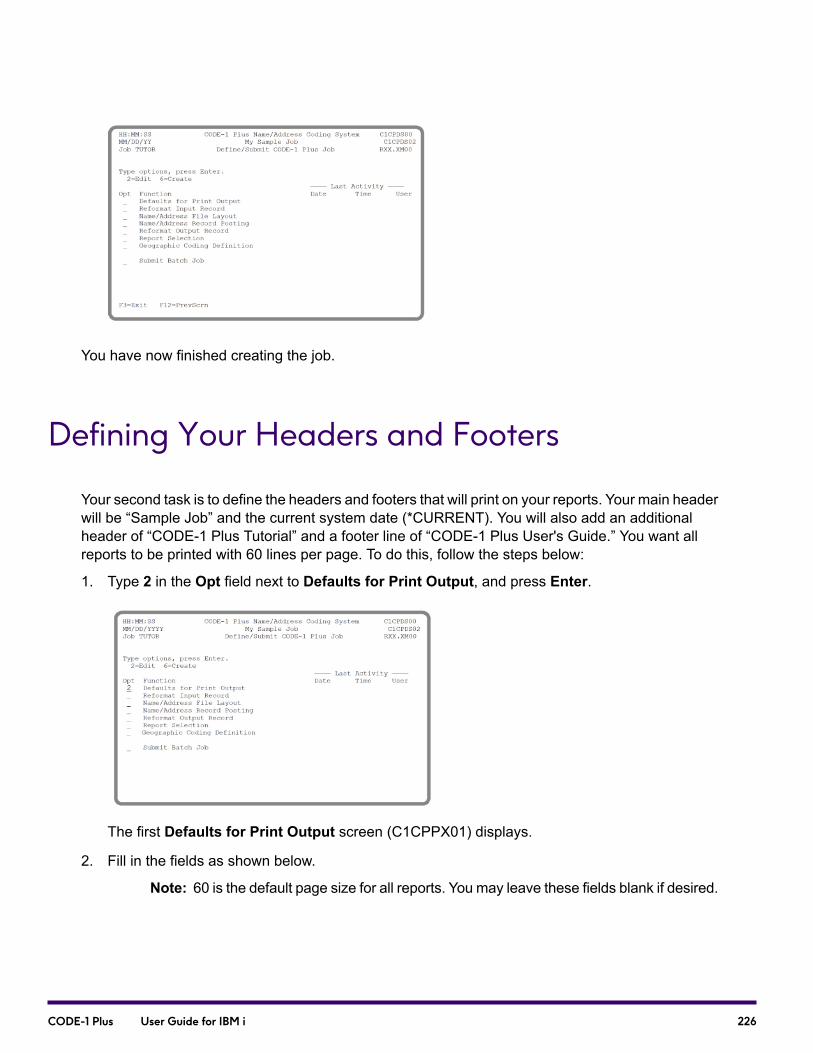
You have now finished creating the job.
Defining Your Headers and Footers
Your second task is to define the headers and footers that will print on your reports. Your main headerwill be “Sample Job” and the current system date (*CURRENT). You will also add an additionalheader of “CODE-1 Plus Tutorial” and a footer line of “CODE-1 Plus User's Guide.” You want allreports to be printed with 60 lines per page. To do this, follow the steps below:
1. Type 2 in the Opt field next to Defaults for Print Output, and press Enter.
The first Defaults for Print Output screen (C1CPPX01) displays.
2. Fill in the fields as shown below.
Note: 60 is the default page size for all reports. You may leave these fields blank if desired.
226CODE-1 Plus User Guide for IBM i
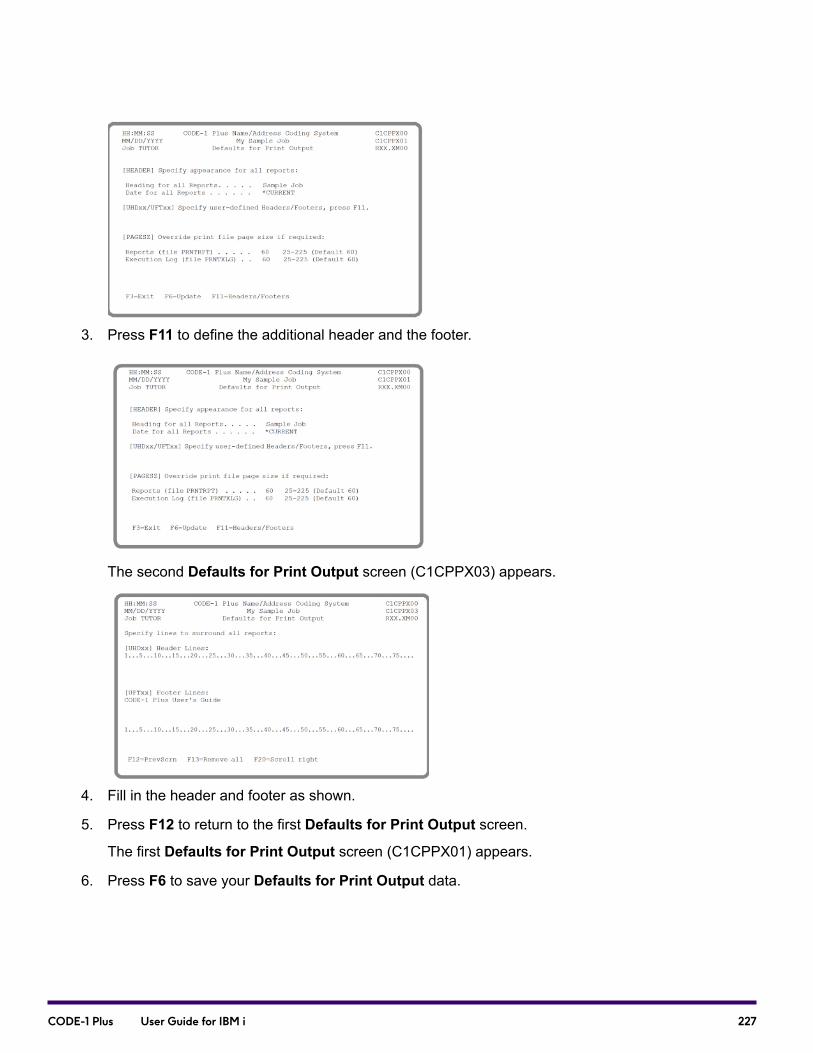
3. Press F11 to define the additional header and the footer.
The second Defaults for Print Output screen (C1CPPX03) appears.
4. Fill in the header and footer as shown.
5. Press F12 to return to the first Defaults for Print Output screen.
The first Defaults for Print Output screen (C1CPPX01) appears.
6. Press F6 to save your Defaults for Print Output data.
227CODE-1 Plus User Guide for IBM i
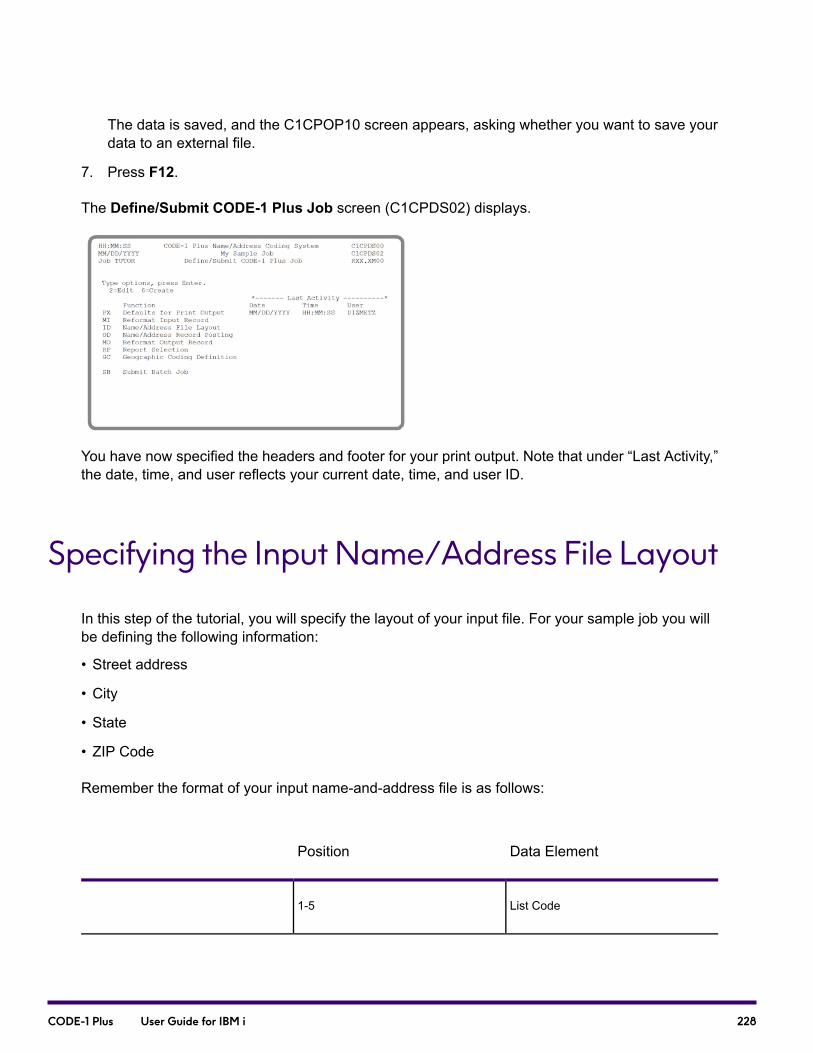
The data is saved, and the C1CPOP10 screen appears, asking whether you want to save yourdata to an external file.
7. Press F12.
The Define/Submit CODE-1 Plus Job screen (C1CPDS02) displays.
You have now specified the headers and footer for your print output. Note that under “Last Activity,”the date, time, and user reflects your current date, time, and user ID.
Specifying the Input Name/Address File Layout
In this step of the tutorial, you will specify the layout of your input file. For your sample job you willbe defining the following information:
• Street address
• City
• State
• ZIP Code
Remember the format of your input name-and-address file is as follows:
Data ElementPosition
List Code1-5
228CODE-1 Plus User Guide for IBM i
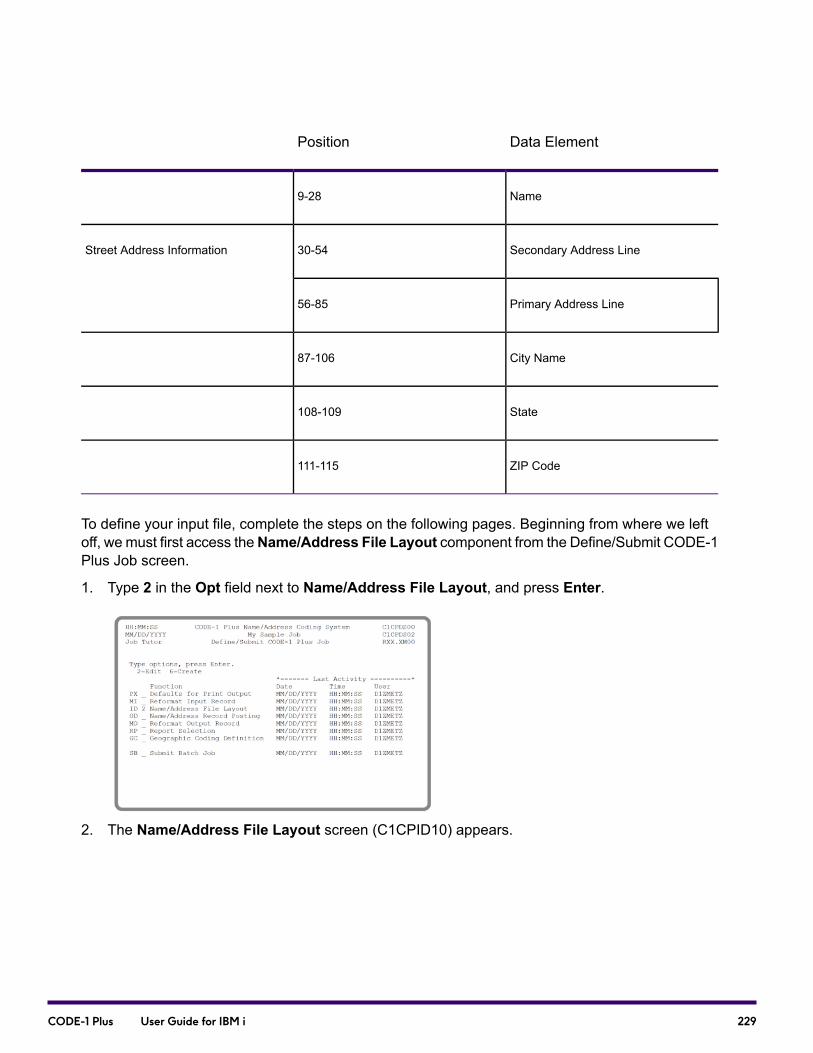
Data ElementPosition
Name9-28
Secondary Address Line30-54Street Address Information
Primary Address Line56-85
City Name87-106
State108-109
ZIP Code111-115
To define your input file, complete the steps on the following pages. Beginning from where we leftoff, we must first access theName/Address File Layout component from the Define/Submit CODE-1Plus Job screen.
1. Type 2 in the Opt field next to Name/Address File Layout, and press Enter.
2. The Name/Address File Layout screen (C1CPID10) appears.
229CODE-1 Plus User Guide for IBM i
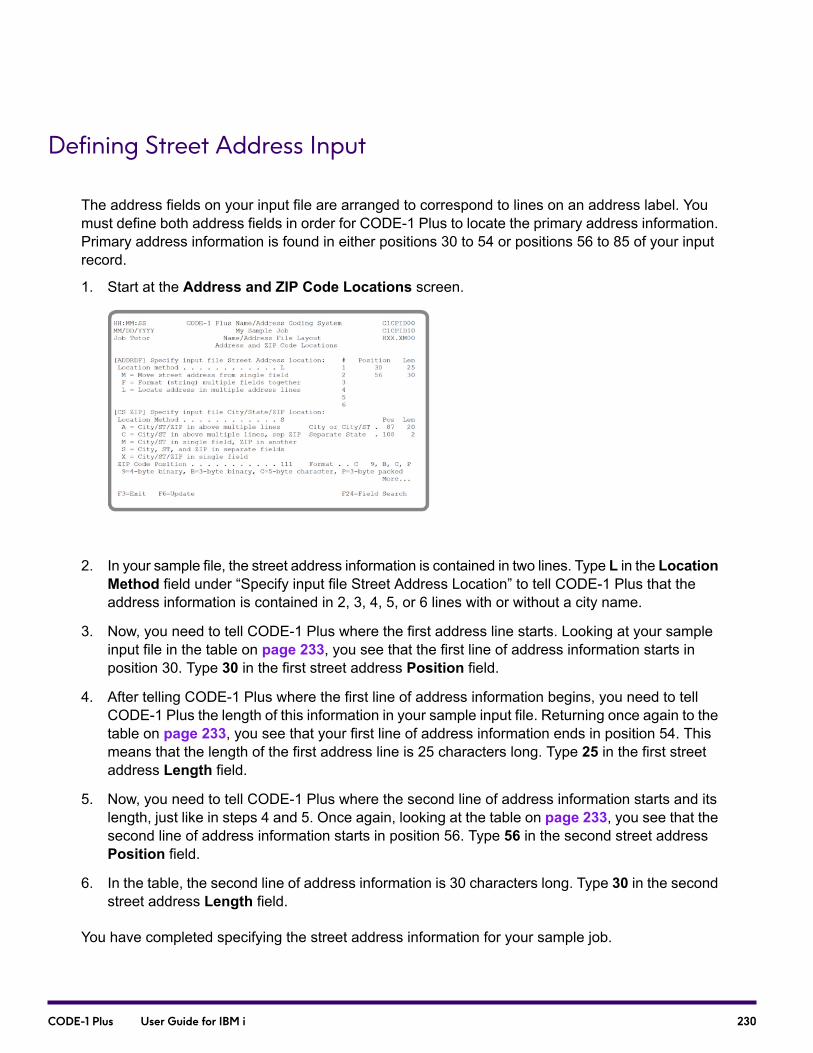
Defining Street Address Input
The address fields on your input file are arranged to correspond to lines on an address label. Youmust define both address fields in order for CODE-1 Plus to locate the primary address information.Primary address information is found in either positions 30 to 54 or positions 56 to 85 of your inputrecord.
1. Start at the Address and ZIP Code Locations screen.
2. In your sample file, the street address information is contained in two lines. Type L in the LocationMethod field under “Specify input file Street Address Location” to tell CODE-1 Plus that theaddress information is contained in 2, 3, 4, 5, or 6 lines with or without a city name.
3. Now, you need to tell CODE-1 Plus where the first address line starts. Looking at your sampleinput file in the table on page 233, you see that the first line of address information starts inposition 30. Type 30 in the first street address Position field.
4. After telling CODE-1 Plus where the first line of address information begins, you need to tellCODE-1 Plus the length of this information in your sample input file. Returning once again to thetable on page 233, you see that your first line of address information ends in position 54. Thismeans that the length of the first address line is 25 characters long. Type 25 in the first streetaddress Length field.
5. Now, you need to tell CODE-1 Plus where the second line of address information starts and itslength, just like in steps 4 and 5. Once again, looking at the table on page 233, you see that thesecond line of address information starts in position 56. Type 56 in the second street addressPosition field.
6. In the table, the second line of address information is 30 characters long. Type 30 in the secondstreet address Length field.
You have completed specifying the street address information for your sample job.
230CODE-1 Plus User Guide for IBM i

Defining the City/State/ZIP Code Layout
The city, state, and ZIP Code information in your sample input file is located in separate fields. Youmust specify the location, length, and format of each of these three data elements.
Looking at the table on page 233, you can see that the city information is located in positions 87 to106, the state information is located in positions 108 to 109, and the ZIP Code information is locatedin positions 111 to 115 in your sample input file. You will need to define all of this information forCODE-1 Plus.
1. Start at the Address and ZIP Code Locations screen.
2. First you need to define how the city, state, and ZIP Code information resides in your sampleinput file. In your file, the city, state, and ZIP Code are in three separate fields. Type S in theLocation Method field under “Specify input file City/State/ZIP Code Location.”
3. Now, you need to tell CODE-1 Plus where the ZIP Code information is located in your input file.Looking at the table on page 233, you see that this information starts in position 111. Type 111 inthe ZIP Code Position field.
4. In this next step, you need to tell CODE-1 Plus that your ZIP Code is in a 5-byte character formatby using the code C. Type C in the ZIP Code Format field.
5. Next, you need to tell CODE-1 Plus the location of your city information in the input file. Lookingat the table on page 233 once again, you can see that the city information starts in position 87.Type 87 in the City or City/ST Position field.
6. Now, you need to tell CODE-1 Plus the length of your city information. According to our table,the length of the city information is 20 characters. Type 20 in the City or City/ST Length field.
7. Next, you need to tell CODE-1 Plus the location of your state information in your input file. Lookingat the table on page 233, you see that your state information starts in position 108. Type 108 inthe Separate State Position field.
231CODE-1 Plus User Guide for IBM i
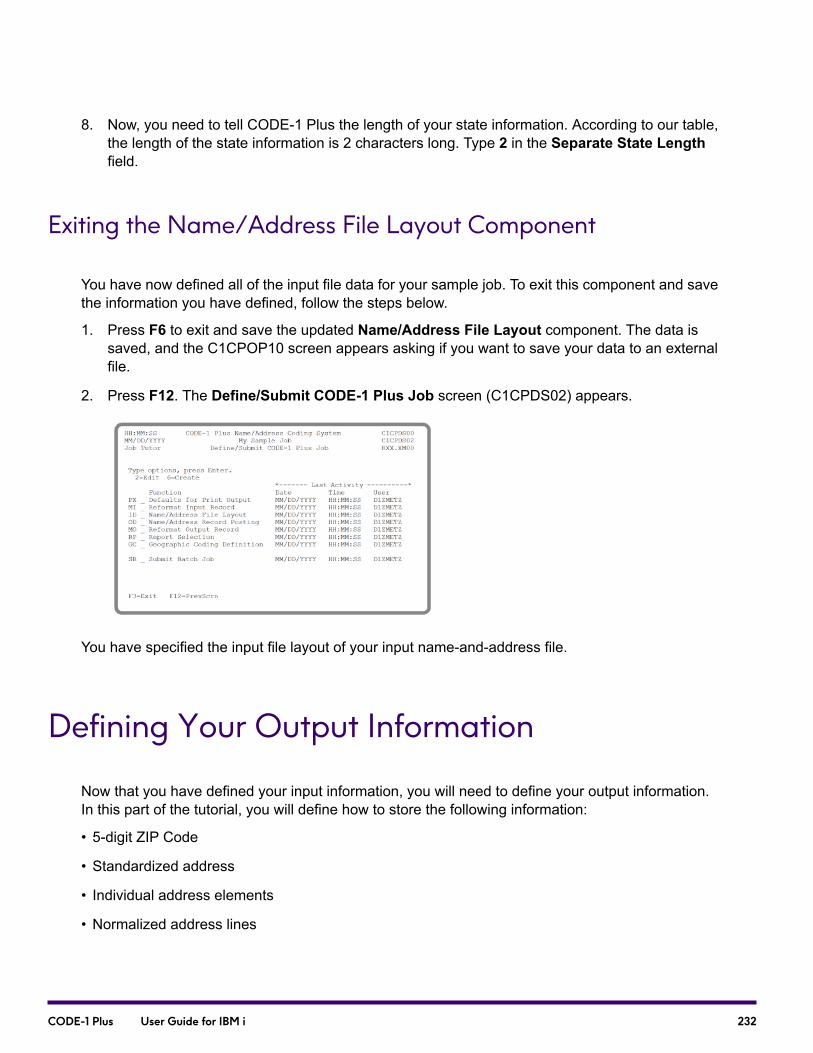
8. Now, you need to tell CODE-1 Plus the length of your state information. According to our table,the length of the state information is 2 characters long. Type 2 in the Separate State Lengthfield.
Exiting the Name/Address File Layout Component
You have now defined all of the input file data for your sample job. To exit this component and savethe information you have defined, follow the steps below.
1. Press F6 to exit and save the updated Name/Address File Layout component. The data issaved, and the C1CPOP10 screen appears asking if you want to save your data to an externalfile.
2. Press F12. The Define/Submit CODE-1 Plus Job screen (C1CPDS02) appears.
You have specified the input file layout of your input name-and-address file.
Defining Your Output Information
Now that you have defined your input information, you will need to define your output information.In this part of the tutorial, you will define how to store the following information:
• 5-digit ZIP Code
• Standardized address
• Individual address elements
• Normalized address lines
232CODE-1 Plus User Guide for IBM i

• Standardized city and state information
• ZIP + 4 Code
• Carrier route code
• Return codes
• Default indicators
• Information returned from the Line of Travel master file
Before you begin defining this information, you need to determine how you want your outputinformation to appear in the output record. For your sample job, you want CODE-1 Plus to store theoutput records in the same format as the input records, with the ZIP + 4 Code and carrier route codeadded as follows.
Data ElementPosition
ZIP + 4 Code (stored with preceding hyphen)116-120
Carrier route code122-125
LOT Code (numeric and alphabetic)126-130
Remember, on page 233 your ZIP Code information ended in position 115—that is why the ZIP + 4Code starts in position 116.
In addition, you want CODE-1 Plus to store the normalized address (if no match was found), theindividual standardized address elements, and return codes. You want these components stored asfollows:
233CODE-1 Plus User Guide for IBM i
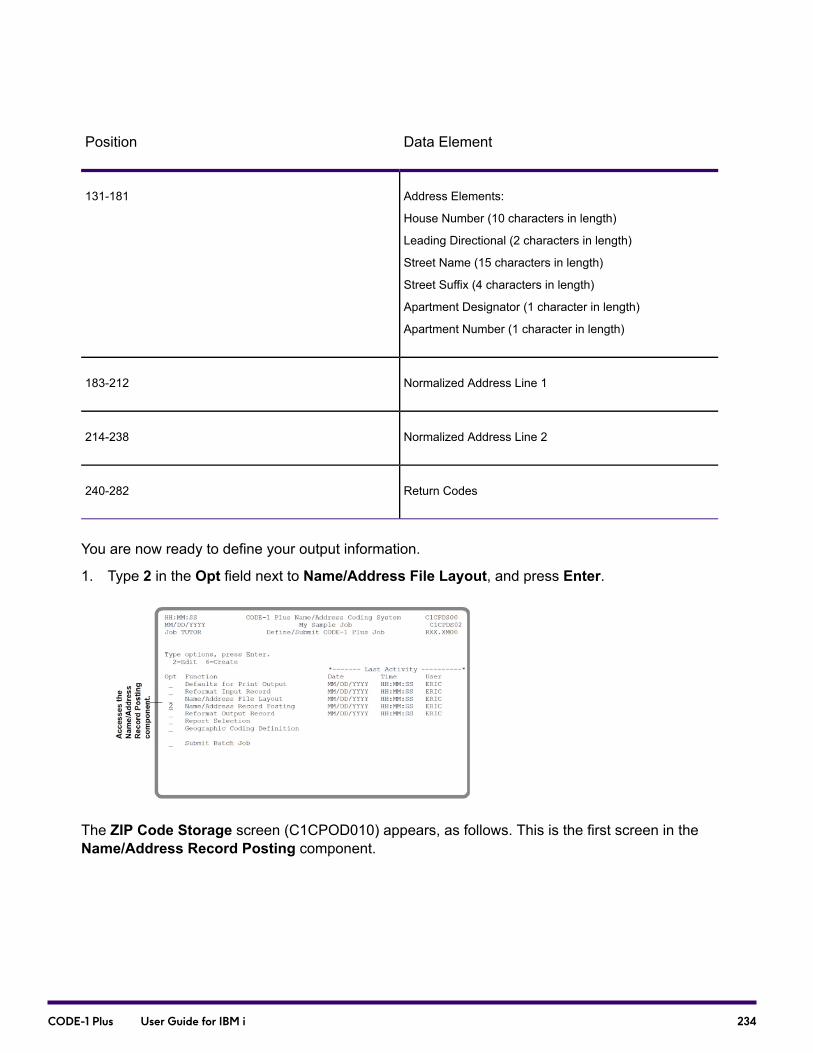
Data ElementPosition
Address Elements:
House Number (10 characters in length)
Leading Directional (2 characters in length)
Street Name (15 characters in length)
Street Suffix (4 characters in length)
Apartment Designator (1 character in length)
Apartment Number (1 character in length)
131-181
Normalized Address Line 1183-212
Normalized Address Line 2214-238
Return Codes240-282
You are now ready to define your output information.
1. Type 2 in the Opt field next to Name/Address File Layout, and press Enter.
The ZIP Code Storage screen (C1CPOD010) appears, as follows. This is the first screen in theName/Address Record Posting component.
234CODE-1 Plus User Guide for IBM i

ZIP Code Storage
In this part of the tutorial, you want to tell CODE-1 Plus where to store the ZIP Code return code inthe output file. The ZIP Code return code tells you why the ZIP Code information was not stored inyour output file.
1. Start at the ZIP Code Storage screen (C1CPOD010).
2. For your sample job, you want CODE-1 Plus to store the ZIP Code return code in position 257on the output file. Type 257 in the Return Code for ZIP Code storage field.
3. Next, you need to tell CODE-1 Plus where you would like the standardized ZIP Code stored inyour output file. For your sample job, you want the standardized ZIP Code to be stored in position111. Type 111 in the Corrected or confirmed ZIP Code field.
4. Finally, you need to tell CODE-1 Plus the format of your output ZIP Code. You want the ZIPCode to be stored as a 5-byte character number, so type C in the Format for ZIP storage field.
5. When you finish filling in the fields, page down to the Carrier Route Storage screen (C1CPOD020).
235CODE-1 Plus User Guide for IBM i

Carrier Route Storage
In this next step, you want to specify where to store the carrier route code and in what type of format.
1. Start at the Carrier Route Storage screen (C1CPOD020).
2. First, tell CODE-1 Plus where you want the carrier route return code stored on your output file.Type 259 in the Return Code for Carrier Route storage field.
3. Next, you need to tell CODE-1 Plus where you want the carrier route code stored in your outputfile. Type 122 in the Carrier Route Code field.
4. When you finish filling in the fields, page down to the ZIP + 4 Add-on Storage screen(C1CPOD030).
ZIP + 4 Add-On Storage
In this section, you are going to tell CODE-1 Plus what to do with the ZIP + 4 information in youroutput file. For your sample job, you want to store the ZIP + 4 Code in character format with apreceding hyphen in positions 116 to 120 of the output record. You also want to store the return codefor ZIP + 4 storage in the next available position (position 261) of your designated area for returncodes.
1. Start at the ZIP + 4 Add-on Storage (C1CPOD030) screen.
236CODE-1 Plus User Guide for IBM i
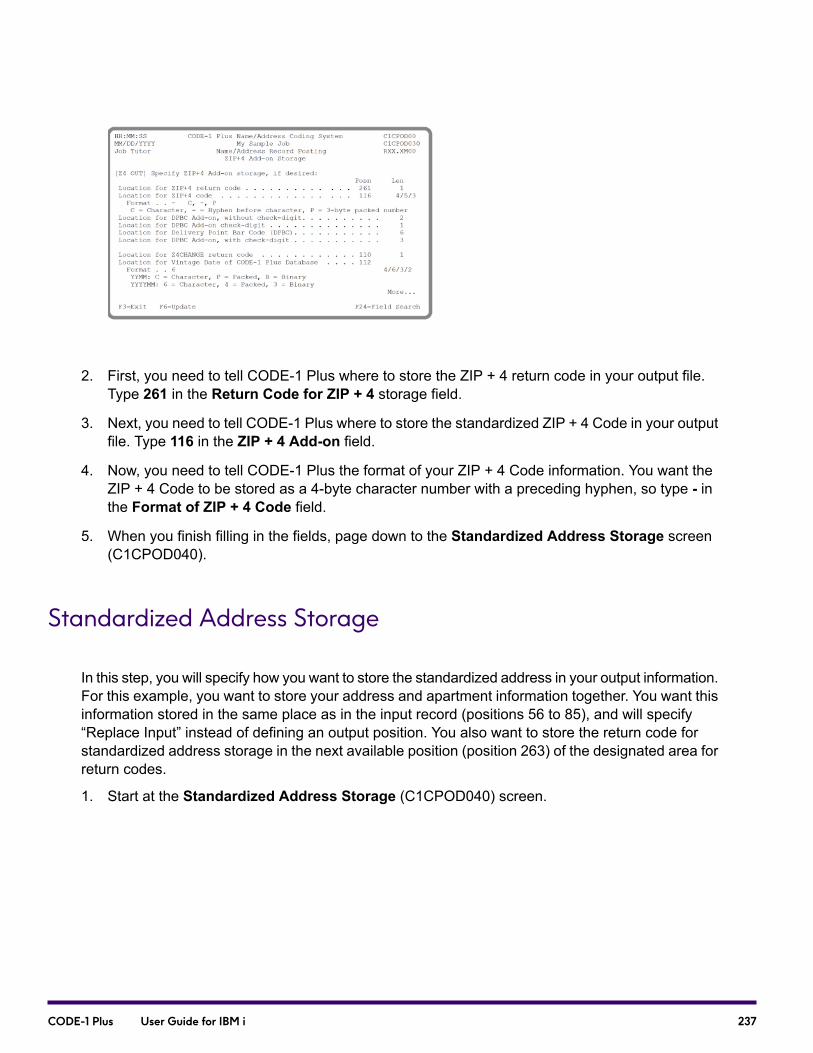
2. First, you need to tell CODE-1 Plus where to store the ZIP + 4 return code in your output file.Type 261 in the Return Code for ZIP + 4 storage field.
3. Next, you need to tell CODE-1 Plus where to store the standardized ZIP + 4 Code in your outputfile. Type 116 in the ZIP + 4 Add-on field.
4. Now, you need to tell CODE-1 Plus the format of your ZIP + 4 Code information. You want theZIP + 4 Code to be stored as a 4-byte character number with a preceding hyphen, so type - inthe Format of ZIP + 4 Code field.
5. When you finish filling in the fields, page down to the Standardized Address Storage screen(C1CPOD040).
Standardized Address Storage
In this step, you will specify how you want to store the standardized address in your output information.For this example, you want to store your address and apartment information together. You want thisinformation stored in the same place as in the input record (positions 56 to 85), and will specify“Replace Input” instead of defining an output position. You also want to store the return code forstandardized address storage in the next available position (position 263) of the designated area forreturn codes.
1. Start at the Standardized Address Storage (C1CPOD040) screen.
237CODE-1 Plus User Guide for IBM i

2. The next available location on the output record for information is position 240. You want theStandardized Address Return Code to be placed in position 240 on the output record, so type240 in the Return Code for Standardized Address storage field.
3. Next, you need to decide if you want to replace your input information on the output record withthe new standardized address. For your example job, you want to replace it with the newinformation, so type Y in the Replace Input field.
4. When you finish filling in the fields, page down to the Address Elements Storage screen(C1CPOD060).
Address Elements Storage
In this section, you need to tell CODE-1 Plus how you want to store each address element. Addresselements include the house number, leading directional, trailing directional, street name, suffix, andother information included in a normal street address line. You are going to store each addresselement in its own field in positions 121 to 183. This allows for a 10-character Street Name field anda blank field between each of the other address element fields.
1. Start at the Address Elements Storage screen (C1CPOD060).
238CODE-1 Plus User Guide for IBM i

2. First, you need to enter the location for the house number in your output file. Type 131 in theHouse Number Position field.
3. Next, you need to tell CODE-1 Plus where to place the leading directional information in youroutput file. Type 142 in the Leading Directional Position field.
4. Next, you need to tell CODE-1 Plus where to place the street name information in your outputfile. Type 145 in the Street Name Position field.
5. Next, you need to tell CODE-1 Plus how long the street name information is. Type 15 in theStreet Name Length field.
6. Next, you need to tell CODE-1 Plus where to place the suffix information in your output file. Type161 in the Suffix Position field.
7. Next, you need to tell CODE-1 Plus where the trailing directional information should be placedin your output file. Type 166 in the Trailing Directional Position field.
8. Next, you need to tell CODE-1 Plus where to place the apartment designator information in youroutput file. Type 169 in the Apartment Designator Position field.
9. Next, you need to tell CODE-1 Plus where to place the apartment number information in youroutput file. Type 174 in the Apartment Number Position field.
10. Next, you need to tell CODE-1 Plus where to place the private mailbox designator in your outputfile. Type 201 in the Private Mailbox Designator Position field.
11. Next, you need to tell CODE-1 Plus where to place the private mailbox number in your outputfile. Type 204 in the Private Mailbox Number Position field.
12. When you finish filling in the fields, page down to the City and State Storage screen(C1CPOD070).
City/State Storage
In this next section, you need to tell CODE-1 Plus how to store the city name and state abbreviation.For your sample job, you want to store the city name and state abbreviation in separate fields, asthey appear in the input file. CODE-1 Plus gives you the options of storing the standard 28-characterform of the city name or the short (13-character) form of the city name. A short city name is theUSPS-accepted abbreviation of a city. For example, the short city name for Macomb Township, MIis Macom Twp.
You only store want to the short form of a city name if the full city name exceeds the length of yourcity name field. In your sample file, your city name field is 20 characters long. Additionally, you wantto tell CODE-1 Plus to store the return code for city/state storage in the next available position (position255) of the return code area of your output file.
1. Start at the City and State Storage screen (C1CPOD070).
239CODE-1 Plus User Guide for IBM i

2. First, you need to tell CODE-1 Plus where you would like the city/state return code stored in youroutput file. Type 242 in the Location for City/State Return Code storage field.
3. Next, you need to tell CODE-1 Plus where to put the city name in your output file. Type 87 in theLocation for City Nameposition field.
4. Next, you need to tell CODE-1 Plus the length of your city name information. Type 20 in the CityName Length field.
5. Next, you need to tell CODE-1 Plus the location for the state abbreviation in your output file.Type 108 in the State Abbreviation (USPS Standard) field.
6. When you finish filling in the fields, page down. The City and State Storage Options screen(C1CPOD073) displays.
7. Page down. The County and Congressional Storage Option screen (C1CPOD076) displays.
8. Page down. The Address Match Information Storage screen (C1CPOD080) displays.
Address Match Information Storage
The Address Match Information Storage screen allows you to specify storage locations for eachof the return codes, match scores, and other qualitative and quantitative data available throughCODE-1 Plus. For your sample job, you want to store all of the information in the remaining positionsdesignated for return codes in your output record. You are going to separate each field by a blankposition.
1. Start at the Address Match Information Storage screen (C1CPOD080).
240CODE-1 Plus User Guide for IBM i
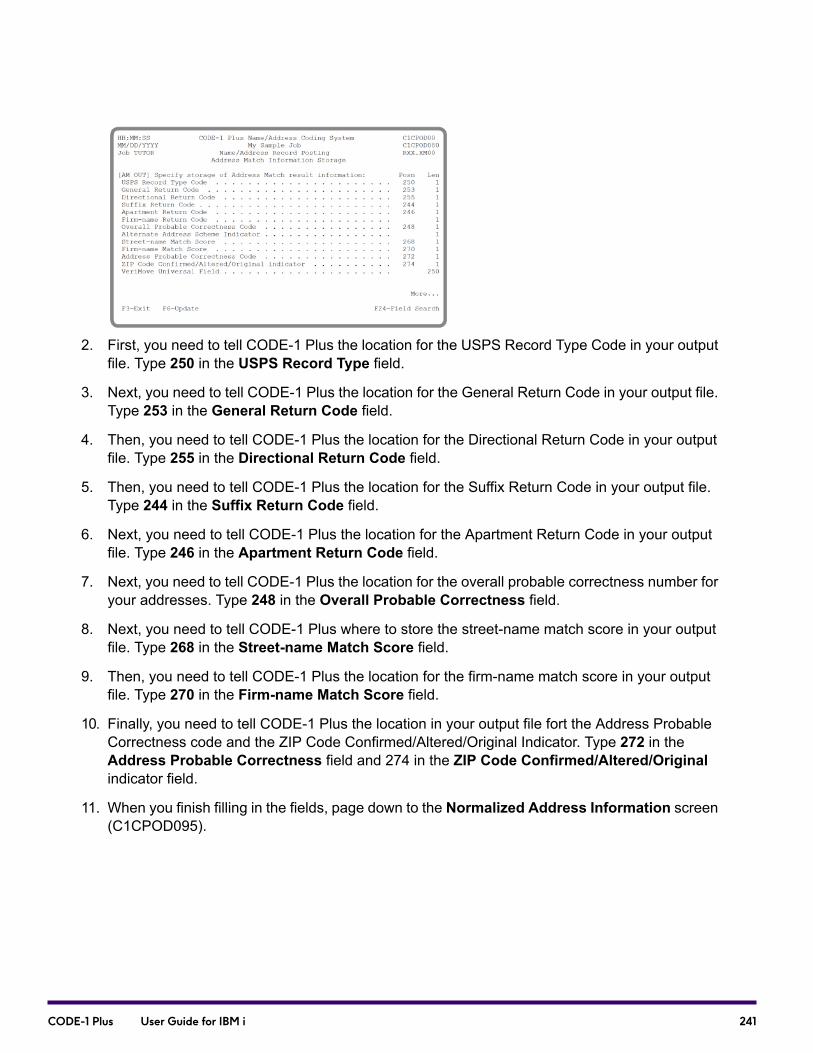
2. First, you need to tell CODE-1 Plus the location for the USPS Record Type Code in your outputfile. Type 250 in the USPS Record Type field.
3. Next, you need to tell CODE-1 Plus the location for the General Return Code in your output file.Type 253 in the General Return Code field.
4. Then, you need to tell CODE-1 Plus the location for the Directional Return Code in your outputfile. Type 255 in the Directional Return Code field.
5. Then, you need to tell CODE-1 Plus the location for the Suffix Return Code in your output file.Type 244 in the Suffix Return Code field.
6. Next, you need to tell CODE-1 Plus the location for the Apartment Return Code in your outputfile. Type 246 in the Apartment Return Code field.
7. Next, you need to tell CODE-1 Plus the location for the overall probable correctness number foryour addresses. Type 248 in the Overall Probable Correctness field.
8. Next, you need to tell CODE-1 Plus where to store the street-name match score in your outputfile. Type 268 in the Street-name Match Score field.
9. Then, you need to tell CODE-1 Plus the location for the firm-name match score in your outputfile. Type 270 in the Firm-name Match Score field.
10. Finally, you need to tell CODE-1 Plus the location in your output file fort the Address ProbableCorrectness code and the ZIP Code Confirmed/Altered/Original Indicator. Type 272 in theAddress Probable Correctness field and 274 in the ZIP Code Confirmed/Altered/Originalindicator field.
11. When you finish filling in the fields, page down to the Normalized Address Information screen(C1CPOD095).
241CODE-1 Plus User Guide for IBM i
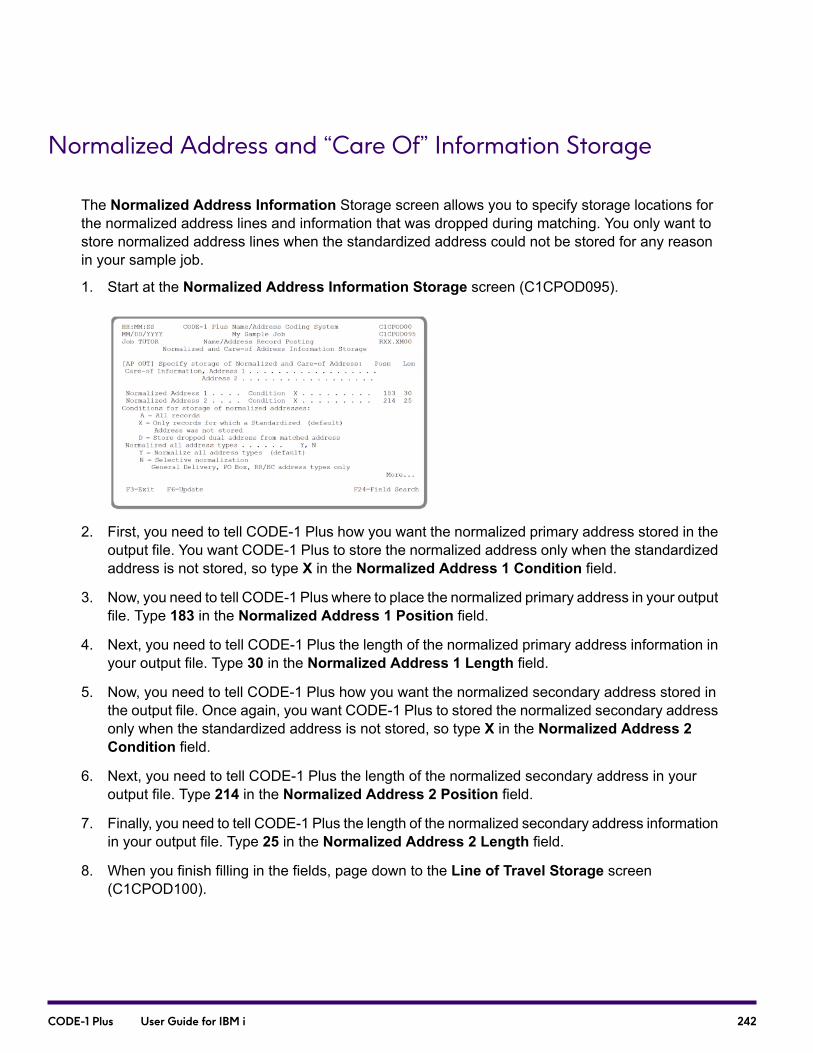
Normalized Address and “Care Of” Information Storage
The Normalized Address Information Storage screen allows you to specify storage locations forthe normalized address lines and information that was dropped during matching. You only want tostore normalized address lines when the standardized address could not be stored for any reasonin your sample job.
1. Start at the Normalized Address Information Storage screen (C1CPOD095).
2. First, you need to tell CODE-1 Plus how you want the normalized primary address stored in theoutput file. You want CODE-1 Plus to store the normalized address only when the standardizedaddress is not stored, so type X in the Normalized Address 1 Condition field.
3. Now, you need to tell CODE-1 Plus where to place the normalized primary address in your outputfile. Type 183 in the Normalized Address 1 Position field.
4. Next, you need to tell CODE-1 Plus the length of the normalized primary address information inyour output file. Type 30 in the Normalized Address 1 Length field.
5. Now, you need to tell CODE-1 Plus how you want the normalized secondary address stored inthe output file. Once again, you want CODE-1 Plus to stored the normalized secondary addressonly when the standardized address is not stored, so type X in the Normalized Address 2Condition field.
6. Next, you need to tell CODE-1 Plus the length of the normalized secondary address in youroutput file. Type 214 in the Normalized Address 2 Position field.
7. Finally, you need to tell CODE-1 Plus the length of the normalized secondary address informationin your output file. Type 25 in the Normalized Address 2 Length field.
8. When you finish filling in the fields, page down to the Line of Travel Storage screen(C1CPOD100).
242CODE-1 Plus User Guide for IBM i

Exiting the Name/Address Record Posting Component
You have now given CODE-1 Plus all of your output requirements. To exit theName/Address RecordPosting component and save the new information:
1. Press F6. The data is saved, and the C1CPOP10 screen displays asking if you want to saveyour data to an external file.
2. Press F12. The Define/Submit CODE-1 Plus Job screen (C1CPDS02) displays.
You have specified the output file record posting requirements.
Selecting Reports to be Printed
In this step, you will simply select the reports that you want CODE-1 Plus to print. Remember thatyou only want the reports by state to print. These include the following reports:
• ZIP + 4 Coding by State Report
• Carrier Coding by State Report
• Line of Travel Coding by State Report
• Summary by State Report
These reports will be printed automatically, by default, unless otherwise specified. Additionally, youdo not want the following reports to be printed:
• ZIP + 4 Coding by 3-Digit ZIP Report
• Carrier Coding by 3-Digit ZIP Report
243CODE-1 Plus User Guide for IBM i
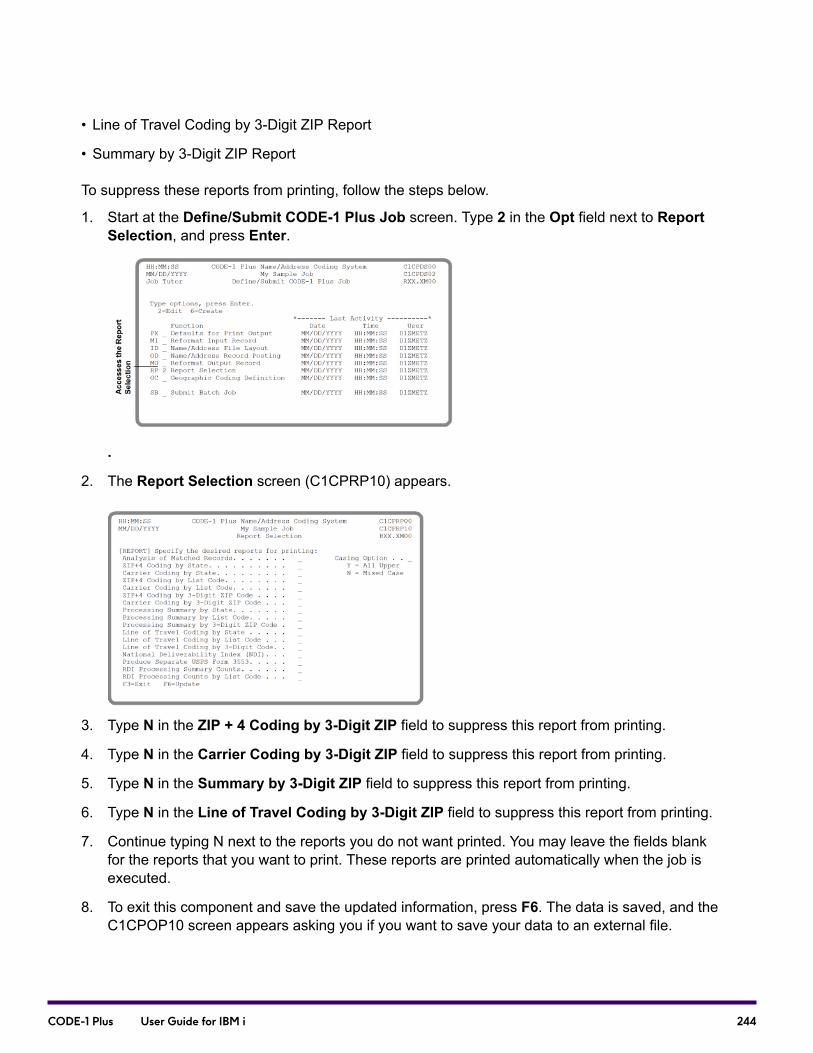
• Line of Travel Coding by 3-Digit ZIP Report
• Summary by 3-Digit ZIP Report
To suppress these reports from printing, follow the steps below.
1. Start at the Define/Submit CODE-1 Plus Job screen. Type 2 in the Opt field next to ReportSelection, and press Enter.
.
2. The Report Selection screen (C1CPRP10) appears.
3. Type N in the ZIP + 4 Coding by 3-Digit ZIP field to suppress this report from printing.
4. Type N in the Carrier Coding by 3-Digit ZIP field to suppress this report from printing.
5. Type N in the Summary by 3-Digit ZIP field to suppress this report from printing.
6. Type N in the Line of Travel Coding by 3-Digit ZIP field to suppress this report from printing.
7. Continue typing N next to the reports you do not want printed. You may leave the fields blankfor the reports that you want to print. These reports are printed automatically when the job isexecuted.
8. To exit this component and save the updated information, press F6. The data is saved, and theC1CPOP10 screen appears asking you if you want to save your data to an external file.
244CODE-1 Plus User Guide for IBM i
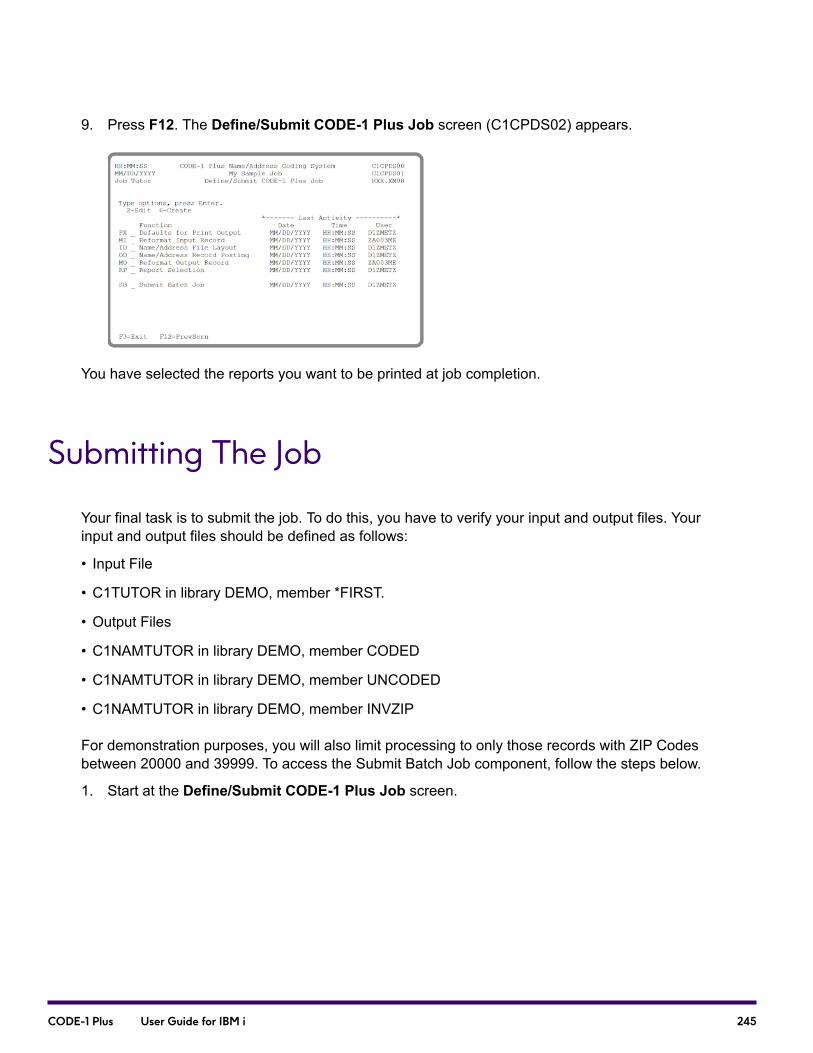
9. Press F12. The Define/Submit CODE-1 Plus Job screen (C1CPDS02) appears.
You have selected the reports you want to be printed at job completion.
Submitting The Job
Your final task is to submit the job. To do this, you have to verify your input and output files. Yourinput and output files should be defined as follows:
• Input File
• C1TUTOR in library DEMO, member *FIRST.
• Output Files
• C1NAMTUTOR in library DEMO, member CODED
• C1NAMTUTOR in library DEMO, member UNCODED
• C1NAMTUTOR in library DEMO, member INVZIP
For demonstration purposes, you will also limit processing to only those records with ZIP Codesbetween 20000 and 39999. To access the Submit Batch Job component, follow the steps below.
1. Start at the Define/Submit CODE-1 Plus Job screen.
245CODE-1 Plus User Guide for IBM i
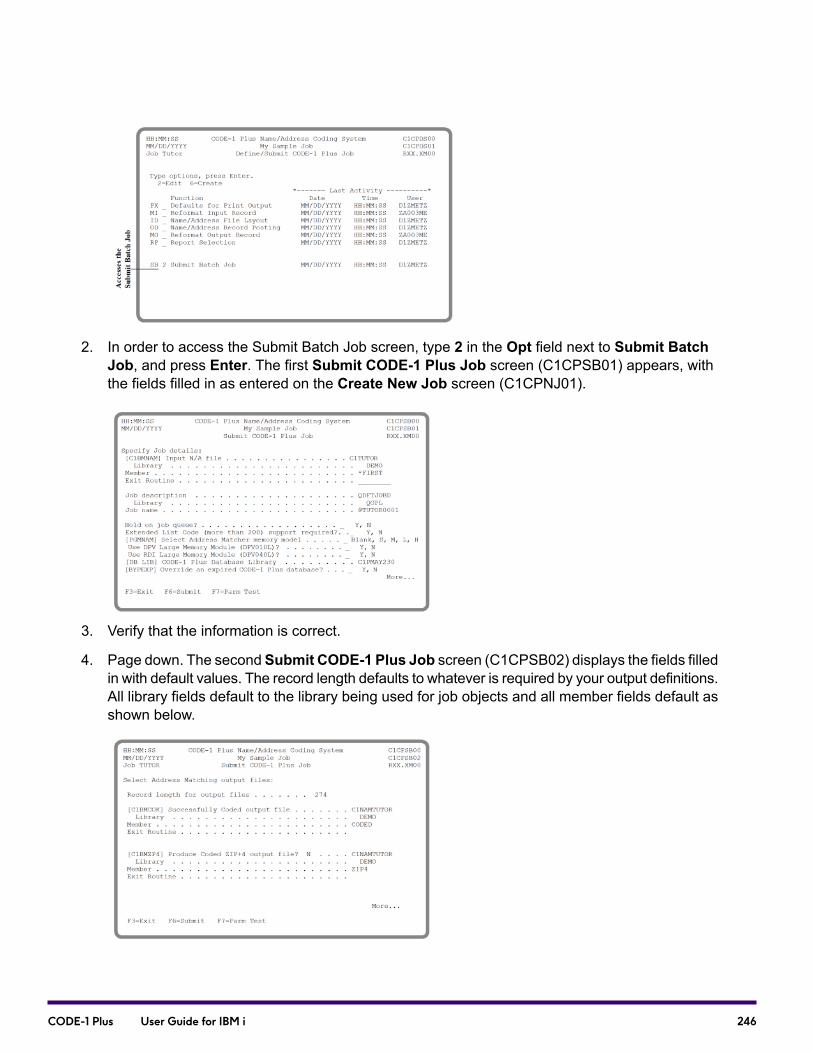
2. In order to access the Submit Batch Job screen, type 2 in the Opt field next to Submit BatchJob, and press Enter. The first Submit CODE-1 Plus Job screen (C1CPSB01) appears, withthe fields filled in as entered on the Create New Job screen (C1CPNJ01).
3. Verify that the information is correct.
4. Page down. The secondSubmit CODE-1 Plus Job screen (C1CPSB02) displays the fields filledin with default values. The record length defaults to whatever is required by your output definitions.All library fields default to the library being used for job objects and all member fields default asshown below.
246CODE-1 Plus User Guide for IBM i

5. Verify that the output files are correctly defined.
6. Because you do not want to produce a coded ZIP + 4 file, type N in the Produce Coded ZIP +4 output file field.
7. Page down. The third Submit CODE-1 Plus Job screen (C1CPSB03) displays with the fieldsfilled in with default values.
8. Verify that all of the output files are correctly defined.
9. Type Y in the Produce Invalid-ZIP output field.
10. Type Y in the Produce Uncoded output file field.
11. Type Y in the Produce Statistics output file field.
12. When you complete this screen as shown above, press page down twice.
The sixth Submit CODE-1 Plus Job screen (C1CPSB06) displays with several options forlimiting the amount of input from a given input file. We want to restrict processing to only thoserecords with ZIP Codes between 20000 and 39999
.
13. Type 20000 in the Low ZIP Code field.
247CODE-1 Plus User Guide for IBM i
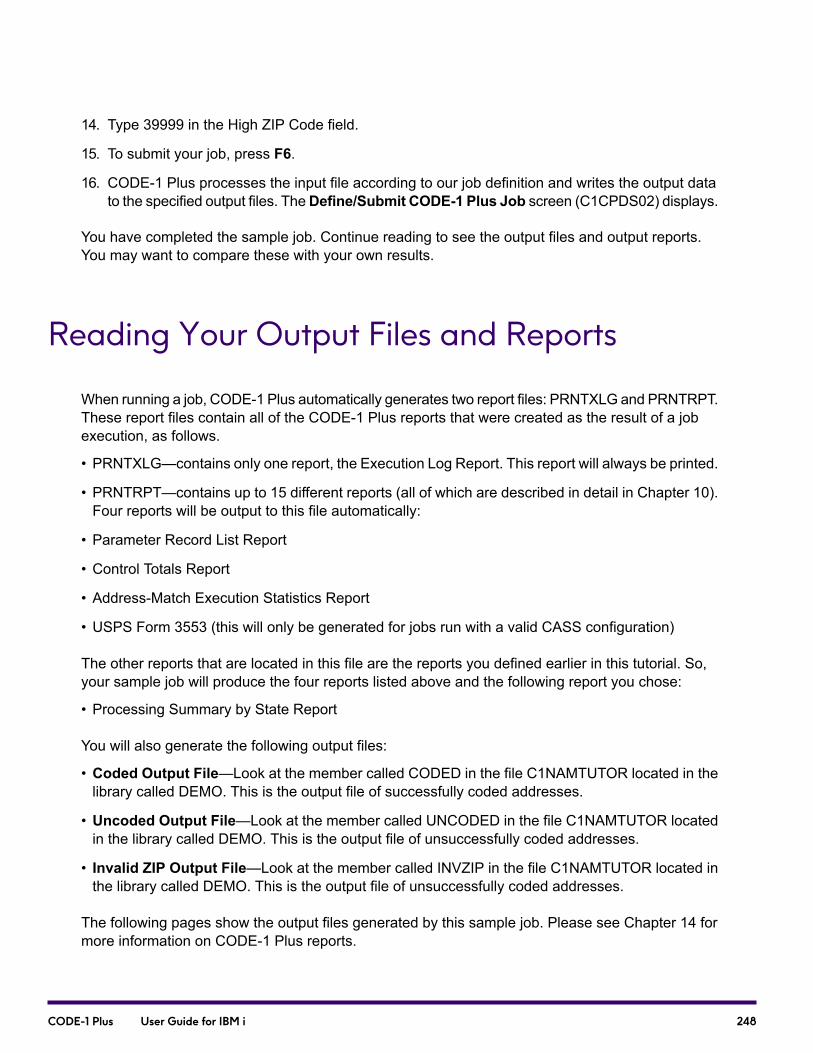
14. Type 39999 in the High ZIP Code field.
15. To submit your job, press F6.
16. CODE-1 Plus processes the input file according to our job definition and writes the output datato the specified output files. TheDefine/Submit CODE-1 Plus Job screen (C1CPDS02) displays.
You have completed the sample job. Continue reading to see the output files and output reports.You may want to compare these with your own results.
Reading Your Output Files and Reports
When running a job, CODE-1 Plus automatically generates two report files: PRNTXLG and PRNTRPT.These report files contain all of the CODE-1 Plus reports that were created as the result of a jobexecution, as follows.
• PRNTXLG—contains only one report, the Execution Log Report. This report will always be printed.
• PRNTRPT—contains up to 15 different reports (all of which are described in detail in Chapter 10).Four reports will be output to this file automatically:
• Parameter Record List Report
• Control Totals Report
• Address-Match Execution Statistics Report
• USPS Form 3553 (this will only be generated for jobs run with a valid CASS configuration)
The other reports that are located in this file are the reports you defined earlier in this tutorial. So,your sample job will produce the four reports listed above and the following report you chose:
• Processing Summary by State Report
You will also generate the following output files:
• Coded Output File—Look at the member called CODED in the file C1NAMTUTOR located in thelibrary called DEMO. This is the output file of successfully coded addresses.
• Uncoded Output File—Look at the member called UNCODED in the file C1NAMTUTOR locatedin the library called DEMO. This is the output file of unsuccessfully coded addresses.
• Invalid ZIP Output File—Look at the member called INVZIP in the file C1NAMTUTOR located inthe library called DEMO. This is the output file of unsuccessfully coded addresses.
The following pages show the output files generated by this sample job. Please see Chapter 14 formore information on CODE-1 Plus reports.
248CODE-1 Plus User Guide for IBM i
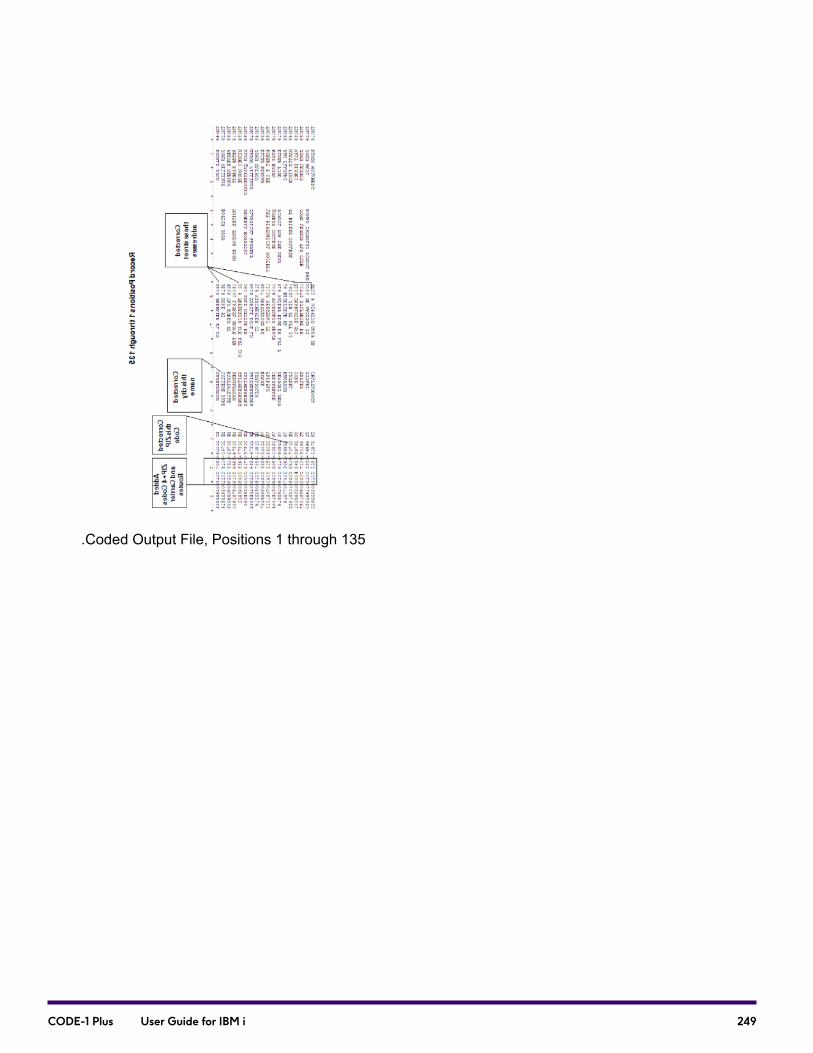
.Coded Output File, Positions 1 through 135
249CODE-1 Plus User Guide for IBM i
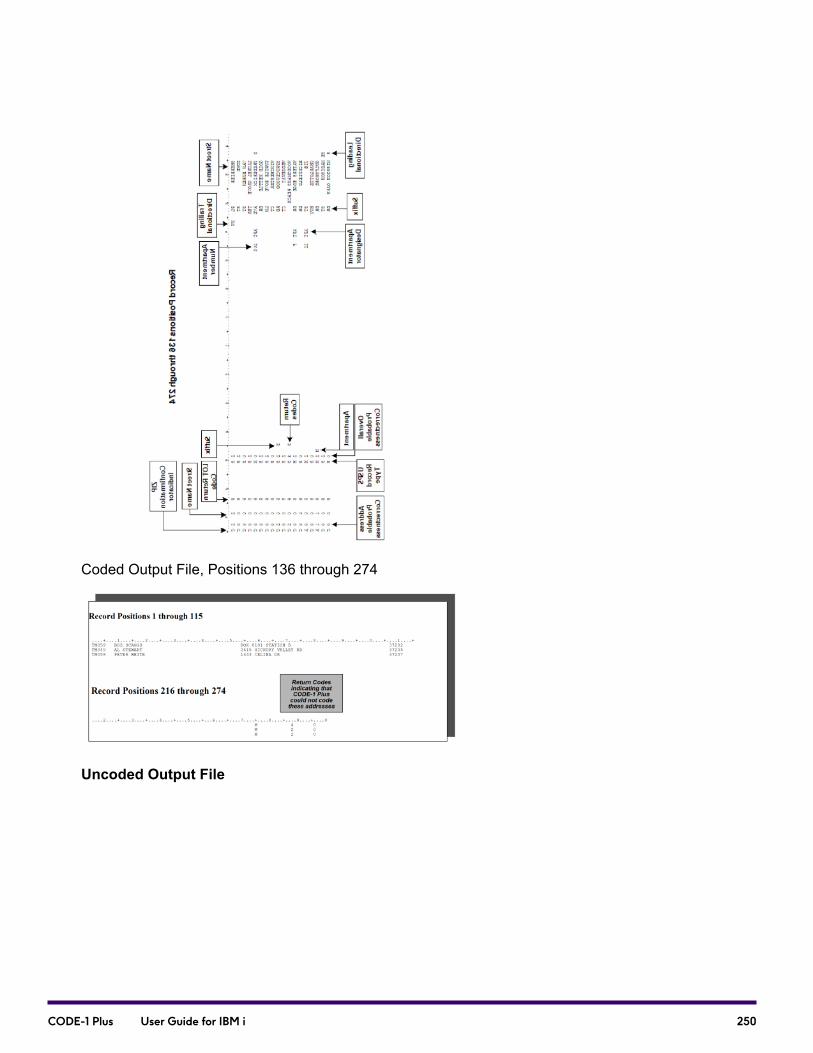
Coded Output File, Positions 136 through 274
Uncoded Output File
250CODE-1 Plus User Guide for IBM i
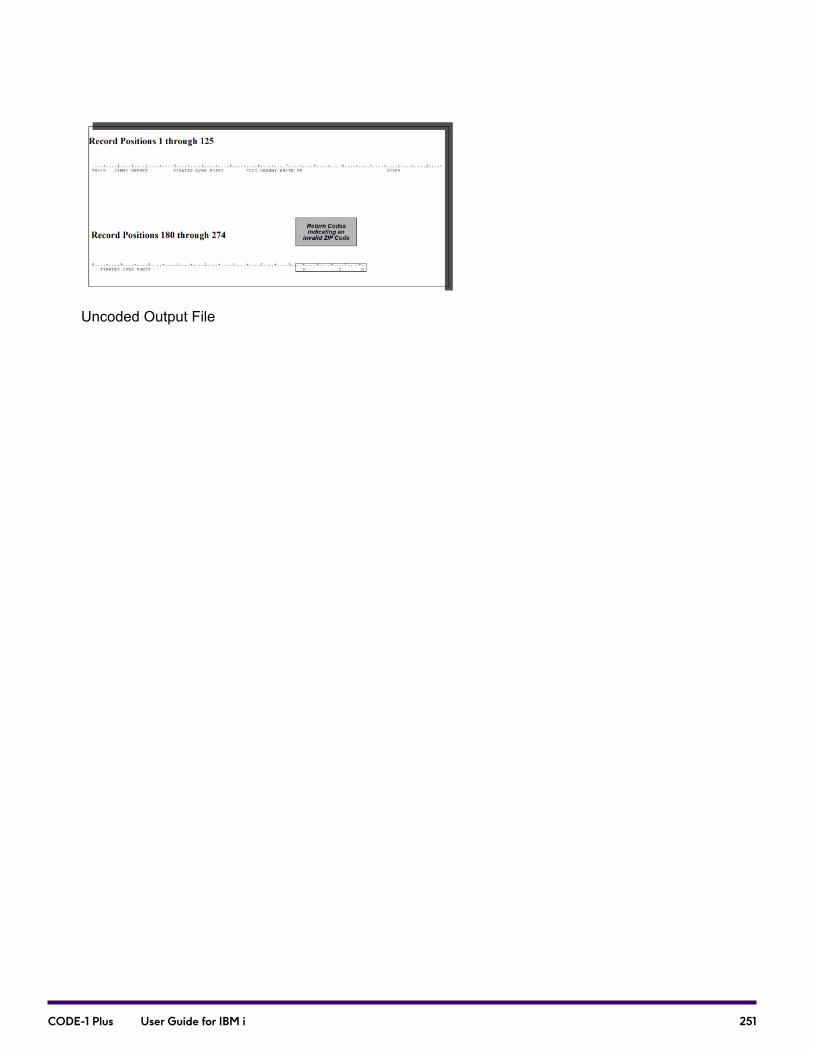
Uncoded Output File
251CODE-1 Plus User Guide for IBM i
10 - Generating Reports
In this section
Understanding the CODE-1 Plus Reports..............................................253Report Parameter...................................................................................254Build Parameter......................................................................................255Using the IBM i Screens to Generate Reports.......................................255Defining Defaults for Print Output...........................................................261Address-Match Execution Statistics Report...........................................265Control Totals Report..............................................................................267Execution Log.........................................................................................269Parameter Record Listing Report...........................................................269Analysis of Matched Records Report.....................................................269Build Report............................................................................................270Coding by State Reports........................................................................270Coding by List Code Reports..................................................................273Coding by 3-Digit ZIP Code Reports......................................................277Processing Summary Reports................................................................280Delivery Point Validation Processing Summary Report..........................281Delivery Point Validation Processing by List Code Report.....................281Residential Delivery File Build Report....................................................281Residential Delivery File Build Execution Log........................................282National Deliverability Index (NDI) Report..............................................282USPS Form 3553 (CASS Summary Report)..........................................282
CODE-1 Plus User Guide for IBM i
Understanding the CODE-1 Plus Reports
Required Reports
CODE-1 Plus automatically generates the following reports for all jobs:
• Address-Match Execution Statistics
• Control Totals Report
• Execution Log
• Parameter Record Listing
Understanding the CODE-1 Plus Reports
Required Reports
CODE-1 Plus automatically generates the following reports for all jobs:
• Address-Match Execution Statistics
• Control Totals Report
• Execution Log
• Parameter Record Listing
Optional Reports
In addition to the automatically generated required reports, you can generate the following optionalreports.
• Analysis of Matched Records
• Build Report
• Carrier Coding by 3-Digit ZIP
• Carrier Coding by List Code
253CODE-1 Plus User Guide for IBM i
• Carrier Coding by State
• Database Print Report
• Delivery Point Validation Processing Summary.
• Delivery Point Validation by List Code
• Line of Travel Coding by 3-Digit ZIP
• Line of Travel Coding by List Code
• Line of Travel Coding by State
• National Delivery Index (NDI)
• Processing Summary by 3-Digit ZIP
• Processing Summary by List Code
• Processing Summary by State
• Residential Delivery File Build Execution Log
• Residential Delivery File Build Report
• USPS Form 3553
• ZIP + 4 Coding by State
• ZIP + 4 Coding by List Code
• ZIP + 4 Coding by 3-Digit ZIP
Report Parameter
You can use the REPORT parameter to define the reports to generate when you submit a batch job.For more information on the REPORT parameter, please refer to the section “REPORT” in “ParameterReference” in your CODE-1 Plus Reference Guide.
254CODE-1 Plus User Guide for IBM i

Build Parameter
You can use the BUILD parameter to generate the BUILD report. For more information on the BUILDparameter, please refer to the section “BUILD” in “Parameter Reference” in your CODE-1 PlusReference Guide.
Using the IBM i Screens to Generate Reports
You can use the Report Selection (C1CPRP10) screen to specify the reports to print at the end ofyour CODE-1 Plus job. To access the Report Selection (C1CPRP10) screen:
1. From the Define/Submit CODE-1 Plus Job screen (C1CPDS02), select Report Selection.
2. The Report Selection screen (C1CPRP10) displays.
3. Use the following table to complete the fields on the Report Selection screen (C1CPRP10).
255CODE-1 Plus User Guide for IBM i
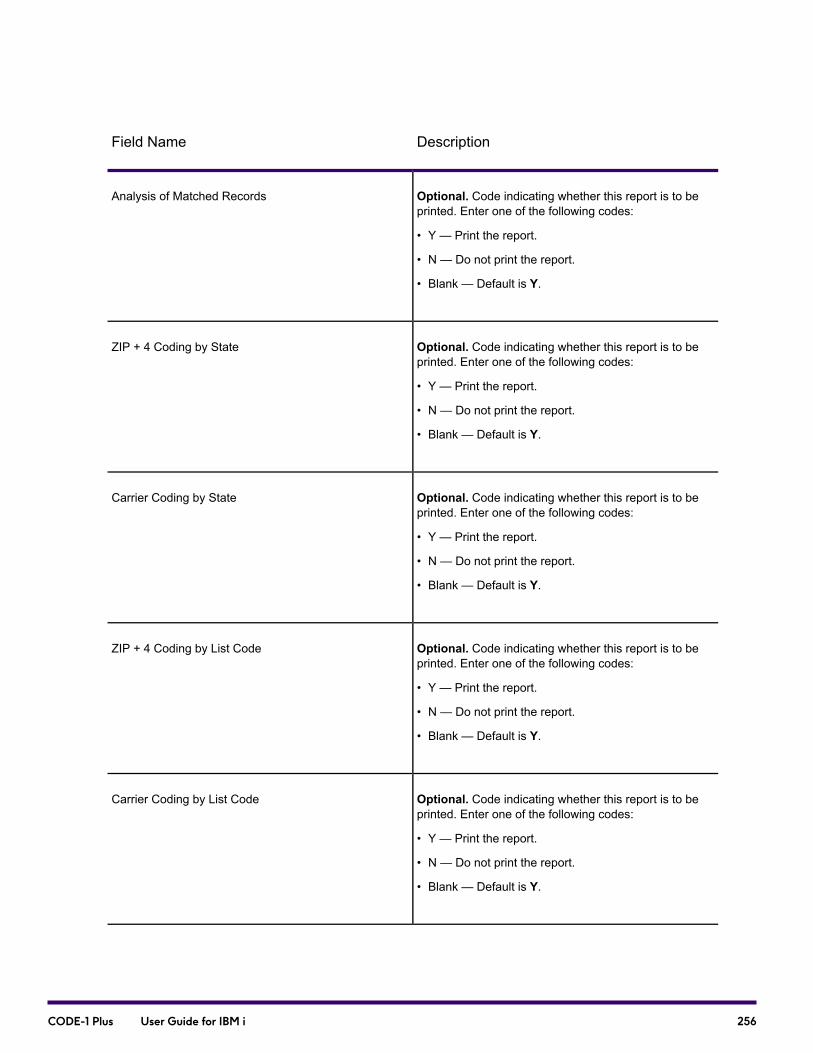
DescriptionField Name
Optional. Code indicating whether this report is to beprinted. Enter one of the following codes:
• Y — Print the report.
• N — Do not print the report.
• Blank — Default is Y.
Analysis of Matched Records
Optional. Code indicating whether this report is to beprinted. Enter one of the following codes:
• Y — Print the report.
• N — Do not print the report.
• Blank — Default is Y.
ZIP + 4 Coding by State
Optional. Code indicating whether this report is to beprinted. Enter one of the following codes:
• Y — Print the report.
• N — Do not print the report.
• Blank — Default is Y.
Carrier Coding by State
Optional. Code indicating whether this report is to beprinted. Enter one of the following codes:
• Y — Print the report.
• N — Do not print the report.
• Blank — Default is Y.
ZIP + 4 Coding by List Code
Optional. Code indicating whether this report is to beprinted. Enter one of the following codes:
• Y — Print the report.
• N — Do not print the report.
• Blank — Default is Y.
Carrier Coding by List Code
256CODE-1 Plus User Guide for IBM i

DescriptionField Name
Optional. Code indicating whether this report is to beprinted. Enter one of the following codes:
• Y — Print the report.
• N — Do not print the report.
• Blank — Default is Y.
ZIP + 4 Coding by 3-Digit ZIP Code
Optional. Code indicating whether this report is to beprinted. Enter one of the following codes:
• Y — Print the report.
• N — Do not print the report.
• Blank — Default is Y.
Carrier Coding by 3-Digit ZIP Code
Optional. Code indicating whether this report is to beprinted. Enter one of the following codes:
• Y — Print the report.
• N — Do not print the report.
• Blank — Default is Y.
Processing Summary by State
Optional. Code indicating whether this report is to beprinted. Enter one of the following codes:
• Y — Print the report.
• N — Do not print the report.
• Blank — Default is Y.
Processing Summary by List Code
Optional. Code indicating whether this report is to beprinted. Enter one of the following codes:
• Y — Print the report.
• N — Do not print the report.
• Blank — Default is Y.
Processing Summary by 3-Digit ZIP Code
257CODE-1 Plus User Guide for IBM i
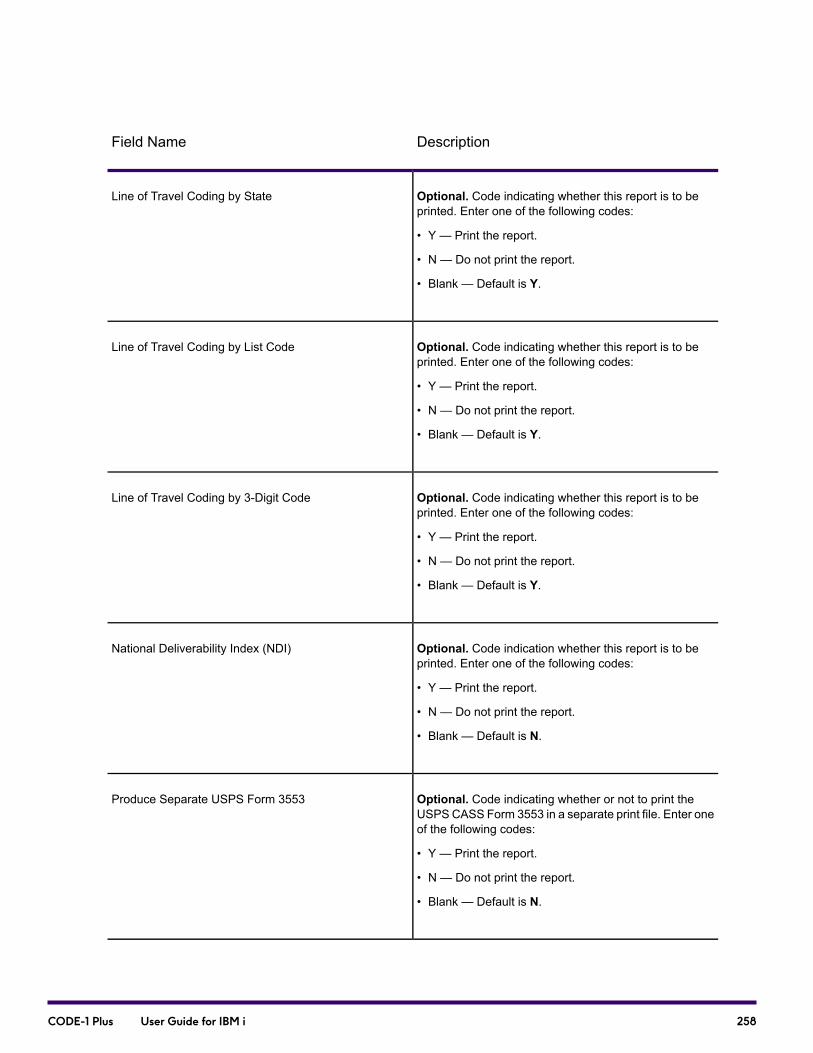
DescriptionField Name
Optional. Code indicating whether this report is to beprinted. Enter one of the following codes:
• Y — Print the report.
• N — Do not print the report.
• Blank — Default is Y.
Line of Travel Coding by State
Optional. Code indicating whether this report is to beprinted. Enter one of the following codes:
• Y — Print the report.
• N — Do not print the report.
• Blank — Default is Y.
Line of Travel Coding by List Code
Optional. Code indicating whether this report is to beprinted. Enter one of the following codes:
• Y — Print the report.
• N — Do not print the report.
• Blank — Default is Y.
Line of Travel Coding by 3-Digit Code
Optional. Code indication whether this report is to beprinted. Enter one of the following codes:
• Y — Print the report.
• N — Do not print the report.
• Blank — Default is N.
National Deliverability Index (NDI)
Optional. Code indicating whether or not to print theUSPSCASS Form 3553 in a separate print file. Enter oneof the following codes:
• Y — Print the report.
• N — Do not print the report.
• Blank — Default is N.
Produce Separate USPS Form 3553
258CODE-1 Plus User Guide for IBM i
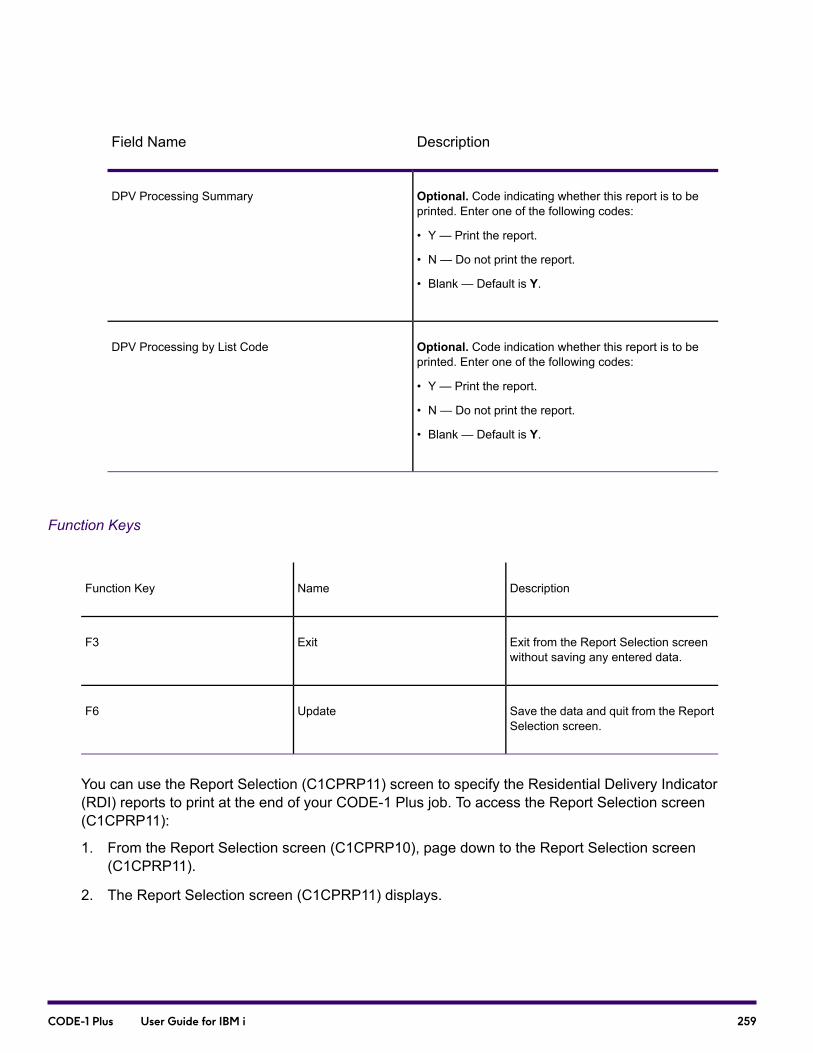
DescriptionField Name
Optional. Code indicating whether this report is to beprinted. Enter one of the following codes:
• Y — Print the report.
• N — Do not print the report.
• Blank — Default is Y.
DPV Processing Summary
Optional. Code indication whether this report is to beprinted. Enter one of the following codes:
• Y — Print the report.
• N — Do not print the report.
• Blank — Default is Y.
DPV Processing by List Code
Function Keys
DescriptionNameFunction Key
Exit from the Report Selection screenwithout saving any entered data.
ExitF3
Save the data and quit from the ReportSelection screen.
UpdateF6
You can use the Report Selection (C1CPRP11) screen to specify the Residential Delivery Indicator(RDI) reports to print at the end of your CODE-1 Plus job. To access the Report Selection screen(C1CPRP11):
1. From the Report Selection screen (C1CPRP10), page down to the Report Selection screen(C1CPRP11).
2. The Report Selection screen (C1CPRP11) displays.
259CODE-1 Plus User Guide for IBM i
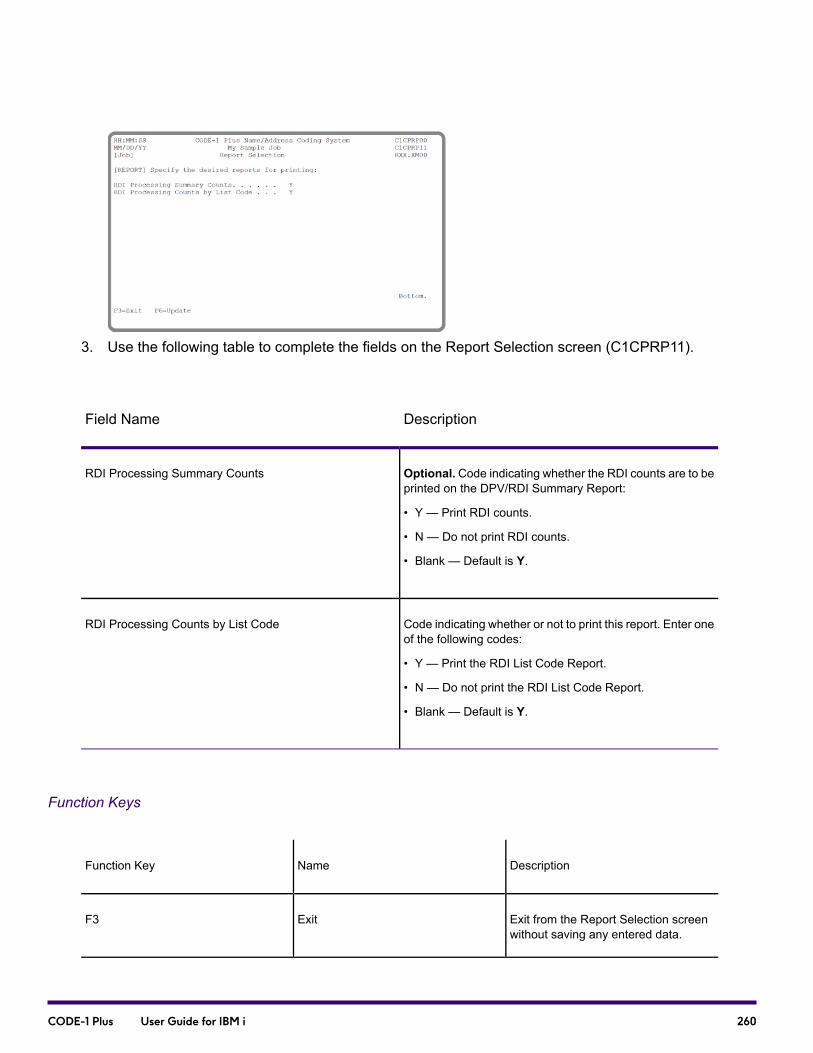
3. Use the following table to complete the fields on the Report Selection screen (C1CPRP11).
DescriptionField Name
Optional. Code indicating whether the RDI counts are to beprinted on the DPV/RDI Summary Report:
• Y — Print RDI counts.
• N — Do not print RDI counts.
• Blank — Default is Y.
RDI Processing Summary Counts
Code indicating whether or not to print this report. Enter oneof the following codes:
• Y — Print the RDI List Code Report.
• N — Do not print the RDI List Code Report.
• Blank — Default is Y.
RDI Processing Counts by List Code
Function Keys
DescriptionNameFunction Key
Exit from the Report Selection screenwithout saving any entered data.
ExitF3
260CODE-1 Plus User Guide for IBM i
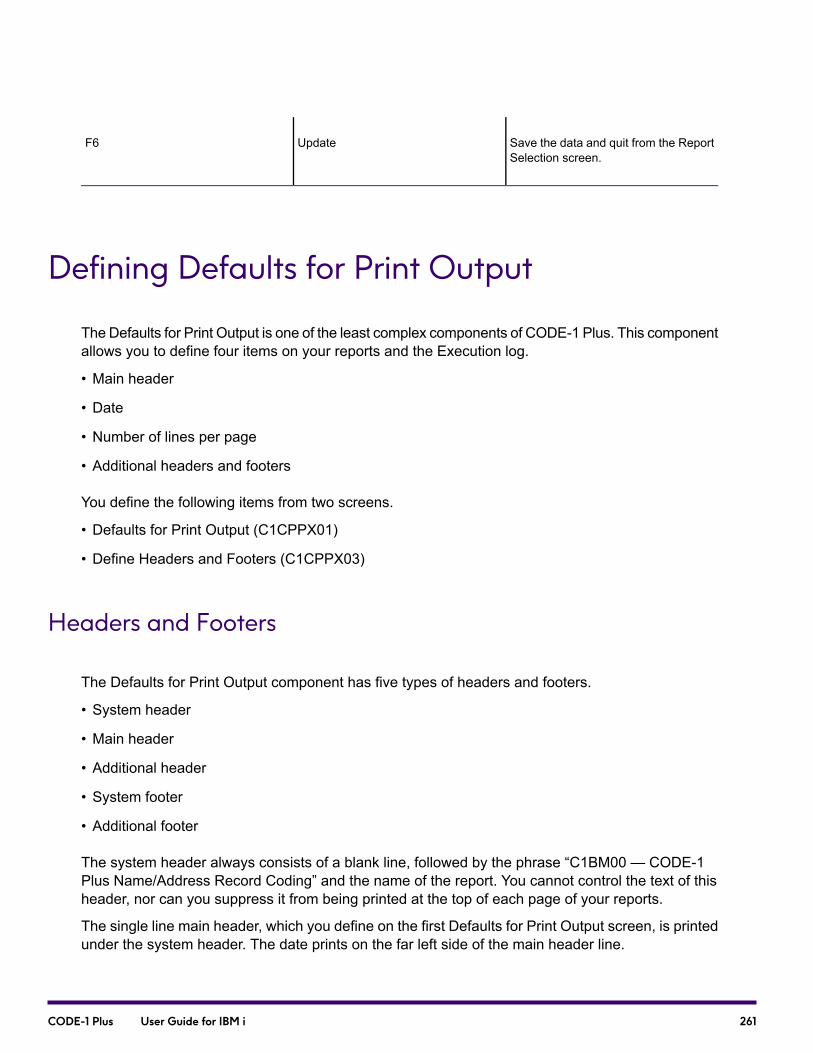
Save the data and quit from the ReportSelection screen.
UpdateF6
Defining Defaults for Print Output
The Defaults for Print Output is one of the least complex components of CODE-1 Plus. This componentallows you to define four items on your reports and the Execution log.
• Main header
• Date
• Number of lines per page
• Additional headers and footers
You define the following items from two screens.
• Defaults for Print Output (C1CPPX01)
• Define Headers and Footers (C1CPPX03)
Headers and Footers
The Defaults for Print Output component has five types of headers and footers.
• System header
• Main header
• Additional header
• System footer
• Additional footer
The system header always consists of a blank line, followed by the phrase “C1BM00 — CODE-1Plus Name/Address Record Coding” and the name of the report. You cannot control the text of thisheader, nor can you suppress it from being printed at the top of each page of your reports.
The single line main header, which you define on the first Defaults for Print Output screen, is printedunder the system header. The date prints on the far left side of the main header line.
261CODE-1 Plus User Guide for IBM i
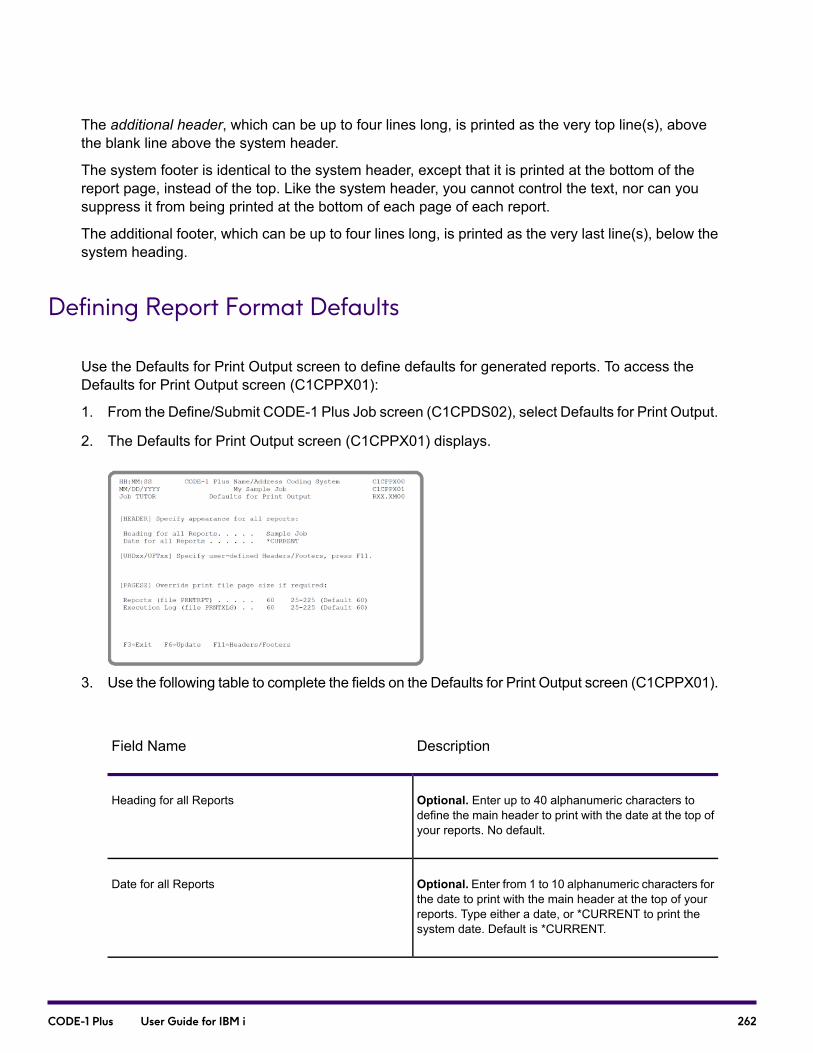
The additional header, which can be up to four lines long, is printed as the very top line(s), abovethe blank line above the system header.
The system footer is identical to the system header, except that it is printed at the bottom of thereport page, instead of the top. Like the system header, you cannot control the text, nor can yousuppress it from being printed at the bottom of each page of each report.
The additional footer, which can be up to four lines long, is printed as the very last line(s), below thesystem heading.
Defining Report Format Defaults
Use the Defaults for Print Output screen to define defaults for generated reports. To access theDefaults for Print Output screen (C1CPPX01):
1. From the Define/Submit CODE-1 Plus Job screen (C1CPDS02), select Defaults for Print Output.
2. The Defaults for Print Output screen (C1CPPX01) displays.
3. Use the following table to complete the fields on the Defaults for Print Output screen (C1CPPX01).
DescriptionField Name
Optional. Enter up to 40 alphanumeric characters todefine the main header to print with the date at the top ofyour reports. No default.
Heading for all Reports
Optional. Enter from 1 to 10 alphanumeric characters forthe date to print with the main header at the top of yourreports. Type either a date, or *CURRENT to print thesystem date. Default is *CURRENT.
Date for all Reports
262CODE-1 Plus User Guide for IBM i

DescriptionField Name
Optional. Enter from 2 to 3 numeric digits for the numberof lines to print on each page of all of the reports exceptthe Execution Log. Minimum is 25. Maximum is 225.Default is 60.
Reports (file PRNTRPT)
Optional. Enter from 2 to 3 numeric digits for the numberof lines to print on each page of the Execution Log.Minimum is 25. Maximum is 225. Default is 60.
Execution Log(file PRNTXLG)
Function Keys
DescriptionNameFunction Key
Exit from the Defaults for Print Outputscreen without saving any entered data.
ExitF3
Save the data and quit from the Defaultsfor Print Output screen.
UpdateF6
Go to the Defaults for Print Output —Define Headers and Footers screen(C1CPPX03).
Headers/FootersF11
Defining Headers and Footers
Use the Define Headers and Footers screen to define the text to print on the headers and footersfor your reports. To access the Define Headers and Footers screen (C1CPPX03):
1. From the Defaults for Print Output screen (C1CPPX01), press F11.
2. The Define Headers and Footers screen (C1CPPX03) displays.
263CODE-1 Plus User Guide for IBM i

Press F20 to scroll to the right and displays screen C1CPPX04, which is a continuation of thenumbered positions that are available for your header and footer information. Press F19 to scrollback to the left and display the screen above.
3. Use the following table to complete the fields on the Define Headers and Footers screen(C1CPPX03).
DescriptionField Name
Optional. Enter up to 4 lines of up to 132 alphanumericcharacters each for the additional header lines that youwant to print at the top of your reports. No default.
Header Lines
Optional. Enter up to 4 lines of up to 132 alphanumericcharacters each for the additional footer lines that youwant to print at the bottom of your reports. No default.
Footer Lines
Function Keys
DescriptionNameFunction Key
Exit from the Defaults for Print Outputscreen without saving any entered data.
ExitF3
264CODE-1 Plus User Guide for IBM i
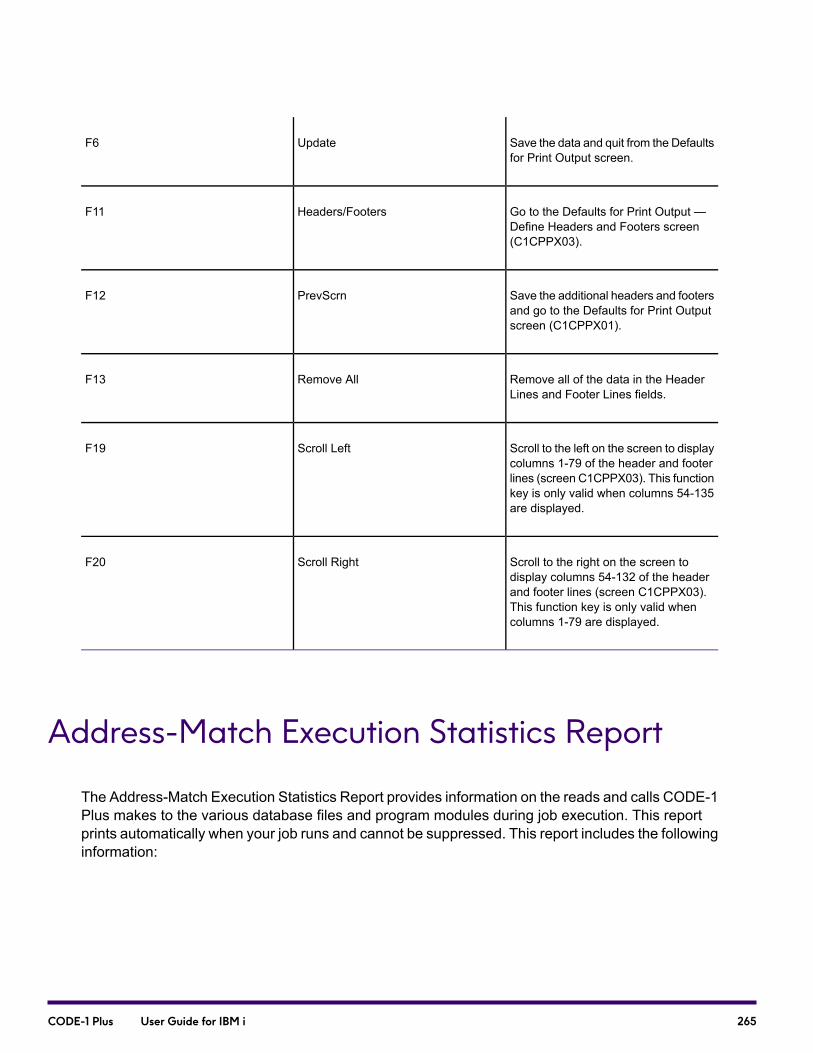
Save the data and quit from the Defaultsfor Print Output screen.
UpdateF6
Go to the Defaults for Print Output —Define Headers and Footers screen(C1CPPX03).
Headers/FootersF11
Save the additional headers and footersand go to the Defaults for Print Outputscreen (C1CPPX01).
PrevScrnF12
Remove all of the data in the HeaderLines and Footer Lines fields.
Remove AllF13
Scroll to the left on the screen to displaycolumns 1-79 of the header and footerlines (screen C1CPPX03). This functionkey is only valid when columns 54-135are displayed.
Scroll LeftF19
Scroll to the right on the screen todisplay columns 54-132 of the headerand footer lines (screen C1CPPX03).This function key is only valid whencolumns 1-79 are displayed.
Scroll RightF20
Address-Match Execution Statistics Report
The Address-Match Execution Statistics Report provides information on the reads and calls CODE-1Plus makes to the various database files and program modules during job execution. This reportprints automatically when your job runs and cannot be suppressed. This report includes the followinginformation:
265CODE-1 Plus User Guide for IBM i

DescriptionField
Number of database reads CODE-1 Plus did to each logicalfile in the database.
Number of CODE-1 Plus Database Reads
Total number of database reads CODE-1 Plus did to theentire CODE-1 Plus database.
Total CODE-1 Plus Database Reads
Number of database read requests CODE-1 Plus did to eachlogical file.
Number of Database Read Requests
Total number of database read requests CODE-1 Plus didto the entire CODE-1 Plus database.
Total CODE-1 Plus Database Read Requests
Number of records requiring address match calls, brokendown by the number of records requiring 1 call, 2 calls, 3calls, and 4 calls.
Address-Match Calls
Number of times the CODE-1 Plus driver program called theC1ANZADR module.
Total analyzer invocations
Number of times CODE-1 Plus determined a locality.ZIP Code setup operations
Statistics for the different types of matches attempted andmaintained (Original ZIP, city-based locality,Finance-NR-based locality, etc.).
Match Attempts and Matches Obtained
Note: A database read request is a request for data that can be satisfied either withinformation on disk or information already in memory. A database read cannot be satisfiedwith the information in memory. CODE-1 Plus must access the database on disk to satisfythe read request.
266CODE-1 Plus User Guide for IBM i
Control Totals Report
The Control Totals Report provides statistics on processed, matched, and unmatched records for ajob. The top of the Control Totals Report displays the CODE-1 Plus release and the vintage datesof the installed databases. This report prints automatically when your job is run and cannot besuppressed. Counts and percentages print for the following fields.
DescriptionField
Number of records read from the input name-and-addressfile C1BMNAM.
Input Name/Address Records Read
Number of records processed. If you used the Z4CHANGEoption, the Bypassed by Z4CHANGE Option entry appearsafter the Input Name/Address Records Read, File C1BMNAMentry. The Z4CHANGE entry shows howmany input recordsdid not have to be processed based on the Z4CHANGEMaster File.
Name/Address Records Processed
Number of records for which a record match was attemptedagainst the database. The subcategories for this field arethe following:
• Original ZIP Code Confirmed—the input ZIP Codematched the database.
• New ZIP Code Determined—the ZIP Code was changedfrom the input as the result of a database match.
• Multiple New ZIP Codes Determined—these records werenot matched because the input ZIP Code was not correctand there were multiple possible new ZIP Codes.
• Original ZIP Code Retained—(No Address MatchPossible)—these records were not matched, but since theinput ZIP Code was a valid USPS ZIP Code, it wasretained.
• No ZIP Code Available—these records were not codedand the input ZIP Code could not be retained because itwas invalid.
Total Records for Which Address Match Attempted
267CODE-1 Plus User Guide for IBM i
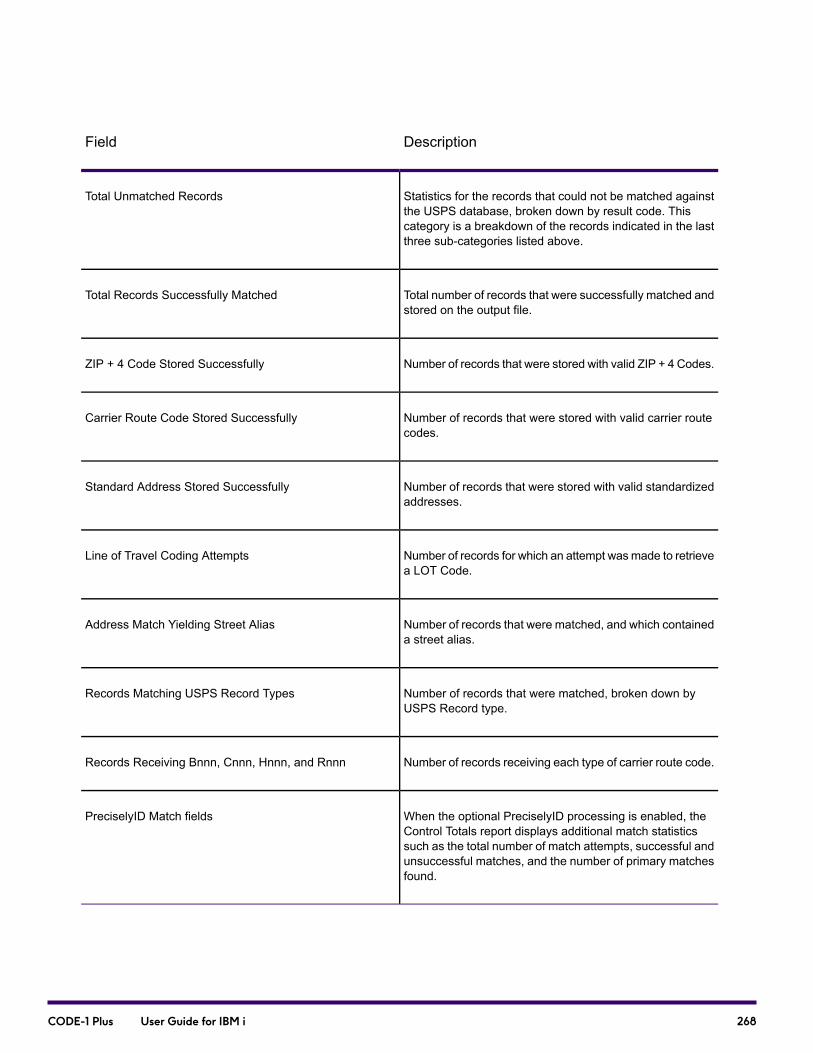
DescriptionField
Statistics for the records that could not be matched againstthe USPS database, broken down by result code. Thiscategory is a breakdown of the records indicated in the lastthree sub-categories listed above.
Total Unmatched Records
Total number of records that were successfully matched andstored on the output file.
Total Records Successfully Matched
Number of records that were stored with valid ZIP + 4 Codes.ZIP + 4 Code Stored Successfully
Number of records that were stored with valid carrier routecodes.
Carrier Route Code Stored Successfully
Number of records that were stored with valid standardizedaddresses.
Standard Address Stored Successfully
Number of records for which an attempt wasmade to retrievea LOT Code.
Line of Travel Coding Attempts
Number of records that were matched, and which containeda street alias.
Address Match Yielding Street Alias
Number of records that were matched, broken down byUSPS Record type.
Records Matching USPS Record Types
Number of records receiving each type of carrier route code.Records Receiving Bnnn, Cnnn, Hnnn, and Rnnn
When the optional PreciselyID processing is enabled, theControl Totals report displays additional match statisticssuch as the total number of match attempts, successful andunsuccessful matches, and the number of primary matchesfound.
PreciselyID Match fields
268CODE-1 Plus User Guide for IBM i
Execution Log
The Execution Log provides information on the steps that CODE-1 Plus executes when processingyour name-and-address file. This report generates automatically while your job is running and cannotbe suppressed. The Execution Log is helpful if your job ends by providing details on how far CODE-1Plus processed the job got before terminating the job. If you contact Technical Support, please havethis report available for reference.
Parameter Record Listing Report
The Parameter Record Listing shows all of the parameters that are used to define a particular job.The Parameter Record Listing prints automatically when a job is run and cannot be suppressed. Ifyou need to contact Precisely Technical Support about a problem with any of your jobs, please havethis report available for reference.
Analysis of Matched Records Report
The Analysis of Matched Records Report provides information on:
• Total number of records that were processed
• Number of processed records successfully matched
• Match details on input directionals, suffixes, and apartment numbers
• Quality of the input file using “Probable Correctness” values
• Combined probable correctness percentage for the entire input file
If any report field contains 0, the field does not print on the report.
269CODE-1 Plus User Guide for IBM i
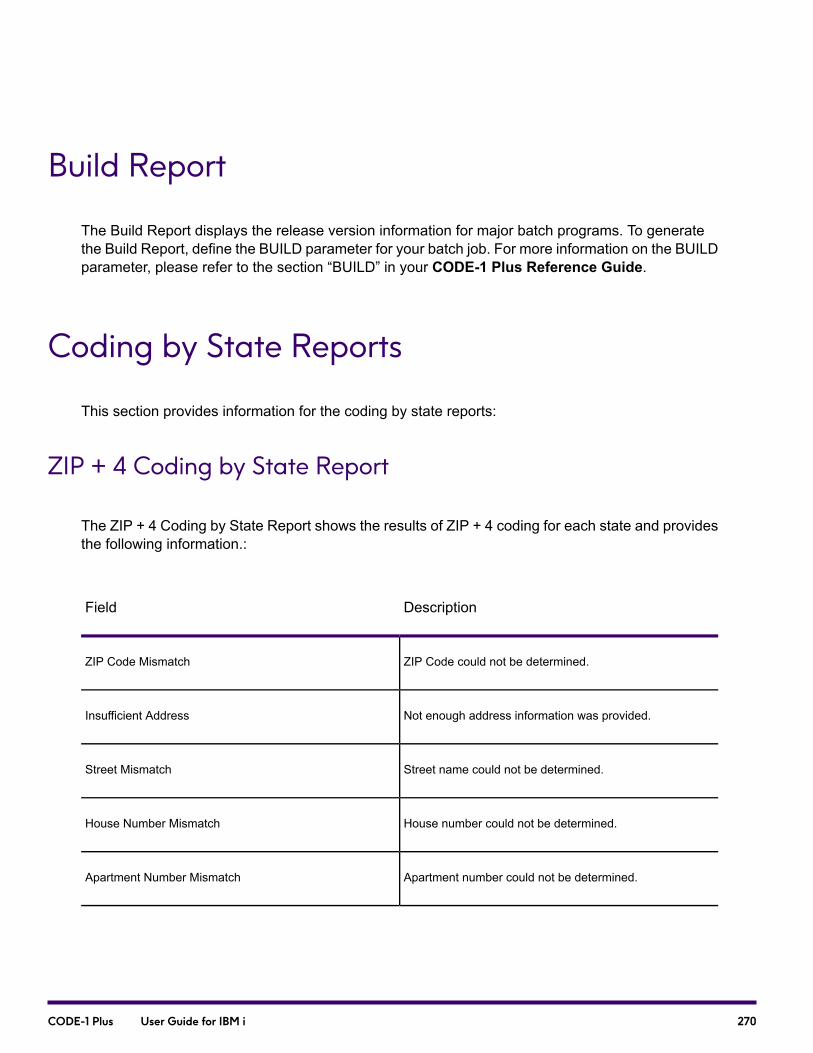
Build Report
The Build Report displays the release version information for major batch programs. To generatethe Build Report, define the BUILD parameter for your batch job. For more information on the BUILDparameter, please refer to the section “BUILD” in your CODE-1 Plus Reference Guide.
Coding by State Reports
This section provides information for the coding by state reports:
ZIP + 4 Coding by State Report
The ZIP + 4 Coding by State Report shows the results of ZIP + 4 coding for each state and providesthe following information.:
DescriptionField
ZIP Code could not be determined.ZIP Code Mismatch
Not enough address information was provided.Insufficient Address
Street name could not be determined.Street Mismatch
House number could not be determined.House Number Mismatch
Apartment number could not be determined.Apartment Number Mismatch
270CODE-1 Plus User Guide for IBM i
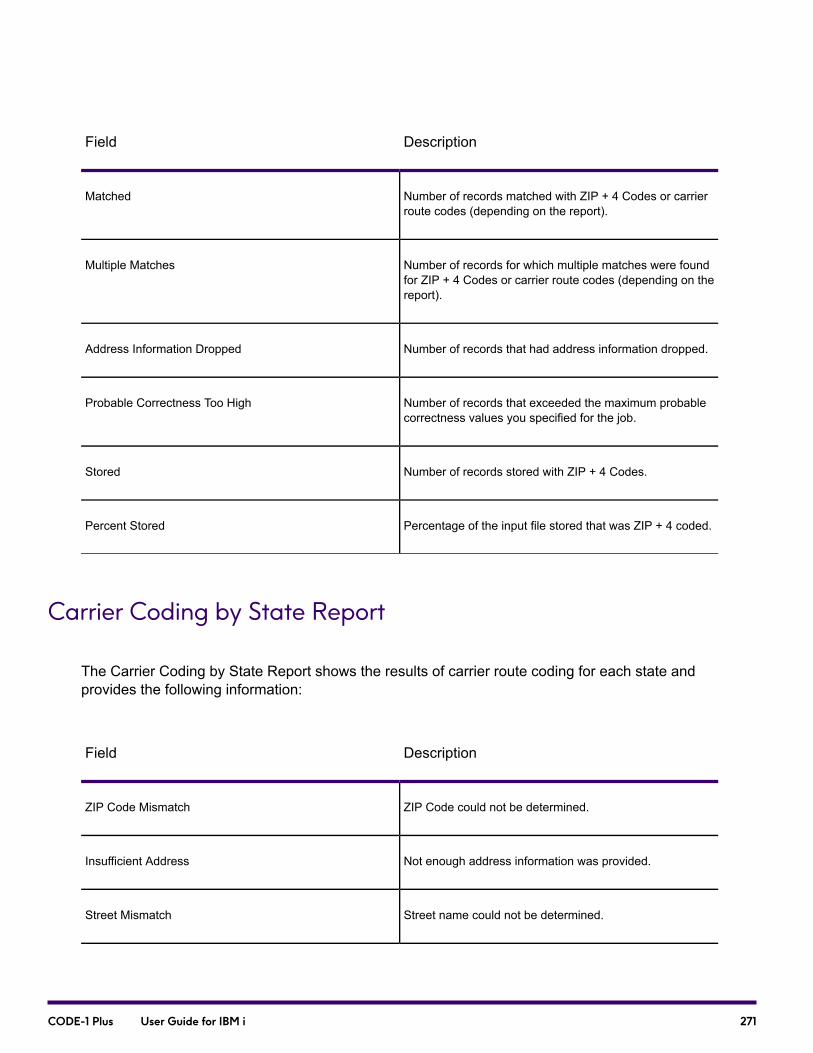
DescriptionField
Number of records matched with ZIP + 4 Codes or carrierroute codes (depending on the report).
Matched
Number of records for which multiple matches were foundfor ZIP + 4 Codes or carrier route codes (depending on thereport).
Multiple Matches
Number of records that had address information dropped.Address Information Dropped
Number of records that exceeded the maximum probablecorrectness values you specified for the job.
Probable Correctness Too High
Number of records stored with ZIP + 4 Codes.Stored
Percentage of the input file stored that was ZIP + 4 coded.Percent Stored
Carrier Coding by State Report
The Carrier Coding by State Report shows the results of carrier route coding for each state andprovides the following information:
DescriptionField
ZIP Code could not be determined.ZIP Code Mismatch
Not enough address information was provided.Insufficient Address
Street name could not be determined.Street Mismatch
271CODE-1 Plus User Guide for IBM i

DescriptionField
House number could not be determined.House Number Mismatch
Apartment number could not be determined.Apartment Number Mismatch
Number of records matched with carrier route codes(depending on the report).
Matched
Number of records for which multiple matches were foundfor carrier route codes (depending on the report).
Multiple Matches
Number of records that had address information dropped.Address Information Dropped
Number of records that exceeded the maximum probablecorrectness values you specified for the job.
Probable Correctness Too High
Number of records stored with carrier route codes.Stored
Percentage of the input file stored that was carrier routecoded.
Percent Stored
Line of Travel Coding by State Report
The Line of Travel Coding by State Report is broken down differently. After the number of recordsprocessed for each state, the report is broken down as follows:
DescriptionField
State for which Line of Travel coding statistics are listed.State
272CODE-1 Plus User Guide for IBM i

DescriptionField
Number of records processed for the state.Number Processed
Number of records for which a LOT code was assigned atthe ZIP + 4 level.
ZIP + 4 Level LOT Coded
Percentage of records that were LOT coded at the ZIP + 4level.
Pct of Nr Processed
Number of records coded with a default LOT code.Default LOT Coded
Percentage of records that were default LOT coded.Pct of Nr Processed
Number of records that were not LOT coded.Uncoded
Percentage of records that were not LOT coded.Pct of Nr Processed
Total for each field on report.Total
Coding by List Code Reports
This section provides information for the coding by list code reports:
ZIP + 4 Coding by List Code Report
The ZIP + 4 Coding by List Code Report lists the input list code, followed by the number of inputrecords for that code and provides the following information.
273CODE-1 Plus User Guide for IBM i
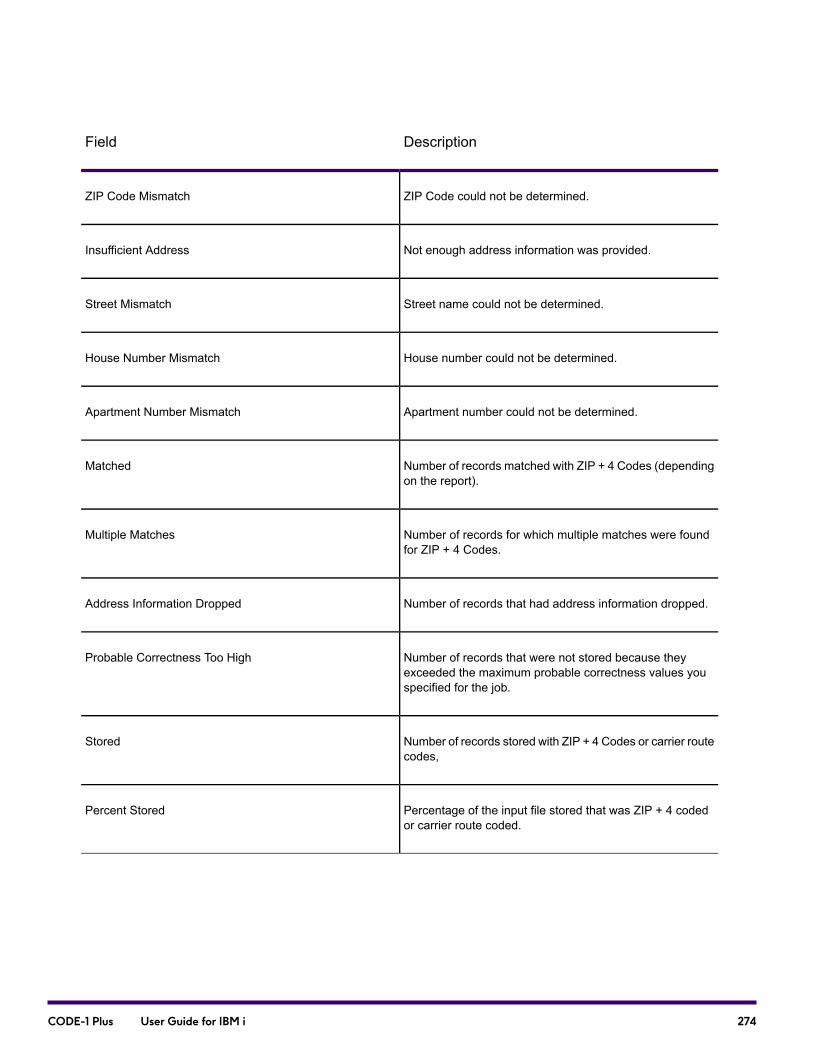
DescriptionField
ZIP Code could not be determined.ZIP Code Mismatch
Not enough address information was provided.Insufficient Address
Street name could not be determined.Street Mismatch
House number could not be determined.House Number Mismatch
Apartment number could not be determined.Apartment Number Mismatch
Number of records matched with ZIP + 4 Codes (dependingon the report).
Matched
Number of records for which multiple matches were foundfor ZIP + 4 Codes.
Multiple Matches
Number of records that had address information dropped.Address Information Dropped
Number of records that were not stored because theyexceeded the maximum probable correctness values youspecified for the job.
Probable Correctness Too High
Number of records stored with ZIP + 4 Codes or carrier routecodes,
Stored
Percentage of the input file stored that was ZIP + 4 codedor carrier route coded.
Percent Stored
274CODE-1 Plus User Guide for IBM i
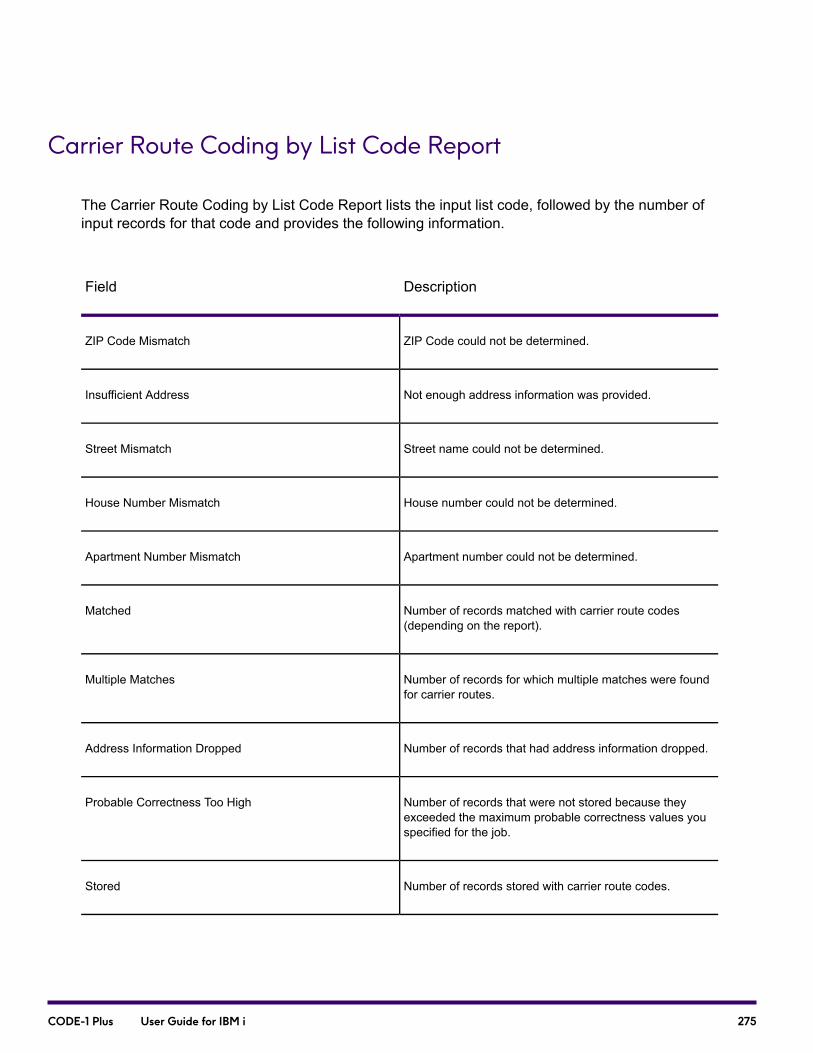
Carrier Route Coding by List Code Report
The Carrier Route Coding by List Code Report lists the input list code, followed by the number ofinput records for that code and provides the following information.
DescriptionField
ZIP Code could not be determined.ZIP Code Mismatch
Not enough address information was provided.Insufficient Address
Street name could not be determined.Street Mismatch
House number could not be determined.House Number Mismatch
Apartment number could not be determined.Apartment Number Mismatch
Number of records matched with carrier route codes(depending on the report).
Matched
Number of records for which multiple matches were foundfor carrier routes.
Multiple Matches
Number of records that had address information dropped.Address Information Dropped
Number of records that were not stored because theyexceeded the maximum probable correctness values youspecified for the job.
Probable Correctness Too High
Number of records stored with carrier route codes.Stored
275CODE-1 Plus User Guide for IBM i
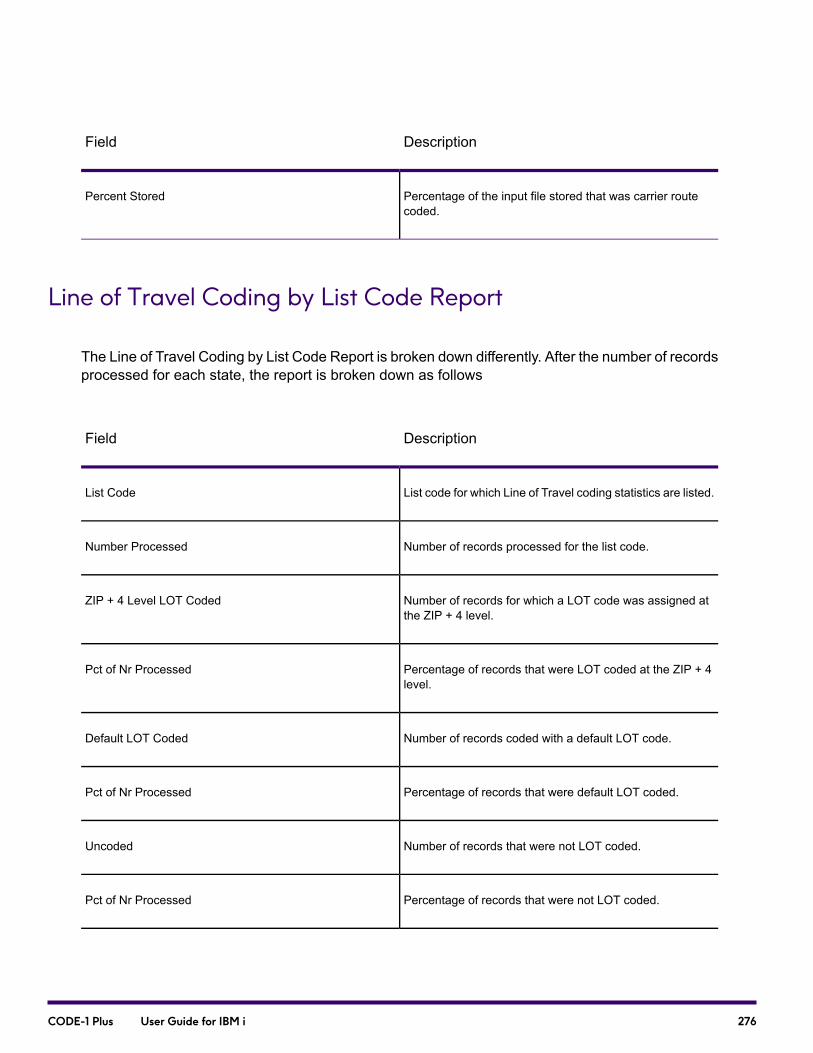
DescriptionField
Percentage of the input file stored that was carrier routecoded.
Percent Stored
Line of Travel Coding by List Code Report
The Line of Travel Coding by List Code Report is broken down differently. After the number of recordsprocessed for each state, the report is broken down as follows
DescriptionField
List code for which Line of Travel coding statistics are listed.List Code
Number of records processed for the list code.Number Processed
Number of records for which a LOT code was assigned atthe ZIP + 4 level.
ZIP + 4 Level LOT Coded
Percentage of records that were LOT coded at the ZIP + 4level.
Pct of Nr Processed
Number of records coded with a default LOT code.Default LOT Coded
Percentage of records that were default LOT coded.Pct of Nr Processed
Number of records that were not LOT coded.Uncoded
Percentage of records that were not LOT coded.Pct of Nr Processed
276CODE-1 Plus User Guide for IBM i
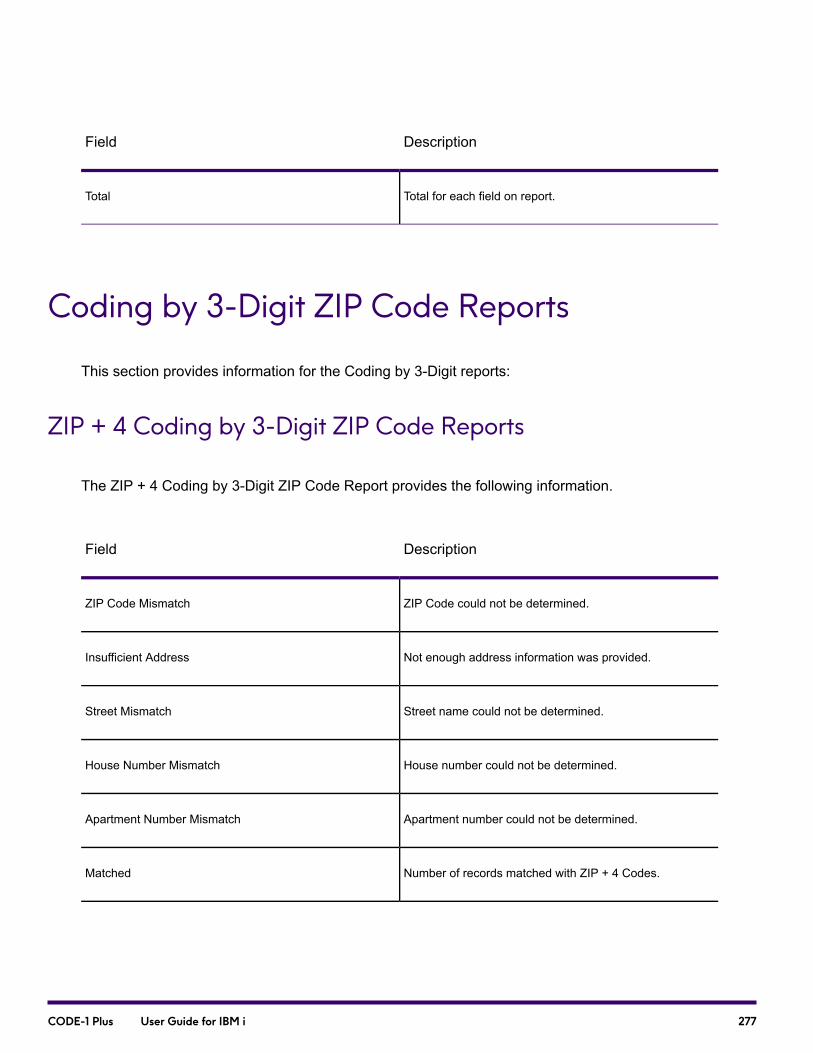
DescriptionField
Total for each field on report.Total
Coding by 3-Digit ZIP Code Reports
This section provides information for the Coding by 3-Digit reports:
ZIP + 4 Coding by 3-Digit ZIP Code Reports
The ZIP + 4 Coding by 3-Digit ZIP Code Report provides the following information.
DescriptionField
ZIP Code could not be determined.ZIP Code Mismatch
Not enough address information was provided.Insufficient Address
Street name could not be determined.Street Mismatch
House number could not be determined.House Number Mismatch
Apartment number could not be determined.Apartment Number Mismatch
Number of records matched with ZIP + 4 Codes.Matched
277CODE-1 Plus User Guide for IBM i

DescriptionField
Number of records for which multiple matches were foundfor ZIP + 4 Codes.
Multiple Matches
Number of records that had address information dropped.Address Information Dropped
Number of records that were not stored because the recordsexceeded the maximum probable correctness valuesspecified for the job.
Probable Correctness Too High
Number of records stored with ZIP + 4 Codes.Stored
Percentage of the input file stored that was ZIP + 4 coded.Percent Stored
Carrier Coding by 3-Digit ZIP Code Reports
The Carrier Coding by 3-Digit ZIP Code Report provides the following information.
DescriptionField
ZIP Code could not be determined.ZIP Code Mismatch
Not enough address information was provided.Insufficient Address
Street name could not be determined.Street Mismatch
House number could not be determined.House Number Mismatch
Apartment number could not be determined.Apartment Number Mismatch
278CODE-1 Plus User Guide for IBM i
DescriptionField
Number of records matched with carrier route codes.Matched
Number of records for which multiple matches were foundfor carrier route codes.
Multiple Matches
Number of records that had address information dropped.Address Information Dropped
Number of records that were not stored because the recordsexceeded the maximum probable correctness valuesspecified for the job.
Probable Correctness Too High
Number of records stored with carrier route codes.Stored
Percentage of the input file stored that was ZIP + 4 codedor carrier route coded.
Percent Stored
Line of Travel Coding by 3-Digit ZIP Code Report
The Line of Travel Coding by 3-Digit ZIP Code Report provides the following information.
DescriptionField
3-Digit code for which Line of Travel coding statistics arelisted.
3-Digit
Number of records processed for the 3-Digit ZIP Code.Number Processed
Number of records for which a LOT code was assigned atthe ZIP + 4 level.
ZIP + 4 Level LOT Coded
279CODE-1 Plus User Guide for IBM i
DescriptionField
Percentage of records that were LOT coded at the ZIP + 4level.
Pct of Nr Processed
Number of records coded with a default LOT code.Default LOT Coded
Percentage of records coded with a default LOT code.Pct of Nr Processed
Number of records that were not LOT coded.Uncoded
Percentage of records that were not LOT coded.Pct of Nr Processed
Total for each field on report.Total
Processing Summary Reports
The Processing Summary reports show—by state, list code, or 3-digit ZIP Code—totals for thefollowing categories:
• Records Processed—number of records processed for this job
• Address Mismatches—number of records for which no address could be determined
• Multiple Matches—number of records for which multiple matches were found
• Unique Matches—number of records for which there was only a single, unique match determined
• Number of ZIP Codes Stored—number of records that were stored with ZIP Codes
• Percentage of ZIP Codes Stored
• Number of Records Stored with ZIP + 4 Codes
• Percentage of Records Stored with ZIP + 4 Codes—Percentage of total number of records storedwith ZIP + 4 Codes
280CODE-1 Plus User Guide for IBM i
• Number of Records Stored with Carrier Route Codes
• Percentage of Records Stored with Carrier Route Codes
• Number of Records Stored with Standardized Addresses
• Percentage of Records Stored with Standardized Addresses
• Number of Records Stored with City and State—Number of records stored with matched city andstate information
• Percentage of Records Stored with City and State
Delivery Point Validation Processing SummaryReport
This report shows you statistics about processed, matched, and unmatched records for a job. Thisreport is printed automatically when your job is run. You cannot turn this feature off.
Delivery Point Validation Processing by ListCode Report
This report shows you statistics about processed, matched, and unmatched records for a job. Thisreport is printed automatically when your job is run; you cannot turn this feature off.
Residential Delivery File Build Report
You will find the following information on this report:
• Parameter given
• Control totals for your RDI File build job
281CODE-1 Plus User Guide for IBM i

Residential Delivery File Build Execution Log
You will find the following information on the execution log:
• Date and time of the RDI File build
• Number of 9-digit input records
• Number of 11-digit input records
National Deliverability Index (NDI) Report
The National Deliverability Index System (NDI) measures and improves address quality throughseven quality indicators. The NDI Report shows how many records fulfill each criteria required foreach quality indicator. The categories are represented by the number of addresses:
• Matched and standardized against the ZIP + 4 file
• Containing apartment numbers
• Containing rural route and box number information
• Containing correct 5-digit ZIP Codes
• Containing carrier route codes
USPS Form 3553 (CASS Summary Report)
The USPS Form 3553 (CASS Summary Report) is a facsimile of the Postal Form 3553. CODE-1Plus generates this form automatically when you are using a CASS-certified configuration. The USPSrequires this form to verify CASS certification.
• Section A contains the CASS-certified vendor name (Precisely), software name, release number,and the configuration used. For Z4CHANGE and LOT processing, the form contains the Z4CHANGEand LOT vendor name, Z4CHANGE and LOT software name, release number, and the configurationused.
282CODE-1 Plus User Guide for IBM i

• Section B of the form contains information about your name-and-address list including the dateyou processed your list against the Master file, Z4CHANGE option, and LOT database. It alsocontains the date (month and year) of the ZIP + 4 (Master file), Z4CHANGE, and LOT databases.Additional list information is also provided including the total number of records processed.
• SectionC contains information about your output file including the number of records ZIP + 4 coded,delivery point coded, 5-digit ZIP coded, carrier route coded, LOT coded, Z4CHANGE processed,and the valid dates (from-to) for the file.
• Section D contains mailer information.
• Section E contains the Qualitative Statistical Summary information for high rise, rural route, LACSLink,EWS, and SuiteLink data.
Note: Pages 2 of the USPS Form 3553 (CASSSummary Report) contains detailed descriptionsof each field on the form.
For more information, please see http://about.usps.com/forms/ps3553.pdf.
283CODE-1 Plus User Guide for IBM i
11 - Getting Started WithInteractive Processing
In this section
Getting Started With the Interactive System..........................................285CODE-1 Plus Interactive System Screen...............................................288Address Matching...................................................................................289Database Inquiry....................................................................................290An Example Work Session.....................................................................294Correcting Uncoded Records.................................................................298Interactive Screen Reference.................................................................298Function Keys.........................................................................................306Address Matching Screens.....................................................................309Database Inquiry Screens......................................................................336Screens that Support Site Customization...............................................348Database Information Screen.................................................................355Customization File Administration..........................................................355Batch Uncoded Records Interface (G1CPBNC).....................................357
CODE-1 Plus User Guide for IBM i
Getting Started With the Interactive System
This chapter describes the CODE-1 Plus interactive address matching and database inquiry functions.The CODE-1 Plus Interactive System is an environment where you canmatch and correct addressesonline through one easy-to-use screen. This screen enables you to use the two main functions,Address Matching and Database Inquiry, and a secondary function that enables you to correctuncoded records. (You must implement the user-exit G1CPBNC to correct uncoded recordsinteractively.) To implement the user-exit G1CPBNC, refer to Correcting Uncoded Records.
Note: To minimize maintenance, the interactive screens in this chapter do not display thedatabase version and the date stamp. We also use “__ of __” to represent the screen currentlydisplayed, instead of “1 of 62,381,” for example.
Note: The CODE-1 Plus Interactive System does not support Auxiliary File/EWS processing.
Address Matching Function
The interactive address matching function enables you to:
• Match a single input address against the master file
• Analyze return codes to determine actions that were taken to attempt a match
• Detect the types and quantities of problems encountered in an input address
• Control the closeness (“tightness” or “looseness”) of address matches
For each match attempt, CODE-1 Plus displays return codes that indicate the success or reason forfailure of the attempt. You can view these return codes in code or expanded English format.
In addition to the return codes, CODE-1 Plus shows you, for each match attempt, parsed addresselements and Delivery Sequence Footnotes (DSF2 codes).
Geographic Coding
The address matching function provides access to the Geographic Coding Information screens.Please refer to the User’s Guide that you received with your Geographic Coding software for detailsabout Geographic Coding Plus.
Note: To access the Geographic Coding Information screens, you must purchase and installthe Precisely Geographic Coding Plus software.
285CODE-1 Plus User Guide for IBM i
Database Inquiry Function
The database inquiry function lets you browse the contents of the CODE-1 Plus database. Usingthis feature, you can look up houses, apartments, and firms on a given street, in a particular city.You can display and analyze the following information for each city in the CODE-1 Plus database:
• City name
• Cities within a state
• Cities within a ZIP Code
• ZIP Codes in a city
• Streets within a city
• Streets within a locality
• Streets within a ZIP Code
• House ranges on a street
• Apartment ranges on a street range
• Firm names within a street range
Database Expiration and Incompatibility
The interactive matcher ceases to function in accordance with the Domestic Mail Manual (DMM)A960matrix. The interactive system inquiry area, however, remains available even after the interactivematcher expires. In this case, the following message will be displayed on the prompt line above thefunction key descriptions:
CODE-1 Plus DATABASE IS EXPIRED
Alternatively, if the CASS cycle date has passed, the following message displays at the prompt:
CODE-1 Plus DATABASE CASS CYCLE IS EXPIRED
The interactive system validates the release of the database against the release of the software. Ifthe releases are incompatible, the following message will appear when you enter the CODE-1 Plusinteractive transaction code:
CODE-1 Plus PROGRAM ERROR, RETURN CODE=ICPT INCOMPATIBLE
DATABASE FOUND
286CODE-1 Plus User Guide for IBM i
In this case, neither the inquiry nor the match process will be accessible.
Expiration of Delivery Point Validation (DPV) Processing
The DPV option will stop working at the end of the fourth month from the release of the database.
If you have an expired DPV database, this message will appear:
DELIVERY POINT VALIDATION SUPPRESSED DUE TO DATABASE
EXPIRATION DATE CHECK
Correcting Uncoded Records Function
When you run a batch job in CODE-1 Plus, you can generate an uncoded records output file(C1BMNCO). This file contains records with valid ZIP Codes, but for some reason, the records didnot match against the database. With a supplied user-exit, you can correct these records in theCODE-1 Plus Interactive screen. You display an uncoded record in the input area, correct the record,write the corrected record to a corrected output file, and then display the next uncoded record. Formore information, refer to Correcting Uncoded Records.
Navigation Function
The navigation function coordinates the match and inquiry functions to position the inquiry portionof the split screen format as close as possible to the point of match failure on a non-matched address.Navigation does not change the display on a matched address; it is geared to react to the matcher’snon-space return codes to drill down into the database as far as possible.
For example, a house range mismatch generally will result in the inquiry half of the screen beingpositioned at the house range on the street entered on the top half of the screen. If the street ismisspelled, however, the position will be at the same street name entered on the match portion ofthe screen. The purpose of this process is to get as close as possible to a correct address withouthaving to drill through apparently correct levels of the database.
The Navigate (Nav) toggle command turns navigation on or off. Navigation is only available in splitscreen processing (since a non-matched address is required to activate the function) and can beused in concert with the UR (batch not coded) function. For more information on the commandsavailable in interactive processing, refer to Command Field.
287CODE-1 Plus User Guide for IBM i
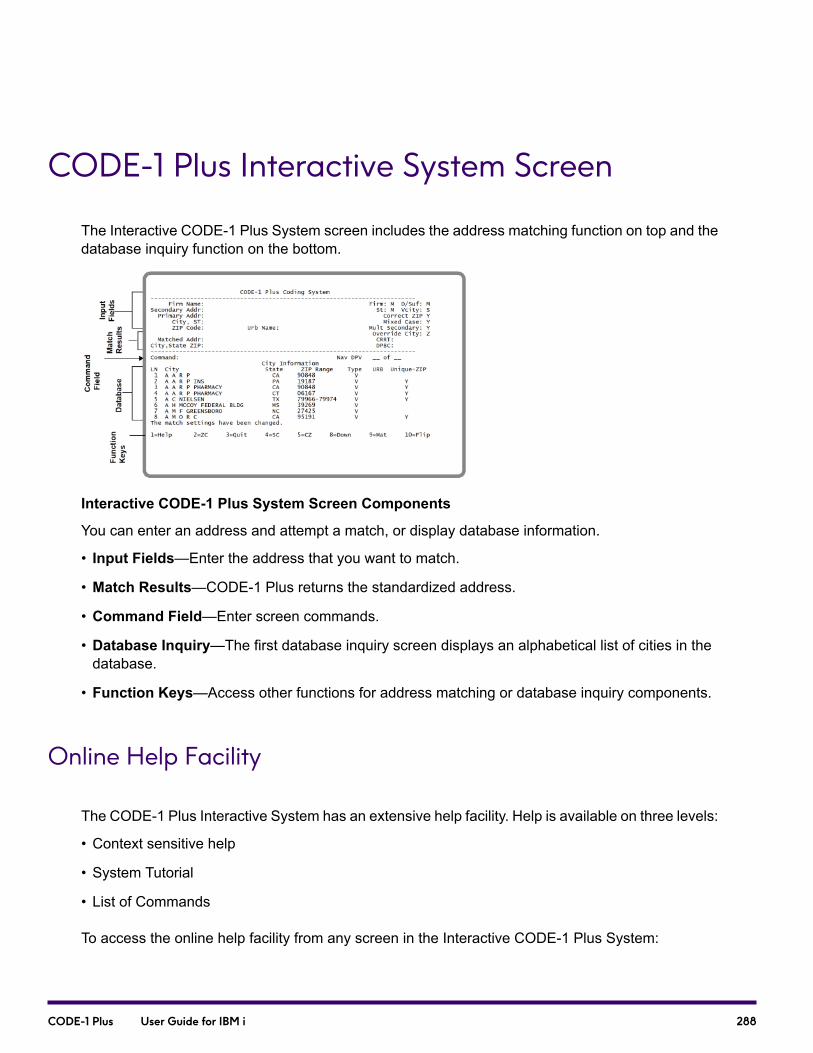
CODE-1 Plus Interactive System Screen
The Interactive CODE-1 Plus System screen includes the address matching function on top and thedatabase inquiry function on the bottom.
Interactive CODE-1 Plus System Screen Components
You can enter an address and attempt a match, or display database information.
• Input Fields—Enter the address that you want to match.
• Match Results—CODE-1 Plus returns the standardized address.
• Command Field—Enter screen commands.
• Database Inquiry—The first database inquiry screen displays an alphabetical list of cities in thedatabase.
• Function Keys—Access other functions for address matching or database inquiry components.
Online Help Facility
The CODE-1 Plus Interactive System has an extensive help facility. Help is available on three levels:
• Context sensitive help
• System Tutorial
• List of Commands
To access the online help facility from any screen in the Interactive CODE-1 Plus System:
288CODE-1 Plus User Guide for IBM i

1. Enter Help in the Command field or press function key F1 or the Help key.
2. The online help facility displays a menu, and you can choose to see the tutorial, a list of all validcommands, or context sensitive help on the screen that was displayed when you accessed theonline help facility.
3. To exit the help facility, press function key F10 or enter X in the Selection field.
Address Matching
To match an address, follow the steps below.
1. Move your cursor to the top of the screen using the Tab key, arrow keys, orField Exit key.
2. Enter any firm name, primary and secondary address lines, city, state, and/or ZIP Code.
3. Press Enter.
4. CODE-1 Plus searches the database to find an address that matches the one you entered.
5. If a match is found, the standardized address line and the standardized city/state/ZIP Code lineappear for you on the top half of the screen.
6. You can display other match result information by entering RC (return codes) or MAT in theCommand field, or pressing F9.
Scrolling Through the Match Results Screens
There are six screens of match results in the CODE-1 Plus Interactive System. Each screen showsyou different information about your match attempt. These screens are the following:
• RC—Return Codes screen
• DS—Delivery Sequence Footnotes2 screen
• PE—Parsed Elements screen
• ME—Multiple Elements screen
• ST—Statistics screen
• DI—Miscellaneous Information/Base Address screen.
289CODE-1 Plus User Guide for IBM i
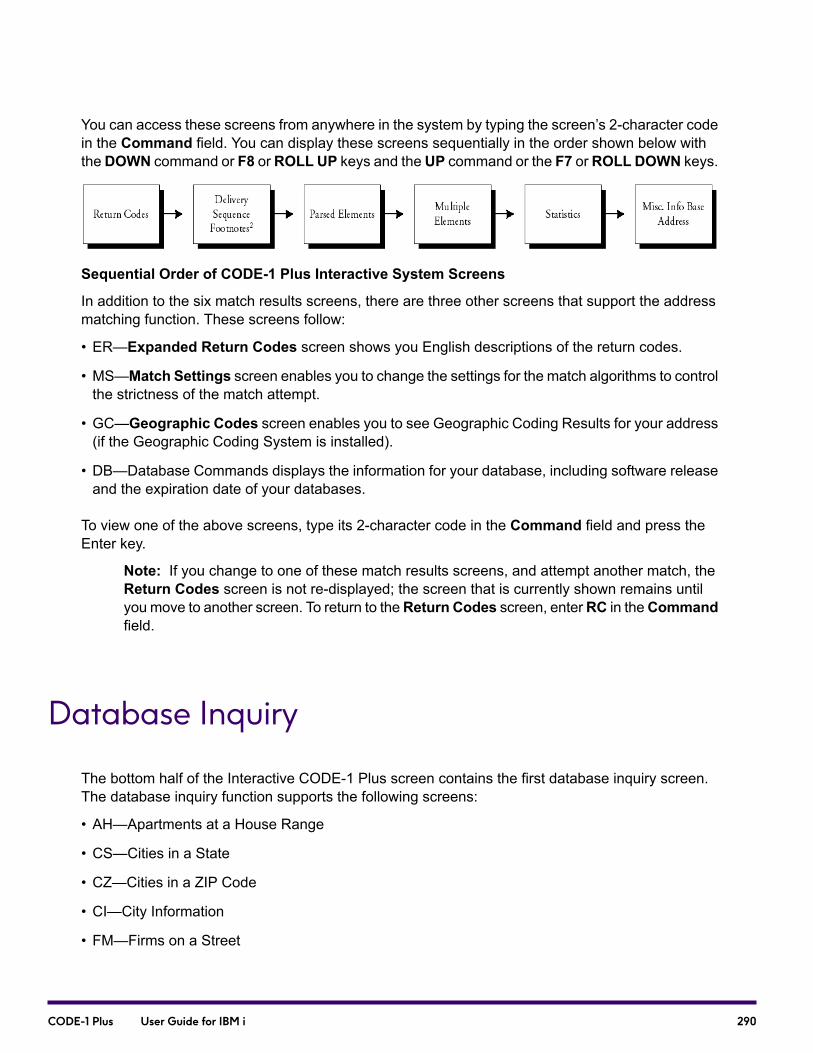
You can access these screens from anywhere in the system by typing the screen’s 2-character codein the Command field. You can display these screens sequentially in the order shown below withtheDOWN command or F8 orROLL UP keys and theUP command or the F7 orROLL DOWN keys.
Sequential Order of CODE-1 Plus Interactive System Screens
In addition to the six match results screens, there are three other screens that support the addressmatching function. These screens follow:
• ER—Expanded Return Codes screen shows you English descriptions of the return codes.
• MS—Match Settings screen enables you to change the settings for the match algorithms to controlthe strictness of the match attempt.
• GC—Geographic Codes screen enables you to see Geographic Coding Results for your address(if the Geographic Coding System is installed).
• DB—Database Commands displays the information for your database, including software releaseand the expiration date of your databases.
To view one of the above screens, type its 2-character code in the Command field and press theEnter key.
Note: If you change to one of these match results screens, and attempt another match, theReturn Codes screen is not re-displayed; the screen that is currently shown remains untilyou move to another screen. To return to theReturn Codes screen, enterRC in theCommandfield.
Database Inquiry
The bottom half of the Interactive CODE-1 Plus screen contains the first database inquiry screen.The database inquiry function supports the following screens:
• AH—Apartments at a House Range
• CS—Cities in a State
• CZ—Cities in a ZIP Code
• CI—City Information
• FM—Firms on a Street
290CODE-1 Plus User Guide for IBM i

• HS—Houses on a Street
• SC—Streets in a City
• SL—Streets in a Locality
• SZ—Streets in a ZIP Code
• GEO—Geographic Coding Interface
• ZC—ZIP Codes in a City.
To make any database inquiry screen take up all of the space on the screen:
1. Type FLIP in the Command field or press function key F10.
More lines are available to display additional information stored in the database.
2. To restore the screen to the original display, enter FLIP again in the Command field.
Navigating Through the Screens
You can access the CI, CS, CZ, and SZ database inquiry screens from anywhere in the system bytyping the screen’s 2-character code in the Command field. Note that to access:
• The Cities in a State screen, type CS followed by a 2-character state code in the Command field.
• The Cities in a ZIP Code screen, type CZ followed by a 5-digit ZIP Code (or 2-digit line number ifyou are on Cities in a State or database screens).
• The Streets in a ZIP Code screen, type SZ followed by a 5-digit ZIP Code (or 2-digit line numberif you are on Cities in a ZIP Code screen).
You can scroll through data on a specific screen as shown in the figure below with theDOWN command or F8 or ROLL UP keys and the UP command or the F7 or ROLL DOWN keys.
291CODE-1 Plus User Guide for IBM i
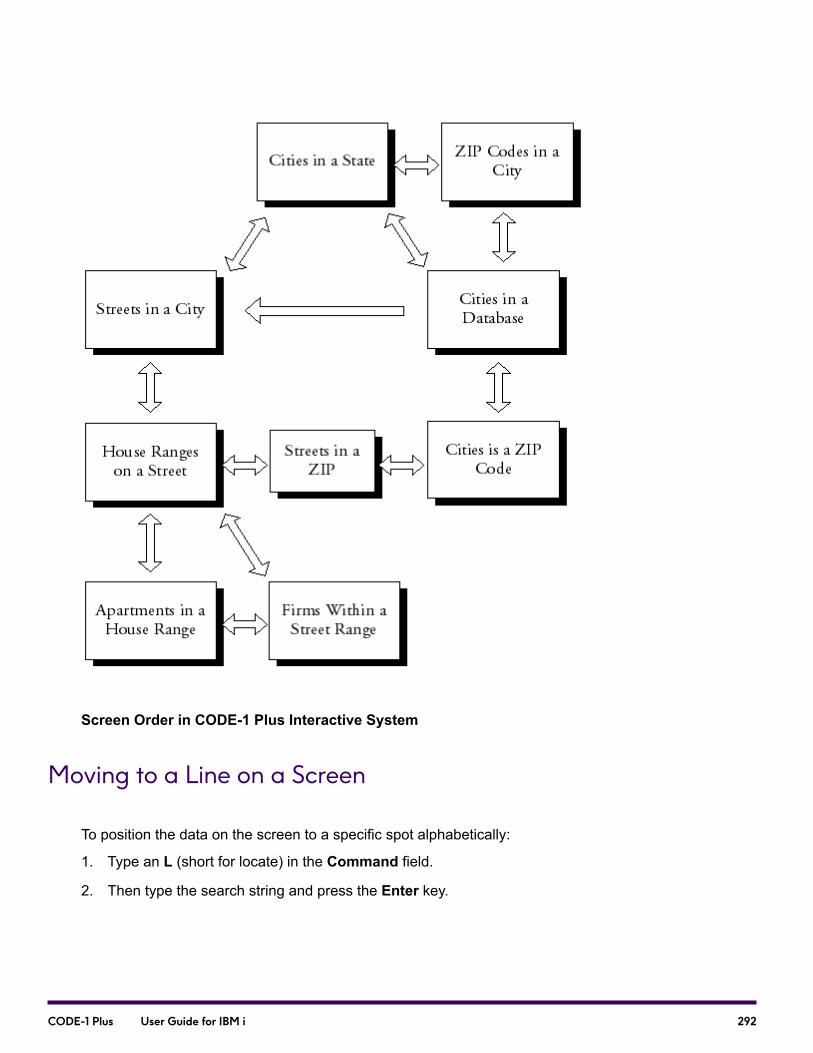
Screen Order in CODE-1 Plus Interactive System
Moving to a Line on a Screen
To position the data on the screen to a specific spot alphabetically:
1. Type an L (short for locate) in the Command field.
2. Then type the search string and press the Enter key.
292CODE-1 Plus User Guide for IBM i
For example, if you wanted to position the list to Lanham while displaying a Cities screen, you wouldenter L LANHAM in the Command field. The first city that starts with the letters L-A-N-H-A-M wouldbecome the first city displayed.
Displaying Data about a Database Entry
To display data for any database line on the screen, use one of the following methods. All methodsproduce the same result.
• First, in the Command field, you can type the 2-character command and the appropriate linenumber. For example, if the city of Lanham, MD is the second city displayed, and we want to displayall of the streets in Lanham, MD, we would:
Type SC 2 (streets in the city on line 2) in the Command field.
All the streets in the city of Lanham appear.
• Most 2-character screen abbreviations (like SC above) are assigned to function keys on the currentscreen. Refer to the display line on the bottom of the screen for the corresponding function keys.If you want to use a function key to access data instead of typing the 2-character code, you canuse one of the two methods described below. To display the streets in Lanham, Maryland again:
Type 2 in the Command field and press the function key F4.
or
Position the cursor on the second line of the display (the line with Lanham, MD) and press F4.
Querying the Database
The following steps clarify the concepts presented above.
1. Start at the first database inquiry screen.
2. Enter FLIP in the Command field and press Enter.
3. Enter L LANHAM in the Command field. The screen changes to display only database inquirywithout address matching.
4. Enter SC 2 in the Command field and press Enter.
Note: You could also enter just SC. The line number defaults to 1, if no line number isentered in the Command field.
The cursor moves to the Streets in a City screen for the city on the first line of the display (inthis case, Lanham MD).
293CODE-1 Plus User Guide for IBM i
5. EnterDOWN in theCommand field and press Enter or press F8 to see the next display of streetsin Lanham, MD. The screen appears with all the streets in Lanham, Maryland.
Note: To combine a display command and a locate command, you can enter the displaycommand, followed by the line number for the display command, followed by the locate string.For example, if your screen displayed the cities in the database, positioned with LANHAM,MD as line 4, and you wanted to see all of the streets in LANHAM starting with PARLIAMENTPL, you would enter SC 4 PARLIAMENT. The Streets in a City screen would be displayed,and PARLIAMENT PL would be the second street displayed.
An Example Work Session
The remainder of this chapter is devoted to an example of how to use the interactive functions tocorrect problem addresses. The first step is to access the interactive matching function and enteran address. The address will not match, so we use the database inquiry to see if our “detective” skillsenable us to find the address. Once we find an address, we return to the address matching functionto look at the results of a match.
The following address is used as input:
LOCUS INC2560 HUNTJEFFERSON VA
You will follow the steps below to correct your input address:
1. Access the CODE-1 Plus Interactive System.
2. Attempt to match a questionable address using different matching algorithms.
3. Browse the postal database to determine the correct address.
4. Successfully match the corrected input address, thereby producing a ZIP + 4 Code, parsedaddress elements, and output return codes.
5. Display geographic codes for the address.
Note: To access the Geographic Coding System screen, you must have purchased andinstalled the Precisely Geographic Coding Plus.
Step 1. Accessing the Interactive System
To start the CODE-1 Plus Interactive system:
1. Enter command CALL G1@@pgms/G1mm01.
294CODE-1 Plus User Guide for IBM i
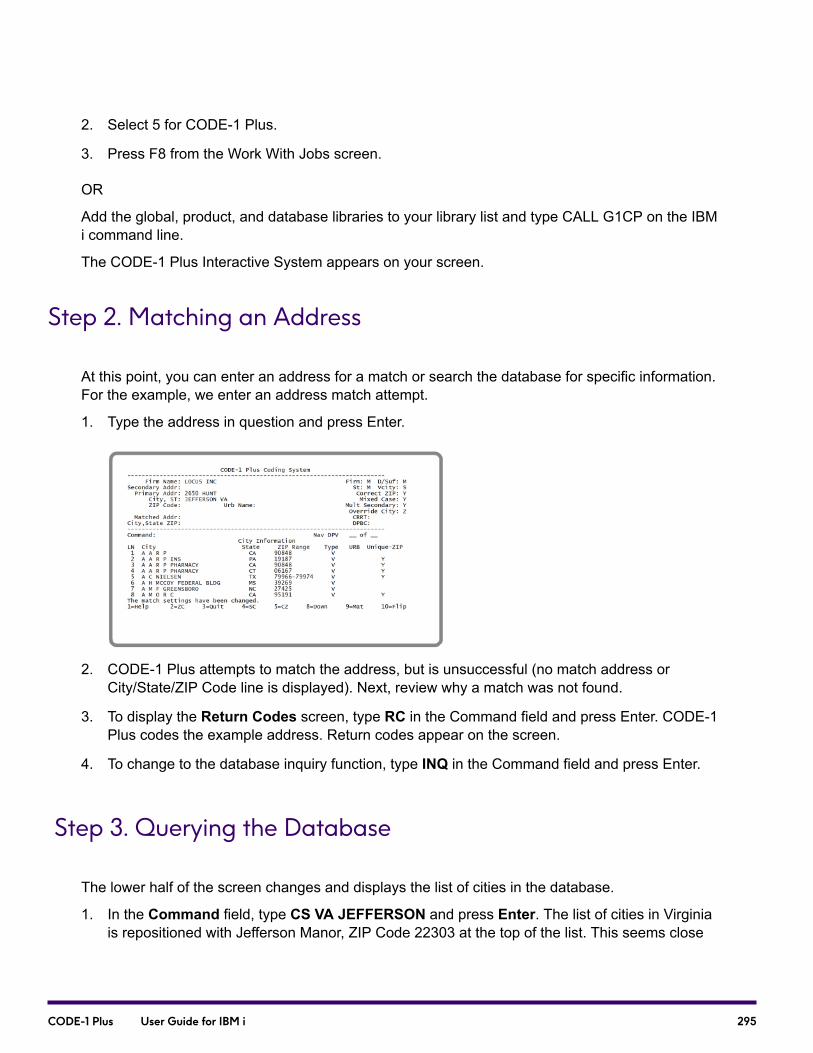
2. Select 5 for CODE-1 Plus.
3. Press F8 from the Work With Jobs screen.
OR
Add the global, product, and database libraries to your library list and type CALL G1CP on the IBMi command line.
The CODE-1 Plus Interactive System appears on your screen.
Step 2. Matching an Address
At this point, you can enter an address for a match or search the database for specific information.For the example, we enter an address match attempt.
1. Type the address in question and press Enter.
2. CODE-1 Plus attempts to match the address, but is unsuccessful (no match address orCity/State/ZIP Code line is displayed). Next, review why a match was not found.
3. To display the Return Codes screen, type RC in the Command field and press Enter. CODE-1Plus codes the example address. Return codes appear on the screen.
4. To change to the database inquiry function, type INQ in the Command field and press Enter.
Step 3. Querying the Database
The lower half of the screen changes and displays the list of cities in the database.
1. In the Command field, type CS VA JEFFERSON and press Enter. The list of cities in Virginiais repositioned with Jefferson Manor, ZIP Code 22303 at the top of the list. This seems close
295CODE-1 Plus User Guide for IBM i

enough to our original address that it bears further investigation. At this point, Jefferson Manoris a secondary city name. The primary city (i.e., the USPS-preferred city name) is obtainedthrough the ZIP Code.
2. In the Command field, type CZ and press Enter.The Cities in ZIP Code screen appears. Noticethat there are two cities for this ZIP Code. Alexandria has a city type of “Primary,” and JeffersonManor has a city type of “Secondary.” Alexandria is the USPS-preferred city name for the ZIPCode 22303.
3. Now, see if there is a street called Hunt in this ZIP Code. To display all of the streets in the ZIPCode range for the first city (Alexandria), in the Command field type SZ HUNT and press Enter.
4. The Streets in ZIP Code screen appears so that “HUNT” would have been the first street on thescreen if it existed. Notice that there is no Hunt Street, but there is a Huntington Avenue. Thisbears further investigation.
5. In the Command field, type HS 3 2560 and press Enter.
6. The list is positioned so that the house range containing 2560 is at the top of the list. Notice that2560 Huntington Avenue is a high rise house type.
7. In the Command field, type FM 3 and press Enter.
8. The Firms on a Street screen appears. The screen displays Locus Inc. located at 2560 HuntingtonAvenue, apartment number 302. The search is complete.
Step 4. Matching an Address—Second Attempt
Now that there is an accurate address, enter it interactively and look at the match return codes. Thefirst thing to do is change the matching algorithm settings to “tight” from the default of medium.
296CODE-1 Plus User Guide for IBM i
1. In the Command field, type MS and press Enter.
2. The Match Settings screen appears. Type T for each of the matching algorithms and pressEnter. The Match Settings screen disappears, and the Firms in a Street screen appears again.A message appears at the bottom of the screen telling you that the settings were changed.
3. Type the correct address matching fields and press Enter.
4. CODE-1 Plus matches the address and shows the matched address.
5. To review the return codes for the match, in the Command field, type RC and press Enter.
6. The Return Codes screen appears. Scroll through to see the other match results screens. Inthe Command field, type DOWN or press F8.
The Delivery Sequence Footnotes screen displays, showing DSF codes that applied to thismatch attempt.
7. Continue to type DOWN in the Command field, or press F8.
The Parsed Elements screen appears.
8. Type DOWN in the Command field, or press F8.
The Multiple Elements screen appears.
9. Type DOWN in the Command field, or press F8.
The Statistics screen appears.
10. Type DOWN in the Command field, or press F8.
The Miscellaneous Address Values screen appears.
11. To exit from the Interactive System, type QUIT in the Command field or press F3.
Step 5. Geographic Coding
In addition to address matching, you can return geographic coding information about the address.If you enter a match attempt, and then access the Geographic Coding Interface screen, the geographicmatch results appears for the ZIP Code and ZIP + 4 Code from the match attempt. If you do notenter a match attempt before accessing the Geographic Coding Interface, enter the ZIP Code andZIP + 4 Codes directly on the screen.
Note: To access the Geographic Coding interface screen, you must have purchased andinstalled Precisely's Geographic Coding Plus.
1. In theCommand field, typeGEO and press Enter. The first Geographic Coding Interface screenappears.
297CODE-1 Plus User Guide for IBM i

2. To display the second Geographic Coding Interface screen, press F8. The second GeographicCoding Interface screen appears.
3. Press F7 once to return to the top of the Geographic Coding Interface screen, and then pressF10 in the Command field.
Correcting Uncoded Records
If you implement the G1CPBNC user-exit program, you can correct uncoded records from theG1CPBNC output file. To correct uncoded records using the CODE-1 Plus Interactive system, usetwo commands: UR (User Read) and UW (User Write). These commands are described below:
To correct uncoded records from the C1BMNCO output file, follow the steps below:
1. Start at the CODE-1 Plus Interactive System screen.
2. Type UR in the Command field.
An uncoded address appears in the input area.
3. You can use any address matching or database inquiry functions necessary to find a match forthis address.
4. Once the uncoded address is matched to the database and corrected, typeUW in theCommandfield. The corrected address is written to an output file.
5. Repeat steps 2 through 4 until all the records in the uncoded records output file are corrected.
Note: For information on the G1CPBNC program, refer toBatch Uncoded Records Interface(G1CPBNC).
Interactive Screen Reference
This section provides a reference for the CODE-1 Plus interactive screens. Each screen is presented,along with its fields and function keys.
298CODE-1 Plus User Guide for IBM i

Command Field
There is one field that appears on every screen in the Interactive CODE-1 Plus System: theCommand field. This field enables you to move gracefully through address match attempt resultsas well as database inquiry data. The following table lists all of the commands that you can enter intheCommand field. In addition, the table lists alternate actions you can take to accomplish the sameresults as the command. For each command listed, the underlined portion is all that is required forentry (you can enter the entire command string, however).
Alternate MethodDescriptionCommand
General Commands
None.Move to the bottom of the data. In theaddress match function, this commandbrings you to the BaseAddress/Dropped Information screen.In the database inquiry function thiscommand repositions the list of data tothe last entry.
BOTTOM
Press F8F8 with a number between 1and 9998 on the command line willscroll down that number of lines.
Move down one display of data. In theaddress match function this commandmoves you to the next match resultsscreen. In the database inquiry functionthis command repositions the list of datadown one display.
NOTE: If the cursor is placed on aspecific line, “DOWN” will result in thatline appearing as the first displayed lineon the screen.
DOWN
None.Allows you to override databaseexpiration, so you can matchinteractively with an expired database.
NOTE: You must use the “EXTEND”command each time an expireddatabase is identified by the softwareinitialization.
EXTEND
299CODE-1 Plus User Guide for IBM i
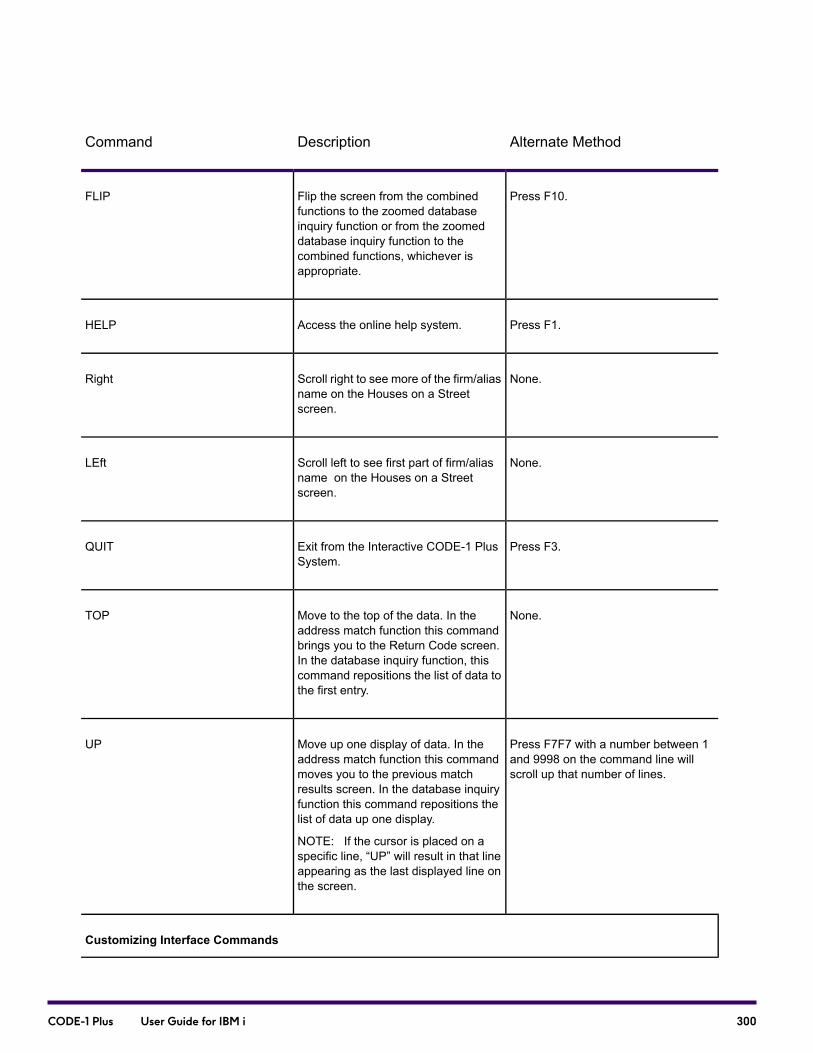
Alternate MethodDescriptionCommand
Press F10.Flip the screen from the combinedfunctions to the zoomed databaseinquiry function or from the zoomeddatabase inquiry function to thecombined functions, whichever isappropriate.
FLIP
Press F1.Access the online help system.HELP
None.Scroll right to see more of the firm/aliasname on the Houses on a Streetscreen.
Right
None.Scroll left to see first part of firm/aliasname on the Houses on a Streetscreen.
LEft
Press F3.Exit from the Interactive CODE-1 PlusSystem.
QUIT
None.Move to the top of the data. In theaddress match function this commandbrings you to the Return Code screen.In the database inquiry function, thiscommand repositions the list of data tothe first entry.
TOP
Press F7F7 with a number between 1and 9998 on the command line willscroll up that number of lines.
Move up one display of data. In theaddress match function this commandmoves you to the previous matchresults screen. In the database inquiryfunction this command repositions thelist of data up one display.
NOTE: If the cursor is placed on aspecific line, “UP” will result in that lineappearing as the last displayed line onthe screen.
UP
Customizing Interface Commands
300CODE-1 Plus User Guide for IBM i
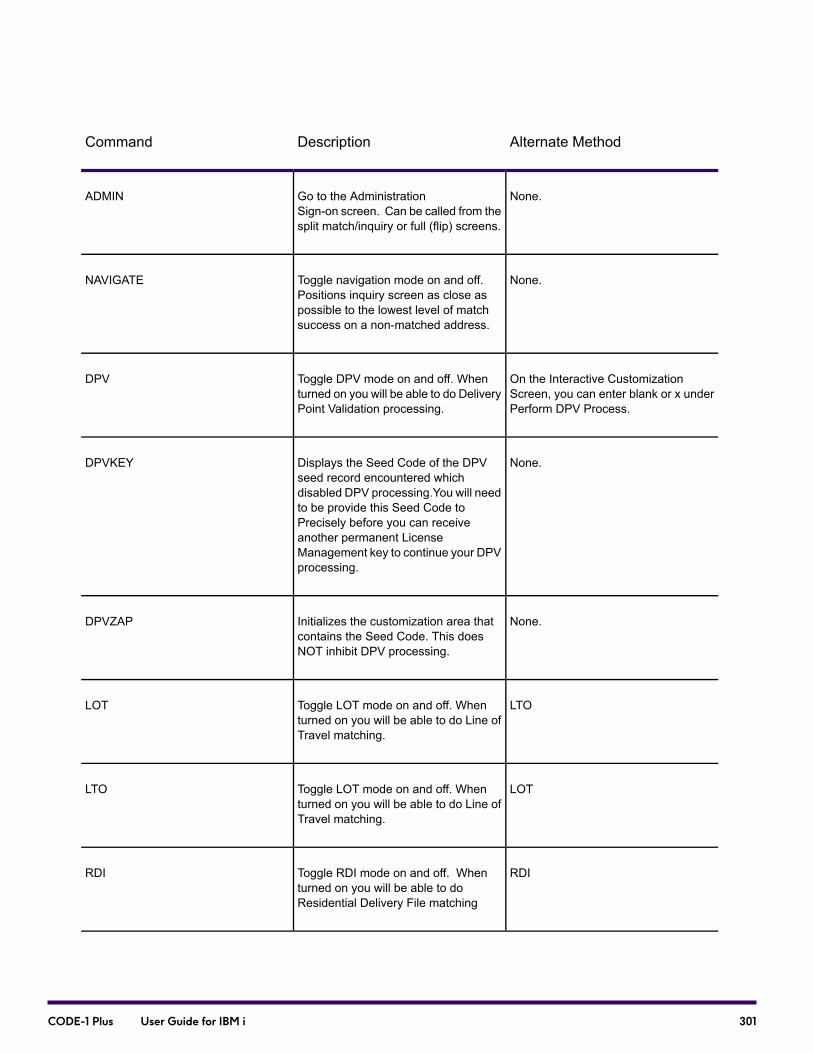
Alternate MethodDescriptionCommand
None.Go to the AdministrationSign-on screen. Can be called from thesplit match/inquiry or full (flip) screens.
ADMIN
None.Toggle navigation mode on and off.Positions inquiry screen as close aspossible to the lowest level of matchsuccess on a non-matched address.
NAVIGATE
On the Interactive CustomizationScreen, you can enter blank or x underPerform DPV Process.
Toggle DPV mode on and off. Whenturned on you will be able to do DeliveryPoint Validation processing.
DPV
None.Displays the Seed Code of the DPVseed record encountered whichdisabled DPV processing.You will needto be provide this Seed Code toPrecisely before you can receiveanother permanent LicenseManagement key to continue your DPVprocessing.
DPVKEY
None.Initializes the customization area thatcontains the Seed Code. This doesNOT inhibit DPV processing.
DPVZAP
LTOToggle LOT mode on and off. Whenturned on you will be able to do Line ofTravel matching.
LOT
LOTToggle LOT mode on and off. Whenturned on you will be able to do Line ofTravel matching.
LTO
RDIToggle RDI mode on and off. Whenturned on you will be able to doResidential Delivery File matching
RDI
301CODE-1 Plus User Guide for IBM i

Alternate MethodDescriptionCommand
Database Inquiry Command
Type the desired line number in theCommand field and press F4.orPositionyour cursor on the desired line andpress F4.
Move to the Apartments at a HouseRange screen for the house rangedisplayed on line <line number>.
This command is only valid from theHouses on a Street screen.
AH <line number>
Type the desired line number in theCommand field and press F2.orPositionyour cursor on the desired line andpress F2.
Display the base street name for thealias street listed on line <line number>.
For the Apartments at a HouseRange screen and Firms on aStreet screen only.
ALIAS <line number>
Press F6.Return to the previous database inquirylevel. (For example, if you were at theStreets in a City screen, this commandwould take you back to the Cities in theDatabase screen.)
BACK
None.Go to the City Information screen.CI <city>
None.Go to the Cities in a State screen forthe two character state abbreviation thatis entered as <state abr.>.
CS <state abr.>
Type the desired line number in theCommand field and press F5.orPositionyour cursor on the desired line andpress F5.
Move to the Cities in a ZIP Code screenfor the ZIP Code that is displayed online <line number>.
or
Move to the Cities in a ZIP Code screenfor the ZIP Code entered as <ZIPCode>.
CZ <line number>
or
CZ <ZIP Code>
302CODE-1 Plus User Guide for IBM i

Alternate MethodDescriptionCommand
None.Display the information for yourdatabase, including software releaseand the expiration date of yourdatabases.
DB
Type the desired line number in theCommand field and press F5.orPositionyour cursor on the desired line andpress F5.
Move to the Firms on a Street screenfor the street name or house rangedisplayed on line <line number>.Thiscommand is only valid from the Houseson a Street, or Apartments at a HouseRange screens.
FM <line number>
Type the desired line number in theCommand field and press F4.orPositionyour cursor on the desired line andpress F4.
Move to the Houses on a Street screenfor the street name that is displayed online<line number>.This command isonly valid from the Streets in a City orStreets in a ZIP Code screens.
HS <line number>
None.Generally positions the database inquiryto the first entry that starts with <string>.
NOTE: If there are multiple cities withthe same name, they will be listed byfinance number, highest to lowest.
LOCATE <string>
Press F9.Go to the address match function. (Thematch results screen that appears whenyou access the database inquiryfunction re-appears.)
MATCH
Type the desired line number in theCommand field and press F4.orPositionyour cursor on the desired line andpress F4.
Move to the Streets in a City screen forthe city name that is displayed on line<line number>.
This command is only valid from theCities in the Database screen.
SC <line number>
Type the desired line number in theCommand field and press F4.orPositionyour cursor on the desired line andpress F4.
Display all streets in the city localitydisplayed on line <line number> on theStreets in a City screen.
SL <line number>
303CODE-1 Plus User Guide for IBM i

Alternate MethodDescriptionCommand
Type the desired line number in theCommand field and press F4.orPositionyour cursor on the desired line andpress F4.
Move to the Streets in a ZIPCode screen for the ZIP Code that isdisplayed on line <line number>.
This command is only valid from theCities in a ZIP Code screen.
SZ <line number>
None.Move to the Streets in a ZIP Codescreen for the ZIP Code entered as<ZIP Code>
SZ <ZIP Code>
Type the desired line number in theCommand field and press F2.orPositionyour cursor on the desired line andpress F2.
Display all ZIP Codes for the city localitydisplayed on line <line number> on theCity Information and Cities in a Statescreens.
ZC <line number>
Address Match Commands
Press F9.Go to the database inquiry function. Ifyou had previously used the databaseinquiry function during this session, thescreen that appeared when you left thedatabase inquiry function reappears.
INQUIRY
None.Display address stack entries for theaddress you entered.
AS
Turn on or off All Street Matchingfunction.
ASM
None.Display current CODE-1 Plus databasevintage and expiration date.
DB
NoneTurn on or off Enhanced StreetMatching function.
ESM
304CODE-1 Plus User Guide for IBM i
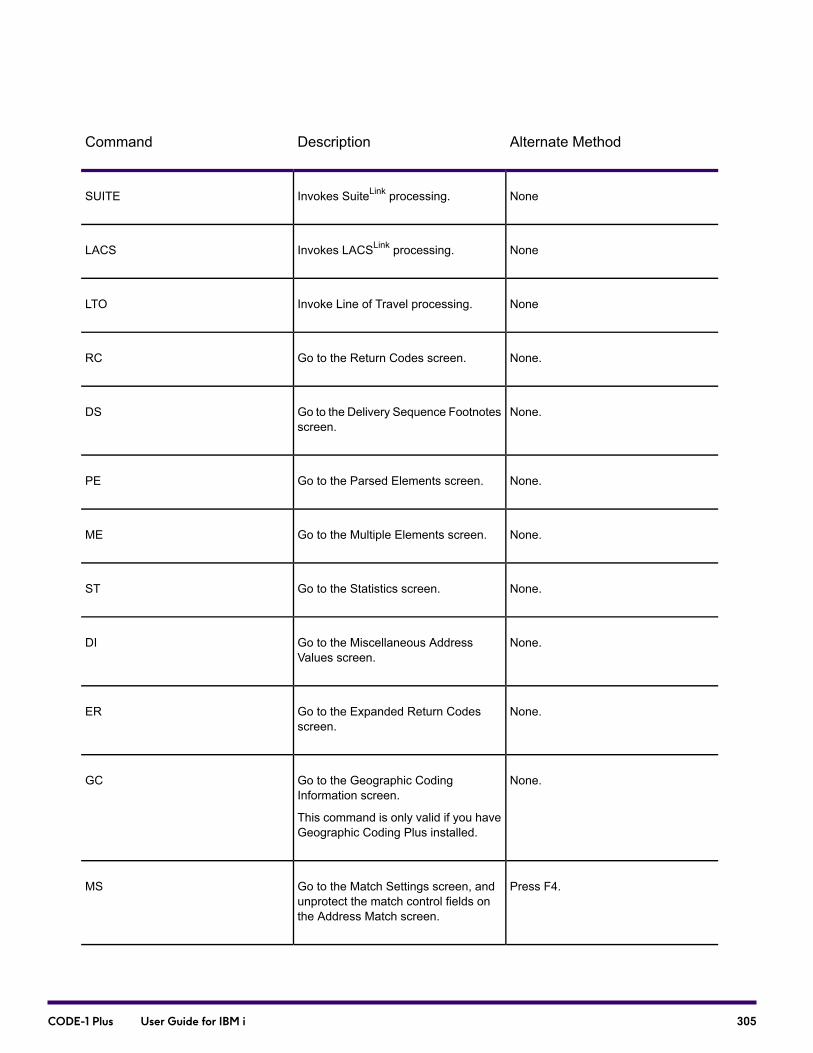
Alternate MethodDescriptionCommand
NoneInvokes SuiteLink processing.SUITE
NoneInvokes LACSLink processing.LACS
NoneInvoke Line of Travel processing.LTO
None.Go to the Return Codes screen.RC
None.Go to the Delivery Sequence Footnotesscreen.
DS
None.Go to the Parsed Elements screen.PE
None.Go to the Multiple Elements screen.ME
None.Go to the Statistics screen.ST
None.Go to the Miscellaneous AddressValues screen.
DI
None.Go to the Expanded Return Codesscreen.
ER
None.Go to the Geographic CodingInformation screen.
This command is only valid if you haveGeographic Coding Plus installed.
GC
Press F4.Go to the Match Settings screen, andunprotect the match control fields onthe Address Match screen.
MS
305CODE-1 Plus User Guide for IBM i

Alternate MethodDescriptionCommand
Press F5.Clear all fields on all address matchfunction screens.
REFRESH
Using Concatenated Commands
You can concatenate commands at the command line or the initial G1CP transaction in CICS. Acombination of the primary screen commands CI, CS, CZ, or SZ; a locate command; and “FLIP” canbe concatenated, or delimited by the semicolon (;) character. From a blank CICS screen, the followingstring would produce a full screen display positioned at “Baltimore” on a “cities in state” screen (withthe state of Maryland):
G1CP, CS MD;L BALTIMORE;FLIP
This command is separated from the transid by a comma, and semicolons delimit the portions of thecommand string. From the command line on any split screen, the same result would be achieved bythe following command:
CS MD;L BALTIMORE;FLIP
If this command were entered on a full inquiry screen display, the final result would be a split screen(match and inquiry) display.
Function Keys
There are certain environmental considerations for the function keys that appear on the screens inthis chapter. These screens are shown as they appear under CICS, IMS, or Unix.
DescriptionNameFunction Key
Obtain online help.HELPF1
List ZIP Codes in City screen.ZCF2
306CODE-1 Plus User Guide for IBM i

DescriptionNameFunction Key
Show the base street name for thehouse range shown.
ALIAS
Exit from the Interactive CODE-1 PlusSystem.
QUITF3
Go to the Streets in a City screen.SCF4
Go to the Match Settings screen.MS
Go to the Streets in a ZIP Code screen.SZ
Go to the Apartments on a Streetscreen.
AH
Go to the Houses on a Street screen.HS
Go to the Cities in a ZIP Code screen.CZF5
Refresh (erase) all of the input andoutput data from the screen.
RE
Go to the Firms on a Street screen.FM
Save current entries after validation.Remain on screen after save.
SAVE
Go to the Geographic Coding Interface(youmust have purchased and installedGeographic Coding Plus separately).
GEOF6
307CODE-1 Plus User Guide for IBM i

DescriptionNameFunction Key
Return to the previous screen.BACK
If the top of the list of DSF2 codes isdisplayed, return to the previous matchresults screen. If the top of the list ofDSF2 codes is not currently displayed,page up the list of codes.
UPF7
Go to the next screen.DOWNF8
Go to the Return Codes screen.MATF9
Go to the database inquiry function.INQ
Restore screen values to currentdatabase entries (at last update tocustomization file).
RESET
Expand the database inquiry functionto fill the entire screen.
FLIPF10
Return to the previous screen withoutmodifying the match settings.
EXIT
Validate the fields. If the validation isunsuccessful, the screen is redisplayed,an error message is displayed, and thefirst field in error is indicated.
VERIFYEnter
If you are a Unix user with a terminal that does not have function keys, you must select a functionusing three key strokes, as follows:
1. Press the ESCAPE key.
308CODE-1 Plus User Guide for IBM i

On some terminals, you must combine the CNTRL key with the left bracket [ key.
2. Press the numeric digit of the function.
For example, for function key 10, you must type 1-0.
3. Press the Enter or RETURN key.
On some terminals, you must combine the CONTROL key with the M key.
Address Matching Screens
The screens shown in this section support the address matching function. The screens are listed inalphabetical order.
Entering the name of a key in the Command field is the same as pressing the function key (forexample, to access online help, you could either press F1 or, in the Command field, type Help andpress Enter.)
Address Match Screen
The Address Match screen occupies the top half of the physical screen in the Interactive CODE-1Plus System, unless you have entered the FLIP command to cause the database inquiry functionto be displayed on the entire physical screen. Use this screen to enter an input address for CODE-1Plus to match against the database. CODE-1 Plus returns the matched, standardized address.
Note: If you attempt to use the DPV option without having a license to do so, the followingmessage will appear at the bottom of this screen:DPV UNAVAILABLE - NO LICENSE FOUND
orDPV UNAVAILABLE - LICENSE INVALID.
DescriptionField Name
Optional. Name of the firm for the record you want to match.Firm Name
Optional. Secondary address line for the record you want tomatch.
Secondary Addr
309CODE-1 Plus User Guide for IBM i
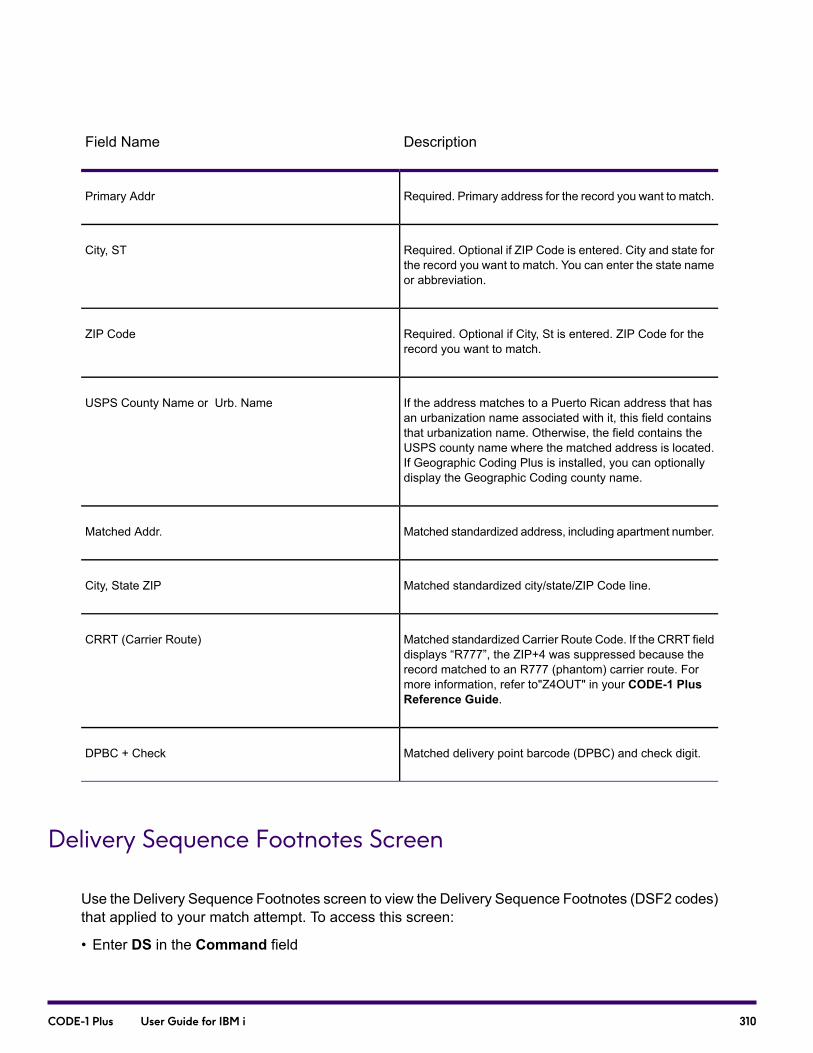
DescriptionField Name
Required. Primary address for the record you want to match.Primary Addr
Required. Optional if ZIP Code is entered. City and state forthe record you want to match. You can enter the state nameor abbreviation.
City, ST
Required. Optional if City, St is entered. ZIP Code for therecord you want to match.
ZIP Code
If the address matches to a Puerto Rican address that hasan urbanization name associated with it, this field containsthat urbanization name. Otherwise, the field contains theUSPS county name where the matched address is located.If Geographic Coding Plus is installed, you can optionallydisplay the Geographic Coding county name.
USPS County Name or Urb. Name
Matched standardized address, including apartment number.Matched Addr.
Matched standardized city/state/ZIP Code line.City, State ZIP
Matched standardized Carrier Route Code. If the CRRT fielddisplays “R777”, the ZIP+4 was suppressed because therecord matched to an R777 (phantom) carrier route. Formore information, refer to"Z4OUT" in your CODE-1 PlusReference Guide.
CRRT (Carrier Route)
Matched delivery point barcode (DPBC) and check digit.DPBC + Check
Delivery Sequence Footnotes Screen
Use the Delivery Sequence Footnotes screen to view the Delivery Sequence Footnotes (DSF2 codes)that applied to your match attempt. To access this screen:
• Enter DS in the Command field
310CODE-1 Plus User Guide for IBM i
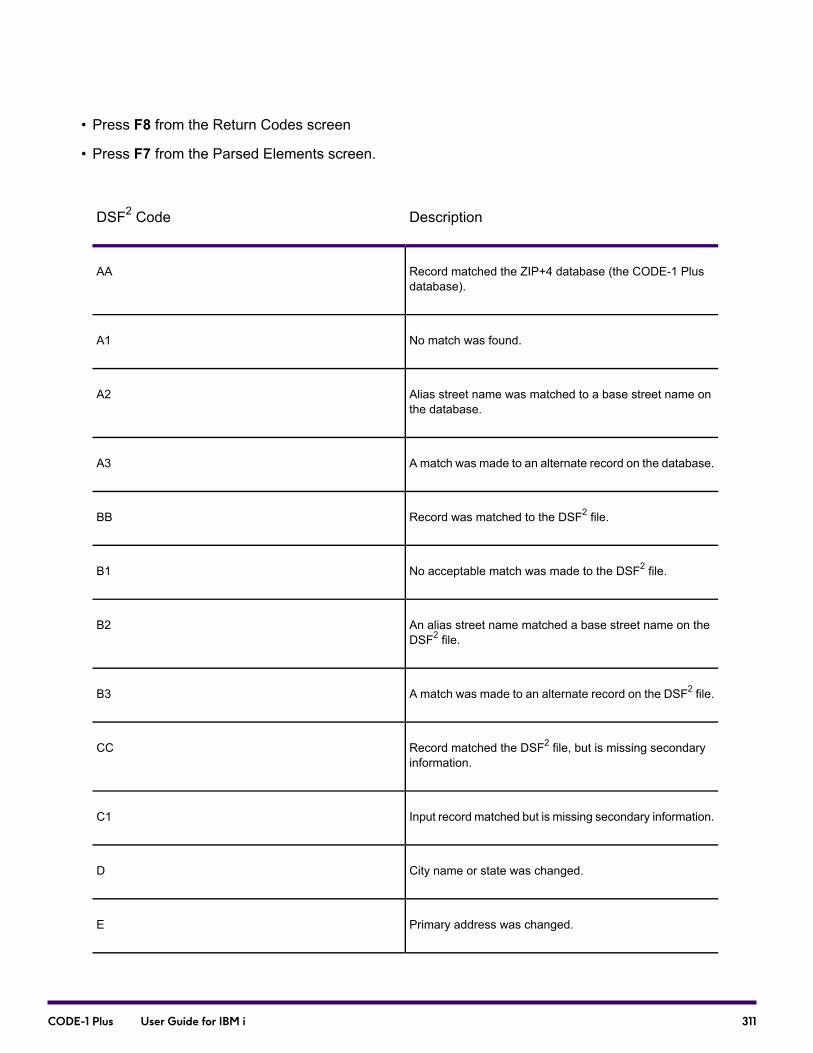
• Press F8 from the Return Codes screen
• Press F7 from the Parsed Elements screen.
DescriptionDSF2 Code
Record matched the ZIP+4 database (the CODE-1 Plusdatabase).
AA
No match was found.A1
Alias street name was matched to a base street name onthe database.
A2
A match was made to an alternate record on the database.A3
Record was matched to the DSF2 file.BB
No acceptable match was made to the DSF2 file.B1
An alias street name matched a base street name on theDSF2 file.
B2
A match was made to an alternate record on the DSF2 file.B3
Record matched the DSF2 file, but is missing secondaryinformation.
CC
Input record matched but is missing secondary information.C1
City name or state was changed.D
Primary address was changed.E
311CODE-1 Plus User Guide for IBM i

DescriptionDSF2 Code
Secondary address was changed.F
The delivery point is vacant.G
ZIP Code was changed.H
Input address could not be parsed.I
City, state, and ZIP Code could not be validated.J
Multiple matches in primary address.K
Multiple matches due to missing or incorrect directionals.K1
Multiple matches due to missing or incorrect suffix.K2
Multiple matches in secondary address.L
Missing street number.M1
Address not found.M2
No such primary number.M3
Firm name not matched.M4
Missing secondary address number.N1
312CODE-1 Plus User Guide for IBM i

DescriptionDSF2 Code
Secondary address number not found on file.N2
Missing rural route/highway contract box number.P1
Rural route/highway contract box number not found on file.P2
Input address matched to a PBSA address.PB
Missing PO Box number.Q1
PO Box number not found on file.Q2
Miscellaneous Information/Base Address Screen
Use the Miscellaneous Information/Base Address screen to view the base address for the streetthat was matched (if applicable) and additional information about the matched address. To accessthis screen, enter the DI command or press F8 from the Statistics screen.
DescriptionField Name
12-character unique and persistent identifier to reference anaddressable location without storing the whole addressstring.
PreciselyID
Base street address for the alias street that the input recordmatched.
Base Address
Preferred Alias Processing Indicator.Preferred Alias
313CODE-1 Plus User Guide for IBM i
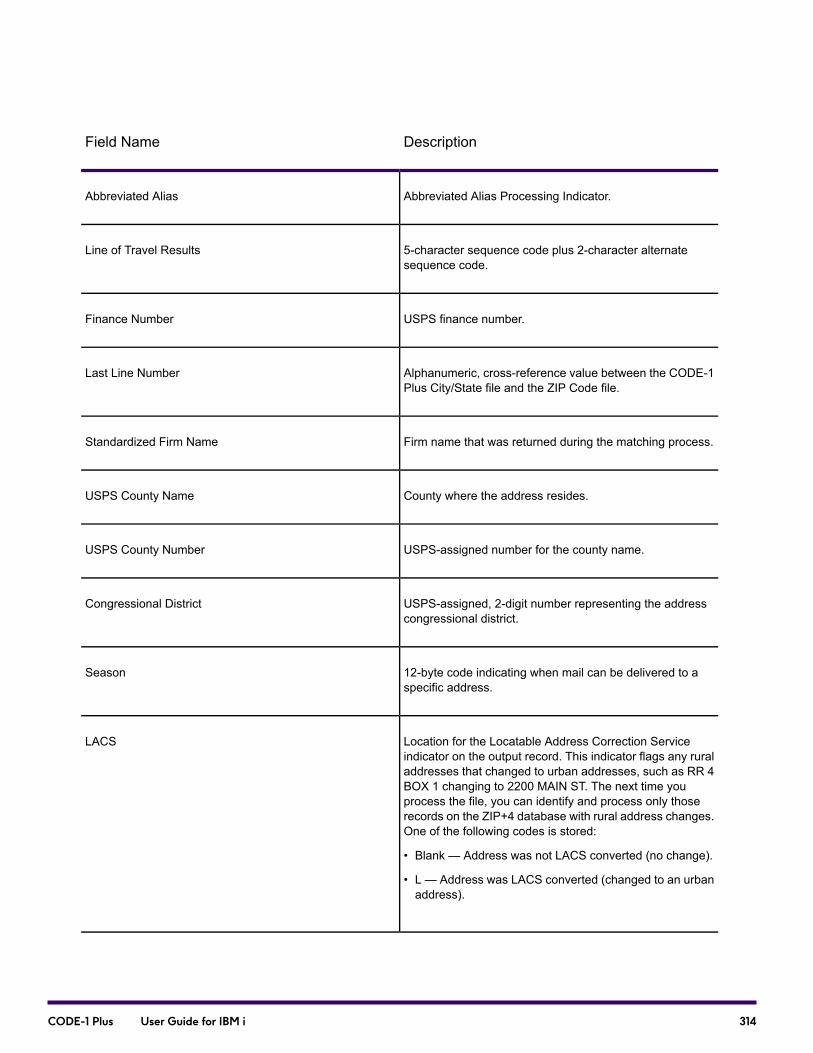
DescriptionField Name
Abbreviated Alias Processing Indicator.Abbreviated Alias
5-character sequence code plus 2-character alternatesequence code.
Line of Travel Results
USPS finance number.Finance Number
Alphanumeric, cross-reference value between the CODE-1Plus City/State file and the ZIP Code file.
Last Line Number
Firm name that was returned during the matching process.Standardized Firm Name
County where the address resides.USPS County Name
USPS-assigned number for the county name.USPS County Number
USPS-assigned, 2-digit number representing the addresscongressional district.
Congressional District
12-byte code indicating when mail can be delivered to aspecific address.
Season
Location for the Locatable Address Correction Serviceindicator on the output record. This indicator flags any ruraladdresses that changed to urban addresses, such as RR 4BOX 1 changing to 2200 MAIN ST. The next time youprocess the file, you can identify and process only thoserecords on the ZIP+4 database with rural address changes.One of the following codes is stored:
• Blank — Address was not LACS converted (no change).
• L — Address was LACS converted (changed to an urbanaddress).
LACS
314CODE-1 Plus User Guide for IBM i
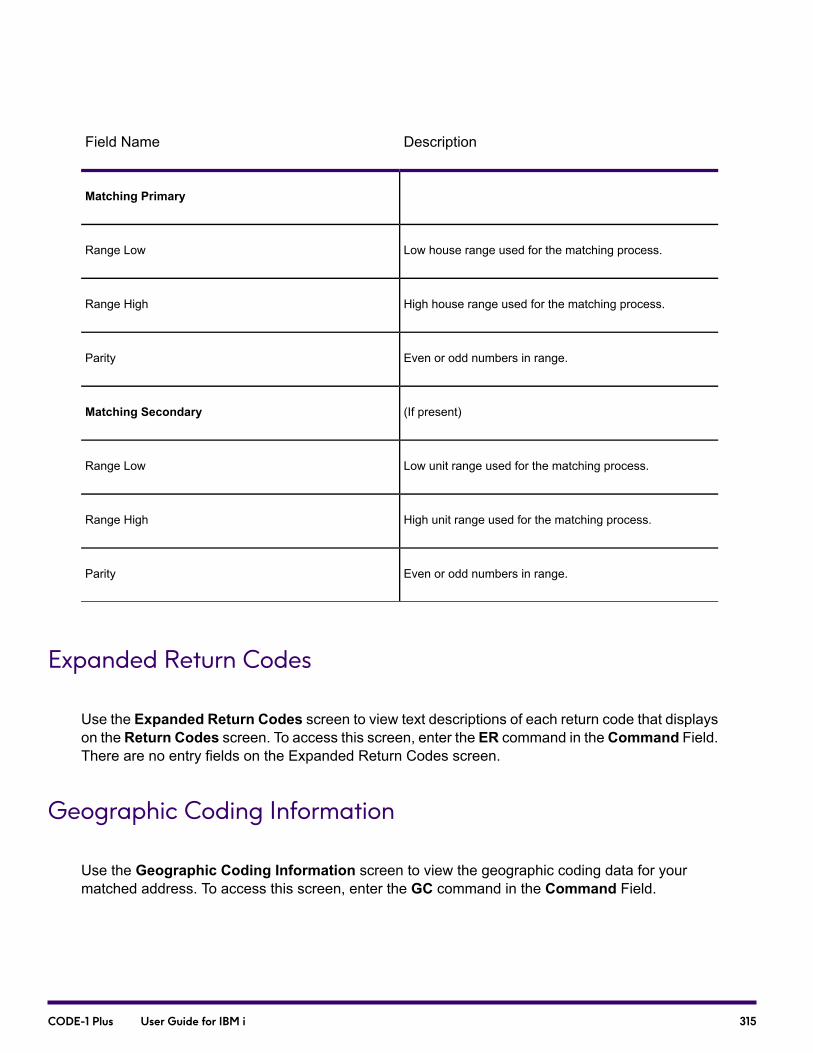
DescriptionField Name
Matching Primary
Low house range used for the matching process.Range Low
High house range used for the matching process.Range High
Even or odd numbers in range.Parity
(If present)Matching Secondary
Low unit range used for the matching process.Range Low
High unit range used for the matching process.Range High
Even or odd numbers in range.Parity
Expanded Return Codes
Use the Expanded Return Codes screen to view text descriptions of each return code that displayson the Return Codes screen. To access this screen, enter the ER command in the Command Field.There are no entry fields on the Expanded Return Codes screen.
Geographic Coding Information
Use the Geographic Coding Information screen to view the geographic coding data for yourmatched address. To access this screen, enter the GC command in the Command Field.
315CODE-1 Plus User Guide for IBM i
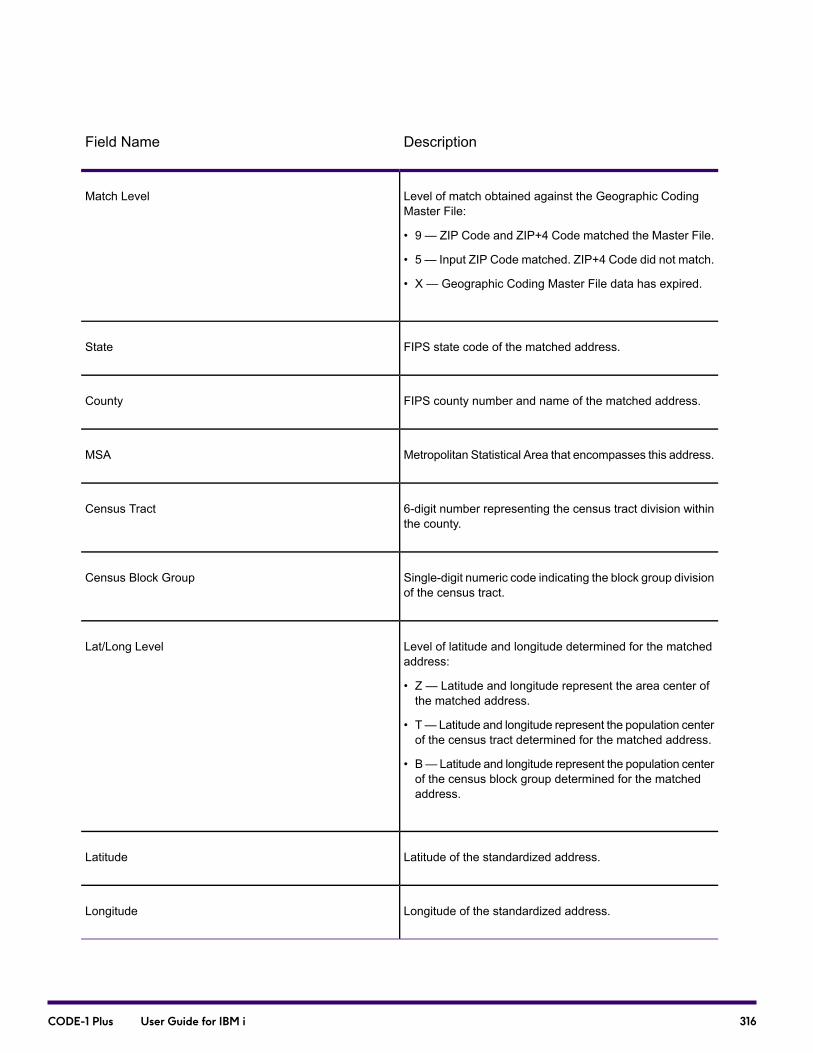
DescriptionField Name
Level of match obtained against the Geographic CodingMaster File:
• 9 — ZIP Code and ZIP+4 Code matched the Master File.
• 5 — Input ZIP Code matched. ZIP+4 Code did not match.
• X — Geographic Coding Master File data has expired.
Match Level
FIPS state code of the matched address.State
FIPS county number and name of the matched address.County
Metropolitan Statistical Area that encompasses this address.MSA
6-digit number representing the census tract division withinthe county.
Census Tract
Single-digit numeric code indicating the block group divisionof the census tract.
Census Block Group
Level of latitude and longitude determined for the matchedaddress:
• Z — Latitude and longitude represent the area center ofthe matched address.
• T— Latitude and longitude represent the population centerof the census tract determined for the matched address.
• B—Latitude and longitude represent the population centerof the census block group determined for the matchedaddress.
Lat/Long Level
Latitude of the standardized address.Latitude
Longitude of the standardized address.Longitude
316CODE-1 Plus User Guide for IBM i

Match Settings Screen
Use the Match Settings screen to tailor your processing requirements and specify whether CODE-1Plus should perform ZIP Code correction. For each of the matching algorithms, you can change thedefault tightness/looseness settings. These settings indicate how close the data on the databasemust be to the input address in order for a match to occur. The tighter the setting, the more closelythe input address must match the database information. To access this screen, enter MS in theCommand field or press F4 from any match results screen.
You can modify the fields on the top half of the physical screen, along with the address matchingfields. When the Match Settings screen displays, you can only enter data in the settings fields onthe upper right portion of the screen. To save your new settings and return to the previous screen,press Enter. Once changed, the settings stay changed for subsequent matches until you changethe settings again or exit.
Note: Although this screen allows you to change the default matching algorithm settings, wesuggest that you maintain the default settings: (M)edium for all matching, and Y(es) for ZIPcorrection.
DescriptionField Name
1-character code indicating the tightness/looseness of thefirm name, directional and suffix, and street name match:
• E — Only equal matches are accepted.
• T — Only tight matches are accepted.
• M — Medium Matches are accepted (default).
• L — Loose matches are accepted.
Algorithms
1-character code indicating whether or not a vanity city nameshould be returned if it is the best match (i.e., it most closelymatches the input). Type one of the following codes:
• X— Yes, return the vanity city name if it is the best match.
• S — No, return the standard city name (default).
(V)anity City
317CODE-1 Plus User Guide for IBM i

DescriptionField Name
1-character code indicating whether or not you want CODE-1Plus to attempt to correct incorrect ZIP Codes (optional).Type one of the following codes:
• Y — Attempt ZIP Code correction, if necessary (default).
• N — No, don't attempt ZIP Code Correction.
Correct ZIP
1-character code indicating whether or not the matchedaddress should be presented in mixed case or upper case:
• C — Mixed case
• L — Lower case
• U — Upper case
Output Case
1-character code indicating whether to attempt multiplesecondary component processing:
• Y — Attempt secondary match.
• N — Assign default ZIP+4 Code.
Mult Secondary
1-character code indicating whether the preferred last linecity name should be stored:
• C — Store the city name from USPS City/State File(default city name)
• P — Store the Primary City Name from the USPSCity/State File.
• Z — Store the ZIP+4 File Preferred Last Line City Name(override city name).
Override City
Multiple Elements Screen
Use theMultiple Elements screen to determine whether multiple match elements were found duringthe match attempt. To access this screen:
318CODE-1 Plus User Guide for IBM i
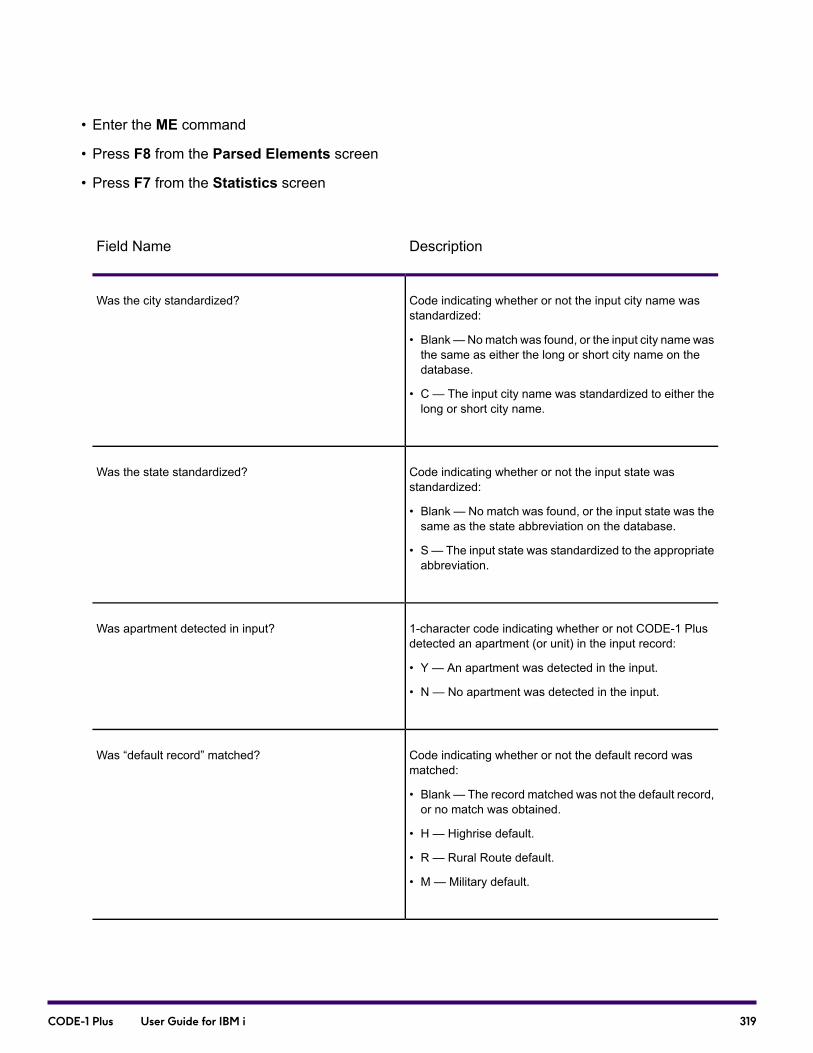
• Enter the ME command
• Press F8 from the Parsed Elements screen
• Press F7 from the Statistics screen
DescriptionField Name
Code indicating whether or not the input city name wasstandardized:
• Blank—Nomatch was found, or the input city name wasthe same as either the long or short city name on thedatabase.
• C — The input city name was standardized to either thelong or short city name.
Was the city standardized?
Code indicating whether or not the input state wasstandardized:
• Blank — No match was found, or the input state was thesame as the state abbreviation on the database.
• S— The input state was standardized to the appropriateabbreviation.
Was the state standardized?
1-character code indicating whether or not CODE-1 Plusdetected an apartment (or unit) in the input record:
• Y — An apartment was detected in the input.
• N — No apartment was detected in the input.
Was apartment detected in input?
Code indicating whether or not the default record wasmatched:
• Blank— The record matched was not the default record,or no match was obtained.
• H — Highrise default.
• R — Rural Route default.
• M — Military default.
Was “default record” matched?
319CODE-1 Plus User Guide for IBM i

DescriptionField Name
Code indicating whether multiple input elements were foundfor the leading directional segment of the standardizedaddress:
• Blank — Only one value was found.
• M — Multiple values were found.
Were multiple input elements found?
Code indicating the type of alternate address scheme touse to obtain a match:
• Blank — No alternate address scheme used.
• D — Delivery point alternate logic used.
• S — Small town default logic used.
• U — Unique ZIP Code logic used.
Alternate addressing scheme
Code indicating whether or not multiple leading directionalmatches were found:
• Blank — Only one leading directional was found.
• M — Multiple leading directionals were found.
Leading dir
Code indicating whether or not multiple street namematches were found:
• Blank — Only one street name was found.
• M — Multiple street names were found.
Street name
Code indicating whether or not multiple suffix matches werefound:
• Blank — Only one suffix was found.
• M — Multiple suffixes were found.
Suffix
320CODE-1 Plus User Guide for IBM i
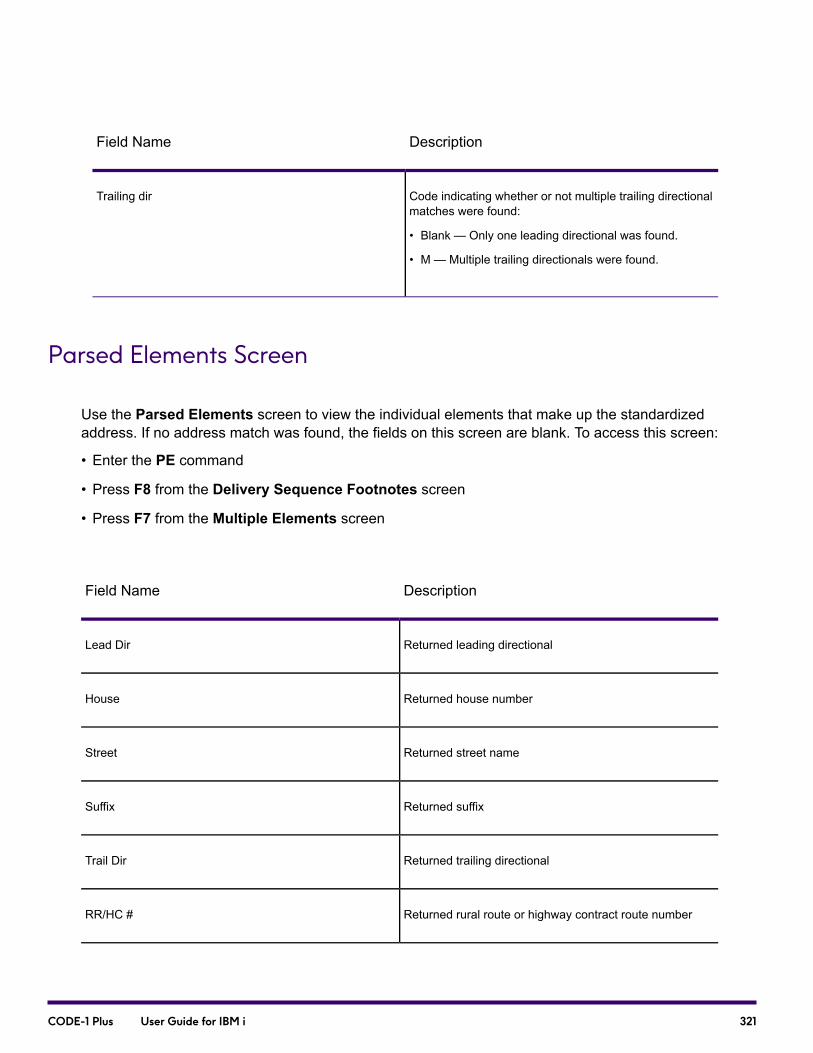
DescriptionField Name
Code indicating whether or not multiple trailing directionalmatches were found:
• Blank — Only one leading directional was found.
• M — Multiple trailing directionals were found.
Trailing dir
Parsed Elements Screen
Use the Parsed Elements screen to view the individual elements that make up the standardizedaddress. If no address match was found, the fields on this screen are blank. To access this screen:
• Enter the PE command
• Press F8 from the Delivery Sequence Footnotes screen
• Press F7 from the Multiple Elements screen
DescriptionField Name
Returned leading directionalLead Dir
Returned house numberHouse
Returned street nameStreet
Returned suffixSuffix
Returned trailing directionalTrail Dir
Returned rural route or highway contract route numberRR/HC #
321CODE-1 Plus User Guide for IBM i
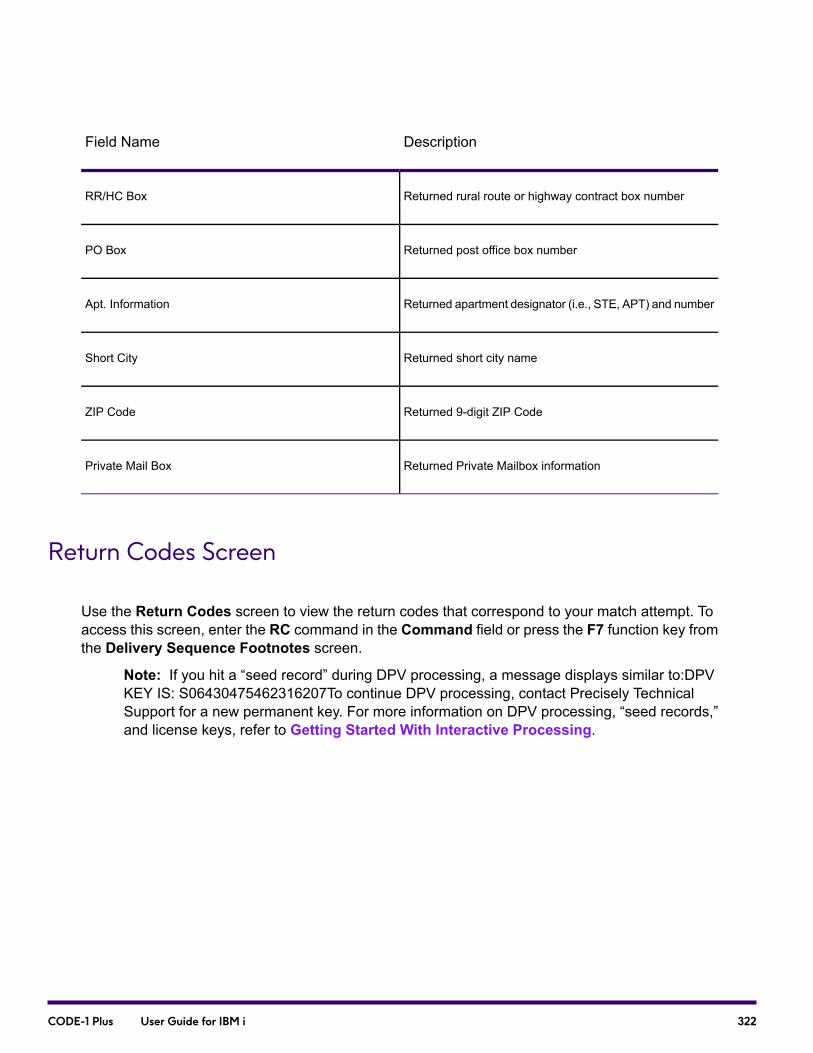
DescriptionField Name
Returned rural route or highway contract box numberRR/HC Box
Returned post office box numberPO Box
Returned apartment designator (i.e., STE, APT) and numberApt. Information
Returned short city nameShort City
Returned 9-digit ZIP CodeZIP Code
Returned Private Mailbox informationPrivate Mail Box
Return Codes Screen
Use the Return Codes screen to view the return codes that correspond to your match attempt. Toaccess this screen, enter the RC command in the Command field or press the F7 function key fromthe Delivery Sequence Footnotes screen.
Note: If you hit a “seed record” during DPV processing, a message displays similar to:DPVKEY IS: S06430475462316207To continue DPV processing, contact Precisely TechnicalSupport for a new permanent key. For more information on DPV processing, “seed records,”and license keys, refer to Getting Started With Interactive Processing.
322CODE-1 Plus User Guide for IBM i
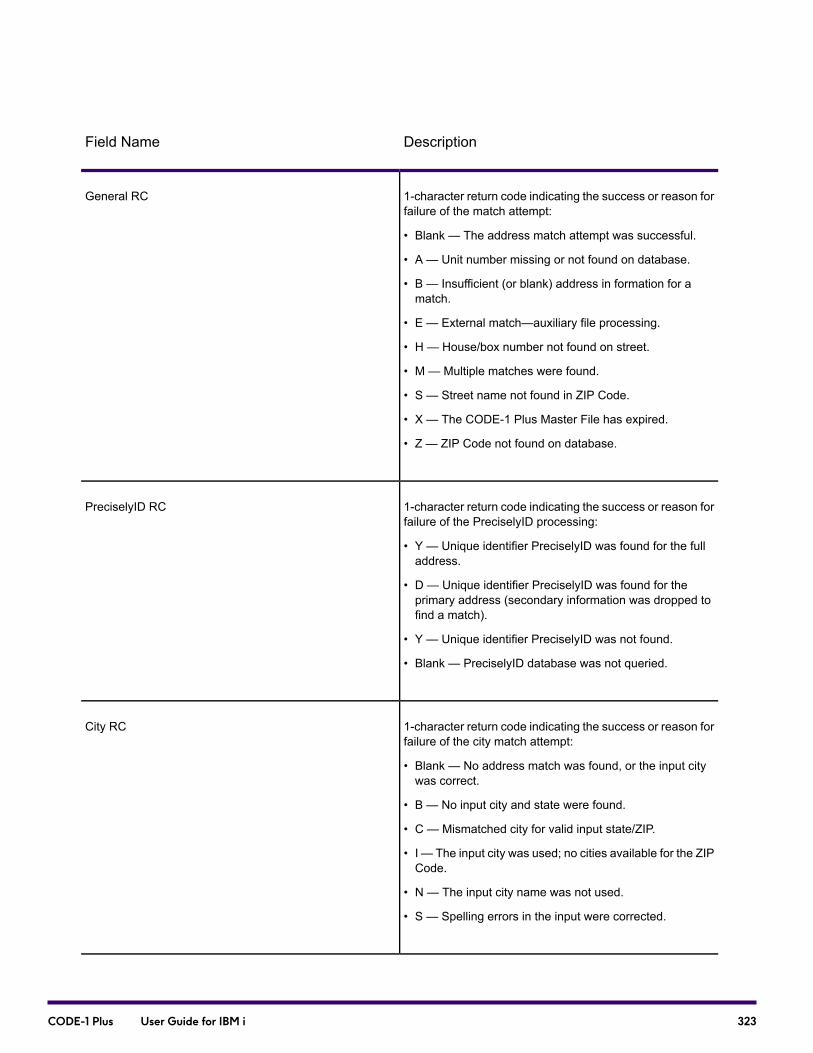
DescriptionField Name
1-character return code indicating the success or reason forfailure of the match attempt:
• Blank — The address match attempt was successful.
• A — Unit number missing or not found on database.
• B — Insufficient (or blank) address in formation for amatch.
• E — External match—auxiliary file processing.
• H — House/box number not found on street.
• M — Multiple matches were found.
• S — Street name not found in ZIP Code.
• X — The CODE-1 Plus Master File has expired.
• Z — ZIP Code not found on database.
General RC
1-character return code indicating the success or reason forfailure of the PreciselyID processing:
• Y — Unique identifier PreciselyID was found for the fulladdress.
• D — Unique identifier PreciselyID was found for theprimary address (secondary information was dropped tofind a match).
• Y — Unique identifier PreciselyID was not found.
• Blank — PreciselyID database was not queried.
PreciselyID RC
1-character return code indicating the success or reason forfailure of the city match attempt:
• Blank — No address match was found, or the input citywas correct.
• B — No input city and state were found.
• C — Mismatched city for valid input state/ZIP.
• I — The input city was used; no cities available for the ZIPCode.
• N — The input city name was not used.
• S — Spelling errors in the input were corrected.
City RC
323CODE-1 Plus User Guide for IBM i
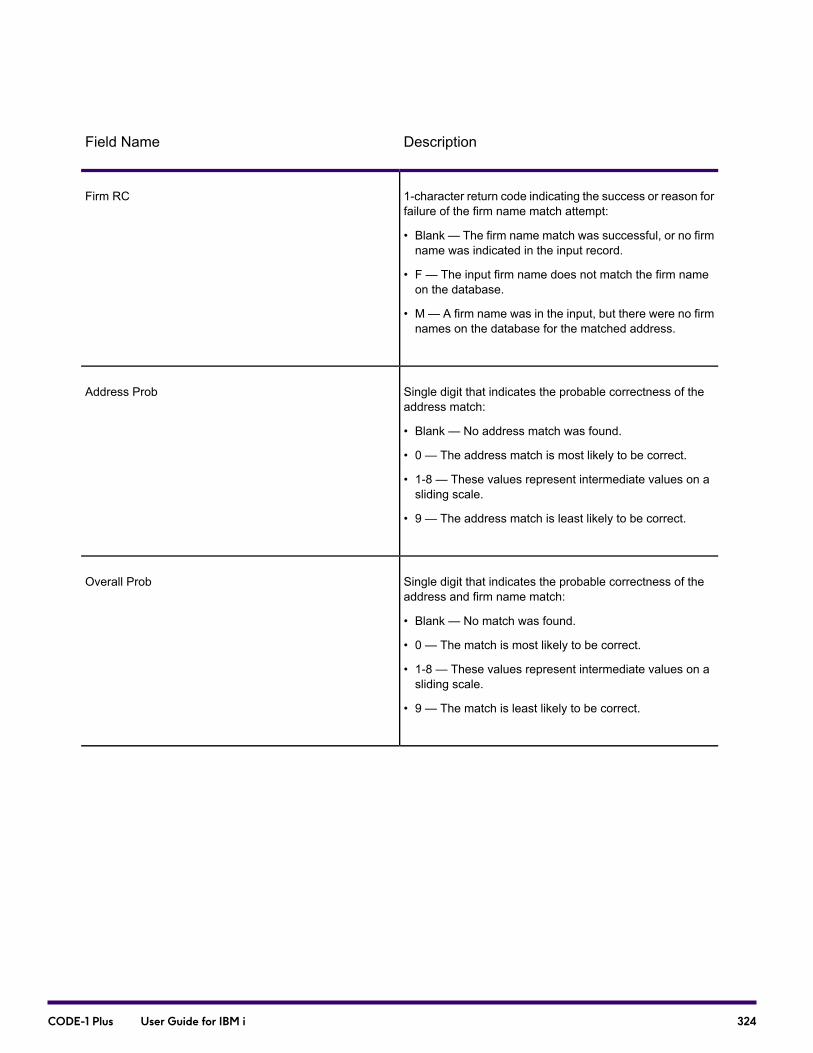
DescriptionField Name
1-character return code indicating the success or reason forfailure of the firm name match attempt:
• Blank — The firm name match was successful, or no firmname was indicated in the input record.
• F — The input firm name does not match the firm nameon the database.
• M — A firm name was in the input, but there were no firmnames on the database for the matched address.
Firm RC
Single digit that indicates the probable correctness of theaddress match:
• Blank — No address match was found.
• 0 — The address match is most likely to be correct.
• 1-8 — These values represent intermediate values on asliding scale.
• 9 — The address match is least likely to be correct.
Address Prob
Single digit that indicates the probable correctness of theaddress and firm name match:
• Blank — No match was found.
• 0 — The match is most likely to be correct.
• 1-8 — These values represent intermediate values on asliding scale.
• 9 — The match is least likely to be correct.
Overall Prob
324CODE-1 Plus User Guide for IBM i
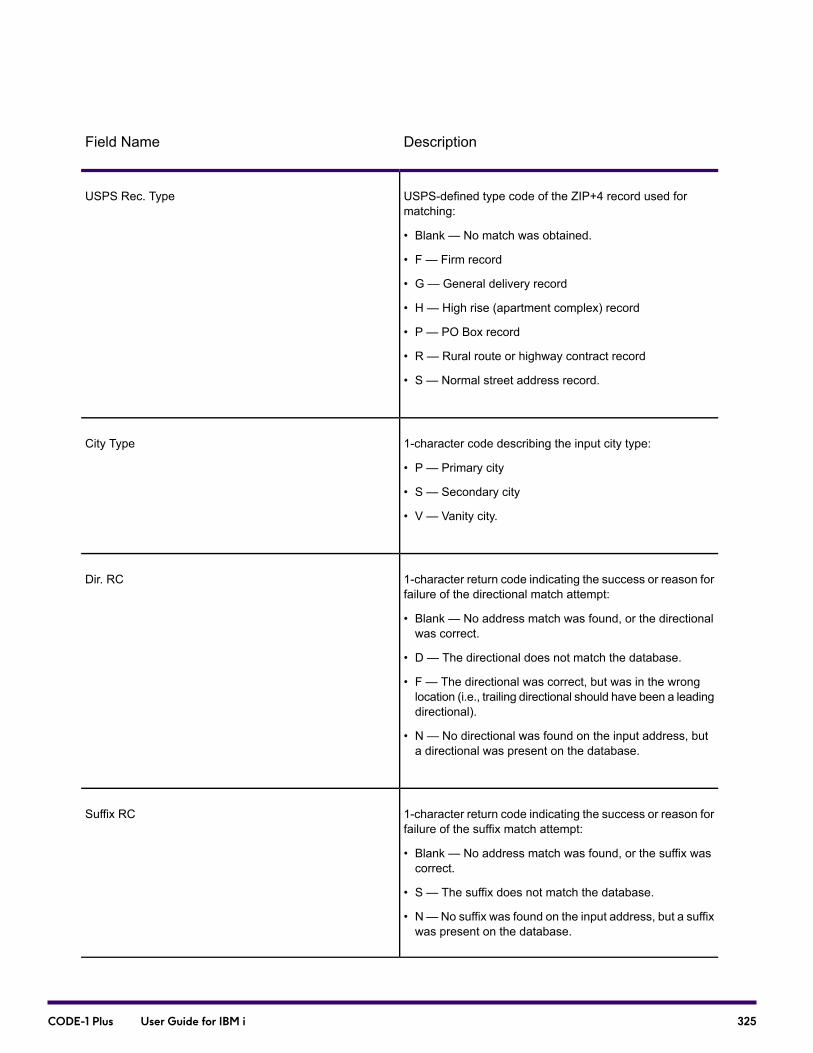
DescriptionField Name
USPS-defined type code of the ZIP+4 record used formatching:
• Blank — No match was obtained.
• F — Firm record
• G — General delivery record
• H — High rise (apartment complex) record
• P — PO Box record
• R — Rural route or highway contract record
• S — Normal street address record.
USPS Rec. Type
1-character code describing the input city type:
• P — Primary city
• S — Secondary city
• V — Vanity city.
City Type
1-character return code indicating the success or reason forfailure of the directional match attempt:
• Blank — No address match was found, or the directionalwas correct.
• D — The directional does not match the database.
• F — The directional was correct, but was in the wronglocation (i.e., trailing directional should have been a leadingdirectional).
• N — No directional was found on the input address, buta directional was present on the database.
Dir. RC
1-character return code indicating the success or reason forfailure of the suffix match attempt:
• Blank — No address match was found, or the suffix wascorrect.
• S — The suffix does not match the database.
• N—No suffix was found on the input address, but a suffixwas present on the database.
Suffix RC
325CODE-1 Plus User Guide for IBM i

DescriptionField Name
1-character return code indicating the success or reason forfailure of the unit (or apartment) match attempt:
• Blank — No address match was found, or the input unitwas correct.
• A — The unit does not match the database.
• N — No unit was found on the input address, but a unitwas present on the database.
• F — Suite number appended due to a firm name match.
Unit RC
Single digit that indicates the probable correctness of thefirm name match:
• Blank — No match was obtained.
• 0 — The input firm name matched the output firm nameexactly.
• 1-9 — These represent intermediate values on a slidingscale.
Firm Score
Single digit that indicates the probable correctness of thestreet name match:
• Blank — No match was obtained.
• 0—The input street namematched the output street nameexactly.
• 1-9 — These represent intermediate values on a slidingscale.
Street Score
1-character code indicating whether the output street addresswas matched from the primary address line or the secondaryaddress line:
• M — A combination of information from the two lines.
• P — Primary line
• S — Secondary line
Source of Addr.
326CODE-1 Plus User Guide for IBM i
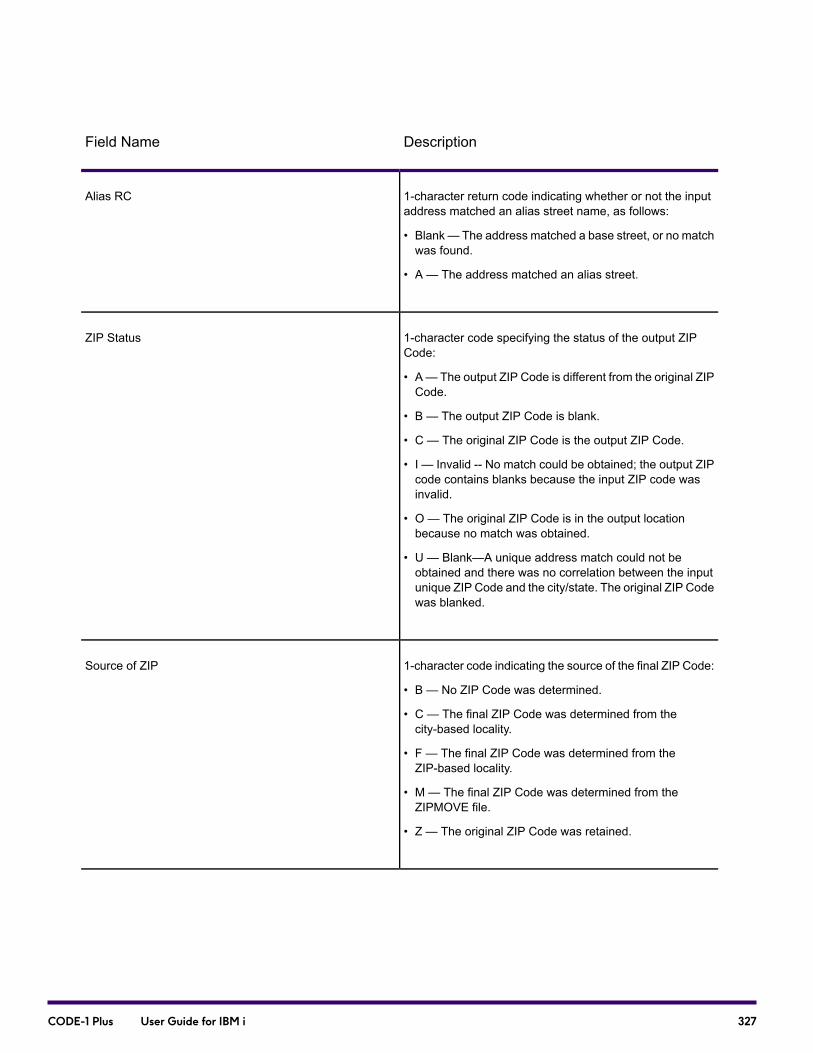
DescriptionField Name
1-character return code indicating whether or not the inputaddress matched an alias street name, as follows:
• Blank— The address matched a base street, or no matchwas found.
• A — The address matched an alias street.
Alias RC
1-character code specifying the status of the output ZIPCode:
• A— The output ZIP Code is different from the original ZIPCode.
• B — The output ZIP Code is blank.
• C — The original ZIP Code is the output ZIP Code.
• I — Invalid -- No match could be obtained; the output ZIPcode contains blanks because the input ZIP code wasinvalid.
• O — The original ZIP Code is in the output locationbecause no match was obtained.
• U — Blank—A unique address match could not beobtained and there was no correlation between the inputunique ZIP Code and the city/state. The original ZIP Codewas blanked.
ZIP Status
1-character code indicating the source of the final ZIP Code:
• B — No ZIP Code was determined.
• C — The final ZIP Code was determined from thecity-based locality.
• F — The final ZIP Code was determined from theZIP-based locality.
• M — The final ZIP Code was determined from theZIPMOVE file.
• Z — The original ZIP Code was retained.
Source of ZIP
327CODE-1 Plus User Guide for IBM i
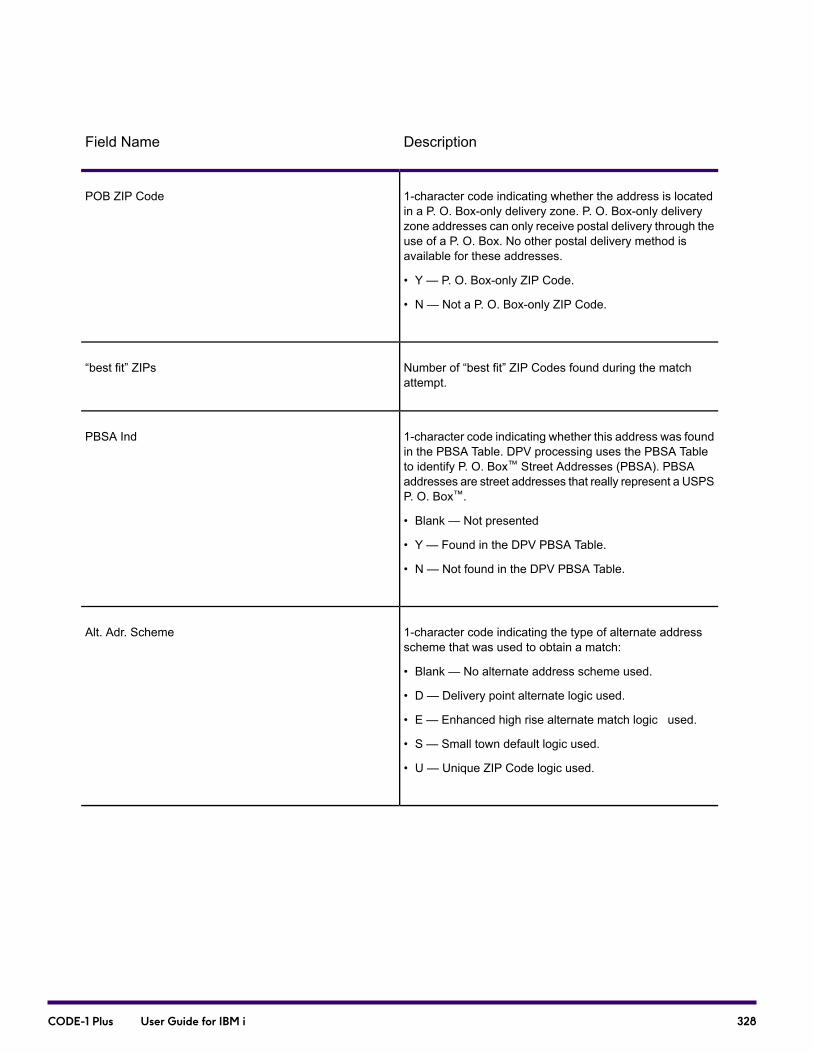
DescriptionField Name
1-character code indicating whether the address is locatedin a P. O. Box-only delivery zone. P. O. Box-only deliveryzone addresses can only receive postal delivery through theuse of a P. O. Box. No other postal delivery method isavailable for these addresses.
• Y — P. O. Box-only ZIP Code.
• N — Not a P. O. Box-only ZIP Code.
POB ZIP Code
Number of “best fit” ZIP Codes found during the matchattempt.
“best fit” ZIPs
1-character code indicating whether this address was foundin the PBSA Table. DPV processing uses the PBSA Tableto identify P. O. Box™ Street Addresses (PBSA). PBSAaddresses are street addresses that really represent a USPSP. O. Box™.
• Blank — Not presented
• Y — Found in the DPV PBSA Table.
• N — Not found in the DPV PBSA Table.
PBSA Ind
1-character code indicating the type of alternate addressscheme that was used to obtain a match:
• Blank — No alternate address scheme used.
• D — Delivery point alternate logic used.
• E — Enhanced high rise alternate match logic used.
• S — Small town default logic used.
• U — Unique ZIP Code logic used.
Alt. Adr. Scheme
328CODE-1 Plus User Guide for IBM i

DescriptionField Name
1-character code indicating the alias type:
• Blank — Street record matched was not an alias street.
• A — Abbreviation street name. This USPS abbreviationis for streets that are over 30 characters long.
• C—Official street name change (Chamber of Commerceaction.
• O — Street record matched was a USPS “other” alias.
• P—Street record matched was a USPS “preferred” alias.
Alias Type
1-character code describing the Line of Travel matchobtained:
• Blank — Invalid data passed to matcher
• 9 — 9-digit ZIP+4 match was successful
• C — Call to LOT matcher failed.
• F — Master file access failure.
• V — Incompatible Master file.
• D — 9-digit ZIP+4 match was unsuccessful (defaultcoded).
Line of Travel RC
1-character return code indicating the result of your DPVprocessing:
• D — Valid primary number; input missing secondarynumber (primary RR).
• M — Unable to resolve the Multiple Condition.
• N — No Delivery Point Validation.
• S—Valid primary number; but secondary number (primaryfor RR) present and is not confirmed.
• Y — Delivery Point validated. Primary number valid andsecond number (when present) valid.
• Blank — Address not presented to DPV table.
DPV Flag
329CODE-1 Plus User Guide for IBM i
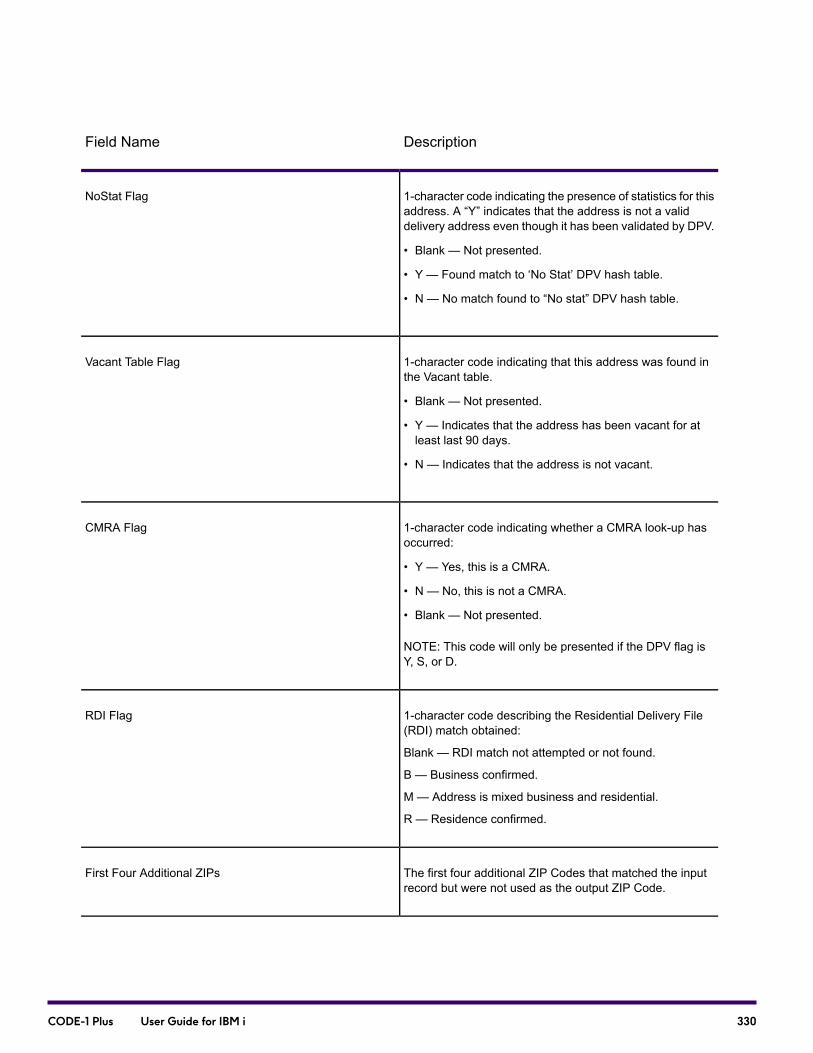
DescriptionField Name
1-character code indicating the presence of statistics for thisaddress. A “Y” indicates that the address is not a validdelivery address even though it has been validated by DPV.
• Blank — Not presented.
• Y — Found match to ‘No Stat’ DPV hash table.
• N — No match found to “No stat” DPV hash table.
NoStat Flag
1-character code indicating that this address was found inthe Vacant table.
• Blank — Not presented.
• Y — Indicates that the address has been vacant for atleast last 90 days.
• N — Indicates that the address is not vacant.
Vacant Table Flag
1-character code indicating whether a CMRA look-up hasoccurred:
• Y — Yes, this is a CMRA.
• N — No, this is not a CMRA.
• Blank — Not presented.
NOTE: This code will only be presented if the DPV flag isY, S, or D.
CMRA Flag
1-character code describing the Residential Delivery File(RDI) match obtained:
Blank — RDI match not attempted or not found.
B — Business confirmed.
M — Address is mixed business and residential.
R — Residence confirmed.
RDI Flag
The first four additional ZIP Codes that matched the inputrecord but were not used as the output ZIP Code.
First Four Additional ZIPs
330CODE-1 Plus User Guide for IBM i
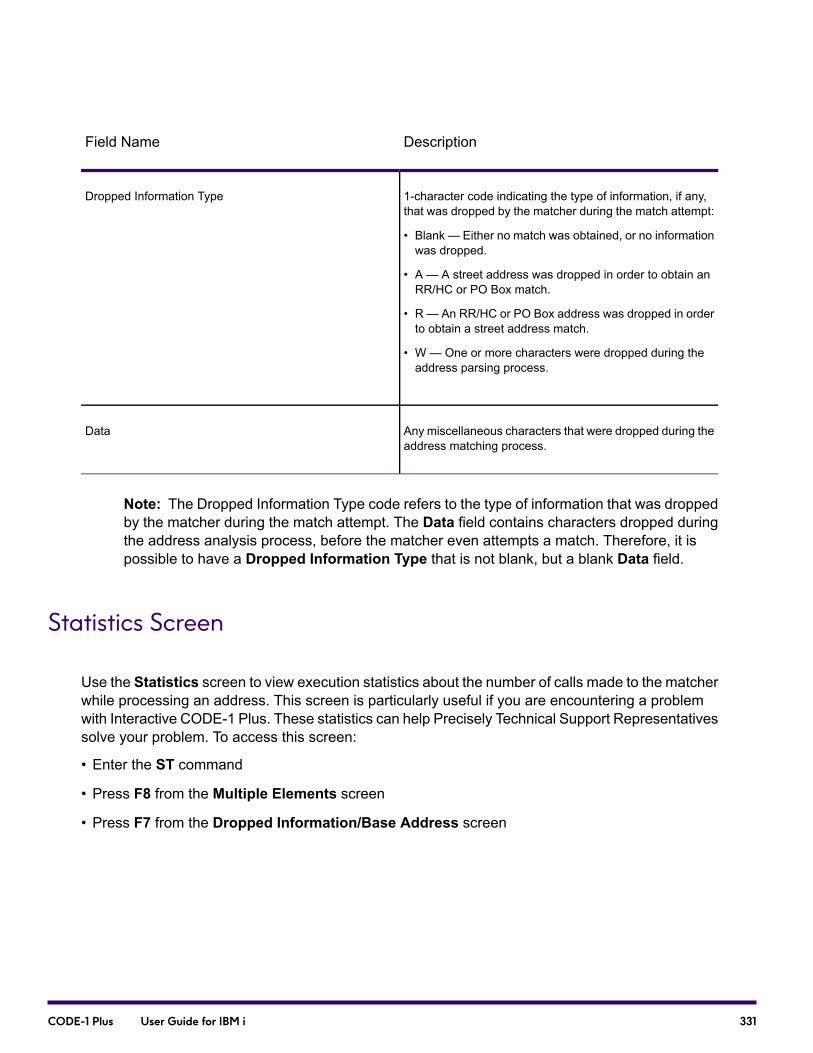
DescriptionField Name
1-character code indicating the type of information, if any,that was dropped by the matcher during the match attempt:
• Blank — Either no match was obtained, or no informationwas dropped.
• A — A street address was dropped in order to obtain anRR/HC or PO Box match.
• R — An RR/HC or PO Box address was dropped in orderto obtain a street address match.
• W — One or more characters were dropped during theaddress parsing process.
Dropped Information Type
Any miscellaneous characters that were dropped during theaddress matching process.
Data
Note: The Dropped Information Type code refers to the type of information that was droppedby the matcher during the match attempt. The Data field contains characters dropped duringthe address analysis process, before the matcher even attempts a match. Therefore, it ispossible to have a Dropped Information Type that is not blank, but a blank Data field.
Statistics Screen
Use the Statistics screen to view execution statistics about the number of calls made to the matcherwhile processing an address. This screen is particularly useful if you are encountering a problemwith Interactive CODE-1 Plus. These statistics can help Precisely Technical Support Representativessolve your problem. To access this screen:
• Enter the ST command
• Press F8 from the Multiple Elements screen
• Press F7 from the Dropped Information/Base Address screen
331CODE-1 Plus User Guide for IBM i

DescriptionField Name
1-character code indicating the results of the match attemptin the city-based locality:
• Blank — Not attempted.
• I — Attempted, improved (a match was found).
• N — Attempted, no match found.
City-based locality match results
1-character code indicating the results of the match attemptin the finance number-based locality:
• Blank — Not attempted.
• I — Attempted, improved (a match was found).
• N — Attempted, no match found.
Finance number-based locality match results
1-character code indicating the results of the match attemptin the original ZIP Code-based locality:
• Blank — Not attempted.
• I — Attempted, improved (a match was found).
• N — Attempted, no match found.
Original ZIP-based match results
The number of attempts that were made to obtain the matchresults.
Number of match attempts
1-character return code indicating the success or reason forfailure of the standardized address match attempt:
• Blank — The address match attempt was successful.
• A — Unit number missing or not found on database.
• B— Insufficient (or blank) address information for a match.
• H — House/Box number not found on street.
• M — Multiple matches were found.
• S — Street name not found in ZIP Code.
• Z — ZIP Code not found on database.
Std. Address RC
332CODE-1 Plus User Guide for IBM i

DescriptionField Name
1-character return code indicating the success or reason forfailure of the 14-digit ZIP Coding attempt (i.e., was an outputZIP Code returned? If not, why not):
• Blank — The match attempt was successful.
• A — Unit number missing or not found on database.
• B— Insufficient (or blank) address information for a match.
• H — House/Box number not found on street.
• M — Multiple matches were found.
• S — Street name not found in ZIP Code.
• Z — ZIP Code not found on database.
ZIP RC
1-character return code indicating the success or reason forfailure of the ZIP+4 Coding attempt (i.e., was an output ZIP+4Code returned? If not, why not):
• Blank — The match attempt was successful.
• A — Unit number missing or not found on database.
• B— Insufficient (or blank) address information for a match.
• H — House/Box number not found on street.
• M — Multiple matches were found.
• S — Street name not found in ZIP Code.
• V — The input matched a non-deliverable streetaddress.NOTE: A non-deliverable ZIP+4 Range is typicallya new ZIP range where the USPS has not finalizedassignments of ZIP+4 codes, thus not permittingassignment of postal code information at this time.
• Z — ZIP Code not found on database.
ZIP+4 RC
333CODE-1 Plus User Guide for IBM i
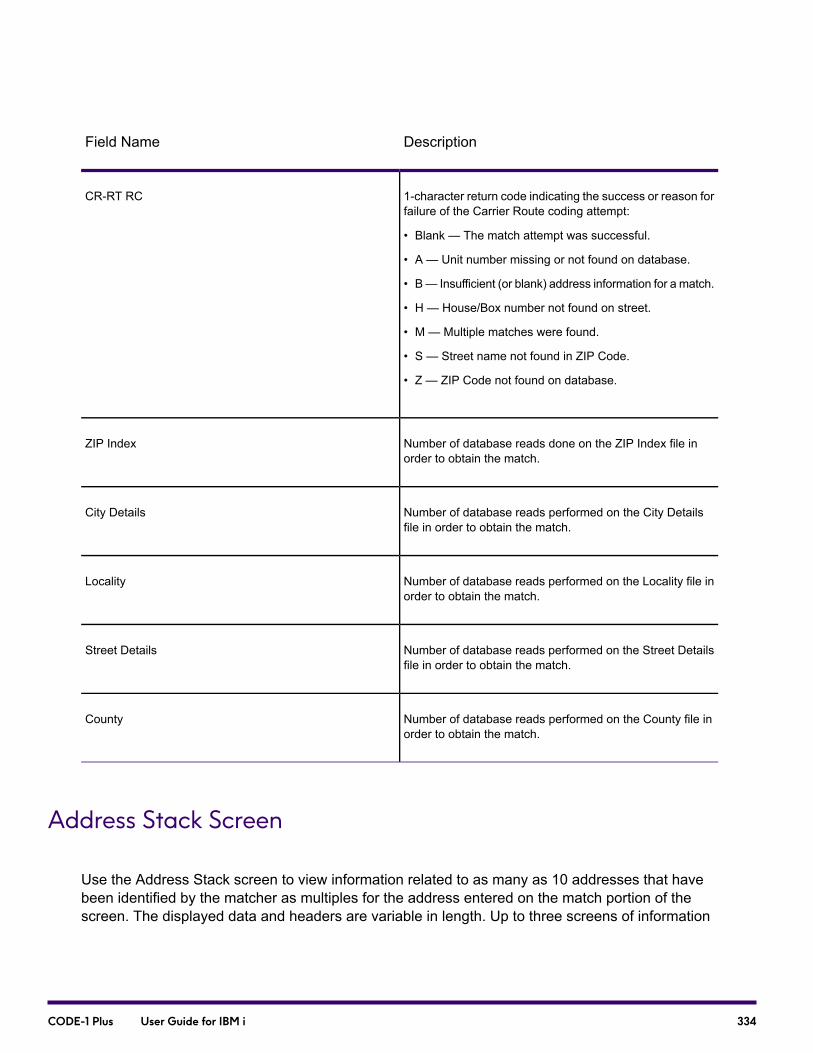
DescriptionField Name
1-character return code indicating the success or reason forfailure of the Carrier Route coding attempt:
• Blank — The match attempt was successful.
• A — Unit number missing or not found on database.
• B— Insufficient (or blank) address information for a match.
• H — House/Box number not found on street.
• M — Multiple matches were found.
• S — Street name not found in ZIP Code.
• Z — ZIP Code not found on database.
CR-RT RC
Number of database reads done on the ZIP Index file inorder to obtain the match.
ZIP Index
Number of database reads performed on the City Detailsfile in order to obtain the match.
City Details
Number of database reads performed on the Locality file inorder to obtain the match.
Locality
Number of database reads performed on the Street Detailsfile in order to obtain the match.
Street Details
Number of database reads performed on the County file inorder to obtain the match.
County
Address Stack Screen
Use the Address Stack screen to view information related to as many as 10 addresses that havebeen identified by the matcher as multiples for the address entered on the match portion of thescreen. The displayed data and headers are variable in length. Up to three screens of information
334CODE-1 Plus User Guide for IBM i

can be accessed by the Left and Right commands (showing additional information) and up to twoscreens with the Up and Down commands (showing additional addresses).
DescriptionField Name
Street name along with directionals, prefix/suffix, and housenumber
Address
City nameCity
State nameSt
ZIP Code and ZIP+4ZIP
Delivery point code and check digitDPC
Carrier Route Code (Cnnn, blank if none)C-Rt
Three-digit combination of codes:
• USPS record type of record matched:
• F — Firm
• G — General delivery
• H — High rise (apartment complex)
• P — PO Box
• R — Rural route/Highway contract
• S — Normal Street Address
• “Default” match:
• H — High Rise Default
• R — Rural Route Default
• M — Military Default
• blank — Not a default record.
• Overall probability of match correctness:
• 0-9 — 0 is most probably correct
RTP
335CODE-1 Plus User Guide for IBM i
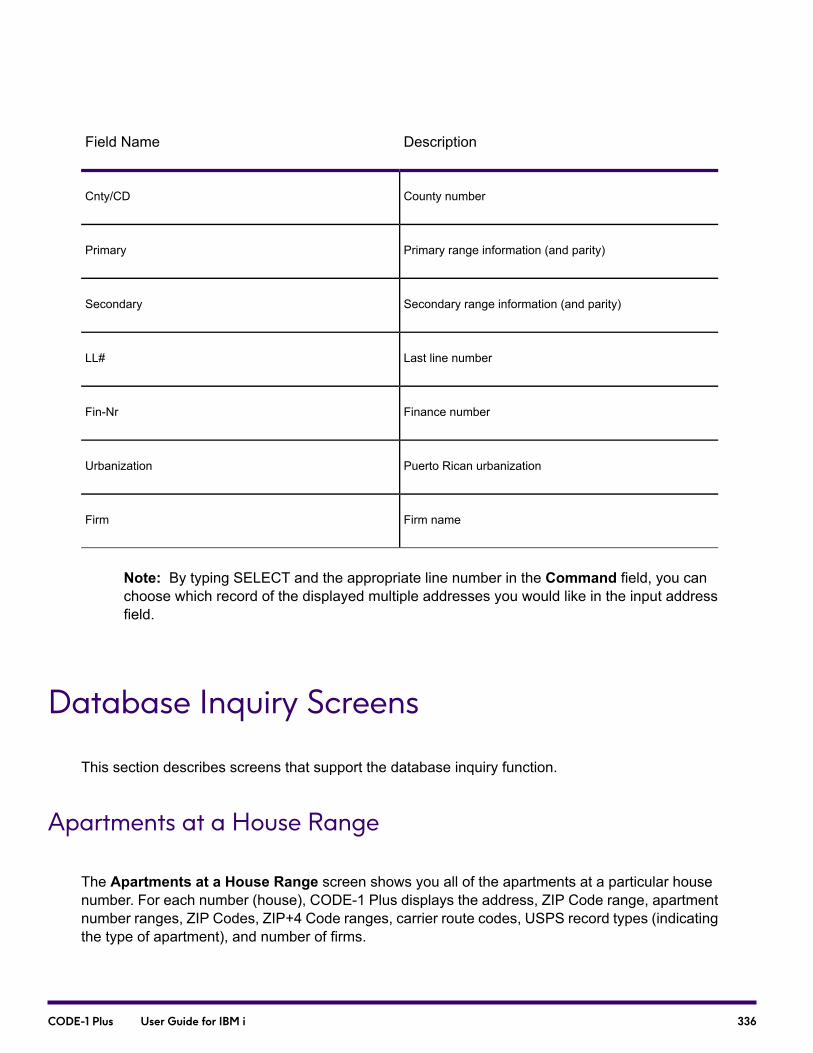
DescriptionField Name
County numberCnty/CD
Primary range information (and parity)Primary
Secondary range information (and parity)Secondary
Last line numberLL#
Finance numberFin-Nr
Puerto Rican urbanizationUrbanization
Firm nameFirm
Note: By typing SELECT and the appropriate line number in the Command field, you canchoose which record of the displayed multiple addresses you would like in the input addressfield.
Database Inquiry Screens
This section describes screens that support the database inquiry function.
Apartments at a House Range
The Apartments at a House Range screen shows you all of the apartments at a particular housenumber. For each number (house), CODE-1 Plus displays the address, ZIP Code range, apartmentnumber ranges, ZIP Codes, ZIP+4 Code ranges, carrier route codes, USPS record types (indicatingthe type of apartment), and number of firms.
336CODE-1 Plus User Guide for IBM i
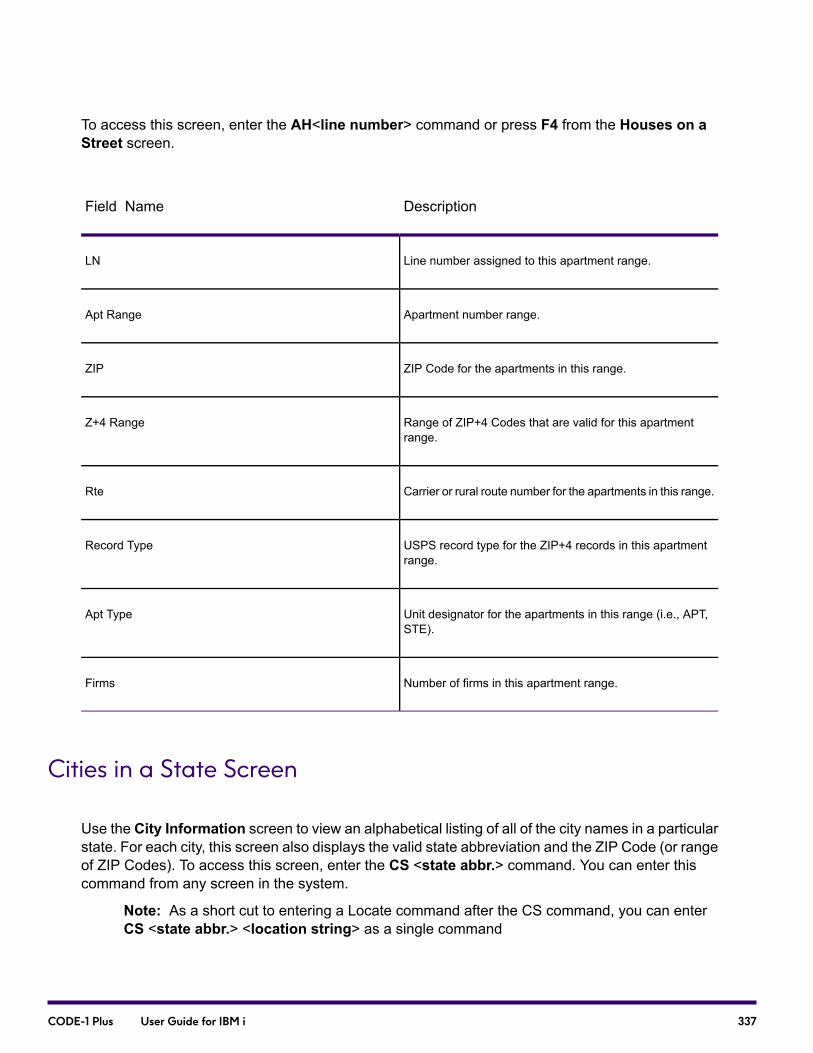
To access this screen, enter the AH<line number> command or press F4 from the Houses on aStreet screen.
DescriptionField Name
Line number assigned to this apartment range.LN
Apartment number range.Apt Range
ZIP Code for the apartments in this range.ZIP
Range of ZIP+4 Codes that are valid for this apartmentrange.
Z+4 Range
Carrier or rural route number for the apartments in this range.Rte
USPS record type for the ZIP+4 records in this apartmentrange.
Record Type
Unit designator for the apartments in this range (i.e., APT,STE).
Apt Type
Number of firms in this apartment range.Firms
Cities in a State Screen
Use the City Information screen to view an alphabetical listing of all of the city names in a particularstate. For each city, this screen also displays the valid state abbreviation and the ZIP Code (or rangeof ZIP Codes). To access this screen, enter the CS <state abbr.> command. You can enter thiscommand from any screen in the system.
Note: As a short cut to entering a Locate command after the CS command, you can enterCS <state abbr.> <location string> as a single command
337CODE-1 Plus User Guide for IBM i

DescriptionField Name
Line number of the city.LN
City name.City
Abbreviations for the state in which the city is located.State
Range of ZIP Codes that are valid for the city.ZIP Range
Code indicating the type of city. One of the following codesappear:
• P — Primary city.
• S — Secondary city.
• V — Vanity city.
Type
Code indicating whether the city is a Puerto Ricanurbanization area. One of the following codes appear:
• Blank — The city is not a Puerto Rican urbanization area.
• Y — The city is a Puerto Rican urbanization area.
Urb
Code indicating whether the ZIP Code for the city is uniqueto that city or resides in multiple cities. One of the followingcodes appear:
• Blank — The ZIP Code is not unique to the city.
• Y — The ZIP Code is unique to the city.
Unique ZIP
Cities in a ZIP Code Screen
Use the Cities in a ZIP Code screen to view all cities in a given ZIP Code. For each city, CODE-1Plus displays the long city names, short city names, and city type. To access this screen:
338CODE-1 Plus User Guide for IBM i
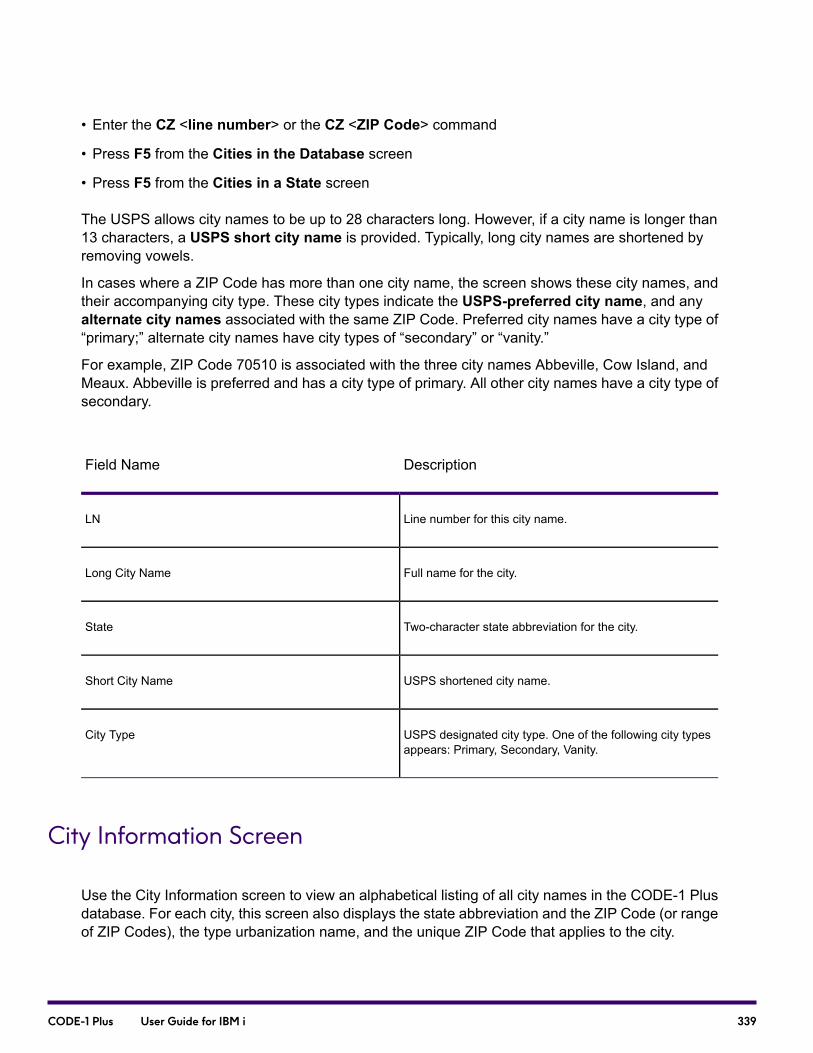
• Enter the CZ <line number> or the CZ <ZIP Code> command
• Press F5 from the Cities in the Database screen
• Press F5 from the Cities in a State screen
The USPS allows city names to be up to 28 characters long. However, if a city name is longer than13 characters, a USPS short city name is provided. Typically, long city names are shortened byremoving vowels.
In cases where a ZIP Code has more than one city name, the screen shows these city names, andtheir accompanying city type. These city types indicate the USPS-preferred city name, and anyalternate city names associated with the same ZIP Code. Preferred city names have a city type of“primary;” alternate city names have city types of “secondary” or “vanity.”
For example, ZIP Code 70510 is associated with the three city names Abbeville, Cow Island, andMeaux. Abbeville is preferred and has a city type of primary. All other city names have a city type ofsecondary.
DescriptionField Name
Line number for this city name.LN
Full name for the city.Long City Name
Two-character state abbreviation for the city.State
USPS shortened city name.Short City Name
USPS designated city type. One of the following city typesappears: Primary, Secondary, Vanity.
City Type
City Information Screen
Use the City Information screen to view an alphabetical listing of all city names in the CODE-1 Plusdatabase. For each city, this screen also displays the state abbreviation and the ZIP Code (or rangeof ZIP Codes), the type urbanization name, and the unique ZIP Code that applies to the city.
339CODE-1 Plus User Guide for IBM i
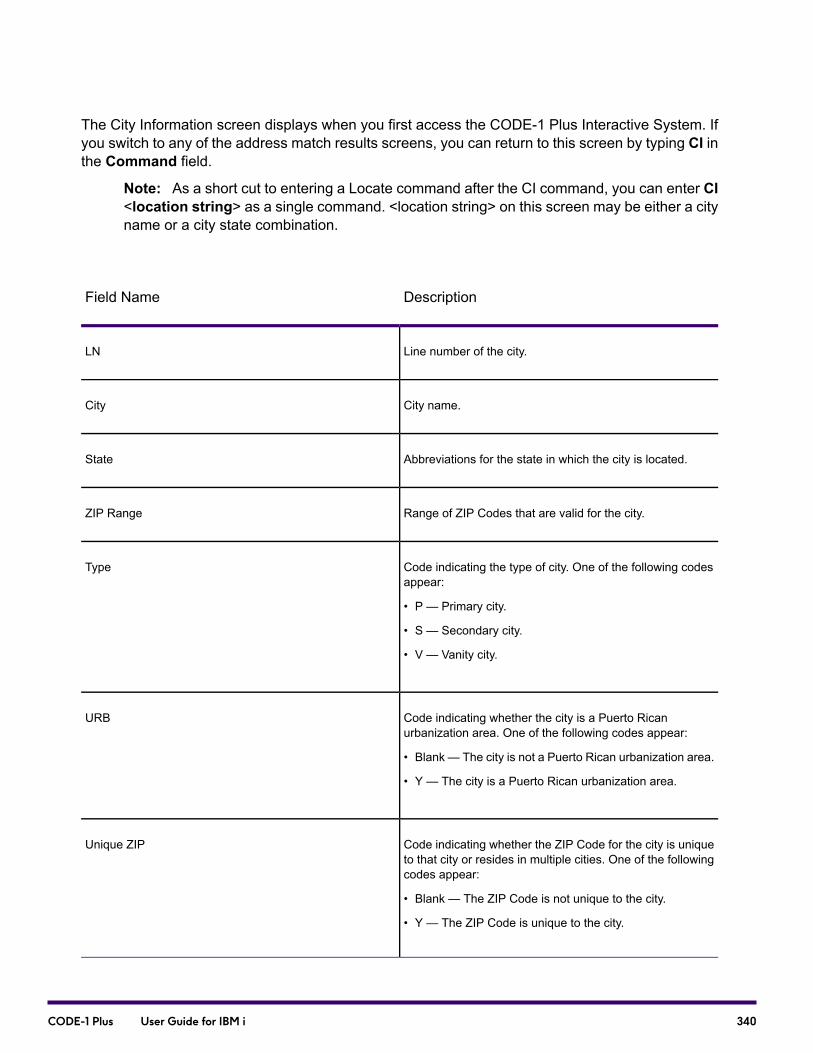
The City Information screen displays when you first access the CODE-1 Plus Interactive System. Ifyou switch to any of the address match results screens, you can return to this screen by typing CI inthe Command field.
Note: As a short cut to entering a Locate command after the CI command, you can enter CI<location string> as a single command. <location string> on this screen may be either a cityname or a city state combination.
DescriptionField Name
Line number of the city.LN
City name.City
Abbreviations for the state in which the city is located.State
Range of ZIP Codes that are valid for the city.ZIP Range
Code indicating the type of city. One of the following codesappear:
• P — Primary city.
• S — Secondary city.
• V — Vanity city.
Type
Code indicating whether the city is a Puerto Ricanurbanization area. One of the following codes appear:
• Blank — The city is not a Puerto Rican urbanization area.
• Y — The city is a Puerto Rican urbanization area.
URB
Code indicating whether the ZIP Code for the city is uniqueto that city or resides in multiple cities. One of the followingcodes appear:
• Blank — The ZIP Code is not unique to the city.
• Y — The ZIP Code is unique to the city.
Unique ZIP
340CODE-1 Plus User Guide for IBM i
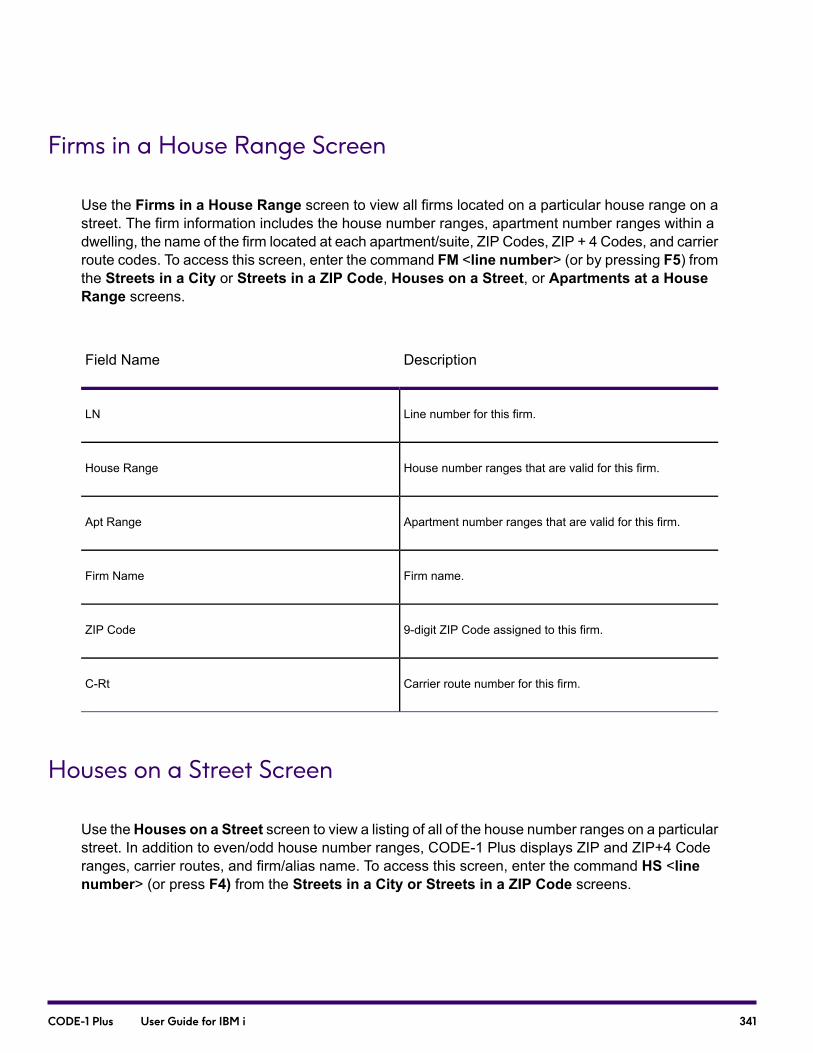
Firms in a House Range Screen
Use the Firms in a House Range screen to view all firms located on a particular house range on astreet. The firm information includes the house number ranges, apartment number ranges within adwelling, the name of the firm located at each apartment/suite, ZIP Codes, ZIP + 4 Codes, and carrierroute codes. To access this screen, enter the command FM <line number> (or by pressing F5) fromthe Streets in a City or Streets in a ZIP Code, Houses on a Street, or Apartments at a HouseRange screens.
DescriptionField Name
Line number for this firm.LN
House number ranges that are valid for this firm.House Range
Apartment number ranges that are valid for this firm.Apt Range
Firm name.Firm Name
9-digit ZIP Code assigned to this firm.ZIP Code
Carrier route number for this firm.C-Rt
Houses on a Street Screen
Use theHouses on a Street screen to view a listing of all of the house number ranges on a particularstreet. In addition to even/odd house number ranges, CODE-1 Plus displays ZIP and ZIP+4 Coderanges, carrier routes, and firm/alias name. To access this screen, enter the command HS <linenumber> (or press F4) from the Streets in a City or Streets in a ZIP Code screens.
341CODE-1 Plus User Guide for IBM i
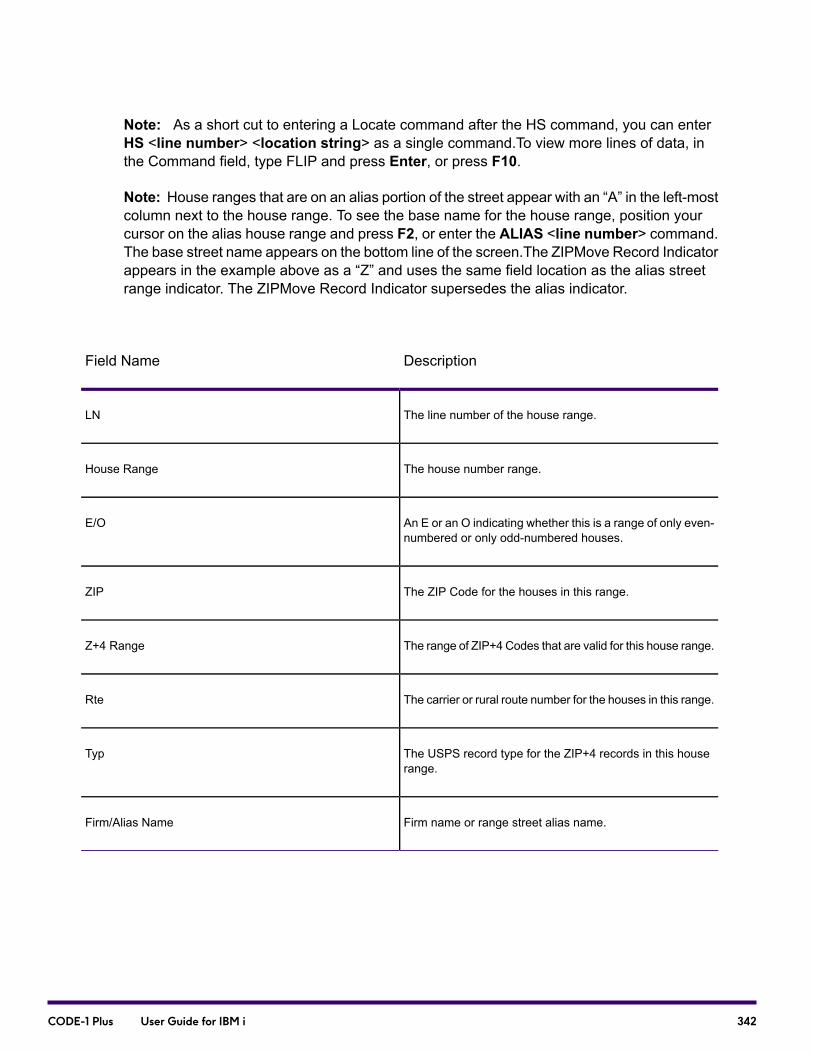
Note: As a short cut to entering a Locate command after the HS command, you can enterHS <line number> <location string> as a single command.To view more lines of data, inthe Command field, type FLIP and press Enter, or press F10.
Note: House ranges that are on an alias portion of the street appear with an “A” in the left-mostcolumn next to the house range. To see the base name for the house range, position yourcursor on the alias house range and press F2, or enter the ALIAS <line number> command.The base street name appears on the bottom line of the screen.The ZIPMove Record Indicatorappears in the example above as a “Z” and uses the same field location as the alias streetrange indicator. The ZIPMove Record Indicator supersedes the alias indicator.
DescriptionField Name
The line number of the house range.LN
The house number range.House Range
An E or an O indicating whether this is a range of only even-numbered or only odd-numbered houses.
E/O
The ZIP Code for the houses in this range.ZIP
The range of ZIP+4 Codes that are valid for this house range.Z+4 Range
The carrier or rural route number for the houses in this range.Rte
The USPS record type for the ZIP+4 records in this houserange.
Typ
Firm name or range street alias name.Firm/Alias Name
342CODE-1 Plus User Guide for IBM i
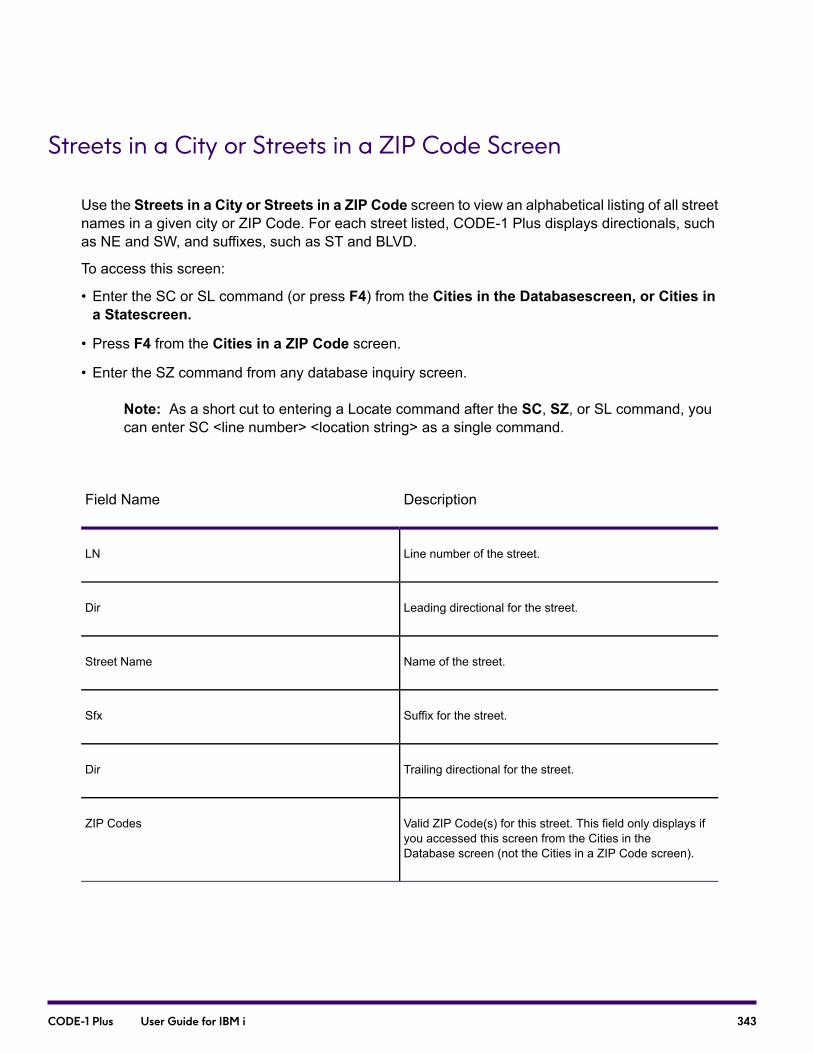
Streets in a City or Streets in a ZIP Code Screen
Use the Streets in a City or Streets in a ZIP Code screen to view an alphabetical listing of all streetnames in a given city or ZIP Code. For each street listed, CODE-1 Plus displays directionals, suchas NE and SW, and suffixes, such as ST and BLVD.
To access this screen:
• Enter the SC or SL command (or press F4) from the Cities in the Databasescreen, or Cities ina Statescreen.
• Press F4 from the Cities in a ZIP Code screen.
• Enter the SZ command from any database inquiry screen.
Note: As a short cut to entering a Locate command after the SC, SZ, or SL command, youcan enter SC <line number> <location string> as a single command.
DescriptionField Name
Line number of the street.LN
Leading directional for the street.Dir
Name of the street.Street Name
Suffix for the street.Sfx
Trailing directional for the street.Dir
Valid ZIP Code(s) for this street. This field only displays ifyou accessed this screen from the Cities in theDatabase screen (not the Cities in a ZIP Code screen).
ZIP Codes
343CODE-1 Plus User Guide for IBM i

Geographic Coding Plus Interface
If you have purchased Geographic Coding Plus from Precisely, you can access that product directlyfrom CODE-1 Plus by typing the command GEO in the Command field on any CODE-1 Plus screen.The Geographic Coding Interface screen displays. If you do a match attempt before you enter theGEO command, your matched ZIP Code and ZIP + 4 Code appear in ZIP Code fields on theGeographic Coding Interface screen. This is the first screen of geographic coding data for yourmatched address. Please refer to your Geographic Coding Plus User's Guide for further referenceon the fields and function keys on this screen.
Note: In a Unix environment, you must source the Geographic Coding Plus setup file beforeyou access the Geographic Coding Interface. This procedure sets up the environment variablesfor the Geographic Coding Plus database.
DescriptionField Name
5-digit ZIP Code for the entered address.ZIP Code
4-digit ZIP+4 Code for the entered address.ZIP+4 Code
Delivery Point Barcode for the entered address.DPBC
House Number for the entered address.House#
Code indicating the level of match obtained against theGeographic Coding Master File. One of the following codesappears:
• 5 — The input ZIP Code matched, but the ZIP+4 Codedid not.
• 9 — Both the ZIP Code and ZIP +4 Code matched theMaster File.
• X—TheGeographic CodingMaster File data has expired.
Match Level
2-character FIPS state code of the matched address.State Code
344CODE-1 Plus User Guide for IBM i
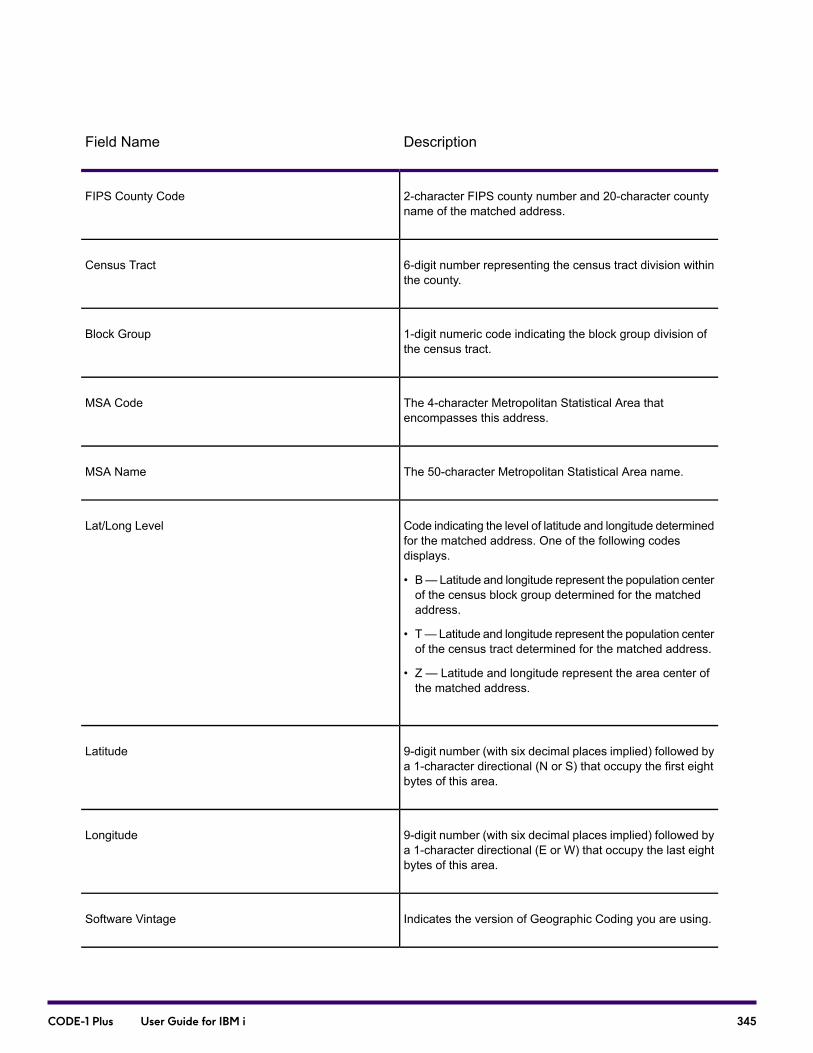
DescriptionField Name
2-character FIPS county number and 20-character countyname of the matched address.
FIPS County Code
6-digit number representing the census tract division withinthe county.
Census Tract
1-digit numeric code indicating the block group division ofthe census tract.
Block Group
The 4-character Metropolitan Statistical Area thatencompasses this address.
MSA Code
The 50-character Metropolitan Statistical Area name.MSA Name
Code indicating the level of latitude and longitude determinedfor the matched address. One of the following codesdisplays.
• B—Latitude and longitude represent the population centerof the census block group determined for the matchedaddress.
• T— Latitude and longitude represent the population centerof the census tract determined for the matched address.
• Z — Latitude and longitude represent the area center ofthe matched address.
Lat/Long Level
9-digit number (with six decimal places implied) followed bya 1-character directional (N or S) that occupy the first eightbytes of this area.
Latitude
9-digit number (with six decimal places implied) followed bya 1-character directional (E or W) that occupy the last eightbytes of this area.
Longitude
Indicates the version of Geographic Coding you are using.Software Vintage
345CODE-1 Plus User Guide for IBM i

DescriptionField Name
Indicates the expiration date of the Geographic Coding Filethat you are using.
File
Number of miles between the two specified addresses, ifnecessary.
Distance in Miles
The following table describes the fields on the second and last screen of geographic coding data foryour matched address.
DescriptionField Name
5-digit ZIP Code for the entered address.ZIP Code
4-digit ZIP+4 Code for the entered address.ZIP+4 Code
Delivery Point Barcode for the entered address.DPBC
House Number for the entered address.House#
MCDs (Minor Civil Divisions) are the primary political oradministrative divisions of a county, representing many kindsof legal entities with a variety of governmental andadministrative functions. CCDs (Census County Divisions)are established in states where there are no legallyestablished MCDs.
MCD/CCD Code
346CODE-1 Plus User Guide for IBM i
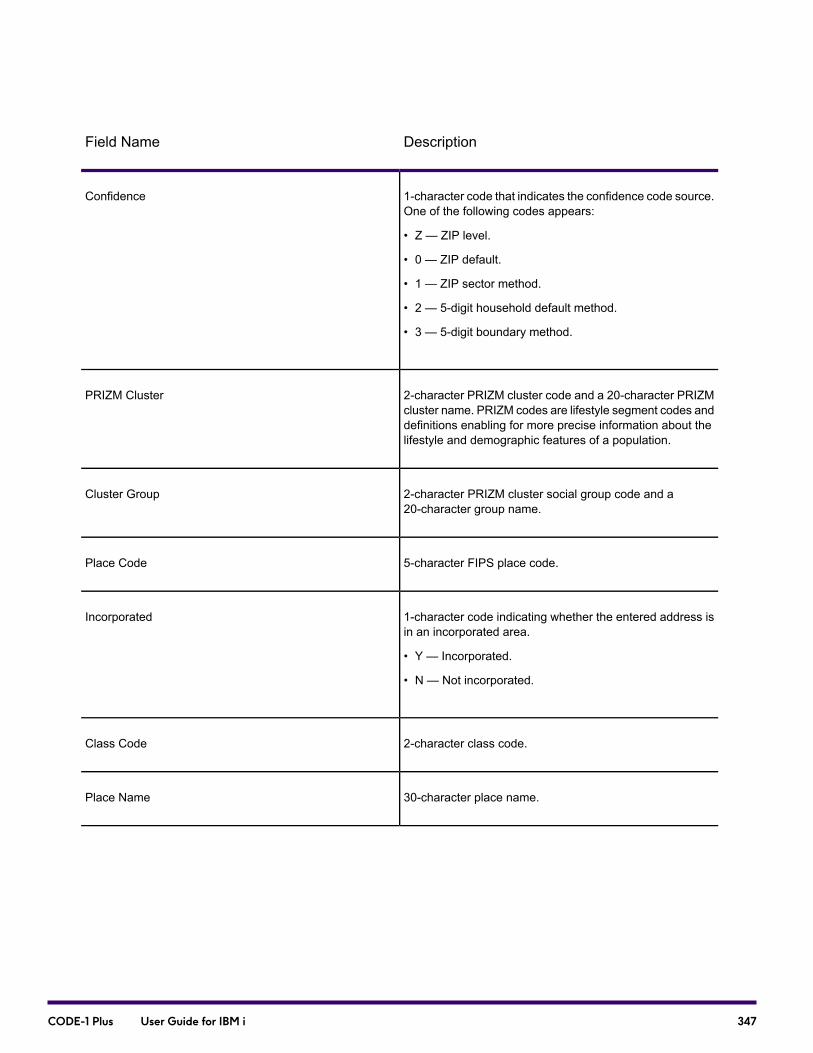
DescriptionField Name
1-character code that indicates the confidence code source.One of the following codes appears:
• Z — ZIP level.
• 0 — ZIP default.
• 1 — ZIP sector method.
• 2 — 5-digit household default method.
• 3 — 5-digit boundary method.
Confidence
2-character PRIZM cluster code and a 20-character PRIZMcluster name. PRIZM codes are lifestyle segment codes anddefinitions enabling for more precise information about thelifestyle and demographic features of a population.
PRIZM Cluster
2-character PRIZM cluster social group code and a20-character group name.
Cluster Group
5-character FIPS place code.Place Code
1-character code indicating whether the entered address isin an incorporated area.
• Y — Incorporated.
• N — Not incorporated.
Incorporated
2-character class code.Class Code
30-character place name.Place Name
347CODE-1 Plus User Guide for IBM i
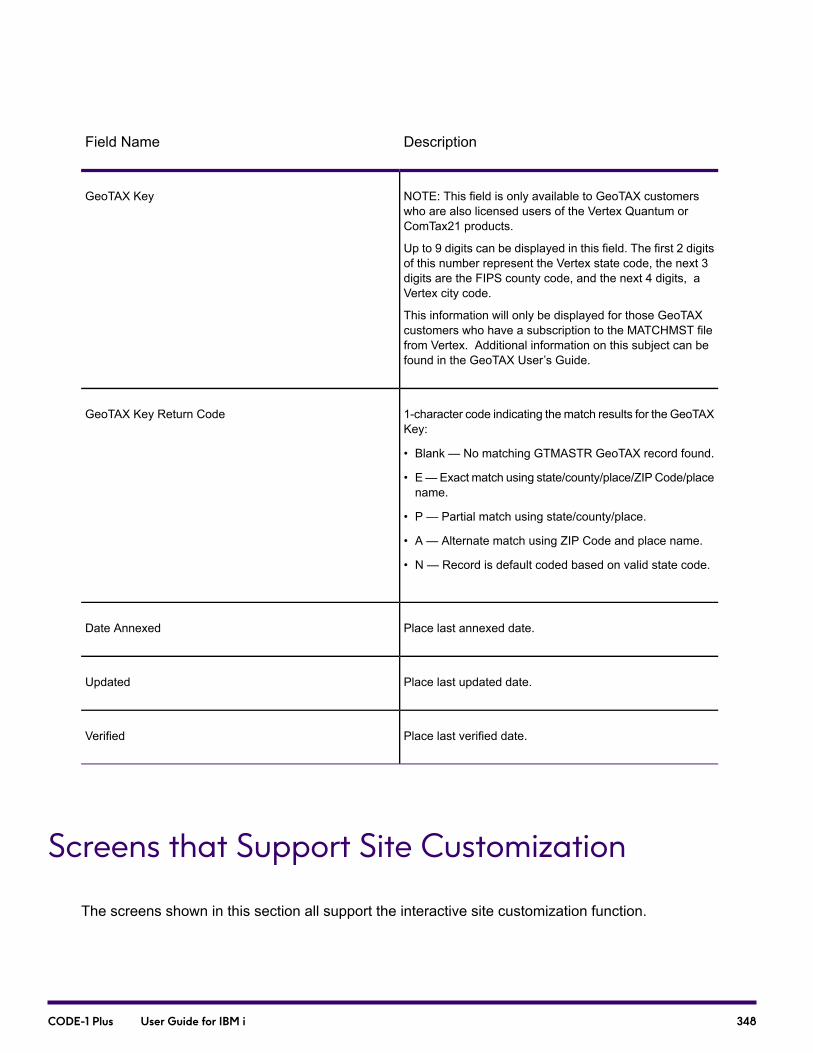
DescriptionField Name
NOTE: This field is only available to GeoTAX customerswho are also licensed users of the Vertex Quantum orComTax21 products.
Up to 9 digits can be displayed in this field. The first 2 digitsof this number represent the Vertex state code, the next 3digits are the FIPS county code, and the next 4 digits, aVertex city code.
This information will only be displayed for those GeoTAXcustomers who have a subscription to the MATCHMST filefrom Vertex. Additional information on this subject can befound in the GeoTAX User’s Guide.
GeoTAX Key
1-character code indicating thematch results for the GeoTAXKey:
• Blank — No matching GTMASTR GeoTAX record found.
• E—Exact match using state/county/place/ZIP Code/placename.
• P — Partial match using state/county/place.
• A — Alternate match using ZIP Code and place name.
• N — Record is default coded based on valid state code.
GeoTAX Key Return Code
Place last annexed date.Date Annexed
Place last updated date.Updated
Place last verified date.Verified
Screens that Support Site Customization
The screens shown in this section all support the interactive site customization function.
348CODE-1 Plus User Guide for IBM i
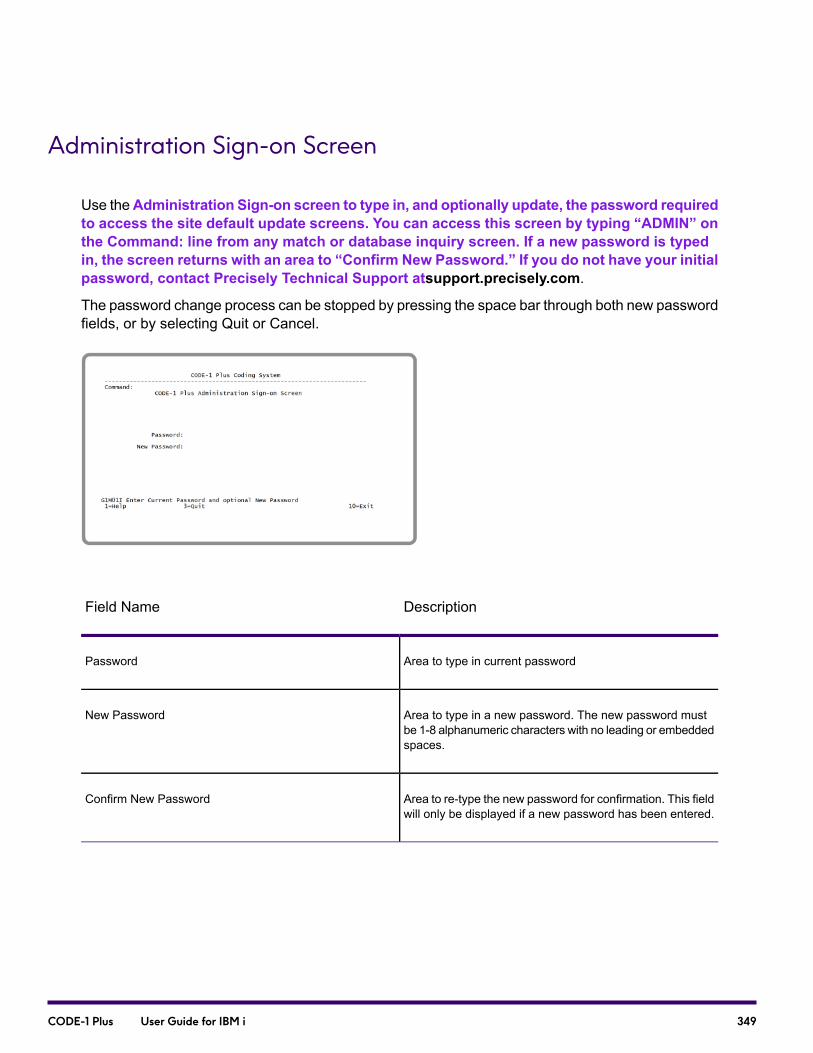
Administration Sign-on Screen
Use theAdministration Sign-on screen to type in, and optionally update, the password requiredto access the site default update screens. You can access this screen by typing “ADMIN” onthe Command: line from any match or database inquiry screen. If a new password is typedin, the screen returns with an area to “Confirm New Password.” If you do not have your initialpassword, contact Precisely Technical Support atsupport.precisely.com.
The password change process can be stopped by pressing the space bar through both new passwordfields, or by selecting Quit or Cancel.
DescriptionField Name
Area to type in current passwordPassword
Area to type in a new password. The new password mustbe 1-8 alphanumeric characters with no leading or embeddedspaces.
New Password
Area to re-type the new password for confirmation. This fieldwill only be displayed if a new password has been entered.
Confirm New Password
349CODE-1 Plus User Guide for IBM i

Interactive Customization Screens
Use the Interactive Customization screens to view, and optionally update, the site-specific valuesyou choose for your system. You can access these screens by successfully entering the existingsystem password on the Administration Sign-on screen (accessed by the “ADMIN” command). Valueson these screens are not updated unless F5 is pressed (or “Save” on the command line is selected),and the changed values are not validated until either the Enter key or “Save” are pressed.
DescriptionField Name
Indicates Split or Full Screen display on entry to system
• S — Split screen display
• F — Full screen display
Initial Screen
Display or suppress database warning
• D — Display database warning
• S — Suppress database warning
Expiration Warning
Firm Match Setting Value. Refer to the “Match SettingsScreen” section earlier in this chapter for an explanation ofthese values.
• T — Tight
• M — Medium
• L — Loose
• E — Equal
Firm
Directional/Suffix Match Setting Value. Refer to the “MatchSettings Screen” section earlier in this chapter for anexplanation of these values.
• T — Tight
• M — Medium
• L — Loose
• E — Equal
Dir/Suffix
350CODE-1 Plus User Guide for IBM i

DescriptionField Name
Street Match Setting Value. Refer to the “Match SettingsScreen” section earlier in this chapter for an explanation ofthese values.
• T — Tight
• M — Medium
• L — Loose
• E — Equal
Street
Match Setting for Vanity Cities. Refer to the “Match SettingsScreen” section earlier in this chapter for an explanation ofthese values.
• X — Allow vanity city names in standardized output.
• S — Only allow primary/secondary city names instandardized output.
Vanity City
Match Setting for ZIP correction. Refer to the “Match SettingsScreen” section earlier in this chapter for an explanation ofthese values.
• Y — Correct input ZIP Codes.
• N — Do not correct input ZIP Codes.
Correct Input ZIP
Returned address settings. Refer to the “Match SettingsScreen” section earlier in this chapter for an explanation ofthese values.
• C — Display matched address in mixed case.
• L — Display matched address in lower case only.
• U — Display matched address in upper case only.
Output Case
Match Setting for Multiple Secondary Components. Referto “Match Settings Screen” section earlier in this chapter foran explanation of these values.
• Y — Attempt secondary match.
• N — Assign default ZIP+4 Code.
Multiple Secondary
351CODE-1 Plus User Guide for IBM i
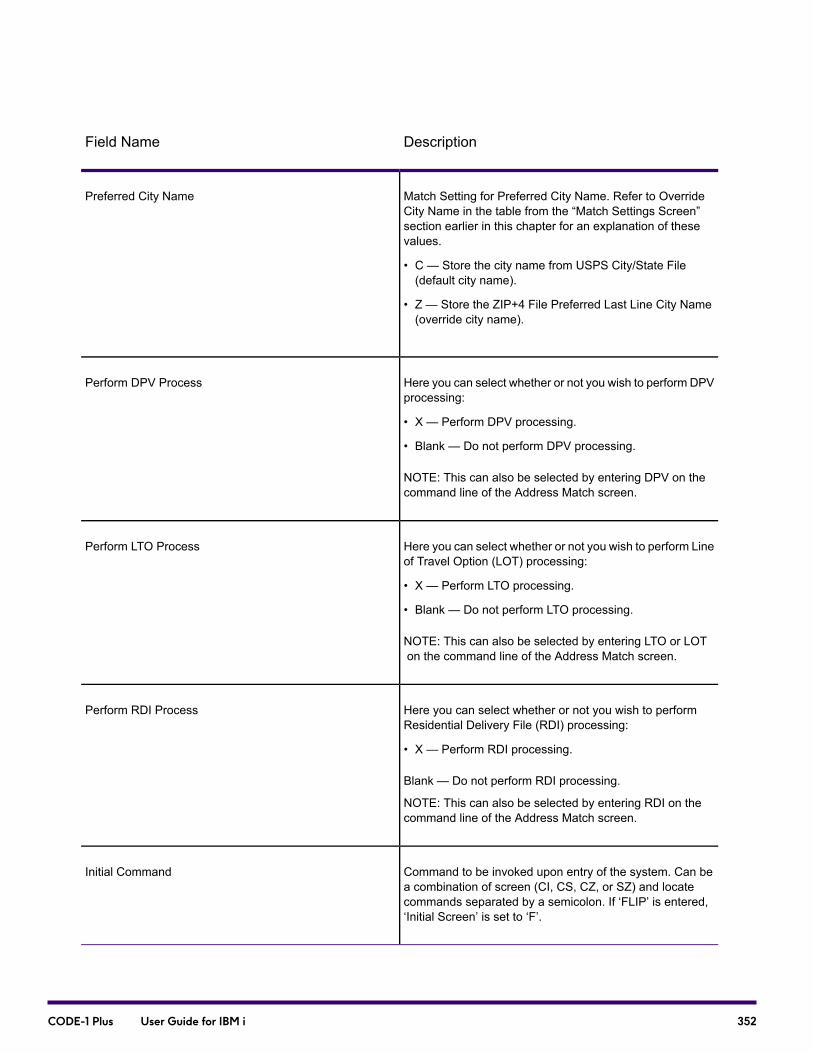
DescriptionField Name
Match Setting for Preferred City Name. Refer to OverrideCity Name in the table from the “Match Settings Screen”section earlier in this chapter for an explanation of thesevalues.
• C — Store the city name from USPS City/State File(default city name).
• Z — Store the ZIP+4 File Preferred Last Line City Name(override city name).
Preferred City Name
Here you can select whether or not you wish to perform DPVprocessing:
• X — Perform DPV processing.
• Blank — Do not perform DPV processing.
NOTE: This can also be selected by entering DPV on thecommand line of the Address Match screen.
Perform DPV Process
Here you can select whether or not you wish to perform Lineof Travel Option (LOT) processing:
• X — Perform LTO processing.
• Blank — Do not perform LTO processing.
NOTE: This can also be selected by entering LTO or LOTon the command line of the Address Match screen.
Perform LTO Process
Here you can select whether or not you wish to performResidential Delivery File (RDI) processing:
• X — Perform RDI processing.
Blank — Do not perform RDI processing.
NOTE: This can also be selected by entering RDI on thecommand line of the Address Match screen.
Perform RDI Process
Command to be invoked upon entry of the system. Can bea combination of screen (CI, CS, CZ, or SZ) and locatecommands separated by a semicolon. If ‘FLIP’ is entered,‘Initial Screen’ is set to ‘F’.
Initial Command
352CODE-1 Plus User Guide for IBM i
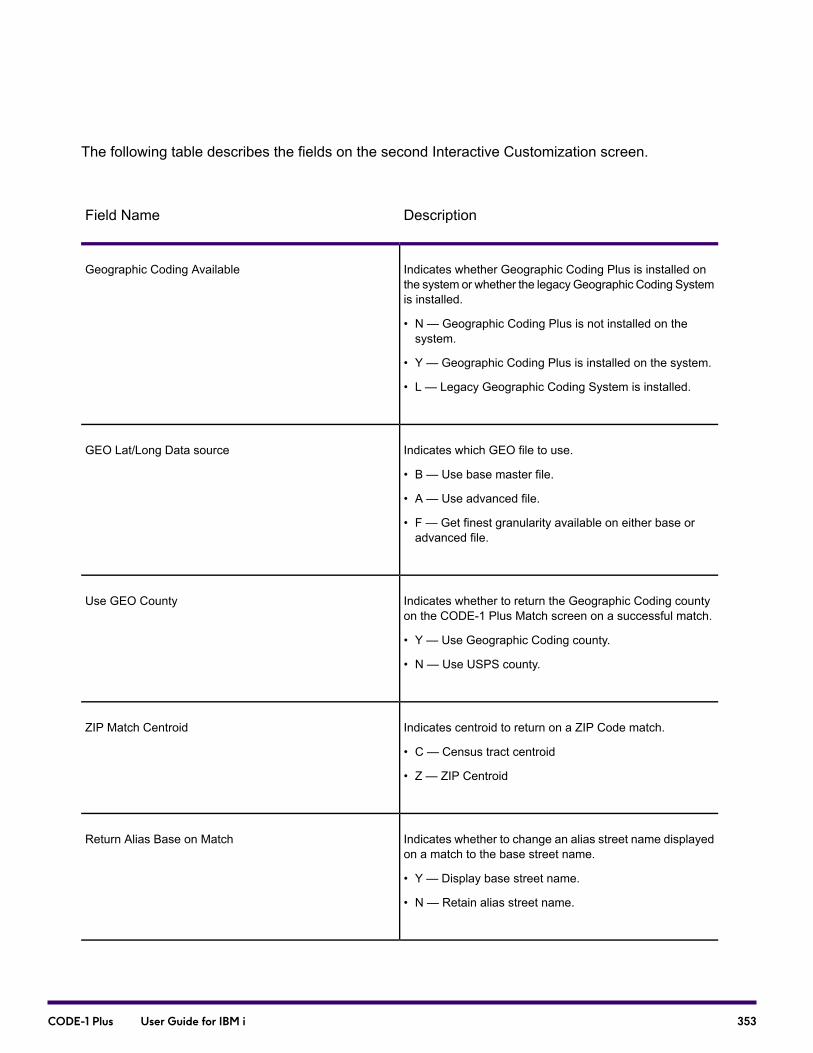
The following table describes the fields on the second Interactive Customization screen.
DescriptionField Name
Indicates whether Geographic Coding Plus is installed onthe system or whether the legacyGeographic Coding Systemis installed.
• N — Geographic Coding Plus is not installed on thesystem.
• Y — Geographic Coding Plus is installed on the system.
• L — Legacy Geographic Coding System is installed.
Geographic Coding Available
Indicates which GEO file to use.
• B — Use base master file.
• A — Use advanced file.
• F — Get finest granularity available on either base oradvanced file.
GEO Lat/Long Data source
Indicates whether to return the Geographic Coding countyon the CODE-1 Plus Match screen on a successful match.
• Y — Use Geographic Coding county.
• N — Use USPS county.
Use GEO County
Indicates centroid to return on a ZIP Code match.
• C — Census tract centroid
• Z — ZIP Centroid
ZIP Match Centroid
Indicates whether to change an alias street name displayedon a match to the base street name.
• Y — Display base street name.
• N — Retain alias street name.
Return Alias Base on Match
353CODE-1 Plus User Guide for IBM i
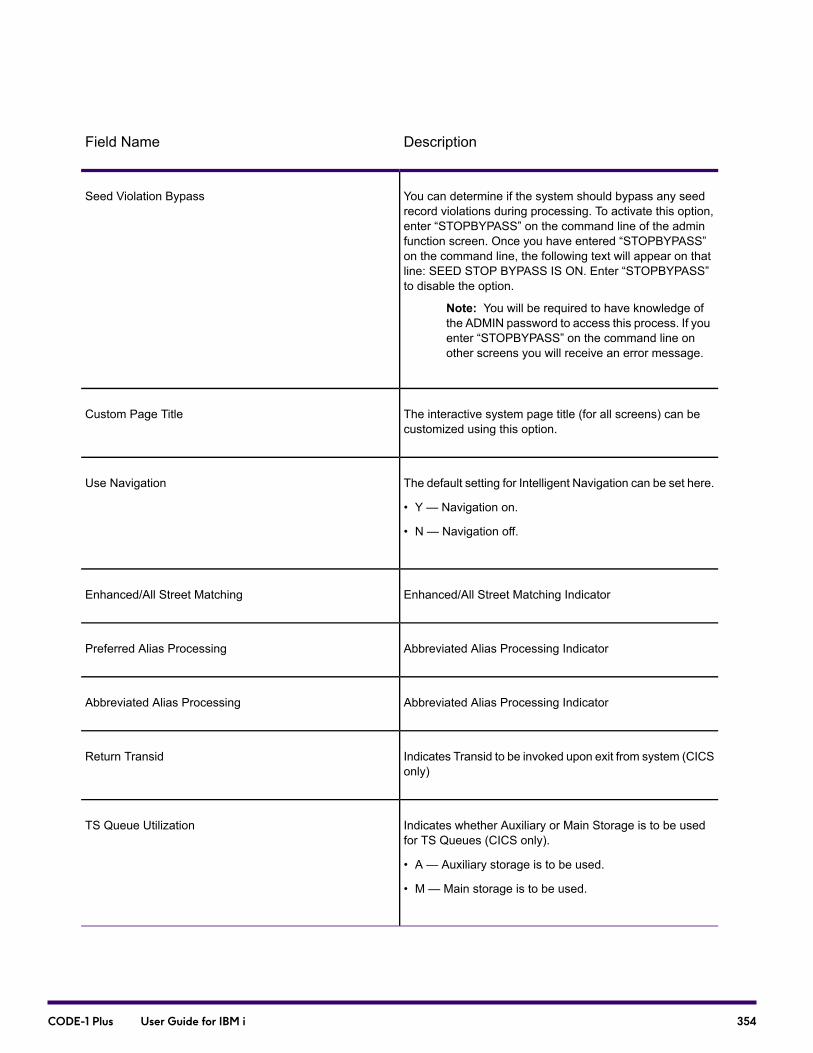
DescriptionField Name
You can determine if the system should bypass any seedrecord violations during processing. To activate this option,enter “STOPBYPASS” on the command line of the adminfunction screen. Once you have entered “STOPBYPASS”on the command line, the following text will appear on thatline: SEED STOP BYPASS IS ON. Enter “STOPBYPASS”to disable the option.
Note: You will be required to have knowledge ofthe ADMIN password to access this process. If youenter “STOPBYPASS” on the command line onother screens you will receive an error message.
Seed Violation Bypass
The interactive system page title (for all screens) can becustomized using this option.
Custom Page Title
The default setting for Intelligent Navigation can be set here.
• Y — Navigation on.
• N — Navigation off.
Use Navigation
Enhanced/All Street Matching IndicatorEnhanced/All Street Matching
Abbreviated Alias Processing IndicatorPreferred Alias Processing
Abbreviated Alias Processing IndicatorAbbreviated Alias Processing
Indicates Transid to be invoked upon exit from system (CICSonly)
Return Transid
Indicates whether Auxiliary or Main Storage is to be usedfor TS Queues (CICS only).
• A — Auxiliary storage is to be used.
• M — Main storage is to be used.
TS Queue Utilization
354CODE-1 Plus User Guide for IBM i
Definition of PFKEYS
The third and last customization screen allows you to define your program function keys (PFKEYS)to maintain any in-house standards for PFKEY usage within the CODE-1 Plus system.
Working within this third screen, you can change the assigned PFKEY of a certain function or thetext associated with a particular PFKEY. For example, you can tab down to PFKEY 01 and changethe text from “Help” to “Info.”
Note: You CANNOT assign one PFKEY to have several functions. If you do, a messagedisplays that “Key designation conflicts with a Multi-Screen Key.” Any errors in defining PFKEYSdisplays in red when you hit the Enter key after making your changes.
Database Information Screen
The Database Information screen shows information related to the software and database installedfor CODE-1 Plus. Specific fields included in the screen are the software release and modificationnumbers, the CASS expiration date of the software, the database vintage date and expiration date(after which inquiry but not matching is permitted) and the days remaining until expiration.
Note: The DPV database vintage date displays only if you have performed a match with DPVturned on.
Customization File Administration
The site customization file (G1CPFDF) is an updateable indexed file for the interactive system. Ifyou plan on modifying default initialization and processing values for your site, you need to installthe customization file. Otherwise, the interactive system will function with the default match settingsand processing on entry to and exit from the CODE-1 Plus software.
Note: The customization file is required for accessing the Geographic Coding Interface screen.If the customization file is not available, the Geographic Coding Interface is not available.
355CODE-1 Plus User Guide for IBM i
File Backup and Security
Because the site customization file can be modified any time the interactive system is available, itis critical to perform regular backups of the file at your site. This ensures ease of recovery of thecurrent site settings in case the file is accidentally lost.
You should limit update access to the interactive system, because the settings in this file apply to allusers. Online access to this file is controlled through a password screen; however, security precautionsmay be appropriate.
File Repair, Re-Initialization, and Password Display
If a backup copy of the customization file is not available and recovery is required, the followingoptions exist using program G1CPDFL.
1. The first option is to physically delete the file and re-run the initialization job, DEFCUSTM.
2. A second option involves the same customization utility, but using job CUSTMUTL. In this casethe utility can be used to repair the G1CPFDF file or display the encrypted password. This jobperforms the following tasks:
a. If an error is detected on the open to the customization file, the program attempts to createthe file.
b. If the attempt is not successful, the program issues an error message and terminates.
c. If the file is opened successfully, a read is attempted for the control record.
d. If the read for the control record fails, the customization utility adds the control record to thefile.
e. If the read for the control record is successful, the customization utility searches for the admin(password) record.
f. If the admin (password) record is found, the customization utility displays the encryptedpassword stored on the record.
g. If the admin record is not found, the initial install password is written to the file.
If required, a decrypting of the password can be obtained by contacting Precisely Technical Support.The Technical Support Representative can use the 16-character hexadecimal representation of thepassword to provide you with the current text value of the password.
356CODE-1 Plus User Guide for IBM i
Batch Uncoded Records Interface (G1CPBNC)
The Interactive CODE-1 Plus System includes a user exit that you can use to correct records thatwere not coded by the batch product. The interface, G1CPBNC, reads an encoded records fileproduced by batch CODE-1 Plus (C1BMNCO).The user exit is designed so that you can pull onerecord at a time into the screen input area, correct the record, and then write the corrected recordout to a corrected file.
Note: To take advantage of the batch non-coded records interface to Interactive CODE-1Plus, you or someone at your site must have modified the sample program, called G1CPBNC,to read records from the C1BMNCO file, pass them to Interactive CODE-1 Plus, wait for theuser to correct the record, receive the records back from Interactive CODE-1 Plus, and thenwrite the corrected records to an output file. This is discussed later in this section.
Once you modify a G1CPBNC user exit program, refer to How it Works to use the UR and UWcommands from the CODE-1 Plus Interactive screen.
Type the UR (User Read) command in the Command field. An address is pulled from the input fileand placed in the address input area.
How it Works
When you enter the UR command, the user exit program G1CPBNC is invoked and the functionalitysupplied by the UR command is contained within this program. The same situation applies to theUW command. You must customize the G1CPBNC to suit the need of your specific environment. Asample user exit program that you can customize is supplied as part of the product.
In addition to the input and output addresses, the complete Command field containing the UR orUW command is passed to the user exit so that additional command parameters can be required aspart of the UR or UW commands (for example, record number of the address being corrected). Youcan specify several screen presentation options to control how the screen appears upon commandcompletion. These screen presentation options control:
• Message that appears
• Clearing of the Command field to blanks
• Sounding of an audible alarm
• Clearing of the address area to blanks
• Cursor position upon the completion of the UR and UW commands
357CODE-1 Plus User Guide for IBM i

A sample program, G1CPBNC, is supplied with the CODE-1 Plus software. The program is writtento read the supplied IVPFILE and write the coded records to a user-defined output file. Your inputfile may have different attributes (for example, record length or address element location) and willneed to be modified accordingly.
In the following section, the required functionality for both the UR and UW commands is described,the calling interface for G1CPBNC is explained, and excerpts from the sample G1CPBNC programare shown. The UR and UW commands are enabled simply by making G1CPBNC available in therun-time environment.
Note: The remaining sections in this chapter are intended for programmers writing theG1CPBNC user-exit program.
UR COMMAND
When you enter a UR (User Read) command, the G1CPBNC user exit program is invoked withUXIT-FUNCTION set to UXIT-READ-FILE. The available functionality includes the following:
• Select and read a record from a user file containing addresses which are to be supplied when theUR command is entered. The selected address is passed to the calling program through theUXIT-P9IN field. The user exit must enable for multiple terminal operators working at the sametime.
• The entire Command field containing the UR command is available to the G1CPBNC program sothat additional user-defined parameters can be defined as part of the UR command. TheCommandfield is passed from the calling program through the UXIT-COMMAND-LINE field.
• Specify the message that appears on the terminal screen at the completion of the UR commandin the UXIT-PROMPT-MESSAGE field.
• Specify whether or not the Command field on the terminal screen is to be blanked-out uponcompletion of execution for the UR command. This is specified via the UXIT-COMMAND field.
• Specify whether or not an audible alarm is to sound at the completion of execution for the URcommand. This is specified via the UXIT-ALARM field.
• Specify whether the cursor on the terminal screen is to be positioned on the address input lines orthe Command field at the completion of execution for the UR command. Since CODE-1 Plusautomatically performs an attempted match subsequent to a UR command,UXIT-CURSOR-CMD-ON-MTCH can be used to position the cursor on the command line (for ananticipated UW command) on a match or in the address area on a non-match or multiple. This isspecified via the UXIT-CURSOR field.
• In order to coordinate the execution of UR and UW commands, an area of statically allocatedmemory is made available that is specific to one individual terminal user. This area isUXIT-SAVE-AREA.
358CODE-1 Plus User Guide for IBM i
UW COMMAND
When you enter a UW (User Write) command, the G1CPBNC user exit program is invoked withUXIT-FUNCTION set to UXIT-WRITE-FILE.
The results from attempting to match the address currently on the terminal screen are passed to theuser exit in the UXIT-P9OUT and UXIT-P9AUDT fields. The user exit should determine whether toaccept the address and write it to a user file containing corrected addresses or reject the addressand display an error message on the terminal screen. The user exit must enable for multiple terminaloperators working at the same time.
• The entire Command field containing the UW command is available to the G1CPBNC programso that additional user-defined parameters can be defined as part of the UW command. TheCommand field is passed from the calling program through the UXIT-COMMAND-LINE field.
• Specify the message which appears on the terminal screen at the completion of the UW commandin the UXIT-PROMPT-MESSAGE field.
• Specify whether or not the Command field on the terminal screen is to be blanked out uponcompletion of execution for the UW command. This is specified via the UXIT-COMMAND field.
• Specify whether or not an audible alarm is to sound at the completion of execution for the UWcommand. This is specified via the UXIT-ALARM field.
• Specify whether or not to clear the address input fields on the terminal screen at the completionof execution for the UW command. This is specified via the UXIT-ADDRESS field.
• Specify whether the cursor on the terminal screen is to be positioned on the address input lines orthe Command field at the completion of execution for the UW command. This is specified via theUXIT-CURSOR field.
• In order to coordinate the execution of UR and UW commands, an area of statically allocatedmemory is made available that is specific to one individual terminal user and common to both theUR and UW commands. This area is UXIT-SAVE-AREA.
Program Parameters
Eleven logical parameters are passed in a single 01 level. These eleven parameters are as follows:
359CODE-1 Plus User Guide for IBM i
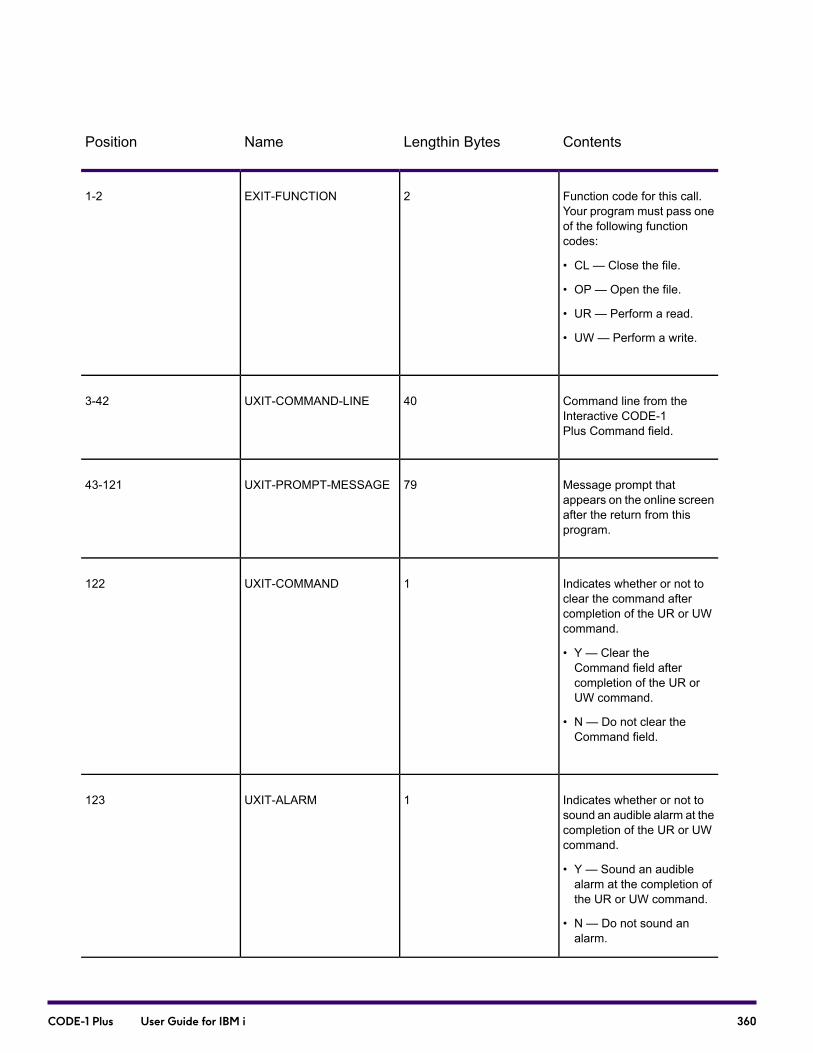
ContentsLengthin BytesNamePosition
Function code for this call.Your program must pass oneof the following functioncodes:
• CL — Close the file.
• OP — Open the file.
• UR — Perform a read.
• UW — Perform a write.
2EXIT-FUNCTION1-2
Command line from theInteractive CODE-1Plus Command field.
40UXIT-COMMAND-LINE3-42
Message prompt thatappears on the online screenafter the return from thisprogram.
79UXIT-PROMPT-MESSAGE43-121
Indicates whether or not toclear the command aftercompletion of the UR or UWcommand.
• Y — Clear theCommand field aftercompletion of the UR orUW command.
• N — Do not clear theCommand field.
1UXIT-COMMAND122
Indicates whether or not tosound an audible alarm at thecompletion of the UR or UWcommand.
• Y — Sound an audiblealarm at the completion ofthe UR or UW command.
• N — Do not sound analarm.
1UXIT-ALARM123
360CODE-1 Plus User Guide for IBM i
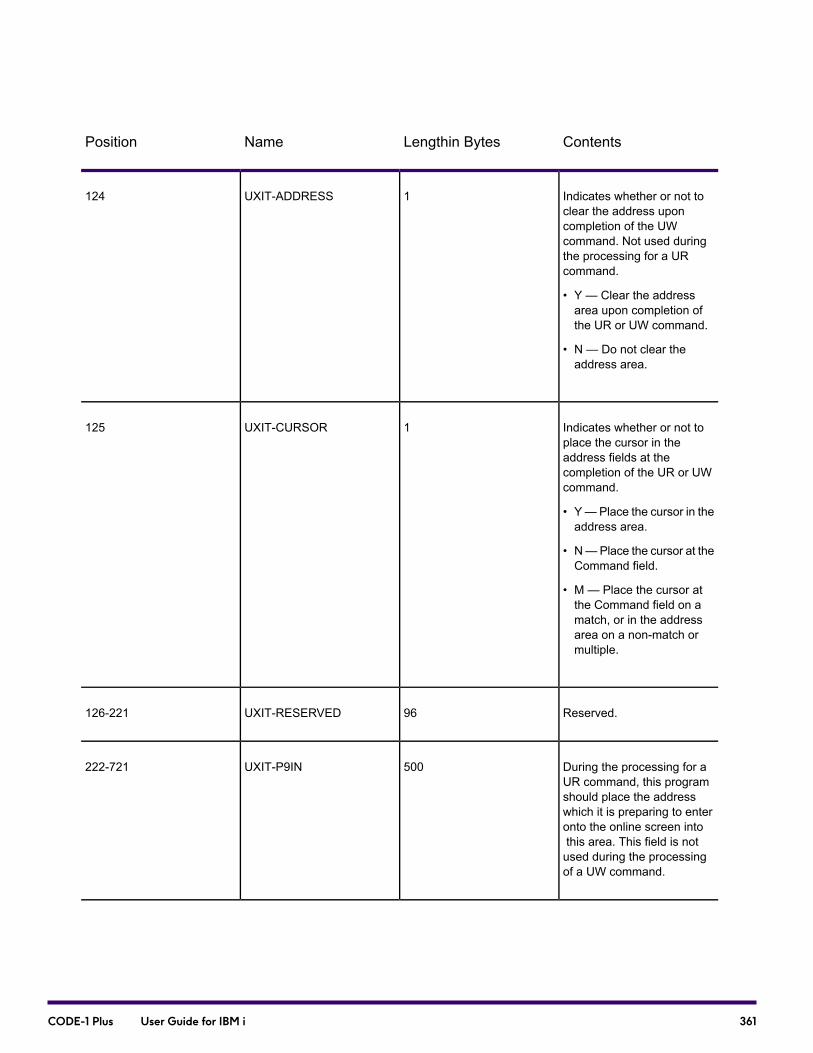
ContentsLengthin BytesNamePosition
Indicates whether or not toclear the address uponcompletion of the UWcommand. Not used duringthe processing for a URcommand.
• Y — Clear the addressarea upon completion ofthe UR or UW command.
• N — Do not clear theaddress area.
1UXIT-ADDRESS124
Indicates whether or not toplace the cursor in theaddress fields at thecompletion of the UR or UWcommand.
• Y—Place the cursor in theaddress area.
• N—Place the cursor at theCommand field.
• M — Place the cursor atthe Command field on amatch, or in the addressarea on a non-match ormultiple.
1UXIT-CURSOR125
Reserved.96UXIT-RESERVED126-221
During the processing for aUR command, this programshould place the addresswhich it is preparing to enteronto the online screen intothis area. This field is notused during the processingof a UW command.
500UXIT-P9IN222-721
361CODE-1 Plus User Guide for IBM i
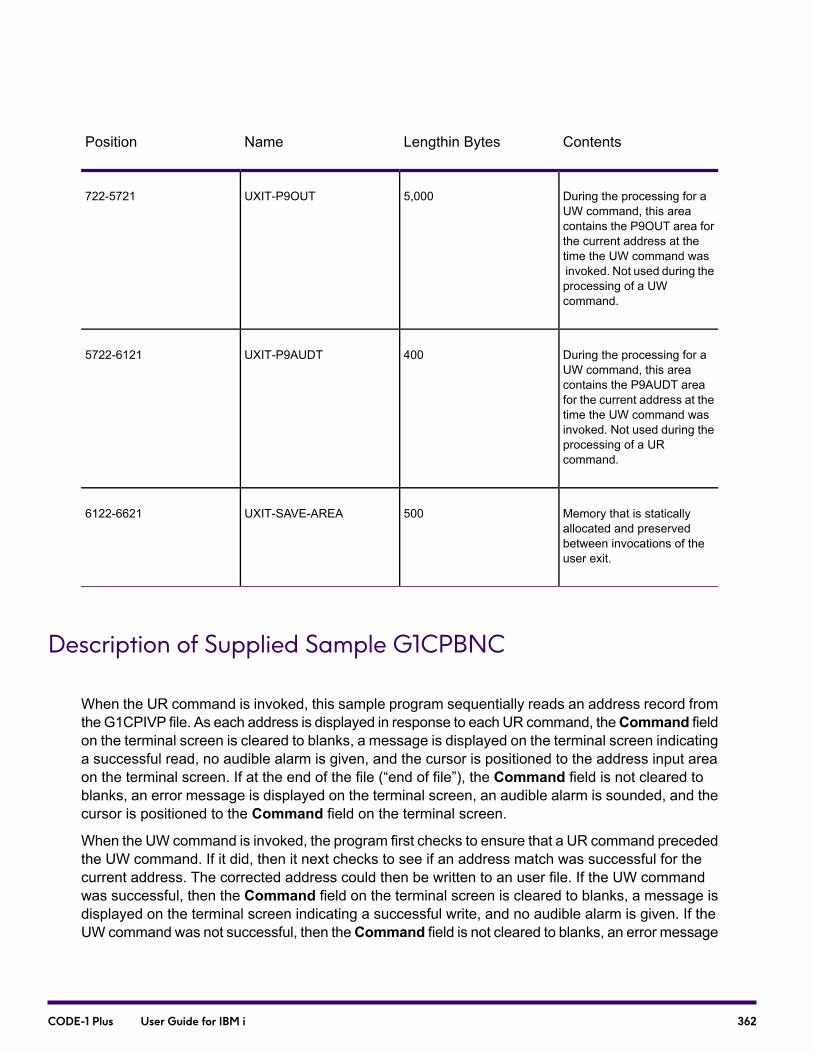
ContentsLengthin BytesNamePosition
During the processing for aUW command, this areacontains the P9OUT area forthe current address at thetime the UW command wasinvoked. Not used during theprocessing of a UWcommand.
5,000UXIT-P9OUT722-5721
During the processing for aUW command, this areacontains the P9AUDT areafor the current address at thetime the UW command wasinvoked. Not used during theprocessing of a URcommand.
400UXIT-P9AUDT5722-6121
Memory that is staticallyallocated and preservedbetween invocations of theuser exit.
500UXIT-SAVE-AREA6122-6621
Description of Supplied Sample G1CPBNC
When the UR command is invoked, this sample program sequentially reads an address record fromtheG1CPIVP file. As each address is displayed in response to each UR command, theCommand fieldon the terminal screen is cleared to blanks, a message is displayed on the terminal screen indicatinga successful read, no audible alarm is given, and the cursor is positioned to the address input areaon the terminal screen. If at the end of the file (“end of file”), the Command field is not cleared toblanks, an error message is displayed on the terminal screen, an audible alarm is sounded, and thecursor is positioned to the Command field on the terminal screen.
When the UW command is invoked, the program first checks to ensure that a UR command precededthe UW command. If it did, then it next checks to see if an address match was successful for thecurrent address. The corrected address could then be written to an user file. If the UW commandwas successful, then the Command field on the terminal screen is cleared to blanks, a message isdisplayed on the terminal screen indicating a successful write, and no audible alarm is given. If theUW command was not successful, then theCommand field is not cleared to blanks, an error message
362CODE-1 Plus User Guide for IBM i
is displayed on the terminal screen, and an audible alarm is sounded. In either case, the cursor ispositioned to the Command field on the terminal screen.
Note: The delivered version of G1CPBNC is set up to perform file I/O against the IVP outputunmatched records file C1BMNCO. In CICS, the program reads and writes to extra partitiondatasets. The transient data queues are “G1IV” (read) and “G1OV” (write). On all otherplatforms, the input sequential dataset is “G1CPIVP,” and the output is to “G1CPOVP”. Alldatasets have LRECL=256, and BLKSIZE is determined by the job control language.
363CODE-1 Plus User Guide for IBM i
12 - Using Z4CHANGE
In this section
What is the Z4CHANGE Option?...........................................................365Using Z4CHANGE Option Processing...................................................366Calling Z4CHANGE From Your Own Driver...........................................368Generating Reports for Z4CHANGE Processing...................................371
CODE-1 Plus User Guide for IBM i
What is the Z4CHANGE Option?
The Z4CHANGEOption is a product provided by the USPS that can save you a considerable amountof processing time. The Z4CHANGE Option is extremely useful if you have large name-and-addressfiles that you use frequently. The Z4CHANGE Option enables you to run that file through CODE-1Plus and attempt to match:
• Only those records with ZIP + 4 Codes changed by the USPS since the file was last processed
• Records that were not successfully coded on previous CODE-1 Plus runs.
In other words, if you have a list that you already processed using CODE-1 Plus, you can run thelist each month using the Z4CHANGE Option processing, and attempt to match those records withnew ZIP + 4 Codes.
Note: Before you use the Z4CHANGE Option, you must run your entire file through CODE-1Plus one time without using Z4CHANGE Option. Then, each time you want to mail recordsfrom your file, run the file again using Z4CHANGE Option processing. Your list stays current,but you do not expend processing time confirming records that were already correct.
Z4CHANGE Option Database
Included with your CODE-1 Plus software is a Z4CHANGE Option database. The database ispublished by the USPS every month and contains all of the ZIP+4 Codes that the USPS changedin the previous 12-month period.
Rules for Using the Z4CHANGE Option
The USPS instituted the following rules regarding Z4CHANGE Option processing:
• You must initially run your entire mailing list through CASS-certified software.
• Subsequently, it is sufficient to use Z4CHANGE Option processing on that list to maintain itscompliance with CASS rules.
• You must run the entire file again at the end of the third year following initial Z4CHANGE Optioncertification. (This means that you do not need to run the file through CASS-certified software everyyear, as long as you are using Z4CHANGE Option processing.)
365CODE-1 Plus User Guide for IBM i
Note: If the USPS determines that significant changes were made to the CASS requirements,you must reprocess your entire list using recently-certified software.
Activating the Z4CHANGE Option
To activate and use Z4CHANGE (C1P430), you can either pass, as parameters, the names ofpre-defined call areas, or use the CS ZIP parameter and the Z4 OUT parameter to provide all theinformation necessary to perform the function accurately and return the appropriate information. Forcomplete parameter record reference material, Appendix E, “Using the Database Functions.”
The call areas and the procedures for filling in the screens are described later in this chapter.
Using Z4CHANGE Option Processing
This section describes the changes to make to your CODE-1 Plus jobs to use Z4CHANGE Optionprocessing (C1P430).
Parameters
To use Z4CHANGE Option processing, add fields to the CS ZIP and Z4 OUT parameters from astandard job. Follow the instructions below to perform Z4CHANGE Option processing in your batchjob.
Process Your Entire List Through CODE-1 Plus
If you want to have CODE-1 Plus write the database vintage date in the output records, do thefollowing:
1. In position 26-28 of the Z4 OUT parameter, specify the location for the database vintage date.
2. In position 30 of the Z4 OUT parameter, specify one of the following codes to indicate the formatof the vintage date:
• C— 4-byte character format (YYMM) (default)
• P— 3-byte packed decimal format (YYMM)
• B— 2-byte binary format (YYMM)
366CODE-1 Plus User Guide for IBM i

• 3 — 3-byte binary format (YYYYMM)
• 6 — 6-byte character format (YYYYMM)
• 4 — 4-byte packed decimal format (YYYYMM)
Each Month, Process Your File Again
If the vintage date is stored in your input records:
1. In positions 44-46 of the CS ZIP parameter, write the location of the master file vintage date inthe input records.
2. In position 48 of the CS ZIP parameter, write one of the following format codes to tell CODE-1Plus the format of the vintage date in the input records:
• C— 4-byte character format (YYMM) (this is the default)
• P— 3-byte packed decimal format (YYMM)
• B— 2-byte binary format (YYMM)
• 3 — 3-byte binary format (YYYYMM)
• 6 — 6-byte character format (YYYYMM)
• 4 — 4-byte packed decimal format (YYYYMM)
3. In positions 32-34 of the Z4 OUT parameter, write the location for the output Z4CHANGE OptionReturn Code. One of the following codes will be stored in the position you specify:
• 0— Address matching was not required for this record (the USPS has not changed this ZIP + 4Code since the database vintage date).
• 4— Address matching was required for this record (the USPS has changed this ZIP + 4 Codesince the database vintage date).
• 8— A fatal error occurred during processing.
If the vintage date is not stored in your input records:
1. In positions 50-55 of the CS ZIP parameter, specify the vintage date of the master file that wasused to process this list the last time the list was processed. Write the date in YYYYMM format.
2. In positions 32-34 of the Z4 OUT parameter, write the location for the output Z4CHANGE Optionreturn code. One of the following codes is stored in the position you specify:
• 0— Address matching was not required for this record (the USPS has not changed this ZIP+4Code since the database vintage date).
367CODE-1 Plus User Guide for IBM i
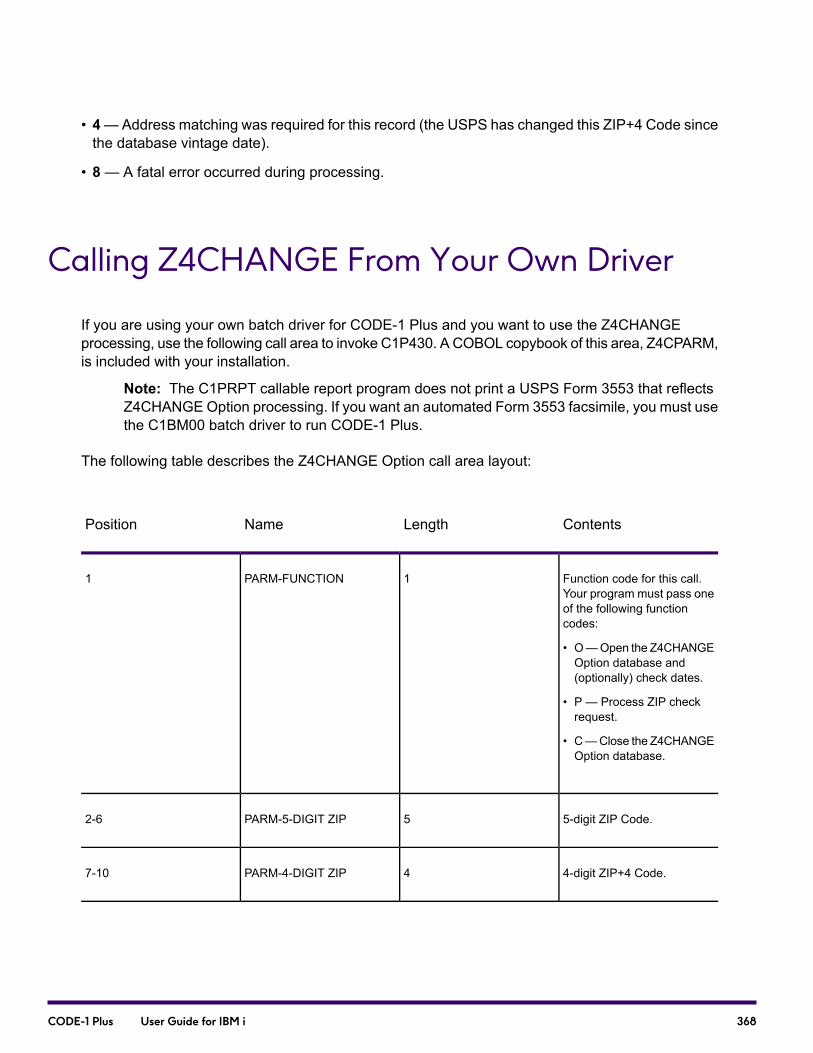
• 4—Address matching was required for this record (the USPS has changed this ZIP+4 Code sincethe database vintage date).
• 8— A fatal error occurred during processing.
Calling Z4CHANGE From Your Own Driver
If you are using your own batch driver for CODE-1 Plus and you want to use the Z4CHANGEprocessing, use the following call area to invoke C1P430. A COBOL copybook of this area, Z4CPARM,is included with your installation.
Note: The C1PRPT callable report program does not print a USPS Form 3553 that reflectsZ4CHANGEOption processing. If you want an automated Form 3553 facsimile, you must usethe C1BM00 batch driver to run CODE-1 Plus.
The following table describes the Z4CHANGE Option call area layout:
ContentsLengthNamePosition
Function code for this call.Your program must pass oneof the following functioncodes:
• O—Open the Z4CHANGEOption database and(optionally) check dates.
• P — Process ZIP checkrequest.
• C—Close the Z4CHANGEOption database.
1PARM-FUNCTION1
5-digit ZIP Code.5PARM-5-DIGIT ZIP2-6
4-digit ZIP+4 Code.4PARM-4-DIGIT ZIP7-10
368CODE-1 Plus User Guide for IBM i

ContentsLengthNamePosition
If PARM-FUNCTION is set toO, your program must passthe date of the CODE-1 Plusdatabase being used for thisCODE-1 Plus run. This datewill be compared to the dateof the Z4CHANGE Optiondatabase to ensure that theyare the same. CODE-1 Pluswill then pass the vintagedate on the Z4CHANGEOption database back to yourcalling program through thisfield.
If PARM-FUNCTION is set toP, your program must passthe date (in YYYYMM format)of the master file that was lastused to match the recordwhose ZIP Code is now beingchecked.
If PARM-FUNCTION is set toC, this field is ignored.
NOTE: This field uses afour-digit year in YYYYformat. If leading zeroes arepassed in lieu of century,century will be calculatedusing the 80/20 rule. That is,YY less than 80 will assumecentury=20, otherwise willassume century=19.
6PARM-DATE-CODED-VINTAGEYYYYMM format
11-16
Reserved.13N/A17-29
Name of the library that holdsthe Z4CHANGE Optionmaster file. Used for AS/400only.
10PARM-DBLIB30-39
369CODE-1 Plus User Guide for IBM i
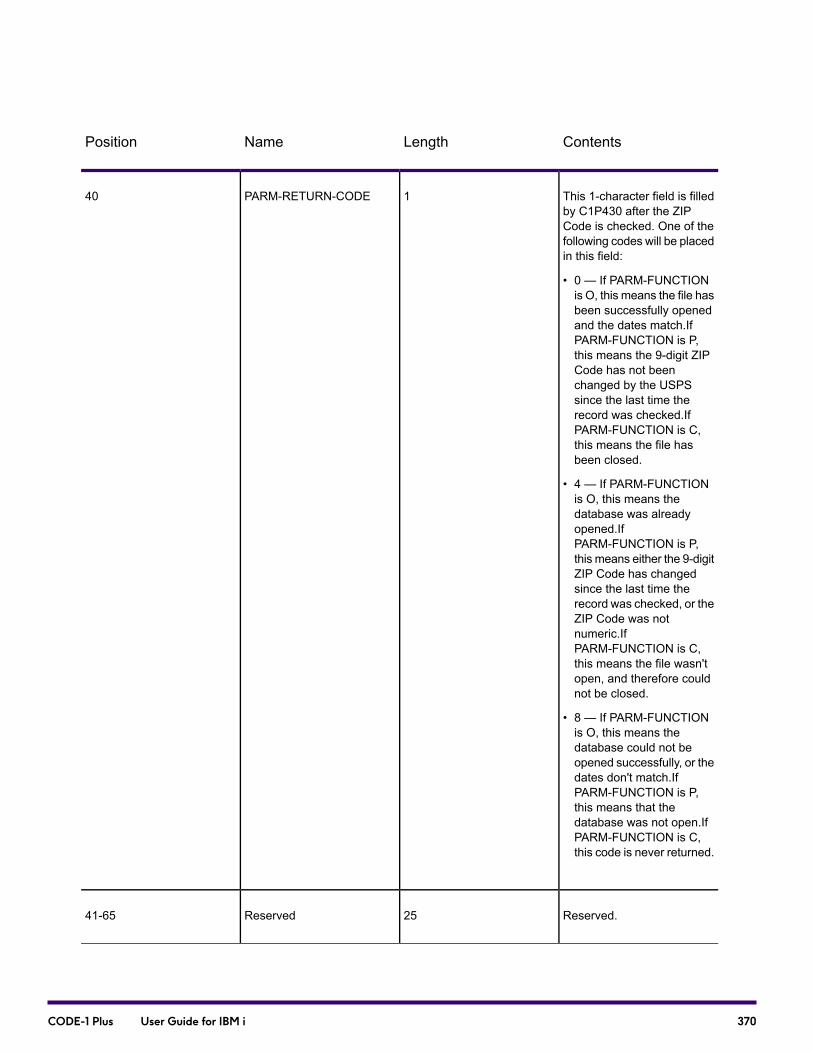
ContentsLengthNamePosition
This 1-character field is filledby C1P430 after the ZIPCode is checked. One of thefollowing codes will be placedin this field:
• 0 — If PARM-FUNCTIONis O, this means the file hasbeen successfully openedand the dates match.IfPARM-FUNCTION is P,this means the 9-digit ZIPCode has not beenchanged by the USPSsince the last time therecord was checked.IfPARM-FUNCTION is C,this means the file hasbeen closed.
• 4 — If PARM-FUNCTIONis O, this means thedatabase was alreadyopened.IfPARM-FUNCTION is P,this means either the 9-digitZIP Code has changedsince the last time therecord was checked, or theZIP Code was notnumeric.IfPARM-FUNCTION is C,this means the file wasn'topen, and therefore couldnot be closed.
• 8 — If PARM-FUNCTIONis O, this means thedatabase could not beopened successfully, or thedates don't match.IfPARM-FUNCTION is P,this means that thedatabase was not open.IfPARM-FUNCTION is C,this code is never returned.
1PARM-RETURN-CODE40
Reserved.25Reserved41-65
370CODE-1 Plus User Guide for IBM i
Generating Reports for Z4CHANGE Processing
When you run a Z4CHANGE job, you can also generate reports about the Z4CHANGE job run.These reports contain important processing information and include a Parameter Record Listing,CASS Form, Control Totals, Analysis of Matched Records, and Address Execution Statistics Reports.For more information on each of these reports, refer to Generating Reports.
371CODE-1 Plus User Guide for IBM i

13 - Using Delivery PointValidation
In this section
What is Delivery Point Validation?..........................................................373Using the Delivery Point Validation Database........................................375Activating Delivery Point Validation........................................................376Understanding DPV Return Information.................................................378DPV Reports...........................................................................................378DPV Error Messages..............................................................................380What If My Mailing Generates a Seed Violation?...................................383
CODE-1 Plus User Guide for IBM i
What is Delivery Point Validation?
The USPS introduced Delivery Point Validation (DPV) to validate the accuracy of address data tothe physical delivery point.
Note: The USPS regulations require Delivery Point Validation (DPV) processing for CASScertification.
CODE-1 Plus does not validate addresses at the specific delivery-point level. CODE-1 Plus onlyconfirms whether an address falls within the low-to-high address range encoded for the named street.CODE-1 Plus uses the DPV option to determine whether the actual address exists to the apartmentor suite information level. The DPV option reduces your undeliverable-as-addressed (UAA) mailvolume that results from inaccurate addresses to reduce postage costs and costs associated withthe handling of inaccurate address information.
Delivery Point Validation processing also confirms whether an address is a commercial mail receivingagency (CMRA) that uses private mail boxes (PMB). You can use DPV to determine the potentialvalidity of PMB information on an input address.
Although DPV can validate the accuracy of an existing address, it cannot be used to create addresslists. The DPV product is a secure dataset of USPS addresses and does NOT contain addressesthat are not delivered by the USPS.
Resolving Multiple Matches
Delivery Point Validation processing can also resolve multiple matches from the ZIP + 4 databaseto increase the number of ZIP + 4 coded records in your address list.
The DPV option processes every ZIP + 4 coded record against the DPV files to resolve multiplematches to the ZIP + 4 database. Resolving ZIP + 4 multiple matches increases your ZIP + 4 matchrate, but also increases processing time. For this reason, you may wish to turn off some of theseoptions.
Use the DPVIN parameter to define the options for multiple match conditions. When verifying propercandidates for DPV processing, the multiple match condition is first checked at the ZIP Code level,carrier route, directional, and then suffix. Multiple match conditions can occur in multiple categories.
The DPVIN parameter includes options for unique ZIP Code and small town default assignmentsand multiple secondary components. The following figure provides examples of multiple matchesthat can be Delivery Point Validated.
For more information on setting upmultiple match options, refer to the DPVIN in Chapter 1, Parametersin your CODE-1 Plus Reference Guide.
373CODE-1 Plus User Guide for IBM i

Figure 1: Multiple Match Examples
374CODE-1 Plus User Guide for IBM i

Using the Delivery Point Validation Database
Delivery Point Validation requires a separate database. Precisely provides an updated DPV databaseevery month. The DPV database must be kept in synch with the USPS ZIP + 4 data. To use DPVprocessing, you must license the DPV option from Precisely and install a License Management keyas required by the USPS. Please refer to your License Management Guide for more informationon obtaining your permanent license key for DPV.
The following table describes the DPV database 120-day expiration cycle.
ExpirationDatabase Month
April 30January
May 31February
June 30March
July 31April
August 31May
September 30June
October 31July
November 30August
December 31September
January 31October
375CODE-1 Plus User Guide for IBM i
ExpirationDatabase Month
February 28November
March 31December
Installing the DPV Database
To install the DPV database in an IBM i environment, complete the following steps:
1. From the Work With Jobs screen, press F20 to access Database Functions.
2. From the Database Functions screen, select option 2: Install Database.
3. On the Install CODE-1 Plus Databases screen (shown below), enter Y in “Install DPVDatabase?”.
4. Specify an install source of C for CD/DVD or I for IDS (downloaded). DPV should be installedinto the same library as your US Postal Database.
Activating Delivery Point Validation
Activating DPV in Batch Mode
To activate DPV in batch mode, you must define:
• DPVIN parameter
• DPVOUT parameter
• Five MAILER parameters
Note: To process DPV on mainframe, the JCL must have DD statements for the DPV DByou intend to use. CODE-1 Plus customers should be aware that batch jobs running with DPVSplit, LACSLink, and SuiteLink may require up to 377M of GETVIS.
376CODE-1 Plus User Guide for IBM i

DPVIN Parameter
The DPVIN parameter activates DPV processing and provides processing options based on matchesto the ZIP + 4 database. For more information on the DPVIN parameter, refer to Chapter 1, Parametersin your CODE-1 Plus Reference Guide.
DPVOUT Parameter
Use the DPVOUT parameter to define your DPV processing output requirements. For more informationon the DPVOUT parameter, refer to Chapter 1, Parameters in your CODE-1 Plus Reference Guide.
Activating Delivery Point Validation
Activating DPV in Batch Mode
To activate DPV in batch mode, you must define:
• DPVIN parameter
• DPVOUT parameter
• Five MAILER parameters
Note: To process DPV on mainframe, the JCL must have DD statements for the DPV DByou intend to use. CODE-1 Plus customers should be aware that batch jobs running with DPVSplit, LACSLink, and SuiteLink may require up to 377M of GETVIS.
DPVIN Parameter
The DPVIN parameter activates DPV processing and provides processing options based on matchesto the ZIP + 4 database. For more information on the DPVIN parameter, refer to Chapter 1, Parametersin your CODE-1 Plus Reference Guide.
DPVOUT Parameter
Use the DPVOUT parameter to define your DPV processing output requirements. For more informationon the DPVOUT parameter, refer to Chapter 1, Parameters in your CODE-1 Plus Reference Guide.
377CODE-1 Plus User Guide for IBM i
Activating DPV in Callable Mode
To use DPV when calling C1MATCHx from your own driver, pass an X to the P9IDPV field in theP9IN call area.
Understanding DPV Return Information
Use the DPVOUT parameter to define the options and location in the output record for the followingDelivery Point Validation processing return information:
• Return Codes
• Footnote Codes
• CMRA Flags
• False/Positive Flag
• Footnote Codes
• No Stat Flag
• Vacant Table Flag
• PBSA Flag
For more information on the DPVOUT parameter, refer to Chapter 1, Parameters in your CODE-1Plus Reference Guide.
DPV Reports
This section describes the reports generated by DPV processing.
378CODE-1 Plus User Guide for IBM i
DPV by List Code Report
The DPV by List Code Report shows you the results of your DPV processing by list code. This reportprints automatically when your job is run, unless you have an N in column 40 of the REPORTparameter. If you need to contact Technical Support, please have this report available. This reportincludes the following information:
• All of the list codes used in DPV processing
• Total number of records presented for DPV processing
• Total number of DPV validated records
• Total number of streets DPV validated
• Total number of high rises DPV validated
• Total number of PO Boxes DPV validated
• Total number of Rural Routes/Highway Contractors DPV validated
• Total number of Firms DPV validated
• Total number of General Delivery DPV validated
• Total number of primary number errors
• Total number of secondary number errors
DPV Processing Summary Report
The DPV Processing Summary Report prints automatically when your job is run, unless you havean N in column 38 of the REPORT parameter. If you need to contact Technical Support, please havethis report available. This report includes the following information:
• Delivery Point Validation attempts with percentages
• Multiple attempts confirmed
• Unique/Small Town Default ZIP + 4 confirmed
• Number of ZIP+4 coded records
• Street records validated
• High Rise records validated
• PO Box records validated
379CODE-1 Plus User Guide for IBM i
• Rural Route/Highway Contract records validated
• Firm records validated
• Primary Number errors
• Secondary Number errors
• False Positives
• Total Residential/Business (RDI) attempts
Note: If you did not hit any seed records during your DPV processing, then the occurrenceis not populated in the false-positive (seed violation) section. A one indicates that you hit aseed record, which halted your DPV processing.
DPV Error Messages
This section describes the error messages you may receive during DPV processing.
Note: Although DPV processing may cease during an execution of CODE-1 Plus, processingwill continue to end-of-file. Any DPV errors you encounter will NOT affect your CODE-1 Plusprocessing.
Expiration of DPV Processing
The DPV option stops working the fourth month from the release of the database.
If you have an expired DPV database, this message displays:
****************************************************************************
*DELIVERYPOINTVALIDATIONSUPPRESSEDDUETODATABASEEXPIRATIONDATECHECK*
****************************************************************************
Another example is:
****************************************************************************
*Database error on DHFDPV -> EXPIRED *
****************************************************************************
380CODE-1 Plus User Guide for IBM i
Open/Read Failure
If you have an open/read failure on the DPV database, this message displays:
****************************************************************************
*OPEN/READ FAILURE ON DPV DATABASE *
****************************************************************************
Seed Records and Stop DPV Processing
Seed records are artificially manufactured addresses provided as part of the DPV option. There areapproximately 5 million seed records residing in a false-positive (seed violation) table to prevent listcreation. For each negative response that occurs during DPV processing, a query must be made tothe false-positive (seed violation) table. A match to this table stops DPV processing with the followingerror message:
****************************************************************************************
*DPV PROCESSINGWAS TERMINATED DUE TO THE DETECTION OF WHAT IS DETERMINED*
*TO BE AN ARTIFICIALLY CREATED ADDRESS. NO ADDRESS BEYOND THIS POINT HAS*
*BEENDPVVALIDATED. INACCORDANCEWITHTHELICENSEAGREEMENTBETWEENUSPS*
*AND Precisely, DPV SHALL BE USED TO VALIDATE LEGITIMATELY OBTAINED *
*ADDRESSES ONLY, AND SHALL NOT BE USED FOR THE PURPOSE OF ARTIFICIALLY*
*CREATING ADDRESS LISTS. THE WRITTEN AGREEMENT BETWEEN Precisely AND *
*ANY CUSTOMER OF Precisely SHALL ALSO INCLUDE THIS SAME RESTRICTION *
*AGAINST USING DPV TO ARTIFICIALLY CREATE ADDRESS LISTS. CONTINUING USE OF*
*DPV REQUIRES COMPLIANCE WITH ALL TERMS OF THE LICENSE AGREEMENT. IF YOU*
*BELIEVE THIS ADDRESS WAS IDENTIFIED IN ERROR, PLEASE CONTACT Precisely. *
* *
****************************************************************************************
381CODE-1 Plus User Guide for IBM i

Note: To continue DPV processing, you must provide the Seed Code listed in the errormessage to Precisely Technical Support to receive a new license key that allows you tocontinue DPV processing.
Software Incompatibility
If your software is not compatible with ZIP + 4 database (or masterfile), this error message displays:
************************************************************************
*DPV MASTER FILE IS NOT COMPATIBLE WITH THE DPV SOFTWARE. DPV DISABLED.*
************************************************************************
DPV File Load or Location Definition
If your DPV database has not been loaded or the location definition for the DPV database has beenimproperly defined, this type of error message displays:
*************************************************************************************
*SPLIT DPV ERROR# 00005, ON FUNCTION: INIT, ERROR DESC: Problem openingdph.hsc file
----- -----
| |
| Error number
DPV Data Base Type
*************************************************************************************
382CODE-1 Plus User Guide for IBM i
What If My Mailing Generates a Seed Violation?
Seed records are artificially manufactured addresses provided as part of the DPV option. There area number of seed records residing in a false-positive (seed violation) table to prevent list creation.For each negative response that occurs in a DPV query, a query must be made to the false-positive(seed violation) table. A match to this table will stop DPV processing, but CODE-1 Plus processingwill continue to the end of your job.
What to do When You Encounter a Seed
If you encounter a seed violation:
1. Review the appropriate USPS information.
a. For a LACSLink seed violation, review the LACSLink End User Licensee PerformanceRequirements document at:
https://postalpro.usps.com/LL_EU_LPR
b. For a DPV seed violation, review the USPS DPV Product Licensee PerformanceRequirements document at:
https://postalpro.usps.com/DPV_LPR
2. Contact Precisely Technical Support atsupport.precisely.com.
383CODE-1 Plus User Guide for IBM i

14 - Using LACSLink
In this section
What is LACSLink?.................................................................................385How Does LACSLink Work?...................................................................386How Do I Install the LACSLink Option?..................................................387How Do I Activate LACSLink?................................................................388Understanding LACSLink Return Information..........................................395LACSLink Reports..................................................................................397What If My Mailing Generates a Seed Violation?...................................398
CODE-1 Plus User Guide for IBM i
What is LACSLink?
You can use LACSLink to implement the USPS Locatable Address Conversion System (LACS) service.LACS is used to provide computerized address list correction for addresses in areas affected byrural route and box numbers to city-style address conversion, and city-style to city-style addressconversions.
LACS provides mailers an automated method of obtaining new addresses when a 911 emergencysystem has been implemented. The 911 address conversions normally involve changing rural-styleaddresses to city-style addresses. In some instances, conversions may result in the renaming orrenumbering of existing city-style addresses.
Note: USPS regulations require LACSLink processing for CASS certification.
What are the Benefits of LACSLink?
LACSLink provides the following benefits:
• Complies with USPS CASS regulations. LACSLink processing is a USPS CASS requirement.
• Prepares you for future USPS CASS regulations. In future CASS cycles, the USPS may expandLACSLink processing requirements.
• Reduces undeliverable mail by providing the most current address information for matches madeto the LACS file.
• Prevents the need for duplicate mailpieces or re-mailings after address corrections are receivedsince the address correction is applied prior to the mailing.
• Lowers your costs by reducing the number of undeliverable and/or duplicate mailpieces by usingthe most current address information.
• Provides the opportunity for faster marketing through accurate mail delivery.
385CODE-1 Plus User Guide for IBM i
Who is Eligible to Use LACSLink?
All CODE-1 Plus customers operating in the United States are eligible to use LACSLink.
Note: The USPS has specific export rules that regulate the distribution of postal databases.At this time, DPV, LACSLink, and SuiteLinkdatabases are not available to customers operating outside of theUnited States. For more information on the USPS rules, go to thehttps://postalpro.usps.com/https://postalpro.usps.com/https://postalpro.usps.com/website.
How Does LACSLink Work?
The following steps describe the sequence of CODE-1 Plus LACSLink processing:
1. Standardizes input address information to conform with USPS requirements including the ZIP + 4Code,
2. Matches the address against the LACS file.
3. If an exact match is made with the old address information on the LACS file, processing updatesthe address.
4. If a match is found, CODE-1 Plus returns the following information:
• Original input address from the mailer
• Input address as standardized and appended with the ZIP + 4 Code (if possible)
• Standardized new address when the standardized input address matches the old address onthe LACS file
• National Delivery Index (NDI) report that includes a breakdown of deliverable address information
5. If no match is found, CODE-1 Plus returns the following information:
• Original input address
• Standardized ZIP + 4 coded version of the input address
• USPS Form 3553
• NDI report
386CODE-1 Plus User Guide for IBM i

How Do I Install the LACSLink Option?
The LACSLink Option is installed as part of your standard CODE-1 Plus installation. The CODE-1Plus installation contains all data needed to perform LACSLink processing (e.g., the security key andthe security file). After installing CODE-1 Plus, you must activate the LACSLink Option to performLACSLink processing.
How Do I Install the LACS Database?
In this section, we provide platform-specific instructions for installing your LACSLink database. TheLACSLink data must be kept in synch with the USPS ZIP + 4 data. Please note that theLACSLink database has a 120-day expiration cycle. Databases expire on the following schedule.
ExpirationDatabase Month
April 30January
May 31February
June 30March
July 31April
August 31May
September 30June
October 31July
November 30August
387CODE-1 Plus User Guide for IBM i
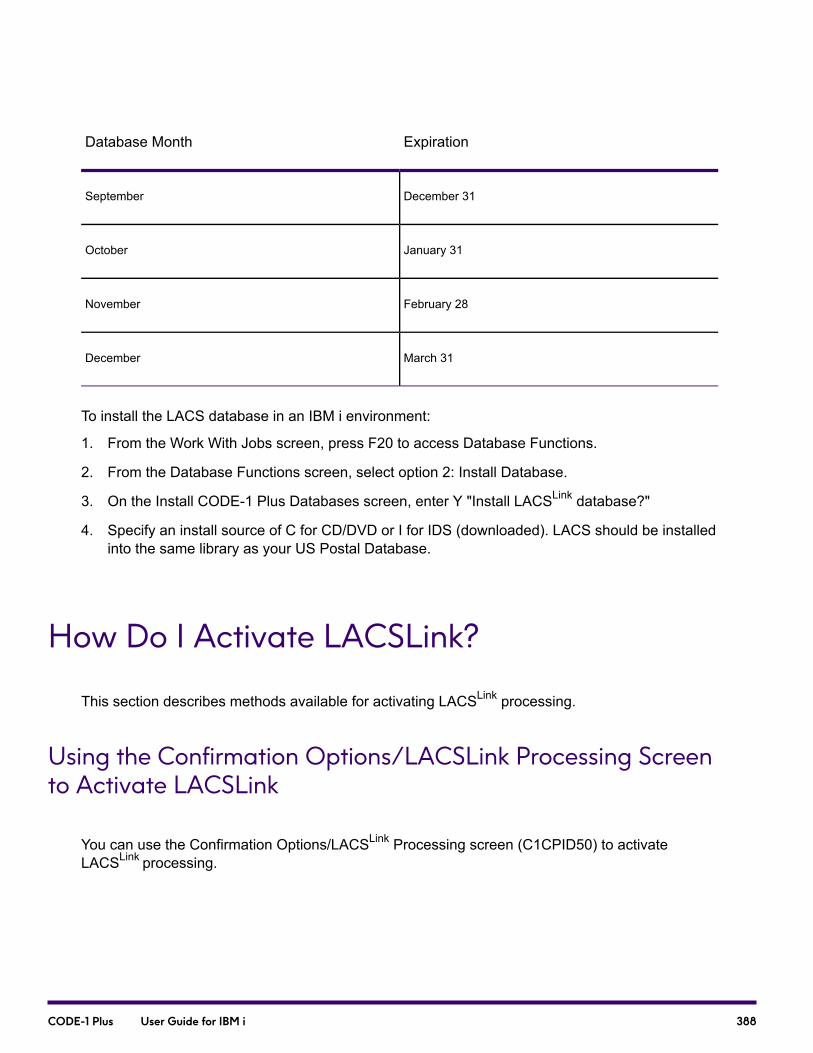
ExpirationDatabase Month
December 31September
January 31October
February 28November
March 31December
To install the LACS database in an IBM i environment:
1. From the Work With Jobs screen, press F20 to access Database Functions.
2. From the Database Functions screen, select option 2: Install Database.
3. On the Install CODE-1 Plus Databases screen, enter Y "Install LACSLink database?"
4. Specify an install source of C for CD/DVD or I for IDS (downloaded). LACS should be installedinto the same library as your US Postal Database.
How Do I Activate LACSLink?
This section describes methods available for activating LACSLink processing.
Using the Confirmation Options/LACSLink Processing Screento Activate LACSLink
You can use the Confirmation Options/LACSLink Processing screen (C1CPID50) to activateLACSLink processing.
388CODE-1 Plus User Guide for IBM i

CommentsDescriptionFormatField Name
Required.No default.The type ofLACSLink processing to beperformed:
Z Perform the ZIP + 4coding process and only callLACSLink if the ZIP + 4process returns a LACSindicator.
Blank or ZLACSLink Processing Type
Required.
Default is W.
This option allows LACSLinkto stop batch jobs when afalse-positive (seed record)has been encountered:
S Shuts down CODE-1 Plusprocessing when afalse-positive (seed record)is encountered.
W Allows CODE-1 Plus tocontinue processing tocompletion of the entire job,generating Form 3553.
S or WLACSLink Seed Recordtreatment
This field allows you tospecify if you want to performalternatedLACSLink processing.
R Perform LACSLink
processing.
L Invoke limitedLACSLink subsystemprocessing. Provides theCODE-1 Plus non-LACSconverted street address,city, and state data to theoutput standardized addressand parsed elements fields.
L or FLACSLink Alternate Option
389CODE-1 Plus User Guide for IBM i

CommentsDescriptionFormatField Name
This option allows you tospecify whether to produce a“99” return code for LACSseed record processing.
Y Do not produce “99”return code for LACS seedrecord processing.
N LACS seed recordprocessing results in “99”return code.
Note: An “S” in“LACSLink SeedRecord treatment”overrides thisoption.
Y or NLACSLinkSuppress 99ReturnCode
RequiredThis option allows you tospecify size of LACSLink
module.
Blank LACS process will beusingMediummemorymodel(default).
P Pico memory model (nofiles in memory).
U Micro memory model (nofiles in memory, onlyindexes).
S Small memory model(Rv9 expansion in memory).
M Medium memory model.
L Large memory model.
H Huge memory model (allfiles in memory).
P, U, S, M, L, or HMemory Model
Activating LACSLink in Batch Mode
To activate LACSLink in batch mode, define the LACS parameter record. For more information onthe LACS parameter, please refer to "Parameter Reference" in yourCODE-1 Plus Reference Guide.
390CODE-1 Plus User Guide for IBM i
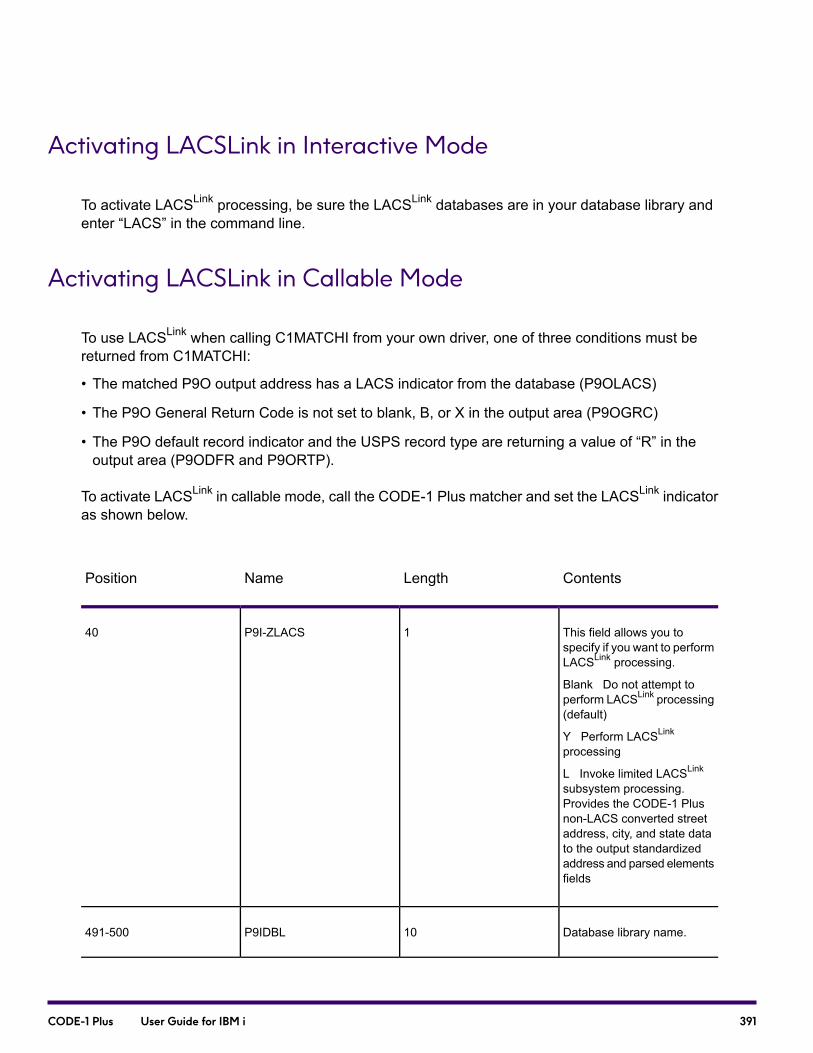
Activating LACSLink in Interactive Mode
To activate LACSLink processing, be sure the LACSLink databases are in your database library andenter “LACS” in the command line.
Activating LACSLink in Callable Mode
To use LACSLink when calling C1MATCHI from your own driver, one of three conditions must bereturned from C1MATCHI:
• The matched P9O output address has a LACS indicator from the database (P9OLACS)
• The P9O General Return Code is not set to blank, B, or X in the output area (P9OGRC)
• The P9O default record indicator and the USPS record type are returning a value of “R” in theoutput area (P9ODFR and P9ORTP).
To activate LACSLink in callable mode, call the CODE-1 Plus matcher and set the LACSLink indicatoras shown below.
ContentsLengthNamePosition
This field allows you tospecify if you want to performLACSLink processing.
Blank Do not attempt toperform LACSLink processing(default)
Y Perform LACSLink
processing
L Invoke limited LACSLink
subsystem processing.Provides the CODE-1 Plusnon-LACS converted streetaddress, city, and state datato the output standardizedaddress and parsed elementsfields
1P9I-ZLACS40
Database library name.10P9IDBL491-500
391CODE-1 Plus User Guide for IBM i
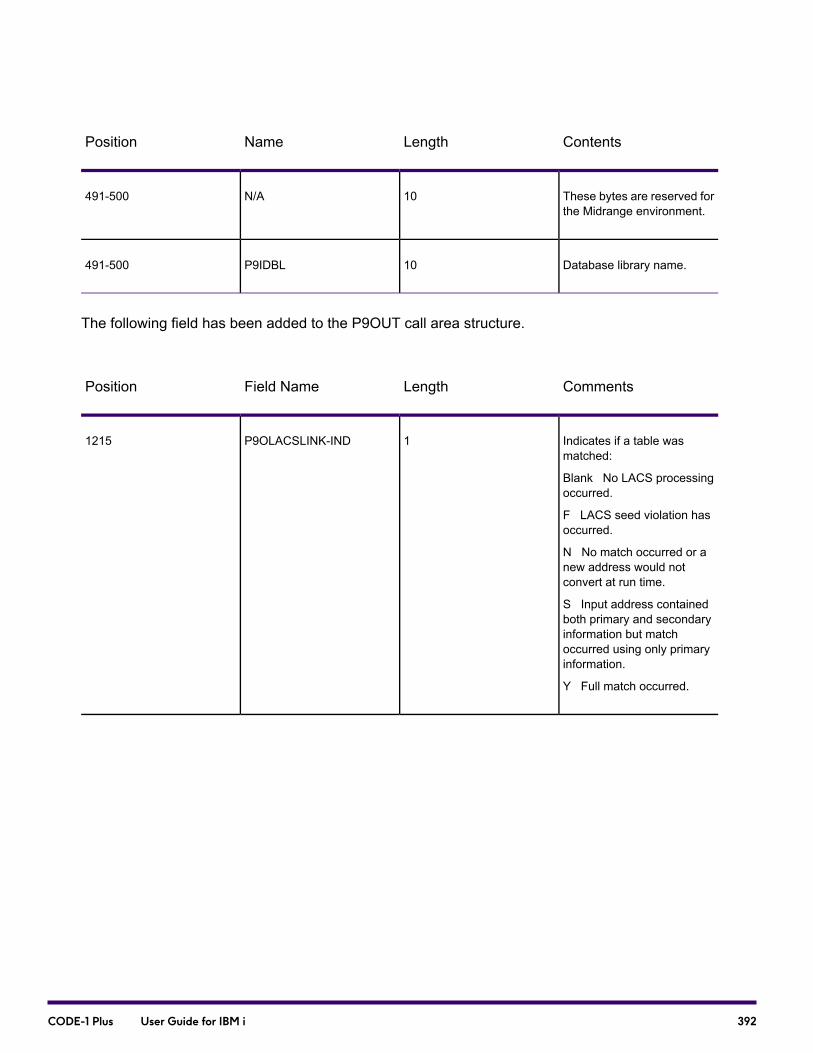
ContentsLengthNamePosition
These bytes are reserved forthe Midrange environment.
10N/A491-500
Database library name.10P9IDBL491-500
The following field has been added to the P9OUT call area structure.
CommentsLengthField NamePosition
Indicates if a table wasmatched:
Blank No LACS processingoccurred.
F LACS seed violation hasoccurred.
N No match occurred or anew address would notconvert at run time.
S Input address containedboth primary and secondaryinformation but matchoccurred using only primaryinformation.
Y Full match occurred.
1P9OLACSLINK-IND1215
392CODE-1 Plus User Guide for IBM i

CommentsLengthField NamePosition
Indicates the success of theLACSLink process:
Blank No LACS processingoccurred.
A LACS record match.
00 No match.
0 Address was passed toLACS process, but could notbe coded by LACS.
1 Address was successfullycoded through the LACSprocess.
2 A LACS False/Positiverecord was encountered, butsoftware is operating in aNCOA/No Stop Capacity. Assuch, NCOA/No StopCapacity allows for the LACSfunction to continueprocessing when a seedrecord is encountered.
09 LACSLinkwas able to findthe input address on itsinternal tables but for somereason did not return the new(converted) address.
14 Match found LACSrecord but would not convert.
92 Match with secondaryinformation.
2P9OLACSLINK-RC1216-1217
393CODE-1 Plus User Guide for IBM i
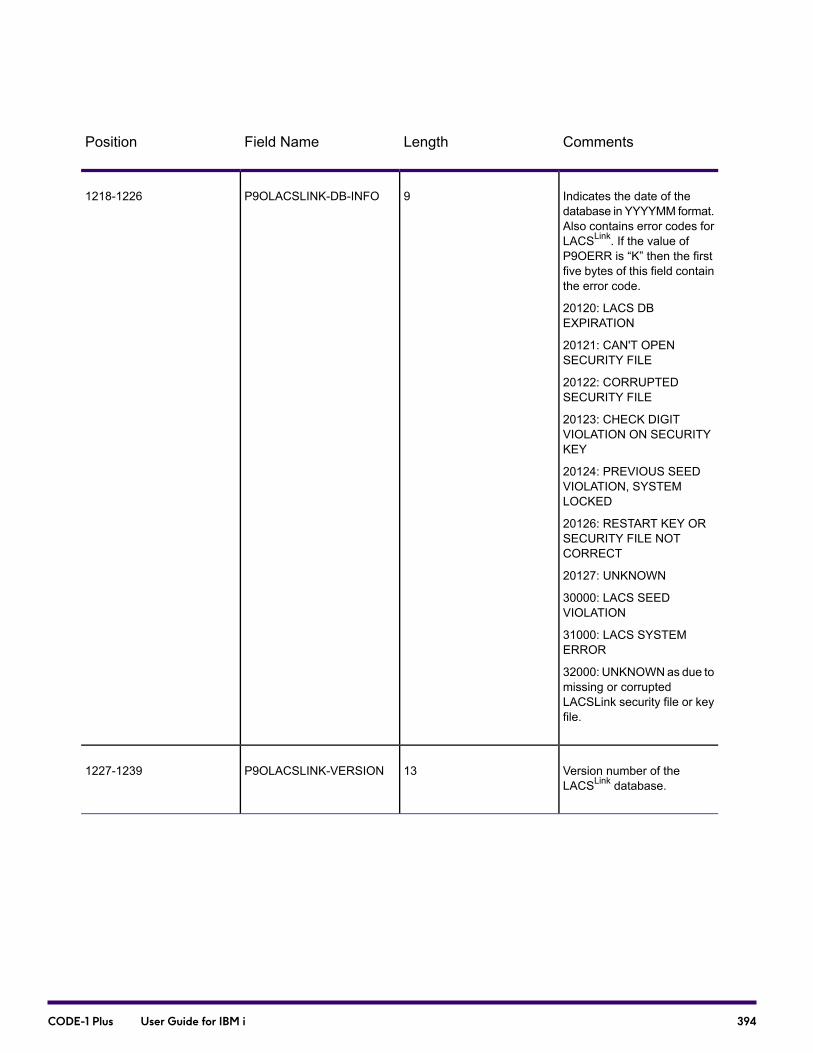
CommentsLengthField NamePosition
Indicates the date of thedatabase in YYYYMM format.Also contains error codes forLACSLink. If the value ofP9OERR is “K” then the firstfive bytes of this field containthe error code.
20120: LACS DBEXPIRATION
20121: CAN'T OPENSECURITY FILE
20122: CORRUPTEDSECURITY FILE
20123: CHECK DIGITVIOLATION ON SECURITYKEY
20124: PREVIOUS SEEDVIOLATION, SYSTEMLOCKED
20126: RESTART KEY ORSECURITY FILE NOTCORRECT
20127: UNKNOWN
30000: LACS SEEDVIOLATION
31000: LACS SYSTEMERROR
32000: UNKNOWNas due tomissing or corruptedLACSLink security file or keyfile.
9P9OLACSLINK-DB-INFO1218-1226
Version number of theLACSLink database.
13P9OLACSLINK-VERSION1227-1239
394CODE-1 Plus User Guide for IBM i
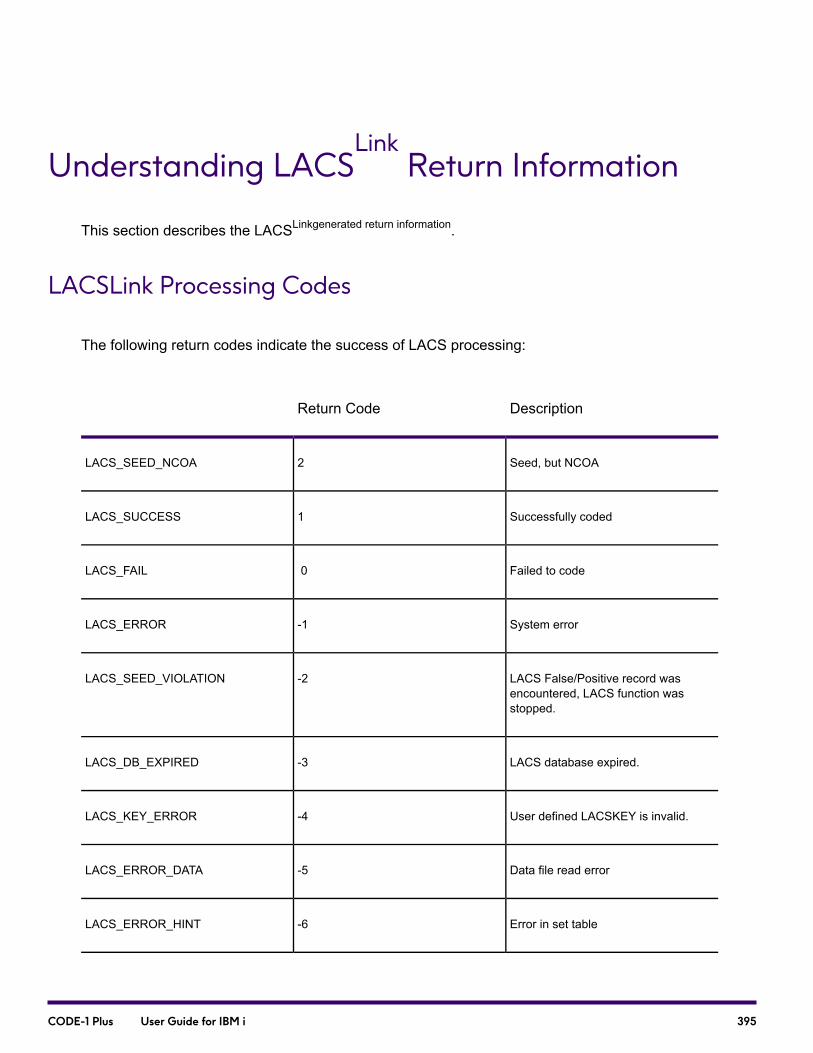
Understanding LACSLink
Return Information
This section describes the LACSLinkgenerated return information.
LACSLink Processing Codes
The following return codes indicate the success of LACS processing:
DescriptionReturn Code
Seed, but NCOA2LACS_SEED_NCOA
Successfully coded1LACS_SUCCESS
Failed to code0LACS_FAIL
System error-1LACS_ERROR
LACS False/Positive record wasencountered, LACS function wasstopped.
-2LACS_SEED_VIOLATION
LACS database expired.-3LACS_DB_EXPIRED
User defined LACSKEY is invalid.-4LACS_KEY_ERROR
Data file read error-5LACS_ERROR_DATA
Error in set table-6LACS_ERROR_HINT
395CODE-1 Plus User Guide for IBM i

DescriptionReturn Code
Database open error-70LACS_ERROR_DBASE0
Database open error-71LACS_ERROR_DBASE1
Database open error-72LACS_ERROR_DBASE2
Database open error-73LACS_ERROR_DBASE3
Database open error-74LACS_ERROR_DBASE4
Database open error-75LACS_ERROR_DBASE5
Error in platform detection-8LACS_ERROR_PLAT
Error in LACS information-9LACS_ERROR_INFO
Error in LACS initialization-10LACS_ERROR_INIT
Error in LACS statistics-11LACS_ERROR_STATS
Error in LACS Secde-12LACS_ERROR_SECDE
Error in LACS Sedin-13LACS_ERROR_SECIN
Error in LLPARSE-14LACS_ERROR_PARSE
Error in rv9esd-15LACS_ERROR_RV9
396CODE-1 Plus User Guide for IBM i
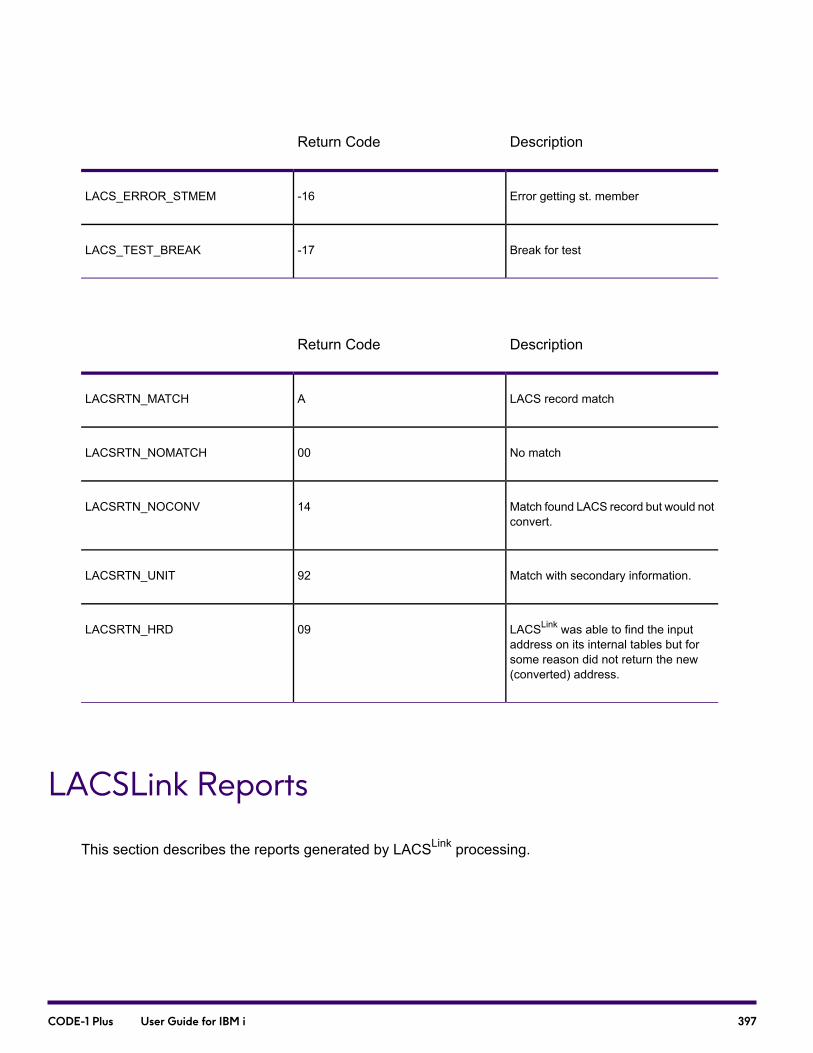
DescriptionReturn Code
Error getting st. member-16LACS_ERROR_STMEM
Break for test-17LACS_TEST_BREAK
DescriptionReturn Code
LACS record matchALACSRTN_MATCH
No match00LACSRTN_NOMATCH
Match found LACS record but would notconvert.
14LACSRTN_NOCONV
Match with secondary information.92LACSRTN_UNIT
LACSLink was able to find the inputaddress on its internal tables but forsome reason did not return the new(converted) address.
09LACSRTN_HRD
LACSLink Reports
This section describes the reports generated by LACSLink processing.
397CODE-1 Plus User Guide for IBM i

LACSLink Information on USPS Form 3553
The Qualitative Statistical Summary (QSS) section of the USPS Form 3553 (CASS Summary Report)displays as shown below if you are processing with the LACSLink Option.
: HIGH RISE :HIGH RISE :RURAL RTE :RURAL RTE : LACS/ : EWS:SUITELINK :
: DEFAULT : EXACT : DEFAULT : EXACT : LACSLINK : ::
:___________:__________:__________:__________:__________:__________:________:
: 2 : 17 : 0 : 0 : 0 : 0 : 0 :
:___________________________________________________________________________:
PS FORM 3553, FEBRUARY 2013 See DMM Sec 708 for more information
What If My Mailing Generates a Seed Violation?
Seed records are artificially manufactured addresses provided as part of the DPV option. There area number of seed records residing in a false-positive (seed violation) table to prevent list creation.For each negative response that occurs in a DPV query, a query must be made to the false-positive(seed violation) table. A match to this table will stop DPV processing, but CODE-1 Plus processingwill continue to the end of your job.
What to do When You Encounter a Seed
If you encounter a seed violation:
1. Review the appropriate USPS information.
a. For a LACSLink seed violation, review the LACSLink End User Licensee PerformanceRequirements document at:
https://postalpro.usps.com/LL_EU_LPR
398CODE-1 Plus User Guide for IBM i
b. For a DPV seed violation, review the USPS DPV Product Licensee PerformanceRequirements document at:
https://postalpro.usps.com/DPV_LPR
2. Contact Precisely Technical Support atsupport.precisely.com.
399CODE-1 Plus User Guide for IBM i

15 - Using SuiteLink
In this section
What is SuiteLink?..................................................................................401How Does SuiteLink Work?....................................................................402How do I Install the SuiteLink Option?...................................................403How Do I Activate SuiteLink?.................................................................404SuiteLink Output.....................................................................................409
CODE-1 Plus User Guide for IBM i
What is SuiteLink?
According to the USPS, 26% of all mail addressed to high-rise addresses (business and residential)ZIP+4 Code to a high-rise default code. The purpose of SuiteLink is to improve business addressingby adding known secondary (suite) numbers to allow delivery sequencing where it would otherwisenot be possible.
The USPS defines SuiteLink as: “a data-only product containing business addressing informationspecifically identified as high-rise default records as a result of CASS processing. This productprovided by the USPS allows developers to create a software interface that will have the capabilityof appending the secondary (suite) information to a business address, providing the input addressis determined to be a highrise default record.”
Note: SuiteLink cannot be used as part of a standalone process; it must be used in conjunctionwith CODE-1 Plus.
Note: The USPS regulations require SuiteLink processing for CASS certification.
Note: The FIRMNM parameter is required when you use the STELNK parameter for SuiteLink®
processing.
What are the Benefits of SuiteLink?
SuiteLink enables customers to provide improved business addressing information by adding knownsuite information to business addresses, which will allow USPS delivery sequencing where it wouldnot otherwise be possible.
The SuiteLinkOption provides you with the ability to improve deliverability for the business addressesin your mailing list. SuiteLink improves business address information by adding accurate secondary(suite) information to the business addresses in your mailing list. Adding this additional informationmakes USPS delivery sequencing available for addresses in your mailing list that previously werenot eligible.
Some of the benefits available to CODE-1 Plus customers through SuiteLink processing are describedbelow.
• Improves the business address information in your mailing list by appending secondary (suite)information to business addresses.
401CODE-1 Plus User Guide for IBM i
• Ensures USPS delivery sequencing for the business addresses in your mailing list.
• SuiteLink processing provides another method to ensure postal coding accuracy resulting in lessundeliverable mail.
Who is Eligible to Use SuiteLink?
SuiteLink is available to all CODE-1 Plus customers operating in the United States. Records that havebeen processed through CASS-Certified ZIP+4 address-matching software and identified as high-risedefaults are potential candidates for SuiteLink processing.
Note: The USPS has specific export rules that regulate the distribution of postal databases. Atthis time, DPV, LACSLink, and SuiteLinkdatabases are not available to customers operating outside of the United States.For more information on the USPS rules, go to thehttps://postalpro.usps.com/https://postalpro.usps.com/https://postalpro.usps.com/ website.
How Does SuiteLink Work?
CODE-1 Plus performs SuiteLink processing in the situations described below.
1. CODE-1 Plus calls SuiteLink when the following conditions are met:
• SuiteLink has been activated via either batch mode, interactive mode, or callable mode and allrequired SuiteLink parameters are defined with valid values.
• CODE-1 Plus successfully coded the address and the following information exists in the addressrecord:
• Firm name
• Valid ZIP code
• Valid ZIP+4 code
• Primary number exists
• A match has been made to a high-rise default record.
• The CODE-1 Plus database is current.
• The SuiteLink database is current.
2. If SuiteLink returns secondary data, CODE-1 Plus performs another match attempt using thecorrected data.
402CODE-1 Plus User Guide for IBM i

3. CODE-1 Plus prints statistics at end of job.
How do I Install the SuiteLink Option?
The SuiteLinkOption is installed as part of your standard CODE-1 Plus installation. The CODE-1 Plusinstallation contains all data needed to perform SuiteLink processing. After installing CODE-1 Plusand the SuiteLink database, you must activate the SuiteLink Option to perform SuiteLink processing.
How do I Install the SuiteLink Database?
In this section, we provide platform-specific instructions for installing your SLKDB database. TheSuiteLink data must be kept in synch with the USPS ZIP + 4 data. Please note that the SLKDBdatabase has a 120-day expiration cycle. Databases expire on the following schedule.
ExpirationDatabase Month
April 30January
May 31February
June 30March
July 31April
August 31May
September 30June
October 31July
403CODE-1 Plus User Guide for IBM i
ExpirationDatabase Month
November 30August
December 31September
January 31October
February 28November
March 31December
To install the SuiteLink database in an IBM i environment, do the following steps.
1. From the Work With Jobs screen, press F20 to access Database Functions.
2. From the Database Functions screen, select 2. Install Database.
3. On the Install CODE-1 Plus Databases screen, enter Y in the "Install SuiteLink Database?” field.
4. Specify an install source of C for CD/DVD or I for IDS (downloaded). SuiteLink should be installedinto the same library as your US Postal Database.
How Do I Activate SuiteLink?
This section describes the methods available for activating SuiteLink processing.
Using the SuiteLink Processing Definition Screen to ActivateSuiteLink
Use the SuiteLink Processing screen (C1CPID45) to define SuiteLink processing options. To accessthe SuiteLink Processing screen (C1CPID45):
1. From the Name/Address File Layout, page down to theSuiteLinkProcessing screen (C1CPID45).
404CODE-1 Plus User Guide for IBM i
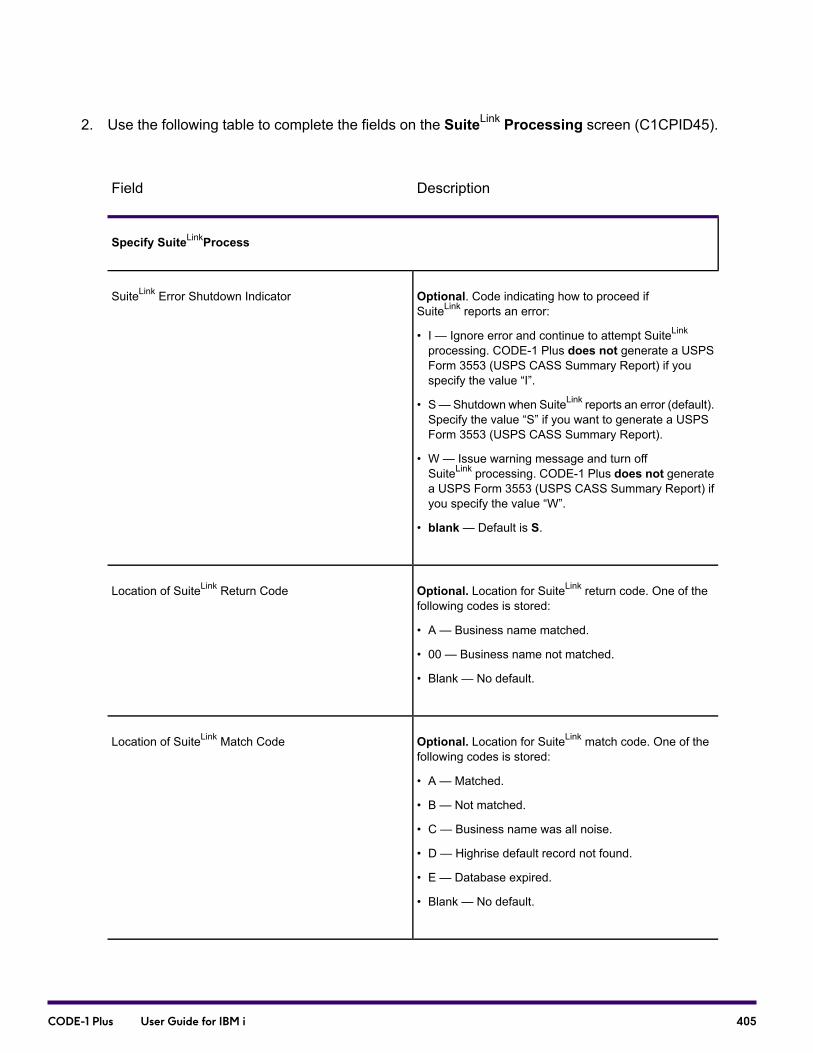
2. Use the following table to complete the fields on the SuiteLink Processing screen (C1CPID45).
DescriptionField
Specify SuiteLinkProcess
Optional. Code indicating how to proceed ifSuiteLink reports an error:
• I — Ignore error and continue to attempt SuiteLink
processing. CODE-1 Plus does not generate a USPSForm 3553 (USPS CASS Summary Report) if youspecify the value “I”.
• S—Shutdown when SuiteLink reports an error (default).Specify the value “S” if you want to generate a USPSForm 3553 (USPS CASS Summary Report).
• W — Issue warning message and turn offSuiteLink processing. CODE-1 Plus does not generatea USPS Form 3553 (USPS CASS Summary Report) ifyou specify the value “W”.
• blank— Default is S.
SuiteLink Error Shutdown Indicator
Optional. Location for SuiteLink return code. One of thefollowing codes is stored:
• A — Business name matched.
• 00 — Business name not matched.
• Blank — No default.
Location of SuiteLink Return Code
Optional. Location for SuiteLink match code. One of thefollowing codes is stored:
• A — Matched.
• B — Not matched.
• C — Business name was all noise.
• D — Highrise default record not found.
• E — Database expired.
• Blank — No default.
Location of SuiteLink Match Code
405CODE-1 Plus User Guide for IBM i

DescriptionField
Optional. Location for SuiteLink match fidelity. One of thefollowing codes is stored:
• 1 — Exact match.
• 2 — Acceptable match (one word not matched).
• 3 — Unacceptable match (more than one word notmatched).
• Blank — No default.
Note: You should ignore the Fidelity Code if theMatch Code is not 'A'. The Fidelity Code is '0' ifthe Match Code is B (no match), C (businessname consisted entirely of "noise" words), or D(9-digit zip not recognized as a high rise default).
Location of SuiteLink Fidelity Code
Optional. This option allows you to specify size ofSuiteLink memory module.
• P — Pico memory model (no files in memory).
• U — Micro memory model (no files in memory, onlyindexes).
• S — Small memory model (slkhdr, slknormal, slknoisein memory).
• M — Medium memory model (slknine file also inmemory).
• L — Large memory model (lcd file also in memory).
• H — Huge memory model (slk file also in memory).
• Blank — Default is M.
Memory Model
Optional. Specify a code to indicate whether to callSuiteLink without appending the secondary information tothe output address line. All other fields, ZIP + 4 value,DPC code, are determined using the secondaryinformation returned by SuiteLink.
• I— Include secondary information from SuiteLink on theoutput address line.
• E—Exclude secondary information from SuiteLink fromthe output address line.
• Blank— Defaults to I.
Exclude Secondary from Output Address Line
406CODE-1 Plus User Guide for IBM i

DescriptionField
Optional. Specify a code to include or exclude any invalid(extraneous) input secondary information.
• I— Include the invalid input secondary information.
• E— Exclude the invalid input secondary information.
• Blank— Defaults to I.
Exclude any Invalid/Extraneous Secondary Informationfrom Output Address Line
Activating SuiteLink in Batch Mode
To activate SuiteLink in batch mode, define the STELNK parameter record. For more information onthe STELNK parameter, please refer to "STELNK " in your CODE-1 Plus Reference Guide.
Activating SuiteLink in Interactive Mode
To activate SuiteLink in Interactive mode, verify that the SuiteLink databases are defined in yourdatabase library and enter “SUITE” on the command line.
Activating SuiteLink in Callable Mode
To use SuiteLink when calling C1MATCHI from your own driver, the following five conditions must bereturned from C1MATCHI.
• There must be a firm name in the P9I input area (P9IFRM).
• There must be a house number in the P9O output area (P9OHS-LB).
• The default record indicator must be returning a value of “H” in the P9O output area (P9ODFR).
• The USPS record type must be returning a value of “H” in the P9O output area (P9ORTP).
• There must be spaces in both the P9O General Return Code and the 9-digit Return Code in theoutput area (P9OGRC and P9O9RC).
If you get a match back from SuiteLink, you need to re-invoke the matcher with the new data. However,do not use the firm name that is returned; just use the secondary information.
407CODE-1 Plus User Guide for IBM i
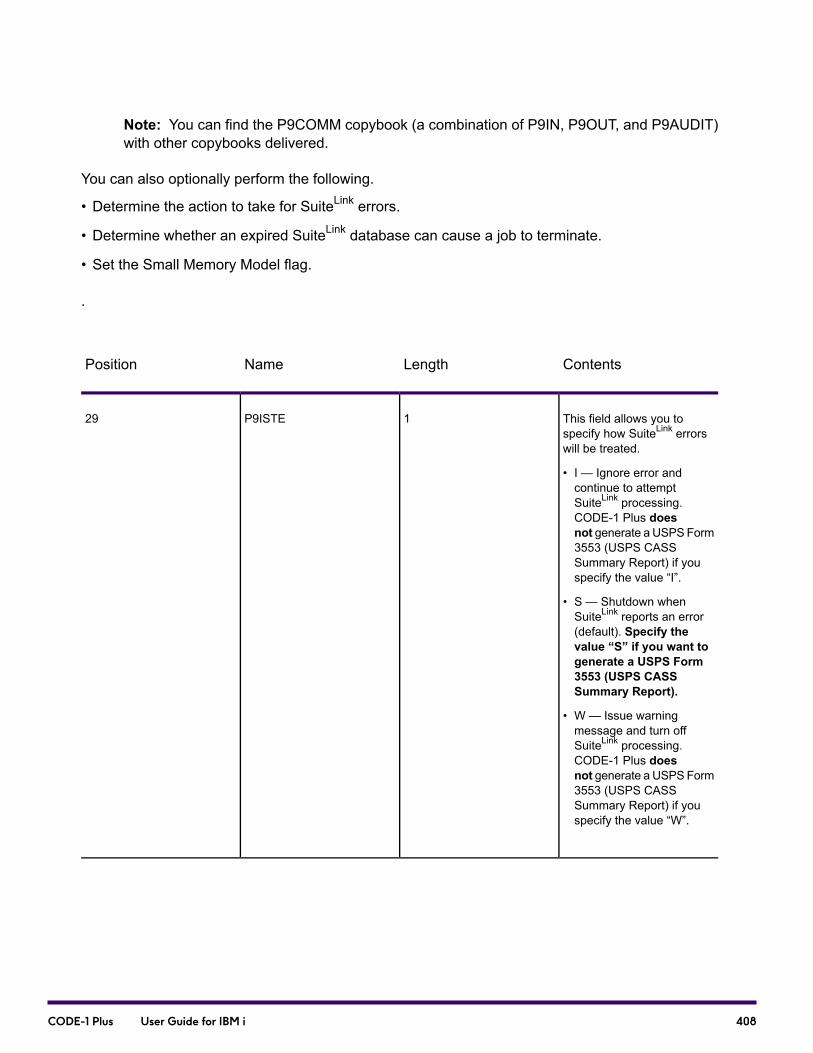
Note: You can find the P9COMM copybook (a combination of P9IN, P9OUT, and P9AUDIT)with other copybooks delivered.
You can also optionally perform the following.
• Determine the action to take for SuiteLink errors.
• Determine whether an expired SuiteLink database can cause a job to terminate.
• Set the Small Memory Model flag.
.
ContentsLengthNamePosition
This field allows you tospecify how SuiteLink errorswill be treated.
• I — Ignore error andcontinue to attemptSuiteLink processing.CODE-1 Plus doesnot generate a USPSForm3553 (USPS CASSSummary Report) if youspecify the value “I”.
• S — Shutdown whenSuiteLink reports an error(default). Specify thevalue “S” if you want togenerate a USPS Form3553 (USPS CASSSummary Report).
• W — Issue warningmessage and turn offSuiteLink processing.CODE-1 Plus doesnot generate a USPSForm3553 (USPS CASSSummary Report) if youspecify the value “W”.
1P9ISTE29
408CODE-1 Plus User Guide for IBM i
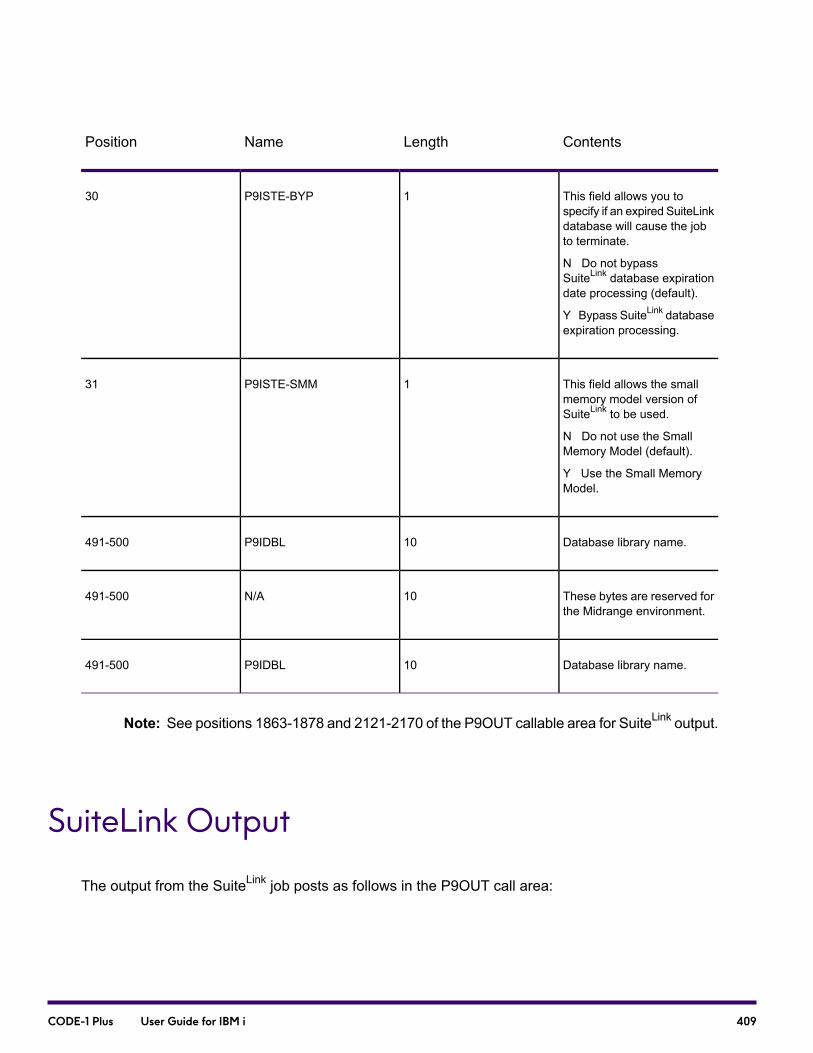
ContentsLengthNamePosition
This field allows you tospecify if an expired SuiteLinkdatabase will cause the jobto terminate.
N Do not bypassSuiteLink database expirationdate processing (default).
Y Bypass SuiteLink databaseexpiration processing.
1P9ISTE-BYP30
This field allows the smallmemory model version ofSuiteLink to be used.
N Do not use the SmallMemory Model (default).
Y Use the Small MemoryModel.
1P9ISTE-SMM31
Database library name.10P9IDBL491-500
These bytes are reserved forthe Midrange environment.
10N/A491-500
Database library name.10P9IDBL491-500
Note: See positions 1863-1878 and 2121-2170 of the P9OUT callable area for SuiteLink output.
SuiteLink Output
The output from the SuiteLink job posts as follows in the P9OUT call area:
409CODE-1 Plus User Guide for IBM i
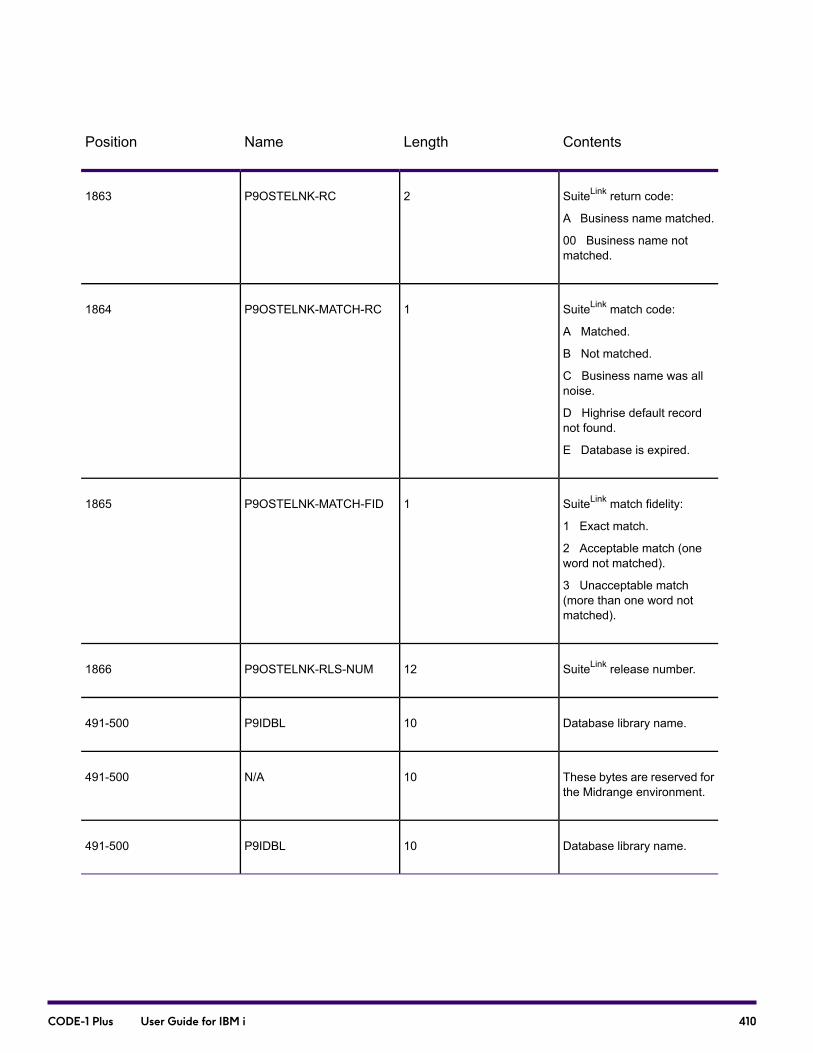
ContentsLengthNamePosition
SuiteLink return code:
A Business name matched.
00 Business name notmatched.
2P9OSTELNK-RC1863
SuiteLink match code:
A Matched.
B Not matched.
C Business name was allnoise.
D Highrise default recordnot found.
E Database is expired.
1P9OSTELNK-MATCH-RC1864
SuiteLink match fidelity:
1 Exact match.
2 Acceptable match (oneword not matched).
3 Unacceptable match(more than one word notmatched).
1P9OSTELNK-MATCH-FID1865
SuiteLink release number.12P9OSTELNK-RLS-NUM1866
Database library name.10P9IDBL491-500
These bytes are reserved forthe Midrange environment.
10N/A491-500
Database library name.10P9IDBL491-500
410CODE-1 Plus User Guide for IBM i
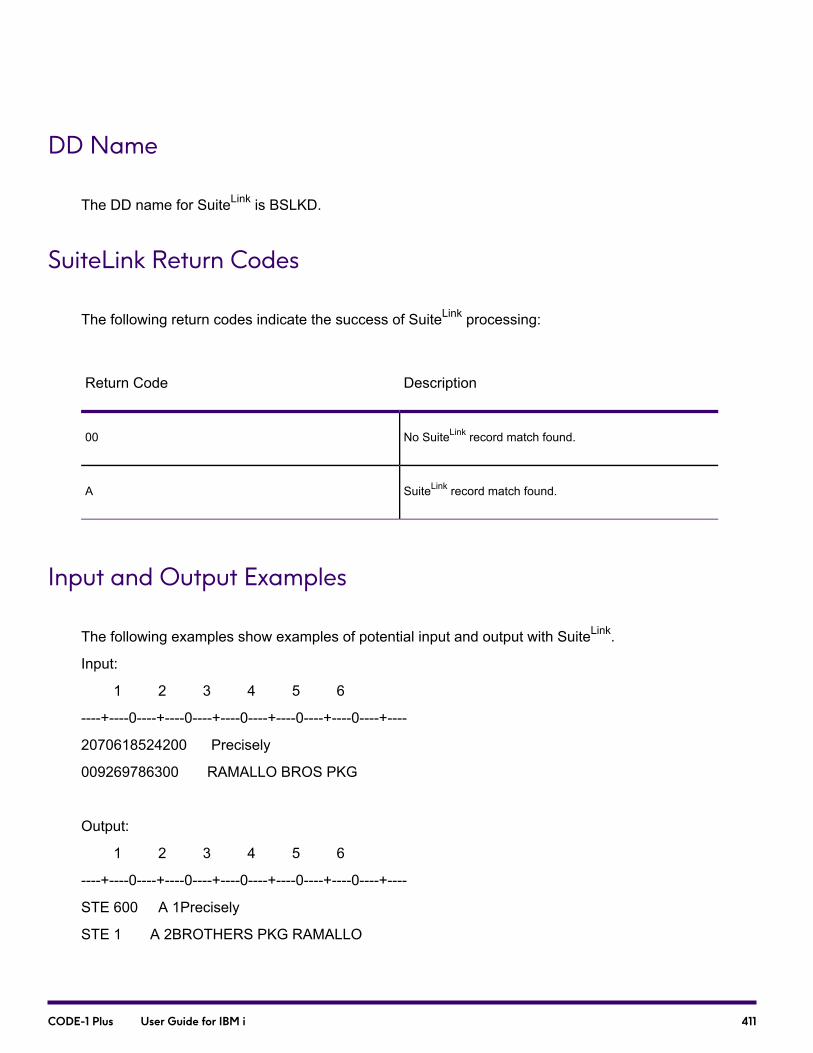
DD Name
The DD name for SuiteLink is BSLKD.
SuiteLink Return Codes
The following return codes indicate the success of SuiteLink processing:
DescriptionReturn Code
No SuiteLink record match found.00
SuiteLink record match found.A
Input and Output Examples
The following examples show examples of potential input and output with SuiteLink.
Input:
1 2 3 4 5 6
----+----0----+----0----+----0----+----0----+----0----+----
2070618524200 Precisely
009269786300 RAMALLO BROS PKG
Output:
1 2 3 4 5 6
----+----0----+----0----+----0----+----0----+----0----+----
STE 600 A 1Precisely
STE 1 A 2BROTHERS PKG RAMALLO
411CODE-1 Plus User Guide for IBM i

SuiteLink Reporting
The CASS 3553 report and the Control Reports include SuiteLink information.
CASS 3553 Report
SuiteLink information has been added to the Qualitative Statistical Summary section of the CASS3553 report:
Control Reports
Line items for SuiteLink are on the Control Reports as follows:
SuiteLink Database version: March 2013, Product Version: 0650
Total Number of SuiteLink Match Attempts xxxxxxxxx nn.nn%
Total Number of Successful SuiteLink Match Attempts xxxxxxxxx nn.nn%
Total Number of Successful SuiteLink Matches with Corrected Suites xxxxxxxxx nn.nn%
412CODE-1 Plus User Guide for IBM i

16 - Using Line of Travel
In this section
What is Line of Travel?...........................................................................414Why Use Line of Travel?........................................................................414Accessing Line of Travel........................................................................415Getting Started with Line of Travel.........................................................415Sorting Your LOT Coded Records..........................................................415Calling the LTO10 Subroutine................................................................416Line of Travel Exit Routine (LTO60).......................................................422Control Totals Report..............................................................................427Alternate Sequence Codes.....................................................................431
CODE-1 Plus User Guide for IBM i
What is Line of Travel?
Line of Travel (LOT) is a feature that assigns a code to your address records, allowing you to qualifyyour Standard letters and flats for USPS Enhanced Carrier Route rates. LOT is also referred to aseLOT or Enhanced Line Of Travel. If you use Line of Travel, your mailing is eligible for the USPSnon-automation Basic Rate. To qualify for this rate, your mail must be in LOT sequence. Assigninga LOT Code to your mailings saves you mailing time and money.
The Line of Travel code indicates the order in which delivery will be made within a given ZIP + 4carrier route and whether delivery will be made in ascending or descending sequence. Line of Travelappends a four digit number and a sequence code to all name and address records with a ZIP + 4Code. This LOT code is then used for sortation purposes to simulate walk sequence mailing withinthe number range associated with the ZIP + 4 Code. After the ZIP + 4 file is LOT-coded, the file isthen sorted sequentially by 5-byte ZIP Code, 4-byte carrier route, 4-byte LOT number, and a 2- or1-character sequence code.
The LOT-coded record includes:
• ZIP + 4 Code
• Delivery Point Code (DPC)
• Carrier Route
• Line of Travel number
• Ascending/descending sequence code
• Optional sequence codes used for sortation provided by the Line of Travel software
Note: Per USPS regulations, records with missing (blank) or invalid (0000) LOT informationare to be sorted to the end of the CRRT.
Why Use Line of Travel?
Sorting your Standard letters and flats in line-of-travel sequence is the only way to qualify yourmailings for USPS Enhanced Carrier Route rates when your mail does not meet the non-automationsaturation and high-density rate requirements. The saturation and high-density categories requirethat your mail be sorted in walk-sequence. Line of Travel simulates walk-sequence, but only for tenor more pieces per carrier route.
414CODE-1 Plus User Guide for IBM i

Accessing Line of Travel
The following methods can be used to invoke Line of Travel:
• Matcher (C1MATCHB)—Line of Travel information can be returned by setting a switch in thematcher.
• LOTOUT parameter—Line of Travel information can be returned via the CODE-1 Plus batch driverusing the LOTOUT parameter.
• Callable subroutine (LTO10)—You can call LTO10 as a subroutine from any program, as long asyou use the parameters defined in this chapter. The LTO10 callable subroutine determines a 4-digitnumber and a 1-character sequence code for a record. These parameters accept your input andreturn a LOT code. Based on your output parameter, LTO10 returns the LOT code to your executableprogram.
• Exit Routine (LTO60)—The LTO60 exit routine posts Line of Travel information onto yourname-and-address record when passed from any Precisely EXEC- level program. Batch driverprocessing requirements are passed via the EXITOP parameter.
Note: CODE-1 Plus does not use LTO60. LTO60 is used from other Precisely applications.
Getting Started with Line of Travel
Line of Travel derives a Line of Travel (LOT) code, which is comprised of a 4-digit Line of Travelsequence number and a 1-character Line of Travel sequence code. The Line of Travel sequencecode is either “A” for ascending, or “D” for descending. Line of Travel then appends the LOT codeto all name and address records with a Delivery Point Barcode and a Carrier Route that matchesthe Line of Travel Master File.
Sorting Your LOT Coded Records
To use Line of Travel to obtain the maximum discount, the USPS Line of Travel Technical Guiderequires you to sort your LOT-coded records in ascending order in the following sequence:
415CODE-1 Plus User Guide for IBM i

1. 5-digit ZIP Code
2. 4-byte Carrier Route Code
3. 4-digit Line of Travel Code
Note: This includes only the numeric portion of the LOT code. It does not include thesequence code.
4. 4-digit ZIP + 4 Code
5. 2-digit Delivery Point Barcode in ascending AND descending order depending on the Line ofTravel sequence code that is appended to each record
Note: The Line of Travel sequence code (either “A” or “D”) is essential for this step.
Since sorting in ascending and descending order can be unwieldy, Line of Travel returns two typesof alternate codes that can be used for sortation. Rather than sorting your output file using the 2-digitDelivery Point Barcode, you should sort it using either the alternate sequence code or the hexadecimalsequence code.
The alternate sequence code is a two-byte code used for final sortation in place of the DPC add-on.It consists of an uppercase letter followed by a digit 0 through 9. Values range from “A0” (99descending) through “J9” (00 descending), and “K0” (00 ascending) through “T9” (99 ascending).
The hexadecimal sequence code is a single-byte code, and it also allows you to sort your file inascending order only. The hexadecimal values range from 0 to FF ascending, then FF through 0descending.
Both the hexadecimal and alternate sequence codes are determined from the DPC add-on and theLOT sequence code. For more information on these codes, please refer to Alternate SequenceCodes.
Note: You must sort your output file as discussed above prior to presorting your mailing whenusing the Precisely MailStream Plus software.
Calling the LTO10 Subroutine
The LTO10 callable subroutine determines a 4-digit sequence number and a 1-charactersequence code for a record. In order to call LTO10, you must pass two parameters:
• Input Parameter—A 50-byte input area containing user-provided data passed from your executableprogram to LTO10.
• Output Parameter — A 100-byte output area containing information returned from LTO10.
416CODE-1 Plus User Guide for IBM i

Using the input parameter, you must pass a 5-digit ZIP Code, a 4-digit ZIP+4 Code, a 2-digit DPC,and a 4-byte Carrier Route as input.
LTO10 then derives a Line of Travel (LOT) code, which is comprised of a 4-digit Line of Travelsequence number and a 1-character Line of Travel sequence code. Based on your output parameter,LTO10 returns the LOT code to your executable program.
The Line of Travel sequence code is either “A” for ascending, or “D” for descending. Since sortingin ascending and descending order can be unwieldy, Line of Travel returns two types of alternatecodes that can be sorted in ascending order only.
The alternate sequence code is a two-byte code used for final sortation in place of the DPC add-on.It consists of an uppercase letter followed by a digit 0 through 9. Values range from “A0” (99descending) through “J9” (00 descending), and “K0” (00 ascending) through “T9” (99 ascending).
The hexadecimal sequence code is a single-byte code, and it also allows you to sort your file inascending order only. There are 200 values ranging from 99 descending through 00 descending,then 00 ascending through 99 ascending. Both the hexadecimal and alternate sequence codes aredetermined from the DPC add-on and the LOT sequence code. For more information on these codes,please refer to Alternate Sequence Codes.
Input Area — Parameter 1
The following table maps the positions in input area Parameter 1.
DescriptionLengthNamePosition
Enter one of the followingcodes:
• E — Perform end-of-jobfunctions, for example,closing the Line of TravelMaster File and anyplatform-specificfunctions.This option willnot free memory.
• Other — Perform match tothe Master File.
1FUNCTION TO PERFORM1
Reserved.9RESERVED2-10
417CODE-1 Plus User Guide for IBM i
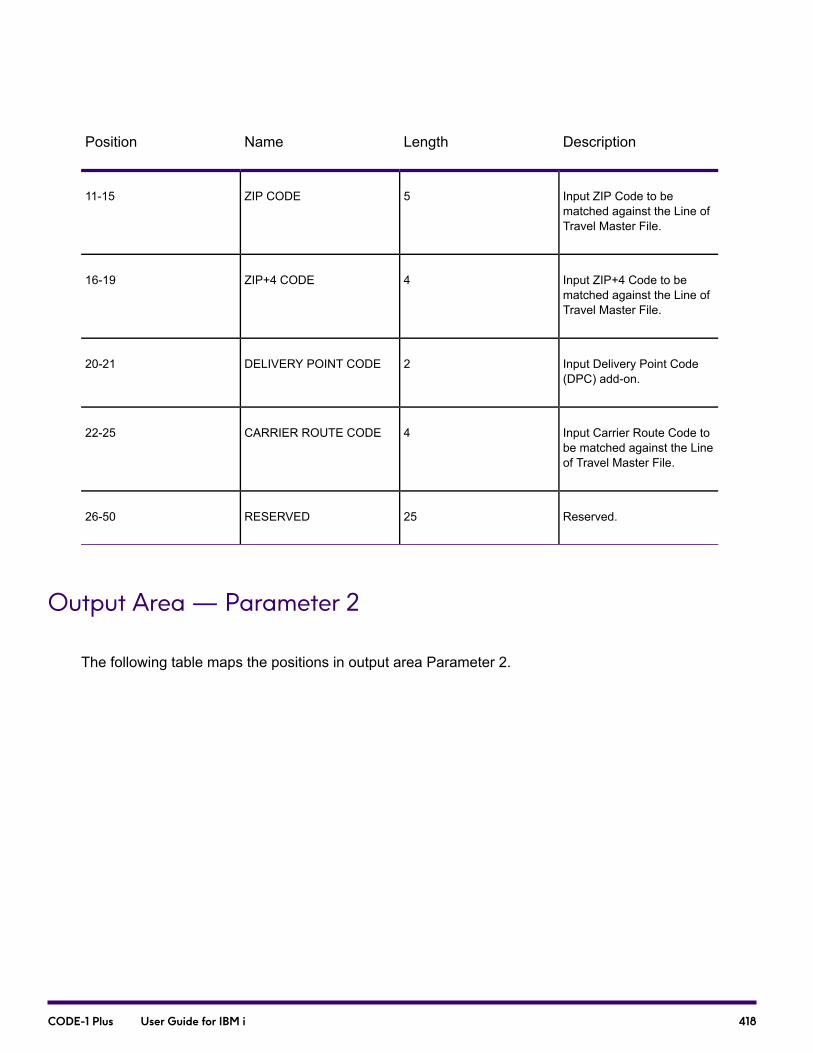
DescriptionLengthNamePosition
Input ZIP Code to bematched against the Line ofTravel Master File.
5ZIP CODE11-15
Input ZIP+4 Code to bematched against the Line ofTravel Master File.
4ZIP+4 CODE16-19
Input Delivery Point Code(DPC) add-on.
2DELIVERY POINT CODE20-21
Input Carrier Route Code tobe matched against the Lineof Travel Master File.
4CARRIER ROUTE CODE22-25
Reserved.25RESERVED26-50
Output Area — Parameter 2
The following table maps the positions in output area Parameter 2.
418CODE-1 Plus User Guide for IBM i
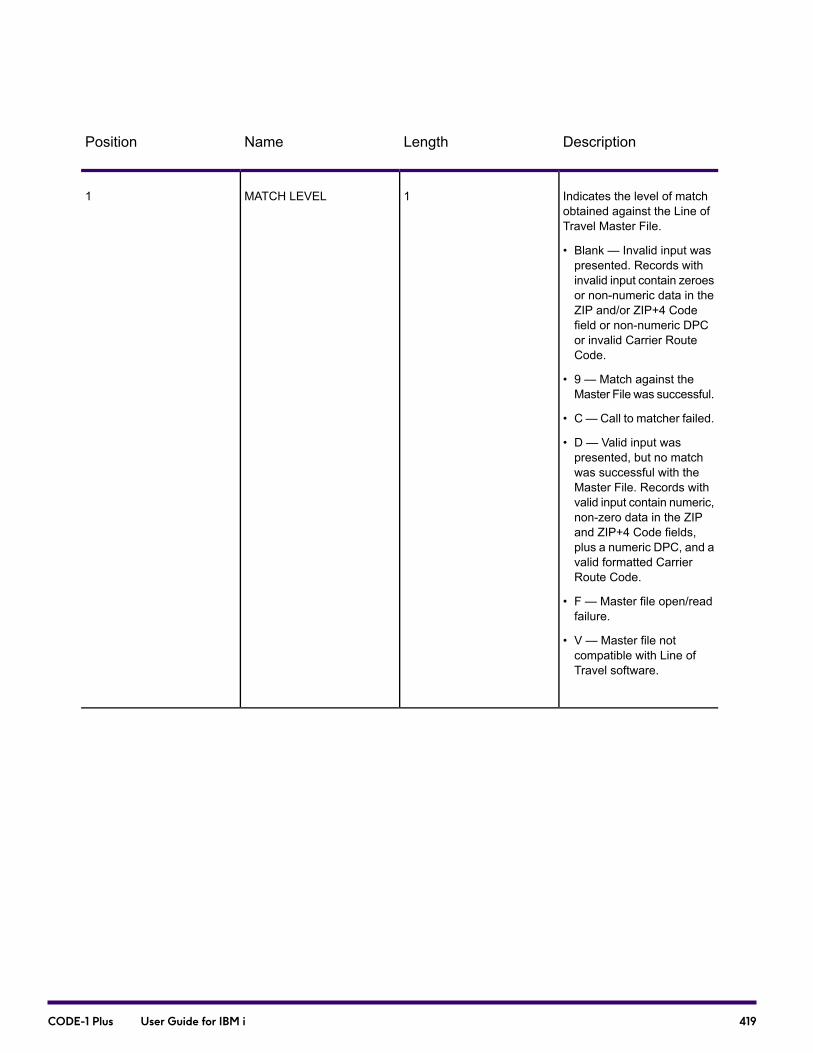
DescriptionLengthNamePosition
Indicates the level of matchobtained against the Line ofTravel Master File.
• Blank — Invalid input waspresented. Records withinvalid input contain zeroesor non-numeric data in theZIP and/or ZIP+4 Codefield or non-numeric DPCor invalid Carrier RouteCode.
• 9 — Match against theMaster File was successful.
• C— Call to matcher failed.
• D — Valid input waspresented, but no matchwas successful with theMaster File. Records withvalid input contain numeric,non-zero data in the ZIPand ZIP+4 Code fields,plus a numeric DPC, and avalid formatted CarrierRoute Code.
• F — Master file open/readfailure.
• V — Master file notcompatible with Line ofTravel software.
1MATCH LEVEL1
419CODE-1 Plus User Guide for IBM i

DescriptionLengthNamePosition
Four-digit Line of Travel(LOT) sequence numbergenerated from the input datadefined in Parameter 1.
If valid input was presented,but no match was successfulwith the Master File, therecord is default coded, andthis field contains zeroes.Please note thatdefault-coded records areeligible for the basicenhanced carrier route rate.
If invalid input was presented,this field is blank.
4LINE OF TRAVEL (LOT)SEQUENCE NUMBER
2-5
One-character Line of Travel(LOT) sequence codegenerated from the input datadefined in Parameter 1.
• Blank — No LOT numbercould be determined, dueto invalid input.
• A — Ascending.
• D — Descending.
Note: If valid inputwas presented, butno match wassuccessful with theMaster File, therecord will be defaultcoded, and thiscode will bereturned.
1LINE OF TRAVEL (LOT)SEQUENCE CODE
6
420CODE-1 Plus User Guide for IBM i

DescriptionLengthNamePosition
Two-character code used forfinal sortation in place of theDPC add-on, which allowsyou to sort your file inascending sequence only,instead of both ascendingand descending. This code isdetermined from the DPCadd-on field and the LOTsequence code. It consists ofan uppercase letter followedby a digit 0 through 9. Valuesrange from "A0" (99descending) through "J9" (00descending), and "K0" (00ascending) through "T9" (99ascending).
2ALTERNATE SEQUENCECODE
7-8
Single-character code usedfor final sortation in place ofthe DPC add-on, whichallows you to sort your file inascending sequence only,instead of both ascendingand descending. Thishexadecimal value isdetermined from the DPCadd-on field and the LOTsequence code. There are200 values ranging from 99descending through 00descending, then 00ascending through 99ascending.
1HEXADECIMALSEQUENCECODE
9
NOTE: LTO10 returns both an alternate sequence code and a hexadecimal sequence code.
Reserved.4RESERVED10-13
Line of Travel releasenumber, shown as nn.n.
4SOFTWARE RELEASENUMBER
14-17
421CODE-1 Plus User Guide for IBM i
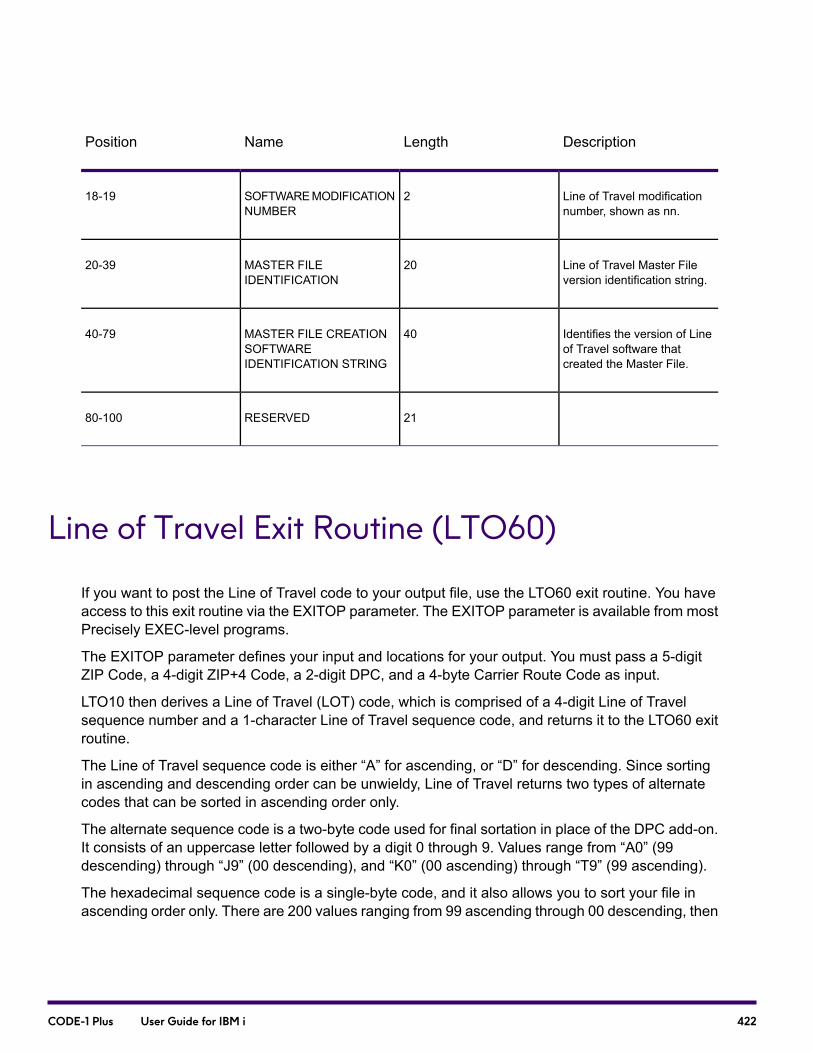
DescriptionLengthNamePosition
Line of Travel modificationnumber, shown as nn.
2SOFTWAREMODIFICATIONNUMBER
18-19
Line of Travel Master Fileversion identification string.
20MASTER FILEIDENTIFICATION
20-39
Identifies the version of Lineof Travel software thatcreated the Master File.
40MASTER FILE CREATIONSOFTWAREIDENTIFICATION STRING
40-79
21RESERVED80-100
Line of Travel Exit Routine (LTO60)
If you want to post the Line of Travel code to your output file, use the LTO60 exit routine. You haveaccess to this exit routine via the EXITOP parameter. The EXITOP parameter is available from mostPrecisely EXEC-level programs.
The EXITOP parameter defines your input and locations for your output. You must pass a 5-digitZIP Code, a 4-digit ZIP+4 Code, a 2-digit DPC, and a 4-byte Carrier Route Code as input.
LTO10 then derives a Line of Travel (LOT) code, which is comprised of a 4-digit Line of Travelsequence number and a 1-character Line of Travel sequence code, and returns it to the LTO60 exitroutine.
The Line of Travel sequence code is either “A” for ascending, or “D” for descending. Since sortingin ascending and descending order can be unwieldy, Line of Travel returns two types of alternatecodes that can be sorted in ascending order only.
The alternate sequence code is a two-byte code used for final sortation in place of the DPC add-on.It consists of an uppercase letter followed by a digit 0 through 9. Values range from “A0” (99descending) through “J9” (00 descending), and “K0” (00 ascending) through “T9” (99 ascending).
The hexadecimal sequence code is a single-byte code, and it also allows you to sort your file inascending order only. There are 200 values ranging from 99 ascending through 00 descending, then
422CODE-1 Plus User Guide for IBM i

00 ascending through 99 ascending. Both the hexadecimal and alternate sequence codes aredetermined from the DPC add-on and the LOT sequence code.
The LTO60 exit routine subsequently returns the information to your Precisely EXEC-level program.
EXITOP Parameter for the LTO60 Exit Routine
The EXITOP parameter allows you to call the LTO60 exit routine. The following table provides anoverview of the EXITOP parameter fields used to access the LTO60 exit routine.
CommentsDescriptionField NamePosition
Required.EXITOP is the onlyacceptable entry.
KEYWORD1-6
Required.LTO60 is the only acceptableentry.
LTO60 is dynamically loadedwhen you enter thisparameter.
EXIT ROUTINE NAME8-15
Required.Location of the input recordZIP Code.
Location of ZIP CODE19-22
423CODE-1 Plus User Guide for IBM i
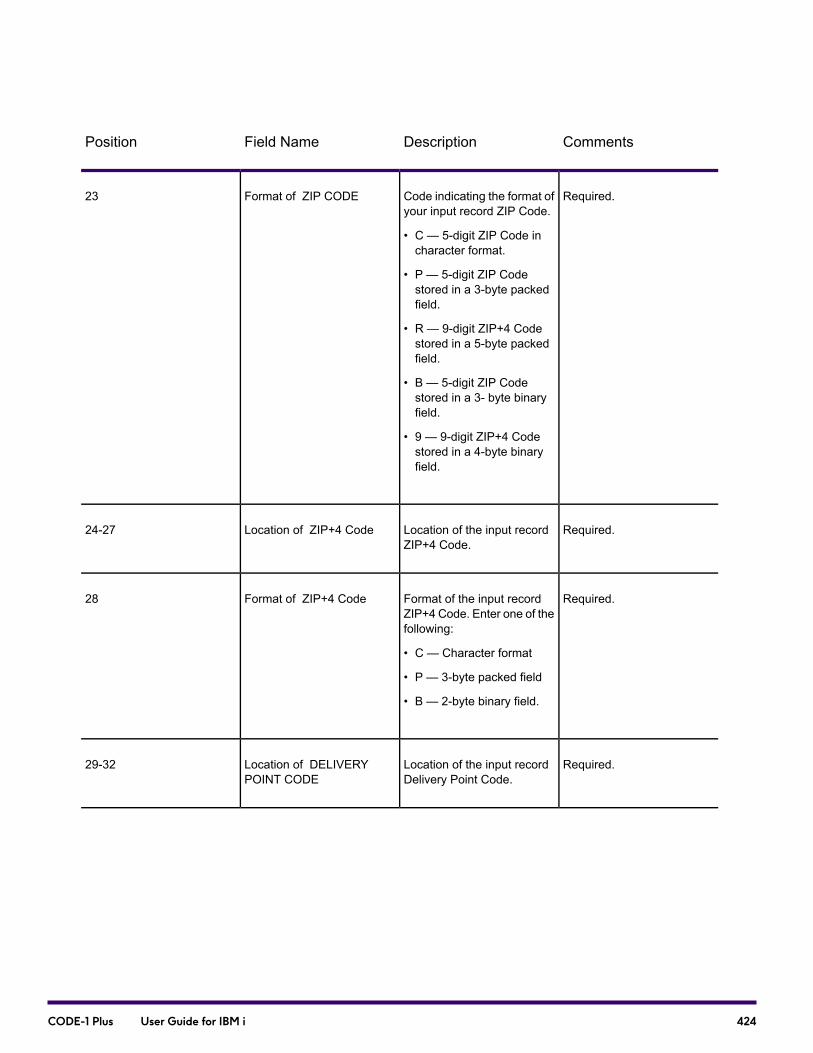
CommentsDescriptionField NamePosition
Required.Code indicating the format ofyour input record ZIP Code.
• C — 5-digit ZIP Code incharacter format.
• P — 5-digit ZIP Codestored in a 3-byte packedfield.
• R — 9-digit ZIP+4 Codestored in a 5-byte packedfield.
• B — 5-digit ZIP Codestored in a 3- byte binaryfield.
• 9 — 9-digit ZIP+4 Codestored in a 4-byte binaryfield.
Format of ZIP CODE23
Required.Location of the input recordZIP+4 Code.
Location of ZIP+4 Code24-27
Required.Format of the input recordZIP+4 Code. Enter one of thefollowing:
• C — Character format
• P — 3-byte packed field
• B — 2-byte binary field.
Format of ZIP+4 Code28
Required.Location of the input recordDelivery Point Code.
Location of DELIVERYPOINT CODE
29-32
424CODE-1 Plus User Guide for IBM i
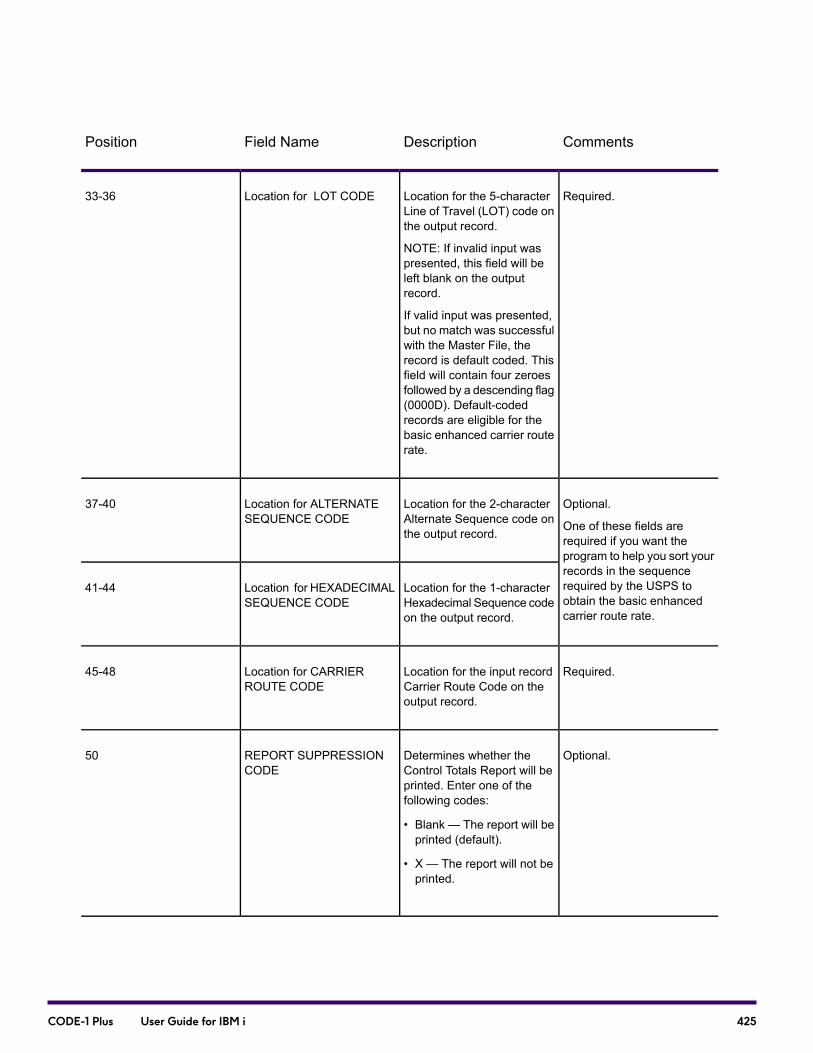
CommentsDescriptionField NamePosition
Required.Location for the 5-characterLine of Travel (LOT) code onthe output record.
NOTE: If invalid input waspresented, this field will beleft blank on the outputrecord.
If valid input was presented,but no match was successfulwith the Master File, therecord is default coded. Thisfield will contain four zeroesfollowed by a descending flag(0000D). Default-codedrecords are eligible for thebasic enhanced carrier routerate.
Location for LOT CODE33-36
Optional.
One of these fields arerequired if you want theprogram to help you sort yourrecords in the sequencerequired by the USPS toobtain the basic enhancedcarrier route rate.
Location for the 2-characterAlternate Sequence code onthe output record.
Location for ALTERNATESEQUENCE CODE
37-40
Location for the 1-characterHexadecimal Sequence codeon the output record.
Location for HEXADECIMALSEQUENCE CODE
41-44
Required.Location for the input recordCarrier Route Code on theoutput record.
Location for CARRIERROUTE CODE
45-48
Optional.Determines whether theControl Totals Report will beprinted. Enter one of thefollowing codes:
• Blank — The report will beprinted (default).
• X — The report will not beprinted.
REPORT SUPPRESSIONCODE
50
425CODE-1 Plus User Guide for IBM i
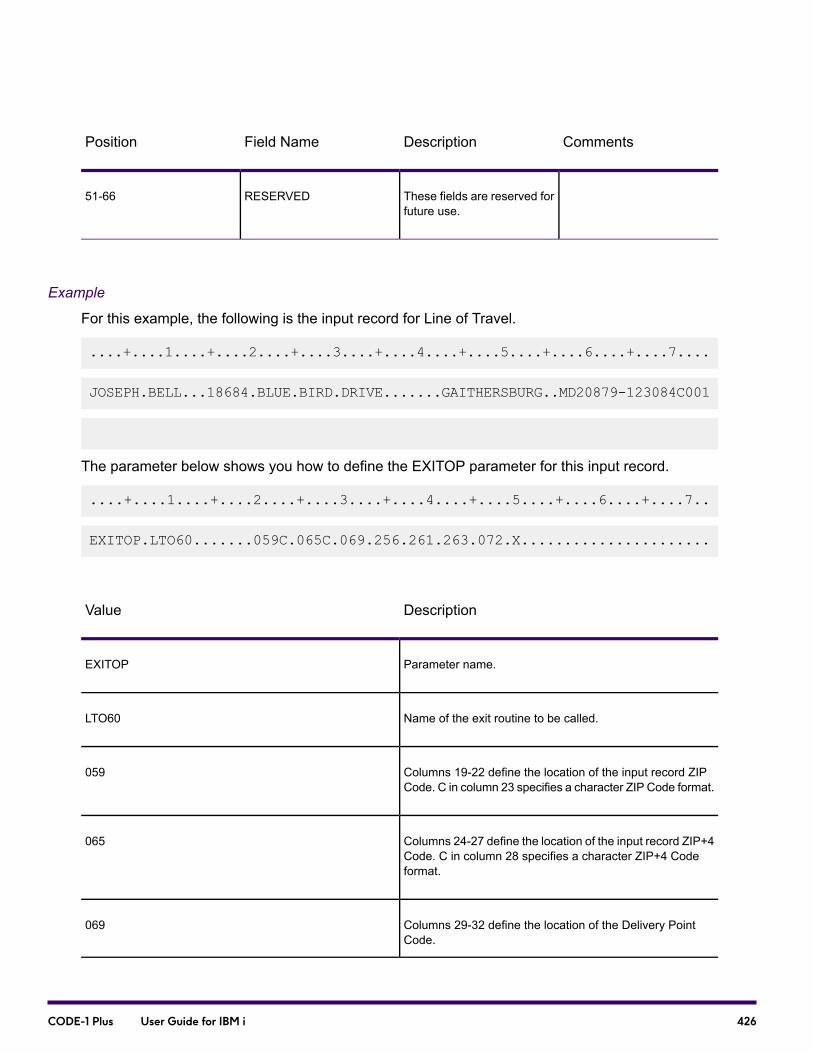
CommentsDescriptionField NamePosition
These fields are reserved forfuture use.
RESERVED51-66
Example
For this example, the following is the input record for Line of Travel.
....+....1....+....2....+....3....+....4....+....5....+....6....+....7....
JOSEPH.BELL...18684.BLUE.BIRD.DRIVE.......GAITHERSBURG..MD20879-123084C001
The parameter below shows you how to define the EXITOP parameter for this input record.
....+....1....+....2....+....3....+....4....+....5....+....6....+....7..
EXITOP.LTO60.......059C.065C.069.256.261.263.072.X......................
DescriptionValue
Parameter name.EXITOP
Name of the exit routine to be called.LTO60
Columns 19-22 define the location of the input record ZIPCode. C in column 23 specifies a character ZIP Code format.
059
Columns 24-27 define the location of the input record ZIP+4Code. C in column 28 specifies a character ZIP+4 Codeformat.
065
Columns 29-32 define the location of the Delivery PointCode.
069
426CODE-1 Plus User Guide for IBM i
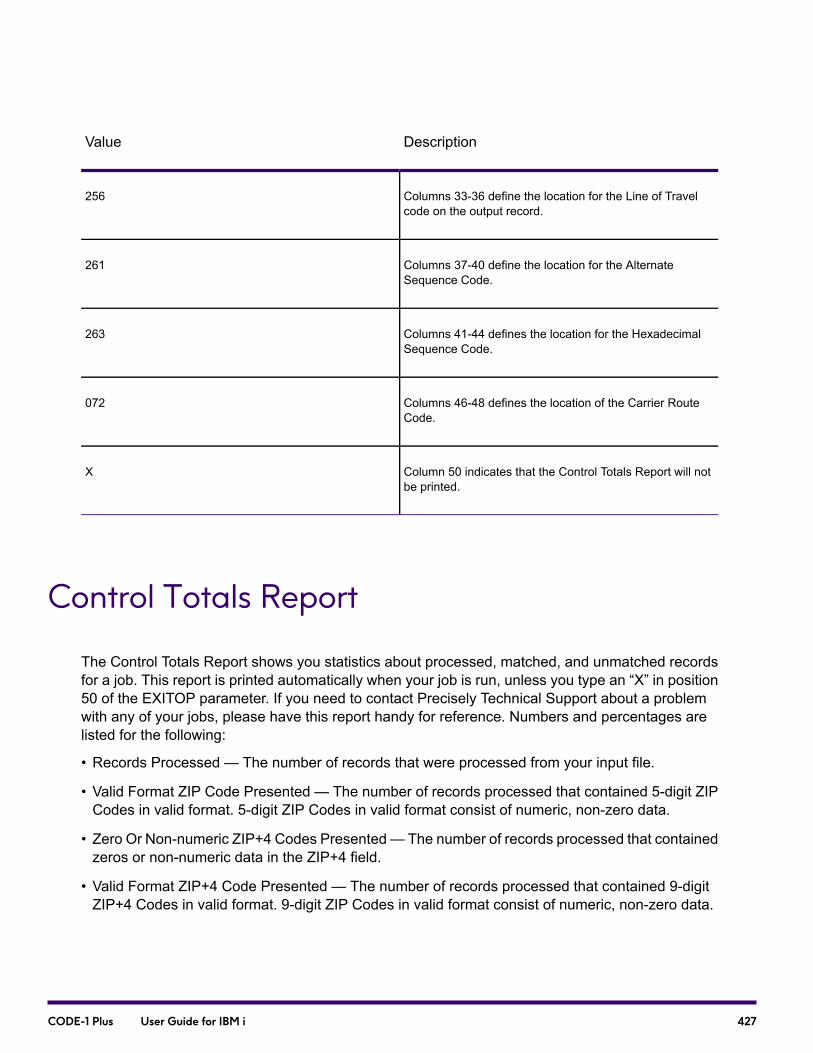
DescriptionValue
Columns 33-36 define the location for the Line of Travelcode on the output record.
256
Columns 37-40 define the location for the AlternateSequence Code.
261
Columns 41-44 defines the location for the HexadecimalSequence Code.
263
Columns 46-48 defines the location of the Carrier RouteCode.
072
Column 50 indicates that the Control Totals Report will notbe printed.
X
Control Totals Report
The Control Totals Report shows you statistics about processed, matched, and unmatched recordsfor a job. This report is printed automatically when your job is run, unless you type an “X” in position50 of the EXITOP parameter. If you need to contact Precisely Technical Support about a problemwith any of your jobs, please have this report handy for reference. Numbers and percentages arelisted for the following:
• Records Processed — The number of records that were processed from your input file.
• Valid Format ZIP Code Presented — The number of records processed that contained 5-digit ZIPCodes in valid format. 5-digit ZIP Codes in valid format consist of numeric, non-zero data.
• Zero Or Non-numeric ZIP+4 Codes Presented— The number of records processed that containedzeros or non-numeric data in the ZIP+4 field.
• Valid Format ZIP+4 Code Presented — The number of records processed that contained 9-digitZIP+4 Codes in valid format. 9-digit ZIP Codes in valid format consist of numeric, non-zero data.
427CODE-1 Plus User Guide for IBM i
• Valid Format DPC Values Presented — The number of records processed that contained 2-digitDPC add-on codes in valid format.
• Invalid Carrier Route Codes Presented— The number of records processed that contained a 4-digitCarrier Route Code in invalid format.
• Valid Carrier Route Codes Presented — The number of records processed that contained a 4-digitCarrier Route Code in valid format.
• Records Not Matching Master File, Invalid Input— The number of records that were not successfullymatched against the Line of Travel Master File, due to invalid input. Records with invalid inputcontain zeroes or non-numeric data in the ZIP and/or ZIP+4 Code field, or a non-numeric DPC orinvalid Carrier Route Code format.
• Records Not Matching Master File, Default Coded — The number of records processed that didnot match the Line of Travel Master file, but contained valid input. These records were defaultcoded, which means the LOT code is four zeroes followed by a descending flag (0000D). Pleasenote that default-coded records do qualify for the basic enhanced carrier route rate.
• Records Matching LOT Master File — The number of records processed that contained valid inputand were successfully matched against the Line of Travel Master File.
• Line of Travel Codes Determined — The number of records processed that were LOT coded. Thisnumber is equal to number of records matching at the ZIP+4 Code level plus the number of recordsthat were default coded.
• LOT Numbers with Ascending Sequence Codes — The number of LOT numbers that are followedby an ascending (A) flag.
• LOT Numbers with Descending Sequence Codes — The number of LOT numbers returned thatare followed by a descending (D) flag.
• Alternate DPC Sequence Codes Determined — The number of records processed for whichalternate DPC sequence codes were determined. Please note that LTO60 returns an alternatesequence code only if positions 37-44 of the EXITOP parameter are not blank.
428CODE-1 Plus User Guide for IBM i
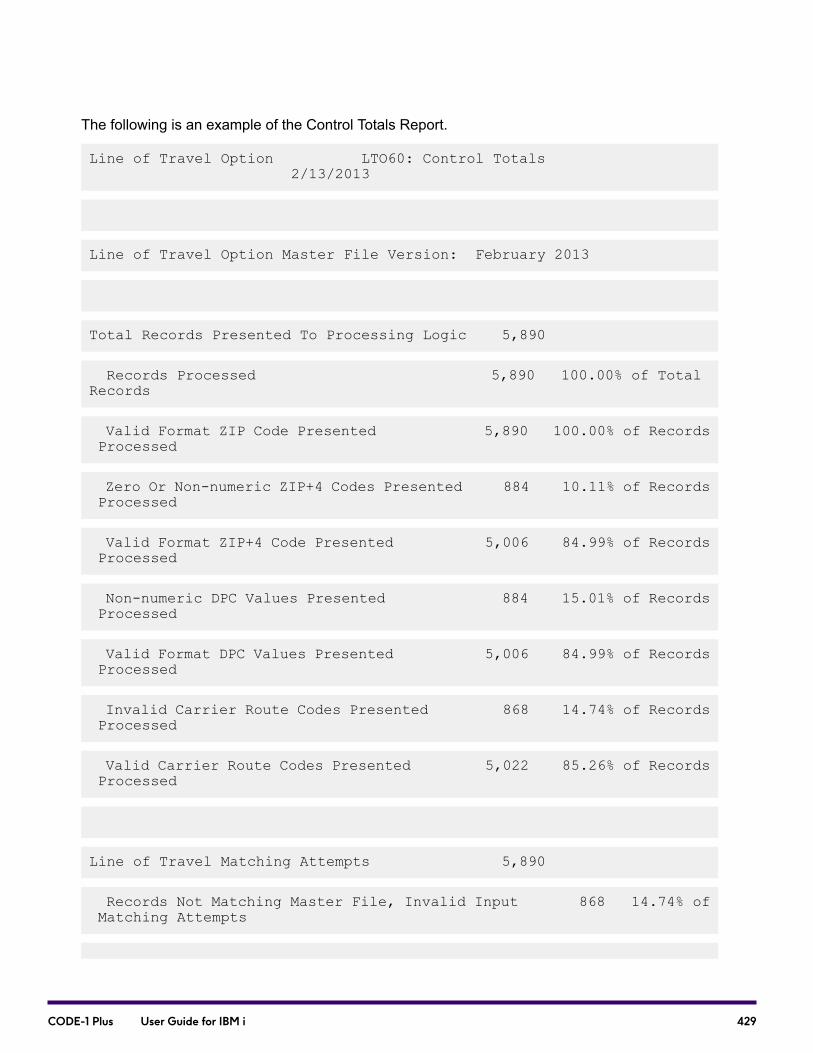
The following is an example of the Control Totals Report.
Line of Travel Option LTO60: Control Totals2/13/2013
Line of Travel Option Master File Version: February 2013
Total Records Presented To Processing Logic 5,890
Records Processed 5,890 100.00% of TotalRecords
Valid Format ZIP Code Presented 5,890 100.00% of RecordsProcessed
Zero Or Non-numeric ZIP+4 Codes Presented 884 10.11% of RecordsProcessed
Valid Format ZIP+4 Code Presented 5,006 84.99% of RecordsProcessed
Non-numeric DPC Values Presented 884 15.01% of RecordsProcessed
Valid Format DPC Values Presented 5,006 84.99% of RecordsProcessed
Invalid Carrier Route Codes Presented 868 14.74% of RecordsProcessed
Valid Carrier Route Codes Presented 5,022 85.26% of RecordsProcessed
Line of Travel Matching Attempts 5,890
Records Not Matching Master File, Invalid Input 868 14.74% ofMatching Attempts
429CODE-1 Plus User Guide for IBM i
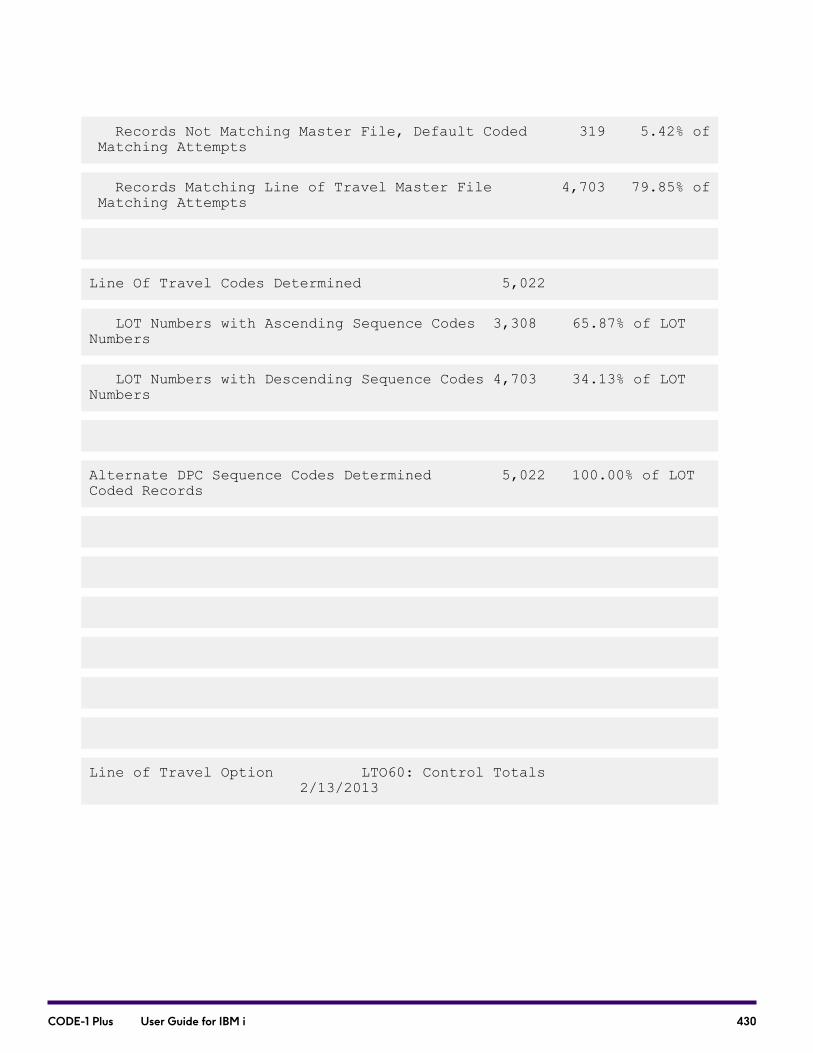
Records Not Matching Master File, Default Coded 319 5.42% ofMatching Attempts
Records Matching Line of Travel Master File 4,703 79.85% ofMatching Attempts
Line Of Travel Codes Determined 5,022
LOT Numbers with Ascending Sequence Codes 3,308 65.87% of LOTNumbers
LOT Numbers with Descending Sequence Codes 4,703 34.13% of LOTNumbers
Alternate DPC Sequence Codes Determined 5,022 100.00% of LOTCoded Records
Line of Travel Option LTO60: Control Totals2/13/2013
430CODE-1 Plus User Guide for IBM i
Alternate Sequence Codes
This section describes how to sort your output records using the two types of alternate sequencecodes generated by the Line of Travel Option. It also provides a reference table for all potentialsequence codes.
Sorting LOT Records Using Alternate Sequence Codes
Line of Travel can help you sort your output records in the sequence required by the USPS to obtainthe basic enhanced carrier route rate. Line of Travel returns two kinds of alternate sequence codesthat you can use when sorting your records prior to presorting your mailing using, for example, thePrecisely MailStream Plus software.
The Alternate Sequence Code(s) are normally obtained by using the LOTOUT parameter. If you areusing a call or EXITOP to get the Alternate Sequence Code(s), note that in order for Line of Travelto return the alternate sequence codes, you must present a 2-character DPC add-on as input. If youare accessing the program via the EXITOP parameter, you must also specify the location of the inputrecord DPC add-on by completing positions 29-32 on the EXITOP parameter, and you must specifya location on the output record for one of the alternate sequence codes by completing positions37-40 or 41-44 on the EXITOP parameter.
Line of Travel uses the DPC add-on and the eLOT sequence code, which is either “A” for ascendingor “D” for descending, to determine the two alternate codes.
The alternate sequence code is a two-character code used to sort your file in ascending order only.It consists of an uppercase letter followed by a digit 0 through 9. Values range from “A0” (99descending) through “J9” (00 descending), and “K0” (00 ascending) through “T9” (99 ascending).
The hexadecimal sequence code is a single-character code, and it also allows you to sort your filein ascending order only. There are 200 values ranging from 99 descending through 00 descending,then 00 ascending through 99 ascending.
If you choose to use one of these codes to sort your file, you must sort your eLOT-coded records inascending order in the following sequence:
1. 5-digit ZIP Code
2. 4-byte Carrier Route Code
3. 4-digit Line of Travel Code
Note: This includes only the numeric portion of the eLOT code. It does not include theeLOT sequence code.
431CODE-1 Plus User Guide for IBM i
4. 4-byte ZIP + 4 Code
5. 2-byte Alternate Sequence Code or 1-character Hexadecimal Sequence Code
Note: Per USPS regulations, records with missing (blank) or invalid (0000) LOT informationare to be sorted to the end of the CRRT.
Sequence Code Table
This table provides a reference for potential sequence codes that correspond to a combination ofthe 2-digit DPC add-on, and the eLOT sequence code.
2-ByteAlternateSequenceCode
1-characterHexadecimalSequenceCode
eLOTSequenceCodeDPC add-onSequence Order
A0X'21'D99001
A1X'22'D98002
A2X'23'D97003
A3X'24'D96004
A4X'25'D95005
A5X'26'D94006
A6X'27'D93007
A7X'28'D92008
A8X'29'D91009
432CODE-1 Plus User Guide for IBM i

2-ByteAlternateSequenceCode
1-characterHexadecimalSequenceCode
eLOTSequenceCodeDPC add-onSequence Order
A9X'2A'D90010
B0X'2B'D89011
B1X'2C'D88012
B2X'2D'D87013
B3X'2E'D86014
B4X'2F'D85015
B5X'30'D84016
B6X'31'D83017
B7X'32'D82018
B8X'33'D81019
B9X'34'D80020
C0X'35'D79021
C1x'36'D78022
C2X'37'D77023
433CODE-1 Plus User Guide for IBM i

2-ByteAlternateSequenceCode
1-characterHexadecimalSequenceCode
eLOTSequenceCodeDPC add-onSequence Order
C3X'38'D76024
C4X'39'D75025
C5X'3A'D74026
C6X'3B'D73027
C7X'3C'D72028
C8X'3D'D71029
C9X'3E'D70030
D0X'3F'D69031
D1X'40'D68032
D2X'41'D67033
D3X'42'D66034
D4X'43'D65035
D5X'44'D64036
D6X'45'D63037
434CODE-1 Plus User Guide for IBM i

2-ByteAlternateSequenceCode
1-characterHexadecimalSequenceCode
eLOTSequenceCodeDPC add-onSequence Order
D8X'47'D61039
D9X'48'D60040
E0X'49'D59041
E1X'4A'D58042
E2X'4B'D57043
E3X'4C'D56044
E4X'4D'D55045
E5X'4E'D54046
E6X'4F'D53047
E7X'50'D52048
E8X'51'D51049
E9X'52'D50050
F0X'53'D49051
F1X'54'D48052
435CODE-1 Plus User Guide for IBM i

2-ByteAlternateSequenceCode
1-characterHexadecimalSequenceCode
eLOTSequenceCodeDPC add-onSequence Order
F2X'55'D47053
F3X'56'D46054
F4X'57'D45055
F5X'58'D44056
F6X'59'D43057
F7X'5A'D42058
F8X'5B'D41059
F9X'5C'D40060
G0X'5D'D39061
G1X'5E'D38062
G2X'5F'D37063
G3X'60'D36064
G4X'61'D35065
G5X'62'D34066
436CODE-1 Plus User Guide for IBM i

2-ByteAlternateSequenceCode
1-characterHexadecimalSequenceCode
eLOTSequenceCodeDPC add-onSequence Order
G6X'63'D33067
G7X'64'D32068
G8X'65'D31069
G9X'66'D30070
H0X'67'D29071
H1X'68'D28072
H2X'69'D27073
H3X'6A'D26074
H4X'6B'D25075
H5X'6C'D24076
H6X'6D'D23077
H7X'6E'D22078
H8X'6F'D21079
H9X'70'D20080
437CODE-1 Plus User Guide for IBM i

2-ByteAlternateSequenceCode
1-characterHexadecimalSequenceCode
eLOTSequenceCodeDPC add-onSequence Order
I0X'71'D19081
I1X'72'D18082
I2X'73'D17083
I3X'74'D16084
I4X'75'D15085
I5X'76'D14086
I6X'77'D13087
I7X'78'D12088
I8X'79'D11089
I9X'7A'D10090
J0x'7B'D09091
J1X'7C'D08092
J2X'7D'D07093
J3X'7E'D06094
438CODE-1 Plus User Guide for IBM i
2-ByteAlternateSequenceCode
1-characterHexadecimalSequenceCode
eLOTSequenceCodeDPC add-onSequence Order
J4X'7F'D05095
J5X'80'D04096
J6X'81'D03097
J7X'82'D02098
J8X'83'D01099
J9X'84'D00100
K0X'85'A00101
K1X'86'A01102
K2X'87'A02103
K3X'88'A03104
K4X'89'A04105
K5X'8A'A05106
K6X'8B'A06107
K7X'8C'A07108
439CODE-1 Plus User Guide for IBM i

2-ByteAlternateSequenceCode
1-characterHexadecimalSequenceCode
eLOTSequenceCodeDPC add-onSequence Order
K8X'8D'A08109
K9X'8E'A09110
L0X'8F'A10111
L1X'90'A11112
L2X'91'A12113
L3X'92'A13114
L4X'93'A14115
L5X'94'A15116
L6X'95'A16117
L7X'96'A17118
L8X'97'A18119
L9X'98'A19120
M0X'99'A20121
M1X'9A'A21122
440CODE-1 Plus User Guide for IBM i

2-ByteAlternateSequenceCode
1-characterHexadecimalSequenceCode
eLOTSequenceCodeDPC add-onSequence Order
M2X'9B'A22123
M3X'9C'A23124
M4X'9D'A24125
M5X'9E'A25126
M6X'9F'A26127
M7X'A0'A27128
M8X'A1'A28129
M9X'A2'A29130
N0X'A3'A30131
N1X'A4'A31132
N2X'A5'A32133
N3X'A6'A33134
N4X'A7'A34135
N5X'A8'A35136
441CODE-1 Plus User Guide for IBM i

2-ByteAlternateSequenceCode
1-characterHexadecimalSequenceCode
eLOTSequenceCodeDPC add-onSequence Order
N6X'A9'A36137
N7X'AA'A37138
N8X'AB'A38139
N9X'AC'A39140
O0X'AD'A40141
O1X'AE'A41142
O2X'AF'A42143
O3X'B0'A43144
O4X'B1'A44145
O5X'B2'A45146
O6X'B3'A46147
O7X'B4'A47148
O8X'B5'A48149
O9X'B6'A49150
442CODE-1 Plus User Guide for IBM i

2-ByteAlternateSequenceCode
1-characterHexadecimalSequenceCode
eLOTSequenceCodeDPC add-onSequence Order
P0X'B7'A50151
P1X'B8'A51152
P2X'B9'A52153
P3X'BA'A53154
P4X'BB'A54155
P5X'BC'A55156
P6X'BD'A56157
P7X'BE'A57158
P8X'BF'A58159
P9X'C0'A59160
Q0X'C1'A60161
Q1X'C2'A61162
Q2X'C3'A62163
Q3X'C4'A63164
443CODE-1 Plus User Guide for IBM i

2-ByteAlternateSequenceCode
1-characterHexadecimalSequenceCode
eLOTSequenceCodeDPC add-onSequence Order
Q4X'C5'A64165
Q5X'C6'A65166
Q6X'C7'A66167
Q7X'C8'A67168
Q8X'C9'A68169
Q9X'CA'A69170
R0X'CB'A70171
R1X'CC'A71172
R2X'CD'A72173
R3X'CE'A73174
R4X'CF'A74175
R5X'D0'A75176
R6X'D1'A76177
R7X'D2'A77178
444CODE-1 Plus User Guide for IBM i

2-ByteAlternateSequenceCode
1-characterHexadecimalSequenceCode
eLOTSequenceCodeDPC add-onSequence Order
R8X'D3'A78179
R9X'D4'A79180
S0X'D5'A80181
S1X'D6'A81182
S2X'D7'A82183
S3X'D8'A83184
S4X'D9'A84185
S5X'DA'A85186
S6X'DB'A86187
S7X'DC'A87188
S8X'DD'A88189
S9X'DE'A89190
T0X'DF'A90191
T1X'E0'A91192
445CODE-1 Plus User Guide for IBM i

2-ByteAlternateSequenceCode
1-characterHexadecimalSequenceCode
eLOTSequenceCodeDPC add-onSequence Order
T2X'E1'A92193
T3X'E2'A93194
T4X'E3'A94195
T5X'E4'A95196
T6X'E5'A96197
T7X'E6'A97198
T8X'E7'A98199
T9X'E8'A99200
446CODE-1 Plus User Guide for IBM i
17 - Using ResidentialDelivery Indicator (RDI)Processing
In this section
What is Residential Delivery File Processing?.......................................448Using RDI Processing............................................................................448Downloading the RDI File.......................................................................448Installing the RDI File.............................................................................448Activating the RDI Option.......................................................................451RDI Reports............................................................................................452
CODE-1 Plus User Guide for IBM i
What is Residential Delivery File Processing?
The Residential Delivery Indicator (RDI) database contains data that indicates whether the USPSidentifies addresses as residential or business addresses.
Using RDI Processing
To use RDI processing, follow these steps.
1. Download the RDI file from Precisely.
2. Import the RDI file.
3. Use the DPVIN parameter to activate RDI processing.
Each step is detailed below.
Downloading the RDI File
To use RDI processing, download the RDI file directly from the Precisely estore, which is the fastestway to download software and data.
Installing the RDI File
To install the RDI file, follow these steps.
1. Access the Database Functions Menu from theWork with Jobs Menu.
448CODE-1 Plus User Guide for IBM i

2. Press F20 from theWork with Jobs screen. "F20=Database Functions" does not need to bedisplayed at the bottom of theWork with Jobs screen to use the F20 function. The DatabaseFunctions screen (C1CPDB01) displays.
3. Select "3. Import RDI Tables" from the Database Functions screen. The Import RDI Tablesscreen (C1CPDB30) displays.
449CODE-1 Plus User Guide for IBM i
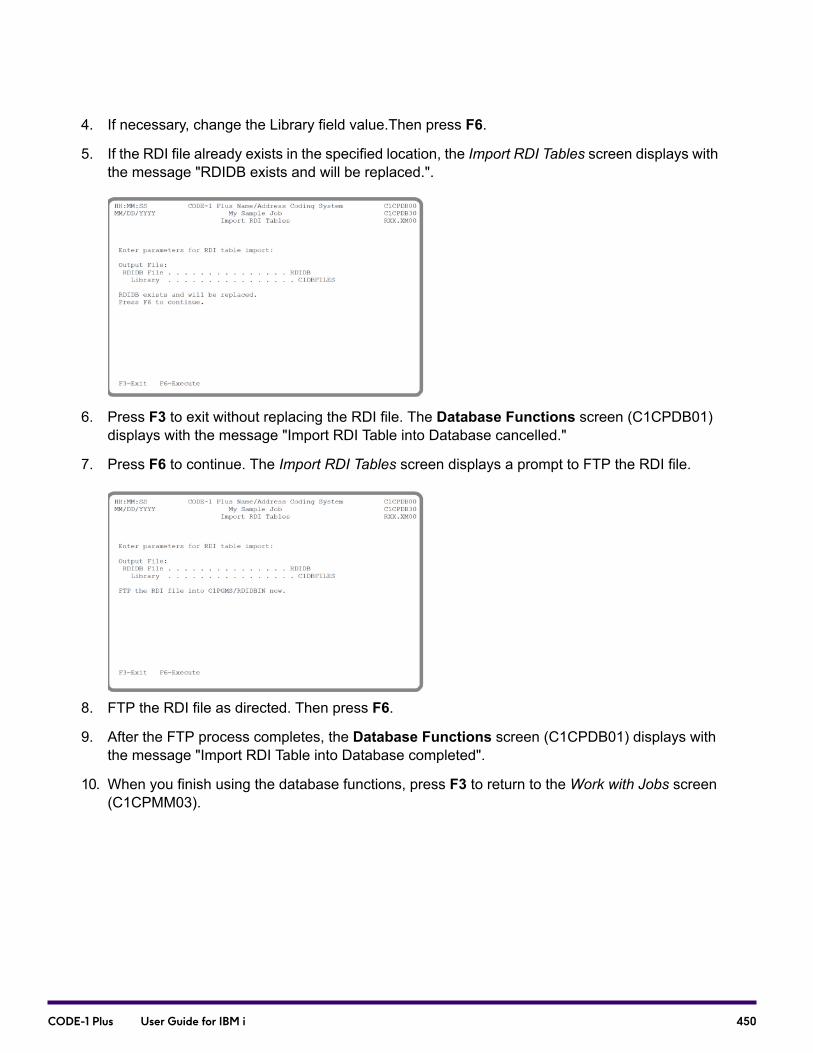
4. If necessary, change the Library field value.Then press F6.
5. If the RDI file already exists in the specified location, the Import RDI Tables screen displays withthe message "RDIDB exists and will be replaced.".
6. Press F3 to exit without replacing the RDI file. The Database Functions screen (C1CPDB01)displays with the message "Import RDI Table into Database cancelled."
7. Press F6 to continue. The Import RDI Tables screen displays a prompt to FTP the RDI file.
8. FTP the RDI file as directed. Then press F6.
9. After the FTP process completes, the Database Functions screen (C1CPDB01) displays withthe message "Import RDI Table into Database completed".
10. When you finish using the database functions, press F3 to return to theWork with Jobs screen(C1CPMM03).
450CODE-1 Plus User Guide for IBM i
Activating the RDI Option
After installing the RDI file, you can use RDI in your CODE-1 Plus processing. Use the followingparameters to activate and define options for RDI processing.
DPVIN Parameter
Use the RDI Indicator field in position 52 of the DPVIN parameter to specify whether to perform RDIprocessing. For more information on the DPVIN parameter, refer to "DPVIN" in your CODE-1 PlusReference Guide.
DPVOUT Parameter
Use the Location for Residential Flag field in positions 50-52 of the DPVOUT parameter to specifythe location on the output record for a 1-character Residential Flag. One of the following codes isstored:
• R — Yes, this address is a residential-only delivery point.
• Blank — Not a residential delivery point.
For more information on the DPVOUT parameter, refer to "DPVOUT" in yourCODE-1 Plus ReferenceGuide/
PGMNAM Parameter
The RDI Large Memory Module (DPV040L) can improve speed during RDI processing. Please referto the PGMNAM parameter in your CODE-1 Plus Reference Guide for more information on usingDPV040L.
REPORT Parameter
Use the following REPORT parameter fields to define the RDI reports.
451CODE-1 Plus User Guide for IBM i

DescriptionField NamePosition
Optional. Specify a code to indicatewhether to print the report:
• Y — Print RDI counts.
• N — Do not print RDI counts.
• Blank— Default is Y.
Residential Delivery Indicator (RDI)Processing Summary Counts
42
Optional. Specify a code to indicatewhether to print the report:
• Y — Print the RDI List Code Report.
• N — Do not print the RDI List CodeReport.
• Blank— Default is Y.
Residential Delivery Indicator (RDI)Processing Counts by List Code
44
RDI Reports
You can print RDI processing results on the following reports:
• Delivery Point Validation Processing Summary Report
• RDI Build Report
• RDI Counts by List Code Report
• Qualitative Statistical Summary (QSS) section of the USPS Form 3553 includes the RDI counts
452CODE-1 Plus User Guide for IBM i
18 - Auxiliary FileProcessing
In this section
What is the Early Warning System?.......................................................454Auxiliary File Processing and EWS........................................................454Building the Auxiliary File with the Early Warning System.....................455AUXIL Parameter...................................................................................456Activating the Auxiliary File/Early Warning System File.........................458Auxiliary File Reports..............................................................................461
CODE-1 Plus User Guide for IBM i
What is the Early Warning System?
The Early Warning System (EWS) was devised by the USPS to prevent address records frommiscoding due to a delay in postal data reaching the USPS address matching files. The less recentthe ZIP+4 File, the higher potential you have for miscoding addresses. When a valid address ismiscoded because the address it matches to in the ZIP+4 File is inexact, it will result in what is termeda “broken address.” Once an address is broken, the effect is permanent without manual intervention.
Using the EWS Auxiliary File with CODE-1 Plus will prevent “broken addresses” from occurring.EWS consists of records containing partial address information limited to the ZIP Code, street name,pre- and post-directionals, and a suffix. For an address record to be EWS-eligible, it must be anaddress not present on the most recent monthly production ZIP+4 File.
Auxiliary File Processing and EWS
CODE-1 Plus implements EWS through Auxiliary File processing. There are two steps to setting upyour auxiliary file. First, you must reformat the record into a structure recognizable by the CODE-1Plus matching engine. Second, CODE-1 Plus must recognize the additional auxiliary file.
When you activate the Auxiliary File, addresses that match to the EWS File will not be coded. CODE-1Plus will report these records as neither matched nor mismatched records. Additionally, addressesthat match to the EWS file will appear on the Control Totals Report as “Confirmed via Match toAuxiliary File.”
Note: You must build the Auxiliary File using the C1AUXBLD program, supplied with yourCODE-1 Plus software.
Note: The USPS refreshes the EWS file on a weekly basis (Thursdays). You can downloadthe EWS file from at the USPS https://postalpro.usps.com/ website. It is a line sequentialfile containing 3950 records and is about 345 KB in size. However, the number of records andfile size is subject to change.
454CODE-1 Plus User Guide for IBM i
Building the Auxiliary File with the Early WarningSystem
There are three major steps you must perform to use EWS in your CODE-1 Plus jobs:
• Step 1 — Download the latest EWS File onto the NT/Windows machine. This file can be found onat the USPS https://postalpro.usps.com/ website.
• Step 2 — Unzip the downloaded file to extract the EWS raw data.
• Step 3 — Translate the downloaded EWS File into a form that is recognized by CODE-1 Plus byusing the C1AUXBLD utility.
• Step 4 — Tell CODE-1 Plus you want to use the translated EWS database, the Auxiliary File, inyour job by using the AUXIL1 parameter.
Each step is detailed below, with platform-specific detail where needed.
C1AUXBLD Utility Program
CODE-1 Plus provides the C1AUXBLD utility program so you can build an EWS file as often asneeded. This utility builds a Precisely-formatted file that will be utilized by the EWS module/lookupprogram.
To build the Auxiliary File with the EWS File:
1. Download the latest EWS File from the USPS https://postalpro.usps.com/ website.
2. Unzip the file and transfer it to the platform on which you are running CODE-1 Plus.
Note: For non-PC-based platforms, convert to a fixed length file with a record length of 89bytes. Also, if transferring to a mainframe platform, be sure the character set is converted toEBCDIC. There are approximately 4,000 records on the EWS file, which are subject to change.
Building Your Auxiliary File
To build your Auxiliary File, follow these steps:
1. Create a file (CRTPF) on your IBM i with a record length of 89.
2. FTP or otherwise upload the EWS file into the file you just created.
455CODE-1 Plus User Guide for IBM i
3. From the Work With Jobs screen, press F20 to access the Database Functions screen.
4. Select Option 9: Convert EWS file into CODE-1 Plus format.
5. On the next screen, fill in the Input EWS file parameters with the name of the file you created.The output file is automatically placed in your database library. The Output File and AddressElement Locations are not changeable at this time.
6. Press F6 to run the conversion. When you return to the menu, your file has been successfullyconverted and can be used as input to your CODE-1 job using the AUXIL1 parameter.
AUXIL Parameter
The AUXIL parameter is used with the C1AUXBLD program, and is used to define the field positionson the input Auxiliary File. This parameter comprises the following:
• Input file number and format
• 5-Digit ZIP location
• Street name/address line length and location
• Street suffix, pre-directional, post-directional, house range, secondary range, and secondarydesignator locations.
CommentsDescriptionField NamePosition
Required.AUXIL is the only acceptableentry.
Keyword1-5
Required.Only numbers 1 through 9are acceptable in thisposition.
Number of the Input File6
456CODE-1 Plus User Guide for IBM i
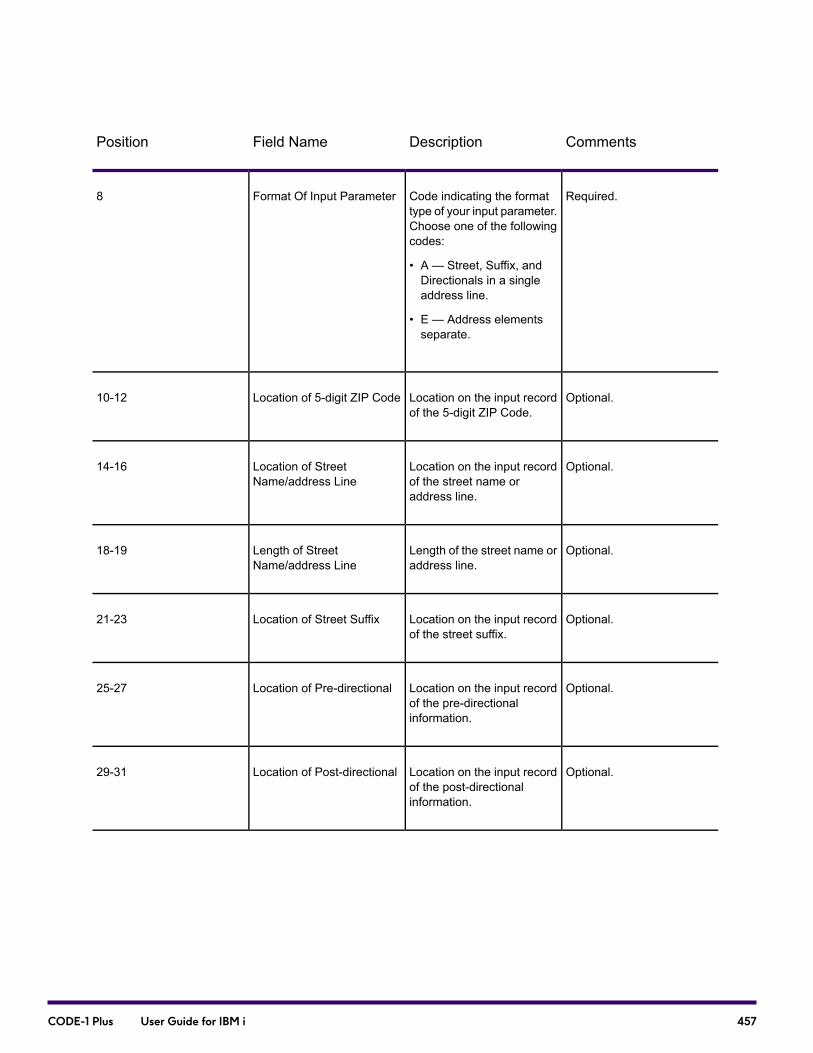
CommentsDescriptionField NamePosition
Required.Code indicating the formattype of your input parameter.Choose one of the followingcodes:
• A — Street, Suffix, andDirectionals in a singleaddress line.
• E — Address elementsseparate.
Format Of Input Parameter8
Optional.Location on the input recordof the 5-digit ZIP Code.
Location of 5-digit ZIP Code10-12
Optional.Location on the input recordof the street name oraddress line.
Location of StreetName/address Line
14-16
Optional.Length of the street name oraddress line.
Length of StreetName/address Line
18-19
Optional.Location on the input recordof the street suffix.
Location of Street Suffix21-23
Optional.Location on the input recordof the pre-directionalinformation.
Location of Pre-directional25-27
Optional.Location on the input recordof the post-directionalinformation.
Location of Post-directional29-31
457CODE-1 Plus User Guide for IBM i

CommentsDescriptionField NamePosition
Optional.Location on the input recordof 20-character house rangeformatted as 10-characterlow range followed by10-character high range.
NOTE: If there is no houserange information in the inputrecord, populate this fieldwith leading zeros.
Location of House Range33-35
Optiona.lLocation on the input recordof 16-character secondaryrange formatted as8-character low rangefollowed by 8-character highrange.
NOTE: If there is nosecondary range informationin the input record, populatethis field with leading zeros.
Location of SecondaryRange
37-39
Optional.Location on the input recordof the secondary designator.
Location of SecondaryDesignator
41-43
Activating the Auxiliary File/Early WarningSystem File
Auxiliary File matching is only available through the CODE-1 Plus batch driver (C1BM00), the callablebatch driver (C1BMCBD), or a user-defined program calling the batch matcher C1MATCHx. Whencalling C1MATCHx through a user-defined program, you must populate P9IAUX as defined in theInput Call Area (P9IN).
458CODE-1 Plus User Guide for IBM i
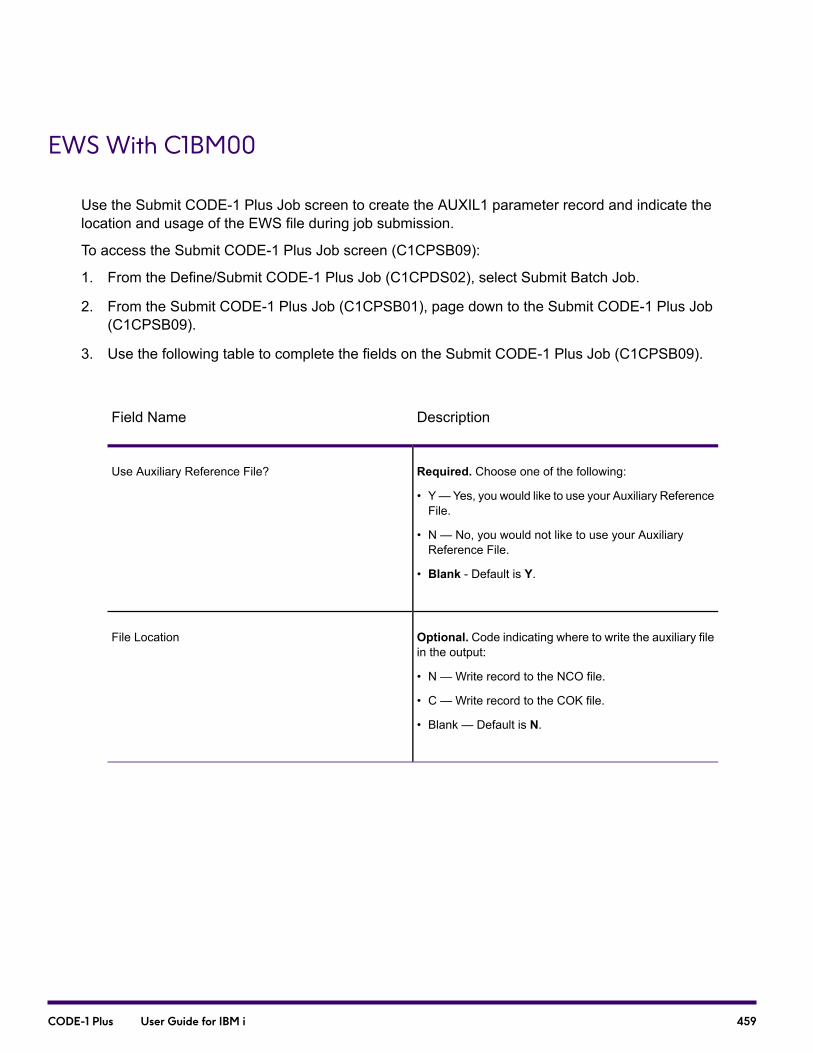
EWS With C1BM00
Use the Submit CODE-1 Plus Job screen to create the AUXIL1 parameter record and indicate thelocation and usage of the EWS file during job submission.
To access the Submit CODE-1 Plus Job screen (C1CPSB09):
1. From the Define/Submit CODE-1 Plus Job (C1CPDS02), select Submit Batch Job.
2. From the Submit CODE-1 Plus Job (C1CPSB01), page down to the Submit CODE-1 Plus Job(C1CPSB09).
3. Use the following table to complete the fields on the Submit CODE-1 Plus Job (C1CPSB09).
DescriptionField Name
Required. Choose one of the following:
• Y—Yes, you would like to use your Auxiliary ReferenceFile.
• N — No, you would not like to use your AuxiliaryReference File.
• Blank - Default is Y.
Use Auxiliary Reference File?
Optional. Code indicating where to write the auxiliary filein the output:
• N — Write record to the NCO file.
• C — Write record to the COK file.
• Blank — Default is N.
File Location
459CODE-1 Plus User Guide for IBM i

Function Keys
DescriptionNameFunction Key
Exit from the EWS FileConversion screen, without saving thedata.
ExitF3
Submit this job.SubmitF6
Submit this job to only test theparameter records that have beengenerated for this job.
Parm TestF7
Submit the Build Report job.Run BUILD ReportF8
If CODE-1 Plus detects an EWS file in the database library, the filename is automatically filled in,and CODE-1 Plus will create an override for G1C1AUX.
EWS When Calling C1MATCHx or C1BMCBD
When calling C1MATCHx through a user-defined program, you must populate P9IAUX as definedin the Input Call Area (P9IN).
When using C1BMCBD to activate and match to the Auxiliary File, you must include the AUXIL1parameter in your CODE-1 Plus batch job. This is not the same parameter used in the C1AUXBLDprogram. The AUXIL1 parameter for the CODE-1 Plus batch driver is as follows:
....+....1....+....2....+....3....+....4....+....5
AUXIL1............................................
When calling C1MATCHx or C1BMCBD, you must make the Auxiliary File known to CODE-1 Plusby defining it in your job control set-up script as G1C1AUX. This file definition should be overriddento the file you created using the C1AUXBLD program described earlier in this chapter.
Note: The Auxiliary matcher is not available as a stand-alone program or as a callable routine.
460CODE-1 Plus User Guide for IBM i

Auxiliary File Reports
In this section, we describe the two reports that are generated when using the Auxiliary File Optionin CODE-1 Plus.
Auxiliary File Build (C1AUXBLD) Reports
The Auxiliary File Build program (C1AUXBLD), generates a standard Precisely job report (PRNTRPT)and an execution log (PRNTXLG). The report lists the parameter given and the control totals for thejob. The execution log shows when the job started and ended. You should check both reports forany error messages.
Note: Because of the way the Auxiliary File is built for use by CODE-1 Plus, the number ofrecords read will not equal the number of physical records written to the output G1C1AUXAuxiliary File.
Auxiliary File Build Report
You will find the following information on this report:
• Parameter given
• Control totals for your Auxiliary File build job
Auxiliary File Build Execution Log
You will find the following information on the execution log:
• The date and time of the Auxiliary File build
• The number of records read
• The number of virtual records written
• The number of physical records written
461CODE-1 Plus User Guide for IBM i
Auxiliary File Reporting in the CODE-1 Plus Matcher
There are no new or separate reports from the CODE-1 Plus matcher as a result of Auxiliary Filematching. The records presented to the CODE-1 Plus matcher that match to the Auxiliary File willshow on a new line of the Control Totals Report under the heading “Confirmed via Match to AuxiliaryFile.” These records will not be included in the counts for any of the following major headings on theControl Totals Report:
• Total records for which Address Match attempted
• Total Unmatched Records
• Total Records successfully Matched.
Another new report line, “Total records Matched to EWS,” will appear on the Control Totals Reportwhen there are EWS matching records. This count will also appear on the PS Form 3553 in SectionE under the heading of EWS.
462CODE-1 Plus User Guide for IBM i

19 - Using PreciselyIDProcessing
In this section
What is PreciselyID Processing?...........................................................464How Does PreciselyID Processing Work?..............................................464Structures Containing PreciselyID Identifiers.........................................464Installing the PreciselyID Database........................................................465Activating the PreciselyID Option...........................................................465PreciselyID Reports................................................................................466
CODE-1 Plus User Guide for IBM i

What is PreciselyID Processing?
For each addressable location, PreciselyID processing provides a unique and persistent identifierto reference the address without storing the whole address string.The PreciselyID is further verificationan address exists, regardless of DPV matching. If the optional PreciselyID database is installed,processing is available in Batch and Interactive. For detailed information, please refer to yourCODE-1Plus Installation Guide.
Additionally, to link the PreciselyID to other data (i.e., geoenrichment), Precisely has done the complexmatching for you. Use the PreciselyID as the gateway to the rest of the Precisely data portfolio.Contact your Sales Representative for more information, based on your specfic needs.
How Does PreciselyID Processing Work?
These steps describe the sequence of CODE-1 Plus PreciselyID processing:
1. CODE-1 Plus validates the addresses in your input file during processing.2. CODE-1 Plus looks up the output address in the PreciselyID database.3. PreciselyID processing returns a code indicating if a PreciselyID was returned, and if it applied
to the full address.
Structures Containing PreciselyID Identifiers
These structures include data to facilitate PreciselyID processing. For more detail, refer to yourCODE-1 Plus Reference Guide.
ContentLengthNamePosition
Indicates whether CODE-1 Plusshould retrieve and return thePreciselyID.
Y - Retrieve and return PreciselyIDinformation
1P9IPRECISELYID537
464CODE-1 Plus User Guide for IBM i

P9 OUT
ContentLengthNamePosition
PreciselyID Status19OPRECISELYID\u0002STATUS4883
PreciselyID Release Name189OPRECISELYID\u0002RELEASE-NAME4884- 4901
PreciselyID Release Number49OPRECISELYID\u0002RELEASE-NUM4902- 4905
PreciselyID Release Date109OPRECISELYID\u0002RELEASE-DATE4906- 4915
PreciselyID129OPRECISELYID\u0002PBKEY4916- 4927
Installing the PreciselyID Database
The PreciselyID Option is installed as part of your standard CODE-1 Plus installation. After installingCODE-1 Plus, you must install the PRCSLYDB database and activate the PreciselyID Option toperform PreciselyID processing. To activate, use the SA2OUT parameter or the Matcher/Inquirysystem.
To install the PreciselyID file, follow these steps.
1. From the Work With Jobs screen, press F20 to access Database Functions.2. From the Database Functions screen, select 2. Install Database.3. On the Install CODE-1 Plus Databases screen, enter Y in the "Install PreciselyID DB?” field.4. When you finish using the database functions, press F3 to return to theWork with Jobs screen
(C1CPMM03).
Activating the PreciselyID Option
After installing the PreciselyID database and enabling the processing, you can use PreciselyID inyour CODE-1 Plus processing. Use the SA2OUT parameter to activate and define options forPreciselyID processing. The SA2OUT parameter is defined in the Name/Address Record Postingfunction (C1CPOD050).
465CODE-1 Plus User Guide for IBM i
PreciselyID Reports
When the optional PreciselyID processing is enabled, the Control Totals report displays additionalPreciselyID match statistics such as the total number of match attempts, successful and unsuccessfulmatches, and the number of exact and default matches found.
466CODE-1 Plus User Guide for IBM i
A - GlossaryAlphabetic character
Any one of the letters A through Z (upper case and lower case).
Alphanumeric character
Any one of the alphabetic characters, or any one of the digits 0 through 9.
Batch job
A batch job consists of a predefined group of processing actions that aredone with little or no interaction between a user and the system. A user putsthe batch job on a job queue (or list), where it waits until the system is readyfor it.
Bit
A unit of data used to make up the bytes of information to be used inprocessing. Either of the binary digits 0 or 1.
Byte
A group of 8 adjacent bits. In the EBCDIC and ASCII coding systems, 1byte represents a character, such as 1 letter in the alphabet. In thedouble-byte coding system, 2 bytes represent a character.
Character
Any letter, number or other symbol in the data character set that is part ofthe organization, control, or representation of data.
Carrier code
A code assigned to each address on a mail carrier’s route.
Coded output file
Output file that contains processed records coded with ZIP + 4 and/or carrierroute codes.
Constant
Data that has an unchanging, predefined value to be used in processing. Aconstant does not change during the running of the program, while thecontents of a field or variable can.
Customer file
An input or output file that contains customer’s names and addresses.
Default value
CODE-1 Plus User Guide for IBM i

A value supplied by the system that is used when no other value is specified by the user.
Directional
A prefix or suffix on an address that identifies a direction. Predirectionals precede street names, such asW. Terry Avenue. Post directionals follow street names, such as 23 Democracy Avenue, NW.
Dropped address information
Address elements dropped during the matching process.
Embedded blank
A space between the characters in a unit of data.
Exit routine
Programming that enables another routine or module, separate from CODE-1 Plus, to execute a seriesof operations and then return to CODE-1 Plus.
Field
A group of related characters (such as a name or amount) that are treated as a unit in a record.
File
A generic term for a set of related records treated as a unit.
Firm name
The company name associated with an address.
General delivery
Mail picked up at post offices by customers who do not use a post office box.
High-rise delivery point
An address in an apartment or office building that accepts mail for tenants or companies within the building.
Highway contract route
A mail route assigned to a private carrier on a contract basis. The post office sometimes assigns contractsfor sparsely populated rural areas.
Input file
Contains variable data used for input. It is typically a name-and-address file, but may contain any type ofdata. The input file is described by the user. It may have any file attributes and may reside on either disk,diskette, or tape.
Invalid ZIP Code File
Output file that contains addresses that have invalid ZIP Codes.
Job description
A set of characters that defines how the system handles a job.
Job queue
468CODE-1 Plus User Guide for IBM i
A waiting list. In this case, a list of the jobs waiting for processing.
Library
An object on disk that serves as a directory of other objects. A library groups related objects, and enablesyou to find objects by name.
Leading zeros
Zeroes that are place-holders to the left of numbers that are right-aligned and smaller than the specifiedfield length.
List codes
A generic term for codes placed next to records in a file. A list code might be used to sort records orperform other operations that require codes to identify like records.
Match attempts
Number of tries the system made to match the input address.
Matching algorithm
Program logic that controls address matching.
Member
Different files within a library.
National character
One of the characters $, @, #, or _ (underscore).
Numeric character
Any one of the digits 0 through 9.
Packed data
Data that is in a packed decimal format.
Packed field
A field that contains data in packed decimal format.
Packed decimal format
Representation of a decimal value in which each byte within a field represents two numeric digits exceptthe rightmost byte, which contains one digit in bits 0 through 3 and the sign in bits 4 through 7. For allother bytes, bits 0 through 3 represent one digit; bits 4 through 7 represent one digit. For example, thedecimal value for +123 would be represented as 0001 0010 0011 1100 in binary notation, or X'123C' inhexadecimal notation. Note that some computers use alternative representations for packed decimalnumbers.
Parameter
Data passed to or received from another program.
469CODE-1 Plus User Guide for IBM i

PreciselyID
A unique and persistent identifier to reference the address without storing the whole address string. ThePreciselyID is further verification an address exists, regardless of DPV matching. Additionally, to link it toother data (i.e., geoenrichment), Precisely has done the complex matching for you. Use the PreciselyIDas the gateway to the rest of the Precisely data portfolio.
Record
A collection of related data or words, treated as a unit, such as one name, address, and telephone number.
Record layout
Layout of a record, showing all the fields it contains along with each field's length, type, and position inthe record.
Record position
The position in a record where a field is located.
Record types
The Postal Service categorizes addresses and assigns each category a code called a record type. Forexample a rural route is assigned a record type of “R.”
Return codes
Codes produced by the system that indicate matching success and either changes made or discrepanciesfound in the input address during matching.
Rural route
A delivery route operated in communities lacking convenient postal facilities and maintained by arearesidents.
Uncoded output file
Output file that contains processed records left uncoded with either ZIP + 4 or carrier route codes.
ZIP Code
A 5-digit code identifying the post office or delivery station associated with an address.
ZIP + 4 Code
A 4-digit code added to a ZIP Code. The first two digits designate a sector that corresponds to a portionof a zone, rural route, several city blocks, or a large building. A company on one floor of a large officebuilding can have its own ZIP + 4 Code.
470CODE-1 Plus User Guide for IBM i

In this section
471CODE-1 Plus User Guide for IBM i

1700 District Ave Ste 300Burlington MA 01803-5230USA
www.precisely.com
Copyright 1998, 2022 Precisely
Copyright © 2022 FDOKUMEN