Clean Spot PCR Workstation instruction manual - Coy ...
13
______________________________________________________________ 14500 Coy Drive, Grass Lake, Michigan 49240 734-475-2200 E-mail: [email protected] www.coylab.com Clean Spot PCR Workstation instruction manual
-
Upload
khangminh22 -
Category
Documents
-
view
5 -
download
0
Transcript of Clean Spot PCR Workstation instruction manual - Coy ...
______________________________________________________________
14500 Coy Drive, Grass Lake, Michigan 49240 734-475-2200 E-mail: [email protected]
www.coylab.com
Clean Spot PCR Workstation
instruction manual
CleanSpot PCR Workstation 102214 1
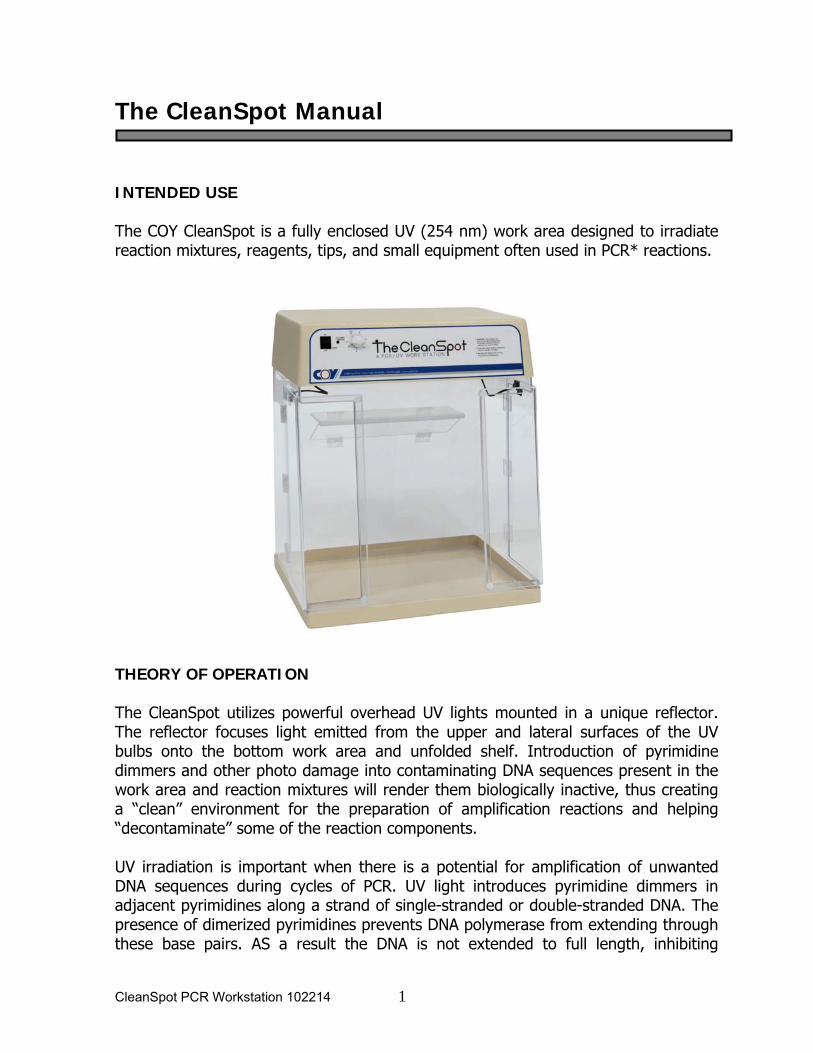
The CleanSpot Manual INTENDED USE The COY CleanSpot is a fully enclosed UV (254 nm) work area designed to irradiate reaction mixtures, reagents, tips, and small equipment often used in PCR* reactions. THEORY OF OPERATION The CleanSpot utilizes powerful overhead UV lights mounted in a unique reflector. The reflector focuses light emitted from the upper and lateral surfaces of the UV bulbs onto the bottom work area and unfolded shelf. Introduction of pyrimidine dimmers and other photo damage into contaminating DNA sequences present in the work area and reaction mixtures will render them biologically inactive, thus creating a “clean” environment for the preparation of amplification reactions and helping “decontaminate” some of the reaction components. UV irradiation is important when there is a potential for amplification of unwanted DNA sequences during cycles of PCR. UV light introduces pyrimidine dimmers in adjacent pyrimidines along a strand of single-stranded or double-stranded DNA. The presence of dimerized pyrimidines prevents DNA polymerase from extending through these base pairs. AS a result the DNA is not extended to full length, inhibiting

CleanSpot PCR Workstation 102214 2
geometric amplification of unwanted DNA targets. If wanted templates were accidentally added to the reaction mixture before irradiation, they would be rendered unamplifiable by current amplification procedures. The duration of the UV dose, i.e., total energy required, will be dependent upon the concentration of contaminating sequences, the base pair length, and the sequence specificity of the DNA. Sarker and Sommer illustrated a logarithmic relationship between relative inactivation by UV light and the length of DNA targets. Targets that are longer and more water saturated are more susceptible to UV light and therefore require less irradiation to inactivate. The work area is large enough to irradiate several racks of tubes, pipettes, pipette tips, and other items required for setting up PCR reactions. Tubes should be uncapped and placed in a microtube rack in the center of the CleanSpot. A typical microtube contains 10X Reaction Buffer, Mg++, nucleotides, and distilled water. Care should be taken not to put items in the shadow of the shelf. Exposure time may be shortened by putting items to be irradiated on the shelf. The CleanSpot inactivates 10 ng of a 1.5 kb target DNA within 25-20 minutes. This time takes into account normal bulb degradation and non-uniformity. An average of 1020 mJ/cm² of UV light is delivered in 30 minutes to the bottom of the unit, in the areas not shaded by the shelf. *PCR (Polymerase Chain Reaction) is covered by U.S. Patents issued to Hoffman La-Roche Corporation.

CleanSpot PCR Workstation 102214 3
TECHNICAL SPECIFICATIONS Dimensions: 18” x 24”W x 28”H (46cm x 61 cm x 71 cm) Weight: 31 pounds (14 kg) Light Source: 2 UV bulbs – 254 nm white fluorescent bulb Electrical: Domestic: 110VAC, 128 Watts, 60Hz, 1.2A International: 220VAC, 128 watts, 50HZ, 0.6A Fuses: Domestic: 1.5A (slow blow) International: 1.25A (slow blow) Replace only with fuse of specified type and current rating Warranty: 6 Months Safety Device: Reed switch prevents operation of UV lamps when doors are open
Door with Reed Switch
Timer
Notch for cord access
CleanSpot PCR Workstation 102214 4
WARNINGS AND PRECAUTIONS
1. The CleanSpot uses two 254 nm UV light bulbs. Always wear protective clothing and safety goggles. DO NOT expose skin to UV light.
2. When using the shelf, the area under the shelf will not be exposed to UV rays,
therefore do not place items under the shelf. The shelf is removable. 3. Some micropipette barrels and plastics are manufactured for prolonged exposure to
UV light, while others may not withstand the exposure. Check with the manufacturer of those products.
4. Do not for any reason defeat the safety switches that prevent the UV light from
operating with the doors open. 5. Over long periods of exposure to UV light, the plastic will begin to show signs of
yellowing. This is a gradual degradation, and testing shows it to become visible only after many months of chamber use.
6. WARNING: This is a non-ventilated, circulation-free enclosure. It is not suitable
for pathogenic, toxic, or volatile procedures. Because there is no exhaust system in this enclosure, continuous flame or high heat burners must not be utilized.
7. WARNING: Do not clean with alcohol or other similar cleaning solutions. See
Page 8 for cleaning instructions.

CleanSpot PCR Workstation 102214 5
COMPONENTS The COY CleanSpot is composed of 4 pieces. Upon receipt, the pieces should be unpacked and examined for damage. The components are described below.
A) BASE TRAY Dimensions: 1.5” high, 24” wide, 18” deep Material: ABS plastic Feature: Easily removed for cleaning B) BACK & SIDES Dimensions: 22.74” high, 52” long Material: Acrylic Features: As an added safety precaution,
wipe down the inside of the CleanSpot with a very moist cloth prior to irradiation.
• One piece construction • Opening for electrical cord • Shelf • 2 hinged doors on each side
for easy interior access • Safety switches prevent
operation of UV lights with doors open
C) TOP Dimensions: 5.5” high, 24” wide, 14” deep Material: ABS plastic
• Houses the UV and white lights
• On/Off switch • Timer switch
D) FRONT Dimensions: 22.75” high, 14” wide Material: Acrylic
Features: Positioned to allow maximum visibility

CleanSpot PCR Workstation 102214 6
ASSEMBLY To remove individual pieces, simply pull straight out of packaging. Refer to the cover and page 4 for component information and illustrations.
1. Position the Base Tray with the angled front toward you.
2. Place the Back and Side Piece inside the Base
Tray. 3. The Front section should be inserted into the
Base Tray with the cut outs positioned to the left and right and the beveled side toward the front.
4. Remove bulbs from the box and install. Install
the white light in the center position and the 2 UV lights in the outer positions. Insert bulbs
and rotate clockwise until tight. 5. Place the Top over the Back, Sides, and Front.
Be sure it fits down securely, using the locater tabs.
6. For each door, plug the safety switch into the
jack located in the Top Piece. 7. If you wish to use the shelf, Slide the shelf
into the slots on the side.

CleanSpot PCR Workstation 102214 7
OPERATION FOR USE IN CONTROLLING PCR CONTAMINATION
Have all of your necessary supplies and equipment reaction set up in the chamber and leave them there during exposure to help “decontaminate” them.
1. In the CleanSpot, prepare samples containing 10X Buffer, Mg++, distilled water, and nucleotides. Place tubes in microtube rack, uncapped.
2. Prepare biological control and place in microtube rack. This should be run with each
irradiation. See BIOLOGICAL CONTROL for more information. 3. For optimal results, place microtube racks in the center of the base tray away from
the shelf. You can also put samples on the shelf and use a reduced exposure time. 4. Shut the doors. The safety circuit becomes complete only when the doors are
closed. By opening the doors, the UV lights are disengaged. 5. The ON/OFF switch operates the fluorescent light. 6. The TIMER operates the UV light. Set timer for 30 min. if the samples are on the
base, or for 15 min. if on the shelf. 7. While still in the chamber, add the remainder of the reaction components to the
tubes. 8. Cap the tubes and put them in your thermal cycler. 9. Leave all of your equipment and supplies in the chamber with the doors closed. so
that they will be “clean” and ready for the next use.
NOTE: Even though you are working inside the chamber, proper handling techniques should be observed. For instance;
● don’t handle or re-use tips ● always use displacement pipettes ● clean gloves
Particular care should be given to the target DNA, primers and DNA polymerase, since typically these can not be irradiated. Do not open these component tubes outside of the chamber and be sure not to contaminate them with “dirty” tips. Also avoid placing the chamber where there will be strong air currents through the chamber when the doors are open, as this will defeat the protection afforded by the still air environment.

CleanSpot PCR Workstation 102214 8
CLEANING 1. Remove any waste or absorbent materials used in the workstation and discard
appropriately. For containment use 1. DO NOT USE ALCOHOL. Alcohol dries plastic, forming cracks which may affect
structural integrity. 2. DO NOT WIPE DOWN WITH DE-IONIZED WATER. 3. If desired, the workstation can be disassembled and wiped more than thoroughly.
Be sure the inner wall surfaces are completely dry before turning on the UV lights. 4. An infrequent wipe-down with a 1% (by volume) Lysol solution will not damage the
acrylic. Be sure the inner wall surfaces are completely dry before turning on the UV lights.
For the reflector 1. Do not use any abrasive materials. 2. Use air or soft brush to clean the reflector. Scratches may be caused by applying
pressure while using a tissue.
CleanSpot PCR Workstation 102214 9
BIOLOGICAL CONTROLS
To assure the time of irradiation is proper, biological control(s) should be run with samples. This control should contain 10 ng of target re-suspended in your standard reaction volume using H20 or buffer. After irradiation, the Biological Control should be amplified, using your normal cycles of PCR. There should be no evidence of of amplification when μl is electrophoresed on an agarose gel. A typical reaction contains: 1. 10X Reaction Buffer 2. Mg++ 3. Nucleotides 4. Distilled water 5. Primers 6. Target DNA 7. DNA polymerase Reagents 1 through 4 should be irradiated. The targets, primers and polymerase may be damaged by irradiation.
REFERENCES
1. Erlich, H.A., Gelfanel, D. and Sninsky, J.J. (1991) Science 252: 1643-1650. 2. Sarker, G. and Sommer, S.S. (1991) Biotechniques 10: 590-594. 3. Haseltine, W. (1983) Cell 33: 13-17. 4. Sarkar, G. and Sommer, S.S. (1990) Nature, 343: 27 5. Sarkar, G. and Sommer, S.S. (1990) Nature, (347) 340-341
CleanSpot PCR Workstation 102214 10
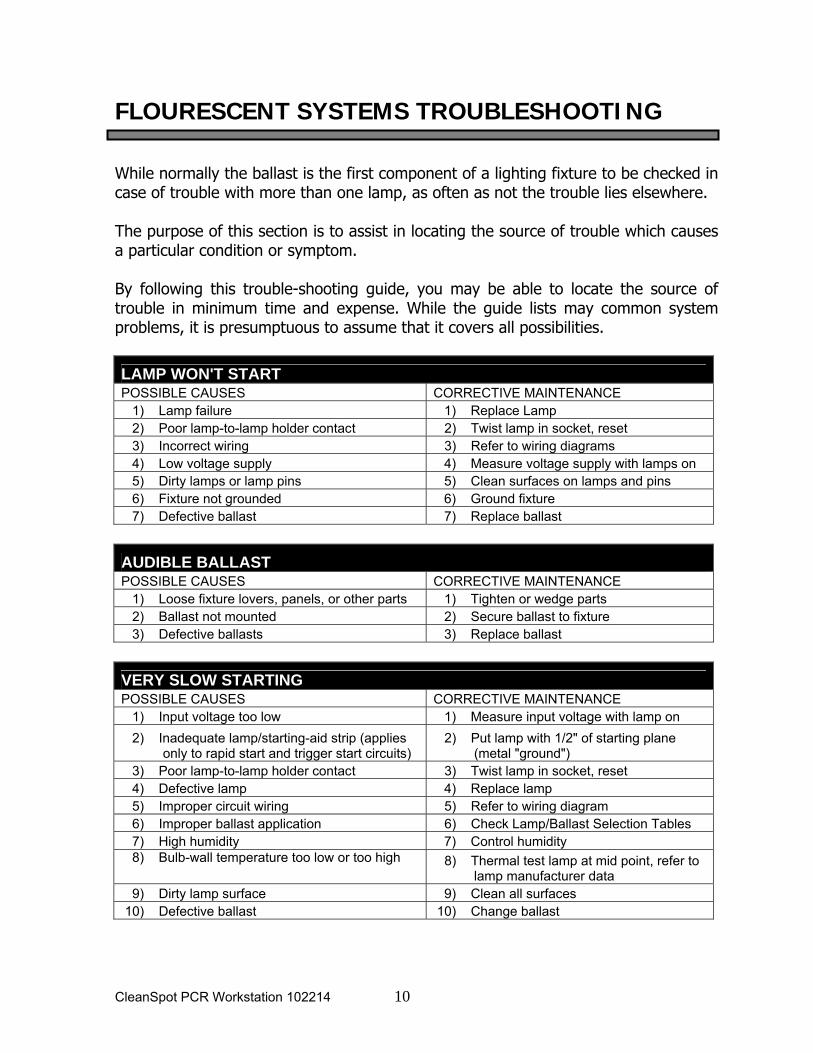
FLOURESCENT SYSTEMS TROUBLESHOOTING
While normally the ballast is the first component of a lighting fixture to be checked in case of trouble with more than one lamp, as often as not the trouble lies elsewhere. The purpose of this section is to assist in locating the source of trouble which causes a particular condition or symptom. By following this trouble-shooting guide, you may be able to locate the source of trouble in minimum time and expense. While the guide lists may common system problems, it is presumptuous to assume that it covers all possibilities.
LAMP WON'T START POSSIBLE CAUSES CORRECTIVE MAINTENANCE 1) Lamp failure 1) Replace Lamp 2) Poor lamp-to-lamp holder contact 2) Twist lamp in socket, reset 3) Incorrect wiring 3) Refer to wiring diagrams 4) Low voltage supply 4) Measure voltage supply with lamps on 5) Dirty lamps or lamp pins 5) Clean surfaces on lamps and pins 6) Fixture not grounded 6) Ground fixture 7) Defective ballast 7) Replace ballast
AUDIBLE BALLAST POSSIBLE CAUSES CORRECTIVE MAINTENANCE 1) Loose fixture lovers, panels, or other parts 1) Tighten or wedge parts 2) Ballast not mounted 2) Secure ballast to fixture 3) Defective ballasts 3) Replace ballast
VERY SLOW STARTING POSSIBLE CAUSES CORRECTIVE MAINTENANCE 1) Input voltage too low 1) Measure input voltage with lamp on 2) Inadequate lamp/starting-aid strip (applies
only to rapid start and trigger start circuits) 2) Put lamp with 1/2" of starting plane
(metal "ground") 3) Poor lamp-to-lamp holder contact 3) Twist lamp in socket, reset 4) Defective lamp 4) Replace lamp 5) Improper circuit wiring 5) Refer to wiring diagram 6) Improper ballast application 6) Check Lamp/Ballast Selection Tables 7) High humidity 7) Control humidity 8) Bulb-wall temperature too low or too high 8) Thermal test lamp at mid point, refer to
lamp manufacturer data 9) Dirty lamp surface 9) Clean all surfaces 10) Defective ballast 10) Change ballast
CleanSpot PCR Workstation 102214 11
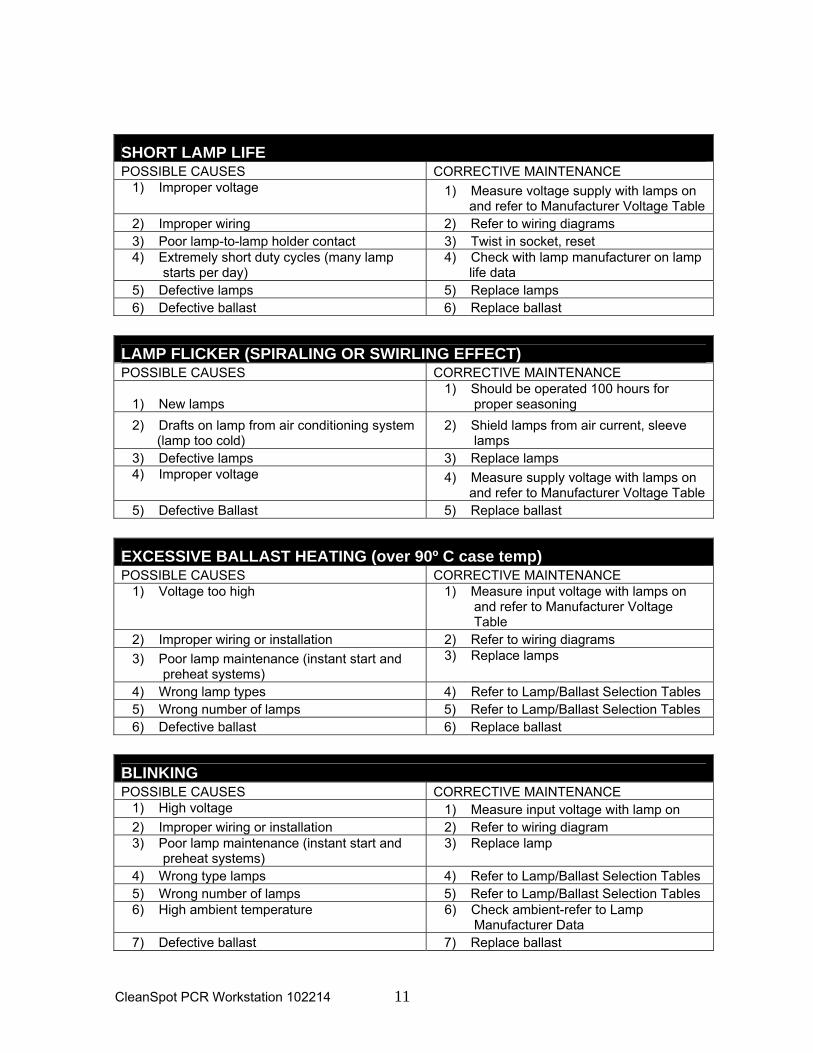
SHORT LAMP LIFE POSSIBLE CAUSES CORRECTIVE MAINTENANCE 1) Improper voltage 1) Measure voltage supply with lamps on
and refer to Manufacturer Voltage Table 2) Improper wiring 2) Refer to wiring diagrams 3) Poor lamp-to-lamp holder contact 3) Twist in socket, reset 4) Extremely short duty cycles (many lamp
starts per day) 4) Check with lamp manufacturer on lamp
life data 5) Defective lamps 5) Replace lamps 6) Defective ballast 6) Replace ballast
LAMP FLICKER (SPIRALING OR SWIRLING EFFECT) POSSIBLE CAUSES CORRECTIVE MAINTENANCE
1) New lamps 1) Should be operated 100 hours for
proper seasoning 2) Drafts on lamp from air conditioning system
(lamp too cold) 2) Shield lamps from air current, sleeve
lamps 3) Defective lamps 3) Replace lamps 4) Improper voltage 4) Measure supply voltage with lamps on
and refer to Manufacturer Voltage Table 5) Defective Ballast 5) Replace ballast
EXCESSIVE BALLAST HEATING (over 90º C case temp) POSSIBLE CAUSES CORRECTIVE MAINTENANCE 1) Voltage too high 1) Measure input voltage with lamps on
and refer to Manufacturer Voltage Table
2) Improper wiring or installation 2) Refer to wiring diagrams 3) Poor lamp maintenance (instant start and
preheat systems) 3) Replace lamps
4) Wrong lamp types 4) Refer to Lamp/Ballast Selection Tables 5) Wrong number of lamps 5) Refer to Lamp/Ballast Selection Tables 6) Defective ballast 6) Replace ballast
BLINKING POSSIBLE CAUSES CORRECTIVE MAINTENANCE 1) High voltage 1) Measure input voltage with lamp on 2) Improper wiring or installation 2) Refer to wiring diagram 3) Poor lamp maintenance (instant start and
preheat systems) 3) Replace lamp
4) Wrong type lamps 4) Refer to Lamp/Ballast Selection Tables 5) Wrong number of lamps 5) Refer to Lamp/Ballast Selection Tables 6) High ambient temperature 6) Check ambient-refer to Lamp
Manufacturer Data 7) Defective ballast 7) Replace ballast
CleanSpot PCR Workstation 102214 12
WARRANTY
COY warrants the CleanSpot (except fluorescent and UV bulbs) against defects in material and workmanship, under normal use, for 6 months from the date of receipt by the purchaser. This warranty excludes damages resulting from misuse, carelessness, or neglect. COY liability under this warranty is limited to the repair of such defects or the replacement of the product, at its option, and is subject to receipt of reasonable proof by the customer that the defect is embraced within the terms of the warranty.
This warranty is in lieu of any other warranties or guarantees, expressed or implied, arising by law or otherwise. COY makes no other warranty, expressed or implied, including warranties of merchantability or fitness for a particular purpose. Under no circumstances shall COY be liable for damages either consequential, compensatory, incidental, or special, sounding negligence, strict liability, breach of warranty or any other theory, arising out of the use of the product listed herein.