Cisco Remote Integrated Service Engine for Citrix NetScaler ...
78
Cisco Remote Integrated Service Engine for Citrix NetScaler Appliances and Cisco Nexus 7000 Series Switches Configuration Guide Last Modified: 2014-04-29 Americas Headquarters Cisco Systems, Inc. 170 West Tasman Drive San Jose, CA 95134-1706 USA http://www.cisco.com Tel: 408 526-4000 800 553-NETS (6387) Fax: 408 527-0883
-
Upload
khangminh22 -
Category
Documents
-
view
0 -
download
0
Transcript of Cisco Remote Integrated Service Engine for Citrix NetScaler ...

Cisco Remote Integrated Service Engine for Citrix NetScalerAppliances and Cisco Nexus 7000 Series Switches ConfigurationGuideLast Modified: 2014-04-29
Americas HeadquartersCisco Systems, Inc.170 West Tasman DriveSan Jose, CA 95134-1706USAhttp://www.cisco.comTel: 408 526-4000 800 553-NETS (6387)Fax: 408 527-0883

Cisco and the Cisco logo are trademarks or registered trademarks of Cisco and/or its affiliates in the U.S. and other countries. To view a list of Cisco trademarks, go to this URL: http://www.cisco.com/go/trademarks. Third-party trademarks mentioned are the property of their respective owners. The use of the word partner does not imply a partnershiprelationship between Cisco and any other company. (1110R)
© 2013-2014 Cisco Systems, Inc. All rights reserved.

C O N T E N T S
P r e f a c e Preface vii
Audience vii
Document Conventions vii
Obtaining Documentation and Submitting a Service Request ix
C H A P T E R 1 New and Changed Information 1
New and Changed Information for RISE Integration 1
C H A P T E R 2 Cisco RISE Integration Overview 3
Finding Feature Information 3
Citrix Netscaler Application Delivery Controller (ADC) 3
Cisco Prime NAM Appliances 4
RISE Functionality 4
Discovery and Bootstrap 4
Health Monitoring 5
Nondisruptive Maintenance 5
One-Arm Mode Deployment 5
High Availability 6
Virtualization 7
C H A P T E R 3 Preparing for RISE Integration 9
Finding Feature Information 9
Information About Preparing for RISE Integration 9
Connection Modes 9
Licensing for Cisco RISE 12
Guidelines and Limitations for Preparing for the RISE Integration 13
Preparing for Cisco RISE with Citrix Application Delivery Controller (ADC) 13
Cisco Remote Integrated Service Engine for Citrix NetScaler Appliances and Cisco Nexus 7000 Series SwitchesConfiguration Guide
iii
Installing the Cisco Nexus 7000 Series Switch 13
Installing the Citrix Netscaler Application Delivery Controller (ADC) Appliance 14
C H A P T E R 4 Configuring RISE 15
Finding Feature Information 16
Licensing for Cisco RISE 16
Prerequisites for Configuring RISE 16
Guidelines and Limitations 16
Guidelines and Limitations for Configuring RISE 17
Default Settings for RISE 17
Accessing the Switch and Appliance Interfaces 18
Accessing the Cisco Nexus Series Switch 18
Accessing the Citrix Netscaler Application Delivery Controller (ADC) Appliance 18
Using the Netscaler CLI 19
Logging onto the CLI Using the Console Port 19
Logging into the Appliance CLI Using SSH 19
Using the Netscaler GUI 20
Using the NetScaler Configuration Utility 20
Using the Statistical Utility 21
Configuring Cisco RISE in a Direct Mode Deployment 21
Configuring RISE in an Indirect Mode Deployment 24
Configuring RISE on the Cisco Nexus Switch 25
Configuring NSIP on the Appliance 27
Configuring NSIP Using the CLI 27
Configuring NSIP Using the Configuration Utility 28
Configuring a NSVLAN on Citrix NetScaler Application Delivery Controller (ADC)
Appliance 28
Configuring NSVLAN Using the CLI 28
Configuring NSVLAN Using the Configuration Utility 29
Configuring RISE in vPC Mode (Recommended Deployment Mode) 29
Configuring RISE in a vPC Direct Mode Deployment 30
Configuring RISE in a vPC Indirect Mode Deployment 33
Configuring RISE on the Cisco Nexus Switch 33
Configuring NSIP on the Appliance 35
Configuring NSIP Using the CLI 35
Cisco Remote Integrated Service Engine for Citrix NetScaler Appliances and Cisco Nexus 7000 Series SwitchesConfiguration Guide
iv
Contents
Configuring NSIP Using the Configuration Utility 37
Configuring a NSVLAN on Citrix NetScaler Application Delivery Controller (ADC)
Appliance 37
Configuring NSVLAN Using the CLI 37
Configuring NSVLAN Using the Configuration Utility 38
Route Health Injection 38
Intelligent Service Card Manager 38
Intelligent Service Card Client 39
Universal Routing Information Base 39
Verifying the RISE Configuration 39
Verifying the ISCM Configuration 41
Monitoring Cisco RISE 44
Configuration Examples for RISE 45
Example: RISE Direct Mode Deployment 45
Example: RISE Indirect Mode Deployment 46
Example: RISE vPC Direct Mode Deployment 46
Related Documents 47
Feature History for RISE 47
C H A P T E R 5 Configuring Auto Policy-Based Routing 49
Finding Feature Information 49
Information About Auto Policy-Based Routing 49
Auto Policy-Based Routing 50
Use Source IP Option 50
Appliance High Availability 50
Licensing for Cisco RISE 52
Guidelines and Limitations for Auto Policy-Based Routing 52
Default Settings for Auto Policy-Based Routing 53
Configuring Auto Policy-Based Routing 53
Enabling the RISE Feature and NS Modes 53
Enabling APBR on the Cisco Nexus Switch 54
Configuring APBR on the Citrix NetScaler Application Delivery Controller (ADC)
Appliance 54
Configuring NSIP on the Appliance 54
Configuring NSIP Using the CLI 54
Cisco Remote Integrated Service Engine for Citrix NetScaler Appliances and Cisco Nexus 7000 Series SwitchesConfiguration Guide
v
Contents

Configuring NSIP Using the Configuration Utility 55
Configuring a NSVLAN on Citrix NetScaler Application Delivery Controller (ADC)
Appliance 56
Configuring NSVLAN Using the CLI 56
Configuring NSVLAN Using the Configuration Utility 56
Enabling the USIP Option 57
Enabling the USIP Option for a Service 57
Enabling the USIP Option for a Service Group 58
Enabling the USIP Option Globally 59
Verifying the Auto Policy-Based Routing Configuration 60
Feature History for Auto Policy-Based Routing 63
C H A P T E R 6 Troubleshooting RISE Integration 65
Finding Feature Information 65
Troubleshooting the RISE Integration 65
Interpreting System Messages 65
Troubleshooting the RISE Configuration on the Switch 66
Troubleshooting the RISE Service on the Appliance 67
Cisco Remote Integrated Service Engine for Citrix NetScaler Appliances and Cisco Nexus 7000 Series SwitchesConfiguration Guide
vi
Contents

Preface
This chapter includes the following sections:
• Audience, page vii
• Document Conventions, page vii
• Obtaining Documentation and Submitting a Service Request, page ix
AudienceThis publication is for network administrators who configure and maintain Cisco Nexus devices.
Document Conventions
As part of our constant endeavor to remodel our documents to meet our customers' requirements, we havemodified the manner in which we document configuration tasks. As a result of this, you may find adeviation in the style used to describe these tasks, with the newly included sections of the documentfollowing the new format.
Note
Command descriptions use the following conventions:
DescriptionConvention
Bold text indicates the commands and keywords that you enter literallyas shown.
bold
Italic text indicates arguments for which the user supplies the values.Italic
Square brackets enclose an optional element (keyword or argument).[x]
Square brackets enclosing keywords or arguments separated by a verticalbar indicate an optional choice.
[x | y]
Cisco Remote Integrated Service Engine for Citrix NetScaler Appliances and Cisco Nexus 7000 Series SwitchesConfiguration Guide
vii

DescriptionConvention
Braces enclosing keywords or arguments separated by a vertical barindicate a required choice.
{x | y}
Nested set of square brackets or braces indicate optional or requiredchoices within optional or required elements. Braces and a vertical barwithin square brackets indicate a required choice within an optionalelement.
[x {y | z}]
Indicates a variable for which you supply values, in context where italicscannot be used.
variable
A nonquoted set of characters. Do not use quotation marks around thestring or the string will include the quotation marks.
string
Examples use the following conventions:
DescriptionConvention
Terminal sessions and information the switch displays are in screen font.screen font
Information you must enter is in boldface screen font.boldface screen font
Arguments for which you supply values are in italic screen font.italic screen font
Nonprinting characters, such as passwords, are in angle brackets.< >
Default responses to system prompts are in square brackets.[ ]
An exclamation point (!) or a pound sign (#) at the beginning of a lineof code indicates a comment line.
!, #
This document uses the following conventions:
Means reader take note. Notes contain helpful suggestions or references to material not covered in themanual.
Note
Means reader be careful. In this situation, you might do something that could result in equipment damageor loss of data.
Caution
Cisco Remote Integrated Service Engine for Citrix NetScaler Appliances and Cisco Nexus 7000 Series SwitchesConfiguration Guide
viii
PrefaceDocument Conventions
Obtaining Documentation and Submitting a Service RequestFor information on obtaining documentation, using the Cisco Bug Search Tool (BST), submitting a servicerequest, and gathering additional information, see What's New in Cisco Product Documentation.
To receive new and revised Cisco technical content directly to your desktop, you can subscribe to the What'sNew in Cisco Product Documentation RSS feed. RSS feeds are a free service.
Cisco Remote Integrated Service Engine for Citrix NetScaler Appliances and Cisco Nexus 7000 Series SwitchesConfiguration Guide
ix
PrefaceObtaining Documentation and Submitting a Service Request

Cisco Remote Integrated Service Engine for Citrix NetScaler Appliances and Cisco Nexus 7000 Series SwitchesConfiguration Guide
x
PrefaceObtaining Documentation and Submitting a Service Request

C H A P T E R 1New and Changed Information
The following table provides an overview of the significant changes to this guide for this current release.The table does not provide an exhaustive list of all changes made to the configuration guide or of the newfeatures in this release.
• New and Changed Information for RISE Integration, page 1
New and Changed Information for RISE IntegrationThis section provides release-specific information for each new and changed feature.
DescriptionReleaseDescriptionFeature
“Auto-Policy Based Routing”Cisco NX-OSRelease 6.2(8)
Added support for autopolicy-based routing (APBR).
Auto Policy-BasedRouting
“Auto-Policy Based Routing”Added support for fail-overtopologies.
Appliance HighAvailability
“Configuring RISE”Added support for connectingservice appliances to CiscoNexus switch virtual portchannel (vPC) peers.
RISE vPC
“Preparing for RISEIntegration” and “ConfiguringRISE on the NetScalerApplication DeliveryController(ADC) Appliance”
Cisco NX-OSRelease 6.2(2a)
Introduced the Cisco RemoteIntegrated Services Engine(RISE) for Citrix NetscalerApplication Delivery Controller(ADC) appliances and CiscoNexus 7000 Series switches.
RISE Integration
Cisco Remote Integrated Service Engine for Citrix NetScaler Appliances and Cisco Nexus 7000 Series SwitchesConfiguration Guide
1

Cisco Remote Integrated Service Engine for Citrix NetScaler Appliances and Cisco Nexus 7000 Series SwitchesConfiguration Guide
2
New and Changed InformationNew and Changed Information for RISE Integration

C H A P T E R 2Cisco RISE Integration Overview
This chapter provides an overview of the Cisco Remote Integrated Service Engine (RISE) protocol with anexternal service appliance and the Cisco Nexus Series switches.
Cisco RISE is an architecture that logically integrates an external service appliance, such as a Citrix NetScalerApplication Delivery Controller (ADC) appliance appears and operates as a service module within the CiscoNexus switch.
The Cisco NX-OS software in which RISE is supported supports the Cisco Nexus Series switches.
This chapter includes the following sections:
• Finding Feature Information, page 3
• Citrix Netscaler Application Delivery Controller (ADC), page 3
• Cisco Prime NAM Appliances, page 4
• RISE Functionality, page 4
• One-Arm Mode Deployment, page 5
• High Availability, page 6
• Virtualization, page 7
Finding Feature InformationYour software release might not support all the features documented in this module. For the latest caveatsand feature information, see the Bug Search Tool at https://tools.cisco.com/bugsearch/ and the release notesfor your software release. To find information about the features documented in this module, and to see a listof the releases in which each feature is supported, see the “New and Changed Information” chapter.
Citrix Netscaler Application Delivery Controller (ADC)The Citrix Netscaler Application Delivery Controller (ADC) is a network switch that performsapplication-specific traffic analysis to intelligently distribute, optimize, and secure layer 4 to layer 7 networktraffic for web applications. For example, a Citrix Netscaler Application Delivery Controller (ADC) makesload balancing decisions on individual HTTP requests instead of on the basis of long-lived TCP connections,
Cisco Remote Integrated Service Engine for Citrix NetScaler Appliances and Cisco Nexus 7000 Series SwitchesConfiguration Guide
3
so that the failure or slowdown of a server is managed much more quickly and with less disruption to clients.The feature set can be broadly categorized as consisting of switching features, security and protection features,and server-farm optimization features.
The Cisco Nexus Series switches are used purely as a 1 and 10-Gigabit Ethernet switch, consolidating 10Gigabit Ethernet connections into a smaller number of server connections trunked to the aggregation layers.These switches are designed for deployment in the core, aggregation, or access layers of a high performance,hierarchical data center network topology.
The CiscoNexus Series switches run on the CiscoNX-OS software. This software fulfills the routing, switching,and storage networking requirements of data centers and provides an Extensible Markup Language (XML)interface and a command-line interface (CLI) that is similar to Cisco IOS software. As a crucial element indata center I/O consolidation, the switch enables I/O consolidation at the access layer and providesinteroperability with the Cisco Nexus Series switches and other standards-based products.
Cisco Prime NAM AppliancesCisco Prime NAM Appliances are purpose-built devices that uniquely combine application visibility andnetwork performance analytics to help accelerate operational decisions. They help you understand who isusing the network, know what applications are running on the network, assess how the applications areperforming, and characterize how traffic over the network is being used. And, when there is a problem, CiscoPrime NAM Appliances can help you find it fast, reducing the time it takes to resolve the problem from daysto just minutes.
RISE Functionality
All features in this section function with IPv4.Note
This section includes the following topics:
Discovery and BootstrapThe discovery and bootstrap functionality enables the Cisco Nexus Series switches to communicate with theappliance by exchanging information to set up the Remote Integrated Service Engine (RISE) channel, whichtransmits control and data packets. Auto-discovery is supported only when you directly connect the serviceappliance with the Cisco Nexus switch. Once you configure the RISE control channel on the switch, theconnected service appliance is set to RISE mode and all of its ports are set to operational mode by default.
In indirect mode (when the appliance is either Layer 2 or Layer 3 adjacent to the switch), you must manuallyconfigure the appliance and the Cisco Nexus switches to establish the control channel connectivity and fordiscovery and bootstrap to occur.
For more information about connection modes, see the “Preparing for RISE Integration” chapter. Forconfiguration information, see the “Configuring RISE” chapter.
Cisco Remote Integrated Service Engine for Citrix NetScaler Appliances and Cisco Nexus 7000 Series SwitchesConfiguration Guide
4
Cisco RISE Integration OverviewCisco Prime NAM Appliances
Health MonitoringA RISE-enabled appliance can use its health monitoring feature to track and support server health by sendingout health probes to verify server responses.
The Cisco Nexus switch and the appliance also periodically send heartbeat packets to each other. If a criticalerror occurs and health monitoring detects a service instance failure, or if the heartbeat is missed six timessuccessively, the RISE channel becomes nonoperational. The health monitoring timer is 30 seconds (sec).
Nondisruptive MaintenanceThe nondisruptive maintenance feature of the Cisco Remote Integration Services Engine (RISE) maintainsthe RISE configuration and runtime information on the Cisco Nexus Series switches during maintenanceprocesses, such as an in-service software upgrade (ISSU) or an in-service software downgrade (ISSD), insteadof being purged.
In-Service Software Upgrade
During an in-service software upgrade (ISSU), all RISE control channel communications are disabled. Theconfiguration state across all components is restored after the ISSU is completed. Data traffic is not affectedduring an ISSU.
In-Service Software Downgrade
During an in-service software downgrade (ISSD), when you are downgrading from a Cisco Nexus Seriesswitch software image with RISE support to an image without RISE support, you are notified that you shouldenter the no feature rise command before proceeding with the downgrade. This removes all of the RISEconfiguration and runtime configuration from the switch.
ISSU Start and Stop Notifications
Cisco Nexus Series switch provides start and stop notifications to the RISE service appliance during anin-service software upgrade (ISSU) or downgrade. This notification includes the hitful and hitless status ofthe line card to which the appliance is connected.
When the RISE service appliance receives a start notification, the appliance stops all control planecommunication with the switch until after the switch sends a stop notification. The appliance uses the hitfuland hitless status in the start and stop notifications to determine whether the data plane is operational.
One-Arm Mode DeploymentThe recommended RISE deployment is a one-arm mode NetScaler deployment with all of the appliance portsbundled as a port channel connected to the Cisco Nexus Series switches.
Cisco Remote Integrated Service Engine for Citrix NetScaler Appliances and Cisco Nexus 7000 Series SwitchesConfiguration Guide
5
Cisco RISE Integration OverviewHealth Monitoring

In the one-armmode (see figure below), the Citrix Netscaler Application Delivery Controller (ADC) applianceis configured with a VLAN that handles both client and server requests.
Figure 1: One-Arm Deployment
High AvailabilityThis section describes the basic redundancy deployments that support the Cisco Remote Integrated ServiceEngine (RISE) runtimemessage handling between a service appliance and the Cisco Nexus 7000 Series switch.A high availability, redundant deployment uses a maximum of two appliances (peers) to support seamlessswitchover of flows in case one of the appliances becomes unresponsive.
When the redundancy involves multiple Cisco Nexus 7000 Series switches, the switches are considered to beboth in active state (one as primary and the other as secondary). When two RISE-enabled appliances areconnected to two Cisco Nexus 7000 Series switches (dedicated), the active appliance is connected to oneCisco Nexus 7000 Series chassis and the standby appliance is connected to the second chassis. This deploymentensures that even if one of the switches goes down, there is minimal disruption in the traffic.
NetScaler high availability can be used in conjunction with vPC. vPC is used when an Nexus switch fails,and NetScaler high availability is there for when a NetScaler fails. A NetScaler HA failover should only betriggered if one of the NetScalers actually stops functioning. If a Nexus switch fails and there is no vPC itcauses the downstream NetScaler to "fail", but only because it lost connection to its HA peer.
Cisco Remote Integrated Service Engine for Citrix NetScaler Appliances and Cisco Nexus 7000 Series SwitchesConfiguration Guide
6
Cisco RISE Integration OverviewHigh Availability

VirtualizationWhen the Cisco Nexus Series switch and the appliance are deployed in a RISE integration, the virtual devicecontext (VDC) on the switch collapses multiple logical networks within a single physical infrastructure.
The appliance creates virtual contexts on the single physical appliance that is connected to the VDCs on theswitch.
• The RISE-enabled appliance appears as a RISE slot within each of the VDCs for which it is a servicecontext. The appliance does not appear in VDCs that are not associated with the RISE service context.
• The appliance has one RISE control channel per RISE instance.
• The service VLAN groups maintain the mapping of all of the data VLANs for each RISE instance.
The VDC ID is part of the discovery and bootstrap payload and the appliance is aware of the VDCs for eachVLAN with which it is associated. The Cisco Nexus Series switch supports 32 RISE instances per VDC.
Multiple appliances can be connected to a single VDC. When two different appliances are connected to thesame VDC, the RISE control VLAN need not be unique because the appliances can share the same RISEcontrol VLAN. One or more appliances can also be connected to different VDCs on the same switch. In amultiple VDC deployment, all of the ports for an appliance are connected to its respective VDC and theVLANs for each appliance do not overlap.
Cisco Remote Integrated Service Engine for Citrix NetScaler Appliances and Cisco Nexus 7000 Series SwitchesConfiguration Guide
7
Cisco RISE Integration OverviewVirtualization

Cisco Remote Integrated Service Engine for Citrix NetScaler Appliances and Cisco Nexus 7000 Series SwitchesConfiguration Guide
8
Cisco RISE Integration OverviewVirtualization

C H A P T E R 3Preparing for RISE Integration
This chapter describes how to install and connect the appliances and the Cisco Nexus Series switches beforedeploying the Remote Integrated Service Engine (RISE) features.
This chapter includes the following sections:
• Finding Feature Information, page 9
• Information About Preparing for RISE Integration, page 9
• Licensing for Cisco RISE , page 12
• Guidelines and Limitations for Preparing for the RISE Integration, page 13
• Preparing for Cisco RISE with Citrix Application Delivery Controller (ADC) , page 13
Finding Feature InformationYour software release might not support all the features documented in this module. For the latest caveatsand feature information, see the Bug Search Tool at https://tools.cisco.com/bugsearch/ and the release notesfor your software release. To find information about the features documented in this module, and to see a listof the releases in which each feature is supported, see the “New and Changed Information” chapter.
Information About Preparing for RISE IntegrationThis section includes the following topics:
Connection ModesYou can connect the Citrix NetScaler Application Delivery Controller (ADC) appliance to the Cisco NexusSeries switch in one of the following ways:
Cisco Remote Integrated Service Engine for Citrix NetScaler Appliances and Cisco Nexus 7000 Series SwitchesConfiguration Guide
9

Direct Connect Mode for a Standalone Switch
In a direct mode deployment, the service appliance is attached to a single Nexus Series switch. The switchcan be standalone device or a VPC peer (recommended deployment). The following figure shows the topologyfor a direct mode deployment for a standalone Cisco Nexus switch.
Figure 2: Direct Connect Mode for the Appliance and a Standalone Switch
Indirect Connect Mode
In an indirect mode deployment, a virtual service appliance is connected to a Cisco Nexus Series switchthrough a switched Layer 2 network. The topology in the following figure is for an indirect mode deployment.
Figure 3: Indirect Connect Mode Through a Layer 2 Network
Cisco Remote Integrated Service Engine for Citrix NetScaler Appliances and Cisco Nexus 7000 Series SwitchesConfiguration Guide
10
Preparing for RISE IntegrationConnection Modes

Virtual Port Channel (vPC) Connect Mode (Recommended Deployment Mode)
In a virtual port channel (vPC) direct mode deployment, the service appliance is attached to a single NexusSeries switch that is a vPC peer. The following figure shows the topology for a vPC direct mode deployment.
Figure 4: vPC Direct Connect Mode for Connecting to vPC Peer Switches
Cisco Remote Integrated Service Engine for Citrix NetScaler Appliances and Cisco Nexus 7000 Series SwitchesConfiguration Guide
11
Preparing for RISE IntegrationConnection Modes

In a vPC indirect mode deployment, the service appliance is indirectly attached to a Cisco Nexus vPC peerthrough a Layer 2 network. The following figure shows the topology for a vPC indirect mode deployment.
Figure 5: vPC Indirect Connect Mode for Connecting to vPC Peer Switches
Licensing for Cisco RISEThe following table shows the licensing requirements for this feature:
License RequirementsProduct
The Cisco Remote Integrated Services Engine (RISE) requires the Enhanced Layer 2 Packageon the Cisco Nexus 7000 Series switch. For a complete explanation of the Cisco NX-OSlicensing scheme and how to obtain and apply licenses, see the Cisco NX-OS Licensing Guide.
CiscoNX-OS
The Cisco Remote Integrated Services Engine (RISE) does not require a license on the CitrixNetScaler Application Delivery Controller (ADC) appliance for auto-attach.
Advanced features, such as auto policy-based routing (APBR), require the NetScaler Platinumor Enterprise license on the Citrix NetScaler Application Delivery Controller (ADC) appliance.
To display the license status, use the show license command in the NetScaler command lineinterface
CitrixCitrixNetscalerApplicationDeliveryController(ADC)operationsystem
Cisco Remote Integrated Service Engine for Citrix NetScaler Appliances and Cisco Nexus 7000 Series SwitchesConfiguration Guide
12
Preparing for RISE IntegrationLicensing for Cisco RISE

Guidelines and Limitations for Preparing for the RISE IntegrationCisco Remote Integration Services Engine (RISE) for Citrix NetScaler Application Delivery Controller (ADC)appliances and Cisco Nexus Series switches has the following guidelines and limitations:
•• For the Citrix Application Delivery Controller (ADC) appliance in a RISE integration, the NetScaler10.1.e or later software release is required.
• In RISE mode, the Citrix Application Delivery Controller (ADC) appliance always uses one link forboth the data and control traffic (typically the port channel link).
Preparing for Cisco RISE with Citrix Application DeliveryController (ADC)
This chapter describes how to prepare for integrating the Cisco Remote Integrated Services Engine (RISE)with Citrix Application Delivery Controller (ADC) appliance connected to the Cisco Nexus 7000 Seriesswitches. The Cisco NX-OS software supports the Cisco Nexus 7000 Series switches, which includes theCisco Nexus 7700 Series switches.
This section includes the following topics:
Installing the Cisco Nexus 7000 Series SwitchPerform the following steps to install and configure your Cisco Nexus switch before configuring the RemoteIntegrated Service Engine (RISE) feature for Cisco Nexus 7000 Series switches and service appliances:
For installation and configuration information, see the Cisco Nexus 7000 Series configuration guidesNote
Step 1 Install the Cisco Nexus 7000 Series switches and perform the basic setup such as applying the required licenses. Forswitch hardware installation instructions, see the Cisco Nexus 7000 Series Hardware Installation and Reference Guide.
Step 2 Install the appropriate Cisco NX-OS release software in your environment and create the basic configuration of the CiscoNexus 7000 Series switches, which includes, but is not limited, to the following tasks:a) Configure the physical Ethernet interfaces or a port channel for connecting to the service appliance and to allow
control and data VLANs.b) Configure the switch virtual interfaces (SVIs) for RISE control and data VLANs.c) Configure the service VLAN groups.d) Enable the RISE feature to allow for RISE integration.
Cisco Remote Integrated Service Engine for Citrix NetScaler Appliances and Cisco Nexus 7000 Series SwitchesConfiguration Guide
13
Preparing for RISE IntegrationGuidelines and Limitations for Preparing for the RISE Integration

Installing the Citrix Netscaler Application Delivery Controller (ADC) AppliancePerform the following steps to install and configure your Citrix NetScaler Application Delivery Controller(ADC) appliances before configuring the Remote Integrated Service Engine (RISE) feature for Cisco NexusSeries switches and Citrix NetScaler Application Delivery Controller (ADC) appliances.
For installation and configuration information, see the Installing the Netscaler Hardware.Note
The Citrix Application Delivery Controller (ADC) appliance is typically mounted in a rack and all modelsship with rack-rail hardware. Installation can include the following tasks:
Step 1 Unpack the appliance—The hardware accessories for your particular appliance, such as cables, adapters, and rail kit,can vary depending on the hardware platform that you ordered. Unpack the box that contains your new appliance on asturdy table with plenty of space and inspect the contents.
Step 2 Mount the appliance in the rack—Most appliances can be installed in standard server racks that conform to EIA-310-Dspecification. The appliances ship with a set of rails that you must install before you mount the appliance. The only toolsthat you need for installing an appliance are a Phillips screwdriver and a flathead screwdriver.
Step 3 Install your 1 G SFP transceivers—A Small Form-Factor Pluggable (SFP) is a compact transceiver that can operate atspeeds of up to 1 gigabit per second and is available in both copper and fiber types. Inserting a 1 G SFP copper transceiverconverts the 1 G SFP port to a 1000BASE-T port. Inserting a 1 G SFP fiber transceiver converts the 1 G SFP port to a1000BASE-X port. Auto-negotiation is enabled by default on the 1 G SFP port into which you insert your 1 G SFPtransceiver. As soon as a link between the port and the network is established, the speed and mode are matched on bothends of the cable.
Step 4 Install your XFP and 10 G SFP+ transceivers—A 10 Gigabit Small Form-Factor Pluggable (XFP or SFP+) is a compactoptical transceiver that can operate at speeds of up to 10 gigabits per second. TheMPX 15000 andMPX 17000 appliancesuse XFP transceivers and the MPX 8200/8400/8600, MPX 9700/10500/12500/15500, MPX11500/13500/14500/16500/18500/20500, MPX 17500/19500/21500, and MPX 17550/19550/20550/21550 appliancesuse 10 G SFP+ transceivers.
What to Do Next
After the appliance is securely mounted on the rack, you are ready to connect the cables. Ethernet cables andthe optional console cable are connected first. Connect the power cable last.
Cisco Remote Integrated Service Engine for Citrix NetScaler Appliances and Cisco Nexus 7000 Series SwitchesConfiguration Guide
14
Preparing for RISE IntegrationInstalling the Citrix Netscaler Application Delivery Controller (ADC) Appliance

C H A P T E R 4Configuring RISE
This chapter describes how to configure the Remote Integrated Service Engine (RISE) feature on the CiscoNexus Series switches and the Cisco NetScaler Application Delivery Controller (ADC) appliance. The CiscoNX-OS software supports the Cisco Nexus Series switches, which includes the Cisco Nexus Series switches.You can find detailed information about supported hardware in theCisco Nexus Series Hardware Installationand Reference Guide.
This chapter includes the following sections:
• Finding Feature Information, page 16
• Licensing for Cisco RISE , page 16
• Prerequisites for Configuring RISE, page 16
• Guidelines and Limitations, page 16
• Default Settings for RISE, page 17
• Accessing the Switch and Appliance Interfaces , page 18
• Configuring Cisco RISE in a Direct Mode Deployment, page 21
• Configuring RISE in an Indirect Mode Deployment, page 24
• Configuring RISE in vPC Mode (Recommended Deployment Mode), page 29
• Route Health Injection, page 38
• Intelligent Service Card Manager, page 38
• Intelligent Service Card Client, page 39
• Universal Routing Information Base, page 39
• Verifying the RISE Configuration, page 39
• Verifying the ISCM Configuration, page 41
• Monitoring Cisco RISE, page 44
• Configuration Examples for RISE, page 45
• Related Documents, page 47
• Feature History for RISE, page 47
Cisco Remote Integrated Service Engine for Citrix NetScaler Appliances and Cisco Nexus 7000 Series SwitchesConfiguration Guide
15
Finding Feature InformationYour software release might not support all the features documented in this module. For the latest caveatsand feature information, see the Bug Search Tool at https://tools.cisco.com/bugsearch/ and the release notesfor your software release. To find information about the features documented in this module, and to see a listof the releases in which each feature is supported, see the “New and Changed Information” chapter or theFeature History table below.
Licensing for Cisco RISEThe following table shows the licensing requirements for this feature:
License RequirementsProduct
The Cisco Remote Integrated Services Engine (RISE) requires the Enhanced Layer 2 Packageon the Cisco Nexus 7000 Series switch. For a complete explanation of the Cisco NX-OSlicensing scheme and how to obtain and apply licenses, see the Cisco NX-OS Licensing Guide.
CiscoNX-OS
The Cisco Remote Integrated Services Engine (RISE) does not require a license on the CitrixNetScaler Application Delivery Controller (ADC) appliance for auto-attach.
Advanced features, such as auto policy-based routing (APBR), require the NetScaler Platinumor Enterprise license on the Citrix NetScaler Application Delivery Controller (ADC) appliance.
To display the license status, use the show license command in the NetScaler command lineinterface
CitrixCitrixNetscalerApplicationDeliveryController(ADC)operationsystem
Prerequisites for Configuring RISEThe RISE feature has the following prerequisites:
• Cable and power up the NetScaler Application Delivery Controller (ADC) appliance. See the “Preparingfor RISE Integration” chapter for information on connecting the Cisco NetScaler Application DeliveryController (ADC) appliance.
• For direct connect mode, create an interface or port channel on the Cisco Nexus Series switch and addall relevant management and data VLANs for the NetScaler Application Delivery Controller (ADC)appliance. See the Cisco Nexus Series NX-OS Interfaces Configuration Guideor information.
• For indirect connect mode, the RISE-enabled appliance must be configured with IP connectivity to theCisco Nexus switch with Layer 2 adjacency.
Guidelines and LimitationsThis section includes the following topics:
Cisco Remote Integrated Service Engine for Citrix NetScaler Appliances and Cisco Nexus 7000 Series SwitchesConfiguration Guide
16
Configuring RISEFinding Feature Information

Guidelines and Limitations for Configuring RISERISE has the following guidelines and limitations:
•When configuring a route-map or prefix-list that contains RHI routes to be redistributed via OSPF,ensure that the prefix-list is created with the le option. For example, the command form ip prefix-listlist1 seq 10 permit 10.16.4.0/24 le 32 ensures that all RHI routes in the range 10.16.4.1/32 to10.16.4.254/32 are redistributed via OSPF without the need to create a prefix-list for each RHI route inthe 10.16.4.0/24 subnet. This action should be performed on the Nexus 7000 Series switch after creatingan active RISE service.
• Auto-discovery, bootstrap, and auto port configuration are supported only in the direct connect and vPCdirect connect modes. In indirect connect mode, manual configuration is required at each end on theCisco Nexus Series switches and the Citrix NetScaler Application Delivery Controller (ADC) appliancein order to establish control channel connectivity and for the discovery and bootstrap process to occur.
•When the Citrix NetScaler Application Delivery Controller (ADC) appliance is indirectly connected tothe Cisco Nexus Series switch, the service or management VLAN on the Citrix NetScaler ApplicationDelivery Controller (ADC) appliance must establish the TCP RISE control channel with the Cisco NexusSeries switches.
• You can create up to 32 RISE services. However, the number of active RISE services that are supportedis limited by the Cisco NX-OS software.
• Multiple instances of RISE services are supported per VDC.
• VLANs cannot be shared across virtual device contexts (VDCs) in a RISE deployment.
• After the RISE service is enabled on the Cisco Nexus Series switch, a service vlan-group must be createdand associated to the RISE service to specify the data VLANs to be used on the Citrix NetScalerApplication Delivery Controller (ADC) appliance.
• Control Plane Policing (CoPP) limits the number of packets that can be handled by a Cisco Nexus Seriesswitch at one time. CoPP policies for RISE ports 8000 and 8001 are enabled by default as part of the(default) CoPP profiles.
Default Settings for RISEThe following table lists the default settings for RISE:
Table 1: Default RISE Parameters on the Cisco Nexus Series Switch
DefaultParameter
DisabledRISE mode
CoPP policies for RISE ports 8000 and 8001 areenabled by default.
CoPP
Cisco Remote Integrated Service Engine for Citrix NetScaler Appliances and Cisco Nexus 7000 Series SwitchesConfiguration Guide
17
Configuring RISEGuidelines and Limitations for Configuring RISE
Accessing the Switch and Appliance InterfacesThis section provides information on how to access the command-line interface (CLI) for the Cisco NexusSeries Series switch and the CLI and GUI for the Citrix NetScaler Application Delivery Controller (ADC)appliance. The switch and appliance interfaces enable you to perform many administrative tasks, includingconfiguring the RISE feature.
Before logging into the interfaces, ensure that you have completed the installation process outlined in the“Preparing for RISE Integration” chapter.This section includes the following topics:
Accessing the Cisco Nexus Series SwitchAfter the Cisco Nexus Series switch boots up, you can access the command-line interface (CLI). See theCiscoNexus Series NX-OS Fundamentals Configuration Guide for more information on using the CLI.
To log onto the CLI through the console port, follow these steps:
Step 1 Use the switch’s IP address to establish a Telnet or SSH connection from your PC to the switch.Step 2 When the login prompt appears, enter your login ID and password to access the switch CLI.
Accessing the Citrix Netscaler Application Delivery Controller (ADC) ApplianceA Citrix NetScaler appliance has both a command line interface (CLI) and a graphical user interface (GUI).The GUI includes a configuration utility for configuring the appliance and a Dashboard for monitoringNetscaler performance. For initial access, all appliances ship with the default NetScaler IP address (NSIP) of192.168.100.1 and default subnet mask of 255.255.0.0. You can assign a new NSIP and an associated subnetmask during initial configuration.
If you are using the direct connect mode to connect the appliance to the Cisco Nexus switch, you are notrequired to access the Citrix Netscaler Application Delivery Controller (ADC) appliance to configureRISE. For direct connect mode, the IP address and VLAN for management are pushed from the CiscoNexus switch as part of RISE simplified provisioning.
Note
The following table summarizes the available access methods.
Table 2: Methods for Accessing the Citrix Netscaler Appliance
Default IP Address Required?PortAccess Method
NoConsoleCLI
YesEthernetCLI and GUI
Cisco Remote Integrated Service Engine for Citrix NetScaler Appliances and Cisco Nexus 7000 Series SwitchesConfiguration Guide
18
Configuring RISEAccessing the Switch and Appliance Interfaces
Using the Netscaler CLIYou can access the CLI either locally by connecting a workstation to the console port or remotely by connectingthrough Secure Shell (SSH) from any workstation on the same network.
To access Citrix eDocs, see the Citrix eDocs listing page for NetScaler 10.1 at http://support.citrix.com/proddocs/topic/netscaler/ns-gen-netscaler10-1-wrapper-con.html.
Note
This section includes the following topics:
Logging onto the CLI Using the Console Port
The appliance has a console port for connecting to a computer workstation. To log on to the appliance, youneed a serial crossover cable and a workstation with a terminal emulation program.
To log onto the CLI through the console port, follow these steps:
Step 1 Connect the console port to a serial port on the workstation, as described in the Citrix eDoc, Connecting the ConsoleCable.
Step 2 On the workstation, start HyperTerminal or any other terminal emulation program. If the logon prompt does not appear,you might need to press Enter one or more times to display the prompt.
Step 3 Log on using the administrator credentials. The command prompt (>) is displayed on the workstation monitor.
Logging into the Appliance CLI Using SSH
The SSH protocol is the recommended remote access method for accessing the command-line interface (CLI)of an appliance remotely from any workstation on the same network. You can use either SSH version 1 (SSH1)or SSH version 2 (SSH2). To verify that the SSH client is installed properly, use it to connect to any deviceon your network that accepts SSH connections.
To log onto the CLI using SSH, follow these steps:
Step 1 On your workstation, start the SSH client.Step 2 For initial configuration, use the default NetScaler IP (NSIP) address, which is 192.168.100.1. For subsequent access,
use the NSIP that was assigned during initial configuration. Select either SSH1 or SSH2 as the protocol. For informationon initial configurations, see the Citrix eDoc, Configuring a NetScaler for the First Time. To access Citrix eDocs, seethe Citrix eDocs listing page for NetScaler 10.1 at http://support.citrix.com/proddocs/topic/netscaler/ns-gen-netscaler10-1-wrapper-con.html.
Step 3 Log on by using the administrator credentials. For initial configuration, use nsroot as both the username and password.For example:login as: nsrootUsing keyboard-interactive authentication.Password:Last login: Tue Jun 16 10:37:28 2009 from 10.102.29.9
Cisco Remote Integrated Service Engine for Citrix NetScaler Appliances and Cisco Nexus 7000 Series SwitchesConfiguration Guide
19
Configuring RISEAccessing the Citrix Netscaler Application Delivery Controller (ADC) Appliance

Done>
Using the Netscaler GUIThe graphical user interface (GUI) includes a configuration utility and a statistical utility, called the Dashboard,either of which you access through a workstation connected to an Ethernet port on the appliance. If yourcomputer does not have a supported Java plug-in installed, the utility prompts you to download and installthe plug-in the first time you log on. If automatic installation fails, you can install the plug-in separately beforeyou attempt to log on to the configuration utility or Dashboard.
Your workstation must have a supported web browser and version 1.6 or above of the Java applet plug-ininstalled to access the configuration utility and Dashboard.
Note
Using the NetScaler Configuration UtilityAfter you log on to the configuration utility, you can configure the appliance through a graphical interfacethat includes context-sensitive help.
If your computer does not have a supported Java plug-in installed, the first time you log on to the appliance,the configuration utility prompts you to download and install the plug-in.
Before installing the Java 2 Runtime Environment, make sure that you have installed the full set of requiredoperating system patches needed for the current Java release.
Note
To log onto the configuration utility, follow these steps:
Step 1 Open your web browser and enter the NetScaler IP (NSIP) address as an HTTP address. If you have not set up the initialconfiguration, enter the default NSIP address (http://192.168.100.1). The Citrix Logon page appears.
If you have two Citrix NetScaler appliances in a high availability setup, make sure that you do not access theGUI by entering the IP address of the secondary Citrix NetScaler appliance. If you do so and use the GUI toconfigure the secondary appliance, your configuration changes are not applied to the primary appliance.
Note
Step 2 In the User Name text box, enter nsroot.Step 3 In the Password text box, type the administrative password that you assigned to the nsroot account during the initial
configuration.Step 4 For Deployment Type, choose NetScaler ADC.Step 5 In the Start in list, click Configuration, and then click Login. The Configuration Utility page appears.
If your workstation does not already have a supported version of the Java runtime plug-in installed, the NetScalerprompts you to download the Java Plug-in. After the download is complete, the configuration utility pageappears.
Note
Cisco Remote Integrated Service Engine for Citrix NetScaler Appliances and Cisco Nexus 7000 Series SwitchesConfiguration Guide
20
Configuring RISEAccessing the Citrix Netscaler Application Delivery Controller (ADC) Appliance

Using the Statistical UtilityThe Dashboard is a browser-based application that displays charts and tables on which you can monitorNetScaler performance.
To log onto Dashboard, follow these steps:
Step 1 Open your web browser and enter the NetScaler appliance's NSIP address as an HTTP address (http://<NSIP>). TheCitrix Logon page appears.
Step 2 In the User Name text box, enter nsroot.Step 3 In the Password text box, enter the administrative password that you assigned to the nsroot account during the initial
configuration.Step 4 In the Start in list, choose Dashboard and then choose Login.
For more information, see the Citrix eDoc, Accessing a Citrix NetScaler. To access Citrix eDocs, see the Citrix eDocslisting page for NetScaler 10.1 at http://support.citrix.com/proddocs/topic/netscaler/ns-gen-netscaler10-1-wrapper-con.html.
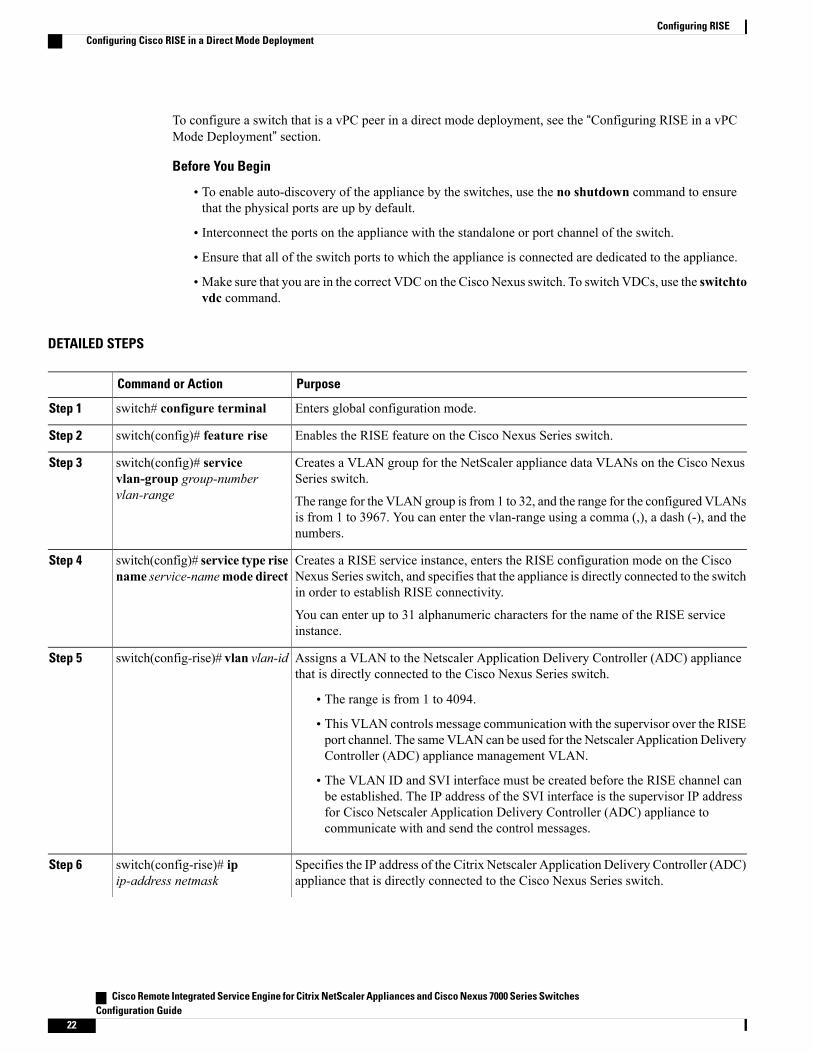
Configuring Cisco RISE in a Direct Mode DeploymentIn a direct mode deployment, the service appliance, such as Citrix Netscaler Application Delivery Controller(ADC) appliance, is attached to a single Nexus Series switch. The switch can be standalone device or a VPCpeer (recommended deployment). The following figure shows the topology for a direct mode deployment fora standalone Cisco Nexus switch.
Figure 6: Direct Connect Mode for the Appliance and a Standalone Switch
This task describes how to configure a standalone Cisco Nexus switch in a direct mode deployment. Afterconfiguring the Cisco Remote Integrated Services Engine (RISE) on the Cisco Nexus Series switch, theappliance that is directly connected to the standalone switch is automatically configured for RISE modeand all of its ports are in operation mode. No configuration is required on the appliance in a direct modedeployment.
Note
Cisco Remote Integrated Service Engine for Citrix NetScaler Appliances and Cisco Nexus 7000 Series SwitchesConfiguration Guide
21
Configuring RISEConfiguring Cisco RISE in a Direct Mode Deployment
To configure a switch that is a vPC peer in a direct mode deployment, see the “Configuring RISE in a vPCMode Deployment” section.
Before You Begin
• To enable auto-discovery of the appliance by the switches, use the no shutdown command to ensurethat the physical ports are up by default.
• Interconnect the ports on the appliance with the standalone or port channel of the switch.
• Ensure that all of the switch ports to which the appliance is connected are dedicated to the appliance.
• Make sure that you are in the correct VDC on the Cisco Nexus switch. To switch VDCs, use the switchtovdc command.
DETAILED STEPS
PurposeCommand or Action
Enters global configuration mode.switch# configure terminalStep 1
Enables the RISE feature on the Cisco Nexus Series switch.switch(config)# feature riseStep 2
Creates a VLAN group for the NetScaler appliance data VLANs on the Cisco NexusSeries switch.
switch(config)# servicevlan-group group-numbervlan-range
Step 3
The range for the VLAN group is from 1 to 32, and the range for the configured VLANsis from 1 to 3967. You can enter the vlan-range using a comma (,), a dash (-), and thenumbers.
Creates a RISE service instance, enters the RISE configuration mode on the CiscoNexus Series switch, and specifies that the appliance is directly connected to the switchin order to establish RISE connectivity.
switch(config)# service type risename service-namemode direct
Step 4
You can enter up to 31 alphanumeric characters for the name of the RISE serviceinstance.
Assigns a VLAN to the Netscaler Application Delivery Controller (ADC) appliancethat is directly connected to the Cisco Nexus Series switch.
switch(config-rise)# vlan vlan-idStep 5
• The range is from 1 to 4094.
• This VLAN controls message communication with the supervisor over the RISEport channel. The sameVLAN can be used for the Netscaler Application DeliveryController (ADC) appliance management VLAN.
• The VLAN ID and SVI interface must be created before the RISE channel canbe established. The IP address of the SVI interface is the supervisor IP addressfor Cisco Netscaler Application Delivery Controller (ADC) appliance tocommunicate with and send the control messages.
Specifies the IP address of the Citrix Netscaler Application Delivery Controller (ADC)appliance that is directly connected to the Cisco Nexus Series switch.
switch(config-rise)# ipip-address netmask
Step 6
Cisco Remote Integrated Service Engine for Citrix NetScaler Appliances and Cisco Nexus 7000 Series SwitchesConfiguration Guide
22
Configuring RISEConfiguring Cisco RISE in a Direct Mode Deployment
PurposeCommand or Action
This IP address controls message communication with the supervisor over the RISEport channel. The same IP address can be used for the management IP address ofNetScaler appliance.
Specifies the RISE VLAN group to be used by Citrix Netscaler Application DeliveryController (ADC) appliance.
switch(config-rise)# vlan groupvlan-group
Step 7
The range is from 1 to 32.
The trunk-allowed VLANs on the port channel must include all of the VLANsin the VLAN group as well as the VLAN for the RISE control message.
Note
Creates an interface for sending out RISE discovery packets.Use one of the following:Step 8
• The range for the slot argument is from 1 to 253. The range for the port argumentis from 1 to 128.
• switch(config-rise)#ethernet slot/port
• The range for the channel-number argument is from 1 to 4096.• switch(config-rise)#port-channelchannel-number
Launches the auto-discovery and bootstrap configuration process. The NetScaler ADCappliance port channel is created with the RISE IP address set at the Citrix NetscalerApplication Delivery Controller (ADC) appliance.
The CiscoNexus Series switches associates the Netscaler ApplicationDeliveryController (ADC) appliance serial number with the virtual slot number forthis Cisco Netscaler Application Delivery Controller (ADC) appliance.
Note
Discovery does not start if any required information (such as the port, RISEVLAN, RISE IP address, or switch virtual interface [SVI] of the RISEVLAN)is not provided. If the discovery times out, the virtual module is shown in theinactive state. The show rise detail command on the switch displays thereason for discovery failure.
Note
switch(config-rise)# noshutdown
Step 9
(Optional) Displays the status of the RISE service module on the Cisco Nexus Seriesswitch. If the RISE service module is operational, the status that is displayed is “active.”
switch(config-rise)# showmodule service
Step 10
(Optional) Connects the Cisco Nexus Series switch to the RISE service module andgenerates a RISE session from the switch, which allows Telnet access.
switch(config-rise)# attach rise{slot slot-number | name name}
Step 11
• The slot number range varies based on the valid slot numbers for a particularVDC. The Cisco Nexus Series switch supports 32 RISE instances per VDC. Theslot number range is as follows:
• From 300 to 331 for VDC 1
• From 332 to 363 for VDC 2
• From 364 to 395 for VDC 3
• From 396 to 427 for VDC 4
• You can enter up to 32 alphanumeric characters for the RISE service modulename.
Cisco Remote Integrated Service Engine for Citrix NetScaler Appliances and Cisco Nexus 7000 Series SwitchesConfiguration Guide
23
Configuring RISEConfiguring Cisco RISE in a Direct Mode Deployment

PurposeCommand or Action
• After you enter the password, you can access the Citrix Netscaler ApplicationDelivery Controller (ADC) appliance to configure it.
Displays the RISE configuration status on the Cisco Nexus Series switch. If RISE isconfigured on the switch, the state that is displayed is “active.”
switch(config-rise)# show riseStep 12
What to Do Next
After configuring RISE on the Cisco Nexus Series switch, the Citrix Netscaler Application DeliveryController (ADC) appliance that is directly connected to the switch is automatically configured for RISEmode and all of its ports are in operation mode. No further configuration is required to deploy RISE onthe Citrix Netscaler Application Delivery Controller (ADC) appliance.
Note
Configuring RISE in an Indirect Mode DeploymentIn an indirect mode deployment, a virtual service appliance, such as Citrix NetScaler Application DeliveryController (ADC) appliance, is connected to a Cisco Nexus Series switch through a switched Layer 2 network.The topology in the following figure is for an indirect mode deployment.
Figure 7: Indirect Connect Mode Through a Layer 2 Network
This section includes the following topics:
Cisco Remote Integrated Service Engine for Citrix NetScaler Appliances and Cisco Nexus 7000 Series SwitchesConfiguration Guide
24
Configuring RISEConfiguring RISE in an Indirect Mode Deployment
Configuring RISE on the Cisco Nexus Switch
Before You Begin
• Enable and configure the Cisco Nexus switches as vPC peers. See the Cisco Nexus Series NX-OSInterfaces Configuration Guide for information. The following parameters must be the same on bothCisco Nexus switches:
◦The vPC ID
◦The name of the RISE service instance
◦The vPC number of the port channel
◦The IP address of the Netscaler appliance
◦The number and range of the VLAN group for the Citrix NetScaler Application Delivery Controller(ADC) appliance.
• Make sure that you are in the correct VDC on the Cisco Nexus switch. To switch VDCs, use the switchtovdc command.
DETAILED STEPS
PurposeCommand or Action
Enters global configuration mode.switch# configure terminalStep 1
Enables the RISE feature on the Cisco Nexus Series switch.switch(config)# feature riseStep 2
Creates a VLAN group for the Citrix NetScaler Application Delivery Controller (ADC)appliance data VLANs on the Cisco Nexus Series switch.
switch(config)# servicevlan-group group-numbervlan-range
Step 3
The range for the VLAN group is from 1 to 32, and the range for the configured VLANsis from 1 to 3967. You can enter the vlan-range using a comma (,), a dash (-), and thenumbers.
Creates a RISE service instance, enters the RISE configuration mode on the Cisco NexusSeries switch, and specifies that the appliance is indirectly connected to the switch inorder to establish RISE connectivity.
switch(config)# service typerise name service-namemodeindirect
Step 4
You can enter up to 31 alphanumeric characters for the name of the RISE service instance.
Assigns a VLAN to the Citrix NetScaler ApplicationDelivery Controller (ADC) appliancethat is directly connected to the Cisco Nexus Series switch.
switch(config-rise)# vlanvlan-id
Step 5
• The range is from 1 to 4094.
• This VLAN controls message communication with the supervisor over the RISEport channel. The same VLAN can be used for the Citrix NetScaler ApplicationDelivery Controller (ADC) appliance management VLAN.
• The VLAN ID and SVI interface must be created before the RISE channel can beestablished. The IP address of the SVI interface is the supervisor IP address for
Cisco Remote Integrated Service Engine for Citrix NetScaler Appliances and Cisco Nexus 7000 Series SwitchesConfiguration Guide
25
Configuring RISEConfiguring RISE on the Cisco Nexus Switch

PurposeCommand or Action
Citrix NetScaler Application Delivery Controller (ADC) appliance to communicatewith and send the control messages.
Specifies the IP address of the Citrix NetScaler Application Delivery Controller (ADC)appliance that is directly connected to the Cisco Nexus Series switch.
switch(config-rise)# ipip-address netmask
Step 6
This IP address controls message communication with the supervisor over the RISE portchannel. The same IP address can be used for the management IP address of NetScalerappliance.
Specifies the RISE VLAN group to be used by Citrix NetScaler Application DeliveryController (ADC) appliance.
switch(config-rise)# vlangroup vlan-group
Step 7
The range is from 1 to 32.
The trunk-allowed VLANs on the port channel must include all of the VLANsin the VLAN group as well as the VLAN for the RISE control VLANmessage.
Note
Launches the auto-discovery and bootstrap configuration process. The Citrix NetScalerApplication Delivery Controller (ADC) appliance port channel is created with the RISEIP address set at the Citrix NetScaler Application Delivery Controller (ADC) appliance.
The Cisco Nexus Series switches associates the NetScaler appliance serialnumber with the virtual slot number for this Citrix NetScaler ApplicationDelivery Controller (ADC) appliance.
Note
Discovery does not start if any required information (such as the port, RISEVLAN, RISE IP address, or switch virtual interface [SVI] of the RISE VLAN)is not provided. If the discovery times out, the virtual module is shown in theinactive state. The show rise command on the switch displays the reason fordiscovery failure.
Note
switch(config-rise)# noshutdown
Step 8
(Optional) Displays the status of the RISE service module on the Cisco Nexus Seriesswitch. If the RISE service module is operational, the status that is displayed is “active.”
switch(config-rise)# showmodule service
Step 9
(Optional) Connects the Cisco Nexus Series switch to the RISE service module andgenerates a RISE session from the switch, which allows Telnet access.
switch(config-rise)# attachrise {slot slot-number | namename}
Step 10
• The slot number range varies based on the valid slot numbers for a particular VDC.The Cisco Nexus Series switch supports 32 RISE instances per VDC. The slotnumber range is as follows:
• From 300 to 331 for VDC 1
• From 332 to 363 for VDC 2
• From 364 to 395 for VDC 3
• From 396 to 427 for VDC 4
• You can enter up to 32 alphanumeric characters for the RISE service module name.
• After you enter the password, you can access the Citrix NetScaler ApplicationDelivery Controller (ADC) appliance to configure it.
Cisco Remote Integrated Service Engine for Citrix NetScaler Appliances and Cisco Nexus 7000 Series SwitchesConfiguration Guide
26
Configuring RISEConfiguring RISE on the Cisco Nexus Switch

PurposeCommand or Action
Displays the RISE configuration status on the Cisco Nexus Series switch. If RISE isconfigured on the switch, the state that is displayed is “active.”
switch(config-rise)# show riseStep 11
Configuring NSIP on the ApplianceThe NetScaler management IP address (NSIP) is the IP address for management and general system accessto the Citrix NetScaler Application Delivery Controller (ADC) appliance and for high availability (HA)communication.
Configuring NSIP Using the CLIYou can configure the NSIP on your appliance by using either the configuration prompts or the command-lineinterface (CLI).
To prevent an attacker from impeding your ability to send packets to the appliance, choose a nonroutableIP address on your organization's LAN as your appliance IP address.
Note
Before You Begin
Ensure that a port channel is configured on the appliance and that the appliance's physical ports are mappedto this port channel.
Perform one of the following tasks:DescriptionOption
Displays prompts for configuring the NSIP.config ns
Configures the NSIP using the CLI.set ns config -ipaddress address -netmask netmask
add ns ip ip-address netmask -type type
add route network netmask gateway
save ns config
reboot
Example:The following example shows how to configure the NSIP using the CLI:set ns config -ipaddress 10.102.29.60 -netmask 255.255.255.0add ns ip 10.102.29.61 255.255.255.0 -type snip
Cisco Remote Integrated Service Engine for Citrix NetScaler Appliances and Cisco Nexus 7000 Series SwitchesConfiguration Guide
27
Configuring RISEConfiguring NSIP on the Appliance
add route 0.0.0.0 0.0.0.0 10.102.29.1save ns
Configuring NSIP Using the Configuration Utility
Before You Begin
• Create a port channel on the Citrix NetScaler Application Delivery Controller (ADC) appliance andmapits physical ports to this port channel.
Step 1 Navigate to System > Settings.Step 2 In the details pane, under Settings, click Change NSIP Settings.Step 3 In the Configure NSIP Settings dialog box, set the parameters. For a description of a parameter, hover the mouse cursor
over the corresponding field.Step 4 Under Interfaces, choose the interfaces from the Available Interfaces list and click Add to move them to the Configured
Interfaces list.Step 5 Click OK. In the Warning dialog box, click OK. The configuration takes effect after the Citrix NetScaler Application
Delivery Controller (ADC) appliance is restarted.
Configuring a NSVLAN on Citrix NetScaler Application Delivery Controller(ADC) Appliance
The NSVLAN is a VLAN to which the NetScaler management IP (NSIP) address's subnet is bound. The NSIPsubnet is available only on interfaces that are associated with NSVLAN. By default, NSVLAN is VLAN1,but you can designate a different VLAN as NSVLAN. If you designate a different VLAN as an NSVLAN,you must reboot the Citrix NetScaler Application Delivery Controller (ADC) appliance for the change to takeeffect. After the reboot, NSIP subnet traffic is restricted to the new NSVLAN.
Perform only one of the following tasks:
Configuring NSVLAN Using the CLIEnter the following commands prompt to configure NSVLAN using the CLI:
Before You Begin
• Create a port channel on the Citrix NetScaler Application Delivery Controller (ADC) appliance andmapits physical ports to this port channel.
Cisco Remote Integrated Service Engine for Citrix NetScaler Appliances and Cisco Nexus 7000 Series SwitchesConfiguration Guide
28
Configuring RISEConfiguring a NSVLAN on Citrix NetScaler Application Delivery Controller (ADC) Appliance

• Configure the NS IP address (NSIP) on the appliance.
Step 1 set ns config - nsvlan positive_integer - ifnum interface_name ... [-tagged (YES | NO)]Youmust reboot the appliance for the configuration to take effect.Note
Step 2 (Optional) show ns configset ns config -nsvlan 300 -ifnum 1/1 1/2 1/3 -tagged NOsave config
Step 3 (Optional) unset ns config -nsvlanRestores the default configuration.
Configuring NSVLAN Using the Configuration Utility
Before You Begin
• Create a port channel on the Citrix NetScaler Application Delivery Controller (ADC) appliance andmapits physical ports to this port channel.
• Configure the NetScaler IP address (NSIP) on the appliance.
Step 1 Navigate to System > Settings.Step 2 In the details pane, under Settings, click Change NSVLAN Settings.Step 3 In the Configure NSVLAN Settings dialog box, set the parameters. For a description of a parameter, hover the mouse
cursor over the corresponding field.Step 4 Under Interfaces, choose the interfaces from the Available Interfaces list and click Add to move them to the Configured
Interfaces list.Step 5 Click OK. In the Warning dialog box, click OK. The configuration takes effect after the Citrix NetScaler Application
Delivery Controller (ADC) appliance is restarted.
Configuring RISE in vPC Mode (Recommended DeploymentMode)
In a virtual port channel (vPC) deployment, two service appliances, such a Citrix NetScaler ApplicationDelivery Controller (ADC) appliance, are each connected to separate Cisco Nexus Series switches that are invPC mode through a peer link. This is the recommended topology for deploying the RISE feature on a CiscoNexus switch and a Citrix NetScaler Application Delivery Controller (ADC) appliance.
This section includes the following topics:
Cisco Remote Integrated Service Engine for Citrix NetScaler Appliances and Cisco Nexus 7000 Series SwitchesConfiguration Guide
29
Configuring RISEConfiguring RISE in vPC Mode (Recommended Deployment Mode)

Configuring RISE in a vPC Direct Mode DeploymentIn an direct mode deployment, the service appliance, such as appliance, is attached to a single Nexus Seriesswitch. The switch can be standalone device or a VPC peer (recommended deployment). The following figureshows the topologies for a vPC direct mode deployment.
Figure 8: vPC Direct Connect Mode for Connecting to vPC Peer Switches
This task describes how to configure a vPC peer switch in a direct mode deployment. After configuringRISE on the Cisco Nexus Series switch, the Citrix NetScaler Application Delivery Controller (ADC)appliance that is directly connected to the switch is automatically configured for RISE mode and all of itsports are in operation mode. No configuration is required on the Citrix NetScaler appliance in a directmode deployment.
Note
Repeat these steps to configure each vPC peer switch to which an appliance is connected.
Before You Begin
• Enable and configure the Cisco Nexus switches as vPC peers. See the Cisco Nexus Series NX-OSInterfaces Configuration Guide for information. The following parameters must be the same on bothCisco Nexus switches:
◦The vPC ID
◦The name of the RISE service instance
◦The vPC number of the port channel
◦The IP address of the appliance
Cisco Remote Integrated Service Engine for Citrix NetScaler Appliances and Cisco Nexus 7000 Series SwitchesConfiguration Guide
30
Configuring RISEConfiguring RISE in a vPC Direct Mode Deployment

◦The number and range of the VLAN group for the ADC appliance
• Make sure that you are in the correct VDC on the Cisco Nexus switch. To switch VDCs, use the switchtovdc command.
DETAILED STEPS
PurposeCommand or Action
Enters global configuration mode.switch# configure terminalStep 1
Enables the RISE feature on the Cisco Nexus Series switch.switch(config)# feature riseStep 2
Creates a VLAN group for the NetScaler appliance data VLANs on the Cisco NexusSeries switch.
switch(config)# servicevlan-group group-numbervlan-range
Step 3
The range for the VLAN group is from 1 to 32, and the range for the configured VLANsis from 1 to 3967. You can enter the vlan-range using a comma (,), a dash (-), and thenumbers.
Creates a RISE service instance, enters the RISE configuration mode on the CiscoNexus Series switch, and specifies that the appliance is directly connected to the switchin order to establish RISE connectivity.
switch(config)# service type risename service-namemode vpc
Step 4
You can enter up to 31 alphanumeric characters for the name of the RISE serviceinstance.
Assigns a VLAN to the NetScaler appliance that is directly connected to the CiscoNexus Series switch.
switch(config-rise)# vlan vlan-idStep 5
• The range is from 1 to 4094.
• This VLAN controls message communication with the supervisor over the RISEport channel. The same VLAN can be used for the Citrix Netscaler ApplicationDelivery Controller (ADC) appliance management VLAN.
• The VLAN ID and SVI interface must be created before the RISE channel canbe established. The IP address of the SVI interface is the supervisor IP addressfor Citrix NetScaler Application Delivery Controller (ADC) appliance tocommunicate with and send the control messages.
Specifies the IP address of the Citrix NetScaler Application Delivery Controller (ADC)appliance that is directly connected to the Cisco Nexus 7000 Series switch.
switch(config-rise)# ipip-address netmask
Step 6
This IP address controls message communication with the supervisor over the RISEport channel. The same IP address can be used for the management IP address of CitrixNetscaler Application Delivery Controller (ADC) appliance.
Specifies the RISE VLAN group to be used by Citrix NetScaler Application DeliveryController (ADC) appliance.
switch(config-rise)# vlan groupvlan-group
Step 7
The range is from 1 to 32.
The trunk-allowed VLANs on the port channel must include all of the VLANsin the VLAN group as well as the VLAN for the RISE control message.
Note
Cisco Remote Integrated Service Engine for Citrix NetScaler Appliances and Cisco Nexus 7000 Series SwitchesConfiguration Guide
31
Configuring RISEConfiguring RISE in a vPC Direct Mode Deployment

PurposeCommand or Action
Creates an interface for sending out RISE discovery packets.Use one of the following:Step 8
• The range for the slot argument is from 1 to 253. The range for the port argumentis from 1 to 128.
• switch(config-rise)#ethernet slot/port
• The range for the channel-number argument is from 1 to 4096.• switch(config-rise)#port-channelchannel-number
Launches the auto-discovery and bootstrap configuration process. The Citrix NetScalerApplication Delivery Controller (ADC) appliance port channel is created with the
switch(config-rise)# noshutdown
Step 9
RISE IP address set at the Citrix NetScaler Application Delivery Controller (ADC)appliance.
The Cisco Nexus Series switches associates the NetScaler appliance serialnumber with the virtual slot number for this Citrix Netscaler ApplicationDelivery Controller (ADC) appliance.
Note
Discovery does not start if any required information (such as the port, RISEVLAN, RISE IP address, or switch virtual interface [SVI] of the RISEVLAN)is not provided. If the discovery times out, the virtual module is shown in theinactive state. The show rise command on the switch displays the reason fordiscovery failure.
Note
(Optional) Displays the status of the RISE service module on the Cisco Nexus Seriesswitch. If the RISE service module is operational, the status that is displayed is “active.”
switch(config-rise)# showmodule service
Step 10
(Optional) Connects the Cisco Nexus Series switch to the RISE service module andgenerates a RISE session from the switch, which allows Telnet access.
switch(config-rise)# attach rise{slot slot-number | name name}
Step 11
• The slot number range varies based on the valid slot numbers for a particularVDC. The Cisco Nexus Series switch supports 32 RISE instances per VDC. Theslot number range is as follows:
• From 300 to 331 for VDC 1
• From 332 to 363 for VDC 2
• From 364 to 395 for VDC 3
• From 396 to 427 for VDC 4
• You can enter up to 32 alphanumeric characters for the RISE service modulename.
• After you enter the password, you can access the Citrix NetScaler ApplicationDelivery Controller (ADC) appliance to configure it.
Displays the RISE configuration status on the Cisco Nexus Series switch. If RISE isconfigured on the switch, the state that is displayed is “active.”
switch(config-rise)# show riseStep 12
Cisco Remote Integrated Service Engine for Citrix NetScaler Appliances and Cisco Nexus 7000 Series SwitchesConfiguration Guide
32
Configuring RISEConfiguring RISE in a vPC Direct Mode Deployment
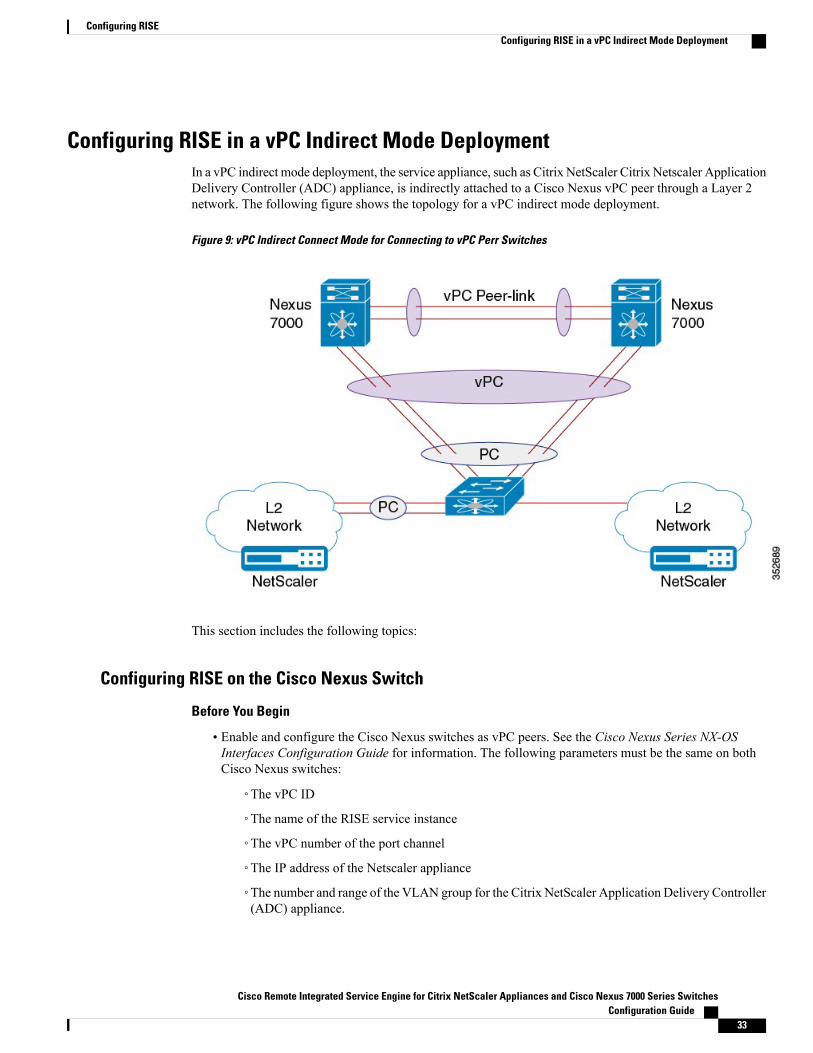
Configuring RISE in a vPC Indirect Mode DeploymentIn a vPC indirect mode deployment, the service appliance, such as Citrix NetScaler Citrix Netscaler ApplicationDelivery Controller (ADC) appliance, is indirectly attached to a Cisco Nexus vPC peer through a Layer 2network. The following figure shows the topology for a vPC indirect mode deployment.
Figure 9: vPC Indirect Connect Mode for Connecting to vPC Perr Switches
This section includes the following topics:
Configuring RISE on the Cisco Nexus Switch
Before You Begin
• Enable and configure the Cisco Nexus switches as vPC peers. See the Cisco Nexus Series NX-OSInterfaces Configuration Guide for information. The following parameters must be the same on bothCisco Nexus switches:
◦The vPC ID
◦The name of the RISE service instance
◦The vPC number of the port channel
◦The IP address of the Netscaler appliance
◦The number and range of the VLAN group for the Citrix NetScaler Application Delivery Controller(ADC) appliance.
Cisco Remote Integrated Service Engine for Citrix NetScaler Appliances and Cisco Nexus 7000 Series SwitchesConfiguration Guide
33
Configuring RISEConfiguring RISE in a vPC Indirect Mode Deployment

• Make sure that you are in the correct VDC on the Cisco Nexus switch. To switch VDCs, use the switchtovdc command.
DETAILED STEPS
PurposeCommand or Action
Enters global configuration mode.switch# configure terminalStep 1
Enables the RISE feature on the Cisco Nexus Series switch.switch(config)# feature riseStep 2
Creates a VLAN group for the Citrix NetScaler Application Delivery Controller (ADC)appliance data VLANs on the Cisco Nexus Series switch.
switch(config)# servicevlan-group group-numbervlan-range
Step 3
The range for the VLAN group is from 1 to 32, and the range for the configured VLANsis from 1 to 3967. You can enter the vlan-range using a comma (,), a dash (-), and thenumbers.
Creates a RISE service instance, enters the RISE configuration mode on the Cisco NexusSeries switch, and specifies that the appliance is indirectly connected to the switch inorder to establish RISE connectivity.
switch(config)# service typerise name service-namemodeindirect
Step 4
You can enter up to 31 alphanumeric characters for the name of the RISE service instance.
Assigns a VLAN to the Citrix NetScaler ApplicationDelivery Controller (ADC) appliancethat is directly connected to the Cisco Nexus Series switch.
switch(config-rise)# vlanvlan-id
Step 5
• The range is from 1 to 4094.
• This VLAN controls message communication with the supervisor over the RISEport channel. The same VLAN can be used for the Citrix NetScaler ApplicationDelivery Controller (ADC) appliance management VLAN.
• The VLAN ID and SVI interface must be created before the RISE channel can beestablished. The IP address of the SVI interface is the supervisor IP address forCitrix NetScaler Application Delivery Controller (ADC) appliance to communicatewith and send the control messages.
Specifies the IP address of the Citrix NetScaler Application Delivery Controller (ADC)appliance that is directly connected to the Cisco Nexus Series switch.
switch(config-rise)# ipip-address netmask
Step 6
This IP address controls message communication with the supervisor over the RISE portchannel. The same IP address can be used for the management IP address of NetScalerappliance.
Specifies the RISE VLAN group to be used by Citrix NetScaler Application DeliveryController (ADC) appliance.
switch(config-rise)# vlangroup vlan-group
Step 7
The range is from 1 to 32.
The trunk-allowed VLANs on the port channel must include all of the VLANsin the VLAN group as well as the VLAN for the RISE control VLANmessage.
Note
Cisco Remote Integrated Service Engine for Citrix NetScaler Appliances and Cisco Nexus 7000 Series SwitchesConfiguration Guide
34
Configuring RISEConfiguring RISE in a vPC Indirect Mode Deployment

PurposeCommand or Action
Launches the auto-discovery and bootstrap configuration process. The Citrix NetScalerApplication Delivery Controller (ADC) appliance port channel is created with the RISEIP address set at the Citrix NetScaler Application Delivery Controller (ADC) appliance.
The Cisco Nexus Series switches associates the NetScaler appliance serialnumber with the virtual slot number for this Citrix NetScaler ApplicationDelivery Controller (ADC) appliance.
Note
Discovery does not start if any required information (such as the port, RISEVLAN, RISE IP address, or switch virtual interface [SVI] of the RISE VLAN)is not provided. If the discovery times out, the virtual module is shown in theinactive state. The show rise command on the switch displays the reason fordiscovery failure.
Note
switch(config-rise)# noshutdown
Step 8
(Optional) Displays the status of the RISE service module on the Cisco Nexus Seriesswitch. If the RISE service module is operational, the status that is displayed is “active.”
switch(config-rise)# showmodule service
Step 9
(Optional) Connects the Cisco Nexus Series switch to the RISE service module andgenerates a RISE session from the switch, which allows Telnet access.
switch(config-rise)# attachrise {slot slot-number | namename}
Step 10
• The slot number range varies based on the valid slot numbers for a particular VDC.The Cisco Nexus Series switch supports 32 RISE instances per VDC. The slotnumber range is as follows:
• From 300 to 331 for VDC 1
• From 332 to 363 for VDC 2
• From 364 to 395 for VDC 3
• From 396 to 427 for VDC 4
• You can enter up to 32 alphanumeric characters for the RISE service module name.
• After you enter the password, you can access the Citrix NetScaler ApplicationDelivery Controller (ADC) appliance to configure it.
Displays the RISE configuration status on the Cisco Nexus Series switch. If RISE isconfigured on the switch, the state that is displayed is “active.”
switch(config-rise)# show riseStep 11
Configuring NSIP on the ApplianceThe NetScaler management IP address (NSIP) is the IP address for management and general system accessto the Citrix NetScaler Application Delivery Controller (ADC) appliance and for high availability (HA)communication.
Configuring NSIP Using the CLI
You can configure the NSIP on your appliance by using either the configuration prompts or the command-lineinterface (CLI).
Cisco Remote Integrated Service Engine for Citrix NetScaler Appliances and Cisco Nexus 7000 Series SwitchesConfiguration Guide
35
Configuring RISEConfiguring RISE in a vPC Indirect Mode Deployment
To prevent an attacker from impeding your ability to send packets to the appliance, choose a nonroutableIP address on your organization's LAN as your appliance IP address.
Note
Before You Begin
Ensure that a port channel is configured on the appliance and that the appliance's physical ports are mappedto this port channel.
Perform one of the following tasks:DescriptionOption
Displays prompts for configuring the NSIP.config ns
Configures the NSIP using the CLI.set ns config -ipaddress address -netmask netmask
add ns ip ip-address netmask -type type
add route network netmask gateway
save ns config
reboot
Example:The following example shows how to configure the NSIP using the CLI:set ns config -ipaddress 10.102.29.60 -netmask 255.255.255.0add ns ip 10.102.29.61 255.255.255.0 -type snipadd route 0.0.0.0 0.0.0.0 10.102.29.1save ns
Cisco Remote Integrated Service Engine for Citrix NetScaler Appliances and Cisco Nexus 7000 Series SwitchesConfiguration Guide
36
Configuring RISEConfiguring RISE in a vPC Indirect Mode Deployment
Configuring NSIP Using the Configuration Utility
Before You Begin
• Create a port channel on the Citrix NetScaler Application Delivery Controller (ADC) appliance andmapits physical ports to this port channel.
Step 1 Navigate to System > Settings.Step 2 In the details pane, under Settings, click Change NSIP Settings.Step 3 In the Configure NSIP Settings dialog box, set the parameters. For a description of a parameter, hover the mouse cursor
over the corresponding field.Step 4 Under Interfaces, choose the interfaces from the Available Interfaces list and click Add to move them to the Configured
Interfaces list.Step 5 Click OK. In the Warning dialog box, click OK. The configuration takes effect after the Citrix NetScaler Application
Delivery Controller (ADC) appliance is restarted.
Configuring a NSVLAN on Citrix NetScaler Application Delivery Controller (ADC) ApplianceThe NSVLAN is a VLAN to which the NetScaler management IP (NSIP) address's subnet is bound. The NSIPsubnet is available only on interfaces that are associated with NSVLAN. By default, NSVLAN is VLAN1,but you can designate a different VLAN as NSVLAN. If you designate a different VLAN as an NSVLAN,you must reboot the Citrix NetScaler Application Delivery Controller (ADC) appliance for the change to takeeffect. After the reboot, NSIP subnet traffic is restricted to the new NSVLAN.
Perform only one of the following tasks:
Configuring NSVLAN Using the CLI
Enter the following commands prompt to configure NSVLAN using the CLI:
Before You Begin
• Create a port channel on the Citrix NetScaler Application Delivery Controller (ADC) appliance andmapits physical ports to this port channel.
• Configure the NS IP address (NSIP) on the appliance.
Step 1 set ns config - nsvlan positive_integer - ifnum interface_name ... [-tagged (YES | NO)]Youmust reboot the appliance for the configuration to take effect.Note
Step 2 (Optional) show ns configset ns config -nsvlan 300 -ifnum 1/1 1/2 1/3 -tagged NOsave config
Cisco Remote Integrated Service Engine for Citrix NetScaler Appliances and Cisco Nexus 7000 Series SwitchesConfiguration Guide
37
Configuring RISEConfiguring RISE in a vPC Indirect Mode Deployment
Step 3 (Optional) unset ns config -nsvlanRestores the default configuration.
Configuring NSVLAN Using the Configuration Utility
Before You Begin
• Create a port channel on the Citrix NetScaler Application Delivery Controller (ADC) appliance andmapits physical ports to this port channel.
• Configure the NetScaler IP address (NSIP) on the appliance.
Step 1 Navigate to System > Settings.Step 2 In the details pane, under Settings, click Change NSVLAN Settings.Step 3 In the Configure NSVLAN Settings dialog box, set the parameters. For a description of a parameter, hover the mouse
cursor over the corresponding field.Step 4 Under Interfaces, choose the interfaces from the Available Interfaces list and click Add to move them to the Configured
Interfaces list.Step 5 Click OK. In the Warning dialog box, click OK. The configuration takes effect after the Citrix NetScaler Application
Delivery Controller (ADC) appliance is restarted.
Route Health InjectionRoute Health Injection (RHI)) allows NetScaler to advertise the VIPs to upstream and downstream routers.The NetScaler uses health probes together. When a VIP becomes unavailable, NetScaler withdraws the RHIinformation.
Once the Service Card (SC) Engine on the Cisco Nexus 7000 Series switch receives the RHI advertisedmessages from the Intelligent Service Card Client (ISCC) residing on the NetScaler appliance, the switchupdates its routing tables to reflect the new route in the RHI message.
Use the show routing command on the switch to display the route automatically inserted for the VIP.
Intelligent Service Card ManagerThe Intelligent Service Card Manager (ISCM) handles tasks related to the initialization and flow of RemoteHealth Injection (RHI) messages.
During ISCM initialization, the ISCM registers with the Universal Routing information Base (URIB) as aURIB client so that it can access the routing database. After registration is successful, the ISCM can add routesreceived from NetScaler to the routing database.
Cisco Remote Integrated Service Engine for Citrix NetScaler Appliances and Cisco Nexus 7000 Series SwitchesConfiguration Guide
38
Configuring RISERoute Health Injection

When the ISCC receives an RHI message from NetScaler, it sends a TLV and encrypted message to ISCMcontaining the RHI payload and RISE headers. ISCM transport decrypts and processes the RHI message.Each RHI message contains a common header with RHI opcode and a RHI request payload. The messageheader also contains the number of RHI entries contained in the RHI request payload.
The ISCM also checks the status of the SVI for the VLAN sent by NetScaler. It obtains the interface numberfor the SVI and call the URIB APIs to add, delete, or delete all routes. The other parameters sent in the URIBAPI are present in the RHI request payload received by the ISCM. All routes are added as static routes to theVRF that this SVI is associated with.
Intelligent Service Card ClientThe Intelligent Service Card Client (ISCC) is the SDK component on NetScaler The Route Health Injection(RHI) message is a pass-through message for the ISCC. The ISCC copies the payload from NetScaler intothe RHI message payload directed towards to the Intelligent Service Card Manager (ISCM).
The ISCM sends an acknowledgment when its processes the RHI message, then the ISCC transparently sendsthe acknowledgment to NetScaler. NetScaler is responsible for starting a timer and handling the failure if itdoes not receive an acknowledgment in time.
Universal Routing Information BaseTheUniversal Routing Information Base (URIB) hosts APIs to add, delete andmodify routes on the Supervisor.The details of route modification are transparent to the ISCM.
Verifying the RISE ConfigurationTo display the RISE configuration on the Cisco Nexus Series switch, perform one of the following tasks.
For detailed information about the fields in the output from these commands, see the “Cisco NX-OS RISECommands” chapter.
Note
PurposeCommand
Displays the status of the RISE service module onthe Cisco Nexus Series switch.
show module service
Displays the RISE configuration status on the CiscoNexus Series switch.
show rise [detail]
Displays VLAN group information for the NetScalerappliance data VLANs on the Cisco Nexus Seriesswitch.
show rise vlan-group
Displays the RISE running configuration on the CiscoNexus Series switch.
show running-config services
Cisco Remote Integrated Service Engine for Citrix NetScaler Appliances and Cisco Nexus 7000 Series SwitchesConfiguration Guide
39
Configuring RISEIntelligent Service Card Client

PurposeCommand
Displays troubleshooting information for RISE onthe Cisco Nexus Series switch.
show tech-support services [detail]
The following example is partial sample output from the show rise command:switch# show riseName Slot Vdc Rise-Ip State Interface
Id Id------------- ---- --- --------------- ------------ ---------mpx205a 332 2 10.90.14.216 active Po2051
The following example is partial sample output from the show rise detail command:swicth# show rise detail
RISE module name: mpx205aState: activeAdmin state: EnabledInterface: Po2051RISE Channel connectivity via interface Po2051Mode: vpcSlot id: 332Service token: 0x2Serial number: MH8C02AM50SUP IP: 10.90.14.138RISE IP: 10.90.14.216VDC id: 2VLAN: 99VLAN group: 20VLAN list: 99-101Data Interface: N/A
To display the RISE configuration on the Citrix Netscaler Application Delivery Controller (ADC) appliance,perform one of the following:
PurposeCommand
Displays the RISE configuration status on the CitrixNetscaler Application Delivery Controller (ADC)appliance.
show rise apbrsvc
The following example is sample output from the show rise profile command:mpx24> show rise profile
1) Service Name : mpx4Status : ActiveMode : vPC-DirectDevice Id : FOC1824R00PSlot Number : 300VDC Id : 1vPC Id : 510SUP IP : 172.16.0.2VLAN : 301VLAN Group : 1ISSU : NoneInterface : LA/1 : 10/3 10/4
2) Service Name : mpx4Status : ActiveMode : vPC-DirectDevice Id : FOC1751R0QVSlot Number : 300VDC Id : 1
Cisco Remote Integrated Service Engine for Citrix NetScaler Appliances and Cisco Nexus 7000 Series SwitchesConfiguration Guide
40
Configuring RISEVerifying the RISE Configuration

vPC Id : 510SUP IP : 172.16.0.3VLAN : 301VLAN Group : 1ISSU : NoneInterface : LA/1 : 10/7 10/8
Done
Verifying the ISCM ConfigurationTo display the ISCM configuration on the Cisco Nexus Series switch, perform one of the following tasks.
For detailed information about the fields in the output from these commands, see the “Cisco NX-OS RISECommands” chapter.
Note
PurposeCommand
Displays the version of each service and version ofISCM on the Cisco Nexus Series switch.
show system internal ISCM rise version
Displays all the statistics of the ISCM packet atRX/TX on a rise socket on the Cisco Nexus Seriesswitch.
show system internal ISCM pkt-stats
Displays VLAN group information for the NetScalerappliance data VLANs on the Cisco Nexus Seriesswitch.
show system internal ISCM mem-stats
Displays the RISE running configuration on the CiscoNexus Series switch.
show system internal ISCM event-historydebugs[detail]
Displays troubleshooting information for RISE onthe Cisco Nexus Series switch.
show system internal ISCM event-history-errors
Displays profile information for RISE on the CiscoNexus Series switch.
show system internal ISCM event-history-all
Displays profile information for RISE on the CiscoNexus Series switch.
show system internal ISCMevent-historywarnings
The following example is partial sample output from the show system internal ISCM rise version command:switch# show system internal iscm rise versionName Version------- ---------ISCM 2.1NAM3 2.1MPX 2.1Emu 2.1VPX 2.1
Cisco Remote Integrated Service Engine for Citrix NetScaler Appliances and Cisco Nexus 7000 Series SwitchesConfiguration Guide
41
Configuring RISEVerifying the ISCM Configuration

The following example is partial sample output from the show system internal ISCM pkt-stats command:switch# show system internal ISCM packet-statsService name: NAM3-------------------------------- -------- --------Opcode Tx Rx-------------------------------- -------- --------RISE_OPC_SVC_HEARTBEAT 0 0RISE_OPC_SVC_BOOTSTRAP_4_APP 0 0RISE_OPC_SVC_APP_OPERATION 1 3RISE_OPC_SVC_APP_ONLINE 0 2RISE_OPC_SVC_APP_TIME_SYNC 0 0RISE_OPC_SVC_NODE_INFO 1 0RISE_OPC_SVC_SC_ONLINE 0 1RISE_OPC_SVC_VDC_INFO 0 0RISE_OPC_SVC_AUTOSTATE 0 0RISE_OPC_SVC_VLAN_STITCH 0 0RISE_OPC_SVC_ASA_APP_OPERATION 0 0RISE_OPC_SVC_ASA_APP_STATE 0 0RISE_OPC_SVC_ASA_VLAN_GROUP 0 0RISE_OPC_SVCCLNT_X86M_PING 0 0RISE_OPC_SVC_RELOAD 0 0RISE_OPC_SVC_SYS_INFO_1 0 0RISE_OPC_SVC_MODULE_STATUS 0 0RISE_OPC_GOLD_CFG 0 0RISE_OPC_SVC_AZUMA_SET_GET 0 0RISE_OPC_SVC_RESET_PASSWORD 0 0RISE_OPC_SVC_RESET_SLV_TILE 0 0RISE_OPC_SVC_TILE_TEMPERATURE 0 0RISE_OPC_SVC_SUP_CMD_REQ 0 23564-------------------------------- -------- --------
Total: 2 23570Service name: MPX-------------------------------- -------- --------Opcode Tx Rx-------------------------------- -------- --------RISE_OPC_SVC_RHI 0 0RISE_OPC_SVC_RHI_BULK 0 0RISE_OPC_SVC_APBR 0 0RISE_OPC_SVC_APBR_BULK 0 0RISE_OPC_SVC_DISCOVERY 57869 57869RISE_OPC_SVC_BOOTSTRAP_CONFIRM 57869 0RISE_OPC_SVC_PORT_STATUS 0 0RISE_OPC_SVC_ISSU 0 0RISE_OPC_SVC_VLAN_GROUP 0 0RISE_OPC_SVC_SYS_INFO 0 0RISE_OPC_SVC_DELETE 0 0RISE_OPC_SVC_BULK 0 0RISE_OPC_CP_SLOT_DOWN 0 0RISE_OPC_SUP_IP_CONFIG 0 0RISE_OPC_RISE_IP_CONFIG 0 0RISE_OPC_SVC_DIRECT_DISCOVERY 2 2RISE_OPC_SVC_DIRECT_BOOTSTRAP_CO 2 2RISE_OPC_SVC_DIRECT_BOOTSTRAP_4_ 0 0RISE_OPC_SVC_DIRECT_PORTS_START 2 2RISE_OPC_SVC_DIRECT_PORTS_END 2 2RISE_OPC_SVC_PURGE 0 0RISE_OPC_SVC_PBR_ENABLE 0 0RISE_OPC_SVC_PBR_DISABLE 0 0-------------------------------- -------- --------
Total: 115746 57877
Service name: Emu-------------------------------- -------- --------Opcode Tx Rx-------------------------------- -------- --------RISE_OPC_SVC_RHI 0 0RISE_OPC_SVC_RHI_BULK 0 0RISE_OPC_SVC_APBR 0 0RISE_OPC_SVC_APBR_BULK 3 3RISE_OPC_SVC_DISCOVERY 58895 58895RISE_OPC_SVC_BOOTSTRAP_CONFIRM 58895 0RISE_OPC_SVC_PORT_STATUS 0 0
Cisco Remote Integrated Service Engine for Citrix NetScaler Appliances and Cisco Nexus 7000 Series SwitchesConfiguration Guide
42
Configuring RISEVerifying the ISCM Configuration

RISE_OPC_SVC_ISSU 0 0RISE_OPC_SVC_VLAN_GROUP 0 0RISE_OPC_SVC_SYS_INFO 0 0RISE_OPC_SVC_DELETE 0 0RISE_OPC_SVC_BULK 0 0RISE_OPC_CP_SLOT_DOWN 0 0RISE_OPC_SUP_IP_CONFIG 0 0RISE_OPC_RISE_IP_CONFIG 0 0RISE_OPC_SVC_DIRECT_DISCOVERY 0 0RISE_OPC_SVC_DIRECT_BOOTSTRAP_CO 0 0RISE_OPC_SVC_DIRECT_BOOTSTRAP_4_ 0 0RISE_OPC_SVC_DIRECT_PORTS_START 0 0RISE_OPC_SVC_DIRECT_PORTS_END 0 0RISE_OPC_SVC_PURGE 0 0RISE_OPC_SVC_PBR_ENABLE 0 0RISE_OPC_SVC_PBR_DISABLE 0 0-------------------------------- -------- --------
Total: 117793 58898
Service name: VPX-------------------------------- -------- --------Opcode Tx Rx-------------------------------- -------- --------RISE_OPC_SVC_RHI 0 0RISE_OPC_SVC_RHI_BULK 0 0RISE_OPC_SVC_APBR 0 0RISE_OPC_SVC_APBR_BULK 0 0RISE_OPC_SVC_DISCOVERY 50588 50587RISE_OPC_SVC_BOOTSTRAP_CONFIRM 50587 0RISE_OPC_SVC_PORT_STATUS 0 0RISE_OPC_SVC_ISSU 0 0RISE_OPC_SVC_VLAN_GROUP 0 0RISE_OPC_SVC_SYS_INFO 0 0RISE_OPC_SVC_DELETE 0 0RISE_OPC_SVC_BULK 0 0RISE_OPC_CP_SLOT_DOWN 0 0RISE_OPC_SUP_IP_CONFIG 0 0RISE_OPC_RISE_IP_CONFIG 0 0RISE_OPC_SVC_DIRECT_DISCOVERY 0 0RISE_OPC_SVC_DIRECT_BOOTSTRAP_CO 0 0RISE_OPC_SVC_DIRECT_BOOTSTRAP_4_ 0 0RISE_OPC_SVC_DIRECT_PORTS_START 0 0RISE_OPC_SVC_DIRECT_PORTS_END 0 0RISE_OPC_SVC_PURGE 0 0RISE_OPC_SVC_PBR_ENABLE 0 0RISE_OPC_SVC_PBR_DISABLE 0 0-------------------------------- -------- --------
Total: 101175 50587 332 2 10.90.14.216 activePo2051
The following example is partial sample output from the show system internal ISCMmem-stats command:switch# show system internal ISCM mem-statsPrivate Mem stats for UUID : Malloc track Library(103) Max types: 5--------------------------------------------------------------------------------Curr alloc: 1353 Curr alloc bytes: 96546(94k)
Private Mem stats for UUID : Non mtrack users(0) Max types: 130--------------------------------------------------------------------------------Curr alloc: 364 Curr alloc bytes: 39020(38k)
Private Mem stats for UUID : libsdwrap(115) Max types: 22--------------------------------------------------------------------------------Curr alloc: 34 Curr alloc bytes: 1149192(1122k)
...
Cisco Remote Integrated Service Engine for Citrix NetScaler Appliances and Cisco Nexus 7000 Series SwitchesConfiguration Guide
43
Configuring RISEVerifying the ISCM Configuration

The following example is partial sample output from the show system internal ISCM event-historydebugs[detail] command:switch# show system internal ISCM event-history debugs1) Event:E_DEBUG, length:45, at 451405 usecs after Fri Nov 25 00:39:14 2011
[104] ISCM_demux(1198):[FU_EVENT_CAT_MTS_MSG]
2) Event:E_DEBUG, length:49, at 451400 usecs after Fri Nov 25 00:39:14 2011[104] ISCM_demux(1190):[Got a message event cat 1]
3) Event:E_DEBUG, length:49, at 451395 usecs after Fri Nov 25 00:39:14 2011[104] ISCM_demux(1189):[Got a message event cat 1]
The following example is partial sample output from the show system internal ISCM event-history-errorscommand:switch# show system internal ISCM event-history-errors1) Event:E_DEBUG, length:45, at 771310 usecs after Fri Nov 25 00:41:01 2011
[104] ISCM_demux(1198):[FU_EVENT_CAT_MTS_MSG]2) Event:E_DEBUG, length:49, at 771305 usecs after Fri Nov 25 00:41:01 2011
[104] ISCM_demux(1190):[Got a message event cat 1]3) Event:E_DEBUG, length:49, at 771301 usecs after Fri Nov 25 00:41:01 2011
[104] ISCM_demux(1189):[Got a message event cat 1]...
The following example is partial sample output from the show system internal ISCM event-history-allcommand:switch# show system internal ISCM event-history-all1) Event:E_DEBUG, length:45, at 341769 usecs after Tue Nov 29 21:25:32 2011
[104] ISCM_demux(1198):[FU_EVENT_CAT_MTS_MSG]2) Event:E_DEBUG, length:49, at 341764 usecs after Tue Nov 29 21:25:32 2011
[104] ISCM_demux(1190):[Got a message event cat 1]3) Event:E_DEBUG, length:49, at 341759 usecs after Tue Nov 29 21:25:32 2011
[104] ISCM_demux(1189):[Got a message event cat 1]
The following example is partial sample output from the show system internal ISCM event-history warningscommand:switch# show system internal ISCM event-history warnings1) Event:E_DEBUG, length:74, at 760859 usecs after Thu Nov 24 21:19:16 2011
[103] ISCM_restore_pss_data(577):[(Error) 0x40480010 in pss2_move2location]etc…
Monitoring Cisco RISEUse the show rise profile command on the Citrix Netscaler Application Delivery Controller (ADC) applianceto display RISE statistics, as shown in the following example:For vPC mode (direct):
mpx24> show rise profile1) Service Name : mpx24
Status : ActiveMode : vPC-DirectDevice Id : FOC2865R92PSlot Number : 300VDC Id : 1vPC Id : 510SUP IP : 172.16.0.2VLAN : 10VLAN Group : 1ISSU : NoneInterface : LA/1 : 10/3 10/4
Cisco Remote Integrated Service Engine for Citrix NetScaler Appliances and Cisco Nexus 7000 Series SwitchesConfiguration Guide
44
Configuring RISEMonitoring Cisco RISE

For Indirect mode (in vPC, only 1 out of 2 entries shown):
1) Service Name : profile_301Status : ActiveMode : IndirectDevice Id : N77-C7706:FXS1736Q96TSlot Number : 332VDC Id : 2vPC Id : 0SUP IP : 172.16.0.2VLAN : 10VLAN Group : 24ISSU : NoneInterface : N/A
Configuration Examples for RISE
Example: RISE Direct Mode DeploymentThis example shows how to configure a RISE service on a standalone Cisco Nexus Series switch that isconnected directly to a Citrix Netscaler Application Delivery Controller (ADC) appliance.
When the Citrix Netscaler Application Delivery Controller (ADC) appliance is directly connected to astandalone Cisco Nexus Series switch and the RISE control channel is configured on the Cisco NexusSeries switch, the Citrix Netscaler Application Delivery Controller (ADC) appliance is automaticallyconfigured for RISE mode and all of its ports are set to operation mode.
Note
switch# configure terminalswitch(config)# port-channel 300switch(config-if)# switchport trunk allowed vlan 20,30,40switch(config-if)# no shutswitch(config)# ethernet 5/1-2switch(config-if-range)# channel-group 100switch(config)# ethernet 6/1-2switch(config-if-range)# channel-group 100switch(config)# service vlan-group 1 20,30,40switch(config)# feature riseswitch(config)# service type rise name ns21 mode directswitch(config-rise)# vlan 3switch(config-rise)# ip 3.3.3.21 255.0.0.0switch(config-rise)# vlan group 1switch(config-rise)# port-channel 100switch(config-rise)# no shutdown
switch(config-rise)# attach rise slot 300Attaching to RISE 300 ...
Username:nsrootWarning: Permanently added '3.3.3.21' (RSA) to the list of known hosts.Password:Last login: Fri Sep 27 14:58:44 2013 from 10.99.0.15Copyright (c) 1980, 1983, 1986, 1988, 1990, 1991, 1993, 1994
The Regents of the University of California. All rights reserved.
Done
Cisco Remote Integrated Service Engine for Citrix NetScaler Appliances and Cisco Nexus 7000 Series SwitchesConfiguration Guide
45
Configuring RISEConfiguration Examples for RISE

Example: RISE Indirect Mode DeploymentThis example shows how to configure a RISE service on the Cisco Nexus Series switch that is connected toa Citrix Netscaler Application Delivery Controller (ADC) appliance through a Layer 2 network:switch# configure terminalswitch(config)# port-channel 301switch(config-if)# switchportswitch(config-if)# switchport mode trunkswitch(config-if)# switchport allowed vlan 10,20,30,40,50,60switch(config)# ethernet 5/1-2switch(config-if-range)# channel-group 100switch(config-if-range)# no shutdownswitch(config)# ethernet 6/1-2switch(config-if-range)# channel-group 100switch(config-if-range)# no shutdownswitch(config)# service vlan-group 1 20,30,40switch(config)# feature riseswitch(config)# service type rise name ns22 mode indirectswitch(config-rise)# vlan 10switch(config-rise)# ip 3.3.3.22 255.0.0.0switch(config-rise)# vlan group 22switch(config-rise)# no shutdownswitch(config-rise)# show module service
switch(config-rise)# attach rise slot 301rise_ent->rise_ip = 2010101ipaddr 10.10.10.5Attaching to RISE 301 ...To exit type 'exit', to abort type '$.'Telnet rlogin escape character is '$'.Trying 10.10.10.5...Connected to 10.10.10.5.Escape character is '^]'.The following sample output from show commands enables you to verify the configuration:switch(config-rise)# show rise detailRISE module name: ns22State: activeAdmin state: enabledInterface: N/AMode: indirectSlot id: 301Service token: 0x1Serial number: HE2H81UJ47SUP IP: 3.101.0.10RISE IP: 10.10.10.5VDC id: 1VLAN: 10VLAN group: 22VLAN list: 122,221-224,231-234
Example: RISE vPC Direct Mode DeploymentYou configure RISE on the Cisco Nexus switch vPC peer that are indirectly connected to the Citrix NetscalerApplication Delivery Controller (ADC) appliance following the same steps that you use to configure anindirect mode deployment.
The following sample outputs show that the RISE device is active and operational and is connected using thevPC deployment mode:switch# show riseName Slot Vdc Rise-Ip State Interface
Id Id------------- ---- --- --------------- ------------ ---------
Cisco Remote Integrated Service Engine for Citrix NetScaler Appliances and Cisco Nexus 7000 Series SwitchesConfiguration Guide
46
Configuring RISEExample: RISE Indirect Mode Deployment

mpx205a 332 2 10.90.14.216 active Po2051
switch# show rise detail
RISE module name: mpx205aState: activeAdmin state: EnabledInterface: Po2051RISE Channel connectivity via interface Po2051Mode: vpcSlot id: 332 <== unique slot ID for the RISE deviceService token: 0x2Serial number: MH8C02AM50SUP IP: 10.90.14.138RISE IP: 10.90.14.216VDC id: 2VLAN: 99VLAN group: 20VLAN list: 99-101Data Interface: N/A
Related DocumentsDocument TitleRelated Topic
Cisco Nexus Series NX-OS Fundamentals Configuration GuideCommands on the Cisco Nexus Seriesswitch
Cisco Nexus Series NX-OS Security Configuration GuideCoPP
Cisco Nexus Series NX-OS Interfaces Configuration GuideInterfaces and vPCs
Cisco Nexus Series NX-OS Unicast Routing Configuration GuidePolicy-based routing
Cisco Nexus Series NX-OS Virtual Device Context ConfigurationGuide
VDCs
Cisco Nexus Series NX-OSHigh Availability and Redundancy GuideHigh availability and Cisco NexusSeries switches
Feature History for RISEThe following table lists the feature history for this feature.
Table 3: Feature History for RISE
Feature InformationReleaseFeature Name
Added support for direct and indirect connect mode for a serviceappliance that is attached to a virtual port channel (vPC) peerthrough a Layer 2 network.
CiscoNX-OS6.2(8)
RISE vPC
Cisco Remote Integrated Service Engine for Citrix NetScaler Appliances and Cisco Nexus 7000 Series SwitchesConfiguration Guide
47
Configuring RISERelated Documents
Feature InformationReleaseFeature Name
This feature was introduced on the Cisco Nexus 7000 Seriesswitches.
CiscoNX-OS6.2(2a)
RISE
This feature was introduced on the Citrix Netscaler ApplicationDelivery Controller (ADC) appliance
CitrixNetscaler10.1.e
Cisco Remote Integrated Service Engine for Citrix NetScaler Appliances and Cisco Nexus 7000 Series SwitchesConfiguration Guide
48
Configuring RISEFeature History for RISE

C H A P T E R 5Configuring Auto Policy-Based Routing
This chapter describes how to configure the Auto Policy-Based Routing (PBR) feature on the Citrix NetScalerApplication Delivery Controller (ADC) appliance to ensure that return traffic from the real server (RS)reaches the RISE appliance.
This chapter includes the following sections:
• Finding Feature Information, page 49
• Information About Auto Policy-Based Routing, page 49
• Licensing for Cisco RISE , page 52
• Guidelines and Limitations for Auto Policy-Based Routing, page 52
• Default Settings for Auto Policy-Based Routing , page 53
• Configuring Auto Policy-Based Routing, page 53
• Verifying the Auto Policy-Based Routing Configuration, page 60
• Feature History for Auto Policy-Based Routing, page 63
Finding Feature InformationYour software release might not support all the features documented in this module. For the latest caveatsand feature information, see the Bug Search Tool at https://tools.cisco.com/bugsearch/ and the release notesfor your software release. To find information about the features documented in this module, and to see a listof the releases in which each feature is supported, see the “New and Changed Information” chapter or theFeature History table below.
Information About Auto Policy-Based RoutingThis section includes the following topics:
Cisco Remote Integrated Service Engine for Citrix NetScaler Appliances and Cisco Nexus 7000 Series SwitchesConfiguration Guide
49

Auto Policy-Based RoutingPolicy-Based Routing (PBR) allows the creation of policies or rules that can selectively alter the path thatpackets take within the network. PBR can be used to mark packets so that certain types of traffic are prioritizedover the rest, sent to a different destination, or exit through a different physical interface on the router.Classification of interesting traffic is performed using access control lists (ACLs).
PBR rules ensure that return traffic from the real server (RS) reaches the Remote Integrated Service Engine(RISE) appliance. The control channel on the Cisco Nexus Series switch is used to automate the creation ofPBR rules.
After the RISE appliance applies the required configuration, the appliance sends auto PBR (APBR) messagesto the Cisco Nexus switch including a list of servers (IP addresses, ports, and protocol) and the next-hop IPaddress of the appliance.
The Cisco Nexus switch creates the PBR rules for the associated switch virtual interfaces (SVIs). For the localservers, the switch creates the ACLs and route maps.
Use Source IP OptionAuto policy-based routing (APBR) rules are configured on the Cisco Nexus switch by the Citrix NetScalerappliance only if the Use Source IP (USIP) option is enabled in the services or service groups on the CitrixNetScaler appliance. The rules are withdrawn when the USIP option is disabled. The USIP option can beconfigured locally or globally.
Appliance High AvailabilityHigh availability is supported for RISE appliances that share an APBR applied interface. Connect yourappliances and Cisco Nexus switches using one of the following topologies to enable high availability:
Cisco Remote Integrated Service Engine for Citrix NetScaler Appliances and Cisco Nexus 7000 Series SwitchesConfiguration Guide
50
Configuring Auto Policy-Based RoutingAuto Policy-Based Routing

• Two appliances that are each connected to a different virtual device context (VDC) in the same CiscoNexus Series switch.
Figure 10: Two Appliances, Two VDCs, One Switch
• Each appliance is connected to a different Cisco Nexus switch and each switch is in virtual port channel(vPC) mode through a peer link.
Figure 11: Two Appliances, Two vPC Peer Switches
Cisco Remote Integrated Service Engine for Citrix NetScaler Appliances and Cisco Nexus 7000 Series SwitchesConfiguration Guide
51
Configuring Auto Policy-Based RoutingAppliance High Availability

• Two appliances are each connected to a different VDC in the same Cisco Nexus Series switch.
In each of the preceding topologies, one appliance is active and the other is in standby. Each connection actsas a separate service and is unaware of the other service. Each appliance sends APBR rules to the service ineach VDC or in each switch, depending upon the topology. Each service sends the appropriate response tothe appliance to which it is connected.
When a failover occurs, the standby appliance becomes the new active appliance. The old active appliancesends a PURGE message to the service. After the APBR purge is complete and the old active appliancereceives a response, the appliance sends fresh APBR rules. Sending fresh rules ensures that the staleconfiguration does not remain on the old active appliance
Licensing for Cisco RISEThe following table shows the licensing requirements for this feature:
License RequirementsProduct
The Cisco Remote Integrated Services Engine (RISE) requires the Enhanced Layer 2 Packageon the Cisco Nexus 7000 Series switch. For a complete explanation of the Cisco NX-OSlicensing scheme and how to obtain and apply licenses, see the Cisco NX-OS Licensing Guide.
CiscoNX-OS
The Cisco Remote Integrated Services Engine (RISE) does not require a license on the CitrixNetScaler Application Delivery Controller (ADC) appliance for auto-attach.
Advanced features, such as auto policy-based routing (APBR), require the NetScaler Platinumor Enterprise license on the Citrix NetScaler Application Delivery Controller (ADC) appliance.
To display the license status, use the show license command in the NetScaler command lineinterface
CitrixCitrixNetscalerApplicationDeliveryController(ADC)operationsystem
Guidelines and Limitations for Auto Policy-Based RoutingAuto policy-based routing (APBR) has the following guidelines and limitations:
• The globally configured Use Source IP (USIP) takes precedence only when the user does not specify alocal choice for the USIP option.
• If the USIP option is set on a service or service group by way of inheritance at the time you create eitherthe service or group, the option is sticky on that service or group.
• If you modify a global property, such as USIP, after you create a service or service group, the globalmodification does not apply to either the service or group. However, you can modify a service or grouplocally by using the set commands.
• One RS cannot be connected through multiple VLAN interfaces. However, one or more RSs can beconnected through the same interface on the Cisco Nexus device to which the APBR policy is applied.
• Multiple next-hop IP addresses for the same RS are not supported in RISE
Cisco Remote Integrated Service Engine for Citrix NetScaler Appliances and Cisco Nexus 7000 Series SwitchesConfiguration Guide
52
Configuring Auto Policy-Based RoutingLicensing for Cisco RISE
• RISE does not support multiple services with the same RS IP address and port protocol. The onlyexception is as follows: Two identical services (with different service names) can be on the active andstandby RISE-enabled appliance, pointing to the same APBR configuration.
• The virtual routing and forwarding (VRF) instance of the route to the RS must be the same as for theclient VLAN switch virtual interface (SVI) to which the virtual IP (VIP) address is associated. The VRFdoes not need to be the default VRF.
•We do not recommend that you make any route changes on the egress interface to the RS. If you domake changes, see the troubleshooting information at http://support.citrix.com/proddocs/topic/netscaler/ns-gen-netscaler-wrapper-con.html.
• Equal Cost Multipath (ECMP) is not supported.
Default Settings for Auto Policy-Based RoutingThe following table lists the default settings for the Use Source IP (USIP) option on the Citrix NetScalerApplication Delivery Controller (ADC) appliance:
Table 4: Default APBR Parameters on the Citrix NetScaler Application Delivery Controller (ADC) Appliance
DefaultParameter
DisabledUSIP
Configuring Auto Policy-Based RoutingThis section includes the following topics:
Enabling the RISE Feature and NS ModesTo manually enable the RISE feature and any RISE_APBR NS modes for publishing APBR rules, type thefollowing commands at the command prompt:
Step 1 (Optional) > enable feature RISEThis step is only required if you did not enable RISE when you configured Cisco RISE with Citrix Netscaler. See the“Configuring Rise” chapter.Enables the RISE feature on the appliance.
Step 2 > enable ns mode RISE_APBREnables the modes of type RISE_APBR on the Citrix Netscaler.
Cisco Remote Integrated Service Engine for Citrix NetScaler Appliances and Cisco Nexus 7000 Series SwitchesConfiguration Guide
53
Configuring Auto Policy-Based RoutingDefault Settings for Auto Policy-Based Routing

Enabling APBR on the Cisco Nexus SwitchYoumust enable the policy-based routing feature on the Cisco Nexus Series switch to support auto policy-basedrouting (APBR). The Citrix Netscaler Application Delivery Controller (ADC) appliance automatically addsthe appropriate rules to the Cisco Nexus switch for APBR.
Before You Begin
Make sure that you are in the correct VDC on the Cisco Nexus switch. To switch VDCs, use the switchtovdc command.
DETAILED STEPS
PurposeCommand or Action
Enters global configuration modeswitch# config termStep 1
Enables policy-based routing (PBR) on the Cisco Nexus Seriesswitch.
switch(config)# feature pbrStep 2
Exits the global configuration mode.switch(config)# exitStep 3
Configuring APBR on the Citrix NetScaler Application Delivery Controller(ADC) Appliance
This section includes the following topics:
Configuring NSIP on the ApplianceThe NetScaler management IP address (NSIP) is the IP address for management and general system accessto the Citrix NetScaler Application Delivery Controller (ADC) appliance and for high availability (HA)communication.
Configuring NSIP Using the CLI
You can configure the NSIP on your appliance by using either the configuration prompts or the command-lineinterface (CLI).
To prevent an attacker from impeding your ability to send packets to the appliance, choose a nonroutableIP address on your organization's LAN as your appliance IP address.
Note
Cisco Remote Integrated Service Engine for Citrix NetScaler Appliances and Cisco Nexus 7000 Series SwitchesConfiguration Guide
54
Configuring Auto Policy-Based RoutingEnabling APBR on the Cisco Nexus Switch

Before You Begin
Ensure that a port channel is configured on the appliance and that the appliance's physical ports are mappedto this port channel.
Perform one of the following tasks:DescriptionOption
Displays prompts for configuring the NSIP.config ns
Configures the NSIP using the CLI.set ns config -ipaddress address -netmask netmask
add ns ip ip-address netmask -type type
add route network netmask gateway
save ns config
reboot
Example:The following example shows how to configure the NSIP using the CLI:set ns config -ipaddress 10.102.29.60 -netmask 255.255.255.0add ns ip 10.102.29.61 255.255.255.0 -type snipadd route 0.0.0.0 0.0.0.0 10.102.29.1save ns
Configuring NSIP Using the Configuration Utility
Before You Begin
• Create a port channel on the Citrix NetScaler Application Delivery Controller (ADC) appliance andmapits physical ports to this port channel.
Step 1 Navigate to System > Settings.Step 2 In the details pane, under Settings, click Change NSIP Settings.Step 3 In the Configure NSIP Settings dialog box, set the parameters. For a description of a parameter, hover the mouse cursor
over the corresponding field.Step 4 Under Interfaces, choose the interfaces from the Available Interfaces list and click Add to move them to the Configured
Interfaces list.Step 5 Click OK. In the Warning dialog box, click OK. The configuration takes effect after the Citrix NetScaler Application
Delivery Controller (ADC) appliance is restarted.
Cisco Remote Integrated Service Engine for Citrix NetScaler Appliances and Cisco Nexus 7000 Series SwitchesConfiguration Guide
55
Configuring Auto Policy-Based RoutingConfiguring APBR on the Citrix NetScaler Application Delivery Controller (ADC) Appliance

Configuring a NSVLAN on Citrix NetScaler Application Delivery Controller (ADC) ApplianceThe NSVLAN is a VLAN to which the NetScaler management IP (NSIP) address's subnet is bound. The NSIPsubnet is available only on interfaces that are associated with NSVLAN. By default, NSVLAN is VLAN1,but you can designate a different VLAN as NSVLAN. If you designate a different VLAN as an NSVLAN,you must reboot the Citrix NetScaler Application Delivery Controller (ADC) appliance for the change to takeeffect. After the reboot, NSIP subnet traffic is restricted to the new NSVLAN.
Perform only one of the following tasks:
Configuring NSVLAN Using the CLI
Enter the following commands prompt to configure NSVLAN using the CLI:
Before You Begin
• Create a port channel on the Citrix NetScaler Application Delivery Controller (ADC) appliance andmapits physical ports to this port channel.
• Configure the NS IP address (NSIP) on the appliance.
Step 1 set ns config - nsvlan positive_integer - ifnum interface_name ... [-tagged (YES | NO)]Youmust reboot the appliance for the configuration to take effect.Note
Step 2 (Optional) show ns configset ns config -nsvlan 300 -ifnum 1/1 1/2 1/3 -tagged NOsave config
Step 3 (Optional) unset ns config -nsvlanRestores the default configuration.
Configuring NSVLAN Using the Configuration Utility
Before You Begin
• Create a port channel on the Citrix NetScaler Application Delivery Controller (ADC) appliance andmapits physical ports to this port channel.
Cisco Remote Integrated Service Engine for Citrix NetScaler Appliances and Cisco Nexus 7000 Series SwitchesConfiguration Guide
56
Configuring Auto Policy-Based RoutingConfiguring APBR on the Citrix NetScaler Application Delivery Controller (ADC) Appliance

• Configure the NetScaler IP address (NSIP) on the appliance.
Step 1 Navigate to System > Settings.Step 2 In the details pane, under Settings, click Change NSVLAN Settings.Step 3 In the Configure NSVLAN Settings dialog box, set the parameters. For a description of a parameter, hover the mouse
cursor over the corresponding field.Step 4 Under Interfaces, choose the interfaces from the Available Interfaces list and click Add to move them to the Configured
Interfaces list.Step 5 Click OK. In the Warning dialog box, click OK. The configuration takes effect after the Citrix NetScaler Application
Delivery Controller (ADC) appliance is restarted.
Enabling the USIP OptionAPBR rules are configured on the Cisco Nexus Series switch by the Citrix Netscaler Application DeliveryController (ADC) appliance when the Use Source IP (USIP) option is enabled. Perform only one of thefollowing tasks to enable the USIP option on the Citrix Netscaler Application Delivery Controller (ADC)appliance:
Enabling the USIP Option for a Service
To create a service and enable and set the Use Source IP (USIP) option on that service, type the followingcommands at the command prompt:
Before You Begin
Ensure that the NSIP and NSVLAN are configured on the Citrix Netscaler Application Delivery Controller(ADC) appliance.
Step 1 Use one of the following commands:DescriptionOption
Creates a service and enables the USIP option. The RISE appliance sends theserver address, port, protocol, and the IP address of the next-hop interface andthe VLAN to the Cisco Nexus switch.
The protocol-type argument specifies a supported protocol including but notlimited to the following keywords: dns, http, ssl, tcp, or udp.
IPv6 addresses are notsupported.
Note
add service service_name ipaddressprotocol-type port_number [-usip[yes | no]
Enables the USIP option on a previously configured service.
This command is not required if you previously configured the specifiedservice using the add service command with the -usip keyword
Note
set service service_name [-usip yes]
Cisco Remote Integrated Service Engine for Citrix NetScaler Appliances and Cisco Nexus 7000 Series SwitchesConfiguration Guide
57
Configuring Auto Policy-Based RoutingConfiguring APBR on the Citrix NetScaler Application Delivery Controller (ADC) Appliance
Example:The following example shows how to create a service named svc12 and enable the USIP option on the service:> add service svc12 192.168.12.23 http 80 -usip YES
Example:The following example shows how to change a previously created service (svc12) to enable APBR:> set service svc12 -usip YES
Step 2 (Optional) unset service service-nameDisables disable the USIP option on an already configured service and deletes the corresponding APBR route on theCisco Nexus device
Example:The following example shows how to disable the USIP option on the service and delete the corresponding APBR routeon the Cisco Nexus device:unset service svc12
Enabling the USIP Option for a Service Group
To create a service group and enable the Use Source IP (USIP) option on that group, enter the followingcommands at the command prompt:
Before You Begin
Ensure that the NSIP and NSVLAN are configured on the Citrix Netscaler Application Delivery Controller(ADC) appliance.
Step 1 > add serviceGroup service_name protocol-type port_number [-usip [yes | no]Creates a service group and enables the USIP option. The RISE appliance sends multiple APBR messages to the CiscoNexus device.
The protocol-type argument specifies a supported protocol including but not limited to the following keywords: dns,http, ssl, tcp, or udp.
IPv6 addresses are notsupported.
Note
Example:The following example shows how to create a service named svc12 and enable the USIP option on the service:> add serviceGroup svc_grp_1 http 80 -usip YES
Step 2 > bind serviceGroup service_group_name ipaddress port_numberAssociates an IP address and port to the service group being configured. Repeat this step for each member IP addressand port.
IPv6 addresses are notsupported.
Note
Cisco Remote Integrated Service Engine for Citrix NetScaler Appliances and Cisco Nexus 7000 Series SwitchesConfiguration Guide
58
Configuring Auto Policy-Based RoutingConfiguring APBR on the Citrix NetScaler Application Delivery Controller (ADC) Appliance
Example:The following example shows how to associate three IP addresses and ports to the group being configured.> bind serviceGroup svc_grp_1 192.168.14.12 80> bind serviceGroup svc_grp_1 192.168.14.13 80> bind serviceGroup svc_grp_1 192.168.14.14 80
Step 3 > set serviceGroup service_name [-usip [yes]Sets the specified service and enables the USIP option.
The -usip keyword is not required on each service if you use the add serviceGroup command with the -usipkeyword.
Note
Example:> set serviceGroup svc_grp_1The following example shows how to disable the USIP option on all members of a service group and delete thecorresponding APBR rules on the Cisco Nexus device:unset serviceGroup svc_grp_1
Enabling the USIP Option Globally
To globally enable Use Source IP (USIP) on the Citrix Netscaler Application Delivery Controller (ADC)appliance and set the USIP option on all services and service groups, enter the following command at thecommand prompt
SUMMARY STEPS
1. > enable ns mode usip
DETAILED STEPS
> enable ns mode usipEnables USIP on the Netscaler Application Delivery Controller (ADC) appliance. All subsequent added services areAPBR services.
Example:The following example shows how to enable USIP on the Citrix Netscaler Application Delivery Controller (ADC)appliance and then create a service for which the USIP option is set because the setting is inherited from the globalconfiguration:> enable ns mode USIPDone> add service svc_gl 192.168.12.72 http 80Done
Cisco Remote Integrated Service Engine for Citrix NetScaler Appliances and Cisco Nexus 7000 Series SwitchesConfiguration Guide
59
Configuring Auto Policy-Based RoutingConfiguring APBR on the Citrix NetScaler Application Delivery Controller (ADC) Appliance
Verifying the Auto Policy-Based Routing ConfigurationTo display the auto policy-based routing (APBR) configuration on the Citrix NetScaler Application DeliveryController (ADC) appliance, perform one of the following tasks on appliance:
PurposeCommand
Displays information about the APBR service.show apbrSvc service
Displays information about the APBR service.show apbrSvc -summary [detail]
Displays information about the license that is loadedon the Citrix NetScaler Application DeliveryController (ADC) appliance.
show license
Displays the RISE running configuration on the CiscoNexus Series switch.
show rise apbrSvc
Displays information about service profile.show rise profile
Displays information about the specified service.show service service-name
The following example is sample output from the show apbrSvc command on the Citrix Netscaler ApplicationDelivery Controller (ADC) appliance. The same information is displayed by using the show rise apbrsvccommand.> show apbrSvc
1) Entity Name : s1Entity Type : ServiceServer IP : 192.168.15.252Server Port : 80Protocol : HTTPNexthop IP : 192.168.4.100VLAN : 4
2) Entity Name : s2Entity Type : ServiceServer IP : 192.168.15.253Server Port : 80Protocol : HTTPNexthop IP : 192.168.4.100VLAN : 4
3) Entity Name : s3Entity Type : ServiceServer IP : 192.168.15.254Server Port : 80Protocol : HTTPNexthop IP : 192.168.4.100VLAN : 4
4) Entity Name : sg2Entity Type : ServiceGroupServer IP : 192.168.13.202Server Port : 101Protocol : HTTPNexthop IP : 192.168.4.100VLAN : 4
5) Entity Name : sg2Entity Type : ServiceGroupServer IP : 192.168.13.202Server Port : 102
Cisco Remote Integrated Service Engine for Citrix NetScaler Appliances and Cisco Nexus 7000 Series SwitchesConfiguration Guide
60
Configuring Auto Policy-Based RoutingVerifying the Auto Policy-Based Routing Configuration

Protocol : HTTPNexthop IP : 192.168.4.100VLAN : 4
Done
The following example is sample output from the show rise apbrsvc-summary command:> show rise apbrSvc -summary----------------------------------------------------------------------------
EntityName IPAddress Port Protocol NexthopIP VLAN----------------------------------------------------------------------------1 s1 192.168.15.252 80 HTTP 192.168.4.100 42 s2 192.168.15.253 80 HTTP 192.168.4.100 43 s3 192.168.15.254 80 HTTP 192.168.4.100 44 sg2 192.168.13.202 101 HTTP 192.168.4.100 45 sg2 192.168.13.202 102 HTTP 192.168.4.100 4Done
The following example is sample output from the show service command. This example shows that UseSource IP (USIP) is enabled on the service and that the APBR rules have been added to the service.
The following status messages for the APBR RISE code can be displayed in the output for this command:Note
• APBR rule successfully Added—The APBR rule was added on the Cisco Nexus device.
• APBR rule successfully Deleted—The APBR rule was deleted on the Cisco Nexus device.
• APBR rule fixed by Admin—The admin has fixed the discrepancy on the Cisco Nexus device.
• APBR rule not configured due to Timeout—The APBR rule was not configured even after retries.
• APBR rule not configured due to Lack of Memory—The APBR rule was not configured becausethere is not enough memory on the Netscaler appliance.
• APBR rule dispatch pending—The APBR rule is pending because it is waiting to be dispatched orit is waiting confirmation from the Cisco Nexus device.
> show service svc_grp_1
s1 (192.168.15.252:80) - HTTPState: DOWNLast state change was at Thu Apr 3 13:04:15 2014Time since last state change: 0 days, 00:00:28.850Server Name: 192.168.15.252Server ID : None Monitor Threshold : 0Max Conn: 0Max Req: 0 Max Bandwidth: 0 kbitsUse Source IP: YES <===Use Proxy Port: NOClient Keepalive(CKA): YESAccess Down Service: NOTCP Buffering(TCPB): YESHTTP Compression(CMP): YESIdle timeout: Client: 180 secServer: 360 secClient IP: DISABLEDCacheable: NOSC: OFFSP: OFFDown state flush: ENABLEDAppflow logging: ENABLEDTD: 0RISE CODE: APBR rule successfully Added <===...Done
Cisco Remote Integrated Service Engine for Citrix NetScaler Appliances and Cisco Nexus 7000 Series SwitchesConfiguration Guide
61
Configuring Auto Policy-Based RoutingVerifying the Auto Policy-Based Routing Configuration

The following example is sample partial output from the show rise profile command:> show rise profile
1) Service Name : NS-riseStatus : ActiveMode : IndirectDevice Id : JAF1429CJLBSlot Number : 300VDC Id : 1vPC Id : 0SUP IP : 173.173.1.1VLAN : 3VLAN Group : 1ISSU : NoneInterface : N/A
To display the auto policy-based routing (APBR) configuration on the Cisco Nexus Series switch and verifythat the APBR policy was added, perform one of the following tasks on the switch:
PurposeCommand
Displays information about the APBR service.show access list dynamic
Displays information about the APBR service.show rise [detail]
Displays information about the license that is loadedon the Citrix Netscaler appliance.
show route-map
Displays the RISE running configuration on the CiscoNexus Series switch.
show service rise auto-pbr ipv4 slot slot
The following example displays dynamic access list matching the Real Server IP addresses:switch# show access-lists dynamic
Example correct output:
IPV4 ACL _rise-system-acl-172.16.10.5-Vlan101010 permit tcp 10.10.10.11/32 eq 80 any20 permit tcp 10.10.10.12/32 eq 80 any
IPV4 ACL _rise-system-acl-172.16.11.5-Vlan101110 permit tcp 10.10.11.11/32 eq 50000 any
The following example is sample output from the show rise command:switch# show rise
Name Slot Vdc Rise-Ip State InterfaceId Id
--------------- ---- --- --------------- ------------ ---------MPX 300 1 10.175.1.11 active Po10Emu 301 1 100.0.1.4 active N/AVPX 302 1 100.0.1.6 active N/A
APBR Configuration <===rs ip rs port protocol nhop ip rs nhop apbr state slot-id--------------- ------- -------- --------------- -------- ---------- -------100.0.1.1 33275 TCP 100.0.1.2 Vlan100 ADD FAIL 301100.0.1.3 64301 TCP 100.0.1.4 Vlan100 ADD DONE 301100.0.1.5 21743 TCP 100.0.1.6 Vlan100 ADD DONE 301
The following partial output from the show rise detail command includes all of the APBR entries that wereautomatically added to the Cisco Nexus Series switch:switch# show rise detail
RISE module name: MPX
Cisco Remote Integrated Service Engine for Citrix NetScaler Appliances and Cisco Nexus 7000 Series SwitchesConfiguration Guide
62
Configuring Auto Policy-Based RoutingVerifying the Auto Policy-Based Routing Configuration

State: activeAdmin state: enabledInterface: Po10Mode: directSlot id: 300Service token: 0x6Serial number: AJSFH28FUFSUP IP: 10.175.1.99RISE IP: 10.175.1.11VDC id: 1VLAN: 175VLAN group: N/AVLAN list: N/AData Interface: N/A
RISE module name: EmuState: activeAdmin state: enabledInterface: N/AMode: indirectSlot id: 301Service token: 0x7Serial number: 123-SERIALSUP IP: 100.0.1.1RISE IP: 100.0.1.4VDC id: 1VLAN: 100VLAN group: N/AVLAN list: N/AData Interface: N/A
RISE module name: VPXState: activeAdmin state: enabledInterface: N/AMode: indirectSlot id: 302Service token: 0x8Serial number: HE2H81UJ47SUP IP: 100.0.1.1RISE IP: 100.0.1.6VDC id: 1VLAN: 100VLAN group: N/AVLAN list: N/AData Interface: N/A
APBR Configurationrs ip rs port protocol nhop ip rs nhop apbr state slot-id--------------- ------- -------- --------------- -------- ---------- -------100.0.1.1 33275 TCP 100.0.1.2 Vlan100 ADD FAIL 301100.0.1.3 64301 TCP 100.0.1.4 Vlan100 ADD DONE 301100.0.1.5 21743 TCP 100.0.1.6 Vlan100 ADD DONE 301
The following partial output from the show service rise auto-pbr command lists all APBR entries on theCisco Nexus Series switch:switch# show service rise ipv4 auto-pbr slot 301
APBR routes added by slot 301rs ip port protocol nhop ip rs nexthop inf--------------- ------ -------- --------------- --------------100.0.1.1 33275 TCP 100.0.1.2 Vlan100100.0.1.3 64301 TCP 100.0.1.4 Vlan100100.0.1.5 21743 TCP 100.0.1.6 Vlan100
Feature History for Auto Policy-Based RoutingThe following table lists the feature history for this feature.
Cisco Remote Integrated Service Engine for Citrix NetScaler Appliances and Cisco Nexus 7000 Series SwitchesConfiguration Guide
63
Configuring Auto Policy-Based RoutingFeature History for Auto Policy-Based Routing

Table 5: Feature History for APBR
Feature InformationReleaseFeature Name
Support for this feature was introduced on the Cisco Nexus 7000Series switches.
CiscoNX-OS6.2(8)
Auto policy-based routing(APBR)
Appliance high availability
APBR on vPC
Cisco Remote Integrated Service Engine for Citrix NetScaler Appliances and Cisco Nexus 7000 Series SwitchesConfiguration Guide
64
Configuring Auto Policy-Based RoutingFeature History for Auto Policy-Based Routing
C H A P T E R 6Troubleshooting RISE Integration
This chapter describes how to troubleshoot the Remote Integrated Service Engine (RISE) feature on theCisco Nexus Series switches and the Cisco NetScaler Application Delivery Controller (ADC) appliance.The Cisco NX-OS software supports the Cisco Nexus Series switch. You can find detailed information aboutsupported hardware in the Cisco Nexus Series Hardware Installation and Reference Guide.
This chapter includes the following sections:
• Finding Feature Information, page 65
• Troubleshooting the RISE Integration, page 65
Finding Feature InformationYour software release might not support all the features documented in this module. For the latest caveatsand feature information, see the Bug Search Tool at https://tools.cisco.com/bugsearch/ and the release notesfor your software release. To find information about the features documented in this module, and to see a listof the releases in which each feature is supported, see the “New and Changed Information” chapter.
Troubleshooting the RISE IntegrationThis chapter includes the following topics:
Interpreting System MessagesFor information on error and system messages for the Cisco Nexus Series switch, see the Cisco MDS 9000Family and Nexus 5000 Series NX-OS System Messages Reference.
For information on systemmessages for the Citrix NetScaler Application Delivery Controller (ADC) appliance,see the Citrix eDocs, Log Message Reference.
To access Citrix eDocs, see the Citrix eDocs listing page for NetScaler 10.1 at http://support.citrix.com/proddocs/topic/netscaler/ns-gen-netscaler10-1-wrapper-con.html.
Note
Cisco Remote Integrated Service Engine for Citrix NetScaler Appliances and Cisco Nexus 7000 Series SwitchesConfiguration Guide
65
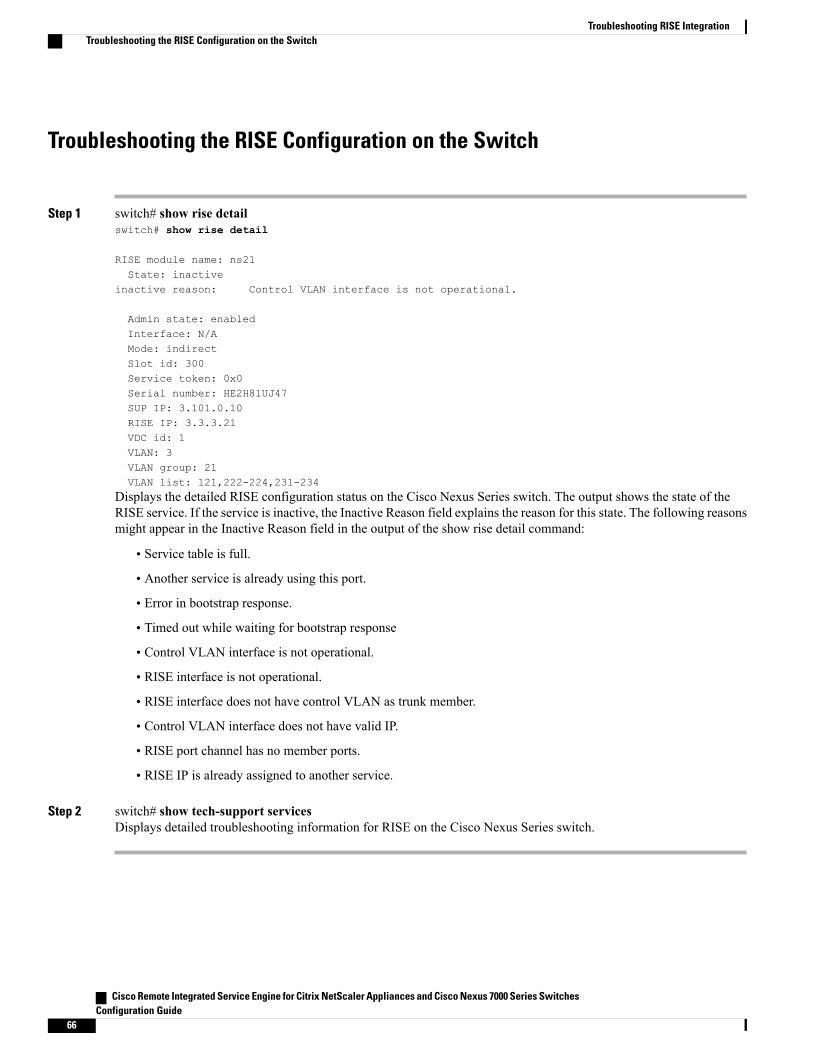
Troubleshooting the RISE Configuration on the Switch
Step 1 switch# show rise detailswitch# show rise detail
RISE module name: ns21State: inactive
inactive reason: Control VLAN interface is not operational.
Admin state: enabledInterface: N/AMode: indirectSlot id: 300Service token: 0x0Serial number: HE2H81UJ47SUP IP: 3.101.0.10RISE IP: 3.3.3.21VDC id: 1VLAN: 3VLAN group: 21VLAN list: 121,222-224,231-234
Displays the detailed RISE configuration status on the Cisco Nexus Series switch. The output shows the state of theRISE service. If the service is inactive, the Inactive Reason field explains the reason for this state. The following reasonsmight appear in the Inactive Reason field in the output of the show rise detail command:
• Service table is full.
• Another service is already using this port.
• Error in bootstrap response.
• Timed out while waiting for bootstrap response
• Control VLAN interface is not operational.
• RISE interface is not operational.
• RISE interface does not have control VLAN as trunk member.
• Control VLAN interface does not have valid IP.
• RISE port channel has no member ports.
• RISE IP is already assigned to another service.
Step 2 switch# show tech-support servicesDisplays detailed troubleshooting information for RISE on the Cisco Nexus Series switch.
Cisco Remote Integrated Service Engine for Citrix NetScaler Appliances and Cisco Nexus 7000 Series SwitchesConfiguration Guide
66
Troubleshooting RISE IntegrationTroubleshooting the RISE Configuration on the Switch

Troubleshooting the RISE Service on the Appliance
At the Citrix Netscaler Application Delivery Controller (ADC) CLI, enter the show rise profile command.Displays RISE configuration status on the Citrix NetScaler Application Delivery Controller (ADC) appliance.
The output shows the state of the RISE service. The status field informs you whether the service is Inactive or Active.If the service is Inactive, it means that the RISE channel was not established or is no longer connected.
RISE-mpx> show rise profile
1) ProfileName: profile_331 IPAddress: 3.101.0.10Mode: Direct Status: ActiveVdcId: 1 SlotNumber: 331Vlan: 3 VlanGroupId: 25Ifnum: LA/1
Done
Cisco Remote Integrated Service Engine for Citrix NetScaler Appliances and Cisco Nexus 7000 Series SwitchesConfiguration Guide
67
Troubleshooting RISE IntegrationTroubleshooting the RISE Service on the Appliance

Cisco Remote Integrated Service Engine for Citrix NetScaler Appliances and Cisco Nexus 7000 Series SwitchesConfiguration Guide
68
Troubleshooting RISE IntegrationTroubleshooting the RISE Service on the Appliance