Session Recording 2106 - Citrix Product Documentation
296
Session Recording 2106 Citrix Product Documentation | docs.citrix.com May 26, 2022
-
Upload
khangminh22 -
Category
Documents
-
view
1 -
download
0
Transcript of Session Recording 2106 - Citrix Product Documentation
Session Recording 2106
Citrix Product Documentation | docs.citrix.com May 26, 2022
Session Recording 2106
Contents
What’s new 3
Fixed issues 5
Known issues 6
Third party notices 6
System requirements 7
Get started 9
Plan your deployment 11
Security recommendations 14
Scalability considerations 19
Install, upgrade, and uninstall 31
Dynamic session recording 78
Configure 84
Configure the connection to the Session Recording Server 84
Authorize users 86
Configure policies 87
Specify where recordings are stored 120
Specify file size for recordings 125
Customize notificationmessages 128
Enable or disable recording 128
Enable or disable digital signing 130
Administrator Logging 130
Database high availability 133
Load balancing 134
© 1999‒2022 Citrix Systems, Inc. All rights reserved. 2
Session Recording 2106
Change your communication protocol 137
Configure Citrix Customer Experience Improvement Program (CEIP) 139
Log events 143
View recordings 156
Launch the Session Recording Player 157
Enable or disable live session playback and playback protection 160
Open and play recordings 161
Highlight idle periods 168
Cache recordings 168
Use events and bookmarks 169
Search for recordings 171
Session Recording web player 173
Troubleshoot 194
Installation of Server components fails 194
Test connection to the Database fails during install 195
Agent cannot connect to the Server 195
Server cannot connect to the Database 197
Sessions are not recording 198
Unable to view live session playback 198
Recordings are corrupted or incomplete 199
Verify component connections 199
Search for recordings using the Player fails 202
Manage your database records 205
Best practices 210
© 1999‒2022 Citrix Systems, Inc. All rights reserved. 3
Session Recording 2106
Configure load balancing in an existing deployment 211
Deploy and load-balance Session Recording in Azure 259
© 1999‒2022 Citrix Systems, Inc. All rights reserved. 4
Session Recording 2106
What’s new
September 29, 2021
What’s new in 2106
This release includes the following new features and enhancements:
Windows Server 2022 support
Components, features, and technologies that support Windows Server operating systems now alsosupport Windows Server 2022, unless noted otherwise. For more information, see Windows Server2022 support.
Monitor file transfers
We have extended the scope of event logging to monitor file transfers between session hosts (VDAs)and client devices (including mapped client drives and generic redirected mass storage devices). Se-lecting the Log sensitive file events option for an event logging policy triggers the logging of filetransfers, no matter whether or not you specify the File monitoring list. This enhanced feature re-quires Windows VDA 2106 or later. For more information, see Configure policies.
Record events only
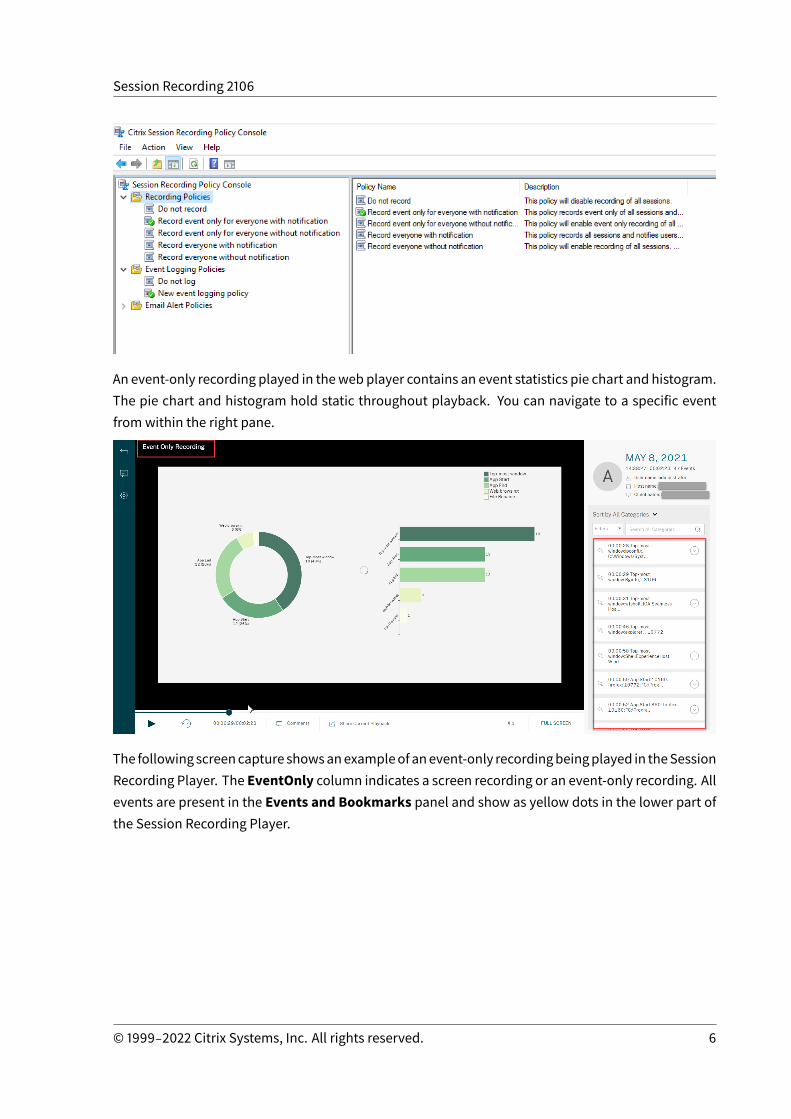
In addition to recording screens, you can now record only specific events. This feature helps to freeup storage space. To use this feature, activate either of the following new system-defined policies andthen set an event logging policy to specify which events to record.
• Record event only for everyone with notification• Record event only for everyone without notification
© 1999‒2022 Citrix Systems, Inc. All rights reserved. 5
Session Recording 2106
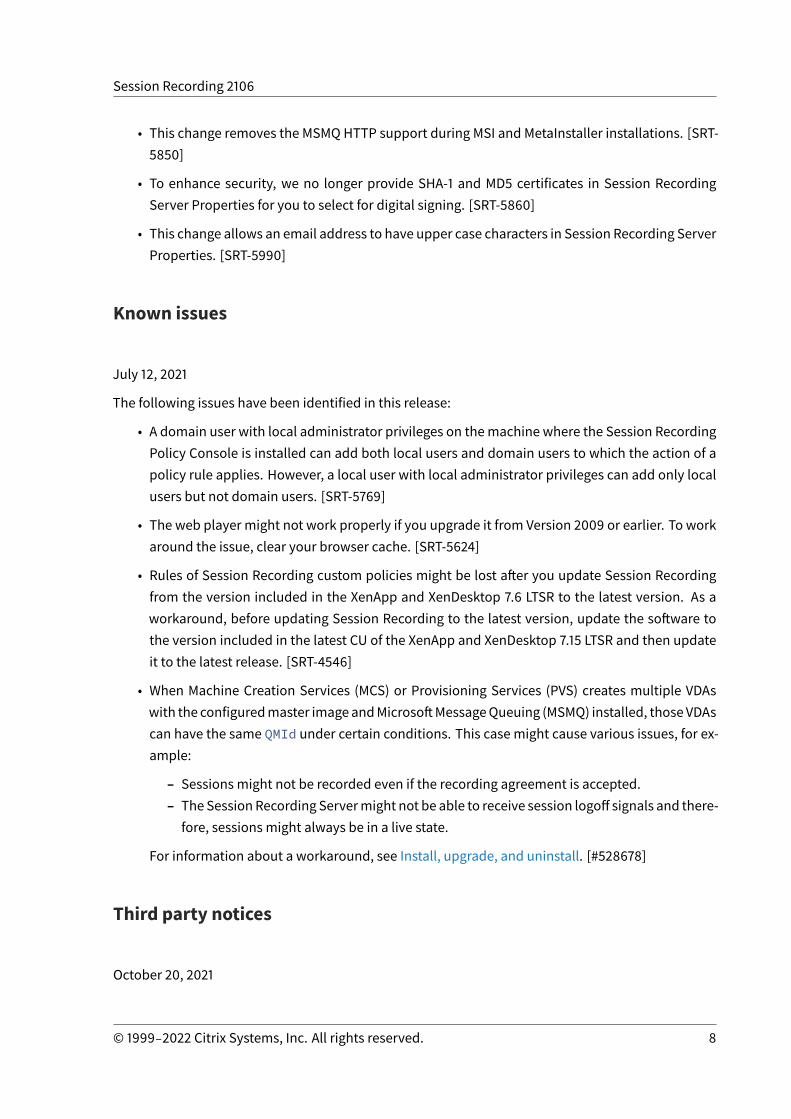
An event-only recording played in theweb player contains an event statistics pie chart and histogram.The pie chart and histogram hold static throughout playback. You can navigate to a specific eventfromwithin the right pane.
The followingscreencapture showsanexampleof anevent-only recordingbeingplayed in theSessionRecording Player. The EventOnly column indicates a screen recording or an event-only recording. Allevents are present in the Events and Bookmarks panel and show as yellow dots in the lower part ofthe Session Recording Player.
© 1999‒2022 Citrix Systems, Inc. All rights reserved. 6

Session Recording 2106
For more information, see Configure policies.
Fixed issues
January 8, 2022
Compared with: Session Recording 2104
Session Recording 2106 adds the following fixes:
• An error occurs if you select and apply a Cryptography: Next Generation (CNG) certifi-cate of the Microsoft Software Key Storage Provider for digitally signing recorded session files.[SRT-5926]
• Some applications for which event logging policies are enabled might become unresponsive.[CVADHELP-17292]
• If theUse video codec for compression policy is set to For entire screen and Visual Quality isset toMedium, a blurred screenmight appear when you use the web player on Microsoft Edge.[SRT-5654]
• When you use the dynamic session recording feature, event logging and email alerts might notwork as expected. [SRT-5750]
© 1999‒2022 Citrix Systems, Inc. All rights reserved. 7
Session Recording 2106
• This change removes the MSMQ HTTP support during MSI and MetaInstaller installations. [SRT-5850]
• To enhance security, we no longer provide SHA-1 and MD5 certificates in Session RecordingServer Properties for you to select for digital signing. [SRT-5860]
• This change allows an email address to have upper case characters in Session Recording ServerProperties. [SRT-5990]
Known issues
July 12, 2021
The following issues have been identified in this release:
• A domain user with local administrator privileges on themachine where the Session RecordingPolicy Console is installed can add both local users and domain users to which the action of apolicy rule applies. However, a local user with local administrator privileges can add only localusers but not domain users. [SRT-5769]
• The web player might not work properly if you upgrade it from Version 2009 or earlier. To workaround the issue, clear your browser cache. [SRT-5624]
• Rules of Session Recording custom policies might be lost after you update Session Recordingfrom the version included in the XenApp and XenDesktop 7.6 LTSR to the latest version. As aworkaround, before updating Session Recording to the latest version, update the software tothe version included in the latest CU of the XenApp and XenDesktop 7.15 LTSR and then updateit to the latest release. [SRT-4546]
• When Machine Creation Services (MCS) or Provisioning Services (PVS) creates multiple VDAswith the configuredmaster imageandMicrosoftMessageQueuing (MSMQ) installed, those VDAscan have the same QMId under certain conditions. This case might cause various issues, for ex-ample:
– Sessions might not be recorded even if the recording agreement is accepted.– The Session Recording Servermight not be able to receive session logoff signals and there-fore, sessions might always be in a live state.
For information about a workaround, see Install, upgrade, and uninstall. [#528678]
Third party notices
October 20, 2021
© 1999‒2022 Citrix Systems, Inc. All rights reserved. 8

Session Recording 2106
Session Recording Version 2106 (PDF Download)
This release of Session Recording can include third party software licensed under the terms definedin this document.
System requirements
September 29, 2021
Session Recording includes the Session Recording Administration components, the Session Record-ing Agent, and the Session Recording Player. You can install the Session Recording Administrationcomponents (Session Recording Database, Session Recording Server, and Session Recording PolicyConsole) on a single server or on different servers. The following section details the requirements foreach of the Session Recording components.
For more information about using this Current Release (CR) in a Long Term Service Release (LTSR)environment and other FAQs, see Knowledge Center article.
Session Recording Database
Supported operating systems:
• Windows Server 2022• Windows Server 2019• Windows Server 2016
Supported Microsoft SQL Server versions:
• Microsoft SQL Server 2019 Enterprise, Express, and Standard editions• Microsoft SQL Server 2017 Enterprise, Express, and Standard editions• Microsoft SQL Server 2016 SP2 Enterprise, Express, and Standard editions• Microsoft SQL Server 2016 SP1 Enterprise, Express, and Standard editions• Microsoft SQL Server 2014 SP2 Enterprise, Express, and Standard editions• Microsoft SQL Server 2012 SP3 Enterprise, Express, and Standard editions• Microsoft SQL Server 2008 R2 SP3 Enterprise, Express, and Standard editions
Supported Azure SQL database services:
• Azure SQL Managed Instance• SQL Server on Azure Virtual Machines (VMs)(Use supported versions of Microsoft SQL Server that are listed earlier.)
Requirement: .NET Framework 4.7.2
© 1999‒2022 Citrix Systems, Inc. All rights reserved. 9

Session Recording 2106
Session Recording Server
Supported operating systems:
• Windows Server 2022• Windows Server 2019• Windows Server 2016
Other requirements:
• Internet Information Services (IIS) 10, 8.5, 8.0, or 7.5• .NET Framework Version 4.7.2• If the Session Recording Server uses HTTPS as its communications protocol, add a valid certifi-cate. Session Recording uses HTTPS by default, which Citrix recommends.
• MicrosoftMessageQueuing (MSMQ),with ActiveDirectory integrationdisabled andMSMQHTTPsupport enabled.
• For Administrator Logging: Latest version of Chrome, Firefox, or Internet Explorer 11
Session Recording Policy Console
Supported operating systems:
• Windows Server 2022• Windows Server 2019• Windows Server 2016
Requirement: .NET Framework 4.7.2
Session Recording Agent
Install the Session Recording Agent on everyWindows Virtual Delivery Agent (VDA) onwhich youwantto record sessions.
Supported operating systems:
• Windows Server 2022• Windows Server 2019• Windows Server 2016• Windows 10, minimum version 1607• Windows 10 Enterprise for Virtual Desktops
Requirements:
• Citrix Virtual Apps and Desktops 7 2106 with Premium license• Citrix Virtual Apps and Desktops 7 1912 LTSR CU3 with Platinum license• XenApp and XenDesktop 7.15 LTSR CU7 with Platinum license
© 1999‒2022 Citrix Systems, Inc. All rights reserved. 10
Session Recording 2106
• .NET Framework 4.7.2• MicrosoftMessageQueuing (MSMQ),with ActiveDirectory integrationdisabled andMSMQHTTPsupport enabled
Session Recording Player
Supported operating systems:
• Windows Server 2022• Windows Server 2019• Windows Server 2016• 64-bit Windows 10, minimum version 1607
Requirement: .NET Framework 4.7.2
Note:
On 32-bit Windows 10, you can install the Player only by using the SessionRecordingPlayer.msifile. The msi file is located on the Citrix Virtual Apps and Desktops ISO under \layout\image-full\x86\Session Recording.
For optimal results, install the Session Recording Player on a workstation with:
• Screen resolution of 1024 x 768• Color depth of at least 32-bit• 2GBRAMminimum;moreRAMandCPU/GPU resources can improveperformancewhenplayinggraphics-intensive recordings, especially when recordings contain many animations
The seek response time depends on the size of the recording and your machine’s hardware specifica-tions.
Get started
July 12, 2021
Session Recording consists of five components:
• Session Recording Agent. A component installed on each VDA for multi-session OS or single-session OS to enable recording. It is responsible for recording session data.
• Session Recording Server. A server that hosts:– The Broker. An IIS 6.0+ hosted Web application that handles the search queries and filedownload requests from the Session Recording Player, handles policy administration re-quests from the Session Recording Policy Console, and evaluates recording policies foreach Citrix Virtual Apps and Desktops session.
© 1999‒2022 Citrix Systems, Inc. All rights reserved. 11
Session Recording 2106
– The StorageManager. AWindows service thatmanages the recorded session files receivedfromeach Session Recording-enabled computer running Citrix Virtual Apps andDesktops.
– Administrator Logging. An optional subcomponent installed with the Session RecordingServer to log the administration activities. All the logging data is stored in a separate SQLServer database named CitrixSessionRecordingLogging by default. You can customizethe database name.
• Session Recording Player. A user interface that users access from a workstation to playrecorded session files.
• Session Recording Database. A component that manages the SQL Server database for stor-ing recorded session data. When this component is installed, it creates a database named Cit-rixSessionRecording by default. You can customize the database name.
• Session Recording Policy Console. A console used to create policies to specify which sessionsare recorded.
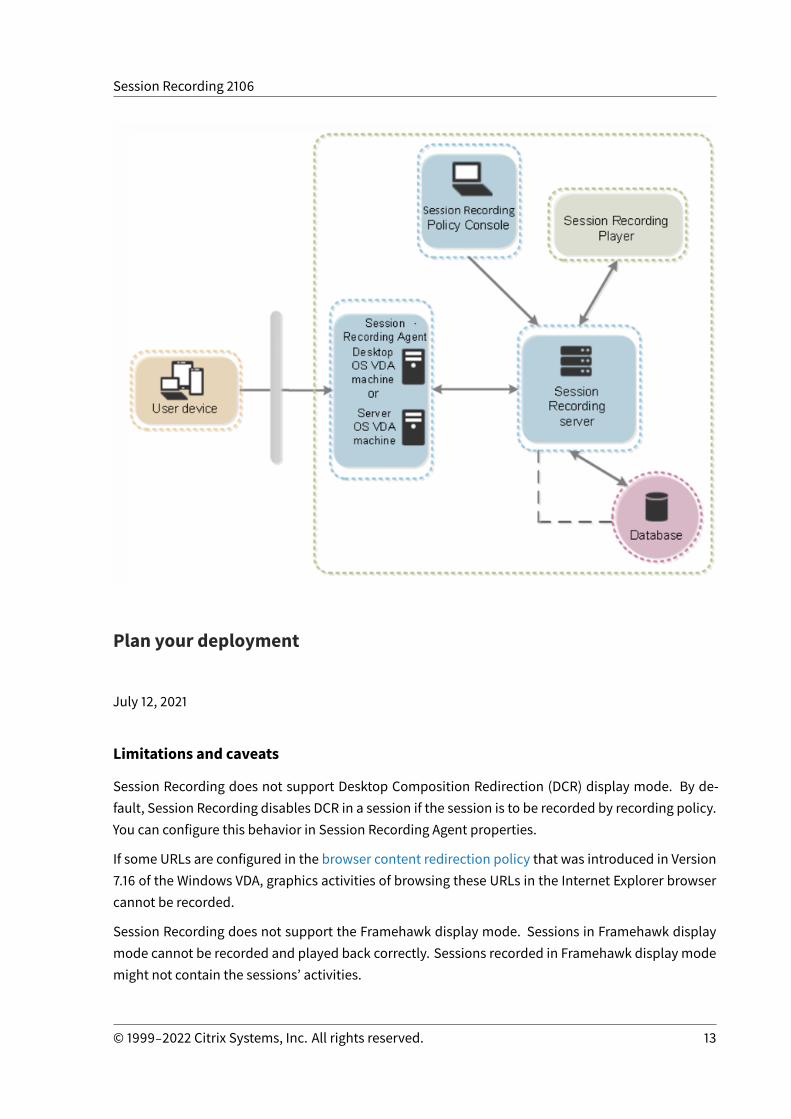
This illustration shows the Session Recording components and their relationship with each other:
In the deployment example illustrated here, the Session Recording Agent, Session Recording Server,Session Recording Database, Session Recording Policy Console, and Session Recording Player all re-side behind a security firewall. The Session Recording Agent is installed on a VDA for multi-sessionOS or single-session OS. A second server hosts the Session Recording Policy Console, a third serveracts as the Session Recording Server, and a fourth server hosts the Session Recording Database. TheSession Recording Player is installed on a workstation. A client device outside the firewall communi-cates with the VDA for multi-session OS on which the Session Recording Agent is installed. Inside thefirewall, the Session Recording Agent, Session Recording Policy Console, Session Recording Player,and Session Recording Database all communicate with the Session Recording Server.
© 1999‒2022 Citrix Systems, Inc. All rights reserved. 12
Session Recording 2106
Plan your deployment
July 12, 2021
Limitations and caveats
Session Recording does not support Desktop Composition Redirection (DCR) display mode. By de-fault, Session Recording disables DCR in a session if the session is to be recorded by recording policy.You can configure this behavior in Session Recording Agent properties.
If some URLs are configured in the browser content redirection policy that was introduced in Version7.16 of the Windows VDA, graphics activities of browsing these URLs in the Internet Explorer browsercannot be recorded.
Session Recording does not support the Framehawk display mode. Sessions in Framehawk displaymode cannot be recorded and played back correctly. Sessions recorded in Framehawk display modemight not contain the sessions’ activities.
© 1999‒2022 Citrix Systems, Inc. All rights reserved. 13
Session Recording 2106
Session Recording cannot record the Lyncwebcam videowhen using the HDX RealTimeOptimizationPack.
Depending upon your environment, you can deploy the Session Recording components in differentscenarios.
A Session Recording deployment is not limited to a single site. Except the Session Recording Agent,all components are independent of the server site. For example, you can configure multiple sites touse a single Session Recording Server.
Alternatively, if you have a large site with many agents and plan to record many graphically intenseapplications (for example, AutoCAD applications), or you have many sessions to record, a SessionRecording Server can experience a high performance demand. To alleviate performance issues, youcan install multiple Session Recording Servers and enable the load balancing feature to make theSession Recording Servers work as a load balancing pool and to share the work load from differentVDAs.
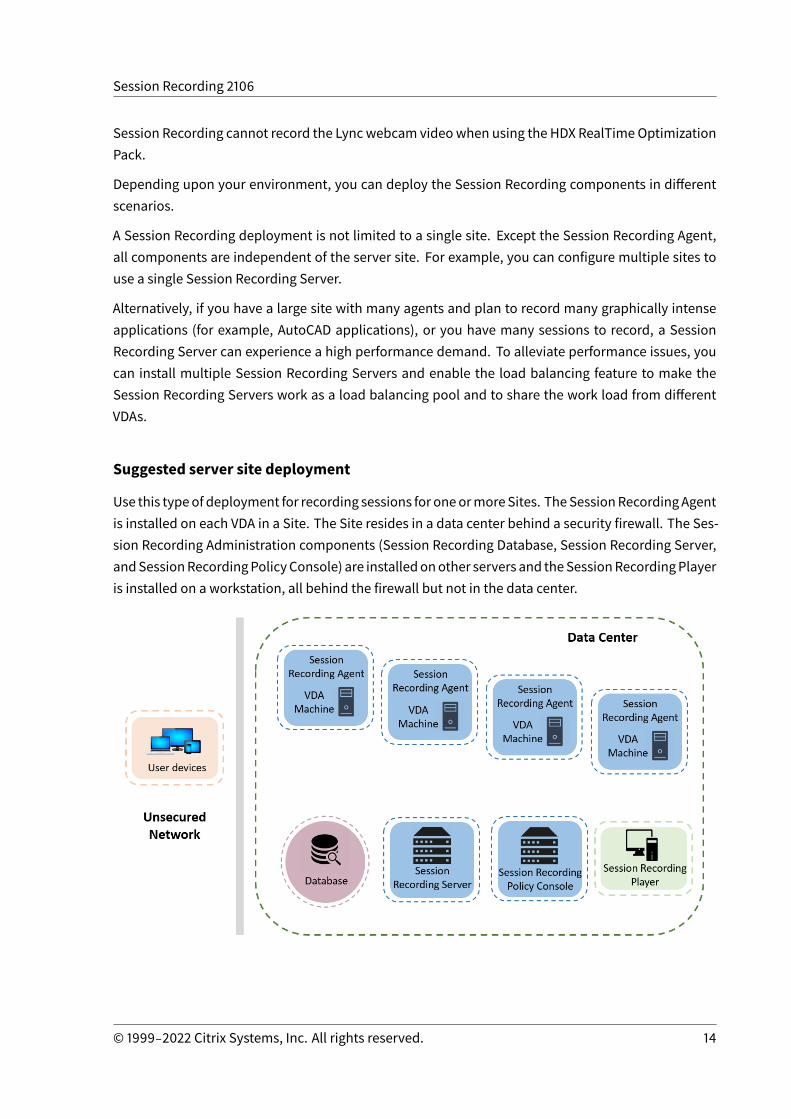
Suggested server site deployment
Use this typeof deployment for recording sessions for oneormoreSites. TheSessionRecordingAgentis installed on each VDA in a Site. The Site resides in a data center behind a security firewall. The Ses-sion Recording Administration components (Session Recording Database, Session Recording Server,andSessionRecordingPolicyConsole) are installedonother servers and theSessionRecordingPlayeris installed on a workstation, all behind the firewall but not in the data center.
© 1999‒2022 Citrix Systems, Inc. All rights reserved. 14

Session Recording 2106
Important deployment notes
• To enable Session Recording components to communicate with each other, install them in thesame domain or across trusted domains that have a transitive trust relationship. The systemcannot be installed on a workgroup or across domains that have an external trust relationship.
• Considering its intensegraphicalnatureandmemoryusagewhenplayingback large recordings,Citrix does not recommend installing the Session Recording Player as a published application.
• The Session Recording installation is configured for TLS/HTTPS communication. Ensure thatyou install a certificate on the Session Recording Server and that the root certificate authority(CA) is trusted on the Session Recording components.
• If you install the Session Recording Database on a standalone server running the Express Edi-tion of SQL Server 2019, SQL Server 2017, SQL Server 2016, SQL Server 2014, SQL Server 2012,or SQL Server 2008 R2, the server must have the TCP/IP protocol enabled and the SQL ServerBrowser service running. These settings are disabled by default, but they must be enabled forthe Session Recording Server to communicate with the database. For information about en-abling these settings, see the Microsoft articles Enable TCP/IP Network Protocol for SQL Serverand SQL Server Browser Service.
• Consider the effects of session sharingwhenplanning your SessionRecordingdeployment. Ses-sion sharing for published applications can conflict with Session Recording policy rules for pub-lished applications. Session Recording matches the active policy with the first published appli-cation that a user opens. After the user opens the first application, any subsequent applicationsopenedduring the same session continue to follow the policy that is in force for the first applica-tion. For example, if a policy states to record only Microsoft Outlook, the recording commenceswhen the user opens Outlook. If the user opens a published Microsoft Word second while Out-look is running, Word also is recorded. Conversely, if the active policy does not specify to recordWord, and the user launches Word before Outlook, Outlook is not recorded.
• Though you can install the Session Recording Server on a Delivery Controller, Citrix does notrecommend that you do so because of performance issues.
• You can install the Session Recording Policy Console on a Delivery Controller.• You can install both the Session Recording Server and the Session Recording Policy Console onthe same system.
• Ensure that the NetBIOS name of the Session Recording Server does not exceed the limit of 15characters. Microsoft has a 15-character limit on the host name length.
• PowerShell 5.1 or later is required for custom event logging. Upgrade PowerShell if you installthe Session Recording Agent onWindows Server 2012 R2 that has PowerShell 4.0 installed. Fail-ure to comply can cause failed API calls.
© 1999‒2022 Citrix Systems, Inc. All rights reserved. 15
Session Recording 2106
Security recommendations
April 29, 2022
Session Recording is deployed within a secure network and accessed by administrators, and as such,is secure. Out-of-the-box deployment is simple and security features such as digital signing and en-cryption can be configured optionally.
Communication between Session Recording components is achieved through Internet InformationServices (IIS) and Microsoft Message Queuing (MSMQ). IIS provides the web services communicationlink between Session Recording components. MSMQ provides a reliable data transport mechanismfor sending recorded session data from the Session Recording Agent to the Session Recording Server.
Warning:
Editing the registry incorrectly can cause serious problems that might require you to reinstallyour operating system. Citrix cannot guarantee that problems resulting from the incorrect useof Registry Editor can be solved. Use Registry Editor at your own risk. Be sure to back up theregistry before you edit it.
Consider these security recommendations when planning your deployment:
• Ensure that you properly isolate the different administrator roles in the corporate network, inthe Session Recording system, or on individual machines. By not doing so, security threats thatcan impact the system functionality or abuse the systemmight occur. We recommend that youassign different administrator roles to different persons or accounts. Do not allow general ses-sion users to have administrator privileges to the VDA system.
– Citrix Virtual Apps and Desktops administrators do not grant VDA local administrator roleto anyusers of published apps or desktops. If the local administrator role is a requirement,protect the Session Recording Agent components by usingWindowsmechanisms or third-party solutions.
– Separately assign the Session Recording database administrator and Session Recordingpolicy administrator.
– We recommend that you do not assign VDA administrator privileges to general sessionusers, especially when using Remote PC Access.
– Session Recording Server local administration account must be strictly protected.– Control access tomachineswhere the Session Recording Player is installed. If a user is notauthorized for the Player role, do not grant that user local administrator role for any playermachine. Disable anonymous access.
– We recommend using a physical machine as a storage server for Session Recording.
• Session Recording records session graphics activities without regard to the sensitivity of thedata. Under certain circumstances, sensitive data (including but not limited to user credentials,
© 1999‒2022 Citrix Systems, Inc. All rights reserved. 16
Session Recording 2106
privacy information, and third-party screens) might be recorded unintentionally. Take the fol-lowing measures to prevent risks:
– Disable core memory dump for VDAs unless for specific troubleshooting cases.To disable core memory dump:1. Right-clickMy Computer, and then select Properties.2. Click the Advanced tab, and then under Startup and Recovery, click Settings.3. UnderWrite Debugging Information, select (none).See the Microsoft article at https://support.microsoft.com/en-us/kb/307973.
– Session owners notify attendees that online meetings and remote assistance softwaremight be recorded if a desktop session is being recorded.
– Ensure that logon credentials or security information does not appear in all local andWebapplications published or used inside the corporation. Otherwise, they are recorded bySession Recording.
– Close any application that might expose sensitive information before switching to a re-mote ICA session.
– We recommend only automatic authentication methods (for example, single sign-on,smartcard) for accessing published desktops or Software as a Service (SaaS) applications.
• Session Recording relies on certain hardware and hardware infrastructure (for example, corpo-rate network devices, operation system) to function properly and to meet security needs. Takemeasures at the infrastructure levels to prevent damage or abuse to those infrastructures andmake the Session Recording function secure and reliable.
– Properly protect and keepnetwork infrastructure supporting Session Recording available.– We recommend using a third-party security solution or Windows mechanism to protectSession Recording components. Session Recording components include:
* On the Session Recording Server· Processes: SsRecStoragemanager.exe and SsRecAnalyticsService.exe· Services: CitrixSsRecStorageManager and CitrixSsRecAnalyticsService· All files in Session Recording Server installation folder· Registry valueswithinHKEY_LOCAL_MACHINE\SOFTWARE\Citrix\SmartAuditor\Server
* On the Session Recording Agent· Process: SsRecAgent.exe· Service: CitrixSmAudAgent· All files in Session Recording Agent installation folder· Registry valueswithinHKEY_LOCAL_MACHINE\SOFTWARE\Citrix\SmartAuditor\Agent
• Set the access control list (ACL) for Message Queuing (MSMQ) on the Session Recording Serverto restrict VDA or VDI machines that can send MSMQ data to the Session Recording Server andprevent unauthorized machines from sending data to the Session Recording Server.
1. Install server feature Directory Service Integration on each Session Recording Server and
© 1999‒2022 Citrix Systems, Inc. All rights reserved. 17

Session Recording 2106
VDA or VDI machine where Session Recording is enabled. Then restart the Message Queu-ing service.
2. From the Windows Start menu on each Session Recording Server, open AdministrativeTools > Computer Management.
3. Open Services and Applications >Message Queuing > Private Queues.
4. Click the private queue citrixsmauddata to open the Properties page and select the Se-curity tab.
5. Add the computers or security groups of the VDAs that send MSMQ data to this server andgrant them the Send Message permission.
© 1999‒2022 Citrix Systems, Inc. All rights reserved. 18

Session Recording 2106
• Properly protect the event log for the Session Record Server and Session Recording Agents. Werecommend using aWindows or third-party remote logging solution to protect the event log orredirect the event log to the remote server.
• Ensure that servers running the Session Recording components are physically secure. If possi-ble, lock these computers in a secure room to which only authorized personnel can gain directaccess.
• Isolate servers running the Session Recording components on a separate subnet or domain.
• Protect the recorded session data from users accessing other servers by installing a firewall be-tween the Session Recording Server and other servers.
• Keep the Session Recording Administration Server and SQL database up-to-date with the latestsecurity updates fromMicrosoft.
• Restrict non-administrators from logging on to the administration machine.
• Strictly limit who is authorized to make recording policy changes and view recorded sessions.
• Install digital certificates, use the Session Recording file signing feature, and set up TLS commu-nications in IIS.
• SetupMSMQtouseHTTPSas its transport. Theway is to set theMSMQprotocol listed inSessionRecording Agent Properties to HTTPS. For more information, see Troubleshoot MSMQ.
© 1999‒2022 Citrix Systems, Inc. All rights reserved. 19
Session Recording 2106
• Use TLS 1.1 or TLS 1.2 (recommended) and disable SSLv2, SSLv3, TLS 1.0 on the Session Record-ing Server and Session Recording Database.
• Disable RC4 cipher suites for TLS on the Session Recording Server and Session RecordingDatabase:
1. Using the Microsoft Group Policy Editor, navigate to Computer Configuration > Adminis-trative Templates > Network > SSL Configuration Settings.
2. Set the SSL Cipher Suite Order policy to Enabled. By default, this policy is set to NotConfigured.
3. Remove any RC4 cipher suites.
• Use playback protection. Playback protection is a Session Recording feature that encryptsrecorded files before they are downloaded to the Session Recording Player. By default, thisoption is enabled and is in Session Recording Server Properties.
• Follow NSIT guidance for cryptographic key lengths and cryptographic algorithms.
• Configure TLS 1.2 support for Session Recording.
We recommend using TLS 1.2 as the communication protocol to ensure the end-to-end securityof the Session Recording components.
To configure TLS 1.2 support of Session Recording:
1. Log on to themachine hosting the Session Recording Server. Install the proper SQL Serverclient component and driver, and set strong cryptography for .NET Framework (version 4or later).a) Install the Microsoft ODBC Driver 11 (or a later version) for SQL Server.b) Apply the latest hotfix rollup of .NET Framework.c) Install ADO.NET - SqlClient based on your version of .NET Framework. For more
information, see https://support.microsoft.com/en-us/kb/3135244.d) AddaDWORDvalueSchUseStrongCrypto= 1underHKEY_LOCAL_MACHINE\SOFTWARE\Microsoft\.NetFramework\v4.0.30319
andHKEY_LOCAL_MACHINE\SOFTWARE\Wow6432Node\Microsoft\.NetFramework\v4.0.30319.e) Restart the machine.
2. Log on to themachine hosting the Session Recording Policy Console. Apply the latest hot-fix rollup of .NET Framework, and set strong cryptography for .NET Framework (version 4or later). Themethod for setting strong cryptography is the same as substeps 1–4 and 1–5.You can omit these steps if you choose to install the Session Recording Policy Console onthe same computer as the Session Recording Server.
To configure the TLS 1.2 support for SQL Server with versions earlier than 2016, see https://support.microsoft.com/en-us/kb/3135244. To use TLS 1.2, configure HTTPS as the communication protocolfor the Session Recording components.
© 1999‒2022 Citrix Systems, Inc. All rights reserved. 20
Session Recording 2106
Scalability considerations
July 12, 2021
SessionRecording is ahighly scalable systemthathandles thousandsor tensof thousandsof sessions.Installingand runningSessionRecording requires fewextra resourcesbeyondwhat is necessary to runCitrix Virtual Apps and Desktops. However, if you plan to use Session Recording to record many ses-sions or if the sessions you plan to record can result in large session files (for example, graphicallyintense applications), consider the performance of your system when planning your Session Record-ing deployment.
This article explains how Session Recording achieves high scalability and how you can get the mostout of your recording system at a lowest cost.
Why Session Recording scales well
There are twomajor reasons that Session Recording scaleswell comparedwith competitive products:
• Small file size
A recorded session file made with Session Recording is highly compact. It is many orders ofmagnitude smaller than an equivalent video recordingmadewith solutions that screen-scrape.The network bandwidth, disk space, and disk IOPS required to transport and store each SessionRecording file is typically at least 10 times less than an equivalent video file.
The small size of recorded session files means faster and smoother rendering of video frames.Recordings are also lossless and have no pixelation that is common in most compact video for-mats. Text in recordings is easy to read during playback as it is in the original sessions. Tomaintain small file sizes, Session Recording does not record key frames within the files. Ses-sion Recording can drop H.264 packages while recording sessions that have videos runningand thus reduce the recording file sizes. To use this functionality, set HKEY_LOCAL_MACHINE\SOFTWARE\Citrix\SmartAuditor\Agent\DropH264Enabled to 1 on the Session Record-ing Agent and set the value of Use video codec for compression to For actively changing re-gions.
© 1999‒2022 Citrix Systems, Inc. All rights reserved. 21

Session Recording 2106
• Low processing required to generate files
A recorded session file contains the ICA protocol data for a session that is extracted virtually inits native format. The file captures the ICA protocol data stream that is used to communicatewith Citrix Workspace app. There is no need to run expensive transcoding or encoding softwarecomponents to change the format of data in real time. The low amount of processing is alsoimportant for VDA scalability and ensures the end-user experience is maintained when manysessions are recorded from the same VDA.
Moreover, only those ICA virtual channels that can be played back are recorded, which resultsin a further optimization. For example, the printer and client drive mapping channels are notrecordedbecause theycangeneratehighvolumesofdatawithoutanybenefit in videoplayback.
Estimate data input and processing rates
The Session Recording Server is the central collection point for recorded session files. Each machinethat is running a multi-session OS VDA with Session Recording enabled sends recorded session datato the Session Recording Server. Session Recording can handle high volumes of data and can toleratebursts and faults, but there are physical limits on howmuch data any one server can handle.
Consider howmuch data you send to each Session Recording Server and how quickly the servers canprocess and store this data. The rate at which your system can store incoming data must be higherthan the data input rate.
© 1999‒2022 Citrix Systems, Inc. All rights reserved. 22
Session Recording 2106
To estimate your data input rate, multiply the number of sessions recorded by the average size ofeach recorded session and divide by the time for which you are recording sessions. For example, youmight record5,000MicrosoftOutlook sessionsof 20MBeachover an8-hourworkday. In this case, thedata input rate is approximately 3.5 Mbps. (5,000 sessions times 20 MB divided by 8 hours, dividedby 3,600 seconds per hour.) A typical Session Recording Server connected to a 100 Mbps LAN withsufficient disk space to store the recorded data can process data at around 5.0 Mbps based on thephysical limits imposed by disk and network IOPS. This rate is the processing rate. In the example,the processing rate (5.0Mbps) is higher than the input rate (3.5 Mbps), so recording the 5,000Outlooksessions is feasible.
Theamountofdataper sessionvariesgreatlydependingonwhat isbeing recorded,whileother factorssuch as the screen resolution, color depth, and graphicsmode also have impacts. A session running aCAD package where graphics activity is constantly high likely generates a much larger recording thana session in which the end user sends and receives emails in Microsoft Outlook. Therefore, recordingthe same number of CAD sessions can generate a high input rate and require the use of more SessionRecording Servers.
Bursts and faults
The previous example assumes a simple uniform throughput of data but does not explain how thesystemdealswith short periods of higher activity, knownas bursts. A burstmight occurwhen all userslog on at the same time in the morning, known as the 9 o’clock rush, or when they receive the sameemail in their Outlook inbox at once. The 5.0 Mbps processing rate of the Session Recording Server ishighly inadequate at dealing with this sudden demand.
The Session Recording Agent running on each VDA uses Microsoft Message Queuing (MSMQ) to sendrecorded data to the Storage Manager running on the central Session Recording Server. The data issent in a store-and-forward manner similar to how an email is delivered between the sender, mailserver, and receiver. If the Session Recording Server or the network cannot handle the high rate ofdata in a burst, the recorded session data is temporarily stored until the backlog of data messagesis cleared. The data message might be temporarily stored in the outgoing queue on the VDA if thenetwork is congested, or stored on the Session Recording Server’s receiving queue if the data hastraversed the network but the Storage Manager is still busy processing other messages.
MSMQ also serves as a fault tolerance mechanism. If the Session Recording Server goes down or thelink is broken, recorded data is held in the outgoing queue on each VDA. When the fault is rectified,all queued data is sent together. The use of MSMQ also allows you to take a Session Recording Serveroffline for upgrade or maintenance without interrupting the recording of existing sessions and losingdata.
The main limitation of MSMQ is that disk space for the temporary storage of data messages is finite.This limitation limits how long a burst, fault, or maintenance event can last before data is eventually
© 1999‒2022 Citrix Systems, Inc. All rights reserved. 23
Session Recording 2106
lost. The overall system can continue after data loss, but in this situation, individual recordings havechunks of data missing. A file with missing data is still playable but only up to the point where datawas first lost. Note the following:
• Adding more disk space to each server, especially the Session Recording Server, and making itavailable to MSMQ can increase the tolerance to bursts and faults.
• It is important to configure the Message Life setting for each Session Recording Agent to an ap-propriate level (on the Connections tab in Session Recording Agent Properties). The defaultvalue of 7,200 seconds (two hours) means that each recorded data message has two hours toreach the Storage Manager before it is discarded and recording files are damaged. With moredisk space available (or fewer sessions to record), you can choose to increase this value. Themaximum value is 365 days.
The other limitation with MSMQ is that when data backlogs, there is extra disk IOPS in the queue toread andwrite datamessages. Under normal conditions, the StorageManager receives andprocessesdata from the network directly without the data message ever being written to disk. Storing the datainvolves a single write operation to disk that appends the recorded session file. When data is back-logged, the disk IOPS is tripled: each message must be written to disk, read from disk, and writtento file. As the Storage Manager is heavily IOPS bound, the processing rate of the Session RecordingServer drops until the backlog ofmessages is cleared. Tomitigate the effects of this extra IOPS, adoptthe following recommendations:
• Ensure that the disk onwhichMSMQ storesmessages is different from the recording file storagefolders. Even though IOPS bus traffic is tripled, the drop in the true processing rate is never assevere.
• Have planned outages at off-peak times only. Depending on budget constraints, follow recog-nized approaches to building high availability servers. The approaches include the use of UPS,dual NICs, redundant switches, and hot swappable memory and disks.
Design for spare capacity
The data rate of recorded session data is unlikely to be uniform, bursts and faults might occur, andthe clearing ofmessage backlogs is expensive in IOPS. For this reason, design each Session RecordingServer with plenty of spare capacity. Adding more servers or improving the specification of existingservers, as described in later sections, always gains you extra capacity. The general rule of thumb is torun each Session Recording server at amaximumof 50%of its total capacity. In the earlier example, ifthe server can process 5.0 Mbps, target the system to run only at 2.5 Mbps. Instead of recording 5,000Outlook sessions that generate 3.5 Mbps on one Session Recording Server, reduce to 3,500 sessionsthat generate only about 2.5 Mbps.
© 1999‒2022 Citrix Systems, Inc. All rights reserved. 24

Session Recording 2106
Backlogs and live playback
Liveplayback iswhena revieweropensasession recording forplaybackwhile the session is still active.During live playback, the Session Recording Agent responsible for the session switches to a streamingmode for that session, and recordingdata is sent immediately to theStorageManagerwithout internalbuffering. Because the recording file is constantly updated, the Player can continue to be fed withthe latest data from the live session. However, data sent from the Agent to the Storage Manager isthrough MSMQ, so the queuing rules described earlier apply. A problem can occur in this scenario.When MSMQ is backlogged, the new recorded data available for live playback is queued like all otherdatamessages. The reviewer can still play the file, but viewing the latest live recordeddata is delayed.If live playback is an important feature for reviewers, ensure a low probability of backlog by designingspare capacity and fault tolerance into your deployment.
Citrix Virtual Apps and Desktops scalability
Session Recording never reduces session performance and never stops sessions in response torecorded data backlogs. Maintaining the end-user experience and single-server scalability isparamount in the design of the Session Recording system. If the recording system becomes irre-versibly overloaded, recorded session data is discarded. Extensive scalability testing by Citrix revealsthat the impact of recording ICA sessions on the performance and scalability of Citrix Virtual Appsand Desktops servers is low. The size of the impact depends on the platform, the memory available,and the graphical nature of the sessions being recorded. With the following configuration, you canexpect a single-server scalability impact of between 1% and 5%. In other words, if a server can host100 users without Session Recording installed, it can host 95–99 users after installation:
• 64-bit server with 8 GB RAM running a multi-session OS VDA• All sessions running Office productivity applications, such as Outlook and Excel• The use of applications is active and sustained• All sessions are recorded as configured by the Session Recording policies
If fewer sessions are recorded or session activity is less sustained and more sporadic, the impact isless. Inmany cases, the scalability impact is negligible and user density per server remains the same.As mentioned earlier, the low impact is due to the simple processing requirements of the SessionRecording components installed on each VDA. Recorded data is extracted from the ICA session stackand sent as-is to the SessionRecording Server throughMSMQ. There is no expensive encoding of data.
There is a minor overhead of using Session Recording even when no sessions are recorded. Althoughthe impact is low, if you are sure that no sessions are recorded from a particular server, you can dis-able recording on that server. Removing Session Recording is one way. A less invasive approach is toclear the Enable session recording for this VDAmachine check box on the SessionRecording tab inSession Recording Agent Properties. If session recording is required in future, reselect this check box.
© 1999‒2022 Citrix Systems, Inc. All rights reserved. 25

Session Recording 2106
Measuring throughput
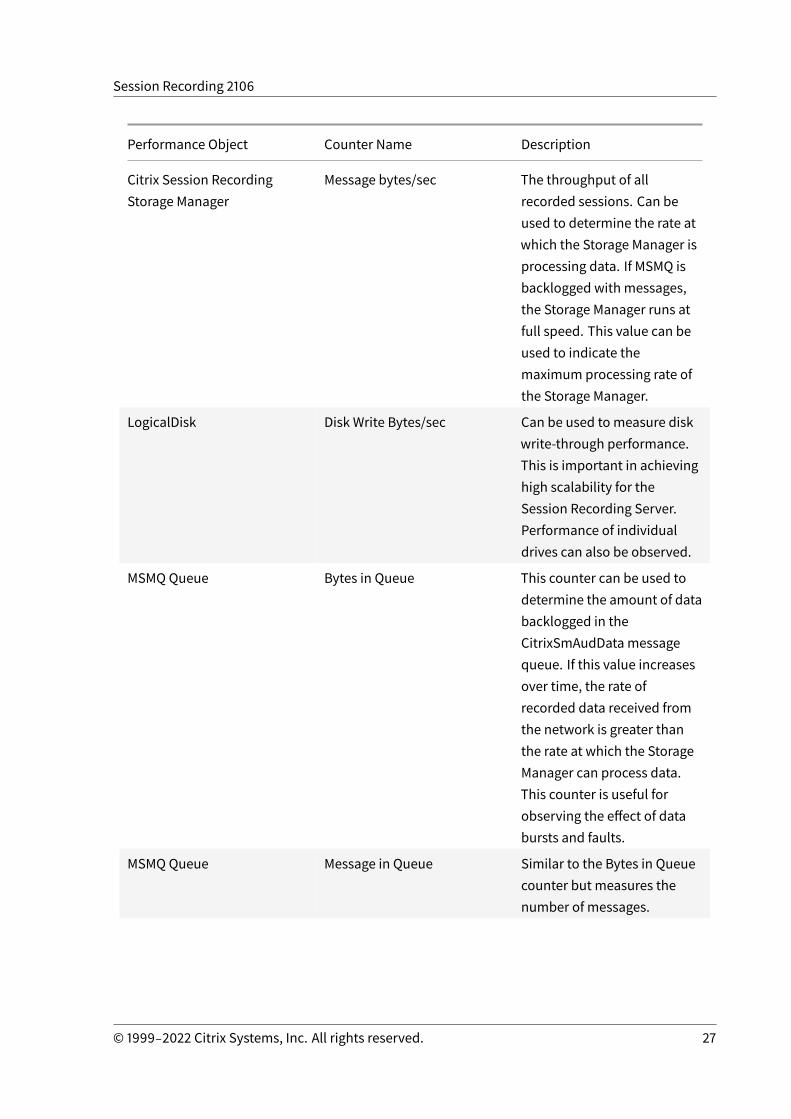
There are various ways to measure the throughput of recorded session data from the sending VDAto the receiving Session Recording Server. One of the simplest and most effective approaches is toobserve the size of files that are recorded, and the rate at which disk space on the Session RecordingServer is being consumed. The volume of data written to disk closely reflects the volume of networktrafficbeinggenerated. TheWindowsPerformanceMonitor tool (perfmon.exe)hasa rangeof standardsystem counters that can be observed in addition to some counters provided by Session Recording.Counters can be used to measure throughput, and identify bottlenecks and system problems. Thefollowing table outlines some of the most useful performance counters.
Performance Object Counter Name Description
Citrix Session RecordingAgent
Active Recording Count Indicates the number ofsessions that are currentlybeing recorded on aparticular VDA.
Citrix Session RecordingAgent
Bytes read from the SessionRecording Driver
The number of bytes readfrom the kernel componentsresponsible for acquiringsession data. Useful fordetermining howmuch data asingle VDA generates for allsessions recorded on thatserver.
Citrix Session RecordingStorage Manager
Active Recording Count Similar to the Citrix SessionRecording Agent counterexcept for the SessionRecording Server. Indicatesthe total number of sessionscurrently being recorded forall servers.
© 1999‒2022 Citrix Systems, Inc. All rights reserved. 26
Session Recording 2106
Performance Object Counter Name Description
Citrix Session RecordingStorage Manager
Message bytes/sec The throughput of allrecorded sessions. Can beused to determine the rate atwhich the Storage Manager isprocessing data. If MSMQ isbacklogged with messages,the Storage Manager runs atfull speed. This value can beused to indicate themaximum processing rate ofthe Storage Manager.
LogicalDisk Disk Write Bytes/sec Can be used to measure diskwrite-through performance.This is important in achievinghigh scalability for theSession Recording Server.Performance of individualdrives can also be observed.
MSMQ Queue Bytes in Queue This counter can be used todetermine the amount of databacklogged in theCitrixSmAudData messagequeue. If this value increasesover time, the rate ofrecorded data received fromthe network is greater thanthe rate at which the StorageManager can process data.This counter is useful forobserving the effect of databursts and faults.
MSMQ Queue Message in Queue Similar to the Bytes in Queuecounter but measures thenumber of messages.
© 1999‒2022 Citrix Systems, Inc. All rights reserved. 27
Session Recording 2106
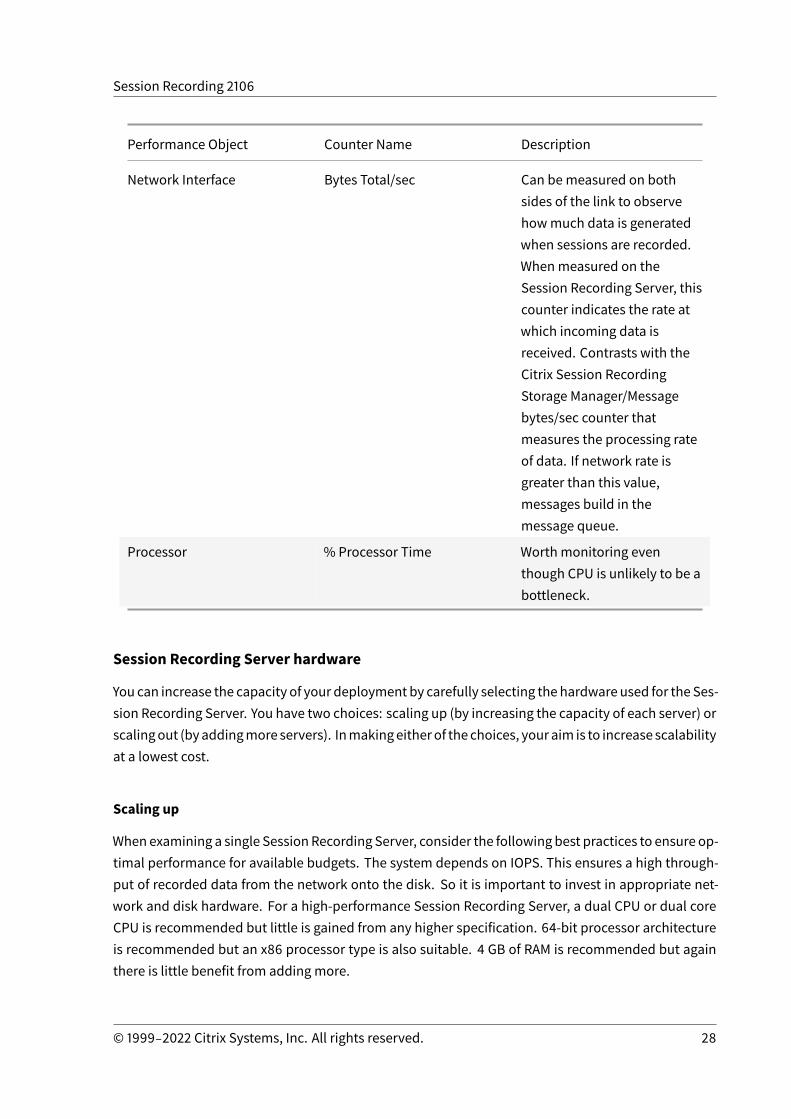
Performance Object Counter Name Description
Network Interface Bytes Total/sec Can bemeasured on bothsides of the link to observehowmuch data is generatedwhen sessions are recorded.Whenmeasured on theSession Recording Server, thiscounter indicates the rate atwhich incoming data isreceived. Contrasts with theCitrix Session RecordingStorage Manager/Messagebytes/sec counter thatmeasures the processing rateof data. If network rate isgreater than this value,messages build in themessage queue.
Processor % Processor Time Worth monitoring eventhough CPU is unlikely to be abottleneck.
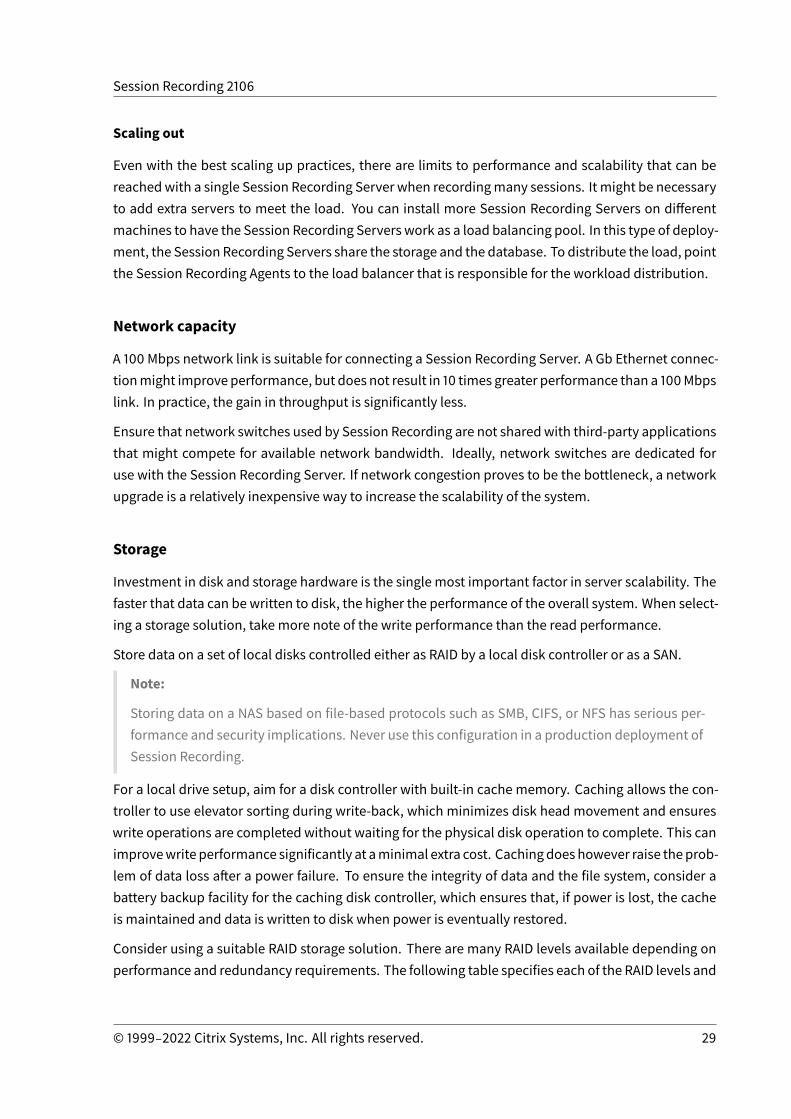
Session Recording Server hardware
You can increase the capacity of your deployment by carefully selecting the hardware used for the Ses-sion Recording Server. You have two choices: scaling up (by increasing the capacity of each server) orscalingout (byaddingmore servers). Inmakingeitherof the choices, your aim is to increase scalabilityat a lowest cost.
Scaling up
When examining a single SessionRecording Server, consider the following best practices to ensure op-timal performance for available budgets. The system depends on IOPS. This ensures a high through-put of recorded data from the network onto the disk. So it is important to invest in appropriate net-work and disk hardware. For a high-performance Session Recording Server, a dual CPU or dual coreCPU is recommended but little is gained from any higher specification. 64-bit processor architectureis recommended but an x86 processor type is also suitable. 4 GB of RAM is recommended but againthere is little benefit from adding more.
© 1999‒2022 Citrix Systems, Inc. All rights reserved. 28
Session Recording 2106
Scaling out
Even with the best scaling up practices, there are limits to performance and scalability that can bereachedwith a single Session Recording Server when recordingmany sessions. It might be necessaryto add extra servers to meet the load. You can install more Session Recording Servers on differentmachines to have the Session Recording Servers work as a load balancing pool. In this type of deploy-ment, the Session Recording Servers share the storage and the database. To distribute the load, pointthe Session Recording Agents to the load balancer that is responsible for the workload distribution.
Network capacity
A 100 Mbps network link is suitable for connecting a Session Recording Server. A Gb Ethernet connec-tionmight improve performance, but does not result in 10 times greater performance than a 100Mbpslink. In practice, the gain in throughput is significantly less.
Ensure that network switches used by Session Recording are not sharedwith third-party applicationsthat might compete for available network bandwidth. Ideally, network switches are dedicated foruse with the Session Recording Server. If network congestion proves to be the bottleneck, a networkupgrade is a relatively inexpensive way to increase the scalability of the system.
Storage
Investment in disk and storage hardware is the single most important factor in server scalability. Thefaster that data can be written to disk, the higher the performance of the overall system. When select-ing a storage solution, take more note of the write performance than the read performance.
Store data on a set of local disks controlled either as RAID by a local disk controller or as a SAN.
Note:
Storing data on a NAS based on file-based protocols such as SMB, CIFS, or NFS has serious per-formance and security implications. Never use this configuration in a production deployment ofSession Recording.
For a local drive setup, aim for a disk controller with built-in cache memory. Caching allows the con-troller to use elevator sorting during write-back, which minimizes disk head movement and ensureswrite operations are completed without waiting for the physical disk operation to complete. This canimprovewrite performance significantly at aminimal extra cost. Cachingdoeshowever raise theprob-lem of data loss after a power failure. To ensure the integrity of data and the file system, consider abattery backup facility for the caching disk controller, which ensures that, if power is lost, the cacheis maintained and data is written to disk when power is eventually restored.
Consider using a suitable RAID storage solution. There are many RAID levels available depending onperformance and redundancy requirements. The following table specifies each of the RAID levels and
© 1999‒2022 Citrix Systems, Inc. All rights reserved. 29
Session Recording 2106
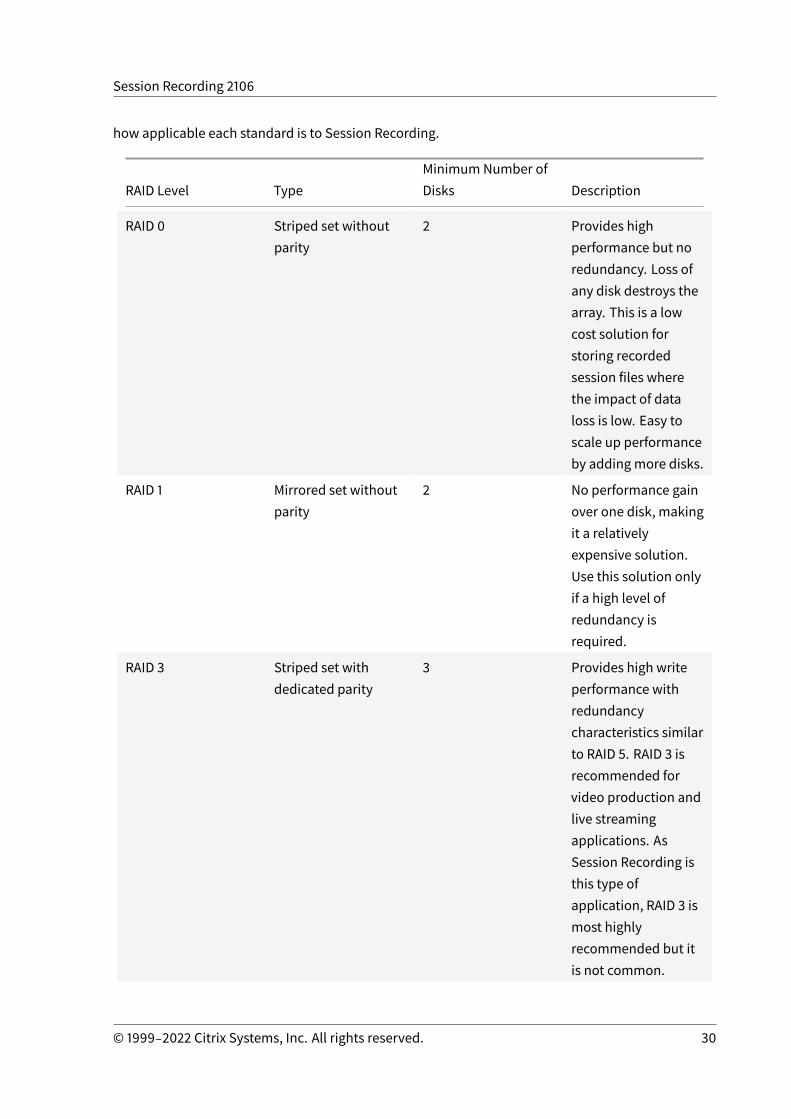
how applicable each standard is to Session Recording.
RAID Level TypeMinimumNumber ofDisks Description
RAID 0 Striped set withoutparity
2 Provides highperformance but noredundancy. Loss ofany disk destroys thearray. This is a lowcost solution forstoring recordedsession files wherethe impact of dataloss is low. Easy toscale up performanceby adding more disks.
RAID 1 Mirrored set withoutparity
2 No performance gainover one disk, makingit a relativelyexpensive solution.Use this solution onlyif a high level ofredundancy isrequired.
RAID 3 Striped set withdedicated parity
3 Provides high writeperformance withredundancycharacteristics similarto RAID 5. RAID 3 isrecommended forvideo production andlive streamingapplications. AsSession Recording isthis type ofapplication, RAID 3 ismost highlyrecommended but itis not common.
© 1999‒2022 Citrix Systems, Inc. All rights reserved. 30
Session Recording 2106
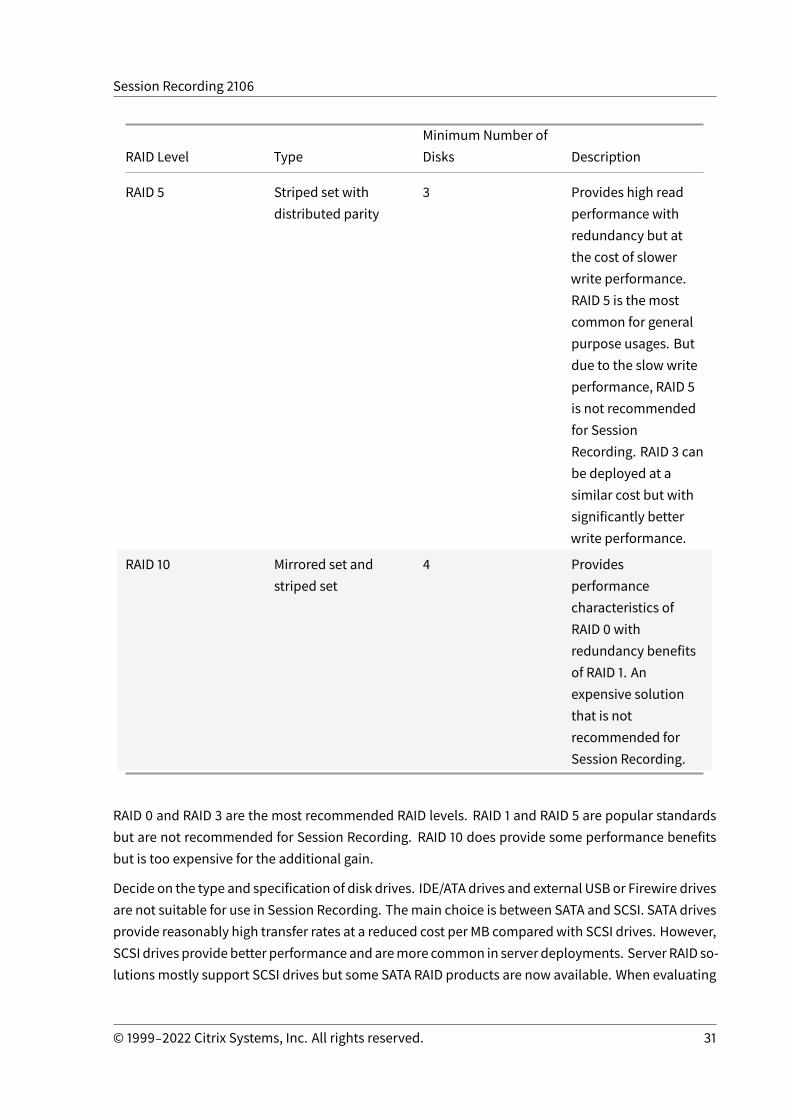
RAID Level TypeMinimumNumber ofDisks Description
RAID 5 Striped set withdistributed parity
3 Provides high readperformance withredundancy but atthe cost of slowerwrite performance.RAID 5 is the mostcommon for generalpurpose usages. Butdue to the slow writeperformance, RAID 5is not recommendedfor SessionRecording. RAID 3 canbe deployed at asimilar cost but withsignificantly betterwrite performance.
RAID 10 Mirrored set andstriped set
4 Providesperformancecharacteristics ofRAID 0 withredundancy benefitsof RAID 1. Anexpensive solutionthat is notrecommended forSession Recording.
RAID 0 and RAID 3 are the most recommended RAID levels. RAID 1 and RAID 5 are popular standardsbut are not recommended for Session Recording. RAID 10 does provide some performance benefitsbut is too expensive for the additional gain.
Decide on the type and specification of disk drives. IDE/ATA drives and external USB or Firewire drivesare not suitable for use in Session Recording. Themain choice is between SATA and SCSI. SATA drivesprovide reasonably high transfer rates at a reduced cost per MB comparedwith SCSI drives. However,SCSI drives providebetter performance andaremore common in server deployments. Server RAID so-lutionsmostly support SCSI drives but some SATA RAID products are now available. When evaluating
© 1999‒2022 Citrix Systems, Inc. All rights reserved. 31
Session Recording 2106
the specifications of disk drive products, consider the rotational speed of disk and other performancecharacteristics.
Because the recording of thousands of sessions per day can consume significant amounts of diskspace, youmust choose betweenoverall capacity andperformance. From the earlier example, record-ing 5,000Outlook sessions over an8-hourworkday consumesabout 100GBof storage space. To store10 days’ worth of recordings (that is, 50,000 recorded session files), you need 1,000 GB (1 TB). Thispressure on disk space can be eased by shortening the retention period before archiving or deletingold recordings. If 1 TB of disk space is available, a seven-day retention period is reasonable, ensuringdisk space usage remains around 700 GB, with 300 GB remaining as a buffer for busy days. In SessionRecording, the archiving and deleting of files is supported with the ICLDB utility and has a minimumretention period of two days. You can schedule a background task to run once a day at some off-peaktime. For more information about the ICLDB commands and archiving, see Manage your databaserecords.
The alternative to using local drive and controllers is to use a SAN storage solution based on block-level disk access. To the Session Recording Server, the disk array appears as a local drive. SANs aremore expensive to set up, but as the disk array is shared, SANs do have the advantage of simplifiedand centralized management. There are two main types of SAN: Fibre Channel and iSCSI. iSCSI isessentially SCSI over TCP/IP and is gaining popularity over Fibre Channel since the introduction of GbEthernet.
Database scalability
The Session Recording Database requires Microsoft SQL Server 2019, Microsoft SQL Server 2017, Mi-crosoftSQLServer 2016,MicrosoftSQLServer 2014,MicrosoftSQLServer 2012, orMicrosoftSQLServer2008 R2. The volume of data sent to the database is small because the database stores onlymetadataabout the recorded sessions. The files of the recorded sessions themselves are written to a separatedisk. Typically, each recorded session requires only about 1 KB of space in the database, unless theSession Recording Event API is used to insert searchable events to the session.
The Express Editions of Microsoft SQL Server 2019, Microsoft SQL Server 2017, Microsoft SQL Server2016, Microsoft SQL Server 2014, Microsoft SQL Server 2012, and Microsoft SQL Server 2008 R2 im-pose a database size limitation of 10 GB. At 1 KB per recording session, the database can catalog about4,000,000 sessions. Other editions of Microsoft SQL Server have no database size restrictions and arelimited only by available disk space. As the number of sessions in the database increases, perfor-mance of the database and speed of searches diminishes only negligibly.
If you are notmaking customizations through the Session Recording Event API, each recorded sessiongenerates four database transactions: two when recording starts, one when the user logs on to thesession being recorded, and one when recording ends. If you use the Session Recording Event APIto customize sessions, each searchable event recorded generates one transaction. Because even the
© 1999‒2022 Citrix Systems, Inc. All rights reserved. 32
Session Recording 2106
most basic database deployment can handle hundreds of transactions per second, the processingload on the database is unlikely to be stressed. The impact is light enough that the Session RecordingDatabase can run on the same SQL Server as other databases, including the Citrix Virtual Apps andDesktops data store database.
If your Session Recording deployment requiresmanymillions of recorded sessions to be cataloged inthe database, follow Microsoft guidelines for SQL Server scalability.
Install, upgrade, and uninstall
May 19, 2022
This article contains the following sections:
Installation checklist
Install Session Recording by using the Citrix Virtual Apps and Desktops installer
Automate installation
Upgrade Session Recording
Uninstall Session Recording
Installation checklist
You can install the Session Recording components by using the Citrix Virtual Apps and Desktops in-staller.
Before you start the installation, complete this list:
Step
Select the machines on which you want toinstall each Session Recording component.Ensure that each computer meets thehardware and software requirements for thecomponent or components to be installed onit.
Use your Citrix account credentials to accessthe Citrix Virtual Apps and Desktops downloadpage and download the product ISO file. Unzipthe ISO file or burn a DVD of it.
© 1999‒2022 Citrix Systems, Inc. All rights reserved. 33
Session Recording 2106
Step
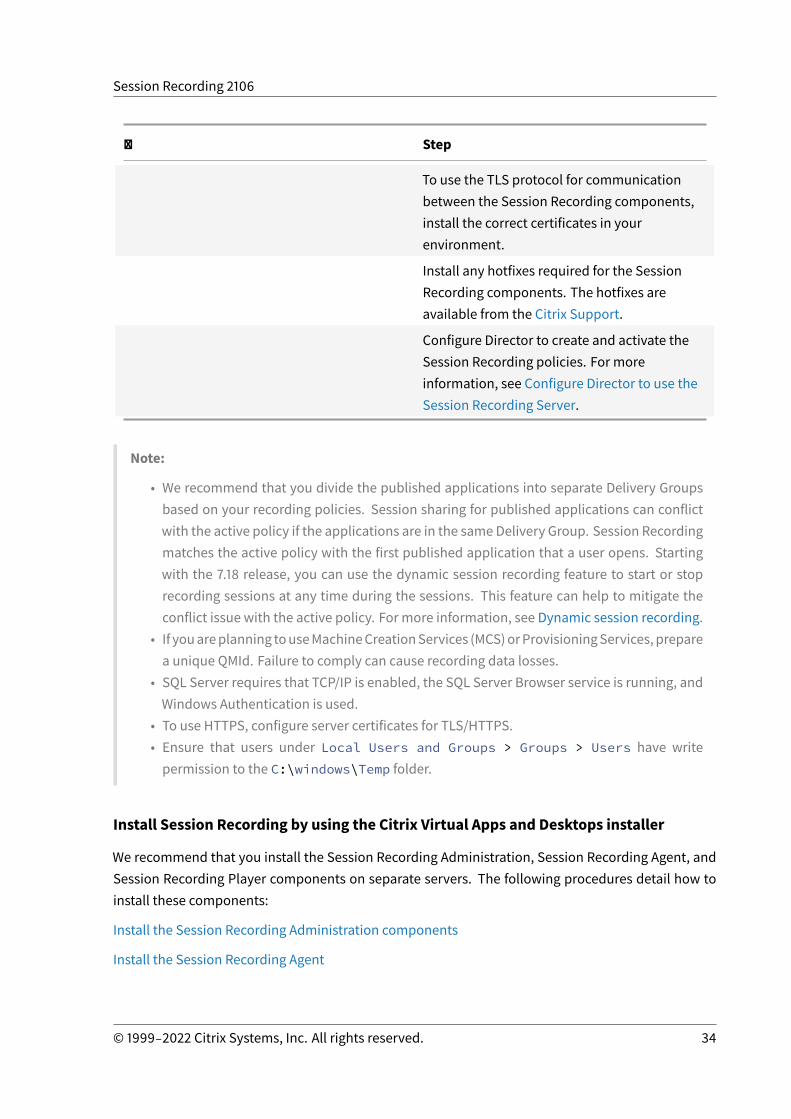
To use the TLS protocol for communicationbetween the Session Recording components,install the correct certificates in yourenvironment.
Install any hotfixes required for the SessionRecording components. The hotfixes areavailable from the Citrix Support.
Configure Director to create and activate theSession Recording policies. For moreinformation, see Configure Director to use theSession Recording Server.
Note:
• We recommend that you divide the published applications into separate Delivery Groupsbased on your recording policies. Session sharing for published applications can conflictwith the active policy if the applications are in the same Delivery Group. Session Recordingmatches the active policy with the first published application that a user opens. Startingwith the 7.18 release, you can use the dynamic session recording feature to start or stoprecording sessions at any time during the sessions. This feature can help to mitigate theconflict issue with the active policy. For more information, see Dynamic session recording.
• If youareplanning touseMachineCreationServices (MCS)orProvisioningServices, preparea unique QMId. Failure to comply can cause recording data losses.
• SQL Server requires that TCP/IP is enabled, the SQL Server Browser service is running, andWindows Authentication is used.
• To use HTTPS, configure server certificates for TLS/HTTPS.• Ensure that users under Local Users and Groups > Groups > Users have writepermission to the C:\windows\Temp folder.
Install Session Recording by using the Citrix Virtual Apps and Desktops installer
We recommend that you install the Session Recording Administration, Session Recording Agent, andSession Recording Player components on separate servers. The following procedures detail how toinstall these components:
Install the Session Recording Administration components
Install the Session Recording Agent
© 1999‒2022 Citrix Systems, Inc. All rights reserved. 34
Session Recording 2106
Install the Session Recording Player
Install the Session Recording Administration components
The Session Recording Administration components include the Session Recording Database, SessionRecording Server, and Session Recording Policy Console. You can choose the component to install ona server.
Step 1: Download the product software and launch the wizard
1. Use your Citrix account credentials to access the Citrix Virtual Apps and Desktops downloadpage and download the product ISO file. Unzip the ISO file or burn a DVD of it.
2. Use a local administrator account to log on to the machine where you are installing the Ses-sion Recording Administration components. Insert the DVD in the drive or mount the ISO file.If the installer does not launch automatically, double-click the AutoSelect application or themounted drive.The installation wizard launches.
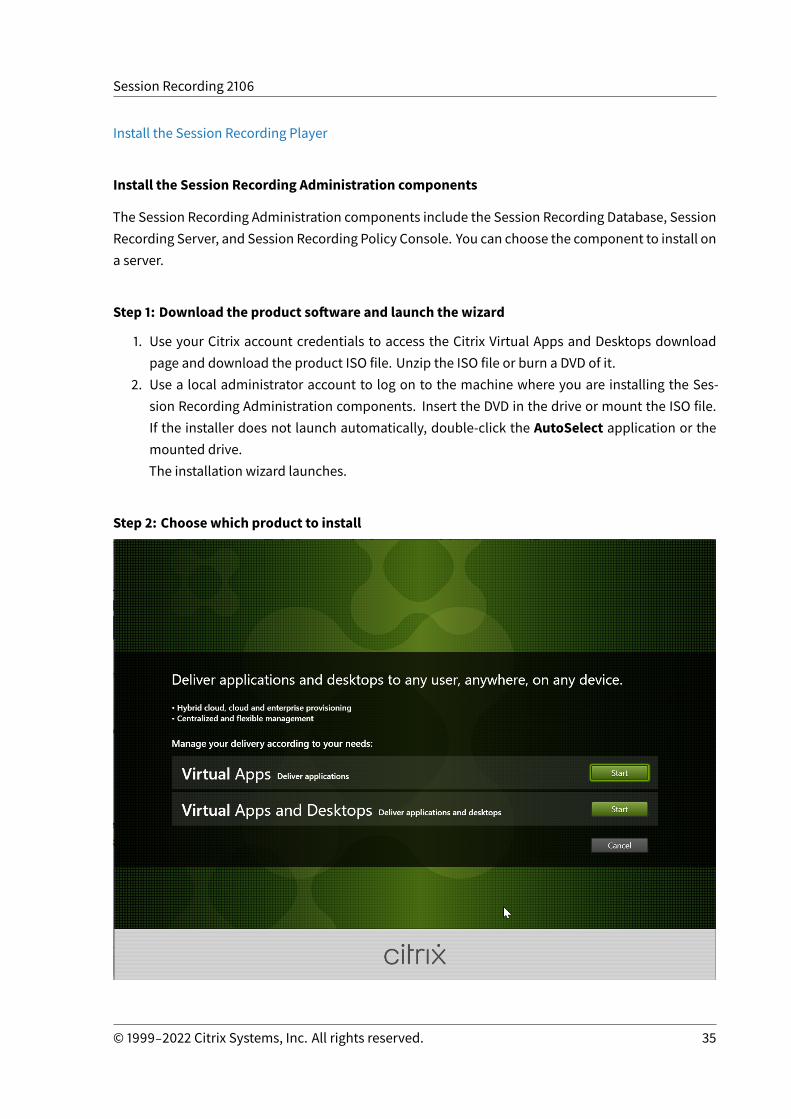
Step 2: Choose which product to install
© 1999‒2022 Citrix Systems, Inc. All rights reserved. 35
Session Recording 2106
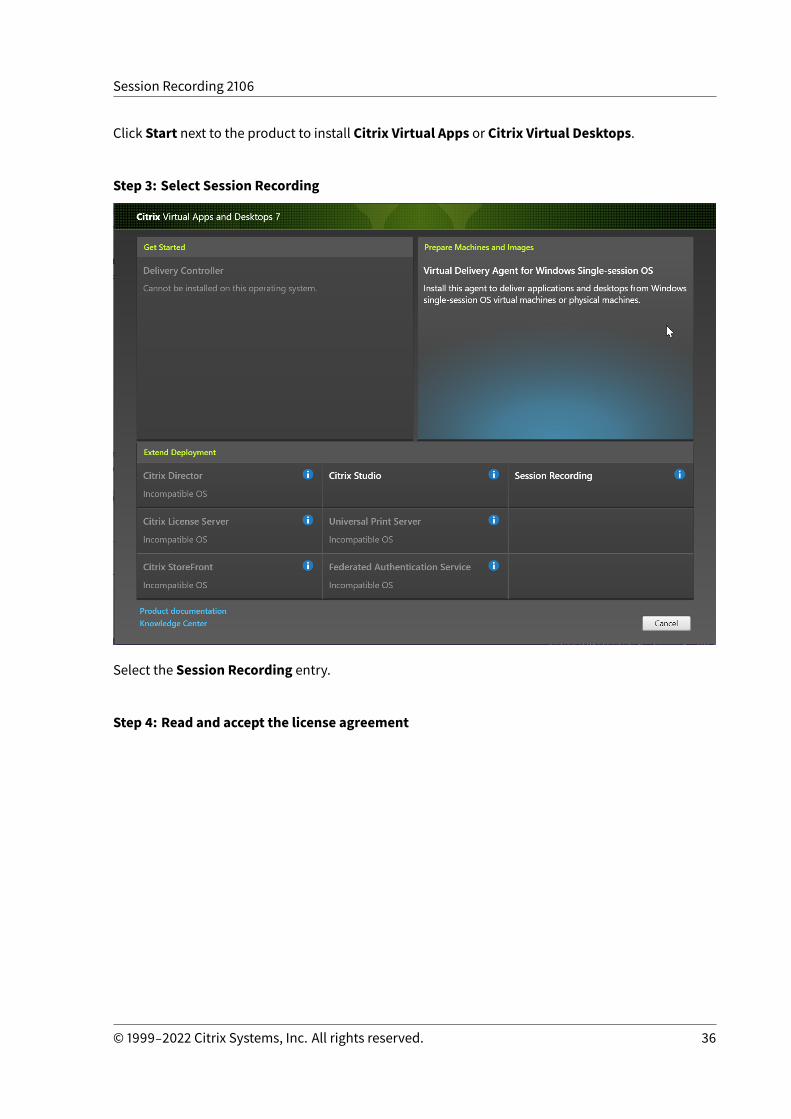
Click Start next to the product to install Citrix Virtual Apps or Citrix Virtual Desktops.
Step 3: Select Session Recording
Select the Session Recording entry.
Step 4: Read and accept the license agreement
© 1999‒2022 Citrix Systems, Inc. All rights reserved. 36

Session Recording 2106
On theSoftwareLicenseAgreementpage, read the license agreement, accept it, and then clickNext.
Step 5: Select the components to install and the installation location
© 1999‒2022 Citrix Systems, Inc. All rights reserved. 37
Session Recording 2106
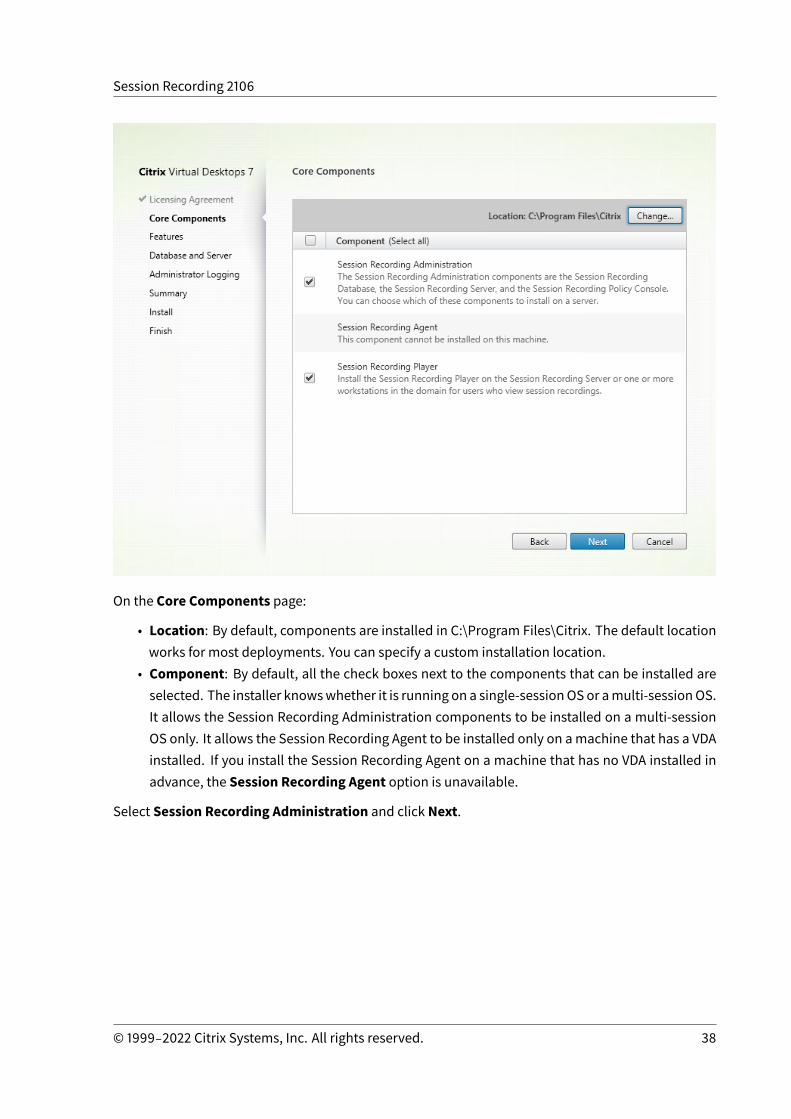
On the Core Components page:
• Location: By default, components are installed in C:\Program Files\Citrix. The default locationworks for most deployments. You can specify a custom installation location.
• Component: By default, all the check boxes next to the components that can be installed areselected. The installer knowswhether it is running on a single-sessionOS or amulti-sessionOS.It allows the Session Recording Administration components to be installed on a multi-sessionOS only. It allows the Session Recording Agent to be installed only on amachine that has a VDAinstalled. If you install the Session Recording Agent on a machine that has no VDA installed inadvance, the Session Recording Agent option is unavailable.
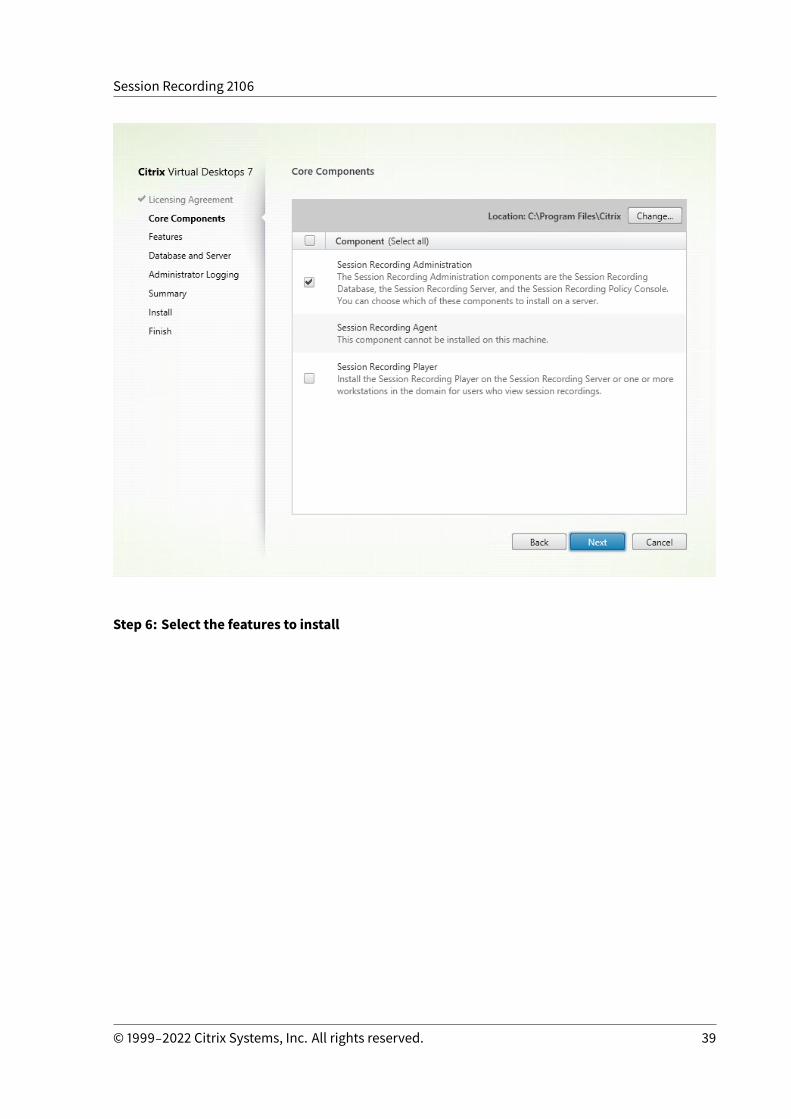
Select Session Recording Administration and click Next.
© 1999‒2022 Citrix Systems, Inc. All rights reserved. 38
Session Recording 2106
Step 6: Select the features to install
© 1999‒2022 Citrix Systems, Inc. All rights reserved. 39
Session Recording 2106
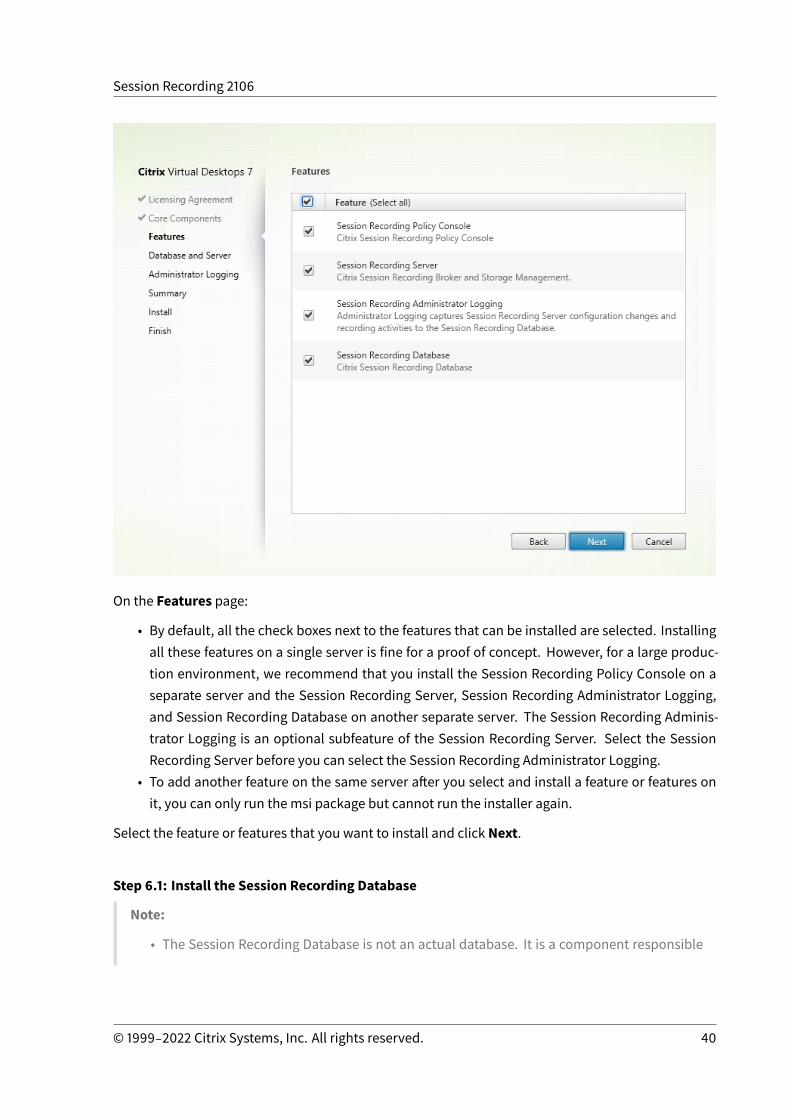
On the Features page:
• By default, all the check boxes next to the features that can be installed are selected. Installingall these features on a single server is fine for a proof of concept. However, for a large produc-tion environment, we recommend that you install the Session Recording Policy Console on aseparate server and the Session Recording Server, Session Recording Administrator Logging,and Session Recording Database on another separate server. The Session Recording Adminis-trator Logging is an optional subfeature of the Session Recording Server. Select the SessionRecording Server before you can select the Session Recording Administrator Logging.
• To add another feature on the same server after you select and install a feature or features onit, you can only run the msi package but cannot run the installer again.
Select the feature or features that you want to install and click Next.
Step 6.1: Install the Session Recording Database
Note:
• The Session Recording Database is not an actual database. It is a component responsible
© 1999‒2022 Citrix Systems, Inc. All rights reserved. 40
Session Recording 2106
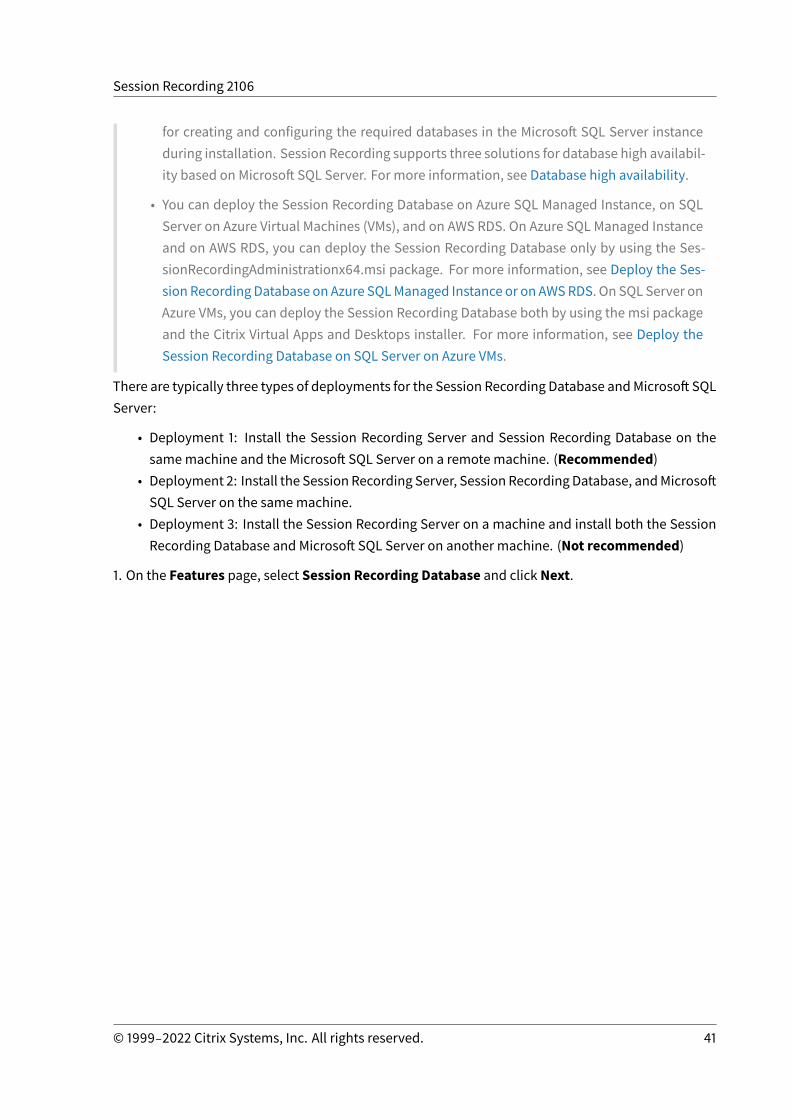
for creating and configuring the required databases in the Microsoft SQL Server instanceduring installation. Session Recording supports three solutions for database high availabil-ity based on Microsoft SQL Server. For more information, see Database high availability.
• You can deploy the Session Recording Database on Azure SQL Managed Instance, on SQLServer on Azure Virtual Machines (VMs), and on AWS RDS. On Azure SQL Managed Instanceand on AWS RDS, you can deploy the Session Recording Database only by using the Ses-sionRecordingAdministrationx64.msi package. For more information, see Deploy the Ses-sion RecordingDatabase on Azure SQLManaged Instance or on AWSRDS. On SQL Server onAzure VMs, you can deploy the Session Recording Database both by using the msi packageand the Citrix Virtual Apps and Desktops installer. For more information, see Deploy theSession Recording Database on SQL Server on Azure VMs.
There are typically three types of deployments for the Session Recording Database andMicrosoft SQLServer:
• Deployment 1: Install the Session Recording Server and Session Recording Database on thesamemachine and the Microsoft SQL Server on a remote machine. (Recommended)
• Deployment 2: Install the Session Recording Server, Session Recording Database, andMicrosoftSQL Server on the samemachine.
• Deployment 3: Install the Session Recording Server on a machine and install both the SessionRecording Database and Microsoft SQL Server on another machine. (Not recommended)
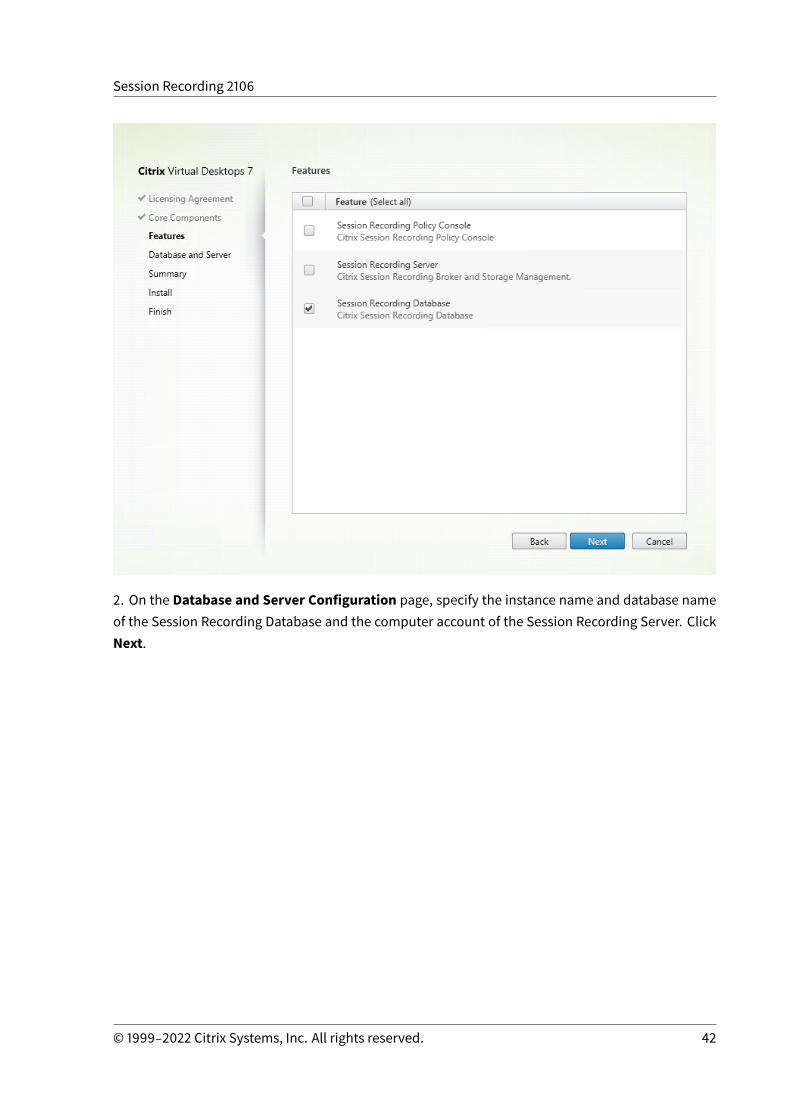
1. On the Features page, select Session Recording Database and click Next.
© 1999‒2022 Citrix Systems, Inc. All rights reserved. 41
Session Recording 2106
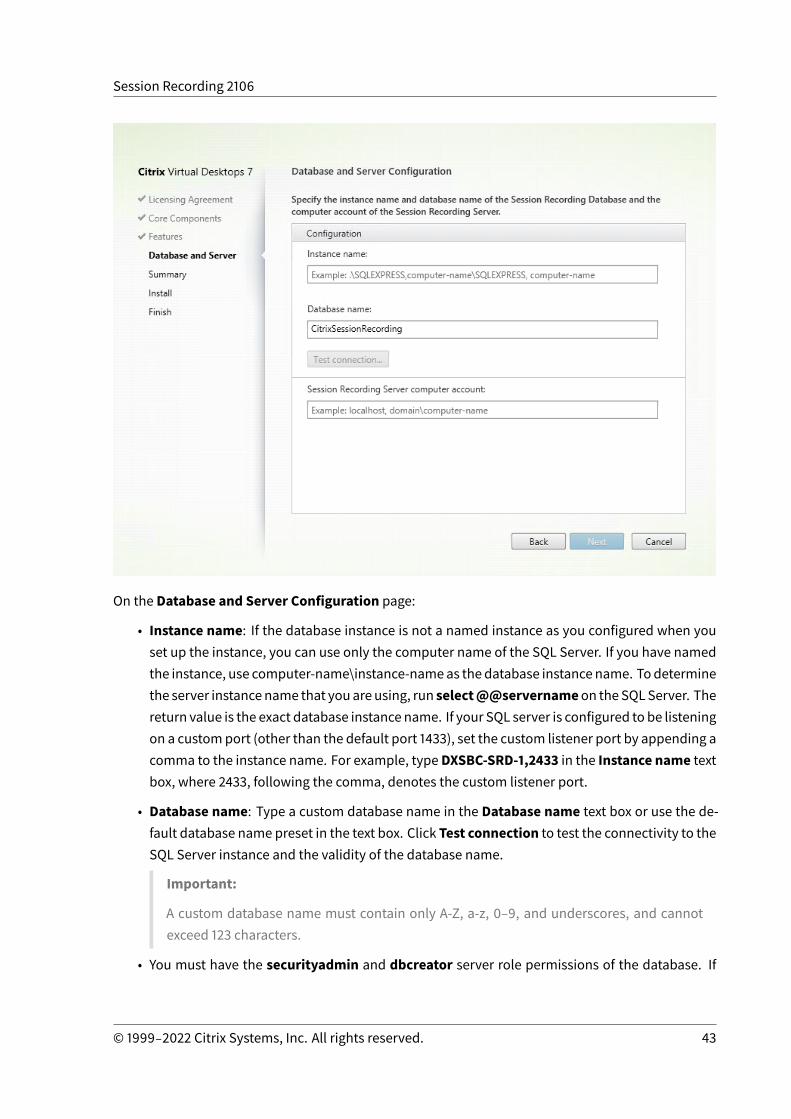
2. On the Database and Server Configuration page, specify the instance name and database nameof the Session Recording Database and the computer account of the Session Recording Server. ClickNext.
© 1999‒2022 Citrix Systems, Inc. All rights reserved. 42
Session Recording 2106
On the Database and Server Configuration page:
• Instance name: If the database instance is not a named instance as you configured when youset up the instance, you can use only the computer name of the SQL Server. If you have namedthe instance, use computer-name\instance-nameas thedatabase instance name. Todeterminethe server instancename that youare using, run select@@servernameon theSQLServer. Thereturn value is the exact database instance name. If your SQL server is configured to be listeningon a customport (other than the default port 1433), set the custom listener port by appending acomma to the instance name. For example, typeDXSBC-SRD-1,2433 in the Instance name textbox, where 2433, following the comma, denotes the custom listener port.
• Database name: Type a custom database name in the Database name text box or use the de-fault database name preset in the text box. Click Test connection to test the connectivity to theSQL Server instance and the validity of the database name.
Important:
A custom database name must contain only A-Z, a-z, 0–9, and underscores, and cannotexceed 123 characters.
• You must have the securityadmin and dbcreator server role permissions of the database. If
© 1999‒2022 Citrix Systems, Inc. All rights reserved. 43

Session Recording 2106
you do not have the permissions, you can:
– Ask the database administrator to assign the permissions for the installation. After theinstallation completes, the securityadmin and dbcreator server role permissions are nolonger necessary and can be safely removed.
– Or, use the SessionRecordingAdministrationx64.msi package under \layout\image-full\x64\Session Recording on the Citrix Virtual Apps and Desktops ISO. During the msiinstallation, a dialog box prompts for the credentials of a database administrator with thesecurityadmin and dbcreator server role permissions. Type the correct credentials andthen clickOK to continue the installation.
The installation creates the Session Recording Database and adds themachine account ofthe Session Recording Server as db_owner.
• Session Recording Server computer account:
– Deployments 1 and 2: Type localhost in the Session Recording Server computer ac-count text box.
– Deployment 3: Type the name of the machine hosting the Session Recording Server inthe format of domain\computer-name. The Session Recording Server computer accountis the user account for accessing the Session Recording Database.
Note:
Attempts to install the Session Recording Administration components can fail with errorcode 1603whenadomainname is set in theSessionRecordingServer computeraccounttext box. As aworkaround, type localhost or NetBIOS domain name\machine name in theSessionRecording Server computer account text box. To get theNetBIOS domain name,run $env:userdomain in PowerShell or echo %UserDomain% in a command prompt onthe machine where the Session Recording Server is installed.
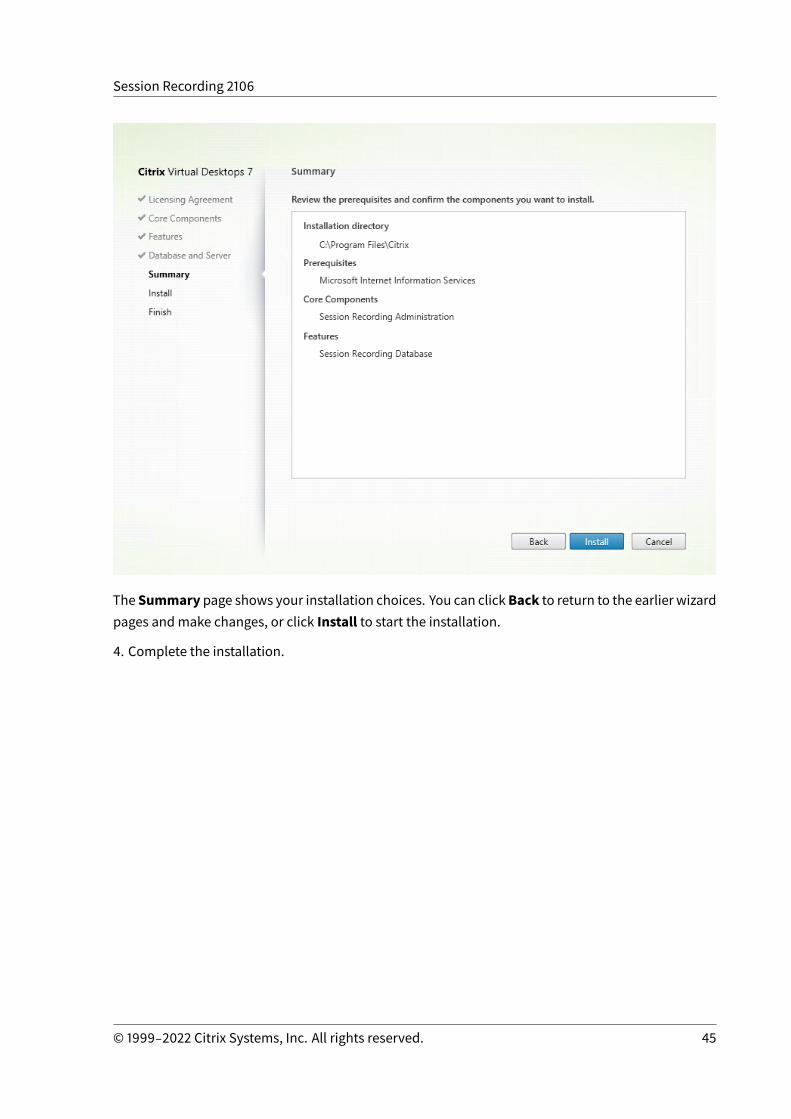
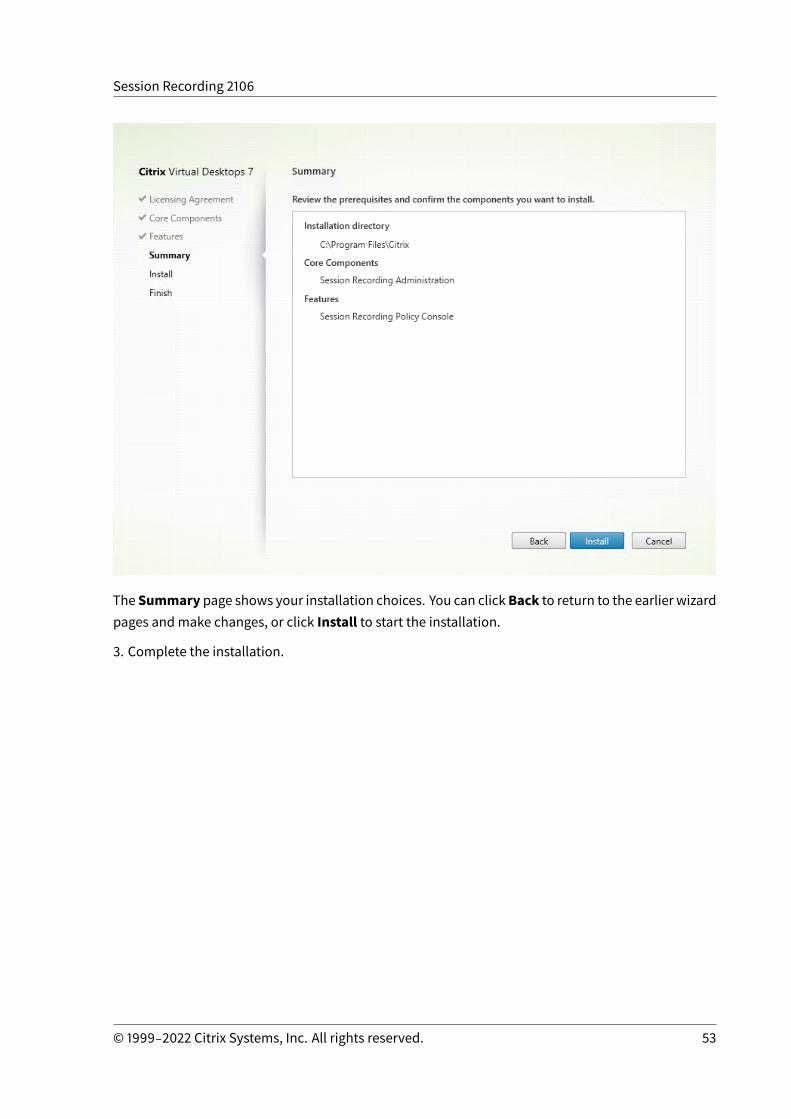
3. Review the prerequisites and confirm the installation.
© 1999‒2022 Citrix Systems, Inc. All rights reserved. 44
Session Recording 2106
The Summary page shows your installation choices. You can clickBack to return to the earlier wizardpages andmake changes, or click Install to start the installation.
4. Complete the installation.
© 1999‒2022 Citrix Systems, Inc. All rights reserved. 45
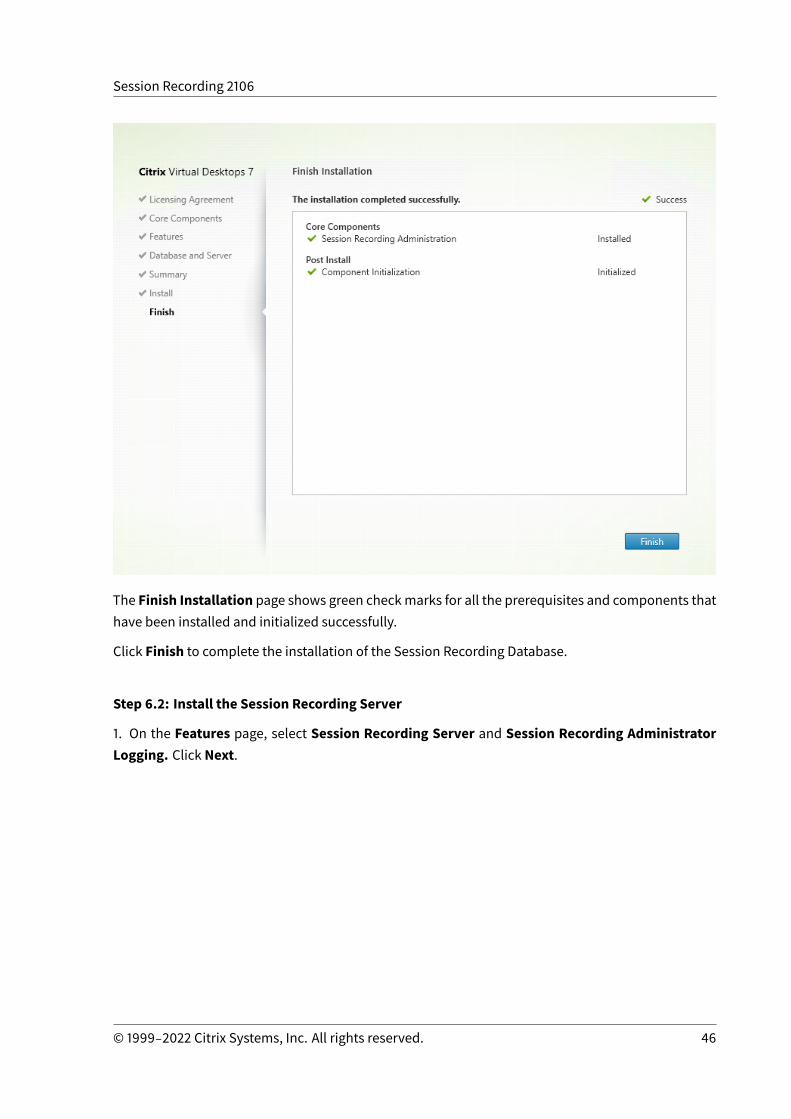
Session Recording 2106
The Finish Installation page shows green checkmarks for all the prerequisites and components thathave been installed and initialized successfully.
Click Finish to complete the installation of the Session Recording Database.
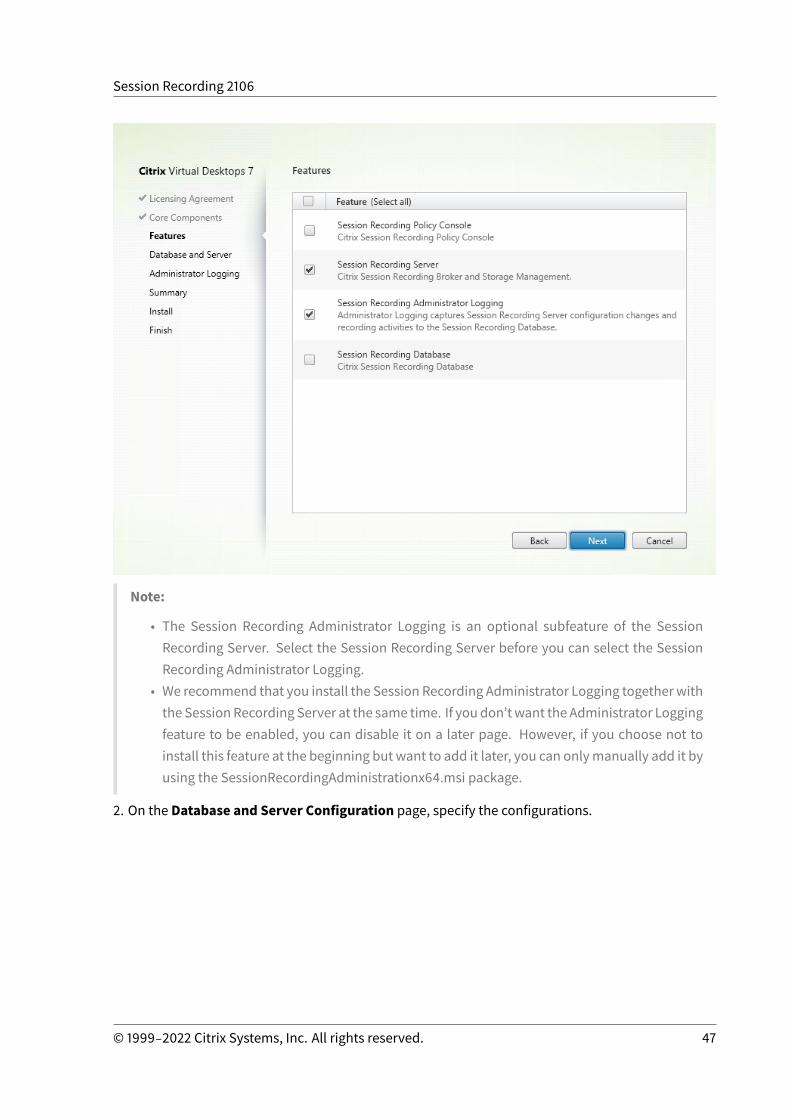
Step 6.2: Install the Session Recording Server
1. On the Features page, select Session Recording Server and Session Recording AdministratorLogging. Click Next.
© 1999‒2022 Citrix Systems, Inc. All rights reserved. 46
Session Recording 2106
Note:
• The Session Recording Administrator Logging is an optional subfeature of the SessionRecording Server. Select the Session Recording Server before you can select the SessionRecording Administrator Logging.
• We recommend that you install the Session Recording Administrator Logging togetherwiththe SessionRecording Server at the same time. If youdon’twant the Administrator Loggingfeature to be enabled, you can disable it on a later page. However, if you choose not toinstall this feature at the beginning but want to add it later, you can onlymanually add it byusing the SessionRecordingAdministrationx64.msi package.
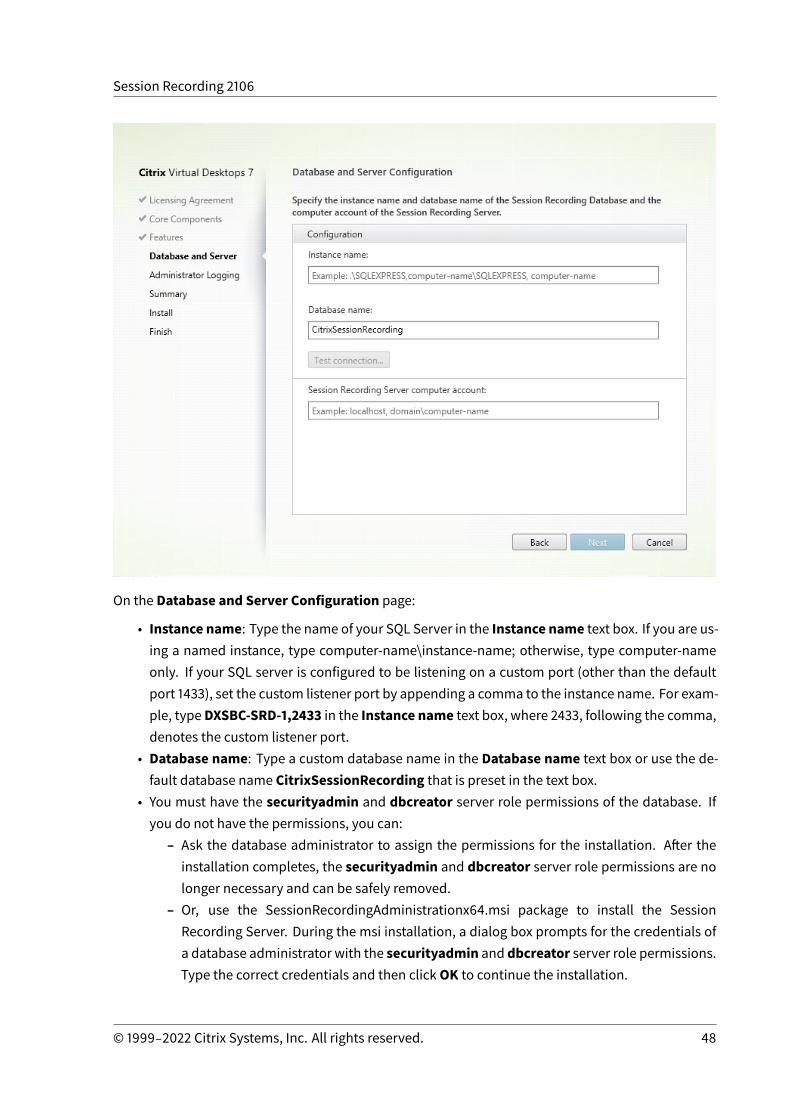
2. On the Database and Server Configuration page, specify the configurations.
© 1999‒2022 Citrix Systems, Inc. All rights reserved. 47
Session Recording 2106
On the Database and Server Configuration page:
• Instance name: Type the name of your SQL Server in the Instance name text box. If you are us-ing a named instance, type computer-name\instance-name; otherwise, type computer-nameonly. If your SQL server is configured to be listening on a custom port (other than the defaultport 1433), set the custom listener port by appending a comma to the instance name. For exam-ple, typeDXSBC-SRD-1,2433 in the Instance name text box, where 2433, following the comma,denotes the custom listener port.
• Database name: Type a custom database name in the Database name text box or use the de-fault database name CitrixSessionRecording that is preset in the text box.
• You must have the securityadmin and dbcreator server role permissions of the database. Ifyou do not have the permissions, you can:
– Ask the database administrator to assign the permissions for the installation. After theinstallation completes, the securityadmin and dbcreator server role permissions are nolonger necessary and can be safely removed.
– Or, use the SessionRecordingAdministrationx64.msi package to install the SessionRecording Server. During the msi installation, a dialog box prompts for the credentials ofa database administrator with the securityadmin and dbcreator server role permissions.Type the correct credentials and then clickOK to continue the installation.
© 1999‒2022 Citrix Systems, Inc. All rights reserved. 48

Session Recording 2106
• After typing the correct instance name and database name, click Test connection to test theconnectivity to the Session Recording Database.
• Type the Session Recording Server computer account, and then click Next.
3. On the Administration Logging Configuration page, specify configurations for the AdministrationLogging feature.
On the Administration Logging Configuration page:
• The Administration Logging database is installed on the SQL Server instance: This text boxis not editable. The SQL Server instance name of the Administration Logging database is auto-matically grabbed from the instance name that you typed on theDatabase and Server Config-uration page.
• Administrator Logging database name: To install the Session Recording Administrator Log-ging feature, type a custom database name for the Administrator Logging database in this textbox or use the default database nameCitrixSessionRecordingLogging that is preset in the textbox.
Note:
© 1999‒2022 Citrix Systems, Inc. All rights reserved. 49

Session Recording 2106
The Administrator Logging database name must be different from the Session RecordingDatabase name that is set in the Database name text box on the previous Database andServer Configuration page.
• After typing the Administrator Logging database name, click Test connection to test the con-nectivity to the Administrator Logging database.
• EnableAdministrationLogging: Bydefault, theAdministrationLogging feature is enabled. Youcan disable it by clearing the check box.
• Enablemandatory blocking: By default, mandatory blocking is enabled. The normal featuresmight beblocked if logging fails. You candisablemandatory blocking by clearing the checkbox.
Click Next to continue the installation.
4. Review the prerequisites and confirm the installation.
The Summary page shows your installation choices. You can clickBack to return to the earlier wizardpages andmake changes, or click Install to start the installation.
5. Complete the installation.
© 1999‒2022 Citrix Systems, Inc. All rights reserved. 50
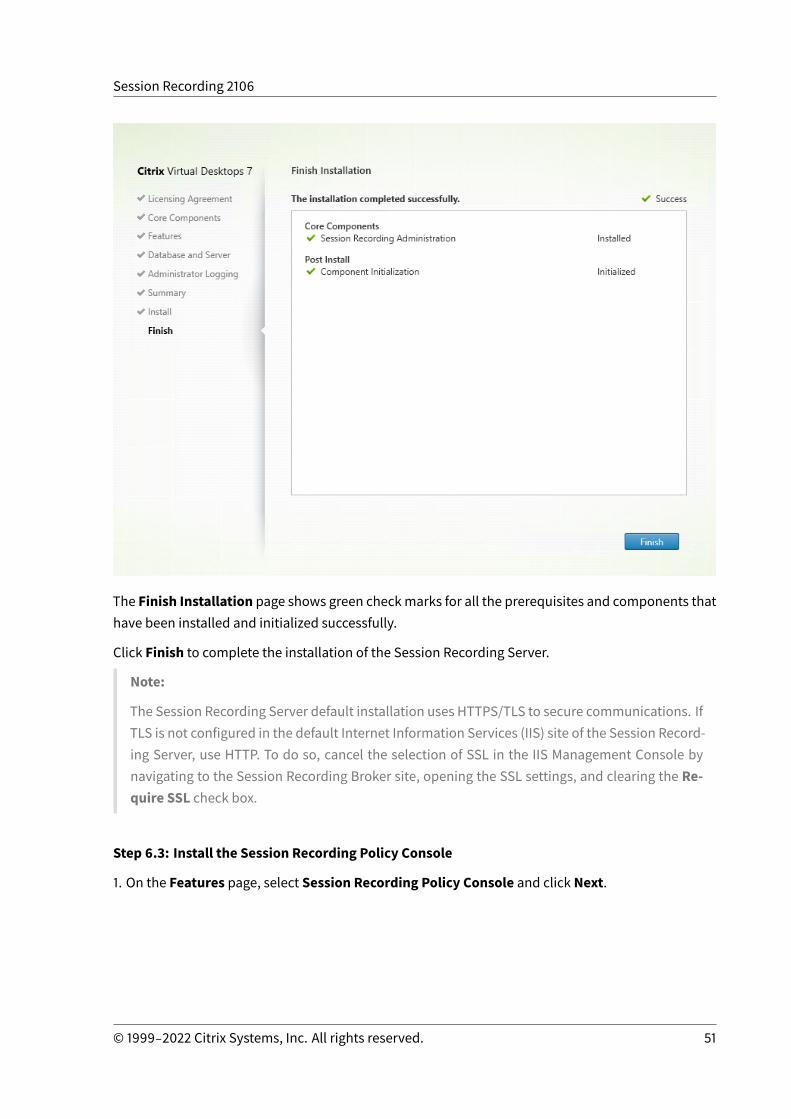
Session Recording 2106
The Finish Installation page shows green checkmarks for all the prerequisites and components thathave been installed and initialized successfully.
Click Finish to complete the installation of the Session Recording Server.
Note:
The Session Recording Server default installation uses HTTPS/TLS to secure communications. IfTLS is not configured in the default Internet Information Services (IIS) site of the Session Record-ing Server, use HTTP. To do so, cancel the selection of SSL in the IIS Management Console bynavigating to the Session Recording Broker site, opening the SSL settings, and clearing the Re-quire SSL check box.
Step 6.3: Install the Session Recording Policy Console
1. On the Features page, select Session Recording Policy Console and click Next.
© 1999‒2022 Citrix Systems, Inc. All rights reserved. 51

Session Recording 2106
2. Review the prerequisites and confirm the installation.
© 1999‒2022 Citrix Systems, Inc. All rights reserved. 52
Session Recording 2106
The Summary page shows your installation choices. You can clickBack to return to the earlier wizardpages andmake changes, or click Install to start the installation.
3. Complete the installation.
© 1999‒2022 Citrix Systems, Inc. All rights reserved. 53
Session Recording 2106
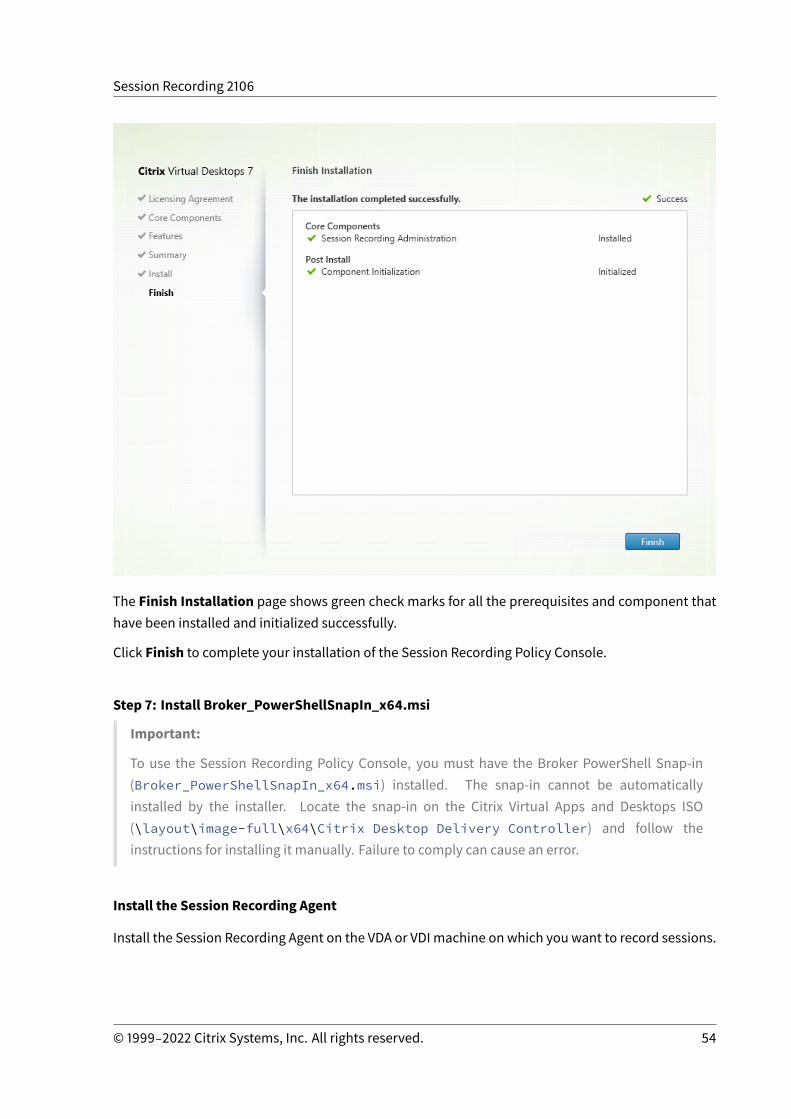
The Finish Installation page shows green check marks for all the prerequisites and component thathave been installed and initialized successfully.
Click Finish to complete your installation of the Session Recording Policy Console.
Step 7: Install Broker_PowerShellSnapIn_x64.msi
Important:
To use the Session Recording Policy Console, you must have the Broker PowerShell Snap-in(Broker_PowerShellSnapIn_x64.msi) installed. The snap-in cannot be automaticallyinstalled by the installer. Locate the snap-in on the Citrix Virtual Apps and Desktops ISO(\layout\image-full\x64\Citrix Desktop Delivery Controller) and follow theinstructions for installing it manually. Failure to comply can cause an error.
Install the Session Recording Agent
Install the Session Recording Agent on the VDA or VDI machine on which you want to record sessions.
© 1999‒2022 Citrix Systems, Inc. All rights reserved. 54
Session Recording 2106
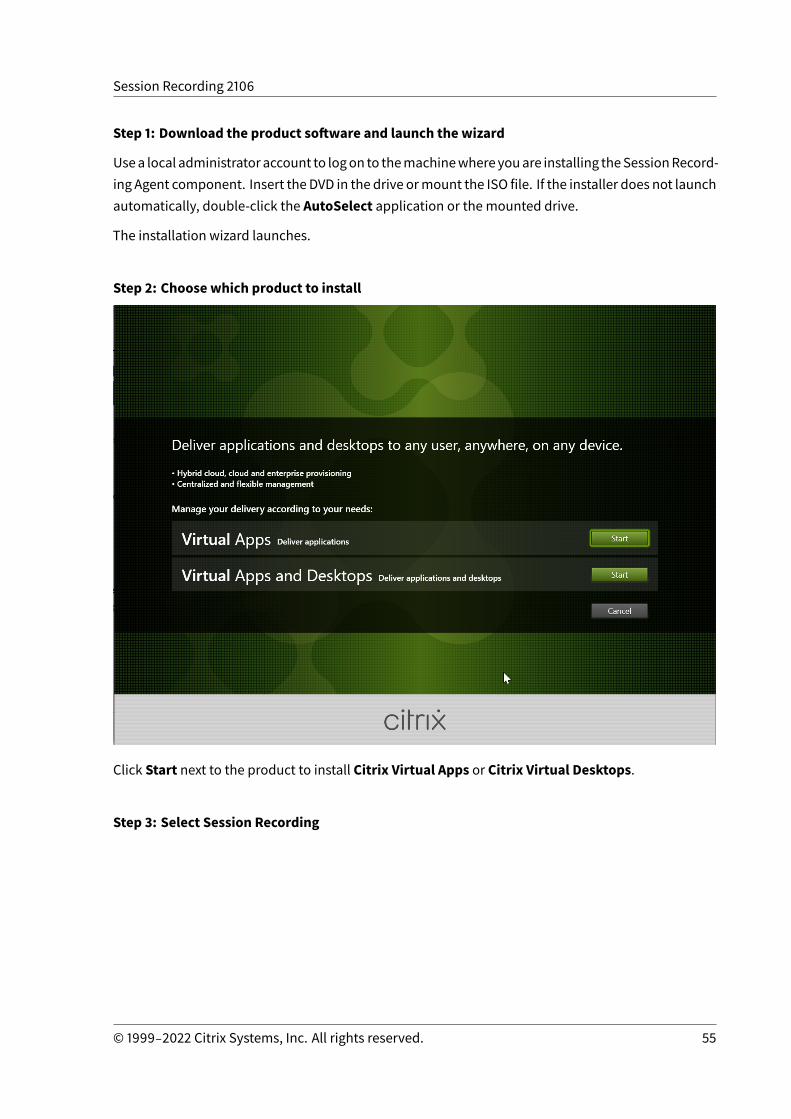
Step 1: Download the product software and launch the wizard
Usea local administrator account to logon to themachinewhereyouare installing theSessionRecord-ing Agent component. Insert the DVD in the drive ormount the ISO file. If the installer does not launchautomatically, double-click the AutoSelect application or the mounted drive.
The installation wizard launches.
Step 2: Choose which product to install
Click Start next to the product to install Citrix Virtual Apps or Citrix Virtual Desktops.
Step 3: Select Session Recording
© 1999‒2022 Citrix Systems, Inc. All rights reserved. 55
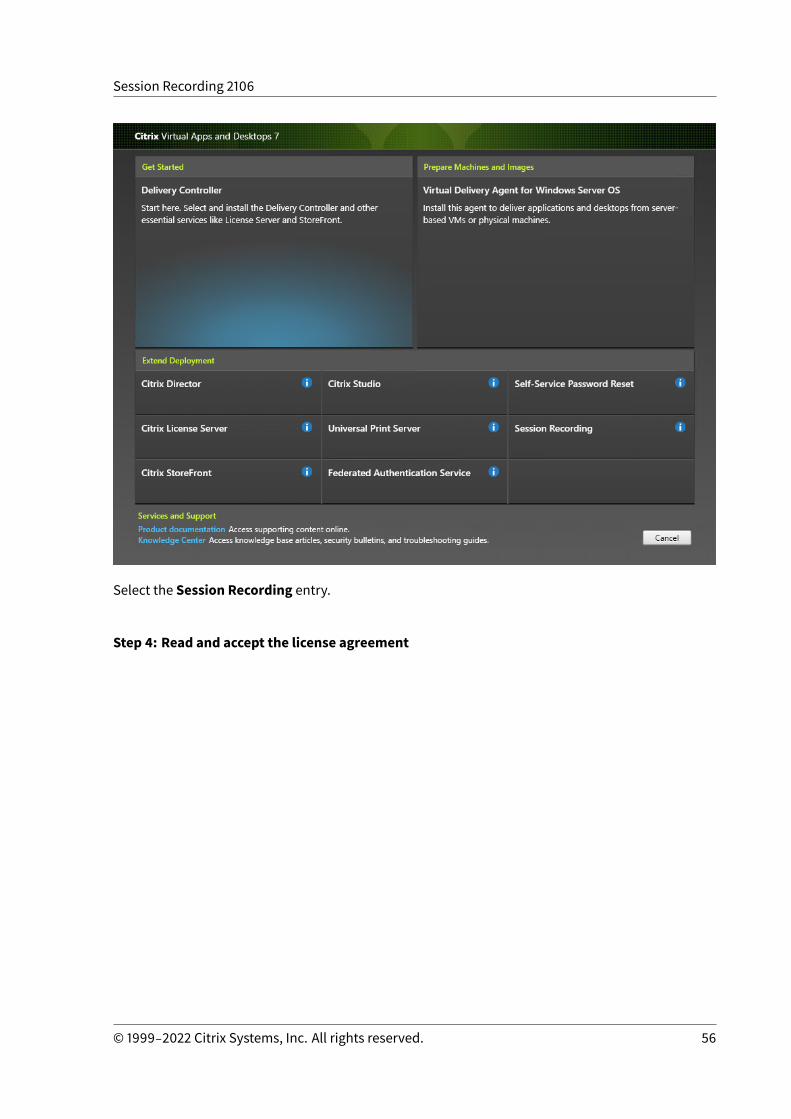
Session Recording 2106
Select the Session Recording entry.
Step 4: Read and accept the license agreement
© 1999‒2022 Citrix Systems, Inc. All rights reserved. 56
Session Recording 2106
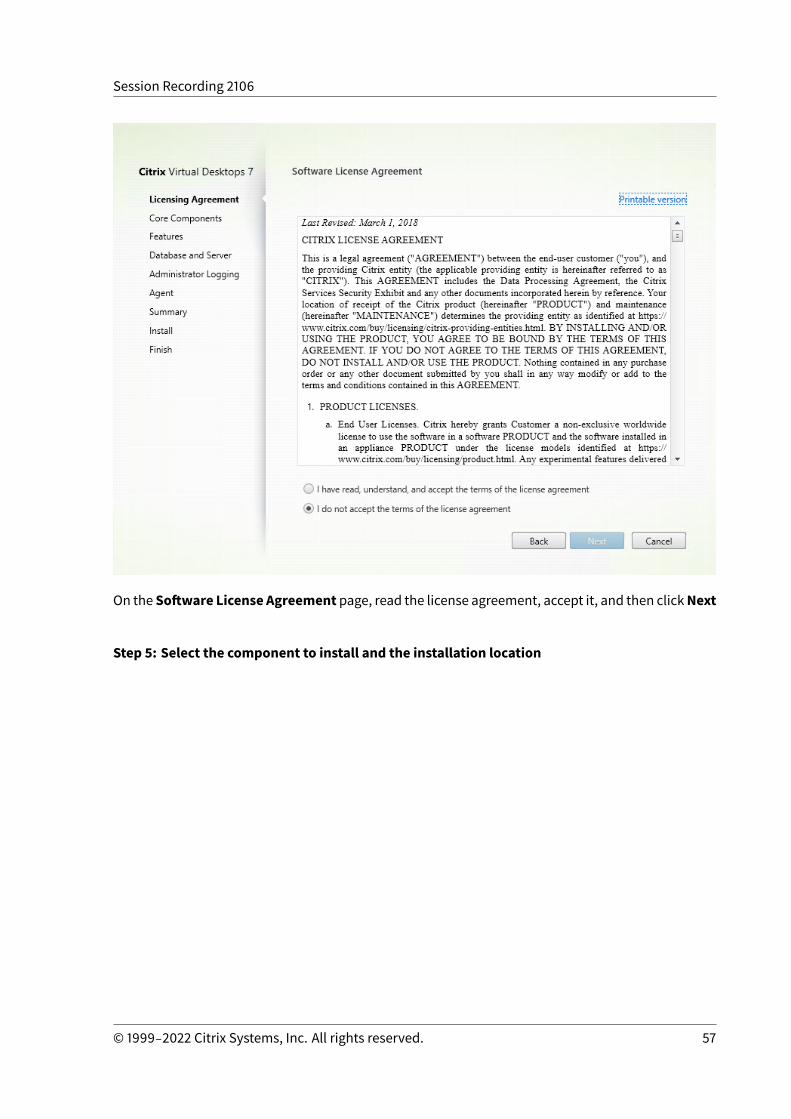
On the Software License Agreement page, read the license agreement, accept it, and then clickNext
Step 5: Select the component to install and the installation location
© 1999‒2022 Citrix Systems, Inc. All rights reserved. 57
Session Recording 2106
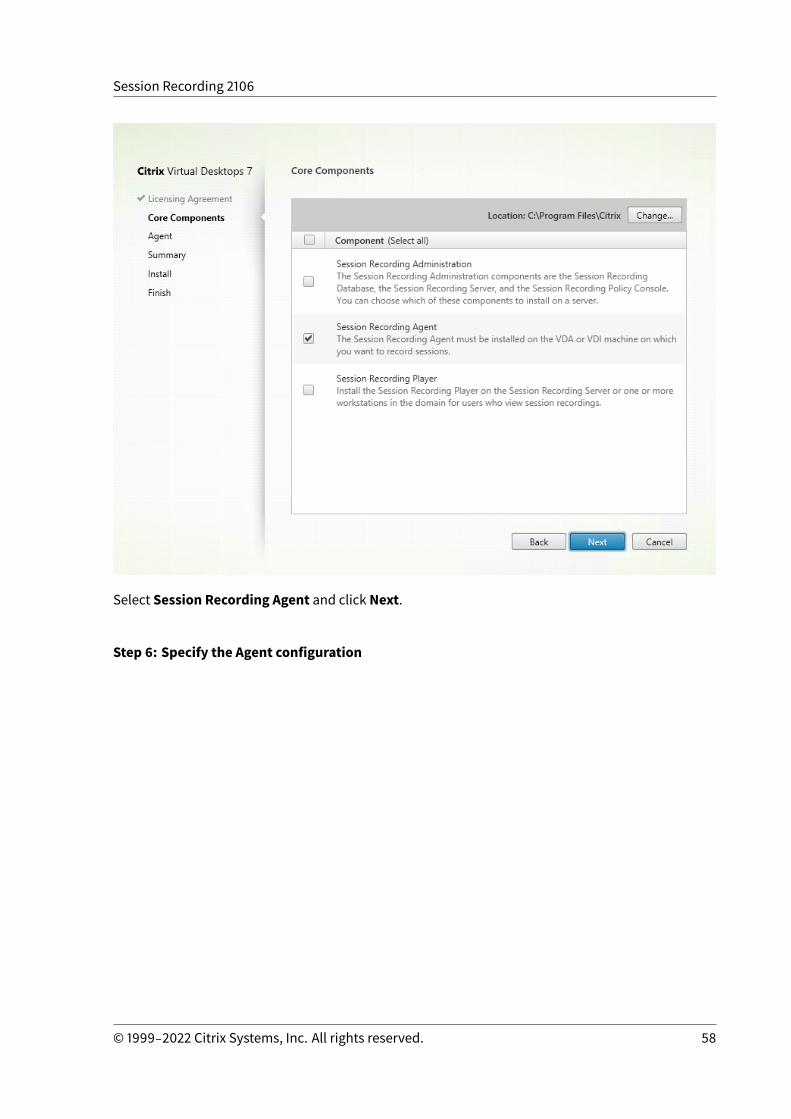
Select Session Recording Agent and click Next.
Step 6: Specify the Agent configuration
© 1999‒2022 Citrix Systems, Inc. All rights reserved. 58
Session Recording 2106
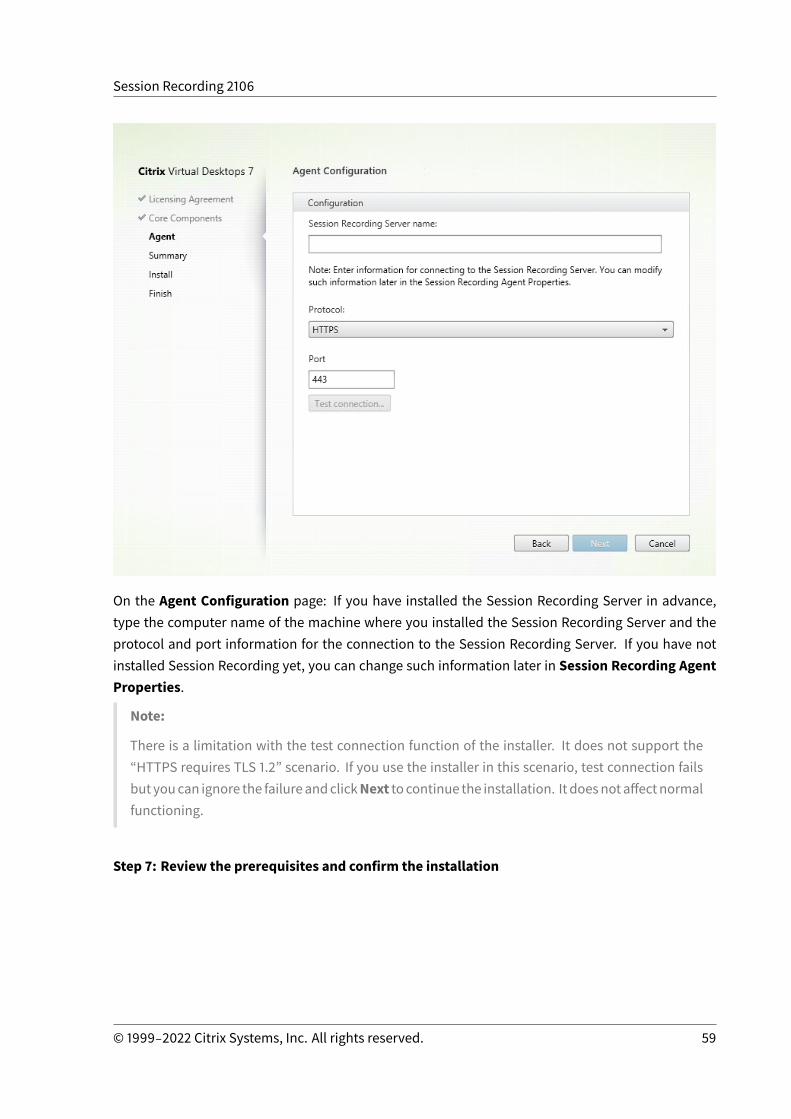
On the Agent Configuration page: If you have installed the Session Recording Server in advance,type the computer name of the machine where you installed the Session Recording Server and theprotocol and port information for the connection to the Session Recording Server. If you have notinstalled Session Recording yet, you can change such information later in Session Recording AgentProperties.
Note:
There is a limitation with the test connection function of the installer. It does not support the“HTTPS requires TLS 1.2” scenario. If you use the installer in this scenario, test connection failsbut youcan ignore the failureandclickNext to continue the installation. It doesnotaffectnormalfunctioning.
Step 7: Review the prerequisites and confirm the installation
© 1999‒2022 Citrix Systems, Inc. All rights reserved. 59
Session Recording 2106
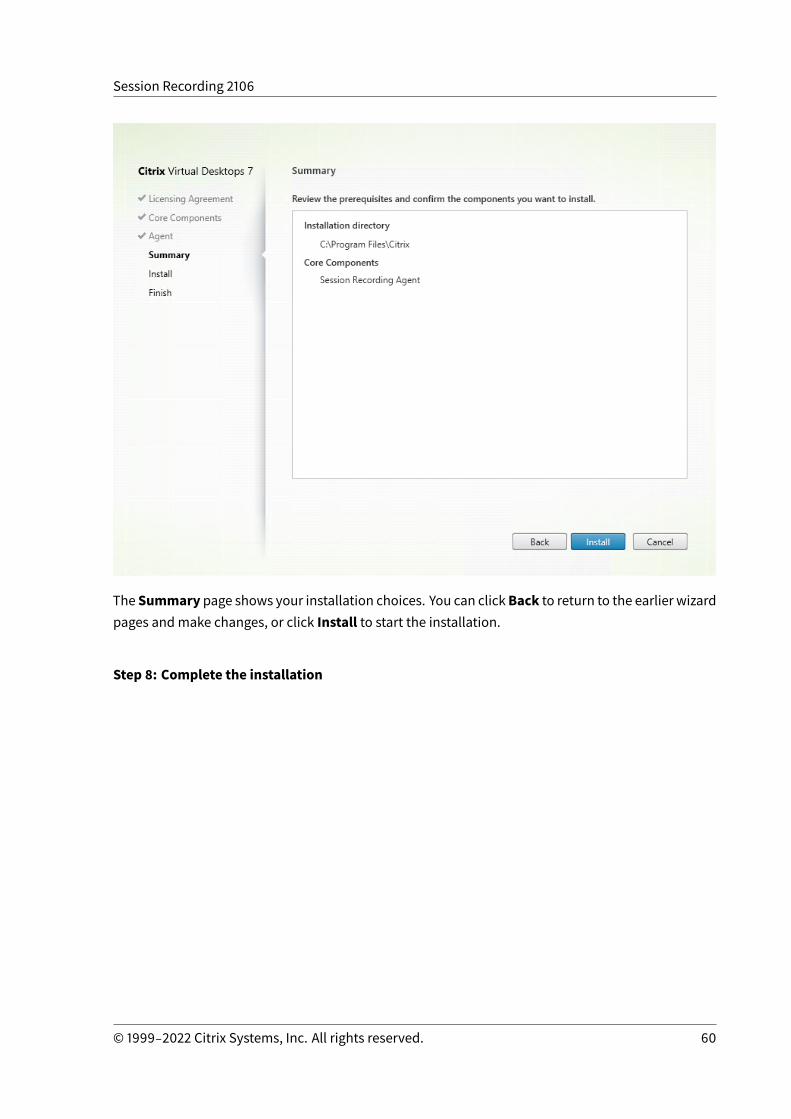
The Summary page shows your installation choices. You can clickBack to return to the earlier wizardpages andmake changes, or click Install to start the installation.
Step 8: Complete the installation
© 1999‒2022 Citrix Systems, Inc. All rights reserved. 60
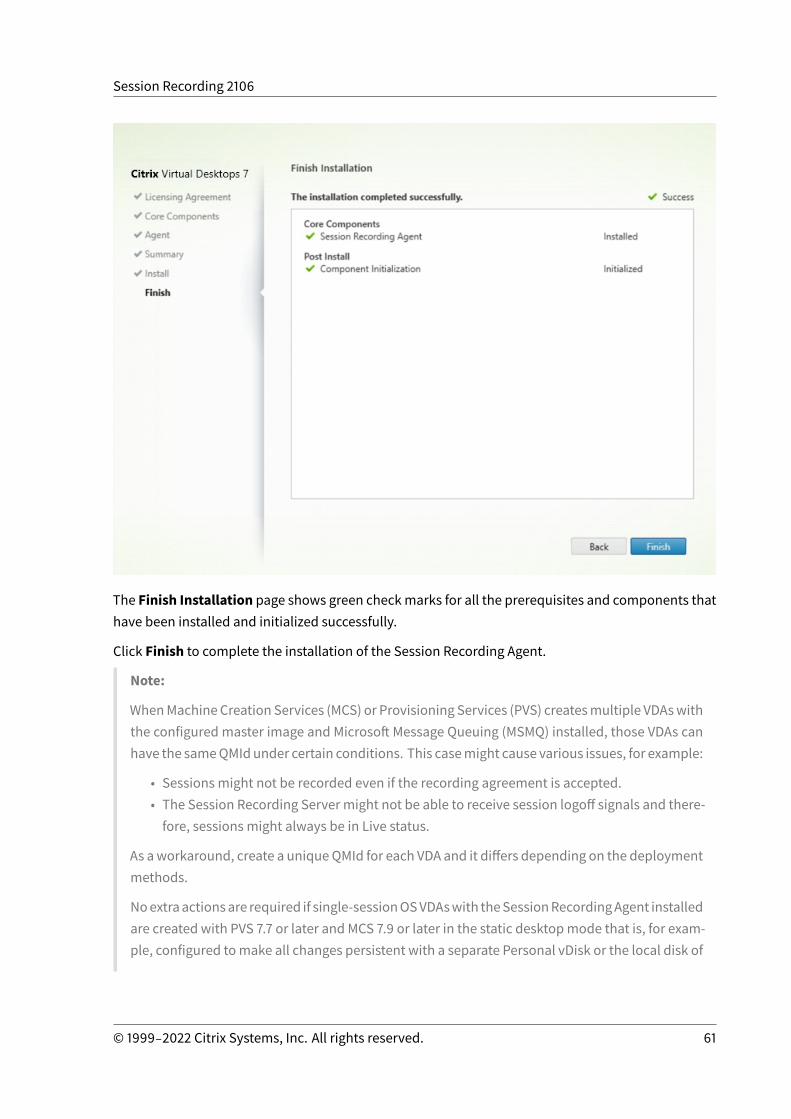
Session Recording 2106
The Finish Installation page shows green checkmarks for all the prerequisites and components thathave been installed and initialized successfully.
Click Finish to complete the installation of the Session Recording Agent.
Note:
WhenMachine Creation Services (MCS) or Provisioning Services (PVS) createsmultiple VDAswiththe configured master image and Microsoft Message Queuing (MSMQ) installed, those VDAs canhave the sameQMIdunder certain conditions. This casemight cause various issues, for example:
• Sessions might not be recorded even if the recording agreement is accepted.• The Session Recording Server might not be able to receive session logoff signals and there-fore, sessions might always be in Live status.
As aworkaround, create a uniqueQMId for each VDA and it differs depending on the deploymentmethods.
Noextraactionsare required if single-sessionOSVDAswith theSessionRecordingAgent installedare created with PVS 7.7 or later and MCS 7.9 or later in the static desktopmode that is, for exam-ple, configured tomake all changes persistent with a separate Personal vDisk or the local disk of
© 1999‒2022 Citrix Systems, Inc. All rights reserved. 61
Session Recording 2106
your VDA.
For multi-session OS VDAs created with MCS or PVS and single-session OS VDAs that are config-ured to discard all changes when a user logs off, use the GenRandomQMID.ps1 script to changethe QMId on system startup. Change the power management strategy to ensure that enoughVDAs are running before user logon attempts.
To use the GenRandomQMID.ps1 script, do the following:
1. Ensure that the execution policy is set to RemoteSigned or Unrestricted in PowerShell.
1 Set-ExecutionPolicy RemoteSigned
2. Create a scheduled task, set the trigger as on systemstartup, and runwith the SYSTEMaccounton the PVS or MCSmaster imagemachine.
3. Add the command as a startup task.
1 powershell .exe -file C:\\GenRandomQMID.ps1
Summary of the GenRandomQMID.ps1 script:
1. Remove the current QMId from the registry.2. AddSysPrep = 1 toHKEY_LOCAL_MACHINE\SOFTWARE\Microsoft\MSMQ\Parameters
.3. Stop related services, including CitrixSmAudAgent and MSMQ.4. To generate a randomQMId, start the services that stopped previously.
Example GENRANDOMQMID.PS1:
1 # Remove old QMId from registry and set SysPrep flag for MSMQ23 Remove-Itemproperty -Path HKLM:Software\Microsoft\MSMQ\Parameters\
MachineCache -Name QMId -Force45 Set-ItemProperty -Path HKLM:Software\Microsoft\MSMQ\Parameters -Name ”
SysPrep” -Type DWord -Value 167 # Get dependent services89 $depServices = Get-Service -name MSMQ -dependentservices | Select -
Property Name10
© 1999‒2022 Citrix Systems, Inc. All rights reserved. 62
Session Recording 2106
11 # Restart MSMQ to get a new QMId1213 Restart-Service -force MSMQ1415 # Start dependent services1617 if ($depServices -ne $null) {181920 foreach ($depService in $depServices) {212223 $startMode = Get-WmiObject win32_service -filter ”NAME = '$(
$depService.Name)'” | Select -Property StartMode2425 if ($startMode.StartMode -eq ”Auto”) {262728 Start-Service $depService.Name29 }3031 }323334 }3536 <!--NeedCopy-->
Install the Session Recording Player
Install the Session Recording Player on the Session Recording Server or on workstations in the do-main.
Step 1: Download the product software and launch the wizard
Usea local administrator account to logon to themachinewhereyouare installing theSessionRecord-ingPlayer component. Insert theDVD in thedrive ormount the ISO file. If the installer does not launchautomatically, double-click the AutoSelect application or the mounted drive.
The installation wizard launches.
Step 2: Choose which product to install
© 1999‒2022 Citrix Systems, Inc. All rights reserved. 63
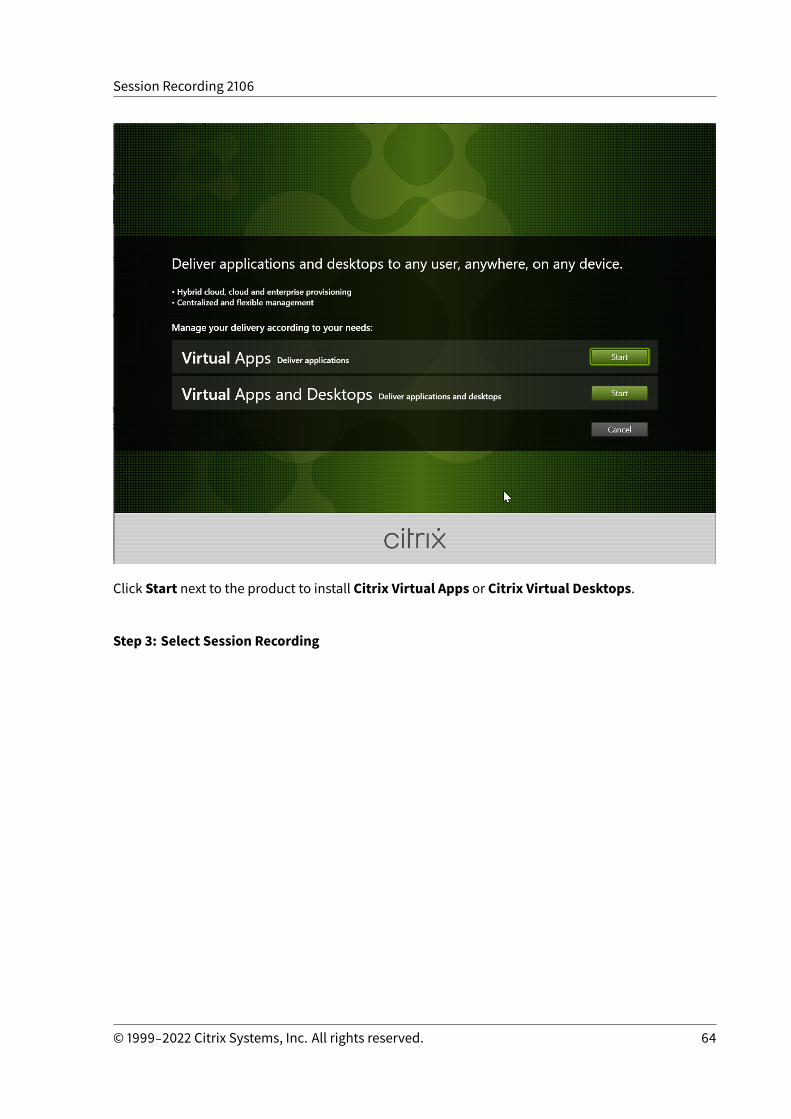
Session Recording 2106
Click Start next to the product to install Citrix Virtual Apps or Citrix Virtual Desktops.
Step 3: Select Session Recording
© 1999‒2022 Citrix Systems, Inc. All rights reserved. 64
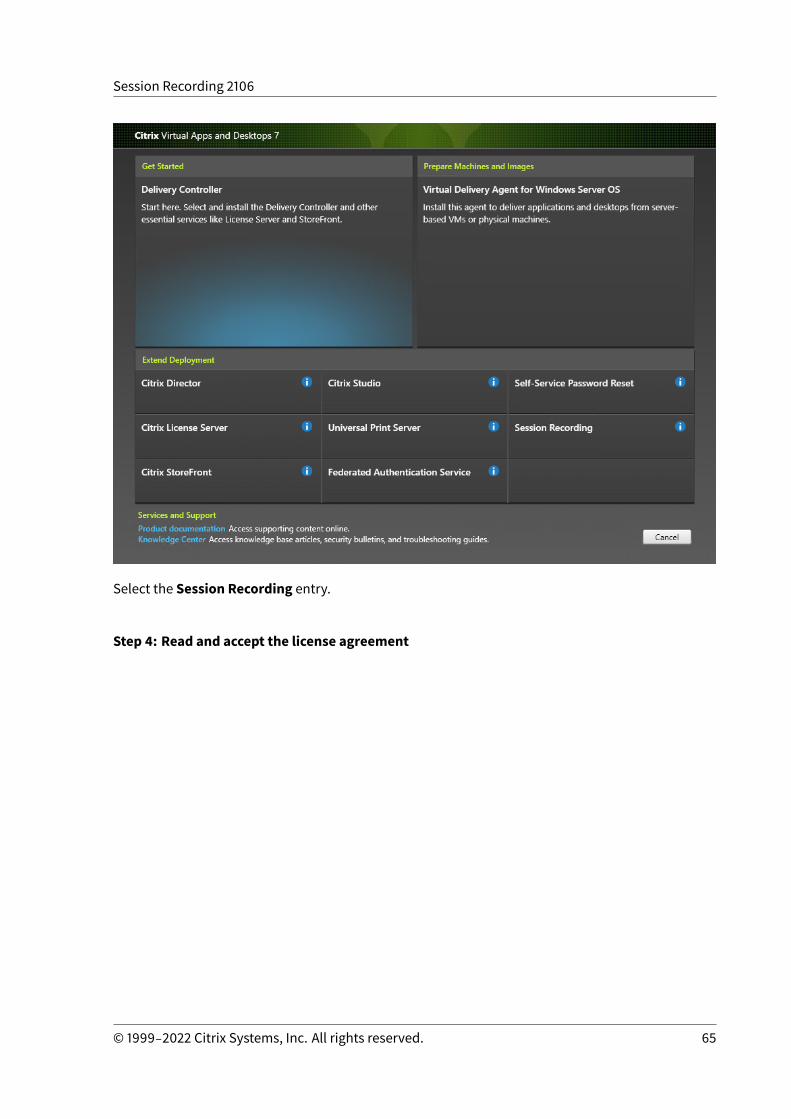
Session Recording 2106
Select the Session Recording entry.
Step 4: Read and accept the license agreement
© 1999‒2022 Citrix Systems, Inc. All rights reserved. 65

Session Recording 2106
On theSoftwareLicenseAgreementpage, read the license agreement, accept it, and then clickNext.
Step 5: Select the component to install and the installation location
© 1999‒2022 Citrix Systems, Inc. All rights reserved. 66
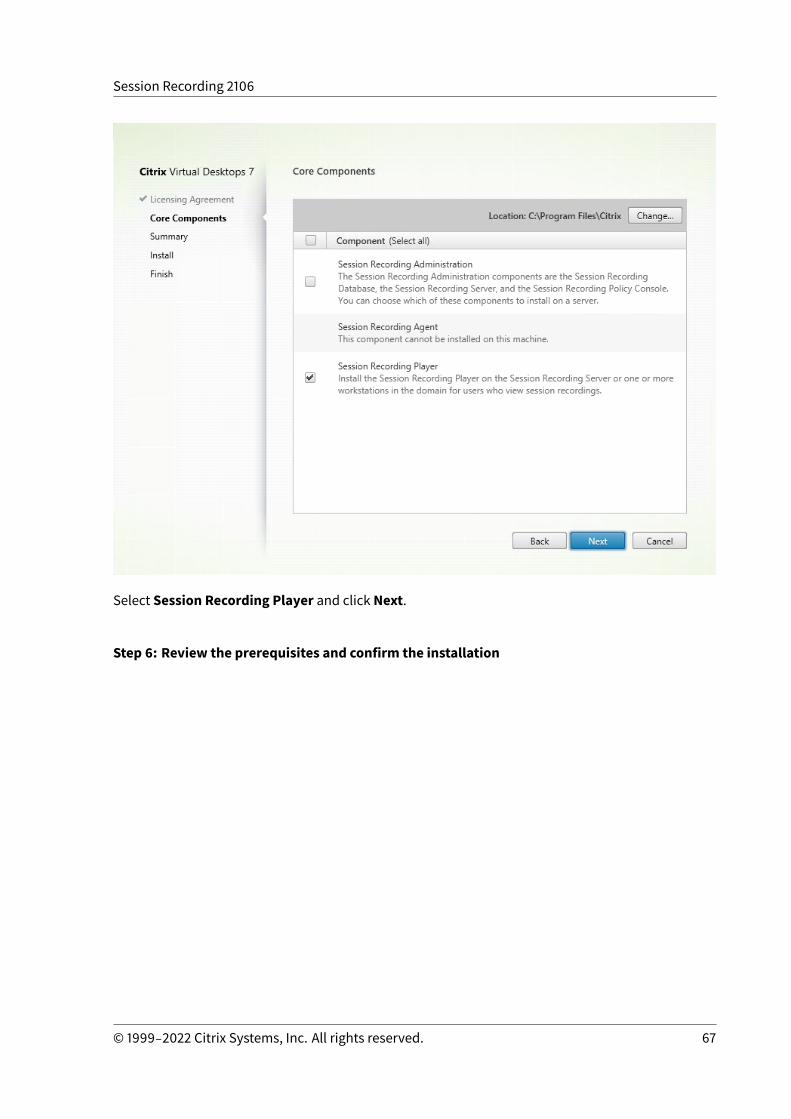
Session Recording 2106
Select Session Recording Player and click Next.
Step 6: Review the prerequisites and confirm the installation
© 1999‒2022 Citrix Systems, Inc. All rights reserved. 67
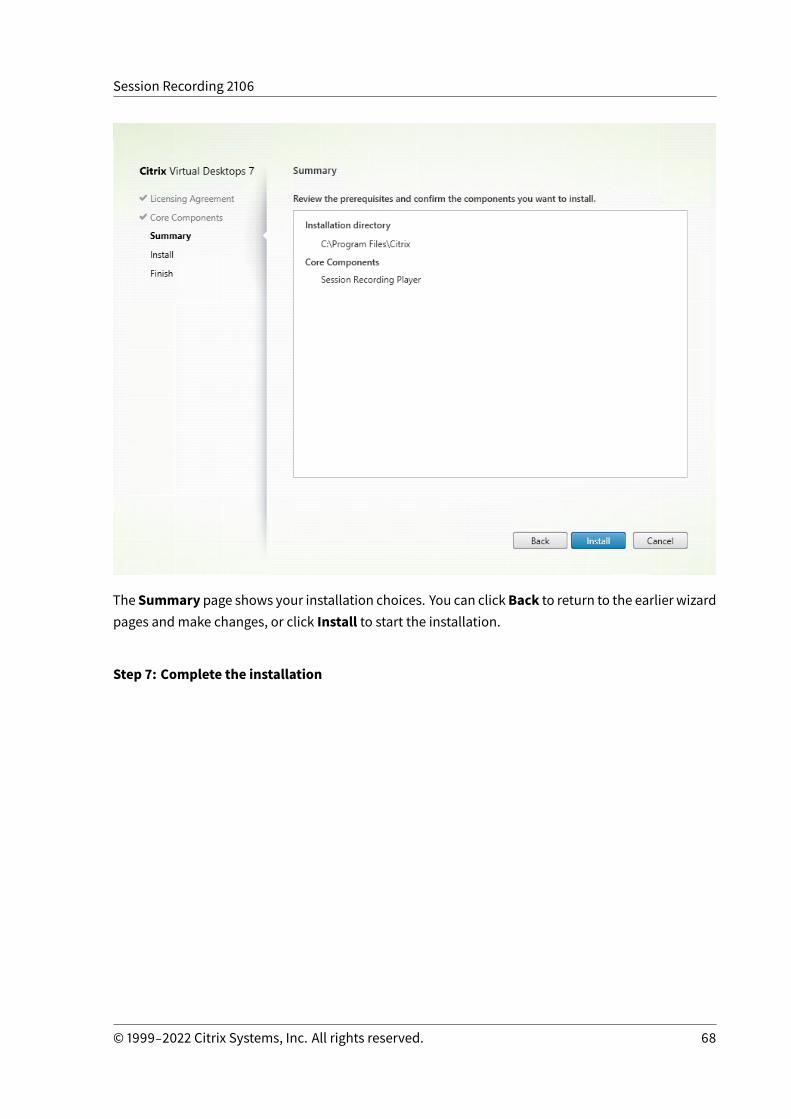
Session Recording 2106
The Summary page shows your installation choices. You can clickBack to return to the earlier wizardpages andmake changes, or click Install to start the installation.
Step 7: Complete the installation
© 1999‒2022 Citrix Systems, Inc. All rights reserved. 68
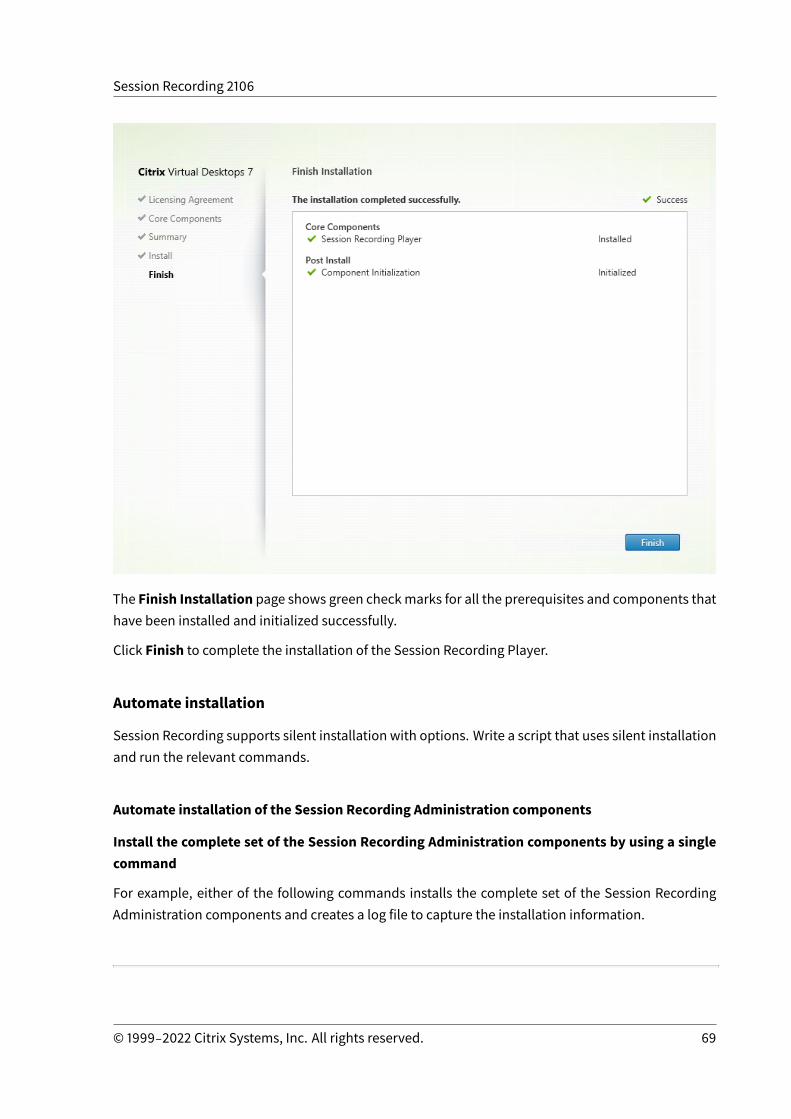
Session Recording 2106
The Finish Installation page shows green checkmarks for all the prerequisites and components thathave been installed and initialized successfully.
Click Finish to complete the installation of the Session Recording Player.
Automate installation
Session Recording supports silent installation with options. Write a script that uses silent installationand run the relevant commands.
Automate installation of the Session Recording Administration components
Install the complete set of the Session Recording Administration components by using a singlecommand
For example, either of the following commands installs the complete set of the Session RecordingAdministration components and creates a log file to capture the installation information.
© 1999‒2022 Citrix Systems, Inc. All rights reserved. 69
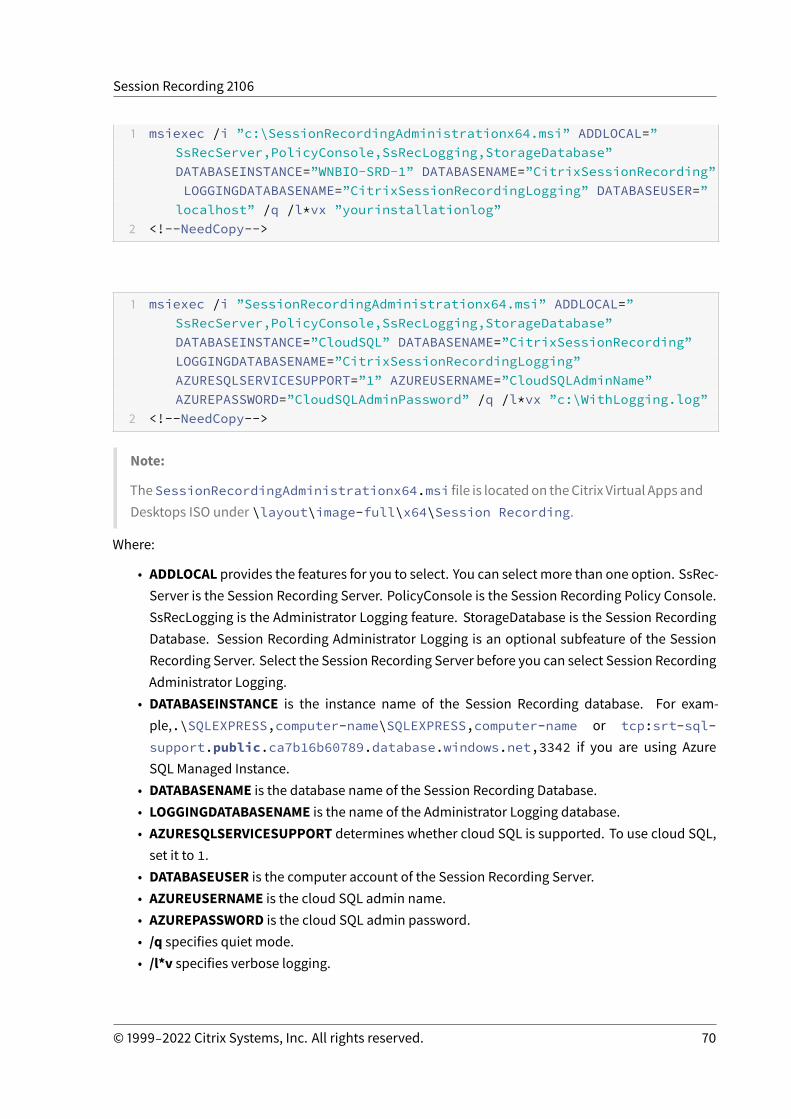
Session Recording 2106
1 msiexec /i ”c:\SessionRecordingAdministrationx64.msi” ADDLOCAL=”SsRecServer,PolicyConsole,SsRecLogging,StorageDatabase”DATABASEINSTANCE=”WNBIO-SRD-1” DATABASENAME=”CitrixSessionRecording”LOGGINGDATABASENAME=”CitrixSessionRecordingLogging” DATABASEUSER=”localhost” /q /l*vx ”yourinstallationlog”
2 <!--NeedCopy-->
1 msiexec /i ”SessionRecordingAdministrationx64.msi” ADDLOCAL=”SsRecServer,PolicyConsole,SsRecLogging,StorageDatabase”DATABASEINSTANCE=”CloudSQL” DATABASENAME=”CitrixSessionRecording”LOGGINGDATABASENAME=”CitrixSessionRecordingLogging”AZURESQLSERVICESUPPORT=”1” AZUREUSERNAME=”CloudSQLAdminName”AZUREPASSWORD=”CloudSQLAdminPassword” /q /l*vx ”c:\WithLogging.log”
2 <!--NeedCopy-->
Note:
TheSessionRecordingAdministrationx64.msi file is locatedon theCitrix Virtual Apps andDesktops ISO under \layout\image-full\x64\Session Recording.
Where:
• ADDLOCAL provides the features for you to select. You can select more than one option. SsRec-Server is the Session Recording Server. PolicyConsole is the Session Recording Policy Console.SsRecLogging is the Administrator Logging feature. StorageDatabase is the Session RecordingDatabase. Session Recording Administrator Logging is an optional subfeature of the SessionRecording Server. Select the Session Recording Server before you can select Session RecordingAdministrator Logging.
• DATABASEINSTANCE is the instance name of the Session Recording database. For exam-ple,.\SQLEXPRESS,computer-name\SQLEXPRESS,computer-name or tcp:srt-sql-support.public.ca7b16b60789.database.windows.net,3342 if you are using AzureSQL Managed Instance.
• DATABASENAME is the database name of the Session Recording Database.• LOGGINGDATABASENAME is the name of the Administrator Logging database.• AZURESQLSERVICESUPPORT determines whether cloud SQL is supported. To use cloud SQL,set it to 1.
• DATABASEUSER is the computer account of the Session Recording Server.• AZUREUSERNAME is the cloud SQL admin name.• AZUREPASSWORD is the cloud SQL admin password.• /q specifies quiet mode.• /l*v specifies verbose logging.
© 1999‒2022 Citrix Systems, Inc. All rights reserved. 70
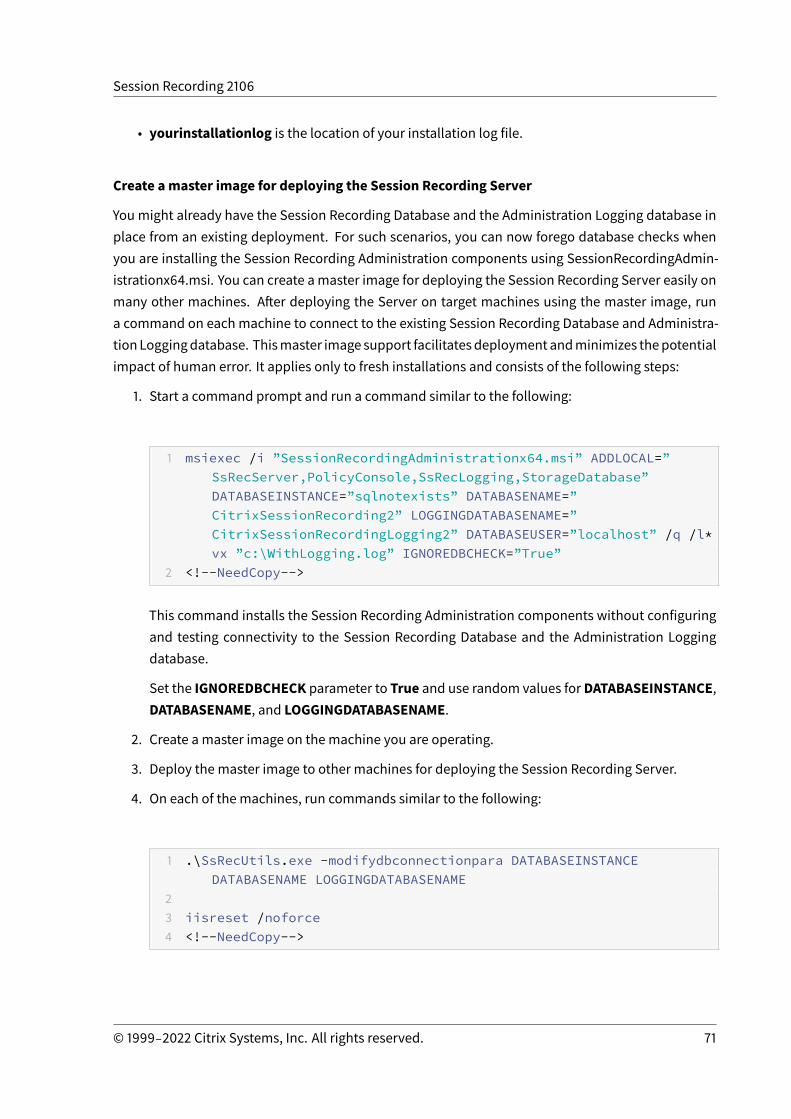
Session Recording 2106
• yourinstallationlog is the location of your installation log file.
Create amaster image for deploying the Session Recording Server
You might already have the Session Recording Database and the Administration Logging database inplace from an existing deployment. For such scenarios, you can now forego database checks whenyou are installing the Session Recording Administration components using SessionRecordingAdmin-istrationx64.msi. You can create amaster image for deploying the Session Recording Server easily onmany other machines. After deploying the Server on target machines using the master image, runa command on each machine to connect to the existing Session Recording Database and Administra-tionLoggingdatabase. Thismaster image support facilitatesdeployment andminimizes thepotentialimpact of human error. It applies only to fresh installations and consists of the following steps:
1. Start a command prompt and run a command similar to the following:
1 msiexec /i ”SessionRecordingAdministrationx64.msi” ADDLOCAL=”SsRecServer,PolicyConsole,SsRecLogging,StorageDatabase”DATABASEINSTANCE=”sqlnotexists” DATABASENAME=”CitrixSessionRecording2” LOGGINGDATABASENAME=”CitrixSessionRecordingLogging2” DATABASEUSER=”localhost” /q /l*vx ”c:\WithLogging.log” IGNOREDBCHECK=”True”
2 <!--NeedCopy-->
This command installs the Session Recording Administration components without configuringand testing connectivity to the Session Recording Database and the Administration Loggingdatabase.
Set the IGNOREDBCHECK parameter to True and use random values forDATABASEINSTANCE,DATABASENAME, and LOGGINGDATABASENAME.
2. Create a master image on the machine you are operating.
3. Deploy the master image to other machines for deploying the Session Recording Server.
4. On each of the machines, run commands similar to the following:
1 .\SsRecUtils.exe -modifydbconnectionpara DATABASEINSTANCEDATABASENAME LOGGINGDATABASENAME
23 iisreset /noforce4 <!--NeedCopy-->
© 1999‒2022 Citrix Systems, Inc. All rights reserved. 71
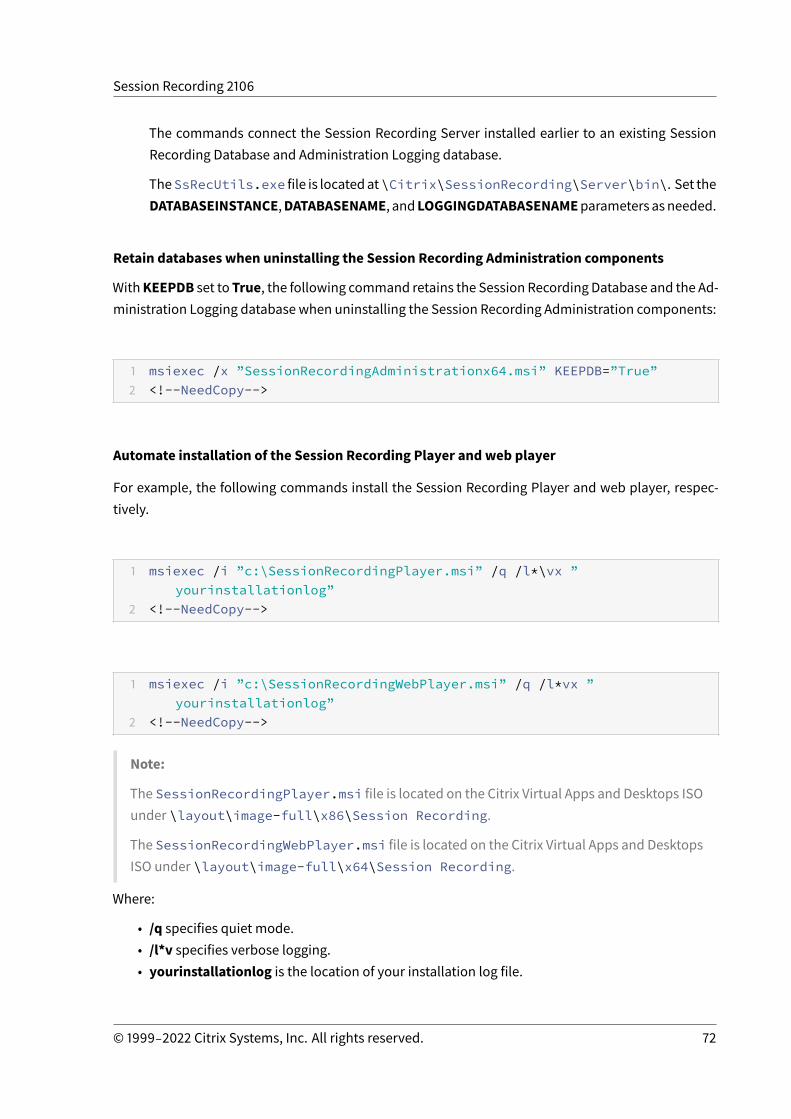
Session Recording 2106
The commands connect the Session Recording Server installed earlier to an existing SessionRecording Database and Administration Logging database.
TheSsRecUtils.exe file is locatedat\Citrix\SessionRecording\Server\bin\. Set theDATABASEINSTANCE,DATABASENAME, andLOGGINGDATABASENAMEparameters asneeded.
Retain databases when uninstalling the Session Recording Administration components
WithKEEPDB set toTrue, the following command retains the Session Recording Database and the Ad-ministration Logging database when uninstalling the Session Recording Administration components:
1 msiexec /x ”SessionRecordingAdministrationx64.msi” KEEPDB=”True”2 <!--NeedCopy-->
Automate installation of the Session Recording Player and web player
For example, the following commands install the Session Recording Player and web player, respec-tively.
1 msiexec /i ”c:\SessionRecordingPlayer.msi” /q /l*\vx ”yourinstallationlog”
2 <!--NeedCopy-->
1 msiexec /i ”c:\SessionRecordingWebPlayer.msi” /q /l*vx ”yourinstallationlog”
2 <!--NeedCopy-->
Note:
The SessionRecordingPlayer.msi file is located on the Citrix Virtual Apps and Desktops ISOunder \layout\image-full\x86\Session Recording.
The SessionRecordingWebPlayer.msi file is located on the Citrix Virtual Apps and DesktopsISO under \layout\image-full\x64\Session Recording.
Where:
• /q specifies quiet mode.• /l*v specifies verbose logging.• yourinstallationlog is the location of your installation log file.
© 1999‒2022 Citrix Systems, Inc. All rights reserved. 72

Session Recording 2106
Automate installation of the Session Recording Agent
For example, the following command installs the Session Recording Agent and creates a log file tocapture the installation information.
For 64-bit systems:
1 msiexec /i SessionRecordingAgentx64.msi /q /l*vx yourinstallationlogSESSIONRECORDINGSERVERNAME=yourservername
2 SESSIONRECORDINGBROKERPROTOCOL=yourbrokerprotocolSESSIONRECORDINGBROKERPORT=yourbrokerport
3 <!--NeedCopy-->
Note:
The SessionRecordingAgentx64.msi file is located on the Citrix Virtual Apps and DesktopsISO under \layout\image-full\x64\Session Recording.
For 32-bit systems:
1 msiexec /i SessionRecordingAgent.msi /q /l*vx yourinstallationlogSESSIONRECORDINGSERVERNAME=yourservername
2 SESSIONRECORDINGBROKERPROTOCOL=yourbrokerprotocolSESSIONRECORDINGBROKERPORT=yourbrokerport
3 <!--NeedCopy-->
Note:
The SessionRecordingAgent.msi file is located on the Citrix Virtual Apps and Desktops ISOunder \layout\image-full\x86\Session Recording.
Where:
• yourservername is the NetBIOS name or FQDN of the machine hosting the Session RecordingServer. If not specified, this value defaults to localhost.
• yourbrokerprotocol is HTTP or HTTPS that the Session Recording Agent uses to communicatewith the Session Recording Broker. If not specified, this value defaults to HTTPS.
• yourbrokerport is theportnumber that theSessionRecordingAgentuses tocommunicatewiththe Session Recording Broker. If not specified, this value defaults to zero, which directs the Ses-sion Recording Agent to use the default port number for your selected protocol: 80 for HTTP or443 for HTTPS.
• /q specifies quiet mode.• /l*v specifies verbose logging.• yourinstallationlog is the location of your installation log file.
© 1999‒2022 Citrix Systems, Inc. All rights reserved. 73
Session Recording 2106
Upgrade Session Recording
You can upgrade certain deployments to later versions without having to first set up newmachines orSites. You can upgrade from the version of Session Recording included in the latest CU of XenApp andXenDesktop 7.6 LTSR, and from any later version, to the latest release of Session Recording.
Note:
When you upgrade Session Recording Administration from 7.6 to 7.13 or later and chooseModifyin Session Recording Administration to add the Administrator Logging service, the SQL Serverinstance name does not appear on the Administrator Logging Configuration page. The follow-ing error message appears when you click Next: Database connection test failed. Please en-ter correct Database instance name. As a workaround, add the read permission for localhostusers to the following SmartAuditor Server registry folder: HKEY_LOCAL_MACHINE\SOFTWARE\Citrix\SmartAuditor\Server.
You cannot upgrade from a Technical Preview version.
Requirements, preparation, and limitations
• Use the Session Recording installer’s graphical or command line interface to upgrade the Ses-sion Recording components on the machine where you installed the components.
• Before any upgrade activity, back up the database named CitrixSessionRecording in the SQLServer instance. In this way, you can restore it if any issues are discovered after the databaseupgrade.
• In addition to being a domain user, you must be a local administrator on the machines whereyou are upgrading the Session Recording components.
• If the Session Recording Server and Session Recording Database are not installed on the sameserver, youmusthave thedatabase rolepermission toupgrade theSessionRecordingDatabase.Otherwise, you can:
– Ask the database administrator to assign the securityadmin and dbcreator server rolepermissions for the upgrade. After the upgrade completes, the securityadmin anddbcre-ator server role permissions are no longer necessary and can be safely removed.
– Or, use the SessionRecordingAdministrationx64.msi package to upgrade. During the msiupgrade, a dialog box prompts for the credentials of a database administratorwhohas thesecurityadmin and dbcreator server role permissions. Type the correct credentials andthen clickOK to continue the upgrade.
• If you donot plan to upgrade all the Session Recording Agents at the same time, SessionRecord-ing Agent 7.6.0 (and later) is compatible with the latest (current) release of Session RecordingServer. However, some new features and bug fixes might not take effect.
• Any sessions started during the upgrade of Session Recording Server are not recorded.• The Graphics Adjustment option in Session Recording Agent Properties is enabled by default
© 1999‒2022 Citrix Systems, Inc. All rights reserved. 74
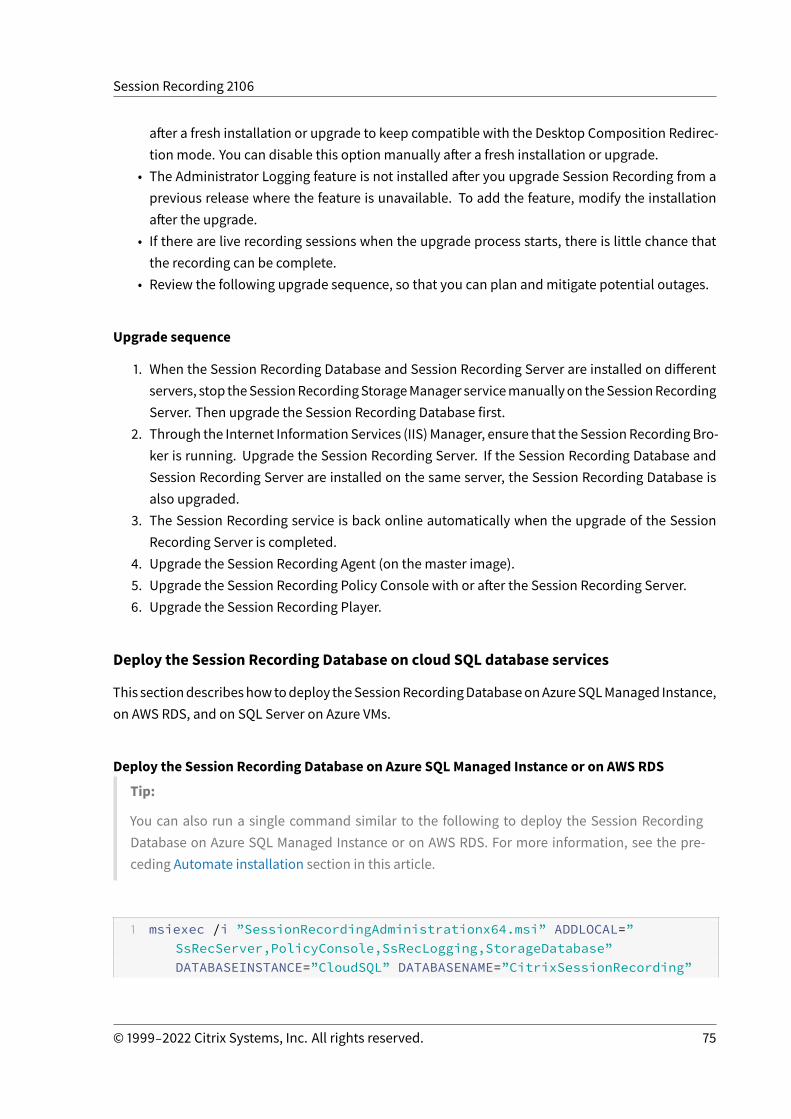
Session Recording 2106
after a fresh installation or upgrade to keep compatible with the Desktop Composition Redirec-tion mode. You can disable this option manually after a fresh installation or upgrade.
• The Administrator Logging feature is not installed after you upgrade Session Recording from aprevious release where the feature is unavailable. To add the feature, modify the installationafter the upgrade.
• If there are live recording sessions when the upgrade process starts, there is little chance thatthe recording can be complete.
• Review the following upgrade sequence, so that you can plan andmitigate potential outages.
Upgrade sequence
1. When the Session Recording Database and Session Recording Server are installed on differentservers, stop theSessionRecordingStorageManager servicemanuallyon theSessionRecordingServer. Then upgrade the Session Recording Database first.
2. Through the Internet Information Services (IIS)Manager, ensure that the SessionRecordingBro-ker is running. Upgrade the Session Recording Server. If the Session Recording Database andSession Recording Server are installed on the same server, the Session Recording Database isalso upgraded.
3. The Session Recording service is back online automatically when the upgrade of the SessionRecording Server is completed.
4. Upgrade the Session Recording Agent (on the master image).5. Upgrade the Session Recording Policy Console with or after the Session Recording Server.6. Upgrade the Session Recording Player.
Deploy the Session Recording Database on cloud SQL database services
This sectiondescribeshowtodeploy theSessionRecordingDatabaseonAzureSQLManaged Instance,on AWS RDS, and on SQL Server on Azure VMs.
Deploy the Session Recording Database on Azure SQL Managed Instance or on AWS RDS
Tip:
You can also run a single command similar to the following to deploy the Session RecordingDatabase on Azure SQL Managed Instance or on AWS RDS. For more information, see the pre-ceding Automate installation section in this article.
1 msiexec /i ”SessionRecordingAdministrationx64.msi” ADDLOCAL=”SsRecServer,PolicyConsole,SsRecLogging,StorageDatabase”DATABASEINSTANCE=”CloudSQL” DATABASENAME=”CitrixSessionRecording”
© 1999‒2022 Citrix Systems, Inc. All rights reserved. 75
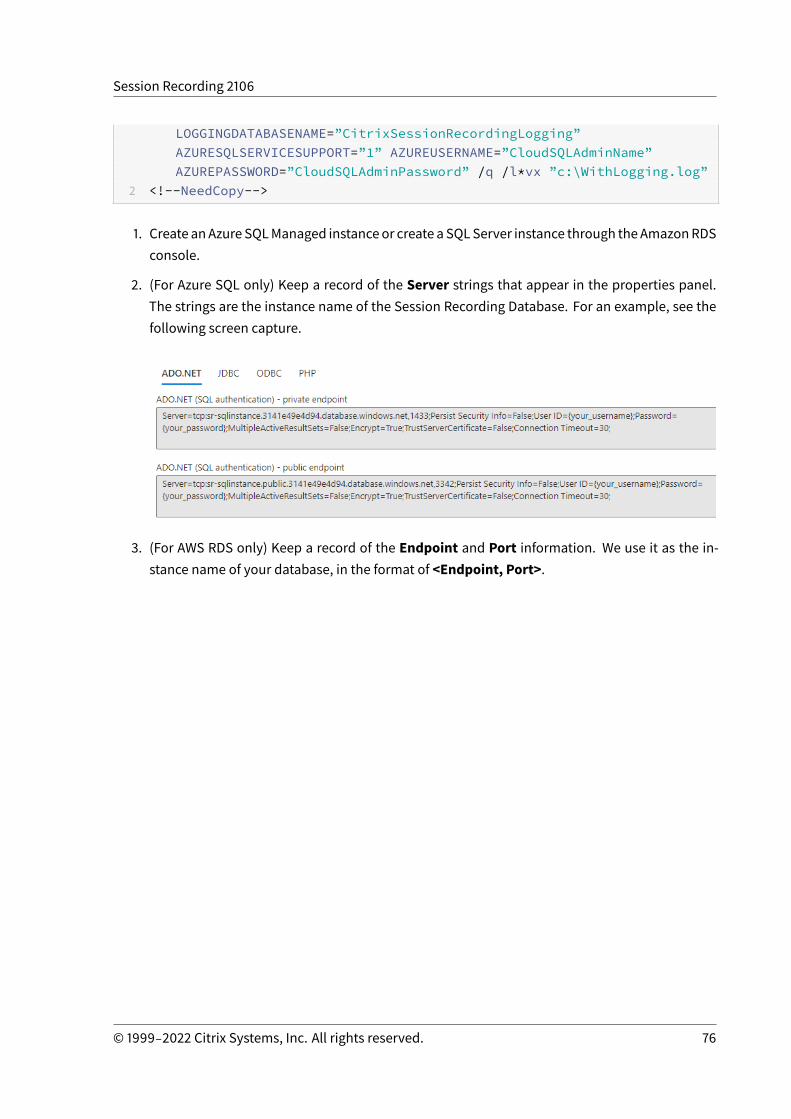
Session Recording 2106
LOGGINGDATABASENAME=”CitrixSessionRecordingLogging”AZURESQLSERVICESUPPORT=”1” AZUREUSERNAME=”CloudSQLAdminName”AZUREPASSWORD=”CloudSQLAdminPassword” /q /l*vx ”c:\WithLogging.log”
2 <!--NeedCopy-->
1. Create anAzure SQLManaged instanceor create a SQLServer instance through theAmazonRDSconsole.
2. (For Azure SQL only) Keep a record of the Server strings that appear in the properties panel.The strings are the instance name of the Session Recording Database. For an example, see thefollowing screen capture.
3. (For AWS RDS only) Keep a record of the Endpoint and Port information. We use it as the in-stance name of your database, in the format of <Endpoint, Port>.
© 1999‒2022 Citrix Systems, Inc. All rights reserved. 76
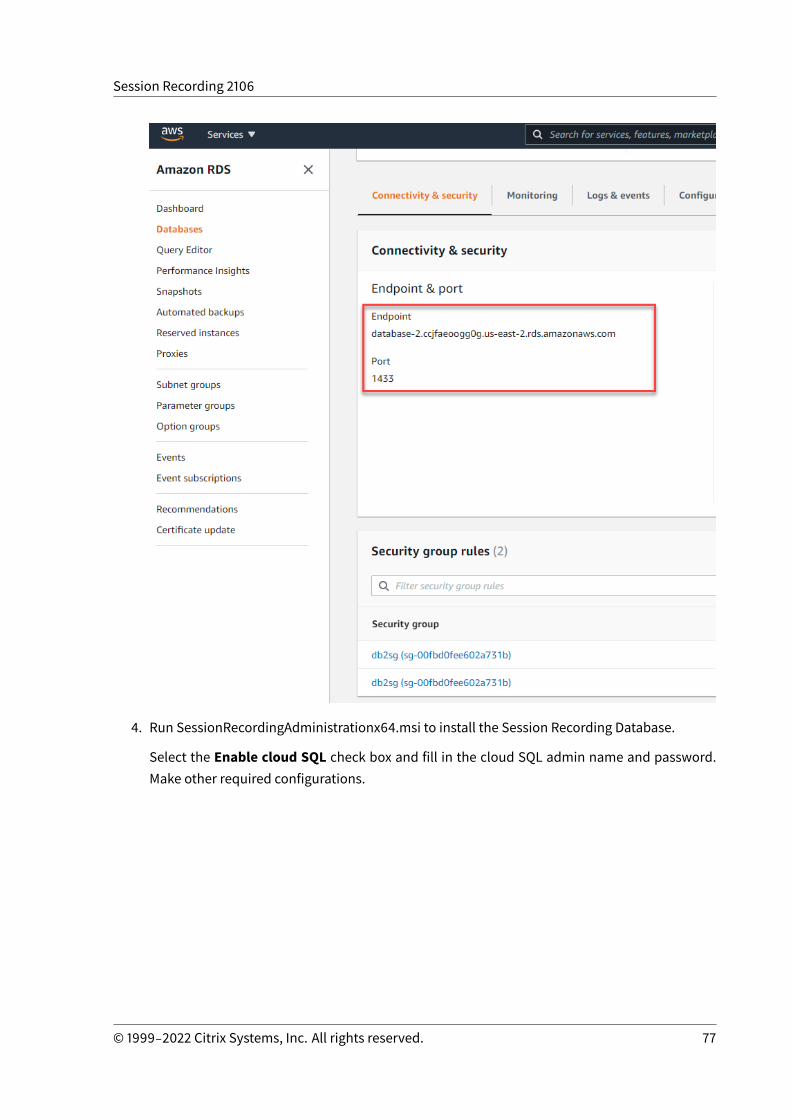
Session Recording 2106
4. Run SessionRecordingAdministrationx64.msi to install the Session Recording Database.
Select the Enable cloud SQL check box and fill in the cloud SQL admin name and password.Make other required configurations.
© 1999‒2022 Citrix Systems, Inc. All rights reserved. 77
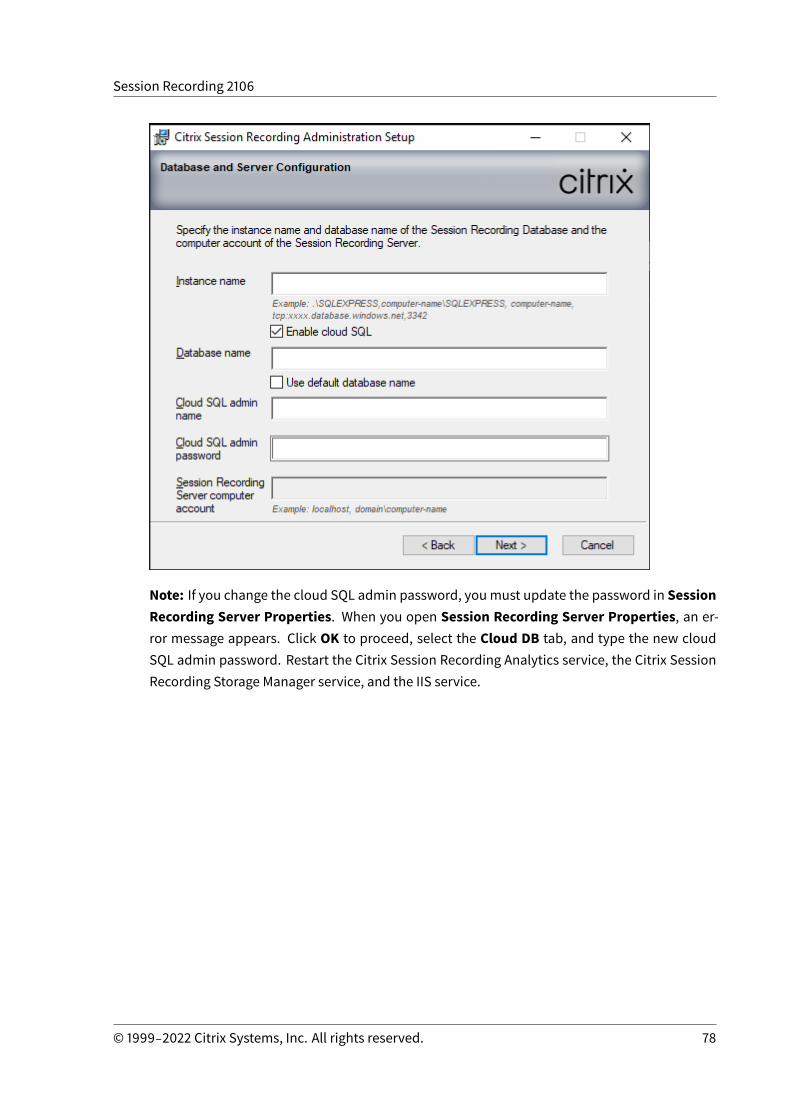
Session Recording 2106
Note: If you change the cloud SQL admin password, youmust update the password in SessionRecording Server Properties. When you open Session Recording Server Properties, an er-ror message appears. Click OK to proceed, select the Cloud DB tab, and type the new cloudSQL admin password. Restart the Citrix Session Recording Analytics service, the Citrix SessionRecording Storage Manager service, and the IIS service.
© 1999‒2022 Citrix Systems, Inc. All rights reserved. 78

Session Recording 2106
Migrate an on-premises database to cloud SQL Managed Instance
1. Migrate your on-premises database according to https://docs.microsoft.com/en-us/data-migration/ or https://docs.aws.amazon.com/prescriptive-guidance/latest/patterns/migrate-an-on-premises-microsoft-sql-server-database-to-amazon-rds-for-sql-server.html.
2. TomakeSessionRecordingworkproperly after themigration, runSsRecUtils.exeon theSessionRecording Server.
C:\Program Files\Citrix\SessionRecording\Server\bin\SsRecUtils.exe -modifyazuredbconnectionpara { Database Instance } { Session RecordingDatabase Name } { Session Recording Logging Database Name } { AzureAdminName} { AzureAdminPassword } iisreset /noforce
3. On theSessionRecordingServer, restart theCitrix SessionRecordingAnalytics service, theCitrixSession Recording Storage Manager service, and the IIS service.
Migrate a production database from Azure SQL Managed Instance to an on-premises database
1. Migrate the database according to https://docs.microsoft.com/en-us/data-migration/.
© 1999‒2022 Citrix Systems, Inc. All rights reserved. 79

Session Recording 2106
2. TomakeSessionRecordingworkproperly after themigration, runSsRecUtils.exeon theSessionRecording Server.
C:\Program Files\Citrix\SessionRecording\Server\bin\SsRecUtils.exe-modifydbconnectionpara { Database Instance } { Session RecordingDatabase Name } { Session Recording Logging Database Name } iisreset /noforce
3. On theSessionRecordingServer, restart theCitrix SessionRecordingAnalytics service, theCitrixSession Recording Storage Manager service, and the IIS service.
Deploy the Session Recording Database on SQL Server on Azure VMs
On SQL Server on Azure VMs, you can deploy the Session Recording Database both by using the msipackage and the Citrix Virtual Apps and Desktops installer.
1. Check out an Azure SQL VM.2. Configure theVMandadd it to thedomainwhere you install theSessionRecording components.3. Use the VM’s FQDN as the instance name during the installation of the Session Recording
Database.Note: If you are using SessionRecordingAdministrationx64.msi for the installation, clear theEnable cloud SQL check box.
4. Follow the installation user interface to complete installing the Session Recording Database.
Uninstall Session Recording
To remove the Session Recording components from a server or workstation, use the uninstallor remove programs option available from the Windows Control Panel. To remove the SessionRecording Database, youmust have the same securityadmin and dbcreator SQL Server role permis-sions as when you installed it.
For security reasons, the Administrator Logging Database is not removed after the components areuninstalled.
Dynamic session recording
July 12, 2021
Previously, session recording started strictly at the very beginning of sessions that met the recordingpolicies and stopped strictly when those sessions ended.
© 1999‒2022 Citrix Systems, Inc. All rights reserved. 80
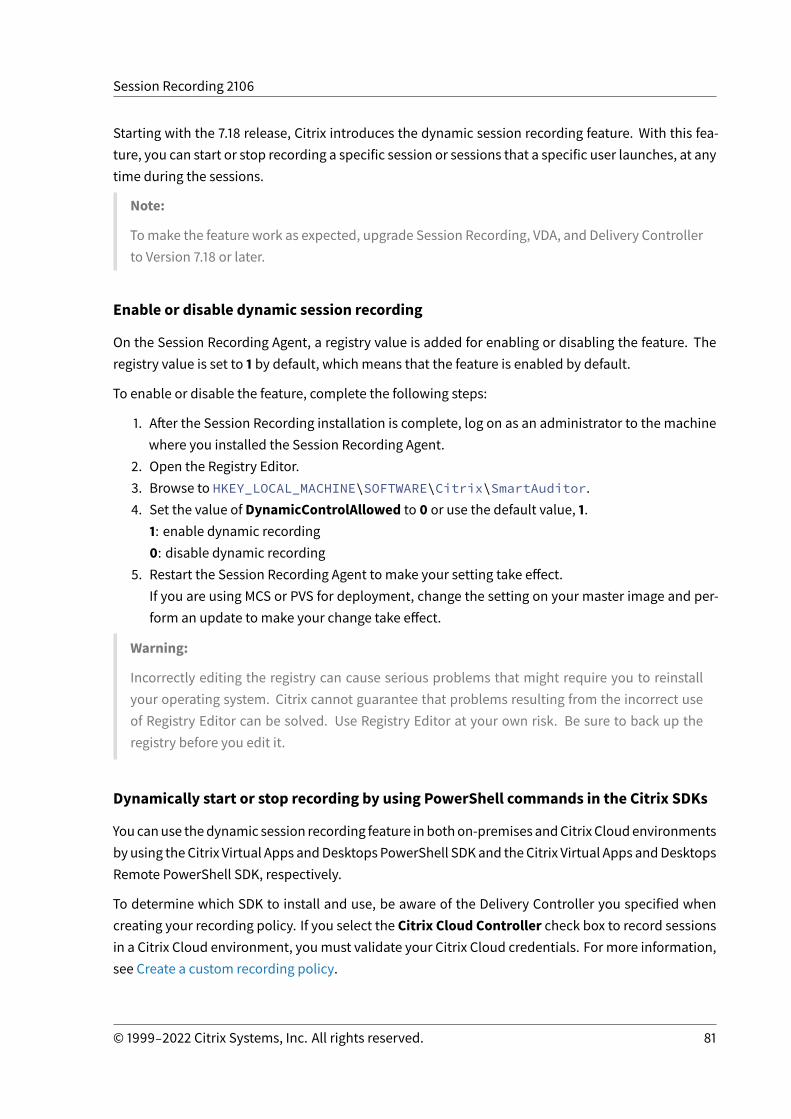
Session Recording 2106
Starting with the 7.18 release, Citrix introduces the dynamic session recording feature. With this fea-ture, you can start or stop recording a specific session or sessions that a specific user launches, at anytime during the sessions.
Note:
Tomake the feature work as expected, upgrade Session Recording, VDA, and Delivery Controllerto Version 7.18 or later.
Enable or disable dynamic session recording
On the Session Recording Agent, a registry value is added for enabling or disabling the feature. Theregistry value is set to 1 by default, which means that the feature is enabled by default.
To enable or disable the feature, complete the following steps:
1. After the Session Recording installation is complete, log on as an administrator to the machinewhere you installed the Session Recording Agent.
2. Open the Registry Editor.3. Browse to HKEY_LOCAL_MACHINE\SOFTWARE\Citrix\SmartAuditor.4. Set the value of DynamicControlAllowed to 0 or use the default value, 1.
1: enable dynamic recording0: disable dynamic recording
5. Restart the Session Recording Agent to make your setting take effect.If you are using MCS or PVS for deployment, change the setting on your master image and per-form an update to make your change take effect.
Warning:
Incorrectly editing the registry can cause serious problems that might require you to reinstallyour operating system. Citrix cannot guarantee that problems resulting from the incorrect useof Registry Editor can be solved. Use Registry Editor at your own risk. Be sure to back up theregistry before you edit it.
Dynamically start or stop recording by using PowerShell commands in the Citrix SDKs
Youcanuse thedynamic session recording feature inbothon-premises andCitrix Cloudenvironmentsby using the Citrix Virtual Apps andDesktops PowerShell SDK and theCitrix Virtual Apps andDesktopsRemote PowerShell SDK, respectively.
To determine which SDK to install and use, be aware of the Delivery Controller you specified whencreating your recording policy. If you select the Citrix Cloud Controller check box to record sessionsin a Citrix Cloud environment, youmust validate your Citrix Cloud credentials. For more information,see Create a custom recording policy.
© 1999‒2022 Citrix Systems, Inc. All rights reserved. 81
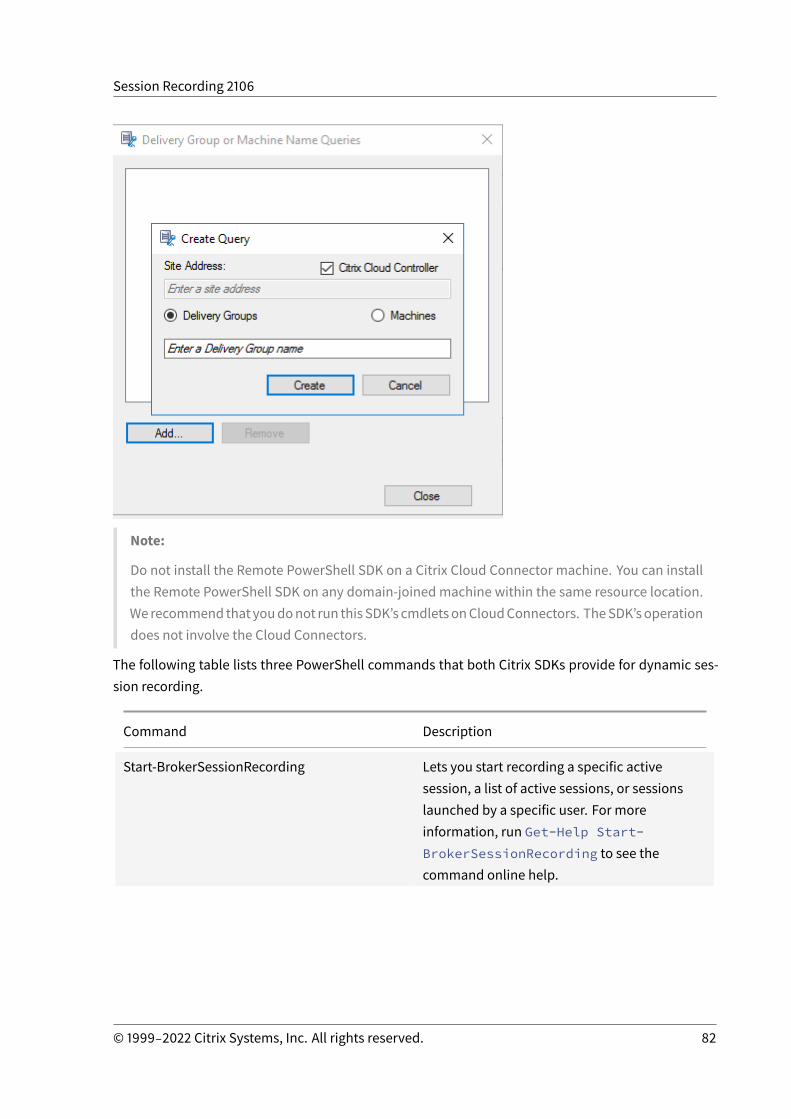
Session Recording 2106
Note:
Do not install the Remote PowerShell SDK on a Citrix Cloud Connector machine. You can installthe Remote PowerShell SDK on any domain-joined machine within the same resource location.We recommend that youdonot run this SDK’s cmdletsonCloudConnectors. TheSDK’soperationdoes not involve the Cloud Connectors.
The following table lists three PowerShell commands that both Citrix SDKs provide for dynamic ses-sion recording.
Command Description
Start-BrokerSessionRecording Lets you start recording a specific activesession, a list of active sessions, or sessionslaunched by a specific user. For moreinformation, run Get-Help Start-BrokerSessionRecording to see thecommand online help.
© 1999‒2022 Citrix Systems, Inc. All rights reserved. 82
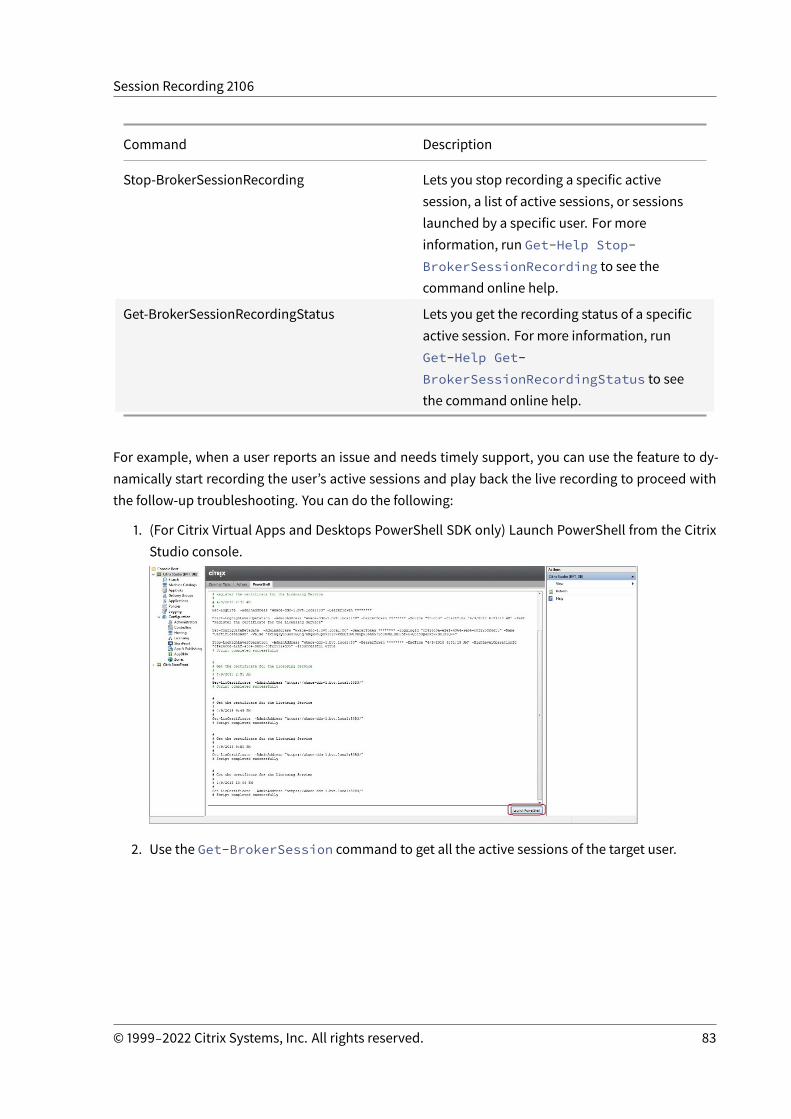
Session Recording 2106
Command Description
Stop-BrokerSessionRecording Lets you stop recording a specific activesession, a list of active sessions, or sessionslaunched by a specific user. For moreinformation, run Get-Help Stop-BrokerSessionRecording to see thecommand online help.
Get-BrokerSessionRecordingStatus Lets you get the recording status of a specificactive session. For more information, runGet-Help Get-BrokerSessionRecordingStatus to seethe command online help.
For example, when a user reports an issue and needs timely support, you can use the feature to dy-namically start recording the user’s active sessions and play back the live recording to proceed withthe follow-up troubleshooting. You can do the following:
1. (For Citrix Virtual Apps and Desktops PowerShell SDK only) Launch PowerShell from the CitrixStudio console.
2. Use the Get-BrokerSession command to get all the active sessions of the target user.
© 1999‒2022 Citrix Systems, Inc. All rights reserved. 83
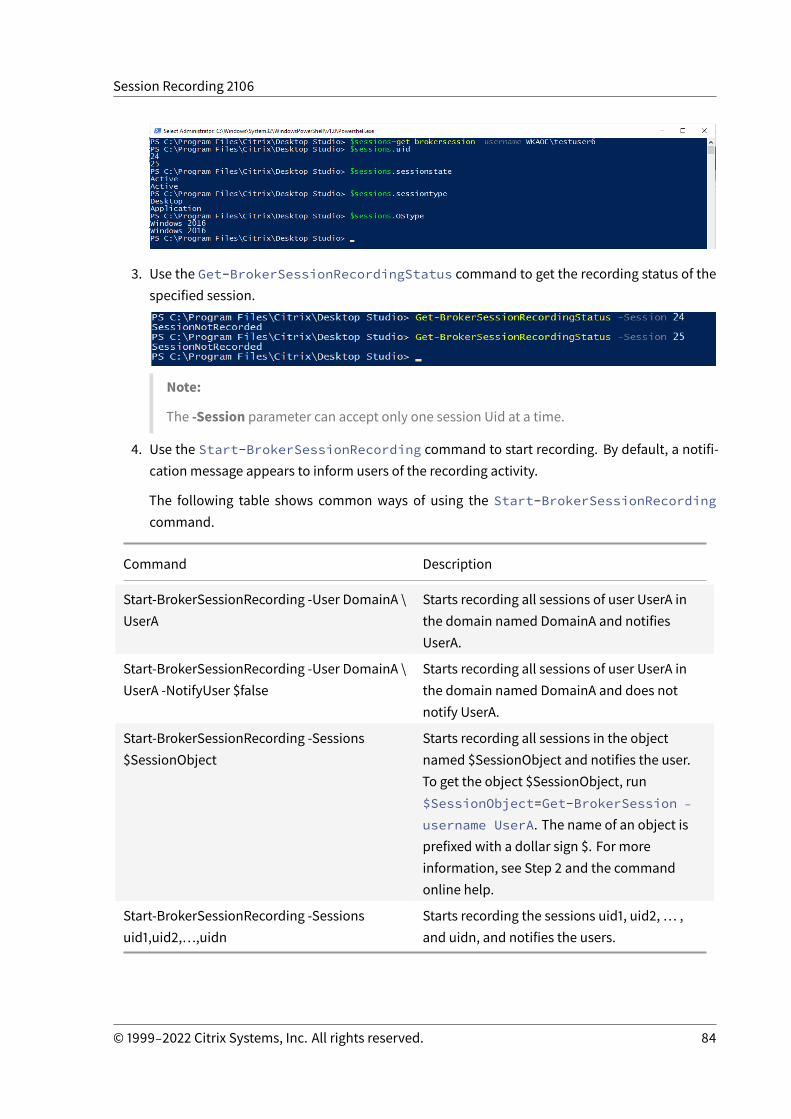
Session Recording 2106
3. Use the Get-BrokerSessionRecordingStatus command to get the recording status of thespecified session.
Note:
The -Session parameter can accept only one session Uid at a time.
4. Use the Start-BrokerSessionRecording command to start recording. By default, a notifi-cation message appears to inform users of the recording activity.
The following table shows common ways of using the Start-BrokerSessionRecordingcommand.
Command Description
Start-BrokerSessionRecording -User DomainA \UserA
Starts recording all sessions of user UserA inthe domain named DomainA and notifiesUserA.
Start-BrokerSessionRecording -User DomainA \UserA -NotifyUser $false
Starts recording all sessions of user UserA inthe domain named DomainA and does notnotify UserA.
Start-BrokerSessionRecording -Sessions$SessionObject
Starts recording all sessions in the objectnamed $SessionObject and notifies the user.To get the object $SessionObject, run$SessionObject=Get-BrokerSession ‒username UserA. The name of an object isprefixed with a dollar sign $. For moreinformation, see Step 2 and the commandonline help.
Start-BrokerSessionRecording -Sessionsuid1,uid2,…,uidn
Starts recording the sessions uid1, uid2, … ,and uidn, and notifies the users.
© 1999‒2022 Citrix Systems, Inc. All rights reserved. 84
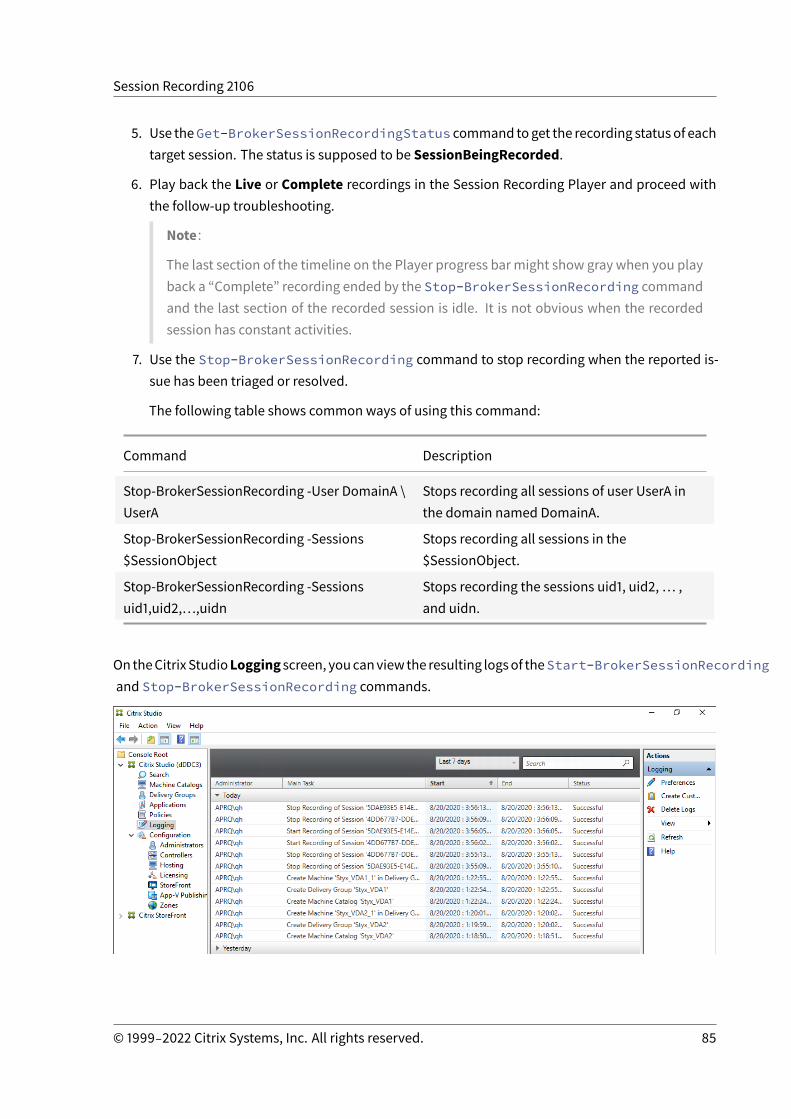
Session Recording 2106
5. Use theGet-BrokerSessionRecordingStatus command toget the recording statusof eachtarget session. The status is supposed to be SessionBeingRecorded.
6. Play back the Live or Complete recordings in the Session Recording Player and proceed withthe follow-up troubleshooting.
Note:
The last section of the timeline on the Player progress bar might show gray when you playback a “Complete” recording ended by the Stop-BrokerSessionRecording commandand the last section of the recorded session is idle. It is not obvious when the recordedsession has constant activities.
7. Use the Stop-BrokerSessionRecording command to stop recording when the reported is-sue has been triaged or resolved.
The following table shows common ways of using this command:
Command Description
Stop-BrokerSessionRecording -User DomainA \UserA
Stops recording all sessions of user UserA inthe domain named DomainA.
Stop-BrokerSessionRecording -Sessions$SessionObject
Stops recording all sessions in the$SessionObject.
Stop-BrokerSessionRecording -Sessionsuid1,uid2,…,uidn
Stops recording the sessions uid1, uid2, … ,and uidn.
On theCitrixStudioLogging screen, youcanviewthe resulting logsof theStart-BrokerSessionRecordingand Stop-BrokerSessionRecording commands.
© 1999‒2022 Citrix Systems, Inc. All rights reserved. 85
Session Recording 2106
Configure
July 12, 2021
After installing the Session Recording components, you can perform the following steps to configureSession Recording to record Citrix Virtual Apps and Desktops sessions and allow users to view them:
• Configure the connection to the Session Recording Server• Authorize users• Create and activate recording policies• Specify where recordings are stored• Specify file size for recordings• Customize notification messages• Enable or disable recording• Enable or disable digital signing• Administrator Logging• Database high availability• Load balancing• Change your communication protocol• Configure CEIP
Configure the connection to the Session Recording Server
July 12, 2021
Configure the connection of the Session Recording Player to the Session RecordingServer
Before a Session Recording Player can play sessions, configure it to connect to the Session RecordingServer that stores the recorded sessions. Each Player can be configured with the ability to connect tomultiple Session Recording Servers, but can connect to only one Session Recording Server at a time.If the Player is configured with the ability to connect to multiple Session Recording Servers, userscan change which Session Recording Server the Player connects to by selecting a check box on theConnections tab at Tools >Options.
1. Log on to the workstation where the Session Recording Player is installed.2. Start the Session Recording Player.3. From the Session Recording Player menu bar, choose Tools >Options.4. On the Connections tab, click Add.
© 1999‒2022 Citrix Systems, Inc. All rights reserved. 86
Session Recording 2106
5. In theHostname field, type the name or IP address of themachine hosting the Session Record-ing Server and select the protocol. By default, Session Recording is configured to use HTTP-S/SSL to secure communications. If SSL is not configured, select HTTP.
6. Toconfigure theSessionRecordingPlayerwith theability to connect tomultipleSessionRecord-ing Servers, repeat Steps 4 and 5 for each Session Recording Server.
7. Ensure that you select the check box for the Session Recording Server you want to connect to.
Configure the connection of the Session Recording Agent to the Session RecordingServer
The connection between the Session Recording Agent and the Session Recording Server is typicallyconfigured when the Session Recording Agent is installed. To configure this connection after the Ses-sion Recording Agent is installed, use Session Recording Agent Properties.
1. Log on to the server where the Session Recording Agent is installed.
2. From the Startmenu, choose Session Recording Agent Properties.
3. Click the Connections tab.
4. In the Session Recording Server field, type the FQDN of the Session Recording Server.
Note:
To useMessageQueuing over HTTPS (TCP is used by default), type an FQDN in the SessionRecording Server field. Otherwise, session recording fails.
5. In the Session Recording StorageManagermessage queue section, select the protocol that isused by the Session Recording Storage Manager to communicate and change the default portnumber if necessary.
Note:
To use Message Queuing over HTTP and HTTPS, install all the IIS recommended features.
6. In theMessage life field, accept thedefault 7,200seconds (twohours) or typeanewvalue for thenumber of seconds each message is retained in the queue if there is a communication failure.After this time elapses, the message is deleted and the file is playable until the point where thedata is lost.
7. In the Session Recording Broker section, select the communication protocol that the SessionRecording Broker uses to communicate and change the default port number if necessary.
8. When prompted, restart the Session Recording Agent Service to accept the changes.
© 1999‒2022 Citrix Systems, Inc. All rights reserved. 87

Session Recording 2106
Authorize users
July 12, 2021
To grant users the rights, you assign users to roles using the Session Recording Authorization Consoleon the Session Recording Server. Five roles are available:
Important:
For security reasons, grant users only the rights they need to perform specific functions, such asviewing recorded sessions.
• PolicyAdministrator. Grants the right to view, create, edit, delete, and enable recording poli-cies. By default, administrators of the machine hosting the Session Recording Server are mem-bers of this role.
• PolicyQuery. Allows the servers hosting the Session Recording Agent to request recording pol-icy evaluations. By default, authenticated users are members of this role.
• LoggingWriter. Grants the right to write the Administrator Logging logs. By default, local ad-ministrators and the Network Service group are members of this role. Changing the defaultLoggingWritermembership can cause log writing failure.
• LoggingReader. Grants the right to query the Administrator Logging logs. There is no defaultmembership in this role.
• Player. Grants the right to view recorded Citrix Virtual Apps and Desktops sessions. There isno default membership in this role. When you install Session Recording, no user has the rightto play recorded sessions. You must assign the right to each user, including the administrator.A user without the permission to play recorded sessions receives the following error messagewhen trying to play a recorded session:
To assign users to a role, do the following:
1. Log on as an administrator to the machine hosting the Session Recording Server.
© 1999‒2022 Citrix Systems, Inc. All rights reserved. 88
Session Recording 2106
2. Start the Session Recording Authorization Console.3. Select the role to which you want to assign users.4. From themenu bar, choose Action > Assign Users and Groups.5. Add the users and groups.
Session Recording supports users and groups defined in Active Directory.
Any changes made to the console take effect during the update that occurs once every minute. Also,starting with the 1906 release, you can use the Session Recording Policy Console to create recordingviewing policies. For more information, see Recording viewing policies.
Configure policies
September 8, 2021
Use the Session Recording Policy Console to create recording policies, event logging policies, andrecording viewing policies. When creating the policies, you can specify Delivery Controllers fromboththe Citrix Cloud and on-premises environments.
Important:
To use the Session Recording Policy Console, you must have the Broker PowerShell Snap-in(Broker_PowerShellSnapIn_x64.msi) or the Citrix Virtual Apps andDesktops Remote PowerShellSDK (CitrixPoshSdk.exe) installed. The installer does not install the snap-ins automatically. Lo-cate the Broker PowerShell snap-in on the Citrix Virtual Apps and Desktops ISO (\layout\image-full\x64\Citrix Desktop Delivery Controller). Locate the Citrix Virtual Apps and Desktops RemotePowerShell (PS) SDK on the Citrix website. Follow the instructions for installing the snap-in andthe SDKmanually. Failure to comply can cause an error.
Tip:
You can edit the registry to prevent recording file losses in case that your Session Record-ing Server might fail unexpectedly. Log on as an administrator to the machine where youinstalled the Session Recording Agent, open the Registry Editor, and add a DWORD valueDefaultRecordActionOnError =1 under HKEY_LOCAL_MACHINE\SOFTWARE\Citrix\SmartAuditor\Agent.
Recording policies
You can activate system-defined recording policies or create and activate your own custom recordingpolicies. System-defined recording policies apply a single rule to all users, published applications,and servers. Custom recording policies specifying which users, published applications, and serversare recorded.
© 1999‒2022 Citrix Systems, Inc. All rights reserved. 89
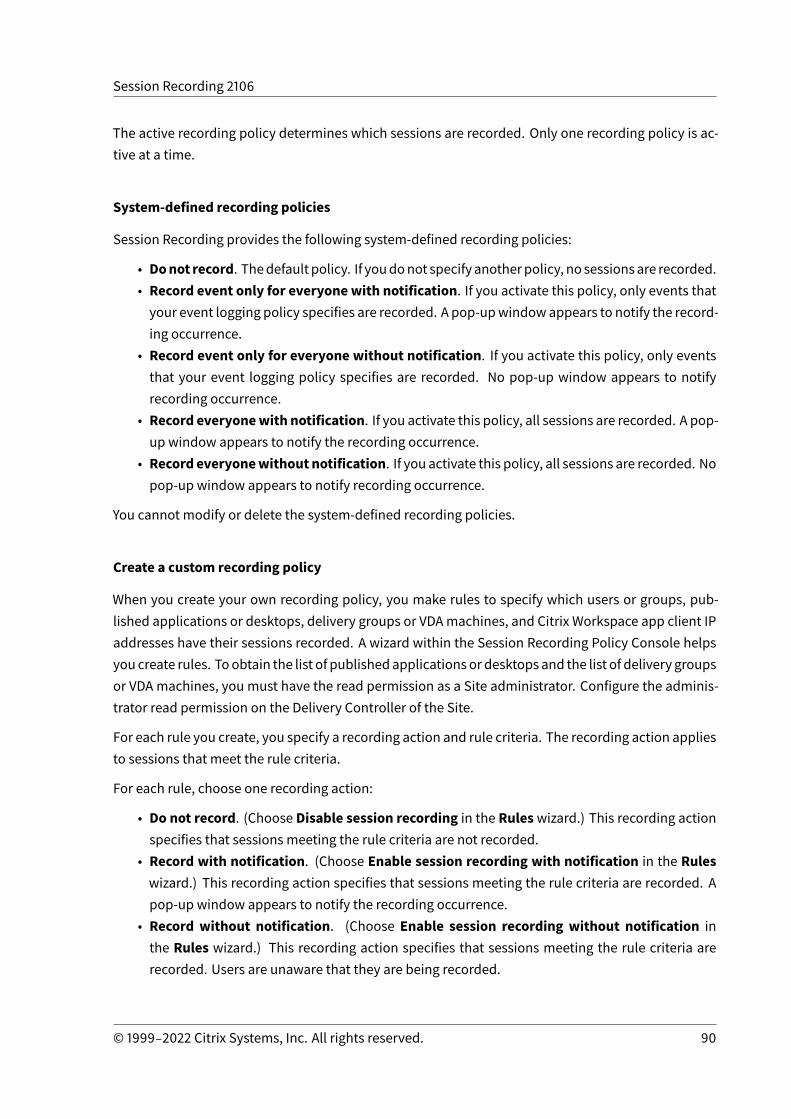
Session Recording 2106
The active recording policy determines which sessions are recorded. Only one recording policy is ac-tive at a time.
System-defined recording policies
Session Recording provides the following system-defined recording policies:
• Donot record. Thedefault policy. If youdonot specify anotherpolicy, no sessionsare recorded.• Record event only for everyonewith notification. If you activate this policy, only events thatyour event logging policy specifies are recorded. A pop-upwindowappears to notify the record-ing occurrence.
• Record event only for everyone without notification. If you activate this policy, only eventsthat your event logging policy specifies are recorded. No pop-up window appears to notifyrecording occurrence.
• Record everyonewith notification. If you activate this policy, all sessions are recorded. A pop-up window appears to notify the recording occurrence.
• Record everyonewithout notification. If you activate this policy, all sessions are recorded. Nopop-up window appears to notify recording occurrence.
You cannot modify or delete the system-defined recording policies.
Create a custom recording policy
When you create your own recording policy, you make rules to specify which users or groups, pub-lished applications or desktops, delivery groups or VDAmachines, and Citrix Workspace app client IPaddresses have their sessions recorded. A wizard within the Session Recording Policy Console helpsyou create rules. Toobtain the list of publishedapplications or desktops and the list of delivery groupsor VDA machines, you must have the read permission as a Site administrator. Configure the adminis-trator read permission on the Delivery Controller of the Site.
For each rule you create, you specify a recording action and rule criteria. The recording action appliesto sessions that meet the rule criteria.
For each rule, choose one recording action:
• Do not record. (Choose Disable session recording in the Ruleswizard.) This recording actionspecifies that sessions meeting the rule criteria are not recorded.
• Record with notification. (Choose Enable session recording with notification in the Ruleswizard.) This recording action specifies that sessions meeting the rule criteria are recorded. Apop-up window appears to notify the recording occurrence.
• Record without notification. (Choose Enable session recording without notification inthe Rules wizard.) This recording action specifies that sessions meeting the rule criteria arerecorded. Users are unaware that they are being recorded.
© 1999‒2022 Citrix Systems, Inc. All rights reserved. 90
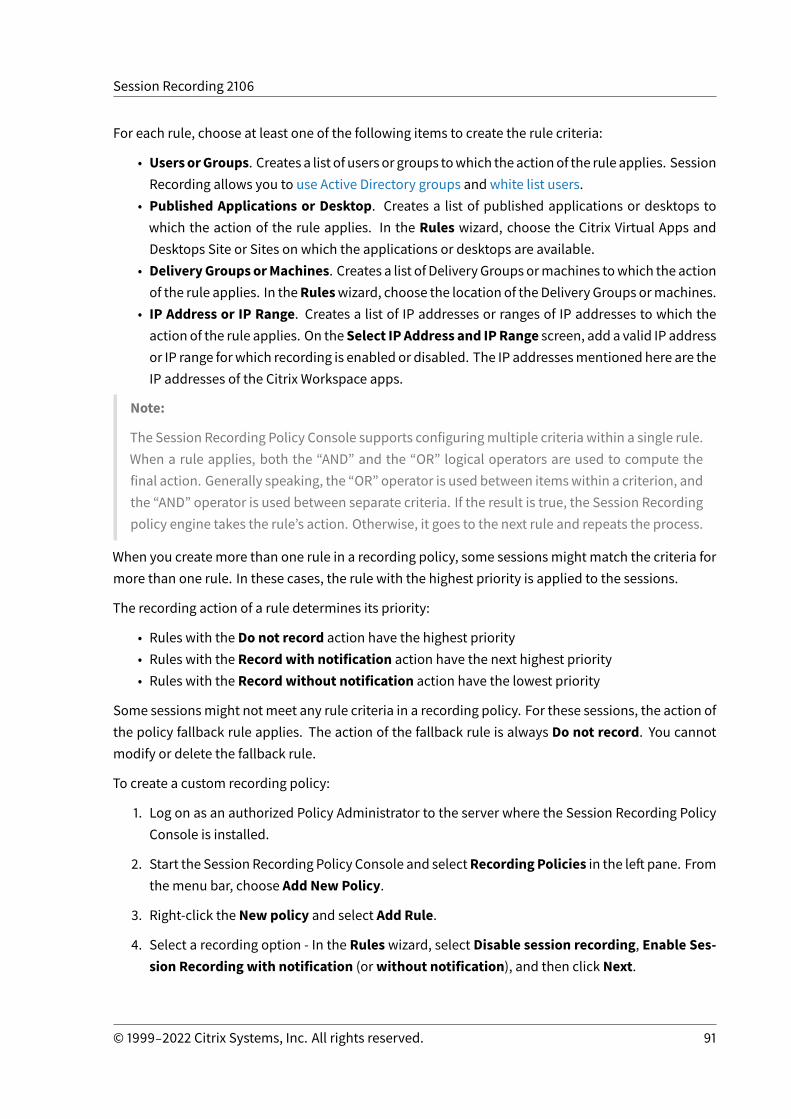
Session Recording 2106
For each rule, choose at least one of the following items to create the rule criteria:
• UsersorGroups. Creates a list of users or groups towhich theactionof the rule applies. SessionRecording allows you to use Active Directory groups and white list users.
• Published Applications or Desktop. Creates a list of published applications or desktops towhich the action of the rule applies. In the Rules wizard, choose the Citrix Virtual Apps andDesktops Site or Sites on which the applications or desktops are available.
• DeliveryGroupsorMachines. Creates a list of Delivery Groups ormachines towhich the actionof the rule applies. In theRuleswizard, choose the location of the Delivery Groups ormachines.
• IP Address or IP Range. Creates a list of IP addresses or ranges of IP addresses to which theaction of the rule applies. On theSelect IP Address and IPRange screen, add a valid IP addressor IP range forwhich recording is enabled or disabled. The IP addressesmentioned here are theIP addresses of the Citrix Workspace apps.
Note:
The Session Recording Policy Console supports configuringmultiple criteria within a single rule.When a rule applies, both the “AND” and the “OR” logical operators are used to compute thefinal action. Generally speaking, the “OR” operator is used between itemswithin a criterion, andthe “AND” operator is used between separate criteria. If the result is true, the Session Recordingpolicy engine takes the rule’s action. Otherwise, it goes to the next rule and repeats the process.
When you create more than one rule in a recording policy, some sessions might match the criteria formore than one rule. In these cases, the rule with the highest priority is applied to the sessions.
The recording action of a rule determines its priority:
• Rules with the Do not record action have the highest priority• Rules with the Record with notification action have the next highest priority• Rules with the Record without notification action have the lowest priority
Some sessionsmight notmeet any rule criteria in a recording policy. For these sessions, the action ofthe policy fallback rule applies. The action of the fallback rule is always Do not record. You cannotmodify or delete the fallback rule.
To create a custom recording policy:
1. Log on as an authorized Policy Administrator to the server where the Session Recording PolicyConsole is installed.
2. Start the Session Recording Policy Console and selectRecording Policies in the left pane. Fromthemenu bar, choose Add New Policy.
3. Right-click the New policy and select Add Rule.
4. Select a recording option - In the Ruleswizard, select Disable session recording, Enable Ses-sion Recording with notification (orwithout notification), and then click Next.
© 1999‒2022 Citrix Systems, Inc. All rights reserved. 91
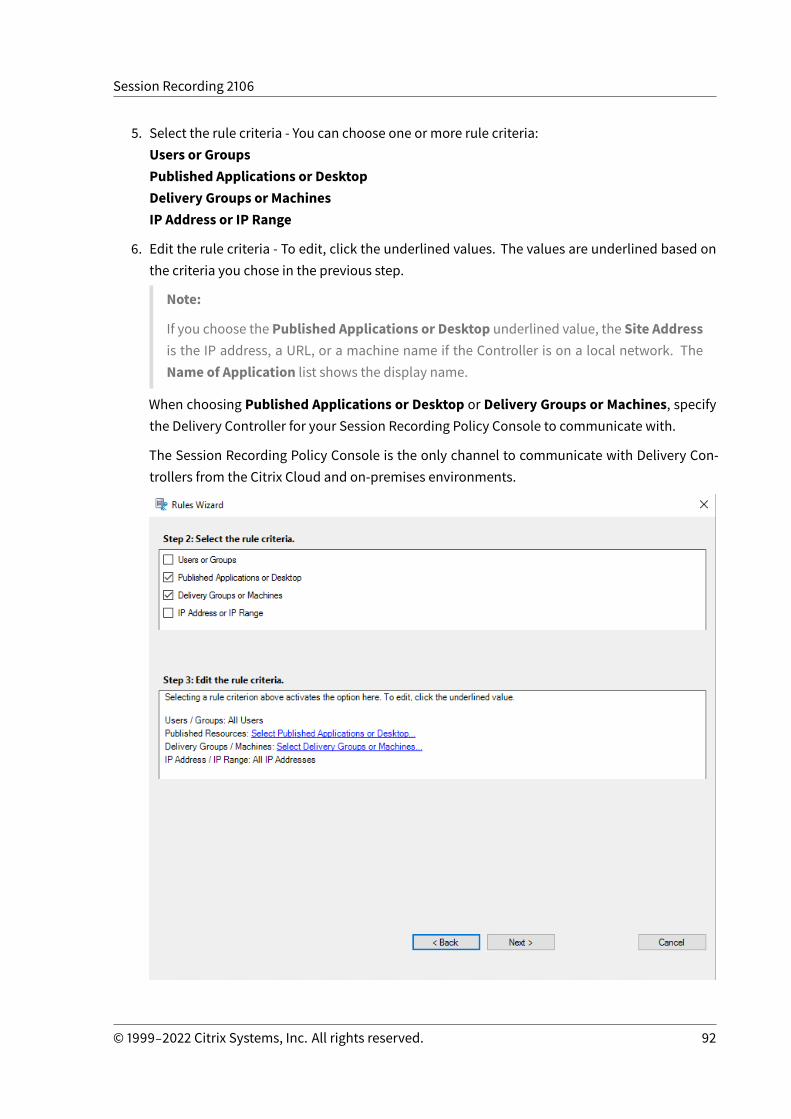
Session Recording 2106
5. Select the rule criteria - You can choose one or more rule criteria:Users or GroupsPublished Applications or DesktopDelivery Groups or MachinesIP Address or IP Range
6. Edit the rule criteria - To edit, click the underlined values. The values are underlined based onthe criteria you chose in the previous step.
Note:
If you choose the Published Applications or Desktop underlined value, the Site Addressis the IP address, a URL, or a machine name if the Controller is on a local network. TheName of Application list shows the display name.
When choosing Published Applications or Desktop or Delivery Groups or Machines, specifythe Delivery Controller for your Session Recording Policy Console to communicate with.
The Session Recording Policy Console is the only channel to communicate with Delivery Con-trollers from the Citrix Cloud and on-premises environments.
© 1999‒2022 Citrix Systems, Inc. All rights reserved. 92
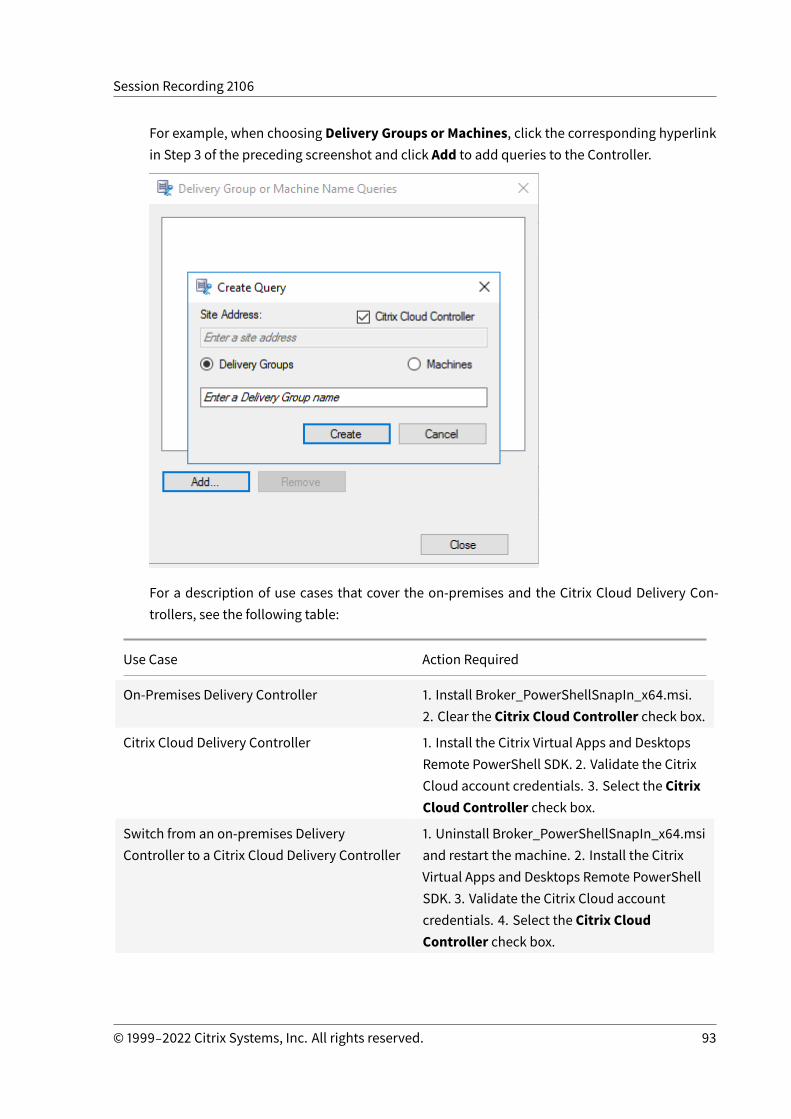
Session Recording 2106
For example, when choosing Delivery Groups or Machines, click the corresponding hyperlinkin Step 3 of the preceding screenshot and click Add to add queries to the Controller.
For a description of use cases that cover the on-premises and the Citrix Cloud Delivery Con-trollers, see the following table:
Use Case Action Required
On-Premises Delivery Controller 1. Install Broker_PowerShellSnapIn_x64.msi.2. Clear the Citrix Cloud Controller check box.
Citrix Cloud Delivery Controller 1. Install the Citrix Virtual Apps and DesktopsRemote PowerShell SDK. 2. Validate the CitrixCloud account credentials. 3. Select the CitrixCloud Controller check box.
Switch from an on-premises DeliveryController to a Citrix Cloud Delivery Controller
1. Uninstall Broker_PowerShellSnapIn_x64.msiand restart the machine. 2. Install the CitrixVirtual Apps and Desktops Remote PowerShellSDK. 3. Validate the Citrix Cloud accountcredentials. 4. Select the Citrix CloudController check box.
© 1999‒2022 Citrix Systems, Inc. All rights reserved. 93
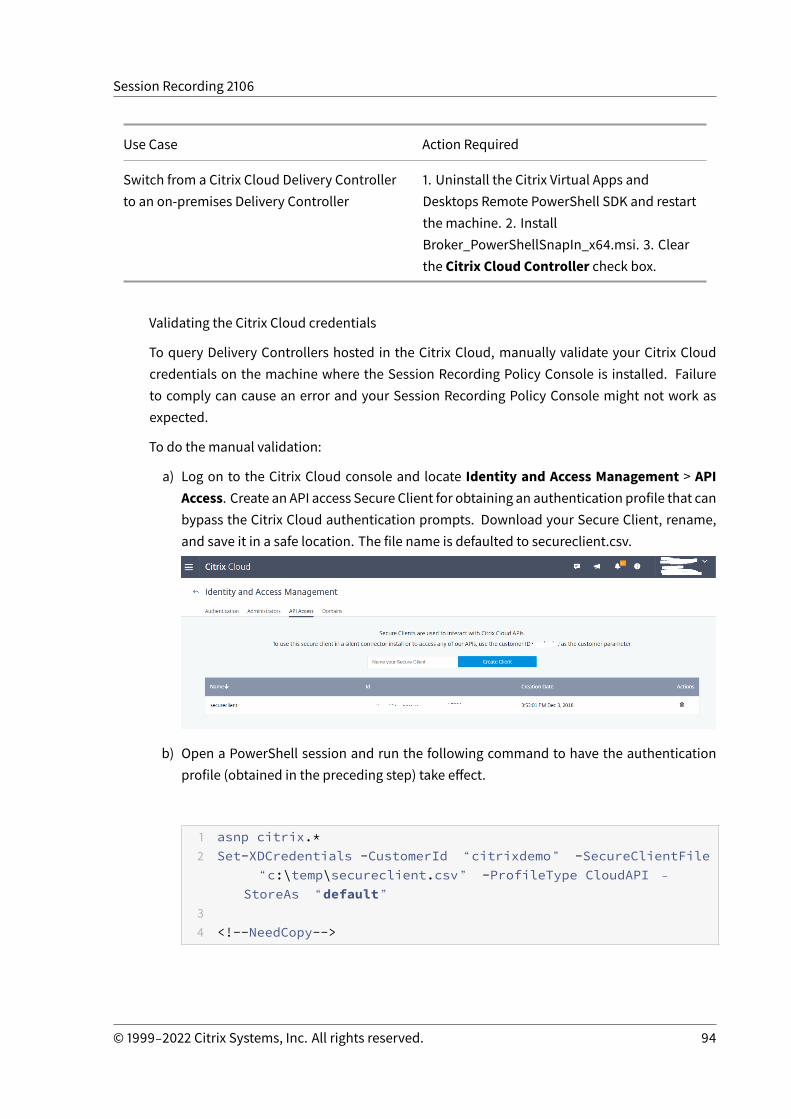
Session Recording 2106
Use Case Action Required
Switch from a Citrix Cloud Delivery Controllerto an on-premises Delivery Controller
1. Uninstall the Citrix Virtual Apps andDesktops Remote PowerShell SDK and restartthe machine. 2. InstallBroker_PowerShellSnapIn_x64.msi. 3. Clearthe Citrix Cloud Controller check box.
Validating the Citrix Cloud credentials
To query Delivery Controllers hosted in the Citrix Cloud, manually validate your Citrix Cloudcredentials on the machine where the Session Recording Policy Console is installed. Failureto comply can cause an error and your Session Recording Policy Console might not work asexpected.
To do the manual validation:
a) Log on to the Citrix Cloud console and locate Identity and Access Management > APIAccess. Create an API access Secure Client for obtaining an authentication profile that canbypass the Citrix Cloud authentication prompts. Download your Secure Client, rename,and save it in a safe location. The file name is defaulted to secureclient.csv.
b) Open a PowerShell session and run the following command to have the authenticationprofile (obtained in the preceding step) take effect.
1 asnp citrix.*2 Set-XDCredentials -CustomerId “ citrixdemo” -SecureClientFile
“ c:\temp\secureclient.csv” -ProfileType CloudAPI ‒StoreAs “ default”
34 <!--NeedCopy-->
© 1999‒2022 Citrix Systems, Inc. All rights reserved. 94
Session Recording 2106
Set CustomerId and SecureClientFile as required. The preceding command creates adefault authentication profile for the customer citrixdemo to bypass authenticationprompts in the current and all subsequent PowerShell sessions.
7. Follow the wizard to finish the configuration.
Note: Limitation regarding prelaunched application sessions:
• If the active policy tries to match an application name, the applications launched in theprelaunched session are not matched, which results in the session not being recorded.
• If the active policy records every application, when a user logs on to Citrix Workspace appfor Windows (at the same time that a prelaunched session is established), a recording noti-fication appears and the prelaunched (empty) session and any applications to be launchedin that session going forward are recorded.
As a workaround, publish applications in separate Delivery Groups according to their recordingpolicies. Do not use an application name as a recording condition. This approach ensures thatprelaunched sessions can be recorded. However, notifications still appear.
Use Active Directory groups
Session Recording allows you to use Active Directory groups when creating policies. Using Active Di-rectory groups instead of individual users simplifies the creation and management of rules and poli-cies. For example, if users in your company’s finance department are contained in an Active Directorygroup named Finance, you can create a rule that applies to all members of this group by selecting theFinance group in theRuleswizard when creating the rule.
White list users
You can create Session Recording policies ensuring that the sessions of some users in your organiza-tion are never recorded. This case is calledwhite listing these users. White listing is useful for users who handle privacy-related information orwhen your organization does not want to record the sessions of a certain class of employees.
For example, if all managers in your company are members of an Active Directory group named Exec-utive, you can ensure that sessions of these users are never recorded by creating a rule that disablessession recording for the Executive group. While the policy containing this rule is active, no sessionsofmembers of the Executive group are recorded. The sessions of othermembers of your organizationare sessions recorded based on other rules in the active policy.
Configure Director to use the Session Recording Server
You can use the Director console to create and activate the recording policies.
© 1999‒2022 Citrix Systems, Inc. All rights reserved. 95
Session Recording 2106
1. For an HTTPS connection, install the certificate to trust the Session Recording Server in theTrusted Root Certificates of the Director server.
2. Toconfigure theDirector server touse theSessionRecordingServer, run theC:\inetpub\wwwroot\Director\tools\DirectorConfig.exe/configsessionrecording command.
3. Type the IP address or FQDN of the Session Recording Server and the port number and con-nection type (HTTP/HTTPS) that the Session Recording Agent uses to connect to the SessionRecording Broker on the Director server.
Event logging policies
Session Recording supports centralized configuration of event logging policies. You can create poli-cies in the Session Recording Policy Console to log various events.
Note:
To log the insertion of USBmass storage devices and the application starts and ends, use SessionRecording Version 1811 or later.To log file operation events and web browsing activities, use Session Recording Version 1903 orlater.To log clipboard activities, use Session Recording Version 2012 or later.
System-defined event logging policy
The system-defined event logging policy is Do not log. It is inactive by default. When it is active, noevents are logged.
You cannot modify or delete the system-defined event logging policy.
Create a custom event logging policy
When you create your own event logging policy, youmake rules to specify which users or groups, pub-lished applications or desktops, delivery groups or VDAmachines, and Citrix Workspace app client IPaddresses have specific events logged during session recording. A wizard within the Session Record-ing Policy Console helps you create rules. To obtain the list of published applications or desktops andthe list of delivery groupsor VDAmachines, youmust have the readpermission as aSite administrator.Configure the administrator read permission on the Delivery Controller of the Site.
To create a custom event logging policy:
1. Log on as an authorized Policy Administrator to the server where the Session Recording PolicyConsole is installed.
2. Start the Session Recording Policy Console.By default, there is no active event logging policy.
© 1999‒2022 Citrix Systems, Inc. All rights reserved. 96
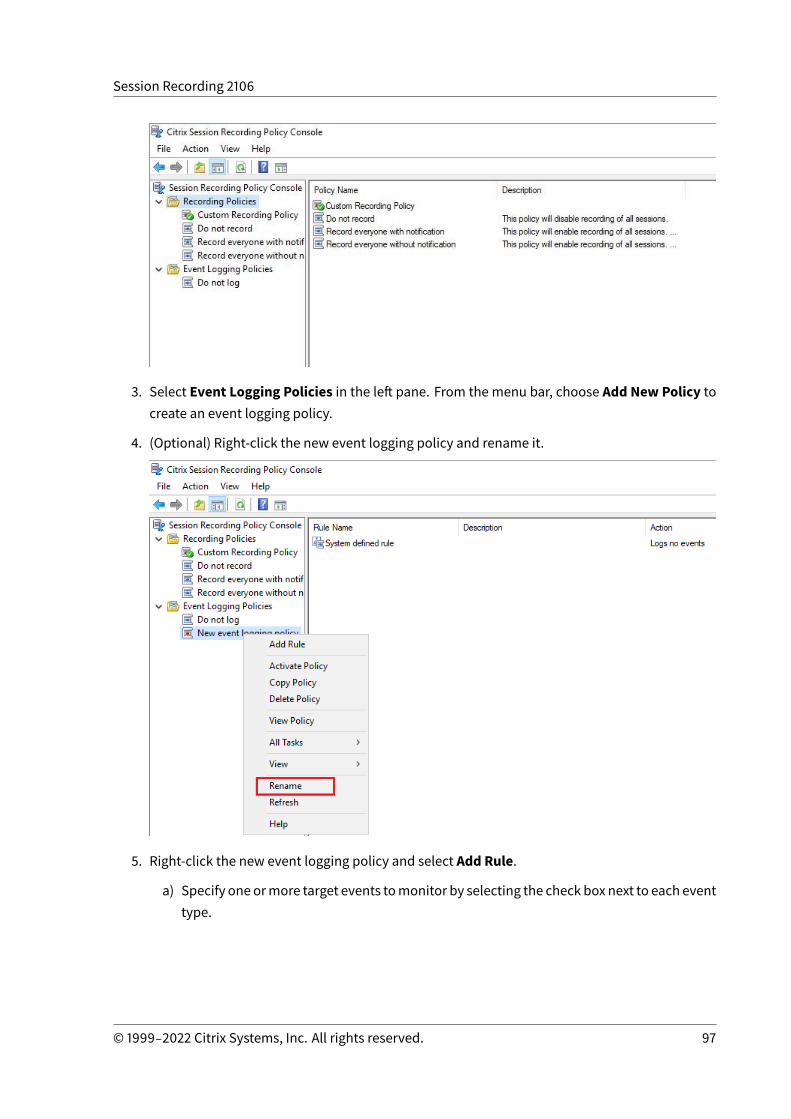
Session Recording 2106
3. Select Event Logging Policies in the left pane. From the menu bar, choose Add New Policy tocreate an event logging policy.
4. (Optional) Right-click the new event logging policy and rename it.
5. Right-click the new event logging policy and select Add Rule.
a) Specify one ormore target events tomonitor by selecting the check box next to each eventtype.
© 1999‒2022 Citrix Systems, Inc. All rights reserved. 97
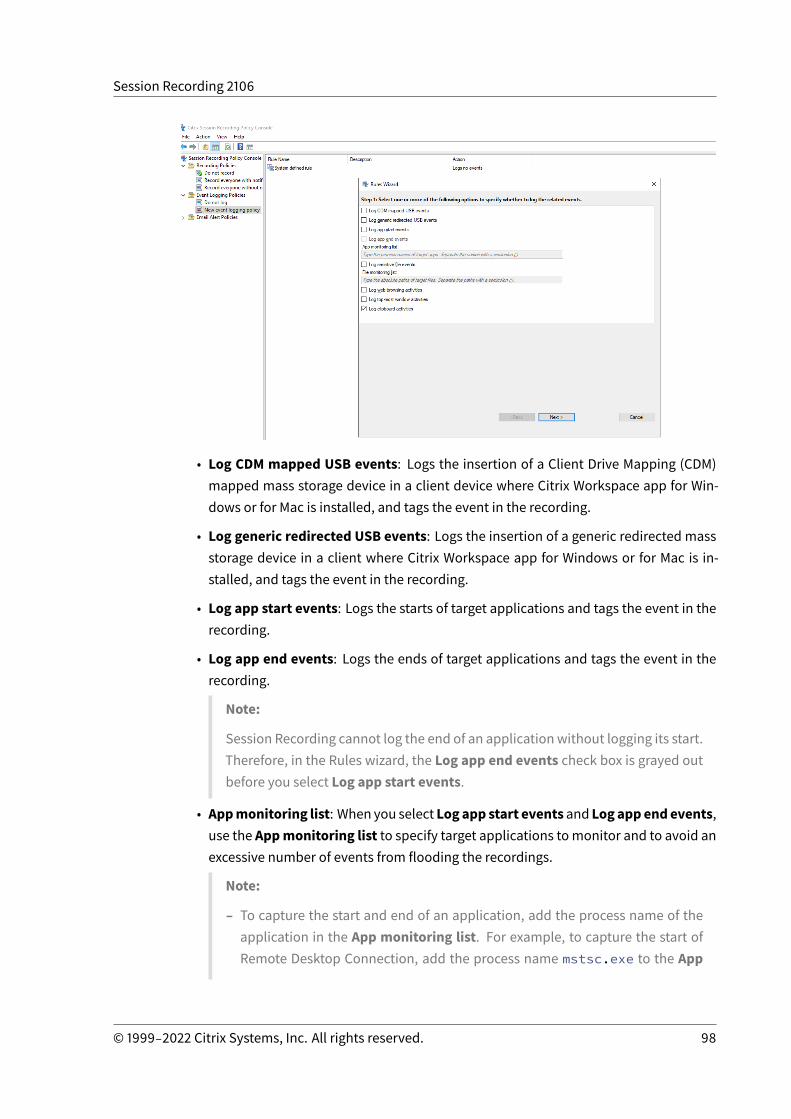
Session Recording 2106
• Log CDM mapped USB events: Logs the insertion of a Client Drive Mapping (CDM)mapped mass storage device in a client device where Citrix Workspace app for Win-dows or for Mac is installed, and tags the event in the recording.
• Log generic redirected USB events: Logs the insertion of a generic redirected massstorage device in a client where Citrix Workspace app for Windows or for Mac is in-stalled, and tags the event in the recording.
• Log app start events: Logs the starts of target applications and tags the event in therecording.
• Log app end events: Logs the ends of target applications and tags the event in therecording.
Note:
Session Recording cannot log the end of an applicationwithout logging its start.Therefore, in the Rules wizard, the Log app end events check box is grayed outbefore you select Log app start events.
• Appmonitoring list: When you select Logapp start events and Logappendevents,use the Appmonitoring list to specify target applications tomonitor and to avoid anexcessive number of events from flooding the recordings.
Note:
– To capture the start and end of an application, add the process name of theapplication in the App monitoring list. For example, to capture the start ofRemote Desktop Connection, add the process name mstsc.exe to the App
© 1999‒2022 Citrix Systems, Inc. All rights reserved. 98
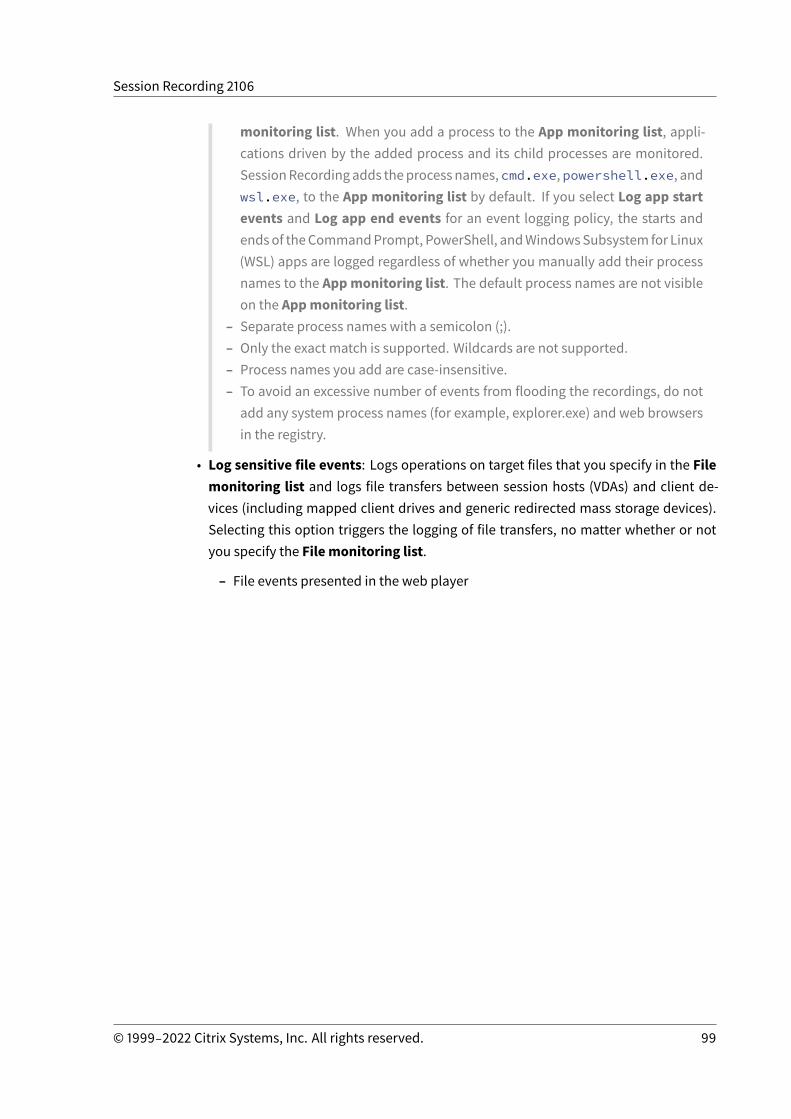
Session Recording 2106
monitoring list. When you add a process to the App monitoring list, appli-cations driven by the added process and its child processes are monitored.SessionRecordingadds theprocessnames,cmd.exe,powershell.exe, andwsl.exe, to the App monitoring list by default. If you select Log app startevents and Log app end events for an event logging policy, the starts andendsof theCommandPrompt, PowerShell, andWindowsSubsystem for Linux(WSL) apps are logged regardless of whether you manually add their processnames to the Appmonitoring list. The default process names are not visibleon the Appmonitoring list.
– Separate process names with a semicolon (;).– Only the exact match is supported. Wildcards are not supported.– Process names you add are case-insensitive.– To avoid an excessive number of events from flooding the recordings, do notadd any system process names (for example, explorer.exe) and web browsersin the registry.
• Log sensitive file events: Logs operations on target files that you specify in the Filemonitoring list and logs file transfers between session hosts (VDAs) and client de-vices (including mapped client drives and generic redirected mass storage devices).Selecting this option triggers the logging of file transfers, no matter whether or notyou specify the File monitoring list.
– File events presented in the web player
© 1999‒2022 Citrix Systems, Inc. All rights reserved. 99
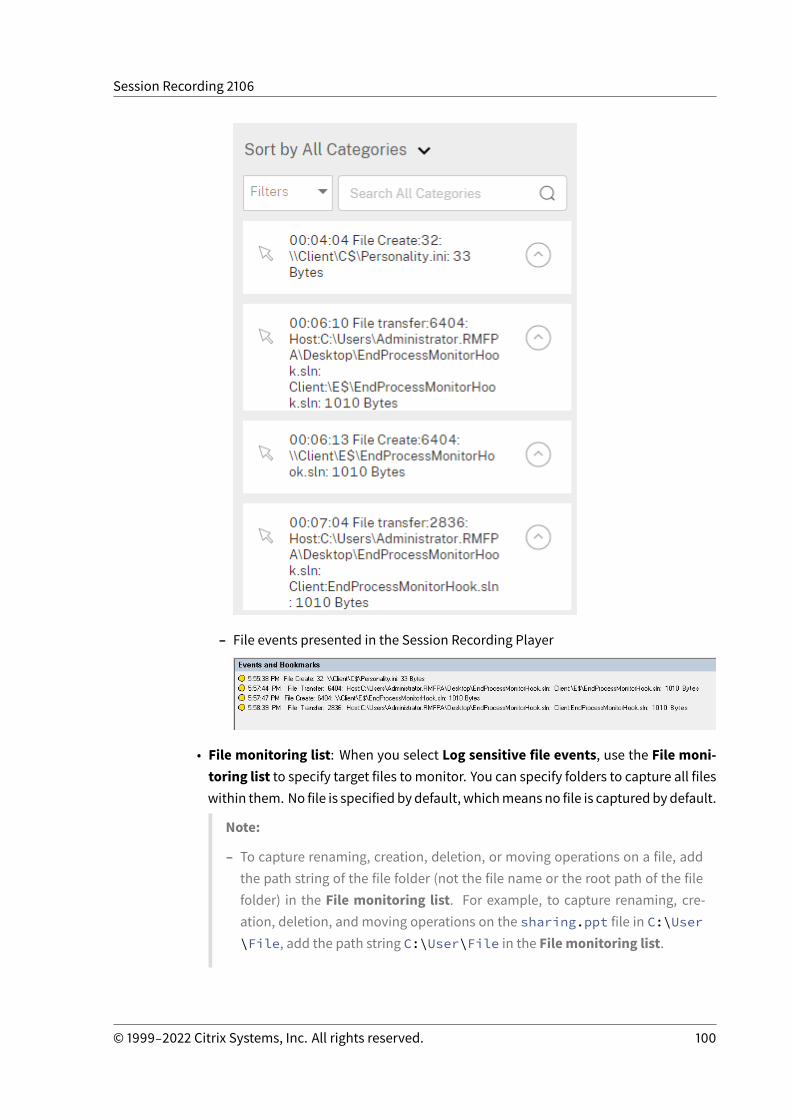
Session Recording 2106
– File events presented in the Session Recording Player
• File monitoring list: When you select Log sensitive file events, use the File moni-toring list to specify target files tomonitor. You can specify folders to capture all fileswithin them. No file is specified by default, whichmeans no file is capturedbydefault.
Note:
– To capture renaming, creation, deletion, or moving operations on a file, addthe path string of the file folder (not the file name or the root path of the filefolder) in the File monitoring list. For example, to capture renaming, cre-ation, deletion, and moving operations on the sharing.ppt file in C:\User\File, add the path string C:\User\File in the File monitoring list.
© 1999‒2022 Citrix Systems, Inc. All rights reserved. 100
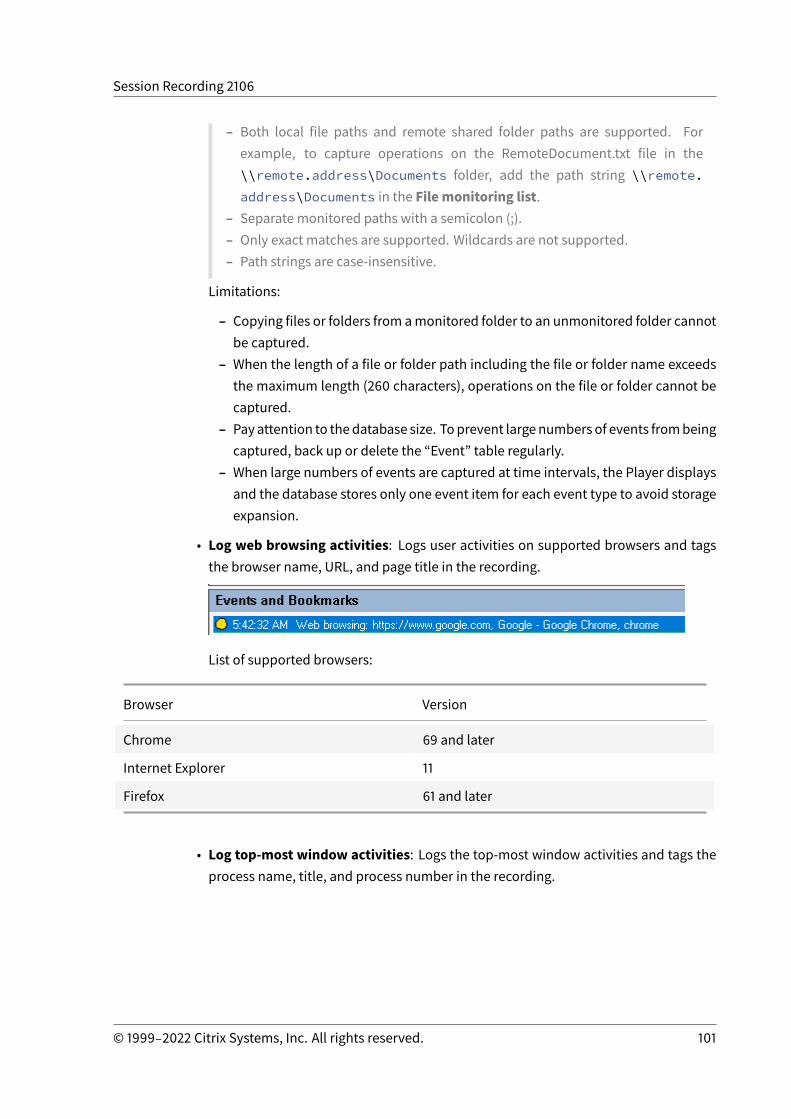
Session Recording 2106
– Both local file paths and remote shared folder paths are supported. Forexample, to capture operations on the RemoteDocument.txt file in the\\remote.address\Documents folder, add the path string \\remote.address\Documents in the File monitoring list.
– Separate monitored paths with a semicolon (;).– Only exact matches are supported. Wildcards are not supported.– Path strings are case-insensitive.
Limitations:
– Copying files or folders from amonitored folder to an unmonitored folder cannotbe captured.
– When the length of a file or folder path including the file or folder name exceedsthe maximum length (260 characters), operations on the file or folder cannot becaptured.
– Payattention to thedatabase size. Toprevent largenumbers of events frombeingcaptured, back up or delete the “Event” table regularly.
– When large numbers of events are captured at time intervals, the Player displaysand the database stores only one event item for each event type to avoid storageexpansion.
• Log web browsing activities: Logs user activities on supported browsers and tagsthe browser name, URL, and page title in the recording.
List of supported browsers:
Browser Version
Chrome 69 and later
Internet Explorer 11
Firefox 61 and later
• Log top-most window activities: Logs the top-most window activities and tags theprocess name, title, and process number in the recording.
© 1999‒2022 Citrix Systems, Inc. All rights reserved. 101

Session Recording 2106
• Log clipboard activities: Logs copy operations of text, images, and files using theclipboard. The process name and file path are logged for a file copy. The processname and title are logged for a text copy. The process name is logged for an imagecopy.
b) Select and edit the rule criteria.
Similar to creating a custom recording policy, you can choose one or more rule criteria:UsersorGroups,PublishedApplicationsorDesktop,DeliveryGroupsorMachines, andIPAddressor IPRange. Formore information, see the instructions in theCreatea customrecording policy section.
Note:
Some sessions might not meet any rule criteria in an event logging policy. For thesesessions, the event logging action of the fallback rule applies, which is alwaysDonotlog. You cannot modify or delete the fallback rule.
c) Follow the wizard to complete the configuration.
© 1999‒2022 Citrix Systems, Inc. All rights reserved. 102
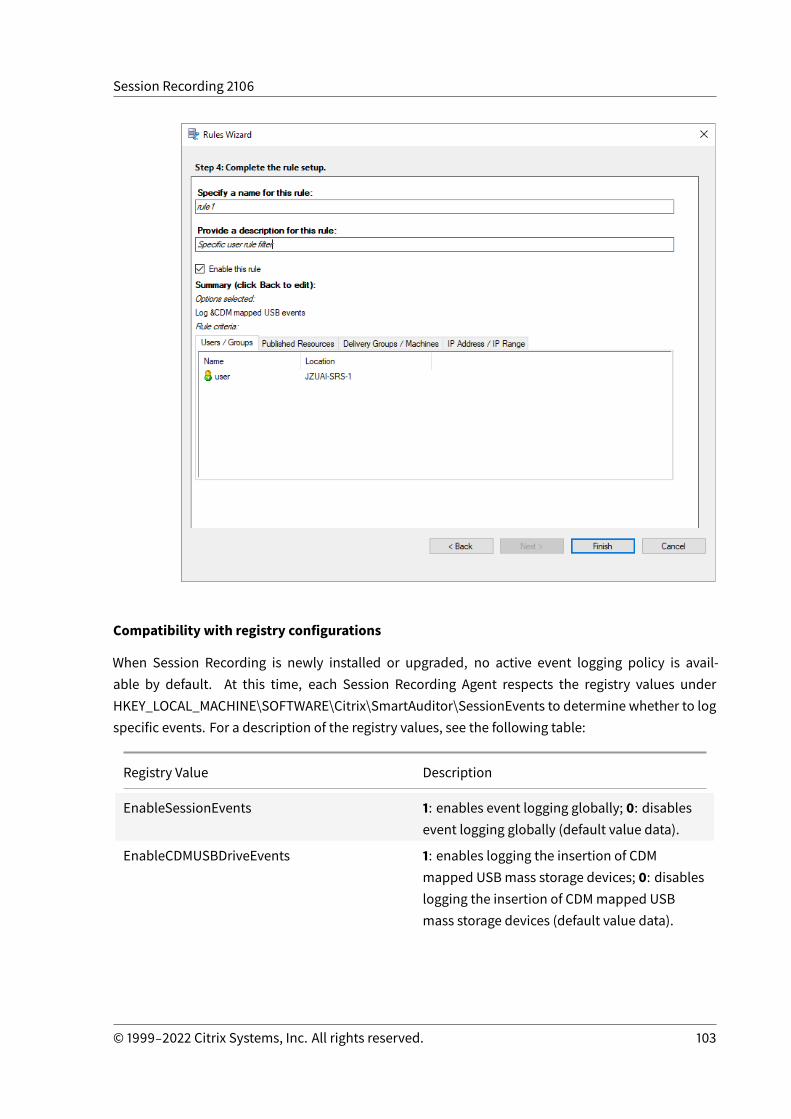
Session Recording 2106
Compatibility with registry configurations
When Session Recording is newly installed or upgraded, no active event logging policy is avail-able by default. At this time, each Session Recording Agent respects the registry values underHKEY_LOCAL_MACHINE\SOFTWARE\Citrix\SmartAuditor\SessionEvents to determine whether to logspecific events. For a description of the registry values, see the following table:
Registry Value Description
EnableSessionEvents 1: enables event logging globally; 0: disablesevent logging globally (default value data).
EnableCDMUSBDriveEvents 1: enables logging the insertion of CDMmapped USBmass storage devices; 0: disableslogging the insertion of CDMmapped USBmass storage devices (default value data).
© 1999‒2022 Citrix Systems, Inc. All rights reserved. 103
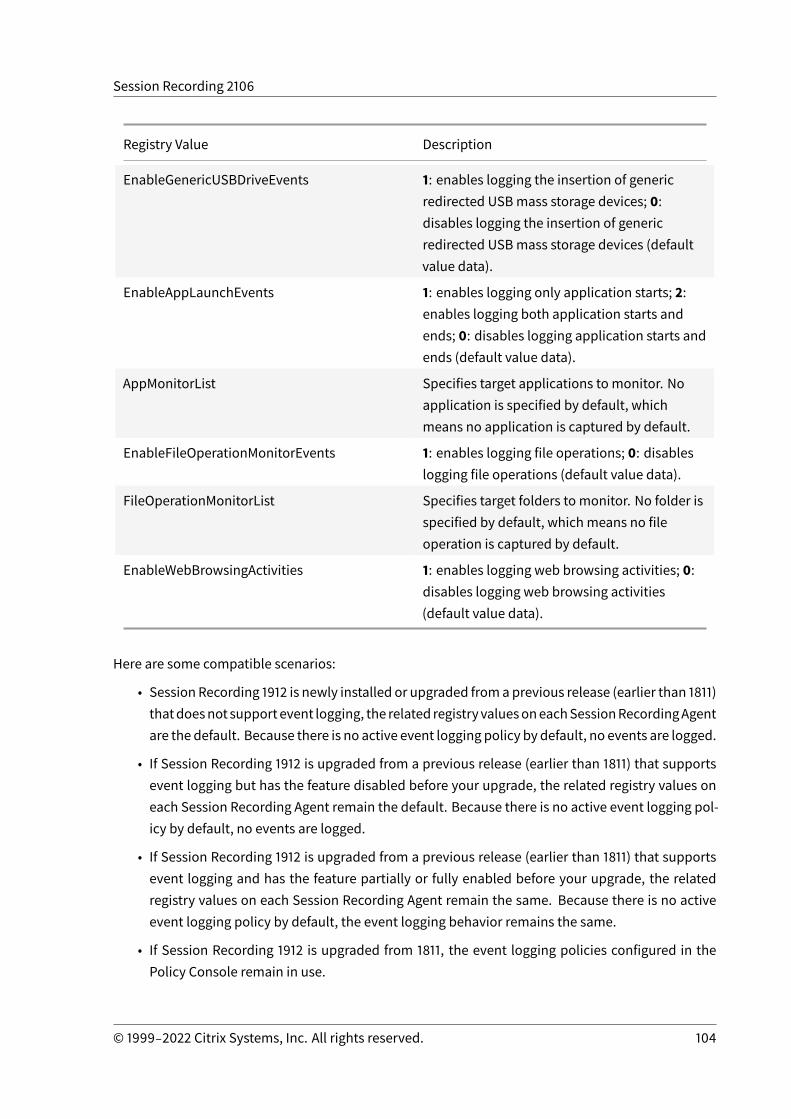
Session Recording 2106
Registry Value Description
EnableGenericUSBDriveEvents 1: enables logging the insertion of genericredirected USBmass storage devices; 0:disables logging the insertion of genericredirected USBmass storage devices (defaultvalue data).
EnableAppLaunchEvents 1: enables logging only application starts; 2:enables logging both application starts andends; 0: disables logging application starts andends (default value data).
AppMonitorList Specifies target applications to monitor. Noapplication is specified by default, whichmeans no application is captured by default.
EnableFileOperationMonitorEvents 1: enables logging file operations; 0: disableslogging file operations (default value data).
FileOperationMonitorList Specifies target folders to monitor. No folder isspecified by default, which means no fileoperation is captured by default.
EnableWebBrowsingActivities 1: enables logging web browsing activities; 0:disables logging web browsing activities(default value data).
Here are some compatible scenarios:
• Session Recording 1912 is newly installed or upgraded fromaprevious release (earlier than 1811)thatdoesnot support event logging, the related registry valuesoneachSessionRecordingAgentare the default. Because there is no active event logging policy by default, no events are logged.
• If Session Recording 1912 is upgraded from a previous release (earlier than 1811) that supportsevent logging but has the feature disabled before your upgrade, the related registry values oneach Session Recording Agent remain the default. Because there is no active event logging pol-icy by default, no events are logged.
• If Session Recording 1912 is upgraded from a previous release (earlier than 1811) that supportsevent logging and has the feature partially or fully enabled before your upgrade, the relatedregistry values on each Session Recording Agent remain the same. Because there is no activeevent logging policy by default, the event logging behavior remains the same.
• If Session Recording 1912 is upgraded from 1811, the event logging policies configured in thePolicy Console remain in use.
© 1999‒2022 Citrix Systems, Inc. All rights reserved. 104
Session Recording 2106
Caution:
When you activate the system-defined or a custom event logging policy in the Session RecordingPolicy Console, the relevant registry settings on each Session Recording Agent are ignored andyou cannot use registry settings for event logging any longer.
Recording viewing policies
The Session Recording Player supports role-based access control. You can create recording viewingpolicies in theSessionRecordingPolicyConsole andaddmultiple rules to eachpolicy. Each ruledeter-mineswhich user or user group can view the recordings originating fromother users and user groups,published applications and desktops, and delivery groups and VDAs you specify.
Create a custom recording viewing policy
Before you can create recording viewing policies, enable the feature as follows:
1. Log on to the machine hosting the Session Recording Server.
2. From the Startmenu, choose Session Recording Server Properties.
3. In Session Recording Server Properties, click the RBAC tab.
4. Select the Allow to configure recording viewing policies check box.
© 1999‒2022 Citrix Systems, Inc. All rights reserved. 105
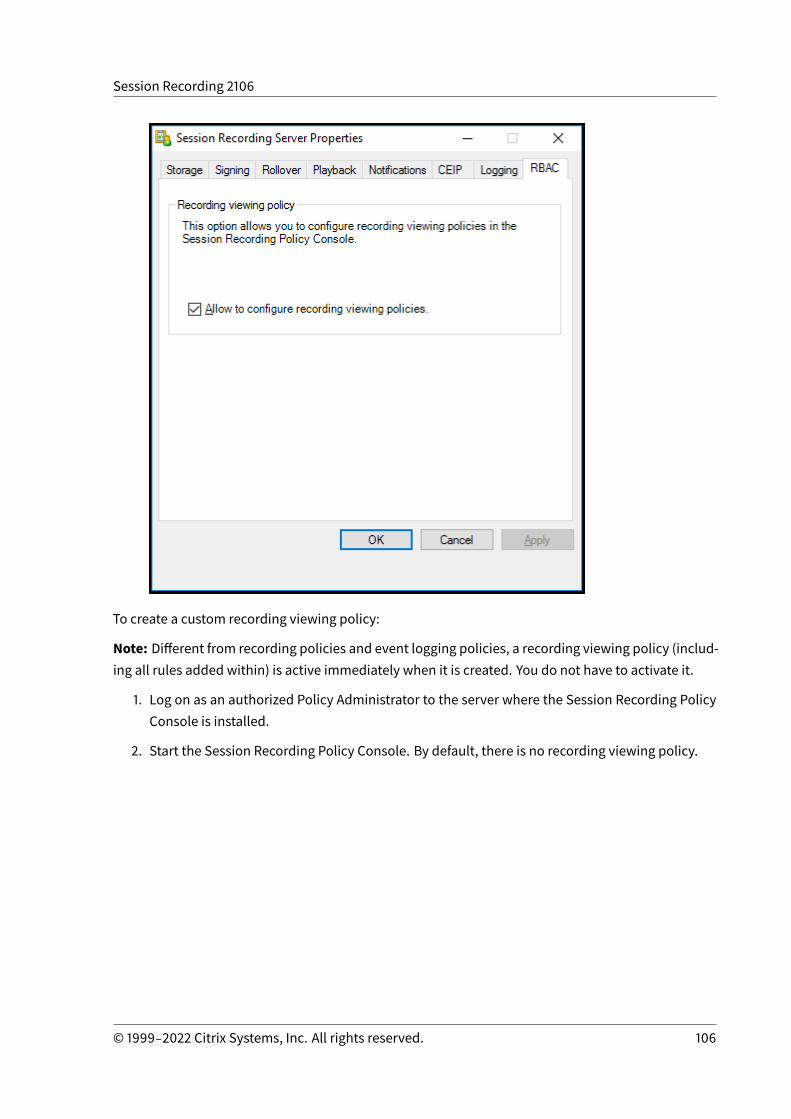
Session Recording 2106
To create a custom recording viewing policy:
Note: Different from recording policies and event logging policies, a recording viewing policy (includ-ing all rules added within) is active immediately when it is created. You do not have to activate it.
1. Log on as an authorized Policy Administrator to the server where the Session Recording PolicyConsole is installed.
2. Start the Session Recording Policy Console. By default, there is no recording viewing policy.
© 1999‒2022 Citrix Systems, Inc. All rights reserved. 106
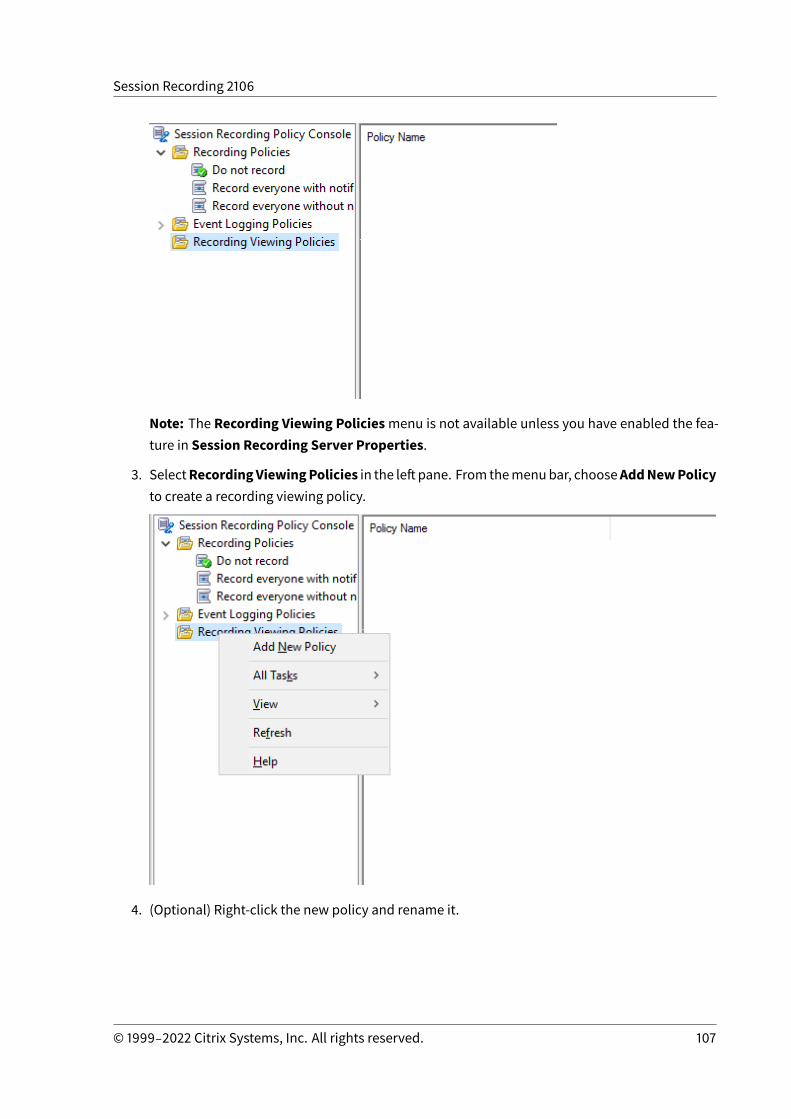
Session Recording 2106
Note: The Recording Viewing Policiesmenu is not available unless you have enabled the fea-ture in Session Recording Server Properties.
3. SelectRecordingViewingPolicies in the leftpane. From themenubar, chooseAddNewPolicyto create a recording viewing policy.
4. (Optional) Right-click the new policy and rename it.
© 1999‒2022 Citrix Systems, Inc. All rights reserved. 107
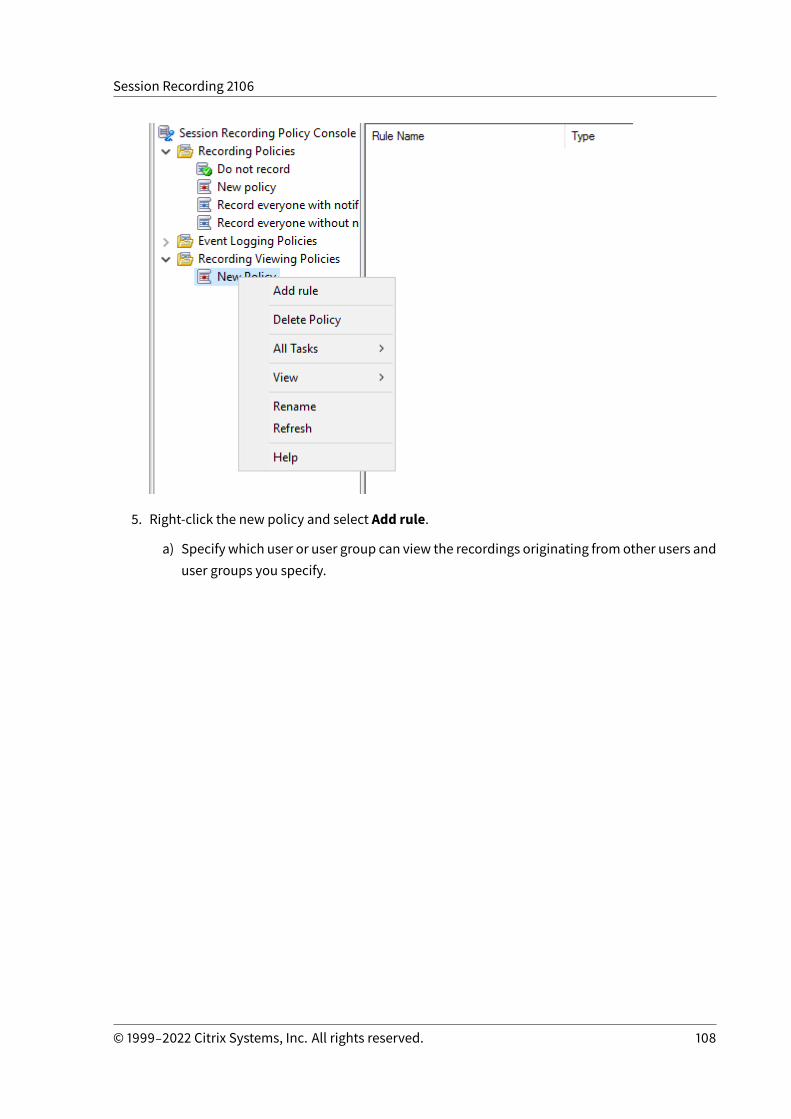
Session Recording 2106
5. Right-click the new policy and select Add rule.
a) Specify which user or user group can view the recordings originating fromother users anduser groups you specify.
© 1999‒2022 Citrix Systems, Inc. All rights reserved. 108
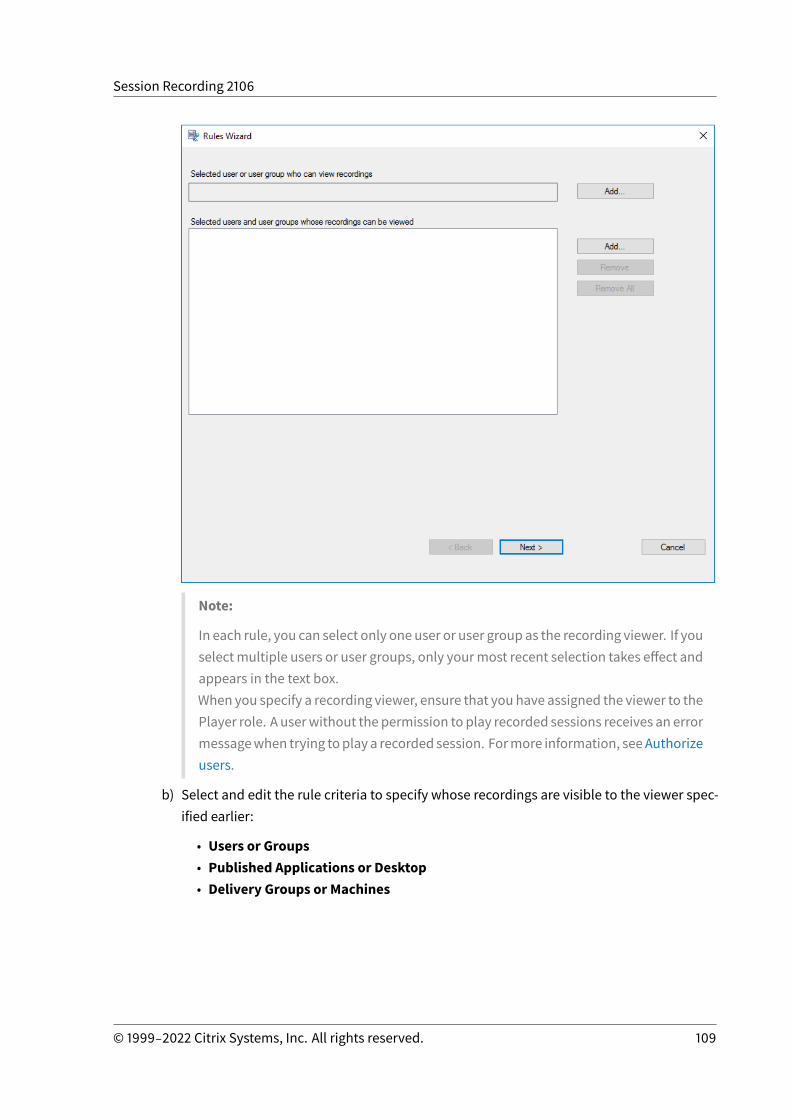
Session Recording 2106
Note:
In each rule, you can select only one user or user group as the recording viewer. If youselectmultiple users or user groups, only yourmost recent selection takes effect andappears in the text box.When you specify a recording viewer, ensure that you have assigned the viewer to thePlayer role. A userwithout the permission to play recorded sessions receives an errormessagewhen trying toplay a recorded session. Formore information, seeAuthorizeusers.
b) Select and edit the rule criteria to specify whose recordings are visible to the viewer spec-ified earlier:
• Users or Groups• Published Applications or Desktop• Delivery Groups or Machines
© 1999‒2022 Citrix Systems, Inc. All rights reserved. 109

Session Recording 2106
Note: If you leave the rule criteria unspecified, the viewer specified earlier has no record-ings to view.
c) Follow the wizard to complete the configuration.
© 1999‒2022 Citrix Systems, Inc. All rights reserved. 110
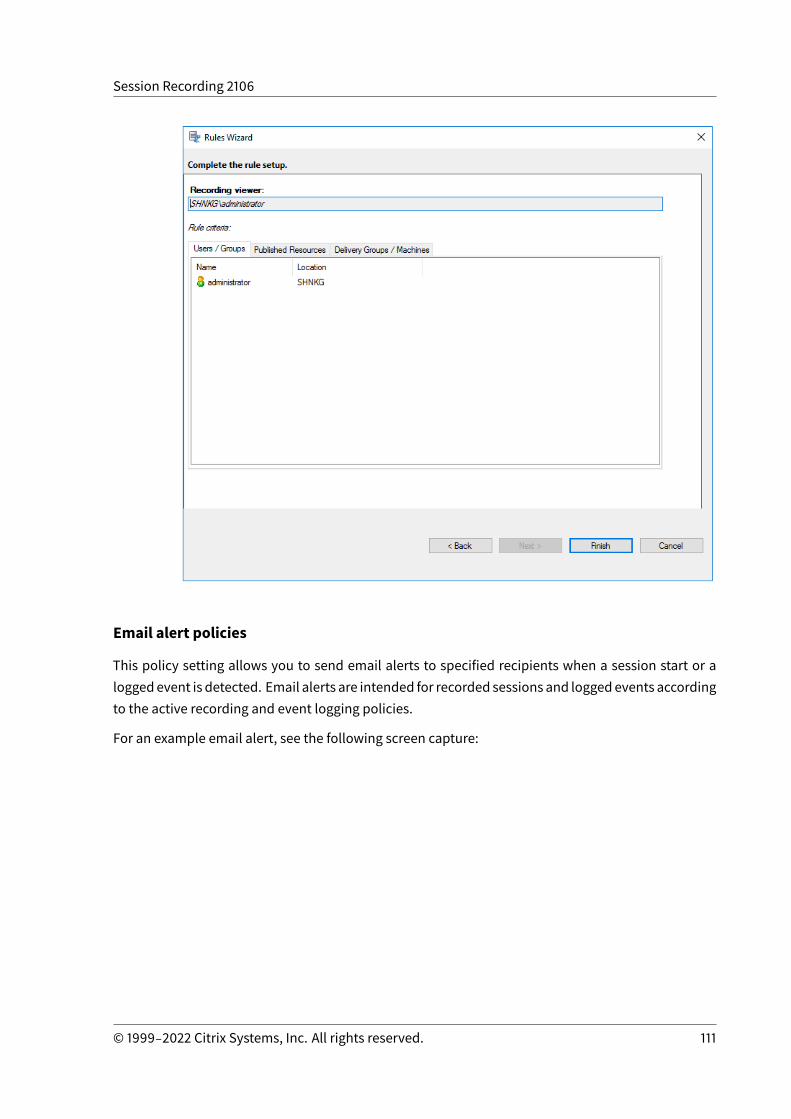
Session Recording 2106
Email alert policies
This policy setting allows you to send email alerts to specified recipients when a session start or aloggedevent is detected. Email alerts are intended for recorded sessions and loggedevents accordingto the active recording and event logging policies.
For an example email alert, see the following screen capture:
© 1999‒2022 Citrix Systems, Inc. All rights reserved. 111

Session Recording 2106
Tip:
Clicking the playback URL opens the playback page of the recorded session in the web player.Clicking here opens the All recordings page in the web player.
You can activate the system-defined email alert policy or create and activate your own custom emailalert policies. When creating a custom policy, you can add multiple rules to each policy. Each ruledetermines which users or groups, published applications or desktops, delivery groups or VDA ma-chines, and Citrix Workspace app client IP addresses can trigger the email alerts when session startsare detected.
Only one email alert policy can be active at a time.
System-defined email alert policy
Session Recording provides one system-defined email alert policy:
• Do not alert. The default policy. If you do not specify another policy, no email alerts are sent.
© 1999‒2022 Citrix Systems, Inc. All rights reserved. 112
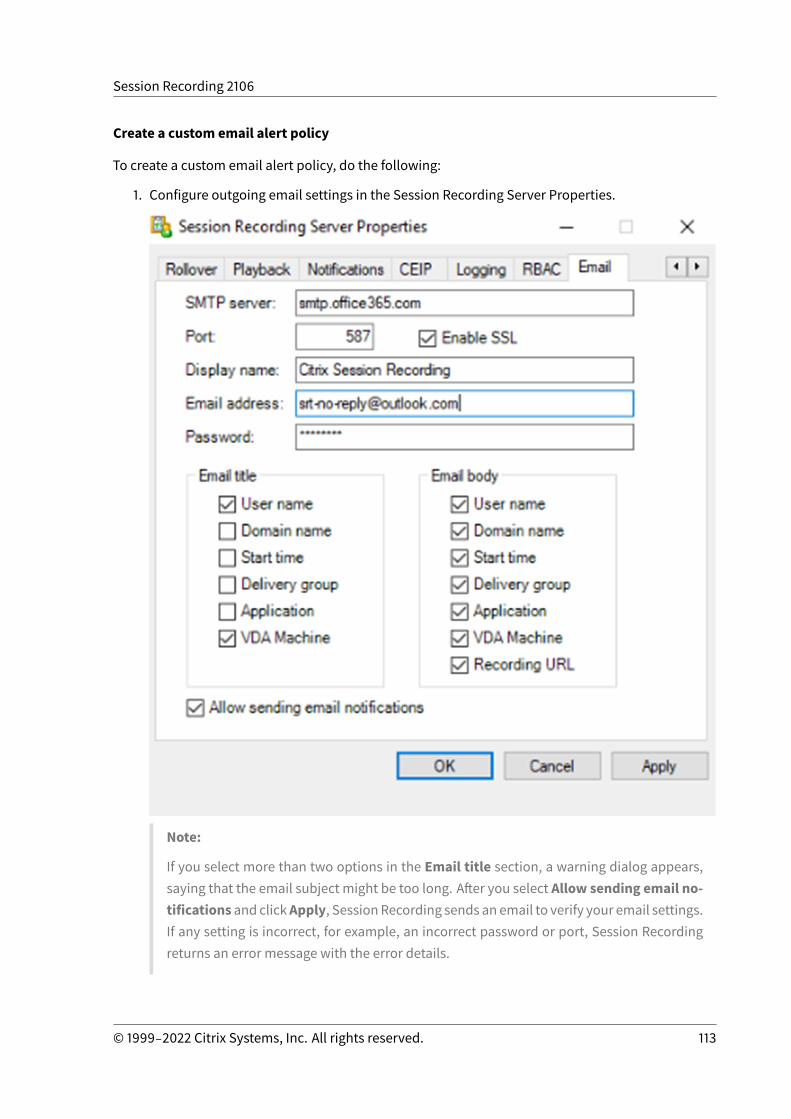
Session Recording 2106
Create a custom email alert policy
To create a custom email alert policy, do the following:
1. Configure outgoing email settings in the Session Recording Server Properties.
Note:
If you select more than two options in the Email title section, a warning dialog appears,saying that the email subject might be too long. After you select Allow sending email no-tifications and clickApply, SessionRecording sends an email to verify your email settings.If any setting is incorrect, for example, an incorrect password or port, Session Recordingreturns an error message with the error details.
© 1999‒2022 Citrix Systems, Inc. All rights reserved. 113
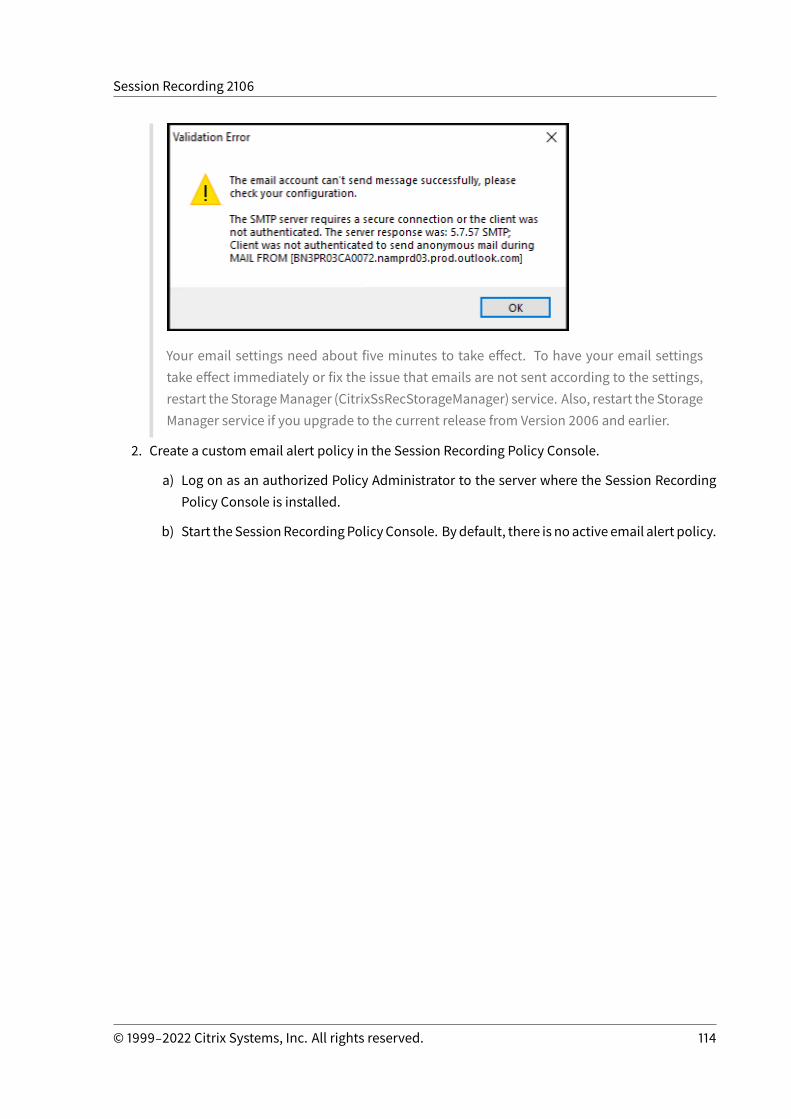
Session Recording 2106
Your email settings need about five minutes to take effect. To have your email settingstake effect immediately or fix the issue that emails are not sent according to the settings,restart the StorageManager (CitrixSsRecStorageManager) service. Also, restart the StorageManager service if you upgrade to the current release from Version 2006 and earlier.
2. Create a custom email alert policy in the Session Recording Policy Console.
a) Log on as an authorized Policy Administrator to the server where the Session RecordingPolicy Console is installed.
b) Start theSessionRecordingPolicyConsole. Bydefault, there is noactive email alert policy.
© 1999‒2022 Citrix Systems, Inc. All rights reserved. 114
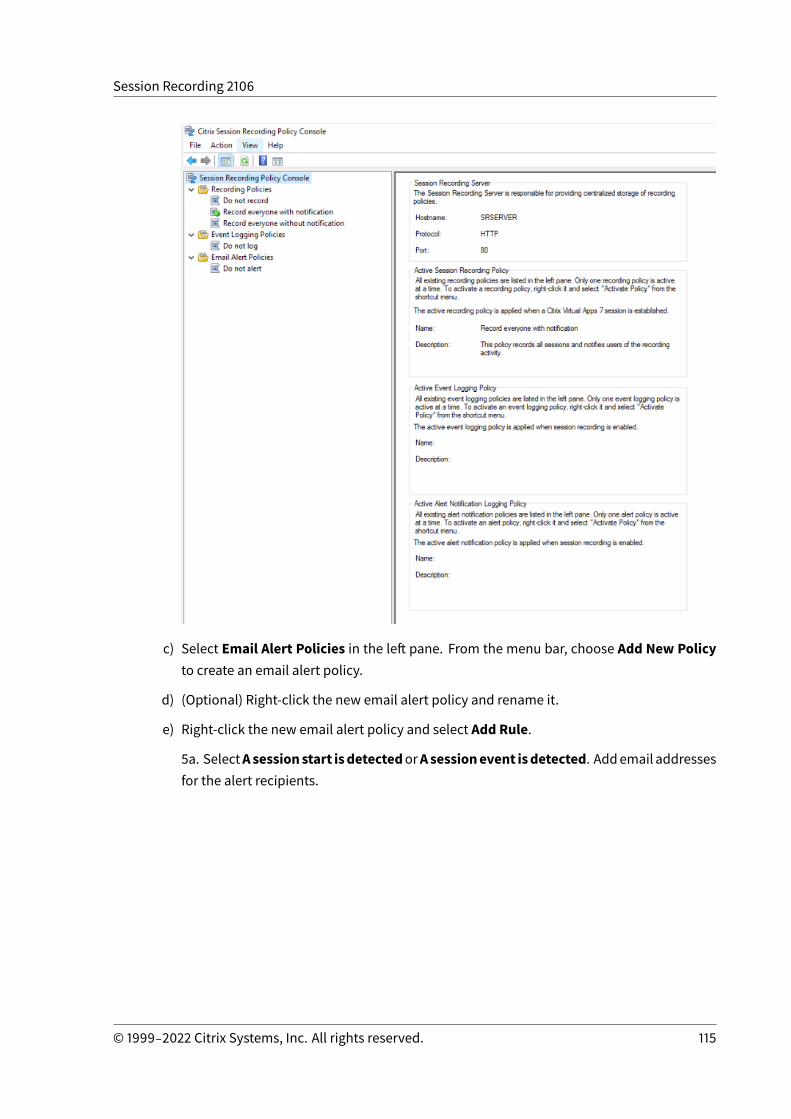
Session Recording 2106
c) Select Email Alert Policies in the left pane. From the menu bar, choose Add New Policyto create an email alert policy.
d) (Optional) Right-click the new email alert policy and rename it.
e) Right-click the new email alert policy and select Add Rule.
5a. SelectAsessionstart isdetectedorAsessionevent isdetected. Addemail addressesfor the alert recipients.
© 1999‒2022 Citrix Systems, Inc. All rights reserved. 115
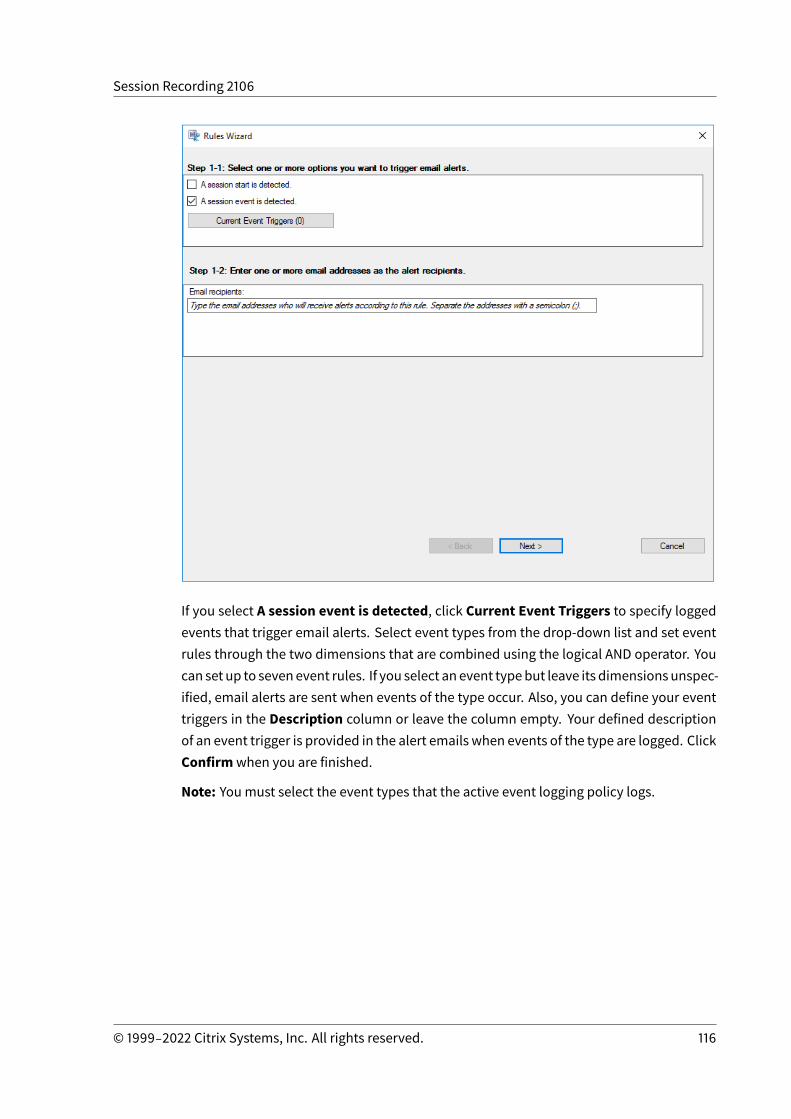
Session Recording 2106
If you select A session event is detected, click Current Event Triggers to specify loggedevents that trigger email alerts. Select event types from the drop-down list and set eventrules through the two dimensions that are combined using the logical AND operator. Youcan set up to sevenevent rules. If you select an event typebut leave its dimensionsunspec-ified, email alerts are sent when events of the type occur. Also, you can define your eventtriggers in the Description column or leave the column empty. Your defined descriptionof an event trigger is provided in the alert emails when events of the type are logged. ClickConfirmwhen you are finished.
Note: Youmust select the event types that the active event logging policy logs.
© 1999‒2022 Citrix Systems, Inc. All rights reserved. 116
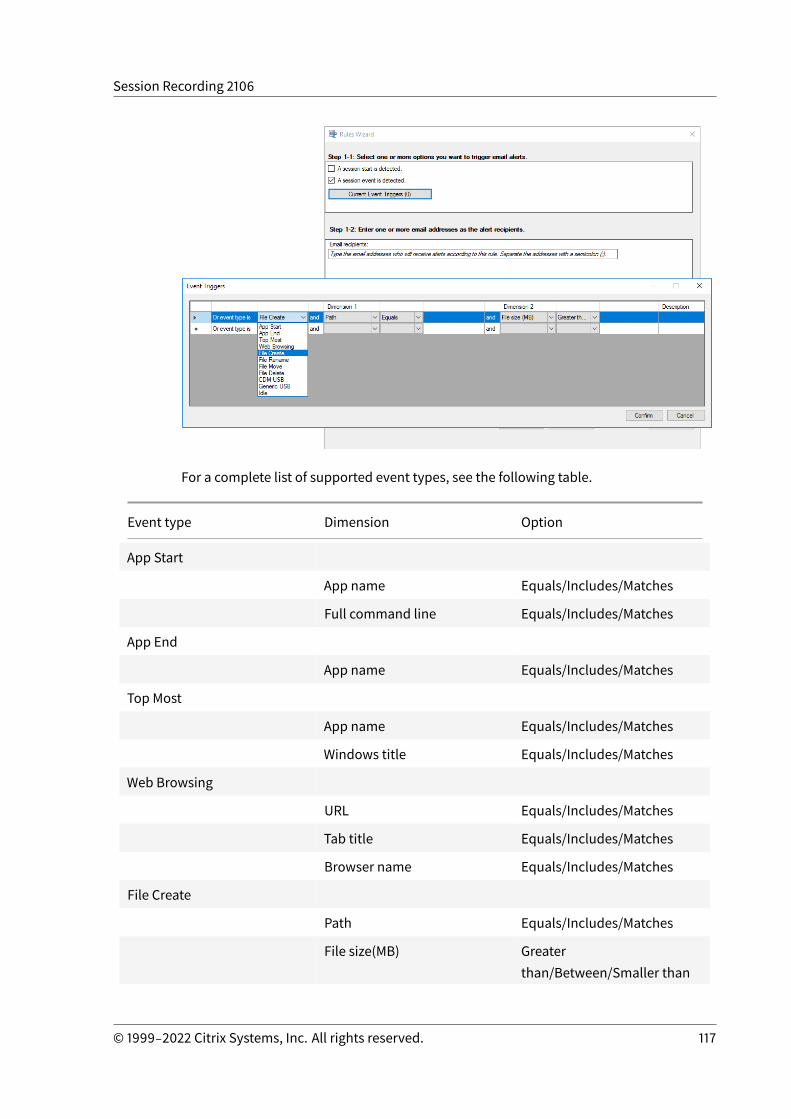
Session Recording 2106
For a complete list of supported event types, see the following table.
Event type Dimension Option
App Start
App name Equals/Includes/Matches
Full command line Equals/Includes/Matches
App End
App name Equals/Includes/Matches
Top Most
App name Equals/Includes/Matches
Windows title Equals/Includes/Matches
Web Browsing
URL Equals/Includes/Matches
Tab title Equals/Includes/Matches
Browser name Equals/Includes/Matches
File Create
Path Equals/Includes/Matches
File size(MB) Greaterthan/Between/Smaller than
© 1999‒2022 Citrix Systems, Inc. All rights reserved. 117

Session Recording 2106
Event type Dimension Option
File Rename
Path Equals/Includes/Matches
Name Equals/Includes/Matches
File Move
Source path Equals/Includes/Matches
Destination path Equals/Includes/Matches
File size(MB) Greaterthan/Between/Smaller than
File Delete
Path Equals/Includes/Matches
File size(MB) Greaterthan/Between/Smaller than
CDM USB
Drive letter Equals
Generic USB
Device name Equals/Includes/Matches
Idle
idle duration(Hrs) Greater than
5b. Add email addresses for the alert recipients.
5c. Click Next to select and edit the rule criteria.
Similar towhen creating a custom recording policy, you can choose one ormore rule crite-ria: Users orGroups,PublishedApplications orDesktop,DeliveryGroups orMachines,and IPAddressor IPRange. Formore information, see the instructions in theCreate a cus-tom recording policy section.
© 1999‒2022 Citrix Systems, Inc. All rights reserved. 118
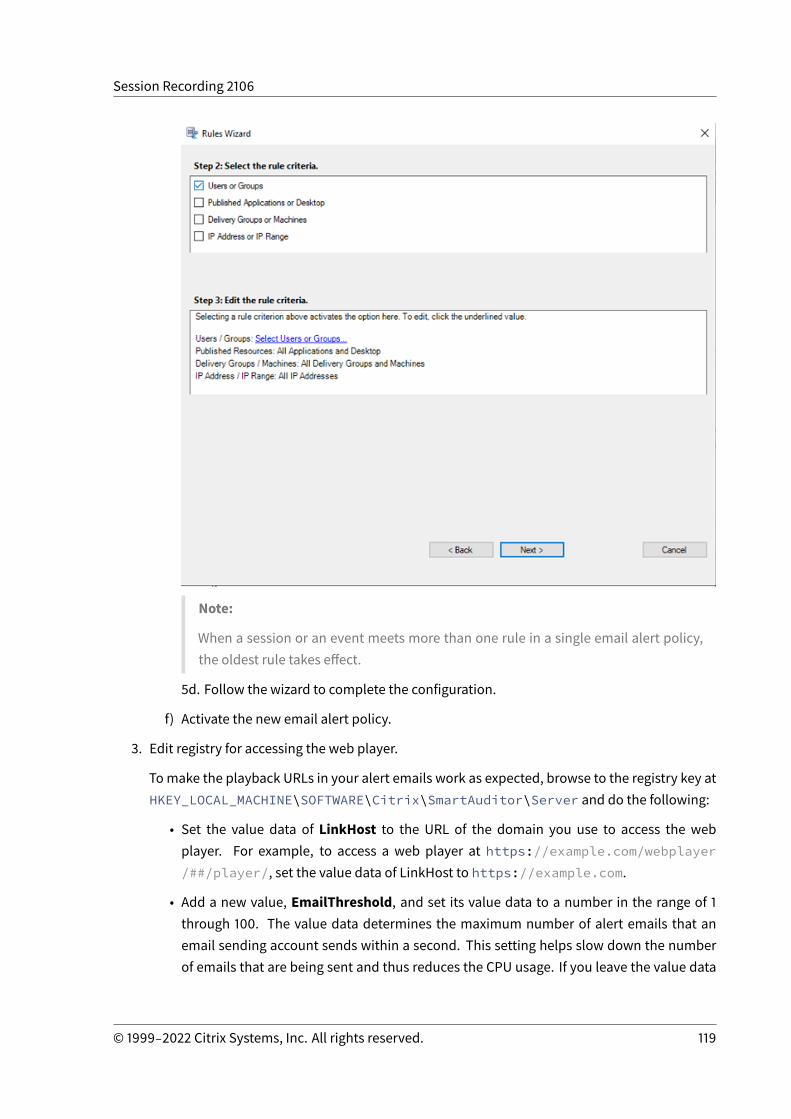
Session Recording 2106
Note:
When a session or an event meets more than one rule in a single email alert policy,the oldest rule takes effect.
5d. Follow the wizard to complete the configuration.
f) Activate the new email alert policy.
3. Edit registry for accessing the web player.
Tomake the playback URLs in your alert emails work as expected, browse to the registry key atHKEY_LOCAL_MACHINE\SOFTWARE\Citrix\SmartAuditor\Server and do the following:
• Set the value data of LinkHost to the URL of the domain you use to access the webplayer. For example, to access a web player at https://example.com/webplayer/##/player/, set the value data of LinkHost to https://example.com.
• Add a new value, EmailThreshold, and set its value data to a number in the range of 1through 100. The value data determines the maximum number of alert emails that anemail sending account sends within a second. This setting helps slow down the numberof emails that are being sent and thus reduces the CPU usage. If you leave the value data
© 1999‒2022 Citrix Systems, Inc. All rights reserved. 119
Session Recording 2106
unspecified or set it to a number out of range, the value data falls back to 25.
Note:
• Your email server might treat an email sending account as a spam bot and thus prevent itfrom sending emails. To allow an account to send emails, an email client such as Outlookmight request that you verify that the account is used by a human user.
• There is a limit for sending emails within a given period. For example, when the daily limitis reached, you cannot send emails until the start of the next day. In this case, ensure thatthe limit is more than the number of sessions being recorded within the period.
Activate a policy
1. Log on as an administrator to the machine where you installed the Session Recording PolicyConsole.
2. Start the Session Recording Policy Console.3. If the Connect to Session Recording Serverwindow appears, ensure that the name of the Ses-
sion Recording Server, protocol, and port are correct. ClickOK.4. In the Session Recording Policy Console, expandRecording Policies or Event Logging Policies
as required.5. Select the policy to activate.6. From themenu bar, choose Activate Policy.
Modify a policy
1. Log on as an administrator to the machine where you installed the Session Recording PolicyConsole.
2. Start the Session Recording Policy Console.3. If the Connect to Session Recording Serverwindow appears, ensure that the name of the Ses-
sion Recording Server, protocol, and port are correct. ClickOK.4. In the Session Recording Policy Console, expandRecording Policies or Event Logging Policies
as required.5. Select the policy you want to modify. The rules for the policy appear in the right pane.6. To add, modify, or delete a rule:
• Fromthemenubar, chooseAddNewRule. If thepolicy is active, apop-upwindowappearsrequesting confirmation of the action. Use the Ruleswizard to create a rule.
• Select the rule you want to modify, right-click, and choose Properties. Use the Ruleswiz-ard to modify the rule.
• Select the rule you want to delete, right-click, and choose Delete Rule.
© 1999‒2022 Citrix Systems, Inc. All rights reserved. 120
Session Recording 2106
Delete a policyNote:
You cannot delete a system-defined policy or a policy that is active.
1. Log on as an administrator to the machine where you installed the Session Recording PolicyConsole.
2. Start the Session Recording Policy Console.3. If the Connect to Session Recording Serverwindow appears, ensure that the name of the Ses-
sion Recording Server, protocol, and port are correct. ClickOK.4. In the Session Recording Policy Console, expandRecording Policies or Event Logging Policies
as required.5. In the left pane, select the policy to delete. If the policy is active, you must activate another
policy.6. From themenu bar, choose Delete Policy.7. Select Yes to confirm the action.
Understand rollover behavior
When you activate a policy, the previously active policy remains in effect until the session beingrecorded ends or the session recording file rolls over. Files roll over when they have reached themaximum size. Formore information about themaximum file size for recordings, see Specify file sizefor recordings.
The following table details what happens when you apply a new recording policy while a session isbeing recorded and a rollover occurs:
If the previous recordingpolicy was:
And the new recording policyis:
After a rollover, the recordingpolicy will be:
Do not record Any other policy No change. The new policytakes effect only when theuser logs on to a new session.
Record without notification Do not record Recording stops.
Record without notification Record with notification Recording continues and anotification message appears.
Record with notification Do not record Recording stops.
Record with notification Record without notification Recording continues. Nomessage appears the nexttime a user logs on.
© 1999‒2022 Citrix Systems, Inc. All rights reserved. 121
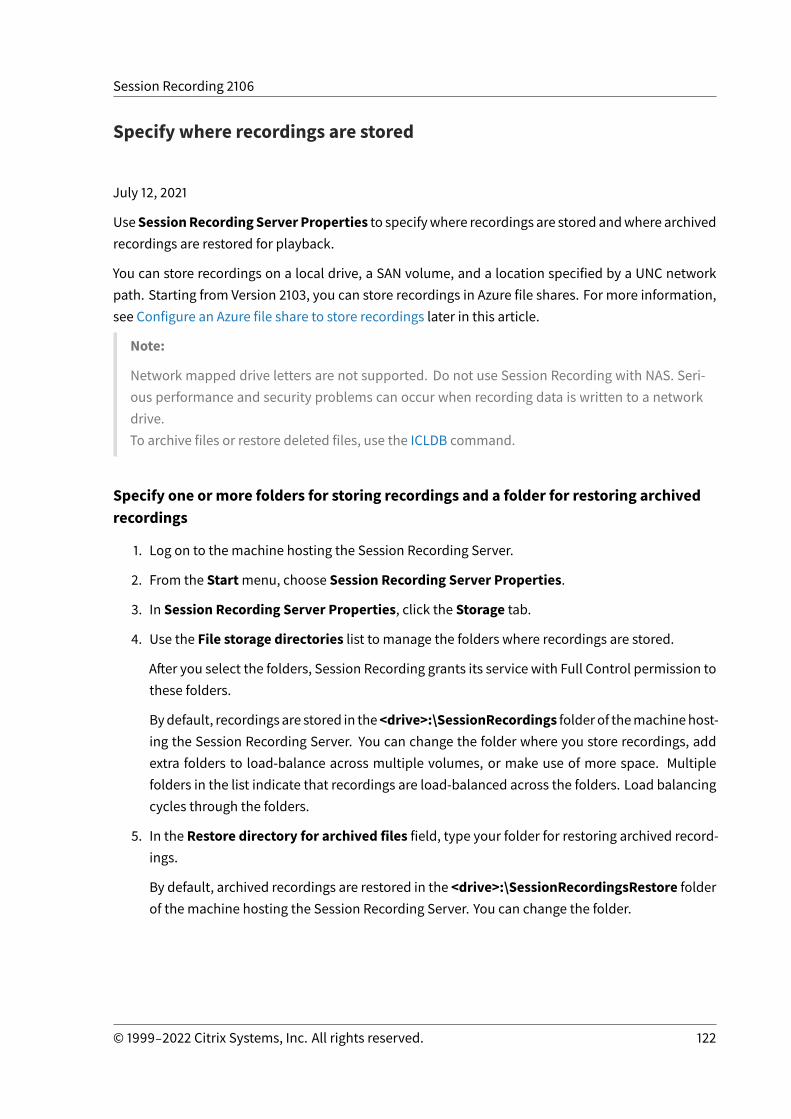
Session Recording 2106
Specify where recordings are stored
July 12, 2021
UseSessionRecordingServerProperties to specifywhere recordings are stored andwhere archivedrecordings are restored for playback.
You can store recordings on a local drive, a SAN volume, and a location specified by a UNC networkpath. Starting from Version 2103, you can store recordings in Azure file shares. For more information,see Configure an Azure file share to store recordings later in this article.
Note:
Network mapped drive letters are not supported. Do not use Session Recording with NAS. Seri-ous performance and security problems can occur when recording data is written to a networkdrive.To archive files or restore deleted files, use the ICLDB command.
Specify one or more folders for storing recordings and a folder for restoring archivedrecordings
1. Log on to the machine hosting the Session Recording Server.
2. From the Startmenu, choose Session Recording Server Properties.
3. In Session Recording Server Properties, click the Storage tab.
4. Use the File storage directories list to manage the folders where recordings are stored.
After you select the folders, Session Recording grants its service with Full Control permission tothese folders.
Bydefault, recordingsare stored in the<drive>:\SessionRecordings folder of themachinehost-ing the Session Recording Server. You can change the folder where you store recordings, addextra folders to load-balance across multiple volumes, or make use of more space. Multiplefolders in the list indicate that recordings are load-balanced across the folders. Load balancingcycles through the folders.
5. In the Restore directory for archived files field, type your folder for restoring archived record-ings.
By default, archived recordings are restored in the <drive>:\SessionRecordingsRestore folderof the machine hosting the Session Recording Server. You can change the folder.
© 1999‒2022 Citrix Systems, Inc. All rights reserved. 122
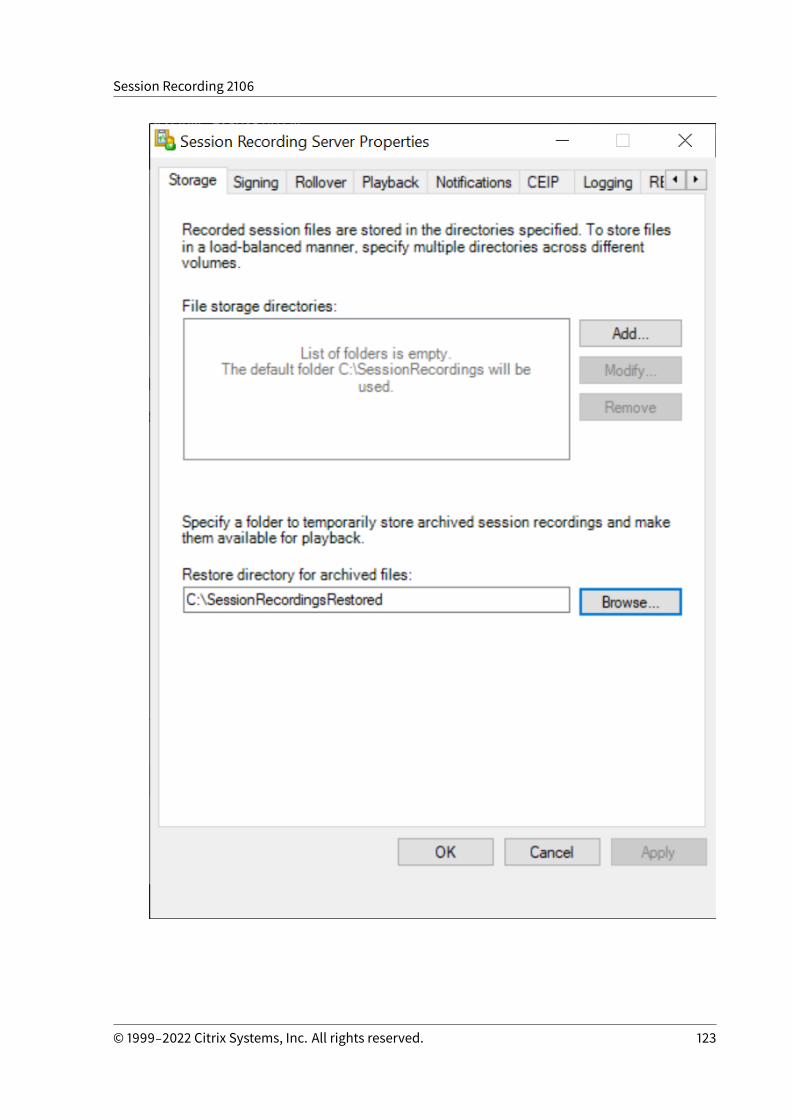
Session Recording 2106
© 1999‒2022 Citrix Systems, Inc. All rights reserved. 123
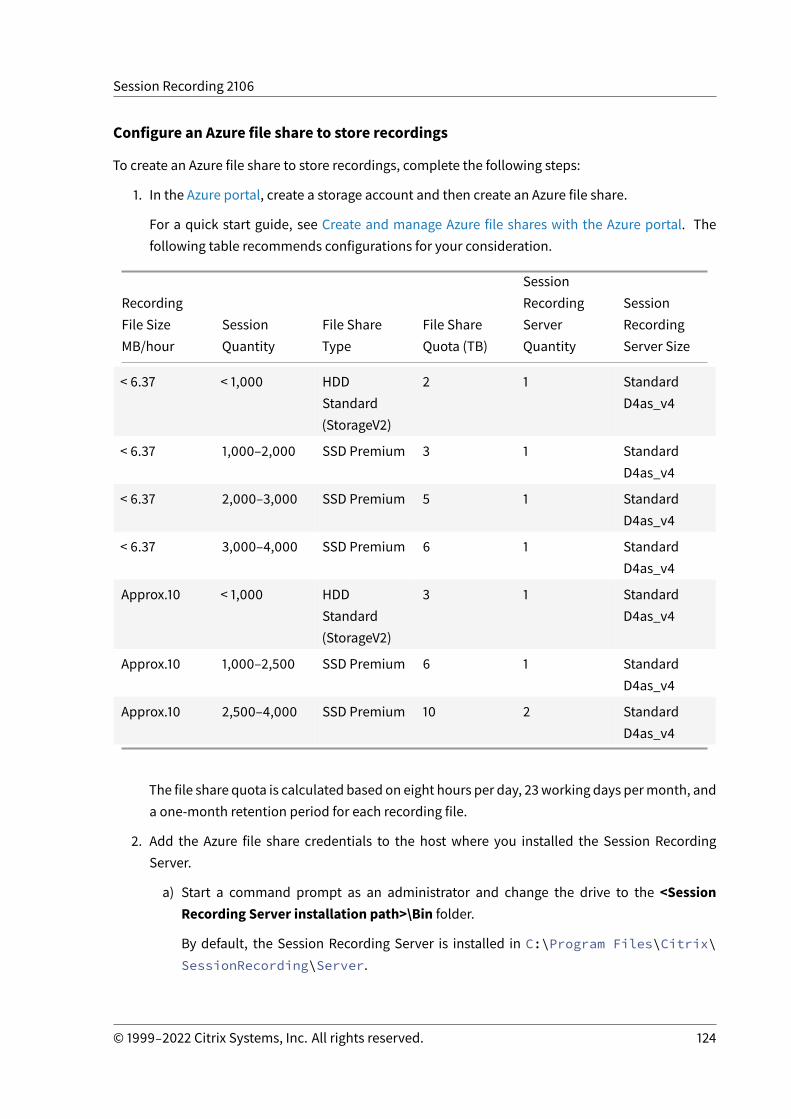
Session Recording 2106
Configure an Azure file share to store recordings
To create an Azure file share to store recordings, complete the following steps:
1. In the Azure portal, create a storage account and then create an Azure file share.
For a quick start guide, see Create and manage Azure file shares with the Azure portal. Thefollowing table recommends configurations for your consideration.
RecordingFile SizeMB/hour
SessionQuantity
File ShareType
File ShareQuota (TB)
SessionRecordingServerQuantity
SessionRecordingServer Size
< 6.37 < 1,000 HDDStandard(StorageV2)
2 1 StandardD4as_v4
< 6.37 1,000–2,000 SSD Premium 3 1 StandardD4as_v4
< 6.37 2,000–3,000 SSD Premium 5 1 StandardD4as_v4
< 6.37 3,000–4,000 SSD Premium 6 1 StandardD4as_v4
Approx.10 < 1,000 HDDStandard(StorageV2)
3 1 StandardD4as_v4
Approx.10 1,000–2,500 SSD Premium 6 1 StandardD4as_v4
Approx.10 2,500–4,000 SSD Premium 10 2 StandardD4as_v4
The file share quota is calculated based on eight hours per day, 23working days permonth, anda one-month retention period for each recording file.
2. Add the Azure file share credentials to the host where you installed the Session RecordingServer.
a) Start a command prompt as an administrator and change the drive to the <SessionRecording Server installation path>\Bin folder.
By default, the Session Recording Server is installed in C:\Program Files\Citrix\SessionRecording\Server.
© 1999‒2022 Citrix Systems, Inc. All rights reserved. 124
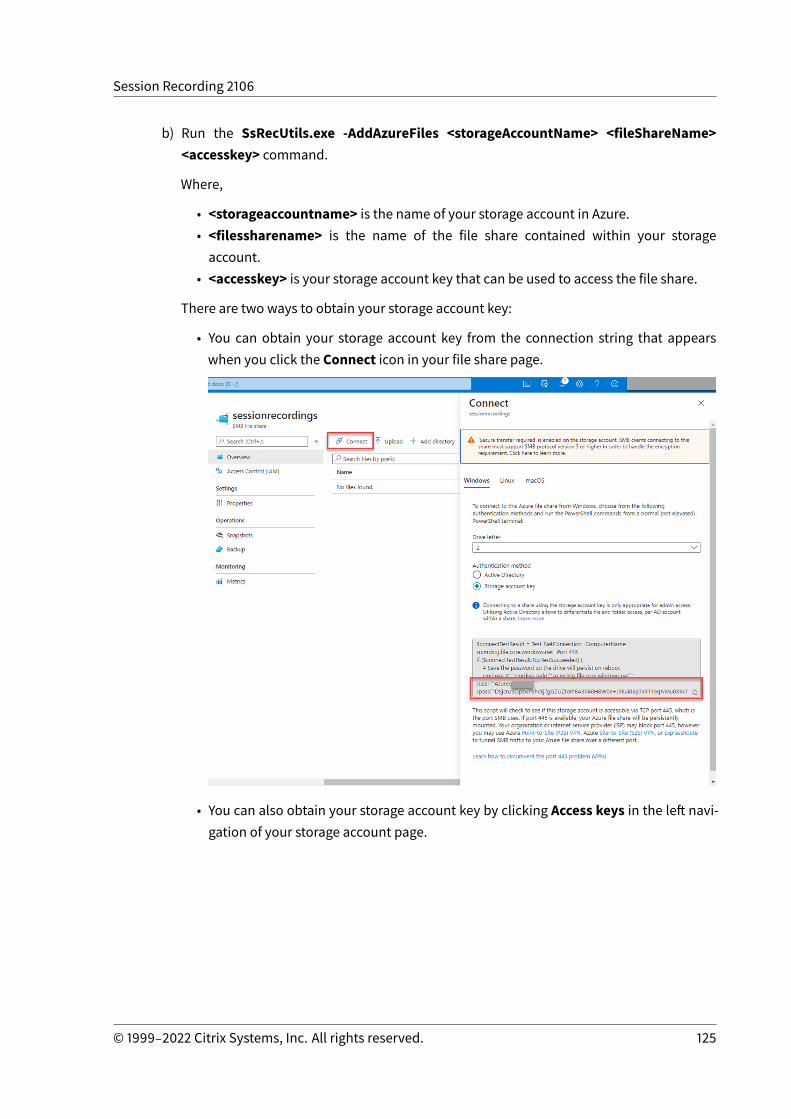
Session Recording 2106
b) Run the SsRecUtils.exe -AddAzureFiles <storageAccountName> <fileShareName><accesskey> command.
Where,
• <storageaccountname> is the name of your storage account in Azure.• <filessharename> is the name of the file share contained within your storageaccount.
• <accesskey> is your storage account key that can be used to access the file share.
There are two ways to obtain your storage account key:
• You can obtain your storage account key from the connection string that appearswhen you click the Connect icon in your file share page.
• You can also obtain your storage account key by clicking Access keys in the left navi-gation of your storage account page.
© 1999‒2022 Citrix Systems, Inc. All rights reserved. 125

Session Recording 2106
c) Mount the Azure file share to the host where you installed the Session Recording Server.
i. Open Session Recording Server Properties.
ii. Click Add on the Storage tab.
iii. Enter theUNCpath in the formatof \\<storageaccountname>.file.core.windows.net\<filessharename>\<subfolder>.
Specify a subfolder under the file share to store your recording files. The SessionRecording Server then automatically creates the subfolder for you.
© 1999‒2022 Citrix Systems, Inc. All rights reserved. 126
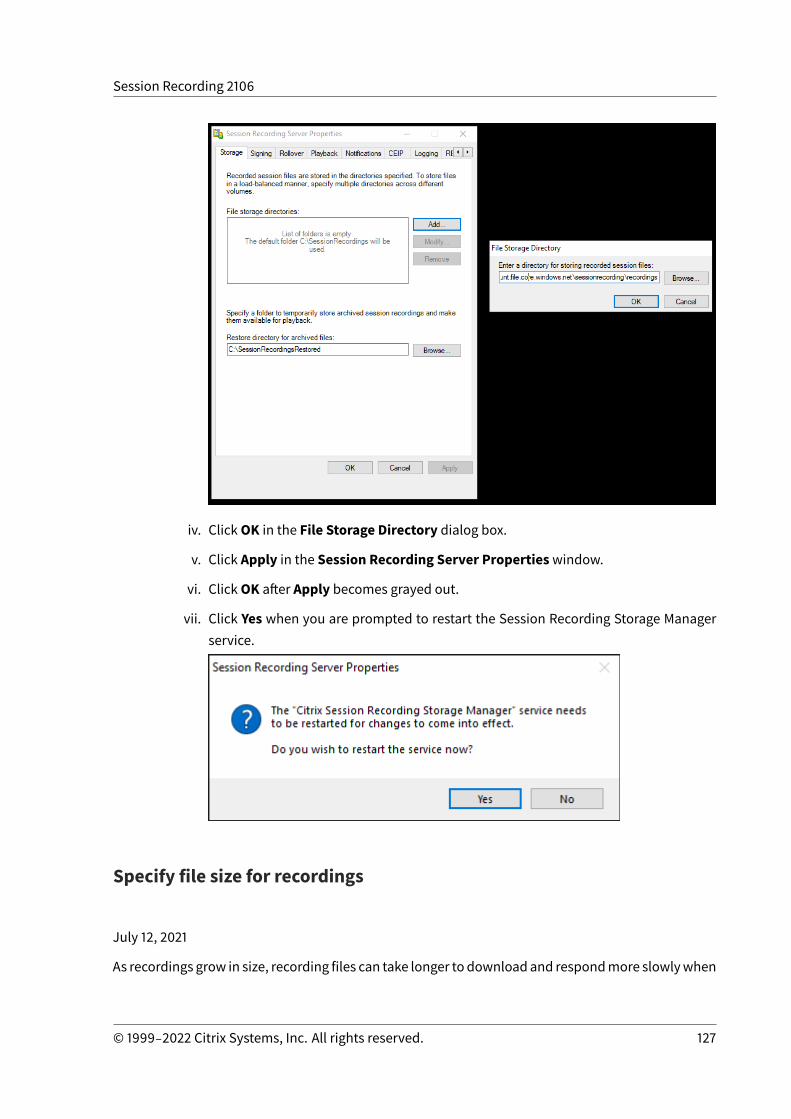
Session Recording 2106
iv. ClickOK in the File Storage Directory dialog box.
v. Click Apply in the Session Recording Server Propertieswindow.
vi. ClickOK after Apply becomes grayed out.
vii. Click Yes when you are prompted to restart the Session Recording Storage Managerservice.
Specify file size for recordings
July 12, 2021
As recordings grow in size, recording files can take longer to download and respondmore slowlywhen
© 1999‒2022 Citrix Systems, Inc. All rights reserved. 127
Session Recording 2106
you use the seek slider to navigate during playback. To control file size, specify a threshold limit for afile. When the recording reaches this limit, Session Recording closes the file and creates an extra fileto continue recording. This action is called a rollover.
You can specify two thresholds for a rollover:
• File size. When the file reaches the specified number of MB, Session Recording closes the fileandopens a newone. By default, files roll over after reaching 50MB. You can specify a limit from10 MB to 300 MB.
• Duration. After the session records for the specified number of hours, the file is closed and anew file is opened. By default, files roll over after recording for 12 hours. You can specify a limitfrom one to 24 hours.
Session Recording checks both fields to determine which event occurs first to determine when to rollover. For example, if you specify 17MB for the file size and six hours for the duration and the recordingreaches 17MB in three hours, Session Recording reacts to the 17MB file size to close the file and opena new one.
Toprevent the creationofmany small files, SessionRecordingdoes not roll over until at least onehourelapses (this value is theminimumnumber that you can type) regardless of the value specified for thefile size. The exception to this rule is if the file size surpasses 300 MB.
Specify themaximum file size for recordings
1. Log on to the machine hosting the Session Recording Server.
2. From the Startmenu, choose Session Recording Server Properties.
3. In Session Recording Server Properties, click the Rollover tab.
© 1999‒2022 Citrix Systems, Inc. All rights reserved. 128
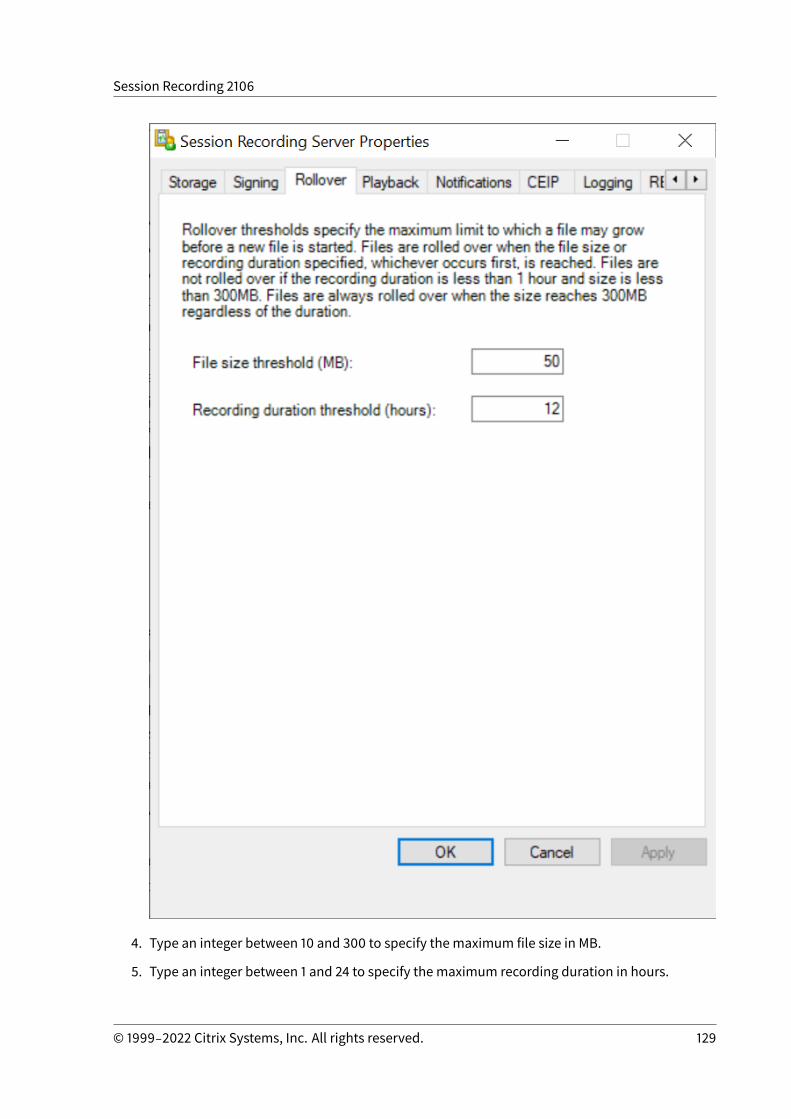
Session Recording 2106
4. Type an integer between 10 and 300 to specify the maximum file size in MB.
5. Type an integer between 1 and 24 to specify the maximum recording duration in hours.
© 1999‒2022 Citrix Systems, Inc. All rights reserved. 129

Session Recording 2106
Customize notificationmessages
July 12, 2021
If the active recording policy specifies that users are notified when their sessions are recorded, a no-tification message appears after the users type their credentials. The default notification message isYour activitywith thedesktoporprogram(s) you recently started is being recorded. If youobjectto this condition, close the desktop or program(s). The users can click OK to dismiss the windowand continue their sessions.
The default notification message appears in the language of the operating system of the computershosting the Session Recording Server.
You can create custom notifications in the languages you choose. However, you can have only onenotificationmessage for each language. Your users see notificationmessages in the languages of theirpreferred local settings.
Create a notificationmessage
1. Log on to the machine hosting the Session Recording Server.2. From the Startmenu, choose Session Recording Server Properties.3. In Session Recording Server Properties, click the Notifications tab.4. Click Add.5. Choose the language for themessage and type the newmessage. You can create only onemes-
sage for each language.
After accepting and activating, the newmessage appears in thelanguage-specific notification message box.
Enable or disable recording
July 12, 2021
You install the Session Recording Agent on multi-session OS VDAs for which you want to record ses-sions. Within each Agent is a setting that enables recording for the VDA on which it is installed. Afterrecording is enabled, Session Recording evaluates the active recording policy that determines whichsessions are recorded.
When you install the Session Recording Agent, recording is enabled. We recommend that you disableSession Recording on VDAs that are not recorded because they experience a small impact on perfor-mance, even if no recording takes place.
© 1999‒2022 Citrix Systems, Inc. All rights reserved. 130
Session Recording 2106
Enable or disable recording on a VDA
1. Log on to the server where the Session Recording Agent is installed.2. From the Startmenu, choose Session Recording Agent Properties.3. Under Session Recording, select or clear the Enable session recording for this VDAmachine
check box to specify whether sessions can be recorded for this VDA.4. When prompted, restart the Session Recording Agent Service to accept the change.
Note:
When you install Session Recording, the active policy isDo not record (no sessions are recorded on any server). To begin recording, use theSession Recording Policy Console to activate a different policy.
Enable custom event recording
Session Recording allows you to use third-party applications to insert custom data, known as events,to recorded sessions. These events appear when the session is viewed using the Session RecordingPlayer. They are part of the recorded session file and cannot bemodified after the session is recorded.
For example, an event might contain the following text: “User opened a browser.” Each time a useropens a browser during a session that is being recorded, the text is inserted to the recording at thatpoint. When the session is played using the Session Recording Player, the viewer can locate and countthe times that the user opened a browser by noting the number of markers that appear in the Eventsand Bookmarks list in the Session Recording Player.
To insert custom events to recordings on a server:
• Use Session Recording Agent Properties to enable a setting on each server where youwant toinsert custom events. Enable each server separately. You cannot globally enable all servers ina site.
• Write applications built on the Event API that runs within each user’s Citrix Virtual Apps andDesktops session (to inject the data into the recording).
The Session Recording installation includes an event recording COM application (API) that allows youto insert text from third-party applications to a recording. You can use the API from many program-ming languages including Visual Basic, C++, or C#. For more information, see the Knowledge Centerarticle CTX226844. TheSessionRecordingEvent API .dll is installed as part of the SessionRecording in-stallation. You can find it at C:\Program Files\Citrix\SessionRecording\Agent\Bin\Interop.UserApi.dll.
To enable custom event recording on a server, do the following:
1. Log on to the server where the Session Recording Agent is installed.2. From the Startmenu, choose Session Recording Agent Properties.3. In Session Recording Agent Properties, click the Recording tab.
© 1999‒2022 Citrix Systems, Inc. All rights reserved. 131
Session Recording 2106
4. Under Custom event recording, select the Allow third party applications to record customdata on this server check box.
Enable or disable digital signing
July 12, 2021
If you install certificates on machines where you installed the Session Recording Server and the Ses-sion Recording Player, you can enhance the security of your deployment by assigning digital signa-tures to Session Recording.
By default, digital signing is disabled. After you select the certificate to sign the recordings, SessionRecording grants the read permission to the Session Recording Storage Manager Service.
Enable digital signing
1. Log on to the machine hosting the Session Recording Server.2. From the Startmenu, choose Session Recording Server Properties.3. In Session Recording Server Properties, click the Signing tab.4. Browse to the certificate that enables secure communication among the machines where you
installed the Session Recording components.
Disable digital signing
1. Log on to the machine hosting the Session Recording Server.2. From the Startmenu, choose Session Recording Server Properties.3. In Session Recording Server Properties, click the Signing tab.4. Click Clear.
Administrator Logging
July 12, 2021
Session Recording Administrator Logging logs the following activities:
• Changes to recording policies and event logging policies on the Session Recording Policy Con-sole or Citrix Director.
• Changes in Session Recording Server Properties.
• Downloads of recordings in the Session Recording Player.
© 1999‒2022 Citrix Systems, Inc. All rights reserved. 132

Session Recording 2106
• Recording a session by Session Recording after policy query.
• Unauthorized attempts to access the Administrator Logging service.
Warning:
Editing the registry incorrectly can cause serious problems that might require you to reinstallyour operating system. Citrix cannot guarantee that problems resulting from the incorrect useof Registry Editor can be solved. Use Registry Editor at your own risk. Be sure to back up theregistry before you edit it.
Disable or enable Administrator Logging
After installation, you can disable or enable the Session Recording Administrator Logging feature inSession Recording Server Properties.
1. As an administrator, log on to the machine where Session Recording Administrator Logging isinstalled.
2. From the Startmenu, choose Session Recording Server Properties.3. Click the Logging tab.
When Session Recording Administrator Logging is disabled, no new activities are logged. You canquery the existing logs from the web-based UI.
Whenmandatory blocking is enabled, the following activities are blocked if the logging fails. A sys-tem event is also logged with an Event ID 6001:
• Changes to recording policies on the Session Recording Policy Console or Citrix Director.• Changes in Session Recording Server Properties.
The mandatory blocking setting does not impact the recording of sessions.
Configure an Administrator Logging service account
By default, Administrator Logging is running as a web application in Internet Information Services(IIS), and its identity is Network Service. To enhance the security level, you can change the identity ofthis web application to a service account or a specific domain account.
1. As an administrator, log on to the machine hosting the Session Recording Server.2. In IIS Manager, click Application Pools.3. In Application Pools, right-click SessionRecordingLoggingAppPool and choose Advanced
Settings.4. Change the attribute identity to the specific account that you want to use.5. Grant the db_owner permission to the account for the database CitrixSessionRecordingLog-
ging on the Microsoft SQL Server.6. Grant the readpermission to theaccount for the registrykeyatHKEY_LOCAL_MACHINE\SOFTWARE\Citrix\SmartAuditor\Server.
© 1999‒2022 Citrix Systems, Inc. All rights reserved. 133
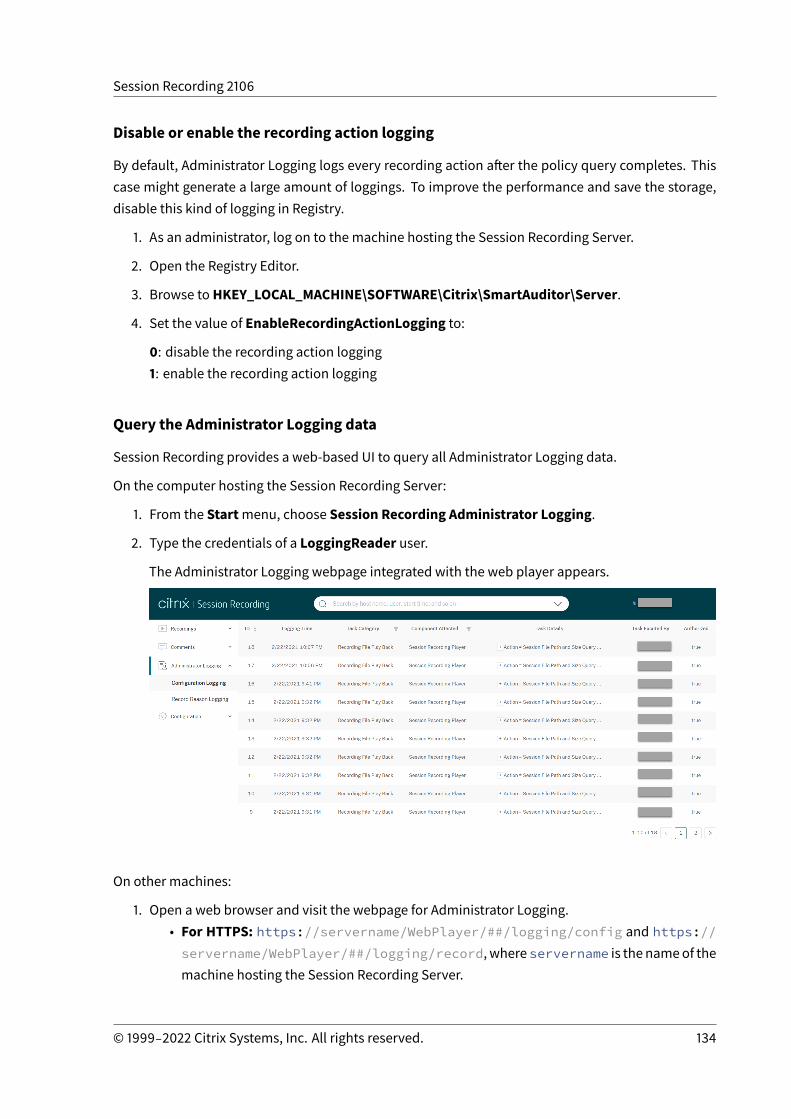
Session Recording 2106
Disable or enable the recording action logging
By default, Administrator Logging logs every recording action after the policy query completes. Thiscase might generate a large amount of loggings. To improve the performance and save the storage,disable this kind of logging in Registry.
1. As an administrator, log on to the machine hosting the Session Recording Server.
2. Open the Registry Editor.
3. Browse toHKEY_LOCAL_MACHINE\SOFTWARE\Citrix\SmartAuditor\Server.
4. Set the value of EnableRecordingActionLogging to:
0: disable the recording action logging1: enable the recording action logging
Query the Administrator Logging data
Session Recording provides a web-based UI to query all Administrator Logging data.
On the computer hosting the Session Recording Server:
1. From the Startmenu, choose Session Recording Administrator Logging.
2. Type the credentials of a LoggingReader user.
The Administrator Logging webpage integrated with the web player appears.
On other machines:
1. Open a web browser and visit the webpage for Administrator Logging.• For HTTPS: https://servername/WebPlayer/##/logging/config and https://servername/WebPlayer/##/logging/record, whereservername is the nameof themachine hosting the Session Recording Server.
© 1999‒2022 Citrix Systems, Inc. All rights reserved. 134

Session Recording 2106
• For HTTP: http://servername/WebPlayer/##/logging/config and http://servername/WebPlayer/##/logging/record, where servername is the name ofthe machine hosting the Session Recording Server.
2. Type the credentials of a LoggingReader user.
Database high availability
July 12, 2021
Session Recording supports the following solutions for database high availability based on the Mi-crosoftSQLServer. Databases canautomatically fail overwhen thehardwareor softwareof aprincipalor primary SQL Server fails, which ensures that Session Recording continues to work as expected.
• Always On availability groups
The Always On availability groups feature is a high availability and disaster-recovery solutionthat provides an enterprise-level alternative to database mirroring. Introduced in SQL Server2012, the Always On availability groups solution maximizes the availability of a set of userdatabases for an enterprise. It requires that the SQL Server instances reside on the WindowsServer Failover Clustering (WSFC) nodes. For more information, see Always On availabilitygroups: a high-availability and disaster-recovery solution.
• SQL Server clustering
The Microsoft SQL clustering technology allows one server to automatically take over thetasks and responsibilities of the server that has failed. However, setting up this solution iscomplicated and the automatic failover is typically slower than alternatives such as SQL Serverdatabase mirroring. For more information, see Always On Failover Cluster Instances (SQLServer).
• SQL Server database mirroring
Database mirroring ensures that an automatic failover occurs in seconds if the active databaseserver fails. This solution ismoreexpensive than theother twosolutionsbecause full SQLServerlicenses are required on each database server. You cannot use the SQL Server Express editionin a mirrored environment. For more information, see Database Mirroring (SQL Server).
Methods for configuring Session Recording with database high availability
To configure Session Recording with database high availability, do either of the following:
• Install the Session Recording Server components first and then configure database high avail-ability for the created databases.
© 1999‒2022 Citrix Systems, Inc. All rights reserved. 135

Session Recording 2106
You can install the Session Recording Administration componentswith databases configured tobe installed on the prepared SQL Server instance. Then, configure database high availability forthe created databases.
– For Always On availability groups and clustering, you must manually change the SQLServer instance name to the name of the availability group listener or SQL Server networkinHKEY_LOCAL_MACHINE\SOFTWARE\Citrix\SmartAuditor\Server\SmAudDatabaseInstance.
– For database mirroring, you must manually add the failover partners for databases inHKEY_LOCAL_MACHINE\SOFTWARE\Citrix\SmartAuditor\Server\DatabaseFailoverPartnerandHKEY_LOCAL_MACHINE\SOFTWARE\Citrix\SmartAuditor\Server\LoggingDatabaseFailoverPartner.
• Configure database high availability for empty databases first and then install the SessionRecording Administration components.You can create two empty databases as the Session Recording Database and the AdministratorLogging Database in the expected primary SQL Server instance and configure high availability.Then enter the SQL Server instance name when installing the Session Recording Servercomponents:
– Touse theAlwaysOnavailability groups solution, enter thenameof your availability grouplistener.
– To use the database mirroring solution, enter the name of your principal SQL Server.– To use the clustering solution, enter the network name of your SQL Server.
Load balancing
July 12, 2021
Session Recording supports load balancing across Session Recording Servers. This article summa-rizes the load balancing configuration using the Citrix ADC as an example. For more information, seeConfigure load balancing in an existing deployment and Deploy and load-balance Session Recordingin Azure.
You can synchronize load balancing configurations among all Session Recording Servers.
Note:
The load balancing feature requires Version 7.16 or later of the Session Recording Server andSession Recording Agent.
Changes to Session Recording in support of load balancing:
• All Session Recording Servers share one folder to store recording files.• All Session Recording Servers share one Session Recording Database.• (Recommended) Install only one Session Recording Policy Console and all Session RecordingServers share this Console.
© 1999‒2022 Citrix Systems, Inc. All rights reserved. 136
Session Recording 2106
Configure load balancing
To use this feature, perform the following steps on Citrix ADC and on the various Session Recordingcomponents:
Configure load balancing (Citrix ADC part)
Configure load balancing servers
Add the Session Recording Servers to the load balancing servers in Citrix ADC.
Configure load balancing services
1. Add a load balancing service for each needed protocol on each Session Recording Server.2. (Recommended) Select the relevant protocol monitor to bind each service monitor.
Configure load balancing virtual servers
1. Create virtual servers with the same Citrix ADC VIP address based on the needed protocols andbind the virtual servers to the relevant load balancing services.
2. Configure persistence on each virtual server.3. (Recommended) Choose LEASTBANDWITH or LEASTPACKETS as the load balancing method
rather than the default method (LEASTCONNECTION).4. Create a certificate to make the HTTPS virtual server UP.
Configure load balancing (Session Recording part)
On each server where you installed the Session Recording Server, do the following
1. (Recommended) Type the same Session Recording Database name during the Session Record-ing Server installation.
2. If you choose the Administrator Logging feature, Citrix recommends that you type the sameAdministrator Logging Database name when you install each Session Recording Server.
3. After sharing the Read/Write permission of the file storage folder with all Session RecordingServer machine accounts, change to use the file storage folder as the shared folder in SessionRecording Server Properties. For more information, see Specify where recordings are restored.
4. Addavalue to theSessionRecordingServer registrykeyatHKEY_LOCAL_MACHINE\SOFTWARE\Citrix\SmartAuditor\Server.Value name: EnableLBValue data: 1 (DWORD, meaning enable)
© 1999‒2022 Citrix Systems, Inc. All rights reserved. 137
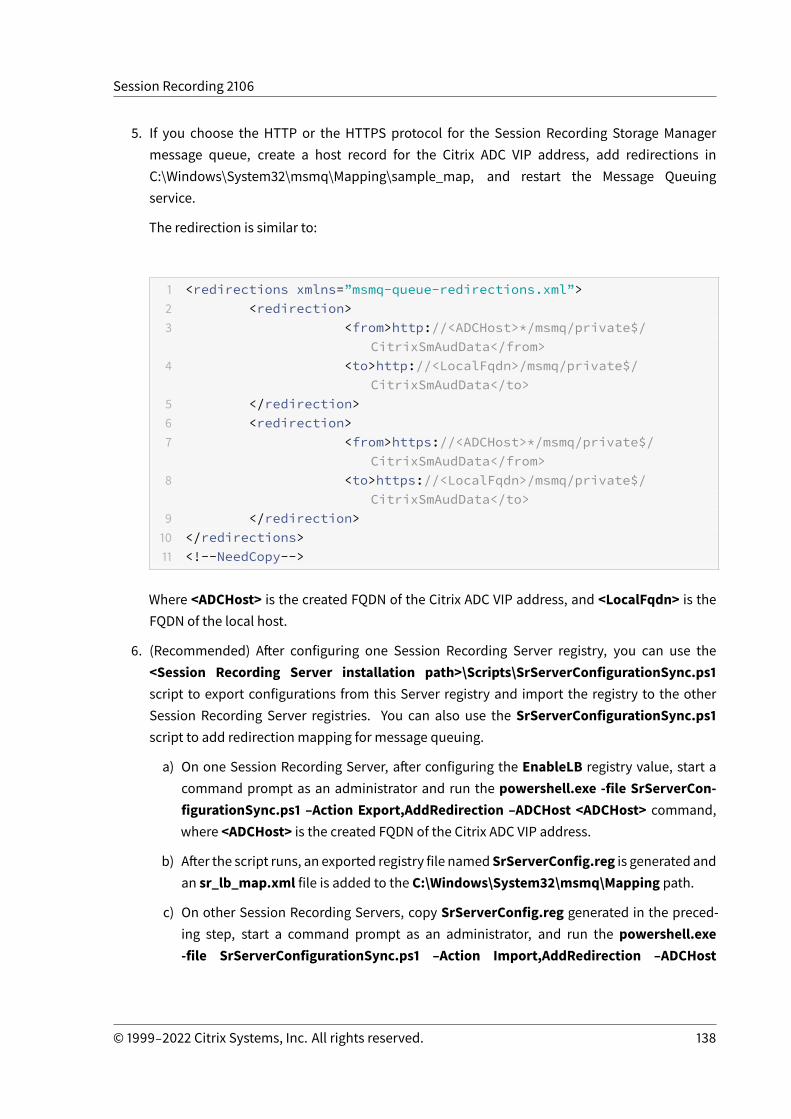
Session Recording 2106
5. If you choose the HTTP or the HTTPS protocol for the Session Recording Storage Managermessage queue, create a host record for the Citrix ADC VIP address, add redirections inC:\Windows\System32\msmq\Mapping\sample_map, and restart the Message Queuingservice.
The redirection is similar to:
1 <redirections xmlns=”msmq-queue-redirections.xml”>2 <redirection>3 <from>http://<ADCHost>*/msmq/private$/
CitrixSmAudData</from>4 <to>http://<LocalFqdn>/msmq/private$/
CitrixSmAudData</to>5 </redirection>6 <redirection>7 <from>https://<ADCHost>*/msmq/private$/
CitrixSmAudData</from>8 <to>https://<LocalFqdn>/msmq/private$/
CitrixSmAudData</to>9 </redirection>10 </redirections>11 <!--NeedCopy-->
Where <ADCHost> is the created FQDN of the Citrix ADC VIP address, and <LocalFqdn> is theFQDN of the local host.
6. (Recommended) After configuring one Session Recording Server registry, you can use the<Session Recording Server installation path>\Scripts\SrServerConfigurationSync.ps1script to export configurations from this Server registry and import the registry to the otherSession Recording Server registries. You can also use the SrServerConfigurationSync.ps1script to add redirection mapping for message queuing.
a) On one Session Recording Server, after configuring the EnableLB registry value, start acommand prompt as an administrator and run the powershell.exe -file SrServerCon-figurationSync.ps1 –Action Export,AddRedirection –ADCHost <ADCHost> command,where <ADCHost> is the created FQDN of the Citrix ADC VIP address.
b) After the script runs, an exported registry file namedSrServerConfig.reg is generated andan sr_lb_map.xml file is added to the C:\Windows\System32\msmq\Mapping path.
c) On other Session Recording Servers, copy SrServerConfig.reg generated in the preced-ing step, start a command prompt as an administrator, and run the powershell.exe-file SrServerConfigurationSync.ps1 –Action Import,AddRedirection –ADCHost
© 1999‒2022 Citrix Systems, Inc. All rights reserved. 138
Session Recording 2106
<ADCHost> command, where <ADCHost> is the created FQDN of the Citrix ADC VIPaddress.
d) After the script runs, the EnableLB value is added to the other Session Recording Serverregistrykeysandan sr_lb_map.xml file is added to theC:\Windows\System32\msmq\Mappingpath.
On the machine where you installed the Session Recording Agent, do the following in SessionRecording Agent Properties
• If you choose the HTTP or the HTTPS protocol for the Session Recording Storage Manager mes-sage queue, type the FQDN of the Citrix ADC VIP address in the Session Recording Server textbox.
• If you choose the default TCP protocol for the Session Recording Storage Manager messagequeue, type the Citrix ADC VIP address in the Session Recording Server text box.
On themachine where you installed the Session Recording Player, do the following
Add the Citrix ADC VIP address or its FQDN as the connected Session Recording Server.
On the SQL Server where you installed the Session Recording Database, do the following
Add all the Session Recording Server machine accounts to the shared Session Recording Databaseand assign themwith the db_owner permission.
Change your communication protocol
July 12, 2021
For security reasons, Citrix does not recommend using HTTP as a communication protocol. TheSession Recording installation is configured to use HTTPS. To use HTTP instead of HTTPS, you mustchange several settings.
Use HTTP as the communication protocol
1. Log on to themachine hosting the Session Recording Server and disable secure connections forSession Recording Broker in IIS.
2. Change the protocol setting from HTTPS to HTTP in Session Recording Agent Properties oneach server where the Session Recording Agent is installed:a) Log on to each server where the Session Recording Agent is installed.
© 1999‒2022 Citrix Systems, Inc. All rights reserved. 139
Session Recording 2106
b) From the Startmenu, choose Session Recording Agent Properties.c) In Session Recording Agent Properties, choose the Connections tab.d) In the Session Recording Broker area, selectHTTP from the Protocol drop-down list and
clickOK to accept the change. If you are prompted to restart the service, click Yes.3. Change the protocol setting from HTTPS to HTTP in the Session Recording Player settings:
a) Log on to each workstation where the Session Recording Player is installed.b) From the Startmenu, choose Session Recording Player.c) From the Session Recording Player menu bar, choose Tools > Options > Connections,
select the server, and chooseModify.d) SelectHTTP from theProtocoldrop-down list and clickOK twice to accept the changeand
exit the dialog box.4. Change the protocol setting from HTTPS to HTTP in the Session Recording Policy Console:
a) Log on to the server where the Session Recording Policy Console is installed.b) From the Startmenu, choose Session Recording Policy Console.c) SelectHTTP from theProtocoldrop-down list and clickOK to connect. If the connection is
successful, this setting is remembered thenext time you start the SessionRecordingPolicyConsole.
Revert to HTTPS as the communication protocol
1. Log on to themachine hosting the Session Recording Server and enable secure connections forthe Session Recording Broker in IIS.
2. Change the protocol setting from HTTP to HTTPS in Session Recording Agent Properties oneach server where the Session Recording Agent is installed:a) Log on to each server where the Session Recording Agent is installed.b) From the Startmenu, choose Session Recording Agent Properties.c) In Session Recording Agent Properties, choose the Connections tab.d) In the Session Recording Broker area, select HTTPS from the Protocol drop-down list
and clickOK to accept the change. If you are prompted to restart the service, click Yes.3. Change the protocol setting from HTTP to HTTPS in the Session Recording Player settings:
a) Log on to each workstation where the Session Recording Player is installed.b) From the Startmenu, choose Session Recording Player.c) From the Session Recording Player menu bar, choose Tools > Options > Connections,
select the server, and chooseModify.d) Select HTTPS from the Protocol drop-down list and click OK twice to accept the change
and exit the dialog box.4. Change the protocol setting from HTTP to HTTPS in the Session Recording Policy Console:
a) Log on to the server where the Session Recording Policy Console is installed.b) From the Startmenu, choose Session Recording Policy Console.c) SelectHTTPS from theProtocol drop-down list and clickOK to connect. If the connection
© 1999‒2022 Citrix Systems, Inc. All rights reserved. 140
Session Recording 2106
is successful, this setting is remembered the next time you start the Session RecordingPolicy Console.
Configure Citrix Customer Experience Improvement Program (CEIP)
July 12, 2021
When you participate in the Citrix Customer Experience Improvement Program (CEIP), anonymousconfiguration and usage data is collected and sent to Citrix to help improve the product quality andperformance. In addition, a copy of the anonymous data is sent to Google Analytics (GA) for fast andefficient analysis.
Settings
CEIP setting
By default, you automatically participate in CEIPwhen you install Session Recording. The first uploadof data occurs approximately seven days after you install Session Recording. To unsubscribe fromCEIP, do the following:
1. Log on to the machine hosting the Session Recording Server.
2. From the Startmenu, choose Session Recording Server Properties.
3. In Session Recording Server Properties, click the CEIP tab.
4. Clear the Participate in the Customer Experience Improvement Program check box.
5. Restart the Citrix Session Recording Analytics Service to make the setting take effect.
© 1999‒2022 Citrix Systems, Inc. All rights reserved. 141
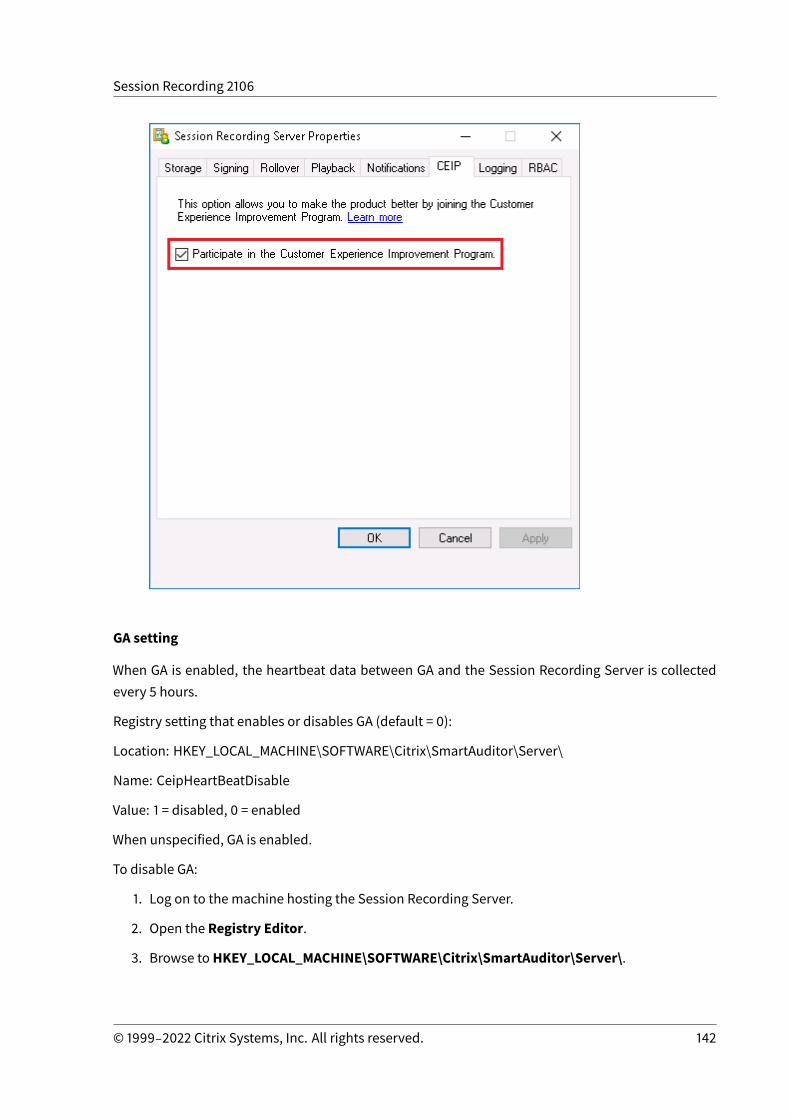
Session Recording 2106
GA setting
When GA is enabled, the heartbeat data between GA and the Session Recording Server is collectedevery 5 hours.
Registry setting that enables or disables GA (default = 0):
Location: HKEY_LOCAL_MACHINE\SOFTWARE\Citrix\SmartAuditor\Server\
Name: CeipHeartBeatDisable
Value: 1 = disabled, 0 = enabled
When unspecified, GA is enabled.
To disable GA:
1. Log on to the machine hosting the Session Recording Server.
2. Open the Registry Editor.
3. Browse toHKEY_LOCAL_MACHINE\SOFTWARE\Citrix\SmartAuditor\Server\.
© 1999‒2022 Citrix Systems, Inc. All rights reserved. 142
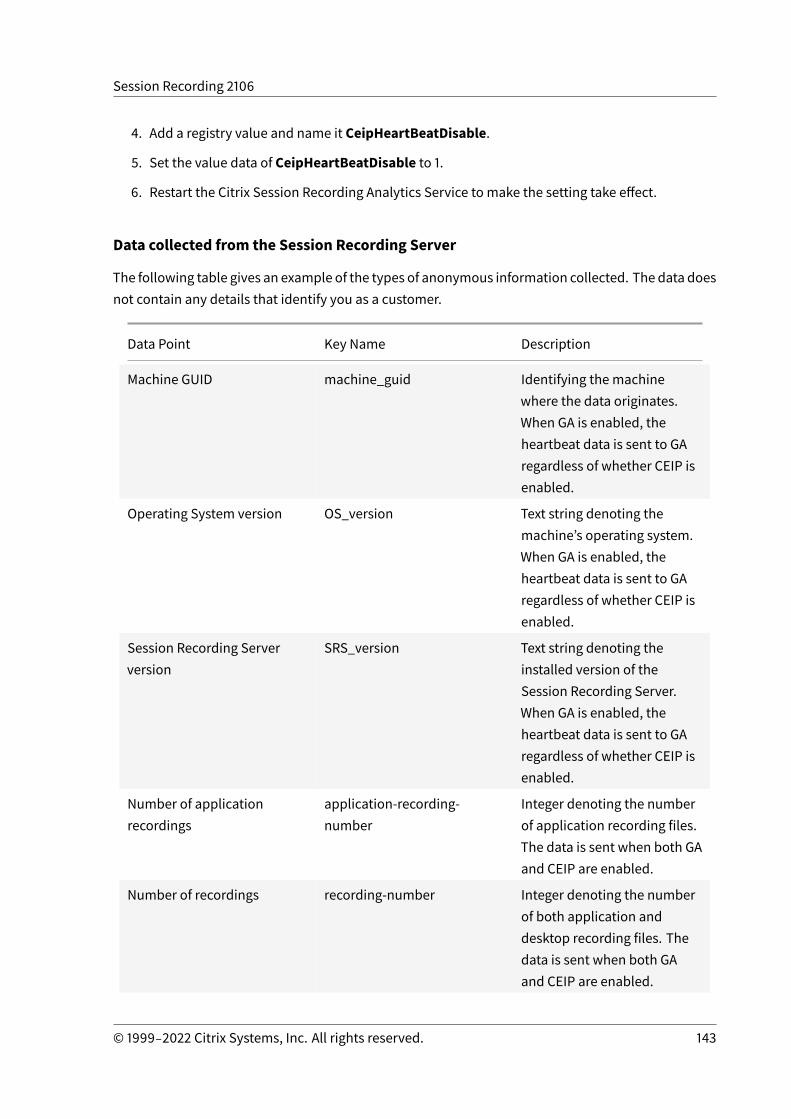
Session Recording 2106
4. Add a registry value and name it CeipHeartBeatDisable.
5. Set the value data of CeipHeartBeatDisable to 1.
6. Restart the Citrix Session Recording Analytics Service to make the setting take effect.
Data collected from the Session Recording Server
The following table gives an example of the types of anonymous information collected. The data doesnot contain any details that identify you as a customer.
Data Point Key Name Description
Machine GUID machine_guid Identifying the machinewhere the data originates.When GA is enabled, theheartbeat data is sent to GAregardless of whether CEIP isenabled.
Operating System version OS_version Text string denoting themachine’s operating system.When GA is enabled, theheartbeat data is sent to GAregardless of whether CEIP isenabled.
Session Recording Serverversion
SRS_version Text string denoting theinstalled version of theSession Recording Server.When GA is enabled, theheartbeat data is sent to GAregardless of whether CEIP isenabled.
Number of applicationrecordings
application-recording-number
Integer denoting the numberof application recording files.The data is sent when both GAand CEIP are enabled.
Number of recordings recording-number Integer denoting the numberof both application anddesktop recording files. Thedata is sent when both GAand CEIP are enabled.
© 1999‒2022 Citrix Systems, Inc. All rights reserved. 143
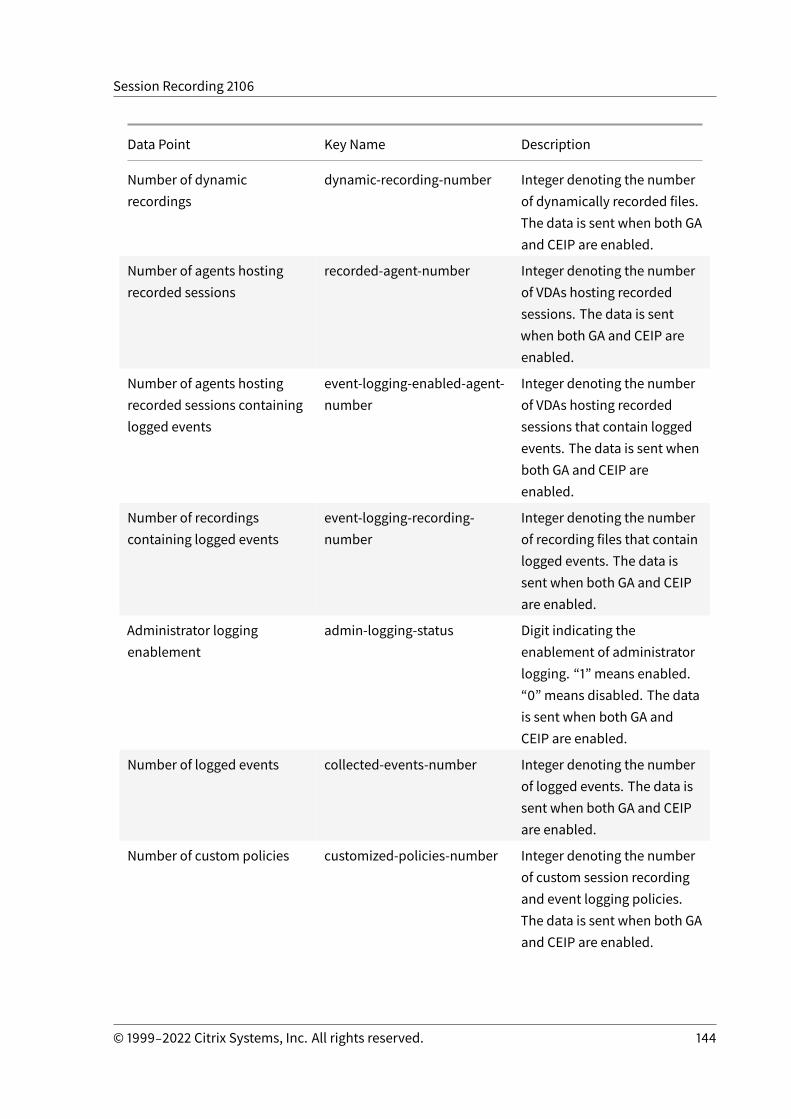
Session Recording 2106
Data Point Key Name Description
Number of dynamicrecordings
dynamic-recording-number Integer denoting the numberof dynamically recorded files.The data is sent when both GAand CEIP are enabled.
Number of agents hostingrecorded sessions
recorded-agent-number Integer denoting the numberof VDAs hosting recordedsessions. The data is sentwhen both GA and CEIP areenabled.
Number of agents hostingrecorded sessions containinglogged events
event-logging-enabled-agent-number
Integer denoting the numberof VDAs hosting recordedsessions that contain loggedevents. The data is sent whenboth GA and CEIP areenabled.
Number of recordingscontaining logged events
event-logging-recording-number
Integer denoting the numberof recording files that containlogged events. The data issent when both GA and CEIPare enabled.
Administrator loggingenablement
admin-logging-status Digit indicating theenablement of administratorlogging. “1” means enabled.“0” means disabled. The datais sent when both GA andCEIP are enabled.
Number of logged events collected-events-number Integer denoting the numberof logged events. The data issent when both GA and CEIPare enabled.
Number of custom policies customized-policies-number Integer denoting the numberof custom session recordingand event logging policies.The data is sent when both GAand CEIP are enabled.
© 1999‒2022 Citrix Systems, Inc. All rights reserved. 144
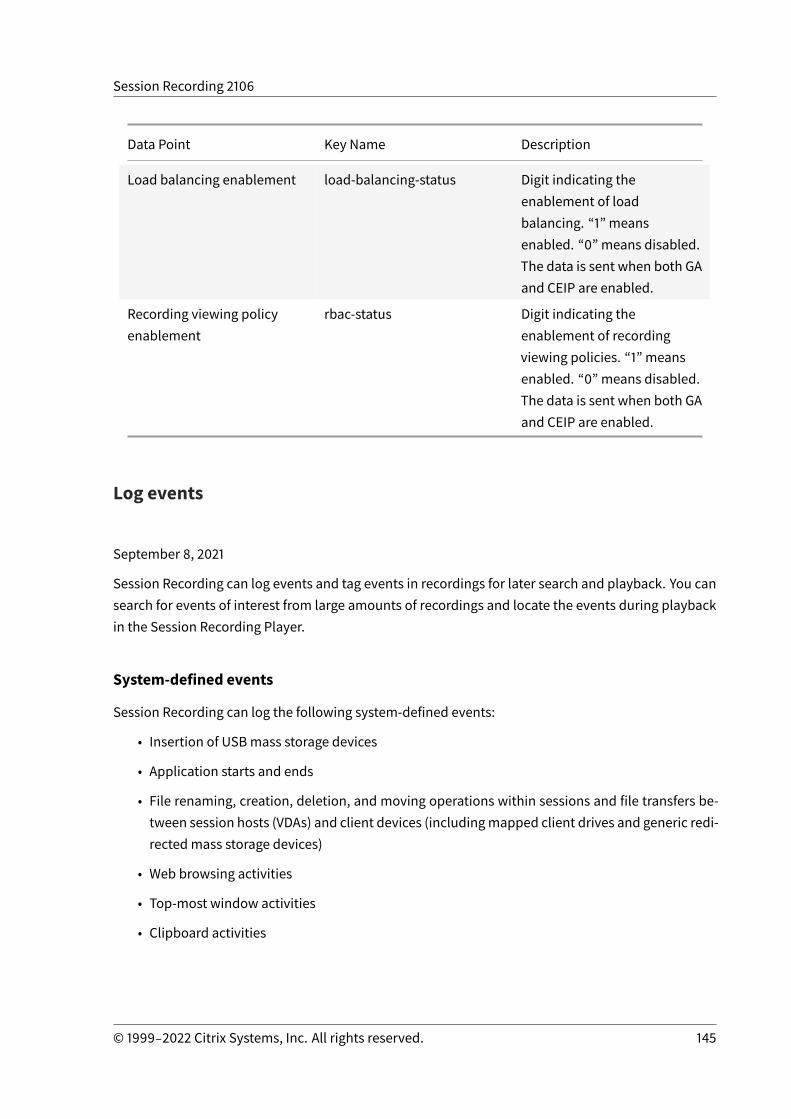
Session Recording 2106
Data Point Key Name Description
Load balancing enablement load-balancing-status Digit indicating theenablement of loadbalancing. “1” meansenabled. “0” means disabled.The data is sent when both GAand CEIP are enabled.
Recording viewing policyenablement
rbac-status Digit indicating theenablement of recordingviewing policies. “1” meansenabled. “0” means disabled.The data is sent when both GAand CEIP are enabled.
Log events
September 8, 2021
Session Recording can log events and tag events in recordings for later search and playback. You cansearch for events of interest from large amounts of recordings and locate the events during playbackin the Session Recording Player.
System-defined events
Session Recording can log the following system-defined events:
• Insertion of USBmass storage devices
• Application starts and ends
• File renaming, creation, deletion, and moving operations within sessions and file transfers be-tween session hosts (VDAs) and client devices (includingmapped client drives and generic redi-rectedmass storage devices)
• Web browsing activities
• Top-most window activities
• Clipboard activities
© 1999‒2022 Citrix Systems, Inc. All rights reserved. 145
Session Recording 2106
Insertion of USBmass storage devices
SessionRecording can log the insertion of a Client DriveMapping (CDM)mappedor generic redirectedUSB mass storage device in a client where Citrix Workspace app for Windows or for Mac is installed.Session Recording tags these events in the recording.
Note:
To use an inserted USB mass storage device and log the insertion events, set the Client USBdevice redirection policy to Allowed in Citrix Studio.
Currently, only the insertion of USBmass storage devices (USBClass 08) can be logged. Formoreinformation, see Event logging policies.
Application starts and ends
Session Recording supports logging of both application starts and ends. When you add a process tothe App monitoring list, apps driven by the added process and its child processes are monitored.Child processes of a parent process that starts before Session Recording runs can also be captured.
Session Recording adds the process names, cmd.exe, powershell.exe, and wsl.exe, to the Appmonitoring list by default. If you select Log app start events and Log app end events for an eventlogging policy, the starts and ends of the CommandPrompt, PowerShell, andWindows Subsystem forLinux (WSL) apps are logged regardless of whether youmanually add their process names to the Appmonitoring list. The default process names are not visible on the Appmonitoring list.
In addition, Session Recording provides a full command line for each app start event logged.
© 1999‒2022 Citrix Systems, Inc. All rights reserved. 146
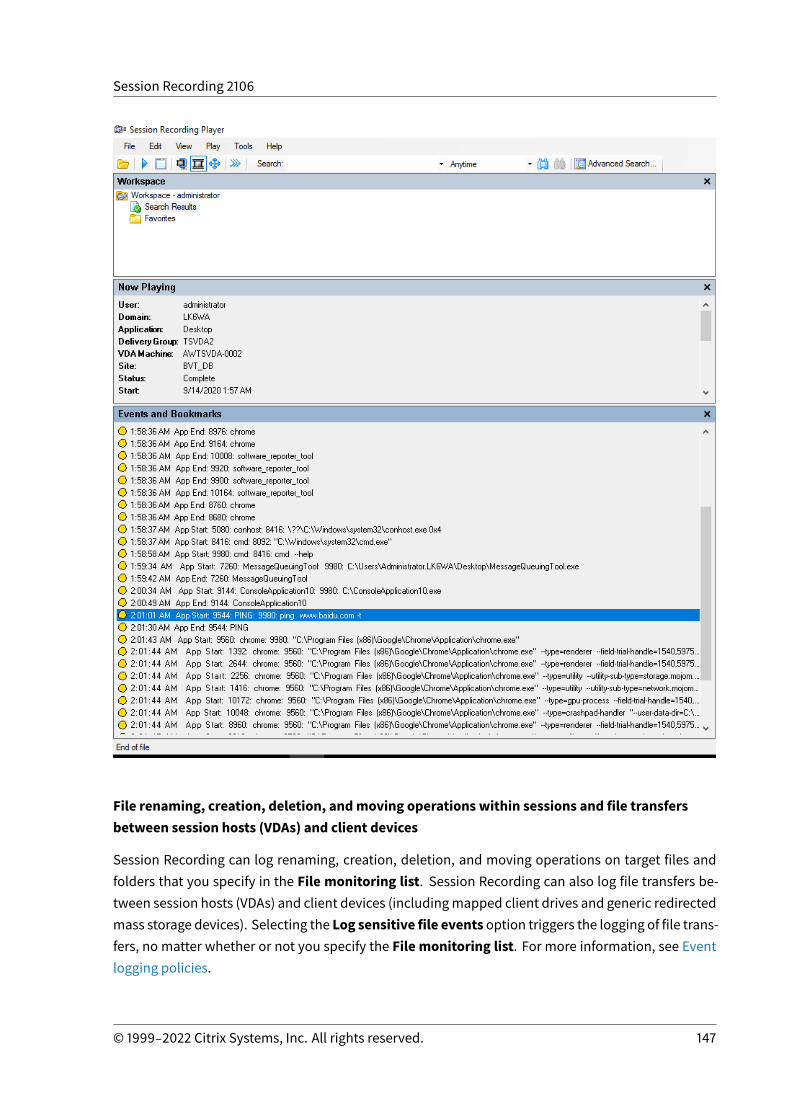
Session Recording 2106
File renaming, creation, deletion, andmoving operations within sessions and file transfersbetween session hosts (VDAs) and client devices
Session Recording can log renaming, creation, deletion, and moving operations on target files andfolders that you specify in the File monitoring list. Session Recording can also log file transfers be-tween session hosts (VDAs) and client devices (includingmapped client drives and generic redirectedmass storage devices). Selecting the Log sensitive file events option triggers the logging of file trans-fers, no matter whether or not you specify the File monitoring list. For more information, see Eventlogging policies.
© 1999‒2022 Citrix Systems, Inc. All rights reserved. 147

Session Recording 2106
Note:
To enable file drag and drop and capture the drag and drop events, set theDrag andDrop policyto Enabled in Citrix Studio.
Web browsing activities
You can log user activities on supported browsers and tag the events in the recording. The browsername, URL, and page title are logged. For an example, see the following screen capture.
When you move your cursor away from a webpage that has focus, your browsing of this webpage istaggedwithout showing thebrowser name. This feature canbeused to estimate how long auser stayson a webpage. For an example, see the following screen capture.
List of supported browsers:
Browser Version
Chrome 69 and later
Internet Explorer 11
Firefox 61 and later
Top-most window activities
SessionRecordingcan log top-mostwindowactivities and tag theevents in the recording. Theprocessname, title, and process number are logged.
© 1999‒2022 Citrix Systems, Inc. All rights reserved. 148
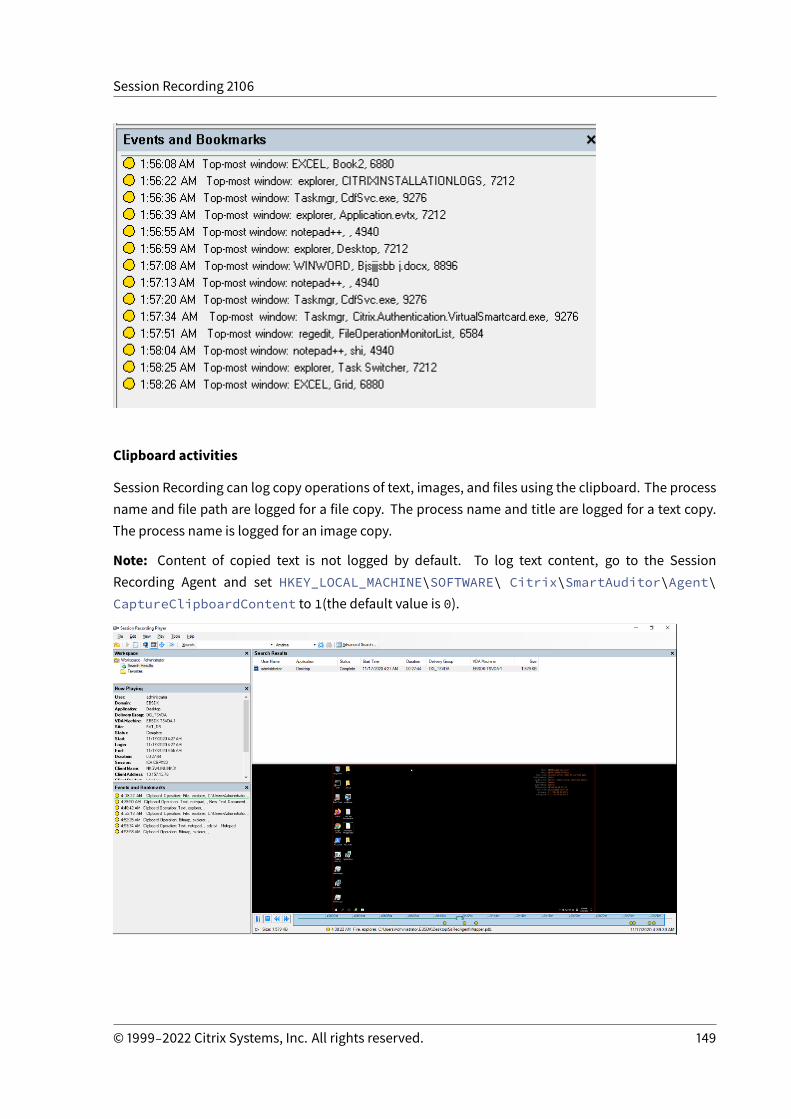
Session Recording 2106
Clipboard activities
Session Recording can log copy operations of text, images, and files using the clipboard. The processname and file path are logged for a file copy. The process name and title are logged for a text copy.The process name is logged for an image copy.
Note: Content of copied text is not logged by default. To log text content, go to the SessionRecording Agent and set HKEY_LOCAL_MACHINE\SOFTWARE\ Citrix\SmartAuditor\Agent\CaptureClipboardContent to 1(the default value is 0).
© 1999‒2022 Citrix Systems, Inc. All rights reserved. 149
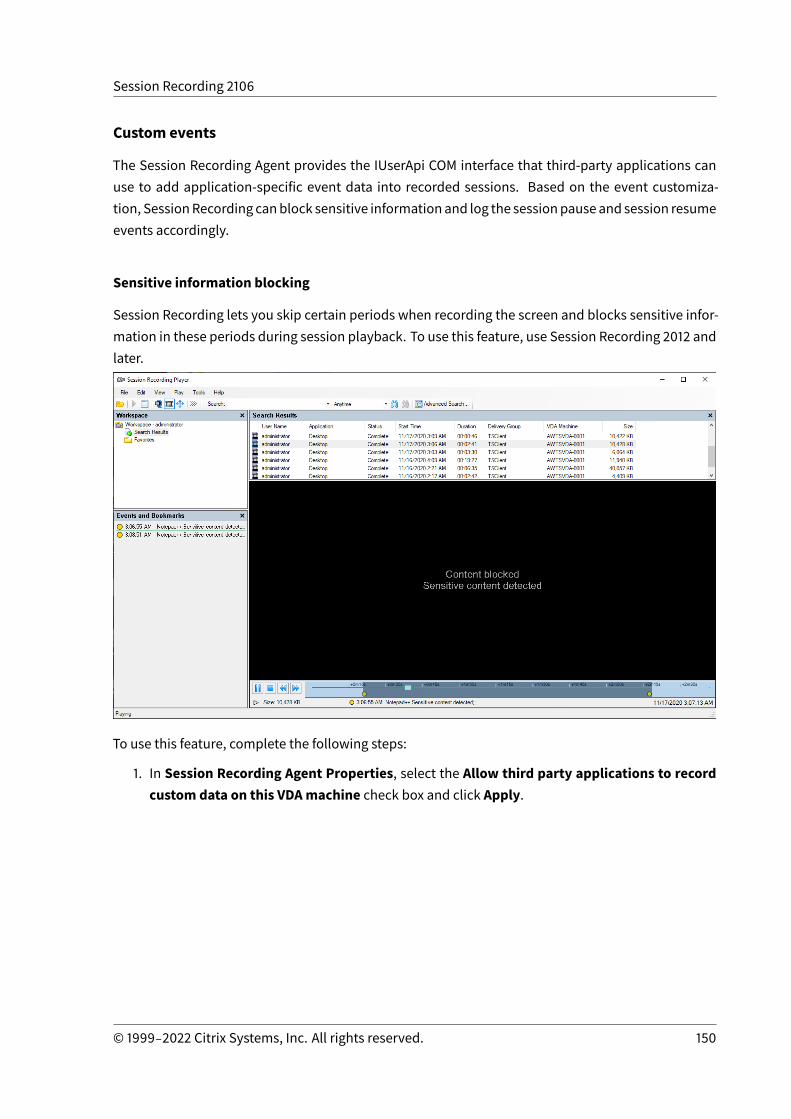
Session Recording 2106
Custom events
The Session Recording Agent provides the IUserApi COM interface that third-party applications canuse to add application-specific event data into recorded sessions. Based on the event customiza-tion, SessionRecording canblock sensitive informationand log the sessionpause and session resumeevents accordingly.
Sensitive information blocking
Session Recording lets you skip certain periods when recording the screen and blocks sensitive infor-mation in these periods during session playback. To use this feature, use Session Recording 2012 andlater.
To use this feature, complete the following steps:
1. In Session Recording Agent Properties, select the Allow third party applications to recordcustom data on this VDAmachine check box and click Apply.
© 1999‒2022 Citrix Systems, Inc. All rights reserved. 150
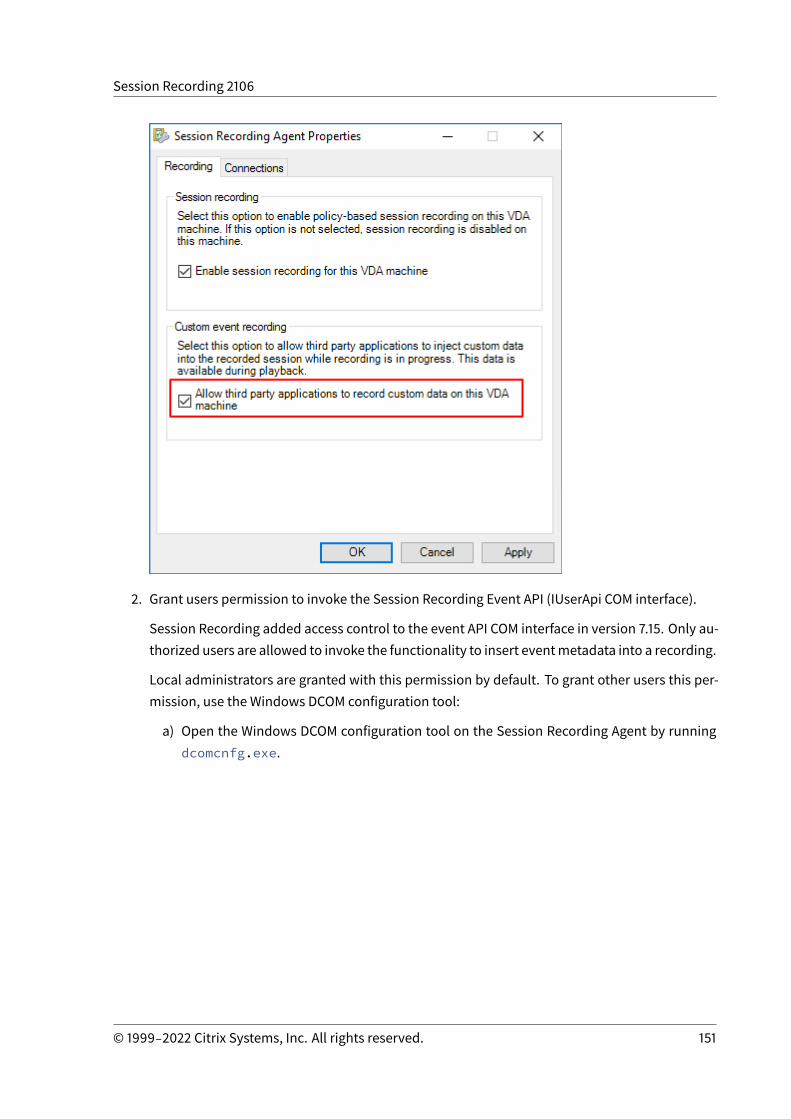
Session Recording 2106
2. Grant users permission to invoke the Session Recording Event API (IUserApi COM interface).
Session Recording added access control to the event API COM interface in version 7.15. Only au-thorized users are allowed to invoke the functionality to insert eventmetadata into a recording.
Local administrators are granted with this permission by default. To grant other users this per-mission, use the Windows DCOM configuration tool:
a) Open the Windows DCOM configuration tool on the Session Recording Agent by runningdcomcnfg.exe.
© 1999‒2022 Citrix Systems, Inc. All rights reserved. 151
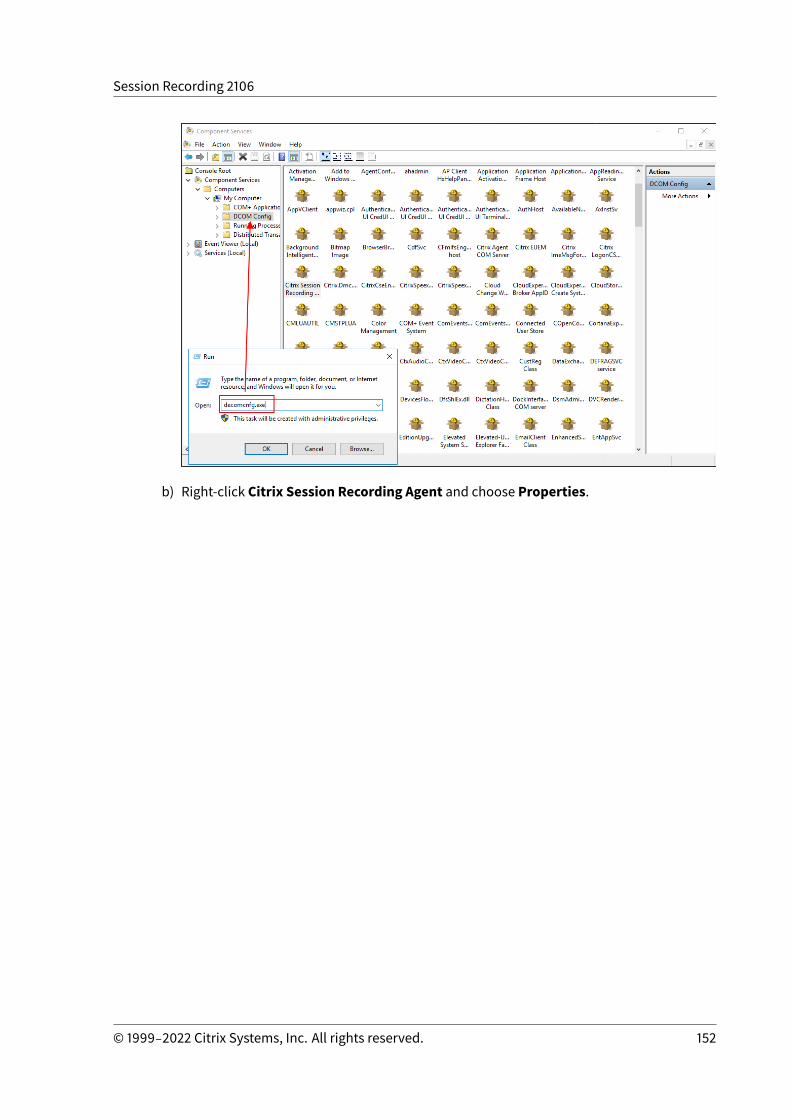
Session Recording 2106
b) Right-click Citrix Session Recording Agent and choose Properties.
© 1999‒2022 Citrix Systems, Inc. All rights reserved. 152
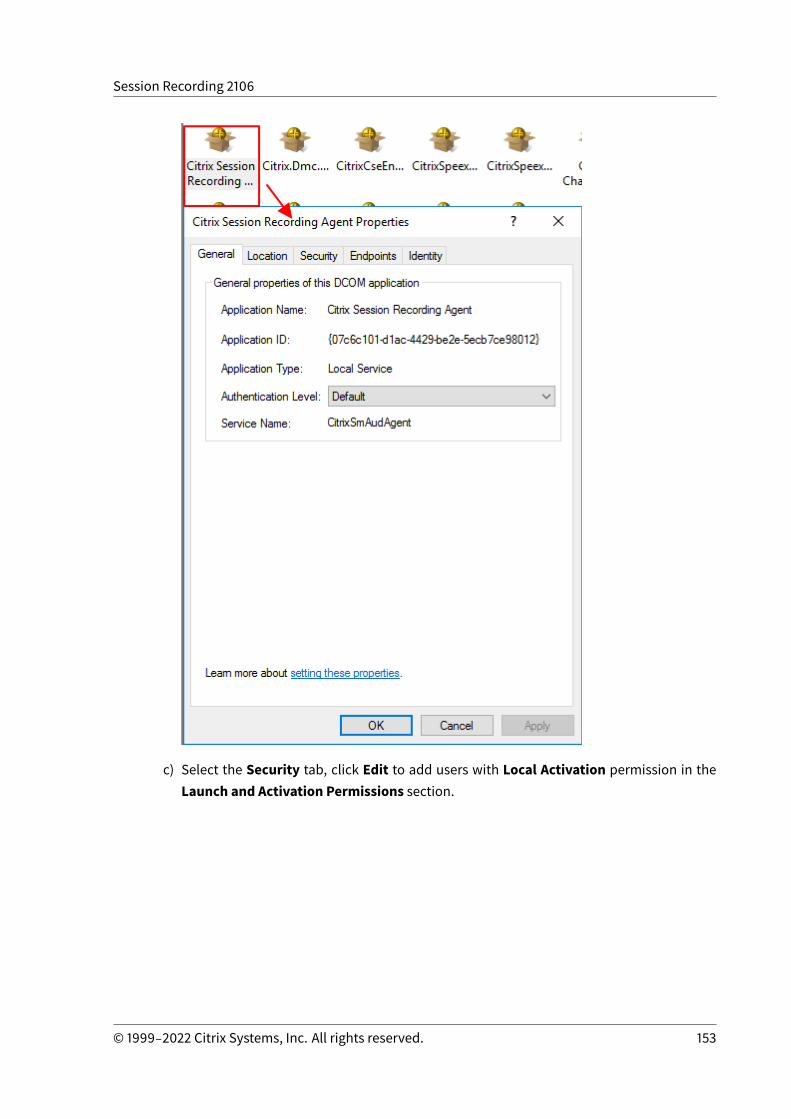
Session Recording 2106
c) Select the Security tab, click Edit to add users with Local Activation permission in theLaunch and Activation Permissions section.
© 1999‒2022 Citrix Systems, Inc. All rights reserved. 153
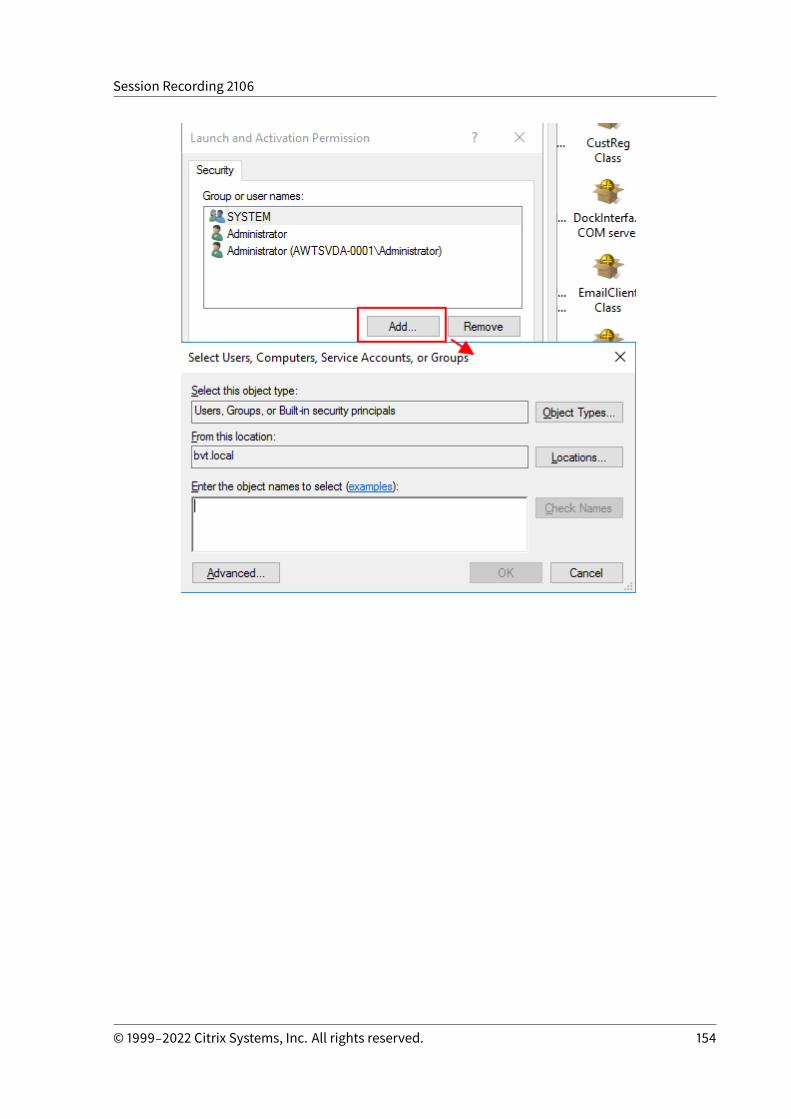
Session Recording 2106
© 1999‒2022 Citrix Systems, Inc. All rights reserved. 154

Session Recording 2106
Note:
DCOM configuration takes effect immediately. There is no need to restart any services orthe machine.
3. Start a Citrix virtual session.
4. Start PowerShell and change the current drive to the <Session Recording Agent installationpath>\Bin folder to import the SRUserEventHelperSnapin.dll module.
5. Run the Session-Pause and Session-Resume cmdlets to set parameters for triggering sen-sitive information blocking.
Parameter Description Required or Optional
-APP The app name that calls thecmdlet.
Required
© 1999‒2022 Citrix Systems, Inc. All rights reserved. 155
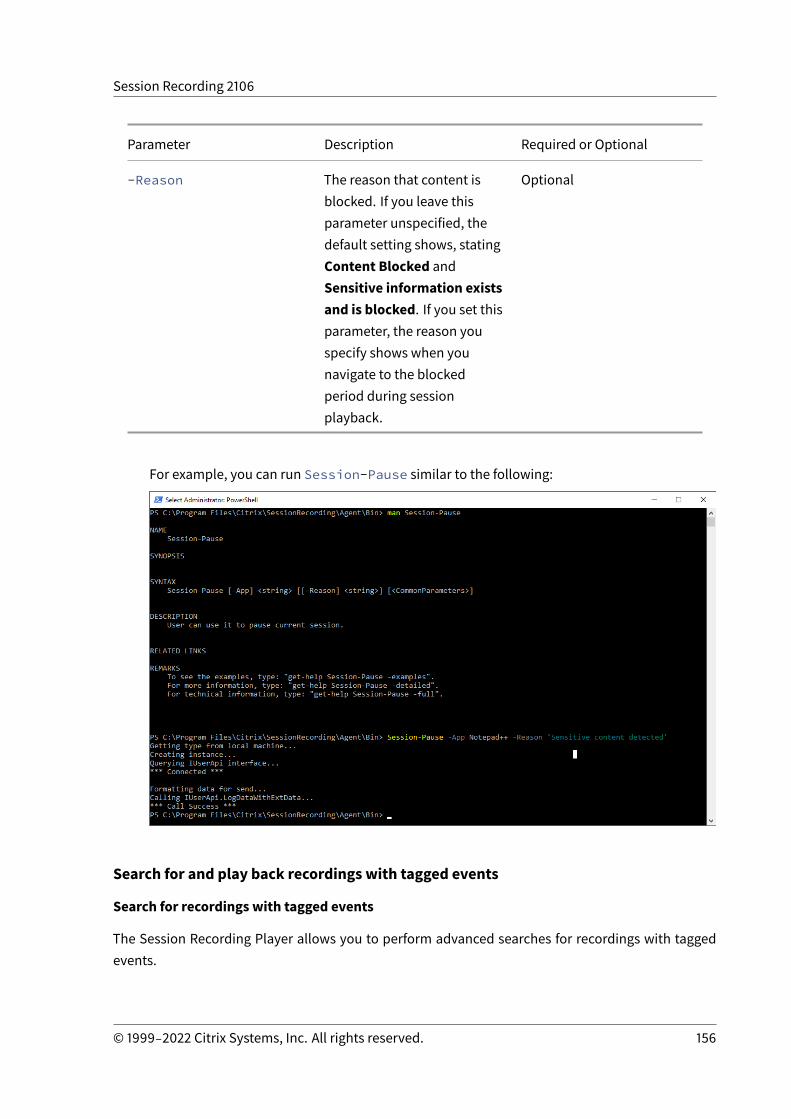
Session Recording 2106
Parameter Description Required or Optional
-Reason The reason that content isblocked. If you leave thisparameter unspecified, thedefault setting shows, statingContent Blocked andSensitive information existsand is blocked. If you set thisparameter, the reason youspecify shows when younavigate to the blockedperiod during sessionplayback.
Optional
For example, you can run Session-Pause similar to the following:
Search for and play back recordings with tagged events
Search for recordings with tagged events
The Session Recording Player allows you to perform advanced searches for recordings with taggedevents.
© 1999‒2022 Citrix Systems, Inc. All rights reserved. 156
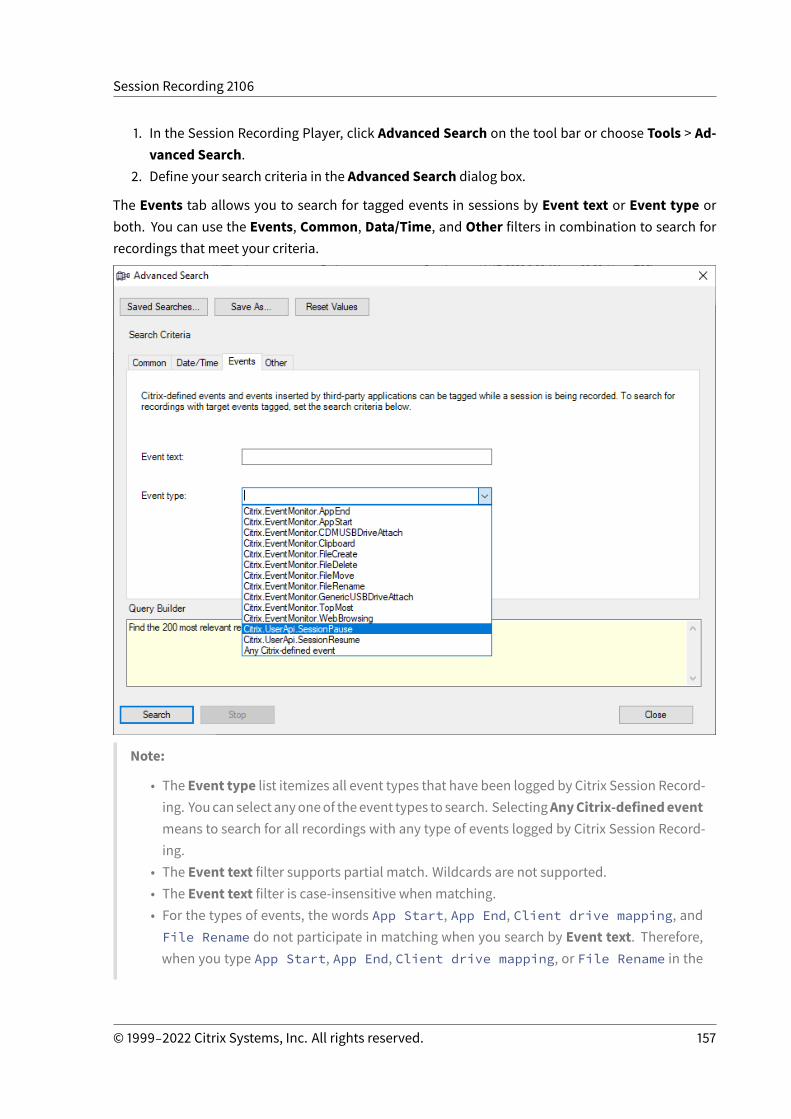
Session Recording 2106
1. In the Session Recording Player, click Advanced Search on the tool bar or choose Tools > Ad-vanced Search.
2. Define your search criteria in the Advanced Search dialog box.
The Events tab allows you to search for tagged events in sessions by Event text or Event type orboth. You can use the Events, Common, Data/Time, and Other filters in combination to search forrecordings that meet your criteria.
Note:
• The Event type list itemizes all event types that have been logged by Citrix Session Record-ing. Youcanselect anyoneof theevent types to search. SelectingAnyCitrix-definedeventmeans to search for all recordings with any type of events logged by Citrix Session Record-ing.
• The Event text filter supports partial match. Wildcards are not supported.• The Event text filter is case-insensitive whenmatching.• For the types of events, the words App Start, App End, Client drive mapping, andFile Rename do not participate in matching when you search by Event text. Therefore,when you type App Start, App End, Client drive mapping, or File Rename in the
© 1999‒2022 Citrix Systems, Inc. All rights reserved. 157
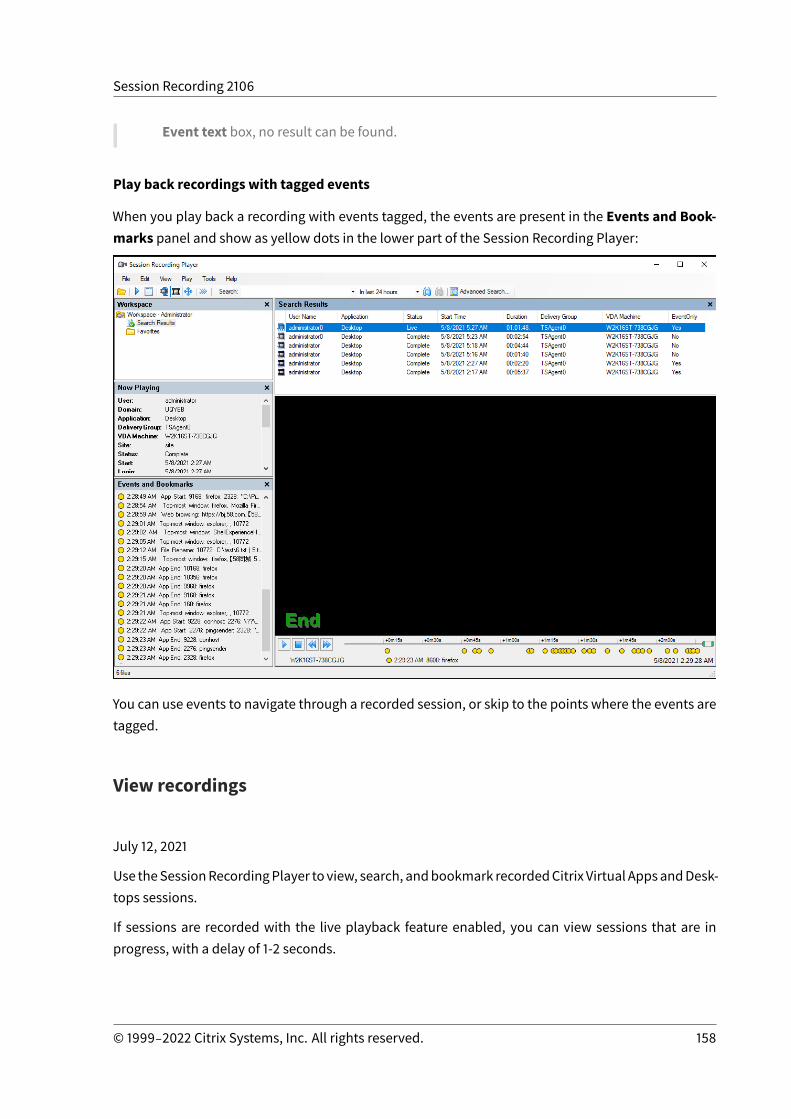
Session Recording 2106
Event text box, no result can be found.
Play back recordings with tagged events
When you play back a recording with events tagged, the events are present in the Events and Book-marks panel and show as yellow dots in the lower part of the Session Recording Player:
You can use events to navigate through a recorded session, or skip to the points where the events aretagged.
View recordings
July 12, 2021
Use theSessionRecordingPlayer to view, search, andbookmark recordedCitrix Virtual AppsandDesk-tops sessions.
If sessions are recorded with the live playback feature enabled, you can view sessions that are inprogress, with a delay of 1-2 seconds.
© 1999‒2022 Citrix Systems, Inc. All rights reserved. 158
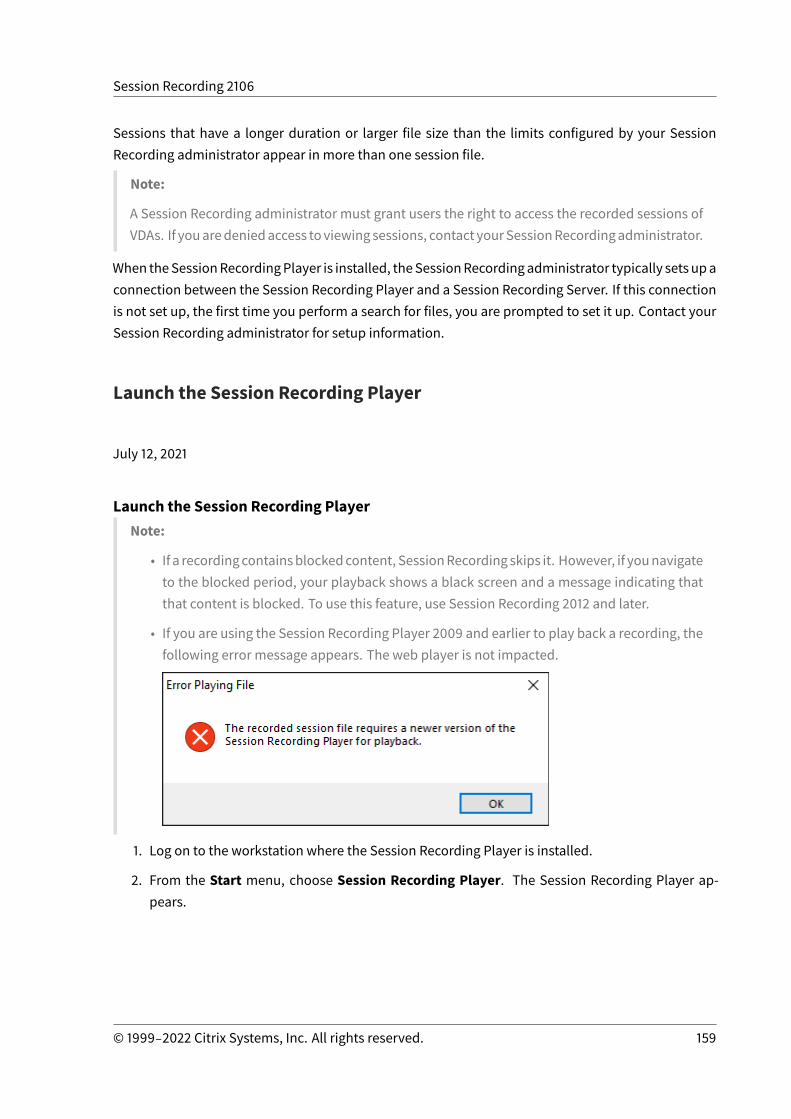
Session Recording 2106
Sessions that have a longer duration or larger file size than the limits configured by your SessionRecording administrator appear in more than one session file.
Note:
A Session Recording administrator must grant users the right to access the recorded sessions ofVDAs. If youaredeniedaccess toviewing sessions, contact yourSessionRecordingadministrator.
When theSessionRecordingPlayer is installed, theSessionRecordingadministrator typically sets upaconnection between the Session Recording Player and a Session Recording Server. If this connectionis not set up, the first time you perform a search for files, you are prompted to set it up. Contact yourSession Recording administrator for setup information.
Launch the Session Recording Player
July 12, 2021
Launch the Session Recording PlayerNote:
• If a recordingcontainsblockedcontent, SessionRecordingskips it. However, if younavigateto the blocked period, your playback shows a black screen and a message indicating thatthat content is blocked. To use this feature, use Session Recording 2012 and later.
• If you are using the Session Recording Player 2009 and earlier to play back a recording, thefollowing error message appears. The web player is not impacted.
1. Log on to the workstation where the Session Recording Player is installed.
2. From the Start menu, choose Session Recording Player. The Session Recording Player ap-pears.
© 1999‒2022 Citrix Systems, Inc. All rights reserved. 159
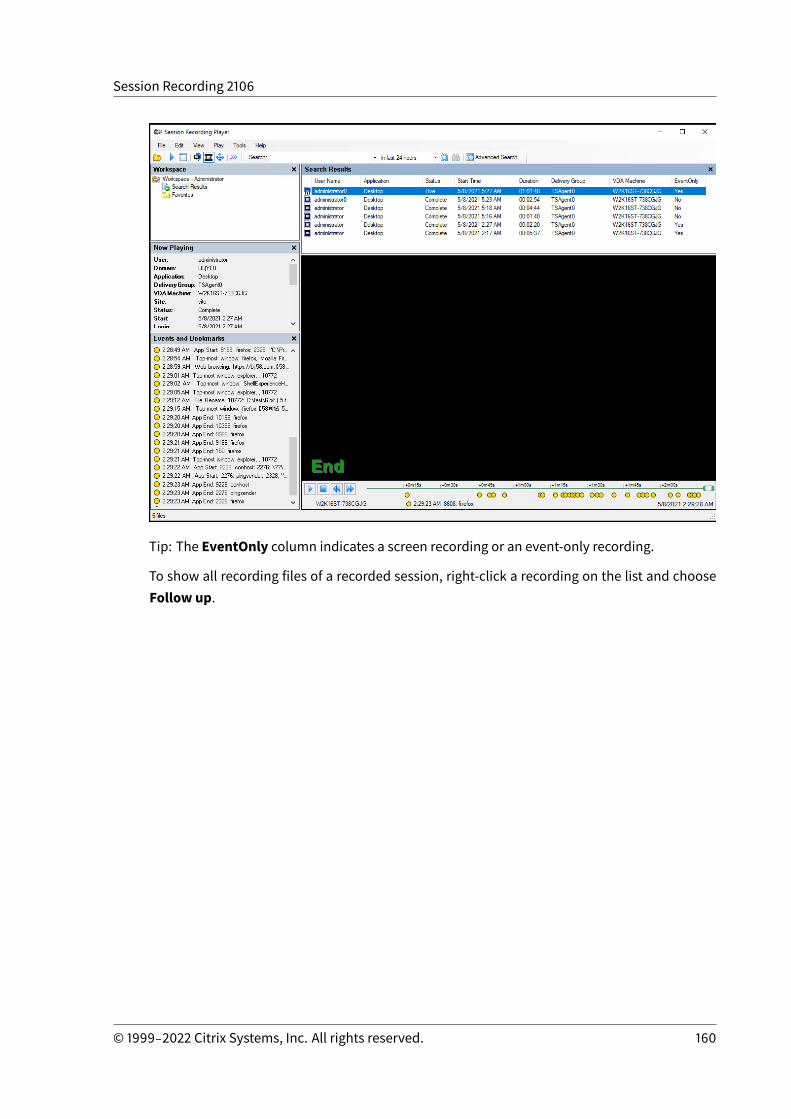
Session Recording 2106
Tip: The EventOnly column indicates a screen recording or an event-only recording.
To show all recording files of a recorded session, right-click a recording on the list and chooseFollow up.
© 1999‒2022 Citrix Systems, Inc. All rights reserved. 160
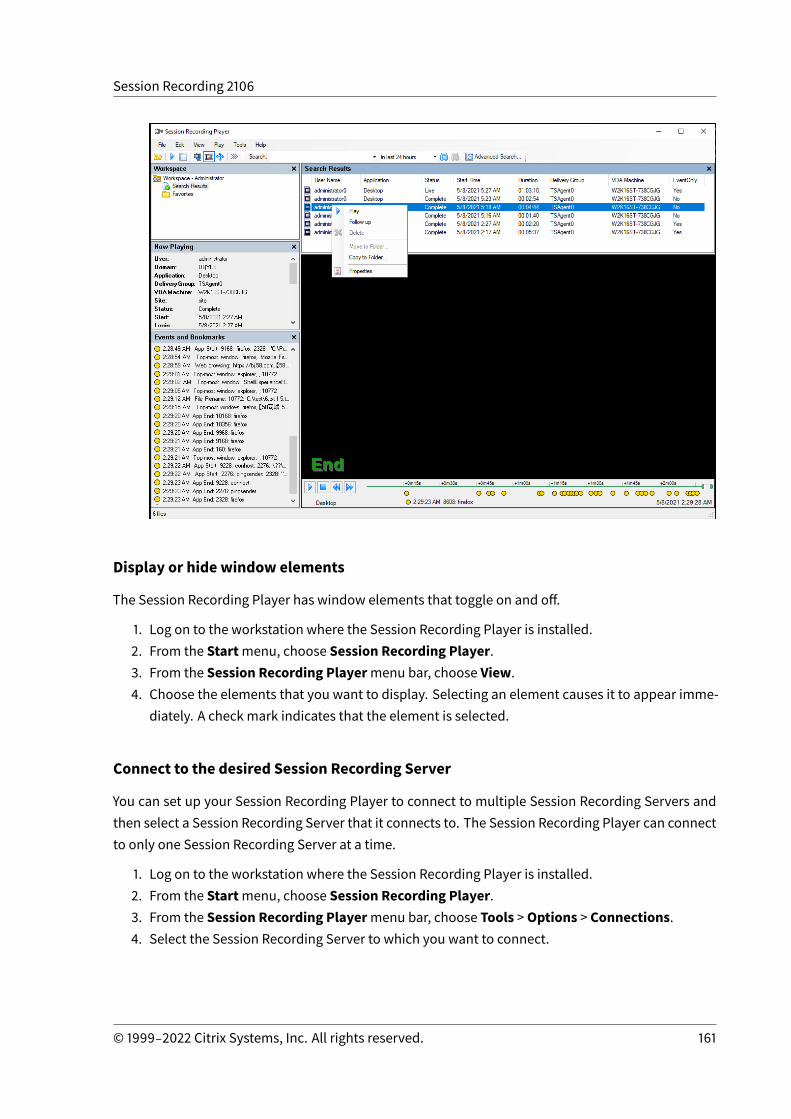
Session Recording 2106
Display or hide window elements
The Session Recording Player has window elements that toggle on and off.
1. Log on to the workstation where the Session Recording Player is installed.2. From the Startmenu, choose Session Recording Player.3. From the Session Recording Playermenu bar, choose View.4. Choose the elements that you want to display. Selecting an element causes it to appear imme-
diately. A check mark indicates that the element is selected.
Connect to the desired Session Recording Server
You can set up your Session Recording Player to connect to multiple Session Recording Servers andthen select a Session Recording Server that it connects to. The Session Recording Player can connectto only one Session Recording Server at a time.
1. Log on to the workstation where the Session Recording Player is installed.2. From the Startmenu, choose Session Recording Player.3. From the Session Recording Playermenu bar, choose Tools >Options > Connections.4. Select the Session Recording Server to which you want to connect.
© 1999‒2022 Citrix Systems, Inc. All rights reserved. 161

Session Recording 2106
Enable or disable live session playback and playback protection
July 12, 2021
Enable or disable live session playback
If sessions are recorded with the live playback feature enabled, you can view a session after or whileit is being recorded. Viewing a session that is being recorded is similar to seeing actions happeninglive. However, there is actually a delay of 1-2 seconds when the data propagates from the VDA.
Some functionality is not available when you view sessions that are not recorded completely:
• A digital signature cannot be assigned until recording is complete. If digital signing is enabled,you can view live playback sessions. But they are not digitally signed and you cannot view thecertificates until the session is completed.
• Playback protection cannot be applied until recording is complete. If playback protection isenabled, you can view live playback sessions. But they are not encrypted until the session iscompleted.
• You cannot cache a file until recording is complete.
By default, live session playback is enabled.
1. Log on to the computer hosting the Session Recording Server.2. From the Startmenu, choose Session Recording Server Properties.3. In Session Recording Server Properties, click the Playback tab.4. Select or clear the Allow live session playback check box.
Enable or disable playback protection
As a security precaution, Session Recording automatically encrypts recorded files that are down-loaded for viewing in the Session Recording Player. This playback protection prevents recorded filesfrom being copied and viewed by anyone other than the user who downloaded the file. The filescannot be played back on another workstation or by another user. Encrypted files are identifiedwith an .icle extension. Unencrypted files are identified with an .icl extension. The files remainencrypted while they reside in %localAppData%\Citrix\SessionRecording\Player\Cacheon the Session Recording Player until an authorized user opens them.
We recommend that you use HTTPS to protect the transfer of data.
By default, playback protection is enabled.
1. Log on to the machine hosting the Session Recording Server.2. From the Startmenu, choose Session Recording Server Properties.
© 1999‒2022 Citrix Systems, Inc. All rights reserved. 162

Session Recording 2106
3. In Session Recording Server Properties, click the Playback tab.4. Select or clear the Encrypt session recording files downloaded for playback check box.
Open and play recordings
July 12, 2021
Open recordings
You can open session recordings in the Session Recording Player in three ways:
• Perform a search using the Session Recording Player. Recorded sessions that meet the searchcriteria appear in the search results area.
• Access recorded session files directly from your local disk drive or a shared drive.• Access recorded session files from a Favorites folder.
When youopena file thatwas recordedwithout a digital signature, awarningmessage appears sayingthat the origin and integrity of the file were not verified. If you are confident of the integrity of the file,click Yes in the warning window to open the file.
A check on the Citrix Workspace app version is conducted before the Session Recording Player playsbacka recording file. If thePlayerdoesnot support theversionof theCitrixWorkspaceapp thathas thefile recorded, an error is returned. To eliminate the error, select Skip Citrix Workspace app versioncheck before playback in Session Recording Server Properties.
© 1999‒2022 Citrix Systems, Inc. All rights reserved. 163
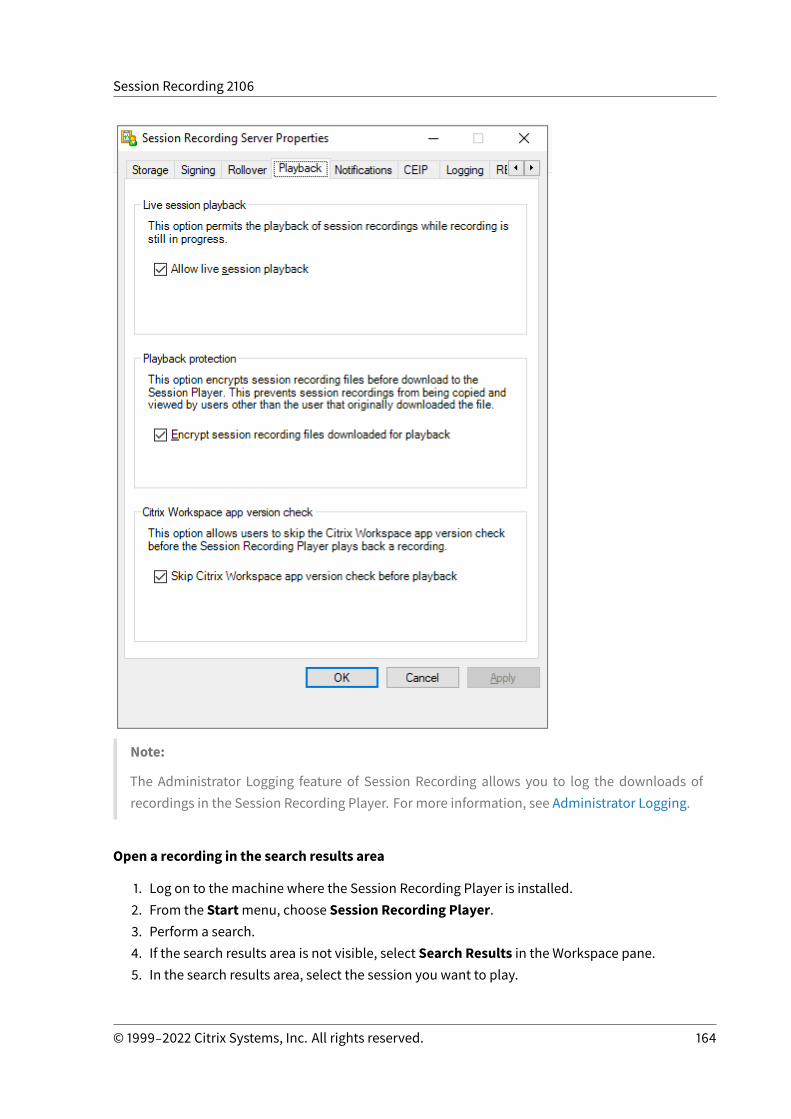
Session Recording 2106
Note:
The Administrator Logging feature of Session Recording allows you to log the downloads ofrecordings in the Session Recording Player. For more information, see Administrator Logging.
Open a recording in the search results area
1. Log on to the machine where the Session Recording Player is installed.2. From the Startmenu, choose Session Recording Player.3. Perform a search.4. If the search results area is not visible, select Search Results in the Workspace pane.5. In the search results area, select the session you want to play.
© 1999‒2022 Citrix Systems, Inc. All rights reserved. 164
Session Recording 2106
6. Do any of the following:• Double-click the session.• Right-click and select Play.• From the Session Recording Playermenu bar, choose Play > Play.
Open a recording by accessing the file
The name of a recorded session file begins with i_, followed by a unique alphanumeric file ID andthen the .icl or .icle extension. The .icl extension denotes the recordings without playbackprotection applied. The .icle extension denotes the recordings with playback protection applied.Recorded session files are saved in a folder that incorporates the date the sessionswere recorded. Forexample, the file for a session recorded on December 22, 2014, is saved in the folder path 2014\12\22.
1. Log on to the workstation where the Session Recording Player is installed.2. From the Startmenu, choose Session Recording Player.3. Do any of the following:
• From the Session Recording Playermenu bar, choose File>Open and browse for the file.• Using Windows Explorer, navigate to the file and drag the file to the Playerwindow.• Using Windows Explorer, navigate to and double-click the file.• If you created Favorites in theWorkspace pane, select Favorites andopen the file from theFavorites area in the same way you open files from the search results area.
Use favorites
Creating theFavorites folders allows you toquickly access recordings that you view frequently. TheseFavorites folders reference recorded session files that are stored on your workstation or on a networkdrive. You can import and export these files to other workstations and share these folders with otherSession Recording Player users.
Note:
Only userswith access rights to the SessionRecordingPlayer candownload the recorded sessionfiles associated with the Favorites folders. Contact your Session Recording administrator for theaccess rights.
To create a Favorites subfolder:
1. Log on to the workstation where the Session Recording Player is installed.2. From the Startmenu, choose Session Recording Player.3. In the Session Recording Playerwindow, select the Favorites folder in your Workspace pane.4. From the menu bar, choose File > Folder > New Folder. A new folder appears under the Fa-
vorites folder.5. Type the folder name, then press Enter or click anywhere to accept the new name.
© 1999‒2022 Citrix Systems, Inc. All rights reserved. 165

Session Recording 2106
Use the other options that appear in the File > Foldermenu to delete, rename, move, copy, import,and export the folders.
Play recordings
After you open a recorded session in the Session Recording Player, you can navigate through therecorded sessions using these methods:
• Use the player controls to play, stop, pause, and increase or decrease playback speed.• Use the seek slider to move forward or backward.
If you have inserted markers to the recording or if the recorded session contains custom events, youcan also navigate through the recorded session by going to those markers and events.
Note:
• During playback of a recorded session, a secondmouse pointer might appear. The secondpointer appears at the point in the recording when the user navigated within Internet Ex-plorer and clicked an image that was originally larger than the screen but was scaled downautomatically by Internet Explorer. While only one pointer appears during the session, twomight appear during playback.
• This version of Session Recording does not support SpeedScreen Multimedia Accelerationand the Flash quality adjustment policy setting. When this option is enabled, playback dis-plays a black square.
• When you record a session with a resolution higher than or equal to 4096 x 4096, theremight be fragments in the recording appearance.
Use the player controls
You can click the player controls in the lower part of the Player window or access them by choosingPlay from the Session Recording Playermenu bar.
Player Control Function
Plays the selected session file.
Pauses playback.
Stops playback. If you click Stop, then Play,the recording restarts at the beginning of thefile.
Halves the current playback speed down to aminimum of one-quarter of the normal speed.
© 1999‒2022 Citrix Systems, Inc. All rights reserved. 166
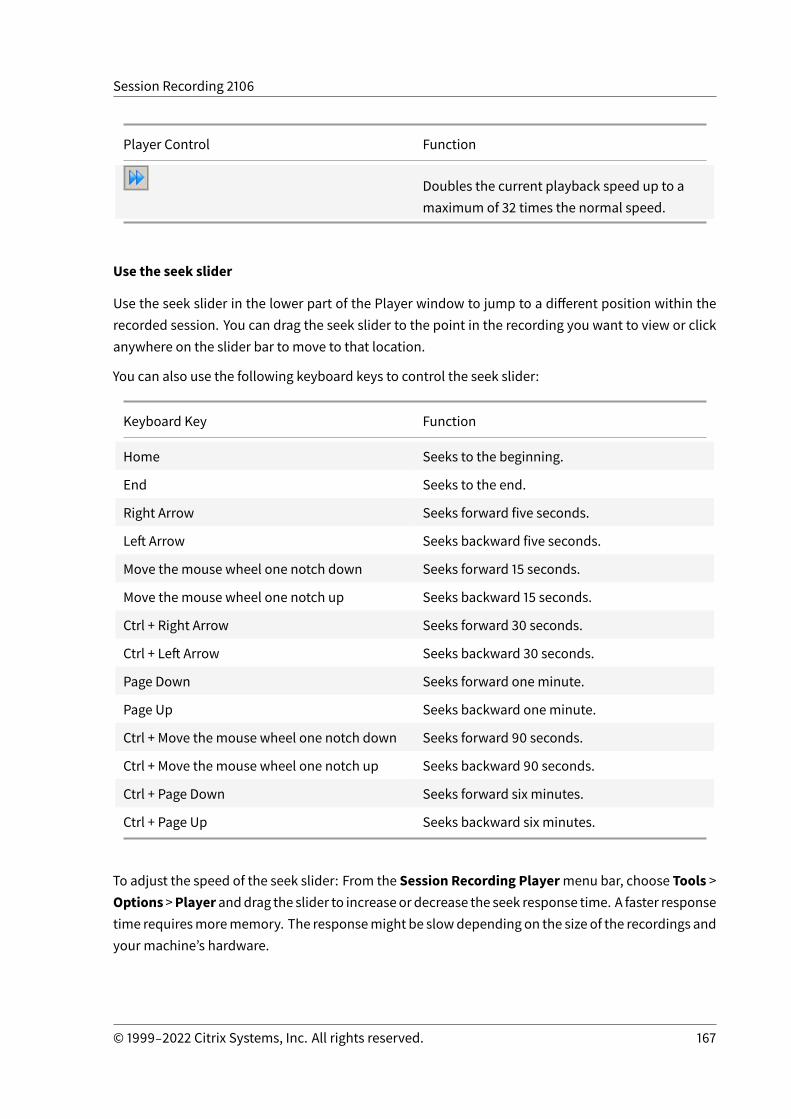
Session Recording 2106
Player Control Function
Doubles the current playback speed up to amaximum of 32 times the normal speed.
Use the seek slider
Use the seek slider in the lower part of the Player window to jump to a different position within therecorded session. You can drag the seek slider to the point in the recording you want to view or clickanywhere on the slider bar to move to that location.
You can also use the following keyboard keys to control the seek slider:
Keyboard Key Function
Home Seeks to the beginning.
End Seeks to the end.
Right Arrow Seeks forward five seconds.
Left Arrow Seeks backward five seconds.
Move the mouse wheel one notch down Seeks forward 15 seconds.
Move the mouse wheel one notch up Seeks backward 15 seconds.
Ctrl + Right Arrow Seeks forward 30 seconds.
Ctrl + Left Arrow Seeks backward 30 seconds.
Page Down Seeks forward oneminute.
Page Up Seeks backward oneminute.
Ctrl + Move the mouse wheel one notch down Seeks forward 90 seconds.
Ctrl + Move the mouse wheel one notch up Seeks backward 90 seconds.
Ctrl + Page Down Seeks forward six minutes.
Ctrl + Page Up Seeks backward six minutes.
To adjust the speed of the seek slider: From the Session Recording Playermenu bar, choose Tools >Options >Playeranddrag the slider to increaseor decrease the seek response time. A faster responsetime requiresmorememory. The responsemight be slowdepending on the size of the recordings andyour machine’s hardware.
© 1999‒2022 Citrix Systems, Inc. All rights reserved. 167
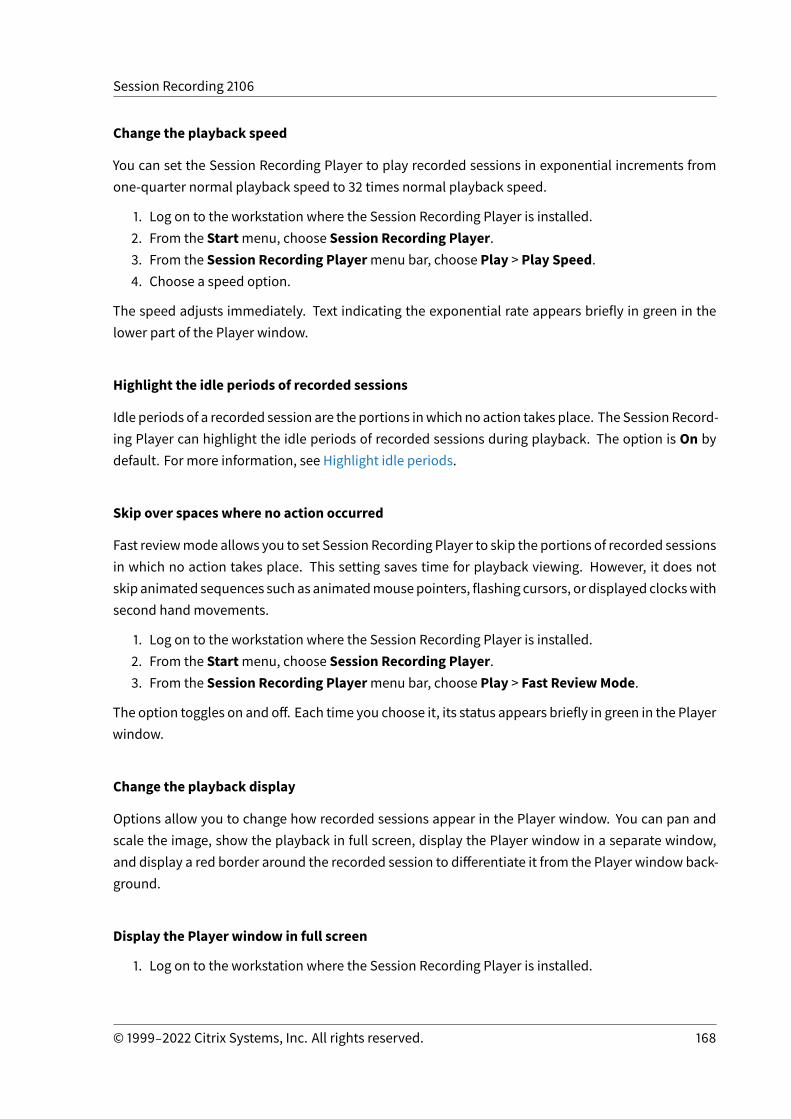
Session Recording 2106
Change the playback speed
You can set the Session Recording Player to play recorded sessions in exponential increments fromone-quarter normal playback speed to 32 times normal playback speed.
1. Log on to the workstation where the Session Recording Player is installed.2. From the Startmenu, choose Session Recording Player.3. From the Session Recording Playermenu bar, choose Play > Play Speed.4. Choose a speed option.
The speed adjusts immediately. Text indicating the exponential rate appears briefly in green in thelower part of the Player window.
Highlight the idle periods of recorded sessions
Idle periods of a recorded session are the portions inwhich no action takes place. The Session Record-ing Player can highlight the idle periods of recorded sessions during playback. The option is On bydefault. For more information, see Highlight idle periods.
Skip over spaces where no action occurred
Fast reviewmode allows you to set Session Recording Player to skip the portions of recorded sessionsin which no action takes place. This setting saves time for playback viewing. However, it does notskip animated sequences such as animatedmousepointers, flashing cursors, or displayed clockswithsecond handmovements.
1. Log on to the workstation where the Session Recording Player is installed.2. From the Startmenu, choose Session Recording Player.3. From the Session Recording Playermenu bar, choose Play > Fast ReviewMode.
The option toggles on and off. Each time you choose it, its status appears briefly in green in the Playerwindow.
Change the playback display
Options allow you to change how recorded sessions appear in the Player window. You can pan andscale the image, show the playback in full screen, display the Player window in a separate window,and display a red border around the recorded session to differentiate it from the Player window back-ground.
Display the Player window in full screen
1. Log on to the workstation where the Session Recording Player is installed.
© 1999‒2022 Citrix Systems, Inc. All rights reserved. 168
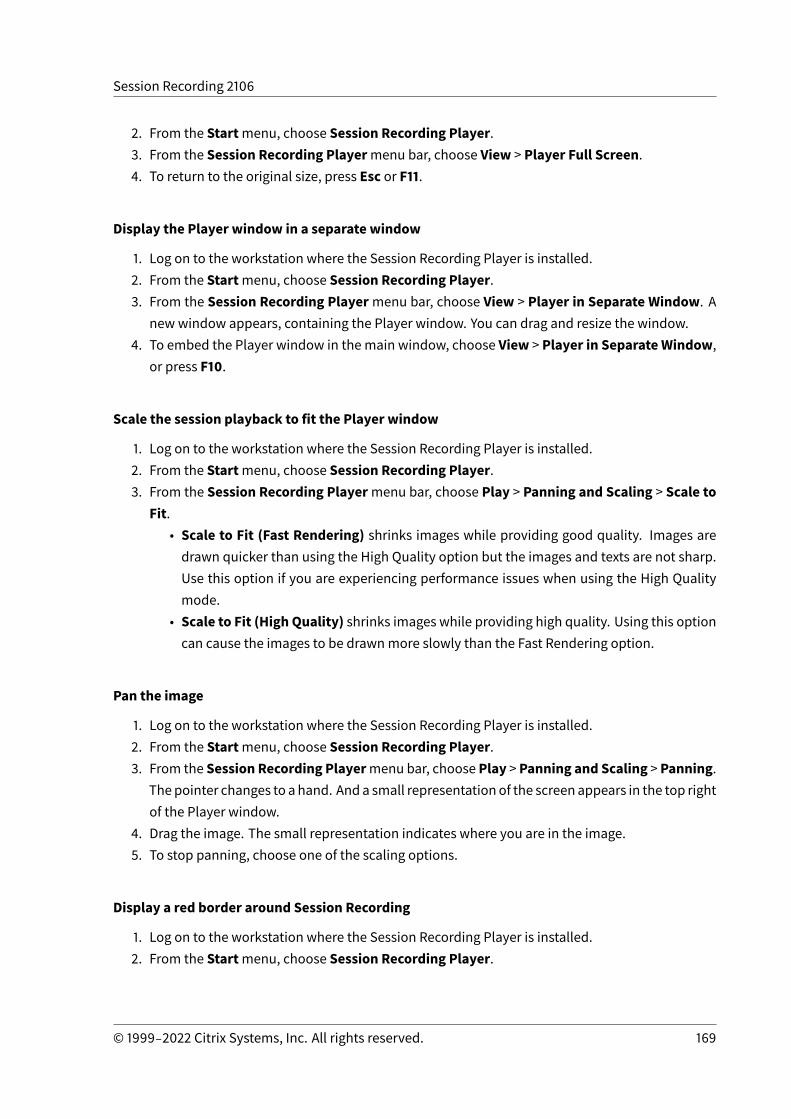
Session Recording 2106
2. From the Startmenu, choose Session Recording Player.3. From the Session Recording Playermenu bar, choose View > Player Full Screen.4. To return to the original size, press Esc or F11.
Display the Player window in a separate window
1. Log on to the workstation where the Session Recording Player is installed.2. From the Startmenu, choose Session Recording Player.3. From the Session Recording Playermenu bar, choose View > Player in Separate Window. A
new window appears, containing the Player window. You can drag and resize the window.4. To embed the Player window in themain window, choose View > Player in Separate Window,
or press F10.
Scale the session playback to fit the Player window
1. Log on to the workstation where the Session Recording Player is installed.2. From the Startmenu, choose Session Recording Player.3. From the Session Recording Playermenu bar, choose Play > Panning and Scaling > Scale to
Fit.• Scale to Fit (Fast Rendering) shrinks images while providing good quality. Images aredrawn quicker than using the High Quality option but the images and texts are not sharp.Use this option if you are experiencing performance issues when using the High Qualitymode.
• Scale to Fit (High Quality) shrinks images while providing high quality. Using this optioncan cause the images to be drawnmore slowly than the Fast Rendering option.
Pan the image
1. Log on to the workstation where the Session Recording Player is installed.2. From the Startmenu, choose Session Recording Player.3. From the Session Recording Playermenu bar, choose Play > Panning and Scaling > Panning.
The pointer changes to a hand. And a small representation of the screen appears in the top rightof the Player window.
4. Drag the image. The small representation indicates where you are in the image.5. To stop panning, choose one of the scaling options.
Display a red border around Session Recording
1. Log on to the workstation where the Session Recording Player is installed.2. From the Startmenu, choose Session Recording Player.
© 1999‒2022 Citrix Systems, Inc. All rights reserved. 169
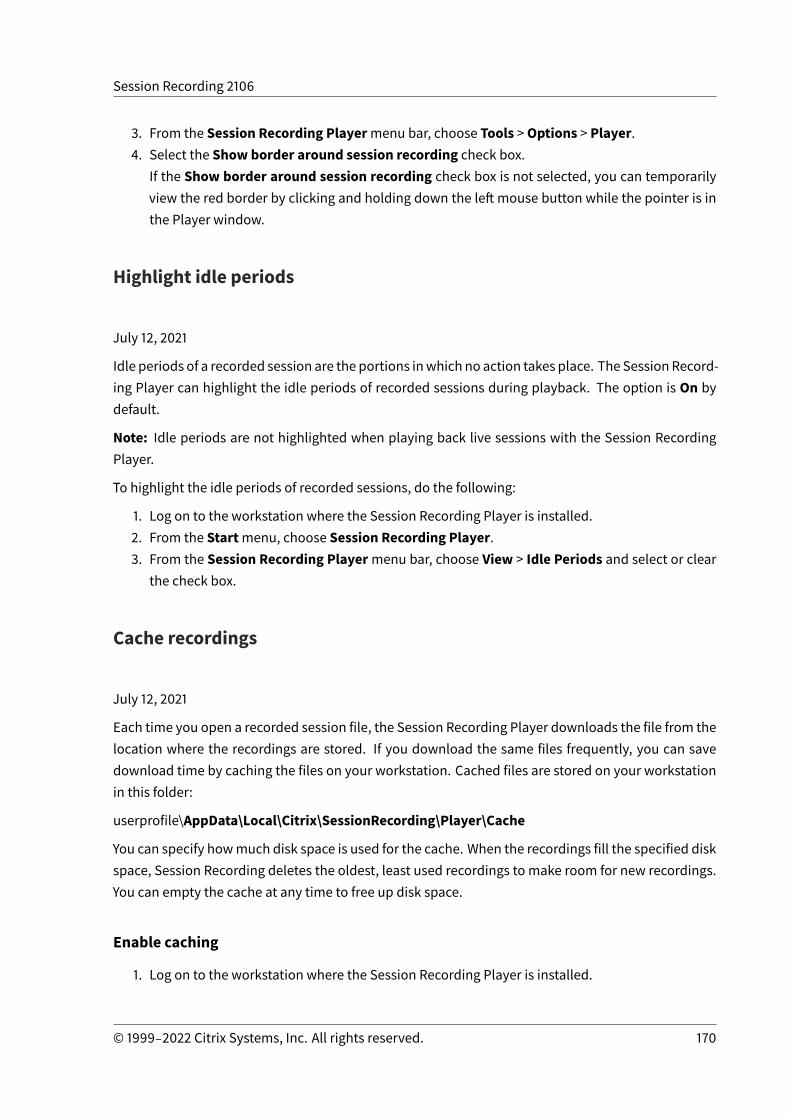
Session Recording 2106
3. From the Session Recording Playermenu bar, choose Tools >Options > Player.4. Select the Show border around session recording check box.
If the Show border around session recording check box is not selected, you can temporarilyview the red border by clicking and holding down the left mouse button while the pointer is inthe Player window.
Highlight idle periods
July 12, 2021
Idle periods of a recorded session are the portions inwhich no action takes place. The Session Record-ing Player can highlight the idle periods of recorded sessions during playback. The option is On bydefault.
Note: Idle periods are not highlighted when playing back live sessions with the Session RecordingPlayer.
To highlight the idle periods of recorded sessions, do the following:
1. Log on to the workstation where the Session Recording Player is installed.2. From the Startmenu, choose Session Recording Player.3. From the Session Recording Playermenu bar, choose View > Idle Periods and select or clear
the check box.
Cache recordings
July 12, 2021
Each time you open a recorded session file, the Session Recording Player downloads the file from thelocation where the recordings are stored. If you download the same files frequently, you can savedownload time by caching the files on your workstation. Cached files are stored on your workstationin this folder:
userprofile\AppData\Local\Citrix\SessionRecording\Player\Cache
You can specify howmuch disk space is used for the cache. When the recordings fill the specified diskspace, Session Recording deletes the oldest, least used recordings to make room for new recordings.You can empty the cache at any time to free up disk space.
Enable caching
1. Log on to the workstation where the Session Recording Player is installed.
© 1999‒2022 Citrix Systems, Inc. All rights reserved. 170
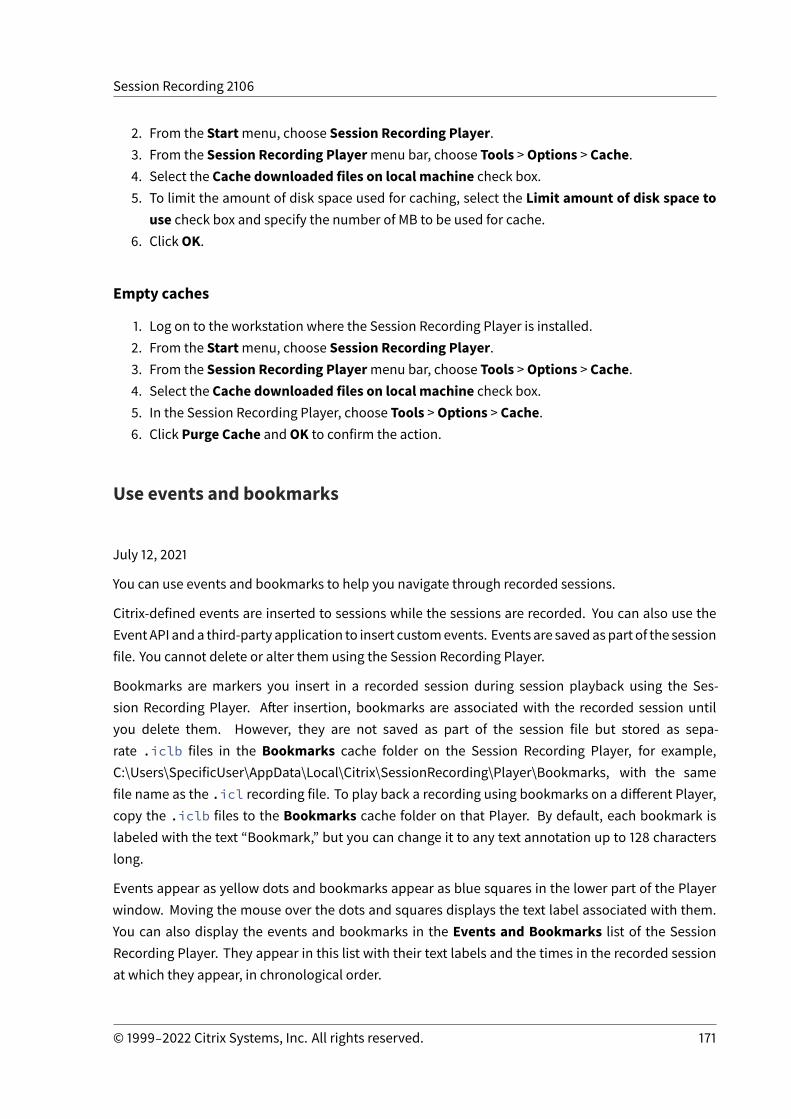
Session Recording 2106
2. From the Startmenu, choose Session Recording Player.3. From the Session Recording Playermenu bar, choose Tools >Options > Cache.4. Select the Cache downloaded files on local machine check box.5. To limit the amount of disk space used for caching, select the Limit amount of disk space to
use check box and specify the number of MB to be used for cache.6. ClickOK.
Empty caches
1. Log on to the workstation where the Session Recording Player is installed.2. From the Startmenu, choose Session Recording Player.3. From the Session Recording Playermenu bar, choose Tools >Options > Cache.4. Select the Cache downloaded files on local machine check box.5. In the Session Recording Player, choose Tools >Options > Cache.6. Click Purge Cache andOK to confirm the action.
Use events and bookmarks
July 12, 2021
You can use events and bookmarks to help you navigate through recorded sessions.
Citrix-defined events are inserted to sessions while the sessions are recorded. You can also use theEvent API anda third-party application to insert customevents. Events are savedaspart of the sessionfile. You cannot delete or alter them using the Session Recording Player.
Bookmarks are markers you insert in a recorded session during session playback using the Ses-sion Recording Player. After insertion, bookmarks are associated with the recorded session untilyou delete them. However, they are not saved as part of the session file but stored as sepa-rate .iclb files in the Bookmarks cache folder on the Session Recording Player, for example,C:\Users\SpecificUser\AppData\Local\Citrix\SessionRecording\Player\Bookmarks, with the samefile name as the .icl recording file. To play back a recording using bookmarks on a different Player,copy the .iclb files to the Bookmarks cache folder on that Player. By default, each bookmark islabeled with the text “Bookmark,” but you can change it to any text annotation up to 128 characterslong.
Events appear as yellow dots and bookmarks appear as blue squares in the lower part of the Playerwindow. Moving the mouse over the dots and squares displays the text label associated with them.You can also display the events and bookmarks in the Events and Bookmarks list of the SessionRecording Player. They appear in this list with their text labels and the times in the recorded sessionat which they appear, in chronological order.
© 1999‒2022 Citrix Systems, Inc. All rights reserved. 171
Session Recording 2106
You can use events and bookmarks to help you navigate through recorded sessions. By going to anevent or bookmark, you can skip to the point in the recorded session where the event or bookmark isinserted.
Display events and bookmarks in the list
The Events and Bookmarks list displays the events and bookmarks inserted in the recorded sessionthat is currently playing. It can show events only, bookmarks only, or both.
1. Log on to the workstation where the Session Recording Player is installed.2. From the Startmenu, choose Session Recording Player.3. Move the mouse pointer to the Events and Bookmarks list area and right-click to display the
menu.4. Choose Show Events Only, Show Bookmarks Only, or Show All.
Insert a bookmark
1. Log on to the workstation where the Session Recording Player is installed.2. From the Startmenu, choose Session Recording Player.3. Begin playing the recorded session to which you want to add a bookmark.4. Move the seek slider to the position where you want to insert the bookmark.5. Move the mouse pointer to the Player window area and right-click to display the menu.6. Add a bookmark with the default Bookmark label or create an annotation:
• To add a bookmark with the default Bookmark label, choose Add Bookmark.• To add a bookmark with a descriptive text label that you create, choose Add Annotation.Type the text label you want to assign to the bookmark, up to 128 characters. ClickOK.
Add or change an annotation
After a bookmark is created, you can add an annotation to it or change its annotation.
1. Log on to the workstation where the Session Recording Player is installed.2. From the Startmenu, choose Session Recording Player.3. Begin playing the recorded session containing the bookmark.4. Ensure that the Events and Bookmarks list is displaying bookmarks.5. Select the bookmark in the Events and Bookmarks list and right-click to display the menu.6. Choose Edit Annotation.7. In the window that appears, type the new annotation and clickOK.
Delete a bookmark
1. Log on to the workstation where the Session Recording Player is installed.
© 1999‒2022 Citrix Systems, Inc. All rights reserved. 172
Session Recording 2106
2. From the Startmenu, choose Session Recording Player.3. Begin playing the recorded session containing the bookmark.4. Ensure that the Events and Bookmarks list is displaying bookmarks.5. Select the bookmark in the Events and Bookmarks list and right-click to display the menu.6. Choose Delete.
Go to an event or bookmark
Going to an event or bookmark causes the Session Recording Player to go to the point in the recordedsession where the event or bookmark is inserted.
1. Log on to the workstation where the Session Recording Player is installed.2. From the Startmenu, choose Session Recording Player.3. Begin playing a session recording containing events or bookmarks.4. Go to an event or bookmark:
• In the lower part of the Player window, click the dot or square representing the event orbookmark to go to the event or bookmark.
• In the Events and Bookmarks list, double-click the event or bookmark to go to it. To goto the next event or bookmark, select any event or bookmark from the list, right-click todisplay the menu, and choose Seek to Bookmark.
Search for recordings
July 12, 2021
The Session Recording Player allows you to perform quick and advanced searches and to specify op-tions that apply to all searches. Results of searches appear in the search results area of the SessionRecording Player.
Note:
To display all available recorded sessions, up to the maximum number of sessions that mightappear in a search, perform a search without specifying any search parameters.
Perform a quick search
1. Log on to the workstation where the Session Recording Player is installed.2. From the Startmenu, choose Session Recording Player.3. Define your search criteria:
• Enter a search criterion in the Search field.
© 1999‒2022 Citrix Systems, Inc. All rights reserved. 173
Session Recording 2106
• Move the mouse pointer over the Search label to display a list of parameters to use as aguideline.
• Click the arrow to the right of the Search field to display the text for the last 64 searchesyou performed.
• Use the drop-down list to the right of the Search field to select a period or duration speci-fying when the session was recorded.
4. Click the binocular icon to the right of the drop-down list to start the search.
Perform an advanced search
Advanced searches might take up to 20 seconds to return results containing more than 150,000 enti-ties. Citrix recommends usingmore accurate search conditions such as a date range or user to reducethe result number.
1. Log on to the workstation where the Session Recording Player is installed.
2. From the Startmenu, choose Session Recording Player.
3. In the Session Recording Player window, click Advanced Search on the tool bar or chooseTools > Advanced Search.
4. Define your search criteria on the tabs of the Advanced Search dialog box:
• Common allows you to search by domain or account authority, site, group, VDA for multi-session OS, application, or file ID.
• Date/Time allows you to search date, day of week, and time of day.• Events allows you to search for Citrix-defined and custom events that are inserted to thesessions.
• Other allows you to search by session name, client name, client address, and recordingduration. It also allows you to specify, for this search, the maximum number of searchresults displayed and whether archived files are included in the search.When you specify search criteria, the query you are creating appears in the pane at thebottom of the dialog box.
5. Click Search to start the search.
You can save and retrieve advanced search queries. Click Save in the Advanced Search dialogbox to save the current query. ClickOpen in theAdvancedSearchdialogbox to retrieve a savedquery. Queries are saved as files with an .isq extension.
Set search options
The Session Recording Player search options allow you to limit the maximum number of sessionrecordings that appear in search results and to specify whether search results include archivedsession files.
© 1999‒2022 Citrix Systems, Inc. All rights reserved. 174
Session Recording 2106
1. Log on to the workstation where the Session Recording Player is installed.2. From the Startmenu, choose Session Recording Player.3. From the Session Recording Playermenu bar, choose Tools >Options > Search.4. In theMaximum result to display field, type the number of search results you want to display.
A maximum of 500 results can be displayed.5. To set whether archived files are included in searches, select or clear Include archived files.
Session Recording web player
July 12, 2021
Overview
The web player lets you use a web browser to view and play back recordings. Using the web player,you can:
• Search for recordings byusing filters, includinghost name, client name, user name, application,client IP address, event text, event type, and time.
• View and play back both live and completed recordings with tagged events listed in the rightpane.
• configure cachememory for storing recordings while playing.
• Record idle events and highlight idle periods.
• Leave comments about a recording and set comment severities.
• Share URLs of recordings.
Note:
Supported browsers include Google Chrome, Microsoft Edge, and Firefox.
Enable the web player
The web player is enabled by default.
• To disable the web player, start a Windows command prompt and run the <SessionRecording Server installation path>\Bin\SsRecUtils.exe ‒disablewebplayercommand.
• To enable the web player, start a Windows command prompt and run the <SessionRecording Server installation path>\Bin\SsRecUtils.exe -enablewebplayercommand.
© 1999‒2022 Citrix Systems, Inc. All rights reserved. 175
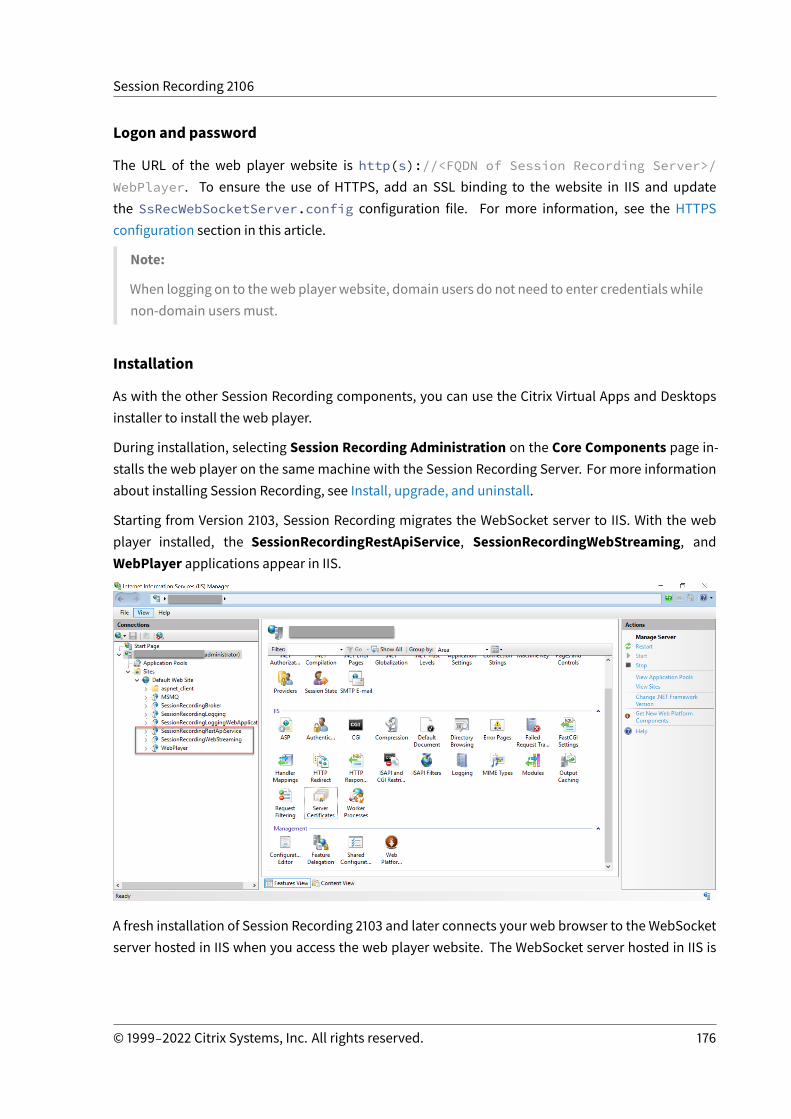
Session Recording 2106
Logon and password
The URL of the web player website is http(s)://<FQDN of Session Recording Server>/WebPlayer. To ensure the use of HTTPS, add an SSL binding to the website in IIS and updatethe SsRecWebSocketServer.config configuration file. For more information, see the HTTPSconfiguration section in this article.
Note:
When logging on to theweb player website, domain users do not need to enter credentials whilenon-domain users must.
Installation
As with the other Session Recording components, you can use the Citrix Virtual Apps and Desktopsinstaller to install the web player.
During installation, selecting Session Recording Administration on the Core Components page in-stalls the web player on the samemachine with the Session Recording Server. For more informationabout installing Session Recording, see Install, upgrade, and uninstall.
Starting from Version 2103, Session Recording migrates the WebSocket server to IIS. With the webplayer installed, the SessionRecordingRestApiService, SessionRecordingWebStreaming, andWebPlayer applications appear in IIS.
A fresh installation of Session Recording 2103 and later connects your web browser to the WebSocketserver hosted in IIS when you access the web player website. The WebSocket server hosted in IIS is
© 1999‒2022 Citrix Systems, Inc. All rights reserved. 176
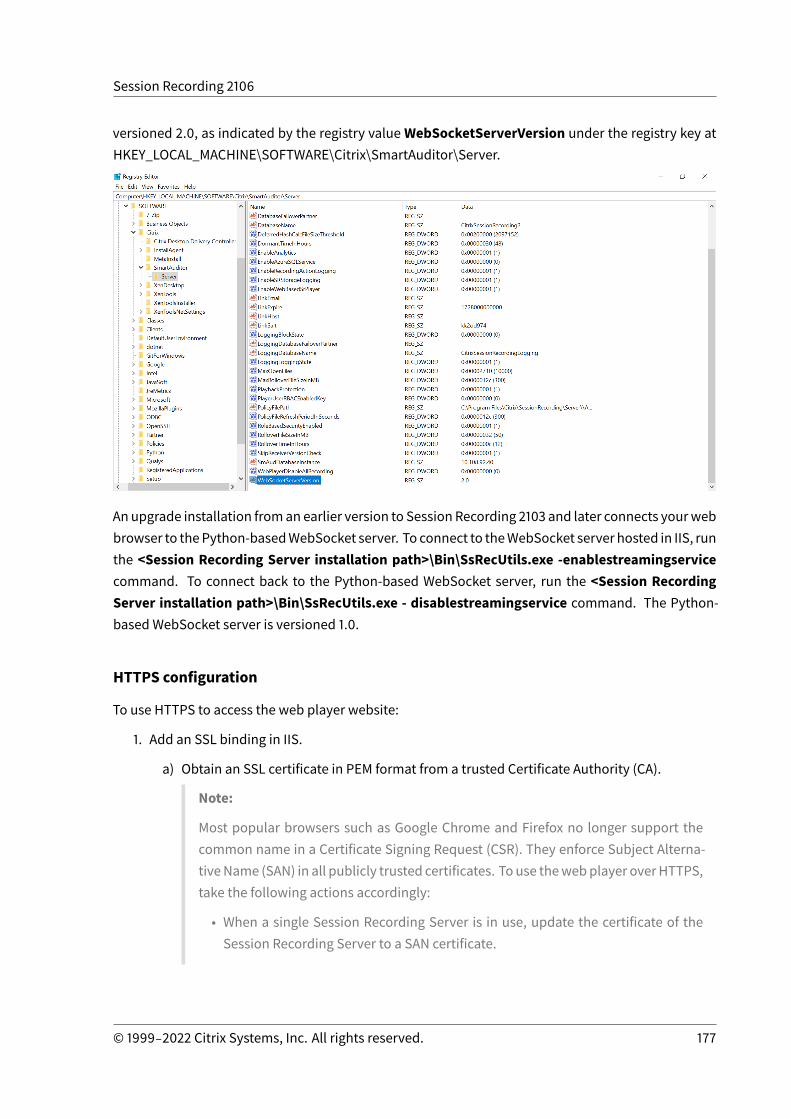
Session Recording 2106
versioned 2.0, as indicated by the registry valueWebSocketServerVersion under the registry key atHKEY_LOCAL_MACHINE\SOFTWARE\Citrix\SmartAuditor\Server.
An upgrade installation froman earlier version to Session Recording 2103 and later connects yourwebbrowser to thePython-basedWebSocket server. To connect to theWebSocket server hosted in IIS, runthe <Session Recording Server installation path>\Bin\SsRecUtils.exe -enablestreamingservicecommand. To connect back to the Python-based WebSocket server, run the <Session RecordingServer installation path>\Bin\SsRecUtils.exe - disablestreamingservice command. The Python-based WebSocket server is versioned 1.0.
HTTPS configuration
To use HTTPS to access the web player website:
1. Add an SSL binding in IIS.
a) Obtain an SSL certificate in PEM format from a trusted Certificate Authority (CA).
Note:
Most popular browsers such as Google Chrome and Firefox no longer support thecommon name in a Certificate Signing Request (CSR). They enforce Subject Alterna-tiveName (SAN) in all publicly trusted certificates. To use thewebplayer overHTTPS,take the following actions accordingly:
• When a single Session Recording Server is in use, update the certificate of theSession Recording Server to a SAN certificate.
© 1999‒2022 Citrix Systems, Inc. All rights reserved. 177
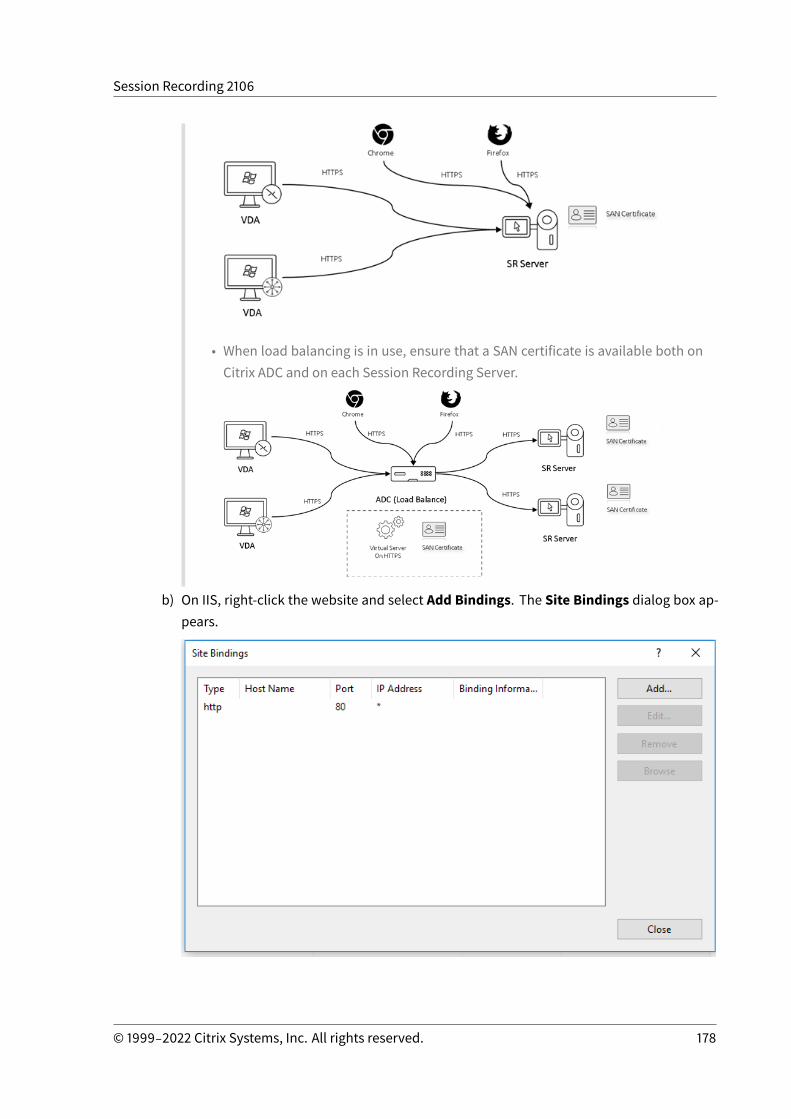
Session Recording 2106
• When load balancing is in use, ensure that a SAN certificate is available both onCitrix ADC and on each Session Recording Server.
b) On IIS, right-click the website and select Add Bindings. The Site Bindings dialog box ap-pears.
© 1999‒2022 Citrix Systems, Inc. All rights reserved. 178
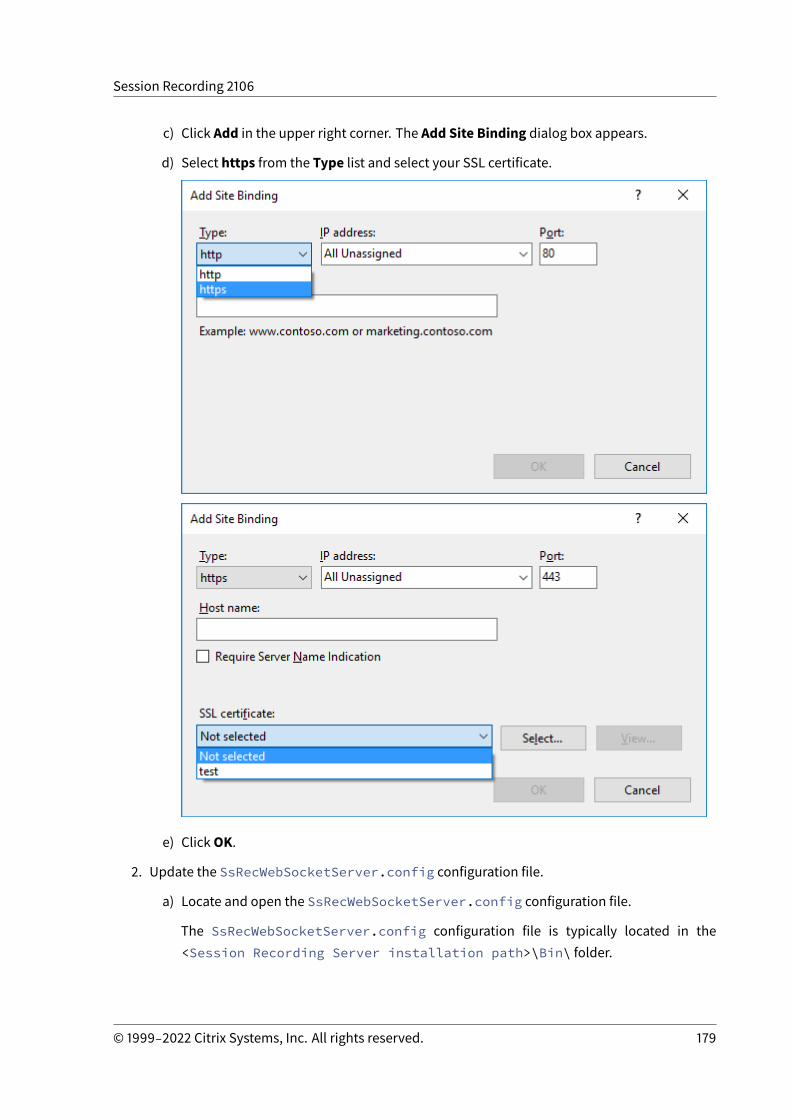
Session Recording 2106
c) Click Add in the upper right corner. The Add Site Binding dialog box appears.
d) Select https from the Type list and select your SSL certificate.
e) ClickOK.
2. Update the SsRecWebSocketServer.config configuration file.
a) Locate and open the SsRecWebSocketServer.config configuration file.
The SsRecWebSocketServer.config configuration file is typically located in the<Session Recording Server installation path>\Bin\ folder.
© 1999‒2022 Citrix Systems, Inc. All rights reserved. 179
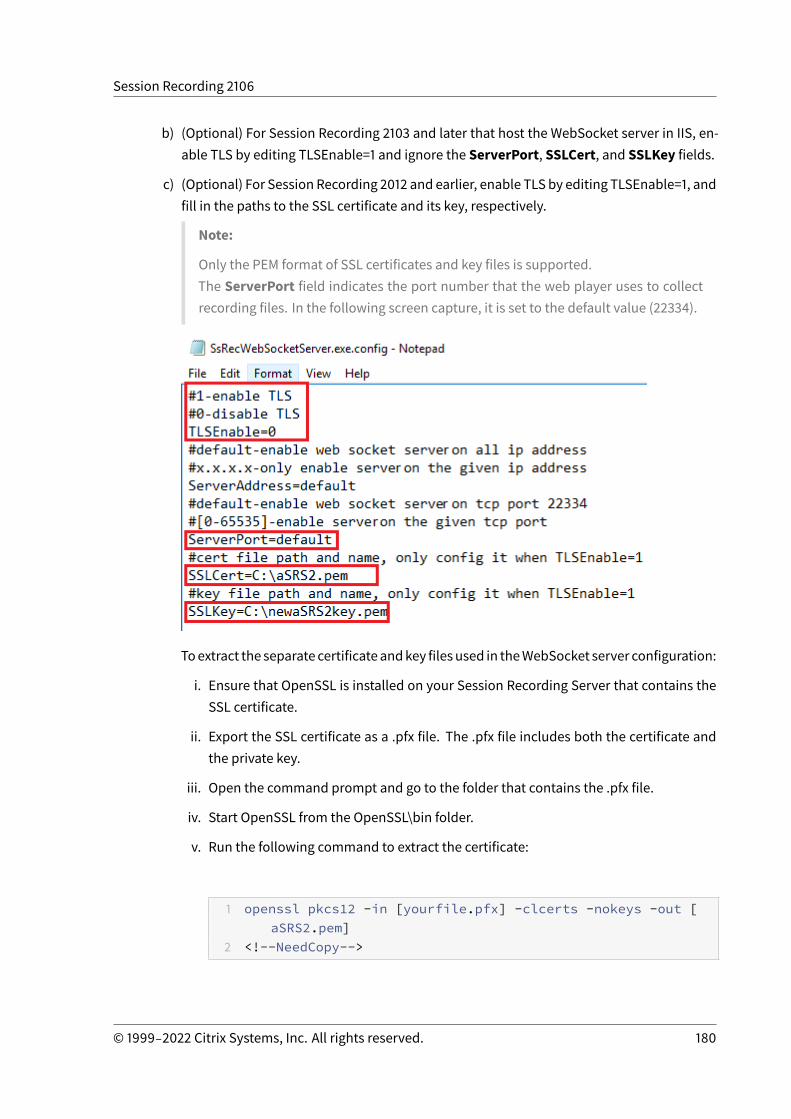
Session Recording 2106
b) (Optional) For Session Recording 2103 and later that host the WebSocket server in IIS, en-able TLS by editing TLSEnable=1 and ignore the ServerPort, SSLCert, and SSLKey fields.
c) (Optional) For Session Recording 2012 and earlier, enable TLS by editing TLSEnable=1, andfill in the paths to the SSL certificate and its key, respectively.
Note:
Only the PEM format of SSL certificates and key files is supported.The ServerPort field indicates the port number that the web player uses to collectrecording files. In the following screen capture, it is set to the default value (22334).
Toextract the separate certificateandkey files used in theWebSocket server configuration:
i. Ensure that OpenSSL is installed on your Session Recording Server that contains theSSL certificate.
ii. Export the SSL certificate as a .pfx file. The .pfx file includes both the certificate andthe private key.
iii. Open the command prompt and go to the folder that contains the .pfx file.
iv. Start OpenSSL from the OpenSSL\bin folder.
v. Run the following command to extract the certificate:
1 openssl pkcs12 -in [yourfile.pfx] -clcerts -nokeys -out [aSRS2.pem]
2 <!--NeedCopy-->
© 1999‒2022 Citrix Systems, Inc. All rights reserved. 180

Session Recording 2106
Enter the import password that you created when exporting the .pfx file.
vi. Run the following command to extract the private key:
1 openssl pkcs12 -in [yourfile.pfx] -nocerts -out [newaSRS2keyWithPassword.pem]
2 <!--NeedCopy-->
Enter the import password that you created when exporting the .pfx file. Provide anew password for protecting your key file when prompted for the PEM pass phrase.
vii. Run the following command to decrypt the private key:
1 openssl rsa -in [newaSRS2keyWithPassword.pem] -out [newaSRS2key.pem]
2 <!--NeedCopy-->
d) Save your changes.
e) Check your firewall settings. Allow SsRecWebSocketServer.exe to use the TCP port (22334by default) and allow access to the web player URL.
f) Run the SsRecUtils ‒stopwebsocketserver command.
View recordings
After you log on, the web player home pagemight hide or show content based on whether the follow-ing option is selected in Session Recording Server Properties.
© 1999‒2022 Citrix Systems, Inc. All rights reserved. 181
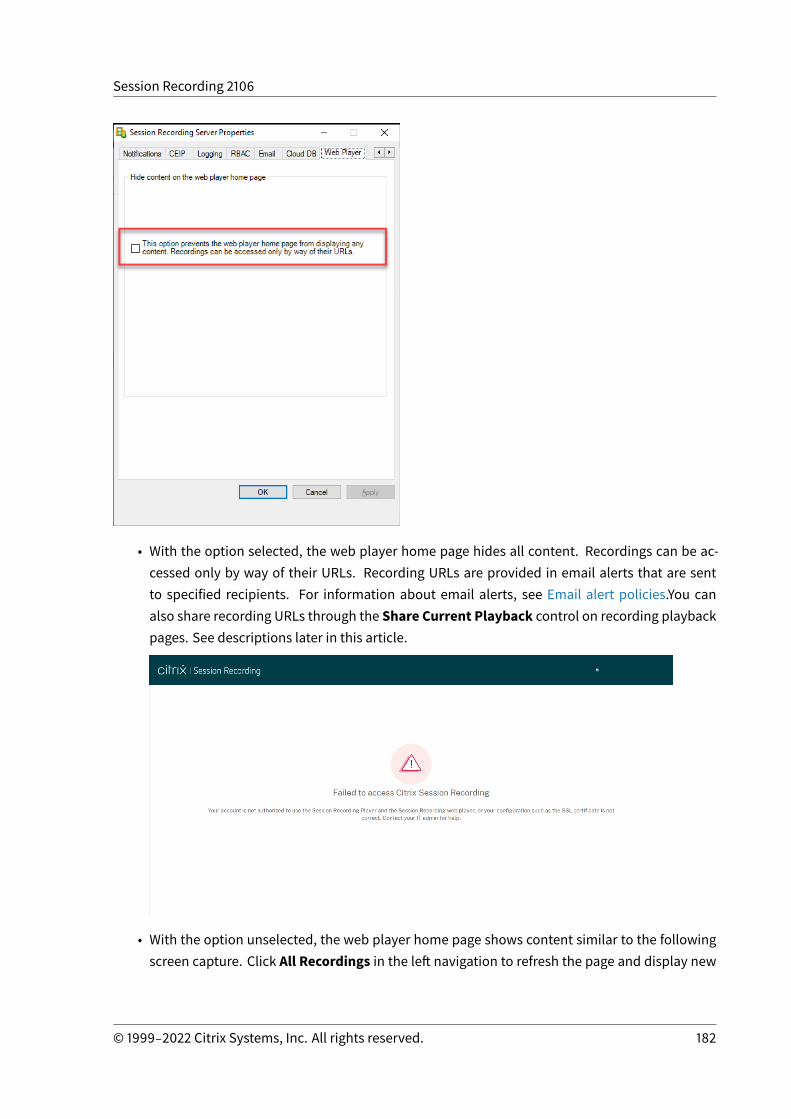
Session Recording 2106
• With the option selected, the web player home page hides all content. Recordings can be ac-cessed only by way of their URLs. Recording URLs are provided in email alerts that are sentto specified recipients. For information about email alerts, see Email alert policies.You canalso share recording URLs through the Share Current Playback control on recording playbackpages. See descriptions later in this article.
• With the option unselected, the web player home page shows content similar to the followingscreen capture. Click All Recordings in the left navigation to refresh the page and display new
© 1999‒2022 Citrix Systems, Inc. All rights reserved. 182
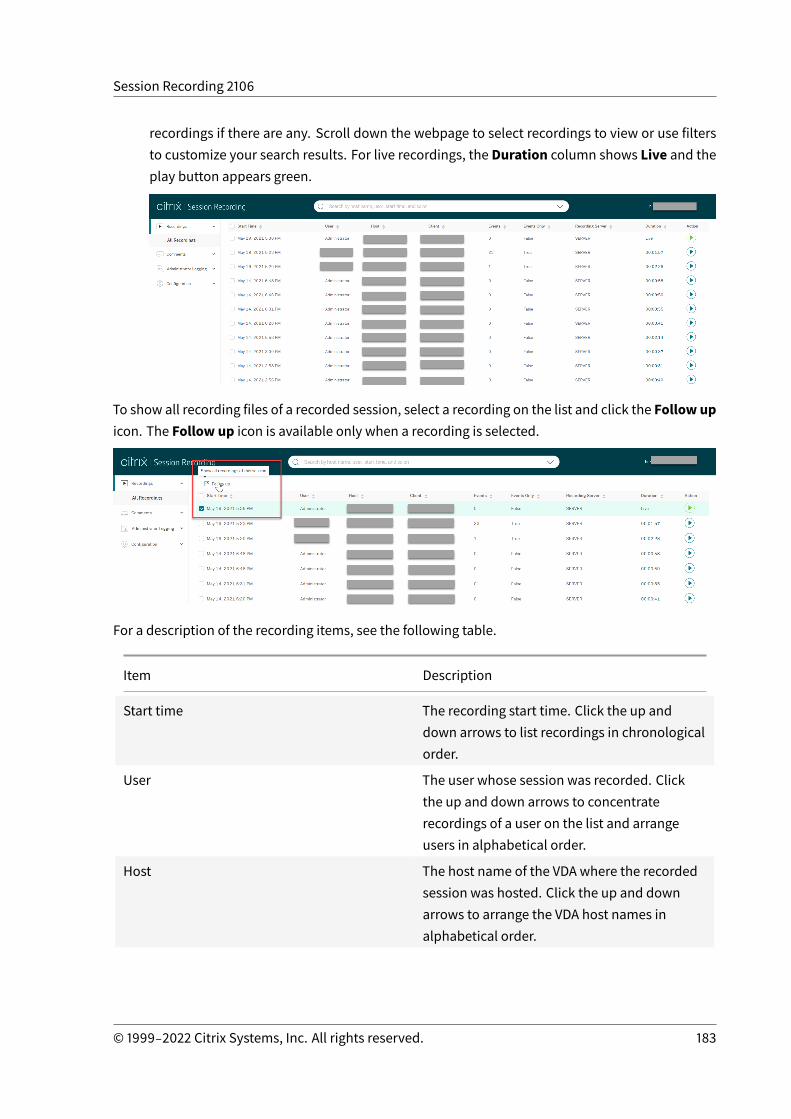
Session Recording 2106
recordings if there are any. Scroll down the webpage to select recordings to view or use filtersto customize your search results. For live recordings, the Duration column shows Live and theplay button appears green.
To show all recording files of a recorded session, select a recording on the list and click the Follow upicon. The Follow up icon is available only when a recording is selected.
For a description of the recording items, see the following table.
Item Description
Start time The recording start time. Click the up anddown arrows to list recordings in chronologicalorder.
User The user whose session was recorded. Clickthe up and down arrows to concentraterecordings of a user on the list and arrangeusers in alphabetical order.
Host The host name of the VDA where the recordedsession was hosted. Click the up and downarrows to arrange the VDA host names inalphabetical order.
© 1999‒2022 Citrix Systems, Inc. All rights reserved. 183
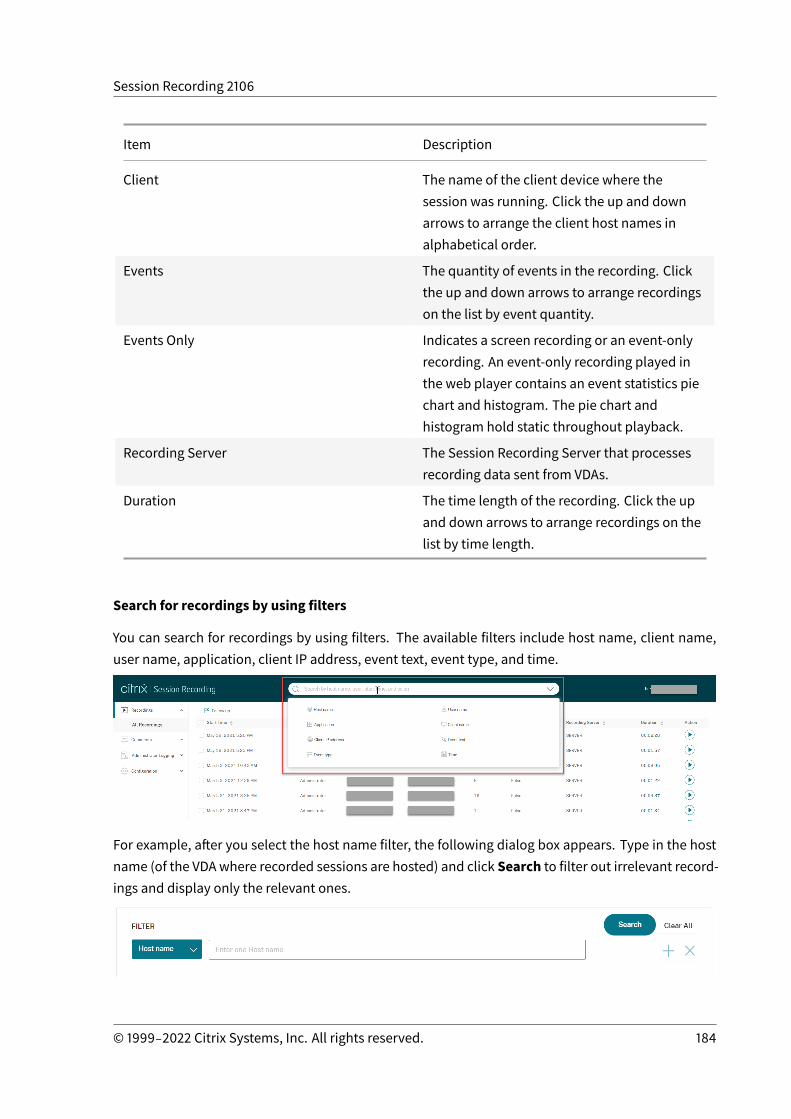
Session Recording 2106
Item Description
Client The name of the client device where thesession was running. Click the up and downarrows to arrange the client host names inalphabetical order.
Events The quantity of events in the recording. Clickthe up and down arrows to arrange recordingson the list by event quantity.
Events Only Indicates a screen recording or an event-onlyrecording. An event-only recording played inthe web player contains an event statistics piechart and histogram. The pie chart andhistogram hold static throughout playback.
Recording Server The Session Recording Server that processesrecording data sent from VDAs.
Duration The time length of the recording. Click the upand down arrows to arrange recordings on thelist by time length.
Search for recordings by using filters
You can search for recordings by using filters. The available filters include host name, client name,user name, application, client IP address, event text, event type, and time.
For example, after you select the host name filter, the following dialog box appears. Type in the hostname (of the VDAwhere recorded sessions are hosted) and click Search to filter out irrelevant record-ings and display only the relevant ones.
© 1999‒2022 Citrix Systems, Inc. All rights reserved. 184
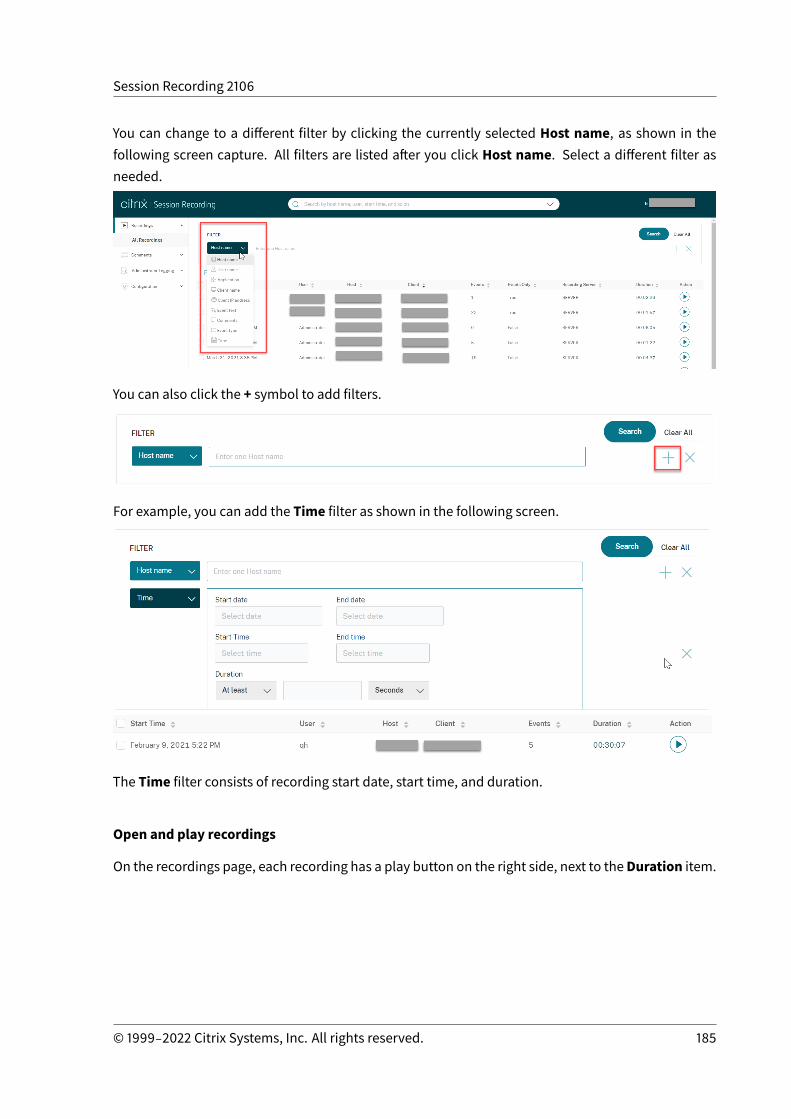
Session Recording 2106
You can change to a different filter by clicking the currently selected Host name, as shown in thefollowing screen capture. All filters are listed after you click Host name. Select a different filter asneeded.
You can also click the + symbol to add filters.
For example, you can add the Time filter as shown in the following screen.
The Time filter consists of recording start date, start time, and duration.
Open and play recordings
On the recordings page, each recording has a play button on the right side, next to theDuration item.
© 1999‒2022 Citrix Systems, Inc. All rights reserved. 185
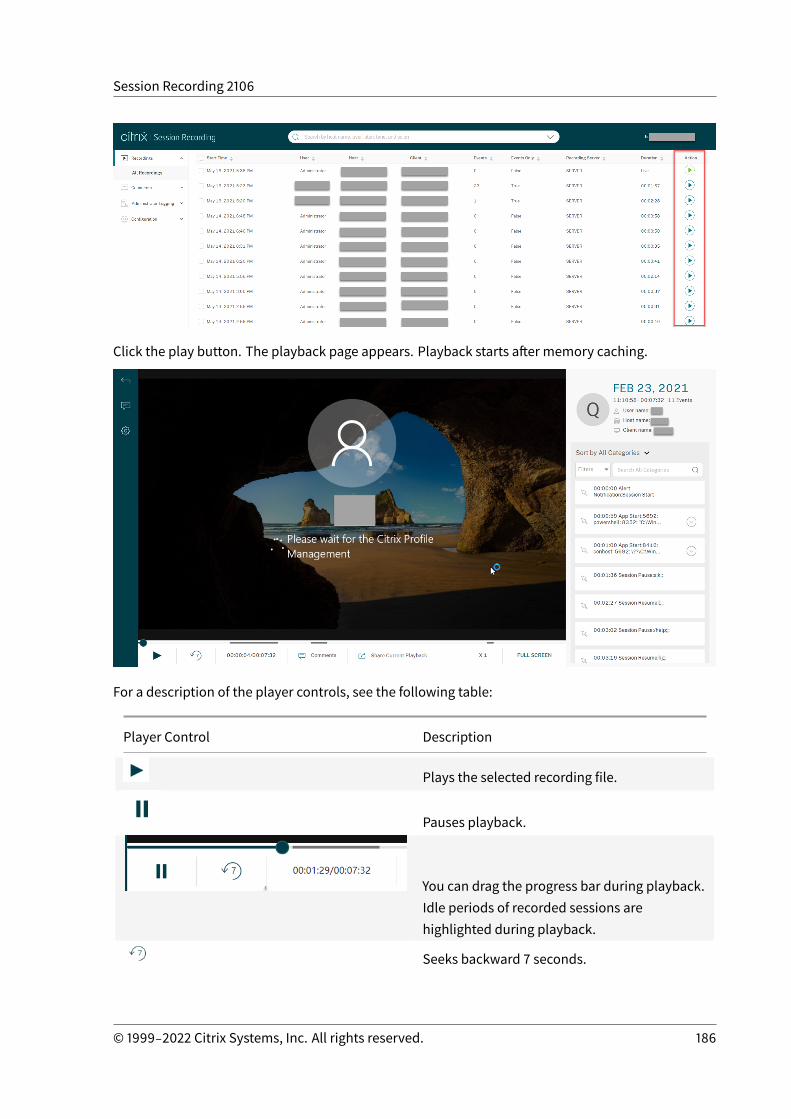
Session Recording 2106
Click the play button. The playback page appears. Playback starts after memory caching.
For a description of the player controls, see the following table:
Player Control Description
Plays the selected recording file.
Pauses playback.
You can drag the progress bar during playback.Idle periods of recorded sessions arehighlighted during playback.
Seeks backward 7 seconds.
© 1999‒2022 Citrix Systems, Inc. All rights reserved. 186
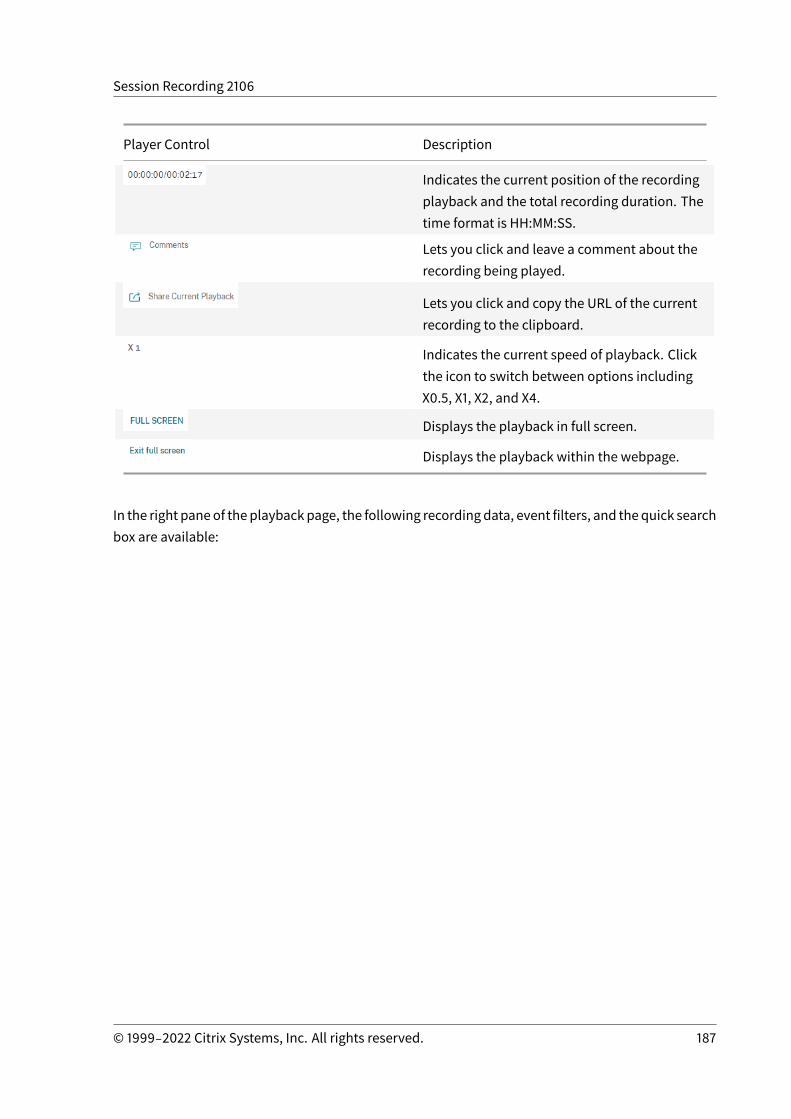
Session Recording 2106
Player Control Description
Indicates the current position of the recordingplayback and the total recording duration. Thetime format is HH:MM:SS.
Lets you click and leave a comment about therecording being played.
Lets you click and copy the URL of the currentrecording to the clipboard.
Indicates the current speed of playback. Clickthe icon to switch between options includingX0.5, X1, X2, and X4.
Displays the playback in full screen.
Displays the playback within the webpage.
In the right paneof the playbackpage, the following recordingdata, event filters, and thequick searchbox are available:
© 1999‒2022 Citrix Systems, Inc. All rights reserved. 187

Session Recording 2106
• Thedate and timeon thewebplayermachine. In this example, February23, 2021 and 11:10:58.
• The duration of the recording in playback. In this example, 00:07:32.
• The number of events in the recording. In this example, 11 EVENTS.
• The name of the user whose session was recorded.
• The host name of the VDA where the recorded session was hosted.
• The name of the client device where the session was running.
• Options for sorting search results: Select Sort by All Categories, Sort by Events, or Sort byComments to sort search results.
© 1999‒2022 Citrix Systems, Inc. All rights reserved. 188
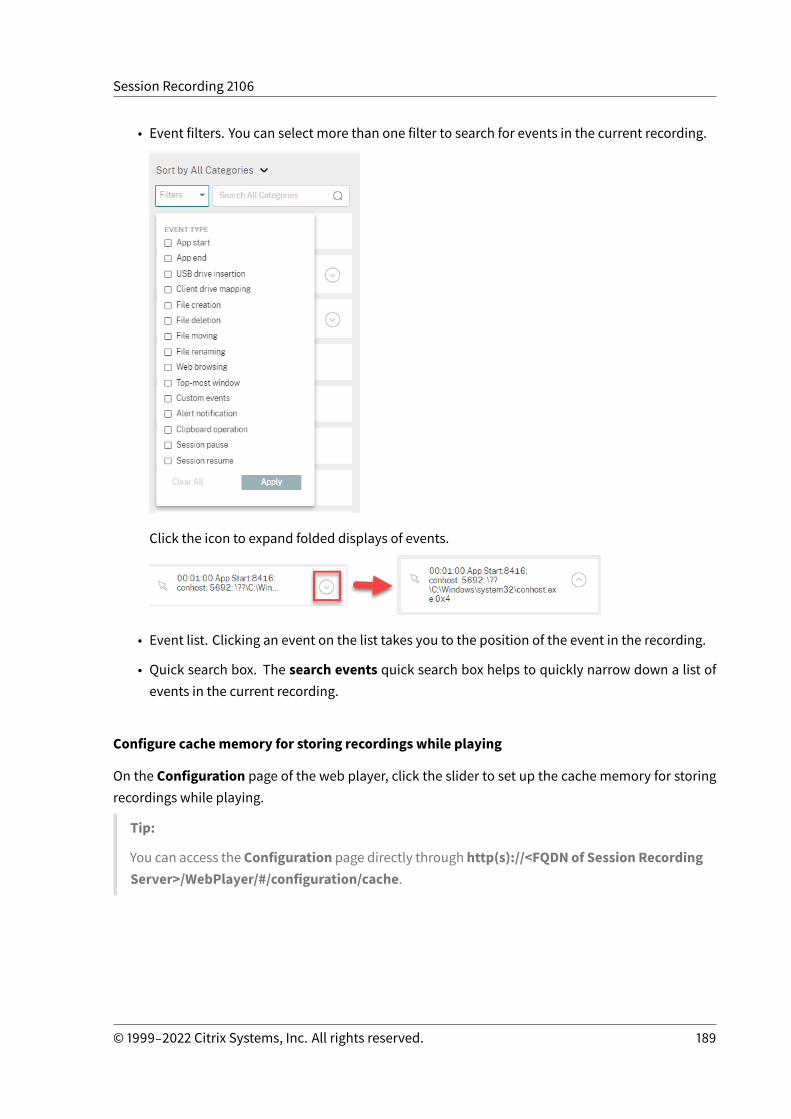
Session Recording 2106
• Event filters. You can select more than one filter to search for events in the current recording.
Click the icon to expand folded displays of events.
• Event list. Clicking an event on the list takes you to the position of the event in the recording.
• Quick search box. The search events quick search box helps to quickly narrow down a list ofevents in the current recording.
Configure cachememory for storing recordings while playing
On the Configuration page of the web player, click the slider to set up the cache memory for storingrecordings while playing.
Tip:
You can access the Configuration page directly through http(s)://<FQDN of Session RecordingServer>/WebPlayer/#/configuration/cache.
© 1999‒2022 Citrix Systems, Inc. All rights reserved. 189
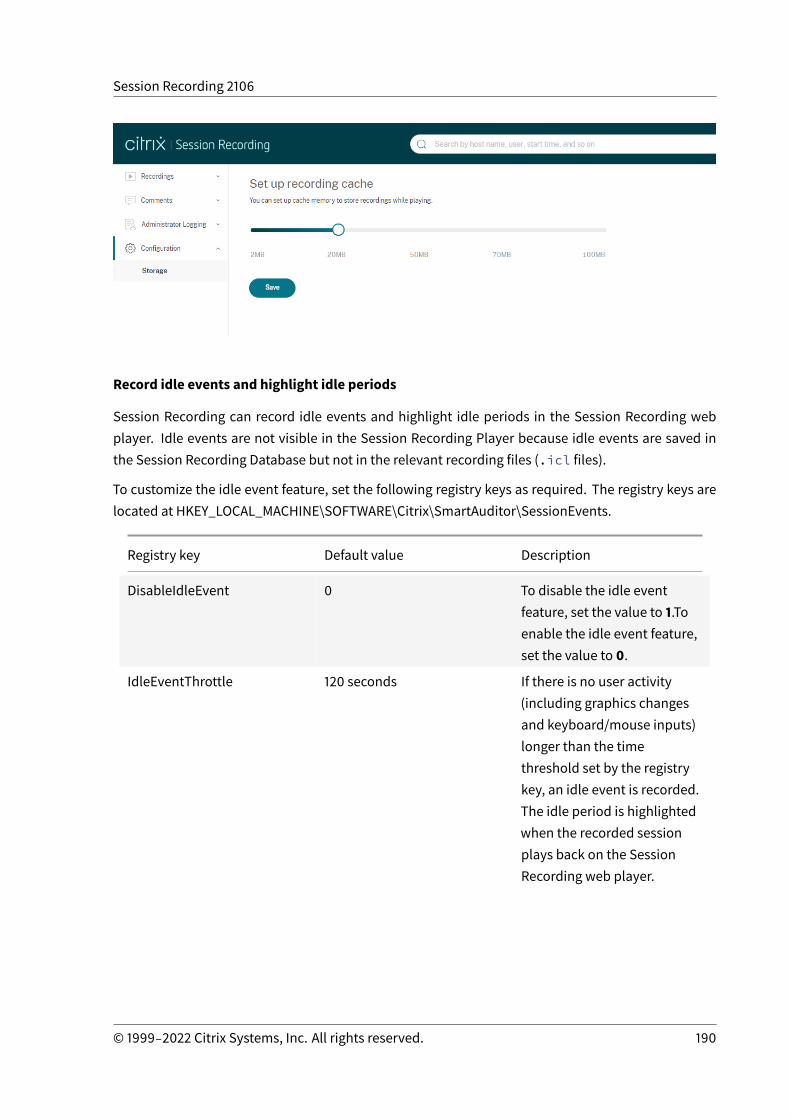
Session Recording 2106
Record idle events and highlight idle periods
Session Recording can record idle events and highlight idle periods in the Session Recording webplayer. Idle events are not visible in the Session Recording Player because idle events are saved inthe Session Recording Database but not in the relevant recording files (.icl files).
To customize the idle event feature, set the following registry keys as required. The registry keys arelocated at HKEY_LOCAL_MACHINE\SOFTWARE\Citrix\SmartAuditor\SessionEvents.
Registry key Default value Description
DisableIdleEvent 0 To disable the idle eventfeature, set the value to 1.Toenable the idle event feature,set the value to 0.
IdleEventThrottle 120 seconds If there is no user activity(including graphics changesand keyboard/mouse inputs)longer than the timethreshold set by the registrykey, an idle event is recorded.The idle period is highlightedwhen the recorded sessionplays back on the SessionRecording web player.
© 1999‒2022 Citrix Systems, Inc. All rights reserved. 190
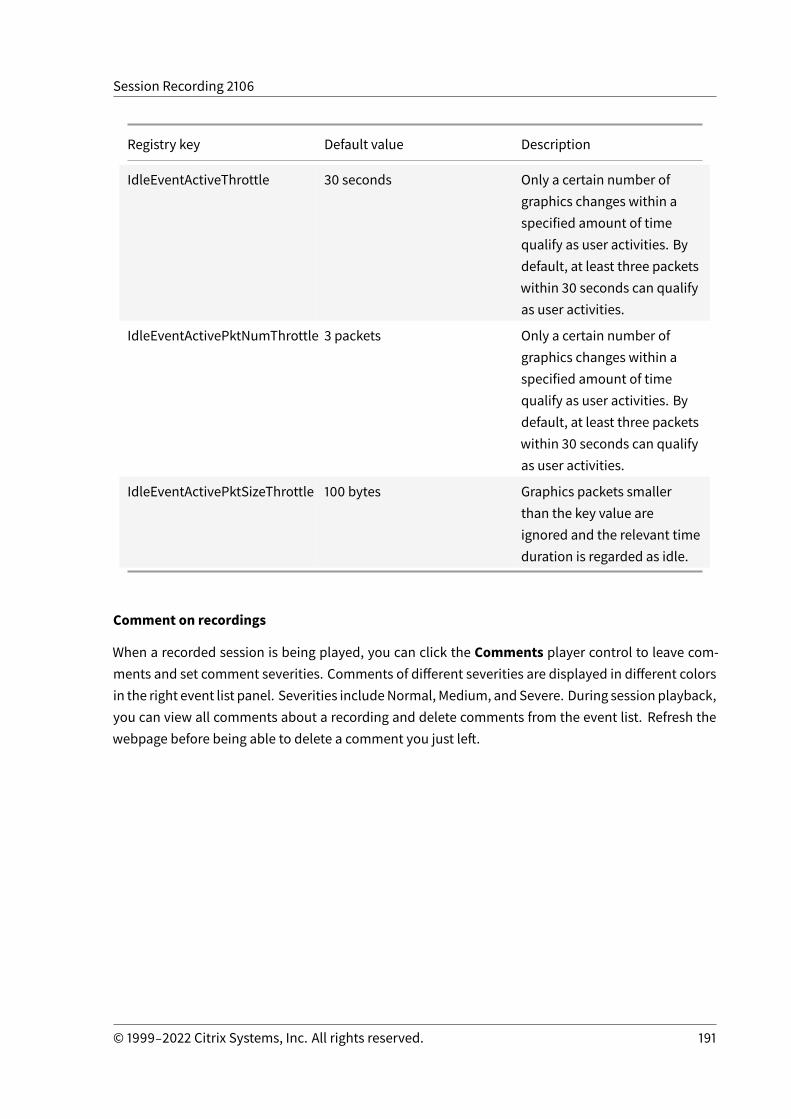
Session Recording 2106
Registry key Default value Description
IdleEventActiveThrottle 30 seconds Only a certain number ofgraphics changes within aspecified amount of timequalify as user activities. Bydefault, at least three packetswithin 30 seconds can qualifyas user activities.
IdleEventActivePktNumThrottle 3 packets Only a certain number ofgraphics changes within aspecified amount of timequalify as user activities. Bydefault, at least three packetswithin 30 seconds can qualifyas user activities.
IdleEventActivePktSizeThrottle 100 bytes Graphics packets smallerthan the key value areignored and the relevant timeduration is regarded as idle.
Comment on recordings
When a recorded session is being played, you can click the Comments player control to leave com-ments and set comment severities. Comments of different severities are displayed in different colorsin the right event list panel. Severities includeNormal, Medium, andSevere. During session playback,you can view all comments about a recording and delete comments from the event list. Refresh thewebpage before being able to delete a comment you just left.
© 1999‒2022 Citrix Systems, Inc. All rights reserved. 191
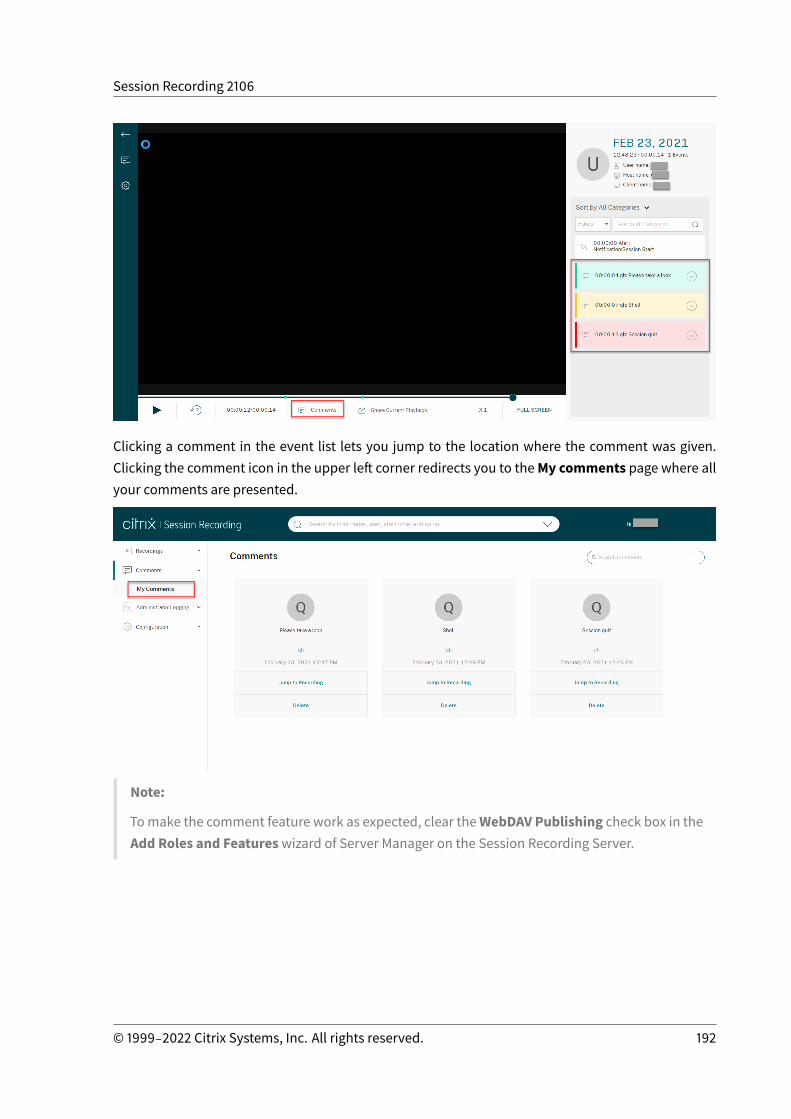
Session Recording 2106
Clicking a comment in the event list lets you jump to the location where the comment was given.Clicking the comment icon in the upper left corner redirects you to theMy comments page where allyour comments are presented.
Note:
Tomake the comment feature work as expected, clear theWebDAV Publishing check box in theAdd Roles and Featureswizard of Server Manager on the Session Recording Server.
© 1999‒2022 Citrix Systems, Inc. All rights reserved. 192
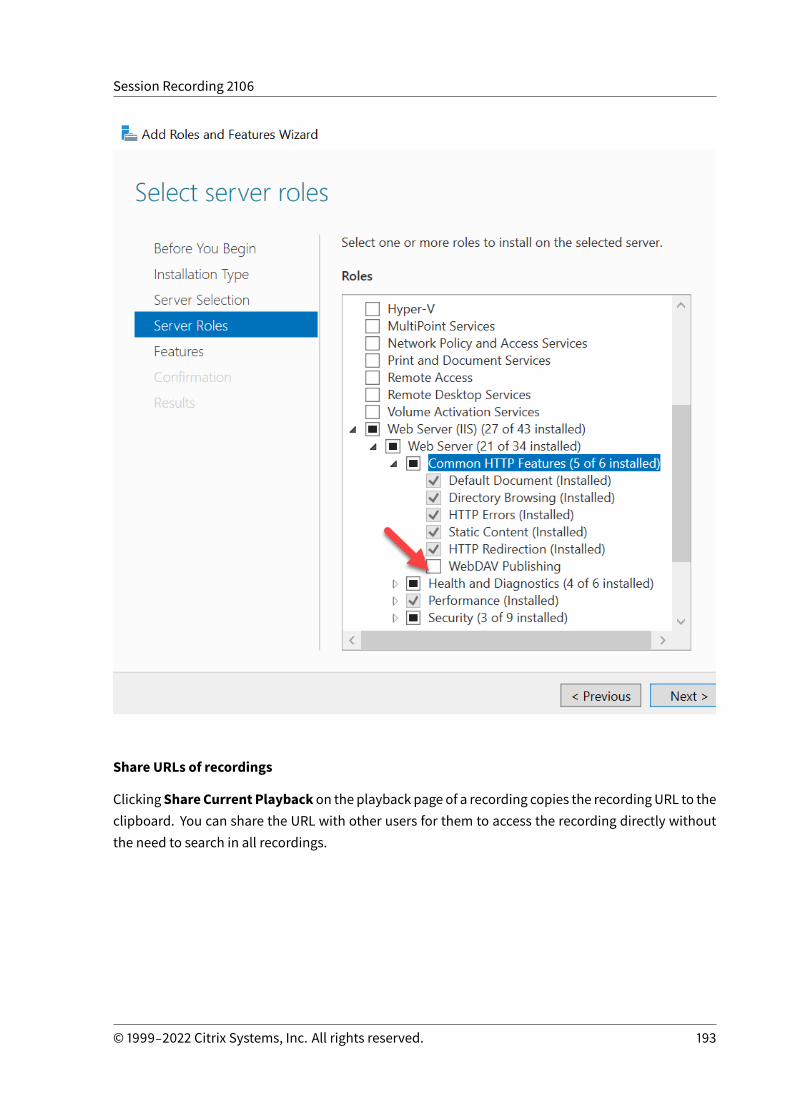
Session Recording 2106
Share URLs of recordings
ClickingShare Current Playback on the playback page of a recording copies the recordingURL to theclipboard. You can share the URL with other users for them to access the recording directly withoutthe need to search in all recordings.
© 1999‒2022 Citrix Systems, Inc. All rights reserved. 193
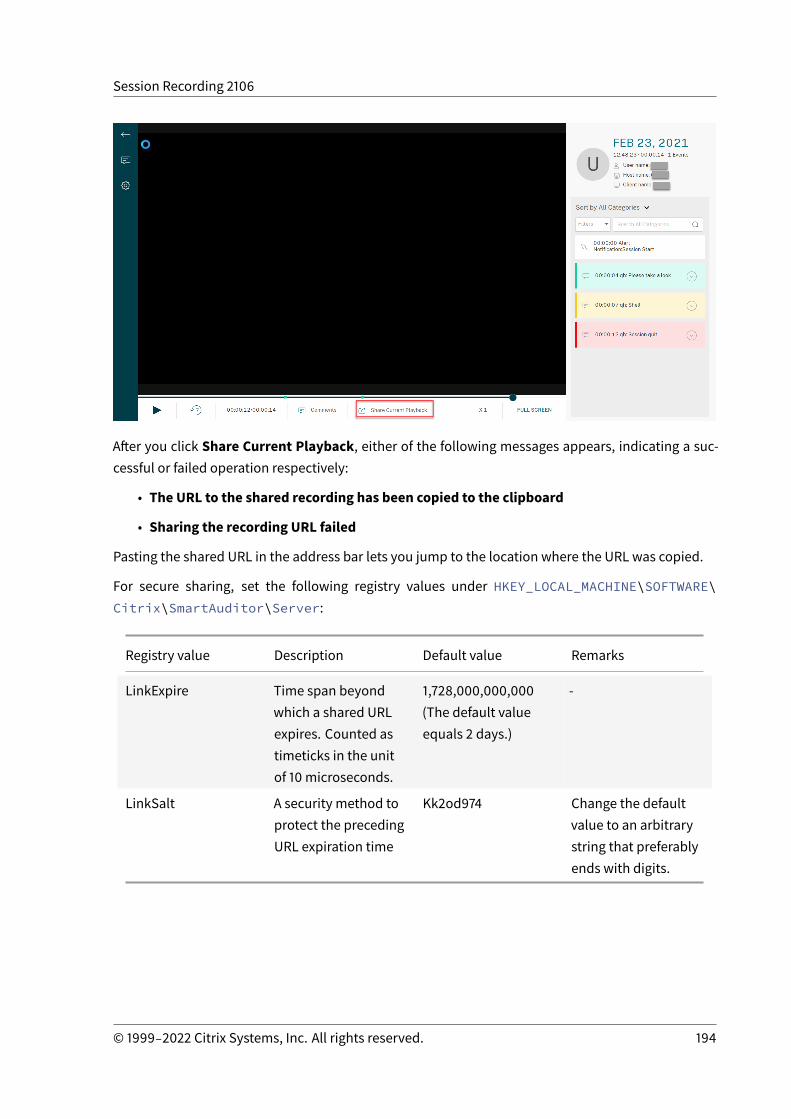
Session Recording 2106
After you click Share Current Playback, either of the following messages appears, indicating a suc-cessful or failed operation respectively:
• The URL to the shared recording has been copied to the clipboard
• Sharing the recording URL failed
Pasting the shared URL in the address bar lets you jump to the location where the URL was copied.
For secure sharing, set the following registry values under HKEY_LOCAL_MACHINE\SOFTWARE\Citrix\SmartAuditor\Server:
Registry value Description Default value Remarks
LinkExpire Time span beyondwhich a shared URLexpires. Counted astimeticks in the unitof 10 microseconds.
1,728,000,000,000(The default valueequals 2 days.)
-
LinkSalt A security method toprotect the precedingURL expiration time
Kk2od974 Change the defaultvalue to an arbitrarystring that preferablyends with digits.
© 1999‒2022 Citrix Systems, Inc. All rights reserved. 194
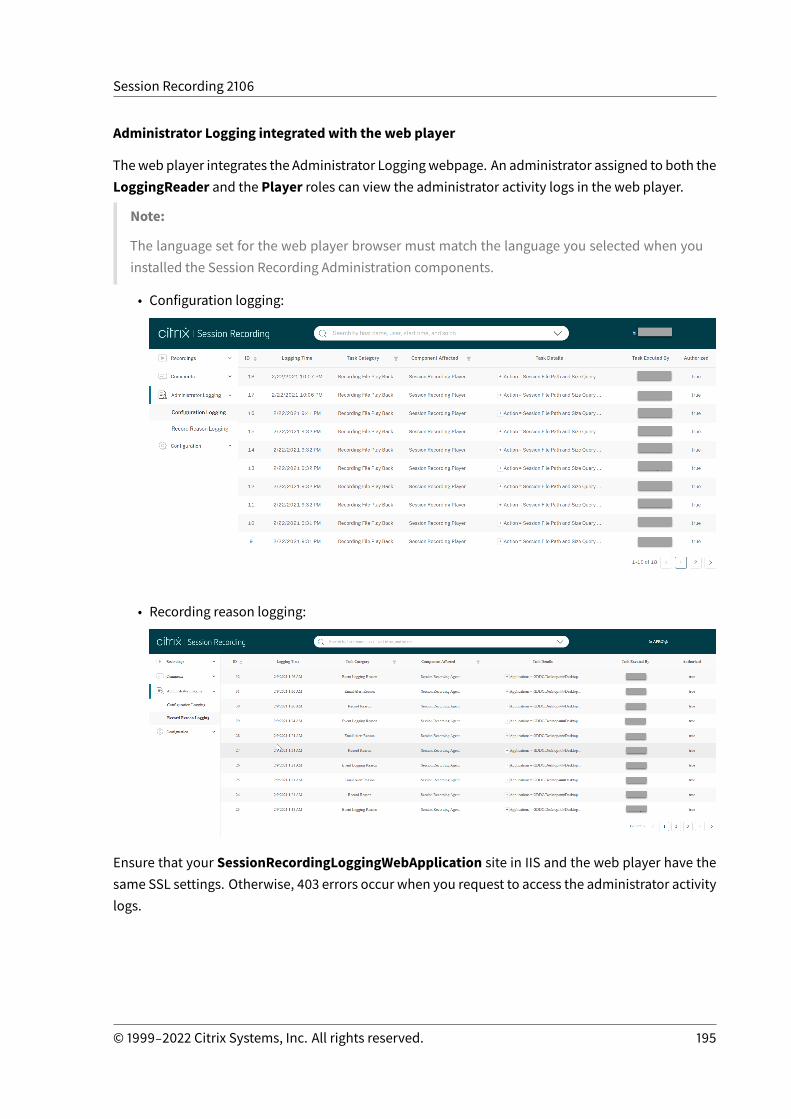
Session Recording 2106
Administrator Logging integrated with the web player
Theweb player integrates the Administrator Loggingwebpage. An administrator assigned to both theLoggingReader and the Player roles can view the administrator activity logs in the web player.
Note:
The language set for the web player browser must match the language you selected when youinstalled the Session Recording Administration components.
• Configuration logging:
• Recording reason logging:
Ensure that your SessionRecordingLoggingWebApplication site in IIS and the web player have thesame SSL settings. Otherwise, 403 errors occur when you request to access the administrator activitylogs.
© 1999‒2022 Citrix Systems, Inc. All rights reserved. 195
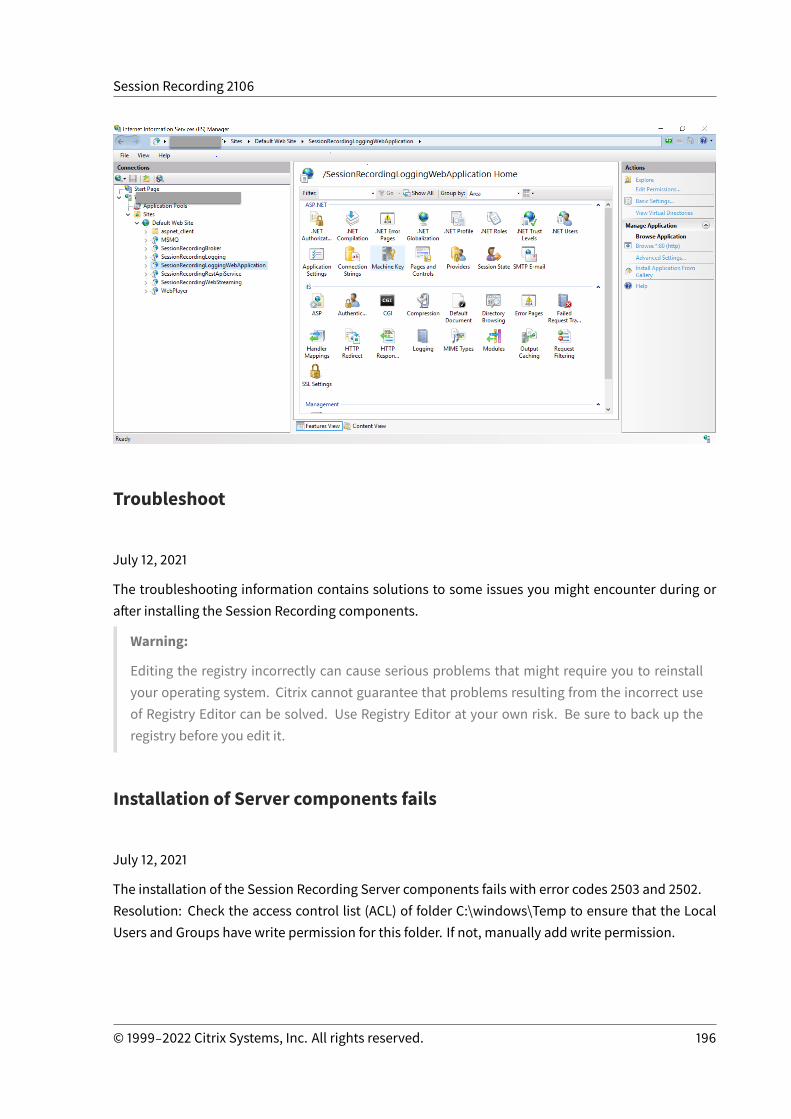
Session Recording 2106
Troubleshoot
July 12, 2021
The troubleshooting information contains solutions to some issues you might encounter during orafter installing the Session Recording components.
Warning:
Editing the registry incorrectly can cause serious problems that might require you to reinstallyour operating system. Citrix cannot guarantee that problems resulting from the incorrect useof Registry Editor can be solved. Use Registry Editor at your own risk. Be sure to back up theregistry before you edit it.
Installation of Server components fails
July 12, 2021
The installation of the Session Recording Server components fails with error codes 2503 and 2502.Resolution: Check the access control list (ACL) of folder C:\windows\Temp to ensure that the LocalUsers and Groups have write permission for this folder. If not, manually add write permission.
© 1999‒2022 Citrix Systems, Inc. All rights reserved. 196
Session Recording 2106
Test connection to the Database fails during install
July 12, 2021
When you install the Session RecordingDatabase or the Session Recording Server, the test connectionfails with the error message Database connection test failed. Please correct Database instancename even if the database instance name is correct.
In this case, ensure that the current user has the public SQL Server role permission to correct thepermission limitation failure.
Agent cannot connect to the Server
July 12, 2021
When the Session Recording Agent cannot connect to the Session Recording Server, the Exceptioncaught while sending poll messages to Session Recording Broker event message is logged, fol-lowed by the exception text. The exception text provides reasons why the connection failed. Thereasons include:
• The underlying connectionwas closed. Could not establish a trust relationship for the SS-L/TLS secure channel. This exception means that the Session Recording Server is using a cer-tificate signed by a CA that the server hosting the Session Recording Agent does not trust or theserver hosting the Session Recording Agent does not have a CA certificate. Alternatively, thecertificate might have expired or been revoked.
Solution: Verify that the correct CA certificate is installed on the server hosting the SessionRecording Agent or use a CA that is trusted.
• The remote server returned an error: (403) forbidden. This standard HTTPS error occurswhen you attempt to connect using HTTP that is unsecure. The machine hosting the SessionRecording Server rejects the connection because it accepts only secure connections.
Solution: Use Session Recording Agent Properties to change the Session Recording Broker pro-tocol toHTTPS.
• The Session Recording Broker returned an unknownerrorwhile evaluating a record policyquery. Errorcode5 (AccessDenied). Formore information, see theEvent logontheSessionRecording Server. This error occurs when sessions are started and a request for a record policyevaluation ismade. The error is a result of the Authenticated Users group (the defaultmember)being removed from the Policy Query role of the Session Recording Authorization Console.
© 1999‒2022 Citrix Systems, Inc. All rights reserved. 197
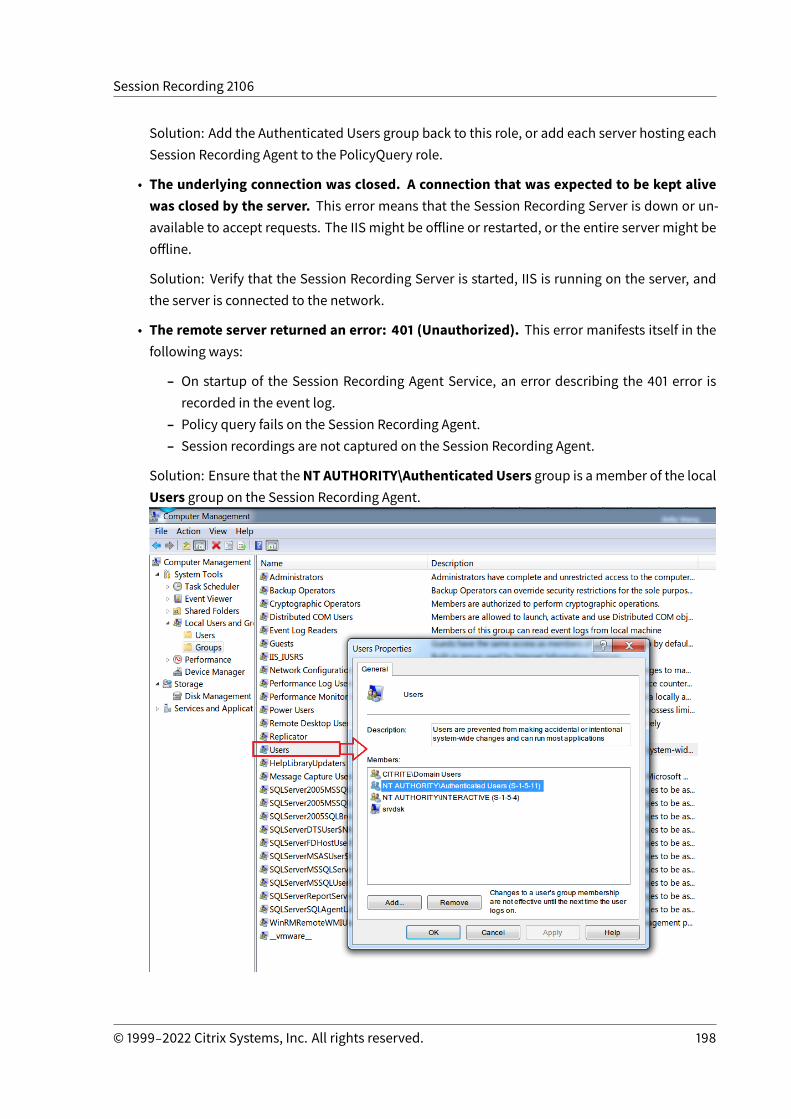
Session Recording 2106
Solution: Add the Authenticated Users group back to this role, or add each server hosting eachSession Recording Agent to the PolicyQuery role.
• The underlying connection was closed. A connection that was expected to be kept alivewas closed by the server. This error means that the Session Recording Server is down or un-available to accept requests. The IIS might be offline or restarted, or the entire server might beoffline.
Solution: Verify that the Session Recording Server is started, IIS is running on the server, andthe server is connected to the network.
• The remote server returned an error: 401 (Unauthorized). This error manifests itself in thefollowing ways:
– On startup of the Session Recording Agent Service, an error describing the 401 error isrecorded in the event log.
– Policy query fails on the Session Recording Agent.– Session recordings are not captured on the Session Recording Agent.
Solution: Ensure that theNT AUTHORITY\Authenticated Users group is amember of the localUsers group on the Session Recording Agent.
© 1999‒2022 Citrix Systems, Inc. All rights reserved. 198
Session Recording 2106
Server cannot connect to the Database
July 12, 2021
When the Session Recording Server cannot connect to the Session RecordingDatabase, youmight seea message similar to one of the following:
Event Source:
A network-related or instance-specific error occurred while establishing a connection to SQLServer. This error appears in the applications event log with ID 2047 in the Event Viewer of the com-puter hosting the Session Recording Server.
Citrix Session Recording Storage Manager Description: Exception caught while establishingdatabase connection. This error appears in the applications event log in the Event Viewer of themachine hosting the Session Recording Server.
Unable to connect to the Session Recording Server. Ensure that the Session Recording Server isrunning. This error message appears when you launch the Session Recording Policy Console.
Resolution:
• The Express Edition of Microsoft SQL Server 2008 R2, Microsoft SQL Server 2012, Microsoft SQLServer 2014, or Microsoft SQL Server 2016 is installed on a stand-alone server and does not havethe correct services or settings configured for Session Recording. The server must have theTCP/IP protocol enabled and the SQL Server Browser service running. See the Microsoft doc-umentation for information about enabling these settings.
• During the Session Recording installation (administration portion), incorrect server anddatabase information was given. Uninstall the Session Recording Database and reinstall it,supplying the correct information.
• The Session Recording Database Server is down. Verify that the server has connectivity.• The machine hosting the Session Recording Server or the machine hosting the Session Record-ing Database Server cannot resolve the FQDN or NetBIOS name of the other. Use the ping com-mand to verify that the names can be resolved.
• Check the firewall configuration on the Session Recording Database to ensure that theSQL Server connections are allowed. For more information, see the Microsoft articleat https://docs.microsoft.com/en-us/sql/sql-server/install/configure-the-windows-firewall-to-allow-sql-server-access?redirectedfrom=MSDN&view=sql-server-ver15.
Logon failed for user ‘NT_AUTHORITY\ANONYMOUS LOGON’. This error message means that theservices are logged on incorrectly as .\administrator.
Resolution: Restart the services as local system user and restart the SQL services.
© 1999‒2022 Citrix Systems, Inc. All rights reserved. 199
Session Recording 2106
Sessions are not recording
July 12, 2021
If application sessions arenot recording successfully, start by checking the application event log in theEvent Viewer on the VDA for multi-session OS that runs the Session Recording Agent and the SessionRecording Server. Doing so can provide valuable diagnostic information.
If sessions are not recording, the possible cause might be:
• Component connectivity and certificates. If the Session Recording components cannot com-municate with each other, session recording can fail. To troubleshoot recording issues, verifythat all components are configured correctly to point to the correct machines and that all cer-tificates are valid and correctly installed.
• Non-Active Directory domain environments. Session Recording is designed to run in a Mi-crosoft Active Directory domain environment. If you are not running in an Active Directory en-vironment, you might experience recording issues. Ensure that all Session Recording compo-nents are running onmachines that are members of an Active Directory domain.
• Session sharing conflictswith the active policy. Session Recordingmatches the active policywith the first published application that a user opens. Subsequent applications opened duringthe same session continue to follow thepolicy that is in force for the first application. Topreventsession sharing from conflicting with the active policy, publish the conflicting applications onseparate VDAs for multi-session OS.
• Recording is not enabled. Bydefault, installing theSessionRecordingAgent onamulti-sessionOS VDA enables recording for the VDA. Recording does not occur until an active recording policyis configured to allow it.
• The active recording policy does not permit recording. A session can be recorded only whenthe session meets the rules of the active recording policy.
• Session Recording services are not running. For sessions to be recorded, the Session Record-ing Agent servicemust be running on a VDA formulti-sessionOSand the SessionRecording Stor-age Manager service must be running on the machine hosting the Session Recording Server.
• MSMQ is not configured. If MSMQ is not correctly configured on the server running the SessionRecording Agent and the machine hosting the Session Recording Server, recording problemsmight occur.
Unable to view live session playback
July 12, 2021
© 1999‒2022 Citrix Systems, Inc. All rights reserved. 200
Session Recording 2106
If you experience difficulties when viewing recordings using the Session Recording Player, the follow-ing error message might appear:
Download of recorded session file failed. Live session playback is not permitted. The serverhas been configured to disallow this feature. This error indicates that the server is configured todisallow the action.
Resolution: In Session Recording Server Properties, choose the Playback tab and select the Allowlive session playback check box.
Recordings are corrupted or incomplete
July 12, 2021
• If recordings are corrupted or incomplete when you view them using the Session RecordingPlayer, youmight also see warnings in the Event logs on the Session Recording Agent.
Event Source: Citrix Session Recording Storage Manager
Description: Data lost while recording file <icl file name>
The issue occurs when MCS or PVS is used to create VDAs with a master image configured andMicrosoft Message Queuing (MSMQ) installed. In this condition, the VDAs have the same QMIdfor MSMQ.
As aworkaround, create auniqueQMId for eachVDA. Formore information, see Install, upgrade,and uninstall.
• The Session Recording Player might report an internal error with themessage - “The file beingplayed has reported that an internal system error (error code: 9) occurred during its origi-nal recording. The file can still be playedup to the point that the recording error occurred”when playing back a certain recording file.
The issue occurs due to insufficient buffer size on the Session Recording Agent when graphicintensive sessions are recorded.
Asaworkaround, changeHKEY_LOCAL_MACHINE\SOFTWARE\Citrix\SmartAuditor\SmAudBufferSizeMBto higher value data on the Session Recording Agent, and then restart the machine.
Verify component connections
July 12, 2021
© 1999‒2022 Citrix Systems, Inc. All rights reserved. 201
Session Recording 2106
During the setup of Session Recording, the components might not connect to other components. Allthe components communicate with the Session Recording Server (Broker). By default, the Broker (anIIS component) is secured using the IIS default website certificate. If one component cannot connectto the Session Recording Server, the other components might also fail when attempting to connect.
The Session Recording Agent and the Session Recording Server (StorageManager andBroker) log con-nection errors in the applications event log in the Event Viewer of the machine hosting the SessionRecording Server. The Session Recording Policy Console and The Session Recording Player displayconnection error messages on screen when they fail to connect.
Verify that the Session Recording Agent is connected
1. Log on to the server where the Session Recording Agent is installed.2. From the Startmenu, choose Session Recording Agent Properties.3. In Session Recording Agent Properties, click Connection.4. Verify that the correct FQDN is entered in the Session Recording Server field.5. Verify that the server given as the value for the Session Recording Server is accessible to your
VDA for multi-session OS.
Note: Check the application event log for errors and warnings.
Verify that the Session Recording Server is connectedCaution:
UsingRegistryEditor cancause seriousproblems thatmight require you to reinstall theoperatingsystem. Citrix cannot guarantee that problems resulting from incorrect use of Registry Editor canbe solved. Use Registry Editor at your own risk.**
1. Log on to the machine hosting the Session Recording Server.2. Open the Registry Editor.3. Browse to HKEY_LOCAL_MACHINE\SOFTWARE\Citrix\SmartAuditor\Server.4. Verify that the SmAudDatabaseInstance value correctly references the Session Recording
Database you installed on your SQL Server instance.
Verify that the Session Recording Database is connected
1. Using a SQL Management tool, open your SQL instance that contains the Session RecordingDatabase you installed.
2. Open the Security permissions of the Session Recording Database.3. Verify that the Session Recording Computer Account has access to the database. For example,
if the machine hosting the Session Recording Server is named SsRecSrv in the MIS domain,
© 1999‒2022 Citrix Systems, Inc. All rights reserved. 202

Session Recording 2106
the computer account in your database must be configured as MIS\SsRecSrv$. This value isconfigured during the Session Recording Database installation.
Test IIS connectivity
Testing connections to the Session Recording Server IIS site by using a Web browser to access theSession Recording Broker webpage can help you determine whether problems with communicationbetween Session Recording components stem from misconfigured protocol configuration, certifica-tion issues, or problems starting Session Recording Broker.
To verify IIS connectivity for the Session Recording Agent:
1. Log on to the server where the Session Recording Agent is installed.2. Open a Web browser and type the following address:
• For HTTPS: https://servername/SessionRecordingBroker/RecordPolicy.rem?wsdl, where servername is the name of the machine hosting the Session RecordingServer.
• For HTTP: http://servername/SessionRecordingBroker/RecordPolicy.rem?wsdl, where servername is the name of the machine hosting the Session RecordingServer.
3. If you are prompted for NT LANManager (NTLM) authentication, log on with a domain adminis-trator account.
To verify IIS connectivity for the Session Recording Player:
1. Log on to the workstation where the Session Recording Player is installed.2. Open a Web browser and type the following address:
• For HTTPS: https://servername/SessionRecordingBroker/Player.rem?wsdl,where servername is the name of the machine hosting the Session Recording Server
• For HTTP: http://servername/SessionRecordingBroker/Player.rem?wsdl,where servername is the name of the machine hosting the Session Recording Server
3. If you are prompted for NT LANManager (NTLM) authentication, log on with a domain adminis-trator account.
To verify IIS connectivity for the Session Recording Policy Console:
1. Log on to the server where the Session Recording Policy Console is installed.2. Open a Web browser and type the following address:
• ForHTTPS:https://servername/SessionRecordingBroker/PolicyAdministration.rem?wsdl, where servername is the name of the machine hosting the SessionRecording Server
• ForHTTP:http://servername/SessionRecordingBroker/PolicyAdministration.rem?wsdl, where servername is the name of the machine hosting the SessionRecording Server
© 1999‒2022 Citrix Systems, Inc. All rights reserved. 203
Session Recording 2106
3. If you are prompted for NT LANManager (NTLM) authentication, log on with a domain adminis-trator account.
If you see an XML document within your browser, it verifies that the machine running the SessionRecording Policy Console is connected to the machine hosting the Session Recording Server usingthe configured protocol.
Troubleshoot certificate issues
If you are using HTTPS as your communication protocol, the machine hosting the Session RecordingServermust be configuredwith a server certificate. All component connections to the Session Record-ing Server must have root certificate authority (CA). Otherwise, attempted connections between thecomponents fail.
You can test your certificates by accessing the Session Recording Broker webpage as youwould whentesting IIS connectivity. If you are able to access the XML page for each component, the certificatesare configured correctly.
Here are some common ways certificate issues cause connections to fail:
• Invalid or missing certificates. If the server running the Session Recording Agent does nothave a root certificate to trust the server certificate and cannot trust and connect to the SessionRecording Server over HTTPS, causing connectivity to fail, verify that all components trust theserver certificate on the Session Recording Server.
• Inconsistent naming. If the server certificate assigned to the machine hosting the SessionRecording Server is created using an FQDN, all connecting components must use the FQDNwhen connecting to the Session Recording Server. If a NetBIOS name is used, configure thecomponents with a NetBIOS name for the Session Recording Server.
• Expiredcertificates. If a server certificate expired, connectivity to theSessionRecordingServerthrough HTTPS fails. Verify the server certificate assigned to the machine hosting the SessionRecording Server is valid and has not expired. If the same certificate is used for the digital sign-ing of session recordings, the event log of the machine hosting the Session Recording Serverprovides error messages that the certificate expired or warning messages when it is about toexpire.
Search for recordings using the Player fails
July 12, 2021
If you experience difficulties when searching for recordings using the Session Recording Player, thefollowing error messages might appear:
© 1999‒2022 Citrix Systems, Inc. All rights reserved. 204
Session Recording 2106
• Search for recorded session files failed. The remote server name could not be resolved:servername. The servername is the name of the server to which the Session Recording Playeris attempting to connect. The Session Recording Player cannot contact the Session RecordingServer. Two possible reasons are an incorrectly typed server name or that the DNS cannot re-solve the server name.
Resolution: From the Player menu bar, choose Tools > Options > Connections and verify thatthe servername in theSessionRecordingServers list is correct. If it is correct, fromacommandprompt, run the ping command to see if the name canbe resolved. When the Session RecordingServer is down or offline, the search for recorded session files failed errormessage isUnable tocontact the remote server.
• Unable to contact the remote server. This error occurs when the Session Recording Server isdown or offline.
Resolution: Verify that the Session Recording Server is connected.
• Access denied. An access denied error can occur if the user was not given permission to searchfor and download recorded session files.
Resolution: Assign the user to the Player role using the Session Recording Authorization Con-sole.
• Access denied when the Player role is assigned. This error occurs when you install the Ses-sion Recording Player on the same machine with the Session Recording Server, and you haveenabled UAC. When you assign the Domain Admins or Administrators user group as the Playerrole, a non-built-in administrator user included in that group might fail to pass the role-basedcheck when searching recordings in the Session Recording Player.
Resolutions:
– Run the Session Recording Player as an administrator.
– Assign specific users as the Player role rather than the entire group.
– Install the Session Recording Player in a separate machine rather than Session RecordingServer.
• Search for recorded session files failed. The underlying connection was closed. Could notestablish a trust relationship for the SSL/TLS secure channel. The error occurs when theSession Recording Server uses a certificate that is signed by a CA that the client device does nottrust or have a CA certificate for.
Resolution: Install the correct or trustedCA certificateworkstationwhere the SessionRecordingPlayer is installed.
• The remote server returned an error: (403) forbidden. This error is a standard HTTPS errorthat occurs when you attempt to connect using HTTP (nonsecure protocol). The server rejects
© 1999‒2022 Citrix Systems, Inc. All rights reserved. 205

Session Recording 2106
the connection because, by default, it is configured to accept only secure connections.
Resolution: From the Session Recording Playermenu bar, choose Tools > Options > Connec-tions. Select the server from the Session Recording Servers list, and clickModify. Change theprotocol fromHTTP toHTTPS.
Troubleshoot MSMQ
If a notification message is given but the viewer cannot find recordings after a search in the SessionRecording Player, there is a problem with MSMQ. Verify that the queue is connected to the SessionRecording Server (StorageManager). Use aWeb browser to test for connection errors (if you are usingHTTP or HTTPS as your MSMQ communication protocol).
To verify that the queue is connected:
1. Log on to the server hosting the Session Recording Agent and view the outgoing queues.
2. Verify that the queue to the machine hosting the Session Recording Server has a connectedstate.
• If the state is waiting to connect, there are messages in the queue, and the protocol isHTTPorHTTPS (corresponding to theprotocol selectedon theConnections tab inSessionRecording Agent Properties), perform Step 3.
• If the state is connectedand there arenomessages in thequeue, theremight beaproblemwith the server hosting the Session Recording Server. Skip Step 3 and perform Step 4.
3. If there are messages in the queue, open a Web browser and type the following address:
• For HTTPS: https://servername/msmq/private$/CitrixSmAudData, whereservername is the name of the machine hosting the Session Recording Server.
• For HTTP: http://servername/msmq/private$/CitrixSmAudData, whereservername is the name of the machine hosting the Session Recording Server.
If the page returns an error such as The server only accepts secure connections, change theMSMQ protocol listed in Session Recording Agent Properties to HTTPS. If the page reports aproblemwith thewebsite security certificate, theremight be aproblemwith a trust relationshipfor the TLS secure channel. In that case, install the correct CA certificate or use a CA that istrusted.
4. If there are no messages in the queue, log on to the machine hosting the Session RecordingServer and view private queues. Select citrixsmauddata. If there are messages in the queue(Number of Messages Column), verify that the Session Recording StorageManager service isstarted. If it is not, restart the service.
© 1999‒2022 Citrix Systems, Inc. All rights reserved. 206
Session Recording 2106
Manage your database records
July 12, 2021
The ICA Log database (ICLDB) utility is a database command-line utility used to manipulate the ses-sion recording database records. This utility is installed, during the Session Recording installation, tothe drive:\Program Files\Citrix\SessionRecording\Server\Bin folder on the server host-ing the Session Recording Server.
Quick reference chart
The following table lists the commands and options that are available for the ICLDB utility. Type thecommands using the following format:
icldb [version | locate | dormant | import | archive | remove | removeall]command-options [/l] [/f] [/s] [/?]
Note:
More extensive instructions are available in the help associated with the utility. To access thehelp, from a command prompt, type the drive:\Program Files\Citrix\SessionRecording\Server\Bin folder, and typeicldb /?. To access help for specific commands, typeicldb *command* /?.
Command Description
archive Archives the session recording files older thanthe retention period specified. Use thiscommand to archive recordings and events inthe recordings. The events are archived in theArchivedEvent database table.
dormant Displays or counts the session recording filesthat are considered dormant. Dormant filesare session recordings that were notcompleted due to data loss. Use this commandto verify if you suspect that you are losing data.You can check whether the session recordingfiles are becoming dormant for the entiredatabase, or only recordings made within thespecified number of days, hours, or minutes.
© 1999‒2022 Citrix Systems, Inc. All rights reserved. 207
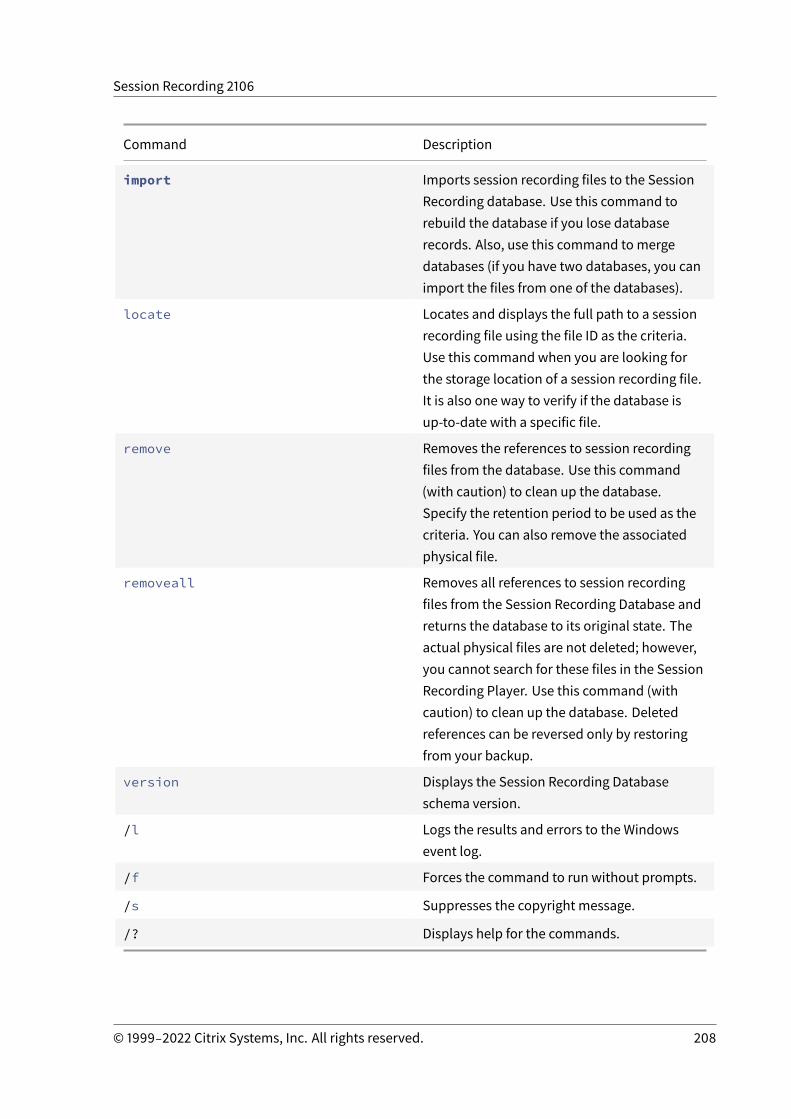
Session Recording 2106
Command Description
import Imports session recording files to the SessionRecording database. Use this command torebuild the database if you lose databaserecords. Also, use this command tomergedatabases (if you have two databases, you canimport the files from one of the databases).
locate Locates and displays the full path to a sessionrecording file using the file ID as the criteria.Use this command when you are looking forthe storage location of a session recording file.It is also one way to verify if the database isup-to-date with a specific file.
remove Removes the references to session recordingfiles from the database. Use this command(with caution) to clean up the database.Specify the retention period to be used as thecriteria. You can also remove the associatedphysical file.
removeall Removes all references to session recordingfiles from the Session Recording Database andreturns the database to its original state. Theactual physical files are not deleted; however,you cannot search for these files in the SessionRecording Player. Use this command (withcaution) to clean up the database. Deletedreferences can be reversed only by restoringfrom your backup.
version Displays the Session Recording Databaseschema version.
/l Logs the results and errors to the Windowsevent log.
/f Forces the command to run without prompts.
/s Suppresses the copyright message.
/? Displays help for the commands.
© 1999‒2022 Citrix Systems, Inc. All rights reserved. 208
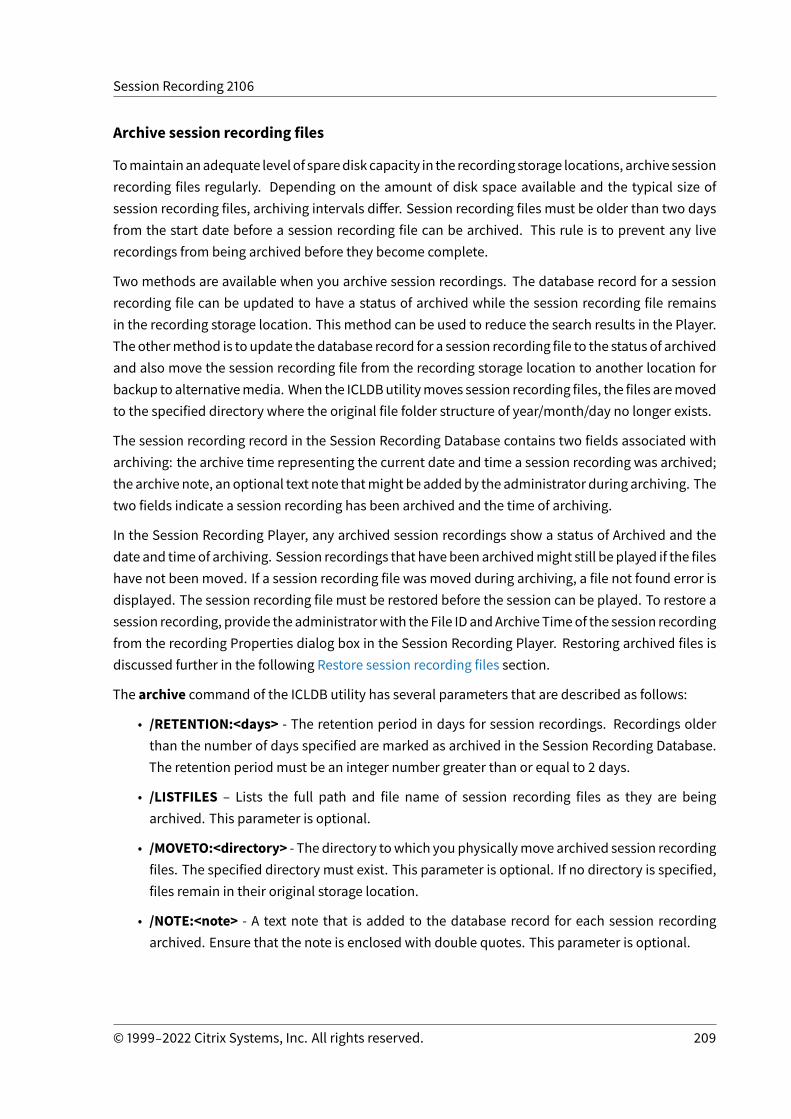
Session Recording 2106
Archive session recording files
Tomaintainanadequate levelof sparedisk capacity in the recording storage locations, archive sessionrecording files regularly. Depending on the amount of disk space available and the typical size ofsession recording files, archiving intervals differ. Session recording files must be older than two daysfrom the start date before a session recording file can be archived. This rule is to prevent any liverecordings from being archived before they become complete.
Two methods are available when you archive session recordings. The database record for a sessionrecording file can be updated to have a status of archived while the session recording file remainsin the recording storage location. This method can be used to reduce the search results in the Player.The othermethod is to update the database record for a session recording file to the status of archivedand also move the session recording file from the recording storage location to another location forbackup to alternativemedia. When the ICLDButilitymoves session recording files, the files aremovedto the specified directory where the original file folder structure of year/month/day no longer exists.
The session recording record in the Session Recording Database contains two fields associated witharchiving: the archive time representing the current date and time a session recording was archived;the archive note, an optional text note thatmight be addedby the administrator during archiving. Thetwo fields indicate a session recording has been archived and the time of archiving.
In the Session Recording Player, any archived session recordings show a status of Archived and thedate and timeof archiving. Session recordings that havebeen archivedmight still be played if the fileshave not been moved. If a session recording file was moved during archiving, a file not found error isdisplayed. The session recording file must be restored before the session can be played. To restore asession recording, provide the administratorwith the File ID andArchive Timeof the session recordingfrom the recording Properties dialog box in the Session Recording Player. Restoring archived files isdiscussed further in the following Restore session recording files section.
The archive command of the ICLDB utility has several parameters that are described as follows:
• /RETENTION:<days> - The retention period in days for session recordings. Recordings olderthan the number of days specified are marked as archived in the Session Recording Database.The retention period must be an integer number greater than or equal to 2 days.
• /LISTFILES – Lists the full path and file name of session recording files as they are beingarchived. This parameter is optional.
• /MOVETO:<directory> - The directory towhich you physicallymove archived session recordingfiles. The specified directory must exist. This parameter is optional. If no directory is specified,files remain in their original storage location.
• /NOTE:<note> - A text note that is added to the database record for each session recordingarchived. Ensure that the note is enclosed with double quotes. This parameter is optional.
© 1999‒2022 Citrix Systems, Inc. All rights reserved. 209
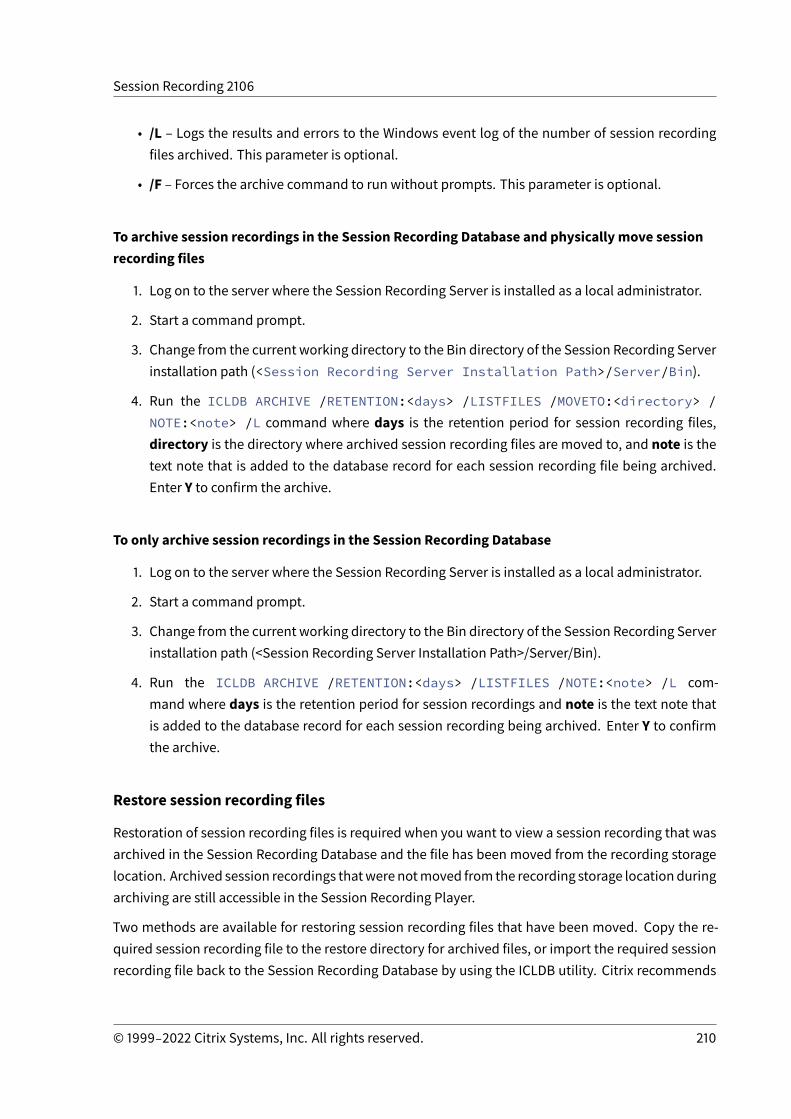
Session Recording 2106
• /L – Logs the results and errors to the Windows event log of the number of session recordingfiles archived. This parameter is optional.
• /F – Forces the archive command to run without prompts. This parameter is optional.
To archive session recordings in the Session Recording Database and physically move sessionrecording files
1. Log on to the server where the Session Recording Server is installed as a local administrator.
2. Start a command prompt.
3. Change from the current working directory to the Bin directory of the Session Recording Serverinstallation path (<Session Recording Server Installation Path>/Server/Bin).
4. Run the ICLDB ARCHIVE /RETENTION:<days> /LISTFILES /MOVETO:<directory> /NOTE:<note> /L command where days is the retention period for session recording files,directory is the directory where archived session recording files are moved to, and note is thetext note that is added to the database record for each session recording file being archived.Enter Y to confirm the archive.
To only archive session recordings in the Session Recording Database
1. Log on to the server where the Session Recording Server is installed as a local administrator.
2. Start a command prompt.
3. Change from the current working directory to the Bin directory of the Session Recording Serverinstallation path (<Session Recording Server Installation Path>/Server/Bin).
4. Run the ICLDB ARCHIVE /RETENTION:<days> /LISTFILES /NOTE:<note> /L com-mand where days is the retention period for session recordings and note is the text note thatis added to the database record for each session recording being archived. Enter Y to confirmthe archive.
Restore session recording files
Restoration of session recording files is required when you want to view a session recording that wasarchived in the Session Recording Database and the file has been moved from the recording storagelocation. Archived session recordings thatwere notmoved from the recording storage locationduringarchiving are still accessible in the Session Recording Player.
Two methods are available for restoring session recording files that have been moved. Copy the re-quired session recording file to the restore directory for archived files, or import the required sessionrecording file back to the Session Recording Database by using the ICLDB utility. Citrix recommends
© 1999‒2022 Citrix Systems, Inc. All rights reserved. 210
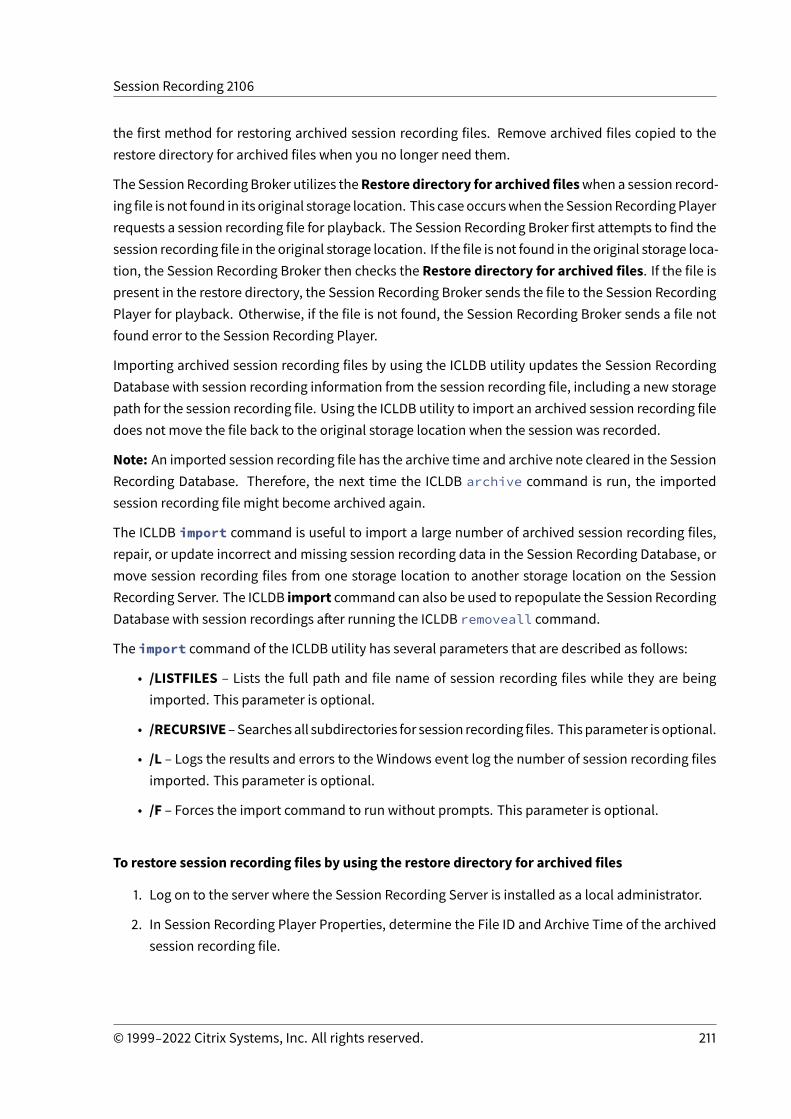
Session Recording 2106
the first method for restoring archived session recording files. Remove archived files copied to therestore directory for archived files when you no longer need them.
The Session Recording Broker utilizes theRestore directory for archived fileswhen a session record-ing file is not found in its original storage location. This caseoccurswhen theSessionRecordingPlayerrequests a session recording file for playback. The Session Recording Broker first attempts to find thesession recording file in the original storage location. If the file is not found in the original storage loca-tion, the Session Recording Broker then checks the Restore directory for archived files. If the file ispresent in the restore directory, the Session Recording Broker sends the file to the Session RecordingPlayer for playback. Otherwise, if the file is not found, the Session Recording Broker sends a file notfound error to the Session Recording Player.
Importing archived session recording files by using the ICLDB utility updates the Session RecordingDatabase with session recording information from the session recording file, including a new storagepath for the session recording file. Using the ICLDB utility to import an archived session recording filedoes not move the file back to the original storage location when the session was recorded.
Note: An imported session recording file has the archive time and archive note cleared in the SessionRecording Database. Therefore, the next time the ICLDB archive command is run, the importedsession recording file might become archived again.
The ICLDB import command is useful to import a large number of archived session recording files,repair, or update incorrect and missing session recording data in the Session Recording Database, ormove session recording files from one storage location to another storage location on the SessionRecording Server. The ICLDB import command can also be used to repopulate the Session RecordingDatabase with session recordings after running the ICLDB removeall command.
The import command of the ICLDB utility has several parameters that are described as follows:
• /LISTFILES – Lists the full path and file name of session recording files while they are beingimported. This parameter is optional.
• /RECURSIVE–Searchesall subdirectories for session recording files. Thisparameter is optional.
• /L – Logs the results and errors to the Windows event log the number of session recording filesimported. This parameter is optional.
• /F – Forces the import command to run without prompts. This parameter is optional.
To restore session recording files by using the restore directory for archived files
1. Log on to the server where the Session Recording Server is installed as a local administrator.
2. In Session Recording Player Properties, determine the File ID and Archive Time of the archivedsession recording file.
© 1999‒2022 Citrix Systems, Inc. All rights reserved. 211
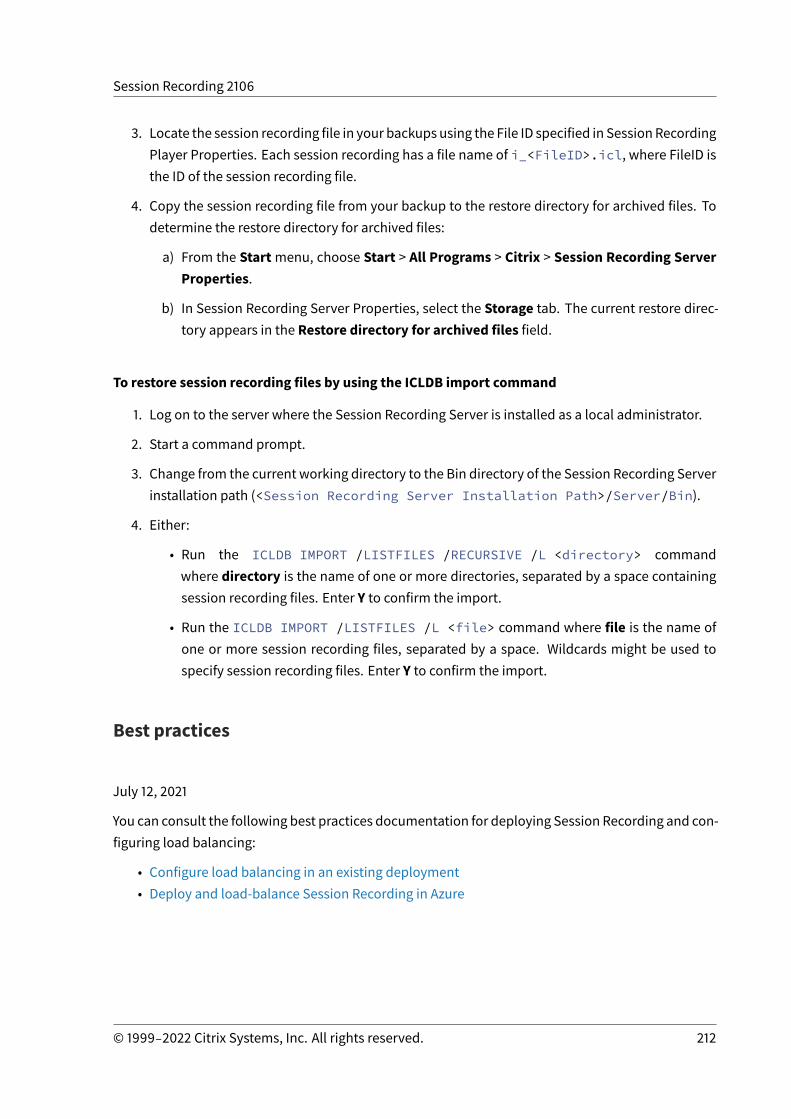
Session Recording 2106
3. Locate the session recording file in your backups using the File ID specified in SessionRecordingPlayer Properties. Each session recording has a file name of i_<FileID>.icl, where FileID isthe ID of the session recording file.
4. Copy the session recording file from your backup to the restore directory for archived files. Todetermine the restore directory for archived files:
a) From the Startmenu, choose Start > All Programs > Citrix > Session Recording ServerProperties.
b) In Session Recording Server Properties, select the Storage tab. The current restore direc-tory appears in the Restore directory for archived files field.
To restore session recording files by using the ICLDB import command
1. Log on to the server where the Session Recording Server is installed as a local administrator.
2. Start a command prompt.
3. Change from the current working directory to the Bin directory of the Session Recording Serverinstallation path (<Session Recording Server Installation Path>/Server/Bin).
4. Either:
• Run the ICLDB IMPORT /LISTFILES /RECURSIVE /L <directory> commandwhere directory is the name of one or more directories, separated by a space containingsession recording files. Enter Y to confirm the import.
• Run the ICLDB IMPORT /LISTFILES /L <file> command where file is the name ofone or more session recording files, separated by a space. Wildcards might be used tospecify session recording files. Enter Y to confirm the import.
Best practices
July 12, 2021
You can consult the following best practices documentation for deploying Session Recording and con-figuring load balancing:
• Configure load balancing in an existing deployment• Deploy and load-balance Session Recording in Azure
© 1999‒2022 Citrix Systems, Inc. All rights reserved. 212

Session Recording 2106
Configure load balancing in an existing deployment
July 12, 2021
This article guides you through the process of adding load balancing nodes using Citrix ADC in anexisting Session Recording deployment. The following servers are used as an example throughoutthe process. You can also deploy and load-balance Session Recording in Azure.
• Session Recording
Host Name Server Role OS IP Address
SRServer1 Session RecordingServer
Windows Server 10.63.32.55
LBDC Domain controller Windows Server 10.63.32.82
TSVDA Session RecordingAgent
Windows Server 10.63.32.215
SRSQL Session RecordingDatabase and the fileserver
Windows Server 10.63.32.91
All Session Recording components and the domain controller share a domain, for example, lb.com. The domain administrator account, for example, lb\administrator, is used for server logon.
• Citrix ADC
Host Name Server RoleManagement IPAddress (NSIP)
Subnet IP Address(SNIP)
Netscaler Citrix ADC VPXinstance
10.63.32.40 10.63.32.109
For more information, see Deploy a Citrix ADC VPX instance.
Step 1: Create shared folders on the file server
1. Log on to the file server by using a domain administrator account, for example, lb\administrator.
2. Create a folder to store recordings and name the folder SessionRecording, for example, C:\SessionRecording. Share the Read/Write permission of the folder with a Session Recording
© 1999‒2022 Citrix Systems, Inc. All rights reserved. 213
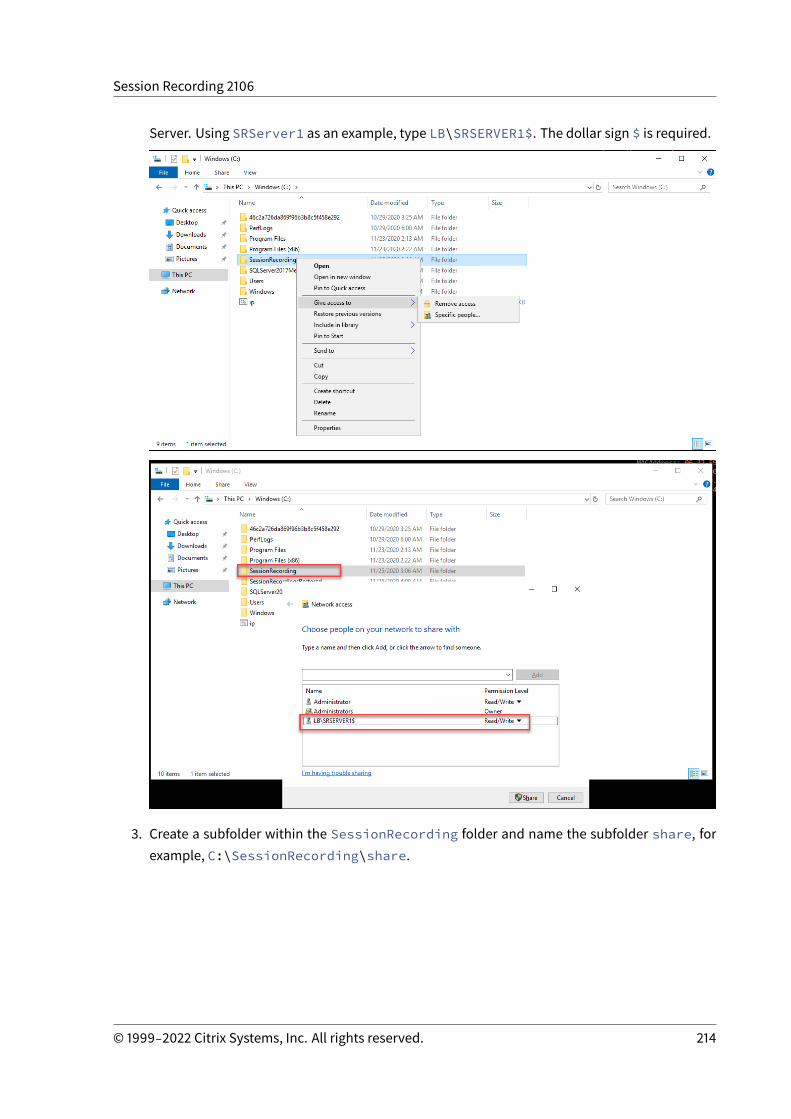
Session Recording 2106
Server. Using SRServer1 as an example, type LB\SRSERVER1$. The dollar sign $ is required.
3. Create a subfolder within the SessionRecording folder and name the subfolder share, forexample, C:\SessionRecording\share.
© 1999‒2022 Citrix Systems, Inc. All rights reserved. 214
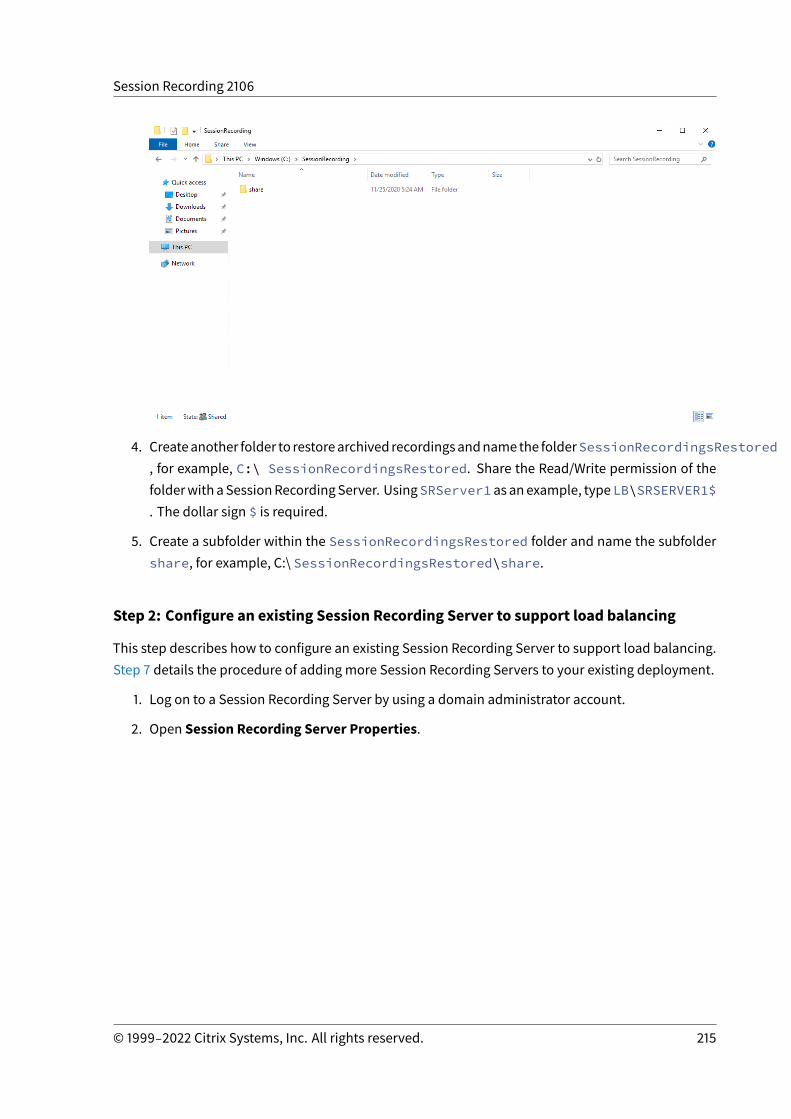
Session Recording 2106
4. Createanother folder to restorearchived recordingsandnamethe folderSessionRecordingsRestored, for example, C:\ SessionRecordingsRestored. Share the Read/Write permission of thefolderwith aSessionRecordingServer. UsingSRServer1as anexample, typeLB\SRSERVER1$. The dollar sign $ is required.
5. Create a subfolder within the SessionRecordingsRestored folder and name the subfoldershare, for example, C:\ SessionRecordingsRestored\share.
Step 2: Configure an existing Session Recording Server to support load balancing
This step describes how to configure an existing Session Recording Server to support load balancing.Step 7 details the procedure of adding more Session Recording Servers to your existing deployment.
1. Log on to a Session Recording Server by using a domain administrator account.
2. Open Session Recording Server Properties.
© 1999‒2022 Citrix Systems, Inc. All rights reserved. 215
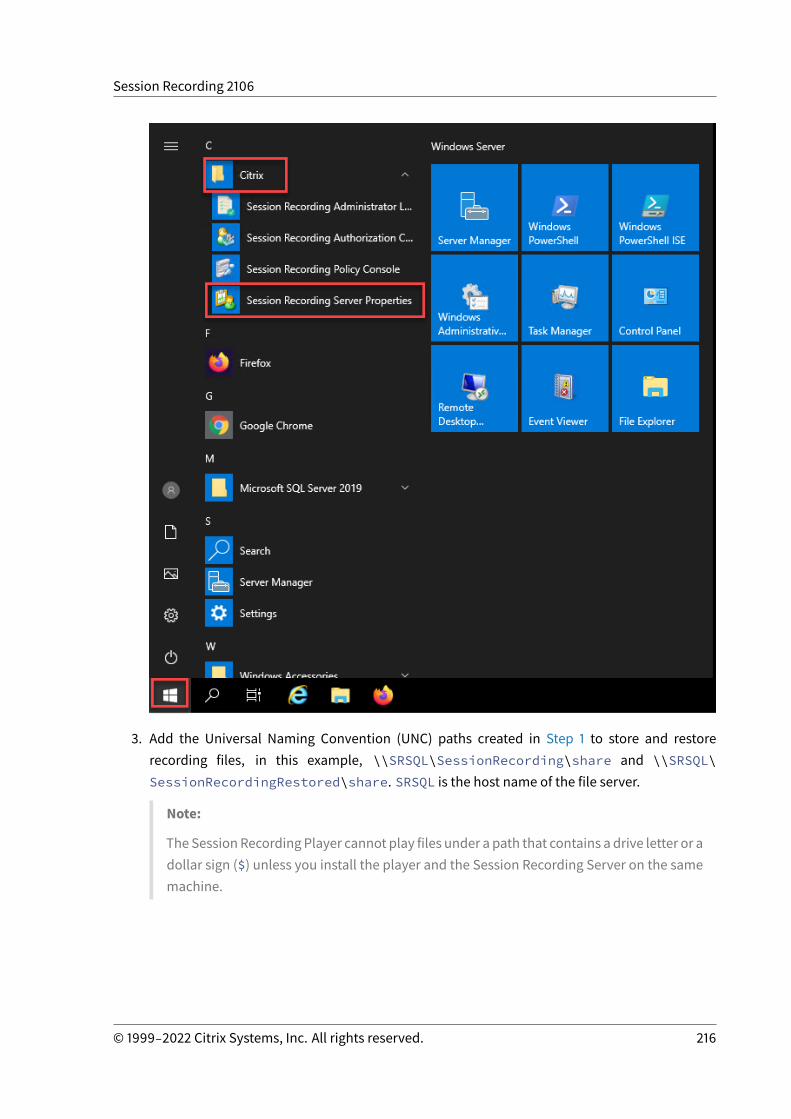
Session Recording 2106
3. Add the Universal Naming Convention (UNC) paths created in Step 1 to store and restorerecording files, in this example, \\SRSQL\SessionRecording\share and \\SRSQL\SessionRecordingRestored\share. SRSQL is the host name of the file server.
Note:
The Session Recording Player cannot play files under a path that contains a drive letter or adollar sign ($) unless you install the player and the Session Recording Server on the samemachine.
© 1999‒2022 Citrix Systems, Inc. All rights reserved. 216
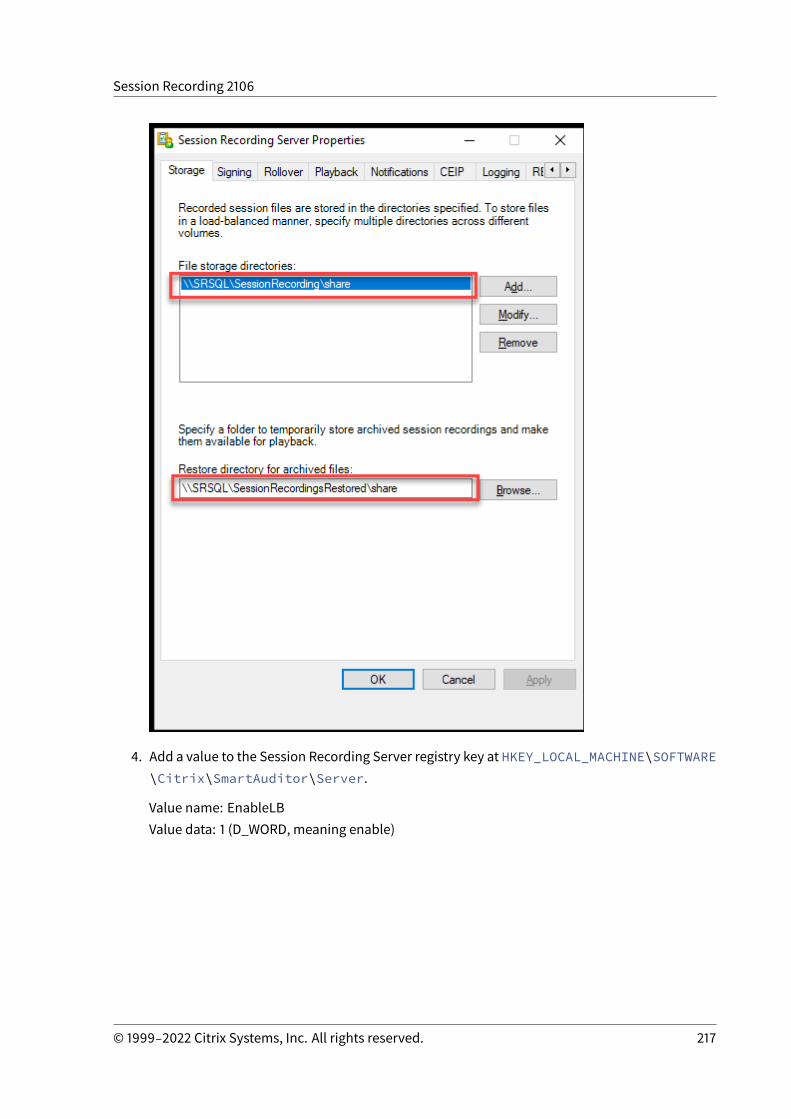
Session Recording 2106
4. Add a value to the Session Recording Server registry key at HKEY_LOCAL_MACHINE\SOFTWARE\Citrix\SmartAuditor\Server.
Value name: EnableLBValue data: 1 (D_WORD, meaning enable)
© 1999‒2022 Citrix Systems, Inc. All rights reserved. 217
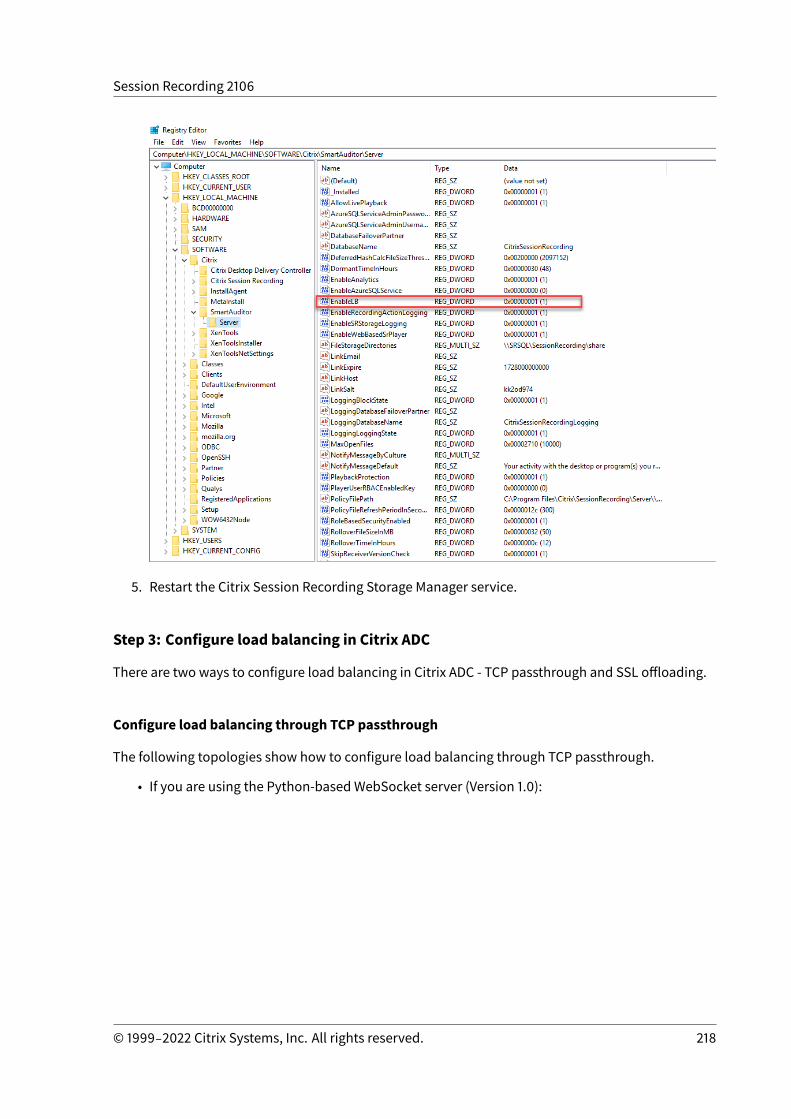
Session Recording 2106
5. Restart the Citrix Session Recording Storage Manager service.
Step 3: Configure load balancing in Citrix ADC
There are two ways to configure load balancing in Citrix ADC - TCP passthrough and SSL offloading.
Configure load balancing through TCP passthrough
The following topologies show how to configure load balancing through TCP passthrough.
• If you are using the Python-based WebSocket server (Version 1.0):
© 1999‒2022 Citrix Systems, Inc. All rights reserved. 218
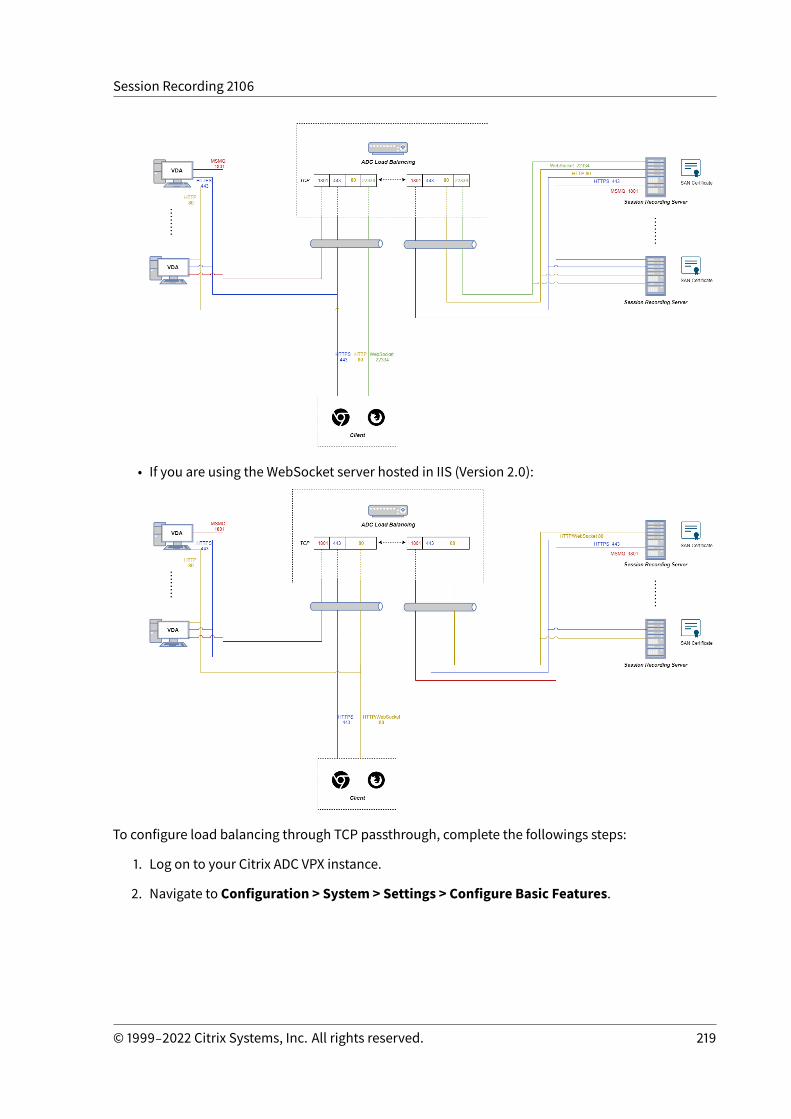
Session Recording 2106
• If you are using the WebSocket server hosted in IIS (Version 2.0):
To configure load balancing through TCP passthrough, complete the followings steps:
1. Log on to your Citrix ADC VPX instance.
2. Navigate to Configuration > System > Settings > Configure Basic Features.
© 1999‒2022 Citrix Systems, Inc. All rights reserved. 219
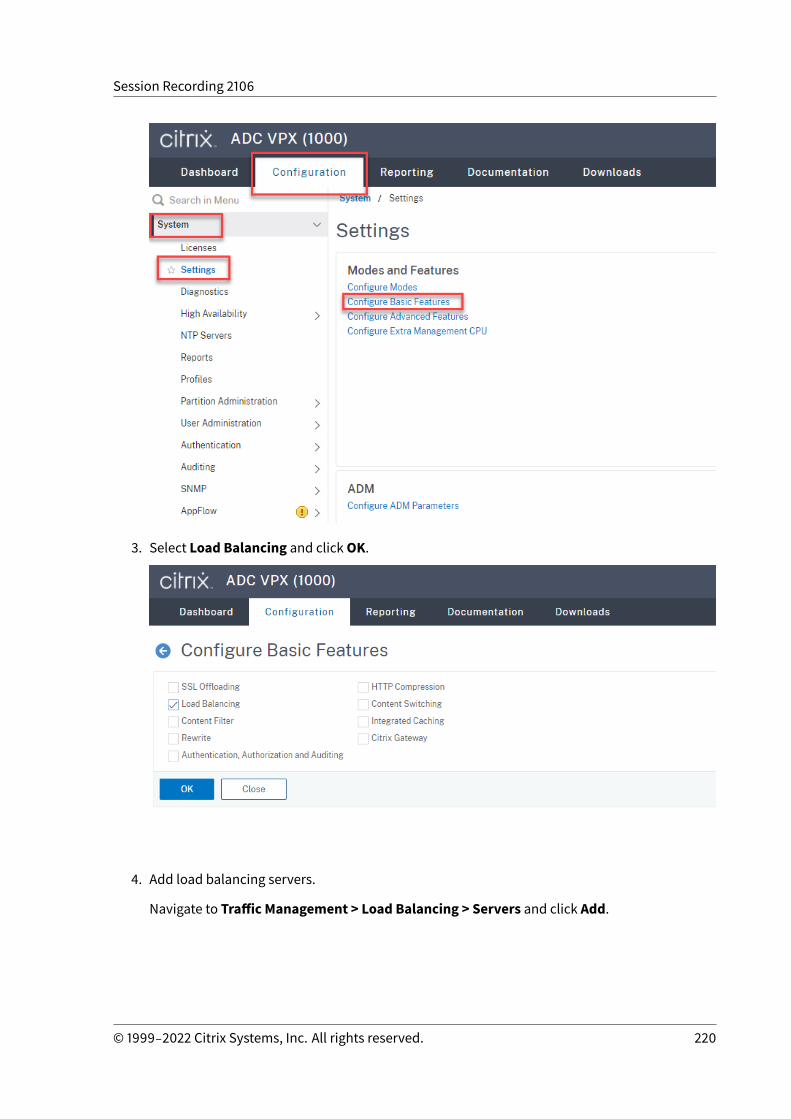
Session Recording 2106
3. Select Load Balancing and clickOK.
4. Add load balancing servers.
Navigate to Traffic Management > Load Balancing > Servers and click Add.
© 1999‒2022 Citrix Systems, Inc. All rights reserved. 220
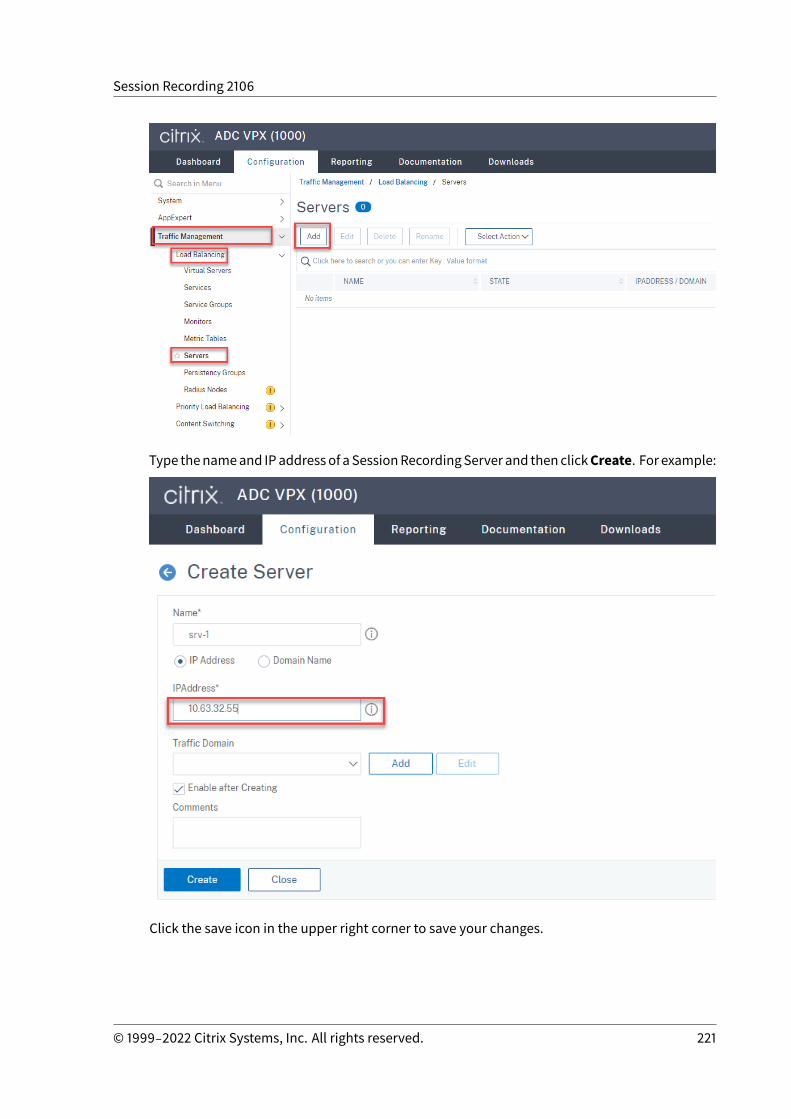
Session Recording 2106
Type thenameand IPaddressof aSessionRecordingServer and thenclickCreate. For example:
Click the save icon in the upper right corner to save your changes.
© 1999‒2022 Citrix Systems, Inc. All rights reserved. 221
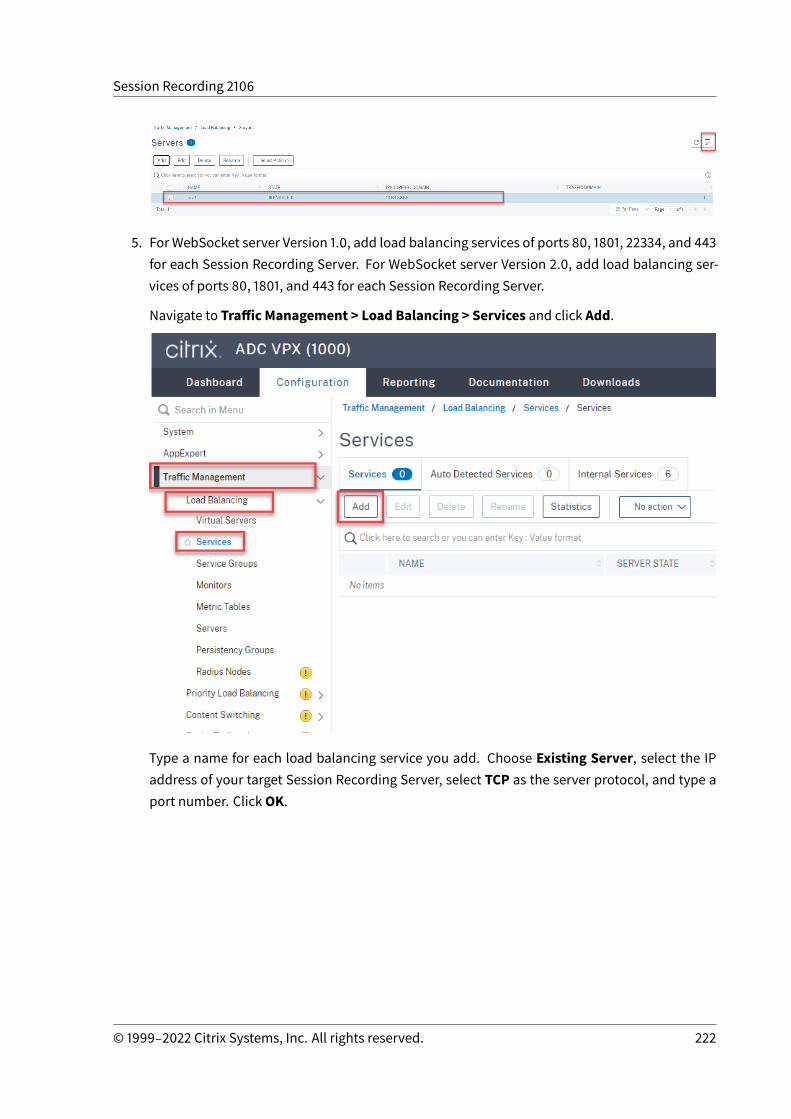
Session Recording 2106
5. For WebSocket server Version 1.0, add load balancing services of ports 80, 1801, 22334, and 443for each Session Recording Server. For WebSocket server Version 2.0, add load balancing ser-vices of ports 80, 1801, and 443 for each Session Recording Server.
Navigate to Traffic Management > Load Balancing > Services and click Add.
Type a name for each load balancing service you add. Choose Existing Server, select the IPaddress of your target Session Recording Server, select TCP as the server protocol, and type aport number. ClickOK.
© 1999‒2022 Citrix Systems, Inc. All rights reserved. 222
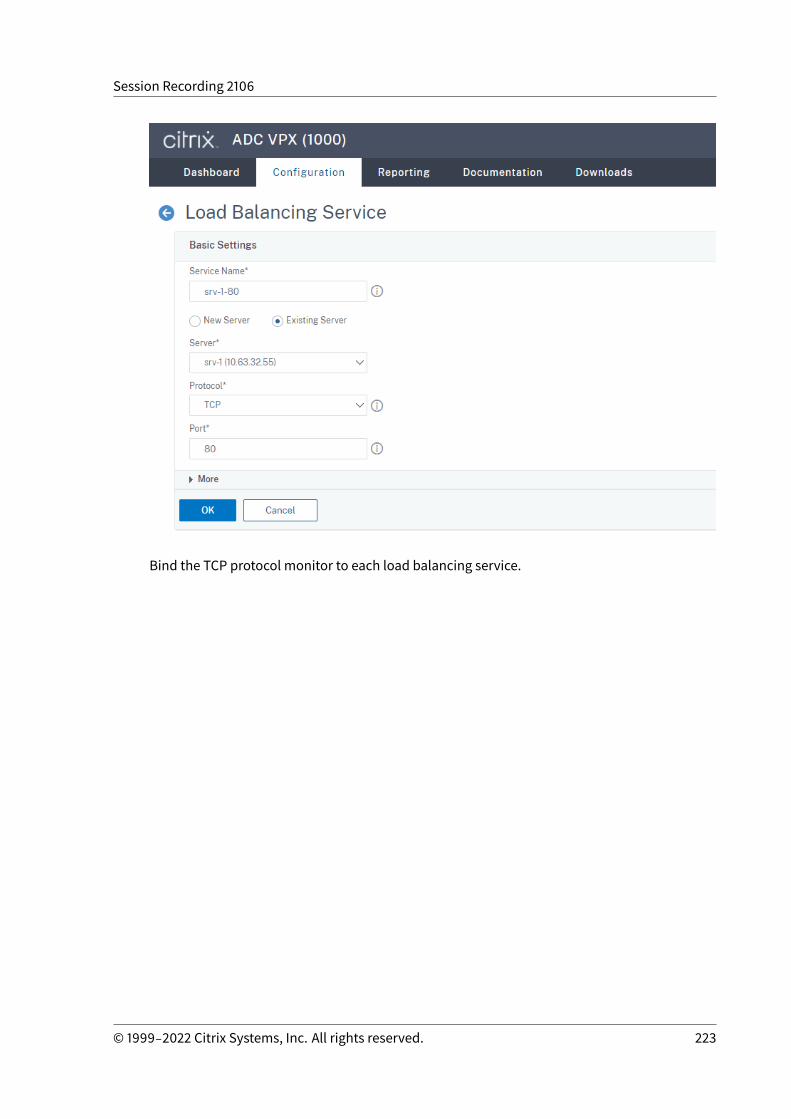
Session Recording 2106
Bind the TCP protocol monitor to each load balancing service.
© 1999‒2022 Citrix Systems, Inc. All rights reserved. 223
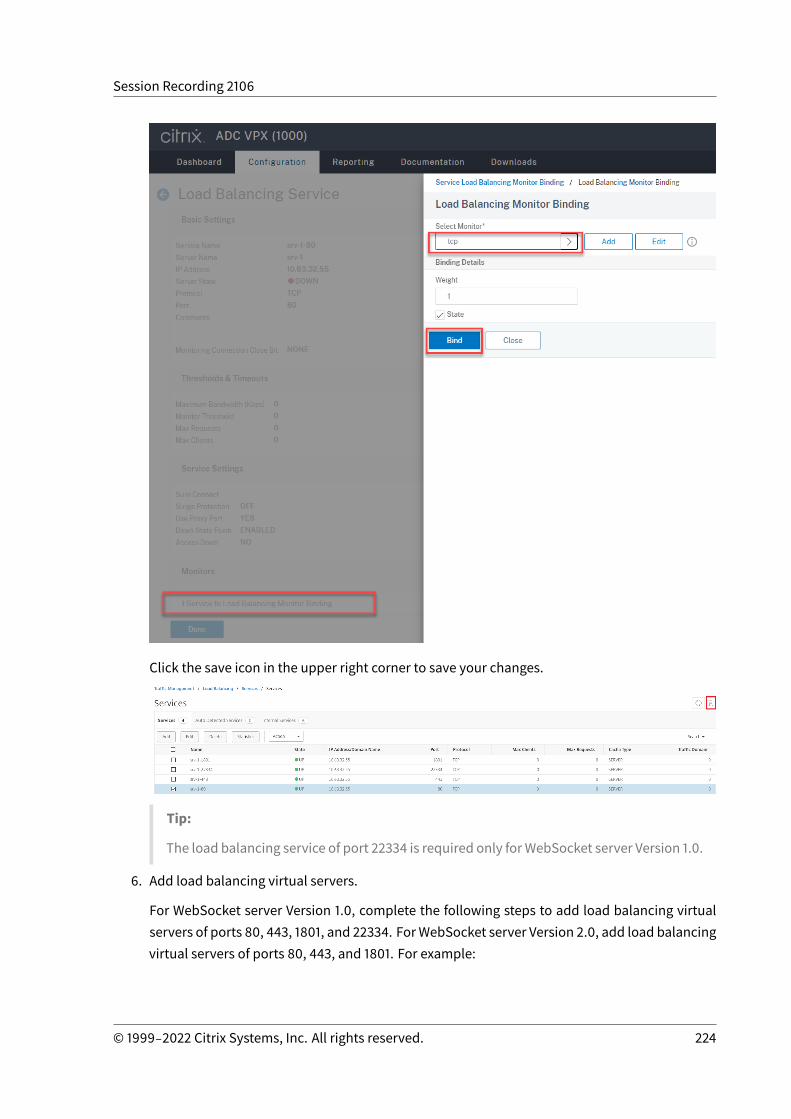
Session Recording 2106
Click the save icon in the upper right corner to save your changes.
Tip:
The load balancing service of port 22334 is required only forWebSocket server Version 1.0.
6. Add load balancing virtual servers.
For WebSocket server Version 1.0, complete the following steps to add load balancing virtualservers of ports 80, 443, 1801, and 22334. ForWebSocket server Version 2.0, add load balancingvirtual servers of ports 80, 443, and 1801. For example:
© 1999‒2022 Citrix Systems, Inc. All rights reserved. 224
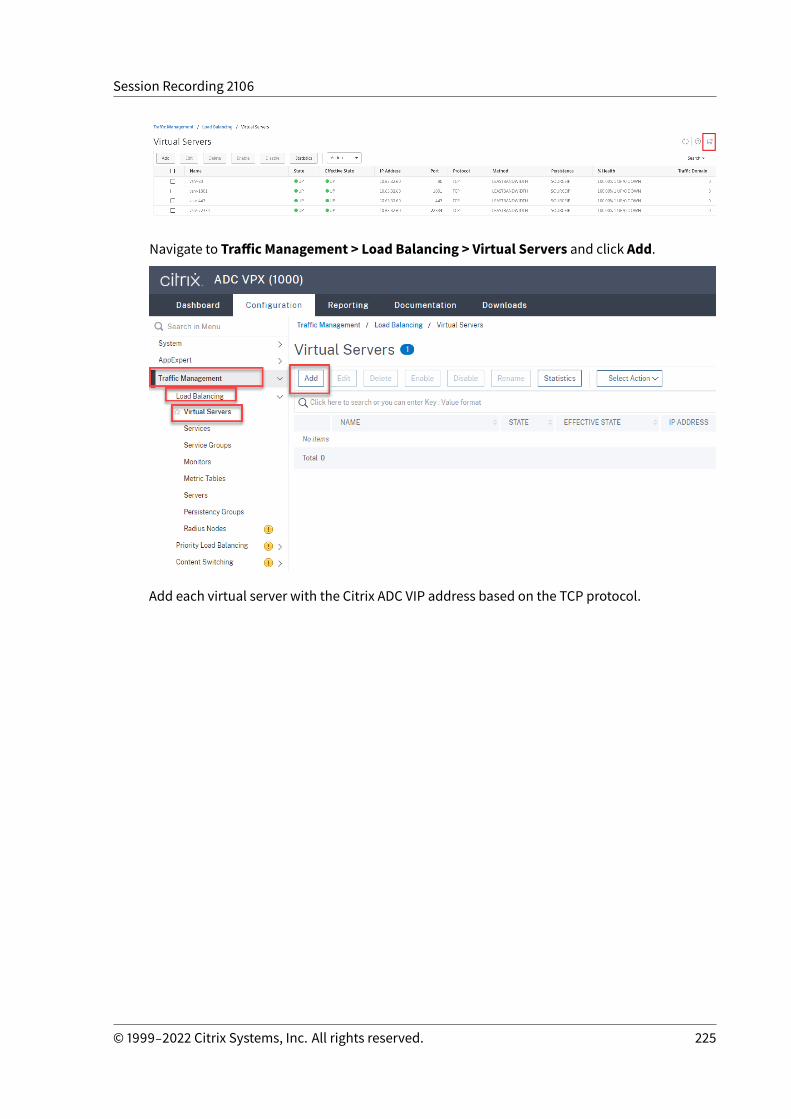
Session Recording 2106
Navigate to Traffic Management > Load Balancing > Virtual Servers and click Add.
Add each virtual server with the Citrix ADC VIP address based on the TCP protocol.
© 1999‒2022 Citrix Systems, Inc. All rights reserved. 225
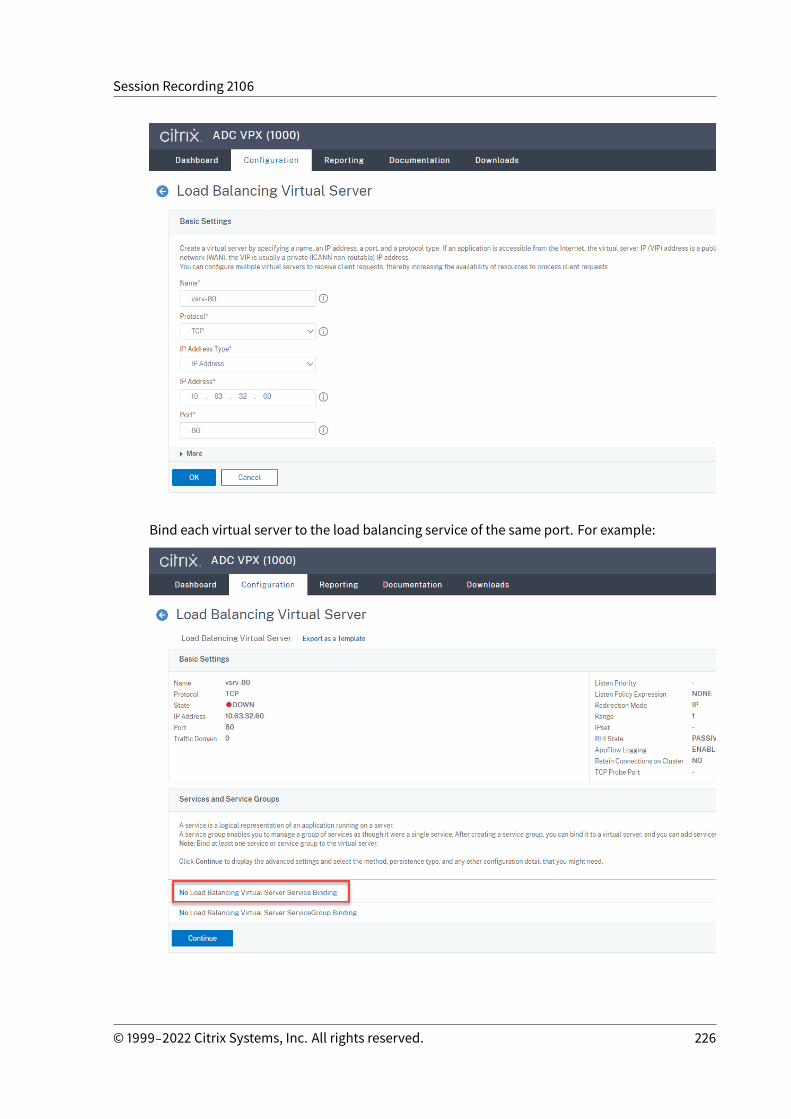
Session Recording 2106
Bind each virtual server to the load balancing service of the same port. For example:
© 1999‒2022 Citrix Systems, Inc. All rights reserved. 226
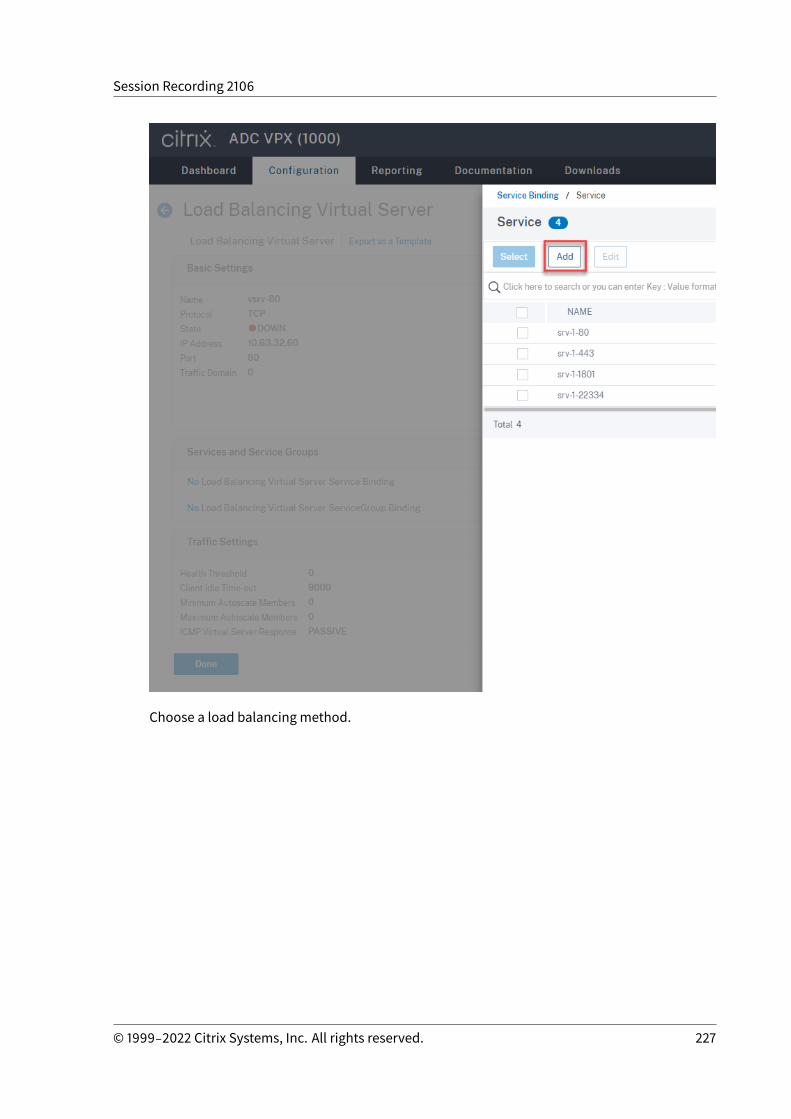
Session Recording 2106
Choose a load balancing method.
© 1999‒2022 Citrix Systems, Inc. All rights reserved. 227

Session Recording 2106
Configure persistence on each virtual server. We recommend you select SOURCEIP as the per-sistence type. For more information, see Persistence settings.
© 1999‒2022 Citrix Systems, Inc. All rights reserved. 228
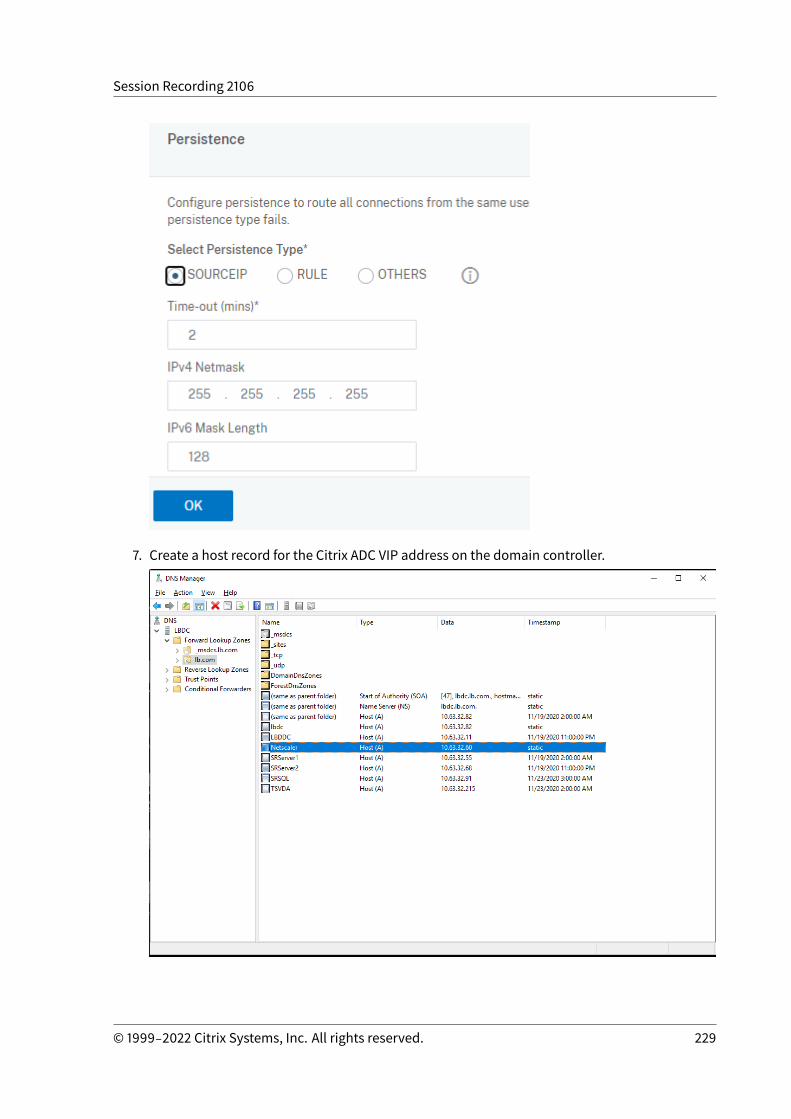
Session Recording 2106
7. Create a host record for the Citrix ADC VIP address on the domain controller.
© 1999‒2022 Citrix Systems, Inc. All rights reserved. 229
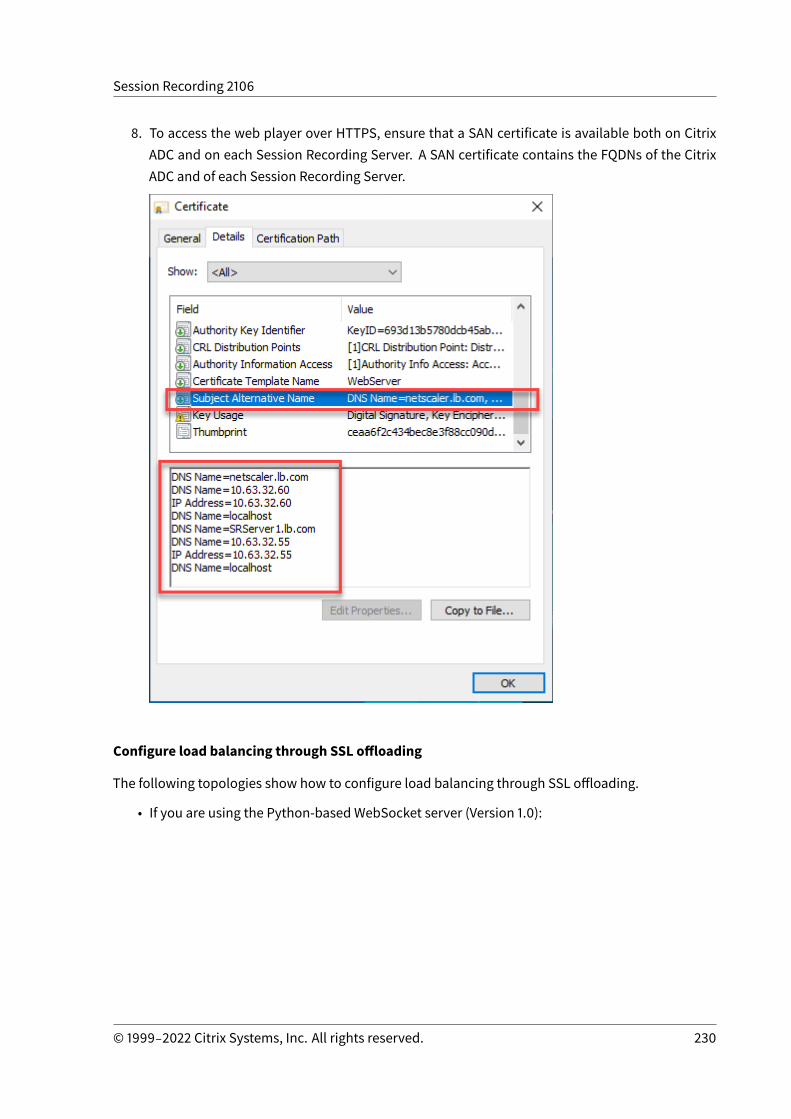
Session Recording 2106
8. To access the web player over HTTPS, ensure that a SAN certificate is available both on CitrixADC and on each Session Recording Server. A SAN certificate contains the FQDNs of the CitrixADC and of each Session Recording Server.
Configure load balancing through SSL offloading
The following topologies show how to configure load balancing through SSL offloading.
• If you are using the Python-based WebSocket server (Version 1.0):
© 1999‒2022 Citrix Systems, Inc. All rights reserved. 230
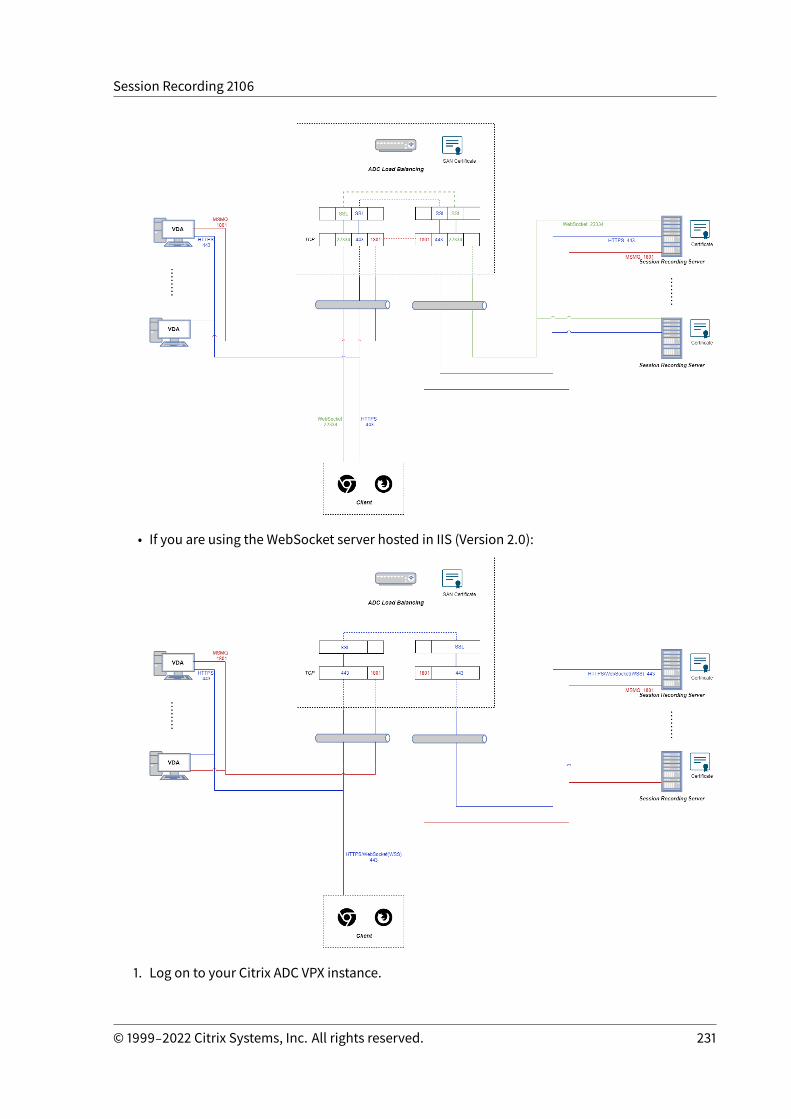
Session Recording 2106
• If you are using the WebSocket server hosted in IIS (Version 2.0):
1. Log on to your Citrix ADC VPX instance.
© 1999‒2022 Citrix Systems, Inc. All rights reserved. 231
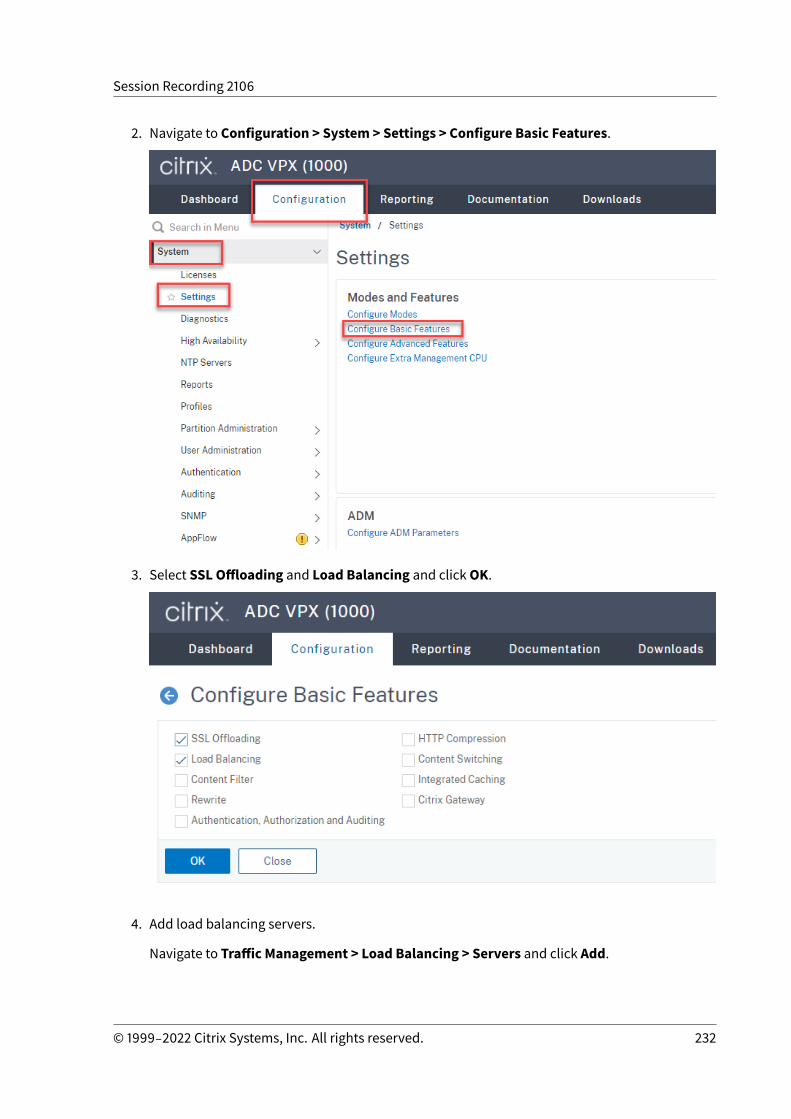
Session Recording 2106
2. Navigate to Configuration > System > Settings > Configure Basic Features.
3. Select SSL Offloading and Load Balancing and clickOK.
4. Add load balancing servers.
Navigate to Traffic Management > Load Balancing > Servers and click Add.
© 1999‒2022 Citrix Systems, Inc. All rights reserved. 232

Session Recording 2106
Type thenameand IPaddressof aSessionRecordingServer and thenclickCreate. For example:
Click the save icon in the upper right corner to save your changes.
© 1999‒2022 Citrix Systems, Inc. All rights reserved. 233
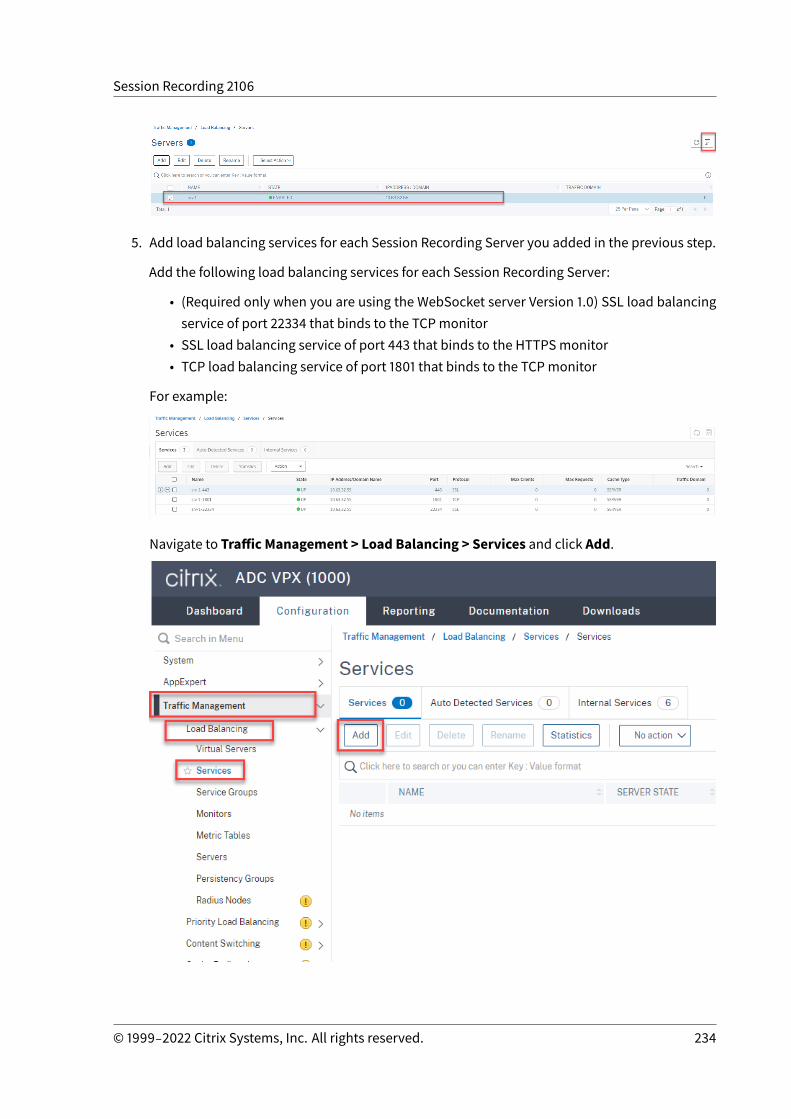
Session Recording 2106
5. Add load balancing services for each Session Recording Server you added in the previous step.
Add the following load balancing services for each Session Recording Server:
• (Required only when you are using the WebSocket server Version 1.0) SSL load balancingservice of port 22334 that binds to the TCPmonitor
• SSL load balancing service of port 443 that binds to the HTTPSmonitor• TCP load balancing service of port 1801 that binds to the TCPmonitor
For example:
Navigate to Traffic Management > Load Balancing > Services and click Add.
© 1999‒2022 Citrix Systems, Inc. All rights reserved. 234
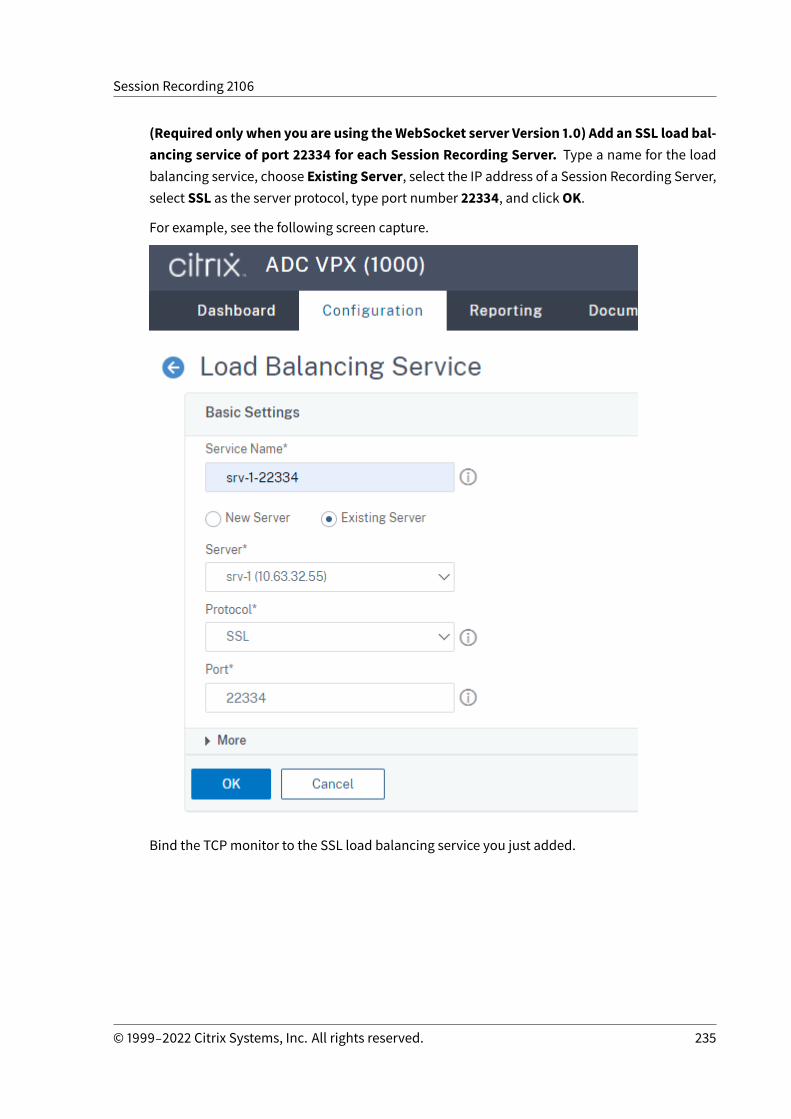
Session Recording 2106
(Required onlywhen you are using theWebSocket server Version 1.0) Add an SSL load bal-ancing service of port 22334 for each Session Recording Server. Type a name for the loadbalancing service, choose Existing Server, select the IP address of a Session Recording Server,select SSL as the server protocol, type port number 22334, and clickOK.
For example, see the following screen capture.
Bind the TCPmonitor to the SSL load balancing service you just added.
© 1999‒2022 Citrix Systems, Inc. All rights reserved. 235
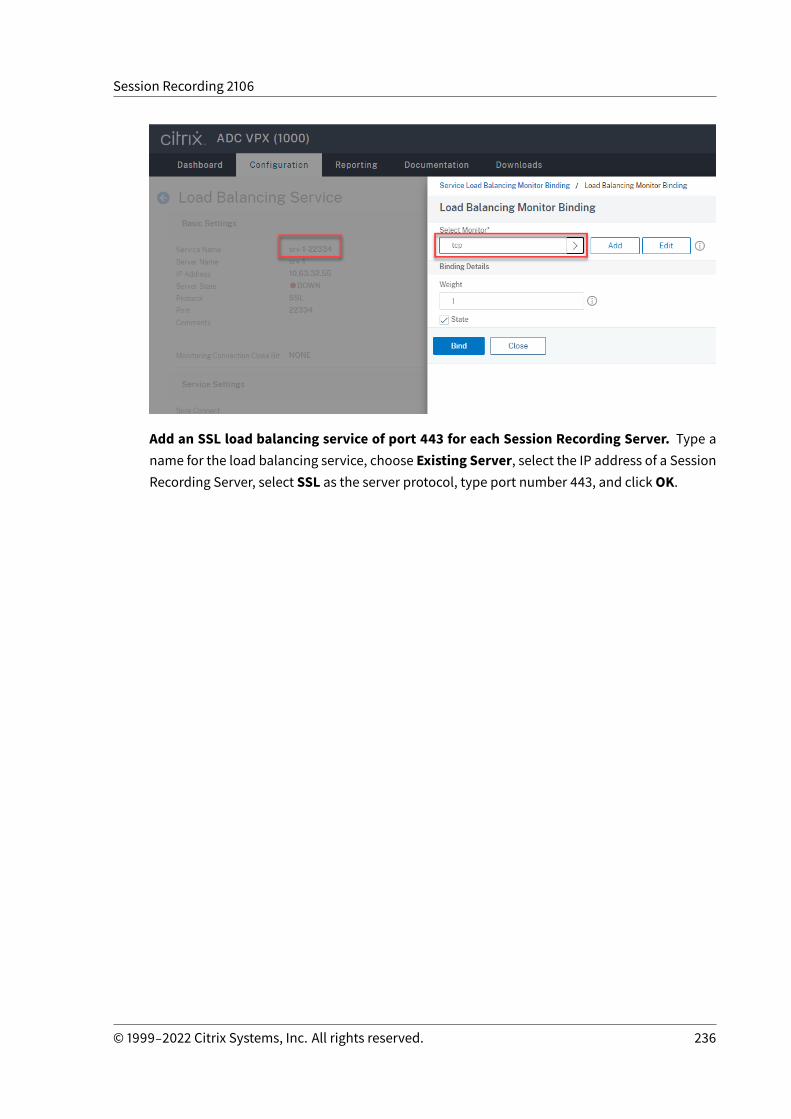
Session Recording 2106
Add an SSL load balancing service of port 443 for each Session Recording Server. Type aname for the load balancing service, choose Existing Server, select the IP address of a SessionRecording Server, select SSL as the server protocol, type port number 443, and clickOK.
© 1999‒2022 Citrix Systems, Inc. All rights reserved. 236
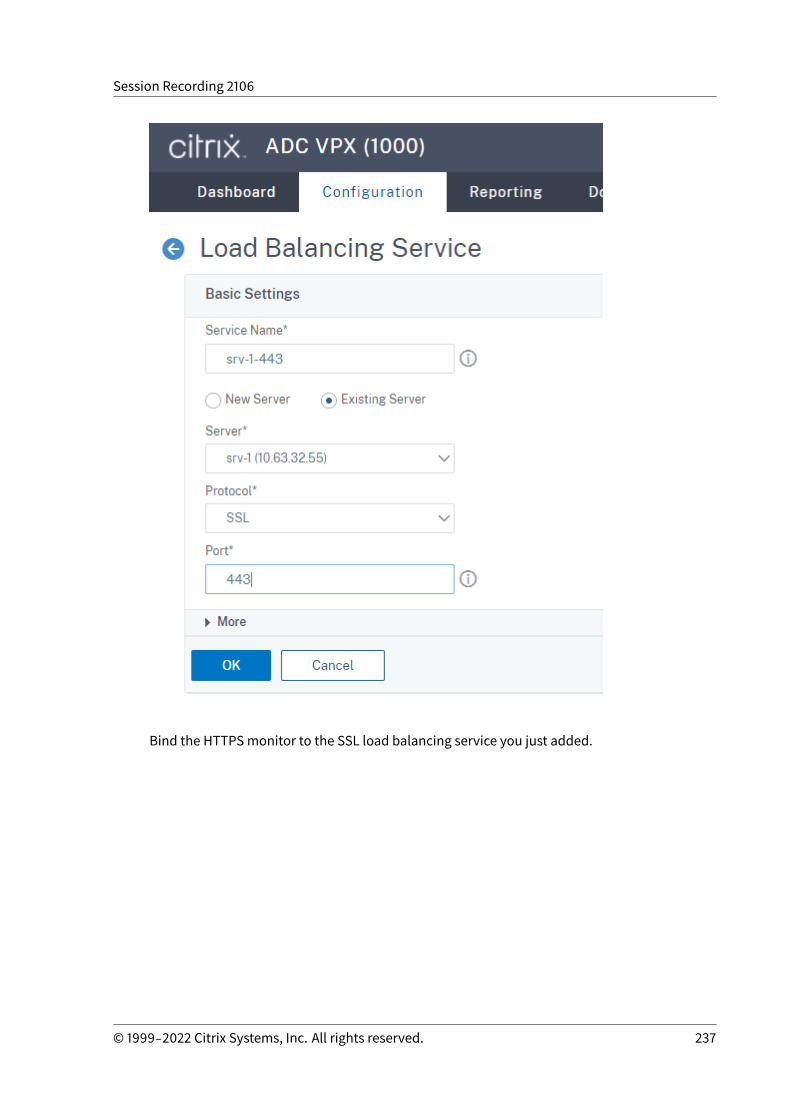
Session Recording 2106
Bind the HTTPSmonitor to the SSL load balancing service you just added.
© 1999‒2022 Citrix Systems, Inc. All rights reserved. 237
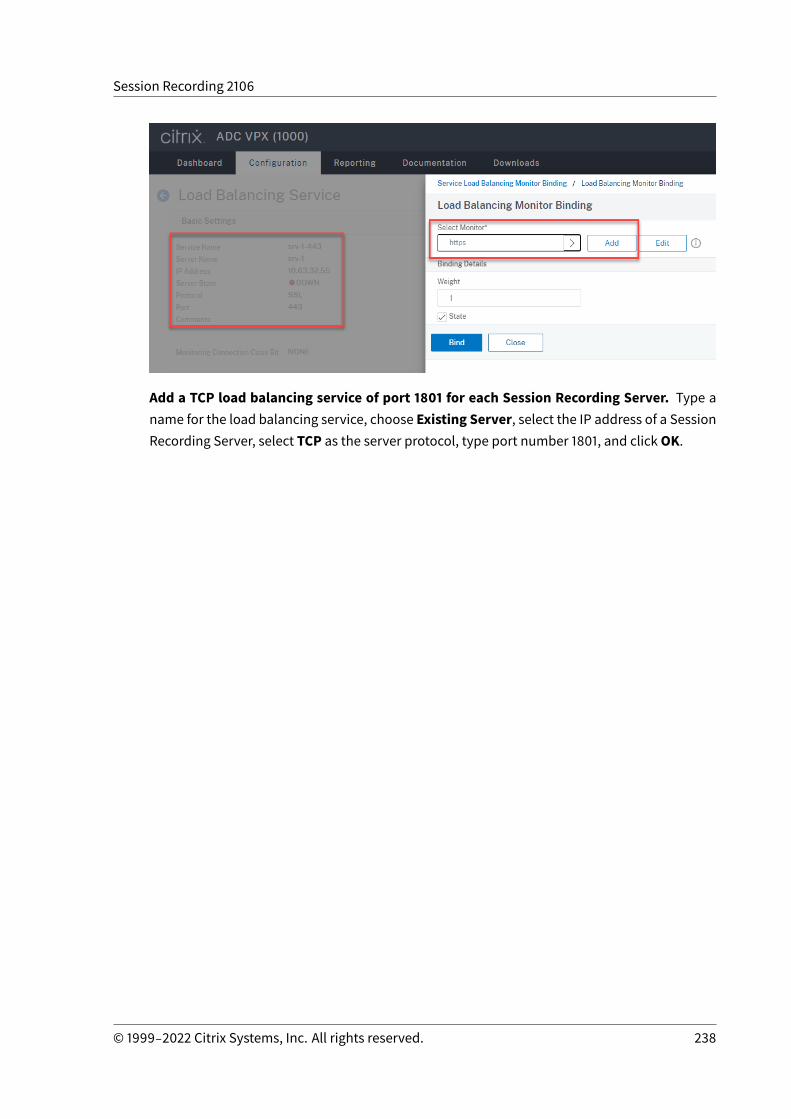
Session Recording 2106
Add a TCP load balancing service of port 1801 for each Session Recording Server. Type aname for the load balancing service, choose Existing Server, select the IP address of a SessionRecording Server, select TCP as the server protocol, type port number 1801, and clickOK.
© 1999‒2022 Citrix Systems, Inc. All rights reserved. 238
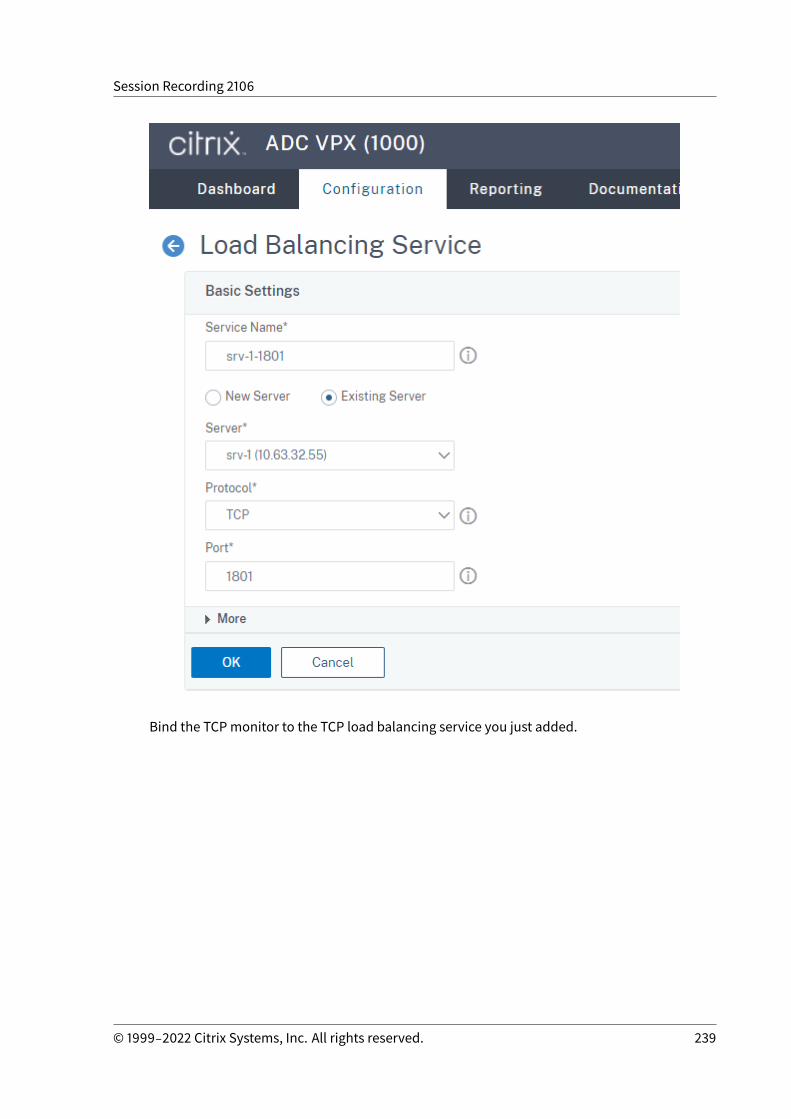
Session Recording 2106
Bind the TCPmonitor to the TCP load balancing service you just added.
© 1999‒2022 Citrix Systems, Inc. All rights reserved. 239
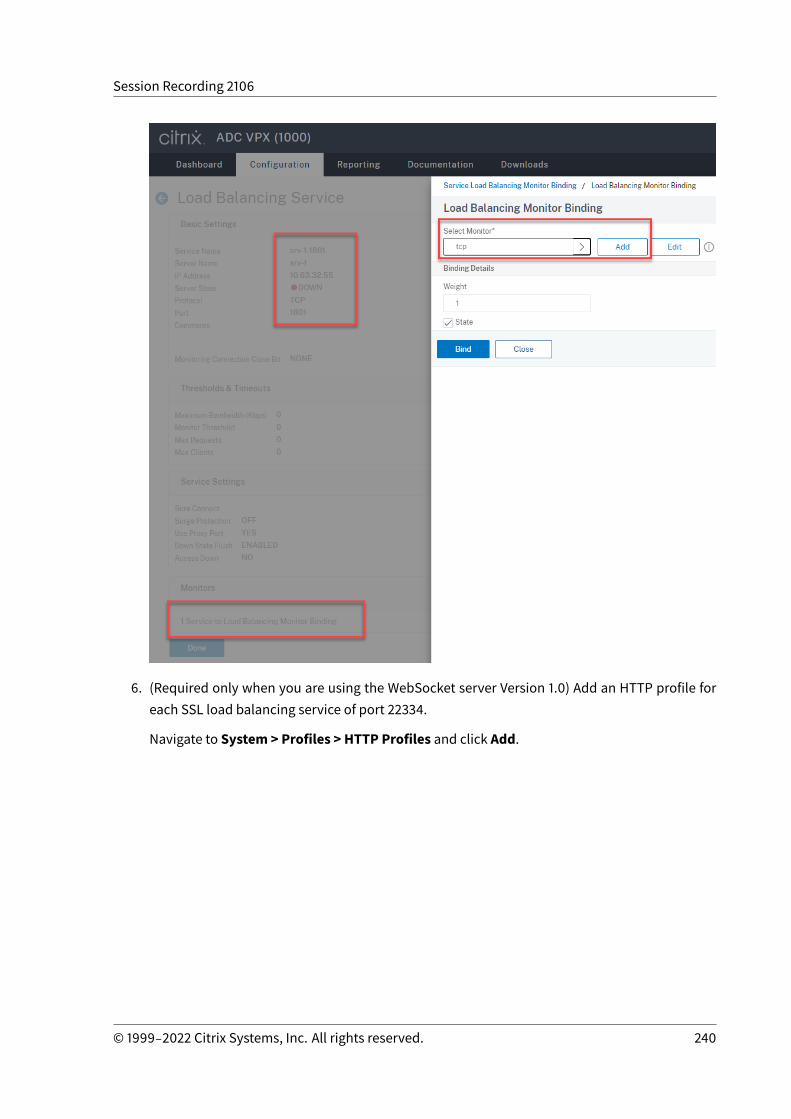
Session Recording 2106
6. (Required only when you are using the WebSocket server Version 1.0) Add an HTTP profile foreach SSL load balancing service of port 22334.
Navigate to System > Profiles > HTTP Profiles and click Add.
© 1999‒2022 Citrix Systems, Inc. All rights reserved. 240
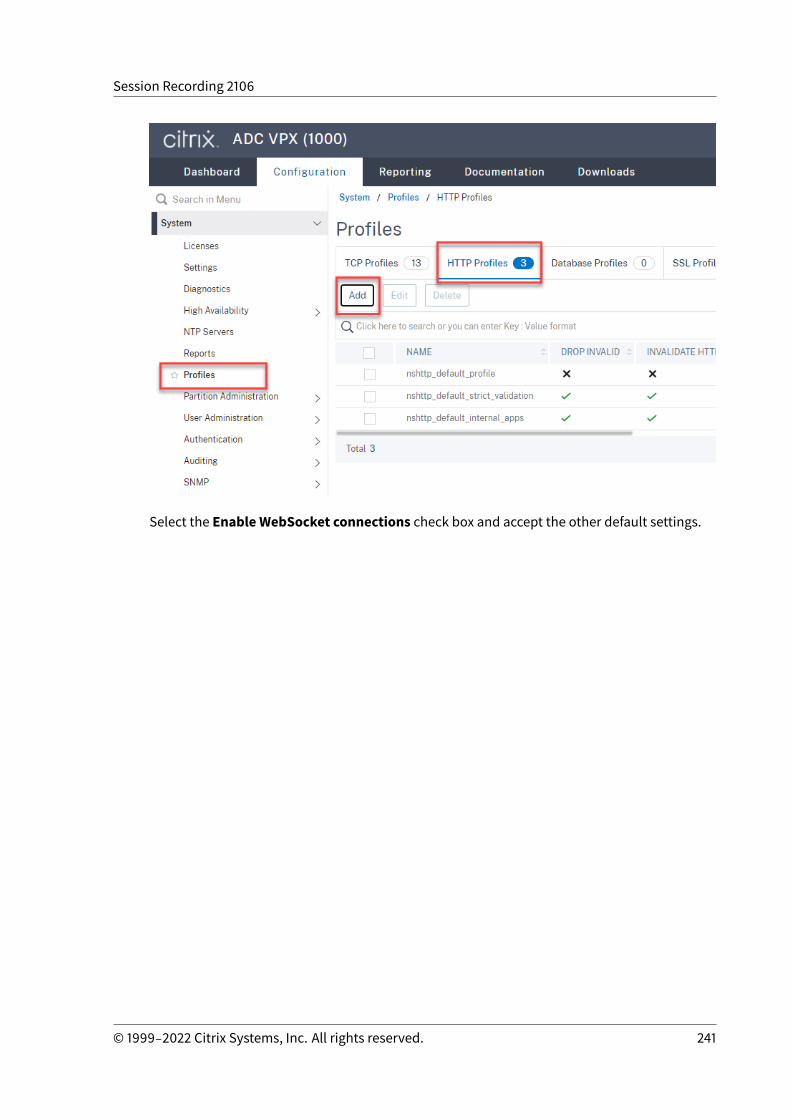
Session Recording 2106
Select the Enable WebSocket connections check box and accept the other default settings.
© 1999‒2022 Citrix Systems, Inc. All rights reserved. 241
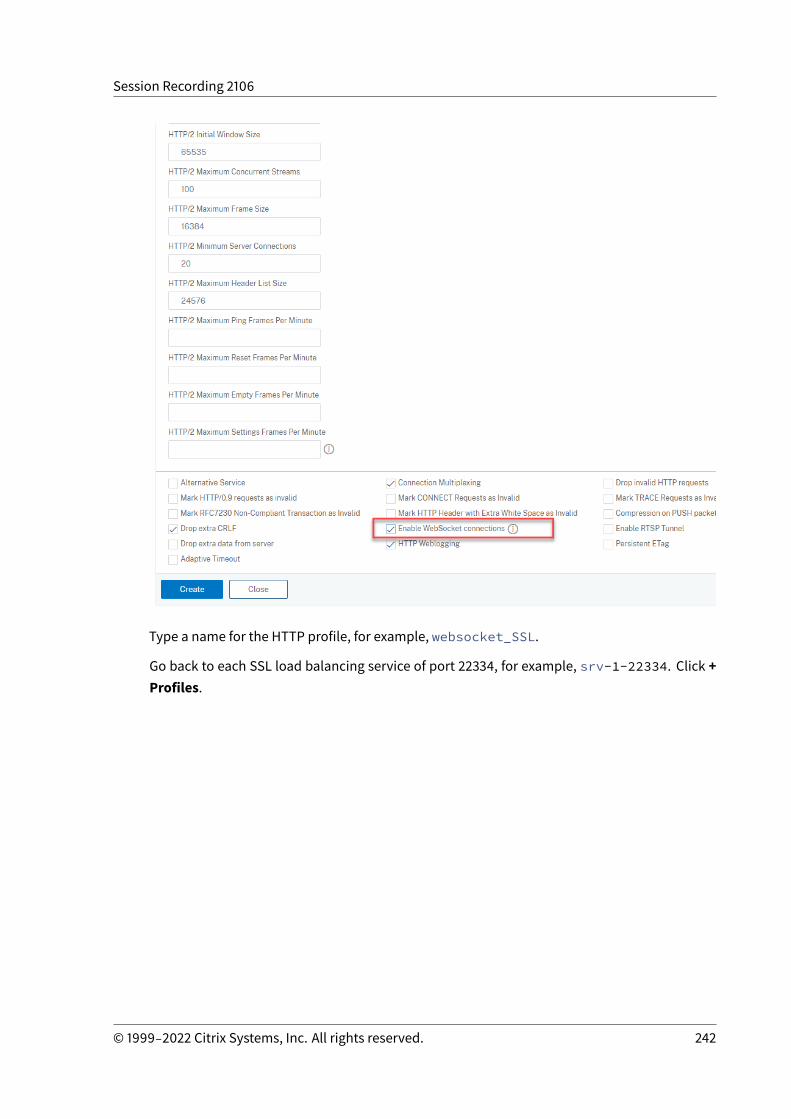
Session Recording 2106
Type a name for the HTTP profile, for example, websocket_SSL.
Go back to each SSL load balancing service of port 22334, for example, srv-1-22334. Click +Profiles.
© 1999‒2022 Citrix Systems, Inc. All rights reserved. 242
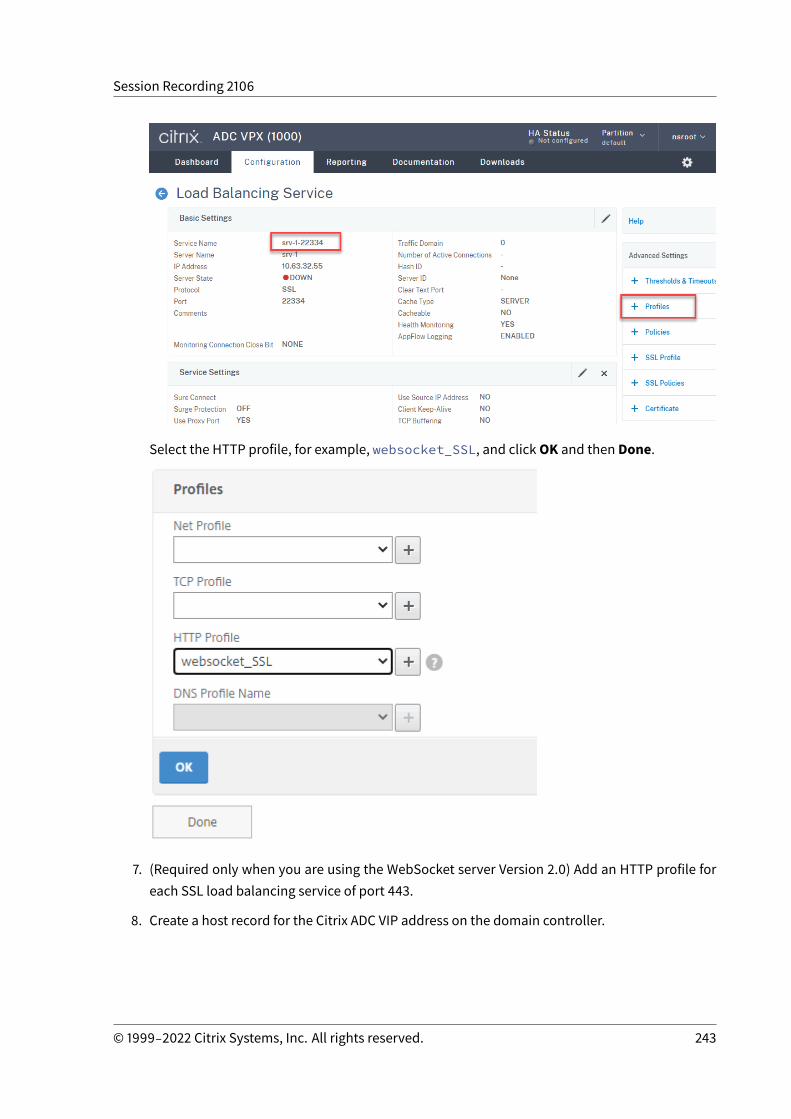
Session Recording 2106
Select the HTTP profile, for example, websocket_SSL, and clickOK and then Done.
7. (Required only when you are using the WebSocket server Version 2.0) Add an HTTP profile foreach SSL load balancing service of port 443.
8. Create a host record for the Citrix ADC VIP address on the domain controller.
© 1999‒2022 Citrix Systems, Inc. All rights reserved. 243
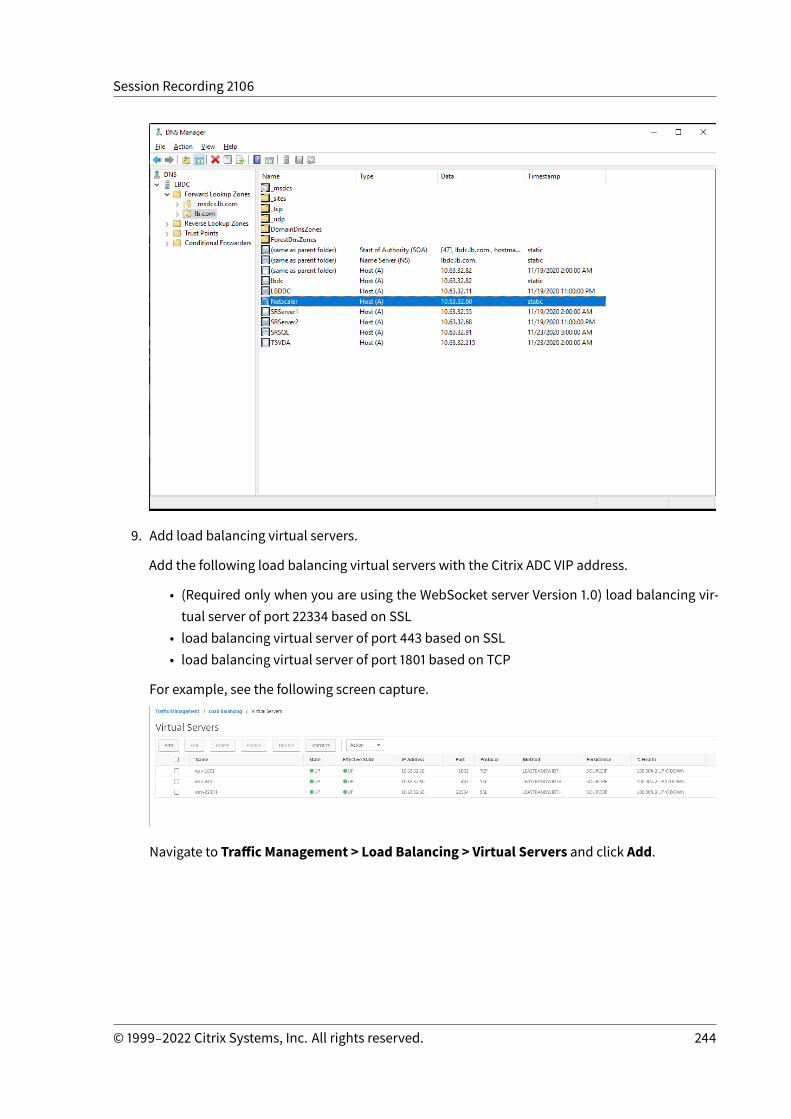
Session Recording 2106
9. Add load balancing virtual servers.
Add the following load balancing virtual servers with the Citrix ADC VIP address.
• (Required only when you are using the WebSocket server Version 1.0) load balancing vir-tual server of port 22334 based on SSL
• load balancing virtual server of port 443 based on SSL• load balancing virtual server of port 1801 based on TCP
For example, see the following screen capture.
Navigate to Traffic Management > Load Balancing > Virtual Servers and click Add.
© 1999‒2022 Citrix Systems, Inc. All rights reserved. 244

Session Recording 2106
Add each virtual server with the Citrix ADC VIP address. Type a server name, select TCP or SSL,and select the relevant port number as described earlier.
Bind each virtual server to the load balancing service of the same port. For example:
© 1999‒2022 Citrix Systems, Inc. All rights reserved. 245
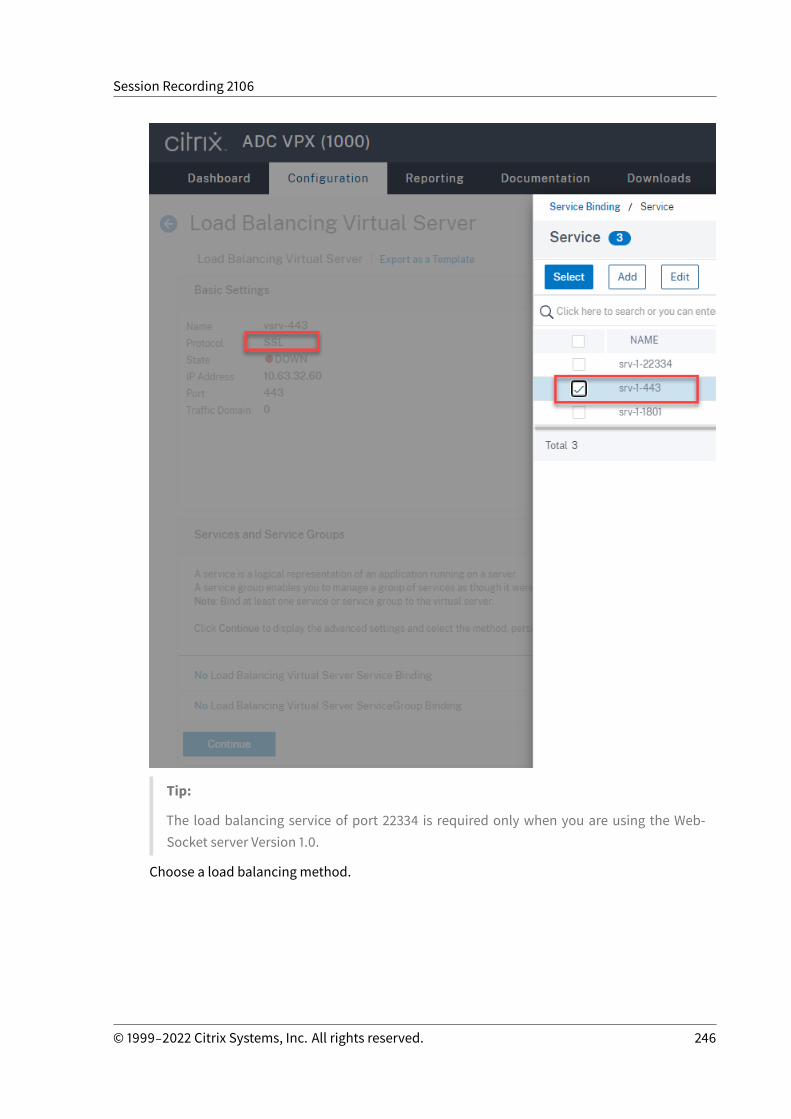
Session Recording 2106
Tip:
The load balancing service of port 22334 is required only when you are using the Web-Socket server Version 1.0.
Choose a load balancing method.
© 1999‒2022 Citrix Systems, Inc. All rights reserved. 246
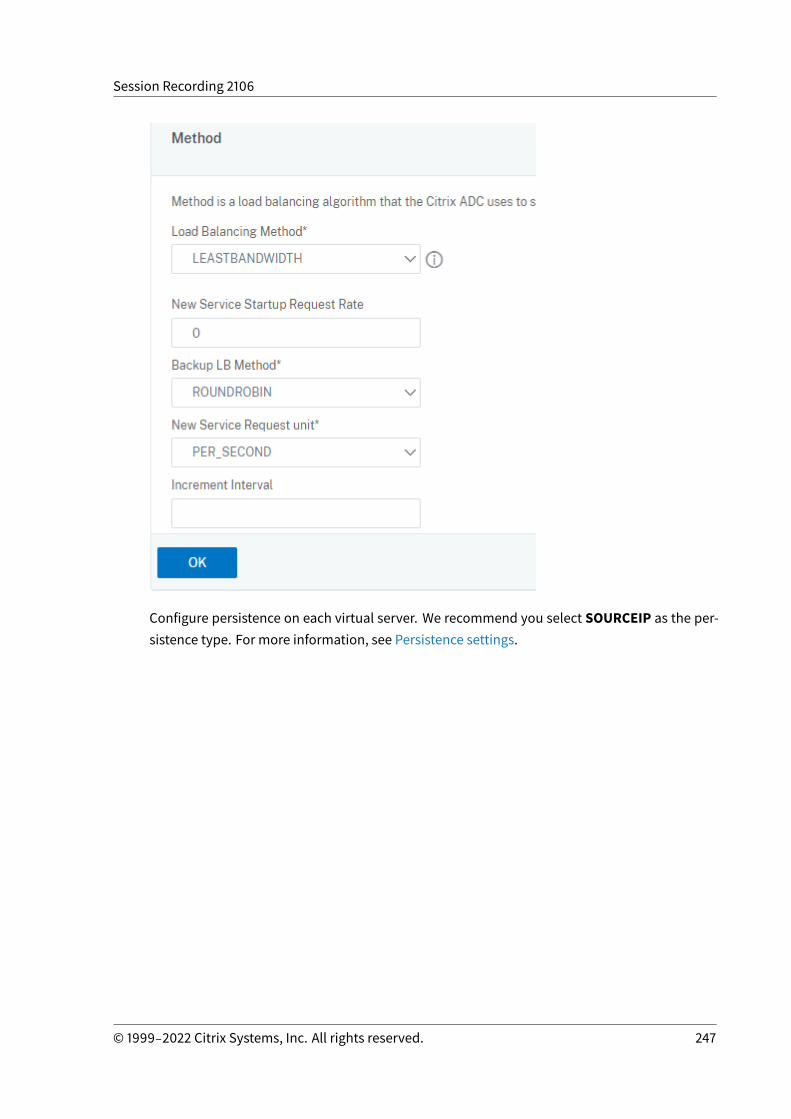
Session Recording 2106
Configure persistence on each virtual server. We recommend you select SOURCEIP as the per-sistence type. For more information, see Persistence settings.
© 1999‒2022 Citrix Systems, Inc. All rights reserved. 247

Session Recording 2106
(Required only when you are using the WebSocket server Version 1.0) Add an HTTP profile forthe load balancing virtual server of port 22334.
10. Install a Subject Alternative Name (SAN) certificate in Citrix ADC.
Obtain a SAN certificate in PEM format from a trusted Certificate Authority (CA). Extract and up-load the certificate and private key files in Citrix ADC by navigating to Traffic Management >SSL > Server Certificate Wizard.
For more information, see SSL certificates.
© 1999‒2022 Citrix Systems, Inc. All rights reserved. 248
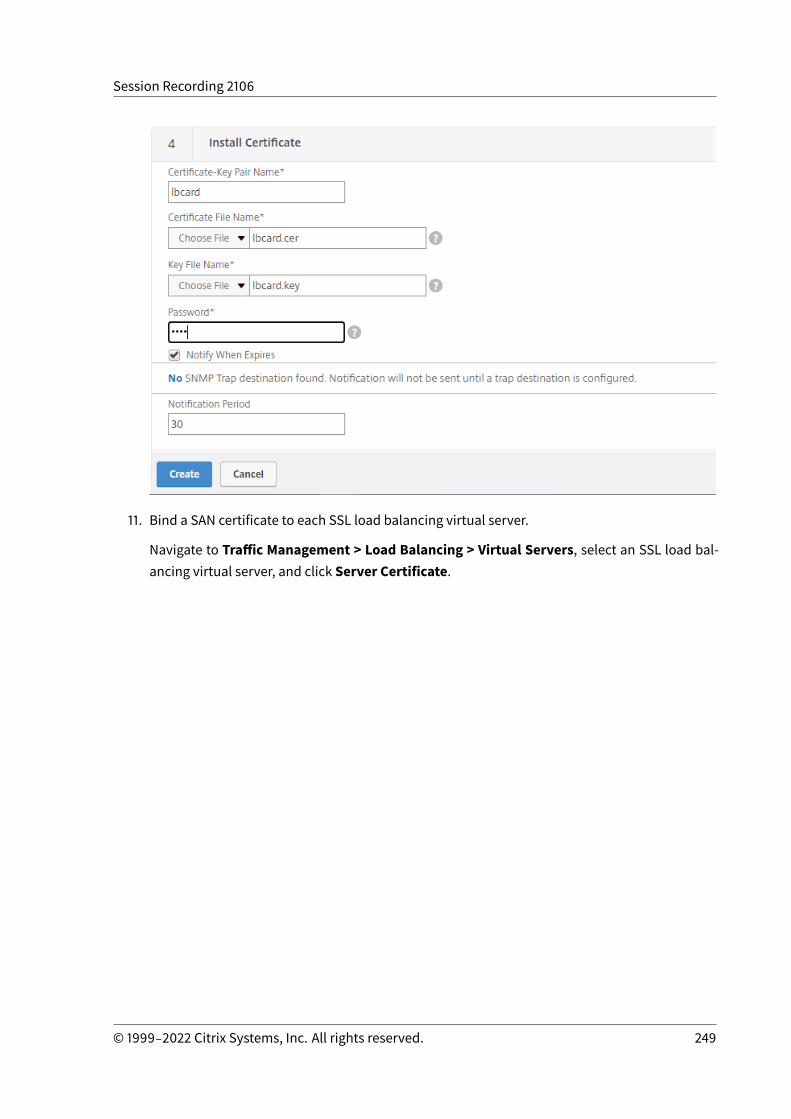
Session Recording 2106
11. Bind a SAN certificate to each SSL load balancing virtual server.
Navigate to Traffic Management > Load Balancing > Virtual Servers, select an SSL load bal-ancing virtual server, and click Server Certificate.
© 1999‒2022 Citrix Systems, Inc. All rights reserved. 249
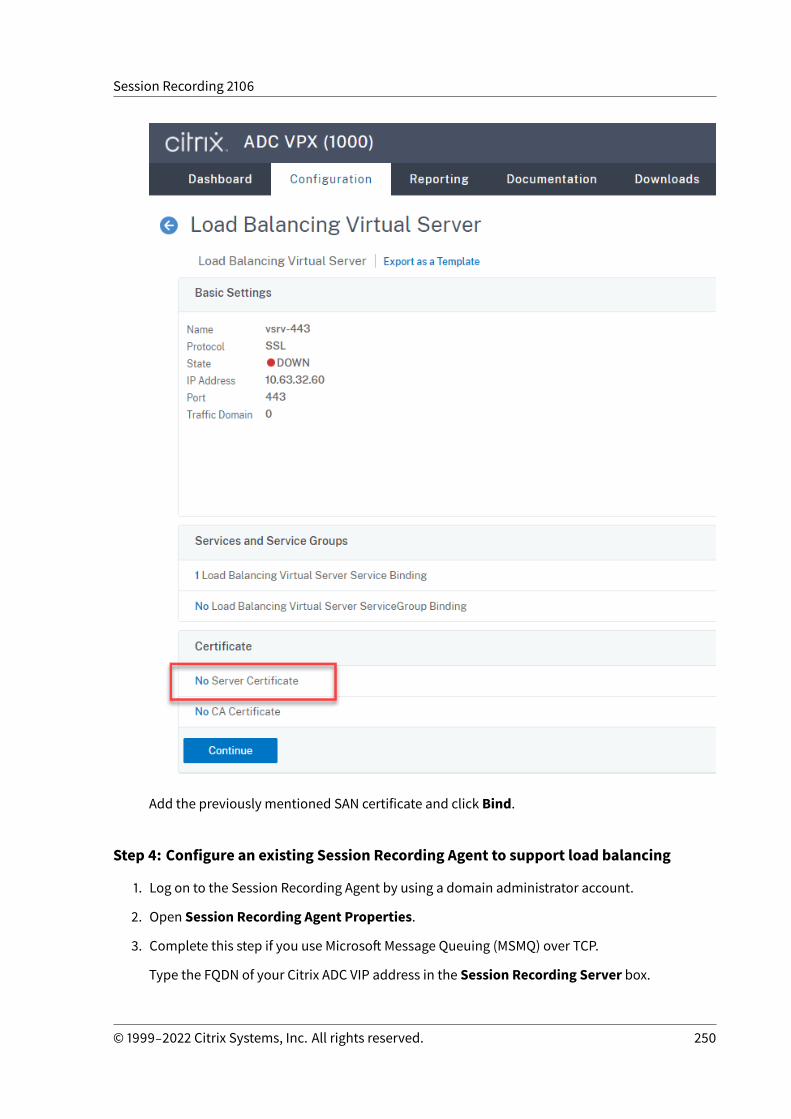
Session Recording 2106
Add the previously mentioned SAN certificate and click Bind.
Step 4: Configure an existing Session Recording Agent to support load balancing
1. Log on to the Session Recording Agent by using a domain administrator account.
2. Open Session Recording Agent Properties.
3. Complete this step if you use Microsoft Message Queuing (MSMQ) over TCP.
Type the FQDN of your Citrix ADC VIP address in the Session Recording Server box.
© 1999‒2022 Citrix Systems, Inc. All rights reserved. 250
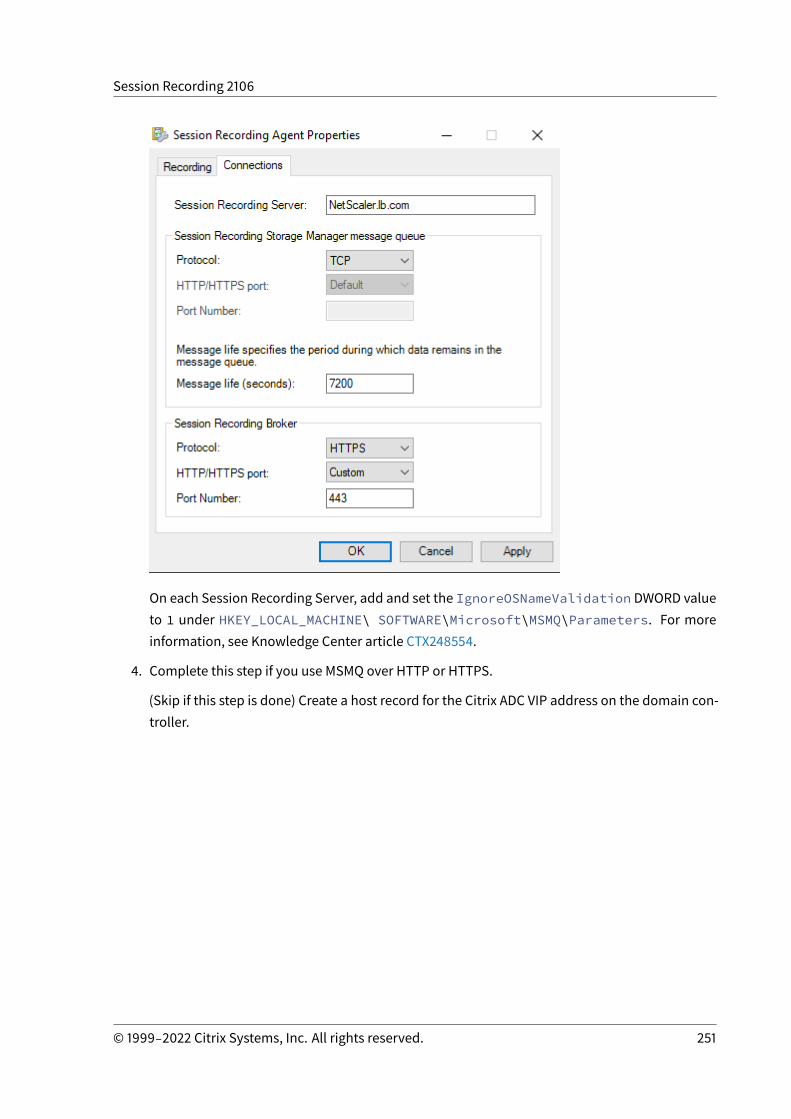
Session Recording 2106
On each Session Recording Server, add and set the IgnoreOSNameValidation DWORD valueto 1 under HKEY_LOCAL_MACHINE\ SOFTWARE\Microsoft\MSMQ\Parameters. For moreinformation, see Knowledge Center article CTX248554.
4. Complete this step if you use MSMQ over HTTP or HTTPS.
(Skip if this step is done) Create a host record for the Citrix ADC VIP address on the domain con-troller.
© 1999‒2022 Citrix Systems, Inc. All rights reserved. 251
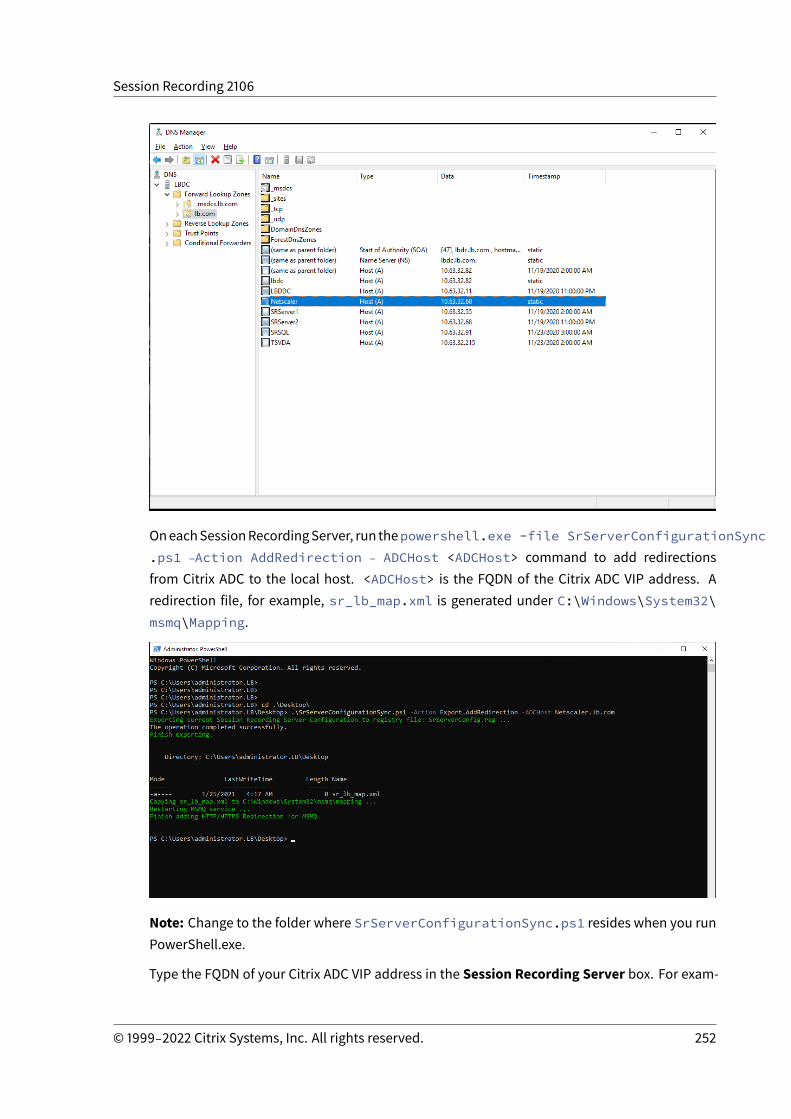
Session Recording 2106
OneachSessionRecordingServer, run thepowershell.exe -file SrServerConfigurationSync.ps1 ‒Action AddRedirection ‒ ADCHost <ADCHost> command to add redirectionsfrom Citrix ADC to the local host. <ADCHost> is the FQDN of the Citrix ADC VIP address. Aredirection file, for example, sr_lb_map.xml is generated under C:\Windows\System32\msmq\Mapping.
Note: Change to the folder where SrServerConfigurationSync.ps1 resides when you runPowerShell.exe.
Type the FQDN of your Citrix ADC VIP address in the Session Recording Server box. For exam-
© 1999‒2022 Citrix Systems, Inc. All rights reserved. 252
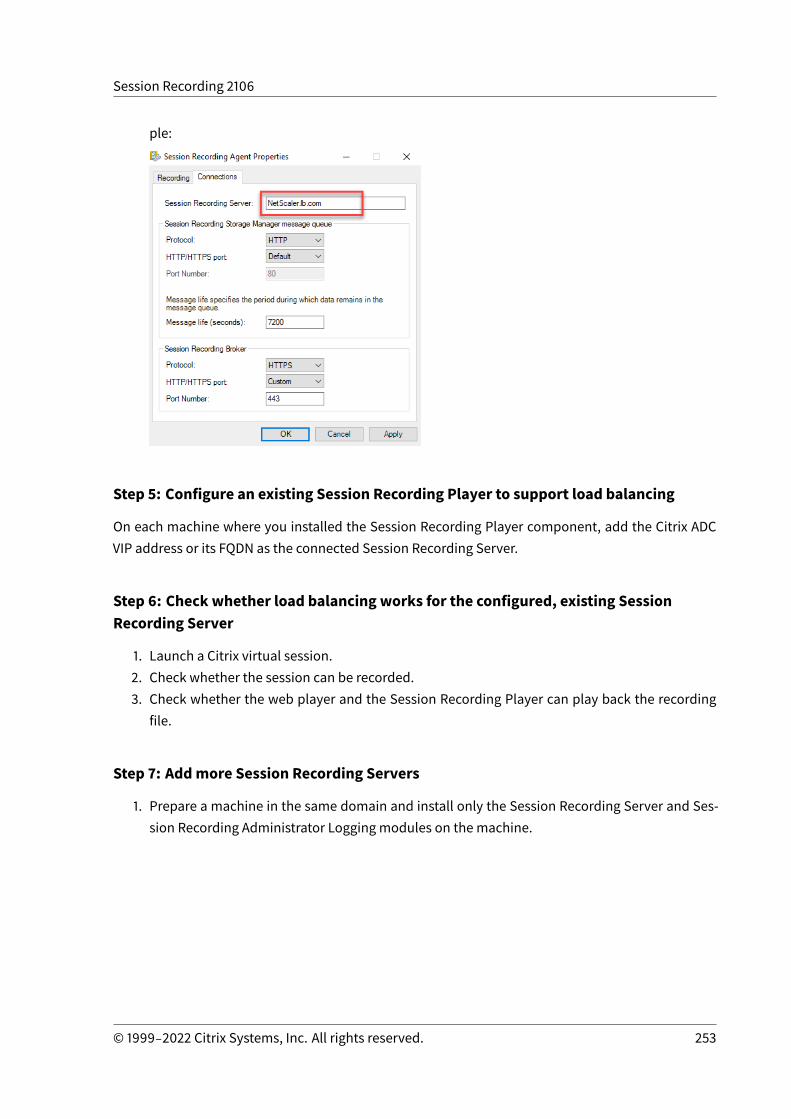
Session Recording 2106
ple:
Step 5: Configure an existing Session Recording Player to support load balancing
On each machine where you installed the Session Recording Player component, add the Citrix ADCVIP address or its FQDN as the connected Session Recording Server.
Step 6: Check whether load balancing works for the configured, existing SessionRecording Server
1. Launch a Citrix virtual session.2. Check whether the session can be recorded.3. Check whether the web player and the Session Recording Player can play back the recording
file.
Step 7: Addmore Session Recording Servers
1. Prepare a machine in the same domain and install only the Session Recording Server and Ses-sion Recording Administrator Logging modules on the machine.
© 1999‒2022 Citrix Systems, Inc. All rights reserved. 253
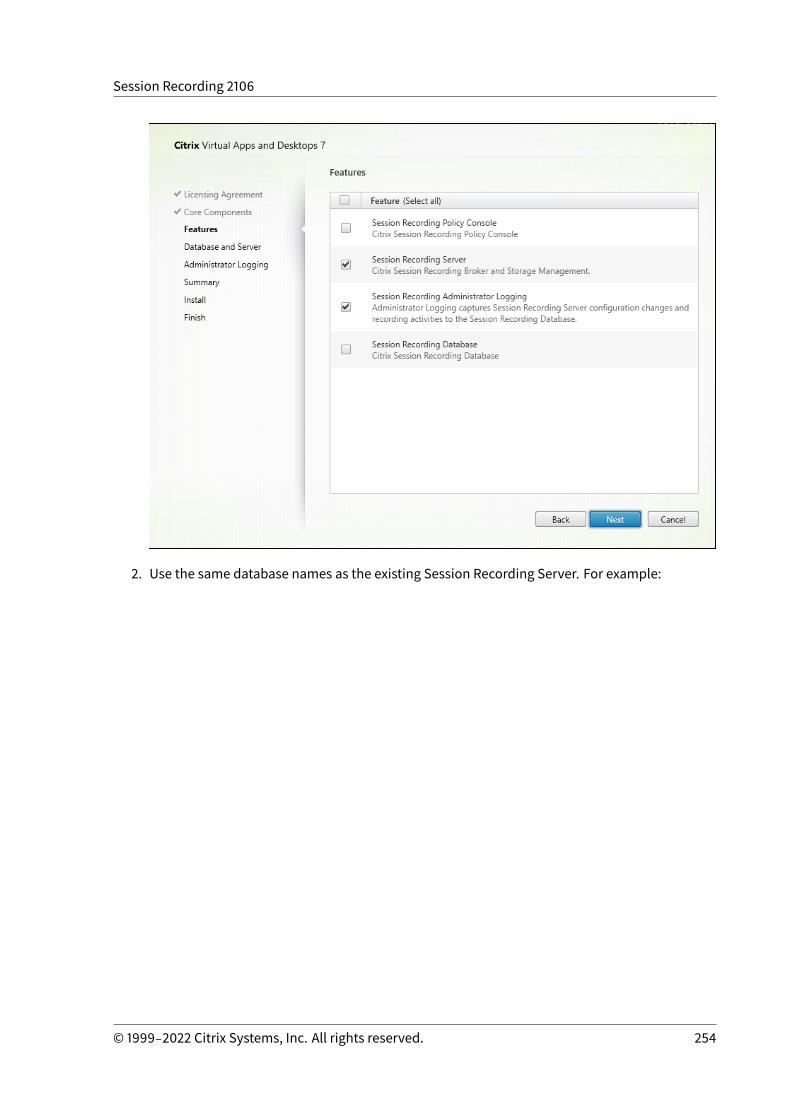
Session Recording 2106
2. Use the same database names as the existing Session Recording Server. For example:
© 1999‒2022 Citrix Systems, Inc. All rights reserved. 254
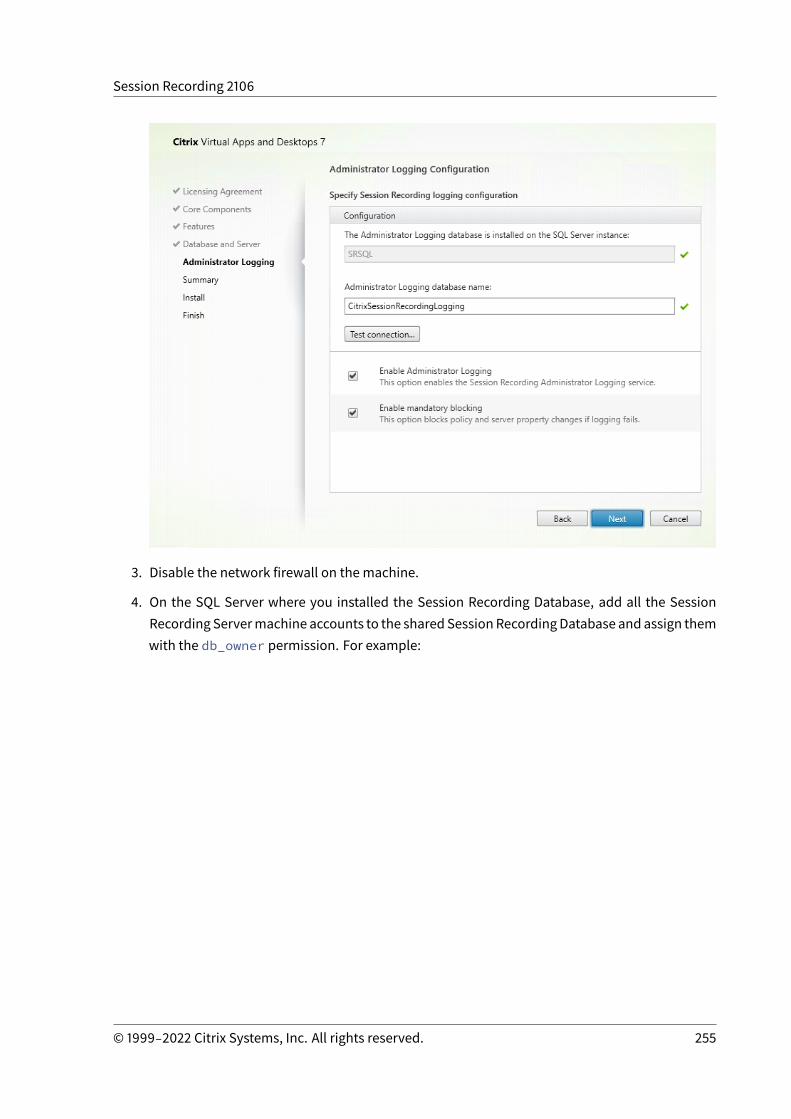
Session Recording 2106
3. Disable the network firewall on the machine.
4. On the SQL Server where you installed the Session Recording Database, add all the SessionRecording Servermachine accounts to the shared SessionRecordingDatabase and assign themwith the db_owner permission. For example:
© 1999‒2022 Citrix Systems, Inc. All rights reserved. 255
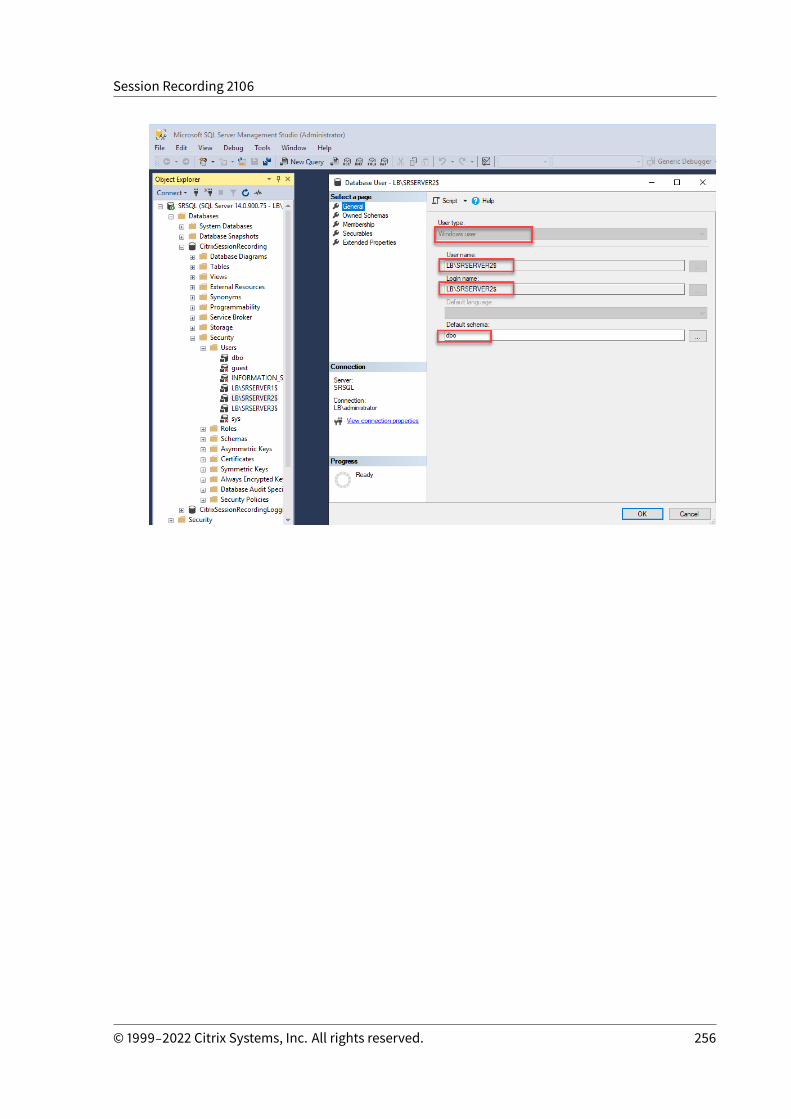
Session Recording 2106
© 1999‒2022 Citrix Systems, Inc. All rights reserved. 256
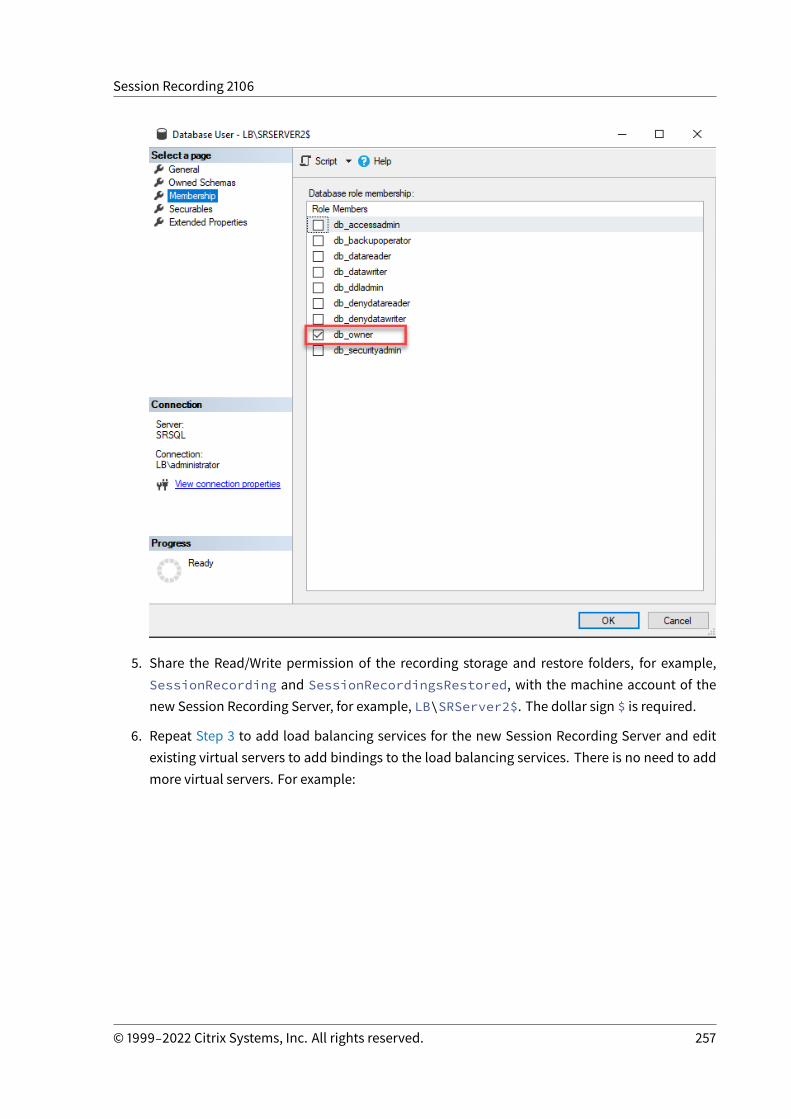
Session Recording 2106
5. Share the Read/Write permission of the recording storage and restore folders, for example,SessionRecording and SessionRecordingsRestored, with the machine account of thenew Session Recording Server, for example, LB\SRServer2$. The dollar sign $ is required.
6. Repeat Step 3 to add load balancing services for the new Session Recording Server and editexisting virtual servers to add bindings to the load balancing services. There is no need to addmore virtual servers. For example:
© 1999‒2022 Citrix Systems, Inc. All rights reserved. 257

Session Recording 2106
© 1999‒2022 Citrix Systems, Inc. All rights reserved. 258

Session Recording 2106
© 1999‒2022 Citrix Systems, Inc. All rights reserved. 259
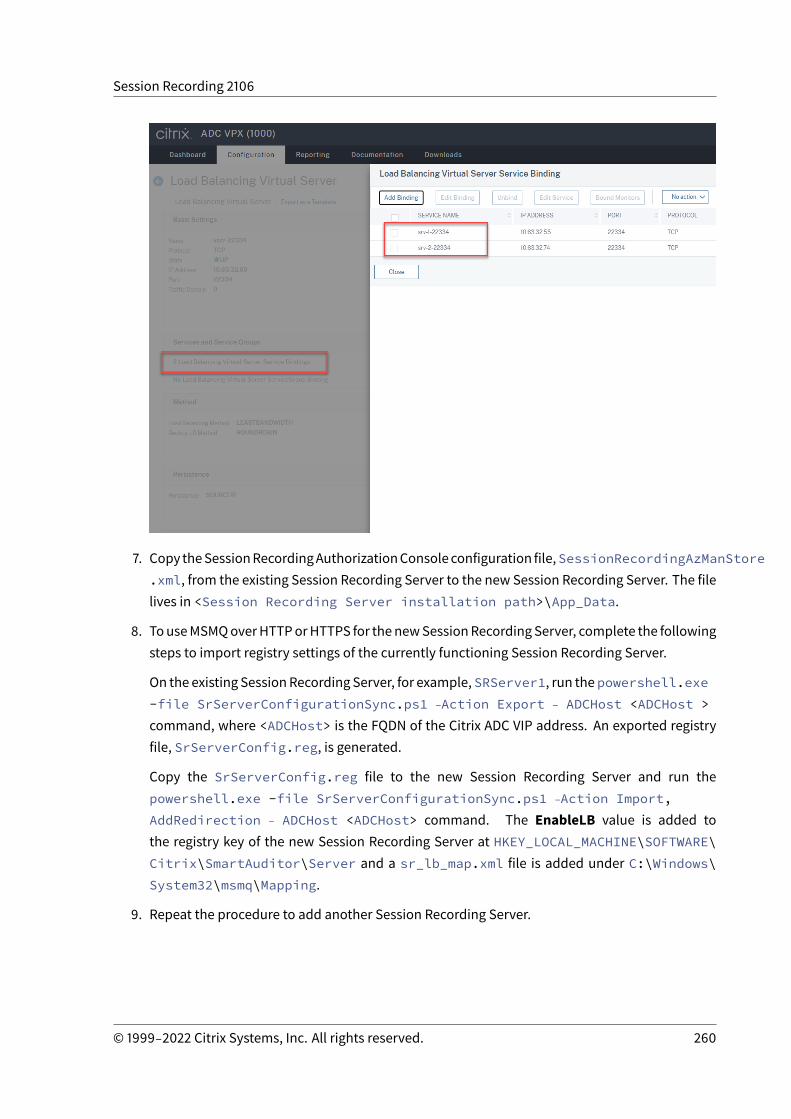
Session Recording 2106
7. Copy theSessionRecordingAuthorizationConsoleconfiguration file,SessionRecordingAzManStore.xml, from the existing Session Recording Server to the new Session Recording Server. The filelives in <Session Recording Server installation path>\App_Data.
8. TouseMSMQoverHTTPorHTTPS for thenewSessionRecordingServer, complete the followingsteps to import registry settings of the currently functioning Session Recording Server.
On the existing SessionRecording Server, for example, SRServer1, run thepowershell.exe-file SrServerConfigurationSync.ps1 ‒Action Export ‒ ADCHost <ADCHost >command, where <ADCHost> is the FQDN of the Citrix ADC VIP address. An exported registryfile, SrServerConfig.reg, is generated.
Copy the SrServerConfig.reg file to the new Session Recording Server and run thepowershell.exe -file SrServerConfigurationSync.ps1 ‒Action Import,AddRedirection ‒ ADCHost <ADCHost> command. The EnableLB value is added tothe registry key of the new Session Recording Server at HKEY_LOCAL_MACHINE\SOFTWARE\Citrix\SmartAuditor\Server and a sr_lb_map.xml file is added under C:\Windows\System32\msmq\Mapping.
9. Repeat the procedure to add another Session Recording Server.
© 1999‒2022 Citrix Systems, Inc. All rights reserved. 260
Session Recording 2106
Troubleshoot
• Sessions are not recording when you use a CNAME record or an ALIAS record for a SessionRecording Server. For more information, see Knowledge Center article CTX248554.
• Recording files can be stored locally but cannot be stored in a Universal Naming Convention(UNC) path. To address this issue, change the startmodeof the Citrix Session Recording StorageManager service to Automatic (Delayed Start).
Deploy and load-balance Session Recording in Azure
July 12, 2021
Prerequisites
• You already have Citrix Virtual Apps and Desktops installed in Azure.• You have an Azure account.
Step 1: Upload the Citrix Virtual Apps and Desktops installer to AzureNote:
SkipStep 1 if youuseyourCitrix account credentials toaccess theCitrix Virtual AppsandDesktopsdownload page and download the product ISO file to a VM in Azure.
1. In the Azure portal, create a general-purpose v2 storage account and accept the default perfor-mance tier, Standard.
All access to Azure Storage goes through a storage account.
© 1999‒2022 Citrix Systems, Inc. All rights reserved. 261
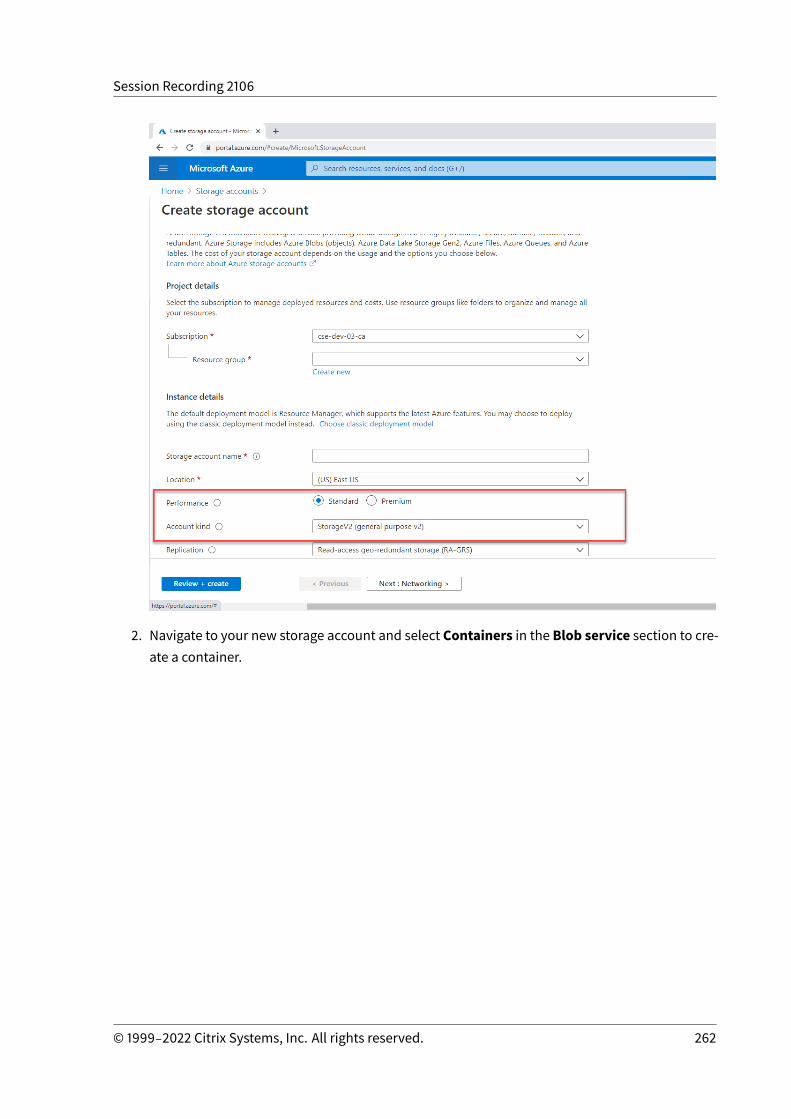
Session Recording 2106
2. Navigate to your new storage account and select Containers in the Blob service section to cre-ate a container.
© 1999‒2022 Citrix Systems, Inc. All rights reserved. 262
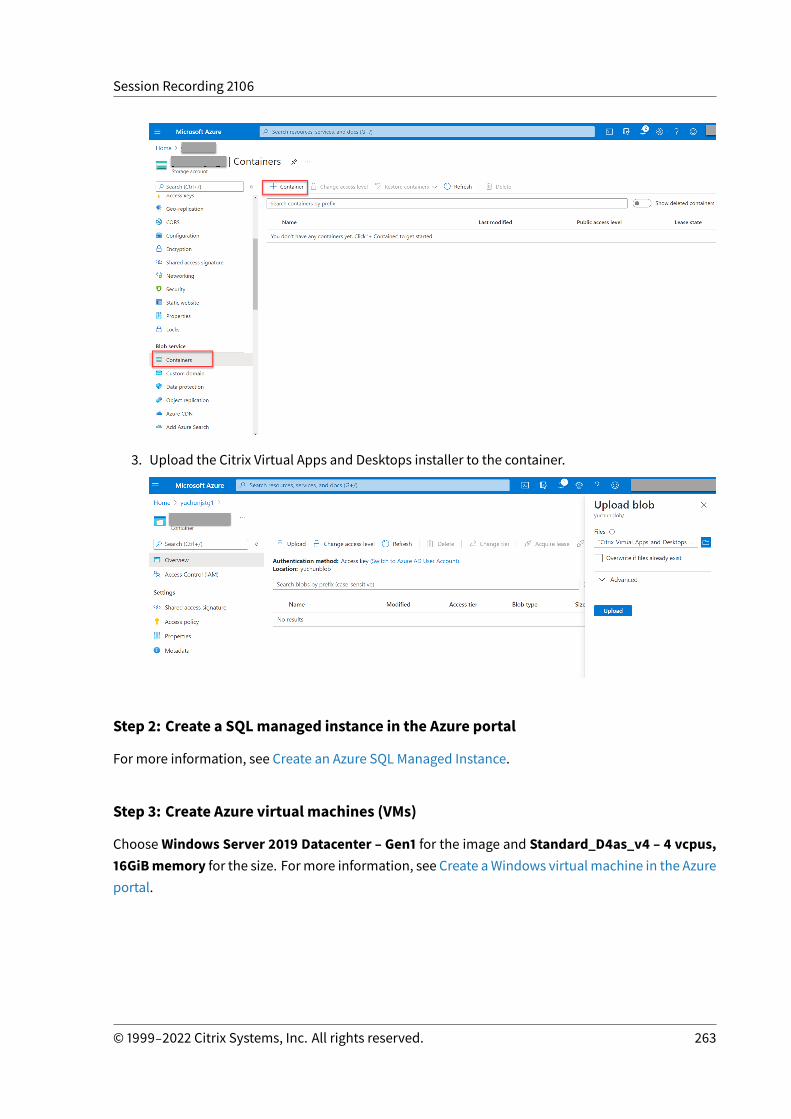
Session Recording 2106
3. Upload the Citrix Virtual Apps and Desktops installer to the container.
Step 2: Create a SQLmanaged instance in the Azure portal
For more information, see Create an Azure SQL Managed Instance.
Step 3: Create Azure virtual machines (VMs)
ChooseWindows Server 2019 Datacenter – Gen1 for the image and Standard_D4as_v4 – 4 vcpus,16GiBmemory for the size. Formore information, see Create aWindows virtual machine in the Azureportal.
© 1999‒2022 Citrix Systems, Inc. All rights reserved. 263

Session Recording 2106
© 1999‒2022 Citrix Systems, Inc. All rights reserved. 264
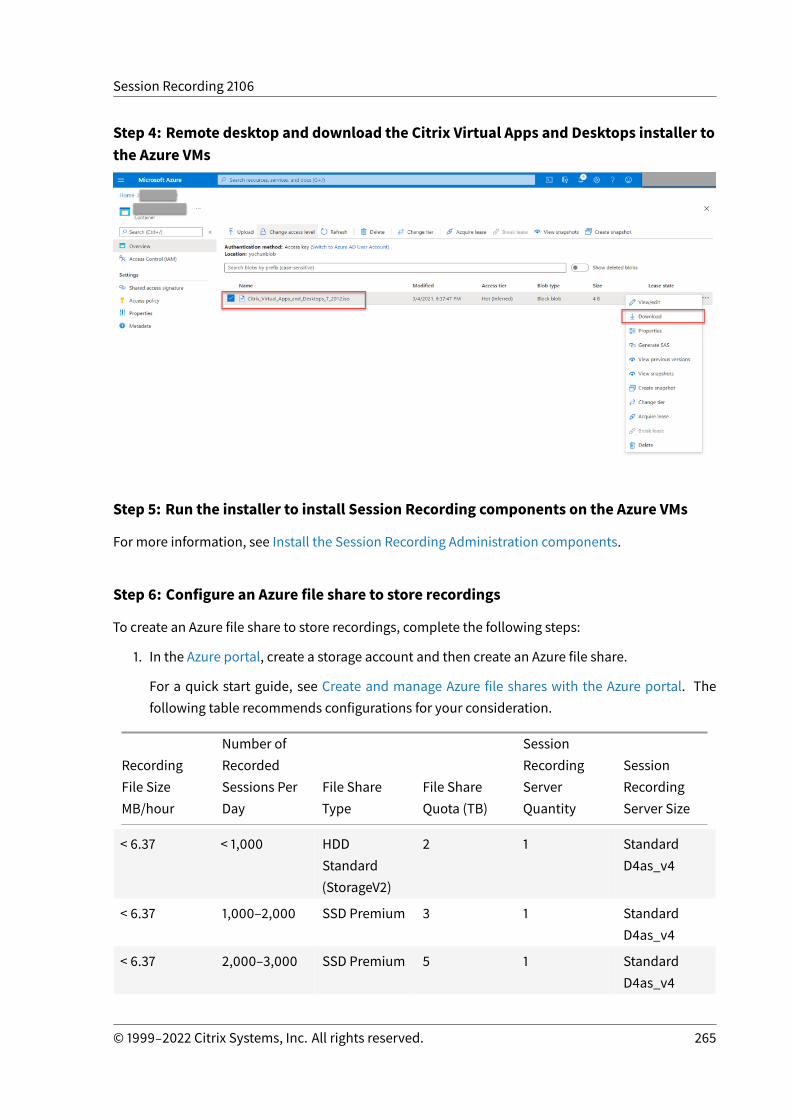
Session Recording 2106
Step 4: Remote desktop and download the Citrix Virtual Apps and Desktops installer tothe Azure VMs
Step 5: Run the installer to install Session Recording components on the Azure VMs
For more information, see Install the Session Recording Administration components.
Step 6: Configure an Azure file share to store recordings
To create an Azure file share to store recordings, complete the following steps:
1. In the Azure portal, create a storage account and then create an Azure file share.
For a quick start guide, see Create and manage Azure file shares with the Azure portal. Thefollowing table recommends configurations for your consideration.
RecordingFile SizeMB/hour
Number ofRecordedSessions PerDay
File ShareType
File ShareQuota (TB)
SessionRecordingServerQuantity
SessionRecordingServer Size
< 6.37 < 1,000 HDDStandard(StorageV2)
2 1 StandardD4as_v4
< 6.37 1,000–2,000 SSD Premium 3 1 StandardD4as_v4
< 6.37 2,000–3,000 SSD Premium 5 1 StandardD4as_v4
© 1999‒2022 Citrix Systems, Inc. All rights reserved. 265
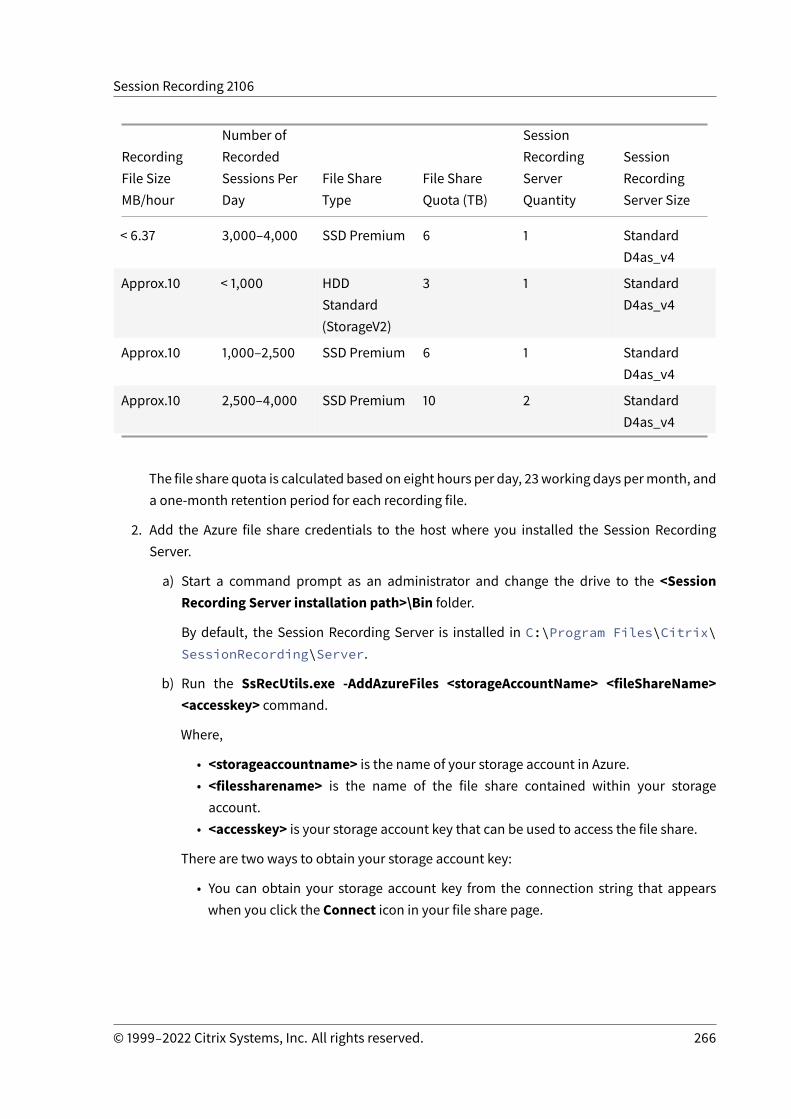
Session Recording 2106
RecordingFile SizeMB/hour
Number ofRecordedSessions PerDay
File ShareType
File ShareQuota (TB)
SessionRecordingServerQuantity
SessionRecordingServer Size
< 6.37 3,000–4,000 SSD Premium 6 1 StandardD4as_v4
Approx.10 < 1,000 HDDStandard(StorageV2)
3 1 StandardD4as_v4
Approx.10 1,000–2,500 SSD Premium 6 1 StandardD4as_v4
Approx.10 2,500–4,000 SSD Premium 10 2 StandardD4as_v4
The file share quota is calculated based on eight hours per day, 23working days permonth, anda one-month retention period for each recording file.
2. Add the Azure file share credentials to the host where you installed the Session RecordingServer.
a) Start a command prompt as an administrator and change the drive to the <SessionRecording Server installation path>\Bin folder.
By default, the Session Recording Server is installed in C:\Program Files\Citrix\SessionRecording\Server.
b) Run the SsRecUtils.exe -AddAzureFiles <storageAccountName> <fileShareName><accesskey> command.
Where,
• <storageaccountname> is the name of your storage account in Azure.• <filessharename> is the name of the file share contained within your storageaccount.
• <accesskey> is your storage account key that can be used to access the file share.
There are two ways to obtain your storage account key:
• You can obtain your storage account key from the connection string that appearswhen you click the Connect icon in your file share page.
© 1999‒2022 Citrix Systems, Inc. All rights reserved. 266
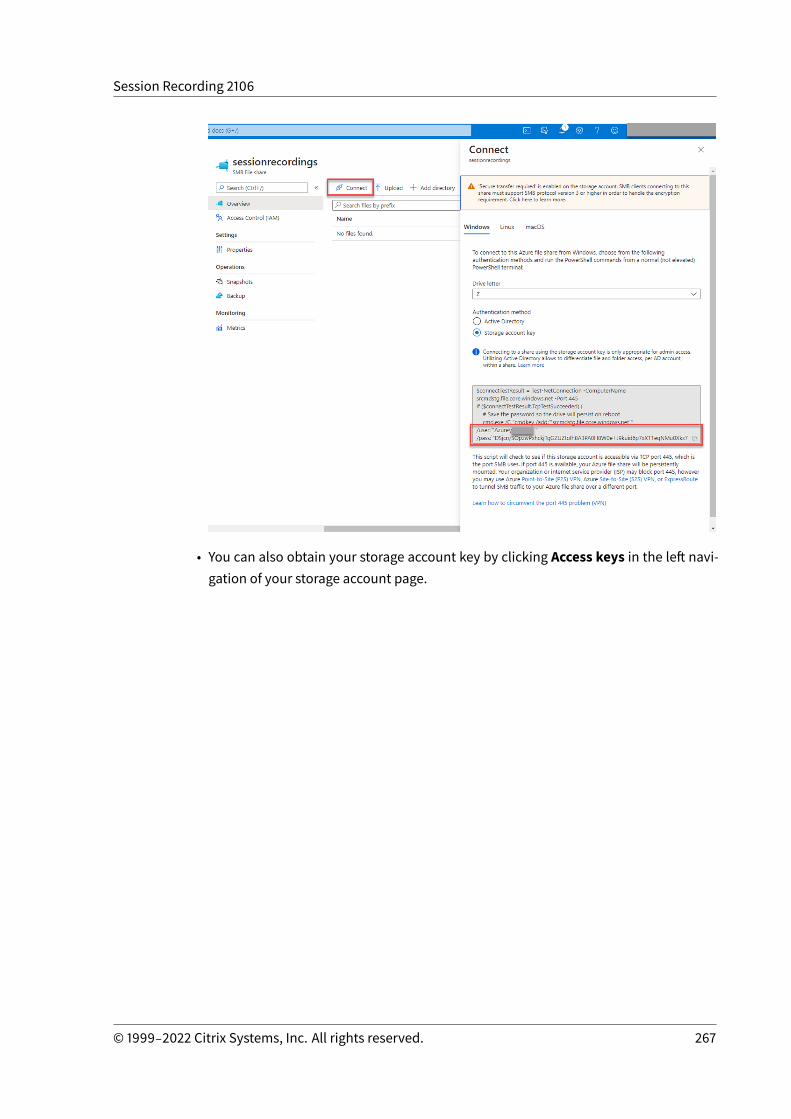
Session Recording 2106
• You can also obtain your storage account key by clicking Access keys in the left navi-gation of your storage account page.
© 1999‒2022 Citrix Systems, Inc. All rights reserved. 267

Session Recording 2106
c) Mount the Azure file share to the host where you installed the Session Recording Server.
i. Open Session Recording Server Properties.
ii. Click Add on the Storage tab.
iii. Enter theUNCpath in the formatof \\<storageaccountname>.file.core.windows.net\<filessharename>\<subfolder>.
Specify a subfolder under the file share to store your recording files. The SessionRecording Server then automatically creates the subfolder for you.
© 1999‒2022 Citrix Systems, Inc. All rights reserved. 268
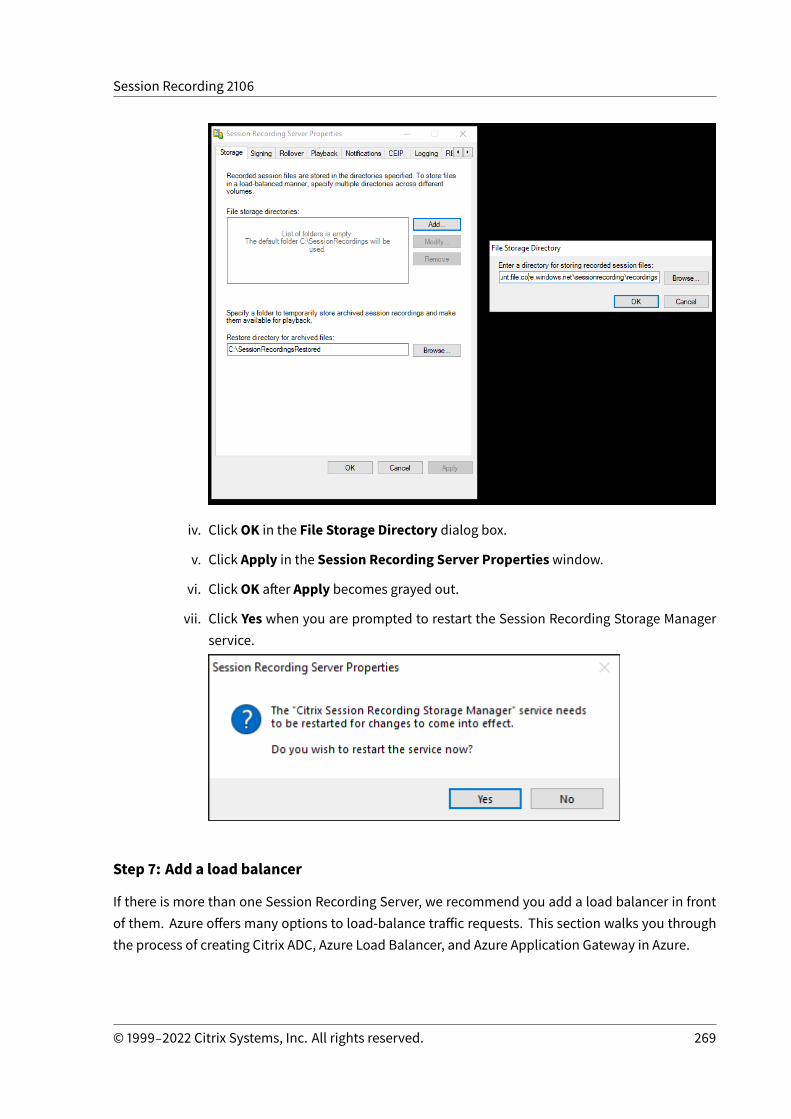
Session Recording 2106
iv. ClickOK in the File Storage Directory dialog box.
v. Click Apply in the Session Recording Server Propertieswindow.
vi. ClickOK after Apply becomes grayed out.
vii. Click Yes when you are prompted to restart the Session Recording Storage Managerservice.
Step 7: Add a load balancer
If there is more than one Session Recording Server, we recommend you add a load balancer in frontof them. Azure offers many options to load-balance traffic requests. This section walks you throughthe process of creating Citrix ADC, Azure Load Balancer, and Azure Application Gateway in Azure.
© 1999‒2022 Citrix Systems, Inc. All rights reserved. 269
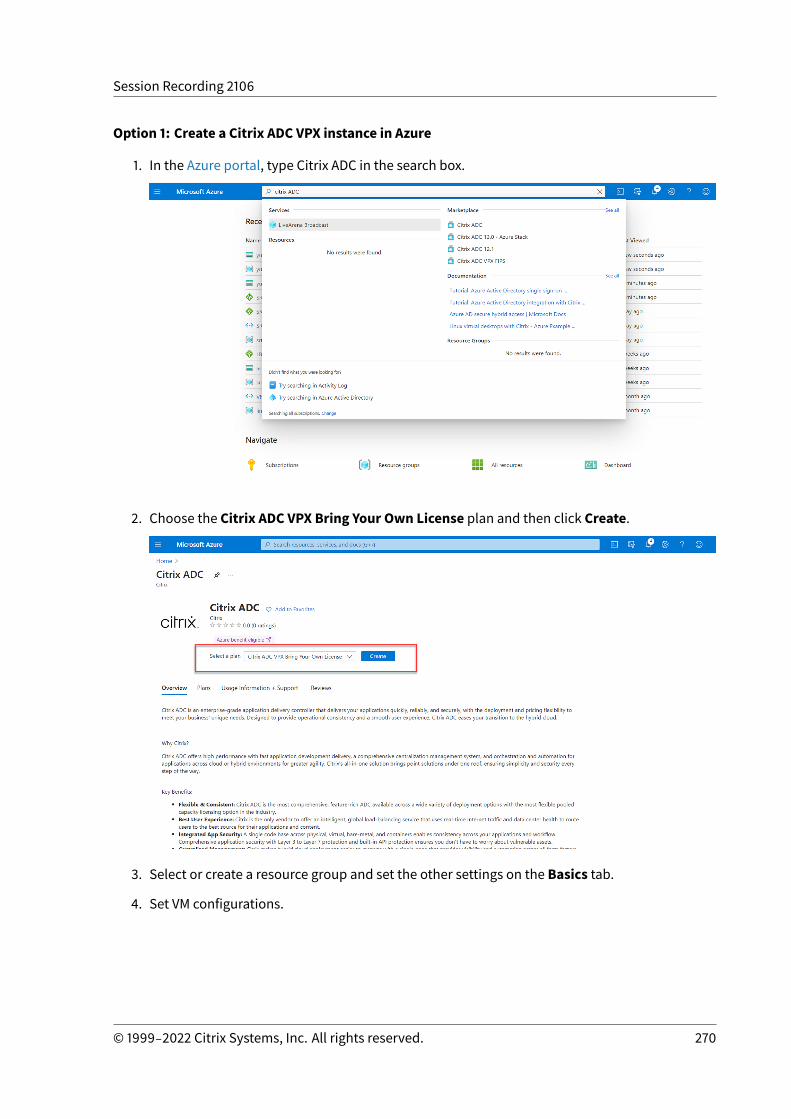
Session Recording 2106
Option 1: Create a Citrix ADC VPX instance in Azure
1. In the Azure portal, type Citrix ADC in the search box.
2. Choose the Citrix ADC VPX Bring Your Own License plan and then click Create.
3. Select or create a resource group and set the other settings on the Basics tab.
4. Set VM configurations.
© 1999‒2022 Citrix Systems, Inc. All rights reserved. 270
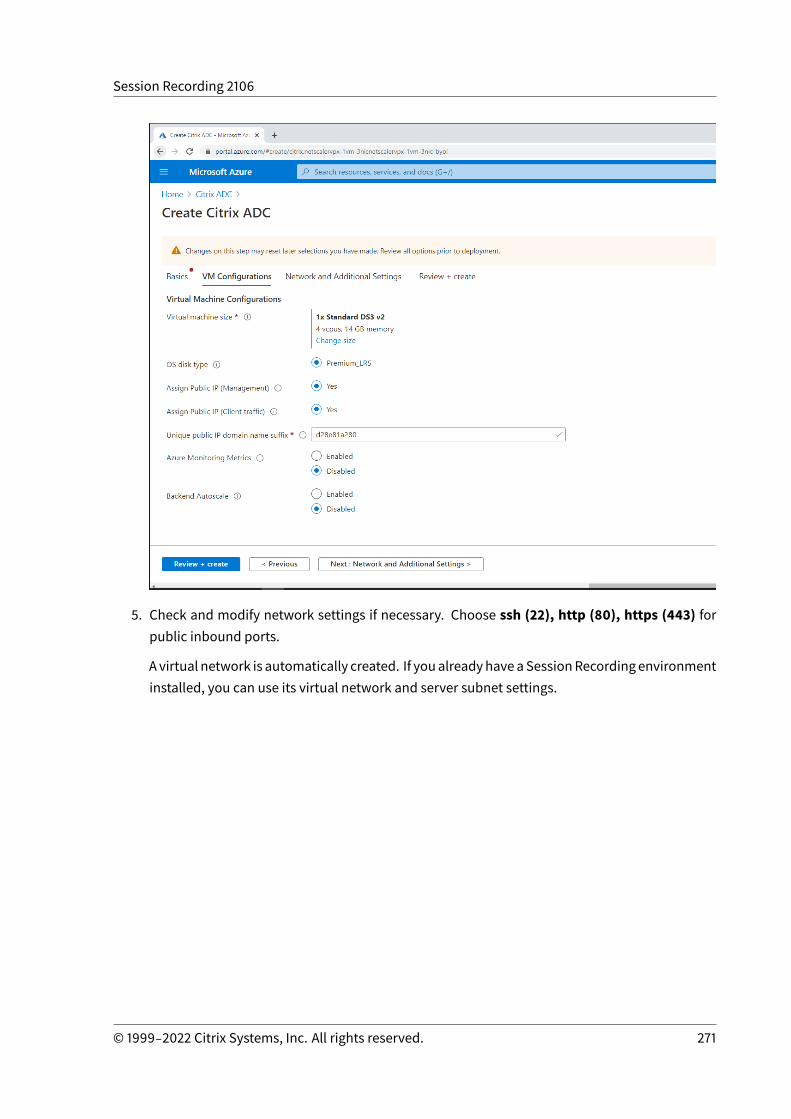
Session Recording 2106
5. Check and modify network settings if necessary. Choose ssh (22), http (80), https (443) forpublic inbound ports.
A virtual network is automatically created. If youalreadyhaveaSessionRecording environmentinstalled, you can use its virtual network and server subnet settings.
© 1999‒2022 Citrix Systems, Inc. All rights reserved. 271
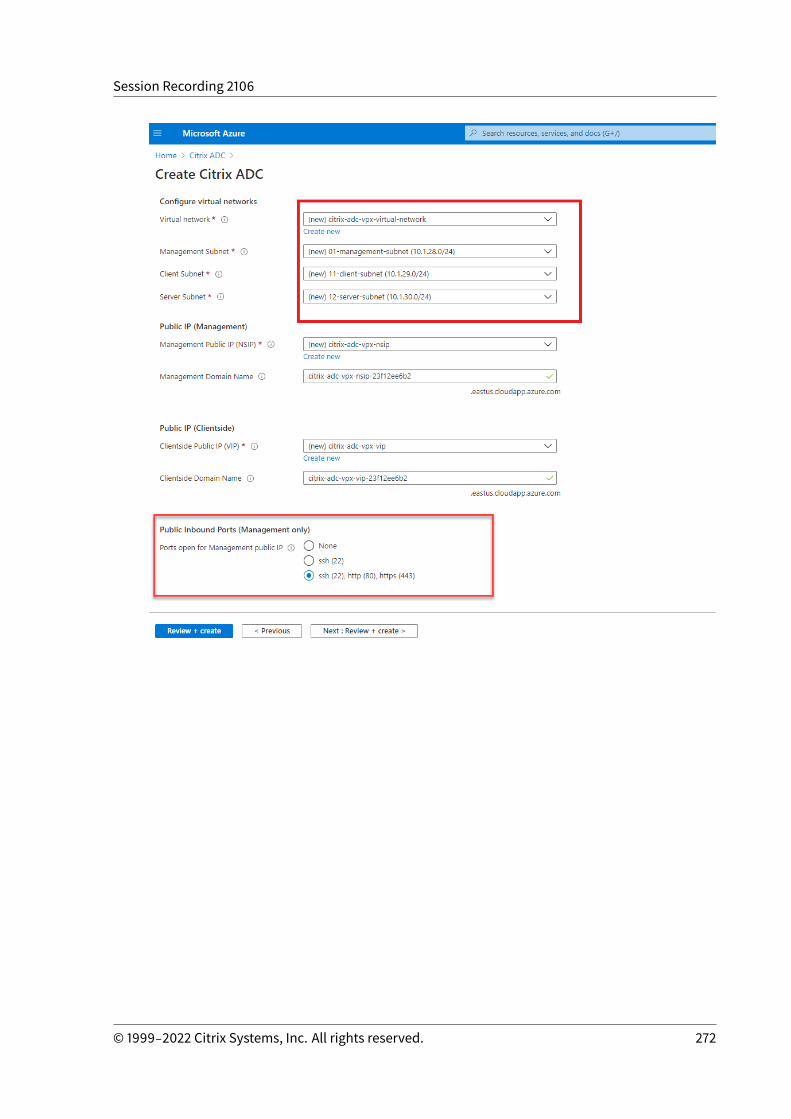
Session Recording 2106
© 1999‒2022 Citrix Systems, Inc. All rights reserved. 272
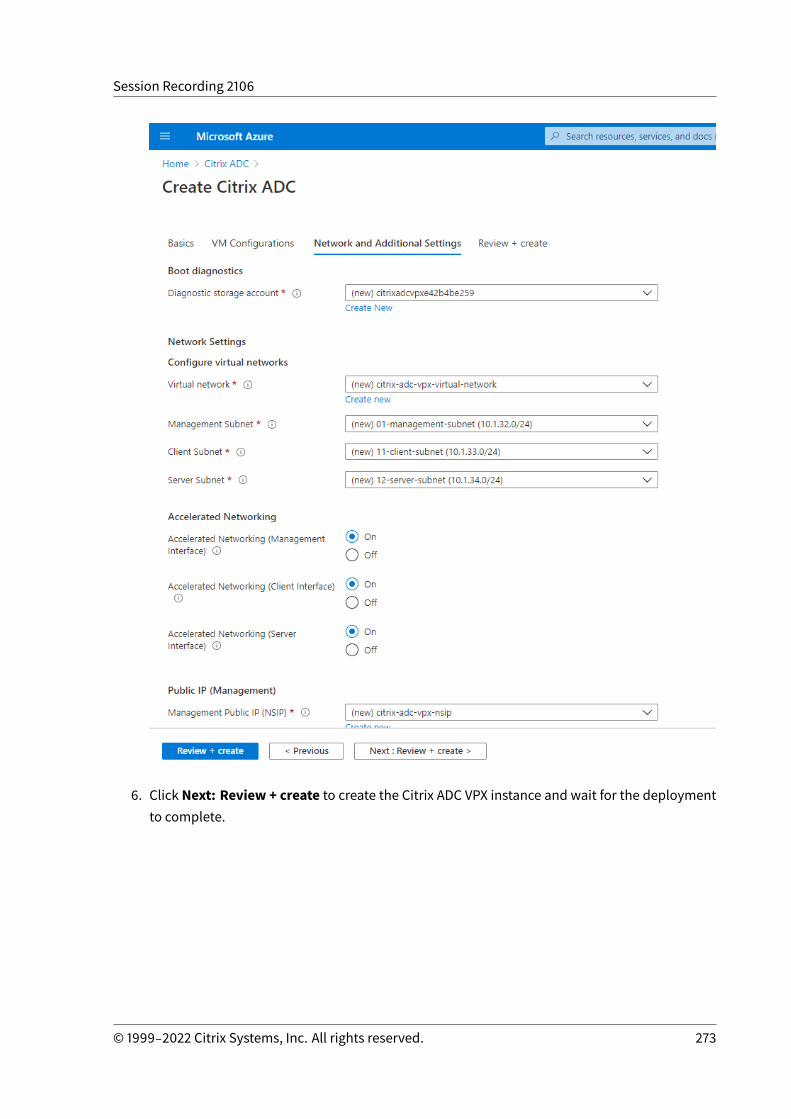
Session Recording 2106
6. Click Next: Review + create to create the Citrix ADC VPX instance and wait for the deploymentto complete.
© 1999‒2022 Citrix Systems, Inc. All rights reserved. 273

Session Recording 2106
7. Set the subnet IP (SNIP) address and the Citrix ADC VIP address to be on the same subnet.
The SNIP address and the VIP address must be on the same subnet. In this example, we set theVIP address to be on the subnet of the SNIP address.
a) Stop the citrix-adc-vpx virtual machine.
b) Change the subnet of the VIP address.
© 1999‒2022 Citrix Systems, Inc. All rights reserved. 274
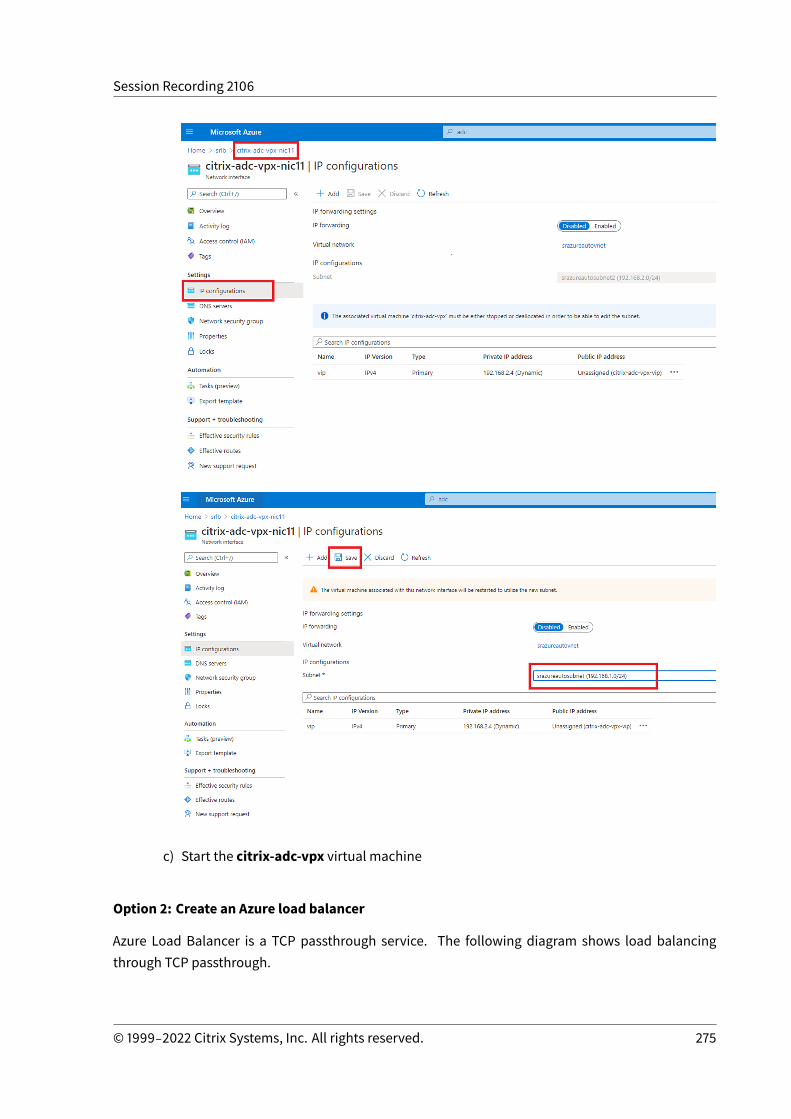
Session Recording 2106
c) Start the citrix-adc-vpx virtual machine
Option 2: Create an Azure load balancer
Azure Load Balancer is a TCP passthrough service. The following diagram shows load balancingthrough TCP passthrough.
© 1999‒2022 Citrix Systems, Inc. All rights reserved. 275
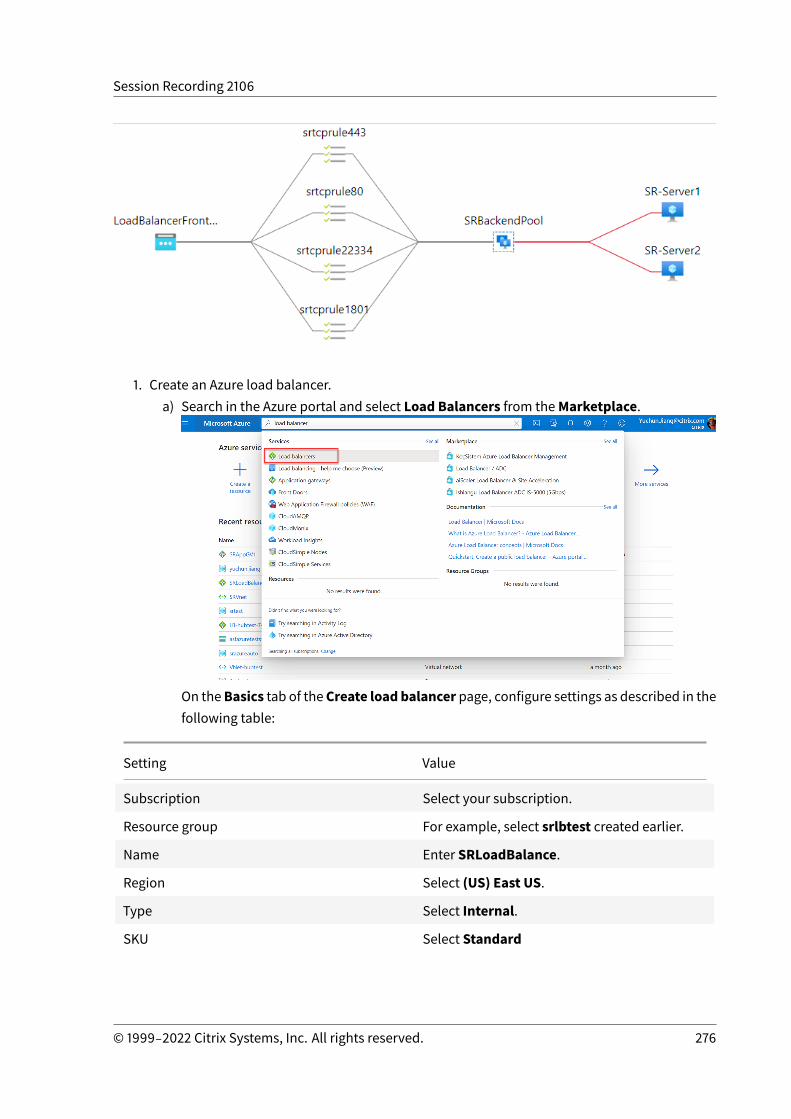
Session Recording 2106
1. Create an Azure load balancer.a) Search in the Azure portal and select Load Balancers from theMarketplace.
On theBasics tab of theCreate load balancer page, configure settings as described in thefollowing table:
Setting Value
Subscription Select your subscription.
Resource group For example, select srlbtest created earlier.
Name Enter SRLoadBalance.
Region Select (US) East US.
Type Select Internal.
SKU Select Standard
© 1999‒2022 Citrix Systems, Inc. All rights reserved. 276
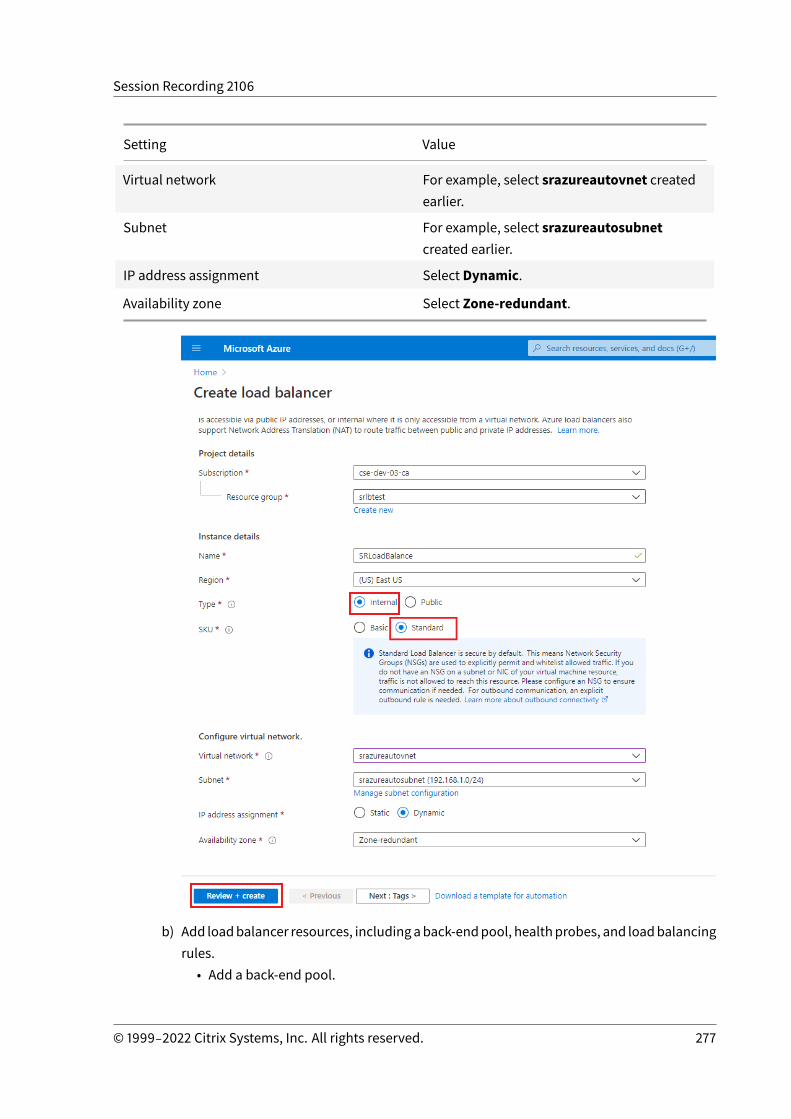
Session Recording 2106
Setting Value
Virtual network For example, select srazureautovnet createdearlier.
Subnet For example, select srazureautosubnetcreated earlier.
IP address assignment Select Dynamic.
Availability zone Select Zone-redundant.
b) Add loadbalancer resources, includingaback-endpool, healthprobes, and loadbalancingrules.
• Add a back-end pool.
© 1999‒2022 Citrix Systems, Inc. All rights reserved. 277
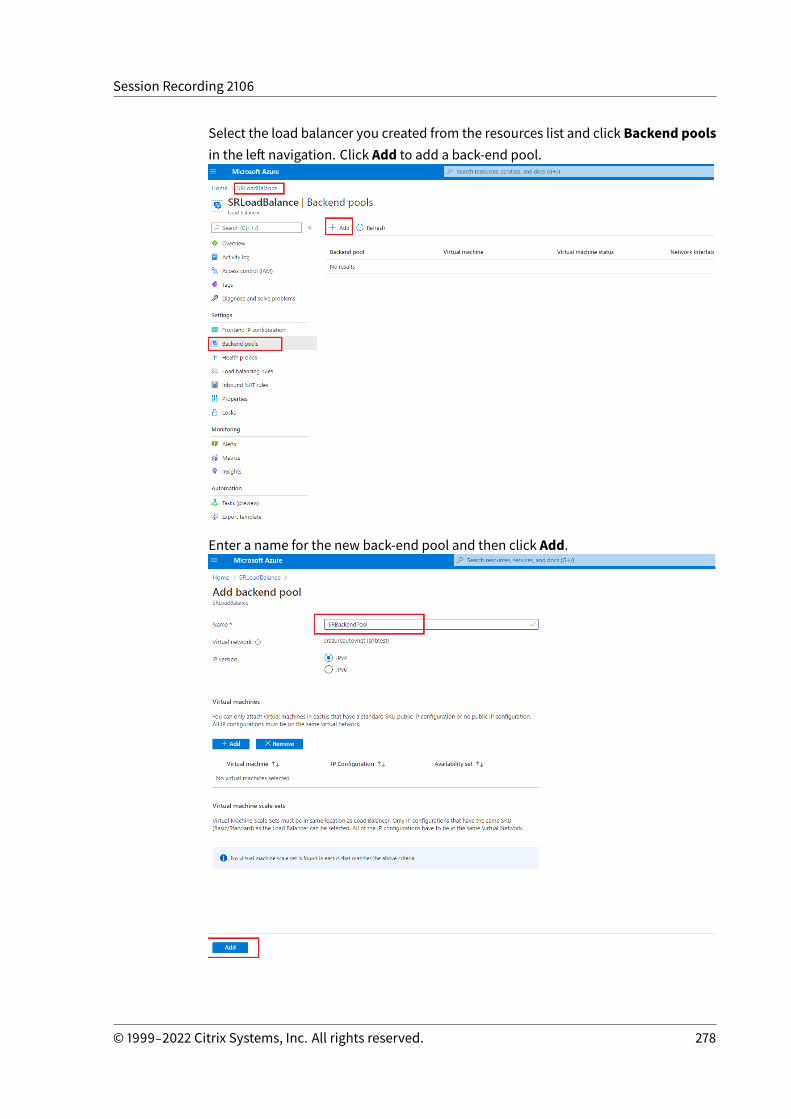
Session Recording 2106
Select the load balancer you created from the resources list and click Backend poolsin the left navigation. Click Add to add a back-end pool.
Enter a name for the new back-end pool and then click Add.
© 1999‒2022 Citrix Systems, Inc. All rights reserved. 278
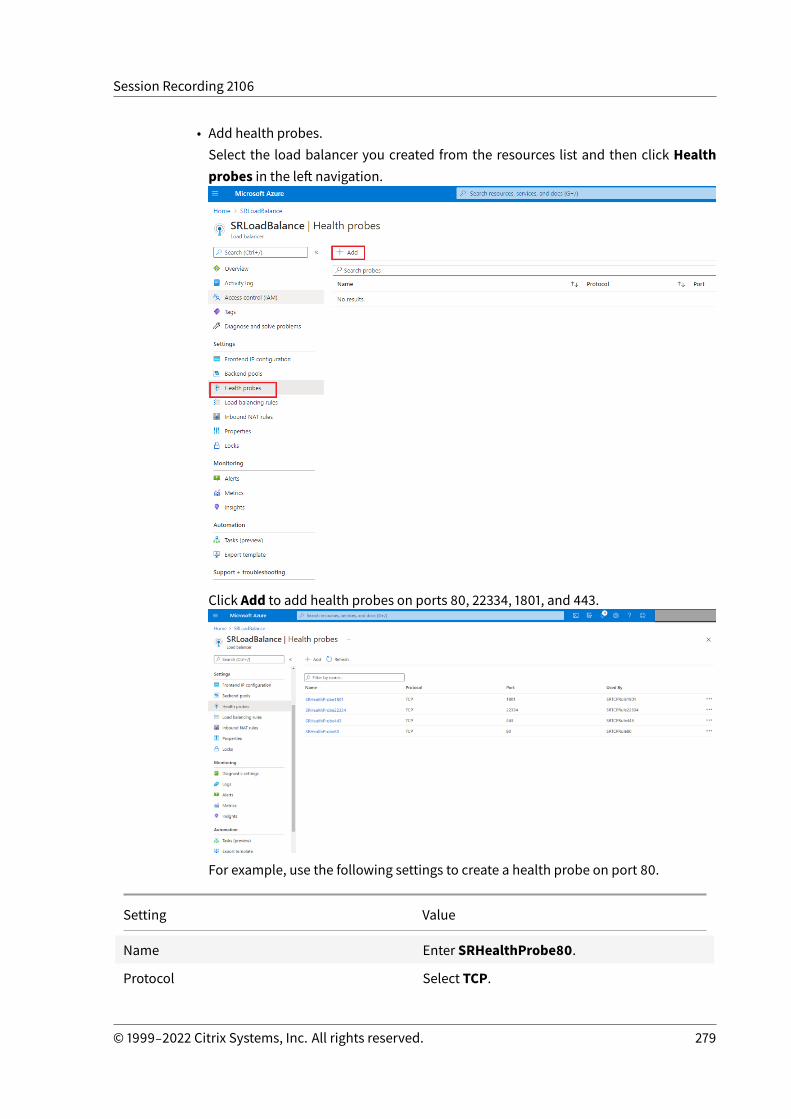
Session Recording 2106
• Add health probes.Select the load balancer you created from the resources list and then click Healthprobes in the left navigation.
Click Add to add health probes on ports 80, 22334, 1801, and 443.
For example, use the following settings to create a health probe on port 80.
Setting Value
Name Enter SRHealthProbe80.
Protocol Select TCP.
© 1999‒2022 Citrix Systems, Inc. All rights reserved. 279

Session Recording 2106
Setting Value
Port Enter 80.
Interval 5
Unhealthy threshold Select 2 for the number of unhealthy thresholdor consecutive probe failures that must occurbefore a VM is considered unhealthy.
• Add a load balancing rule.Select the load balancer you created from the resources list and then click Load bal-ancing rules in the left navigation. Click Add to add a load balancing rule.
© 1999‒2022 Citrix Systems, Inc. All rights reserved. 280

Session Recording 2106
Click Add to add load balancing rules for ports 80, 22334, 1801, and 443.
For example, use the following settings to create a load balancing rule for port 80.
© 1999‒2022 Citrix Systems, Inc. All rights reserved. 281
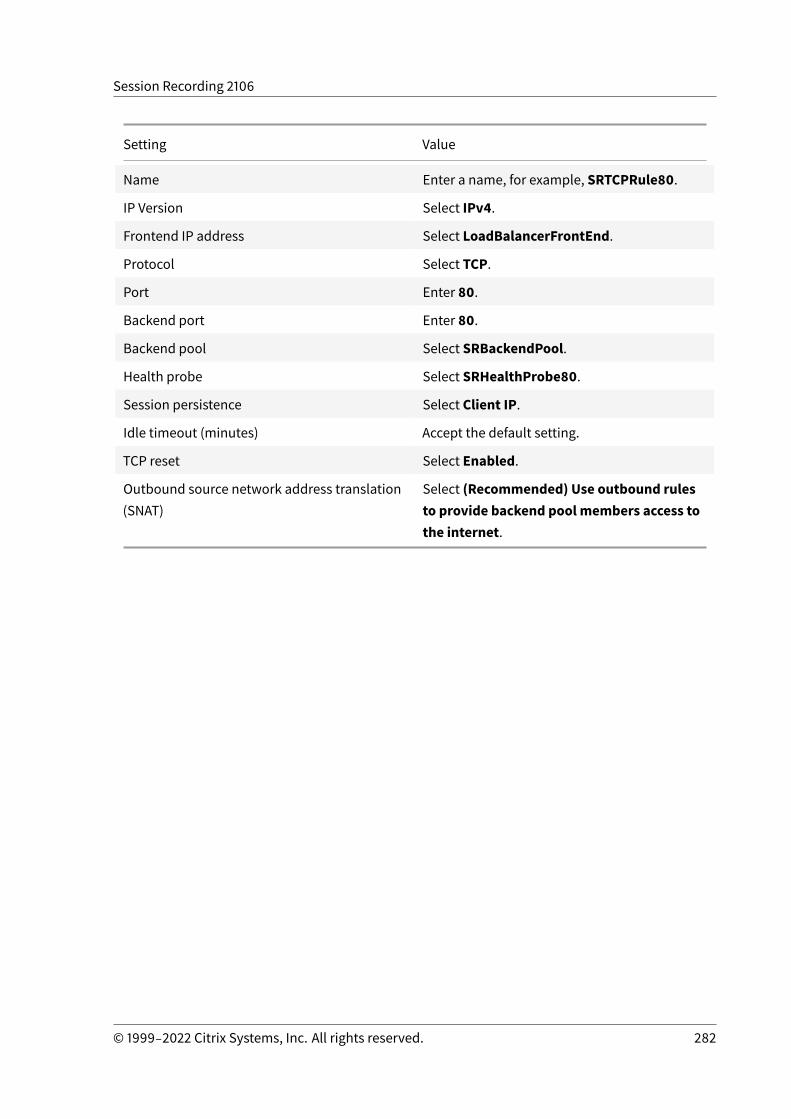
Session Recording 2106
Setting Value
Name Enter a name, for example, SRTCPRule80.
IP Version Select IPv4.
Frontend IP address Select LoadBalancerFrontEnd.
Protocol Select TCP.
Port Enter 80.
Backend port Enter 80.
Backend pool Select SRBackendPool.
Health probe Select SRHealthProbe80.
Session persistence Select Client IP.
Idle timeout (minutes) Accept the default setting.
TCP reset Select Enabled.
Outbound source network address translation(SNAT)
Select (Recommended) Use outbound rulesto provide backend pool members access tothe internet.
© 1999‒2022 Citrix Systems, Inc. All rights reserved. 282
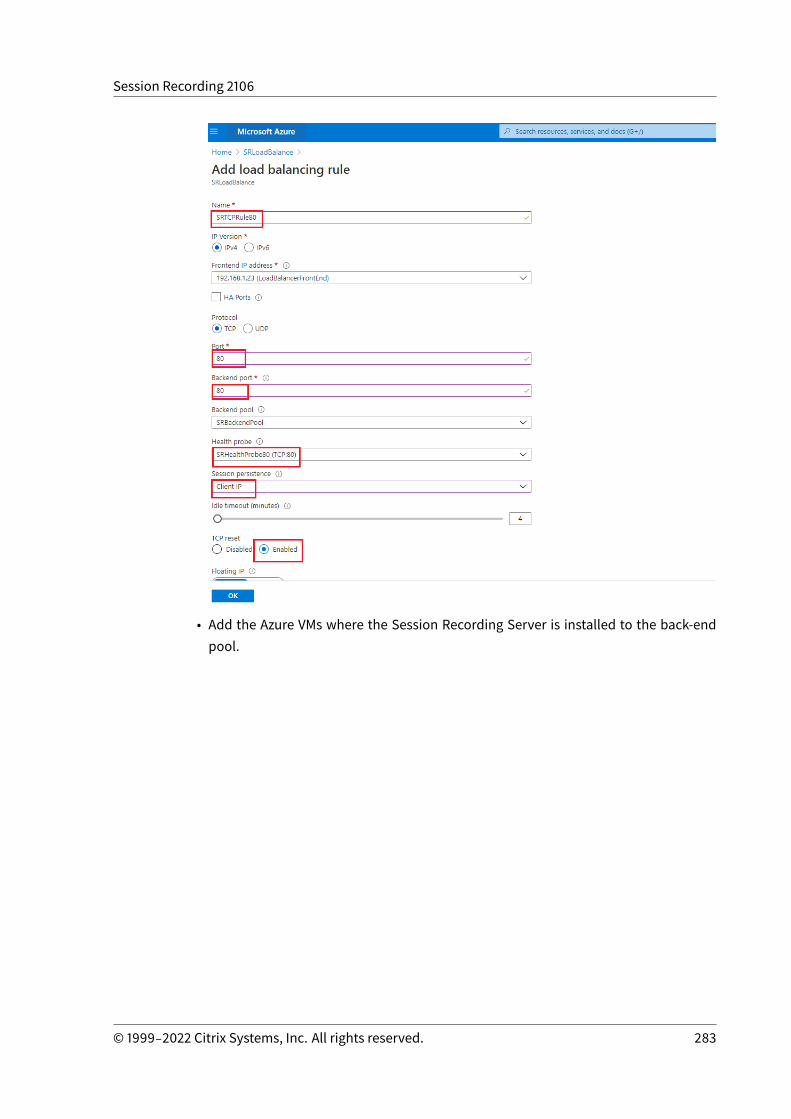
Session Recording 2106
• Add the Azure VMs where the Session Recording Server is installed to the back-endpool.
© 1999‒2022 Citrix Systems, Inc. All rights reserved. 283
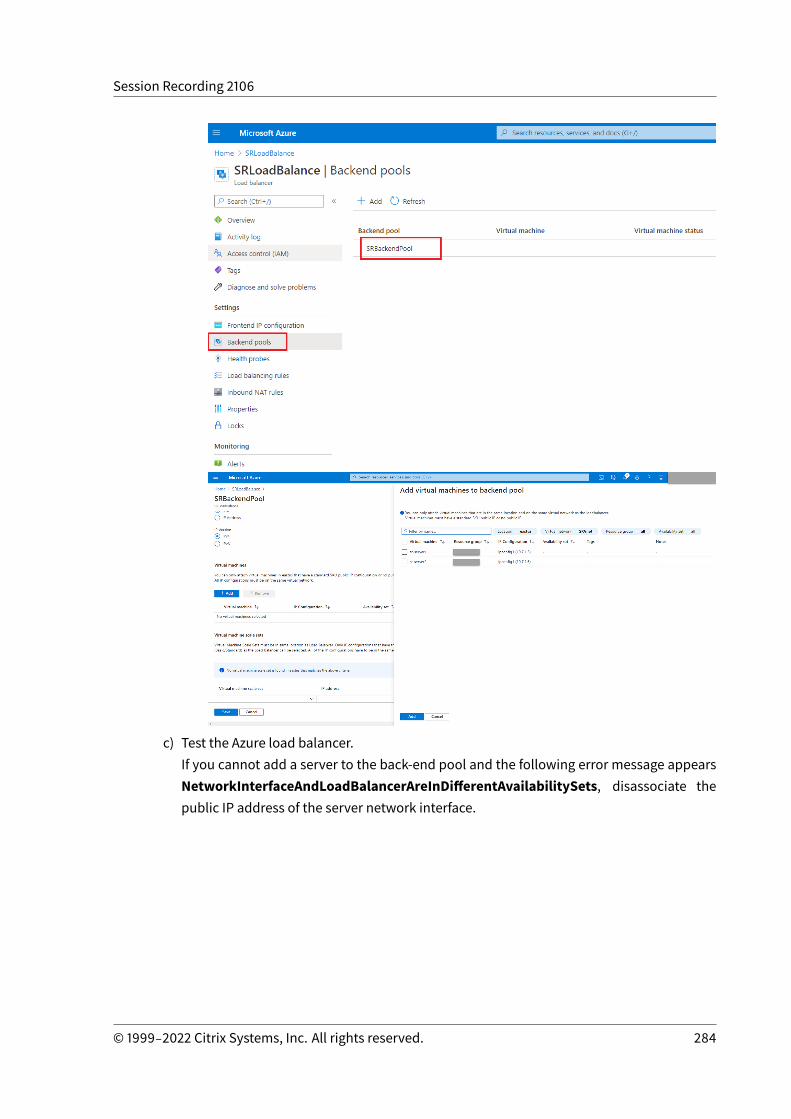
Session Recording 2106
c) Test the Azure load balancer.If you cannot add a server to the back-end pool and the following error message appearsNetworkInterfaceAndLoadBalancerAreInDifferentAvailabilitySets, disassociate thepublic IP address of the server network interface.
© 1999‒2022 Citrix Systems, Inc. All rights reserved. 284
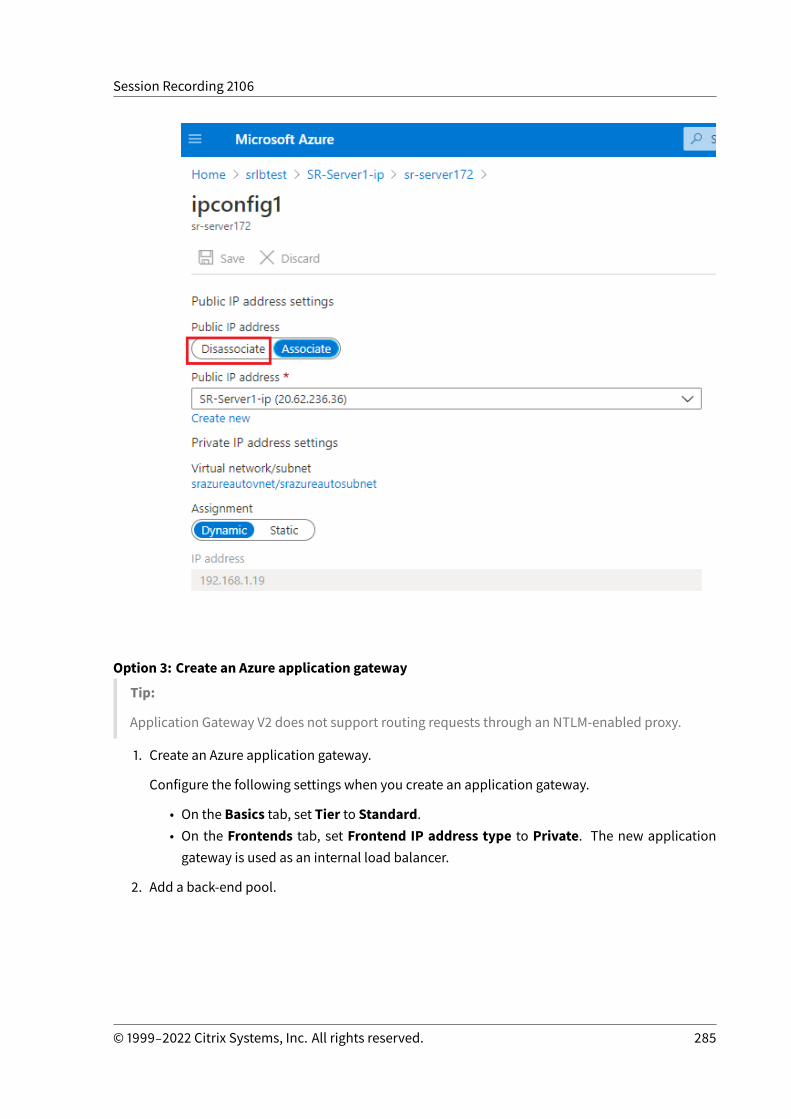
Session Recording 2106
Option 3: Create an Azure application gateway
Tip:
Application Gateway V2 does not support routing requests through an NTLM-enabled proxy.
1. Create an Azure application gateway.
Configure the following settings when you create an application gateway.
• On the Basics tab, set Tier to Standard.• On the Frontends tab, set Frontend IP address type to Private. The new applicationgateway is used as an internal load balancer.
2. Add a back-end pool.
© 1999‒2022 Citrix Systems, Inc. All rights reserved. 285
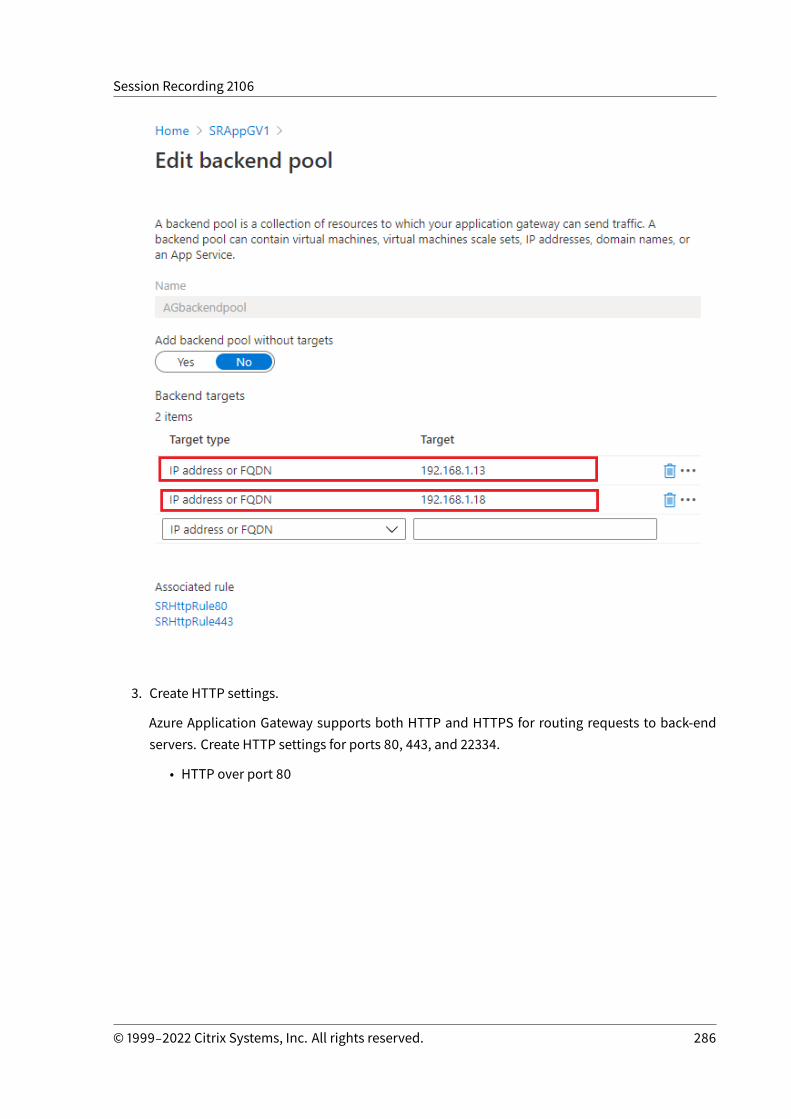
Session Recording 2106
3. Create HTTP settings.
Azure Application Gateway supports both HTTP and HTTPS for routing requests to back-endservers. Create HTTP settings for ports 80, 443, and 22334.
• HTTP over port 80
© 1999‒2022 Citrix Systems, Inc. All rights reserved. 286
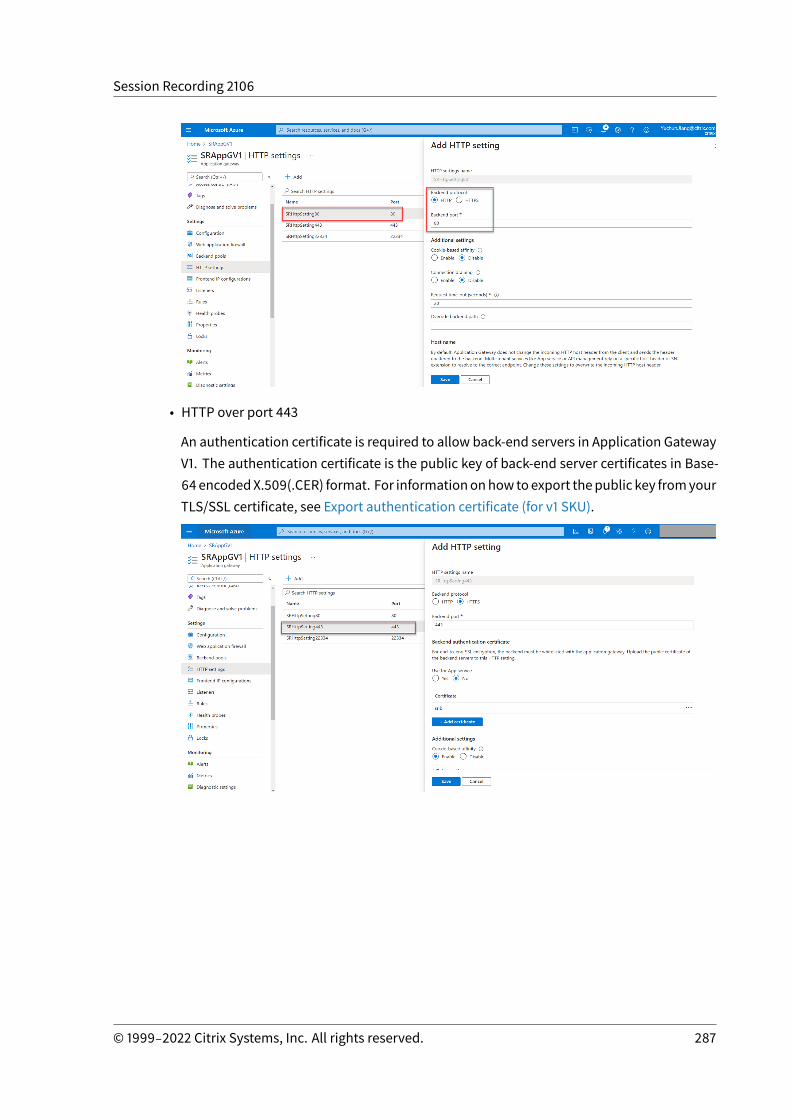
Session Recording 2106
• HTTP over port 443
An authentication certificate is required to allow back-end servers in Application GatewayV1. The authentication certificate is the public key of back-end server certificates in Base-64encodedX.509(.CER) format. For informationonhowtoexport thepublic key fromyourTLS/SSL certificate, see Export authentication certificate (for v1 SKU).
© 1999‒2022 Citrix Systems, Inc. All rights reserved. 287
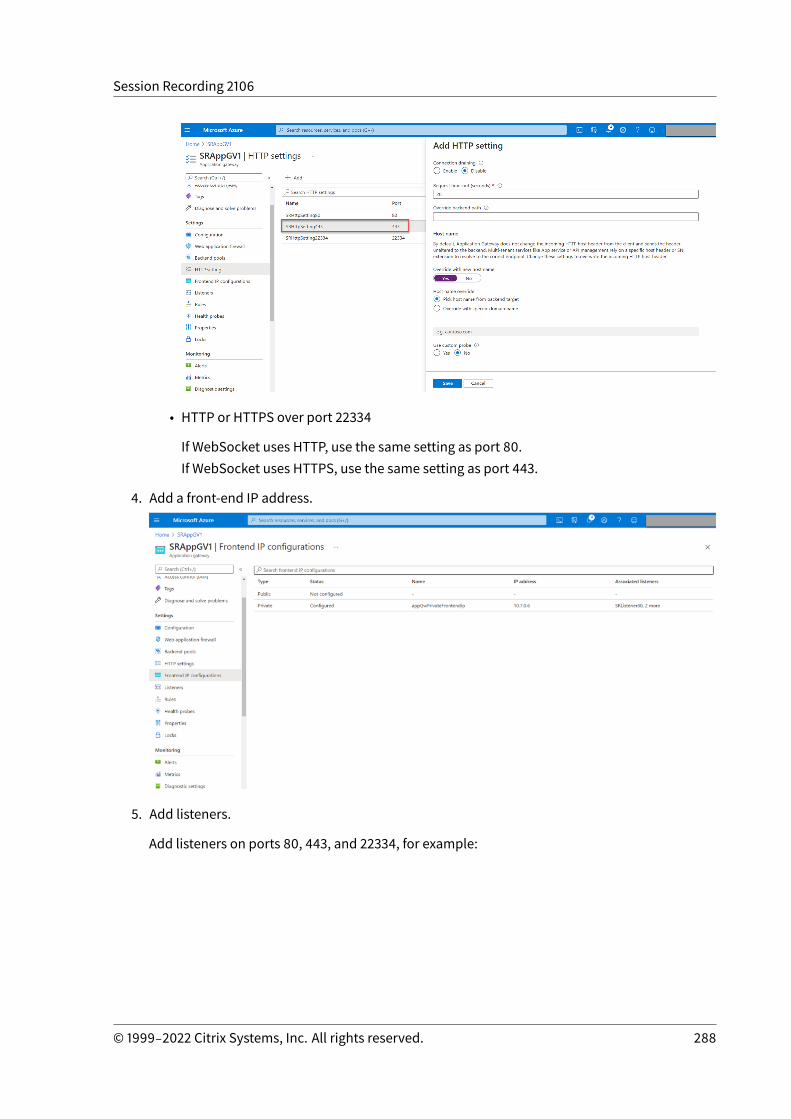
Session Recording 2106
• HTTP or HTTPS over port 22334
If WebSocket uses HTTP, use the same setting as port 80.If WebSocket uses HTTPS, use the same setting as port 443.
4. Add a front-end IP address.
5. Add listeners.
Add listeners on ports 80, 443, and 22334, for example:
© 1999‒2022 Citrix Systems, Inc. All rights reserved. 288
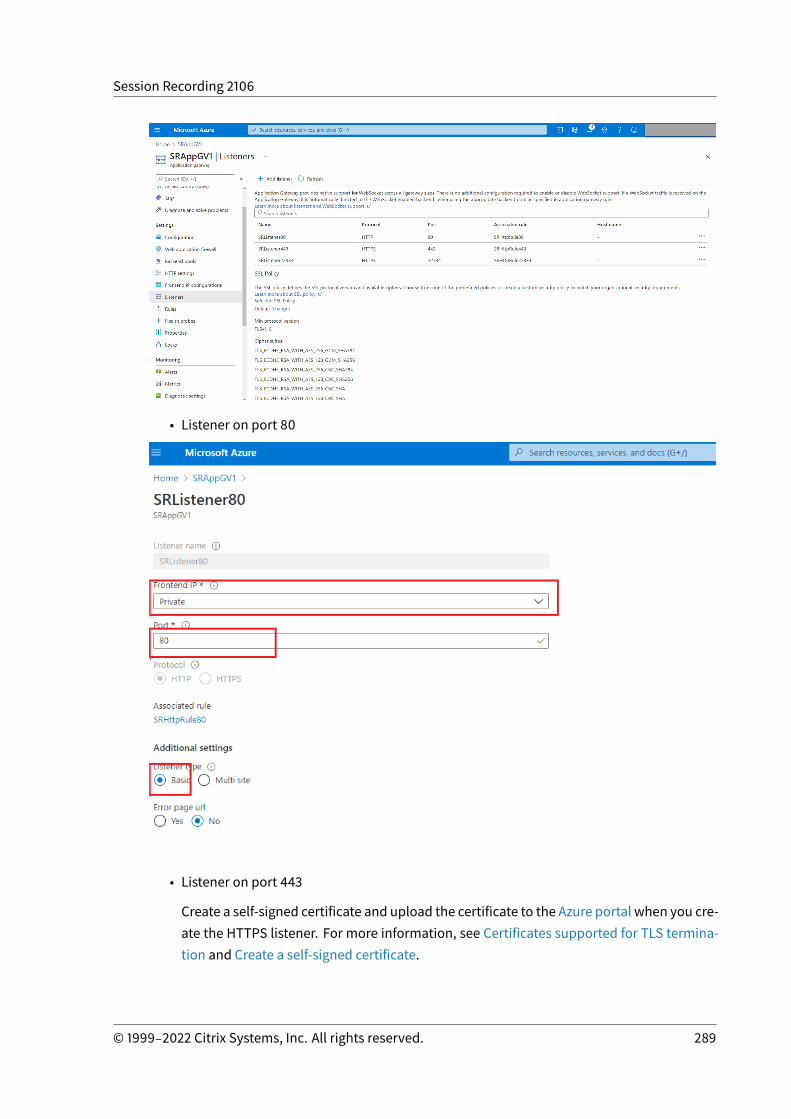
Session Recording 2106
• Listener on port 80
• Listener on port 443
Create a self-signed certificate and upload the certificate to the Azure portal when you cre-ate the HTTPS listener. For more information, see Certificates supported for TLS termina-tion and Create a self-signed certificate.
© 1999‒2022 Citrix Systems, Inc. All rights reserved. 289
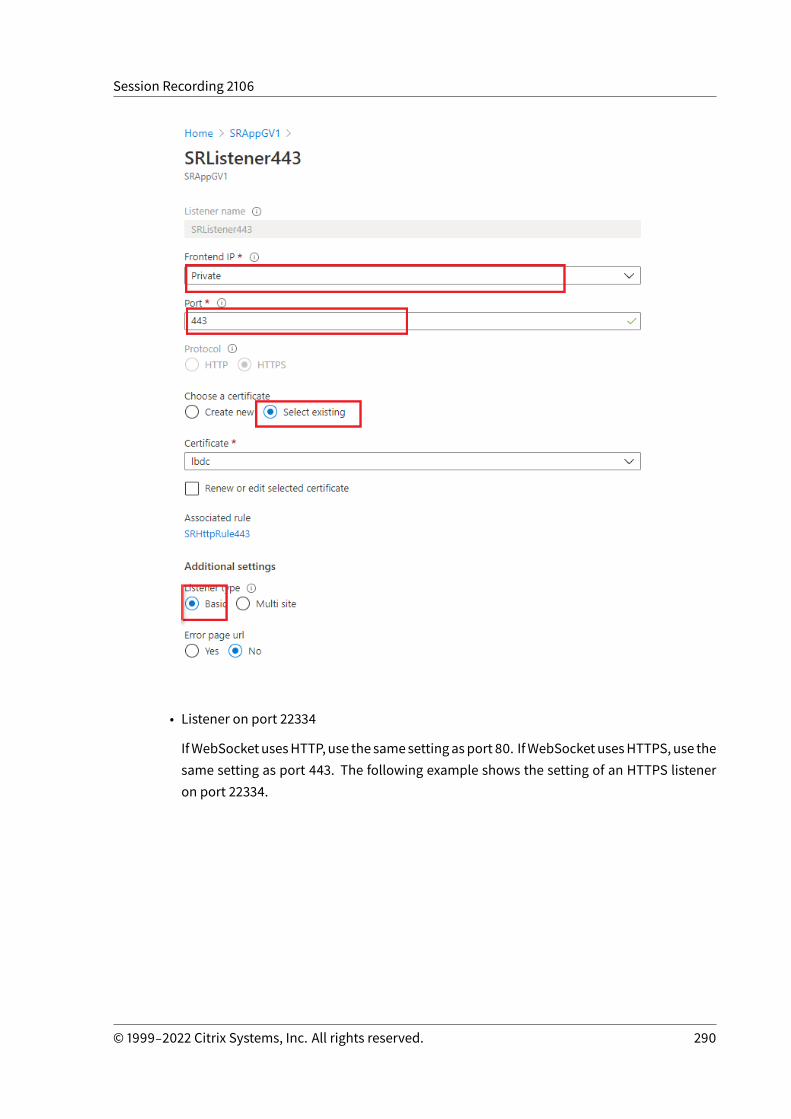
Session Recording 2106
• Listener on port 22334
IfWebSocketusesHTTP, use the samesettingasport 80. IfWebSocketusesHTTPS, use thesame setting as port 443. The following example shows the setting of an HTTPS listeneron port 22334.
© 1999‒2022 Citrix Systems, Inc. All rights reserved. 290

Session Recording 2106
6. Create request routing rules.
Create rules for ports 80, 443, and 22334, for example:
© 1999‒2022 Citrix Systems, Inc. All rights reserved. 291
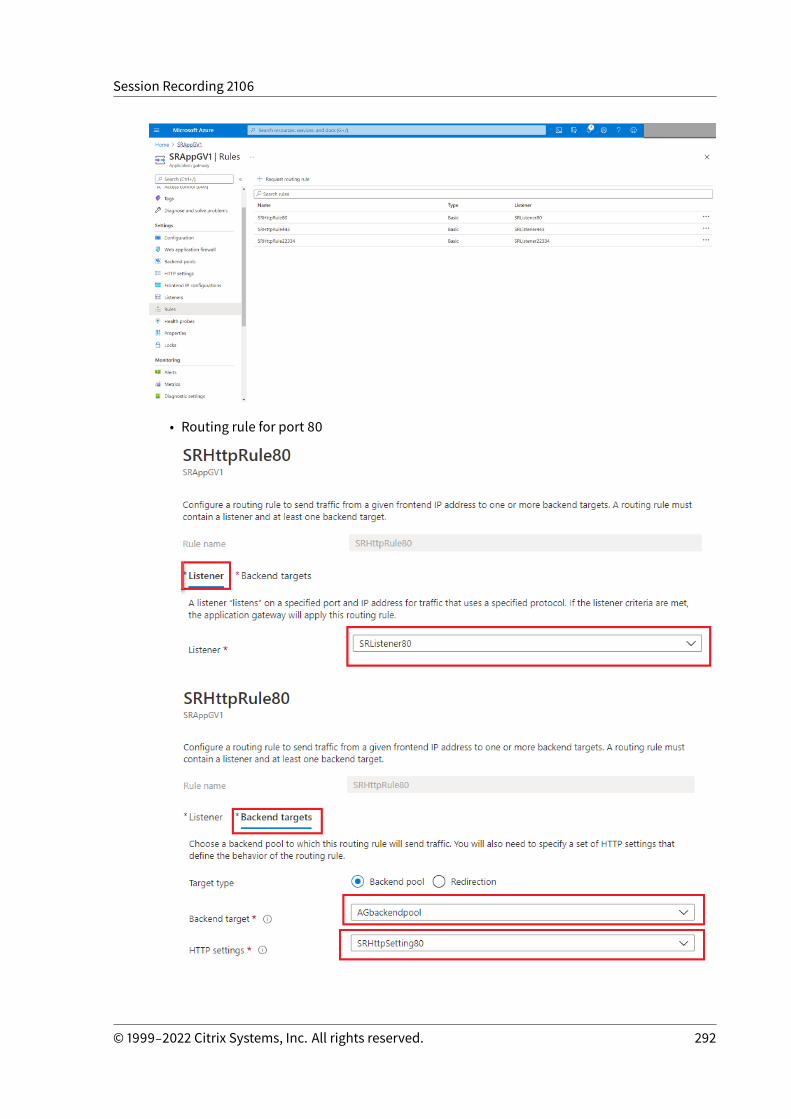
Session Recording 2106
• Routing rule for port 80
© 1999‒2022 Citrix Systems, Inc. All rights reserved. 292
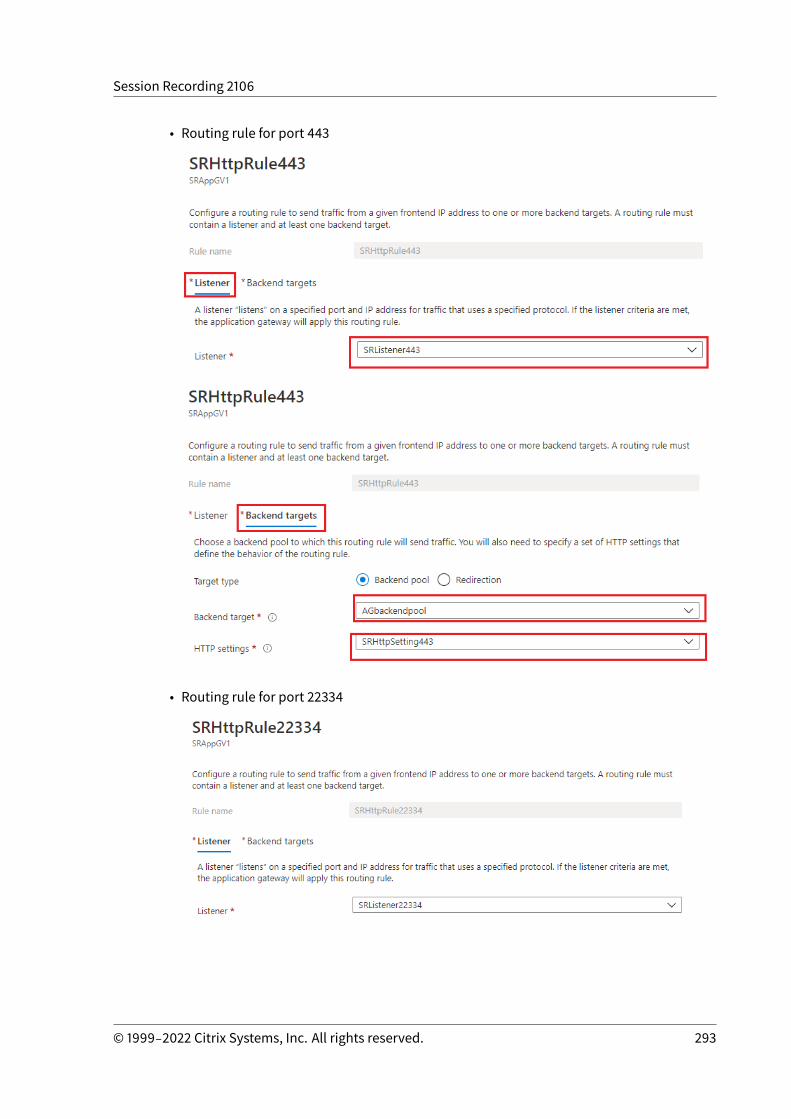
Session Recording 2106
• Routing rule for port 443
• Routing rule for port 22334
© 1999‒2022 Citrix Systems, Inc. All rights reserved. 293
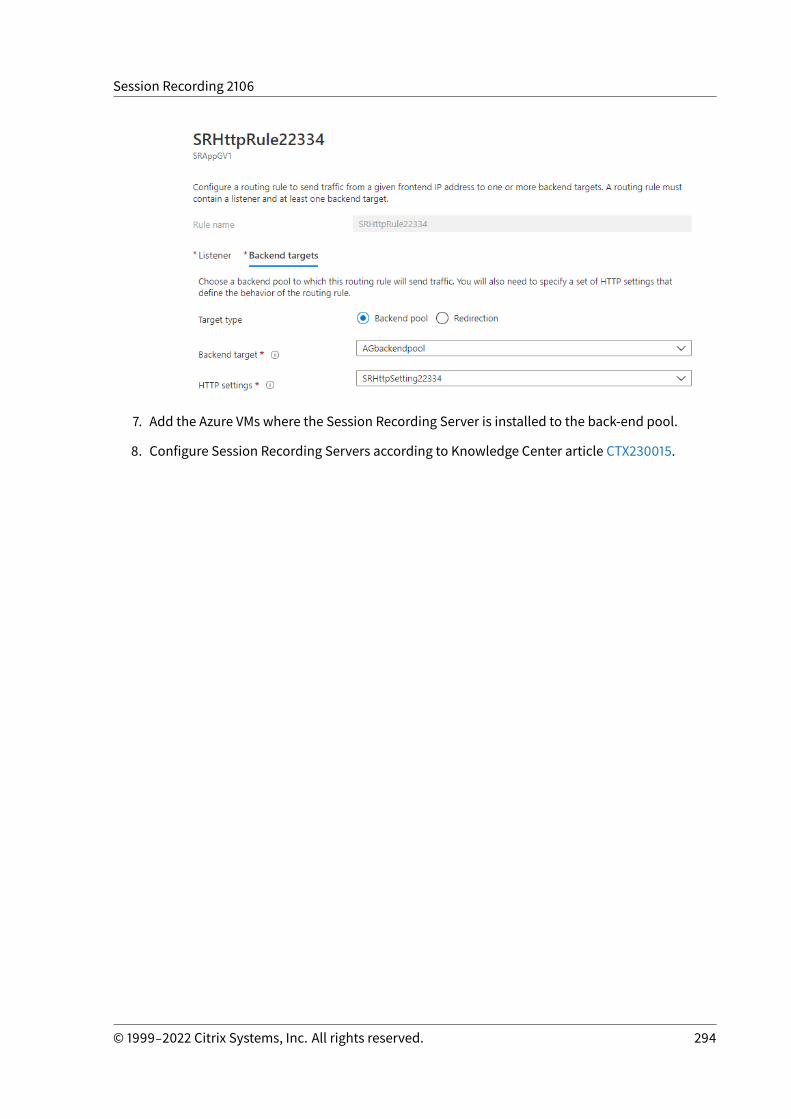
Session Recording 2106
7. Add the Azure VMs where the Session Recording Server is installed to the back-end pool.
8. Configure Session Recording Servers according to Knowledge Center article CTX230015.
© 1999‒2022 Citrix Systems, Inc. All rights reserved. 294

Session Recording 2106
© 1999‒2022 Citrix Systems, Inc. All rights reserved. 295
LocationsCorporate Headquarters | 851 Cypress Creek Road Fort Lauderdale, FL 33309, United StatesSilicon Valley | 4988 Great America Parkway Santa Clara, CA 95054, United States
© 2022 Citrix Systems, Inc. All rights reserved. Citrix, the Citrix logo, and other marks appearing herein are property of
Citrix Systems, Inc. and/or one or more of its subsidiaries, andmay be registered with the U.S. Patent and Trademark Office
and in other countries. All other marks are the property of their respective owner(s).
Citrix Product Documentation | docs.citrix.com May 26, 2022