Linux Virtual Delivery Agent 2109 - Citrix Product ...
428
Linux Virtual Delivery Agent 2109 Citrix Product Documentation | docs.citrix.com April 18, 2022
-
Upload
khangminh22 -
Category
Documents
-
view
1 -
download
0
Transcript of Linux Virtual Delivery Agent 2109 - Citrix Product ...
Linux Virtual Delivery Agent 2109
Citrix Product Documentation | docs.citrix.com April 18, 2022
Linux Virtual Delivery Agent 2109
Contents
What’s new 3
Fixed issues 5
Known issues 5
Third party notices 7
Deprecation 7
System requirements 8
Installation overview 13
Quick installation by using easy install (Recommended) 14
Install Linux Virtual Delivery Agent for RHEL/CentOSmanually 34
Install Linux Virtual Delivery Agent for SUSEmanually 74
Install Linux Virtual Delivery Agent for Ubuntumanually 108
Install Linux Virtual Delivery Agent for Debianmanually 146
Create Linux VDAs in Citrix Virtual Apps and Desktops Standard for Azure 179
Use Machine Creation Services (MCS) to create Linux VMs 183
Use Citrix Provisioning to create Linux VMs 232
Configure Delivery Controllers for XenDesktop 7.6 and earlier versions 233
Configure the Linux VDA 235
Integrate NIS with Active Directory 235
Publish applications 242
Linux VDA self-update 243
Remote PC Access 247
Print 259
File copy and paste 267
© 1999‒2022 Citrix Systems, Inc. All rights reserved. 2
Linux Virtual Delivery Agent 2109
File transfer 268
PDF printing 272
Configure graphics 273
Thinwire progressive display 283
Non-GRID 3D graphics 286
Configure policies 287
Policy support list 289
Configure IPv6 299
Configure Citrix Customer Experience Improvement Program (CEIP) 300
Configure USB redirection 305
HDXwebcam video compression 312
HDX screen sharing 317
Configure session reliability 325
Soft keyboard 327
Client Input Method Editor (IME) 330
Support for multiple language inputs 331
Dynamic keyboard layout synchronization 333
Client IME user interface synchronization 337
HDX Insight 341
Rendezvous protocol 342
Adaptive transport 344
Integrate with the Citrix Telemetry Service 347
Tracing On 351
Shadow sessions 355
© 1999‒2022 Citrix Systems, Inc. All rights reserved. 3
Linux Virtual Delivery Agent 2109
Browser content redirection 361
Support Citrix Workspace app for HTML5 367
Monitor Linux VMs and Linux sessions 368
Monitor service daemon 375
Secure user sessions using TLS 378
Secure user sessions using DTLS 382
Text-based session watermark 383
Support for smart cards 384
Double-hop single sign-on authentication 395
Configure unauthenticated sessions 397
Configure LDAPS 400
Create a Python3 virtual environment 404
XDPing 407
Configure Xauthority 412
Configure Federated Authentication Service 415
© 1999‒2022 Citrix Systems, Inc. All rights reserved. 4
Linux Virtual Delivery Agent 2109
What’s new
October 12, 2021
What’s new in 2109
Version 2109 of the Linux VDA includes the following new features and enhancements:
Support for HDX screen sharing (experimental)
As an experimental feature, the Linux VDA now lets you share the screen of your virtual desktop withsession users on other virtual desktops. The screen sharing feature is disabled by default. For moreinformation, see HDX screen sharing.
Citrix Virtual Channel Software Development Kit (SDK) for the Linux VDA (experimental)
Citrix Virtual Channel SDK for the Linux VDA is now available. With the Virtual Channel SDK, you canwrite server-side applications to run on the VDA. For more information, see the Citrix Virtual ChannelSDK for the Linux VDA documentation.
Citrix Virtual Channel SDK for the Linux VDA is available for download at the Citrix Virtual Apps andDesktops download page. Expand the appropriate version of Citrix Virtual Apps and Desktops andclick Components to select the Linux VDA download.
FAS support for VDAs using PBIS
You can now use Federated Authentication Service (FAS) to authenticate users logging on to a LinuxVDAthatwas joined toaWindowsdomainusingPowerBroker IdentityServices (PBIS).WhenyouselectPBISwhile running ctxfascfg.sh, enter thehost nameof theKeyDistributionCenter (KDC) aspromptedby the script. For more information, see Configure Federated Authentication Service.
Linux streaming support for RHEL 8.4, RHEL 7.9, and SUSE 12.5
Using the Linux streaming feature with Citrix Provisioning, you can provision Linux virtual desktopsdirectly in the Citrix Virtual Apps and Desktops environment. For more information, see Use CitrixProvisioning to create Linux VMs.
© 1999‒2022 Citrix Systems, Inc. All rights reserved. 5
Linux Virtual Delivery Agent 2109
Keyboard layout synchronization support for MATE desktop
We have extended the keyboard layout synchronization support to MATE desktop. Anytime the key-board layout on your client device changes, the layout on your VDA where you installed the MATEdesktop environment follows suit. For more information, see Dynamic keyboard layout synchroniza-tion.
Session data query utility
We now provide a utility (ctxsdcutil) that you can use to query session data on each Linux VDA. Toquery the following data of all sessions or a specific session hosted on a VDA, run the /opt/Citrix/VDA/bin/ctxsdcutil -q <all | SessionID> [-c] command. The [-c] argument means toquery data every second.
• Input Session Bandwidth• Output Session Bandwidth• Output Session Line Speed• Latency - Last Recorded• Round Trip Time• Output ThinWire Bandwidth• Output Audio Bandwidth• Output Printer Bandwidth• Input Drive Bandwidth• Output Drive Bandwidth
New Linux sessionmetrics are available
We have added the following metrics for you to track, aggregate, and visualize the performance ofyour Linux sessions:
• Logon duration
Logon duration is a measure of the logon process from the time a user connects from CitrixWorkspace app to the time when a session is ready to use. You can view this metric on theMonitor tab of the Citrix Virtual Apps and Desktops service. Monitor is available as the Directorconsole tomonitor and troubleshoot Citrix Virtual Apps andDesktops Current Release and LTSRdeployments.
• Session auto reconnect count
You can now view the number of auto reconnects in a Linux session through the Trends viewof both Citrix Director and Monitor. Auto reconnect is enabled when the Session Reliabilityor the Auto Client Reconnect policies are in effect. For more information about session recon-
© 1999‒2022 Citrix Systems, Inc. All rights reserved. 6
Linux Virtual Delivery Agent 2109
nections, see Sessions. For more information about policies, see Auto client reconnect policysettings and Session reliability policy settings.
For more information, see Monitor Linux VMs and Linux sessions.
Fixed issues
December 21, 2021
The following issues have been fixed since Linux Virtual Delivery Agent 2107:
• The mouse buttons 6 and 7might not be recognized in a Linux VDA session. [CVADHELP-17477]
Known issues
October 12, 2021
The following issues have been identified in this release:
• In a GNOME desktop session, attempts to change the keyboard layout might fail. [CVADHELP-15639]
• Non-seamless published applications might exit shortly after launch. The issue occurs after aMutter upgrade to a version later than mutter-3.28.3-4. To work around the issue, use mutter-3.28.3-4 or earlier. [LNXVDA-6967]
• The Linux VDA does not work as expectedwhen you use NVIDIA GRID 3D cardswithout enablingHDX 3D Pro. The issue occurs on RHEL 7.7 and earlier, SUSE 12.5 and earlier, and Ubuntu 16.04.The reason is that multiple OpenGL libraries cannot coexist in the graphics systems of theseLinux distributions.
• Anunexpectedwindowappearsduring filedownload. Thewindowdoesnotaffect the filedown-load functionality and it disappears automatically after a while. [LNXVDA-5646]
• The default settings of PulseAudio cause the sound server program to exit after 20 seconds ofinactivity. When PulseAudio exits, audio does not work. To work around this issue, set exit-idle-time=-1 in the /etc/pulse/daemon.conf file. [LNXVDA-5464]
• libtcmalloc 4.3.0 in SUSE 12.5 might cause processes to exit unexpectedly.
• Thectxhdx servicemight exit unexpectedly on theUbuntu 16.04 andSUSE 12.5 VDAs. The issueoccurs with the GNU C Library (glibc) Versions 2.22 through 2.24. The issue is fixed in glibc2.25. If you are using the SUSE 12.5 distribution, you can install the patch that SUSE provides
© 1999‒2022 Citrix Systems, Inc. All rights reserved. 7
Linux Virtual Delivery Agent 2109
for fixing the issue. No fix is available for Ubuntu 16.04 at the time the Linux VDA is released.[LNXVDA-4481]
• Sessions cannot be launched in CitrixWorkspace app for Linuxwhen SSL encryption is enabled.[RFLNX-1557]
• The indicator-datetime-service process does not consume the $TZ environment vari-able. When the client and session locate in different time zones, the unity panel on Ubuntu16.04 Unity Desktop does not show the time of the client. [LNXVDA-2128]
• Ubuntu graphics: In HDX 3D Pro, a black framemight appear around applications after resizingthe Desktop Viewer, or sometimes, the background can appear black.
• Printers created by the Linux VDA printing redirection might not be removed after logging outof a session.
• CDM files are missing when a directory contains numerous files and subdirectories. This issuemight occur if the client side has toomany files or directories.
• In this release, only UTF-8 encoding is supported for non-English languages.
• Citrix Workspace app for Android CAPS LOCK state might be reversed during session roaming.The CAPS LOCK state can be lost when roaming an existing connection to Citrix Workspace appfor Android. As a workaround, use the Shift key on the extended keyboard to switch betweenupper case and lower case.
• Shortcut keys with ALT do not always work when you connect to the Linux VDA using CitrixWorkspace app for Mac. Citrix Workspace app for Mac sends AltGr for both left and right Op-tions/Alt keys by default. You canmodify this behavior within the Citrix Workspace app settingsbut the results vary with different applications.
• Registration fails when the Linux VDA is rejoined to the domain. The rejoining generates a freshset of Kerberos keys. But, the Broker might use a cached out-of-date VDA service ticket basedon the previous set of Kerberos keys. When the VDA tries to connect to the Broker, the Brokermight not be able to establish a return security context to the VDA. The usual symptom is thatthe VDA registration fails.
This problem can eventually resolve itself when the VDA service ticket expires and is renewed.But because service tickets are long-lived, it can take a long time.
As a workaround, clear the Broker’s ticket cache. Restart the Broker or run the following com-mand on the Broker from a command prompt as Administrator:
1 klist -li 0x3e4 purge2 <!--NeedCopy-->
© 1999‒2022 Citrix Systems, Inc. All rights reserved. 8
Linux Virtual Delivery Agent 2109
This command purges all service tickets in the LSA cache held by the Network Service principalunder which the Citrix Broker Service runs. It removes service tickets for other VDAs and poten-tially other services. However, it is harmless – these service tickets can be reacquired from theKDC when needed again.
• Audio plug-n-play is not supported. You can connect an audio capture device to the client ma-chine before starting to record audio in the ICA session. If a capture device is attached after theaudio recording application has started, the application might become unresponsive and youmust restart it. If a capture device is unplugged while recording, a similar issue might occur.
• Citrix Workspace app for Windowsmight experience audio distortion during audio recording.
Third party notices
October 12, 2021
Linux Virtual Delivery Agent Version 2109 (PDF Download)
This release of the Linux VDA can include third party software licensed under the terms defined in thedocument.
Deprecation
March 1, 2022
The announcements in this article are intended to give you advanced notice of platforms, Citrix prod-ucts, and features that are being phased out so that you can make timely business decisions. Citrixmonitors customer use and feedback to determine when they are withdrawn. Announcements canchange in subsequent releases andmight not include every deprecated feature or functionality.For details about product lifecycle support, see the Product Lifecycle Support Policy article.
Deprecations and removals
The following table shows the platforms, Citrix products, and features that are deprecated orremoved.Deprecated items are not removed immediately. Citrix continues to support them in this release butthey will be removed in a future Current Release.Removed items are either removed, or are no longer supported, in the Linux VDA.
© 1999‒2022 Citrix Systems, Inc. All rights reserved. 9

Linux Virtual Delivery Agent 2109
Item Deprecation announced in Removed in
Support for SUSE 12.5 2109 2204
Support for Ubuntu 16.04 2109 2203
Support for RHEL 7.7, CentOS7.7
2006 2009
Support for SUSE 12.3 2006 2006
Support for RHEL 6.10,CentOS 6.10
2003 2003
Support for RHEL 6.9, CentOS6.9
1909 1909
Support for RHEL 7.5, CentOS7.5
1903 1903
Support for RHEL 7.4, CentOS7.4
1811 1811
Support for RHEL 6.8, CentOS6.8
1811 1811
Support for RHEL 7.3, CentOS7.3
7.18 7.18
Support for RHEL 6.6, CentOS6.6
7.16 7.16
SUSE 11.4 7.16 7.16
System requirements
October 22, 2021
Linux distributionsNote:
System requirements for components not covered here (such as Citrix Workspace app) are de-scribed in their respective documentation sets.
Before installing the Linux VDA, install .NET Core Runtime 3.1 according to the instructions athttps://docs.microsoft.com/en-us/dotnet/core/install/linux-package-managers.
© 1999‒2022 Citrix Systems, Inc. All rights reserved. 10
Linux Virtual Delivery Agent 2109
Formore informationaboutusing thisCurrentRelease (CR) inaLongTermService (LTSR) environmentand other FAQs, see Knowledge Center article.
The Linux VDA supports the following Linux distributions:
Important:
When the support from your OS vendor expires, Citrix might be limited in its ability to remediateproblems.
• SUSE Linux Enterprise:– Server 12 Service Pack 5 + SUSE Linux Enterprise Workstation Extension 12 SP5– Server 12 Service Pack 5
• Red Hat Enterprise Linux– Workstation 8.4– Workstation 8.3– Workstation 8.2– Workstation 8.1– Workstation 7.9– Workstation 7.8– Server 8.4– Server 8.3– Server 8.2– Server 8.1– Server 7.9– Server 7.8
• CentOS Linux– CentOS 8 (2105)– CentOS 8.3– CentOS 8.2– CentOS 8.1– CentOS 7.9– CentOS 7.8
• Ubuntu Linux– Ubuntu Desktop 20.04– Ubuntu Server 20.04– Ubuntu Desktop 18.04– Ubuntu Server 18.04– Ubuntu Live Server 18.04– Ubuntu Desktop 16.04– Ubuntu Server 16.04
• Debian Linux
© 1999‒2022 Citrix Systems, Inc. All rights reserved. 11
Linux Virtual Delivery Agent 2109
– Debian 10.9
Note:
• CentOS project shifts focus to CentOS Stream. CentOS Linux 8, as a rebuild of RHEL 8, endsat the end of 2021. CentOS Stream continues after that date, serving as the upstream (de-velopment) branch of Red Hat Enterprise Linux. For more information, see https://www.redhat.com/en/blog/centos-stream-building-innovative-future-enterprise-linux.
• When you use Citrix Provisioning to stream Linux target devices, create a separate boot par-titionon the single shared-disk image so that theprovisioneddevices canboot as expected.
• Avoid formatting any partition with btrfs. GRUB2 has an intrinsic problem finding btrfs par-titions. GRUB stands for GRand Unified Bootloader.
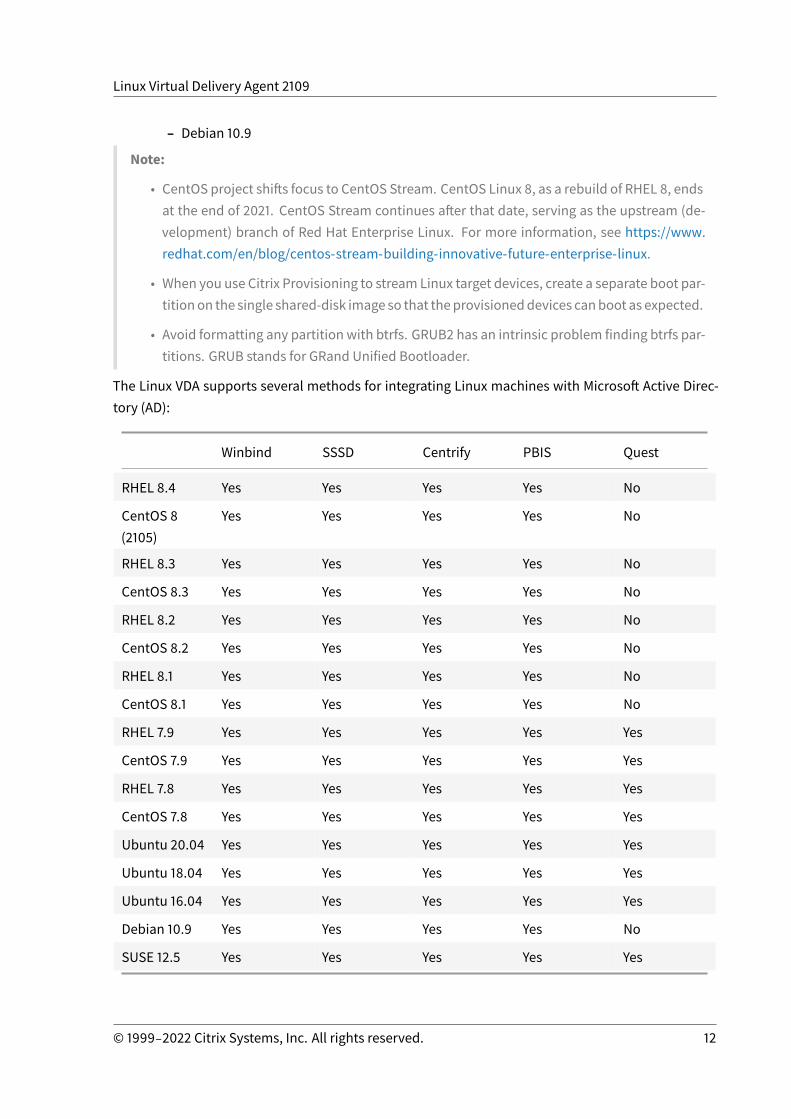
The Linux VDA supports several methods for integrating Linux machines with Microsoft Active Direc-tory (AD):
Winbind SSSD Centrify PBIS Quest
RHEL 8.4 Yes Yes Yes Yes No
CentOS 8(2105)
Yes Yes Yes Yes No
RHEL 8.3 Yes Yes Yes Yes No
CentOS 8.3 Yes Yes Yes Yes No
RHEL 8.2 Yes Yes Yes Yes No
CentOS 8.2 Yes Yes Yes Yes No
RHEL 8.1 Yes Yes Yes Yes No
CentOS 8.1 Yes Yes Yes Yes No
RHEL 7.9 Yes Yes Yes Yes Yes
CentOS 7.9 Yes Yes Yes Yes Yes
RHEL 7.8 Yes Yes Yes Yes Yes
CentOS 7.8 Yes Yes Yes Yes Yes
Ubuntu 20.04 Yes Yes Yes Yes Yes
Ubuntu 18.04 Yes Yes Yes Yes Yes
Ubuntu 16.04 Yes Yes Yes Yes Yes
Debian 10.9 Yes Yes Yes Yes No
SUSE 12.5 Yes Yes Yes Yes Yes
© 1999‒2022 Citrix Systems, Inc. All rights reserved. 12

Linux Virtual Delivery Agent 2109
Foramatrixof theLinuxdistributionsand theXorgversions that this versionof theLinuxVDAsupports,see the following table. For more information, see XorgModuleABIVersions.
Linux distribution Xorg version
RHEL 8.4, CentOS 8 (2105) 1.20.10
RHEL 8.3, CentOS 8.3 1.20.8
RHEL 8.2, CentOS 8.2 1.20.8
RHEL 8.1, CentOS 8.1 1.20.8
RHEL 7.9, CentOS 7.9 1.20
RHEL 7.8, CentOS 7.8 1.20
Ubuntu 20.04 1.20
Ubuntu 18.04 1.19
Ubuntu 16.04 1.18
Debian 10.9 1.20
SUSE 12.5 1.19
Do not use HWE kernel or HWE Xorg on Ubuntu.
Use PulseAudio 13.99 on RHEL 8.x and CentOS 8.x.
In all cases, the supported processor architecture is x86-64.
Note:
• GNOMEandKDEdesktopsare supportedonSUSE 12, RHEL7, CentOS7, RHEL8, andCentOS8. Unity desktop is supported on Ubuntu 16.04. GNOME desktop is supported on Ubuntu20.04, Ubuntu 18.04, andDebian 10.9. MATEdesktop is supported on all Linux distributionsthat the Linux VDA supports, except SUSE 12.5. At least one desktopmust be installed.
Citrix Virtual Desktops
The Linux VDA is compatible with all currently supported versions of Citrix Virtual Apps and Desktops.For informationabout theCitrix product lifecycle, and to findoutwhenCitrix stops supporting specificversions of products, see the Citrix Product Lifecycle Matrix.
The configuration process for Linux VDAs differs slightly from Windows VDAs. However, any DeliveryController farm is able to broker both Windows and Linux desktops.
© 1999‒2022 Citrix Systems, Inc. All rights reserved. 13

Linux Virtual Delivery Agent 2109
Supported host platforms and virtualization environments
• Bare metal servers• Citrix Hypervisor• VMware ESX and ESXi• Microsoft Hyper-V• Nutanix AHV• Microsoft Azure Resource Manager• Amazon Web Services (AWS)• Google Cloud Platform (GCP)
Tip:
See the vendor’s documentation for the list of supported platforms.
Note:
Azure, AWS, and GCP are compatible only with the Citrix Virtual Apps and Desktops service. Baremetal servers are not supported when MCS is used to create virtual machines.
Active Directory integration packages
The Linux VDA supports the following Active Directory integration packages or products:
• SambaWinbind• Quest Authentication Services v4.1 or later• Centrify DirectControl• SSSD• PBIS (compatible with RHEL 7, Ubuntu, and Debian)
Tip:
For the list of supported platforms, see the documentation from the vendors of the Active Direc-tory integration packages.
HDX 3D Pro
The following hypervisors and NVIDIA GRID™ GPU are required to support HDX 3D Pro.
Hypervisors
• Citrix Hypervisor• VMware ESX and ESXi• Nutanix AHV
© 1999‒2022 Citrix Systems, Inc. All rights reserved. 14
Linux Virtual Delivery Agent 2109
Note:
The hypervisors are compatible with certain Linux distributions.
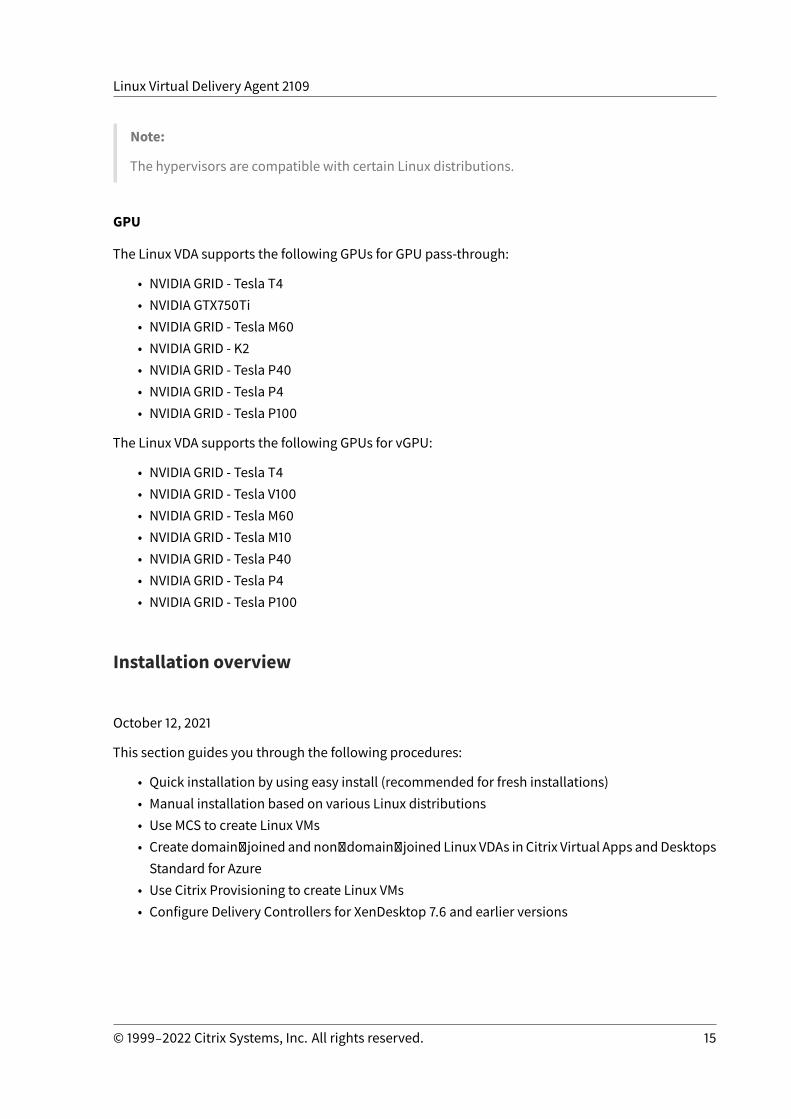
GPU
The Linux VDA supports the following GPUs for GPU pass-through:
• NVIDIA GRID - Tesla T4• NVIDIA GTX750Ti• NVIDIA GRID - Tesla M60• NVIDIA GRID - K2• NVIDIA GRID - Tesla P40• NVIDIA GRID - Tesla P4• NVIDIA GRID - Tesla P100
The Linux VDA supports the following GPUs for vGPU:
• NVIDIA GRID - Tesla T4• NVIDIA GRID - Tesla V100• NVIDIA GRID - Tesla M60• NVIDIA GRID - Tesla M10• NVIDIA GRID - Tesla P40• NVIDIA GRID - Tesla P4• NVIDIA GRID - Tesla P100
Installation overview
October 12, 2021
This section guides you through the following procedures:
• Quick installation by using easy install (recommended for fresh installations)• Manual installation based on various Linux distributions• Use MCS to create Linux VMs• Create domain joined and non domain joined Linux VDAs in Citrix Virtual Apps andDesktopsStandard for Azure
• Use Citrix Provisioning to create Linux VMs• Configure Delivery Controllers for XenDesktop 7.6 and earlier versions
© 1999‒2022 Citrix Systems, Inc. All rights reserved. 15
Linux Virtual Delivery Agent 2109
Quick installation by using easy install (Recommended)
February 22, 2022
Important:
For fresh installations, we recommend you refer to this article for a quick installation. This articlesteps through how to install and configure the Linux VDA by using easy install. Easy install savestime and labor and is less error-prone than manual installation. It helps you set up a runningenvironment of the Linux VDA by installing the necessary packages and customizing the config-uration files automatically.
Step 1: Prepare configuration information and the Linuxmachine
Collect the following configuration information needed for easy install:
• Host name - Host name of the machine on which the Linux VDA is to be installed• IP address of Domain Name Server• IP address or string name of NTP Server• Domain Name - The NetBIOS name of the domain• Realm Name - The Kerberos realm name• FQDN of Active Domain - Fully qualified domain name
Important:
• To install the Linux VDA, verify that the repositories are added correctly on the Linux ma-chine.
• To launch a session, verify that the X Window system and desktop environments are in-stalled.
Considerations
• The workgroup name, by default, is the domain name. To customize the workgroup in yourenvironment, do the following:
a. Create the /tmp/ctxinstall.conf file on the Linux VDAmachine.b. Add the workgroup=<your workgroup> line to the file and save your changes.
• Centrify does not support pure IPv6 DNS configuration. At least one DNS server using IPv4 isrequired in /etc/resolv.conf for adclient to find AD services properly.
Log:
© 1999‒2022 Citrix Systems, Inc. All rights reserved. 16
Linux Virtual Delivery Agent 2109
1 ADSITE : Check that this machine's subnet is in a site known byAD : Failed
2 : This machine's subnet is not known by AD.3 : We guess you should be in the site Site1.4 <!--NeedCopy-->
This issue is unique to Centrify and its configuration. To resolve this issue, do the following:
a. Open Administrative Tools on the domain controller.b. Select Active Directory Sites and Services.c. Add a proper subnet address for Subnets.
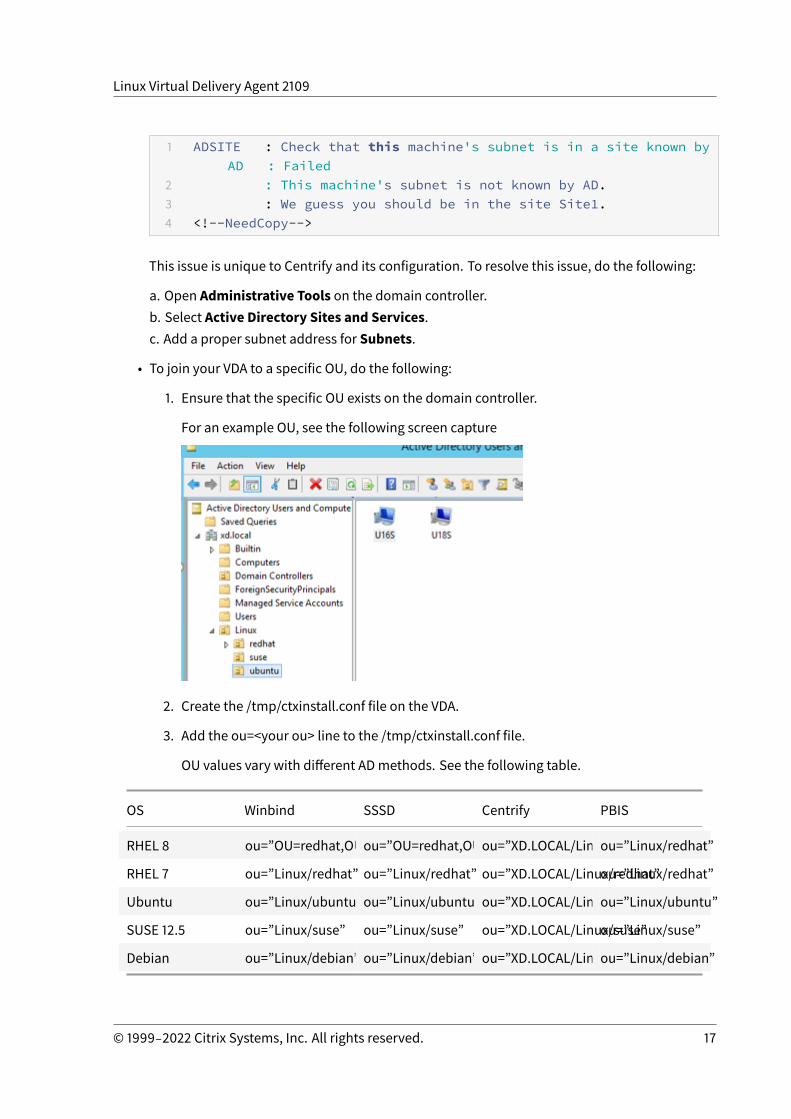
• To join your VDA to a specific OU, do the following:
1. Ensure that the specific OU exists on the domain controller.
For an example OU, see the following screen capture
2. Create the /tmp/ctxinstall.conf file on the VDA.
3. Add the ou=<your ou> line to the /tmp/ctxinstall.conf file.
OU values vary with different ADmethods. See the following table.
OS Winbind SSSD Centrify PBIS
RHEL 8 ou=”OU=redhat,OU=Linux”ou=”OU=redhat,OU=Linux”ou=”XD.LOCAL/Linux/redhat”ou=”Linux/redhat”
RHEL 7 ou=”Linux/redhat” ou=”Linux/redhat” ou=”XD.LOCAL/Linux/redhat”ou=”Linux/redhat”
Ubuntu ou=”Linux/ubuntu”ou=”Linux/ubuntu”ou=”XD.LOCAL/Linux/ubuntu”ou=”Linux/ubuntu”
SUSE 12.5 ou=”Linux/suse” ou=”Linux/suse” ou=”XD.LOCAL/Linux/suse”ou=”Linux/suse”
Debian ou=”Linux/debian” ou=”Linux/debian” ou=”XD.LOCAL/Linux/debian”ou=”Linux/debian”
© 1999‒2022 Citrix Systems, Inc. All rights reserved. 17
Linux Virtual Delivery Agent 2109
• Easy install supports pure IPv6 as of Linux VDA 7.16. The following preconditions and limitationsapply:
– Your Linux repository must be configured to ensure that your machine can download re-quired packages over pure IPv6 networks.
– Centrify is not supported on pure IPv6 networks.
Note:
If your network is pure IPv6 and all your input is in proper IPv6 format, the VDA registerswith the Delivery Controller through IPv6. If your network has a hybrid IPv4 and IPv6 con-figuration, the type of the first DNS IP address determines whether IPv4 or IPv6 is used forregistration.
• If you choose Centrify as the method to join a domain, the ctxinstall.sh script requires the Cen-trify package. There are two ways for ctxinstall.sh to get the Centrify package:
– Easy install helps download the Centrify package from the Internet automatically. Thefollowing are the URLs for each distribution:
RHEL: wget http://edge.centrify.com/products/centrify-suite/2016-update-1/installers/centrify-suite-2016.1-rhel4-x86_64.tgz?_ga=1.178323680.558673738.1478847956
CentOS:wget http://edge.centrify.com/products/centrify-suite/2016-update-1/installers/centrify-suite-2016.1-rhel4-x86_64.tgz?_ga=1.186648044.558673738.1478847956
SUSE: wget http://edge.centrify.com/products/centrify-suite/2016-update-1/installers/centrify-suite-2016.1-suse10-x86_64.tgz?_ga=1.10831088.558673738.1478847956
Ubuntu/Debian: wget https://downloads.centrify.com/products/infrastructure-services/19.9/centrify-infrastructure-services-19.9-deb8-x86_64.tgz?_ga=2.151462329.1042350071.1592881996-604509155.1572850145
– Fetch theCentrify package froma local directory. Todesignate thedirectoryof theCentrifypackage, do the following:
a. Create the /tmp/ctxinstall.conf file on the Linux VDA server if it does not exist.b. Add the “centrifypkgpath=<path name>” line to the file.
For example:
1 cat /tmp/ctxinstall.conf2 set “ centrifypkgpath=/home/mydir”3 ls -ls /home/mydir4 9548 -r-xr-xr-x. 1 root root 9776688 May 13 2016
adcheck-rhel4-x86_64
© 1999‒2022 Citrix Systems, Inc. All rights reserved. 18
Linux Virtual Delivery Agent 2109
5 4140 -r--r--r--. 1 root root 4236714 Apr 21 2016centrifyda-3.3.1-rhel4-x86_64.rpm
6 33492 -r--r--r--. 1 root root 34292673 May 13 2016centrifydc-5.3.1-rhel4-x86_64.rpm
7 4 -rw-rw-r--. 1 root root 1168 Dec 1 2015centrifydc-install.cfg
8 756 -r--r--r--. 1 root root 770991 May 13 2016centrifydc-ldapproxy-5.3.1-rhel4-x86_64.rpm
9 268 -r--r--r--. 1 root root 271296 May 13 2016centrifydc-nis-5.3.1-rhel4-x86_64.rpm
10 1888 -r--r--r--. 1 root root 1930084 Apr 12 2016centrifydc-openssh-7.2p2-5.3.1-rhel4-x86_64.rpm
11 124 -rw-rw-r--. 1 root root 124543 Apr 19 2016centrify-suite.cfg
12 0 lrwxrwxrwx. 1 root root 10 Jul 9 2012 install-express.sh -> install.sh
13 332 -r-xr-xr--. 1 root root 338292 Apr 10 2016 install.sh
14 12 -r--r--r--. 1 root root 11166 Apr 9 2015 release-notes-agent-rhel4-x86_64.txt
15 4 -r--r--r--. 1 root root 3732 Aug 24 2015 release-notes-da-rhel4-x86_64.txt
16 4 -r--r--r--. 1 root root 2749 Apr 7 2015 release-notes-nis-rhel4-x86_64.txt
17 12 -r--r--r--. 1 root root 9133 Mar 21 2016 release-notes-openssh-rhel4-x86_64.txt
18 <!--NeedCopy-->
• If you choose PBIS as the method to join a domain, the ctxinstall.sh script requires the PBISpackage. There are two ways for ctxinstall.sh to get the PBIS package:
– Easy install helps download the PBIS package from the Internet automatically. The follow-ing are the URLs for each distribution:
RHEL 7 / CentOS 7 / SUSE 12.5: wget https://github.com/BeyondTrust/pbis-open/releases/download/8.8.0/pbis-open-8.8.0.506.linux.x86_64.rpm.sh
RHEL 8 / CentOS 8: wget https://github.com/BeyondTrust/pbis-open/releases/download/9.1.0/pbis-open-9.1.0.551.linux.x86_64.rpm.sh
Ubuntu/Debian: wget https://github.com/BeyondTrust/pbis-open/releases/download/8.8.0/pbis-open-8.8.0.506.linux.x86_64.deb.sh
– Fetch a specific version of the PBIS package from the Internet. To do so, change the “pbis-DownloadPath” line in the /opt/Citrix/VDA/sbin/ctxinstall.sh file to designate the URL of
© 1999‒2022 Citrix Systems, Inc. All rights reserved. 19
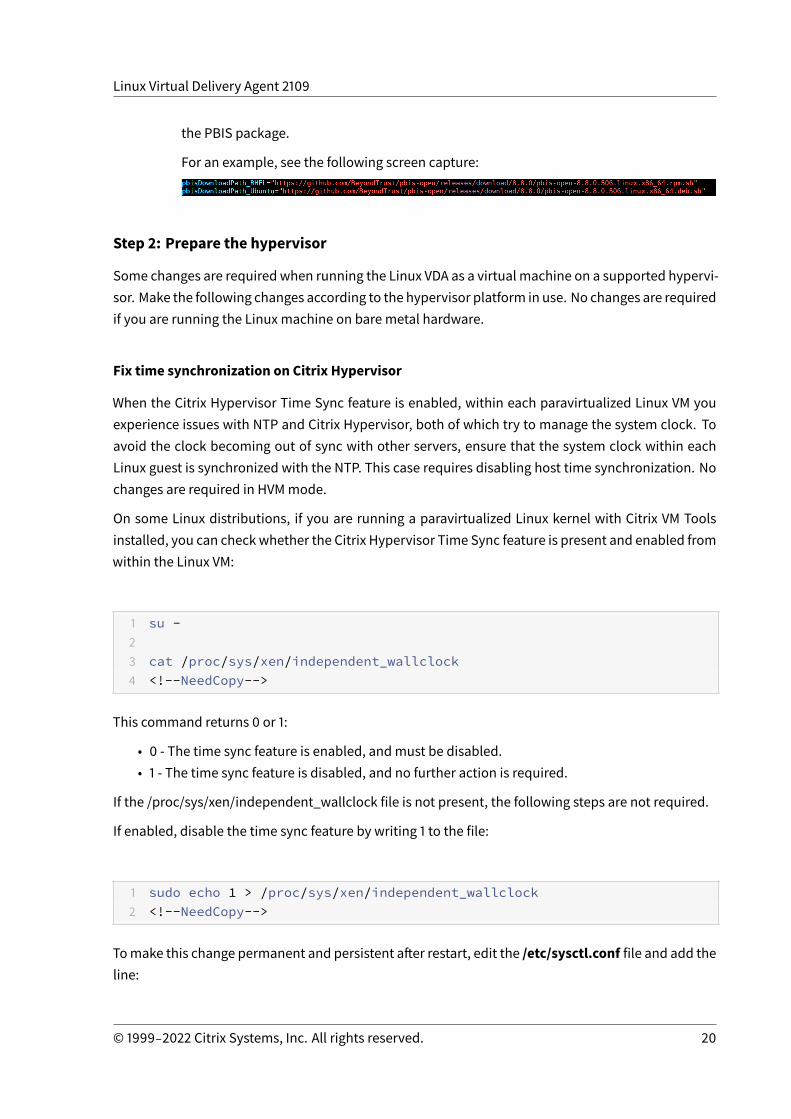
Linux Virtual Delivery Agent 2109
the PBIS package.
For an example, see the following screen capture:
Step 2: Prepare the hypervisor
Some changes are required when running the Linux VDA as a virtual machine on a supported hypervi-sor. Make the following changes according to the hypervisor platform in use. No changes are requiredif you are running the Linux machine on bare metal hardware.
Fix time synchronization on Citrix Hypervisor
When the Citrix Hypervisor Time Sync feature is enabled, within each paravirtualized Linux VM youexperience issues with NTP and Citrix Hypervisor, both of which try to manage the system clock. Toavoid the clock becoming out of sync with other servers, ensure that the system clock within eachLinux guest is synchronized with the NTP. This case requires disabling host time synchronization. Nochanges are required in HVMmode.
On some Linux distributions, if you are running a paravirtualized Linux kernel with Citrix VM Toolsinstalled, you can checkwhether the Citrix Hypervisor Time Sync feature is present and enabled fromwithin the Linux VM:
1 su -23 cat /proc/sys/xen/independent_wallclock4 <!--NeedCopy-->
This command returns 0 or 1:
• 0 - The time sync feature is enabled, andmust be disabled.• 1 - The time sync feature is disabled, and no further action is required.
If the /proc/sys/xen/independent_wallclock file is not present, the following steps are not required.
If enabled, disable the time sync feature by writing 1 to the file:
1 sudo echo 1 > /proc/sys/xen/independent_wallclock2 <!--NeedCopy-->
Tomake this change permanent and persistent after restart, edit the /etc/sysctl.conf file and add theline:
© 1999‒2022 Citrix Systems, Inc. All rights reserved. 20
Linux Virtual Delivery Agent 2109
xen.independent_wallclock = 1
To verify these changes, restart the system:
1 su -23 cat /proc/sys/xen/independent_wallclock4 <!--NeedCopy-->
This command returns the value 1.
Fix time synchronization on Microsoft Hyper-V
The Linux VMs with Hyper-V Linux Integration Services installed can apply the Hyper-V time synchro-nization feature to use the time of the host operating system. To ensure that the system clock remainsaccurate, youmust enable this feature alongside the NTP services.
From themanagement operating system:
1. Open the Hyper-V Manager console.2. For the settings of a Linux VM, select Integration Services.3. Ensure that Time synchronization is selected.
Note:
This approach is different fromVMware andCitrix Hypervisor, where host time synchronization isdisabled to avoid conflicts with NTP. Hyper-V time synchronization can coexist and supplementNTP time synchronization.
Fix time synchronization on ESX and ESXi
When the VMware Time Synchronization feature is enabled, within each paravirtualized Linux VM youexperience issueswith the NTP and the hypervisor, both of which try to synchronize the system clock.To avoid the clock becoming out of sync with other servers, ensure that the system clock within eachLinux guest is synchronized with the NTP. This case requires disabling host time synchronization.
If you are running a paravirtualized Linux kernel with VMware Tools installed:
1. Open the vSphere Client.2. Edit settings for the Linux VM.3. In the Virtual Machine Properties dialog, open theOptions tab.4. Select VMware Tools.5. In the Advanced box, clear Synchronize guest timewith host.
© 1999‒2022 Citrix Systems, Inc. All rights reserved. 21
Linux Virtual Delivery Agent 2109
Step 3: (For Ubuntu 16.04 only) Install OpenJDK 11
On Ubuntu 16.04, install OpenJDK 11 by completing the following steps:
1. Download the latest OpenJDK 11 from https://jdk.java.net/archive/.2. Run the tar zxf openjdk-11.0.2_linux-x64_bin.tar.gz command to unzip the down-
loaded package.3. (Optional) Run the mv jdk-11.0.2/ <target directory> command to save OpenJDK in
a target directory.4. Run theupdate-alternatives --install /usr/bin/java java <custom directory
>/bin/java 2000 command to set up the Java runtime.5. Run the java -version command to verify the version of Java.
Step 4: Download the Linux VDA package
Go to the Citrix Virtual Apps and Desktops download page. Expand the appropriate version of CitrixVirtual Apps and Desktops and click Components to download the Linux VDA package that matchesyour Linux distribution.
Step 5: Install the Linux VDA package
To set up the environment for the Linux VDA, run the following commands.
For RHEL and CentOS distributions:
1 sudo yum -y localinstall <PATH>/<Linux VDA RPM>2 <!--NeedCopy-->
For Ubuntu/Debian distributions:
1 sudo dpkg -i <PATH>/<Linux VDA deb>2 sudo apt-get install -f3 <!--NeedCopy-->
Note:
To install the necessary dependencies for a Debian distribution, add the deb http://deb.debian.org/debian/ oldstable main line to the /etc/apt/sources.list file.
For SUSE distributions:
© 1999‒2022 Citrix Systems, Inc. All rights reserved. 22
Linux Virtual Delivery Agent 2109
1 zypper -i install <PATH>/<Linux VDA RPM>2 <!--NeedCopy-->
Step 6: Set up the runtime environment to complete the installationNote:
Before setting up the runtime environment, ensure that the en_US.UTF-8 locale has been in-stalled in your OS. If the locale is not available in your OS, run the sudo locale-gen en_US.UTF-8 command. For Debian, edit the /etc/locale.gen file by uncommenting the ## en_US.UTF-8 UTF-8 line and then run the sudo locale-gen command.
After installing the Linux VDA package, configure the running environment by using the ctxinstall.shscript. You can run the script in interactive mode or silent mode.
Note:
Easy install might seem unresponsive while it downloads .NET Core Runtime that is over 27 MBin size. For the downloading progress, check /var/log/ctxinstall.log.
Interactivemode:
To do a manual configuration, run the following command and type the relevant parameter at eachprompt.
1 sudo /opt/Citrix/VDA/sbin/ctxinstall.sh2 <!--NeedCopy-->
Silent mode:
Touse easy install in silentmode, set the following environment variables before running ctxinstall.sh.
• CTX_EASYINSTALL_HOSTNAME=host-name – Denotes the host name of the Linux VDA server.• CTX_EASYINSTALL_DNS=ip-address-of-dns – IP address of DNS.• CTX_EASYINSTALL_NTPS=address-of-ntps – IP address or string name of the NTP server.• CTX_EASYINSTALL_DOMAIN=domain-name – The NetBIOS name of the domain.• CTX_EASYINSTALL_REALM=realm-name – The Kerberos realm name.• CTX_EASYINSTALL_FQDN=ad-fqdn-name• CTX_EASYINSTALL_ADINTEGRATIONWAY=winbind | sssd | centrify | pbis –Denotes theActiveDirectory integration method.
• CTX_EASYINSTALL_USERNAME=domain-user-name – Denotes the name of the domain user;used to join the domain.
© 1999‒2022 Citrix Systems, Inc. All rights reserved. 23
Linux Virtual Delivery Agent 2109
• CTX_EASYINSTALL_PASSWORD=password – Specifies the password of the domain user; usedto join the domain.
The ctxsetup.sh script uses the following variables:
• CTX_XDL_SUPPORT_DDC_AS_CNAME=Y | N – The Linux VDA supports specifying a DeliveryController name using a DNS CNAME record.
• CTX_XDL_DDC_LIST=’list-ddc-fqdns’ – The Linux VDA requires a space-separated list of Deliv-ery Controller Fully Qualified Domain Names (FQDNs) to use for registering with a Delivery Con-troller. At least one FQDN or CNAMEmust be specified.
• CTX_XDL_VDA_PORT=port-number – The Linux VDA communicates with Delivery Controllersthrough a TCP/IP port.
• CTX_XDL_REGISTER_SERVICE=Y | N – The Linux Virtual Desktop services are started after ma-chine startup.
• CTX_XDL_ADD_FIREWALL_RULES=Y | N – The Linux Virtual Desktop services require incomingnetwork connections to be allowed through the system firewall. You can open the requiredports (by default ports 80 and 1494) automatically in the system firewall for the Linux VirtualDesktop.
• CTX_XDL_HDX_3D_PRO=Y | N – Linux Virtual Desktop supports HDX 3D Pro, a set of graphicsacceleration technologies designed to optimize the virtualization of rich graphics applica-tions. HDX 3D Pro requires a compatible NVIDIA GRID graphics card to be installed. If HDX3D Pro is selected, the VDA is configured for VDI desktops (single-session) mode - (that is,CTX_XDL_VDI_MODE=Y).
• CTX_XDL_VDI_MODE=Y |N –Whether to configure themachine as adedicateddesktopdeliverymodel (VDI) or hosted shared desktop delivery model. For HDX 3D Pro environments, set thevalue to Y.
• CTX_XDL_SITE_NAME=dns-name – The Linux VDA discovers LDAP servers through DNS. Tolimit the DNS search results to a local Site, specify a DNS Site name. If unnecessary, set to<none>.
• CTX_XDL_LDAP_LIST=’list-ldap-servers’ – The Linux VDA queries DNS to discover LDAPservers. If DNS cannot provide LDAP service records, you can provide a space-separated list ofLDAP FQDNs with LDAP ports. For example, ad1.mycompany.com:389. If unnecessary, set to<none>.
• CTX_XDL_SEARCH_BASE=search-base-set – The Linux VDA queries LDAP through a searchbase set to the root of the Active Directory Domain (for example, DC=mycompany,DC=com). Toimprovesearchperformance, youcanspecifya searchbase (forexample,OU=VDI,DC=mycompany,DC=com).If unnecessary, set to <none>.
© 1999‒2022 Citrix Systems, Inc. All rights reserved. 24
Linux Virtual Delivery Agent 2109
• CTX_XDL_FAS_LIST=’list-fas-servers’ – The Federated Authentication Service (FAS) serversare configured through AD Group Policy. The Linux VDA does not support AD Group Policy, butyou can provide a semicolon-separated list of FAS servers instead. The sequence must be thesame as configured in AD Group Policy. If any server address is removed, fill its blank with the<none> text string and do not modify the order of server addresses.
• CTX_XDL_DOTNET_RUNTIME_PATH=path-to-install-dotnet-runtime – The path to install.NET Core Runtime 3.1 for supporting the new broker agent service (ctxvda). The default pathis /usr/bin.
• CTX_XDL_DESKTOP_ENVIRONMENT=gnome/mate – Specifies the GNOME or MATE desktopenvironment to use in sessions. If you leave the variable unspecified, the desktop currentlyinstalled on the VDA is used. However, if the currently installed desktop is MATE, you must setthe variable value tomate.
Note:
You can also change the desktop environment for a target session user by completing thefollowing steps:
1. Create a .xsession file under the $HOME/<username> directory on the VDA.
2. Edit the .xsession file to specify a desktop environment based on distributions.
For MATE desktop on CentOS, Ubuntu, and Debian
MSESSION=”$(type -p mate-session)”if [ -n “$MSESSION” ]; thenexec mate-sessionfi
For GNOME desktop on CentOS
GSESSION=”$(type -p gnome-session)”if [ -n “$GSESSION” ]; then
1 export GNOME_SHELL_SESSION_MODE=classic2 exec gnome-session --session=gnome-classic fi
**For GNOME desktop on Ubuntu and Debian**
GSESSION=”$(type -p gnome-session)”if [ -n “$GSESSION” ]; then
1 exec gnome-session fi
© 1999‒2022 Citrix Systems, Inc. All rights reserved. 25
Linux Virtual Delivery Agent 2109
3. Share the 700 file permission with the target session user.
• CTX_XDL_START_SERVICE=Y | N – Whether or not the Linux VDA services are started when theconfiguration is complete.
• CTX_XDL_TELEMETRY_SOCKET_PORT – The socket port for listening for Citrix Scout. The de-fault port is 7503.
• CTX_XDL_TELEMETRY_PORT – The port for communicatingwith Citrix Scout. The default portis 7502.
If any parameters are not set, the installation rolls back to interactive mode, with a prompt for userinput. When all parameters are already set through the environment variables, the ctxinstall.sh scriptstill prompts for user input for the path to install .NET Core Runtime 3.1.
In silent mode, youmust run the following commands to set environment variables and then run thectxinstall.sh script.
1 export CTX_EASYINSTALL_HOSTNAME=host-name23 export CTX_EASYINSTALL_DNS=ip-address-of-dns45 export CTX_EASYINSTALL_NTPS=address-of-ntps67 export CTX_EASYINSTALL_DOMAIN=domain-name89 export CTX_EASYINSTALL_REALM=realm-name1011 export CTX_EASYINSTALL_FQDN=ad-fqdn-name1213 export CTX_EASYINSTALL_ADINTEGRATIONWAY=winbind | sssd | centrify |
pbis1415 export CTX_EASYINSTALL_USERNAME=domain-user-name1617 export CTX_EASYINSTALL_PASSWORD=password1819 export CTX_XDL_SUPPORT_DDC_AS_CNAME=Y | N2021 export CTX_XDL_DDC_LIST=‘ list-ddc-fqdns’2223 export CTX_XDL_VDA_PORT=port-number2425 export CTX_XDL_REGISTER_SERVICE=Y | N26
© 1999‒2022 Citrix Systems, Inc. All rights reserved. 26

Linux Virtual Delivery Agent 2109
27 export CTX_XDL_ADD_FIREWALL_RULES=Y | N2829 export CTX_XDL_HDX_3D_PRO=Y | N3031 export CTX_XDL_VDI_MODE=Y | N3233 export CTX_XDL_SITE_NAME=dns-site-name | '<none>'3435 export CTX_XDL_LDAP_LIST=‘ list-ldap-servers’ | '<none>'3637 export CTX_XDL_SEARCH_BASE=search-base-set | '<none>'3839 export CTX_XDL_FAS_LIST=‘ list-fas-servers’ | '<none>'4041 export CTX_XDL_DOTNET_RUNTIME_PATH=path-to-install-dotnet-runtime4243 export CTX_XDL_DESKTOP_ENVIRONMENT= gnome | mate | '<none>'4445 export CTX_XDL_TELEMETRY_SOCKET_PORT=port-number4647 export CTX_XDL_TELEMETRY_PORT=port-number4849 export CTX_XDL_START_SERVICE=Y | N5051 sudo -E /opt/Citrix/VDA/sbin/ctxinstall.sh52 <!--NeedCopy-->
When running the sudo command, type the -E option topass the existing environment variables to thenew shell it creates. We recommend that you create a shell script file from the preceding commandswith #!/bin/bash as the first line.
Alternatively, you can specify all parameters by using a single command:
1 sudo CTX_XDL_SUPPORT_DDC_AS_CNAME=Y|N \23 CTX_XDL_DDC_LIST=‘ list-ddc-fqdns’ \45 CTX_XDL_VDA_PORT=port-number \67 CTX_XDL_REGISTER_SERVICE=Y|N \89 CTX_XDL_ADD_FIREWALL_RULES=Y|N \1011 CTX_XDL_AD_INTEGRATION=1|2|3|4 \
© 1999‒2022 Citrix Systems, Inc. All rights reserved. 27
Linux Virtual Delivery Agent 2109
1213 CTX_XDL_HDX_3D_PRO=Y|N \1415 CTX_XDL_VDI_MODE=Y|N \1617 CTX_XDL_SITE_NAME=dns-name \1819 CTX_XDL_LDAP_LIST=‘ list-ldap-servers’ \2021 CTX_XDL_SEARCH_BASE=search-base-set \2223 CTX_XDL_FAS_LIST=‘ list-fas-servers’ \2425 CTX_XDL_DOTNET_RUNTIME_PATH=path-to-install-dotnet-runtime \2627 CTX_XDL_DESKTOP_ENVIRONMENT=gnome | mate \2829 CTX_XDL_TELEMETRY_SOCKET_PORT=port-number \3031 CTX_XDL_TELEMETRY_PORT=port-number \3233 CTX_XDL_START_SERVICE=Y|N \3435 /opt/Citrix/VDA/sbin/ctxsetup.sh36 <!--NeedCopy-->
Step 7: Run XDPing
Run sudo /opt/Citrix/VDA/bin/xdping to check for common configuration issues with a LinuxVDA environment. For more information, see XDPing.
Step 8: Run the Linux VDA
Start the Linux VDA:
To start the Linux VDA services:
1 sudo /sbin/service ctxhdx start23 sudo /sbin/service ctxvda start4 <!--NeedCopy-->
© 1999‒2022 Citrix Systems, Inc. All rights reserved. 28
Linux Virtual Delivery Agent 2109
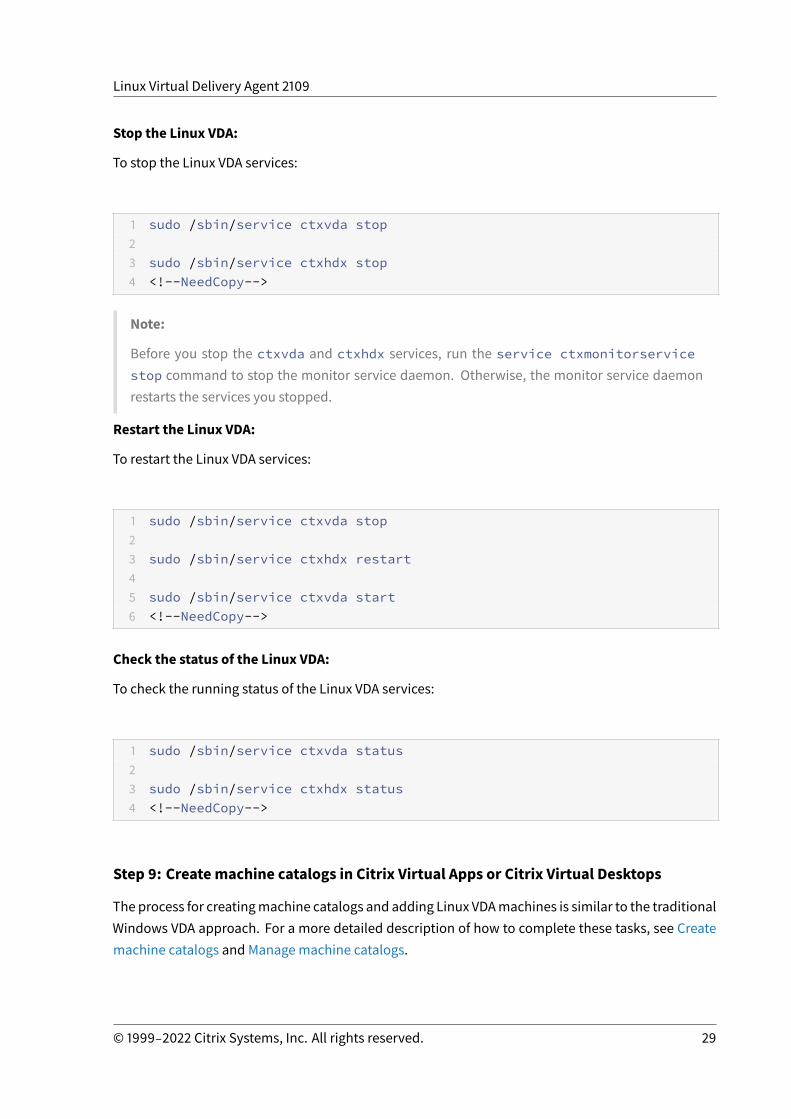
Stop the Linux VDA:
To stop the Linux VDA services:
1 sudo /sbin/service ctxvda stop23 sudo /sbin/service ctxhdx stop4 <!--NeedCopy-->
Note:
Before you stop the ctxvda and ctxhdx services, run the service ctxmonitorservicestop command to stop the monitor service daemon. Otherwise, the monitor service daemonrestarts the services you stopped.
Restart the Linux VDA:
To restart the Linux VDA services:
1 sudo /sbin/service ctxvda stop23 sudo /sbin/service ctxhdx restart45 sudo /sbin/service ctxvda start6 <!--NeedCopy-->
Check the status of the Linux VDA:
To check the running status of the Linux VDA services:
1 sudo /sbin/service ctxvda status23 sudo /sbin/service ctxhdx status4 <!--NeedCopy-->
Step 9: Createmachine catalogs in Citrix Virtual Apps or Citrix Virtual Desktops
The process for creatingmachine catalogs and adding Linux VDAmachines is similar to the traditionalWindows VDA approach. For a more detailed description of how to complete these tasks, see Createmachine catalogs and Managemachine catalogs.
© 1999‒2022 Citrix Systems, Inc. All rights reserved. 29
Linux Virtual Delivery Agent 2109
For creating machine catalogs that contain Linux VDA machines, there are a few restrictions that dif-ferentiate the process from creating machine catalogs for Windows VDAmachines:
• For the operating system, select:– TheMulti-session OS option for a hosted shared desktops delivery model.– The Single-session OS option for a VDI dedicated desktop delivery model.
• Do not mix Linux and Windows VDAmachines in the samemachine catalog.
Note:
Early versions of Citrix Studio did not support the notion of a “Linux OS.” However, selecting theWindows Server OS or Server OS option implies an equivalent hosted shared desktops deliv-ery model. Selecting theWindows Desktop OS or Desktop OS option implies a single user permachine delivery model.
Tip:
If you remove and rejoin a machine to the Active Directory domain, you must remove and addthe machine to the machine catalog again.
Step 10: Create delivery groups in Citrix Virtual Apps or Citrix Virtual Desktops
Theprocess for creatingadeliverygroupandaddingmachinecatalogscontainingLinuxVDAmachinesis almost identical to Windows VDA machines. For a more detailed description of how to completethese tasks, see Create Delivery Groups.
For creatingdelivery groups that contain LinuxVDAmachine catalogs, the following restrictionsapply:
• Ensure that the AD users and groups you select have been properly configured to log on to theLinux VDAmachines.
• Do not allow logon of unauthenticated (anonymous) users.• Do not mix the delivery group with machine catalogs that contain Windowsmachines.
Important:
Publishing applications is supported with Linux VDA Version 1.4 and later. However, the LinuxVDA does not support the delivery of desktops and apps to the samemachine.
For information about how to createmachine catalogs anddelivery groups, seeCitrix Virtual Apps andDesktops 7 2109.
Troubleshooting
Use the information in this section to troubleshoot issues that can arise from using easy install.
© 1999‒2022 Citrix Systems, Inc. All rights reserved. 30
Linux Virtual Delivery Agent 2109
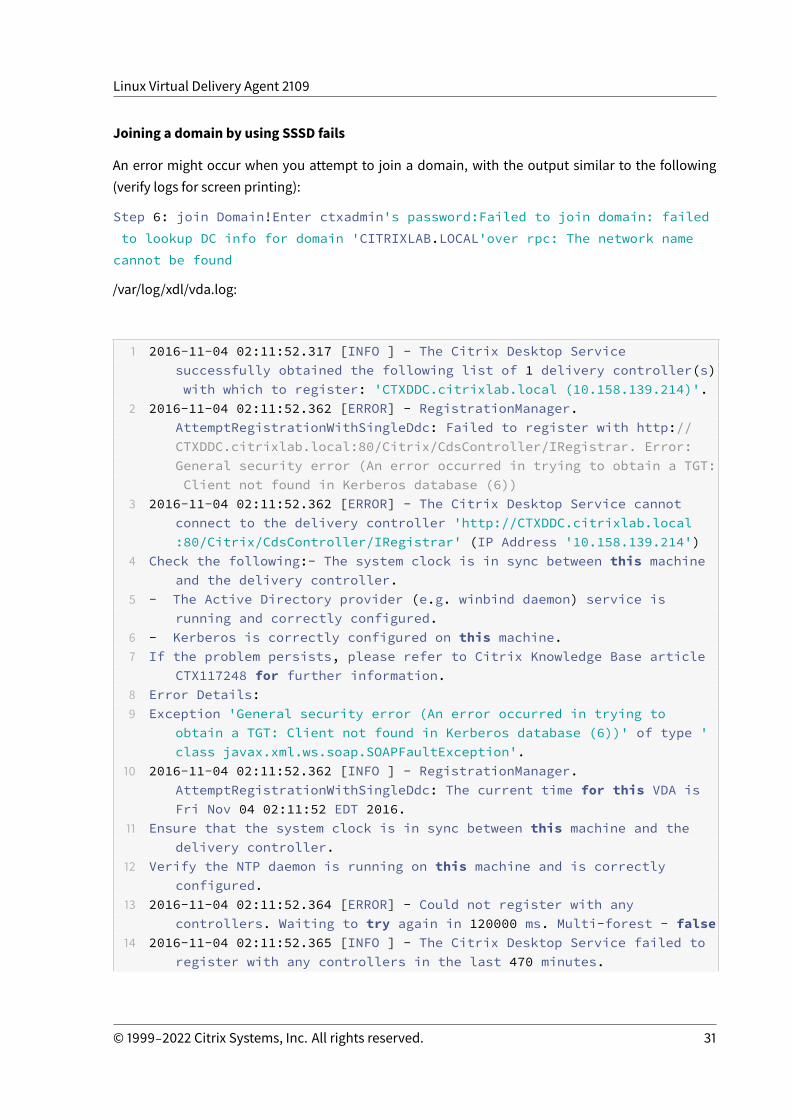
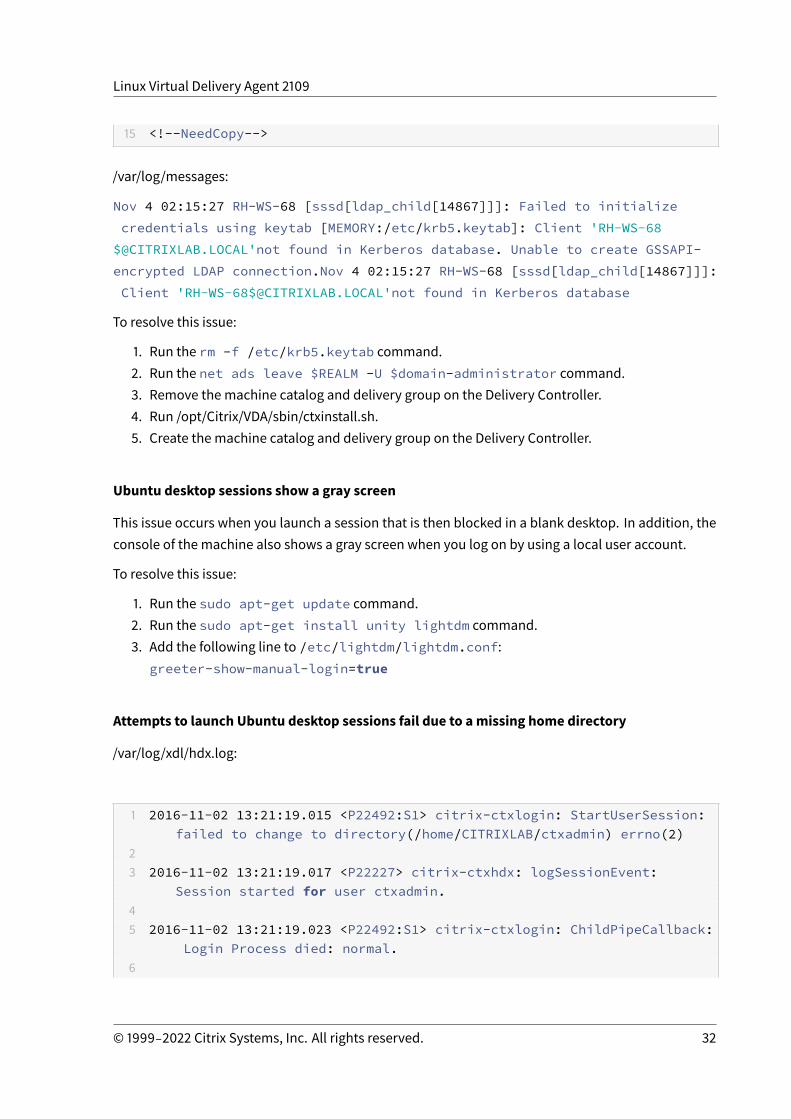
Joining a domain by using SSSD fails
An error might occur when you attempt to join a domain, with the output similar to the following(verify logs for screen printing):
Step 6: join Domain!Enter ctxadmin's password:Failed to join domain: failedto lookup DC info for domain 'CITRIXLAB.LOCAL'over rpc: The network name
cannot be found
/var/log/xdl/vda.log:
1 2016-11-04 02:11:52.317 [INFO ] - The Citrix Desktop Servicesuccessfully obtained the following list of 1 delivery controller(s)with which to register: 'CTXDDC.citrixlab.local (10.158.139.214)'.
2 2016-11-04 02:11:52.362 [ERROR] - RegistrationManager.AttemptRegistrationWithSingleDdc: Failed to register with http://CTXDDC.citrixlab.local:80/Citrix/CdsController/IRegistrar. Error:General security error (An error occurred in trying to obtain a TGT:Client not found in Kerberos database (6))
3 2016-11-04 02:11:52.362 [ERROR] - The Citrix Desktop Service cannotconnect to the delivery controller 'http://CTXDDC.citrixlab.local:80/Citrix/CdsController/IRegistrar' (IP Address '10.158.139.214')
4 Check the following:- The system clock is in sync between this machineand the delivery controller.
5 - The Active Directory provider (e.g. winbind daemon) service isrunning and correctly configured.
6 - Kerberos is correctly configured on this machine.7 If the problem persists, please refer to Citrix Knowledge Base article
CTX117248 for further information.8 Error Details:9 Exception 'General security error (An error occurred in trying to
obtain a TGT: Client not found in Kerberos database (6))' of type 'class javax.xml.ws.soap.SOAPFaultException'.
10 2016-11-04 02:11:52.362 [INFO ] - RegistrationManager.AttemptRegistrationWithSingleDdc: The current time for this VDA isFri Nov 04 02:11:52 EDT 2016.
11 Ensure that the system clock is in sync between this machine and thedelivery controller.
12 Verify the NTP daemon is running on this machine and is correctlyconfigured.
13 2016-11-04 02:11:52.364 [ERROR] - Could not register with anycontrollers. Waiting to try again in 120000 ms. Multi-forest - false
14 2016-11-04 02:11:52.365 [INFO ] - The Citrix Desktop Service failed toregister with any controllers in the last 470 minutes.
© 1999‒2022 Citrix Systems, Inc. All rights reserved. 31
Linux Virtual Delivery Agent 2109
15 <!--NeedCopy-->
/var/log/messages:
Nov 4 02:15:27 RH-WS-68 [sssd[ldap_child[14867]]]: Failed to initializecredentials using keytab [MEMORY:/etc/krb5.keytab]: Client 'RH-WS-68
[email protected]'not found in Kerberos database. Unable to create GSSAPI-encrypted LDAP connection.Nov 4 02:15:27 RH-WS-68 [sssd[ldap_child[14867]]]:Client '[email protected]'not found in Kerberos database
To resolve this issue:
1. Run the rm -f /etc/krb5.keytab command.2. Run the net ads leave $REALM -U $domain-administrator command.3. Remove the machine catalog and delivery group on the Delivery Controller.4. Run /opt/Citrix/VDA/sbin/ctxinstall.sh.5. Create the machine catalog and delivery group on the Delivery Controller.
Ubuntu desktop sessions show a gray screen
This issue occurs when you launch a session that is then blocked in a blank desktop. In addition, theconsole of the machine also shows a gray screen when you log on by using a local user account.
To resolve this issue:
1. Run the sudo apt-get update command.2. Run the sudo apt-get install unity lightdm command.3. Add the following line to /etc/lightdm/lightdm.conf:
greeter-show-manual-login=true
Attempts to launch Ubuntu desktop sessions fail due to amissing home directory
/var/log/xdl/hdx.log:
1 2016-11-02 13:21:19.015 <P22492:S1> citrix-ctxlogin: StartUserSession:failed to change to directory(/home/CITRIXLAB/ctxadmin) errno(2)
23 2016-11-02 13:21:19.017 <P22227> citrix-ctxhdx: logSessionEvent:
Session started for user ctxadmin.45 2016-11-02 13:21:19.023 <P22492:S1> citrix-ctxlogin: ChildPipeCallback:
Login Process died: normal.6
© 1999‒2022 Citrix Systems, Inc. All rights reserved. 32
Linux Virtual Delivery Agent 2109
7 2016-11-02 13:21:59.217 <P22449:S1> citrix-ctxgfx: main: Exitingnormally.
8 <!--NeedCopy-->
Tip:
The root causeof this issue is that thehomedirectory is not created for thedomainadministrator.
To resolve this issue:
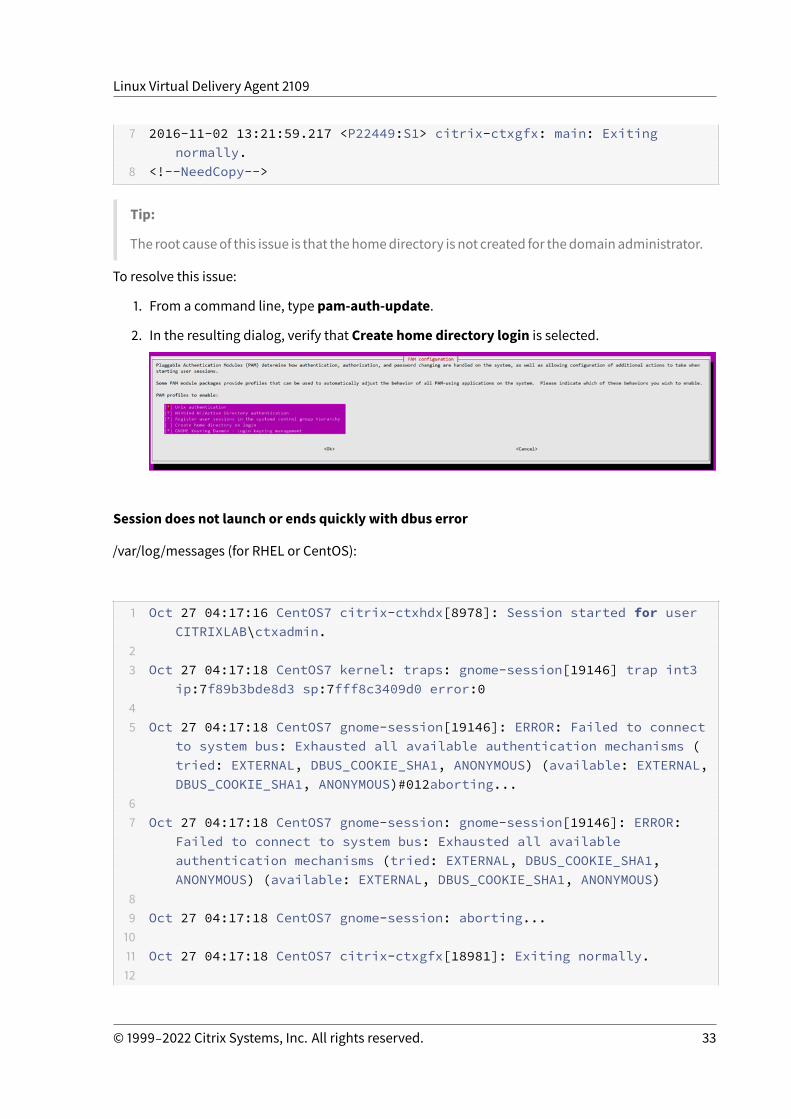
1. From a command line, type pam-auth-update.
2. In the resulting dialog, verify that Create home directory login is selected.
Session does not launch or ends quickly with dbus error
/var/log/messages (for RHEL or CentOS):
1 Oct 27 04:17:16 CentOS7 citrix-ctxhdx[8978]: Session started for userCITRIXLAB\ctxadmin.
23 Oct 27 04:17:18 CentOS7 kernel: traps: gnome-session[19146] trap int3
ip:7f89b3bde8d3 sp:7fff8c3409d0 error:045 Oct 27 04:17:18 CentOS7 gnome-session[19146]: ERROR: Failed to connect
to system bus: Exhausted all available authentication mechanisms (tried: EXTERNAL, DBUS_COOKIE_SHA1, ANONYMOUS) (available: EXTERNAL,DBUS_COOKIE_SHA1, ANONYMOUS)#012aborting...
67 Oct 27 04:17:18 CentOS7 gnome-session: gnome-session[19146]: ERROR:
Failed to connect to system bus: Exhausted all availableauthentication mechanisms (tried: EXTERNAL, DBUS_COOKIE_SHA1,ANONYMOUS) (available: EXTERNAL, DBUS_COOKIE_SHA1, ANONYMOUS)
89 Oct 27 04:17:18 CentOS7 gnome-session: aborting...1011 Oct 27 04:17:18 CentOS7 citrix-ctxgfx[18981]: Exiting normally.12
© 1999‒2022 Citrix Systems, Inc. All rights reserved. 33
Linux Virtual Delivery Agent 2109
13 Oct 27 04:17:18 CentOS7 citrix-ctxhdx[8978]: Session stopped for userCITRIXLAB\ctxadmin.
14 <!--NeedCopy-->
Or, alternately for Ubuntu distributions, use the log /var/log/syslog:
1 Nov 3 11:03:52 user01-HVM-domU pulseaudio[25326]: [pulseaudio] pid.c:Stale PID file, overwriting.
23 Nov 3 11:03:52 user01-HVM-domU pulseaudio[25326]: [pulseaudio] bluez5-
util.c: Failed to get D-Bus connection: Did not receive a reply.Possible causes include: the remote application did not send a reply, the message bus security policy blocked the reply, the replytimeout expired, or the network connection was broken.
45 Nov 3 11:03:52 user01-HVM-domU pulseaudio[25326]: [pulseaudio] hashmap
.c: Assertion 'h' failed at pulsecore/hashmap.c:116, functionpa_hashmap_free(). Aborting.
67 Nov 3 11:03:52 user01-HVM-domU pulseaudio[25352]: [pulseaudio] core-
util.c: Failed to connect to system bus: Did not receive a reply.Possible causes include: the remote application did not send a reply, the message bus security policy blocked the reply, the replytimeout expired, or the network connection was broken.
89 Nov 3 11:03:52 user01-HVM-domU pulseaudio[25352]: message repeated 10
times: [ [pulseaudio] core-util.c: Failed to connect to system bus:Did not receive a reply. Possible causes include: the remoteapplication did not send a reply, the message bus security policyblocked the reply, the reply timeout expired, or the networkconnection was broken.]
1011 Nov 3 11:03:52 user01-HVM-domU pulseaudio[25352]: [pulseaudio] pid.c:
Daemon already running.Nov 3 11:03:58 user01-HVM-domU citrix-ctxgfx[24693]: Exiting normally
12 <!--NeedCopy-->
Some groups or modules do not take effect until a restart. If the dbus error messages appear in thelog, we recommend that you restart the system and retry.
SELinux prevents SSHD from accessing the home directory
The user can launch a session but cannot log on.
© 1999‒2022 Citrix Systems, Inc. All rights reserved. 34
Linux Virtual Delivery Agent 2109
/var/log/ctxinstall.log:
1 Jan 25 23:30:31 yz-rhel72-1 setroubleshoot[3945]: SELinux is preventing/usr/sbin/sshd from setattr access on the directory /root. Forcomplete SELinux messages. run sealert -l 32f52c1f-8ff9-4566-a698-963a79f16b81
23 Jan 25 23:30:31 yz-rhel72-1 python[3945]: SELinux is preventing /usr/
sbin/sshd from setattr access on the directory /root.45 ***** Plugin catchall_boolean (89.3 confidence) suggests
******************67 If you want to allow polyinstantiation to enabled89 Then you must tell SELinux about this by enabling the '
polyinstantiation_enabled' boolean.1011 You can read 'None' man page for more details.1213 Do1415 setsebool -P polyinstantiation_enabled 11617 ***** Plugin catchall (11.6 confidence) suggests
**************************1819 If you believe that sshd should be allowed setattr access on the root
directory by default.2021 Then you should report this as a bug.2223 You can generate a local policy module to allow this access.2425 Do2627 allow this access for now by executing:2829 # grep sshd /var/log/audit/audit.log | audit2allow -M mypol3031 # semodule -i mypol.pp32 <!--NeedCopy-->
© 1999‒2022 Citrix Systems, Inc. All rights reserved. 35
Linux Virtual Delivery Agent 2109
To resolve this issue:
1. Disable SELinux by making the following change to /etc/selinux/config.
SELINUX=disabled
2. Restart the VDA.
Install Linux Virtual Delivery Agent for RHEL/CentOSmanually
October 28, 2021
Important:
For fresh installations, we recommend you use easy install for a quick installation. Easy installsaves time and labor and is less error-prone than themanual installation detailed in this article.
Step 1: Prepare RHEL 8/CentOS 8, RHEL 7/CentOS 7 for VDA installation
Step 1a: Verify the network configuration
Ensure that the network is connected and configured correctly. For example, you must configure theDNS server on the Linux VDA.
Step 1b: Set the host name
To ensure that the host name of the machine is reported correctly, change the /etc/hostname file tocontain only the host name of the machine.
hostname
Step 1c: Assign a loopback address to the host name
To ensure that the DNS domain name and Fully Qualified Domain Name (FQDN) of the machine arereported back correctly, change the following line of the /etc/hosts file to include the FQDN andhost name as the first two entries:
127.0.0.1hostname-fqdnhostname localhost localhost.localdomain localhost4 localhost4.localdomain4
For example:
127.0.0.1 vda01.example.comvda01 localhost localhost.localdomain localhost4 localhost4.localdomain4
Remove any other references to hostname-fqdn or hostname from other entries in the file.
© 1999‒2022 Citrix Systems, Inc. All rights reserved. 36
Linux Virtual Delivery Agent 2109
Note:
The Linux VDA currently does not support NetBIOS name truncation. Therefore, the host namemust not exceed 15 characters.
Tip:
Use a–z, A–Z, 0–9, and hyphen (-) characters only. Avoid underscores (_), spaces, and other sym-bols. Donot start ahostnamewithanumberanddonotendwithahyphen. This rule alsoappliesto Delivery Controller host names.
Step 1d: Check the host name
Verify that the host name is set correctly:
1 hostname2 <!--NeedCopy-->
This command returns only themachine’s host name and not its fully qualified domain name (FQDN).
Verify that the FQDN is set correctly:
1 hostname -f2 <!--NeedCopy-->
This command returns the FQDN of the machine.
Step 1e: Check name resolution and service reachability
Verify that you can resolve the FQDN and ping the domain controller and Delivery Controller:
1 nslookup domain-controller-fqdn23 ping domain-controller-fqdn45 nslookup delivery-controller-fqdn67 ping delivery-controller-fqdn8 <!--NeedCopy-->
If you cannot resolve the FQDN or ping either of thesemachines, review the steps before proceeding.
© 1999‒2022 Citrix Systems, Inc. All rights reserved. 37
Linux Virtual Delivery Agent 2109
Step 1f: Configure clock synchronization
Maintaining accurate clock synchronization between the VDAs, Delivery Controllers, and domain con-trollers is crucial. Hosting the Linux VDA as a virtualmachine can cause clock skew problems. For thisreason, synchronizing time with a remote time service is preferred.
AnRHEL8/RHEL7default environmentuses theChronydaemon (chronyd) for clock synchronization.
Configure the Chrony service
As a root user, edit /etc/chrony.conf and add a server entry for each remote time server:
1 server peer1-fqdn-or-ip-address iburst23 server peer2-fqdn-or-ip-address iburst4 <!--NeedCopy-->
In a typical deployment, synchronize time from the local domain controllers and not directly frompublic NTPpool servers. Add a server entry for eachActiveDirectory domain controller in the domain.
Remove any other server entries listed including loopback IP address, localhost, and public server*.pool.ntp.org entries.
Save changes and restart the Chrony daemon:
1 sudo /sbin/service chronyd restart2 <!--NeedCopy-->
Step 1g: Install OpenJDK 11
The Linux VDA requires the presence of OpenJDK 11. The runtime environment is automatically in-stalled as a dependency when you install the Linux VDA.
Confirm the correct version:
1 sudo yum info java-11-openjdk2 <!--NeedCopy-->
The prepackaged OpenJDKmight be an earlier version. Update to OpenJDK 11:
© 1999‒2022 Citrix Systems, Inc. All rights reserved. 38
Linux Virtual Delivery Agent 2109
1 sudo yum -y update java-11-openjdk2 <!--NeedCopy-->
Step 1h: Install PostgreSQL
The Linux VDA requires either PostgreSQL 10.5 or later on RHEL 8 or PostgreSQL 9.2 or later on RHEL7.
Install the following packages:
1 sudo yum -y install postgresql-server23 sudo yum -y install postgresql-jdbc4 <!--NeedCopy-->
The following post-installation step is required to initialize the database and to ensure that the ser-vice starts upon machine startup. This action creates database files under /var/lib/pgsql/data. Thecommand differs between PostgreSQL 10 and 9:
1 sudo postgresql-setup initdb2 <!--NeedCopy-->
Step 1i: Start PostgreSQL
Start the service uponmachine startup and start the service immediately:
1 sudo systemctl enable postgresql23 sudo systemctl start postgresql4 <!--NeedCopy-->
Check the version of PostgreSQL by using:
1 psql --version2 <!--NeedCopy-->
© 1999‒2022 Citrix Systems, Inc. All rights reserved. 39
Linux Virtual Delivery Agent 2109
(RHEL 7 only) Verify that the data directory is set by using the psql command-line utility:
1 sudo -u postgres psql -c 'show data_directory'2 <!--NeedCopy-->
Step 2: Prepare the hypervisor
Some changes are required when running the Linux VDA as a virtual machine on a supported hypervi-sor. Make the following changes according to the hypervisor platform in use. No changes are requiredif you are running the Linux machine on bare metal hardware.
Fix time synchronization on Citrix Hypervisor
When the Citrix Hypervisor Time Sync feature is enabled, within each paravirtualized Linux VM youexperience issues with NTP and Citrix Hypervisor, both of which try to manage the system clock. Toavoid the clock becoming out of sync with other servers, ensure that the system clock within eachLinux guest is synchronized with the NTP. This case requires disabling host time synchronization. Nochanges are required in HVMmode.
On some Linux distributions, if you are running a paravirtualized Linux kernel with Citrix VM Toolsinstalled, you can checkwhether the Citrix Hypervisor Time Sync feature is present and enabled fromwithin the Linux VM:
1 su -23 cat /proc/sys/xen/independent_wallclock4 <!--NeedCopy-->
This command returns 0 or 1:
• 0 - The time sync feature is enabled, andmust be disabled.• 1 - The time sync feature is disabled, and no further action is required.
If the /proc/sys/xen/independent_wallclock file is not present, the following steps are not required.
If enabled, disable the time sync feature by writing 1 to the file:
1 sudo echo 1 > /proc/sys/xen/independent_wallclock2 <!--NeedCopy-->
© 1999‒2022 Citrix Systems, Inc. All rights reserved. 40

Linux Virtual Delivery Agent 2109
Tomake this change permanent and persistent after restart, edit the /etc/sysctl.conf file and add theline:
xen.independent_wallclock = 1
To verify these changes, restart the system:
1 su -23 cat /proc/sys/xen/independent_wallclock4 <!--NeedCopy-->
This command returns the value 1.
Fix time synchronization on Microsoft Hyper-V
The Linux VMs with Hyper-V Linux Integration Services installed can apply the Hyper-V time synchro-nization feature to use the time of the host operating system. To ensure that the system clock remainsaccurate, youmust enable this feature alongside the NTP services.
From themanagement operating system:
1. Open the Hyper-V Manager console.2. For the settings of a Linux VM, select Integration Services.3. Ensure that Time synchronization is selected.
Note:
This approach is different fromVMware andCitrix Hypervisor, where host time synchronization isdisabled to avoid conflicts with NTP. Hyper-V time synchronization can coexist and supplementNTP time synchronization.
Fix time synchronization on ESX and ESXi
When the VMware Time Synchronization feature is enabled, within each paravirtualized Linux VM youexperience issueswith the NTP and the hypervisor, both of which try to synchronize the system clock.To avoid the clock becoming out of sync with other servers, ensure that the system clock within eachLinux guest is synchronized with the NTP. This case requires disabling host time synchronization.
If you are running a paravirtualized Linux kernel with VMware Tools installed:
1. Open the vSphere Client.2. Edit settings for the Linux VM.3. In the Virtual Machine Properties dialog, open theOptions tab.
© 1999‒2022 Citrix Systems, Inc. All rights reserved. 41
Linux Virtual Delivery Agent 2109
4. Select VMware Tools.5. In the Advanced box, clear Synchronize guest timewith host.
Step 3: Add the Linux virtual machine (VM) to the Windows domain
The Linux VDA supports several methods for adding Linux machines to the Active Directory (AD) do-main:
• SambaWinbind• Quest Authentication Services• Centrify DirectControl• SSSD• PBIS
Follow instructions based on your chosenmethod.
Note:
Session launches might fail when the same user name is used for the local account in the LinuxVDA and the account in AD.
SambaWinbind
Install or update the required packages:
For RHEL 8/CentOS 8:
1 sudo yum -y install samba-winbind samba-winbind-clients krb5-workstation oddjob-mkhomedir realmd authselect
2 <!--NeedCopy-->
For RHEL 7/CentOS 7:
1 sudo yum -y install samba-winbind samba-winbind-clients krb5-workstation authconfig oddjob-mkhomedir
2 <!--NeedCopy-->
Enable Winbind daemon to start uponmachine startup
The Winbind daemonmust be configured to start uponmachine startup:
© 1999‒2022 Citrix Systems, Inc. All rights reserved. 42
Linux Virtual Delivery Agent 2109
1 sudo /sbin/chkconfig winbind on2 <!--NeedCopy-->
Configure Winbind Authentication
Configure the machine for Kerberos authentication by using Winbind:
1. Run the following command.
For RHEL 8:
1 sudo authselect select winbind with-mkhomedir --force2 <!--NeedCopy-->
For RHEL 7:
1 sudo authconfig --disablecache --disablesssd --disablesssdauth --enablewinbind --enablewinbindauth --disablewinbindoffline --smbsecurity=ads --smbworkgroup=domain --smbrealm=REALM --krb5realm=REALM --krb5kdc=fqdn-of-domain-controller --winbindtemplateshell=/bin/bash --enablemkhomedir --updateall
2 <!--NeedCopy-->
WhereREALM is the Kerberos realmname in uppercase anddomain is theNetBIOSnameof thedomain.
If DNS-based lookup of the KDC server and realm name is required, add the following two op-tions to the previous command:
--enablekrb5kdcdns --enablekrb5realmdns
Ignore any errors returned from the authconfig command about the winbind service failingto start. The errors can occur when authconfig tries to start the winbind service without themachine yet being joined to the domain.
2. Open /etc/samba/smb.conf and add the following entries under the [Global] section, but afterthe section generated by the authconfig tool:
kerberos method = secrets and keytabwinbind refresh tickets = truewinbind offline logon = no
© 1999‒2022 Citrix Systems, Inc. All rights reserved. 43
Linux Virtual Delivery Agent 2109
3. (RHEL8only)Open /etc/krb5.conf andaddentries under the[libdefaults],[realms], and[domain_realm] sections:
Under the [libdefaults] section:
default_ccache_name = FILE:/tmp/krb5cc_%{ uid }default_realm = REALMdns_lookup_kdc = true
Under the [realms] section:
REALM = {kdc = fqdn-of-domain-controller}
Under the [domain_realm] section:
realm = REALM.realm = REALM
The Linux VDA requires the system keytab file /etc/krb5.keytab to authenticate and register with theDelivery Controller. The previous kerberosmethod setting forcesWinbind to create the systemkeytabfile when the machine is first joined to the domain.
Join Windows domain
Your domain controller must be reachable and you must have an Active Directory user account withpermissions to add computers to the domain:
RHEL 8:
1 sudo realm join -U user --client-software=winbind REALM2 <!--NeedCopy-->
RHEL 7:
1 sudo net ads join REALM -U user2 <!--NeedCopy-->
REALM is the Kerberos realm name in uppercase, and user is a domain user who has permissions toadd computers to the domain.
© 1999‒2022 Citrix Systems, Inc. All rights reserved. 44
Linux Virtual Delivery Agent 2109
Configure PAM for Winbind
By default, the configuration for the Winbind PAMmodule (pam_winbind) does not enable Kerberosticket caching and home directory creation. Open /etc/security/pam_winbind.conf and add orchange the following entries under the [Global] section:
krb5_auth = yeskrb5_ccache_type = FILEmkhomedir = yes
Ensure that any leading semi-colons fromeach setting are removed. These changes require restartingthe Winbind daemon:
1 sudo /sbin/service winbind restart2 <!--NeedCopy-->
Tip:
The winbind daemon stays running only if the machine is joined to a domain.
Open /etc/krb5.conf and change the following setting under the [libdefaults] section from KEYRINGto FILE type:
default_ccache_name = FILE:/tmp/krb5cc_%{ uid }
Verify domainmembership
The Delivery Controller requires that all VDA machines (Windows and Linux VDAs) have a computerobject in Active Directory.
Run the net ads command of Samba to verify that the machine is joined to a domain:
1 sudo net ads testjoin2 <!--NeedCopy-->
Run the following command to verify extra domain and computer object information:
1 sudo net ads info2 <!--NeedCopy-->
© 1999‒2022 Citrix Systems, Inc. All rights reserved. 45
Linux Virtual Delivery Agent 2109
Verify Kerberos configuration
To ensure that Kerberos is configured correctly for use with the Linux VDA, verify that the systemkeytab file has been created and contains valid keys:
1 sudo klist -ke2 <!--NeedCopy-->
This command displays the list of keys available for the various combinations of principal names andcipher suites. Run the Kerberos kinit command to authenticate the machine with the domain con-troller using these keys:
1 sudo kinit -k MACHINE\$@REALM2 <!--NeedCopy-->
The machine and realm names must be specified in uppercase. The dollar sign ($) must be escapedwith a backslash (\) to prevent shell substitution. In some environments, the DNS domain name isdifferent from the Kerberos realm name. Ensure that the realm name is used. If this command issuccessful, no output is displayed.
Verify that the TGT ticket for the machine account has been cached using:
1 sudo klist2 <!--NeedCopy-->
Examine the account details of the machine using:
1 sudo net ads status2 <!--NeedCopy-->
Verify user authentication
Use thewbinfo tool to verify that domain users can authenticate with the domain:
1 wbinfo --krb5auth=domain\\username%password2 <!--NeedCopy-->
© 1999‒2022 Citrix Systems, Inc. All rights reserved. 46
Linux Virtual Delivery Agent 2109
The domain specified here is the AD domain name, not the Kerberos realm name. For the bash shell,the backslash (\) character must be escaped with another backslash. This command returns a mes-sage indicating success or failure.
To verify that theWinbind PAMmodule is configured correctly, log on to the Linux VDA using a domainuser account that has not been used before.
1 ssh localhost -l domain\\username2 id -u3 <!--NeedCopy-->
Verify that the tickets in the Kerberos credential cache are valid and not expired:
1 klist2 <!--NeedCopy-->
Exit the session.
1 exit2 <!--NeedCopy-->
A similar test can be performed by logging on to the Gnome or KDE console directly. Proceed to Step6: Install the Linux VDA after the domain joining verification.
Quest Authentication Services
Configure Quest on domain controller
Assume that you have installed and configured the Quest software on the Active Directory domaincontrollers, and have been granted administrative privileges to create computer objects in Active Di-rectory.
Enable domain users to log on to Linux VDAmachines
To enable domain users to establish HDX sessions on a Linux VDAmachine:
1. In the Active Directory Users and Computers management console, open Active Directory userproperties for that user account.
2. Select the Unix Account tab.3. Check Unix-enabled.
© 1999‒2022 Citrix Systems, Inc. All rights reserved. 47
Linux Virtual Delivery Agent 2109
4. Set the Primary GID Number to the group ID of an actual domain user group.
Note:
These instructions are equivalent for setting up domain users for logon using the console, RDP,SSH, or any other remoting protocol.
Configure Quest on Linux VDA
Work around SELinux policy enforcement
The default RHEL environment has SELinux fully enforced. This enforcement interferes with the Unixdomain socket IPCmechanisms used by Quest, and prevents domain users from logging on.
The convenient way to work around this issue is to disable SELinux. As a root user, edit /etc/selinux/-config and change the SELinux setting:
SELINUX=permissive
This change requires a machine restart:
1 reboot2 <!--NeedCopy-->
Important:
Use this setting carefully. Reenabling SELinux policy enforcement after disabling can cause acomplete lockout, even for the root user and other local users.
Configure VAS daemon
Auto-renewal of Kerberos tickets must be enabled and disconnected. Authentication (offline logon)must be disabled.
1 sudo /opt/quest/bin/vastool configure vas vasd auto-ticket-renew-interval 32400
23 sudo /opt/quest/bin/vastool configure vas vas_auth allow-disconnected-
auth false4 <!--NeedCopy-->
© 1999‒2022 Citrix Systems, Inc. All rights reserved. 48
Linux Virtual Delivery Agent 2109
This command sets the renewal interval to nine hours (32,400 seconds) which is one hour less thanthe default 10-hour ticket lifetime. Set this parameter to a lower value on systemswith a shorter ticketlifetime.
Configure PAM and NSS
To enable domain user logon through HDX and other services such as su, ssh, and RDP, run the follow-ing commands to configure PAM and NSSmanually:
1 sudo /opt/quest/bin/vastool configure pam23 sudo /opt/quest/bin/vastool configure nss4 <!--NeedCopy-->
Join Windows domain
Join the Linux machine to the Active Directory domain using the Quest vastool command:
1 sudo /opt/quest/bin/vastool -u user join domain-name2 <!--NeedCopy-->
The user is any domain user who has permissions to join computers to the Active Directory domain.The domain-name is the DNS name of the domain, for example, example.com.
Verify domainmembership
The Delivery Controller requires that all VDA machines (Windows and Linux VDAs) have a computerobject in Active Directory. To verify that a Quest-joined Linux machine is on the domain:
1 sudo /opt/quest/bin/vastool info domain2 <!--NeedCopy-->
If the machine is joined to a domain, this command returns the domain name. If the machine is notjoined to any domain, the following error appears:
ERROR: No domain could be found.ERROR: VAS_ERR_CONFIG: at ctx.c:414 in _ctx_init_default_realmdefault_realm not configured in vas.conf. Computer may not be joined todomain
© 1999‒2022 Citrix Systems, Inc. All rights reserved. 49
Linux Virtual Delivery Agent 2109
Verify user authentication
To verify that Quest can authenticate domain users through PAM, log on to the Linux VDA using a do-main user account that has not been used before.
1 ssh localhost -l domain\\username2 id -u3 <!--NeedCopy-->
Verify that a corresponding Kerberos credential cache file was created for the UID returned by the id-u command:
1 ls /tmp/krb5cc_uid2 <!--NeedCopy-->
Verify that the tickets in the Kerberos credential cache are valid and not expired:
1 /opt/quest/bin/vastool klist2 <!--NeedCopy-->
Exit the session.
1 exit2 <!--NeedCopy-->
A similar test can be performed by logging on to the Gnome or KDE console directly. Proceed to Step6: Install the Linux VDA after the domain joining verification.
Centrify DirectControl
Join a Windows domain
With the Centrify DirectControl Agent installed, join the Linuxmachine to the Active Directory domainusing the Centrify adjoin command:
1 su ‒2 adjoin -w -V -u user domain-name3 <!--NeedCopy-->
© 1999‒2022 Citrix Systems, Inc. All rights reserved. 50
Linux Virtual Delivery Agent 2109
The user parameter is any Active Directory domain user who has permissions to join computers to theActive Directory domain. The domain-name is the name of the domain to join the Linux machine to.
Verify domainmembership
The Delivery Controller requires that all VDA machines (Windows and Linux VDAs) have a computerobject in Active Directory. To verify that a Centrify-joined Linux machine is on the domain:
1 su ‒2 adinfo3 <!--NeedCopy-->
Verify that the Joined to domain value is valid and the CentrifyDC mode returns connected. If themode remains stuck in the starting state, then the Centrify client is experiencing server connection orauthentication problems.
More comprehensive system and diagnostic information is available using:
1 adinfo --sysinfo all2 adinfo ‒ diag3 <!--NeedCopy-->
Test connectivity to the various Active Directory and Kerberos services.
1 adinfo --test2 <!--NeedCopy-->
Proceed to Step 6: Install the Linux VDA after the domain joining verification.
SSSD
If you are using SSSD, follow the instructions in this section. This section includes instructions forjoining a Linux VDA machine to a Windows domain and provides guidance for configuring Kerberosauthentication.
To set up SSSD on RHEL and CentOS, do the following:
1. Join the domain and create host keytab2. Set up SSSD3. Enable SSSD
© 1999‒2022 Citrix Systems, Inc. All rights reserved. 51
Linux Virtual Delivery Agent 2109
4. Verify the Kerberos configuration5. Verify user authentication
Join the domain and create host keytab
SSSD does not provide Active Directory client functions for joining the domain andmanaging the sys-tem keytab file. You can use adcli, realmd, or Samba instead.
This section describes the Samba and the adcli approaches for RHEL 7 and RHEL 8 respectively. Forrealmd, see the RHEL or CentOS documentation. These steps must be followed before configuringSSSD.
• Samba (RHEL 7):
Install or update the required packages:
1 sudo yum -y install krb5-workstation authconfig oddjob-mkhomedirsamba-common-tools
2 <!--NeedCopy-->
On the Linux client with properly configured files:
– /etc/krb5.conf– /etc/samba/smb.conf:
Configure the machine for Samba and Kerberos authentication:
1 sudo authconfig --smbsecurity=ads --smbworkgroup=domain --smbrealm=REALM --krb5realm=REALM --krb5kdc=fqdn-of-domain-controller --update
2 <!--NeedCopy-->
WhereREALM is the Kerberos realm name in uppercase and domain is the short NetBIOS nameof the Active Directory domain.
Note:
Settings in this article are meant for the single-domain, single-forest model. ConfigureKerberos based on your AD infrastructure.
If DNS-based lookup of the KDC server and realm name is required, add the following two op-tions to the preceding command:
--enablekrb5kdcdns --enablekrb5realmdns
© 1999‒2022 Citrix Systems, Inc. All rights reserved. 52

Linux Virtual Delivery Agent 2109
Open /etc/samba/smb.conf and add the following entries under the [Global] section, but afterthe section generated by the authconfig tool:
kerberos method = secrets and keytabwinbind offline logon = no
Join the Windows domain. Ensure that your domain controller is reachable and you have anActive Directory user account with permissions to add computers to the domain:
1 sudo net ads join REALM -U user2 <!--NeedCopy-->
REALM is theKerberos realmname inuppercaseanduser is adomainuserwhohaspermissionsto add computers to the domain.
• Adcli (RHEL 8):
Install or update the required packages:
1 sudo yum -y install samba-common samba-common-tools krb5-workstation authconfig oddjob-mkhomedir realmd oddjobauthselect
2 <!--NeedCopy-->
Configure the machine for Samba and Kerberos authentication:
1 sudo authselect select sssd with-mkhomedir --force2 <!--NeedCopy-->
Open /etc/krb5.conf and add the entries under the [realms] and [domain_realm] sections.
Under the [realms] section:
REALM = {kdc = fqdn-of-domain-controller}
Under the [domain_realm] section:
realm = REALM.realm = REALM
Join the Windows domain. Ensure that your domain controller is reachable and you have anActive Directory user account with permissions to add computers to the domain:
© 1999‒2022 Citrix Systems, Inc. All rights reserved. 53
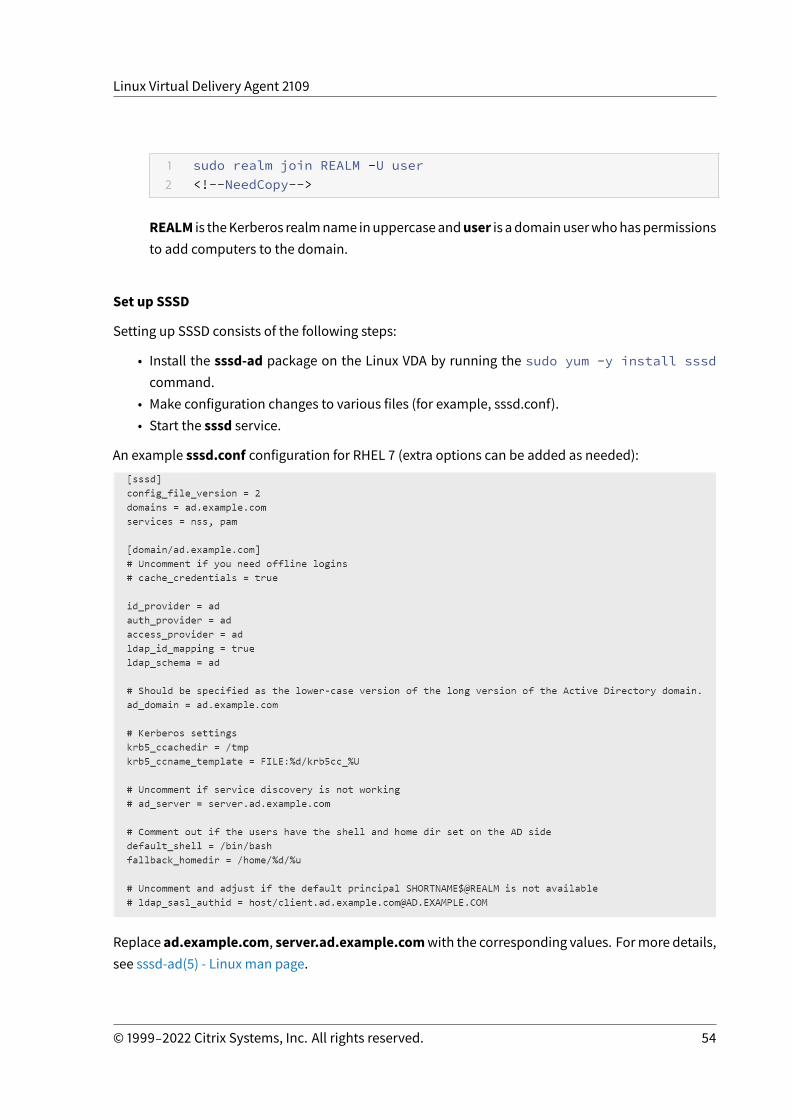
Linux Virtual Delivery Agent 2109
1 sudo realm join REALM -U user2 <!--NeedCopy-->
REALM is theKerberos realmname inuppercaseanduser is adomainuserwhohaspermissionsto add computers to the domain.
Set up SSSD
Setting up SSSD consists of the following steps:
• Install the sssd-ad package on the Linux VDA by running the sudo yum -y install sssdcommand.
• Make configuration changes to various files (for example, sssd.conf).• Start the sssd service.
An example sssd.conf configuration for RHEL 7 (extra options can be added as needed):
Replace ad.example.com, server.ad.example.comwith the corresponding values. Formore details,see sssd-ad(5) - Linux man page.
© 1999‒2022 Citrix Systems, Inc. All rights reserved. 54
Linux Virtual Delivery Agent 2109
(RHEL 8 only)Open /etc/sssd/sssd.conf andadd the followingentriesunder the [domain/ad.example.com]section:
ad_gpo_access_control = permissivefull_name_format = %2$s\\%1$sfallback_homedir = /home/%d/%u## Kerberos settingskrb5_ccachedir = /tmpkrb5_ccname_template = FILE:%d/krb5cc_%U
Set the file ownership and permissions on sssd.conf:
chown root:root /etc/sssd/sssd.confchmod 0600 /etc/sssd/sssd.confrestorecon /etc/sssd/sssd.conf
Enable SSSD
RHEL 8:
Run the following commands to enable SSSD:
1 sudo systemctl restart sssd2 sudo systemctl enable sssd.service3 sudo chkconfig sssd on4 <!--NeedCopy-->
RHEL 7/CentOS 7:
Use authconfig to enable SSSD. Install oddjob-mkhomedir to ensure that the home directory cre-ation is compatible with SELinux:
1 authconfig --enablesssd --enablesssdauth --enablemkhomedir ‒ -update23 sudo service sssd start45 sudo chkconfig sssd on6 <!--NeedCopy-->
Verify Kerberos configuration
Verify that the system keytab file has been created and contains valid keys:
© 1999‒2022 Citrix Systems, Inc. All rights reserved. 55
Linux Virtual Delivery Agent 2109
1 sudo klist -ke2 <!--NeedCopy-->
This command displays the list of keys available for the various combinations of principal names andcipher suites. Run the Kerberos kinit command to authenticate the machine with the domain con-troller using these keys:
1 sudo kinit ‒ k MACHINE\$@REALM2 <!--NeedCopy-->
The machine and realm names must be specified in uppercase. The dollar sign ($) must be escapedwith a backslash (\) to prevent shell substitution. In some environments, the DNS domain name isdifferent from the Kerberos realm name. Ensure that the realm name is used. If this command issuccessful, no output is displayed.
Verify that the TGT ticket for the machine account has been cached using:
1 sudo klist2 <!--NeedCopy-->
Verify user authentication
Use the getent command to verify that the logon format is supported and the NSS works:
1 sudo getent passwd DOMAIN\\username2 <!--NeedCopy-->
TheDOMAIN parameter indicates the short version domain name. If another logon format is needed,verify by using the getent command first.
The supported logon formats are:
• Down-level logon name: DOMAIN\username• UPN: [email protected]• NetBIOS Suffix format: username@DOMAIN
To verify that the SSSD PAM module is configured correctly, log on to the Linux VDA using a domainuser account that has not been used before.
© 1999‒2022 Citrix Systems, Inc. All rights reserved. 56
Linux Virtual Delivery Agent 2109
1 sudo ssh localhost ‒ l DOMAIN\\username23 id -u4 <!--NeedCopy-->
Verify that a corresponding Kerberos credential cache file was created for the uid returned by thecommand:
1 ls /tmp/krb5cc_{2 uid }34 <!--NeedCopy-->
Verify that the tickets in the user’s Kerberos credential cache are valid and not expired.
1 klist2 <!--NeedCopy-->
Proceed to Step 6: Install the Linux VDA after the domain joining verification.
PBIS
Download the required PBIS package
For RHEL 7/CentOS 7, for example:
1 wget https://github.com/BeyondTrust/pbis-open/releases/download/8.8.0/pbis-open-8.8.0.506.linux.x86_64.rpm.sh
2 <!--NeedCopy-->
For RHEL 8/CentOS8, for example:
1 wget https://github.com/BeyondTrust/pbis-open/releases/download/9.1.0/pbis-open-9.1.0.551.linux.x86_64.rpm.sh
2 <!--NeedCopy-->
© 1999‒2022 Citrix Systems, Inc. All rights reserved. 57
Linux Virtual Delivery Agent 2109
Make the PBIS installation script executable
For RHEL 7/CentOS 7, for example:
1 chmod +x pbis-open-8.8.0.506.linux.x86_64.rpm.sh2 <!--NeedCopy-->
For RHEL 8/CentOS 8, for example:
1 chmod +x pbis-open-9.1.0.551.linux.x86_64.rpm.sh2 <!--NeedCopy-->
Run the PBIS installation script
For RHEL 7/CentOS 7, for example:
1 sh pbis-open-8.8.0.506.linux.x86_64.rpm.sh2 <!--NeedCopy-->
For RHEL 8/CentOS 8, for example:
1 sh pbis-open-9.1.0.551.linux.x86_64.rpm.sh2 <!--NeedCopy-->
Join Windows domain
Your domain controller must be reachable and you must have an Active Directory user account withpermissions to add computers to the domain:
1 /opt/pbis/bin/domainjoin-cli join domain-name user2 <!--NeedCopy-->
Theuser is a domain userwho has permissions to add computers to the Active Directory domain. Thedomain-name is the DNS name of the domain, for example, example.com.
Note: To set Bash as the default shell, run the /opt/pbis/bin/config LoginShellTemplate/bin/bashcommand.
© 1999‒2022 Citrix Systems, Inc. All rights reserved. 58

Linux Virtual Delivery Agent 2109
Verify domainmembership
The Delivery Controller requires that all VDA machines (Windows and Linux VDAs) have a computerobject in Active Directory. To verify that a PBIS-joined Linux machine is on the domain:
1 /opt/pbis/bin/domainjoin-cli query2 <!--NeedCopy-->
If themachine is joined to adomain, this command returns the information about the currently joinedAD domain and OU. Otherwise, only the host name appears.
Verify user authentication
Toverify thatPBIScanauthenticatedomainusers throughPAM, logon to theLinuxVDAusingadomainuser account that has not been used before.
1 ssh localhost -l domain\\user23 id -u4 <!--NeedCopy-->
Verify that a corresponding Kerberos credential cache file was created for the UID returned by the id-u command:
1 ls /tmp/krb5cc_uid2 <!--NeedCopy-->
Exit the session.
1 exit2 <!--NeedCopy-->
Proceed to Step 6: Install the Linux VDA after the domain joining verification.
Step 4: Install .NET Core Runtime 3.1 as a prerequisite
Before installing the Linux VDA, install .NET Core Runtime 3.1 according to the instructions at https://docs.microsoft.com/en-us/dotnet/core/install/linux-package-managers.
© 1999‒2022 Citrix Systems, Inc. All rights reserved. 59
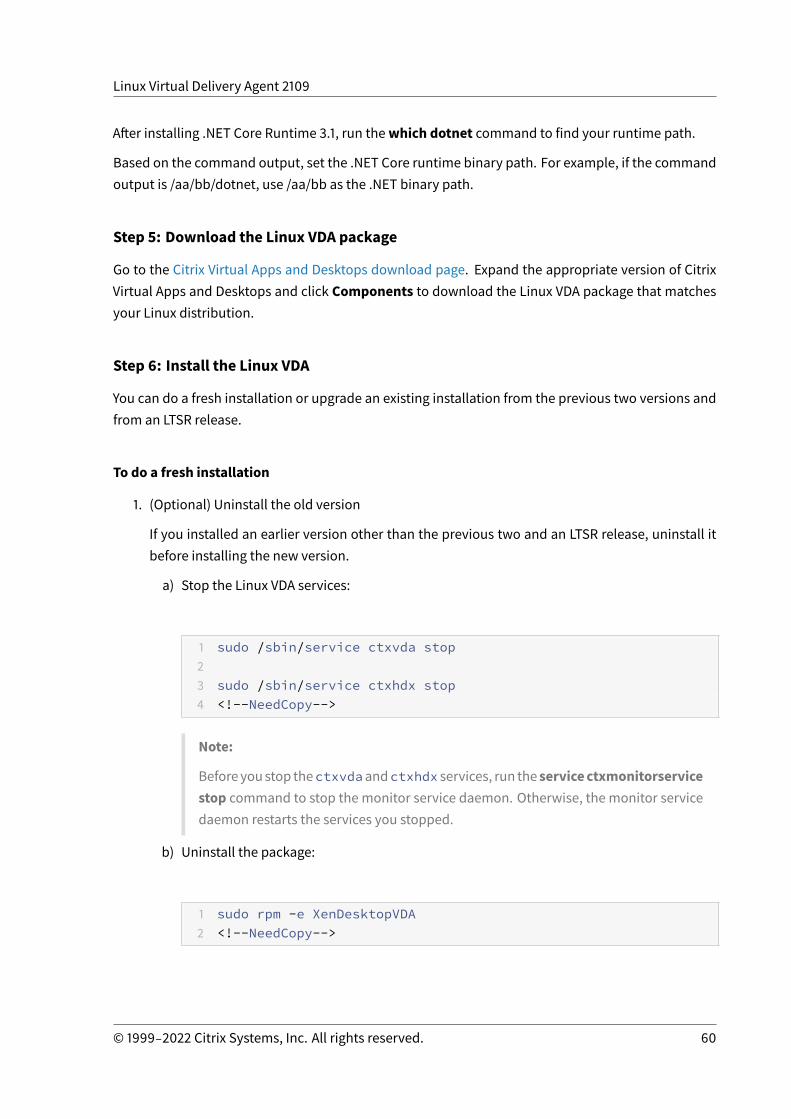
Linux Virtual Delivery Agent 2109
After installing .NET Core Runtime 3.1, run thewhich dotnet command to find your runtime path.
Based on the command output, set the .NET Core runtime binary path. For example, if the commandoutput is /aa/bb/dotnet, use /aa/bb as the .NET binary path.
Step 5: Download the Linux VDA package
Go to the Citrix Virtual Apps and Desktops download page. Expand the appropriate version of CitrixVirtual Apps and Desktops and click Components to download the Linux VDA package that matchesyour Linux distribution.
Step 6: Install the Linux VDA
You can do a fresh installation or upgrade an existing installation from the previous two versions andfrom an LTSR release.
To do a fresh installation
1. (Optional) Uninstall the old version
If you installed an earlier version other than the previous two and an LTSR release, uninstall itbefore installing the new version.
a) Stop the Linux VDA services:
1 sudo /sbin/service ctxvda stop23 sudo /sbin/service ctxhdx stop4 <!--NeedCopy-->
Note:
Beforeyoustop thectxvdaandctxhdx services, run the servicectxmonitorservicestop command to stop the monitor service daemon. Otherwise, the monitor servicedaemon restarts the services you stopped.
b) Uninstall the package:
1 sudo rpm -e XenDesktopVDA2 <!--NeedCopy-->
© 1999‒2022 Citrix Systems, Inc. All rights reserved. 60
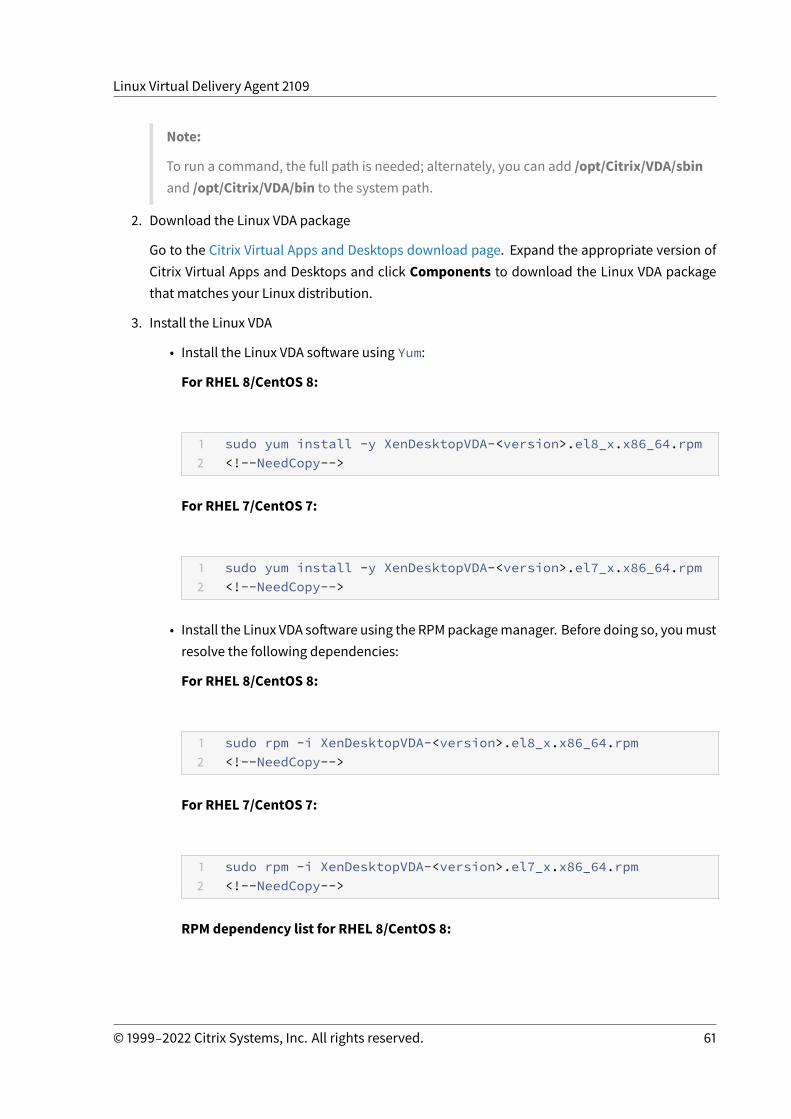
Linux Virtual Delivery Agent 2109
Note:
To run a command, the full path is needed; alternately, you can add /opt/Citrix/VDA/sbinand /opt/Citrix/VDA/bin to the system path.
2. Download the Linux VDA package
Go to the Citrix Virtual Apps and Desktops download page. Expand the appropriate version ofCitrix Virtual Apps and Desktops and click Components to download the Linux VDA packagethat matches your Linux distribution.
3. Install the Linux VDA
• Install the Linux VDA software using Yum:
For RHEL 8/CentOS 8:
1 sudo yum install -y XenDesktopVDA-<version>.el8_x.x86_64.rpm2 <!--NeedCopy-->
For RHEL 7/CentOS 7:
1 sudo yum install -y XenDesktopVDA-<version>.el7_x.x86_64.rpm2 <!--NeedCopy-->
• Install the Linux VDA software using the RPMpackagemanager. Before doing so, youmustresolve the following dependencies:
For RHEL 8/CentOS 8:
1 sudo rpm -i XenDesktopVDA-<version>.el8_x.x86_64.rpm2 <!--NeedCopy-->
For RHEL 7/CentOS 7:
1 sudo rpm -i XenDesktopVDA-<version>.el7_x.x86_64.rpm2 <!--NeedCopy-->
RPM dependency list for RHEL 8/CentOS 8:
© 1999‒2022 Citrix Systems, Inc. All rights reserved. 61
Linux Virtual Delivery Agent 2109
1 qt5-qtbase >= 5.5~23 ibus >= 1.545 nss-tools >= 3.44.067 gperftools-libs >= 2.489 cyrus-sasl-gssapi >= 2.11011 python2 >= 2.7~1213 postgresql-jdbc >= 42.2.31415 postgresql-server >= 10.61617 java-11-openjdk >= 111819 icoutils >= 0.322021 firewalld >= 0.8.02223 policycoreutils-python-utils >= 2.92425 python3-policycoreutils >= 2.92627 dbus >= 1.12.82829 dbus-common >= 1.12.83031 dbus-daemon >= 1.12.83233 dbus-tools >= 1.12.83435 dbus-x11 >= 1.12.83637 xorg-x11-server-utils >= 7.73839 xorg-x11-xinit >= 1.3.44041 libXpm >= 3.5.124243 libXrandr >= 1.5.144
© 1999‒2022 Citrix Systems, Inc. All rights reserved. 62
Linux Virtual Delivery Agent 2109
45 libXtst >= 1.2.34647 motif >= 2.3.44849 pam >= 1.3.15051 util-linux >= 2.32.15253 util-linux-user >= 2.32.15455 xorg-x11-utils >= 7.55657 bash >= 4.45859 findutils >= 4.66061 gawk >= 4.26263 sed >= 4.56465 cups >= 2.26667 foomatic-filters >= 4.0.96869 cups-filters >= 1.20.07071 ghostscript >= 9.257273 libxml2 >= 2.97475 libmspack >= 0.776 <!--NeedCopy-->
RPM dependency list for RHEL 7/CentOS 7:
1 qt5-qtbase >= 5.5~23 libmspack >= 0.545 ibus >= 1.567 cyrus-sasl-gssapi >= 2.18
© 1999‒2022 Citrix Systems, Inc. All rights reserved. 63
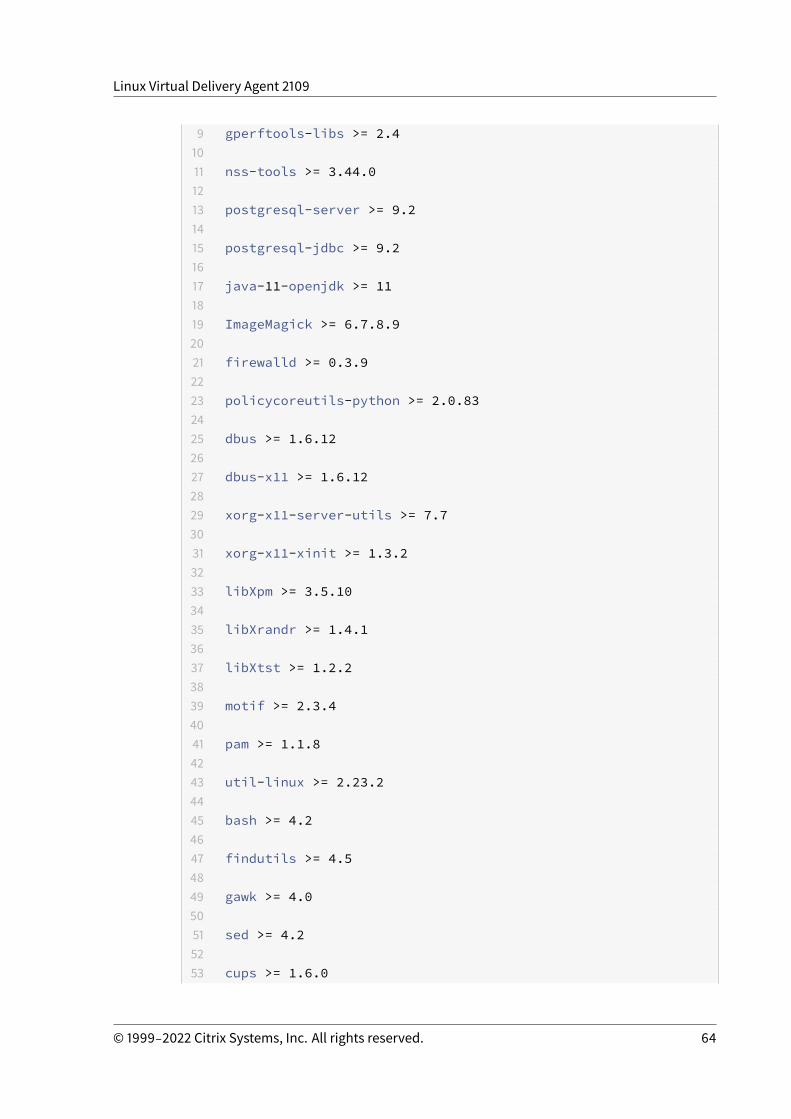
Linux Virtual Delivery Agent 2109
9 gperftools-libs >= 2.41011 nss-tools >= 3.44.01213 postgresql-server >= 9.21415 postgresql-jdbc >= 9.21617 java-11-openjdk >= 111819 ImageMagick >= 6.7.8.92021 firewalld >= 0.3.92223 policycoreutils-python >= 2.0.832425 dbus >= 1.6.122627 dbus-x11 >= 1.6.122829 xorg-x11-server-utils >= 7.73031 xorg-x11-xinit >= 1.3.23233 libXpm >= 3.5.103435 libXrandr >= 1.4.13637 libXtst >= 1.2.23839 motif >= 2.3.44041 pam >= 1.1.84243 util-linux >= 2.23.24445 bash >= 4.24647 findutils >= 4.54849 gawk >= 4.05051 sed >= 4.25253 cups >= 1.6.0
© 1999‒2022 Citrix Systems, Inc. All rights reserved. 64
Linux Virtual Delivery Agent 2109
5455 foomatic-filters >= 4.0.95657 openldap >= 2.45859 cyrus-sasl >= 2.16061 cyrus-sasl-gssapi >= 2.16263 libxml2 >= 2.96465 python-requests >= 2.6.06667 gperftools-libs >= 2.46869 rpmlib(FileDigests) <= 4.6.0-17071 rpmlib(PayloadFilesHavePrefix) <= 4.0-17273 pmlib(CompressedFileNames) <= 3.0.4-17475 rpmlib(PayloadIsXz) <= 5.2-176 <!--NeedCopy-->
Note:
For a matrix of the Linux distributions and the Xorg versions that this version of the LinuxVDA supports, see System requirements.
After installing the Linux VDA on RHEL 7.x, run the sudo yum install -y python-websockify x11vnc command. The purpose is to install python-websockify andx11vnc manually for using the session shadowing feature. For more information, seeShadow sessions.
To upgrade an existing installation
You can upgrade an existing installation from the previous two versions and from an LTSR release.
Note:
Upgrading an existing installation overwrites the configuration files under /etc/xdl. Before youconduct an upgrade, make sure to back up the files.
• To upgrade your software using Yum:
For RHEL 7/CentOS 7:
© 1999‒2022 Citrix Systems, Inc. All rights reserved. 65
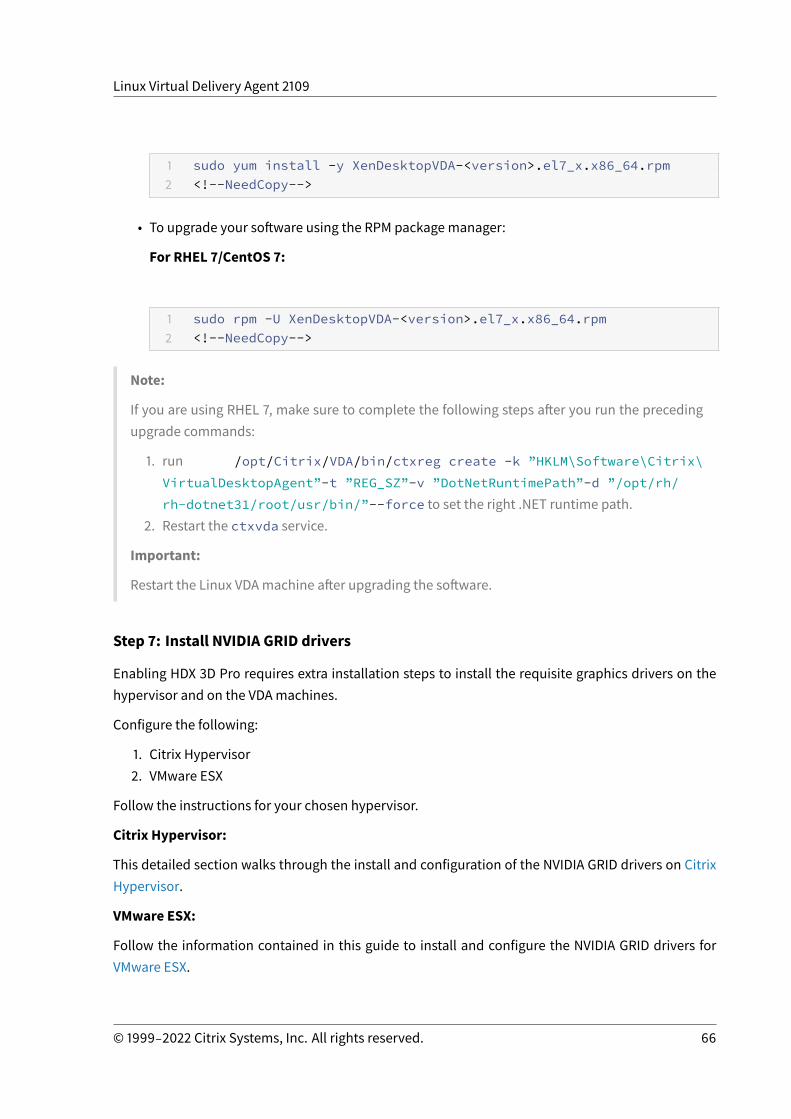
Linux Virtual Delivery Agent 2109
1 sudo yum install -y XenDesktopVDA-<version>.el7_x.x86_64.rpm2 <!--NeedCopy-->
• To upgrade your software using the RPM packagemanager:
For RHEL 7/CentOS 7:
1 sudo rpm -U XenDesktopVDA-<version>.el7_x.x86_64.rpm2 <!--NeedCopy-->
Note:
If you are using RHEL 7, make sure to complete the following steps after you run the precedingupgrade commands:
1. run /opt/Citrix/VDA/bin/ctxreg create -k ”HKLM\Software\Citrix\VirtualDesktopAgent”-t ”REG_SZ”-v ”DotNetRuntimePath”-d ”/opt/rh/rh-dotnet31/root/usr/bin/”--force to set the right .NET runtime path.
2. Restart the ctxvda service.
Important:
Restart the Linux VDAmachine after upgrading the software.
Step 7: Install NVIDIA GRID drivers
Enabling HDX 3D Pro requires extra installation steps to install the requisite graphics drivers on thehypervisor and on the VDAmachines.
Configure the following:
1. Citrix Hypervisor2. VMware ESX
Follow the instructions for your chosen hypervisor.
Citrix Hypervisor:
This detailed section walks through the install and configuration of the NVIDIA GRID drivers on CitrixHypervisor.
VMware ESX:
Follow the information contained in this guide to install and configure the NVIDIA GRID drivers forVMware ESX.
© 1999‒2022 Citrix Systems, Inc. All rights reserved. 66
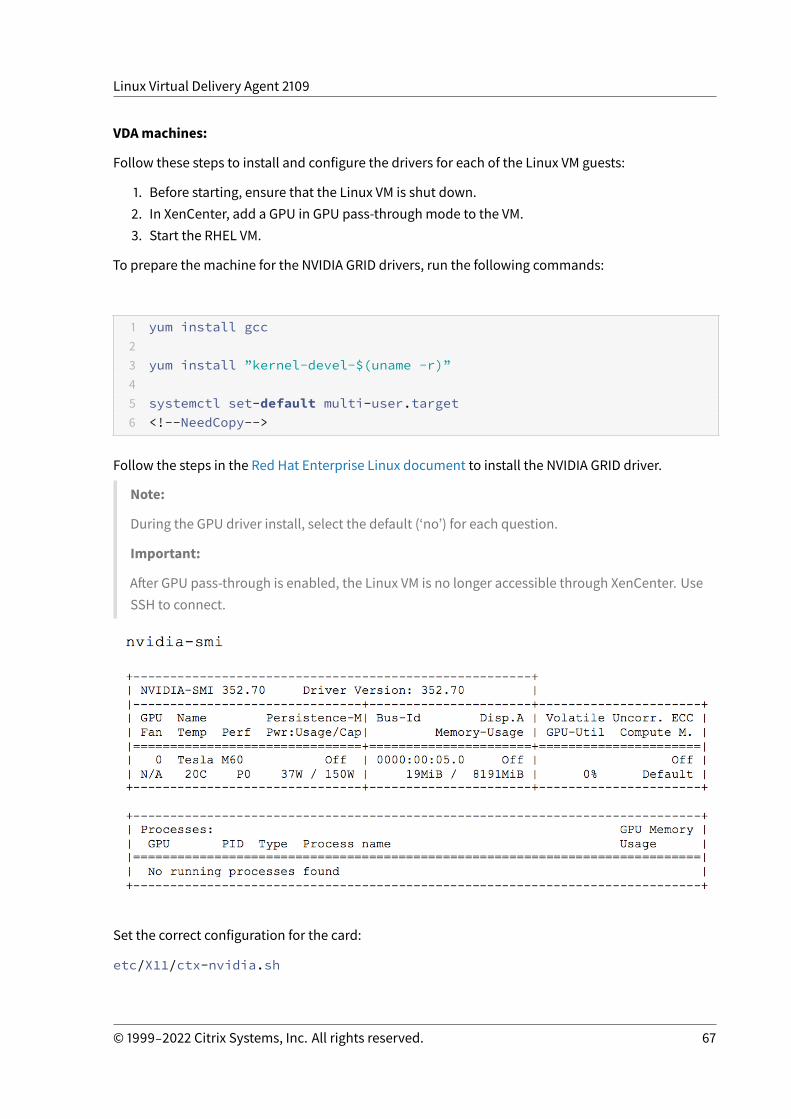
Linux Virtual Delivery Agent 2109
VDAmachines:
Follow these steps to install and configure the drivers for each of the Linux VM guests:
1. Before starting, ensure that the Linux VM is shut down.2. In XenCenter, add a GPU in GPU pass-throughmode to the VM.3. Start the RHEL VM.
To prepare the machine for the NVIDIA GRID drivers, run the following commands:
1 yum install gcc23 yum install ”kernel-devel-$(uname -r)”45 systemctl set-default multi-user.target6 <!--NeedCopy-->
Follow the steps in the Red Hat Enterprise Linux document to install the NVIDIA GRID driver.
Note:
During the GPU driver install, select the default (‘no’) for each question.
Important:
After GPU pass-through is enabled, the Linux VM is no longer accessible through XenCenter. UseSSH to connect.
Set the correct configuration for the card:
etc/X11/ctx-nvidia.sh
© 1999‒2022 Citrix Systems, Inc. All rights reserved. 67
Linux Virtual Delivery Agent 2109
To take advantageof large resolutions andmulti-monitor capabilities, youneeda validNVIDIA license.To apply for the license, follow the product documentation from “GRID Licensing Guide.pdf - DU-07757-001 September 2015.”
Step 8: Configure the Linux VDA
After installing the package, you must configure the Linux VDA by running the ctxsetup.sh script. Be-fore making any changes, the script verifies the environment and ensures that all dependencies areinstalled. If necessary, you can rerun the script at any time to change settings.
You can run the script manually with prompting, or automatically with preconfigured responses. Re-view Help about the script before proceeding:
1 sudo /opt/Citrix/VDA/sbin/ctxsetup.sh --help2 <!--NeedCopy-->
Prompted configuration
Run amanual configuration with prompted questions:
1 sudo /opt/Citrix/VDA/sbin/ctxsetup.sh2 <!--NeedCopy-->
Automated configuration
For anautomated install, provide theoptions requiredby the setup scriptwith environment variables.If all required variables are present, the script does not prompt for any information.
Supported environment variables include:
• CTX_XDL_SUPPORT_DDC_AS_CNAME=Y | N – The Linux VDA supports specifying a DeliveryController name using a DNS CNAME record. Set to N by default.
• CTX_XDL_DDC_LIST=’list-ddc-fqdns’ – The Linux VDA requires a space-separated list of Deliv-ery Controller Fully Qualified Domain Names (FQDNs) to use for registering with a Delivery Con-troller. At least one FQDN or CNAME alias must be specified.
• CTX_XDL_VDA_PORT=port-number – The Linux VDA communicates with Delivery Controllersthrough a TCP/IP port, which is port 80 by default.
© 1999‒2022 Citrix Systems, Inc. All rights reserved. 68
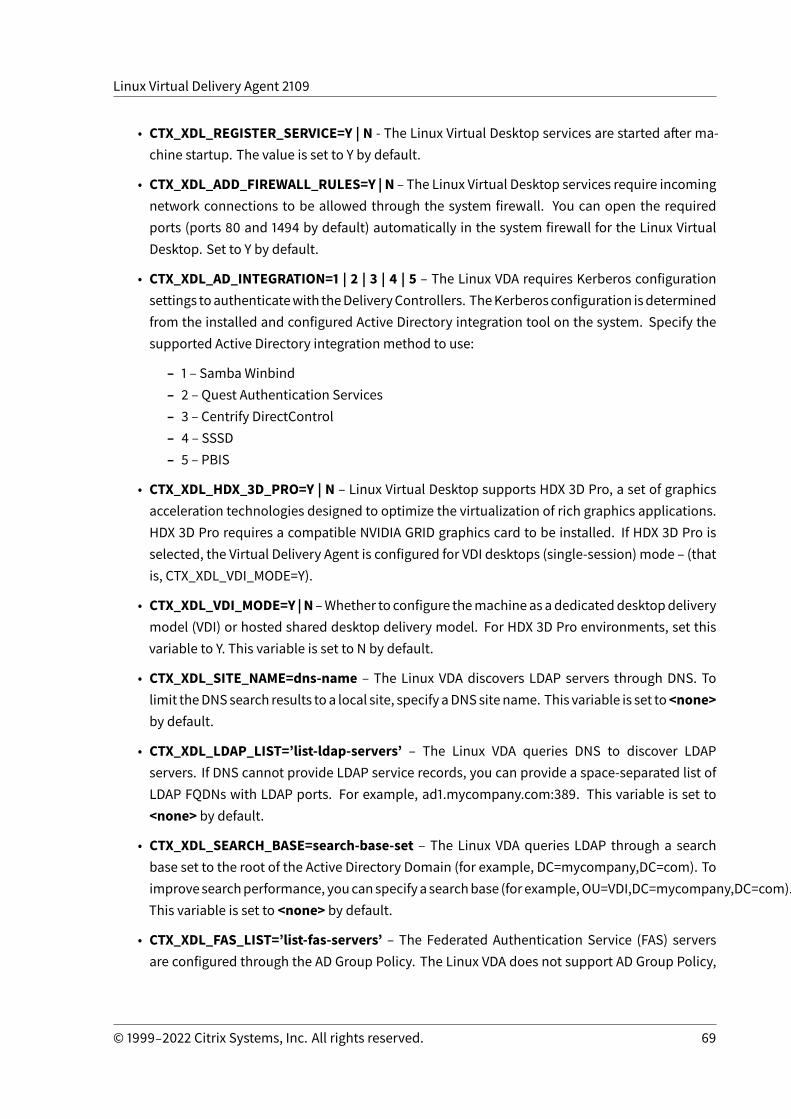
Linux Virtual Delivery Agent 2109
• CTX_XDL_REGISTER_SERVICE=Y | N - The Linux Virtual Desktop services are started after ma-chine startup. The value is set to Y by default.
• CTX_XDL_ADD_FIREWALL_RULES=Y | N – The Linux Virtual Desktop services require incomingnetwork connections to be allowed through the system firewall. You can open the requiredports (ports 80 and 1494 by default) automatically in the system firewall for the Linux VirtualDesktop. Set to Y by default.
• CTX_XDL_AD_INTEGRATION=1 | 2 | 3 | 4 | 5 – The Linux VDA requires Kerberos configurationsettings toauthenticatewith theDeliveryControllers. TheKerberosconfiguration isdeterminedfrom the installed and configured Active Directory integration tool on the system. Specify thesupported Active Directory integration method to use:
– 1 – SambaWinbind– 2 – Quest Authentication Services– 3 – Centrify DirectControl– 4 – SSSD– 5 – PBIS
• CTX_XDL_HDX_3D_PRO=Y | N – Linux Virtual Desktop supports HDX 3D Pro, a set of graphicsacceleration technologies designed to optimize the virtualization of rich graphics applications.HDX 3D Pro requires a compatible NVIDIA GRID graphics card to be installed. If HDX 3D Pro isselected, the Virtual Delivery Agent is configured for VDI desktops (single-session) mode – (thatis, CTX_XDL_VDI_MODE=Y).
• CTX_XDL_VDI_MODE=Y |N –Whether to configure themachine as adedicateddesktopdeliverymodel (VDI) or hosted shared desktop delivery model. For HDX 3D Pro environments, set thisvariable to Y. This variable is set to N by default.
• CTX_XDL_SITE_NAME=dns-name – The Linux VDA discovers LDAP servers through DNS. Tolimit theDNSsearch results toa local site, specify aDNSsitename. This variable is set to<none>by default.
• CTX_XDL_LDAP_LIST=’list-ldap-servers’ – The Linux VDA queries DNS to discover LDAPservers. If DNS cannot provide LDAP service records, you can provide a space-separated list ofLDAP FQDNs with LDAP ports. For example, ad1.mycompany.com:389. This variable is set to<none> by default.
• CTX_XDL_SEARCH_BASE=search-base-set – The Linux VDA queries LDAP through a searchbase set to the root of the Active Directory Domain (for example, DC=mycompany,DC=com). Toimprovesearchperformance, youcanspecifya searchbase (forexample,OU=VDI,DC=mycompany,DC=com).This variable is set to <none> by default.
• CTX_XDL_FAS_LIST=’list-fas-servers’ – The Federated Authentication Service (FAS) serversare configured through the AD Group Policy. The Linux VDA does not support AD Group Policy,
© 1999‒2022 Citrix Systems, Inc. All rights reserved. 69
Linux Virtual Delivery Agent 2109
but you can provide a semicolon-separated list of FAS servers instead. The sequence must bethe same as configured in the AD Group Policy. If any server address is removed, fill its blankwith the <none> text string and do not modify the order of server addresses.
• CTX_XDL_DOTNET_ RUNTIME_PATH=path-to-install-dotnet-runtime – The path to install.NET Core Runtime 3.1 for supporting the new broker agent service (ctxvda). The default pathis /usr/bin.
• CTX_XDL_DESKTOP _ENVIRONMENT=gnome/mate – Specifies the GNOME or MATE desktopenvironment to use in sessions. If you leave the variable unspecified, the desktop currentlyinstalled on the VDA is used. However, if the currently installed desktop is MATE, you must setthe variable value tomate.
Note:
You can also change the desktop environment for a target session user by completing thefollowing steps:
1. Create a .xsession file under the $HOME/<username> directory on the VDA.
2. Edit the .xsession file to specify a desktop environment based on distributions.
For MATE desktop on CentOS, Ubuntu, and Debian
MSESSION=”$(type -p mate-session)”if [ -n “$MSESSION” ]; thenexec mate-sessionfi
For GNOME desktop on CentOS
GSESSION=”$(type -p gnome-session)”if [ -n “$GSESSION” ]; then
1 export GNOME_SHELL_SESSION_MODE=classic2 exec gnome-session --session=gnome-classic fi
**For GNOME desktop on Ubuntu and Debian**
GSESSION=”$(type -p gnome-session)”if [ -n “$GSESSION” ]; then
1 exec gnome-session fi
3. Share the 700 file permission with the target session user.
• CTX_XDL_START_SERVICE=Y | N – Whether or not the Linux VDA services are started when the
© 1999‒2022 Citrix Systems, Inc. All rights reserved. 70
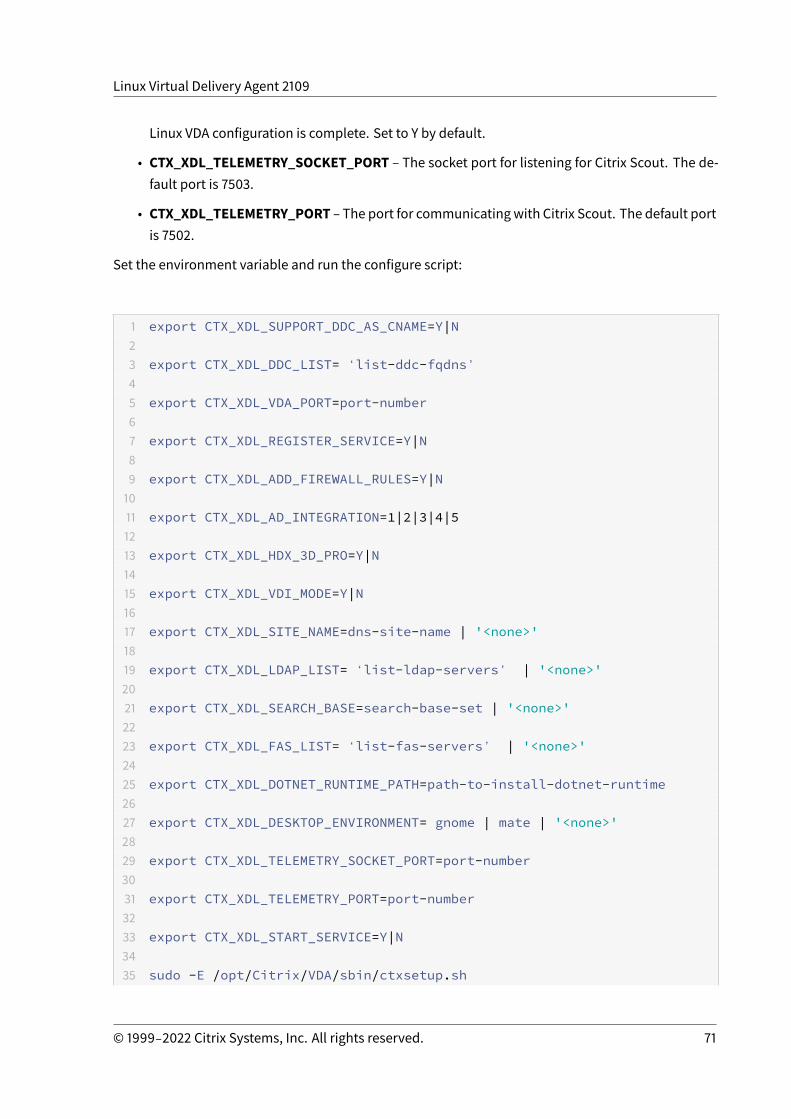
Linux Virtual Delivery Agent 2109
Linux VDA configuration is complete. Set to Y by default.
• CTX_XDL_TELEMETRY_SOCKET_PORT – The socket port for listening for Citrix Scout. The de-fault port is 7503.
• CTX_XDL_TELEMETRY_PORT – The port for communicatingwith Citrix Scout. The default portis 7502.
Set the environment variable and run the configure script:
1 export CTX_XDL_SUPPORT_DDC_AS_CNAME=Y|N23 export CTX_XDL_DDC_LIST=‘ list-ddc-fqdns’45 export CTX_XDL_VDA_PORT=port-number67 export CTX_XDL_REGISTER_SERVICE=Y|N89 export CTX_XDL_ADD_FIREWALL_RULES=Y|N1011 export CTX_XDL_AD_INTEGRATION=1|2|3|4|51213 export CTX_XDL_HDX_3D_PRO=Y|N1415 export CTX_XDL_VDI_MODE=Y|N1617 export CTX_XDL_SITE_NAME=dns-site-name | '<none>'1819 export CTX_XDL_LDAP_LIST=‘ list-ldap-servers’ | '<none>'2021 export CTX_XDL_SEARCH_BASE=search-base-set | '<none>'2223 export CTX_XDL_FAS_LIST=‘ list-fas-servers’ | '<none>'2425 export CTX_XDL_DOTNET_RUNTIME_PATH=path-to-install-dotnet-runtime2627 export CTX_XDL_DESKTOP_ENVIRONMENT= gnome | mate | '<none>'2829 export CTX_XDL_TELEMETRY_SOCKET_PORT=port-number3031 export CTX_XDL_TELEMETRY_PORT=port-number3233 export CTX_XDL_START_SERVICE=Y|N3435 sudo -E /opt/Citrix/VDA/sbin/ctxsetup.sh
© 1999‒2022 Citrix Systems, Inc. All rights reserved. 71
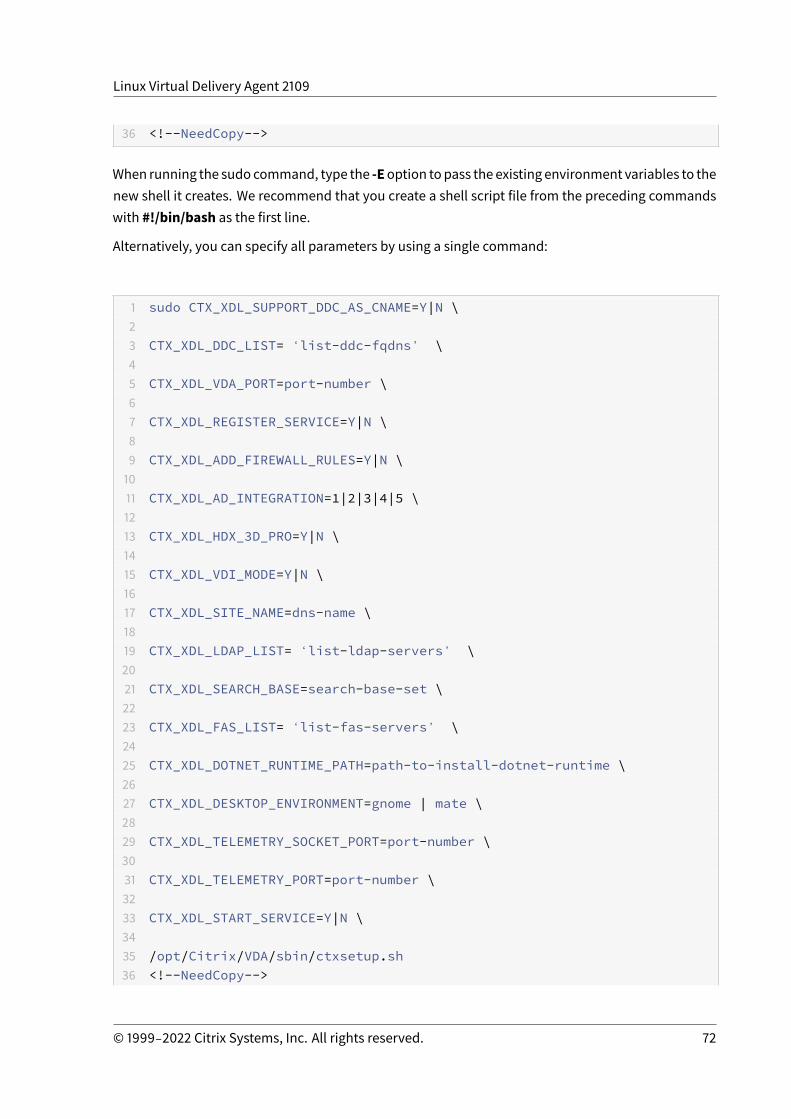
Linux Virtual Delivery Agent 2109
36 <!--NeedCopy-->
When running the sudo command, type the -Eoption topass the existing environment variables to thenew shell it creates. We recommend that you create a shell script file from the preceding commandswith #!/bin/bash as the first line.
Alternatively, you can specify all parameters by using a single command:
1 sudo CTX_XDL_SUPPORT_DDC_AS_CNAME=Y|N \23 CTX_XDL_DDC_LIST=‘ list-ddc-fqdns’ \45 CTX_XDL_VDA_PORT=port-number \67 CTX_XDL_REGISTER_SERVICE=Y|N \89 CTX_XDL_ADD_FIREWALL_RULES=Y|N \1011 CTX_XDL_AD_INTEGRATION=1|2|3|4|5 \1213 CTX_XDL_HDX_3D_PRO=Y|N \1415 CTX_XDL_VDI_MODE=Y|N \1617 CTX_XDL_SITE_NAME=dns-name \1819 CTX_XDL_LDAP_LIST=‘ list-ldap-servers’ \2021 CTX_XDL_SEARCH_BASE=search-base-set \2223 CTX_XDL_FAS_LIST=‘ list-fas-servers’ \2425 CTX_XDL_DOTNET_RUNTIME_PATH=path-to-install-dotnet-runtime \2627 CTX_XDL_DESKTOP_ENVIRONMENT=gnome | mate \2829 CTX_XDL_TELEMETRY_SOCKET_PORT=port-number \3031 CTX_XDL_TELEMETRY_PORT=port-number \3233 CTX_XDL_START_SERVICE=Y|N \3435 /opt/Citrix/VDA/sbin/ctxsetup.sh36 <!--NeedCopy-->
© 1999‒2022 Citrix Systems, Inc. All rights reserved. 72
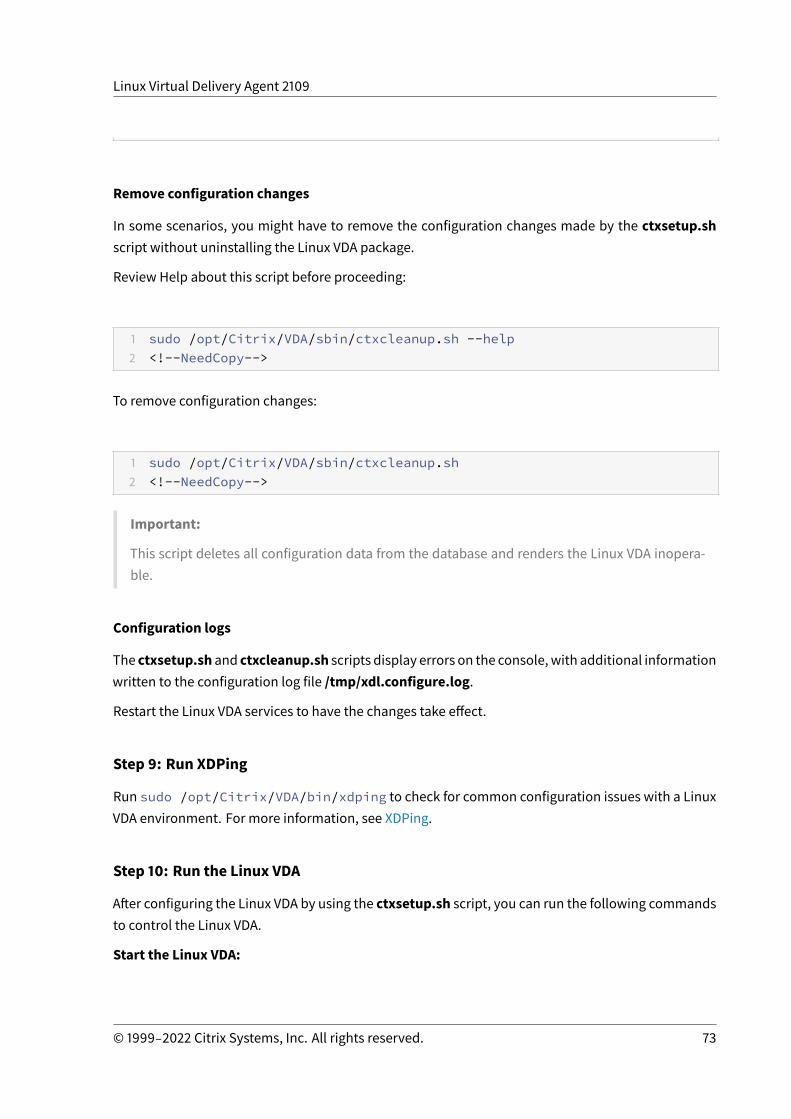
Linux Virtual Delivery Agent 2109
Remove configuration changes
In some scenarios, you might have to remove the configuration changes made by the ctxsetup.shscript without uninstalling the Linux VDA package.
Review Help about this script before proceeding:
1 sudo /opt/Citrix/VDA/sbin/ctxcleanup.sh --help2 <!--NeedCopy-->
To remove configuration changes:
1 sudo /opt/Citrix/VDA/sbin/ctxcleanup.sh2 <!--NeedCopy-->
Important:
This script deletes all configuration data from the database and renders the Linux VDA inopera-ble.
Configuration logs
The ctxsetup.sh and ctxcleanup.sh scripts display errors on the console, with additional informationwritten to the configuration log file /tmp/xdl.configure.log.
Restart the Linux VDA services to have the changes take effect.
Step 9: Run XDPing
Run sudo /opt/Citrix/VDA/bin/xdping to check for common configuration issues with a LinuxVDA environment. For more information, see XDPing.
Step 10: Run the Linux VDA
After configuring the Linux VDA by using the ctxsetup.sh script, you can run the following commandsto control the Linux VDA.
Start the Linux VDA:
© 1999‒2022 Citrix Systems, Inc. All rights reserved. 73
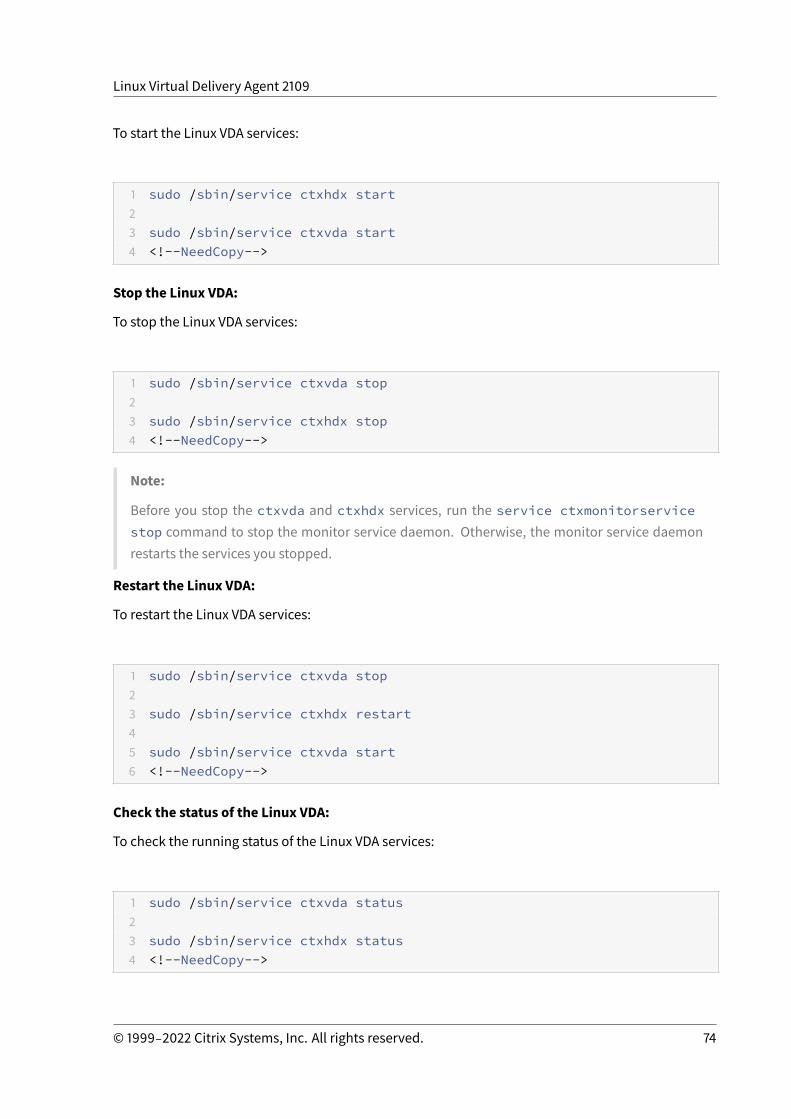
Linux Virtual Delivery Agent 2109
To start the Linux VDA services:
1 sudo /sbin/service ctxhdx start23 sudo /sbin/service ctxvda start4 <!--NeedCopy-->
Stop the Linux VDA:
To stop the Linux VDA services:
1 sudo /sbin/service ctxvda stop23 sudo /sbin/service ctxhdx stop4 <!--NeedCopy-->
Note:
Before you stop the ctxvda and ctxhdx services, run the service ctxmonitorservicestop command to stop the monitor service daemon. Otherwise, the monitor service daemonrestarts the services you stopped.
Restart the Linux VDA:
To restart the Linux VDA services:
1 sudo /sbin/service ctxvda stop23 sudo /sbin/service ctxhdx restart45 sudo /sbin/service ctxvda start6 <!--NeedCopy-->
Check the status of the Linux VDA:
To check the running status of the Linux VDA services:
1 sudo /sbin/service ctxvda status23 sudo /sbin/service ctxhdx status4 <!--NeedCopy-->
© 1999‒2022 Citrix Systems, Inc. All rights reserved. 74
Linux Virtual Delivery Agent 2109
Step 11: Create themachine catalog in Citrix Virtual Apps or Citrix Virtual Desktops
The process for creatingmachine catalogs and adding Linux VDAmachines is similar to the traditionalWindows VDA approach. For a more detailed description of how to complete these tasks, see Createmachine catalogs and Managemachine catalogs.
For creating machine catalogs that contain Linux VDA machines, there are a few restrictions that dif-ferentiate the process from creating machine catalogs for Windows VDAmachines:
• For the operating system, select:– TheMulti-session OS option for a hosted shared desktops delivery model.– The Single-session OS option for a VDI dedicated desktop delivery model.
• Do not mix Linux and Windows VDAmachines in the samemachine catalog.
Note:
Early versions of Citrix Studio did not support the notion of a “Linux OS.” However, selecting theWindows Server OS or Server OS option implies an equivalent hosted shared desktops deliv-ery model. Selecting theWindows Desktop OS or Desktop OS option implies a single user permachine delivery model.
Tip:
If you remove and rejoin a machine to the Active Directory domain, you must remove and addthe machine to the machine catalog again.
Step 12: Create the delivery group in Citrix Virtual Apps or Citrix Virtual Desktops
Theprocess for creatingadeliverygroupandaddingmachinecatalogscontainingLinuxVDAmachinesis almost identical to Windows VDA machines. For a more detailed description of how to completethese tasks, see Create Delivery Groups.
For creatingdelivery groups that contain LinuxVDAmachine catalogs, the following restrictionsapply:
• Ensure that the AD users and groups you select have been properly configured to log on to theLinux VDAmachines.
• Do not allow logon of unauthenticated (anonymous) users.• Do not mix the delivery group with machine catalogs that contain Windowsmachines.
Important:
Publishing applications is supported with Linux VDA Version 1.4 and later. However, the LinuxVDA does not support the delivery of desktops and apps to the samemachine.
For information about how to createmachine catalogs anddelivery groups, seeCitrix Virtual Apps andDesktops 7 2109.
© 1999‒2022 Citrix Systems, Inc. All rights reserved. 75

Linux Virtual Delivery Agent 2109
Install Linux Virtual Delivery Agent for SUSEmanually
October 28, 2021
Important:
For fresh installations, we recommend you use easy install for a quick installation. Easy installsaves time and labor and is less error-prone than themanual installation detailed in this article.
Step 1: Prepare for installation
Step 1a: Launch the YaST tool
The SUSE Linux Enterprise YaST tool is used for configuring all aspects of the operating system.
To launch the text-based YaST tool:
1 su -23 yast4 <!--NeedCopy-->
To launch the UI-based YaST tool:
1 su -23 yast2 &4 <!--NeedCopy-->
Step 1b: Configure networking
The following sections provide information on configuring the various networking settings and ser-vices used by the Linux VDA. Configuring networking is carried out via the YaST tool, not via othermethods such as Network Manager. These instructions are based on using the UI-based YaST tool.The text-based YaST tool can be used but has a differentmethod of navigation that is not documentedhere.
Configure host name and DNS
1. Open YaST Network Settings.
© 1999‒2022 Citrix Systems, Inc. All rights reserved. 76
Linux Virtual Delivery Agent 2109
2. SLED 12 Only: On the Global Options tab, change the Network Setup Method toWicked Ser-vice.
3. Open theHostname/DNS tab.4. Clear Change hostname via DHCP.5. Check Assign Hostname to Loopback IP.6. Edit the following to reflect your networking setup:
• Host name – Add the DNS host name of the machine.• Domain name – Add the DNS domain name of the machine.• Name server – Add the IP address of the DNS server. It is typically the IP address of the ADDomain Controller.
• Domain search list – Add the DNS domain name.
Note:
The Linux VDA currently does not support NetBIOS name truncation. Therefore, the host namemust not exceed 15 characters.Tip:
Use a–z, A–Z, 0–9, and hyphen (-) characters only. Avoid underscores (_), spaces, and other sym-bols. Donot start ahostnamewithanumberanddonotendwithahyphen. This rule alsoappliesto Delivery Controller host names.
Disable multicast DNS
OnSLEDonly, thedefault settingshavemulticastDNS (mDNS) enabled,which can lead to inconsistentname resolution results. mDNS is not enabled on SLES by default, so no action is required.
To disable mDNS, edit /etc/nsswitch.conf and change the line containing:
hosts: files mdns_minimal [NOTFOUND=return] dns
To:
hosts: files dns
Check the host name
Verify that the host name is set correctly:
1 hostname2 <!--NeedCopy-->
This command returns only themachine’s host name and not its fully qualified domain name (FQDN).
Verify that the FQDN is set correctly:
© 1999‒2022 Citrix Systems, Inc. All rights reserved. 77
Linux Virtual Delivery Agent 2109
1 hostname -f2 <!--NeedCopy-->
This command returns the machine’s FQDN.
Check name resolution and service reachability
Verify that you can resolve the FQDN and ping the domain controller and Delivery Controller:
1 nslookup domain-controller-fqdn23 ping domain-controller-fqdn45 nslookup delivery-controller-fqdn67 ping delivery-controller-fqdn8 <!--NeedCopy-->
If you cannot resolve the FQDN or ping either of thesemachines, review the steps before proceeding.
Step 1c: Configure the NTP service
It is crucial to maintain accurate clock synchronization between the VDAs, Delivery Controllers, anddomain controllers. Hosting the Linux VDA as a virtual machine can cause clock skew problems. Forthis reason, maintaining time using a remote NTP service is preferred. Some changes might be re-quired to the default NTP settings:
1. Open YaST NTP Configuration and select the General Settings tab.2. In the Start NTP Daemon section, check Now and on Boot.3. If present, select the Undisciplined Local Clock (LOCAL) item and click Delete.4. Add an entry for an NTP server by clicking Add.5. Select the Server Type and click Next.6. Type the DNS name of the NTP server in the Address field. This service is normally hosted on
the Active Directory domain controller.7. Leave the Options field unchanged.8. Click Test to verify that the NTP service is reachable.9. ClickOK through the set of windows to save the changes.
© 1999‒2022 Citrix Systems, Inc. All rights reserved. 78
Linux Virtual Delivery Agent 2109
Note:
For SLES 12 implementations, theNTPdaemonmight fail to start due to a knownSUSE issuewithAppArmor policies. Follow the resolution for additional information.
Step 1d: Install Linux VDA dependent packages
The Linux VDA software for SUSE Linux Enterprise depends on the following packages:
• Postgresql10-server 10.12 or later• OpenJDK 11• OpenMotif Runtime Environment 2.3.1 or later• Cups 1.6.0 or later• Foomatic filters 3.0.0 or later• ImageMagick 6.8 or later
Add repositories
You can obtain some required packages, such as PostgreSQL and ImageMagick, from the SUSE LinuxEnterprise Software Development Kit (SDK). To obtain the packages, add the SDK repository by usingYaST or download the SDK image file and thenmount it locally by using the following commands:
1 sudo mkdir -p /mnt/sdk23 sudo mount -t iso9660 path-to-iso/SLE-12-SP5-SDK-DVD-x86_64-GM-DVD1.iso
/mnt/sdk45 sudo zypper ar -f /mnt/sdk sdk6 <!--NeedCopy-->
Install the Kerberos client
Install the Kerberos client for mutual authentication between the Linux VDA and the Delivery Con-trollers:
1 sudo zypper install krb5-client2 <!--NeedCopy-->
The Kerberos client configuration depends on which Active Directory integration approach is used.See the following description.
© 1999‒2022 Citrix Systems, Inc. All rights reserved. 79
Linux Virtual Delivery Agent 2109
Install OpenJDK 11
The Linux VDA requires the presence of OpenJDK 11.
To install OpenJDK 11, run the following command:
1 sudo zypper install java-11-openjdk2 <!--NeedCopy-->
Install PostgreSQL
On SLED/SLES 12, install the packages:
1 sudo zypper install postgresql-init23 sudo zypper install postgresql10-server45 sudo zypper install postgresql-jdbc6 <!--NeedCopy-->
Post-installation steps are required to initialize the database service and to ensure that PostgreSQL isstarted uponmachine startup:
1 sudo systemctl enable postgresql23 sudo systemctl restart postgresql4 <!--NeedCopy-->
Database files locate at /var/lib/pgsql/data.
Remove repositories
With dependent packages installed, run the following commands to remove the SDK repository thatwas set up earlier and the media mounted:
1 sudo zypper rr sdk23 sudo umount /mnt/sdk4
© 1999‒2022 Citrix Systems, Inc. All rights reserved. 80
Linux Virtual Delivery Agent 2109
5 sudo rmdir /mnt/sdk6 <!--NeedCopy-->
Step 2: Prepare Linux VM for Hypervisor
Some changes are required when running the Linux VDA as a virtual machine on a supported hypervi-sor. Make the following changes according to the hypervisor platform in use. No changes are requiredif you are running the Linux machine on bare metal hardware.
Fix time synchronization on Citrix Hypervisor
If the Citrix Hypervisor Time Sync feature is enabled, within each paravirtualized Linux VM you expe-rience issues with NTP and Citrix Hypervisor both trying to manage the system clock. To avoid theclock becoming out of sync with other servers, the system clock within each Linux guest must be syn-chronized with NTP. This case requires disabling host time synchronization. No changes are requiredin HVMmode.
On some Linux distributions, if you are running a paravirtualized Linux kernel with Citrix VM Toolsinstalled, you can checkwhether the Citrix Hypervisor Time Sync feature is present and enabled fromwithin the Linux VM:
1 su -23 cat /proc/sys/xen/independent_wallclock4 <!--NeedCopy-->
This command returns 0 or 1:
• 0 - The time sync feature is enabled, andmust be disabled.• 1 - The time sync feature is disabled, and no further action is required.
If the /proc/sys/xen/independent_wallclock file is not present, the following steps are not required.
If enabled, disable the time sync feature by writing 1 to the file:
1 sudo echo 1 > /proc/sys/xen/independent_wallclock2 <!--NeedCopy-->
Tomake this change permanent and persistent after restart, edit the /etc/sysctl.conf file and add theline:
© 1999‒2022 Citrix Systems, Inc. All rights reserved. 81
Linux Virtual Delivery Agent 2109
xen.independent_wallclock = 1
To verify these changes, restart the system:
1 reboot2 <!--NeedCopy-->
After restart, verify that the setting is correct:
1 su -23 cat /proc/sys/xen/independent_wallclock4 <!--NeedCopy-->
This command returns the value 1.
Fix time synchronization on Microsoft Hyper-V
Linux VMs with Hyper-V Linux Integration Services installed can apply the Hyper-V time synchroniza-tion feature touse thehostoperating system’s time. Toensure that the systemclock remainsaccurate,enable this feature alongside the NTP services.
From themanagement operating system:
1. Open the Hyper-V Manager console.2. For the settings of a Linux VM, select Integration Services.3. Ensure that Time synchronization is selected.
Note:
This approach is different fromVMware andCitrix Hypervisor, where host time synchronization isdisabled to avoid conflicts with NTP. Hyper-V time synchronization can coexist and supplementNTP time synchronization.
Fix time synchronization on ESX and ESXi
If the VMware Time Synchronization feature is enabled, within each paravirtualized Linux VM you ex-perience issueswithNTPand thehypervisor both trying to synchronize the systemclock. To avoid theclock becoming out of sync with other servers, synchronize the system clock within each Linux guestwith NTP. This case requires disabling host time synchronization.
If you are running a paravirtualized Linux kernel with VMware Tools installed:
© 1999‒2022 Citrix Systems, Inc. All rights reserved. 82
Linux Virtual Delivery Agent 2109
1. Open the vSphere Client.2. Edit settings for the Linux VM.3. In the Virtual Machine Properties dialog, open theOptions tab.4. Select VMware Tools.5. In the Advanced box, clear Synchronize guest timewith host.
Step 3: Add the Linux virtual machine (VM) to the Windows domain
The Linux VDA supports several methods for adding Linux machines to the Active Directory (AD) do-main:
• SambaWinbind• Quest Authentication Service• Centrify DirectControl• SSSD• PBIS
Follow instructions based on your chosenmethod.
Note:
Session launches might fail when the same user name is used for the local account in the LinuxVDA and the account in AD.
SambaWinbind
Join Windows domain
Your domain controller must be reachable and you must have an Active Directory user account withpermissions to addmachines to the domain:
1. Open YaST Windows Domain Membership.
2. Make the following changes:
• Set the Domain or Workgroup to the name of your Active Directory domain or the IP ad-dress of the domain controller. Ensure that the domain name is in uppercase.
• Check Also Use SMB information for Linux Authentication.• Check Create Home Directory on Login.• Check Single Sign-on for SSH.• Ensure thatOffline Authentication is not checked. This option is not compatible with theLinux VDA.
3. ClickOK. If prompted to install some packages, click Install.
4. If a domain controller is found, it asks whether you want to join the domain. Click Yes.
© 1999‒2022 Citrix Systems, Inc. All rights reserved. 83
Linux Virtual Delivery Agent 2109
5. When prompted, type the credentials of a domain user with permission to add computers tothe domain and clickOK.
6. A message indicating success is displayed.
7. If prompted to install some samba and krb5 packages, click Install.
YaST might have indicated that these changes require some services or the machine to be restarted.We recommend you restart the machine:
1 su -23 reboot4 <!--NeedCopy-->
SUSE 12 Only: Patch Kerberos credential cache name
SUSE 12 has changed the default Kerberos credential cache name specification from the usualFILE:/tmp/krb5cc_%{uid} to DIR:/run/user/%{uid}/krb5cc. This new DIR caching method is notcompatible with the Linux VDA and must be changed manually. As a root user, edit /etc/krb5.confand add the following setting under the [libdefaults] section if not set:
default_ccache_name = FILE:/tmp/krb5cc_%{ uid }
Verify domainmembership
The Delivery Controller requires that all VDA machines (Windows and Linux VDAs) have a computerobject in Active Directory.
Run the net ads command of Samba to verify that the machine is joined to a domain:
1 sudo net ads testjoin2 <!--NeedCopy-->
Run the following command to verify extra domain and computer object information:
1 sudo net ads info2 <!--NeedCopy-->
© 1999‒2022 Citrix Systems, Inc. All rights reserved. 84
Linux Virtual Delivery Agent 2109
Verify Kerberos configuration
To ensure that Kerberos is configured correctly for use with the Linux VDA, verify that the systemkeytab file has been created and contains valid keys:
1 sudo klist ‒ ke2 <!--NeedCopy-->
This command displays the list of keys available for the various combinations of principal names andcipher suites. Run the Kerberos kinit command to authenticate the machine with the domain con-troller using these keys:
1 sudo kinit -k MACHINE\$@REALM2 <!--NeedCopy-->
The machine and realm names must be specified in uppercase. The dollar sign ($) must be escapedwith a backslash (\) to prevent shell substitution. In some environments, the DNS domain name isdifferent from the Kerberos realm name. Ensure that the realm name is used. If this command issuccessful, no output is displayed.
Verify that the TGT ticket for the machine account has been cached using:
1 sudo klist2 <!--NeedCopy-->
Examine the machine account details using:
1 sudo net ads status2 <!--NeedCopy-->
Verify user authentication
Use the wbinfo tool to verify that domain users can authenticate with the domain:
1 wbinfo --krb5auth=domain\\username%password2 <!--NeedCopy-->
© 1999‒2022 Citrix Systems, Inc. All rights reserved. 85
Linux Virtual Delivery Agent 2109
The domain specified here is the AD domain name, not the Kerberos realm name. For the bash shell,the backslash (\) character must be escaped with another backslash. This command returns a mes-sage indicating success or failure.
To verify that theWinbind PAMmodule is configured correctly, log on to the Linux VDA using a domainuser account that has not been used before.
1 ssh localhost -l domain\\username2 id -u3 <!--NeedCopy-->
Verify that a corresponding Kerberos credential cache file was created for the uid returned by the id-u command:
1 ls /tmp/krb5cc_uid2 <!--NeedCopy-->
Verify that the tickets in the user’s Kerberos credential cache are valid and not expired:
1 klist2 <!--NeedCopy-->
Exit the session.
1 exit2 <!--NeedCopy-->
A similar test can be performed by logging on to the Gnome or KDE console directly. Proceed to Step6: Install the Linux VDA after the domain joining verification.
Quest authentication service
Configure Quest on domain controller
Assume that you have installed and configured the Quest software on the Active Directory domaincontrollers, and have been granted administrative privileges to create computer objects in Active Di-rectory.
© 1999‒2022 Citrix Systems, Inc. All rights reserved. 86

Linux Virtual Delivery Agent 2109
Enable domain users to log on to Linux VDAmachines
To enable domain users to establish HDX sessions on a Linux VDAmachine:
1. In the Active Directory Users and Computers management console, open Active Directory userproperties for that user account.
2. Select the Unix Account tab.3. Check Unix-enabled.4. Set the Primary GID Number to the group ID of an actual domain user group.
Note:
These instructions are equivalent for setting up domain users for logon using the console, RDP,SSH, or any other remoting protocol.
Configure Quest on Linux VDA
Configure VAS daemon
Auto-renewal of Kerberos tickets must be enabled and disconnected. Authentication (offline logon)must be disabled:
1 sudo /opt/quest/bin/vastool configure vas vasd auto-ticket-renew-interval 32400
23 sudo /opt/quest/bin/vastool configure vas vas_auth allow-disconnected-
auth false4 <!--NeedCopy-->
This command sets the renewal interval to nine hours (32,400 seconds) which is one hour less thanthe default 10-hour ticket lifetime. Set this parameter to a lower value on systemswith a shorter ticketlifetime.
Configure PAM and NSS
To enable domain user logon through HDX and other services such as su, ssh, and RDP, run the follow-ing commands to configure PAM and NSSmanually:
1 sudo /opt/quest/bin/vastool configure pam23 sudo /opt/quest/bin/vastool configure nss4 <!--NeedCopy-->
© 1999‒2022 Citrix Systems, Inc. All rights reserved. 87
Linux Virtual Delivery Agent 2109
Join Windows domain
Join the Linux machine to the Active Directory domain using the Quest vastool command:
1 sudo /opt/quest/bin/vastool -u user join domain-name2 <!--NeedCopy-->
The user is any domain user who has permissions to join computers to the Active Directory domain.The domain-name is the DNS name of the domain, for example, example.com.
Verify domainmembership
The Delivery Controller requires that all VDA machines (Windows and Linux VDAs) have a computerobject in Active Directory. To verify that a Quest-joined Linux machine is on the domain:
1 sudo /opt/quest/bin/vastool info domain2 <!--NeedCopy-->
If the machine is joined to a domain, this command returns the domain name. If the machine is notjoined to any domain, the following error appears:
ERROR: No domain could be found.ERROR: VAS_ERR_CONFIG: at ctx.c:414 in _ctx_init_default_realmdefault_realm not configured in vas.conf. Computer may not be joined todomain
Verify user authentication
To verify that Quest can authenticate domain users through PAM, log on to the Linux VDA using a do-main user account that has not been used before.
1 ssh localhost -l domain\\username2 id -u3 <!--NeedCopy-->
Verify that a corresponding Kerberos credential cache file was created for the uid returned by the id-u command:
© 1999‒2022 Citrix Systems, Inc. All rights reserved. 88
Linux Virtual Delivery Agent 2109
1 ls /tmp/krb5cc_uid2 <!--NeedCopy-->
Verify that the tickets in the Kerberos credential cache are valid and not expired:
1 /opt/quest/bin/vastool klist2 <!--NeedCopy-->
Exit the session.
1 exit2 <!--NeedCopy-->
A similar test can be performed by logging on to the Gnome or KDE console directly. Proceed to Step6: Install the Linux VDA after the domain joining verification.
Centrify DirectControl
Join Windows domain
With the Centrify DirectControl Agent installed, join the Linuxmachine to the Active Directory domainusing the Centrify adjoin command:
1 su ‒2 adjoin -w -V -u user domain-name3 <!--NeedCopy-->
The user is any Active Directory domain user who has permissions to join computers to the ActiveDirectory domain. The domain-name is the name of the domain to join the Linux machine to.
Verify domainmembership
The Delivery Controller requires that all VDA machines (Windows and Linux VDAs) have a computerobject in Active Directory. To verify that a Centrify-joined Linux machine is on the domain:
1 su ‒23 adinfo
© 1999‒2022 Citrix Systems, Inc. All rights reserved. 89

Linux Virtual Delivery Agent 2109
4 <!--NeedCopy-->
Verify that the Joined to domain value is valid and the CentrifyDC mode returns connected. If themode remains stuck in the starting state, then the Centrify client is experiencing server connection orauthentication problems.
More comprehensive system and diagnostic information is available using:
1 adinfo --sysinfo all23 adinfo ‒ diag4 <!--NeedCopy-->
Test connectivity to the various Active Directory and Kerberos services.
1 adinfo --test2 <!--NeedCopy-->
Proceed to Step 6: Install the Linux VDA after the domain joining verification.
SSSD
If youareusingSSSDonSUSE, follow the instructions in this section. This section includes instructionsfor joining a Linux VDAmachine to aWindowsdomain andprovides guidance for configuringKerberosauthentication.
To set up SSSD on SUSE, complete the following steps:
1. Join the domain and create host keytabs2. Configure PAM for SSSD3. Set up SSSD4. Enable SSSD5. Verify domain membership6. Verify the Kerberos configuration7. Verify user authentication
Join the domain and create host keytab
SSSD does not provide Active Directory client functions for joining the domain andmanaging the sys-tem keytab file. You can use the Samba approach instead. Complete the following steps before con-figuring SSSD.
© 1999‒2022 Citrix Systems, Inc. All rights reserved. 90
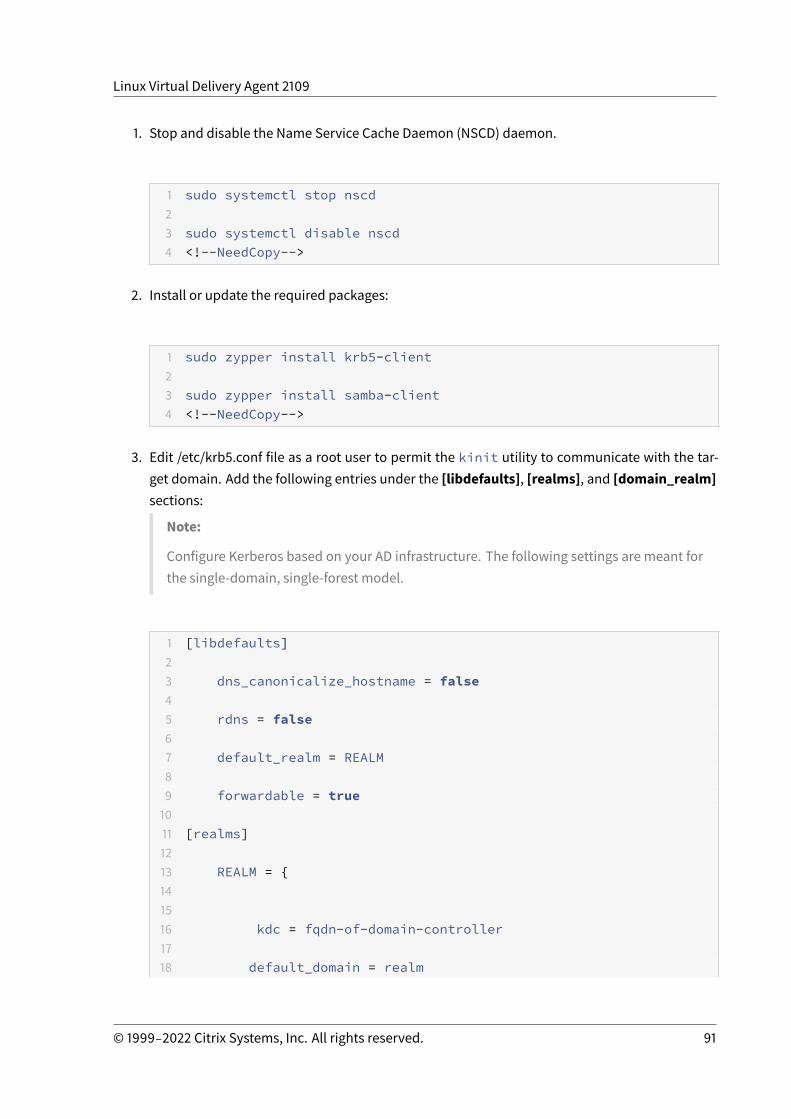
Linux Virtual Delivery Agent 2109
1. Stop and disable the Name Service Cache Daemon (NSCD) daemon.
1 sudo systemctl stop nscd23 sudo systemctl disable nscd4 <!--NeedCopy-->
2. Install or update the required packages:
1 sudo zypper install krb5-client23 sudo zypper install samba-client4 <!--NeedCopy-->
3. Edit /etc/krb5.conf file as a root user to permit the kinit utility to communicate with the tar-get domain. Add the following entries under the [libdefaults], [realms], and [domain_realm]sections:
Note:
Configure Kerberos based on your AD infrastructure. The following settings are meant forthe single-domain, single-forest model.
1 [libdefaults]23 dns_canonicalize_hostname = false45 rdns = false67 default_realm = REALM89 forwardable = true1011 [realms]1213 REALM = {141516 kdc = fqdn-of-domain-controller1718 default_domain = realm
© 1999‒2022 Citrix Systems, Inc. All rights reserved. 91
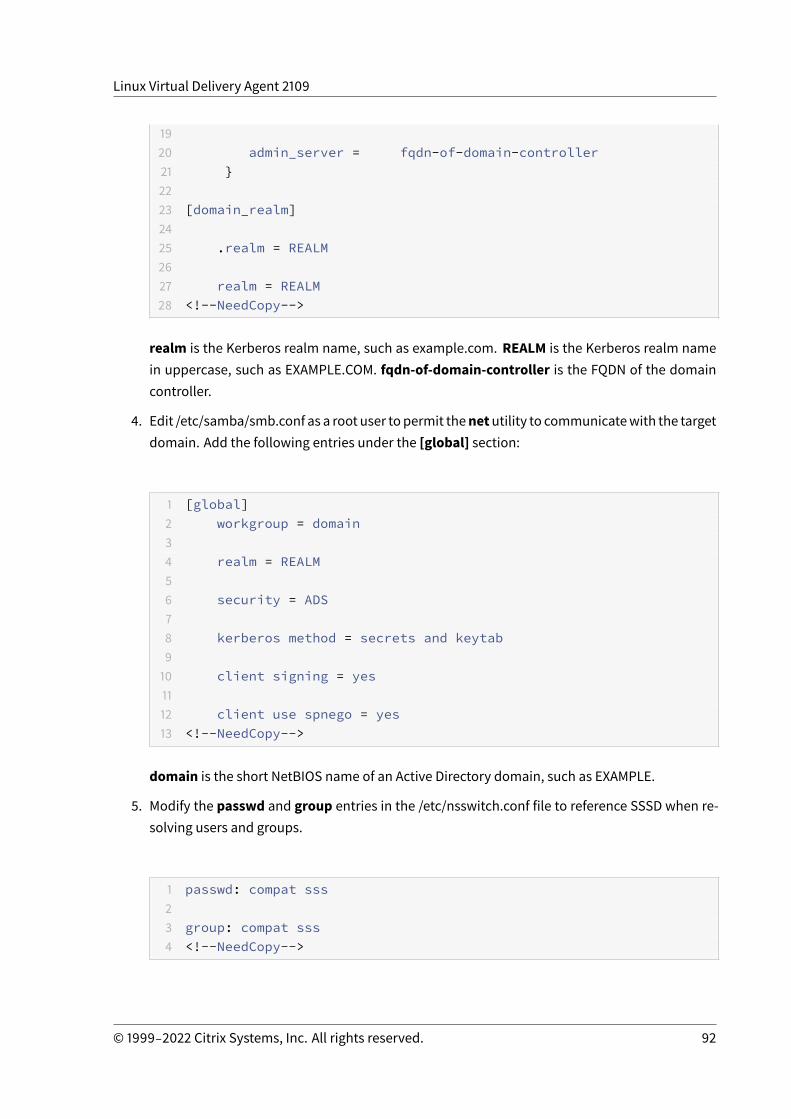
Linux Virtual Delivery Agent 2109
1920 admin_server = fqdn-of-domain-controller21 }2223 [domain_realm]2425 .realm = REALM2627 realm = REALM28 <!--NeedCopy-->
realm is the Kerberos realm name, such as example.com. REALM is the Kerberos realm namein uppercase, such as EXAMPLE.COM. fqdn-of-domain-controller is the FQDN of the domaincontroller.
4. Edit /etc/samba/smb.conf as a root user topermit thenetutility to communicatewith the targetdomain. Add the following entries under the [global] section:
1 [global]2 workgroup = domain34 realm = REALM56 security = ADS78 kerberos method = secrets and keytab910 client signing = yes1112 client use spnego = yes13 <!--NeedCopy-->
domain is the short NetBIOS name of an Active Directory domain, such as EXAMPLE.
5. Modify the passwd and group entries in the /etc/nsswitch.conf file to reference SSSD when re-solving users and groups.
1 passwd: compat sss23 group: compat sss4 <!--NeedCopy-->
© 1999‒2022 Citrix Systems, Inc. All rights reserved. 92
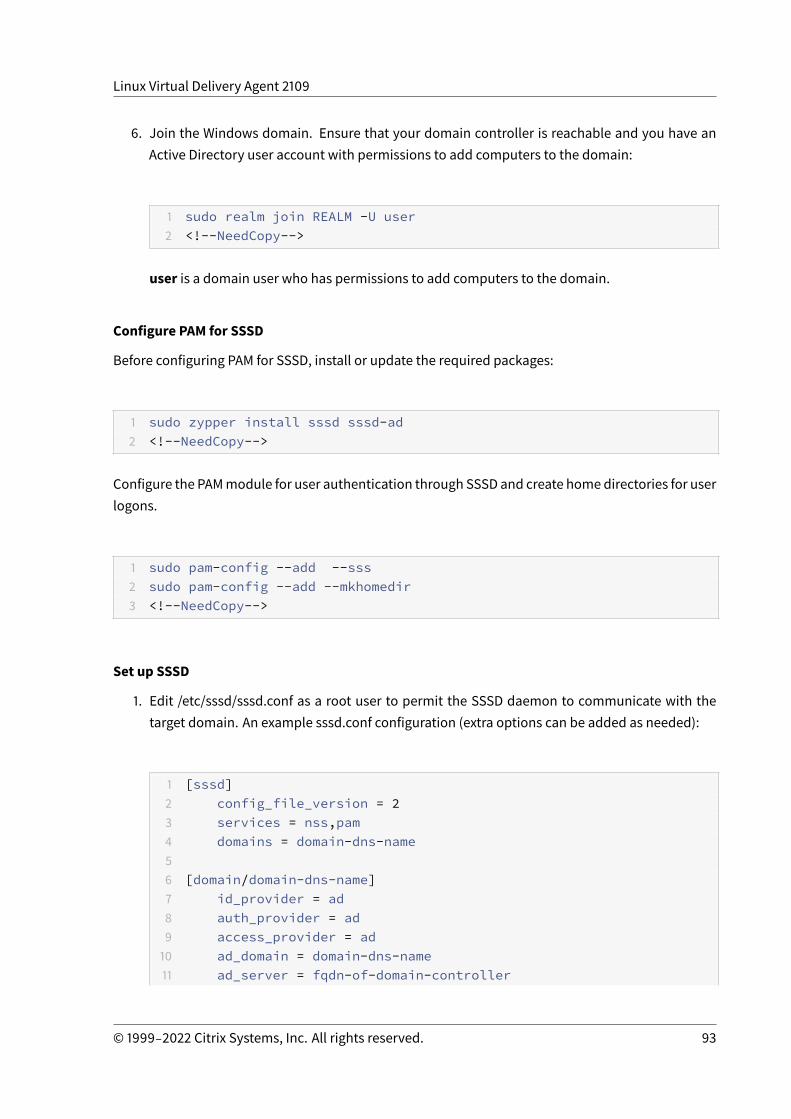
Linux Virtual Delivery Agent 2109
6. Join the Windows domain. Ensure that your domain controller is reachable and you have anActive Directory user account with permissions to add computers to the domain:
1 sudo realm join REALM -U user2 <!--NeedCopy-->
user is a domain user who has permissions to add computers to the domain.
Configure PAM for SSSD
Before configuring PAM for SSSD, install or update the required packages:
1 sudo zypper install sssd sssd-ad2 <!--NeedCopy-->
Configure the PAMmodule for user authentication through SSSD and create homedirectories for userlogons.
1 sudo pam-config --add --sss2 sudo pam-config --add --mkhomedir3 <!--NeedCopy-->
Set up SSSD
1. Edit /etc/sssd/sssd.conf as a root user to permit the SSSD daemon to communicate with thetarget domain. An example sssd.conf configuration (extra options can be added as needed):
1 [sssd]2 config_file_version = 23 services = nss,pam4 domains = domain-dns-name56 [domain/domain-dns-name]7 id_provider = ad8 auth_provider = ad9 access_provider = ad10 ad_domain = domain-dns-name11 ad_server = fqdn-of-domain-controller
© 1999‒2022 Citrix Systems, Inc. All rights reserved. 93
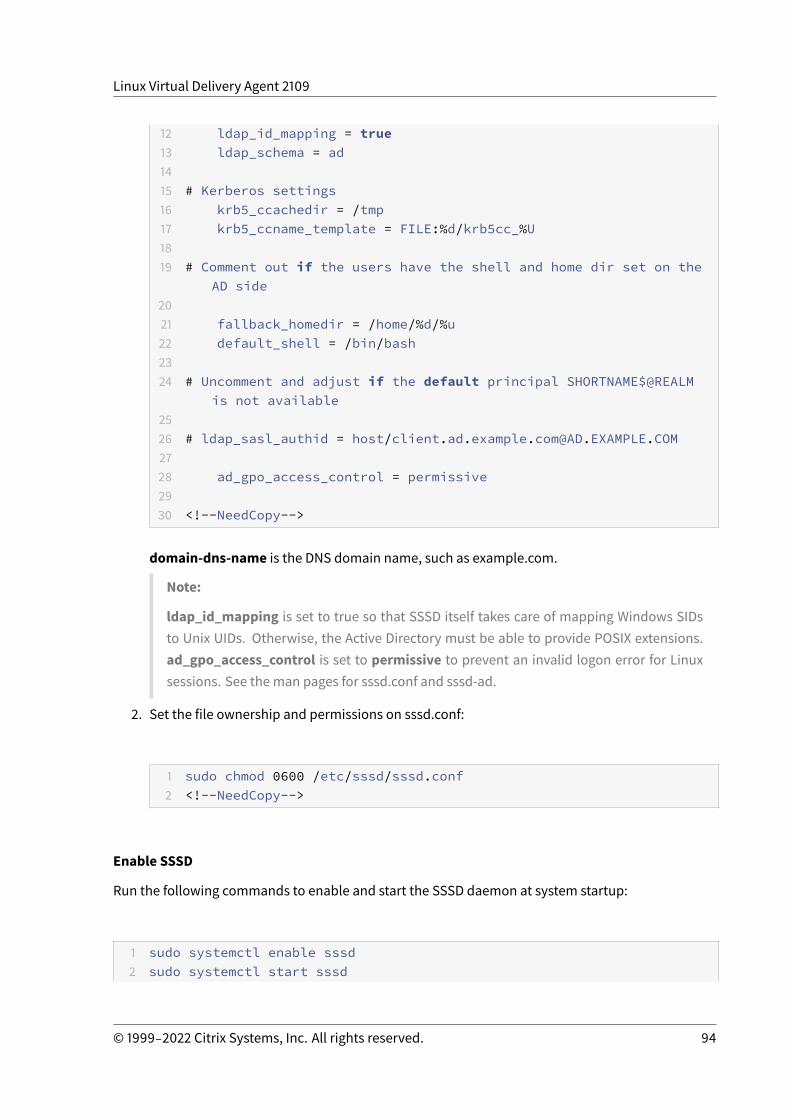
Linux Virtual Delivery Agent 2109
12 ldap_id_mapping = true13 ldap_schema = ad1415 # Kerberos settings16 krb5_ccachedir = /tmp17 krb5_ccname_template = FILE:%d/krb5cc_%U1819 # Comment out if the users have the shell and home dir set on the
AD side2021 fallback_homedir = /home/%d/%u22 default_shell = /bin/bash2324 # Uncomment and adjust if the default principal SHORTNAME$@REALM
is not available2526 # ldap_sasl_authid = host/[email protected] ad_gpo_access_control = permissive2930 <!--NeedCopy-->
domain-dns-name is the DNS domain name, such as example.com.
Note:
ldap_id_mapping is set to true so that SSSD itself takes care of mapping Windows SIDsto Unix UIDs. Otherwise, the Active Directory must be able to provide POSIX extensions.ad_gpo_access_control is set to permissive to prevent an invalid logon error for Linuxsessions. See the man pages for sssd.conf and sssd-ad.
2. Set the file ownership and permissions on sssd.conf:
1 sudo chmod 0600 /etc/sssd/sssd.conf2 <!--NeedCopy-->
Enable SSSD
Run the following commands to enable and start the SSSD daemon at system startup:
1 sudo systemctl enable sssd2 sudo systemctl start sssd
© 1999‒2022 Citrix Systems, Inc. All rights reserved. 94
Linux Virtual Delivery Agent 2109
3 <!--NeedCopy-->
Verify domainmembership
1. Run the net ads command of Samba to verify that the machine is joined to a domain:
1 sudo net ads testjoin2 <!--NeedCopy-->
2. Run the following command to verify extra domain and computer object information:
1 sudo net ads info2 <!--NeedCopy-->
Verify Kerberos configuration
To verify that Kerberos is configured correctly for usewith the Linux VDA, verify that the systemkeytabfile has been created and contains valid keys:
1 sudo klist -ke2 <!--NeedCopy-->
This command displays the list of keys available for the various combinations of principal names andcipher suites. Run the Kerberos kinit command to authenticate the machine with the domain con-troller using these keys:
1 sudo kinit ‒ k MACHINE\$@REALM2 <!--NeedCopy-->
The machine and realm names must be specified in uppercase. The dollar sign ($) must be escapedwith a backslash (\) to prevent shell substitution. In some environments, the DNS domain name isdifferent from the Kerberos realm name. Ensure that the realm name is used. If this command issuccessful, no output is displayed.
Verify that the TGT ticket for the machine account has been cached using:
© 1999‒2022 Citrix Systems, Inc. All rights reserved. 95
Linux Virtual Delivery Agent 2109
1 sudo klist2 <!--NeedCopy-->
Verify user authentication
SSSD does not provide a command-line tool for testing authentication directly with the daemon, andcan only be done via PAM.
To verify that the SSSD PAM module is configured correctly, log on to the Linux VDA using a domainuser account that has not been used before.
1 ssh localhost -l domain\\username23 id -u45 klist67 exit8 <!--NeedCopy-->
Verify that the Kerberos tickets returned by the klist command are correct for that user and havenot expired.
As a root user, verify that a corresponding ticket cache file was created for the uid returned by theprevious id -u command:
1 ls /tmp/krb5cc_uid2 <!--NeedCopy-->
A similar test can be performed by logging on to the Gnome or KDE console directly. Proceed to Step6: Install the Linux VDA after the domain joining verification.
PBIS
Download the required PBIS package
For example:
© 1999‒2022 Citrix Systems, Inc. All rights reserved. 96
Linux Virtual Delivery Agent 2109
1 wget https://github.com/BeyondTrust/pbis-open/releases/download/8.8.0/pbis-open-8.8.0.506.linux.x86_64.rpm.sh
2 <!--NeedCopy-->
Make the PBIS installation script executable
For example:
1 chmod +x pbis-open-8.8.0.506.linux.x86_64.rpm.sh2 <!--NeedCopy-->
Run the PBIS installation script
For example:
1 sh pbis-open-8.8.0.506.linux.x86_64.rpm.sh2 <!--NeedCopy-->
Join a Windows domain
Your domain controller must be reachable and you must have an Active Directory user account withpermissions to add computers to the domain:
1 /opt/pbis/bin/domainjoin-cli join domain-name user2 <!--NeedCopy-->
Theuser is a domain userwho has permissions to add computers to the Active Directory domain. Thedomain-name is the DNS name of the domain, for example, example.com.
Note: To set Bash as the default shell, run the /opt/pbis/bin/config LoginShellTemplate/bin/bashcommand.
Verify domainmembership
The Delivery Controller requires that all VDA machines (Windows and Linux VDAs) have a computerobject in Active Directory. To verify that a PBIS-joined Linux machine is on the domain:
© 1999‒2022 Citrix Systems, Inc. All rights reserved. 97
Linux Virtual Delivery Agent 2109
1 /opt/pbis/bin/domainjoin-cli query2 <!--NeedCopy-->
If themachine is joined to adomain, this command returns the information about the currently joinedAD domain and OU. Otherwise, only the host name appears.
Verify user authentication
Toverify thatPBIScanauthenticatedomainusers throughPAM, logon to theLinuxVDAusingadomainuser account that has not been used before.
1 ssh localhost -l domain\\user23 id -u4 <!--NeedCopy-->
Verify that a corresponding Kerberos credential cache file was created for the UID returned by the id-u command:
1 ls /tmp/krb5cc_uid2 <!--NeedCopy-->
Exit the session.
1 exit2 <!--NeedCopy-->
Proceed to Step 6: Install the Linux VDA after the domain joining verification.
Step 4: Install .NET Core Runtime 3.1 as a prerequisite
Before installing the Linux VDA, install .NET Core Runtime 3.1 according to the instructions at https://docs.microsoft.com/en-us/dotnet/core/install/linux-package-managers.
After installing .NET Core Runtime 3.1, run thewhich dotnet command to find your runtime path.
Based on the command output, set the .NET Core runtime binary path. For example, if the commandoutput is /aa/bb/dotnet, use /aa/bb as the .NET binary path.
© 1999‒2022 Citrix Systems, Inc. All rights reserved. 98
Linux Virtual Delivery Agent 2109
Step 5: Download the Linux VDA package
Go to the Citrix Virtual Apps and Desktops download page. Expand the appropriate version of CitrixVirtual Apps and Desktops and click Components to download the Linux VDA package that matchesyour Linux distribution.
Step 6: Install the Linux VDA
Step 6a: Uninstall the old version
If you installed an earlier version other than the previous two and an LTSR release, uninstall it beforeinstalling the new version.
1. Stop the Linux VDA services:
1 sudo /sbin/service ctxvda stop23 sudo /sbin/service ctxhdx stop4 <!--NeedCopy-->
Note:
Beforeyoustop thectxvdaandctxhdx services, run theservice ctxmonitorservicestop command to stop the monitor service daemon. Otherwise, the monitor service
daemon restarts the services you stopped.
2. Uninstall the package:
1 sudo rpm -e XenDesktopVDA2 <!--NeedCopy-->
Important:
Upgrading from the latest two versions is supported.
Note:
Installation components are located in /opt/Citrix/VDA/.
To run a command, the full path is needed; alternatively, you can add /opt/Citrix/VDA/sbin and/opt/Citrix/VDA/bin to the system path.
© 1999‒2022 Citrix Systems, Inc. All rights reserved. 99
Linux Virtual Delivery Agent 2109
Step 6b: Install the Linux VDA
Install the Linux VDA software using Zypper:
For SUSE 12:
1 sudo zypper install XenDesktopVDA-<version>.sle12_x.x86_64.rpm2 <!--NeedCopy-->
Install the Linux VDA software using the RPMpackagemanager. Before doing so, resolve the followingdependencies:
For SUSE 12:
1 sudo rpm -i XenDesktopVDA-<version>.sle12_x.x86_64.rpm2 <!--NeedCopy-->
Step 6c: Upgrade the Linux VDA (optional)
You can upgrade an existing installation from the previous two versions and from an LTSR release.
Note:
Upgrading an existing installation overwrites the configuration files under /etc/xdl. Before youconduct an upgrade, make sure to back up the files.
For SUSE 12:
1 sudo rpm -U XenDesktopVDA-<version>.sle12_x.x86_64.rpm2 <!--NeedCopy-->
RPM Dependency list for SUSE 12:
1 libQt5Core5 >= 5.5~23 mozilla-nss-tools >= 3.47.145 postgresql-server >= 10.1267 postgresql-jdbc >= 9.28
© 1999‒2022 Citrix Systems, Inc. All rights reserved. 100
Linux Virtual Delivery Agent 2109
9 java-11-openjdk >= 111011 ImageMagick >= 6.81213 dbus-1 >= 1.8.81415 dbus-1-x11 >= 1.8.81617 libXpm4 >= 3.5.111819 libXrandr2 >= 1.4.22021 libXtst6 >= 1.2.22223 motif >= 2.32425 pam >= 1.1.82627 bash >= 4.22829 findutils >= 4.53031 gawk >= 4.13233 sed >= 4.23435 cups >= 1.6.03637 cups-filters-foomatic-rip >= 1.0.03839 openldap2 >= 2.44041 cyrus-sasl >= 2.14243 cyrus-sasl-gssapi >= 2.14445 libxml2 >= 2.94647 libmspack0 >= 0.44849 python-requests >= 2.8.15051 rpmlib(PayloadFilesHavePrefix) <= 4.0-15253 rpmlib(CompressedFileNames) <= 3.0.4-1
© 1999‒2022 Citrix Systems, Inc. All rights reserved. 101
Linux Virtual Delivery Agent 2109
5455 rpmlib(PayloadIsLzma) <= 4.4.6-15657 libtcmalloc4 >= 2.55859 libcap-progs >= 2.226061 xorg-x11-server >= 7.6_1.18.3-76.156263 ibus >= 1.56465 xorg- x11-server = 7.6_1.19.66667 xorg-x11 = 7.6_16869 postgresql10-server >= 10.127071 libgtk-2_0-0 >= 2.247273 libgthread-2_0-0 >= 2.487475 pulseaudio-utils >= 5.07677 lsb-release >= 2.078 <!--NeedCopy-->
Important:
Restart the Linux VDAmachine after upgrading.
Step 7: Configure the Linux VDA
After installing the package, you must configure the Linux VDA by running the ctxsetup.sh script. Be-fore making any changes, the script verifies the environment and ensures that all dependencies areinstalled. If necessary, you can rerun the script at any time to change settings.
You can run the script manually with prompting, or automatically with preconfigured responses. Re-view Help about the script before proceeding:
1 sudo /opt/Citrix/VDA/sbin/ctxsetup.sh ‒ help2 <!--NeedCopy-->
© 1999‒2022 Citrix Systems, Inc. All rights reserved. 102
Linux Virtual Delivery Agent 2109
Prompted configuration
Run amanual configuration with prompted questions:
1 sudo /opt/Citrix/VDA/sbin/ctxsetup.sh2 <!--NeedCopy-->
Automated configuration
For an automated installation, provide the options required by the setup scriptwith environment vari-ables. If all required variables are present, the script does not prompt for any information.
Supported environment variables include:
• CTX_XDL_SUPPORT_DDC_AS_CNAME=Y | N – The Linux VDA supports specifying a DeliveryController name using a DNS CNAME record. Set to N by default.
• CTX_XDL_DDC_LIST=’list-ddc-fqdns’ – The Linux VDA requires a space-separated list of Deliv-ery Controller Fully Qualified Domain Names (FQDNs) to use for registering with a Delivery Con-troller. At least one FQDN or CNAME alias must be specified.
• CTX_XDL_VDA_PORT=port-number – The Linux VDA communicates with Delivery Controllersthrough a TCP/IP port, which is port 80 by default.
• CTX_XDL_REGISTER_SERVICE=Y | N - The Linux Virtual Desktop services are started after ma-chine startup. The value is set to Y by default.
• CTX_XDL_ADD_FIREWALL_RULES=Y | N – The Linux Virtual Desktop services require incomingnetwork connections to be allowed through the system firewall. You can open the requiredports (ports 80 and 1494 by default) automatically in the system firewall for the Linux VirtualDesktop. Set to Y by default.
• CTX_XDL_AD_INTEGRATION=1 | 2 | 3 | 4 – The Linux VDA requires Kerberos configuration set-tings to authenticate with the Delivery Controllers. The Kerberos configuration is determinedfrom the installed and configured Active Directory integration tool on the system. Specify thesupported Active Directory integration method to use:
– 1 – SambaWinbind– 2 – Quest Authentication Service– 3 – Centrify DirectControl– 4 – SSSD
• CTX_XDL_HDX_3D_PRO=Y | N – Linux Virtual Desktop supports HDX 3D Pro, a set of graphicsacceleration technologies designed to optimize the virtualization of rich graphics applications.HDX 3D Pro requires a compatible NVIDIA GRID graphics card to be installed. If HDX 3D Pro is
© 1999‒2022 Citrix Systems, Inc. All rights reserved. 103
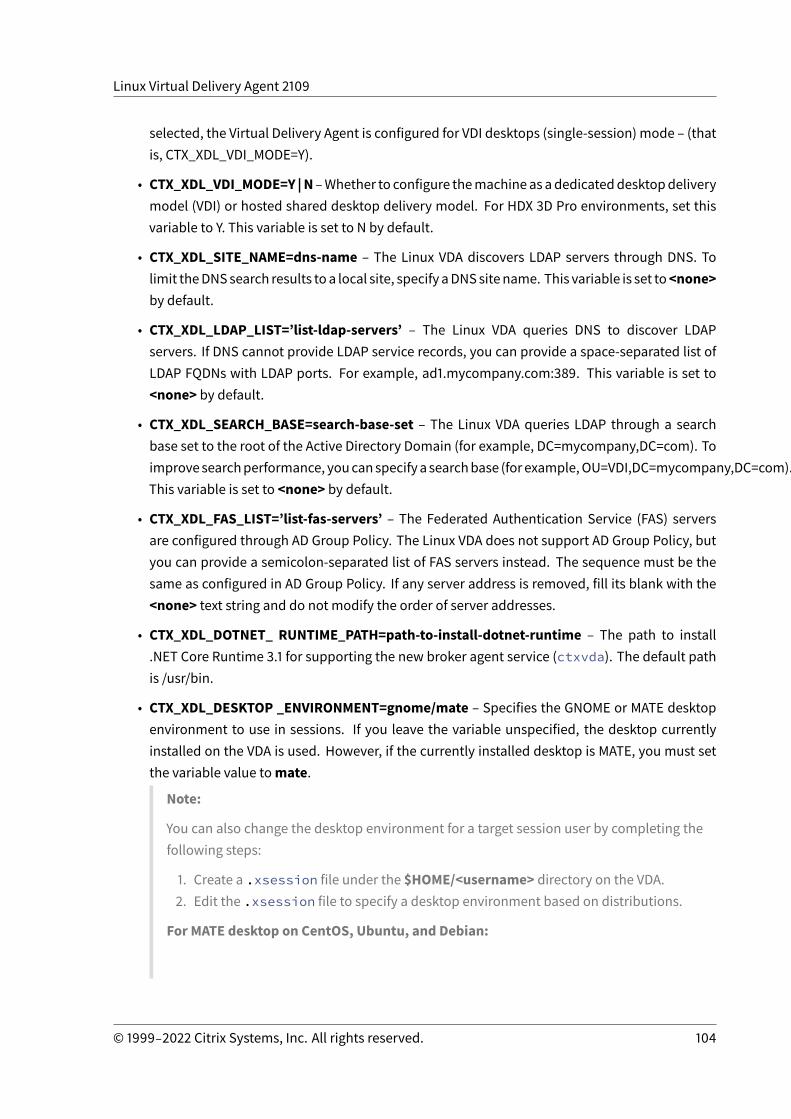
Linux Virtual Delivery Agent 2109
selected, the Virtual Delivery Agent is configured for VDI desktops (single-session) mode – (thatis, CTX_XDL_VDI_MODE=Y).
• CTX_XDL_VDI_MODE=Y |N –Whether to configure themachine as adedicateddesktopdeliverymodel (VDI) or hosted shared desktop delivery model. For HDX 3D Pro environments, set thisvariable to Y. This variable is set to N by default.
• CTX_XDL_SITE_NAME=dns-name – The Linux VDA discovers LDAP servers through DNS. Tolimit theDNSsearch results toa local site, specify aDNSsitename. This variable is set to<none>by default.
• CTX_XDL_LDAP_LIST=’list-ldap-servers’ – The Linux VDA queries DNS to discover LDAPservers. If DNS cannot provide LDAP service records, you can provide a space-separated list ofLDAP FQDNs with LDAP ports. For example, ad1.mycompany.com:389. This variable is set to<none> by default.
• CTX_XDL_SEARCH_BASE=search-base-set – The Linux VDA queries LDAP through a searchbase set to the root of the Active Directory Domain (for example, DC=mycompany,DC=com). Toimprovesearchperformance, youcanspecifya searchbase (forexample,OU=VDI,DC=mycompany,DC=com).This variable is set to <none> by default.
• CTX_XDL_FAS_LIST=’list-fas-servers’ – The Federated Authentication Service (FAS) serversare configured through AD Group Policy. The Linux VDA does not support AD Group Policy, butyou can provide a semicolon-separated list of FAS servers instead. The sequence must be thesame as configured in AD Group Policy. If any server address is removed, fill its blank with the<none> text string and do not modify the order of server addresses.
• CTX_XDL_DOTNET_ RUNTIME_PATH=path-to-install-dotnet-runtime – The path to install.NET Core Runtime 3.1 for supporting the new broker agent service (ctxvda). The default pathis /usr/bin.
• CTX_XDL_DESKTOP _ENVIRONMENT=gnome/mate – Specifies the GNOME or MATE desktopenvironment to use in sessions. If you leave the variable unspecified, the desktop currentlyinstalled on the VDA is used. However, if the currently installed desktop is MATE, you must setthe variable value tomate.
Note:
You can also change the desktop environment for a target session user by completing thefollowing steps:
1. Create a .xsession file under the $HOME/<username> directory on the VDA.2. Edit the .xsession file to specify a desktop environment based on distributions.
For MATE desktop on CentOS, Ubuntu, and Debian:
© 1999‒2022 Citrix Systems, Inc. All rights reserved. 104
Linux Virtual Delivery Agent 2109
1 MSESSION=”$(type -p mate-session)”2 if [ -n ”$MSESSION” ]; then3 exec mate-session4 fi5 <!--NeedCopy-->
For GNOME desktop on CentOS:
1 GSESSION=”$(type -p gnome-session)”2 if [ -n ”$GSESSION” ]; then3 export GNOME_SHELL_SESSION_MODE=classic4 exec gnome-session --session=gnome-classic5 fi6 <!--NeedCopy-->
For GNOME desktop on Ubuntu and Debian:
1 GSESSION=”$(type -p gnome-session)”2 if [ -n ”$GSESSION” ]; then3 exec gnome-session4 fi5 <!--NeedCopy-->
1. Share the 700 file permission with the target session user.
• CTX_XDL_START_SERVICE=Y | N – Whether or not the Linux VDA services are started when theLinux VDA configuration is complete. Set to Y by default.
• CTX_XDL_TELEMETRY_SOCKET_PORT – The socket port for listening for Citrix Scout. The de-fault port is 7503.
• CTX_XDL_TELEMETRY_PORT – The port for communicatingwith Citrix Scout. The default portis 7502.
Set the environment variable and run the configure script:
1 export CTX_XDL_SUPPORT_DDC_AS_CNAME=Y|N23 export CTX_XDL_DDC_LIST=‘ list-ddc-fqdns’45 export CTX_XDL_VDA_PORT=port-number
© 1999‒2022 Citrix Systems, Inc. All rights reserved. 105

Linux Virtual Delivery Agent 2109
67 export CTX_XDL_REGISTER_SERVICE=Y|N89 export CTX_XDL_ADD_FIREWALL_RULES=Y|N1011 export CTX_XDL_AD_INTEGRATION=1|2|3|41213 export CTX_XDL_HDX_3D_PRO=Y|N1415 export CTX_XDL_VDI_MODE=Y|N1617 export CTX_XDL_SITE_NAME=dns-site-name | '<none>'1819 export CTX_XDL_LDAP_LIST=‘ list-ldap-servers’ | '<none>'2021 export CTX_XDL_SEARCH_BASE=search-base-set | '<none>'2223 export CTX_XDL_FAS_LIST=‘ list-fas-servers’ | '<none>'2425 export CTX_XDL_DOTNET_RUNTIME_PATH=path-to-install-dotnet-runtime2627 export CTX_XDL_DESKTOP_ENVIRONMENT= gnome | mate | '<none>'2829 export CTX_XDL_TELEMETRY_SOCKET_PORT=port-number3031 export CTX_XDL_TELEMETRY_PORT=port-number3233 export CTX_XDL_START_SERVICE=Y|N3435 sudo -E /opt/Citrix/VDA/sbin/ctxsetup.sh36 <!--NeedCopy-->
When running the sudo command, type the -Eoption topass the existing environment variables to thenew shell it creates. We recommend that you create a shell script file from the preceding commandswith #!/bin/bash as the first line.
Alternatively, you can specify all parameters by using a single command:
1 sudo CTX_XDL_SUPPORT_DDC_AS_CNAME=Y|N \23 CTX_XDL_DDC_LIST=‘ list-ddc-fqdns’ \45 CTX_XDL_VDA_PORT=port-number \6
© 1999‒2022 Citrix Systems, Inc. All rights reserved. 106
Linux Virtual Delivery Agent 2109
7 CTX_XDL_REGISTER_SERVICE=Y|N \89 CTX_XDL_ADD_FIREWALL_RULES=Y|N \1011 CTX_XDL_AD_INTEGRATION=1|2|3|4 \1213 CTX_XDL_HDX_3D_PRO=Y|N \1415 CTX_XDL_VDI_MODE=Y|N \1617 CTX_XDL_SITE_NAME=dns-name \1819 CTX_XDL_LDAP_LIST=‘ list-ldap-servers’ \2021 CTX_XDL_SEARCH_BASE=search-base-set \2223 CTX_XDL_FAS_LIST=‘ list-fas-servers’ \2425 CTX_XDL_DOTNET_RUNTIME_PATH=path-to-install-dotnet-runtime \2627 CTX_XDL_DESKTOP_ENVIRONMENT=gnome | mate \2829 CTX_XDL_TELEMETRY_SOCKET_PORT=port-number \3031 CTX_XDL_TELEMETRY_PORT=port-number \3233 CTX_XDL_START_SERVICE=Y|N \3435 /opt/Citrix/VDA/sbin/ctxsetup.sh36 <!--NeedCopy-->
Remove configuration changes
In some scenarios, you might have to remove the configuration changes made by the ctxsetup.shscript without uninstalling the Linux VDA package.
Review Help about this script before proceeding:
1 sudo /usr/local/sbin/ctxcleanup.sh --help2 <!--NeedCopy-->
To remove configuration changes:
© 1999‒2022 Citrix Systems, Inc. All rights reserved. 107
Linux Virtual Delivery Agent 2109
1 sudo /usr/local/sbin/ctxcleanup.sh2 <!--NeedCopy-->
Important:
This script deletes all configuration data from the database and renders the Linux VDA inopera-ble.
Configuration logs
The ctxsetup.sh and ctxcleanup.sh scripts display errors on the console, with additional informationwritten to a configuration log file:
/tmp/xdl.configure.log
Restart the Linux VDA services to have the changes take effect.
Step 8: Run XDPing
Run sudo /opt/Citrix/VDA/bin/xdping to check for common configuration issues with a LinuxVDA environment. For more information, see XDPing.
Step 9: Run the Linux VDA
After configuring the Linux VDA by using the ctxsetup.sh script, you can run the following commandsto control the Linux VDA.
Start the Linux VDA:
To start the Linux VDA services:
1 sudo /sbin/service ctxhdx start23 sudo /sbin/service ctxvda start4 <!--NeedCopy-->
Stop the Linux VDA:
To stop the Linux VDA services:
© 1999‒2022 Citrix Systems, Inc. All rights reserved. 108
Linux Virtual Delivery Agent 2109
1 sudo /sbin/service ctxvda stop23 sudo /sbin/service ctxhdx stop4 <!--NeedCopy-->
Note:
Before you stop the ctxvda and ctxhdx services, run the service ctxmonitorservicestop command to stop the monitor service daemon. Otherwise, the monitor service daemonrestarts the services you stopped.
Restart the Linux VDA:
To restart the Linux VDA services:
1 sudo /sbin/service ctxvda stop23 sudo /sbin/service ctxhdx restart45 sudo /sbin/service ctxvda start6 <!--NeedCopy-->
Check the Linux VDA status:
To check the running status of the Linux VDA services:
1 sudo /sbin/service ctxvda status23 sudo /sbin/service ctxhdx status4 <!--NeedCopy-->
Step 10: Create themachine catalog in Citrix Virtual Apps or Citrix Virtual Desktops
The process for creatingmachine catalogs and adding Linux VDAmachines is similar to the traditionalWindows VDA approach. For a more detailed description of how to complete these tasks, see Createmachine catalogs and Managemachine catalogs.
For creating machine catalogs that contain Linux VDA machines, there are a few restrictions that dif-ferentiate the process from creating machine catalogs for Windows VDAmachines:
• For the operating system, select:– TheMulti-session OS option for a hosted shared desktops delivery model.
© 1999‒2022 Citrix Systems, Inc. All rights reserved. 109
Linux Virtual Delivery Agent 2109
– The Single-session OS option for a VDI dedicated desktop delivery model.• Do not mix Linux and Windows VDAmachines in the samemachine catalog.
Note:
Early versions of Citrix Studio did not support the notion of a “Linux OS.” However, selecting theWindows Server OS or Server OS option implies an equivalent hosted shared desktops deliv-ery model. Selecting theWindows Desktop OS or Desktop OS option implies a single user permachine delivery model.
Tip:
If you remove and rejoin a machine to the Active Directory domain, you must remove and addthe machine to the machine catalog again.
Step 11: Create the delivery group in Citrix Virtual Apps or Citrix Virtual Desktops
Theprocess for creatingadeliverygroupandaddingmachinecatalogscontainingLinuxVDAmachinesis almost identical to Windows VDA machines. For a more detailed description of how to completethese tasks, see Create Delivery Groups.
For creatingdelivery groups that contain LinuxVDAmachine catalogs, the following restrictionsapply:
• Ensure that the AD users and groups you select have been properly configured to log on to theLinux VDAmachines.
• Do not allow logon of unauthenticated (anonymous) users.• Do not mix the delivery group with machine catalogs that contain Windowsmachines.
Important:
Publishing applications is supported with Linux VDA Version 1.4 and later. However, the LinuxVDA does not support the delivery of desktops and apps to the samemachine.
For information about how to createmachine catalogs anddelivery groups, seeCitrix Virtual Apps andDesktops 7 2109.
Install Linux Virtual Delivery Agent for Ubuntumanually
January 27, 2022
Important:
For fresh installations, we recommend you use easy install for a quick installation. Easy installsaves time and labor and is less error-prone than themanual installation detailed in this article.
© 1999‒2022 Citrix Systems, Inc. All rights reserved. 110

Linux Virtual Delivery Agent 2109
Step 1: Prepare Ubuntu for VDA installation
Step 1a: Verify the network configuration
Ensure that the network is connected and configured correctly. For example, you must configure theDNS server on the Linux VDA.
If you are using a Ubuntu 18.04 Live Server, make the following change in the /etc/cloud/cloud.cfgconfiguration file before setting the host name:
preserve_hostname: true
Step 1b: Set the host name
To ensure that the host name of the machine is reported correctly, change the /etc/hostname file tocontain only the host name of the machine.
hostname
Step 1c: Assign a loopback address to the host name
Ensure that the DNS domain name and Fully Qualified Domain Name (FQDN) of the machine are re-ported back correctly. The way is to change the following line of the /etc/hosts file to include theFQDN and host name as the first two entries:
127.0.0.1 hostname-fqdn hostname localhost
For example:
127.0.0.1 vda01.example.com vda01 localhost
Remove any other references to hostname-fqdn or hostname from other entries in the file.
Note:
The Linux VDA currently does not support NetBIOS name truncation. Therefore, the host namemust not exceed 15 characters.
Tip:
Use a–z, A–Z, 0–9, and hyphen (-) characters only. Avoid underscores (_), spaces, and other sym-bols. Donot start ahostnamewithanumberanddonotendwithahyphen. This rule alsoappliesto Delivery Controller host names.
Step 1d: Check the host name
Verify that the host name is set correctly:
© 1999‒2022 Citrix Systems, Inc. All rights reserved. 111
Linux Virtual Delivery Agent 2109
1 hostname2 <!--NeedCopy-->
This command returns only the host name of the machine and not its FQDN.
Verify that the FQDN is set correctly:
1 hostname -f2 <!--NeedCopy-->
This command returns the FQDN of the machine.
Step 1e: Disable multicast DNS
The default settings have multicast DNS (mDNS) enabled, which can lead to inconsistent name reso-lution results.
To disablemDNS, edit /etc/nsswitch.conf and change the line containing:
hosts: files mdns_minimal [NOTFOUND=return] dns
To:
hosts: files dns
Step 1f: Check name resolution and service reachability
Verify that you can resolve the FQDN and ping the domain controller and Delivery Controller:
1 nslookup domain-controller-fqdn23 ping domain-controller-fqdn45 nslookup delivery-controller-fqdn67 ping delivery-controller-fqdn8 <!--NeedCopy-->
If you cannot resolve the FQDN or ping either of thesemachines, review the steps before proceeding.
© 1999‒2022 Citrix Systems, Inc. All rights reserved. 112
Linux Virtual Delivery Agent 2109
Step 1g: Configure clock synchronization (chrony)
Maintaining accurate clock synchronization between the VDAs, Delivery Controllers and domain con-trollers is crucial. Hosting the Linux VDA as a virtualmachine can cause clock skew problems. For thisreason, synchronizing time with a remote time service is preferred.
Install chrony:
1 apt-get install chrony2 <!--NeedCopy-->
As a root user, edit /etc/chrony/chrony.conf and add a server entry for each remote time server:
server peer1-fqdn-or-ip-address iburstserver peer2-fqdn-or-ip-address iburst
In a typical deployment, synchronize time from the local domain controllers and not directly frompublic NTPpool servers. Add a server entry for eachActiveDirectory domain controller in the domain.
Remove any other server or pool entries listed including loopback IP address, localhost, and publicserver *.pool.ntp.org entries.
Save changes and restart the Chrony daemon:
1 sudo systemctl restart chrony2 <!--NeedCopy-->
Step 1h: Install OpenJDK 11
The Linux VDA requires the presence of OpenJDK 11.
On Ubuntu 16.04, install OpenJDK 11 y completing the following steps:
1. Download the latest OpenJDK 11 from https://jdk.java.net/archive/.2. Run the tar zxf openjdk-11.0.2_linux-x64_bin.tar.gz command to unzip the down-
loaded package.3. (Optional) Run the mv jdk-11.0.2/ <target directory> command to save OpenJDK in
a target directory.4. Run theupdate-alternatives --install /usr/bin/java java <custom directory
>/bin/java 2000 command to set up the Java runtime.5. Run the java -version command to verify the version of Java.
On Ubuntu 20.04 and Ubuntu 18.04, install OpenJDK 11 by using:
© 1999‒2022 Citrix Systems, Inc. All rights reserved. 113
Linux Virtual Delivery Agent 2109
1 sudo apt-get install -y openjdk-11-jdk2 <!--NeedCopy-->
Step 1i: Install PostgreSQL
The Linux VDA requires PostgreSQL Version 9.x on Ubuntu:
1 sudo apt-get install -y postgresql23 sudo apt-get install -y libpostgresql-jdbc-java4 <!--NeedCopy-->
Step 1j: Install Motif
1 sudo apt-get install -y libxm42 <!--NeedCopy-->
Step 1k: Install other packages
1 sudo apt-get install -y libsasl2-223 sudo apt-get install -y libsasl2-modules-gssapi-mit45 sudo apt-get install -y libldap-2.4-267 sudo apt-get install -y krb5-user89 sudo apt-get install -y libgtk2.0-010 <!--NeedCopy-->
Step 2: Prepare the hypervisor
Some changes are required when running the Linux VDA as a virtual machine on a supported hypervi-sor. Make the following changes according to the hypervisor platform in use. No changes are requiredif you are running the Linux machine on bare metal hardware.
© 1999‒2022 Citrix Systems, Inc. All rights reserved. 114
Linux Virtual Delivery Agent 2109
Fix time synchronization on Citrix Hypervisor
When the Citrix Hypervisor Time Sync feature is enabled, within each paravirtualized Linux VM youexperience issues with NTP and Citrix Hypervisor, both of which try to manage the system clock. Toavoid the clock becoming out of sync with other servers, ensure that the system clock within eachLinux guest is synchronized with the NTP. This case requires disabling host time synchronization. Nochanges are required in HVMmode.
On some Linux distributions, if you are running a paravirtualized Linux kernel with Citrix VM Toolsinstalled, you can checkwhether the Citrix Hypervisor Time Sync feature is present and enabled fromwithin the Linux VM:
1 su -23 cat /proc/sys/xen/independent_wallclock4 <!--NeedCopy-->
This command returns 0 or 1:
• 0 - The time sync feature is enabled, andmust be disabled.• 1 - The time sync feature is disabled, and no further action is required.
If the /proc/sys/xen/independent_wallclock file is not present, the following steps are not required.
If enabled, disable the time sync feature by writing 1 to the file:
1 sudo echo 1 > /proc/sys/xen/independent_wallclock2 <!--NeedCopy-->
Tomake this change permanent and persistent after restart, edit the /etc/sysctl.conf file and add theline:
xen.independent_wallclock = 1
To verify these changes, restart the system:
1 su -23 cat /proc/sys/xen/independent_wallclock4 <!--NeedCopy-->
This command returns the value 1.
© 1999‒2022 Citrix Systems, Inc. All rights reserved. 115
Linux Virtual Delivery Agent 2109
Fix time synchronization on Microsoft Hyper-V
Linux VMswith Hyper-V Linux Integration Services installed can use the Hyper-V time synchronizationfeature to use the host operating system’s time. To ensure that the system clock remains accurate,enable this feature alongside NTP services.
From themanagement operating system:
1. Open the Hyper-V Manager console.2. For the settings of a Linux VM, select Integration Services.3. Ensure that Time synchronization is selected.
Note:
This approach is different fromVMware andCitrix Hypervisor, where host time synchronization isdisabled to avoid conflicts with NTP. Hyper-V time synchronization can coexist and supplementNTP time synchronization.
Fix time synchronization on ESX and ESXi
When the VMware Time Synchronization feature is enabled, within each paravirtualized Linux VM youexperience issueswith the NTP and the hypervisor, both of which try to synchronize the system clock.To avoid the clock becoming out of sync with other servers, ensure that the system clock within eachLinux guest is synchronized with the NTP. This case requires disabling host time synchronization.
If you are running a paravirtualized Linux kernel with VMware Tools installed:
1. Open the vSphere Client.2. Edit settings for the Linux VM.3. In the Virtual Machine Properties dialog, open theOptions tab.4. Select VMware Tools.5. In the Advanced box, clear Synchronize guest timewith host.
Step 3: Add the Linux virtual machine (VM) to the Windows domain
The Linux VDA supports several methods for adding Linux machines to the Active Directory (AD) do-main:
• SambaWinbind• Quest Authentication Service• Centrify DirectControl• SSSD• PBIS
Follow instructions based on your chosenmethod.
© 1999‒2022 Citrix Systems, Inc. All rights reserved. 116
Linux Virtual Delivery Agent 2109
Note:
Session launches might fail when the same user name is used for the local account in the LinuxVDA and the account in AD.
SambaWinbind
Install or update the required packages
1 sudo apt-get install winbind samba libnss-winbind libpam-winbind krb5-config krb5-locales krb5-user
2 <!--NeedCopy-->
Enable the Winbind daemon to start onmachine startup
The Winbind daemonmust be configured to start on machine startup:
1 sudo systemctl enable winbind2 <!--NeedCopy-->
Note:
Ensure that the winbind script is located under /etc/init.d.
Configure Kerberos
Open /etc/krb5.conf as a root user, andmake the following settings:
Note:
Configure Kerberos based on your AD infrastructure. The following settings are meant for thesingle-domain, single-forest model.
[libdefaults]
default_realm = REALM
dns_lookup_kdc = false
[realms]
REALM = {
admin_server = domain-controller-fqdn
© 1999‒2022 Citrix Systems, Inc. All rights reserved. 117

Linux Virtual Delivery Agent 2109
kdc = domain-controller-fqdn
}
[domain_realm]
domain-dns-name = REALM
.domain-dns-name = REALM
The domain-dns-name parameter in this context is the DNS domain name, such as example.com.The REALM is the Kerberos realm name in uppercase, such as EXAMPLE.COM.
Configure Winbind Authentication
ConfigureWinbindmanuallybecauseUbuntudoesnothavea tool likeauthconfig inRHELandyast2in SUSE.
Open /etc/samba/smb.conf, andmake the following settings:
[global]
workgroup = WORKGROUP
security = ADS
realm = REALM
encrypt passwords = yes
idmap config *:range = 16777216-33554431
winbind trusted domains only = no
kerberos method = secrets and keytab
winbind refresh tickets = yes
template shell = /bin/bash
WORKGROUP is the first field in REALM, and REALM is the Kerberos realm name in uppercase.
Configure nsswitch
Open /etc/nsswitch.conf, and append winbind to the following lines:
passwd: compat winbindgroup: compat winbind
© 1999‒2022 Citrix Systems, Inc. All rights reserved. 118
Linux Virtual Delivery Agent 2109
Join Windows Domain
Your domain controller must be reachable and you must have an Active Directory user account withpermissions to add computers to the domain:
1 sudo net ads join REALM -U user2 <!--NeedCopy-->
Where REALM is the Kerberos realm name in uppercase, and user is a domain user with permissionsto add computers to the domain.
Restart winbind
1 sudo systemctl restart winbind2 <!--NeedCopy-->
Configure PAM for Winbind
Run the following command and ensure that theWinbind NT/Active Directory authentication andCreate home directory on login options are selected:
1 sudo pam-auth-update2 <!--NeedCopy-->
Tip:
The winbind daemon stays running only if the machine is joined to a domain.
Verify Domain Membership
The Delivery Controller requires that all VDA machines, whether Windows or Linux, have a computerobject in Active Directory.
Run the net ads command of Samba to verify that the machine is joined to a domain:
1 sudo net ads testjoin2 <!--NeedCopy-->
© 1999‒2022 Citrix Systems, Inc. All rights reserved. 119
Linux Virtual Delivery Agent 2109
Run the following command to verify extra domain and computer object information:
1 sudo net ads info2 <!--NeedCopy-->
Verify Kerberos Configuration
To verify that Kerberos is configured correctly for usewith the Linux VDA, verify that the systemkeytabfile has been created and contains valid keys:
1 sudo klist -ke2 <!--NeedCopy-->
This command displays the list of keys available for the various combinations of principal names andcipher suites. Run the Kerberos kinit command to authenticate the machine with the domain con-troller using these keys:
1 sudo kinit -k MACHINE\$@REALM2 <!--NeedCopy-->
The machine and realm names must be specified in uppercase. The dollar sign ($) must be escapedwith a backslash (\) to prevent shell substitution. In some environments, the DNS domain name isdifferent from the Kerberos realm name. Ensure that the realm name is used. If this command issuccessful, no output is displayed.
Verify that the TGT ticket for the machine account has been cached using:
1 sudo klist2 <!--NeedCopy-->
Examine the account details of the machine using:
1 sudo net ads status2 <!--NeedCopy-->
© 1999‒2022 Citrix Systems, Inc. All rights reserved. 120

Linux Virtual Delivery Agent 2109
Verify user authentication
Use thewbinfo tool to verify that domain users can authenticate with the domain:
1 wbinfo --krb5auth=domain\\username%password2 <!--NeedCopy-->
The domain specified here is the AD domain name, not the Kerberos realm name. For the bash shell,the backslash (\) character must be escaped with another backslash. This command returns a mes-sage indicating success or failure.
To verify that theWinbind PAMmodule is configured correctly, log on to the Linux VDA using a domainuser account that has not been used before.
1 ssh localhost -l domain\\username23 id -u4 <!--NeedCopy-->
Note:
To run an SSH command successfully, ensure that SSH is enabled and working properly.
Verify that a corresponding Kerberos credential cache file was created for the uid returned by the id-u command:
1 ls /tmp/krb5cc_uid2 <!--NeedCopy-->
Verify that the tickets in the user’s Kerberos credential cache are valid and not expired:
1 klist2 <!--NeedCopy-->
Exit the session.
1 exit2 <!--NeedCopy-->
© 1999‒2022 Citrix Systems, Inc. All rights reserved. 121

Linux Virtual Delivery Agent 2109
A similar test can be performed by logging on to the Gnome or KDE console directly. Proceed to Step6: Install the Linux VDA after the domain joining verification.
Tip:
If you succeed in user authentication but cannot show your desktop when logging on with a do-main account, restart the machine and then try again.
Quest authentication service
Configure Quest on domain controller
Assume that you have installed and configured the Quest software on the Active Directory domaincontrollers, and have been granted administrative privileges to create computer objects in Active Di-rectory.
Enable domain users to log on to Linux VDAmachines
To enable domain users to establish HDX sessions on a Linux VDAmachine:
1. In the Active Directory Users and Computers management console, open Active Directory userproperties for that user account.
2. Select the Unix Account tab.3. Check Unix-enabled.4. Set the Primary GID Number to the group ID of an actual domain user group.
Note:
These instructions are equivalent for setting up domain users for logon using the console, RDP,SSH, or any other remoting protocol.
Configure Quest on Linux VDA
Work around SELinux policy enforcement
The default RHEL environment has SELinux fully enforced. This enforcement interferes with the Unixdomain socket IPCmechanisms used by Quest, and prevents domain users from logging on.
The convenient way to work around this issue is to disable SELinux. As a root user, edit /etc/selinux/-config and change the SELinux setting:
SELINUX=disabled
This change requires a machine restart:
© 1999‒2022 Citrix Systems, Inc. All rights reserved. 122
Linux Virtual Delivery Agent 2109
1 reboot2 <!--NeedCopy-->
Important:
Use this setting carefully. Reenabling SELinux policy enforcement after disabling can cause acomplete lockout, even for the root user and other local users.
Configure VAS daemon
Auto-renewal of Kerberos tickets must be enabled and disconnected. Authentication (offline logon)must be disabled:
1 sudo /opt/quest/bin/vastool configure vas vasd auto-ticket-renew-interval 32400
23 sudo /opt/quest/bin/vastool configure vas vas_auth allow-disconnected-
auth false4 <!--NeedCopy-->
This command sets the renewal interval to nine hours (32,400 seconds) which is one hour less thanthe default 10-hour ticket lifetime. Set this parameter to a lower value on systemswith a shorter ticketlifetime.
Configure PAM and NSS
To enable domain user logon through HDX and other services such as su, ssh, and RDP, run the follow-ing commands to configure PAM and NSSmanually:
1 sudo /opt/quest/bin/vastool configure pam23 sudo /opt/quest/bin/vastool configure nss4 <!--NeedCopy-->
Join Windows domain
Join the Linux machine to the Active Directory domain using the Quest vastool command:
© 1999‒2022 Citrix Systems, Inc. All rights reserved. 123
Linux Virtual Delivery Agent 2109
1 sudo /opt/quest/bin/vastool -u user join domain-name2 <!--NeedCopy-->
The user is any domain user with permissions to join computers to the Active Directory domain. Thedomain-name is the DNS name of the domain, for example, example.com.
Verify domainmembership
The Delivery Controller requires that all VDA machines, whether Windows or Linux, have a computerobject in Active Directory. To verify that a Quest-joined Linux machine is on the domain:
1 sudo /opt/quest/bin/vastool info domain2 <!--NeedCopy-->
If the machine is joined to a domain, this command returns the domain name. If the machine is notjoined to any domain, the following error appears:
ERROR: No domain could be found.ERROR: VAS_ERR_CONFIG: at ctx.c:414 in _ctx_init_default_realmdefault_realm not configured in vas.conf. Computer may not be joined todomain
Verify user authentication
To verify that Quest can authenticate domain users through PAM, log on to the Linux VDA using a do-main user account that has not been used before.
1 ssh localhost -l domain\\username23 id -u4 <!--NeedCopy-->
Verify that a corresponding Kerberos credential cache file was created for the UID returned by the id-u command:
1 ls /tmp/krb5cc_uid2 <!--NeedCopy-->
© 1999‒2022 Citrix Systems, Inc. All rights reserved. 124
Linux Virtual Delivery Agent 2109
Verify that the tickets in the Kerberos credential cache are valid and not expired:
1 /opt/quest/bin/vastool klist2 <!--NeedCopy-->
Exit the session.
1 exit2 <!--NeedCopy-->
Proceed to Step 6: Install the Linux VDA after the domain joining verification.
Centrify DirectControl
Join Windows domain
With the Centrify DirectControl Agent installed, join the Linuxmachine to the Active Directory domainusing the Centrify adjoin command:
1 su ‒2 adjoin -w -V -u user domain-name3 <!--NeedCopy-->
The user parameter is any Active Directory domain user with permissions to join computers to theActive Directory domain. The domain-name parameter is the name of the domain to join the Linuxmachine to.
Verify domainmembership
The Delivery Controller requires that all VDA machines, whether Windows or Linux, have a computerobject in Active Directory. To verify that a Centrify-joined Linux machine is on the domain:
1 su ‒23 adinfo4 <!--NeedCopy-->
© 1999‒2022 Citrix Systems, Inc. All rights reserved. 125
Linux Virtual Delivery Agent 2109
Verify that the Joined to domain value is valid and the CentrifyDC mode returns connected. If themode remains stuck in the starting state, then the Centrify client is experiencing server connection orauthentication problems.
More comprehensive system and diagnostic information is available using:
1 adinfo --sysinfo all23 adinfo --diag4 <!--NeedCopy-->
Test connectivity to the various Active Directory and Kerberos services.
1 adinfo --test2 <!--NeedCopy-->
Proceed to Step 6: Install the Linux VDA after the domain joining verification.
SSSD
Configure Kerberos
Run the following command to install Kerberos:
1 sudo apt-get install krb5-user2 <!--NeedCopy-->
To configure Kerberos, open /etc/krb5.conf as root and set the parameters:
Note:
Configure Kerberos based on your AD infrastructure. The following settings are meant for thesingle-domain, single-forest model.
[libdefaults]
default_realm = REALM
dns_lookup_kdc = false
[realms]
REALM = {
© 1999‒2022 Citrix Systems, Inc. All rights reserved. 126
Linux Virtual Delivery Agent 2109
admin_server = domain-controller-fqdn
kdc = domain-controller-fqdn
}
[domain_realm]
domain-dns-name = REALM
.domain-dns-name = REALM
The domain-dns-name parameter in this context is the DNS domain name, such as example.com.The REALM is the Kerberos realm name in uppercase, such as EXAMPLE.COM.
Join the domain
SSSDmust be configured to use Active Directory as its identity provider and Kerberos for authentica-tion. However, SSSD does not provide AD client functions for joining the domain and managing thesystem keytab file. You can use adcli, realmd, or Samba instead.
Note:
This section only provides information for adcli and Samba.
• If you use adcli to join the domain, complete the following steps:
1. Install adcli.
1 sudo apt-get install adcli2 <!--NeedCopy-->
2. Join the domain with adcli.
Remove the old system keytab file and join the domain using:
1 su -23 rm -rf /etc/krb5.keytab45 adcli join domain-dns-name -U user -H hostname-fqdn6 <!--NeedCopy-->
The user is a domain user with permissions to add machines to the domain. The hostname-fqdn is the host name in FQDN format for the machine.
© 1999‒2022 Citrix Systems, Inc. All rights reserved. 127
Linux Virtual Delivery Agent 2109
The -H option is necessary for adcli to generate SPN in the format of host/hostname-fqdn@REALM, which the Linux VDA requires.
3. Verify system keytab.
For a Ubuntu 20.04 machine, run the adcli testjoin command to test whether it is joinedto the domain.
For a Ubuntu 18.04 or Ubuntu 16.04 machine, run the sudo klist -ket command to ensurethat the system keytab file has been created.
Verify that the timestamp for each keymatches the time themachinewas joined to the domain.
• If you use Samba to join the domain, complete the following steps:
1. Install the package.
1 sudo apt-get install samba krb5-user2 <!--NeedCopy-->
2. Configure Samba.
Open /etc/samba/smb.conf, andmake the following settings:
[global]
workgroup = WORKGROUP
security = ADS
realm = REALM
client signing = yes
client use spnego = yes
kerberos method = secrets and keytab
WORKGROUP is the first field in REALM, and REALM is the Kerberos realm name in uppercase.
3. Join the domain with Samba.
Your domain controller must be reachable and youmust have a Windows account with permis-sions to add computers to the domain.
1 sudo net ads join REALM -U user2 <!--NeedCopy-->
WhereREALM is the Kerberos realm name in uppercase, and user is a domain user with permis-sions to add computers to the domain.
© 1999‒2022 Citrix Systems, Inc. All rights reserved. 128
Linux Virtual Delivery Agent 2109
Set up SSSD
Install or update required packages:
Install the required SSSD and configuration packages if not already installed:
1 sudo apt-get install sssd2 <!--NeedCopy-->
If the packages are already installed, an update is recommended:
1 sudo apt-get install --only-upgrade sssd2 <!--NeedCopy-->
Note:
By default, the install process in Ubuntu configures nsswitch.conf and the PAM login moduleautomatically.
Configure SSSD
SSSD configuration changes are required before starting the SSSD daemon. For some versions ofSSSD, the /etc/sssd/sssd.conf configuration file is not installed by default and must be created man-ually. As root, either create or open /etc/sssd/sssd.conf andmake the following settings:
[sssd]
services = nss, pam
config_file_version = 2
domains = domain-dns-name
[domain/domain-dns-name]
id_provider = ad
access_provider = ad
auth_provider = krb5
krb5_realm = REALM
## Set krb5_renewable_lifetime higher if TGT renew lifetime is longer than14 days
krb5_renewable_lifetime = 14d
© 1999‒2022 Citrix Systems, Inc. All rights reserved. 129

Linux Virtual Delivery Agent 2109
## Set krb5_renew_interval to lower value if TGT ticket lifetime is shorterthan 2 hours
krb5_renew_interval = 1h
krb5_ccachedir = /tmp
krb5_ccname_template = FILE:%d/krb5cc_%U
## This ldap_id_mapping setting is also the default value
ldap_id_mapping = true
override_homedir = /home/%d/%u
default_shell = /bin/bash
ad_gpo_map_remote_interactive = +ctxhdx
Note:
ldap_id_mapping is set to true so that SSSD itself takes care of mapping Windows SIDs to UnixUIDs. Otherwise, the Active Directory must be able to provide POSIX extensions. PAM servicectxhdx is added to ad_gpo_map_remote_interactive.
The domain-dns-name parameter in this context is the DNS domain name, such as exam-ple.com. The REALM is the Kerberos realm name in uppercase, such as EXAMPLE.COM. There isno requirement to configure the NetBIOS domain name.
For information about the configuration settings, see theman pages for sssd.conf and sssd-ad.
The SSSD daemon requires that the configuration file must have owner read permission only:
1 sudo chmod 0600 /etc/sssd/sssd.conf2 <!--NeedCopy-->
Start SSSD daemon
Run the following commands to start the SSSD daemon now and to enable the daemon to start uponmachine startup:
1 sudo systemctl start sssd23 sudo systemctl enable sssd4 <!--NeedCopy-->
© 1999‒2022 Citrix Systems, Inc. All rights reserved. 130
Linux Virtual Delivery Agent 2109
PAM configuration
Run the following command and ensure that the SSS authentication and Create home directory onlogin options are selected:
1 sudo pam-auth-update2 <!--NeedCopy-->
Verify domainmembership
The Delivery Controller requires that all VDA machines (Windows and Linux VDAs) have a computerobject in Active Directory.
• If you use adcli to verify domain membership, run the sudo adcli info domain-dns-name command to show the domain information.
• If you use Samba to verify domain membership, run the sudo net ads testjoin commandto verify that the machine is joined to a domain and the sudo net ads info command toverify extra domain and computer object information.
Verify Kerberos configuration
To verify that Kerberos is configured correctly for usewith the Linux VDA, verify that the systemkeytabfile has been created and contains valid keys:
1 sudo klist -ke2 <!--NeedCopy-->
This command displays the list of keys available for the various combinations of principal names andcipher suites. Run the Kerberos kinit command to authenticate the machine with the domain con-troller using these keys:
1 sudo kinit -k MACHINE\$@REALM2 <!--NeedCopy-->
The machine and realm names must be specified in uppercase. The dollar sign ($) must be escapedwith a backslash (\) to prevent shell substitution. In some environments, the DNS domain name isdifferent from the Kerberos realm name. Ensure that the realm name is used. If this command issuccessful, no output is displayed.
© 1999‒2022 Citrix Systems, Inc. All rights reserved. 131
Linux Virtual Delivery Agent 2109
Verify that the TGT for the machine account has been cached using:
1 sudo klist2 <!--NeedCopy-->
Verify user authentication
SSSD does not provide a command-line tool for testing authentication directly with the daemon, andcan only be done via PAM.
To verify that the SSSD PAM module is configured correctly, log on to the Linux VDA using a domainuser account that has not been used before.
1 ssh localhost -l domain\\username23 id -u45 klist67 exit8 <!--NeedCopy-->
Verify that the Kerberos tickets returned by the klist command are correct for that user and have notexpired.
As a root user, verify that a corresponding ticket cache file was created for the uid returned by theprevious id -u command:
1 ls /tmp/krb5cc_uid2 <!--NeedCopy-->
A similar test can be performed by logging on to KDE or Gnome Display Manager. Proceed to Step 6:Install the Linux VDA after the domain joining verification.
PBIS
Download the required PBIS package
For example:
© 1999‒2022 Citrix Systems, Inc. All rights reserved. 132

Linux Virtual Delivery Agent 2109
1 sudo wget https://github.com/BeyondTrust/pbis-open/releases/download/8.8.0/pbis-open-8.8.0.506.linux.x86_64.deb.sh
2 <!--NeedCopy-->
Make the PBIS installation script executable
For example:
1 sudo chmod +x pbis-open-8.8.0.506.linux.x86_64.deb.sh2 <!--NeedCopy-->
Run the PBIS installation script
For example:
1 sudo sh pbis-open-8.8.0.506.linux.x86_64.deb.sh2 <!--NeedCopy-->
Join Windows domain
Your domain controller must be reachable and you must have an Active Directory user account withpermissions to add computers to the domain:
1 sudo /opt/pbis/bin/domainjoin-cli join domain-name user2 <!--NeedCopy-->
Theuser is a domain userwho has permissions to add computers to the Active Directory domain. Thedomain-name is the DNS name of the domain, for example, example.com.
Note: To set Bash as the default shell, run the sudo /opt/pbis/bin/config LoginShellTem-plate/bin/bash command.
Verify domainmembership
The Delivery Controller requires that all VDA machines (Windows and Linux VDAs) have a computerobject in Active Directory. To verify that a PBIS-joined Linux machine is on the domain:
© 1999‒2022 Citrix Systems, Inc. All rights reserved. 133

Linux Virtual Delivery Agent 2109
1 /opt/pbis/bin/domainjoin-cli query2 <!--NeedCopy-->
If themachine is joined to adomain, this command returns the information about the currently joinedAD domain and OU. Otherwise, only the host name appears.
Verify user authentication
Toverify thatPBIScanauthenticatedomainusers throughPAM, logon to theLinuxVDAusingadomainuser account that has not been used before.
1 sudo ssh localhost -l domain\\user23 id -u4 <!--NeedCopy-->
Verify that a corresponding Kerberos credential cache file was created for the UID returned by the id-u command:
1 ls /tmp/krb5cc_uid2 <!--NeedCopy-->
Exit the session.
1 exit2 <!--NeedCopy-->
Proceed to Step 6: Install the Linux VDA after the domain joining verification.
Step 4: Install .NET Core Runtime 3.1 as a prerequisite
Before installing the Linux VDA, install .NET Core Runtime 3.1 according to the instructions at https://docs.microsoft.com/en-us/dotnet/core/install/linux-package-managers.
After installing .NET Core Runtime 3.1, run thewhich dotnet command to find your runtime path.
Based on the command output, set the .NET Core runtime binary path. For example, if the commandoutput is /aa/bb/dotnet, use /aa/bb as the .NET binary path.
© 1999‒2022 Citrix Systems, Inc. All rights reserved. 134
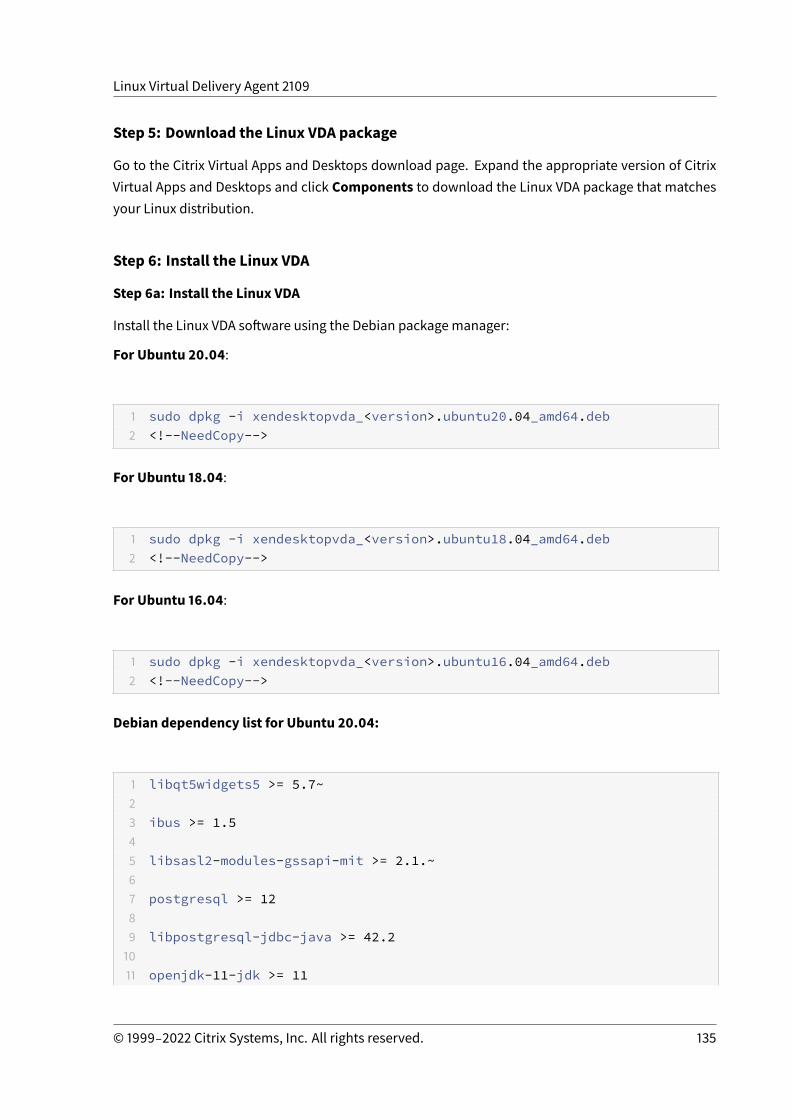
Linux Virtual Delivery Agent 2109
Step 5: Download the Linux VDA package
Go to the Citrix Virtual Apps and Desktops download page. Expand the appropriate version of CitrixVirtual Apps and Desktops and click Components to download the Linux VDA package that matchesyour Linux distribution.
Step 6: Install the Linux VDA
Step 6a: Install the Linux VDA
Install the Linux VDA software using the Debian packagemanager:
For Ubuntu 20.04:
1 sudo dpkg -i xendesktopvda_<version>.ubuntu20.04_amd64.deb2 <!--NeedCopy-->
For Ubuntu 18.04:
1 sudo dpkg -i xendesktopvda_<version>.ubuntu18.04_amd64.deb2 <!--NeedCopy-->
For Ubuntu 16.04:
1 sudo dpkg -i xendesktopvda_<version>.ubuntu16.04_amd64.deb2 <!--NeedCopy-->
Debian dependency list for Ubuntu 20.04:
1 libqt5widgets5 >= 5.7~23 ibus >= 1.545 libsasl2-modules-gssapi-mit >= 2.1.~67 postgresql >= 1289 libpostgresql-jdbc-java >= 42.21011 openjdk-11-jdk >= 11
© 1999‒2022 Citrix Systems, Inc. All rights reserved. 135
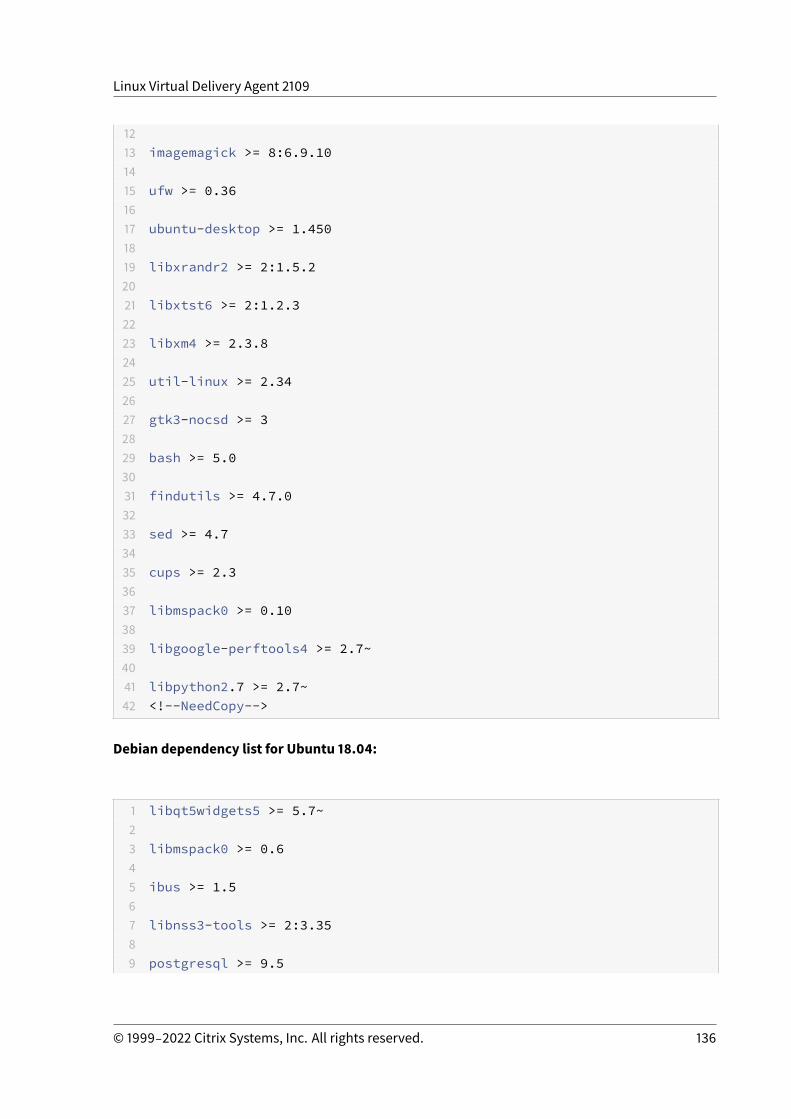
Linux Virtual Delivery Agent 2109
1213 imagemagick >= 8:6.9.101415 ufw >= 0.361617 ubuntu-desktop >= 1.4501819 libxrandr2 >= 2:1.5.22021 libxtst6 >= 2:1.2.32223 libxm4 >= 2.3.82425 util-linux >= 2.342627 gtk3-nocsd >= 32829 bash >= 5.03031 findutils >= 4.7.03233 sed >= 4.73435 cups >= 2.33637 libmspack0 >= 0.103839 libgoogle-perftools4 >= 2.7~4041 libpython2.7 >= 2.7~42 <!--NeedCopy-->
Debian dependency list for Ubuntu 18.04:
1 libqt5widgets5 >= 5.7~23 libmspack0 >= 0.645 ibus >= 1.567 libnss3-tools >= 2:3.3589 postgresql >= 9.5
© 1999‒2022 Citrix Systems, Inc. All rights reserved. 136
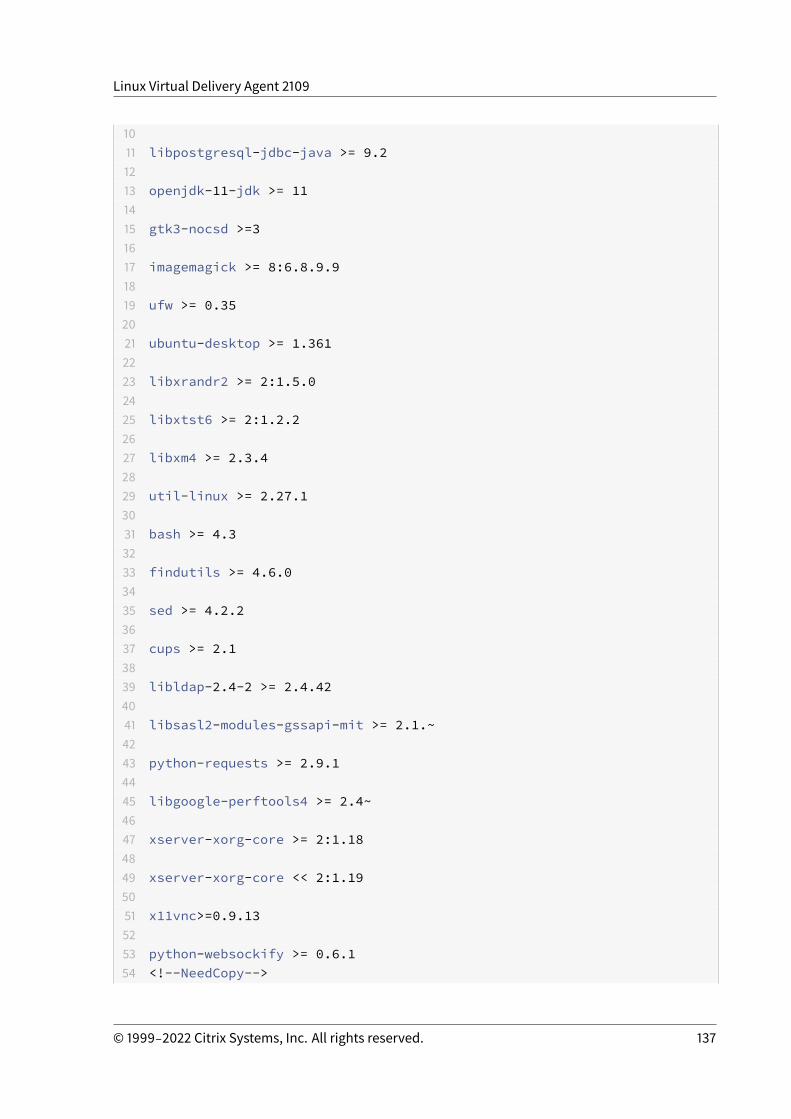
Linux Virtual Delivery Agent 2109
1011 libpostgresql-jdbc-java >= 9.21213 openjdk-11-jdk >= 111415 gtk3-nocsd >=31617 imagemagick >= 8:6.8.9.91819 ufw >= 0.352021 ubuntu-desktop >= 1.3612223 libxrandr2 >= 2:1.5.02425 libxtst6 >= 2:1.2.22627 libxm4 >= 2.3.42829 util-linux >= 2.27.13031 bash >= 4.33233 findutils >= 4.6.03435 sed >= 4.2.23637 cups >= 2.13839 libldap-2.4-2 >= 2.4.424041 libsasl2-modules-gssapi-mit >= 2.1.~4243 python-requests >= 2.9.14445 libgoogle-perftools4 >= 2.4~4647 xserver-xorg-core >= 2:1.184849 xserver-xorg-core << 2:1.195051 x11vnc>=0.9.135253 python-websockify >= 0.6.154 <!--NeedCopy-->
© 1999‒2022 Citrix Systems, Inc. All rights reserved. 137
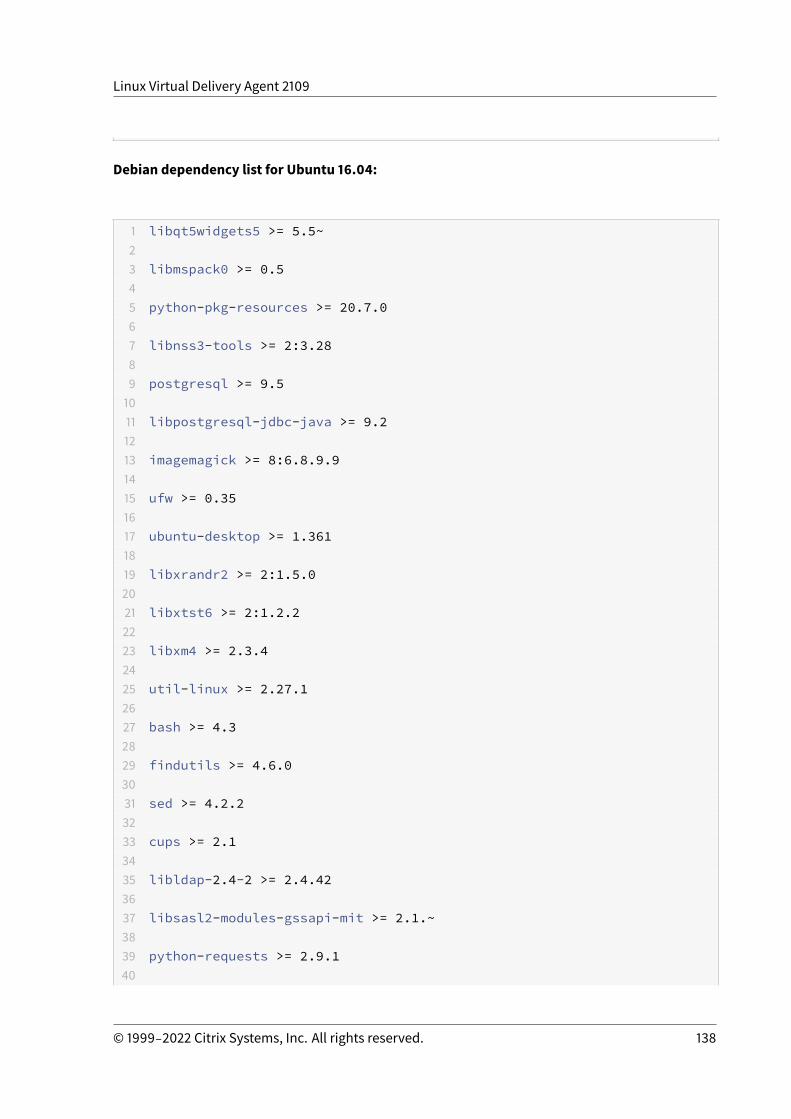
Linux Virtual Delivery Agent 2109
Debian dependency list for Ubuntu 16.04:
1 libqt5widgets5 >= 5.5~23 libmspack0 >= 0.545 python-pkg-resources >= 20.7.067 libnss3-tools >= 2:3.2889 postgresql >= 9.51011 libpostgresql-jdbc-java >= 9.21213 imagemagick >= 8:6.8.9.91415 ufw >= 0.351617 ubuntu-desktop >= 1.3611819 libxrandr2 >= 2:1.5.02021 libxtst6 >= 2:1.2.22223 libxm4 >= 2.3.42425 util-linux >= 2.27.12627 bash >= 4.32829 findutils >= 4.6.03031 sed >= 4.2.23233 cups >= 2.13435 libldap-2.4-2 >= 2.4.423637 libsasl2-modules-gssapi-mit >= 2.1.~3839 python-requests >= 2.9.140
© 1999‒2022 Citrix Systems, Inc. All rights reserved. 138
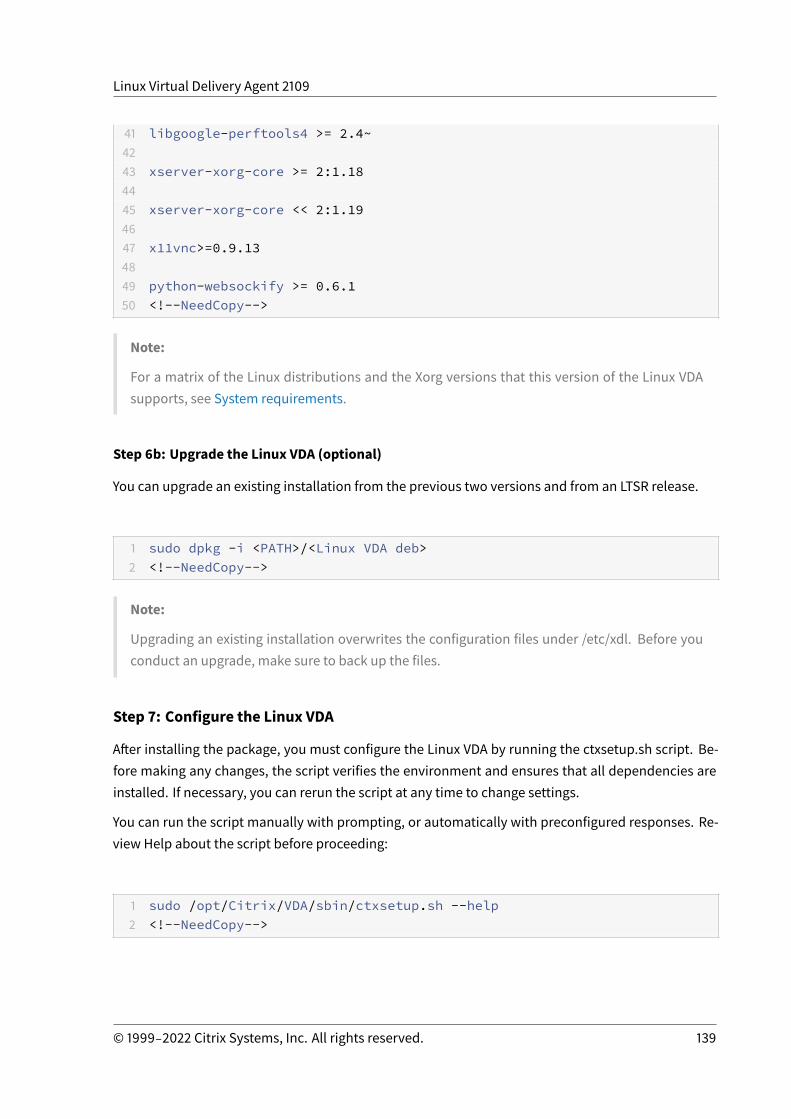
Linux Virtual Delivery Agent 2109
41 libgoogle-perftools4 >= 2.4~4243 xserver-xorg-core >= 2:1.184445 xserver-xorg-core << 2:1.194647 x11vnc>=0.9.134849 python-websockify >= 0.6.150 <!--NeedCopy-->
Note:
For a matrix of the Linux distributions and the Xorg versions that this version of the Linux VDAsupports, see System requirements.
Step 6b: Upgrade the Linux VDA (optional)
You can upgrade an existing installation from the previous two versions and from an LTSR release.
1 sudo dpkg -i <PATH>/<Linux VDA deb>2 <!--NeedCopy-->
Note:
Upgrading an existing installation overwrites the configuration files under /etc/xdl. Before youconduct an upgrade, make sure to back up the files.
Step 7: Configure the Linux VDA
After installing the package, you must configure the Linux VDA by running the ctxsetup.sh script. Be-fore making any changes, the script verifies the environment and ensures that all dependencies areinstalled. If necessary, you can rerun the script at any time to change settings.
You can run the script manually with prompting, or automatically with preconfigured responses. Re-view Help about the script before proceeding:
1 sudo /opt/Citrix/VDA/sbin/ctxsetup.sh --help2 <!--NeedCopy-->
© 1999‒2022 Citrix Systems, Inc. All rights reserved. 139
Linux Virtual Delivery Agent 2109
Prompted configuration
Run amanual configuration with prompted questions:
1 sudo /opt/Citrix/VDA/sbin/ctxsetup.sh2 <!--NeedCopy-->
Automated configuration
For an automated install, the options required by the setup script can be provided with environmentvariables. If all required variables are present, the script does not prompt theuser for any information,allowing for a scripted installation process.
Supported environment variables include:
• CTX_XDL_SUPPORT_DDC_AS_CNAME=Y | N – The Linux VDA supports specifying a DeliveryController name using a DNS CNAME record. Set to N by default.
• CTX_XDL_DDC_LIST=’list-ddc-fqdns’ – The Linux VDA requires a space-separated list of Deliv-ery Controller Fully Qualified Domain Names (FQDNs) to use for registering with a Delivery Con-troller. At least one FQDN or CNAME alias must be specified.
• CTX_XDL_VDA_PORT=port-number – The Linux VDA communicates with Delivery Controllersthrough a TCP/IP port, which is port 80 by default.
• CTX_XDL_REGISTER_SERVICE=Y | N – The Linux Virtual Desktop services are started after ma-chine startup. Set to Y by default.
• CTX_XDL_ADD_FIREWALL_RULES=Y | N – The Linux Virtual Desktop services require incomingnetwork connections to be allowed through the system firewall. You can open the requiredports (ports 80 and 1494 by default) automatically in the system firewall for the Linux VirtualDesktop. Set to Y by default.
• CTX_XDL_AD_INTEGRATION=1 | 2 | 3 | 4 |5 – The Linux VDA requires Kerberos configurationsettings toauthenticatewith theDeliveryControllers. TheKerberosconfiguration isdeterminedfrom the installed and configured Active Directory integration tool on the system. Specify thesupported Active Directory integration method to use:
– 1 – SambaWinbind– 2 – Quest Authentication Service– 3 – Centrify DirectControl– 4 – SSSD– 5 – PBIS
© 1999‒2022 Citrix Systems, Inc. All rights reserved. 140
Linux Virtual Delivery Agent 2109
• CTX_XDL_HDX_3D_PRO=Y | N – Linux Virtual Desktop supports HDX 3D Pro, a set of graphicsacceleration technologies designed to optimize the virtualization of rich graphics applications.HDX 3D Pro requires a compatible NVIDIA GRID graphics card to be installed. If HDX 3D Pro isselected, the Virtual Delivery Agent is configured for VDI desktops (single-session) mode – (thatis, CTX_XDL_VDI_MODE=Y).
• CTX_XDL_VDI_MODE=Y |N –Whether to configure themachine as adedicateddesktopdeliverymodel (VDI) or hosted shared desktop delivery model. For HDX 3D Pro environments, set thisvariable to Y. This variable is set to N by default.
• CTX_XDL_SITE_NAME=dns-name – The Linux VDA discovers LDAP servers through DNS. Tolimit theDNSsearch results toa local site, specify aDNSsitename. This variable is set to<none>by default.
• CTX_XDL_LDAP_LIST=’list-ldap-servers’ – The Linux VDA queries DNS to discover LDAPservers. If DNS cannot provide LDAP service records, you can provide a space-separated list ofLDAP FQDNs with LDAP ports. For example, ad1.mycompany.com:389. This variable is set to<none> by default.
• CTX_XDL_SEARCH_BASE=search-base-set – The Linux VDA queries LDAP through a searchbase set to the root of the Active Directory Domain (for example, DC=mycompany,DC=com).However, to improve search performance, you can specify a search base (for example,OU=VDI,DC=mycompany,DC=com). This variable is set to <none> by default.
• CTX_XDL_FAS_LIST=’list-fas-servers’ – The Federated Authentication Service (FAS) serversare configured through AD Group Policy. The Linux VDA does not support AD Group Policy, butyou can provide a semicolon-separated list of FAS servers instead. The sequence must be thesame as configured in AD Group Policy. If any server address is removed, fill its blank with the<none> text string and do not modify the order of server addresses.
• CTX_XDL_DOTNET_ RUNTIME_PATH=path-to-install-dotnet-runtime – The path to install.NET Core Runtime 3.1 for supporting the new broker agent service (ctxvda). The default pathis /usr/bin.
• CTX_XDL_DESKTOP _ENVIRONMENT=gnome/mate – Specifies the GNOME or MATE desktopenvironment to use in sessions. If you leave the variable unspecified, the desktop currentlyinstalled on the VDA is used. However, if the currently installed desktop is MATE, you must setthe variable value tomate.
Note:
You can also change the desktop environment for a target session user by completing thefollowing steps:
1. Create a .xsession file under the $HOME/<username> directory on the VDA.
© 1999‒2022 Citrix Systems, Inc. All rights reserved. 141
Linux Virtual Delivery Agent 2109
2. Edit the .xsession file to specify a desktop environment based on distributions.
For MATE desktop on CentOS, Ubuntu, and Debian
MSESSION=”$(type -p mate-session)”if [ -n “$MSESSION” ]; thenexec mate-sessionfi
For GNOME desktop on CentOS
GSESSION=”$(type -p gnome-session)”if [ -n “$GSESSION” ]; then
1 export GNOME_SHELL_SESSION_MODE=classic2 exec gnome-session --session=gnome-classic fi
**For GNOME desktop on Ubuntu and Debian**
GSESSION=”$(type -p gnome-session)”if [ -n “$GSESSION” ]; then
1 exec gnome-session fi
3. Share the 700 file permission with the target session user.
• CTX_XDL_START_SERVICE=Y | N – Whether or not the Linux VDA services are started when theLinux VDA configuration is complete. Set to Y by default.
• CTX_XDL_TELEMETRY_SOCKET_PORT – The socket port for listening for Citrix Scout. The de-fault port is 7503.
• CTX_XDL_TELEMETRY_PORT – The port for communicatingwith Citrix Scout. The default portis 7502.
Set the environment variable and run the configure script:
1 export CTX_XDL_SUPPORT_DDC_AS_CNAME=Y|N23 export CTX_XDL_DDC_LIST=‘ list-ddc-fqdns’45 export CTX_XDL_VDA_PORT=port-number67 export CTX_XDL_REGISTER_SERVICE=Y|N8
© 1999‒2022 Citrix Systems, Inc. All rights reserved. 142
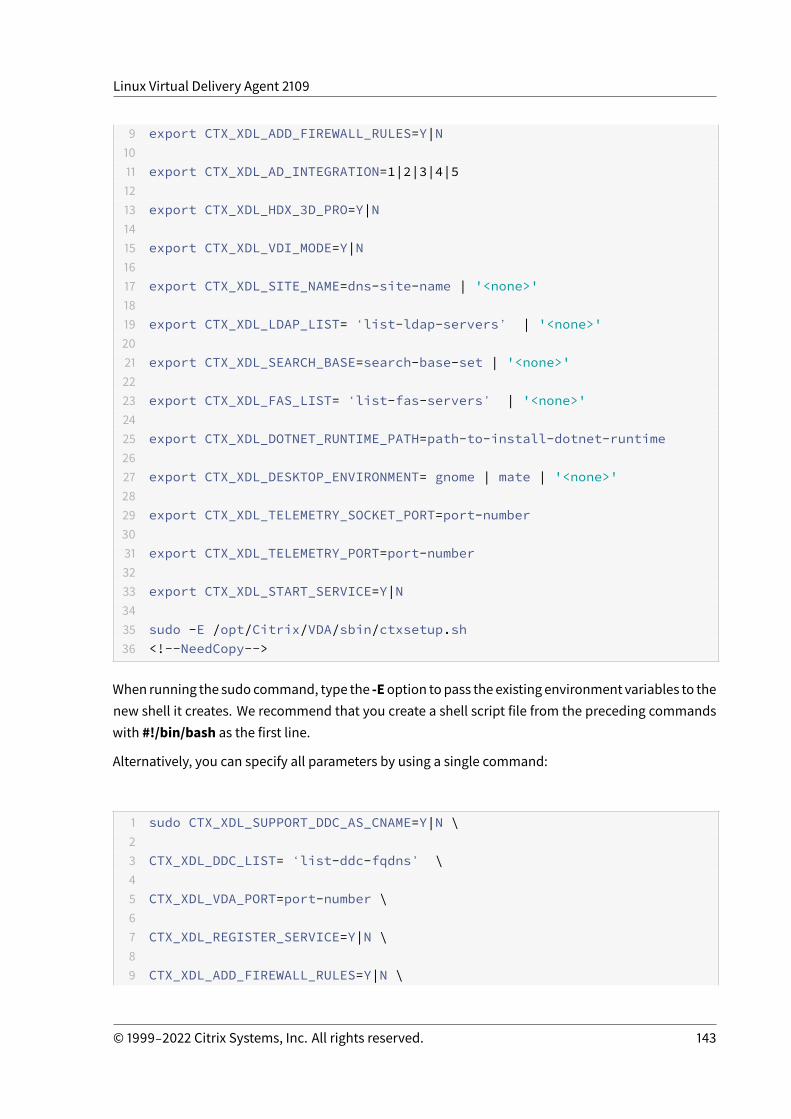
Linux Virtual Delivery Agent 2109
9 export CTX_XDL_ADD_FIREWALL_RULES=Y|N1011 export CTX_XDL_AD_INTEGRATION=1|2|3|4|51213 export CTX_XDL_HDX_3D_PRO=Y|N1415 export CTX_XDL_VDI_MODE=Y|N1617 export CTX_XDL_SITE_NAME=dns-site-name | '<none>'1819 export CTX_XDL_LDAP_LIST=‘ list-ldap-servers’ | '<none>'2021 export CTX_XDL_SEARCH_BASE=search-base-set | '<none>'2223 export CTX_XDL_FAS_LIST=‘ list-fas-servers’ | '<none>'2425 export CTX_XDL_DOTNET_RUNTIME_PATH=path-to-install-dotnet-runtime2627 export CTX_XDL_DESKTOP_ENVIRONMENT= gnome | mate | '<none>'2829 export CTX_XDL_TELEMETRY_SOCKET_PORT=port-number3031 export CTX_XDL_TELEMETRY_PORT=port-number3233 export CTX_XDL_START_SERVICE=Y|N3435 sudo -E /opt/Citrix/VDA/sbin/ctxsetup.sh36 <!--NeedCopy-->
When running the sudo command, type the -Eoption topass the existing environment variables to thenew shell it creates. We recommend that you create a shell script file from the preceding commandswith #!/bin/bash as the first line.
Alternatively, you can specify all parameters by using a single command:
1 sudo CTX_XDL_SUPPORT_DDC_AS_CNAME=Y|N \23 CTX_XDL_DDC_LIST=‘ list-ddc-fqdns’ \45 CTX_XDL_VDA_PORT=port-number \67 CTX_XDL_REGISTER_SERVICE=Y|N \89 CTX_XDL_ADD_FIREWALL_RULES=Y|N \
© 1999‒2022 Citrix Systems, Inc. All rights reserved. 143
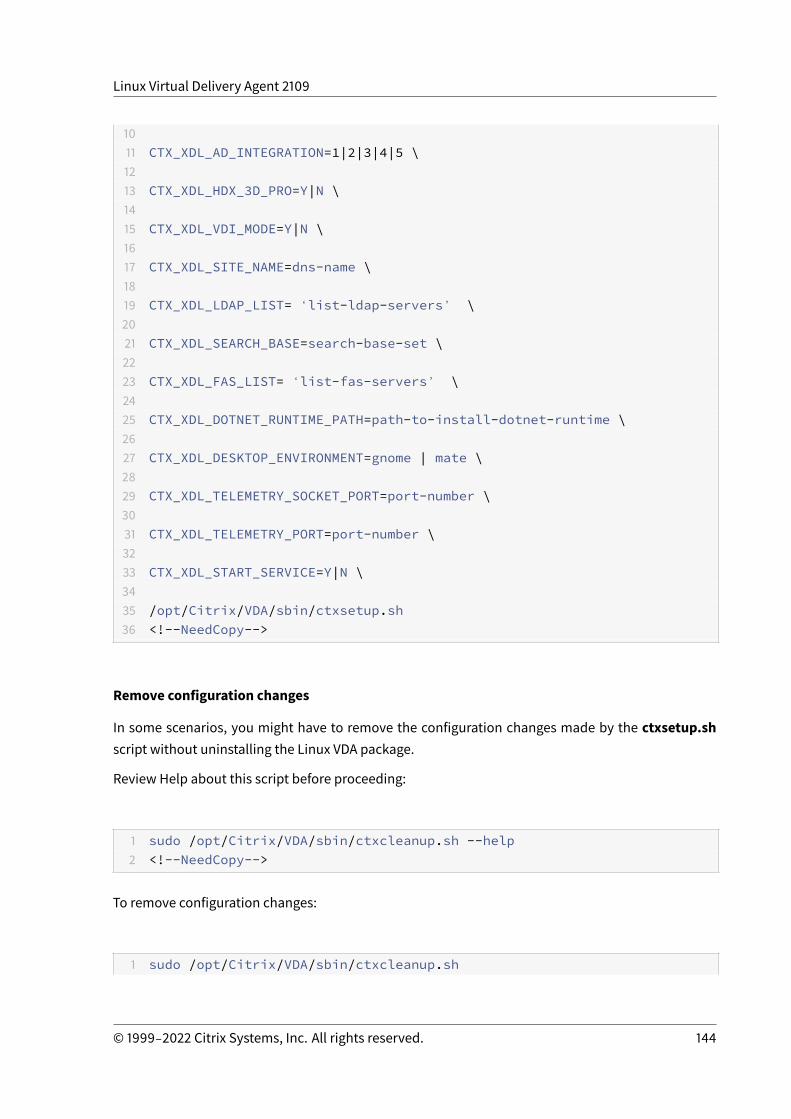
Linux Virtual Delivery Agent 2109
1011 CTX_XDL_AD_INTEGRATION=1|2|3|4|5 \1213 CTX_XDL_HDX_3D_PRO=Y|N \1415 CTX_XDL_VDI_MODE=Y|N \1617 CTX_XDL_SITE_NAME=dns-name \1819 CTX_XDL_LDAP_LIST=‘ list-ldap-servers’ \2021 CTX_XDL_SEARCH_BASE=search-base-set \2223 CTX_XDL_FAS_LIST=‘ list-fas-servers’ \2425 CTX_XDL_DOTNET_RUNTIME_PATH=path-to-install-dotnet-runtime \2627 CTX_XDL_DESKTOP_ENVIRONMENT=gnome | mate \2829 CTX_XDL_TELEMETRY_SOCKET_PORT=port-number \3031 CTX_XDL_TELEMETRY_PORT=port-number \3233 CTX_XDL_START_SERVICE=Y|N \3435 /opt/Citrix/VDA/sbin/ctxsetup.sh36 <!--NeedCopy-->
Remove configuration changes
In some scenarios, you might have to remove the configuration changes made by the ctxsetup.shscript without uninstalling the Linux VDA package.
Review Help about this script before proceeding:
1 sudo /opt/Citrix/VDA/sbin/ctxcleanup.sh --help2 <!--NeedCopy-->
To remove configuration changes:
1 sudo /opt/Citrix/VDA/sbin/ctxcleanup.sh
© 1999‒2022 Citrix Systems, Inc. All rights reserved. 144
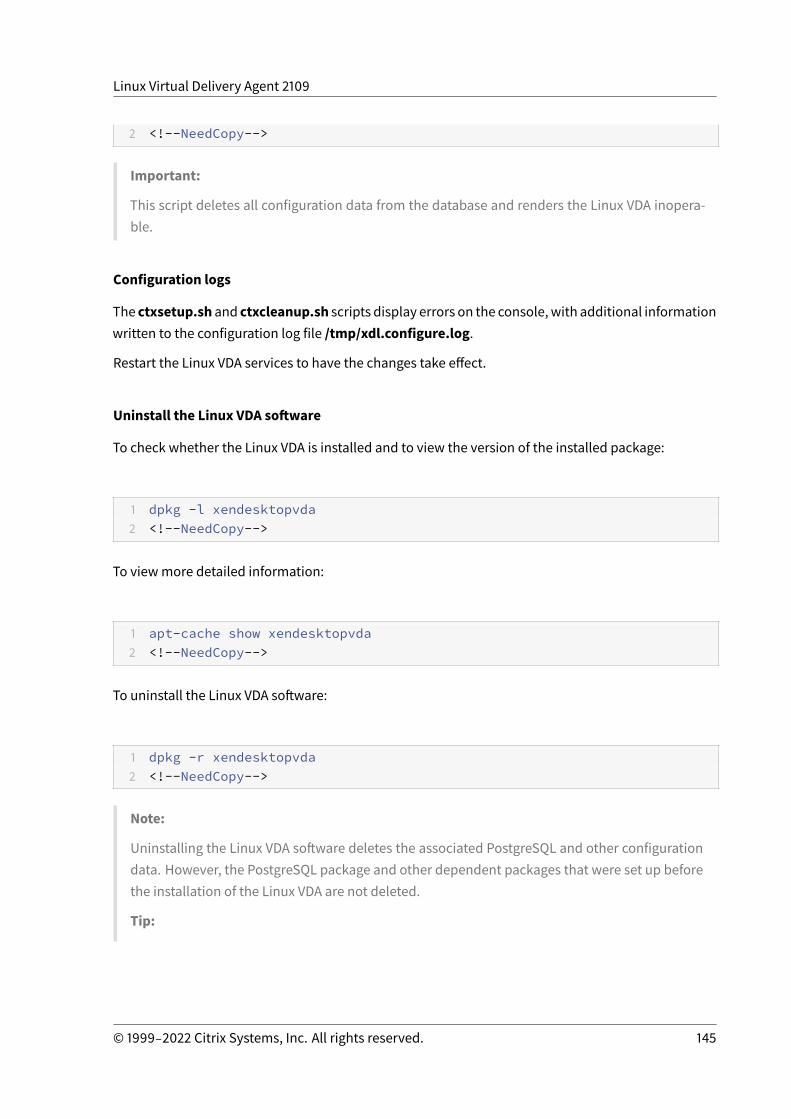
Linux Virtual Delivery Agent 2109
2 <!--NeedCopy-->
Important:
This script deletes all configuration data from the database and renders the Linux VDA inopera-ble.
Configuration logs
The ctxsetup.sh and ctxcleanup.sh scripts display errors on the console, with additional informationwritten to the configuration log file /tmp/xdl.configure.log.
Restart the Linux VDA services to have the changes take effect.
Uninstall the Linux VDA software
To check whether the Linux VDA is installed and to view the version of the installed package:
1 dpkg -l xendesktopvda2 <!--NeedCopy-->
To viewmore detailed information:
1 apt-cache show xendesktopvda2 <!--NeedCopy-->
To uninstall the Linux VDA software:
1 dpkg -r xendesktopvda2 <!--NeedCopy-->
Note:
Uninstalling the Linux VDA software deletes the associated PostgreSQL and other configurationdata. However, the PostgreSQL package and other dependent packages that were set up beforethe installation of the Linux VDA are not deleted.
Tip:
© 1999‒2022 Citrix Systems, Inc. All rights reserved. 145
Linux Virtual Delivery Agent 2109
The information in this section does not cover the removal of dependent packages includingPostgreSQL.
Step 8: Run XDPing
Run sudo /opt/Citrix/VDA/bin/xdping to check for common configuration issues with a LinuxVDA environment. For more information, see XDPing.
Step 9: Run the Linux VDA
Once you have configured the Linux VDA using the ctxsetup.sh script, you use the following com-mands to control the Linux VDA.
Start the Linux VDA:
To start the Linux VDA services:
1 sudo systemctl start ctxhdx23 sudo systemctl start ctxvda4 <!--NeedCopy-->
Stop the Linux VDA:
To stop the Linux VDA services:
1 sudo systemctl stop ctxvda23 sudo systemctl stop ctxhdx4 <!--NeedCopy-->
Note:
Before you stop the ctxvda and ctxhdx services, run the service ctxmonitorservicestop command to stop the monitor service daemon. Otherwise, the monitor service daemonrestarts the services you stopped.
Restart the Linux VDA:
To restart the Linux VDA services:
© 1999‒2022 Citrix Systems, Inc. All rights reserved. 146

Linux Virtual Delivery Agent 2109
1 sudo systemctl stop ctxvda23 sudo systemctl restart ctxhdx45 sudo systemctl restart ctxvda6 <!--NeedCopy-->
Check the Linux VDA status:
To check the running status of the Linux VDA services:
1 sudo systemctl status ctxvda23 sudo systemctl status ctxhdx4 <!--NeedCopy-->
Step 10: Create themachine catalog in Citrix Virtual Apps or Citrix Virtual Desktops
The process for creatingmachine catalogs and adding Linux VDAmachines is similar to the traditionalWindows VDA approach. For a more detailed description of how to complete these tasks, see Createmachine catalogs and Managemachine catalogs.
For creating machine catalogs that contain Linux VDA machines, there are a few restrictions that dif-ferentiate the process from creating machine catalogs for Windows VDAmachines:
• For the operating system, select:– TheMulti-session OS option for a hosted shared desktops delivery model.– The Single-session OS option for a VDI dedicated desktop delivery model.
• Do not mix Linux and Windows VDAmachines in the samemachine catalog.
Note:
Early versions of Citrix Studio did not support the notion of a “Linux OS.” However, selecting theWindows Server OS or Server OS option implies an equivalent hosted shared desktops deliv-ery model. Selecting theWindows Desktop OS or Desktop OS option implies a single user permachine delivery model.
Tip:
If you remove and rejoin a machine to the Active Directory domain, you must remove and addthe machine to the machine catalog again.
© 1999‒2022 Citrix Systems, Inc. All rights reserved. 147

Linux Virtual Delivery Agent 2109
Step 11: Create the delivery group in Citrix Virtual Apps or Citrix Virtual Desktops
Theprocess for creatingadeliverygroupandaddingmachinecatalogscontainingLinuxVDAmachinesis almost identical to Windows VDA machines. For a more detailed description of how to completethese tasks, see Create Delivery Groups.
For creatingdelivery groups that contain LinuxVDAmachine catalogs, the following restrictionsapply:
• Ensure that the AD users and groups you select have been properly configured to log on to theLinux VDAmachines.
• Do not allow logon of unauthenticated (anonymous) users.• Do not mix the delivery group with machine catalogs that contain Windowsmachines.
For information about how to createmachine catalogs anddelivery groups, seeCitrix Virtual Apps andDesktops 7 2109.
Install Linux Virtual Delivery Agent for Debianmanually
January 27, 2022
Important:
For fresh installations, we recommend you use easy install for a quick installation. Easy installsaves time and labor and is less error-prone than themanual installation detailed in this article.
Step 1: Prepare Debian for VDA installation
Step 1a: Verify the network configuration
Ensure that the network is connected and configured correctly. For example, you must configure theDNS server on the Linux VDA.
Step 1b: Set the host name
To ensure that the host name of the machine is reported correctly, change the /etc/hostname file tocontain only the host name of the machine.
hostname
Step 1c: Assign a loopback address to the host name
Ensure that the DNS domain name and Fully Qualified Domain Name (FQDN) of the machine are re-ported back correctly. The way is to change the following line of the /etc/hosts file to include theFQDN and host name as the first two entries:
© 1999‒2022 Citrix Systems, Inc. All rights reserved. 148
Linux Virtual Delivery Agent 2109
127.0.0.1 hostname-fqdn hostname localhost
For example:
127.0.0.1 vda01.example.com vda01 localhost
Remove any other references to hostname-fqdn or hostname from other entries in the file.
Note:
The Linux VDA currently does not support NetBIOS name truncation. Therefore, the host namemust not exceed 15 characters.
Tip:
Use a–z, A–Z, 0–9, and hyphen (-) characters only. Avoid underscores (_), spaces, and other sym-bols. Donot start ahostnamewithanumberanddonotendwithahyphen. This rule alsoappliesto Delivery Controller host names.
Step 1d: Check the host name
Verify that the host name is set correctly:
1 hostname2 <!--NeedCopy-->
This command returns only the host name of the machine and not its FQDN.
Verify that the FQDN is set correctly:
1 hostname -f2 <!--NeedCopy-->
This command returns the FQDN of the machine.
Step 1e: Disable multicast DNS
The default settings have multicast DNS (mDNS) enabled, which can lead to inconsistent name reso-lution results.
To disablemDNS, edit /etc/nsswitch.conf and change the line containing:
hosts: files mdns_minimal [NOTFOUND=return] dns
To:
hosts: files dns
© 1999‒2022 Citrix Systems, Inc. All rights reserved. 149
Linux Virtual Delivery Agent 2109
Step 1f: Check name resolution and service reachability
Verify that you can resolve the FQDN and ping the domain controller and Delivery Controller:
1 nslookup domain-controller-fqdn23 ping domain-controller-fqdn45 nslookup delivery-controller-fqdn67 ping delivery-controller-fqdn8 <!--NeedCopy-->
If you cannot resolve the FQDN or ping either of thesemachines, review the steps before proceeding.
Step 1g: Configure clock synchronization (chrony)
Maintaining accurate clock synchronization between the VDAs, Delivery Controllers and domain con-trollers is crucial. Hosting the Linux VDA as a virtualmachine can cause clock skew problems. For thisreason, synchronizing time with a remote time service is preferred.
Install chrony:
1 apt-get install chrony2 <!--NeedCopy-->
As a root user, edit /etc/chrony/chrony.conf and add a server entry for each remote time server:
server peer1-fqdn-or-ip-address iburstserver peer2-fqdn-or-ip-address iburst
In a typical deployment, synchronize time from the local domain controllers and not directly frompublic NTPpool servers. Add a server entry for eachActiveDirectory domain controller in the domain.
Remove any other server or pool entries listed including loopback IP address, localhost, and publicserver *.pool.ntp.org entries.
Save changes and restart the Chrony daemon:
1 sudo systemctl restart chrony2 <!--NeedCopy-->
© 1999‒2022 Citrix Systems, Inc. All rights reserved. 150

Linux Virtual Delivery Agent 2109
Step 1h: Install packages
1 sudo apt-get install -y libsasl2-223 sudo apt-get install -y libgtk2.0-04 <!--NeedCopy-->
Step 1i: Add the oldstable repository
To install the necessary dependencies for a Debian distribution, add the deb http://deb.debian.org/debian/ oldstable main line to the /etc/apt/sources.list file.
Step 2: Prepare the hypervisor
Some changes are required when running the Linux VDA as a virtual machine on a supported hypervi-sor. Make the following changes according to the hypervisor platform in use. No changes are requiredif you are running the Linux machine on bare metal hardware.
Fix time synchronization on Citrix Hypervisor
When the Citrix Hypervisor Time Sync feature is enabled, within each paravirtualized Linux VM youexperience issues with NTP and Citrix Hypervisor, both of which try to manage the system clock. Toavoid the clock becoming out of sync with other servers, ensure that the system clock within eachLinux guest is synchronized with the NTP. This case requires disabling host time synchronization. Nochanges are required in HVMmode.
On some Linux distributions, if you are running a paravirtualized Linux kernel with Citrix VM Toolsinstalled, you can checkwhether the Citrix Hypervisor Time Sync feature is present and enabled fromwithin the Linux VM:
1 su -23 cat /proc/sys/xen/independent_wallclock4 <!--NeedCopy-->
This command returns 0 or 1:
• 0 - The time sync feature is enabled, andmust be disabled.• 1 - The time sync feature is disabled, and no further action is required.
© 1999‒2022 Citrix Systems, Inc. All rights reserved. 151
Linux Virtual Delivery Agent 2109
If the /proc/sys/xen/independent_wallclock file is not present, the following steps are not required.
If enabled, disable the time sync feature by writing 1 to the file:
1 sudo echo 1 > /proc/sys/xen/independent_wallclock2 <!--NeedCopy-->
Tomake this change permanent and persistent after restart, edit the /etc/sysctl.conf file and add theline:
xen.independent_wallclock = 1
To verify these changes, restart the system:
1 su -23 cat /proc/sys/xen/independent_wallclock4 <!--NeedCopy-->
This command returns the value 1.
Fix time synchronization on Microsoft Hyper-V
Linux VMswith Hyper-V Linux Integration Services installed can use the Hyper-V time synchronizationfeature to use the host operating system’s time. To ensure that the system clock remains accurate,enable this feature alongside NTP services.
From themanagement operating system:
1. Open the Hyper-V Manager console.2. For the settings of a Linux VM, select Integration Services.3. Ensure that Time synchronization is selected.
Note:
This approach is different fromVMware andCitrix Hypervisor, where host time synchronization isdisabled to avoid conflicts with NTP. Hyper-V time synchronization can coexist and supplementNTP time synchronization.
Fix time synchronization on ESX and ESXi
When the VMware Time Synchronization feature is enabled, within each paravirtualized Linux VM youexperience issueswith the NTP and the hypervisor, both of which try to synchronize the system clock.
© 1999‒2022 Citrix Systems, Inc. All rights reserved. 152
Linux Virtual Delivery Agent 2109
To avoid the clock becoming out of sync with other servers, ensure that the system clock within eachLinux guest is synchronized with the NTP. This case requires disabling host time synchronization.
If you are running a paravirtualized Linux kernel with VMware Tools installed:
1. Open the vSphere Client.2. Edit settings for the Linux VM.3. In the Virtual Machine Properties dialog, open theOptions tab.4. Select VMware Tools.5. In the Advanced box, clear Synchronize guest timewith host.
Step 3: Add the Linux virtual machine (VM) to the Windows domain
The Linux VDA supports several methods for adding Linux machines to the Active Directory (AD) do-main:
• SambaWinbind• Quest Authentication Service• Centrify DirectControl• SSSD• PBIS
Follow instructions based on your chosenmethod.
Note:
Session launches might fail when the same user name is used for the local account in the LinuxVDA and the account in AD.
SambaWinbind
Install or update the required packages
1 sudo apt-get install winbind samba libnss-winbind libpam-winbind krb5-config krb5-locales krb5-user
2 <!--NeedCopy-->
Enable the Winbind daemon to start onmachine startup
The Winbind daemonmust be configured to start on machine startup:
© 1999‒2022 Citrix Systems, Inc. All rights reserved. 153
Linux Virtual Delivery Agent 2109
1 sudo systemctl enable winbind2 <!--NeedCopy-->
Note:
Ensure that the winbind script is located under /etc/init.d.
Configure Kerberos
Open /etc/krb5.conf as a root user, andmake the following settings:
Note:
Configure Kerberos based on your AD infrastructure. The following settings are meant for thesingle-domain, single-forest model.
[libdefaults]
default_realm = REALM
dns_lookup_kdc = false
[realms]
REALM = {
admin_server = domain-controller-fqdn
kdc = domain-controller-fqdn
}
[domain_realm]
domain-dns-name = REALM
.domain-dns-name = REALM
The domain-dns-name parameter in this context is the DNS domain name, such as example.com.The REALM is the Kerberos realm name in uppercase, such as EXAMPLE.COM.
Configure Winbind Authentication
Open /etc/samba/smb.conf, andmake the following settings:
[global]
workgroup = WORKGROUP
security = ADS
realm = REALM
© 1999‒2022 Citrix Systems, Inc. All rights reserved. 154
Linux Virtual Delivery Agent 2109
encrypt passwords = yes
idmap config *:range = 16777216-33554431
winbind trusted domains only = no
kerberos method = secrets and keytab
winbind refresh tickets = yes
template shell = /bin/bash
WORKGROUP is the first field in REALM, and REALM is the Kerberos realm name in uppercase.
Configure nsswitch
Open /etc/nsswitch.conf, and append winbind to the following lines:
passwd: systemd winbindgroup: systemd winbind
Join Windows Domain
Your domain controller must be reachable and you must have an Active Directory user account withpermissions to add computers to the domain:
1 sudo net ads join REALM -U user2 <!--NeedCopy-->
Where REALM is the Kerberos realm name in uppercase, and user is a domain user with permissionsto add computers to the domain.
Restart Winbind
1 sudo systemctl restart winbind2 <!--NeedCopy-->
Configure PAM for Winbind
Run the following command and ensure that theWinbind NT/Active Directory authentication andCreate home directory on login options are selected:
© 1999‒2022 Citrix Systems, Inc. All rights reserved. 155
Linux Virtual Delivery Agent 2109
1 sudo pam-auth-update2 <!--NeedCopy-->
Tip:
The winbind daemon stays running only if the machine is joined to a domain.
Verify Domain Membership
The Delivery Controller requires that all VDA machines, whether Windows or Linux, have a computerobject in Active Directory.
Run the net ads command of Samba to verify that the machine is joined to a domain:
1 sudo net ads testjoin2 <!--NeedCopy-->
Run the following command to verify extra domain and computer object information:
1 sudo net ads info2 <!--NeedCopy-->
Verify Kerberos Configuration
To verify that Kerberos is configured correctly for usewith the Linux VDA, verify that the systemkeytabfile has been created and contains valid keys:
1 sudo klist -ke2 <!--NeedCopy-->
This command displays the list of keys available for the various combinations of principal names andcipher suites. Run the Kerberos kinit command to authenticate the machine with the domain con-troller using these keys:
1 sudo kinit -k MACHINE\$@REALM2 <!--NeedCopy-->
© 1999‒2022 Citrix Systems, Inc. All rights reserved. 156

Linux Virtual Delivery Agent 2109
The machine and realm names must be specified in uppercase. The dollar sign ($) must be escapedwith a backslash (\) to prevent shell substitution. In some environments, the DNS domain name isdifferent from the Kerberos realm name. Ensure that the realm name is used. If this command issuccessful, no output is displayed.
Verify that the TGT ticket for the machine account has been cached using:
1 sudo klist2 <!--NeedCopy-->
Examine the account details of the machine using:
1 sudo net ads status2 <!--NeedCopy-->
Verify user authentication
Use thewbinfo tool to verify that domain users can authenticate with the domain:
1 wbinfo --krb5auth=domain\\username%password2 <!--NeedCopy-->
The domain specified here is the AD domain name, not the Kerberos realm name. For the bash shell,the backslash (\) character must be escaped with another backslash. This command returns a mes-sage indicating success or failure.
To verify that theWinbind PAMmodule is configured correctly, log on to the Linux VDA using a domainuser account that has not been used before.
1 ssh localhost -l domain\\username23 id -u4 <!--NeedCopy-->
Note:
To run an SSH command successfully, ensure that SSH is enabled and working properly.
© 1999‒2022 Citrix Systems, Inc. All rights reserved. 157
Linux Virtual Delivery Agent 2109
Verify that a corresponding Kerberos credential cache file was created for the uid returned by the id-u command:
1 ls /tmp/krb5cc_uid2 <!--NeedCopy-->
Verify that the tickets in the user’s Kerberos credential cache are valid and not expired:
1 klist2 <!--NeedCopy-->
Exit the session.
1 exit2 <!--NeedCopy-->
A similar test can be performed by logging on to the Gnome or KDE console directly. Proceed to Step6: Install the Linux VDA after the domain joining verification.
Tip:
If you succeed in user authentication but cannot show your desktop when logging on with a do-main account, restart the machine and then try again.
Quest authentication service
Configure Quest on domain controller
Assume that you have installed and configured the Quest software on the Active Directory domaincontrollers, and have been granted administrative privileges to create computer objects in Active Di-rectory.
Enable domain users to log on to Linux VDAmachines
To enable domain users to establish HDX sessions on a Linux VDAmachine:
1. In the Active Directory Users and Computers management console, open Active Directory userproperties for that user account.
2. Select the Unix Account tab.3. Check Unix-enabled.4. Set the Primary GID Number to the group ID of an actual domain user group.
© 1999‒2022 Citrix Systems, Inc. All rights reserved. 158
Linux Virtual Delivery Agent 2109
Note:
These instructions are equivalent for setting up domain users for logon using the console, RDP,SSH, or any other remoting protocol.
Configure Quest on Linux VDA
Work around SELinux policy enforcement
The default RHEL environment has SELinux fully enforced. This enforcement interferes with the Unixdomain socket IPCmechanisms used by Quest, and prevents domain users from logging on.
The convenient way to work around this issue is to disable SELinux. As a root user, edit /etc/selinux/-config and change the SELinux setting:
SELINUX=disabled
This change requires a machine restart:
1 reboot2 <!--NeedCopy-->
Important:
Use this setting carefully. Reenabling SELinux policy enforcement after disabling can cause acomplete lockout, even for the root user and other local users.
Configure VAS daemon
Auto-renewal of Kerberos tickets must be enabled and disconnected. Authentication (offline logon)must be disabled:
1 sudo /opt/quest/bin/vastool configure vas vasd auto-ticket-renew-interval 32400
23 sudo /opt/quest/bin/vastool configure vas vas_auth allow-disconnected-
auth false4 <!--NeedCopy-->
This command sets the renewal interval to nine hours (32,400 seconds) which is one hour less thanthe default 10-hour ticket lifetime. Set this parameter to a lower value on systemswith a shorter ticketlifetime.
© 1999‒2022 Citrix Systems, Inc. All rights reserved. 159
Linux Virtual Delivery Agent 2109
Configure PAM and NSS
To enable domain user logon through HDX and other services such as su, ssh, and RDP, run the follow-ing commands to configure PAM and NSSmanually:
1 sudo /opt/quest/bin/vastool configure pam23 sudo /opt/quest/bin/vastool configure nss4 <!--NeedCopy-->
Join Windows domain
Join the Linux machine to the Active Directory domain using the Quest vastool command:
1 sudo /opt/quest/bin/vastool -u user join domain-name2 <!--NeedCopy-->
The user is any domain user with permissions to join computers to the Active Directory domain. Thedomain-name is the DNS name of the domain, for example, example.com.
Verify domainmembership
The Delivery Controller requires that all VDA machines, whether Windows or Linux, have a computerobject in Active Directory. To verify that a Quest-joined Linux machine is on the domain:
1 sudo /opt/quest/bin/vastool info domain2 <!--NeedCopy-->
If the machine is joined to a domain, this command returns the domain name. If the machine is notjoined to any domain, the following error appears:
ERROR: No domain could be found.ERROR: VAS_ERR_CONFIG: at ctx.c:414 in _ctx_init_default_realmdefault_realm not configured in vas.conf. Computer may not be joined todomain
Verify user authentication
© 1999‒2022 Citrix Systems, Inc. All rights reserved. 160
Linux Virtual Delivery Agent 2109
To verify that Quest can authenticate domain users through PAM, log on to the Linux VDA using a do-main user account that has not been used before.
1 ssh localhost -l domain\\username23 id -u4 <!--NeedCopy-->
Verify that a corresponding Kerberos credential cache file was created for the UID returned by the id-u command:
1 ls /tmp/krb5cc_uid2 <!--NeedCopy-->
Verify that the tickets in the Kerberos credential cache are valid and not expired:
1 /opt/quest/bin/vastool klist2 <!--NeedCopy-->
Exit the session.
1 exit2 <!--NeedCopy-->
Proceed to Step 6: Install the Linux VDA after the domain joining verification.
Centrify DirectControl
Join Windows domain
With the Centrify DirectControl Agent installed, join the Linuxmachine to the Active Directory domainusing the Centrify adjoin command:
1 su ‒2 adjoin -w -V -u user domain-name3 <!--NeedCopy-->
© 1999‒2022 Citrix Systems, Inc. All rights reserved. 161
Linux Virtual Delivery Agent 2109
The user parameter is any Active Directory domain user with permissions to join computers to theActive Directory domain. The domain-name parameter is the name of the domain to join the Linuxmachine to.
Verify domainmembership
The Delivery Controller requires that all VDA machines, whether Windows or Linux, have a computerobject in Active Directory. To verify that a Centrify-joined Linux machine is on the domain:
1 su ‒23 adinfo4 <!--NeedCopy-->
Verify that the Joined to domain value is valid and the CentrifyDC mode returns connected. If themode remains stuck in the starting state, then the Centrify client is experiencing server connection orauthentication problems.
More comprehensive system and diagnostic information is available using:
1 adinfo --sysinfo all23 adinfo --diag4 <!--NeedCopy-->
Test connectivity to the various Active Directory and Kerberos services.
1 adinfo --test2 <!--NeedCopy-->
Proceed to Step 6: Install the Linux VDA after the domain joining verification.
SSSD
Configure Kerberos
Run the following command to install Kerberos:
© 1999‒2022 Citrix Systems, Inc. All rights reserved. 162
Linux Virtual Delivery Agent 2109
1 sudo apt-get install krb5-user2 <!--NeedCopy-->
To configure Kerberos, open /etc/krb5.conf as root and set the parameters:
Note:
Configure Kerberos based on your AD infrastructure. The following settings are meant for thesingle-domain, single-forest model.
[libdefaults]
default_realm = REALM
dns_lookup_kdc = false
[realms]
REALM = {
admin_server = domain-controller-fqdn
kdc = domain-controller-fqdn
}
[domain_realm]
domain-dns-name = REALM
.domain-dns-name = REALM
The domain-dns-name parameter in this context is the DNS domain name, such as example.com.The REALM is the Kerberos realm name in uppercase, such as EXAMPLE.COM.
Join the domain
SSSDmust be configured to use Active Directory as its identity provider and Kerberos for authentica-tion. However, SSSD does not provide AD client functions for joining the domain and managing thesystem keytab file. You can use adcli, realmd, or Samba instead.
Note:
This section only provides information for adcli and Samba.
• If you use adcli to join the domain, complete the following steps:
1. Install adcli.
© 1999‒2022 Citrix Systems, Inc. All rights reserved. 163
Linux Virtual Delivery Agent 2109
1 sudo apt-get install adcli2 <!--NeedCopy-->
2. Join the domain with adcli.
Remove the old system keytab file and join the domain using:
1 su -23 rm -rf /etc/krb5.keytab45 adcli join domain-dns-name -U user -H hostname-fqdn6 <!--NeedCopy-->
The user is a domain user with permissions to add machines to the domain. The hostname-fqdn is the host name in FQDN format for the machine.
The -H option is necessary for adcli to generate SPN in the format of host/hostname-fqdn@REALM, which the Linux VDA requires.
3. Verify system keytab.
Run the sudo klist -ket command to ensure that the system keytab file has been created.
Verify that the timestamp for each keymatches the time themachinewas joined to the domain.
• If you use Samba to join the domain, complete the following steps:
1. Install the package.
1 sudo apt-get install samba krb5-user2 <!--NeedCopy-->
2. Configure Samba.
Open /etc/samba/smb.conf, andmake the following settings:
[global]
workgroup = WORKGROUP
security = ADS
realm = REALM
client signing = yes
© 1999‒2022 Citrix Systems, Inc. All rights reserved. 164

Linux Virtual Delivery Agent 2109
client use spnego = yes
kerberos method = secrets and keytab
WORKGROUP is the first field in REALM, and REALM is the Kerberos realm name in uppercase.
3. Join the domain with Samba.
Your domain controller must be reachable and youmust have a Windows account with permis-sions to add computers to the domain.
1 sudo net ads join REALM -U user2 <!--NeedCopy-->
WhereREALM is the Kerberos realm name in uppercase, and user is a domain user with permis-sions to add computers to the domain.
Set up SSSD
Install or update required packages:
Install the required SSSD and configuration packages if not already installed:
1 sudo apt-get install sssd2 <!--NeedCopy-->
If the packages are already installed, an update is recommended:
1 sudo apt-get install --only-upgrade sssd2 <!--NeedCopy-->
Note:
By default, the install process in Ubuntu automatically configures nsswitch.conf and the PAMlogin module.
Configure SSSD
SSSD configuration changes are required before starting the SSSD daemon. For some versions ofSSSD, the /etc/sssd/sssd.conf configuration file is not installed by default and must be created man-ually. As root, either create or open /etc/sssd/sssd.conf andmake the following settings:
© 1999‒2022 Citrix Systems, Inc. All rights reserved. 165
Linux Virtual Delivery Agent 2109
[sssd]
services = nss, pam
config_file_version = 2
domains = domain-dns-name
[domain/domain-dns-name]
id_provider = ad
access_provider = ad
auth_provider = krb5
krb5_realm = REALM
## Set krb5_renewable_lifetime higher if TGT renew lifetime is longer than14 days
krb5_renewable_lifetime = 14d
## Set krb5_renew_interval to lower value if TGT ticket lifetime is shorterthan 2 hours
krb5_renew_interval = 1h
krb5_ccachedir = /tmp
krb5_ccname_template = FILE:%d/krb5cc_%U
## This ldap_id_mapping setting is also the default value
ldap_id_mapping = true
override_homedir = /home/%d/%u
default_shell = /bin/bash
ad_gpo_map_remote_interactive = +ctxhdx
Note:
ldap_id_mapping is set to true so that SSSD itself takes care of mapping Windows SIDs to UnixUIDs. Otherwise, the Active Directory must be able to provide POSIX extensions. PAM servicectxhdx is added to ad_gpo_map_remote_interactive.
The domain-dns-name parameter in this context is the DNS domain name, such as exam-ple.com. The REALM is the Kerberos realm name in uppercase, such as EXAMPLE.COM. There isno requirement to configure the NetBIOS domain name.
For information about the configuration settings, see theman pages for sssd.conf and sssd-ad.
© 1999‒2022 Citrix Systems, Inc. All rights reserved. 166
Linux Virtual Delivery Agent 2109
The SSSD daemon requires that the configuration file must have owner read permission only:
1 sudo chmod 0600 /etc/sssd/sssd.conf2 <!--NeedCopy-->
Start SSSD daemon
Run the following commands to start the SSSD daemon now and to enable the daemon to start uponmachine startup:
1 sudo systemctl start sssd23 sudo systemctl enable sssd4 <!--NeedCopy-->
PAM configuration
Run the following command and ensure that the SSS authentication and Create home directory onlogin options are selected:
1 sudo pam-auth-update2 <!--NeedCopy-->
Verify domainmembership
The Delivery Controller requires that all VDA machines (Windows and Linux VDAs) have a computerobject in Active Directory.
• If you use adcli to verify domain membership, run the sudo adcli info domain-dns-name command to show the domain information.
• If you use Samba to verify domain membership, run the sudo net ads testjoin commandto verify that the machine is joined to a domain and the sudo net ads info command toverify extra domain and computer object information.
© 1999‒2022 Citrix Systems, Inc. All rights reserved. 167

Linux Virtual Delivery Agent 2109
Verify Kerberos configuration
To verify that Kerberos is configured correctly for usewith the Linux VDA, verify that the systemkeytabfile has been created and contains valid keys:
1 sudo klist -ke2 <!--NeedCopy-->
This command displays the list of keys available for the various combinations of principal names andcipher suites. Run the Kerberos kinit command to authenticate the machine with the domain con-troller using these keys:
1 sudo kinit -k MACHINE\$@REALM2 <!--NeedCopy-->
The machine and realm names must be specified in uppercase. The dollar sign ($) must be escapedwith a backslash (\) to prevent shell substitution. In some environments, the DNS domain name isdifferent from the Kerberos realm name. Ensure that the realm name is used. If this command issuccessful, no output is displayed.
Verify that the TGT for the machine account has been cached using:
1 sudo klist2 <!--NeedCopy-->
Verify user authentication
SSSD does not provide a command-line tool for testing authentication directly with the daemon, andcan only be done via PAM.
To verify that the SSSD PAM module is configured correctly, log on to the Linux VDA using a domainuser account that has not been used before.
1 ssh localhost -l domain\\username23 id -u45 klist6
© 1999‒2022 Citrix Systems, Inc. All rights reserved. 168
Linux Virtual Delivery Agent 2109
7 exit8 <!--NeedCopy-->
Verify that the Kerberos tickets returned by the klist command are correct for that user and have notexpired.
As a root user, verify that a corresponding ticket cache file was created for the uid returned by theprevious id -u command:
1 ls /tmp/krb5cc_uid2 <!--NeedCopy-->
A similar test can be performed by logging on to KDE or Gnome Display Manager. Proceed to Step 6:Install the Linux VDA after the domain joining verification.
PBIS
Download the required PBIS package
For example:
1 sudo wget https://github.com/BeyondTrust/pbis-open/releases/download/8.8.0/pbis-open-8.8.0.506.linux.x86_64.deb.sh
2 <!--NeedCopy-->
Make the PBIS installation script executable
For example:
1 sudo chmod +x pbis-open-8.8.0.506.linux.x86_64.deb.sh2 <!--NeedCopy-->
Run the PBIS installation script
For example:
1 sudo sh pbis-open-8.8.0.506.linux.x86_64.deb.sh2 <!--NeedCopy-->
© 1999‒2022 Citrix Systems, Inc. All rights reserved. 169
Linux Virtual Delivery Agent 2109
Join Windows domain
Your domain controller must be reachable and you must have an Active Directory user account withpermissions to add computers to the domain:
1 sudo /opt/pbis/bin/domainjoin-cli join domain-name user2 <!--NeedCopy-->
Theuser is a domain userwho has permissions to add computers to the Active Directory domain. Thedomain-name is the DNS name of the domain, for example, example.com.
Note: To set Bash as the default shell, run the sudo /opt/pbis/bin/config LoginShellTem-plate/bin/bash command.
Verify domainmembership
The Delivery Controller requires that all VDA machines (Windows and Linux VDAs) have a computerobject in Active Directory. To verify that a PBIS-joined Linux machine is on the domain:
1 /opt/pbis/bin/domainjoin-cli query2 <!--NeedCopy-->
If themachine is joined to adomain, this command returns the information about the currently joinedAD domain and OU. Otherwise, only the host name appears.
Verify user authentication
Toverify thatPBIScanauthenticatedomainusers throughPAM, logon to theLinuxVDAusingadomainuser account that has not been used before.
1 sudo ssh localhost -l domain\\user23 id -u4 <!--NeedCopy-->
Verify that a corresponding Kerberos credential cache file was created for the UID returned by the id-u command:
© 1999‒2022 Citrix Systems, Inc. All rights reserved. 170
Linux Virtual Delivery Agent 2109
1 ls /tmp/krb5cc_uid2 <!--NeedCopy-->
Exit the session.
1 exit2 <!--NeedCopy-->
Proceed to Step 6: Install the Linux VDA after the domain joining verification.
Step 4: Install .NET Core Runtime 3.1 as a prerequisite
Before installing the Linux VDA, install .NET Core Runtime 3.1 according to the instructions at https://docs.microsoft.com/en-us/dotnet/core/install/linux-package-managers.
After installing .NET Core Runtime 3.1, run thewhich dotnet command to find your runtime path.
Based on the command output, set the .NET Core runtime binary path. For example, if the commandoutput is /aa/bb/dotnet, use /aa/bb as the .NET binary path.
Step 5: Download the Linux VDA package
Go to the Citrix Virtual Apps and Desktops download page. Expand the appropriate version of CitrixVirtual Apps and Desktops and click Components to download the Linux VDA package that matchesyour Linux distribution.
Step 6: Install the Linux VDA
Step 6a: Install the Linux VDA
Install the Linux VDA software using the Debian packagemanager:
1 sudo dpkg -i xendesktopvda_<version>.debian10_amd64.deb2 <!--NeedCopy-->
Debian dependency list for Debian 10.7:
1 libqt5widgets5 >= 5.5~2 ibus >= 1.5
© 1999‒2022 Citrix Systems, Inc. All rights reserved. 171
Linux Virtual Delivery Agent 2109
3 postgresql >= 114 libpostgresql-jdbc-java >= 42.25 openjdk-11-jdk >= 116 imagemagick >= 8:6.9.107 ufw >= 0.368 desktop-base >= 10.0.29 libxrandr2 >= 2:1.5.110 libxtst6 >= 2:1.2.311 libxm4 >= 2.3.812 util-linux >= 2.3313 gtk3-nocsd >= 314 bash >= 5.015 findutils >= 4.6.016 sed >= 4.717 cups >= 2.218 ghostscript >= 9.27~19 libmspack0 >= 0.1020 libgoogle-perftools4 >= 2.7~21 libpython2.7 >= 2.7~22 libsasl2-modules-gssapi-mit >= 2.1.~2324 <!--NeedCopy-->
Note:
For a matrix of the Linux distributions and the Xorg versions that this version of the Linux VDAsupports, see System requirements.
Step 6b: Upgrade the Linux VDA (optional)
You can upgrade an existing installation from the previous two versions and from an LTSR release.
1 sudo dpkg -i <PATH>/<Linux VDA deb>2 <!--NeedCopy-->
Note:
Upgrading an existing installation overwrites the configuration files under /etc/xdl. Before youconduct an upgrade, make sure to back up the files.
© 1999‒2022 Citrix Systems, Inc. All rights reserved. 172

Linux Virtual Delivery Agent 2109
Step 7: Configure the Linux VDA
After installing the package, you must configure the Linux VDA by running the ctxsetup.sh script. Be-fore making any changes, the script verifies the environment and ensures that all dependencies areinstalled. If necessary, you can rerun the script at any time to change settings.
You can run the script manually with prompting, or automatically with preconfigured responses. Re-view Help about the script before proceeding:
1 sudo /opt/Citrix/VDA/sbin/ctxsetup.sh --help2 <!--NeedCopy-->
Prompted configuration
Run amanual configuration with prompted questions:
1 sudo /opt/Citrix/VDA/sbin/ctxsetup.sh2 <!--NeedCopy-->
Automated configuration
For an automated install, the options required by the setup script can be provided with environmentvariables. If all required variables are present, the script does not prompt theuser for any information,allowing for a scripted installation process.
Supported environment variables include:
• CTX_XDL_SUPPORT_DDC_AS_CNAME=Y | N – The Linux VDA supports specifying a DeliveryController name using a DNS CNAME record. Set to N by default.
• CTX_XDL_DDC_LIST=’list-ddc-fqdns’ – The Linux VDA requires a space-separated list of Deliv-ery Controller Fully Qualified Domain Names (FQDNs) to use for registering with a Delivery Con-troller. At least one FQDN or CNAME alias must be specified.
• CTX_XDL_VDA_PORT=port-number – The Linux VDA communicates with Delivery Controllersthrough a TCP/IP port, which is port 80 by default.
• CTX_XDL_REGISTER_SERVICE=Y | N – The Linux Virtual Desktop services are started after ma-chine startup. Set to Y by default.
• CTX_XDL_ADD_FIREWALL_RULES=Y | N – The Linux Virtual Desktop services require incomingnetwork connections to be allowed through the system firewall. You can open the required
© 1999‒2022 Citrix Systems, Inc. All rights reserved. 173

Linux Virtual Delivery Agent 2109
ports (ports 80 and 1494 by default) automatically in the system firewall for the Linux VirtualDesktop. Set to Y by default.
• CTX_XDL_AD_INTEGRATION=1 | 2 | 3 | 4 |5 – The Linux VDA requires Kerberos configurationsettings toauthenticatewith theDeliveryControllers. TheKerberosconfiguration isdeterminedfrom the installed and configured Active Directory integration tool on the system. Specify thesupported Active Directory integration method to use:
– 1 – SambaWinbind– 2 – Quest Authentication Service– 3 – Centrify DirectControl– 4 – SSSD– 5 – PBIS
• CTX_XDL_HDX_3D_PRO=Y | N – Linux Virtual Desktop supports HDX 3D Pro, a set of graphicsacceleration technologies designed to optimize the virtualization of rich graphics applications.HDX 3D Pro requires a compatible NVIDIA GRID graphics card to be installed. If HDX 3D Pro isselected, the Virtual Delivery Agent is configured for VDI desktops (single-session) mode – (thatis, CTX_XDL_VDI_MODE=Y).
• CTX_XDL_VDI_MODE=Y |N –Whether to configure themachine as adedicateddesktopdeliverymodel (VDI) or hosted shared desktop delivery model. For HDX 3D Pro environments, set thisvariable to Y. This variable is set to N by default.
• CTX_XDL_SITE_NAME=dns-name – The Linux VDA discovers LDAP servers through DNS. Tolimit theDNSsearch results toa local site, specify aDNSsitename. This variable is set to<none>by default.
• CTX_XDL_LDAP_LIST=’list-ldap-servers’ – The Linux VDA queries DNS to discover LDAPservers. If DNS cannot provide LDAP service records, you can provide a space-separated list ofLDAP FQDNs with LDAP ports. For example, ad1.mycompany.com:389. This variable is set to<none> by default.
• CTX_XDL_SEARCH_BASE=search-base-set – The Linux VDA queries LDAP through a searchbase set to the root of the Active Directory Domain (for example, DC=mycompany,DC=com).However, to improve search performance, you can specify a search base (for example,OU=VDI,DC=mycompany,DC=com). This variable is set to <none> by default.
• CTX_XDL_FAS_LIST=’list-fas-servers’ – The Federated Authentication Service (FAS) serversare configured through AD Group Policy. The Linux VDA does not support AD Group Policy, butyou can provide a semicolon-separated list of FAS servers instead. The sequence must be thesame as configured in AD Group Policy. If any server address is removed, fill its blank with the<none> text string and do not modify the order of server addresses.
• CTX_XDL_DOTNET_ RUNTIME_PATH=path-to-install-dotnet-runtime – The path to install
© 1999‒2022 Citrix Systems, Inc. All rights reserved. 174
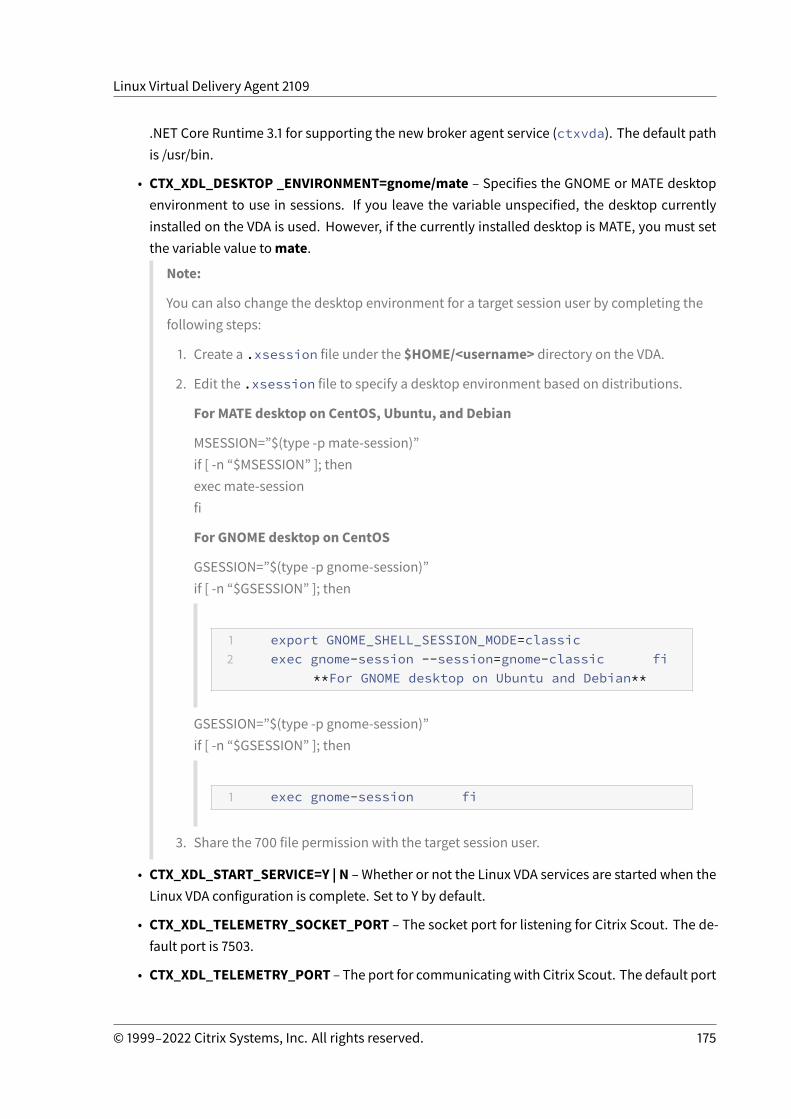
Linux Virtual Delivery Agent 2109
.NET Core Runtime 3.1 for supporting the new broker agent service (ctxvda). The default pathis /usr/bin.
• CTX_XDL_DESKTOP _ENVIRONMENT=gnome/mate – Specifies the GNOME or MATE desktopenvironment to use in sessions. If you leave the variable unspecified, the desktop currentlyinstalled on the VDA is used. However, if the currently installed desktop is MATE, you must setthe variable value tomate.
Note:
You can also change the desktop environment for a target session user by completing thefollowing steps:
1. Create a .xsession file under the $HOME/<username> directory on the VDA.
2. Edit the .xsession file to specify a desktop environment based on distributions.
For MATE desktop on CentOS, Ubuntu, and Debian
MSESSION=”$(type -p mate-session)”if [ -n “$MSESSION” ]; thenexec mate-sessionfi
For GNOME desktop on CentOS
GSESSION=”$(type -p gnome-session)”if [ -n “$GSESSION” ]; then
1 export GNOME_SHELL_SESSION_MODE=classic2 exec gnome-session --session=gnome-classic fi
**For GNOME desktop on Ubuntu and Debian**
GSESSION=”$(type -p gnome-session)”if [ -n “$GSESSION” ]; then
1 exec gnome-session fi
3. Share the 700 file permission with the target session user.
• CTX_XDL_START_SERVICE=Y | N – Whether or not the Linux VDA services are started when theLinux VDA configuration is complete. Set to Y by default.
• CTX_XDL_TELEMETRY_SOCKET_PORT – The socket port for listening for Citrix Scout. The de-fault port is 7503.
• CTX_XDL_TELEMETRY_PORT – The port for communicatingwith Citrix Scout. The default port
© 1999‒2022 Citrix Systems, Inc. All rights reserved. 175

Linux Virtual Delivery Agent 2109
is 7502.
Set the environment variable and run the configure script:
1 export CTX_XDL_SUPPORT_DDC_AS_CNAME=Y|N23 export CTX_XDL_DDC_LIST=‘ list-ddc-fqdns’45 export CTX_XDL_VDA_PORT=port-number67 export CTX_XDL_REGISTER_SERVICE=Y|N89 export CTX_XDL_ADD_FIREWALL_RULES=Y|N1011 export CTX_XDL_AD_INTEGRATION=1|2|3|4|51213 export CTX_XDL_HDX_3D_PRO=Y|N1415 export CTX_XDL_VDI_MODE=Y|N1617 export CTX_XDL_SITE_NAME=dns-site-name | '<none>'1819 export CTX_XDL_LDAP_LIST=‘ list-ldap-servers’ | '<none>'2021 export CTX_XDL_SEARCH_BASE=search-base-set | '<none>'2223 export CTX_XDL_FAS_LIST=‘ list-fas-servers’ | '<none>'2425 export CTX_XDL_DOTNET_RUNTIME_PATH=path-to-install-dotnet-runtime2627 export CTX_XDL_DESKTOP_ENVIRONMENT= gnome | mate | '<none>'2829 export CTX_XDL_TELEMETRY_SOCKET_PORT=port-number3031 export CTX_XDL_TELEMETRY_PORT=port-number3233 export CTX_XDL_START_SERVICE=Y|N3435 sudo -E /opt/Citrix/VDA/sbin/ctxsetup.sh36 <!--NeedCopy-->
When running the sudo command, type the -Eoption topass the existing environment variables to thenew shell it creates. We recommend that you create a shell script file from the preceding commandswith #!/bin/bash as the first line.
© 1999‒2022 Citrix Systems, Inc. All rights reserved. 176
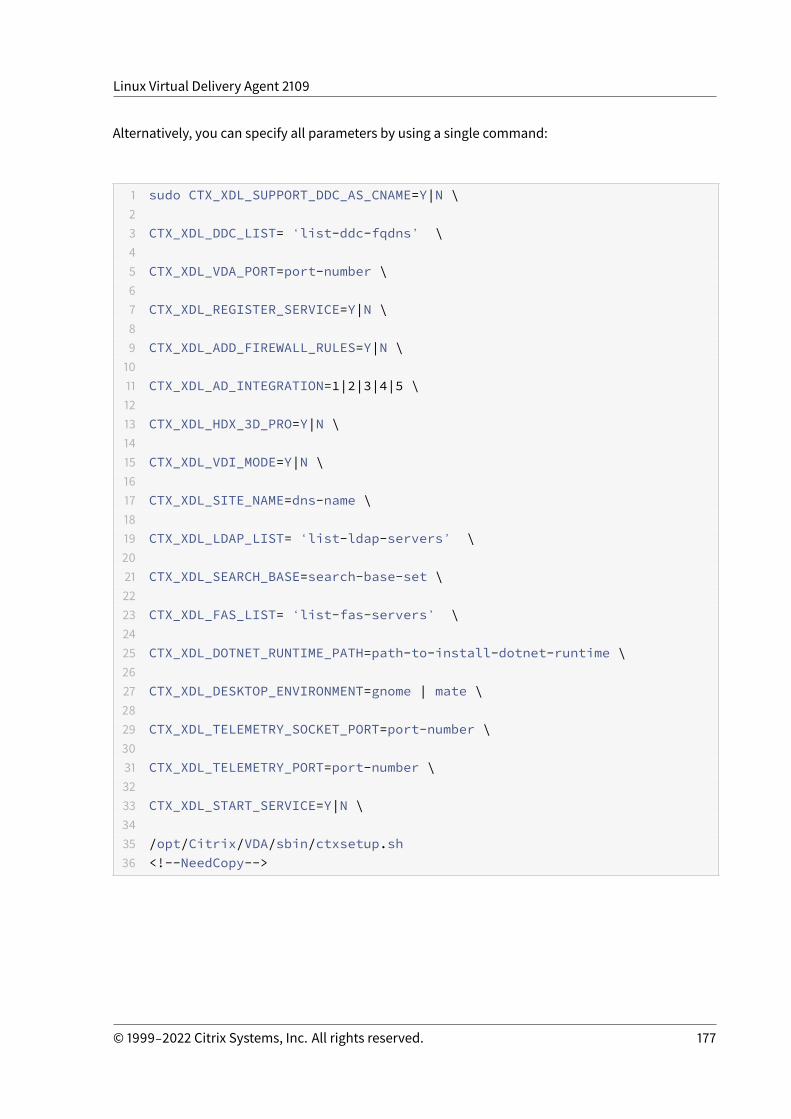
Linux Virtual Delivery Agent 2109
Alternatively, you can specify all parameters by using a single command:
1 sudo CTX_XDL_SUPPORT_DDC_AS_CNAME=Y|N \23 CTX_XDL_DDC_LIST=‘ list-ddc-fqdns’ \45 CTX_XDL_VDA_PORT=port-number \67 CTX_XDL_REGISTER_SERVICE=Y|N \89 CTX_XDL_ADD_FIREWALL_RULES=Y|N \1011 CTX_XDL_AD_INTEGRATION=1|2|3|4|5 \1213 CTX_XDL_HDX_3D_PRO=Y|N \1415 CTX_XDL_VDI_MODE=Y|N \1617 CTX_XDL_SITE_NAME=dns-name \1819 CTX_XDL_LDAP_LIST=‘ list-ldap-servers’ \2021 CTX_XDL_SEARCH_BASE=search-base-set \2223 CTX_XDL_FAS_LIST=‘ list-fas-servers’ \2425 CTX_XDL_DOTNET_RUNTIME_PATH=path-to-install-dotnet-runtime \2627 CTX_XDL_DESKTOP_ENVIRONMENT=gnome | mate \2829 CTX_XDL_TELEMETRY_SOCKET_PORT=port-number \3031 CTX_XDL_TELEMETRY_PORT=port-number \3233 CTX_XDL_START_SERVICE=Y|N \3435 /opt/Citrix/VDA/sbin/ctxsetup.sh36 <!--NeedCopy-->
© 1999‒2022 Citrix Systems, Inc. All rights reserved. 177

Linux Virtual Delivery Agent 2109
Remove configuration changes
In some scenarios, you might have to remove the configuration changes made by the ctxsetup.shscript without uninstalling the Linux VDA package.
Review Help about this script before proceeding:
1 sudo /opt/Citrix/VDA/sbin/ctxcleanup.sh --help2 <!--NeedCopy-->
To remove configuration changes:
1 sudo /opt/Citrix/VDA/sbin/ctxcleanup.sh2 <!--NeedCopy-->
Important:
This script deletes all configuration data from the database and renders the Linux VDA inopera-ble.
Configuration logs
The ctxsetup.sh and ctxcleanup.sh scripts display errors on the console, with additional informationwritten to the configuration log file /tmp/xdl.configure.log.
Restart the Linux VDA services to have the changes take effect.
Uninstall the Linux VDA software
To check whether the Linux VDA is installed and to view the version of the installed package:
1 dpkg -l xendesktopvda2 <!--NeedCopy-->
To viewmore detailed information:
1 apt-cache show xendesktopvda2 <!--NeedCopy-->
© 1999‒2022 Citrix Systems, Inc. All rights reserved. 178

Linux Virtual Delivery Agent 2109
To uninstall the Linux VDA software:
1 dpkg -r xendesktopvda2 <!--NeedCopy-->
Note:
Uninstalling the Linux VDA software deletes the associated PostgreSQL and other configurationdata. However, the PostgreSQL package and other dependent packages that were set up beforethe installation of the Linux VDA are not deleted.
Tip:
The information in this section does not cover the removal of dependent packages includingPostgreSQL.
Step 8: Run XDPing
Run sudo /opt/Citrix/VDA/bin/xdping to check for common configuration issues with a LinuxVDA environment. For more information, see XDPing.
Step 9: Run the Linux VDA
Once you have configured the Linux VDA using the ctxsetup.sh script, you use the following com-mands to control the Linux VDA.
Start the Linux VDA:
To start the Linux VDA services:
1 sudo systemctl start ctxhdx23 sudo systemctl start ctxvda4 <!--NeedCopy-->
Stop the Linux VDA:
To stop the Linux VDA services:
1 sudo systemctl stop ctxvda23 sudo systemctl stop ctxhdx
© 1999‒2022 Citrix Systems, Inc. All rights reserved. 179
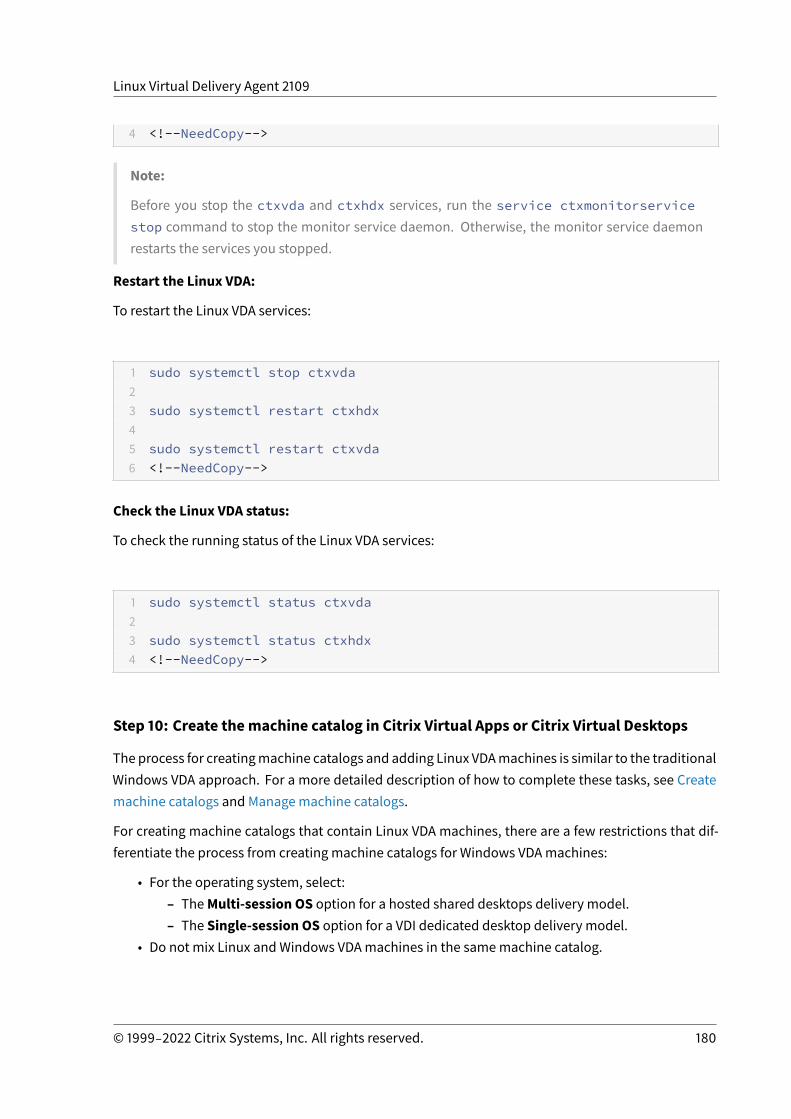
Linux Virtual Delivery Agent 2109
4 <!--NeedCopy-->
Note:
Before you stop the ctxvda and ctxhdx services, run the service ctxmonitorservicestop command to stop the monitor service daemon. Otherwise, the monitor service daemonrestarts the services you stopped.
Restart the Linux VDA:
To restart the Linux VDA services:
1 sudo systemctl stop ctxvda23 sudo systemctl restart ctxhdx45 sudo systemctl restart ctxvda6 <!--NeedCopy-->
Check the Linux VDA status:
To check the running status of the Linux VDA services:
1 sudo systemctl status ctxvda23 sudo systemctl status ctxhdx4 <!--NeedCopy-->
Step 10: Create themachine catalog in Citrix Virtual Apps or Citrix Virtual Desktops
The process for creatingmachine catalogs and adding Linux VDAmachines is similar to the traditionalWindows VDA approach. For a more detailed description of how to complete these tasks, see Createmachine catalogs and Managemachine catalogs.
For creating machine catalogs that contain Linux VDA machines, there are a few restrictions that dif-ferentiate the process from creating machine catalogs for Windows VDAmachines:
• For the operating system, select:– TheMulti-session OS option for a hosted shared desktops delivery model.– The Single-session OS option for a VDI dedicated desktop delivery model.
• Do not mix Linux and Windows VDAmachines in the samemachine catalog.
© 1999‒2022 Citrix Systems, Inc. All rights reserved. 180
Linux Virtual Delivery Agent 2109
Note:
Early versions of Citrix Studio did not support the notion of a “Linux OS.” However, selecting theWindows Server OS or Server OS option implies an equivalent hosted shared desktops deliv-ery model. Selecting theWindows Desktop OS or Desktop OS option implies a single user permachine delivery model.
Tip:
If you remove and rejoin a machine to the Active Directory domain, you must remove and addthe machine to the machine catalog again.
Step 11: Create the delivery group in Citrix Virtual Apps or Citrix Virtual Desktops
Theprocess for creatingadeliverygroupandaddingmachinecatalogscontainingLinuxVDAmachinesis almost identical to Windows VDA machines. For a more detailed description of how to completethese tasks, see Create Delivery Groups.
For creatingdelivery groups that contain LinuxVDAmachine catalogs, the following restrictionsapply:
• Ensure that the AD users and groups you select have been properly configured to log on to theLinux VDAmachines.
• Do not allow logon of unauthenticated (anonymous) users.• Do not mix the delivery group with machine catalogs that contain Windowsmachines.
For information about how to createmachine catalogs anddelivery groups, seeCitrix Virtual Apps andDesktops 7 2109.
Create Linux VDAs in Citrix Virtual Apps and Desktops Standard for Azure
October 12, 2021
You can create both domain-joined andnon-domain-joined Linux VDAs in Citrix Virtual Apps andDesk-tops Standard for Azure to deliver virtual apps and desktops to any device from Microsoft Azure. Formore information, see Citrix Virtual Apps and Desktops Standard for Azure.
Supported Linux distributions
The following Linux distributions support this feature:
• RHEL 8.3• RHEL 8.2• RHEL 7.8
© 1999‒2022 Citrix Systems, Inc. All rights reserved. 181
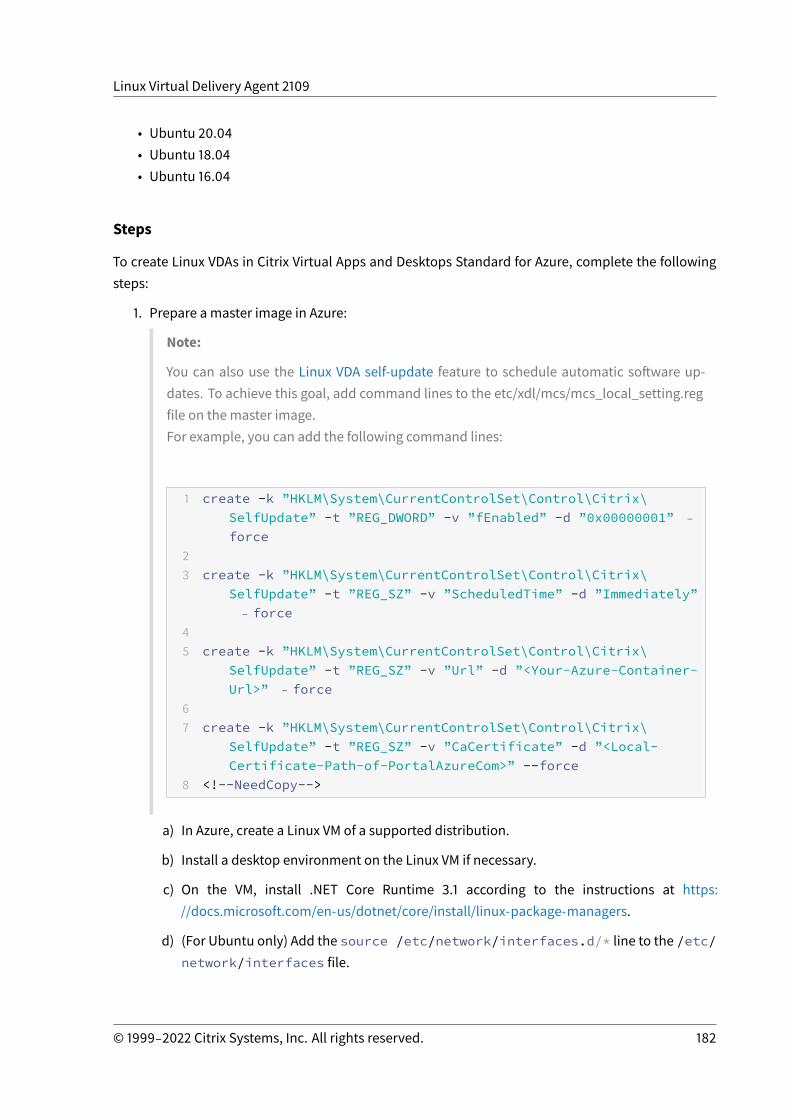
Linux Virtual Delivery Agent 2109
• Ubuntu 20.04• Ubuntu 18.04• Ubuntu 16.04
Steps
To create Linux VDAs in Citrix Virtual Apps and Desktops Standard for Azure, complete the followingsteps:
1. Prepare a master image in Azure:
Note:
You can also use the Linux VDA self-update feature to schedule automatic software up-dates. To achieve this goal, add command lines to the etc/xdl/mcs/mcs_local_setting.regfile on the master image.For example, you can add the following command lines:
1 create -k ”HKLM\System\CurrentControlSet\Control\Citrix\SelfUpdate” -t ”REG_DWORD” -v ”fEnabled” -d ”0x00000001” ‒force
23 create -k ”HKLM\System\CurrentControlSet\Control\Citrix\
SelfUpdate” -t ”REG_SZ” -v ”ScheduledTime” -d ”Immediately”‒ force
45 create -k ”HKLM\System\CurrentControlSet\Control\Citrix\
SelfUpdate” -t ”REG_SZ” -v ”Url” -d ”<Your-Azure-Container-Url>” ‒ force
67 create -k ”HKLM\System\CurrentControlSet\Control\Citrix\
SelfUpdate” -t ”REG_SZ” -v ”CaCertificate” -d ”<Local-Certificate-Path-of-PortalAzureCom>” --force
8 <!--NeedCopy-->
a) In Azure, create a Linux VM of a supported distribution.
b) Install a desktop environment on the Linux VM if necessary.
c) On the VM, install .NET Core Runtime 3.1 according to the instructions at https://docs.microsoft.com/en-us/dotnet/core/install/linux-package-managers.
d) (For Ubuntu only) Add the source /etc/network/interfaces.d/* line to the /etc/network/interfaces file.
© 1999‒2022 Citrix Systems, Inc. All rights reserved. 182
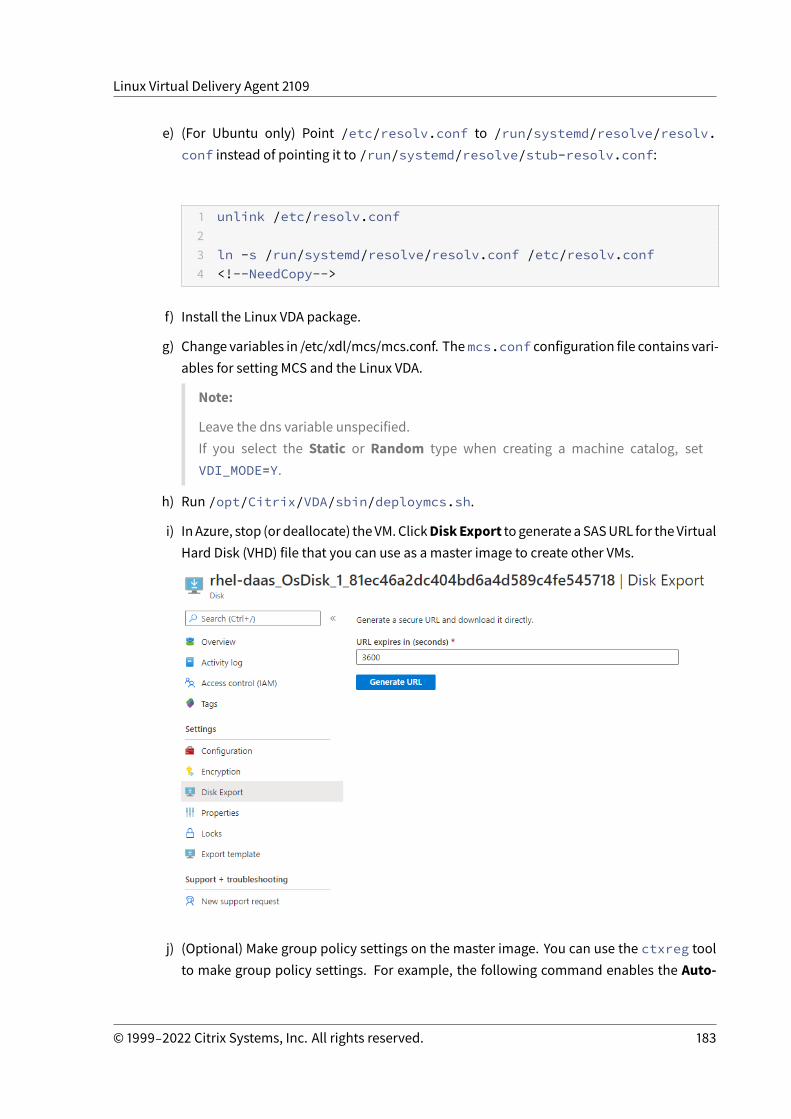
Linux Virtual Delivery Agent 2109
e) (For Ubuntu only) Point /etc/resolv.conf to /run/systemd/resolve/resolv.conf instead of pointing it to /run/systemd/resolve/stub-resolv.conf:
1 unlink /etc/resolv.conf23 ln -s /run/systemd/resolve/resolv.conf /etc/resolv.conf4 <!--NeedCopy-->
f) Install the Linux VDA package.
g) Change variables in /etc/xdl/mcs/mcs.conf. Themcs.conf configuration file contains vari-ables for setting MCS and the Linux VDA.
Note:
Leave the dns variable unspecified.If you select the Static or Random type when creating a machine catalog, setVDI_MODE=Y.
h) Run /opt/Citrix/VDA/sbin/deploymcs.sh.
i) In Azure, stop (ordeallocate) theVM.ClickDiskExport to generate aSASURL for theVirtualHard Disk (VHD) file that you can use as a master image to create other VMs.
j) (Optional) Make group policy settings on the master image. You can use the ctxreg toolto make group policy settings. For example, the following command enables the Auto-
© 1999‒2022 Citrix Systems, Inc. All rights reserved. 183
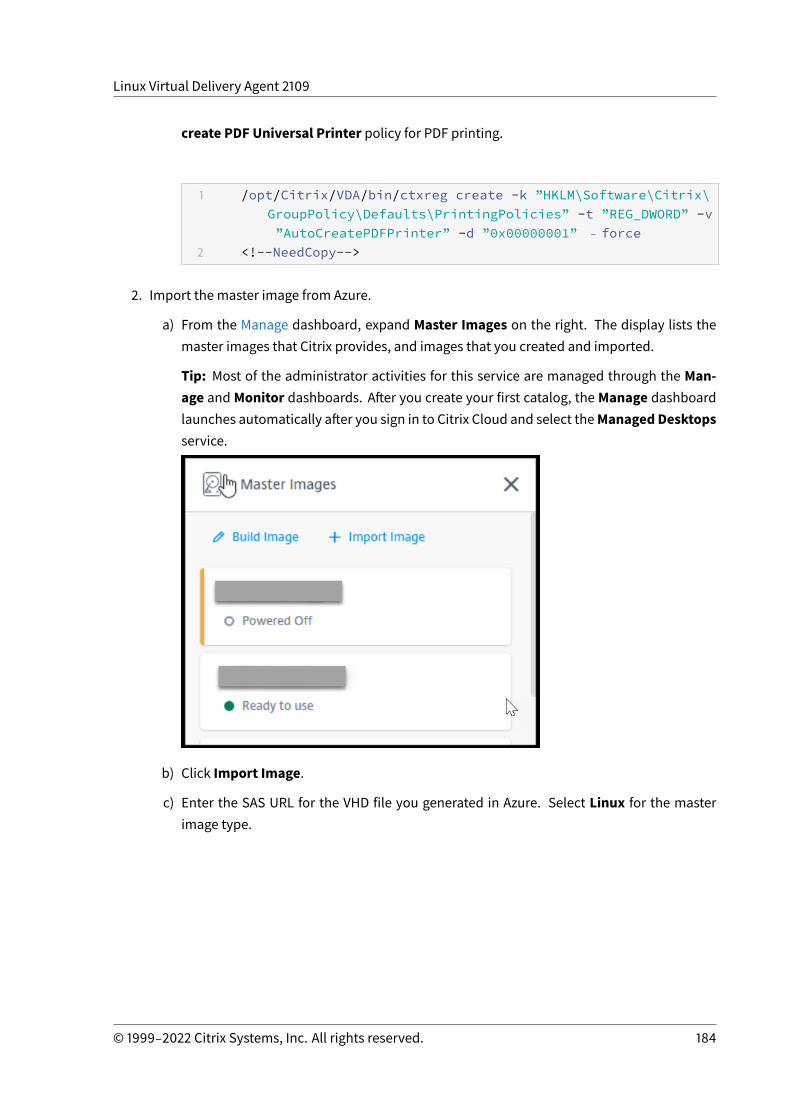
Linux Virtual Delivery Agent 2109
create PDF Universal Printer policy for PDF printing.
1 /opt/Citrix/VDA/bin/ctxreg create -k ”HKLM\Software\Citrix\GroupPolicy\Defaults\PrintingPolicies” -t ”REG_DWORD” -v”AutoCreatePDFPrinter” -d ”0x00000001” ‒ force
2 <!--NeedCopy-->
2. Import the master image from Azure.
a) From the Manage dashboard, expand Master Images on the right. The display lists themaster images that Citrix provides, and images that you created and imported.
Tip: Most of the administrator activities for this service are managed through the Man-age andMonitor dashboards. After you create your first catalog, theManage dashboardlaunches automatically after you sign in to Citrix Cloud and select theManaged Desktopsservice.
b) Click Import Image.
c) Enter the SAS URL for the VHD file you generated in Azure. Select Linux for the masterimage type.
© 1999‒2022 Citrix Systems, Inc. All rights reserved. 184
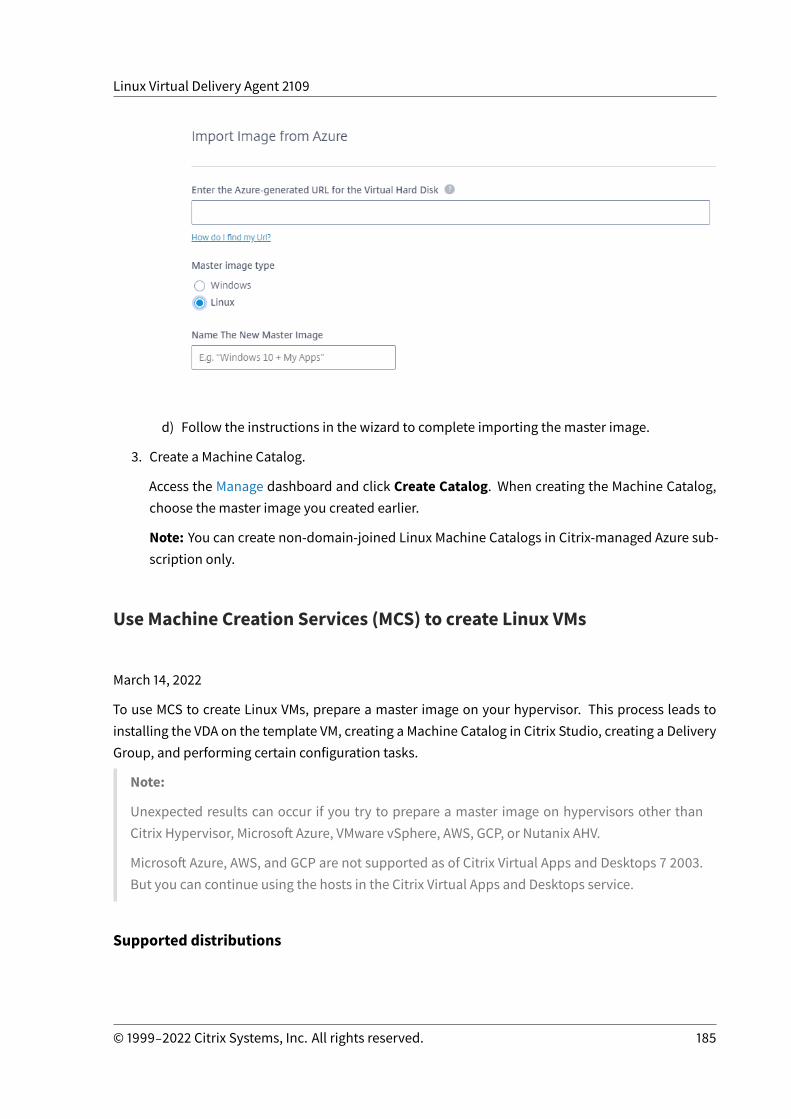
Linux Virtual Delivery Agent 2109
d) Follow the instructions in the wizard to complete importing the master image.
3. Create a Machine Catalog.
Access the Manage dashboard and click Create Catalog. When creating the Machine Catalog,choose the master image you created earlier.
Note: You can create non-domain-joined Linux Machine Catalogs in Citrix-managed Azure sub-scription only.
Use Machine Creation Services (MCS) to create Linux VMs
March 14, 2022
To use MCS to create Linux VMs, prepare a master image on your hypervisor. This process leads toinstalling the VDA on the template VM, creating a Machine Catalog in Citrix Studio, creating a DeliveryGroup, and performing certain configuration tasks.
Note:
Unexpected results can occur if you try to prepare a master image on hypervisors other thanCitrix Hypervisor, Microsoft Azure, VMware vSphere, AWS, GCP, or Nutanix AHV.
Microsoft Azure, AWS, and GCP are not supported as of Citrix Virtual Apps and Desktops 7 2003.But you can continue using the hosts in the Citrix Virtual Apps and Desktops service.
Supported distributions
© 1999‒2022 Citrix Systems, Inc. All rights reserved. 185
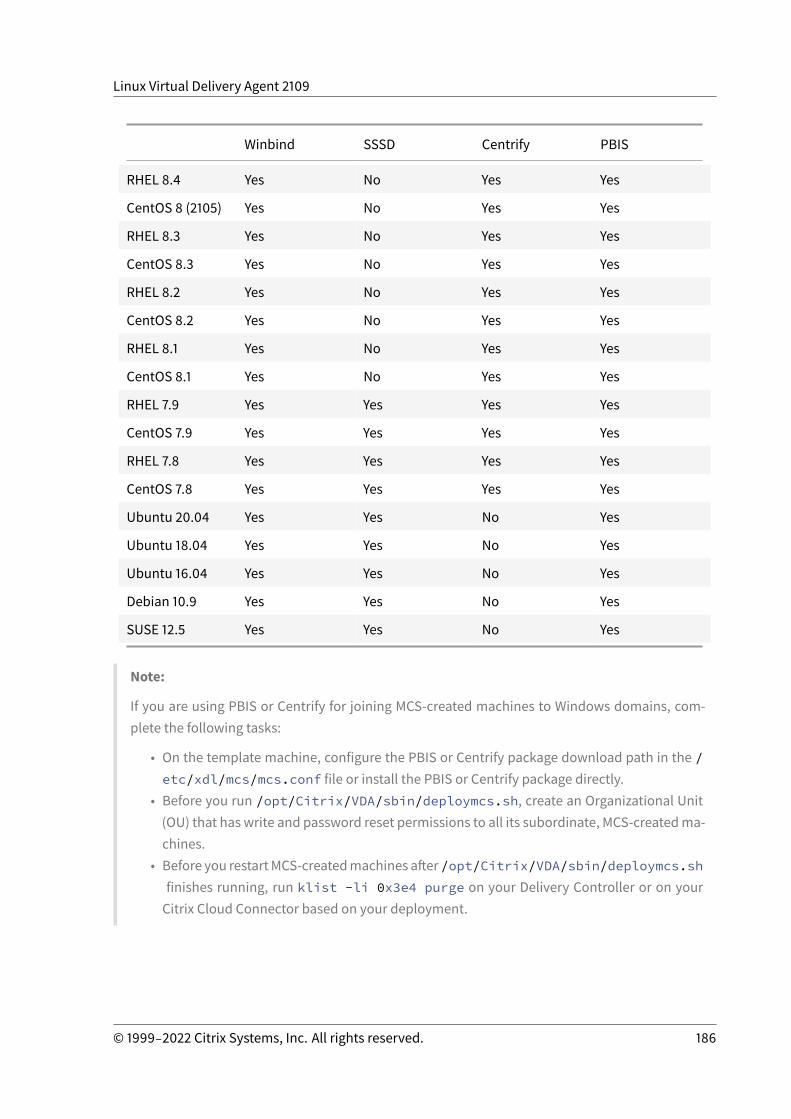
Linux Virtual Delivery Agent 2109
Winbind SSSD Centrify PBIS
RHEL 8.4 Yes No Yes Yes
CentOS 8 (2105) Yes No Yes Yes
RHEL 8.3 Yes No Yes Yes
CentOS 8.3 Yes No Yes Yes
RHEL 8.2 Yes No Yes Yes
CentOS 8.2 Yes No Yes Yes
RHEL 8.1 Yes No Yes Yes
CentOS 8.1 Yes No Yes Yes
RHEL 7.9 Yes Yes Yes Yes
CentOS 7.9 Yes Yes Yes Yes
RHEL 7.8 Yes Yes Yes Yes
CentOS 7.8 Yes Yes Yes Yes
Ubuntu 20.04 Yes Yes No Yes
Ubuntu 18.04 Yes Yes No Yes
Ubuntu 16.04 Yes Yes No Yes
Debian 10.9 Yes Yes No Yes
SUSE 12.5 Yes Yes No Yes
Note:
If you are using PBIS or Centrify for joining MCS-created machines to Windows domains, com-plete the following tasks:
• On the template machine, configure the PBIS or Centrify package download path in the /etc/xdl/mcs/mcs.conf file or install the PBIS or Centrify package directly.
• Before you run /opt/Citrix/VDA/sbin/deploymcs.sh, create an Organizational Unit(OU) that has write and password reset permissions to all its subordinate, MCS-createdma-chines.
• Before you restartMCS-createdmachines after/opt/Citrix/VDA/sbin/deploymcs.shfinishes running, run klist -li 0x3e4 purge on your Delivery Controller or on yourCitrix Cloud Connector based on your deployment.
© 1999‒2022 Citrix Systems, Inc. All rights reserved. 186
Linux Virtual Delivery Agent 2109
Use MCS to create Linux VMs on Citrix Hypervisor
Step 1: Prepare amaster image
Amaster image contains the operating system, non-virtualized applications, VDA, and other software.To prepare a master image, do the following:
Step 1a: Install Citrix VM Tools
Install Citrix VM Tools on the template VM for each VM to be able to use the xe CLI or XenCenter. VMperformance can be slow unless you install the tools. Without the tools, you cannot do any of thefollowing:
• Cleanly shut down, restart, or suspend a VM.• View the VM performance data in XenCenter.• Migrate a running VM (through XenMotion).• Create snapshots or snapshots with memory (checkpoints), and revert to snapshots.• Adjust the number of vCPUs on a running Linux VM.
1. Run the following command tomount Citrix VM Tools named guest-tools.iso.
1 sudo mount /dev/cdrom /mnt2 <!--NeedCopy-->
2. Run the following command to install the xe-guest-utilities package based on your Linuxdistribution.
For RHEL/CentOS:
1 sudo rpm -i /mnt/Linux/xe-guest-utilities_{2 package-version }3 _all.rpm4 <!--NeedCopy-->
For Ubuntu/Debian:
1 sudo dpkg -i /mnt/Linux/xe-guest-utilities_{2 package-version }3 _all.deb4 <!--NeedCopy-->
© 1999‒2022 Citrix Systems, Inc. All rights reserved. 187
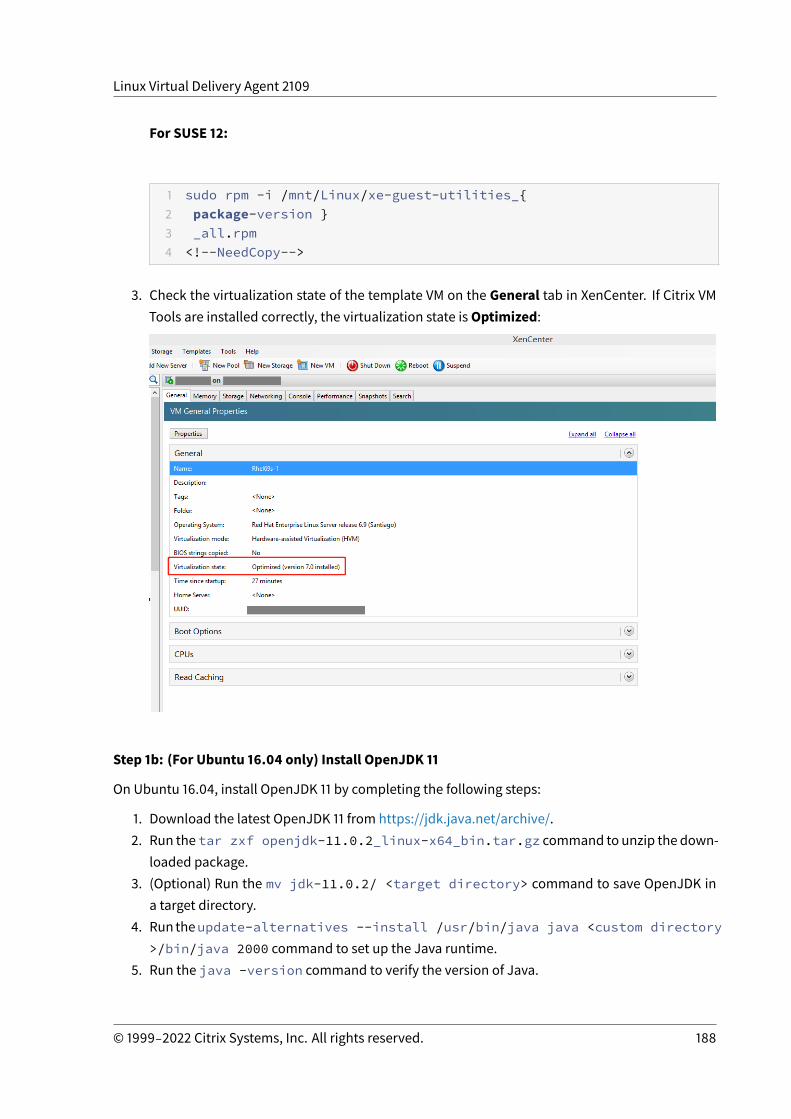
Linux Virtual Delivery Agent 2109
For SUSE 12:
1 sudo rpm -i /mnt/Linux/xe-guest-utilities_{2 package-version }3 _all.rpm4 <!--NeedCopy-->
3. Check the virtualization state of the template VM on the General tab in XenCenter. If Citrix VMTools are installed correctly, the virtualization state isOptimized:
Step 1b: (For Ubuntu 16.04 only) Install OpenJDK 11
On Ubuntu 16.04, install OpenJDK 11 by completing the following steps:
1. Download the latest OpenJDK 11 from https://jdk.java.net/archive/.2. Run the tar zxf openjdk-11.0.2_linux-x64_bin.tar.gz command to unzip the down-
loaded package.3. (Optional) Run the mv jdk-11.0.2/ <target directory> command to save OpenJDK in
a target directory.4. Run theupdate-alternatives --install /usr/bin/java java <custom directory
>/bin/java 2000 command to set up the Java runtime.5. Run the java -version command to verify the version of Java.
© 1999‒2022 Citrix Systems, Inc. All rights reserved. 188
Linux Virtual Delivery Agent 2109
Step 1c: Install the Linux VDA package on the template VM
Note:
To use a currently running VDA as the template VM, skip this step.
Before installing the Linux VDA package on the template VM, install .NET Core Runtime 3.1. Formore information, see Installation overview.
Based on your Linux distribution, run the following command to set up the environment for the LinuxVDA:
For RHEL/CentOS:
1 sudo yum ‒ y localinstall <PATH>/<Linux VDA RPM>2 <!--NeedCopy-->
For Ubuntu/Debian:
1 sudo dpkg ‒ i <PATH>/<Linux VDA DEB>23 apt-get install -f4 <!--NeedCopy-->
For SUSE 12:
1 sudo zypper ‒ i install <PATH>/<Linux VDA RPM>2 <!--NeedCopy-->
Step 1d: Enable repositories to install the tdb-tools package
For RHEL 7 server:
1 subscription-manager repos --enable=rhel-7-server-optional-rpms2 <!--NeedCopy-->
For RHEL 7 workstation:
© 1999‒2022 Citrix Systems, Inc. All rights reserved. 189
Linux Virtual Delivery Agent 2109
1 subscription-manager repos --enable=rhel-7-workstation-optional-rpms2 <!--NeedCopy-->
Step 1e: Install the EPEL repository that can offer ntfs-3g
Install the EPEL repository on RHEL 8/CentOS 8, RHEL 7/CentOS 7 so that running deploymcs.sh laterinstalls the ntfs-3g package available in the EPEL repository.
Step 1f: Manually install ntfs-3g on SUSE 12
On the SUSE 12 platform, no repository provides ntfs-3g. Download the source code, compile, andinstall ntfs-3g manually:
1. Install the GNU Compiler Collection (GCC) compiler system and the make package:
1 sudo zypper install gcc2 sudo zypper install make3 <!--NeedCopy-->
2. Download the ntfs-3g package.
3. Decompress the ntfs-3g package:
1 sudo tar -xvzf ntfs-3g_ntfsprogs-<package version>.tgz2 <!--NeedCopy-->
4. Enter the path to the ntfs-3g package:
1 sudo cd ntfs-3g_ntfsprogs-<package version>2 <!--NeedCopy-->
5. Install ntfs-3g:
1 ./configure2 make3 make install4 <!--NeedCopy-->
© 1999‒2022 Citrix Systems, Inc. All rights reserved. 190
Linux Virtual Delivery Agent 2109
Step 1g: Set up the runtime environment
Before running deploymcs.sh, do the following:
• Change variables in/etc/xdl/mcs/mcs.conf. Themcs.conf configuration file provides vari-ables for setting MCS and the Linux VDA. The following are variables you can set as required:
– Use_Existing_Configurations_Of_Current_VDA: Determines whether to use theexisting configurations of the currently running VDA. If set to Y, the configuration files onMCS-createdmachines are the sameas the equivalents on the currently runningVDA.How-ever, you still must configure the dns and AD_INTEGRATION variables. The default valueis N, whichmeans the configuration templates on themaster image determine the config-uration files on MCS-createdmachines.
– dns: Sets the DNS IP address.
– AD_INTEGRATION: SetsWinbind, SSSD (SSSD is not supported on SUSE), PBIS, or Centrify(we support Centrify only on RHEL and CentOS).
– CENTRIFY_DOWNLOAD_PATH: Sets the path for downloading the Centrify package. Thevalue takes effect only when you set the AD_INTEGRATION variable to Centrify.
– CENTRIFY_SAMBA_DOWNLOAD_PATH: Sets the path for downloading the Centrify Sambapackage. The value takes effect only when you set the AD_INTEGRATION variable to Cen-trify.
– WORKGROUP: Sets the workgroup name (case-sensitive) if you configured it in AD.
• On the template machine, add command lines to the /etc/xdl/mcs/mcs_local_setting.reg file for writing or updating registry values as required. This action prevents the loss of dataand settings every time an MCS-provisionedmachine restarts.
Each line in the /etc/xdl/mcs/mcs_local_setting.reg file is a command for setting orupdating a registry value.
Forexample, youcanadd the followingcommand lines to the/etc/xdl/mcs/mcs_local_setting.reg file to write or update a registry value respectively:
1 create -k ”HKLM\System\CurrentControlSet\Control\Citrix\VirtualChannels\Clipboard\ClipboardSelection” -t ”REG_DWORD” -v ”Flags” -d ”0x00000003” --force
2 <!--NeedCopy-->
© 1999‒2022 Citrix Systems, Inc. All rights reserved. 191
Linux Virtual Delivery Agent 2109
1 update -k ”HKLM\System\CurrentControlSet\Control\Citrix\VirtualChannels\Clipboard\ClipboardSelection” -v ”Flags” -d ”0x00000003”
2 <!--NeedCopy-->
Step 1h: Create amaster image
1. Run /opt/Citrix/VDA/sbin/deploymcs.sh.
2. (Optional) On the template VM, update the configuration templates to customize the relevant/etc/krb5.conf, /etc/samba/smb.conf, and /etc/sssd/sssd.conf files on all createdVMs.
For Winbind users, update the /etc/xdl/mcs/winbind_krb5.conf.tmpl and /etc/xdl/mcs/winbind_smb.conf.tmpl templates.
For SSSD users, update the /etc/xdl/mcs/sssd.conf.tmpl, /etc/xdl/mcs/sssd_krb5.conf.tmpl, and /etc/xdl/mcs/sssd_smb.conf.tmpl templates.
For Centrify users, update the /etc/xdl/mcs/centrify_krb5.conf.tmpl and /etc/xdl/mcs/centrify_smb.conf.tmpl templates.
Note:
Keep the existing format used in the template files and use variables such as $WORK-GROUP, $REALM, $realm, ${new_hostname}, and $AD_FQDN.
3. On Citrix Hypervisor, shut down the template VM. Create and name a snapshot of your masterimage.
Step 2: Create amachine catalog
In Citrix Studio, create a machine catalog and specify the number of VMs to create in the catalog. Doother configuration tasks as needed. For more information, see Create a machine catalog using Stu-dio.
Step 3: Create a delivery group
A machine catalog is a collection of machines selected from one or more Machine Catalogs. The ma-chine catalog specifies which users can use thosemachines, and the applications and desktops avail-able to those users. For more information, see Create Delivery Groups.
© 1999‒2022 Citrix Systems, Inc. All rights reserved. 192
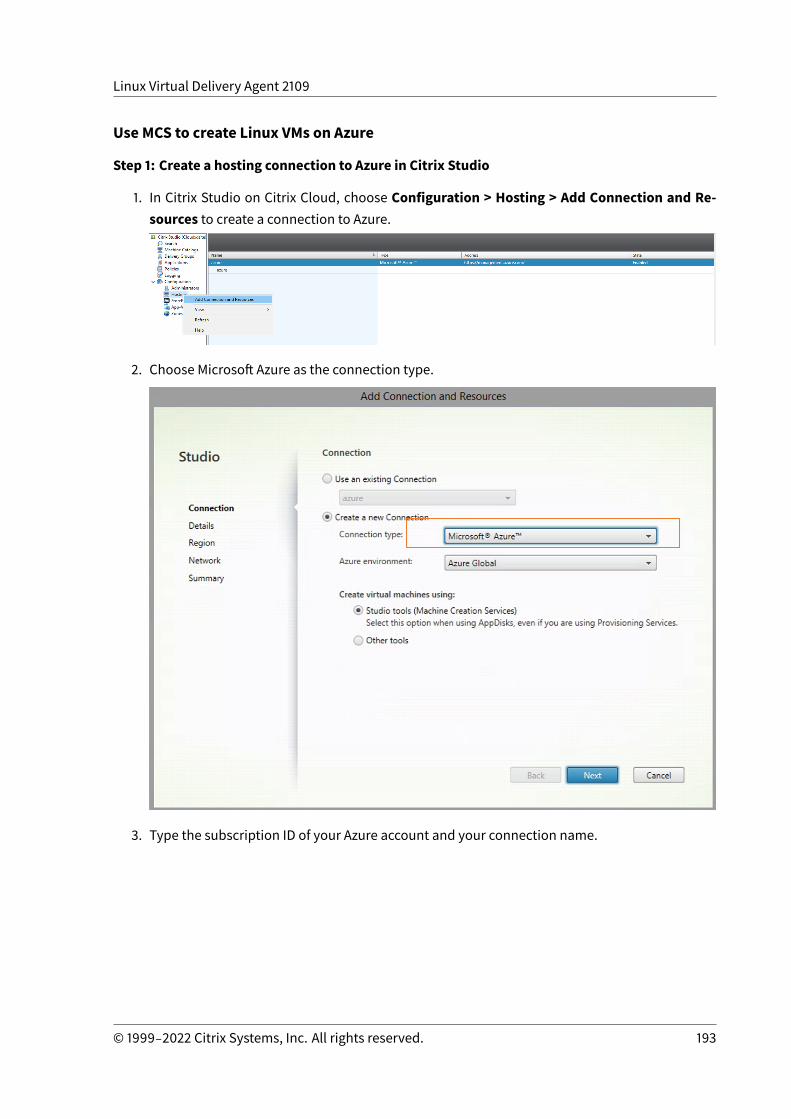
Linux Virtual Delivery Agent 2109
Use MCS to create Linux VMs on Azure
Step 1: Create a hosting connection to Azure in Citrix Studio
1. In Citrix Studio on Citrix Cloud, choose Configuration > Hosting > Add Connection and Re-sources to create a connection to Azure.
2. Choose Microsoft Azure as the connection type.
3. Type the subscription ID of your Azure account and your connection name.
© 1999‒2022 Citrix Systems, Inc. All rights reserved. 193
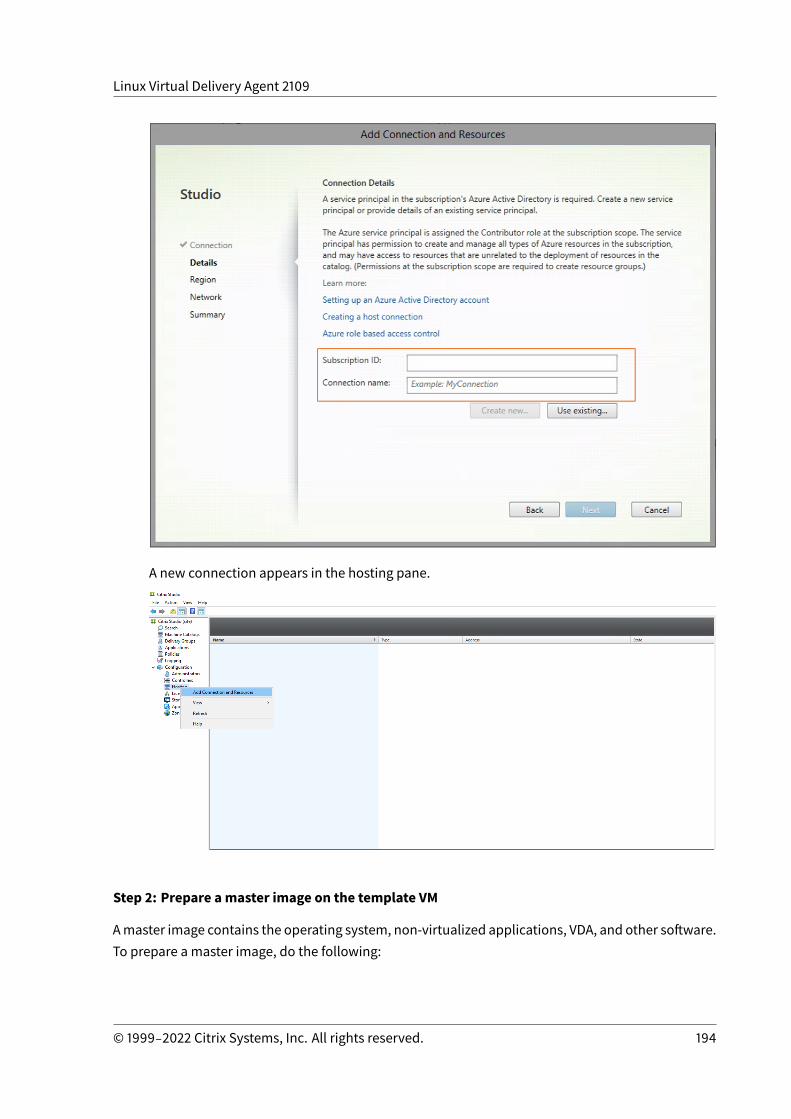
Linux Virtual Delivery Agent 2109
A new connection appears in the hosting pane.
Step 2: Prepare amaster image on the template VM
Amaster image contains the operating system, non-virtualized applications, VDA, and other software.To prepare a master image, do the following:
© 1999‒2022 Citrix Systems, Inc. All rights reserved. 194
Linux Virtual Delivery Agent 2109
Step 2a: Configure cloud-init for Ubuntu 18.04
To ensure that a VDA host name persists when a VM is restarted or stopped, run the following com-mand.
1 echo ”preserve_hostname: true” > /etc/cloud/cloud.cfg.d/99_hostname.cfg
2 <!--NeedCopy-->
Ensure that the following lines are present under the system_info section in the /etc/cloud/cloud.cfgfile:
1 system_info:2 network:3 renderers: ['netplan', 'eni', 'sysconfig']4 <!--NeedCopy-->
Step 2b: (For Ubuntu 16.04 only) Install OpenJDK 11
On Ubuntu 16.04, install OpenJDK 11 by completing the following steps:
1. Download the latest OpenJDK 11 from https://jdk.java.net/archive/.2. Run the tar zxf openjdk-11.0.2_linux-x64_bin.tar.gz command to unzip the down-
loaded package.3. (Optional) Run the mv jdk-11.0.2/ <target directory> command to save OpenJDK in
a target directory.4. Run theupdate-alternatives --install /usr/bin/java java <custom directory
>/bin/java 2000 command to set up the Java runtime.5. Run the java -version command to verify the version of Java.
Step 2c: Install the Linux VDA package on the template VM
Note:
To use a currently running VDA as the template VM, skip this step.
Before installing the Linux VDA package on the template VM, install .NET Core Runtime 3.1. Formore information, see Installation overview.
Based on your Linux distribution, run the following command to set up the environment for the LinuxVDA:
© 1999‒2022 Citrix Systems, Inc. All rights reserved. 195
Linux Virtual Delivery Agent 2109
For RHEL/CentOS:
1 sudo yum ‒ y localinstall <PATH>/<Linux VDA RPM>2 <!--NeedCopy-->
For Ubuntu/Debian:
1 sudo dpkg ‒ i <PATH>/<Linux VDA DEB>23 apt-get install -f4 <!--NeedCopy-->
For SUSE 12:
1 sudo zypper ‒ i install <PATH>/<Linux VDA RPM>2 <!--NeedCopy-->
Step 2d: Install the EPEL repository that can offer ntfs-3g
Install the EPEL repository on RHEL 8/CentOS 8, RHEL 7/CentOS 7 so that running deploymcs.sh laterinstalls the ntfs-3g package available in the EPEL repository.
Step 2e: Manually install ntfs-3g on SUSE 12
On the SUSE 12 platform, no repository provides ntfs-3g. Download the source code, compile, andinstall ntfs-3g manually:
1. Install the GNU Compiler Collection (GCC) compiler system and the make package:
1 sudo zypper install gcc2 sudo zypper install make3 <!--NeedCopy-->
2. Download the ntfs-3g package.
3. Decompress the ntfs-3g package:
© 1999‒2022 Citrix Systems, Inc. All rights reserved. 196
Linux Virtual Delivery Agent 2109
1 sudo tar -xvzf ntfs-3g_ntfsprogs-<package version>.tgz2 <!--NeedCopy-->
4. Enter the path to the ntfs-3g package:
1 sudo cd ntfs-3g_ntfsprogs-<package version>2 <!--NeedCopy-->
5. Install ntfs-3g:
1 ./configure2 make3 make install4 <!--NeedCopy-->
Step 2f: Set up the runtime environment
Before running deploymcs.sh, do the following:
• Change variables in/etc/xdl/mcs/mcs.conf. Themcs.conf configuration file provides vari-ables for setting MCS and the Linux VDA. The following are some of the variables, of which dnsand AD_INTEGRATIONmust be set:
Note: If a variable can be set with multiple values, put the values inside single quotes and sep-arate themwith spaces. For example, LDAP_LIST=’aaa.lab:389 bbb.lab:389.’
– Use_Existing_Configurations_Of_Current_VDA: Determines whether to use theexisting configurations of the currently running VDA. If set to Y, configuration files on MCS-createdmachines are the same as the equivalents on the currently running VDA. However,you still must configure the dns and AD_INTEGRATION variables. The default value is N,which means the configuration templates on the master image determine the configura-tion files on MCS-createdmachines.
– dns: Sets the DNS IP address.
– AD_INTEGRATION: SetsWinbind, SSSD (SSSD is not supported on SUSE), PBIS, or Centrify(we support Centrify only on RHEL and CentOS).
– CENTRIFY_DOWNLOAD_PATH: Sets the path for downloading the Centrify package. Thevalue takes effect only when you set the AD_INTEGRATION variable to Centrify.
© 1999‒2022 Citrix Systems, Inc. All rights reserved. 197
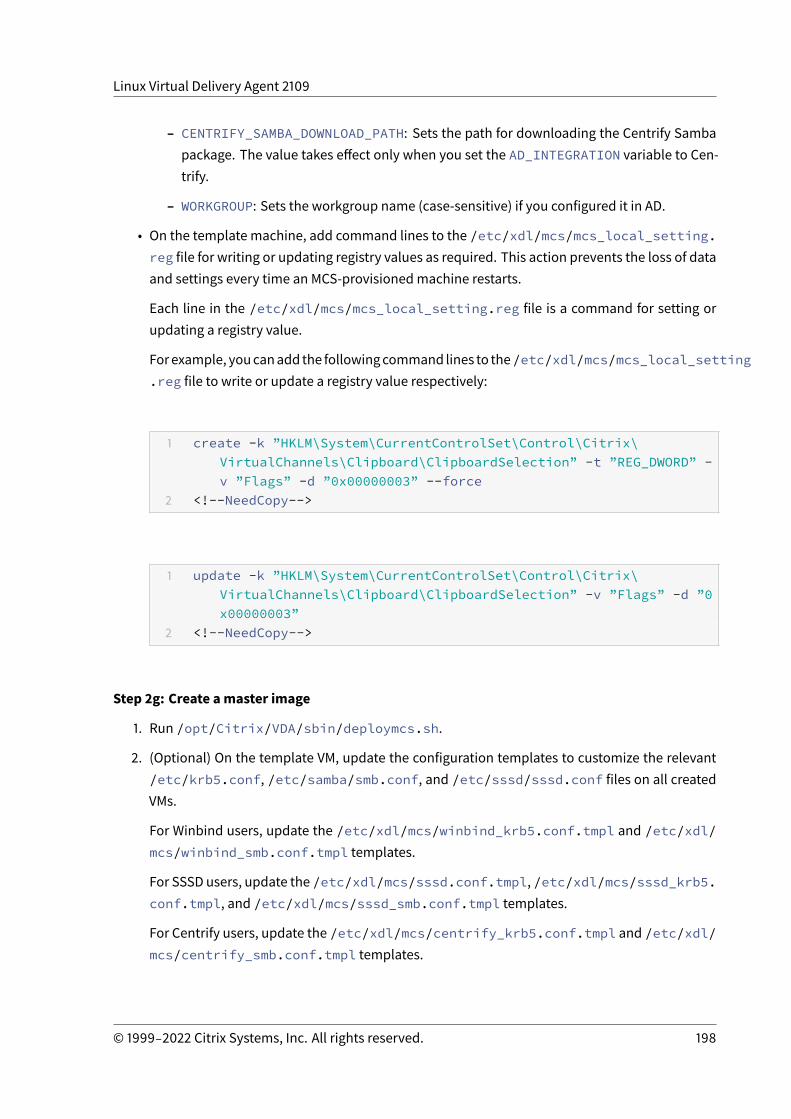
Linux Virtual Delivery Agent 2109
– CENTRIFY_SAMBA_DOWNLOAD_PATH: Sets the path for downloading the Centrify Sambapackage. The value takes effect only when you set the AD_INTEGRATION variable to Cen-trify.
– WORKGROUP: Sets the workgroup name (case-sensitive) if you configured it in AD.
• On the template machine, add command lines to the /etc/xdl/mcs/mcs_local_setting.reg file for writing or updating registry values as required. This action prevents the loss of dataand settings every time an MCS-provisionedmachine restarts.
Each line in the /etc/xdl/mcs/mcs_local_setting.reg file is a command for setting orupdating a registry value.
Forexample, youcanadd the followingcommand lines to the/etc/xdl/mcs/mcs_local_setting.reg file to write or update a registry value respectively:
1 create -k ”HKLM\System\CurrentControlSet\Control\Citrix\VirtualChannels\Clipboard\ClipboardSelection” -t ”REG_DWORD” -v ”Flags” -d ”0x00000003” --force
2 <!--NeedCopy-->
1 update -k ”HKLM\System\CurrentControlSet\Control\Citrix\VirtualChannels\Clipboard\ClipboardSelection” -v ”Flags” -d ”0x00000003”
2 <!--NeedCopy-->
Step 2g: Create amaster image
1. Run /opt/Citrix/VDA/sbin/deploymcs.sh.
2. (Optional) On the template VM, update the configuration templates to customize the relevant/etc/krb5.conf, /etc/samba/smb.conf, and /etc/sssd/sssd.conf files on all createdVMs.
For Winbind users, update the /etc/xdl/mcs/winbind_krb5.conf.tmpl and /etc/xdl/mcs/winbind_smb.conf.tmpl templates.
For SSSD users, update the /etc/xdl/mcs/sssd.conf.tmpl, /etc/xdl/mcs/sssd_krb5.conf.tmpl, and /etc/xdl/mcs/sssd_smb.conf.tmpl templates.
For Centrify users, update the /etc/xdl/mcs/centrify_krb5.conf.tmpl and /etc/xdl/mcs/centrify_smb.conf.tmpl templates.
© 1999‒2022 Citrix Systems, Inc. All rights reserved. 198
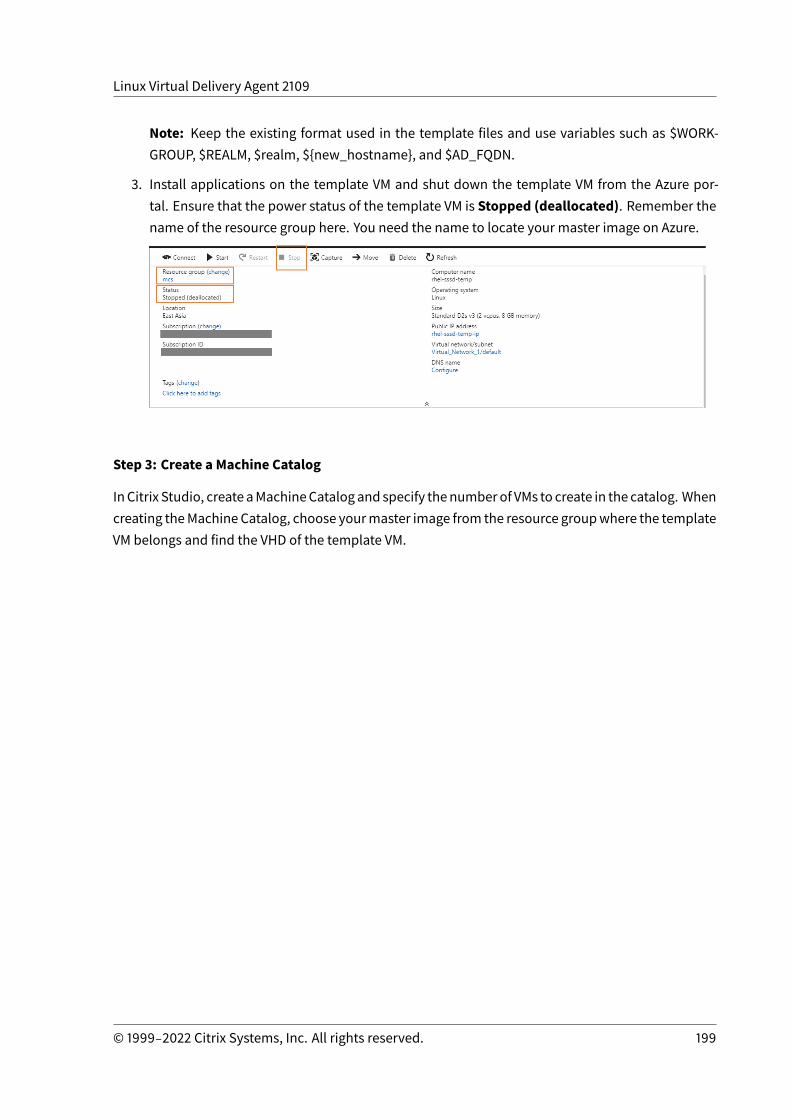
Linux Virtual Delivery Agent 2109
Note: Keep the existing format used in the template files and use variables such as $WORK-GROUP, $REALM, $realm, ${new_hostname}, and $AD_FQDN.
3. Install applications on the template VM and shut down the template VM from the Azure por-tal. Ensure that the power status of the template VM is Stopped (deallocated). Remember thename of the resource group here. You need the name to locate your master image on Azure.
Step 3: Create a Machine Catalog
In Citrix Studio, create aMachineCatalogand specify thenumberof VMs to create in the catalog. Whencreating theMachine Catalog, choose yourmaster image from the resource groupwhere the templateVM belongs and find the VHD of the template VM.
© 1999‒2022 Citrix Systems, Inc. All rights reserved. 199
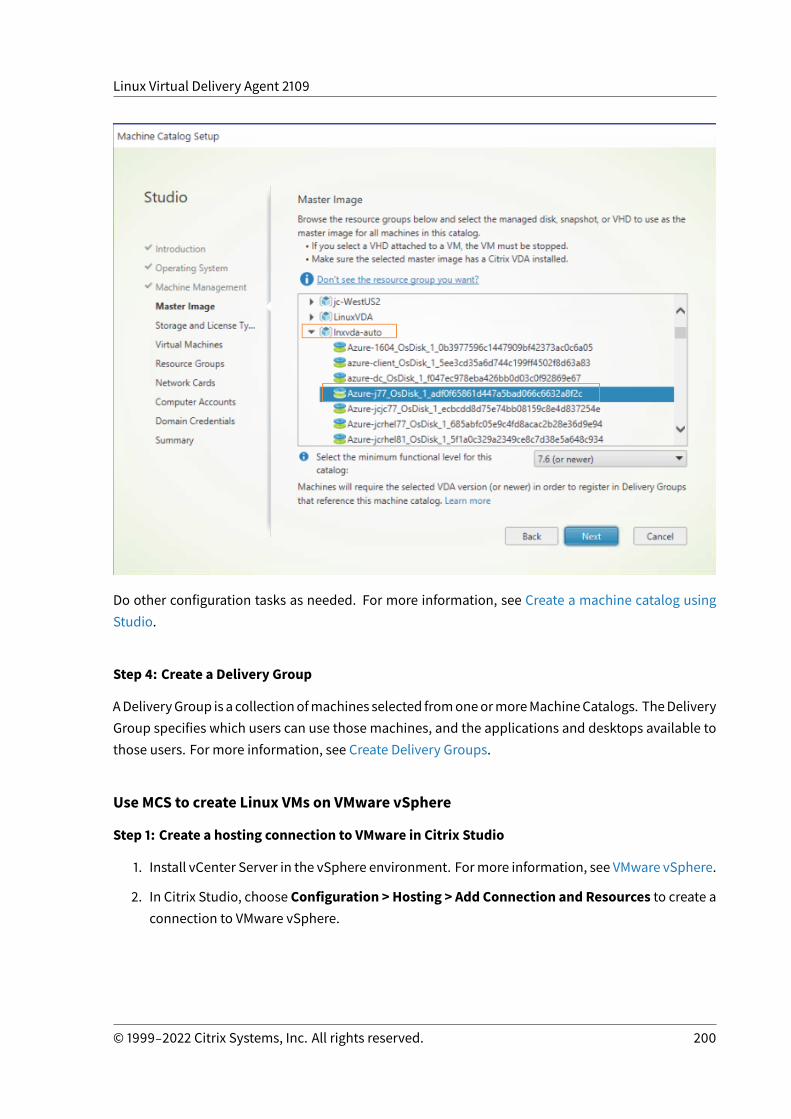
Linux Virtual Delivery Agent 2109
Do other configuration tasks as needed. For more information, see Create a machine catalog usingStudio.
Step 4: Create a Delivery Group
ADeliveryGroup is a collectionofmachines selected fromoneormoreMachineCatalogs. TheDeliveryGroup specifies which users can use those machines, and the applications and desktops available tothose users. For more information, see Create Delivery Groups.
Use MCS to create Linux VMs on VMware vSphere
Step 1: Create a hosting connection to VMware in Citrix Studio
1. Install vCenter Server in the vSphere environment. Formore information, see VMware vSphere.
2. In Citrix Studio, choose Configuration > Hosting > Add Connection and Resources to create aconnection to VMware vSphere.
© 1999‒2022 Citrix Systems, Inc. All rights reserved. 200
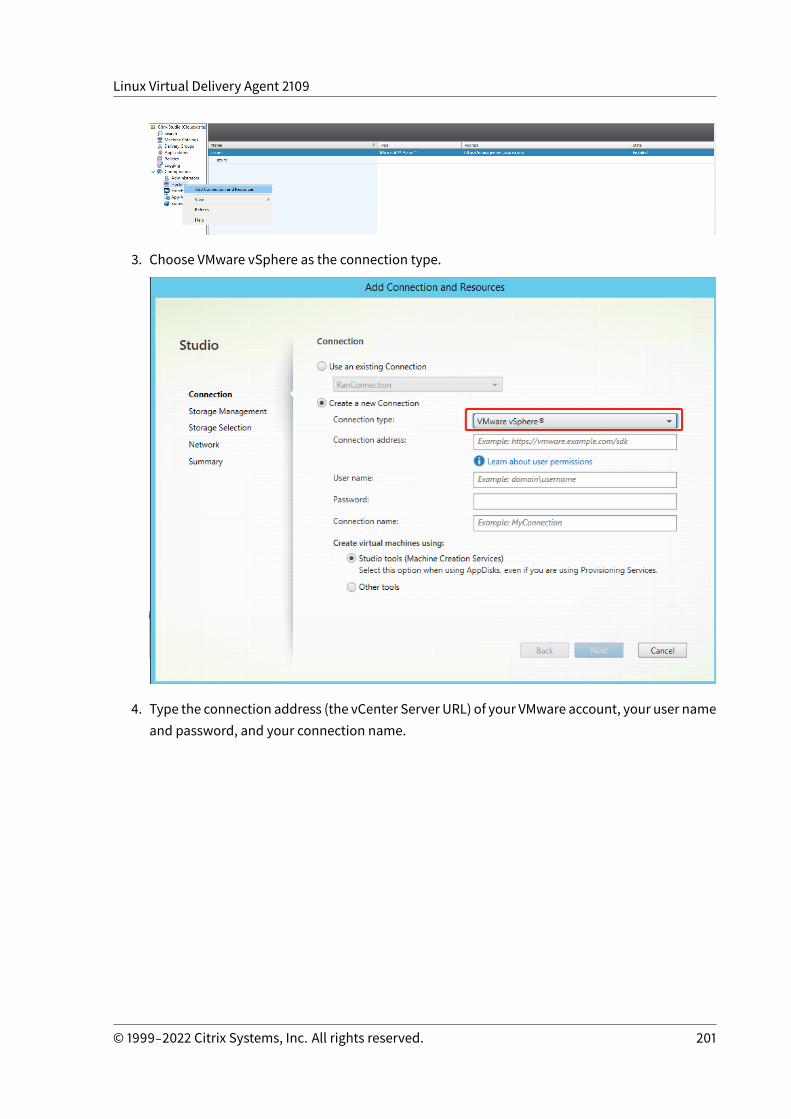
Linux Virtual Delivery Agent 2109
3. Choose VMware vSphere as the connection type.
4. Type the connection address (the vCenter Server URL) of your VMware account, your user nameand password, and your connection name.
© 1999‒2022 Citrix Systems, Inc. All rights reserved. 201
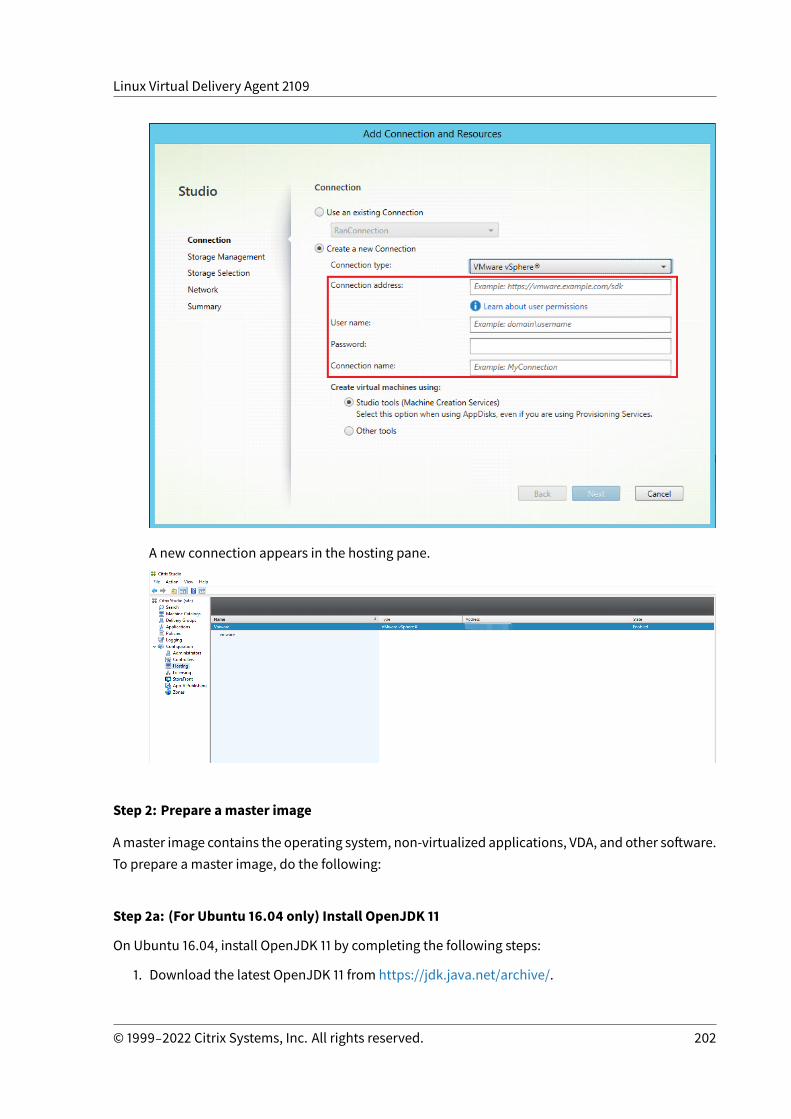
Linux Virtual Delivery Agent 2109
A new connection appears in the hosting pane.
Step 2: Prepare amaster image
Amaster image contains the operating system, non-virtualized applications, VDA, and other software.To prepare a master image, do the following:
Step 2a: (For Ubuntu 16.04 only) Install OpenJDK 11
On Ubuntu 16.04, install OpenJDK 11 by completing the following steps:
1. Download the latest OpenJDK 11 from https://jdk.java.net/archive/.
© 1999‒2022 Citrix Systems, Inc. All rights reserved. 202
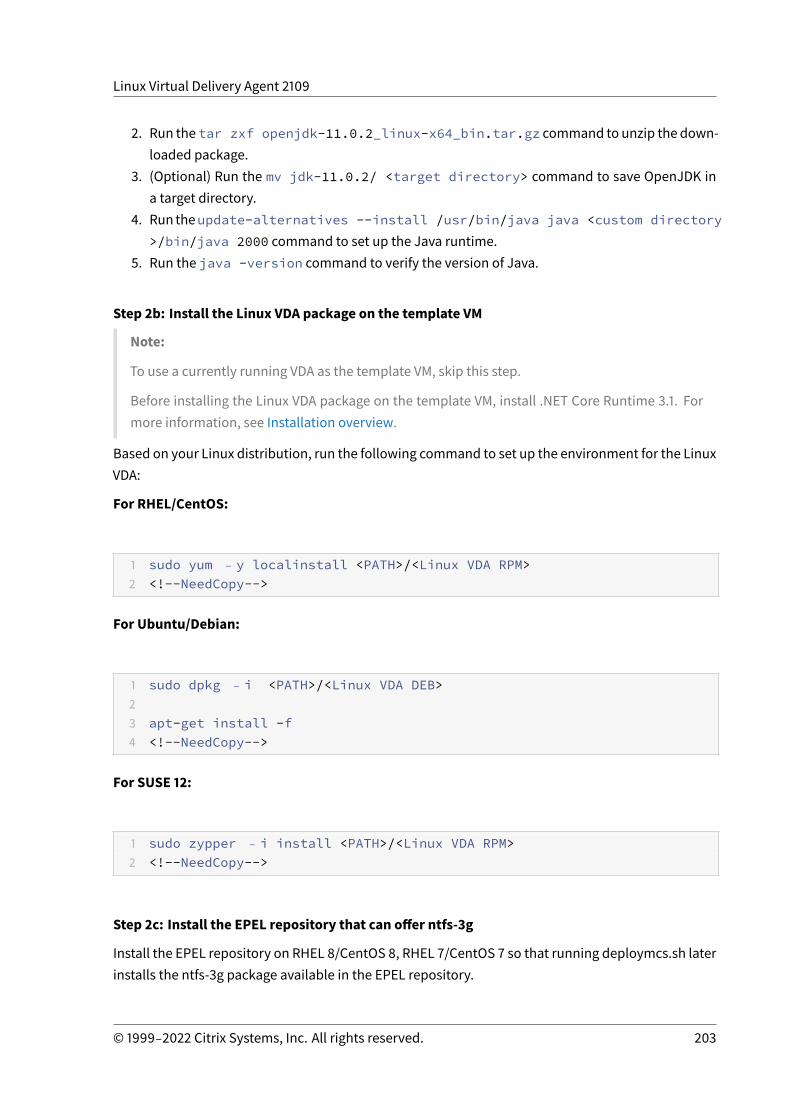
Linux Virtual Delivery Agent 2109
2. Run the tar zxf openjdk-11.0.2_linux-x64_bin.tar.gz command to unzip the down-loaded package.
3. (Optional) Run the mv jdk-11.0.2/ <target directory> command to save OpenJDK ina target directory.
4. Run theupdate-alternatives --install /usr/bin/java java <custom directory>/bin/java 2000 command to set up the Java runtime.
5. Run the java -version command to verify the version of Java.
Step 2b: Install the Linux VDA package on the template VM
Note:
To use a currently running VDA as the template VM, skip this step.
Before installing the Linux VDA package on the template VM, install .NET Core Runtime 3.1. Formore information, see Installation overview.
Based on your Linux distribution, run the following command to set up the environment for the LinuxVDA:
For RHEL/CentOS:
1 sudo yum ‒ y localinstall <PATH>/<Linux VDA RPM>2 <!--NeedCopy-->
For Ubuntu/Debian:
1 sudo dpkg ‒ i <PATH>/<Linux VDA DEB>23 apt-get install -f4 <!--NeedCopy-->
For SUSE 12:
1 sudo zypper ‒ i install <PATH>/<Linux VDA RPM>2 <!--NeedCopy-->
Step 2c: Install the EPEL repository that can offer ntfs-3g
Install the EPEL repository on RHEL 8/CentOS 8, RHEL 7/CentOS 7 so that running deploymcs.sh laterinstalls the ntfs-3g package available in the EPEL repository.
© 1999‒2022 Citrix Systems, Inc. All rights reserved. 203
Linux Virtual Delivery Agent 2109
Step 2d: Manually install ntfs-3g on SUSE 12
On the SUSE 12 platform, no repository provides ntfs-3g. Download the source code, compile, andinstall ntfs-3g manually:
1. Install the GNU Compiler Collection (GCC) compiler system and the make package:
1 sudo zypper install gcc2 sudo zypper install make3 <!--NeedCopy-->
2. Download the ntfs-3g package.
3. Decompress the ntfs-3g package:
1 sudo tar -xvzf ntfs-3g_ntfsprogs-<package version>.tgz2 <!--NeedCopy-->
4. Enter the path to the ntfs-3g package:
1 sudo cd ntfs-3g_ntfsprogs-<package version>2 <!--NeedCopy-->
5. Install ntfs-3g:
1 ./configure2 make3 make install4 <!--NeedCopy-->
Step 2e: Set up the runtime environment
Before running deploymcs.sh, do the following:
• Change variables in/etc/xdl/mcs/mcs.conf. Themcs.conf configuration file provides vari-ables for setting MCS and the Linux VDA. The following are some of the variables, of which dnsand AD_INTEGRATIONmust be set:
Note: If a variable can be set with multiple values, put the values inside single quotes and sep-arate themwith spaces. For example, LDAP_LIST=’aaa.lab:389 bbb.lab:389.’
© 1999‒2022 Citrix Systems, Inc. All rights reserved. 204
Linux Virtual Delivery Agent 2109
– Use_Existing_Configurations_Of_Current_VDA: Determines whether to use theexisting configurations of the currently running VDA. If set to Y, the configuration files onMCS-createdmachines are the sameas the equivalents on the currently runningVDA.How-ever, you still must configure the dns and AD_INTEGRATION variables. The default valueis N, whichmeans the configuration templates on themaster image determine the config-uration files on MCS-createdmachines.
– dns: Sets the DNS IP address.
– AD_INTEGRATION: SetsWinbind, SSSD (SSSD is not supported on SUSE), PBIS, or Centrify(we support Centrify only on RHEL and CentOS).
– CENTRIFY_DOWNLOAD_PATH: Sets the path for downloading the Centrify package. Thevalue takes effect only when you set the AD_INTEGRATION variable to Centrify.
– CENTRIFY_SAMBA_DOWNLOAD_PATH: Sets the path for downloading the Centrify Sambapackage. The value takes effect only when you set the AD_INTEGRATION variable to Cen-trify.
– WORKGROUP: Sets the workgroup name (case-sensitive) if you configured it in AD.
• On the template machine, add command lines to the /etc/xdl/mcs/mcs_local_setting.reg file for writing or updating registry values as required. This action prevents the loss of dataand settings every time an MCS-provisionedmachine restarts.
Each line in the /etc/xdl/mcs/mcs_local_setting.reg file is a command for setting orupdating a registry value.
Forexample, youcanadd the followingcommand lines to the/etc/xdl/mcs/mcs_local_setting.reg file to write or update a registry value respectively:
1 create -k ”HKLM\System\CurrentControlSet\Control\Citrix\VirtualChannels\Clipboard\ClipboardSelection” -t ”REG_DWORD” -v ”Flags” -d ”0x00000003” --force
2 <!--NeedCopy-->
1 update -k ”HKLM\System\CurrentControlSet\Control\Citrix\VirtualChannels\Clipboard\ClipboardSelection” -v ”Flags” -d ”0x00000003”
2 <!--NeedCopy-->
Step 2f: Create amaster image
© 1999‒2022 Citrix Systems, Inc. All rights reserved. 205
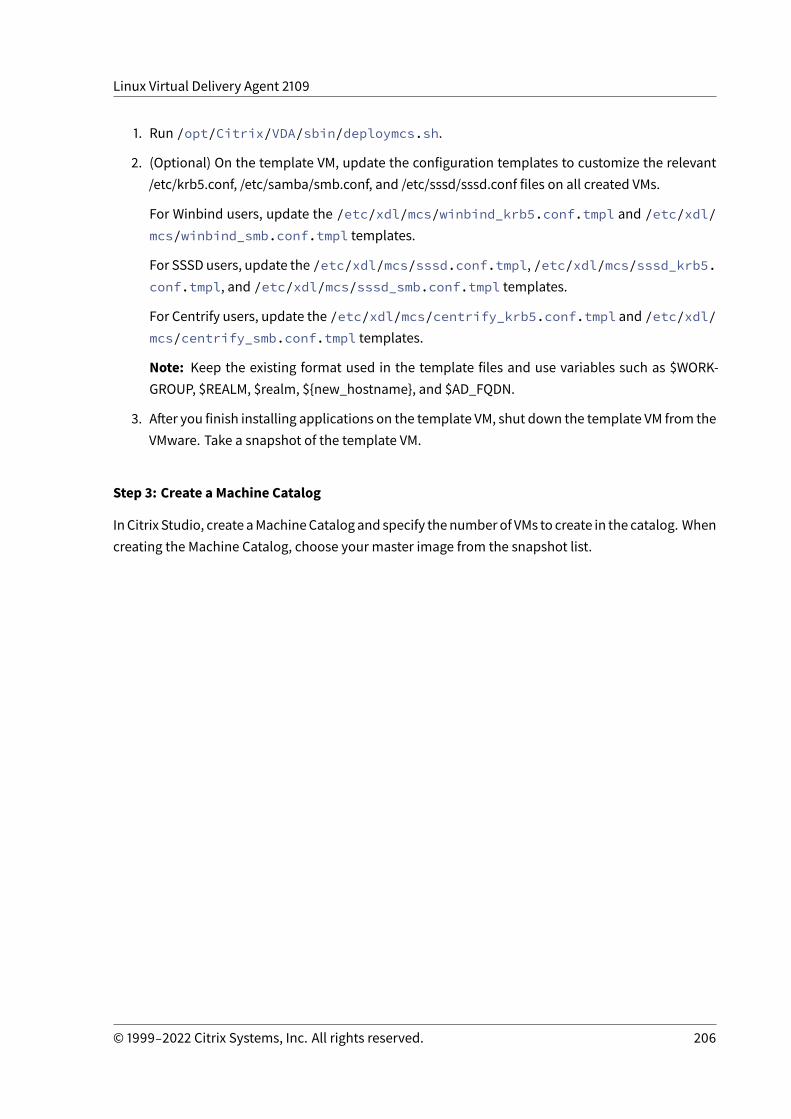
Linux Virtual Delivery Agent 2109
1. Run /opt/Citrix/VDA/sbin/deploymcs.sh.
2. (Optional) On the template VM, update the configuration templates to customize the relevant/etc/krb5.conf, /etc/samba/smb.conf, and /etc/sssd/sssd.conf files on all created VMs.
For Winbind users, update the /etc/xdl/mcs/winbind_krb5.conf.tmpl and /etc/xdl/mcs/winbind_smb.conf.tmpl templates.
For SSSD users, update the /etc/xdl/mcs/sssd.conf.tmpl, /etc/xdl/mcs/sssd_krb5.conf.tmpl, and /etc/xdl/mcs/sssd_smb.conf.tmpl templates.
For Centrify users, update the /etc/xdl/mcs/centrify_krb5.conf.tmpl and /etc/xdl/mcs/centrify_smb.conf.tmpl templates.
Note: Keep the existing format used in the template files and use variables such as $WORK-GROUP, $REALM, $realm, ${new_hostname}, and $AD_FQDN.
3. After you finish installing applications on the template VM, shut down the template VM from theVMware. Take a snapshot of the template VM.
Step 3: Create a Machine Catalog
In Citrix Studio, create aMachineCatalogand specify thenumberof VMs to create in the catalog. Whencreating the Machine Catalog, choose your master image from the snapshot list.
© 1999‒2022 Citrix Systems, Inc. All rights reserved. 206
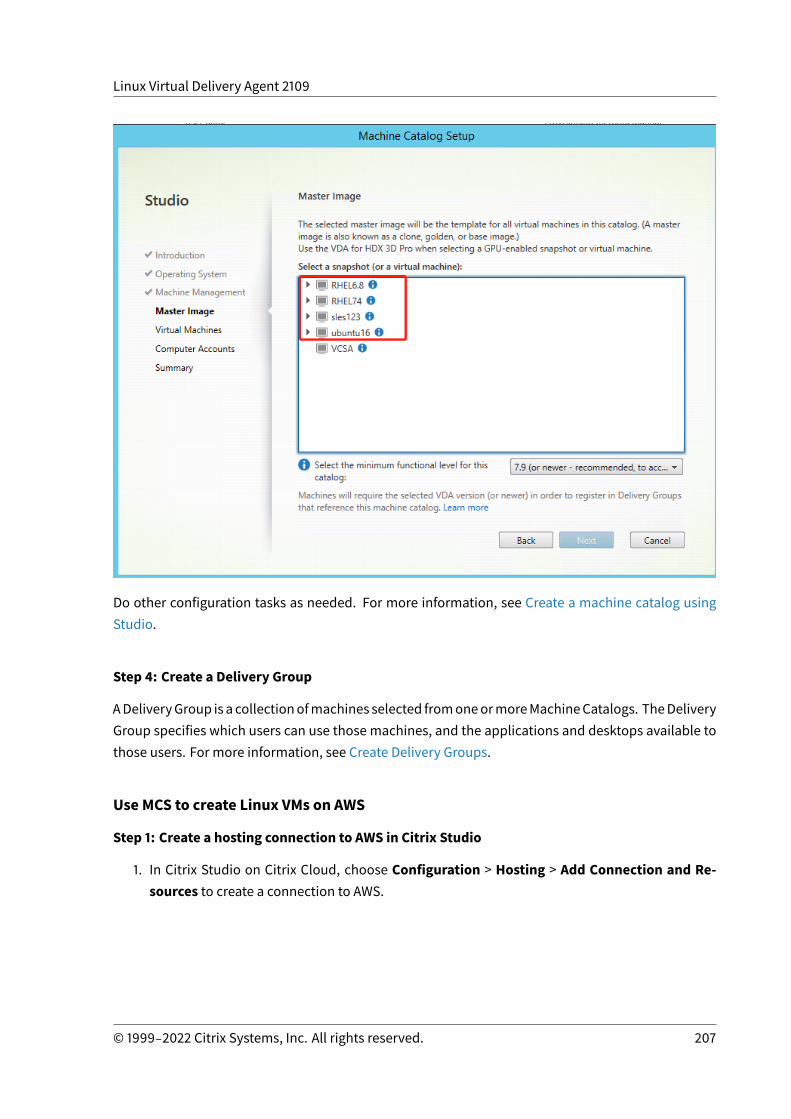
Linux Virtual Delivery Agent 2109
Do other configuration tasks as needed. For more information, see Create a machine catalog usingStudio.
Step 4: Create a Delivery Group
ADeliveryGroup is a collectionofmachines selected fromoneormoreMachineCatalogs. TheDeliveryGroup specifies which users can use those machines, and the applications and desktops available tothose users. For more information, see Create Delivery Groups.
Use MCS to create Linux VMs on AWS
Step 1: Create a hosting connection to AWS in Citrix Studio
1. In Citrix Studio on Citrix Cloud, choose Configuration > Hosting > Add Connection and Re-sources to create a connection to AWS.
© 1999‒2022 Citrix Systems, Inc. All rights reserved. 207
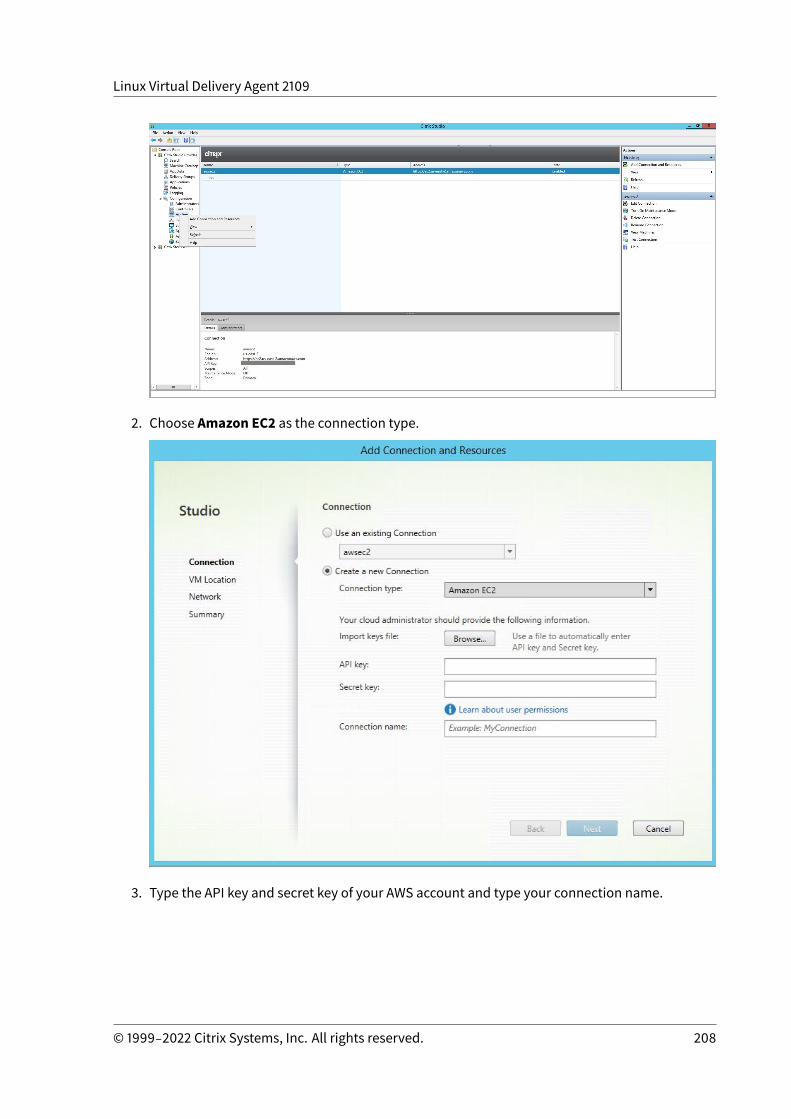
Linux Virtual Delivery Agent 2109
2. Choose Amazon EC2 as the connection type.
3. Type the API key and secret key of your AWS account and type your connection name.
© 1999‒2022 Citrix Systems, Inc. All rights reserved. 208
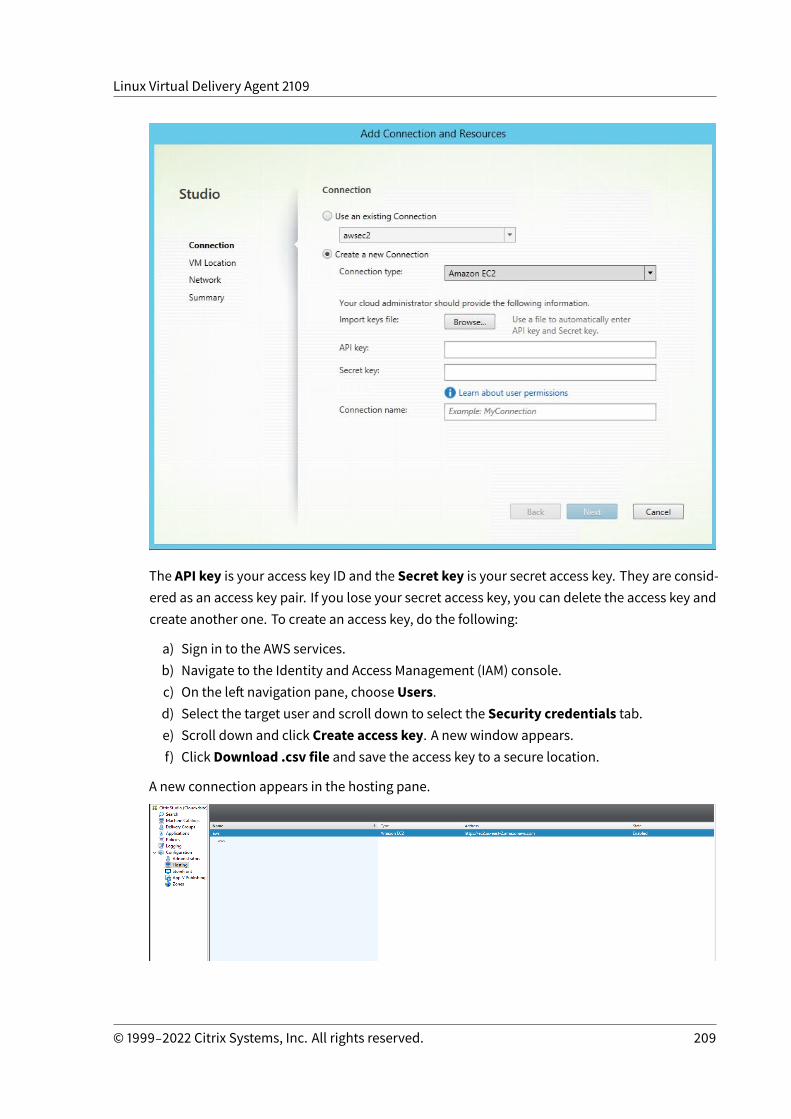
Linux Virtual Delivery Agent 2109
The API key is your access key ID and the Secret key is your secret access key. They are consid-ered as an access key pair. If you lose your secret access key, you can delete the access key andcreate another one. To create an access key, do the following:
a) Sign in to the AWS services.b) Navigate to the Identity and Access Management (IAM) console.c) On the left navigation pane, choose Users.d) Select the target user and scroll down to select the Security credentials tab.e) Scroll down and click Create access key. A new window appears.f) Click Download .csv file and save the access key to a secure location.
A new connection appears in the hosting pane.
© 1999‒2022 Citrix Systems, Inc. All rights reserved. 209
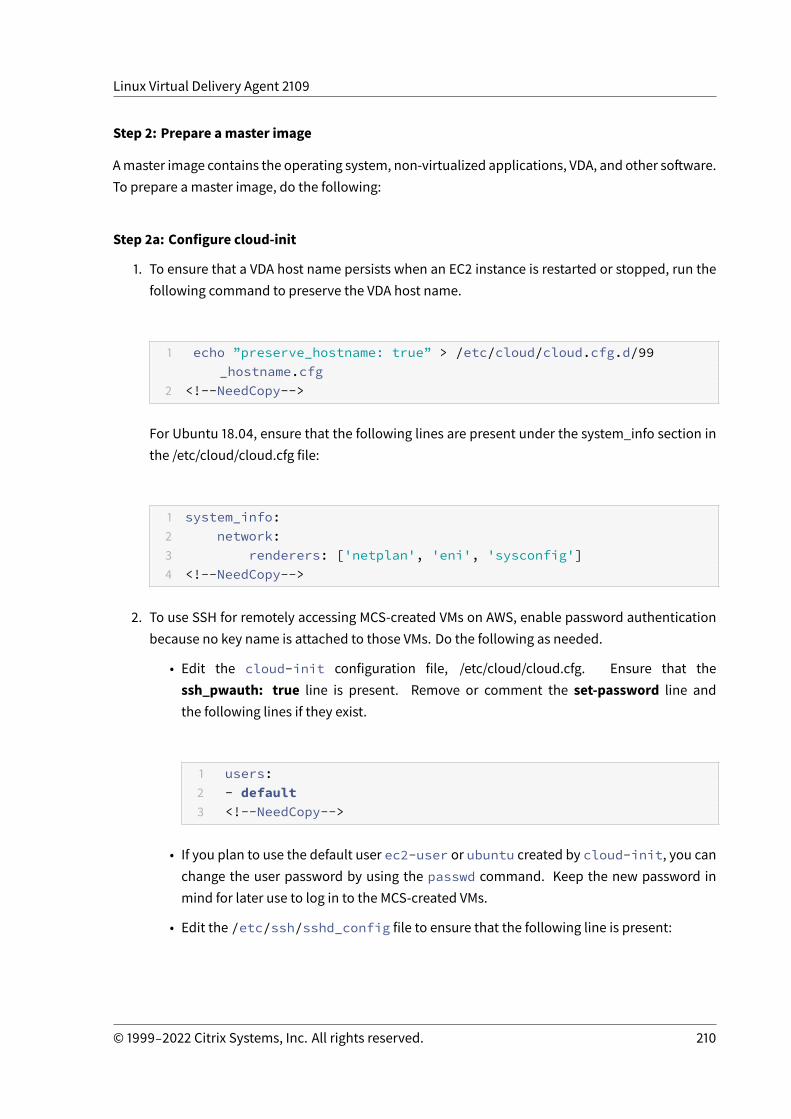
Linux Virtual Delivery Agent 2109
Step 2: Prepare amaster image
Amaster image contains the operating system, non-virtualized applications, VDA, and other software.To prepare a master image, do the following:
Step 2a: Configure cloud-init
1. To ensure that a VDA host name persists when an EC2 instance is restarted or stopped, run thefollowing command to preserve the VDA host name.
1 echo ”preserve_hostname: true” > /etc/cloud/cloud.cfg.d/99_hostname.cfg
2 <!--NeedCopy-->
For Ubuntu 18.04, ensure that the following lines are present under the system_info section inthe /etc/cloud/cloud.cfg file:
1 system_info:2 network:3 renderers: ['netplan', 'eni', 'sysconfig']4 <!--NeedCopy-->
2. To use SSH for remotely accessing MCS-created VMs on AWS, enable password authenticationbecause no key name is attached to those VMs. Do the following as needed.
• Edit the cloud-init configuration file, /etc/cloud/cloud.cfg. Ensure that thessh_pwauth: true line is present. Remove or comment the set-password line andthe following lines if they exist.
1 users:2 - default3 <!--NeedCopy-->
• If you plan to use the default user ec2-user or ubuntu created by cloud-init, you canchange the user password by using the passwd command. Keep the new password inmind for later use to log in to the MCS-created VMs.
• Edit the /etc/ssh/sshd_config file to ensure that the following line is present:
© 1999‒2022 Citrix Systems, Inc. All rights reserved. 210
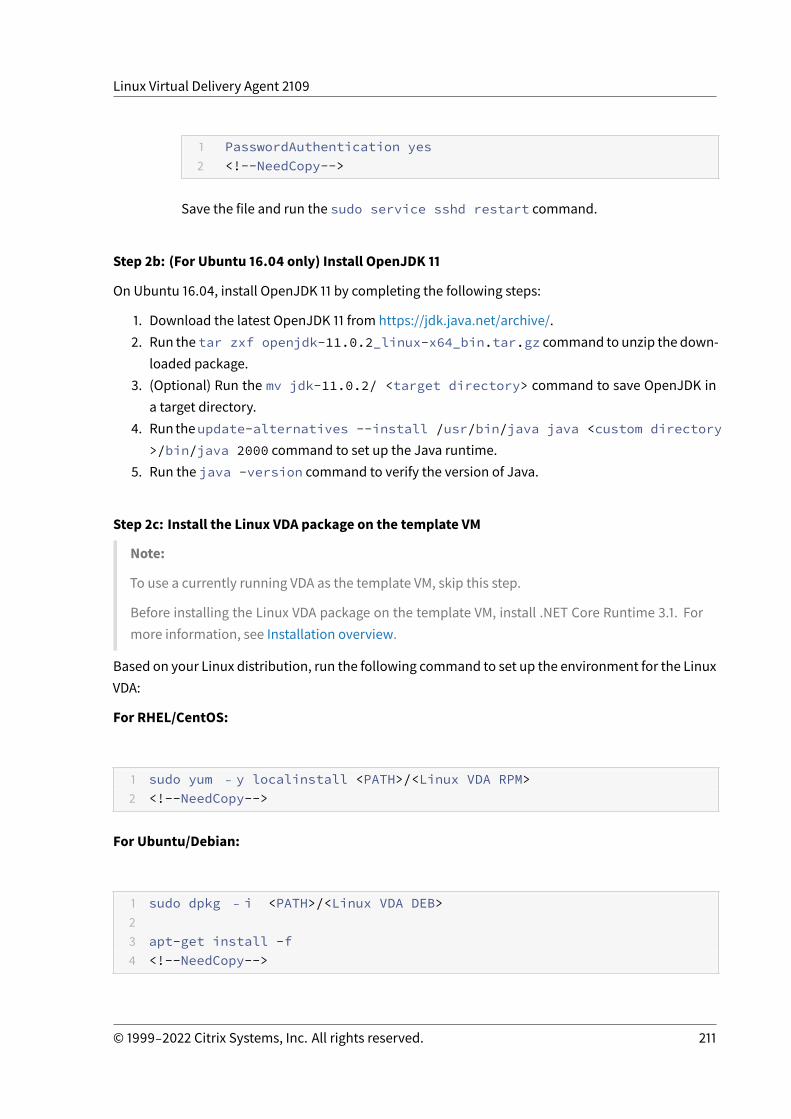
Linux Virtual Delivery Agent 2109
1 PasswordAuthentication yes2 <!--NeedCopy-->
Save the file and run the sudo service sshd restart command.
Step 2b: (For Ubuntu 16.04 only) Install OpenJDK 11
On Ubuntu 16.04, install OpenJDK 11 by completing the following steps:
1. Download the latest OpenJDK 11 from https://jdk.java.net/archive/.2. Run the tar zxf openjdk-11.0.2_linux-x64_bin.tar.gz command to unzip the down-
loaded package.3. (Optional) Run the mv jdk-11.0.2/ <target directory> command to save OpenJDK in
a target directory.4. Run theupdate-alternatives --install /usr/bin/java java <custom directory
>/bin/java 2000 command to set up the Java runtime.5. Run the java -version command to verify the version of Java.
Step 2c: Install the Linux VDA package on the template VM
Note:
To use a currently running VDA as the template VM, skip this step.
Before installing the Linux VDA package on the template VM, install .NET Core Runtime 3.1. Formore information, see Installation overview.
Based on your Linux distribution, run the following command to set up the environment for the LinuxVDA:
For RHEL/CentOS:
1 sudo yum ‒ y localinstall <PATH>/<Linux VDA RPM>2 <!--NeedCopy-->
For Ubuntu/Debian:
1 sudo dpkg ‒ i <PATH>/<Linux VDA DEB>23 apt-get install -f4 <!--NeedCopy-->
© 1999‒2022 Citrix Systems, Inc. All rights reserved. 211
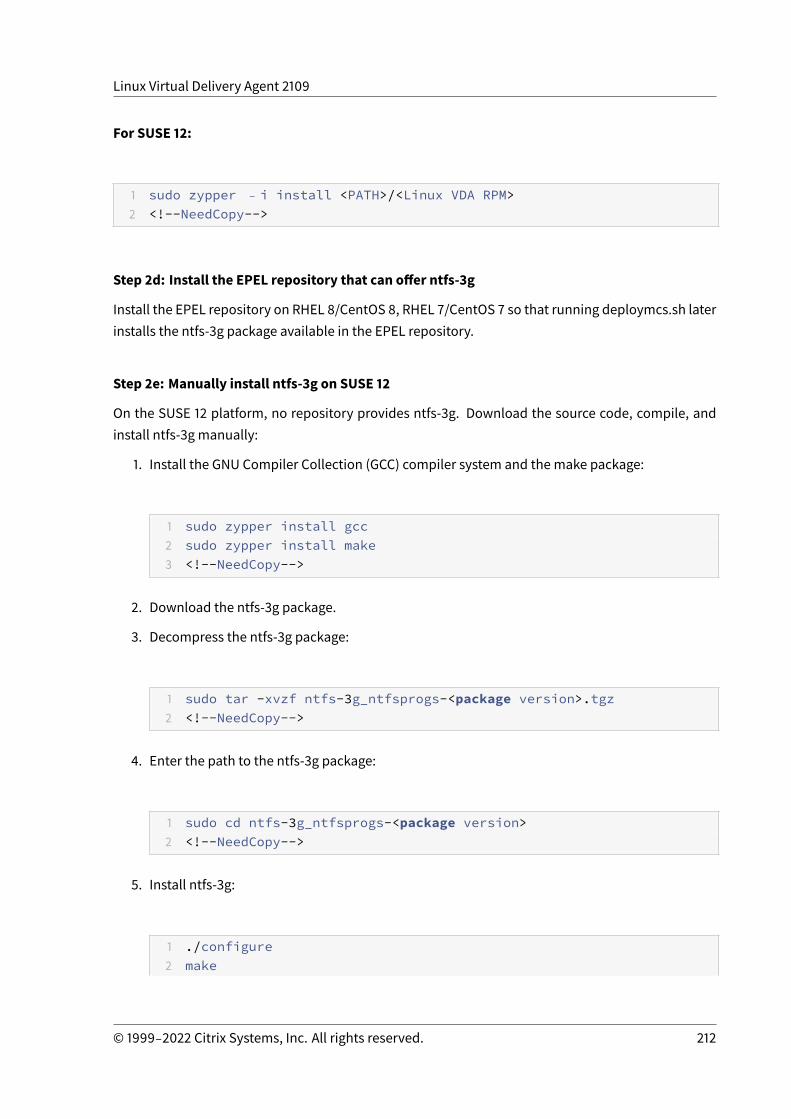
Linux Virtual Delivery Agent 2109
For SUSE 12:
1 sudo zypper ‒ i install <PATH>/<Linux VDA RPM>2 <!--NeedCopy-->
Step 2d: Install the EPEL repository that can offer ntfs-3g
Install the EPEL repository on RHEL 8/CentOS 8, RHEL 7/CentOS 7 so that running deploymcs.sh laterinstalls the ntfs-3g package available in the EPEL repository.
Step 2e: Manually install ntfs-3g on SUSE 12
On the SUSE 12 platform, no repository provides ntfs-3g. Download the source code, compile, andinstall ntfs-3g manually:
1. Install the GNU Compiler Collection (GCC) compiler system and the make package:
1 sudo zypper install gcc2 sudo zypper install make3 <!--NeedCopy-->
2. Download the ntfs-3g package.
3. Decompress the ntfs-3g package:
1 sudo tar -xvzf ntfs-3g_ntfsprogs-<package version>.tgz2 <!--NeedCopy-->
4. Enter the path to the ntfs-3g package:
1 sudo cd ntfs-3g_ntfsprogs-<package version>2 <!--NeedCopy-->
5. Install ntfs-3g:
1 ./configure2 make
© 1999‒2022 Citrix Systems, Inc. All rights reserved. 212
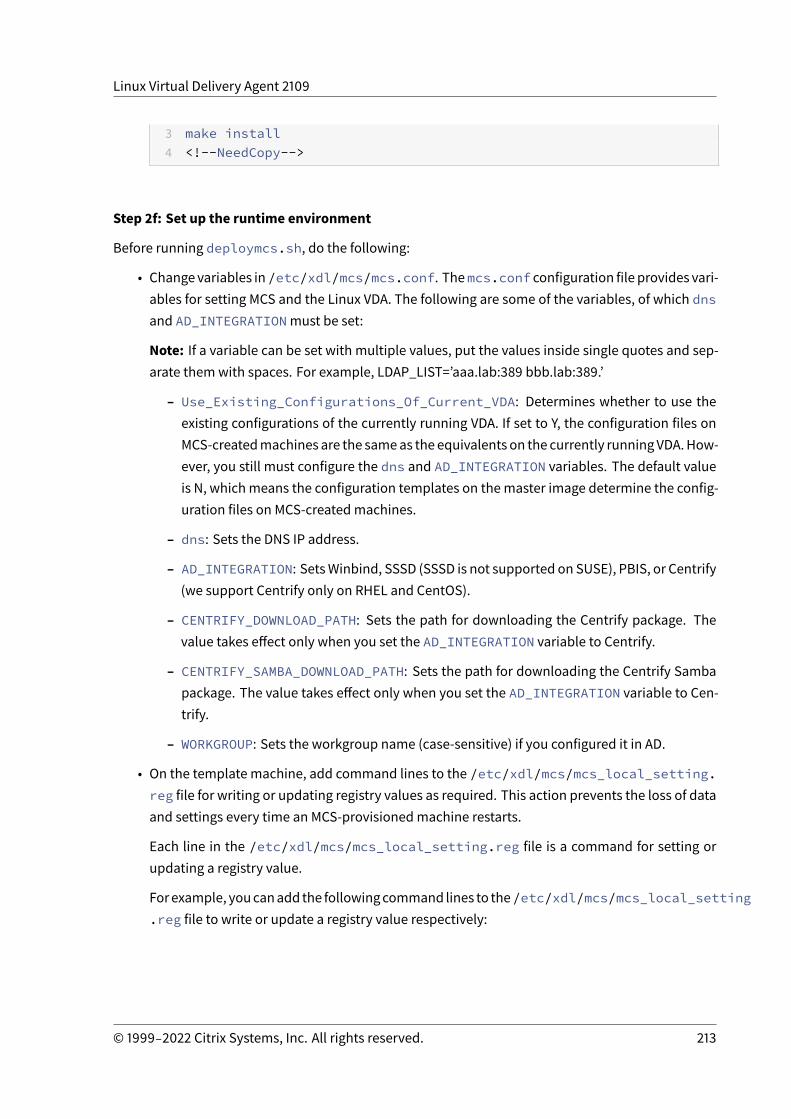
Linux Virtual Delivery Agent 2109
3 make install4 <!--NeedCopy-->
Step 2f: Set up the runtime environment
Before running deploymcs.sh, do the following:
• Change variables in/etc/xdl/mcs/mcs.conf. Themcs.conf configuration file provides vari-ables for setting MCS and the Linux VDA. The following are some of the variables, of which dnsand AD_INTEGRATIONmust be set:
Note: If a variable can be set with multiple values, put the values inside single quotes and sep-arate themwith spaces. For example, LDAP_LIST=’aaa.lab:389 bbb.lab:389.’
– Use_Existing_Configurations_Of_Current_VDA: Determines whether to use theexisting configurations of the currently running VDA. If set to Y, the configuration files onMCS-createdmachines are the sameas the equivalents on the currently runningVDA.How-ever, you still must configure the dns and AD_INTEGRATION variables. The default valueis N, whichmeans the configuration templates on themaster image determine the config-uration files on MCS-createdmachines.
– dns: Sets the DNS IP address.
– AD_INTEGRATION: SetsWinbind, SSSD (SSSD is not supported on SUSE), PBIS, or Centrify(we support Centrify only on RHEL and CentOS).
– CENTRIFY_DOWNLOAD_PATH: Sets the path for downloading the Centrify package. Thevalue takes effect only when you set the AD_INTEGRATION variable to Centrify.
– CENTRIFY_SAMBA_DOWNLOAD_PATH: Sets the path for downloading the Centrify Sambapackage. The value takes effect only when you set the AD_INTEGRATION variable to Cen-trify.
– WORKGROUP: Sets the workgroup name (case-sensitive) if you configured it in AD.
• On the template machine, add command lines to the /etc/xdl/mcs/mcs_local_setting.reg file for writing or updating registry values as required. This action prevents the loss of dataand settings every time an MCS-provisionedmachine restarts.
Each line in the /etc/xdl/mcs/mcs_local_setting.reg file is a command for setting orupdating a registry value.
Forexample, youcanadd the followingcommand lines to the/etc/xdl/mcs/mcs_local_setting.reg file to write or update a registry value respectively:
© 1999‒2022 Citrix Systems, Inc. All rights reserved. 213
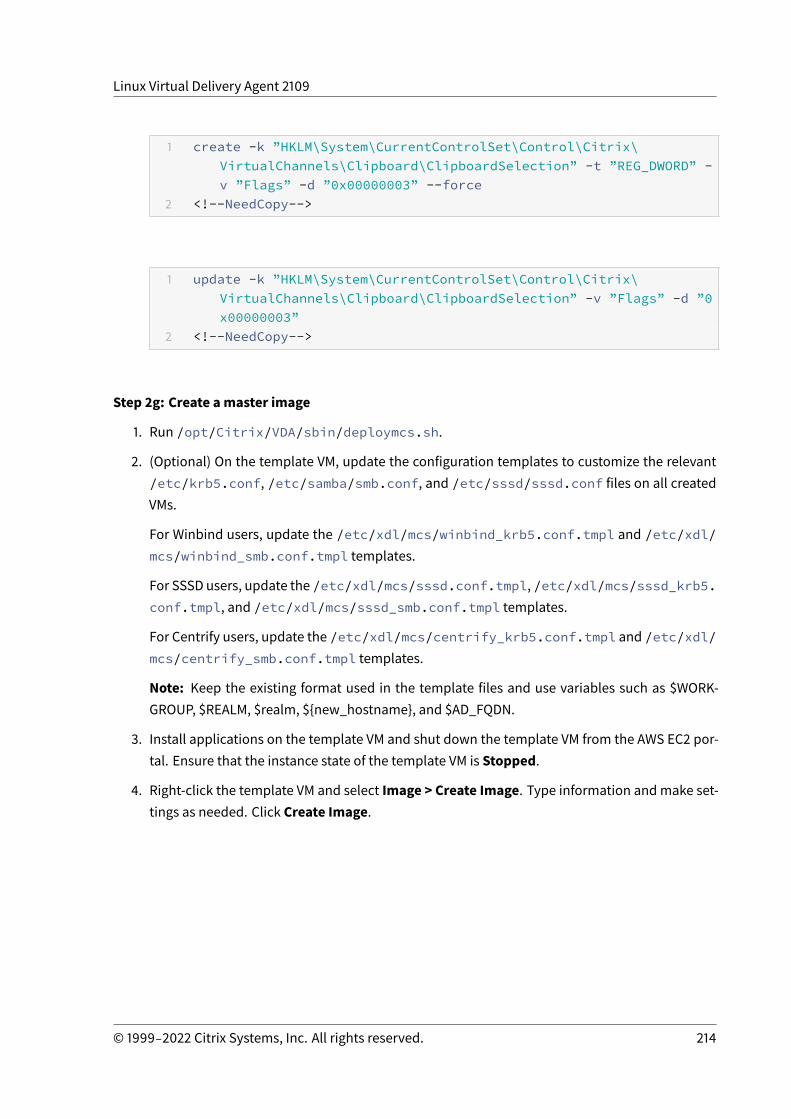
Linux Virtual Delivery Agent 2109
1 create -k ”HKLM\System\CurrentControlSet\Control\Citrix\VirtualChannels\Clipboard\ClipboardSelection” -t ”REG_DWORD” -v ”Flags” -d ”0x00000003” --force
2 <!--NeedCopy-->
1 update -k ”HKLM\System\CurrentControlSet\Control\Citrix\VirtualChannels\Clipboard\ClipboardSelection” -v ”Flags” -d ”0x00000003”
2 <!--NeedCopy-->
Step 2g: Create amaster image
1. Run /opt/Citrix/VDA/sbin/deploymcs.sh.
2. (Optional) On the template VM, update the configuration templates to customize the relevant/etc/krb5.conf, /etc/samba/smb.conf, and /etc/sssd/sssd.conf files on all createdVMs.
For Winbind users, update the /etc/xdl/mcs/winbind_krb5.conf.tmpl and /etc/xdl/mcs/winbind_smb.conf.tmpl templates.
For SSSD users, update the /etc/xdl/mcs/sssd.conf.tmpl, /etc/xdl/mcs/sssd_krb5.conf.tmpl, and /etc/xdl/mcs/sssd_smb.conf.tmpl templates.
For Centrify users, update the /etc/xdl/mcs/centrify_krb5.conf.tmpl and /etc/xdl/mcs/centrify_smb.conf.tmpl templates.
Note: Keep the existing format used in the template files and use variables such as $WORK-GROUP, $REALM, $realm, ${new_hostname}, and $AD_FQDN.
3. Install applications on the template VM and shut down the template VM from the AWS EC2 por-tal. Ensure that the instance state of the template VM is Stopped.
4. Right-click the template VM and select Image > Create Image. Type information andmake set-tings as needed. Click Create Image.
© 1999‒2022 Citrix Systems, Inc. All rights reserved. 214
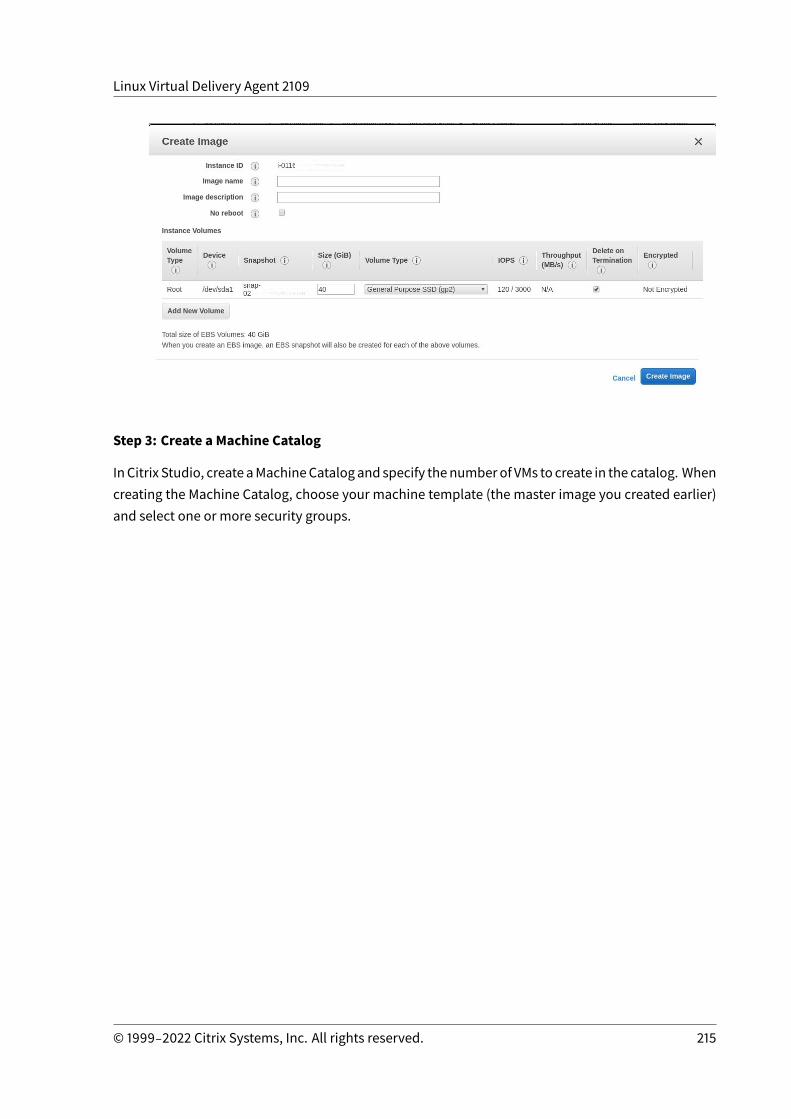
Linux Virtual Delivery Agent 2109
Step 3: Create a Machine Catalog
In Citrix Studio, create aMachineCatalogand specify thenumberof VMs to create in the catalog. Whencreating the Machine Catalog, choose your machine template (the master image you created earlier)and select one or more security groups.
© 1999‒2022 Citrix Systems, Inc. All rights reserved. 215
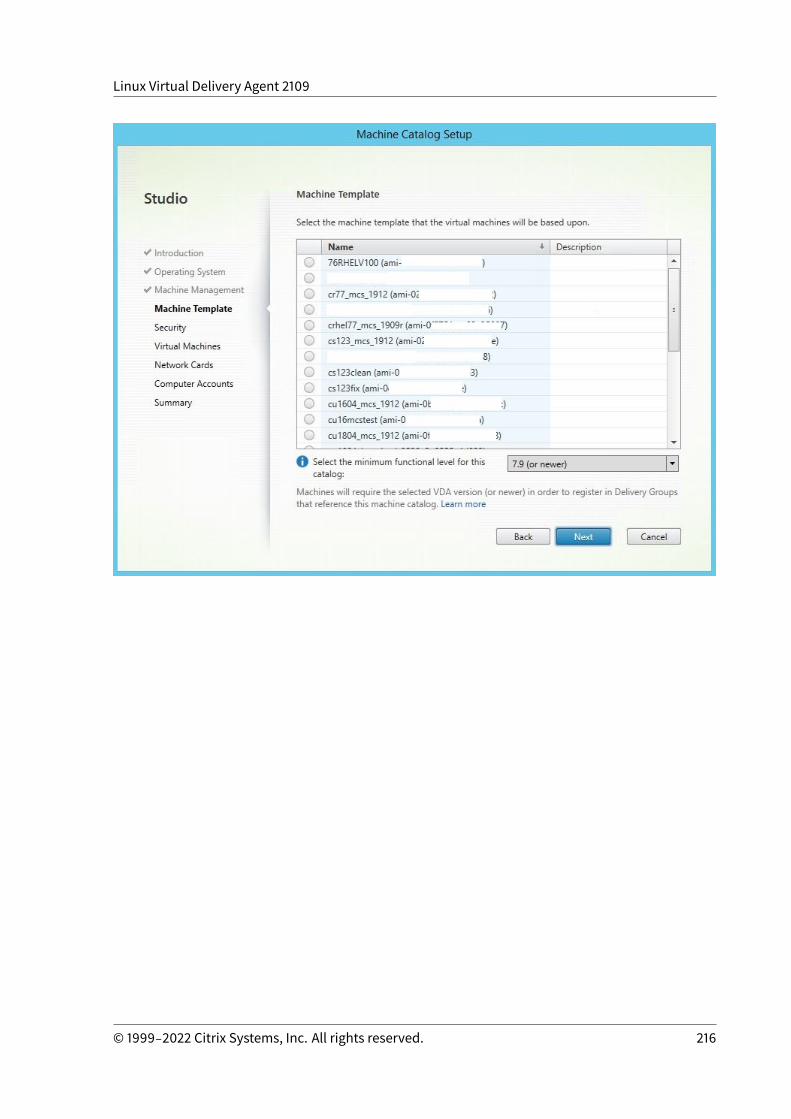
Linux Virtual Delivery Agent 2109
© 1999‒2022 Citrix Systems, Inc. All rights reserved. 216
Linux Virtual Delivery Agent 2109
Do other configuration tasks as needed. For more information, see Create a machine catalog usingStudio.
Step 4: Create a Delivery Group
ADeliveryGroup is a collectionofmachines selected fromoneormoreMachineCatalogs. TheDeliveryGroup specifies which users can use those machines, and the applications and desktops available tothose users. For more information, see Create Delivery Groups.
Use MCS to create Linux VMs on GCP
Step 1: Set up your GCP environment
For more information, see Google Cloud Platform virtualization environments.
Step 2: Create a hosting connection to GCP in Citrix Studio
1. In Citrix Studio on Citrix Cloud, choose Configuration > Hosting > Add Connection and Re-sources to create a connection to GCP.
© 1999‒2022 Citrix Systems, Inc. All rights reserved. 217
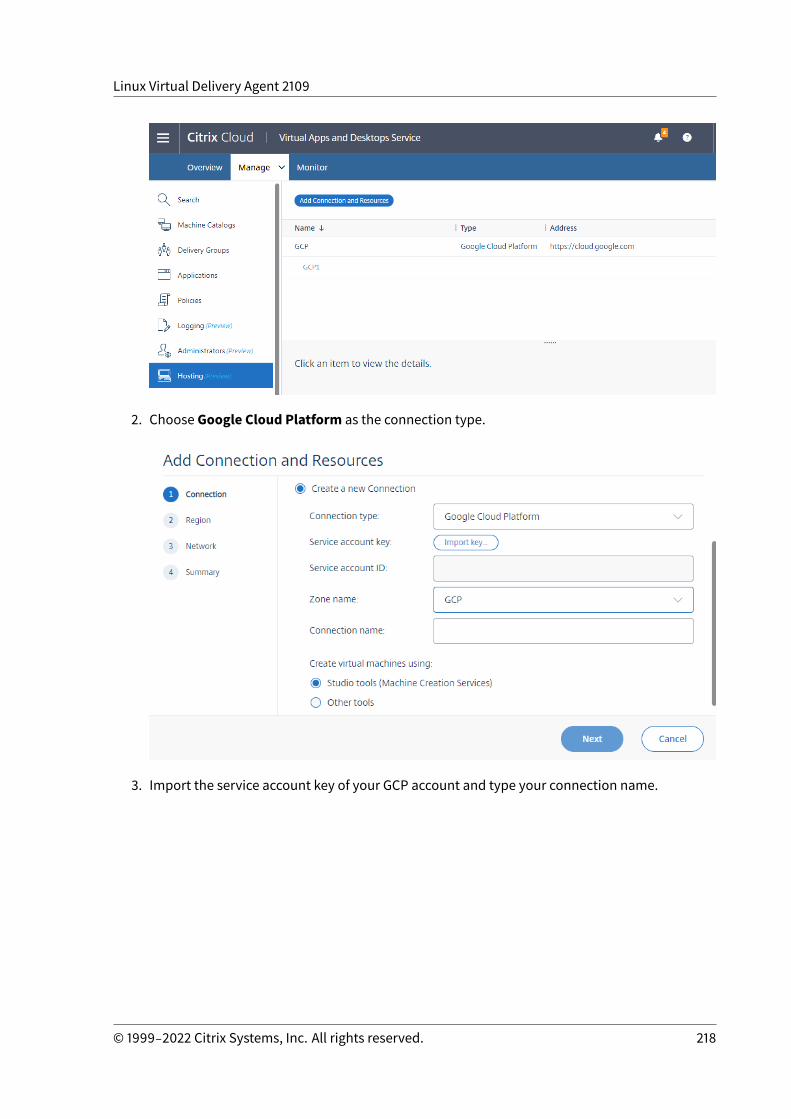
Linux Virtual Delivery Agent 2109
2. Choose Google Cloud Platform as the connection type.
3. Import the service account key of your GCP account and type your connection name.
© 1999‒2022 Citrix Systems, Inc. All rights reserved. 218

Linux Virtual Delivery Agent 2109
A new connection appears in the hosting pane.
Step 3: Prepare amaster image
Amaster image contains the operating system, non-virtualized applications, VDA, and other software.To prepare a master image, do the following:
Step 3a: (For Ubuntu 16.04 only) Install OpenJDK 11
On Ubuntu 16.04, install OpenJDK 11 by completing the following steps:
© 1999‒2022 Citrix Systems, Inc. All rights reserved. 219
Linux Virtual Delivery Agent 2109
1. Download the latest OpenJDK 11 from https://jdk.java.net/archive/.2. Run the tar zxf openjdk-11.0.2_linux-x64_bin.tar.gz command to unzip the down-
loaded package.3. (Optional) Run the mv jdk-11.0.2/ <target directory> command to save OpenJDK in
a target directory.4. Run theupdate-alternatives --install /usr/bin/java java <custom directory
>/bin/java 2000 command to set up the Java runtime.5. Run the java -version command to verify the version of Java.
Step 3b: Install the Linux VDA package on the template VM
Note:
To use a currently running VDA as the template VM, skip this step.
Before installing the Linux VDA package on the template VM, install .NET Core Runtime 3.1. Formore information, see Installation overview.
Based on your Linux distribution, run the following command to set up the environment for the LinuxVDA:
For RHEL/CentOS:
1 sudo yum ‒ y localinstall <PATH>/<Linux VDA RPM>2 <!--NeedCopy-->
For Ubuntu/Debian:
1 sudo dpkg ‒ i <PATH>/<Linux VDA DEB>23 apt-get install -f4 <!--NeedCopy-->
For SUSE 12:
1 sudo zypper ‒ i install <PATH>/<Linux VDA RPM>2 <!--NeedCopy-->
Step 3c: Install the EPEL repository that can offer ntfs-3g
© 1999‒2022 Citrix Systems, Inc. All rights reserved. 220
Linux Virtual Delivery Agent 2109
Install the EPEL repository on RHEL 8/CentOS 8, RHEL 7/CentOS 7 so that running deploymcs.sh laterinstalls the ntfs-3g package available in the EPEL repository.
Step 3d: Manually install ntfs-3g on SUSE 12
On the SUSE 12 platform, no repository provides ntfs-3g. Download the source code, compile, andinstall ntfs-3g manually:
1. Install the GNU Compiler Collection (GCC) compiler system and the make package:
1 sudo zypper install gcc2 sudo zypper install make3 <!--NeedCopy-->
2. Download the ntfs-3g package.
3. Decompress the ntfs-3g package:
1 sudo tar -xvzf ntfs-3g_ntfsprogs-<package version>.tgz2 <!--NeedCopy-->
4. Enter the path to the ntfs-3g package:
1 sudo cd ntfs-3g_ntfsprogs-<package version>2 <!--NeedCopy-->
5. Install ntfs-3g:
1 ./configure2 make3 make install4 <!--NeedCopy-->
Step 3e: Set up the runtime environment
Before running deploymcs.sh, do the following:
© 1999‒2022 Citrix Systems, Inc. All rights reserved. 221
Linux Virtual Delivery Agent 2109
• Change variables in/etc/xdl/mcs/mcs.conf. Themcs.conf configuration file provides vari-ables for setting MCS and the Linux VDA. The following are some of the variables, of which dnsand AD_INTEGRATIONmust be set:
Note: If a variable can be set with multiple values, put the values inside single quotes and sep-arate themwith spaces. For example, LDAP_LIST=’aaa.lab:389 bbb.lab:389.’
– Use_Existing_Configurations_Of_Current_VDA: Determines whether to use theexisting configurations of the currently running VDA. If set to Y, the configuration files onMCS-createdmachines are the sameas the equivalents on the currently runningVDA.How-ever, you still must configure the dns and AD_INTEGRATION variables. The default valueis N, whichmeans the configuration templates on themaster image determine the config-uration files on MCS-createdmachines.
– dns: Sets the DNS IP address.
– AD_INTEGRATION: SetsWinbind, SSSD (SSSD is not supported on SUSE), PBIS, or Centrify(we support Centrify only on RHEL and CentOS).
– CENTRIFY_DOWNLOAD_PATH: Sets the path for downloading the Centrify package. Thevalue takes effect only when you set the AD_INTEGRATION variable to Centrify.
– CENTRIFY_SAMBA_DOWNLOAD_PATH: Sets the path for downloading the Centrify Sambapackage. The value takes effect only when you set the AD_INTEGRATION variable to Cen-trify.
– WORKGROUP: Sets the workgroup name (case-sensitive) if you configured it in AD.
• On the template machine, add command lines to the /etc/xdl/mcs/mcs_local_setting.reg file for writing or updating registry values as required. This action prevents the loss of dataand settings every time an MCS-provisionedmachine restarts.
Each line in the /etc/xdl/mcs/mcs_local_setting.reg file is a command for setting orupdating a registry value.
Forexample, youcanadd the followingcommand lines to the/etc/xdl/mcs/mcs_local_setting.reg file to write or update a registry value respectively:
1 create -k ”HKLM\System\CurrentControlSet\Control\Citrix\VirtualChannels\Clipboard\ClipboardSelection” -t ”REG_DWORD” -v ”Flags” -d ”0x00000003” --force
2 <!--NeedCopy-->
© 1999‒2022 Citrix Systems, Inc. All rights reserved. 222
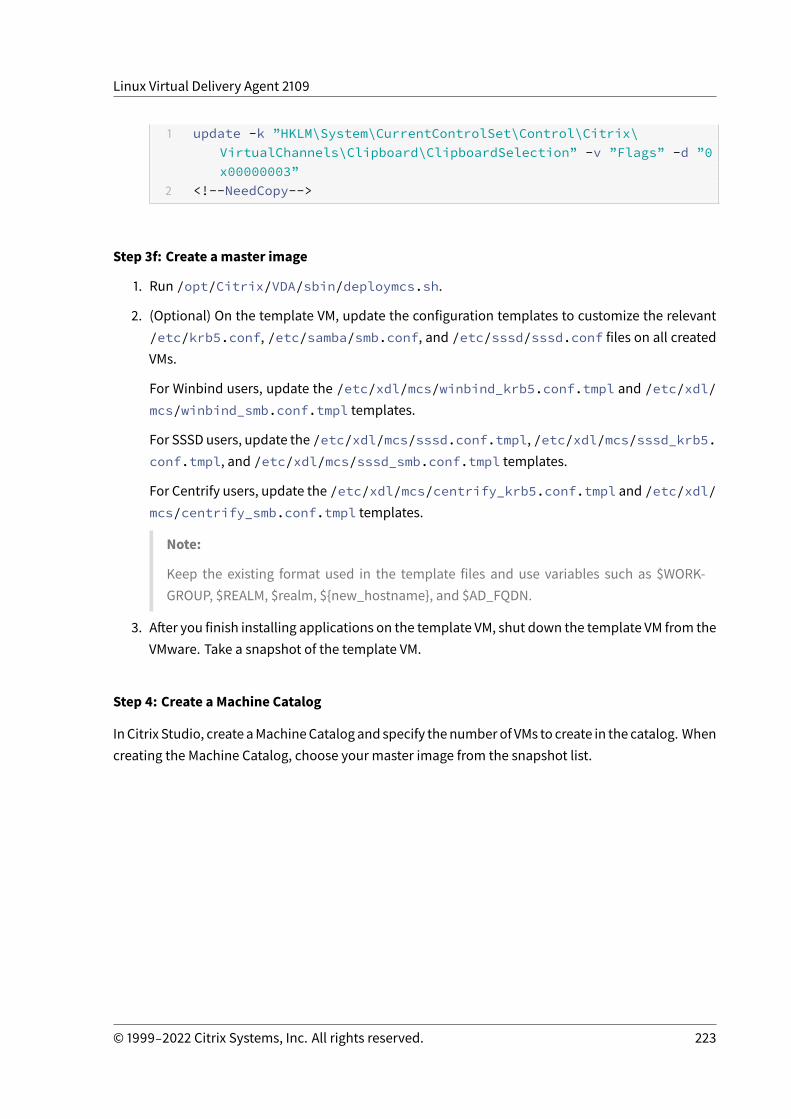
Linux Virtual Delivery Agent 2109
1 update -k ”HKLM\System\CurrentControlSet\Control\Citrix\VirtualChannels\Clipboard\ClipboardSelection” -v ”Flags” -d ”0x00000003”
2 <!--NeedCopy-->
Step 3f: Create amaster image
1. Run /opt/Citrix/VDA/sbin/deploymcs.sh.
2. (Optional) On the template VM, update the configuration templates to customize the relevant/etc/krb5.conf, /etc/samba/smb.conf, and /etc/sssd/sssd.conf files on all createdVMs.
For Winbind users, update the /etc/xdl/mcs/winbind_krb5.conf.tmpl and /etc/xdl/mcs/winbind_smb.conf.tmpl templates.
For SSSD users, update the /etc/xdl/mcs/sssd.conf.tmpl, /etc/xdl/mcs/sssd_krb5.conf.tmpl, and /etc/xdl/mcs/sssd_smb.conf.tmpl templates.
For Centrify users, update the /etc/xdl/mcs/centrify_krb5.conf.tmpl and /etc/xdl/mcs/centrify_smb.conf.tmpl templates.
Note:
Keep the existing format used in the template files and use variables such as $WORK-GROUP, $REALM, $realm, ${new_hostname}, and $AD_FQDN.
3. After you finish installing applications on the template VM, shut down the template VM from theVMware. Take a snapshot of the template VM.
Step 4: Create a Machine Catalog
In Citrix Studio, create aMachineCatalogand specify thenumberof VMs to create in the catalog. Whencreating the Machine Catalog, choose your master image from the snapshot list.
© 1999‒2022 Citrix Systems, Inc. All rights reserved. 223
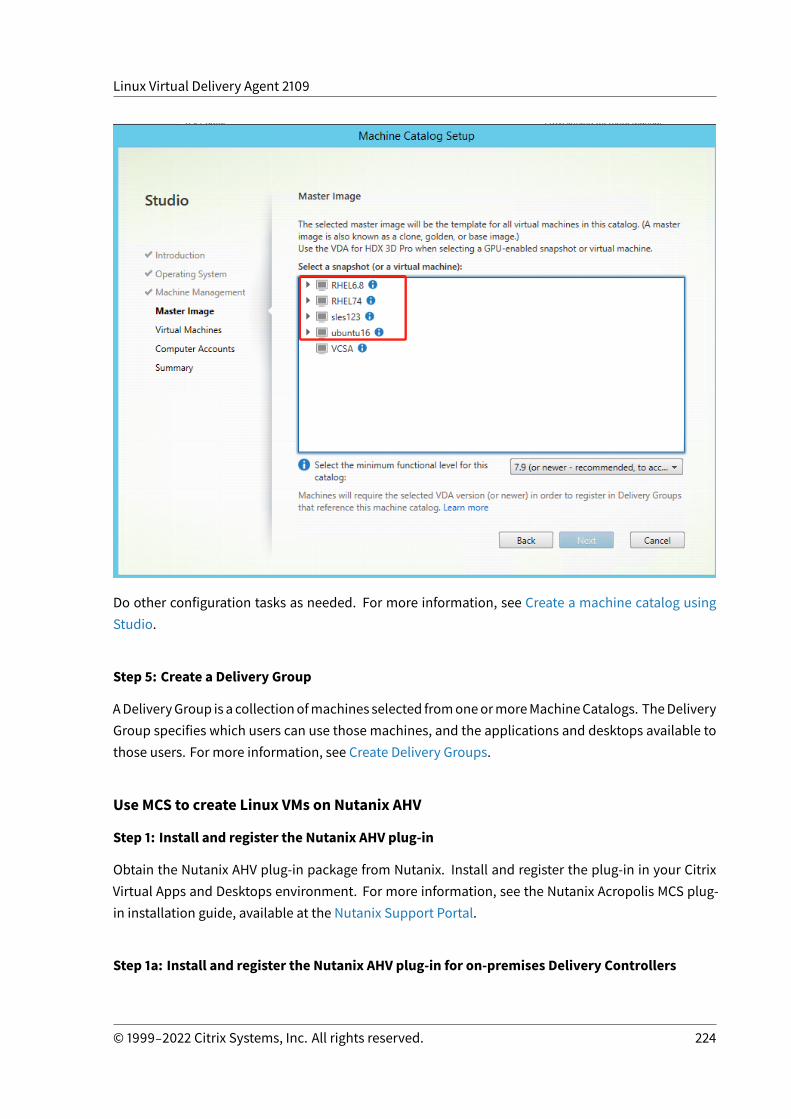
Linux Virtual Delivery Agent 2109
Do other configuration tasks as needed. For more information, see Create a machine catalog usingStudio.
Step 5: Create a Delivery Group
ADeliveryGroup is a collectionofmachines selected fromoneormoreMachineCatalogs. TheDeliveryGroup specifies which users can use those machines, and the applications and desktops available tothose users. For more information, see Create Delivery Groups.
Use MCS to create Linux VMs on Nutanix AHV
Step 1: Install and register the Nutanix AHV plug-in
Obtain the Nutanix AHV plug-in package from Nutanix. Install and register the plug-in in your CitrixVirtual Apps and Desktops environment. For more information, see the Nutanix Acropolis MCS plug-in installation guide, available at the Nutanix Support Portal.
Step 1a: Install and register the Nutanix AHV plug-in for on-premises Delivery Controllers
© 1999‒2022 Citrix Systems, Inc. All rights reserved. 224
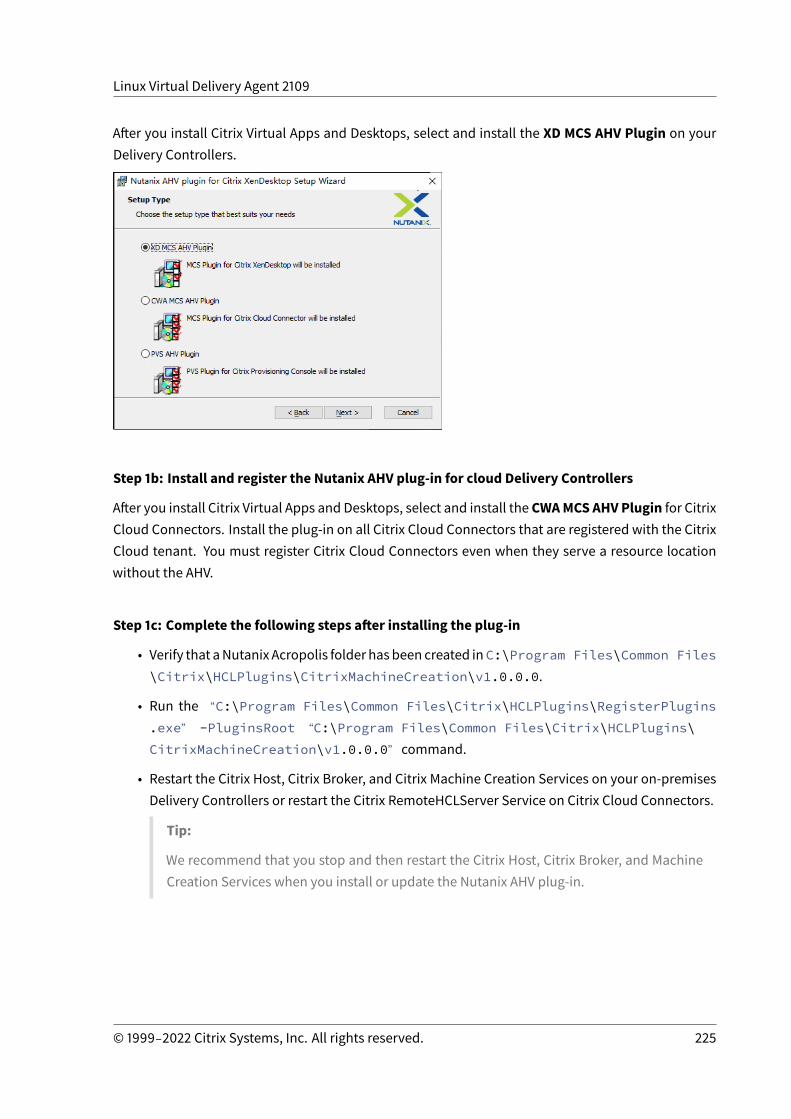
Linux Virtual Delivery Agent 2109
After you install Citrix Virtual Apps and Desktops, select and install the XD MCS AHV Plugin on yourDelivery Controllers.
Step 1b: Install and register the Nutanix AHV plug-in for cloud Delivery Controllers
After you install Citrix Virtual Apps and Desktops, select and install the CWAMCS AHV Plugin for CitrixCloud Connectors. Install the plug-in on all Citrix Cloud Connectors that are registered with the CitrixCloud tenant. You must register Citrix Cloud Connectors even when they serve a resource locationwithout the AHV.
Step 1c: Complete the following steps after installing the plug-in
• Verify that aNutanix Acropolis folder hasbeen created inC:\Program Files\Common Files\Citrix\HCLPlugins\CitrixMachineCreation\v1.0.0.0.
• Run the “C:\Program Files\Common Files\Citrix\HCLPlugins\RegisterPlugins.exe” -PluginsRoot “C:\Program Files\Common Files\Citrix\HCLPlugins\CitrixMachineCreation\v1.0.0.0” command.
• Restart the Citrix Host, Citrix Broker, and Citrix Machine Creation Services on your on-premisesDelivery Controllers or restart the Citrix RemoteHCLServer Service on Citrix Cloud Connectors.
Tip:
We recommend that you stop and then restart the Citrix Host, Citrix Broker, and MachineCreation Services when you install or update the Nutanix AHV plug-in.
© 1999‒2022 Citrix Systems, Inc. All rights reserved. 225

Linux Virtual Delivery Agent 2109
Step 2: Create a hosting connection to Nutanix in Citrix Studio
1. For on-premises Delivery Controllers, choose Configuration > Hosting > Add Connection andResources in the on-premises Citrix Studio. For cloud Delivery Controllers, choose Manage >Hosting > Add Connection and Resources in the web-based Studio console on Citrix Cloud tocreate a connection to the Nutanix hypervisor.
2. In theAddConnectionandResourceswizard, selectNutanix AHVas the connection typeon theConnection page, and then specify the hypervisor address, credentials, and your connectionname. On the Network page, select a network for the hosting unit.
For example, in the on-premises Citrix Studio:
For example, in the web-based Studio console on Citrix Cloud:
© 1999‒2022 Citrix Systems, Inc. All rights reserved. 226
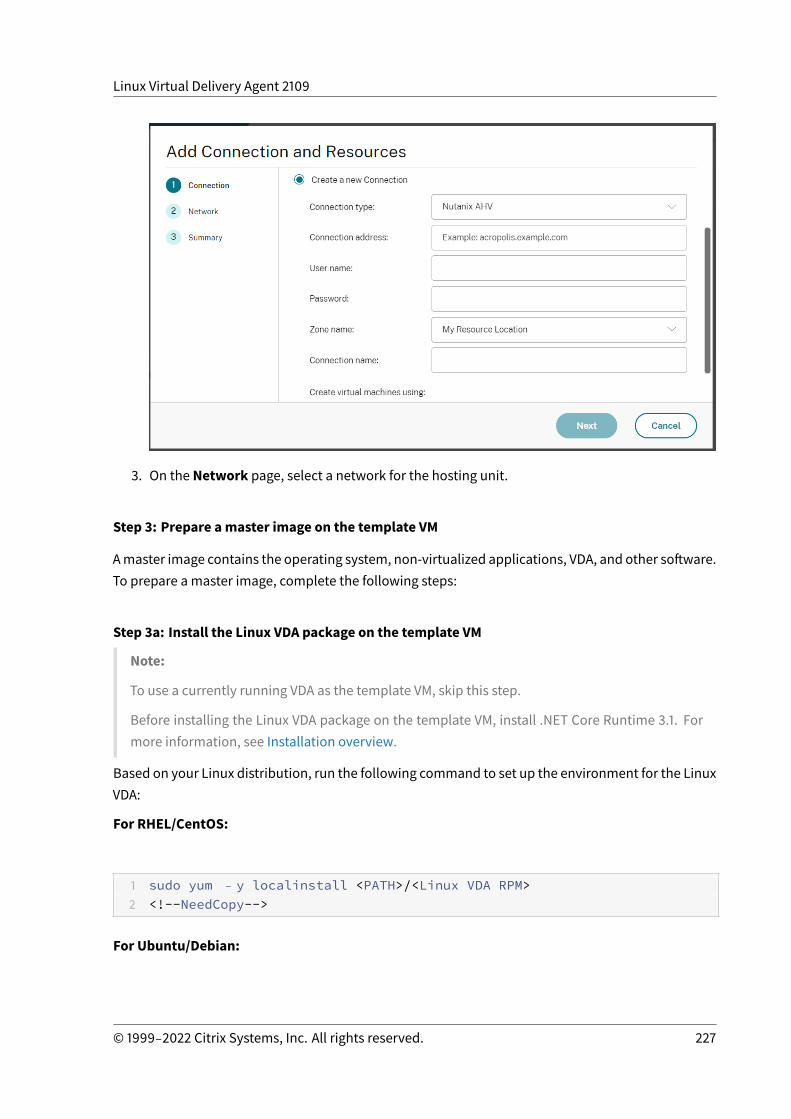
Linux Virtual Delivery Agent 2109
3. On the Network page, select a network for the hosting unit.
Step 3: Prepare amaster image on the template VM
Amaster image contains the operating system, non-virtualized applications, VDA, and other software.To prepare a master image, complete the following steps:
Step 3a: Install the Linux VDA package on the template VM
Note:
To use a currently running VDA as the template VM, skip this step.
Before installing the Linux VDA package on the template VM, install .NET Core Runtime 3.1. Formore information, see Installation overview.
Based on your Linux distribution, run the following command to set up the environment for the LinuxVDA:
For RHEL/CentOS:
1 sudo yum ‒ y localinstall <PATH>/<Linux VDA RPM>2 <!--NeedCopy-->
For Ubuntu/Debian:
© 1999‒2022 Citrix Systems, Inc. All rights reserved. 227
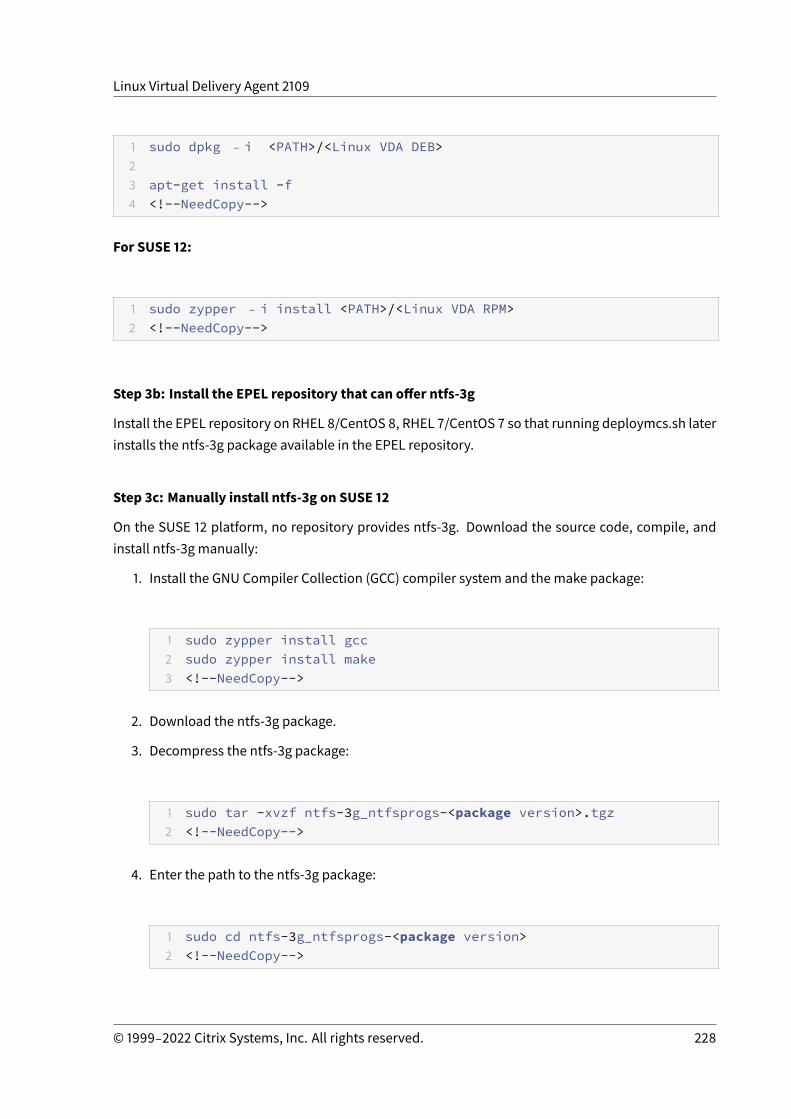
Linux Virtual Delivery Agent 2109
1 sudo dpkg ‒ i <PATH>/<Linux VDA DEB>23 apt-get install -f4 <!--NeedCopy-->
For SUSE 12:
1 sudo zypper ‒ i install <PATH>/<Linux VDA RPM>2 <!--NeedCopy-->
Step 3b: Install the EPEL repository that can offer ntfs-3g
Install the EPEL repository on RHEL 8/CentOS 8, RHEL 7/CentOS 7 so that running deploymcs.sh laterinstalls the ntfs-3g package available in the EPEL repository.
Step 3c: Manually install ntfs-3g on SUSE 12
On the SUSE 12 platform, no repository provides ntfs-3g. Download the source code, compile, andinstall ntfs-3g manually:
1. Install the GNU Compiler Collection (GCC) compiler system and the make package:
1 sudo zypper install gcc2 sudo zypper install make3 <!--NeedCopy-->
2. Download the ntfs-3g package.
3. Decompress the ntfs-3g package:
1 sudo tar -xvzf ntfs-3g_ntfsprogs-<package version>.tgz2 <!--NeedCopy-->
4. Enter the path to the ntfs-3g package:
1 sudo cd ntfs-3g_ntfsprogs-<package version>2 <!--NeedCopy-->
© 1999‒2022 Citrix Systems, Inc. All rights reserved. 228
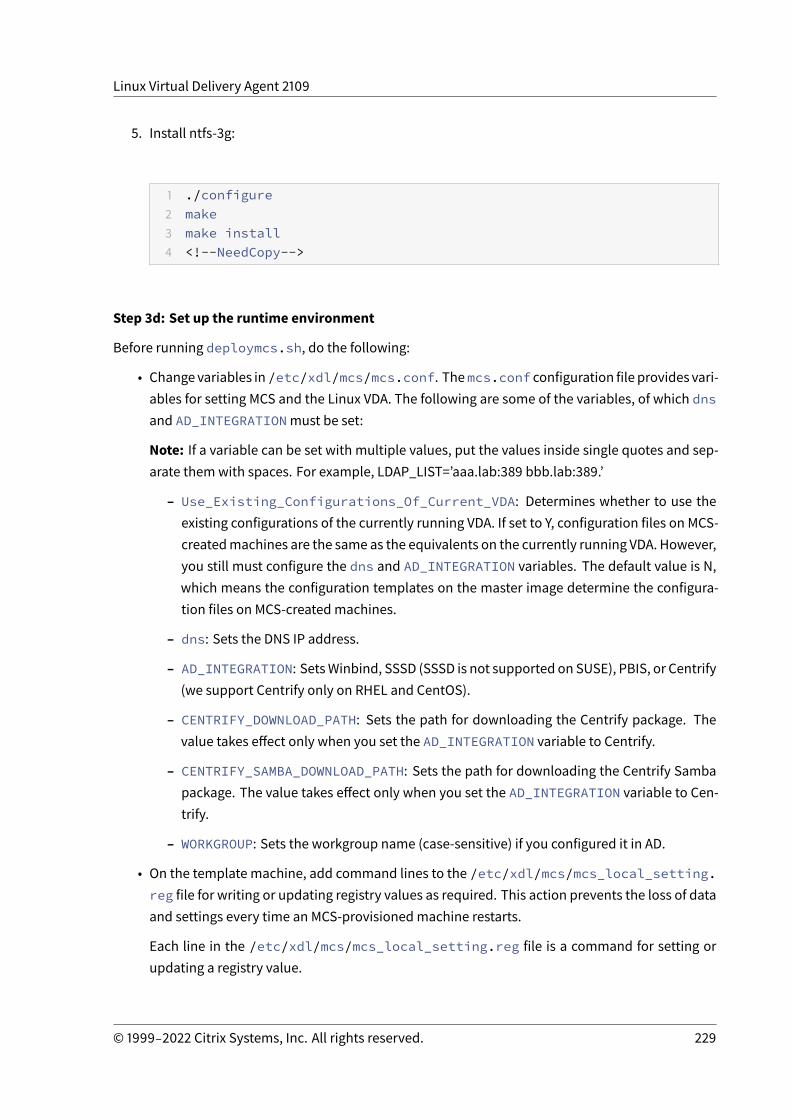
Linux Virtual Delivery Agent 2109
5. Install ntfs-3g:
1 ./configure2 make3 make install4 <!--NeedCopy-->
Step 3d: Set up the runtime environment
Before running deploymcs.sh, do the following:
• Change variables in/etc/xdl/mcs/mcs.conf. Themcs.conf configuration file provides vari-ables for setting MCS and the Linux VDA. The following are some of the variables, of which dnsand AD_INTEGRATIONmust be set:
Note: If a variable can be set with multiple values, put the values inside single quotes and sep-arate themwith spaces. For example, LDAP_LIST=’aaa.lab:389 bbb.lab:389.’
– Use_Existing_Configurations_Of_Current_VDA: Determines whether to use theexisting configurations of the currently running VDA. If set to Y, configuration files on MCS-createdmachines are the same as the equivalents on the currently running VDA. However,you still must configure the dns and AD_INTEGRATION variables. The default value is N,which means the configuration templates on the master image determine the configura-tion files on MCS-createdmachines.
– dns: Sets the DNS IP address.
– AD_INTEGRATION: SetsWinbind, SSSD (SSSD is not supported on SUSE), PBIS, or Centrify(we support Centrify only on RHEL and CentOS).
– CENTRIFY_DOWNLOAD_PATH: Sets the path for downloading the Centrify package. Thevalue takes effect only when you set the AD_INTEGRATION variable to Centrify.
– CENTRIFY_SAMBA_DOWNLOAD_PATH: Sets the path for downloading the Centrify Sambapackage. The value takes effect only when you set the AD_INTEGRATION variable to Cen-trify.
– WORKGROUP: Sets the workgroup name (case-sensitive) if you configured it in AD.
• On the template machine, add command lines to the /etc/xdl/mcs/mcs_local_setting.reg file for writing or updating registry values as required. This action prevents the loss of dataand settings every time an MCS-provisionedmachine restarts.
Each line in the /etc/xdl/mcs/mcs_local_setting.reg file is a command for setting orupdating a registry value.
© 1999‒2022 Citrix Systems, Inc. All rights reserved. 229
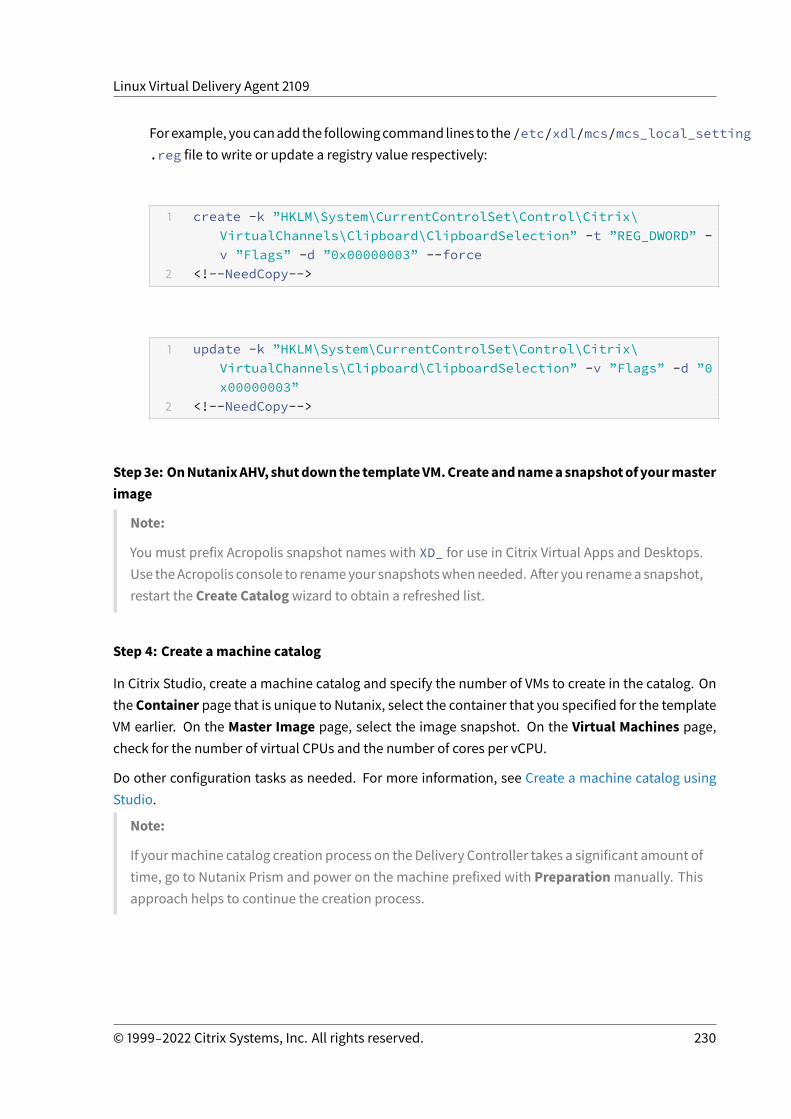
Linux Virtual Delivery Agent 2109
Forexample, youcanadd the followingcommand lines to the/etc/xdl/mcs/mcs_local_setting.reg file to write or update a registry value respectively:
1 create -k ”HKLM\System\CurrentControlSet\Control\Citrix\VirtualChannels\Clipboard\ClipboardSelection” -t ”REG_DWORD” -v ”Flags” -d ”0x00000003” --force
2 <!--NeedCopy-->
1 update -k ”HKLM\System\CurrentControlSet\Control\Citrix\VirtualChannels\Clipboard\ClipboardSelection” -v ”Flags” -d ”0x00000003”
2 <!--NeedCopy-->
Step3e: OnNutanixAHV, shutdownthetemplateVM.Createandnameasnapshotofyourmasterimage
Note:
You must prefix Acropolis snapshot names with XD_ for use in Citrix Virtual Apps and Desktops.Use theAcropolis console to renameyour snapshotswhenneeded. After you renamea snapshot,restart the Create Catalogwizard to obtain a refreshed list.
Step 4: Create amachine catalog
In Citrix Studio, create a machine catalog and specify the number of VMs to create in the catalog. Onthe Container page that is unique to Nutanix, select the container that you specified for the templateVM earlier. On the Master Image page, select the image snapshot. On the Virtual Machines page,check for the number of virtual CPUs and the number of cores per vCPU.
Do other configuration tasks as needed. For more information, see Create a machine catalog usingStudio.
Note:
If yourmachine catalog creation process on the Delivery Controller takes a significant amount oftime, go to Nutanix Prism and power on the machine prefixed with Preparationmanually. Thisapproach helps to continue the creation process.
© 1999‒2022 Citrix Systems, Inc. All rights reserved. 230
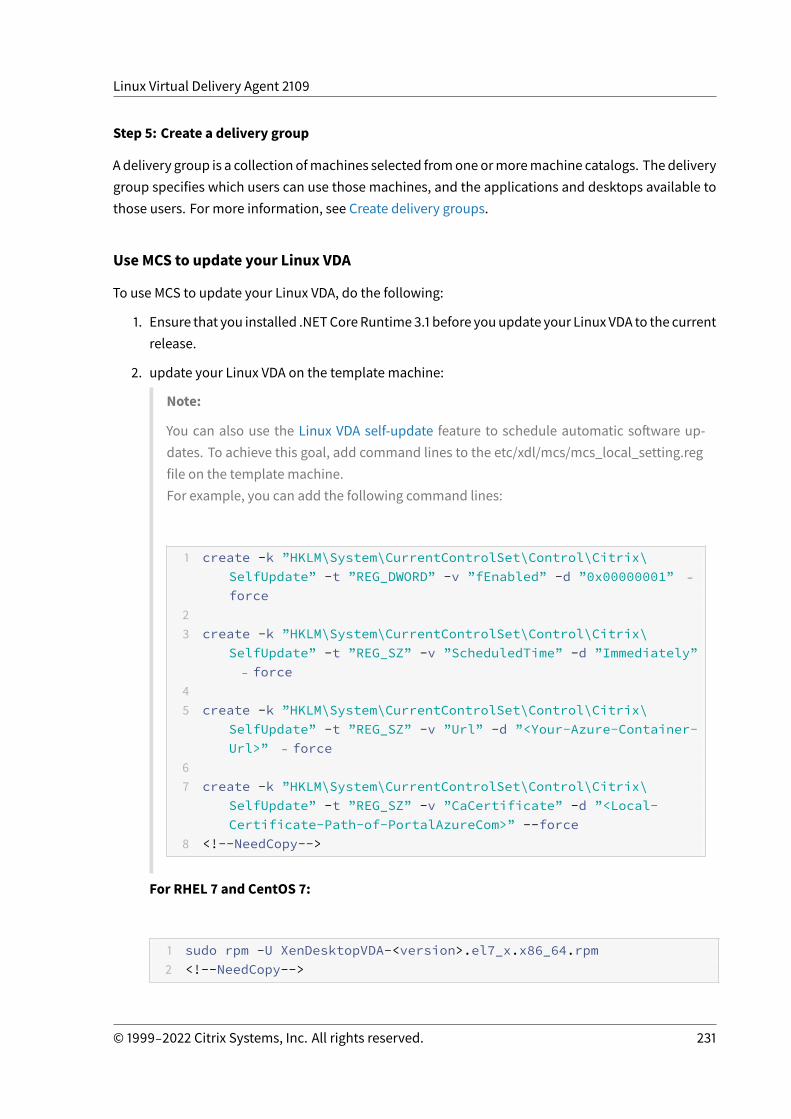
Linux Virtual Delivery Agent 2109
Step 5: Create a delivery group
Adelivery group is a collection ofmachines selected fromoneormoremachine catalogs. The deliverygroup specifies which users can use those machines, and the applications and desktops available tothose users. For more information, see Create delivery groups.
Use MCS to update your Linux VDA
To use MCS to update your Linux VDA, do the following:
1. Ensure that you installed .NETCoreRuntime3.1 before youupdate your Linux VDA to the currentrelease.
2. update your Linux VDA on the template machine:
Note:
You can also use the Linux VDA self-update feature to schedule automatic software up-dates. To achieve this goal, add command lines to the etc/xdl/mcs/mcs_local_setting.regfile on the template machine.For example, you can add the following command lines:
1 create -k ”HKLM\System\CurrentControlSet\Control\Citrix\SelfUpdate” -t ”REG_DWORD” -v ”fEnabled” -d ”0x00000001” ‒force
23 create -k ”HKLM\System\CurrentControlSet\Control\Citrix\
SelfUpdate” -t ”REG_SZ” -v ”ScheduledTime” -d ”Immediately”‒ force
45 create -k ”HKLM\System\CurrentControlSet\Control\Citrix\
SelfUpdate” -t ”REG_SZ” -v ”Url” -d ”<Your-Azure-Container-Url>” ‒ force
67 create -k ”HKLM\System\CurrentControlSet\Control\Citrix\
SelfUpdate” -t ”REG_SZ” -v ”CaCertificate” -d ”<Local-Certificate-Path-of-PortalAzureCom>” --force
8 <!--NeedCopy-->
For RHEL 7 and CentOS 7:
1 sudo rpm -U XenDesktopVDA-<version>.el7_x.x86_64.rpm2 <!--NeedCopy-->
© 1999‒2022 Citrix Systems, Inc. All rights reserved. 231
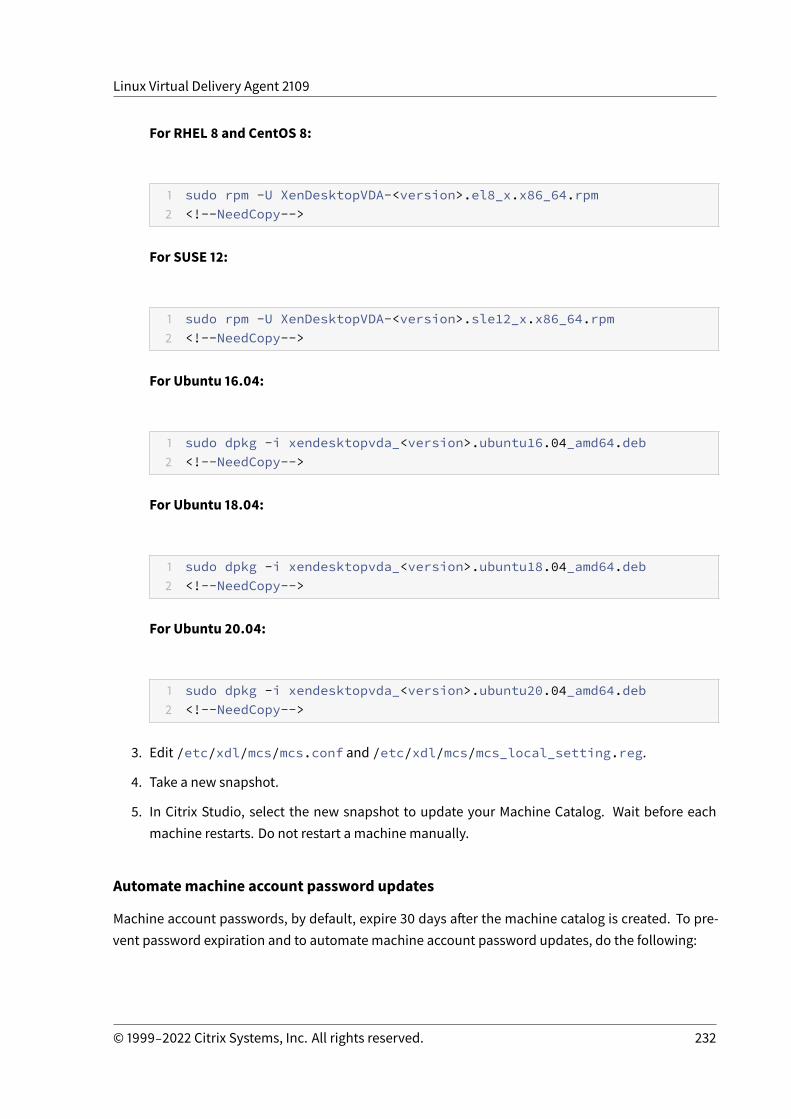
Linux Virtual Delivery Agent 2109
For RHEL 8 and CentOS 8:
1 sudo rpm -U XenDesktopVDA-<version>.el8_x.x86_64.rpm2 <!--NeedCopy-->
For SUSE 12:
1 sudo rpm -U XenDesktopVDA-<version>.sle12_x.x86_64.rpm2 <!--NeedCopy-->
For Ubuntu 16.04:
1 sudo dpkg -i xendesktopvda_<version>.ubuntu16.04_amd64.deb2 <!--NeedCopy-->
For Ubuntu 18.04:
1 sudo dpkg -i xendesktopvda_<version>.ubuntu18.04_amd64.deb2 <!--NeedCopy-->
For Ubuntu 20.04:
1 sudo dpkg -i xendesktopvda_<version>.ubuntu20.04_amd64.deb2 <!--NeedCopy-->
3. Edit /etc/xdl/mcs/mcs.conf and /etc/xdl/mcs/mcs_local_setting.reg.
4. Take a new snapshot.
5. In Citrix Studio, select the new snapshot to update your Machine Catalog. Wait before eachmachine restarts. Do not restart a machine manually.
Automatemachine account password updates
Machine account passwords, by default, expire 30 days after the machine catalog is created. To pre-vent password expiration and to automate machine account password updates, do the following:
© 1999‒2022 Citrix Systems, Inc. All rights reserved. 232
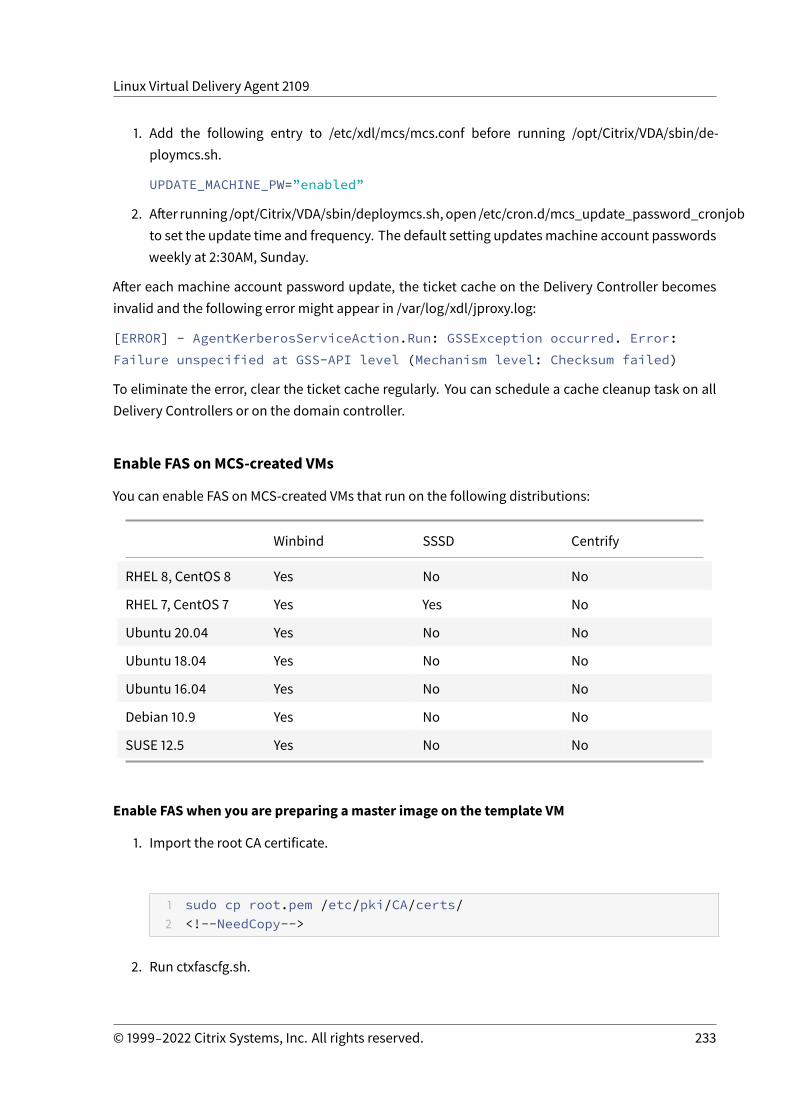
Linux Virtual Delivery Agent 2109
1. Add the following entry to /etc/xdl/mcs/mcs.conf before running /opt/Citrix/VDA/sbin/de-ploymcs.sh.
UPDATE_MACHINE_PW=”enabled”
2. After running /opt/Citrix/VDA/sbin/deploymcs.sh, open /etc/cron.d/mcs_update_password_cronjobto set the update time and frequency. The default setting updatesmachine account passwordsweekly at 2:30AM, Sunday.
After each machine account password update, the ticket cache on the Delivery Controller becomesinvalid and the following error might appear in /var/log/xdl/jproxy.log:
[ERROR] - AgentKerberosServiceAction.Run: GSSException occurred. Error:Failure unspecified at GSS-API level (Mechanism level: Checksum failed)
To eliminate the error, clear the ticket cache regularly. You can schedule a cache cleanup task on allDelivery Controllers or on the domain controller.
Enable FAS on MCS-created VMs
You can enable FAS on MCS-created VMs that run on the following distributions:
Winbind SSSD Centrify
RHEL 8, CentOS 8 Yes No No
RHEL 7, CentOS 7 Yes Yes No
Ubuntu 20.04 Yes No No
Ubuntu 18.04 Yes No No
Ubuntu 16.04 Yes No No
Debian 10.9 Yes No No
SUSE 12.5 Yes No No
Enable FAS when you are preparing amaster image on the template VM
1. Import the root CA certificate.
1 sudo cp root.pem /etc/pki/CA/certs/2 <!--NeedCopy-->
2. Run ctxfascfg.sh.
© 1999‒2022 Citrix Systems, Inc. All rights reserved. 233
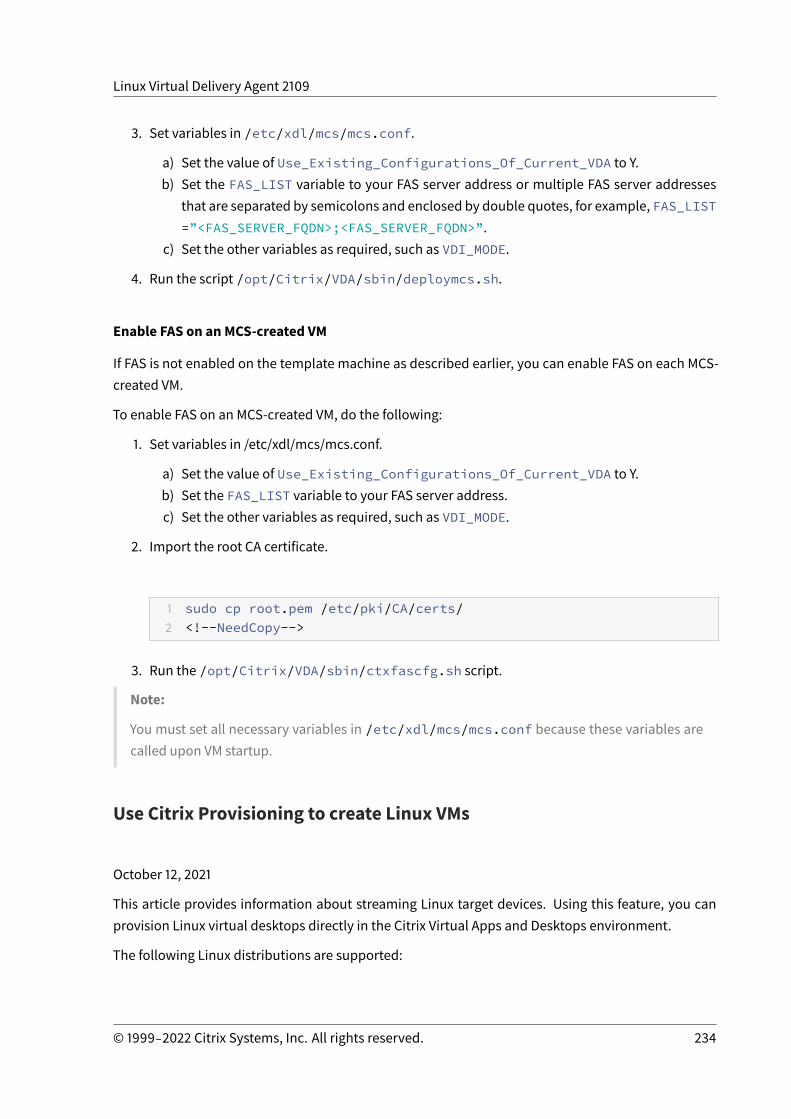
Linux Virtual Delivery Agent 2109
3. Set variables in /etc/xdl/mcs/mcs.conf.
a) Set the value of Use_Existing_Configurations_Of_Current_VDA to Y.b) Set the FAS_LIST variable to your FAS server address or multiple FAS server addresses
that are separated by semicolons and enclosed by double quotes, for example, FAS_LIST=”<FAS_SERVER_FQDN>;<FAS_SERVER_FQDN>”.
c) Set the other variables as required, such as VDI_MODE.
4. Run the script /opt/Citrix/VDA/sbin/deploymcs.sh.
Enable FAS on an MCS-created VM
If FAS is not enabled on the template machine as described earlier, you can enable FAS on each MCS-created VM.
To enable FAS on an MCS-created VM, do the following:
1. Set variables in /etc/xdl/mcs/mcs.conf.
a) Set the value of Use_Existing_Configurations_Of_Current_VDA to Y.b) Set the FAS_LIST variable to your FAS server address.c) Set the other variables as required, such as VDI_MODE.
2. Import the root CA certificate.
1 sudo cp root.pem /etc/pki/CA/certs/2 <!--NeedCopy-->
3. Run the /opt/Citrix/VDA/sbin/ctxfascfg.sh script.
Note:
You must set all necessary variables in /etc/xdl/mcs/mcs.conf because these variables arecalled upon VM startup.
Use Citrix Provisioning to create Linux VMs
October 12, 2021
This article provides information about streaming Linux target devices. Using this feature, you canprovision Linux virtual desktops directly in the Citrix Virtual Apps and Desktops environment.
The following Linux distributions are supported:
© 1999‒2022 Citrix Systems, Inc. All rights reserved. 234
Linux Virtual Delivery Agent 2109
• Ubuntu 16.04• Ubuntu 18.04• Ubuntu 20.04• RHEL 8.4• RHEL 8.3• RHEL 7.9• SUSE 12.5
Important:
• We recommend that you use the current release installation package, available in the Cit-rix Provisioning executable, Citrix_Provisioning_2109.iso. Use the package basedon your Linux distribution. Citrix Provisioning Server 2109 or later is required to use Linuxstreaming agent 2109 and later.
• When you use Citrix Provisioning to stream Linux target devices, create a separate boot par-titionon the single shared-disk image so that theprovisioneddevices canboot as expected.
For more information, see Streaming Linux target devices in the Citrix Provisioning documentation.
Configure Delivery Controllers for XenDesktop 7.6 and earlier versions
March 22, 2022
XenDesktop 7.6 and earlier versions require changes to support the Linux VDA. For those versions, ahotfix or update script is required. The installation and verification instructions are provided in thisarticle.
Update Delivery Controller configuration
For XenDesktop 7.6 SP2, apply Hotfix Update 2 to update the Broker for Linux Virtual Desktops. HotfixUpdate 2 is available here:
CTX142438: Hotfix Update 2 - For Delivery Controller 7.6 (32-bit) – English
For versions earlier than XenDesktop 7.6 SP2, you can use the PowerShell script named Update-BrokerServiceConfig.ps1 to update the Broker Service configuration. This script is available in thefollowing package:
• citrix-linuxvda-scripts.zip
Repeat the following steps on every Delivery Controller in the farm:
1. Copy the Update-BrokerServiceConfig.ps1 script to the Delivery Controller machine.
© 1999‒2022 Citrix Systems, Inc. All rights reserved. 235
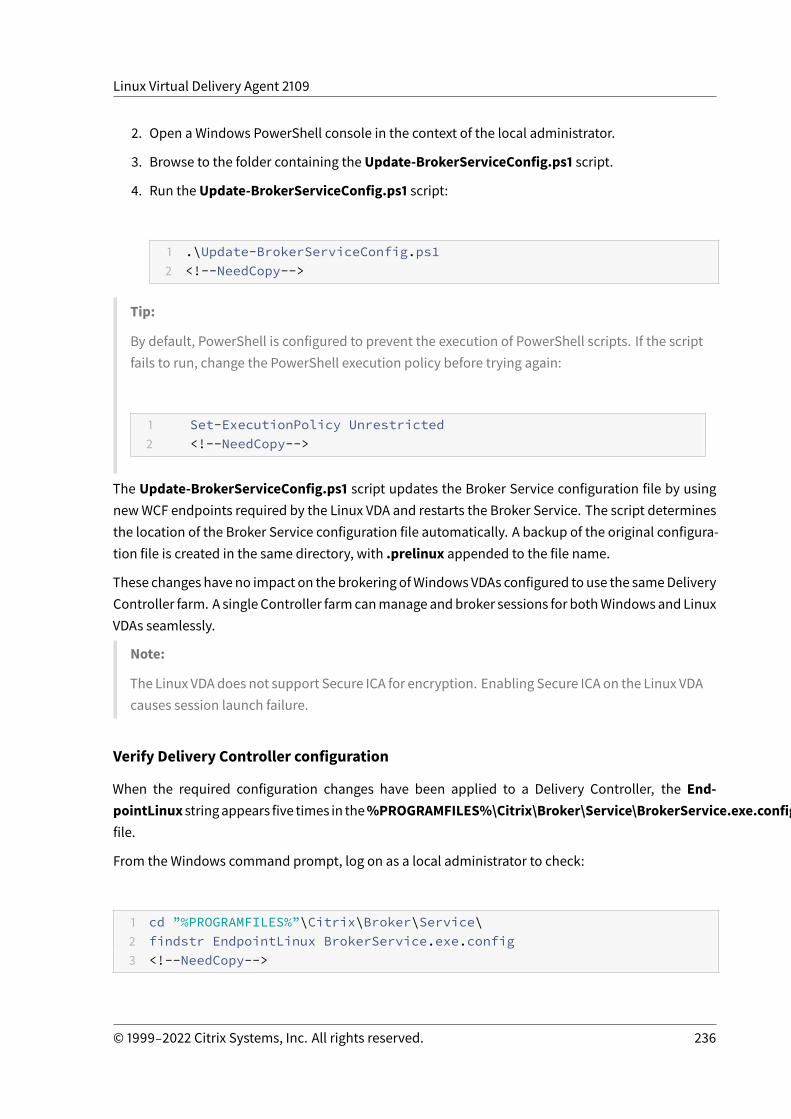
Linux Virtual Delivery Agent 2109
2. Open a Windows PowerShell console in the context of the local administrator.
3. Browse to the folder containing the Update-BrokerServiceConfig.ps1 script.
4. Run the Update-BrokerServiceConfig.ps1 script:
1 .\Update-BrokerServiceConfig.ps12 <!--NeedCopy-->
Tip:
By default, PowerShell is configured to prevent the execution of PowerShell scripts. If the scriptfails to run, change the PowerShell execution policy before trying again:
1 Set-ExecutionPolicy Unrestricted2 <!--NeedCopy-->
The Update-BrokerServiceConfig.ps1 script updates the Broker Service configuration file by usingnewWCF endpoints required by the Linux VDA and restarts the Broker Service. The script determinesthe location of the Broker Service configuration file automatically. A backup of the original configura-tion file is created in the same directory, with .prelinux appended to the file name.
These changes have no impact on the brokering ofWindows VDAs configured to use the sameDeliveryController farm. A single Controller farmcanmanage andbroker sessions for bothWindowsandLinuxVDAs seamlessly.
Note:
The Linux VDAdoes not support Secure ICA for encryption. Enabling Secure ICA on the Linux VDAcauses session launch failure.
Verify Delivery Controller configuration
When the required configuration changes have been applied to a Delivery Controller, the End-pointLinux stringappears five times in the%PROGRAMFILES%\Citrix\Broker\Service\BrokerService.exe.configfile.
From the Windows command prompt, log on as a local administrator to check:
1 cd ”%PROGRAMFILES%”\Citrix\Broker\Service\2 findstr EndpointLinux BrokerService.exe.config3 <!--NeedCopy-->
© 1999‒2022 Citrix Systems, Inc. All rights reserved. 236

Linux Virtual Delivery Agent 2109
Configure the Linux VDA
October 12, 2021
This section details the features of the Linux VDA, including feature description, configuration, andtroubleshooting.
Tip:
The xdlcollect Bash script used to collect logs is integrated into the Linux VDA software andlocated under /opt/Citrix/VDA/bin. After you install the Linux VDA, you can run the bash /opt/Citrix/VDA/bin/xdlcollect.sh command to collect logs.
After log collection completes, a compressed log file is generated in the same folder as the script.xdlcollect can ask you whether or not to upload the compressed log file to Citrix Insight Ser-vices (CIS). If you agree, xdlcollect returns an upload_ID after the upload completes. The up-load does not remove the compressed log file from your local machine. Other users can use theupload_ID to access the log file in CIS.
Integrate NIS with Active Directory
October 12, 2021
This article describes how to integrate NIS with Windows Active Directory (AD) on the Linux VDA byusing SSSD. The Linux VDA is considered a component of Citrix Virtual Apps and Desktops. As a result,it fits tightly into the Windows AD environment.
Using NIS as a UID and GID provider instead of using AD requires that the account information (username and password combinations) is the same in both AD and NIS.
Note:
Authentication is still performed by the AD server. NIS+ is not supported. If you use NIS as theUID and GID provider, the POSIX attributes from the Windows server are no longer used.
Tip:
Thismethod represents a deprecatedway to deploy the Linux VDA, which is used only for specialuse cases. For an RHEL/CentOS distribution, follow the instructions in Install Linux Virtual Deliv-ery Agent for RHEL/CentOS. For an Ubuntu distribution, follow the instructions in Install LinuxVirtual Delivery Agent for Ubuntu.
What is SSSD?
© 1999‒2022 Citrix Systems, Inc. All rights reserved. 237
Linux Virtual Delivery Agent 2109
SSSD is a system daemon. Its primary function is to provide access to identify and authenticate re-mote resources through a common framework that can provide caching and offline support for thesystem. It provides both PAMandNSSmodules, and in the future can support D-BUS based interfacesfor extended user information. It also provides a better database to store local user accounts andextended user data.
Integrate NIS with AD
To integrate NIS with AD, do the following:
1. Add the Linux VDA as a NIS client2. Join the domain and create a host keytab using Samba3. Set up SSSD4. Configure NSS/PAM5. Verify the Kerberos configuration6. Verify user authentication
Add the Linux VDA as a NIS client
Configure the NIS client:
1 yum ‒ y install ypbind rpcbind oddjob-mkhomedir2 <!--NeedCopy-->
Set the NIS domain:
1 ypdomainname nis.domain2 echo ”NISDOMAIN=nis.domain” >> /etc/sysconfig/network3 <!--NeedCopy-->
Add the IP address for the NIS server and client in /etc/hosts:
{ NIS server IP address } server.nis.domain nis.domain
Configure NIS by authconfig:
1 sudo authconfig --enablenis --nisdomain=nis.domain --nisserver=server.nis.domain --enablemkhomedir --update
2 <!--NeedCopy-->
© 1999‒2022 Citrix Systems, Inc. All rights reserved. 238
Linux Virtual Delivery Agent 2109
The nis.domain represents the domain name of the NIS server. The server.nis.domain is the hostname of the NIS server, which can also be the IP address of the NIS server.
Configure the NIS services:
1 sudo systemctl start rpcbind ypbind23 sudo systemctl enable rpcbind ypbind4 <!--NeedCopy-->
Ensure that the NIS configuration is correct:
1 ypwhich2 <!--NeedCopy-->
Validate that the account information is available from the NIS server:
1 getent passwd nisaccount2 <!--NeedCopy-->
Note:
Thenisaccount represents the realNISaccounton theNIS server. Ensure that theUID,GID, homedirectory, and login shell are configured correctly.
Join the domain and create a host keytab using Samba
SSSD does not provide AD client functions for joining the domain and managing the system keytabfile. There are a fewmethods for achieving the functions, including:
• adcli• realmd• Winbind• Samba
The information in this section describes the Samba approach only. For realmd, see the RHEL orCentOS vendor’s documentation. These steps must be followed before configuring SSSD.
Join the domain and create host keytab using Samba:
On the Linux client with properly configured files:
© 1999‒2022 Citrix Systems, Inc. All rights reserved. 239
Linux Virtual Delivery Agent 2109
• /etc/krb5.conf• /etc/samba/smb.conf:
Configure the machine for Samba and Kerberos authentication:
1 sudo authconfig --smbsecurity=ads --smbworkgroup=domain --smbrealm=REALM --krb5realm=REALM --krb5kdc=fqdn-of-domain-controller --update
2 <!--NeedCopy-->
Where REALM is the Kerberos realm name in uppercase and domain is the NetBIOS name of the do-main.
If DNS-based lookup of the KDC server and realm name is required, add the following two options tothe preceding command:
--enablekrb5kdcdns --enablekrb5realmdns
Open /etc/samba/smb.conf and add the following entries under the [Global] section, but after thesection generated by the authconfig tool:
kerberos method = secrets and keytabwinbind offline logon = no
Joining the Windows domain requires that your domain controller is reachable and you have an ADuser account with permissions to add computers to the domain:
1 sudo net ads join REALM -U user2 <!--NeedCopy-->
REALM is the Kerberos realm name in uppercase and user is a domain user who has permissions toadd computers to the domain.
Set up SSSD
Setting up SSSD consists of the following steps:
• Install the sssd-ad and sssd-proxy packages on the Linux client machine.• Make configuration changes to various files (for example, sssd.conf).• Start the sssd service.
/etc/sssd/sssd.conf
An example sssd.conf configuration (more options can be added as needed):
© 1999‒2022 Citrix Systems, Inc. All rights reserved. 240
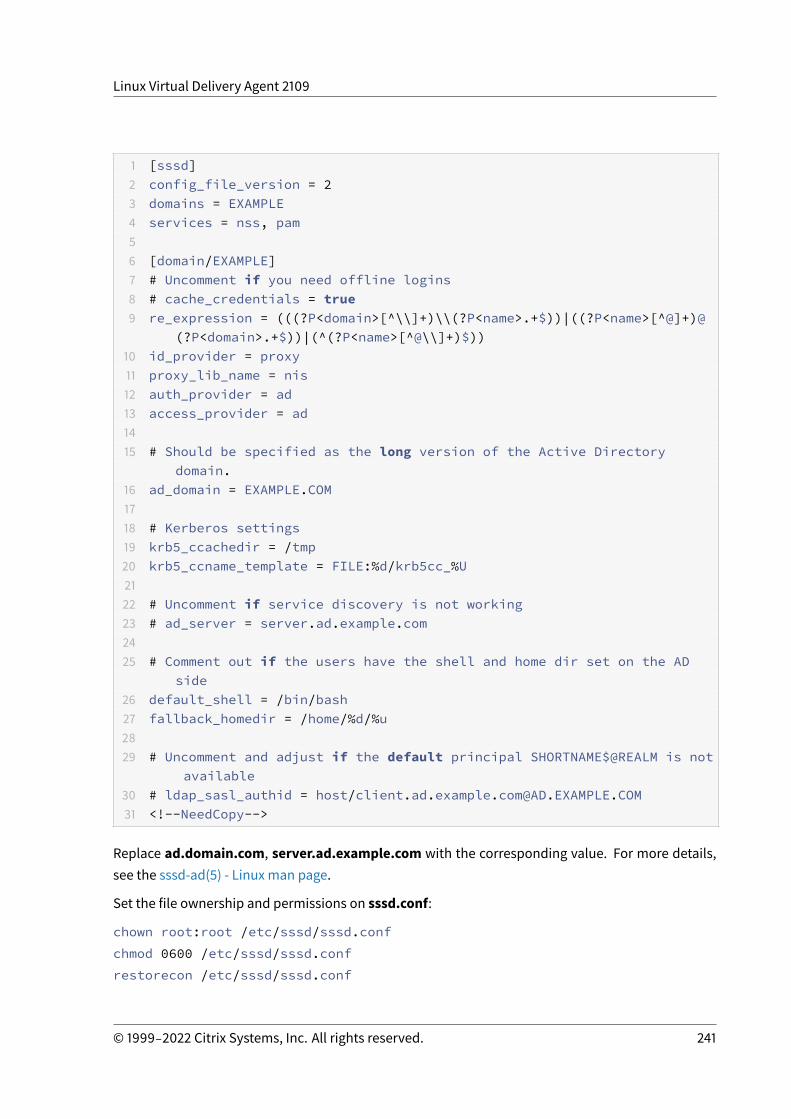
Linux Virtual Delivery Agent 2109
1 [sssd]2 config_file_version = 23 domains = EXAMPLE4 services = nss, pam56 [domain/EXAMPLE]7 # Uncomment if you need offline logins8 # cache_credentials = true9 re_expression = (((?P<domain>[^\\]+)\\(?P<name>.+$))|((?P<name>[^@]+)@
(?P<domain>.+$))|(^(?P<name>[^@\\]+)$))10 id_provider = proxy11 proxy_lib_name = nis12 auth_provider = ad13 access_provider = ad1415 # Should be specified as the long version of the Active Directory
domain.16 ad_domain = EXAMPLE.COM1718 # Kerberos settings19 krb5_ccachedir = /tmp20 krb5_ccname_template = FILE:%d/krb5cc_%U2122 # Uncomment if service discovery is not working23 # ad_server = server.ad.example.com2425 # Comment out if the users have the shell and home dir set on the AD
side26 default_shell = /bin/bash27 fallback_homedir = /home/%d/%u2829 # Uncomment and adjust if the default principal SHORTNAME$@REALM is not
available30 # ldap_sasl_authid = host/[email protected] <!--NeedCopy-->
Replace ad.domain.com, server.ad.example.com with the corresponding value. For more details,see the sssd-ad(5) - Linux man page.
Set the file ownership and permissions on sssd.conf:
chown root:root /etc/sssd/sssd.confchmod 0600 /etc/sssd/sssd.confrestorecon /etc/sssd/sssd.conf
© 1999‒2022 Citrix Systems, Inc. All rights reserved. 241
Linux Virtual Delivery Agent 2109
Configure NSS/PAM
RHEL/CentOS:
Use authconfig to enable SSSD. Install oddjob-mkhomedir to ensure that the home directory cre-ation is compatible with SELinux:
1 authconfig --enablesssd --enablesssdauth --enablemkhomedir --update23 sudo systemctl start sssd45 sudo systemctl enable sssd6 <!--NeedCopy-->
Tip:
When configuring Linux VDA settings, consider that for SSSD, there has no special settings for theLinux VDA client. For extra solutions in the ctxsetup.sh script, use the default value.
Verify the Kerberos configuration
To ensure that Kerberos is configured correctly for use with the Linux VDA, check that the systemkeytab file has been created and contains valid keys:
1 sudo klist -ke2 <!--NeedCopy-->
This command displays the list of keys available for the various combinations of principal names andcipher suites. Run the Kerberos kinit command to authenticate the machine with the domain con-troller using these keys:
1 sudo kinit ‒ k MACHINE\$@REALM2 <!--NeedCopy-->
The machine and realm names must be specified in uppercase. The dollar sign ($) must be escapedwith a backslash (\) to prevent shell substitution. In some environments, the DNS domain name isdifferent from the Kerberos realm name. Ensure that the realm name is used. If this command issuccessful, no output is displayed.
Verify that the TGT ticket for the machine account has been cached using:
© 1999‒2022 Citrix Systems, Inc. All rights reserved. 242

Linux Virtual Delivery Agent 2109
1 sudo klist -ke2 <!--NeedCopy-->
Verify user authentication
Use the getent command to verify that the logon format is supported and whether the NSS works:
1 sudo getent passwd DOMAIN\\username2 <!--NeedCopy-->
TheDOMAIN parameter indicates the short version domain name. If another logon format is needed,verify by using the getent command first.
The supported logon formats are:
• Down-level logon name: DOMAIN\username• UPN: [email protected]• NetBIOS Suffix format: username@DOMAIN
To verify that the SSSD PAM module is configured correctly, use a domain user account to log on tothe Linux VDA. The domain user account has not been used before.
1 sudo ssh localhost ‒ l DOMAIN\\username23 id -u4 <!--NeedCopy-->
Check that a corresponding Kerberos credential cache file was created for the uid returned by thecommand:
1 ls /tmp/krb5cc_{2 uid }34 <!--NeedCopy-->
Check that the tickets in the user’s Kerberos credential cache are valid and not expired:
© 1999‒2022 Citrix Systems, Inc. All rights reserved. 243
Linux Virtual Delivery Agent 2109
1 klist2 <!--NeedCopy-->
Publish applications
October 12, 2021
With Linux VDA Version 7.13, Citrix added the seamless applications feature to all the supported Linuxplatforms. No specific installation procedures are required to use this feature.
Tip:
With Linux VDA version 1.4, Citrix added support for non-seamless published applications andsession sharing.
Publish applications using Citrix Studio
You can publish applications installed on a Linux VDA when you create a delivery group or add appli-cations to an existing delivery group. The process is similar to publishing applications installed on aWindows VDA. For more information, see the Citrix Virtual Apps and Desktops documentation (basedon the version of Citrix Virtual Apps and Desktops being used).
Note:
• When configuring delivery groups, ensure that the delivery type is set to Desktop and ap-plications or Applications.
• Publishing applications is supported with Linux VDA Version 1.4 and later. However, theLinux VDA does not support the delivery of desktops and apps to the same machine. Toaddress this issue, we recommend that you create separate delivery groups for app anddesktop deliveries.
• To use seamless applications, do not disable the seamless mode on StoreFront. The seam-less mode is enabled by default. If you have already disabled it by setting “TWIMode=Off,”remove this setting instead of changing it to “TWIMode=On.” Otherwise you might not beable to launch a published desktop.
Limitation
The Linux VDA does not support the launch of multiple concurrent instances of the same applicationby a single user.
© 1999‒2022 Citrix Systems, Inc. All rights reserved. 244
Linux Virtual Delivery Agent 2109
In an app session, only shortcuts that are specific to the app work as expected.
Known issues
The following known issues are identified during publishing applications:
• Non-rectangular windows are not supported. The corners of a window might show the server-side background.
• Preview of the content of a window from a published application is not supported.• Currently, the seamless mode supports the following Window Managers: Mutter, Metacity, andCompiz (Ubuntu 16.04). Kwin and other windowmanagers are not supported. Ensure that yourwindowmanager is set a supported one.
• When you runmultiple LibreOffice applications, only the one launched first shows on Citrix Stu-dio because these applications share the process.
• Published Qt5-based applications like “Dolphin” might not show icons. To resolve the issue,see the article at https://wiki.archlinux.org/index.php/Qt#Configuration_of_Qt5_apps_under_environments_other_than_KDE_Plasma.
• All the taskbar buttons of published applications running in the same ICA session are combinedin the same group. To resolve this issue, set the taskbar property not to combine taskbar but-tons.
Linux VDA self-update
October 22, 2021
This feature helps to automatically update your Linux VDA software - immediately, or at a scheduledtime. It is beneficial especially when you create Linux VDAs in Citrix Virtual Apps and Desktops Stan-dard for Azure. You have no administrator privileges of the VMs in Azure. For more information, seeCreate Linux VDAs in Citrix Virtual Apps and Desktops Standard for Azure.
Configuration
To use this feature, complete the following steps:
Step 1: Upload update information and new VDA packages to your Azure container
Step 1a: Create a container under your Azure storage account and set your container access level toBlob (Anonymous read access for blobs only).
© 1999‒2022 Citrix Systems, Inc. All rights reserved. 245

Linux Virtual Delivery Agent 2109
Note:
Azure containers and blobs are exclusively held and managed by customers. Citrix is not liablefor any security issues with them. To ensure data security and cost efficiency, set your containeraccess level to Private (no anonymous access) after each self-update.
Step1b: Incorporate your VDA update information to a JSON file named UpdateInfo.json. For an ex-ample of the file format, see the following block:
1 {23 ”Version”: ”21.04.200.4”,4 ”Distributions”:[5 {67 ”TargetOS”: ”RHEL7_9”,8 ”PackageName”: ””,9 ”PackageHash”: ””10 }11 ,12 {1314 ”TargetOS”: ”RHEL8_3”,15 ”PackageName”: ”XenDesktopVDA-21.04.200.4-1.el8_x.x86_64.rpm”,16 ”PackageHash”: ”
a6f2aba23b84bbc3a4640294a8bb92474e0cacbab1e5ae33416c0a4473a28d73”17 }18 ,19 {2021 ”TargetOS”: ”UBUNTU16_04”,22 ”PackageName”: ””,23 ”PackageHash”: ””24 }25 ,26 {2728 ”TargetOS”: ”UBUNTU18_04”,29 ”PackageName”: ”xendesktopvda_21.04.200.4-1.ubuntu18.04_amd64.deb”,30 ”PackageHash”: ”4148
cc3f25d3717e3cbc19bd953b42c72bd38ee3fcd7f7034c2cd6f2b15b3c5a”31 }32 ,33 {
© 1999‒2022 Citrix Systems, Inc. All rights reserved. 246
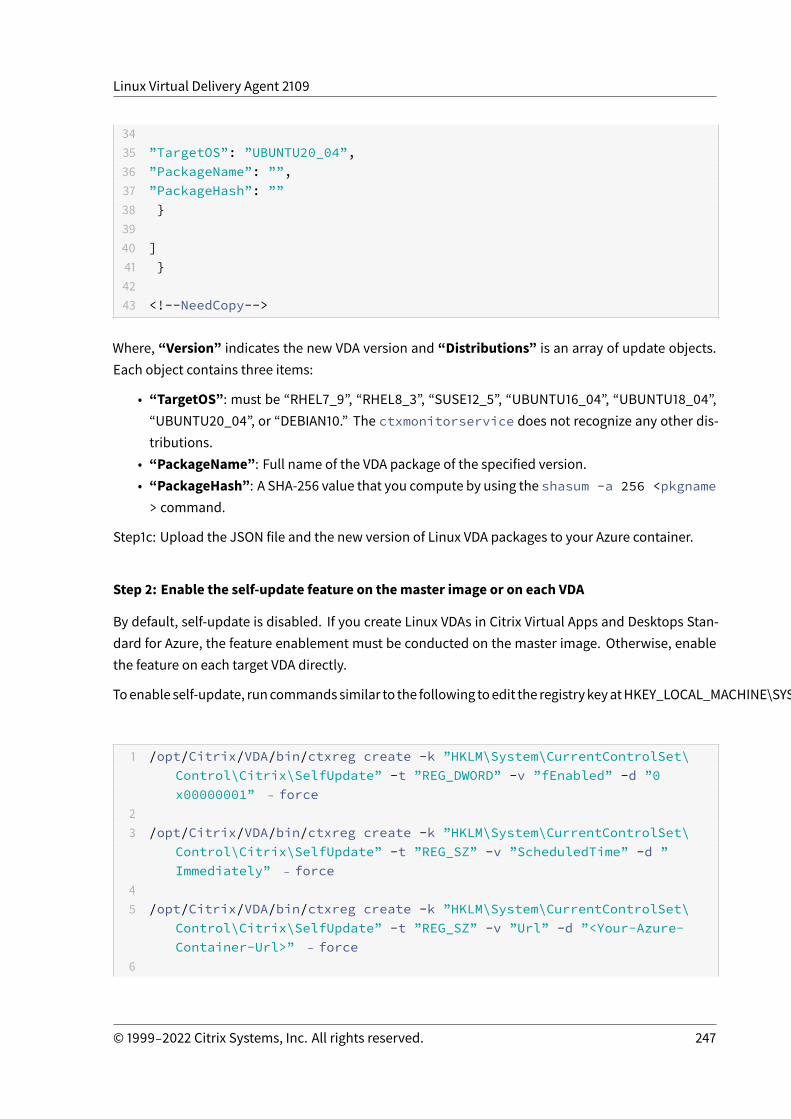
Linux Virtual Delivery Agent 2109
3435 ”TargetOS”: ”UBUNTU20_04”,36 ”PackageName”: ””,37 ”PackageHash”: ””38 }3940 ]41 }4243 <!--NeedCopy-->
Where, “Version” indicates the new VDA version and “Distributions” is an array of update objects.Each object contains three items:
• “TargetOS”: must be “RHEL7_9”, “RHEL8_3”, “SUSE12_5”, “UBUNTU16_04”, “UBUNTU18_04”,“UBUNTU20_04”, or “DEBIAN10.” The ctxmonitorservice does not recognize any other dis-tributions.
• “PackageName”: Full name of the VDA package of the specified version.• “PackageHash”: A SHA-256 value that you compute by using the shasum -a 256 <pkgname> command.
Step1c: Upload the JSON file and the new version of Linux VDA packages to your Azure container.
Step 2: Enable the self-update feature on themaster image or on each VDA
By default, self-update is disabled. If you create Linux VDAs in Citrix Virtual Apps and Desktops Stan-dard for Azure, the feature enablement must be conducted on the master image. Otherwise, enablethe feature on each target VDA directly.
Toenable self-update, runcommandssimilar to the following toedit the registrykeyatHKEY_LOCAL_MACHINE\SYSTEM\CurrentControlSet\Control\Citrix\SelfUpdate.
1 /opt/Citrix/VDA/bin/ctxreg create -k ”HKLM\System\CurrentControlSet\Control\Citrix\SelfUpdate” -t ”REG_DWORD” -v ”fEnabled” -d ”0x00000001” ‒ force
23 /opt/Citrix/VDA/bin/ctxreg create -k ”HKLM\System\CurrentControlSet\
Control\Citrix\SelfUpdate” -t ”REG_SZ” -v ”ScheduledTime” -d ”Immediately” ‒ force
45 /opt/Citrix/VDA/bin/ctxreg create -k ”HKLM\System\CurrentControlSet\
Control\Citrix\SelfUpdate” -t ”REG_SZ” -v ”Url” -d ”<Your-Azure-Container-Url>” ‒ force
6
© 1999‒2022 Citrix Systems, Inc. All rights reserved. 247

Linux Virtual Delivery Agent 2109
7 /opt/Citrix/VDA/bin/ctxreg create -k ”HKLM\System\CurrentControlSet\Control\Citrix\SelfUpdate” -t ”REG_SZ” -v ”CaCertificate” -d ”<Local-Certificate-Path-of-PortalAzureCom>” --force
8 <!--NeedCopy-->
The following table describes the registry settings.
Registry setting Description
fEnabled This setting is required. By default, the value is0, which means self-update is disabled. Youcan set it to 1 to enable self-update.
Url This setting is required. It sets the URL of yourAzure container to get the update informationand new VDA packages.
ScheduledTime This setting is required. You can set it toImmediately or NextStart. Immediatelymeans to run an update immediately afterdownloading VDA packages. This option isappropriate when the download speed is highand your update is urgent. But it can disruptthe user experience if there are any livesessions when you download the package.NextStartmeans to execute an update uponthe next start of the ctxmonitorservice.This option is appropriate when the downloadspeed is not high and your update is noturgent.
CaCertificate This setting is optional. It sets the full path of aPEM certificate to verify the URL of your Azurecontainer. For Azure blobs, it can be thecertificate of portal.azure.com that is retrievedfrom the browser and then converted to PEM.For security, we recommend you add thisregistry setting, but it is supported only onUbuntu. On RHEL, it misses linking some NSSlibraries for the curl command. Make sure toset the least privileges of the certificate.
© 1999‒2022 Citrix Systems, Inc. All rights reserved. 248

Linux Virtual Delivery Agent 2109
When the ctxmonitorservice restarts, it first queries Url to get the UpdateInfo.json file andretrieves the update version from the JSON file. Then the ctxmonitorservice compares theupdate version with the current version. If the current version is earlier, the service downloadsthe new version of the VDA package from Azure and saves it locally. After that, it runs an updateaccording to the setting of ScheduledTime. For an on-premises deployment, you can restart thectxmonitorservice directly to trigger the update. However, in Citrix Virtual Apps and DesktopsStandard for Azure where you have no administrator privileges to the VMs, the ctxmonitorservicecan be restarted only after the VDA machine is restarted. If an update fails, your VDA is rolled back tothe existing version.
Note:
• The registry settings you configured on the master image cannot be changed.• If all VMs in an environment download a package at the same time, the local network canbe congested.
• If both an update and the rollback fail, user data is lost.• If an update fails but the rollback succeeds, users on the samenetworkmight havedifferentversions of the Linux VDA. This case is suboptimal.
• An update typically takes several minutes to complete. There is no status indicator in CitrixStudio.
Remote PC Access
October 12, 2021
Overview
RemotePCAccess is anextensionofCitrix Virtual AppsandDesktops. It enablesorganizations toeasilyallow employees to access their physical office PCs remotely in a secure manner. If users can accesstheir office PCs, they can access all the applications, data, and resources they need to do their work.
Remote PC Access uses the same Citrix Virtual Apps and Desktops components that deliver virtualdesktops and applications. The requirements and process of deploying and configuring Remote PCAccess are the same as the requirements and process required for deploying Citrix Virtual Apps andDesktops for the delivery of virtual resources. This uniformity provides a consistent and unified ad-ministrative experience. Users receive the best user experience by using Citrix HDX to deliver theirremote office PC sessions.
For more information, see Remote PC Access in the Citrix Virtual Apps and Desktops documentation.
© 1999‒2022 Citrix Systems, Inc. All rights reserved. 249
Linux Virtual Delivery Agent 2109
Considerations
These considerations are specific to the Linux VDA:
• On physical machines, use the Linux VDA only in non-3D mode. Due to limitations on NVIDIA’sdriver, the local screen of the PC cannot be blacked out and displays the activities of the sessionwhen HDX 3Dmode is enabled. Showing this screen is a potential security risk.
• Use machine catalogs of type single-session OS for physical Linux machines.
• Automatic user assignment is not available for Linux machines. With automatic user assign-ment, users are assigned to their machines automatically when they log on locally to the PCs.This logon occurs without administrator intervention. The Citrix Workspace app running on theclient device gives users access to the applications and data on the office PCwithin the RemotePC Access desktop session.
• If users are already logged on to their PCs locally, attempts to launch the PCs from StoreFrontfail.
• Power saving options are not available for Linux machines.
Configuration
To deliver Linux PC sessions, install the Linux VDA on target PCs, create a machine catalog of the Re-mote PC Access type, and create a Delivery Group to make the PCs in the machine catalog availablefor users who request access. The following section details the procedure:
Step 1 - Install the Linux VDA on target PCs
We recommend you use easy install to install the Linux VDA. During the installation, set the value ofthe CTX_XDL_VDI_MODE variable to Y.
Step 2 - Create amachine catalog of the Remote PC Access type
1. In Citrix Studio, right-click Machine Catalogs and select Create Machine Catalog from theshortcut menu.
© 1999‒2022 Citrix Systems, Inc. All rights reserved. 250
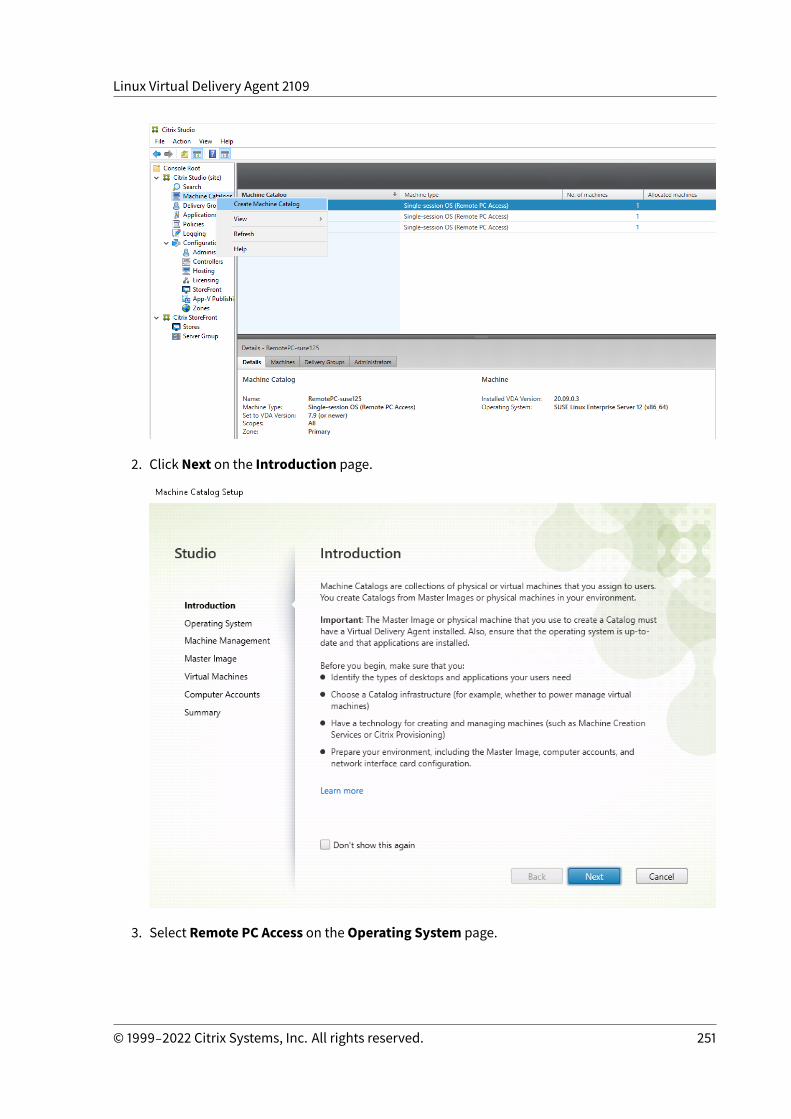
Linux Virtual Delivery Agent 2109
2. Click Next on the Introduction page.
3. Select Remote PC Access on theOperating System page.
© 1999‒2022 Citrix Systems, Inc. All rights reserved. 251
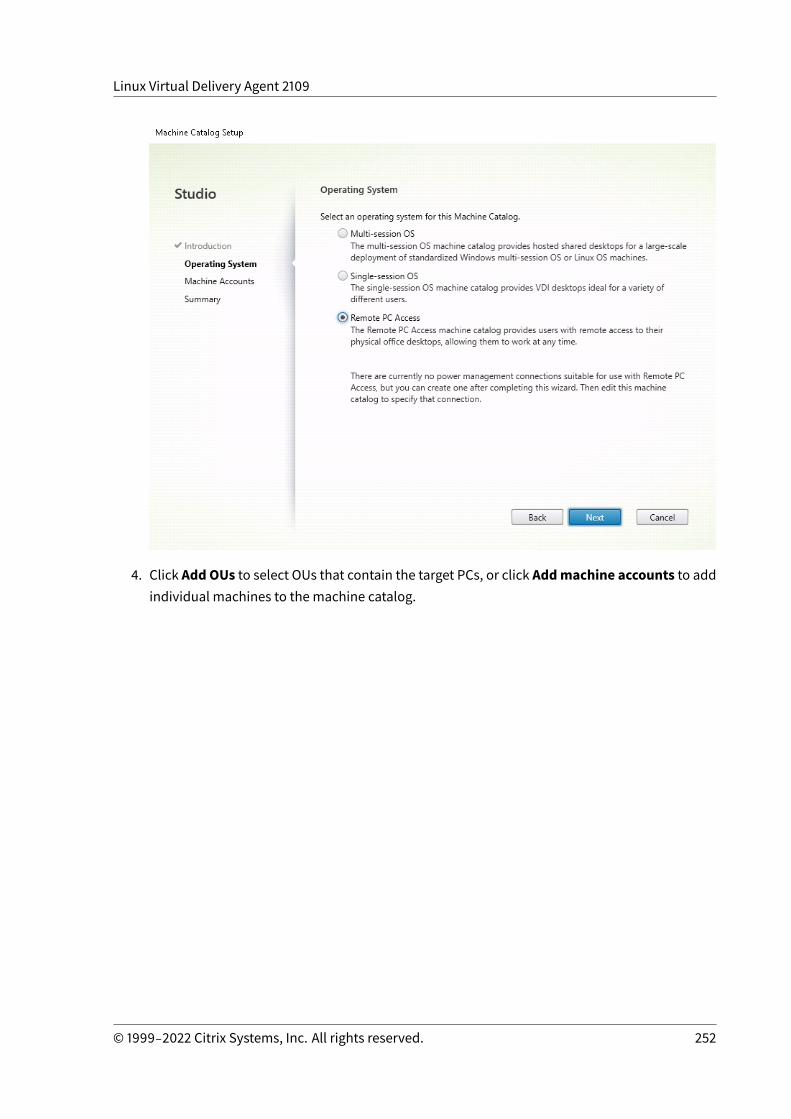
Linux Virtual Delivery Agent 2109
4. Click Add OUs to select OUs that contain the target PCs, or click Addmachine accounts to addindividual machines to the machine catalog.
© 1999‒2022 Citrix Systems, Inc. All rights reserved. 252
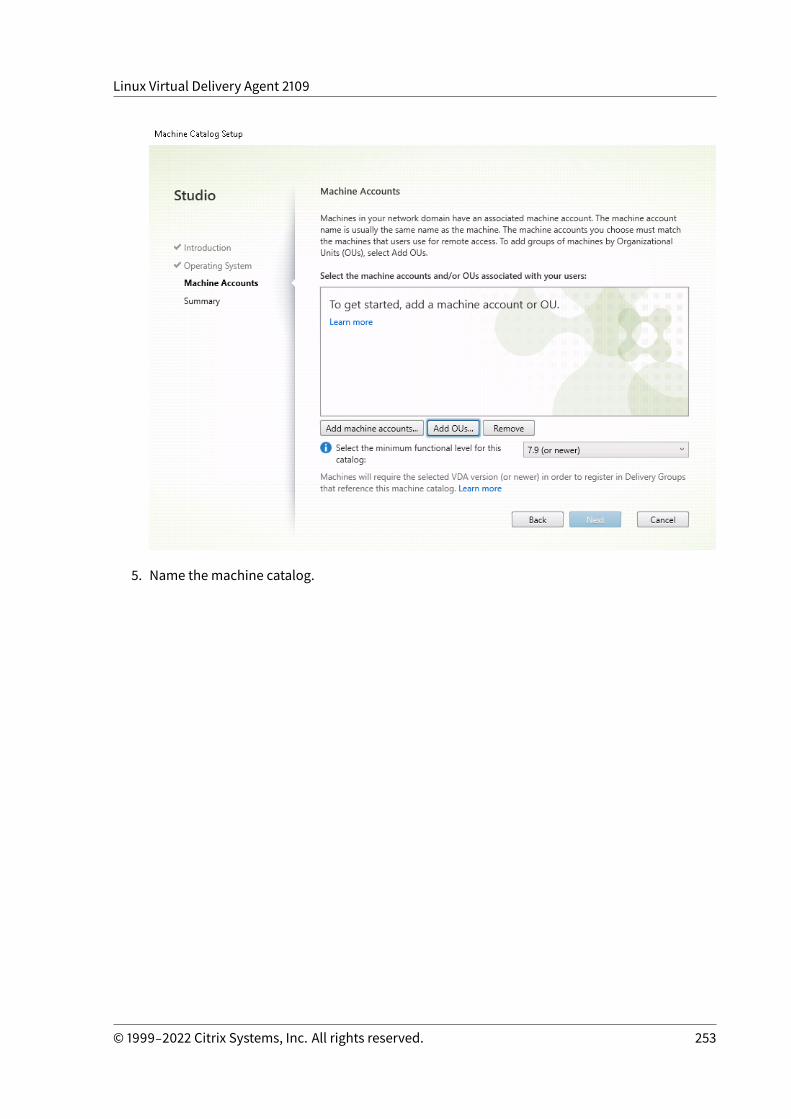
Linux Virtual Delivery Agent 2109
5. Name the machine catalog.
© 1999‒2022 Citrix Systems, Inc. All rights reserved. 253
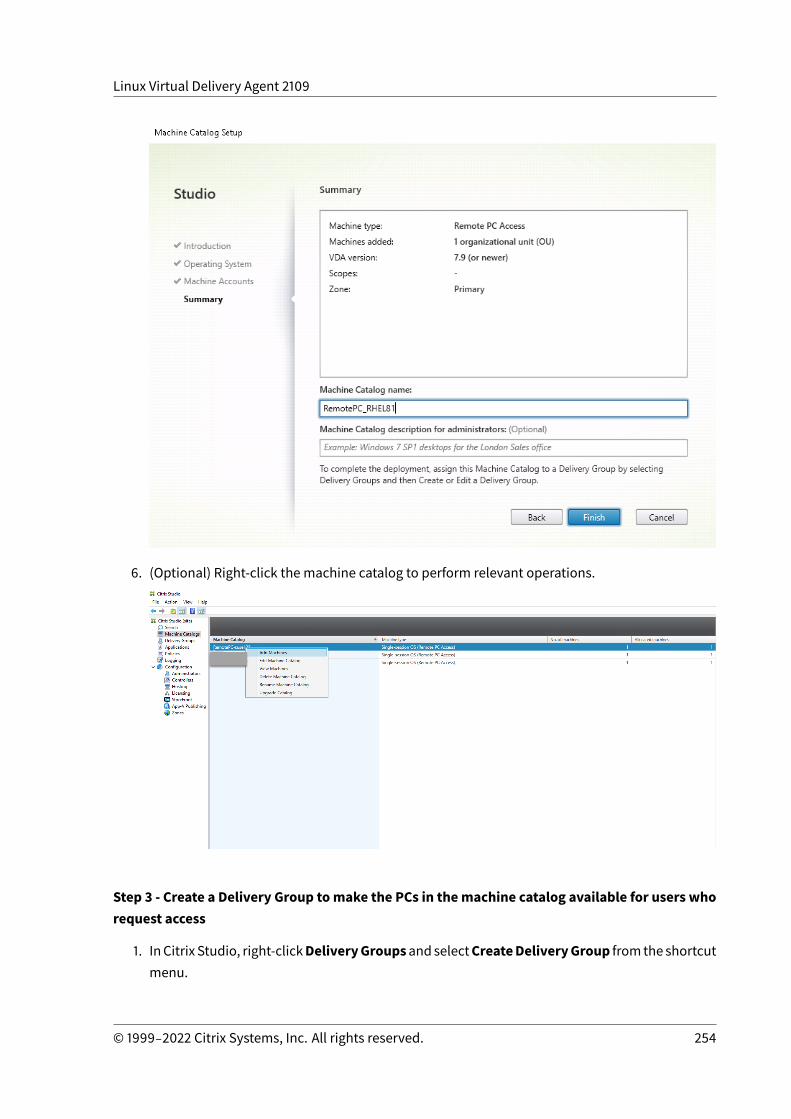
Linux Virtual Delivery Agent 2109
6. (Optional) Right-click the machine catalog to perform relevant operations.
Step 3 - Create a Delivery Group tomake the PCs in themachine catalog available for users whorequest access
1. InCitrix Studio, right-clickDeliveryGroupsandselectCreateDeliveryGroup fromthe shortcutmenu.
© 1999‒2022 Citrix Systems, Inc. All rights reserved. 254
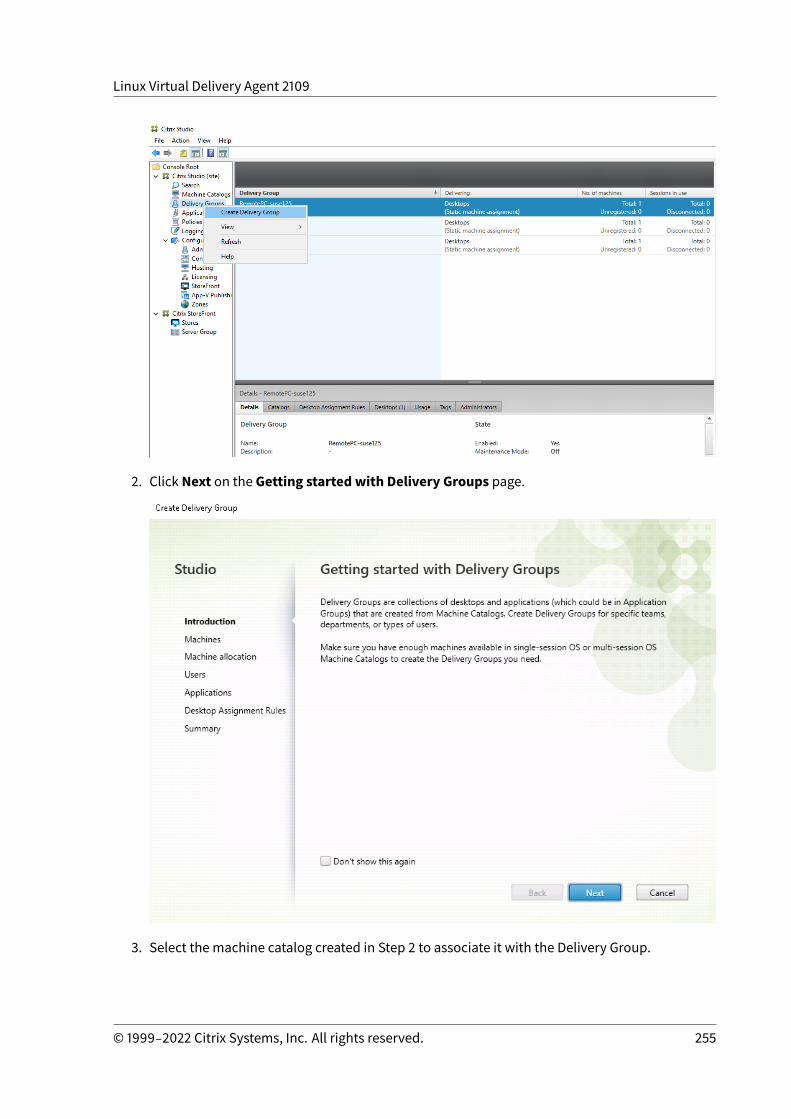
Linux Virtual Delivery Agent 2109
2. Click Next on the Getting started with Delivery Groups page.
3. Select the machine catalog created in Step 2 to associate it with the Delivery Group.
© 1999‒2022 Citrix Systems, Inc. All rights reserved. 255
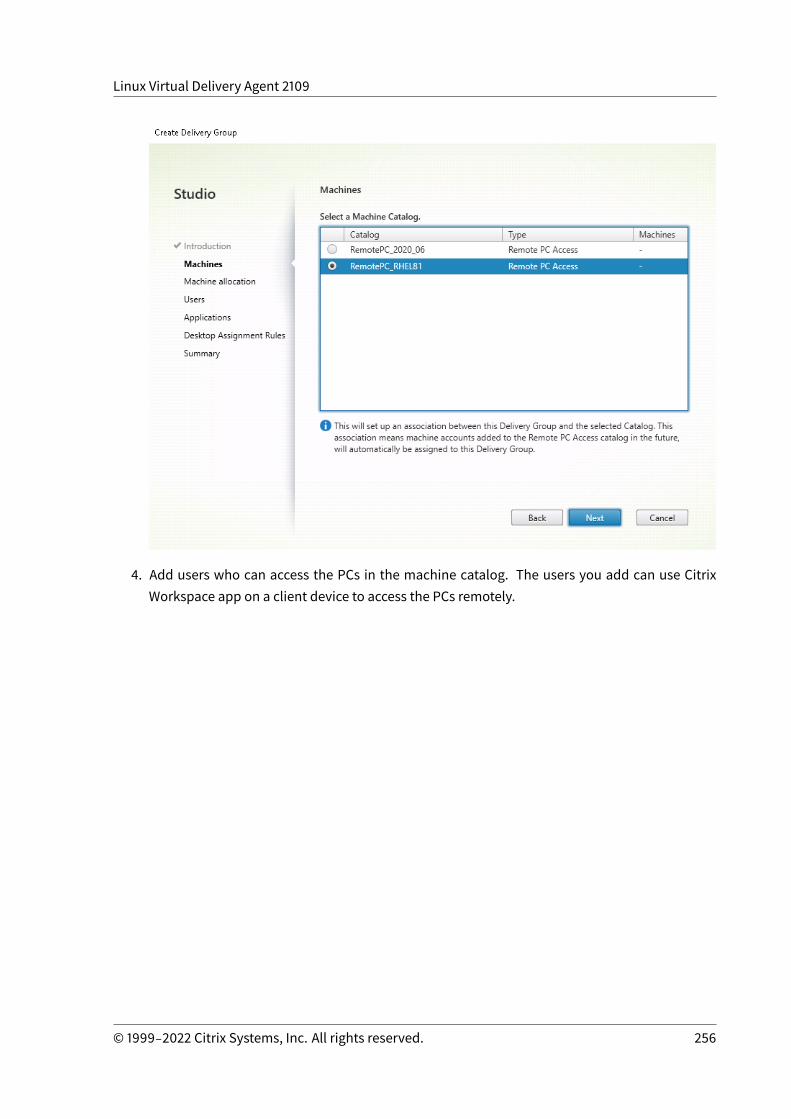
Linux Virtual Delivery Agent 2109
4. Add users who can access the PCs in the machine catalog. The users you add can use CitrixWorkspace app on a client device to access the PCs remotely.
© 1999‒2022 Citrix Systems, Inc. All rights reserved. 256
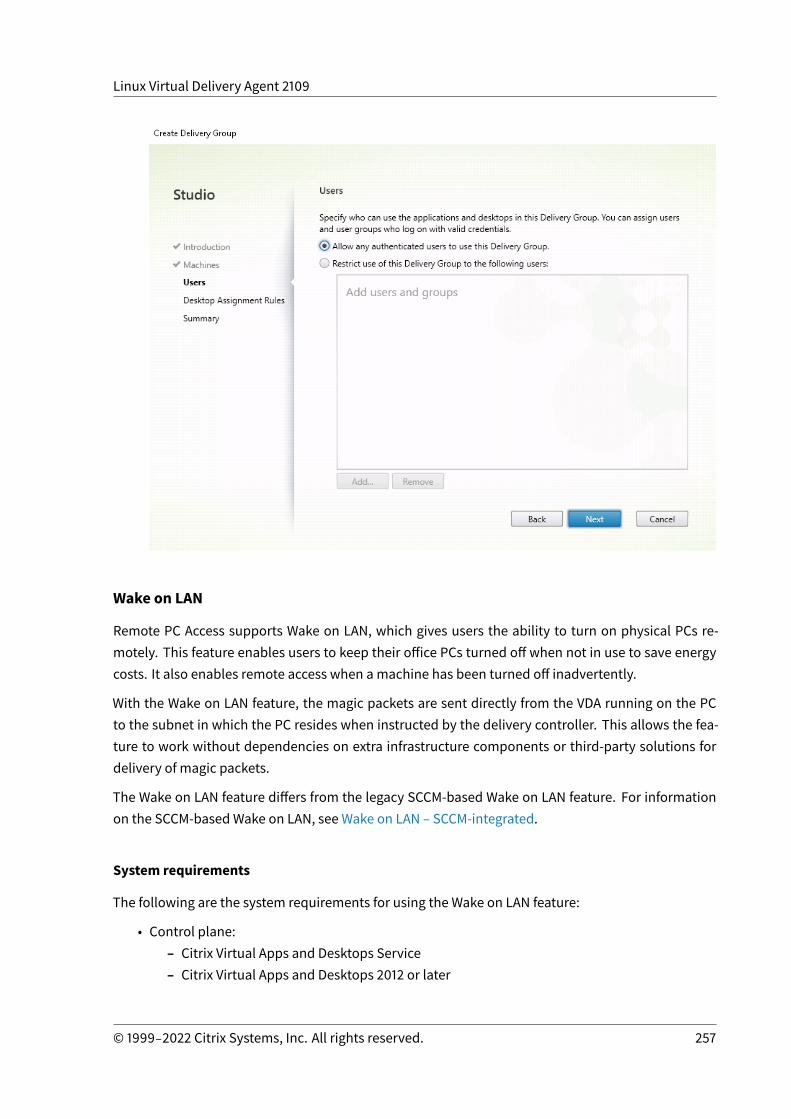
Linux Virtual Delivery Agent 2109
Wake on LAN
Remote PC Access supports Wake on LAN, which gives users the ability to turn on physical PCs re-motely. This feature enables users to keep their office PCs turned off when not in use to save energycosts. It also enables remote access when amachine has been turned off inadvertently.
With the Wake on LAN feature, the magic packets are sent directly from the VDA running on the PCto the subnet in which the PC resides when instructed by the delivery controller. This allows the fea-ture to work without dependencies on extra infrastructure components or third-party solutions fordelivery of magic packets.
The Wake on LAN feature differs from the legacy SCCM-based Wake on LAN feature. For informationon the SCCM-based Wake on LAN, see Wake on LAN – SCCM-integrated.
System requirements
The following are the system requirements for using the Wake on LAN feature:
• Control plane:– Citrix Virtual Apps and Desktops Service– Citrix Virtual Apps and Desktops 2012 or later
© 1999‒2022 Citrix Systems, Inc. All rights reserved. 257
Linux Virtual Delivery Agent 2109
• Physical PCs:– VDA version 2012 or later– Wake on LAN enabled in BIOS and on the NIC
Configure Wake on LAN
Currently, the configuration of integrated Wake on LAN is only supported using PowerShell.
To configure Wake on LAN:
1. Create the Remote PC Access machine catalog if you do not have one already.
2. Create the Wake on LAN host connection if you do not have one already.
Note:
To use the Wake on LAN feature, if you have a host connection of the “Microsoft Configura-tion Manager Wake on LAN” type, create a host connection.
3. Retrieve the Wake on LAN host connection’s unique identifier.
4. Associate the Wake on LAN host connection with a machine catalog.
To create the Wake on LAN host connection:
1 # Load Citrix SnapIns2 Add-PSSnapIn -Name ”*citrix*”34 # Provide the name of the Wake on LAN host connection5 [string]$connectionName = ”Remote PC Access Wake on LAN”67 # Create the hypervisor connection8 $hypHc = New-Item -Path xdhyp:\Connections `9 -Name $connectionName `10 -HypervisorAddress ”N/A” `11 -UserName ”woluser” `12 -Password ”wolpwd” `13 -ConnectionType Custom `14 -PluginId VdaWOLMachineManagerFactory `15 -CustomProperties ”<CustomProperties></
CustomProperties>” `16 -Persist1718 $bhc = New-BrokerHypervisorConnection -HypHypervisorConnectionUid
$hypHc.HypervisorConnectionUid19
© 1999‒2022 Citrix Systems, Inc. All rights reserved. 258
Linux Virtual Delivery Agent 2109
20 # Wait for the connection to be ready before trying to use it21 while (-not $bhc.IsReady)22 {2324 Start-Sleep -s 525 $bhc = Get-BrokerHypervisorConnection -
HypHypervisorConnectionUid $hypHc.HypervisorConnectionUid26 }2728 <!--NeedCopy-->
When the host connection is ready, run the following commands to retrieve the host connec-tion’s unique identifier:
1 $bhc = Get-BrokerHypervisorConnection -Name ”<WoL Connection Name>”
2 $hypUid = $bhc.Uid3 <!--NeedCopy-->
After you retrieve the connection’s unique identifier, run the following commands to associatethe connection with the Remote PC Access machine catalog:
1 Get-BrokerCatalog -Name ”<Catalog Name>” | Set-BrokerCatalog -RemotePCHypervisorConnectionUid $hypUid
2 <!--NeedCopy-->
5. Enable Wake on LAN in BIOS and on the NIC on each VM in the machine catalog.
Note: Themethod for enabling Wake on LAN varies with different machine configurations.
• To enable Wake on LAN in BIOS:a) Enter BIOS and enable the Wake on LAN feature.
The method for accessing BIOS depends on the manufacturer of your motherboardand the BIOS vendor the manufacturer has selected.
b) Save your settings and restart the machine.• To enable Wake on LAN on the NIC:
a) Run thesudo ethtool <NIC> command to checkwhether yourNIC supportsmagicpackets.<NIC> is thedevicenameof yourNIC, for example,eth0. Thesudo ethtool <NIC>command provides output about the capabilities of your NIC:
© 1999‒2022 Citrix Systems, Inc. All rights reserved. 259
Linux Virtual Delivery Agent 2109
– If the output contains a line similar to Supports Wake-on: <letters>where<letters> contains the letter g, your NIC supports the Wake on LAN magicpacket method.
– If the output contains a line similar to Wake-on: <letters>where <letters>contains the letter g and does not contain the letter d, the Wake on LAN magicpacket method is enabled. However, if <letters> contains the letter d, it indi-cates that the Wake on LAN feature is disabled. In this case, enable Wake on LANby running the sudo ethtool -s <NIC> wol g command.
b) On most distributions, the sudo ethtool -s <NIC> wol g command is requiredafter each startup. To persistently set this option, complete the following steps basedon your distributions:Ubuntu:Add the up ethtool -s <NIC> wol g line to the interface configuration file /etc/network/interfaces. For example:
1 # ifupdown has been replaced by netplan(5) on this system.See
2 # /etc/netplan for current configuration.3 # To re-enable ifupdown on this system, you can run:4 # sudo apt install ifupdown5 auto eth06 iface eth0 inet static7 address 10.0.0.18 netmask 255.255.240.09 gateway 10.0.0.110 up ethtool -s eth0 wol g11 <!--NeedCopy-->
RHEL/SUSE:Add the following ETHTOOL_OPTS parameter to the interface configuration file /etc/sysconfig/network-scripts/ifcfg-<NIC>:
1 ETHTOOL_OPTS=”-s ${2 DEVICE }3 wol g”4 <!--NeedCopy-->
Design considerations
When you are planning to use Wake on LAN with Remote PC Access, consider the following:
© 1999‒2022 Citrix Systems, Inc. All rights reserved. 260
Linux Virtual Delivery Agent 2109
• Multiple machine catalogs can use the sameWake on LAN host connection.• For aPC towakeupanother PC, bothPCsmust be in the same subnet anduse the sameWakeonLANhost connection. It does notmatter if the PCs are in the sameor differentmachine catalogs.
• Host connections are assigned to specific zones. If your deployment contains more than onezone, you need a Wake on LAN host connection in each zone. The same applies to machinecatalogs.
• Magic packets arebroadcastedusing theglobal broadcast address 255.255.255.255. Ensure thatthe address is not blocked.
• There must be at least one PC turned on in the subnet - for every Wake on LAN connection - tobe able to wake upmachines in that subnet.
Operational considerations
The following are considerations for using the Wake on LAN feature:
• The VDA must register at least once before the PC can be woken up using the integrated Wakeon LAN feature.
• Wake on LAN can only be used to wake up PCs. It does not support other power actions, suchas restart or shut down.
• After the Wake on LAN connection is created, it is visible in Studio. However, editing its proper-ties within Studio is not supported.
• Magic packets are sent in one of the two ways:– When a user tries to launch a session to their PC and the VDA is unregistered– When an administrator sends a power on commandmanually from Studio or PowerShell
• Because thedelivery controller is unawareof aPC’spower state, StudiodisplaysNotSupportedunder power state. The delivery controller uses the VDA registration state to determinewhethera PC is on or off.
More resources
The following are other resources for Remote PC Access:
• Solution design guidance: Remote PC Access Design Decisions.
• Examples of Remote PC Access architectures: Reference Architecture for Citrix Remote PC Ac-cess Solution.
October 12, 2021
© 1999‒2022 Citrix Systems, Inc. All rights reserved. 261
Linux Virtual Delivery Agent 2109
This article provides information about printing best practices.
Installation
The Linux VDA requires both cups and foomatic filters. The filters are installed when you install theVDA. You can also install the filters manually based on the distribution. For example:
On RHEL 7:
1 sudo yum ‒ y install cups23 sudo yum -y install foomatic-filters4 <!--NeedCopy-->
On RHEL 6:
1 sudo yum ‒ y install cups23 sudo yum -y install foomatic4 <!--NeedCopy-->
Configuration
There are three types of Universal Printer Driver supplied by Citrix (postscript, pcl5, and pcl6). How-ever, the Universal Printer Driver might not be compatible with your client printer. In this case, youronly option in earlier releases was to edit the ~/.CtxlpProfile$CLIENT_NAME configuration file. Start-ing with Version 1906, you can choose to configure the Printer driver mapping and compatibilitypolicy in Citrix Studio instead.
To configure the Printer driver mapping and compatibility policy in Citrix Studio:
1. Select the Printer driver mapping and compatibility policy.
2. Click Add.
3. Fill in Driver namewith the driver name of the client printer. If you are using Citrix Workspaceapp for Linux, fill in the printer name instead.
4. Choose Replace with and type in the absolute path of the driver file on the VDA.
© 1999‒2022 Citrix Systems, Inc. All rights reserved. 262
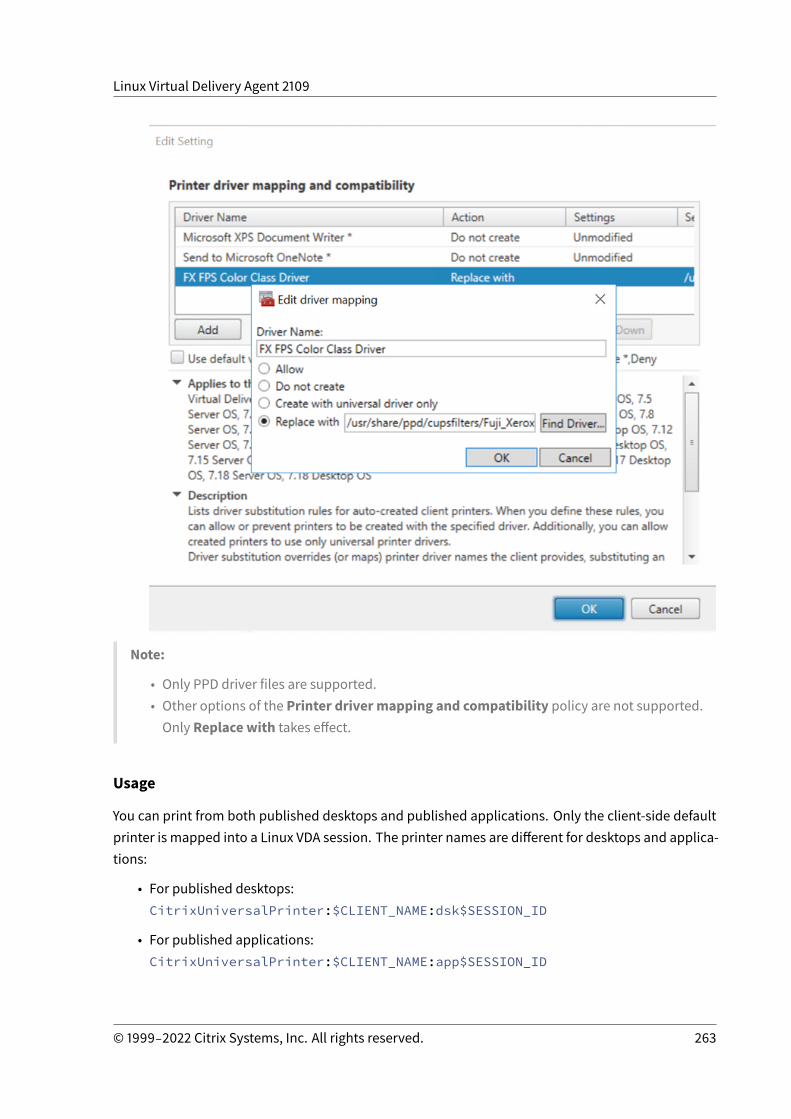
Linux Virtual Delivery Agent 2109
Note:
• Only PPD driver files are supported.• Other options of the Printer driver mapping and compatibility policy are not supported.Only Replace with takes effect.
Usage
You can print from both published desktops and published applications. Only the client-side defaultprinter is mapped into a Linux VDA session. The printer names are different for desktops and applica-tions:
• For published desktops:CitrixUniversalPrinter:$CLIENT_NAME:dsk$SESSION_ID
• For published applications:CitrixUniversalPrinter:$CLIENT_NAME:app$SESSION_ID
© 1999‒2022 Citrix Systems, Inc. All rights reserved. 263
Linux Virtual Delivery Agent 2109
Note:
If the same user opens both a published desktop and a published application, both printers areavailable to the session. Printing onadesktopprinter in apublishedapplication session, or print-ing on an application printer in a published desktop fails.
Troubleshooting
Unable to print
Whenprinting is notworking correctly, check the print daemon, ctxlpmngt, and theCUPs framework.
The print daemon, ctxlpmngt, is a per-session process and must be running for the length of thesession. Run the following command to verify that the printing daemon is running. If ctxlpmngt isnot running, start ctxlpmngtmanually from a command line.
1 ps ‒ ef | grep ctxlpmngt2 <!--NeedCopy-->
If printing is still not working, check the CUPS framework. The ctxcups service is used for printermanagement and communicates with the Linux CUPS framework. It is a single process per machineand can be checked by running the following command:
1 service ctxcups status2 <!--NeedCopy-->
Extra steps for collecting CUPS logs
To collect CUPS logs, run the following commands to configure theCUPS service file. Otherwise, CUPSlogs cannot be recorded in hdx.log:
1 sudo service cups stop23 sudo vi /etc/systemd/system/printer.target.wants/cups.service45 PrivateTmp=false67 sudo service cups start8
© 1999‒2022 Citrix Systems, Inc. All rights reserved. 264
Linux Virtual Delivery Agent 2109
9 sudo systemctl daemon-reload10 <!--NeedCopy-->
Note:
This configuration is made only for collecting the full printing log when an issue arises. Undernormal circumstances, this configuration is not recommended because it breaks CUPS security.
Print output is garbled
An incompatible printer driver can cause garbled output. A per-user driver configuration is availableand can be configured by editing the ~/.CtxlpProfile$CLIENT_NAME configuration file:
1 [DEFAULT_PRINTER]23 printername=45 model=67 ppdpath=89 drivertype=10 <!--NeedCopy-->
Important:
The printername is a field containing the name of the current client-side default printer. It is aread-only value. Do not edit it.
The fields ppdpath, model, and drivertype cannot be set at the same time because only onetakes effect for the mapped printer.
• If the Universal Printer driver is not compatible with the client printer, configure the model ofthe native printer driver using themodel= option. You can find the current model name of theprinter by using the lpinfo command:
1 lpinfo ‒ m23 …45 xerox/ph3115.ppd.gz Xerox Phaser 3115, SpliX V. 2.0.06
© 1999‒2022 Citrix Systems, Inc. All rights reserved. 265
Linux Virtual Delivery Agent 2109
7 xerox/ph3115fr.ppd.gz Xerox Phaser 3115, SpliX V. 2.0.08 xerox/ph3115pt.ppd.gz Xerox Phaser 3115, SpliX V. 2.0.0910 <!--NeedCopy-->
You can then set the model to match the printer:
1 model=xerox/ph3115.ppd.gz2 <!--NeedCopy-->
• If the Universal Printer driver is not compatible with the client printer, configure the PPD filepath of the native printer driver. The value of ppdpath is the absolute path of the native printerdriver file.
For example, there is a ppd driver under /home/tester/NATIVE_PRINTER_DRIVER.ppd:
1 ppdpath=/home/tester/NATIVE_PRINTER_DRIVER.ppd2 <!--NeedCopy-->
• There are three types of Universal Printer Driver supplied by Citrix (postscript, pcl5, and pcl6).You can configure the driver type based on your printer properties.
For example, if the client default printer driver type is PCL5, set drivertype to:
1 drivertype=pcl52 <!--NeedCopy-->
Output size is zero
Try different types of printers. And try a virtual printer like CutePDF and PDFCreator to find outwhether this issue is related to the printer driver.
The print job depends on the printer driver of the client default printer. It’s important to identify thetype of the current active driver type. If the client printer is using a PCL5 driver but the Linux VDAchooses a Postscript driver, an issue can occur.
If the printer driver type is correct, you can identify the problem by performing the following steps:
1. Log on to a published desktop session.
2. Run the vi ~/.CtxlpProfile$CLIENT_NAME command.
© 1999‒2022 Citrix Systems, Inc. All rights reserved. 266
Linux Virtual Delivery Agent 2109
3. Add the following field to save the spool file on the Linux VDA:
1 deletespoolfile=no2 <!--NeedCopy-->
4. Log off and back on to load the configuration changes.
5. Print the document to reproduce the issue. After printing, a spool file is saved under/var/spool/cups-ctx/$logon_user/$spool_file.
6. Check whether the spool is empty. If the spool file is zero, it represents an issue. Contact CitrixSupport (and provide the printing log) for more guidance.
7. If the spool size is not zero, copy the file to the client. The spool file content depends on theprinter driver typeof the client default printer. If themappedprinter (native) driver is postscript,the spool file can be opened in the Linux OS directly. Check whether the content is correct.
If the spool file is PCL, or if the client OS is Windows, copy the spool file to the client and print iton the client-side printer by using a different printer driver.
8. Change the mapped printer to use a different printer driver. The following example uses thepostscript client printer as an example:
a) Log on to an active session and open a browser on the client desktop.
b) Open the printing management portal:
1 localhost:6312 <!--NeedCopy-->
c) Choose themappedprinterCitrixUniversalPrinter:$ClientName:app/dsk$SESSION_IDandModify Printer. This operation requires administrator privileges.
d) Retain the cups-ctx connection, then click Continue to change the printer driver.
e) In theMake andModel fields, choose a different printer driver from the Citrix UPD driver.For example, if the CUPS-PDF virtual printer is installed, select the Generic CUPS-PDFPrinter driver. Save the change.
f) If this process succeeds, configure the PPD file path of the driver in .CtxlpPro-file$CLIENT_NAME to allow the mapped printer to use the newly selected driver.
Known issues
The following issues have been identified during printing on the Linux VDA:
© 1999‒2022 Citrix Systems, Inc. All rights reserved. 267

Linux Virtual Delivery Agent 2109
CTXPS driver is not compatible with some PLC printers
If you encounter printing output corruption, set the printer driver to the native one provided by themanufacturer.
Slow printing performance for large documents
When you print a large document on a local client printer, the document is transferred over the serverconnection. On slow connections, the transfer can take a long time.
Printer and print job notifications seen from other sessions
Linux does not have the same session concept as the Windows operating system. Therefore, all usersget system-widenotifications. Youcandisable thesenotificationsby changing theCUPSconfigurationfile: /etc/cups/cupsd.conf.
Locate the current policy name configured in the file:
DefaultPolicy default
If the policy name is default, add the following lines to the default policy XML block:
1 <Policy default>23 # Job/subscription privacy...45 JobPrivateAccess default67 JobPrivateValues default89 SubscriptionPrivateAccess default1011 SubscriptionPrivateValues default1213 … …1415 <Limit Create-Printer-Subscription>1617 Require user @OWNER1819 Order deny,allow2021 </Limit>22
© 1999‒2022 Citrix Systems, Inc. All rights reserved. 268

Linux Virtual Delivery Agent 2109
23 <Limit All>2425 Order deny,allow2627 </Limit>2829 </Policy>30 <!--NeedCopy-->
File copy and paste
October 12, 2021
Users can copy and paste files between a session and a local client. This feature requires Citrix VirtualApps and Desktops 2006 or later and Citrix Workspace app 1903 or later for Windows. Copy and pastefunctions by using the right-click menu or keyboard shortcuts.
To successfully copy and paste files, ensure that:
• The maximum number of files does not exceed 20.• The maximum file size does not exceed 200 MB.
Supported platforms
The file copy and paste feature is available for:
• RHEL 7.8• SLES 12.5• Ubuntu 16.04• Ubuntu 18.04• Debian 10
Relevant policies
The following clipboard policies are relevant to configuring the feature. For more information aboutthe clipboard policies, see Policy support list.
• Client clipboard redirection• Clipboard selection update mode• Primary selection update mode
© 1999‒2022 Citrix Systems, Inc. All rights reserved. 269
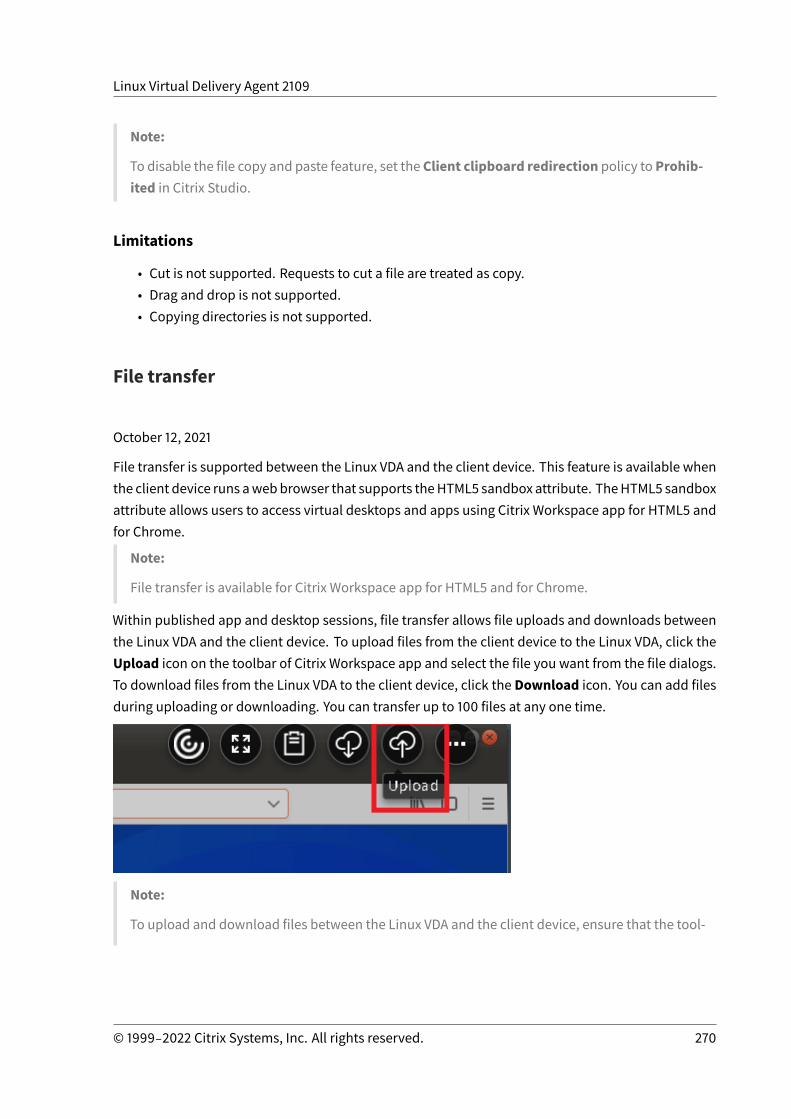
Linux Virtual Delivery Agent 2109
Note:
To disable the file copy and paste feature, set the Client clipboard redirection policy toProhib-ited in Citrix Studio.
Limitations
• Cut is not supported. Requests to cut a file are treated as copy.• Drag and drop is not supported.• Copying directories is not supported.
File transfer
October 12, 2021
File transfer is supported between the Linux VDA and the client device. This feature is available whenthe client device runs awebbrowser that supports theHTML5 sandbox attribute. TheHTML5 sandboxattribute allows users to access virtual desktops and apps using Citrix Workspace app for HTML5 andfor Chrome.
Note:
File transfer is available for Citrix Workspace app for HTML5 and for Chrome.
Within published app and desktop sessions, file transfer allows file uploads and downloads betweenthe Linux VDA and the client device. To upload files from the client device to the Linux VDA, click theUpload icon on the toolbar of Citrix Workspace app and select the file you want from the file dialogs.To download files from the Linux VDA to the client device, click the Download icon. You can add filesduring uploading or downloading. You can transfer up to 100 files at any one time.
Note:
To upload and download files between the Linux VDA and the client device, ensure that the tool-
© 1999‒2022 Citrix Systems, Inc. All rights reserved. 270

Linux Virtual Delivery Agent 2109
bar of Citrix Workspace app is enabled.You can use a version of Citrix Workspace app that lets you drag and drop files.
Auto-download is an enhancement for file transfer. Files you download or move to the Save to MyDevice directory on the VDA are transferred to the client device automatically.
Note:
Auto-download requires theAllow file transferbetweendesktopandclientandDownload filefrom desktop policies to be set to Allowed.
Here are some use cases for auto-download:
• Download files to Save to My Device
Within published desktop and web browser app sessions, files you download from websitescan be saved to the Save toMy Device directory on the VDA for automatic transfer to the clientdevice. To achieve auto-download, set the default download directory of the in-session webbrowser to Save to My Device and set a local download directory in the web browser that runsyour Citrix Workspace app for HTML5 or for Chrome.
• Move or copy files to Save to My Device
Within published desktop sessions, choose the target files and move or copy them to the Saveto My Device directory for availability on the client device.
File transfer policies
You can use Citrix Studio to set the file transfer policies. By default, file transfer is enabled.
Policy descriptions:
• Allow file transfer between desktop and client. Allows or prevents users from transferringfiles between a Citrix Virtual Apps and Desktops session and their devices.
© 1999‒2022 Citrix Systems, Inc. All rights reserved. 271

Linux Virtual Delivery Agent 2109
• Download file from desktop. Allows or prevents users from downloading files from a CitrixVirtual Apps and Desktops session to their device.
• Upload file to desktop. Allows or prevents users from uploading files from their device to aCitrix Virtual Apps and Desktops session.
Note:
To ensure that theDownload file fromdesktop andUpload file to desktop policies take effect,set the Allow file transfer between desktop and client policy to Allowed.
Usage
To use the file transfer feature through Citrix Workspace app for HTML5:
1. In Citrix Studio, set theWebSockets connections policy to Allowed.
2. In Citrix Studio, enable file transfer through the file transfer policies described earlier.
3. In theCitrix StoreFrontmanagement console, clickStores, select theManageReceiver forWebSites node, and enable Citrix Receiver for HTML5 by selecting the Always use Receiver forHTML5 option.
© 1999‒2022 Citrix Systems, Inc. All rights reserved. 272
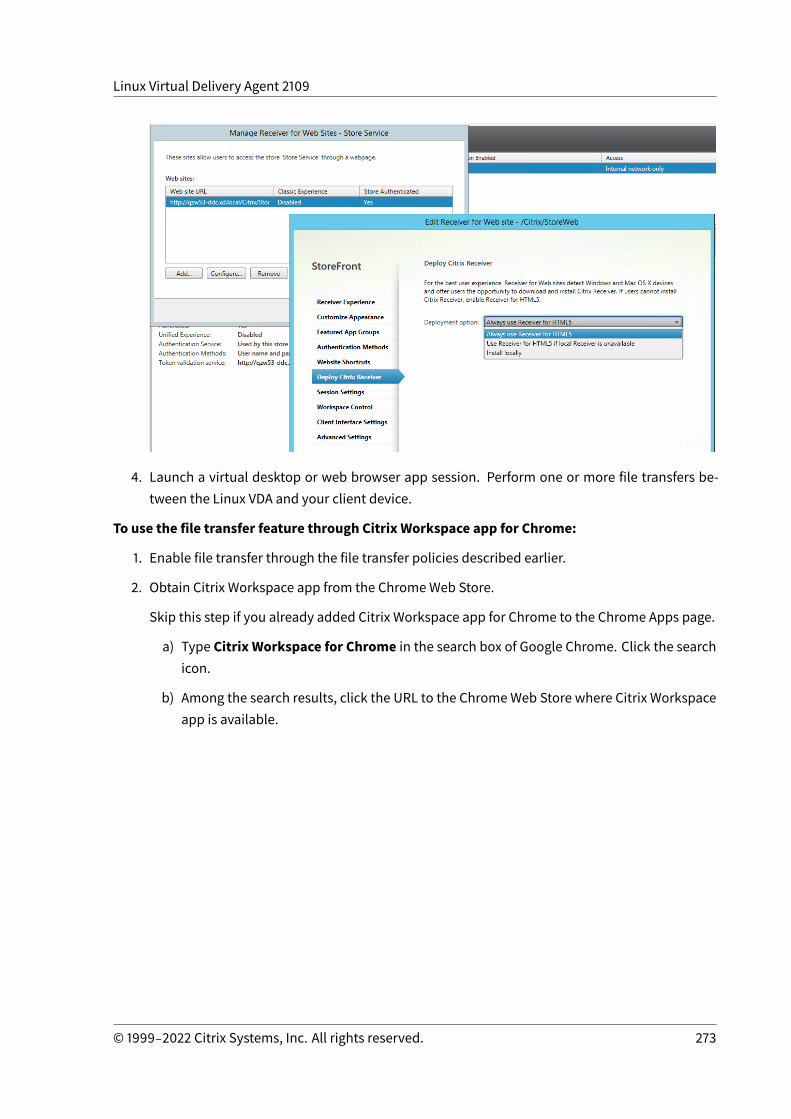
Linux Virtual Delivery Agent 2109
4. Launch a virtual desktop or web browser app session. Perform one or more file transfers be-tween the Linux VDA and your client device.
To use the file transfer feature through Citrix Workspace app for Chrome:
1. Enable file transfer through the file transfer policies described earlier.
2. Obtain Citrix Workspace app from the ChromeWeb Store.
Skip this step if you already added Citrix Workspace app for Chrome to the Chrome Apps page.
a) Type Citrix Workspace for Chrome in the search box of Google Chrome. Click the searchicon.
b) Among the search results, click the URL to the ChromeWeb Store where Citrix Workspaceapp is available.
© 1999‒2022 Citrix Systems, Inc. All rights reserved. 273
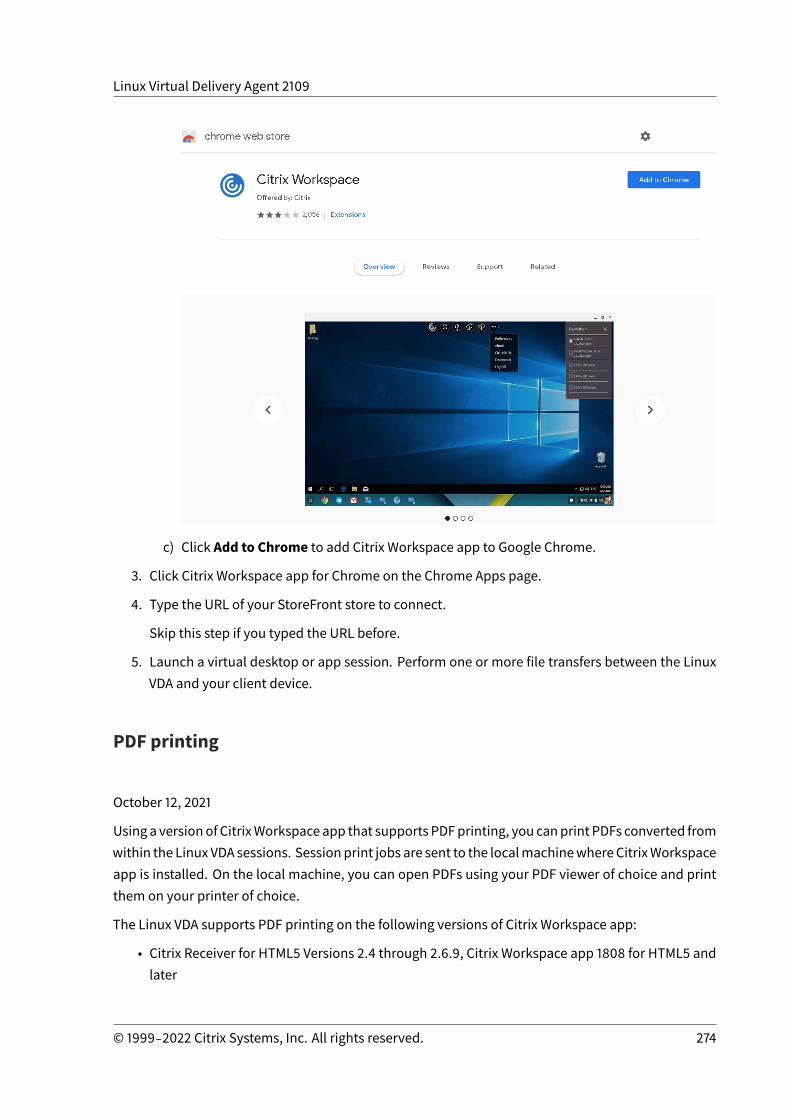
Linux Virtual Delivery Agent 2109
c) Click Add to Chrome to add Citrix Workspace app to Google Chrome.
3. Click Citrix Workspace app for Chrome on the Chrome Apps page.
4. Type the URL of your StoreFront store to connect.
Skip this step if you typed the URL before.
5. Launch a virtual desktop or app session. Perform one or more file transfers between the LinuxVDA and your client device.
PDF printing
October 12, 2021
Using a versionof CitrixWorkspace app that supports PDFprinting, you canprint PDFs converted fromwithin the Linux VDA sessions. Sessionprint jobs are sent to the localmachinewhereCitrixWorkspaceapp is installed. On the local machine, you can open PDFs using your PDF viewer of choice and printthem on your printer of choice.
The Linux VDA supports PDF printing on the following versions of Citrix Workspace app:
• Citrix Receiver for HTML5 Versions 2.4 through 2.6.9, Citrix Workspace app 1808 for HTML5 andlater
© 1999‒2022 Citrix Systems, Inc. All rights reserved. 274
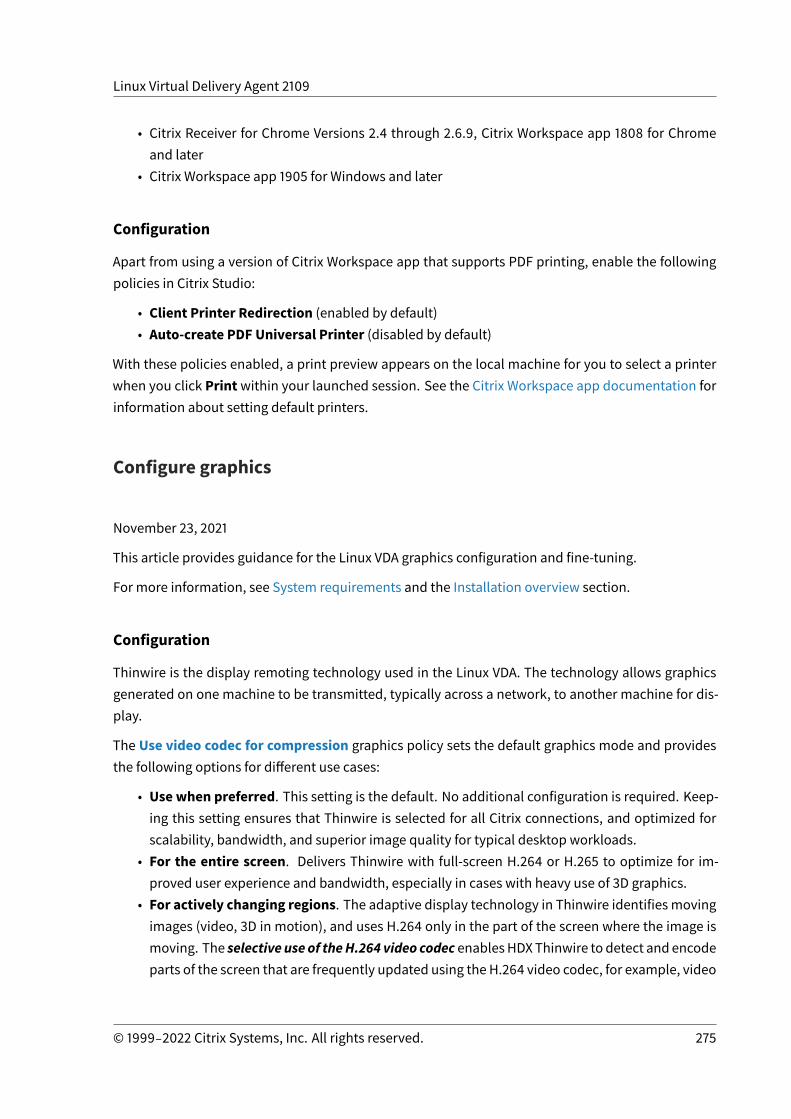
Linux Virtual Delivery Agent 2109
• Citrix Receiver for Chrome Versions 2.4 through 2.6.9, Citrix Workspace app 1808 for Chromeand later
• Citrix Workspace app 1905 for Windows and later
Configuration
Apart from using a version of Citrix Workspace app that supports PDF printing, enable the followingpolicies in Citrix Studio:
• Client Printer Redirection (enabled by default)• Auto-create PDF Universal Printer (disabled by default)
With these policies enabled, a print preview appears on the local machine for you to select a printerwhen you click Printwithin your launched session. See the Citrix Workspace app documentation forinformation about setting default printers.
Configure graphics
November 23, 2021
This article provides guidance for the Linux VDA graphics configuration and fine-tuning.
For more information, see System requirements and the Installation overview section.
Configuration
Thinwire is the display remoting technology used in the Linux VDA. The technology allows graphicsgenerated on one machine to be transmitted, typically across a network, to another machine for dis-play.
The Use video codec for compression graphics policy sets the default graphics mode and providesthe following options for different use cases:
• Use when preferred. This setting is the default. No additional configuration is required. Keep-ing this setting ensures that Thinwire is selected for all Citrix connections, and optimized forscalability, bandwidth, and superior image quality for typical desktop workloads.
• For the entire screen. Delivers Thinwire with full-screen H.264 or H.265 to optimize for im-proved user experience and bandwidth, especially in cases with heavy use of 3D graphics.
• For actively changing regions. The adaptive display technology in Thinwire identifies movingimages (video, 3D in motion), and uses H.264 only in the part of the screen where the image ismoving. The selective use of theH.264 video codec enablesHDXThinwire to detect and encodeparts of the screen that are frequently updated using the H.264 video codec, for example, video
© 1999‒2022 Citrix Systems, Inc. All rights reserved. 275
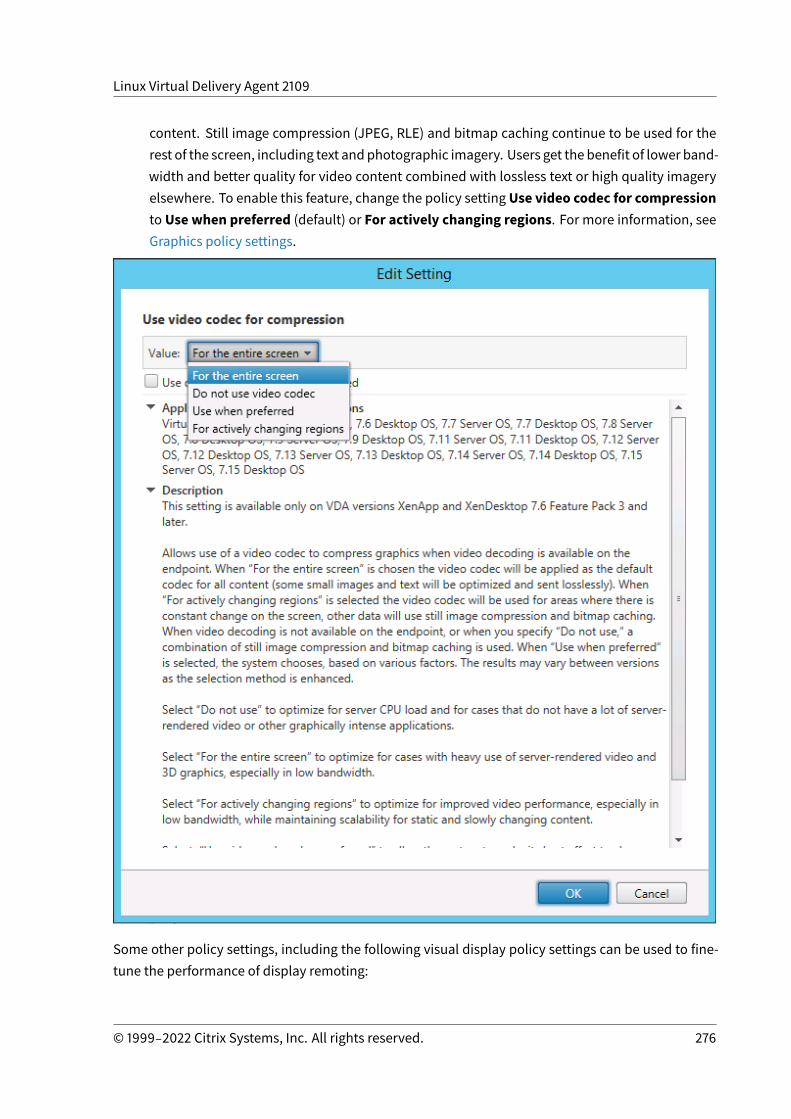
Linux Virtual Delivery Agent 2109
content. Still image compression (JPEG, RLE) and bitmap caching continue to be used for therest of the screen, including text andphotographic imagery. Users get the benefit of lower band-width and better quality for video content combined with lossless text or high quality imageryelsewhere. To enable this feature, change the policy settingUse video codec for compressionto Use when preferred (default) or For actively changing regions. For more information, seeGraphics policy settings.
Some other policy settings, including the following visual display policy settings can be used to fine-tune the performance of display remoting:
© 1999‒2022 Citrix Systems, Inc. All rights reserved. 276
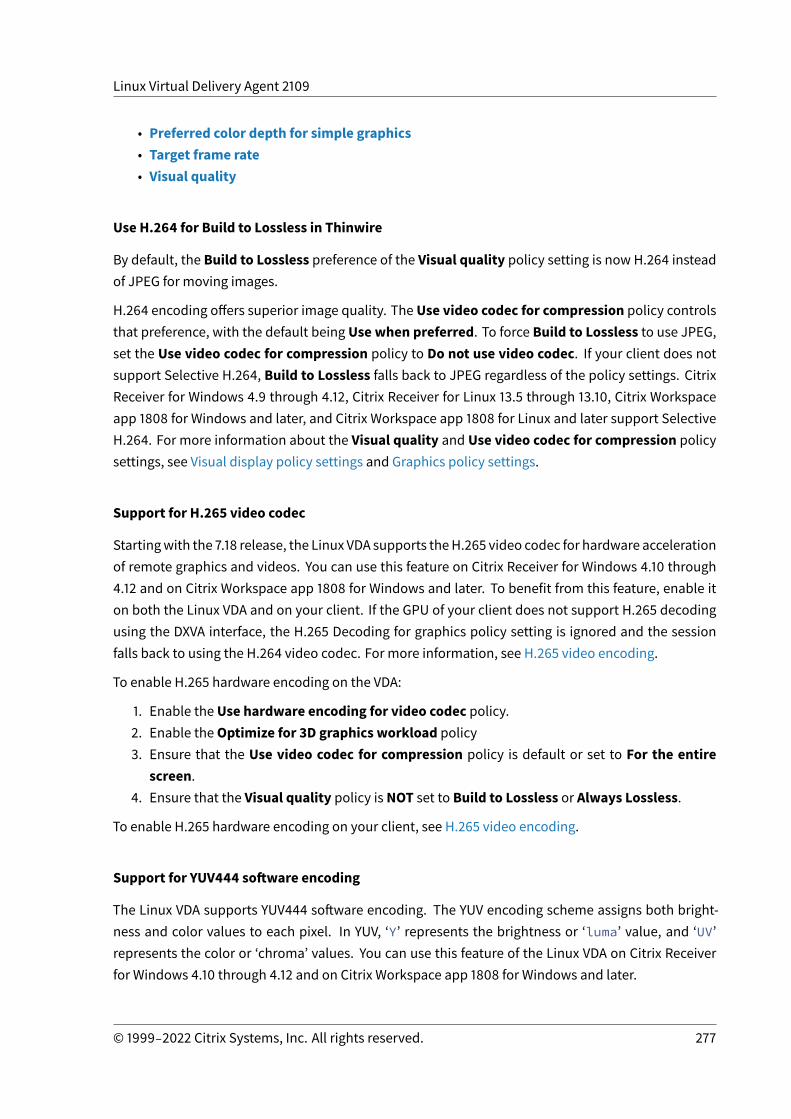
Linux Virtual Delivery Agent 2109
• Preferred color depth for simple graphics• Target frame rate• Visual quality
Use H.264 for Build to Lossless in Thinwire
By default, the Build to Lossless preference of the Visual quality policy setting is now H.264 insteadof JPEG for moving images.
H.264 encoding offers superior image quality. The Use video codec for compression policy controlsthat preference, with the default being Use when preferred. To force Build to Lossless to use JPEG,set the Use video codec for compression policy to Do not use video codec. If your client does notsupport Selective H.264, Build to Lossless falls back to JPEG regardless of the policy settings. CitrixReceiver for Windows 4.9 through 4.12, Citrix Receiver for Linux 13.5 through 13.10, Citrix Workspaceapp 1808 for Windows and later, and Citrix Workspace app 1808 for Linux and later support SelectiveH.264. For more information about the Visual quality and Use video codec for compression policysettings, see Visual display policy settings and Graphics policy settings.
Support for H.265 video codec
Startingwith the 7.18 release, the Linux VDA supports theH.265 video codec for hardware accelerationof remote graphics and videos. You can use this feature on Citrix Receiver for Windows 4.10 through4.12 and on Citrix Workspace app 1808 for Windows and later. To benefit from this feature, enable iton both the Linux VDA and on your client. If the GPU of your client does not support H.265 decodingusing the DXVA interface, the H.265 Decoding for graphics policy setting is ignored and the sessionfalls back to using the H.264 video codec. For more information, see H.265 video encoding.
To enable H.265 hardware encoding on the VDA:
1. Enable the Use hardware encoding for video codec policy.2. Enable theOptimize for 3D graphics workload policy3. Ensure that the Use video codec for compression policy is default or set to For the entire
screen.4. Ensure that the Visual quality policy is NOT set to Build to Lossless or Always Lossless.
To enable H.265 hardware encoding on your client, see H.265 video encoding.
Support for YUV444 software encoding
The Linux VDA supports YUV444 software encoding. The YUV encoding scheme assigns both bright-ness and color values to each pixel. In YUV, ‘Y’ represents the brightness or ‘luma’ value, and ‘UV’represents the color or ‘chroma’ values. You can use this feature of the Linux VDA on Citrix Receiverfor Windows 4.10 through 4.12 and on Citrix Workspace app 1808 for Windows and later.
© 1999‒2022 Citrix Systems, Inc. All rights reserved. 277
Linux Virtual Delivery Agent 2109
Each unique Y, U, and V value comprises 8 bits, or one byte, of data. The YUV444 data format transmits24 bits per pixel. The YUV422 data format shares U and V values between two pixels, which results inan average transmission rate of 16 bits per pixel. The following table shows an intuitive comparisonbetween YUV444 and YUV420.
YUV444 YUV420
To enable YUV444 software encoding on the VDA:
1. Enable the Allow visually lossless compression policy.2. Ensure that the Use video codec for compression policy is set to For the entire screen.3. Ensure that the Visual quality policy is set to Always Lossless or Build to Lossless.
Adjust average bit rates based on bandwidth estimates
Citrix enhances HDX 3D Pro hardware encoding by adjusting average bit rates based on bandwidthestimates.
When theHDX 3DPro hardware encoding is in use, the VDA can intermittently estimate the bandwidthof thenetworkandadjust thebit ratesof encoded framesbasedon thebandwidthestimates. Thisnewfeature provides a mechanism to balance between sharpness and fluency.
This feature is enabled by default. To disable it, run the following command:
1 sudo /opt/Citrix/VDA/bin/ctxreg create -k ”HKEY_LOCAL_MACHINE\SYSTEM\CurrentControlSet\Control\Citrix\Thinwire” -t ”REG_DWORD” -v ”DisableReconfigureEncoder” -d ”0x00000001” --force
2 <!--NeedCopy-->
In addition to using this feature, you can also run the following commands to adjust between sharp-ness and fluency. The AverageBitRatePercent andMaxBitRatePercent parameters set the percent-age of bandwidth usage. The higher values you set, the sharper graphics and lower fluency you get.The recommended setting range is 50–100.
© 1999‒2022 Citrix Systems, Inc. All rights reserved. 278
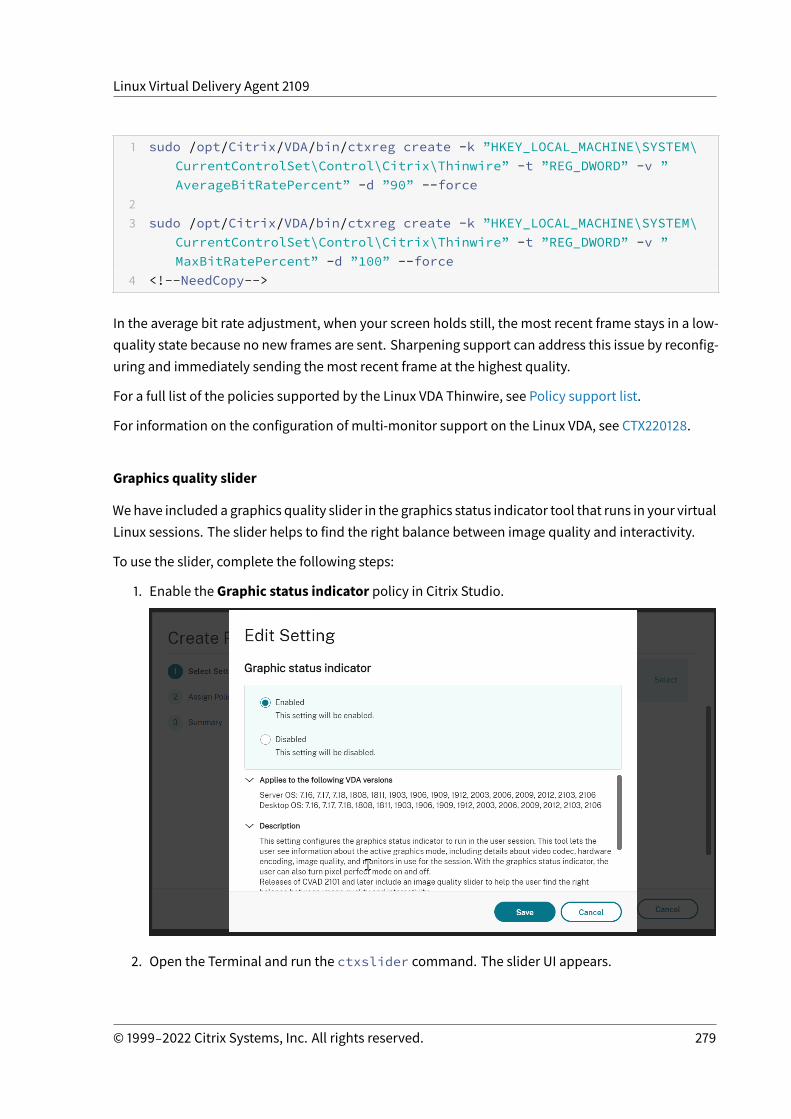
Linux Virtual Delivery Agent 2109
1 sudo /opt/Citrix/VDA/bin/ctxreg create -k ”HKEY_LOCAL_MACHINE\SYSTEM\CurrentControlSet\Control\Citrix\Thinwire” -t ”REG_DWORD” -v ”AverageBitRatePercent” -d ”90” --force
23 sudo /opt/Citrix/VDA/bin/ctxreg create -k ”HKEY_LOCAL_MACHINE\SYSTEM\
CurrentControlSet\Control\Citrix\Thinwire” -t ”REG_DWORD” -v ”MaxBitRatePercent” -d ”100” --force
4 <!--NeedCopy-->
In the average bit rate adjustment, when your screen holds still, the most recent frame stays in a low-quality state because no new frames are sent. Sharpening support can address this issue by reconfig-uring and immediately sending the most recent frame at the highest quality.
For a full list of the policies supported by the Linux VDA Thinwire, see Policy support list.
For information on the configuration of multi-monitor support on the Linux VDA, see CTX220128.
Graphics quality slider
Wehave included a graphics quality slider in the graphics status indicator tool that runs in your virtualLinux sessions. The slider helps to find the right balance between image quality and interactivity.
To use the slider, complete the following steps:
1. Enable the Graphic status indicator policy in Citrix Studio.
2. Open the Terminal and run the ctxslider command. The slider UI appears.
© 1999‒2022 Citrix Systems, Inc. All rights reserved. 279
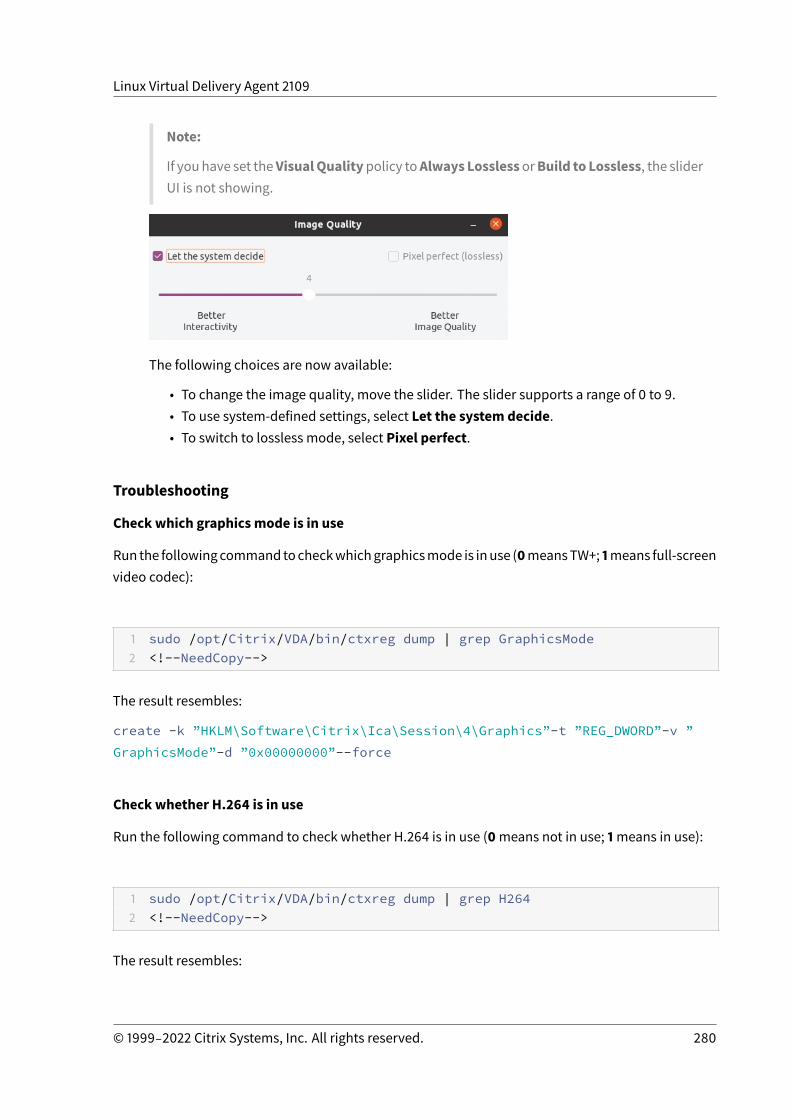
Linux Virtual Delivery Agent 2109
Note:
If youhave set theVisualQualitypolicy toAlways LosslessorBuild to Lossless, the sliderUI is not showing.
The following choices are now available:
• To change the image quality, move the slider. The slider supports a range of 0 to 9.• To use system-defined settings, select Let the system decide.• To switch to lossless mode, select Pixel perfect.
Troubleshooting
Check which graphics mode is in use
Run the followingcommand tocheckwhichgraphicsmode is inuse (0meansTW+; 1means full-screenvideo codec):
1 sudo /opt/Citrix/VDA/bin/ctxreg dump | grep GraphicsMode2 <!--NeedCopy-->
The result resembles:
create -k ”HKLM\Software\Citrix\Ica\Session\4\Graphics”-t ”REG_DWORD”-v ”GraphicsMode”-d ”0x00000000”--force
Check whether H.264 is in use
Run the following command to check whether H.264 is in use (0means not in use; 1means in use):
1 sudo /opt/Citrix/VDA/bin/ctxreg dump | grep H2642 <!--NeedCopy-->
The result resembles:
© 1999‒2022 Citrix Systems, Inc. All rights reserved. 280
Linux Virtual Delivery Agent 2109
create -k ”HKLM\Software\Citrix\Ica\Session\4\Graphics”-t ”REG_DWORD”-v ”H264”-d ”0x00000000”--force
Check whether H.265 is in use
Run the following command to checkwhether full-screenH.265 is in use (0means not in use; 1meansin use):
1 sudo /opt/Citrix/VDA/bin/ctxreg dump | grep H2652 <!--NeedCopy-->
The result resembles:
create -k ”HKLM\Software\Citrix\Ica\Session\4\Graphics”-t ”REG_DWORD”-v ”H265”-d ”0x00000000”--force
Check which YUV encoding scheme is in use
Run the following command to checkwhich YUVencoding scheme is in use (0means YUV420. 1meansYUV422. 2means YUV444):
Note: The value of YUVFormat is meaningful only when a video codec is in use.
1 sudo /opt/Citrix/VDA/bin/ctxreg dump | grep YUVFormat2 <!--NeedCopy-->
The result resembles:
create -k ”HKLM\Software\Citrix\Ica\Session\4\Graphics”-t ”REG_DWORD”-v ”YUVFormat”-d ”0x00000000”--force
Check whether YUV444 software encoding is in use
Run the following command to check whether YUV444 software encoding is in use:
1 sudo /opt/Citrix/VDA/bin/ctxreg dump | grep Graphics2 <!--NeedCopy-->
When YUV444 is in use, the result resembles:
© 1999‒2022 Citrix Systems, Inc. All rights reserved. 281
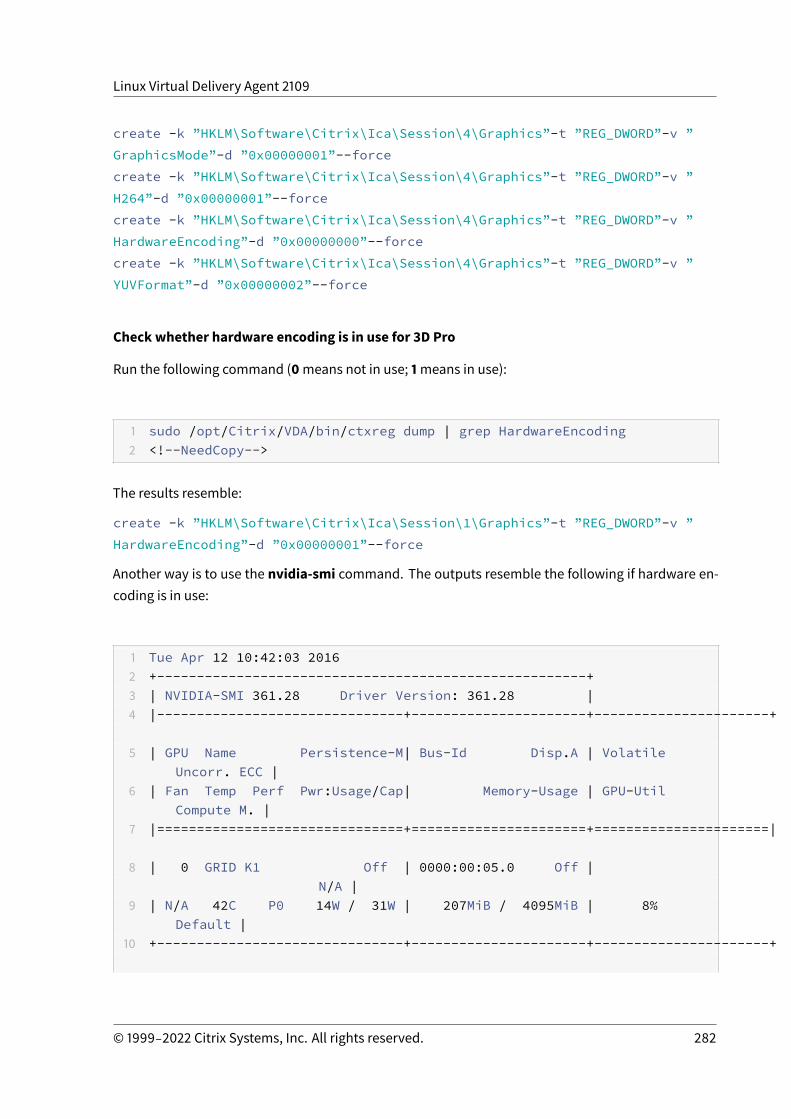
Linux Virtual Delivery Agent 2109
create -k ”HKLM\Software\Citrix\Ica\Session\4\Graphics”-t ”REG_DWORD”-v ”GraphicsMode”-d ”0x00000001”--forcecreate -k ”HKLM\Software\Citrix\Ica\Session\4\Graphics”-t ”REG_DWORD”-v ”H264”-d ”0x00000001”--forcecreate -k ”HKLM\Software\Citrix\Ica\Session\4\Graphics”-t ”REG_DWORD”-v ”HardwareEncoding”-d ”0x00000000”--forcecreate -k ”HKLM\Software\Citrix\Ica\Session\4\Graphics”-t ”REG_DWORD”-v ”YUVFormat”-d ”0x00000002”--force
Check whether hardware encoding is in use for 3D Pro
Run the following command (0means not in use; 1means in use):
1 sudo /opt/Citrix/VDA/bin/ctxreg dump | grep HardwareEncoding2 <!--NeedCopy-->
The results resemble:
create -k ”HKLM\Software\Citrix\Ica\Session\1\Graphics”-t ”REG_DWORD”-v ”HardwareEncoding”-d ”0x00000001”--force
Another way is to use the nvidia-smi command. The outputs resemble the following if hardware en-coding is in use:
1 Tue Apr 12 10:42:03 20162 +------------------------------------------------------+3 | NVIDIA-SMI 361.28 Driver Version: 361.28 |4 |-------------------------------+----------------------+----------------------+
5 | GPU Name Persistence-M| Bus-Id Disp.A | VolatileUncorr. ECC |
6 | Fan Temp Perf Pwr:Usage/Cap| Memory-Usage | GPU-Util Compute M. |
7 |===============================+======================+======================|
8 | 0 GRID K1 Off | 0000:00:05.0 Off | N/A |
9 | N/A 42C P0 14W / 31W | 207MiB / 4095MiB | 8% Default |
10 +-------------------------------+----------------------+----------------------+
© 1999‒2022 Citrix Systems, Inc. All rights reserved. 282

Linux Virtual Delivery Agent 2109
1112 +-----------------------------------------------------------------------------+
13 | Processes: GPUMemory |
14 | GPU PID Type Process name Usage |
15 |=============================================================================|
16 | 0 2164 C+G /usr/local/bin/ctxgfx 106MiB |
17 | 0 2187 G Xorg 85MiB |
18 +-----------------------------------------------------------------------------+
19 <!--NeedCopy-->
Verify that the NVIDIA GRID graphics driver is installed correctly
To verify that the NVIDIA GRID graphics driver is installed correctly, run nvidia-smi. The results resem-ble:
1 +------------------------------------------------------+2 | NVIDIA-SMI 352.70 Driver Version: 352.70 |3 |-------------------------------+----------------------+----------------------+
4 | GPU Name Persistence-M| Bus-Id Disp.A | VolatileUncorr. ECC |
5 | Fan Temp Perf Pwr:Usage/Cap| Memory-Usage | GPU-Util Compute M. |
6 |===============================+======================+======================|
7 | 0 Tesla M60 Off | 0000:00:05.0 Off | Off |
8 | N/A 20C P0 37W / 150W | 19MiB / 8191MiB | 0% Default |
9 +-------------------------------+----------------------+----------------------+
1011 +-----------------------------------------------------------------------------+
12 | Processes: GPU
© 1999‒2022 Citrix Systems, Inc. All rights reserved. 283
Linux Virtual Delivery Agent 2109
Memory |13 | GPU PID Type Process name
Usage |14 |=============================================================================|
15 | No running processes found |
16 +-----------------------------------------------------------------------------+
17 <!--NeedCopy-->
Set the correct configuration for the card:
etc/X11/ctx-nvidia.sh
HDX 3D Promulti-monitor redraw issues
If you are seeing redraw issues on screens other than the primarymonitor, check that theNVIDIA GRIDlicense is available.
Check Xorg error logs
The log file of Xorg is named similar to Xorg.{DISPLAY}.log in the /var/log/ folder.
Known issues and limitations
For vGPU, the Citrix Hypervisor local console shows the ICA desktop session screen
Workaround: Disable the VM’s local VGA console by running the following command:
1 xe vm-param-set uuid=<vm-uuid> platform:vgpu_extra_args=”disable_vnc=1”2 <!--NeedCopy-->
NVIDIA K2 graphics cards do not support YUV444 hardware encoding in pass-throughmode
With Build to Lossless enabled through the policy setting, a black or gray screen appears when usersare launching an app/desktop session with an NVIDIA K2 graphics card. The issue occurs becauseNVIDIA K2 graphics cards do not support YUV444 hardware encoding in pass-throughmode. Formoreinformation, see Video Encode and Decode GPU Support Matrix.
© 1999‒2022 Citrix Systems, Inc. All rights reserved. 284
Linux Virtual Delivery Agent 2109
Gnome 3 desktop popups slowwhen logging on
It is a limitation of Gnome 3 desktop session startup.
Some OpenGL/WebGL applications do not render well upon resizing the Citrix Workspace appwindow
Resizing the window of Citrix Workspace app changes the screen resolution. The NVIDIA proprietarydriver changes some internal states andmight require applications to respond accordingly. For exam-ple, the WebGL library element lightgl.jsmight spawn an error saying that ‘Rendering to thistexture is not supported (incomplete frame buffer)’.
Thinwire progressive display
October 12, 2021
Session interactivity can degrade on low bandwidth or high latency connections. For example, onconnectionswith less than 2Mbps bandwidth or latency ofmore than 200ms, scrolling on awebpagecan become slow, unresponsive, or choppy. Keyboard andmouse operations can lag behind graphicsupdates.
Through version 7.17, you were able to use policy settings to reduce bandwidth consumption by con-figuring the session to Low visual quality, or setting a lower color depth (16-bit or 8-bit graphics).However, you had to know that a user was on a weak connection. HDX Thinwire did not dynamicallyadjust static image quality based on network conditions.
Starting with Version 7.18, HDX Thinwire, by default, switches to a progressive update mode whenavailable bandwidth falls below 2 Mbps, or network latency exceeds 200ms. In this mode:
• All static images are heavily compressed.• Text quality is reduced.
Forexample, in the followinggraphicwhereprogressiveupdatemode isactive, the lettersFandehaveblue artifacts, and the image is heavily compressed. This approach significantly reduces bandwidthconsumption, which allows images and text to be received more quickly, and session interactivityimproves.
© 1999‒2022 Citrix Systems, Inc. All rights reserved. 285
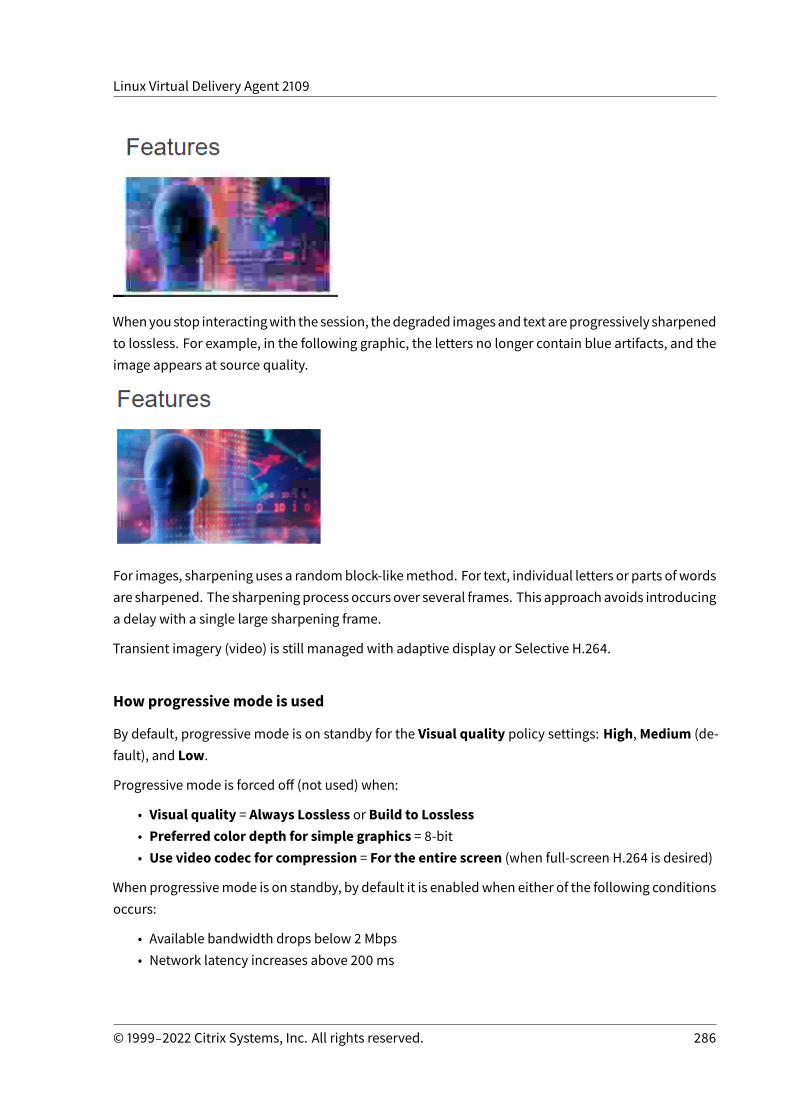
Linux Virtual Delivery Agent 2109
Whenyoustop interactingwith the session, thedegraded imagesand text areprogressively sharpenedto lossless. For example, in the following graphic, the letters no longer contain blue artifacts, and theimage appears at source quality.
For images, sharpening uses a randomblock-likemethod. For text, individual letters or parts ofwordsare sharpened. The sharpening process occurs over several frames. This approach avoids introducinga delay with a single large sharpening frame.
Transient imagery (video) is still managed with adaptive display or Selective H.264.
How progressivemode is used
By default, progressive mode is on standby for the Visual quality policy settings: High,Medium (de-fault), and Low.
Progressive mode is forced off (not used) when:
• Visual quality = Always Lossless or Build to Lossless• Preferred color depth for simple graphics = 8-bit• Use video codec for compression = For the entire screen (when full-screen H.264 is desired)
When progressivemode is on standby, by default it is enabledwhen either of the following conditionsoccurs:
• Available bandwidth drops below 2 Mbps• Network latency increases above 200ms
© 1999‒2022 Citrix Systems, Inc. All rights reserved. 286
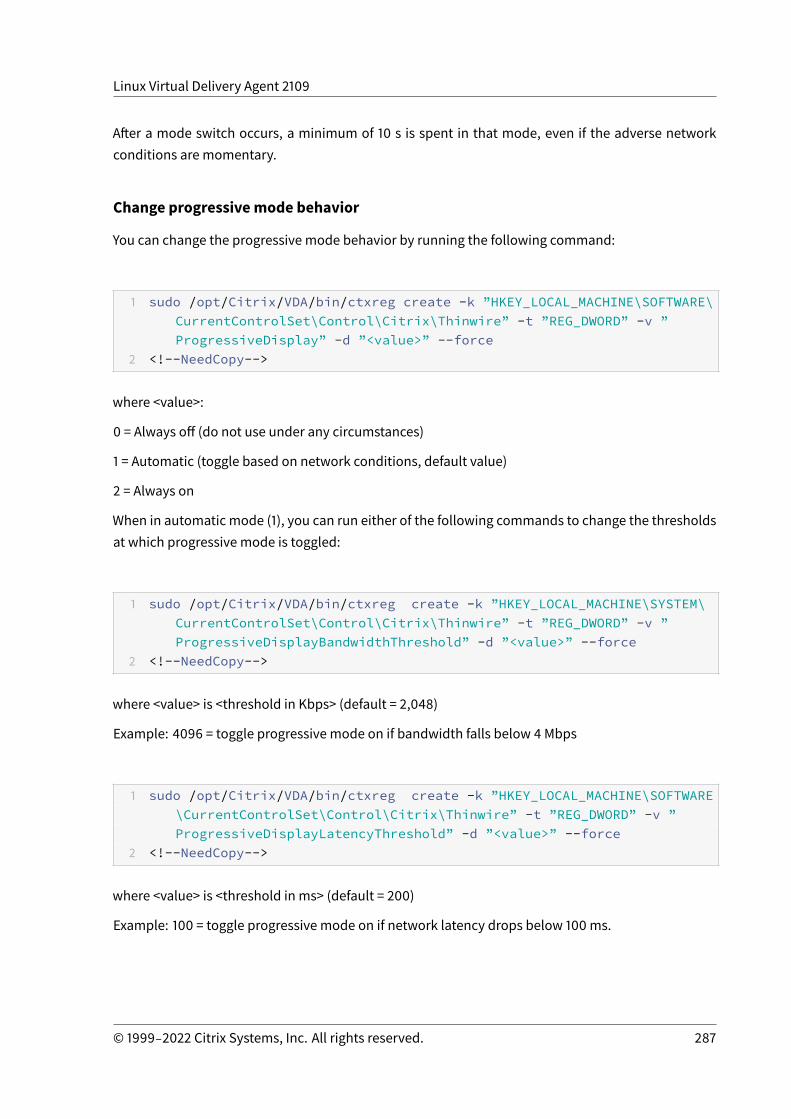
Linux Virtual Delivery Agent 2109
After a mode switch occurs, a minimum of 10 s is spent in that mode, even if the adverse networkconditions are momentary.
Change progressivemode behavior
You can change the progressive mode behavior by running the following command:
1 sudo /opt/Citrix/VDA/bin/ctxreg create -k ”HKEY_LOCAL_MACHINE\SOFTWARE\CurrentControlSet\Control\Citrix\Thinwire” -t ”REG_DWORD” -v ”ProgressiveDisplay” -d ”<value>” --force
2 <!--NeedCopy-->
where <value>:
0 = Always off (do not use under any circumstances)
1 = Automatic (toggle based on network conditions, default value)
2 = Always on
When in automatic mode (1), you can run either of the following commands to change the thresholdsat which progressive mode is toggled:
1 sudo /opt/Citrix/VDA/bin/ctxreg create -k ”HKEY_LOCAL_MACHINE\SYSTEM\CurrentControlSet\Control\Citrix\Thinwire” -t ”REG_DWORD” -v ”ProgressiveDisplayBandwidthThreshold” -d ”<value>” --force
2 <!--NeedCopy-->
where <value> is <threshold in Kbps> (default = 2,048)
Example: 4096 = toggle progressive mode on if bandwidth falls below 4 Mbps
1 sudo /opt/Citrix/VDA/bin/ctxreg create -k ”HKEY_LOCAL_MACHINE\SOFTWARE\CurrentControlSet\Control\Citrix\Thinwire” -t ”REG_DWORD” -v ”ProgressiveDisplayLatencyThreshold” -d ”<value>” --force
2 <!--NeedCopy-->
where <value> is <threshold in ms> (default = 200)
Example: 100 = toggle progressive mode on if network latency drops below 100ms.
© 1999‒2022 Citrix Systems, Inc. All rights reserved. 287
Linux Virtual Delivery Agent 2109
Non-GRID 3D graphics
October 12, 2021
Overview
With this feature enhancement, the Linux VDA supports not only NVIDIA GRID 3D cards but also non-GRID 3D cards.
Installation
Touse the non-GRID 3Dgraphics feature, youmust install XDamage as a prerequisite. Typically, XDam-age exists as an extension of XServer.
Configuration
Xorg configuration files
If your 3D card driver is NVIDIA, the configuration files are installed and set automatically.
Other types of 3D cards
If your 3D card driver is NOT NVIDIA, you must modify the four template configuration files installedunder /etc/X11/:
• ctx-driver_name-1.conf• ctx-driver_name-2.conf• ctx-driver_name-3.conf• ctx-driver_name-4.conf
Using ctx-driver_name-1.conf as an example, do the following tomodify the template configurationfiles:
1. Replace driver_namewith your actual driver name.
For example, if your driver name is intel, you can change the configuration file name to ctx-intel-1.conf.
2. Add the video driver information.
Each template configuration file contains a section named “Device,” which is commented out.This section describes the video driver information. Enable this section before adding yourvideo driver information. To enable this section:
© 1999‒2022 Citrix Systems, Inc. All rights reserved. 288
Linux Virtual Delivery Agent 2109
a) See the 3D card guide provided by the manufacturer for configuration information. A na-tive configuration file can be generated. Verify that your 3D card can work in a local envi-ronmentwith the native configuration file when you are not using a Linux VDA ICA session.
b) Copy the “Device” section of the native configuration file to ctx-driver_name-1.conf.
3. Run the following command to set the registry key so that the Linux VDA can recognize the con-figuration file name set in Step 1.
1 /opt/Citrix/VDA/bin/ctxreg create -k ”HKEY_LOCAL_MACHINE\System\CurrentControlSet\Control\Citrix\XDamage” -t ”REG_SZ” -v ”DriverName” -d ”intel” --force
2 <!--NeedCopy-->
Enable the non-GRID 3D graphics feature
The non-GRID 3D graphics feature is disabled by default. You can run the following command to en-able it by setting XDamageEnabled to 1.
1 /opt/Citrix/VDA/bin/ctxreg create -k ”HKEY_LOCAL_MACHINE\System\CurrentControlSet\Control\Citrix\XDamage” -t ”REG_DWORD” -v ”XDamageEnabled” -d ”0x00000001” --force
2 <!--NeedCopy-->
Troubleshooting
No or garbled graphic output
If you can run 3D applications locally and all configurations are correct, missing or garbled graphicoutput is the result of a bug. Use /opt/Citrix/VDA/bing/setlog and set GFX_X11 to verbose to collectthe trace information for debugging.
Hardware encoding does not work
This feature supports only software encoding.
Configure policies
October 12, 2021
© 1999‒2022 Citrix Systems, Inc. All rights reserved. 289
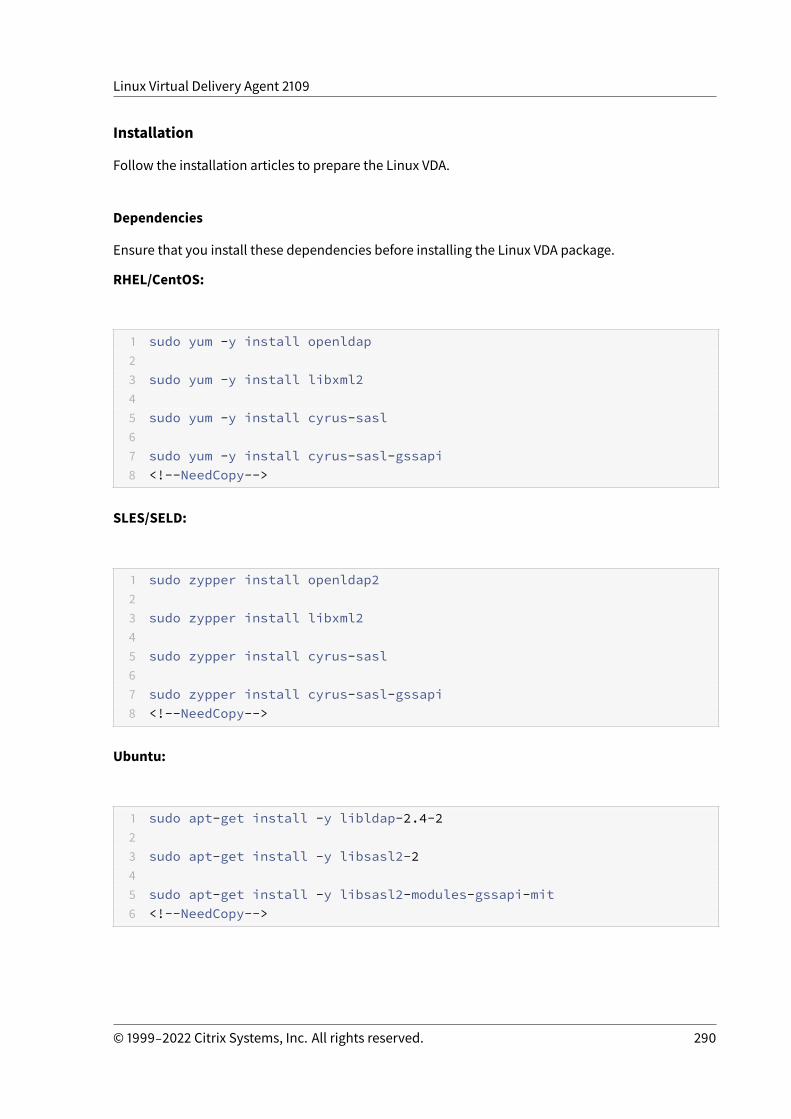
Linux Virtual Delivery Agent 2109
Installation
Follow the installation articles to prepare the Linux VDA.
Dependencies
Ensure that you install these dependencies before installing the Linux VDA package.
RHEL/CentOS:
1 sudo yum -y install openldap23 sudo yum -y install libxml245 sudo yum -y install cyrus-sasl67 sudo yum -y install cyrus-sasl-gssapi8 <!--NeedCopy-->
SLES/SELD:
1 sudo zypper install openldap223 sudo zypper install libxml245 sudo zypper install cyrus-sasl67 sudo zypper install cyrus-sasl-gssapi8 <!--NeedCopy-->
Ubuntu:
1 sudo apt-get install -y libldap-2.4-223 sudo apt-get install -y libsasl2-245 sudo apt-get install -y libsasl2-modules-gssapi-mit6 <!--NeedCopy-->
© 1999‒2022 Citrix Systems, Inc. All rights reserved. 290
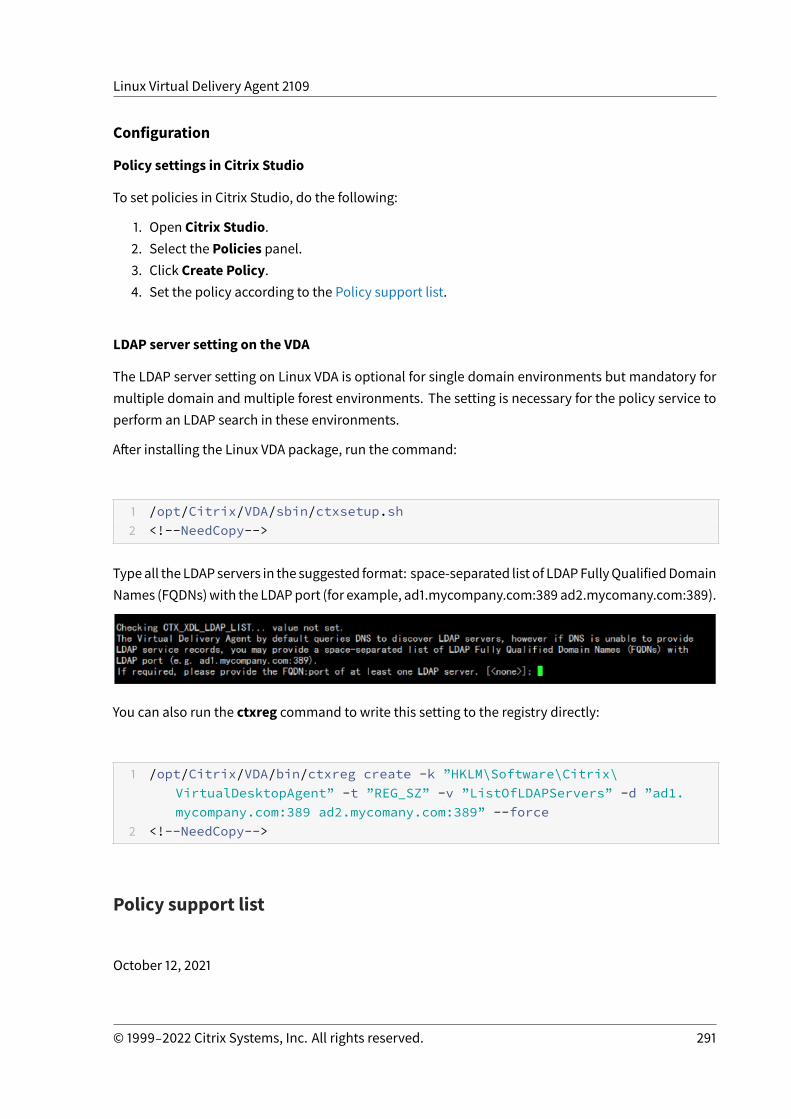
Linux Virtual Delivery Agent 2109
Configuration
Policy settings in Citrix Studio
To set policies in Citrix Studio, do the following:
1. Open Citrix Studio.2. Select the Policies panel.3. Click Create Policy.4. Set the policy according to the Policy support list.
LDAP server setting on the VDA
The LDAP server setting on Linux VDA is optional for single domain environments but mandatory formultiple domain and multiple forest environments. The setting is necessary for the policy service toperform an LDAP search in these environments.
After installing the Linux VDA package, run the command:
1 /opt/Citrix/VDA/sbin/ctxsetup.sh2 <!--NeedCopy-->
Typeall the LDAPservers in the suggested format: space-separated list of LDAPFullyQualifiedDomainNames (FQDNs)with the LDAPport (for example, ad1.mycompany.com:389ad2.mycomany.com:389).
You can also run the ctxreg command to write this setting to the registry directly:
1 /opt/Citrix/VDA/bin/ctxreg create -k ”HKLM\Software\Citrix\VirtualDesktopAgent” -t ”REG_SZ” -v ”ListOfLDAPServers” -d ”ad1.mycompany.com:389 ad2.mycomany.com:389” --force
2 <!--NeedCopy-->
Policy support list
October 12, 2021
© 1999‒2022 Citrix Systems, Inc. All rights reserved. 291
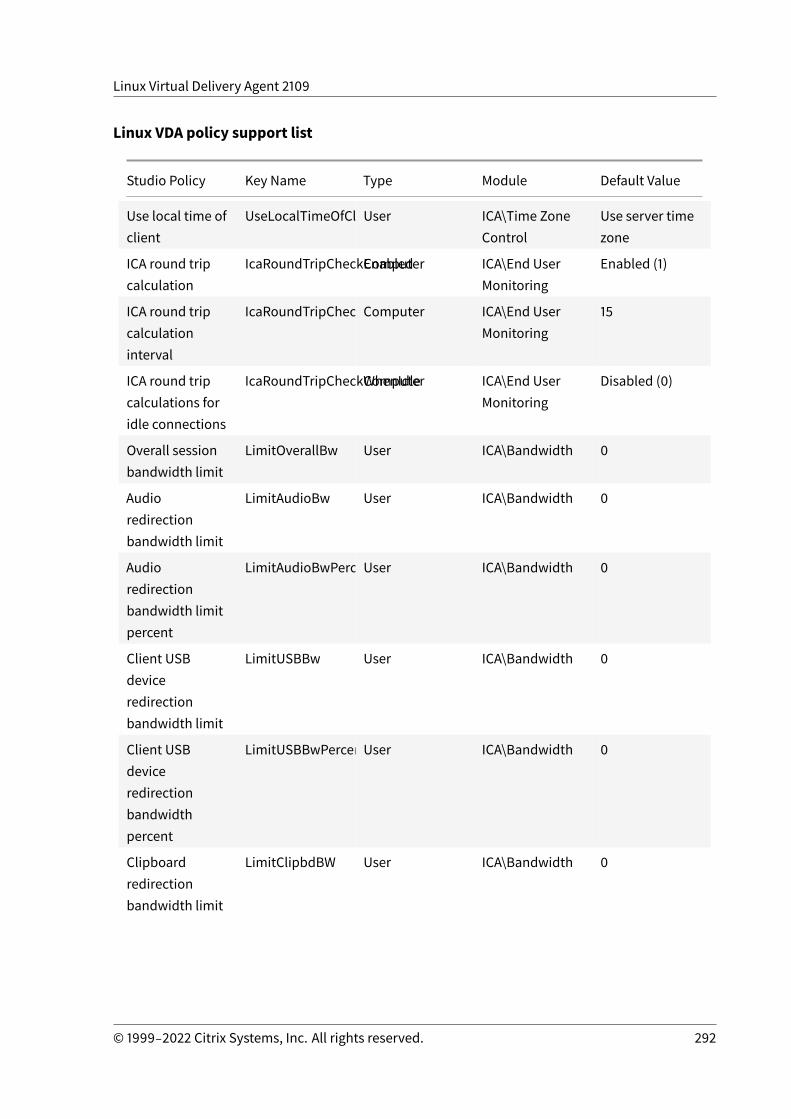
Linux Virtual Delivery Agent 2109
Linux VDA policy support list
Studio Policy Key Name Type Module Default Value
Use local time ofclient
UseLocalTimeOfClientUser ICA\Time ZoneControl
Use server timezone
ICA round tripcalculation
IcaRoundTripCheckEnabledComputer ICA\End UserMonitoring
Enabled (1)
ICA round tripcalculationinterval
IcaRoundTripCheckPeriodComputer ICA\End UserMonitoring
15
ICA round tripcalculations foridle connections
IcaRoundTripCheckWhenIdleComputer ICA\End UserMonitoring
Disabled (0)
Overall sessionbandwidth limit
LimitOverallBw User ICA\Bandwidth 0
Audioredirectionbandwidth limit
LimitAudioBw User ICA\Bandwidth 0
Audioredirectionbandwidth limitpercent
LimitAudioBwPercentUser ICA\Bandwidth 0
Client USBdeviceredirectionbandwidth limit
LimitUSBBw User ICA\Bandwidth 0
Client USBdeviceredirectionbandwidthpercent
LimitUSBBwPercentUser ICA\Bandwidth 0
Clipboardredirectionbandwidth limit
LimitClipbdBW User ICA\Bandwidth 0
© 1999‒2022 Citrix Systems, Inc. All rights reserved. 292
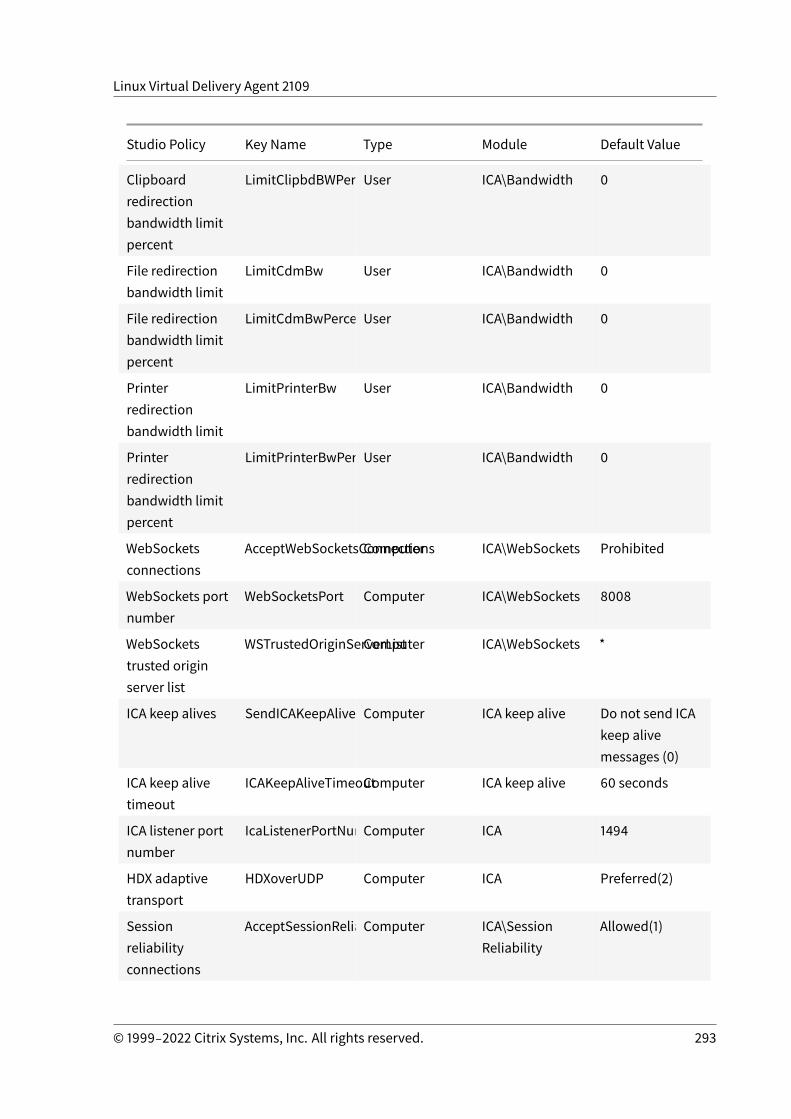
Linux Virtual Delivery Agent 2109
Studio Policy Key Name Type Module Default Value
Clipboardredirectionbandwidth limitpercent
LimitClipbdBWPercentUser ICA\Bandwidth 0
File redirectionbandwidth limit
LimitCdmBw User ICA\Bandwidth 0
File redirectionbandwidth limitpercent
LimitCdmBwPercentUser ICA\Bandwidth 0
Printerredirectionbandwidth limit
LimitPrinterBw User ICA\Bandwidth 0
Printerredirectionbandwidth limitpercent
LimitPrinterBwPercentUser ICA\Bandwidth 0
WebSocketsconnections
AcceptWebSocketsConnectionsComputer ICA\WebSockets Prohibited
WebSockets portnumber
WebSocketsPort Computer ICA\WebSockets 8008
WebSocketstrusted originserver list
WSTrustedOriginServerListComputer ICA\WebSockets *
ICA keep alives SendICAKeepAlivesComputer ICA keep alive Do not send ICAkeep alivemessages (0)
ICA keep alivetimeout
ICAKeepAliveTimeoutComputer ICA keep alive 60 seconds
ICA listener portnumber
IcaListenerPortNumberComputer ICA 1494
HDX adaptivetransport
HDXoverUDP Computer ICA Preferred(2)
Sessionreliabilityconnections
AcceptSessionReliabilityConnectionsComputer ICA\SessionReliability
Allowed(1)
© 1999‒2022 Citrix Systems, Inc. All rights reserved. 293
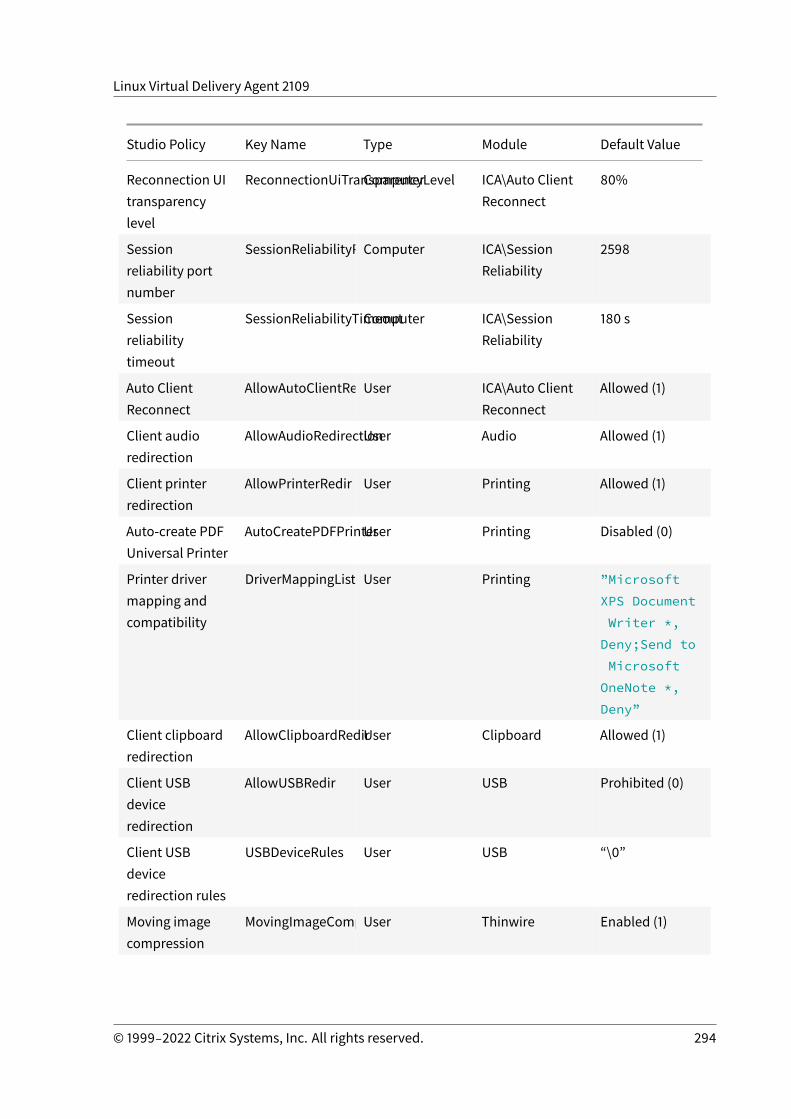
Linux Virtual Delivery Agent 2109
Studio Policy Key Name Type Module Default Value
Reconnection UItransparencylevel
ReconnectionUiTransparencyLevelComputer ICA\Auto ClientReconnect
80%
Sessionreliability portnumber
SessionReliabilityPortComputer ICA\SessionReliability
2598
Sessionreliabilitytimeout
SessionReliabilityTimeoutComputer ICA\SessionReliability
180 s
Auto ClientReconnect
AllowAutoClientReconnectUser ICA\Auto ClientReconnect
Allowed (1)
Client audioredirection
AllowAudioRedirectionUser Audio Allowed (1)
Client printerredirection
AllowPrinterRedir User Printing Allowed (1)
Auto-create PDFUniversal Printer
AutoCreatePDFPrinterUser Printing Disabled (0)
Printer drivermapping andcompatibility
DriverMappingList User Printing ”MicrosoftXPS DocumentWriter *,Deny;Send toMicrosoftOneNote *,Deny”
Client clipboardredirection
AllowClipboardRedirUser Clipboard Allowed (1)
Client USBdeviceredirection
AllowUSBRedir User USB Prohibited (0)
Client USBdeviceredirection rules
USBDeviceRules User USB “\0”
Moving imagecompression
MovingImageCompressionConfigurationUser Thinwire Enabled (1)
© 1999‒2022 Citrix Systems, Inc. All rights reserved. 294
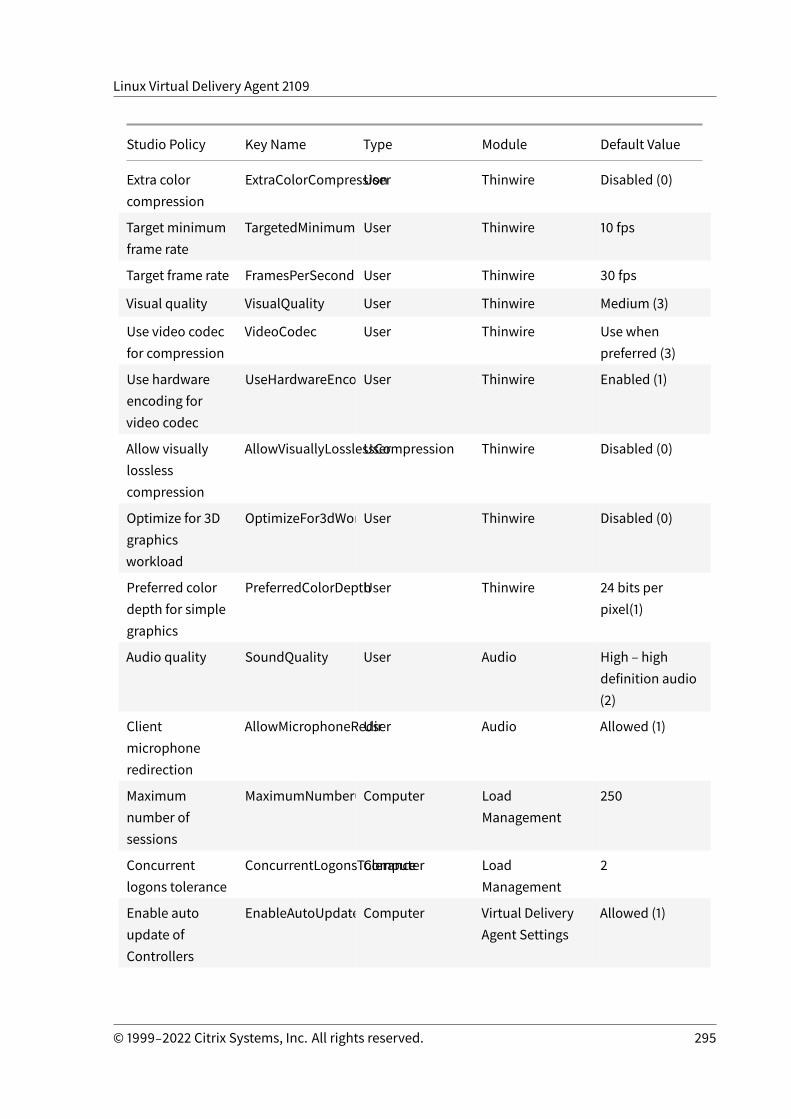
Linux Virtual Delivery Agent 2109
Studio Policy Key Name Type Module Default Value
Extra colorcompression
ExtraColorCompressionUser Thinwire Disabled (0)
Target minimumframe rate
TargetedMinimumFramesPerSecondUser Thinwire 10 fps
Target frame rate FramesPerSecond User Thinwire 30 fps
Visual quality VisualQuality User Thinwire Medium (3)
Use video codecfor compression
VideoCodec User Thinwire Use whenpreferred (3)
Use hardwareencoding forvideo codec
UseHardwareEncodingForVideoCodecUser Thinwire Enabled (1)
Allow visuallylosslesscompression
AllowVisuallyLosslessCompressionUser Thinwire Disabled (0)
Optimize for 3Dgraphicsworkload
OptimizeFor3dWorkloadUser Thinwire Disabled (0)
Preferred colordepth for simplegraphics
PreferredColorDepthUser Thinwire 24 bits perpixel(1)
Audio quality SoundQuality User Audio High – highdefinition audio(2)
Clientmicrophoneredirection
AllowMicrophoneRedirUser Audio Allowed (1)
Maximumnumber ofsessions
MaximumNumberOfSessionsComputer LoadManagement
250
Concurrentlogons tolerance
ConcurrentLogonsToleranceComputer LoadManagement
2
Enable autoupdate ofControllers
EnableAutoUpdateOfControllersComputer Virtual DeliveryAgent Settings
Allowed (1)
© 1999‒2022 Citrix Systems, Inc. All rights reserved. 295
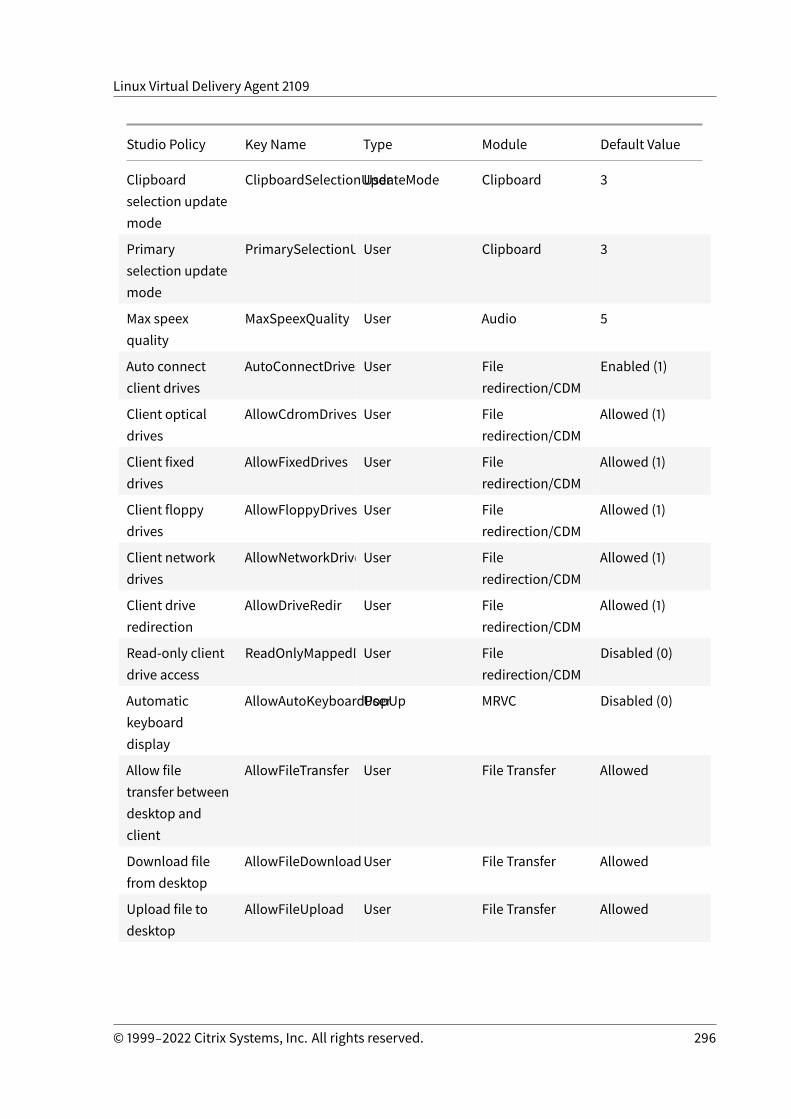
Linux Virtual Delivery Agent 2109
Studio Policy Key Name Type Module Default Value
Clipboardselection updatemode
ClipboardSelectionUpdateModeUser Clipboard 3
Primaryselection updatemode
PrimarySelectionUpdateModeUser Clipboard 3
Max speexquality
MaxSpeexQuality User Audio 5
Auto connectclient drives
AutoConnectDrives User Fileredirection/CDM
Enabled (1)
Client opticaldrives
AllowCdromDrives User Fileredirection/CDM
Allowed (1)
Client fixeddrives
AllowFixedDrives User Fileredirection/CDM
Allowed (1)
Client floppydrives
AllowFloppyDrives User Fileredirection/CDM
Allowed (1)
Client networkdrives
AllowNetworkDrivesUser Fileredirection/CDM
Allowed (1)
Client driveredirection
AllowDriveRedir User Fileredirection/CDM
Allowed (1)
Read-only clientdrive access
ReadOnlyMappedDriveUser Fileredirection/CDM
Disabled (0)
Automatickeyboarddisplay
AllowAutoKeyboardPopUpUser MRVC Disabled (0)
Allow filetransfer betweendesktop andclient
AllowFileTransfer User File Transfer Allowed
Download filefrom desktop
AllowFileDownloadUser File Transfer Allowed
Upload file todesktop
AllowFileUpload User File Transfer Allowed
© 1999‒2022 Citrix Systems, Inc. All rights reserved. 296
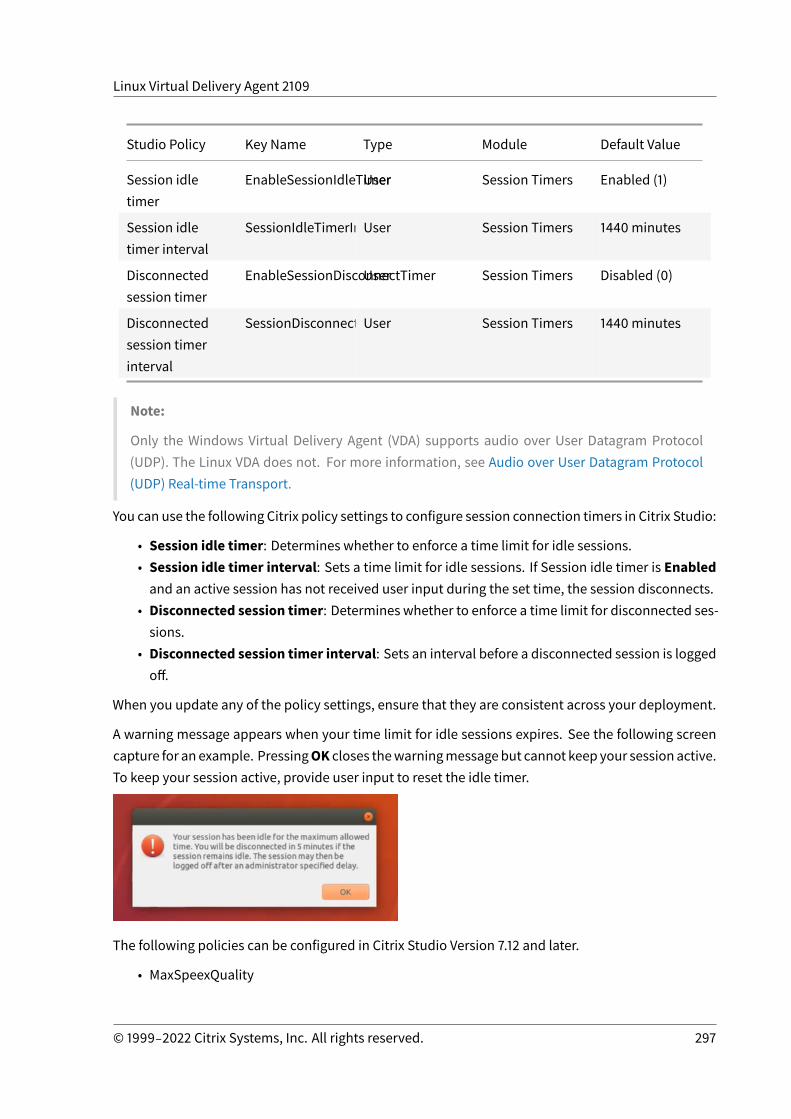
Linux Virtual Delivery Agent 2109
Studio Policy Key Name Type Module Default Value
Session idletimer
EnableSessionIdleTimerUser Session Timers Enabled (1)
Session idletimer interval
SessionIdleTimerIntervalUser Session Timers 1440minutes
Disconnectedsession timer
EnableSessionDisconnectTimerUser Session Timers Disabled (0)
Disconnectedsession timerinterval
SessionDisconnectTimerPeriodUser Session Timers 1440minutes
Note:
Only the Windows Virtual Delivery Agent (VDA) supports audio over User Datagram Protocol(UDP). The Linux VDA does not. For more information, see Audio over User Datagram Protocol(UDP) Real-time Transport.
You can use the following Citrix policy settings to configure session connection timers in Citrix Studio:
• Session idle timer: Determines whether to enforce a time limit for idle sessions.• Session idle timer interval: Sets a time limit for idle sessions. If Session idle timer is Enabledand an active session has not received user input during the set time, the session disconnects.
• Disconnected session timer: Determines whether to enforce a time limit for disconnected ses-sions.
• Disconnected session timer interval: Sets an interval before a disconnected session is loggedoff.
When you update any of the policy settings, ensure that they are consistent across your deployment.
A warning message appears when your time limit for idle sessions expires. See the following screencapture for an example. PressingOK closes thewarningmessagebut cannot keep your session active.To keep your session active, provide user input to reset the idle timer.
The following policies can be configured in Citrix Studio Version 7.12 and later.
• MaxSpeexQuality
© 1999‒2022 Citrix Systems, Inc. All rights reserved. 297
Linux Virtual Delivery Agent 2109
Value (integer): [0–10]
Default value: 5
Details:
Audio redirection encodes audio data with the Speex codec when audio quality is medium orlow (see thepolicy Audioquality). Speex is a lossy codec,whichmeans that it achieves compres-sion at the expense of fidelity of the input speech signal. Unlike some other speech codecs, it ispossible to control the tradeoffmadebetweenquality andbit rate. The Speex encodingprocessis controlled most of the time by a quality parameter that ranges from 0 to 10. The higher thequality is, the higher the bit rate.
Themax Speex quality chooses the best Speex quality to encode audio data according to audioquality and bandwidth limit (see the policy Audio redirection bandwidth limit). If the audioquality is medium, the encoder is in wide band mode, which means a higher sampling rate. Ifthe audio quality is low, the encoder is in narrow band mode, which means a lower samplingrate. The same Speex quality has different bit rates in different modes. The best Speex qualityis when the largest value meets the following conditions:
– It is equal to or less than the max Speex quality.– Its bit rate is equal to or less than the bandwidth limit.
Related Settings: Audio quality, Audio redirection bandwidth limit
• PrimarySelectionUpdateMode
Value (enum): [0, 1, 2, 3]
Default value: 3
Details:
Primary selection is used when you select data and paste it by pressing the middle mouse but-ton.
This policy controls whether primary selection changes on the Linux VDA and client can updatethe clipboard on each other. There are four value options:
© 1999‒2022 Citrix Systems, Inc. All rights reserved. 298
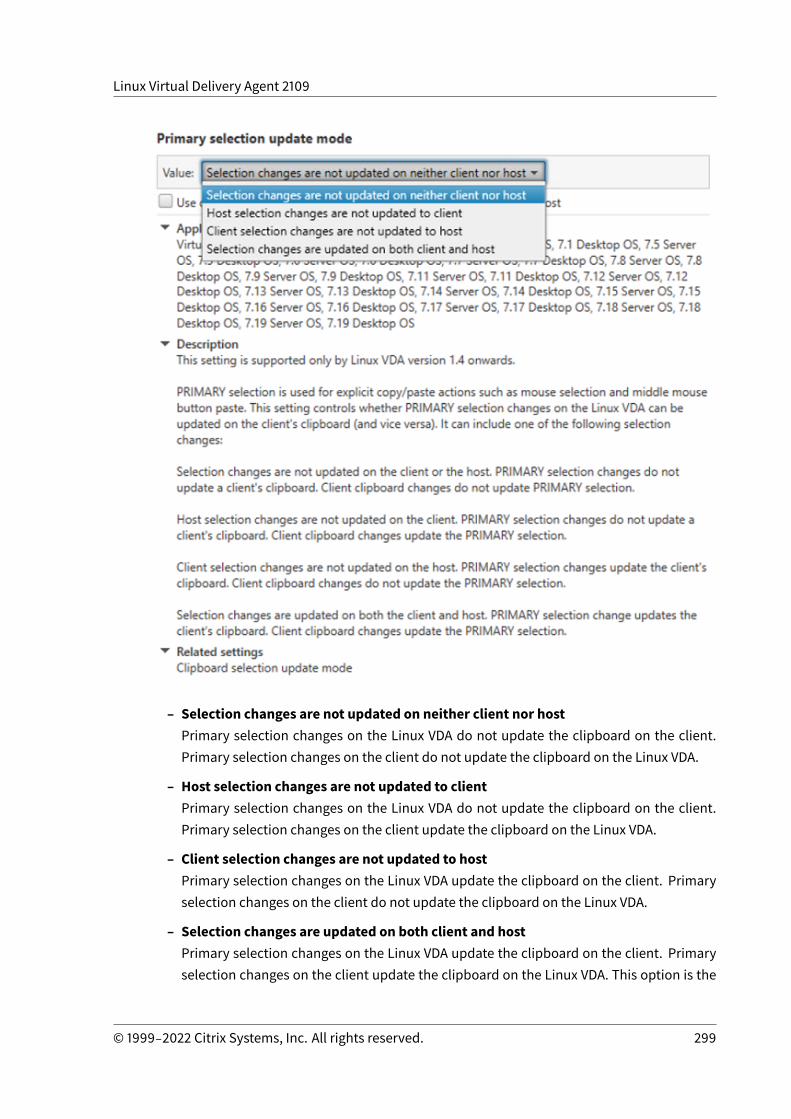
Linux Virtual Delivery Agent 2109
– Selection changes are not updated on neither client nor hostPrimary selection changes on the Linux VDA do not update the clipboard on the client.Primary selection changes on the client do not update the clipboard on the Linux VDA.
– Host selection changes are not updated to clientPrimary selection changes on the Linux VDA do not update the clipboard on the client.Primary selection changes on the client update the clipboard on the Linux VDA.
– Client selection changes are not updated to hostPrimary selection changes on the Linux VDA update the clipboard on the client. Primaryselection changes on the client do not update the clipboard on the Linux VDA.
– Selection changes are updated on both client and hostPrimary selection changes on the Linux VDA update the clipboard on the client. Primaryselection changes on the client update the clipboard on the Linux VDA. This option is the
© 1999‒2022 Citrix Systems, Inc. All rights reserved. 299
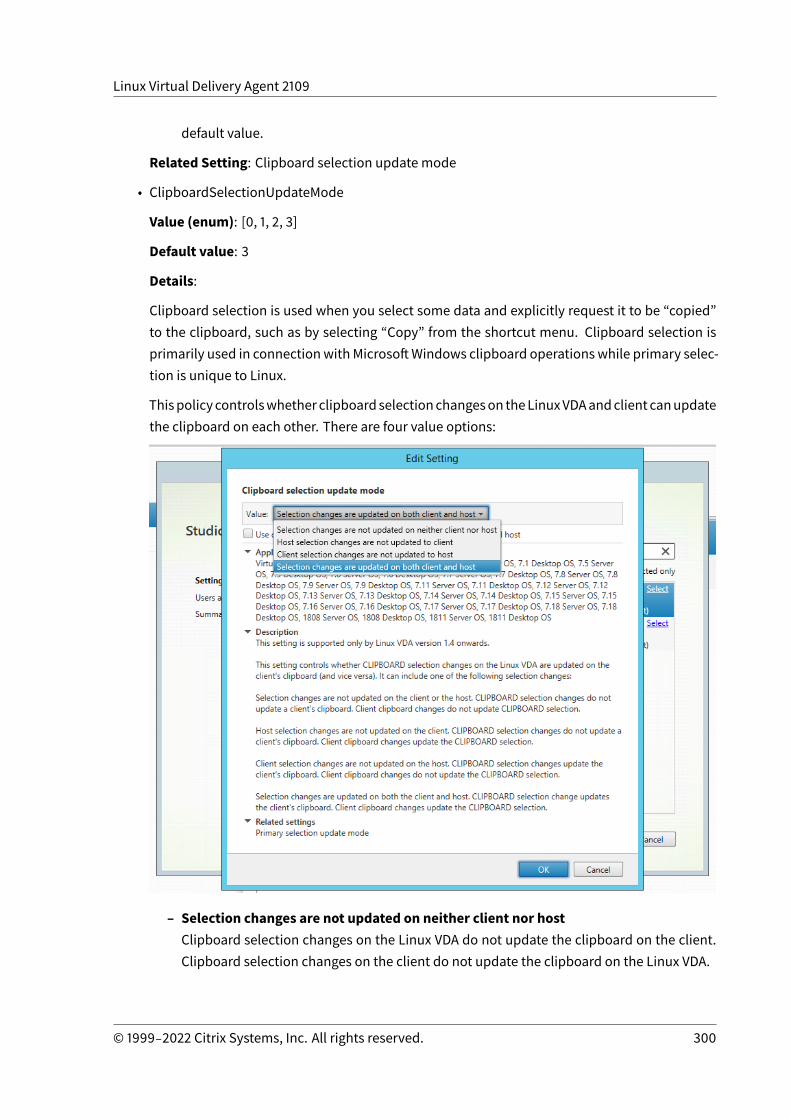
Linux Virtual Delivery Agent 2109
default value.
Related Setting: Clipboard selection update mode
• ClipboardSelectionUpdateMode
Value (enum): [0, 1, 2, 3]
Default value: 3
Details:
Clipboard selection is used when you select some data and explicitly request it to be “copied”to the clipboard, such as by selecting “Copy” from the shortcut menu. Clipboard selection isprimarily used in connectionwithMicrosoftWindows clipboard operations while primary selec-tion is unique to Linux.
Thispolicy controlswhether clipboardselectionchangeson theLinuxVDAandclient canupdatethe clipboard on each other. There are four value options:
– Selection changes are not updated on neither client nor hostClipboard selection changes on the Linux VDA do not update the clipboard on the client.Clipboard selection changes on the client do not update the clipboard on the Linux VDA.
© 1999‒2022 Citrix Systems, Inc. All rights reserved. 300
Linux Virtual Delivery Agent 2109
– Host selection changes are not updated to clientClipboard selection changes on the Linux VDA do not update the clipboard on the client.Clipboard selection changes on the client update the clipboard on the Linux VDA.
– Client selection changes are not updated to hostClipboard selection changes on the Linux VDA update the clipboard on the client. Clip-board selection changes on the client do not update the clipboard on the Linux VDA.
– Selection changes are updated on both client and hostClipboard selection changes on the Linux VDA update the clipboard on the client. Clip-board selection changes on the client update the clipboard on the Linux VDA. This optionis the default value.
Related Setting: Primary selection update mode
Note:
The Linux VDA supports both clipboard selection and primary selection. To control the copy andpaste behaviors between the Linux VDA and the client, we recommend that you set both clip-board selection update mode and primary selection update mode to the same value.
Configure IPv6
October 12, 2021
The Linux VDA supports IPv6 to align with Citrix Virtual Apps and Desktops. When using this feature,consider the following:
• For dual stack environments, IPv4 is used unless IPv6 is explicitly enabled.• If IPv6 is enabled in an IPv4 environment, the Linux VDA fails to function.
Important:
• The whole network environment must be IPv6, not only for the Linux VDA.• Centrify does not support pure IPv6.
No special setup tasks are required for IPv6 when you install the Linux VDA.
Configure IPv6 for the Linux VDA
Before changing the configuration for the Linux VDA, ensure that your Linux virtual machine has pre-viously worked in an IPv6 network. There are two registry keys related to IPv6 configuration:
© 1999‒2022 Citrix Systems, Inc. All rights reserved. 301

Linux Virtual Delivery Agent 2109
1 “ HKLM\Software\Policies\Citrix\VirtualDesktopAgent” -t “ REG_DWORD”-v “ OnlyUseIPv6ControllerRegistration”
2 “ HKLM\Software\Policies\Citrix\VirtualDesktopAgent” -t “ REG_DWORD”-v “ ControllerRegistrationIPv6Netmask”
3 <!--NeedCopy-->
OnlyUseIPv6ControllerRegistrationmust be set to 1 to enable IPv6 on the Linux VDA:
1 sudo /opt/Citrix/VDA/bin/ctxreg create -k ”HKLM\Software\Policies\Citrix\VirtualDesktopAgent” -t ”REG_DWORD” -v ”OnlyUseIPv6ControllerRegistration” -d ”0x00000001” --force
2 <!--NeedCopy-->
If the Linux VDA hasmore than one network interfaces, ControllerRegistrationIPv6Netmask can beused to specify which one is used for the Linux VDA registration:
1 sudo /opt/Citrix/VDA/bin/ctxreg create -k ”HKLM\Software\Policies\Citrix\VirtualDesktopAgent” -t ”REG_SZ” -v ”ControllerRegistrationIPv6Netmask ” -d ”{
2 IPv6 netmask }3 ” --force4 <!--NeedCopy-->
Replace {IPv6 netmask}with the real netmask (for example, 2000::/64).
For more information about IPv6 deployment in Citrix Virtual Apps and Desktops, see IPv4/IPv6 sup-port.
Troubleshooting
Check thebasic IPv6networkenvironmentanduseping6 to checkwhetherADandDeliveryControllerare reachable.
Configure Citrix Customer Experience Improvement Program (CEIP)
October 12, 2021
© 1999‒2022 Citrix Systems, Inc. All rights reserved. 302
Linux Virtual Delivery Agent 2109
Whenyouparticipate in theCEIP, anonymous statistics andusage information are sent toCitrix to helpimprove the quality and performance of Citrix products. In addition, a copy of the anonymous data issent to Google Analytics (GA) for fast and efficient analysis.
Registry settings
By default, you automatically participate in the CEIP when you install the Linux VDA. The first uploadof data occurs approximately seven days after you install the Linux VDA. You can change this defaultsetting in the registry.
• CEIPSwitch
Registry setting that enables or disables the CEIP (default = 0):
Location: HKEY_LOCAL_MACHINE\SOFTWARE\Citrix\CEIP
Name: CEIPSwitch
Value: 1 = disabled, 0 = enabled
When unspecified, the CEIP is enabled.
You can run the following command on a client to disable the CEIP:
1 /opt/Citrix/VDA/bin/ctxreg update -k ”HKEY_LOCAL_MACHINE\SOFTWARE\Citrix\CEIP” -v ”CEIPSwitch” -d ”1”
2 <!--NeedCopy-->
• GASwitch
Registry setting that enables or disables GA (default = 0):
Location: HKEY_LOCAL_MACHINE\SOFTWARE\Citrix\CEIP
Name: GASwitch
Value: 1 = disabled, 0 = enabled
When unspecified, GA is enabled.
You can run the following command on a client to disable GA:
1 /opt/Citrix/VDA/bin/ctxreg update -k ”HKEY_LOCAL_MACHINE\SOFTWARE\Citrix\CEIP” -v ”GASwitch” -d ”1”
2 <!--NeedCopy-->
• DataPersistPath
© 1999‒2022 Citrix Systems, Inc. All rights reserved. 303
Linux Virtual Delivery Agent 2109
Registry setting that controls the data persisting path (default = /var/xdl/ceip):
Location: HKEY_LOCAL_MACHINE\SOFTWARE\Citrix\CEIP
Name: DataPersistPath
Value: String
You can run the following command to set this path:
1 /opt/Citrix/VDA/bin/ctxreg update -k ”HKEY_LOCAL_MACHINE\SOFTWARE\Citrix\CEIP” -v ”DataPersistPath” -d ”your_path”
2 <!--NeedCopy-->
If the configured path does not exist or cannot be accessed, data is saved in the default path.
CEIP data collected from the Linux VDA
The following table gives an example of the types of anonymous information collected. The data doesnot contain any details that identify you as a customer.
Data Point Key Name Description
Machine GUID machine_guid Identifying the machinewhere the data originates
AD solution ad_solution Text string denoting themachine’s domain joiningmethod
Linux kernel version kernel_version Text string denoting themachine’s kernel version
LVDA version vda_version Text string denoting theinstalled version of the LinuxVDA.
LVDA update or fresh install update_or_fresh_install Text string denoting thecurrent Linux VDA package isbeing freshly installed orupdated
LVDA installed method install_method Text string denoting that thecurrent Linux VDA package isinstalled by using MCS, PVS,easy install, or manualinstallation.
© 1999‒2022 Citrix Systems, Inc. All rights reserved. 304
Linux Virtual Delivery Agent 2109
Data Point Key Name Description
HDX 3D pro enabled or not hdx_3d_pro Text string denoting whetherHDX 3D Pro is enabled on themachine
VDI mode enabled or not vdi_mode Text string denoting whetherVDI mode is enabled
System Locale system_locale Text string denoting the localeof this machine
LVDA key services last restarttime
ctxhdx ctxvda The last restart time of thectxhdx and ctxvda services,in the format of dd-hh:mm:ss,for example, 10-17:22:19
GPU type gpu_type Denoting the GPU type of themachine
CPU cores cpu_cores Integer denoting the numberof CPU cores of the machine
CPU frequency cpu_frequency Float denoting the CPUfrequency in MHz
Physical memory size memory_size Integer denoting the physicalmemory size in KB
Launched session number session_launch Integer denoting the numberof sessions launched (loggedon or reconnected) on themachine at the time wecollect this data point
Linux OS name and version os_name_version Text string denoting the LinuxOS name and version of themachine
Session key session_key Identifying the session wherethe data originates
Resource type resource_type Text string denoting theresource type of the launchedsession: desktop or<appname>
© 1999‒2022 Citrix Systems, Inc. All rights reserved. 305

Linux Virtual Delivery Agent 2109
Data Point Key Name Description
Active session time active_session_time Used to save the session’sactive times. One session canhave multiple active timesbecause the session candisconnect/reconnect
Session duration time session_duration_time Used to save the session’sduration from logon to logoff
Receiver client type receiver_type Integer denoting the type ofCitrix Workspace app used tolaunch the session
Receiver client version receiver_version Text string denoting theversion of Citrix Workspaceapp used to launch thesession
Printing count printing_count Integer denoting the numberof times the session uses theprinting function
USB redirection count usb_redirecting_count Integer denoting the numberof times the session uses aUSB device
Gfx Provider type gfx_provider_type Text string denoting thegraphics provider type of thesession
Shadowing count shadow_count Integer denoting the numberof times the session has beenshadowed
User selected Language ctxism_select Composed long string thatcontains all languages thatusers have selected
Smartcard redirecting count scard_redirecting_count Integer denoting the numberof times smart cardredirection is used for sessionlogons and userauthentication for in-sessionapps
© 1999‒2022 Citrix Systems, Inc. All rights reserved. 306
Linux Virtual Delivery Agent 2109
Configure USB redirection
October 12, 2021
USBdevices are sharedbetweenCitrixWorkspace app and the Linux VDAdesktop. When aUSBdeviceis redirected to the desktop, the user can use the USB device as if it were locally connected.
Tip:
We recommend using USB redirection when the network latency is lower than 100milliseconds.Do not use USB redirection when the network latency is higher than 200milliseconds.
USB redirection includes three main areas of functionality:
• Open-source project implementation (VHCI)• VHCI service• USB service
Open-source VHCI:
This portion of the USB redirection feature develops a general USB device sharing system over an IPnetwork. It consists of a Linux kernel driver and some usermode libraries that allow you to communi-cate with the kernel driver to get all the USB data. In the Linux VDA implementation, Citrix reuses thekernel driver of VHCI. However, all theUSBdata transfers between the Linux VDAandCitrixWorkspaceapp are encapsulated in the Citrix ICA protocol package.
VHCI service:
The VHCI service is an open-source service provided by Citrix to communicate with the VHCI kernelmodule. This service works as a gateway between VHCI and the Citrix USB service.
USB service:
The USB service represents a Citrix module that manages all the virtualization and data transfers onthe USB device.
HowUSB redirection works
Typically, if a USB device is redirected successfully to the Linux VDA, one or more device nodes arecreated in the system /dev path. Sometimes, however, the redirecteddevice is not usable for an activeLinux VDA session. USB devices rely on drivers to function properly and some devices require specialdrivers. If drivers are not provided, the redirectedUSBdevices are inaccessible to the active Linux VDAsession. To ensure USB device connectivity, install the drivers and configure the system properly.
The Linux VDA supports a list of USB devices that are successfully redirected to and from the client. Inaddition, the device is properlymounted, especially the USB disk, allowing the user to access the diskwithout any additional configuration.
© 1999‒2022 Citrix Systems, Inc. All rights reserved. 307
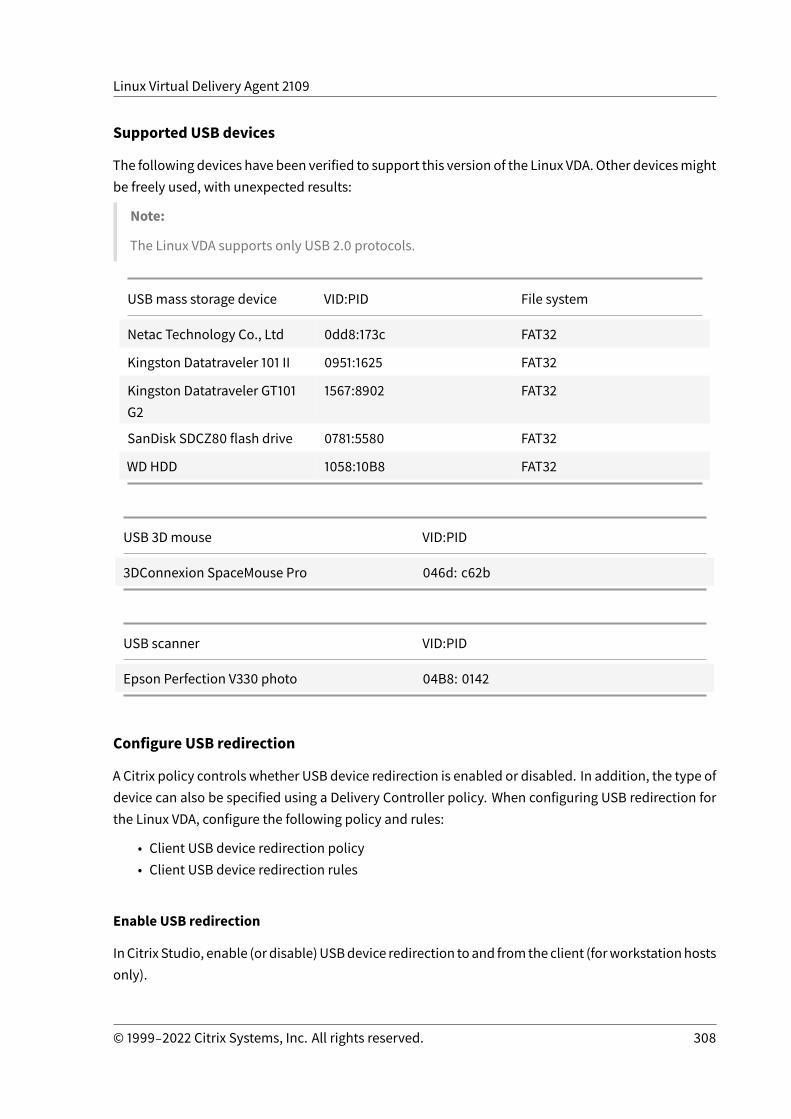
Linux Virtual Delivery Agent 2109
Supported USB devices
The following devices have been verified to support this version of the Linux VDA. Other devicesmightbe freely used, with unexpected results:
Note:
The Linux VDA supports only USB 2.0 protocols.
USBmass storage device VID:PID File system
Netac Technology Co., Ltd 0dd8:173c FAT32
Kingston Datatraveler 101 II 0951:1625 FAT32
Kingston Datatraveler GT101G2
1567:8902 FAT32
SanDisk SDCZ80 flash drive 0781:5580 FAT32
WD HDD 1058:10B8 FAT32
USB 3Dmouse VID:PID
3DConnexion SpaceMouse Pro 046d: c62b
USB scanner VID:PID
Epson Perfection V330 photo 04B8: 0142
Configure USB redirection
A Citrix policy controls whether USB device redirection is enabled or disabled. In addition, the type ofdevice can also be specified using a Delivery Controller policy. When configuring USB redirection forthe Linux VDA, configure the following policy and rules:
• Client USB device redirection policy• Client USB device redirection rules
Enable USB redirection
InCitrix Studio, enable (or disable)USBdevice redirection toand fromtheclient (forworkstationhostsonly).
© 1999‒2022 Citrix Systems, Inc. All rights reserved. 308
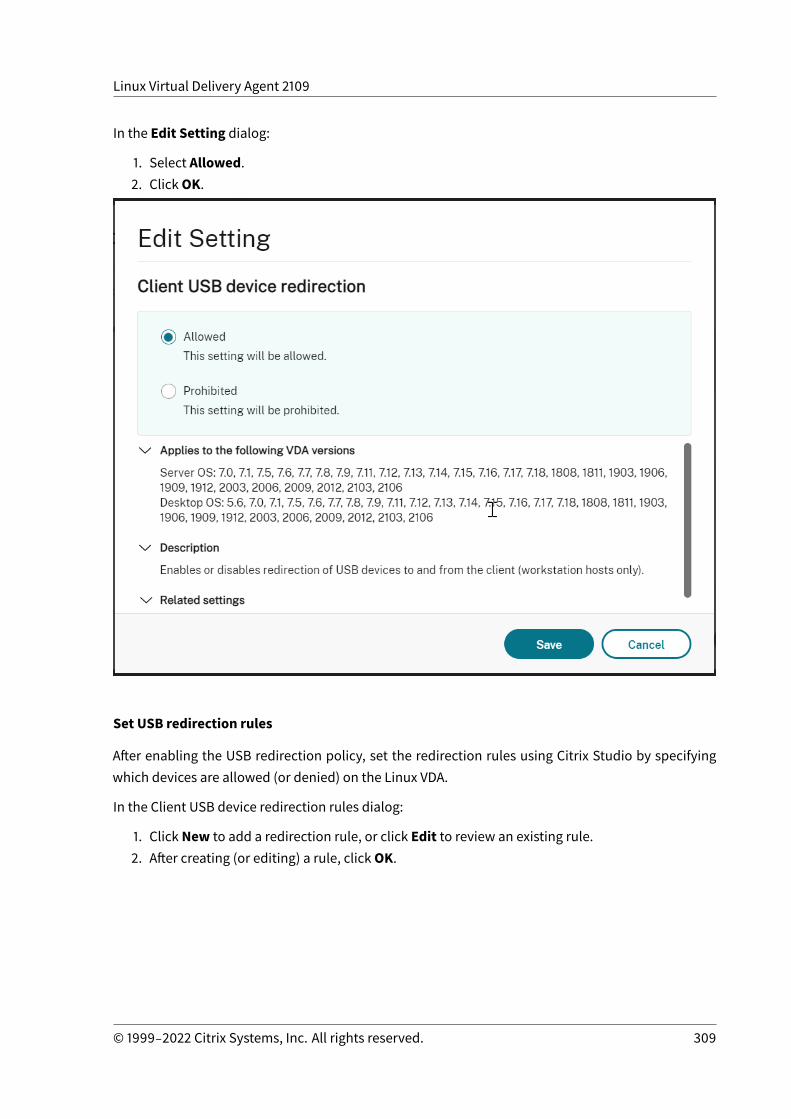
Linux Virtual Delivery Agent 2109
In the Edit Setting dialog:
1. Select Allowed.2. ClickOK.
Set USB redirection rules
After enabling the USB redirection policy, set the redirection rules using Citrix Studio by specifyingwhich devices are allowed (or denied) on the Linux VDA.
In the Client USB device redirection rules dialog:
1. Click New to add a redirection rule, or click Edit to review an existing rule.2. After creating (or editing) a rule, clickOK.
© 1999‒2022 Citrix Systems, Inc. All rights reserved. 309
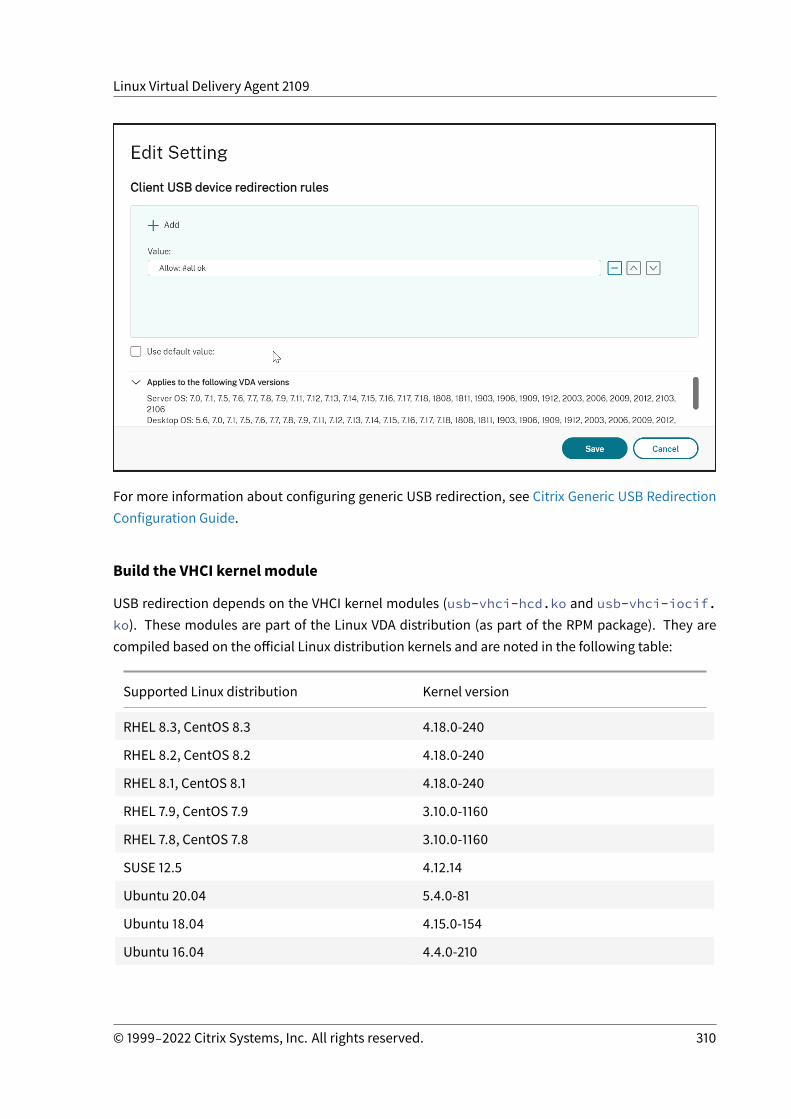
Linux Virtual Delivery Agent 2109
For more information about configuring generic USB redirection, see Citrix Generic USB RedirectionConfiguration Guide.
Build the VHCI kernel module
USB redirection depends on the VHCI kernel modules (usb-vhci-hcd.ko and usb-vhci-iocif.ko). These modules are part of the Linux VDA distribution (as part of the RPM package). They arecompiled based on the official Linux distribution kernels and are noted in the following table:
Supported Linux distribution Kernel version
RHEL 8.3, CentOS 8.3 4.18.0-240
RHEL 8.2, CentOS 8.2 4.18.0-240
RHEL 8.1, CentOS 8.1 4.18.0-240
RHEL 7.9, CentOS 7.9 3.10.0-1160
RHEL 7.8, CentOS 7.8 3.10.0-1160
SUSE 12.5 4.12.14
Ubuntu 20.04 5.4.0-81
Ubuntu 18.04 4.15.0-154
Ubuntu 16.04 4.4.0-210
© 1999‒2022 Citrix Systems, Inc. All rights reserved. 310
Linux Virtual Delivery Agent 2109
Supported Linux distribution Kernel version
Debian 10 4.19.0-17
Important:
If the kernel of your machine is not compatible with the driver built for the Linux VDA, the USBservice might fail to start. In this case, you can use the USB redirection feature only if you buildyour own VHCI kernel modules.
Verify whether your kernel is consistent with themodules built by Citrix
On the command line, run the following command to verify whether the kernel is consistent:
1 insmod /opt/Citrix/VDA/lib64/usb-vhci-hcd.ko2 <!--NeedCopy-->
If the command runs successfully, the kernel module has loaded successfully and the version is con-sistent with the one installed by Citrix.
If the command runswith errors, the kernel is inconsistentwith the Citrixmodule andmust be rebuilt.
Rebuild the VHCI kernel module
If your kernel module is inconsistent with the Citrix version, do the following:
1. Download the LVDA source code from the Citrix download site. Select the file contained in thesection “Linux Virtual Delivery Agent (sources).”
2. Extract the citrix-linux-vda-sources.zip file. Navigate to linux-vda-sources/vhci-hcd-1.15.zipand extract the VHCI source files by using the unzip vhci-hcd-1.15.zip command.
3. Ensure that you have the Linux VDA package installed, and then run either of the following com-mands:
• sudo bash ctxusbcfg.sh dkms
This command lets you use the Dynamic Kernel Module Support (DKMS) program toman-age your VHCI kernel modules. DKMS is not available for SUSE.
Note:
The sudo bash ctxusbcfg.sh dkms command installs the kernel-devel andDKMS programs on your VDA. When installing the programs on RHEL and CentOS,
© 1999‒2022 Citrix Systems, Inc. All rights reserved. 311
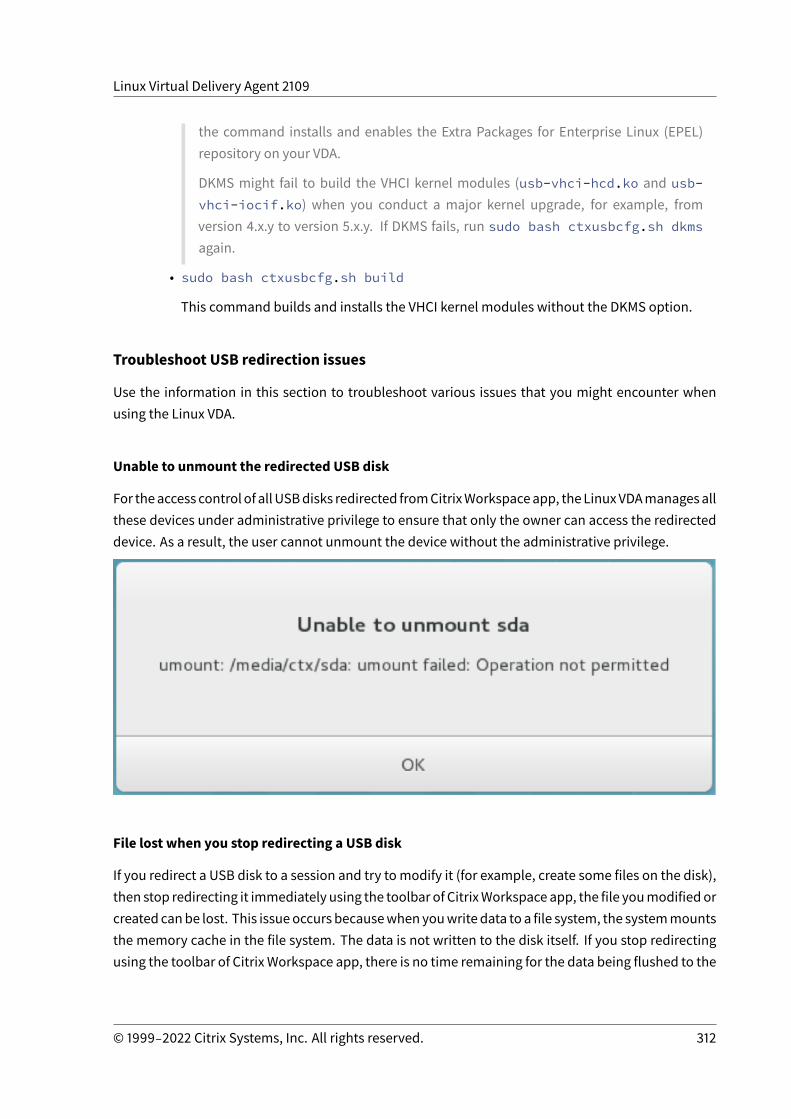
Linux Virtual Delivery Agent 2109
the command installs and enables the Extra Packages for Enterprise Linux (EPEL)repository on your VDA.
DKMS might fail to build the VHCI kernel modules (usb-vhci-hcd.ko and usb-vhci-iocif.ko) when you conduct a major kernel upgrade, for example, fromversion 4.x.y to version 5.x.y. If DKMS fails, run sudo bash ctxusbcfg.sh dkmsagain.
• sudo bash ctxusbcfg.sh build
This command builds and installs the VHCI kernel modules without the DKMS option.
Troubleshoot USB redirection issues
Use the information in this section to troubleshoot various issues that you might encounter whenusing the Linux VDA.
Unable to unmount the redirected USB disk
For theaccess control of allUSBdisks redirected fromCitrixWorkspaceapp, theLinuxVDAmanagesallthese devices under administrative privilege to ensure that only the owner can access the redirecteddevice. As a result, the user cannot unmount the device without the administrative privilege.
File lost when you stop redirecting a USB disk
If you redirect a USB disk to a session and try tomodify it (for example, create some files on the disk),then stop redirecting it immediately using the toolbar of CitrixWorkspace app, the file youmodified orcreated canbe lost. This issueoccurs becausewhenyouwrite data to a file system, the systemmountsthe memory cache in the file system. The data is not written to the disk itself. If you stop redirectingusing the toolbar of Citrix Workspace app, there is no time remaining for the data being flushed to the
© 1999‒2022 Citrix Systems, Inc. All rights reserved. 312
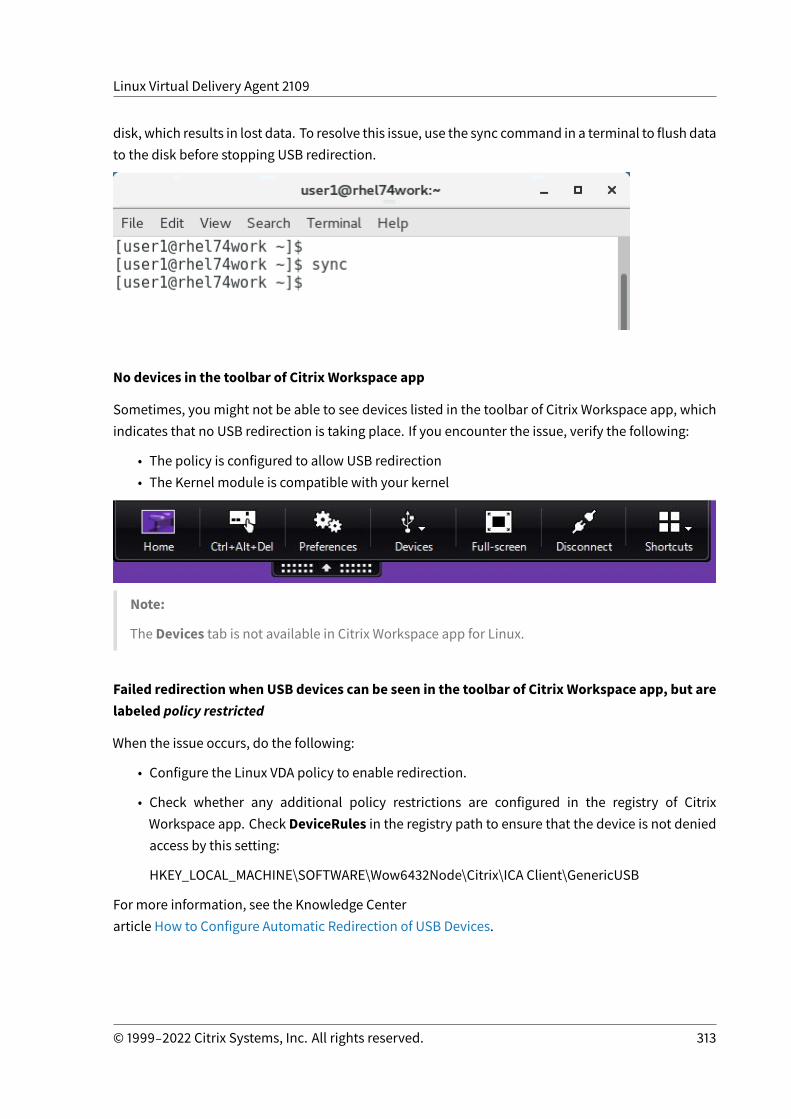
Linux Virtual Delivery Agent 2109
disk, which results in lost data. To resolve this issue, use the sync command in a terminal to flush datato the disk before stopping USB redirection.
No devices in the toolbar of Citrix Workspace app
Sometimes, you might not be able to see devices listed in the toolbar of Citrix Workspace app, whichindicates that no USB redirection is taking place. If you encounter the issue, verify the following:
• The policy is configured to allow USB redirection• The Kernel module is compatible with your kernel
Note:
The Devices tab is not available in Citrix Workspace app for Linux.
Failed redirection when USB devices can be seen in the toolbar of Citrix Workspace app, but arelabeled policy restricted
When the issue occurs, do the following:
• Configure the Linux VDA policy to enable redirection.
• Check whether any additional policy restrictions are configured in the registry of CitrixWorkspace app. Check DeviceRules in the registry path to ensure that the device is not deniedaccess by this setting:
HKEY_LOCAL_MACHINE\SOFTWARE\Wow6432Node\Citrix\ICA Client\GenericUSB
For more information, see the Knowledge Centerarticle How to Configure Automatic Redirection of USB Devices.
© 1999‒2022 Citrix Systems, Inc. All rights reserved. 313
Linux Virtual Delivery Agent 2109
A USB device is redirected successfully, but I cannot use it in my session
Typically, only supported USB devices can be redirected. Other devices might be redirected to anactive Linux VDA session too. For every redirected device, a node owned by the user is created in thesystem /devpath. However, it is thedrivers and theconfiguration thatdeterminewhether theuser canuse the device successfully. If you find a device owned (plugged in) but inaccessible, add the deviceto an unrestricted policy.
Note:
In the case of USB drives, the Linux VDA configures andmounts the disk. The user (and only theowner who installed it) can access the disk without any additional configuration. This might notbe the case for devices that are not in the supported device list.
HDXwebcam video compression
October 12, 2021
Overview
Users of video conferencing applications running in Linux VDA sessions can now use their webcamswith HDXwebcam video compression. This feature is enabled by default. We recommend you alwaysuse HDX webcam video compression if possible.
HDXwebcam video compression is also calledOptimizedwebcammode. This type of webcam videocompression sends the H.264 video directly to the video conferencing application running in the vir-tual session. HDXwebcamvideo compression uses themultimedia framework technology that is partof the client operating system to intercept video from capture devices, transcode, and compress it.Manufacturers of capture devices supply the drivers that plug into the OS kernel streaming architec-ture.
The client handles communication with the webcam. The client then sends the video only to theserver that can display it properly. The server doesn’t deal directly with the webcam, but its integra-tion gives you the same experience in your desktop. Workspace app compresses the video to savebandwidth and provide better resiliency on WAN scenarios.
© 1999‒2022 Citrix Systems, Inc. All rights reserved. 314
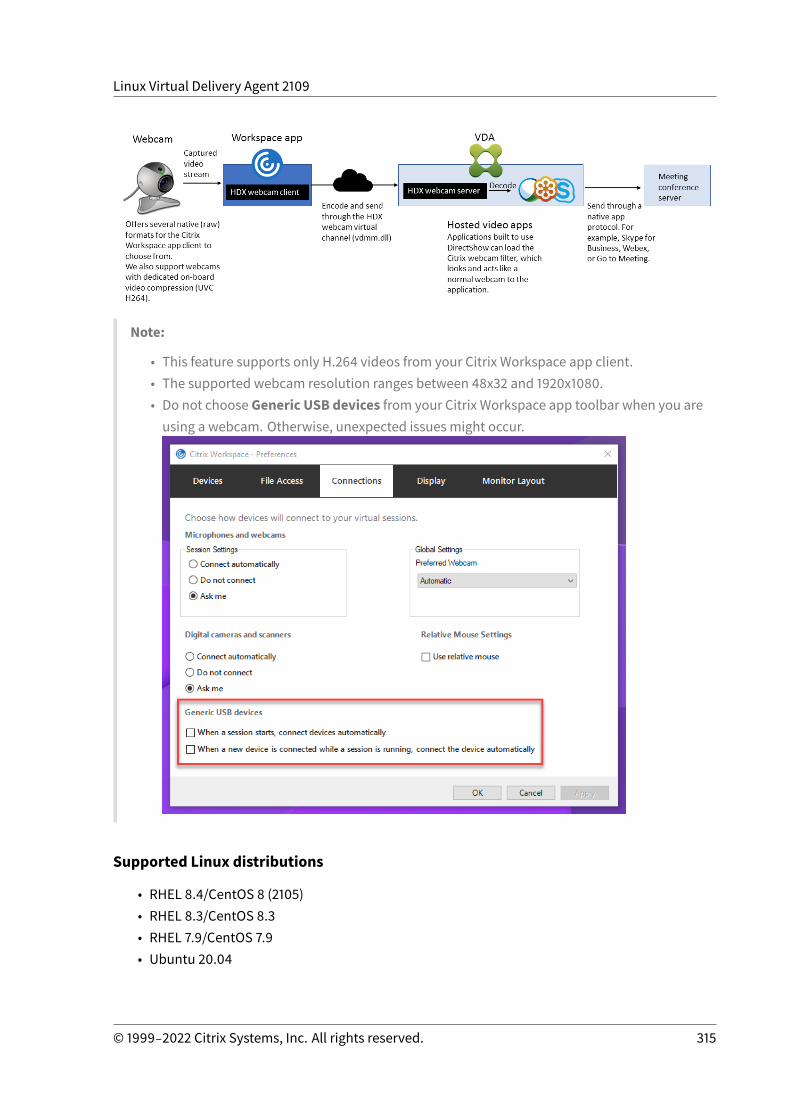
Linux Virtual Delivery Agent 2109
Note:
• This feature supports only H.264 videos from your Citrix Workspace app client.• The supported webcam resolution ranges between 48x32 and 1920x1080.• Do not choose Generic USB devices from your Citrix Workspace app toolbar when you areusing a webcam. Otherwise, unexpected issues might occur.
Supported Linux distributions
• RHEL 8.4/CentOS 8 (2105)• RHEL 8.3/CentOS 8.3• RHEL 7.9/CentOS 7.9• Ubuntu 20.04
© 1999‒2022 Citrix Systems, Inc. All rights reserved. 315
Linux Virtual Delivery Agent 2109
• Ubuntu 18.04• Ubuntu 16.04• Debian 10
Supported Citrix Workspace app
HDX webcam video compression supports the following versions of Citrix Workspace app:
Platform Processor
Citrix Workspace app for Windows Citrix Workspace app for Windows supportswebcam video compression for 32-bit and64-bit apps on XenApp and XenDesktop 7.17and later. On earlier versions, Citrix Workspaceapp for Windows supports only 32-bit apps.
Citrix Workspace app for Mac Citrix Workspace app for Mac 2006 and latersupport webcam video compression for 64-bitapps on XenApp and XenDesktop 7.17 and later.On earlier versions, Citrix Workspace app forMac supports only 32-bit apps.
Citrix Workspace app for Linux Citrix Workspace app for Linux supports only32-bit apps on the virtual desktop.
Citrix Workspace app for Chrome Because some ARM Chromebooks don’tsupport H.264 encoding, only 32-bit apps canuse the optimized HDX webcam videocompression.
Fully tested webcams
Different webcams offer different frame rates and have different levels of brightness and contrast.Citrix uses the following webcams for initial feature validation:
• Logitech HDWebcam C270• Logitech Webcam C930e• Microsoft-LiftCam-HD3000
Configuration
This feature is enabled by default. To use it, complete the following verification and configuration:
© 1999‒2022 Citrix Systems, Inc. All rights reserved. 316
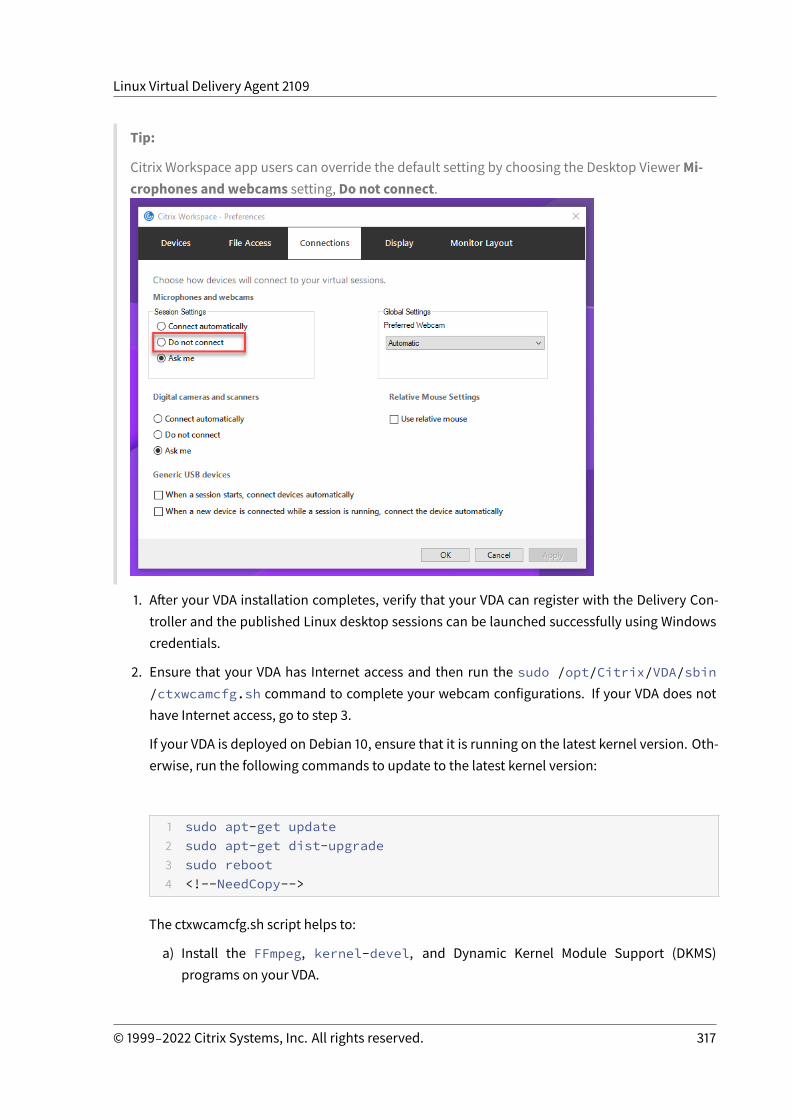
Linux Virtual Delivery Agent 2109
Tip:
Citrix Workspace app users can override the default setting by choosing the Desktop ViewerMi-crophones and webcams setting, Do not connect.
1. After your VDA installation completes, verify that your VDA can register with the Delivery Con-troller and the published Linux desktop sessions can be launched successfully using Windowscredentials.
2. Ensure that your VDA has Internet access and then run the sudo /opt/Citrix/VDA/sbin/ctxwcamcfg.sh command to complete your webcam configurations. If your VDA does nothave Internet access, go to step 3.
If your VDA is deployed on Debian 10, ensure that it is running on the latest kernel version. Oth-erwise, run the following commands to update to the latest kernel version:
1 sudo apt-get update2 sudo apt-get dist-upgrade3 sudo reboot4 <!--NeedCopy-->
The ctxwcamcfg.sh script helps to:
a) Install the FFmpeg, kernel-devel, and Dynamic Kernel Module Support (DKMS)programs on your VDA.
© 1999‒2022 Citrix Systems, Inc. All rights reserved. 317
Linux Virtual Delivery Agent 2109
• FFmpeg is used for video decoding.• kernel-devel is used tobuild a virtualwebcamkernelmodule of the correspondingversion.
• DKMS is used to dynamically manage the virtual webcam kernel module.
Note:
When installing the preceding programs on RHEL and CentOS, the ctxwcamcfg.shscript installs and enables the following repositories on your VDA:
• Extra Packages for Enterprise Linux (EPEL)• RPM Fusion
b) Download the v4l2loopback open source code from https://github.com/umlaeute/v4l2loopback and use DKMS tomanage v4l2loopback.v4l2loopback is a kernel module that allows you to create V4L2 loopback devices.
c) Run the sudo service ctxwcamsd restart command. The Linux VDA’s webcam ser-vice - ctxwcamsd - restarts and loads the v4l2loopback kernel module for the HDXweb-cam video compression feature.
3. If your VDA does not have Internet access, build the v4l2loopback kernel module on anothermachine and then copy it to your VDA.
a) Prepare a build machine that has Internet access and has the same kernel version withyour VDA. The uname -r command helps to find kernel versions.
b) On the build machine, run the sudo mkdir -p /var/xdl command.
c) Copy /var/xdl/configure_* from your VDA to the build machine under /var/xdl/.
d) On the build machine, run the sudo /opt/Citrix/VDA/sbin/ctxwcamcfg.sh command to build the kernel module. If the command runs successfully, itcreates a v4l2loopback.ko file under the /var/lib/dkms/v4l2loopback/1.81b8df79107d1fbf392fdcbaa051bd227a9c94c1/$(uname -r)/x86_64/module/path. Ignore errors that might occur when you run the ctxwcamcfg.sh script.
e) Copy v4l2loopback.ko from the build machine to your VDA and place it under /opt/Citrix/VDA/lib64/.
f) On your VDA, run the sudo service ctxwcamsd restart command to restart the we-bcam service and load the v4l2loopback kernel module.
g) Make sure to install the FFmpeg programon your VDAbefore you can use theHDXwebcamvideo compression feature.
© 1999‒2022 Citrix Systems, Inc. All rights reserved. 318
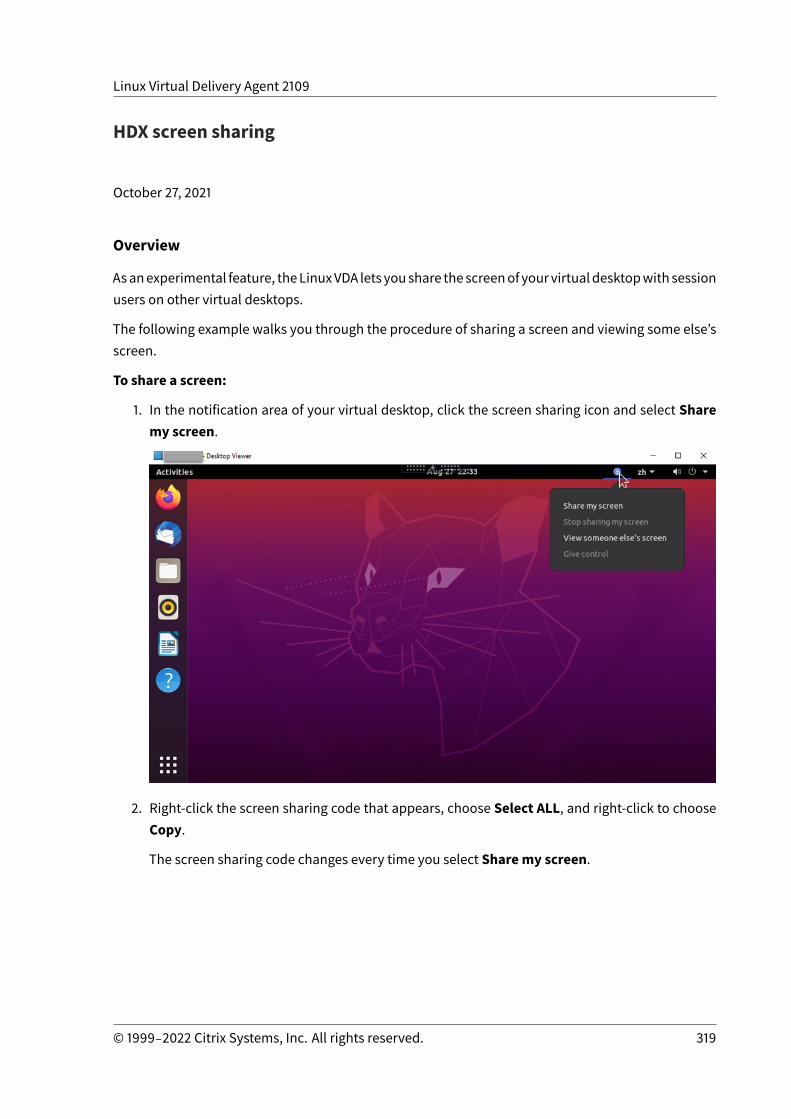
Linux Virtual Delivery Agent 2109
HDX screen sharing
October 27, 2021
Overview
Asanexperimental feature, theLinuxVDA lets youshare the screenof yourvirtualdesktopwith sessionusers on other virtual desktops.
The following example walks you through the procedure of sharing a screen and viewing some else’sscreen.
To share a screen:
1. In the notification area of your virtual desktop, click the screen sharing icon and select Sharemy screen.
2. Right-click the screen sharing code that appears, choose Select ALL, and right-click to chooseCopy.
The screen sharing code changes every time you select Sharemy screen.
© 1999‒2022 Citrix Systems, Inc. All rights reserved. 319
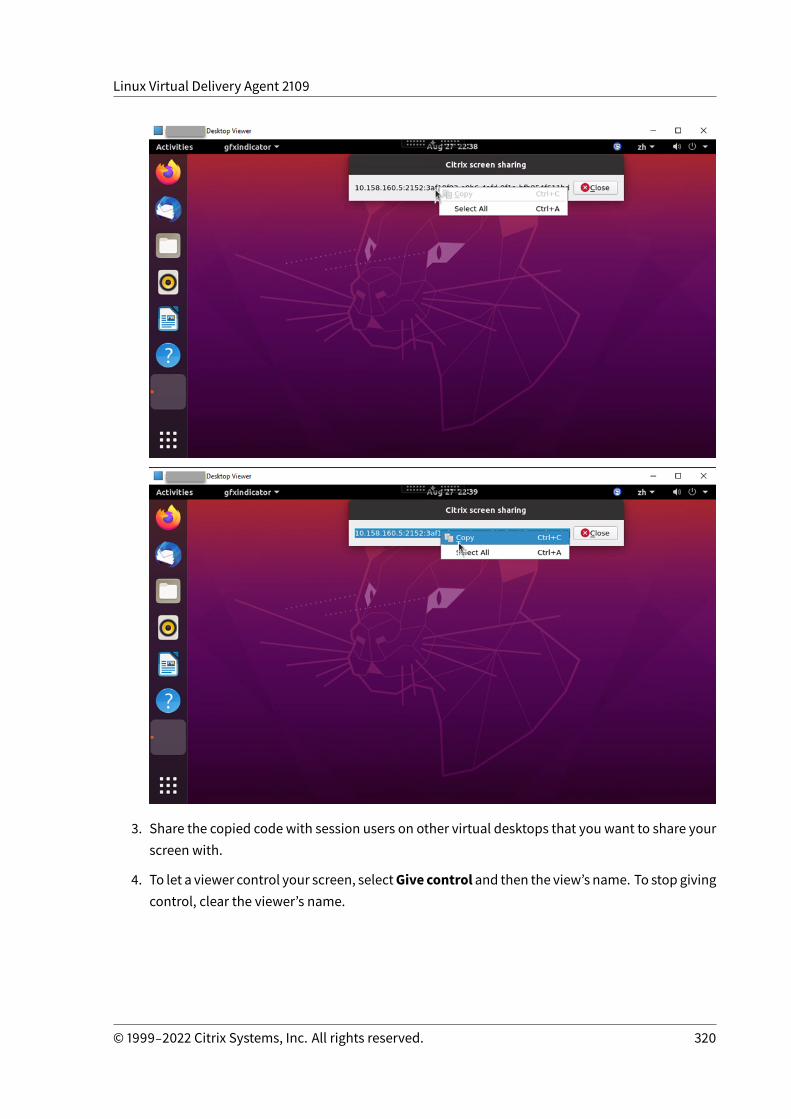
Linux Virtual Delivery Agent 2109
3. Share the copied code with session users on other virtual desktops that you want to share yourscreen with.
4. To let a viewer control your screen, selectGive control and then the view’s name. To stop givingcontrol, clear the viewer’s name.
© 1999‒2022 Citrix Systems, Inc. All rights reserved. 320

Linux Virtual Delivery Agent 2109
5. To stop sharing your screen, select Stop sharingmy screen.
To view someone else’s screen:
1. In the notification area of your virtual desktop, click the screen sharing icon and select Viewsomeone else’s screen.
© 1999‒2022 Citrix Systems, Inc. All rights reserved. 321
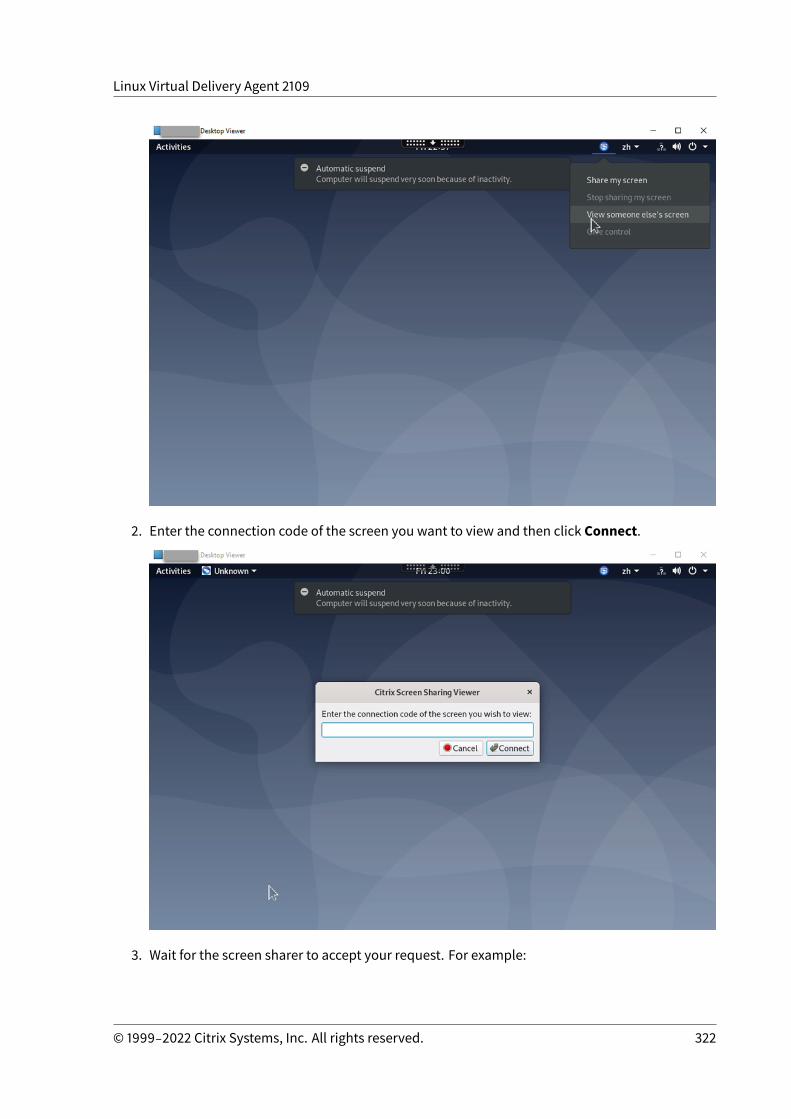
Linux Virtual Delivery Agent 2109
2. Enter the connection code of the screen you want to view and then click Connect.
3. Wait for the screen sharer to accept your request. For example:
© 1999‒2022 Citrix Systems, Inc. All rights reserved. 322
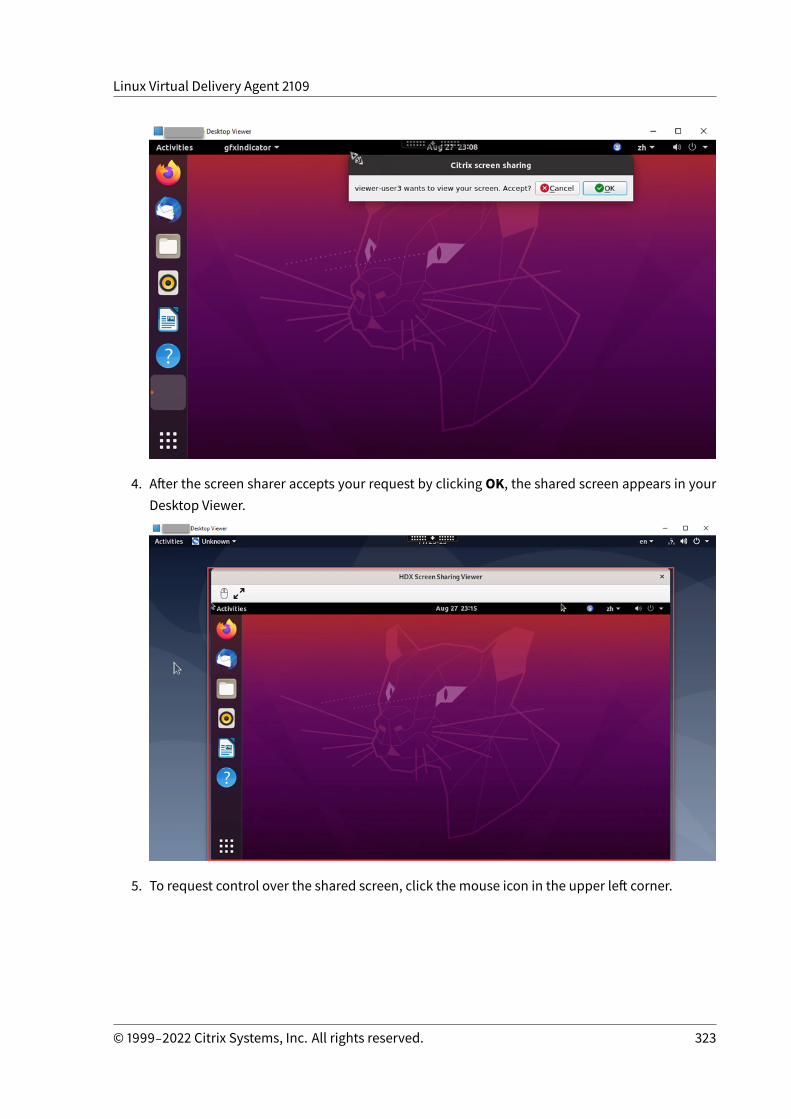
Linux Virtual Delivery Agent 2109
4. After the screen sharer accepts your request by clicking OK, the shared screen appears in yourDesktop Viewer.
5. To request control over the shared screen, click the mouse icon in the upper left corner.
© 1999‒2022 Citrix Systems, Inc. All rights reserved. 323
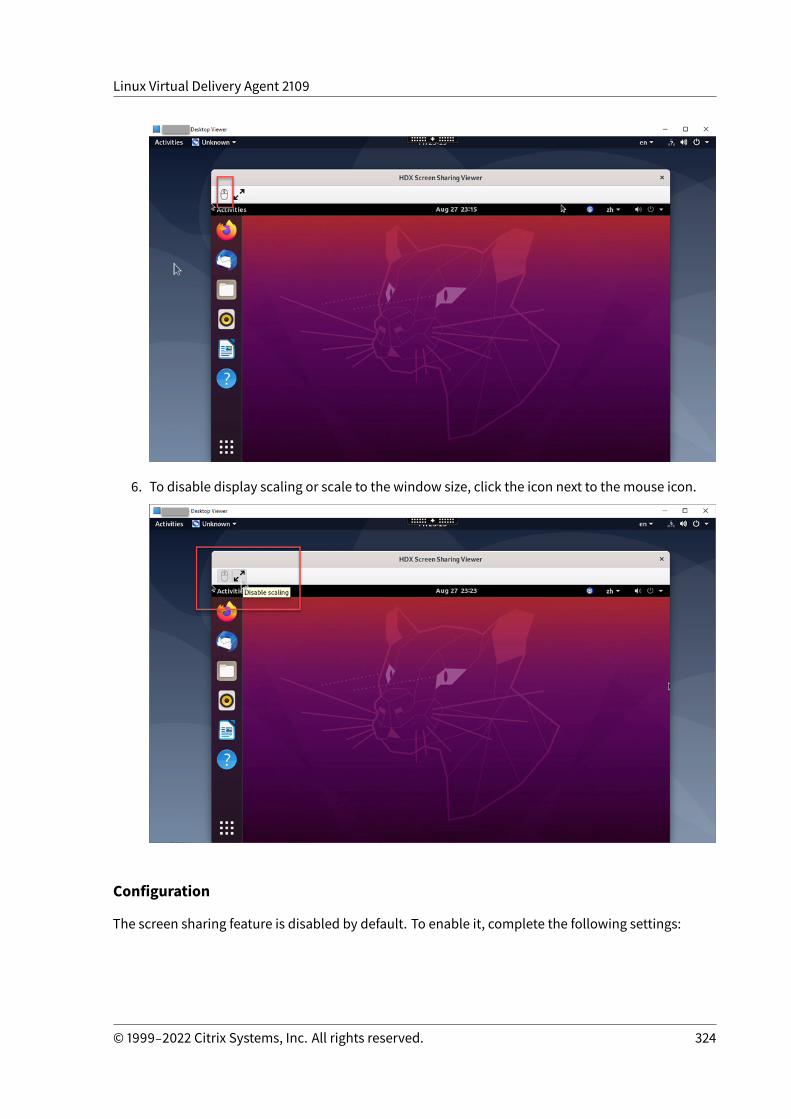
Linux Virtual Delivery Agent 2109
6. To disable display scaling or scale to the window size, click the icon next to the mouse icon.
Configuration
The screen sharing feature is disabled by default. To enable it, complete the following settings:
© 1999‒2022 Citrix Systems, Inc. All rights reserved. 324
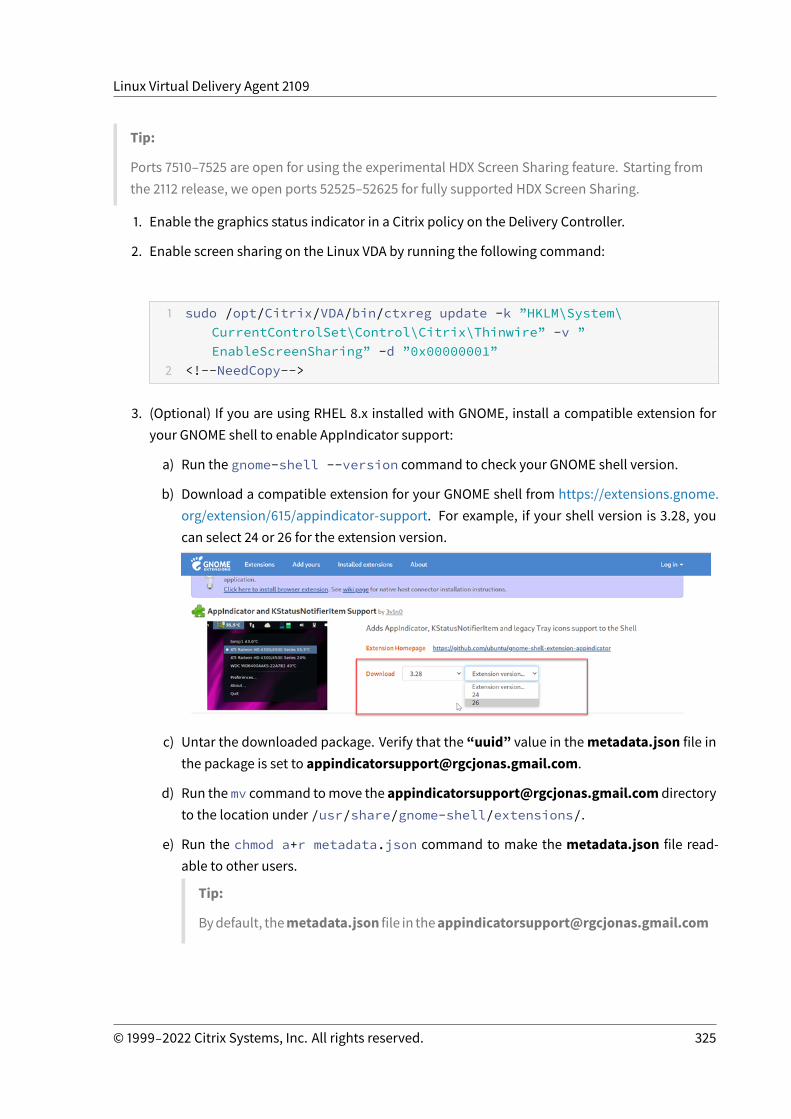
Linux Virtual Delivery Agent 2109
Tip:
Ports 7510–7525 are open for using the experimental HDX Screen Sharing feature. Starting fromthe 2112 release, we open ports 52525–52625 for fully supported HDX Screen Sharing.
1. Enable the graphics status indicator in a Citrix policy on the Delivery Controller.
2. Enable screen sharing on the Linux VDA by running the following command:
1 sudo /opt/Citrix/VDA/bin/ctxreg update -k ”HKLM\System\CurrentControlSet\Control\Citrix\Thinwire” -v ”EnableScreenSharing” -d ”0x00000001”
2 <!--NeedCopy-->
3. (Optional) If you are using RHEL 8.x installed with GNOME, install a compatible extension foryour GNOME shell to enable AppIndicator support:
a) Run the gnome-shell --version command to check your GNOME shell version.
b) Download a compatible extension for your GNOME shell from https://extensions.gnome.org/extension/615/appindicator-support. For example, if your shell version is 3.28, youcan select 24 or 26 for the extension version.
c) Untar the downloaded package. Verify that the “uuid” value in themetadata.json file inthe package is set to [email protected].
d) Run the mv command tomove the [email protected] directoryto the location under /usr/share/gnome-shell/extensions/.
e) Run the chmod a+r metadata.json command to make the metadata.json file read-able to other users.
Tip:
Bydefault, themetadata.json file in [email protected]
© 1999‒2022 Citrix Systems, Inc. All rights reserved. 325
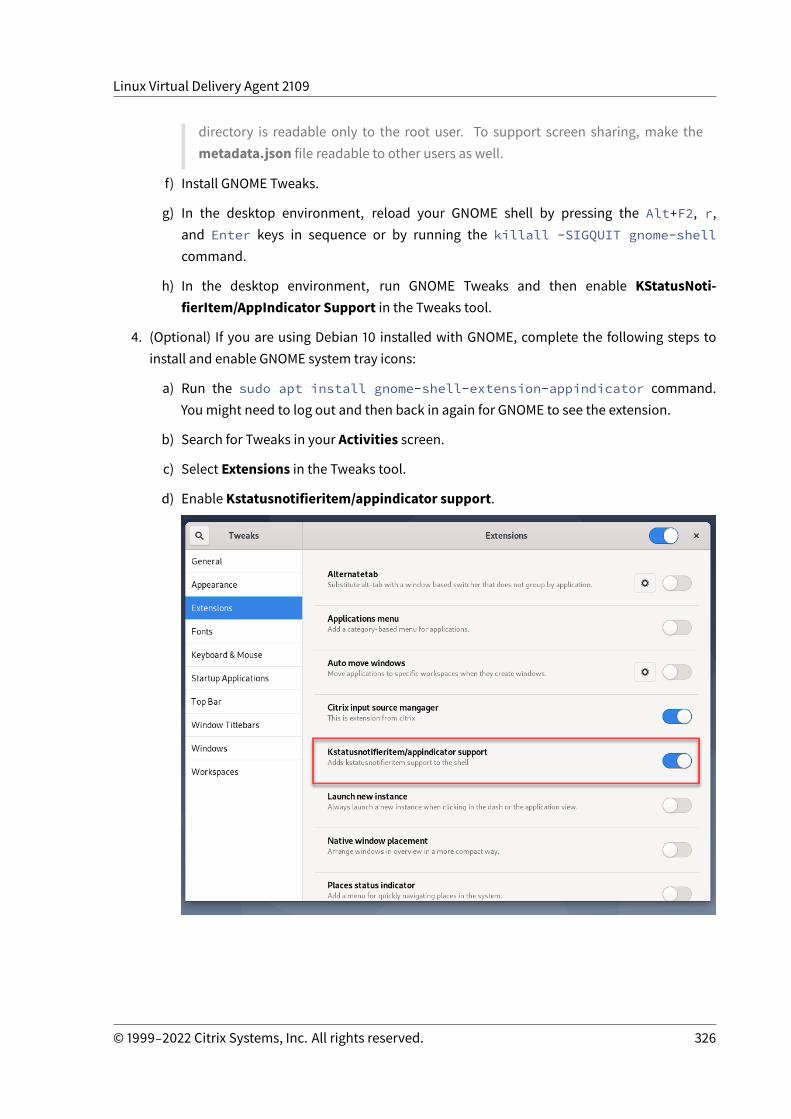
Linux Virtual Delivery Agent 2109
directory is readable only to the root user. To support screen sharing, make themetadata.json file readable to other users as well.
f) Install GNOME Tweaks.
g) In the desktop environment, reload your GNOME shell by pressing the Alt+F2, r,and Enter keys in sequence or by running the killall -SIGQUIT gnome-shellcommand.
h) In the desktop environment, run GNOME Tweaks and then enable KStatusNoti-fierItem/AppIndicator Support in the Tweaks tool.
4. (Optional) If you are using Debian 10 installed with GNOME, complete the following steps toinstall and enable GNOME system tray icons:
a) Run the sudo apt install gnome-shell-extension-appindicator command.Youmight need to log out and then back in again for GNOME to see the extension.
b) Search for Tweaks in your Activities screen.
c) Select Extensions in the Tweaks tool.
d) Enable Kstatusnotifieritem/appindicator support.
© 1999‒2022 Citrix Systems, Inc. All rights reserved. 326
Linux Virtual Delivery Agent 2109
Limitations
• The screen sharing feature does not support the H.265 video codec.
• The screen sharing feature is not available for app sessions.
Configure session reliability
October 12, 2021
Citrix introduces the session reliability feature to all supported Linux platforms. Session reliability isenabled by default.
Session reliability reconnects ICA sessions seamlessly across network interruptions. For more infor-mation about session reliability, see Auto client reconnect and session reliability.
Note: Data transmitted through a session reliability connection is in plain text by default. For securitypurposes, We recommend that you enable TLS encryption. For more information about TLS encryp-tion, see Secure user sessions using TLS.
Configuration
Policy settings in Citrix Studio
You can set the following policies for session reliability in Citrix Studio:
• Session reliability connections• Session reliability timeout• Session reliability port number• Reconnection UI transparency level
Formore information, see Session reliability policy settings and Auto client reconnect policy settings.
Note: After setting the Session reliability connections or Session reliability port number policy,restart the VDA service and the HDX service, in this order, for your settings to take effect.
Settings on the Linux VDA
• Enable/disable the session reliability TCP listener
By default, the session reliability TCP listener is enabled and listening on port 2598. To disable thelistener, run the following command.
© 1999‒2022 Citrix Systems, Inc. All rights reserved. 327
Linux Virtual Delivery Agent 2109
1 /opt/Citrix/VDA/bin/ctxreg update -k ”HKEY_LOCAL_MACHINE\SYSTEM\CurrentControlSet\Control\Citrix\WinStations\cgp” -v ”fEnableWinStation” -d ”0x00000000”
2 <!--NeedCopy-->
Note: Restart the HDX service for your settings to take effect. Disabling the TCP listener does notdisable session reliability. Session reliability is still available through other listeners (for example,SSL) if the feature is enabled through the Session reliability connections policy.
• Session reliability port number
You can also set the session reliability port number by using the following command (using port num-ber 2599 as an example).
1 /opt/Citrix/VDA/bin/ctxreg update -k ”HKEY_LOCAL_MACHINE\SYSTEM\CurrentControlSet\Control\Citrix\WinStations\cgp” -v ”PortNumber”-d ”2599”
2 <!--NeedCopy-->
Note: Restart the HDX service for your setting to take effect. If the port number has been set throughthe policy setting in Citrix Studio, your setting on the Linux VDA is ignored. Ensure that the firewall onthe VDA is configured not to prohibit network traffic through the set port.
• Server-to-client keep-alive interval
Session reliability keep-alivemessages are sent between the Linux VDA and the ICA client when thereis no activity in the session (for example, no mouse movement, no screen update). The keep-alivemessages are used to detect whether the client is still responsive. If there is no response from theclient, the session is suspended until the client reconnects. This setting specifies the number of sec-onds between successive keep-alivemessages. By default, this setting is not configured. To configureit, run the following command (using 10 seconds as an example).
1 /opt/Citrix/VDA/bin/ctxreg create -k ”HKEY_LOCAL_MACHINE\SOFTWARE\Citrix\XTEConfig” -t ”REG_DWORD” -v ”CgpServerToClientKeepAlive” -d ”10” --force
• Client-to-server keep-alive interval
This setting specifies the number of seconds between successive keep-alive messages sent from theICA client to the Linux VDA. By default, this setting is not configured. To configure it, run the followingcommand (using 10 seconds as an example).
© 1999‒2022 Citrix Systems, Inc. All rights reserved. 328
Linux Virtual Delivery Agent 2109
1 /opt/Citrix/VDA/bin/ctxreg create -k ”HKEY_LOCAL_MACHINE\SOFTWARE\Citrix\XTEConfig” -t ”REG_DWORD” -v ”CgpClientToServerKeepAlive” -d ”10” --force
2 <!--NeedCopy-->
Troubleshooting
Unable to launch sessions after enabling session reliability through the policy setting.
To work around this issue, do the following:
1. Ensure that the VDA service andHDX service are restarted, in this order, after you enable sessionreliability through the policy setting in Citrix Studio.
2. On the VDA, run the following command to verify that the session reliability TCP listener is run-ning (using port 2598 as an example).
1 netstat -an | grep 25982 <!--NeedCopy-->
If there is no TCP listener on the session reliability port, enable the listener by running the fol-lowing command.
1 /opt/Citrix/VDA/bin/ctxreg update -k ”HKEY_LOCAL_MACHINE\SYSTEM\CurrentControlSet\Control\Citrix\WinStations\cgp” -v ”fEnableWinStation” -d ”0x00000001”
2 <!--NeedCopy-->
Soft keyboard
October 12, 2021
The soft keyboard feature is available in a Linux virtual desktop or application session. The soft key-board shows or hides automatically when you enter or leave an input field.
© 1999‒2022 Citrix Systems, Inc. All rights reserved. 329

Linux Virtual Delivery Agent 2109
© 1999‒2022 Citrix Systems, Inc. All rights reserved. 330
Linux Virtual Delivery Agent 2109
Note:
The feature is available for RHEL 7.8, RHEL 7.9, RHEL 8.1,RHEL 8.2, RHEL 8.3, SUSE 12.5, Ubuntu16.04, and Ubuntu 18.04. It is supported on Citrix Workspace app for iOS and for Android.
Enable and disable the feature
The feature is disabled by default. Use the ctxreg utility to enable or disable the feature. The featureconfiguration on a given Linux VDA applies to all sessions on that VDA.
To enable the feature:
1. Run the command:
1 /opt/Citrix/VDA/bin/ctxreg update -k ”HKLM\System\CurrentControlSet\Control\Citrix\VirtualChannels\MrVc” -v ”Enabled” -d ”0x00000001”
2 <!--NeedCopy-->
2. In Citrix Studio, set the Automatic keyboard display policy to Allowed.
3. (Optional) For RHEL 7 and CentOS 7, run the following command to configure Intelligent InputBus (IBus) as the default IM service:
1 echo ”GTK_IM_MODULE=ibus” >>/etc/bashrc2 <!--NeedCopy-->
To disable the feature, run the command:
1 /opt/Citrix/VDA/bin/ctxreg update -k ”HKLM\System\CurrentControlSet\Control\Citrix\VirtualChannels\MrVc” -v ”Enabled” -d ”0x00000000”
2 <!--NeedCopy-->
Note:
The preceding settings take effect when you log on to a new session or log off and back on to thecurrent session.
Limitations
• The feature might not work as expected with Google Chrome, LibreOffice, and other apps.
© 1999‒2022 Citrix Systems, Inc. All rights reserved. 331
Linux Virtual Delivery Agent 2109
• To display the soft keyboard again after hiding it manually, click a non-input field and then thecurrent input field again.
• The soft keyboard might not appear when you click from one input field to another in a webbrowser. To work around this issue, click a non-input field and then the target input field.
• The feature does not support Unicode characters and double-byte characters (such as Chinese,Japanese, and Korean characters).
• The soft keyboard is not available for password input fields.
• The soft keyboard might overlap the current input field. In this case, move the app window orscroll up your screen to move the input field to an accessible position.
• Due tocompatibility issuesbetweenCitrixWorkspaceappandHuawei tablets, the softkeyboardappears on Huawei tablets even with a physical keyboard connected.
Client Input Method Editor (IME)
October 12, 2021
Overview
Double-byte characters such as Chinese, Japanese, and Korean characters must be typed through anIME. Type such characters with any IME that is compatible with Citrix Workspace app on the clientside, such as the Windows native CJK IME.
Installation
This feature is installed automatically when you install the Linux VDA.
Usage
Open a Citrix Virtual Apps or Citrix Virtual Desktops session as per usual.
Change your input method as required on the client side to start using the client IME feature.
Known issues
• Double-clicking a cell in aGoogle spreadsheet is amust before you canuse the client IME featureto type characters in the cell.
• The client IME feature is not disabled automatically in Password fields.• The IME user interface does not follow the cursor in the input area.
© 1999‒2022 Citrix Systems, Inc. All rights reserved. 332
Linux Virtual Delivery Agent 2109
Support for multiple language inputs
October 12, 2021
As of the Linux VDA Version 1.4, Citrix has added support for published applications. Users can accessa desired Linux application without the Linux desktop environment.
However, the native language bar on the Linux VDA was unavailable to the published application be-cause the language bar is highly integrated with the Linux desktop environment. As a result, userswere unable to input text in a language that requires IME such as Chinese, Japanese, or Korean. It wasalso not possible for users to switch between keyboard layouts during an application session.
To address those issues, this feature provides a language bar for published applications that accepttext input. The languagebar enables users to select a server-side IMEand to switchbetweenkeyboardlayouts during an application session.
Configuration
You can use the ctxreg utility to enable or disable this feature (disabled by default). The feature con-figuration on a given Linux VDA server applies to all applications published on that VDA.
Theconfigurationkey is “HKEY_LOCAL_MACHINE\SYSTEM\CurrentControlSet\Control\Citrix\LanguageBar”and the type is DWORD.
To enable this feature, run the command:
1 /opt/Citrix/VDA/bin/ctxreg update -k ”HKEY_LOCAL_MACHINE\SYSTEM\CurrentControlSet\Control\Citrix\LanguageBar” -v ”Enabled” -d ”0x00000001”
2 <!--NeedCopy-->
To disable this feature, run the command:
1 /opt/Citrix/VDA/bin/ctxreg update -k ”HKEY_LOCAL_MACHINE\SYSTEM\CurrentControlSet\Control\Citrix\LanguageBar” -v ”Enabled” -d ”0x00000000”
2 <!--NeedCopy-->
Usage
The usage is straightforward.
© 1999‒2022 Citrix Systems, Inc. All rights reserved. 333
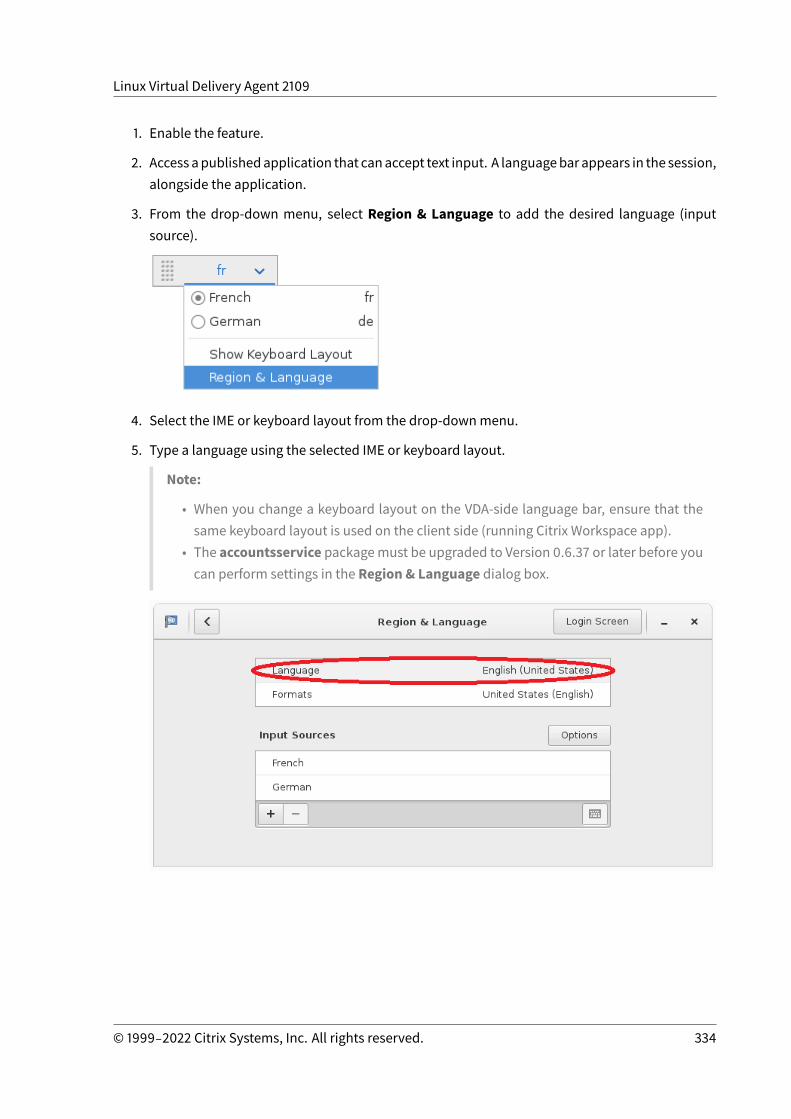
Linux Virtual Delivery Agent 2109
1. Enable the feature.
2. Access apublishedapplication that canaccept text input. A languagebar appears in the session,alongside the application.
3. From the drop-down menu, select Region & Language to add the desired language (inputsource).
4. Select the IME or keyboard layout from the drop-downmenu.
5. Type a language using the selected IME or keyboard layout.
Note:
• When you change a keyboard layout on the VDA-side language bar, ensure that thesame keyboard layout is used on the client side (running Citrix Workspace app).
• The accountsservice packagemust be upgraded to Version 0.6.37 or later before youcan perform settings in the Region & Language dialog box.
© 1999‒2022 Citrix Systems, Inc. All rights reserved. 334
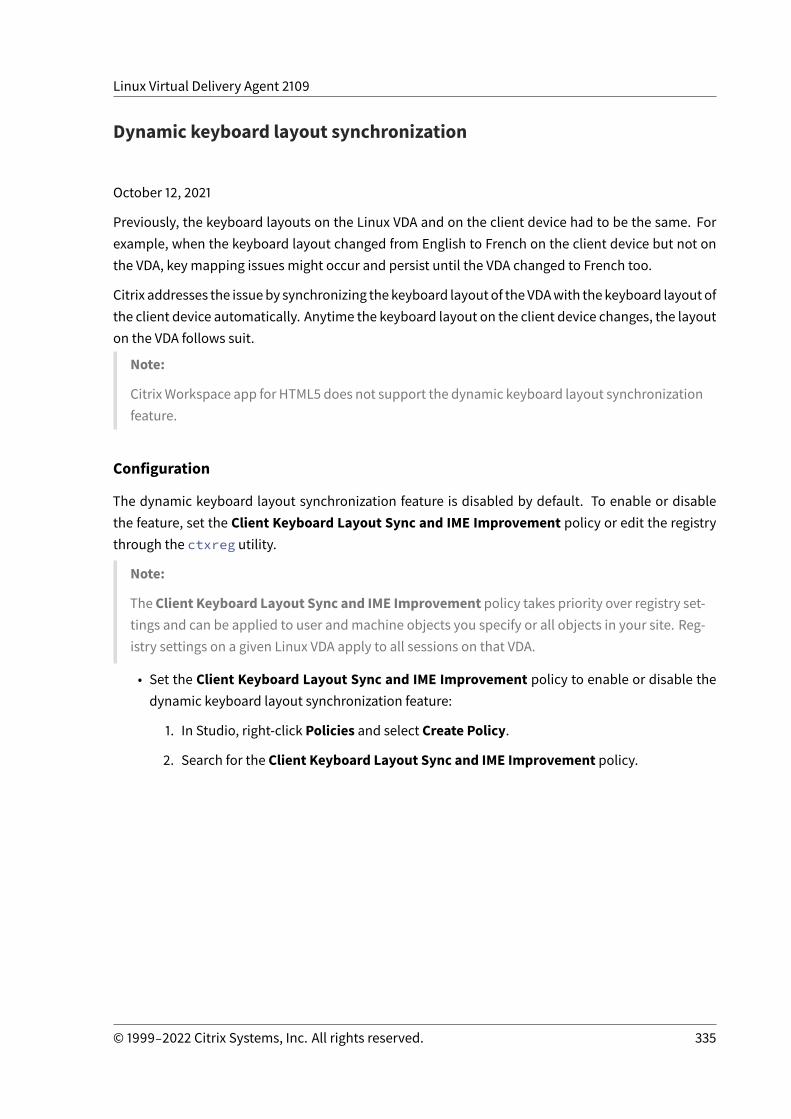
Linux Virtual Delivery Agent 2109
Dynamic keyboard layout synchronization
October 12, 2021
Previously, the keyboard layouts on the Linux VDA and on the client device had to be the same. Forexample, when the keyboard layout changed from English to French on the client device but not onthe VDA, key mapping issues might occur and persist until the VDA changed to French too.
Citrix addresses the issueby synchronizing the keyboard layout of the VDAwith the keyboard layout ofthe client device automatically. Anytime the keyboard layout on the client device changes, the layouton the VDA follows suit.
Note:
CitrixWorkspace app for HTML5 does not support the dynamic keyboard layout synchronizationfeature.
Configuration
The dynamic keyboard layout synchronization feature is disabled by default. To enable or disablethe feature, set the Client Keyboard Layout Sync and IME Improvement policy or edit the registrythrough the ctxreg utility.
Note:
The Client Keyboard Layout Sync and IME Improvement policy takes priority over registry set-tings and can be applied to user andmachine objects you specify or all objects in your site. Reg-istry settings on a given Linux VDA apply to all sessions on that VDA.
• Set the Client Keyboard Layout Sync and IME Improvement policy to enable or disable thedynamic keyboard layout synchronization feature:
1. In Studio, right-click Policies and select Create Policy.
2. Search for the Client Keyboard Layout Sync and IME Improvement policy.
© 1999‒2022 Citrix Systems, Inc. All rights reserved. 335
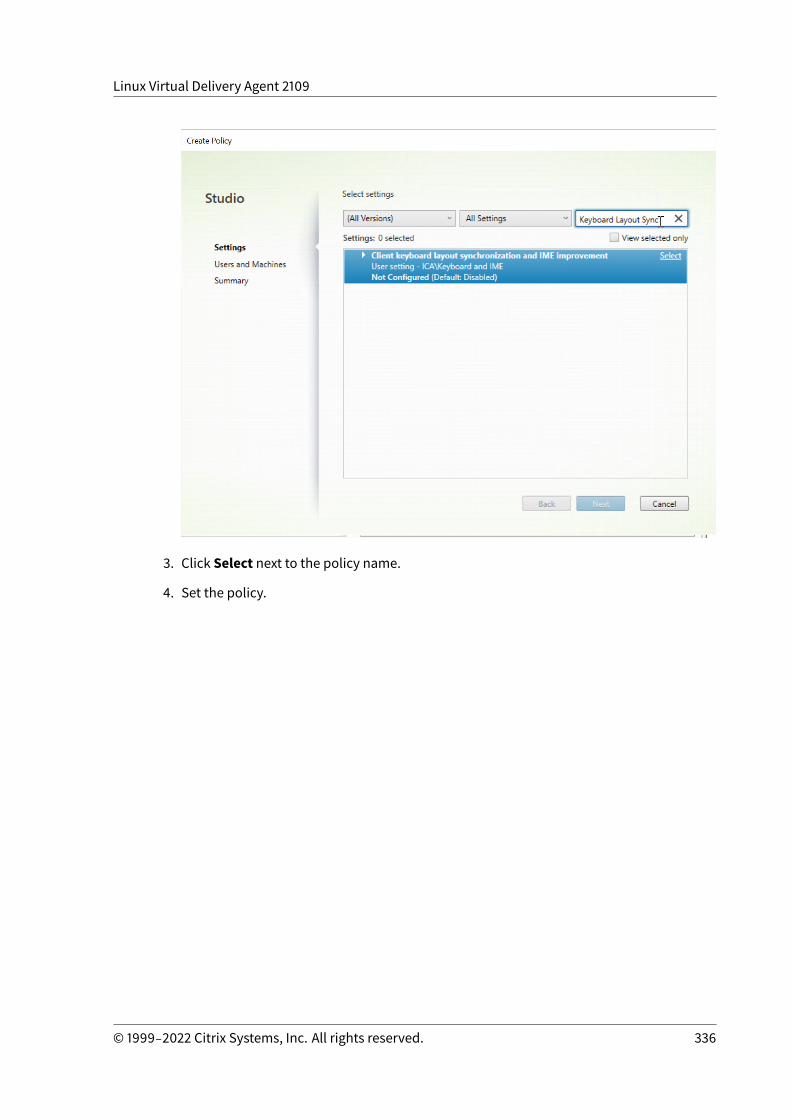
Linux Virtual Delivery Agent 2109
3. Click Select next to the policy name.
4. Set the policy.
© 1999‒2022 Citrix Systems, Inc. All rights reserved. 336

Linux Virtual Delivery Agent 2109
There are three options available:
– Disabled: disables dynamic keyboard layout synchronization and client IME user in-terface synchronization.
– Support dynamic client keyboard layout synchronization: enables dynamic key-board layout synchronization regardless of the DWORD value of the SyncKeyboard-Layout registry key at HKEY_LOCAL_MACHINE\SYSTEM \CurrentControlSet\Control\Citrix\LanguageBar.
– Support dynamic client keyboard layout synchronization and IME improve-ment: enables both dynamic keyboard layout synchronization and client IME userinterface synchronization regardless of the DWORD values of the SyncKeyboard-Layout and SyncClientIME registry keys at HKEY_LOCAL_MACHINE\SYSTEM \CurrentControlSet\Control\Citrix\LanguageBar.
• Edit the registry through the ctxreg utility to enable or disable the dynamic keyboard layoutsynchronization feature:
© 1999‒2022 Citrix Systems, Inc. All rights reserved. 337
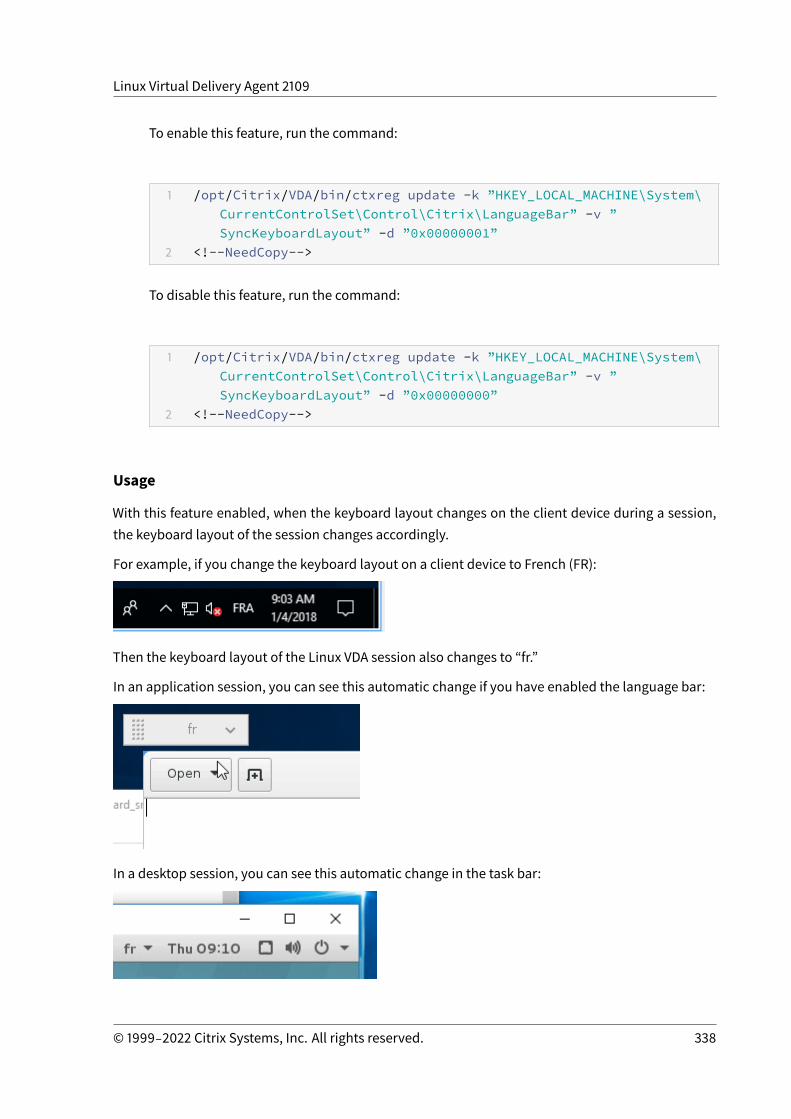
Linux Virtual Delivery Agent 2109
To enable this feature, run the command:
1 /opt/Citrix/VDA/bin/ctxreg update -k ”HKEY_LOCAL_MACHINE\System\CurrentControlSet\Control\Citrix\LanguageBar” -v ”SyncKeyboardLayout” -d ”0x00000001”
2 <!--NeedCopy-->
To disable this feature, run the command:
1 /opt/Citrix/VDA/bin/ctxreg update -k ”HKEY_LOCAL_MACHINE\System\CurrentControlSet\Control\Citrix\LanguageBar” -v ”SyncKeyboardLayout” -d ”0x00000000”
2 <!--NeedCopy-->
Usage
With this feature enabled, when the keyboard layout changes on the client device during a session,the keyboard layout of the session changes accordingly.
For example, if you change the keyboard layout on a client device to French (FR):
Then the keyboard layout of the Linux VDA session also changes to “fr.”
In an application session, you can see this automatic change if you have enabled the language bar:
In a desktop session, you can see this automatic change in the task bar:
© 1999‒2022 Citrix Systems, Inc. All rights reserved. 338

Linux Virtual Delivery Agent 2109
Client IME user interface synchronization
October 12, 2021
Overview
To date, the client IME user interface (including the composition window and candidate window) waspositioned in the upper left corner of the screen. It did not follow the cursor and sometimes waslocated far from the cursor in the text input area:
Citrix enhances usability and further improves the user experience with the client IME as follows:
© 1999‒2022 Citrix Systems, Inc. All rights reserved. 339
Linux Virtual Delivery Agent 2109
Prerequisites for using the feature
1. Enable Intelligent Input Bus (IBus) on your Linux VDA. For information on how to enable IBuson a Linux OS, see the OS vendor’s documentation. For example:
• Ubuntu: https://help.ubuntu.com/community/ibus• CentOS, RHEL: https://access.redhat.com/documentation/en-us/red_hat_enterprise_linux/7/html/7.0_release_notes/sect-red_hat_enterprise_linux-7.0_release_notes-internationalization-input_methods
• Debian: https://wiki.debian.org/I18n/ibus• SUSE: https://documentation.suse.com/sles/15-SP2/html/SLES-all/cha-gnome-settings.html#sec-gnome-settings-lang
2. The feature installs automatically but youmust enable it before you can use it.
Enable and disable the feature
The client IME user interface synchronization feature is disabled by default. To enable or disablethe feature, set the Client Keyboard Layout Sync and IME Improvement policy or edit the registrythrough the ctxreg utility.
Note:
The Client Keyboard Layout Sync and IME Improvement policy takes priority over registry set-tings and can be applied to user andmachine objects you specify or all objects in your site. Reg-istry settings on a given Linux VDA apply to all sessions on that VDA.
• Set the Client Keyboard Layout Sync and IME Improvement policy to enable or disable theclient IME user interface synchronization feature:
1. In Studio, right-click Policies and select Create Policy.
2. Search for the Client Keyboard Layout Sync and IME Improvement policy.
© 1999‒2022 Citrix Systems, Inc. All rights reserved. 340

Linux Virtual Delivery Agent 2109
3. Click Select next to the policy name.
4. Set the policy.
© 1999‒2022 Citrix Systems, Inc. All rights reserved. 341
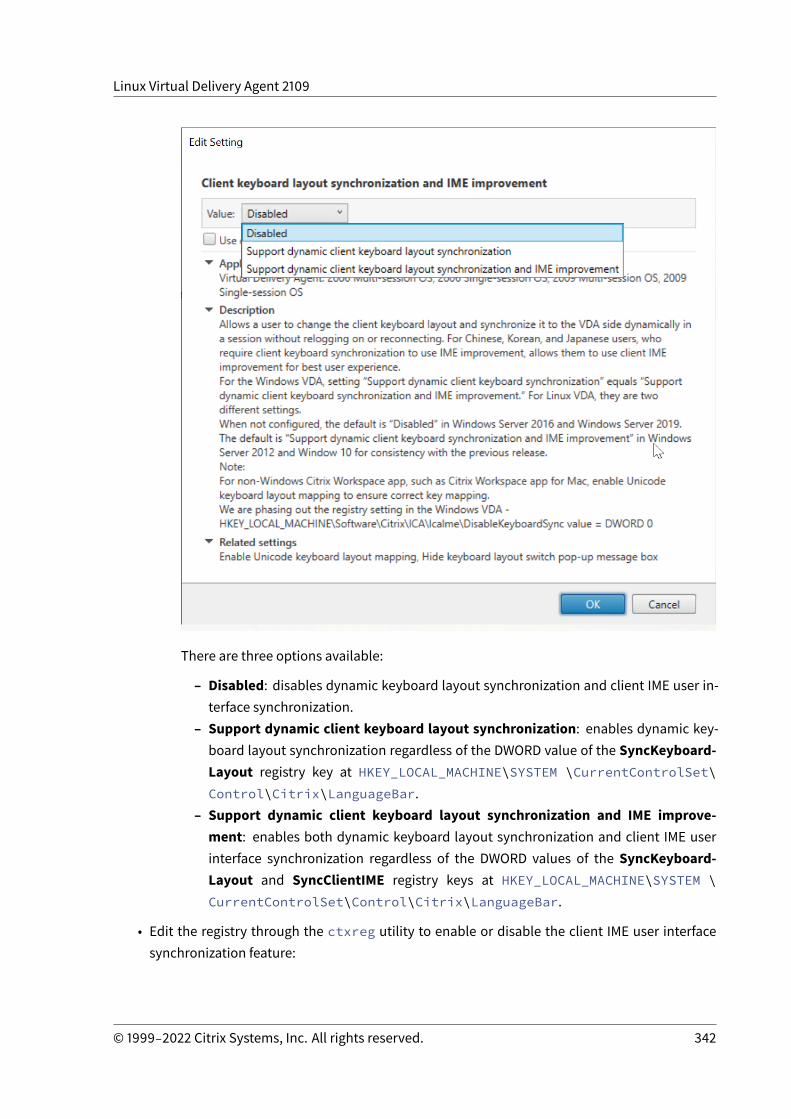
Linux Virtual Delivery Agent 2109
There are three options available:
– Disabled: disables dynamic keyboard layout synchronization and client IME user in-terface synchronization.
– Support dynamic client keyboard layout synchronization: enables dynamic key-board layout synchronization regardless of the DWORD value of the SyncKeyboard-Layout registry key at HKEY_LOCAL_MACHINE\SYSTEM \CurrentControlSet\Control\Citrix\LanguageBar.
– Support dynamic client keyboard layout synchronization and IME improve-ment: enables both dynamic keyboard layout synchronization and client IME userinterface synchronization regardless of the DWORD values of the SyncKeyboard-Layout and SyncClientIME registry keys at HKEY_LOCAL_MACHINE\SYSTEM \CurrentControlSet\Control\Citrix\LanguageBar.
• Edit the registry through the ctxreg utility to enable or disable the client IME user interfacesynchronization feature:
© 1999‒2022 Citrix Systems, Inc. All rights reserved. 342
Linux Virtual Delivery Agent 2109
To enable the feature, run the command:
1 /opt/Citrix/VDA/bin/ctxreg update -k ”HKEY_LOCAL_MACHINE\System\CurrentControlSet\Control\Citrix\LanguageBar” -v ”SyncClientIME” -d ”0x00000001”
2 <!--NeedCopy-->
To disable the feature, run the command:
1 /opt/Citrix/VDA/bin/ctxreg update -k ”HKEY_LOCAL_MACHINE\System\CurrentControlSet\Control\Citrix\LanguageBar” -v ”SyncClientIME” -d ”0x00000000”
2 <!--NeedCopy-->
HDX Insight
October 12, 2021
Overview
The Linux VDA partially supports the HDX Insight feature. HDX Insight is part of the Citrix ApplicationDelivery Management (ADM) and is based on the popular industry standard AppFlow. It enables ITto deliver an exceptional user experience by providing unprecedented end-to-end visibility into theCitrix ICA traffic that passes through the Citrix ADC or Citrix SD-WAN application networking fabric.For more information, see HDX Insight
Installation
No dependent packages need installation.
Usage
HDX Insight analyzes the ICA messages passed through the Citrix ADC between Citrix Workspace appand the Linux VDA. All HDX Insight data is sourced from the NSAP virtual channel and sent uncom-pressed. The NSAP virtual channel is enabled by default.
The following commands disable and enable the NSAP virtual channel, respectively:
© 1999‒2022 Citrix Systems, Inc. All rights reserved. 343
Linux Virtual Delivery Agent 2109
1 sudo /opt/Citrix/VDA/bin/ctxreg create -k ”HKLM\Software\Citrix\VirtualDesktopAgent” -t ”REG_DWORD” -v ”EnableNSAP” -d ”0x00000000”--force
2 <!--NeedCopy-->
1 sudo /opt/Citrix/VDA/bin/ctxreg create -k ”HKLM\Software\Citrix\VirtualDesktopAgent” -t ”REG_DWORD” -v ”EnableNSAP” -d ”0x00000001”--force
2 <!--NeedCopy-->
Troubleshooting
No data points are displayed
There might be two causes:
• HDX Insight is not configured correctly.
For example, AppFlow is not enabled on the Citrix ADC or an incorrect Citrix ADC instance isconfigured on the Citrix ADM.
• The ICA Control Virtual Channel is not started on the Linux VDA.
ps aux | grep -i ctxctl
If ctxctl is not running, contact your administrator to report a bug to Citrix.
No application data points are displayed
Verify that the seamless virtual channel is enabled and a seamless application is launched for awhile.
Rendezvous protocol
October 12, 2021
In environments that use the Citrix Gateway service, the Rendezvous protocol allows HDX sessions tobypass the Citrix Cloud Connector and connect directly and securely to the Citrix Gateway service.
Requirements:
• Access to environment using Citrix Workspace and Citrix Gateway service.
© 1999‒2022 Citrix Systems, Inc. All rights reserved. 344
Linux Virtual Delivery Agent 2109
• Control Plane: Citrix Virtual Apps and Desktops Service (Citrix Cloud).• Linux VDA Version 2012 or later.• Enable the Rendezvous protocol in the Citrix policy. Formore information, see Rendezvous pro-tocol policy setting.
• The VDAs must have access to https://*.nssvc.net, including all subdomains. If you can-not whitelist all subdomains in that manner, use https://*.c.nssvc.net and https://*.g.nssvc.net instead. For more information, see the Internet Connectivity Requirementssection of the Citrix Cloud documentation (under Virtual Apps and Desktop service) and theKnowledge Center article CTX270584.
• Cloud Connectorsmust obtain the VDAs’ FQDNswhen brokering a session. To achieve this goal,enable DNS resolution for the site: Using the Citrix Virtual Apps and Desktops Remote Power-Shell SDK, run the commandSet-BrokerSite -DnsResolutionEnabled $true. Formoreinformation about the Citrix Virtual Apps and Desktops Remote PowerShell SDK, see SDKs andAPIs.
Important:
The Rendezvous protocol doesn’t support transparent or explicit proxies. To use proxies, con-tinue to use the Cloud Connector for ICA traffic.
If you enable Rendezvous and the VDA cannot reach the Citrix Gateway service directly, the VDA fallsback to proxy the HDX session through the Cloud Connector.
If youmeet all requirements, follow these steps to validate if Rendezvous is in use:
1. Launch a terminal on the VDA.2. Run su root -c ”/opt/Citrix/VDA/bin/ctxquery -f iuStdP”.3. The TRANSPORT PROTOCOLS indicates the type of connection:
• TCP Rendezvous: TCP - SSL - CGP - ICA• EDT Rendezvous: UDP - DTLS - CGP - ICA• Proxy through Cloud Connector: TCP - CGP - ICA
This diagram is an overview of the Rendezvous connection flow. Follow the steps to understand theflow.
© 1999‒2022 Citrix Systems, Inc. All rights reserved. 345
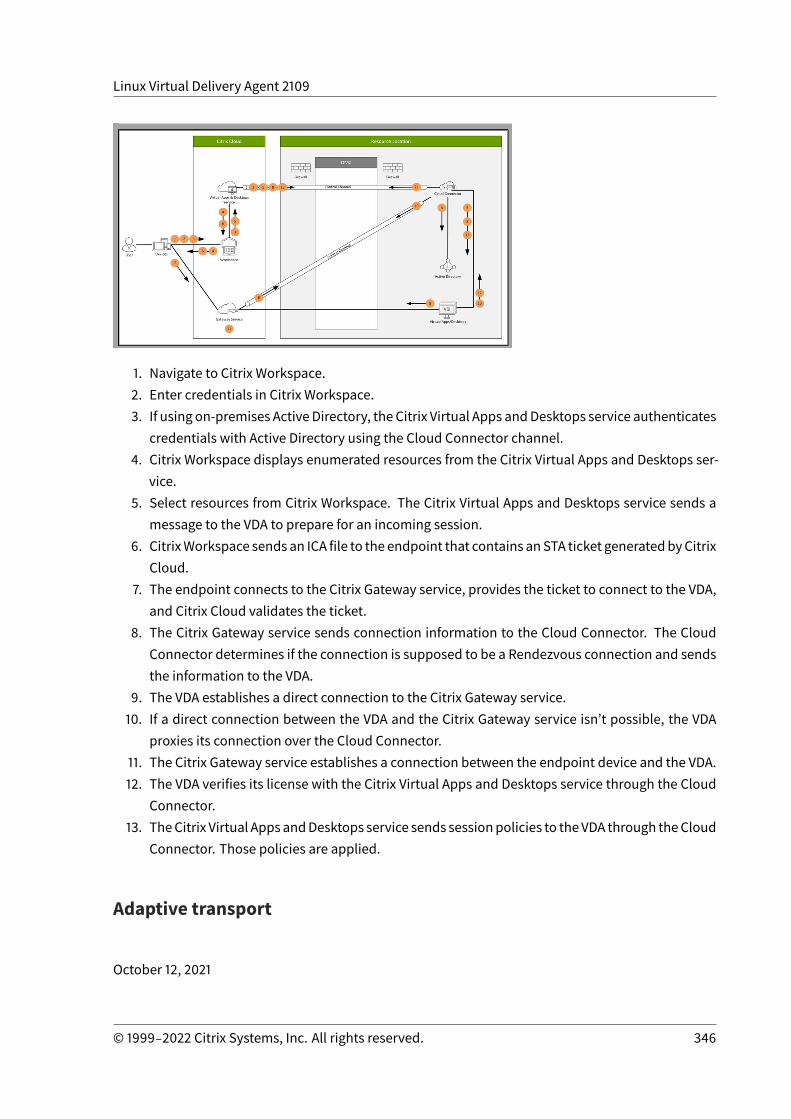
Linux Virtual Delivery Agent 2109
1. Navigate to Citrix Workspace.2. Enter credentials in Citrix Workspace.3. If using on-premises Active Directory, the Citrix Virtual Apps andDesktops service authenticates
credentials with Active Directory using the Cloud Connector channel.4. Citrix Workspace displays enumerated resources from the Citrix Virtual Apps and Desktops ser-
vice.5. Select resources from Citrix Workspace. The Citrix Virtual Apps and Desktops service sends a
message to the VDA to prepare for an incoming session.6. CitrixWorkspace sends an ICA file to the endpoint that contains anSTA ticket generatedbyCitrix
Cloud.7. The endpoint connects to the Citrix Gateway service, provides the ticket to connect to the VDA,
and Citrix Cloud validates the ticket.8. The Citrix Gateway service sends connection information to the Cloud Connector. The Cloud
Connector determines if the connection is supposed to be a Rendezvous connection and sendsthe information to the VDA.
9. The VDA establishes a direct connection to the Citrix Gateway service.10. If a direct connection between the VDA and the Citrix Gateway service isn’t possible, the VDA
proxies its connection over the Cloud Connector.11. The Citrix Gateway service establishes a connection between the endpoint device and the VDA.12. The VDA verifies its license with the Citrix Virtual Apps and Desktops service through the Cloud
Connector.13. TheCitrix Virtual Apps andDesktops service sends sessionpolicies to the VDA through theCloud
Connector. Those policies are applied.
Adaptive transport
October 12, 2021
© 1999‒2022 Citrix Systems, Inc. All rights reserved. 346
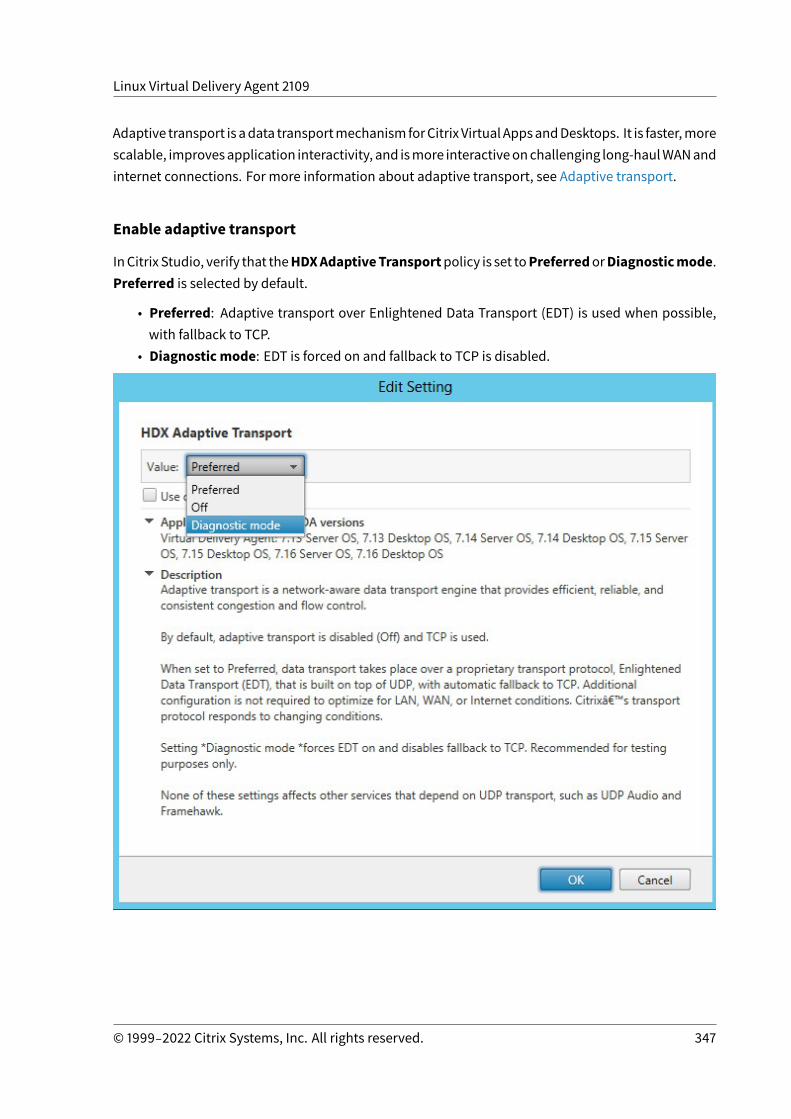
Linux Virtual Delivery Agent 2109
Adaptive transport is adata transportmechanismforCitrix VirtualAppsandDesktops. It is faster,morescalable, improvesapplication interactivity, and ismore interactiveonchallenging long-haulWANandinternet connections. For more information about adaptive transport, see Adaptive transport.
Enable adaptive transport
InCitrix Studio, verify that theHDXAdaptiveTransportpolicy is set toPreferredorDiagnosticmode.Preferred is selected by default.
• Preferred: Adaptive transport over Enlightened Data Transport (EDT) is used when possible,with fallback to TCP.
• Diagnostic mode: EDT is forced on and fallback to TCP is disabled.
© 1999‒2022 Citrix Systems, Inc. All rights reserved. 347
Linux Virtual Delivery Agent 2109
Disable adaptive transport
To disable adaptive transport, set theHDX Adaptive Transport policy toOff in Citrix Studio.
Check whether adaptive transport is enabled
To check whether UDP listeners are running, run the following command.
1 netstat -an | grep ”1494\|2598”2 <!--NeedCopy-->
In normal circumstances, the output is similar to the following.
1 udp 0 0 0.0.0.0:2598 0.0.0.0:*23 udp 0 0 :::1494 :::*4 <!--NeedCopy-->
EDTMTU discovery
EDT automatically determines the Maximum Transmission Unit (MTU) when establishing a session.Doing so prevents EDT packet fragmentation that might result in performance degradation or failureto establish a session.
Minimum requirements:
• Linux VDA 2012• Citrix Workspace app 1911 for Windows• Citrix ADC:
– 13.0.52.24– 12.1.56.22
• Session reliability must be enabled
If using client platforms or versions that do not support this feature, see Knowledge Center articleCTX231821 for details about how to configure a custom EDT MTU that is appropriate for your environ-ment.
WARNING:
Editing the registry incorrectly can cause serious problems that might require you to reinstallyour operating system. Citrix cannot guarantee that problems resulting from the incorrect use
© 1999‒2022 Citrix Systems, Inc. All rights reserved. 348
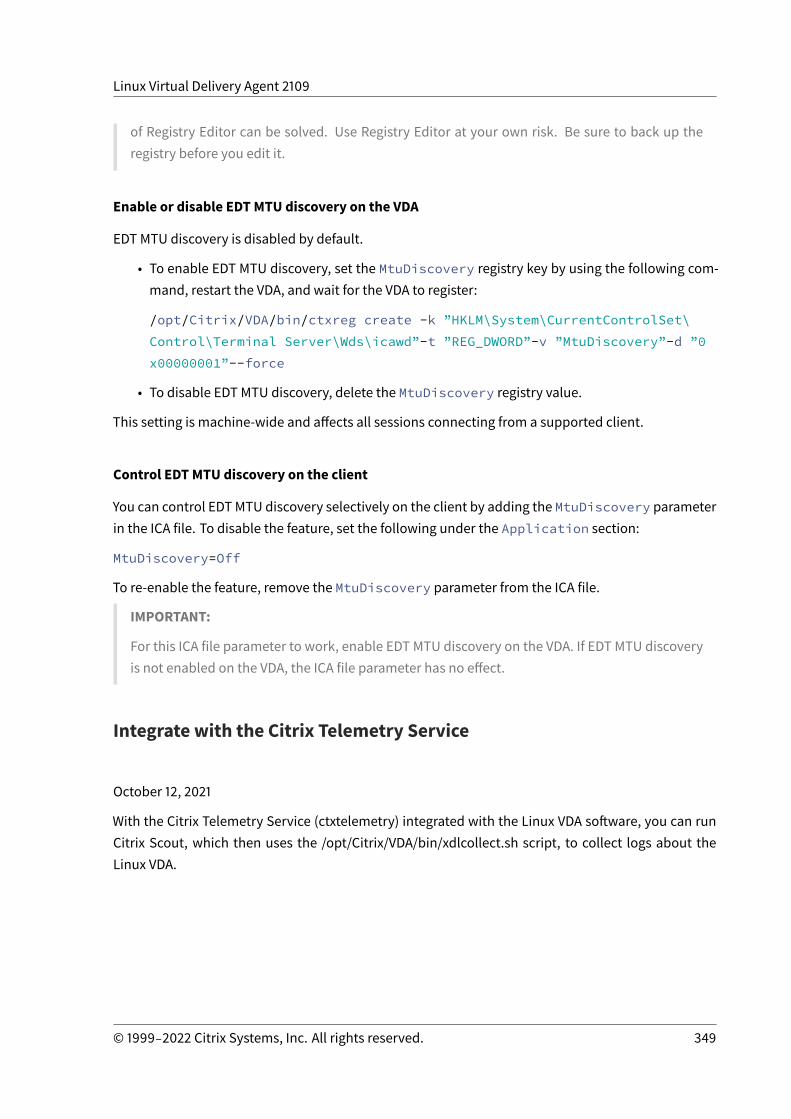
Linux Virtual Delivery Agent 2109
of Registry Editor can be solved. Use Registry Editor at your own risk. Be sure to back up theregistry before you edit it.
Enable or disable EDT MTU discovery on the VDA
EDT MTU discovery is disabled by default.
• To enable EDT MTU discovery, set the MtuDiscovery registry key by using the following com-mand, restart the VDA, and wait for the VDA to register:
/opt/Citrix/VDA/bin/ctxreg create -k ”HKLM\System\CurrentControlSet\Control\Terminal Server\Wds\icawd”-t ”REG_DWORD”-v ”MtuDiscovery”-d ”0x00000001”--force
• To disable EDT MTU discovery, delete the MtuDiscovery registry value.
This setting is machine-wide and affects all sessions connecting from a supported client.
Control EDT MTU discovery on the client
You can control EDTMTU discovery selectively on the client by adding the MtuDiscovery parameterin the ICA file. To disable the feature, set the following under the Application section:
MtuDiscovery=Off
To re-enable the feature, remove the MtuDiscovery parameter from the ICA file.
IMPORTANT:
For this ICA file parameter to work, enable EDT MTU discovery on the VDA. If EDT MTU discoveryis not enabled on the VDA, the ICA file parameter has no effect.
Integrate with the Citrix Telemetry Service
October 12, 2021
With the Citrix Telemetry Service (ctxtelemetry) integrated with the Linux VDA software, you can runCitrix Scout, which then uses the /opt/Citrix/VDA/bin/xdlcollect.sh script, to collect logs about theLinux VDA.
© 1999‒2022 Citrix Systems, Inc. All rights reserved. 349
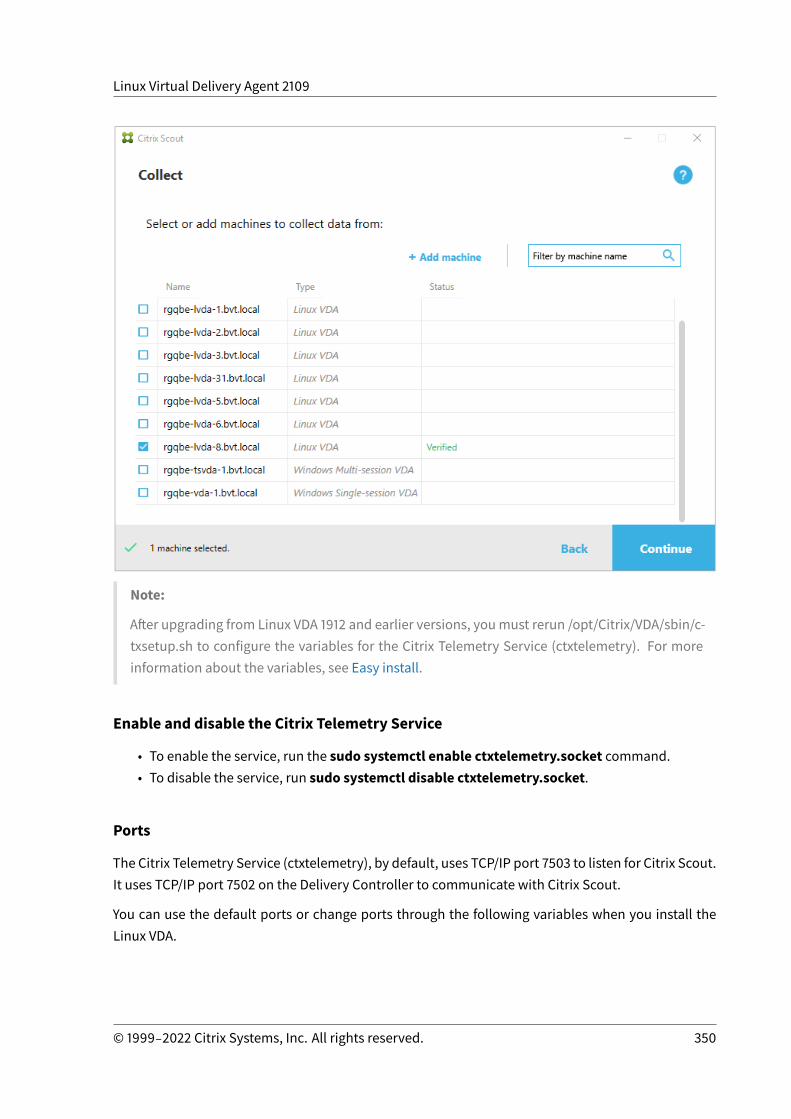
Linux Virtual Delivery Agent 2109
Note:
After upgrading from Linux VDA 1912 and earlier versions, youmust rerun /opt/Citrix/VDA/sbin/c-txsetup.sh to configure the variables for the Citrix Telemetry Service (ctxtelemetry). For moreinformation about the variables, see Easy install.
Enable and disable the Citrix Telemetry Service
• To enable the service, run the sudo systemctl enable ctxtelemetry.socket command.• To disable the service, run sudo systemctl disable ctxtelemetry.socket.
Ports
The Citrix Telemetry Service (ctxtelemetry), by default, uses TCP/IP port 7503 to listen for Citrix Scout.It uses TCP/IP port 7502 on the Delivery Controller to communicate with Citrix Scout.
You can use the default ports or change ports through the following variables when you install theLinux VDA.
© 1999‒2022 Citrix Systems, Inc. All rights reserved. 350
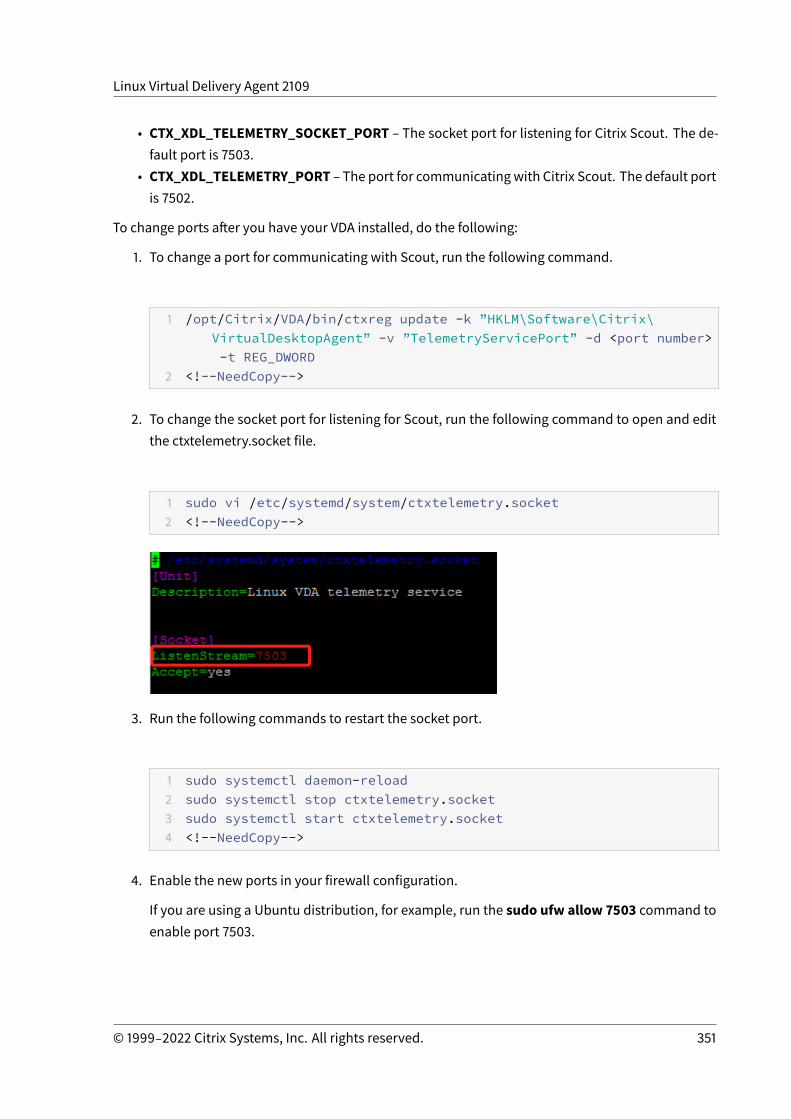
Linux Virtual Delivery Agent 2109
• CTX_XDL_TELEMETRY_SOCKET_PORT – The socket port for listening for Citrix Scout. The de-fault port is 7503.
• CTX_XDL_TELEMETRY_PORT – The port for communicatingwith Citrix Scout. The default portis 7502.
To change ports after you have your VDA installed, do the following:
1. To change a port for communicating with Scout, run the following command.
1 /opt/Citrix/VDA/bin/ctxreg update -k ”HKLM\Software\Citrix\VirtualDesktopAgent” -v ”TelemetryServicePort” -d <port number>-t REG_DWORD
2 <!--NeedCopy-->
2. To change the socket port for listening for Scout, run the following command to open and editthe ctxtelemetry.socket file.
1 sudo vi /etc/systemd/system/ctxtelemetry.socket2 <!--NeedCopy-->
3. Run the following commands to restart the socket port.
1 sudo systemctl daemon-reload2 sudo systemctl stop ctxtelemetry.socket3 sudo systemctl start ctxtelemetry.socket4 <!--NeedCopy-->
4. Enable the new ports in your firewall configuration.
If you are using a Ubuntu distribution, for example, run the sudo ufw allow 7503 command toenable port 7503.
© 1999‒2022 Citrix Systems, Inc. All rights reserved. 351
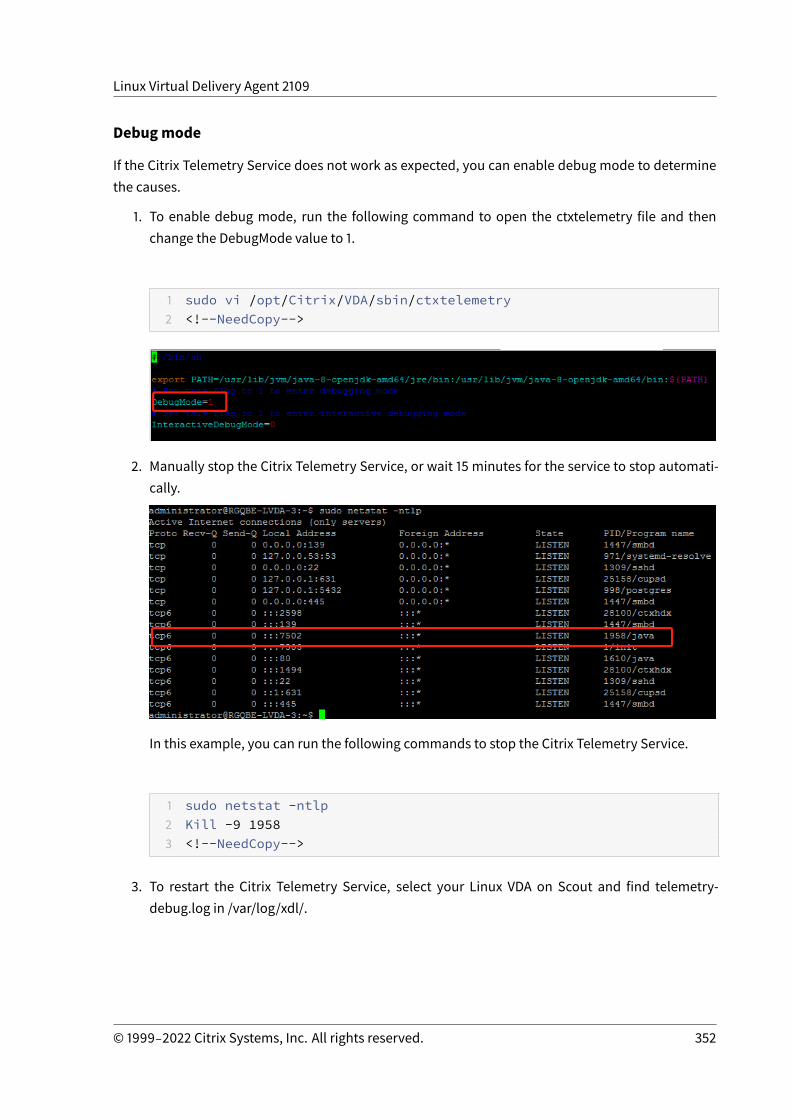
Linux Virtual Delivery Agent 2109
Debugmode
If the Citrix Telemetry Service does not work as expected, you can enable debug mode to determinethe causes.
1. To enable debug mode, run the following command to open the ctxtelemetry file and thenchange the DebugMode value to 1.
1 sudo vi /opt/Citrix/VDA/sbin/ctxtelemetry2 <!--NeedCopy-->
2. Manually stop the Citrix Telemetry Service, or wait 15 minutes for the service to stop automati-cally.
In this example, you can run the following commands to stop the Citrix Telemetry Service.
1 sudo netstat -ntlp2 Kill -9 19583 <!--NeedCopy-->
3. To restart the Citrix Telemetry Service, select your Linux VDA on Scout and find telemetry-debug.log in /var/log/xdl/.
© 1999‒2022 Citrix Systems, Inc. All rights reserved. 352
Linux Virtual Delivery Agent 2109
Service wait time
The systemd daemon that opens the socket port starts by default and uses few resources. The CitrixTelemetry Service stops by default and starts only when there is a log collection request from theDelivery Controller. After log collection completes, the service awaits new collection requests for aduration of 15 minutes and stops again if there are not any. You can configure the wait time throughthe following command. The minimum value is 10 minutes. If you set a value less than 10 minutes,the minimum value, 10 minutes, takes effect. After setting the wait time, stop and restart the service.
1 /opt/Citrix/VDA/bin/ctxreg create -k ”HKLM\Software\Citrix\VirtualDesktopAgent” -v ”TelemetryServiceIdleTimeoutInMinutes” -d <number> -t REG_DWORD
2 <!--NeedCopy-->
Verification tests
Before a collection starts, verification tests run automatically for each selected machine. These testsensure that the requirements are met. If a test fails for a machine, Scout displays a message, withsuggested corrective actions. For more information about verification tests, see the Verification testssection in the Citrix Scout documentation.
Tracing On
October 12, 2021
Overview
Collecting logs and reproducing issues slow down the diagnostics and degrade the user experience.The Tracing On feature eases such efforts. Tracing is enabled for the Linux VDA by default.
Configuration
The ctxlogd daemon and the setlog utility are now included in the Linux VDA release package. Bydefault, the ctxlogd daemon starts after you install and configure the Linux VDA.
© 1999‒2022 Citrix Systems, Inc. All rights reserved. 353
Linux Virtual Delivery Agent 2109
ctxlogd daemon
All the other services that are traced depend on the ctxlogd daemon. You can stop the ctxlogddaemon if you do not want to keep the Linux VDA traced.
setlog utility
Tracing On is configured using the setlog utility, which is under the /opt/Citrix/VDA/bin/ path. Onlythe root user has the privilege to run it. You can use the GUI or run commands to view and change theconfigurations. Run the following command for help with the setlog utility:
1 setlog help2 <!--NeedCopy-->
Values
By default, Log Output Path is set to /var/log/xdl/hdx.log, Max Log Size is set to 200 MB, and youcan save up to two old log files under Log Output Path.
View the current setlog values:
1 setlog values23 log_path (Log Output Path) = /var/log/xdl/hdx.log45 log_size (Max Log Size (MiB)) = 20067 log_count (Max Old Log Files) = 28 <!--NeedCopy-->
View or set a single setlog value:
1 setlog value <name> [<value>]2 <!--NeedCopy-->
For example:
1 setlog value log_size 1002 <!--NeedCopy-->
© 1999‒2022 Citrix Systems, Inc. All rights reserved. 354
Linux Virtual Delivery Agent 2109
Levels
By default, log levels are set towarning (case-insensitive).
To view log levels set for different components, run the following command:
1 setlog levels2 <!--NeedCopy-->
To set log levels (including Disabled, Inherited, Verbose, Information, Warnings, Errors, and Fatal Er-rors), run the following command:
1 setlog level <class> [<level>]2 <!--NeedCopy-->
Log Level Command Parameter (Case-Insensitive)
Disabled none
Inherited inherit
Verbose verbose
Information info
Warnings warning
Errors error
Fatal Errors fatal
The <class> variable specifies one component of the Linux VDA. To cover all components, set it toall. For example:
1 setlog level all error2 <!--NeedCopy-->
Flags
By default, the flags are set as follows:
© 1999‒2022 Citrix Systems, Inc. All rights reserved. 355
Linux Virtual Delivery Agent 2109
1 setlog flags23 DATE = true45 TIME = true67 NAME = true89 PID = true1011 TID = false1213 SID = true1415 UID = false1617 GID = false1819 CLASS = false2021 LEVEL = false2223 FUNC = true2425 FILE = false26 <!--NeedCopy-->
View the current flags:
1 setlog flags2 <!--NeedCopy-->
View or set a single log flag:
1 setlog flag <flag> [<state>]2 <!--NeedCopy-->
Restore Defaults
Revert all levels, flags, and values to the default settings:
© 1999‒2022 Citrix Systems, Inc. All rights reserved. 356

Linux Virtual Delivery Agent 2109
1 setlog default2 <!--NeedCopy-->
Important:
The ctxlogd service is configured using the /var/xdl/.ctxlog file, which only root users can cre-ate. Other users do not havewrite permission to this file. We recommend that root users not givewrite permission to other users. Failure to comply can cause the arbitrary or malicious configu-ration to ctxlogd, which can affect server performance and therefore the user experience.
Troubleshooting
The ctxlogddaemon fails and you cannot restart the ctxlogd servicewhen the /var/xdl/.ctxlog fileis missing (for example, accidentally deleted).
/var/log/messages:
1 Apr 1 02:28:21 RH72 citrix-ctxlogd[17881]: Failed to open loggingconfiguration file.
23 Apr 1 02:28:21 RH72 systemd: ctxlogd.service: main process exited, code
=exited, status=1/FAILURE45 Apr 1 02:28:21 RH72 systemd: Unit ctxlogd.service entered failed state.67 Apr 1 02:28:21 RH72 systemd: ctxlogd.service failed.8 <!--NeedCopy-->
To solve this issue, run setlog as a root user to recreate the /var/xdl/.ctxlog file. Then restart thectxlogd service on which other services depend.
Shadow sessions
October 12, 2021
The session shadowing feature allows domain administrators to view users’ ICA sessions in an in-tranet. The feature uses noVNC to connect to the ICA sessions and is supported only with RHEL 7.xand Ubuntu 16.04.
© 1999‒2022 Citrix Systems, Inc. All rights reserved. 357
Linux Virtual Delivery Agent 2109
Note:
To use the session shadowing feature, the version of Citrix Director must be 7.16 or later.
Installation and configuration
Dependencies
Twonewdependencies, python-websockify and x11vnc, are required for session shadowing. Thepython-websockify and x11vnc dependencies are installed automatically when you install theLinux VDA on Ubuntu 16.04. On RHEL 7.x, you must install python-websockify and x11vnc man-ually after you install the Linux VDA.
Run the following command on RHEL 7.x to install python-websockify and x11vnc (x11vnc ver-sion 0.9.13 or later).
1 sudo yum install -y python-websockify x11vnc2 <!--NeedCopy-->
To resolve python-websockify and x11vnc, enable the following repositories on RHEL 7.x:
• Extra Packages for Enterprise Linux (EPEL)
The EPEL repository is required for both python-websockify and x11vnc. Run the followingcommand to enable the EPEL repository:
1 sudo yum install https://dl.fedoraproject.org/pub/epel/epel-release-latest-$(rpm -E '%{
2 rhel }3 ').noarch.rpm4 <!--NeedCopy-->
• Optional RPMs
Run either of the following commands to enable the optional RPMs repository for installingsome dependency packages of x11vnc:
For workstation:
1 subscription-manager repos --enable=rhel-7-workstation-optional-rpms
2 <!--NeedCopy-->
© 1999‒2022 Citrix Systems, Inc. All rights reserved. 358
Linux Virtual Delivery Agent 2109
For server:
1 subscription-manager repos --enable=rhel-7-server-optional-rpms2 <!--NeedCopy-->
Port
The session shadowing feature automatically selects available ports from within 6001-6099 to buildup connections from the Linux VDA to Citrix Director. Therefore, the number of ICA sessions that youcan shadowconcurrently is limited to 99. Ensure that enoughports are available tomeet your require-ments, especially for multi-session shadowing.
Registry
The following table lists related registries:
Registry Description Default Value
EnableSessionShadowing Enables or disables thesession shadowing feature
1 (Enabled)
ShadowingUseSSL Determines whether toencrypt the connectionbetween the Linux VDA andCitrix Director
0 (Disabled)
Run the ctxreg command on the Linux VDA to change the registry values. For example, to disablesession shadowing, run the following command:
1 /opt/Citrix/VDA/bin/ctxreg update -k ”HKLM\Software\Citrix\VirtualDesktopAgent” -v ”EnableSessionShadowing” -d 0x00000000
SSL
The noVNC connection between the Linux VDA and Citrix Director uses the WebSocket protocol. Forsession shadowing, whether ws:// or wss:// is chosen is determined by the previously mentioned“ShadowingUseSSL” registry. By default, ws:// is chosen. However, for security reasons, we recom-mend that you use wss:// and install certificates on each Citrix Director client and on each Linux
© 1999‒2022 Citrix Systems, Inc. All rights reserved. 359

Linux Virtual Delivery Agent 2109
VDA server. Citrix disclaims any security responsibility for the Linux VDA session shadowing by usingws://.
Obtain server and root SSL certificates
Certificates must be signed by a trusted Certificate Authority (CA).
A separate server certificate (including the key) is required for each Linux VDA server on which youwant to configure SSL. A server certificate identifies a specific computer, so you must know the FullyQualified DomainName (FQDN) of each server. For convenience, you can use awildcard certificate forthe whole domain instead. In this case, youmust know at least the domain name.
In addition to installing a server certificate on each server, you must install a root certificate from thesame CA on each Citrix Director client that communicates with the Linux VDA server. Root certificatesare available from the same CAs that issue the server certificates. You can install server and clientcertificates fromaCA that is bundledwith youroperating system, fromanenterpriseCA (aCA that yourorganizationmakes accessible to you), or from a CA not bundledwith your operating system. Consultthe security team of your organization to find out which of the methods they require for obtainingcertificates.
Important:
• The Common Name for a server certificate must be the exact FQDN of the Linux VDA server orat least the correct wildcard plus domain characters. For example, vda1.basedomain.com or*.basedomain.com.
• Hashingalgorithms including theSHA1andMD5are tooweak for signatures indigital certificatesfor some browsers to support. So SHA-256 is specified as the minimum standard.
Install a root certificate on each Citrix Director client
Session shadowing uses the same registry-based certificate store as IIS, so you can install root certifi-cates using IIS or the Microsoft Management Console (MMC) Certificates snap-in. When you receive acertificate from a CA, you can restart the Web Server Certificate Wizard in IIS and the wizard installsthe certificate. Alternatively, you can view and import certificates on the computer using the MMCand add the certificate as a standalone snap-in. Internet Explorer and Google Chrome import the cer-tificates installed on your operation system by default. For Mozilla Firefox, youmust import your rootSSL certificates on the Authorities tab of Certificate Manager.
Install a server certificate and its key on each Linux VDA server
Name the server certificates “shadowingcert.*” and the key file “shadowingkey.*” (* can indicate theformat, for example, shadowingcert.csr and shadowingkey.key). Put server certificates and key files
© 1999‒2022 Citrix Systems, Inc. All rights reserved. 360
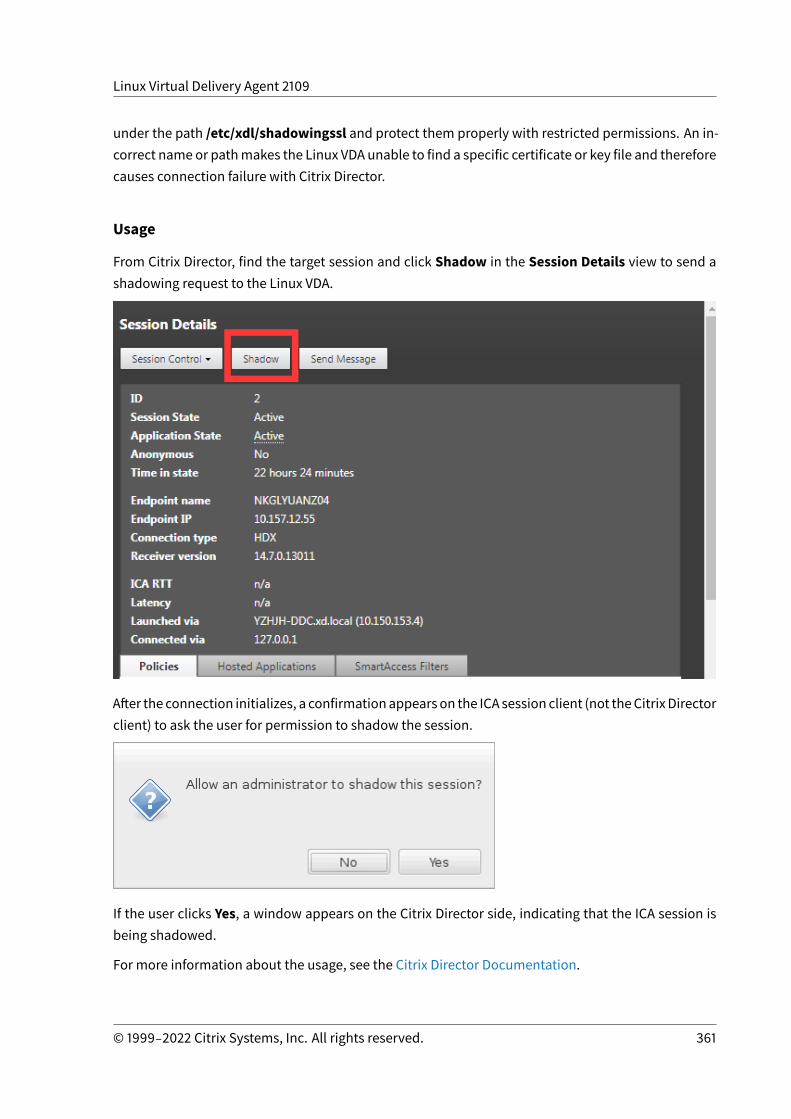
Linux Virtual Delivery Agent 2109
under the path /etc/xdl/shadowingssl and protect them properly with restricted permissions. An in-correct name or pathmakes the Linux VDA unable to find a specific certificate or key file and thereforecauses connection failure with Citrix Director.
Usage
From Citrix Director, find the target session and click Shadow in the Session Details view to send ashadowing request to the Linux VDA.
After the connection initializes, a confirmationappears on the ICA session client (not theCitrixDirectorclient) to ask the user for permission to shadow the session.
If the user clicks Yes, a window appears on the Citrix Director side, indicating that the ICA session isbeing shadowed.
For more information about the usage, see the Citrix Director Documentation.
© 1999‒2022 Citrix Systems, Inc. All rights reserved. 361
Linux Virtual Delivery Agent 2109
Limitations
• Session shadowing is designed foruse in an Intranetonly. It doesnotwork for external networkseven connecting through Citrix Gateway. Citrix disclaims any responsibility for the Linux VDAsession shadowing in an external network.
• With session shadowing enabled, a domain administrator can only view the ICA sessions, buthas no permission to write or control it.
• After anadministrator clicksShadow fromCitrixDirector, a confirmationappears toask theuserfor permission to shadow the session. A session can be shadowed only when the session usergives the permission.
• The previously mentioned confirmation has a timeout limitation, which is 20s. A shadowingrequest fails when the time runs out.
• One ICA session can be shadowed by only one administrator in one Citrix Director window. Ifan ICA session has been shadowed by administrator A and meanwhile, administrator B sendsa shadowing request, the confirmation for getting the user permission reappears on the userdevice. If the user agrees, the shadowing connection for administrator A stops and a new shad-owing connection is built for administrator B. It is the same if another shadowing request forthe same ICA session is sent by the same administrator.
• To use session shadowing, install Citrix Director 7.16 or later.• A Citrix Director client uses an FQDN rather than an IP address to connect to the target LinuxVDA server. Therefore, the Citrix Director client must be able to resolve the FQDN of the LinuxVDA server.
Troubleshooting
If session shadowing fails, perform debugging on both the Citrix Director client and the Linux VDA.
On the Citrix Director client
Through the developer tools of the browser, check the output logs on the Console tab. Or, check theresponse of the ShadowLinuxSession API on theNetwork tab. If the confirmation for getting the userpermission appears but the connection fails to be built, ping the FQDN of the Linux VDA manually toverify that Citrix Director can resolve the FQDN. If there is an issuewith the wss:// connection, checkyour certificates.
On the Linux VDA
Verify that the confirmation for getting the user permission appears in response to a shadowing re-quest. If it does not, check the vda.log and hdx.log files for clues. To obtain the vda.log file, do thefollowing:
© 1999‒2022 Citrix Systems, Inc. All rights reserved. 362
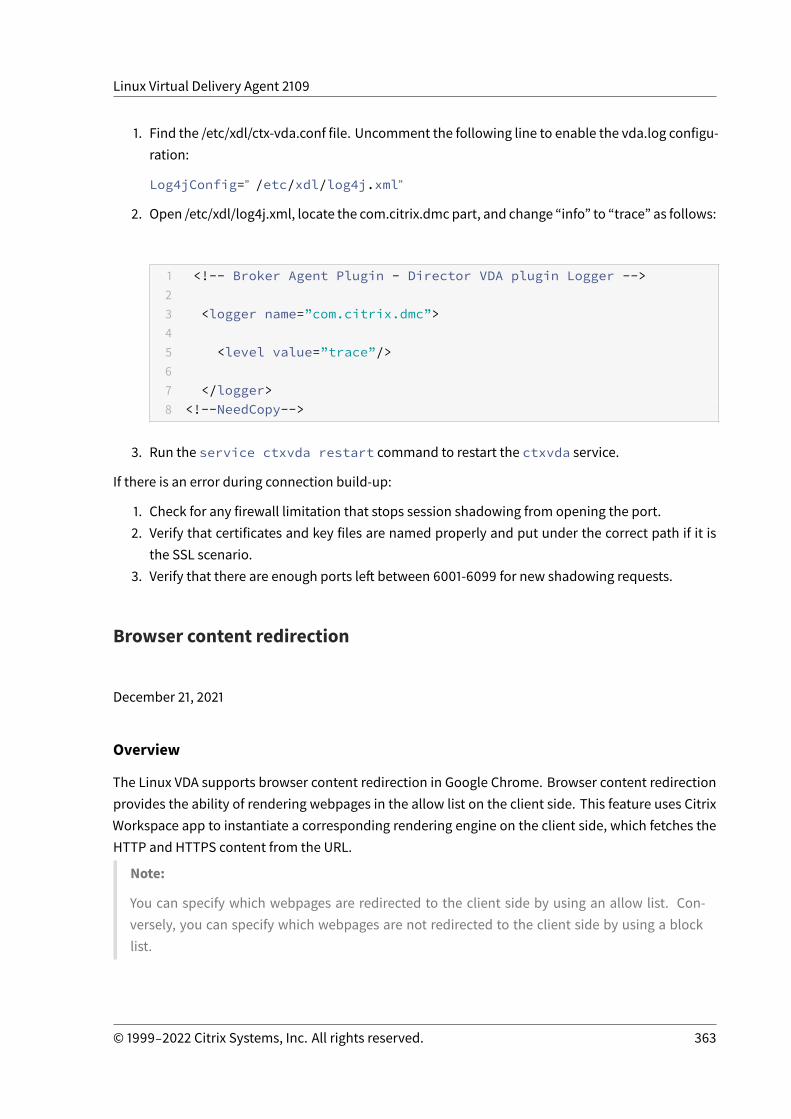
Linux Virtual Delivery Agent 2109
1. Find the /etc/xdl/ctx-vda.conf file. Uncomment the following line to enable the vda.log configu-ration:
Log4jConfig=”/etc/xdl/log4j.xml”
2. Open /etc/xdl/log4j.xml, locate the com.citrix.dmc part, and change “info” to “trace” as follows:
1 <!-- Broker Agent Plugin - Director VDA plugin Logger -->23 <logger name=”com.citrix.dmc”>45 <level value=”trace”/>67 </logger>8 <!--NeedCopy-->
3. Run the service ctxvda restart command to restart the ctxvda service.
If there is an error during connection build-up:
1. Check for any firewall limitation that stops session shadowing from opening the port.2. Verify that certificates and key files are named properly and put under the correct path if it is
the SSL scenario.3. Verify that there are enough ports left between 6001-6099 for new shadowing requests.
Browser content redirection
December 21, 2021
Overview
The Linux VDA supports browser content redirection in Google Chrome. Browser content redirectionprovides the ability of rendering webpages in the allow list on the client side. This feature uses CitrixWorkspace app to instantiate a corresponding rendering engine on the client side, which fetches theHTTP and HTTPS content from the URL.
Note:
You can specify which webpages are redirected to the client side by using an allow list. Con-versely, you can specify which webpages are not redirected to the client side by using a blocklist.
© 1999‒2022 Citrix Systems, Inc. All rights reserved. 363
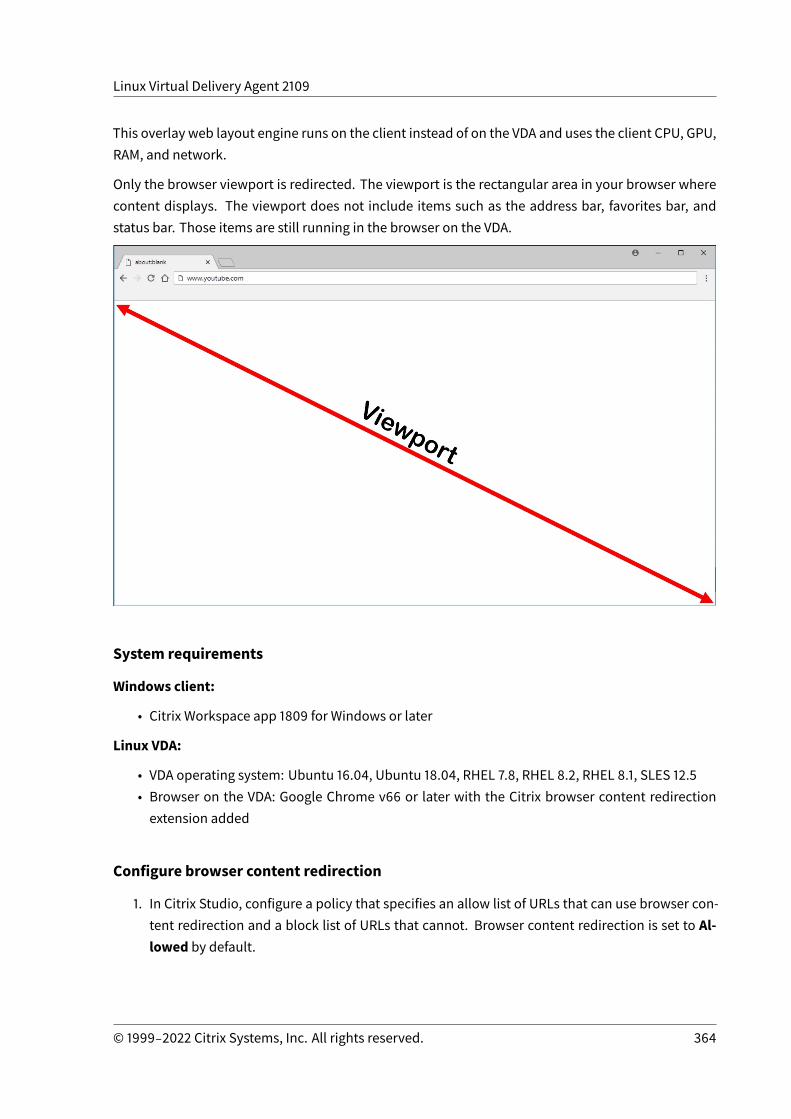
Linux Virtual Delivery Agent 2109
This overlay web layout engine runs on the client instead of on the VDA and uses the client CPU, GPU,RAM, and network.
Only the browser viewport is redirected. The viewport is the rectangular area in your browser wherecontent displays. The viewport does not include items such as the address bar, favorites bar, andstatus bar. Those items are still running in the browser on the VDA.
System requirements
Windows client:
• Citrix Workspace app 1809 for Windows or later
Linux VDA:
• VDA operating system: Ubuntu 16.04, Ubuntu 18.04, RHEL 7.8, RHEL 8.2, RHEL 8.1, SLES 12.5• Browser on the VDA: Google Chrome v66 or later with the Citrix browser content redirectionextension added
Configure browser content redirection
1. In Citrix Studio, configure a policy that specifies an allow list of URLs that can use browser con-tent redirection and a block list of URLs that cannot. Browser content redirection is set to Al-lowed by default.
© 1999‒2022 Citrix Systems, Inc. All rights reserved. 364
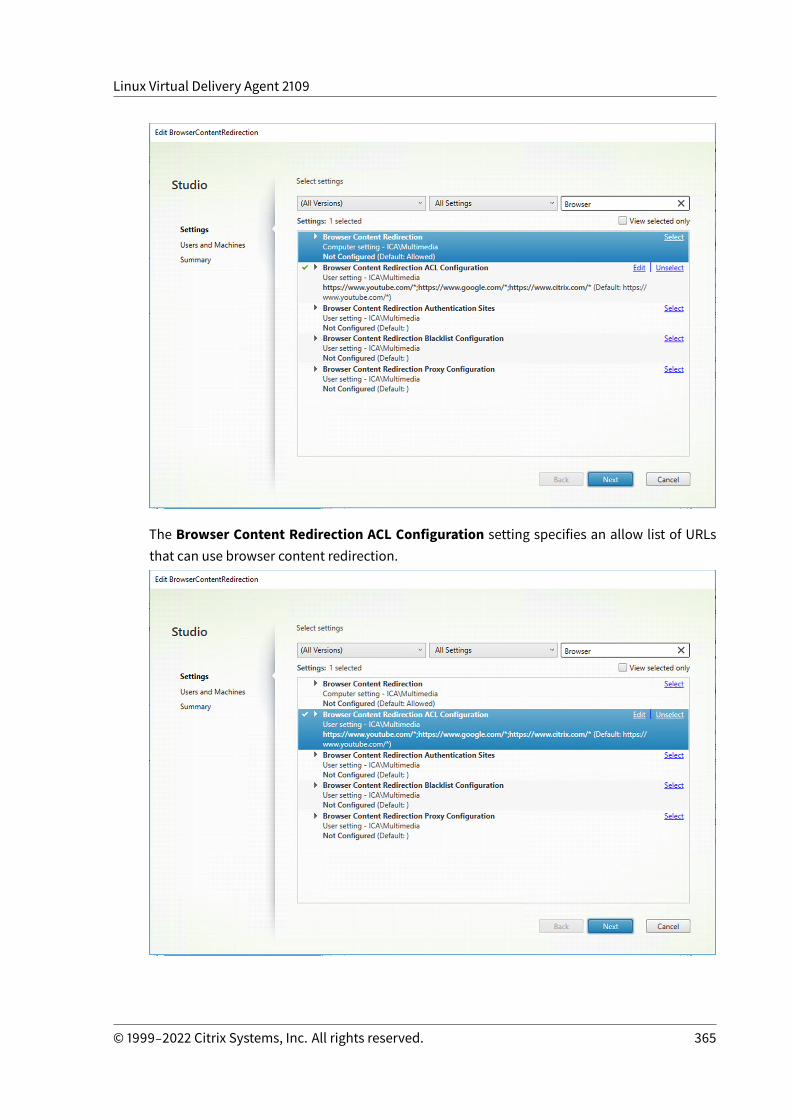
Linux Virtual Delivery Agent 2109
The Browser Content Redirection ACL Configuration setting specifies an allow list of URLsthat can use browser content redirection.
© 1999‒2022 Citrix Systems, Inc. All rights reserved. 365
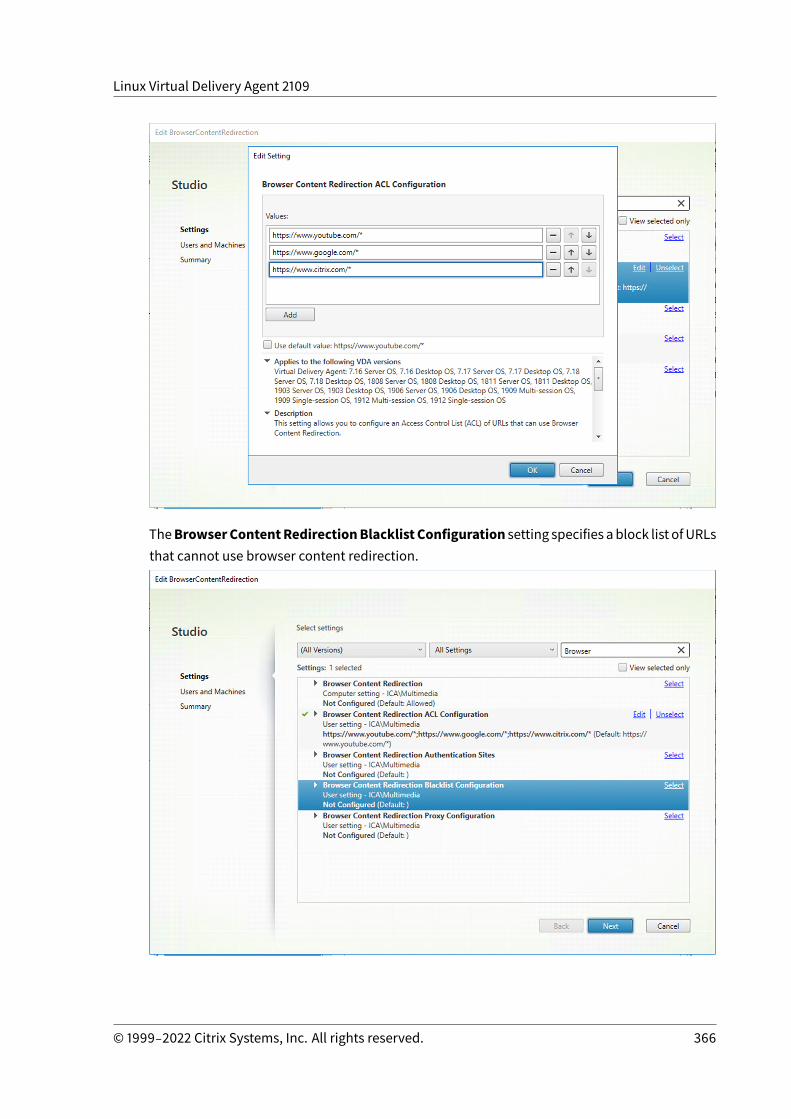
Linux Virtual Delivery Agent 2109
TheBrowserContentRedirectionBlacklist Configuration setting specifies ablock list ofURLsthat cannot use browser content redirection.
© 1999‒2022 Citrix Systems, Inc. All rights reserved. 366

Linux Virtual Delivery Agent 2109
Note:
The Linux VDA currently does not support the Browser Content Redirection Proxy Con-figuration setting.
2. For the browser on the VDA to detect whether a URL (being navigated to) matches an allow listor a block list, add the Citrix browser content redirection extension from the ChromeWebStore.Click Add to Chrome on the VDA.
Important:
The extension is not required on the client. Add it only on the VDA.
Chrome extensions are installed on a per-user basis. Updating a golden image to add orremove an extension is not required.
If a match to a URL is found in an allow list (for example, https://www.mycompany.com/) but notin any block list, a virtual channel (CTXCSB) instructs the Citrix Workspace app that a redirection isrequired and relays the URL. Citrix Workspace app then instantiates a local rendering engine and dis-plays the website.
Citrix Workspace app then blends back the website into the virtual desktop browser content areaseamlessly.
© 1999‒2022 Citrix Systems, Inc. All rights reserved. 367

Linux Virtual Delivery Agent 2109
1. Icon of the Citrix browser content redirection extension
The color of the extension icon specifies the status of theChromeextension. It is oneof the threecolors:
• Green: Active and connected• Gray: Not active/idle on the current tab• Red: Broken/Not working
2. Viewport rendered on the client or blended back to the virtual desktop
3. Linux VDA
4. Windows client
Redirection scenarios
Here are scenarios of how the Citrix Workspace app fetches content:
© 1999‒2022 Citrix Systems, Inc. All rights reserved. 368
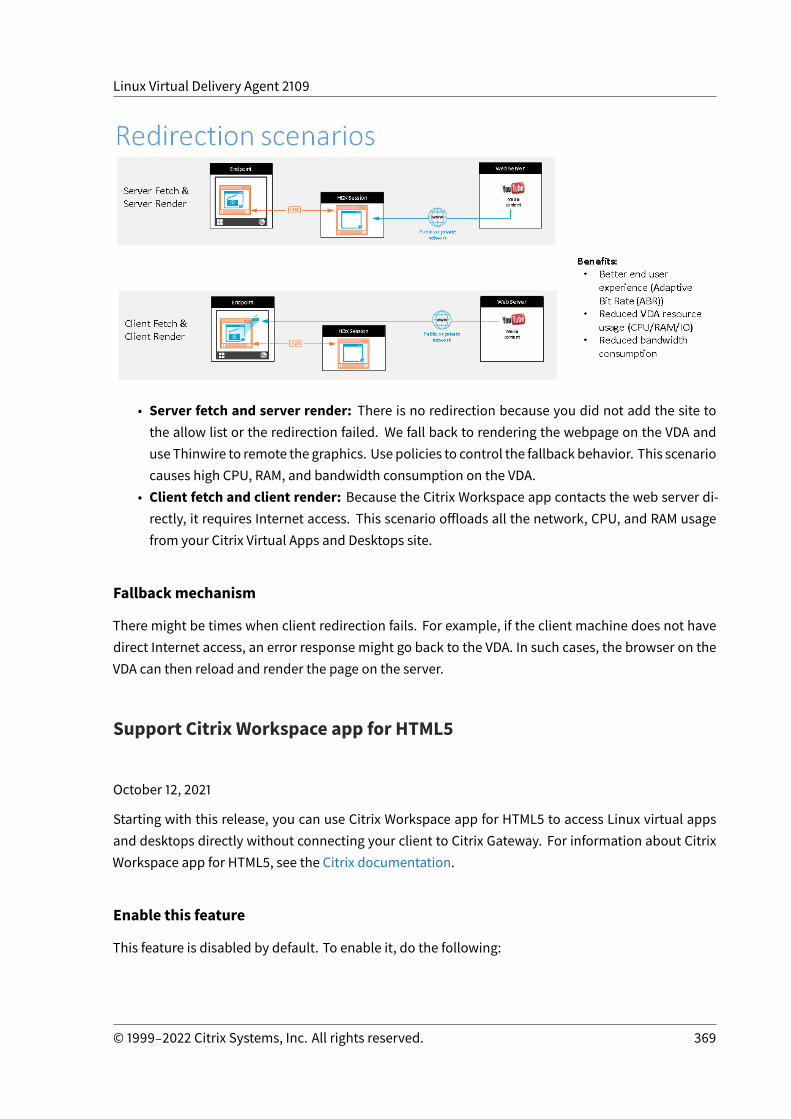
Linux Virtual Delivery Agent 2109
• Server fetch and server render: There is no redirection because you did not add the site tothe allow list or the redirection failed. We fall back to rendering the webpage on the VDA anduse Thinwire to remote the graphics. Use policies to control the fallback behavior. This scenariocauses high CPU, RAM, and bandwidth consumption on the VDA.
• Client fetch and client render: Because the Citrix Workspace app contacts the web server di-rectly, it requires Internet access. This scenario offloads all the network, CPU, and RAM usagefrom your Citrix Virtual Apps and Desktops site.
Fallbackmechanism
There might be times when client redirection fails. For example, if the client machine does not havedirect Internet access, an error response might go back to the VDA. In such cases, the browser on theVDA can then reload and render the page on the server.
Support Citrix Workspace app for HTML5
October 12, 2021
Starting with this release, you can use Citrix Workspace app for HTML5 to access Linux virtual appsand desktops directly without connecting your client to Citrix Gateway. For information about CitrixWorkspace app for HTML5, see the Citrix documentation.
Enable this feature
This feature is disabled by default. To enable it, do the following:
© 1999‒2022 Citrix Systems, Inc. All rights reserved. 369
Linux Virtual Delivery Agent 2109
1. In Citrix StoreFront, enable Citrix Workspace app for HTML5.
For the detailed procedure, see Step 1 of Knowledge Center article CTX208163.
2. Enable WebSocket connections.
a) In Citrix Studio, set theWebSockets connections policy to Allowed.
You can also set the otherWebSocket policies. For a full list of theWebSocket policies, seeWebSockets policy settings.
b) On the VDA, restart the ctxvda service and the ctxhdx service, in this order, for your set-ting to take effect.
c) On the VDA, run the following command to check whether the WebSocket listener is run-ning.
netstat -an | grep 8008
When the WebSocket listener is running, the command output is similar to the following:
tcp 0 0 :::8008 :::* LISTEN
Note: You can also enable TLS encryption to secure WebSocket connections. For informationabout enabling TLS encryption, see Secure user sessions using TLS.
Monitor Linux VMs and Linux sessions
February 16, 2022
The following table lists somemetrics that are available for Linux VMs and Linux sessions.
© 1999‒2022 Citrix Systems, Inc. All rights reserved. 370
Linux Virtual Delivery Agent 2109
MetricMin. VDA VersionRequired Description Remarks
Logon duration 2109 It is a measure of thelogon process fromthe time a userconnects from CitrixWorkspace app to thetime when a sessionis ready to use. Toview the metric of asession, go to theMonitor tab of theCitrix Virtual Appsand Desktops service.Monitor is availableas the Directorconsole to monitorand troubleshootCitrix Virtual Appsand Desktops CurrentRelease and LTSRdeployments. On theMonitor tab, clickView HistoricalTrend in the AverageLogon Durationsection. On theLogon Performancepage, set filterconditions and clickApply to visualizemetrics.
Available only inMonitor.
© 1999‒2022 Citrix Systems, Inc. All rights reserved. 371
Linux Virtual Delivery Agent 2109
MetricMin. VDA VersionRequired Description Remarks
Session autoreconnect count
2109 To view the numberof auto reconnects ina session, access theTrends view. Setconditions and clickApply to narrowsearch results. TheSession AutoReconnect Countcolumn displays thenumber of autoreconnects in asession. Autoreconnect is enabledwhen the SessionReliability or theAuto ClientReconnect policiesare in effect. For moreinformation aboutsessionreconnections, seeSessions. For moreinformation aboutpolicies, see Autoclient reconnectpolicy settings andSession reliabilitypolicy settings
Available both inCitrix Director and inMonitor.
Idle time 2103 To access this metric,open the All Sessionspage by selectingFilters > Sessions >All Sessions.
Available both inCitrix Director and inMonitor.
© 1999‒2022 Citrix Systems, Inc. All rights reserved. 372
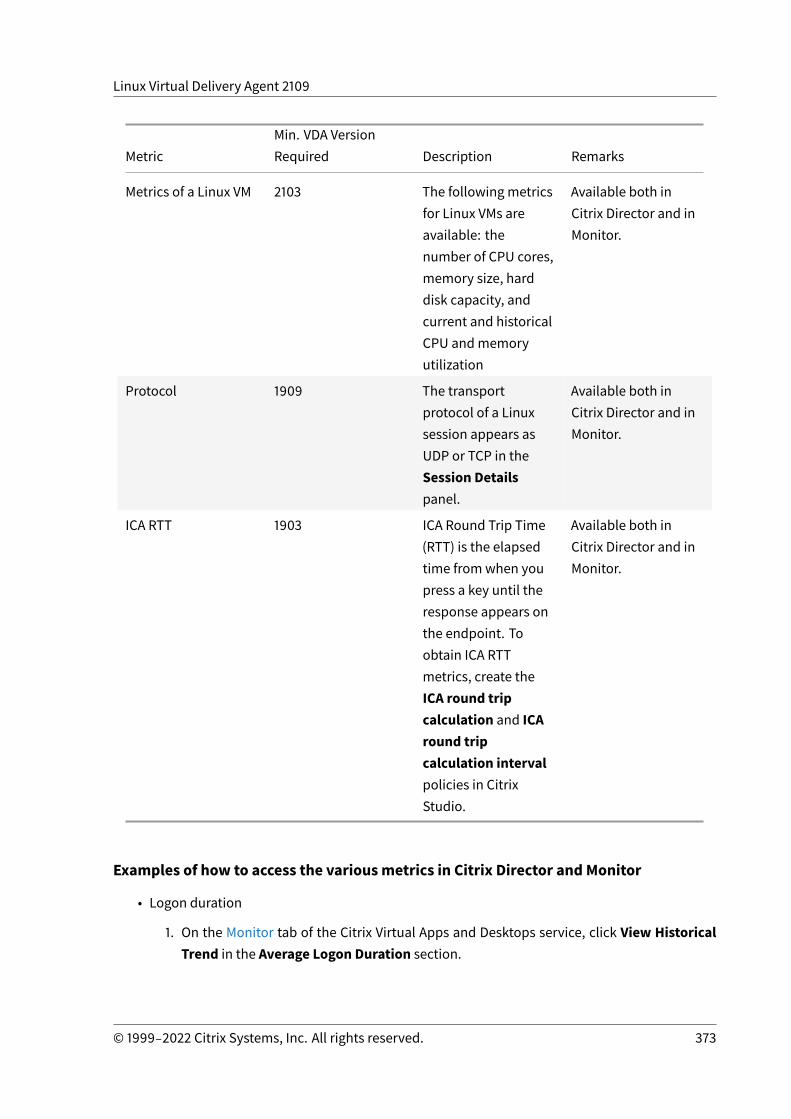
Linux Virtual Delivery Agent 2109
MetricMin. VDA VersionRequired Description Remarks
Metrics of a Linux VM 2103 The following metricsfor Linux VMs areavailable: thenumber of CPU cores,memory size, harddisk capacity, andcurrent and historicalCPU andmemoryutilization
Available both inCitrix Director and inMonitor.
Protocol 1909 The transportprotocol of a Linuxsession appears asUDP or TCP in theSession Detailspanel.
Available both inCitrix Director and inMonitor.
ICA RTT 1903 ICA Round Trip Time(RTT) is the elapsedtime fromwhen youpress a key until theresponse appears onthe endpoint. Toobtain ICA RTTmetrics, create theICA round tripcalculation and ICAround tripcalculation intervalpolicies in CitrixStudio.
Available both inCitrix Director and inMonitor.
Examples of how to access the variousmetrics in Citrix Director and Monitor
• Logon duration
1. On the Monitor tab of the Citrix Virtual Apps and Desktops service, click View HistoricalTrend in the Average Logon Duration section.
© 1999‒2022 Citrix Systems, Inc. All rights reserved. 373
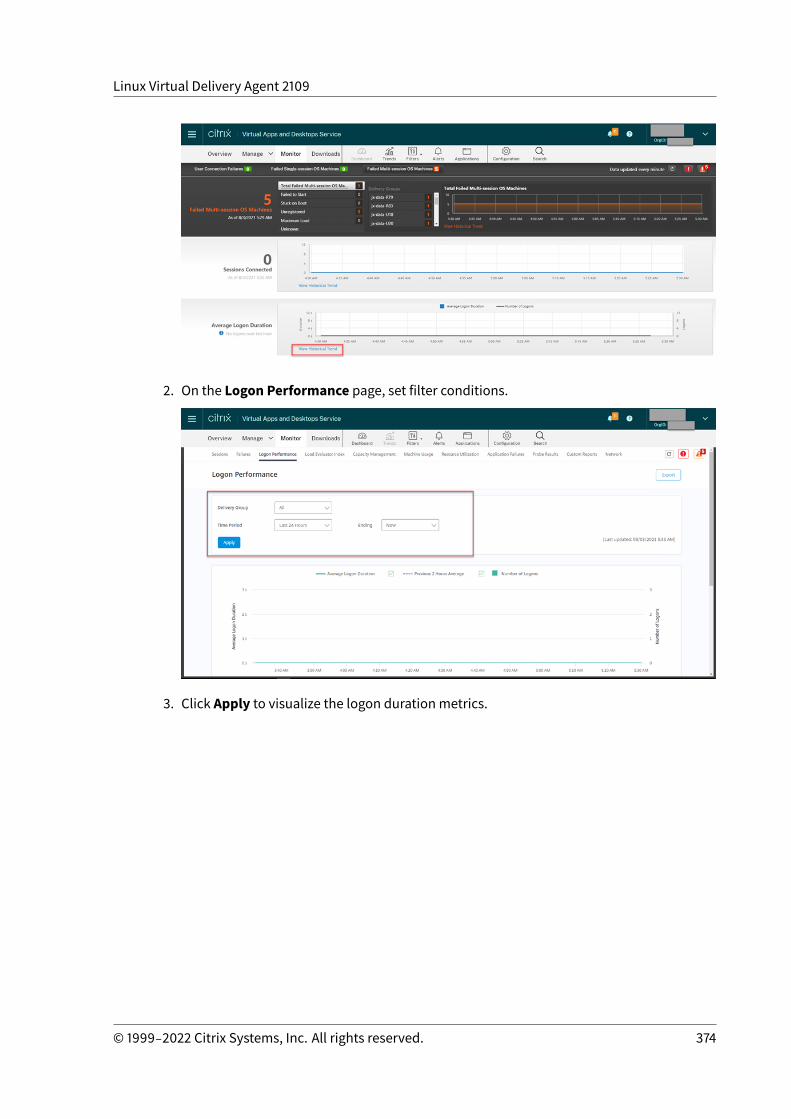
Linux Virtual Delivery Agent 2109
2. On the Logon Performance page, set filter conditions.
3. Click Apply to visualize the logon duration metrics.
© 1999‒2022 Citrix Systems, Inc. All rights reserved. 374
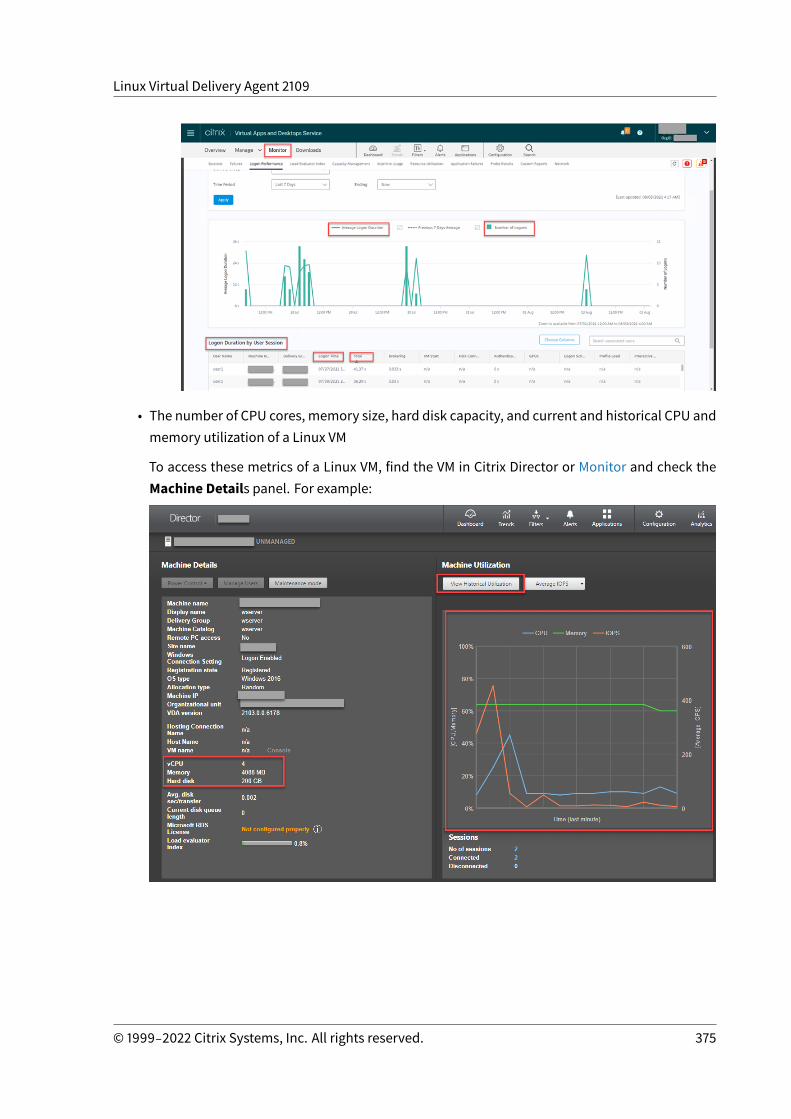
Linux Virtual Delivery Agent 2109
• The number of CPU cores, memory size, hard disk capacity, and current and historical CPU andmemory utilization of a Linux VM
To access these metrics of a Linux VM, find the VM in Citrix Director or Monitor and check theMachine Details panel. For example:
© 1999‒2022 Citrix Systems, Inc. All rights reserved. 375
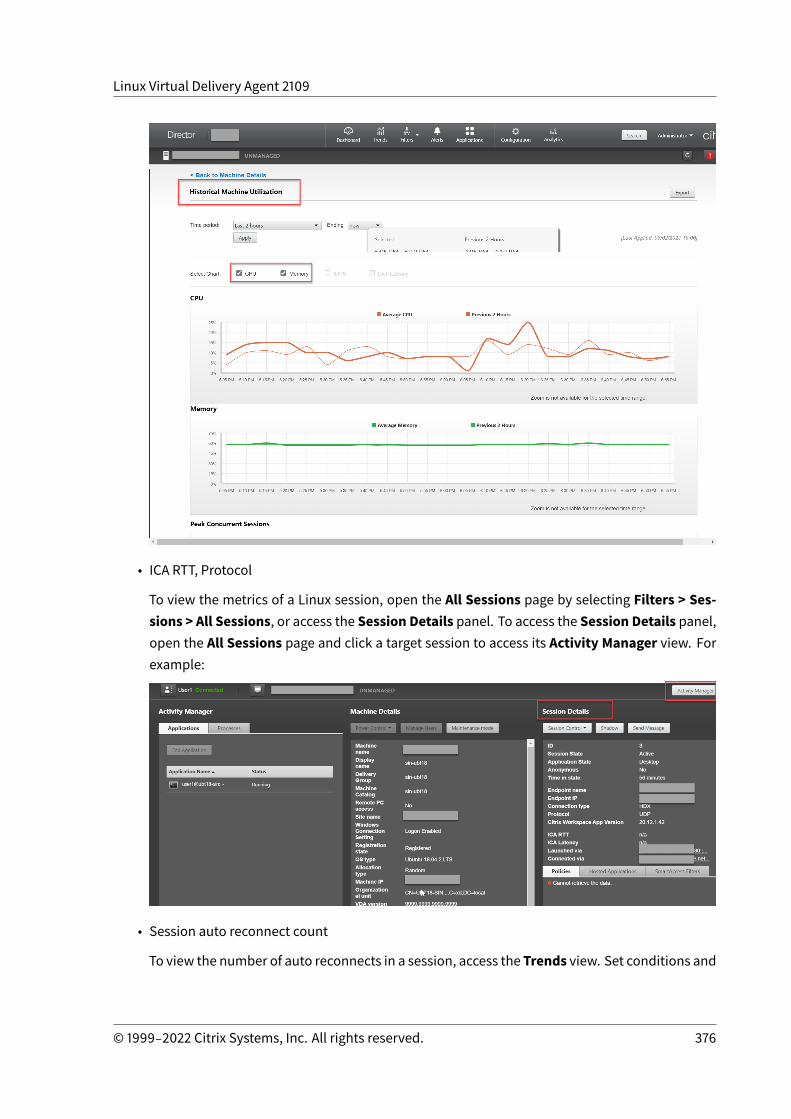
Linux Virtual Delivery Agent 2109
• ICA RTT, Protocol
To view the metrics of a Linux session, open the All Sessions page by selecting Filters > Ses-sions > All Sessions, or access the Session Details panel. To access the Session Details panel,open the All Sessions page and click a target session to access its Activity Manager view. Forexample:
• Session auto reconnect count
To view the number of auto reconnects in a session, access the Trends view. Set conditions and
© 1999‒2022 Citrix Systems, Inc. All rights reserved. 376
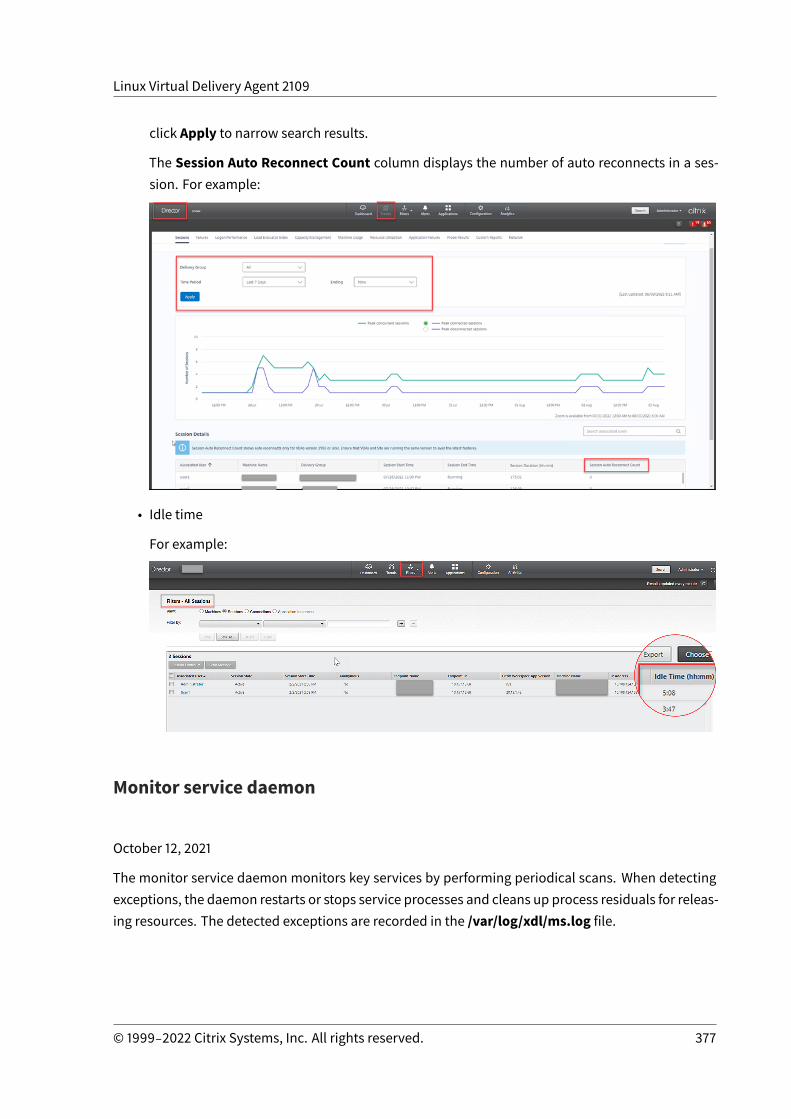
Linux Virtual Delivery Agent 2109
click Apply to narrow search results.
The Session Auto Reconnect Count column displays the number of auto reconnects in a ses-sion. For example:
• Idle time
For example:
Monitor service daemon
October 12, 2021
The monitor service daemon monitors key services by performing periodical scans. When detectingexceptions, the daemon restarts or stops service processes and cleans up process residuals for releas-ing resources. The detected exceptions are recorded in the /var/log/xdl/ms.log file.
© 1999‒2022 Citrix Systems, Inc. All rights reserved. 377
Linux Virtual Delivery Agent 2109
Configuration
Themonitor service daemon starts automatically when you start the VDA.
You can configure the feature through the scanningpolicy.conf, rulesets.conf, and whitelist.conffiles with administrator privileges. The configuration files are located at /opt/Citrix/VDA/sbin.
Tomake your changes in the scanningpolicy.conf, rulesets.conf, andwhitelist.conf files take effect,run the following command to restart the monitor service daemon.
1 service ctxmonitorservice restart2 <!--NeedCopy-->
• scanningpolicy.conf
This configuration file enables or disables themonitor service daemon. It sets the service detec-tion interval and specifies whether to repair detected exceptions.
– MonitorEnable: true/false (true by default)
– DetectTime: 20 (unit: seconds, default value: 20, minimum value: 5)
– AutoRepair: true/false (true by default)
– MultBalance: false
– ReportAlarm: false
• rulesets.conf
This configuration file specifies the target services tomonitor. Thereare fourmonitored servicesby default as shown in the following screen capture.
© 1999‒2022 Citrix Systems, Inc. All rights reserved. 378

Linux Virtual Delivery Agent 2109
To configure each service to monitor, set the following fields.
– MonitorUser: all
– MonitorType: 3
– ProcessName: <> (The process name cannot be left blank andmust be exactly matched.)
– Operation: 1/2/4/8 (1 = stop the service when exceptions are detected. 2 = kill the servicewhen exceptions are detected. 4 = restart the service. 8 = clean up the Xorg process resid-uals.)
– DBRecord: false
• whitelist.conf
The target services specified in the rulesets.conf file must also be configured inwhitelist.conffile. The white list configuration is a secondary filter for security.
To configure thewhite list, include only the process names (whichmust bematch exactly) in thewhitelist.conf file. For an example, see the following screen capture.
© 1999‒2022 Citrix Systems, Inc. All rights reserved. 379
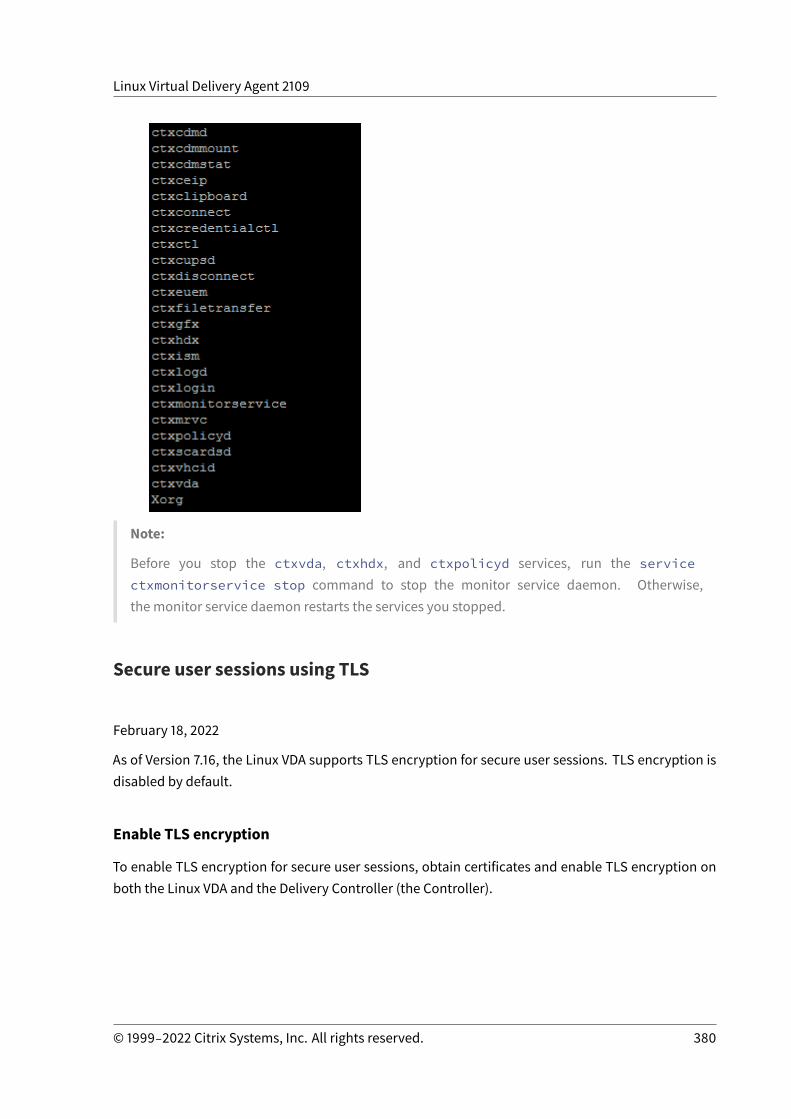
Linux Virtual Delivery Agent 2109
Note:
Before you stop the ctxvda, ctxhdx, and ctxpolicyd services, run the servicectxmonitorservice stop command to stop the monitor service daemon. Otherwise,the monitor service daemon restarts the services you stopped.
Secure user sessions using TLS
February 18, 2022
As of Version 7.16, the Linux VDA supports TLS encryption for secure user sessions. TLS encryption isdisabled by default.
Enable TLS encryption
To enable TLS encryption for secure user sessions, obtain certificates and enable TLS encryption onboth the Linux VDA and the Delivery Controller (the Controller).
© 1999‒2022 Citrix Systems, Inc. All rights reserved. 380

Linux Virtual Delivery Agent 2109
Obtain certificates
Obtain server certificates in PEM format and root certificates in CRT format from a trusted CertificateAuthority (CA). A server certificate contains the following sections:
• Certificate• Unencrypted private key• Intermediate certificates (optional)
An example of a server certificate:
© 1999‒2022 Citrix Systems, Inc. All rights reserved. 381
Linux Virtual Delivery Agent 2109
© 1999‒2022 Citrix Systems, Inc. All rights reserved. 382
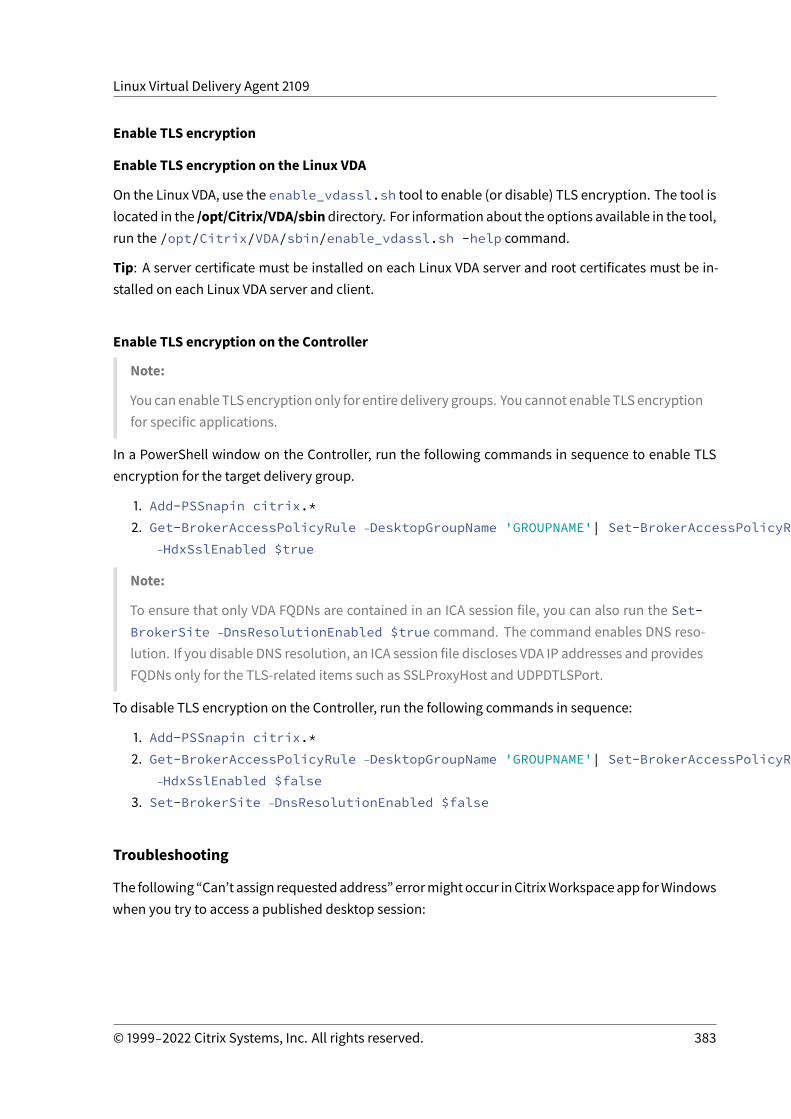
Linux Virtual Delivery Agent 2109
Enable TLS encryption
Enable TLS encryption on the Linux VDA
On the Linux VDA, use the enable_vdassl.sh tool to enable (or disable) TLS encryption. The tool islocated in the /opt/Citrix/VDA/sbindirectory. For information about the options available in the tool,run the /opt/Citrix/VDA/sbin/enable_vdassl.sh -help command.
Tip: A server certificate must be installed on each Linux VDA server and root certificates must be in-stalled on each Linux VDA server and client.
Enable TLS encryption on the Controller
Note:
You canenable TLS encryptiononly for entire delivery groups. You cannot enable TLS encryptionfor specific applications.
In a PowerShell window on the Controller, run the following commands in sequence to enable TLSencryption for the target delivery group.
1. Add-PSSnapin citrix.*2. Get-BrokerAccessPolicyRule ‒DesktopGroupName 'GROUPNAME'| Set-BrokerAccessPolicyRule
‒HdxSslEnabled $true
Note:
To ensure that only VDA FQDNs are contained in an ICA session file, you can also run the Set-BrokerSite ‒DnsResolutionEnabled $true command. The command enables DNS reso-lution. If you disable DNS resolution, an ICA session file discloses VDA IP addresses and providesFQDNs only for the TLS-related items such as SSLProxyHost and UDPDTLSPort.
To disable TLS encryption on the Controller, run the following commands in sequence:
1. Add-PSSnapin citrix.*2. Get-BrokerAccessPolicyRule ‒DesktopGroupName 'GROUPNAME'| Set-BrokerAccessPolicyRule
‒HdxSslEnabled $false3. Set-BrokerSite ‒DnsResolutionEnabled $false
Troubleshooting
The following “Can’t assign requestedaddress” errormightoccur inCitrixWorkspaceapp forWindowswhen you try to access a published desktop session:
© 1999‒2022 Citrix Systems, Inc. All rights reserved. 383
Linux Virtual Delivery Agent 2109
As a workaround, add an entry to the hosts file, which is similar to:
<IP address of the Linux VDA> <FQDN of the Linux VDA>
On Windows machines, the hosts file typically locates at C:\Windows\System32\drivers\etc\hosts.
Secure user sessions using DTLS
October 12, 2021
DTLS encryption is a fully supported feature starting with the 7.18 release. By default, this feature isenabled on the Linux VDA. For more information, see Transport Layer Security.
Enable DTLS encryption
Verify that adaptive transport is enabled
InCitrix Studio, verify that theHDXAdaptiveTransportpolicy is set toPreferredorDiagnosticmode.
Enable SSL encryption on the Linux VDA
On the Linux VDA, use the enable_vdassl.sh tool to enable (or disable) SSL encryption. The toolis located at /opt/Citrix/VDA/sbin. For information about the options available in the tool, run the/opt/Citrix/VDA/sbin/enable_vdassl.sh ‒h command.
Note:
Currently, the Linux VDA supports both DTLS 1.0 and DTLS 1.2. DTLS 1.2 requires Citrix Receiverfor Windows 4.12, or Citrix Workspace app 1808 for Windows or later. If your client supports onlyDTLS 1.0 (for example, Citrix Receiver for Windows 4.11), set SSLMinVersion to TLS_1.0 and
© 1999‒2022 Citrix Systems, Inc. All rights reserved. 384

Linux Virtual Delivery Agent 2109
SSLCipherSuite to COM or ALL using the enable_vdassl.sh tool.
Text-based session watermark
October 12, 2021
Text-based session watermarks help to deter and enable tracking data theft. This traceable informa-tion appears on the session desktop as a deterrent to those using photographs and screen capturesto steal data. You can specify awatermark that is a layer of text, which displays over the entire sessionscreen without changing the content of the original document.
Important:
Text-based session watermarking is not a security feature. The solution does not prevent datatheft completely, but it provides some level of deterrent and traceability. We do not guaranteecomplete information traceability when using this feature. However, we recommend that youcombine this feature with other security solutions as applicable.
The session watermark is text and is applied to the session that is delivered to the user. The sessionwatermark carries information for tracking data theft. The most important data is the identity of thelogon user of the current session inwhich the screen imagewas taken. To trace the data leakagemoreeffectively, include other information such as server or client internet protocol address and a connecttime.
To adjust the user experience, use the Session Watermark policy settings to configure the placementand watermark appearance on the screen.
Limitations
• Session watermarks are not supported in sessions where browser content redirection is used.To use the session watermark feature, ensure that browser content redirection is disabled.
• Session watermark is not supported and does not appear if the session is running in full-screenhardware accelerated H.264 or H.265 encoding mode with legacy NVIDIA drivers (in this case,NvCaptureType is set to 2 in the registry).
• Watermarks are not visible for session shadowing.• If you press the Print Screen key to capture a screen, the screen captured at the VDA side doesnot include the watermarks. We recommend that you take measures to avoid screen capturesbeing copied.
© 1999‒2022 Citrix Systems, Inc. All rights reserved. 385
Linux Virtual Delivery Agent 2109
Support for smart cards
October 12, 2021
You can use a smart card connected to the client device for authenticationwhen logging on to a Linuxvirtual desktop session. This feature is implemented through smart card redirection over the ICAsmart card virtual channel. You can also use the smart card within the session. Use cases includeadding a digital signature to a document, encrypting or decrypting an email, and authenticating to awebsite that requires smart card authentication.
The Linux VDAuses the sameconfiguration as theWindowsVDA for this feature. Formore information,see the Configure the smart card environment section in this article.
Note:
Using amapped smart cardwithin a Linux VDA session to signon toCitrix Gateway is not officiallysupported.
Prerequisites
The availability of smart card pass-through authentication is contingent on the following conditions:
• Your Linux VDA is installed on one of the following distributions:
– RHEL 8/CentOS 8– RHEL 7/CentOS 7– Ubuntu 20.04– Ubuntu 18.04– Ubuntu 16.04– Debian 10.9
After the VDA installation completes, verify that your VDA can register with the Delivery Con-troller and the published Linux desktop sessions can be launched successfully using Windowscredentials.
• Smart cards supported by OpenSC are used. For more information, see Ensure that OpenSCsupports your smart card.
• Citrix Workspace app for Windows is used.
Ensure that OpenSC supports your smart card
OpenSC is awidelyusedsmart carddriveronRHEL7.4+. Asa fully compatible replacementofCoolKey,OpenSC supports many types of smart cards (see Smart Card Support in Red Hat Enterprise Linux).
© 1999‒2022 Citrix Systems, Inc. All rights reserved. 386
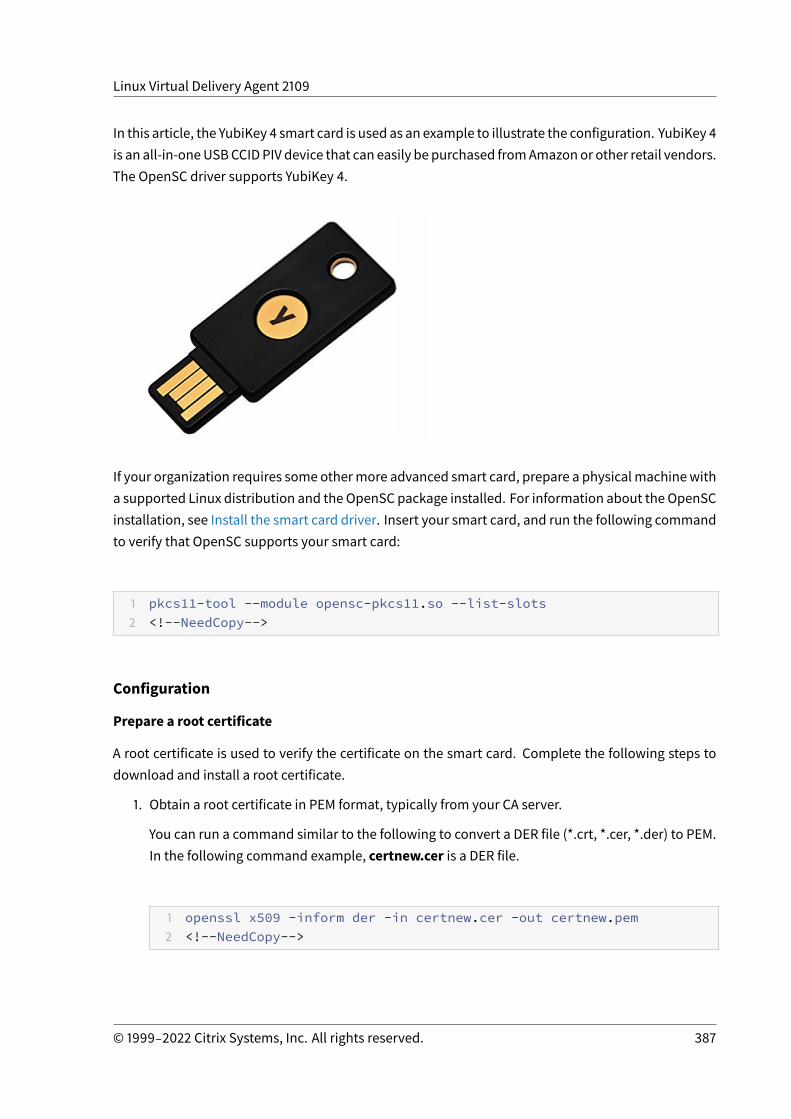
Linux Virtual Delivery Agent 2109
In this article, the YubiKey 4 smart card is used as an example to illustrate the configuration. YubiKey 4is an all-in-oneUSBCCIDPIV device that can easily be purchased fromAmazonor other retail vendors.The OpenSC driver supports YubiKey 4.
If your organization requires some othermore advanced smart card, prepare a physicalmachinewitha supported Linux distribution and the OpenSC package installed. For information about the OpenSCinstallation, see Install the smart card driver. Insert your smart card, and run the following commandto verify that OpenSC supports your smart card:
1 pkcs11-tool --module opensc-pkcs11.so --list-slots2 <!--NeedCopy-->
Configuration
Prepare a root certificate
A root certificate is used to verify the certificate on the smart card. Complete the following steps todownload and install a root certificate.
1. Obtain a root certificate in PEM format, typically from your CA server.
You can run a command similar to the following to convert a DER file (*.crt, *.cer, *.der) to PEM.In the following command example, certnew.cer is a DER file.
1 openssl x509 -inform der -in certnew.cer -out certnew.pem2 <!--NeedCopy-->
© 1999‒2022 Citrix Systems, Inc. All rights reserved. 387
Linux Virtual Delivery Agent 2109
2. Install the root certificate to the openssl directory. The certnew.pem file is used as an exam-ple.
1 cp certnew.pem <path where you install the root certificate>2 <!--NeedCopy-->
To create a path for installing the root certificate, run sudo mdkir -p <path where youinstall the root certificate>.
Build the pam_krb5module on RHEL 8/CentOS 8
Smart cardauthenticationdependson thepam_krb5module,which is deprecatedonRHEL8/CentOS8. To use smart card authentication on RHEL 8/CentOS 8, build the pam_krb5 module as follows:
1. Download the pam_krb5-2.4.8-6 source code from https://centos.pkgs.org/7/centos-x86_64/pam_krb5-2.4.8-6.el7.x86_64.rpm.html.
2. Build and install the pam_krb5 module on RHEL 8/CentOS 8.
1 yum install -y opensc pcsc-lite pcsc-lite-libs pcsc-lite-ccid nss-tools
2 yum install gcc krb5-devel pam-devel autoconf libtool3 rpm2cpio pam_krb5-2.4.8-6.el7.src.rpm | cpio ‒ div4 tar xvzf pam_krb5-2.4.8.tar.gz5 cd pam_krb5-2.4.86 ./configure --prefix=/usr7 make8 make install9 <!--NeedCopy-->
3. Verify that pam_krb5.so exists under /usr/lib64/security/.
1 ls -l /usr/lib64/security | grep pam_krb52 <!--NeedCopy-->
Configure the smart card environment
You can use the ctxsmartlogon.sh script to configure the smart card environment or complete theconfiguration manually.
© 1999‒2022 Citrix Systems, Inc. All rights reserved. 388

Linux Virtual Delivery Agent 2109
(Option 1) Use the ctxsmartlogon.sh script to configure the smart card environment
Note:
The ctxsmartlogon.sh script adds PKINIT information to the default realm. You can change thissetting through the /etc/krb5.conf configuration file.
Before using smart cards for the first time, run the ctxsmartlogon.sh script to configure the smart cardenvironment.
Tip:
If you have used SSSD for domain joining, restart the SSSD service after you run ctxsmartlo-gon.sh.
1 sudo /opt/Citrix/VDA/sbin/ctxsmartlogon.sh2 <!--NeedCopy-->
The results resemble the following:
You can also disable smart cards by running the ctxsmartlogon.sh script:
1 sudo /opt/Citrix/VDA/sbin/ctxsmartlogon.sh2 <!--NeedCopy-->
The results resemble the following:
© 1999‒2022 Citrix Systems, Inc. All rights reserved. 389
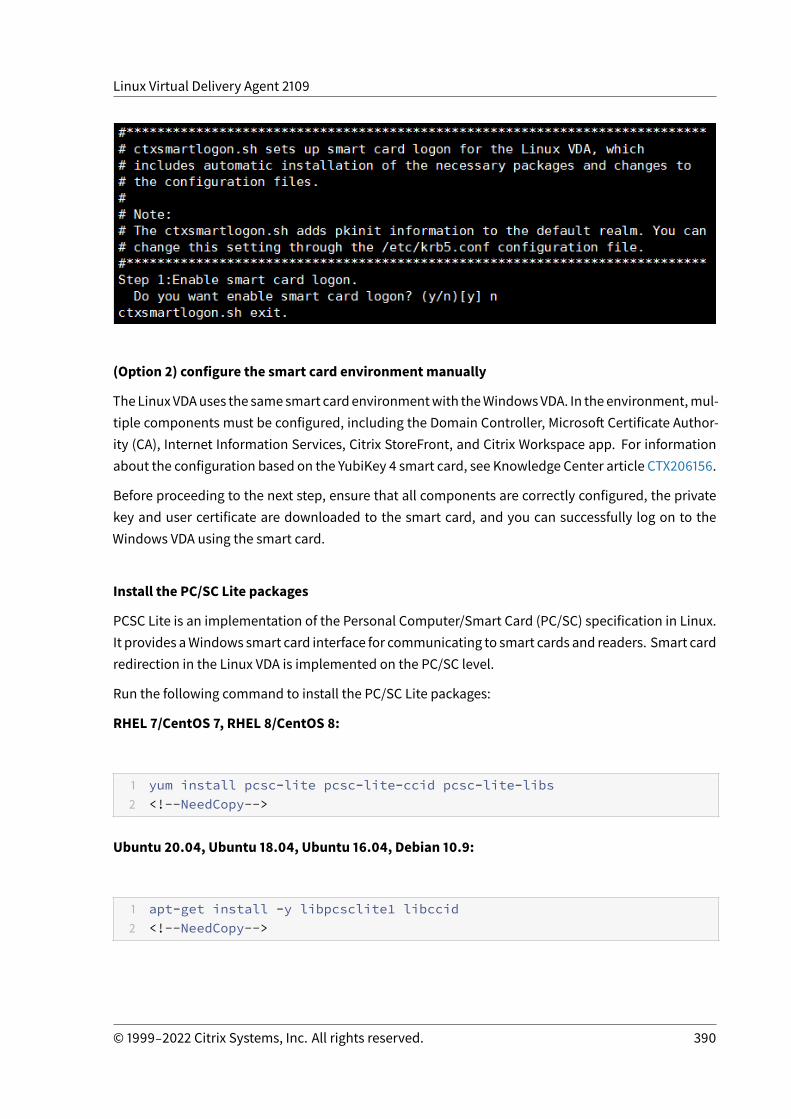
Linux Virtual Delivery Agent 2109
(Option 2) configure the smart card environmentmanually
TheLinuxVDAuses the samesmart cardenvironmentwith theWindowsVDA. In theenvironment,mul-tiple components must be configured, including the Domain Controller, Microsoft Certificate Author-ity (CA), Internet Information Services, Citrix StoreFront, and Citrix Workspace app. For informationabout the configuration based on the YubiKey 4 smart card, see Knowledge Center article CTX206156.
Before proceeding to the next step, ensure that all components are correctly configured, the privatekey and user certificate are downloaded to the smart card, and you can successfully log on to theWindows VDA using the smart card.
Install the PC/SC Lite packages
PCSC Lite is an implementation of the Personal Computer/Smart Card (PC/SC) specification in Linux.It provides aWindows smart card interface for communicating to smart cards and readers. Smart cardredirection in the Linux VDA is implemented on the PC/SC level.
Run the following command to install the PC/SC Lite packages:
RHEL 7/CentOS 7, RHEL 8/CentOS 8:
1 yum install pcsc-lite pcsc-lite-ccid pcsc-lite-libs2 <!--NeedCopy-->
Ubuntu 20.04, Ubuntu 18.04, Ubuntu 16.04, Debian 10.9:
1 apt-get install -y libpcsclite1 libccid2 <!--NeedCopy-->
© 1999‒2022 Citrix Systems, Inc. All rights reserved. 390

Linux Virtual Delivery Agent 2109
Install the smart card driver
OpenSC is a widely used smart card driver. If OpenSC is not installed, run the following command toinstall it:
RHEL 7/CentOS 7, RHEL 8/CentOS 8:
1 yum install opensc2 <!--NeedCopy-->
Ubuntu 20.04, Ubuntu 18.04, Ubuntu 16.04, Debian 10.9:
1 apt-get install -y opensc2 <!--NeedCopy-->
Install the PAMmodules for smart card authentication
Run the following command to install the pam_krb5 and krb5-pkinit modules.
RHEL 7/CentOS 7:
1 yum install pam_krb5 krb5-pkinit2 <!--NeedCopy-->
RHEL 8/CentOS 8:
1 yum install krb5-pkinit2 <!--NeedCopy-->
Ubuntu 20.04, Ubuntu 18.04, Ubuntu 16.04:
1 apt-get install libpam-krb5 krb5-pkinit2 <!--NeedCopy-->
Debian 10.9:
© 1999‒2022 Citrix Systems, Inc. All rights reserved. 391

Linux Virtual Delivery Agent 2109
1 apt-get install -y libpam-krb5 krb5-pkinit2 <!--NeedCopy-->
The pam_krb5module is a pluggable authenticationmodule that PAM-aware applications can use tocheck passwords and obtain ticket-granting tickets from the Key Distribution Center (KDC). The krb5-pkinitmodule contains thePKINITplug-in that allows clients to obtain initial credentials from theKDCusing a private key and a certificate.
Configure the pam_krb5module
The pam_krb5 module interacts with the KDC to get Kerberos tickets using certificates in the smartcard. To enable pam_krb5 authentication in PAM, run the following command:
1 authconfig --enablekrb5 --update2 <!--NeedCopy-->
In the /etc/krb5.conf configuration file, add PKINIT information according to the actual realm.
Note:
The pkinit_cert_match option specifies matching rules that the client certificate must matchbefore it is used to attempt PKINIT authentication. The syntax of the matching rules is:
[relation-operator] component-rule…
where relation-operator can be either &&, meaning all component rules must match, or ||,meaning only one component rule must match.
Here is an example of a generic krb5.conf file:
1 EXAMPLE.COM = {234 kdc = KDC.EXAMPLE.COM56 auth_to_local = RULE:[1:$1@$0]78 pkinit_anchors = FILE:<path where you install the root certificate
>/certnew.pem910 pkinit_kdc_hostname = KDC.EXAMPLE.COM11
© 1999‒2022 Citrix Systems, Inc. All rights reserved. 392
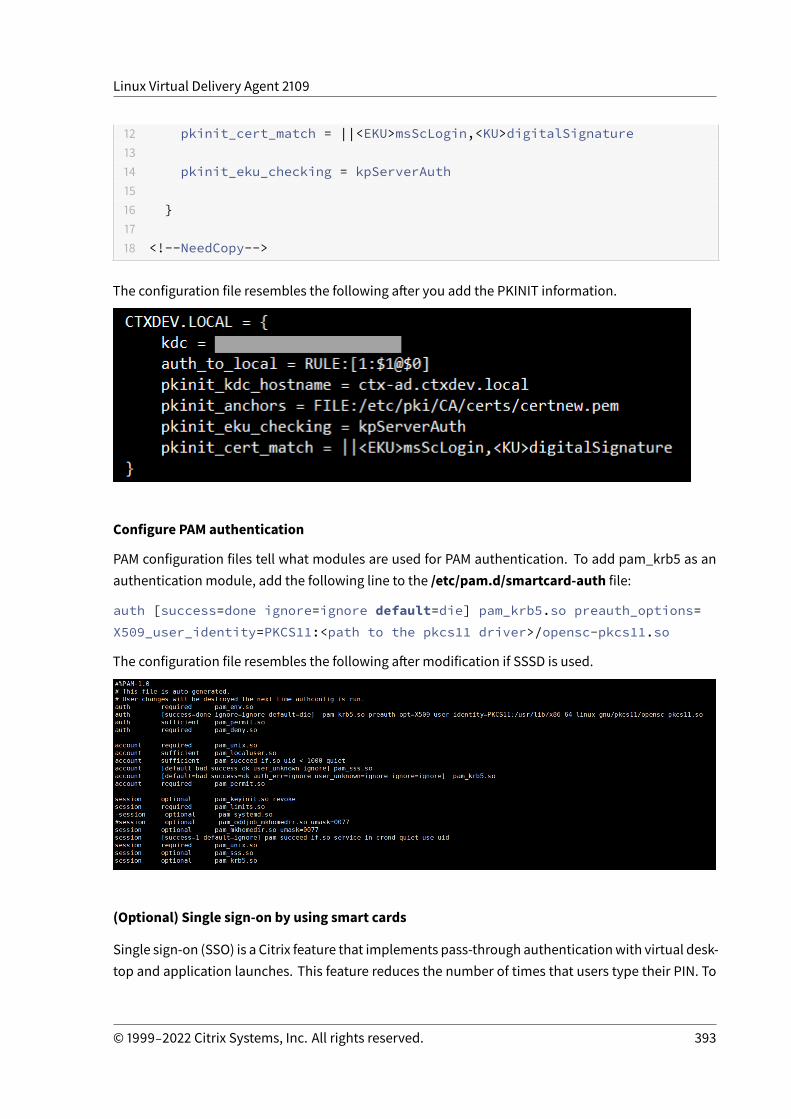
Linux Virtual Delivery Agent 2109
12 pkinit_cert_match = ||<EKU>msScLogin,<KU>digitalSignature1314 pkinit_eku_checking = kpServerAuth1516 }1718 <!--NeedCopy-->
The configuration file resembles the following after you add the PKINIT information.
Configure PAM authentication
PAM configuration files tell what modules are used for PAM authentication. To add pam_krb5 as anauthentication module, add the following line to the /etc/pam.d/smartcard-auth file:
auth [success=done ignore=ignore default=die] pam_krb5.so preauth_options=X509_user_identity=PKCS11:<path to the pkcs11 driver>/opensc-pkcs11.so
The configuration file resembles the following after modification if SSSD is used.
(Optional) Single sign-on by using smart cards
Single sign-on (SSO) is a Citrix feature that implements pass-through authenticationwith virtual desk-top and application launches. This feature reduces the number of times that users type their PIN. To
© 1999‒2022 Citrix Systems, Inc. All rights reserved. 393
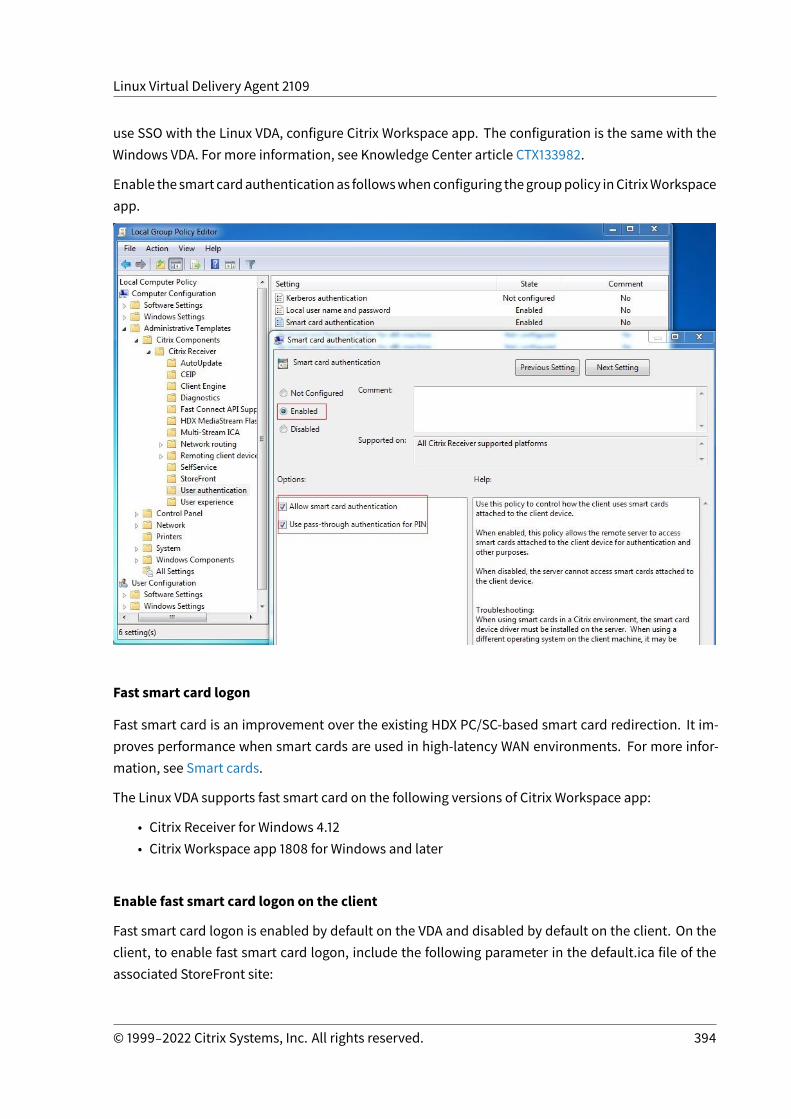
Linux Virtual Delivery Agent 2109
use SSO with the Linux VDA, configure Citrix Workspace app. The configuration is the same with theWindows VDA. For more information, see Knowledge Center article CTX133982.
Enable the smart cardauthenticationas followswhenconfiguring thegrouppolicy inCitrixWorkspaceapp.
Fast smart card logon
Fast smart card is an improvement over the existing HDX PC/SC-based smart card redirection. It im-proves performance when smart cards are used in high-latency WAN environments. For more infor-mation, see Smart cards.
The Linux VDA supports fast smart card on the following versions of Citrix Workspace app:
• Citrix Receiver for Windows 4.12• Citrix Workspace app 1808 for Windows and later
Enable fast smart card logon on the client
Fast smart card logon is enabled by default on the VDA and disabled by default on the client. On theclient, to enable fast smart card logon, include the following parameter in the default.ica file of theassociated StoreFront site:
© 1999‒2022 Citrix Systems, Inc. All rights reserved. 394

Linux Virtual Delivery Agent 2109
1 [WFClient]2 SmartCardCryptographicRedirection=On3 <!--NeedCopy-->
Disable fast smart card logon on the client
To disable fast smart card logon on the client, remove the SmartCardCryptographicRedirection pa-rameter from the default.ica file of the associated StoreFront site.
Usage
Log on to the Linux VDA by using a smart card
You can use a smart card to log on to the Linux VDA in both SSO and non-SSO scenarios.
• In the SSO scenario, you are logged on to StoreFront automatically by using the cached smartcard certificate and PIN. When you launch a Linux virtual desktop session in StoreFront, the PINis passed to the Linux VDA for smart card authentication.
• In the non-SSO scenario, you are prompted to select a certificate and type a PIN to log on toStoreFront.
When you launch a Linux virtual desktop session in StoreFront, a dialog box for logon to the Linux VDAappears as follows. The user name is extracted from the certificate in the smart card and you musttype the PIN again for logon authentication.
This behavior is the same with the Windows VDA.
© 1999‒2022 Citrix Systems, Inc. All rights reserved. 395
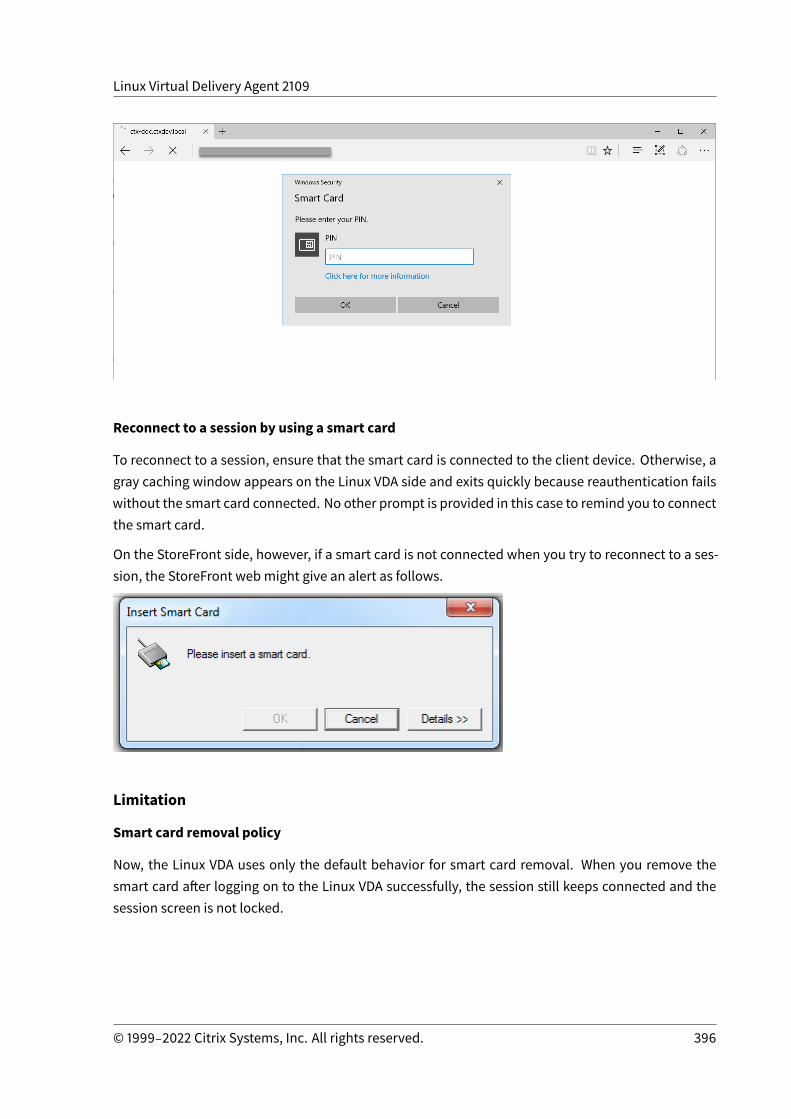
Linux Virtual Delivery Agent 2109
Reconnect to a session by using a smart card
To reconnect to a session, ensure that the smart card is connected to the client device. Otherwise, agray caching window appears on the Linux VDA side and exits quickly because reauthentication failswithout the smart card connected. No other prompt is provided in this case to remind you to connectthe smart card.
On the StoreFront side, however, if a smart card is not connected when you try to reconnect to a ses-sion, the StoreFront webmight give an alert as follows.
Limitation
Smart card removal policy
Now, the Linux VDA uses only the default behavior for smart card removal. When you remove thesmart card after logging on to the Linux VDA successfully, the session still keeps connected and thesession screen is not locked.
© 1999‒2022 Citrix Systems, Inc. All rights reserved. 396
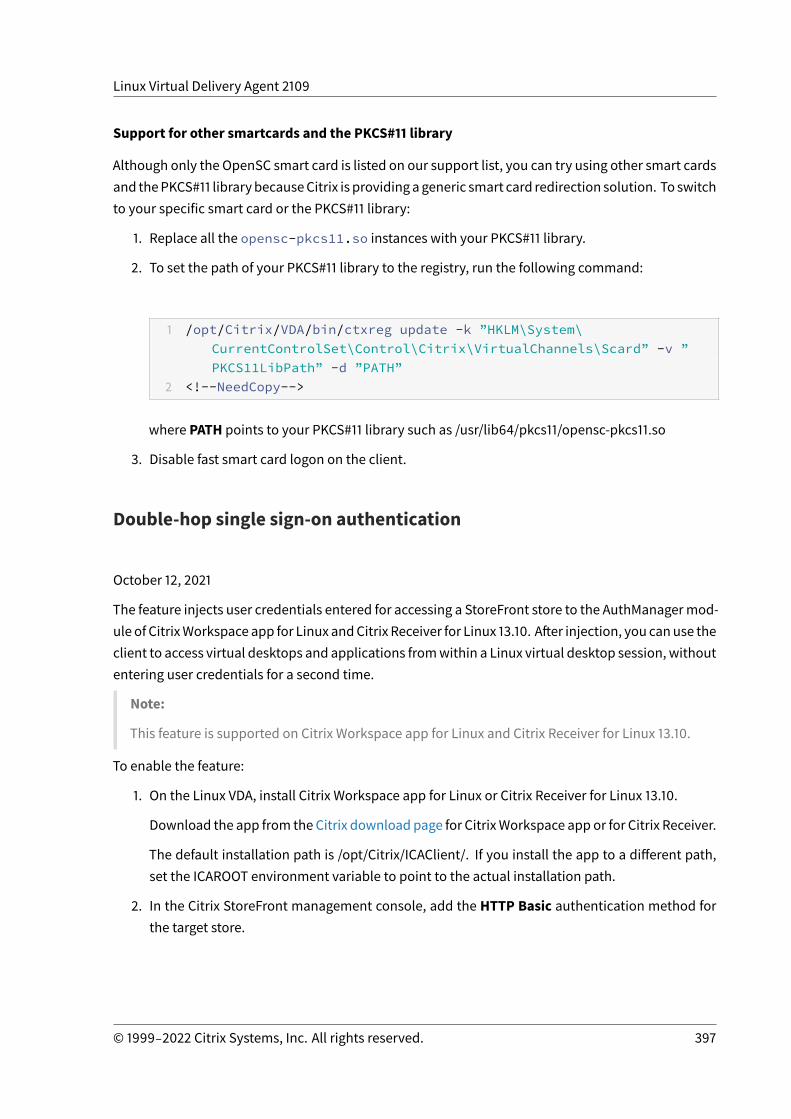
Linux Virtual Delivery Agent 2109
Support for other smartcards and the PKCS#11 library
Although only the OpenSC smart card is listed on our support list, you can try using other smart cardsand thePKCS#11 librarybecauseCitrix is providingageneric smart card redirection solution. To switchto your specific smart card or the PKCS#11 library:
1. Replace all the opensc-pkcs11.so instances with your PKCS#11 library.
2. To set the path of your PKCS#11 library to the registry, run the following command:
1 /opt/Citrix/VDA/bin/ctxreg update -k ”HKLM\System\CurrentControlSet\Control\Citrix\VirtualChannels\Scard” -v ”PKCS11LibPath” -d ”PATH”
2 <!--NeedCopy-->
where PATH points to your PKCS#11 library such as /usr/lib64/pkcs11/opensc-pkcs11.so
3. Disable fast smart card logon on the client.
Double-hop single sign-on authentication
October 12, 2021
The feature injects user credentials entered for accessing a StoreFront store to the AuthManagermod-ule of CitrixWorkspace app for Linux andCitrix Receiver for Linux 13.10. After injection, you canuse theclient to access virtual desktops and applications fromwithin a Linux virtual desktop session, withoutentering user credentials for a second time.
Note:
This feature is supported on Citrix Workspace app for Linux and Citrix Receiver for Linux 13.10.
To enable the feature:
1. On the Linux VDA, install Citrix Workspace app for Linux or Citrix Receiver for Linux 13.10.
Download the app from the Citrix download page for CitrixWorkspace app or for Citrix Receiver.
The default installation path is /opt/Citrix/ICAClient/. If you install the app to a different path,set the ICAROOT environment variable to point to the actual installation path.
2. In the Citrix StoreFront management console, add the HTTP Basic authentication method forthe target store.
© 1999‒2022 Citrix Systems, Inc. All rights reserved. 397

Linux Virtual Delivery Agent 2109
3. Add the following key to the AuthManager configuration file ($ICAROOT/config/AuthManCon-fig.xml) for allowing the HTTP Basic authentication:
1 <Protocols>2 <HTTPBasic>3 <Enabled>True</Enabled>4 </HTTPBasic>5 </Protocols>6 <!--NeedCopy-->
4. Run the following commands to install the root certificate in the specified directory.
1 cp rootcert.pem $ICAROOT/keystore/cacerts/2 $ICAROOT/util/ctx_rehash $ICAROOT/keystore/cacerts/3 <!--NeedCopy-->
5. Run the following command to enable the feature:
© 1999‒2022 Citrix Systems, Inc. All rights reserved. 398
Linux Virtual Delivery Agent 2109
1 /opt/Citrix/VDA/bin/ctxreg update -k ”HKLM\System\CurrentControlSet\Control\Citrix” -v ”LurSsonEnabled” -d ”0x00000001”
2 <!--NeedCopy-->
6. LaunchaLinux virtual desktop sessionandstartCitrixWorkspaceapp for LinuxorCitrixReceiverfor Linux 13.10 within that session.
You are prompted for a store account the first time you start Citrix Workspace app for Linux orCitrix Receiver for Linux 13.10within a Linux virtual desktop session. Later on, you are logged onto the store you specified earlier automatically.
Note:
Enter an HTTPS URL as your store account.
Configure unauthenticated sessions
October 12, 2021
Use the information in this article to configure unauthenticated sessions. No special settings are re-quired when installing the Linux VDA to use this feature.
© 1999‒2022 Citrix Systems, Inc. All rights reserved. 399
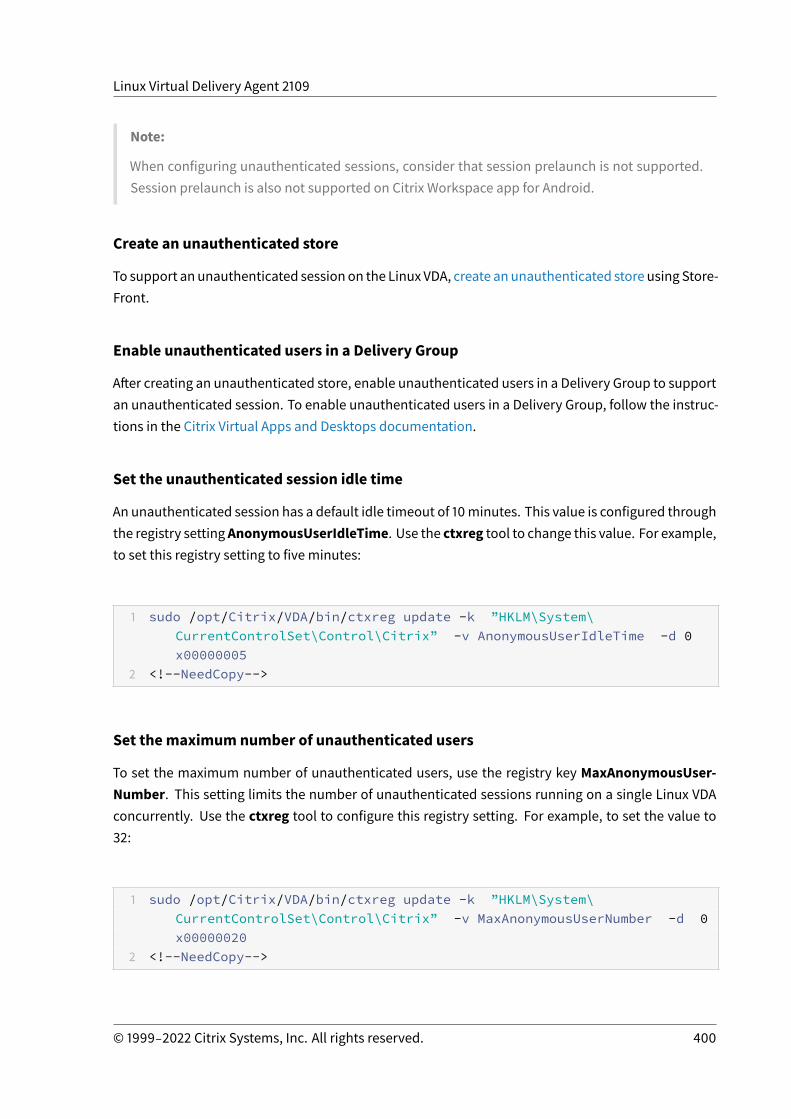
Linux Virtual Delivery Agent 2109
Note:
When configuring unauthenticated sessions, consider that session prelaunch is not supported.Session prelaunch is also not supported on Citrix Workspace app for Android.
Create an unauthenticated store
To support an unauthenticated session on the Linux VDA, create anunauthenticated store using Store-Front.
Enable unauthenticated users in a Delivery Group
After creating an unauthenticated store, enable unauthenticated users in a Delivery Group to supportan unauthenticated session. To enable unauthenticated users in a Delivery Group, follow the instruc-tions in the Citrix Virtual Apps and Desktops documentation.
Set the unauthenticated session idle time
An unauthenticated session has a default idle timeout of 10minutes. This value is configured throughthe registry settingAnonymousUserIdleTime. Use the ctxreg tool to change this value. For example,to set this registry setting to five minutes:
1 sudo /opt/Citrix/VDA/bin/ctxreg update -k ”HKLM\System\CurrentControlSet\Control\Citrix” -v AnonymousUserIdleTime -d 0x00000005
2 <!--NeedCopy-->
Set themaximum number of unauthenticated users
To set the maximum number of unauthenticated users, use the registry key MaxAnonymousUser-Number. This setting limits the number of unauthenticated sessions running on a single Linux VDAconcurrently. Use the ctxreg tool to configure this registry setting. For example, to set the value to32:
1 sudo /opt/Citrix/VDA/bin/ctxreg update -k ”HKLM\System\CurrentControlSet\Control\Citrix” -v MaxAnonymousUserNumber -d 0x00000020
2 <!--NeedCopy-->
© 1999‒2022 Citrix Systems, Inc. All rights reserved. 400
Linux Virtual Delivery Agent 2109
Important:
Limit the number of unauthenticated sessions. Toomany sessions being launched concurrentlycan cause problems on the VDA, including running out of available memory.
Troubleshooting
Consider the following when configuring unauthenticated sessions:
• Failed to log on to an unauthenticated session.
Verify that the registry was updated to include the following (set to 0):
1 sudo /opt/Citrix/VDA/bin/ctxreg read ‒ k ”HKLM\System\CurrentControlSet\Control\Citrix” ‒ v MaxAnonymousUserNumber
2 <!--NeedCopy-->
Verify that the ncsd service is running and configured to enable passwd cache:
1 ps uax | grep nscd2 cat /etc/nscd.conf | grep 'passwd' | grep 'enable-cache'3 <!--NeedCopy-->
Set the passwd cache variable to no if it is enabled, then restart the ncsd service. You might need toreinstall the Linux VDA after changing this configuration.
• The lock screen button is displayed in an unauthenticated session with KDE.
The lock screen button and menu are disabled by default in an unauthenticated session. However,they can still be displayed in KDE. In KDE, to disable the lock screen button and menu for a particu-lar user, add the following lines to the configuration file $Home/.kde/share/config/kdeglobals. Forexample:
1 [KDE Action Restrictions]2 action/lock_screen=false3 <!--NeedCopy-->
However, if the KDE Action Restrictions parameter is configured as immutable in a global widekdeglobals file such as /usr/share/kde-settings/kde-profile/default/share/config/kdeglobals, the user configuration has no effect.
© 1999‒2022 Citrix Systems, Inc. All rights reserved. 401
Linux Virtual Delivery Agent 2109
To resolve this issue, modify the system-wide kdeglobals file to remove the [$i] tag at the [KDEAction Restrictions] section, or directly use the system-wide configuration to disable the lockscreen button and menu. For details about the KDE configuration, see the KDE System Administra-tion/Kiosk/Keys page.
Configure LDAPS
October 12, 2021
Secure LDAP (LDAPS) allows you to enable the Secure Lightweight Directory Access Protocol for yourActive Directory managed domains to provide communications over SSL (Secure Socket Layer)/TLS(Transport Layer Security).
By default, LDAP communications between client and server applications are not encrypted. LDAPusing SSL/TLS (LDAPS) enables you to protect the LDAP query content between the Linux VDA and theLDAP servers.
The following Linux VDA components have dependencies on LDAPS:
• Broker agent: Linux VDA registration with a Delivery Controller• Policy service: Policy evaluation
Configuring LDAPS involves:
• Enable LDAPS on the Active Directory (AD)/LDAP server• Export the root CA for client use• Enable/disable LDAPS on the Linux VDA• Configure LDAPS for third-party platforms• Configure SSSD• Configure Winbind• Configure Centrify• Configure Quest
Note:
You can run the following command to set amonitoring cycle for your LDAP servers. The defaultvalue is 15 minutes. Set it to 10 minutes at least.
1 /opt/Citrix/VDA/bin/ctxreg create -k ”HKLM\Software\Citrix\VirtualDesktopAgent” -v ”ListOfLDAPServersMonitorPeroid” -t ”REG_DWORD” -d ”0x0000000f” --force
2 <!--NeedCopy-->
© 1999‒2022 Citrix Systems, Inc. All rights reserved. 402
Linux Virtual Delivery Agent 2109
Enable LDAPS on the AD/LDAP server
You can enable LDAP over SSL (LDAPS) by installing a properly formatted certificate from either a Mi-crosoft certification authority (CA) or a non-Microsoft CA.
Tip:
LDAP over SSL/TLS (LDAPS) is enabled automatically when you install an Enterprise Root CA ona domain controller.
For more information about how to install the certificate and verify the LDAPS connection, see Howto enable LDAP over SSL with a third-party certification authority on the Microsoft Support site.
When you have amulti-tier (such as a two-tier or three-tier) certificate authority hierarchy, you do notautomatically have the appropriate certificate for LDAPS authentication on the domain controller.
For information about how to enable LDAPS for domain controllers using a multi-tier certificate au-thority hierarchy, see the LDAP over SSL (LDAPS) Certificate article on the Microsoft TechNet site.
Enable root certificate authority for client use
The client must be using a certificate from a CA that the LDAP server trusts. To enable LDAPS authen-tication for the client, import the root CA certificate to a trusted keystore.
For more information about how to export Root CA, see How to export Root Certification AuthorityCertificate on the Microsoft Support website.
Enable or disable LDAPS on the Linux VDA
To enable or disable LDAPS on the Linux VDA, run the following script (while logged on as an adminis-trator):
The syntax for this command includes the following:
• Enable LDAP over SSL/TLS with the root CA certificate provided:
1 /opt/Citrix/VDA/sbin/enable_ldaps.sh -Enable pathToRootCA2 <!--NeedCopy-->
• Enable LDAP over SSL/TLS with channel binding:
© 1999‒2022 Citrix Systems, Inc. All rights reserved. 403
Linux Virtual Delivery Agent 2109
1 /opt/Citrix/VDA/sbin/enable_ldaps.sh -Enablecb pathToRootCA2 <!--NeedCopy-->
Note:
The root CA certificate for channel bindingmust be in PEM format. If enabling LDAPS doesnot create a Python3 virtual environment successfully, create it manually following the in-structions at Create a Python3 virtual environment.
To address SSL connection errors that you might encounter when using the pip tool, con-sider adding the following trusted hosts to the /etc/pip.conf file:[global]trusted-host =pypi.orgfiles.pythonhosted.org
• Fall back to LDAP without SSL/TLS
1 /opt/Citrix/VDA/sbin/enable_ldaps.sh -Disable2 <!--NeedCopy-->
The Java keystore dedicated for LDAPS is located in /etc/xdl/.keystore. Affected registry keys include:
1 HKLM\Software\Citrix\VirtualDesktopAgent\ListOfLDAPServers23 HKLM\Software\Citrix\VirtualDesktopAgent\ListOfLDAPServersForPolicy45 HKLM\Software\Citrix\VirtualDesktopAgent\UseLDAPS67 HKLM\Software\Policies\Citrix\VirtualDesktopAgent\Keystore89 HKLM\Software\Citrix\VirtualDesktopAgent\EnableChannelBinding10 <!--NeedCopy-->
Configure LDAPS for third-party platform
Besides the Linux VDA components, several third-party software components that adhere to the VDAmight also require secure LDAP, such as SSSD, Winbind, Centrify, and Quest. The following sectionsdescribe how to configure secure LDAP with LDAPS, STARTTLS, or SASL sign and seal.
© 1999‒2022 Citrix Systems, Inc. All rights reserved. 404
Linux Virtual Delivery Agent 2109
Tip:
Not all of these software components prefer to use SSL port 636 to ensure secure LDAP. Andmostof the time, LDAPS (LDAP over SSL on port 636) cannot coexist with STARTTLS on port 389.
SSSD
Configure the SSSD secure LDAP traffic on port 636 or port 389 as per the options. For more informa-tion, see the SSSD LDAP Linux man page.
Winbind
The Winbind LDAP query uses the ADS method. Winbind supports only the StartTLS method on port389. Affected configuration files are /etc/samba/smb.conf and /etc/openldap/ldap.conf (for RHEL)or /etc/ldap/ldap.conf (for Ubuntu). Change the files as follows:
• smb.conf
ldap ssl = start tlsldap ssl ads = yesclient ldap sasl wrapping = plain
• ldap.conf
TLS_REQCERT never
Alternately, secure LDAP can be configured by SASL GSSAPI sign and seal, but it cannot coexist withTLS/SSL. To use SASL encryption, change the smb.conf configuration:
ldap ssl = offldap ssl ads = noclient ldap sasl wrapping = seal
Centrify
Centrify does not support LDAPSonport 636. However, it does provide secure encryptiononport 389.For more information, see the Centrify site.
Quest
Quest Authentication Service does not support LDAPS on port 636, but it provides secure encryptionon port 389 using a different method.
© 1999‒2022 Citrix Systems, Inc. All rights reserved. 405
Linux Virtual Delivery Agent 2109
Troubleshooting
The following issues might arise when you use this feature:
• LDAPS service availability
Verify that the LDAPS connection is available on the AD/LDAP server. The port is on 636 by de-fault.
• Linux VDA registration failed when LDAPS is enabled
Verify that the LDAP server andports are configured correctly. Check theRoot CACertificate firstand ensure that it matches the AD/LDAP server.
• Incorrect registry change by accident
If the LDAPS related keys were updated by accident without using enable_ldaps.sh, it mightbreak the dependency of LDAPS components.
• LDAP traffic is not encrypted through SSL/TLS fromWireshark or any other networkmon-itoring tools
By default, LDAPS is disabled. Run /opt/Citrix/VDA/sbin/enable_ldaps.sh to force it.
• There is no LDAPS traffic fromWireshark or any other networkingmonitoring tool
LDAP/LDAPS traffic occurs when Linux VDA registration and Group Policy evaluation occur.
• Failed to verify LDAPS availability by running ldp connect on the AD server
Use the AD FQDN instead of the IP Address.
• Failed to import Root CA certificate by running the /opt/Citrix/VDA/sbin/enable_ldaps.shscript
Provide the full path of the CA certificate, and verify that the Root CA Certificate is the correcttype. It is supposed to be compatible withmost of the Java Keytool types supported. If it is notlisted in the support list, you can convert the type first. We recommend the base64 encodedPEM format if you encounter a certificate format problem.
• Failed to show the Root CA certificate with Keytool -list
When you enable LDAPS by running /opt/Citrix/VDA/sbin/enable_ldaps.sh, the certifi-cate is imported to /etc/xdl/.keystore, and the password is set to protect the keystore. If youforget the password, you can rerun the script to create a keystore.
Create a Python3 virtual environment
December 23, 2021
© 1999‒2022 Citrix Systems, Inc. All rights reserved. 406
Linux Virtual Delivery Agent 2109
If you are connecting to the network, running the sudo /opt/Citrix/VDA/bin/xdping or /opt/Citrix/VDA/sbin enable_ldaps.sh command can create a Python3 virtual environment. How-ever, if the commands fail to create a Python3 virtual environment, you can create it manually evenwithout a network connection. This article details the prerequisites and steps to create a Python3virtual environment without a network connection.
Prerequisites
• Youmust have administrative privileges to access the /opt/Citrix/VDA/sbin/ctxpython3directory.
• Thewheel files of Python3 packages are in place. You can download thewheel files from https://pypi.org/.
Create a Python3 virtual environment
Complete the following steps to create a Python3 virtual environment:
1. Install Python3 dependencies.
For RHEL:
1 yum -y install python36-devel krb5-devel gcc2 <!--NeedCopy-->
Note:
You might have to enable a particular repository to install some dependencies. For RHEL7, run the subscription-manager repos --enable rhel-7-server-optional-rpms command. For RHEL 8, run the subscription-manager repos --enable=rhel-8-for-x86_64-appstream-rpms command.
For Ubuntu\Debian:
1 apt-get -y install python3-dev python3-pip libkrb5-dev2 <!--NeedCopy-->
For SUSE:
1 zypper -i -n install python3-devel python3-setuptools krb5-develgcc libffi48-devel
© 1999‒2022 Citrix Systems, Inc. All rights reserved. 407
Linux Virtual Delivery Agent 2109
2 <!--NeedCopy-->
Note:
Youmighthave toenable theSUSE_Linux_Enterprise_Software_Development_Kit_12_SP5_x86_64repository to install some dependencies.
2. Create a Python3 virtual environment.
Note:
To address SSL connection errors that you might encounter when using the pip tool, con-sider adding the following trusted hosts to the /etc/pip.conf file:[global]trusted-host =pypi.orgfiles.pythonhosted.org
For RHEL, Ubuntu, Debian:
1 sudo python3 -m venv /opt/Citrix/VDA/sbin/ctxpython32 <!--NeedCopy-->
For SUSE:
1 sudo python3 -m venv /opt/Citrix/VDA/sbin/ctxpython323 sudo /opt/Citrix/VDA/sbin/ctxpython3/bin/python3 -m pip install
setuptools==40.6.24 <!--NeedCopy-->
3. Install LDAPS dependencies.
For RHEL, Ubuntu, Debian:
1 sudo /opt/Citrix/VDA/sbin/ctxpython3/bin/python3 -m pip installcffi == 1.14.2 cryptography == 3.1 decorator == 4.4.2 gssapi==1.6.2 ldap3==2.8.1 netifaces == 0.10.9 pg8000 == 1.17.0psutil == 5.8.0 pyasn1 == 0.4.8 pycparser == 2.20 scramp ==1.2.0 six == 1.15.0 termcolor == 1.1.0
2 <!--NeedCopy-->
© 1999‒2022 Citrix Systems, Inc. All rights reserved. 408
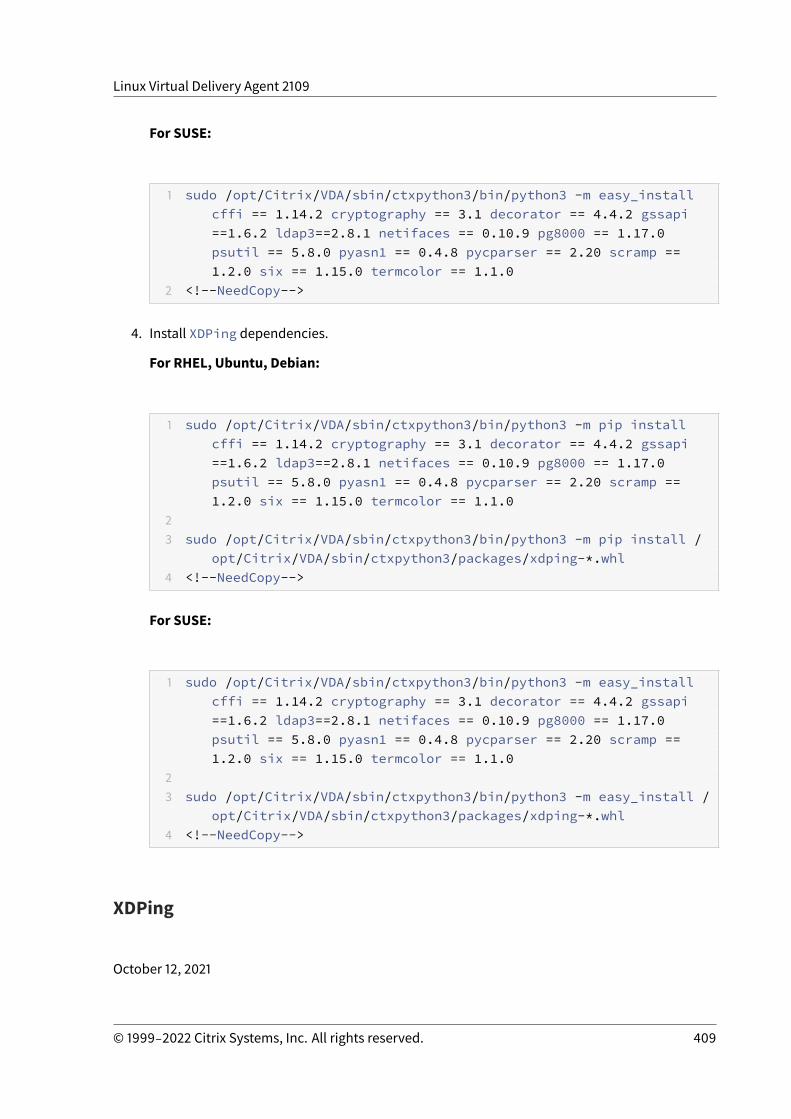
Linux Virtual Delivery Agent 2109
For SUSE:
1 sudo /opt/Citrix/VDA/sbin/ctxpython3/bin/python3 -m easy_installcffi == 1.14.2 cryptography == 3.1 decorator == 4.4.2 gssapi==1.6.2 ldap3==2.8.1 netifaces == 0.10.9 pg8000 == 1.17.0psutil == 5.8.0 pyasn1 == 0.4.8 pycparser == 2.20 scramp ==1.2.0 six == 1.15.0 termcolor == 1.1.0
2 <!--NeedCopy-->
4. Install XDPing dependencies.
For RHEL, Ubuntu, Debian:
1 sudo /opt/Citrix/VDA/sbin/ctxpython3/bin/python3 -m pip installcffi == 1.14.2 cryptography == 3.1 decorator == 4.4.2 gssapi==1.6.2 ldap3==2.8.1 netifaces == 0.10.9 pg8000 == 1.17.0psutil == 5.8.0 pyasn1 == 0.4.8 pycparser == 2.20 scramp ==1.2.0 six == 1.15.0 termcolor == 1.1.0
23 sudo /opt/Citrix/VDA/sbin/ctxpython3/bin/python3 -m pip install /
opt/Citrix/VDA/sbin/ctxpython3/packages/xdping-*.whl4 <!--NeedCopy-->
For SUSE:
1 sudo /opt/Citrix/VDA/sbin/ctxpython3/bin/python3 -m easy_installcffi == 1.14.2 cryptography == 3.1 decorator == 4.4.2 gssapi==1.6.2 ldap3==2.8.1 netifaces == 0.10.9 pg8000 == 1.17.0psutil == 5.8.0 pyasn1 == 0.4.8 pycparser == 2.20 scramp ==1.2.0 six == 1.15.0 termcolor == 1.1.0
23 sudo /opt/Citrix/VDA/sbin/ctxpython3/bin/python3 -m easy_install /
opt/Citrix/VDA/sbin/ctxpython3/packages/xdping-*.whl4 <!--NeedCopy-->
XDPing
October 12, 2021
© 1999‒2022 Citrix Systems, Inc. All rights reserved. 409
Linux Virtual Delivery Agent 2109
Description
The Linux XDPing tool is a command-line based application that automates the process of checkingfor common configuration issues with a Linux VDA environment.
The Linux XDPing tool performsover 150 individual tests on the system,which are broadly categorizedas follows:
• Check whether Linux VDA system requirements are met• Identify and display machine information including the Linux distributions• Check the Linux kernel compatibility• Check for any known Linux distribution issues that can impact the Linux VDA operation• Check the Security-Enhanced Linux (SELinux) mode and compatibility• Identify network interfaces and check network settings• Check storage partitioning and available disk space• Check machine host and domain name configuration• Check DNS configuration and perform lookup tests• Identify underlying hypervisors and check virtual machine configuration. Support for:
– Citrix Hypervisor– Microsoft HyperV– VMware vSphere
• Check time settings and check whether network time synchronization is operational• Check whether PostgreSQL service is properly configured and operational• Check whether the firewall is enabled and required ports are open• Check Kerberos configuration and perform authentication tests• Check the LDAP search environment for the group policy service engine• Check whether Active Directory integration is set up properly and the currentmachine is joinedto the domain. Support for:
– SambaWinbind– Dell Quest Authentication Services– Centrify DirectControl– SSSD
• Check the integrity of the Linux computer object in Active Directory• Check Pluggable Authentication Module (PAM) configuration• Check the core dump pattern• Check whether packages required by the Linux VDA are installed• Identify the Linux VDA package and check the integrity of the installation• Check the integrity of the PostgreSQL registry database• Check whether the Linux VDA services are properly configured and operational• Check the integrity of the VDA and HDX configuration• Probe each configured Delivery Controller to test that the Broker Service is reachable, opera-
© 1999‒2022 Citrix Systems, Inc. All rights reserved. 410

Linux Virtual Delivery Agent 2109
tional, and responsive• Check whether the machine is registered with the Delivery Controller farm• Check the state of each active or disconnected HDX session• Scan log files for the Linux VDA related errors and warnings• Check whether the version of Xorg is suitable
Use the Linux XDPing toolNote:
Running ctxsetup.sh does not install XDPing. You can run sudo /opt/Citrix/VDA/bin/xdping to install XDPing.This command also creates a Python3 virtual environment that is required for XDPing. Ifthis command fails to create a Python3 virtual environment, create it manually following theinstructions at Create a Python3 virtual environment.
To address SSL connection errors that you might encounter when using the pip tool, consideradding the following trusted hosts to the /etc/pip.conf file:[global]trusted-host =pypi.orgfiles.pythonhosted.org
XDPing comes with the single executable named xdping that is run from the command shell.
To display the command-line options, use the --help option:
1 sudo /opt/Citrix/VDA/bin/xdping --help2 <!--NeedCopy-->
To run the full suite of tests, run xdpingwithout any command-line options:
1 sudo /opt/Citrix/VDA/bin/xdping2 <!--NeedCopy-->
To check the environment before installing the Linux VDA package, run the pre-flight tests:
1 sudo /opt/Citrix/VDA/bin/xdping --preflight2 <!--NeedCopy-->
To run specific test categories only, for example, the time and Kerberos tests, use the -T option:
© 1999‒2022 Citrix Systems, Inc. All rights reserved. 411

Linux Virtual Delivery Agent 2109
1 sudo /opt/Citrix/VDA/bin/xdping -T time,kerberos2 <!--NeedCopy-->
To probe a particular XenDesktop Controller:
1 sudo /opt/Citrix/VDA/bin/xdping -d myddc.domain.net2 <!--NeedCopy-->
Sample Output
The following is a sample output from running the Kerberos test:
© 1999‒2022 Citrix Systems, Inc. All rights reserved. 412
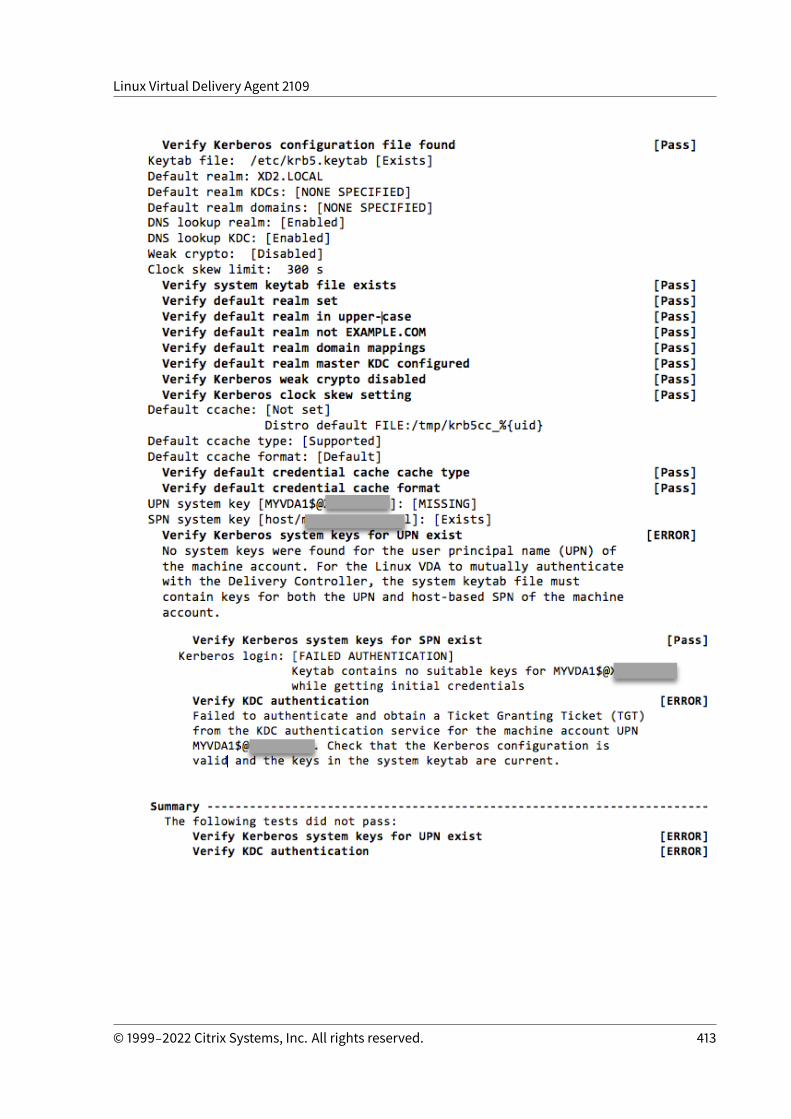
Linux Virtual Delivery Agent 2109
© 1999‒2022 Citrix Systems, Inc. All rights reserved. 413
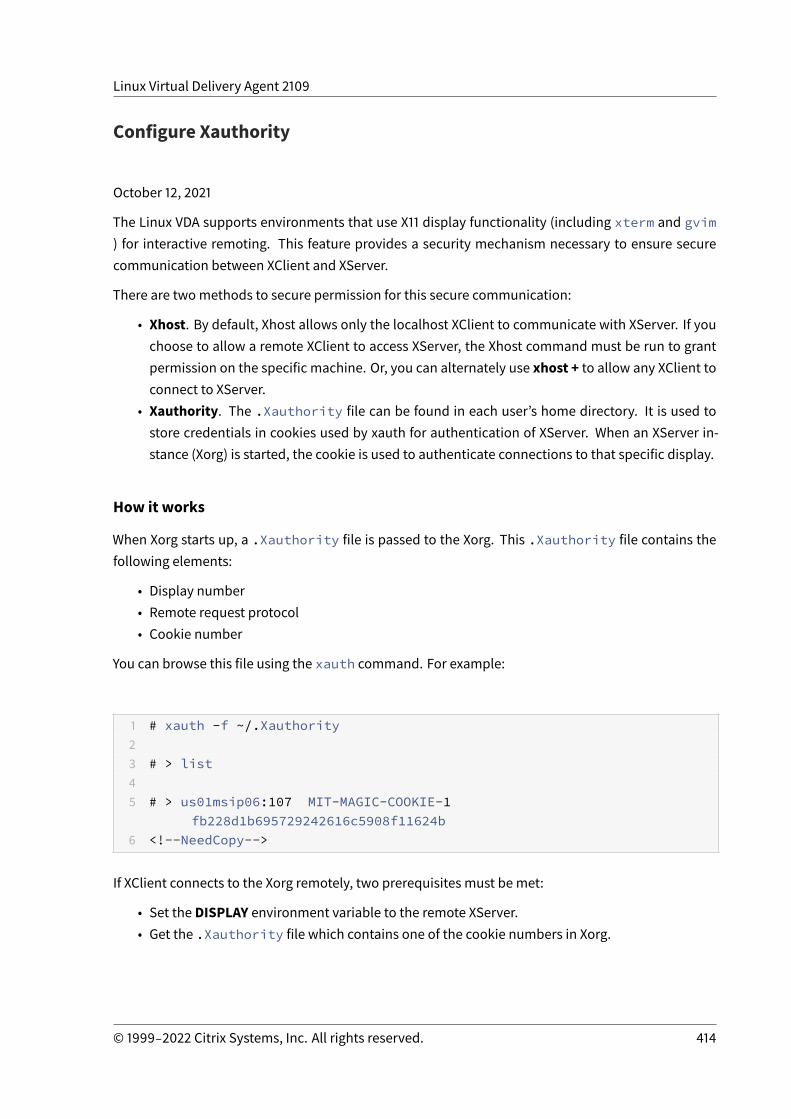
Linux Virtual Delivery Agent 2109
Configure Xauthority
October 12, 2021
The Linux VDA supports environments that use X11 display functionality (including xterm and gvim) for interactive remoting. This feature provides a security mechanism necessary to ensure securecommunication between XClient and XServer.
There are twomethods to secure permission for this secure communication:
• Xhost. By default, Xhost allows only the localhost XClient to communicate with XServer. If youchoose to allow a remote XClient to access XServer, the Xhost command must be run to grantpermission on the specific machine. Or, you can alternately use xhost + to allow any XClient toconnect to XServer.
• Xauthority. The .Xauthority file can be found in each user’s home directory. It is used tostore credentials in cookies used by xauth for authentication of XServer. When an XServer in-stance (Xorg) is started, the cookie is used to authenticate connections to that specific display.
How it works
When Xorg starts up, a .Xauthority file is passed to the Xorg. This .Xauthority file contains thefollowing elements:
• Display number• Remote request protocol• Cookie number
You can browse this file using the xauth command. For example:
1 # xauth -f ~/.Xauthority23 # > list45 # > us01msip06:107 MIT-MAGIC-COOKIE-1
fb228d1b695729242616c5908f11624b6 <!--NeedCopy-->
If XClient connects to the Xorg remotely, two prerequisites must be met:
• Set the DISPLAY environment variable to the remote XServer.• Get the .Xauthority file which contains one of the cookie numbers in Xorg.
© 1999‒2022 Citrix Systems, Inc. All rights reserved. 414
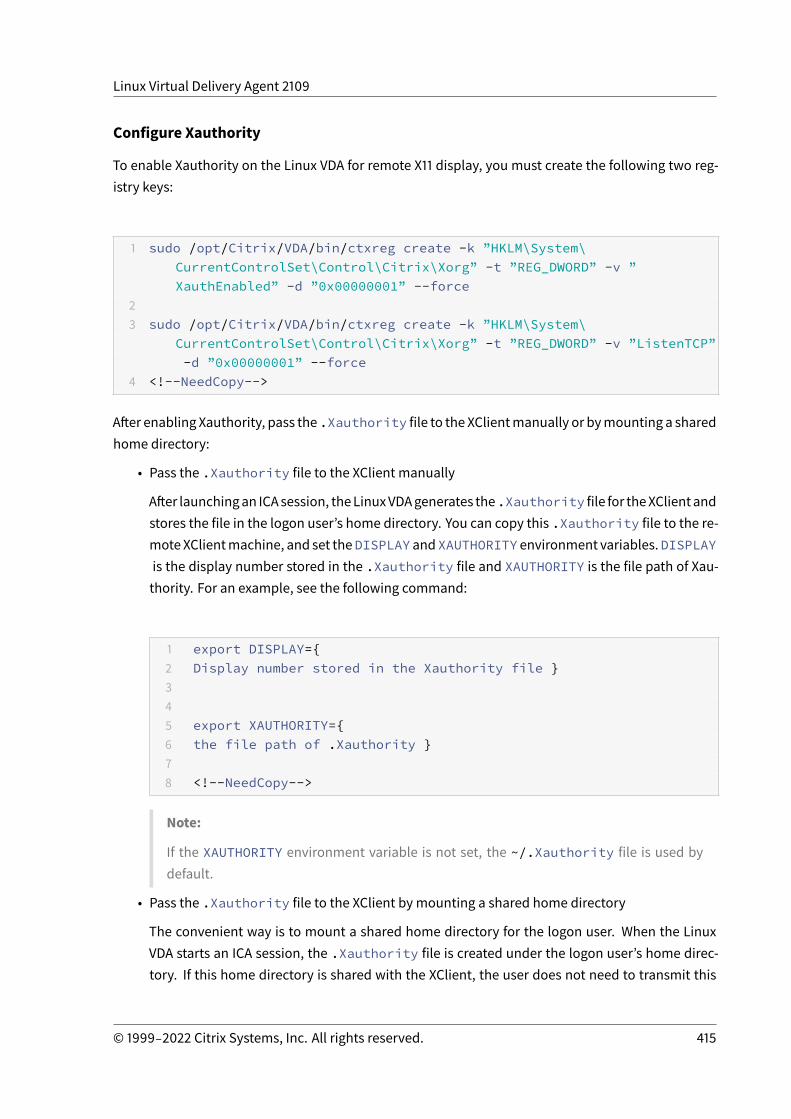
Linux Virtual Delivery Agent 2109
Configure Xauthority
To enable Xauthority on the Linux VDA for remote X11 display, you must create the following two reg-istry keys:
1 sudo /opt/Citrix/VDA/bin/ctxreg create -k ”HKLM\System\CurrentControlSet\Control\Citrix\Xorg” -t ”REG_DWORD” -v ”XauthEnabled” -d ”0x00000001” --force
23 sudo /opt/Citrix/VDA/bin/ctxreg create -k ”HKLM\System\
CurrentControlSet\Control\Citrix\Xorg” -t ”REG_DWORD” -v ”ListenTCP”-d ”0x00000001” --force
4 <!--NeedCopy-->
After enabling Xauthority, pass the.Xauthority file to the XClientmanually or bymounting a sharedhome directory:
• Pass the .Xauthority file to the XClient manually
After launchingan ICAsession, theLinuxVDAgenerates the.Xauthority file for theXClientandstores the file in the logon user’s home directory. You can copy this .Xauthority file to the re-mote XClientmachine, and set theDISPLAY andXAUTHORITY environment variables.DISPLAYis the display number stored in the .Xauthority file and XAUTHORITY is the file path of Xau-thority. For an example, see the following command:
1 export DISPLAY={2 Display number stored in the Xauthority file }345 export XAUTHORITY={6 the file path of .Xauthority }78 <!--NeedCopy-->
Note:
If the XAUTHORITY environment variable is not set, the ~/.Xauthority file is used bydefault.
• Pass the .Xauthority file to the XClient by mounting a shared home directory
The convenient way is to mount a shared home directory for the logon user. When the LinuxVDA starts an ICA session, the .Xauthority file is created under the logon user’s home direc-tory. If this home directory is shared with the XClient, the user does not need to transmit this
© 1999‒2022 Citrix Systems, Inc. All rights reserved. 415
Linux Virtual Delivery Agent 2109
.Xauthority file to the XClient manually. After the DISPLAY and XAUTHORITY environmentvariables are set correctly, the GUI is displayed in the XServer desktop automatically.
Troubleshooting
If Xauthority does not work, follow the troubleshooting steps:
1. As an administrator with root privilege, retrieve all Xorg cookies:
1 ps aux | grep -i xorg2 <!--NeedCopy-->
This command displays the Xorg process and the parameters passed to Xorg while starting. An-other parameter displays which .Xauthority file is used. For example:
1 /var/xdl/xauth/.Xauthority1102 <!--NeedCopy-->
Display the cookies using the Xauth command:
1 Xauth -f /var/xdl/xauth/.Xauthority1102 <!--NeedCopy-->
2. Use the Xauth command to show the cookies contained in ~/.Xauthority. For the same dis-play number, the displayed cookies must be the same in the .Xauthority files of Xorg andXClient.
3. If the cookies are the same, check the remote display port accessibility by using the IP addressof the Linux VDA (for example, 10.158.11.11) and the published desktop display number (for ex-ample, 160).
Run the following command on the XClient machine:
1 telnet 10.158.11.11 61602 <!--NeedCopy-->
The port number is the sum of 6000 + <display number>.
If this telnet operation fails, the firewall might be blocking the request.
© 1999‒2022 Citrix Systems, Inc. All rights reserved. 416
Linux Virtual Delivery Agent 2109
Configure Federated Authentication Service
October 12, 2021
You can use Federated Authentication Service (FAS) to authenticate users logging on to a Linux VDA.The Linux VDA uses the same Windows environment as the Windows VDA for the FAS logon feature.For information about configuring the Windows environment for FAS, see Federated AuthenticationService. This article provides extra information specific to the Linux VDA.
Note
The Linux VDA does not support the In-session Behavior policy.
The Linux VDA uses short connections to transmit data with FAS servers.c
Configure FAS on the Linux VDA
FAS support on RHEL 8/CentOS 8
FASdepends on the pam_krb5module, which is deprecated onRHEL 8/CentOS 8. To use FAS onRHEL8/CentOS 8, build the pam_krb5 module as follows:
1. Download the pam_krb5-2.4.8-6 source code from the following website:
https://centos.pkgs.org/7/centos-x86_64/pam_krb5-2.4.8-6.el7.x86_64.rpm.html.
2. Build and install the pam_krb5 module on RHEL 8/CentOS 8.
1 yum install make gcc krb5-devel pam-devel autoconf libtool2 rpm2cpio pam_krb5-2.4.8-6.el7.src.rpm | cpio -div3 tar xvzf pam_krb5-2.4.8.tar.gz4 cd pam_krb5-2.4.85 ./configure --prefix=/usr6 make7 make install8 <!--NeedCopy-->
3. Verify that pam_krb5.so exists under /usr/lib64/security/.
1 ls -l /usr/lib64/security | grep pam_krb52 <!--NeedCopy-->
© 1999‒2022 Citrix Systems, Inc. All rights reserved. 417
Linux Virtual Delivery Agent 2109
Set FAS servers
For fresh Linux VDA installation, to use FAS, type the FQDN of each FAS server when you are asked forCTX_XDL_FAS_LIST during the execution of ctxinstall.sh or ctxsetup.sh. Because the Linux VDA doesnot support AD Group Policy, you can provide a semicolon-separated list of FAS servers instead. If anyserver address is removed, fill its blank with the <none> text string and do not modify the order ofserver addresses.
For upgrading an existing Linux VDA installation, you can rerun ctxsetup.sh to set the FAS servers.Or you can run the following commands to set the FAS servers and to restart the ctxvda service tomake your setting take effect.
1 sudo /opt/Citrix/VDA/bin/ctxreg create -k ”HKLM\Software\Citrix\VirtualDesktopAgent\Authentication\UserCredentialService” -t ”REG_SZ” -v ”Addresses” -d ”<Your-FAS-Server-List>” --force
23 service ctxjproxy restart45 service ctxvda restart6 <!--NeedCopy-->
To update the FAS servers through ctxreg, run the following commands:
1 sudo /opt/Citrix/VDA/bin/ctxreg update -k ”HKLM\Software\Citrix\VirtualDesktopAgent\Authentication\UserCredentialService” -v ”Addresses” -d ”<Your-FAS-Server-List>”
23 service ctxjproxy restart45 service ctxvda restart6 <!--NeedCopy-->
Install certificates
For the verification of users’ certificates, install the root CA certificate and all intermediate certificateson the VDA. For example, to install the root CA certificate, obtain the AD root certificate from the pre-ceding Retrieve the CA Certificate from the Microsoft CA (on AD) step, or download its DER formatfrom the root CA server http://CA-SERVER/certsrv.
© 1999‒2022 Citrix Systems, Inc. All rights reserved. 418
Linux Virtual Delivery Agent 2109
Note:
The following commands also apply to configuring an intermediate certificate.
Convert a DER file (.crt, .cer, .der) to PEM by running the command similar to the following:
1 sudo openssl x509 -inform der -in root.cer -out root.pem2 <!--NeedCopy-->
Then, install the root CA certificate to the openssl directory by running the command similar to thefollowing:
1 sudo cp root.pem /etc/pki/CA/certs/2 <!--NeedCopy-->
Note:
Do not put the root CA certificate under the /root path. Otherwise, FAS does not have the readpermission to the root CA certificate.
Run ctxfascfg.sh
Run the ctxfascfg.sh script to configure FAS parameters:
1 sudo /opt/Citrix/VDA/sbin/ctxfascfg.sh2 <!--NeedCopy-->
Two environment variables are added so that ctxfascfg.sh can be run in silent mode:
• CTX_FAS_ADINTEGRATIONWAY=winbind | sssd | centrify | pbis – Denotes the Active Direc-tory integration method, which equals to CTX_EASYINSTALL_ADINTEGRATIONWAY whenCTX_EASYINSTALL_ADINTEGRATIONWAY is specified. IfCTX_EASYINSTALL_ADINTEGRATIONWAYis not specified, CTX_FAS_ADINTEGRATIONWAY uses its own value setting. If you select PBIS,youmust enter the host name of the Key Distribution Center (KDC) as prompted by the script.
• CTX_FAS_CERT_PATH =<certificate path> – Specifies the full path that stores the root certifi-cate and all intermediate certificates.
Choose the correct Active Directory integration method and then type the correct path of certificates(for example, /etc/pki/CA/certs/).
© 1999‒2022 Citrix Systems, Inc. All rights reserved. 419
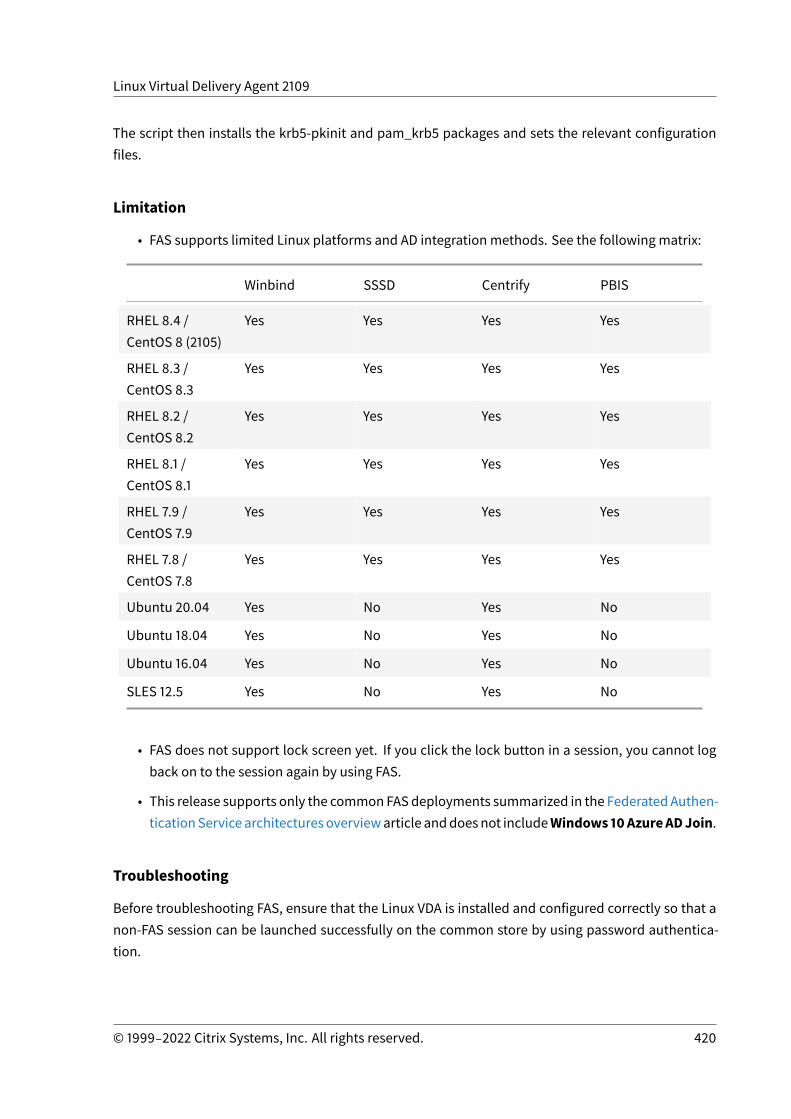
Linux Virtual Delivery Agent 2109
The script then installs the krb5-pkinit and pam_krb5 packages and sets the relevant configurationfiles.
Limitation
• FAS supports limited Linux platforms and AD integration methods. See the following matrix:
Winbind SSSD Centrify PBIS
RHEL 8.4 /CentOS 8 (2105)
Yes Yes Yes Yes
RHEL 8.3 /CentOS 8.3
Yes Yes Yes Yes
RHEL 8.2 /CentOS 8.2
Yes Yes Yes Yes
RHEL 8.1 /CentOS 8.1
Yes Yes Yes Yes
RHEL 7.9 /CentOS 7.9
Yes Yes Yes Yes
RHEL 7.8 /CentOS 7.8
Yes Yes Yes Yes
Ubuntu 20.04 Yes No Yes No
Ubuntu 18.04 Yes No Yes No
Ubuntu 16.04 Yes No Yes No
SLES 12.5 Yes No Yes No
• FAS does not support lock screen yet. If you click the lock button in a session, you cannot logback on to the session again by using FAS.
• This release supports only the commonFASdeployments summarized in the Federated Authen-ticationService architectures overviewarticle anddoesnot includeWindows 10AzureADJoin.
Troubleshooting
Before troubleshooting FAS, ensure that the Linux VDA is installed and configured correctly so that anon-FAS session can be launched successfully on the common store by using password authentica-tion.
© 1999‒2022 Citrix Systems, Inc. All rights reserved. 420
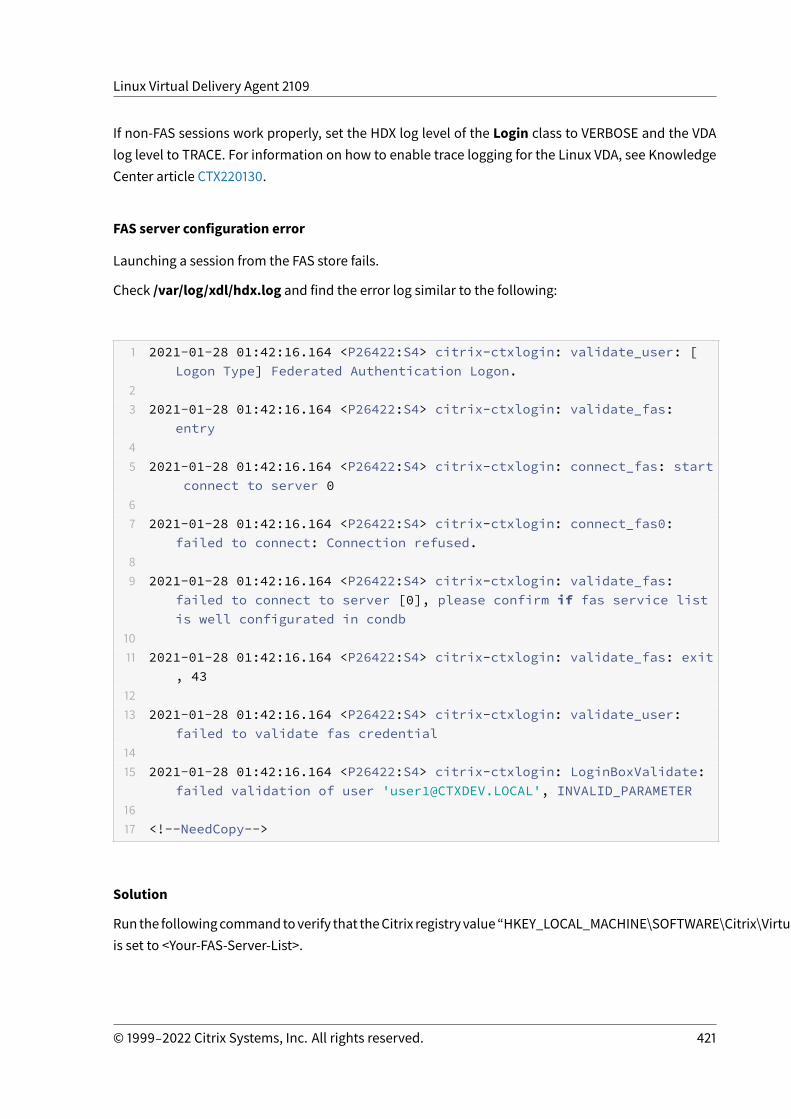
Linux Virtual Delivery Agent 2109
If non-FAS sessions work properly, set the HDX log level of the Login class to VERBOSE and the VDAlog level to TRACE. For information on how to enable trace logging for the Linux VDA, see KnowledgeCenter article CTX220130.
FAS server configuration error
Launching a session from the FAS store fails.
Check /var/log/xdl/hdx.log and find the error log similar to the following:
1 2021-01-28 01:42:16.164 <P26422:S4> citrix-ctxlogin: validate_user: [Logon Type] Federated Authentication Logon.
23 2021-01-28 01:42:16.164 <P26422:S4> citrix-ctxlogin: validate_fas:
entry45 2021-01-28 01:42:16.164 <P26422:S4> citrix-ctxlogin: connect_fas: start
connect to server 067 2021-01-28 01:42:16.164 <P26422:S4> citrix-ctxlogin: connect_fas0:
failed to connect: Connection refused.89 2021-01-28 01:42:16.164 <P26422:S4> citrix-ctxlogin: validate_fas:
failed to connect to server [0], please confirm if fas service listis well configurated in condb
1011 2021-01-28 01:42:16.164 <P26422:S4> citrix-ctxlogin: validate_fas: exit
, 431213 2021-01-28 01:42:16.164 <P26422:S4> citrix-ctxlogin: validate_user:
failed to validate fas credential1415 2021-01-28 01:42:16.164 <P26422:S4> citrix-ctxlogin: LoginBoxValidate:
failed validation of user '[email protected]', INVALID_PARAMETER1617 <!--NeedCopy-->
Solution
Runthe followingcommandtoverify that theCitrix registry value“HKEY_LOCAL_MACHINE\SOFTWARE\Citrix\VirtualDesktopAgent\Authentication\UserCredentialService”is set to <Your-FAS-Server-List>.
© 1999‒2022 Citrix Systems, Inc. All rights reserved. 421
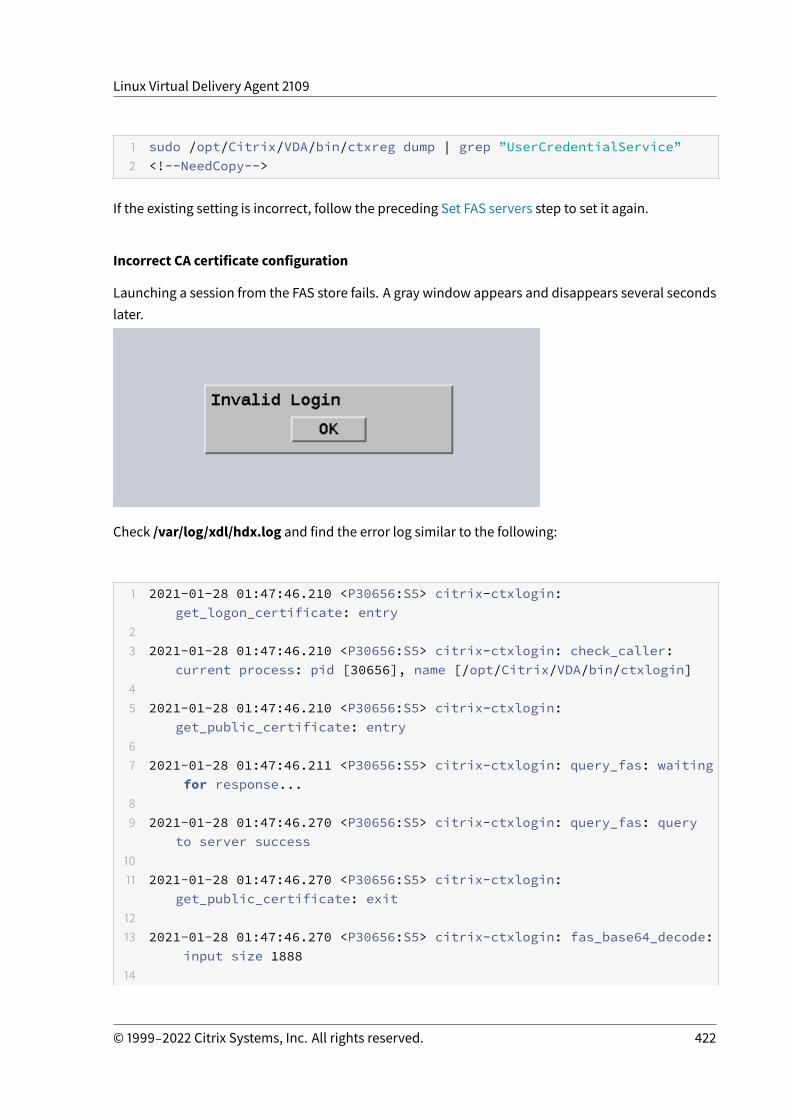
Linux Virtual Delivery Agent 2109
1 sudo /opt/Citrix/VDA/bin/ctxreg dump | grep ”UserCredentialService”2 <!--NeedCopy-->
If the existing setting is incorrect, follow the preceding Set FAS servers step to set it again.
Incorrect CA certificate configuration
Launching a session from the FAS store fails. A gray window appears and disappears several secondslater.
Check /var/log/xdl/hdx.log and find the error log similar to the following:
1 2021-01-28 01:47:46.210 <P30656:S5> citrix-ctxlogin:get_logon_certificate: entry
23 2021-01-28 01:47:46.210 <P30656:S5> citrix-ctxlogin: check_caller:
current process: pid [30656], name [/opt/Citrix/VDA/bin/ctxlogin]45 2021-01-28 01:47:46.210 <P30656:S5> citrix-ctxlogin:
get_public_certificate: entry67 2021-01-28 01:47:46.211 <P30656:S5> citrix-ctxlogin: query_fas: waiting
for response...89 2021-01-28 01:47:46.270 <P30656:S5> citrix-ctxlogin: query_fas: query
to server success1011 2021-01-28 01:47:46.270 <P30656:S5> citrix-ctxlogin:
get_public_certificate: exit1213 2021-01-28 01:47:46.270 <P30656:S5> citrix-ctxlogin: fas_base64_decode:
input size 188814
© 1999‒2022 Citrix Systems, Inc. All rights reserved. 422
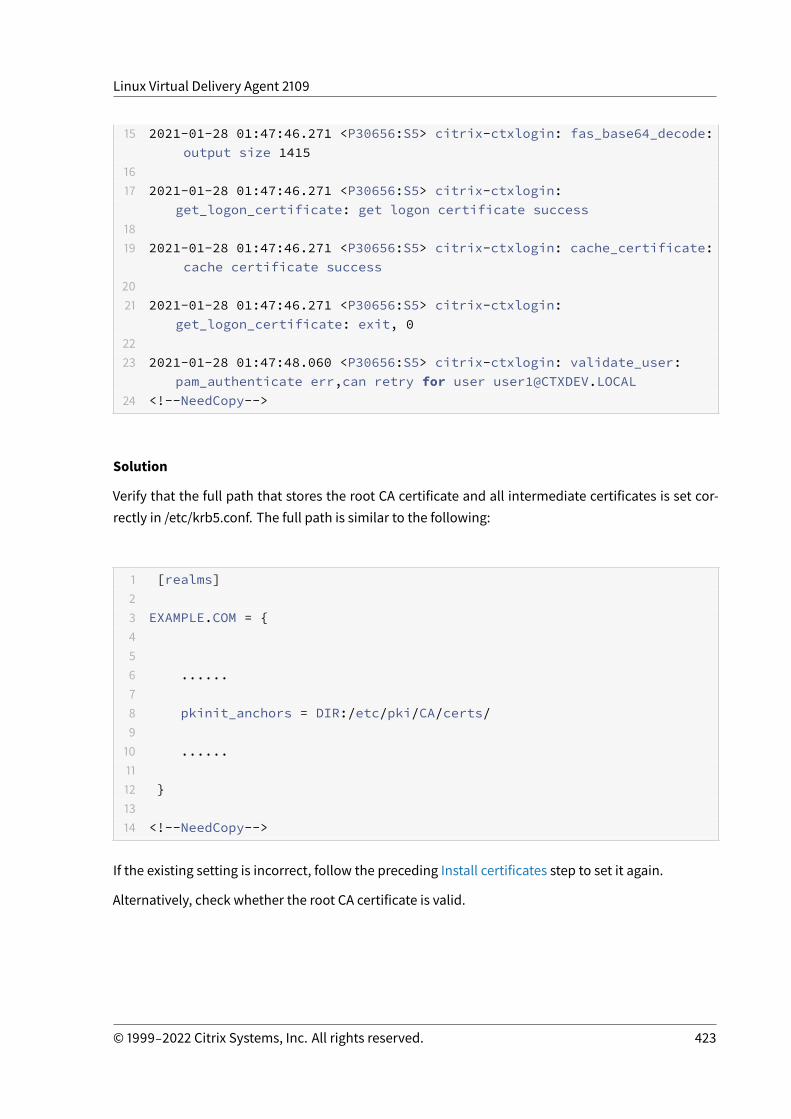
Linux Virtual Delivery Agent 2109
15 2021-01-28 01:47:46.271 <P30656:S5> citrix-ctxlogin: fas_base64_decode:output size 1415
1617 2021-01-28 01:47:46.271 <P30656:S5> citrix-ctxlogin:
get_logon_certificate: get logon certificate success1819 2021-01-28 01:47:46.271 <P30656:S5> citrix-ctxlogin: cache_certificate:
cache certificate success2021 2021-01-28 01:47:46.271 <P30656:S5> citrix-ctxlogin:
get_logon_certificate: exit, 02223 2021-01-28 01:47:48.060 <P30656:S5> citrix-ctxlogin: validate_user:
pam_authenticate err,can retry for user [email protected] <!--NeedCopy-->
Solution
Verify that the full path that stores the root CA certificate and all intermediate certificates is set cor-rectly in /etc/krb5.conf. The full path is similar to the following:
1 [realms]23 EXAMPLE.COM = {456 ......78 pkinit_anchors = DIR:/etc/pki/CA/certs/910 ......1112 }1314 <!--NeedCopy-->
If the existing setting is incorrect, follow the preceding Install certificates step to set it again.
Alternatively, check whether the root CA certificate is valid.
© 1999‒2022 Citrix Systems, Inc. All rights reserved. 423
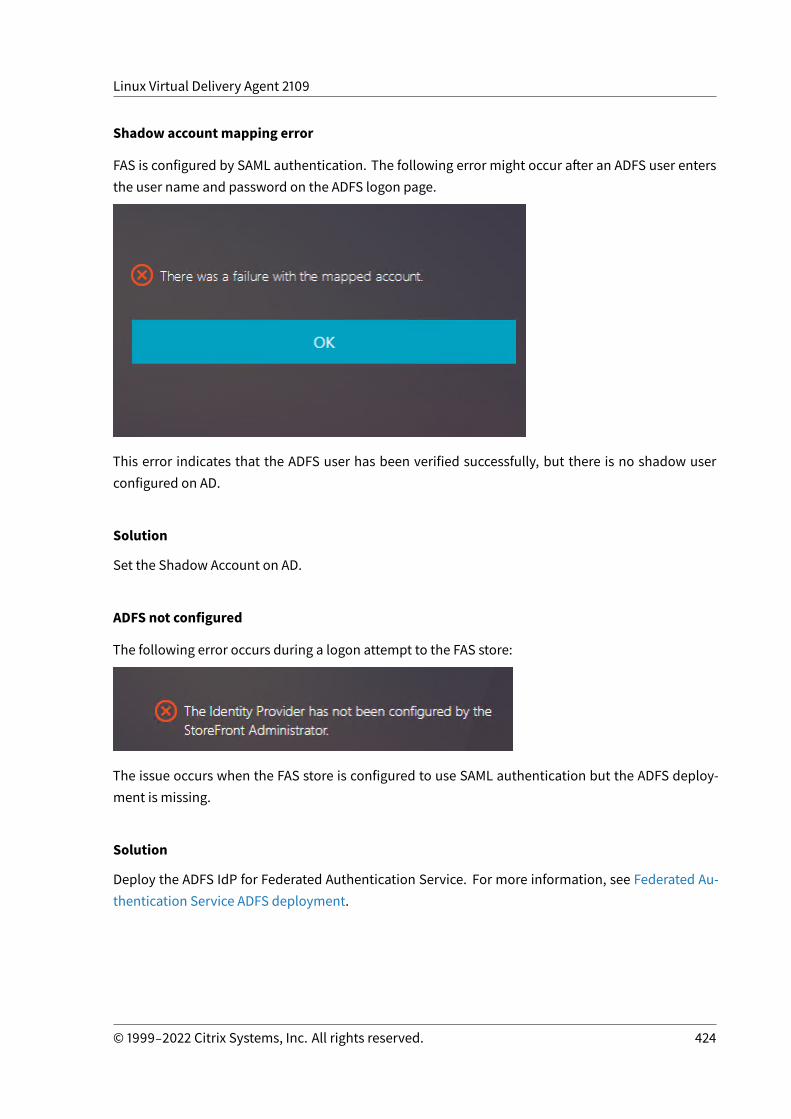
Linux Virtual Delivery Agent 2109
Shadow accountmapping error
FAS is configured by SAML authentication. The following error might occur after an ADFS user entersthe user name and password on the ADFS logon page.
This error indicates that the ADFS user has been verified successfully, but there is no shadow userconfigured on AD.
Solution
Set the Shadow Account on AD.
ADFS not configured
The following error occurs during a logon attempt to the FAS store:
The issue occurs when the FAS store is configured to use SAML authentication but the ADFS deploy-ment is missing.
Solution
Deploy the ADFS IdP for Federated Authentication Service. For more information, see Federated Au-thentication Service ADFS deployment.
© 1999‒2022 Citrix Systems, Inc. All rights reserved. 424

Linux Virtual Delivery Agent 2109
Related information
• The common FAS deployments are summarized in the Federated Authentication Service archi-tectures overview article.
• “How-to” articles are introduced in the Federated Authentication Service configuration andmanagement article.
Known issue
When FAS is in use, you can fail when trying to launch a published desktop or app session with non-English characters.
Workaround
Right-click Manage Templates in the CA tool to change the Citrix_SmartcardLogon template fromBuild from this Active Directory information to Supply in the request:
© 1999‒2022 Citrix Systems, Inc. All rights reserved. 425
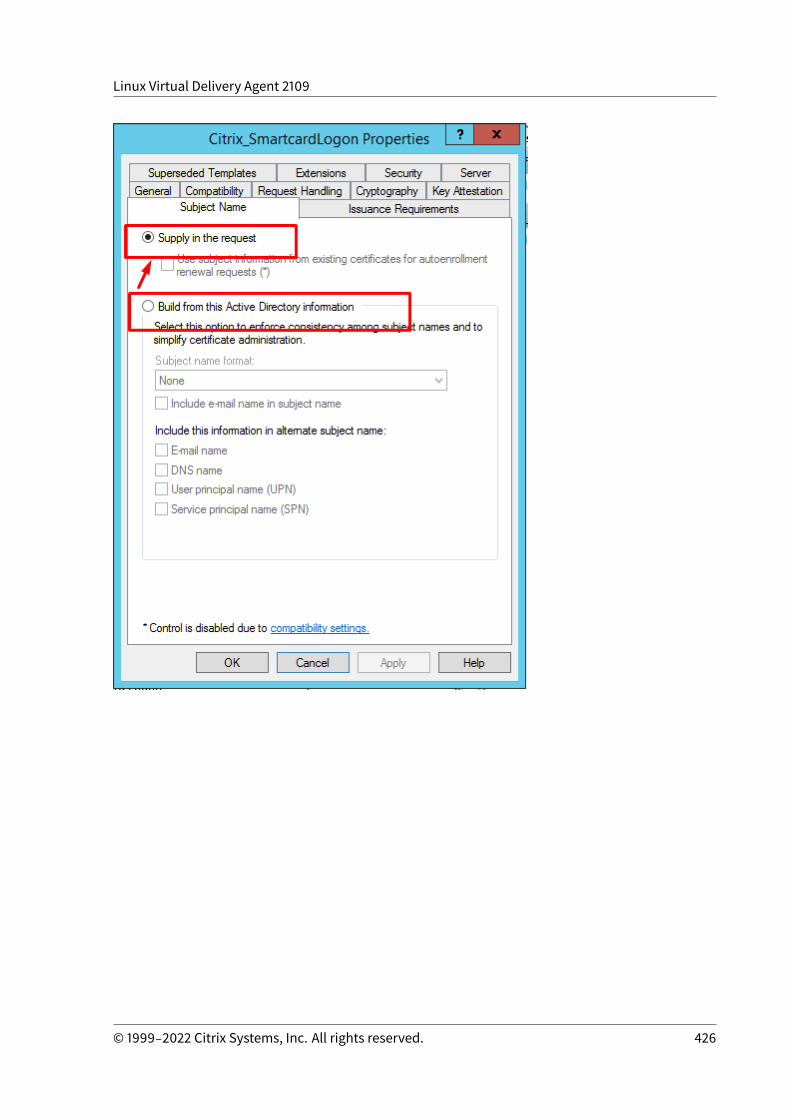
Linux Virtual Delivery Agent 2109
© 1999‒2022 Citrix Systems, Inc. All rights reserved. 426

Linux Virtual Delivery Agent 2109
© 1999‒2022 Citrix Systems, Inc. All rights reserved. 427
LocationsCorporate Headquarters | 851 Cypress Creek Road Fort Lauderdale, FL 33309, United StatesSilicon Valley | 4988 Great America Parkway Santa Clara, CA 95054, United States
© 2022 Citrix Systems, Inc. All rights reserved. Citrix, the Citrix logo, and other marks appearing herein are property of
Citrix Systems, Inc. and/or one or more of its subsidiaries, andmay be registered with the U.S. Patent and Trademark Office
and in other countries. All other marks are the property of their respective owner(s).
Citrix Product Documentation | docs.citrix.com April 18, 2022