Chemistry 2315 Laboratory Manual - CiteSeerX
30
Chemistry 2315 Laboratory Manual
-
Upload
khangminh22 -
Category
Documents
-
view
1 -
download
0
Transcript of Chemistry 2315 Laboratory Manual - CiteSeerX

Chemistry 2315
Laboratory Manual

2
Table of Contents
Lab Week Number Title Page
1 Lab Check In; Fermentation of Sucrose 3 2 Distillation of Ethanol 5 3 Extraction of Caffeine from Tea 7 4 Thin-Layer and Column Chromotography of Caffeine 10 5 Synthesis of Salicyclic Acid 12 6 Synthesis of Aspirin 14 7 Synthesis of Isopentyl Acetate 16 8 Analysis of Isopentyl Acetate by GC and IR Spectroscopy 18 9 Dehydration of 2-Methylcyclohexanol 20 10 Synthesis and Chemiluminescence of Luminol 23 11 Stereochemistry of Br2 addition to trans-Cinnamic Acid 27 12 Grignard Synthesis of Triphenylmethanol 29 13 Lab Check Out Scope of the Lab Manual. This lab manual is for use in the current Organic Chemistry Laboratory I course, Chemistry 2315. The manual gives the procedures for the experiments with limited background. The book required for this course, as well as for Chemistry 2325 is: Techniques in Organic Chemistry 2nd Edition, by Mohrig, Hammond, Schatz and Morrill, Freeman, 2006. Frequent reference is also made to the textbook for the lecture courses Chemistry 2310 and Chemistry 2320: Organic Chemistry, 5th ed., Bruice, Prentice Hall, 2007.

3
Chemistry 2315 – Experiment 1 – Lab Week 1
Fermentation of Sucrose
The fermentation of a carbohydrate to produce ethanol (grain alcohol) has been of scientific and sociological importance for a very long time (LOC p. 441, top paragraph). In this experiment a solution of sucrose, which is common table sugar, is converted to ethanol and carbon dioxide by the action of the collection of enzymes in ordinary baker’s yeast, invertase and zymase. The first step, catalyzed by invertase is the hydrolysis of sucrose to glucose and fructose and both of these are converted to ethanol and carbon dioxide under zymase catalysis. This reaction, carried out at room
C12H22O11 + H2O C6H12O6 + C6H12O6 sucrose glucose fructose
Glucose + Fructose 4 CH3CH2OH + 4 CO2
invertase
zymase
temperature takes several days to go to completion. Next weeks experiment will deal with the distillation of the aqueous solution of ethanol. Procedure Sucrose (20 g) is placed in a 250 mL Erlenmeyer flask along with 75 mL of distilled water. After stirring for a few minutes add 100 ml of distilled water and 1.5 g of dry yeast. After stirring long enough for the sugar and yeast to dissolve, add 17 mL Pasteur Salt solution and swirl gently. Make sure the contents are thoroughly mixed by swirling the flask periodically as you continue. The fermentation must be carried out in the absence of oxygen in order to prevent the production of acetic acid, a further product of fermentation when the reaction is carried out in the presence of oxygen. Fit the flask with a one-hole rubber stopper equipped with a short length of glass tubing to which is attached a length of rubber tubing. Fit the other end of the rubber tubing with an eight-inch length of glass tubing. Insert this into a six-inch

4
test tube that is clamped in a vertical position. Add saturated lime water (Ca(OH)2) to this tube to a depth of one inch. Assuming your apparatus does not have a leak, this configuration will be airtight. The evolution of carbon dioxide will drive out the residual air that is in the apparatus, and the test tube bubbler will ensure that no oxygen will diffuse back into the fermentation flask. The appearance of bubbles, and the formation of a white precipitate of calcium carbonate, serves as evidence that a reaction is really taking place. Let this apparatus sit undisturbed for one week. Bubbles should appear before you leave the lab. If they do not, you probably have a leak between the rubber hose and the glass tube. To get a tight fit, wrap a short length of copper wire around the hose at the two places identified by the arrows in the figure to the right and twist to secure the hose to the tube. The metal clamps that you use to fasten condenser hose to condensers will not work. References: TOC refers to your laboratory text, Techniques in Organic Chemistry,
Mohrig, Hammond, Schatz and Morrill, Freeman, 2006. LOC refers to your Chem 2310/2320 text book, Organic Chemistry, 5th
ed., Bruice, Prentice Hall, 2007.
Safety Precautions (read before starting the experiment): Avoid contact between skin, eyes and clothing with all chemicals used in this experiment. Do not breathe any vapors or dust from these chemicals.

5
Chemistry 2315 – Experiment 2 – Lab Week 2
Distillation of Ethanol prepared by Fermentation Prelab Reading Assignment: TOC p.p. 127 – 136. Since last week’s experiment the fermentation should have gone to completion and most of the yeast particles should have settled out. The next step is to vacuum filter the liquid in the fermentation flask. In order to avoid clogging the pores of the filter paper, add 10 g of Celite filter aid and stir to wet the Celite. Assemble vacuum filter apparatus consisting of a 500 mL filter flask equipped with a Buchner funnel and wet filter paper (TOC p. 110, Fig. 9.5). In a 50 mL beaker place about 30 mL of Celite and enough water to nearly fill the beaker. Stir and pour into the Buchner funnel while applying suction. This will create a bed of filter aid atop your filter paper. Momentarily stop the suction and empty (and discard) the water from the filter flask. Pour the material that remains in your fermentation flask into the Buchner funnel and apply suction. The filter paper may clog in spite of this procedure. If a small amount of your crude product refuses to go through the filter paper, stop the aspirator flow and continue with the filtrate that you have. Discard the yeast residue and the Celite in the solid waste container. Assemble the distilling apparatus (TOC p. 134, Fig. 11.6) and add two boiling chips. Carefully heat the solution to boiling and attempt to adjust the rate of distillation to about 1 drop/second. Distill the ethanol, collecting the liquid in a 100-ml graduated cylinder. Record the temperature as each 2.0 ml collects in the graduate cylinder. After about 20 ml have been collected change to a second graduate cylinder. When about 30 ml more of distillate has collected, turn off the heat and remove the heating mantle from the distillation flask. During the distillation, the water content will be minimized if you collect distillate at a slow rate. The reflux ratio can be controlled by adjusting the temperature. In order to determine the density of your distillate, weigh a dry 10-ml Erlenmeyer flask and pipet 10.00 ml of your distillate into the flask and weigh once more to a precision of 0.01 gram. Calculate the density of your ethanol solution. Determine the weight % ethanol in the distillate using Figure 3 on the following page. To check your results, the following polynomial equation (D = density of your solution) gives weight % ethanol to ±1%. Weight % Ethanol = 3349 – 11008 D + 12764 D2 – 5108 D3
Safety Precautions (read before starting the experiment): Avoid contact between skin, eyes and clothing with all chemicals used in this experiment. Do not breathe any vapors or dust from these chemicals.

6
0 20 40 60 80 1000.75
0.80
0.85
0.90
0.95
1.00
Figure 3
Den
sity
% Ethanol by Weight
Questions
1. Write balanced equations for the formation of ethanol from sucrose. 2. During the fermentation reaction a precipitate forms in the Ca(OH)2 solution.
Write a balanced equation for the reaction giving the precipitate. 3. Why is not possible to separate ethanol and water by distillation?
4. What is the density of an aqueous ethanol solution containing 80% ethanol by
weight? References: TOC refers to your laboratory text, Techniques in Organic Chemistry,
Mohrig, Hammond, Schatz and Morrill, Freeman, 2006. LOC refers to your Chem 2310/2320 text book, Organic Chemistry, 5th
ed., Bruice, Prentice Hall, 2007.

7
Chemistry 2315 – Experiment 3 – Lab Week 3
Extraction of Caffeine from Tea Leaves Prelab Reading Assignment: TOC p.p. 75-100. Background: Extraction involves the removal of a solute from one solvent by shaking with another solvent, immiscible with the first. In the organic chemistry laboratory extraction is a widely used tool for the isolation of a product of a reaction and for the separation of various components from a mixture. A common application is to separate one substance from its impurities.
The characteristics of a good extraction solvent are: 1. The extraction solvent should be immiscible with the other solvent. 2. A low boiling point is a desirable characteristic of the extraction solvent to insure that
it can be evaporated easily to allow recovery the extracted substance. 3. The extraction solvent should have a high affinity for the substance being extracted
(i.e. the solute should dissolve readily in the extraction solvent). Most extraction solvents are organic compounds that are immiscible with water. Some of the more common extraction solvents used in the organic laboratory are: ether, petroleum ether, pentane, hexane, and methylene chloride. If a solution is comprised of a solute dissolved in solvent 1 and a solvent 2 is added to the separation vessel (usually a separatory funnel) and the resulting mixture is mixed, for example by shaking the separatory funnel, the solute will be distributed into both solvent layers. An equilibrium will be established in both layers with the ratio of the concentration of the solute in the two layers defining a constant. This constant is called the Distribution Coefficient, K, and is defined by K=C1/C2
Where C1 and C2 are the concentrations of the solute in solvents 1 and 2 , respectively. If K is greater than 100 then one single extraction will suffice. If K is less than 10 then multiple extractions will be necessary to isolate most of solute In this experiment we will extract caffeine from tea leaves. Caffeine, a purine base, is related to the guanine and adenine components of deoxyribonucleic acids (DNA).
8
NH
NNH
N
O
NH2
N
NNH
N
NH2
N
NN
N
O
CH3
H3C
CH3
O
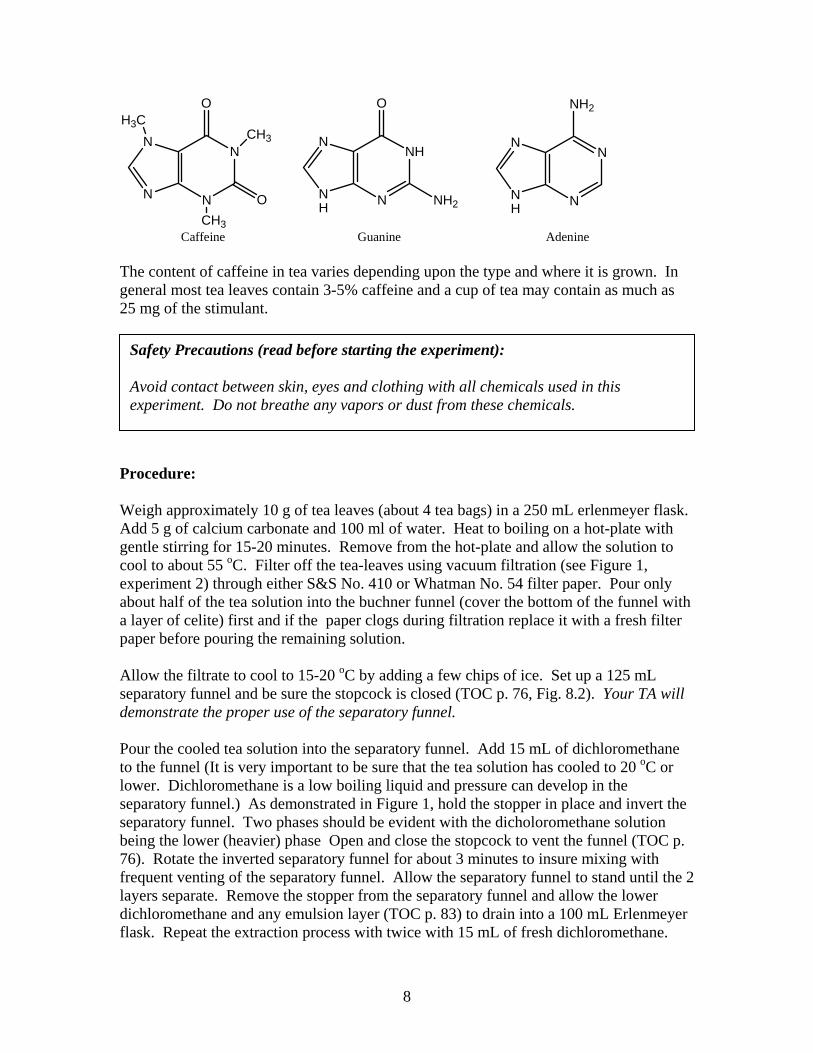
Caffeine Guanine Adenine The content of caffeine in tea varies depending upon the type and where it is grown. In general most tea leaves contain 3-5% caffeine and a cup of tea may contain as much as 25 mg of the stimulant. Procedure: Weigh approximately 10 g of tea leaves (about 4 tea bags) in a 250 mL erlenmeyer flask. Add 5 g of calcium carbonate and 100 ml of water. Heat to boiling on a hot-plate with gentle stirring for 15-20 minutes. Remove from the hot-plate and allow the solution to cool to about 55 oC. Filter off the tea-leaves using vacuum filtration (see Figure 1, experiment 2) through either S&S No. 410 or Whatman No. 54 filter paper. Pour only about half of the tea solution into the buchner funnel (cover the bottom of the funnel with a layer of celite) first and if the paper clogs during filtration replace it with a fresh filter paper before pouring the remaining solution. Allow the filtrate to cool to 15-20 oC by adding a few chips of ice. Set up a 125 mL separatory funnel and be sure the stopcock is closed (TOC p. 76, Fig. 8.2). Your TA will demonstrate the proper use of the separatory funnel.
Pour the cooled tea solution into the separatory funnel. Add 15 mL of dichloromethane to the funnel (It is very important to be sure that the tea solution has cooled to 20 oC or lower. Dichloromethane is a low boiling liquid and pressure can develop in the separatory funnel.) As demonstrated in Figure 1, hold the stopper in place and invert the separatory funnel. Two phases should be evident with the dicholoromethane solution being the lower (heavier) phase Open and close the stopcock to vent the funnel (TOC p. 76). Rotate the inverted separatory funnel for about 3 minutes to insure mixing with frequent venting of the separatory funnel. Allow the separatory funnel to stand until the 2 layers separate. Remove the stopper from the separatory funnel and allow the lower dichloromethane and any emulsion layer (TOC p. 83) to drain into a 100 mL Erlenmeyer flask. Repeat the extraction process with twice with 15 mL of fresh dichloromethane.
Safety Precautions (read before starting the experiment): Avoid contact between skin, eyes and clothing with all chemicals used in this experiment. Do not breathe any vapors or dust from these chemicals.

9
Pour the aqueous (tea) solution out the top of the separatory funnel into a beaker. Rinse the separatory funnel with distilled water and pour the combined dichloromethane extracts back into the funnel. Add about 20 mL of water, stopper the funnel, and rotate to mix as before. If some emulsion is still present at the interface between the two solutions, place a piece of glass wool in the bottom of the dichloromethane layer using a stirring rod. This should break up the emulsion while draining. Drain the lower dichloromethane layer into a 100 mL Erlenmeyer flask. Add a few grams of anhydrous magnesium sulfate to the dichloromethane solution, stopper the flask and allow to stand for a few minutes with occasional swirling. Place a fluted filter paper into a dry conical funnel and filter the dichloromethane solution and collect the filtrate in a clean, dry and weighed (tared) 100 mL Erlenmeyer flask. Allow the dichloromethane to evaporate by heating in a water bath (about 50 oC) in the hood. Continue to heat on the water bath until a dry greenish residue of crude caffeine forms on the bottom of the flask. Place a stopper in the 100 mL Erlenmeyer flask and put it in your lab drawer. This is the starting material for the chromatography experiment next week. References: TOC refers to your laboratory text, Techniques in Organic Chemistry,
Mohrig, Hammond, Schatz and Morrill, Freeman, 2006. LOC refers to your Chem 2310/2320 text book, Organic Chemistry, 5th
ed., Bruice, Prentice Hall, 2007. Questions
1. Why are the tea leaves boiled in water in this experiment? If you made a cup of tea by placing a tea bag in cold water how would it taste compared to tea made by placing the tea bag in boiling water?
2. Why is the aqueous tea solution cooled before adding dichloromethane? What
would be the result of adding dichloromethane to a 55o tea solution? 3. What is the function of salt (NaCl) sometimes added to the aqueous layer during
an extraction? What is this process called?
4. Why is the extraction more efficient when 3 extractions (15 mL dichloromethane each) are used instead of a single extraction using 45 mL of dichloromethane?

10
Chemistry 2315 – Experiment 4– Lab Week 4
Thin-Layer and Column Chromotography of Caffeine. Prelab Reading Assignment: TOC p.p. 175 – 189; 206-223. The greenish residue from the previous experiment contains mostly caffeine which is white and a small amount of chlorophyll. Pure caffeine can be obtained by sublimation but we will use an alternative method to obtain the pure product, column chromatography. Thin-layer chromatography (TLC) will be used to follow the progress of the separation by column chromatography.
N
N N
N NN
N
NMg
CH2
H3C
CH3
CH3
O
H3C
H3C
OO
C20H39
CH2
CH3
H3CO
O
O
O
CH3
CH3
H3C
Caffeine
Chlorophyll a Procedure: Pack the column (use a 25 mL buret) with 1.5 g. of 60 mesh silica gel according to the directions given (TOC p. 214, Fig. 17.3). Load the crude product (dissolved in a minimum amount of chloroform) onto the column. Elute the column with three 5-mL portions of dichloromethane followed by three 5 mL portions of 5% ethyl acetate in dichloromethane and finally with three to six 5 mL portions of pure ethyl acetate. Collect approximately 5 mL fractions in numbered test tubes.
Safety Precautions (read before starting the experiment): Avoid contact between skin, eyes and clothing with all chemicals used in this experiment. Do not breathe any vapors or dust from these chemicals.

11
The developing chamber may consist of a wide-mouth capped jar (TOC p. 184, Fig. 15.6) with a piece of filter paper inserted to act as a wick to insure saturation with solvent vapor. Add enough ethyl acetate to cover the bottom of the jar to a depth of about 3 mm. Mark a short line about 1 cm from the bottom edge of a TLC plate (TOC p. 181, Fig. 15.3) and using a micropipet spot the plate with 1-5 µL of fraction 1 and with the standard caffeine solution at the 1 cm mark on the plate. The volume of the liquid in the spot should be adjusted by practice so that it has a diameter of about 2 mm. If more material is required you can spot the solution in the same place after the first spot has dried. As many as 5 spots can be placed on a single TLC plate. The TLC plate can then be developed by placing in the developing chamber with a pair of tweezers. The plate should be removed when the solvent has reached about 1 cm from the top of the plate. Mark the solvent front with a pencil and allow the solvent on the plate to dry in the hood. Number the plate and set aside for examination. Repeat this procedure with all of the fractions collected. The spots due to caffeine on the TLC plates can be observed by shining the UV lamp (TOC p. 185, Fig. 15.7) on the plate in a darkened room. Outline the dark spots due to caffeine with a pencil while the lamp is on. Spots due to chlorophyll are pale green in ordinary light and can be marked in the same way. Prepare a table of the results of the TLC analyses showing what compounds are present in each fraction. Qualitatively estimate the relative amounts of caffeine in each fraction as 0 (none), S (small amount), M (medium amount) and L (large amount). Questions
1. How would you isolate the caffeine obtained from the column chromatography experiment?
2. Determine the relative Rf values of caffeine from your TLC data. 3. Give a reason for the Rf value of caffeine being greater than that for chlorophyll. 4. What conclusions could you draw from the fact that two compounds of unknown
identity have identical Rf values during a TLC experiment? References: TOC refers to your laboratory text, Techniques in Organic Chemistry,
Mohrig, Hammond, Schatz and Morrill, Freeman, 2006. LOC refers to your Chem 2310/2320 text book, Organic Chemistry, 5th
ed., Bruice, Prentice Hall, 2007.

12
Chemistry 2315 – Experiment 5 – Lab Week 5
Synthesis of Salicylic Acid by Hydrolysis of Oil of Wintergreen Prelab Reading Assignment: TOC 100 – 111, 116 - 123 The objective of this experiment is to synthesize salicylic acid and to purify it by recrystallization. Salicylic acid is an important intermediate in the manufacture of aspirin (experiment 6). In our synthesis we will use a natural product, oil of wintergreen (methyl salicylate) which makes up about 90% of the oil extracted from the wintergreen plant. The ester (methyl salicylate) is readily hydrolyzed to the corresponding salt
Methyl salicylate Salicylic Acid
OH
COOCH3
O-Na+
COO-Na+
OH
COOH
2 NaOH
- H2O- CH3OH
H2SO4
- Na2SO4
by treatment with aqueous sodium hydroxide. Since there are two acidic protons on salicylic acid, the initial product is the disodium salt which upon treatment with a strong acid (sulfuric acid in this case) is converted to salicylic acid. Salicylic acid has limited solubility in water (0.23 g/100 mL at 25 oC) and it precipitates during the reaction. Procedure. Equip a 100 mL round-bottomed flask clamped to a ring-stand with a water-cooled condenser. Remove the condenser while placing 4.6 g (0.12 mol) of sodium hydroxide and 25 mL water in the flask with swirling until the solid dissolves. Add 2.0 mL (0.015 mol) of methyl salicylate, add two boiling stones, and replace the condenser. Place a heating mantle under the flask and heat the reaction mixture under a gentle reflux for 15 min. The initially formed solid will dissolve as the temperature increases. After refluxing, remove the heating mantle and allow the flask to cool by placing it in a beaker containing cold tap water. Carefully add about 3 mL at a time of 3 M sulfuric acid solution until you have added just enough to give a heavy white precipitate. After the precipitate forms add an additional 3
Safety Precautions (read before starting the experiment): Avoid contact between skin, eyes and clothing with all chemicals used in this experiment. Do not breathe any vapors or dust from these chemicals.

13
mL of 3 M sulfuric acid solution to ensure complete precipitation. It will require a total of 15-25 ml of the acid solution. Cool the solution to about 5 oC in an ice-water bath and collect the crude product by vacuum filtration (TOC p. 110, Fig. 9.5). Place the crude product along with a boiling stone in a dry 125 mL Erlenmeyer flask and in another 125 mL Erlenmeyer place 60 mL of water and heat nearly to boiling on a hot plate. Carefully pour about 20 mL of the hot water into the flask containing the crude product and heat to boiling on the hot plate. Continue adding about 5 mL portions of hot water until the solid has dissolved. When the all of the solid has dissolved add about 10 mL of hot water and record the total amount of hot water added. Place the flask on the bench top until crystallization has taken place throughout the solution and the temperature has cooled nearly to room temperature. Then, place the flash in an ice-water bath for about 10 min. (Be sure you allow the flask to cool to near room temperature before using the ice-water bath.) Collect the crystals by vacuum filtration. Disconnect the vacuum and wash with about 5 ml of ice-water. Connect the vacuum once more to remove water and continue pulling air through the filter for at least 5 min. Collect the crystals on a filter paper and place in your desk drawer until the next lab period. By that time the crystals should be dry. Weigh your salicylic acid product and calculate your percent yield. Take the melting point (TOC p. 120-121) of your product and compare this with the expected value (ask your TA for the expected melting point after you have taken your melting point). Questions
1. When the melting point of a known compound is measured, the value is sometimes lower than that given in the literature. Give possible reasons for the discrepancy.
2. If an attempt to recrystallize a solid from a solvent it was found that no solid was deposited on cooling. How could the solid be recovered from this experiment.
3. If only 0.5 g of salicylic acid was obtained from the hydrolysis of 1.0 g of methyl salicylate, what is the percentage yield in the reaction? What is the theoretical yield of the acid?
4. What factors might contribute to lowering the yield during this synthesis? References: TOC refers to your laboratory text, Techniques in Organic Chemistry,
Mohrig, Hammond, Schatz and Morrill, Freeman, 2006. LOC refers to your Chem 2310/2320 text book, Organic Chemistry, 5th
ed., Bruice, Prentice Hall, 2007.

14
Chemistry 2315 – Experiment 6 – Lab Week 6
Prelab Reading Assignment: TOC pp. 100-111, LOC p. 745.
Synthesis of Aspirin In this experiment we synthesize a derivative of one of the oldest drugs in use today. Hippocrates, sometime between 460 and 377 B.C. described pain relief from a powder obtained from the bark and leaves of the willow tree. In 1829 it was reported that the active pain reliever was salicin that is now known to be salicylic acid, the product of last week’s experiment. Salicylic acid was observed to produce undesirable side effects including irritation of membranes lining the stomach. The synthesis of aspirin, the acetyl derivative of salicylic acid, which we carry out in this lab was first accomplished by German chemist Felix Hofmann in 1893 who also found that aspirin acted as a pain reliever without producing the undesirable side effects. Hofmann’s synthesis involves the phosphoric acid catalyzed esterification of the hydroxyl group of salicylic acid by reaction with acetic anhydride.
COOH
OH
COOH
O
H3C
C=O
O
H3C
C=O
HOC=O
H3CCH3
O+ +H3PO4
Salicyclic Acid Acetic Anhydride Acetylsalicyclic Acid Acetic Acid
(aspirin) Procedure. Acetic anhydride is a toxic lachrymator (tear causing) liquid. The esterification must be carried out in the hood. Place salicylic acid (1.0 g, 7.2 mmol) in a dry 50-mL Erlenmeyer flask. Pipet (using a pipet bulb) 2.0 mL (21 mmol) of acetic anhydride into the flask. Add 5 drops of phosphoric acid (85%) and mix by swirling the flask. Let the reaction mixture stand for about 10 min. in the hood during which time it will become warm.
Safety Precautions (read before starting the experiment): Avoid contact between skin, eyes and clothing with all chemicals used in this experiment. Do not breathe any vapors or dust from these chemicals. Wear gloves when handling and mixing the chemicals. Salicylic acid is toxic and is an irritant. Acetic anhydride a toxic, corrosive lachrymator. Phosphoric acid is a strong acid and causes burns.

15
Heat in a water bath (about 50 oC) for 5 min. Warm tap water can be placed in a beaker and heated on a hot plate to prepare the water bath. Place the flask in an ice-water bath for a few minutes and gently scratch the inside wall below the liquid to induce crystallization. Add about 10 ml of cold water and 6 g. of ice and stir to break up the solid. When the ice has melted collect the crystals by vacuum filtration (TOC p. 110, Fig. 9.5). Wash any remaining solid from the flask using a minimum volume of ice-cold water. Wash the solid on the filter funnel with several 2 mL portions of ice-cold water. Residual water can be removed by pressing the solid with a cork while pulling air through the filter. Keep enough of the crude solid to use for a melting point determination (about 10 mg). Place your crude product in a 50 mL Erlenmeyer flask along with 1.5 mL of ethanol and stir to dissolve, heating in a water bath if necessary. Pour 10 mL of warm water (about 60 oC) into the solution. If the solution becomes cloudy, heat the flask in the water bath until it becomes clear. Allow the solution to cool to room temperature (about 15 min). Then place the flask in an ice-water bath for about 5 min to allow crystallization to go to completion. Collect your crystalline product by vacuum filtration and allow the crystals to stand on a filter paper until the next laboratory period. Weigh your product and calculate the percent yield. Compare the melting points of the crude product with that of the recrystallized sample. During the next laboratory period record the IR spectrum of your product and compare it to the spectrum provided (by your TA). Questions
1. What is the purpose of adding 85% phosphoric acid during this synthesis? 2. Can you suggest a possible replacement for acetic anhydride in the synthesis
of aspirin? 3. In this experiment which of the reactants is the limiting reagent? 4. What is the theoretical yield of aspirin in your experiment? Show your
calculations. References: TOC refers to your laboratory text, Techniques in Organic Chemistry,
Mohrig, Hammond, Schatz and Morrill, Freeman, 2006. LOC refers to your Chem 2310/2320 text book, Organic Chemistry, 5th
ed., Bruice, Prentice Hall, 2007.

16
Chemistry 2315 – Experiment 7 – Lab Week 7
Synthesis of Isopentyl Acetate Prelab Reading Assignment: Gas-Liquid Chromotography (TOC pp. 190-205). The objective of this experiment is to synthesize isopentyl acetate, the major component in banana oil, which has a banana odor.
H3C
H2C
CH3
HCH2O
H
H3C
H2C
CH3
HCH2O
O
H3C
H3C C
O
O
H+
+ H2O
H2SO4
Acetic Acid Isopentyl alcohol Isopentyl Acetate
(banana oil) Procedure. Place isopentyl alcohol (16 mL, 0.147 mol) in a 100-mL round-bottomed flask together with glacial acetic acid (22 mL, 0.38 mol) and cautiously add 1 mL of concentrated sulfuric acid. Equip the flask with a water-cooled condenser and place it in a heating mantle. Add 2 boiling chips and bring the solution to a gentle reflux and continue heating for 1 hr. Allow the flask to cool in an ice-water bath and pour the solution into a small separatory funnel (TOC p.p. 60-61, Fig. 8.2). Wash the reaction mixture with 25 mL of water and then a 25 mL portion of 0.5 M sodium bicarbonate. Vent the funnel after gently mixing to allow carbon dioxide to escape. Shake the funnel with frequent venting until no more gas is released. Remove the lower aqueous layer and extract with additional 25 mL portions of 0.5 M sodium bicarbonate until the aqueous layer remains blue to litmus paper. Finally, wash the organic layer with 25 mL 4M NaCl solution. Dry the crude ester over CaCl2 for about 5 min. and filter through a cotton plug in a small funnel (TOC p. 96, Fig. 8.15) into a 50 mL round-bottom flask. Put a stopper in place and set aside the flask until the next lab period.
Safety Precautions (read before starting the experiment): Avoid contact between skin, eyes and clothing with all chemicals used in this experiment. Do not breathe any vapors or dust from these chemicals. Wear gloves when handling and mixing the chemicals. Isopentyl alcohol and isopentyl acetate are flammable and are irritants.. Acetic Acid and concentrated H2SO4 are corrosive and cause severe burns.

17
At the beginning of the next lab period, set up for simple distillation (TOC p. 134, Fig. 11.6) and collect the fraction boiling between 137 and 142 oC. Use a tared receiving flask and weigh after the distillation to determine the yield of product. Questions
1. During the isolation procedure, the ester is washed with 0.5 M sodium bicarbonate. Why is this necessary?
2. Many esterification reactions are carried out in alcohol solution and the alcohol is one of the reactants. Comment on what properties of the alcohol are desirable for this procedure.
3. If an acid labeled with 18O in the carbonyl group is esterified with unlabeled alcohol show by equations where the 18O can be expected to be found in the product.
4. What is the function of the concentrated sulfuric acid in the ester synthesis? References: TOC refers to your laboratory text, Techniques in Organic Chemistry,
Mohrig, Hammond, Schatz and Morrill, Freeman, 2006. LOC refers to your Chem 2310/2320 text book, Organic Chemistry, 5th
ed., Bruice, Prentice Hall, 2007.

18
Chemistry 2315 – Experiment 8 – Lab Week 8
Analysis of Isopentyl Acetate and I.R. Spectroscopy.
Prelab Reading Assignment: TOC p. 246-247. You will determine the purity of your product from last week by gas chromatographic analysis using a non-polar column which will be column A. A column temperature of about 120 oC should be suitable for the analysis. Inject a 5-µL sample of the product in CHCl3 (1/1) and start the chart recorder and watch for peaks. After recording the chromatogram, inject a 5-µL sample of your reactant alcohol in CHCl3 (1/1) for a reference. Prepare for the I.R. experiment by placing a drop of your product on a salt-plate and making a liquid film by setting a second salt-plate on top of the first. Record the I.R. spectrum (see hand-out and instructions from your T.A.). Compare your spectrum with the authentic spectrum of isopentyl acetate. The following instructions are for the use of the GOW-MAC gas chromatograph.
Instrument Preparation (TA before lab period):
1. Set regulator pressure to 30 psi. 2. Check to be sure that all temperature and current dials are fully counter-
clockwise. 3. Check gas flow from exit ports. 4. Turn power switch to ON. 5. Set temperature controls to desired value (column 100o, Injection port 110 oC,
detector 120 oC). Remember that the injection port and detector temperatures should be 10 degrees higher than the column temperature. Allow about 1 hour for temperatures to stabilize.
6. When temperatures have stabilized the detector current should be set to 150 mA.
7. Set polarity to + for column A use. 8. Set attenuation to have the largest peak to about 75% full-scale deflection.
Safety Precautions (read before starting the experiment): Avoid contact between skin, eyes and clothing with all chemicals used in this experiment. Do not breathe any vapors or dust from these chemicals. Wear gloves when handling and mixing the chemicals. Isopentyl alcohol and isopentyl acetate are flammable and are irritants..

19
Instrument Shut-Down (TA at the end of lab period): 1. Any less-volatile sample components that remain in the column should be
eluted before the instrument is turned off. 2. Reduce the detector current by turning the detector control fully counter-
clockwise. 3. Turn the power switch to off. 4. Turn the recorder off and remove and cap the recorder pen. 5. First make sure the detector current is off and then close the main gas valve.
Questions Questions 1-4 in TOC on p. 205.
References: TOC refers to your laboratory text, Techniques in Organic Chemistry, Mohrig, Hammond, Schatz and Morrill, Freeman, 2006.
LOC refers to your Chem 2310/2320 text book, Organic Chemistry, 5th
ed., Bruice, Prentice Hall, 2007.

20
Chemistry 2315 – Experiment 9 – Lab Week 9
Dehydration of 2-Methylcyclohexanol
Prelab Reading Assignment: LOC p.p. 438-439. The objective of this experiment is to observe the dehydration of 2-methylcyclohexanol and the further rearrangement of the initial product in the presence of sulfuric acid.
CH3
OH
CH3 CH3 CH2
bp 165-168 oC bp 110 oC bp 104 oC bp 102 oC
density 0.93 g/ml
H2SO4
H3PO4
A simple procedure for the synthesis of alkenes is the acid-catalyzed dehydration (removal of water) of an alcohol. When the alcohol is unsymmetrically substituted, as in the present case, a mixture of isomeric alkenes results and the most stable one predominates. Whenever a small amount of an isomerically pure alkene is needed, other (generally more expensive) synthetic methods are used. Almost any strong proton donor (Brönsted acid) will catalyze the dehydration of secondary and tertiary alcohols, as will many Lewis acids (I2, BF3, etc.). Sulfuric acid is strong enough to catalyze the isomerization of the alkene products by protonation of the double bond. For this reason, somewhat weaker acids such as phosphoric or oxalic acids or potassium bisulfate find frequent use. In our experiment, 2-methylcyclohexanol will be dehydrated to a mixture of alkenes. After removal of the co-distilled water and traces of acid, the overall yield will be calculated and the presence of the alkene will be confirmed. This is accomplished by
Safety Precautions (read before starting the experiment): Avoid contact between skin, eyes and clothing with all chemicals used in this experiment. Do not breathe any vapors or dust from these chemicals. Wear gloves when handling and mixing the chemicals. Concentrated H2SO4 is corrosive and causes severe burns.

21
reaction with KMnO4 and the ratio of the products may be determined by gas chromatography (GC). Procedure. To a 50 mL round-bottom flask, add 10mL of 2-methylcyclohexanol along with 3 mL of 85% phosphoric acid and a boiling chip are added to a 50 mL round-bottom flask. Add 10 drops of conc. sulfuric acid. Lubricate the flask joint lightly and attach the flask to an assembly for fractional distillation (TOC p.p. 142-145) using a test tube for collection of the distillate. Heat the contents of the flask slowly and evenly (heating mantle) until the product distills. The temperature of the distillate should be kept below 96 oC by regulating the rate of heating. If the temperature at the top of the column exceeds 96 oC, the distillate will contain significant amount of reactant which complicates the GC analysis and decreases the yield of product. The efficiency of fractional distillation is strongly dependent upon the maintenance of vapor-liquid equilibrium, which requires careful heating. Continue the distillation until 8 –10 mL of liquid have been collected but be careful to stop heating before the reaction flask becomes dry.*
Using a Pasteur pipette, draw out the lower water layer. Wash the upper organic layer with approximately 3 mL of 10% sodium carbonate solution by repeated “squirting” of the lower water layer into the upper organic layer using the Pasteur pipette. Repeat the process with 5 mL of saturated NaCl solution. Dry the organic layer by adding a small amount of calcium chloride, corking the test tube, and allowing the solution to stand for about 10 minutes. Transfer the dry organic liquid to a pre-weighed vial and determine the yield of your product. Product Analysis Perform the qualitative tests for alkenes (potassium permanganate oxidation and bromine addition) on your cyclohexene product and on 2-methylcyclohexanol. The permanganate test consists of adding 1 drop of 2% potassium permanganate to a small test tube containing a few drops of product and 2 mL of water. The formation of a brown precipitate is a positive test for unsaturation. The bromine test consists of adding a few drops of 5% bromine in dichloromethane solution to a test tube containing about 3 drops of product in 1 mL of dichloromethane. The immediate disappearance of the red-brown bromine color is a positive test for unsaturation. Determine the purity of your product by GC analysis (see experiment 6). Record and explain your results. *Never distill an organic substance to dryness. This can be extremely dangerous because many organic liquids contain small amounts of peroxides (compounds with general formula ROOH) formed by reaction with atmospheric oxygen. Peroxides are unstable (and often shock sensitive) and may explode when heated.

22
Questions
1. What was the purpose of washing the organic layer with 10% sodium carbonate solution during the extraction.
2. Suggest a purpose of the presence of H3PO4 in this experiment. 3. How would you expect the product distribution to change if conc. H2SO4 was
not included in the reaction mixture? 4. Suggest a mechanism for the reaction in the presence of conc. H2SO4. 5. Suggest possible side reactions that may be expected to take place if the
reaction is carried out in the presence of HCl rather than H2SO4. References: TOC refers to your laboratory text, Techniques in Organic Chemistry,
Mohrig, Hammond, Schatz and Morrill, Freeman, 2006. LOC refers to your Chem 2310/2320 text book, Organic Chemistry, 5th
ed., Bruice, Prentice Hall, 2007.

23
Chemistry 2315 – Experiment 10 – Lab Week 10
Synthesis and Chemiluminescence of Luminol
Bioluminescence and chemiluminescence both involve chemical reactions that result in the emission of light. They differ in that bioluminescence refers to the emission of light by a living organism, while chemiluminescence involves light production by purely a chemical means. A surprising diversity of organisms are able to emit light, including some fungi, dinoflagellates, protozoans, bacteria, hydras, sponges, corals, jellyfish, worms, shrimp, clams, snails, insects, squids, and fishes. Perhaps the most well known example is termites, where in some cases it is believed that a distinctive pattern of light flashes aids in finding a mate. The emission of light is a way, other than simply giving off heat, for an exothermic reaction to give off energy. In order to produce light, the chemical reaction must produce a molecule that is in a high-energy, electronically excited state, which means that an electron has been elevated to an orbital that is of higher energy than its normal ground state orbital. When the electron loses energy and returns to its ground state, light is emitted. This process is diagrammed below. From physics you may be familiar with the equation relating energy (E) to the frequency (ν) of light, E = hν, where h is Planck’s constant, 1.58 × 10⁻³⁴ kcal-sec. Chemists often refer to light as hν.
Energy
Excited state(singlet)
∆E = hν
Ground state
-hν
The excited state shown above is a singlet, because it has paired spins that cancel each other out. Singlet excited states only last for a very short time (lifetime <10-9 sec) and they then fall to the lower orbital. The emission of light is called fluorescence. If the excited state is a triplet, having electron spins that are identical, it lasts much longer (lifetime 10-4 sec to several minutes). The longer lifetime occurs because it takes longer to flip one of the spins and gain the low energy ground state. The inversion of spin is called “intersystem crossing.”
Triplet(spins same)
Singlet(spins opposite)
intersystemcrossing

24
The overall scheme, the production of light involves the excitation of a molecule to its triplet state, followed by intersystem crossing to a singlet state and emission of light as the electron falls to the ground state.
A B* B* B
(triplet) (singlet) ground state)
-hν
Both bioluminescence and chemiluminescence follow this general scheme. They are also both similar in that they require oxygen. In this experiment, you will synthesize the molecule luminol, which loses nitrogen and forms an excited triplet state in the presence of hydrogen peroxide (H2O2). As the system undergoes intersystem crossing and decay to the ground state, blue-green light is emitted. You will prepare luminol in the following two-step synthesis. 3-Nitrophthalic acid will first be heated with hydrazine to eliminate two moles of water and generate two amide linkages in a geometrically favorable six-membered ring. This product is then reduced with the mild reducing agent sodium hydrosulfite to convert the nitro group to an amino group. The product is luminol.
NO2COOH
COOH+
NH2NH2
NO2
NHNH
O
O
NH2
NHNH
O
O
heat
-H2O
3-nitrophthalic acidmp 222 °CMW 211
hydrazineMW 32.1
5-nitrophthalhydrazide luminol(5-aminophthalihydrazide)
mp 332 °CMW 177
Synthesis of Luminol
Na2S2O4
To oxidize the luminol and produce light, base is first added to produce a resonance stabilized dianion. The amide bonds are then cleaved oxidatively to give the anion of 3-aminophthalic acid in its triplet excited state. Intersystem crossing then yields the singlet state, and the falling of the electrons to their ground state results in the production of a beautiful blue-green light.

25
NH2
NN
O
O
H
H
NH2
NN
O
O
Triplet excitedstate + N2
Singlet excitedstate
intersystemcrossing
NH2CO2
CO2
hν +
Oxidation and chemiluminescence of luminol
Procedure. In a 20 × 150 mm test tube, place 0.5 g of 3-nitrophthalic acid, 1 mL of 8% aqueous hydrazine, and 2 mL of triethylene glycol. Add a boiling chip and a thermometer and take it to the fume hood. Bring the solution to a boil using a burner and continue to boil the solution, driving off all of the water. By intermittent gentle heating, maintain the temperature between 210-220 °C for two minutes. Let the tube air-cool to below 100 °C and add 10 mL of hot water. Cool the tube in ice, and then collect the light yellow product (5-nitrophthalhydrazide) by vacuum filtration, washing with a little water. Place the wet solid in another test tube and add 1 g of sodium hydrosulfite and 3 mL of 5% aqueous NaOH. Over a burner in the hood, heat the tube to a boil, stir with a glass rod, and keep the solution near boiling for 3 minutes. Add 1 mL of acetic acid and cool the tube in an ice bath. Using suction filtration, collect the pale yellow crystals of luminol and wash with a little water. To observe the chemiluminescence, first dissolve the moist luminol in 10 mL of 5% aqueous NaOH and add 200 mL of water; call this solution A. In another flask, mix 20 mL of 3% aqueous potassium ferricyanide (K3Fe(CN)6), 20 mL of 3% aqueous hydrogen peroxide, and 160 mL of water; this is solution B. In a dark place, place a funnel in a large Erlenmeyer flask or beaker and simultaneously pour roughly equal quantities of solutions A and B through the funnel. Swirling the flask will cause the mixture to glow.
Safety Precautions (read before starting the experiment): Avoid contact between skin, eyes and clothing with all chemicals used in this experiment. Do not breathe any vapors or dust from these chemicals. Wear gloves when handling and mixing the chemicals. 5% Sodium hydroxide and acetic acid are corrosive and can cause burns. Hydrazine is corrosive and a suspected carcinogen.

26
Questions 1. What is the theoretical yield of luminol in this experiment? 2. The lab introduction states that treatment of luminol with base produces a
resonance stabilized dianion. Draw three resonance forms for the dianion. 3. Define the terms; ground state, excited state, singlet, triplet, and intersystem
crossing.
References: TOC refers to your laboratory text, Techniques in Organic Chemistry, Mohrig, Hammond, Schatz and Morrill, Freeman, 2006.
LOC refers to your Chem 2310/2320 text book, Organic Chemistry, 5th
ed., Bruice, Prentice Hall, 2007.

27
Chemistry 2315 – Experiment 11 – Lab Week 11
The Stereochemistry of the Addition of Br2 to trans-Cinnamic Acid
Prelab Reading Assignment: LOC p.p. 175-178, 242-243 The addition of molecular bromine to an alkene illustrates typical reactions of the double bond (LOC, p. 176). The mechanism of the reaction involves the initial formation of the bromonium ion/bromide ion pair which is followed by backside attack by bromide ion to give the product of anti - addition. For stereochemistry of anti-addition see LOC, p. 243.
H
Ph H
CO2H
+ Br Br
Br+
CO2HH
HPh
Br-
PhCHBrCHBrCO2H
trans-Cinnamic Acid Bromonium Ion- Bromide Ion Pair
2,3-dibromo-3-phenylpropionic acid
Procedure. Equip a 25 mL round-bottom flask with a water-cooled condenser and place 0.60 g of trans-cinnamic acid in the flask. Add 3.5 mL of dichloromethane and 2.0 mL of 10% bromine in dichloromethane solution. Place the flask in a water bath heated to about 50 oC and allow the solution to reflux gently for 30 min. In order to ensure complete reaction, add additional bromine solution dropwise thru the top of the condenser until a light orange color persists. Allow the reaction mixture to cool to room temperature in the air before further cooling in an ice-water bath for 10 minutes. Collect the crude product by vacuum filtration (TOC p. 110, Fig. 9.5) and wash the solid three times with 2 mL portions of cold dichloromethane. In order to do this the vacuum must be disconnected while washing and then connecting again to remove the solvent.
Safety Precautions (read before starting the experiment): Avoid contact between skin, eyes and clothing with all chemicals used in this experiment. Do not breathe any vapors or dust from these chemicals. Wear gloves when handling and mixing the chemicals. Bromine is corrosive and causes severe burns. It is toxic and an eye and skin irritant. Dichloromethane is toxic and an irritant. Trans-cinnamic acid is an irritant.

28
Recrystallize your product by placing the solid in a 50 mL Erlenmeyer flask along with 2.0 mL of ethanol. Heat to boiling on a hot plate until all crystals have dissolved or add 0.5 mL aliquots of ethanol, if necessary, with boiling until the crystals dissolve. Add a volume of H2O equal to the total volume of ethanol and warm the solution until any crystals that formed upon adding water dissolve. Allow the flask to cool to room temperature and then place the flask in an ice-water bath for a few minutes. Collect the crystals by vacuum filtration (TOC p. 110, Fig. 9.5) and set aside on a filter paper until the next lab period. Determine the yield and m.p. of your product. Questions
1. From the melting point of your product decide whether a syn or anti addition of bromine takes place in this reaction.
2. Using your answer to question 1, write the mechanism of the addition reaction which accounts for the observed stereochemistry of the product.
3. If the reaction were carried out in the presence of high concentrations of Cl-, an additional product is expected to be formed. Suggest a structure for this product.
4. The melting points of the two racemic mixtures which could be formed by the addition reaction are: Enantiomers (2R,3S) and (2S,3R) mp 202-204oC Enantiomers (2R,3R) and (2S,3S) mp 93.5-95oC Show the projection formulas (Fisher or Newman) for the product that you isolated.
References: TOC refers to your laboratory text, Techniques in Organic Chemistry,
Mohrig, Hammond, Schatz and Morrill, Freeman, 2006. LOC refers to your Chem 2310/2320 text book, Organic Chemistry, 5th
ed., Bruice, Prentice Hall, 2007.

29
Chemistry 2315 – Experiment 12 – Lab Week 12
Grignard Synthesis of Benzoic Acid
Prelab Reading Assignment: LOC p. 796-799. The addition of a Grignard reagent to a carbonyl compound is a common method to produce a new C-C bond (LOC p.p. 796-799). In this experiment, phenylmagnesium bromide is prepared and allowed to react with methyl carbon dioxide first form a salt of benzoic acid. Acid work-up then results in the formation of benzoic acid.
Br
+ Mganhydrous ether
MgBr
MgBrO C O1)
2) aqueos acid
COH
O
Procedure. Equip a 250 mL round-bottom flask with a Claisen adapter/distilling head and attach to a ring stand in the hood. Cap the opening directly above the flask with a fold-over rubber septum (TOC p.p. 51 – 53). Insert a reflux condenser in the other opening. Attach a calcium chloride drying tube to the top of the condenser (TOC p. 50). Preparation of Phenylmagnesium Bromide. Place 1.50 g. magnesium turnings along with a crystal of iodine and 20 mL ether in the flask. Dissolve 6.7 mL bromobenzene (10.0 g, 0.064 mol) in 20 mL anhydrous ether and place in a dropping funnel. Add 4-5 mL of bromobenzene solution by way of the dropping funnel. Warm the flask gently with a
Safety Precautions (read before starting the experiment): Avoid contact between skin, eyes and clothing with all chemicals used in this experiment. Do not breathe any vapors or dust from these chemicals. Wear gloves when handling and mixing the chemicals. Ether (diethyl ether) is low boiling and extremely flammable. The reaction must be carried out in the hood and no flames are allowed in the laboratory.
b

30
warm water-bath until bubbles are formed indicating that the reaction has started. If the reaction has not started within 5 min. ask your TA for help. After the reaction has started, add the bromobenzene solution dropwise at a rate which maintains a gentle reflux. When the addition of bromobenzene is complete warm the mixture in a hot water-bath to maintain reflux for an additional 20 min. Carbonation of Phenylmagnesium Bromide. Into a 150 mL Erlenmeyer flask approximately filled with dry ice, add slowly with gentle swirling the anhydrous ether solution of phenylmagnesium bromide. The mixture will become thick and an additional 10 mL of anhydrous ether should be added after the addition of the Grignard Reagent is complete. In order to remove the unreactive dry ice from the mixture, place the flask in a warm water bath until the dry ice sublimes. Then slowly add 12 mL of ice cold 6 M H2SO4. Isolation and Purification of Benzoic Acid. After the mixture has been stirred, transfer the contents of the Erlenmeyer flask to a separatory funnel. Wash the flask with technical grade ether and transfer the ether wash to the separatory funnel. Shake the funnel, venting frequently, and then separate the layers. Was the lower aqueous layer two times with 8 mL of technical grade ether and combine these ether washings with the original ether layer. Extract the resulting ether solution with three 8 mL portions of 5% NaOH. Combine the NaOH extracts and add 6 M HCl dropwise (carefully) until precipitation of the benzoic acid is complete. Isolate the benzoic acid by suction filtration, recyrstallize from water, dry on filter paper. Determine the yield of benzoic acid. The calculate yield is probably higher that the actual yield, why? Questions. 1. What would the Grignard reagent be converted to if water accidentally got in the Erlenmeyer flask containing the reagent? 2. What product would be obtained if phenylmagnesium bromide was treated with acetone? 3. Write the mechanism for the preparation of the final product obtained by the conditions in question 2. 4. Using an equation, explain what occurs when H2SO4 is added to the carbonated reaction mixture.