CHEM 114 GENERAL CHEMISTRY LABORATORY-II BOOKLET
42
1 CHEM 114 GENERAL CHEMISTRY LABORATORY-II BOOKLET 2020 SPRING
-
Upload
khangminh22 -
Category
Documents
-
view
1 -
download
0
Transcript of CHEM 114 GENERAL CHEMISTRY LABORATORY-II BOOKLET

1
CHEM 114
GENERAL CHEMISTRY
LABORATORY-II
BOOKLET
2020 SPRING

2
PREFACE
Üniversitelerde Fen bölümleri, tıp ve mühendislik öğrencileri ilk yıllarında Kimya
Laboratuvarı dersi ile karşılaşmaktadır. Kimya Laboratuvarı dersi ile ilgili bu kitapçığın
başında öncelikle kimya laboratuvarı için son derece önemli olan kimya laboratuvarında
uyulacak kurallar ve laboratuvarda alınması gereken güvenlik önlemleri açıklanmıştır.
Laboratuvar güvenliği ile ilgili detaylı bilgiler, verilen web bağlantısındaki kaynakta yer
almaktadır. Kimya Laboratuvarında kullanılan malzemelerin tanıtıldığı bölümden sonra,
Genel Kimya Ders konuları ile bağlantılı seçilen deneylerin föyleri yer almaktadır.
Laboratuvara ilk geldiğiniz gün, kimya laboratuvarında uyulacak kurallar ve
laboratuvarda alınması gereken güvenlik önlemleri konularında bilgilendirilerek, yangın
tüpleri, güvenlik duşu, göz yıkama muslukları gibi kaza anında kullanılacak malzeme ve
sistemlerin yerleri ve nasıl çalıştıklarını öğreneceksiniz.
Kimya laboratuvarları, her an istenmeyen kazaların yaşanabileceği yerler olması nedeni
ile herşeyden önce güvenlik konularındaki bilgilerin öğrenilmesi çok önemlidir. İlk hafta
güvenlik kuralları ve önlemleri bölümünü ve her deney haftası deney föyünü mutlaka okuyup
öğrenerek geliniz.
Hepinize sağlıklı, başarılı ve kazasız bir eğitim, öğretim dönemi dilerim.
Saygılarımla
Prof. Dr. Serap BEŞLİ
Kimya Bölüm Başkanı

3
CONTENT
PREFACE ................................................................................................................................. 2
CONTENT ................................................................................................................................ 3
COURSE REQUIREMENTS AND RULES ......................................................................... 4
LABORATORY SAFETY RULES AND CAUTIONS ........................................................ 6
LABORATORY EQUIPMENTS ......................................................................................... 10
EXPERIMENT 1: SEPARATION OF MIXTURES OF LIQUIDS BY DISTILLATION
.................................................................................................................................................. 15
EXPERIMENT 2: A KINETIC STUDY OF IODINE CLOCK REACTION ................. 17
EXPERIMENT 3: LEAD IODIDE PRECIPITATION REACTION ............................... 20
EXPERIMENT 4: ACID - BASE TITRATION ................................................................. 24
EXPERIMENT 5: MOLECULAR WEIGHT DETERMINATION USING FREEZING
POINT DEPRESSION ........................................................................................................... 31
EXPERIMENT 6: ELECTROLYSIS OF WATER ............................................................ 36
EXPERIMENT 7: DETERMINATION OF REACTION ENTHALPY .......................... 38

4
COURSE REQUIREMENTS AND RULES
1. Students must attend the General Chemistry Laboratory course in their registered section.
Section change is not allowed during the semester.
2. Attendance compulsion is %80 for the laboratory. The student will fail the course in the
case of absence of two or more experiments.
3. During the lab session, students have to wear their lab coat, lab goggles and latex gloves.
Students must bring their own lab coat, lab goggles and latex gloves to the lab. If a student
does not bring lab coat, lab goggles and latex gloves to the lab or not use these items in the
lab, she/he will not be allowed to attend the lab. It will be treated as a failure for the
experiment.
4. If the student will be late more than 10 minutes to the lab course, she/he will not to be
allowed to attend the lab. It will be treated as a failure for the experiment.
5. Mobile phones are strictly forbidden.
6. Students are not allowed to leave the lab without permission of the lab assistant.
7. In order to provide life safety and to ensure the success of experiment in a safe manner,
hand jokes between students is strictly forbidden. Also, touching to chemicals without
gloves, sniffing and tasting them are dangerous.
8. In every experiment, chemicals and materials for the experiment will be supplied to the
students by lab assistants. The students will not borrow the chemicals and materials from
other students.
9. At the end of each experiment, all the glass or metal materials will be cleaned by students
and the experiment set will be delivered to the lab technician with signature.
10. The distribution of the overall course grade is as follows:
a. Lab Performance (10%)
b. Mid-term exam (40%)
c. Final exam (50%)
11. Lab Performance: In each lab session, students will be evaluated based on the following
expectations:
a. Following instructions
b. Being Punctual
c. Group Work Contribution
Students should become familiar with these expectations to get full credit for lab
performance.
12. At the beginning of the semester, students must attend the lab safety training and take the
exam about the safety rules of laboratory.
Students who get 60 or above in the exam will be eligible to attend the lab sessions. The
training and the exam will be given on the second week of the semester.
13. Make-up: If a lab session is missed due to illness, make-up for only one missed experiment
will be given at the end of the semester.

5
Students need to inform their instructor (not the lab assistants) at the earliest opportunity
and must present a health report within one week. A make-up of the missed experiment
will be given at the end of the semester.

6
LABORATORY SAFETY RULES AND CAUTIONS
1. Students must wear lab coat and safety glasses in the lab. Students without lab coat or
safety glasses will not be allowed in the lab.
2. Contact lances are not allowed in the lab.
Acid and organic chemical vapors could get in between eye and lances. Thus, lances can
be glued on the eye in the case of an accident and can be diffıcult to remove.
3. Wide dresses, sandal type shoes shouldn’t be worn in the lab and long hair should be tied.
4. Food, drink and chewing gum are not allowed in the lab.
5. Students should know where the fire extinguisher, first aid cabinet and shower are placed
in the lab.
6. Learn the emergency exit from the lab in the case of a fire.
7. Use the shower when your dresses or hair catches fire.
8. Do not run and do not make jokes in the chemistry lab.
9. Benches should not be used to sit on or to leave bags or personal things.
10. Smoke and vapor released during chemical reactions should not be smelled directly.
11. It is not allowed for students to work alone in chemistry labs without assistants or
instructors.
12. Do not use Bunsen burners next to flammable chemicals (i.e. ethers)
13. Read the labels carefully on the bottle before you use the chemicals.
14. Read the experimental procedure before coming to the lab. Students who come to lab
without knowledge about the experiment could create risks for themselves and other
students.
15. In the case of any accident (glass cut, acid/base burn, fainting etc.) immediately inform
your assistant or instructor.
16. Do not orientate the test tube toward yourself or your friend. Reaction carried out in the
test tube might be dangerous.
17. Water should not be added on concentrated acids. Acids should be added to the water
slowly and by stirring.
18. It is forbidden to smell and to taste the chemicals and to pull solutions by mouth when
using pipet.
19. Chemicals (solid, liquid or solution) must not be dumped into the sink. Waste bottles in the
lab should be used. Learn where the waste bottles in the lab are.
20. Use the “broken glass” labeled container in the lab for the broken glass pieces.
21. Matchstick, litmus paper must not be disposed to the sink.
22. Mercury vapor is invisible and toxic. Mercury releasing from a broken thermometer is very
dangerous and should be reported to the lab assistant or instructor immediately.
23. Materials like hot test tube, crucible, and beaker must not hold by naked hand. Tube tongs
should be used or left to cool on an asbestos wire.
24. Please use the amount of chemicals given in the procedure. Use of excess amounts can
make it difficult to control the reactions or cause side reactions.
25. Left behind chemicals should not be returned to the stock bottles; instead, should be
discarded into the waste bottles.

7
26. Always keep your working area and balance clean. Work clean and be tidy in the lab.
27. Don’t change the locations of chemicals during the experiment.
28. At the end of the experiment, hand in all the materials you used to the lab
assistant/technician as cleaned.
29. Make sure that gas and water taps are closed before leaving the lab.
30. Wash your hands before leaving the lab.
31. Check the following link for moe information:
http://www.gtu.edu.tr/Files/kimyaBolumu/documents/LabGuvenlik.pdf

8
The following cases must be notified firstly to the assistant or lecturer. BURN: expose the burned area to the tap water (5-10 min.), apply first aid.
CUT / INJURY: Wash with water and apply first aid.
FAINTING: Provide fresh air. Lay down and put the head lower than the body.
FIRE: (Notify the assistant immediately) Put the bunsen burner off. Use shower in case of hair and clothes caches fire. Use the fire extinguisher when necessary.
BLEEDING: compress on the wound, keep the wound above the heart level and get medical help.
CHEMICAL SPILL: clean in a manner appropriate to the chemical. Aqueous solutions can be removed with water. Information your assistant.
ACID BURNS: Use NaHCO3 solution BASE BURNS: Use Boric acid or Acetic acid solution
CHEMICALS SPILLED IN THE EYE: The Eye is washed immediately with plenty of water for at least 15 minutes (use the eye-wash shower rooms) Get medical help.

9
Laboratory Safety Symbols

10
LABORATORY EQUIPMENTS

11

12

13

14

15
EXPERIMENT 1: SEPARATION OF MIXTURES OF LIQUIDS BY
DISTILLATION
Purpose: Separation and purification of compounds in a mixture.
Theory: Distillation is one of the most common methods used for the purification and
separation of organic compounds. Distillation is carried out by the evaporation of liquids by
heating and re-condensation of the vapour into liquid again. Common distillation types can be
listed as follows:
Simple distillation: It is applied on the compounds which do not decompose on or around the
boiling temperatures.
Vacuum distillation: It is used for the compounds which can decompose near or under the
boiling temperatures.
Steam distillation: It is used for the separation of compounds from non-volatile mixtures which
are not soluble in water.
Fractional distillation: It is applied on liquids which have close boiling points.
Materials Chemicals
Round bottom flask (250 ml)
Erlenmayer (250 ml)
Magnetic stirrer heater
Thermometer
Condenser
Water bath
Volumetric cyclinder (100 ml)
Rubber stopper (14/23)
Ethanol (C2H5OH)
Dichlorometane (CH2Cl2)
Set Up:
Fig. 13.1 Experimental design.
16
Procedure:
1) Heat the liquid slowly. Temperature rises up and stays constant when it reaches to the
boiling temperature.
2) The distillate called frontier is collected and taken away, and another flask is placed to
collect the main distillate.
3) The dropping speed should be as one or two drops per second while heating.
4) During heating, the thermometer should be checked continuously. The pure distillate
should be collected around the boiling point.
5) If the temperature of the mixture exceeds the boiling temperature, another fraction can
be collected. Remember that these two extra fractions may have the target compound.
Another distillation can be applied later.
Pre-lab Questions: Give answers to the following questions in pre-lab reports.
1) Temperature rises up and stays constant when it reaches to the boiling temperature.
Why?
Report Questions: Give answers to the following questions in pre-lab reports.
1) How many fractions did you get?
2) Write the distillation temperatures of the fractions you collected and predict what kind
of liquids exist in the the mixture.

17
EXPERIMENT 2: A KINETIC STUDY OF IODINE CLOCK REACTION
Purpose: To determine the effect of concentration of reactants on the reaction rates.
Theory: The rate equation for a chemical reaction A+ B → products may be expressed as
R= k [A] m [ B ]n
R represents the rate of reactıon in terms of the change in concentratıons of reactants (∆C)
divided by the time interval ∆t
R= - (∆C) / (∆t)
As the reactıon proceeds, the rate varies; therefore R indicates the initial rate of reaction.
k is known as the specific rate constant, which is specific to the reaction.
[A] and [ B ] gives the molar concentrations of the reactants.
m+n define the order of the reaction. The order of any reaction should be determined
experimentally, and can not be deduced from the balanced form of the reaction.
The rate of any reaction depends on several parameters:
a) Concentration of the reactants
b) Presence of a catalyst
c) Temperature
In this experiment, the effects of concentration on the rate of the following reactions will
be investigated.
2I-(aq) + H2O2 (aq) + 2H- (aq) → I2(aq) + 2H2O (aq) (1)
2S2O3 -2(aq) + I2 (aq) → 2I -(aq) + S4O6 -2 (aq) (2)
I2 + starch indicator → blue colored complex (3)
The iodine (I2), produced in reaction (1) is absorbed immediately by thiosulfate (S2O3-2)
ion in the solution (reaction 2). When S2O3 -2 used up completely the concentration of I2
is increased, which can be observed easily by the formation of deep blue colour (reaction
3).
The rate expression for this reaction can be written as:
R= k [I-] x [H2O2] y [S2O3 -2] z
The aim is to find out x,y and z for the reaction and the order of the reaction.
To determine the effect of temperature the following equation can be used.

18
Where k is the rate constant at different temperatures, A is the Arrhenius constant, Ea is
the activation energy in J/mole, R is the law constant (8.314 J/molK) and T is the absolute
temperature in Kelvin.
Materials Chemicals
Beaker (100 ml) x 2 Erlenmayer (100 ml) x 5 Glass funnel (big) Graduated cylinders (10 ml) Volumetric cyclinder (50 ml) Watch glass Spatula Magnetic stirrer with heating Stirring bar Filter paper Glass rod Pasteur pipette
0.2 M KI
3% H2O2
1M H2SO4
0.1 M Na2S2O3
distilled water
Starch
Precautions:
H2O2: Solutions are irritant to mucous membranes, eyes and skin. If swallowed, evolution of
oxygen may cause nausea, vomiting and internal bleeding. Avoid contact with eyes and skin.
Procedure
Four different trials will be carried out. In each trial, the concentration of only one reagent will
be changed. The required amount of water will be added to keep the total volume same in each
trial. Then volumes of reagents can be used as concentration during calculations.
MIXTURE B MIXTURE A
Trial H2O2, ml H2SO4 (1M),
ml
Na2S2O3, ml KI, ml Starch
(spatula)
Distilled
water,ml
1 2.5 3 3 10 1 33
2 2.5 3 3 5 1 38
3 5 3 3 5 1 35
4 2.5 3 1.5 5 1 39

19
1) For each trial prepare the above mixtures A and B in a 100 ml beaker separately. To
get better results the volumes should be measured with a pipet. The mixtures should be
colorless.
2) Note the time of addition of mixtures, stir the contents of the beaker, and observe
carefully when the color changes to blue. Record the time, and calculate the time
elapsed in minutes (t1).
3) Repeat step (2) with the second beaker (trial2) and find the time for color change again
(t2).
4) For the third beaker (trial3), measure 5 ml of H2O2 and repeat step (1) and (2) (t3).
5) For the last trial (trial4), repeat step (1) again (t4).
The dependence of the reaction rate on the concentration of the reactants can be observed by
comparing the results.
Pre-lab Questions: Give answers to the following questions in pre-lab reports.
1) Which factors affect the reaction rate? Explain how each factor affect the reaction rate.
2) Using the data given below, determine the rate law expression for the reaction:
A + B → products
[A] [B] Time (sec)
0.1 M 0.1 M 60
0.2 M 0.1 M 30
0.2 M 0.05 M 120
Report Questions: Give answers to the following questions in lab reports.
1) By using your experimental result, calculate the time needed for the appearance of
blue color, when 9 ml Na2S2O3, 20 ml KI and 10 ml H2O2 are mixed.

20
EXPERIMENT 3: LEAD IODIDE PRECIPITATION REACTION
Purpose: Invesigation of a precipitation reaction and to learn the general laboratory techniques
(solving, crystallization, filtration) used in chemistry laboratories.
Theory: In precipitation reactions, solutions of the anions and cations are mixed and a solid
called precipitate is obtained as reaction product. Solid reactants and products used in chemical
reactions in general may need to be purified. Solving, crystallization, and filtration are the
tecniques used for purification of solid substances.
Solving: Solving process is made by gradually adding the substance to be solved into the
solvent. After each addition, the mixture is stirred with the aid of a stick to dissolve the
substance. If there are large pieces of the substance, they are crushed and the mixture is heated
if necessary. Glass container do not contact directly to the flame during heating. Asbestos fiber
is used for this purpose. When working with organic and flammable solvents, open flame is
very dangerous, therefore electrical heaters should be used if possible. If there isn’t an electrical
heater, an asbestos heating wire should be used necessarily over a low flame very carefully.
Excessive boiling should be avoided during heating.
Crystallization: Crystallization is one of the purification methods that is based on the principles
of dissolution of a substance in a solvent in which the solubility of the substance is maximum
when the solvent is hot and minimum when cold. Therefore, the choice of solvent in
crystallization process is very important.
Crystallization Technique: Prepare a hot saturated solution of the crystalline matter in a suitable
solvent. This solution is hot filtered into a clean flask with a preheated funnel. The purpose of
this filtration is to separate solid particles that are insoluble in hot solvent. The purpose of
heating the funnel is to prevent crystallization from saturated hot solution on cold funnel wall.
Prior to filtration, funnel must be heated either in an oven or by exposure to a hot steam.
Saturated solution is filtered into the beaker and allowed to cool by covering the beaker
with watch glass. The cooling rate is one of the most important factors that affect the size of the
crystals. If large crystals are desired to be obtained, cooling should be slow, and small crystals
are obtained by fast cooling. Ice bath can be used for rapid cooling.
In some cases, the substance may be separated as an oil without crystallization. In such
cases, the solution is heated again to dissolve the oily substance and left to cool very slowly
without shaking. To ensure slow cooling, the area around the beaker may be wraped with a
clean towel.
If the crystallization does not occur even though the solution was throughly cooled, a
glass rod is rubbed against the wall of the beaker for scratching operation, or a seed crystal
should be added to the solution. It should also be noted that it is difficult to crystallize from the
viscous solution which is concentrated by throughly evaporating. So, to concentrate the solution
by excessive evaporation should be avoided.
After the formation of crystals they are separated by filtration through a funnel, the
crystals are washed with a small amount of a solvent which can not solve crytals in cold and
dried.

21
Filtration: The filtration process is applied in two ways:
a) Simple filtration
For this purpose, the filter paper is folded first in half and then four, after that upper part
of filter paper rounded with a scissors and, formed into cone shape by opening one of the plies.
Paper is placed on the funnel. Funnel is placed on a ring holder depending on its diameter. After
placing a clean beaker under the funnel, the mixture to be filtered is poured in the center of the
filter paper with the help of a glass rod. The filtered mixture should never be filled to the higher
level of 1 cm below the upper edge of the filter paper.
Pleated paper filter can also be used in the filtering process. Preparation of pleated filter
paper is as follows: Round filter paper before folding in half after four (Figure 14.1).
Figure 14.1 Preparation of Pleated Filter Paper
Then the fold is opened, 1 to 2 and 3 to 2 are overlaid and folded to form 4 and 5 corners. Then
the sequence (1,5), (3,4), (1,4) and (3,5) are fitted to the corners and folds are created manually
pressing the sharp edges. After each folding in the opposite direction of their pleated folds of
filter paper is ready to use. (Figure 14.2).
Figure 14.2 Pleated Filter Paper
b) Filtering with Buchner Funnel
Buchner funnel with filter assembly is shown in Figure 14.3.
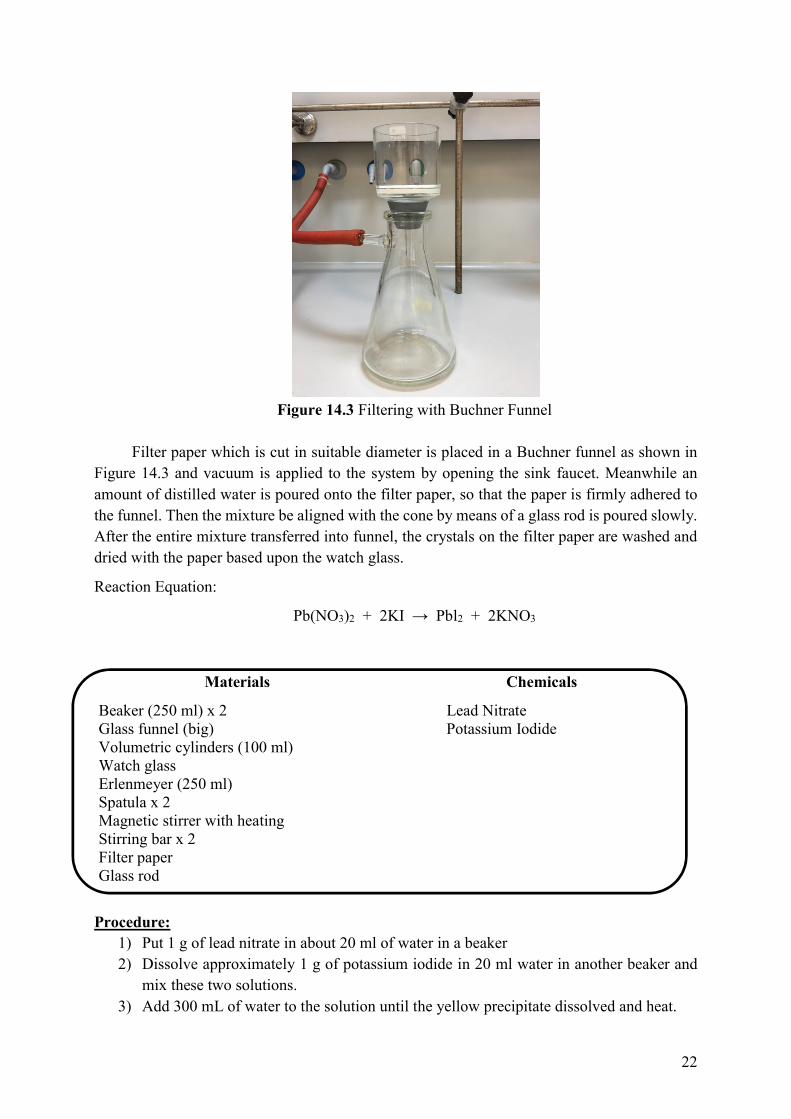
22
Figure 14.3 Filtering with Buchner Funnel
Filter paper which is cut in suitable diameter is placed in a Buchner funnel as shown in
Figure 14.3 and vacuum is applied to the system by opening the sink faucet. Meanwhile an
amount of distilled water is poured onto the filter paper, so that the paper is firmly adhered to
the funnel. Then the mixture be aligned with the cone by means of a glass rod is poured slowly.
After the entire mixture transferred into funnel, the crystals on the filter paper are washed and
dried with the paper based upon the watch glass.
Reaction Equation:
Pb(NO3)2 + 2KI → Pbl2 + 2KNO3
Materials Chemicals
Beaker (250 ml) x 2 Glass funnel (big) Volumetric cylinders (100 ml) Watch glass Erlenmeyer (250 ml) Spatula x 2 Magnetic stirrer with heating Stirring bar x 2 Filter paper Glass rod
Lead Nitrate Potassium Iodide
Procedure:
1) Put 1 g of lead nitrate in about 20 ml of water in a beaker
2) Dissolve approximately 1 g of potassium iodide in 20 ml water in another beaker and
mix these two solutions.
3) Add 300 mL of water to the solution until the yellow precipitate dissolved and heat.

23
Since a large amount of water is necessary, large beaker should be used for the reaction.
4) Filter the boiling solution on funnel with a pleated filter paper into another beaker.
Before filtering process the funnel must be heated by holding to vapor.
5) Crystallize the collected filtrates by cooling in ice.
6) Dry filtered crystals.
Crystals are yellow colored and hexagonal shaped and insoluble in alcohol. The
solubility in water is 0.063 g / 100 ml at 20 °C.
Fig. 14.4 Yellow precipitate, Pbl2
Experimental Data:
The mass of Pb(NO3)2 ____________________________
The mass of KI ____________________________
The mass of filtering paper ____________________________
Filter paper + product mass ____________________________
Product mass ____________________________
Calculations: Show the calculations step by step in lab reports.
Number of moles of Pb(NO3)2 ...........................................
Number of moles of KI ...........................................
Name and number of moles of excess reactant ...........................................
Number of moles of the product (obtained) ...........................................
Number of moles of the product (theoretical) ...........................................
%Yield ...........................................
Questions: Give answers to the following questions in pre-lab reports.
1) If 25 ml of 0.5 M Pb(NO3)2 solution is added into 50 ml 0.5 M KI solution , how
many grams of PbI2 precipitates ?

24
EXPERIMENT 4: ACID - BASE TITRATION
Purpose: Preparation of acid and base solutions, learning of neutralization reaction.
Theory: We encounter the concept of acids and bases in our daily life. For example, acid rain
phenomenon is known as a current environmental issue. Acids and bases are one of the most
important topics in chemistry since a majority of the chemical reaction is the acid and base
reaction.
Despite the wide variety of definitions of acids and bases were made, Arrhenius,
Bronsted-Lowry and Lewis definitions are commonly used today.
Acid: Acid turns blue litmus paper red; is active with some metals (active metals)
exposing hydrogen gas; has sour taste and forms hydrogen ions in the aqueous solution.
HCl H+ Cl-+
H2SO4 2H+ SO4-2+
HNO3 H+ NO3-+
H2O
H2O
H2O
Base: Base turns red litmus paper blue and neutralizes acid. It forms OH- ions in aqueous
solution;. Bases form water and carbonated compounds reacting with CO2. They don’t react
with many of metal (except amphoteric metals).
NaOH Na+ OH-+
Ca(OH)2 Ca+2 2OH-+
H2O
H2O
Al(OH)3 Al+3 3OH-+
H2O
Lowry-Bronsted Acid-Base Definition: Acids are substances which give proton, bases are substances which take proton.
According to scientists conjugate base is formed when acid gives proton and similarly conjugate
acid is formed when base takes proton.
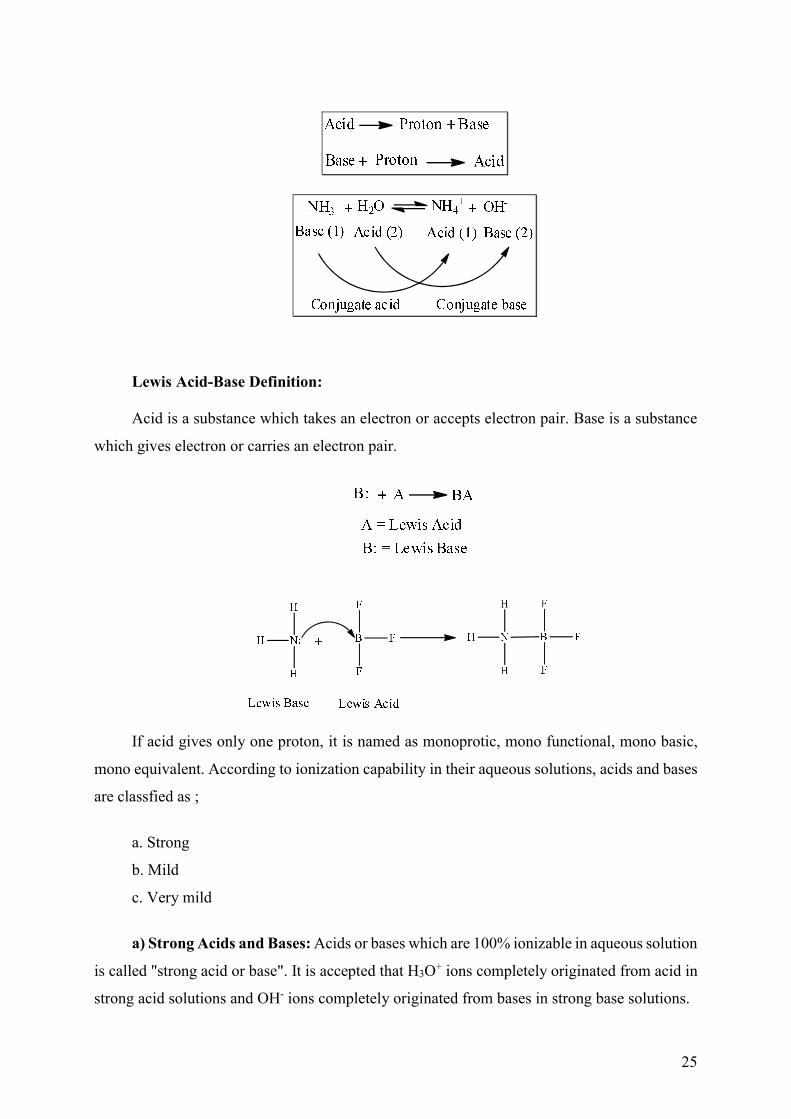
25
Lewis Acid-Base Definition: Acid is a substance which takes an electron or accepts electron pair. Base is a substance
which gives electron or carries an electron pair.
If acid gives only one proton, it is named as monoprotic, mono functional, mono basic,
mono equivalent. According to ionization capability in their aqueous solutions, acids and bases
are classfied as ;
a. Strong
b. Mild
c. Very mild
a) Strong Acids and Bases: Acids or bases which are 100% ionizable in aqueous solution
is called "strong acid or base". It is accepted that H3O+ ions completely originated from acid in
strong acid solutions and OH- ions completely originated from bases in strong base solutions.

26
HCl H2O H3O+ Cl-+ +
NaOH H2ONa+ OH-+
b) Weak Acids and Bases (1): Weak acids or bases cannot be ionized 100% in their
aqueous solutions. Ionization of acids and bases is a chemical equilibrium reaction either with
acidity constant, Ka or basicity constant, Kb.
CH3COOH H2O H3O+ CH3COO-+ +
NH3 NH4+ OH-+H2O+
Ka
Kb
Ka = 1,8. 10-5
Kb = 1,8. 10-5
c) Weak Acids and Bases (2): Weak acids or bases can be partially ionized in their
aqueous solution. Their Ka and Kb constants are very low whereas their pKa and pKb values
are very high.
H3C C OH
H
H
Ka = 1,3. 10-16 H2N pKb = 9,13
Volumetric Analysis:
Analysis of the synthesized or natural samples is one of the fundamental subjects of the
chemistry. In chemical analysis, identification of the analytes in a sample called “analysis” and
determination the amounts of the analytes in a sample called “analysis”. There are two basic
methods for quantitative analysis of the chemical samples in which no instruments are used.
These methods are “gravimetric analysis” and “volumetric analysis”. In gravimetric analysis,
amount of a known (identified) substance is determined by measurement of mass. For this, a
water insoluble compound of the substance is prepared via a chemical reaction. And mass of
the compound is used to calculate the amount of this substance. Volumetric analysis is based
on the measurement of the volume of a solution prepared in exact concentration of a substance
which gives a complete reaction with the analyte. By using the measured volume, the
concentration or mass of the substance can be calculated.

27
Figure 4.1. Titration setup
Titration, also known as titrimetry, is a common laboratory method
of quantitative chemical analysis that is used to determine the unknown concentration of an
identified analyte. Since volume measurements play a key role in titration, it is also known
as volumetric analysis.
In titrations, known concentration and volume of titrant reacts with a solution
of analyte to determine the concentration . Standard solutions are used as titrant to determine
the unknown concentrations of substances. Standard solution is a solution containing a
precisely known concentration of an element or a substance. Chemical substances generally
contain impurities, therefore solution concentration can not be known precisely. Titrant
solutions are standardized by titration of primary standard (pure, high molecular weight,..)
substances.
Volume of titrant used to reach the equivalent point is called titration volume.
The equivalence point, or stoichiometric point, of a chemical reaction is the point at
which chemically equivalent quantities of acid and base have been mixed. In other words, the
moles of acid are equivalent to the moles of base. It can be found by means of an indicator,
most often phenolphthalein. In a reaction, the equivalence of the reactants as well as products
is conserved. The endpoint refers to the point at which the indicator changes colour in a
colourimetric titration. Indicators are substances which show whether the substance tested is

28
basic or acidic. pH indicator is a chemical detector for protons in acid-base titrations.
The reagent of known concentration and volume used in titrations.
An acid–base reaction is a chemical reaction that occurs between an acid and a base. It
is shown as;
H+(aq) OH-(aq) H2O(s)+ Ksu= 10-14
Reaction is balanced. If the reacting acid and base are both too strong, pH would be 7 at
the time that the titration was completed.
· Equivalence factor: The number of hydrogen and hydroxide ions that can be substituted
for the acids and bases (e).
· Equivalent weight: The ratio of the molecular weight to equivalence factor (E).
· Amount of equivalent gram: The ratio of the grams of material to equivalent weight
(EA).
· Normality: Normality is a measure of concentration equal to the gram equivalent weight
per liter of solution (N).
Volume of solution: liter (V).
Amount of dissolved matter: gram (m).
Molecular weight: g/mol (MA)
These terms using;
According to principle of equivalence; Na . Va = Nb . Vb
Students will find the amount of acid to neutralize 25 mL of 1 M sodium hydroxide. Acid
and base will react to form sodium chloride which can be crystallized further.
Neutralization reaction ;
HCl + NaOH NaCl + H2O

29
Materials Chemicals
Erlenmeyer flask (250 mL) x 5 Beaker (100 ml) Burette (25 ml or 50 mL) Volumetric cylinder (100 mL) Spatula Dropper Clamp, clamp holder and stand
HCl solution 1 M NaOH solution Methyl orange (indicator)
Experimental Procedure:
Figure 4.2. Experimental set up for pH titration
In this experiment, sodium hydroxide forms sodium chloride-soluble salt with
hydrochloric acid neutralization. This solution is concentrated and crystallized in the
crystallization vessel.
1. Prepare 25 ml 1 M NaOH solution in an erlenmeyer.
2. Add two drops of methyl orange to the NaOH solution and mix them.
3. Full the burette with unknown molarity HCl solution end of the zero point.

30
4. Add in a small volume of hydrochloric acid solution onto sodium hydroxide solution.
Shake after each addition. Continue the addition of acid until a red solution appears.
5. Please read through the burette volume of added acid.
6. Repeat titration (4. step) two more times. And use the average value of these 3 titrations
for your calculations.
Cautions:
Wear protective gloves, gowns, glasses and a mask.
Avoid breathing vapors.
Results and discussion:
HCl quantitaties which is needed neutralization.
1.Titration 2.Titration 3.Titration
Used NaOH volume (ml)
Used HCl volume (ml)
Normality of the HCl solution
Normality of the NaOH solution
Milliequivalent gram of used HCl
Milliequivalent gram of used NaOH
Questions:
1. Explain acids and bases definitions of Arrhenius, Bronsted-Lowry and Lewis.
2. Explain definitions of Titration, The equivalence point, Indicator, titrant briefly?
3. A 25 ml solution of 0.5 M NaOH is titrated until neutralized into a 50 ml sample of HCl.
What was the concentration of the HCl?

31
EXPERIMENT 5: MOLECULAR WEIGHT DETERMINATION USING
FREEZING POINT DEPRESSION
Purpose: Freezing point determination and molecular weight determination of a solute from
the freezing point depression of solvent. Determination of molecular weight of sulfur from the
freezing point depression of naphthalene.
Theory: When a pure solid is heated, temperature of the solid increases until melting point of
the solid is reached and temperature stays constant during fusion. Temperature starts to increase
after the phase change (from solid to liquid) is complete.
Temperature increases of solid and liquid states are different, since heat capacities of solid and
liquid states are not same. As it can be seen in temperature-time graph (Figure 12.1) below
liquid starts to turn into solid at temperature T1 and the temperature remains constant during
this turning period (time t1 - t2).
Fig. 12.1 Temperature - time graph (cooling curve).
During freezing, as the particles pass from liquid to solid, the potential energy of the
material starts to decrease. For this reason, the formation of solid particles during freezing forms
heat energy, and this energy that meets the heat energy dissipated by cooling. As a result, the
temperature remains constant until the freezing is complete. This helps us to determine the
freezing point of a subtance. The melting point of a substance is the temperature at which the
liquid is equilibrated together. For example, at 1 atm pressure, ice melts at 0 ° C. During melting
period solids become irregular and transfer into liquid from a regular and certain crystal
structure. The amount of heat required to melt one mole of a solid is called molar heat of fusion.
Then, the heat given will increase the average kinetic energy of the liquid molecules and
the temperature of the liquid will increase until the temperature reaches the boiling point. The

32
temperature at which the vapor pressure of a liquid is equal to the atmospheric pressure is called
boiling point. At this temperature the liquid starts to boil. The boiling liquid evaporates and
over time the whole liquid becomes vapor. The subsequent heat is used to increase the kinetic
energy of the vapor molecules. The amount of heat required to evaporate one mole of liquid is
called the molar heat of vaporization. The temperature, called as condensation temperature, at
which the gas is converted into liquid is the same as the temperature at which the liquid is
converted into the liquid (boiling point). In the similar case, the temperature (freezing point) at
which the liquid turns into solid is the same as the temperature at which the liquid turns into
liquid (melting point). It is known that, compared to pure solvents, the total vapor pressure of
unvolatile solutions of these solvents is lower. The decrease in vapor pressure in such solutions,
causes the boiling point to rise and the freezing point to decrease. Such properties of solutions
are called "colligative properties".
Colligative properties are numerical properties that are not depend on the structure and
chemical properties of the material but only depend on the structure of the molecule. These
properties include lowering of vapor pressure, depression of freezing point, boiling point
elevation and osmotic press. The colligative properties vary depending on the solute / solvent
particle ratio in the solution. In general, the addition of a solute raises the boiling point of the
solvent while reducing the freezing point. The descent of the freezing point for a given solvent
is directly proportional to the concentration of the solute present in the solvent.
T = Kd ×m T = Freezing point depression
Kd = Freezing point depression constant of solvent
m = molality
Molality is the number of moles of solute in 1000 g of solvent.
Molality (m) = number moles of solute, n / 1000 g solvent
Measurements related to freezing point depression as well as boiling point elevation can be
used to determine the molecular weights of substances. For instance, a certain amount of
substance with an unknown molecular weight is dissolved in a solvent with a known freezing
point depression constant. This solution is allowed to freeze and the freezing point is
determined. Freezing point depression and molality of the solution are determined.
In this experiment naphthalene is solvent and sulfur is solute. If one mole of sulfur is
dissolved in 1000 grams of naphthalene, freezing point of the solvent decreases by 6.9°C (Kd =
6.9°C/molal). A known amount of sulfur will be dissolved in a known amount of naphthalene
and molecular weight of sulfur will be determined.

33
Materials
Beaker (400 ml)
Two holed cork
Test tube
Magnetic stirrer and stirring bar
100 0C (0.1 0C scaled) thermometer
Clamp, clamp holder and stand
Chemicals
Naphthalene
Sulfur
Procedure:
1) Place the thermometer in a two holed cork in a way that 70°C and above of thermometer
scala can be read.
2) Make sure that the tip of the thermometer does not touch bottom (otherwise it would be
broken).
3) Weigh 5 g of naphthalene and record the amount of solvent, m2.
4) Pour all naphthalene in the bottom of a big test tube. Make sure that the test tube is clean
and dry before filling.
5) Cover the tube with the two holed cork with thermometer and a wire stirrer placed.
6) Place the tube in a beaker containing water.
7) Heat the beaker slowly until naphtelene completely melts. Melting point is observed
around 80°C.
8) Take the bunsen burner under the beaker and put it off. Record the temperature at every
30 second while stirring continuously. Continue this procedure till the temperature
drops to 75°C.
9) Weigh 1 g of sulfur (record the amount of solute, m1) and add on the cooled solid
naphthalene.
10) Place the thermometer and stirrer, and heat in a water bath until naphthalene and sulfur
melt completely.
11) After turning the bunsen burner off and record the temperature drop at every 30 second
in the 85-70°C range.
12) Do your calculations using your experimental data.
To clean the test tube, heat in water bath once more until all contents melt. Take the
thermometer and stirrer out after contents of the test tube completely melted. Empty the melted
naphthalene in the naphthalene labeled beaker. Never pour the melted naphthalene in the sink.
Pre-lab Questions: Give answers to the following questions in pre-lab reports.
1) Define the following terms briefly:
Colligative properties
Molar heat of evaporation

34
Results and Discussion: Show the calculations step by step in lab reports and draw the
necessary curves.
1) Draw the cooling curves for pure naphthalene and suphur-naphthalene solution on a
graph paper.
Naphthalene (solvent ) weight (m2) ………………………………………
Cooling curve data of pure Naphthalene
t (time, s) T (temperature, °C) t (time, s) T (temperature, °C) ……………… ………………… ……………… …………………
……………… ………………… ……………… …………………
……………… ………………… ……………… …………………
……………… ………………… ……………… …………………
……………… ………………… ……………… …………………
……………… ………………… ……………… …………………
……………… ………………… ……………… …………………
……………… ………………… ……………… …………………
……………… ………………… ……………… …………………
Sulfur (solute) weight(m1) ………………………………………
Cooling curve data of Suphur solution in Naphthalene
t (time, s) T (temperature, °C) t (time, s) T (temperature, °C) ……………… ………………… ……………… …………………
……………… ………………… ……………… …………………
……………… ………………… ……………… …………………
……………… ………………… ……………… …………………
……………… ………………… ……………… …………………
……………… ………………… ……………… …………………
……………… ………………… ……………… …………………
……………… ………………… ……………… …………………
……………… ………………… ……………… …………………

35
2) Determine the freezing points from the cooling curves.
Freezing point of pure naphthalene (T1)
………………………………………………
Freezing point of the solution (T2)
………………………………………………
3) Kd ( Naphthalene) is 6.9° C/molal. Calculate the molality of the solution.
Freezing point depression (T) ………………………………………………
Molality of the solution (m) ………………………………………………
4) Calculate the molecular weight of sulfur using Molality (m), m1 ve m2 data.
Molecular weight of sulfur (MW) ………………………………………………
5) Atomic mass of sulfur is 32 g/mol. write the molecular formula of sulfur as Sn using
the molecular weight value you found.
Sn ………………………………………………
6) Look at the correct molecular formula of sulfur in your book. Calculate the theoretical
molecular weight of suphur and percentage error of your experiment.
% Error in MW ………………………………………………
Report Questions: Give answers to the following questions in lab reports.
1. What is the percentage error in the freezing point value of naphthalene ?
2. What is the advantage of using experimental freezing point value for naphtelene to
determine the molecular weight of sulfur?

36
EXPERIMENT 6: ELECTROLYSIS OF WATER
Purpose: In this experiment, the electrolysis of water will be carried out and water will be
decomposed into H2 and O2 by electric energy.
Theory: An electrolysis cell is an electrochemical cell that carry out chemical reactions from
non-spontaneous chemical reactions through the application of external electric energy. In an
electrolysis cell, the two conducting electrodes immerse in an electrolyte solution and
current/voltage source is connected to the tip of electrodes which are not in the solution. Anode
is the electrode connected to the positive terminal of the current/voltage source and cathode is
the electrode which is connected to the negative part. In order to create electrolysis; a voltage
difference between the electrodes which is greater than the total of anode and cathode
equilibrium voltages is applied. The direction of ions inside cell depends on the sign of charge
they carry. While positively charges ions move toward the negative electrode (cathode),
negatively charged ions move toward to the positive electrode (anode). Electrons required for
reduction reactions are supplied from current/voltages source. Some of applications of the
electrolytic cell include the purification of metals (copper, silver, aluminum etc.), coating of
various metal surface, silver, nickel or chromium, polishing metals, purifying metals from oils
as cathode or anode, synthesis of Cl2 gas, obtaining H2 and O2 from water decomposition,
charge of batteries containing lead sulfate, separation of organic tissues for medicinal purposes.
The relationship between chemical reactions and electrical energy is described by
Michael Faraday in the early 19th century. Faraday has observed that the amount of reactants
is proportional to the amount of current and electrons passing from the system during
electrolysis.
Electrical charge carried by 1 mole (as Avogadro's number, 6.02x10²³) of electron is
called the Faraday constant and shown as F.
� =�
� × �
� = � × �
�
�=
�
� × �
�
�=
� × �
� × �
Here:
m: amount of matter collected in
electrolysis,
M: molar mass of material collected in
electrolysis
I: current (Ampere)
t: time (second)
n = number of electrons transferred per
mole.

37
Materials Voltage-current source Burette (50 ml) x 2 Clamps Sports Crocodile tipped connection cables Steel (or platinum) electrodes x 2 Beaker (600 ml) Pipette bulb
Chemicals H2SO4 solution
Set Up:
Fig. 10.1 Experimental design of water electrolysis.
Procedure:
1) Take 14 mL of concentrated sulfuric acid and complete to 250 mL with distilled water.
Add 250 mL H2SO4 solution into 500 mL beaker.
2) Attach two burettes upside down to the sports by clamps and immerse into your acidic
solution. Pull up acidic solution a certain level into burette by using a pipette bulb fitted
to tip of burette. Close burette tap and remove the pipette bulb. Repeat the same
procedure with the other burette.
3) Put tip of electrodes into tubes. Connect electrode outside part to the direct current
output of current/voltage source with crocodile pointed cables.
4) The current is set to about 300 mA and is applied for 2 minutes.
5) Note the observations and amount.
Pre-lab Questions: Give answers to the following questions in pre-lab reports.
1) What are the applications of the electrolytic cells?
Report Questions: Give answers to the following questions in lab reports.
Determine the nature and the quantities of the gases in the burettes.

38
EXPERIMENT 7: DETERMINATION OF REACTION ENTHALPY
Purpose: To investigate heat changes during chemical and physical events.
Theory: Thermochemistry is concerned with chemical phenomena accompanying changes in
heat. The amount of heat exchanged with the surroundings is an important property of a
chemical reaction. The amount of heat absorbed or released during a reaction under constant
pressure is called "enthalpy" and is represented by the variable H. When the pressure of the
system doesn't change, the change in enthalpy of a system equals the heat exchanged with the
surroundings: H=q
If a reaction gives heat to its environment, that reaction is exothermic and enthalpy change (ΔH)
is negative. If a reaction receives heat from its environment, that reaction is endothermic and
enthalpy change (ΔH) is positive. Reaction enthalpy can be classified into more specific
categories:
Formation enthalpy is the enthalpy change during the formation of 1 mole substance from its
elements in standard conditions.
Enthalpy of combustion is the enthalpy change during combustion of a 1 mole substance in
the presence of oxygen.
Enthalpy of solution, vaporization, melting and sublimation is related with changes of state
of matter or related with dissociations of molecules and ions.
Enthalpy of neutralization is the heat released during acid-base reactions when one mole of
water is produced.
Heat measurements are performed by carrying out a chemical reaction in a calorimeter (Figure
1). The reactants are stirred in a container made of polyurethane foam and the temperature
change is measured. Polyurethane foam is a good thermal insulator that the cup and its content
are considered in isolation.
Figure 1: Representation of coffe cup calorimeter.
The amount of heat lost or gained in chemical reactions can be calculated by the following
formula:
q= m.c.ΔT

39
where m is the mass of solution (g), c is the specific heat (cal/g °C, J/g °C), and ΔT is the
temperature change of the solution (Tfinal-Tinitial).
The heat gained by calorimeter is calculated by following formula:
qcal = heat capacity of calorimeter. ΔT
The heat capacity of a calorimeter is given in cal / °C or J / °C. In this experiment, first the heat
capacity of a calorimeter will be predicted, and then the heat of fusion of ice and heat of
neutralization will be measured.
Materials
Beaker (100 ml) x2
Volumetric cyclinder (100 ml) x 2
Calorimeter
Thermometer
2 piece Styrofoam coffee cup
Chemicals
30 ml 2 M HCl solution
30 ml 2 M NaOH solution
1 piece of ice cube
Distilled water
Precautions:
If an acid is to be diluted, pour acid slowly into the water with constant stirring. Never
add water to acid.
Never inhale gaseous fumes or position your noise directly above the sample. If you
need to determine the odor of a gas, gently fan a small amount of the vapor toward your
nose with your hand.
Procedure:
A) Determining the heat capacity of a calorimeter
1) Put 50 ml water into the calorimeter and measure the temperature 3 times at 30 second
intervals.
2) Put 60-70 ml water into a beaker and heat it about 50°C.
3) Carefully move the hot water from the heater and measure the temperature 3 times at
30 second intervals.
4) As soon as measuring the hot water’s temperature, add the hot water into the calorimeter
containing cold water. After mixing, measure the temperature 3 times at 30 second
intervals.
5) Calculate the heat capacity of the calorimeter.
B) Determining the heat of fusion of ice
1) Put 60-70 ml water into a beaker and heat it to around 500C.
2) Carefully move the hot water from the heater and add it into the calorimeter and measure
the temperature 3 or 4 times at 30 second intervals.

40
3) Put an ice cube which its temperature is already known (ask your assistant), to the hot
water in the calorimeter. Stir and then measure the final temperature after the ice is
totally melt.
4) Precisely measure the final volume of water.
5) Calculate the heat required to melt the ice cube (heat of fusion).
C) Determining the heat of neutralization
1) Place 30 ml of 2 M HCl solution into the calorimeter and measure the temperature 3 or
4 times at 30 second intervals (thermometer should be dry and clean).
2) Place 30 ml of 2 M NaOH solution into the calorimeter and measure the temperature 3
or 4 times at 30 second intervals (thermometer should be dry and clean).
3) Add NaOH solution into HCl solution in the calorimeter, stir and measure the
temperature 4 times at 30 second intervals.
4) Calculate the heat of neutralization for 1 mole of water produced.
The solution obtained after neutralization has a density of 1.02 g/ml and its specific heat
is 0.95 cal/g0C.
Pre-lab Questions: Give answers to the following questions in pre-lab reports.
1) Define the following terms in your own words
Enthalpy
Exothermic reaction
Endothermic reaction
Heat capacity
2) Determine the final temperature when 100 g of ice at − 9 °C is mixed with 600 g of
water at 30°C.
(cice = 0.5 cal/g°C, cwater = 1 cal/g°C, ΔH = 80 cal/g)
Report: Show the calculations step by step in lab reports.
A) Determining the heat capacity of a calorimeter
Temperature of Cold Water Temperature of Hot Water
_____________ ______________
_____________ ______________
_____________ ______________
Temperature of Mixture
_______________
_______________

41
_______________
Heat lost by hot water
Heat gained by cold water
Heat gained by calorimeter
Heat capacity of calorimeter
_________________________________
_________________________________
_________________________________
_________________________________
cal
cal
cal
cal/0C
B) Determining the heat of fusion of ice
Volume of hot water
Temperature of hot water
Temperature after mixing
Temperature change
Heat lost by water
Heat lost by calorimeter
__________
__________
__________
__________
__________
__________
Mass of ice
Initial temperature of ice
Temperature after mixing
Temperature change
Heat gained by ice
__________
__________
__________
__________
__________
Heat for melting ice
Heat of fusion
Molar heat of fusion
_______________________
_______________________
_______________________
cal
cal/g
cal/mole
C) Determining the heat of neutralization
Temperature of NaOH solution Temperature of HCl solution
___________ ___________
___________ ___________
___________ ___________
Temperature of Mixture
_______________
_______________
_______________
Heat gained by solution
Heat gained by calorimeter
Total heat released
Mole number of water
______________________
______________________
______________________
______________________
cal
cal
cal
mole

42
Heat of neutralization ______________________ cal/mole