Laboratory experiments on the structure of subducted lithosphere
Upload
khangminh22Category
view
3download
0
NEWLAB 0 RATO RY
EXPERIMENTS
IN
PRACTICAL
CHEMISTRY
lEWTON HENRY BLACK
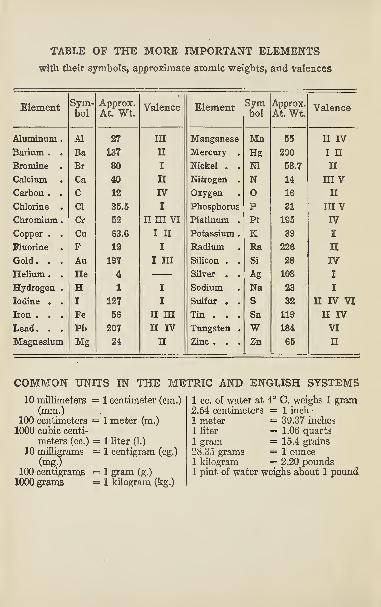
TABLE OF THE MORE IMPORTANT ELEMENTS
with their S3nnbols, approximate atomic weights, and valences
Element Sym-bol
Approx.At. Wt.
Valence Element Symbol
Approx.At. Wt.
Valence
Alumimxm . A1 27 III Manganese Mn 65 n IV
Barium . . Ba 137 n Mercury . Hg 200 I nBromine . Br 80 I Nickel o . Ni 68.7 nCalcium Ca 40 n Nitrogen . N 14 m VCarbon . . C 12 IV Oxygen 0 16 nChlorine . Cl 36.5 I Phosphorus P 31 m VChromium
.
Cr 52 n m VI Platinum . Pt 196 IV
Copper . . Cu 63.6 I n Potassium . K 39 I
Fluorine . F 19 I Radium Ra 226 nGold. . . Au 197 I m Silicon . . Si 28 IV
Helium . . He 4 — Silver . . Ag 108 I
Hydrogen . H 1 I Sodium Na 23 I
Iodine . . I 127 I Sulfur . . S 32 n IV VI
Iron . . . Fe 56 n m Tin . . . Sn 119 U IV
Lead . . . Pb 207 n IV Tungsten . W 184 VI
Magnesium Mg 24 n Zinc . . . Zn 66 n
COMMON UNITS IN THE METRIC AND ENGLISH SYSTEMS
10 millimeters = 1 centimeter (cm.)
(mm.)100 centimeters = 1 meter (m.)
1000 cubic centi-
meters (cc.) = 1 liter (1.)
10 milligrams = 1 centigram (eg.)
(mg.)
100 centigrams = 1 gram (g.)
1000 grams = 1 kilogram (kg.)
1 cc. of water at 4° C. weighs 1 gram2.54 centimeters = 1 inch
1 meter = 39.37 inches
1 hter = 1.06 quarts
1 gram = 15.4 grains
28.35 grams = 1 ounce1 kilogram == 2.20 pounds1 pint of water weighs about 1 pound

GENERAL SUGGESTIONS
1. Follow Directions. Before performing an experiment,
read the directions through carefully. Make sure that you un-
derstand the object of the experiment. Follow the directions
closely ;remember that every word is significant.
2. Notebook. A careful record of each experiment per-
formed should be kept in a substantial notebook. Record the
date, the title of the experiment, and the subheadings andparagraph letters (e.g. a, b).
Do not duplicate the printed directions. State briefly in
your own words what you did, what you observed, and what con°
elusions you drew. Answer every direct question by a definite
statement. Make a simple labeled diagram of the apparatus.
3. Quantities of materials. Do not take more of the mate-
rials than the amount specified. To take more means a waste
of material and of time.
4. Disposal of waste. Such solids as matches, filter papers,
bits of glass, and unconsumed chemicals should be thrown into
the waste jars and not into the sink. If much acid or other
liquid is emptied into the sink, flush it out with plenty of water,
5. Regulate your burner. The size of the burner flame
should be regulated by the stopcock. A small flame is often
better than a large one for heating test tubes and beakers.
6. Neatness is essential. Make sure your apparatus is
clean. After each day's work clean up your apparatus and putyour desk in order.
Qx MBBIS

NEWLABORATORY EXPERIMENTS
IN
PRACTICAL CHEMISTRY

THE MACMILLAN COMPANYNEW YORK • BOSTON - CHICAGO • DALLAS
ATLANTA • SAN FRANCISCO
MACMILLAN AND CO., LimitedLONDON • BOMBAY • CALCUTTA • MADRAS
MELBOURNE
THE MACMILLAN COMPANYOF CANADA, Limited
TORONTO

Digitized by the Internet Archive
in 2017 with funding from
University of Alberta Libraries
https://archive.org/details/newlaboratoryexp00blac_0
Courtesy
of
Henry
S.
Wolkins
Co.,
Boston.

NEWLABORATORY EXPERIMENTS
IN
PRACTICAL CHEMISTRY
TO ACCOMPANY
BLACK AND CONANT’S
‘^NEW PRACTICAL CHEMISTRY^’
BY
NEWTON HENRY BLACK,ASSISTANT PROFESSOR OP PHYSICS, HARVARD UNIVERSITYFORMERLY SCIENCE MASTER, ROXBURY LATIN SCHOOL
BOSTON, MASS.
NEW YORKTHE MACMILLAN COMPANY
1950

COPTBIGHT, 1936,
Bt the MACMILLAN COMPANY
All rights reserved — no part of this book may be
reproduced in any form without permission in writing
from the publisher, except by a reviewer who wishes
to quote brief passages in connection with a review
written for inciusion in magazme or newspaper.
Set up and electrotyped. Published June, 1936.
Twenty-first Printing, 1950.
PRINTED IN THE UNITED STATES OF AMERICA
LIBRARY
UrtlVERSITY OF ALBERTA

PREFACE
This book has been arranged to accompany Black and
Conant’s New Practical Chemistry. The directions are framed
primarily to meet the needs of students who are studjdng the
subject for the first time. These experiments are the result
of the author’s long experience as a teacher of beginners in
chemistry.
Laboratory work in any science is fundamental, and the study
of a textbook merely extends and organizes the information
that the student gets in the laboratory. The experiments
which the student does with his own hands should make the
fundamental principles of the science real and concrete to him.
It is also essential for him to perform certain experiments which
will indicate how these facts and principles are utilized at homeand in the commercial and industrial life of the community.
The directions are at first very full and detailed, but they are
gradually abbreviated in order to leave more and more to the
student’s own initiative and imagination. It is hoped that
they are so clearly stated and illustrated that the teacher will
be largely freed from the necessity of repeating the details
of manipulation. Frequent questions (in italics) have been
inserted in the directions to focus the attention of the student
on the important facts to be observed.
One of the aims of all laboratory work is to arouse the stu-
dent’s enthusiasm for finding things out by experiment. Toencourage this spirit, additional experiments, which are markedOptional, have been included. These may well be used to give
elasticity and variety to the laboratory work as well as to
emphasize the close connection between chemistry in the school
laboratory and chemistry in the household, in the factory, or onthe farm.

VI PREFACE
The introductory paragraphs are intended to give the setting
of the experiment and to indicate its significance. These maywell be amplified by the teacher in the oral discussion preceding
each experiment.
It is expected that the instructor will select those experiments
which meet the needs of his class. Probably an average class of
beginners in chemistry can in one school year perform success-
fully not more than forty of these experiments. It is far better to
have a small number carefully done, well written up, andthoroughly understood, than to rush through many carelessly.
Special care has been taken to select significant experi-
ments and to word the directions so clearly that they can not
be misunderstood. The author is greatly indebted to manyteachers of chemistry for valuable suggestions. He wishes
especially to mention Mr. M. E. Post, of the High School,
Berkeley, California and Mr. Raymond S. Tobey, of the Girls’
Latin School, Boston, Mass.
The apparatus required for the essential experiments is simple
and the chemicals are inexpensive (see lists in Appendix).
The essential experiments marked in the table of contents with a
star (*) deal with fundamental facts and should be included in
every first-year course.

TABLE OF CONTENTS
(FIRST HALF YEAR)
Hints on Laboratory Manipulation
How TO Keep Laboratory Notes
How to make Diagrams for the Notebook . . . .
EXPBBIMBNT
A. Preliminary Experiment on the Metric System
B. Preliminary Experiment in Laboratory Manipulations .
1. *Changes in Metals Heated in Air
2. *Change in Weight of a Metal Heated in Air .
3. Separating a Mixture into Its Components
4. *Decomposition of a Compound5. *OxYGEN— Preparation and Properties ....6. Percentage of Oxygen in Potassium Chlorate (Quantitative)
7. *Hydrogen— Preparation and Properties . . . .
8. Reduction of an Oxide with Hydrogen . . . .
9. *Electrolysis of Water . .
10. Distillation of Water11. *Measurement of Water of Hydration (Quantitative) .
12. ^Replacement of Hydrogen by a Metal (Quantitative)
13. Analysis of an Unknown Mixture (Quantitative)
14. Decomposition of Water by Sodium
15. *Chlorine — Preparation and Properties ....16. *Hydrochloric Acid
17. *Test for a Chloride
18. Hypochlorous Acid— Bleaching
19. Acids, Bases, and Salts
20. Concentration of a Solution by Titration (Quantitative)
.
21. *CONDUCTIVITY OF SUBSTANCES IN SOLUTION . . . .
22. *Preparation of Soluble Salts
23. *Preparation of Insoluble Salts — Types of Reactions .
24. *Different Forms of Sulfur
25. *Hydrogen Sulfide
26. *SuLFUR Dioxide and Sulfurous Acidvii
PAGE
1
8
9
10
14
16
18
19
21
23
25
27
29
30
33
35
36
39
40
42
44
46
47
48
50
52
54
55
56
59
61

viii TABLE OF CONTENTS
EXPERIMENT PAGE
27. *SuLFURic Acid o = . 64
28. ^Destructive Distillation of Coal ..... 66
29. Analysis of Coal (Quantitative) 68
30. *Charcoal— Preparation and Properties .... 70
31. *Carbon Dioxide — Preparation and Properties . . 72
32. Carbon Monoxide — Preparation and Properties . . 74
33. *Weight of a Liter of Oxygen (Quantitative) ... 76
34. Gram-molecular Weight of Carbon Dioxide (Quantitative) 79
35. Atomic Weight of Copper (Quantitative) .... 81
36. Composition and Formula of a Compound (Quantitative) . 83
(SECOND HALF YEAR)
37. Atmospheric Nitrogen (Optional) 85
38. *Percentage of Oxygen in Air (Quantitative) ... 87
39. *Ammonia— Preparation and Properties .... 90
40. Analysis of Household Ammonia (Quantitative) ... 92
41. *Nitric Acid 94
42. Nitric Oxide and Dioxide 97
43. Nitrous Oxide 99
44. *Bromine — Preparation and Properties . . . .10145. *IODiNE — Preparation and Properties 104
46. The Halogen Acids 106
47. Sodium Carbonate and Bicarbonate 107
48. Analysis of Baking Powder (Optional) .... 108
49. Hydrolysis of Salts 110
50. *Flame Tests Ill
51. Acids of Phosphorus 113
52. Soil Testing (Optional) 114
53. A Fusible Alloy 116
54. Solutions of Gases, Liquids, and Solids . . . .11755. *Effect of Temperature on Solubility .... 119
56. Solubility of Common Salt (Quantitative) .... 120
57. Water of Hydration— Efflorescence and Deliquescence 121
58. Fractional Crystallization 123
59. Colloids 125
60. *Treatment of Hard Water 127
51. Mortar and Concrete 129
62. Compounds of Silicon (Optional) ...... 131

TABLE OF CONTENTS ix
EXPERIMENT PAGE
63. *Acetylene and Methane . 132
64. Gasoline and Kerosene (Optional) ..... 134
65. Alcohol— Preparation and Properties .... 137
66. Determination of the Acidity of Vinegar (Quantitative) . 139
67. *SoAP— Preparation and Uses 141
68. Removal of Spots and Stains 142
69. Textile Fibers (Optional) 144
70. Components of Foods 146
71. Food Components of Milk (Optional) 147
72. Extracting Metals 150
73. Aluminum Hydroxide — Preparation and Uses (Optional) 153
74. *CoBALT Nitrate Tests for Metals 154
75. *Relative Activity of Metals 156
76. Ferrous Compounds 157
77. Ferric Compounds 159
78. Blueprints and Inks 160
79. The Chlorides of Tin (Optional) 162
80. Salts of Lead 163
81. Copper Compounds 165
82. Analysis of the Oxides of Copper (Quantitative) . . 166
33. *Borax Bead Tests for Metals 168
84. Silver Compounds in Photography 170
85. *Separation of Silver, Mercury, and Lead . . . 171
86. Analysis of a Silver Coin (Quantitative) .... 173
87. Dyeing (Optional) 175
88. Paints (Optional) 176
89. Identification of Simple Compounds ..... 178
90. Inorganic Chemical Preparations 180
Appendix
Tables of Aqueous Tension 182
Densities of Gases . 182
Table Showing Density of Hydrogen under Varying Conditions 183
The Metric System 184
Table of Solubilities 185
Rules for Solubility 186
List of Experiments and Corresponding Chapters in the Text-book 186
List of Laboratory Supplies 187

^3’ ^
BlowpipeThistle
tube
WSi
Florence
Deflagrating flask
TesUtubebrush
X^PipestemT triangle
Clamp
Ring Filter papers
Bunsenburner
Wing top
Tripod
Iron stand withring and clamps
Test Graduated Test-tube rack
tube cylinder

NEW LABORATORY EXPERIMENTSIN PRACTICAL CHEMISTRY
HINTS ABOUT LABORATORY MANIPULATION
Check up your apparatus. Make sure that the outfit in
your desk is complete and in good condition. On the opposite
page you will find the names and pictures of somepieces of apparatus with which you must becomefamiliar. Keep the articles clean and arranged
in an orderly fashion.
Bunsen burner. In a laboratory provided with
gas the Bunsen burner (Fig. 1) is almost indis-
pensable as a source of heat. When the air holes
at the base of the burner
are open, air is drawn in
and mixes with the gas.
It should burn with a
clear, blue flame ; the size
of the flame can be controlled by ad-
justing the stopcock. When the holes
at the base of the burner tube are
closed, a yellow, luminous flame results.
In lighting such a burner, never hold
the match over it while turning on the
gas; turn on the gas and then apply
the match. Otherwise it will probably
‘"snap back,” that is, burn at the base
inside the tube. In this condition the
burner gives off a disagreeable gas andbecomes extremely hot. Turn off a “snapped” lamp, allow it
to cool, and relight it properly.
Fig. 2. Probable tempera-tures in (a) s. Bunsen flameand (b) a Fisher flame.

2 HINTS ABOUT LABORATORY MANIPULATION
In the Fisher form of Meker burner the flame is muchhotter, as shown in figure 2. This is due to the fact that the
gas is supplied with a large volume of air and that the grid on top
of the burner prevents the flame
from “striking back.” In fact,
there is practically a solid cone of
burning gas.
Glass tubing. To cut a piece of
small glass tubing, lay it on the
table and make a scratch with a
triangular file or glass-blower’s knife
at the point where it is to be cut. Next take the tube in both
hands, placing the thumbs on the side opposite the scratch.
Now press the thumbs against the tube and pull the ends
toward you (Fig. 3).
Fig. 3. How to break glass tubingwhich has been scratched.
•ywri/v^
V
Fig. 4. Heating glass tubing in a flat flame.
To bend glass tubing,
rotate it in a flat flame,
such as that furnished bythe wing top on the Bun-sen burner (Fig. 4), until
soft. Then take it out of
the flame and gradually
bend it into the desired shape. In order to make a good bend(Fig. 5), the tube must be heated evenly over a portion which
Good bend is at Icast 5 cm. in length. Remember that hot
glass placed on a cold table is almost sure to break.
Before glass tubes are used for any purpose, the
sharp edges must be rounded by being heated near
the top of a Bunsen flame. This is called “ fire-
polishing ” the ends of the tube.
Setting up apparatus. In putting together apparatus it is
often necessary to push a glass tube through a stopper. It is a
good plan to lubricate the glass tubing with water and to
insert the tube with a slow twisting motion— not by pushing.
It is also very important to have the joints tight. To test
apparatus for gas-tightness, either compress the air in it by
jjsad bend
Fig. 5. Agood and abad bend.

HINTS ABOUT LABORATORY MANIPULATION 3
blowing or draw some air out by suction. Since some part of
the apparatus is generally under water, the level of the water
can be made to rise or fall in a tube. If there is a leak, this
level will change slowly when the opening where the lips were
applied is closed. Do not try to plug up holes with matches
or wax but set up the apparatus properly.
Heating apparatus. Wipe dry the outside of every glass or
porcelain vessel before heating it. In heating a test tube
containing a liquid, hold it in an inclined position with some
Fig. 6. Proper way to hold a stopper while pouring.
kind of holder and keep it moving in the flame, taking carb
not to let the flame touch the glass above the liquid. Don’t
try to boil a liquid in a flask or beaker with a direct flame. Use
the wire gauze with asbestos center. Turn the flame down until
it is just the size of the beaker and boiling will begin sooner.
Porcelain dishes are used chiefly in evaporating and should
be heated over asbestos. A porcelain crucible may be sup-
ported on the pipestem triangle and heated directly, provided
it is warmed up gradually and cooled off slowly.
Handling materials. Don’t try to pour solids out of a bottle.
Use some kind of spoon or ladle. Don’t weigh materials
directly on the scale pans, use a piece of creased paper. Don’t
use more material than required and don’t pour back excess
material into the reagent bottle.
In pouring liquids from a bottle, some care must be taken to
prevent the liquid from running down the side of the bottle.

4 HINTS ABOUT LABORATORY MANIPULATION
Place the neck of the bottle lightly against the rim of the vessel
into which the liquid is being poured. The stopper must never
he laid down on the desk. Hold it
between the fingers as shown in
figure 6.
To filter a liquid, first fold the
filter paper in quarters and then
open it up to form a cone (Fig. 7).
Fit the cone into a funnel of such
size that the paper does not quiteFig. 7 . Folding a ter paper.
^g|- thoroughly
with water. The filter is now ready for use.
Stirring rods should be fire-polished. They are very conven-
ient in pouring liquids.
The liquid may easily
be made to flow downthe rod (Fig. 8). Astirring rod should also
be used in testing with
litmus paper. Put a
drop of the liquid to be
tested on the paper.
Never dip the paper
into the liquid.
Weighing and counting weights. In weighing out the ma=
terials for an experiment, use the platform, or trip, scales (Fig. 9).
If these are in good condition, they are sensitive to one-tenth
of a gram (0.1 g.).
Remember that the
thing to be weighed
is put on the left-hand
pan and the weights
on the right-hand pan ;
remember to use the
slider for weights under
10 grams.
Fig. 8. Pouring a liquid down a glass rod.

HINTS ABOUT LABORATORY MANIPULATION 5
For quantitative experiments use the horn-pan balance
(Fig. 10), which is sensitive to one-hundredth of a gram (0.01 g.).
A triple-beam balance (Fig. 11) is preferred by some because
weighings can be quickly made from 0.01 up to 111 grams
without the use of loose weights. An analytical balance
Fig. II. A triple-beam balance with no loose weights.
(Fig. 12) is provided with agate bearings, and has a graduated
beam with a 10-mg. rider;
it is enclosed in a glass case. Such
a balance should be sensitive to 0.1 mg. when loaded with

6 HINTS ABOUT LABORATORY MANIPULATION
100 grams. Examine the box of weights and see how they are
arranged and marked (Fig. 13). Notice that the heavier
Fig. 12. An analytical balance with a graduated beam.
weights (one gram and above) are made of brass and that the
fractional weights are of German silver or aluminum andare marked in milligrams. Thus, 500 milligrams is 0.5 grams
and 10 milligrams is 0.01 grams.
Use of the balance. In weigh-
ing, first see that your balance
swings freely and evenly, that is,
that the pointer swings an equal
distance to the right and left. If
it does not, adjust it either bymeans of a setscrew or by adding
counterbalance. Place the object
to be weighed on the left-hand
Fig. 13. Box of weights. pan and the weights on the right.

HINTS ABOUT LABORATORY MANIPULATION 7
Fig. 14. Graduatedglass cylinder.
First try a weight which you think is a little heavier than the
object;remove it if too heavy and try smaller ones in order.
Never handle the weights with your fingers;
always use the forceps. Count up the weights
on the pan and write down the total at once
in your notebook, not on a scrap of paper.
Experience shows that many mistakes in results
are due to miscounting weights. Check this result
by noting those absent from the box. Begin-
ning with the largest weight, return them to
the box and again count them as you replace
them. In this way you double check yourself.
Do not wait for a balance to come to rest.
A good balance will continue to swing for a
long time. Place just enough weights on the
pan so that the pointer swings an equal dis-
tance to the right and left.
Measuring volumes. A graduated glass cylinder (Fig. 14)
is commonly used to measure the volume of a liquid. Care
must be taken to keep the eye on a level with the surface of
the liquid. Get familiar with the
scale markings and their value.
The eye should follow the scale
from the zero end. It will also be
noticed that the surface of water is
not flat but curved. Such a curved
surface is called a meniscus. Witha concave meniscus, such as occurs
on water, the position of the lowest
point of the lowest curve against the
scale is to be taken as the reading
(Fig. 15), In measuring small vol-
umes use a smaller graduated cylin-
der, a conical graduate, or a graduated test tube. For measuring
rather large volumes of liquids we use volumetric flasks which are
graduated on the neck to contain a definite volume at 20° C,
Fig. 15. Reading the meniscusof water (17.8).

8 HINTS ABOUT LABORATORY MANIPULATION
HOW TO KEEP LABORATORY NOTES
It is a necessary part of the laboratory study of chemistry
to keep in a notebook a neat and accurate record of all ex-
perimental work. It will be found helpful to follow the general
order used in this manual with the same headings and sub-
headings. Observations should he recorded immediately. Theauthor believes that the student should answer in complete sen-
tence form all the italicized questions given in the directions.
But these sentences should be concise.
The data obtained in quantitative experiments should becarefully labeled, and the result of each measurement should
be placed on a separate line in tabular form. This is illustrated
in the following table of sample data obtained for Exp. 6
:
Wt. of crucible and potassium chlorate 22.03 g.
Wt. of crucible empty 20.30 g.
Wt. of potassium chlorate 1.73 g.
Wt. after first heating 21.42 g.
Wt. after last heating 21.35 g.
Wt. of oxygen (Loss of wt.) 0.68 g.
Percentage of oxygen in potassium chlorate 39 %
The data must he entered at once directly in the notebook, never
on loose pieces of paper. All computations should also be
made in the notebook. Don't crowd your figures
!
It will save time in the end to acquire the habit of recording
data legibly and of arranging the computations so that the
method of calculation is evident at once. In general your data
will be accurate only to three significant figures (p. 112) and
%ometimes less, therefore you should keep only three significant
figures in your calculations.
Do your experiments entirely independently. Record what
you have done and seen. If you allow another student to
perform the experiments for you or if you copy his notes, you
are getting no benefit from this work, and you are wasting
your own time.

HINTS ABOUT LABORATORY MANIPULATION 9
HOW TO MAKE NOTEBOOK DRAWINGS
Don’t try to make a picture of your apparatus, but make asectional drawing. Imagine the apparatus to be cut by a
vertical plane; suppose the sheet of paper to be placed in the
position of this plane. Then draw the lines where the paper
would cut the intersected apparatus. Figure 16 shows a
sectional drawing of the apparatus used to make oxygen.
It is also useful for review purposes to label the drawing. A
Fig. i6. Sectional drawing of oxygen-generating apparatus. (See also Fig. 27,)
carefully labeled diagram of your apparatus may well take the
place of a word-description in your notes. Unless you are un-usually skillful in free-hand drawing, you had better use a ruler.

EXPERIMENT A
Preliminary Experiment on the Metric System
Apparatus.— 30-cm. rule with inches on the reverse side. 100-cc. graduated
cylinder. Test tubes (6" X f") and (8" X 1"). small beaker, andevaporating dish. Horn-pan balance and set of weights.
Introduction. The metric system is based on the meter
(m.), which is approximately 39.37 inches, or a little more than
a yard. In the chemical laboratory we commonly use the
centimeter (cm.), which is one-hundredth of a meter, just as
CENTIMETERS & MILLIMETERS
1
1
nil nil II
2
iliiii
3
INI nil
4
iiiilii
1 5
iiiiliiii
6
iiiliiii
7 8
llllllll! Illllllll
9
III|!!II
10
i
1 1 1 1
1
1
1
1 1 1 1 MM2
1 1 1 11
1 1 1
3
MM 1 1 1 1
4
INCHES & TENTHS
Fig. 17. English and metric units of length.
the cent is one-hundredth of a dollar. It will be well to re-
member that 1 inch is equal to 2.54 centimeters or that 10
centimeters are approximately equal to 4 inches. This can
be visualized by examining the scales in figure 17. In measur-
ing very short distances, such as the diameter of a wire, we use
a millimeter (mm.), which is one-thousandth of a meter, or
one-tenth of a centimeter. In measuring longer distances
out of doors, we use the kilometer (km.), which is one thousand
meters, or about 0.62 miles.
In measuring volumes, we commonly use the cubic centimeter
(cc.), which is, of course, the volume of a cube one centimeter
on each edge. For larger volumes we use the liter (1.), which
is the volume of a cube 10 centimeters on each edge. There-to

THE METRIC SYSTEM 11
fore a liter is equal to 1000 cubic centimeters. It is well to
remember that a liter is about equal to one quart. One cubic
centimeter is one-thousandth of a liter, hence the abbreviation,
ml., is sometimes used for the cubic centimeter.
In weighing objects in the chemical laboratory, we use
the gram as the unit of weight. This is the weight of one
cubic centimeter of water at 4° C., or 39° F. In elementary
chemistry, we shall often need to weigh things to the nearest
hundredth of a gram, or centigram (eg.). In analytical chem-
istry, we weigh to the nearest milligram (mg.), which is one-
thousandth of a gram, and in atomic-weight determinations,
we try to weigh to one-hundredth of a milligram, or one-hun-
dred-thousandth of a gram. For larger weights, we use the
kilogram (kg.), or 1000 grams, as the unit. It is well to remem-ber that one kilogram is equal to 2.2 pounds.
SUMMARY OF IMPORTANT METRIC UNITS*
1 centimeter (cm.)
1 meter (m.)
1 kilometer (km.)
1 inch
1 meter
1 liter (1.)
1 liter
1 gram (g.)
1 kilogram (kg.)
1 kilogram
10 millimeters (mm.)
100 centimeters (cm.)
1000 meters (m.)
2.64 centimeters
39.37 inches
1000 cubic centimeters (cc.)
1.08 quarts
100 centigrams (eg.)
1000 grams
2.20 pounds
Directions. 1. Measurement of length. Examine the 30-cm.
rule on both sides so as to become familiar with the relative
sizes of the centimeter and the inch. Measure (a) the length
of the page in this book, (&) the height of a test tube, and(c) the diameter of an evaporating dish (across the top).
Measure first in centimeters and millimeters and record the
result as a whole number of centimeters with a decimal to
express the millimeters. Then express this measurement in
inches and a decimal fraction (two places) of an inch. Use
* These units should be memorizeu.
12 THE METRIC SYSTEM
this relation : 2.54 cm. = 1 inch. Record in your notebook
your results in tabular form as follows
:
Object Centimeters Inches
(a) cm. in.
( b ) cm. in.
(c) cm. in.
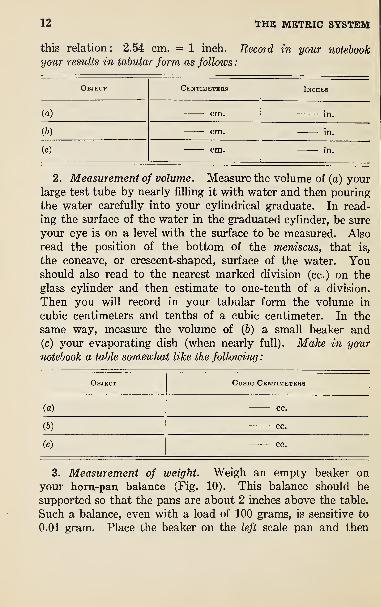
2. Measurement of volume. Measure the volume of (a) yourlarge test tube by nearly filling it with water and then pouring
the water carefully into your cylindrical graduate. In read-
ing the surface of the water in the graduated cylinder, be sure
your eye is on a level with the surface to be measured. Also
read the position of the bottom of the meniscus, that is,
the concave, or crescent-shaped, surface of the water. Youshould also read to the nearest marked division (cc.) on the
glass cylinder and then estimate to one-tenth of a division.
Then you will record in your tabular form the volume in
cubic centimeters and tenths of a cubic centimeter. In the
same way, measure the volume of (6) a small beaker and(c) your evaporating dish (when nearly full). Make in your
notebook a table somewhat like the following
:
Object Cubic Centimeters
(a) CC.
(b) cc.
(C) cc.
3. Measurement of weight. Weigh an empty beaker on
your horn-pan balance (Fig. 10). This balance should be
supported so that the pans are about 2 inches above the table.
Such a balance, even with a load of 100 grams, is sensitive to
0.01 gram. Place the beaker on the left scale pan and then

THE METRIC SYSTEM 13
with the forceps place on the right scale pan a weight which you
think is a bit too heavy to balance the beaker. If it proves to be
heavier, replace it with the next smaller weight. If this is too
light, add to the right scale pan the next smaller weight. In
this manner proceed to add weights until you have the beaker
balanced so nearly that one centigram (0.01 g.) can be detected
in the movement of the pointer of the balance as it swings
back and forth. Remember that a good balance should not
quickly come to rest
!
Now fill the beaker about half full of water and weigh the
beaker and water. Then compute the weight of the water in
the beaker. Also pour all the water into your graduated
cylinder and find its volume. In this way you can check the
accuracy of your weighing because one gram of water occupies
one cubic centimeter. Why do you not expect the volume in
cubic centimeters to check exactly with the weight in grams? It
will he convenient to record in your notebook your weights in
tabular form:
Object Weight
Beaker + Water g.
Beaker empty g-
Weight of Water g.
Volume of Water .... cc.

14 LABORATORY MANIPULATIONS
EXPERIMENT B
Preliminary Experiment in Laboratory Manipulations
Apparatus. — Bunsen burner. Rubber tubing. Triangular file. Wingtop.
Material. — Asbestos paper (6" X 6")- Glass tubing (about 30 cm. long
and 7 mm. in diameter). Pins. Matches.
Introduction. We shall use the type of gas burner nowalmost universally found in chemical laboratories. It wasinvented in 1855 by a famous German chemist, Robert
^Wilhelm Bunsen (1811-1899), who taught for
many years at the University of Heidelberg. If
coal gas is burned in an ordinary jet, the flame
is smoky. But when the gas is mixed with a
suitable amount of air, the flame is much hotter
and does not deposit soot.
Caution. A flame with a "Soaring” sound
means that too much air is entering the burner.
If the flame “strikes back” andFig. i8. Parts of bums noisily at the base of theBunsen burner,
j^umgr, it means that there is not
enough gas pressure and too much air. Turn off
the gas and start again. But be sure to give the
burner a chance to cool off before you touch it.
1. Bunsen burner. Identify the essential
parts of the burner, such as the gas orifice, collar,
air holes, and barrel, shown in figure 18. Attach
it by means of the rubber tubing to the gas pipe.
Turn on the gas. (a) What is the difference in the
character of the flame when the air holes are open Fig. 19. Parts
and when they are closed? (b) What is the effectBunsen
of regulating the supply of gas at the stopcock ?
2. Bunsen flame. If we look at the flame when the holes
are open, we shall see that there are two cones, an inner cone
A which is blue and an outer one B which is bluish-purple

LABORATORY MANIPULATIONS 15
(Fig. 19). The space A within the inner cone is filled with a
mixture of gas and air. This mixture is partially burned in
B and completely burned in C. We may show
that the space A contains unburned gas and is
cool
:
() We may place a match on a pin and
suspend it on the top of a Bunsen burner as
shown in figure 20. When we turn on the gas
and light it, why doesi the match head not take
fire at once?
() We may hold a sheet of asbestos paper pig. 20 , Match
vertically against the flame as shown in fig- inside the Bunsen
ure 21, and then quickly remove it. Repeat
with the paper held horizontally. We shall find that the paper
has been scorched. What does the
inner space within the charred area
indicate ?
3. Handling glass tubing, (a) Tocut a piece of glass tubing, we first
scratch the tube at the point where
we wish to cut it. This may be done
with a triangular file. Then we hold
the tube in both hands with the thumbnails opposite the scratch. By bend-
ing the tubing and at the same time pulling the hands apart,
the tube will break clean across. (6) To bend glass tubing, wefirst place the wing top on the Bunsen burner and light the
burner and adjust the collar to give a blue flame. Hold a 6-inch
piece of glass tubing in the flame so that about 2 inches in
the middle will be heated. Rotate the tube slowly in your
fingers so that it will be heated evenly on all sides. As soon as
the tube where heated has become quite soft, remove the tube
from the flame and slowly bend it until the two arms are at
right angles. Why may the tube he red hot in the middle and yet
can he easily handled at the ends? To test the bend, lay it onan asbestos square. It should lie flat. Also the bend should
Fig. 21. Scorching paper in aBunsen flame.

16 METALS HEATED IN AIR
be rounded and not sharply angular as shown in figure 5.
After the tube has become cool enough to handle in the middle,
the ends should be fire-polished. To do this we hold the end
in the upper part of the ordinary blue Bunsen flame. Whenthe flame turns yellow, it means that the glass has begun to
soften and the sharp edges at the end are rounded off. Whyshould the ends of a glass tube be fire-polished ?
EXPERIMENT 1
Changes in Metals Heated in Air
Apparatus.— Forceps. Bunsen burner. Tripod and pipe-stem triangle.
Lid of porcelain crucible. Iron wire 6" long.
Materials. — Copper wire (# 24). Magnesium ribbon (6 cm.). Tin
(mossy). Lead strip (2 cm. X 0.5 cm.). Aluminum wire (# 18).
Introduction. When wood or coal burns, it seems to disap-
pear except for the ashes left behind. About one hundred
and fifty years ago chemists began
to study this process. Their dis-
coveries enabled the science of
chemistry to advance rapidly. Thetrue explanation of burning wasfound by studying the change
which many metals undergo whenheated in air. In this experiment
we shall observe how certain metals
change when heated.
Directions, a. Copper. Exam-ine a piece of bright copper wire
and record those characteristic
properties which enable one to
recognize it as copper, such as its
color, hardness, luster, and heaviness. Hold the wire with forceps
in the tip of the flame of a Bunsen burner (Fig. 22) until you
are sure that longer heating will produce no further change.
Fig. 22 Heating wire in Bunsenflame.

METALS HEATED IN AIR 17
Cool and compare the surface material with a piece that has
not been heated.
How has the copper changed?
Note. Always state the experimental evidence on which you base your
conclusions.
You might well record your observations in this experiment
in a tabular form like the following
:
MetalHeated
Phopeeties
BEFORE HEATING AFTER HEATING
Copper ....Magnesium . . .
Lead
Aluminum . . .
Tin
b. Magnesium. Repeat the experiment (a), using a piece of
magnesium ribbon. Record definite properties of magnesiumand of the product^ such as color, appearance (metallic or other-
wise), and pliability or brittleness.
c. Lead. Repeat the experiment (a), using a strip of lead.
First scrape it in order to get a fresh metallic surface.
d. Aluminum. Repeat the experiment (a), using a piece of
aluminum wire.
e. Tin. Place the lid of a crucible on a pipe-stem triangle
which is supported on a tripod. On this lid heat a few pieces
of granulated tin. Always apply heat to a porcelain vessel
gently at first by waving the flame about under the vessel.
Then turn down the flame and set the burner under the lid.
Stir the melted tin with an iron wire. Compare the original
tin with the product.
18 WEIGHT OP A METAL HEATED
EXPERIMENT 2
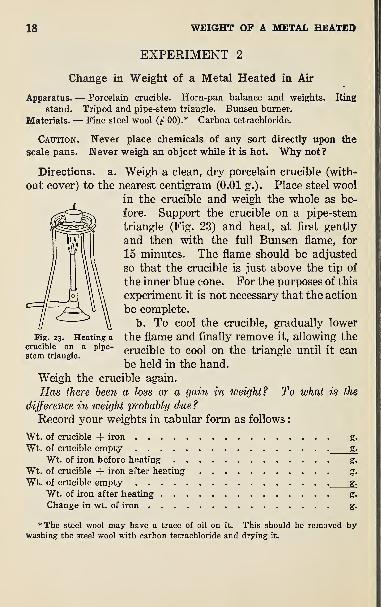
Change in Weight of a Metal Heated in Air
Apparatus. — Porcelain crucible. Horn-pan balance and weights. Ringstand. Tripod and pipe-stem triangle. Bunsen burner.
Materials. — Fine steel wool (# 00).* Carbon tetrachloride.
Caution. Never place chemicals of any sort directly upon the
scale pans. Never weigh an object while it is hot. Why not?
Directions, a. Weigh a clean, dry porcelain crucible (with-
out cover) to the nearest centigram (0.01 g.). Place steel wool
in the crucible and weigh the whole as be-
fore. Support the crucible on a pipe-stem
triangle (Fig. 23) and heat, at first gently
and then with the full Bunsen flame, for
15 minutes. The flame should be adjusted
so that the crucible is just above the tip of
the inner blue cone. For the purposes of this
experiment it is not necessary that the action
be complete.
b. To cool the crucible, gradually lower
the flame and finally remove it, allowing the
crucible to cool on the triangle until it can
be held in the hand.
Weigh the crucible again.
Has there been a loss or a gain in weight? To what is the
difference in weight probably due ?
Record your weights in tabular form as follows
:
Wt. of crucible -f iron g.
Wt. of crucible empty g.
Wt. of iron before heating g.
Wt. of crucible + iron after heating g.
Wt. of crucible empty g.
Wt. of iron after heating g.
Change in wt. of iron g.
* The steel wool may have a trace of oil on it. This should be removed bywashing the steel wool with carbon tetrachloride and drying it.
Fig. 23. Heating acrucible on a pipe-
stem triangle.

A MIXTURE AND ITS COMPONENTS 19
IEXPERIMENT 3
Separating a Mixture into Its Components
Apparatus.— Test tubes and corks to fit. Funnel. Filter papers. Crys-
tallizing dish. Small flask. Evaporating dish. Ring stand.
Materials.— Black gunpowder. Carbon bisulfide.
Introduction. A material as found in nature is rarely a
pure substance. It consists of at least two substances more or
less uniformly distributed throughout the material and loosely
or firmly held together as the case may be. Such a material is
called a mixture, and its ingredients are called components.
Each component retains its identity and its own set of physical
and chemical properties. But the properties of a mixture are
intermediate between the properties of its components. In this
experiment we shall show that black gunpowder, although
apparently homogeneous, is really a mixture of three quite
different substances: sulfur, saltpeter, and charcoal. Theproblem, then, is to make use of certain properties of each
substance to separate it from the mixture.
Directions, a. Examine some black gunpowder. Although
it is a mixture of three different substances, yet they are so
carefully put together that they are not easily discernible.
However, we can separate the various components by using
suitable solvents. Carbon bisulfide will dissolve the sulfur,
and water will dissolve the niter, or saltpeter; and the
charcoal, which is insoluble in both of these solvents, is left
behind.
b. Put about 5 g. of gunpowder into a test tube to which acork has been fitted. Pour upon the gunpowder 10 cc. of
carbon bisulfide, replace the cork, and shake the test tube for
5 minutes. Allow it to settle, pour off the clear liquid through
a dry filter (Pig. 24) into a beaker or crystallizing dish, and set
it aside where no flame will get at it.
Caution. Carbon bisulfide is very inflammable and must neverbe handled near a flame.

20 A MIXTURE AND ITS COMPONENTS
The carbon bisulfide will soon evaporate and leave crystals
of sulfur.
c. Spread the black residue left in the test tube on a filter
paper to dry. When it has dried, transfer the residue to asmall fiask. Pour 20 cc. of hot water upon it and shake for
Fig. 24. Separating a mixture by filtration.
5 minutes. The saltpeter has dissolved, and the solution
may be filtered into a clean evaporating dish. By heating
the filtrate, the water is evaporated. A white residue, the
saltpeter, or niter, is left.
d. The black residue left on the filter paper is charcoal, or
carbon, which is the third component of gunpowder.
Results. What property of each of the three components Oj
gunpowder was made use of in this separation 'f
DECOMPOSITION OF A COMPOUND 21
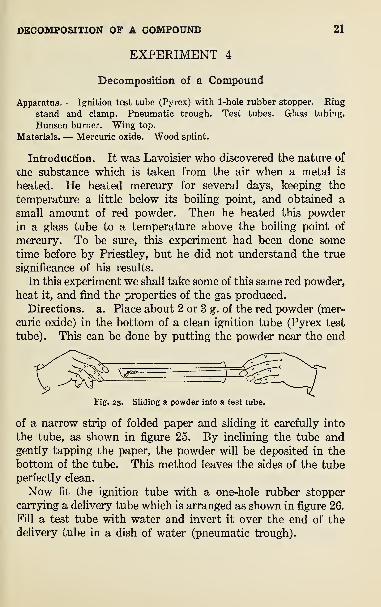
EXPERIMENT 4
Decomposition of a Compound
Apparatus.— Ignition test tube (Pyrex) with 1-hole rubber stopper. Ring
stand and clamp. Pneumatic trough. Test tubes. Glass tubing.
Bunsen burner. Wing top.
Materials. — Mercuric oxide. Wood splint.
Introduction. It was Lavoisier who discovered the nature of
the substance which is taken from the air when a metal is
heated. He heated mercury for several days, keeping the
temperature a little below its boiling point, and obtained a
small amount of red powder. Then he heated this powderin a glass tube to a temperature above the boiling point of
mercury. To be sure, this experiment had been done sometime before by Priestley, but he did not understand the true
significance of his results.
In this experiment we shall take some of this same red powder,
heat it, and find the properties of the gas produced.
Directions, a. Place about 2 or 3 g. of the red powder (mer-
curic oxide) in the bottom of a clean ignition tube (Pyrex test
tube). This can be done by putting the powder near the end
Fig. 2$. Sliding a powder into a test tube.
of a narrow strip of folded paper and sliding it carefully into
the tube, as shown in figure 25. By inclining the tube andgently tapping the paper, the powder will be deposited in the
bottom of the tube. This method leaves the sides of the tubeperfectly clean.
Now fit the ignition tube with a one-hole rubber stopper
carrying a delivery tube which is arranged as shown in figure 26,
Fill a test tube with water and invert it over the end of the
delivery tube in a dish of water (pneumatic trough).
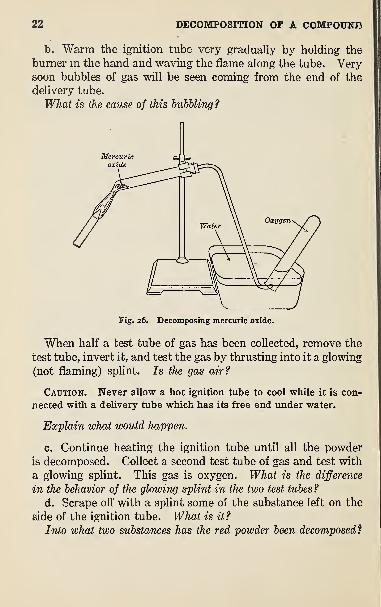
22 DECOMPOSITION OF A COMPOUND
b. Warm the ignition tube very gradually by holding the
burner in the hand and waving the flame along the tube. Verysoon bubbles of gas will be seen coming from the end of the
delivery tube.
What is the cause of this huhUing?
When half a test tube of gas has been collected, remove the
test tube, invert it, and test the gas by thrusting into it a glowing
(not flaming) splint. Is the gas air?
Caution. Never allow a hot ignition tube to cool while it is con-
nected with a delivery tube which has its free end under water.
Explain what would happen.
c. Continue heating the ignition tube until all the powder
is decomposed. Collect a second test tube of gas and test with
a glowing splint. This gas is oxygen. What is the difference
in the behavior of the glowing splint in the two test tubes ?
d. Scrape off with a splint some of the substance left on the
side of the ignition tube. What is it ?
Into what two substances has the red powder been decomposed?

OXYGEN— PREPARATION AND PROPERTIES 23
EXPERIMENT 5
Oxygen— Preparation and Properties
Apparatus. — Test tube and 1-hole stopper. Ring stand with clamp.
Bunsen burner. 4 wide-mouth bottles. 4 glass squares. Pneumatic
trough. Deflagrating spoon. Glass tubing.
Materials. — Potassium (or sodium) chlorate. Manganese dioxide. Woodsplint. Splinter of charcoal. Copper wire (15 cm. # 18). Sulfur.
Red phosphorus. Asbestos paper.
Introduction. The mercuric oxide used in experiment 4 is
too expensive to use in large quantities to produce oxygen. In
this experiment we shall therefore use potassium chlorate, a
substance containing much oxygen. A black powder, man-ganese dioxide, will also be added. The latter will, when the
experiment is completed, be left in the tube unchanged. It
has, however, the remarkable property of enabling the po-
tassium chlorate to give off its oxygen at a lower temperature
and more evenly. Such a substance which changes the speed
of a chemical reaction without being itself permanently altered
is called a catalytic agent.
Preparation. Mix on paper about 10 g. of potassium chlorate
and about one-third its bulk of manganese dioxide. Slide the
mixture into a test tube, clamp it horizontally, and tap it so
as to distribute the mixture along the side of the lower half
of the tube, leaving space above the mixture to the end of the
tube. Insert the rubber stopper carrying the delivery tube
as shown in figure 27. Fill the pneumatic trough with enough
water to cover the support for the bottles. Fill 4 wide-mouth
bottles with water, cover them with glass plates, and invert
them in the trough.
Use a small Bunsen flame to heat the tube, keep the flame
moving, and remove the flame when the gas comes too fast.
Heat slowly. Will the gas which passes over at first be pure oxy-
gen? Now fill the bottles with oxygen one by one, covering
each when full with a glass plate and setting it mouth upwards
on the table. After the fourth bottle is filled, remove the

24 OXYGEN— PREPARATION AND PROPERTIES
delivery tube from the water and allow the test tube to cool.
The residue in the test tube may easily be removed with warmwater.
Properties, a. Use one bottle of the gas to determine such
properties as color, odor, and solubility, and then thrust in a
glowing splint. (Sometimes a slight cloud is present when
oxygen is made from potassium chlorate, because of the presence
of an impurity.) The solubility can be inferred from the
method of collecting the gas.
b. Charcoal. Wind one end of a piece of wire around a thin
splinter of charcoal. Heat the charcoal until it glows brightly
and immediately lower it into a bottle of oxygen. Compare the
combustion of charcoal in oxygen with that in air. Of what does
the gas produced probably consist ?
c. Sulfur. Line a combustion, or deflagrating, spoon with
asbestos paper and put into it about 0.5 cc. of sulfur. Ignite
the sulfur in the Bunsen flame. Observe the flame for a mo-ment and then lower the spoon into a bottle of oxygen, keeping
the mouth of the bottle closed as far as possible with the glass
plate. Compare the flame of sulfur burning in oxygen with that

OXYGEN IN POTASSIUM CHLORATE 25
in air. Is it finally extinguished ? If so, why ? Very cautiously
smell the contents left in the bottle. What is it ?
d. Phosphorus. Clean and reline the spoon with asbestos.
Place in it a bit of red phosphorus (size of small pea), ignite and
lower it into another bottle of oxygen. Compare the burning
as before. Is the product a gas or does it consist of fine solid
particles ?
Caution. Before putting the spoon away, clean it by heating it to
redness for two minutes to burn up all the phosphorus.
Results. Record the properties of oxygen which you have
observed in this experiment. What is its most striking character-
istic?
EXPERIMENT 6
Percentage of Oxygen in Potassium Chlorate
{Quantitative Experiment)
Apparatus.— Porcelain crucible and cover. Ring stand. Horn-pan bal-
ance. Set of weights. Pipe-stem triangle. Iron forceps. Bunsenburner.
Materials.— Dry potassium chlorate.
Introduction. Since potassium chlorate is a chemical com-pound, it will be interesting to determine its percentage of
oxygen. All chemical compounds have a definite percentage
composition. Later we shall see how it is possible to determine
the percentage of chlorine and potassium in the potassium
chlorate. Since this is a quantitative experiment, it will bewell to read again at this point the special directions concern-
ing weighing, counting of weights, and the use of balances.
Directions. Clean and dry a porcelain crucible and cover.
Weigh the empty crucible to a centigram (0.01 g.). Put about
2 grams of dry powdered potassium chlorate into the crucible
and weigh again as before.

26 OXYGEN IN POTASSIUM CHLORATE
Place the covered crucible on the pipe-stem triangle and sup-
port it on the ring stand at some convenient height (Fig. 28).
Begin heating with a small Bunsen flame (about 5 cm. high)
very gently. Lift the cover occasionally with the forceps
and adjust the flame so that
the melted potassium chlorate
gives off its oxygen slowly. If
some should spatter upon the
cover, withdraw the flame andremove the cover to a clean
piece of smooth paper. Loosen
the bits of solid matter with
a pin and very carefully re-
turn them to the crucible.
Continue heating until the
bubbling slackens, then heat
strongly for 10 minutes. Nowlower the flame to permit the
crucible gradually to cool andAnally remove it. When it
is cold, weigh it again to the
nearest centigram (0.01 g.).
Again heat very hot for about 5 minutes, cool, and weigh
as before. If the weight has not changed during the second
heating, we may consider that the oxygen has been completely
expelled. If the weight is less, heat once again for 5 minutes
and continue in this way until two successive weights are the
same. This process is called heating to constant weight.
The loss of weight is equal to the weight of the oxygen. Theresidue in the crucible is called potassium chloride.
The percentage of oxygen in potassium chlorate may be calcu-
lated thus : -
_x Wt. of oxygen
100 “
Fig. 28. Heating potassium chlorate in acovered crucible.
Wt. of potassium chlorate
Make all computations in your notebook. Arrange your
work in tabular form
:

HYDROGEN— PREPARATION AND PROPERTIES 27
Wt. of crucible + potassium chlorate g.
Wt. of crucible empty g.
Wt. of potassium chlorate g.
Wt. after first heating g.
Wt. after last heating g.
Wt. of oxygen g.
Percentage of oxygen in potassium chlorate %
Compute the average of the percentages found by all in the class
who have done this experiment. What law of chemistry is
illustrated?
EXPERIMENT 7
Hydrogen— Preparation and Properties
Apparatus.— Wide-mouth bottle with 2-hole stopper. Thistle tube.
Pneumatic trough. Glass tubing. 3 wide-mouth bottles and glass
squares. Bunsen burner. Test tube.
Materials. — Zinc (mossy). Dilute sulfuric acid (1 : 6). Copper sulfate
solution. Wax tapers.
Thistle tube
Preparation. A convenient method of preparing hydrogen
is furnished by the action of zinc on dilute sulfuric acid. Place
about 20 grams of zinc
in a bottle provided
with a two-hole rub-
ber stopper carr5dng
a thistle tube and a
delivery tube. Theapparatus is arranged
for collecting the gas
over water (Fig. 29).
Insert the stopper
tightly with a twisting
motion and pourthrough the thistle
tube enough dilute sulfuric acid to cover the zinc. Why should
the thistle tube dip into the acid ? If the gas does not come off
freely, add through the thistle tube a few drops of copper sul-
Pneumatic trough--^
Fig. 29. Generating hydrogen by the action of zinc
on dilute sulfuric acid.

28 HYDROGEN— PREPARATION AND PROPERTIES
fate solution. But do not add more acid to the generator
without consulting the instructor.
The gas which passes over first is evidently a mixture of
hydrogen and air. A confined mixture of hydrogen and air,
if ignited, explodes with great violence. To determine whenthe hydrogen is free of air, collect a test tube full of the gas,
carry it mouth downward to a small fiame, and ignite the gas.
Continue to collect and test the gas in this way until a portion
does not give a sharp explosion but burns quietly. Thencollect 3 bottles of hydrogen, cover each with a glass plate, andset mouth downward on the desk.
Properties, a. Allow one bottle of hydrogen to stand un-
covered (mouth up) for a minute. Then bring a lighted taper
to the mouth of the bottle. What does the result show about the
density of hydrogen as compared with air ?
b. Light a short taper and lift a second bottle of hydrogen
(mouth downward). Insert the burning taper almost to the
bottom of the bottle and then withdraw it slowly. Whathappens to the flame of the taper ? What occurs at the mouth of
the bottle? Explain.
c. Place a bottle of hydrogen, mouth downward, over a bottle
of air, mouth upward. Allow the bottles to remain mouth to
mouth in this position for 3 minutes. Carry first the lower
bottle and then the upper bottle quickly to a flame. Whatfact about the diffusion of gases does this experiment illustrate ?
d. Filter the liquid remaining in the flask and evaporate
to about one-half its volume in a porcelain dish over asbestos.
Allow the liquid to stand until crystals (zinc sulfate) form.
These crystals are composed of zinc, sulfur, and oxygen.
Complete in your notebook the equation for the reaction:
zinc + sulfuric acid —> +
e. Summarize the properties of hydrogen and compare with
those of oxygen.

REDUCTION Ol' AJN OXIDE 29
EXPERIMENT 8
Reduction of an Oxide with Hydrogen
Apparatus. — Wide-mouth bottle with 2-hole stopper. Thistle tube. Dry-
ing tube with stopper. Ring stand and clamp. Bunsen burner. Test
tube. Glass tubing.
Materials. — Copper oxide (wire form). Zinc. Dilute sulfuric acid.
Absorbent cotton. JFused calcium chloride.
Introduction. We have already seen that bright metallic
copper turns to black copper oxide when heated in the air
Fig. 30. Reducing copper oxide with dry hydrogen.
(Exp. 1). In this experiment we shall reverse the process of
oxidation and change copper oxide back to metallic copper;
this is called reduction.
For this purpose we shall use dry hydrogen (free from water
vapor), which can be obtained by passing the gas from the
generator through a tube filled with granulated calcium chloride.
This drying material is held in position by loose plugs of cot-
ton placed at each end of the tube.
Directions, a. Place about 0.5 cc. of black copper oxide in
the bottom of a dry test tube and place the latter in a slightly
inclined position with mouth downward (Fig. 30). Insert a

30 ELECTROLYSIS OF WATER
straight piece of glass tubing into the stopper of the drying
tube and introduce this tubing into the test tube until the end
touches the copper oxide.
b. Now generate hydrogen as in Experiment 7, and wait
3 minutes to allow all the air to be replaced by hydrogen.
Caution. Don’t bring a flame near the apparatus until all the air
is driven out.
Cautiously heat the copper oxide to redness, being careful
to keep the flame away from the mouth of the tube.
c. Note any change in the copper oxide. What collects in the
cool part of the tube? What substance is reduced and what
substance is oxidized in this experiment ?
Why is it necessary to dry the hydrogen?
EXPERIMENT 9
Electrolysis of Water*
Apparatus.— Hoffman electrolysis apparatus (Fig. 31). Battery jar
(4" X 5")- Two test tubes. Ring stand with two clamps. Twocopper insulated wires with platinum electrodes attached. Storage
battery (3 cells) or 4 dry cells (new) or a 100-watt lamp and socket with
connections for 110-volt direct current.
Materials.— Water solution of sulfuric acid (1 vol. acid to 15 vol. water)
Wood splints.
Introduction. Although this experiment may be done as a
class demonstration, there is a genuine thrill which the beginner
will experience if he performs it for himself. The object of the
experiment is not only to show that water is a combination of
oxygen and hydrogen, but also to determine the relative volumes
of each gas. Since pure water is a very poor conductor of elec-
tricity, we shall add a very little sulfuric acid to increase its
conductivity. But if you were to test the quantity of acid
* Unless the laboratory is equipped with electricity at each table, this experiment
should be done as a class experiment by the instructor.

ELECTROLYSIS OF WATER 31
left in the water after you had been using the apparatus, you
would find the quantity of sulfuric acid unchanged.
Directions. {Class experiment.) Set up the Hoffman elec-
trolysis apparatus, if it is available, as shown in figure 31.
A 6-volt storage battery or 4 new dry
cells in series or, better, a 110-volt direct
current with a 100-watt lamp in series
may be used as a source of electricity.
Fill the reservoir nearly full of water to
which has been added one volume of sul-
furic acid to 15 volumes of water.
Caution. To prepare dilute sulfuric acid
always pour the acid slowly into the water—never the reverse.
Connect the battery with the electrode
terminals. Bubbles of gas collect at each
electrode and rise in the liquid. Theelectrode connected with the positive
terminal of the battery is called the anode
and that connected with the negative
terminal is the cathode. Compare the vol-
umes of gases collected in the two tubes.
When the volume of gas at the cathode
has reached 50 cc., disconnect the wires and measure the vol-
umes in the tubes carefully.
To test the gas in the cathode tube, open the stopcock at the
top and apply a lighted splint. What happens? Then apply
a glowing splint to the stopcock at the top of the other tube.
What happens ?
Note. The tubes above the stopcocks should be dried out carefully
with filter paper before applying the above tests, otherwise the sputtering
drops of acid will interfere.
{Student experiment.) a. Fill a small battery jar about
two-thirds full of water containing about one part by volumeof sulfuric acid to 15 parts of water. Fill two test tubes with
Fig. 31. Hoffman ap-paratus for the electroly-
sis of water.

32 ELECTROLYSIS OF WATER
the dilute sulfuric acid, cover the end of each tube with yourthumb, and invert it into the water of the jar. Slip each tube
into its clamp and push it down until the platinum electrode
is entirely within the tube as shown in figure 32. Each elec-
trode consists of a strip of plati-
num foil soldered to a piece
of rubber-covered copper wire.
The exposed copper wire andsoldered joint should be covered
with paraffin or sealing wax.
Wash your hands thoroughly to
remove every trace of the acid.
b. Connect the two electrodes
with a 6-volt storage battery, or
with a 110-volt direct-current
circuit having a 100-watt lamp in series. Note the positive ( +)and negative (— ) terminals. We shall assume in this experi-
ment that electricity enters the solution at the + electrode
(anode) and leaves the solution at the — electrode (cathode).
c. As soon as the instructor has inspected your apparatus,
turn on the current. How does the volume of gas liberated at
the anode compare with the volume liberated at the cathode during
the same length of time ?
When the water in one of the tubes has been displaced by the
gas, remove the tube from the battery jar. Holding the mouthof the tube downward, bring it near a flame. What is the gas ?
As soon as the other tube is filled with gas, close it with your
thumb and remove it from the jar. Invert the tube and insert
a glowing splint. What is the gas? What gas is collected at
the cathode ? What gas is collected at the anode ?
Assume that there is the same weight of sulfuric acid in the
battery jar at the end of the experiment as at the beginning.
Where did the gases come from? Complete the word-equation:
water —>- +
What was the purpose of adding the sulfuric acid?
Test tubes
Fig. 32. Electrolysis of water withstudent’s form of apparatus.

DISTILLATION OF WATER 33
EXPERIMENT 10
Distillation of Water
Apparatus. — Liebig condenser. Boiling flask. Flask with 1-hole stopper.
Ring stand. Wire gauze with asbestos center. Bunsen burner.
Wide-mouth bottle. Test tubes. Glass tubing.
Materials. — Common salt (sodium chloride). Potassium permanganate
(or copper sulfate). Ammonia water (concentrated). Litmus paper
(red). Marble chips or glass beads.
Introduction. Natural water is never absolutely pure. Tomake it fit for drinking and for industrial purposes, filtration,
boiling, or treatment with a chemical, such as chlorine, is
resorted to. But for laboratory use it is absolutely essential
to distill the water. This process consists in boiling the water
and condensing the steam. If the apparatus is clean and if the
impurities have a higher boiling point than the water, the dis-
tillate is pure. The following experiment illustrates the process.
Directions. (Class experiment) a. Set up the Liebig con-
denser and boiling flask as shown in figure 33. Use about 100 cc.

34 DISTILLATION OF WATER
of ordinary water and add to it one drop of concentratedammonium hydroxide solution. Add enough copper sulfate
to give it a distinctly blue color. In each of six clean test tubesplace one drop of phenolphthalein solution (an indicator whichturns pink with ammonia) and catch the distillate in these test
tubes. Change the test tube
as soon as 15 cc. of liquid
has come over.
Questions. Does the am-monia pass over with the
steam ? Does the copper sul-
fate pass over with the steam ?
Do the first portions of the
distillate contain more or less
ammonia than the later por-
tions ?
(Student experiment.)
b. Dissolve a spoonful of
common salt in about 50 cc.
of water. Put the solution
in a flask which is arranged
as in figure 34. A few chips of marble in the flask will prevent
"‘bumping.” The steam from the boiling water in the flask is
condensed by conducting it into the test tube, which is kept cold
by the water in the bottle. Boil gently until 5 cc. has distilled
over. Taste the distilled water. Is it free from salt Explain.
Repeat, using 50 cc. of water colored with a crystal of
potassium permanganate. Is the distillate colorless? (Don't
taste it.)
c. Add a few drops of concentrated solution of ammonia (a
gas) to 50 cc. of water. Note the odor of the liquid and place a
drop of it on red litmus paper. Result ?
Distill the dilute ammonia water in the same way in which
you did the salt water. What is the odor of the distilled liquid?
Test it with red litmus paper. Is it free from ammonia?Explain.
Fig. 34. Simple apparatus for distilling water.

WATER OF HYDRATION 35
: EXPERIMENT 11
Measurement of Water of Hydration
' (Quantitative Experiment)
Apparatus. — Ring stand. Pipe-stem triangle. Porcelain crucible. Horn-
I
pan balance and weights. Bunsen burner.
I
Materials.— Barium chloride (or gypsum or copper sulfate) crystals.
!
Introduction. The amount of water of crystallization con-
tained in a hydrate, such as gypsum, copper sulfate, or barium
chloride, is a definite quantity and varies with different crystal-
lized substances. It can be determined by heating a knownquantity of the crystallized substance until all of the water
is driven off. We can tell when the process is complete
because then the substance ceases to lose weight on further
heating. We use barium chloride because it is easily obtained
pure.
Directions, a. Weigh a clean, dry crucible with cover to
the nearest centigram (0.01 g.). Place about 3 grams of crystal-
lized barium chloride (do not try to take an exact amount) in
the crucible and weigh again with cover carefully. Record
these weights in tabular form as shown below.
b. Place the covered crucible on the pipe-stem triangle andplace this on the ring stand, as shown in figure 28. Heat the
crucible at first very gently, holding the burner in the hand.
Why begin heating gently? Then place the burner under the
crucible and adjust the flame so that the top of the inner blue
cone is a short distance below the crucible. After heating for
10 minutes, remove the cover and continue heating strongly
5 minutes longer. Then gradually cool the crucible and reweigh
to the nearest centigram.
c. Reheat the crucible (without cover) for 5 minutes, allow
it to cool, and reweigh. Repeat this operation until the weight
is constant. Why? From your results calculate the percentage
of water of hydration present in the crystals.

36 REPLACEMENT OF HYDROGEN BY A METAL
Wt. of crucible + barium chloride crystals
Wt. of crucible emptyWt. of barium chloride taken . . ,
Wt. after first heating
Wt. after last heating
Wt. of water of hydration
Percentage of waterwt. of water
wt. of barium chlorideX 100 =
g.
Izg.
g-
Mlg.
%
EXPERIMENT 12
Replacement of Hydrogen by a Metal
{Quantitative Experiment)
Apparatus.— Gas-measuring tube, 50-cc. Battery jar (about 4" X 5")c
Horn-pan balance and weights. Thermometer. Barometer.
Material. — Magnesium ribbon. Cone, hydrochloric acid. Thread.
Introduction. In this experiment we shall determine the
weight of magnesium required to generate 1 gram of hydrogen.
This is called the equivalent weight of magnesium. We shall
need (1) to take a known weight of magnesium, (2) to displace
hydrogen from an acid with this quantity of the metal, (3) to
measure the volume of hydrogen replaced, and (4) knowing
the density of hydrogen (grams per liter), to compute the
weight of this hydrogen. (5) Finally, we may calculate from
the weight of magnesium used and the weight of the hydrogen
evolved the weight of magnesium needed to give one gram of
hydrogen; thus,
X _ Wt. of magnesium used
1 Wt. of hydrogen evolved
Directions. It will be well to fill a small battery jar about
f full of water at the temperature of the room.
a. Since magnesium ribbon is very nearly uniform in size,
its weight may be considered proportional to its length. Wemay then measure off several meters of clean, bright ribbon
(enough for the whole class) and weigh it as precisely as possible

REPLACEMENT OF HYDROGEN BY A METAL 37
with the best balances available. From these data we can
compute the weight of 1 cm. of ribbon and the length of
magnesium ribbon which will weigh about 0.045 grams. Record
the weight of magnesium actually
used.
b. Roll the magnesium ribbon
into a loose coil but small enough
to slide easily into the gas-
measuring tube. Attach a piece
of thread to the coil. Pour about
5 cc. of concentrated hydrochloric
acid into the gas-measuring tube
and then fill it with water slowly
in order to avoid as much as pos-
sible mixing the acid and water.
c. Now put the weighed piece
of magnesium ribbon into the
measuring tube and lower it
about 5 cm., holding it by the
thread so that it will not sink
too far. Then place your thumbover the mouth of the tube andinvert it into the battery jar of
water. Let the tube rest on the
bottom of the jar so that it holds
the thread, as shown in figure 35.
Since the acid is heavier (sp. gr. 1.19) than water, it will
gradually flow downward in the tube and react with the mag-nesium. The magnesium may be allowed to rise nearly to the
graduated portion of the tube. If any magnesium sticks to
the sides of the glass tube as the liquid goes down, rinse it off
by shaking the glass. What is the gas which is collected ? Fromwhat substance does the gas come? Copy and complete the
following word-equation
:
Fig. 35. Apparatus for determiningthe equivalent of magnesium.
magnesium + hydrochloric acid +

38 REPLACEMENT OF HYDROGEN BY A METAL
d. When the action has ceased and the liquid is clear of
bubbles of gas, raise or lower the measuring tube so that the
surface of the liquid inside the tube is at the same level as the
surface of the liquid in the jar. Then read very carefully the
volume of the hydrogen collected and record it in your notebookin a table similar to the one shown below.
TABLEData:
Weight of magnesium used g.
Volume of hydrogen obtained cc.
Temperature of water in jar ° C.
Barometric pressure mm.Density of hydrogen under these conditions g./cc.
Computations:
Weight of the hydrogen evolved g.
Weight of magnesium needed to get 1 g. hydrogen g.
Since the density of hydrogen depends on the temperature
and pressure, it will be necessary to record also the temperature
of the liquid in the jar and the barometric pressure.
From the table in the Appendix giving the density of
hydrogen at various temperatures and pressures, find the
density of hydrogen (grams per liter) at the temperature and
pressure in this experiment. Record in your notebook the density
of hydrogen as collected, expressed as grams per cubic centimeter.
From this density as given in the table and the volume you
have measured, calculate the weight of the hydrogen collected.
Finally, calculate the weight of magnesium needed to get 1 gram
of hydrogen.

ANALYSIS OF A MIXTURE 39
EXPERIMENT 13
Analysis of an Unknown Mixture *
(Quantitative Experiment)
Apparatus. — Ignition test tube (Pyrex), 6" X f". Ring stand and clamp.
Bunsen burner or Fisher form of Meker burner. Horn-pan balance
and weights. Porcelain crucible.
Materials. — Unknown mixture of potassium chloride and potassium
chlorate (furnished by your instructor). Shredded asbestos.
Introduction. In this experiment you will have an oppor-
tunity to apply your chemical formulas as well as your skill in
weighing. The problem is to determine the composition of a
mixture of potassium chloride and potassium chlorate byfinding the loss of weight in the sample due to the evolution of
oxygen upon heating. An unknown sample (numbered) will be
furnished by the instructor.
Directions. Clean and dry an ignition test tube and fasten
a loop of copper wire around it near the open end. Suspend
the tube from the hook over the pan of your horn-pan balance
and weigh to the nearest centigram (0.01 g.). Place about
2 grams of the unknown sample in the test tube. Be sure
that none of the powder sticks to the walls of the tube. Nowweigh the tube again with the sample in order to determine
the weight of the sample within a centigram.
Prepare two plugs of shredded asbestos by first heating the
asbestos in a porcelain crucible in order that it may be thor-
oughly dry. Push one plug, about 15 mm. long, down into
the ignition tube until it is about 5 cm. from the bottom of
the tube. Push the second plug into the tube until it is about
9 cm. from the bottom. Again weigh the loaded ignition
tube as carefully as before.
Now clamp the ignition tube so that it is nearly horizontal
but so that the closed end is a little lower than the open end.
* This experiment is based on a similar one used in the laboratories of Chemis-try A at Harvard University.

40 DECOMPOSITION OF WATER BY SODIUM
Heat the tube, at first gently, until the contents begin to melt.
Keep up this slow decomposition for about 5 minutes. Thenheat the residue more vigorously for 3 minutes.
Caution. Do not heat the tube to such a point that white fumesappear above the second asbestos plug.
Allow the tube to cool to the temperature of the room andreweigh as precisely as your balance allows.
Calculations. How much oxygen was evolved from your
sample? How much potassium chlorate was needed to produce
this oxygen? What percentage of your mixture was potassium
chlorate?
EXPERIMENT 14
Decomposition of Water by Sodium
Apparatus. — Knife. Evaporating dish. Forceps. Ring stand and clamp.
Pneumatic trough. Large test tube. Glass plate. Stirring rod.
Materials.— Sodium metal. Litmus-paper strips, red and blue. Lead foil.
Caution. The reaction of sodium with water is violent. Don’t
handle sodium with wet hands. Follow the directions.
Introduction. Water is the most familiar of all chemical
compounds. We have already seen [p. 22] * that it may be
decomposed by an electric current into two entirely different
substances — oxygen and hydrogen. Hydrogen can be got
from water, even at ordinary temperatures, by means of certain
active metals such as sodium and potassium. But it is nec-
essary to follow directions carefully since these metals react
vigorously with the water. However, for laboratory purposes
we use a much cheaper and less active metal such as zinc; and
because the action of zinc on water is too slow, we add an acid
like dilute sulfuric or hydrochloric acid. (See Experiment 7.)
A great many metals have the power to drive hydrogen out of
* Bracketed numbers refer to pages in Black and Conant’s New Practical
Chemistry.

DECOMPOSITION OF WATER BY SODIUM 41
Fig. 36. Violent action of
sodium on water.
an acid solution and to take its place in the solution. In recent
years electricity has become so cheap a form of energy that
much of the hydrogen which is used
commercially is prepared by the elec-
trolysis of water.
Directions, a. What is the ap-
pearance of a freshly cut surface of
sodium? Is sodium hard or soft?
Heavy or light?
b. Fill an evaporating dish half
full of water, and float upon it a
piece of filter paper. Then with the forceps drop on the filter
paper a bit of sodium (size of the head of a match). It is well
to protect the eyes against spattering drops with a plate of
glass (Fig. 36). Observe the results.
The filter paper keeps the sodium in place, thus preventing
it from spinning around on the surface of the water.
c. After the action has ceased, wet your fingers with the
solution and rub them together. Result ? Test with a stirring
rod the action of a drop of the solution on red and on blue
litmus paper. Result ?
d. Wrap a clean, freshly cut piece of sodium (about 3 mm. in
diameter) in dry lead foil (tea lead). Punch several holes in
the lead with a knife blade.
Holding the lead in forceps,
quickly slip it under the
mouth of a large inverted
test tube filled with water
(Fig. 37). If necessary, use
another piece of sodium
wrapped in lead to complete
the filling of the tube. If
the sodium escapes from the
lead covering, stand back!
When the tube ic filled with gas, carry it mouth downwardto a flame and ignite the gas. Result? This gas is hydrogen.
Sodium wrapped in lead foil
Fig* 37* Collecting the gas evolved fromsodium and water.

42 CHLORINE— PREPARATION AND PROPERTIES
and the yellow flame is due to sodium. If sodium is an element
^
where does the gas come from ?
Draw a labeled diagram of the apparatus used in (d).
Copy in your notebook and complete the word equation:
Water + sodium— sodium hydroxide +
EXPERIMENT 15
Chlorine— Preparation and Properties
{Class Experiment)
Apparatus.— Flask with 2-hole stopper. Ring stand with large ring andclamp. Thistle tube. Bunsen burner. Pan or water bath. 4 wide-
mouth bottles and glass plates. Pneumatic trough. Mortar andpestle. One hydrogen generator for class. Glass tubing.
Materials. — Manganese dioxide. Concentrated hydrochloric acid. Pow-dered antimony. Taper.
Introduction. Next to water, probably the most familiar
compound is common salt, which we shall show to be made upof the metal sodium and the gas chlorine. Commercially
chlorine is prepared by the electrolysis of salt water; but in
the laboratory it is more convenient to make it from con-
centrated hydrochloric acid. This acid is treated with an
oxidizing agent which oxidizes the hydrogen of the acid to
water and sets free the chlorine. In this experiment we shall
use manganese dioxide (Mn02) as the oxidizing agent. Thereaction is as follows
:
4 HCl + Mn02 —^ MnCh + 2 H26 + CI2 |hydrochloric manganese manganese water chlorine
acid dioxide chloride
In this reaction the manganese unites with one-half of the
chlorine of the hydrochloric acid;
the rest of the chlorine is
evolved as a gas when the mixture is warmed.
Caution. Chlorine is a poisonous gas. Avoid inhaling muchchlorine. Breathing ammonia gives some relief. This experiment
should be done under a hood or in a place where there is a good draft.

CHLORINE— PREPARATION AND PROPERTIES 43
Preparation. Set up the apparatus as in figure 38. Place
about 10 g. of granular manganese dioxide in the generating
flask and pour in about 25 cc. of concentrated hydrochloric
acid. Rotate the flask in order to mix
the contents thoroughly.
Heat the water in the dish under
the flask to boiling. Fill 4 wide-
mouth bottles by the displacement of
the air, holding a piece of white paper
behind the bottles to see when they
are full. Note the color of the gas.
Cover the bottles with glass plates
and set them aside.
Properties, a. Solubility in water.
Slide one of the glass plates aside andfill one bottle of chlorine about one-
third full of cold water. Cover it
with the palm of your hand and shake
the contents vigorously. Lower the bottle into a trough of
water and remove your hand. What can you say about the
solubility of chlorine ?
b. Action with metals. Grind up in a mortar a fragment of
antimony and sprinkle some of the powdered antimony (Sb)
into a bottle of chlorine. Name the product (SbCL) and write
the equation. Is oxygen always necessary for combustion ?
c. Action with hydrogen. Introduce a jet of burning hydro-
gen into a bottle of chlorine. Blow gently across the mouth of
the bottle and note the change of color. Name the product
and write the equation for the burning.
d. Action with hydrocarbons. Lower a lighted taper or
candle into a bottle of the gas by means of a wire handle.
Blow gently across the mouth of the bottle. Name two products
of this action.
e. Summarize the properties of chlorine which you have observed
in this experiment.
Fig. 38. Preparation of
chlorine.

44 HYDROCHLORIC. ACID
EXPERIMENT 16
Hydrochloric Acid
Apparatus. — Ring stand with clamp and large ring. Bunsen burner.
Asbestos gauze. Florence flask with 2-hole stopper. Thistle tube.
Wide-mouth bottles and glass squares. Glass tubing. Cardboard.
Dish. Stirring rod.
Materials.— Sodium chloride (common salt). Concentrated sulfuric acid.
Litmus papers. Concentrated ammonium hydroxide. Wood splint.
Filter paper. Magnesium.
Introduction. Of the acids, undoubtedly sulfuric (oil of vit-
riol) is the most important. In this experiment we shall
find out what happens whenit is added to common salt.
The gas which is evolved on
heating, known as hydrogen
chloride, has an extremely
pungent odor, and therefore
it is advisable to do this ex-
periment in a well-ventilated
place (or under a hood).
The water solution of hydro-
gen chloride is called hydro-
chloric acid.
Preparation. Arrange a
flask with stopper, thistle
tube, and delivery tube as
shown in figure 39. Pour
into the flask 7 cc. of water
and then slowly add 20 cc. of concentrated sulfuric acid (H2SO4).
Caution. Always pour the sulfuric acid into the water.
Cool the diluted acid by holding the flask in a stream of
running water. When the acid is cold, put into it about 15 g.
of common salt (NaCl). Replace the stopper carrying the
thistle tube and delivery tube and set the flask on the asbestos
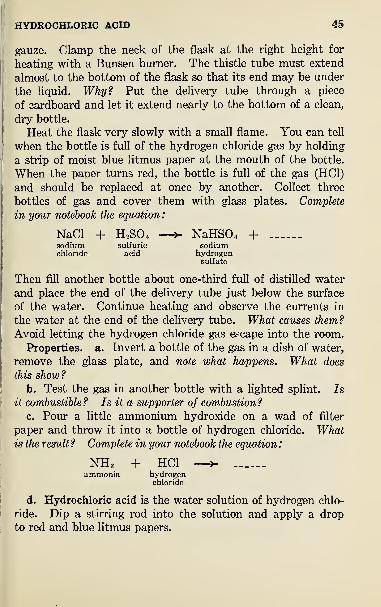
HYDROCHLORIC ACID 45
gauze. Clamp the neck of the flask at the right height for
heating with a Bunsen burner. The thistle tube must extend
almost to the bottom of the flask so that its end may be under
the liquid. Why? Put the delivery tube through a piece
of cardboard and let it extend nearly to the bottom of a clean,
dry bottle.
Heat the flask very slowly with a small flame. You can tell
when the bottle is full of the hydrogen chloride gas by holding
a strip of moist blue litmus paper at the mouth of the bottle.
When the paper turns red, the bottle is full of the gas (HCl)
and should be replaced at once by another. Collect three
bottles of gas and cover them with glass plates. Complete
in your notebook the equation
:
NaCl + H2SO4 — NaHS04 +sodium sulfuric sodiumchloride acid hydrogen
sulfate
Then fill another bottle about one-third full of distilled water
and place the end of the delivery tube just below the surface
of the water. Continue heating and observe the currents in
the water at the end of the delivery tube. What causes them?
Avoid letting the hydrogen chloride gas escape into the room.
Properties, a. Invert a bottle of the gas in a dish of water,
remove the glass plate, and note what happens. What does
this show ?
b. Test the gas in another bottle with a lighted splint. Is
it combustible ? Is it a supporter of combustion ?
c. Pour a little ammonium hydroxide on a wad of filter
paper and throw it into a bottle of hydrogen chloride. Whatis the result ? Complete in your notebook the equation
:
NH3 + HCl —>•
ammonia hydrogenchloride
d. Hydrochloric acid is the water solution of hydrogen chlo-
ride. Dip a stirring rod into the solution and apply a drop
to red and blue litmus papers.

46 TEST FOR A CHLORIDE
Pour some of the hydrochloric acid just made into a test tube
and drop into it a strip of magnesium. Test the gas set free
with a flame. Result? Complete in your notebook the equation:
Mg + > +
EXPERIMENT 17
Test for a Chloride
Apparatus.— Test tubes and rack.
Materials. — Dilute hydrochloric acid. Dilute nitric acid. Solutions ot
silver nitrate (5%), ammonium hydroxide, disodium phosphate, and po-
tassium oxalate. “ Unknown ” solution.
Directions, a. Fill a test tube half full of dilute hydrochloric
acid and add a few drops of silver nitrate solution (AgNOs).
The solid which separates out, i.e. the precipitate, is silver
chloride (AgCl). Complete the equation in your notebook :
HCl +AgN03—^ +Record the color and appearance of this precipitate. Label
and set the tube aside for further experimenting.
b. In the same way add a few drops of silver nitrate solution
to a solution of disodium phosphate. The precipitate in this
case is silver phosphate.
Record its color and appearance. Label the test tube and set
it aside.
c. To a solution of potassium oxalate add a few drops of
silver nitrate solution. The precipitate is silver oxalate.
Record its color and appearance. Label this test tube and
set it aside.
d. Try the effect of dilute nitric acid on each of the three
precipitates just prepared. How can you distinguish between
silver chloride, silver phosphate, and silver oxalate ?
e. Prepare another portion of silver chloride by adding silver
nitrate solution to a solution of sodium chloride (common salt).
Compete the equation in your notebook
:
NaCl + AgNOs
—
^ +-

HYPOCHLOROUS ACID— BLEACHING 47
Find out whether this precipitate (AgCl) is soluble in ammoniumhydroxide.
f. Prepare still another portion of silver chloride and stand
the tube in the sunlight. What is the result ?
Summarize the three characteristic properties of silver chloride.
How would you test for a soluble chloride ?
g. Apply these tests to an “ unknown solution ’’ which you
may obtain from the instructor. In making your report on
this unknown solution, record the result of each step in the
process of testing as weh as your final conclusion. That is,
report the reaction of successive additions of silver nitrate, am-
monium hydroxide, and nitric acid and your decision as to whether
it is a chloride.
EXPERIMENT 18
Hypochlorous Acid— Bleaching
{Optional Experiment)
Apparatus.— Test tubes and rack. Carbon dioxide generator (Kipp).
Funnel.
Materials. — Bleaching powder (chloride of lime). Filter papers. Marblechips. Washing soda. Sodium sulfite. Concentrated hydrochloric
acid. Colored calico. Litmus paper.
Preparation. Make a saturated solution of bleaching
powder (chloride of lime) by adding about 2 cc. of the powderto 20 cc. of water in a test tube and by shaking occasionally.
Filter off the clear solution and pass carbon dioxide (made bythe action of hydrochloric acid on marble) through the liquid
for at least 5 minutes. The equation for this reaction is as
follows
:
CaOCl 2 + H 2CO 3 —5- CaCOsI + HOCl + HClchloride carbonic calcium hypochlorous hydrochloricof lime acid carbonate acid acid
By filtering off the precipitate, calcium carbonate, we obtain
a clear solution containing the hypochlorous acid.
48 ACIDS, BASES, AND SALTS
Use in bleaching. Place in the solution of the hypochlorous
acid, just prepared, small strips of (1 ) litmus paper, (2 ) paper
with printing on it, (3) paper on which there is writing in ink,
(4) paper with pencil marks, and (5) colored calico. Record
the effect on each. Which of these materials is colored with
organic compounds and which with free carbon? Does hypo-
chlorous acid oxidize free carbon ? What does it oxidize ?
Bleaching. Unbleached cotton cloth may be bleached with
chloride of lime as follows: (1) First clean the cloth of grease
by boiling it in a weak solution of washing soda (5% Na 2C03solution). (2) Then wash and place the cloth in a bleach bath
(10% CaOCh solution). (3) After 5 minutes partially wring
the cloth and place it in a very dilute solution of sulfuric acid
(5 cc. cone. H 2SO 4 in 100 cc. water). (4) Again place the
cloth in the bleach solution and thus alternate until the color
is removed. (5) To remove any traces of the hypochlorous
acid left in the cloth, wash it several times in a solution of
sodium sulfite (5% Na 2S03 sol.). Mount in your notebook
a sample of the original cloth and another as bleached.
EXPERIMENT 19
Acids, Bases, and Salts
Apparatus.— Test tubes and rack. Stirring rod. Evaporating dish.
Tripod and asbestos gauze. Glass plate. Bunsen burner.
Materials.— Dilute hydrochloric, sulfuric, nitric, and acetic acids. Litmus
papers (red and blue). Solutions of sodium hydroxide, potassium
hydroxide, ammonium hydroxide, and calcium hydroxide. Sodiumhydroxide (sticks or pellets).
Directions, a. Acids. Prepare dilute solutions of the fob
lowing acids by adding a few drops of each to 10 cc. of water
:
hydrochloric, sulfuric, nitric, and acetic. Lay a piece of blue
litmus paper and a piece of red litmus paper on a glass plate.
Touch both kinds of paper with the end of a clean glass rod wet
with each acid in turn. What changes do you observe ?

ACIDS, BASES, AND SALTS 49
Taste one drop of each of the dilute solutions and imme-
diately rinse the mouth with water. What is the distinctive
taste of acid?
Write the formulas of these acids (see Chap. XII) and find out
what element is present in all of them.
b. Bases. In a similar way test with litmus papers dilute
solutions of the following bases : sodium hydroxide, potassium
hydroxide, ammonium hydroxide, and calcium hydroxide.
What is the characteristic change in litmus which you observe
with bases?
Taste a drop of calcium hydroxide solution. How would
you characterize the taste of bases ?
Write out the formulas of these bases and find out in what respect
they are similar in composition.
c. Salts. Dissolve a small piece of sodium hydroxide (a
stick about 1 cm. long or 6 pellets) in about 20 cc. of water in a
test tube. Stir it until all is dissolved and then pour out about
15 cc. of the solution
into an evaporating dish
(Fig. 40). Add dilute
hydrochloric acid a little
at a time and keep
stirring the liquid until
a drop on a glass rod
gives no basic reaction
with litmus.
Then dilute the 5 cc. Neutralizing a base with an acid,
of sodium hydroxide
solution which was left in the test tube until it is five times as
dilute, and also dilute the acid solution the same amount.Now use these much diluted acid and base solutions to bring
the solution in the evaporating dish to the neutral point, or
end point, i.e. the point where it affects neither red nor blue
litmus paper. This process is called neutralization.
Evaporate the neutral solution to dryness slowly so that the
liquid does not spatter. Taste the residue. What is it ?

50 TITRATION OF A SOLUTION
The scientific name for the residue is sodium chloride, whichindicates that it contains only sodium and chlorine. What has'probably become of the other eleme'nts in the acid and base ?
Complete the equation in your notebook:
NaOH + HCl—^ NaCl + ....
EXPERIMENT 20
Concentration of a Solution by Titration
((Quantitative Experiment)
Apparatus. — Two burettes. Small Erlenmeyer flask (50 cc.). Stirring rod.
Ring stand with 2 clamps.
Materials. — Fifth-normal solution of sodium hydroxide (8 g. to 1 liter) anda solution of hydrochloric acid (nearly the same concentration, madeby diluting 34 cc. of cone, hydrochloric acid to 1 liter).* Phenol-
phthalein solution (1 g. dissolved in 100 cc. of 50% alcohol).
Introduction. A normal solution of a base contains 17 g. of
replaceable hydroxyl (OH) per liter. Ho'w many grams of
sodium hydroxide (NaOH) must be dissolved in water and madeup to a liter to form a fifth-normal {0.2 N) solution?
A normal solution of an acid contains 1 g. of replaceable
hydrogen per liter. How many grams of hydrogen chloride
{HCl) does one liter of a normal hydrochloric acid solution contain?
Directions, a. Fill one burette nearly full of a sodium
hydroxide solution of known concentration (0.2 N). Label
the burette and clamp it in a vertical position. Then fill
another burette with the hydrochloric acid, the concentration of
which is to be determined (Fig. 41). Draw from each burette
enough liquid to remove the air bubbles from the tip and to
bring the meniscus (the curved surface of the liquid) down to
the graduated portion of the burette.
*The precise amount of material needed to make one liter of normal solution
(NaOH or HCl) can be purchased in a small glass-stoppered bottle under the trade
name “ Fixanal.”

TITRATION OF A SOLUTION 51
b. Examine carefully the markings on the burettes in order
to understand the graduations. In reading a burette, make
sure that the eye is on a level with the lowest part of the menis-
cus, as shown in figure 15. Record the readings of both burettes
in tabular form as indicated on page 52.
Note. Observe that the graduation is down-
wards. If then the reading is four-tenths of a cc.
I above the 1 cc. mark, the reading is 0.6 cc. (not
ij 1.4 cc.).
c. Let about 10 cc. of the basic solution
i flow out into a little flask and then add a
; drop or two of some indicator, such as
' phenolphthalein solution. Remember that
this indicator turns a pink color when the
;solution is basic; an acid solution remains
I
colorless.
' d. Now set the flask on a sheet of white
paper under the other burette and allow the
acid to run in a few drops at a time. Shake' the solution in the flask vigorously after
each addition of a few drops. When the
acid begins to decolorize the indicator near
the point where it enters, work more cau-
tiously. Add one drop at a time and shake
the solution until the pink color just dis-
j
appears. Now add a drop or two of the
I
base until the reddish tinge just appears; see whether one
I
drop of acid will make the solution colorless. Continue in
this way until a reversal of color is got by one drop of base
or acid.
e. Read the level of the liquid in each burette to one-tenth
of a cubic centimeter (0.1 cc.) and record in the table. To find
the volume of base used, subtract the first burette reading
;
(before neutralization) from the burette reading after neutrali-
zation and record in your notebook that result in the column of
the table marked Difference.
Fig. 41. Titration of abase with an acid.

52 CONDUCTIVITY OF A SOLUTION
TABLE
Titration
Base Burette Acid Burette
Readings Difference Readings Difference
No. 1
2
3
In a similar way find the volume of acid used to neutralize
the base. Since the volumes of base and acid used are inversely
proportional to the concentrations of the base and acid, we can
easily compute the concentration of the acid (assuming the base
to be 0.2 N): x N _ Volume base used
0.2 N Volume acid used
Wash out the flask and make another determination ; repeat
the process until you get three consistent results. Take the
average, or mean, of these three results as the concentration oj
the acid, expressed as a decimal fraction of a normal solution.
EXPERIMENT 21
Conductivity of Substances in Solution
(Class Experiment)
Apparatus.— Conductivity apparatus (wide-mouth bottle fitted with 2-hole
rubber stopper and carbon rods inserted). Lamp socket and 25-watt
bulb. Electric current from lighting system or battery.
Materials. — Solutions of hydrochloric acid, sodium chloride, sodium hy-
droxide, alcohol, sugar, acetic acid, and ammonium hydroxide.
Introduction. If the laboratory is provided with electric
lights (110 volts) suspended over the tables, it is easy to remove
a lamp bulb and insert in its place a plug with extension cord.
Connect the electrodes (platinum or carbon) of your conductiv

CONDUCTIVITY OF A SOLUTION 53
ity apparatus (Fig. 42) in series with the socket of the lighting
circuit. Screw a lamp (25-40 watts) into the socket of your
apparatus and test your electric circuit by short-circuiting the
two electrodes with a
knife-blade. The lampshould glow brightly
;
in fact, the brilliancy
of its light will meas-
ure roughly the elec-
trical conductivity of
the short-circuiting
substance. Beforetesting the conduc-
tivity of any given
solution, rinse theelectrodes with distilled water until no sign of a glow is seen
in the lamp filament when they are held for 10 seconds or moreimmersed in distilled water.
Note. In cases where the electric-lighting circuit cannot be used, 4 dry-
cells or a 6-volt storage battery with a 6-volt miniature lamp as an indicator
can be employed.
Electrolytes and nonelectrolytes. In setting up your con-
ductivity apparatus and in changing the solution, loosen the
lamp in the socket of your apparatus and do not screw it downto make contact until all the connections have been made. Test
the conductivity of the following solutions: (1) dilute hydro-
chloric acid (1 : 4) ; (2) sodium chloride (10%) ; (3) sodium
hydroxide (10%) ; (4) alcohol (10%) ; (5) sugar (10%) ; (6) dis-
tilled water.
Classify the substances used above according to their electrical
conductivities.
Relative conductivity of acids. Prepare solutions of hydro-
chloric acid and acetic acid which have the same molecular con-
centration; for example, one-fifth normal (0.2 N). Comparethe conductivity of these acid solutions as indicated by the bright-
ness of the lamp. Why is it necessary to have the electrodes im-
Fig. 42. Testing the conductivity of solutions.
54 PREPARATION OF SOLUBLE SALTS
mersed to the same depth in both cases? Which acid is more
completely ionized ?
Relative conductivity of bases. Prepare solutions of sodiumhydroxide and ammonium hydroxide which have the samemolecular concentration
;for example, one-fifth normal (0.2 N).
Compare the conductivity of these basic solutions as indicated
by the brightness of the lamp. Arrange the electrodes so that
they are immersed to the same depth in each case. Which base
is more completely ionized ?
Ions of acids and bases. What ion is common to all acids?
What is the other ion of hydrochloric acid ? Of acetic acid ?
What ion is common to all bases ? What is the other ion of
sodium hydroxide ? Of ammonium hydroxide ?
What is the significance of the terms ‘"strong” and “weak”as applied to acids and bases ?
EXPERIMENT 22
Preparation of Soluble Salts
Apparatus.— Test tubes and rack. Tripod or ring stand and asbestos
gauze. Bunsen burner. Funnel. Stirring rod.
Materials. — Dilute hydrochloric, nitric, and sulfuric acids. Zinc. Mag-nesium oxide. Sodium carbonate. Dilute solutions of sodium hy-
droxide and potassium hydroxide. Litmus papers. Filter paper.
1. Metal and acid. Many of the soluble salts (see Table ol
Solubilities in Appendix) of the common metals, such as zinc
(Zn), iron (Fe), magnesium (Mg), and copper (Cu), can be
prepared by replacing the hydrogen in the common acids.
Such salts as zinc chloride (ZnCb), magnesium sulfate (MgS04),
copper nitrate (Cu(N03) 2), and iron sulfate (FeS04) can be thus
prepared.
To 5 cc. of dilute hydrochloric acid add zinc until there is no
further action. Filter, evaporate a few drops of the filtrate
almost to dryness on a watchglass, and cool. What is the
residue ? Write the equation for the reaction.

PREPARATION OF INSOLUBLE SALTS 55
2. Metallic oxide and acid. Dissolve about 5 g. of magne-
sium oxide (MgO) in dilute sulfuric acid and filter if necessary
;
then evaporate a little of the clear solution to a small volume and
cool. What is the residue? Write the equation for the reaction.
3. Carbonate and acid. Heat 10 cc. of a solution of sodium
carbonate (Na 2C03) to the boiling point and add dilute hydro-
chloric acid as long as it causes effervescence. Evaporate a
little of the resulting solution to dryness. What is the residue ?
Write the equation for the reaction.
Try the action of hydrochloric acid on solid sodium carbonate.
Compare the action of hydrochloric acid on a carhoniate with the
action of sulfuric acid on a chloride.
4. Neutralization of a base and an acid. Sodium chloride
(NaCl) has already (Exp. 19) been prepared by neutralizing
sodium hydroxide (NaOH) with hydrochloric acid. In a similar
way potassium chloride (KCl), sodium sulfate (Na 2S04), potas-
sium sulfate (K 2SO 4), sodium nitrate (NaNOs), and potassium
nitrate (KNO 3 ) can be prepared.
Make one of these salts by neutralizing a suitable base andacid. Evaporate the salt solution nearly to dryness andexamine the residue. Write the equation for the reaction.
5. Summarize the four methods of making soluble salts.
EXPERIMENT 23
Preparation of Insoluble Salts — Types of Reactions
Apparatus. — Test tubes and rack. Small beakers. Asbestos gauze. Bun-sen burner. Tripod.
Materials. — Solutions of lead nitrate and lead acetate. Lead oxide
(litharge) and lead carbonate. Sodium chloride solution. Dilute
hydrochloric acid.
We may illustrate the various ways of preparing an insoluble
salt by preparing lead chloride (PbCb) as follows
:
1. Salt and acid. Heat in a test tube 20 cc. of lead nitrate
(Pb(N03) 2) solution to boiling and add 5 cc. of dilute hydro-

56 FORMS OF SULFUR
chloric acid. Set aside to cool. What is the precipitate? Write
the equation for the reaction.
2. Salt and salt. Heat 20 cc. of lead acetate (Pb(C 2H 302) 2)
solution and add 5 cc. of sodium chloride solution. Set aside
to cool. What is the precipitate ? Write the equation.
3. Oxide and acid. Dissolve in a beaker 1 g. of lead oxide
(PbO) in boiling dilute hydrochloric acid and add about 50 cc.
of boiling water. Decant the clear solution and set it aside.
What is the precipitate? Write the equation for the reaction.
4. Salt and acid. Dissolve 1 g. of lead carbonate (PbCOs)in boiling hydrochloric acid and proceed as in part (3).
Types of reactions. Chemical changes may be classified as
(1) direct combination, (2) simple decomposition, (3) simple re-
placement, and (4) double replacement. The fourth class
(double replacement) has been subdivided into three types
according to the products:
(a) one product insoluble, (b) one
product volatile, and (c) one product slightly ionized. Classify
all the chemical reactions in this experiment and in the preceding
one.
EXPERIMENT 24
Forms of Sulfur
Apparatus.— Test tubes and rack. Crystallizing dish. Bunsen burner.
Magnifying glass. Dish of water. Clamp. Funnel. Beaker.
Materials.— Roll sulfur. Carbon bisulfide. Filter paper (10 cm. in
diameter). Dime or other piece of silver.
Introduction. Sulfur is a very interesting element, not only
because it can easily be obtained in the three states— solid,
liquid, and gaseous — but also because it exists in two solid, two
liquid, and three vapor forms. The two solid forms differ
in certain physical properties. One of them is rhombic in
crystalline form and is stable at ordinary temperatures. At96° C. it changes into another solid form, which is monoclinic,
or prismatic, and is the stable form from that temperature

FORMS OF SULFUR 5f
up to its melting point, 119.25° C. If either solid form is
heated slowly and carefully, it will give one of the liquid forms
of sulfur; but if it is heated much hotter, it changes into an
entirely different liquid form of sulfur, which boils at 445° C.
The vapor of sulfur can exist in three different molecular forms
(Ss, Se, and S 2) according to the temperature. In this experi-
ment you will study solid and liquid sulfur in its various allo-
tropic forms.
Fig. 43. A, Pouring a solution of sulfur into a crystallizing dish. B, Meltingsulfur in a test tube. C, Pouring melted sidfur into a filter paper.
Directions, a. Crystals obtained from solution. Put about
2 or 3 g. of powdered roll sulfur in a test tube, add about a
quarter of a test-tubeful of carbon bisulfide, and shake the tube.
Caution. Carbon bisulfide is a volatile liquid which easily takes
fire. No flame should be near it.
j
Pour off the clear solution (Fig. 43 A) into a crystallizing dish.
Set it aside to evaporate the liquid at some distance from a
flame.
(While waiting for the crystals to form, proceed with part (b).)
I
When crystals have formed, examine them with a magnifying
!glass and note their shape; put them in a dry test tube andlabel them rhombic sulfur. Draw several crystals in your
notebook.

58 FORMS OF SULFUR
b. Crystals obtained by slowly cooling molten sulfur. Place
a folded filter paper in a funnel and have a dish of water
at hand. Fill a clean, dry test tube half full of powderedsulfur. Melt the sulfur very slowly by holding the test tube
in an inclined position well above the flame (Fig. 43 b) and byturning the tube in order not to overheat the sulfur at any point.
The liquid sulfur should be pale yellow ; if it becomes dark in
color, it shows that it has been overheated.
Pour the liquid sulfur into a folded filter paper (Fig. 43 c)
and watch the crystals form. As soon as they extend from the
sides to the center of the cone, break the surface crust and pour
the sulfur which is still liquid into the water in the dish. Atonce open up the filter paper and examine the crystals with a
lens. Make a drawing of a few of them and record their color and
transparency. This form of sulfur is called
prismatic sulfur.
Keep some of these crystals and observe
any change in their appearance.
c. Plastic sulfury obtained by heating sul-
fur to its boiling point and then suddenly
cooling it. Fill a beaker with water and
place it on the table beside you. Half fill
a test tube (preferably the one used in (b))
with small pieces of roll sulfur, hold the
test tube in some kind of clamp (a folded
strip of paper vdll serve), and very gently heat the sulfur until
it melts. When it is completely melted, heat it more strongly
and observe the changes in color and fluidity.
When the sulfur is boiling vigorously, pour it into the beaker
of water (Fig. 44).
Caution. Do not become alarmed if the sulfur vapor begins to
burn at the mouth of the test tube. Do not, however, spill burning
sulfur on the table.
Observe what happens to the sulfur which remains in the test
tube as it slowly cools.
Fig. 44. Pouring boiling
sulfur into cold water.

HYDROGEN SULFIDE 59
Take the solid from the beaker and examine it. Note its
color. Is it hard or soft ? Is it elastic or brittle ? This form of
sulfur is called plastic sulfur or amorphous sulfur.
Find out whether plastic sulfur is soluble or insoluble in
carbon bisulfide.
d. Test for free sulfur. Sulfur combines very readily with
silver to form a black silver sulfide. Heat a minute particle of
sulfur on a silver coin;a black stain is produced.
EXPERIMENT 25
Hydrogen Sulfide
Apparatus.— Ring stand and clamp. Large test tube (8"X 1") and 1-hole
stopper to fit. Test tubes and rack. Bunsen burner. Glass tubing.
Wide-mouth bottle. Glass nozzle.
Materials. — Iron sulfide. Dilute hydrochloric acid. Solutions of lead
nitrate, copper sulfate, and cadmium nitrate. Litmus papers.
Introduction. The odor characteristic of rotten eggs is due
to hydrogen sulfide, a gas much used in the chemical laboratory.
It is indispensable to the chemist as a laboratory reagent in the
processes of analysis. The common metals unite with sulfur
to form sulfides, which vary in their solubility to such an extent
that one may easily divide the metals into groups for final iden-
tification. These sulfides are often colored and their colors
give us another means of identifying metals.
Besides being unpleasant, the gas is poisonous and produces
headache when inhaled in considerable quantities. Therefore
a water solution is often used in the laboratory.
Preparation. When iron filings and powdered sulfur are
mixed together and heated, the product is iron sulfide (ferrous
sulfide). Carefully slide two or three small pieces of iron
sulfide (FeS) into a large test tube and pour in enough dilute
hydrochloric acid to cover the iron sulfide.
Complete in your notebook the equation
:
FeS + 2 HCl—^ -f- ^

60 HYDROGEN SULFIDE
Note the odor of the gas. Do not inhale much of it as it is
somewhat poisonous.
Tests. The odor is a sufficient test when considerable
quantities of the gas are present;but a more sensitive test is
to dip a strip of filter paper into a solution of lead nitrate
Pb(N03)2 and to hold it in the gas to be tested.
Complete in your notebook the equation for testing for the gas
with lead nitrate
:
H 2S +Pb(N03)2—^ I +Properties, a. To make a simple hydrogen sulfide generator,
fit the large test tube with a 1-hole stopper and delivery tube
as shown in figure 45. Collect the
gas in a dry test tube by the dis-
placement of air, remove the de-
livery tube, and light the gas in
this test tube. As soon as the gas
in the test tube burns quietly, at-
tach a glass nozzle* or jet to the
delivery tube and set fire to the gas.
b. Cautiously smell the gas
around the flame. Hold a cold,
dry bottle over the flame and note
whether any product of the com-
bustion is condensed therein. Whatare the two products of the complete
combustion of hydrogen sulfide ?
Write the equation for this reaction
in your notebook.
c. Extinguish the flame and in-
sert the delivery tube to the bot-
tom of a test tube which is three-fourths full of water. Let the
gas bubble through the water 3 or 4 minutes. (If the action
in the generator slackens, gently warm the large test tube.)
* A glass nozzle or jet is made by heating a straight piece of glass tubing in the
Bunsen flame and, when soft, pulling it out so that the bore is reduced. The tube
is then cut off at the constricted portion.
Fig. 45. Preparing a solution of
hydrogen sulfide.

61SULFUR DIOXIDE AND SULFUROUS ACIDI
I
What effect has this solution on blue litmus paper? This solution
is called hydrosulfuric acid.
Uses. A solution of hydrogen sulfide is a very useful reagent
in chemical analysis to determine what metals are present in a
material of unknown composition. Some of the metallic sul-
fides are insoluble and have distinctive colors.
Add a portion of the hydrosulfuric acid just prepared to a
; solution of copper sulfate. What are the products formed?
j
Complete the equation in your notebook
:
H 2S + CUSO 4—^ 1 +Add another portion of the hydrosulfuric acid to a solution
of cadmium nitrate. What are the products formed ? Complete
\
the equation in your notebook :
H 2S -h Cd(N03)2— + +;
e. Summarize the observed properties of hydrogen sulfide.
EXPERIMENT 26
Sulfur Dioxide and Sulfurous Acid
(Class Experiment)
Apparatus.— Platinum wire. Bunsen burner. Bulb tube. Ring stand
with ring and clamp. Asbestos gauze. Erlenmeyer (conical) flask
(250 cc.) with 2-hole stopper. Funnel. Pinchcock (screw). Rubberconnection tube. 3 wide-mouth bottles and glass squares. Test tubes.
Evaporating dish. Glass tubing.' Materials. — Sulfur. Iron pyrite. Sodium bisulfite. Dilute hydrochloric
acid. Pink flower. Thin slice of apple. Litmus papers. Zinc.
Lead nitrate test paper.
Introduction. Everyone is more or less familiar with the
^
choking gas known as "‘the smell of burning sulfur.” ThisI gas is sulfur dioxide (SO 2) and is formed when sulfur is burnedor when a metallic sulfide is heated strongly. A more con-
venient method of preparing it in the laboratory is by slowly
dropping hydrochloric acid upon sodium hydrogen sulfite
;
(NaHSOs). This experiment should be done under a hood.

62 SULFUR DIOXIDE AND SULFUROUS ACID
Preparation. 1. Touch a bit of sulfur with a warm platinum
wire and bring the wire with adhering sulfur again into the flameo
Withdraw it and observe the color oj
the flame of burning sulfur; also note the
odor of the gas produced. Write in your
notebook the equation for the reaction.
Heat (or roast) in a little bulb tube
(Fig. 46) a few particles of iron pyrite
(FeS 2). What is the solid which con-
denses on the cool part of the tube ?
2. A convenient method of prepar-
ing sulfur dioxide in the laboratory is
to drop hydrochloric acid slowly on
sodium hydrogen sulfite (NaHSOs).This reaction may be expressed by the
following equation
:
Fife. 46. Heating iron pyrite
in a bulb tube.
NaHSOs + HCl—> NaCl + H 2O + SO 2 |
Arrange the apparatus as shownin figure 47. Place in the flask
about 10 g. of sodium bisulfite
(sodium hydrogen sulfite) and re-
place the stopper carrying the
funnel tube and delivery tube.
Attach a straight glass tube to
the delivery tube in order to makeit reach down to the bottom of a
wide-mouth bottle.
Fill the funnel with dilute hy-
drochloric acid and then adjust
the pinchcock to admit the acid
into the flask drop by drop. Toincrease the speed of the reaction,
warm the flask very gently from
time to time as needed.
As soon as the air in the flask
Fig. 47. Dropping hydrochloric
acid on sodium bisulfite to generate
sulfur dioxide.

SULFUR DIOXIDE AND SULFUROUS ACID 63
has been swept out, collect two bottles of the gas by upwarddisplacement of air. Cover each bottle with a glass plate.
Boil half a test-tubeful of water in order to drive off the dis-
solved air and then cool it under running water. Insert the
, delivery tube to the bottom of the boiled water
and let the gas bubble through for 5 minutes.
Cork this test tube just as soon as the delivery
I
tube is taken out in order to keep out the air.
I
Properties, a. Uncover one of the bottles
of gas just enough to pour in a little water
;
then close it tightly with the palm of the hand
and shake the contents (Fig. 48). Is the
' hand held against the mouth of the bottle byatmospheric pressure (suction) or not? Is
ithe gas soluble ?
: b. In the second bottle of gas place a moist
'pink flower (carnation) and a thin slice of
apple. Leave another slice of apple exposed to the air outside.
Compare the pieces. What is the effect of sulfur dioxide on' vegetable coloring matter ?
,
c. Sulfurous acid. Test the aqueous solution made in (a)
1
with litmus papers. Write in your notebook the equation for
\
the formation of sulfurous acid Is sulfur dioxide anI acidic or a basic oxide?
;
Boil 5 cc. of this solution slowly in an evaporating dish and
! note the odor from time to time. Write in your notebook the
I
equation which represents this change and compare it with the
' preceding equation.
\
To detect sulfurous acid, we may reduce it to hydrogen' sulfide by using a suitable reducing agent, such as nascent
hydrogen. Put a few pieces of zinc in a test tube and cover
the metal with dilute hydrochloric acid. As soon as the
action becomes vigorous, test the gas with a strip of moist
lead nitrate paper (the paper should remain white). Nowpour in 2 or 3 cc. of sulfurous acid and test again with lead
nitrate paper.
Fig. 48. Shakinga bottle containing
sulfur dioxide andwater.

64 SULFURIC ACID
d. Summarize the properties of sulfur dioxide: color, odor,
density as compared with air, and solubility.
Also summarize the properties of sulfurous acid: action on
vegetable coloring matter; stability; oxidizing or reducing agent.
EXPERIMENT 27
Sulfuric Acid
Apparatus. — Test tubes and rack. Bunsen burner.
Materials. — Concentrated sulfuric acid. Zinc. Dilute sulfuric acid.
Sodium chloride. Wood splint. Dilute solutions of sodium sulfate,
zinc sulfate, and copper sulfate. Barium chloride solution. Dilute
hydrochloric acid.
Introduction. Sulfuric acid is the most important substance
used in chemical industries, with the exception of water. Theacid itself or some substance made by means of it is used in
almost every industry. The manufacture of fertilizers, of
explosives, and of other acids and the refining of petroleum oil
are important examples of processes that use immense quantities
of sulfuric acid. Ordinary commercial sulfuric acid is knownas “oil of vitriol.” We shall see in this experiment that its
properties are quite different in concentrated form and in
dilute solution.
1. Heat of dilution. Fill a test tube about one-third full of
water and then pour into it very gradually an equal volume of
concentrated sulfuric acid. Touch the outside of the test
tube and record any change in temperature.
Caution. Remember that the concentrated sulfuric acid is to
be poured slowly into the water. The reverse order produces danger-
ously explosive spattering. Why?
2. Action on zinc. Place a strip of zinc in a test tube and
cover it with concentrated sulfuric acid. If there is no action,
warm the acid cautiously.
SULFURIC ACID 65
Caution. Hot concentrated sulfuric acid causes very severe
bums when it touches the skin. Do not pour hot concentrated
sulfuric acid into water. Let it cool first.
iPlace another strip of zinc in a test tube and cover it with
I
dilute sulfuric acid. Name the products formed in this reaction
\
and write in your notebook the equation.
Compare the action of concentrated and of dilute sulfuric acid
[on zinc.
3. Action on common salt. Try the effect of both dilute and
I
concentrated sulfuric acid on common salt (sodium chloride).
Identify the gaseous products.
4. Action on wood and paper. Insert a wood splint into a
little concentrated sulfuric acid in a test tube and let it stand
for a few minutes.
Dip a glass rod into dilute sulfuric acid and write with it on
paper. Warm the paper gently over a flame. What property
' of sulfuric acid do these experiments with wood and paper
\illustrate ?
I
5. Test for a sulfate. Prepare in separate test tubes dilute
solutions of sulfuric acid, sodium sulfate, zinc sulfate, and
I
copper sulfate. Add to each solution a few drops of barium
chloride solution (BaCb) and then dilute hydrochloric acid,
j
Complete in your notebook the equation
:
H2SO4 BaCb—^ “b
What insoluble precipitate is formed in each case ?
To a solution of sodium phosphate add a few drops of barium
chloride and dilute hydrochloric acid. Why is it necessary to
' add hydrochloric acid in testing for sulfates ?
^
How would you distinguish between a sulfide, a sulfite, and a

66 DISTILLATION OF COAL
EXPERIMENT 28
Destructive Distillation of Coal
Apparatus. — Ring stand with clamp. Ignition test tube (“Pyrex”) with
1-hole stopper. Large test tube with 2-hole stopper. Bunsen burner
with wing top. Glass tubing.
Materials. — Small pieces of bituminous (soft) coal.* Litmus papers.
Lead nitrate test papers.
Introduction. The coal we burn today was once living vege-
tation and long ago was buried in beds of sand. In consequence
the vegetable matter has undergone a partial decomposition
which has yielded amorphous carbon as the main product.
Hard coal contains about 90 per cent carbon, nearly all of which
is in the uncombined state; but soft coal contains consid-
erably less uncombined carbon, and considerably more carbon
combined with hydrogen, oxygen, nitrogen, and sulfur. Large
quantities of soft coal are heated in iron retorts, or ovens, and
the various products are collected and utilized. For example,
ammonia gas is got from the scrubbing towers;a tarry matter,
called “coal tar,” is also saved and has proved to be an ex-
tremely valuable by-product. The final product is illuminating
gas, which is now used extensively as a fuel. Coke is left in
the retorts. Coke is not only a fuel but also a valuable aid in
various metallurgical processes. In this experiment we shall
carry out on a small scale the process of the destructive dis-
tillation of coal.
Distillation of coal. Fill an ignition tube about three-fourths
full of small pieces of soft coal and clamp it horizontally, as
shown in figure 49. Have the delivery tube extend nearly to
the bottom of the condensing tube (large test tube). Heat the
ignition tube gently at first and then strongly. During the
heating, test the stream of gas in the delivery tube for hydrogen
sulfide (H 2S) with a strip of paper moistened in lead nitrate
* The instructor should test the coal for ammonia before giving it out because
some coal does not give off much ammonia.

DISTILLATION OF COAL 67
solution, and also for ammonia with moistened red litmus paper.
Results?
Products, a. Bring a flame to the end of the jet tube.
Does the gas burn ?
b. Observe the properties of the material in the condensing
tube. Name it.
c. When no more gas is given off, stop heating and allow
the ignition tube to become cool enough to handle. Shake
Fig. 49. Destructive distillation of coal.
its contents out on the base of the ring stand. Compare this
residue in color, structure, and weight with the original coal.
Name it.
d. Why is this process called destructive distillation ?
e. Name three important products of the destructive distillation
of coal. Name a by-product.

68 ANALYSIS OF COAI,
EXPERIMENT 29
Analysis of Coal— Gravimetric
{Optional Experiment)
Apparatus. — Ring stand with ring. Pipe-stem triangle. Porcelain cru-
cible with cover. Bunsen burner. Horn-pan balance and weights.
Mortar and pestle. Drying oven.
Materials. — Samples of coal (from home).
Introduction. When coal burns, the most evident constit-
uents are (1) moisture, (2) volatile matter, (3) fixed carbon,
and finally, (4) a residue of ash. The fixed carbon is volatilized
only when heated in contact with air. These several con-
stituents cannot be sharply separated, and hence such an
analysis depends upon more or less arbitrarily standardized
methods. This proximate analysis” does, however, furnish
an acceptable indicator of the t5npe of coal. Coals are classified
according to the relative proportion of fixed carbon to volatile
matter. The ratio of fixed carbon to volatile matter is called
the ‘Tuel ratio.” Thus the fuel ratio of anthracite coal is not
less than 10 ; while the fuel ratio of bituminous coals varies
usually from 3 to 6.
Direction, a. Moisture. Pulverize several pieces of coal
to particles about the size of a pea and mix thoroughly. Takeabout a teaspoonful of this pulverized coal and grind it in a
mortar to a very fine powder. Weigh to a centigram (0.01 g.) a
clean, dry crucible and cover, and weigh out about 2 g. of the
powdered coal. Record all these weights in tabular form
:
Wt. of crucible and cover g.
Wt. of crucible, cover, and coal g.
Wt. of coal g.
Heat the crucible (uncovered) in an oven for an hour at 104°-
107° C. Then cool and again weigh the crucible (including the
cover). The loss of weight equals the weight of the moisture
driven off. Calculate the percentage of moisture in the coal.

ANALYSIS OF COAL 69
b. Volatile matter. Heat the covered crucible and contents
from (a) on a pipe-stem triangle with the Bunsen flame until no
more smoke comes off. Remember that a crucible should not
be heated or cooled too suddenly, but when once hot it should
be heated until the entire cru-
cible is red-hot. Let the crucible
cool with the cover on and then
reweigh. The loss in weight
during this heating is due to
the volatile matter which has
been expelled. Compute the 'per-
centage of volatile matter in the
coal.
c. Fixed carbon {coke). Re-
move the cover from the cru-
cible and incline it on the
pipe-stem triangle (Fig. 50).
Heat the crucible and contents
from (b) to a full red heat until
all the carbon has burned off.r 1 ^ Fig. 50. Determining the ash in coal.In the same way burn off any ^ ^
deposit on the cover. Cool and weigh the crucible (with cover)
and its residue of ash. The loss of weight during this heating is
the weight of the fixed carbon. Calculate the percentage affixed
carbon in coal.
d. Ash. The residue left in the crucible from (c) is the non-
I
volatile mineral matter of the coal and is called ash. Calculate
; the percentage of ash in coal.
e. Compare the proximate analysis of your sample of coal' with the analysis given in Engineering Handbooks (Marks’sMechanical Engineers’ Handbook).

70 CHARCOAL
EXPERIMENT 30
Charcoal — Preparation and Properties
Apparatus.— Tripod. Bunsen burner. Sand crucible. Iron crucible andcover. Pipe-stem triangle. Ignition tube with 1-hole stopper. Ringstand and clamp. Test tubes. Mortar and pestle.
Materials.— Blocks of wood. Solution of molasses, brown sugar, cochineal,
or indigo. Animal charcoal (boneblack). Copper sulfate solution.
Hydrogen sulfide solution. Powdered copper oxide. Limewater.
Preparation. {Class Experiment.) When animal or vege-
table matter is heated strongly in the absence of air, the residue
is charcoal. We may easily prepare wood charcoal by placing
on a thin layer of sand in a sand crucible or
on a small iron pan a few chips or small
blocks of wood. If we then cover themwith sand to keep out the air (Fig. 51) andheat strongly until all smoking ceases, wefind, when the crucible is cool, that the
residue is charcoal.
Properties. {Student Experiment.) a. Toshow that carbon is a decolorizer, fill a test
tube half full of water which has in it enough
molasses, brown sugar, cochineal, or indigo
to give a decided color. Add about 5 cc.
of animal charcoal to the solution, shake
thoroughly, and boil for 3-4 mdnutes. Filter
the solution, and, if the filtrate is not clear
and transparent, repeat the operation with fresh animal char-
coal. The activity of the charcoal is much increased by previous
heating in a covered iron crucible. If a solution of sugar or
molasses was used, taste the filtrate to determine whether
or not the sugar has been removed.
Repeat this experiment with a solution of copper sulfate.
Can the colors he removed from all liquids hy filtering them through
animal charcoal (boneblack) ?
b. To show that carbon is a deodorizer, fill a test tube about
one-fourth full of powdered wood charcoal and add about 5 cc. of
Fig. 51. Preparation
of charcoal in a sandcrucible.

CHARCOAL 71
hydrogen sulfide (H 2S) solution. Cork the test tube and at short
intervals for 15 minutes shake the contents vigorously. Com-pare the odor with that of the origi-
nal solution and, if it is not percep-
tibly removed, add more charcoal
and continue shaking the contents.
What use of this property of charcoal
!
was made in the World War?
j
Uses. The most importantchemical use of charcoal (or coke)
j
is as a reducing agent. Mix inti-
!
mately about 5 g. of copper oxide
I
(CuO) with 1 g. of powdered wood' charcoal in a mortar. By means
of a folded strip of paper, slide the
mixture into an ignition test tube
(Pyrex) and fit it with a 1-hole
stopper carrying a delivery tube.
Arrange the apparatus as shown in
figure 52 so that the gas evolved when the tube is heated
will bubble through a little limewater in a test tube.
Heat the mixture in the ignition tube at first gently to avoid
cracking the glass and then as strongly as possible, beginning
at the part near the stopper and gradually moving the flame
toward the closed end. The tube must be heated persistently
for at least 10 minutes. What is the first change that takes place
in the limewater ?
Remove the delivery tube from the limewater and stop
heating. When the tube is cold, pour its contents into a mortar
and vigorously grind the residue under water. Let a stream
of water wash away the lighter particles. What substance is
carried away by the water? What is left in the mortar? Whatelement is taken from the copper oxide? Describe the process.
Write in your notebook the equation of the reaction.
Results. Summarize the properties of charcoal (carbon)
which you have observed in this experiment.
Fig. 52. Reducing copper oxide
with carbon.
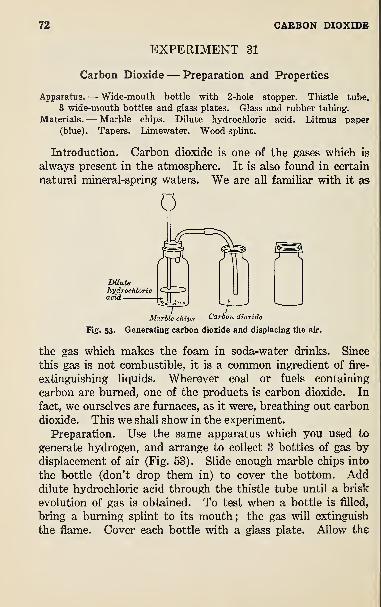
72 CARBON DIOXIDE
EXPERIMENT 31
Carbon Dioxide — Preparation and Properties
Apparatus.— Wide-mouth bottle with 2-hole stopper. Thistle tube.
3 wide-mouth bottles and glass plates. Glass and rubber tubing.
Materials. — Marble chips. Dilute hydrochloric acid. Litmus paper
(blue). Tapers. Limewater. Wood splint.
Introduction. Carbon dioxide is one of the gases which is
always present in the atmosphere. It is also found in certain
natural mineral-spring waters. We are all familiar with it as
Fig. 53. Generating carbon dioxide and displacing the air.
the gas which makes the foam in soda-water drinks. Since
this gas is not combustible, it is a common ingredient of fire-
extinguishing liquids. Wherever coal or fuels containing
carbon are burned, one of the products is carbon dioxide. In
fact, we ourselves are furnaces, as it were, breathing out carbon
dioxide. This we shall show in the experiment.
Preparation. Use the same apparatus which you used to
generate hydrogen, and arrange to collect 3 bottles of gas bydisplacement of air (Fig. 53). Slide enough marble chips into
the bottle (don’t drop them in) to cover the bottom. Adddilute hydrochloric acid through the thistle tube until a brisk
evolution of gas is obtained. To test when a bottle is filled,
bring a burning splint to its mouth; the gas will extinguish
the flame. Cover each bottle with a glass plate. Allow the

CARBON DIOXIDE 73
gas to bubble through a little water in a test tube. Taste the
liquid and test it with litmus paper. Complete in your notebook
the equations
:
CaCOs + - HCl H2CO3 +marble carbonic
acid
H2CO3 >- -}-
Properties, a. Light a taper and pour car-
bon dioxide from one of the bottles over it as
you would pour water. Does the gas support
combustion? Is the gas heavier or lighter than
air ?
b. Pour about 10 cc. of water into a bottle
of the gas, cover at once tightly with the palmof the hand (Fig. 54), and shake it vigorously. Is the hand
sucked in, that is, held against the mouth of the bottle by atmos-
pheric pressure? Is the gas soluble?
c. Pour about half a test tube full of clear
limewater into a bottle of carbon dioxide and
shake the bottle. The milkiness is due to
the calcium carbonate which is precipitated.
This serves as a good test for carbon dioxide.
Complete in your notebook the equation
:
Ca(OH)2 + CO 2—^ CaC03 i _
limewater calciumcarbonate
d. Burn a pine splint in a bottle of air.
Add a little limewater and shake the bottle.
What gas is formed when wood burns ?
Blow through a glass tube into a test tube
half full of limewater (Fig. 55). What gas does the air exhaled
from the lungs contain ?
Results. Make a list of the properties of carbon dioxide which
you have observed.
TAmevfater
.
Fig. 55. Blowingthrough limewater
Fig. 54. Shakingcarbon dioxide withwater.

CARBON MONOXIDEf4
EXPERIMENT 32
Carbon Monoxide— Preparation and Properties
Apparatus. — Ring stand with 1 ring and clamp. Wire gauze with asbestos
center. Bunsen burner. Small flask with 2-hole stopper fitted with
delivery tube and dropping funnel. Pinchcock (screw). Pneumatictrough. 3 wide-mouth bottles and glass squares.
Materials. — Concentrated sulfuric acid. Formic acid. Taper. Lime-water.
Introduction. Another oxide of carbon is produced when anysubstance containing carbon burns in a limited supply of oxygen.
This is called carbon
monoxide. This gas,
we shall see, is quite
different from carbon
dioxide in its properties.
The most important
fact to remember is that
carbon monoxide is a
poisonous gas. Ex-haust gases of every
gas engine contain somecarbon monoxide. Veryoften we read of persons
who have been poisoned
while working on an
automobile in a small
closed garage. This gas
also forms a large part
of common illuminating
gas, and for this reason one must never allow the gas to escape
from the pipe unignited.
Caution. Carbon monoxids is very poisonous. Do not inhale it.
Do not let it escape into the room. Get rid of any surplus gas by
burning it.
Fig. 56. Generating carbon monoxide by drop-
ping formic acid on warm concentrated sulfuric
acid.

p
r CARBON MONOXIDE 75
Preparation. Fit a small flask with a two-hole stopper carry-
ing a delivery tube and a funnel connected by a short rubber
tube and pinchcock with a straight tube, as shown in figure 56.
Set up the apparatus on a ring stand with the asbestos wire
netting under the flask at such a height as to heat the flask very
gently with a small flame (Fig. 56). Arrange the delivery tube
for collecting the gas over water. Remove the stopper from
; the flask and pour in 15 cc. of concentrated sulfuric acid. Re-
I place the stopper and partially fill the funnel with formic acid
(HCOOH). Never let this run out entirely during the experi-
j
ment.
i Allow a few drops of the formic acid to flow into the flask and
1warm very gently. Adjust the pinchcock to admit the formic
acid one drop at a time and to get a steady flow of gas from
the flask. Collect 3 bottles full of the gas and close the pinch-
I cock to stop the generation of gas. Complete in your notebook
' the equation
:
HCOOH— +formic acid
Explain how the concentrated sulfuric acid helps along this
,simple decomposition.
j
Properties, a. Do not use the first bottle. Why not?
Light a short taper and lift one bottle mouth downward.! Thrust the burning taper up into it. Does the gas burn? Does
: the taper burn in the gas ?
I
b. Take another bottle of the gas and slip the glass plate
partly off in order to pour into the bottle 5 cc. of clear lime-
water; then quickly replace the plate and, holding it tightly
against the mouth of the bottle, shake the contents of the
I
bottle. Note any change in the limewater. Now light a taper,
remove the glass plate, and quickly ignite the gas. Replace
the cover at once and, when the flame dies out, shake the con-
i
tents again. What gas is formed when carbon monoxide burns ?
\ c. Summarize the properties of carbon monoxide. How could
you distinguish burning carbon monoxide from burning hydrogen ?'

76 WEIGHT OF A LITER OF OXYGEN
EXPERIMENT 33
Weight of a Liter of Oxygen
{Quantitative Experiment)
Apparatus. — Iron crucible. Ring stand and clamp. Pneumatic trough.
2-liter bottle (acid bottle). Test tube with 1-hole stopper. Horn-panbalance and weights. Bunsen burner. Glass plate. Graduated cyl-
inder. Glass tubing.
Materials. — Manganese dioxide (powdered and thoroughly dried). Welldried (for several hours) potassium chlorate (c.p.). Glass wool or
shredded asbestos.
Introduction. According to Avogadro’s theory, equal vol-
umes of gases under like conditions of temperature and pressure
contain the same number of molecules. This gives a simple
method of comparing the weights of molecules of gas by com-paring the densities of the gases ; that is, their weights per unit
volume. Chemists have agreed to take the molecular weight
of oxygen as exactly 32 and to use this as their standard of
molecular weights. The density of oxygen has been determined
with very great precision and is found to be about 1.429 gramsper liter (0° C. and 760 mm.). This means that it takes
32— or 22.4 liters of oxygen under standard conditions to weigh
32 grams. It is also found that if we divide the molecular
weight of any gas by its density, we always get 22.4 liters.
Therefore the most convenient way to determine the molecular
weight of any gas is to find the weight in grams of 22.4 liters
of the gas (at 0° C. and 760 mm.). Thus it is seen that the
gram-molecular volume (22.4 1.) depends on the density of
oxygen.
In this experiment we first determine the weight of a definite
volume of oxygen and then compute the weight of one liter
measured under standard conditions. To determine the weight
of the oxygen, we weigh the generating apparatus both before
and after a definite volume of oxygen has been produced. To
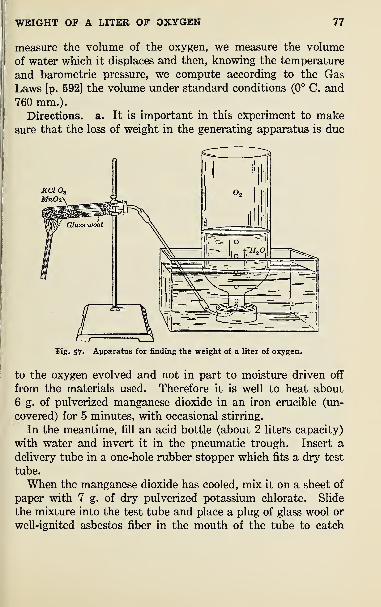
WEIGHT OF A LITER OF OXYGEN 77
measure the volume of the oxygen, we measure the volume
of water which it displaces and then, knowing the temperature
and barometric pressure, we compute according to the GasLaws [p. 592] the volume under standard conditions (0° C. and
760 mm.).
Directions, a. It is important in this experiment to makesure that the loss of weight in the generating apparatus is due
Fig. 57. Apparatus for finding the weight of a liter of oxygen.
to the oxygen evolved and not in part to moisture driven off
from the materials used. Therefore it is well to heat about
6 g. of pulverized manganese dioxide in an iron crucible (un-
covered) for 5 minutes, with occasional stirring.
In the meantime, fill an acid bottle (about 2 liters capacity)
with water and invert it in the pneumatic trough. Insert a
delivery tube in a one-hole rubber stopper which fits a dry test
tube.
When the manganese dioxide has cooled, mix it on a sheet of
paper with 7 g. of dry pulverized potassium chlorate. Slide
the mixture into the test tube and place a plug of glass wool or
well-ignited asbestos fiber in the mouth of the tube to catch

78 WEIGHT OF A LITER OF OXYGEN
small particles carried along by the gas. Weigh the test tube
with its contents to the nearest centigram (0.01 g.). Record
the result in your notebook in a table.
Replace the stopper in the test tube and test for air-tightness
as follows. Place the end of the delivery tube in your mouthand suck out some of the air. If the tip of your tongue seems
to adhere to the tube, the apparatus is tight. Arrange the
apparatus as in figure 57.
b. Heat the contents of the test tube with a small flame,
beginning at the top and gradually working downward. Collect
all the gas evolved in the bottle. Don’t hurry! Regulate the
heating so that you could count the bubbles of oxygen.
When the bottle is nearly full, or when the oxygen has stopped
coming over, remove the delivery tube from the water and allow
the test tube to cool.
c. In the meantime, to measure the volume of the oxygen,
first equalize the level of the water inside and outside the bottle.
To do this, it may be necessary to lower the bottle and incline
it. Then, while the bottle is in this position, close it with a
stopper or glass plate and set it upright on the table.
To measure the volume of gas collected in the bottle, measure
the amount of water needed to fill the bottle, pouring the water
into the bottle from a graduated cylinder. Record in your
notebook the total volume of water used, the temperature of the
water in the pneumatic trough, and the barometric pressure.
When the test tube has cooled so that it feels barely warm,weigh the test tube and its contents as before and record the
weight in your notebook.
Computation. Compute the loss of weight, which is the
weight of oxygen evolved.
Correct the barometric pressure for aqueous tension [p. 597]
and then reduce the observed volume of oxygen from the
observed temperature and pressure to 0° C. and 760 mm.From this reduced volume and the weight, compute the
weight of 1 liter of oxygen (density). Do all your computations
in your notebook.

GRAM-MOLECULAR WEIGHT OF CARBON DIOXIDE 79
Table
Wt. of test tube + contents before heating g.
Wt. of test tube + contents after heating g.
Wt. of oxygen evolved g.
Temperature ° C.
Volume of oxygen under conditions of exp cc.
Barometric pressure mm.Pressure due to water vapor mm.Corrected barometric pressure mm.
Volume of oxygen under standard conditions cc.
Density of oxygen (wt. of 1 liter) g.
' EXPERIMENT 34
Gram-Molecular Weight of Carbon Dioxide
!(Quantitative Experiment)
Apparatus. — A 500-cc. flask with 1-hole stopper. Pinchcock. Rubber
tube. Two wide-mouth bottles with 2-hole stoppers. Thistle tube.
Horn-pan balance and weights. Ring stand. Glass tubing. Ther-
!mometer. Barometer.
Materials. — Marble chips. Dilute hydrochloric acid. Concentrated sul-
furic acid.
Introduction. When the chemist uses as many grams of a
substance as there are units in its molecular weight, he calls
this weight the gram-molecular weight. Experiments show! [p. 244] that the gram-molecular {molar) weight of any gas occupies
under standard conditions 22.U liters. In the laboratory weI
weigh a given volume of gas (reduced to standard conditions)
I
and then compute the weight in grams of 22.4 liters.
' Directions, a. Arrange a large flask with a 1-hole rubber
I
stopper which has a glass tube extending nearly to the bottomof the flask. Attach to the outer end of the glass tube a short
' rubber tube provided with a pinchcock. Weigh the flask
i fitted with stopper, tube, and pinchcock with great care to a' centigram (0.01 g.). Then open the pinchcock and connect
I
the rubber tube to a supply of dry carbon dioxide. This can

80 GRAM-MOLECULAR WEIGHT OF CARBON DIOXIDE
Fig. 58. Filling a flask with dry carbondioxide.
easily be obtained by putting a few pieces of marble in a generat-
ing bottle and connecting it with a gas-washing bottle whichcontains concentrated sulfuric acid (Fig. 58).
b. Add dilute hydrochloric acid to the marble, loosen the
rubber stopper in the flask so that a free current of gas maypass through, and pass a steady stream of carbon dioxide
through the apparatus for
10 minutes. Then insert
the stopper as before anddisconnect from the gen-
erator. Open the pinch-
cock for an instant so that
the pressure inside the flask
may be the same as out-
side, and weigh the flask to
centigrams.
To make sure that the
flask is entirely filled with carbon dioxide, it is well to connect
it again with the generator and to let the gas pass through for
5 minutes longer. As soon as constant weight has been attained
(which indicates that the flask is entirely filled), read and record
the temperature of the room and the barometric pressure.
c. The gain in weight of the flask when filled with carbon
dioxide is, of course, only a small quantity because it is the
difference between the weight of the carbon dioxide and the
weight of the air in the flask. To find the weight of the air,
we determine its volume by filling the flask with water from a
graduated cylinder, reducing this volume to standard conditions
and then computing the weight of that volume of air. (Assume
that 1 liter of air at 0° C. and 760 mm. weighs 1.29 g.) To get
the weight of the carbon dioxide in the flask, add the weight
of the air in the flask to the gain in weight when filled with
carbon dioxide. We now have determined the weight of a
certain volume (reduced to standard conditions) of carbon
dioxide and can readily compute the weight of 22.4 liters of the
gas.

ATOMIC WEIGHT OF COPPER 81
Arrange all your calculations in an orderly fashion in your note-
book and record your data and results in tabular form
:
Table
Weight of flask with air g
Weight of flask with carbon dioxide, 1st trial g,
Weight of flask with carbon dioxide, 2d trial gGain in weight of flask when filled with carbon dioxide ... g
Temperature of room ° CBarometric pressure mmVolume of the flask cc
Volume of flask at 0° C. and 760 mm cc
Weight of air in flask (1 liter = 1.29 g.) gWeight of carbon dioxide in flask gWeight of 22.4 liters of carbon dioxide g
EXPERIMENT 35
Atomic Weight of Copper
{Quantitative Experiment)
Apparatus. — Ring stand and clamp. Ignition test tube (“Pyrex”).
Horn-pan balance and weights. Bunsen burner. Glass tubing. Rub-ber tubing.
Materials. — Copper oxide (powder).
Introduction. We may determine the combining weight
of copper by reducing a known weight of copper oxide to metallic
copper. Assuming the combining weight of oxygen to be 8, wemay compute from the actual weights of copper and oxygen the
combining weight of copper. The atomic weight of copper is
either equal to or some multiple of its combining weight. Todetermine this multiple we may make use of a fact discovered
by Dulong and Petit : the products of the atomic weights of the
solid elements by their specific heats * are in almost all cases
* Heat is measured in calories. A calorie is the heat required to raise the tem-
perature of a gram of water 1° C. The number of calories required to raise the
temperature of a gram of a substance 1° C. is called its specific heat.

82 ATOMIC WEIGHT OF COPPER
numbers lying between 6 and 7, the average being 64. This is not
a method of determining atomic weights but is an easy way to
find the factor {valence) by which the combining weight mustbe multiplied in order to get
the atomic weight.
Directions. Clean and dry
an ignition test tube and weigh
it to a centigram (0.01 g.).
Slide into the tube by meansof a folded strip of paper 2 or
3 g. of black copper oxide
(powder). Be sure that all of
the oxide is at the bottomof the tube and carefully weigh
the tube with the copper oxide.
Clamp a piece of glass tubing in a horizontal position as in
figure 59. Since illuminating gas contains a large percentage
of hydrogen, it is convenient to use it as the reducing agent.
We may burn the excess of gas as it issues from the mouth of
the test tube and then turn the gas down so that the flame is
only about 1 cm. high. Heat the test tube slowly until the
oxide is red-hot. After 5-minutes’ heating, turn off the gas
and rotate the test tube, tapping it to make the oxide fall to
the other side. Again insert the gas tube and continue heating
until the black copper oxide is entirely reduced to red copper.
Cool the ignition tube and weigh again.
Computation. The loss of weight is the weight of the oxygen
removed from the oxide. Assuming the combining weight of
oxygen to be 8, calculate the combining weight of copper; thus
:
X _ Wt. of copper
8 ~ Wt. of oxygen
Assume the specific heat of copper to be 0.0936 and the con-
stant product (at. wt. X sp. ht.) to be 6.4 ;compute the approxi-
mate atomic weight of copper. What is the factor (whole number)
Fig. 59. Reducing copper oxide to
copper with illuminating gas.

COMPOSITION OF A COMPOUND 83
hy which the combining weight must be multiplied in order to get
the atomic weight? Multiply the combining weight of copper
by this factor. The product is the atomic weight. Comparethis result with the value given in the Table of Atomic Weights
and compute the percentage error.
Show clearly in your notebook all your computations and record
your data and results in tabular form
:
Table
Wt. of test tube
Wt. of test tube + copper oxide
Wt. of test tube + copper
Wt, of oxygen
Wt. of copper
Combining wt. of copper (Oxygen =8)Factor by which the combining wt. must be multiplied in order to get
the atomic wtAtomic wt. of copper
Atomic wt. of copper according to Table of Atomic Weights
Percentage error
g-
g-
g.
g-
63.6
%
EXPERIMENT 36
Composition and Formula of a Compound
{Quantitative Experiment)
Apparatus. — Porcelain crucible and cover. Pipe-stem triangle. Tripod
or ring stand with 1 ring. Bunsen burner. Horn-pan balance andweights.
Materials. — Copper wire (/ 30). Sulfur (powdered).
Introduction. When metallic copper is heated with sulfur,
the product is a compound, copper sulfide. If we know the
weight of the copper and of the copper sulfide produced, wemay compute the weight of the sulfur which has united with the
copper. Then we can compute what fraction (percentage) of
the copper sulfide is copper and what fraction is sulfur. Finally,
using the percentages of composition just determined and
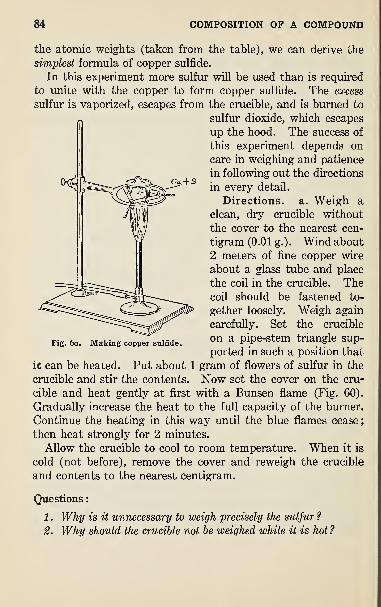
84 COMPOSITION OF A COMPOUND
the atomic weights (taken from the table), we can derive the
simplest formula of copper sulfide.
In this experiment more sulfur will be used than is required
to unite with the copper to form copper sulfide. The excess
sulfur is vaporized, escapes from the crucible, and is burned to
sulfur dioxide, which escapes
up the hood. The success of
this experiment depends on
care in weighing and patience
in following out the directions
in every detail.
Directions, a. Weigh a
clean, dry crucible without
the cover to the nearest cen-
tigram (0.01 g.) . Wind about
2 meters of fine copper wire
about a glass tube and place
the coil in the crucible. Thecoil should be fastened to-
gether loosely. Weigh again
carefully. Set the crucible
on a pipe-stem triangle sup-
ported in such a position that
it can be heated. Put about 1 gram of flowers of sulfur in the
crucible and stir the contents. Now set the cover on the cru-
cible and heat gently at first with a Bunsen flame (Fig. 60).
Gradually increase the heat to the full capacity of the burner.
Continue the heating in this way until the blue flames cease
;
then heat strongly for 2 minutes.
Allow the crucible to cool to room temperature. When it is
cold (not before), remove the cover and reweigh the crucible
and contents to the nearest centigram.
Questions
:
1 . Why is it unnecessary to weigh precisely the sulfur ?
2. Why should the crucible not he weighed while it is hot ?

ATMOSPHERIC NITROGEN 85
Computation. Copy the following table and record your
data and calculations as follows
:
Wt. of crucible and copper wire g.
Wt. of crucible empty . g.
Wt. of copper taken g.
Wt. of crucible and copper sulfide g.
Wt. of crucible empty . g.
Wt. of copper sulfide g.
Wt. of sulfur used g.
Percentage of sulfur
Percentage of copper
wt. of sulfur
wt. of copper sulfide
wt. of copper
wt. of copper sulfide
X 100 = . . . . %
X 100 = . . . . %
b. Find the simplest formula for copper sulfide. To do this,
divide the percentage of sulfur by its atomic weight, and also
the percentage of copper by its atomic weight. These quotients
will show the relative number of each kind of atom.
Percentage At. Wt. At. Ratio
Sulfur -4-32 =Copper -4- 63.6 =
What is the simplest formula for this sulfide of copper?
EXPERIMENT 37
Atmospheric Nitrogen
{Optional Experiment)
Apparatus.— A 2-liter bottle with 2-hole stopper. Hard-glass tubing
(20 cm.) with two 1-hole stoppers. Bunsen burner. 3 wide-mouthbottles. Pneumatic trough. Ring stand and clamp. Tubing.
Materials. — Copper gauze or turnings.
Introduction. The atmosphere is composed of about four-
fifths nitrogen, about one-fifth oxygen, and slightly less than
one per cent argon together with varying amounts of carbon
dioxide and water vapor and traces of rare gases. Since the
air is a mixture composed of so many gases, it will be worthwhile to study in more detail one of them, atmospheric nitrogen.

ATMOSPHERIC NITROGEN
Preparation of atmospheric nitrogen. Since the oxygen of
the air combines readily with hot copper and the nitrogen
does not, it is easy to obtain nitrogen from air. Set up the
apparatus as in figure 61. The hard-glass tube contains copper
gauze or clean copper turnings. Thecurrent of air is obtained by letting
water from the tap fill the bottle.Copper Gauze
r' '3^mitogen
\ \\ k-''
c_ =
\
\
0
Fig. 6i. Passing air over hot copper.
Heat the copper at first gently by moving the flame along
the tube and then strongly. Do not burn the stopper. Care-
fully turn on the water in order to drive the air from the bottle
very slowly over the hot copper. Collect three bottles of gas.
Properties, a. Apply a lighted taper to a bottle of the gas
collected. What happens? Leave the bottle uncovered for
3 minutes and test again. Does the taper now hum in the gas or
not ? Conclusions ?
b. Add a little clear limewater to another bottle and shake
the contents. Does the limewater turn milky ?
c. Find out whether burning sulfur will continue to burn in
nitrogen.
d. Make a list ofthe properties ofnitrogen which you have observed.
What is the black substance seen on the copper after cooling?
What component of the air was removed by the copper ?
How can you distinguish nitrogen from carbon dioxide ?
Why was the air passed over the copper slowly?
What impurity does the nitrogen thus prepared contain ? (p. 263.)
How would you show the presence of moisture in the air ? Howremove it ?

PERCENTAGE OF OXYGEN IN AIR 87
EXPERIMENT 38
Percentage of Oxygen in Air
{Quantitative Experiment)
Apparatus. — Pneumatic trough. Ring stand with clamp. 100-cc. grad-
uated cylinder. Graduated test tube (25 cc.). Thermometer. Ba-
I
rometer.
Materials. — Yellow phosphorus. Copper wire (30 cm. # 18). Pyrogallol.
Sodium hydroxide solution (1 to 4 by weight). Wood splint.
I
Introduction. A convenient method of determining what
I percentage of the air is oxygen consists in burning some sub-
Istance in a definite volume of air and then measuring the volume
of the remaining gas. Yellow phosphorus is a good substance
;
for this purpose because it forms an oxide which is soluble in
' water.
Caution. Great care must be taken never to handle yellow
phosphorus except under water.
i Directions, a. To get a definite volume of air, invert a
,
100-cc. graduated cylinder so that its mouth dips under the sur-
face of the water in a pneumatic trough. The cylinder may be
tipped to let part of the enclosed air escape, and then it should
be securely clamped in a vertical position so that the water level
is the same inside and outside the cylinder. The volume of the
air thus confined (about 100 cc.) should he carefully observed and
recorded. Also record the barometric pressure and the tempera-
ture of the water, which should have stood long enough to be at
the temperature of the room. Applying the Gas Laws, com-
pute the volume that this air would occupy under standard con-
ditions (0° C. and 760 mm.).
b. A piece of ordinary phosphorus should now be stuck onthe end of a piece of copper wire * (under water), and the wi^e
carrying the phosphorus should be pushed up into the air space
^ It will be safer to let the instructor fasten the wire around the phosphorus.
Transfer the phosphorus to your desk in an evaporating dish, keeping it under
water all the time. Return the phosphorus in the same way.
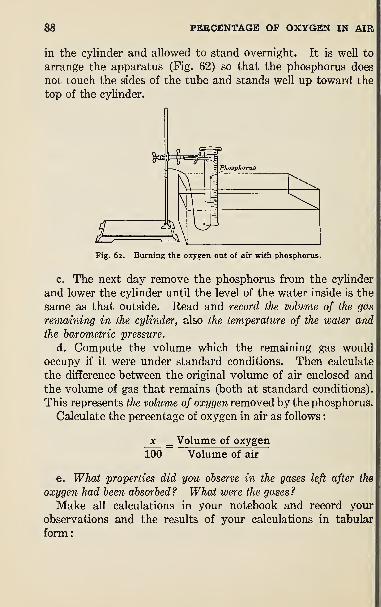
88 PERCENTAGE OF OXYGEN IN AIR
in the cylinder and allowed to stand overnight. It is well to
arrange the apparatus (Fig. 62) so that the phosphorus does
not touch the sides of the tube and stands well up toward the
top of the cylinder.
Fig. 62. Burning the oxygen out of air with phosphorus.
c. The next day remove the phosphorus from the cylinder
and lower the cylinder until the level of the water inside is the
same as that outside. Read and record the volume of the gas
remaining in the cylinder, also the temperature of the water and
the barometric pressure.
d. Compute the volume which the remaining gas would
occupy if it were under standard conditions. Then calculate
the difference between the original volume of air enclosed and
the volume of gas that remains (both at standard conditions).
This represents the volume of oxygen removed by the phosphorus.
Calculate the percentage of oxygen in air as follows
:
X ^ Volume of oxygen
100 Volume of air
e. What properties did you observe in the gases left after the
oxygen had been absorbed ? What were the gases ?
Make all calculations in your notebook and record your
observations and the results of your calculations in tabular
form:

PERCENTAGE OF OXYGEN IN AIR 89
Volume of air taken . cc.
Temperature of the water, first day ° C.
Barometric pressure, first day mm.Volxune of air at 0° C. and 760 mm cc.
Volume of gas remaining in cylinder cc-
Temperature of water, second day ° C.
Barometric pressure, second day mm.Volume of gas remaining at 0° C. and 760 mm cCo
Volume of oxygen absorbed by phosphorus cc.
Percentage of oxygen in air (by volume) %
Alternative method. Another and quicker method of ab-
i
sorbing the oxygen from the air is by means of an alkaline
! solution of pyrogallol. This is an organic chemical used as a
photographic developer. It is impossible to write an equation
representing the organic chemistry involved in this process
because the products of oxidation are numerous and compli-
cated. Although this method is often used in volumetric
analysis, it requires considerable skill to get good results.
Directions. Fit a good, solid, rubber stopper to a 100-cc.
graduated cylinder and measure with a centimeter-rule the
distance between the top-graduation mark and the bottom of
the stopper. By laying the rule alongside the graduations on
the cylinder, determine the number of cubic centimeters between
the top-graduation line and the bottom of the stopper.
Grind up about 1 gram of pyrogallol in a mortar and place the
powder in the bottom of the graduated cylinder. Now measure
out in a graduated test tube a volume of sodium hydroxide solu-
tion (1 to 4 by weight) equal to the volume of the cylinder
between the graduations and the stopper. Pour this alkaline
solution into the cylinder, which already has about 1 gram of
pyrogallol in the bottom. Instantly replace the stopper firmly
and shake the cylinder vigorously for two or three minutes.
This alkaline solution of pyrogallol absorbs the oxygen from
the air in the cylinder.
Invert the cylinder and thrust the top into a pneumatic
trough nearly full of water at room temperature. Then removethe stopper. Note the result.

90 AMMONIA
Allow the cylinder to stand in the trough of water for a fewminutes until the cylinder and the gas have come to the tem-
perature of the room. Equalize the water levels inside andoutside the cylinder by raising or lowering the cylinder. Note
precisely the volume of gas left in the cylinder. The difference
between this volume and the 100 cc. of air is the volume of
oxygen absorbed.
Again close the mouth of the cylinder with a stopper, removeit from the trough of water, and stand it upright on the table.
Test the remaining gas in the cylinder with a burning splint.
Note the result. The gas left is mainly nitrogen.
Record your data and results in your notebook in tabular form
:
Data
:
Volume of air taken 100.0 cc.
Volume of gas remaining in cylinder . cc.
Calculations
:
Volume of oxygen absorbed cc.
Percentage of oxygen in air %
EXPERIMENT 39
Ammonia— Preparation and Properties
Apparatus. — Large test tube (20 X 2.5 cm.) fitted with 1-hole stopper.
Ring stand with ring and clamp. Bunsen burner. 3 wide-mouth
bottles. Glass squares. Pneumatic trough. Glass tubing.
Materials.— Slaked lime. Ammonium chloride. Litmus papers. Tapers.
Concentrated hydrochloric acid.
Introduction. When organic compounds containing nitrogen
are heated with lime, they are decomposed and one of the
products is ammonia (NHs). This is the familiar gas which is
characteristic of the household cleaning agent known as “am-monia water.” But ammonia formed in this way is always
mixed with large amounts of other substances, which are formed
during the decomposition of the organic compounds. When coal
is heated in a closed vessel and the gaseous products are passed
through water, the ammonia gas dissolves. This ammonia

AMMONIA 91
[solution is then mixed with sulfuric acid, and the ammoniumsulfate is separated by crystallization. In the laboratory,
ammonia can be readily prepared from any ammonium salt,
such as ammonium sulfate ((NH4)2S04) or sal-ammoniac
I (NH4CI), by heating it with any of
: the alkalies. Since lime (Ca(OH) 2)
is the cheapest alkali, it is the one
' commonly employed. As the gas,
ammonia, is lighter than air, we1may collect it in an inverted bottle
by displacing the air.
Directions, a. Preparation. Mixon a piece of paper 2 parts of pow-
'dered slaked lime (Ca(OH)2) and
i
1 part of ammonium chloride
;
(NH4CI). Place this mixture in a
i large test tube which is provided
with a delivery tube, as shown in
figure 63 . Do not fill the tube morethan half full. Clamp and incline
it slightly downward in order that
any condensed moisture may not
run back and crack the tube.
Warm the mixture very gently, beginning with the portion
near the mouth of the tube and gradually extending the heat
to other portions, but keep the flame moving continually. Assoon as the smell of ammonia shows that the gas is escaping
from the bottle, lift it and cover its mouth with a glass plate.
Set it aside mouth downward. In this way collect 3 bottles of
the gas.
b. Properties. Put one bottle mouth downward into a basin
of water (pneumatic trough). Remove the glass plate andshake the bottle a little. Note what happens. Replace the
glass plate and remove the bottle with its contents. Test the
liquid with litmus papers. What is the action of ammonia onwater? Write in your notebook the equation.
Fig. 63. Preparing ammonia anddisplacing the air.

92 ANALYSIS OF HOUSEHOLD AMMONIA
Pour into a warm, dry bottle two or three drops of concen-
trated hydrochloric acid. Cover this bottle with a glass plate
and invert it upon a covered bottle of ammonia. Keep the
bottles mouth to mouth while you remove both plates at the
same time. The white solid which is formed is ammoniumchloride (NH4CI). Write in your notebook the equation for the
reaction.
Push a lighted taper up into an inverted bottle of the gas.
Does the gas burn? Does it support combustion of a taper?
Apply a lighted taper to the gas issuing from the exit-tube of the
generator. Observe whether the gas burns (1) while the lighted
taper is present and (2) after it is removed.
c. Results. Make a list of the properties of ammonia which
you have observed in this experiment. Complete the equation
for its preparation
:
Ca(OH)2 + 2 NH4CI—^ + + I
How could you prove that a given substance was an ammoniumsalt?
EXPERIMENT 40
Analysis of Household Ammonia
{Quantitative Experiment)
Apparatus. — 10-cc, pipette. Small beaker. Ring stand and clamp.
Burette.
Materials.— Bottle of “household ammonia.” Methyl-orange solution.
Normal hydrochloric acid solution.
Introduction. The value of “household ammonia” depends
upon the amount of base (NH4OH) which it contains. It often
happens that some brands contain one-tenth as much as others
and yet are retailed at the same price. There is no way in which
the average consumer can detect the difference, and often the
grocer does not know the concentration of the brand he sells.
However, it is quite easy for a student of chemistry to measure

^ALYSIS OF HOUSEHOLD AMMONIA 93
the concentration of a sample of household ammonia by titra-
tion with an acid of known concentration. Our first step is to
review the experiment on the neutralization of
a base and an acid by titration (Exp. 20).
Directions. Bring from home or buy of a
igrocer at least 100 cc. (4 oz.) of household am-
monia. Take a 10-cc. pipette (Fig. 64) and
[rinse it out with the ammonia solution (throw
away the rinsings) . Measure out very carefully
!l0 cc. of the household ammonia with a pipette
las follows: Insert the jet end of the pipette
deeply in the liquid and place the other end in
the mouth. By drawing (sucking) the air out
iof the pipette, the liquid is forced up into it.
As soon as the liquid rises above the 10-cc. markIon the stem, remove the pipette from your
mouth and quickly cover the end with your
finger. By moving your finger slightly, the
liquid is allowed to flow out until the surface is just on the mark.
Let this carefully measured volume of household ammoniaflow out into a clean beaker and add about 20 cc. of distilled
Iwater. Add two or three drops of methyl-orange solution to the' mixture. This indicator turns red with acids and yellow with bases.
\
Fill a burette with a normal solution of hydrochloric acid.
Take the usual precautions about rinsing out the burette with a
little of the solution to be used in it and see that the tip is filled
iwith the solution. Read and record the surface of the acid' solution (which must be on the graduated portion of the burette).
I Then place the beaker on a sheet of white paper directly underI the burette and let the acid flow slowly into the ammoniasolution, stirring constantly, until the change of color shows
I
that enough acid has been added. In fact, too much acid has
doubtless been used in this preliminary trial, but note the
\volume of acid actually used.
I In the next trial the acid may be drawn off rapidly until the
I
volume used has come within 2 cc. of that employed in the first
Fig. 64. A 10-cc.
pipette.

94 NITRIC ACID
trial. Now proceed very slowly until a single drop changes the
color of the indicator. Make several trials until three consecu-
tive trials agree within 0.5 cc. Find the average of these
three consistent values for the volume of normal hydrochloric
acid which neutralizes 10 cc. of the household ammonia.Results. Compute the volume of normal acid required to
neutralize 1 cc. of the ammonia solution. This volume, or
factor, expresses the multiple of normality of the ammoniasolution. If this volume is less than one, it expresses the
fractional normality of the ammonia solution. A normal
ammonia solution contains 17 g. of ammonia per liter, or is
about 1.7 per cent ammonia. Therefore the product of the
normality of the ammonia solution and 1.7 gives the percentage
of ammonia in the household ammonia.
Arrange the data and results in tabular form and show each
step in the computation.
EXPERIMENT 41
Nitric Acid
Apparatus.— Tubulated retort (250 cc.) with glass stopper. Tripod.
Bunsen burner. Asbestos gauze. Ring stand and clamp. Large test
tube. Battery jar. Funnel. Test tubes.
Materials.— Sodium nitrate. Concentrated sulfuric acid. Excelsior.
White woolen yarn. Concentrated ammonium hydroxide. Copperturnings. Zinc (mossy). Ferrous sulfate solution (freshly prepared
and saturated).
Introduction. Nitric acid boils at a much lower temperature
than sulfuric acid and therefore can be prepared by the double
decomposition between a nitrate and sulfuric acid. The mix-
ture has to be heated hot enough to make the nitric acid pass
off as fast as it is formed. But nitric acid very readily decom-
poses when it is heated, and so the acid is prepared at the lowest
temperature which can be used to effect its production. Since
nitric acid is very corrosive, the preparation must be carried
on in apparatus composed entirely of glass.

NITRIC ACID 95
Caution. Nitric acid and sulfuric acid are both very corrosive.
Do not drop any acid on your flesh or clothing.
Preparation. Place about 20 grams of sodium nitrate on a
piece of paper and fold the paper so that the solid may be
slipped into the retort through the short tubular opening. Sup-
port the retort on the
wire gauze with as-
ibestos center, which
is itself supported on
a tripod. Clamp the
j
neck of the retort in
!such a way (Fig. 65)
I that it extends into
a large test tube or
;
small flask partly im-' mersed in cold water.
!Pour 15 cc. of concen-
trated sulfuric acid
through a funnel upon' the nitrate and then
I
carefully remove the
funnel without dropping acid from it. Replace the glass
stopper in the short tube.
!As soon as the sulfuric acid has moistened the entire mass of
I
nitrate crystals, begin heating the retort gently. Distill at
I
as low a temperature as possible until no more nitric acid con-' denses in the neck of the retort. The brown color observed in
! the retort is due to a little nitric dioxide (Exp. 42).
Allow the retort to cool in position. The residue, which is
sodium hydrogen sulfate (NaHS04 ), may be removed with
warm water. Write in your notebook the equation for the prepara-
tion of nitric acid.
Properties. 1 . The nitric acid just prepared is 100% pure,
and great care must be used in handling it. Pour 2 cc. of this
' acid into a test tube and insert a small, loose wad of excelsior
1so that it remains about an inch above the acid. Holding the
Fig. 6$. Making nitric acid with a tubulated retort.

96 NITRIC ACID
test tube in a holder, boil the acid vigorously until the vapor'
reaches the excelsior. Now move the test tube so as to heat
the excelsior itself for a few seconds. How does this experiment
illustrate the oxidizing action of nitric acid ?
2. Pour 2 cc. of the acid on a piece of white woolen yam in a
test tube, rinse with water, and then add ammonium hydroxide.
This action of nitric acid followed by ammonium hydroxide
serves as a test for those nitrogenous substances known as
proteins.
3. Pour 2 cc. of the acid on a small piece of copper in a test
tube. This action is characteristic of nitric acid. Repeat this
experiment using zinc instead
of copper. Compare the action of
nitric acid on metals with that
of hydrochloric and sulfuric acids.
Test for the nitrate (NO 3“) ion.
This is a very delicate test, and
the directions must be followed
with care. Pour into a test tube
about 3 cc. of ferrous sulfate (FeS04) solution. Add to it
2 drops of dilute nitric acid and shake the test tube. Holding
the tube in an inclined position, pour 2 cc. of concentrated
sulfuric acid slowly down the side of the tube (Fig. 66). Theheavy acid will run down the tube and form a separate layer
under the mixture of the other two solutions already in the tube.
Sometimes the test fails because the tube becomes hot. In
this case let the tube stand quietly a few minutes. Describe
the coloration in the ring where the two layers meet. Repeat this
test using a very small amount of sodium nitrate dissolved in
2 cc. of water instead of the dilute nitric acid.
Summarize the properties of nitric acid.
Fig. 66. Testing for nitrate ions with
ferrous sulfate solution.

NITRIC OXIDE AND DIOXIDE 9t
EXPERIMENT 42
Nitric Oxide and Dioxide
Apparatus. — Wide-mouth bottle with 2-hole stopper. Thistle tube.
Pneumatic trough. 3 wide-mouth bottles and glass squares. Def-
lagrating spoon. Large test tube with 2-hole stopper. Dropper^
Glass tubing.
Materials.— Copper turnings. Concentrated nitric acid. Tapers. Asbes-
tos paper. Red phosphorus. Sodium peroxide.
Introduction. Nitrogen forms five different oxides. How-ever, only three of these, nitric oxide (NO), nitric dioxide (N02)r
and nitrous oxide (N 2O), are of sufficient importance to be
studied at present. Theaction of nitric acid uponmetals is more compli-
cated than that of the
other common acids, such
as hydrochloric acid andsulfuric acid, which wehave already studied.
This is because it acts as a
powerful oxidizing agent
as well as an acid. Whendilute nitric^cid is al-
lowed to react with metallic copper, the metal probably first
displaces the hydrogen, as with other acids. But this hydrogen
is immediately oxidized into water by the oxygen which is given
off by the nitric acid. Therefore the final result is that wehave copper nitrate (Cu(N03) 2 ) and water left in the fiask, andnitric oxide is the gas produced. This gas readily changes into
nitric dioxide on exposure to the air, as we shall see in the
following experiment.
Preparation. Place some pieces of copper (about 10 g.)
in a generating bottle and fit it with a 2-hole stopper carrying
a thistle tube and a delivery tube as in figure 67. Prepare to
collect 3 bottles of gas over water. Pour in enough water to

98 NITRIC OXIDE AND DIOXIDE
cover the copper and the lower end of the thistle tube and then
add about half as much concentrated nitric acid. The action
may be a bit slow in starting;
if necessary, add from time to
time small quantities of the concentrated nitric acid. If the
action becomes very vigorous, add cold water.
After the air in the generator has been swept out, fill twobottles with the gas, nitric oxide (NO), and fill the third bottle
half full. Let them stand in the trough for later use.
Note the color of the gas in the generating bottle just after the
action starts, and again later. Also observe the color of the liquid
left in the generator. This color is characteristic of the cupric
ion (Cu++).
Copy in your notebook and complete the equation:
3 Cu + 8 HNO. CuCNOs)^ I +Properties. 1. Let one bottle of nitric oxide escape into the
air. What evidence of chemical change do you observe ?
2. Cover a second bottle of the gas with a glass plate and set
it upright on the table. Plunge a lighted taper into the gas,
withdraw it at once, and replace the plate.
Does nitric oxide support the combustion of a taper ?
Does nitric oxide support the burning ofphosphorus ?
Line a deflagrating
spoon with asbestos
paper and put into
it a bit of red phos-
phorus. Ignite the
phosphorus andwhen it is burning
vigorously plunge it
into the same bottle.
3. To study the
effect of oxygen on
nitric oxide, set up
SodiumPeroxide
Fig. 68.
^\\ N
o
o -J \w v ° y
\ —
-
Generating oxygen and introducing the gas
into nitric oxide.
a little oxygen generator as in figure 68. Place in the large test
tube about 2 cc. of sodium peroxide (Na202 ) and fill the dropper

iriTROUS OXIDE 99
with water.* Immerse the deliveiy tube in the trough and let
the water drop a little at a time on the peroxide. When the
air has been displaced from the test tube, allow the oxygen to
ascend slowly into the bottle which is only half full of nitric
oxide. Note the change in color. Does the volume of the gas
change ? If so, in which direction ? Compare the result with that
obtained by allowing air to mix with nitric oxide. With what gas
^in the air does the nitric oxide combine to become brawn? Thebrown gas is nitric dioxide (NO 2).
I
Summarize in parallel columns the properties of nitric oxide
and nitric dioxide.
EXPERIMENT 43
I
Nitrous Oxide
Apparatus.— Small flask with 1-hole stopper. Large test tube with 2-hole
stopper. Ring stand and clamp. Pneumatic trough. 4 wide-mouth
bottles and glass squares. Test tube with 1-hole stopper. Glass
I tubing.
Materials. — Ammonium nitrate. Wood splint. Copper turnings. Con-
1
centrated nitric acid. Anhydrous copper sulfate.
Introduction. The gas which the dentist uses as an anesthetic
is nitrous oxide (N2O). It is conveniently prepared in the
I
laboratory by heating ammonium nitrate (NH4NO3). This
;
decomposes into water and nitrous oxide. Since all nitrogen
'compounds are unstable, it is particularly necessary to carry
ion this experiment with great care in order that the process maynot proceed with explosive violence.
Preparation. Set up the apparatus as shown in figure 69.
Put about 15 grams of pure crystallized ammonium nitrate' (NH4NO3) into the flask and clamp it with the neck inclined
slightly downward. The ammonium nitrate on heating decom-poses into water and a gas, nitrous oxide (N2O). Hence a
'
* The instructor may have several of these oxygen generators set up and ready
I' for use by the class.

100 NITROUS OXIDE
condensing trap is inserted in the delivery tube. It is better to
use warm water in the bottles and trough when collecting this gas.
The heat must be carefully
regulated or an explosion mayoccur. Therefore it is ad-
visable that two pupils worktogether on this experiment
and that one of them give his
entire attention to heating the
flask gently and steadily.
Heat the nitrate gently
until it is melted and a good
/Fig. 69. Generating nitrous oxide.
deal of water of crystallization has been driven off. Keep the
flame moving since overheating in one spot will cause trouble.
Caution. If brown fumes appear in the flask during the heating,
allow the flask to cool a little.
Let the first jarful of gas escape as it is mostly air from the
flask and test tube. Collect three and a half bottles of the gas
and then remove the delivery tube from the water before the
heating is discontinued.
Identify the liquid in the large test tube by adding a little
anhydrous copper sulfate. Complete in your notebook the
equation:NH.NO,—v N 2O + + ....
Properties. 1. Describe the color and odor of the gas.
2. Pour a little cold water into a bottle of the gas and cover it
tightly with the palm of your hand. Shake the contents of

BROMINE ~~ PREPARATION AND PROPERTIES 101
the bottle vigorously. What dees this experiment show about the
solubility of the gas in cold water ?
3. Plunge a glowing wood splint into another bottle of the
gas. What other gas have we already studied which behaves in
much the same way?4. Prepare some nitric oxide by putting a few pieces of copper
turnings into a test tube which is fitted with a stopper and a
delivery tube. Cover the copper with water, add an equal
volume of concentrated nitric acid, and at once insert the
stopper. Let the nitric oxide bubble into water until the
colored gas in the test-tube generator has disappeared. Thenplace the end of the delivery tube under the bottle which is
half full of nitrous oxide. Does the nitrous oxide react on nitric
oxide in the same way as oxygen in Experiment ?
Questions. (1) Why is it better to collect nitrous oxide over
warm water ? (2) Why does nitrous oxide support the combustion
of a burning splint while nitric oxide does not? (3) How would
you distinguish between nitric oxide and nitrous oxide ? (4) Be-
tween nitrous oxide and oxygen?
EXPERIMENT 44
Bromine — Preparation and Properties
apparatus. — Ring stand and clamp. Test tubes and rack. 1-hole stopper
to fit test tube. Wide-mouth bottle. Bunsen burner. Glass tubing.
Materials.— Sodium bromide. Manganese dioxide. Concentrated sul-
furic acid. Carbon bisulfide. Chlorine water (saturate water with
the gas).
Introduction. Bromine and iodine belong to the halogen
family and therefore have much in common with chlorine, the
chemical changes of which we have already studied (Exp. 15).
Bromine can be prepared in much the same way as chlorine.
In the laboratory we use a mixture of manganese dioxide,
sodium bromide, and sulfuric acid. The equation is similar
tp that for making chlorine
:
2 NaBr -j- 2 H 2SO4 {“ Mn02 ^ Na2S04 "h 2 H 2O -f- Br2 ^

102 BROMINE— PREPARATION
Bromine, however, is a liquid which has a suffocating odor. In
fact, the name bromine means a “stench.” Since it attacks
the nose and throat even more violently than chlorine and also
irritates the eyes and burns the skin, great care must be exer-
cised in handling bromine in the laboratory.
Caution. Always use the hood in preparing bromine.
Iodine, on the other hand, is a solid which is prepared in
exactly the same way as bromine and chlorine, namely, by
warming a mixture of manganese dioxide and sodium iodide in
sulfuric acid. Iodine is very
easily vaporized and the
vapor on cooling passes di-
rectly to a solid without
forming a liquid. This
process is called sublimation
and will be used in Experi-
ment 45 in preparing iodine.
Preparation.* Fit a cork
stopper to a test tube and
cut a hole through it. In-
sert a delivery tube and set
up the apparatus as in fig-
Fig. 70 . Preparation o( bromine. '"’e 70. Mix OH a piece of
paper about 1 cc. of sodium
bromide crystals with about the same bulk of manganesedioxide and put the mixture into the test tube. Add about
2 cc. of concentrated sulfuric acid to 1 cc. of water in a test
tube and cool it. Then pour the acid on the mixture of sodium
bromide and manganese dioxide. Insert the stopper carrying
a delivery tube which extends to the bottom of the test tube
containing about 10 cc. of water. It is well to stand the test
tube in a bottle of cold water.
Heat the mixture very gently but not enough to boil the black
liquid through the delivery tube. Stop heating when all the
* The instructor may prefer to do this experiment as a class experiment andlise the glass retort as in making nitric acid.
-HzO

BROMINE— PROPERTIES 103
red vapor has been driven over, and at the same time remove
I
the delivery tube from the water. Why?Properties. 1. Note the color of bromine vapor and the color
of the liquid bromine.
Fill the test tube containing the bromine about half full of
water. Set the mixture aside.
Is bromine heavier or lighter than water ? Is it soluble in water ?
I
2. Pour about 3 cc. of the “bromine water’’ just prepared
into a test tube and add not more than 1 cc. of carbon bisulfide,
j
Cover the tube with your thumb and shake the contents vigor-
ously. Most of the carbon bisulfide settles to the bottom.
Compare the colors of the bisulfide and water and so the relative
! solubility of bromine in these two liquids.
Test for a bromide. Dissolve a small crystal of sodium
I bromide in about 5 cc. of water. Note the color of the solution.
IAdd 2 cc. of carbon bisulfide and shake the mixture. Why is
' die carbon bisulfide not colored by the bromine ?
I
Now add a few drops of freshly prepared chlorine water * and
I
shake the contents vigorously. Allow the mixture to settloc
I
What substance has been set free by the chlorine ? Complete the
:equaUon:
__ __ _ _l_ _ __
Summarize the properties of bromine : color, odor, density of
! vapor (compared with air), density of liquid (compared with
iwater), relative solubility in water and carbon bisulfide, and
! activity compared with chlorine.
I
* A convenient way of making chlorine water is as follows : Drop a few small
icrystals of potassium chlorate into a test tube and cover them with concentrated
' hydrochloric acid diluted with an equal volume of water. Warm the tube a little
and as soon as the chlorine begins to escape from the tube, fill it nearly full of water.

104 IODINE— PREPARATION
EXPERIMENT 45
Iodine — Preparation and Properties
Apparatus.— Test tubes and rack. Bunsen burner. Evaporating dish.
Tripod. Crystallizing dish. Asbestos gauze. Mortar and pestle.
Materials.— Sodium iodide. Manganese dioxide. Concentrated sulfuric
acid. Alcohol. Sodium iodide solution. Carbon bisulfide. Chlorine
water. Bromine water. Sodium thiosulfate solution.
Preparation. Pour into an evaporating dish about 3 cc. of
water and add about twice that volume of concentrated sulfuric
acid. Pulverize several crystals (about 2 g.) of sodium iodide
with about as much manganese di-
oxide and add the mixture to the acid.
Set the evaporating dish on the as-
bestos gauze supported on the tripod
and place a crystallizing dish half full
of cold water upon it in such a waythat the iodine vapor may be con-
densed on the bottom of the cool dish
(Fig. 71).
Warm the evaporating dish with a
very small flame. If the iodine vapor
(violet) escapes, decrease the heat andreflll the crystallizing dish with cold water. The iodine vapor
condenses as a solid {i.e. sublimes) on the bottom of the cold
dish. Scrape off the iodine crystals on a paper.
Complete and balance the following equation in your notebook
:
Nal + __ H 2SO4 + Mn02Na2S04 “i- MnS04 4“ “h
Properties. Solvents. Try to dissolve a crystal of iodine
in water by shaking it with a few cubic centimeters of water.
Is the iodine quite insoluble in water?
To the water and iodine in the test tube add an equal volume
of carbon bisulfide (or carbon tetrachloride) and shake the

.IODINE— PROPERTIES 105
I
mixture. Compare the solubility of iodine in water and in
i carbon bisulfide.
1
Try the solubility of iodine in ethyl alcohol ;also in solutions
I
of sodium iodide and sodium thiosulfate (“hypo’'). Tabulate
fin your notebook the solubilities of iodine in these various solvents
I and the colors of the solutions as follows
:
Solvent CoLOB OF SolutionSolubility
(Very great, moderate, or slight)
WaterCarbon bisulfide, etc. .
Alcohol
Sodium iodide sol. . .
ij Replacement of iodine. Dissolve a small crystal of sodium
|: iodide in about 5 cc. of water and then add a few cubic centi-
i
meters of carbon bisulfide. Shake the mixture. Why is the
liquid not colored with the iodine ?
I Add a few drops of chlorine water and shake the liquids vigor-
I
ously. Allow the mixture to settle. What substance has been
i
set free by the chlorine ? Complete in your notebook the equation
:
-Nal + CU—^To another portion of sodium iodide solution, add bromine
water and carbon bisulfide. After shaking the mixture let it
;
settle. What substance has been set free by the bromine ? Com-Iplete in your notebook the equation:
__ Nal -|~ Brg—^ d-
Assume that the more active element replaces the less active
element; which of these halogens is the most active and which is
the least active ?
Summarize the properties of iodine : color of solid, color of
vapor, density of vapor (compared with air), density of solid
(compared with water), and relative solubilities in the various
solvents used.

106 HALOGEN ACIDS
EXPERIMENT 46
The Halogen Acids
Apparatus.— Test tubes and rack. Bunsen burner.
Materials.— Sodium chloride. Sodium bromide. Sodium iodide. Con-centrated sulfuric acid. Blue litmus paper. Concentrated ammoniumhydroxide. Filter papers.
Hydrogen chloride. Put about 1 g. of common salt (sodium
chloride, NaCl) in a test tube and add a few drops of concen-
trated sulfuric acid. If no action is visible, add a few drops
more of sulfuric acid and warm the tube gently. Whathappens
?
Blow across the mouth of the tube. What is the result?
Hold a strip of moistened blue litmus paper near the mouth of
the tube. Result ? Hold a piece of filter paper which has been
moistened in ammonia water near the tube. Explain the
formation of a white cloud.
Write in your notebook the equation for the preparation of
hydrogen chloride.
Hydrogen bromide. Repeat in every detail the experiment,
using sodium bromide. Answer the same questions. Rememberthat all the hydrogen halides are colorless. How do you account
for the colored gas in the test tube? What element gives this
color? What does it indicate as to the stability of hydrogen
bromide ? What gas is formed besides hydrogen bromide ? (Smell
the gas very cautiously.)
Complete in your notebook the equations:
__ NaBr + H 2SO4 —^ Na 2S04 + — _
H2SO4 + 2 HBr—^ H2SO3 + -- + —
-
—> + SO2 4“ +Hydrogen iodide. Again repeat the experiment as before,
using sodium iodide. Answer the same questions. The amount
of the fuming when you blow across the mouth of the test tube
indicates the quantity of hydrogen iodide coming from the tube.
What is the colored vapor?

SODIUM CARBONATE AND BICARBONATE 107
What gas, which you can recognize by its odor, is formed besides
hydrogen iodide ?
Complete in your notebook the equations:
8 Nal + __ H 2SO4 —^ - Na2S04 +H2SO4 + 8 HI — H2S + ____ +
Comparison. What does this experiment show with regard to
the relative stabilities of hydrogen chloride, hydrogen bromide, and
hydrogen iodide ?
Why are hydrobromic and hydriodic acids not usually prepared
in this way ?
EXPERIMENT 47
Sodium Carbonate and Bicarbonate
Apparatus. — Test tubes. 1-hole stopper to fit test tube. Ring stand
and clamp. Bunsen burner. Beakers. Tripod and asbestos gauze.
Glass tubing. Horn-pan balance and^
weights.
Materials.— Sodium bicarbonate (baking
soda). Limewater. Potassium bitar- NaHCO^trate (cream of tartar).
Effect of heating the bicarbonate.
Put about 2-3 g. of sodium bicar-
bonate (NaHCOs) into a test tube
and clamp it so that the mouth is
inclined slightly upward. Arrange
j
the delivery tube so that it leads into
! a test tube containing limewater
!
(Ca(OH) 2) (Fig. 72). Warm the bi-
I
carbonate gently with a small flame,
taking care not to heat the test
I
tube hot enough to color the flame
yellow.
What gas is evolved? What collects
on the cool part of the test tube? To a part of the residue
(Na 2C03) left in the tube add an acid. What is the result'^
Fig. 72. Heating sodiumbicarbonate and passing thegas into limewater.

108 ANALYSIS OF BAKING POWDER
Complete in your notebook the equation for the action of heat on
sodium bicarbonate:
__ NaHCOs — Na 2C03 -f- -f-
Compare the taste of the bicarbonate with that of the carbonate.
Baking powder. Weigh out 2 g. of potassium bitartrate
(cream of tartar, KHC4H4O6). Calculate the amount of
sodium bicarbonate required from the following equation
:
KHC4H4O6 + NaHCOs —^ KNaC4H406 + H2O + CO2 >1^
cream of baking Rochelletartar soda salt
Weigh out this amount of sodium bicarbonate and mix the two
salts thoroughly on paper.
Put half of this mixture into a beaker half full of cold water
and the other half into another beaker half full of hot water.
What is the gas which escapes? What is the difference between
the action of cold and of hot water on this mixture? Why is water
needed in this chemical reaction?
EXPERIMENT 48
Analysis of Baking Powder
{Optional Experiment)
Apparatus.— Test tubes and rack. Bunsen burner. Evaporating dish.
Funnel. Beaker (small). Stirring rod. Ring stand and asbestos
gauze.
Materials. — Sample of baking powder (2 tablespoonfuls, from home).
Iodine solution. Barium chloride solution. Dilute hydrochloric acid.
Concentrated sulfuric acid. Concentrated nitric acid. Ammoniummolybdate solution. Sodium hydroxide solution. Filter papers.
Introduction. Sodium bicarbonate is an essential ingredient
of all baking powders. How could you prove its presence ? Theother necessary ingredient is some solid substance which is
weakly acidic, such as cream of tartar, calcium acid phosphate,
or alum. A small amount of starch or flour is usually added to
keep the mixture dry. The different kinds of baking powder

ANALYSIS OF BAKING POWDER 109
vary according to the kind of acid agent present. Some pow-
ders have a mixture of two or even of all three of these acid-
forming ingredients.
Directions, a. Place about 10 g. of a baking powder in a
beaker and add about 50 cc. of water. Stir the mixture well
until all the gas is evolved. Then filter and test the filtrate
and residue for the various ingredients as follows
:
b. Starch. Will the starch he found in the filtrate or in the
residue? Test for starch with one drop of iodine solution as
: in Exp. 70.
c. Sulfates. Ordinary alum is a double salt of aluminumsulfate and potassium sulfate (K2SO4 • Ah (804)3 • 24 H2O),
I Ammonium alum is also a double salt of ammonium sulfate and
aluminum sulfate ((NH4)2S04 • Al2(S04)3 • 24H 2O). Thus it
will be seen that if a baking powder contains alum, the filtrate
will contain sulfates. Test the filtrate with barium chloride
I solution and dilute hydrochloric acid as in Exp. 27.
d. Tartrates. Pour about 5 cc. of the filtrate from (a) into
an evaporating dish and add 5 drops of concentrated sulfuric
acid. Evaporate to dryness over a small flame. Charring
,
and the odor of burnt sugar indicate the presence of a
I
tartrate.
e. Phosphates. If the baking powder contains calcium acid
I
phosphate, it will be found in the filtrate from (a). To test for a
I
phosphate, take a few cubic centimeters of the filtrate and:acidify with a few drops of nitric acid. Warm the mixture andadd a few drops to 5 cc. of ammonium molybdate solution
((NH4)2Mo04). Set it aside. A bright-yellow precipitate
indicates a phosphate.
f. Ammonium salts. If the baking powder contains am-monium alum, we can detect it by pouring about 5 cc. of the
filtrate into a test tube and adding the same volume of sodiumhydroxide solution. If it is heated to boiling, ammonia gas is
evolved.
g. Calcium and aluminum. Since a baking powder contain-
ing sulfates always contains aluminum and one containing

110 HYDROLYSIS OF SALTS
phosphates always contains calcium, we need not make special
tests for these metals here.
Results. In making the report of your chemical analysis
of baking powder, state where you obtained it, the name of the
manufacturer, exact name of the brand, what you tested for andhow, and what you found present.
EXPERIMENT 49
Hydrolysis of Salts
Apparatus.— Test tubes and rack. Stirring rod.
Materials.— Litmus papers (red and blue). Copper sulfate, aluminumsulfate, ferric chloride, sodium chloride, potassium nitrate, sodiumcarbonate, and sodium tetraborate (borax).
Introduction. Not all salt solutions react neutral when tested
with litmus paper. This is due to the fact that water is itself
dissociated very slightly into H+ and OH“. The action of
the ions of water on a dissolved salt is called hydrolysis. Whenthe ions of the salt unite with the ions of water to form the
undissociated molecules of a weak base, an equivalent amountof hydrogen ions (H+) is set free and the solution gives an acid
reaction with litmus. When the ions of the salt unite with
the ions of water to form the undissociated molecules of a weakacid, an equivalent amount of hydroxyl ions (OH-) is set free
and the solution gives a basic reaction with litmus.
Note. Remember that the reddening of blue litmus indicates
H'*' ions and the turning blue of red litmus, OH“ ions.
Directions. Testing salt solutions with litmus. Dissolve
about 0.5 g. of each of the following substances in 10 cc. of dis-
tilled water in separate test tubes: copper sulfate (CUSO4),
sodium chloride (NaCl), sodium carbonate (Na2C03), aluminumsulfate (Al2(S04)3), ferric chloride (FeCR), potassium nitrate
(KNO3), and sodium tetraborate (Na2B407).

FLAME TESTS 111
Test each solution with litmus paper by putting a small drop
of the liquid on the paper with a clean glass rod. (Be sure to
rinse the rod for each new salt solution.)
It will be convenient to record the results in your notebook in a
tabular form as follows
:
' Salt Foemula Action with RedLitmus
Action with BlueLitmus
Copper sulfate . . .
Sodium chloride . .
j
Sodium carbonate
Aluminum sulfate . .
1
Ferric chloride . . .
Potassium nitrate . .
j
Sodium tetraborate .
Results. Divide these solutions into three classes: (1) those
that give an acid reaction, (2) those that give a basic reaction,
and (3) those that are neutral. Take one case from each of
these three classes and explain in terms of the ionic theory the
reaction of the solution toward litmus. Write in your notebook
equations to illustrate hydrolysis in classes 1 and 2.
.rEXPERIMENT 50
Flame Tests
Apparatus. — Bunsen burner. Platinum (or nichrome) wire mounted in a
glass tube. Test tubes. Cobalt glass (2 or 3 squares).
Materials. — Concentrated hydrochloric acid. Chlorides of sodium, potas-
sium, lithium, calcium, strontium, and barium. Unknowns.
Introduction. There are certain metals which are easily
detected in whatever salt they may occur because of a char-
acteristic color which each imparts to the Bunsen flame. Thisfurnishes a convenient and often a very delicate qualitative test
for these metals. We shall study compounds of sodium, potas-
sium, lithium, calcium, strontium, and barium. We may use

112 FLAME TESTS
0
Fig. 73. Flame test for
sodium, etc.
a piece of platinum wire which has a little hook bent at one end
and is melted into a short piece of glass tube at the other end.
(Nichrome wire may be substituted here, and one end may be
twisted around a match stick to serve as a handle.)
Hold the end of the platinum wire in the blue Bunsen flame.
If the flame is colored by it, dip the wire in a little concentrated
hydrochloric acid in a test tube and again hold it in the flame.
Repeat this several times until the wire
ifi \ceases to impart any color to the flame,
vf Directions, a. Sodium. Heat the
end of the cleaned wire and quickly
touch a tiny particle of sodium chloride.
Hold the wire with the adhering par-
ticle in the lower part of the outer blue
layer of the flame (Fig. 73) and note
the color of the flame produced. Examinethe sodium flame through two thicknesses of blue (cobalt) glass.
What tint of light is absorbed by the blue glass and hence does
not reach the eye? Hold the wire in the flame until the color
has nearly disappeared; then clean it as before by dipping in
hydrochloric acid.
b. Potassium. When the wire is quite clean, heat it and
touch a bit of potassium chloride. Record the color imparted
to the flame. Hold two thicknesses of blue glass between the
flame and the eye and observe whether the color is absorbed.
Mix together intimately a little sodium chloride and potas-
sium chloride and plunge the hot wire into the mixture. Record
the color imparted to the flame. Why do you not see both of the
characteristic colors? Now examine the flame of the mixture
through blue glass. Which metal can you recognize in this way ?
c. Lithium, calcium, strontium, and barium. When the wire
is thoroughly clean and imparts no color to the flame, plunge
it into a little lithium chloride and hold it in the flame. Note
the characteristic color.
Repeat this experiment with the chlorides of the other three
metals (Ca, Sr, and Ba), and tabulate your results
:

ACIDS OF PHOSPHORUS 113
Substance Fokmula Colob op Flame Remarks
d. Test for unknown. Obtain from the instructor a num-bered envelope containing an “unknown.” This may contain
one or two salts of these six metals. Record the number of your
unknown and identify it.
I
EXPERIMENT 51
! Acids of Phosphorus
Apparatus. — Wide-mouth bottle. Glass square. Deflagrating spoon,
j
Beaker. Tripod. Asbestos gauze. Bunsen burner. Test tubes andrack. Forceps.
I
Materials.— Yellow phosphorus. Dilute nitric acid.
I
Dilute ammonium hydroxide. Silver nitrate solu-
tion. Ammonium molybdate solution. Litmus
\ papers.
j
Caution. Yellow phosphorus takes fire readily.
I It should always be handled with forceps.
Preparation. Place about 20 cc. of distilled
water in a clean wide-mouth bottle or pint
fruit jar. Line a deflagrating spoon with as-
bestos paper and put in it a piece of yellow
I
phosphorus. Ignite it by touching it with a
I
hot wire and lower the burning phosphorus
I
into the bottle or jar, quickly covering the
I
mouth of the bottle with a glass plate (Fig. 74).
I
As soon as the phosphorus stops burning, remove the spoon
I
and shake the bottle to dissolve the phosphorus pentoxide (P 2O 5)
.
Fig. 74. Burningphosphorus on adeflagrating spoonin a bottle with alittle water.
114 SOIL TESTINGI
Test the solution with litmus paper. Write in your notebook the
equations for (a) burning phosphorus in air and (b) dissolving
phosphorus pentoxide in water.
Pour 3 cc. of dilute nitric acid into the solution in a beaker
and boil it down to about half its original volume. Thehydrogen ion of the nitric acid acts as a catalyst to convert the
metaphosphoric acid (HPO3) by addition of water to ortho-
phosphoric acid (H3PO4). Write the equation.
Tests. Add to a portion of the orthophosphoric acid nearly
enough dilute ammonium hydroxide to neutralize the acid;
then add silver nitrate solution drop by drop until a precipi-
tate is formed. Name and describe this precipitate. Write the
equation.
To about 10 cc. of a solution of ammonium molybdate add
a few drops of the orthophosphoric acid. Let the mixture
stand for several minutes and then warm gently. A precipitate
shows the presence of the phosphate ion (PO 4 ). Describe
the precipitate.
Try the effect of adding ammonium hydroxide solution until
the solution is alkaline. Note the result. Again acidify with
nitric acid and record the result.
EXPERIMENT 52
Soil Testing
{Optional Experiment)
Apparatus.— Beaker. 3 pint fruit jars. Graduated cylinder. Magnifying
glass.
Material.— Sample of soil (from home garden). Litmus papers.
Litmus test for acidity. Place some soil in a beaker or
tumbler and moisten it well with distilled water. Put a strip
of blue litmus paper on the moist mass. If the soil is acid, the
litmus paper will turn pink within 15 minutes.

SOIL TESTING 115
Sometimes it is necessary to test soil for acidity where dis-
tilled water is not available. In this case the test may be madeby taking a handful of moist soil direct from the field and press-
ing it into a ball. Then break the ball in two so that the litmus
paper may be placed between the two halves. After 10 minutes
examine the litmus paper.
Note. It is well to handle the litmus paper with forceps because the
perspiration of the hands is usually slightly acid. Use only the best litmus
-paper.
What are the means of correcting acidity in the soil ?
Percentage of sand, silt, and clay. Put about 2 table-
spoonfuls of fine soil in a pint fruit jar three-fourths full of
water. Shake the mixture vigorously for several minutes andthen let it stand for one minute. Pour off the muddy water
into a second jar. The sediment remaining in the first jar is
composed mainly of sand.
When the second jar has been standing 5 minutes, pour off
the muddy water into a third jar. Add more water to this jar
and shake it vigorously. After it has stood for at least 2-3
hours, pour off the water. The residue left in the second jar
was largely silt; the residue in the third jar is almost entirely
clay. Dry each of these three residues and determine the
volumes of each portion in a graduated cylinder. Compute the
percentage of sand, of silt, and of clay in the soil. Note how fine
the particles of each ingredient are and examine them under a mag-
nifying glass.

116 A FUSIBLE ALLOY
EXPERIMENT 53
A Fusible Alloy
Apparatus.— Iron crucible, 20 cc. Pipe-stem triangle. Forceps. Bunsenburner (or Fisher form of Meker burner). Ring stand. Cover of
pasteboard box. Iron wire, 6" of # 14. Evaporating dish. Horn-panbalance and weights.
Materials.— Bismuth, gran. Cadmium, mossy. Lead, gran. Tin, gran.
Introduction. When two or more metals are melted together
and the resulting product is allowed to solidify, the product is
called an alloy. Although alloys have been known since ancient
times, it is only recently that they have assumed an enormous
importance both commercially and theoretically. Among the
alloys which are easily fusible and
so can be prepared in the labora-
tory is Wood’s metal. This is
composed of bismuth 50%, lead
25%, tin 13%, and cadmium 13%;it melts at about 60° C. Its low
melting point makes it very useful
for plugs in automatic fire-spririkler
systems. In general, an alloy has
a lower melting point than its com-
ponent metals. In other words,
the melting point of a pure metal
can be lowered by adding another
metal.
Directions, a. Preparation. Use
an iron crucible to melt the com-
ponent metals and support it in a
pipe-stem triangle on the ring of the iron support stand, as
shown in figure 75. Use a Bunsen burner or, if available, the
Fisher form of the Meker burner. While the crucible is getting
hot, weigh out about 10 grams of bismuth, 5 grams of lead,
2.5 grams of tin, and 2.5 grams of cadmium. Mix on a sheet
fig. 75. Melting metals in an iron
crucible.

SOLUTIONS OF GASES, LIQUIDS, AND SOLIDS 117
of paper the lead and tin, and place in the crucible. Whenthese are melted, add the bismuth and cadmium. Stir with an
iron wire until the whole mass is thoroughly liquefied.
Moisten the cover of a small pasteboard box and tilt it
against the base of the iron stand. With forceps lift the
crucible from the flame and carefully pour the molten alloy into
the lower edge of the box cover. This liquid may be solidified
by pouring a little water on it.
b. Properties. Examine the alloy and compare its appearance
with that of the component metals.
Determine its density (g./cc.) by weighing a sample on your
horn-pan scales and by measuring its volume by putting it in a
graduated cylinder partly filled with water.
Heat some water in an evaporating dish until it boils. Thenput in a piece of the alloy which you have prepared. Whathappens to the alloy?
The melting points of the components are as follows : bismuth269° C., cadmium 321° C., lead 327° C., and tin 232° C.
How does the melting point of the alloy compare with the melting
points of its components ?
EXPERIMENT 54
Solutions of Gases, Liquids, and Solids
Apparatus. — Test tubes and rack. Bunsen burner. Funnel. Watchglasses.
Materials. — Concentrated ammonium hydroxide. Carbon tetrachloride.
, Glycerol. Copper sulfate. Potassium chlorate. Calcium carbonate
(powdered). Filter papers.
Introduction. Water is our most important solvent not only
for solids but for liquids and gases as well. When a solid has
been mixed with water, it is impossible to see the separate
particles, even with a powerful microscope. The solid has beensubdivided into very small particles. Therefore a solution
offers a large surface on which chemical action may take place.

118 SOLUTIONS OF GASES, LIQUIDS, AND SOLIDS
A very large number of the important chemical changes in
nature and in the industries are brought about between sub-
stances in solutions. Some substances are said to be insoluble
in water, but this is not strictly true since even such a substance
as glass dissolves to a very slight extent in water. In this experi-
ment and the next you will learn that the solubility of various
substances depends upon several factors.
Gases in water. Warm gently in a test tube a little water
drawn from the faucet. Is there any evidence that a gas has
been dissolved in the water ?
In the same way heat gently a little ammonia water (am-
monium hydroxide) and note any evidence that a gas has been
dissolved in the water.
Are gases more soluble in hot or in cold water ?
Liquids in liquids. Add to 5 cc. of water in a test tube
5 cc. of carbon tetrachloride, a few drops at a time, and shake
the mixture vigorously after each addition. Are water and
carbon tetrachloride miscible at each stage?
Repeat, using glycerol and water.
Solids in liquids. Place in separate test tubes about 1 g.
of each of the following powdered substances : copper sulfate
(CUSO 4), potassium chlorate (KCIO 3), and calcium carbonate
(CaCOs). Add to each substance 10 cc. of water and shake
each test tube.
What evidence is there that these substances have dissolved?
If there is any doubt as to whether any of a solid has dis-
solved, filter off 5 cc. of the liquid and evaporate on a watch
glass to dryness.
If in any case all the solid has dissolved, add another gramof the powdered solid and continue this process as long as it is
completely dissolved.
What are the relative solubilities of these three substances in
water?

EFFECT OF TEMPERATURE ON SOLUBILITY 119
EXPERIMENT 55
Effect of Temperature on Solubility
Apparatus. — Test tubes and rack. Ring stand. Bunsen burner. Asbestos
gauze Large beaker.
Materials, — Copper sulfate. Sodium chloride.
Solubility in cold water. Add to 10 cc. of water in a test
tube 2 g. of well pulverized copper sulfate and shake the tube
until the solid dissolves. Continue adding 2-grani portions
until the solution is saturated, that
is, until some of the solid remains
undissolved after shaking. Calculate
the amount (g.) which would dissolve
in 100 g. of cold water.
Repeat the experiment, using so-
dium chloride (common salt) instead
of copper sulfate.
Solubility in hot water. Heat the
solutions just prepared in a beaker of
boiling water (Fig. 76) and continue
to add 2-gram portions of the solid
until each solution is saturated at
100° C. Compute for each solid the
amount which dissolves in 100 g. of hot
water.
Cooling a saturated solution. Cool
the solutions just prepared by holding
the test tubes in running water from the faucet. Observe the
amount and size of the crystals formed in each tube.
Warm the contents of the tubes carefully by putting themonce more into the boiling water until the crystals are again
dissolved. Set the tubes away in the test-tube rack and let
them cool slowly until the next laboratory period. Comparethe crystals formed quietly and slowly with those formed quickly,.
Fig. 76. Heating solutions in
hot water.

120 SOLUBILITY OF COMMON SALT
EXPERIMENT 56
Solubility of Common Salt
{Quantitative Experiment)
Apparatus.— Small flask with stopper. Evaporating dish. Horn-pan bal-
ance and weights. Ring stand. Copper water bath or large beaker.
Tripod. Bunsen burner. Thermometer. Funnel.Materials.— Sodium chloride. Filter paper.
a. First make a saturated solution of sodium chloride.
This can be done by placing 10 g. of common salt with 20 cc.
of water in a stoppered flask or bottle andshaking the contents at intervals for 15 min-
utes ; or by dissolving 10 g. of salt in 20 cc.
of boiling water and allowing the solution
to cool to the temperature of the room(shaking the so-
lution occasion-
ally). In either
case some of the
salt should re-
main undis-solved.
b. Take the
temperature of
Fig. 77. Evaporating over
a water bath (copper).
the saturated salt solution just pre-
pared. Carefully weigh a clean, dry
evaporating dish and then pour into
it through a Alter a portion of the
solution. Reweigh as rapidly as pos-
sible, but carefully.
c. Evaporate the solution com-
pletely to dryness upon a water bath Fig* 78. Evaporating on a beaker
(Fig. 77) or on a beaker of boilingof boUmg water,
water (Fig. 78). Be careful not to lose any of the salt byspurting. Let the dish and contents cool and again weigh.
Reheat the dish and contents until the weight is constant.

WATER OF HYDRATION 121
Note. Care must be taken to replace the water from time to time in
the copper bath or beaker.
d. Compute the number of grams of salt soluble in 100 g. of
water at the observed temperature. Compare your result with
the results plotted in the curves shown in figure 209 on page
374 of the textbook. Record in your notebook your data and
results in tabular form somewhat as follows:
Data:
Temperature of solution ° C.
Wt. of dish + solution g.
Wt. of dish^
^
Wt. of solution g.
Wt. of dish + dry solid g.
Wt. of dish g.
V/t. of salt g.
Calculations
:
Wt. of water g.
Wt. of salt dissolved in 100 g. of water at ° C g.
^ EXPERIMENT 57
Water of Hydration— Efflorescence and Deliquescence
Apparatus. — Three watch glasses. Ring stand with clamp. Bunsenburner. Test tubes.
Materials. — Crystals of sodium carbonate and gypsum. Fused calcium
chloride. Crystals of potassium chlorate, potassium nitrate, potassium
alum, zinc sulfate, sodium sulfate, and copper sulfate.
Introduction. Some substances, such as washing soda, which
are crystalline in form, crumble to a powdery mass when exposed
to the air for a few days, and their crystalline form disappears.
Careful observation shows that these crystals have given off
water vapor. This water is an essential part of the crystalline
form, and when it leaves the crystal, the form disappears.
This process is called efflorescence. Crystals are usually
formed from solutions, and the water is built into the crystal
at the time of its formation. Such a crystal containing water of
crystallization is called a hydrate. But the water is not so

122 WATER OF HYDRATION
firmly combined as its other constituents, and very often amoderate heat will drive off this water of hydration. When all
the water has been removed, the substance is said to be dehy-
drated, or in an anhydrous form. Certain substances, whenexposed to the air, automatically take water from the air in
sufficient quantity to make a solution of the substance. This
process is called deliquescence and is particularly valuable in
a dr5dng agent.
Directions, a. Place a fresh glassy crystal of washing soda
(sodium carbonate) on a watch glass and set it aside until the
next laboratory period. Treat in the same way a small crystal
of gypsum and a piece of fused calcium chloride. Be sure to
label each watch glass. After a day
or two describe any changes which
you observe in the appearance of each
substance.
b. Place a clear crystal of wash-
ing soda in a dry test tube and clamp
the tube in a horizontal position.
Heat the crystal gently and observe
any changes in its appearance.
What condenses on the walls of the
tube ?
c. In separate dry test tubes
warm gently (Fig. 79) a few crystals
of each of the following substances :
potassium chlorate, potassium nitrate, potassium alum, zinc
sulfate, and sodium sulfate.
Record in your notebook the results in tabular form as follows
:
Substance Heated Amount of CondensedWater Appearance of Residue
Fig. 79. Testing substances for
water of crystallization.

FRACTIONAL CRYSTALLIZATION 123
Note. The amount of condensed water may be indicated by the words,
“a trace,” “little,” or “much.” Even anhydrous substances often contain
a little moisture, which is said to be “water mechanically held.”
Are all crystalline substances hydrates ?
d. In another test tube heat gently a small crystal of copper
sulfate (blue vitriol). Observe the change in color and form.
When the tube is cold, add a few drops of hot water. Note the
change in color. Pour the solution on a watch glass and set it
aside to recrystallize. Compare the product with the original
substance.
EXPERIMENT 58
Fractional Crystallization *
Apparatus. — Ring stand or tripod. Asbestos square. Bunsen burner.
250-cc. beaker. Funnel. Test tubes and rack.
Materials.— Mixture of copper nitrate and potassium chlorate (1:1 byweight). Filter paper.
Introduction. Crystals are chemically homogeneous bodies
having regular geometrical forms. The form of the crystals is
characteristic of the substance. In the process of crystalliza-
tion from solution, there is a tendency to exclude from the
crystal all matter not homogeneous with it. Hence, if the
process of crystallization is not too rapid, and if the solution is
not too concentrated, this process is a valuable way of purifying
salts.
In the process of fractional crystallization, the separation
of the two substances depends on the relative solubilities of the
substances in hot and cold solutions. In this experiment weshall use a 1 : 1 mixture of cupric nitrate and potassium chlorate.
It so happens that these two compounds differ markedly in
their solubilities at varying temperatures, as is shown in the
table on the next page
:
* This experiment is based on a similar experiment used in Chemistry A in the
Chemical Laboratories of Harvard University.

124 FRACTIONAL CRYSTALLIZATION
20° C. 40° C. 60° C. 80° C. 100° c.
Copper nitrate .... 56 g. 62 g. 64 g. 68 g.
Potassium chlorate . . 7g. 14 g. 25 g. 39 g. 57 g.
It will be seen that copper nitrate is much more soluble in water
than potassium chlorate, and potassium chlorate is nearly
eight times as soluble in boiling water as in water at 20° C.
Directions. Add 30 grams of this mixture to 50 cc. of water
in a 250-cc. beaker. Heat and at the same time stir the mixture
until the solution boils. All the solid should be dissolved.
Filter the hot solution as rapidly as possible (use a crinkled
filter paper). Then concentrate the filtrate by evaporation
until crystals of potassium chlorate begin to appear in the
boiling solution. At this point stop heating and set the beaker
aside to cool to room temperature. (If a light-greenish pre-
cipitate appears, this is a basic salt of copper, which can be
readily dissolved by adding 2 cc. of dilute nitric acid to the
solution.) When the solution is at room temperature, as
determined by using a thermometer, filter and wash the crystals
with 10 cc. of cold water. In this process let all the liquid drain
from the filter paper before washing the crystals a second and
a third time.
In case the potassium chlorate crystals are bluish, redissolve
them in the minimum volume of boiling water and set the solu-
tion aside to crystallize. To dry the crystals, let them remain
several hours on the opened filter paper.
Since potassium chlorate does not form hydrates and is neither
deliquescent nor efflorescent, it is especially convenient to
prepare. When pure, the product is white and dry. Weigh a
small empty bottle, put in your potassium chlorate, and reweigh.
These weighings need only be to 0.1 gram. Label the bottle
with your name, the date, the experiment number, gross
weight, tare weight, and net weight. Hand this to your instruc-
tor with your report.

COLLOIDS 125
EXPERIMENT 59
Colloids
(Class Experiment)
Apparatus. — Parchment paper (circles 10 cm. in diam.). Mortar and
pestle. Beaker. Test tubes. Bunsen burner.
Materials. — Starch. Solutions of sodium chloride, silver nitrate, gelatin
(2 per cent), sodium silicate (sp. gr. about 1.1), iodine, and soap.
Mineral oil. Concentrated hydrochloric acid.
Introduction. In colloids the particles are much larger than
simple molecules and yet so small that they will not settle
out. Some substances, like starch, glue, and gelatin, always
dissolve to give a colloid. Other substances with relatively
simple molecules can under certain conditions often be obtained
as colloids. It is possible to prepare membranes (for example,
of collodion) which will allow salts and other substances to
pass through but which will retain colloids. This process of
separation is called dialysis. Small amounts of one colloidal
substance will often prevent the precipitation of another
relatively unstable colloid. There are many practical illustra-
tions of the use of protective colloids. Casein acts as a pro-
tective colloid in milk, keeping a considerable amount of the
butter fat in solution. Many colloids on cooling or on con-
centration by evaporation turn into jelly-like materials, which
are called gels. In this experiment we have to do with these
colloidal phenomena.
Directions, a. Dialysis. Rub a pinch of starch to a smoothpaste with a few drops of cold water in a mortar. Add a little
common salt mixed with distilled water. Make a dialyser byfolding a circle of parchment paper (free from pinholes) into a
cone as if to fit a funnel and fastening it with two paper clips at
opposite sides of its circumference. Fill the dialyser two-thirds
full of the starch-salt solution and carefully float it in a large
beaker of distilled water (Fig. 80). Test small portions of
the starch-salt solution for starch by adding a drop of iodine

126 COLLOIDS
solution.* The iodine is absorbed by the colloidal starch
particles and gives a blue color. The salt may be tested for byshowing the presence of a chloride by means of silver nitrate
solution (Exp. 17). From time to
time test the surrounding distilled
water for starch and a chloride.
Which of the two substances, starch or
salt, passed through the membrane ?
b. Protective colloids. To a few
drops of silver nitrate solution, addan excess of sodium chloride. Shake
the mixture vigorously, and note
whether the precipitate settles out.
Repeat, using a silver nitrate solu-
tion which has been mixed with its own volume of a gelatin
solution (about 2 per cent gelatin). What effect does the gelatin
seem to have ?
Shake a little mineral oil (machine oil) with water. Thenshake oil with a soap solution. Compare the results and explain.
c. Formation of gels. Concentrate a little gelatin solution
to about a 10-per cent solution, and cool it under running water.
If it gelatinizes, determine whether it will liquefy again on
being immersed in a beaker of hot water. Is this change
reversible ?
To a little water-glass (sodium silicate) solution, add 2 or 3
drops (not more) of concentrated hydrochloric acid. If it does
not immediately gelatinize, cool it and set it aside. What is
the gelatinized product (p. 413) ?
* Iodine solution may be prepared by dissolving 2 g. of iodine and 10 g. ol
potassium iodide in 100 cc. of water.
Fig. 8o. Dialysis of starch
through filter paper.

HARD WATER 127
EXPERIMENT 60
Treatment of Hard Water
Apparatus.— Carbon dioxide generator (Exp. 53). Large test tube. Test
tubes and rack. 2 small beakers. Funnel. Bunsen burner.
Materials. — Limewater. Marble chips. Concentrated hydrochloric acid.
Calcium sulfate solution. Magnesium sulfate solution. Sodium car-
bonate solution. Filter papers. Concentrated ammonium hydroxide.
Ammonium oxalate solution. Ammonium chloride solution. Solution
of disodium phosphate.
Introduction. Hard water is undesirable for industrial and
household uses for two reasons. In the first place, when such
water is used in the boiler, it deposits a heavy crust, called
‘‘boiler scale.’’ This is not only a poor conductor of heat but
also dangerous for the life of the boiler. In the second place,
hard water is unsuitable for washing purposes because it will
not easily form a lather with soap. The hardness of water is
due to the mineral matter which is in solution. If these
minerals in solution are chiefiy calcium and magnesium bicar-
bonate, the water is said to have temporary hardness. If the
minerals are sulfates of these same metals, the water is per-
manently hard. In this experiment we shall learn some of the
methods of treatment for these two kinds of hard water.
Directions, a. Temporary hardness. Dilute about 10 cc.
of saturated limewater by adding an equal volume of water.
Pass a steady stream of carbon dioxide through the half-satu-
rated limewater until the precipitate (CaCOs) is formed andthen is redissolved. The clear liquid contains calcium bicar-
bonate (Ca(HC03)2) and is called water of temporary hardness.
Write two equations to represent these changes.
b. Removing temporary hardness. To about 5 cc. of the
hard water just prepared, add about 3 cc. of saturated lime-
water and shake the mixture. What is the precipitate? Com-plete in your notebook the equation
:
Ca(HC03)2 + Ca(OH)2

128 HARD WATER
Boil for several minutes about 5 cc. of the hard water pre-
pared in (a). The acid salt (bicarbonate) is changed backinto the normal salt with the loss of carbonic acid. Set the
tube with contents aside to settle. Complete in your notebook
the equation:
Ca(HC03)2—^ CaCOs -|- -1-
Compare the amounts of precipitated calcium carbonate formed
by boiling and adding limewater. Explain,
c. Permanent hardness. Pour 10 cc. of a solution of calcium
sulfate* into a small beaker and the same volume of magne-sium sulfate solution into another beaker. Add to each 5 cc.
of sodium carbonate solution. (Compare the solubilities of
calcium carbonate and sulfate. Table in Appendix.) Filter
each solution. What is the precipitate in each case? Write
the ionic equations for these reactions.
Add to the filtrate from the calcium sulfate solution just
prepared 5 cc. of concentrated ammonium hydroxide and 5 cc.
of a solution of ammonium oxalate. If the calcium ion (Ca++)
is present, a white precipitate of calcium oxalate will be formed.
Add to the filtrate from the magnesium sulfate solution which
has just been prepared 5 cc. of a solution of ammonium chloride,
5 cc. of concentrated ammonium hydroxide, and 5 cc. of a
solution of disodium phosphate. If the magnesium ion (Mg++)
is present, a white precipitate of magnesium ammonium phos-
phate will be formed.
Results. What does this experiment show in regard to “soft-
ening” permanently hard waters with sodium carbonate?
* The calcium sulfate solution should be prepared some time beforehand. Shake
some plaster of Paris with water ; let it stand for some time and then filter.

MORTAR AND CONCRETE 129
EXPERIMENT 61
Mortar and Concrete
Iron wire (#16). Meker2 wide-mouth bottles with
Apparatus. — Ring stand with smallest ring,
burner. Evaporating dish. Test tubes,
corks.
Materials.— Marble chips. Lumps of quicklime. Litmus papers,
(clean, sharp). Dilute hydrochloric acid. Portland cement.
Sand
Mortar is made by mixing sand with wet,
lime. Lime is ordinarily made by heating
Cement is believed to be a
Introduction.
freshly slaked
limestone (CaCOs) to a red heat,
mixture of calcium silicate andcalcium aluminate. When this is
mixed with water, sand, andbroken stone, the product hardens
and forms concrete, with which
we are all familiar in buildings,
roads, and dams. The advantage
that cement has over mortar whichhas led to its very extensive use
in recent years is that cement will
harden even under water and can,
therefore, be employed in the con-
struction of dams, foundations of
bridges, and similar structures.
In this experiment we shall see
how lime is prepared from lime-
stone, and how it is used to makemortar. Then we shall use cementwith sand to make concrete.
Directions, a. Making quick-
lime. Wrap an iron wire arounda small chip of marble (about 5 mm.) and hang it in the hottest
part of the flame of a Meker burner (Fig. 81) or blast lamp.Heat it as hot as possible for 15-20 minutes. The product is

130 MORTAR AND CONCRETE
calcium oxide, or quicklime (CaO). Compare it with marble.
Write the equation for this reaction.
b. Slaking quicklime. Pour a little boiling water on a lumpof quicklime (about 25 g.) in an evaporating dish. Pour the
water upon it a little at a time as long as it is taken up readily.
Do not add too much water. Watch the lump for some time
and note any changes (heat, volume, appearance). At the end
you should have a smooth, stiff paste. Test with litmus and
write the equation for this reaction.
c. Mixing mortar. Mix with the paste just prepared about
50 g. of sand and add more water if required. Make up part
of the mortar into a ball and place in a wide-mouth bottle.
Cork it tightly. Spread the rest on a board. After two days
compare the two samples of mortar. Test each with dilute
hydrochloric acid. Explain the difference in the two samples of
mortar. Write the equation for the setting of mortar.
d. Portland cement. Mix a tablespoonful of cement with
twice its bulk of clean sharp sand and then add slowly enough
water to make a stiff paste. Take part of this mixture and
make a small ball. Place this in a wide-mouth bottle and cork
it tightly. Pour the rest of the paste into a small pasteboard or
wooden box which has been greased. After two days examine
each sample of concrete. What advantages has concrete over
mortar as a building material ?

COMPOUNDS OF SILICON 131
EXPERIMENT 62
Compounds of Silicon
(Optional Experiment)
Apparatus.— Mortar and pestle. Iron crucible. Pipe-stem triangle. Tri-
pod. Bunsen burner. Funnel. Evaporating dish. Asbestos gauze.
Beaker (250 cc.).
Materials. — Clean sand (silica). Sodium carbonate. Sodium silicate (solu-
tion). Filter papers. Dilute hydrochloric acid. Crystals of copper
sulfate, nickel sulfate, cobalt nitrate, zinc sulfate, and ferrous sulfate.
Sodium silicate. Thoroughly mix 1 g. of clean sand (Si02)
with 5-6 g. of dry sodium carbonate by grinding them together
in a mortar. Put the mixture into an iron crucible and heat
gently over a Bunsen flame until the effervescence ceases, andthen to a red heat until the whole mass is fused. Allow the
fused mass to become thoroughly cold and then dissolve as
much of it as is soluble in 25 cc. of boiling water. Filter
the mixture and discard the residue. Concentrate the filtrate
by evaporating the solution to about one-third its original
volume. This solution contains sodium silicate, or water
glass (Na2Si03).
Silicic acid. Acidify the solution of sodium silicate by the
addition of dilute hydrochloric acid. The gelatinous precipitate
is silicic acid (H 2Si03). Slowly evaporate the acid mixture,
heating it gently to avoid sputtering, until a dry, white powderremains. Heat almost to redness for a few minutes and then
let it cool.
Extract the sodium chloride from the residue by adding 25 cc.
of water and boiling gently for several minutes. Identify whatremains.
What was formed during the fusion ? Write the equation.
What was formed by adding hydrochloric acid? Write the
equation.
What was the object of heating nearly to redness? Write the
equation.

132 ACETYLENE AND METHANE
A chemical recreation. Mix thoroughly in a beaker about
30 cc. of the commercial solution of water glass with about
twice its volume of water. Drop a small crystal of each of the
following substances into this solution : copper sulfate, nickel
sulfate, cobalt nitrate, zinc sulfate, and ferrous sulfate. Let
the solution stand quietly over night. This is sometimes called
“ The Chemist’s Garden.” Record and explain the changes
observed.
EXPERIMENT 63
Acetylene and Methane
Apparatus.— Test tubes. Ignition tube with 1-hole stopper. Glass tubing.
250-cc. wide-mouth bottle. Ring stand and clamp. Evaporating dish.
Materials.— Calcium carbide. Limewater. Soda lime. Sodium acetate
(powdered, anhydrous).
Introduction. Methane, or marsh gas, is formed in marshes
and is produced by the decay of vegetable matter. It is often
present in coal mines and forms a considerable part of natural
gas. Ordinary coal gas contains from 35 to 40 per cent by vol-
ume of methane. Acetylene is another hydrocarbon which is
valuable as an illuminant and as a fuel gas. While it is unsafe
to compress acetylene in tanks, yet it may safely be dissolved
under pressure in acetone. This is the way it is compressed in
Presto-Lite cylinders. The oxyacetylene blowpipe gives an
exceedingly hot flame much used in cutting and welding metals.
Directions. 1. Acetylene (H 2C 2). Invert a test tube filled
with water in an evaporating dish half filled with water. Dropa piece of calcium carbide (CaC 2), the size of a pea, into the
water and quickly place the mouth of the test tube over the
carbide. Collect the gas in the test tube.
When the gas has filled the test tube, lift the tube out of the
water and set fire to the gas in the test tube. Note the luminos-
ity of the flame. To test the product of this combustion, close
the test tube, add a little clear limewater, and shake. What is
one product of the combustion of acetylene ?

ACETYLENE AND METHANE 133
Devise and carry out a simple experiment to compare the
densities of acetylene and air.
Test the liquid left in the evaporating dish with litmus papers.
What is the suspended solid ?
Write the equation for the interaction of the calcium carbide and
water.
2. Methane (CH4). Mix thoroughly about 4 cc. of pow-dered sodium acetate (NaC 2H302) with the same quantity of
soda lime (NaOH+Ca(OH) 2)
.
Place the mixture in an igni-
tion tube. Clamp the tube
near the mouth so that it is
held in a horizontal position
and insert a one-hole stopper
fitted with an L-tube pointing
upward. Tap the ignition
tube to make the mixture
settle and leave a space above
the mixture to the end of the
tube.
Heat the tube with a mov-ing flame in order not' to melt
the glass. Test the gas byslipping a test tube over the
vertical part of the L-tube
(Fig. 82). After a minute or
two remove this test tube full
of gas a little distance away and see whether it burns quietly.
When a sample of the gas burns quietly, bring a flame to the
end of the outlet tube. Note the structure of the flame and its
luminosity.
Hold a clean dry bottle inverted over the flame for a minute
and note the interior surface of the bottle. What are the drops
that appear on the inside of the bottle ?
Quickly pour about 20 cc. of limewater into the bottle, cover
it, and shake it. What is the gaseous product of burning methane?

134 GASOLINE AND KEROSENE
Write the equation for the preparation of methane (considering
soda lime as sodium hydroxide), and also the equation for the
combustion of methane.
Summarize the observed properties of acetylene and methane.
Make labeled diagrams of the apparatus in your notebook.
EXPERIMENT 64
Gasoline and Kerosene
{Optional Experiment)
Apparatus.— Hydrometer. Baume scale for light liquids. Hydrometerjar or cylinder. Tripod. Bunsen burner. Asbestos gauze. Beaker.
Watcfi glass. Wide-mouth bottle with cork. Iron dish with sand.
Ring stand. Thermometer. Evaporating dish.
Materials.— Gasoline (petrol). Kerosene. Wood splint.
Introduction. Gasoline and kerosene are both hydrocarbons
which are prepared by the fractional distillation of crude oil.
Other products which are obtained in this process are benzine,
lubricating oils, vaseline, and paraffin. Sometimes coke is
also prepared from crude oil. All petroleum products are
mixtures of hydrocarbons; this applies, for instance, to kero-
sene and gasoline, which has approximately the composition
C7H16. They are not chemical compounds and have no definite
composition. In recent years the demand for gasoline as a fuel
for internal-combustion engines has made it necessary to
increase the production. So it has come about that some of the
less volatile, more complex hydrocarbons in petroleum have
been subjected, under high pressure, to a gasoline-refining
process, called “cracking,” and this has increased our supply of
gasoline. The specific properties of gasoline depend upon the
method of manufacture, the process of distillation, and the
particular source of the crude oil.
Directions, a. Specific gravity. Although this test is not
very important in determining the properties of gasoline and

GASOLINE AND KEROSENE 13S
Hydrometer—^
Gasoline-
kerosene, yet it is worth while applying since it is an easy
method of detecting differences in the commercial materials*
The regular commercial hydrometer
(Fig. 83) may be used to determine the
specific gravity. Since the scale of the
instrument is, as a rule, made for 60° F.
(15.6° C.), it is usually easier to get the
liquid at this temperature than to makethe necessary corrections. After the
specific gravity has been approximately
determined, raise the hydrometer nearly
down to the bulb, and wipe the stem
clean;
then carefully allov/ it to sink in
the liquid. This must be done in such
a way that the stem of the hydrometer
is not wet above the point correspond-
ing to the specific gravity of the liquid.
Now read the mark on the stem corre-
sponding to the level of the liquid. In
this way determine the specific gravity of gasoline and kerosene
Fig. 83. Finding the den-sity of gasoline.
Note. Commercial hydrometers are often graduated according to the
Baume Scales. The scales are divided into divisions called degrees (°)
;
the scale for liquids lighter than water begins at 10°, which corresponds to a
specific gravity of 1, and increases as the specific gravity decreases. Degrees
Baume can he converted into specific-gravity readings hy the following equation :
140Specific Gravity = ,30 + Degrees BauSi
Commercial gasoline (petrol) ranges from 50° Be to 90° Beand over.
b. Volatility. This is probably the most important single
test of gasoline. We may roughly compare the volatility of
various samples of gasoline and of kerosene by the following
method: Place ten drops of gasoline on a watch glass andset the glass on a beaker half filled with boiling water.
Caution. Gasoline vapor is inflammable. Keep it away from-
all flames.

136 GASOLINE AND KEROSENE
Note the length of time required for its complete evaporation.
Repeat the experiment, using 10 drops of kerosene.
Compare the volatility of gasoline and kerosene.
Combustion of gasoline. Warm a wide-mouth bottle andthen pour into it one drop of gasoline. Cork the bottle and
shake it vigorously. Remove the cork
and bring a lighted splint to the mouthof the bottle. If there is no decided
result, remove the splint, add another
drop of gasoline, and repeat the opera-
tion. Continue in this way to addgasoline, one drop at a time, until the
vapor burns with explosive violence.
What was in the bottle besides gasoline?
What is meant by an *‘exptosive mix-
ture”?
Flash point of kerosene. Arrange
a porcelain dish on a sand batn as mfigure 84. Fill the dish with kerosene
to within half a centimeter of the top,
and adjust the thermometer in the
center of the liquid so that it almost
reaches the bottom but does not quite
touch the dish. Put the Bunsenburner under the center of the dish
and allow the apparatus to get warm. From time to time apply
a little test flame by passing it slowly across the dish about a cen.
timeter above the liquid and just in front of the thermometer.
Continue in this way until the vapor above the liquid ignites
with a slight flash. The lowest temperature at which a liquid
does this, as shown by a thermometer, is called the flash point.
Repeat the experiment several times to make sure that youhave found the lowest temperature at which the flash can be
obtained.
Note. Most states have laws which forbid the sale for illuminating
purposes of oil which has a flash point lower than about 110° F.
^lining the flash point of kero-
ene.

ALCOHOL— PREPARATION 137
EXPERIMENT 65
Alcohol— Preparation and Properties
Apparatus.— A 2-liter bottle or flask. Wide-mouth bottle with 2-hole
stopper. Drying tube. Boiling flask with side tube. Tripod andasbestos gauze. Ring stand and clamp. Liebig condenser. Test
tubes. Bunsen burner or, better, an electric heater. Thermometer.
Watch glass. Rubber tubing. Glass tubing.
Materials.— Corn sirup or molasses. Yeast cake. Limewater. Sodiumhydroxide (stick or pellet form). Glass beads. Asbestos wool. Iodine.
Sodium hydroxide solution. Litmus papers.
Fermentation.* Dissolve about 200 cc. of corn sirup or
molasses in 2 liters of water in a large bottle or flask (Fig. 85).
Crumble a yeast cake
and mix it with water,
making a thin paste.
Then add it to the sugar
solution. Connect this
bottle with another con-
taining limewater, as
shown in the figure. Thebulb tube contains sticks
of sodium hydroxide to
absorb from the air anycarbon dioxide whichmight affect the lime-
water. Set the apparatus aside in a warm place (about 30° C.)
for 2-3 days. The change of sugar solution (glucose) into alcohol
and carbon dioxide is represented by the following equation
:
enzyme
C 6H12O6 ^ 2C 2H 5OH + 2CO 2 1glucose alcohol
Distillation. After the sugar solution has fermented, pour
off the clear liquid and give each student or group of students
about 150-200 cc. The apparatus for separating the alcohol
* This part of the experiment may well be done by the instructor or a small
group of students for the whole class.
Fig. 8s. Fermentation of molasses in the
laboratory.

138 ALCOHOL— PROPERTIES
from the solution may be set up as in figure 86. To prevent
bumping, it is well to add a few glass beads or pieces of red-hot
pumice stone to the boiling flask. In connecting the condenser
to the water supply, be sure to have the cold water enter the
jacket at the lower tube.
Record the temperature at which the first few drops of liquid
appear in the condenser and again when about one-half of the
liquid has distilled over.
Properties. As soon as a few drops of the distillate have
been collected, pour them on a. watch glass. Note the odor
of the distillate. Test it with litmus papers. Saturate a bit
of asbestos wool with the liquid and try to ignite it. Torecognize one product of burning alcohol, hold a cold wide-
mouth bottle over the flame. Close the bottle, pour in a little
limewater, and shake the contents. Make an equation for the
combustion of ethyl alcohol (C 2H 6OH).

THE ACIDITY OF VINEGAR 139
Test. Add 3-4 cc. of iodine solution to about 5 cc. of the
distillate and then add sodium hydroxide solution until the
brown color disappears. Warm the mixture and set it aside
for a few minutes. The precipitate is iodoform (CHI 3) andshows the presence of ethyl alcohol. Record the color and odor.
Summarize the properties of alcohol which you have observed.
Name two substances which result from the fermentation of sugar.
EXPERIMENT 66
Determination of the Acidity of Vinegar
{Quantitative Experiment)
Apparatus.— Burette (50-cc. grad. XIS cc.). Pipette, volumetric (10-cc.).
Ring stand and clamp.
Materials. — 100 cc. of several kinds of vinegar, such as cider and distilled.
0.1 N. solution of sodium hydroxide. Phenolphthalein solution
(a few cc.).r
Introduction. Vinegar is still made by allowing fruit juices
to ferment to alcohol and the alcohol to ferment to acetic acid.
It seems that in the presence of a certain microorganism the
alcohol is oxidized by the air to acetic acid.
C2H5OH + O2— CH3COOH + H2Oalcohol (air) acetic acid
The product of this process, vinegar, contains from 3 to 6 per
cent of acetic acid. The Federal statutes require that all
vinegar sold must contain not less than 4 grams of acetic acid
per 100 cc. of vinegar. The amount of acid present may be
determined by titrating a known volume of the sample of
vinegar against a solution of sodium hydroxide of known con-
centration.
Directions. Prepare a normal solution of sodium hydroxide
by dissolving 40 grams of sodium hydroxide in distilled water
and diluting to 1 liter. Then take 10 cc. of this normal solution
and dilute it again to 100 cc. with distilled water. This gives a

140 THE ACIDITY OF VINEGAR
dilute solution of sodium hydroxide of which 1 cc. contains
0.004 grams of sodium hydroxide.
By means of a graduated pipette, place exactly 10 cc. of the
sample of vinegar in a small flask and then add about 50 cc. of
distilled water. To this dilute acid solution add 2 or 3 drops
of the indicator, phenolphthalein solution. Now All the burette
with the tenth-normal sodium hydroxide solution and proceed
to titrate the diluted vinegar solution with the basic solution.
Run this basic solution slowly, drop by drop, into the flask
until the solution is neutral, following the same procedure as
that used in Experiment 20. The liquids should be thoroughly
mixed after each addition of the sodium hydroxide solution.
Consider this as a preliminary test and now repeat the titration
with 3 samples of the vinegar to be tested. The equation for
this reaction is as follows
:
40 70
NaOH + CH3COOH—^ CHsCOONa + H2Oacetic acid sodium acetate
Calculations. It will be convenient to record your data and
results in your notebook in tabular form as follows
:
Data
:
Concentration of NaOH solution used 0.1 N.
Wt. of NaOH in 1 cc. of solution 0.004 g.
Vol. of NaOH sol. used to neutralize 10 cc. vinegar . . . (1) —cc.
(2 ) —cc.
(3) —cc.
Mean . . cc.
Calculation
:
Wt. of NaOH contained in mean volume used g.
Wt. of CH 3COOH in 10 cc. of vinegar (calculated) g.
Wt. of acetic acid in 100 cc. of vinegar g.

SOAP— ITS PREPARATION 141
EXPERIMENT 67
Soap — Its Preparation and Uses
Apparatus.— Evaporating dish. Tripod and asbestos gauze. Bunsen
burner. Stirring rod. Test tubes and rack.
Materials.— Alcohol. Vegetable oil (olive, cottonseed, or cocoanut).
Sodium hydroxide solution (30%). Calcium chloride solution. Kero-
sene.
Introduction. Sodium hydroxide (NaOH) is one of the
strong bases (an alkali). When fats or vegetable oils are boiled
with it, they are saponified, i.e, converted into soap. These
fats are chiefiy glyceryl esters of organic acids. On boiling,
the fat is decomposed by the sodium hydroxide into glycerol
(C 3H 6 (0H) 3 ) and the sodium salt of the organic acid, which is
soap. The following equation represents such a reaction
:
Fat Alkali
(Ci7H35COO)3C3H5 + 3 NaOHglyceryl stearate
Soap Glycerol
3 Ci7H35COONa -f- C3H5(OH)3sodium stearate
Directions, a. Preparation. Add10 cc. of alcohol to about 2 teaspoon-
fuls of oil (olive, cottonseed, or cocoa-
nut) in an evaporating dish. Heatthe dish with a small fiame which
barely touches the dish. Then add
5 cc. of a 20 per cent solution of
sodium hydroxide and continue heat-
ing and stirring the contents con-
stantly until the odor of alcohol is
no longer perceptible (Fig. 87). Thepasty mass which remains in the dish
is the soap mixed with glycerol.
Note. To save time in this experiment, alcohol is used as a commonsolvent for the oil and the alkali. In commercial work it is not used.
Fig. 87. Making soap.
b. Uses. Wash your hands with a little of the soap whichyou have just made. Does it lather readily? When too muchalkali has been used, the soap makes the hands rough. An

142 REMOVAL OF SPOTS AND STAINS
excess of oil makes the soap greasy. What about the quality of
your soap?
Make a half test-tubeful of soap solution, add to it half as
much calcium chloride (CaCh) solution, and shake the liquid.
An insoluble calcium soap is formed. This insoluble soap,
which is formed whenever soap is used with "‘hard’' water, is
useless for cleaning purposes.
Put 1 cc. of kerosene into 10 cc. of water in a test tube andshake the mixture. Note that the oil is broken up into tiny
globules, which form an emulsion. Let the test tube stand for
a minute to see whether the emulsion remains ; then add about
3 cc. of soap solution to the mixture and shake again. Whateffect does the soap have on the permanency of the emulsion? In
this same way soap forms an emulsion with the oil. It is this
oil that makes dirt cling to the fibers of clothing. This action
loosens the dirt so that it can be easily removed by mechanical
washers.
EXPERIMENT 68
Removal of Spots and Stains
Apparatus. — Beakers. Test tubes and rack. Bunsen burner.
Materials.— Samples of various kinds of cloth (cotton, wool, silk, andrayon) spotted with grease, sugar, ink, iron rust, etc. Carbon tetra-
chloride, turpentine, oxalic acid, Javelle water, etc.
Introduction. The simplicity of the cleansing process varies
with the character of the stain. For example, the removal of a
grease spot from cloth is merely a process of solution andabsorption ; but the removal of a fruit stain or of an ink spot
from cloth often involves a careful study of the cloth itself as
well as of the various bleaching reagents.
In general, there are three methods of treatment: (1) warm
water will remove sugar, glue, blood, if not too old; (2) gasoline,
carbon tetrachloride, and turpentine will act as solvents for
grease and paint and so can be used to remove such spots;

REMOVAL OF SPOTS AND STAINS 143
(3) bleaching agents, such as oxalic acid or citric acid, followed
by bleaching powder may be used to remove ink spots. Of
course, it is quite important to remember that gasoline vapor
is very inflammable and should never be used in the house.
Some absorbent material must be placed beneath the goods
to be cleaned in order that the grease may be washed through
by the gasoline. Otherwise, rubbing a little gasoline on a
spot merely spreads the grease over a larger area. In using
bleaching agents it is necessary to remove with dilute ammoniawater the traces of such agents, which might rot the fibers of
the cloth.
It is always well to test the treatment on a small sample of the
goods before trying to remove the spot or stain from a gar-
ment. In general, greater care must be exercised with woolen
and silk goods than with cotton, and especially with colored
goods. This is due to the fact that protein material (silk and
wool) is attacked by many chemicals.
The following table will be useful for reference
:
Stain Removed by
Sugar, glue, blood Warm waterGrease Carbon tetrachloride or gasoline ; followed by warm
soapsuds and ammonia waterPaint, varnish . . . Turpentine (except on silk)
Tar, pitch .... Soap and oil ; followed by turpentine
Inks Warm oxalic or tartaric acid (20%) or salt and lemonIron rust .... Warm oxalic or citric acid (10%)Fruit, tea, and coffee Hot water. Javelle water *
Acids Ammonia water to neutralize the acid ; then washwith water
Grass Sponge with alcohol or ammonia water
Directions. Take samples of 3 or 4 different kinds of cloth
and stain them with ink, acid, sirup, and oil. Treat each
* Javelle water is made by dissolving a pound of washing soda (Na 2C03 • 10
B 2O) in a quart of boiling water. Add a quarter of a pound of chloride of lime
fCaOCh) to a quart of hot water. Mix the two solutions and decant the clear
solution of sodium hypochlorite (NaOCl) for use.

144 TEXTILE FIBERS
sample according to the methods just described. Cut the
samples down to some convenient but uniform size and mountwith a label in your notebook. Show a sample of the piece
of cloth before and after treatment. Also describe briefly just
what the treatment was in each case.
EXPERIMENT 69
Textile Fibers
(Class Experiment)
Apparatus.— Compound microscope. Test tubes and rack. Bunsen burner.
Materials.— Samples of cotton, wool, silk, linen, and rayon cloth. Samples
of cotton and wool mixed goods, cotton and linen mixed goods. Sodiumhydroxide solution (20%). Alcoholic solution of fuchsin. Dilute
ammonium hydroxide. Nickel hydroxide solution. Dilute hydro-
chloric acid.
Introduction. Clothing stands next to food as a necessity
for the human race. Textiles are, in general, made up of fibers
which are either plant products, such as cotton and linen, or
animal products, such as wool and silk. In recent years manyprocesses have been developed by which the fibers of cotton,
which is cheap, may be made to look very much like the moreexpensive silk fibers. However, these fibers can always be
identified by chemical or microscopic examination. In this
experiment we shall learn some of the chemical tests which can
be applied in distinguishing these textile fibers.
Directions, a. Microscopic study offibers.* Study carefully
the appearance of fibers of cotton, wool, silk, linen, and rayon
under the microscope. A projection microscope will greatly
aid in this experiment. (Compare with figure 272 on page 461
in B. & C., New Practical Chemistry.)
b. Cotton and wool. Place in separate test tubes a sample
(3 cm. X 3 cm.) of cotton cloth, woolen cloth, and mixed goods.
* The instructor will have the slides prepared and set up. These slides can bepurchased already prepared.

TEXTILE FIBERS 145
Cover each with sodium hydroxide solution (20%) and boil for
2-3 minutes. Add water when necessary to keep the cloth
covered with liquid.
Caution. Take great care not to let the hot alkali spatter over
on your hands.
Which one of these fibers is completely soluble in sodium hydrox-
ide solution?
c. Cotton and linen. Wet a sample of cloth (part linen)
with a 1 per cent alcoholic solution of fuchsin, wash well in
water, and then moisten with ammonium hydroxide. Thelinen (flax) fibers in the cloth will be colored red, while the
cotton remains uncolored.
d. Wool and silk. Put strips of wool and silk in separate
test tubes and cover each with a solution of nickel hydroxide.*
After 2 minutes remove the residue and boil for another 2
minutes in a 1% solution of hydrochloric acid. Which of the
samples remains undissolved?
e. Silk and rayon. Since rayon is an artificial silk manu-factured in various ways from cellulose, it is easy to distinguish
it from real silk. Cellulose is the vegetable material found in
the woody fiber of plants, and real silk is an animal fiber which
is made of complex nitrogen compounds. Apply the burning
test as follows: Ravel out threads from samples of real silk
and rayon and separate the distinct kinds of threads. Burneach of the distinct kinds of threads in small test tubes and
note the odor. What is the distinctive odor produced by burning
real silk?
f. Si7fe, wool^ and cotton. How would you detect the presence
of silk, wool, or cotton in a sample ?
* Nickel hydroxide solution may be prepared by dissolving 5 g. of nickel sulfate
in 100 cc. of water and then adding a solution of sodium hydroxide until the nickel
hydroxide is completely precipitated. Wash the precipitate well and dissolve it
in 25 cc. of concentrated ammonium hydroxide. Then add 25 cc. of distilled water.

146 COMPONENTS OF FOODS
EXPERIMENT 70
Components of Foods
Apparatus.— Test tubes and rack. Bunsen burner. Mortar and pestle.
Large beaker. Funnel. Crystallizing dish. Iron spoon.
Materials. — Starch. Iodine solution. Glucose. Fehling’s solution (two
solutions). Concentrated nitric acid. Concentrated ammonium hy-
droxide. Egg. Cornmeal. Peanuts. Oatmeal. Ether. Filter
papers.
Introduction. It is customary to divide the food we eat into
four classes: (1) carbohydrates, such as starch and sugar,
which furnish both heat and energy and help in building fats
in the body; (2) fats, such as butter, meat fat, and olive oil,
which produce both heat and energy; (3) proteins, such as
lean meat and the whites of eggs, which are chemically very
complex substances rich in nitrogen and which replace the
worn-out muscle tissue. Finally, there are various (4) mineral
compounds, which serve the body in a great variety of waysbut are needed in extremely small quantities. In addition tc
these substances it has been shown that very minute amountsof certain other compounds seem to be essential for the growth
and healthy condition of animals. These substances are called
vitamins. In this experiment we shall learn the tests for the
four components of our food first mentioned.
Directions, a. Starch. Put a pinch of starch into a test
tube and fill the tube half full of water. Shake the contents
and boil. Has the starch changed ? Cool the liquid in running
water and, as soon as it is cold, divide it into two parts. Toone add a drop of iodine solution (iodine in potassium iodide).
The blue color which is produced is the iodine test for starch.
b. Glucose. Dissolve about 1 cc. of glucose in 10 cc. of
water. Add 5 cc. of an alkaline solution of copper sulfate (Feh-
ling’s solution) and boil for a few minutes. The red precipitate
(cuprous oxide, CU 2O) is the characteristic test for glucose.
c. Protein. Place a few bits of the white of a hard-boiled
egg in a test tube and add a few drops of concentrated nitric

FOOD COMPONENTS OF MILK 147
acid. Wash off the acid with water and pour off the liquid.
Then pour a few drops of ammonium hydroxide on the egg.
The yellow color is a test for proteins (nitrogenous compounds).
d. Fats and oils. Half fill a test tube with cornmeal or
crushed peanuts and pour in enough ether or benzine (away from
flames) to cover the solid to a depth of a centimeter. Stand
the test tube in a beaker of hot water and occasionally shake
the contents. Filter and let the filtrate evaporate spontane-
ously in a crystallizing dish. The fat or oil extracted remains
in the dish.
e. Mineral matter. Place about half a teaspoonful of oat-
meal on a porcelain crucible cover and heat it (under the hood)
until no more fumes are given off. Then heat it strongly to
burn off the carbon. The white ash contains various mineral
compounds.
f . Examination of a food. Apply these tests to one or morefoods, such as lean meat, bread, beans (dried), and cheese.
Record your results in tabular form.
EXPERIMENT 71
Food Components of Milk
{Optional Experiment)
Apparatus.— Evaporating dish. Short stirring rod. Steam bath. Tripod.
Bunsen burner. Ring stand. Horn-pan balance and weights.
Test tubes and rack. Funnel.
Materials.— Sample of milk (from home). Acetic acid. Junket tablets.
Fehling’s solution. Concentrated nitric acid. Concentrated ammo-nium hydroxide.
Introduction. Milk is one of the most valuable of foods.
The average of a large number of analyses shows that its
approximate composition is as follows
:
Water 87 % Fat 4%Protein 3.3% Lactose 5%
Mineral matter 0.7%

148 FOOD COMPONENTS OF MILK
From this it will be seen that milk contains proteins, fats, andcarbohydrates, which are essential in any well-balanced diet.
For persons of all ages milk forms one of the most economical
sources of proteins, fats, mineral compounds, and vitamins.
For growing children there is nothing which so adequately andeconomically supplies all of the essential foods.
Milk is a natural emulsion of tiny globules of fat. Onstanding, the fat (cream) comes to the top. The difference
between whole milk and skim milk is readily seen when a
sample is examined under the microscope (Fig. 88).
Fig. 88. Whole milk (a) and skim milk (b) as seen under the microscope.
Directions, a. Percentage of solids and water. To deter-
mine the percentage of water in milk, we have only to evaporate
to dryness a known weight of milk. During this process a scumforms over the surface of the liquid, which retards evaporation,
and so it is well to use a short stirring rod occasionally to
break up the scum.
Weigh a small, clean evaporating dish together with a short
stirring rod and then pour into it about 20 cc. of milk and weigh
again. Evaporate over a steam bath to dryness. As soon
as the residue is perfectly dry, wipe dry the outside of the dish.
Then cool and reweigh. From these results compute the
percentages of solids and water in the sample of milk taken.
(Cow’s milk usually contains not less than 12 per cent of
solids.)

FOOD COMPONENTS OF MILK 149
b. Protein. The principal protein in milk is casein, which is
used in the manufacture of cheese. Add 2-3 drops of acetic
acid (vinegar may be used) to 10 cc. of milk. When thoroughly
mixed and allowed to stand, the casein separates in the form of a
curd. When milk sours, the lactic acid formed in the milk
causes a natural curdling. Prove that the curd is a protein
(Exp. 70).
Another method of separating the casein is by means of
rennet. ‘‘Junket’' tablets contain dried rennet. Dissolve
about one-half of such a tablet in water and add the solution to
about 100 cc. of warm milk. Again the casein will separate as
a curd.
There is another protein in milk which remains in solution
when the casein is separated either by an acid or by rennet.
This is albumin, which is much like the white of egg. Filter
off the milk curd (casein) and boil the clear liquid (whey).
This coagulates the albumin in the form of white flakes. Prove
that the tough scum which forms on the surface of boiled milk
is coagulated albumin (a protein).
c. Sugar of milk (lactose). The filtrate left after the casein
and albumin have been coagulated and removed contains the
sugar of milk. By evaporation of this filtrate we obtain a
residue. The taste shows that this sugar is only about one-
sixth as sweet as cane sugar. Test it with Fehling’s solution.
d. Butter fat. The most valuable component of milk is
doubtless the butter fat.* The most practical method of deter-
mining the percentage of butter fat is the Babcock test. In this
process a definite quantity (17.6 cc.) of milk is treated with sul-
furic acid (17.5 cc., sp. gr. 1.83), which dissolves the casein of
the milk and thus facilitates the separation of the fat. This
mixture is then whirled in a centrifugal machine, and the fat
collects on the surface. The necessary apparatus is shown in
* Since cream will rise on a sample of milk in 5 minutes sufficiently to destroy the
uniformity of the sample, great care must be used to get a fair sample. Mix the
cream with the milk thoroughly by pouring the milk from one vessel to another
several times.

150 EXTRACTING METALS
figure 89. The test bottle is so made that the graduations on
the neck indicate the percentage of fat directly. Further
directions are furnished with the apparatus.
Fig. 89. Milk-testing outfit. Centrifuge. Babcock test bottles and lactometer
EXPERIMENT 72
Extracting Metals
Apparatus.— Ignition tube (Pyrex), 6" X f". 1-hole stopper with bent
delivery tube. Test tubes. Ring stand with ring and clamp. Bunsenburner (or Fisher form). Pipe-stem triangle. Porcelain crucible.
Porcelain battery top. Tumbler. 2 dry cells or 110-volt d-c. line with
60-watt lamp in series.
Materials. — Metallic oxide, such as lead oxide, ferric oxide, or zinc oxide.
Metallic sulfide (galena). Charcoal (powdered). Limewater. Sat-
urated copper sulfate solution. Two electric-light carbons. Dilute
nitric acid (1 : 1).
Introduction. There are three general methods of extracting
metals from the ores. First, by roasting the ore with a flux
that will unite with the rocky material in which the ore is found.
Second, by reducing the ore by heating it with some form of
carbon. In this process the carbon unites with the oxygen of
the ore and goes off as carbon monoxide gas. In case it is a

EXTRACTING METALS 151
carbonate or a sulfide, it must first be heated to obtain the oxide,
and then the oxide is reduced with carbon. Third, by elec-
trolysis : the ore is fused and then the metal is deposited by the
electric current at the cathode.
Iron is obtained by reduction in a blast furnace with coke,
limestone being used as a flux. Copper, lead, and zinc are
obtained by roasting and reduction.
Aluminum and magnesium are ob-
tained by electrolysis. Copper is
purified by electrolysis.
In this experiment we shall first
reduce litharge (PbO) with carbon;
second, we shall roast and reduce
lead sulfide (PbS) ; and third, weshall deposit pure copper from a solu-
tion of copper sulfate (CUSO 4).
Directions, a. Reduction. On a
sheet of paper mix 15 grams of lead
oxide with about 1 gram of powdered
charcoal. Slide this mixture into anignition test tube and insert a stopper
and delivery tube as shown in fig-
ure 90. Fill another test tube about
full of limewater. Let the delivery tube just dip below the
surface of the limewater.
Heat the ignition test tube gradually by waving the Bunsenflame about the tube, beginning at the upper part of the mix-
ture. Finally heat the mixture as hot as possible with the
Bunsen flame. The Fisher form of the Meker burner is excel-
lent for this experiment.
What change do you notice at first in the limewater ? What gas
is produced in this process ?
Keep on heating until this gas ceases to be given off. How do
you test this point? Then remove the test tube containing the
limewater and allow the ignition tube to cool. Remove the
stopper and delivery tube and empty very carefully the con-
Fig. 90. Reducing lead oxide
with charcoal.

152 EXTRACTING METALS
tents of the ignition tube upon the base of the ring stand.
Write the equation for this reduction process.
b. Roasting and reduction. Put a little lead sulfide (PbS)
in a porcelain crucible and mount on the pipe-stem triangle as
shown in figure 23. Heat the crucible as hot as possible for a
few minutes. Cautiously smell the gas which is produced.
When an ore is roasted in air, it reacts
with the oxygen. The residue left is
the oxide. What is the gas evolved?
Write the equation for this roasting
process.
If time permits, reduce with char-
coal, as in part (a), the residue left.
c. Electrolysis. Place a saturated
solution of copper sulfate (CUSO4) in a
glass tumbler and insert two carbon
rods in the clamps of the battery top,
as shown in figure 91. Connect the
terminals with a source of direct cur-
rent such as 2 dry cells or a 110-volt d-c. line with a 60-watt
lamp in series. Allow the current to pass through the copper
sulfate solution for about 5 minutes. Then disconnect the
electric current and lift the carbon electrodes out of the solution.
Rinse and examine each carefully. What substance was deposited
on one of the electrodes? Was it on the anode or the cathode?
Place the electrode with the deposit in a test tube containing
a little dilute nitric acid. What does this show the deposit to be?
Questions on the theory. Write the equation for the dissocia-
tion of copper sulfate. How do the copper ions become copper
Fig. 91. Electrolysis of cop-
per sulfate solution.
atoms?
theory?
How do you express these facts in terms of the electron

ALXJMINUM HYDROXIDE 153
EXPERIMENT 73
Aluminum Hydroxide — Preparation and Uses
{Optional Experiment)
Apparatus.— Test tubes and rack. Wide-mouth bottle or glass cylinder.
Materials.— Aluminum sulfate. Limewater. Clay. Cochineal or indigo.
Dilute ammonium hydroxide.
Preparation. Prepare about 5 cc. of aluminum sulfate solu-
tion (Al 2 (S04) 3) or the same quantity of any aluminum salt
and add limewater until a precipitate is formed. Describe the
appearance of the precipitate (Al(OH) 3) and write the equation.
Clarifying muddy water. Fill a glass bottle or cylinder
about two-thirds full of water and render the water turbid with
a little finely pulverized clay. Pour in about 10 cc. of aluminumsulfate solution and mix it thoroughly with the turbid water.
Then add slowly, without stirring, 20 cc. of limewater. Set
the cylinder aside to settle. What precipitate was formed in
the turbid water? Explain how the suspended particles of clay
are removed.
Mordant. Take about 5 cc. of water in a test tube andadd enough cochineal or indigo solution to color the water
faintly. Add an equal volume of aluminum sulfate solution
and enough ammonium hydroxide to precipitate the aluminumhydroxide. Shake the test tube and allow the contents to
settle. Note the effect on the color of the solution.
Note. The particles of dyestuff are much smaller than those of the
clay, but the aluminum hydroxide collects them. In dyeing cloth, aluminumhydroxide is sometimes used as a binder (mordant) between the cloth and
the dye.

154 COBALT NITRATE TESTS FOR METALS
EXPERIMENT 74
Cobalt Nitrate Tests for Metals
Apparatus.— Forceps. Blowpipe. Bunsen burner.
Materials. — Charcoal block (or block of plaster of Paris). Zinc sulfate.
Solution of cobalt nitrate (5%). Aluminum sulfate. Magnesiumcarbonate. Unknowns.
Introduction. Cobalt nitrate (Co(NO 3 ) 2) is often used in
analytical work to test for certain metals because it unites with
metal oxides, forming chemically colored compounds. Thus,
aluminum compounds, when converted into the oxides by heat
before the blowpipe flame, give a blue coloration when further
heated with cobalt nitrate. When this is done, the oxide forms
cobalt aluminate. In a simi-
lar way zinc compounds, whenheated with cobalt nitrate,
form double oxides of cobalt
and zinc, which have a similar
color.
The use of the blowpipe.
It will be well to practice using
the blowpipe before beginning
Fig. 92. Using a blowpipe flame on the experiment. Use a Bunsencharcoal. burner with its air inlets closed
to give a luminous flame. Then turn the gas down so that the
flame is only 4 or 5 cm. high. Put the tip of the blowpipe in the
middle of the flame and blow in such a way that a small blue flame
is produced. It should now be possible to turn this little Bun-sen flame downward on the object to be heated. After a little
practice it will be found possible to do these things at the same time:
1. to keep a steady stream of air in the blowpipe ; 2. to breathe
through the nose ; 3. to keep a surplus of air in the cheeks.
Zinc. Make a cavity in a charcoal block with the top of the
forceps. Place a little zinc sulfate in this cavity and heat
it as hot as possible at the tip of a small blowpipe flame (Fig. 92).
After the residue has cooled, record its color.

COBALT NITRATE TESTS FOR METALS 155
Put a drop or two of cobalt nitrate solution on the residue andreheat it intensely. After it has cooled, record the color of the
mass that remains on the charcoal block.
Aluminum. Make a fresh cavity in the block and place
in it some aluminum compound, as aluminum sulfate, and
repeat the test made with the zinc compound. Record the
characteristic coloration which is obtained.
Magnesium. Repeat (a), using some compound of mag-nesium, such as magnesium carbonate or sulfate. Heat the massuntil it glows brightly.
Cool and moisten the fused
mass with only a very
little cobalt nitrate solu-
tion. Reheat intensely
and after the mass has
cooled, note carefully the
delicate coloration.
Lead. A convenient
test for lead is the char-
coal test. Heat a fragment of lead in the oxidizing flame and
note the result. Mix lead oxide with soda, and heat on charcoal
in the reducing flame (Fig. 93). Note the metallic globule.
Unknown. Obtain from the instructor some compound of
aluminum, zinc, or magnesium and identify the metal with
the blowpipe and cobalt nitrate solution. Record in your note-
book, preferably in tabular form, your results as follows
:
Fig. 93. Oxidizing and reducing flames.
TABLE
Compound Used Color op Residue after FirstHeating
Color of Residue afterHeating with Co(N03)2
Unknown , . .
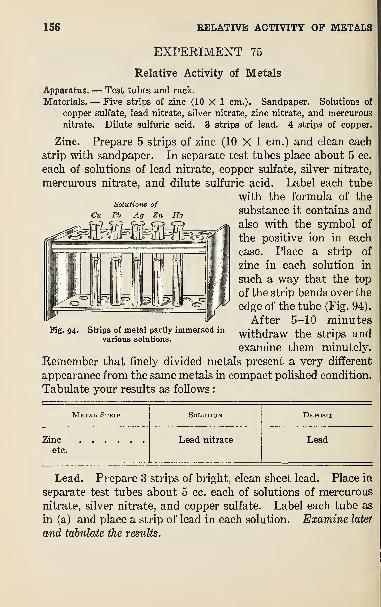
156 RELATIVE ACTIVITY OF METALS
EXPERIMENT 75
Relative Activity of Metals
Apparatus.— Test tubes and rack.
Materials.— Five strips of zinc (10 X 1 cm.). Sandpaper. Solutions of
copper sulfate, lead nitrate, silver nitrate, zinc nitrate, and mercurous
nitrate. Dilute sulfuric acid. 3 strips of lead. 4 strips of copper.
Cu
Solutions of
Pb Ag Zn Hg
Zinc. Prepare 5 strips of zinc (10 X 1 cm.) and clean each
strip with sandpaper. In separate test tubes place about 5 cc.
each of solutions of lead nitrate, copper sulfate, silver nitrate,
mercurous nitrate, and dilute sulfuric acid. Label each tube
with the formula of the
substance it contains and
also with the sjnnbol of
the positive ion in each
case. Place a strip of
zinc in each solution in
such a way that the top
of the strip bends over the
edge of the tube (Fig. 94).
After 5-10 minuteswithdraw the strips and
examine them minutely.
Remember that finely divided metals present a very different
appearance from the same metals in compact polished condition.
Tabulate your results as follows :
Fig. 94. Strips of metal partly immersed in
various solutions.
Metal Strip Solution Deposit
Zinc Lead nitrate Leadetc.
Lead. Prepare 3 strips of bright, clean sheet lead. Place in
separate test tubes about 5 cc. each of solutions of mercurous
nitrate, silver nitrate, and copper sulfate. Label each tube as
in (a) and place a strip of lead in each solution. Examine later
and tabulate the results.

FERROUS COMPOUNDS 157
Copper. In the same way prepare 4 strips of copper and
place them in another set of test tubes containing solutions of
lead nitrate, silver nitrate, zinc nitrate, and mercurous nitrate.
Note any change in the color of the solution left in the test tube.
. Record negative as well as positive results. For each case giving
a positive result write the equation showing the ions. In those
cases which give a negative result, explain why it is so. Compare! your results with the Replacement Series of Metals on p. 485
in B. & C., New Practical Chemistry.
EXPERIMENT 76
Ferrous Compounds
Apparatus.— Test tubes and rack. Bunsen burner. Funnel. Small
flask and cork. Tripod. Asbestos gauze.
Materials. — Small iron nails (or steel wool). Dilute hydrochloric acid.
Filter papers. Dilute ammonium hydroxide. Potassium ferrocyanide
solution. Potassium ferricyanide solution. Potassium sulphocyanate
solution.. ^
Introduction. Iron forms two sets of compounds— ferrous
compounds, in which the iron has a valence of two, and ferric
compounds, in which the valence of iron is three. The process
of changing the ferrous to ferric is called oxidation, which meansan increase in valence. On the other hand, the process of
changing from ferric to ferrous is called reduction, and this
involves a decrease in the valence of the iron. In this experi-
ment we shall learn how to prepare ferrous compounds and
how to test for the same. In Experiment 77 we shall learn
how to convert ferrous to ferric compounds and how to make the
appropriate tests.
Directions. 1. Making ferrous chloride. Place in a test
tube about a spoonful of small iron nails or a small bundle of
steel wool and add just enough dilute hydrochloric acid to
dissolve the iron. Warm the acid to keep the action going
briskly. Identify the gas given off. Account for its odor and
for the insoluble black residue.

158 FERROUS COMPOUNDS
Filter the liquid into a small flask containing about 50 cc. of
boiling water. Add a few nails and cork the flask loosely,
removing the cork only when pouring out some of the solution.
Note the color of the solution. Write the equation for making
ferrous chloride (FeCh).
2. Ferrous hydroxide. Pour about 5 cc. of this ferrous chlo-
ride solution into a test tube and add dilute ammonium hydrox-
ide until the solution after shaking gives the odor of ammonia.What is the precipitate? Write the equation for this reaction.
Filter and open out the paper with the precipitate. Lay it
aside to dry. Note the changes in the color of the precipitate whenexposed to the air.
3. Tests, a. To about 5 cc. of ferrous chloride solution addabout 1 cc. of potassium ferrocyanide (K 4Fe(CN) 6 ) solution.
Note that the white precipitate immediately begins to turn blue.
Write the equation, assuming that potassium ferrocyanide ionizes
as follows
:
K4Fe(CN)6— 4 K+ + Fe(CN)6
b. To another portion of ferrous chloride solution add potas-
sium ferricyanide (K 3Fe(CN) 6) solution. Note the color pro-
duced. Note whether there is a precipitate or simply a colored
solution. To determine the color of a very deeply colored
solution, dilute with much water.
c. To still another portion of ferrous chloride solution add
potassium sulphocyanate (KSCN) solution. The result should
be negative.
Give one distinctive test for ferrous salts (Fe++).
Note. Keep the rest of the ferrous chloride solution for Exp. 77.

JFERRIC COMPOUNDS 159
EXPERIMENT 77
Ferric Compounds
Apparatus.— Small flask. Tripod. Asbestos gauze. Bunsen burner.
1-hole rubber stopper with Bunsen valve (Fig. 95). Test tubes and
rack.
Materials. — Ferrous chloride solution (from Exp. 76). Concentrated
hydrochloric and nitric acids. Concentrated ammonium hydroxide.
Solutions of potassium ferrocyanide, potassium ferricyanide, andpotassium sulphocyanate. Steel wool. Iron turnings.
Ferrous to ferric. Boil the remainder of the ferrous chloride
solution (Exp. 76) with a little concentrated hydrochloric acid
and nitric acid for about 2 minutes. Note the change in color
— this is characteristic of ferric solutions. The nitric acid
serves as an oxidizing agent. Complete and balance in your
notebook the equation:
__ FeCh + - HCl + [0] —^ FeCls + —
_
Ferric hydroxide. To a portion of the
ferric chloride solution, add an excess of
ammonium hydroxide. If the precipi-
tate is green, the above action (called
oxidation) was incomplete and should
be repeated. Write the equation for the
formation of ferric hydroxide (Fe(0H)3).
Explain the change in color in the ferrous
hydroxide prepared in Exp. 76.
Tests. Repeat all the tests of Exp. 76
(3), using ferric chloride solution instead
of ferrous chloride. Give two distinctive
tests for a ferric salt.
Reduction of a ferric compound. Boil
in a small flask * (Fig. 95) the remainder
of the ferric chloride solution with a
* It is well in preparing ferrous compounds to provide the flask with a BunsenValve. This is a short rubber tube with a slit cut in the side and plugged at the end

160 BLUEPRINTS AND INKS
few drops of concentrated hydrochloric acid and some iron
turnings or small iron nails. Keep the action going vigorously
until the characteristic color of ferric compounds has disap-
peared. Pour off some of the clear solution and test quickly
for the ferrous ion. Complete in your notebook the equation
:
FeCls + Fe
—
Summarize the results of the following reagents with ferrous
and ferric compounds in tabular form
:
Reagents Feeeous Feeeic
Ammonium hydroxide . .
Potassium ferrocyanide . .
Potassium ferricyanide . .
Potassium sulphocyanate .
EXPERIMENT 78
Blueprints and Inks
Apparatus.— Two photographic trays or shallow pans, enameled (8" X10"). Test tubes and rack. Graduated cylinder, 100 cc.
Materials.— Ferric chloride solution (4%). Potassium ferricyanide solu-
tion (10%). Oxalic acid solution (5%). Good bond paper (3"X4").Absorbent cotton. Nutgall powder.
Introduction. Blueprints are commonly used in place of
photographs in making copies of engineering drawings. The
paper is prepared by first soaking it in a solution of potassium
ferricyanide and a ferric salt and then drying it in a dark place.
When a drawing on tracing cloth is placed upon such a sensitized
paper and the two are exposed to the sunlight, the paper turns
a brownish color, except where it is covered by the black lines.
The paper is then thoroughly washed with water to remove the
soluble salts. The portions that were exposed to the light turn
blue, leaving the rest white. The light has reduced the ferric
salt (usually ferric ammonium citrate) to the ferrous salt. In

BLUEPRINTS AND INKS 161
the process of washing, this ferrous salt reacts with the potas-
sium ferricyanide to form the insoluble deep blue known as
Turnbull’s blue.
Directions. Blueprint paper, (a) In a dark-room or cup-
board, mix in a test tube about 10 cc. of ferric chloride solution
with an equal volume of oxalic acid (H2C2O4) solution. Divide
this mixture into two equal parts. Keep one portion in the
dark. Expose the other to sunlight for several minutes. Then
add to each portion about 4 or 5 drops of potassium ferricyanide
solution.
Compare the results. In which case has a ferrous salt been
produced? This is an example of photochemical action, that
is, a reaction produced by light.
Complete in your notebook the following equation
:
__ FeCla + H 2C 2O 4—^ - + - HCl + __ CO 2 \
(b) Prepare in a darkened room another portion of the
mixture prepared in (a) and coat a piece of nonporous bondpaper with this solution. You may use a wad of absorbent
cotton, soaked in the solution, to coat the paper with a thin
layer of the solution. Put the paper aside in a dark place to
dry. In the meantime cut a stencil from a piece of cardboard.
Lay this stencil over the sensitized paper and expose both to
the sunlight for a few (5) minutes.
To develop the print, float the paper on a solution of potas-
sium ferricyanide. Then wash the paper in water until all the
yellow color has been removed from the unexposed portions of
the paper. Dry the blueprint and mount it in your notebook.
Complete in your notebook the following equation
:
__ FeCL + - K3Fe(CN)6 —
^
In making commercial blueprint paper, ferric ammoniumcitrate is used because it contains both the iron salt and areducing agent.
Making ink. Mix in a test tube a concentrated solution of
ferrous sulfate with a little of a solution of powdered nutgalls

162 THE CHLORIDES OF TIN
(containing gallic acid). What is the color of the mixture?
What change does the mixture undergo on standing for a few min-utes ? When used in a pen, how does it work as ink ?
To a small portion of the ink, add some oxalic acid solution.
What is the result? What does this experiment suggest about amethod of removing ink stains ?
Note. Circular No. 95 published by the U. S. Bureau of Standards
gives much valuable information about inks.
EXPERIMENT 79
The Chlorides of Tin
{Optional Experiment)
Apparatus.— Test tubes. Bunsen burner.
Materials.— Tin. Concentrated hydrochloric acid. Concentrated nitric
acid. Solutions of mercuric chloride and ferric chloride.
Introduction. From the position of tin in the Replacement
Series of Metals [p. 485] we should expect this metal to react
with hydrochloric acid and set free hydrogen. But tin forms
two chlorides, stannous chloride (SnCh) and stannic chloride
(SnCB). The stannous chloride is easily oxidized to the stannic
chloride, and with suitable reagents the stannic chloride can
be reduced to stannous chloride. Conversely, the reagents
used in these changes are themselves reduced or oxidized.
Compare these compounds with the ferrous and ferric com-
pounds in Exp. 76 and 77. Tin compounds are very important
in the textile industry.
Directions, a. Pour upon a small piece of metallic tin (about
1 g.) in a test tube 5 cc. of concentrated hydrochloric acid and
5 cc. of water. Warm the solution if necessary to keep up a
vigorous action until the tin has disappeared. What was the
gas evolved ? Is the action slow or fast ?
b. To determine which chloride of tin has been formed, add
a few drops of this tin solution to 5 cc. of mercuric chloride

SALTS OF LEAD 163
(HgCl 2) solution. The white precipitate formed is mercurous
chloride (HgCl). Now add a few drops more of the tin solu-
tion and heat the mixture gently. The dark-gray precipitate
is metallic mercury. What does this prove as to the tin compound
formed hy the action of the hydrochloric acid on tin? Write anequation for the reaction.
c. Dilute 1 cc. of ferric chloride (FeCls) solution with 3 cc.
of water and add drop by drop some of your original tin solution
until a change in color takes place. What was the change in
color? Recall that in dilute solutions ferric salts are reddish-
brown and ferrous salts are colorless. Write the equation for the
reaction. What kind of change has taken place in the tin com-
pound
?
d. Add 10 drops of concentrated nitric acid to 5 cc. of the
original tin solution and heat to boiling. Cool the solution and
test it with mercuric chloride solution as in (b). What has
happened to the stannous chloride solution? Will this change he
brought about by the air? How would you prevent a solution of
stannous chloride from changing ?
e. Boil for several minutes a small portion of the stannic
solution (SnCR) from (d) with a little granulated tin. Now addmercuric chloride solution and compare with the results in (b).
Write the chemical equation for this reaction. What kind of
chemical change was this ?
EXPERIMENT 80
Salts of Lead
Apparatus. — Test tubes. Bunsen burner.
Materials. — Solutions of lead nitrate, sodium iodide, and hydrogen sulfide.
Dilute nitric acid and hydrochloric acid.
Introduction. Since many of the salts of lead are insoluble,
since they can easily be prepared by precipitation from solu-
tion, and since they have a distinctive color, it will be useful in
identifying compounds of lead to become familiar with their
appearance.

164 SALTS OF LEAD
Directions, a. Dilute 3 cc. of lead nitrate solution in a test
tube with 5 cc. of water and then add a solution of hydrogen
sulfide. Name and describe the precipitate. Write the equation
for its formation. Add 5 cc. of dilute nitric acid. Does the
precipitate dissolve in nitric acid ?
b. Dilute 3 cc. of lead nitrate solution with 5 cc. of water
and add 10 drops of dilute hydrochloric acid. Name and de-
scribe the precipitate. Write the equation for its formation. Heatthe solution. What change occurs? Cool it again under
running water. What appears? What do you conclude about
the solubility of lead chloride ? What other insoluble chloride have
you prepared? How could you distinguish between these chlo-
rides ?
c. To 3 cc. of lead nitrate solution diluted with 5 cc. of water,
add 3 cc. of sodium iodide solution. Write the equation for the
reaction. Heat the solution to boiling. What happens ? Cool
the solution again. What property of lead iodide is indicated ?
d. Repeat (c) using potassium dichromate (K 2Cr207 ) solu-
tion instead of potassium iodide. Name and describe the
precipitate. Write the equation for its formation.
e. To 3 cc. of lead nitrate solution diluted with 5 cc. of water,
add 10 drops of dilute sulfuric acid. Name and describe the
precipitate. What other insoluble sulfate have you prepared ?
Summarize the way in which you would use these experiments
to identify compounds of lead in solution. Which of these experi-
ments is the more delicate test for lead?

COPPER COMPOUNDS 165
EXPERIMENT 81
Copper Compounds
Apparatus.— Test tubes and rack. Small flask. Tripod. Asbestos gauze.
Bunsen burner.
Materials.— Crystals of copper sulfate, sodium chloride, copper chloride,
and sodium sulfate. Copper filings. Concentrated hydrochloric acid.
Sodium hydroxide solution. Litmus papers. Potassium ferrocyanide
solution. Concentrated ammonium hydroxide.
Color of cupric ions. Dissolve in separate test tubes small
crystals of copper sulfate, copper chloride, sodium chloride,
and sodium sulfate in 15 cc. of water. Note the color of the solu-
tions. What are the colors, respectively, of the cupric (Cu++),
sodium (Na+), sulfate (SO 4”), and chloride (CP) ions?
Cuprous compounds. Dissolve a teaspoonful of cupric chloride
(CuCb) in 15 cc. of water in a small flask. Add a teaspoonful
of copper fllings and 5 cc. of concentrated hydrochloric acid, andboil gently until the green color has quite disappeared. Pourhalf of the product^into 100 cc. of water. What is the color of
the cuprous ions (Cu+) ? Write the equation for the reduction of
cupric salts with copper.
To the remainder of the cuprous chloride (CuCl) solution addsodium hydroxide solution until the solution is strongly alkaline.
Note the color of the precipitate. Try the effect of heating it.
Write the equations representing these changes.
Cupric compounds. Test a solution of copper sulfate with
litmus paper. Explain the reaction by means of the ionic
theory. (See p. 344 in B. & C., New Practical Chemistry).
Add sodium hydroxide solution to a cold solution of copper
sulfate as long as it forms a precipitate. Note the color of the
precipitate. Heat the mixture until no further change takes
place. Write the equations for these changes.
Tests for cupric ions (Cu++). a. Add a few drops of copper
sulfate solution to half a test-tubeful of water and then addpotassium ferrocyanide (K 4Fe(CN) 6) solution. The precipitate
is cupric ferrocyanide (Cu2Fe(CN) 6). Write the equation for this
reaction.

166 ANALYSIS OF THE OXIDES OF COPPER
b. Another characteristic test for the cupric ion is to add con-
centrated ammonium hydroxide drop by drop to the copper
solution until no further change is produced. The deep-blue
color is due to a complex copper-ammonia ion (Cu(NH 3) 4++),
EXPERIMENT 82
Analysis of the Oxides of Copper*
{Quantitative Experiment)
Apparatus.— Combustion tube, Pyrex resistance glass (30 cm. X 13 mm.inside diam.). Combustion boat, porcelain (6 cm. X 7 mm.). Corks.
Glass tubing. Bunsen burner or preferably Fisher form of Meker.Horn-pan balance and weights. Ring stand and clamp.
Materials.— Cupric oxide, black powder, c.p. Cuprous oxide, red powder,
c.p.
Introduction. We may demonstrate the truth of the Law of
Multiple Proportions by analyzing the oxides of copper. Whenthese oxides are heated in a current of hydrogen, metallic copper
is left. The oxygen has united with the hydrogen to produce
water. Since coal gas is largely made up of hydrogen, it can
be used as the reducing agent. The loss in weight which takes
place when the oxide is reduced gives the weight of oxygen in
the oxide. Then we can calculate the percentage composition
of each oxide. Assuming the atomic weights of copper andoxygen, we can compute the simplest formula for each oxide.
Directions, a. Cupric oxide. The essential part of the
apparatus used in this experiment is shown in figure 96. Aporcelain boat B is weighed and then weighed again with black
copper oxide placed within it. The boat is then slipped into the
hard-glass tube T, which has been provided with a cork at each
* This experiment may well be carried out as a Cooperative Experiment, half of
the class doing part (a) and the rest part (b)
.

ANALYSIS OF THE OXIDES OF COPPER 167
end carrying a glass tube. The tube C is connected to the gas
supply, and the tube 0 is bent upwards and constricted at its
outer end to form a jet. The hard-glass tube T is clamped
near one end so that the end carrying the tube 0 is slightly
lower than the end carrying the tube C. The purpose of this
tilt is to keep any drops of water which may be formed from
running back on the hotter part of the tube T and so cracking it.
Gas-
Flame —
O
Porcelain boat Copper oxide Combustion tube
Fig. g6. Reduction tube and porcelain boat.
Test the apparatus in order to be sure that it is air-tight. Drysome pulverized cupric oxide by heating it in a porcelain
crucible and then allowing it to cool in a desiccator. Use about
1.5 grams of the cupric oxide.
Allow the gas to pass through tube T for a minute and test
the gas coming from tube 0 to make sure that all the air has
been displaced. Then light the gas as it comes out of the jet 0.
Begin heating tube T, very gently at first, under one end of the
boat B. You will soon notice that the black color of the cupric
oxide at that end of the boat is changing to red (metallic copper).
As this change takes place, move the flame gradually so as to
heat the rest of the boat until all the black color is gone. Allow
the tube to cool with the gas still passing through. When the
tube is cold, the boat is removed and reweighed.
The data and calculations should be put into your notebookin tabular form
:
Data
:
Weight of boat and black cupric.oxide g„
Weight of boat^
g.
Weight of black cupric oxide g.
Weight of boat and copper g„
Weight of boat g^
Weight of copper g.

168 BORAX BEAD TESTS FOR METALS
Calculation
:
Weight of cupric oxide g.
Weight of copper . g.
Weight of oxygen g.
Percentage of oxygen in cupric oxide %Percentage of copper in cupric oxide %
Percentage of oxygen _16
~
Percentage of copper _6376
Therefore the simplest formula for cupric oxide is
b. Cuprous oxide. In the meantime another student will
repeat this experiment, using about 2.5 grams of cuprous oxide.
Pure cuprous oxide is a red powder which tends to pass into the
cupric oxide. It can be kept successfully if sealed up in a small
bottle which is not opened until required. If the bottle has
been opened for some time, its contents should not be used in
this experiment.
EXPERIMENT 83
Borax Bead Tests for Metals
Apparatus. — Platinum (mounted). Bunsen burner.
Materials.— Borax (powdered). Cobalt nitrate. Manganese dioxide.
Chromium sulfate. Ferrous sulfate. Nickel nitrate. Unknowns.
Introduction. Ordinary borax is hydrated sodium tetra-
borate (Na 2B 407 • 10 H 2O). When heated, borax swells be-
cause of the evaporation of the water of hydration and then
melts to a clear glassy mass. The oxides of certain metals
impart characteristic colors to beads of borax, which acts as a
flux dissolving the metallic oxide.
Making borax beads. Attach one end of a piece of platinum
wire to a piece of glass tubing by melting the glass. Bend the
other end of the platinum wire into a loop, about 3 mm. in
diameter. Heat the wire in the Bunsen flame and while still

BORAX BEAD TESTS FOR METALS 169
hot dip it quickly into some powdered borax. Heat strongly
in the flame. After a moment the borax shrinks into a small
transparent bead. Dip this again into the borax and repeat
this process until you have
formed a round bead as large
as the loop.
Tests for metals. Touch this
borax bead, while still hot, to a
tiny bit of some cobalt com- 97- Making a^borax bead in the
pound, such as cobalt nitrate.
Heat again in the hot outer portion (Fig. 97) of the Bunsenflame (oxidizing) until the color is uniform. If the bead is
black, too much of the salt was used. Try again. To removethe bead, dip it, while red-hot, in water. Record in your note-
book the characteristic colors
:
Metals Foemula ofCompound
Color of BeadIN Oxidizing Flame
Cobalt, etc. . . . . .
Repeat this experiment with compounds of manganese,chromium, iron, and nickel, using each time a newly made bead.
Learn the characteristic colors of
these metals.
Repeat this experiment using the
reducing flame, i.e. just at the tip
of the inner cone (Fig. 98), with
each metal. Also note any differ-
ences in color between the beadwhen hot and when cold.
Ask the instructor for an unknown
Fig. 98 . Making a borax bead in
the inner flame.
Test for an unknown.salt to test by the bead method.

170 SILVER COMPOUNDS IN PHOTOGRAPH'S
EXPERIMENT 84
Silver Compounds in Photography
Apparatus. — Test tubes and rack. Funnel. Shallow dish or tray.
Materials.— Silver nitrate solution. Potassium bromide solution. Filter
papers. Tube of photographic developing powder. Sodium thio-
sulfate (hypo) solution. Potassium chloride solution.
Introduction. The sensitive plate or film is coated with
silver bromide (AgBr) embedded in gelatin. After exposure
to light (the eye detects no changes), the plate is placed in a
developing solution. This solution contains various carbon
compounds derived from benzene, such as pyrogallol, hydro-
quinone, and metol, and acts upon the silver bromide in pro-
portion to the intensity of the light falling on the different
parts of the plate. The silver bromide is reduced to metallic
silver, and thus the image is formed. As soon as the image has
acquired sufficient density, the plate is washed and placed in a
solution of sodium thiosulfate (hypo), which removes all the
silver bromide that the light and developing solution have not
affected. Since no further change can take place on the plate,
the image is said to be “fixed” and the “negative” is made.
This experiment should be done in a darkened room or in test
tubes wrapped in dark paper.
Directions, a. Action of light on silver bromide. Add 5 cc.
of silver nitrate solution to 5 cc. of potassium bromide solution.
Describe the 'precipitate and 'write the equation for its formation.
Pour a little of the precipitate on a filter paper and place it in
the direct sunlight. Examine it after a few minutes.
Expose the precipitate remaining in the test tube to a bright
light for a few seconds and then add 5 cc. of a developing solu-
tion. Allow the action to continue for 2-3 minutes. Describe
an'y changes occurring in the precipitate. Then add 5 cc. of a
saturated solution of sodium thiosulfate (hypo) and shake the
mixture. What is the effect of adding the thiosulfate ?
b. Silver bromide^ not exposed to light. Add 5 cc. of silver
nitrate solution to 5 cc. of potassium bromide solution, but

SEPARATION OF SILVER, MERCURY, AND LEAD 171
without exposing to the light the silver bromide formedo Then
add 5 cc. of the developer. Keep it in the dark for a few
minutes. What is the result? Add 5 cc. of the “hjrpo” solu-
tion. Compare the result with that obtained in (a).
c. Printing. Pour a little silver nitrate solution into a
shallow dish and float upon it a piece of well-sized paper. Re-
move the paper and let it dry. Then float it on the surface
of a little potassium chloride solution in another dish. Again
dry the paper. All this must be done in a darkened room or
closet. Place a key or opaque stencil over the paper and expose
it to the light for a few minutes. Examine it in a dim light
and then immerse the paper in a developing solution for 2
minutes. Rinse it and place it in the ‘‘hypo’’ solution for 10
minutes. Rinse it thoroughly; dry and mount it in your
notebook.
EXPERIMENT 85
Separation of Silver, Mercury, and Lead
Apparatus. — Test tubes and rack. Funnel. Bunsen burner.
Materials. — Solutions of silver, lead, and mercurous nitrates. Hydro-chloric acid, concentrated and dilute. Nitric acid, concentrated anddilute. Concentrated and dilute ammonium hydroxide. Solution of
potassium chromate. Copper strip. Filter papers. Litmus papers.
Unknown solutions.
Silver chloride (AgCl). Add to 5 cc. of silver nitrate (AgNOs)solution an equal volume of water and then add drop by drop
dilute hydrochloric acid. Shake between the drops and allow
the precipitate to settle until the next drop produces no further
precipitation. What is the precipitate ? Write the equation.
Let the precipitate settle and then pour away the liquid.
What does it contain? Add to the precipitate a little distilled
water and shake the mixture. Allow the precipitate to settle
and again pour off the liquid. Now try to dissolve the silver
chloride in boiling hot water. Is silver chloride soluble in hot
water ?

172 SEPARATION OF SILVER, MERCURY, AND LEAD
Divide the remaining silver chloride into two parts. To onepart add dilute ammonium hydroxide. Is silver chloride soluble
in ammonium hydroxide ? Set the other part of the silver chlo-
ride in the sunlight and examine it later.
Mercurous chloride (HgCl). To 5 cc. of mercurous nitrate
(HgNOs) solution, add 5 cc. of distilled water and then adddilute hydrochloric acid, drop by drop, until the action is com-plete. Write the equation. Wash the precipitate with cold
water ; then divide it into two parts. Does mercurous chloride
dissolve in hot water ? Add to the other portion of the precipitate
some concentrated ammonium hydroxide. How would you test
for a soluble mercurous salt ?
Lead chloride (PbCb). Dilute 5 cc. of lead nitrate
(Pb(N03 ) 2) solution with 5 cc. of distilled water and then addhydrochloric acid, drop by drop, until the precipitation is com-plete. Name the precipitate and write the equation. Wash the
precipitate with cold water and boil it with distilled water. Is
lead chloride soluble in hot water?
Divide the solution into two parts. To one part add a solu-
tion of potassium chromate (K2Cr04). What is the precipitate?
Write the equation. Examine the other portion of the solution
after it has become cold. How would you test for a soluble lead
salt ?
The separation. Make a mixture in one test tube of solu-
tions of silver nitrate, lead nitrate, and mercurous nitrate.
Add dilute hydrochloric acid until the precipitation is complete.
Filter and wash the precipitated chlorides with a little cold
water.
To separate the lead, wash the precipitate thoroughly with
boiling water and keep the washings. Which one of the chlorides
will dissolve ? Test the filtrate for the presence of this compound.
Next, to separate the silver, wash the precipitate remaining
on the filter paper with dilute ammonium hydroxide and keep
the washings. Which chloride is now dissolved ? Which remains
on the filter ? Add to the filtrate a slight excess of nitric acid
(test with litmus paper). Name the precipitate.

ANALYSIS OF A SILVER COIN 173
Finally, to show that the residue left on the filter contains
a compound of mercury, pour on it a little aqua regia (1 cc. of
concentrated hydrochloric acid and 0.5 cc. of concentrated
nitric acid) and catch the filtrate in a clean test tube. Dilute
the solution thus obtained with 5 cc. of water and put into it a
small strip of bright copper. After a few minutes, remove the
copper ;wash and rub it. Explain the result.
Testing an unknown. Obtain from the instructor a solution
which contains one or more of these metals (silver, mercury,
and lead) and analyze the solution. Report the negative as well
as the positive results.
EXPERIMENT 86
Analysis of a Silver Coin
{Quantitative Experiment)
Apparatus. — Two beakers. Tripod. Asbestos gauze. Bunsen burner.
Stirring rod. Funnel. Wash-bottle. Horn-pan balance and weights.
Ring stand.
Materials. — Dime (cut into 2 or 3 pieces). Concentrated nitric acid.
Dilute hydrochloric acid. Filter papers.
Introduction. When a dime is dissolved in nitric acid, the
metals (silver and copper) are converted into nitrates. Thesilver, which is precipitated with hydrochloric acid as silver
chloride, is filtered off, dried, and weighed. From the weight
of the silver chloride, the weight of silver in the coin and the
percentage of silver present may be calculated.
Directions. Weigh to a centigram (0.01 g.) a portion of a
clean ten-cent piece, place it in a small beaker, and pour in
about 20 cc. of nitric acid (diluted with an equal volume of
water). As soon as the vigorous action is over, warm the
solution gently and add more acid, if necessary, to dissolve
the metal. Then dilute the solution by adding 30 cc. of dis-
tilled water.
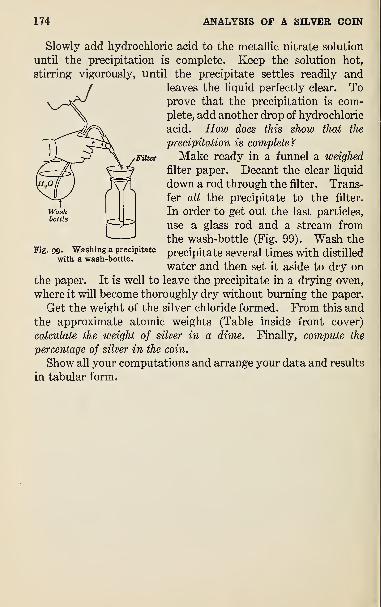
174 ANALYSIS OF A SILVER COIN
Slowly add hydrochloric acid to the metallic nitrate solution
until the precipitation is complete. Keep the solution hot,
stirring vigorously, until the precipitate settles readily andleaves the liquid perfectly clear. Toprove that the precipitation is com-
plete, add another drop of hydrochloric
acid. How does this show that the
precipitation is complete?
Make ready in a funnel a weighed
filter paper. Decant the clear liquid
down a rod through the filter. Trans-
fer all the precipitate to the filter.
In order to get out the last particles,
use a glass rod and a stream from
the wash-bottle (Fig. 99). Wash the
precipitate several times with distilled
water and then set it aside to dry on
the paper. It is well to leave the precipitate in a drying oven,
where it will become thoroughly dry without burning the paper.
Get the weight of the silver chloride formed. From this and
the approximate atomic weights (Table inside front cover)
calculate the weight of silver in a dime. Finally, compute the
percentage of silver in the coin.
Show all your computations and arrange your data and results
in tabular form.
Fig. 99. Washing a precipitate
with a wash-bottle.

DYEING 175
EXPERIMENT 87
Dyeing
{Optional Experiment)
Apparatus. — Beakers. Stirring rod.
Materials.— Concentrated solutions of picric acid and logwood. Strips
of cotton cloth (1" X 2")» Woolen yarn. Sodium carbonate solution
(2%). Congo red. Sodium sulfate solution (10%).
Introduction. Nearly all the dyes used to-day are complex
organic substances prepared from coal tar. Many dyestuffs
are soluble in water, and when the cloth is placed in such highly
colored solutions, the dye becomes attached to the cloth. Silk
and wool are particularly easy to dye in this way. But there
are many other colored substances which can be used as dyes
only if employed in connection with a metallic hydroxide called
a mordant. If the hydroxide is precipitated on the cloth in the
presence of the dye, it will bind the colored material to the fabric.
Because some dyes give different colors with different mordants,
a pattern of colors may be dyed on a cloth in one dyeing.
Directions, a. Direct dyeing. Fill a beaker half full of a
concentrated solution of picric acid. Put in it a piece of clean,
white cotton cloth * and a few strands of white woolen yarn.
Boil for about five minutes. Keep the cloth entirely immersed
in the dye. Remove both the cotton and wool, and wash themthoroughly with water. Compare the results. In which fabric
is the color fast ?
Repeat the experiment, using logwood solution instead of
picric acid.
b. Dyeing with a mordant. To mordant cotton cloth, soak
it in a solution of aluminum sulfate and squeeze out the excess
liquid. Now dip the cloth in ammonium hydroxide and again
squeeze out the excess liquid. What compound is now incor-
porated in the cloth ? Write the equation for its formation.
* To remove all foreign matter from the cloth, place the strips in a beaker and
cover them with sodium carbonate solution (2 per cent solution). Boil the liquid
for 5 minutes. Remove the strips and rinse thoroughly with water.

176 PAINTS
Boil the mordanted cloth in logwood solution for about 5
minutes. Wash and dry the cloth. Compare the color of the
mordanted cotton dyed in logwood with the color of the unmordanted
cotton dyed in logwood.
When the pieces of cloth and yarn are dry, attach them (prop-
erly labeled) to your notebook.
c. Dyeing without a mordant. Some dyestuffs will dye
cotton fast without the use of mordants. Congo red (sold at
the druggist’s) is a dyestuff of this class. Prepare a solution
containing 2 g. sodium carbonate, 10 g. sodium sulfate, and 0.2 g.
Congo red in 100 cc. of water. Heat the solution to boiling andimmerse in it a wet unmordanted strip of cotton and continue
boiling for 5 minutes. Remove the cloth, rinse, and test to
see whether the cloth is dyed fast.
EXPERIMENT 88
Paints
{Optional Experiment)
Apparatus.— Test tubes. Funnel. Filter papers. Bunsen burner.
Materials. — Solutions of potassium iodide, mercuric chloride, potassium
chromate (sat.), lead acetate (sat.), ferric chloride (25 per cent), potas-
sium ferrocyanide (25 per cent), sodium hydroxide (10 per cent). Woodsplints. Linseed oil. Turpentine. Absorbent cotton.
Introduction. A paint is a mixture of a pigment, a vehicle,
or carrier, and a drier. A pigment is a finely divided, insoluble
colored powder. One may judge the value of a pigment accord-
ing to its body, covering power, drying quality, durability, and its
beauty of shade. The vehicle is a fluid (such as linseed oil or
pyroxylin) which acts as a carrier for the pigment and which
oxidizes when exposed to air with the production of a hard,
elastic surface. A drier increases the drying qualities of the
paint. Oil paints ‘"dry” because of oxidation; water colors,
pyroxylin paints, and spirit varnishes (shellac) dry by evapora-
tion of one of the components. In this experiment you will
prepare a number of tvnical pigments.
PAINTS 177
Directions, a. Brilliant scarlet. Fill a test tube half full
of a solution of potassium iodide. To this solution add a so-
lution of mercuric chloride. Filter, wash, and dry the precipi-
tate. Name the product, describe its color, and write the equation
for its formation.
b. Chrome yellow. Fill a test tube half full of a concentrated
solution of potassium chromate and add a solution of lead
acetate. Shake the tube vigorously. Filter, wash, and dry
the precipitate. Name the product, describe its color, and write
the equation for its formation.
c. Prussian blue. Fill a test tube one-third full of ferric
chloride solution and then add an equal volume of potassium
ferrocyanide solution. Filter, wash, and dry the precipitate.
Note the color of the precipitate. Give its chemical name.
d. Chrome orange. Prepare a second portion of lead
chromate (b), pour off the liquid, and add to the precipitate
about 5 cc. of a solution of sodium hydroxide. Boil the mixture
gently for several minutes until the precipitate changes to an
orange color. This pigment consists of a basic chromate of
lead of rather variable composition dependent upon the length
of time the action is allowed to proceed. Filter, wash, anddry the precipitate. Note its color.
e. Brunswick green. This pigment is prepared by mixing
together in various proportions barytes (BaS04), Prussian blue,
and chrome yellow. A series of shades varying from pale
greenish-yellow to deep bluish-green may be prepared. On a
clean filter paper mix a small portion of chrome yellow (b) with
an equal portion of Prussian blue (c). Record the color of the
resulting pigment.
f. To each residue left on the filter papers add a few drops of
linseed oil. Mix well, using a clean splint for each pigment.
Add a drop or two of turpentine to make a paint of the right
consistency. With clean pieces of absorbent cotton smear a
square (1" on a side) in your notebook with each paint pre-
pared. Label each square with its pigment and allow it to dry.

178 IDENTIFICATION OF SIMPLE COMPOUNDS
EXPERIMENT 89
Identification of Simple Compounds
Apparatus.— Test tubes. Ignition tube. Bunsen burner. Platinum wire.
Charcoal block. Cobalt glass.
Materials.— Solutions of silver nitrate, barium chloride, cobalt nitrate,
and ferrous sulfate. Dilute hydrochloric and nitric acids. Con-centrated sulfuric acid. Borax. Unknowns.
Introduction. One of the most interesting and practical
divisions of chemistry is qualitative analysis, by which one is
able to determine what elements are present in materials.
This part of chemistry has been developed to such a degree of
precision that it is almost a special art and science by itself.
In this experiment you will have a practical review of the
tests which you have already studied for a number of metals
and acids. You will be given a small sample of a material the
composition of which is unknown to you. In making each
test use only a very small portion, and always keep a little for
verification of your results. Keep a record of all the tests youmake and of the results even though they are negative. Whenyou have decided what is in the unknown material, it is well to
apply all the confirmatory tests which are appropriate.
Directions, a. If the material is a solid, it will be well to
make a preliminary examination by means of (1) the flame test
with clean platinum wire, (2) the cobalt nitrate test, and (3) the
borax-head test.
b. Heat the substance in a small ignition tube as hot as
possible. Water in the tube may mean water of hydration
or water held mechanically. Blackening indicates an organic
compound. A colorless gas might indicate a carbonate, an
ammonium compound, or a sulfite. Brown fumes indicate a
nitrate, a nitrite, or a bromide. Violet fumes indicate an iodide.
A sublimate indicates a mercury or an ammonium compound.
c. Add dilute hydrochloric acid. Effervescence with colorless
gas indicates a carbonate, a sulfite, or a sulfide. Brown fumes
indicate a nitrite.

IDENTIFICATION OF SIMPLE COMPOUNDS 179
d. Add concentrated sulfuric acid. A colorless gas indicates a
chloride, sulfide, sulfite, carbonate, or acetate. Brown fumes
indicate a bromide, nitrate, or nitrite. Purple fumes indicate
an iodide.
e. If the unknown material is wholly or partially soluble in
water, test the water solution for a chloride, a sulfate, and a
nitrate.
f. Add hydrochloric acid. A precipitate indicates silver,
mercury (-ous), or lead, which may be separated as in Exp. 85.
g. Bubble hydrogen sulfide into the liquid made slightly acid
with hydrochloric acid. A yellow precipitate indicates cad-
mium or tin (-ic). A black precipitate indicates copper,
mercury (-ic), or lead. A brown precipitate indicates tin
(-ous)
.
h. Boil the solution and make it alkaline with ammoniumhydroxide. Then add ammonium sulfide. A black precipitate
indicates iron, cobalt, or nickel. A white precipitate indicates
zinc or aluminum. A pink precipitate indicates manganese.
i. Boil the solution and add ammonium chloride and after-
wards ammonium carbonate solution. A white precipitate indi-
cates barium, strontium, or calcium. Try flame tests.
j. After the above metals have been removed or proved
absent, the solution may still contain magnesium, sodium,
potassium, and ammonium. To some of the solution add
sodium phosphate (Na 2HP04). A white crystalline precipitate
indicates magnesium. Sodium and potassium can easily be
detected with the flame test. Ammonium compounds give
the odor of ammonia when heated with sodium hydroxide.
After one has identified any of the above metals, it is well to
look up the special properties of its compounds and to apply
some confirmatory tests.*
Don’t fail to record the number of your unknown and to state
what you decide that it contains, with your reasons.
* It will be well at this point to consult some textbook on qualitative analysis,
such as A. A, Noyes’s Qualitative Chemical Analysis, published by The MacmillanCompany.

180 INORGANIC CHEMICAL PREPARATIONS
Screw top
EXPERIMENT 90
Inorganic Chemical Preparations
Introduction. The work of the chemist consists in preparing
substances in a purer form than was available hitherto, or by a
cheaper method. It will be interesting to learn how to prepare
and purify substances. In an elementary course we mustlimit ourselves in the main to some of the simpler inorganic
substances. We suggest that you select some element or
compound in which you are interested and that you read up in
your school-library reference books how it may be prepared
in the laboratory. You will naturally have to confine yourself
to such chemicals and apparatus as are found in your school
laboratory, or to such as are available in the
neighboring drugstore.
General directions. Among the processes
which you may need to use are solution, precipi-
tation, filtration, decantation, washing, evaporation,
crystallization, drying, and pulverizing. Be sure
to plan ahead carefully and to submit to your
instructor a detailed, written description of your
proposed method of procedure for making the
preparation. Record accurately the weights of
materials to be used, and calculate the amount of the product
which you expect to make. And finally, weigh the actual sub-
stance that you obtain and hand it in with your report, neatly
labeled in a clean, dry bottle (Fig. 100). Include in your report
careful descriptions of the tests which you have applied to the
finished product in order to prove that it is actually what you
expected to get.
The following materials are suggested as possibilities
:
1. Chrome alum (K 2SO 4 • Cr 2 (S04)3 • 24 II 2O)
2. Microcosmic salt (HNaNH 4P04 • 4 H 2O)
3. Tartar emetic (KSb0(C4H406) • ^ H 2O)
4. Blue vitriol (CUSO 4 • 5 H 2O)
Fig. 100. Speci-
men bottle.

INORGANIC CHEMICAL PREPARATIONS 181
5. Copperas (FeS04 • 7 H 2O)
6. Lead chromate (PbCr04)
7. Epsom salts (MgS04 • 7 H 2O)
8. Vermilion (HgS)
9. Rochelle salts (KNaC4H406 • 4 H 2O)
10.
Zinc sulfate (ZnS04 • 7 H 2O)
Note. Do not begin work on your preparation until your plan has been
approved by your instructor. Naturally he will not consent to your working
with dangerous substances or expensive and elaborate apparatus. It is ex-
pected that you will devote your spare time for about a month to this experi-
ment. In grading your results, account will be taken of the initiative, energy,
and skill displayed as well as the quantity and quality of the product.

APPENDIX
PRESSURE OF WATER VAPOR, OR AQUEOUS TENSION
{In millimeters of mercury)
Tempebatube Pbessube Tempebatube Pbessube Tempebatube Pbessube
0° c. 4.6 mm. 11° c. 9.8 mm. 22° C. 19.8 mm.1° 4.9 12° 10.5 23° 21.02° 5.3 13° 11.2 24° 22.33° 5.7 14° 12.0 25° 23.74° 6.1 15° 12.8 26° 25.15° 6.5 16° 13.6 27° 26.76° 7.0 17° 14.5 28° 28.37° 7.5 18° 15.5 29° 29.98° 8.0 19° 16.5 30° 31.79° 8.6 20° 17.5 50° 92.3
10° 9.2 21° 18.6 100° 760.0
DENSITIES OF IMPORTANT GASES
{Approximate weight of 1 liter under standard conditions)
Acetylene (C 2H2 ) 1.16 grams
Air 1.29“
Ammonia (NH 3 ) 0.77“
Carbon dioxide (CO 2 ) 1.98“
Carbon monoxide (CO) 1.25“
Chlorine (CI2 ) 3.17“
Helium (He) 0.18“
Hydrogen (H 2) 0.09“
Hydrogen chloride (HCl) 1.64“
Hydrogen sulfide (H 2S) 1.54“
Methane (CH4) 0.72“
Nitric oxide (NO) 1.34“
Nitrogen (N2 ) 1-25“
Nitrous oxide (N2O) 1.98“
Oxygen (O 2 ) 1.43“
Sulfur dioxide (SO 2 ) 2.93“
182

APPENDIX 183
Density of Hydrogen (in grams per liter), Measured over Water, atVarying Temperatures and Pressures.
(To get weight of 1 cc., move decimal point 3 places to left.)
Tempebatuke in Degkebs Centigkade
H ti
15° 16° 17° 18° 19° 20° 21° 22° 23° 24°
740 0.0815 0.0811 0.0807 0.0803 0.0799 0.0795 0.0792 0.0787 0.0784 0.0780
741 .0816 .0812 .0808 .0804 .0800 .0797 .0793 .0788 .0785 .0781
742 .0817 .0813 .0809 .0805 .0801 .0798 .0794 .0789 .0786 .0782
743 .0818 .0814 .0810 .0806 .0803 .0799 .0795 .0790 .0787 .0783
744 .0819 .0815 .0812 .0808 .0804 .0800 .0796 .0792 .0788 .0784
746 .0820 .0817 .0813 .0809 .0805 .0801 .0797 .0793 .0789 .0785
746 .0821 .0818 .0814 .0810 .0806 .0802 .0798 .0794 .0790 .0786
747 .0823 .0819 .0815 .0811 .0807 .0803 .0799 .0795 .0791 .0787
748 .0824 .0820 .0816 .0812 .0808 .0804 .0800 .0796 .0792 .0788
749 .0825 .0821 .0817 .0813 .0809 .0806 .0802 .0797 .0793 .0789
760 .0826 .0822 .0818 .0814 .0810 .0807 .0803 .0798 .0795 .0791
761 .0827 .0823 .0819 .0815 .0811 .0808 .0804 .0799 .0796 .0792
762 .0828 .0824 .0820 .0816 .0813 .0809 .0805 .0800 .0797 .0793
763 .0829 .0826 .0822 .0818 .0814 .0810 .0806 .0802 .0798 .0794
764 .0830 .0827 .0823 .0819 .0815 .0811 .0807 .0803 .0799 .0795
766 .0832 .0828 .0824 .0820 .0816 .0812 .0808 .0804 .0800 .0796
766 .0833 .0829 .0825 .0821 .0817 .0813 .0809 .0805 .0801 .0797
767 .0834 .0830 .0826 .0822 .0818 .0814 .0810 .0806 .0802 .0798
768 .0835 .0831 .0827 .0823 .0819 .0815 .0812 .0807 .0803 .0799
.0800769 .0836 .0832 .0828 .0824 .0820 .0817 .0813 .0808 .0804
760 .0837 .0833 .0829 .0825 .0822 .0818 .0814 .0809 .0806 .0802
761 .0838 .0835 .0831 .0826 .0823 .0819 .0815 .0810 .0807 .0803
762 .0839 .0836 .0832 .0828 .0824 .0820 .0816 .0812 .0808 .0804
763 .0841 .0837 .0833 .0829 .0825 .0821 .0817 .0813 .0809 .0805
764 .0842 .0838 .0834 .0830 .0826 .0822 .0818 .0814 .0810 .0806
766 .0843 .0839 .0835 .0831 .0827 .0823 .0819 .0815 .0811 .0807
766 .0844 .0840 .0836 .0832 .0828 .0824 .0820 .0816 .0812 .0808
767 .0845 .0841 .0837 .0833 .0829 .0825 .0822 .0817 .0813 .0809
768 .0846 .0842 .0838 .0834 .0830 .0826 .0823 .0818 .0814 .0810
769 .0847 .0844 .0840 .0835 .0832 .0828 .0824 .0819 .0815 .0812

184 APPENDIX
THE METRIC SYSTEM
In this system of weights and measures the relation of the
units is expressed in multiples of ten. During the last hundredyears most of the civilized nations of the world, except GreatBritain and the United States, have adopted the metric system.
Even in these countries it is almost universally used in scientific
work; and in the United States, fortunately, the system of
money is made on the decimal plan.
Some important units of length. The unit is the meter,
which is equal to 39.37 inches.
1 meter (m.) = 100 centimeters (cm.).
1 centimeter = 10 millimeters (mm.).
1 kilometer (km.) = 1000 meters.
2.54 centimeters = 1 inch.
The chemist needs to become familiar with the centimeter andmillimeter. Thus, the barometer may read 760 mm. or 76 cm.or about 30 inches.
Units of volume or capacity. The unit of volume that is mostextensively used in the laboratory is the volume of a cube of
which the edge is 1 centimeter. This is called a cubic centi'
meter (cc.).
1 liter (1.) = 1000 cubic centimeters (cc. or ml.).
1 liter = 1.06 quarts.
Thus, a 500-cc. flask holds half a liter or about a pint (16
ounces of water).
Units of Weight. The unit of weight is the gram, which is
approximately the weight of one cubic centimeter of water.
1 gram (g.) = 1000 milligrams (mg.).
1 gram = 100 centigrams (eg.).
1 kilogram (kg.) = 1000 grams.
1 kilogram =2.2 pounds.
1 ounce (avoirdupois) = 28.35 grams.
The chemist usually expresses weights in grams and decimal
fractions thereof. Thus, a crucible may weigh 12.53 g. Every
student in chemistry needs to become very familiar with centi-
meters, cubic centimeters, and grams.

APPENDIX 185
TABLE OF SOLUBILITIES
S, soluble in water. P, slightly soluble in water.
I, insoluble in water. la, insoluble in water and dilute acids.
Acetate Bromide
Carbonate
Chloride
Hydroxide
Iodide
Nitrate
Oxide
Phosphate
SulfateSulfide
Aluminum . . s s _ s I s s I I sAmmonium . s s s s s s s — s s sBarium . . . s s I s p s s — I la sCalcium . . s s I s p s s — I P pCopper . . . s s I s I s s I I S la
Ferrous (Fe++) s s I s I s s I I s I
Ferric (Fe+++) — s — s I — s I I s —Lead . . . s p I p I I s I I la la
Magnesium . s s I s I s s I I S I
ManganeseMercurous
s s I s I s s I p s I
(Hg+) . .
Mercuricp I I I — I s I I p la
(Hg++) . . s I s I I s I I s la
Nickel . . . s s I s I s s I I s I
Potassium . . s s s s s s s s s s SSilver . . . s la I la — la s I I p la
Sodium . . .
Stannouss S s s s s s s s s S
(Sn++) . .
Stannics s — s I s — I I s la
(Sn++++) . s s — s I s — I I — laZinc .... s s I s I s s I I s I

186 APPENDIX
GENERAL RULES FOR SOLUBILITY
(The exceptions to these rules are few and unimportant.)
1. All sodium, potassium, and ammonium compounds are soluble
in water.
2. All nitrates, chlorates, and acetates are soluble in water.
3. All chlorides are soluble, except those of silver, mercury (mercurous),
and lead (lead slightly soluble).
4. All sulfates are soluble, except those of barium, lead, and calcium
(calcium slightly soluble). The silver and the mercurous sulfates are only
moderately soluble.
5. All carbonates are insoluble, except those of sodium, potassium, andammonium.
6. All oxides and hydroxides are insoluble, except those of ammonium,sodium, potassium, and barium (calcium hydroxide slightly soluble).
EXPERIMENTS AND CORRESPONDING CHAPTERS
The Arabic numerals refer to Black’s New Laboratory Experiments in
Practical Chemistry, and the Roman numerals to Black and Conant’s
New Practical Chemistry.
Experiments Chapters Experiments Chapters
A, B I 37, 38 XIX1, 2 II 39, 40 XX3, 4 III 41, 42, 43 XXI5, 6 IV XXII7, 8 V 44, 45, 46 XXIII9, 10 VI 47, 48, 49, 50 XXIV11 VII 51, 52, 53 XXV12
13
VIIIIX
54, 55, 56, 57,
1
58, 59 j
XXVI
14, 15 X 60, 61, 62 XXVII16, 17, 18 XI 63, 64 XXVIII19, 20 XII 65, 66 XXIX21, 22, 23 XIII
XIV67,68,69,70,1
71 /XXX
24, 25 XV 72, 73, 74, 75 XXXI26, 27 XVI 76, 77, 78 XXXII28, 29, 30, 1 XVII 79, 80, 81, 82 XXXIII
31, 32 / 83, 84, 85 XXXIV33, 34, 35, 36 XVIII 87, 88 XXXV
89, 90 XXXVI

APPENDIX 187
LIST OF LABORATORY SUPPLIES
Apparatus— Individual
Beakers (3), 100 cc., 250 cc., 400 cc.
Blowpipe, brass, 8"
Bottle, narrow neck, 1000 cc.
Bottles (4), wide mouth, 250 cc.
Brush, test-tube
Burner, BunsenBurner, Fisher form of MekerClamp, wire form for test tube
Clamps (2), iron, small; for burettes; for test tubes; etc.
Crucible, porcelain, with cover, § 0
Crucible, sheet-iron, with cover, 50 cc.
Dish, crystallizing, 3" diam.
Dish, evaporating, porcelain, # 1
Dish, tin or iron, sand-bath
Dropper, medicine
File, triangular, 5"
Filter papers (25), diam. about 10 cm.
Flask, distilling with side tube, 250 cc.
Flask, Erlenmeyer, 125 cc.
Flask, Erlenmeyer, 250 cc.
Flask, Florence, 500 cc.
Forceps, brass, curved for weights
Forceps, iron, 3"
Funnel, 60°, 2^"
Gauze, iron with asbestos center, 5" X 5"
Graduate, cylindrical, 100 cc.
Mortar and pestle, porcelain, about 7.5 cm.
Pan, agate, shallow, 1 qt.
Pinchcock (Hoffman’s screw)
Plates, glass (4), 3" X 3"
Platinum wire, # 28, 2" (or Nichrome wire 6")
Rack for 12 test tubes
Reagent bottles (H2SO4, HCl, HNO3, NH4OH), 4 oz., glass stopper,
raised letters.
Retort, tubulated, with ground-glass stopper, 4 oz.
Rods (2), glass for stirring, 15 cm. long and 5 mm. diam.
Sponge
Spoon, combustion or deflagrating, bowl 1 cm.
Stand, iron, with 3 rings
Stoppers, rubber with one hole, (2) to fit test tube, (1) to fit ignition
tube, (2) to fit combustion tubing, (1) to fit 250-cc. flask

188 APPENDIX
Stoppers, rubber with two holes (1) to fit 500-cc. flask, (2) to fit wide-
mouth bottle, (1) to fit large test tube, (1) to fit 250-cc. flask
Triangle, pipe-stem, size to support # 0 crucible
Tripod, iron, to support dishes over burner
Trough, pneumatic, with shelf or support for bottles
Tube, straight calcium chloride, with bulb, 6"
Tube, ignition (Pyrex), 6" XTubes (12), test (soft glass), 6" X f"Tube, test (soft glass), 8" X 1"
Tube, test, graduated, 25 cc.
Tube, thistle, stem 25 cm. X 6 mm.Tubing, rubber, 2', in diam.
Tubing, rubber, 6", "in diam.
Watch glasses (3), 2^" in diam.
Wing-top for Bunsen burner
Apparatus— General. {For 10 Students)
5 Balances,* horn-pan, 7^" beam, sensitive to 0.01 g.
2 Balances, trip scales with rider (0-10 g.) and weights (1 g. to 500 g.) in
block
1 Barometer, mercury
5 Battery jars (4" X 5")
1 lb. Beads, glass, small
1 Blast lamp1 Blower, rotary with electric motor ; or foot bellows
2 Bottles, acid, about 2^ liters
4 Burettes, 50 cc. graduated to 0.1 cc., Mohr with fittings
6 Cells, dry or 2 six-volt storage batteries
2 pkg. Cigar lighters, wood splints
10 Cobalt-glass plates, double thickness, 2" X 2"
5 Condensers, Liebig or spiral, 15"
5 Large clamps for ring stand and 6 ft. rubber tubing {\”) for connec*
tions for condensers
5 Combustion tubes, 20 cm. long, 15 mm. inside diam.
1 set Cork-borers (6) and sharpener
100 Corks, best grade, long, assorted sizes (# 7, 8, 9, 10, 12)
5 Crucibles, Dixon (sand), 4" deep
1 Cylinder, graduated, 250 cc.
1 Cylinder, graduated, 500 cc.
* Some teachers may prefer to use a better balance (Fig. 11) with agate planes
and agate knife edges, with three rider beams. Under these conditions 5 balances,
if used in rotation, might serve 10 students, and separate sets of weights are not
required.

APPENDIX 189
2 Hoffman electrolysis App. (Fig. 31)
5 Electrolysis App. (Fig. 32)
2 Files, round
1 Fire extinguisher (carbon tetrachloride)
1 First-aid cabinet with emergency supplies
5 Gas-measuring tubes, 50 cc. graduated to cc.
1 Glass cutter
1 Hydrometer for light liquids
1 doz. Jars, pint, fruit
1 Kipp’s generator, 1 qt.
2 Magnifying lenses (doublet)
1 Meter stick
1 Microscope, compound (1" eyepiece, f" and objectives)
1 Milk-testing outfit (Babcock) for butter fat
1 Oven, drying, electric or gas
5 Pans, iron, 6" shallow form “ sand bath ”
5 Pipettes, 10 cc., volumetric
5 Plates, glass, 4" X 4"
1 Pliers, side-cutting
1 doz. Rules, wood, metric, 30 cm.
5 sheets Sandpaper # 1
1 pr. Shears, metal-cutting
1 pk. Splints, wood1 pkg. Tapers, wax5 Thermometers, graduated from — 10° to -f 110° C.
5 lb. Tubing, soft glass, assorted, 6-7 mm. outside diamete?
5 Waterbaths, copper, 5"
1 Waterstill, automatic, gas (Fig. 48 in B. & C., New Praclimt Chemistrgy
5 sets Weights,* good grade, 50 g. to 0.01 g., fractional weights, all in
covered wooden box
Materials. (For 10 Students)
1 lb. Acid, acetic (30%) c. p.
1 lb. Acid, formic (50%)12 lb. Acid, hydrochloric, c. p. (sp. gr. 1.19)
7 lb. Acid, nitric, c. p. (sp. gr. 1.42)
8 oz. Acid, oxalic, cryst., c. p.
18 lb. Acid, sulfuric, c. p. (sp. gr. 1.84)
1 gal. Alcohol, denatured
2 qt. Alcohol, ethyl (95%)1 lb. Alum, potassium and aluminum sulfate
4 oz. Aluminum, sheet, 18 gauge
* See footnote in regard to balances.

1«0 APPENDIX
8 oz. Aluminum sulfate, cryst.
1 lb. Aluminum wire (# 18)
1 lb. Ammonium chloride, c. p.
10 lb. Ammonium hydroxide, c. p. (sp. gr. 0.90)
1 oz. Ammonium molybdate, cryst., c. p.
8 oz. Ammonium nitrate, cryst., c. p.
4 oz. Ammonium oxalate, cryst., c. p.
1 lb. Ammonium sulfide solution
4 oz. Antimony, powdered
3 sq. ft. Asbestos paper, thick
1 lb. Barium chloride, cryst., c. p.
4 oz. Bismuth, metal (gran.)
1 lb. Bleaching powder (chloride of lime)
1 lb. Boneblack
1 lb. Borax powder1 oz. Bromine, c. p.
4 oz. Cadmium, metal (mossy)
1 oz. Cadmium nitrate, c. p.
1 lb. Calcium carbide
5 lb. Calcium carbonate (marble chips)
1 lb. Calcium carbonate (precipitated chalk)
4 oz. Calcium chloride, cryst., c. p.
2 lb. Calcium chloride (fused or granular)
2 lb. Calcium oxide (quicklime) in tin can
1 lb. Calcium sulfate, gypsum5 lb. Calcium sulfate, plaster of Paris
12 Carbon rods (6" X ift-")
2 lb. Carbon bisulfide (technical)
1 lb. Carbon tetrachloride (technical)
12 Charcoal blocks for blowpiping
1 lb. Charcoal, wood (powdered)
4 oz. Chromium (ic) sulfate, dry, purified
1 oz. Cobalt chloride, c. p.
1 oz. Cobalt nitrate, c. p.
1 oz. Cochineal, powder
32 sq. in. Copper gauze, 80 mesh8 oz. Copper sheet, 0.005" thick
2 lb. Copper turnings, clean, fine
1 lb. spool Copper wire, # 18
1 lb. spool Copper wire, # 24
1 lb. spool Copper wire, § 30
1 lb. Copper chloride, c. p.
4 oz. Copper (ic) nitrate, cryst., c. p»

APPENDIX 191
4 oz. Copper (ic) oxide, black powder, c. p.
4 oz. Copper (ous) oxide, red powder, c. p.
8 oz. Copper oxide, wire form
4 oz. Copper sulfate, anhydrous, c. p.
1 lb. Copper sulfate, cryst., c. p.
4 oz. Cotton, absorbent
1 lb. Ether, U. S. P. Squibb’s
4 oz. Fehling’s solution, two solutions in separate bottles
1 lb. Formaldehyde (37 %)10 g. Fuchsin (Rosaniline)
4 oz. Gelatin, gran.
1 oz. Glass wool, fine threads
1 lb. Glucose (sirup)
8 oz. Glycerin, white, U. S. P.
1 lb. Hydrogen peroxide, U. S. P.
1 oz. Iodine, resublimed, U. S. P.
4 oz. Iron chloride (ferric), c. p.
1 lb. Iron filings, clean, fine, or steel wool
8 oz. Iron powder reduced by hydrogen
1 lb. Iron (ferric) oxide, technical
1 lb. Iron pyrite
1 lb. Iron sulfate (ferrous), cryst., c. p.
1 lb. Iron sulfide (ferrous), sticks, for HjS1 pkg. Junket (rennet) tablets
1 lb. Kaolin (china clay)
1 lb. Lead, metal, foil (tea lead)
1 lb. Lead, metal, finely divided
4 oz. Lead acetate, cryst., c. p.
8 oz. Lead carbonate (basic, dry)
1 lb. Lead nitrate, cryst., c. p.
1 lb. Lead oxide (litharge), powder1 lb. Lead sulfide (galena)
1 oz. Lithium chloride, c. p.
1 oz. Litmus cubes
2 tubes Litmus paper— 100 strips blue
2 tubes Litmus paper — 100 strips red
4 oz. Logwood, extract
1 oz. Magnesium, metal, ribbon
8 oz. Magnesium carbonate, powder4 oz. Magnesium oxide
1 lb. Magnesium sulfate, cryst. (Epsom salts)
4 oz. Manganese chloride, cryst.
2 lb. Manganese dioxide, gran., free from carbon

192 APPENDIX
4 oz. Manganese dioxide, powdered, c. p.
4 oz. Mercuric chloride, U. S. P., powder8 oz. Mercuric oxide, red powder4 oz. Mercurous nitrate, cryst.
4 oz. Mercury, metal, redistilled
10 g. Methyl orange
1 pt. Molasses, good quality
4 oz. Nickel (ous) sulfate, cryst.
1 pt. Olive oil
8 oz. Parchment paper
4 oz. Phenolphthalein solution (1%)1 oz. Phosphorus, red, amorphous4 oz. Phosphorus, yellow, sticks
4 oz. Picric acid, U. S. P., cryst.
4 oz. Potassium bitartrate (cream of tartar), c. p., powder4 oz. Potassium bromide, U. S. P., cryst.
4 oz. Potassium carbonate, cryst., c. p.
1 lb. Potassium chlorate, small cryst., c. p.
4 oz. Potassium chloride, cryst., c. p.
4 oz. Potassium chromate, cryst., purified
1 lb. Potassium dichromate, cryst., technical
4 oz. Potassium ferricyanide, cryst., c. p.
4 oz. Potassium ferrocyanide, cryst., c. p.
1 lb. Potassium hydroxide, U. S. P., pellets
4 oz. Potassium iodide, cryst., c. p.
1 lb. Potassium nitrate, cryst., c. p.
4 oz. Potassium oxalate, cryst., c. p.
4 oz. Potassium permanganate, cryst., c. p.
8 oz. Potassium-sodium tartrate (Rochelle salt), U. S. P., powder4 oz. Potassium sulfocyanate (thiocyanate), cryst., c. p.
1 oz. Pyrogallol
5 lb. Silica (sand)
4 oz. Silver nitrate, cryst., c. p.
1 lb. Soda lime, granular
4 oz. Sodium, metal
1 lb. Sodium acetate, powdered, anhydrous, c. p.
1 lb. Sodium bicarbonate (baking soda), U. S. P., powder1 lb. Sodium bisulfite, dry, purified
4 oz. Sodium bromide, cryst., c. p.
1 lb. Sodium carbonate (washing soda), U. S. P., cryst.
8 oz. Sodium carbonate, dry, c. p.
5 lb. Sodium chloride (common salt), fine, white
2 lb. Sodium hydroxide, sticks, U. S. P.

APPENDIX 193
4 oz. Sodium iodide, U. S. P.
1 lb. Sodium nitrate, cryst., c. p.
4 oz. Sodium peroxide, powder, purified
4 oz. Sodium phosphate (disodium), cryst., c. p.
1 pt. Sodium silicate solution (water glass), technical
1 lb. Sodium sulfate, cryst., c. p.
2 lb. Sodium thiosulfate (“ hypo ”), cryst., pea size
1 lb. Starch, corn
1 lb. Starch, potato
4 oz. Steel wool (# 00)
4 oz. Strontium chloride, cryst., c. p.
2 lb. Sugar, granulated
1 lb. Sulfur, roll
1 lb. Sulfur, flowers, sublimed
4 oz. Tin, mossy4 oz. Tin, foil (0.0015" thick), pure
1 pt. Turpentine
2 lb. Zinc, mossy, technical
1 lb. Zinc, sheet
4 oz. Zinc oxide, powder8 oz. Zinc sulfate, cryst., technical
PMiscellaneous Supplies. It should be noted that this list does
not include various materials which can readily be obtained at home or
at the local stores, such as apples, baking powders, bread, butter, oleo-
margarine, soft and hard coal, calico, cotton cloth, woolen cloth and yarn,
silk, linen, mixed goods, gasoline, gunpowder, iron nails, kerosene, ma-chine oil, linseed oil, labels, matches, meat, cornmeal, oatmeal, milk, eggs,
peanuts, pinks, Portland cement, rubber bands, Castile soap, vinegar,
household ammonia, excelsior, wood chips and splints, candles, photo-
graphic developing powders, and yeast cakes.


i
I'

DATE DUE SLIP
QO 33 BG2 1937 LAB-MAN-BLACK NEHTON HENRY
NEH PRACTICAL CHEHISTRY
39891 1B9 CURR HIST
^00002 1691803
OD 33 B62 1937 lab. man.Black, Newton Henry.
New practical chemistry :
39891 169 CURR HIST
COLLaVTJOW

!PouR-riGtritE Logarithms
N 0 I 2 3 4 5 6 7 8 9 I 2 3 4 5 6 7 8 9
lO 0000 0043 0086 0128 0170 0212 0253 0294 0334 0374 4 8 12 17 21 25 29 33 37II 0414 0453 0492 0531 0569 0607 0645 0682 0719 075s 4 8 II 15 19 23 26 30 3412 0792 0828 0864 0899 0934 0969 1004 1038 1072 1106 3 7 10 14 17 21 24 28 31
13 1139 1173 1206 1239 1271 1303 1335 1367 1399 1430 3 6 10 13 16 19 23 26 29
14 1461 1492 1523 1553 1584 1614 1644 1673 1703 1732 3 6 9 12 15 18 21 24 27
IS 1761 1790 1818 1847 187s 1903 1931 1959 1987 2014 3 6 8 II 14 17 20 22 2516 2041 2068 2095 2122 2148 2175 2201 2227 2253 2279 3 5 8 II 13 16 18 21 24
17 2304 2330 235s 2380 2405 2430 2455 2480 2504 2529 2 5 7 10 12 IS 17 20 22
18 2553 2577 2601 2625 2648 2672 269s 2718 2742 2765 2 5 7 9 12 14 16 19 21
19 2788 2810 2833 2856 2878 2900 2923 2945 2967 2989 2 4 7 9 II 13 16 18 20
20 3010 3032 3054 3075 3096 3118 3139 3160 3181 3201 2 4 6 8 II 13 IS 17 19
21 3222 3243 3263 3284 3304 3324 3345 3365 3385 3404 2 4 6 8 10 12 14 16 18
22 3424 3444 3464 3483 3502 3522 3541 3560 3579 3598 2 4 6 8 10 12 14 IS 17
23 3617 3636 3655 3674 3692 3711 3729 3747 3766 3784 2 4 6 7 9 II 13 15 17
24 3802 3820 3838 3856 3874 3892 3909 3927 3945 3962 2 4 5 7 9 II 12 14 16
25 3979 3997 4014 4031 4048 4065 4082 4099 4116 4133 2 3 5 7 9 10 12 14 IS
26 4150 4166 4183 4200 4216 4232 4249 4265 4281 4298 2 3 5 7 8 10 II 13 15
27 4314 4330 4346 4362 4378 4393 4409 4425 4440 4456 2 3 5 6 8 9 II 13 14
28 4472 4487 4502 4518 4533 4548 4564 4579 4594 4609 2 3 5 6 8 9 II 12 14
29 4624 4639 4654 4669 4683 4698 4713 4728 4742 4757 I 3 4 6 7 9 10 12 13
30 4771 4786 4800 4814 4829 4843 4857 4871 4886 4900 I 3 4 6 7 9 10 II 13
31 4914 4928 4942 4955 4969 4983 4997 5011 5024 5038 I 3 4 6 7 8 10 II 12
32 5051 5065 5079 5092 5105 5119 5132 5145 5159 5172 I 3 4 5 7 8 9 II 12
33 518s 5198 5211 5224 5237 5250 5263 5276 5289 5302 I 3 4 5 6 8 9 10 12
34 5315 5328 5340 5353 5366 5378 5391 5403 5416 5428 I 3 4 5 6 8 9 10 II
35 5441 5453 5465 5478 549° 5502 SS14 5527 5539 5551 I 2 4 5 6 7 9 10 II
36 5563 5575 5587 5599 5611 5623 5635 5647 5658 5670 I 2 4 5 6 7 8 10 II
37 5682 5694 570s 5717 5729 5740 5752 5763 5775 5786 I 2 3 5 6 7 8 9 10
38 5798 5809 5821 5832 5843 5855 5866 5877 5888 5899 I 2 3 5 6 7 8 9 10
39 S9II 5922 5933 5944 5955 5966 5977 5988 5999 6010 I 2 3 4 5 7 8 9 10
40 6021 6031 6042 6053 6064 607 s 6085 6096 6107 6117 I 2 3 4 5 6 8 9 10
41 6128 6138 6149 6160 6170 6180 6191 6201 6212 6222 I 2 3 4 5 6 7 8 9
42 6232 6243 6253 6263 6274 6284 6294 6304 6314 6325 I 2 3 4 5 6 7 8 9
43 633s 6345 6355 6365 6375 6385 6395 6405 6415 6425 I 2 3 4 5 6 7 8 9
44 643s 6444 6454 6464 6474 6484 6493 6503 6513 6522 I 2 3 4 5 6 7 8 9
45 6532 6542 6551 6561 6571 6580 6590 6599 6609 6618 I 2 3 4 5 6 7 8 9
46 6628 6637 6646 6656 6665 6675 6684 6693 6702 6712 I 2 3 4 5 6 7 7 8
47 6721 6730 6739 6749 6758 6767 6776 678s 6794 6803 I 2 3 4 5 5 6 7 8
48 6812 6821 6830 6839 6848 6857 6866 6875 6884 6893 I 2 3 4 4 5 6 7 8
49 6902 6911 6920 6928 6937 6946 6955 6964 6972 6981 I 2 3 4 4 5 6 7 8
50 6990 6998 7007 7016 7024 7033 7042 7050 7059 7067 I 2 3 3 4 5 6 7 8
SI 7076 7084 7093 7101 7110 7118 7126 7135 7143 7152 I 2 3 3 4 5 6 7 8
52 7160 7168 7177 7185 7193 7202 7210 7218 7226 7235 I 2 2 3 4 5 6 7 7
S3 7243 7251 7259 7267 7275 7284 7292 7300 7308 7316 I 2 2 3 4 5 6 6 7
54 7324 7332 7340 7348 7356 7364 7372 7380 7388 7396 I 2 2 3 4 5 6 6 7
0 I 2 3 4 5 6 7 8 9 I 2 3 4 s 6 7 8 9

Four-Figure Logarithms — Continued
N 0 I 2 3 4 S 6 7 8 9 I 2 3 4 5 6 7 8 9
55 7404 7412 7419 7427 7435 7443 7451 7459 7466 7474 I 2 2 3 4 5 5 6 7
56 7482 7490 7497 7505 7513 7520 7528 7536 7543 7551 I 2 2 3 4 5 5 6 7
57 7559 7566 7574 7582 7589 7597 7604 7612 7619 7627 I 2 2 3 4 5 5 6 7
58 7634 7642 7649 7657 7664 7672 7679 7686 7694 7701 I I 2 3 4 4 5 6 7
59 7709 7716 7723 7731 7738 7745 7752 7760 7767 7774 I I 2 3 4 4 5 6 7
60 7782 7789 7796 7803 7810 7818 7825 ’832 7839 7846 I I 2 3 4 4 5 6 6
61 7853 7860 7868 7875 7882 7889 7896 7903 7910 7917 I I 2 3 4 4 5 6 6
62 7924 7931 7938 7945 7952 7959 7966 7973 7980 7987 I I 2 3 3 4 5 6 6
63 7993 8000 8007 8014 8021 8028 S035 8041 8048 8055 I I 2 3 3 4 5 5 6
64 8062 8069 8075 8082 8089 8096 8102 8109 8116 8122 I I 2 3 3 4 5 5 6
65 8129 8136 8142 8149 8156 8162 8169 8176 8182 8189 I I 2 3 3 4 5 5 6
66 8195 8202 8209 8215 8222 8228 8235 8241 8248 8254 I I 2 3 3 4 5 5 6
67 8261 8267 8274 8280 8287 8293 8299 8306 8312 8319 I I 2 3 3 4 5 5 6
68 8325 8331 8338 8344 8351 8357 8363 8370 8376 8382 I I 2 3 3 4 4 5 6
69 8388 8395 8401 8407 8414 8420 8426 8432 8439 8445 I I 2 2 3 4 4 5 6
70 8451 8457 8463 8470 8476 8482 8488 8494 8500 8506 I I 2 2 3 4 4 5 6
71 8513 8519 8525 8531 8537 8543 8549 8555 8561 8567 I I 2 2 3 4 4 5 5
72 8573 8579 8585 8591 8597 8603 8609 8615 8621 8627 I I 2 2 3 4 4 5 5
73 8633 8639 8645 8651 8657 8663 8669 8675 8681 8686 I I 2 2 3 4 4 5 5
74 8692 8698 8704 8710 8716 8722 8727 8733 8739 8745 I I 2 2 3 4 4 5 5
75 8751 8756 8762 8768 8774 8779 8785 8791 8797 8802 I I 2 2 3 3 4 5 5
76 8808 8814 8820 8825 8831 8837 8842 8848 8854 8859 I I 2 2 3 3 4 5 5
77 8865 8871 8876 8882 8887 8893 8899 8904 8910 8915 I I 2 2 3 3 4 4 5
78 8921 8927 8932 8938 8943 8949 8954 8960 8965 8971 I I 2 2 3 3 4 4 5
79 8976 8982 8987 8993 8998 9004 9009 9015 9020 9025 I I 2 2 3 3 4 4 5
80 9031 9036 9042 9047 9053 9058 9063 9069 9074 9079 I I 2 2 3 3 4 4 1;
81 9085 9090 9096 9101 9106 9112 9117 9122 9128 9133 I I 2 2 3 3 4 4 5
82 9138 9143 9149 9154 9159 9165 9170 9175 9180 9186 I I 2 2 3 3 4 4 5
83 9191 9196 9201 9206 9212 9217 9222 9227 9232 9238 I I 2 2 3 3 4 4 5
84 9243 9248 9253 9258 9263 9269 9274 9279 9284 9289 I I 2 2 3 3 4 4 5
85 9294 9299 9304 9309 9315 9320 9325 9330 9335 9340 I I 2 2 3 3 4 4 5
86 9345 9350 9355 9360 9365 9370 9375 9380 9385 9390 I I 2 2 3 3 4 4 5
87 9395 9400 9405 9410 9415 9420 9425 9430 9435 9440 0 I I 2 2 3 3 4 488 9445 9450 9455 9460 9465 9469 9474 9479 9484 9489 0 I I 2 2 3 3 4 489 9494 9499 9504 9509 9513 9518 9523 9528 9533 9538 0 I I 2 2 3 3 4 4
90 9542 9547 9552 9557 9562 9566 9571 9576 9581 9586 0 I I 2 2 3 3 4 491 9590 9595 g6oo 9605 9609 9614 9619 9624 9628 9633 0 I I 2 2 3 3 4 492 9638 9643 9647 9652 9657 9661 9666 9671 9675 9680 0 I I 2 2 3 3 4 4
93 9685 9689 9694 9699 9703 9708 9713 9717 9722 9727 0 I I 2 2 3 3 4 4
94 9731 9736 9741 9745 9750 9754 9759 9763 9768 9773 0 I 1 2 2 3 3 4 4
95 9777 9782 9786 9791 9795 9800 9805 9809 9814 9818 0 I I 2 2 3 3 4 496 9823 9827 9832 9836 9841 9845 9850 9854 9859 9863 0 I I 2 2 3 3 4 497 9868 9872 9877 9881 9886 9890 9894 9899 9903 9908 0 1 I 2 2 3 3 4 498 9912 9917 9921 9926 9930 9934 9939 9943 9948 9952 0 I I 2 2 3 3 4 499 9956 9961 9965 9969 9974 9978 9983 9987 9991 9996 0 I I 2 2 3 3 3 4
0 I 2 3 4 5 6 7 8 9 I 2 3 4 5 6 7 8 9

Copyright © 2022 FDOKUMEN