By Ray E Badness
58
By Ray E Badness Foreword by Mark Simon
-
Upload
khangminh22 -
Category
Documents
-
view
1 -
download
0
Transcript of By Ray E Badness
By Ray E BadnessForeword by Mark Simon
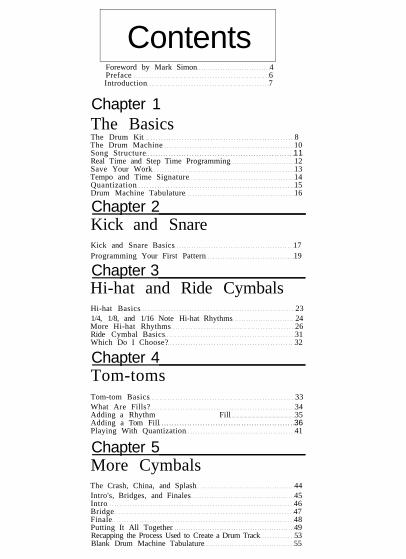
ContentsForeword by Mark Simon 4Preface 6Introduction 7
Chapter 1The BasicsThe Drum Kit 8The Drum Machine 10Song Structure 11Real Time and Step Time Programming 12Save Your Work 13Tempo and Time Signature 14Quantization 15Drum Machine Tabulature 16
Chapter 2Kick and SnareKick and Snare Basics 17Programming Your First Pattern 19
Chapter 3Hi-hat and Ride CymbalsHi-hat Basics 231/4, 1/8, and 1/16 Note Hi-hat Rhythms 24More Hi-hat Rhythms 26Ride Cymbal Basics 31Which Do I Choose? 32
Chapter 4Tom-tomsTom-tom Basics 33What Are Fills? 34Adding a Rhythm Fill 35Adding a Tom Fill 36Playing With Quantization 41
Chapter 5More CymbalsThe Crash, China, and Splash 44Intro's, Bridges, and Finales 45Intro 46Bridge 47Finale 48Putting It All Together 49Recapping the Process Used to Create a Drum Track 53Blank Drum Machine Tabulature 55
DRUMPROGRAMMING
A Complete Guide to Program and Think Like A Drummer
By Ray F. BadnessStudio Musician, B.S.E.E., M.S.E.E.
Foreword by Mark Simon
CoverSpecial Thanks to:
Anita Lawhor at RadiusMichael D'Amore at Yamaha
James Catalano at Ludwig Drums
Layout and Production - Ron Middlebrook
ISBN 0-931759-54-2SAN 683-8022
© Copyright 199] by Roger W. Graham.
CEENTERSTREAM PublicationsP.O. Box 17878 Anaheim Hills, CA 92807Phone/Fax (714) 779-9390 - E-Mail, [email protected] rights for publication and distribution are reserved. No part of this book may be reproduced in any formor by only electronic or mechanical means including information storage and retrieval systems without
FOREWORDby Mark Simon
When Ron Middlebrook of Centerstream Publishing first approached me about writing aforeword for a book on drum machine programming, I was skeptical. I thought, "who needsanother book about programming drum machines, most of the tapes I hear prove that people arealready quite adept at programming drum machines... to sound like drum machines!"
So, I read the book and was pleasantly surprised! This is not a "select pattern 22, enteredit mode B by selecting the green button labeled quantize" book. This is a book about learning tothink and program like a drummer. This (in my opinion) is a very important subject.
I meet people daily who play me their tapes with incredibly simulated guitar and sax solos,great string and horn lines, but inevitably their phenomenal feats of programming areovershadowed by a a lackluster drum track, Why will many composers spend hours getting thepitch-bend on a background harmonica track just right, only to use a "preset" drum pattern? I feelthe problem is simply a lack of good information to help them understand a complex instrumentthey do not play. That's where this book comes in. Ray has taken a direct and mathematicalapproach to teaching you drumming. I like that he gives you solid guidelines in which to work,not "rules set in stone".
When I was a working session drummer, and I would get a call from a producer I hadnever worked with before, I would try to find other albums and projects he had done to becomefamiliar with what he looked for in a drummer. I would then go to the session ready to simulatewhat I thought he wanted in a drummer. However, in many instances after the first pass he wouldtell me that I played too simple or there were loo many fills, or what ever the style was I had heardin his previous work. He would then explain that he "had hired me for my skill and reputation as acreative drummer, not as a drum machine", and that "if he had wanted the same stuff again, hewould have hired the same drummer". The point to this story is not to say, "don't bother doingyour homework, because doing my homework kept me working as a session drummer for manyyears. The point to this story is to "use your creativity".
As Ray points out, go by what your ears tell you. If it sounds good, DO IT! If it doesn't,go back and try again. By following this book you can get an understanding of the drum kit thattakes many drummers years to learn. In this age of technology, with sampling and computerassisted performance, it's easy to think our drum programming and sequencing sound "real" whencompared to other programming. But remember a drum machine is an "emulation" of a drum kit,so strive to be as creative as a "human drummer" no! a "preprogrammed drummer".
Have fun with this book and may you hear many limes upon its completion my favoritequestion about my drum machine tracks, "Who played the drums?, you used a drum machine?!"
BIO
Mark Simon was a "session drummer" for many years playing on countless record, T.V.,
and demo projects before becoming a full-time composer. Although he currently doesn't earn his
living as a drummer, Mark continues to play "real drums" for enjoyment and composing new
rhythmic ideas. Because after all, drum machines cannot be creative, (yet) they can only play what
you give them. Garbage in - Garbage out. Cool ideas in = Cool ideas out.
4
I would like to express a special thank you to the following persons fortheir unfailing support during this long and cumbersome project:
Rick BilheimerScott Lewis
Steve McEnteeDan Bertolucci
Rich AdamsChris DunkerMarq Ligman
Dan PolidiJohn Riley
John HanlonSteve WilsonPeter Doctors
andTom Graham
Thank you gentlemen.
5
Preface
Learning to program adrum machine can be both con-fusing and frustrating. Myfirst experience was no excep-tion. No matter how hard Itried, I could not manage to getthe machine to play therhythms I heard in my head.This was partly because Icouldn't play a real drum kit,and partly because I didn'thave the six years of collegeneeded to program the model Ihad. Thoroughly confused andbroke from my so called"investment", I set out forcollege to solve all my prob-lems or so I thought.
During my years atcollege, I searched high andlow for a book such as thisone, One that was geared to-ward the novice user and couldexplain both the basics ofdrumming and drum pro-gramming in 100 pages or less.I'm still looking for that book.Luckily, you've just found it.
Ray F.Badness
6
IntroductionThe complexity of most drum machines makes them difficult, if not
downright confusing to operate. To make matters worse, the owner'smanuals have a tendency to assume that the reader is familiar with sheetmusic, song structuring techniques, and the rudiments of drumming. Thiscouldn't be a worse assumption since many people who own drummachines are self taught musicians who cannot read sheet music or play areal drum kit. This text will therefore present material in such a mannerthat no music theory or drumming background is required.
Each chapter of this text will explore a different piece of drumhardware, including how it is played, and how it is programmed. Inaddition, short exercises throughout the book will further exemplify theconcepts presented and produce a sample song when completed. Probablythe most important aspect of this text is that you need not be able to play adrum rhythm with your hands in order to program. Programming will betaught using a play by number system that is so simple, anyone can learn.In a nutshell, all of the basic instruction you will need to master the art ofdrum programming lies in the following pages.
Realistic drumming techniques will be the focus of this text for tworeasons. First, they will save you money. How? Drummers with ten armsaren't very easy to come by. Consequently, your first world tour will bequite expensive when you have to hire five drummers to play what you'vehaphazardly programmed. Second, lawsuits over sampling are common.You cannot possibly get yourself into trouble if you do your owndrumming. Besides, anyone can digitally sample a drum riff from an oldJames Brown or Van Halen record. Be both original and cost effective atthe same time; do your own drumming.
If you haven't done so already, read or skim through your owner'smanual to get a basic understanding of how your machine operates. It isnot necessary that you master all of its operations, just take a few momentsto recognize the many functions that it can perform and note some of themost common keystrokes used such as pattern creation, pattern clearing,tempo adjustment, time signature specification, and quantization change.There is no question that you will not understand everything the first timearound. That is hopefully where this text will fill in the gaps. In just a fewhours you will be well on your way to making great music and havinggreat fun.
As a precautionary note, you will need 42 empty patterns in yourdrum machine to complete this text. Check your machine and verify thatpatterns 01 through 42 are indeed empty. If they are not, consult yourowner's manual for the specific keystrokes required to clear them. Goodluck!
7
-Chapter 1-
The Drum Kit
Drums, cymbals, sticks now what? Confusion! Drummers make it look so easy. Theirseemingly effortless motions impose an aura of magic over a drum kit. Similarly, a "good" martini alsoseems magical, but in actuality, the methods used to master both are really quite simple (only simple inthought however). The critical and most difficult part is the physical motion. This is the part that takesyears to master and consequently, is the magic.
Upon first glance, drumming may seem to be complex because of the number of different motionsand amount of gear involved. But upon closer inspection, you will notice that certain rituals are repeatedover and over for generic outcomes. Let me try and put it in perspective for you. When you get up in themorning, why do you go to work? Because you need to catch up on your sleep? Well, some do, but mostpeople go to work because they need money. The ritual here is work, and the outcome is money.Drumming is much the same. When you want a bare bones basic drum beat, play the Kick Bass, Snare,and Hi-hat. When you want to accent a note or chord in your music, strike the Kick and a Cymbal at thesame time. When you want to speed up your music, play faster. I think you get the picture. Honestly,the only complex part of drumming is disciplining your hands and feet to play different rhythms at thesame time.
The modern day musician has therefore been confronted with a modern day dilemma; to be or notto be a real drummer. A real kit takes years to master. To gracefully pound it with all four limbs and looksmooth at the same time is a real challenge. Not only this, but finding a place to practice can also be a timeconsuming venture. On the other hand, all of this pain and suffering can be bypassed for a few hundredbucks, this text, and a pair of headphones. Yes, once again modern electronic technology has prevailed.For a fraction of the cost of a real kit, a drum machine will allow you to own a digital sample of mostevery piece of drum hardware in existence. But, although the price of a drum machine is right, none of thecurrent models can "identically" mimic a real drummer, yet! Nevertheless, it's an alternative that must beconsidered given the fact that drum machines have been steadily improving.
Most modern day drumming uses patterns borrowed from the past. In this sense, half of yourwork has already been done for you. All you have to do is repeat history. For this reason, as we makeour way through this text, you are sure to recognize many of the patterns. This is yet one more examplethat drumming is not that difficult.
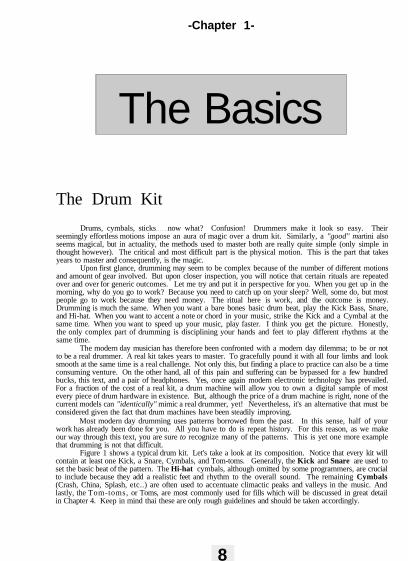
Figure 1 shows a typical drum kit. Let's take a look at its composition. Notice that every kit willcontain at least one Kick, a Snare, Cymbals, and Tom-toms. Generally, the Kick and Snare are used toset the basic beat of the pattern. The Hi-hat cymbals, although omitted by some programmers, are crucialto include because they add a realistic feet and rhythm to the overall sound. The remaining Cymbals(Crash, China, Splash, etc..) are often used to accentuate climactic peaks and valleys in the music. Andlastly, the Tom-toms, or Toms, are most commonly used for fills which will be discussed in great detailin Chapter 4. Keep in mind thai these are only rough guidelines and should be taken accordingly.
8
The Basics

As we've just discussed, each piece of drum hardware has a musical purpose. You will generallyfind that each is struck with a repeating pattern and force. Probably the most important thing to rememberis that a drummer has only two hands and two feet. Since you too have only four limbs, obviously (hereis a limit as to how many pieces you can strike at one time.
In general, a basic drum rhythm will entail controlling the amount of Hi-hat separation with yourleft foot, and producing the Kick Bass rhythm with your right. Your left hand strikes the Snare drum, andthe right strikes the Hi-hat. It is important to note that the Snare will be on your right and the Hi-hat onyour left (your right arm crosses over the left to strike the Hi-hat). Notice that only three pieces of drumhardware are used. The Kick Bass, Snare, and the Hi-hat. Also notice that it takes all four limbs tocontrol them. However, your arms and legs are not confined to this configuration. Just about anything ispossible. As you will see in Chapter 3, the right hand can also be used to strike the Ride Cymbal insteadof the Hi-hal. I encourage you to be creative when programming and experiment with the hardware atyour disposal. Figure 1 will help you picture realistic arm motions.
Keep in mind that your drum rhythms should theoretically match your music. If this statementconfuses you, take a closer listen to your favorite records. Listen to the way the Kick and Snare rhythmcompliments the music. You will find that, there is a definite correlation between the strum of the guitarand the rhythm that the Kick and Snare produce. If there is no guitar in your music, you will find that thiscorrelation occurs with another instrument. In Rap music for example, the syllables in the lyrics followthe Kick and Snare rhythm. For now, just keep this in mind. We'll talk more about how to do this inChapter 2.
9

The Drum Machine
Today's drum machines are of superb 16 bit audio quality and contain standard features that couldonly be dreamt of ten years ago (human feel, automatic drum fills, MIDI, etc.). Whereas it wasexcusable to sound awful with the first generation of drum machines, today there is no excuse for baddrum programming.
Over the Last decade, drum programming has found its way into almost every genre of music.From the music we hear on our radios and televisions, to the P.A.̀ s at our local night clubs, it'severywhere. For those of us who know how to program, it's music to our ears, but to the live drummer itmust surely seem to be a forecast for extinction.
Fortunately, no one is becoming extinct, including the live drummer. Not only are his techniquesand methods in great demand by us, the programmers, but he also has something that our modernelectronics will never replace...his human essence. Would you pay to see a band with no humanmembers? I rest my case. It's terribly more exciting to watch humans perform than to listen to a box fullof electronics spit out pre-programmed data. On the other hand, if you were a record producer interestedin keeping recording costs to a minimum, you would surely opt for the box full of electronics. What's mypoint? There is plenty of room in the world of music for drummers and drum machines. In fact, they areboth necessities!
What is a dram machine? A drum machine is a computer whose sole purpose is to facilitatethe recording and playback of drum rhythms. It is different from a personal computer (PC) in tworegards; one, it has drum sounds stored inside of il, and two, it has a built in sequencer. That is not to saythat a personal computer cannot be configured to play drum rhythms. Quite to the contrary, it is entirelypossible. However, it costs a significant amount of money to buy the sequencing software, MIDIinterface, and sound source. If you are short on cash, a drum machine will get you the most bang for yourbuck.
What does a sequencer do and where do the drum sounds come from? A sequencer does just whatyou might guess. It allows the composer to arrange sounds and patterns in any sequence, then play themback as arranged. As for the drum sounds, they arc merely digital samples stored on memory chips insidethe machine.
What is a digital sample? A digital sample is a non-continuous approximation of an analogsound. In plain English, an analog sound is the real thing, or in our case, the one that emanates from adrum when hit. As for a digital sample, think of a "connet the dots" puzzle in a child's game book. Bydrawing a line through the dots placed on a page, you can create a picture. This picture is not the realthing, but it's so close that anyone can tell what it is. Digital sampling is a similar process of storing audiodot locations in memory. When played back, they sound very close to the original, so close in fact that it'shard, if not impossible, to tell the difference.
As you might imagine, if there were more dots on your page, your picture would look much better.Theoretically, with a very large number of dots placed very close together, the dots would appear to formthe picture without having to connect them. So how do you electronically put more dots on a page? Takea higher bit sample. I'm sure you have heard of 12 bit or 16 bit samples? Higher bit samples haveimproved audio quality, just as more dots on a page make a better picture. For this reason, 16 bit samplessound better than 12 bit. It is interesting to note that the current electronic technology will allow samplingin excess of 16 bits. Unfortunately, your ear probably wouldn't be able to hear the difference and mostmusicians wouldn't be able to afford it.
As you can imagine, the first commercially available drum machines were dramatically differentthan those available today. They drew heckling and disgust from live drummers, and for good reason. Tosay that they sounded phony is putting it mildly. Not only this, but most contained barely enough memoryto program a few elaborate, non-repetetive songs. This meant that if the user were to perform for anyextended period of time, he would either have to repeat patterns often, or take frequent breaks to reload thememory of the machine. This was all compounded by the fact that memory cartridges were expensive andonly available for some machines. These early drum machines also had reputations for being veryunreliable. System crashes, or failures, were common. As with any budding technology, time wasneeded for perfection.
10

Today, perfection is near. Not only do the most recent machines sound more realistic than everbefore, but they ail support a standardized set of MIDI (Musical Instrument Digital Interface) features.These standardized MIDI features enable them to talk to one another and to other MIDI equipped devices.This ability has many applications including but not limited to, syncing your drum patterns to taped music,triggering samples existing in other machines, transferring and storing your machine's memory ontofloppy or fixed disk, and remote starting and stopping of other machines. Please refer to your local libraryor book store if you wish to find out more about the applications and protocol of MIDI. There have beenmany excellent books written on the subject, and you will surely wish to explore them after mastering theart of drum programming. Keep in mind that knowledge of MIDI is not required in order to program yourdrum machine.
Song Structure
Your song structure will make or break your song. However, if you wish to forge into thenineties by breaking traditional song structures, skipping this section will be your destiny.
If it is pop stardom you desire, your songs should generally last between 3 and 4 minutes.Longer compositions will tend to do one of two things; bore the listener, or overexpose your catchiestpassages. As they say, too much of a good thing can be detrimental. When in doubt, leave the listenerwanting more. Along the same line, instrumental sections are fine, but 12 minute solos may also bore thelistener.
As for the title of your song, something so simple could never be more important. If you've evergone into a music store in search of a recording but been unable to find il because the lyric line stuck inyour mind had absolutely nothing to do with the song title, you know what 1 mean. Theoretically, bytaking your song title from the catchiest passage of your tune, you will allow the listener to immediatelylocate it when in doubt. Let me show you what I mean. I'll give you a few song titles and you see if youcan remember the melody. "Sweet Home Alabama" -Lynyrd Skynyrd, "Lucille" -Kenny Rogers,"Rhinestone Cowboy" - Glenn Campbell. These are all songs that we love to hale but the song titleimmediately brings to mind the catchiest passage. This of course translates into additional record sales,which of course means more money for the writer (i.e. you).
All songs arc comprised of blocks that fit together in many ways. These blocks are known as theVerse, Chorus, Bridge, Intro, and Finale. The Intro is used to begin the song, and the Finale isused to end it. The portion of your song that repeats over and over is called the Chorus. Likewise, thepart that does not repeat, or vocal story telling portion, is done in the Verse. A Bridge is used to smooththe transition between Chorus and Verse and vice versa. Your song may or may not need one. However,if a transition doesn't sound pleasing, that is probably a good indication that you do.
A musical unit known as a Measure, or Bar, is used to define the length of a music block. Ameasure will vary in time duration depending on the time signature and tempo of the music. In 4/4 time,which we will discuss later, one measure consists of 4 beats, each one quarter note in length. Don't worryif you don't understand the music theory, drum machines and sequencers know how long a measure lasts.They automatically determine its length when you specify the tempo and time signature to them. Sincemost all music is written in 4/4 time, this leaves only one thing for you to specify which is the tempo. Theupcoming section entitled Tempo and Time Signature lists approximate tempos for a few styles of music.You may wish to increase or decrease these to suit your needs.
In most well structured songs, you will generally find that the length of a Chorusor Verse wilt be a multiple of 8 bars. For example, a 16 bar Verse and 8 bar Chorus arequite common. Why multiples of 8 bars? It just seems to sound best when done in this fashion. Tosay that you cannot do otherwise is quite to the contrary. I encourage creativity and new thinking. Intro'sand Finales can be short (1 or 2 bars) or iong (8 or 16 bars), just remember not to bore the listener and tokeep the overall song time around 4 minutes. Likewise, the length of a Bridge is completely arbitrary, butgenerally one or two bars are used.
11
The solo is generally played over the music of a Verse. Note that it can also be playedover a Chorus or any bit of music you desire, but the standard lengths are 8, 16, or 32 bars depending onskill and the situation. A good rule of thumb is to limit your solo to the length of a Verse.
Keep in mind that composing a song is not an instantaneous process. It will take lime to exploredifferent ideas and song structures. Experiment with the guidelines that have been presented and don'tgive up until it sounds the way you want. Your persistence will pay off.
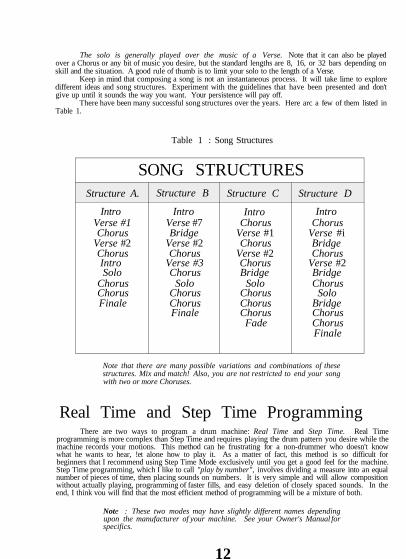
There have been many successful song structures over the years. Here arc a few of them listed inTable 1.
Table 1 : Song Structures
SONG STRUCTURESStructure A.
IntroVerse #1Chorus
Verse #2ChorusIntroSolo
ChorusChorusFinale
Structure B
IntroVerse #7Bridge
Verse #2Chorus
Verse #3Chorus
SoloChorusChorusFinale
Structure C
IntroChorus
Verse #1Chorus
Verse #2ChorusBridge
SoloChorusChorusChorusFade
Structure D
IntroChorus
Verse #iBridgeChorus
Verse #2BridgeChorus
SoloBridgeChorusChorusFinale
Note that there are many possible variations and combinations of thesestructures. Mix and match! Also, you are not restricted to end your songwith two or more Choruses.
Real Time and Step Time ProgrammingThere are two ways to program a drum machine: Real Time and Step Time. Real Time
programming is more complex than Step Time and requires playing the drum pattern you desire while themachine records your motions. This method can he frustrating for a non-drummer who doesn't knowwhat he wants to hear, !et alone how to play it. As a matter of fact, this method is so difficult forbeginners that I recommend using Step Time Mode exclusively until you get a good feel for the machine.Step Time programming, which I like to call "play by number", involves dividing a measure into an equalnumber of pieces of time, then placing sounds on numbers. It is very simple and will allow compositionwithout actually playing, programming of faster fills, and easy deletion of closely spaced sounds. In theend, I think vou will find that the most efficient method of programming will be a mixture of both.
Note : These two modes may have slightly different names dependingupon the manufacturer of your machine. See your Owner's Manual forspecifics.
12

Save Your Work
I can't stress this enough. Save your work frequently! As with all micro-computers, there is atendency to crash just when you've finished your best work (Murphy's Law). You will find that somedrum machines operate very erratically when 95% or more of the memory is used. If you must operate inthis area, save frequently and be prepared for the worst.
Most drum machines will allow memory storage to an expensive external memory cartridge, or to acassette. It takes a lot longer to save to cassette, but for the price you can't beat it. If you areprogramming a drum machine and have a personal computer (PC) available, check your music softwaremanuals because some sequencing software will allow you to do a bulk memory dump and store data onyour hard drive. This is much faster than saving to cassette, and much cheaper than a memory cartridge.If you do not own a personal computer there is another way to save your data quickly. For a few hundredbucks you can purchase a portable floppy drive. This unit represents a somewhat large initial investment,but keep in mind that floppy disks can be purchased inexpensively and can hold quite a large amount ofdata. As a side note, if you are using a personal computer to sequence your drum programming, make abackup copy of your sequencing files. Believe me, you'll be happy you did when your hard drive fails.
I can'l help but remember my first drum machine crash. I had been blindly punching buttons forthree months and had somewhat perfected 10 songs. I was just making some final changes to the drumpatterns for a gig the following week when "all of the sudden", the machine started going through its start-up routine. After it finished, to my extreme disappointment, I discovered everything was gone.Everything! Three months of work vanished into thin air in only a few seconds. Maybe you can relate orhave experienced this kind of extreme disappointment. While I was hyperventilating, my concernedroommate called the paramedics because he "thought" I was going into shock.
When the fire truck arrived, the paramedics asked me, "What happened?" I felt so stupid sayingmy drum machine crashed. Here were six paramedics expecting a heart attack victim. Finally, with greatreluctance I said, "My drum machine crashed", trying to retain what little bit of self esteem I had. As youcan imagine, the laughter that ensued was the best these men had had all week.
Let this be a lesson to you. My machine completely cleared itself to the factory showroom state inseconds, through no fault of my own! As a result, we didn't play the gig the following week, or the weekafter. I thought things would be different if I bought a new drum machine. Yah, you guessed it. That onecrashed too, but this time I was ready for it.
Save your work!
13

Tempo and Time Signature
Drum machines have limitations as to how fast or slow they will play your music. On the low end,it's generally around 50 beats per minute and on the high end, around 250. As you might guess, thetempo of a style of music will vary greatly depending on the artist. I have listed the approximate temposfor various styles of music in Table 2. You may wish to increase or decrease these tempos to suit yourneeds. In any case, they will give you a place to start.
Table 2 : Suggested tempos for various styles of music.
Style of MusicSlow Rock and Country
Rock, Metal, Pop, Country,Hip-Hop, House, Funk, and
Industrial
Fast Rock and Country
Slow Punk Rock
Tempo50
100
150
(beats / minute)
- 100
- 150
- 200
250
The time signature of your music is also very important. Most music on the radio and television ii4/4 time. It is the single most popular time signature used today. Even though most drum machines willallow you to play in a variety of time signatures, I think you will find 4/4 the easiest. For this reason, ailpatterns in this book are written for the 4/4 time signature.
What does 4/4 stand for? The numerator represents the number of beats per measure and thedenominator represents the note given a value of one beat. In this signature there are 4 beats per measurewith a quarter note carrying the value of one beat. Simply put, 1 measure = 4 beats = 4 quarter notes or 4x 1/4 = 4/4 = 1. Complete understanding of this concept is not crucial. What is important is that the timesignature of your drum machine is set to 4/4 when programming any patterns in this text.
14
QuantizationI know you've heard this word before and wondered what it meant. Quantization is a fancy word
for dividing a measure into an equal number of pieces of time. For 8 pieces you will need 1/8quantization. For 16 pieces you will need 1/16 quantization. I think you get the picture.
One sixteenth quantization will be used as the standard in this text because it lends itself nicely toprogramming todays popular drumming techniques including, double kick bass and 1/16 note hi-hatrhythms.
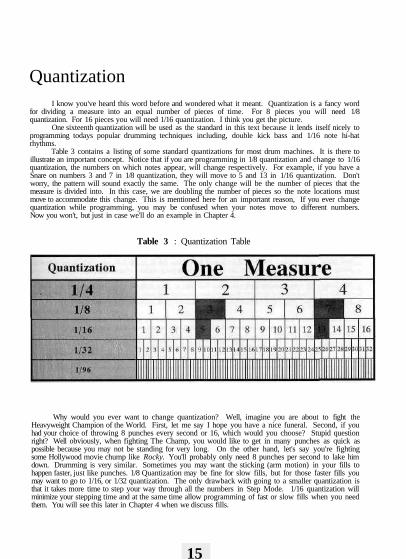
Table 3 contains a listing of some standard quantizations for most drum machines. It is there toillustrate an important concept. Notice that if you are programming in 1/8 quantization and change to 1/16quantization, the numbers on which notes appear, will change respectively. For example, if you have aSnare on numbers 3 and 7 in 1/8 quantization, they will move to 5 and 13 in 1/16 quantization. Don'tworry, the pattern will sound exactly the same. The only change will be the number of pieces that themeasure is divided into. In this case, we are doubling the number of pieces so the note locations mustmove to accommodate this change. This is mentioned here for an important reason, If you ever changequantization while programming, you may be confused when your notes move to different numbers.Now you won't, but just in case we'll do an example in Chapter 4.
Table 3 : Quantization Table
Why would you ever want to change quantization? Well, imagine you are about to fight theHeavyweight Champion of the World. First, let me say I hope you have a nice funeral. Second, if youhad your choice of throwing 8 punches every second or 16, which would you choose? Stupid questionright? Well obviously, when fighting The Champ, you would like to get in many punches as quick aspossible because you may not be standing for very long. On the other hand, let's say you're fightingsome Hollywood movie chump like Rocky. You'll probably only need 8 punches per second to lake himdown. Drumming is very similar. Sometimes you may want the sticking (arm motion) in your fills tohappen faster, just like punches. 1/8 Quantization may be fine for slow fills, but for those faster fills youmay want to go to 1/16, or 1/32 quantization. The only drawback with going to a smaller quantization isthat it takes more time to step your way through all the numbers in Step Mode. 1/16 quantization willminimize your stepping time and at the same time allow programming of fast or slow fills when you needthem. You will see this later in Chapter 4 when we discuss fills.
15
Drum Machine Tabulature
The drum machine tabulature used in this book may seem confusing at first glance, but don'tworry. It is quite simple to understand because it is presented in a format anyone can read. Here's how itworks.
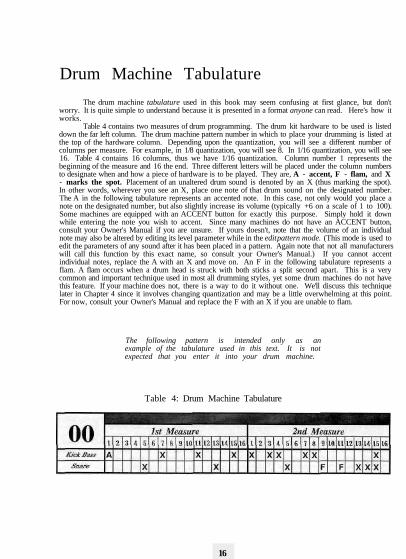
Table 4 contains two measures of drum programming. The drum kit hardware to be used is listeddown the far left column. The drum machine pattern number in which to place your drumming is listed atthe top of the hardware column. Depending upon the quantization, you will see a different number ofcolumns per measure. For example, in 1/8 quantization, you will see 8. In 1/16 quantization, you will see16. Table 4 contains 16 columns, thus we have 1/16 quantization. Column number 1 represents thebeginning of the measure and 16 the end. Three different letters will be placed under the column numbersto designate when and how a piece of hardware is to be played. They are, A - accent, F - flam, and X- marks the spot. Placement of an unaltered drum sound is denoted by an X (thus marking the spot).In other words, wherever you see an X, place one note of that drum sound on the designated number.The A in the following tabulature represents an accented note. In this case, not only would you place anote on the designated number, but also slightly increase its volume (typically +6 on a scale of 1 to 100).Some machines are equipped with an ACCENT button for exactly this purpose. Simply hold it downwhile entering the note you wish to accent. Since many machines do not have an ACCENT button,consult your Owner's Manual if you are unsure. If yours doesn't, note that the volume of an individualnote may also be altered by editing its level parameter while in the edit pattern mode. (This mode is used toedit the parameters of any sound after it has been placed in a pattern. Again note that not all manufacturerswill call this function by this exact name, so consult your Owner's Manual.) If you cannot accentindividual notes, replace the A with an X and move on. An F in the following tabulature represents aflam. A flam occurs when a drum head is struck with both sticks a split second apart. This is a verycommon and important technique used in most all drumming styles, yet some drum machines do not havethis feature. If your machine does not, there is a way to do it without one. We'll discuss this techniquelater in Chapter 4 since it involves changing quantization and may be a little overwhelming at this point.For now, consult your Owner's Manual and replace the F with an X if you are unable to flam.
The following pattern is intended only as anexample of the tabulature used in this text. It is notexpected that you enter it into your drum machine.
Table 4: Drum Machine Tabulature
16

Kick and Snare Basics
Let's discuss some very fundamental concepts regarding the Kick and Snare drums. If you arealready familiar with what they are and how they are played, you may wish to skip ahead two paragraphs.
Kick drums come in various sizes and are generally located on the floor facing toward thedrummer. As the name implies, foot and leg motion are used to depress a mallet clad pedal which strikesthe face of the drum. Although tonality is a function of size, tuning, electronic signal processing, andwhat is stuffed inside of them, generally, larger diameter drums have a lower pitch than smaller.
The Snare drum on the other hand, is usually hit with a stick or brush. Although one could usejust about anything including his/her hands, head, or feet, most drum machine samples were producedusing a stick. The Snare also varies in tonality depending on the location of the stick impact, tuning, andelectronic signal processing.
Because the Kick and Snare are the backbone of every drum rhythm, you should lay them downfirst when composing your patterns. How do you do this? As we will discuss later, the Snare is placedon the same numbers of every measure (5 and 13 in 1/16 quantization). The Kick however, takes a littlemore thought. Ideally, you would like to come up with a rough idea for your song first (i.e. rhythm guitarlick). Then, taking note of the rhythm of your strum, correlate the Kick rhythm with it. When composingyour pattern, your goal should be to make most every strum fall on either a Kick or a Snare. Trial anderror is the key here since you may find that some on and some off add a nice touch. The primary concernis to merely find a rhythm that compliments your music. Similarly, if you are programming Rap music,you would like to correlate the Kick and Snare rhythm with the syllables of the lyrics. As always, thesegeneralizations merely represent a good starting point for your drumming creativity. If confusion is stillabound, listen closely to the drumming in your favorite songs. Analyze and lake note of the way the Kickand Snare rhythm matches the music. This will surely answer many of your questions.
Before composing a Kick and Snare rhythm, it is necessary to decide which of the many samplesinside of your drum machine that you will use. This process is similar to color coordinating your clothingin the morning. While a turtle neck sweater may look absolutely phenomenal with a pair of polyesterpants, combining it with a pair of paisley Bermuda shorts results in a fashion atrocity. Remember, beautyis in the eye of the beholder so choose a Kick and Snare that you feel not only sound good together, butalso fit your music.
Matching a drum rhythm with your music will most likely be a trial and error process in thebeginning. In fact, it will probably be easier to come up with a drum rhythm first, then put music to it.
17
This is not a very efficient way to go about writing a song though. This is because you will most likelyproduce bits and pieces of music that may or may not sound good when fit together. The solution lays inthe programming methods of this text and practice.
On that note, let's discuss a couple of rules of thumb to keep in mind when composing patterns.First, do not make your patterns any longer than two Bars. (Note: Some drum machines willask you to specify your pattern length in beats as opposed to Bars. This is not a problem since 4 beats = 1Bar in 4/4 time. For 2 Bars, specify 8 beats.) The problem here is that your drum machine does notcontain an infinite amount of memory and you will use it up very quickly. Manufacturers do this because,one, memory is expensive, and two, they would like you to by their expensive memory cartridge. Forthese reasons, optimize your memory use. Two Bar patterns will do a very good job of this.Consequently they will be used exclusively throughout (his text. Also keep in mind that most all songparts are generally a multiple of two Bars. For this and countless other reasons, you cannot go wrongusing this rule of thumb. Second, the Snare is always placed on numbers 5 and 13 of eachmeasure when using 1/16 quantization. (Note: Some drum machines utilize different numberingschemes when in Step Mode. The numbers are not 1 through 16, but instead based on the beat number ofthe measure. Don't let this throw you. If you have a machine that uses this convention, keep in mind thatthere are 4 beats per measure in 4/4 time. For this reason, the numbers may start with either a 1, 2, 3, or 4and be followed by a slash and another number. Each of the 4 beats per measure will be divided andnumbered in accordance with the quantization selected. For example, if you select 1/16 quantization youwill get 16 numbers per measure each representing a discrete space on which to place a sound.) Onceagain, sixteenth quantization means that each measure is divided into sixteen equal pieces of time. Noticethat no matter how you slice it, the numbers 5 and 13 are eight numbers apart. This translates into aregular and repeating snare beat.
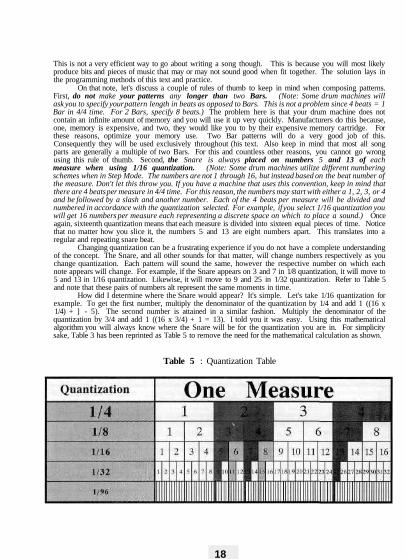
Changing quantization can be a frustrating experience if you do not have a complete understandingof the concept. The Snare, and all other sounds for that matter, will change numbers respectively as youchange quantization. Each pattern will sound the same, however the respective number on which eachnote appears will change. For example, if the Snare appears on 3 and 7 in 1/8 quantization, it will move to5 and 13 in 1/16 quantization. Likewise, it will move to 9 and 25 in 1/32 quantization. Refer to Table 5and note that these pairs of numbers alt represent the same moments in time.
How did I determine where the Snare would appear? It's simple. Let's take 1/16 quantization forexample. To get the first number, multiply the denominator of the quantization by 1/4 and add 1 ((16 x1/4) + ] - 5). The second number is attained in a similar fashion. Multiply the denominator of thequantization by 3/4 and add 1 ((16 x 3/4) + 1 = 13). I told you it was easy. Using this mathematicalalgorithm you will always know where the Snare will be for the quantization you are in. For simplicitysake, Table 3 has been reprinted as Table 5 to remove the need for the mathematical calculation as shown.
Table 5 : Quantization Table
18

Since the Snare repeats over and over at equal intervals, it is therefore up to theKick to produce the different sounding rhythms. This is how the drums are matched toyour music. In Step Mode, all It takes is a little trial and error to find the numbers that translate into therhythm you hear in your mind. With a little practice, you will soon be able to make an educated guesswhere to place the Kicks for the rhythm you want.
Placing a Snare on numbers 5 and 13 is a good starting point for most drumrhythms. However, you may wish to add more Snares, especially if you areprogramming Rap rhythms. In a case such as this, try 8 and/or 10 in addition to 5 and13 for a more funky feet.
It is very common today to find two Kick drums in a drum kit. Most drum kits of yesteryear hadonly one. As you can imagine, with only a single Kick, drummers were limited in both speed andrhythms. Double Kick, or two Kick drums, allow the drummer to produce faster, more diverse Kickrhythms because there are two bass drums, one for each foot. Unfortunately, this also creates a dilemma.Namely, it requires removing the left foot from the Hi-hat pedal in order to play the second Kick. Becauseof this, you will find that some drummers have 2 Hi-hats, one locked in the closed position, and oneunaltered as before. This in turn allows the drummer to play the Hi-hat in the closed position withouthaving to remove his left foot from the second Kick to depress the pedal. Of course, Ihis whole processadds to the complexity and cost of drumming, but the sound makes the sacrifice worthwhile.
Double Kick is not hard to master with a drum machine. In fact, you probably would havediscovered it on your own if I didn't tell you. In 1/16 quantization, all you have to do is place the Kickson adjacent numbers and increase the tempo. For ear pleasing reasons, it is not advisable to place sixteenKicks in a row. Place them next to each other, here and there, or wherever you find produces a rhythm toyour liking. Experimentation is the key. For example, placing Kicks on numbers 7, 9, 10, and 11 andincreasing the tempo to around 150 will do the trick. You will see how simple it is in the next sectionwhen we key in our first patterns.
Note that a real drummer will vary the amount of force applied on each Kick. This is easilyremedied in our case by increasing the volume of some of the Kicks slightly. Consult your Owner'sManual for specific instruction on editing single note parameters. Typically, increasing the volume levelby +6 on a scale of 1 to 100 will improve realism greatly. Experimentation is the key here.
You may also wish to vary the pilch of your Kicks. As you can imagine, a real drummer cannotperfectly tune both of his Kicks to exactly the same pitch as you can with your drum machine. For thisreason, if you vary the pitch of your Kicks slightly, you may notice an even greater increase in realisticsound.
Programming Your First PatternConsult your Owner's Manual for instruction on pattern creation if you are not already familiar
with your machine. Most drum machines will ask you to specify the length of your pattern before youstart. Two Bars will be the standard length for all patterns in this book, so if you must, specify 2. Againnote that some drum machines will ask you to specify your pattern length in beats. If this is the case, use8 beats since 4 beats = 1 Bar in 4/4 time. You will also wish designate the time signature at which youwill be working. Again, all patterns in this book are written for 4/4 time (Note that this is the defaulttime signature for most drum machines so you can probably skip this step). As for tempo, designate 115beats per minute. Don't forget, some drum machines utilize different numbering schemes when in StepMode. The numbers are not 1 through 16, but instead based on the beat number of the measure. Don't letthis throw you. If you have a machine that uses this convention, keep in mind that there are 4 beats permeasure in 4/4 time. For this reason, the numbers may start with either a 1, 2, 3, or 4 and be followed bya slash and another number. Each of the 4 beats per measure will be divided and numbered in accordancewith the quantization selected. For example, if you select 1/16 quantization you wiil get 16 numbers permeasure each representing a discrete space on which to place a sound.
19
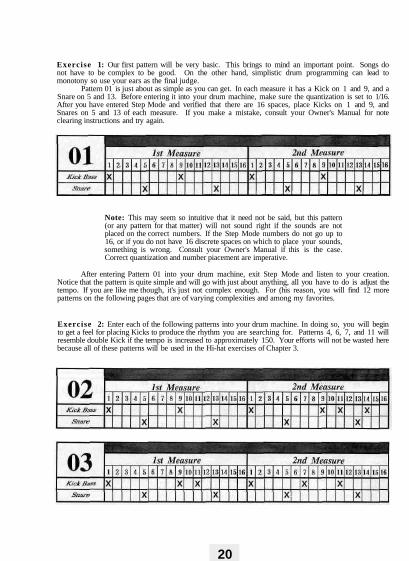
Exercise 1: Our first pattern will be very basic. This brings to mind an important point. Songs donot have to be complex to be good. On the other hand, simplistic drum programming can lead tomonotony so use your ears as the final judge.
Pattern 01 is just about as simple as you can get. In each measure it has a Kick on 1 and 9, and aSnare on 5 and 13. Before entering it into your drum machine, make sure the quantization is set to 1/16.After you have entered Step Mode and verified that there are 16 spaces, place Kicks on 1 and 9, andSnares on 5 and 13 of each measure. If you make a mistake, consult your Owner's Manual for noteclearing instructions and try again.
Note: This may seem so intuitive that it need not be said, but this pattern(or any pattern for that matter) will not sound right if the sounds are notplaced on the correct numbers. If the Step Mode numbers do not go up to16, or if you do not have 16 discrete spaces on which to place your sounds,something is wrong. Consult your Owner's Manual if this is the case.Correct quantization and number piacement are imperative.
After entering Pattern 01 into your drum machine, exit Step Mode and listen to your creation.Notice that the pattern is quite simple and will go with just about anything, all you have to do is adjust thetempo. If you are like me though, it's just not complex enough. For (his reason, you will find 12 morepatterns on the following pages that are of varying complexities and among my favorites.
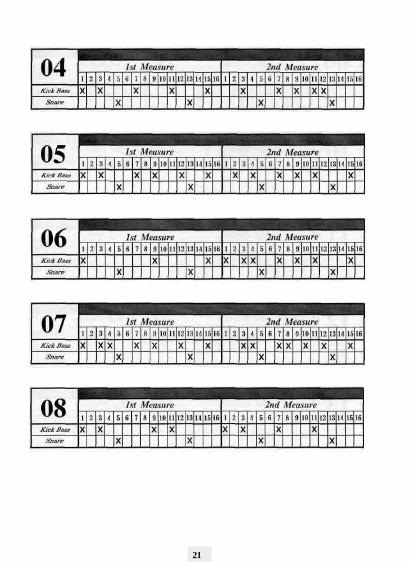
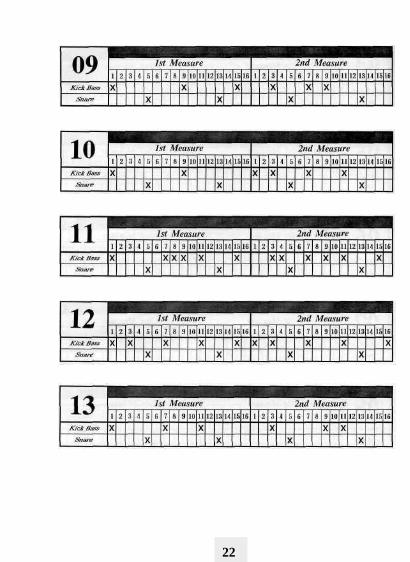
Exercise 2: Enter each of the following patterns into your drum machine. In doing so, you will beginto get a feel for placing Kicks to produce the rhythm you are searching for. Patterns 4, 6, 7, and 11 willresemble double Kick if the tempo is increased to approximately 150. Your efforts will not be wasted herebecause all of these patterns will be used in the Hi-hat exercises of Chapter 3.
20
21
22
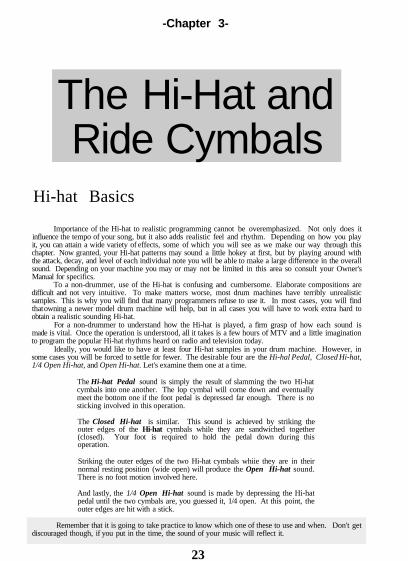
-Chapter 3-
The Hi-Hat andRide Cymbals
Hi-hat Basics
Importance of the Hi-hat to realistic programming cannot be overemphasized. Not only does itinfluence the tempo of your song, but it also adds realistic feel and rhythm. Depending on how you playit, you can attain a wide variety of effects, some of which you will see as we make our way through thischapter. Now granted, your Hi-hat patterns may sound a little hokey at first, but by playing around withthe attack, decay, and level of each individual note you will be able to make a large difference in the overallsound. Depending on your machine you may or may not be limited in this area so consult your Owner'sManual for specifics.
To a non-drummer, use of the Hi-hat is confusing and cumbersome. Elaborate compositions aredifficult and not very intuitive. To make matters worse, most drum machines have terribly unrealisticsamples. This is why you will find that many programmers refuse to use it. In most cases, you will findthat owning a newer model drum machine will help, but in all cases you will have to work extra hard toobtain a realistic sounding Hi-hat.
For a non-drummer to understand how the Hi-hat is played, a firm grasp of how each sound ismade is vital. Once the operation is understood, all it takes is a few hours of MTV and a little imaginationto program the popular Hi-hat rhythms heard on radio and television today.
Ideally, you would like to have at least four Hi-hat samples in your drum machine. However, insome cases you will be forced to settle for fewer. The desirable four are the Hi-hal Pedal, Closed Hi-hat,1/4 Open Hi-hat, and Open Hi-hat. Let's examine them one at a time.
The Hi-hat Pedal sound is simply the result of slamming the two Hi-hatcymbals into one another. The lop cymbal will come down and eventuallymeet the bottom one if the foot pedal is depressed far enough. There is nosticking involved in this operation.
The Closed Hi-hat is similar. This sound is achieved by striking theouter edges of the Hi-hat cymbals while they are sandwiched together(closed). Your foot is required to hold the pedal down during thisoperation.
Striking the outer edges of the two Hi-hat cymbals whiie they are in theirnormal resting position (wide open) will produce the Open Hi-hat sound.There is no foot motion involved here.
And lastly, the 1/4 Open Hi-hat sound is made by depressing the Hi-hatpedal until the two cymbals are, you guessed it, 1/4 open. At this point, theouter edges are hit with a stick.
Remember that it is going to take practice to know which one of these to use and when. Don't getdiscouraged though, if you put in the time, the sound of your music will reflect it.
23
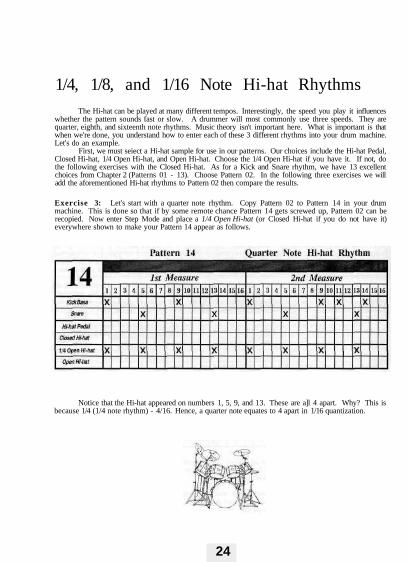
1/4, 1/8, and 1/16 Note Hi-hat RhythmsThe Hi-hat can be played at many different tempos. Interestingly, the speed you play it influences
whether the pattern sounds fast or slow. A drummer will most commonly use three speeds. They arequarter, eighth, and sixteenth note rhythms. Music theory isn't important here. What is important is thatwhen we're done, you understand how to enter each of these 3 different rhythms into your drum machine.Let's do an example.
First, we must seiect a Hi-hat sample for use in our patterns. Our choices include the Hi-hat Pedal,Closed Hi-hat, 1/4 Open Hi-hat, and Open Hi-hat. Choose the 1/4 Open Hi-hat if you have it. If not, dothe following exercises with the Closed Hi-hat. As for a Kick and Snare rhythm, we have 13 excellentchoices from Chapter 2 (Patterns 01 - 13). Choose Pattern 02. In the following three exercises we willadd the aforementioned Hi-hat rhythms to Pattern 02 then compare the results.
Exercise 3: Let's start with a quarter note rhythm. Copy Pattern 02 to Pattern 14 in your drummachine. This is done so that if by some remote chance Pattern 14 gets screwed up, Pattern 02 can berecopied. Now enter Step Mode and place a 1/4 Open Hi-hat (or Closed Hi-hat if you do not have it)everywhere shown to make your Pattern 14 appear as follows.
Notice that the Hi-hat appeared on numbers 1, 5, 9, and 13. These are a]l 4 apart. Why? This isbecause 1/4 (1/4 note rhythm) - 4/16. Hence, a quarter note equates to 4 apart in 1/16 quantization.
24
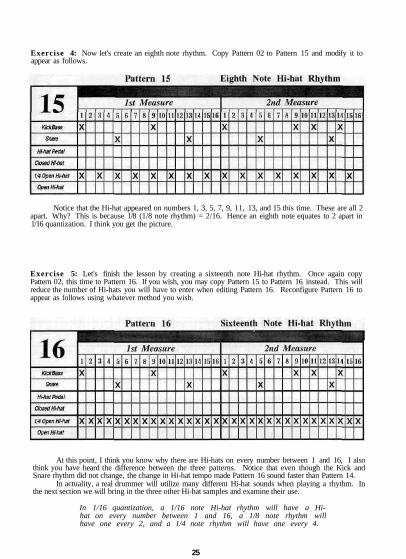
Exercise 4: Now let's create an eighth note rhythm. Copy Pattern 02 to Pattern 15 and modify it toappear as follows.
Notice that the Hi-hat appeared on numbers 1, 3, 5, 7, 9, 11, 13, and 15 this time. These are all 2apart. Why? This is because 1/8 (1/8 note rhythm) = 2/16. Hence an eighth note equates to 2 apart in1/16 quantization. I think you get the picture.
Exercise 5: Let's finish the lesson by creating a sixteenth note Hi-hat rhythm. Once again copyPattern 02, this time to Pattern 16. If you wish, you may copy Pattern 15 to Pattern 16 instead. This willreduce the number of Hi-hats you will have to enter when editing Pattern 16. Reconfigure Pattern 16 toappear as follows using whatever method you wish.
At this point, I think you know why there are Hi-hats on every number between 1 and 16, I alsothink you have heard the difference between the three patterns. Notice that even though the Kick andSnare rhythm did not change, the change in Hi-hat tempo made Pattern 16 sound faster than Pattern 14.
In actuality, a real drummer will utilize many different Hi-hat sounds when playing a rhythm. Inthe next section we will bring in the three other Hi-hat samples and examine their use.
In 1/16 quantization, a 1/16 note Hi-hat rhythm will have a Hi-hat on every number between 1 and 16, a 1/8 note rhythm willhave one every 2, and a 1/4 note rhythm will have one every 4.
25
More Hi-hat RhythmsNow that we've got 1/4, 1/8, and 1/16 note rhythms under our belt, let's create some new rhythms
by combining all of the Hi-hat samples inside of your drum machine. Keep in mind that your Hi-hatpatterns will most likely sound a little hokey when compared with the real thing, but if you play aroundwith the attack, decay, and level of each individual note in your pattern, you'll be surprised at thedifference you can make. Limitations in this area may become apparent with older drum machines.
There are no rules in songwriting, only patterns that sound good when played. Do not let thepatterns I am about to present confine your creativity. They are only a basis from which to build yourdrumming technique. Analyze them, experiment, and challenge yourself, because after all, that is whatwill set you apart from everyone else.
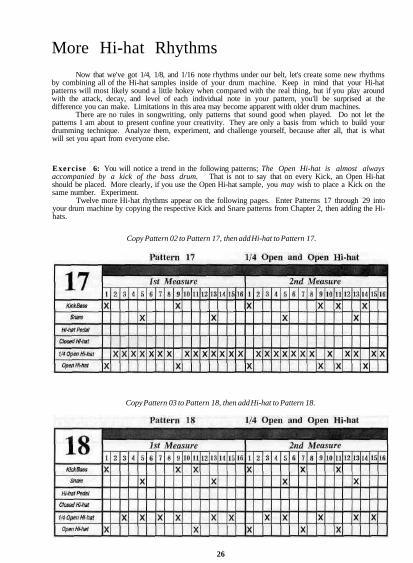
Exercise 6: You will notice a trend in the following patterns; The Open Hi-hat is almost alwaysaccompanied by a kick of the bass drum. That is not to say that on every Kick, an Open Hi-hatshould be placed. More clearly, if you use the Open Hi-hat sample, you may wish to place a Kick on thesame number. Experiment.
Twelve more Hi-hat rhythms appear on the following pages. Enter Patterns 17 through 29 intoyour drum machine by copying the respective Kick and Snare patterns from Chapter 2, then adding the Hi-hats.
Copy Pattern 02 to Pattern 17, then add Hi-hat to Pattern 17.
Copy Pattern 03 to Pattern 18, then add Hi-hat to Pattern 18.
26
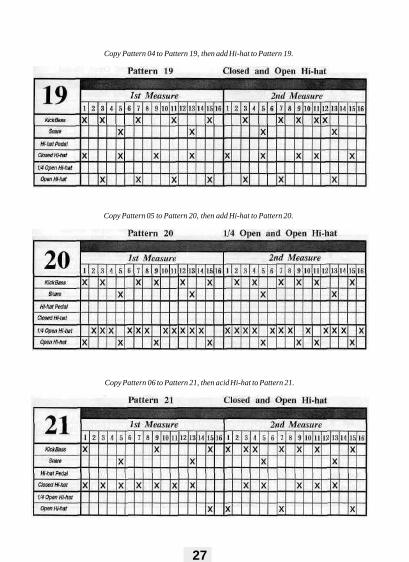
Copy Pattern 04 to Pattern 19, then add Hi-hat to Pattern 19.
Copy Pattern 05 to Pattern 20, then add Hi-hat to Pattern 20.
Copy Pattern 06 to Pattern 21, then acid Hi-hat to Pattern 21.
27
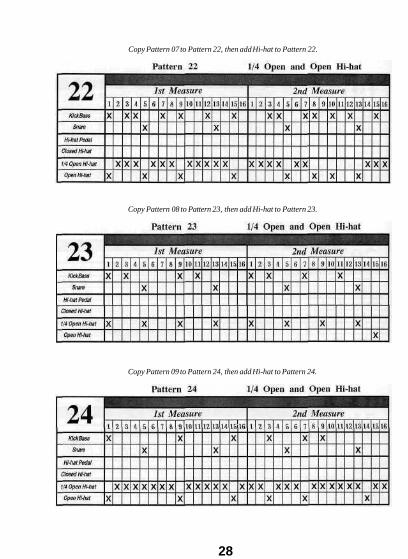
Copy Pattern 07 to Pattern 22, then add Hi-hat to Pattern 22.
Copy Pattern 08 to Pattern 23, then add Hi-hat to Pattern 23.
Copy Pattern 09 to Pattern 24, then add Hi-hat to Pattern 24.
28
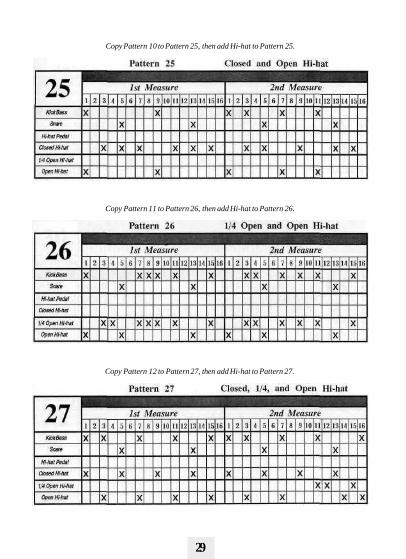
Copy Pattern 10 to Pattern 25, then add Hi-hat to Pattern 25.
Copy Pattern 11 to Pattern 26, then add Hi-hat to Pattern 26.
Copy Pattern 12 to Pattern 27, then add Hi-hat to Pattern 27.
29
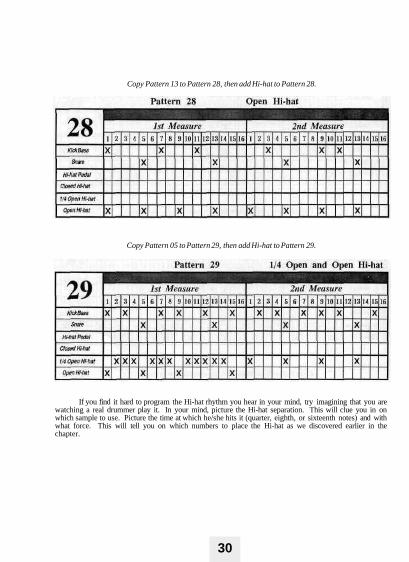
Copy Pattern 13 to Pattern 28, then add Hi-hat to Pattern 28.
Copy Pattern 05 to Pattern 29, then add Hi-hat to Pattern 29.
If you find it hard to program the Hi-hat rhythm you hear in your mind, try imagining that you arewatching a real drummer play it. In your mind, picture the Hi-hat separation. This will clue you in onwhich sample to use. Picture the time at which he/she hits it (quarter, eighth, or sixteenth notes) and withwhat force. This will tell you on which numbers to place the Hi-hat as we discovered earlier in thechapter.
30

Ride Cymbal Basics
The Ride is a cymbal as are the Hi-hats, Crash, and China. It has a different shape and soundthough. Although it can be hit anywhere, there are basically two regions that are most often played; thecenter and the edge. The center is cup shaped and when hit, sounds much like a bell. For this reason youwill find it listed as either Bell or Cup in most drum machines. The other region, or the outer edge of theRide cymbal, vaguely resembles the sound of tapping your car hood with the radio antenna. (I do notrecommend trying this at home. Only insured professionals should attempt this risky maneuver.) Thisunique tone will generally be listed as Edge or Ride.
Both regions of the Ride cymbal are played with much the same hand rhythms as the Hi-hat, butusually only with one hand. BoLh the Hi-hat and Ride arc not usually played at the same time, but they canbe. Here again, physical limitations should constrain your programming. If it sounds like it lakes threearms to play, it probably will.
In the next exercise, we will punch in a Kick and Snare rhythm thai has not yet been entered intoyour drum machine. Then, just as with the Hi-hat, we will compare quarter, eighth, and sixteenth noteRide cymbal rhythms with it.
Exercise 7: Enter the following three patterns into your drum machine, and as with the Hi-hat, listento the difference.
Copy Pattern 30 to 31 and make the following changes.
31

Copy Pattern 31 to 32 and make the following changes.
Again notice that the 1/16 note rhythm makes the overall pattern sound faster.
Which Do I Choose?
With all of these choices (1/4 Open Hi-hat, Open Hi-hat, Closed Hi-hat, Hi-hat Pedal, Ride cup,and Ride edge), how do you decide what to use and when? Well, besides what sounds best to your ear,there is a simple rule of thumb. Use either the Open Hi-hat, Ride cup, or Ride edge in yourChorus. And for the Verse, use any of the Hi-hats, but not the Ride cup or Ride edge.This rule is not etched in stone, but is followed quite often in many songs. Use it where it sounds best.Elsewhere, I encourage you to be creative.
There is one more special tip I would like to pass on. Many times you wilt come up with asection of music and put drums to it, but not know whether to use it as a Chorus orVerse. In times such as these, I let the drum machine decide. If the music sounds bestwith the Ride cup, I use it as a Chorus. Likewise, if the Hi-hat compliments the musicbest, I use it as a Verse.
32
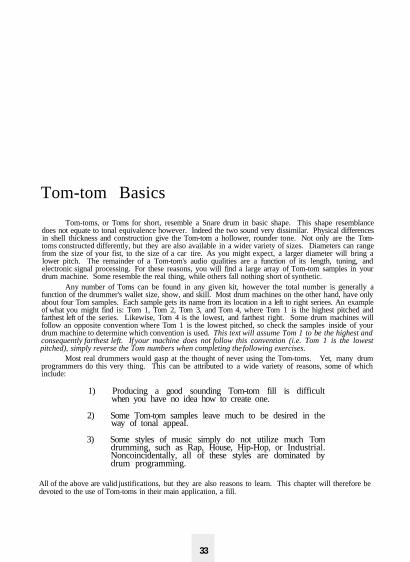
Tom-tom Basics
Tom-toms, or Toms for short, resemble a Snare drum in basic shape. This shape resemblancedoes not equate to tonal equivalence however. Indeed the two sound very dissimilar. Physical differencesin shell thickness and construction give the Tom-tom a hollower, rounder tone. Not only are the Tom-toms constructed differently, but they are also available in a wider variety of sizes. Diameters can rangefrom the size of your fist, to the size of a car tire. As you might expect, a larger diameter will bring alower pitch. The remainder of a Tom-tom's audio qualities are a function of its length, tuning, andelectronic signal processing. For these reasons, you will find a large array of Tom-tom samples in yourdrum machine. Some resemble the real thing, while others fall nothing short of synthetic.
Any number of Toms can be found in any given kit, however the total number is generally afunction of the drummer's wallet size, show, and skill. Most drum machines on the other hand, have onlyabout four Tom samples. Each sample gets its name from its location in a left to right seriees. An exampleof what you might find is: Tom 1, Tom 2, Tom 3, and Tom 4, where Tom 1 is the highest pitched andfarthest left of the series. Likewise, Tom 4 is the lowest, and farthest right. Some drum machines willfollow an opposite convention where Tom 1 is the lowest pitched, so check the samples inside of yourdrum machine to determine which convention is used. This text will assume Tom 1 to be the highest andconsequently farthest left. If your machine does not follow this convention (i.e. Tom 1 is the lowestpitched), simply reverse the Tom numbers when completing the following exercises.
Most real drummers would gasp at the thought of never using the Tom-toms. Yet, many drumprogrammers do this very thing. This can be attributed to a wide variety of reasons, some of whichinclude:
1) Producing a good sounding Tom-tom fill is difficultwhen you have no idea how to create one.
2) Some Tom-tom samples leave much to be desired in theway of tonal appeal.
3) Some styles of music simply do not utilize much Tomdrumming, such as Rap, House, Hip-Hop, or Industrial.Noncoincidentally, all of these styles are dominated bydrum programming.
All of the above are valid justifications, but they are also reasons to learn. This chapter will therefore bedevoted to the use of Tom-toms in their main application, a fill.
33
What are Fills?
Fills are short sections of drumming that differ from the basic drum pattern. What does that mean?Well, rather than boring the listener by repealing a 2 bar pattern for 4 minutes, short sections of differentdrum rhythms arc inserted (hence the name "fill") to break up repetition and form semi-climactic peaks andvalleys. They can be as simple as changing the Kick and/or Hi-hat rhythm at or near the end of a measure(a Rhythm Fill), or as complex as pounding every piece of hardware at your fingertips for a minute and ahalf (a Solo). The complexity is up to you, however, I think you will find that simplicity and complexityboth have their moments. As a general rule, the sound of your music should take priority over the skillrating. On the other hand, the more complex your drumming is, the less it will sound programmed.
How long does a fill last? Well, that is completely up to you and basically depends on whatsounds best in your song. Most commonly, a fill will last 1/8, 1/4, 1/2, or 1 measure. Atany rate, one is always placed during the last measure of the Verse and Chorus. (When in1/16 quantization, an 1/8 measure fill starts on the number 15 and ends on 16. A 1/4 measure fill starts on13 and ends on 16. A 1/2 measure fill starts on the number 9 and ends on 16, and a 1 measure fill startson the number 1 and ends on 16. Again, the size of your fill doesn't matter much. What matters is whatsounds best in your song.)
Have you ever heard someone speak in monotone? This is how your drumming sounds if you donot use fills. In order to speak with expression you've got to vary your tone and accent the importantphrases. Accent and differentiate the various blocks of your song by varying the drumming. Forexample, when transitioning between Verse and Chorus, and vice-versa, place a fillduring the end of the last measure. To explain further, if your Verse is 16 measures long, placesome sort of fill during the end of the 16th measure. It could involve the Snare, Kick, Toms, Hi-hat,Cymbals, all of the above, or anything you desire. Even silence can add a nice twist, but by placing somesort of fill at the end of the last measure, you will vary the tone and help lead into the next section ofmusic.
The end of the last measure is not the only place you should use fills. As ageneral rule of thumb, place them at the end of every fourth bar. Now obviously, you donot want your song to sound like one big drum, solo, so be selective about the size and tone of your fills.Place large fills at the junctions of major song blocks such as the Verse and Chorus,and save the small fills for mid-Verse, mid-Chorus, etc...
A "Small" fill implies 1/4 or 1/8 measure long. It could amount to an extra sticking of the Snare atthe end of a measure. It could also translate into a change in the Kick rhythm (Rhythm Fill), or a changein the Hi-hat rhythm. It could involve combining a Kick and a Cymbal crash (we'll discuss the methodsof Cymbal placement in Chapter 5). A fill can be anything you desire, or nothing at all (silence). Useyour imagination, but keep your fills fairly simple when programming smaller ones.
If you repeat the fill used at the end of Verse #1, at the end of Verse #2, that's perfectly fine, butkeep in mind that a real drummer will tend to vary his fills throughout a song. Although this isn't anabsolute requirement, if you can do this, you are approaching mastery of the art of drumming and drumprogramming.
As a general rule of thumb, Rhythm fills are placed at the end of the 4th and 12thbars in a 16 bar Verse. Snare and/or Tom fills (fills composed mainly of Snare and/orTorn notes) are placed at the end of the 8th and 16th. Note that this equates to somesort of fill, no matter how small, being placed at the end of every 4th bar. For thisreason, when all else fails, place a rhythm fill at the end of every 4th bar. Keep inmind that although the aforementioned do not have to be that long or that way, they area good place to start.
34
Adding a Rhythm Fill
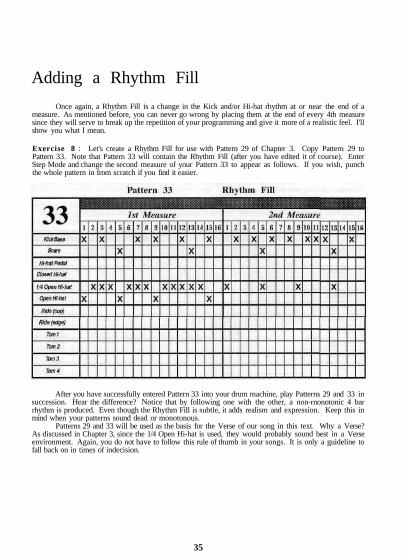
Once again, a Rhythm Fill is a change in the Kick and/or Hi-hat rhythm at or near the end of ameasure. As mentioned before, you can never go wrong by placing them at the end of every 4th measuresince they will serve to break up the repetition of your programming and give it more of a realistic feel. I'llshow you what I mean.
Exercise 8 : Let's create a Rhythm Fill for use with Pattern 29 of Chapter 3. Copy Pattern 29 toPattern 33. Note that Pattern 33 will contain the Rhythm Fill (after you have edited it of course). EnterStep Mode and change the second measure of your Pattern 33 to appear as follows. If you wish, punchthe whole pattern in from scratch if you find it easier.
After you have successfully entered Pattern 33 into your drum machine, play Patterns 29 and 33 insuccession. Hear the difference? Notice that by following one with the other, a non-rnonotonic 4 barrhythm is produced. Even though the Rhythm Fill is subtle, it adds realism and expression. Keep this inmind when your patterns sound dead or monotonous.
Patterns 29 and 33 will be used as the basis for the Verse of our song in this text. Why a Verse?As discussed in Chapter 3, since the 1/4 Open Hi-hat is used, they would probably sound best in a Verseenvironment. Again, you do not have to follow this rule of thumb in your songs. It is only a guideline tofall back on in times of indecision.
35
Adding a Tom Fill
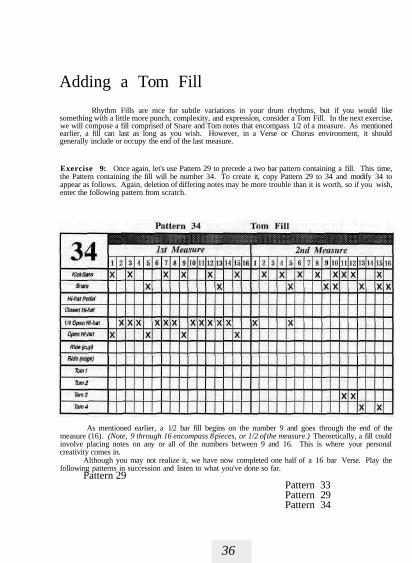
Rhythm Fills are nice for subtle variations in your drum rhythms, but if you would likesomething with a little more punch, complexity, and expression, consider a Tom Fill. In the next exercise,we will compose a fill comprised of Snare and Tom notes that encompass 1/2 of a measure. As mentionedearlier, a fill can last as long as you wish. However, in a Verse or Chorus environment, it shouldgenerally include or occupy the end of the last measure.
Exercise 9: Once again, let's use Pattern 29 to precede a two bar pattern containing a fill. This time,the Pattern containing the fill will be number 34. To create it, copy Pattern 29 to 34 and modify 34 toappear as follows. Again, deletion of differing notes may be more trouble than it is worth, so if you wish,enter the following pattern from scratch.
As mentioned earlier, a 1/2 bar fill begins on the number 9 and goes through the end of themeasure (16). (Note, 9 through 16 encompass 8 pieces, or 1/2 of the measure.) Theoretically, a fill couldinvolve placing notes on any or all of the numbers between 9 and 16. This is where your personalcreativity comes in.
Although you may not realize it, we have now completed one half of a 16 bar Verse. Play thefollowing patterns in succession and listen to what you've done so far.
Pattern 29Pattern 33Pattern 29Pattern 34
36
Keep in mind that when composing a Verse or Chorus for your own song, the approach should bethe same; Compose a two bar pattern first, then copy it to different numbers and add fills.
In a very short time, many patterns will be chained together. It may be awkward to play all ofthem in succession by hand, so at this point, you may wish to have the drum machine do it for you.Consult your Owner's Manual regarding song creation procedures for your machine. After you have donethis, create a song titled Verse1 with a tempo of 115 and enter the previous four pattern sequence in theorder shown. To make sure it sounds right, play it back.
It should be emphasized at this point that you cannot toss any old fill into your song. You mustcreate fills that match and compliment your music. For this reason, when composing your first few songsit may be easier to program a fill first, then compose music around it.
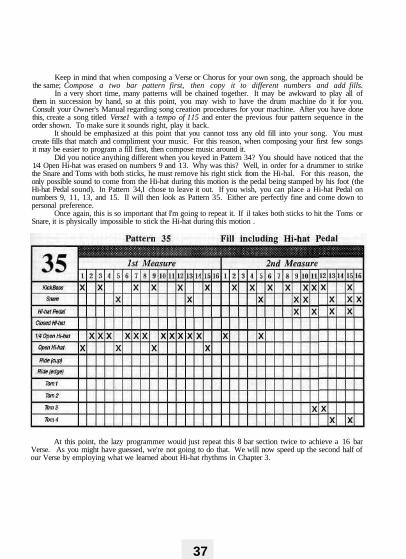
Did you notice anything different when you keyed in Pattern 34? You should have noticed that the1/4 Open Hi-hat was erased on numbers 9 and 13. Why was this? Well, in order for a drummer to strikethe Snare and Toms with both sticks, he must remove his right stick from the Hi-hal. For this reason, theonly possible sound to come from the Hi-hat during this motion is the pedal being stamped by his foot (theHi-hat Pedal sound). In Pattern 34,I chose to leave it out. If you wish, you can place a Hi-hat Pedal onnumbers 9, 11, 13, and 15. Il will then look as Pattern 35. Either are perfectly fine and come down topersonal preference.
Once again, this is so important that I'm going to repeat it. If il takes both sticks to hit the Toms orSnare, it is physically impossible to stick the Hi-hat during this motion .
At this point, the lazy programmer wouid just repeat this 8 bar section twice to achieve a 16 barVerse. As you might have guessed, we're not going to do that. We will now speed up the second half ofour Verse by employing what we learned about Hi-hat rhythms in Chapter 3.
37
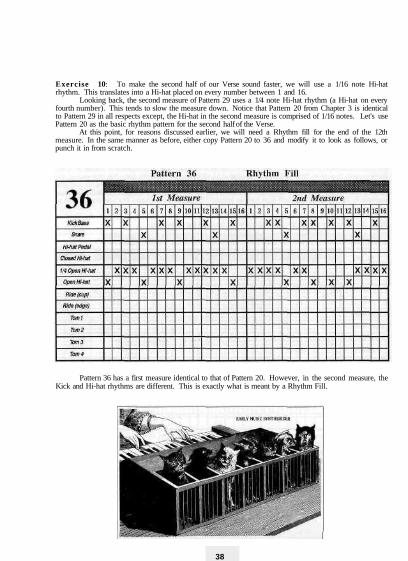
Exercise 10: To make the second half of our Verse sound faster, we will use a 1/16 note Hi-hatrhythm. This translates into a Hi-hat placed on every number between 1 and 16.
Looking back, the second measure of Pattern 29 uses a 1/4 note Hi-hat rhythm (a Hi-hat on everyfourth number). This tends to slow the measure down. Notice that Pattern 20 from Chapter 3 is identicalto Pattern 29 in all respects except, the Hi-hat in the second measure is comprised of 1/16 notes. Let's usePattern 20 as the basic rhythm pattern for the second half of the Verse.
At this point, for reasons discussed earlier, we will need a Rhythm fill for the end of the 12thmeasure. In the same manner as before, either copy Pattern 20 to 36 and modify it to look as follows, orpunch it in from scratch.
Pattern 36 has a first measure identical to that of Pattern 20. However, in the second measure, theKick and Hi-hat rhythms are different. This is exactly what is meant by a Rhythm Fill.
38
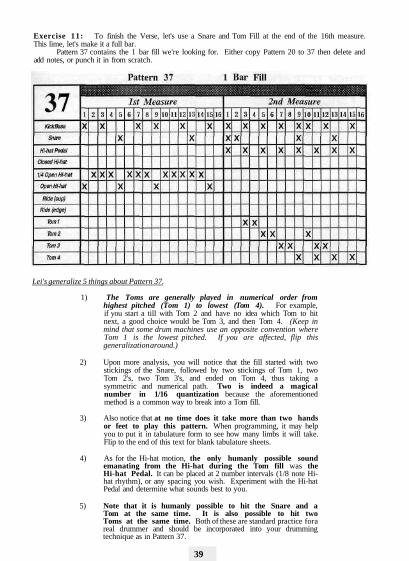
Exercise 11: To finish the Verse, let's use a Snare and Tom Fill at the end of the 16th measure.This lime, let's make it a full bar.
Pattern 37 contains the 1 bar fill we're looking for. Either copy Pattern 20 to 37 then delete andadd notes, or punch it in from scratch.
Lei's generalize 5 things about Pattern 37.
1) The Toms are generally played in numerical order fromhighest pitched (Tom 1) to lowest (Tom 4). For example,if you start a till with Tom 2 and have no idea which Tom to hitnext, a good choice would be Tom 3, and then Tom 4. (Keep inmind that some drum machines use an opposite convention whereTom 1 is the lowest pitched. If you are affected, flip thisgeneralization around.)
2) Upon more analysis, you will notice that the fill started with twostickings of the Snare, followed by two stickings of Tom 1, twoTom 2's, two Tom 3's, and ended on Tom 4, thus taking asymmetric and numerical path. Two is indeed a magicalnumber in 1/16 quantization because the aforementionedmethod is a common way to break into a Tom fill.
3) Also notice that at no time does it take more than two handsor feet to play this pattern. When programming, it may helpyou to put it in tabulature form to see how many limbs it will take.Flip to the end of this text for blank tabulature sheets.
4) As for the Hi-hat motion, the only humanly possible soundemanating from the Hi-hat during the Tom fill was theHi-hat Pedal. It can be placed at 2 number intervals (1/8 note Hi-hat rhythm), or any spacing you wish. Experiment with the Hi-hatPedal and determine what sounds best to you.
5) Note that it is humanly possible to hit the Snare and aTom at the same time. It is also possible to hit twoToms at the same time. Both of these are standard practice forareal drummer and should be incorporated into your drummingtechnique as in Pattern 37.
39

In Exercise 13 we will construct an 8 bar Chorus. It will be different from the Verse in the respectthat it will use 1/32 quantization in conjunction with one of the fills. If you've ever wondered how to getfaster sticking into your fills without increasing the tempo of your drum machine, this is it.
Exercise 12: If you haven't done so already, now is the time to consult your Owner's Manualregarding song creation. Although you can play the following pattern sequence by hand, you'll save yourfingers some trouble if you let the machine do it for you. Create a song, call it Verse 1, use a tempo of115, and place the following patterns in sequence under it.
Verse 1Pattern 29Pattern 33Pattern 29Pattern 34Pattern 20Pattern 36Pattern 20Pattern 37
Tell me it's nice.
Exercise 13: And now for the Chorus. Let's keep it short and sweet and limit it to 8 bars. Keep inmind that a Chorus can be as long as you wish, however 8 bars is the most common length. Asmentioned in Chapter 3, we would either like to use the Open Hi-hat or Ride cymbal in the Chorus.Pattern 31 from Chapter 3 will be a good choice for the basic drum rhythm since it meets this criteria.
We do not wish to repeat Pattern 31 four times for a total of 8 bars. Just as before, we will place afill at the end of every fourth measure. We could use a Rhythm Fill as before, but for the sake of practice,let's make it a 1/2 bar Snare and Tom Fill.
Copy Pattern 31 to Pattern 38. Using the usual techniques, make your Pattern 38 identical to thefollowing utilizing Step Mode.
Now listen to Patterns 31 and 38 in succession.
40
Playing With Quantization
For simplicity sake, when starling this text it was my intention to do all programming in 1/16quantization. After reaching this chapter however, I feel I must briefly expose you to programming inanother quantization. Honestly, it is not that difficult. 1/32 quantization is much like 1/16 quantization,the only difference is that instead of 16, each measure is divided into 32 pieces.
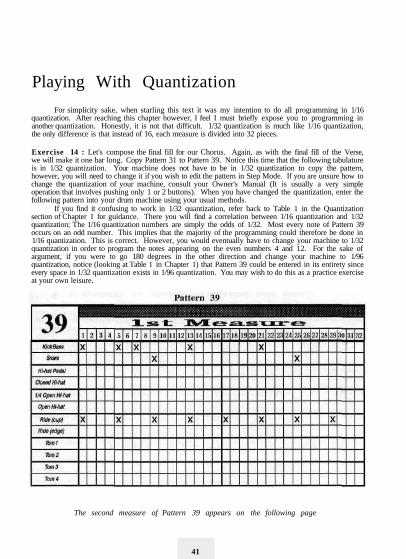
Exercise 14 : Let's compose the final fill for our Chorus. Again, as with the final fill of the Verse,we will make it one bar long. Copy Pattern 31 to Pattern 39. Notice this time that the following tabulatureis in 1/32 quantization. Your machine does not have to be in 1/32 quantization to copy the pattern,however, you will need to change it if you wish to edit the pattern in Step Mode. If you are unsure how tochange the quantization of your machine, consult your Owner's Manual (It is usually a very simpleoperation that involves pushing only 1 or 2 buttons). When you have changed the quantization, enter thefollowing pattern into your drum machine using your usual methods.
If you find it confusing to work in 1/32 quantization, refer back to Table 1 in the Quantizationsection of Chapter 1 for guidance. There you will find a correlation between 1/16 quantization and 1/32quantization; The 1/16 quantization numbers are simply the odds of 1/32. Most every note of Pattern 39occurs on an odd number. This implies that the majority of the programming could therefore be done in1/16 quantization. This is correct. However, you would eventually have to change your machine to 1/32quantization in order to program the notes appearing on the even numbers 4 and 12. For the sake ofargument, if you were to go 180 degrees in the other direction and change your machine to 1/96quantization, notice (looking at Table 1 in Chapter 1) that Pattern 39 could be entered in its entirety sinceevery space in 1/32 quantization exists in 1/96 quantization. You may wish to do this as a practice exerciseat your own leisure.
The second measure of Pattern 39 appears on the following page
41
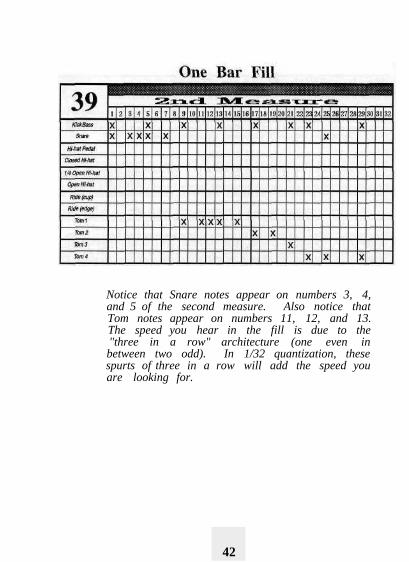
Notice that Snare notes appear on numbers 3, 4,and 5 of the second measure. Also notice thatTom notes appear on numbers 11, 12, and 13.The speed you hear in the fill is due to the"three in a row" architecture (one even inbetween two odd). In 1/32 quantization, thesespurts of three in a row will add the speed youare looking for.
42

Exercise 15 : Let's take a listen to the complete Chorus. Play the following patterns in succession.
ChorusPattern 31Pattern 38Pattern 31Pattern 39
That's it. It's that simple to compose either a Chorus or Verse. The only tough part is coming upwith the fills to match your music. With a little practice, even that will be easy.
Again, here are 2 helpful rules to follow until you acquire your own fill technique.
1) Play the Toms in increasing numerical order (Tom1 toTom4) with the ultimate goal being to get to Tom 4 (thefloor torn) by the end of the fill.
2) If the sticking in your fills isn't happening fast enough,change to 1/32 quantization and place your notes onthree numbers in a row (two odds and an even).Placement as such wilt bring faster sticking withoutincreasing the tempo of your drum machine.
I would like to explain the difference between 1/32 and 1/16 quantization once again for clarity. Asyou can imagine, with 32 pieces, there are 16 that will not appear if you change your machine back to 1/16quantization. The pattern will sound the same, however the difference will occur when you enter StepMode. Here, you will see only 16 of the original 32 pieces. They are: 1, 3, 5, 7, 9, 13, 15, 17, 19, 21,23, 25, 27, 29, and 31. Yes, all of the odd numbers. You won't be able to see any notes that were oneven numbers, yet the drum machine knows that they are there and they will be heard when the pattern isplayed.
On a similar note, if you enter a rhythm into your drum machine using the Real Time Mode, thenenter Step Mode, you may not be able to see all of the notes that you punched in. This is because someReal Time Modes use a quantization of 1/96 and beyond to record your motions. If you are steppingthrough a pattern that was recorded using 1/96 quantization and you are now in 1/16 quantization, there are80 (96 - 16 = 80) numbers that you won't be able to see unless you change your machine back to 1/96quantization. The notes are there, all you have to do is change the quantization to see them.
In Chapter 1, I mentioned that there was another way to flam if your drum machine did not have aflam button. It can be easily accomplished by placing your machine in a small quantization then puttingtwo Snares on numbers adjacent to one another. For example, place your machine in 1/96 quantizationthen put a Snare on numbers 73 and 74. Now play the pattern back at tempo of 100. What you hear iswhat is known as a flam. As mentioned in Chapter 1, a flam entails striking a drum head with both sticks,a split second apart. The problem with this method is two fold. First, the speed of the flam is now afunction of the tempo. If you increase the tempo to say 250, the two Snare notes will sound as one. Howdo you get around this? Place the Snare notes at a wider interval. For example, 73 and 75. Second,when producing a flam, a real drummer will strike the drum head using less force with one stick. To solvethis dilemma you will need to decrease the volume of one of the notes slightly. If you have a newer drummachine, this can be done in the edit pattern mode. This mode will allow you to edit the parameters of anysingle note in a programmed pattern. Or, if your machine has touch sensitive pads, simply hit the padsofter on one note.
As you've seen in this chapter, Tom-toms are an integral part of drumming. They are mainly usedfor fills but can also be incorporated into a basic drum rhythm. Use them and experiment!
43

The Crash, China, and Splash
The preceding four chapters have provided many helpful hints to make your drum programmingsound more realistic. There are yet a few more suggestions which we will discuss in this fifth and finalchapter.
The last pieces of drum hardware to be covered are the Crash, China, and Splash cymbals. (Notethat the Hi-hat and Ride are also cymbals, but because of the similar sticking techniques used to strikethem, they were grouped together and covered in Chapter 2). If your drum programming is still lackingthe realism you desire, the Crash, China, and Splash cymbals will provide it. In addition, they will alsoprovide a means to create a wider tonal variation in your music. On that note, many programmers fail touse cymbals and it shows in the tedium of their songs. A good analogy for this type of programmingmight be listening to a monotonic public speaker. After ten minutes you're drowsy, and after twentyyou're comatose. Some drum programming makes me feel this way. On the other hand, otherprogrammers use cymbals, but fail to climax their music effectively. To avoid these pitfalls, use the threerules of thumb that will be mentioned later in this chapter, and above all, experiment! Experimentation willlead to cymbal placements that sound best with your music. Let's take a closer look at what makes each ofthese cymbals sound unique.
The Crash, as with all cymbals, comes in assorted thicknesses anddiameters, each resonating at a different pitch. Its basic shape is always thesame and resembles that of an upside-down saucer. If you have ever hearda marching band leader crash two cymbals together, then you are alreadyfamiliar with the bright lone that this cymbal makes.
The China is much the same size as the Crash, but differs in thickness,shape, and tone. When looking at one, you will notice that the outer edgespoon up. It is this shape in conjunction with its thin construction thatproduces its characteristic dull tone.
The Splash is essentially a mini Crash. Because of its small diameter itresonates at a higher pitch than either of the previously mentioned two.Unfortunately, since it does not come as a stock sample in most drummachines it will not be used in this chapter. The main reason you wouldwant to use one is for the same reasons stated before. Since it is struck inmuch the same manner as the Crash and China, should you ever obtain aSplash sample in the future, the information contained in this chapter shouldbe an adequate guide for its placement in your programming.
44
Most drum machines contain very few cymbal samples. A China sample will occasionally befound, but few contain a Splash. The only sample resident in most drum machines is the Crash. Eventhough newer machines have made headway in this area with much more numerous samples than previousmodels, there are still relatively few (comparatively speaking to what you would find in a good sized realkit).
Most real drummers have a large array of different diameter Crash cymbals in their kit. This makesit possible to match the pitch of the cymbal with the sound of the music. Most newer drum machines willsimilarly allow the user to vary the pitch of the samples. This works to a certain degree, but becomesterribly unrealistic as pitch variations become extreme (and sometimes even when not so extreme).
Keep in mind that it will require experimentation to place cymbals where they sound best In yourmusic. To shorten the learning curve, I suggest that you take a stroll down to your local nightclub andwatch a real drummer in action. Take special note of how he/she will accent notes and chordes withcymbal Crashes. Also note the way he/she will use a cymbal to crescendo a section of music. Keep inmind that even an oddly placed cymbal can add a new twist to your music. In the case of cymbals, apicture will certainly be worth a thousand words. Even if your television is as close as you can get to areal drummer, a few hours of MTV will help.
As with any other piece of drum hardware, the cymbals have certain regularities of use. Here are 3rules of thumb.
1) A Crash cymbal is almost always accompanied by anaccented kick of the bass drum. Even though it is yourprerogative to place Kicks anywhere you wish, I think you will findthat it sounds best when you do this.
2) A Crash cymbal on the first number of the first measureof every Verse and Chorus is pretty standard. Generallymore are used, but this is a good starting point.
3) A Crash cymbal is almost always placed on the firstnumber of the measure immediately following a fill.
If you're confused, hang tight, these three rules will be exemplified throughout the chapter.
Intro's, Bridges, and Finales
Intro's, Bridges, and Finales are very important pieces of your song. They are responsible formaking the transitions between Verse and Chorus, Chorus and Verse, and beginning and end, soundsmooth. Without them, your song might seem mechanical, boring, and unrefined. Even though it isimportant to have a good Verse and Chorus, without these three pieces, your song may not be the best itcan possibly be. The length of your Intro, Bridge, or Finale can be 1, 2, or more measures long andinvolve just about any sounds you wish. The only catch is that they must create a smooth transition fromone part to the next.
45
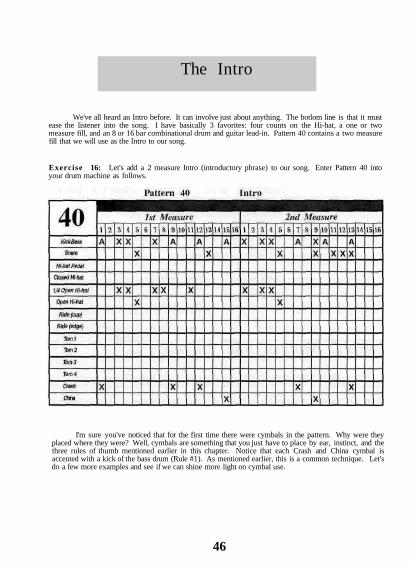
The Intro
We've all heard an Intro before. It can involve just about anything. The botlom line is that it mustease the listener into the song. I have basically 3 favorites: four counts on the Hi-hat, a one or twomeasure fill, and an 8 or 16 bar combinational drum and guitar lead-in. Pattern 40 contains a two measurefill that we will use as the Intro to our song.
Exercise 16: Let's add a 2 measure Intro (introductory phrase) to our song. Enter Pattern 40 intoyour drum machine as follows.
I'm sure you've noticed that for the first time there were cymbals in the pattern. Why were theyplaced where they were? Well, cymbals are something that you just have to place by ear, instinct, and thethree rules of thumb mentioned earlier in this chapter. Notice that each Crash and China cymbal isaccented with a kick of the bass drum (Rule #1). As mentioned earlier, this is a common technique. Let'sdo a few more examples and see if we can shine more light on cymbal use.
46
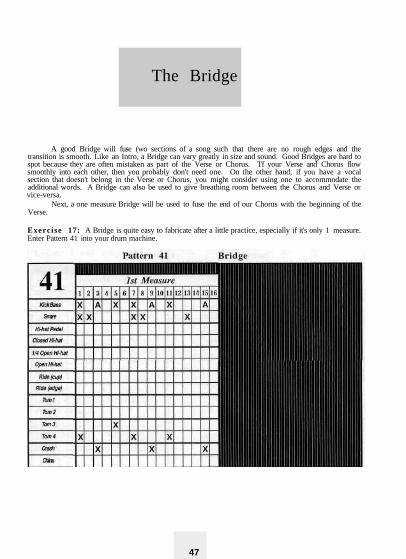
The Bridge
A good Bridge will fuse (wo sections of a song such that there are no rough edges and thetransition is smooth. Like an Intro, a Bridge can vary greatly in size and sound. Good Bridges are hard tospot because they are often mistaken as part of the Verse or Chorus. Tf your Verse and Chorus flowsmoothly into each other, then you probably don't need one. On the other hand, if you have a vocalsection that doesn't belong in the Verse or Chorus, you might consider using one to accommodate theadditional words. A Bridge can also be used to give breathing room between the Chorus and Verse orvice-versa.
Next, a one measure Bridge will be used to fuse the end of our Chorus with the beginning of theVerse.
Exercise 17: A Bridge is quite easy to fabricate after a little practice, especially if it's only 1 measure.Enter Pattern 41 into your drum machine.
47
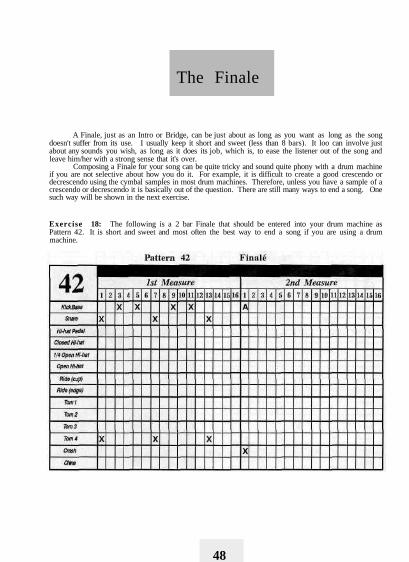
The Finale
A Finale, just as an Intro or Bridge, can be just about as long as you want as long as the songdoesn't suffer from its use. I usually keep it short and sweet (less than 8 bars). It loo can involve justabout any sounds you wish, as long as it does its job, which is, to ease the listener out of the song andleave him/her with a strong sense that it's over.
Composing a Finale for your song can be quite tricky and sound quite phony with a drum machineif you are not selective about how you do it. For example, it is difficult to create a good crescendo ordecrescendo using the cymbal samples in most drum machines. Therefore, unless you have a sample of acrescendo or decrescendo it is basically out of the question. There are still many ways to end a song. Onesuch way will be shown in the next exercise.
Exercise 18: The following is a 2 bar Finale that should be entered into your drum machine asPattern 42. It is short and sweet and most often the best way to end a song if you are using a drummachine.
48
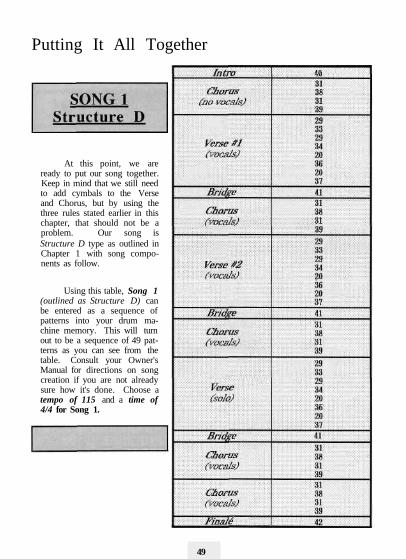
Putting It All Together
At this point, we areready to put our song together.Keep in mind that we still needto add cymbals to the Verseand Chorus, but by using thethree rules stated earlier in thischapter, that should not be aproblem. Our song isStructure D type as outlined inChapter 1 with song compo-nents as follow.
Using this table, Song 1(outlined as Structure D) canbe entered as a sequence ofpatterns into your drum ma-chine memory. This will turnout to be a sequence of 49 pat-terns as you can see from thetable. Consult your Owner'sManual for directions on songcreation if you are not alreadysure how it's done. Choose atempo of 115 and a time of4/4 for Song 1.
49
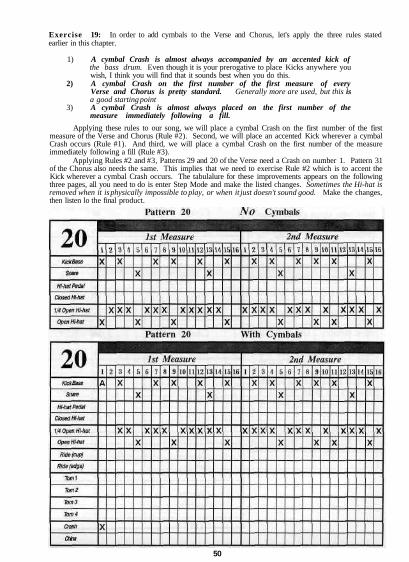
Exercise 19: In order to add cymbals to the Verse and Chorus, let's apply the three rules statedearlier in this chapter.
1) A cymbal Crash is almost always accompanied by an accented kick ofthe bass drum. Even though it is your prerogative to place Kicks anywhere youwish, I think you will find that it sounds best when you do this.
2) A cymbal Crash on the first number of the first measure of everyVerse and Chorus is pretty standard. Generally more are used, but this isa good starting point
3) A cymbal Crash is almost always placed on the first number of themeasure immediately following a fill.
Applying these rules to our song, we will place a cymbal Crash on the first number of the firstmeasure of the Verse and Chorus (Rule #2). Second, we will place an accented Kick wherever a cymbalCrash occurs (Rule #1). And third, we will place a cymbal Crash on the first number of the measureimmediately following a fill (Rule #3).
Applying Rules #2 and #3, Patterns 29 and 20 of the Verse need a Crash on number 1. Pattern 31of the Chorus also needs the same. This implies that we need to exercise Rule #2 which is to accent theKick wherever a cymbal Crash occurs. The tabulalure for these improvements appears on the followingthree pages, all you need to do is enter Step Mode and make the listed changes. Sometimes the Hi-hat isremoved when it is physically impossible to play, or when it just doesn't sound good. Make the changes,then listen lo the final product.
50

51
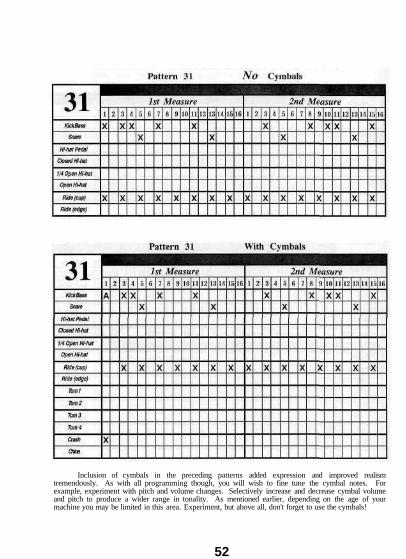
Inclusion of cymbals in the preceding patterns added expression and improved realismtremendously. As with all programming though, you will wish to fine tune the cymbal notes. Forexample, experiment with pitch and volume changes. Selectively increase and decrease cymbal volumeand pitch to produce a wider range in tonality. As mentioned earlier, depending on the age of yourmachine you may be limited in this area. Experiment, but above all, don't forget to use the cymbals!
52

LET`S RECAP THE THOUGHT PROCESS USED TO CREATE A DRUM TRACK
1. Lay down a 2 bar Kick and Snare rhythm that compliments your guitar riff,keyboard melody, bass line, etc. As shown in Chapter 2, the Snare alwaysgoes on numbers 5 and 13 when in 1/16 quantization. For Rap rhythms, tryadding a Snare on 8 and/or 10 in addition to 5 and 13.
2. (A) After completing Step 1, copy the Kick and Snare rhythm to a fewempty patterns and add 1/4, 1/8, and 1/16 note Hi-hat rhythms as describedin Chapter 3. Try using different Hi-hat samples in the patterns. Yourultimate goal should be to find a rhythm that sounds best with your music.Use the guidelines presented in Chapter 3 and experiment. For Raprhythms, try adding a Tambourine or Shaker on the numbers 1, 3, 4, 5, 7,8, 9, 11, 12, 13, and 15.
(B) Once again, copy the Kick and Snare rhythm to a few more emptypatterns. This time, add different Ride cymbal rhythms.
(C) Compare all of the patterns created in Steps 2A and 2B and determinewhich one sounds the best with your music. This is the pattern that you willuse as the basis for your Verse or Chorus. The question is, how do youdecide which to use it in? Consult the section of this text entitled Which Do IChoose? It is located in Chapter 3 and will provide some guidelines formaking this decision.
3. (A) Copy the pattern chosen in Step 2C to a few empty patterns. Thistime, add different Rhythm Fills as described in Chapter 4. Recall that aRhythm Fill is a change in the Kick and/or Hi-hat rhythm at or near the endof a measure. As before, decide on a favorite.
(B) Once again, copy the pattern chosen in Step 2C to a few more emptypatterns. This time, create large and small fills using whatever sounds youwish. The techniques shown in Chapter 4 will be quite applicable here, justremember to remove the Hi-hat and Ride cymbal notes where they arephysically impossible for a real drummer to play. Note that the number offills you will need to create depends on the length of your Verse or Chorusand what sounds best to you. Generally, the length of a Chorus or Versewill be a multiple of 8 bars. More specifically, a 16 bar Verse and an 8 barChorus are quite common. In a 16 bar Verse you may wish to place RhythmFills at the end of the 4th and 12th measures, a large fill at the end of the16th, and a small fill at the end of the 8th. Determine which fills sound bestwith your music, and as shown in Chapter 4, construct your Verse orChorus,
4. If you have just completed the drumming for your Verse, repeat Steps 1through 3 to compose the Chorus. Likewise, if you have just composed theChorus, compose the Verse.
5. If you haven't done so already, now is the time to determine a structure foryour song. For a few examples, consult the section in Chapter 1 entitledSong Structures. Try a few different arrangements to see how your songsounds best. This will require creating an Intro, and depending upon yourstructure, may also require a Bridge and Finale. Consult Chapter 5 forinstruction on creating these sections.
6. You are now ready to add the Crash, China, and Splash cymbals asdescribed in Chapter 5, Follow the three rules of thumb stated there andonce again, remove the Hi-hat and Ride cymbal notes where they arephysically impossible to play.
7. SAVE YOUR WORK!
Composing a drum track is that simple and will become second nature after you have done it a few times.Hang in there!
53

Congratulations! You have now completed this text andwill be producing great sounding drum rhythms in no time.As you have just learned, the rudiments of drumming are notthat difficult. Your real challenge lays in learning thekeystrokes to operate your machine. With the exercisespresented herein, you now have a good foundation from whichto build your drumming technique. Take what you have justlearned and experiment. Break the rules! Use theaforementioned guidelines merely as a starting point, and fallback on them only in times of indecision. It is in this mannerthat you will develop a style all your own and excel over thecreations of others. If you do not intend to have a realdrummer play your rhythms, then the sky is the limit, andindeed you should try sampling it!
54

Blank Drum Machine Tabulature
55

56
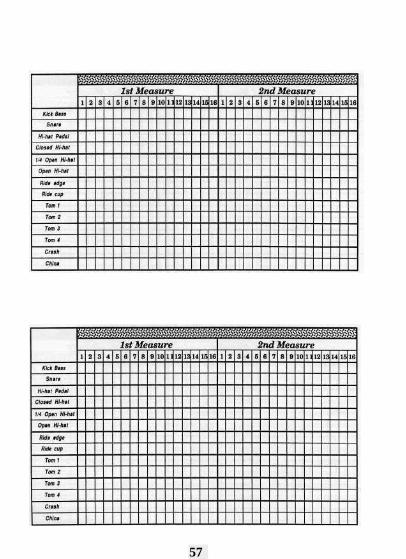
57
58