EAGLE Licensing Information User Manual - Oracle Help Center
Upload
khangminh22Category
view
3download
0
Business Center
Portfolio User Guide October 2018
CyberSource Corporation HQ | P.O. Box 8999 | San Francisco, CA 94128-8999 | Phone: 800-530-9095

CyberSource Contact InformationFor general information about our company, products, and services, go to http://www.cybersource.com.
For sales questions about any CyberSource Service, email [email protected] or call 650-432-7350 or 888-330-2300 (toll free in the United States).
For support information about any CyberSource Service, visit the Support Center: http://www.cybersource.com/support
Copyright© 2018 CyberSource Corporation. All rights reserved. CyberSource Corporation ("CyberSource") furnishes this document and the software described in this document under the applicable agreement between the reader of this document ("You") and CyberSource ("Agreement"). You may use this document and/or software only in accordance with the terms of the Agreement. Except as expressly set forth in the Agreement, the information contained in this document is subject to change without notice and therefore should not be interpreted in any way as a guarantee or warranty by CyberSource. CyberSource assumes no responsibility or liability for any errors that may appear in this document. The copyrighted software that accompanies this document is licensed to You for use only in strict accordance with the Agreement. You should read the Agreement carefully before using the software. Except as permitted by the Agreement, You may not reproduce any part of this document, store this document in a retrieval system, or transmit this document, in any form or by any means, electronic, mechanical, recording, or otherwise, without the prior written consent of CyberSource.
Restricted Rights LegendsFor Government or defense agencies. Use, duplication, or disclosure by the Government or defense agencies is subject to restrictions as set forth the Rights in Technical Data and Computer Software clause at DFARS 252.227-7013 and in similar clauses in the FAR and NASA FAR Supplement.
For civilian agencies. Use, reproduction, or disclosure is subject to restrictions set forth in subparagraphs (a) through (d) of the Commercial Computer Software Restricted Rights clause at 52.227-19 and the limitations set forth in CyberSource Corporation's standard commercial agreement for this software. Unpublished rights reserved under the copyright laws of the United States.
TrademarksAuthorize.Net, eCheck.Net, and The Power of Payment are registered trademarks of CyberSource Corporation.
CyberSource, CyberSource Payment Manager, CyberSource Risk Manager, CyberSource Decision Manager, and CyberSource Connect are trademarks and/or service marks of CyberSource Corporation.
All other brands and product names are trademarks or registered trademarks of their respective owners.
2
Contents
Chapter 1 Virtual Terminal 10Configuring Global Virtual Terminal Settings 10Configuring Virtual Terminal Receipts 11Using Batch Files to Process Multiple Transactions 12
Eligible Batch Upload Transaction Types 13Uploading Batch Transaction Requests 14Searching for and Reviewing Batch Files 15Downloading Reports for Uploaded Batch Files 15Downloading Templates for Uploading Batch Files 16
Chapter 2 Transaction Management 17Search Intro Page 17Processing Intro Page 18Transaction Types and Concepts 19
Transaction Types 19Available Processing Actions 20Processing Outcomes 21Types of Searches 21
Migrating from the Classic Business Center 21Changes to Searches 22Changes to Available Actions (Follow Ons) 22
Searching for Transactions 23Using the Search Toolbar 24
Using Filters and Parameters in Searches 25Changing the Format of the Transactions List 26Exporting Search Results 26Saving a Set of Search Criteria 27
Deleting a Saved Search 27Performing Similar Searches 28Secure Acceptance Search 28Payer Authentication Search 29
Performing Focused Searches 30Search by Transaction Phase 30
Settlements Pending Batch 31Authorizations Ready to Settle 33
New Business Center Online Help | 2018 3
Authorizations Needing Review 33Exception Search 34
Viewing Transaction Details 34The Details Page 35
Inquiring About Transactions 35Viewing and Saving Receipts 36
Processing Transactions 36Settling Transactions 37Reversing Authorization Transactions 38Voiding Transactions 38Crediting (Refunding) Transactions 39Creating New Orders and Authorizations 39
Creating a New Authorization 40Generating Secure Tokens for Transactions 41
Chapter 3 Tools 42Audit Search 42
Chapter 4 Portfolio Management 43Managing Merchant Accounts 43
Understanding How Merchant Accounts Work 44Creating Merchant Accounts 44
Sending Email to Merchants 45Uploading Multiple Merchant Accounts 46
Reporting on Uploaded Merchant Files 46Editing Merchant Details 46
Searching for Merchants 47Selecting Payment Processors 48Selecting Merchant Products 48Updating Merchant Account Status 49
Exporting Merchant Lists 50Enabling Merchant Portfolio Tools 51
Applying Branding 51Creating Branding Themes 51Modifying Existing Themes 52Assigning Branding Themes to Countries 52
Configuring Payer Authentication Profiles 53Configuring Secure Acceptance Profiles 53
Creating Secure Acceptance Profiles 54Publishing Secure Acceptance Profiles 54Searching for Secure Acceptance Profiles 55Editing Secure Acceptance Configurations 56Assigning Secure Acceptance Profiles to Merchants 57
Configuring Virtual Terminal Profiles 57Creating Virtual Terminal Profiles 58
New Business Center Online Help | September 2018 4
Searching for Virtual Terminal Profiles 58Assigning Virtual Terminal Profiles 59Unassigning Virtual Terminal Profiles 59Editing Virtual Terminal Profiles 60
Enabling Service Fees 60
Chapter 5 Reports 62Reporting Terms and Concepts 63Viewing On-Demand Reports 63
Payment Batch Summary 65Payer Authentication Summary 66Notification of Change 67Net Funding 68Purchase and Refund Details 68Chargeback Report 69Interchange Clearing Levels 71Retrieval Request Report 71
Accessing Downloadable Reports 73Downloading Available Reports 73
Information Available in Downloadable Reports 75Generating One-Time Reports 76Working with Standard Report Subscriptions 78Generating Custom Reports 79
Creating New Custom Report Subscriptions 80Saving Existing Reports as New Subscriptions 83
Modifying Custom Report Subscriptions 84Deleting Report Subscriptions 85
Appendix: Reporting Fields and Descriptions 86Application Fields 86Authorization Results Fields 86Bank Information Fields 87Batch Fields 87Bill To Fields 88Chargeback and Retrieval Fields 89Check Fields 90Conversion Fields 91Deposit Fields 91Device Fields 92Event Fields 92Exception Fields 93Fee Fields 95Fee Summary Fields 96Funding Fields 97Fund Transfer Fields 98Invoice Fields 98JP Fields 99
New Business Center Online Help | September 2018 5
Line Item Fields 100Payer Authentication Request Fields 100Payer Authentication Response Fields 101Payment Data Fields 101Payment Method Fields 105POS Terminal Exceptions Fields 106Profile Fields 107Proof XML Fields 108Recipient Fields 108Request Fields 109Risk Fields 110Sender Fields 113Sender Fields 113Settlement Fields 114Shipping Fields 115Ship To Fields 115Token Fields 116Travel Fields 116Verify Enrollment Request Fields 117Verify Enrollment Response Fields 117
Appendix: Application Types and ICS Services 117
Chapter 6 Payment Configuration 124Configuring Digital Payment Solutions 124
Using Visa Checkout 125Configuring Visa Checkout 125Downloading Your Visa Checkout Key 126Using Visa Checkout Profiles 127
Using Android Pay 128Configuring Android Pay 128
Using Apple Pay 129Enrolling in Apple Pay 129Downloading Your Apple Pay Certificate Request and Public Key 130
Using Samsung Pay 131Configuring Samsung Pay 131Downloading Your Samsung Pay Certificate Request and Public Key 131
Using Masterpass 132Configuring Masterpass 133Updating Your Masterpass Configuration 133
Managing Security Keys 134Understanding Key Types 134Creating New Keys 135Deactivating Keys 136Deleting Keys 137
Configuring Payment Processors 137Managing Secure Acceptance Settings 138
New Business Center Online Help | September 2018 6

Creating New Secure Acceptance Profiles 138Copying Secure Acceptance Profiles 139Editing Secure Acceptance Profiles 139Activating Secure Acceptance Profiles 140
Deactivating Secure Acceptance Profiles 141Searching for Secure Acceptance Profiles 141
Viewing Secure Acceptance Profiles 142Managing Smart Authorization Settings 142Managing Webhook Settings 143
Adding a New Configuration 143Editing Notification Configurations 144
Deleting a Webhook Configuration 144Processing Notifications 145Responding to Notifications 145Troubleshooting Notifications 145Supported Payment Methods 146
Chapter 7 Account Management 148Using the Message Center 148
Viewing Messages in the Message Center 148Viewing Urgent Alerts 149Viewing Notifications 149
Managing Alert Preferences 149Managing Alerting Contacts 150Enabling System Alerts 151
Managing Account Details 151Add Account Contact Information 152Managing IP Address Access to Business Center 153
Adding an IP Address 153Editing an IP Address 154Deleting an IP Address 154
Deleting Saved IP Addresses 155Managing Roles 155
Understanding Default Roles 156Viewing Role Attributes 156Searching for Roles 157Creating New Roles 157Updating Role Permissions 159Deleting Roles 160Business Center Permissions 160
Case Management 161Credit Card Account Updater 162Decision Manager 163Hosted Order Page 164Merchant Settings 164Mobile Point-of-Sale (mPOS) 165
New Business Center Online Help | September 2018 7
Payment 165Payment Tokenization 166Recurring Billing 167Reporting 167Secure Acceptance 168Secure File Share 168Tools 168Transaction Marking (AFS) 169Transaction Search 169User Management 170Virtual Terminal 170Third Party 170
Managing Users 171Creating and Modifying User Accounts 171Updating a User Account 172
Assigning Roles to Users 172Enabling Password Recovery Devices 173Updating Account Status 174Downloading User Account Details 175
Updating Your User Profile 176Managing Groups 176
Creating Groups 177Editing Groups 177
Deleting Groups 178Paying Your CyberSource Invoice 178
New Business Center Online Help | September 2018 8
New Business Center Online Help | 2018 9
Recent Revisions to This Document
Release ChangesSeptember 2018 Initial release.
1. Virtual Terminal
You can set up your Virtual Terminal to include all the information you need to collect during both Card Present (retail) or Card Not Present transactions. When making your selections, be sure to collect enough information that you can troubleshoot the order if an issue arises. Each transaction type requires at least the following information to be collected:
• Card Present: All card information (except for the card verification number), amountand currency, transaction source and type, and customer name
• Card Not Present: All Card Present values, as well as complete billing information
Options available are based on the profile and settings created for you, and may not be editable. The selections you make appear on the One-Time Payment page.
You can also configure how your customer receipts appear, including order details and contact information.
Configuring Global Virtual Terminal SettingsUse the Global tab on the Virtual Terminal Settings page to establish the values you want to capture for Card Present and Card Not Present transactions.
To configure global settings:
1 On the left navigation pane, click Virtual Terminal.
2 Click Terminal Settings. The Terminal Settings page appears.
3 On the Global tab, choose the Card Status for which you want to configure settings. The Terminal Settings page refreshes to show available settings.
4 Select the check box to use the values for all new orders of that type.
New Business Center Online Help | 2018 10
Chapter 1 Virtual Terminal
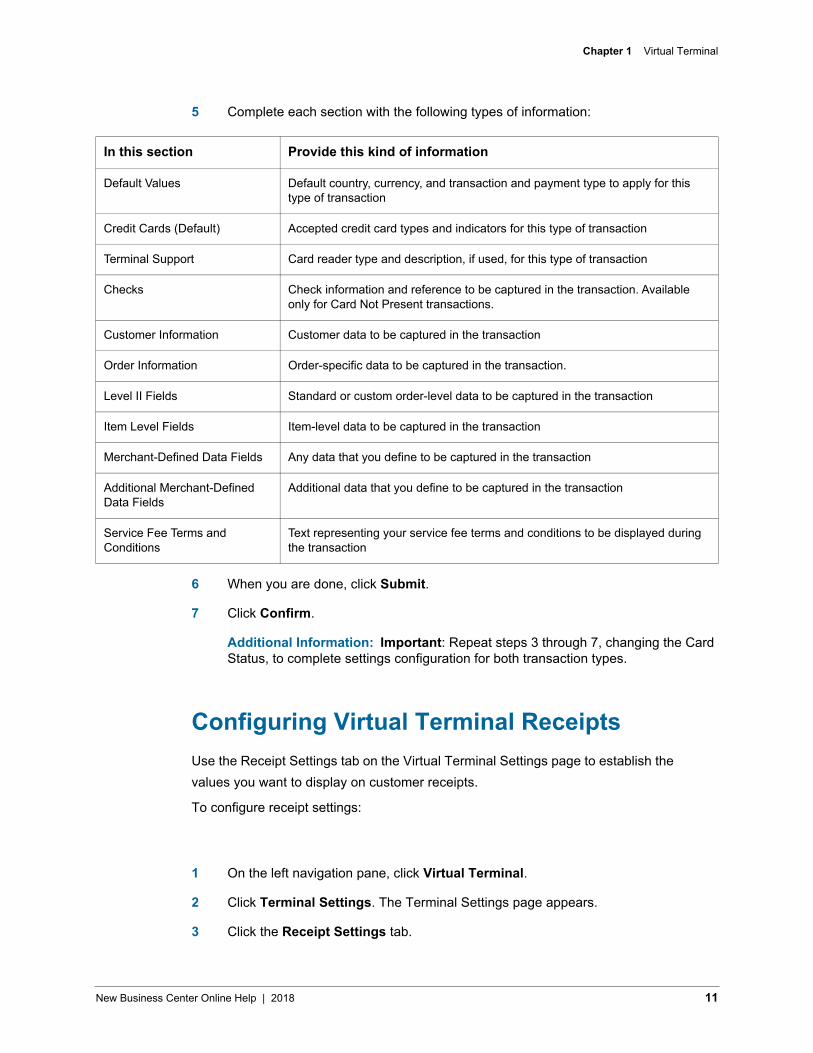
5 Complete each section with the following types of information:
6 When you are done, click Submit.
7 Click Confirm.
Additional Information: Important: Repeat steps 3 through 7, changing the Card Status, to complete settings configuration for both transaction types.
Configuring Virtual Terminal ReceiptsUse the Receipt Settings tab on the Virtual Terminal Settings page to establish the values you want to display on customer receipts.
To configure receipt settings:
1 On the left navigation pane, click Virtual Terminal.
2 Click Terminal Settings. The Terminal Settings page appears.
3 Click the Receipt Settings tab.
In this section Provide this kind of information
Default Values Default country, currency, and transaction and payment type to apply for this type of transaction
Credit Cards (Default) Accepted credit card types and indicators for this type of transaction
Terminal Support Card reader type and description, if used, for this type of transaction
Checks Check information and reference to be captured in the transaction. Available only for Card Not Present transactions.
Customer Information Customer data to be captured in the transaction
Order Information Order-specific data to be captured in the transaction.
Level II Fields Standard or custom order-level data to be captured in the transaction
Item Level Fields Item-level data to be captured in the transaction
Merchant-Defined Data Fields Any data that you define to be captured in the transaction
Additional Merchant-Defined Data Fields
Additional data that you define to be captured in the transaction
Service Fee Terms and Conditions
Text representing your service fee terms and conditions to be displayed during the transaction
New Business Center Online Help | 2018 11
Chapter 1 Virtual Terminal
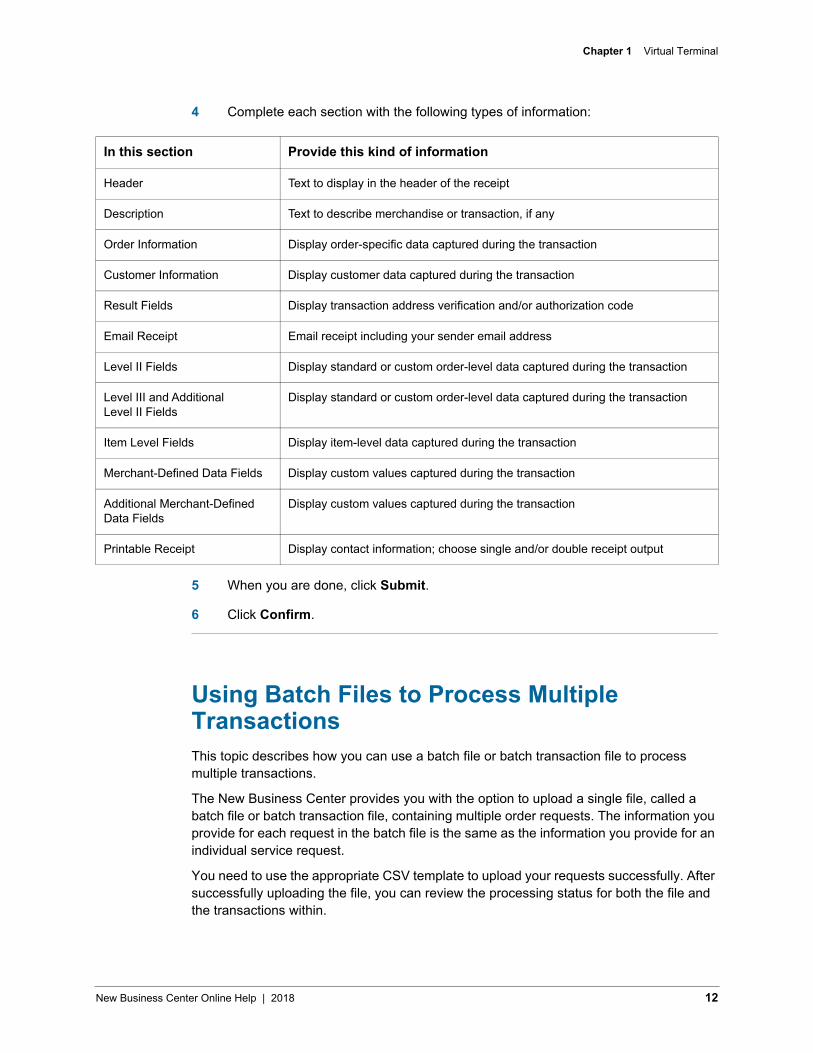
4 Complete each section with the following types of information:
5 When you are done, click Submit.
6 Click Confirm.
Using Batch Files to Process Multiple TransactionsThis topic describes how you can use a batch file or batch transaction file to process multiple transactions.
The New Business Center provides you with the option to upload a single file, called a batch file or batch transaction file, containing multiple order requests. The information you provide for each request in the batch file is the same as the information you provide for an individual service request.
You need to use the appropriate CSV template to upload your requests successfully. After successfully uploading the file, you can review the processing status for both the file and the transactions within.
In this section Provide this kind of information
Header Text to display in the header of the receipt
Description Text to describe merchandise or transaction, if any
Order Information Display order-specific data captured during the transaction
Customer Information Display customer data captured during the transaction
Result Fields Display transaction address verification and/or authorization code
Email Receipt Email receipt including your sender email address
Level II Fields Display standard or custom order-level data captured during the transaction
Level III and Additional Level II Fields
Display standard or custom order-level data captured during the transaction
Item Level Fields Display item-level data captured during the transaction
Merchant-Defined Data Fields Display custom values captured during the transaction
Additional Merchant-Defined Data Fields
Display custom values captured during the transaction
Printable Receipt Display contact information; choose single and/or double receipt output
New Business Center Online Help | 2018 12

Chapter 1 Virtual Terminal
What else can I do?
• Send an individual request instead
• Search for a file uploaded to my account
• Check the status of a file being uploaded
• View a daily report of uploaded batch files
• Download a template for a specific type of transaction
Learn more about:
• How is this different from what I did in the Classic Business Center?
• What kind of orders I can upload?
• What happens if my file does not successfully upload?
Eligible Batch Upload Transaction Types
This topic identifies the different transaction types and their associated available templates.
The following types of transactions can be uploaded in batch. Each type has an associated template containing the appropriate fields needed to successfully upload batch files.
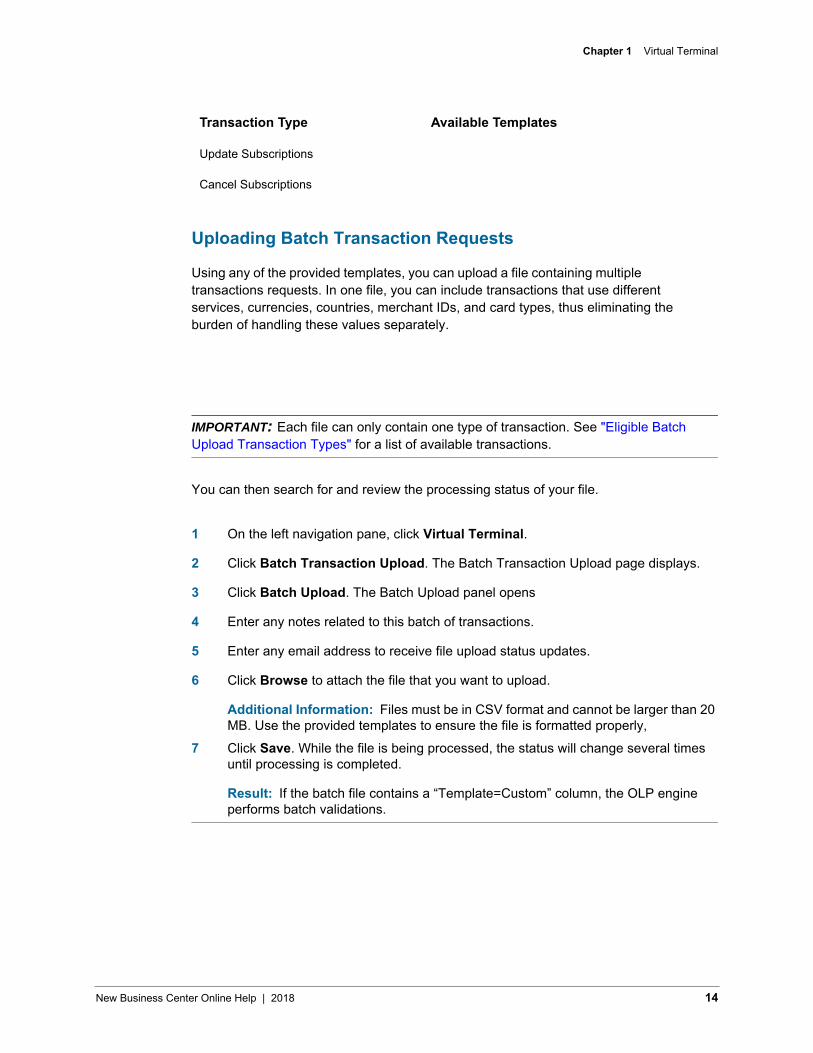
Transaction Type Available Templates
Card Transaction Authorizations
Sales
Captures
Credits
Sales with Level III
Captures with Level III
Original Credit Transactions
Check Transaction Electronic Check Debits
Electronic Check Credits
Subscription Create Subscriptions
New Business Center Online Help | 2018 13
Chapter 1 Virtual Terminal
Uploading Batch Transaction Requests
Using any of the provided templates, you can upload a file containing multiple transactions requests. In one file, you can include transactions that use different services, currencies, countries, merchant IDs, and card types, thus eliminating the burden of handling these values separately.
IMPORTANT: Each file can only contain one type of transaction. See "Eligible Batch Upload Transaction Types" for a list of available transactions.
You can then search for and review the processing status of your file.
1 On the left navigation pane, click Virtual Terminal.
2 Click Batch Transaction Upload. The Batch Transaction Upload page displays.
3 Click Batch Upload. The Batch Upload panel opens
4 Enter any notes related to this batch of transactions.
5 Enter any email address to receive file upload status updates.
6 Click Browse to attach the file that you want to upload.
Additional Information: Files must be in CSV format and cannot be larger than 20 MB. Use the provided templates to ensure the file is formatted properly,
7 Click Save. While the file is being processed, the status will change several times until processing is completed.
Result: If the batch file contains a “Template=Custom” column, the OLP engine performs batch validations.
Update Subscriptions
Cancel Subscriptions
Transaction Type Available Templates
New Business Center Online Help | 2018 14
Chapter 1 Virtual Terminal
Searching for and Reviewing Batch Files
You can search for and review batch files in any status by date or the batch ID number. You can search for files uploaded during the past six months. The search results indicate the current status of the batch, including the number of transactions, and how many were accepted or rejected.
To search for uploaded batch files:
1
2
3
On the left navigation pane, click Tools & Settings.
Click Batch Transactions. The Batch Uploads page displays.
Click Add a Filter and select either Batch ID or Date. Enter the appropriate value and press Enter.
Results display in the Batch Upload List.
Downloading Reports for Uploaded Batch Files
This topic provides instructions to download reports for uploaded batch files.
You can download a report containing details of any batch file and its status after the file successfully finishes processing.
For more information about elements included in the report, see “Batch File Reports” in the Offline Transaction File Submission ImplementationGuide.
To download batch upload reports:
1 Using the steps in Searching for and Reviewing Batch Files search for the batch for which you want to download a report.
2 Select the circle next to the Batch ID, then click the Download Report icon.
3 Select either CSV or XML format.
4 Follow your browser's settings to save and open the file.
Additional Information: you can only download reports for batch files which have completed processing.
New Business Center Online Help | 2018 15
Chapter 1 Virtual Terminal
Downloading Templates for Uploading Batch Files
To successfully process multiple transactions at once, download the corresponding template for batch files in CSV format. Add transaction data to the template, then upload the file on the Batch Transaction Upload page.
To download batch upload template:
1 On the left navigation pane, click Virtual Terminal.
2 Click Batch Transaction Upload. The Batch Upload page displays.
3 Click Templates. The Download Templates panel opens.
4 In the Templates drop down, select the type of template you want to save.
5 Click Download.
6 Follow your browser’s settings to save and open the file.
Additional Information: depending on the services you have enabled, you may not be able to successfully upload files for some transaction types. Contact Customer Support if you have questions about which templates to use.
New Business Center Online Help | 2018 16
2. Transaction Management
This section covers the features and functionality for the Transaction Management module.
• Understanding transaction types and conept
• Searching for transactions, including focused searches
• Viewing transaction details
• Processing transactions
In addition, you can learn more about transitioning from the Classic Business Center.
Introduction to SearchYou can search for and filter transactions using a variety of criteria. You can view the details of a particular transaction, or export the results to a CSV or JSON file using these methods:
• Use the search toolbar to choose specific filters
• Use the search field to look for transactions that include specific text
• Select additional filters to narrow results
• Perform a search you previously saved
What else can you do?
• Review the details of a transaction
• Perform processing actions on a specific transaction
• Change the way results are displayed
• Save search criteria for future searches
• Search for payer authentication transactions
• Search for secure acceptance transactions
• Search for transactions in a particular processing phase (for example, pending batch)
Learn more about:
• How transaction search is different from Classic Business Center
• The information that appears on the Details page
New Business Center Online Help | 2018 17
Chapter 2 Transaction Management
• Using filters and parameters to improve search results
Introduction to ProcessingDepending on the type of transaction and where it is in the processing cycle, you can perform one or more actions, including:
• Settle
• Reverse
• Void
• Credit/refund
• Create new order or authorization
• Get a receipt
What else can you do?
• Search for a different transaction
• Search for a similar transaction
• Create a token from a transaction
• Search for Secure Acceptance transactions
Learn more about:
• How transaction search is different from Classic Business Center
• Types of transactions and available actions
• The information that appears on the Details page
• Finding the transactions you need to review
• Using Virtual Terminal to create transactions
• Uploading transactions in a batches
• Generating reports including your transactions
New Business Center Online Help | 2018 18
Chapter 2 Transaction Management
Transaction Types and ConceptsThis section covers basic transaction concepts and terms used in the New Business Center:
• Transaction types
• Available processing actions
• Processing outcomes
• Search types
For more information about how transaction management is different in the New Business Center than in the Classic Business Center, see "Migrating from the Classic Business Center."
Transaction Types
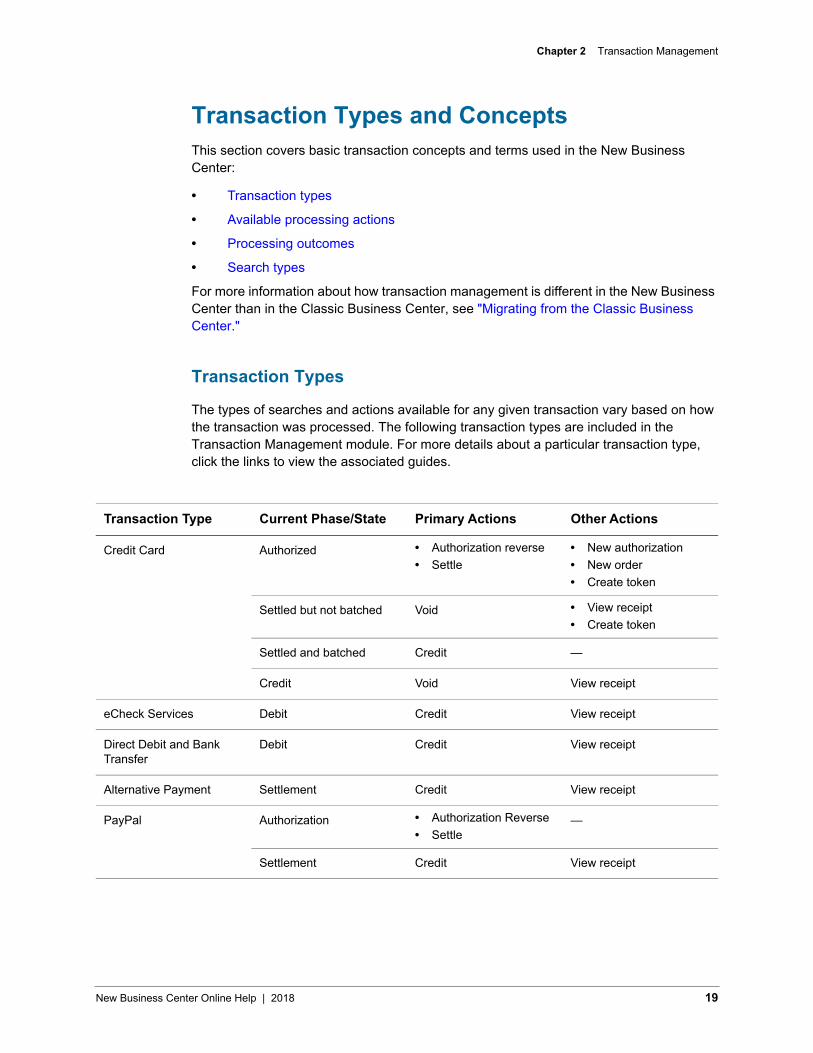
The types of searches and actions available for any given transaction vary based on how the transaction was processed. The following transaction types are included in the Transaction Management module. For more details about a particular transaction type, click the links to view the associated guides.
Transaction Type Current Phase/State Primary Actions Other Actions
Credit Card Authorized • Authorization reverse• Settle
• New authorization• New order• Create token
Settled but not batched Void • View receipt• Create token
Settled and batched Credit —
Credit Void View receipt
eCheck Services Debit Credit View receipt
Direct Debit and Bank Transfer
Debit Credit View receipt
Alternative Payment Settlement Credit View receipt
PayPal Authorization • Authorization Reverse• Settle
—
Settlement Credit View receipt
New Business Center Online Help | 2018 19
Chapter 2 Transaction Management
Available Processing Actions
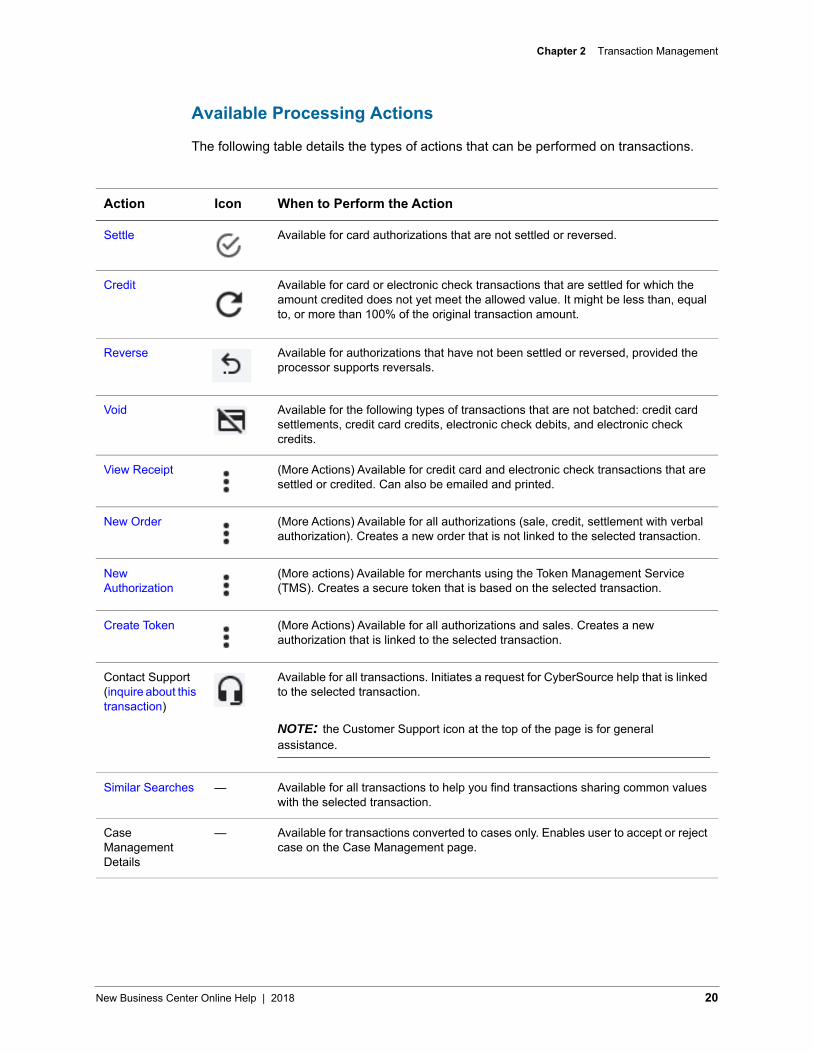
The following table details the types of actions that can be performed on transactions.
Action Icon When to Perform the Action
Settle Available for card authorizations that are not settled or reversed.
Credit Available for card or electronic check transactions that are settled for which the amount credited does not yet meet the allowed value. It might be less than, equal to, or more than 100% of the original transaction amount.
Reverse Available for authorizations that have not been settled or reversed, provided the processor supports reversals.
Void Available for the following types of transactions that are not batched: credit card settlements, credit card credits, electronic check debits, and electronic check credits.
View Receipt (More Actions) Available for credit card and electronic check transactions that are settled or credited. Can also be emailed and printed.
New Order (More Actions) Available for all authorizations (sale, credit, settlement with verbal authorization). Creates a new order that is not linked to the selected transaction.
New Authorization
(More actions) Available for merchants using the Token Management Service (TMS). Creates a secure token that is based on the selected transaction.
Create Token (More Actions) Available for all authorizations and sales. Creates a new authorization that is linked to the selected transaction.
Contact Support (inquire about this transaction)
Available for all transactions. Initiates a request for CyberSource help that is linked to the selected transaction.
NOTE: the Customer Support icon at the top of the page is for generalassistance.
Similar Searches — Available for all transactions to help you find transactions sharing common values with the selected transaction.
Case Management Details
— Available for transactions converted to cases only. Enables user to accept or reject case on the Case Management page.
New Business Center Online Help | 2018 20
Chapter 2 Transaction Management
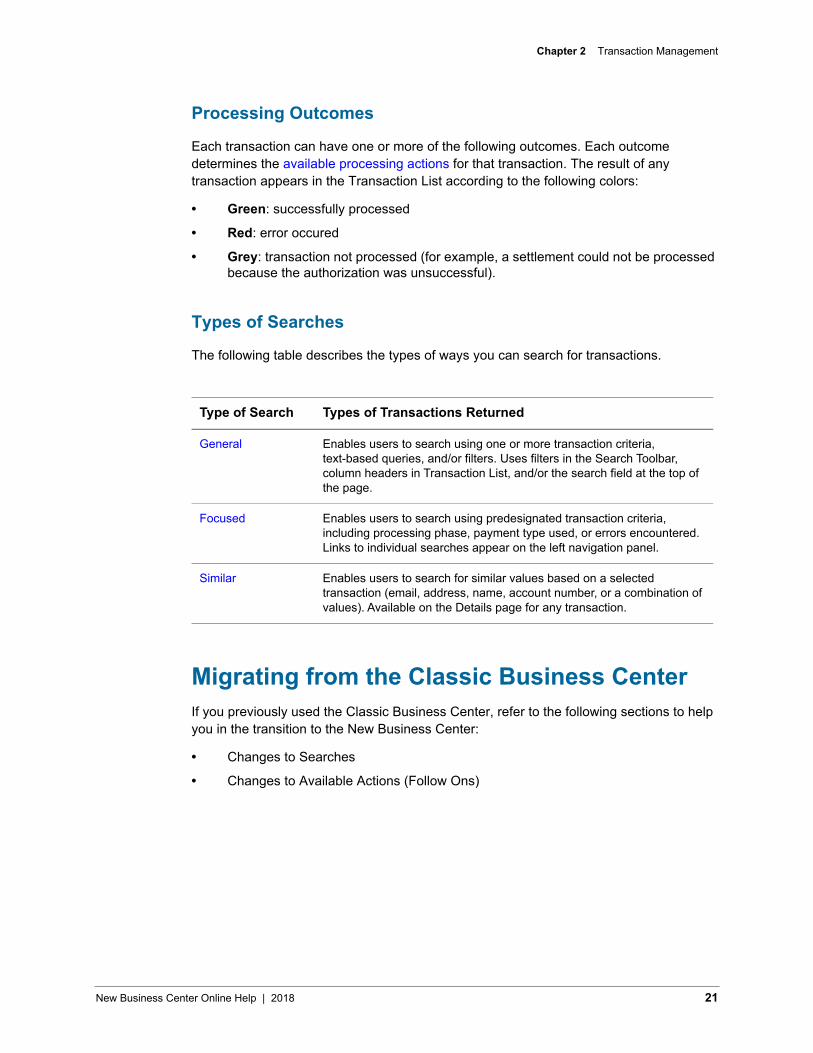
Processing Outcomes
Each transaction can have one or more of the following outcomes. Each outcome determines the available processing actions for that transaction. The result of any transaction appears in the Transaction List according to the following colors:
• Green: successfully processed
• Red: error occured
• Grey: transaction not processed (for example, a settlement could not be processedbecause the authorization was unsuccessful).
Types of Searches
The following table describes the types of ways you can search for transactions.
Migrating from the Classic Business CenterIf you previously used the Classic Business Center, refer to the following sections to help you in the transition to the New Business Center:
• Changes to Searches
• Changes to Available Actions (Follow Ons)
Type of Search Types of Transactions Returned
General Enables users to search using one or more transaction criteria, text-based queries, and/or filters. Uses filters in the Search Toolbar, column headers in Transaction List, and/or the search field at the top of the page.
Focused Enables users to search using predesignated transaction criteria, including processing phase, payment type used, or errors encountered. Links to individual searches appear on the left navigation panel.
Similar Enables users to search for similar values based on a selected transaction (email, address, name, account number, or a combination of values). Available on the Details page for any transaction.
New Business Center Online Help | 2018 21

Chapter 2 Transaction Management
Changes to Searches
Use the following table to find the new names and locations of searches available in the Classic Business Center.
NOTE: Advanced Search features are now a part of the new search toolbar.
Changes to Available Actions (Follow Ons)
The following table describes how the names and availability of Classic Business Center actions (previously called “follow on” actions) have been in the New Business Center. For more information about when certain actions are available, as well as their associated icons, see "Available Processing Actions."
Classic Business Center Search New Business Center Search
General Search Transactions
Order Search Transactions | Search by Merchant Ref ID
Request Search Transactions | Search by Request ID
Auths Ready to Settle Search by Phase | Authorizations Ready to Settle
Pending Settlement Search by Phase | Settlements Pending Batch
Exception Search (Declined Authorizations)
Search by Phase | Authorizations Needing Review
Payer Auth Search Payer Authentication
Secure Acceptance Search Secure Acceptance
Reversal Search Not supported
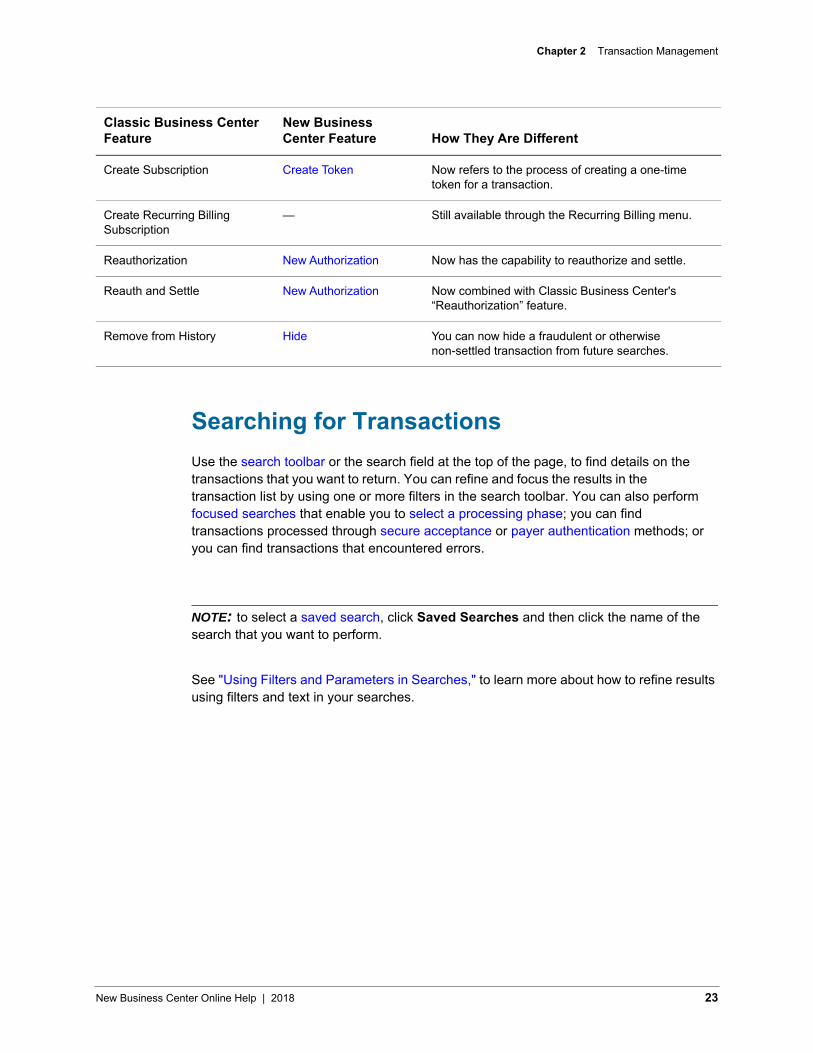
Classic Business Center Feature
New Business Center Feature How They Are Different
Capture Settle You can now settle part or all of any transaction that is not reversed, fully settled, or expired.
Full Authorization Reversal Reverse —
Credit Credit You can now credit part or all of any settled and batched transaction.
New Business Center Online Help | 2018 22
Chapter 2 Transaction Management
Searching for TransactionsUse the search toolbar or the search field at the top of the page, to find details on the transactions that you want to return. You can refine and focus the results in the transaction list by using one or more filters in the search toolbar. You can also perform focused searches that enable you to select a processing phase; you can find transactions processed through secure acceptance or payer authentication methods; or you can find transactions that encountered errors.
NOTE: to select a saved search, click Saved Searches and then click the name of the search that you want to perform.
See "Using Filters and Parameters in Searches," to learn more about how to refine results using filters and text in your searches.
Create Subscription Create Token Now refers to the process of creating a one-time token for a transaction.
Create Recurring Billing Subscription
— Still available through the Recurring Billing menu.
Reauthorization New Authorization Now has the capability to reauthorize and settle.
Reauth and Settle New Authorization Now combined with Classic Business Center's “Reauthorization” feature.
Remove from History Hide You can now hide a fraudulent or otherwise non-settled transaction from future searches.
Classic Business Center Feature
New Business Center Feature How They Are Different
New Business Center Online Help | 2018 23
Chapter 2 Transaction Management
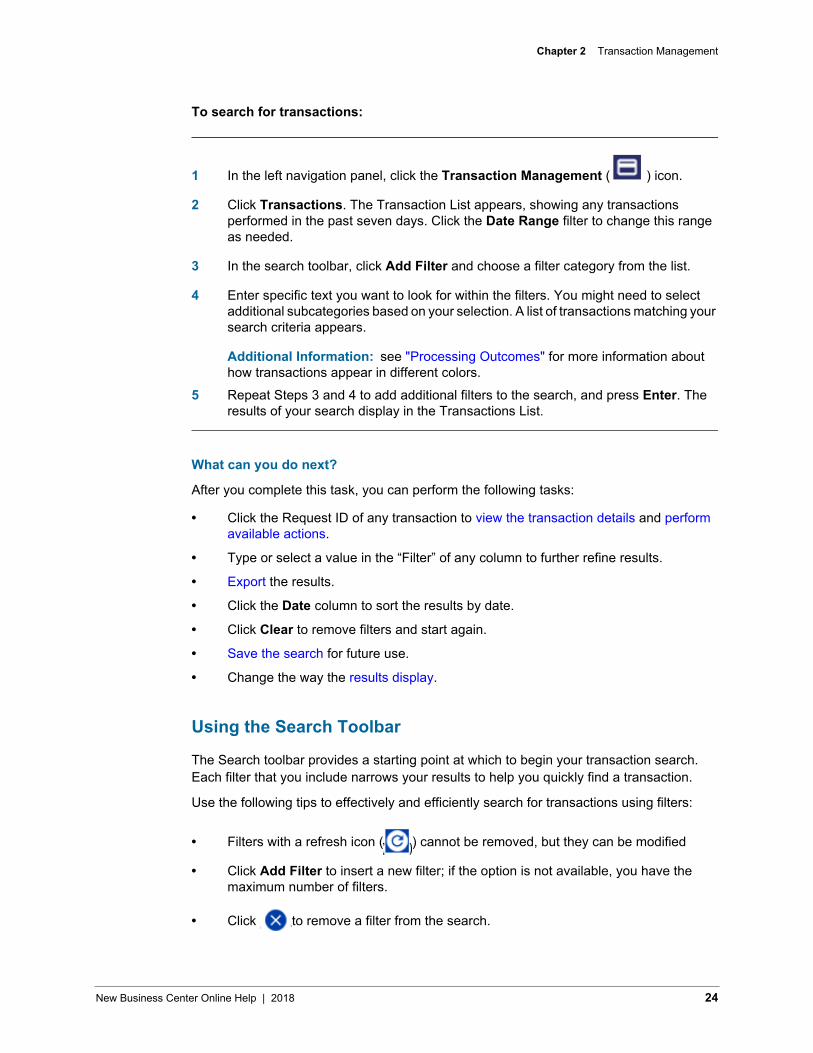
To search for transactions:
1 In the left navigation panel, click the Transaction Management ( ) icon.
2 Click Transactions. The Transaction List appears, showing any transactions performed in the past seven days. Click the Date Range filter to change this range as needed.
3 In the search toolbar, click Add Filter and choose a filter category from the list.
4 Enter specific text you want to look for within the filters. You might need to select additional subcategories based on your selection. A list of transactions matching your search criteria appears.
Additional Information: see "Processing Outcomes" for more information about how transactions appear in different colors.
5 Repeat Steps 3 and 4 to add additional filters to the search, and press Enter. The results of your search display in the Transactions List.
What can you do next?
After you complete this task, you can perform the following tasks:
• Click the Request ID of any transaction to view the transaction details and performavailable actions.
• Type or select a value in the “Filter” of any column to further refine results.
• Export the results.
• Click the Date column to sort the results by date.
• Click Clear to remove filters and start again.
• Save the search for future use.
• Change the way the results display.
Using the Search Toolbar
The Search toolbar provides a starting point at which to begin your transaction search. Each filter that you include narrows your results to help you quickly find a transaction.
Use the following tips to effectively and efficiently search for transactions using filters:
• Filters with a refresh icon ( ) cannot be removed, but they can be modified
• Click Add Filter to insert a new filter; if the option is not available, you have themaximum number of filters.
• Click to remove a filter from the search.
New Business Center Online Help | 2018 24
Chapter 2 Transaction Management
• Multiple filters create an “AND” search.
• The date is always required and defaults to the past seven days.
• Click Clear to remove all optional filters and return to the default search.
For more information about using free text and other filtering options, see "Using Filtersand Parameters in Searches."
Using Filters and Parameters in Searches
Follow these tips to include filters and text in your searches:
• Free-text search must include at least three characters. Use the search field in theupper right-hand corner or choose “Free Text” in the search toolbar).
• Enter search text to find results within the following fields:
– Merchant Reference Number
– Request ID
– Account BIN
– Account Suffix
– Transaction Reference Number
– Token/Subscription ID
– Payment Method
– Payment Processor
– Billing First Name
– Billing Last Name
– Billing Zip Code
– Shipping First Name
– Shipping Last Name
– Shipping Zip Code
– Customer IP Address
– True IP Address
– Merchant Customer ID
– Device ID
– Device Smart ID
• Combine multiple filters to create an “AND” search. For example, to search for Visacredit card transactions that ran through the Virtual Terminal for the past month, youwould add one filter for Payment Method as Visa, and another filter for ConnectionMethod as Virtual Terminal, along with the date filter:
a Date Range > Last month
b Add a Filter > Payment Category > Credit Card > Visa
c Add a Filter > Connection Method > Virtual Terminal
New Business Center Online Help | 2018 25
Chapter 2 Transaction Management
• Additional searches are available help you find transactions in a particular phase ofprocessing; for payer authenticationtransactions; for secure acceptancetransactions; and for transactions that encounter errors.
Changing the Format of the Transactions List
You can customize the format of the Transactions List by adding, removing, or changing the order of columns in the list.
NOTE: at least one transaction must appear in the Transactions List to perform these functions.
Exporting Search Results
You can export a maximum of 2000 search results from the Transaction List in either CSV or JSON format.
1 Click the Export ( ) icon and choose the format for the file.
Additional Information: if the number of results exceeds 2000, use additional filters to narrow the search, or use the Reporting module instead.
2 Follow your browser's instructions to save the file.
New Business Center Online Help | 2018 26
Chapter 2 Transaction Management
Saving a Set of Search Criteria
Saving a search enables you to create a set of search criteria that you can reuse without re-selecting the filters each time.
1 In the left navigation panel, click the Transaction Management ( ) icon.
2 Click Transactions.
3 Perform the transaction search using your preferred methods.
4 Click Save.
5 Type a name for the search you want to save (up to 60 characters) and click the checkmark ( ) icon.
6 Click Saved Searches at any time to run the search again.
Deleting a Saved Search
You can delete a saved search when you no longer need it.
1 In the left navigation panel, click the Transaction Management ( ) icon.
2 Click Transactions.
3 Click Saved Searches. The Saved Searches panel opens.
4 Click the Delete ( ) icon next to the search that you want to delete.
5 Click Yes.
New Business Center Online Help | 2018 27
Chapter 2 Transaction Management
Performing Similar Searches
Business Center enables you to quickly search for transactions related to the one you are reviewing:
• To search for similar transactions:
1 In the left navigation panel, click the Transaction Management ( ) icon.
2 Click Transactions.
3 Search transactions using your preferred methods.
4 Click the Request ID link of the transaction you want to view. The Details page opens.
5 Under Similar Searches, click the link to related data that you want to include in the search:
a All: find transactions containing the same billing name, billing account number, and shipping address.
b Email: find transactions containing the same email address.c Name: find transactions containing the same first and last name.d Account Number: find transactions containing the same account number.
Secure Acceptance Search
Use this search to find and review details for transactions processed through Secure Acceptance checkout. The search filter defaults to the current date, but you can include up to the previous six months of transactions, as well as filter by the following values:
• Account Suffix
• Last Name
• Merchant Reference Number
• Transaction UUID
• Request ID
• UUID/Merchant ID (available for reseller users)
New Business Center Online Help | 2018 28
Chapter 2 Transaction Management
NOTE: for more information about using Secure Acceptance payment methods, see the Payment Security documentation.
1 In the left navigation pane, click the Transaction Management ( ) icon.
2 Click Secure Acceptance Search. The Secure Acceptance search page appears.
3 Choose the date range for your search and click Apply.
4 If desired, click Add Field to add a filter, type in the specific value, and press Enter.
What can you do next?
After you complete this task, you can perform the following tasks:
• To view the Details page, click the Request ID of the transaction.
• To view the logs for a particular transaction, click the View icon to open the SecureAcceptance Transaction Details panel.
Payer Authentication Search
Use this search to find and review details for transactions processed through Payer Authentication methods. You can choose to search by date using the following filters:
• Request ID
• XID
• Application—Payer Authentication Enrollment, Payer Authentication Validation, orCredit Card Authorization
1 In the left navigation pane, click the Transaction Management icon.
2 Click Payer Authentication. The Payer Authentication search page displays.
3 Click Add Field to select a filter.
4 To change the dates included in results, click Date Range and choose an option, or create a custom range (up to two years prior to today's date).
5 Click a transaction's Request ID to view the Details page.
New Business Center Online Help | 2018 29
Chapter 2 Transaction Management
Performing Focused SearchesIn addition to the general transaction search feature, several focused searches are available to help you quickly find transactions. These searches contain preselected results fields; just add your search parameters and generate. You can search for transactions by processing phase for transactions that were processed with secure acceptance or payer authentication tools, or for transactions that encountered an error.
Search by Transaction Phase
This search enables you to view up to 2000 transactions in any phase of the processing cycle. The phase that you choose determines the number of actions that are available to further process a transaction.
See "Available Processing Actions" for more details on icons and what they represent.
• Settlements Pending Batch: search for transactions that were settled in the past 48hours, but are not yet batched. You can take these actions:
– Void
– Export
• Authorizations Ready to Settle: search by date for transactions that are authorizedbut not yet settled. You can also take these actions:
– Settle
– Hide
• Authorizations Needing Review: search by date for transactions and reasons that areflagged for review as a result of your Smart Authorization Settings. You can also takethese actions:
– Settle
– Hide
• Exception Search: search by date for transactions that encountered errors duringprocessing either at the CyberSource or processor level.
NOTE: the Merchant ID column/filter is included for account users and resellers.
1 In the left navigation pane, click the Transaction Management ( ) icon.
2 Click Search by Transaction Phase. The Search by Phase page appears.
To search for transactions by processing phase:
New Business Center Online Help | 2018 30

Chapter 2 Transaction Management
3 Choose one of these filters:
a Settlements Pending Batchb Authorizations Ready to Settlec Authorizations Needing Reviewd Exception Search
4 Choose the date range for your search, then click Apply. Results appear in the Search by Phase list.
Additional Information: searches return a maximum 2000 transactions. When more than 2000 results are found, the search page displays “Showing 2000 (capped) transactions with filters” at the top of the page.
The Settlements Pending Batch filter returns only data from the previous 48 hours, and cannot be modified.To view the details of any transaction, click the Request ID link of the selected transaction. For more information about additional actions available for each search filter, click the link to the appropriate filter listed in Step 3.
Settlements Pending Batch
Use this filter to find transactions that are settled by the merchant in the past 48 hours but that are not yet forwarded by CyberSource to the backend processors to fulfill a transaction. You can also choose to export search results, or void any transaction that does not require further processing.
Void Transactions
1
2
3
To void one or more transactions, check the box for the transaction row and then click
the Void ( ) icon above the Search by Phase list.
Click Confirm to void transaction(s).
Result: A confirmation panel displays the selected transactions.Close the panel to update the Search by Phase list.
New Business Center Online Help | 2018 31
Chapter 2 Transaction Management
Export Transactions
1 To export one or more transactions, check the box for the transaction row and then click the Export ( ) icon above the Search by Phase list.
2 Choose either CSV or XML format. The Export Search Results panel opens.
3 Select one or more of the following types of data to include in the output and then click Export CSV or Export XML:
a Paymentb Order informationc Billing informationd Shipping information
4 Follow your browser's instructions to download and save the file.
New Business Center Online Help | 2018 32
Chapter 2 Transaction Management
Authorizations Ready to Settle
Use this filter to find authorization transactions that are not settled. You can hide selected transactions from future searches; use this option when you know that you will never capture an authorization for the transaction (for example, fraudulent or canceled orders). You can also choose to quickly settle selected transactions.
NOTE: hidden transactions do not appear in future search results.
Authorizations Needing Review
Use this filter to find authorization transactions flagged for review for either Smart Authorization or Authorization Code Needed reasons. You can hide transactions from future searches; use this option when you know you will never capture an authorization for the transaction (for example, fraudulent or canceled orders). You can also quickly settle one or more flagged transactions.
NOTE: hidden transactions do not appear in future search results.
Hiding Transactions
1 Select one or more transactions and click the Hide ( ) icon above the Search by Phase list.
2 Click Confirm to verify your selection. A confirmation panel displays the selected transactions.
3 Close the panel to update the Search by Phase list.
Settling Transactions
1 Select one or more transactions and click the Settle ( ) icon above the Search by Phase list.
2 Click Confirm to verify your selection. A confirmation panel displays the transactions.
3 Close the panel to update the Search by Phase list.
New Business Center Online Help | 2018 33

Chapter 2 Transaction Management
Exception Search
Use this filter to review details, including the reason, of transactions that encountered an error during processing.
NOTE: you can also find this information in the Transaction Exception Detail report.
Viewing Transaction DetailsWhen you perform a general search, a list of transactions matching your filters appears. You can view details of any transaction by clicking the link containing the request ID. Depending on the type and status of the transaction, you might be able to perform additional actions. See "Available Processing Actions" for more details on icons and what they represent.
1 In the left navigation panel, click the Transaction Management ( ) icon.
2 Click Transactions.
3 Search transactions search using your preferred methods.
4 Click the Request ID link of the transaction that you want to view. The Details page opens.
What can you do next?
After completing this task you can view all details for the transaction and perform the following tasks:
• Perform a similar search
• Process a transaction, such as settle, reverse, void, or credit
• Request or view a token
• Create a new authorization or new order
• Request assistance on this transaction from Customer Support
New Business Center Online Help | 2018 34
Chapter 2 Transaction Management
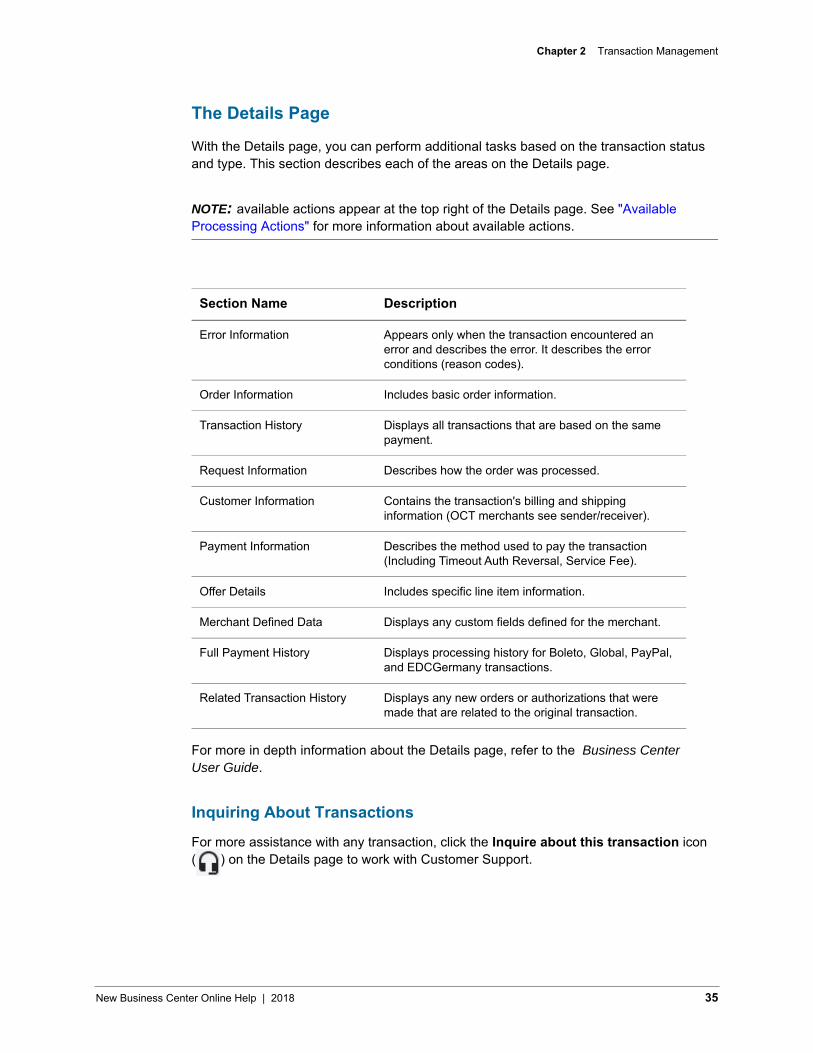
The Details Page
With the Details page, you can perform additional tasks based on the transaction status and type. This section describes each of the areas on the Details page.
NOTE: available actions appear at the top right of the Details page. See "Available Processing Actions" for more information about available actions.
For more in depth information about the Details page, refer to the Business Center User Guide.
Inquiring About Transactions
For more assistance with any transaction, click the Inquire about this transaction icon ( ) on the Details page to work with Customer Support.
Section Name Description
Error Information Appears only when the transaction encountered an error and describes the error. It describes the error conditions (reason codes).
Order Information Includes basic order information.
Transaction History Displays all transactions that are based on the same payment.
Request Information Describes how the order was processed.
Customer Information Contains the transaction's billing and shipping information (OCT merchants see sender/receiver).
Payment Information Describes the method used to pay the transaction (Including Timeout Auth Reversal, Service Fee).
Offer Details Includes specific line item information.
Merchant Defined Data Displays any custom fields defined for the merchant.
Full Payment History Displays processing history for Boleto, Global, PayPal, and EDCGermany transactions.
Related Transaction History Displays any new orders or authorizations that were made that are related to the original transaction.
New Business Center Online Help | 2018 35
Chapter 2 Transaction Management
Viewing and Saving Receipts
You can access receipts for settled and credit card and electronic check transactions; they are available on the Details page. You can also email or print the receipt for your records.
1 Using the steps in "Searching for Transactions," click the Request ID of the transaction.
2 On the Details page, click the More Actions ( ) icon.
3 Click View Receipt. The Substitute Receipt panel opens.
a To email a copy of the receipt to one or more recipients, click the Email icon.b To print a copy of the receipt, click the Print icon.
Processing TransactionsDepending on the type of transaction and where it is in the processing cycle, you can perform one or more actions, including:
• Settle
• Reverse
• Void
• Credit/refund
• Create new order or authorization
• Get a receipt
See "Available Processing Actions" for descriptions and icons associated with each of these actions.
NOTE: for more assistance with any transaction, click the Inquire about this transaction icon ( ) on the Details page to work with Customer Support.
What else can you do?
• Understand how transaction search is different from Classic Business Center
• Understand what is displayed on the Details page
• Learn more about when you can perform an action
• Search for similar transactions
• Create a token
• Review case-related details (Decision Manager)
New Business Center Online Help | 2018 36
Chapter 2 Transaction Management
Settling Transactions
You can settle part or all of an authorization that has not already been reversed or fully settled or that is not yet expired. The Business Center enables you to partially settle transactions until the original value of the authorization is met.
IMPORTANT: if you use the processor TSYS Acquiring Solutions (Vital), do not settle an amount greater than 99,999.99. If you do, Vital automatically rejects your request. The amount limit applies to all payment types and whether the settlement request contains one payment type or a combination of payment types.
1 Using the steps in "Searching for Transactions," locate and select the Request ID of the transaction you want to settle.
2 On the Details page, click the Settle ( ) icon. The Credit Card Settlement panel opens.
3 Enter an amount less than or equal to the value of the original authorization that you want to settle.
4 Enter any customer reference information or comments in the settlement.
5 Click Settle.
6 Click Confirm. The Credit Card Settlement panel closes and the Substitute Receipt panel opens.
New Business Center Online Help | 2018 37
Chapter 2 Transaction Management
Reversing Authorization Transactions
You can reverse an authorization for transaction as long as it is not yet settled. Reversing a transaction allows you to release the hold that the authorization placed on the customer's funds. If the transaction is already settled, you can void it instead.
NOTE: each issuing bank has its own rules for deciding whether a full authorization reversal succeeds or fails. If a reversal fails, contact your issuing bank to learn whether it is possible to reverse the authorization another way.
1 Using the steps in "Searching for Transactions," locate and select the Request ID of the transaction you want to reverse.
2 On the Details page, click the Reverse ( ) icon.
Additional Information: if the transaction cannot be reversed, this icon does not appear. For more information, see "Available Processing Actions."
3 Click Confirm,
Voiding Transactions
You can void any transaction that is settled but not yet batched. If the transaction is batched, you can credit/refund it instead.
NOTE: some processors allow voided transactions to be reversed. Contact your processor for more information about this process.
1 Using the steps in "Searching for Transactions," locate and select the Request ID of the transaction you want to void.
2 On the Details page, click the Void ( ) icon.
Additional Information: if the transaction cannot be voided, this icon does not appear. For more information, see "Available Processing Actions."
3 Click Confirm.
New Business Center Online Help | 2018 38
Chapter 2 Transaction Management
Crediting (Refunding) Transactions
Context
You can credit (“refund”) a transaction after it is settled and batched. You can credit any partial or full amount until the original amount is met. If the transaction is not yet been batched, you can reverse or void it instead. Credits are available for credit card, eCheck, and Alt Pay transactions, depending on the processor you use.
NOTE: depending on your account's configuration, you might be able to refund more or less than 100% of the settlement amount. Contact Customer Support to set up or find out the refund settings for your account.
1 Using the steps in "Searching for Transactions," locate and select the Request ID of the transaction you want to void.
2 On the Details page, click the Credit ( ) icon.
Additional Information: the Credit icon continues to display as long as the transaction can be credited. When the maximum amount is reached, the icon no longer appears.
3 Enter the amount of the transaction.
4 Click Confirm.
Creating New Orders and Authorizations
You can process additional orders or authorizations for your customers without having to store or require the customer to enter billing and shipping address and payment card information on your web site.Instead, you retrieve a previous authorization in the Business Center and use the information from that order to process a new one. The information is then added to the Related Transaction section of your original transaction:
• Order: New Orders enable you to process a new transaction based on, but not linkedto, the original transaction. You can process the order with an amount different thanthe original amount.
• Authorization: New Authorizations (reauthorizations) enable you to process a newtransaction linked to the original. The payment information and amount must be thesame as the original transaction’s.
NOTE: expired authorizations require a new authorization and cannot be settled.
New Business Center Online Help | 2018 39
Chapter 2 Transaction Management
1 Using the steps in "Searching for Transactions," find and select the Request ID of the transaction for which you want to create a new order.
2 On the Details page, click the More Actions ( ) icon.
3 Click New Order.
4 Click Confirm. The One-Time Payment page opens.
5 Complete fields as necessary and click Submit.
Creating a New Authorization
1 Using the steps in "Searching for Transactions," find and select the Request ID of the transaction for which you want to create a new authorization.
2 On the Details page, click the More Actions ( ) icon.
3 Click New Authorization.
4 Click Confirm. The One-Time Payment page opens.
5 Complete fields as necessary and click Submit.
New Business Center Online Help | 2018 40
Chapter 2 Transaction Management
Generating Secure Tokens for Transactions
If you are subscribed to the Token Management Service (TMS), you can generate tokens to process transactions without saving sensitive card information.
NOTE: recurring billing subscriptions are available through the Recurring Billing feature.
1 Using the steps in "Searching for Transactions," find and select the Request ID of the transaction for which you want to generate a token.
2 On the Details page, click Create Token. The Create Token panel opens.
3 Verify that the payment, billing, and shipping information is correct, as well as any custom merchant data.
4 Click Save. The Create Token panel closes, and a confirmation message appears with the new token information.
5 Click the token link to view the new token. The Token Search page opens.
New Business Center Online Help | 2018 41

New Business Center Online Help | 2018 42
3. Tools
The Tools ( ) module enables you to review changes to your account made by other users.
Audit SearchYou can use the search feature in the audit log to review changes made by users within the past month to several kinds of information, depending on the features enabled for your account:
• Merchant Configuration
• User Management
• Security Keys
• Digital Payment Solutions
• Secure File Share
• Terminal Management
To search for changes in the audit log:
1 In the left navigation pane, click Tools.
2 Click Audit Search. The Audit Search page displays any results from the previous seven days.
3 In the search toolbar, select a category and press Enter.
Additional Information: To further refine results, select a subcategory, user name, and/or merchant ID. Matching results display in the Audit Search list.
4 To export your results, click Export and follow your browser's instructions to save and open the file.
4. Portfolio Management
Portfolio Management contains the following features:
• Managing Merchant Accounts
• Enabling Merchant Portfolio Tools
Managing Merchant AccountsEstablishing and managing your merchant IDs (MIDs) are an important part of processing payments successfully. You can configure merchants to process against one or more payment processors (for example, Visa and Mastercard transactions through CM-CIC; American Express through AMEX Direct; or Diner's Card to First Data).
Several parts comprise merchant management:
• Creating individual or uploading multiple merchant accounts
• Editing merchant account details, including account status and selected paymentprocessors and products
• Configuring portfolio tools, such as payer authentication (3D secure) and secureacceptance methods, virtual terminal, or risk controls.
IMPORTANT: accounts (MIDs) in Test status can only access the test environment for Business Center. Value added configurations from the test environment are not carried over to the Live Business Center.
What else can you do?
• Manage merchant users, roles, and groups
• Work with merchant security keys
• Search for and upload merchant transactions
• Review merchant data through reports and analytics
• Configure settings for merchant IP address access to Business Center
• Enable merchant digital payment services
New Business Center Online Help | 2018 43
Chapter 4 Portfolio Management
• Update merchant virtual terminal or secure acceptance settings
Understanding How Merchant Accounts Work
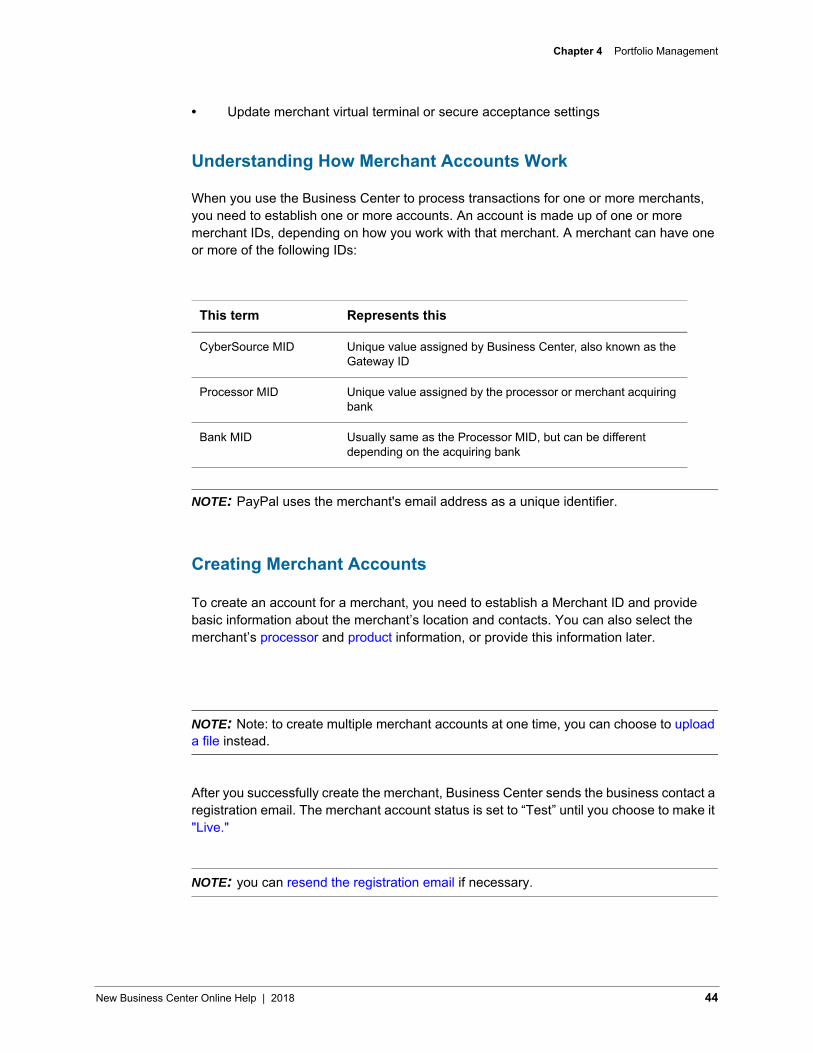
When you use the Business Center to process transactions for one or more merchants, you need to establish one or more accounts. An account is made up of one or more merchant IDs, depending on how you work with that merchant. A merchant can have one or more of the following IDs:
NOTE: PayPal uses the merchant's email address as a unique identifier.
Creating Merchant Accounts
To create an account for a merchant, you need to establish a Merchant ID and provide basic information about the merchant’s location and contacts. You can also select the merchant’s processor and product information, or provide this information later.
NOTE: Note: to create multiple merchant accounts at one time, you can choose to upload a file instead.
After you successfully create the merchant, Business Center sends the business contact a registration email. The merchant account status is set to “Test” until you choose to make it "Live."
NOTE: you can resend the registration email if necessary.
This term Represents this
CyberSource MID Unique value assigned by Business Center, also known as the Gateway ID
Processor MID Unique value assigned by the processor or merchant acquiring bank
Bank MID Usually same as the Processor MID, but can be different depending on the acquiring bank
New Business Center Online Help | 2018 44
Chapter 4 Portfolio Management
1 In the left navigation panel, click the Portfolio Management ( ) icon.
2 Under Merchants, click Manage Merchants. The Manage Merchants page appears.
3 Click Add Merchant. The Add Merchant panel opens.
4 Enter the merchant’s name and location information, as well as the names of the merchant’s business, technical, and emergency contacts.
5 Click Next to continue and select processors the merchant will use. For more information, see Selecting Payment Processors.
Additional Information: available processors are configured by Customer Support. To skip this step and select processors later, choose Skip Processor in the dropdown list.
6 Click Save. The Confirmation tab displays.
7 Review the merchant details, then click Close. To edit instead, click Edit Merchant and follow the steps in Editing Merchant Details.
8 To activate a particular product for the merchant, click the product you want to configure:
a Secure Acceptanceb Virtual Terminalc 3D Secure (Payer Authentication)d Risk Control Settings (if enabled)
Important: clicking the link for any product takes you to the product’s page.
Sending Email to Merchants
Business Center automatically sends an email to the business contact to create an account, but you can resend email to the merchant’s business contact if the account is either in Test or Live status; the email contains links to allow the contact to create both merchant and account administrator accounts. Each merchant account can have one account administrator, and up to eight merchant administrators, at any time.
NOTE: email cannot be sent to inactive merchants; you must first change the status of the account.
New Business Center Online Help | 2018 45
Chapter 4 Portfolio Management
Uploading Multiple Merchant Accounts
If you have several merchant accounts to create or update, you can upload an XML or CSV file instead of creating one account at a time. You can upload up to 1000 merchants in a single file.
After uploading the file, you can search for and download reports containing information about the status of the file. Business Center includes the overall status, as well as the number of merchants uploaded successfully/not successfully.
Reporting on Uploaded Merchant Files
You can track which merchants were successfully added or updated in a particular batch through the download option. You can choose to download either a CSV or XML file. Each file contains the overall file status as well as the status of each merchant uploaded.
1 In the left navigation panel, click the Portfolio Management icon.
2 Under Merchants, click Merchant File Upload. The Merchant File Upload page appears.
3 To filter the list, click Add Filter in the search toolbar and select the criteria you want to use, then press Enter.
Editing Merchant Details
You can update all information associated with a merchant (including the products and processors used) except for the merchant’s ID. Additionally, you can change the status of the merchant’s account.
To locate a particular merchant, follow the steps in "Searching for Merchants."
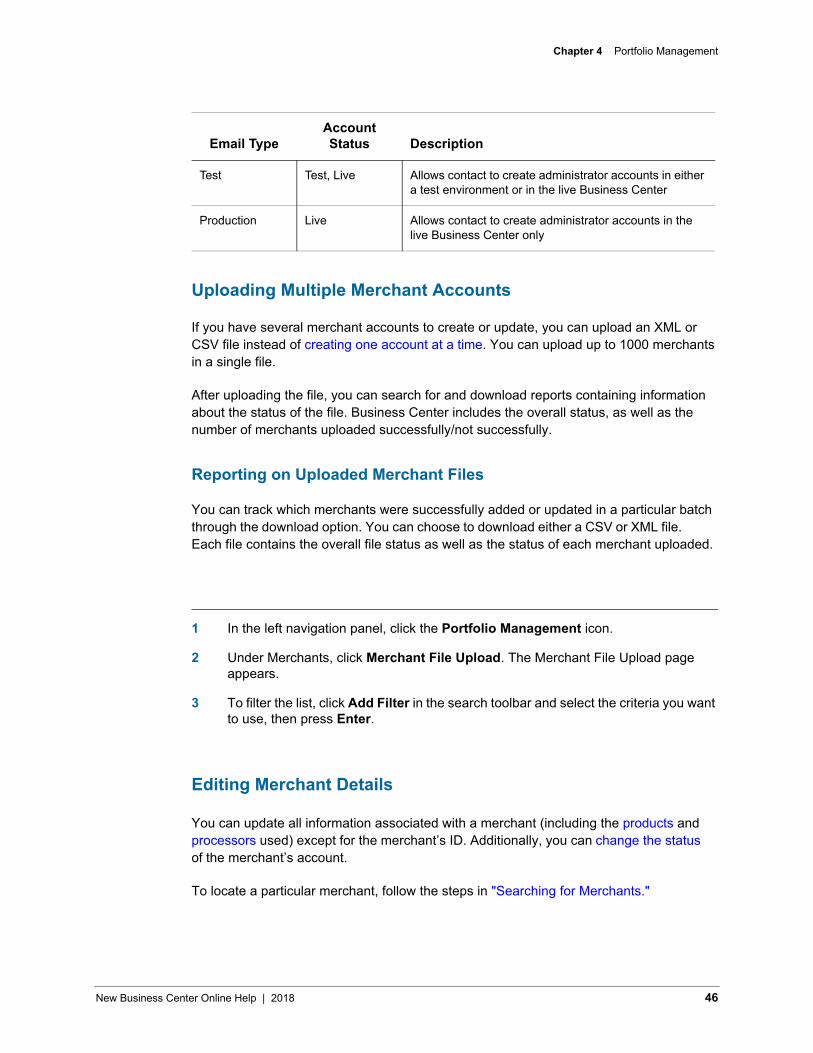
Email TypeAccount Status Description
Test Test, Live Allows contact to create administrator accounts in either a test environment or in the live Business Center
Production Live Allows contact to create administrator accounts in the live Business Center only
New Business Center Online Help | 2018 46
Chapter 4 Portfolio Management
To edit a merchant account:
1 In the left navigation panel, click the Portfolio Management icon.
2 Under Merchants, click Manage Merchants. The Manage Merchants page appears.
3 Select the merchant account you want to update, then click the Edit Merchant ( ) icon. The Edit Merchant panel opens.
Additional Information: if the merchant you want to update does not appear, use the steps In Searching for Merchants to locate it.
4 Make changes as necessary, then click Save.
5 To update processor settings, click the Processor Settings tab. For more information, see "Selecting Payment Processors."
6 To update product settings, at the bottom of the Basic Settings tab, under Product Enablement, click the name of the product you want to configure. For more information, see "Selecting Merchant Products."
Searching for Merchants
By default, all merchants associated with your account display in the Manage Merchants list. If necessary, you can search for specific merchant accounts using the Search toolbar. The filters enable you to search by the merchant’s (CyberSource or processor) ID, name, or status.
To search for merchant accounts:
1 In the left navigation panel, click the Portfolio Management icon.
2 Under Merchants, click Manage Merchants. The Manage Merchants page appears.
3 In the search toolbar, click Add Filter, then select the filter you want to use to search for the merchant.
4 Enter or select the required information, then press Enter. The Merchant List displays the results of your search.
Additional Information: click Add Filter to add more criteria to your search. Each filter creates an “AND” search.
New Business Center Online Help | 2018 47

Chapter 4 Portfolio Management
Selecting Payment Processors
Before merchants can accept customer orders, you must identify which payment processor(s) to use. You can select processors and payment types the merchant allows either when you create the merchant account, or you can edit the account later. You can configure multiple processors for each merchant.
Refer to Payment Processors for a list of card types supported for each payment processor.
To select payment processors:
1 In the left navigation panel, click the Portfolio Management icon.
2 Under Merchants, click Manage Merchants. The Manage Merchants page appears.
3 Perform one of the following:
a Existing merchant: select the merchant account you want to update, then click the Edit Merchant icon. The Edit Merchant panel opens.
b New merchant: click Add Merchant. The Add Merchant panel opens.
4 Click the Processor Settings tab.
Additional Information: new merchants must complete the fields on the Basic Info tab first.
5 In the Choose Processor list, select the processor you want to use. Information specific to the processor displays below in the panel.
Additional Information: to skip this step while creating a merchant, select Skip Processor. Important: you cannot select Skip Processor while editing a merchant’s account; at least one processor must be selected.
6 Complete the processor’s required details, then click Save.
7 To add additional processors, click Add Another Processor. To remove an existing processor, click Remove.
Selecting Merchant Products
You can enable, disable, or change configurations available to merchants for the
following products:
• Secure Acceptance
• Virtual Terminal
New Business Center Online Help | 2018 48

Chapter 4 Portfolio Management
• 3D Secure (Payer Authentication)
• Risk Control Settings (if enabled)
NOTE: you can also select products for merchants after creating the account by going directly to the product’s page and selecting the merchant for which you want to configure.
IMPORTANT: for new merchant accounts, you must first complete the steps in Adding Merchant Accounts before these options are available.
To select payment products:
1 In the left navigation panel, click the Portfolio Management icon.
2 Under Merchants, click Manage Merchants. The Manage Merchants page appears.
3 Select the merchant account you want to update, then click the Edit Merchant icon. The Edit Merchant panel opens.
4 At the bottom of the Basic Info tab, under Product Enablement, click the name of the product you want to configure. The selected product’s configuration page displays.
Updating Merchant Account Status
For each of your merchant accounts, you can monitor and update the account’s
status. The table below describes the options available at any time.
IMPORTANT: updating the status of an account has an immediate impact to the processes and transactions within the account. Contact support if you have more questions about making changes to the status of a merchant account.
If the current status is…
You can change it to… Purpose and impact includes…
Test Live Ready to go live after a test period
Live Inactive Transactions cannot be processed, users cannot log into Business Center
New Business Center Online Help | 2018 49
Chapter 4 Portfolio Management
After changing the account status you can resend the registration email if necessary.
To update account status:
1 In the left navigation panel, click the Portfolio Management icon.
2 Under Merchants, click Manage Merchants. The Manage Merchants page appears.
Additional Information: f the merchant you want to update does not appear, use the steps In Searching for Merchants to locate it.
3 Select the merchant account you want to update, then click the Change Status ( ) icon.
4 Select the appropriate status, then click Update Status.
Exporting Merchant Lists
You can export the list of your merchant accounts at any time. The CSV file includes the merchants currently displayed in the Merchant List; each merchant’s ID, name, creation date, and status are listed.
NOTE: Note: export is only available for the entire list of merchants displayed; if you select a merchant, the feature is disabled. To filter the list of merchants before exporting, follow the steps in Searching for Merchants.
To export merchant account details:
1 In the left navigation panel, click the Portfolio Management icon.
2 Under Merchants, click Manage Merchants. The Manage Merchants page appears.
3 Click the Export to CSV ( ) icon. A confirmation message displays.
4 Follow your browser’s settings to download and the save the file.
Inactive Live Transactions and subscriptions will process; access to Business Center restored
If the current status is…
You can change it to… Purpose and impact includes…
New Business Center Online Help | 2018 50
Chapter 4 Portfolio Management
Enabling Merchant Portfolio ToolsYou can enable or disable services profiles for a merchant account any time after the merchant account is created. Each tool can be managed individually:
• Payer Authentication (3D Secure)
• Secure Acceptance
• Virtual Terminal
• Service Fees
Applying Branding
You can apply your own branding values, including colors, logo, and contact information for customer support.
WARNING: Before creating a custom URL and branding themes, verify the URL is available and accessible. Contact Customer Support for assistance.
Creating Branding Themes
You can set up themes to apply to your merchants' Business Center experience that more closely resembles their own branding. You can assign the theme to one or more countries, and modify the theme as needed.
To create branding themes:
1 In the left navigation panel, click the Portfolio Management ( ) icon.
2 Under Portfolio Tools, click Branding. The Branding page appears.
3 Click Add Theme. The Configure Theme panel opens.
4 Enter the name you want to use for the theme.
5 Click Browse to find and upload the logo file you want to appear on all pages in Business Center.
6 In the Customer Support Email Alias field, enter the text (not the email address) that appears as a link to send an email to your customer support.
7 In the Customer Support Phone Number field, enter the phone number your users dial to reach your customer support.
New Business Center Online Help | 2018 51
Chapter 4 Portfolio Management
8 In the Custom URL field, enter the URL that users will type to access your branded Business Center application.
Additional Information: all URLs must contain "ebc.cybersource.com."9 Under Theme Colors, select the color (or type the hex value) you want to display in
the top bar, as well as the primary, secondary, and link colors.
Additional Information: click Preview to see the color scheme applied.10 When you are done, click Save.
Modifying Existing Themes
You can change the elements of a theme, including the name, if a value
changes. Changes are automatically applied to all assigned countries.
To modify branding themes:
1 In the left navigation panel, click the Portfolio Management ( ) icon.
2 Under Portfolio Tools, click Branding. The Branding page appears.
3 Next to the theme you want to update, click Configure. The Configure Theme panel opens and displays saved values.
4 Make changes as needed.
Additional Information: click Preview to see the color scheme applied.5 When you are done, click Save.
Assigning Branding Themes to Countries
You can choose how Business Center will appear and how users will access it based on
the user's country.
To assign a branding theme to one or more countries:
1 In the left navigation panel, click the Portfolio Management ( ) icon.
2 Under Portfolio Tools, click Branding. The Branding page appears.
New Business Center Online Help | 2018 52
Chapter 4 Portfolio Management
3 Next to the theme you want to assign, click Assign. The Theme Assignment panel opens.
4 To make this theme your organization default, check the Set this theme as your company default box.
5 Select one or more countries in which this theme will be applied when a user accesses Business Center.
6 When you are done, click Save.
Configuring Payer Authentication Profiles
3D Secure (Payer Authentication) payment processing enables you to more securely authenticate card-not-present transactions. You can enable the use of 3D Secure, as well as the individual payment methods. When you enable a payment method, you need to set the values you want to use.
You can enable and configure profiles for the following payment types:
• Verified by Visa
• Mastercard SecureCode
• American Express SafeKey
• JCB J/Secure
• Diners Club
Configuring Secure Acceptance Profiles
You can create templates to apply to your merchants’ checkout experience, setting up as many different configurations and settings as you need. Each template (profile) can then be assigned to individual merchants; merchants will see only what you have included in their profile during checkout.
• Create or edit a profile
• Publish a profile
• Search for a profile
• Switch between Portfolio and Merchant views
• Assign a profile to a merchant
NOTE: you can also use the Secure Acceptance Settings page in the Payment Configuration module to configure a specific merchant's profile.
New Business Center Online Help | 2018 53

Chapter 4 Portfolio Management
Creating Secure Acceptance Profiles
You can create profiles to represent the payment methods that you accept from your merchants. After you create the profile, you can publish it, and then assign it to the merchant.
To create a secure acceptance profile:
1 In the left navigation panel, click the Portfolio Management icon.
2 Under Portfolio Tools, click Secure Acceptance Profile. The Secure Acceptance Profile page appears.
3 Click New Profile. The Create Profile panel opens.
4 Enter the profile name and description, the company name, the integration method used to process notifications and the contact to whom they will be sent, and any additional services.
Additional Information: the integration method cannot be changed later.
5 Click Submit. The Create Profile panel closes and the Edit Profile page appears.
Additional Information: the profile is created as “In Progress”. You can complete profile values in order to publish it using the steps in Editing Secure Acceptance Configurations at any time.
Publishing Secure Acceptance Profiles
Publishing a profile makes the profile available for assignment to the merchant. Until the profile is completed and published, it remains in progress, and you can make updates using the steps in Editing Secure Acceptance Configurations.
To publish a secure acceptance profile:
1 In the left navigation panel, click the Portfolio Management icon.
2 Under Portfolio Tools, click Secure Acceptance Profile. The Secure Acceptance Profile page appears.
New Business Center Online Help | 2018 54
Chapter 4 Portfolio Management
3 Perform one of the following:
a On the In Progress Profiles tab, select the profile you want to publish and click
thePublish Profile ( ) icon.
b On the Edit Profile page, click the Publish Profile ( ) icon.
4 Click Confirm.
Searching for Secure Acceptance Profiles
You can choose to filter the list of profiles by selecting the specific merchant you want to
review in the search toolbar.
To search for secure acceptance profiles:
1 In the left navigation panel, click the Portfolio Management icon.
2 Under Portfolio Tools, click Secure Acceptance Profile. The Secure Acceptance Profile page appears.
3 In the search toolbar, click the Name filter and select the merchant you want to display. The Profile list updates with the merchant profiles you select.
Additional Information: Note: to search for In Progress profiles, click the In Progress Profiles tab first.
Viewing Secure Acceptance Profiles
You can view a profile without editing it using the View Profile option.
To view a secure acceptance profile:
1 In the left navigation panel, click the Portfolio Management icon.
2 Under Portfolio Tools, click Secure Acceptance Profile. The Secure Acceptance Profile page appears.
3 On the Complete Profiles tab, in the Profile Name column, select the check box for the profile you want to view.
4 Click the View Profile icon. The Edit Profile page appears, with all data in read-only mode.
New Business Center Online Help | 2018 55

Chapter 4 Portfolio Management
Switching between Portfolio and Merchant Views
Business Center provides the ability to view profiles at both the portfolio and merchant views. When you work at the portfolio level, you can configure across merchants; at the merchant level, set configurations for an individual merchant account.
To switch between views:
1 In the left navigation panel, click the Portfolio Management icon.
2 Under Portfolio Tools, click Secure Acceptance Profile. The Secure Acceptance Profile page appears.
3 Click the Switch Mode ( ) icon, and then select Portfolio Mode or Merchant Mode. The Secure Acceptance Profile page refreshes and displays the appropriate selection.
Editing Secure Acceptance Configurations
You can make changes to an In Progress profile, then publish the changes to the Complete profile, at any time. You can make updates to the following profile information:
Tab Name Description
General Information Enter basic information about the name and format of the profile
Payment Settings Select accepted card types, checkout methods, and reversal preferences
Payment Form Set up checkout steps, and which fields to include in billing and order review forms
Notifications Designate where to send transaction data
Customer Response Customize response and error messages
Branding Add your branding logos, fonts, and colors
New Business Center Online Help | 2018 56
Chapter 4 Portfolio Management
Assigning Secure Acceptance Profiles to Merchants
You can assign any published profile to a merchant account that is enabled for
Secure Acceptance payment processing.
To assign secure acceptance profiles:
1 In the left navigation panel, click the Portfolio Management icon.
2 Under Portfolio Tools, click Secure Acceptance Profile. The Secure Acceptance Profile page appears.
3 Click Assign Profiles. The Merchant Assignment page appears.
4 In the Merchant list, select the merchant to which you want to assign profiles. The Available Profiles list updates to display profiles available for assignment.
Additional Information: make sure the Enable Merchant option at the top of the page is selected for the merchant.
5 In the Available Profiles list, select one or more profiles to make available to the merchant.
6 In the Default Profile list, select which of the profiles should appear by default. To skip this step, choose Do Not Apply Default.
7 Click Save.
8 Click Confirm.
Configuring Virtual Terminal Profiles
Virtual Terminal profiles enable you to set up a template of values that can be assigned to one or more merchants. Profiles can also be edited, and changes will automatically be applied to all merchants using the profile. You can also search for profiles or merchants to view which merchants have been assigned Virtual Terminal profiles. If you need to, you can remove the profile from the merchant account.
NOTE: you can also use the Virtual Terminal Settings page in the Payment Configuration module to configure a specific merchant's profile.
New Business Center Online Help | 2018 57
Chapter 4 Portfolio Management
Creating Virtual Terminal Profiles
You can create a profile that contains the Virtual Terminal settings you want to assign to a merchant account, including the default country and currency, and the values you want to display and require the merchant to complete, and whether to include it on the receipt. When you create the profile, you need to choose whether to allow the merchant to make changes to the template, or to control those changes yourself. After creating the profile, you can assign it to a merchant.
To create a virtual terminal profile:
1 In the left navigation panel, click the Portfolio Management icon.
2 Under Portfolio Tools, click Virtual Terminal Profile. The Virtual Terminal Profile page appears.
3 On the Profile List tab, click New Profile. The Add New Product Profile panel opens.
4 Enter the profile settings, default values, and customer and order information you want to include in the profile.
Additional Information: Important: If you choose not to allow merchants to edit their own profiles, you will have to make any required changes on their behalf.
5 Click Create. The Add New Product Profile panel closes and the Profile List refreshes to include the profile.
Searching for Virtual Terminal Profiles
1 In the left navigation panel, click the Portfolio Management icon.
2 Under Portfolio Tools, click Virtual Terminal Profile. The Virtual Terminal Profile page appears.
3 On the Profile List tab, in the search toolbar, select the Profile Name you want to find. The Profile List updates to show the selected profile.
Additional Information: you can also sort the list by profile name, description, or number of merchants assigned.
New Business Center Online Help | 2018 58
Chapter 4 Portfolio Management
Assigning Virtual Terminal Profiles
You can assign a profile for Virtual Terminal settings to a merchant; each merchant can
only have one profile assigned at any time. You can also unassign a profile if needed.
NOTE: profiles can be assigned to multiple merchants.
1 In the left navigation panel, click the Portfolio Management icon.
2 Under Portfolio Tools, click Virtual Terminal Profile. The Virtual Terminal Profile page appears.
3 Click the Merchant List tab.
4 In the Merchant List, select the merchant to which you want to assign a profile, and
then click the Assign Profile ( ) icon. The Assign Profile panel opens.
5 In the Profile ID list, select the profile you want to assign.
6 Review the settings and make changes as necessary.
7 Click Save. The Assign Profile panel closes and the Merchant List refreshes to include the profile name.
Unassigning Virtual Terminal Profiles
1 In the left navigation panel, click the Portfolio Management icon.
2 Under Portfolio Tools, click Virtual Terminal Profile. The Virtual Terminal Profile page appears.
3 Click the Merchant List tab.
4 In the Merchant List, select the merchant from which you want to remove a profile,
and then click the Unassign Profile ( ) icon.
5 Click Confirm. The Merchant List refreshes and “NO PROFILE ASSIGNED” appears.
New Business Center Online Help | 2018 59
Chapter 4 Portfolio Management
Editing Virtual Terminal Profiles
You can update a profile’s default values, as well as customer and order information to display and require. Changes that you make impact all merchants using the Virtual Terminal profile.
To edit virtual terminal profiles:
1 In the left navigation panel, click the Portfolio Management icon.
2 Under Portfolio Tools, click Virtual Terminal Profile. The Virtual Terminal Profile page appears.
3 On the Profile List tab, select the profile you want to edit, and then click the Edit Profile ( ) icon. The Edit Product Profile panel opens.
4 Make changes as necessary.
Additional Information: Important: If you choose not to allow merchants to edit their own profiles, you will have to make any required changes on their behalf.
5 When you are done, click Update.
6 Click Confirm. The Edit Product Profile panel closes.
Enabling Service Fees
If you have subscribed to the service, you can enable service fees by merchant. When you enable service fees, you select the products and card types the merchant can use, as well as the type and amount of the fee. You can also opt in to daily and/or monthly reports.
To enable service fees:
1 In the left navigation panel, click the Portfolio Management icon.
2 Under Portfolio Tools, click Service Fee. The Service Fee page appears.
3 In the search toolbar, click the Merchant ID filter to select a merchant.
4 Click the Enable option. The Service Fee page displays available options.
5 Select the products, payment methods and fee amounts you want to include, and enter information about the merchant and reporting.
New Business Center Online Help | 2018 60

Chapter 4 Portfolio Management
6 When you are done, click Submit.
New Business Center Online Help | 2018 61
5. Reports
ReportsBusiness Center provides several ways for you to generate and export reports, as well as create and manage report subscriptions. The Reports module enables you to:
• Download available reports
• Create a new standard or custom report
• View an on-demand report
You can also learn more about terms and concepts used in Business Center reporting.
What else can you do?
• Review analytics
• Review details for a single transaction
Refer to the Reporting Migration Guide to learn more about:
• Understanding which features and reports changed from Classic Business Center
• Transitioning to RESTful APIs from the previous programmatic access methods
• Finding answers to frequently asked questions (FAQs)
New Business Center Online Help | 2018 62
Chapter 5 Reports
Reporting Terms and ConceptsBusiness Center offers several options for accessing and downloading your transaction data. Some users may also access financial data; see the Financial Reporting Guide for more information. You can view on-demand reports in your browser or choose to download reports available through subscription. You can also decide whether or not you want to generate a report once, or request it to automatically be created at your desired interval.
The following table describes the terms and concepts used in Business Center:
IMPORTANT: several types of reports may be available to you in Availble Reports, based on your reporting history and services you use with the Business Center. See "Viewing On-Demand Reports" for a complete list and more information.
NOTE: If you previously used Classic Business Center, refer to the Reporting MigrationGuide for more information on switching from Classic to new reports.
Viewing On-Demand ReportsThe following reports may be available on demand through your browser, depending on which Business Center services you use.
This term Means this
On-Demand A preconfigured report specifically designed to be viewed in the browser.
Downloadable Any report that has been created through a subscription and is ready for you to download.
Select this report To view this data
Payment Batch Summary Sale and refund counts and amounts by currency and payment method.
Payer Authorization Summary Number of transactions and total amount for groups of transactions based on each currency and card type you support. Enabled for users using payer authorization service.
New Business Center Online Help | 2018 63
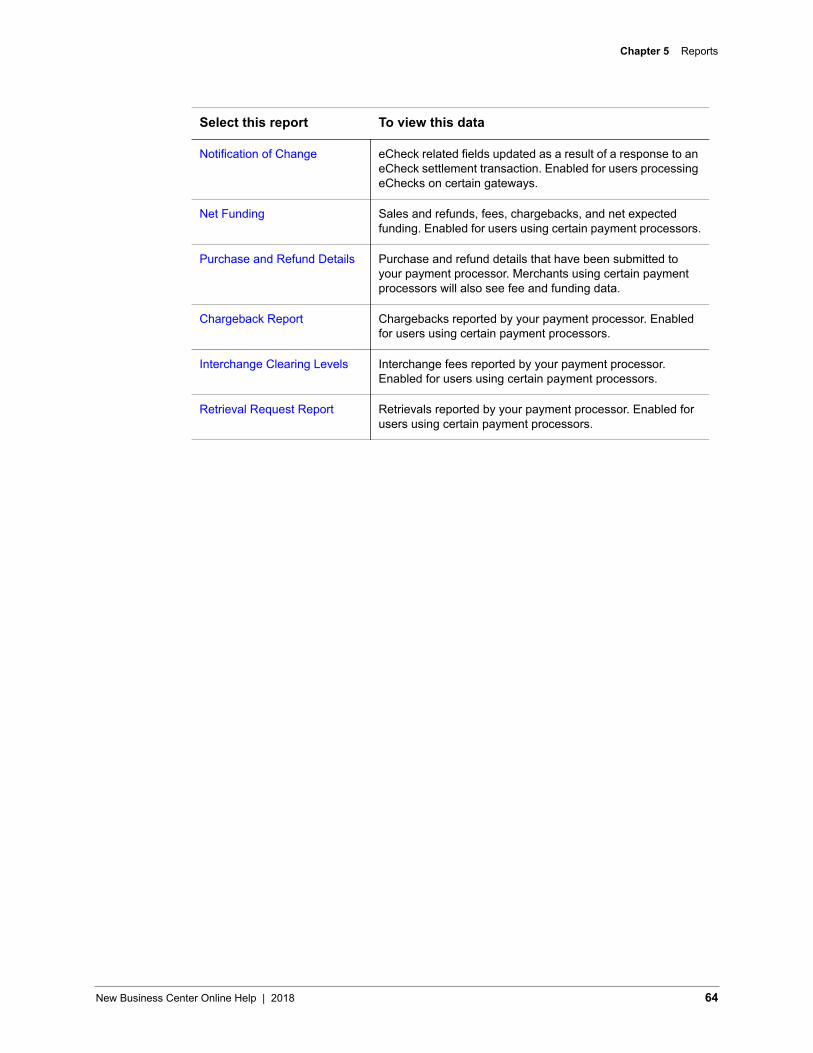
Chapter 5 Reports
Notification of Change eCheck related fields updated as a result of a response to an eCheck settlement transaction. Enabled for users processing eChecks on certain gateways.
Net Funding Sales and refunds, fees, chargebacks, and net expected funding. Enabled for users using certain payment processors.
Purchase and Refund Details Purchase and refund details that have been submitted to your payment processor. Merchants using certain payment processors will also see fee and funding data.
Chargeback Report Chargebacks reported by your payment processor. Enabled for users using certain payment processors.
Interchange Clearing Levels Interchange fees reported by your payment processor. Enabled for users using certain payment processors.
Retrieval Request Report Retrievals reported by your payment processor. Enabled for users using certain payment processors.
Select this report To view this data
New Business Center Online Help | 2018 64
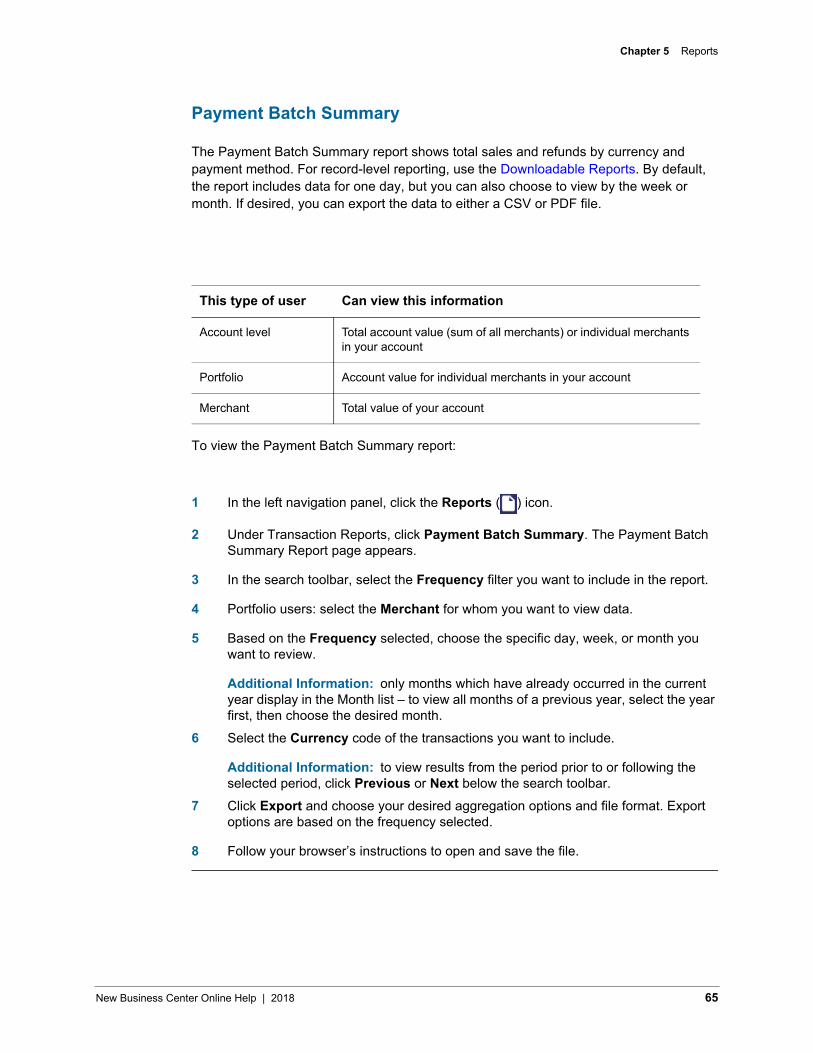
Chapter 5 Reports
Payment Batch Summary
The Payment Batch Summary report shows total sales and refunds by currency and payment method. For record-level reporting, use the Downloadable Reports. By default, the report includes data for one day, but you can also choose to view by the week or month. If desired, you can export the data to either a CSV or PDF file.
To view the Payment Batch Summary report:
1 In the left navigation panel, click the Reports ( ) icon.
2 Under Transaction Reports, click Payment Batch Summary. The Payment Batch Summary Report page appears.
3 In the search toolbar, select the Frequency filter you want to include in the report.
4 Portfolio users: select the Merchant for whom you want to view data.
5 Based on the Frequency selected, choose the specific day, week, or month you want to review.
Additional Information: only months which have already occurred in the current year display in the Month list – to view all months of a previous year, select the year first, then choose the desired month.
6 Select the Currency code of the transactions you want to include.
Additional Information: to view results from the period prior to or following the selected period, click Previous or Next below the search toolbar.
7 Click Export and choose your desired aggregation options and file format. Export options are based on the frequency selected.
8 Follow your browser’s instructions to open and save the file.
This type of user Can view this information
Account level Total account value (sum of all merchants) or individual merchants in your account
Portfolio Account value for individual merchants in your account
Merchant Total value of your account
New Business Center Online Help | 2018 65
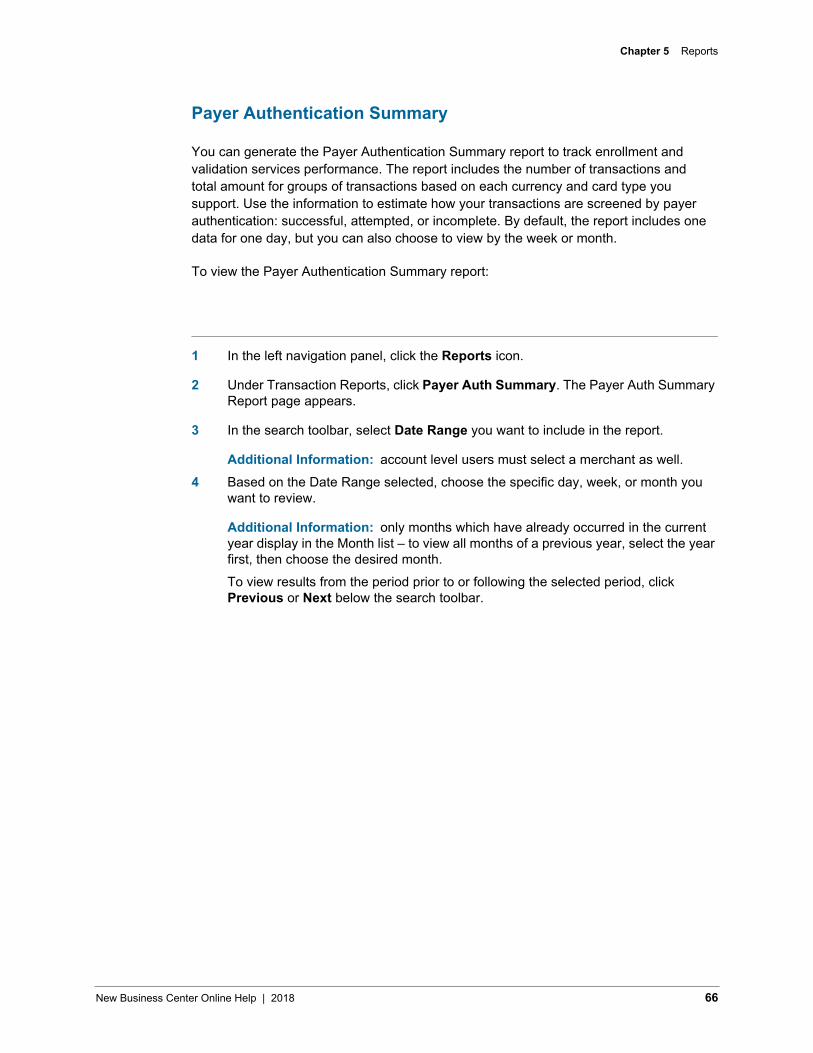
Chapter 5 Reports
Payer Authentication Summary
You can generate the Payer Authentication Summary report to track enrollment and validation services performance. The report includes the number of transactions and total amount for groups of transactions based on each currency and card type you support. Use the information to estimate how your transactions are screened by payer authentication: successful, attempted, or incomplete. By default, the report includes one data for one day, but you can also choose to view by the week or month.
To view the Payer Authentication Summary report:
1 In the left navigation panel, click the Reports icon.
2 Under Transaction Reports, click Payer Auth Summary. The Payer Auth Summary Report page appears.
3 In the search toolbar, select Date Range you want to include in the report.
Additional Information: account level users must select a merchant as well.4 Based on the Date Range selected, choose the specific day, week, or month you
want to review.
Additional Information: only months which have already occurred in the current year display in the Month list – to view all months of a previous year, select the year first, then choose the desired month.To view results from the period prior to or following the selected period, click Previous or Next below the search toolbar.
New Business Center Online Help | 2018 66

Chapter 5 Reports
Notification of Change
You can view a list of eCheck-related values updated as a result of a response to an eCheck settlement transaction in the Notification of Change report. Merchants who have an active PGP key can also export this information to a CSV or XML file. By default, the report shows data from the prior day, but you can also choose to view by the previous week, previous month, or a custom date range (up to six months).
To view the Notification of Change report:
1 In the left navigation panel, click the Reports icon.
2 Under Transaction Reports, click Notification of Change. The Notification of Change page appears.
3 In the search toolbar, select the Date Range of transactions to be included in the report. Results are automatically sorted in ascending order (Latest Results First).
4 To view results in descending order, select Oldest Results First in the Sort Order filter.
5 Click Export and choose your desired file format.
Additional Information: Export is available only if you have a PGP security key.
6 Follow your browser’s instructions to open and save the file.
New Business Center Online Help | 2018 67
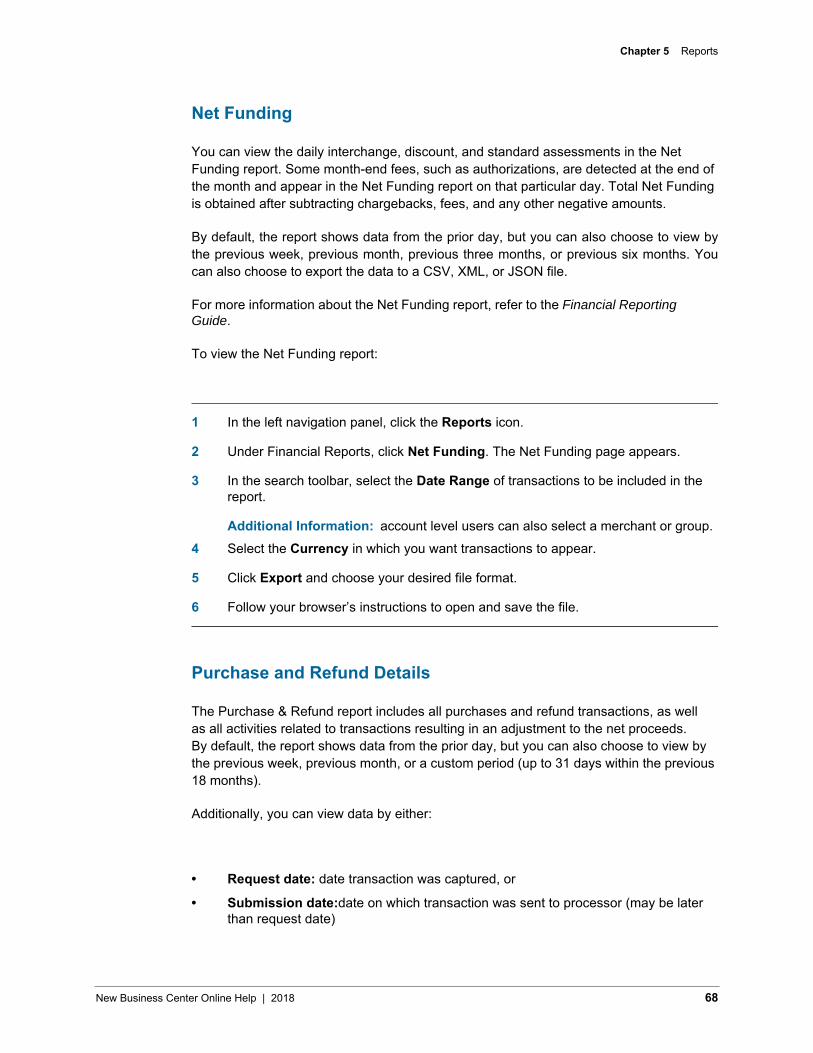
Chapter 5 Reports
Net Funding
You can view the daily interchange, discount, and standard assessments in the Net Funding report. Some month-end fees, such as authorizations, are detected at the end of the month and appear in the Net Funding report on that particular day. Total Net Funding is obtained after subtracting chargebacks, fees, and any other negative amounts.
By default, the report shows data from the prior day, but you can also choose to view by the previous week, previous month, previous three months, or previous six months. You can also choose to export the data to a CSV, XML, or JSON file.
For more information about the Net Funding report, refer to the Financial Reporting Guide.
To view the Net Funding report:
1 In the left navigation panel, click the Reports icon.
2 Under Financial Reports, click Net Funding. The Net Funding page appears.
3 In the search toolbar, select the Date Range of transactions to be included in the report.
Additional Information: account level users can also select a merchant or group.4 Select the Currency in which you want transactions to appear.
5 Click Export and choose your desired file format.
6 Follow your browser’s instructions to open and save the file.
Purchase and Refund Details
The Purchase & Refund report includes all purchases and refund transactions, as well as all activities related to transactions resulting in an adjustment to the net proceeds. By default, the report shows data from the prior day, but you can also choose to view by the previous week, previous month, or a custom period (up to 31 days within the previous 18 months).
Additionally, you can view data by either:
• Request date: date transaction was captured, or
• Submission date:date on which transaction was sent to processor (may be laterthan request date)
New Business Center Online Help | 2018 68
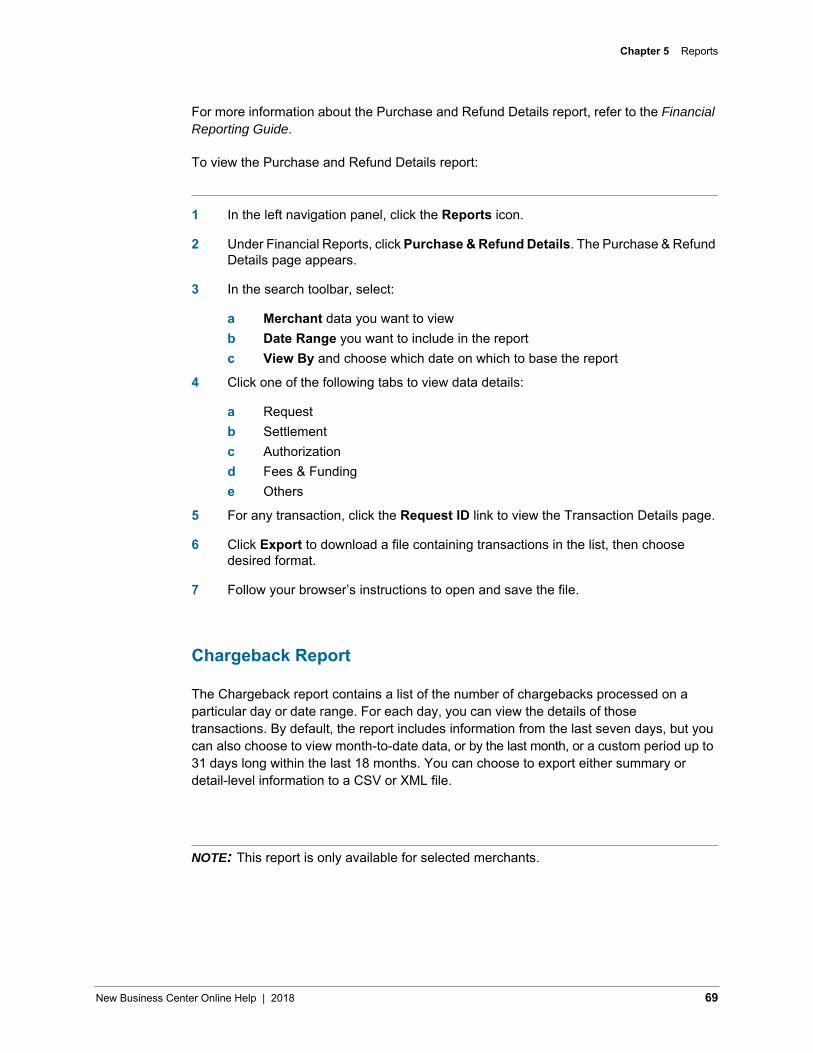
Chapter 5 Reports
For more information about the Purchase and Refund Details report, refer to the Financial Reporting Guide.
To view the Purchase and Refund Details report:
1 In the left navigation panel, click the Reports icon.
2 Under Financial Reports, click Purchase & Refund Details. The Purchase & Refund Details page appears.
3 In the search toolbar, select:
a Merchant data you want to viewb Date Range you want to include in the reportc View By and choose which date on which to base the report
4 Click one of the following tabs to view data details:
a Requestb Settlementc Authorizationd Fees & Fundinge Others
5 For any transaction, click the Request ID link to view the Transaction Details page.
6 Click Export to download a file containing transactions in the list, then choose desired format.
7 Follow your browser’s instructions to open and save the file.
Chargeback Report
The Chargeback report contains a list of the number of chargebacks processed on a particular day or date range. For each day, you can view the details of those transactions. By default, the report includes information from the last seven days, but you can also choose to view month-to-date data, or by the last month, or a custom period up to 31 days long within the last 18 months. You can choose to export either summary or detail-level information to a CSV or XML file.
NOTE: This report is only available for selected merchants.
New Business Center Online Help | 2018 69
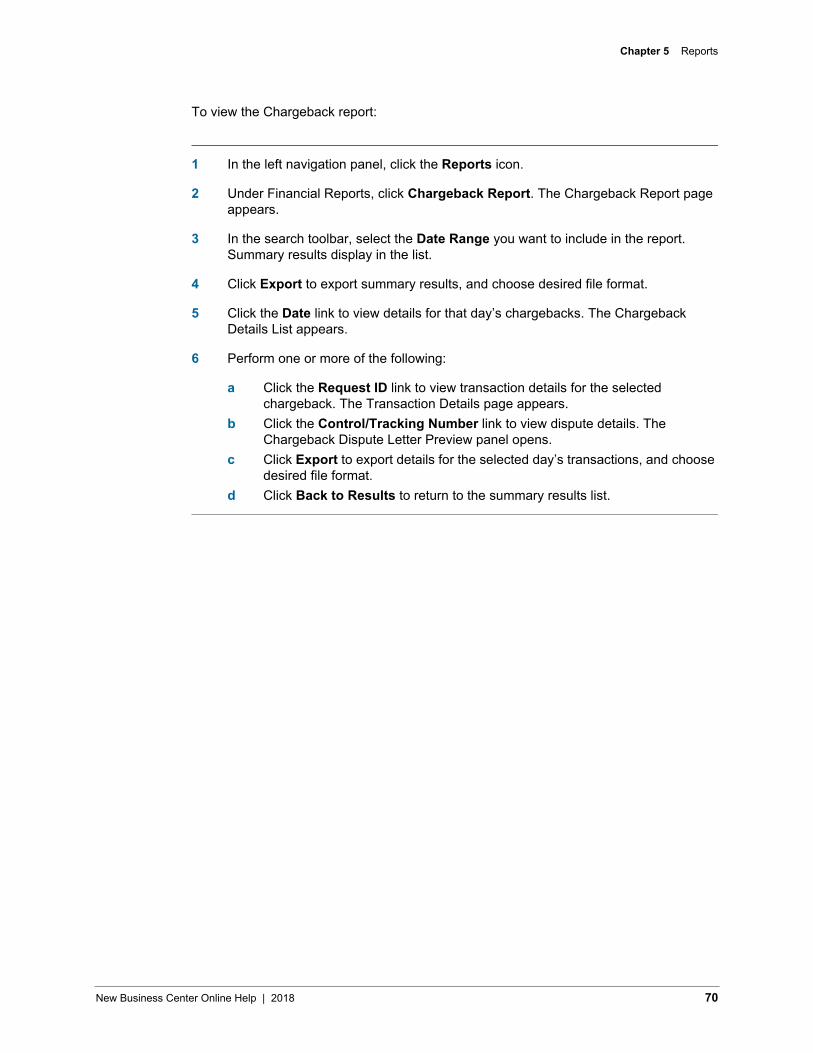
Chapter 5 Reports
To view the Chargeback report:
1 In the left navigation panel, click the Reports icon.
2 Under Financial Reports, click Chargeback Report. The Chargeback Report page appears.
3 In the search toolbar, select the Date Range you want to include in the report. Summary results display in the list.
4 Click Export to export summary results, and choose desired file format.
5 Click the Date link to view details for that day’s chargebacks. The Chargeback Details List appears.
6 Perform one or more of the following:
a Click the Request ID link to view transaction details for the selected chargeback. The Transaction Details page appears.
b Click the Control/Tracking Number link to view dispute details. The Chargeback Dispute Letter Preview panel opens.
c Click Export to export details for the selected day’s transactions, and choose desired file format.
d Click Back to Results to return to the summary results list.
New Business Center Online Help | 2018 70
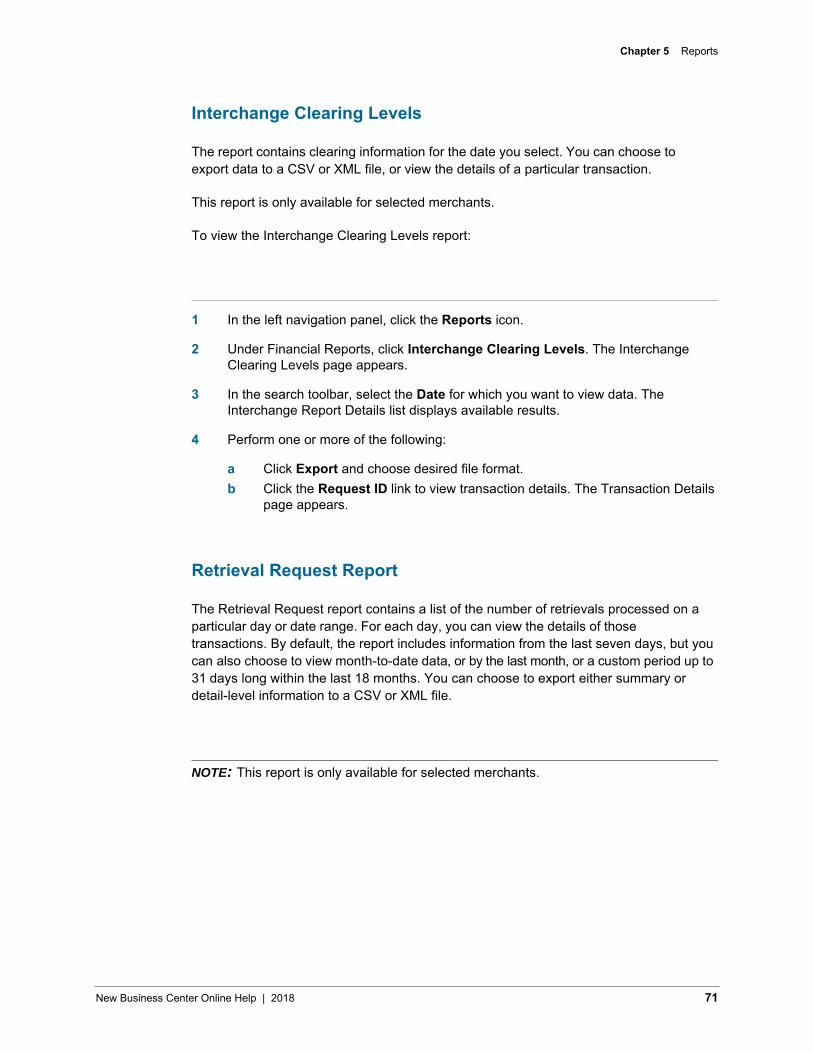
Chapter 5 Reports
Interchange Clearing Levels
The report contains clearing information for the date you select. You can choose to export data to a CSV or XML file, or view the details of a particular transaction.
This report is only available for selected merchants.
To view the Interchange Clearing Levels report:
1 In the left navigation panel, click the Reports icon.
2 Under Financial Reports, click Interchange Clearing Levels. The Interchange Clearing Levels page appears.
3 In the search toolbar, select the Date for which you want to view data. The Interchange Report Details list displays available results.
4 Perform one or more of the following:
a Click Export and choose desired file format.b Click the Request ID link to view transaction details. The Transaction Details
page appears.
Retrieval Request Report
The Retrieval Request report contains a list of the number of retrievals processed on a particular day or date range. For each day, you can view the details of those transactions. By default, the report includes information from the last seven days, but you can also choose to view month-to-date data, or by the last month, or a custom period up to 31 days long within the last 18 months. You can choose to export either summary or detail-level information to a CSV or XML file.
NOTE: This report is only available for selected merchants.
New Business Center Online Help | 2018 71
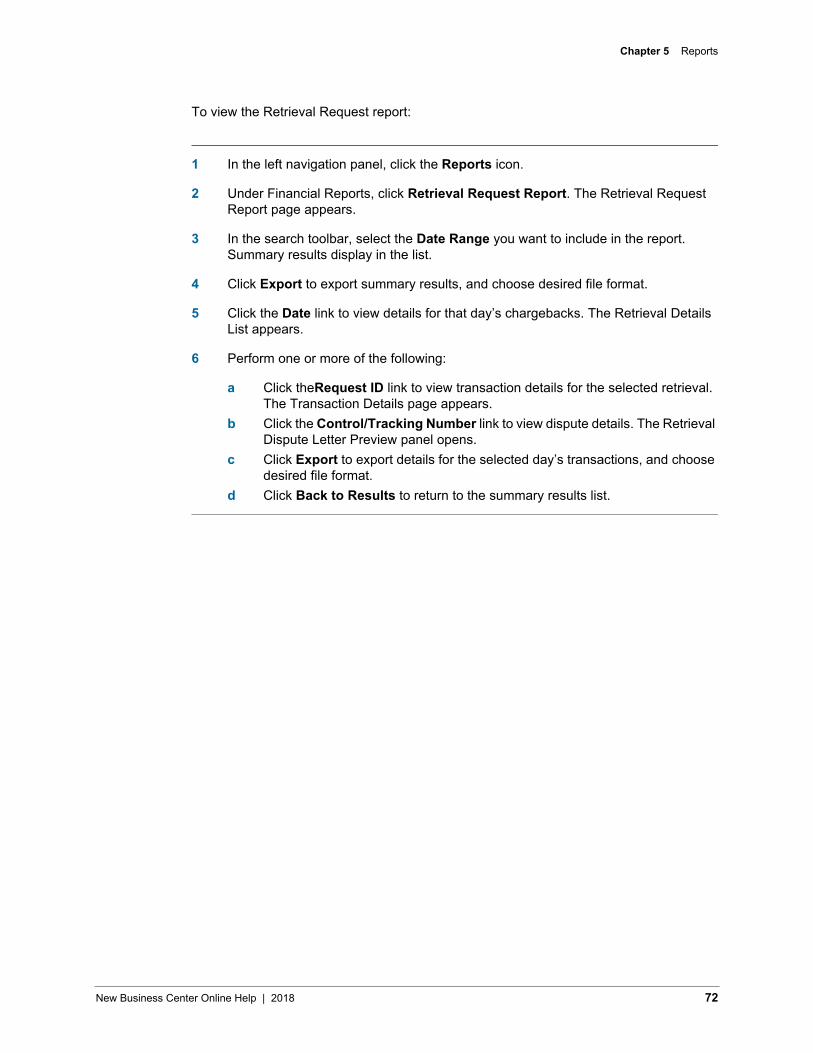
Chapter 5 Reports
To view the Retrieval Request report:
1 In the left navigation panel, click the Reports icon.
2 Under Financial Reports, click Retrieval Request Report. The Retrieval Request Report page appears.
3 In the search toolbar, select the Date Range you want to include in the report. Summary results display in the list.
4 Click Export to export summary results, and choose desired file format.
5 Click the Date link to view details for that day’s chargebacks. The Retrieval Details List appears.
6 Perform one or more of the following:
a Click theRequest ID link to view transaction details for the selected retrieval. The Transaction Details page appears.
b Click the Control/Tracking Number link to view dispute details. The Retrieval Dispute Letter Preview panel opens.
c Click Export to export details for the selected day’s transactions, and choose desired file format.
d Click Back to Results to return to the summary results list.
New Business Center Online Help | 2018 72
Chapter 5 Reports
Accessing Downloadable ReportsBusiness Center generates and stores reports to which you have subscribed in the Available Reports section. These reports include standard preconfigured reports that you have enabled, as well as any custom reports you have created. Partners and account level users can also create reports that consolidate data for one or all merchants, or a group of merchants in the portfolio.
NOTE: if you previously used Classic Business Center, refer to the Reporting MigrationGuide for more information on switching from Classic to new reports.
You can also manage your current subscriptions, or create a new custom one-time report or subscription.
Downloading Available Reports
The following types of downloadable reports are available in the Business Center, depending on your reporting history and usage:
• Custom: a one-time or recurring report you create yourself, either from scratch orfrom another report
• Classic: new versions of reports you used in Classic Business Center. See theReporting Migration Guide for more information.
• Standard: preconfigured recurring reports provided by Business Center; you canchoose whether or not to enable the subscription, or use the report as a template fora custom report.
• Third-Party: reports received by Business Center on your behalf, usually from apayment processor. See the Reporting Migration Guide for more information.
• Legacy: Classic Business Center reports. See the Reporting Migration Guide formore information.
NOTE: One or more reports tab may not contain any results, especially if you did not use Classic Business Center.
New Business Center Online Help | 2018 73
Chapter 5 Reports
To download available reports:
1 On the left navigation pane, click the Reports ( ) icon.
2 Under Downloadable Reports, click Available Reports. The Available Reports page appears.
3 Click the tab containing the report you want to download.
4 In the Download ( ) column, click the file format link.
Additional Information: only reports that have successfully completed generating and that contain data include links.
5 Follow your browser’s instructions to open and save the file.
New Business Center Online Help | 2018 74
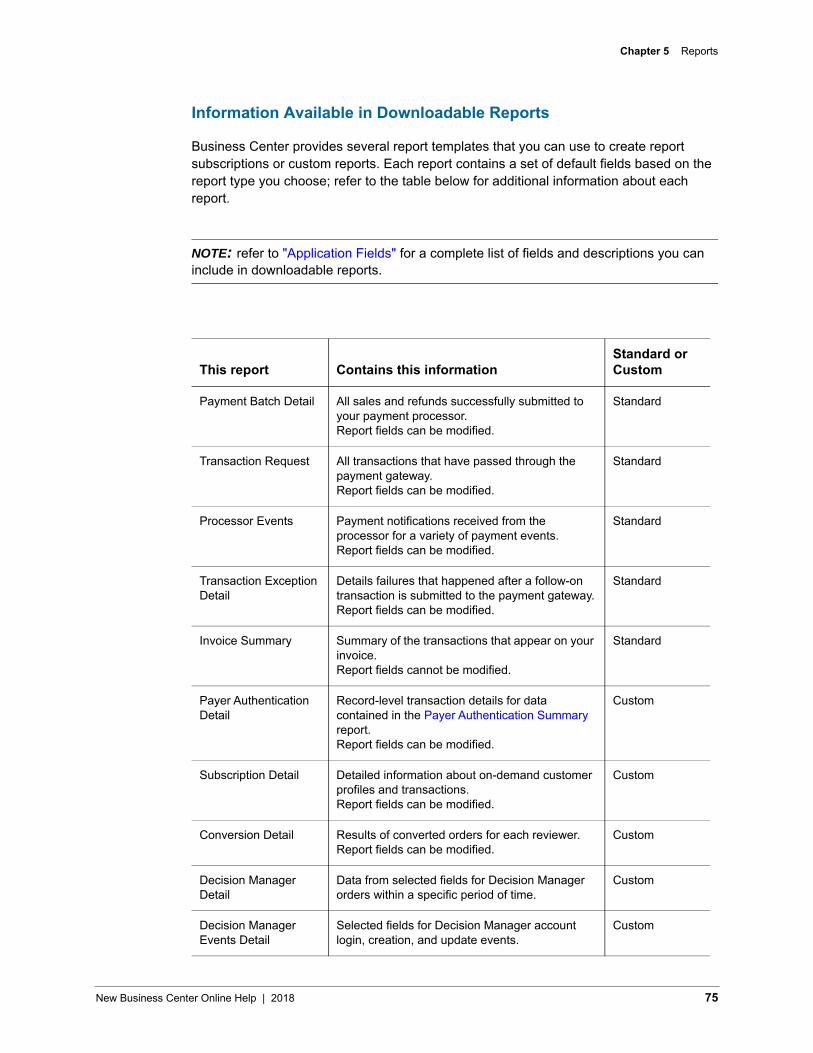
Chapter 5 Reports
Information Available in Downloadable Reports
Business Center provides several report templates that you can use to create report subscriptions or custom reports. Each report contains a set of default fields based on the report type you choose; refer to the table below for additional information about each report.
NOTE: refer to "Application Fields" for a complete list of fields and descriptions you can include in downloadable reports.
This report Contains this informationStandard or Custom
Payment Batch Detail All sales and refunds successfully submitted to your payment processor.Report fields can be modified.
Standard
Transaction Request All transactions that have passed through the payment gateway.Report fields can be modified.
Standard
Processor Events Payment notifications received from the processor for a variety of payment events.Report fields can be modified.
Standard
Transaction Exception Detail
Details failures that happened after a follow-on transaction is submitted to the payment gateway.Report fields can be modified.
Standard
Invoice Summary Summary of the transactions that appear on your invoice.Report fields cannot be modified.
Standard
Payer Authentication Detail
Record-level transaction details for data contained in the Payer Authentication Summary report.Report fields can be modified.
Custom
Subscription Detail Detailed information about on-demand customer profiles and transactions.Report fields can be modified.
Custom
Conversion Detail Results of converted orders for each reviewer.Report fields can be modified.
Custom
Decision Manager Detail
Data from selected fields for Decision Manager orders within a specific period of time.
Custom
Decision Manager Events Detail
Selected fields for Decision Manager account login, creation, and update events.
Custom
New Business Center Online Help | 2018 75
Chapter 5 Reports
NOTE: If you use financial services, refer to the Financial Reporting Guide for more information about additional available reports.
Generating One-Time Reports
Business Center enables you to create your own reports when your needs don’t require an ongoing subscription. A one-time report might be useful when:
• You need information about transactions that happened before you set up yourrecurring subscription
• You want to test a report before setting up a recurring subscription
• You need a particular type of information only one time, so a recurring subscriptionis unnecessary
When you need past information that spans more than 31 days, you can create multiple one-time reports. In order to protect system performance, each user is able to generate up to three one-time reports concurrently. Additional one-time reports can be scheduled after the first three reports complete.
After your one-time report is generated, it is available for download on the Available Reports page. Depending on the size of the report, it might take longer than 6 hours to generate.
NOTE: The process for creating a report subscription is the same as for creating a one-time report. The steps listed below focus on creating a one-time report; to follow steps specifically for creating custom subscriptions, see "Creating New Custom Report Subscriptions."
New Business Center Online Help | 2018 76
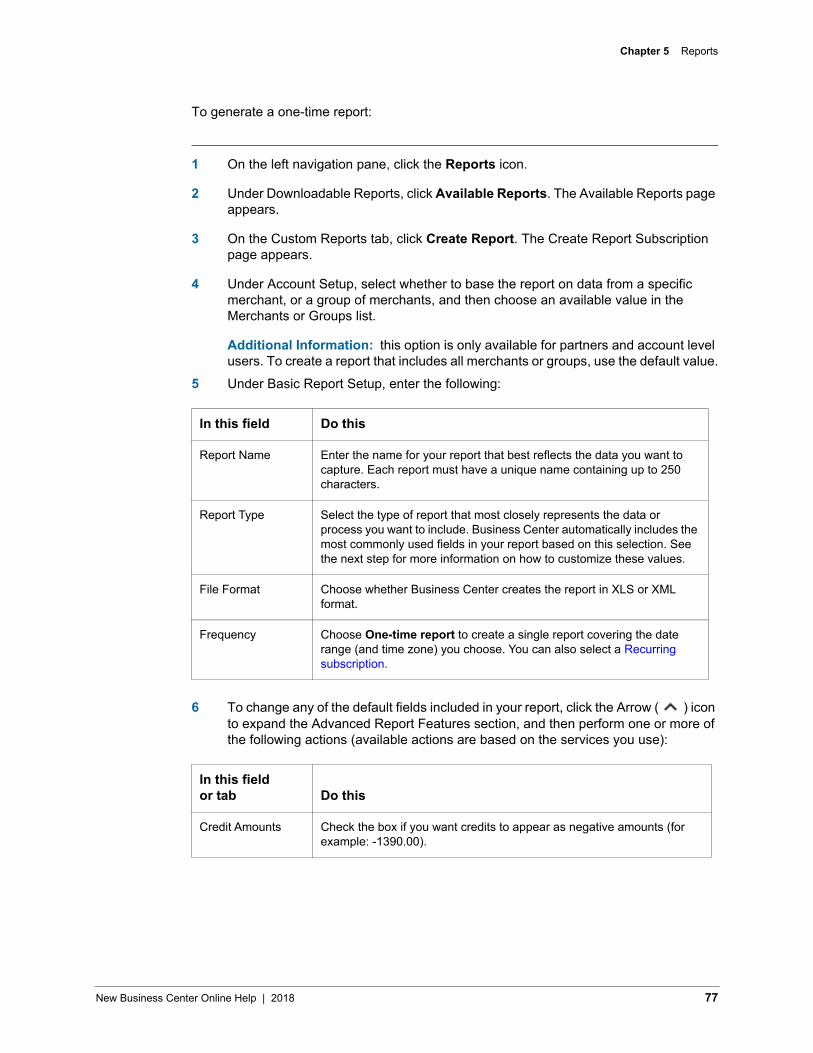
Chapter 5 Reports
To generate a one-time report:
1 On the left navigation pane, click the Reports icon.
2 Under Downloadable Reports, click Available Reports. The Available Reports page appears.
3 On the Custom Reports tab, click Create Report. The Create Report Subscription page appears.
4 Under Account Setup, select whether to base the report on data from a specific merchant, or a group of merchants, and then choose an available value in the Merchants or Groups list.
Additional Information: this option is only available for partners and account level users. To create a report that includes all merchants or groups, use the default value.
5 Under Basic Report Setup, enter the following:
6 To change any of the default fields included in your report, click the Arrow ( ) icon to expand the Advanced Report Features section, and then perform one or more of the following actions (available actions are based on the services you use):
In this field Do this
Report Name Enter the name for your report that best reflects the data you want to capture. Each report must have a unique name containing up to 250 characters.
Report Type Select the type of report that most closely represents the data or process you want to include. Business Center automatically includes the most commonly used fields in your report based on this selection. See the next step for more information on how to customize these values.
File Format Choose whether Business Center creates the report in XLS or XML format.
Frequency Choose One-time report to create a single report covering the date range (and time zone) you choose. You can also select a Recurring subscription.
In this field or tab Do this
Credit Amounts Check the box if you want credits to appear as negative amounts (for example: -1390.00).
New Business Center Online Help | 2018 77
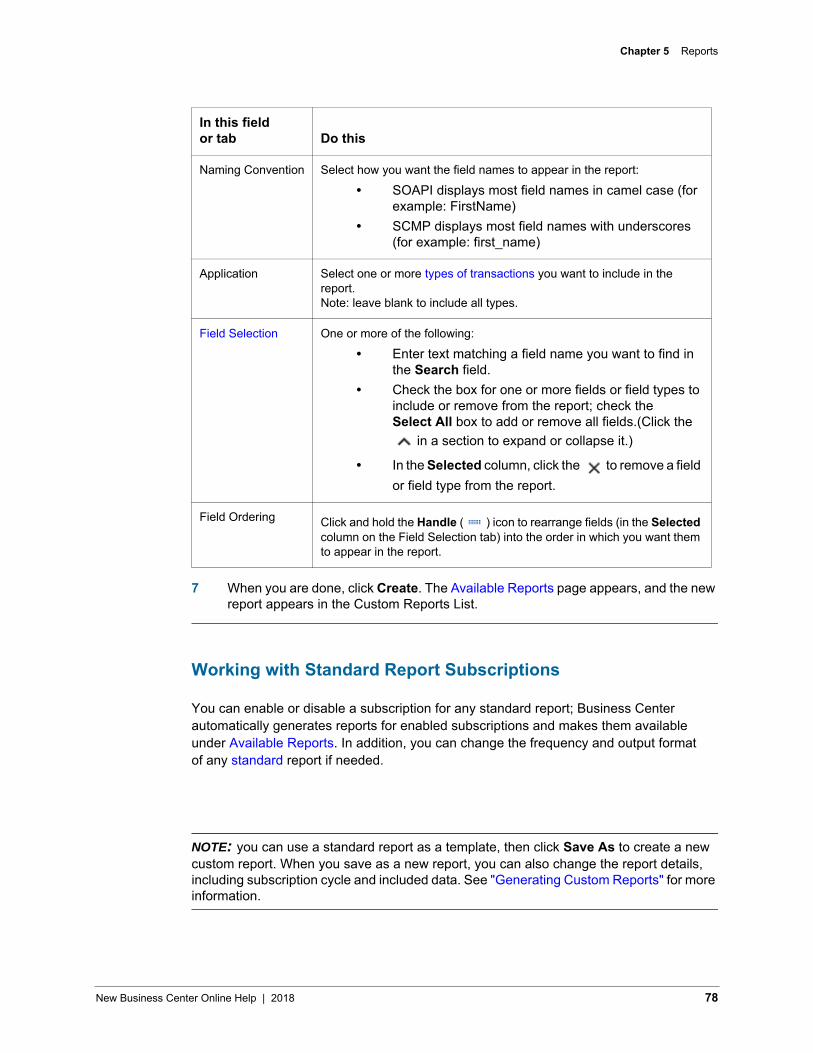
Chapter 5 Reports
7 When you are done, click Create. The Available Reports page appears, and the new report appears in the Custom Reports List.
Working with Standard Report Subscriptions
You can enable or disable a subscription for any standard report; Business Center automatically generates reports for enabled subscriptions and makes them available under Available Reports. In addition, you can change the frequency and output format of any standard report if needed.
NOTE: you can use a standard report as a template, then click Save As to create a new custom report. When you save as a new report, you can also change the report details, including subscription cycle and included data. See "Generating Custom Reports" for more information.
Naming Convention Select how you want the field names to appear in the report:
• SOAPI displays most field names in camel case (forexample: FirstName)
• SCMP displays most field names with underscores(for example: first_name)
Application Select one or more types of transactions you want to include in the report.Note: leave blank to include all types.
Field Selection One or more of the following:
• Enter text matching a field name you want to find inthe Search field.
• Check the box for one or more fields or field types toinclude or remove from the report; check theSelect All box to add or remove all fields.(Click the
in a section to expand or collapse it.)
• In the Selected column, click the to remove a field or field type from the report.
Field Ordering Click and hold the Handle ( ) icon to rearrange fields (in the Selected column on the Field Selection tab) into the order in which you want them to appear in the report.
In this field or tab Do this
New Business Center Online Help | 2018 78
Chapter 5 Reports
To modify a standard report subscription:
1 On the left navigation pane, click the Reports icon.
2 Under Downloadable Reports, click Report Subscription Management. The Report Subscription Management page appears.
3 Click the Standard Report Subscriptions tab. The Standard Report Subscriptions List appears.
4 Select one or more of the following:
a In the Enable column, select the box to activate the subscription; deselect to inactivate.
b In the Frequency column, click the Down Arrow ( ) icon to modify how often the report is generated.
c In the Format column, click the Down Arrow icon to modify the file format of the report.
Additional Information: click Save As to create a new version of the report.
Generating Custom Reports
Business Center enables you to create your own reports based on the type of data you want to track (for example, transaction requests or invoice summaries). When you create a report subscription, Business Center provides a set of fields for you to choose from; you can also add and remove additional fields based on your needs, and choose the order in which they appear and how they display in the report. You can also set how often you want to generate the report (or if you want to just run it once). Successfully generated reports appear in the Available Reports section.
To create a custom report subscription, create a brand new subscription, or save an existing standard or custom report as a new report.
NOTE: refer to the "Application Fields" for a complete list of fields and descriptions.
New Business Center Online Help | 2018 79

Chapter 5 Reports
Creating New Custom Report Subscriptions
A recurring report subscription is a template that describes the attributes of a report, including how often it runs and the period of time it spans. After your recurring report is generated, it is available for download on the Available Reports page. You can maintain up to 20 report subscriptions at any time.
In addition to choosing from available fields, you can customize the following attributes of a recurring subscription:
• Name: a unique name for the report. The name cannot be changed after a report iscreated.
• Report type: a set of reports that can be customized. The report type cannot bechanged after a report is created.
• Format: the format of a generated report (XML or CSV).
• Frequency: the frequency at which a report runs: daily, weekly, or monthly.
• Start time: the time of day at which a report runs.
NOTE: The process for creating a report subscription is the same as for creating a one-time report. The steps listed below focus on creating recurring subscriptions; to follow steps specifically for generating a one-time report, see "Generating One-Time Reports."
New Business Center Online Help | 2018 80
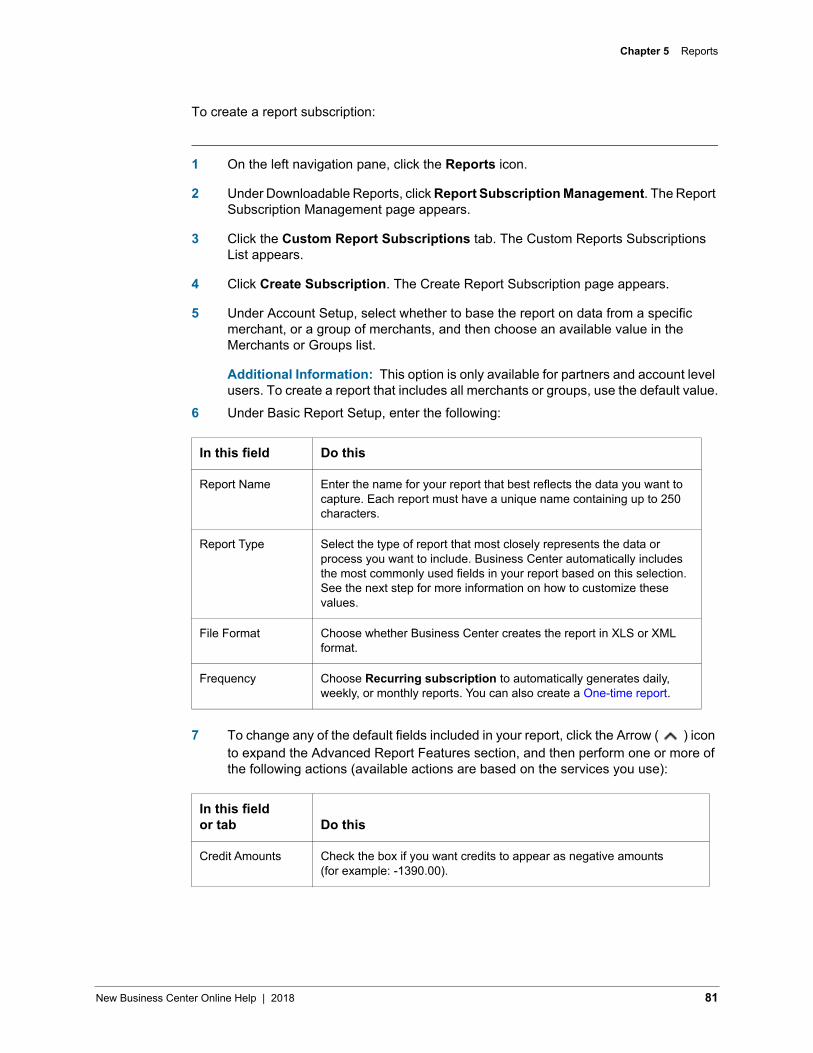
Chapter 5 Reports
To create a report subscription:
1 On the left navigation pane, click the Reports icon.
2 Under Downloadable Reports, click Report Subscription Management. The Report Subscription Management page appears.
3 Click the Custom Report Subscriptions tab. The Custom Reports Subscriptions List appears.
4 Click Create Subscription. The Create Report Subscription page appears.
5 Under Account Setup, select whether to base the report on data from a specific merchant, or a group of merchants, and then choose an available value in the Merchants or Groups list.
Additional Information: This option is only available for partners and account level users. To create a report that includes all merchants or groups, use the default value.
6 Under Basic Report Setup, enter the following:
7 To change any of the default fields included in your report, click the Arrow ( ) icon to expand the Advanced Report Features section, and then perform one or more of the following actions (available actions are based on the services you use):
In this field Do this
Report Name Enter the name for your report that best reflects the data you want to capture. Each report must have a unique name containing up to 250 characters.
Report Type Select the type of report that most closely represents the data or process you want to include. Business Center automatically includes the most commonly used fields in your report based on this selection. See the next step for more information on how to customize these values.
File Format Choose whether Business Center creates the report in XLS or XML format.
Frequency Choose Recurring subscription to automatically generates daily, weekly, or monthly reports. You can also create a One-time report.
In this field or tab Do this
Credit Amounts Check the box if you want credits to appear as negative amounts (for example: -1390.00).
New Business Center Online Help | 2018 81
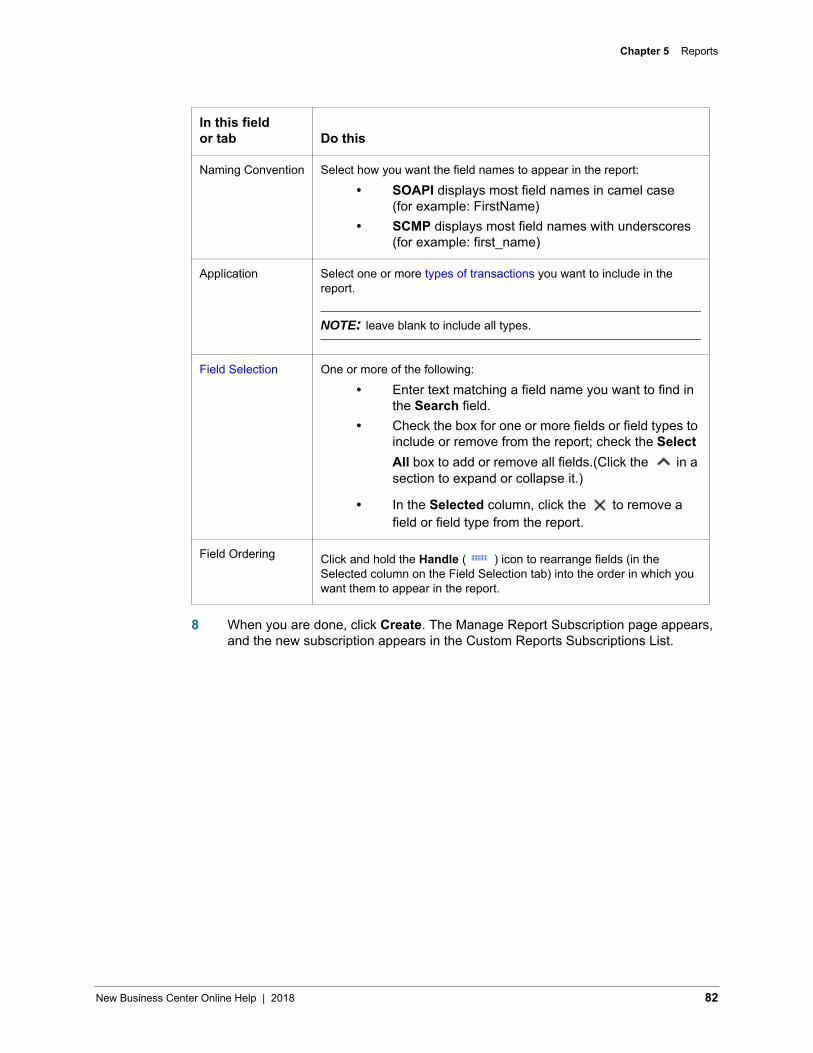
Chapter 5 Reports
8 When you are done, click Create. The Manage Report Subscription page appears, and the new subscription appears in the Custom Reports Subscriptions List.
Naming Convention Select how you want the field names to appear in the report:
• SOAPI displays most field names in camel case(for example: FirstName)
• SCMP displays most field names with underscores(for example: first_name)
Application Select one or more types of transactions you want to include in the report.
NOTE: leave blank to include all types.
Field Selection One or more of the following:
• Enter text matching a field name you want to find inthe Search field.
• Check the box for one or more fields or field types toinclude or remove from the report; check the SelectAll box to add or remove all fields.(Click the in asection to expand or collapse it.)
• In the Selected column, click the to remove a field or field type from the report.
Field Ordering Click and hold the Handle ( ) icon to rearrange fields (in the Selected column on the Field Selection tab) into the order in which you want them to appear in the report.
In this field or tab Do this
New Business Center Online Help | 2018 82
Chapter 5 Reports
Saving Existing Reports as New Subscriptions
You can choose to save any existing custom report as a new one; this enables you to copy over all the existing values, and change as much as you need to create a new report with a new name.
To create a new report or subscription based on an existing report:
1 On the left navigation pane, click the Reports icon.
2 Under Downloadable Reports, click Report Subscription Management. The Report Subscription Management page appears.
3 Click the Custom Report Subscriptions tab. The Custom Reports Subscriptions List appears.
4 Next to the report you want to copy, click the Save As ( ) icon. The Save New Subscription page appears.
5
6
7
8
Under Account Setup, select whether to base the report on data from a specific merchant, or a group of merchants, and then choose an available value in the Merchants or Groups list.
Note: to create a report that includes all merchants or groups, use the default value.
Under Basic Report Setup, enter a unique name for the report.
Additional Information: all reports must have a unique name.
Use the steps in "Creating New Custom Report Subscriptions" as a guideline for modifying report values.
Important: you must change at least value to save the new report.When you are done, click Save As. The Manage Report Subscription page appears, and the new subscription appears in the Custom Reports Subscriptions List.
New Business Center Online Help | 2018 83
Chapter 5 Reports
Modifying Custom Report Subscriptions
You can edit the values in the report (except the report name and frequency), or delete subscriptions you no longer need.
NOTE: You can also create a new report based on the subscription.
To edit report subscriptions:
1
2
3
4
5
6
7
On the left navigation pane, click the Reports icon.
Under Downloadable Reports, click Report Subscription Management. The Report Subscription Management page appears.
Use the steps in "Creating New Custom Report Subscriptions" as a guideline for modifying report values.
Click the Custom Report Subscriptions tab. The Custom Reports Subscriptions List appears.
In the row containing the report you want to edit, click the Edit ( ) icon. The Edit Report Subscription page appears.
Important: you must change at least attribute or field to save the report.When you are done, click Edit.
Click Confirm.
New Business Center Online Help | 2018 84
Chapter 5 Reports
Deleting Report Subscriptions
You can delete subscriptions you no longer need.
To delete report subscriptions:
1 On the left navigation pane, click the Reports icon.
2 Under Downloadable Reports, click Report Subscription Management. The Report Subscription Management page appears.
3 Click the Custom Report Subscriptions tab. The Custom Reports Subscriptions List appears.
4 In the row containing the report you want to delete, click the Delete ( ) icon.
5 Click Confirm. The Custom Report Subscriptions list refreshes and removes the subscription.
New Business Center Online Help | 2018 85
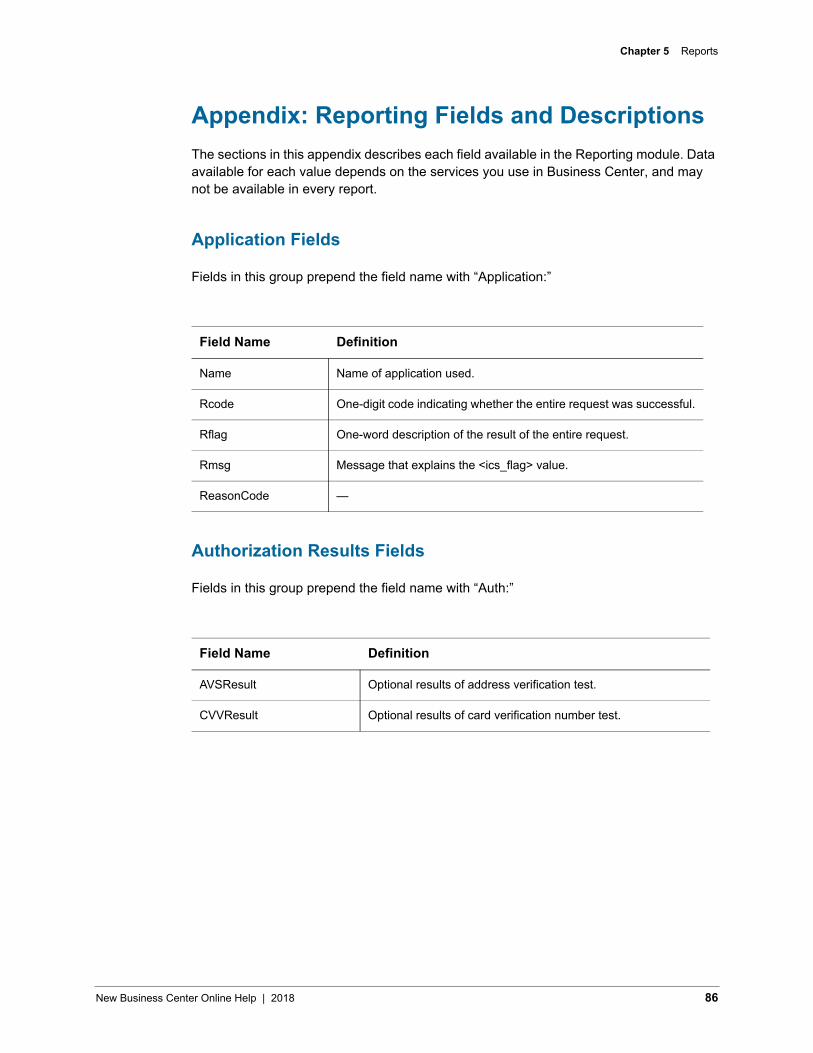
Chapter 5 Reports
Appendix: Reporting Fields and DescriptionsThe sections in this appendix describes each field available in the Reporting module. Data available for each value depends on the services you use in Business Center, and may not be available in every report.
Application Fields
Fields in this group prepend the field name with “Application:”
Authorization Results Fields
Fields in this group prepend the field name with “Auth:”
Field Name Definition
Name Name of application used.
Rcode One-digit code indicating whether the entire request was successful.
Rflag One-word description of the result of the entire request.
Rmsg Message that explains the <ics_flag> value.
ReasonCode —
Field Name Definition
AVSResult Optional results of address verification test.
CVVResult Optional results of card verification number test.
New Business Center Online Help | 2018 86

Chapter 5 Reports
Bank Information Fields
Fields in this group prepend the field name with “BankInfo:”
Batch Fields
Fields in this group prepend the field name with “Batch:”
Field Name Definition
Address Bank’s address.
BranchCode Code that identifies the branch of the customer's bank when you are not using the IBAN.
City City in which the bank is located.
Country Country in which the bank is located.
Name Bank’s name.
SwiftCode Bank’s SWIFT code. Unique address of the bank. Also known as the Bank Identification Code (BIC).
Field Name Definition
BatchDate Date when the batch was sent to the processor.
BatchID CyberSource batch in which the transaction was sent.
Status Status of batch file.
SuccessFlag Indicates whether batch file processing was successful.
New Business Center Online Help | 2018 87
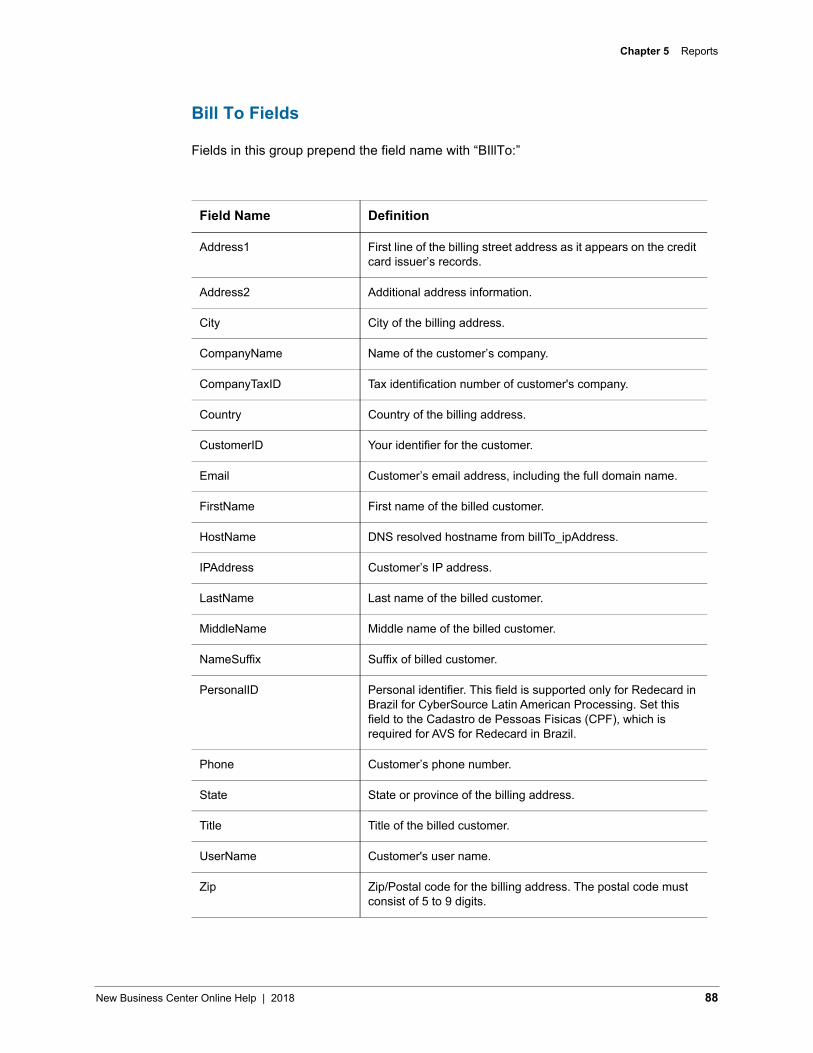
Chapter 5 Reports
Bill To Fields
Fields in this group prepend the field name with “BIllTo:”
Field Name Definition
Address1 First line of the billing street address as it appears on the credit card issuer’s records.
Address2 Additional address information.
City City of the billing address.
CompanyName Name of the customer’s company.
CompanyTaxID Tax identification number of customer's company.
Country Country of the billing address.
CustomerID Your identifier for the customer.
Email Customer’s email address, including the full domain name.
FirstName First name of the billed customer.
HostName DNS resolved hostname from billTo_ipAddress.
IPAddress Customer’s IP address.
LastName Last name of the billed customer.
MiddleName Middle name of the billed customer.
NameSuffix Suffix of billed customer.
PersonalID Personal identifier. This field is supported only for Redecard in Brazil for CyberSource Latin American Processing. Set this field to the Cadastro de Pessoas Fisicas (CPF), which is required for AVS for Redecard in Brazil.
Phone Customer’s phone number.
State State or province of the billing address.
Title Title of the billed customer.
UserName Customer's user name.
Zip Zip/Postal code for the billing address. The postal code must consist of 5 to 9 digits.
New Business Center Online Help | 2018 88
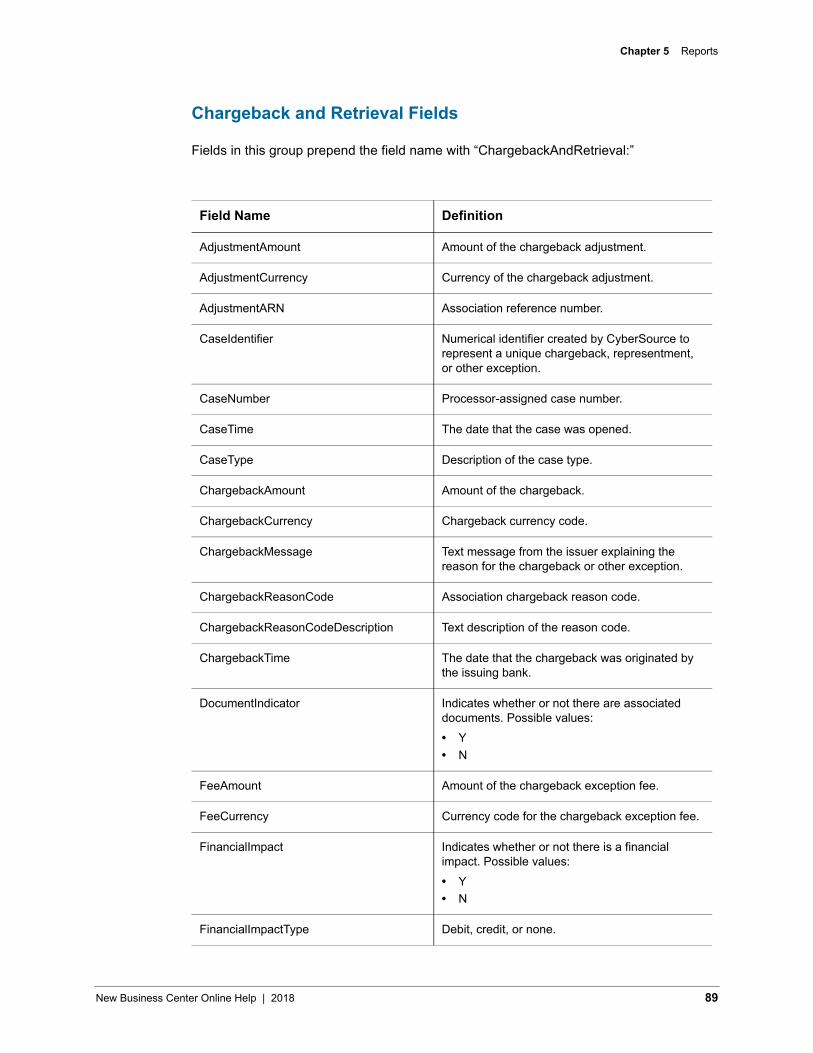
Chapter 5 Reports
Chargeback and Retrieval Fields
Fields in this group prepend the field name with “ChargebackAndRetrieval:”
Field Name Definition
AdjustmentAmount Amount of the chargeback adjustment.
AdjustmentCurrency Currency of the chargeback adjustment.
AdjustmentARN Association reference number.
CaseIdentifier Numerical identifier created by CyberSource to represent a unique chargeback, representment, or other exception.
CaseNumber Processor-assigned case number.
CaseTime The date that the case was opened.
CaseType Description of the case type.
ChargebackAmount Amount of the chargeback.
ChargebackCurrency Chargeback currency code.
ChargebackMessage Text message from the issuer explaining the reason for the chargeback or other exception.
ChargebackReasonCode Association chargeback reason code.
ChargebackReasonCodeDescription Text description of the reason code.
ChargebackTime The date that the chargeback was originated by the issuing bank.
DocumentIndicator Indicates whether or not there are associated documents. Possible values:• Y• N
FeeAmount Amount of the chargeback exception fee.
FeeCurrency Currency code for the chargeback exception fee.
FinancialImpact Indicates whether or not there is a financial impact. Possible values:• Y• N
FinancialImpactType Debit, credit, or none.
New Business Center Online Help | 2018 89
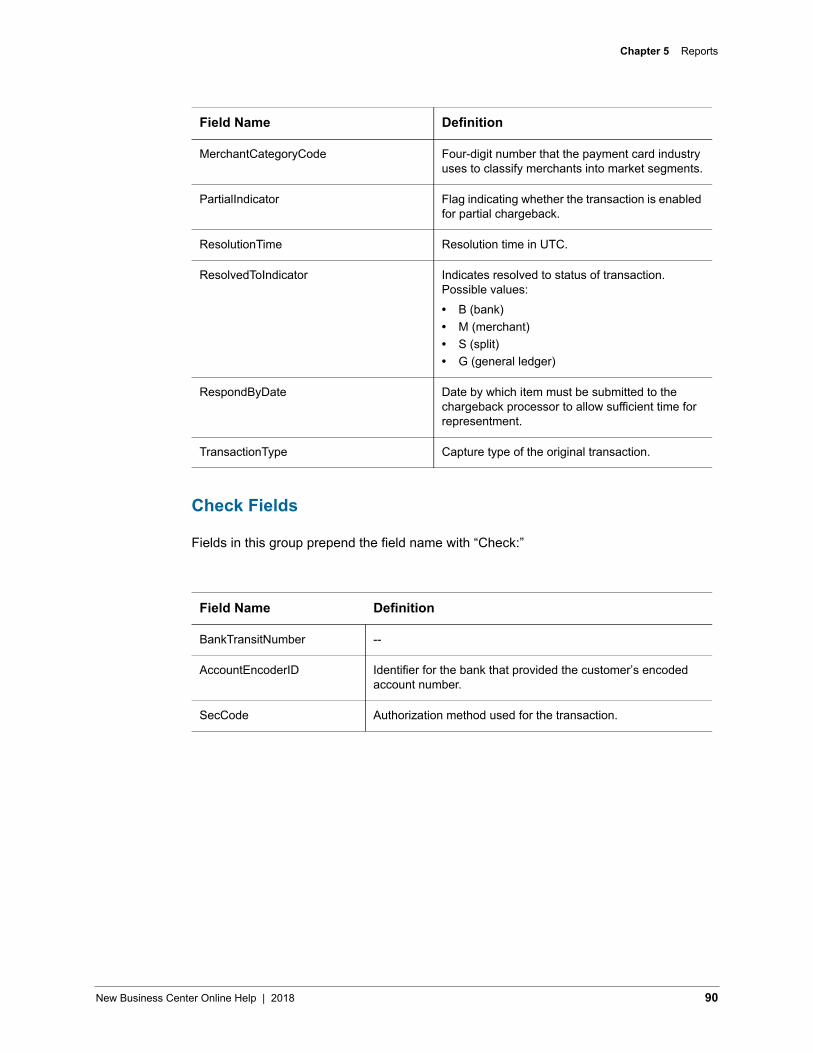
Chapter 5 Reports
Check Fields
Fields in this group prepend the field name with “Check:”
MerchantCategoryCode Four-digit number that the payment card industry uses to classify merchants into market segments.
PartialIndicator Flag indicating whether the transaction is enabled for partial chargeback.
ResolutionTime Resolution time in UTC.
ResolvedToIndicator Indicates resolved to status of transaction. Possible values:• B (bank)• M (merchant)• S (split)• G (general ledger)
RespondByDate Date by which item must be submitted to the chargeback processor to allow sufficient time for representment.
TransactionType Capture type of the original transaction.
Field Name Definition
BankTransitNumber --
AccountEncoderID Identifier for the bank that provided the customer’s encoded account number.
SecCode Authorization method used for the transaction.
Field Name Definition
New Business Center Online Help | 2018 90

Chapter 5 Reports
Conversion Fields
Fields in this group prepend the field name with “Conversion:”
Deposit Fields
Fields in this group prepend the field name with “Deposit:”
Field Name Definition
ConversionDate Date order converted.
NewDecision Reviewer evaluation result.
OriginalDecision Order profile evaluation result.
Profile Order profile used to evaluate the order.
Reviewer Person who evaluated order originally marked for review.
ReviewerComments Additional information added by reviewer.
Queue Review queue originally assigned to order.
Field Name Definition
Amount Amount of the deposit.
Category Category of the deposit.
Currency Currency code of the deposit.
ExchangeRate Exchange rate. Includes a decimal point and up to 4 decimal places.
ExchangeRateDescription Exchange rate description from the funding bank.
Identifier Unique reference number for this deposit.
MerchantBankAcctLast4 Bank account number to which the funds transfer will be deposited. For security purposes, all but the last 4 digits are masked.
MerchantBankAcctName Name used on the bank account.
MerchantBankCode Routing number for the account to which the funds transfer will be deposited.
New Business Center Online Help | 2018 91

Chapter 5 Reports
Device Fields
Fields in this group prepend the field name with “Device:”
Event Fields
Fields in this group prepend the field name with “Event:”
MerchantBankCountry Country in which the bank is located. Use the two-character ISO Standard Country Codes.
MerchantBankName Bank's name.
MerchantID CyberSource merchant ID.
Method Funds transfer method.
Status Status of the deposit. Possible values:• S (success)• P (pending)• F (failed)
Time Deposit time for the transaction in UTC.
TransferMessage Deposit transfer message provided by the processor.
Type Description of events included in this funds transfer.
Field Name Definition
DeviceID Identification number of device used for transaction.
Field Name Definition
Amount Amount for the event.
CurrencyCode Currency code for the event.
Event Type of event that occurred for the transaction.
EventDate Date in GMT format that the event occurred. This field can be null for some event types, such as Declined.
Field Name Definition
New Business Center Online Help | 2018 92
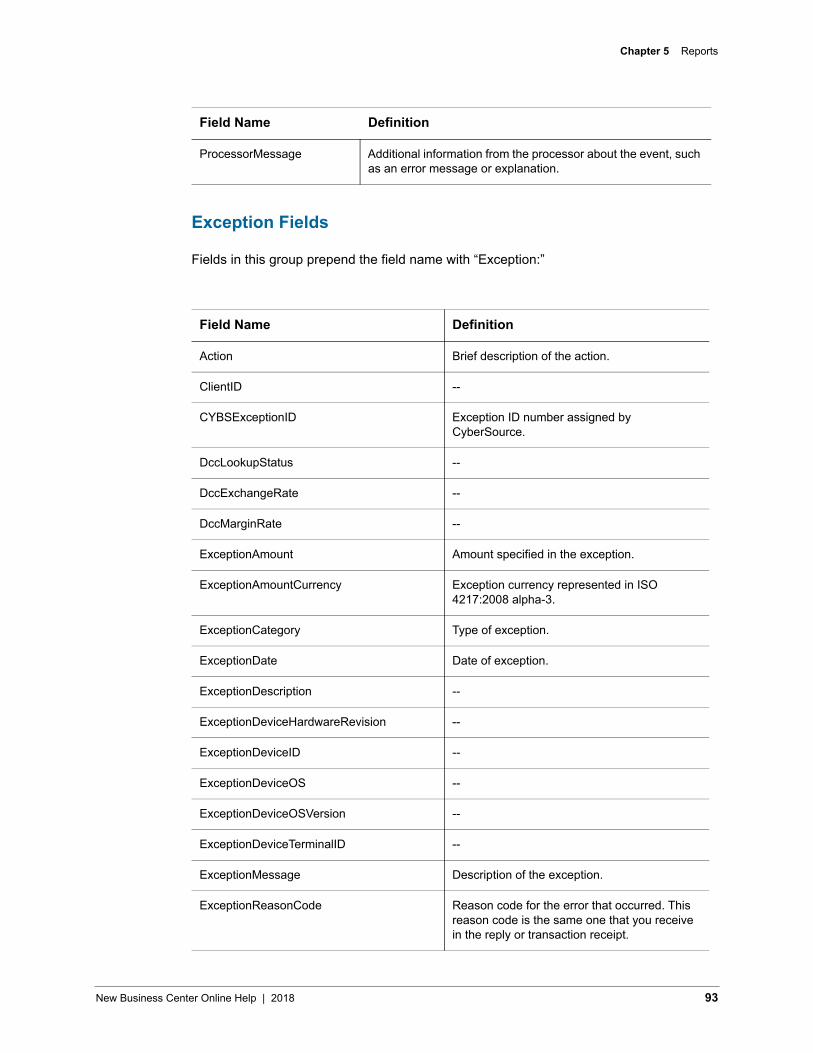
Chapter 5 Reports
Exception Fields
Fields in this group prepend the field name with “Exception:”
ProcessorMessage Additional information from the processor about the event, such as an error message or explanation.
Field Name Definition
Action Brief description of the action.
ClientID --
CYBSExceptionID Exception ID number assigned by CyberSource.
DccLookupStatus --
DccExchangeRate --
DccMarginRate --
ExceptionAmount Amount specified in the exception.
ExceptionAmountCurrency Exception currency represented in ISO 4217:2008 alpha-3.
ExceptionCategory Type of exception.
ExceptionDate Date of exception.
ExceptionDescription --
ExceptionDeviceHardwareRevision --
ExceptionDeviceID --
ExceptionDeviceOS --
ExceptionDeviceOSVersion --
ExceptionDeviceTerminalID --
ExceptionMessage Description of the exception.
ExceptionReasonCode Reason code for the error that occurred. This reason code is the same one that you receive in the reply or transaction receipt.
Field Name Definition
New Business Center Online Help | 2018 93
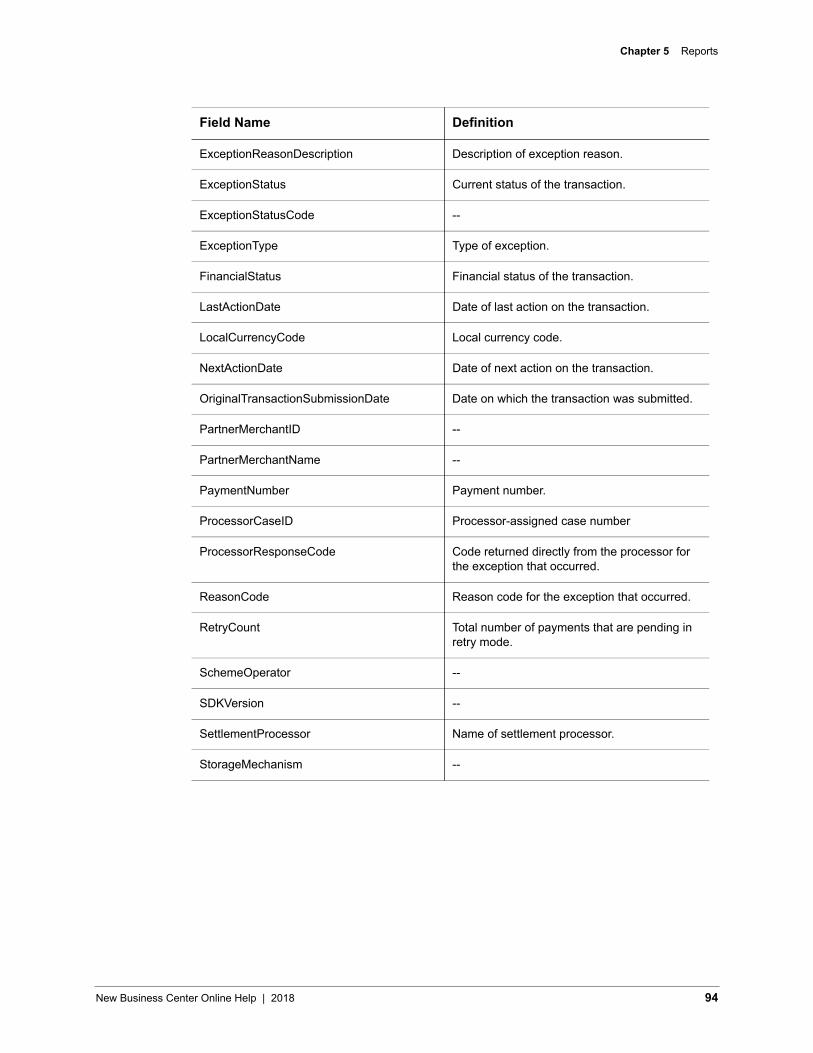
Chapter 5 Reports
ExceptionReasonDescription Description of exception reason.
ExceptionStatus Current status of the transaction.
ExceptionStatusCode --
ExceptionType Type of exception.
FinancialStatus Financial status of the transaction.
LastActionDate Date of last action on the transaction.
LocalCurrencyCode Local currency code.
NextActionDate Date of next action on the transaction.
OriginalTransactionSubmissionDate Date on which the transaction was submitted.
PartnerMerchantID --
PartnerMerchantName --
PaymentNumber Payment number.
ProcessorCaseID Processor-assigned case number
ProcessorResponseCode Code returned directly from the processor for the exception that occurred.
ReasonCode Reason code for the exception that occurred.
RetryCount Total number of payments that are pending in retry mode.
SchemeOperator --
SDKVersion --
SettlementProcessor Name of settlement processor.
StorageMechanism --
Field Name Definition
New Business Center Online Help | 2018 94
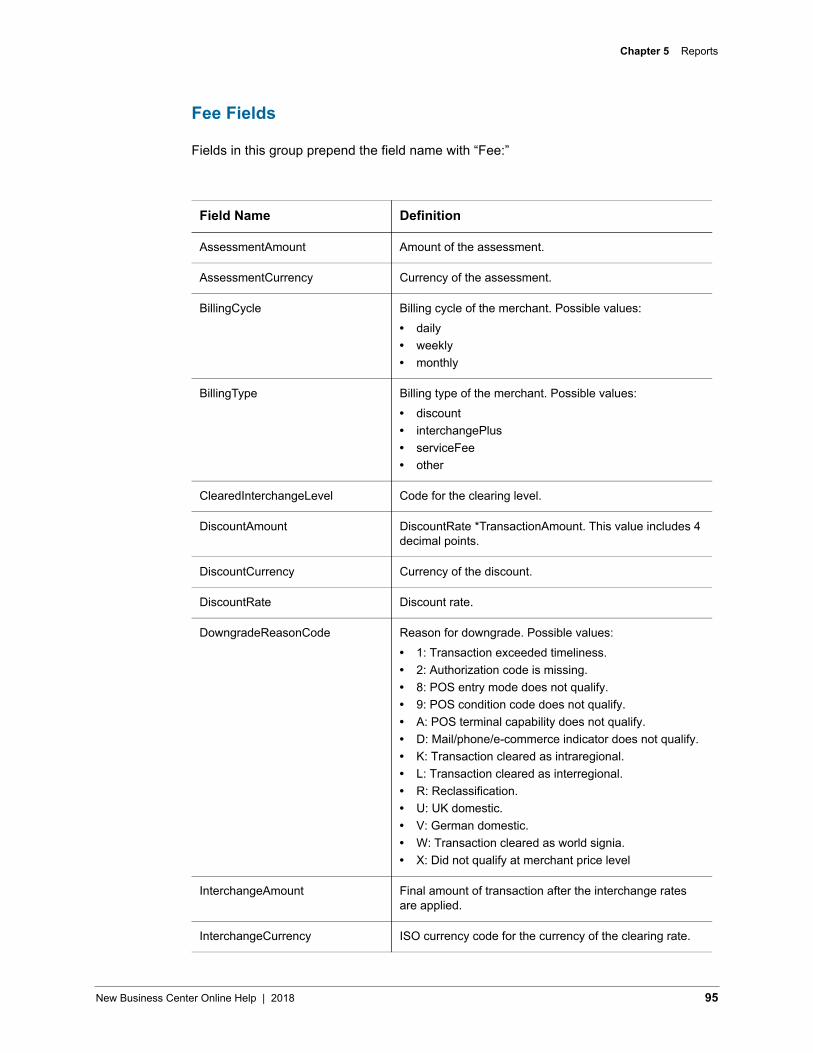
Chapter 5 Reports
Fee Fields
Fields in this group prepend the field name with “Fee:”
Field Name Definition
AssessmentAmount Amount of the assessment.
AssessmentCurrency Currency of the assessment.
BillingCycle Billing cycle of the merchant. Possible values:• daily• weekly• monthly
BillingType Billing type of the merchant. Possible values:• discount• interchangePlus• serviceFee• other
ClearedInterchangeLevel Code for the clearing level.
DiscountAmount DiscountRate *TransactionAmount. This value includes 4 decimal points.
DiscountCurrency Currency of the discount.
DiscountRate Discount rate.
DowngradeReasonCode Reason for downgrade. Possible values:• 1: Transaction exceeded timeliness.• 2: Authorization code is missing.• 8: POS entry mode does not qualify.• 9: POS condition code does not qualify.• A: POS terminal capability does not qualify.• D: Mail/phone/e-commerce indicator does not qualify.• K: Transaction cleared as intraregional.• L: Transaction cleared as interregional.• R: Reclassification.• U: UK domestic.• V: German domestic.• W: Transaction cleared as world signia.• X: Did not qualify at merchant price level
InterchangeAmount Final amount of transaction after the interchange rates are applied.
InterchangeCurrency ISO currency code for the currency of the clearing rate.
New Business Center Online Help | 2018 95
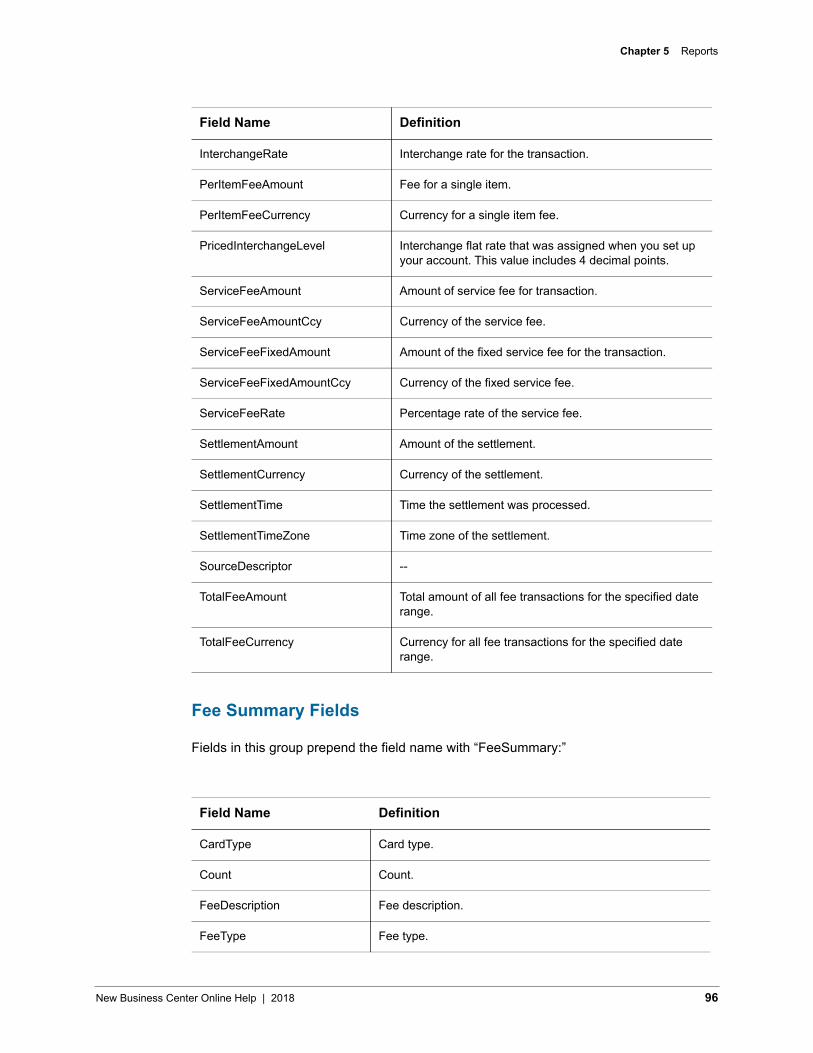
Chapter 5 Reports
Fee Summary Fields
Fields in this group prepend the field name with “FeeSummary:”
InterchangeRate Interchange rate for the transaction.
PerItemFeeAmount Fee for a single item.
PerItemFeeCurrency Currency for a single item fee.
PricedInterchangeLevel Interchange flat rate that was assigned when you set up your account. This value includes 4 decimal points.
ServiceFeeAmount Amount of service fee for transaction.
ServiceFeeAmountCcy Currency of the service fee.
ServiceFeeFixedAmount Amount of the fixed service fee for the transaction.
ServiceFeeFixedAmountCcy Currency of the fixed service fee.
ServiceFeeRate Percentage rate of the service fee.
SettlementAmount Amount of the settlement.
SettlementCurrency Currency of the settlement.
SettlementTime Time the settlement was processed.
SettlementTimeZone Time zone of the settlement.
SourceDescriptor --
TotalFeeAmount Total amount of all fee transactions for the specified date range.
TotalFeeCurrency Currency for all fee transactions for the specified date range.
Field Name Definition
CardType Card type.
Count Count.
FeeDescription Fee description.
FeeType Fee type.
Field Name Definition
New Business Center Online Help | 2018 96
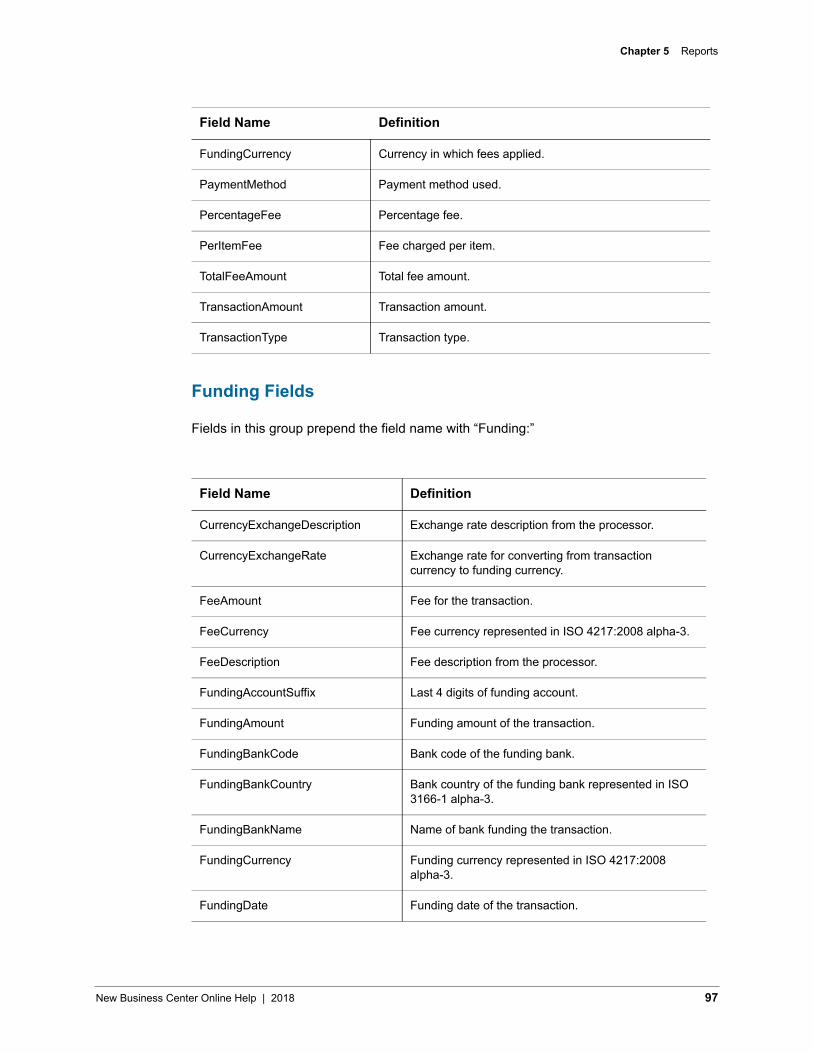
Chapter 5 Reports
Funding Fields
Fields in this group prepend the field name with “Funding:”
FundingCurrency Currency in which fees applied.
PaymentMethod Payment method used.
PercentageFee Percentage fee.
PerItemFee Fee charged per item.
TotalFeeAmount Total fee amount.
TransactionAmount Transaction amount.
TransactionType Transaction type.
Field Name Definition
CurrencyExchangeDescription Exchange rate description from the processor.
CurrencyExchangeRate Exchange rate for converting from transaction currency to funding currency.
FeeAmount Fee for the transaction.
FeeCurrency Fee currency represented in ISO 4217:2008 alpha-3.
FeeDescription Fee description from the processor.
FundingAccountSuffix Last 4 digits of funding account.
FundingAmount Funding amount of the transaction.
FundingBankCode Bank code of the funding bank.
FundingBankCountry Bank country of the funding bank represented in ISO 3166-1 alpha-3.
FundingBankName Name of bank funding the transaction.
FundingCurrency Funding currency represented in ISO 4217:2008 alpha-3.
FundingDate Funding date of the transaction.
Field Name Definition
New Business Center Online Help | 2018 97

Chapter 5 Reports
Fund Transfer Fields
Fields in this group prepend the field name with “FundTransfer:”
Invoice Fields
Fields in this group prepend the field name with “Invoice:”
FundingIdentificationNumber Funding identification for the funding of the transaction.
FundingProcessorMessage Funding response message from the processor.
FundingTransferMessage Funding transfer message provided by the processor.
ProcessorResponseCode Funding response code from the processor.
Status Funding status. Possible values:• S (success)• P (pending)• F (failed)
Field Name Definition
BankCheckDigit Code used to validate the customer's account number.
IbanIndicator International Bank Account Number (IBAN).
Field Name Definition
BillingGroupDescription Description of the billing group.
NotProcessed Number of unprocessed transactions.
OrganizationID Merchant ID.
PerformedServices CyberSource ICS service name.
Processed Number of processed transactions.
Total Invoice count.
Field Name Definition
New Business Center Online Help | 2018 98

Chapter 5 Reports
JP Fields
Fields in this group prepend the field name with “JP:”
Field Name Definition
Date Date of transaction.
Time Time of transaction.
MerchantID CyberSource (gateway) merchant identifier.
RequestID Client request identifier.
MerchantReferenceNumber Merchant order reference or tracking number.
PaymentMethod Method of payment.
CardSuffix Last four digits of card.
Amount Transaction grand total.
TransactionType Type of transaction.
CustomerFirstName Customer first name.
CustomerLastName Customer last name.
AuthorizationCode Transaction authorization code.
SubscriptionID Customer profile identifier for requested service.
AuthForward Name of Japanese acquirer that processed transaction. Available only for CCS (CAFIS) and JCN Gateway.
JPOPaymentMethod Type of Japanese payment method used.
JPOInstallmentMethod Number of payment installments (Japanese payment method only).
TransactionReferenceNumber Reference number used to reconcile CyberSource (gateway) reports with processor reports.
Currency Currency used in transaction.
Gateway Name of gateway used to process transaction.
NetworkTokenTransType Network token transaction type.
New Business Center Online Help | 2018 99
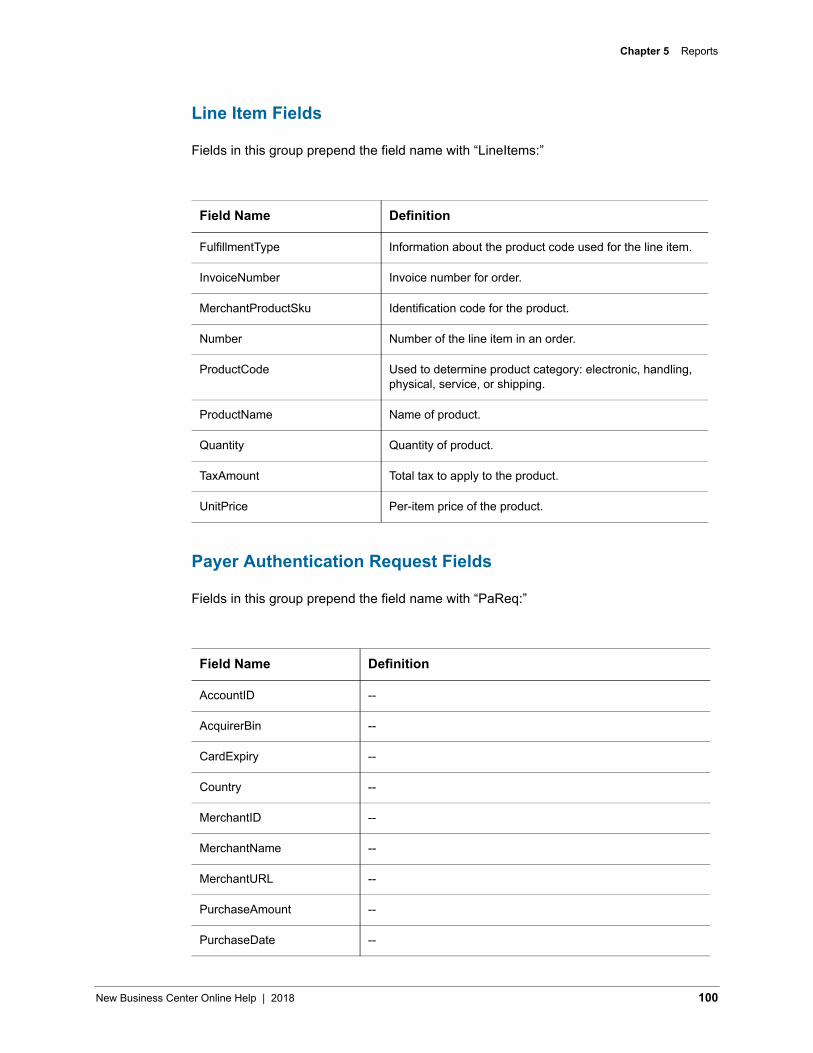
Chapter 5 Reports
Line Item Fields
Fields in this group prepend the field name with “LineItems:”
Payer Authentication Request Fields
Fields in this group prepend the field name with “PaReq:”
Field Name Definition
FulfillmentType Information about the product code used for the line item.
InvoiceNumber Invoice number for order.
MerchantProductSku Identification code for the product.
Number Number of the line item in an order.
ProductCode Used to determine product category: electronic, handling, physical, service, or shipping.
ProductName Name of product.
Quantity Quantity of product.
TaxAmount Total tax to apply to the product.
UnitPrice Per-item price of the product.
Field Name Definition
AccountID --
AcquirerBin --
CardExpiry --
Country --
MerchantID --
MerchantName --
MerchantURL --
PurchaseAmount --
PurchaseDate --
New Business Center Online Help | 2018 100
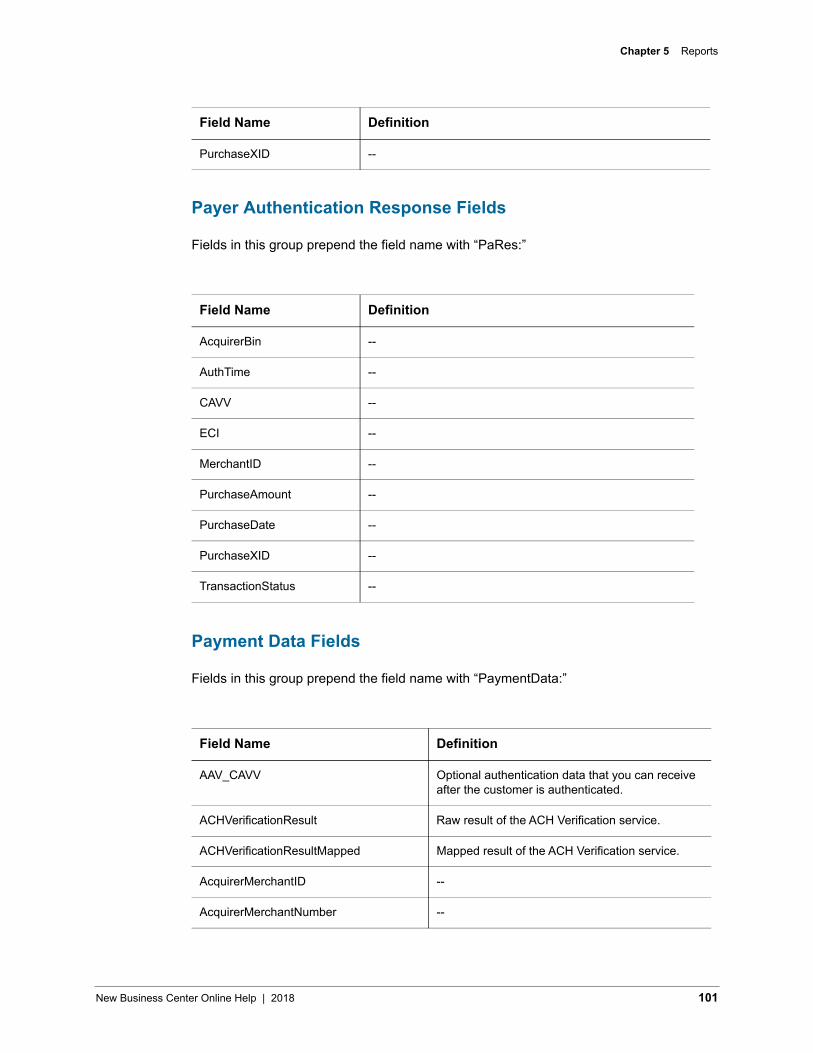
Chapter 5 Reports
Payer Authentication Response Fields
Fields in this group prepend the field name with “PaRes:”
Payment Data Fields
Fields in this group prepend the field name with “PaymentData:”
PurchaseXID --
Field Name Definition
AcquirerBin --
AuthTime --
CAVV --
ECI --
MerchantID --
PurchaseAmount --
PurchaseDate --
PurchaseXID --
TransactionStatus --
Field Name Definition
AAV_CAVV Optional authentication data that you can receive after the customer is authenticated.
ACHVerificationResult Raw result of the ACH Verification service.
ACHVerificationResultMapped Mapped result of the ACH Verification service.
AcquirerMerchantID --
AcquirerMerchantNumber --
Field Name Definition
New Business Center Online Help | 2018 101
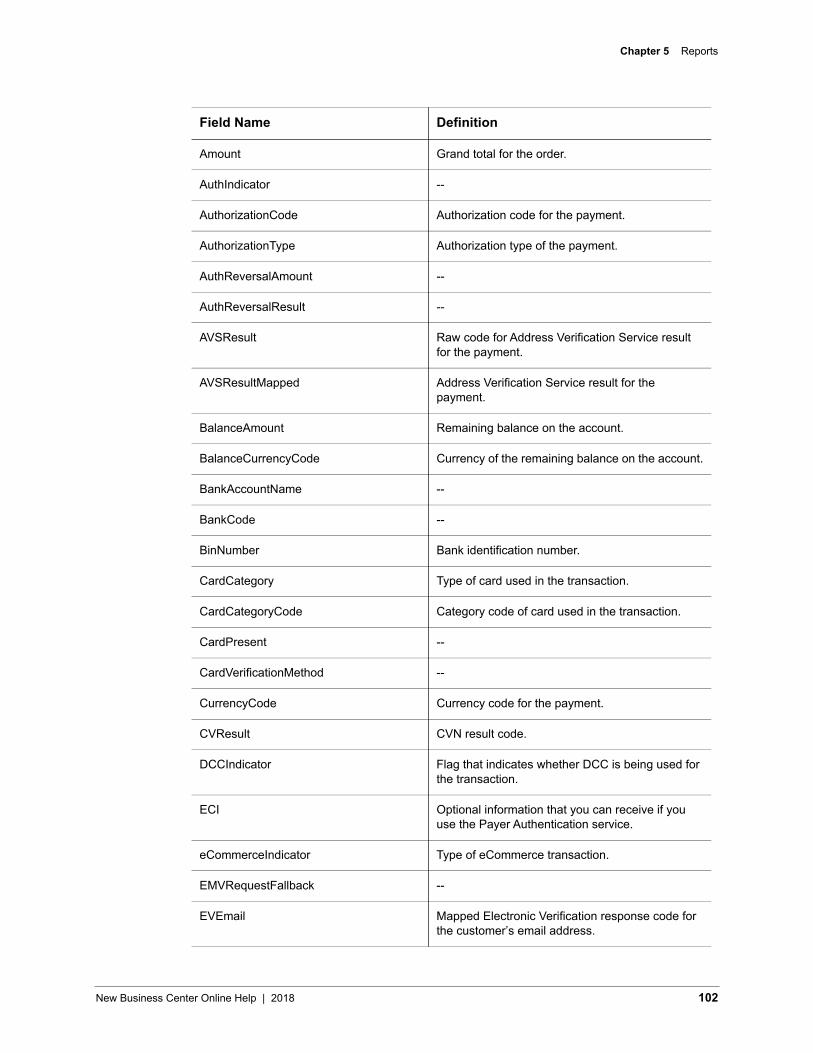
Chapter 5 Reports
Amount Grand total for the order.
AuthIndicator --
AuthorizationCode Authorization code for the payment.
AuthorizationType Authorization type of the payment.
AuthReversalAmount --
AuthReversalResult --
AVSResult Raw code for Address Verification Service result for the payment.
AVSResultMapped Address Verification Service result for the payment.
BalanceAmount Remaining balance on the account.
BalanceCurrencyCode Currency of the remaining balance on the account.
BankAccountName --
BankCode --
BinNumber Bank identification number.
CardCategory Type of card used in the transaction.
CardCategoryCode Category code of card used in the transaction.
CardPresent --
CardVerificationMethod --
CurrencyCode Currency code for the payment.
CVResult CVN result code.
DCCIndicator Flag that indicates whether DCC is being used for the transaction.
ECI Optional information that you can receive if you use the Payer Authentication service.
eCommerceIndicator Type of eCommerce transaction.
EMVRequestFallback --
EVEmail Mapped Electronic Verification response code for the customer’s email address.
Field Name Definition
New Business Center Online Help | 2018 102
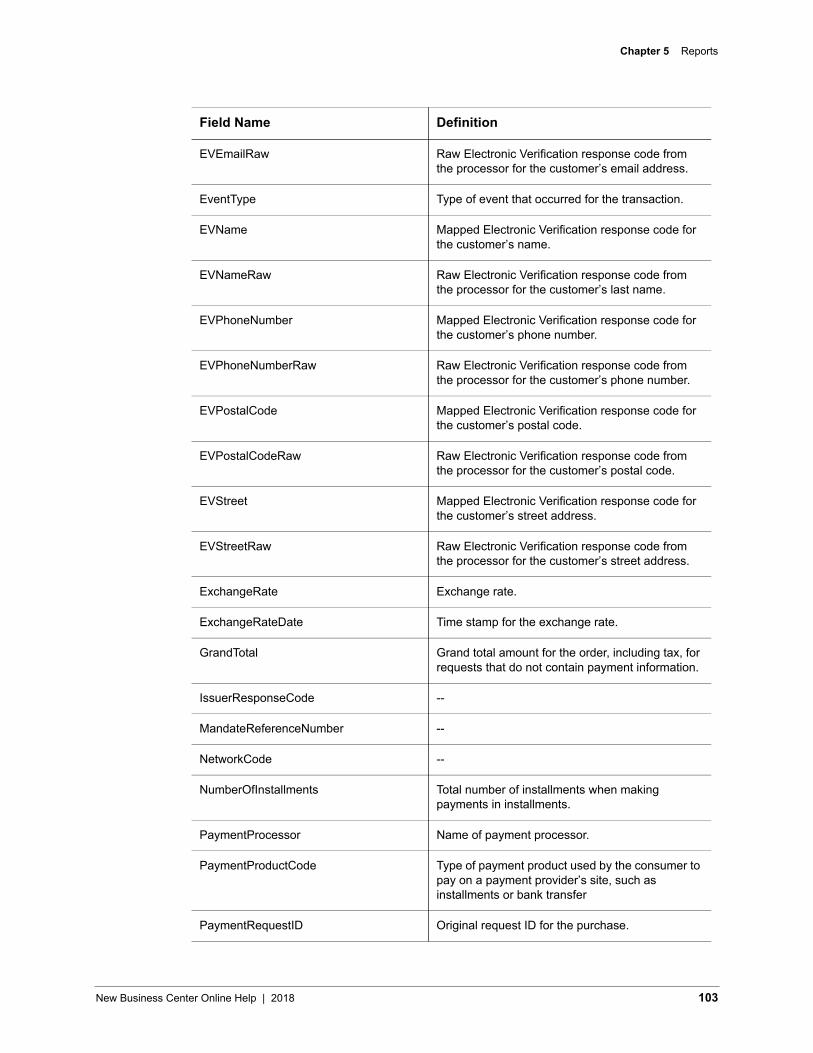
Chapter 5 Reports
EVEmailRaw Raw Electronic Verification response code from the processor for the customer’s email address.
EventType Type of event that occurred for the transaction.
EVName Mapped Electronic Verification response code for the customer’s name.
EVNameRaw Raw Electronic Verification response code from the processor for the customer’s last name.
EVPhoneNumber Mapped Electronic Verification response code for the customer’s phone number.
EVPhoneNumberRaw Raw Electronic Verification response code from the processor for the customer’s phone number.
EVPostalCode Mapped Electronic Verification response code for the customer’s postal code.
EVPostalCodeRaw Raw Electronic Verification response code from the processor for the customer’s postal code.
EVStreet Mapped Electronic Verification response code for the customer’s street address.
EVStreetRaw Raw Electronic Verification response code from the processor for the customer’s street address.
ExchangeRate Exchange rate.
ExchangeRateDate Time stamp for the exchange rate.
GrandTotal Grand total amount for the order, including tax, for requests that do not contain payment information.
IssuerResponseCode --
MandateReferenceNumber --
NetworkCode --
NumberOfInstallments Total number of installments when making payments in installments.
PaymentProcessor Name of payment processor.
PaymentProductCode Type of payment product used by the consumer to pay on a payment provider’s site, such as installments or bank transfer
PaymentRequestID Original request ID for the purchase.
Field Name Definition
New Business Center Online Help | 2018 103
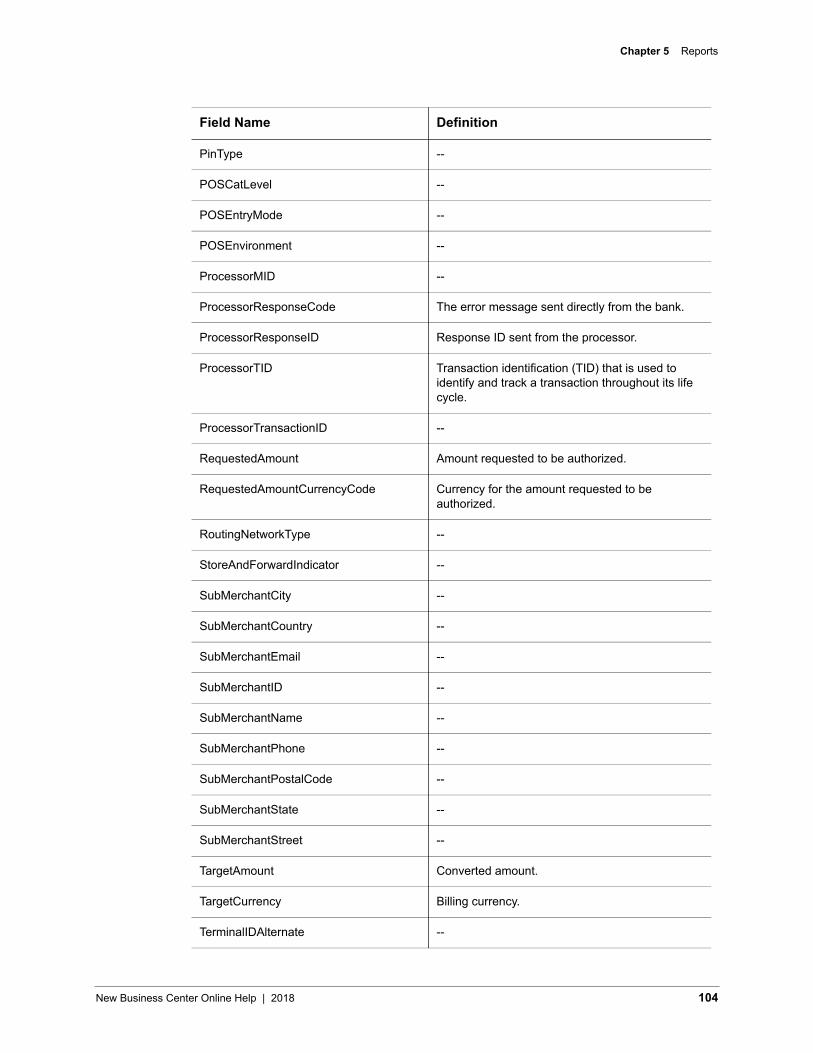
Chapter 5 Reports
PinType --
POSCatLevel --
POSEntryMode --
POSEnvironment --
ProcessorMID --
ProcessorResponseCode The error message sent directly from the bank.
ProcessorResponseID Response ID sent from the processor.
ProcessorTID Transaction identification (TID) that is used to identify and track a transaction throughout its life cycle.
ProcessorTransactionID --
RequestedAmount Amount requested to be authorized.
RequestedAmountCurrencyCode Currency for the amount requested to be authorized.
RoutingNetworkType --
StoreAndForwardIndicator --
SubMerchantCity --
SubMerchantCountry --
SubMerchantEmail --
SubMerchantID --
SubMerchantName --
SubMerchantPhone --
SubMerchantPostalCode --
SubMerchantState --
SubMerchantStreet --
TargetAmount Converted amount.
TargetCurrency Billing currency.
TerminalIDAlternate --
Field Name Definition
New Business Center Online Help | 2018 104
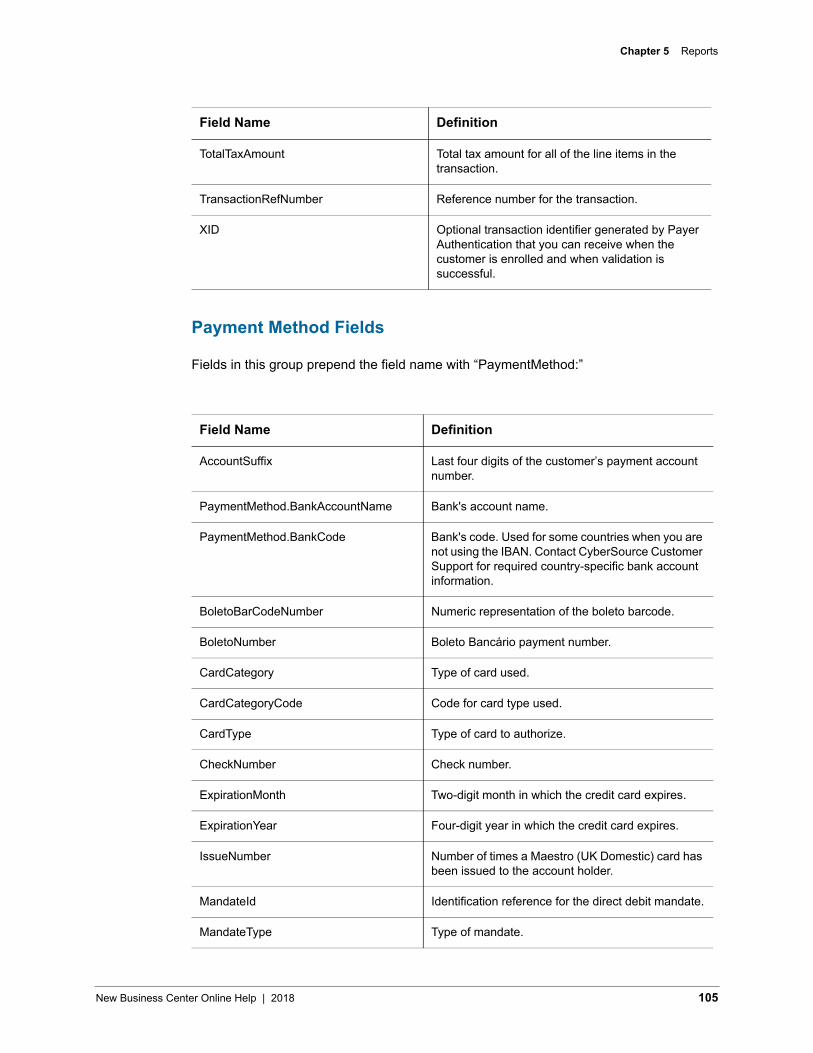
Chapter 5 Reports
Payment Method Fields
Fields in this group prepend the field name with “PaymentMethod:”
TotalTaxAmount Total tax amount for all of the line items in the transaction.
TransactionRefNumber Reference number for the transaction.
XID Optional transaction identifier generated by Payer Authentication that you can receive when the customer is enrolled and when validation is successful.
Field Name Definition
AccountSuffix Last four digits of the customer’s payment account number.
PaymentMethod.BankAccountName Bank's account name.
PaymentMethod.BankCode Bank's code. Used for some countries when you are not using the IBAN. Contact CyberSource Customer Support for required country-specific bank account information.
BoletoBarCodeNumber Numeric representation of the boleto barcode.
BoletoNumber Boleto Bancário payment number.
CardCategory Type of card used.
CardCategoryCode Code for card type used.
CardType Type of card to authorize.
CheckNumber Check number.
ExpirationMonth Two-digit month in which the credit card expires.
ExpirationYear Four-digit year in which the credit card expires.
IssueNumber Number of times a Maestro (UK Domestic) card has been issued to the account holder.
MandateId Identification reference for the direct debit mandate.
MandateType Type of mandate.
Field Name Definition
New Business Center Online Help | 2018 105
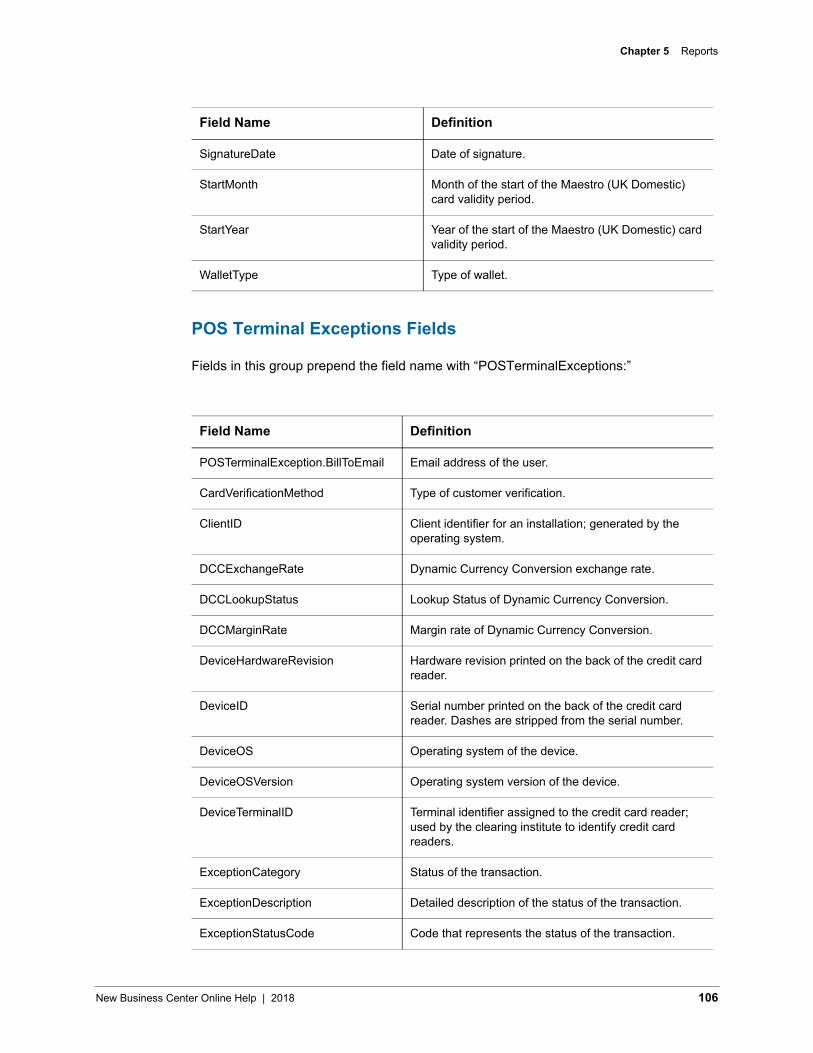
Chapter 5 Reports
POS Terminal Exceptions Fields
Fields in this group prepend the field name with “POSTerminalExceptions:”
SignatureDate Date of signature.
StartMonth Month of the start of the Maestro (UK Domestic) card validity period.
StartYear Year of the start of the Maestro (UK Domestic) card validity period.
WalletType Type of wallet.
Field Name Definition
POSTerminalException.BillToEmail Email address of the user.
CardVerificationMethod Type of customer verification.
ClientID Client identifier for an installation; generated by the operating system.
DCCExchangeRate Dynamic Currency Conversion exchange rate.
DCCLookupStatus Lookup Status of Dynamic Currency Conversion.
DCCMarginRate Margin rate of Dynamic Currency Conversion.
DeviceHardwareRevision Hardware revision printed on the back of the credit card reader.
DeviceID Serial number printed on the back of the credit card reader. Dashes are stripped from the serial number.
DeviceOS Operating system of the device.
DeviceOSVersion Operating system version of the device.
DeviceTerminalID Terminal identifier assigned to the credit card reader; used by the clearing institute to identify credit card readers.
ExceptionCategory Status of the transaction.
ExceptionDescription Detailed description of the status of the transaction.
ExceptionStatusCode Code that represents the status of the transaction.
Field Name Definition
New Business Center Online Help | 2018 106
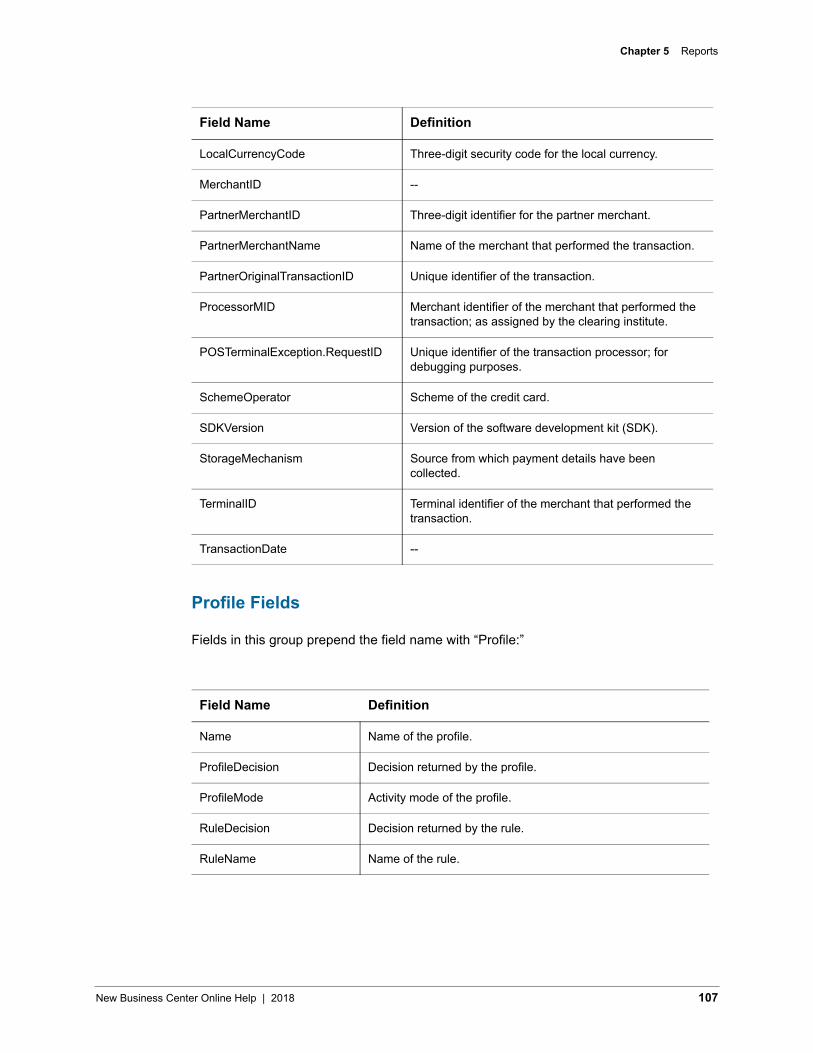
Chapter 5 Reports
Profile Fields
Fields in this group prepend the field name with “Profile:”
LocalCurrencyCode Three-digit security code for the local currency.
MerchantID --
PartnerMerchantID Three-digit identifier for the partner merchant.
PartnerMerchantName Name of the merchant that performed the transaction.
PartnerOriginalTransactionID Unique identifier of the transaction.
ProcessorMID Merchant identifier of the merchant that performed the transaction; as assigned by the clearing institute.
POSTerminalException.RequestID Unique identifier of the transaction processor; for debugging purposes.
SchemeOperator Scheme of the credit card.
SDKVersion Version of the software development kit (SDK).
StorageMechanism Source from which payment details have been collected.
TerminalID Terminal identifier of the merchant that performed the transaction.
TransactionDate --
Field Name Definition
Name Name of the profile.
ProfileDecision Decision returned by the profile.
ProfileMode Activity mode of the profile.
RuleDecision Decision returned by the rule.
RuleName Name of the rule.
Field Name Definition
New Business Center Online Help | 2018 107
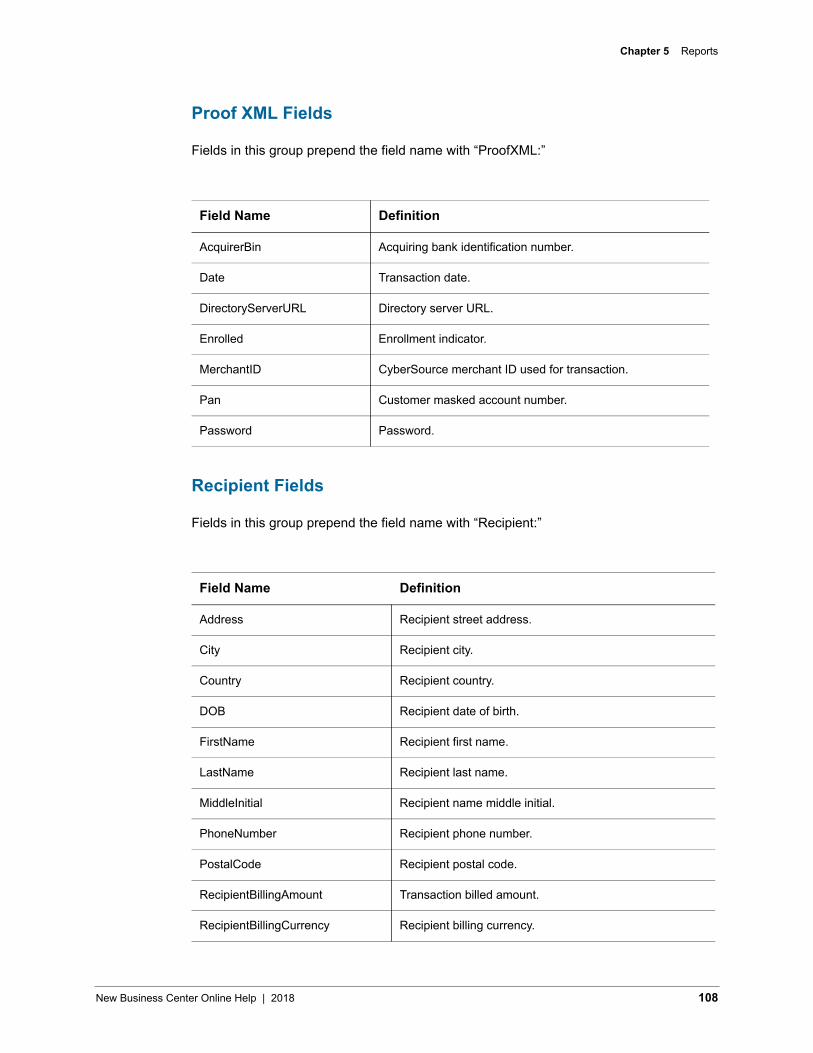
Chapter 5 Reports
Proof XML Fields
Fields in this group prepend the field name with “ProofXML:”
Recipient Fields
Fields in this group prepend the field name with “Recipient:”
Field Name Definition
AcquirerBin Acquiring bank identification number.
Date Transaction date.
DirectoryServerURL Directory server URL.
Enrolled Enrollment indicator.
MerchantID CyberSource merchant ID used for transaction.
Pan Customer masked account number.
Password Password.
Field Name Definition
Address Recipient street address.
City Recipient city.
Country Recipient country.
DOB Recipient date of birth.
FirstName Recipient first name.
LastName Recipient last name.
MiddleInitial Recipient name middle initial.
PhoneNumber Recipient phone number.
PostalCode Recipient postal code.
RecipientBillingAmount Transaction billed amount.
RecipientBillingCurrency Recipient billing currency.
New Business Center Online Help | 2018 108
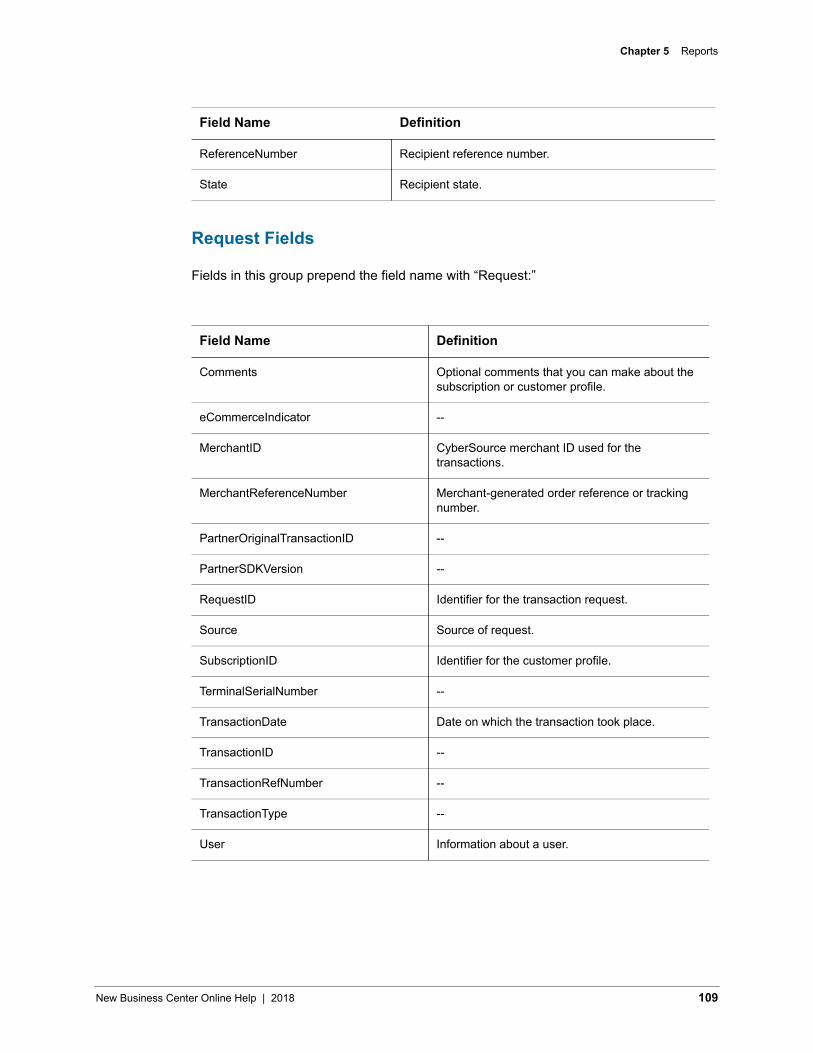
Chapter 5 Reports
Request Fields
Fields in this group prepend the field name with “Request:”
ReferenceNumber Recipient reference number.
State Recipient state.
Field Name Definition
Comments Optional comments that you can make about the subscription or customer profile.
eCommerceIndicator --
MerchantID CyberSource merchant ID used for the transactions.
MerchantReferenceNumber Merchant-generated order reference or tracking number.
PartnerOriginalTransactionID --
PartnerSDKVersion --
RequestID Identifier for the transaction request.
Source Source of request.
SubscriptionID Identifier for the customer profile.
TerminalSerialNumber --
TransactionDate Date on which the transaction took place.
TransactionID --
TransactionRefNumber --
TransactionType --
User Information about a user.
Field Name Definition
New Business Center Online Help | 2018 109
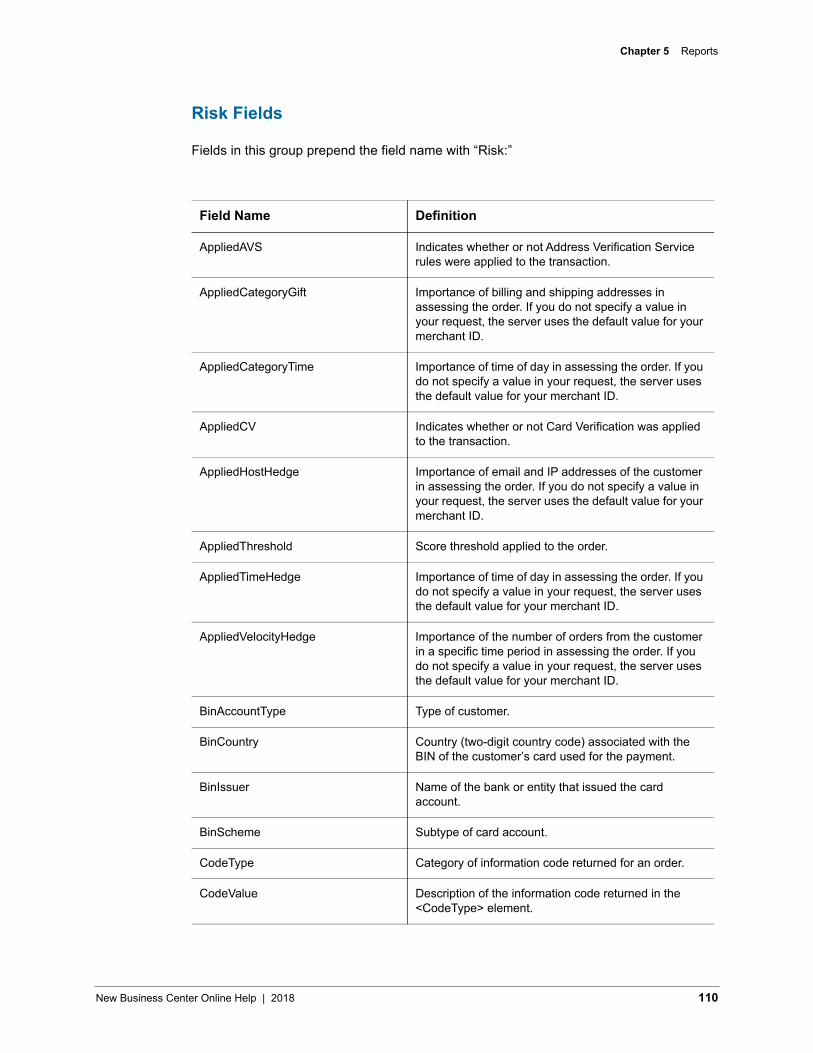
Chapter 5 Reports
Risk Fields
Fields in this group prepend the field name with “Risk:”
Field Name Definition
AppliedAVS Indicates whether or not Address Verification Service rules were applied to the transaction.
AppliedCategoryGift Importance of billing and shipping addresses in assessing the order. If you do not specify a value in your request, the server uses the default value for your merchant ID.
AppliedCategoryTime Importance of time of day in assessing the order. If you do not specify a value in your request, the server uses the default value for your merchant ID.
AppliedCV Indicates whether or not Card Verification was applied to the transaction.
AppliedHostHedge Importance of email and IP addresses of the customer in assessing the order. If you do not specify a value in your request, the server uses the default value for your merchant ID.
AppliedThreshold Score threshold applied to the order.
AppliedTimeHedge Importance of time of day in assessing the order. If you do not specify a value in your request, the server uses the default value for your merchant ID.
AppliedVelocityHedge Importance of the number of orders from the customer in a specific time period in assessing the order. If you do not specify a value in your request, the server uses the default value for your merchant ID.
BinAccountType Type of customer.
BinCountry Country (two-digit country code) associated with the BIN of the customer’s card used for the payment.
BinIssuer Name of the bank or entity that issued the card account.
BinScheme Subtype of card account.
CodeType Category of information code returned for an order.
CodeValue Description of the information code returned in the <CodeType> element.
New Business Center Online Help | 2018 110

Chapter 5 Reports
ConsumerLoyalty Indicates whether a loyalty program is used or the number of the loyalty reward account that is used.
ConsumerPasswordProvided Reserved for future use.
ConsumerPromotions Reserved for future use.
CookiesAccepted Indicates whether the customer’s Web browser accepts cookies. This field can contain one of the following values:• true: The customer’s browser accepts cookies.• false: The customer’s browser does not accept
cookies.
CookiesEnabled Indicates whether cookies are enabled in the customer’s browser.
DeviceFingerPrint Indicates whether Device Fingerprint is used.
Factors Information that affected the score of the order.
FlashEnabled Indicates whether Flash is enabled in the customer’s browser.
GiftWrap Reserved for future use.
HostSeverity Risk associated with the customer's email domain.
ImagesEnabled Indicates whether images are enabled in the customer’s browser.
IPCity Name of the city decoded from the IP address used directly or indirectly by the customer to send the order.
IPCountry Name of the country decoded from the IP address used directly or indirectly by the customer to send the order.
IPRoutingMethod Routing method decoded from the IP address used directly or indirectly by the customer to send the order.
IPState Name of the state decoded from the IP address used directly or indirectly by the customer to send the order.
JavascriptEnabled Indicates whether JavaScript is enabled in the customer’s browser.
LostPassword Reserved for future use.
Field Name Definition
New Business Center Online Help | 2018 111
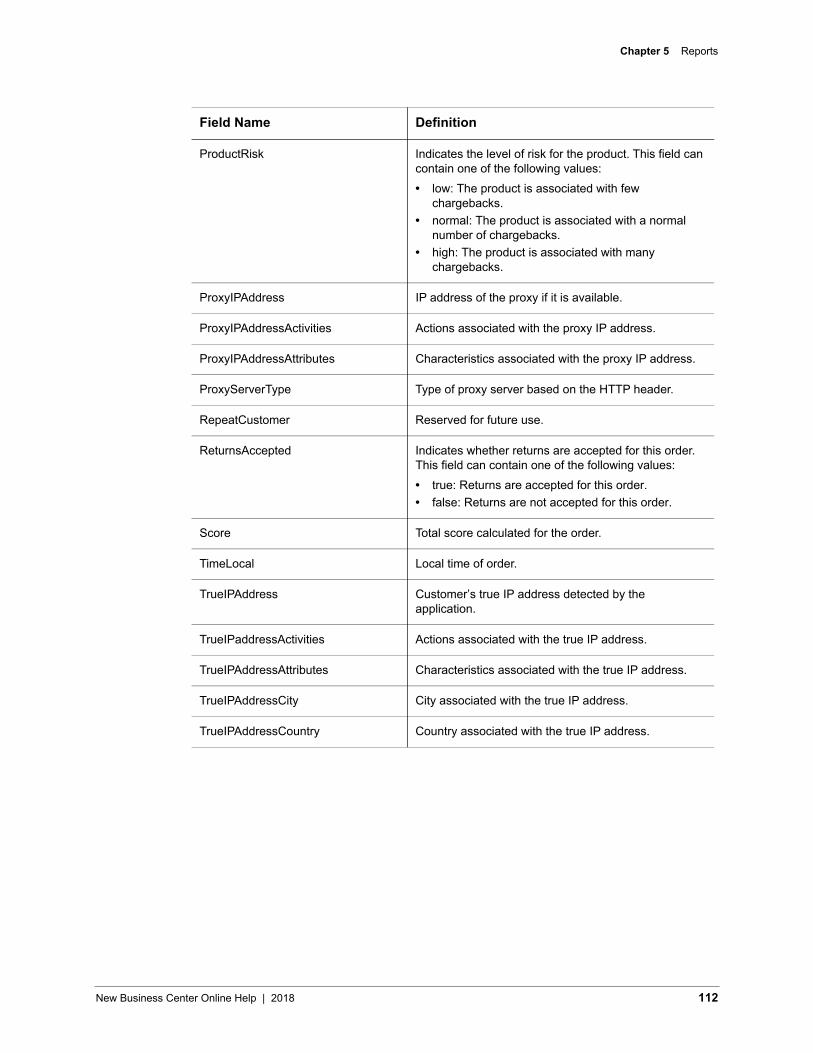
Chapter 5 Reports
ProductRisk Indicates the level of risk for the product. This field can contain one of the following values:• low: The product is associated with few
chargebacks.• normal: The product is associated with a normal
number of chargebacks.• high: The product is associated with many
chargebacks.
ProxyIPAddress IP address of the proxy if it is available.
ProxyIPAddressActivities Actions associated with the proxy IP address.
ProxyIPAddressAttributes Characteristics associated with the proxy IP address.
ProxyServerType Type of proxy server based on the HTTP header.
RepeatCustomer Reserved for future use.
ReturnsAccepted Indicates whether returns are accepted for this order. This field can contain one of the following values:• true: Returns are accepted for this order.• false: Returns are not accepted for this order.
Score Total score calculated for the order.
TimeLocal Local time of order.
TrueIPAddress Customer’s true IP address detected by the application.
TrueIPaddressActivities Actions associated with the true IP address.
TrueIPAddressAttributes Characteristics associated with the true IP address.
TrueIPAddressCity City associated with the true IP address.
TrueIPAddressCountry Country associated with the true IP address.
Field Name Definition
New Business Center Online Help | 2018 112
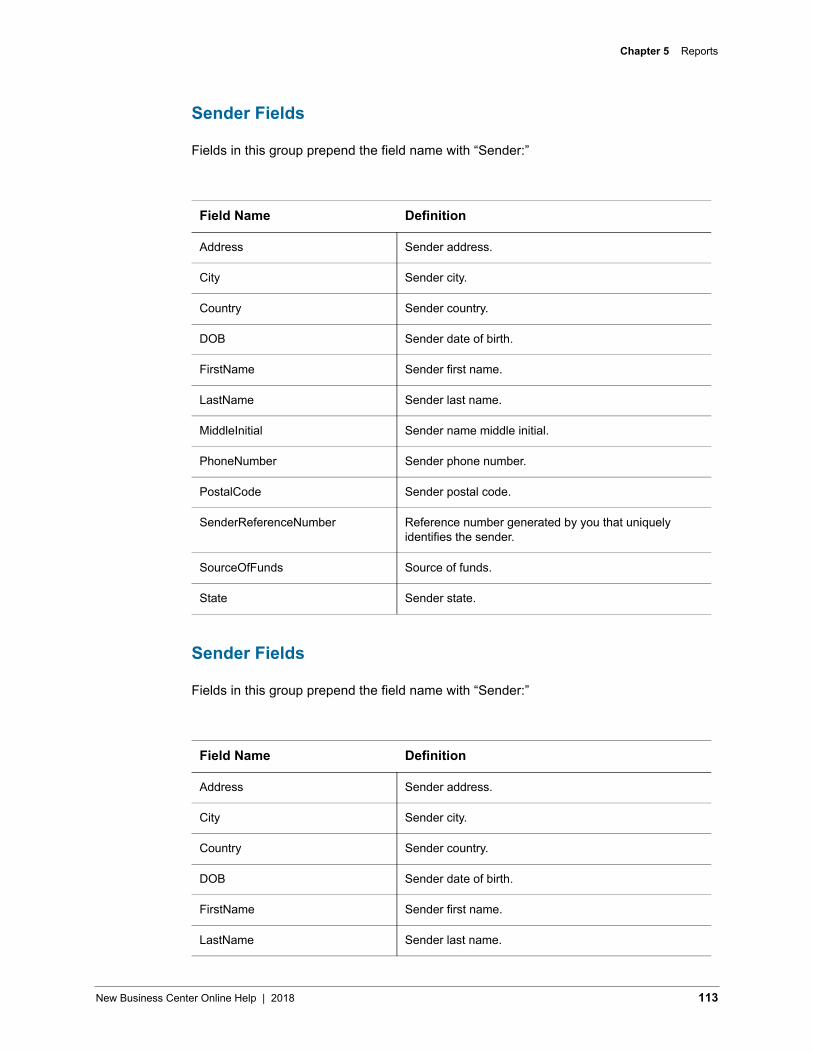
Chapter 5 Reports
Sender Fields
Fields in this group prepend the field name with “Sender:”
Sender Fields
Fields in this group prepend the field name with “Sender:”
Field Name Definition
Address Sender address.
City Sender city.
Country Sender country.
DOB Sender date of birth.
FirstName Sender first name.
LastName Sender last name.
MiddleInitial Sender name middle initial.
PhoneNumber Sender phone number.
PostalCode Sender postal code.
SenderReferenceNumber Reference number generated by you that uniquely identifies the sender.
SourceOfFunds Source of funds.
State Sender state.
Field Name Definition
Address Sender address.
City Sender city.
Country Sender country.
DOB Sender date of birth.
FirstName Sender first name.
LastName Sender last name.
New Business Center Online Help | 2018 113
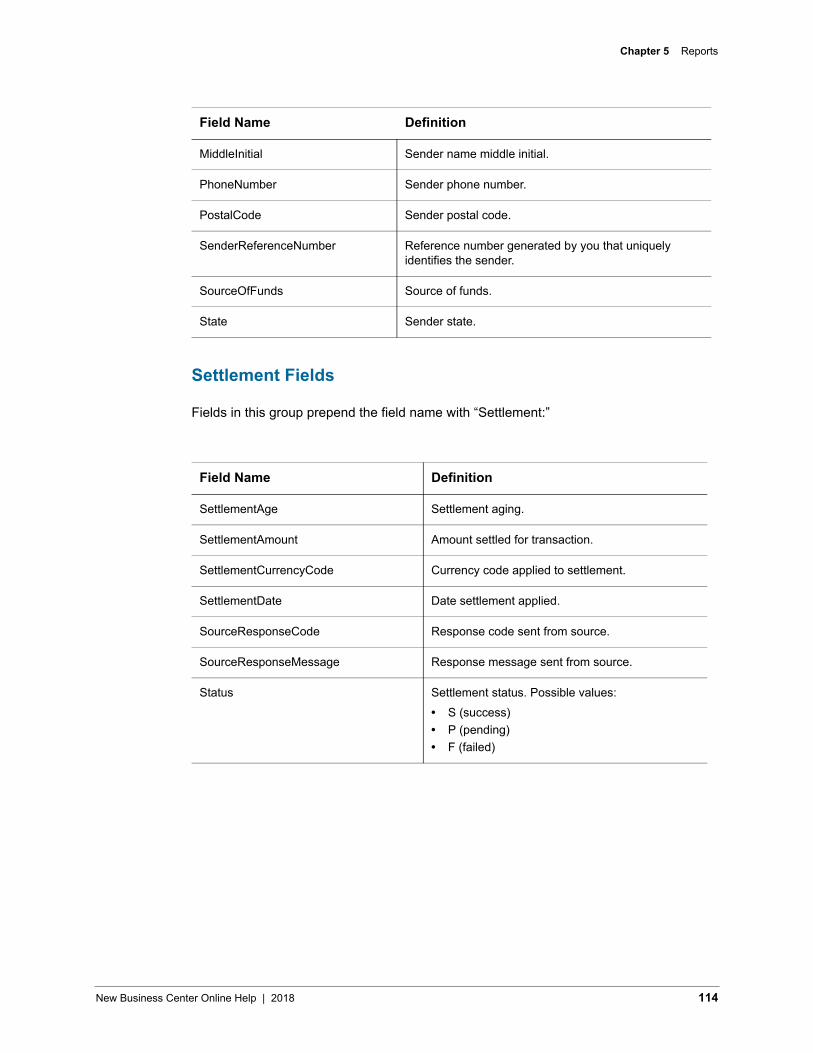
Chapter 5 Reports
Settlement Fields
Fields in this group prepend the field name with “Settlement:”
MiddleInitial Sender name middle initial.
PhoneNumber Sender phone number.
PostalCode Sender postal code.
SenderReferenceNumber Reference number generated by you that uniquely identifies the sender.
SourceOfFunds Source of funds.
State Sender state.
Field Name Definition
SettlementAge Settlement aging.
SettlementAmount Amount settled for transaction.
SettlementCurrencyCode Currency code applied to settlement.
SettlementDate Date settlement applied.
SourceResponseCode Response code sent from source.
SourceResponseMessage Response message sent from source.
Status Settlement status. Possible values:• S (success)• P (pending)• F (failed)
Field Name Definition
New Business Center Online Help | 2018 114
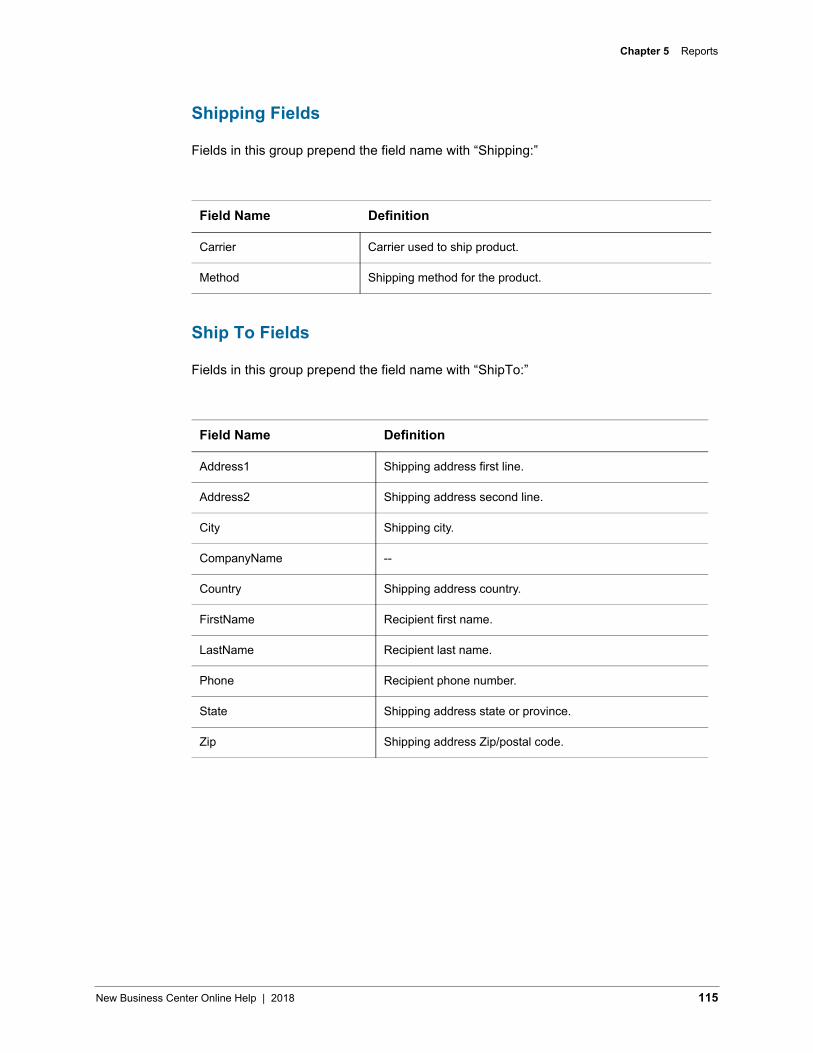
Chapter 5 Reports
Shipping Fields
Fields in this group prepend the field name with “Shipping:”
Ship To Fields
Fields in this group prepend the field name with “ShipTo:”
Field Name Definition
Carrier Carrier used to ship product.
Method Shipping method for the product.
Field Name Definition
Address1 Shipping address first line.
Address2 Shipping address second line.
City Shipping city.
CompanyName --
Country Shipping address country.
FirstName Recipient first name.
LastName Recipient last name.
Phone Recipient phone number.
State Shipping address state or province.
Zip Shipping address Zip/postal code.
New Business Center Online Help | 2018 115
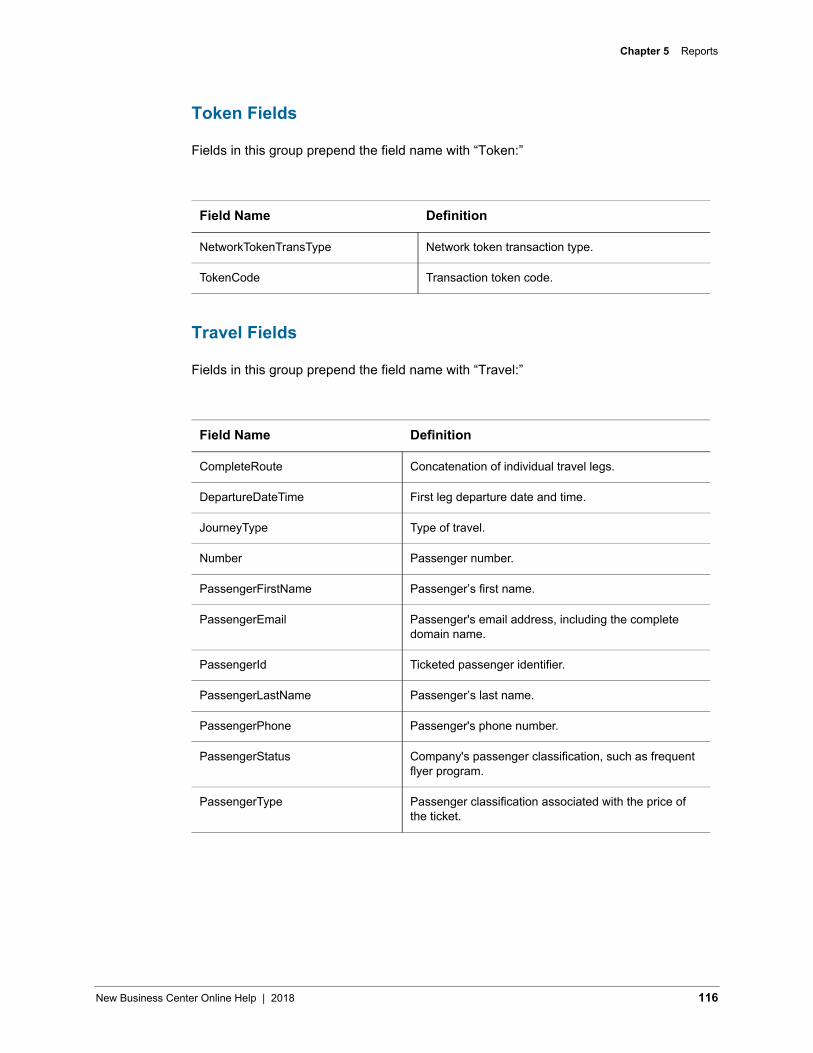
Chapter 5 Reports
Token Fields
Fields in this group prepend the field name with “Token:”
Travel Fields
Fields in this group prepend the field name with “Travel:”
Field Name Definition
NetworkTokenTransType Network token transaction type.
TokenCode Transaction token code.
Field Name Definition
CompleteRoute Concatenation of individual travel legs.
DepartureDateTime First leg departure date and time.
JourneyType Type of travel.
Number Passenger number.
PassengerFirstName Passenger’s first name.
PassengerEmail Passenger's email address, including the complete domain name.
PassengerId Ticketed passenger identifier.
PassengerLastName Passenger’s last name.
PassengerPhone Passenger's phone number.
PassengerStatus Company's passenger classification, such as frequent flyer program.
PassengerType Passenger classification associated with the price of the ticket.
New Business Center Online Help | 2018 116
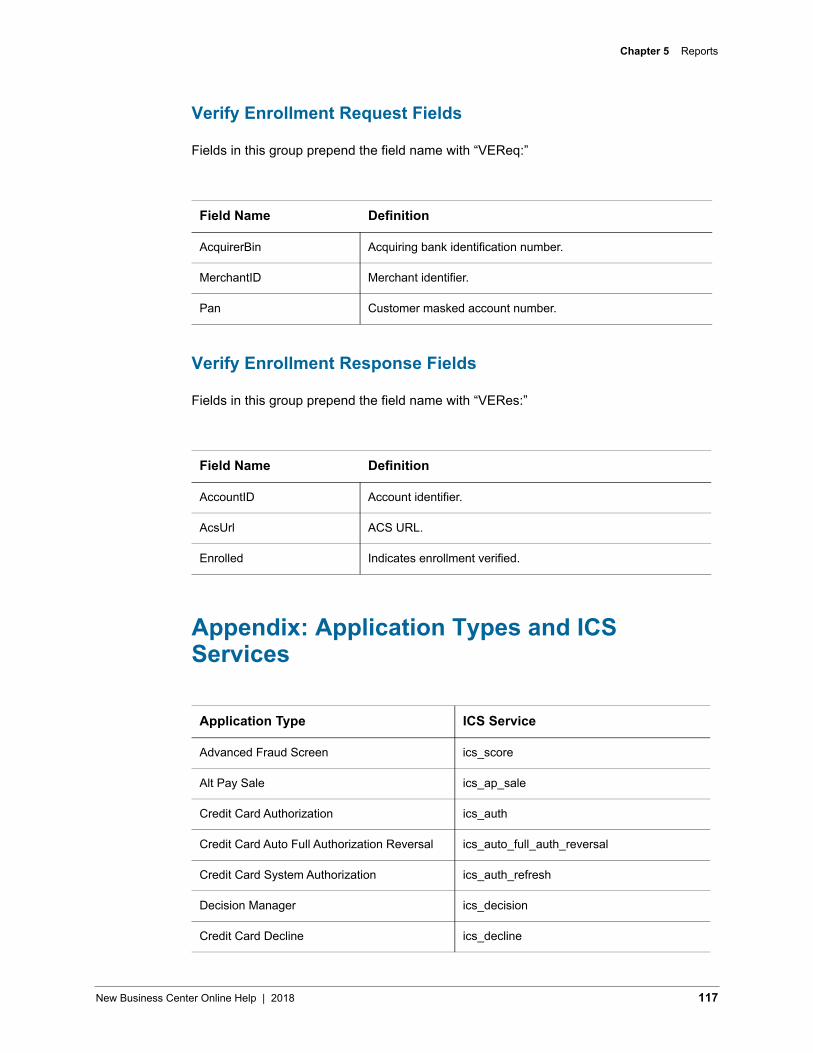
Chapter 5 Reports
Verify Enrollment Request Fields
Fields in this group prepend the field name with “VEReq:”
Verify Enrollment Response Fields
Fields in this group prepend the field name with “VERes:”
Appendix: Application Types and ICS Services
Field Name Definition
AcquirerBin Acquiring bank identification number.
MerchantID Merchant identifier.
Pan Customer masked account number.
Field Name Definition
AccountID Account identifier.
AcsUrl ACS URL.
Enrolled Indicates enrollment verified.
Application Type ICS Service
Advanced Fraud Screen ics_score
Alt Pay Sale ics_ap_sale
Credit Card Authorization ics_auth
Credit Card Auto Full Authorization Reversal ics_auto_full_auth_reversal
Credit Card System Authorization ics_auth_refresh
Decision Manager ics_decision
Credit Card Decline ics_decline
New Business Center Online Help | 2018 117
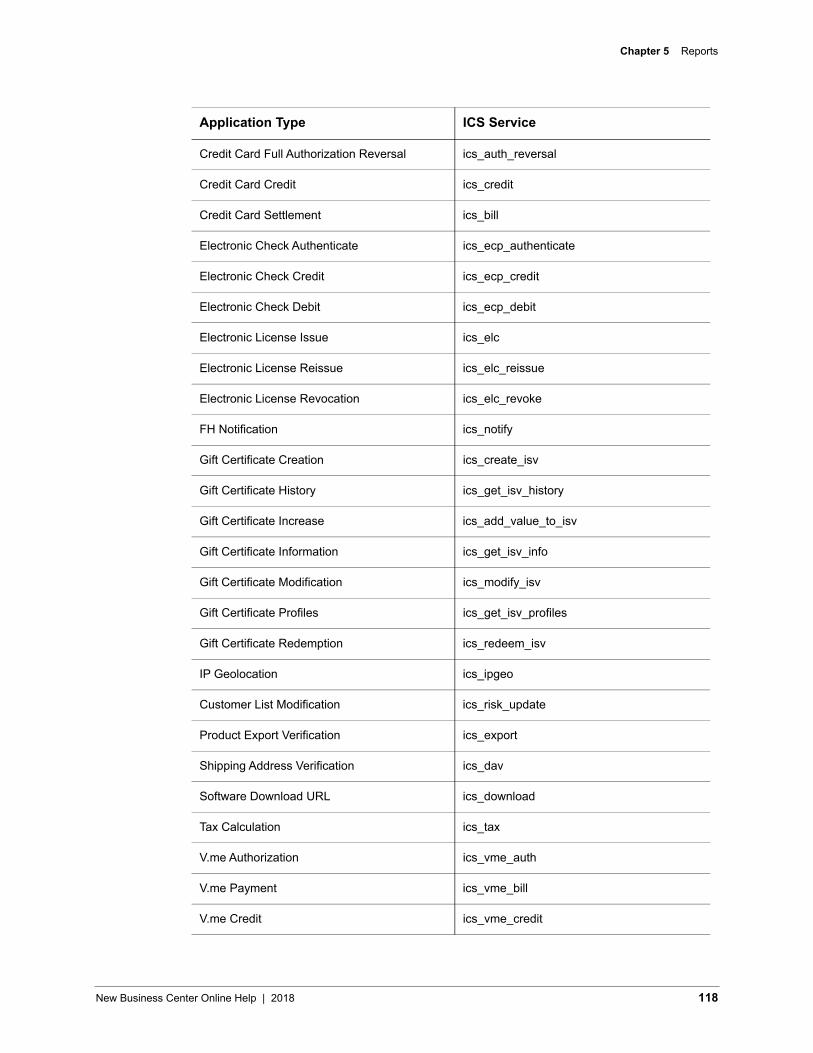
Chapter 5 Reports
Credit Card Full Authorization Reversal ics_auth_reversal
Credit Card Credit ics_credit
Credit Card Settlement ics_bill
Electronic Check Authenticate ics_ecp_authenticate
Electronic Check Credit ics_ecp_credit
Electronic Check Debit ics_ecp_debit
Electronic License Issue ics_elc
Electronic License Reissue ics_elc_reissue
Electronic License Revocation ics_elc_revoke
FH Notification ics_notify
Gift Certificate Creation ics_create_isv
Gift Certificate History ics_get_isv_history
Gift Certificate Increase ics_add_value_to_isv
Gift Certificate Information ics_get_isv_info
Gift Certificate Modification ics_modify_isv
Gift Certificate Profiles ics_get_isv_profiles
Gift Certificate Redemption ics_redeem_isv
IP Geolocation ics_ipgeo
Customer List Modification ics_risk_update
Product Export Verification ics_export
Shipping Address Verification ics_dav
Software Download URL ics_download
Tax Calculation ics_tax
V.me Authorization ics_vme_auth
V.me Payment ics_vme_bill
V.me Credit ics_vme_credit
Application Type ICS Service
New Business Center Online Help | 2018 118

Chapter 5 Reports
V.me Auth Reversal ics_vme_auth_reversal
Denied Parties Check ics_dpc
Download ics_get
SmartCert Download ics_grover
Bank Transfer ics_bankxfr
Certificate Generation ics_certgen
Rate Check ics_fxrates
Hotlist Check ics_hotlist
IFS Setup ics_ifs_setup
IFS Update ics_ifs_update
Payer Authentication Enrollment ics_pa_enroll
Payer Authentication Validation ics_pa_validate
Voided Transactions ics_void
Alt Pay Initiate ics_ap_initiate
Alt Pay Service Status ics_ap_check_status
Alt Pay Refund ics_ap_refund
Get Checkout Details ics_ap_checkout_details
Get Transaction Details ics_ap_transaction_details
Confirm Purchase ics_ap_confirm_purchase
Alt Pay Authorization ics_ap_auth
Alt Pay Authorization Reversal ics_ap_auth_reversal
Alt Pay Capture ics_ap_capture
Alt Pay Refund ics_ap_vme_refund
Alt Pay Session ics_ap_sessions
Alt Pay Order ics_ap_order
Alt Pay Billing Agreement ics_ap_billing_agreement
Application Type ICS Service
New Business Center Online Help | 2018 119
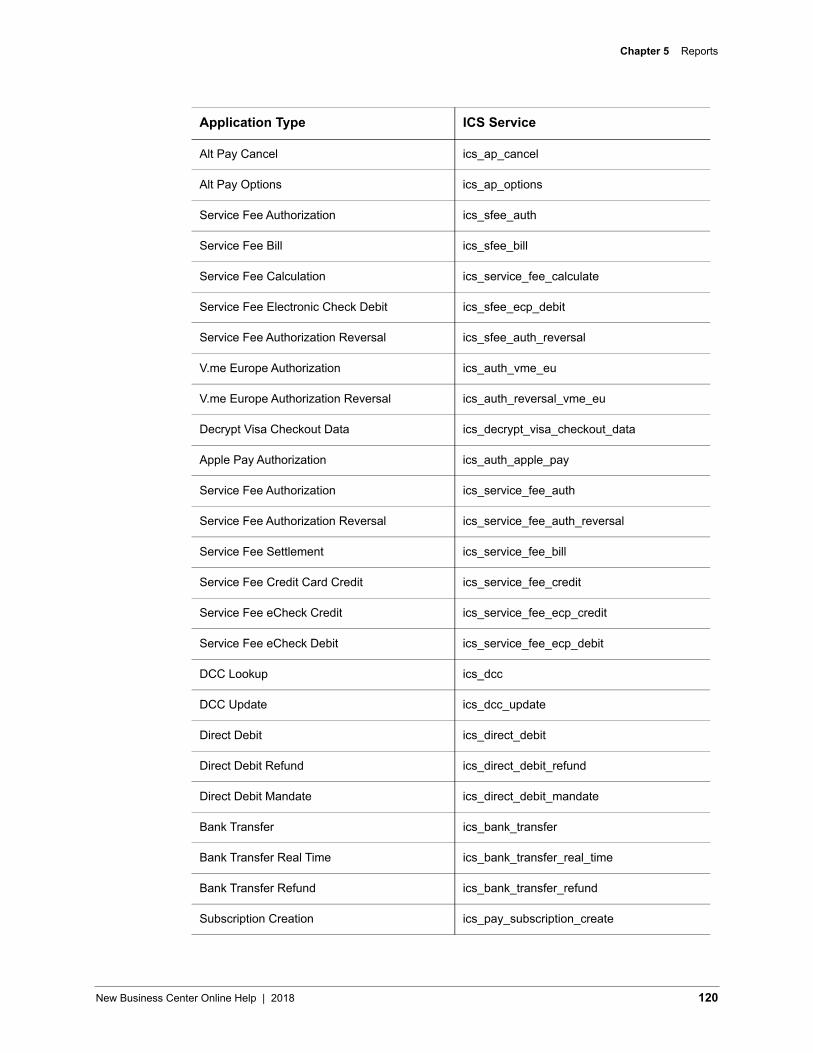
Chapter 5 Reports
Alt Pay Cancel ics_ap_cancel
Alt Pay Options ics_ap_options
Service Fee Authorization ics_sfee_auth
Service Fee Bill ics_sfee_bill
Service Fee Calculation ics_service_fee_calculate
Service Fee Electronic Check Debit ics_sfee_ecp_debit
Service Fee Authorization Reversal ics_sfee_auth_reversal
V.me Europe Authorization ics_auth_vme_eu
V.me Europe Authorization Reversal ics_auth_reversal_vme_eu
Decrypt Visa Checkout Data ics_decrypt_visa_checkout_data
Apple Pay Authorization ics_auth_apple_pay
Service Fee Authorization ics_service_fee_auth
Service Fee Authorization Reversal ics_service_fee_auth_reversal
Service Fee Settlement ics_service_fee_bill
Service Fee Credit Card Credit ics_service_fee_credit
Service Fee eCheck Credit ics_service_fee_ecp_credit
Service Fee eCheck Debit ics_service_fee_ecp_debit
DCC Lookup ics_dcc
DCC Update ics_dcc_update
Direct Debit ics_direct_debit
Direct Debit Refund ics_direct_debit_refund
Direct Debit Mandate ics_direct_debit_mandate
Bank Transfer ics_bank_transfer
Bank Transfer Real Time ics_bank_transfer_real_time
Bank Transfer Refund ics_bank_transfer_refund
Subscription Creation ics_pay_subscription_create
Application Type ICS Service
New Business Center Online Help | 2018 120

Chapter 5 Reports
Subscription Modification ics_pay_subscription_update
Subscription Delete ics_pay_subscription_delete
PayPal Payment Request ics_paypal_payment
PayPal Credit ics_paypal_credit
Direct Debit Validation ics_direct_debit_validate
PIN-less Debit ics_pinless_debit
PIN-less Debit Validation ics_pinless_debit_validate
PIN-less Debit Reversal ics_pinless_debit_reversal
PayPal Preapproved Payment ics_paypal_preapproved_payment
PayPal Button Create ics_paypal_button_create
PayPal Preapproved Update ics_paypal_preapproved_update
Subscription Payment Modification ics_pay_subscription_event_upd
Subscription Payment Modification ics_pay_subscription_event_update
Subscription Retrieval ics_pay_subscription_retrieve
PayPal Express Checkout Do Payment ics_paypal_ec_do_payment
PayPal Express Checkout Settlement ics_paypal_ec_do_capture
PayPal Express Checkout Auth Reversal ics_paypal_auth_reversal
PayPal Express Checkout Settlement ics_paypal_do_capture
PayPal Express Checkout Set ics_paypal_ec_set
PayPal Express Checkout Refund ics_paypal_refund
PayPal Express Checkout Get Details ics_paypal_ec_get_details
PayPal Express Checkout Order Setup ics_paypal_ec_order_setup
PayPal Express Checkout Authorization ics_paypal_authorization
PayPal Express Checkout Billing Agreement Create
ics_paypal_create_agreement
PayPal Express Checkout Billing Agreement Update
ics_paypal_update_agreement
Application Type ICS Service
New Business Center Online Help | 2018 121

Chapter 5 Reports
PayPal Express Checkout Do Reference ics_paypal_do_ref_transaction
PayPal Settlement paypal_settlement
PayPal Get Transaction Details ics_paypal_get_txn_details
PayPal Transaction Search ics_paypal_transaction_search
PayPal Payment paypal_ipn
China Payment ics_china_payment
China Refund ics_china_refund
Boleto Payment ics_boleto_payment
Case Management Action ics_cm_action
BIN Lookup Service ics_bin_lookup
Original Credit Transaction ics_oct
Timeout OCT Reversal ics_timeout_oct_reversal
Apple Pay Authorization ics_auth|001
V.me Authorization ics_ap_auth|vme
V.me Authorization Reversal ics_ap_auth_reversal|vme
V.me Payment ics_ap_capture|vme
V.me Refund ics_ap_refund|vme
V.me Europe Authorization ics_auth|vmeeu
V.me Europe Authorization Reversal ics_auth_reversal|vmeeu
Decision Manager Events ics_dm_event
Timeout Auth Reversal ics_timeout_auth_reversal
PayPal Billing Agreement paypal_mip_agreement_ipn
Subscription Creation Duplicates ics_pay_subscription_create_dup
Acquirer Risk Controls ics_arc
Android Pay Authorization ics_auth|006
Chase Pay Authorization ics_auth|007
Application Type ICS Service
New Business Center Online Help | 2018 122
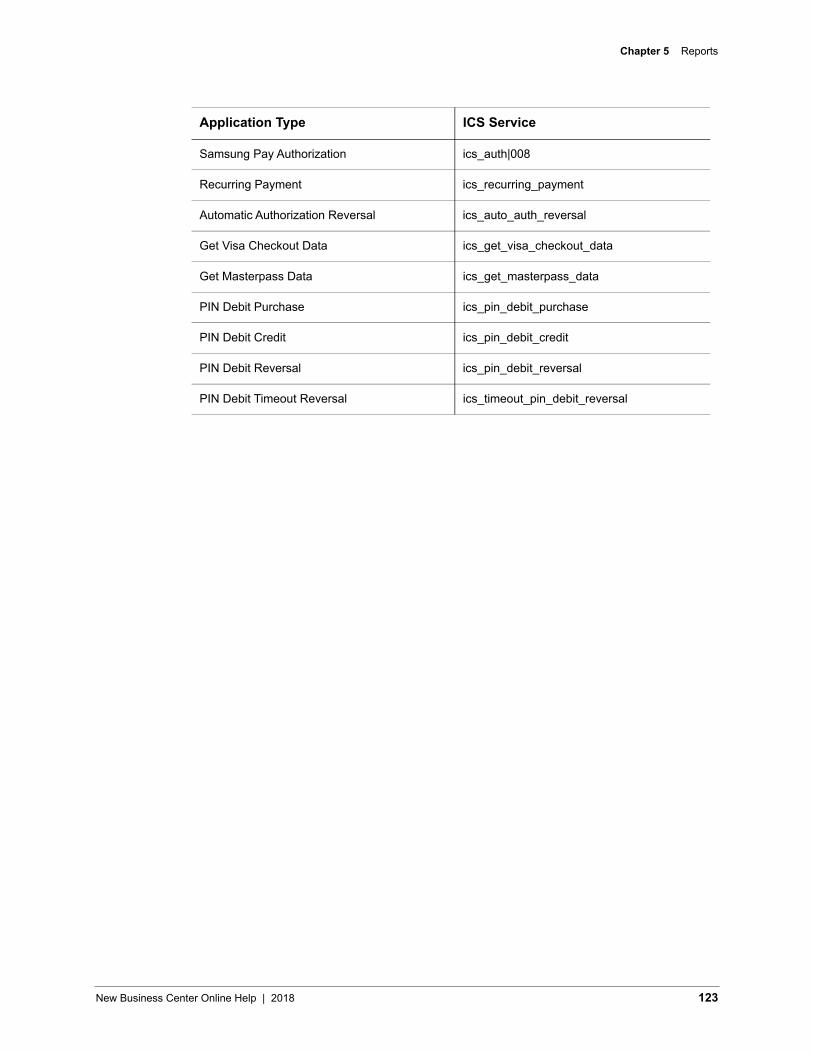
Chapter 5 Reports
Samsung Pay Authorization ics_auth|008
Recurring Payment ics_recurring_payment
Automatic Authorization Reversal ics_auto_auth_reversal
Get Visa Checkout Data ics_get_visa_checkout_data
Get Masterpass Data ics_get_masterpass_data
PIN Debit Purchase ics_pin_debit_purchase
PIN Debit Credit ics_pin_debit_credit
PIN Debit Reversal ics_pin_debit_reversal
PIN Debit Timeout Reversal ics_timeout_pin_debit_reversal
Application Type ICS Service
New Business Center Online Help | 2018 123
6. Payment Configuration
Payment ConfigurationThe Payment Configuration module enables you to configure payment settings, products, and services you use to process transactions. These include:
• Enabling digital payment solutions (Visa Checkout, Android Pay, Apple Pay,Samsung Pay, and Masterpass)
• Configuring payment processors
• Creating and managing security keys
• Managing settings for secure acceptance, webhooks, and smart authorization
Configuring Digital Payment SolutionsYou can configure one or more digital payment types to allow your customers to use to make payments. Availability is based on your processor's capabilities, regional availability, and/or that your partners have enabled on your behalf:
• Visa Checkout
• Android Pay
• Apple Pay
• Samsung Pay
• Masterpass
You can enable a digital payment product, when it is available to you. Some vendors require agreement to a terms of service, and may require additional information about how you process customer payment information.
IMPORTANT: some solutions require that your processor support payment network tokenization. Check with your processor before configuring a digital payment type to make sure the proper payment security requirements have been met.
For more information about any of the available digital payment solutions, visit the Mobile Payments site, or contact your local sales representative.
New Business Center Online Help | 2018 124
Chapter 6 Payment Configuration
Using Visa Checkout
The Visa Checkout digital payment solution allows you to provide your customers with an easy way to use their cards to make online payments. Visa Checkout offers a seamless checkout experience that does not require customers to leave your Web site or mobile application when processing their payments.
The Visa Checkout set up process involves both configuring your Visa Checkout account, and creating one or more checkout profiles. Use the secure key to process your transactions.
Configuring Visa Checkout
The Visa Checkout digital payment solution allows you to provide your customers with an easy way to use their cards to make online payments. Visa Checkout offers a seamless checkout experience that does not require customers to leave your Web site or mobile application when processing their payments.
NOTE: the Configure button displays regardless of whether or not Visa Checkout has already been configured. If the Visa Checkout feature has not been enabled for your account, click Learn More to find out if you meet the prerequisites to use Visa Checkout.
Enabling Visa Checkout
1 On the left navigation pane, click the Payment Configuration icon
2 Click Digital Payment Solutions. The Digital Payments page appears.
3 Click Configure. The Visa Merchant Services Agreement appears.
4 Review the Visa Checkout Services Agreement, then click Agree and Create Account. The Visa Checkout Configuration panel opens to the Merchant Configuration section.
5 Enter your payment details, and then click Submit.
New Business Center Online Help | 2018 125
Chapter 6 Payment Configuration
Modifying Visa Checkout Settings
1 On the left navigation pane, click the Payment Configuration icon.
2 Click Digital Payment Solutions. The Digital Payments page displays.
3 Click Configure. The Visa Checkout Configuration panel opens.
4 In the Merchant Configuration section verify and enter information as necessary.
5 Click Submit. The Key Information section appears.
6 To download your key, click the Download icon. To return to the Merchant Configuration section, click Edit Configuration.
What can you do next?
You can perform the following tasks:
• Download your secure transaction key
• Set up a checkout profile
Downloading Your Visa Checkout Key
Once you have enabled Visa Checkout, you can download your secure key to use during Visa Checkout transactions.
IMPORTANT: your key is unique to your account. Keep the information in a safe location and do not share it.
1 On the left navigation pane, click the Payment Configuration icon.
2 Click Digital Payment Solutions. The Digital Payments page appears.
3 Click Configure. The Visa Checkout Configuration panel opens.
4 In the Merchant Configuration section, verify and enter information as necessary.
5 Click Submit. The Key Information section appears.
6 Click the Download icon to download your key.
7 Follow your browser's instructions to save and open the key.
New Business Center Online Help | 2018 126

Chapter 6 Payment Configuration
Using Visa Checkout Profiles
Use Visa Checkout profiles to control the types of cards that your customers use during checkout. Available card types are determined by the country in which you are located. In addition, you can choose to not require shipping, or limit the regions where you ship products.
Creating a Visa Checkout Profile
1 On the left navigation pane, click the Payment Configuration icon.
2 Click Digital Payment Solutions. The Digital Payments page appears.
3 Click Manage Profiles. The Manage Profiles panel opens.
4 Click New Profile. The New Profile Configuration panel opens.
5 Enter the profile name and select billing countries. Enter other details as necessary.
6 Click Save Profile.
Editing a Visa Checkout Profile
1 On the Digital Payments page, click Manage Profiles. The Manage Profiles panel opens.
2 Next to the profile you want to edit, click the Edit icon. The Edit Profile Configuration panel opens.
3 Enter the profile name and select billing countries. Enter other details as necessary.
4 Click Save Profile.
Deleting a Visa Checkout Profile
1 On the Digital Payments page, click Manage Profiles. The Manage Profiles panel appears.
2 Next to the profile you want to delete, click the Delete icon.
New Business Center Online Help | 2018 127
Chapter 6 Payment Configuration
Using Android Pay
The Android Pay mobile payment solution makes it easier for you to enable mobile payments for Android users. This payment solution offers customers simplicity, security, and choice when making purchases using their Android devices.
IMPORTANT: your processor must support payment network tokenization in order to use Android Pay. If your processor does not, or if CyberSource does not support tokenization with your processor, you will not be able to enable Android Pay for the account.
Configuring Android Pay
The Android Pay configuration process includes generating a public key to encrypt Android Pay transactions. In addition, if you use SDK, you can generate a security key to use in your transaction signature.
NOTE: the Configure button displays regardless of whether or not Android Pay has already been configured. If the Android Pay feature has not been enabled for your account, click Learn More to find out if you meet the prerequisites to use Android Pay.
To generate a public key for Android Pay:
1 On the left navigation pane, click the Payment Configuration icon.
2 Click Digital Payment Solutions. The Digital Payments page appears.
3 Click Configure. The Visa Checkout Configuration panel opens.
4 Click Generate Public Key.
5 In the Actions column, click the Download icon.
6 Follow your browser's instructions to save and open the file.
New Business Center Online Help | 2018 128

Chapter 6 Payment Configuration
Using Apple Pay
The Apple Pay digital payment solution enables you to process payments from your mobile iOS application or in a browser. Apple Pay provides your customers with a secure and seamless shopping experience when they use your iOS application on their mobile devices or in a browser.
IMPORTANT: your processor must support payment network tokenization in order to use Apple Pay. If your processor does not, or if CyberSource does not support tokenization with your processor, you will not be able to enable Apple Pay for the account.
Enrolling in Apple Pay
The Apple Pay configuration process involves creating a Certificate Signing Request (CSR) linked to your Apple Merchant ID. Before you begin this process, be sure to register for the certificate on the Apple Pay for Developers website. The Apple Pay Certificate is required for creating an iOS application, but not needed for payment processing with CyberSource.
NOTE: the Configure button displays regardless of whether or not Apple Pay has already been configured. If the Apple Pay feature has not been enabled for your account, click Learn More to find out if you meet the prerequisites to use Apple Pay.
To enroll in Apple Pay:
1 On the left navigation pane, click the Payment Configuration icon.
2 Click Digital Payment Solutions. The Digital Payments page appears.
3 Click Configure. The Visa Checkout Configuration panel opens.
4 Enter your Apple Merchant ID.
5 Click Generate New CSR.
6 To download your CSR, click the Download icon next to the key.
7 Follow your browser's instructions to save and open the file.
8 Complete the enrollment process by submitting your CSR to Apple.
Additional Information: For information about adding certificates to your Apple Merchant ID, refer to the Apple Pay PassKit.
New Business Center Online Help | 2018 129
Chapter 6 Payment Configuration
Downloading Your Apple Pay Certificate Request and Public Key
After you generate the CSR, you can download the file to submit to Apple. You can also update the Apple Merchant ID associated with the CSR.
To update Apple Pay configuration:
1 On the left navigation pane, click the Payment Configuration icon.
2 Click Digital Payment Solutions. The Digital Payments page appears.
3 Click Configure. The Visa Checkout Configuration panel opens.
4 To download your CSR, click the Download icon next to the key.
5 Follow your browser's instructions to save and open the file.
6 To edit your Apple Merchant ID, click the Edit icon. The Edit CSR panel opens.
7 Modify your merchant ID as necessary and click Update.
New Business Center Online Help | 2018 130
Chapter 6 Payment Configuration
Using Samsung Pay
The Samsung Pay payment solution offers customers simplicity, security, and choice when making purchases using their Samsung devices.
IMPORTANT: your processor must support payment network tokenization in order to use Samsung Pay. If your processor does not, or if CyberSource does not support tokenization with your processor, you will not be able to enable Samsung Pay for the account.
Configuring Samsung Pay
The Samsung Pay configuration process involves creating a Certificate Signing Request (CSR) linked to your Samsung Partner ID. Before you begin this process, be sure to register for the certificate on the Samsung Pay Parnter Portal.
NOTE: the Configure button displays regardless of whether or not Samsung Pay has already been configured. If the Samsung Pay feature has not been enabled for your account, click Learn More to find out if you meet the prerequisites to use Samsung Pay.
To enroll in Samsung Pay:
1 On the left navigation pane, click the Payment Configuration icon.
2 Click Digital Payment Solutions. The Digital Payments page appears.
3 Click Configure. The Samsung Pay Configuration panel opens.
4 Enter your Samsung Partner ID.
5 Click Generate New CSR.
6 To download your CSR, click the Download icon next to the key.
7 Follow your browser's instructions to save and open the file.
8 Complete the enrollment process by submitting your CSR to Samsung.
Downloading Your Samsung Pay Certificate Request and Public Key
After you generate a Certificate Signing Request (CSR), you can either download the file to submit to Samsung, or use the public key for Samsung Pay transactions. You can also update the Samsung Partner ID associated with the CSR.
New Business Center Online Help | 2018 131
Chapter 6 Payment Configuration
To update Samsung Pay configuration:
1 On the left navigation pane, click the Payment Configuration icon
2 Click Digital Payment Solutions. The Digital Payments page appears.
3 Click Configure. The Samsung Pay Configuration panel opens.
4 To download your CSR, click the Download icon.
5 Follow your browser's instructions to save and open the file.
6 To edit your Samsung Partner ID, click the Edit icon. The Edit CSR panel opens.
7 Modify your partner ID as necessary and click Update.
Additional Information: only one CSR file is permitted per account.
Using Masterpass
The Masterpass digital payment solution enables you to provide your customers with an easy way to use their cards to make online payments. Masterpass is a digital wallet that simplifies the checkout process across your purchases online, and in-store, with one secure account.
Masterpass uses the Checkout ID as a primary component in initiating the Masterpass payment mark. Masterpass and CyberSouce require this value for encryption of sensitive payment credentials.
New Business Center Online Help | 2018 132

Chapter 6 Payment Configuration
Configuring Masterpass
The Masterpass enrollment process enables you use Masterpass during checkout for the brands you select. You can also enable 3D Secure authentication for transactions. Finally, you can elect to receive Customer Payment Account Numbers (PAN), or have CyberSource manage this data on your behalf.
NOTE: the Configure button displays regardless of whether or not Masterpass has already been configured. If the Masterpass feature has not been enabled for your account, click Learn More to find out if you meet the prerequisites to use Masterpass.
To enroll in Masterpass:
1 On the left navigation pane, click the Payment Configuration icon
2 Click Digital Payment Solutions. The Digital Payments page appears.
3 Click Configure. The Masterpass Configuration panel opens.
4 Review and accept the Masterpass Operating Rules, and then click Agree and Create Account.
5 Provide your merchant details, and any additional security options you want to enable.
6 Click Enroll Merchant. The Enrollment Details panel opens.
Updating Your Masterpass Configuration
At any time, you can choose to change your security settings, and/or update required merchant information, to use in Masterpass transactions.
To update Masterpass configuration:
1 On the left navigation pane, click the Payment Configuration icon
2 Click Digital Payment Solutions. The Digital Payments page appears.
3 Click Configure. The Masterpass Configuration panel opens.
4 Click Edit Configuration.
5 Update values as necessary, and then click Update Merchant.
New Business Center Online Help | 2018 133

Chapter 6 Payment Configuration
Managing Security KeysDepending on the way that you connect to and use payment methods, you need to generate secure keys to use in authentication for transactions. You can create new keys, or deactivate or delete obsolete keys.
Understanding Key Types
The following table describes the types of keys you can create through Business Center, based on your account settings.
Key Type Key Subtype Used for Valid for
Transaction Processing Simple Order Simple Order API 2 years
SOAP XML-based Simple Order API
3 years
SCMP Simple Commerce Messaging API
2 years
Secure Acceptance Merchant-hosted checkout pages
2 years
OAuth 2.0 -- Account Updater and mobile Point-of-Sale (mPOS) transactions
Indefinite
API Keys Certificate Merchant Management Services (MMS) and mass key transactions
2 years
Shared Secret Key Flex and Reporting transactions
3 years
PGP Keys -- Pretty Good Privacy encryption
Indefinite
New Business Center Online Help | 2018 134

Chapter 6 Payment Configuration
IMPORTANT: Business Center updates the status of keys near expiration to “Active and close to expiration.” If the expiration date passes, the key's status changes to “Inactive.” After a key becomes inactive, it can no longer be used to process payments and must be replaced.
Creating New Keys
Depending on your account settings, you can create a variety of security keys to use with your payment processing methods. For more information about key types and uses, see Understanding Key Types.
To create security keys:
1 On the left navigation pane, click the Payment Configuration ( ) icon.
2 Click Key Management. The Key Management page appears.
3 In the search toolbar, select the Key type you want to create.
Additional Information: Portfolio users: select your merchant as well.
4 In the search toolbar, select the Context (Live or Test environment) in which to create the key.
5 Click Add. The Generate Key panel opens.
6 Follow the steps for the type of key you want to create:
To create this key Select a subtype and follow these instructions:
Transaction Processing
Simple Order: Select key type and download JNLP file.
SOAP: Select key type and generate new key.
SCMP: Select key type and download JNLP file.
Secure Acceptance: Select key type and values then generate new key.
OAuth 2.0 No subtype: Select credential type and values then generate credentials.
API Key Certificate: Select key type and download JNLP file.
Shared Secret Key: Select key type and generate new key.
PGP Keys No subtype: Select key type and generate new key.
New Business Center Online Help | 2018 135

Chapter 6 Payment Configuration
Deactivating Keys
You can deactivate a key if you no longer need to use it for payment
processing.
NOTE: keys become inactive after reaching the expiration date.
To deactivate security keys:
1 On the left navigation pane, click the Payment Configuration icon.
2 Click Key Management. The Key Management page appears.
3 In the search toolbar:
a Select Secure Acceptance or PGP in the Key type filter.b Select the Context (Live or Test environment) in which the key was created.
Additional Information: Portfolio users: select your merchant as well.4 Click the banner of the key you want to deactivate to expand the key information.
5 Click the Deactivate ( ) icon.
6 Click Yes.
New Business Center Online Help | 2018 136
Chapter 6 Payment Configuration
Deleting Keys
You can delete a key if you no longer need to use it for payment processing.
NOTE: keys become inactive after reaching the expiration date.
To delete security keys:
1 On the left navigation pane, click the Payment Configuration icon.
2 Click Key Management. The Key Management page appears.
3 In the search toolbar, select the Key type you want to delete.
Additional Information: Portfolio users: select your merchant as well.4 In the search toolbar, select the Context (Live or Test environment) in which the key
was created.
5 Click the banner of the key you want to delete to expand the key information.
Additional Information: delete is not available for Secure Acceptance and PGP keys.
6 Click the Delete ( ) icon.
7 Click Yes.
Configuring Payment ProcessorsTo select a payment processor:
1 On the left navigation pane, click the Payment Configuration icon.
2 Click Processor Configuration. The Processor Configuration page appears.
3 In the Active Processor list, select the processor you want to use.
4 To make the processor your default, check the box.
5 Click Save.
New Business Center Online Help | 2018 137
Chapter 6 Payment Configuration
Managing Secure Acceptance SettingsYou can create secure acceptance profiles to use during checkout, creating as many active profiles as you need for your business model. The options available to you are determined by your merchant account provider:
• Create or edit a profile
• Copy an existing profile
• Activate or deactivate a profile
• Search for a profile
NOTE: to create profiles for your merchants, follow the steps in "Creating New Secure Acceptance Profiles" the Portfolio Management module.
Creating New Secure Acceptance Profiles
You can create profiles to represent the payment methods that you accept during checkout. After you create the profile, you can activate it so it can be used for Web/Mobile or Silent POST orders.
To create a secure acceptance profile:
1 On the left navigation pane, click the Payment Configuration ( ) icon.
2 Click Secure Acceptance Settings. The Secure Acceptance Settings page appears.
3 Click New Profile. The Create Profile panel opens.
4 Enter the profile name and description, the company name, the integration method used to process notifications and the contact to whom they will be sent, and any additional services.
Additional Information: the integration method cannot be changed later.5 Click Submit. The Create Profile panel closes and the Edit Profile page appears.
Additional Information: the profile is created as “Inactive.” You can complete profile values in order to promote it using the steps in Editing Secure Acceptance Profiles at any time.
New Business Center Online Help | 2018 138
Chapter 6 Payment Configuration
Copying Secure Acceptance Profiles
You can copy an existing profile and save it with a different name and description. All of the values in the original profile are included in the new profile.
To copy a secure acceptance profile:
1 On the left navigation pane, click the Payment Configuration icon.
2 Click Secure Acceptance Settings. The Secure Acceptance Settings page appears.
3 Check the box next to the profile you want to copy, and click the Copy ( ) icon.
4 Click Confirm. The Copy Profile panel opens.
5 Enter the new profile name and description and click Submit.
Editing Secure Acceptance Profiles
To edit a secure acceptance profile, you make changes to an inactive profile, then promote the changes to the active profile:
NOTE: available options are determined by your merchant account provider.
Tab Name Description
General Information Enter basic information about the name and format of the profile
Payment Settings Select accepted card types, checkout methods, and reversal preferences
Payment Form Set up checkout steps, and which fields to include in billing and order review forms
Notifications Designate where to send transaction data
Customer Response Customize response and error messages
Branding Add your branding logos, fonts, and colors
New Business Center Online Help | 2018 139
Chapter 6 Payment Configuration
To edit secure acceptance profiles:
1 On the left navigation pane, click the Payment Configuration icon.
2 Click Secure Acceptance Settings. The Secure Acceptance Settings page appears.
3 Click the Inactive Profiles tab.
4 In the Profile Name column, click the name of the profile you want to edit. The Edit Profile page appears.
Additional Information: you can also select an Active profile, and click the Edit icon. Business Center automatically takes you to the Inactive version of the profile.
5 Click the tab containing the information you want to update and make changes as necessary.
6 When you are done, click Save.
Additional Information: click the Promote Profile icon to add changes to the Active profile.
Activating Secure Acceptance Profiles
Activating or promoting a profile makes the profile available for use during checkout. Until the profile is completed and activated, it remains inactive, and you can make updates using the steps in "Editing Secure Acceptance Profiles." If necessary, you can also deactivate an active profile.
To activate a secure acceptance profile:
1 On the left navigation pane, click the Payment Configuration icon.
2 Click Secure Acceptance Settings. The Secure Acceptance Settings page appears.
3 Perform one of the following steps:
a On the Active Profiles tab, select the profile you want to activate and click the Promote Profile ( ) icon.
b On the Edit Profile page, click the Promote Profile ( ) icon.
4 Click Confirm.
New Business Center Online Help | 2018 140
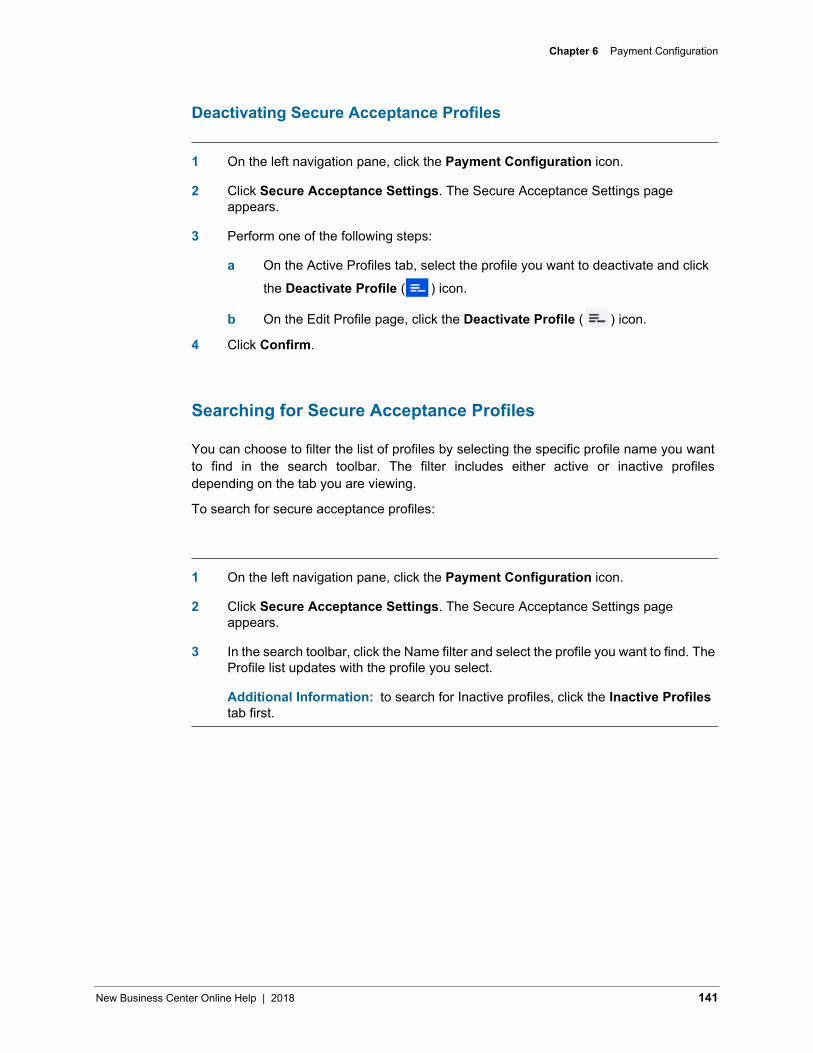
Chapter 6 Payment Configuration
Deactivating Secure Acceptance Profiles
1 On the left navigation pane, click the Payment Configuration icon.
2 Click Secure Acceptance Settings. The Secure Acceptance Settings page appears.
3 Perform one of the following steps:
a On the Active Profiles tab, select the profile you want to deactivate and click
the Deactivate Profile ( ) icon.
b On the Edit Profile page, click the Deactivate Profile ( ) icon.
4 Click Confirm.
Searching for Secure Acceptance Profiles
You can choose to filter the list of profiles by selecting the specific profile name you want to find in the search toolbar. The filter includes either active or inactive profiles depending on the tab you are viewing.
To search for secure acceptance profiles:
1 On the left navigation pane, click the Payment Configuration icon.
2 Click Secure Acceptance Settings. The Secure Acceptance Settings page appears.
3 In the search toolbar, click the Name filter and select the profile you want to find. The Profile list updates with the profile you select.
Additional Information: to search for Inactive profiles, click the Inactive Profiles tab first.
New Business Center Online Help | 2018 141

Chapter 6 Payment Configuration
Viewing Secure Acceptance Profiles
You can view an active profile without editing it using the View Profile option.
To view a secure acceptance profile:
1 On the left navigation pane, click the Payment Configuration icon.
2 Click Secure Acceptance Settings. The Secure Acceptance Settings page appears.
3 On the Active Profiles tab, perform one of the following:
a Select the check box for the profile you want to view and click the View Profile icon.
b In the Profile Name column, click the name of the profile you want to view.Additional Information: The Edit Profile page appears, with all data in read-only mode. To switch to edit mode, click the Edit icon. The inactive copy of the profile appears.
Smart Authorization SettingsContext
You can use Smart Authorization settings to help you identify orders needing review. You can select a variety of reasons to set an order aside, including address verification, card verification numbers, transaction amount, or irregular contents.
To enable smart authorization settings:
1 In the left navigation panel, click the Payment Configuration icon.
2 Click Smart Auth. The Smart Auth Settings page appears.
3 In the search toolbar, select the merchant for which you want to enable settings.
4 Select the values to enable or disable.
5 Click Save.
New Business Center Online Help | 2018 142
Chapter 6 Payment Configuration
Managing Webhook SettingsYou can set up a webhook notification so that you can receive payment event notifications from alternate payment processors. Active configurations enable you to receive updates about your processed payments and send responses for supported payment methods.
You can also edit and delete a configuration as needed.
Adding a New Configuration
You can add a webhook configuration to your secure URL so that you can receive notifications of changes to payment transaction status. Secure URLs must conform to the following rules:
• Be an HTTPS URL
• Be served on port 443 (not port 8443)
• Respond with HTTP code 200 to both HEAD and POST requests
• Respond to POST requests within 10 seconds
• Use a certificate that has been issued by a trusted source
To add a new configuration:
1 In the left navigation panel, click the Payment Configuration ( ) icon.
2 Click Webhook Settings. The Webhook Settings page appears.
3
4
5
6
7
Additional Information: only one listener configuration can be active at any time. To add a new configuration delete the existing one first.
Click Create. The Webhook Notification pane opens.
Enter the URL of the location where you want to receive notifications.
Important: if you do not enable the notification before saving, the configuration remains inactive.
Click Enable.
Select the Shared Secret key that you want to use.
Important: you must have an active API key in order to configure a webhook notification.Click Save.
New Business Center Online Help | 2018 143
Chapter 6 Payment Configuration
Editing Notification Configurations
You can update the URL if you need to change the listener for your notifications, or the shared secret key if the key is expired or has been deleted.
IMPORTANT: notifications are not sent when keys expire or are deleted. Should your listener fail, and CyberSource is unable to deliver notifications for 48 hours, your listener will be disabled. For more information on troubleshooting your connection, see Processing Notifications.
To edit a notification configuration:
1 In the left navigation panel, click the Payment Configuration icon.
2 Click Webhook Settings. The Webhook Settings page appears.
Additional Information: only one listener configuration can be active at any time. To add a new configuration delete the existing one first.
3 Click Configure. The Webhook Notification panel opens.
4 Make changes as necessary, and click Save. The updated save date and time of the configuration display on the Webhook Notifications page.
Deleting a Webhook Configuration
If you need to create a new configuration, or if you no longer need to receive notifications, you can delete the webhook configuration.
1 In the left navigation panel, click the Payment Configuration icon.
2 Click Webhook Settings. The Webhook Settings page appears.
3 Click Configure. The Webhook Notification panel opens.
4 Click Delete. The Webhook Notification panel closes and the configuration is removed.
New Business Center Online Help | 2018 144
Chapter 6 Payment Configuration
Processing Notifications
After your webhook connection is saved and active, Business Center sends notifications when changes to payment status occur. Each notification contains the shared secret key along with the payload. For details about the Payload Message Attributes, see "Understanding Payload Message Attributes."
NOTE: you can use the Payments Events Report to validate payment events received via webhook notifications. See the Reporting Developer Guide for more information.
Responding to Notifications
Use the following responses for each notification received:
Troubleshooting Notifications
If you do not receive notifications as expected, verify the following to correct the problem:
• The listener service is available.
• The notification is active in the Business Center.
• The URL meets the minimum requirements:
– Listener uses an HTTPS URL (for example, https://example.com, nothttp://example.com),
– URL is served on port 443 (for example, https://example.com orhttps://example.com:443, not https://example.com:8443).
– Both HEAD and POST request respond with HTTP code 200. Refer to one ofthe following specifications for relevant definitions:
https://www.w3.org/Protocols/rfc2616/rfc2616-sec10.html, or -https://www.w3.org/Protocols/rfc2616/rfc2616-sec9.html.
Response Type Description
ACKNOWLEDGEMENT Return HTTP code 200 (OK) to acknowledge receipt of the message. Acknowledge messages when issues are encountered during consumption so that you can troubleshoot the problem. If necessary, contact CyberSource Support for additional help.
UNAVAILABILITY Listeners are marked as unavailable if you send three non HTTP code 200 responses consecutively within an hour.
RETRY ATTEMPTS One message per hour is sent in a retry attempt for 48 hours after the listener is identified as unavailable.
DISABLED Listener is disabled if all retry attempts fail for 48 hours.
New Business Center Online Help | 2018 145
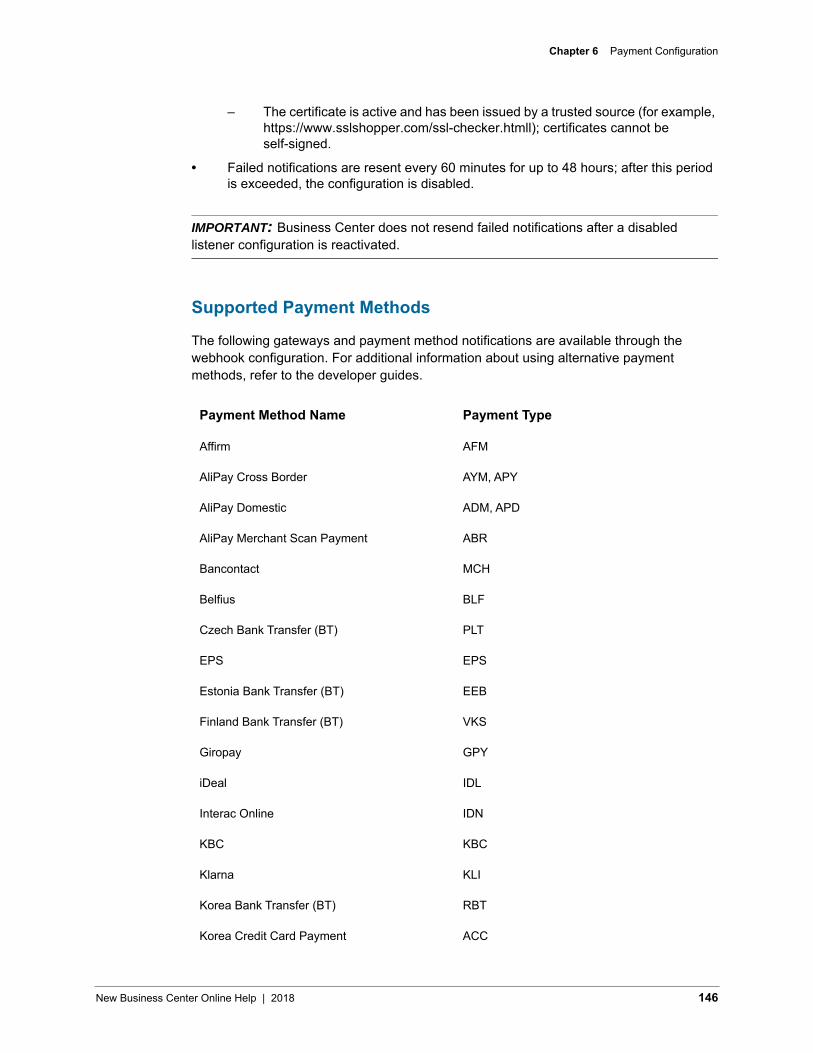
Chapter 6 Payment Configuration
– The certificate is active and has been issued by a trusted source (for example,https://www.sslshopper.com/ssl-checker.htmll); certificates cannot beself-signed.
• Failed notifications are resent every 60 minutes for up to 48 hours; after this periodis exceeded, the configuration is disabled.
IMPORTANT: Business Center does not resend failed notifications after a disabled listener configuration is reactivated.
Supported Payment Methods
The following gateways and payment method notifications are available through the webhook configuration. For additional information about using alternative payment methods, refer to the developer guides.
Payment Method Name Payment Type
Affirm AFM
AliPay Cross Border AYM, APY
AliPay Domestic ADM, APD
AliPay Merchant Scan Payment ABR
Bancontact MCH
Belfius BLF
Czech Bank Transfer (BT) PLT
EPS EPS
Estonia Bank Transfer (BT) EEB
Finland Bank Transfer (BT) VKS
Giropay GPY
iDeal IDL
Interac Online IDN
KBC KBC
Klarna KLI
Korea Bank Transfer (BT) RBT
Korea Credit Card Payment ACC
New Business Center Online Help | 2018 146
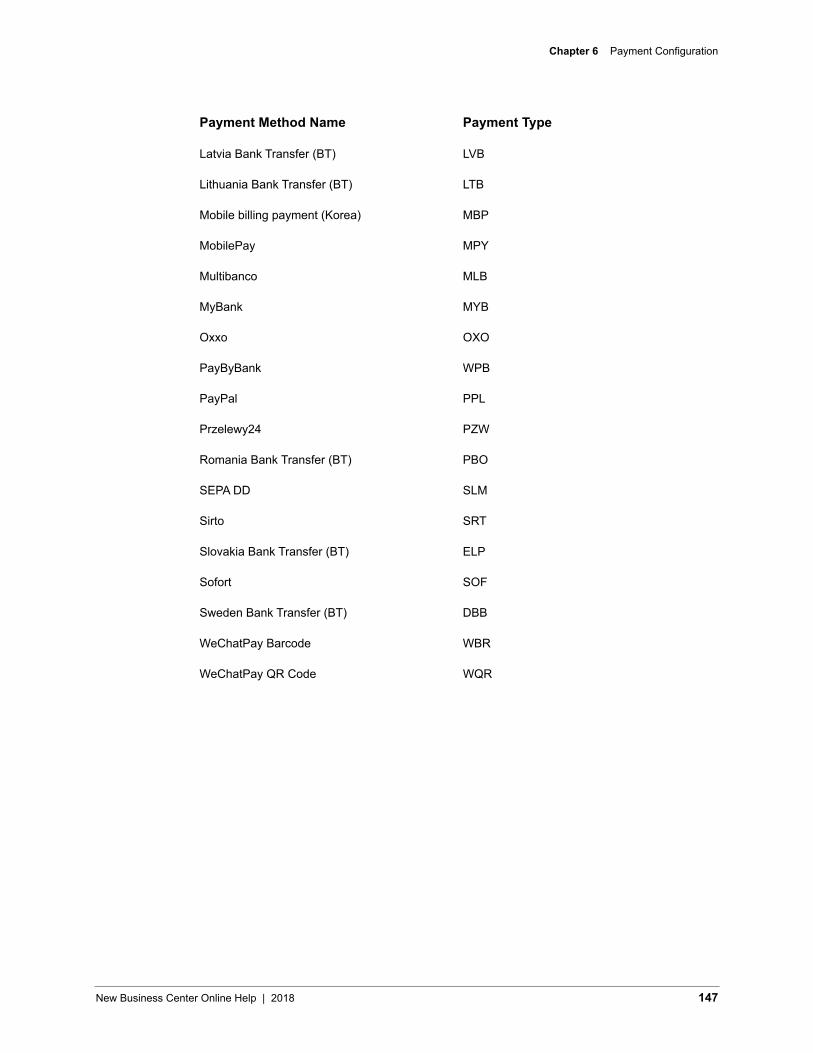
Chapter 6 Payment Configuration
Latvia Bank Transfer (BT) LVB
Lithuania Bank Transfer (BT) LTB
Mobile billing payment (Korea) MBP
MobilePay MPY
Multibanco MLB
MyBank MYB
Oxxo OXO
PayByBank WPB
PayPal PPL
Przelewy24 PZW
Romania Bank Transfer (BT) PBO
SEPA DD SLM
Sirto SRT
Slovakia Bank Transfer (BT) ELP
Sofort SOF
Sweden Bank Transfer (BT) DBB
WeChatPay Barcode WBR
WeChatPay QR Code WQR
Payment Method Name Payment Type
New Business Center Online Help | 2018 147
7. Account Management
The Account Management ( ) module enables you to configure application-wide settings for your account and users, including the groups and roles to which they belong, access to Business Center, preferences for receiving Business Center notifications, and ability to pay your bill online:
• Set preferences for and view messages from Business Center
• Manage account information, including secure and saved IP addresses
• Manage roles, users, and groups
• Pay an invoice
Using the Message CenterYou can view Business Center messages on the Business Center home page:
• New urgent alerts appear on screen when you log in; you can also access themthrough the Alerts menu in the header bar
• Non-urgent notifications are available under the Notifications menu in the header bar
Viewing Messages in the Message Center
All message types sent in the last six months appear in the Message Center, even if you have dismissed them from view on the home page.
To view messages:
1 On the left navigation pane, click the Account Management ( ) icon.
2 Click Message Center. The Message Center page appears.
3 The Message Center list displays the message type, method of delivery, subject, and date sent. To view the content of any message, click the message row.
New Business Center Online Help | 2018 148
Chapter 7 Account Management
Viewing Urgent Alerts
Urgent alerts are notifications that require immediate attention. These alerts are sent by the CyberSource support team and appear when you log into Business Center. The following options are available:
• Click Dismiss to remove the alert from the home page (you can still view it in theMessage Center)
• Click Next to read additional messages (when available)
• Click the X to close the window and retain all alerts (will display again at next login)
• Click Alerts in the header menu to view a list of current alerts
Viewing Notifications
Notifications (messages) represent a historical log of all messages sent to designated contacts. Messages are kept for six months in the Message Center; you can search for and sort messages.
To view notifications:
1 Follow the steps in "Viewing Messages in the Message Center" to view all notifications sent.
2 Click Notifications in the header menu to view most recent notifications.
Managing Alert PreferencesYou can provide contact information and select which users will receive notifications (by email and/or text) for each of the following types of events:
This Type of Event Provides this Information
Real Time Outage System outages, including services impacted, start time, and duration
Late Batching Delays in batch processing and funding
Late Reporting Delays in reporting, including impacted reports
Maintenance Upcoming system maintenance
Custom Product enhancements or upcoming changes related to a product
Holiday Upcoming holidays
New Business Center Online Help | 2018 149
Chapter 7 Account Management
Managing Alerting Contacts
To enable alerts for application-wide events, you must provide information for each type of contact: business, technical, and emergency:
• Business Contact: receives registration completion and merchant status changenotifications, and login instructions to the Business Center.
• Technical Contact: receives automatically generated notifications, such as productupdates; may also receive non-urgent issue notifications
• Emergency Contact: receives urgent messages such as service outagenotifications
NOTE: to view the list of countries that support SMS alerts, click Supported Countries at the bottom of the page.
WARNING: modifying contact information on this page also updates your contact information on the Account Information page.
To add contact information:
1 On the left navigation pane, click the Account Management( ) icon.
2 Click Alert Preferences. The Alert Preferences page appears.
3 Enter each contact's first and last name, phone number, and email address.
4 Next to SMS Phone Number, click the Edit ( ) icon to enter the number where you want to receive alerts.
Additional Information: to enable text alerts, you must verify the number and agree to the terms of service. A verification message will be sent to the number you provide.
5 Click Save.
New Business Center Online Help | 2018 150
Chapter 7 Account Management
Enabling System Alerts
Once you have set up the contacts to whom notifications will be sent, you can select how and when each contact should be notified. Rules and rates of the SMS provider apply to all alerts.
NOTE: if the phone number and/or email address is the same for multiple contacts, all those contacts will be selected to receive the alert.
1 On the left navigation pane, click the Account Management icon.
2 Click Alert Preferences. The Alert Preferences page appears.
3 Under the Notification Type, select the contacts and methods for each alert type.
Additional Information: email notifications for Emergency Contact for Real-Time Outage cannot be disabled.
4 Click Save.
Managing Account DetailsYou can update location and contact information for each of your merchants to ensure that contacts receive important information from CyberSource. The contact information you provide also enables your users to request help for your organization.
In addition, you can add security for Business Center by including safe IP addresses where users can access the application.
WARNING: modifying contact information on this page also updates your contact information on the Alert Preferences page. Make sure to verify SMS-enabled (text) phone numbers so contacts continue to receive designated alerts.
New Business Center Online Help | 2018 151
Chapter 7 Account Management
1 On the left navigation pane, click the Account Management ( ) icon.
2 Click Account Information. The Account Information page appears.
Additional Information: portfolio users must select a merchant from the Merchant filter in the search toolbar.
3 Enter the address details.
4 When you are done, click Save.
Add Account Contact Information
1 On the left navigation pane, click the Account Management icon.
2 Click Account Information. The Account Information page appears.
Additional Information: portfolio users must select a merchant from the Merchant filter in the search toolbar.
3 Under Contacts, enter the first and last name, phone number, and email address for each contact.
4 Next to SMS Phone Number, click the Edit ( ) icon to enter the number where you want to receive alerts.
Additional Information: to receive alerts, you must verify the number and agree to the terms of service.
5 Click Save.
Additional Information: to view the list of countries that support SMS alerts, click Supported Countries.
New Business Center Online Help | 2018 152
Chapter 7 Account Management
Managing IP Address Access to Business Center
Adding IP addresses to either a white list or a bypass list allows you to control users’ access to the Business Center. In addition, you can choose to require users to verify an IP address.
Access Types:
• White List: Only designated IP addresses are allowed access
• Bypass List:If the IP address does not fall within a specified range, users mustanswer security questions before access is granted
NOTE: Note: the option you select applies to all designated IP addresses.
WARNING: Warning: editing or deleting IP addresses through this function can remove access to Business Center for one or more users, including your own. Exercise extreme caution when performing these tasks. For help correcting issues with IP addresses, contact Customer Support.
Adding an IP Address
1 On the left navigation pane, click the Account Management ( ) icon.
2 Click IP Range Settings. The IP Range Settings page appears.
3 At the bottom of the page, click the Plus (+) icon. The Add IP Address panel opens.
4 Enter the start and end values for the IP addresses you want to allow.
Additional Information: to limit access to a specific IP address, enter the same value in both fields.
5 Enter a description for the entry if necessary.
6 Click Save. The Add IP Address panel closes and the Configure IP Settings page updates to display the new addresses.
New Business Center Online Help | 2018 153

Chapter 7 Account Management
Editing an IP Address
1 On the left navigation pane, click the Account Managementicon.
2 Click IP Range Settings. The IP Range Settings page appears.
3 Next to the value you want to update, click the Edit ( ) icon. The Edit IP Address panel opens.
4 Enter the start and end values for the IP addresses you want to allow.
Additional Information: to limit access to a specific IP address, enter the same value in both fields.
5 Enter a description for the entry if necessary.
6 Click Save. The Edit IP Address panel closes and the Configure IP Settings page updates to display the new addresses.
Deleting an IP Address
1 On the left navigation pane, click the Account Management icon.
2 Click IP Range Settings. The IP Range Settings page appears.
3 Next to the value you want to delete, click the Edit icon. The Edit IP Address panel opens.
4 Click Delete.
5 Click Confirm. The Edit IP Address panel closes and the Configure IP Settings page removes the entry.
New Business Center Online Help | 2018 154
Chapter 7 Account Management
Deleting Saved IP Addresses
If you use the “Remember Me” option when logging into Business Center, your computer’s IP address is added as a safe location. If you no longer use that IP address, or don’t want your computer to remember it, you can delete it from the My IP Settings page.
NOTE: Note: only IP addresses you have saved using your user name/password display on this page.
1 On the left navigation pane, click the Account Management icon.
2 Click My IP Settings. The My IP Settings page appears.
3 Select the IP address you want to delete, then click the Delete ( ) icon at the bottom of the page.
4 Click Confirm.
Managing RolesYou can create, and mass edit, assign, and delete roles using the Roles feature. Roles enable you to segregate duties and access to features for your users, such as Reporting, Virtual Terminal, and Transaction Search. Business Center includes both default roles as well as the ability to create new roles that best support your business model.
IMPORTANT: before you assign permissions to roles, make sure you have subscribed to the appropriate service. To modify your service subscriptions, contact your local Sales Representative.
What else can you do?
• Learn about default roles are and what permissions are included
• View role attributes
• Search for roles
• Create and assign roles
• Edit permissions assigned to roles
• Delete obsolete roles
• Assign users to groups
New Business Center Online Help | 2018 155
Chapter 7 Account Management
NOTE: for a complete list of available Business Center permissions, see “Business Center Permissions” in the Business Center User Guide.
Understanding Default Roles
Business Center provides three default roles that you can assign to each user. The permissions cannot be changed for these roles, although the users assigned to them can.
• Administrator: This role contains all permissions and enables up to nine users tocreate, modify, and delete merchant ID users. The account administrator user cannotbe deleted.
• Report Download: This role enables users to download programmable reports.Because the password for downloading reports never expires, the user cannot log into the Business Center.
• User Report Download: This role enables users to download the programmableuser permissions report. Users with this role cannot log in to the Business Center
Viewing Role Attributes
You can select any existing role within your own Merchant ID and view the permissions assigned. Use the steps in "Searching for Roles" to view a specific role. If you have permission to do so, you can edit or delete the role instead.
NOTE: as the Administrator role contains all permissions, you cannot view the role’s attributes.
To view role attributes:
1 In the left navigation panel, click the Account Management ( ) icon.
2 Click Roles. The Roles page appears.
3 In the Search toolbar, select Myself in the Merchant filter. The Role List displays the list of available merchants.
4 Select the check box next to the role you want to view, then click the View icon. The Role Editor panels opens.
Additional Information: you can only view the attributes of one role at a time.
New Business Center Online Help | 2018 156
Chapter 7 Account Management
Searching for Roles
You can search for any existing role to view assigned permissions, update role permissions, or delete an obsolete role. If you cannot find the role you need, you can create a new one instead.
To search for roles:
1 In the left navigation panel, click the Account Management icon.
2 Click Roles. The Roles page appears.
3 In the search toolbar, select the merchant you want using the Merchant filter. The Role List displays the list of available merchants.
4 To filter the results further, type the text you want to search for in the Filter field. The Role List displays corresponding results.
Creating New Roles
You can create roles that contain one or more Business Center permissions. Once created, they are available to quickly assign to one or more users.
For example, perhaps all your customer service representatives have permission to add orders in the Virtual Terminal, but only one employee (Employee A) is allowed to issue credits. To efficiently assign this type of permission, you can create and assign a role to everyone except Employee A. For Employee A, you can either create a separate role that includes the credit permission, or create a custom role when you create or edit the user account for Employee A.
For a complete list of permissions, see the Business Center User Guide.
IMPORTANT: each user can have only one role assigned at any time. Plan your roles accordingly; for example, by the user’s business function, security level, or responsibilities.
New Business Center Online Help | 2018 157
Chapter 7 Account Management
To create a role:
1 In the left navigation panel, click the Account Management icon.
2 Click Roles. The Roles page appears.
3 Click Add New Role. The Role Editor panel opens.
4 Enter the role name and description.
Additional Information: role names cannot be changed.
5 To add a permission, do one or more of the following:
a To include all available permissions, click Select All.b To search for a particular permission, type the name in the search field, then
select permissions from the results.Additional Information: clear the text to return to the full permissions list.
c To select all permissions within a specific group, check the box next to the group name (for example, Virtual Terminal Permissions).
d To view available permissions within a specific group, click the down arrow to expand the group, then select one or more permissions.
e The permissions you select appear in the Selected column. Click the X next to any permission to remove it.
6 When you are done, click Save.
New Business Center Online Help | 2018 158
Chapter 7 Account Management
Updating Role Permissions
You can update the permissions assigned to any role. For more information about what each permission provides, see Business Center Permissions in the Business Center User Guide.
NOTE: you can update the description associated with a role; however, role names cannot be modified.
Default roles cannot be modified.
WARNING: modifying role permissions affects all users assigned to the role. Make changes with caution.
To update role permissions:
1 In the left navigation panel, click the Account Management icon.
2 Click Roles. The Roles page appears.
3 Use the steps in "Searching for Roles" to locate the role you want to update, then select the check box next to the role name.
4 Click the Edit icon. The Role Editor panel opens.
5 Make changes as necessary, then click Save.
New Business Center Online Help | 2018 159
Chapter 7 Account Management
Deleting Roles
If you no longer need to use a role, you can delete it.
WARNING: deleting roles affects all users assigned to the role. Be sure to assign users to a new role first.
To delete roles:
1 In the left navigation panel, click the Account Management icon.
2 Click Roles. The Roles page appears.
3 Use the steps in "Searching for Roles" to locate the role(s) you want to delete, then select the check box next to each role name.
Additional Information: default roles cannot be deleted.4 Click the Delete icon.
5 Click Confirm.
Business Center Permissions
This section describes the types and names of permissions available in the Business Center. Some permissions are restricted to specific account types, services, or users. Before assigning any permissions to roles or users, verify you have subscribed to the appropriate services with your local Sales Representative.
For example:
• Only an administrator can configure reports.
• Only a merchant can access the Virtual Terminal.
• To process card authorizations and sales in the Virtual Terminal, users must havethree permissions: Virtual Terminal Transaction, Payment Verification, and PaymentDebit.
NOTE: check the Dependencies column for any permission to view prerequisites and/or co-requisites.
New Business Center Online Help | 2018 160
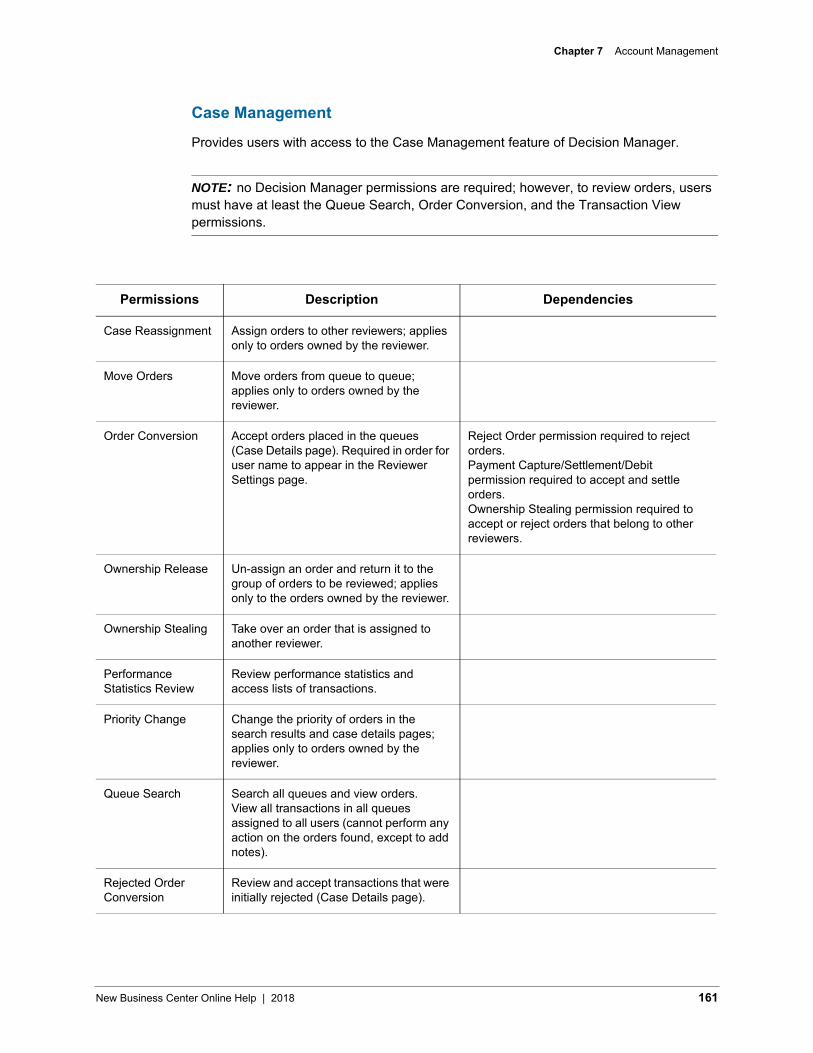
Chapter 7 Account Management
Case Management
Provides users with access to the Case Management feature of Decision Manager.
NOTE: no Decision Manager permissions are required; however, to review orders, users must have at least the Queue Search, Order Conversion, and the Transaction View permissions.
Permissions Description Dependencies
Case Reassignment Assign orders to other reviewers; applies only to orders owned by the reviewer.
Move Orders Move orders from queue to queue; applies only to orders owned by the reviewer.
Order Conversion Accept orders placed in the queues (Case Details page). Required in order for user name to appear in the Reviewer Settings page.
Reject Order permission required to reject orders.Payment Capture/Settlement/Debit permission required to accept and settle orders.Ownership Stealing permission required to accept or reject orders that belong to other reviewers.
Ownership Release Un-assign an order and return it to the group of orders to be reviewed; applies only to the orders owned by the reviewer.
Ownership Stealing Take over an order that is assigned to another reviewer.
Performance Statistics Review
Review performance statistics and access lists of transactions.
Priority Change Change the priority of orders in the search results and case details pages; applies only to orders owned by the reviewer.
Queue Search Search all queues and view orders.View all transactions in all queues assigned to all users (cannot perform any action on the orders found, except to add notes).
Rejected Order Conversion
Review and accept transactions that were initially rejected (Case Details page).
New Business Center Online Help | 2018 161
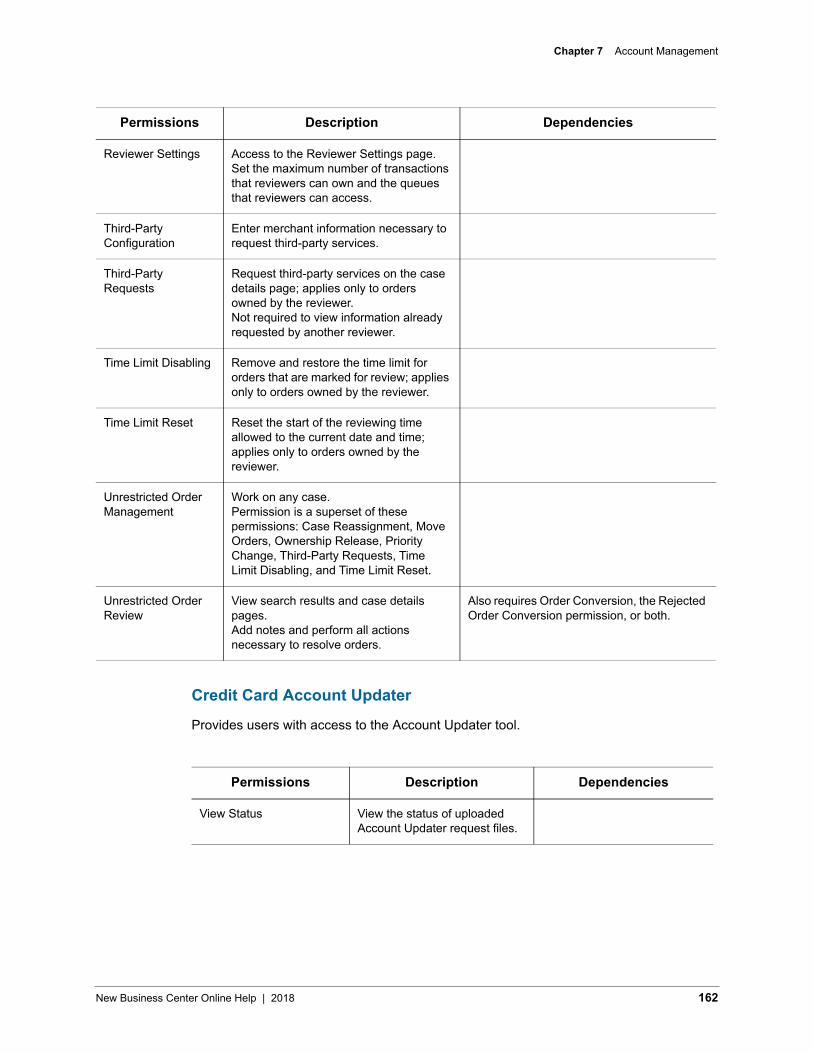
Chapter 7 Account Management
Credit Card Account Updater
Provides users with access to the Account Updater tool.
Reviewer Settings Access to the Reviewer Settings page.Set the maximum number of transactions that reviewers can own and the queues that reviewers can access.
Third-Party Configuration
Enter merchant information necessary to request third-party services.
Third-Party Requests
Request third-party services on the case details page; applies only to orders owned by the reviewer.Not required to view information already requested by another reviewer.
Time Limit Disabling Remove and restore the time limit for orders that are marked for review; applies only to orders owned by the reviewer.
Time Limit Reset Reset the start of the reviewing time allowed to the current date and time; applies only to orders owned by the reviewer.
Unrestricted Order Management
Work on any case.Permission is a superset of these permissions: Case Reassignment, Move Orders, Ownership Release, Priority Change, Third-Party Requests, Time Limit Disabling, and Time Limit Reset.
Unrestricted Order Review
View search results and case details pages.Add notes and perform all actions necessary to resolve orders.
Also requires Order Conversion, the Rejected Order Conversion permission, or both.
Permissions Description Dependencies
Permissions Description Dependencies
View Status View the status of uploaded Account Updater request files.
New Business Center Online Help | 2018 162
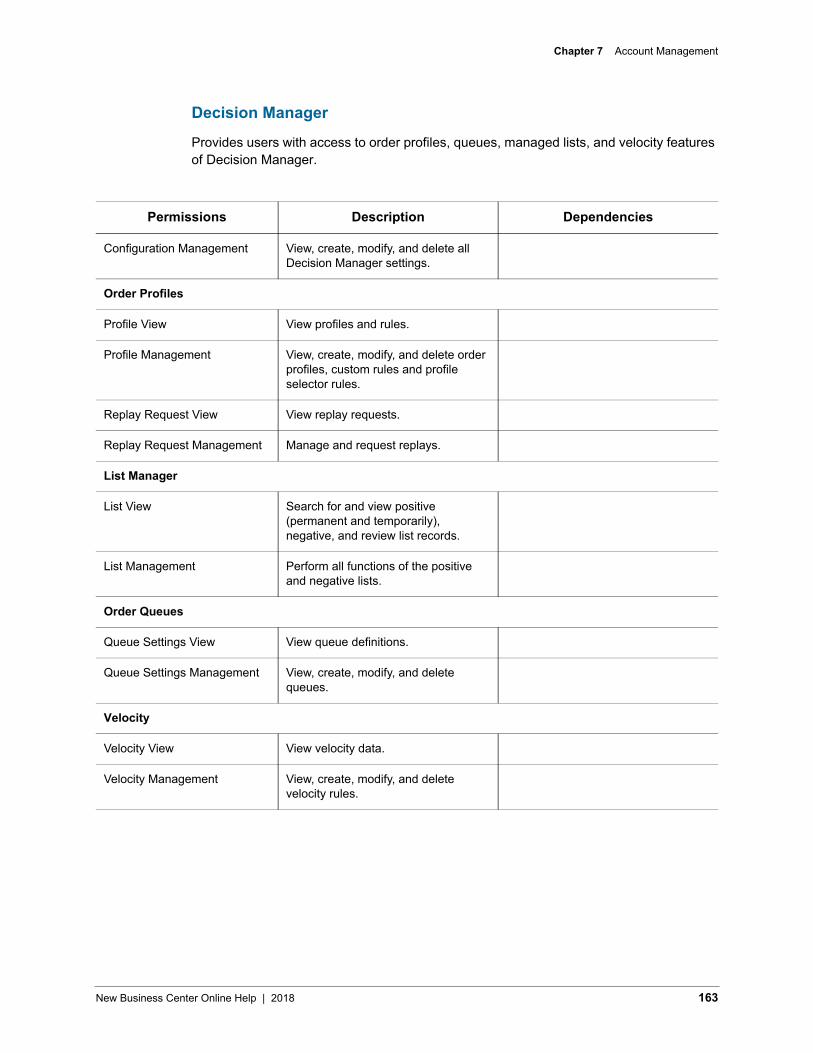
Chapter 7 Account Management
Decision Manager
Provides users with access to order profiles, queues, managed lists, and velocity features of Decision Manager.
Permissions Description Dependencies
Configuration Management View, create, modify, and delete all Decision Manager settings.
Order Profiles
Profile View View profiles and rules.
Profile Management View, create, modify, and delete order profiles, custom rules and profile selector rules.
Replay Request View View replay requests.
Replay Request Management Manage and request replays.
List Manager
List View Search for and view positive (permanent and temporarily), negative, and review list records.
List Management Perform all functions of the positive and negative lists.
Order Queues
Queue Settings View View queue definitions.
Queue Settings Management View, create, modify, and delete queues.
Velocity
Velocity View View velocity data.
Velocity Management View, create, modify, and delete velocity rules.
New Business Center Online Help | 2018 163

Chapter 7 Account Management
Hosted Order Page
Provides users access to the Hosted Order page.
Merchant Settings
Provides users with access to basic Merchant ID information.
Permissions Description Dependencies
Script Management View, create, and delete Hosted Order Page security scripts.
Settings Management Modify Hosted Order Page settings.
Settings View View Hosted Order Page settings (modify not allowed).
Permissions Description Dependencies
Banking Information Management
View and modify payment processor information.
Merchant Information and Alert Preferences Management
View and modify basic contact and service information.
API Key Management View, create, modify, and delete API keys.
PGP Security Settings Upload, activate, and deactivate encryption keys used to encrypt Account Updater response files.
Message Center View Access to Message Center to view and search for current and historical messages.
Processor Settings Ability to switch from primary to secondary processor. Used when primary processor experiences an outage.
Requires existing configuration of secondary processor.
New Business Center Online Help | 2018 164

Chapter 7 Account Management
Mobile Point-of-Sale (mPOS)
Provides users with access to mobile point-of-sale features.
Payment
Provides users with ability to process these payment types.
NOTE: users must also have permission to use the feature where the payment type can be processed (Virtual Terminal, customer profiles, and subscriptions).
Permissions Description Dependencies
mPOS Device Access Access to mobile device endpoint. Ability to access mPOS key creation.
mPOS Device Management Access to mobile registration API. Ability to activate and deactivate mobile devices.
mPOS Device Terminal ID Management
Access to update terminal ID via device management.
Terminal Management Ability to access terminal management to activate and deactivate terminals.
Permissions Description Dependencies
Payment Authorization Process card authorizations.
Payment Void Void a debit or credit, or reverse a card authorization.
Re-Authorization Access to New Authorization option.Retrieve order information in the Virtual Terminal.
Payment Authorization and Virtual Terminal Transaction permissions required to re-authorize a partial transaction.
Payment Credit Process refunds: all credits (card, electronic check, and others if applicable), bank transfer refund, and direct debit refund.
Payment Capture/Settlement/Debit
Process credit card capture, electronic check debit, and direct debit.
New Business Center Online Help | 2018 165

Chapter 7 Account Management
Payment Tokenization
Provides users with access to all customer data stored by the Secure Storage feature.
Create New Order from Previous Authorization
Access to Create Order option.Retrieve order information in the Virtual Terminal.
Payment Authorization and Virtual Terminal Transaction permissions required to process a new order.
Re-Authorization and Settlement
Access to New Authorization option.Retrieve order information in the Virtual Terminal.
Payment Authorization, Capture/Settlement/Debit, and Virtual Terminal Transaction permissions required to re-authorize and capture.
Full Authorization Reversal Reverse a card authorization.
Service Fee Refund Process refunds for service fees on transactions.
Payment Standalone Credit TBD
Permissions Description Dependencies
Permissions Description Dependencies
Profile View View payment tokenization settings (modify not allowed).
Profile Management Create, view, and modify all information.
Profile Delete Delete profiles.
On-Demand Payment On-Demand Payment: can process on-demand payments.
Depending on one-time payment type, also requires Virtual Terminal Transaction, Payment Authorization, Payment Capture/Settlement/Debit, and/or Payment Credit permissions.
New Business Center Online Help | 2018 166
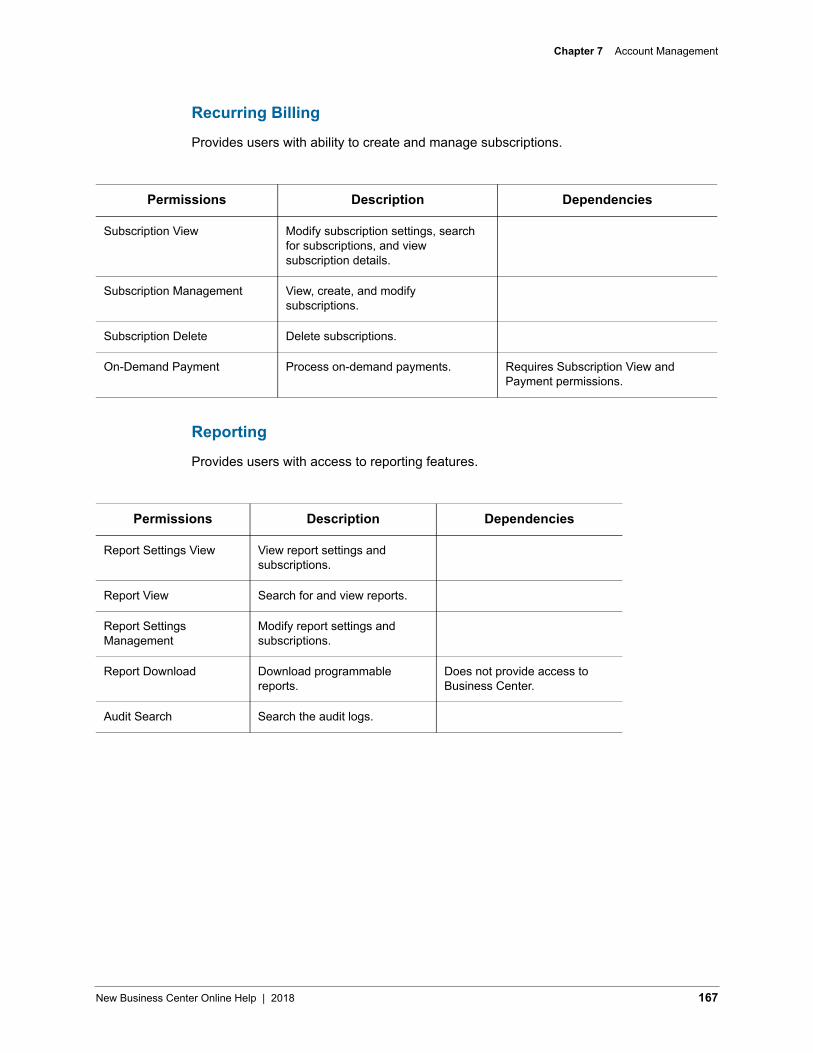
Chapter 7 Account Management
Recurring Billing
Provides users with ability to create and manage subscriptions.
Reporting
Provides users with access to reporting features.
Permissions Description Dependencies
Subscription View Modify subscription settings, search for subscriptions, and view subscription details.
Subscription Management View, create, and modify subscriptions.
Subscription Delete Delete subscriptions.
On-Demand Payment Process on-demand payments. Requires Subscription View and Payment permissions.
Permissions Description Dependencies
Report Settings View View report settings and subscriptions.
Report View Search for and view reports.
Report Settings Management
Modify report settings and subscriptions.
Report Download Download programmable reports.
Does not provide access to Business Center.
Audit Search Search the audit logs.
New Business Center Online Help | 2018 167
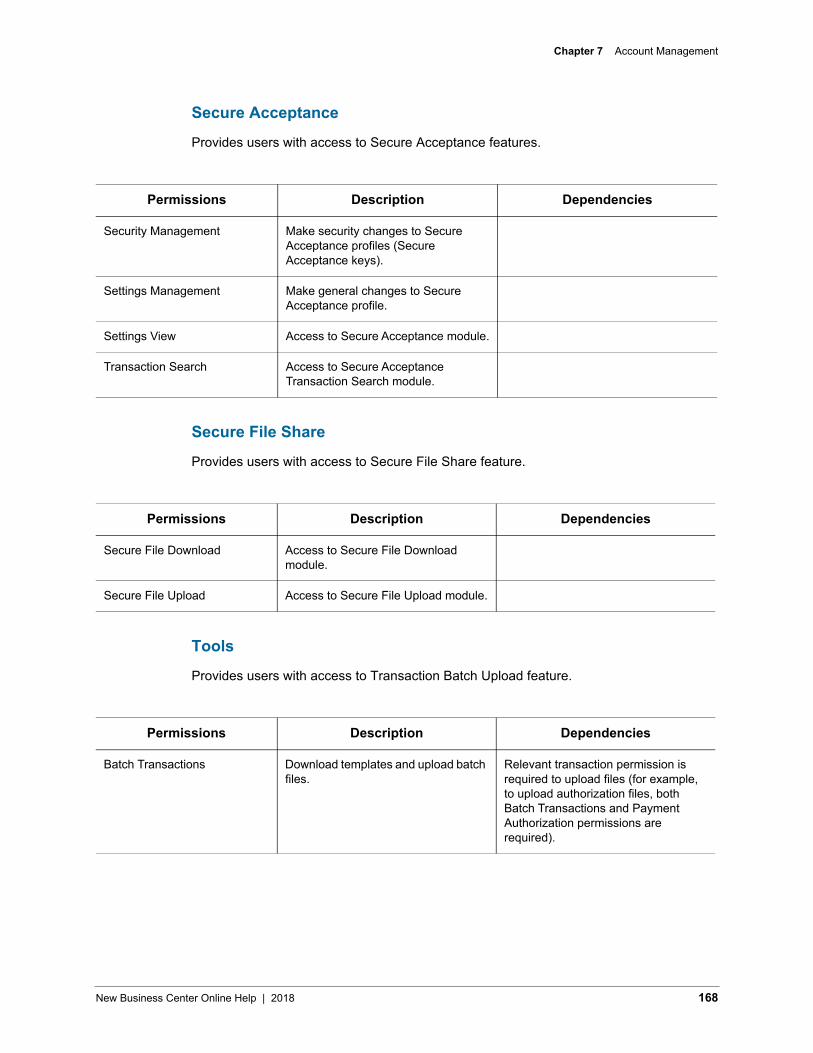
Chapter 7 Account Management
Secure Acceptance
Provides users with access to Secure Acceptance features.
Secure File Share
Provides users with access to Secure File Share feature.
Tools
Provides users with access to Transaction Batch Upload feature.
Permissions Description Dependencies
Security Management Make security changes to Secure Acceptance profiles (Secure Acceptance keys).
Settings Management Make general changes to Secure Acceptance profile.
Settings View Access to Secure Acceptance module.
Transaction Search Access to Secure Acceptance Transaction Search module.
Permissions Description Dependencies
Secure File Download Access to Secure File Download module.
Secure File Upload Access to Secure File Upload module.
Permissions Description Dependencies
Batch Transactions Download templates and upload batch files.
Relevant transaction permission is required to upload files (for example, to upload authorization files, both Batch Transactions and Payment Authorization permissions are required).
New Business Center Online Help | 2018 168
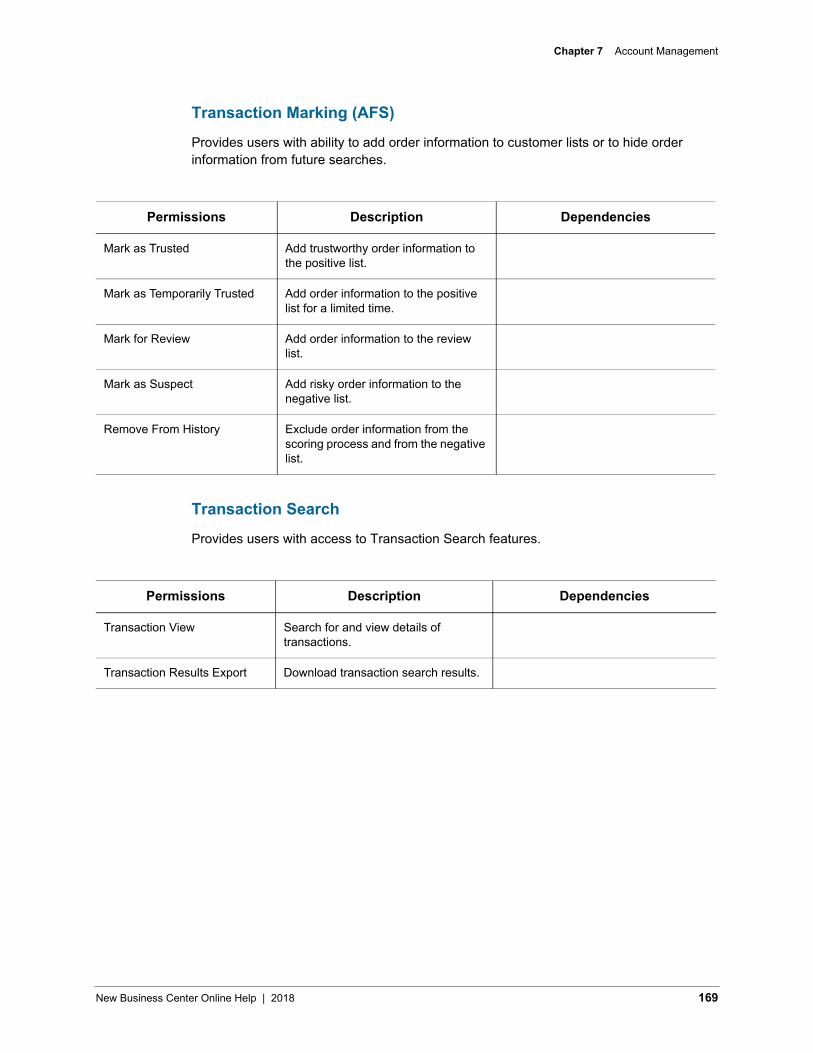
Chapter 7 Account Management
Transaction Marking (AFS)
Provides users with ability to add order information to customer lists or to hide order information from future searches.
Transaction Search
Provides users with access to Transaction Search features.
Permissions Description Dependencies
Mark as Trusted Add trustworthy order information to the positive list.
Mark as Temporarily Trusted Add order information to the positive list for a limited time.
Mark for Review Add order information to the review list.
Mark as Suspect Add risky order information to the negative list.
Remove From History Exclude order information from the scoring process and from the negative list.
Permissions Description Dependencies
Transaction View Search for and view details of transactions.
Transaction Results Export Download transaction search results.
New Business Center Online Help | 2018 169
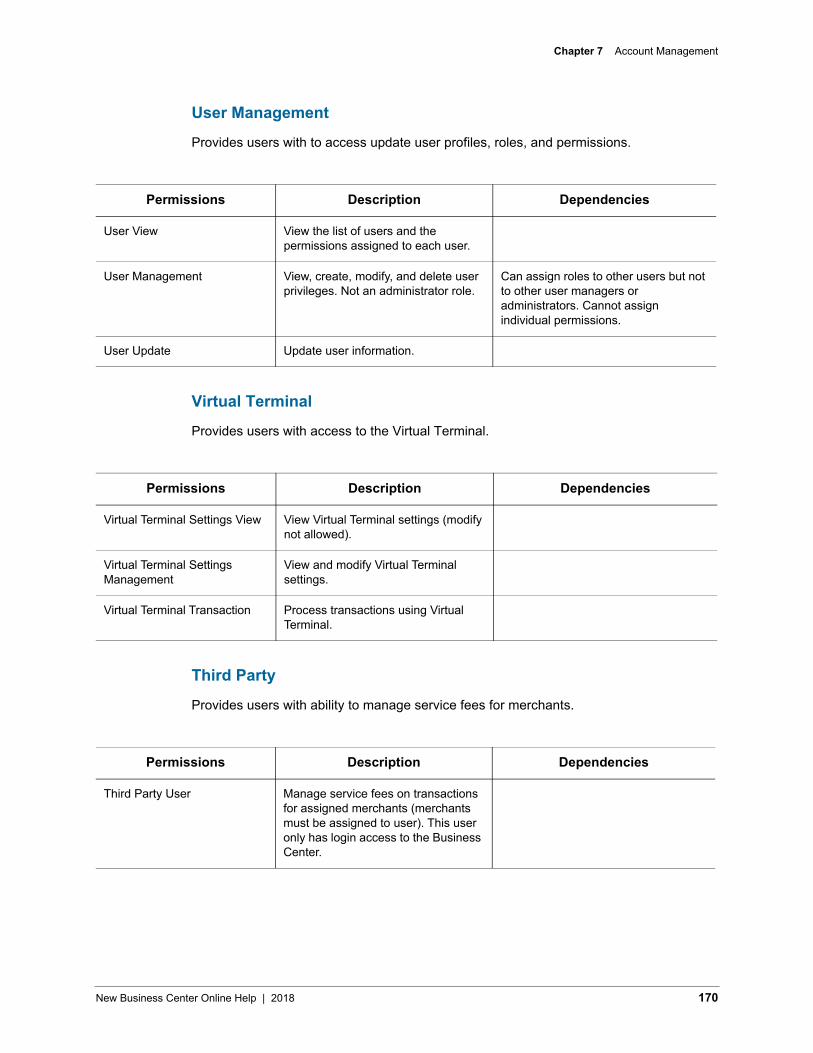
Chapter 7 Account Management
User Management
Provides users with to access update user profiles, roles, and permissions.
Virtual Terminal
Provides users with access to the Virtual Terminal.
Third Party
Provides users with ability to manage service fees for merchants.
Permissions Description Dependencies
User View View the list of users and the permissions assigned to each user.
User Management View, create, modify, and delete user privileges. Not an administrator role.
Can assign roles to other users but not to other user managers or administrators. Cannot assign individual permissions.
User Update Update user information.
Permissions Description Dependencies
Virtual Terminal Settings View View Virtual Terminal settings (modify not allowed).
Virtual Terminal Settings Management
View and modify Virtual Terminal settings.
Virtual Terminal Transaction Process transactions using Virtual Terminal.
Permissions Description Dependencies
Third Party User Manage service fees on transactions for assigned merchants (merchants must be assigned to user). This user only has login access to the Business Center.
New Business Center Online Help | 2018 170
Chapter 7 Account Management
Managing UsersThe Users module enables you to create, edit, disable, and delete users, as well as the following functions for new and existing users:
• Assigning roles
• Creating custom roles
• Adding and verifying password recovery devices
• Assigning groups
NOTE: you can also update your own user profile as well.
Creating and Modifying User Accounts
When you create a new user, you need to select the Merchant ID to which the user will be assigned. The Merchant ID you select determines the data to which the user will have access.
As part of the account creation process, you will also need to assign the user a role. The user’s role determines which features and security access the user will have.
What else can you do?
• Create a custom role for the user
• Assign the user to a group
• Add password recovery device details
1 In the left navigation panel, click the Account Management ( ) icon.
2 Click Users. The Users page appears.
3 Click Add User. The Add User panel opens.
4 Select the correct Merchant ID in the drop down list.
5 Enter the user's name and email address. The user will receive registration instructions at this address.
Additional Information: you can create a user name for the user, or leave the field blank. If you do so, the user is required to create a user name during the registration process.
6 In the Role drop down, select the role to which you want to assign the user. For more information about creating and assigning custom roles, see "Assigning Roles to Users."
New Business Center Online Help | 2018 171
Chapter 7 Account Management
7 If available, select a group for the user. For more information about using groups, see "Managing Groups."
8 When you are done, click Save.
Updating a User Account
1 In the left navigation panel, click the Account Management icon.
2 Click Users. The Users page appears.
3 Select the user name of the user to whom you want to update. The user’s Profile panel opens.
4 Follow the appropriate steps to update the user’s account:
a Assign a role.b Add or update the phone number or email address used for password
recovery.c Enable or disable the user’s account.d Delete the user’s account.
Assigning Roles to Users
You can assign any role to a user when creating and editing a user’s account. The role determines which features and security the user has; for more information about default and standard roles, see "Managing Roles."
You can also choose to create and assign a custom role for any one user; this role is unique to that user only, and will not be added to the Role List on the Roles page.
New Business Center Online Help | 2018 172
Chapter 7 Account Management
To assign roles:
1 In the left navigation panel, click the Account Management icon.
2 Click Users. The Users page appears.
3 Select the user name of the user to whom you want to assign roles. The user’s Profile panel opens.
4 In the Role dropdown, select the role. To assign a custom role, do the following:
a Select Custom in the dropdown list.b Click Customize.c Select one or more permissions to assign to the user, and click Next.
Additional Information: to view the permissions in a previously assigned custom role, click Customize.
IMPORTANT: each user can only have one role assigned.
5 Click Save.
Enabling Password Recovery Devices
You can update the email address and/or phone number where you want to receive details on how to recover your Business Center password, for your own account, or if you have permission, for other users. When you enter the details, the owner of the email address and/or phone number will receive additional instructions to verify the device for password recovery.
NOTE: a device has been verified when a green check mark displays next to the field.
To enable password recovery devices:
1 In the left navigation panel, click the Account Management icon.
2 Click Users. The Users page appears.
3 Perform one of the following steps:
a Click the user name of the person for whom you want to add device information. The Profile panel for the user opens.
b To enable devices for your own account, at the top right corner, click your name, then My Profile. The My Profile panel opens
New Business Center Online Help | 2018 173
Chapter 7 Account Management
4 Under Recovery Information, click Edit next to the email or phone number you want to update.
Result: Warning: Once added, you can only update an email address or phone number; the information cannot be deleted.
5 Enter and confirm the address or number you want to use, then click Submit. Verification instructions are sent to the device entered when you enter a new value.
Additional Information: to use a phone number to receive text (SMS) messages, your country must be supported.
Updating Account Status
You can update the status of a user’s account by disabling or enabling the account. If the user no longer needs to access Business Center, you can delete the account instead.
NOTE: users can update some elements of their own profiles, including name, password, contact details, and preferred time zone and language.
Disabling or Enabling User Accounts
1 In the left navigation panel, click the Account Management icon.
2 Click Users. The Users page appears.
3 Select the user(s) for whom you want to update account status, then click the
Disable ( ) or Enable ( ) icon.
Taking this action Has this impact
Disabling a user User records may be disabled to disallow access, while still retaining the user record.
Enabling a user Users may be enabled if they are locked (by failed login attempts) or disabled.
Deleting a user Removes the user from active status. Past audit logs are kept but the user can no longer login.
New Business Center Online Help | 2018 174
Chapter 7 Account Management
Deleting User Accounts
1 In the left navigation panel, click the Account Management icon.
2 Click Users. The Users page appears.
3 Select the user(s) you want to delete, then click the Delete icon.
4 Click Confirm.
Downloading User Account Details
You can download the complete list of users for any merchant account. Both active and inactive users are included.
NOTE: only the complete list is available for download. Selecting a user disables the function.
To download user accounts:
1 In the left navigation panel, click the Account Managementicon.
2 Click Users. The Users page appears.
3 Click the Download Users ( ) icon.
4 Click Download CSV or Download XML.
5 Follow your browser’s instructions to save and open the file.
New Business Center Online Help | 2018 175
Chapter 7 Account Management
Updating Your User Profile
You can update your own user profile at any time. Business Center enables you to change your name, password, password recovery devices, time zone, and language preference.
To update your user profile:
1 In the header menu, click your name, and then click My Profile. The My Profile panel opens.
2 Make necessary changes to your information.
Additional Information: user name cannot be updated.
3 When you are done, click Save. The My Profile panel closes.
Managing GroupsIf you subscribe to the service fees feature, you can create groups and assign users to them. Use groups to align data rollup in merchant records to match your online transactions, store-based transactions, and reporting (for example, territory or sales leader). You can create, edit, and delete groups.
IMPORTANT: group assignments do not affect user permissions; to manage permissions and roles assigned to users, use the Users or Roles features.
New Business Center Online Help | 2018 176

Chapter 7 Account Management
Creating Groups
Create groups to logically organize merchant records for use in reporting.
To create a group:
1 On the left navigation pane, click the Account Management ( ) icon.
2 Click Group Management. The Group Management page appears.
3 Click the Plus (+) icon at the bottom of the page. The Create a Group panel opens.
4 Enter the group’s name and description, then select one or more merchants to include in the group.
Additional Information: Merchants may be members of more than group.
5 Click Create.
What can you do next?
You can perform the following tasks:
• Assign a group to a user
• Add a merchant to a group
• Remove a merchant from a group (edit group)
Editing Groups
You can update the description and members of any group.
To edit a group:
1 On the left navigation pane, click the Account Management icon.
2 Click Group Management. The Group Management page appears.
3 Click the name of the group you want to edit. The Edit Group panel opens.
4 Update the group’s description and merchant members as needed.
Additional Information: Group names cannot be modified.
5 Click Save.
New Business Center Online Help | 2018 177
Chapter 7 Account Management
Deleting Groups
You can delete a group if you no longer need to use it.
To delete a group:
1 On the left navigation pane, click the Account Management icon.
2 Click Group Management. The Group Management page appears.
3 Click the name of the group you want to delete. The Edit Group panel opens.
4 Click Delete.
5 Click Confirm.
Paying Your CyberSource InvoiceCyberSource enables you to pay your invoice online with a credit card, check, or via direct transfer from your bank account or credit card. Simply follow the instructions on the page to enter and process your payment information.
New Business Center Online Help | 2018 178
Copyright © 2022 FDOKUMEN