
BROILER HANDBOOK - Zenag Chicken
32
BROILER HANDBOOK More Meat, More Profit
-
Upload
khangminh22 -
Category
Documents
-
view
4 -
download
0
Transcript of BROILER HANDBOOK - Zenag Chicken

BROILERHANDBOOK
More Meat, More Profit

1.1 Why farm Broilers? 1.2 Broiler Production Process 1.3 Housing and Equipment1.4 Broiler Farming Objectives 1.5 Record Keeping
Page 1
ContentsSection 1: Introduction Page 2
Section 2: Chick Management Page 8 2.1 Stockmanship2.2 Chick Transport and Handling2.3 Shed Preparation2.4 Brooding Management• Temperature Guidelines• Assessing Temperature• Spot Brooding Temperature• Water & Drinking• Feed & Feeding• Light Control
Section 3: Growing Management Page 19
4.1 Ready for Market4.2 Shed Clean-out
3.1 Stock Density3.2 Light and Temperature3.3 Water and Drinking3.4 Feed and Feeding3.5 Litter Management 3.6 Stress Management3.7 Biosecurity
Section 4: Post farming Page 27
Contact Page 29

Introduction
The purpose of this handbook is to provide management guidelines that optimise broiler performance and increase profits. While many poultry principles are universal, it’s important to recognise that every farm is different. The most successful farmers develop their own management programs. This requires an understanding of local environmental factors, poultry housing and equipment. This handbook is intended as a reference source for PNG poultry farmers.
The handbook was created by Zenag Chicken for a PNG farming context. The document draws on our rich farming history, as well as common poultry practices from around the world.
In this section, you’ll learn:
CONTENTS REFERENCE PAGE
1. Why farm Broilers? Page 32. Broiler Production Process Page 4 3. Housing and Equipment Page 54. Broiler Farming Objectives Page 65. Record Keeping Page 7
Page 2
Section 1

Small-hold poultry farming is one of the fastest growing SME sectors in PNG. NARI estimates that approximately 1 in 4 PNG households are engaged in some form of poultry production. Furthermore, stringent biosecurity measures have ensured the country remains free of the world’s worst avian diseases. PNG’s relative disease-free and favourable climate are the cornerstones of the poultry industry’s success.
As a healthy and cheap source of protein, demand for chicken meat continues to grow steadily. Consumer preferences for poultry will continue to be driven by rising incomes and population growth. Furthermore, well managed birds can be ready for sale at 6 weeks of age. This short production cycle can generate quick returns for broiler farmers.
1.1 Why Farm Broilers?
42 Days
Page 3

1.2 Broiler Production Process
Page 4
Male lineRearing
Female line Time scale
Grandparent Farm(From New Zealand)
Total time frame 52 weeks (364 days)
Egg production
0-18 weeks
19-65 weeks
Hatchery
Egg storage
Incubation
Hatching
Egg storage
Incubation
Hatching
7-10 days
21 days
Parent Farm
Rearing
Egg production
0-18 weeks
19-65 weeks
Hatchery
Egg storage
Incubation
Hatching
7-10 days
21 days
Same day
Broiler Farm
Brooding
Depletion
Growing
0-10 days
11-42 days
Day 42
Rearing
Egg production

HousingChicken sheds should be carefully planned to provide comfort and ideal conditions for optimal growth. The following factors should be considered when building a chicken shed:
1. Reflective roofing. Reduce impact of sun’s heat.2. Open sides (Chicken wire). Maximise ventilation and fresh air flow.3. East to West facing. No direct sunlight inside shed.4. Litter is soft and dry. 5. Stocking density recommendation: 15kg/m2 hot climates and 20kg/m2
cold climates)6. Biosecurity: No contact with other people, animals or birds.
STRONG BIOSECURITY = STRONG DISEASE CONTROL
EquipmentEquipment should always be clean and well maintained for optimal growth. The following equipment factors should be considered:
1. Feeders: Plan for 50 chickens per feeder.2. Water Drinker: Plan for 50 chickens per drinker.
If stocking rate increases more feeders and drinkers should be provided.
1.3 Housing and Equipment
Page 5

Broiler Farming Key ObjectivesThe overall objective in broiler farming is to grow chickens as cheaply and efficiently as possible to increase profits. The following performance indicators should be reviewed to assess performance of each flock.
• Low Mortality i.e. Only few chickens die during growing period.• Low FCR (Feed Conversion Rate). The amount of feed consumed per
kilo of meat. The lower the FCR, the more efficient chickens are at converting feed into meat.
E.g. 50 chicken sample has total weight of 110kg (50 x 2.2kg each). Total feed consumption was 160kg (25kg Starter + 50kg Grower + 95kg Finisher)
1.4 Broiler Farming Objectives
Page 6
FCR = Total Feed Consumed
Total Live Weight
FCR = 170kg110kg
Broiler Performance Targets
Flock Age(Days)
Average LiveWeight (kg)
Total Mortality (%) FCR
35 2.14 2.5 1.548
36 2.24 2.5 1.568
37 2.33 3.0 1.587
38 2.43 3.0 1.607
39 2.52 3.5 1.627
40 2.62 3.5 1.647
41 2.71 4.0 1.667
42 2.81 4.0 1.687
FCR= 1,545 (Each chicken consumed 1.545kg of feed per kg of growth)

1.5 Record Keeping
Record keeping is important as it monitors performance. Accurate record keeping will allow you to clearly see if management changes have made a difference to overall flock performance.
Page 7
BROILER PERFORMANCE SHEET
Farm: Shed: Date Placed:Flocks: Day Placed:DOC Body Weight (G): Total # Placed: GM:
DAY DATE AGE MORTS TOTAL DEP % CUMU ENDING INVTY
BODY NOTES (For Managers use) LUX LIGHT
ONSTD ACT1 572 733 914 1115 1346 1607 1898 2209 25610 29411 33612 38113 42914 48015 53516 53917 65518 71919 78620 85621 92922 100423 108224 116225 124426 132827 141428 150129 159030 168031 177132 186333 195634 205035 214436 223937 233438 242939 252440 262041 2715 PERFORMANCE42 2809 MORT:43 2904 ALW:44 2997 AGE:45 3091 FCR:

Chick ManagementOBJECTIVE
Providing chicks with a good start is the most important part of managing your flock. This will successfully develop optimal feeding and drinking behaviour, resulting in correct organ development and fast growth with maximum uniformity.
Chick behaviour should always be monitored as they will tell you If they are comfortable or not. Always refer back to the 5 key principles of Stockmanship when assessing a flock.
In this section, you’ll learn:
CONTENTS REFERENCE PAGE
1. Stockmanship Page 92. Chick Transport and Handling Page 103. Shed Preparation Page 114. Brooding Management Page 12
• Temperature Guidelines • Assessing Temperature Page 14• Spot Brooding Temperature Page 15• Water and Drinking • Feed and Feeding Page 17 • Light Control Page 18
Page 8
Section 2
Page 16
Page 13

Stockmanship
Page 9
Activity D
istr
ibut
ion
Air Q
ualit
y
Wat
er
Feed
Standing
.. .. .
. .... .... . .... ......... .. ........ . ... ... .
....
Eating Drinking Walking Sleeping
. ... .. . ..... ... .... . .. .. . . .. ... .. .. ... ... . .. ... ... ... . .. ....... ...
. .. ... . .. ... .. ... .. . .... .... ... . ... .. . ..... ... .... . .. .. . . .. ... .. .. ... ... . .. ... ... ... . .. ....... ...
. .. ... . .. ... .. ... .. . .... .... ... . ... .. . ..... ... .... . .. .. . . .. ... .. .. ... ... . .. ... ... ... . .. ....... ...
. .. ... . .. ... .. ... .. . .... .... .... ... .. . ..... ... .... . .. .. . . .. ... .. .. ... ... . .. ... ... ... . .. ....... ...
. .. ... . .. ... .. ... .. . .... .... ...
. .... . . ...... .. .... ... .. . . ..... ... . ... . .. .. .. . .. ....... ...
.
.. .. . .. ... .... . . .... .... ... . .... . . ...... .. .... ... .. . . ..... ... . ... . .. .. .. . .. ....... ...
.
.. .. . .. ... .... . . .... .... ... Are chickens evenly distributed? D I S T R I B U T I O N
F E E D• Is it easily available?• Is it dry and fresh?• Are feeders clean?
A I R Q U A L I T Y• Take 3 deep breaths and assess air quality• Does the shed smell fresh or stale and bad?• Is there enough ventilation?
A C T I V I T Y• Are chickens active? • Do the chickens sound comfortable and not stressed?
W A T E R• Is it easily available?• Is it cold and fresh?• Are drinkers clean?• Taste ok to drink?
.
..
.
.
. .
.
..
.
..
..
.
.
..
.
.
........
.... .
.
.
. .
....
..
..
..
...
... ...
... ... .
.. . .. ... ... ... . .. ... ..
. ... . .. ..
.
..
.
..
.
. .
.
..
.
.
.
.
... . .. ... ..
.
..
.
. .
.
... ...
.
. .. .
.... ..
.
..
.
..
.
..
.
.
...
... .
.
..
.
.
. ..
.
... .
.
. .
. .. .. ...
.............
.
..
.
........
.
..
.
..... ..
.
.
. .. .
.
..
.
..
.
.
..
.
..
..
.
..
.
..
.
.
..
...
.
..
.
.
. .
.
..
.
..
..
.
.
..
.
.
........
.... .
.
.
. .
....
..
..
..
...
... ...
...
... ... . .. ... ... ... . .. ... ..
. ... . .. ..
.
..
.
..
.
. .
.
..
.
.
.
.
... . .. ... ..
.
..
.
. .
.
... ...
.
. .. .
.... ...
..
.
..
.
..
.
.
...
... .
.
..
.
.
. ..
.
... .
.
. .
. .. .. ...
.............
.
..
.
........
.
..
.
..... ..
.
.
. .. .
.
..
.
..
.
.
..
.
..
..
.
..
.
..
.
.
..
...

Minimising stress and maintaining optimal temperature are the two most important considerations when transporting DOCs. Heat stress and suffocation are the two most common causes of DOC mortality.
2.1 Chick Transport and Handling
• Handle with care• Stack with gaps so hot air escapes• Stack in shade on dry ground
• Never leave in direct sun• Never stack on wet ground• Never shake DOC box
Under shadeCreate space between boxes
Direct sunlight
Page 10
• 25°C is the ideal temperature for transporting DOCs.• Over 30°C will cause heat stress and potentially kill DOCs.

Sheds should be fully cleaned and prepared for brooding before new DOCs arrive onto the farm. This will ensure best performance of the flock and help reduce the risk of disease. Pre-Placement checklist:
Drinker Equipment1. Confirm equipment capabilities suit placement. (1x bell drinker = 50x DOC)2. All drinkers working fine with fresh water. 3. Flushed, cleaned and disinfected.
Feeder Equipment1. Confirm equipment capabilities suit placement.
(1x feeder = 50x DOC)2. Cleaned and disinfected.3. All feeders working fine with fresh starter feed.4. Tip feed on paper (70g per chick).
Litter1. Dry, soft, low levels of dust are comfortable for chicks.2. Recommended material: Wood shavings or coffee husk/coconut husk.3. DO NOT USE SAWDUST! 4. Spread evenly throughout shed 5-10cm in depth.
Brooding Area1. A designated brooding area is installed inside shed 1.5 m2 per 50x DOC.2. Area is cleaned, disinfected and fresh litter spread.3. Paper laid out covering 100% of brooding area. Removed after 3 days.
Heater System1. Ensure heating system works and the temperature is regulated.
2.2 Shed Preparation
Page 11
Right image: Example of shed prepared and ready for chick placement

Brooding is the most important part of a chickens life. Growth in the first 14 days affects the development of immune and digestive systems. To ensure strong early development, brooding should be managed carefully following these key principles:
1. Temperature management2. Easy access to cool clean water 3. Easy access to high quality chick starter feed4. Fresh air5. High light intensity and long day length6. Comfort (no stress, no disease)
Some farmers use brooding rings, others use a small section of the shed, others use the whole shed. Whatever your preference, the key principles remain the same.
2.3 Brooding Management
Right image: Example of half shed brooding
Left image: Example of small section brooding
Page 12

As seen in the diagram above, during egg incubation and the first 5 days of life, chicks cannot produce enough heat to properly control their body temperature. It is critical to provide enough heat during this “Cold Blooded” period to ensure optimal development and growth performance. Always observe chick behaviour!
Brooding ManagementTemperature Guidelines
One simple method of monitoring chick temperature is to place feet on face.
• If their feet feel cold they are cold. Increase temperature of shed.
• If their feet feel hot they are hot. Decrease temperature of shed.
• If feet feel same temperature as your face, they are ok.
Mercury thermostats should be placed just above chick height inside the shed and used as a tool for management.
Page 13
Brooding Temperature Guideline ( C)
Age C
1 34.5
2 34.0
3 33.5
4 33.0
5 32.5
6 32.0
7 31.5
8 31.0
9 30.5
10 30.0
11 29.5
12 29.0
13 28.5
14 28.0
Days: 0 - 5 - 10 - 15 - 21 / 5 - 10 - 15 - 20 - 25 - 30 - 35 - 42
Hatchery
“Cold Blooded”
Broiler Shed
“Warm Blooded”
Development Phase Growth Phase

Description• No Activity• Even Distribution• Spread Wings and Pant
Action Required• Decrease Temperature• Increase Ventilation
TOO HOT!!
Description• Good activity• Even Distribution• Sound comfortable
Action Required• None Required
Description• No activity• Huddle together
TOO COLD!!
Action• Increase Temperature• Check Ventilation
Page 14
Brooding ManagementTemperature Checking

Spot BroodingSpot brooding is the most common brooding method used throughout PNG. For optimal broiler performance results, ensure to constantly check chick behaviour as an indicator of correct brooding temperature.
Brooding ManagementSpot Brooding Temperature
TEMPERATURE TOO HIGH TEMPERATURE CORRECT
.. .
. ..
.... ...
. ..
.. .
. .... .
...
.
... .. ..
..
.. ..
.. .
. .... .
.. ..
.. .
. .... .
.. ..
.. .
. .... .
.. ..
.. .
..
.
.. ... ..
.. ...
.. ... ..
.. .
. .... .
.. .... .. .... .
.. ..
.. .
. .... .
.. ..
.. .
. .... .
.. ..
.. .
. .... .
.. .... .. .... .
.. .... .. .... .
.. .. .. .. .... .
.. ..
.. .
. .... .
.. .... .. .... .
.. ..
.. .
. .... .
.. .... .. .... .
.. .... .. .... .
.. ..
... ...
..... ..
... ...
..... ..
... ...
..... ..
... ...
..... ..
... ...
..... ..
.. .. ..
.. . .. ..
... ...
..... .. ... .
.....
.. ..
... ...
..... ..
... ...
..... ..
... ...
..... ..
... ...
..... ..
... ...
..... .. ... .
.....
.. ..
... ...
..... ..
... ...
..... ..
... ...
..... ..
.Feed drumFeed on paper
Drink
Heat Light
Page 15
• No Activity• Even Distribution• Spread Wings and Pant• Chicks move away from heat source• Action: Lower temperature
• Good Activity• Even Distribution• Sound comfortable• No Action Required
• No Activity• BAD Distribution• Chicks noisy and move close to heat
source• Action: Increase Temperature
• No Activity• BAD Distribution• Action: Review wind/breeze, uneven
light distribution or outside noise stress
.. .
. ..
.... ...
. ..
.. .
. .... .
...
.
... .. ..
..
.. ..
.. .
. .... .
.. ..
.. .
. .... .
.. ..
.. .
. .... .
.. ..
.. .
..
.
.. ... ..
.. ...
.. ... ..
.. .
. .... .
.. .... .. .... .
.. ..
.. .
. .... .
.. ..
.. .
. .... .
.. ..
.. .
. .... .
.. .... .. .... .
.. .... .. .... .
.. .. .. .. .... .
.. ..
.. .
. .... .
.. .... .. .... .
.. ..
.. .
. .... .
.. .... .. .... .
.. .... .. .... .
.. ..
... ...
..... ..
... ...
..... ..
... ...
..... ..
... ...
..... ..
... ...
..... ..
.. .. ..
.. . .. ..
... ...
..... .. ... .
.....
.. ..
... ...
..... ..
... ...
..... ..
... ...
..... ..
... ...
..... ..
... ...
..... .. ... .
.....
.. ..
... ...
..... ..
... ...
..... ..
... ...
..... ..
.
TEMPERATURE TOO LOW WINDY

Water is an essential component of chick development and affects the long term growth of a chicken. Water provided should be clean, a cool temperature and changed every day to refresh. Water spillage should be kept to a minimum as it degrades litter quality. Chicks should not have to travel more than 2 metres to find water inside a shed.
Page 16
Brooding ManagementWater and Drinking
Nipple Drinkers
1. Nipple Drinkers should be provided at a rate of 1/10 chicks. 2. Nipple height = equal to eye level.3. Pressurise system by installing header water tank.4. Water pressure should be low so there is a water droplet on nipple.5. Flow rate should be 40ml/ minute.6. Flush regularly to maintain cool temperature and good hygiene.
Bell Drinkers
1. Bell drinkers should be provided at a rate of 1/50 chicks. 2. Height = equal to breast level of standing chick.3. Water level should be 5mm below lip of drinker. Avoid spillage.4. Regular checks, assessments and adjustments.5. Flush regularly to maintain cool temperature and clean for good
hygiene.

FeedBroiler feed is the largest proportion of overall cost of production. For optimal final performance and growth, chicks should have immediate access to clean and fresh starter feed.
1. Frequent additions of small amounts stimulates feeding activity.2. High quality chick starter in a dust-free crumble form should be
used at a rate of 500g per chick.3. Feeder height should ensure easy accessibility for DOCs.
Crop Fill Check Crop fill check is a way to monitor early feeding activity of DOCs.
Page 17
Brooding ManagementFeed and Feeding
Crop Fill Assessment Guidelines
Time Since Time Since PlacementPlacement
Target Crop Full (% chicks with full
crops)
12 Hours >85%
24 Hours >95%
48 Hours >100%
Feed needs to be in a dust-free crumble form.
Feeder height needs to allow for easy chick accessibility.
Full + Rounded Crop Empty Crop
Example of shed workers tipping broiler starter feed during brooding.

Light programs in brooding stimulates the chicks into feeding and drinking, providing the best possible start for early development. Light intensity and distribution throughout the shed significantly affects broiler activity and growth. To save power costs, coincide light programs with natural daylight sunrise and sunset.
Page 18
Brooding ManagementLight Control
1. There should ALWAYS be some period of darkness for rest and development.2. If the recommended lighting schedule above is uneconomical or not
available the program can be altered. Priority should be given to providing 23hrs of light for first 7 days as this dramatically improves chick development. 3. Any change to the lighting program should always be altered at the
“ON TIME.” DO NOT alter the “OFF TIME” as chicks prepare for sleep at the same time every day.
Recommended Lighting Program
Age (Days)
Light Intensity(Lux)
Day Length (Hours)
Dark periods(Hours)
1-7 40 23 18 10 20 49-14 10 14 10
Top image: Example of good light intensity and distribution throughout a shed.

Growing ManagementOBJECTIVE
To provide the perfect environment for optimal growth and flock performance.
Carefully monitoring chicken behaviour will indicate their level of comfort. Always refer to the 5 key principles of Stockmanship when assessing a flock.
CONTENTS REFERENCE PAGE
1. Stocking Density Page 202. Light and Temperature Page 21 3. Water and Drinking 4. Feed and Feeding Page 235. Litter management Page 246. Stress management 7. Biosecurity 8. Ready for Market Page 279. Shed Clean-out Page 28
Section 3
Page 19
Page 25Page 26
Page 22

Stocking DensityStocking density affects flock performance (FCR, growth rate and mortality) and shed litter quality. Optimal stocking densities result in maximum economic returns, however they depend on the environmental conditions, bird management and ventilation capability.
Overstocking increases the environmental pressures on broilers and will reduce performance. In general, stocking densities should be reduced in hot climates and increased in cold climates. Stocking density should be calculated at final processing weight. Our recommendations for PNG are:
3.1 Stocking Density
Hot Climate + No Fan Ventilation = Low Stocking Density = Optimal Flock Performance
Page 20
Maximum Stocking Density for sheds with NO ventilation (No Fans)1. Hot climates (PNG coastal areas) = 15-18 kg/ m2 (6-7 x 2.5kg chickens/ m2) 2. Cold climates (PNG highlands) = 25 kg/ m2 (8-9 x 2.5kg chickens/ m2)
For sheds with Tunnel Fan Ventilation 1. Hot climates (PNG coastal areas) = 25kg/ m2 (10x 2.5kg chickens/ m2)2. Cold climates (PNG highlands) = 35kg/ m2 (14x 2.5kg chickens/ m2)
Cool Climate + Tunnel Fan Ventilation = High Stocking Density = Optimal Flock Performance
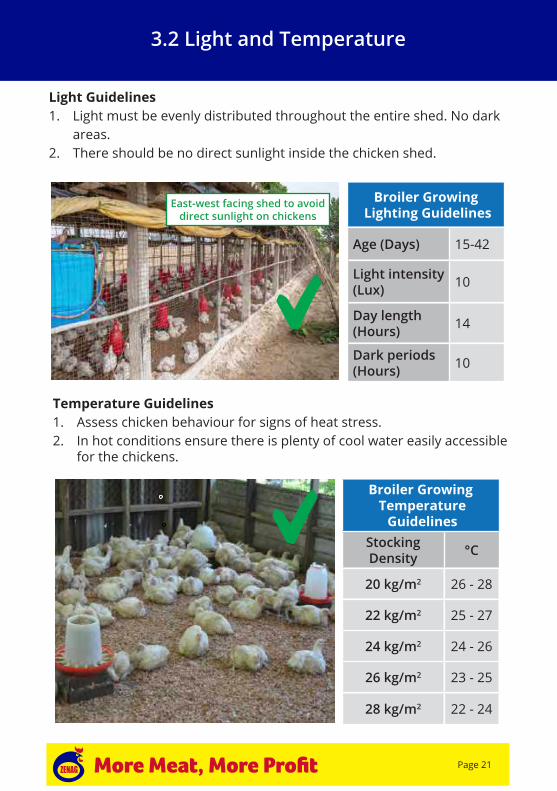
3.2 Light and Temperature
Temperature Guidelines1. Assess chicken behaviour for signs of heat stress.2. In hot conditions ensure there is plenty of cool water easily accessible
for the chickens.
Page 21
East-west facing shed to avoid direct sunlight on chickens
Broiler Growing Lighting Guidelines
Age (Days) 15-42
Light intensity(Lux) 10
Day length (Hours) 14
Dark periods(Hours) 10
Broiler Growing Temperature
GuidelinesStocking Density °C
20 kg/m2 26 - 28
22 kg/m2 25 - 27
24 kg/m2 24 - 26
26 kg/m2 23 - 25
28 kg/m2 22 - 24
Light Guidelines1. Light must be evenly distributed throughout the entire shed. No dark
areas.2. There should be no direct sunlight inside the chicken shed.

3.3 Water and Drinking
Water is an essential component of a chicken’s life and should always be easily accessible for birds at all stages of the growing period.
Bell Drinker Management1. Lower water level after brooding to
avoid spillage. 2. Minimum 6mm water level above base.3. Adjust bell drinker height so water is in
line with a chicken’s back.4. Clean daily to reduce bacterial growth.5. Drain and replace water constantly to
refresh.6. Ratio of 50 chickens per bell drinker.
Nipple Drinker Management1. Increase water pressure after brooding
to avoid spillage. 2. Minimum flow rate of 60ml/min.3. Adjust nipple line height so a chicken
stretches up to drink.4. Clean lines between flocks to reduce
bacterial growth.5. Ratio of 10 chickens per nipple drinker.
Water Spillage = Poor litter quality = Poor flock performance
Bell Drinker
Nipple Drinker
Page 22
Top image: Example of shed with correct drinker and feeder heights.

3.4 Feed and Feeding
Broiler Starter • Sieved Crumble• No dust• Ratio 500g /chick
Broiler Grower • Mini-pellet • 1.5 – 3mm size• Ratio 1000g / bird
Broiler Finisher • Pellet • 5 – 8mm size• Feed until harvest
Auto Feed Hanging ManualPlastic Feed
Page 23
1. Ensure feeder heights are correct for the age of each flock.2. Don’t waste feed from spillage. 3. Regularly clean the feeders to ensure the feed stays fresh. 4. Ratio of 25 chickens per feeder.
For optimal flock performance always buy chicken feed from a reputable feed manufacturing company. Chickens should always have access to feed. Below is what we recommend feeding a flock:

3.5 Litter Management
Correct litter management is fundamental to achieve optimal flock performance, good flock health with low sickness/disease risk, and attributes to providing high quality meat.
Key Litter Functions:1. Dry, good moisture absorption ability. 2. Provides insulation barrier. 3. Low levels of dust (SAWDUST IS NOT GOOD!).4. Soft and comfortable for the chicken’s feet.5. Recommended material: Wood shavings,
coffee or shredded coconut husk, rice hulls, shredded paper.
Page 24
Wet/muddy and caked litter = bad for flock health
Example of dry, soft and fluffy litter
Water spillage = bad for health
Litter Management1. Spread evenly throughout the shed at 10 - 20cm depth. 2. Avoid water spillage from drinkers as it “cakes” litter. 3. Constant ranking to air-out litter and remove “caked litter”.4. Litter can be re-used between flocks, however should be piled together and composted for 14 days before re-using. The composting effect will kill most bacteria in litter. 5. If there is disease challenge DO NOT RE-USE LITTER between flocks.

3.6 Stress Management
Stress can affect broiler performance and sometimes even kill chickens. Farm managers need to continuously assess potential causes of stress and implement measures to mitigate stress risk. Factors associated with triggering stress in broilers include:
1. Noise - Outside lawn mower, people yelling, barking dogs etc.2. Predation - Cats and dogs trying to eat chickens.3. Temperature - Shed environment conditions too hot.4. Disease - Poor biosecurity management.
Example of outside noise stress (lawn mower) on broilers. Stress leads to smothering, high mortality and bad flock performance.
Page 25

1. Minimising the number of people visiting a shed/farm.2. Ensuring workers have clean uniforms, wear appropriate footwear
and they shower before entry.3. When entering sheds, workers/visitors should wash and sanitise
hands and boots.4. Control entry of rodents, insects and wild animals.5. Continuously cleaning and drying all equipment. 6. Ensuring at least 14 days downtime, full shed clean-outs and shed
sanitisation between flocks.
Page 26
3.7 Biosecurity
Biosecurity ManagementBiosecurity refers to management protocols to prevent the introduction and spread of disease/sickness onto a farm or flock. It is an integral management component of any poultry farm. Strong biosecurity management includes:
Shoes must be clean when entering the sheds.
Clean uniforms and head nets will prevent disease.

3.7 Ready For Market
Much time, work and money has gone into farming a flock to reach this point of their life. The main objective is to ensure minimal mortality during the catching, handling and transporting process to the market.
Page 27
4.1 Ready for market
Handling, Transporting and Holding at Market
1. Always handle chicken with care as seen in the photo the right.
2. NEVER LEAVE BIRDS IN DIRECT SUNLIGHT.
3. Ensure sufficient ventilation is provided during transportation to market.
4. Chickens should not be without feed for more than 8 hours.
5. Provide water whenever possible during transport and at the market.
Example of optimal broiler care at market.
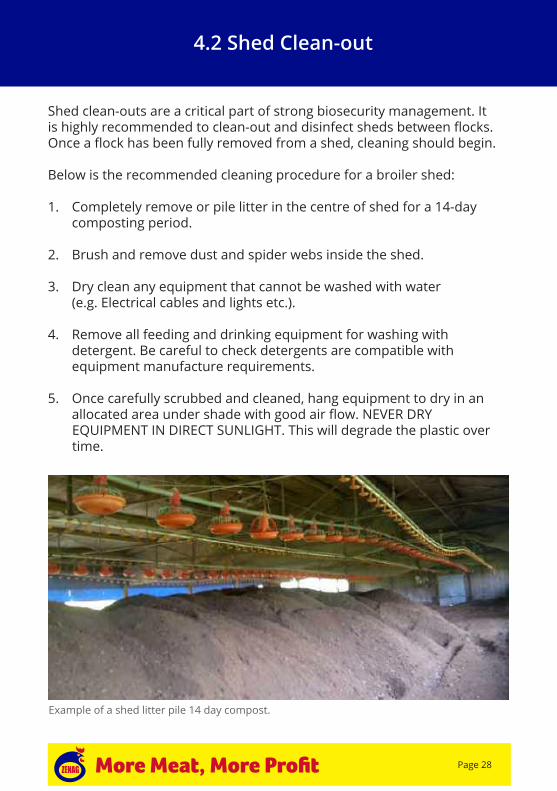
Shed clean-outs are a critical part of strong biosecurity management. It is highly recommended to clean-out and disinfect sheds between flocks. Once a flock has been fully removed from a shed, cleaning should begin.
Below is the recommended cleaning procedure for a broiler shed:
1. Completely remove or pile litter in the centre of shed for a 14-day composting period.
2. Brush and remove dust and spider webs inside the shed.
3. Dry clean any equipment that cannot be washed with water (e.g. Electrical cables and lights etc.).
4. Remove all feeding and drinking equipment for washing with detergent. Be careful to check detergents are compatible with equipment manufacture requirements.
5. Once carefully scrubbed and cleaned, hang equipment to dry in an allocated area under shade with good air flow. NEVER DRY
EQUIPMENT IN DIRECT SUNLIGHT. This will degrade the plastic over time.
Example of a shed litter pile 14 day compost.
Page 28
4.2 Shed Clean-out
Contact
Page 29
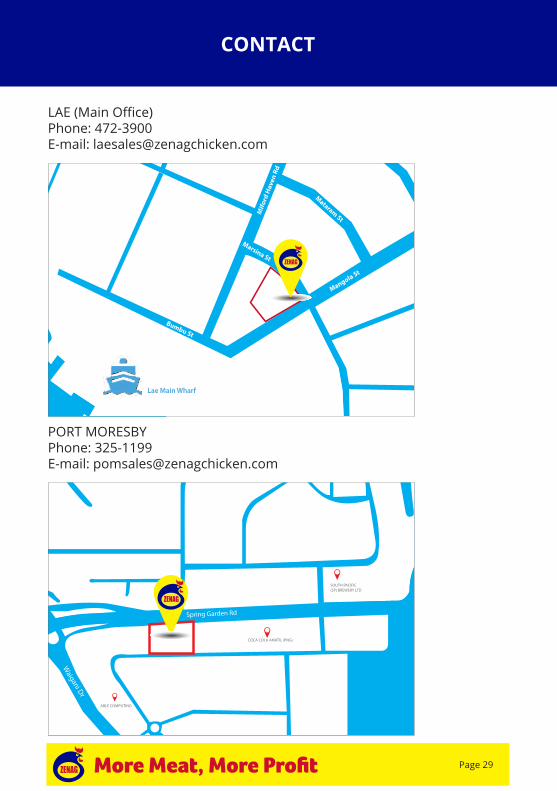
PORT MORESBY Phone: 325-1199E-mail: [email protected]
CONTACTLAE MAIN MARKET
Mifo
rd H
aven
Rd
LAE MAIN WHARF
Mangola St
Mataram St
Marsina St
Lae Main Wharf
Bumbu St
SOUTH PACIFIC(SP) BREWERY LTD
Spring Garden Rd
Waigani Dr
COCA COLA AMATIL (PNG)
ABLE COMPUTING
LAE (Main Office) Phone: 472-3900E-mail: [email protected]

Meatier
Pawa Protein
JuicierTastier
Pawa Kaikai

www.zenagchicken.com
More Meat, More Profit