BMC Remedy Change Management User Guide - | matching ...
520
BMC Remedy Change Management User Guide Supporting BMC Remedy Change Management version 7.6.04 January 2011 www.bmc.com
-
Upload
khangminh22 -
Category
Documents
-
view
2 -
download
0
Transcript of BMC Remedy Change Management User Guide - | matching ...
BMC Remedy ChangeManagement User Guide
Supporting
BMC Remedy Change Management version 7.6.04
January 2011
www.bmc.com

Contacting BMC Software
You can access the BMC Software website at http://www.bmc.com. From this website, you can obtaininformation about the company, its products, corporate offices, special events, and career opportunities.
United States and Canada
Address BMC SOFTWARE INC2101 CITYWEST BLVDHOUSTON TX 77042-2827 USA
Telephone 1 713 918 8800or1 800 841 2031
Fax 1 713 918 8000
Outside United States and Canada
Telephone +01 713 918 8800 Fax +01 713 918 8000
© Copyright 1996, 1998-1999, 2002-2006, 2009-2011 BMC Software, Inc.BMC, BMC Software, and the BMC Software logo are the exclusive properties of BMC Software, Inc., areregistered with the U.S. Patent and Trademark Office, and may be registered or pending registration inother countries. All other BMC trademarks, service marks, and logos may be registered or pendingregistration in the U.S. or in other countries. All other trademarks or registered trademarks are theproperty of their respective owners.
BladeLogic and the BladeLogic logo are the exclusive properties of BladeLogic, Inc. The BladeLogictrademark is registered with the U.S. Patent and Trademark Office, and may be registered or pendingregistration in other countries. All other BladeLogic trademarks, service marks, and logos may beregistered or pending registration in the U.S. or in other countries. All other trademarks or registeredtrademarks are the property of their respective owners.
Current and Notes are trademarks or registered trademarks of International Business MachinesCorporation in the United States, other countries, or both.
IT Infrastructure Library® is a registered trademark of the Office of Government Commerce and is usedhere by BMC Software, Inc., under license from and with the permission of OGC.
ITIL® is a registered trademark, and a registered community trademark of the Office of GovernmentCommerce, and is registered in the U.S. Patent and Trademark Office, and is used here by BMC Software,Inc., under license from and with the permission of OGC.
Oracle and Java are registered trademarks of Oracle and/or its affiliates. Other names may be trademarksof their respective owners.
Crystal Reports is a trademark or registered trademark of SAP AG in Germany and in several other countries.
The information included in this documentation is the proprietary and confidential information of BMCSoftware, Inc., its affiliates, or licensors. Your use of this information is subject to the terms and conditionsof the applicable End User License agreement for the product and to the proprietary and restricted rightsnotices included in the product documentation.
Restricted rights legend
U.S. Government Restricted Rights to Computer Software. UNPUBLISHED—RIGHTS RESERVEDUNDER THE COPYRIGHT LAWS OF THE UNITED STATES. Use, duplication, or disclosure of any dataand computer software by the U.S. Government is subject to restrictions, as applicable, set forth in FARSection 52.227-14, DFARS 252.227-7013, DFARS 252.227-7014, DFARS 252.227-7015, and DFARS252.227-7025, as amended from time to time. Contractor/Manufacturer is BMC SOFTWARE INC, 2101CITYWEST BLVD, HOUSTON TX 77042-2827, USA. Any contract notices should be sent to this address.
Customer support
Support website
You can obtain technical support from BMC 24 hours a day, 7 days a week at http://www.bmc.com/support. From thiswebsite, you can
■ read overviews about support services and programs that BMC offers
■ find the most current information about BMC products
■ search a database for problems similar to yours and possible solutions
■ order or download product documentation
■ download products and maintenance
■ report a problem or ask a question
■ subscribe to receive proactive e-mail alerts
■ find worldwide BMC support center locations and contact information, including e-mail addresses, fax numbers, andtelephone numbers
Support by telephone or e-mail
In the United States and Canada, if you need technical support and do not have access to the web, call 800 537 1813 orsend an e-mail message to [email protected]. (In the subject line, enter SupID:yourSupportContractID, suchas SupID:12345). Outside the United States and Canada, contact your local support center for assistance.
Before contacting BMC
Have the following information available so that Customer Support can begin working on your issue immediately:
■ product information
― product name― product version (release number)― license number and password (trial or permanent)
■ operating system and environment information
― machine type― operating system type, version, and service pack or other maintenance level such as PUT or PTF― system hardware configuration― serial numbers― related software (database, application, and communication) including type, version, and service pack or
maintenance level
■ sequence of events leading to the problem
■ commands and options that you used
■ messages received (and the time and date that you received them)
― product error messages― messages from the operating system, such as file system full― messages from related software
3
License key and password information
If you have questions about your license key or password, use one of the following methods to get assistance:
■ Send an e-mail to [email protected].
■ Use the Customer Support website at http://www.bmc.com/support.
4 BMC Remedy Change Management User Guide

Contents
About this Book 15BMC Remedy IT Service Management Suite documents .........................................15Conventions .....................................................................................................................19Syntax statements ...........................................................................................................19
Chapter 1 Introducing BMC Remedy Change Management 21About BMC Remedy Change Management ...............................................................21BMC Remedy ITSM usability enhancements .............................................................22
What's new in BMC Remedy Change Management ......................................26Where to find features and fields that have moved .......................................26
Process flow and the stages of a change request ........................................................28Change Request form views .........................................................................................32
Best Practice view—Change Request form ......................................................32Classic view—Change Request form ...............................................................34
Calbro Services sample data .........................................................................................35User roles in the change request lifecycle ...................................................................36
Additional Change Management user roles ....................................................40SMPM user roles ..................................................................................................43
Change request lifecycle ................................................................................................47User scenarios ..................................................................................................................50
Calbro Services .....................................................................................................50BMC Remedy Change Management user scenarios .......................................51
Chapter 2 Introducing Release Management 59About Release Management ........................................................................................59Milestones in the release request lifecycle ..................................................................60Release Management form views .................................................................................65
Best Practice view—Release Request form ......................................................66Classic view—Release Request form ................................................................67
Best practices for managing release requests - Using this guide .............................68User scenarios ..................................................................................................................70
BMC Remedy Release Management use cases ................................................71
Chapter 3 Using the Change Management Console and the Change form 75About the IT Home Page ...............................................................................................75
Configuring the IT Home Page ..........................................................................78
Contents 5

Navigating consoles, forms, and modules .................................................................79Using Global search ........................................................................................................82User interface standards for field labels ......................................................................83Icons used in the interface .............................................................................................84Change Management Console functional areas .........................................................84
Change Management Console ...........................................................................85Tooltip data shown in consoles .........................................................................90Company and Console View .............................................................................91
Change form functional areas .......................................................................................92
Chapter 4 Using the Release Management Console and the Release form 99Release Management Console functional areas .........................................................99Release form functional areas .....................................................................................104Activity form functional areas ....................................................................................109
Chapter 5 Change Manager role 111Working as a change manager ...................................................................................111Using the Change Management Console as a change manager ............................113Initiate stage - Creating change requests ...................................................................113
Creating a change request at the initiate stage—Best Practice view ..........114Creating a change request at the Initiate stage — Classic View .................118Adding Requester information ........................................................................124Adding classification information ...................................................................126Adding vendor information .............................................................................129Recording activities for a change request .......................................................130Creating emergency change requests .............................................................133Atrium Impact Simulator analysis for change requests ...............................134Creating a change request from Atrium Impact Simulator .........................135Modifying change requests - Additional information you can enter ........138
Review and Authorize stage - Risk and impact analysis ........................................139Risk assessment ..................................................................................................140Specifying risk level at the Review and Authorize stage .............................142Computing risk levels .......................................................................................142Planning dependencies for change requests ..................................................143Risk Recalculation ..............................................................................................144
Approvals - Approving change requests ..................................................................144Understanding the change management approval process ........................146Approving or rejecting requests ......................................................................147Performing additional approval functions ....................................................147Viewing change requests awaiting approval .................................................148Viewing approvers for a change request ........................................................148
6 BMC Remedy Change Management User Guide
Plan and Schedule stage - Planning the change request .........................................149Planning the change request at the Plan and Schedule stage ......................150
Closed stage - Completing change requests .............................................................153Closing a change request ..................................................................................155Creating change requests as rollbacks ............................................................156Working with reassignment requests .............................................................156
Registering time segments ...........................................................................................157Registering unique business events and operational categorizations ......158Registering time segments for CIs - Creating a blackout schedule ............164Understanding server time, time zones, and time segments ......................169
Using Schedule Assist to search for available times ................................................170Detecting CI collisions between change requests ....................................................176Monitoring the progress of a change request ...........................................................179
Monitoring associated tasks .............................................................................181Viewing the audit log ........................................................................................181Viewing affected areas ......................................................................................182
Working with costs .......................................................................................................183Calculating the costs of a change request .......................................................185Using auto-cost estimates .................................................................................185Allocating costs to configuration items ..........................................................186Performing additional functions with costs ...................................................188
Using BMC Service Level Management with BMC Remedy ChangeManagement ..................................................................................................................188
Viewing service targets in BMC Remedy Change Management ................189Creating service targets for a change request ................................................192
Using the Change Calendar ........................................................................................194Tooltip data shown in Change Calendar .......................................................196Filtering criteria in the Change Calendar .......................................................197Viewing change requests ..................................................................................200Viewing business events ...................................................................................201Using Quick Links .............................................................................................201Setting time zone preferences for the Change Calendar ..............................202
Using the Change Management Dashboard .............................................................203
Chapter 6 Change coordinator role 207Implement stage - Working as a change coordinator ..............................................207
Implementing a change request .......................................................................209Identifying change requests as rollbacks ..................................................................210Using the Change Management Console as a change coordinator .......................211Working with change request assignments ..............................................................211
Automatically assigning changes ....................................................................212
Contents 7

Receiving notifications of change request assignments ...............................213Viewing assigned changes ...............................................................................213Assigning change requests ...............................................................................214Assigning changes to change implementers ..................................................216Tracking efforts for a change request ..............................................................217Reassigning change requests ............................................................................219
Working with relationships .........................................................................................220Related request types for BMC Remedy Change Management and ReleaseManagement .......................................................................................................222Configuration Item relationship types ...........................................................230Defining relationships .......................................................................................231Viewing the impact of CIs on change requests .............................................237Copying relationships .......................................................................................240Viewing relationships .......................................................................................241Creating related change requests ....................................................................242Relating change requests ..................................................................................242Assigning sequence numbers to dependent change requests .....................243Performing additional functions with related change requests ..................245Working with related configuration items .....................................................246Performing additional functions with relationships ....................................248Relating CIs to alternate data sets ..................................................................251Creating CI unavailability ................................................................................253Performing additional functions with CI unavailability ..............................259
Implement stage - Working with tasks ......................................................................260Task Management System overview ..............................................................261Relation of task statuses to change statuses ...................................................262Viewing task groups and tasks .......................................................................265Relating ad hoc tasks to change requests .......................................................265Relating predefined task group or task templates to a change request ...267Assigning a sequence number to task groups and tasks ............................268Adding work information to a task ................................................................269Performing additional service request functions ..........................................270
Responding to task reassignments as a change coordinator ..................................272Tracking the time spent working on change requests ..................................272
Chapter 7 Release coordinator role 275Working as a release coordinator ..............................................................................275Using the Release Management Console ..................................................................276Initiate milestone - Creating release requests ...........................................................276
8 BMC Remedy Change Management User Guide
Creating a release request at the initiate milestone—Best Practice view .....................................................................................................................................277Creating a release request at the initiate milestone—Classic view ............282Specifying the business justification ...............................................................286Creating a manifest ............................................................................................288Detecting CI collisions between change requests .........................................291Scheduling releases ............................................................................................294Performing additional functions from the Process Flow Status bar ..........299Recording release activities ..............................................................................301Modifying release requests - Moving the release forward ..........................304
Planning milestone - Planning and scheduling the release request ......................305Build milestone - Building a controlled environment for the release ...................308Test milestone - Testing the release ............................................................................310Deployment milestone - Rolling out the release to the business ...........................311Close Down milestone - Completing release requests ............................................312Monitoring the progress of a release request ...........................................................314Working with release request assignments ..............................................................316
Automatically assigning releases ....................................................................318Reassigning release requests ............................................................................318Working with release reassignment requests ................................................319Tracking efforts for a release record ................................................................320Performing additional release request functions ..........................................320Receiving notifications of release request assignments ...............................321Assigning release requests ...............................................................................322
Working with release manifests .................................................................................323Using Quick Actions on changes and activities ............................................324Performing other functions with related release requests ...........................325
Managing release activities .........................................................................................325Creating activities - basic steps ........................................................................326Creating activity assignments .........................................................................328
Working with release relationships ...........................................................................330Defining release relationships ..........................................................................330Searching for request types and establishing the relationship type ...........333Using Quick Actions on relationships ............................................................335
Rolling up costs - Working with financial information .........................................337Understanding the approval process .........................................................................339
Approving or rejecting release requests .........................................................339Performing additional functions with related change requests ..................340
Chapter 8 Task implementer role 341Working with BMC Remedy Change Management as a task implementer ........341
Contents 9

Implement stage - Working on task assignments ....................................................343Receiving notification of task assignment by BMC Remedy Alert .............343Working on assigned tasks ...............................................................................344Performing additional task functions .............................................................345
Using CCM tasks ..........................................................................................................347Best practice CCM task templates and templates .........................................353
Chapter 9 Change Management approver role 355Working with BMC Remedy Change Management as an approver ....................355Approval processes provided out-of-the-box ...........................................................357Approving changes using Approval Central ...........................................................362
Multiple approvers and multiple approval levels ........................................364Approving changes using the Process Flow Status bar ..........................................364Handling approvals for emergency change requests ..............................................366Resubmitting a rejected change request ...................................................................367Adding approvers .........................................................................................................367
Adding additional approvers ..........................................................................368Adding alternate approvers ............................................................................369Acting as an alternate approver .......................................................................370Viewing and remove non-approver notifications ........................................371Adding non-approval notifications .................................................................372
Chapter 10 Activity assignee role 375Working with activities as an activity assignee ........................................................375
Using the Release Management Console .......................................................376Activities ........................................................................................................................376Working on activities ...................................................................................................377Accepting activity assignments .................................................................................379
Reviewing activity assignments ......................................................................379Receiving notifications of activity assignments ...........................................380Reassigning activities .......................................................................................381
Entering work information .........................................................................................381Modifying an activity ........................................................................................382
Creating activity task groups and tasks ...................................................................383Planning financial information for activities ...........................................................385Planning dates ...............................................................................................................386Closing the activity .......................................................................................................387
Chapter 11 Supplemental Change Management tasks 389Setting application preferences and options .............................................................389
Setting application preferences - Change Management ..............................390
10 BMC Remedy Change Management User Guide
Setting the BMC Remedy Change Management view .................................392Viewing your profile ....................................................................................................393
Updating assignment availability ...................................................................394Working with records ..................................................................................................394
Searching all records .........................................................................................395Printing records ..................................................................................................395Modifying records .............................................................................................396
Working with requester records .................................................................................396Creating a requester record ..............................................................................397
Using Reminders ...........................................................................................................398Creating and viewing reminders .....................................................................398Modifying and deleting reminders .................................................................400
Sending and receiving change notifications ............................................................400Notifications by groups .....................................................................................400Notifications by roles ........................................................................................401
Broadcasting messages ................................................................................................402Managing broadcasts ........................................................................................403Creating broadcast messages ...........................................................................404
Sending pages and email messages ...........................................................................406Sending email .....................................................................................................406Paging a person or on-call group ....................................................................407
Searching for records ....................................................................................................408Using custom searches ......................................................................................409Manage My Searches - Creating a custom search with advancedqualifications ......................................................................................................409
Working with reports ...................................................................................................411Generating a report ............................................................................................412BMC Remedy Change Management predefined reports .............................416
Using the Change Management KPI flashboards ....................................................420Change Management KPIs ...............................................................................421Change Management KPI flashboard variables ............................................422Opening the KPI flashboards from the BMC Remedy Change Managementconsole .................................................................................................................423Viewing and displaying data from the KPI flashboards ..............................424
Using the Change Management ROI flashboard .....................................................425Opening the ROI flashboards ...........................................................................426Configured parameters .....................................................................................427Viewing and displaying data ...........................................................................428Active variables ..................................................................................................428
Selecting change templates ..........................................................................................429Associating custom process flows to a change template ........................................430
Contents 11
Copying change requests .............................................................................................431Copying tasks from another change request ............................................................432Using phases with change requests ...........................................................................434Using BMC Remedy Change Management with other applications ....................436
Managing inventory locations .........................................................................436Using the Configuration Manager ..................................................................438
Chapter 12 Supplemental Release Management tasks 439Setting application preferences and options .............................................................439
Setting application preferences - Release Management ...............................440Setting the Release Management view ..........................................................442
Sending release or activity notifications ...................................................................443Release Management predefined reports ..................................................................444Managing SLM service targets ....................................................................................445Working with release request approvals ...................................................................446
Viewing release requests awaiting approval .................................................446Approving or rejecting release requests .........................................................447Performing additional approval functions ....................................................447
Selecting release templates ..........................................................................................448Selecting activity templates .........................................................................................450Using the Release Management KPI flashboards ....................................................450
Release Management KPIs ...............................................................................451Release Management KPI flashboard variables ............................................451Viewing and displaying data ...........................................................................452
Chapter 13 Managing configuration items 453Overview - Configuration items .................................................................................453Creating a CI ..................................................................................................................454Searching for CIs from the Change Management console ......................................459Inventory management ................................................................................................460
Placing bulk CIs in inventory ...........................................................................460Placing non-bulk CIs in inventory .................................................................461Managing inventory tasks ................................................................................462
Chapter 14 Working with the Overview console 465Functional areas ............................................................................................................465Console List table ..........................................................................................................468Selecting status values ..................................................................................................469
Chapter 15 Working with the Requester console 471Requester role ................................................................................................................471
12 BMC Remedy Change Management User Guide
Requester console users ...............................................................................................472Working with service requests ...................................................................................473
Defining a service request ................................................................................474Performing other service request functions ...................................................476Troubleshooting service requests with errors ...............................................477Viewing service request details from a change request form .....................479
Appendix A Change request status transitions 481State transitions - Draft to Closed ...............................................................................481State transitions of change requests ...........................................................................487Additional status values for change requests ...........................................................490
Requirements for status reasons ......................................................................491
Appendix B Change and Configuration Management (CCM) 493About Change and Configuration Management (CCM) ........................................493Processing Configuration Management tasks ..........................................................495
Policy-based tasks ..............................................................................................495Deployment-based tasks ...................................................................................496Verification-based tasks ....................................................................................496
CCM solution overview ...............................................................................................496
Contents 13

14 BMC Remedy Change Management User Guide

About this BookThis guide describes how to use the BMC Remedy Change and Release Managementapplications, which are a part of the BMC Remedy IT Service Management (BMCRemedy ITSM) Suite. The suite also includes the following applications:
■ The BMC Remedy Asset Management applications.
■ The BMC Remedy Service Desk solution (which includes theBMC Remedy Incident Management application and the BMC Remedy ProblemManagement application).
The applications run in conjunction with the BMC Remedy Action Request Systemplatform (BMC Remedy AR System platform) and share a common database. Theapplications consume data from the BMC Atrium Configuration ManagementDatabase (BMC Atrium CMDB) application.
BMC Remedy IT Service Management Suitedocuments
The following table lists the documentation available for BMC Remedy ChangeManagement 7.6.03. It also lists relevant documents for related solutions and products.
Unless otherwise noted, online documentation in Adobe Acrobat (PDF) format isavailable on product installation CDs, on the Customer Support website http://www.bmc.com/support , or both.
Title Document provides Audience
BMC Remedy Change Management
BMC Remedy ITSM ConfigurationQuick Start
A reference card to quickly installand configure applications in theBMC Remedy ITSM suite.
Administrators
About this Book 15
Title Document provides Audience
BMC Remedy Change ManagementUser's Guide
Procedures for using the BMCRemedy Change Managementapplications; includes newfeatures and overview.
Everyone
BMC Remedy IT ServiceManagement Concepts Guide
Conceptual overview of theapplications that make up theBMC Remedy ITSM suite ofapplications
Everyone
BMC Remedy IT ServiceManagement Administration Guide
Procedures for configuring theBMC Remedy ITSM applications.
Administrators
BMC Remedy IT ServiceManagement Data ManagementAdministrator's Guide
Procedures for using the DataManagement tool that is part ofthe BMC Remedy ITSM suite.
Administrators
BMC Remedy IT ServiceManagement Guide to Multi-Tenancy
Scenarios for implementing multi-tenancy. It also describes howmulti-tenancy is implemented inthe BMC Atrium CMDB productand how that implementationrelates to multi-tenancy asimplemented in the BMC RemedyITSM applications
Everyone
BMC Remedy IT ServiceManagement Installation Guide
Procedures for installing the BMCRemedy IT Service Managementapplications and solutions, BMCRemedy Service Desk solution(BMC Remedy IncidentManagement and BMC RemedyProblem Management), BMCRemedy Change Management,and BMC Remedy AssetManagement.
Administrators
BMC Remedy IT ServiceManagement Release Notes
Information about known issues ineach release of BMC RemedyITSM. Also provides a list of newfeatures included with theapplications.
Everyone
Help Help for using BMC RemedyChange Management, available byclicking Help in the productinterface.Available from help links afterhelp is installed.
Everyone
Other BMC Remedy IT Service Management products
BMC Remedy IT Service Management Suite documents
16 BMC Remedy Change Management User Guide
Title Document provides Audience
BMC Remedy Asset ManagementUser’s Guide
Procedures for using the BMCRemedy Asset Managementapplication; includes new featuresand overview.
Everyone
BMC Remedy Service Desk: IncidentManagement User’s Guide
Procedures for using the BMCRemedy Service Desk: IncidentManagement application; includesnew features and overview.
Everyone
BMC Remedy Service Desk: ProblemManagement User’s Guide
Procedures for using the BMCRemedy Service Desk: ProblemManagement application; includesnew features and overview.
Everyone
BMC Remedy ITSM Virtualization Lifecycle Management
BMC Remedy IT ServiceManagement Virtualization LifecycleManagement Getting Started Guide
Procedures to install the BMCRemedy ITSM VirtualizationLifecycle Management extension.Also includes procedures toconfigure and use the functionalityprovided by the extension.
Everyone
BMC Remedy IT ServiceManagement Virtualization LifecycleManagement Release Notes
Information about known issues inthe BMC Remedy ITSMVirtualization LifecycleManagement extension and a listof new features provided by theextension
Everyone
Solutions
BMC Dashboards for BusinessService Management Getting Started
Information about installing,configuring, and using BMCDashboards for BSM.
Everyone
BMC Atrium Core
BMC Atrium CMDBAdministrator's Guide
Information about configuring theBMC Atrium CMDB application tomanage data about your ITenvironment
Administrators
BMC Atrium CMDB Common DataModel Diagram
Hierarchical diagram of all classesin the CDM, including uniqueattributes and applicablerelationships.
Administrators
BMC Atrium CMDB Normalizationand Reconciliation Guide
Information about configuring andmanaging jobs that normalize andreconcile product informationfrom data providers that is used toupdate the BMC Atrium CMDB.
Administrators
BMC Remedy IT Service Management Suite documents
About this Book 17

Title Document provides Audience
BMC Atrium Core Concepts andPlanning Guide
Information about BMC AtriumCMDB concepts and best practicesfor planning your BMC AtriumCMDB implementation.
Executives and administrators
BMC Atrium CMDB User's Guide Information about using BMCAtrium CMDB, including how tosearch for CIs and relationships,launch federated data, generatereports, and run reconciliation jobs.
Users
BMC Atrium Discovery and Dependency Mapping
BMC Atrium Discovery andDependency Mapping: PopulatingBMC Atrium CMDB
Information about configuring aconnection to BMC AtriumCMDB, synchronizing discoverydata, and reconciling andmaintaining the data.
Administrator
BMC BladeLogic Client Automation
BMC Configuration Automation forClients Configuration DiscoveryIntegration for CMDBImplementation Guide
Instructions about planning,installing, and configuring theConfiguration Discoveryintegration. This guide alsoincludes information aboutrelationship classes and mapping,data exchanges, and reconciliationdefinitions.
Administrator
BMC Remedy Action Request System
BMC Remedy Action Request SystemConcepts Guide
Concepts for using the BMCRemedy Action Request System.
Administrators
BMC Remedy Action RequestSystem: BMC Remedy ApprovalServer Guide
Topics on installation andconfiguration of the ApprovalServer, how to use the ApprovalServer, and understanding theapproval workflow.
Users and administrators
BMC Service Level Management
BMC Service Level ManagementConfiguration Guide
Procedures for configuring theBMC Service Level Managementapplication.
Administrators
BMC Service Level ManagementUser's Guide
Procedures for using the BMCService Level Managementapplication.
Everyone
BMC Remedy ITSM 7.6.00 Patch 001(document used by multipleapplications)
BMC Remedy IT Service Management Suite documents
18 BMC Remedy Change Management User Guide
Title Document provides Audience
BMC Remedy IT ServiceManagement Technical Bulletin
Information about known issues ineach release of BMC RemedyITSM 7.6.00 Patch 001 and a list ofproduct updates included with thepatch
Everyone
ConventionsThis document uses the following special conventions:
■ All syntax, operating system terms, and literal examples arepresented in this typeface.
■ Variable text in path names, system messages, or syntax is displayed in italic text:testsys/instance/fileName
■ This document uses a symbol to show menu sequences. For example, Actions => Create Test instructs you to choose the Create Test command from the Actionsmenu.
Syntax statementsThis topic explains conventions for showing syntax statements.
A sample statement follows:
COMMAND KEYWORD1 [KEYWORD2 | KEYWORD3] KEYWORD4={YES | NO} fileName…
Convention Example
Items in italic type represent variables that youmust replace with a name or value. If a variableis represented by two or more words, initialcapitals distinguish the second and subsequentwords.
alias
databaseDirectory
serverHostName
Brackets indicate a group of optional items. Donot type the brackets when you enter theoption. A comma means that you can chooseone or more of the listed options. You must usea comma to separate the options if you choosemore than one option.
[tableName, columnName, field]
[-full, -incremental, -level] (UNIX)
Conventions
About this Book 19
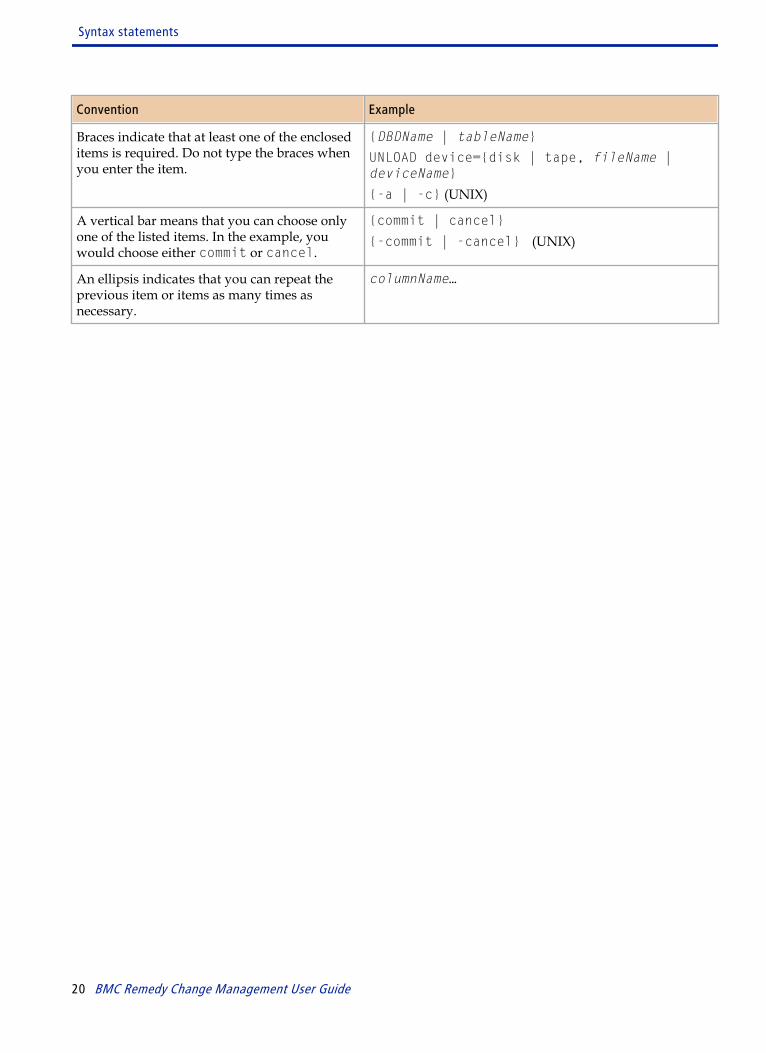
Convention Example
Braces indicate that at least one of the encloseditems is required. Do not type the braces whenyou enter the item.
{DBDName | tableName}
UNLOAD device={disk | tape, fileName |deviceName}
{-a | -c} (UNIX)
A vertical bar means that you can choose onlyone of the listed items. In the example, youwould choose either commit or cancel.
{commit | cancel}
{-commit | -cancel} (UNIX)
An ellipsis indicates that you can repeat theprevious item or items as many times asnecessary.
columnName…
Syntax statements
20 BMC Remedy Change Management User Guide
Introducing BMC Remedy ChangeManagement
This section helps you get started using the BMC Remedy Change Managementapplication.
About BMC Remedy Change ManagementThe IT Infrastructure Library (ITIL) specifies that the primary objective of ChangeManagement is to enable beneficial changes to be made, with minimum disruptionto IT services.” As part of the BMC Business Service Management strategy, BMCRemedy Change Management applies a repeatable process for production changesto improve the stability of business service and required changes.
BMC Remedy Change Management includes change requests and approval, riskanalysis, planning, orchestration of tasks, verification, and recording changes to theproduction environment in the BMC Atrium Configuration Management Database(BMC Atrium CMDB). The BMC Remedy Change Management part of the BSMstrategy enables you to gain control of the IT environment and automate the entirechange lifecycle, thus reducing the business impact of changes.
Using ITIL V3 best practices, BMC Remedy Change Management providesscheduling and task assignment functionality, and reporting capabilities forreviewing performance and improving processes. Because BMC Remedy ChangeManagement is integrated with the BMC Atrium CMDB, it enables you to relatechanges to other records, such as configuration items (including services) andincidents.
BMC Remedy Change Management provides a system of planning, scheduling,implementing, and tracking changes that need to be completed within yourorganization. BMC Remedy Change Management is closely aligned with standardITIL service management processes. It works in conjunction with the BMC RemedyApproval Server and the other BMC Remedy IT Service Management (BMC RemedyITSM) applications. Using BMC Remedy Change Management in combination withthese applications enables you to assess the scope of the change, analyze the costsassociated with the change (in terms of time and expense), perform impact and risk
1
Chapter 1 Introducing BMC Remedy Change Management 21
analysis, and schedule the resources needed to complete the change. Using the BMCService Level Management (BMC SLM) application enables you to define servicetargets and measure the efforts of your support staff as they implement the changes.
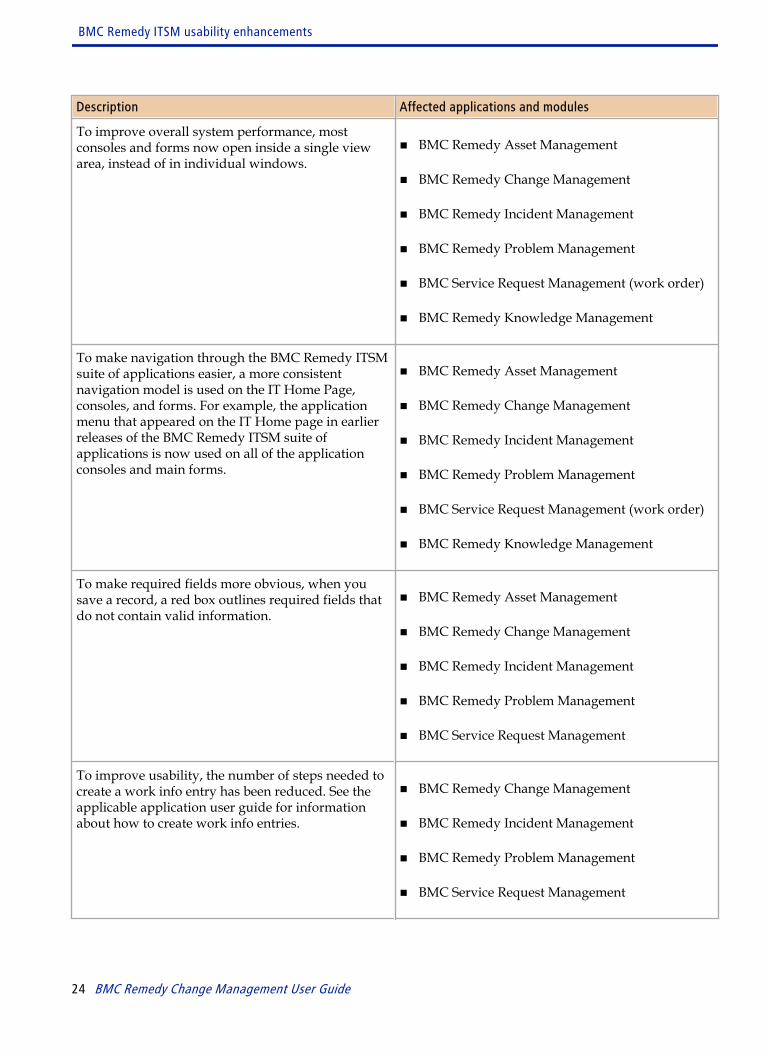
BMC Remedy ITSM usability enhancementsThe BMC Remedy ITSM 7.6.04 release contains the following usabilityenhancements. These enhancements are available only when the applications areaccessed through a web browser.
Table 1: BMC Remedy ITSM usability enhancements
Description Affected applications and modules
To help you retrieve information faster, the type-ahead search functionality is available on morefields. When you start to type a query into a fieldthat has the type-ahead search functionality, one ormore possible matches are immediately presentedfor selection in a drop-down list. As you type morecharacters, the list changes to match what you type.
■ BMC Remedy Change Management
■ Release Management
■ BMC Remedy Incident Management
■ BMC Remedy Problem Management
■ BMC Remedy Knowledge Management
■ BMC Service Request Management
To improve application usability when using theBest Practice and Classic view, a system–generatedrecord ID is assigned to all new record typesimmediately when the application displays the formin New mode.
■ BMC Remedy Change Management
■ Release Management
■ BMC Remedy Incident Management
■ BMC Problem Management
■ BMC Service Request Management (work order)
BMC Remedy ITSM usability enhancements
22 BMC Remedy Change Management User Guide

Description Affected applications and modules
To improve application performance, systemadministrators can configure system messages fromfilters and servers to appear in a message bar insteadof in pop-up windows. For information about thisconfiguration, see the BMC Remedy Action RequestSystem 7.6.04 Configuration Guide.
■ BMC Remedy Asset Management
■ BMC Remedy Change Management
■ Release Management
■ BMC Remedy Incident Management
■ BMC Remedy Problem Management
■ BMC Remedy Knowledge Management
■ BMC Service Request Management
■ BMC Service Level Management
Using the Application Preferences settings, you canconfigure the system to display a confirmationmessage when you submit a new record. Forinformation about these settings, see yourapplication's user guide.
■ BMC Remedy Change Management
■ Release Management
■ BMC Remedy Incident Management
■ BMC Remedy Problem Management
■ BMC Service Request Management (work order)
To provide easier access to the BMC ServiceManagement Process Model (SMPM) from theapplications, the Process Overview link is availablefrom the Quick Actions navigation area of the mainforms. The Process Overview link is also availableabove the main tables on the consoles.
■ BMC Remedy Asset Management
■ BMC Remedy Change Management
■ BMC Remedy Incident Management
■ BMC Remedy Problem Management
BMC Remedy ITSM usability enhancements
Chapter 1 Introducing BMC Remedy Change Management 23
Description Affected applications and modules
To improve overall system performance, mostconsoles and forms now open inside a single viewarea, instead of in individual windows.
■ BMC Remedy Asset Management
■ BMC Remedy Change Management
■ BMC Remedy Incident Management
■ BMC Remedy Problem Management
■ BMC Service Request Management (work order)
■ BMC Remedy Knowledge Management
To make navigation through the BMC Remedy ITSMsuite of applications easier, a more consistentnavigation model is used on the IT Home Page,consoles, and forms. For example, the applicationmenu that appeared on the IT Home page in earlierreleases of the BMC Remedy ITSM suite ofapplications is now used on all of the applicationconsoles and main forms.
■ BMC Remedy Asset Management
■ BMC Remedy Change Management
■ BMC Remedy Incident Management
■ BMC Remedy Problem Management
■ BMC Service Request Management (work order)
■ BMC Remedy Knowledge Management
To make required fields more obvious, when yousave a record, a red box outlines required fields thatdo not contain valid information.
■ BMC Remedy Asset Management
■ BMC Remedy Change Management
■ BMC Remedy Incident Management
■ BMC Remedy Problem Management
■ BMC Service Request Management
To improve usability, the number of steps needed tocreate a work info entry has been reduced. See theapplicable application user guide for informationabout how to create work info entries.
■ BMC Remedy Change Management
■ BMC Remedy Incident Management
■ BMC Remedy Problem Management
■ BMC Service Request Management
BMC Remedy ITSM usability enhancements
24 BMC Remedy Change Management User Guide
Description Affected applications and modules
To make searching for information acrossapplications easier and more intuitive, a globalsearch option is available. The search scans andretrieves information from the installed BMCRemedy ITSM applications and presents it in areadable, consumable format. See the applicableapplication user guide for information about how theglobal search function works.
■ BMC Remedy Asset Management
■ BMC Remedy Change Management
■ BMC Remedy Incident Management
■ BMC Remedy Problem Management
■ BMC Service Request Management(work order)
To make creating Relationships easier, a new linkcalled Create Relationship to is available. See theapplicable application user guide for informationabout how the link works.
■ BMC Remedy Change Management
■ BMC Remedy Incident Management
■ BMC Remedy Problem Management
To help you find field-level details more easily, youcan use the new Detail icon to display detailedinformation about the field's content. For example, ifyou click the Detail icon associated with theCustomer field, the People form appears withinformation about the customer whose name appearsin the field. This new feature replaces thehyperlinked field labels in earlier versions of theapplications.
■ BMC Remedy Change Management
■ Release Management
■ BMC Remedy Incident Management
■ BMC Remedy Problem Management
■ BMC Service Request Management (work order)
To quickly access BMC Atrium Explorer from theService and CI fields, you can click the new ExploreCI icon.
■ BMC Remedy Asset Management
■ BMC Remedy Change Management
■ BMC Remedy Incident Management
■ BMC Remedy Problem Management
BMC Remedy ITSM usability enhancements
Chapter 1 Introducing BMC Remedy Change Management 25

Description Affected applications and modules
To improve search capabilities, a new search icon isadded to the fields that open a search dialog box orform.
■ BMC Remedy Change Management
■ Release Management
■ BMC Remedy Incident Management
■ BMC Remedy Problem Management
■ Task Management
■ BMC Service Request Management (work order)
What's new in BMC Remedy Change Management
The following topics are new features in this release:
■ The Vendor Management feature has been included in this release of BMCRemedy Change Management. For more information, see the BMC Remedy ITService Management Release Notes.
■ The Assignment fields in the Change Template have been updated to include allassignment fields including Change Manager fields. For more information, see theBMC Remedy IT Service Management Configuration Guide.
For information on additional enhancements to BMC Remedy Change Management,see “BMC Remedy ITSM usability enhancements” on page 22.
Where to find features and fields that have moved
This section lists features and fields that have moved from their previous locationson the user interface and provides you with their new location.
On the console
The following console features and links have moved.
■ Defined Searches— You now access Defined Searches from the Filter By dropdown menu at the top of the console.
BMC Remedy ITSM usability enhancements
26 BMC Remedy Change Management User Guide

■ Manage My Searches—You now access Manage My Searches by clicking themagnifying glass icon beside the Filter By field.
■ Process Overview—You now access Process Overview from a link above theconsole table.
■ KPIs—You now access the KPIs by clicking the KPIs link in the Functions menuon the navigation pane.
■ Consoles—You now access other consoles from the Applications menu.
On the form
The following application form features, fields, and links have been added or moved.
■ You now access these fields from the main body of the form:
— Assigned Group
— Assignee
— Vendor Group
— Vendor Ticket Number
— Status
— Status Reason
■ The following links are available on the top of the Relationships tab:
— Impact Analysis
— Quick Actions menu
■ The Console link is no longer available in the left Navigation pane.
■ You now access the following links from the Quick Action section of theNavigation pane.
— Create Relationship to—for creating relationships between the current recordand other record types.
— Create Related Request—for creating other record types.
— Process Overview—for opening a process flow diagram.
— Work Info—Changes have been made to the way that you create workinformation entries in Best Practice view. For information about creating work
BMC Remedy ITSM usability enhancements
Chapter 1 Introducing BMC Remedy Change Management 27
information entries in this view, see “Recording activities for a change request”on page 130.
— Relationships—Changes have been made to the way you create relationshipsin the Best Practice view. For information about how to create relationships inthis view, see “Defining relationships” on page 231
■ Tool bar—The Change form tool bar is removed. The following tool bar functionshave been retained and are available from other locations on the interface:
— Return to Home Page —To close the application and return to the Home page,click the Home icon on the breadcrumb bar. This function replaces the Closebutton, which has been removed from the interface.
— New mode—To invoke new mode, open the Applications menu, select ChangeManagement, and click New Change.
— Modify mode—If your installation is configured to open a new change requestform after you click save when creating a new change request record, then toinvoke Modify mode you must open the change request record that you wantto modify from the console.
— Search mode—From the breadcrumb bar, return to the Change console and useSearch Change in the Navigation pane.
Process flow and the stages of a changerequest
The user interface in BMC Remedy Change Management enables managers,administrators, users, and approvers to perform regular tasks simply and efficiently.The Process Flow Status bar on the Change form steps you through the changeprocess from the Initiate stage to the Closed stage. It provides a visual mechanism totrack the five stages of a change request, as indicated by best practices that arerooted in ITIL processes.
(For more information, see User roles in the change request lifecycle on page 36.)The current stage of the change is highlighted on the Change form by color and by text.
Process flow and the stages of a change request
28 BMC Remedy Change Management User Guide
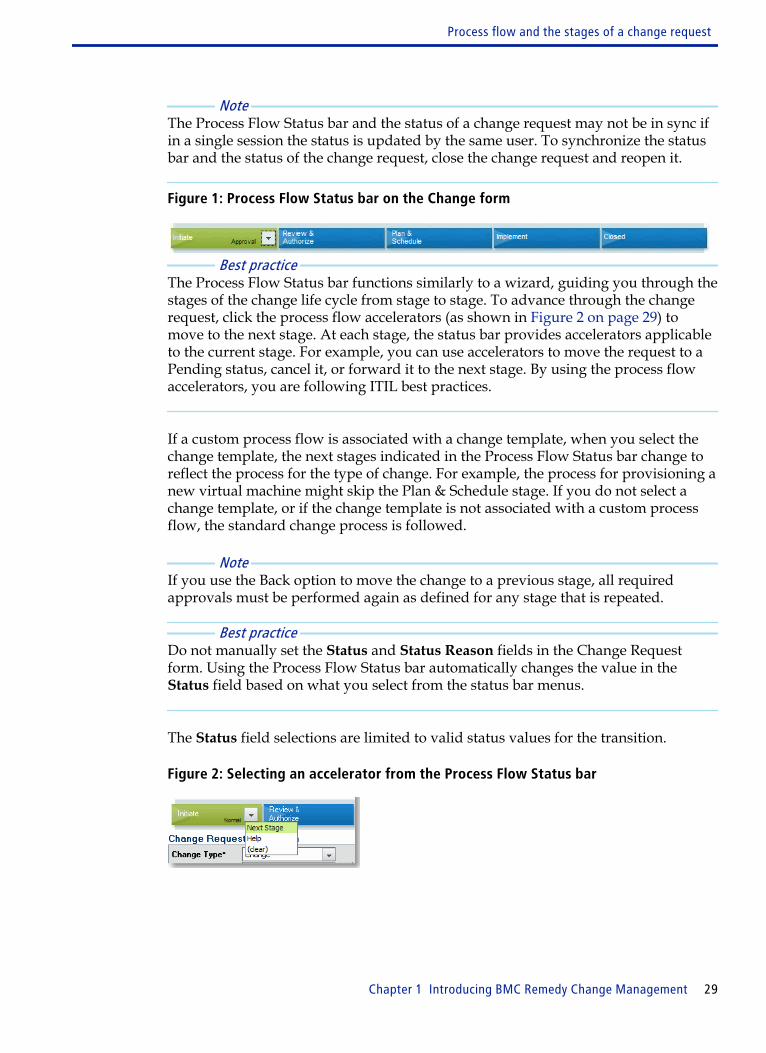
Note The Process Flow Status bar and the status of a change request may not be in sync ifin a single session the status is updated by the same user. To synchronize the statusbar and the status of the change request, close the change request and reopen it.
Figure 1: Process Flow Status bar on the Change form
Best practice The Process Flow Status bar functions similarly to a wizard, guiding you through thestages of the change life cycle from stage to stage. To advance through the changerequest, click the process flow accelerators (as shown in Figure 2 on page 29) tomove to the next stage. At each stage, the status bar provides accelerators applicableto the current stage. For example, you can use accelerators to move the request to aPending status, cancel it, or forward it to the next stage. By using the process flowaccelerators, you are following ITIL best practices.
If a custom process flow is associated with a change template, when you select thechange template, the next stages indicated in the Process Flow Status bar change toreflect the process for the type of change. For example, the process for provisioning anew virtual machine might skip the Plan & Schedule stage. If you do not select achange template, or if the change template is not associated with a custom processflow, the standard change process is followed.
Note If you use the Back option to move the change to a previous stage, all requiredapprovals must be performed again as defined for any stage that is repeated.
Best practice Do not manually set the Status and Status Reason fields in the Change Requestform. Using the Process Flow Status bar automatically changes the value in theStatus field based on what you select from the status bar menus.
The Status field selections are limited to valid status values for the transition.
Figure 2: Selecting an accelerator from the Process Flow Status bar
Process flow and the stages of a change request
Chapter 1 Introducing BMC Remedy Change Management 29
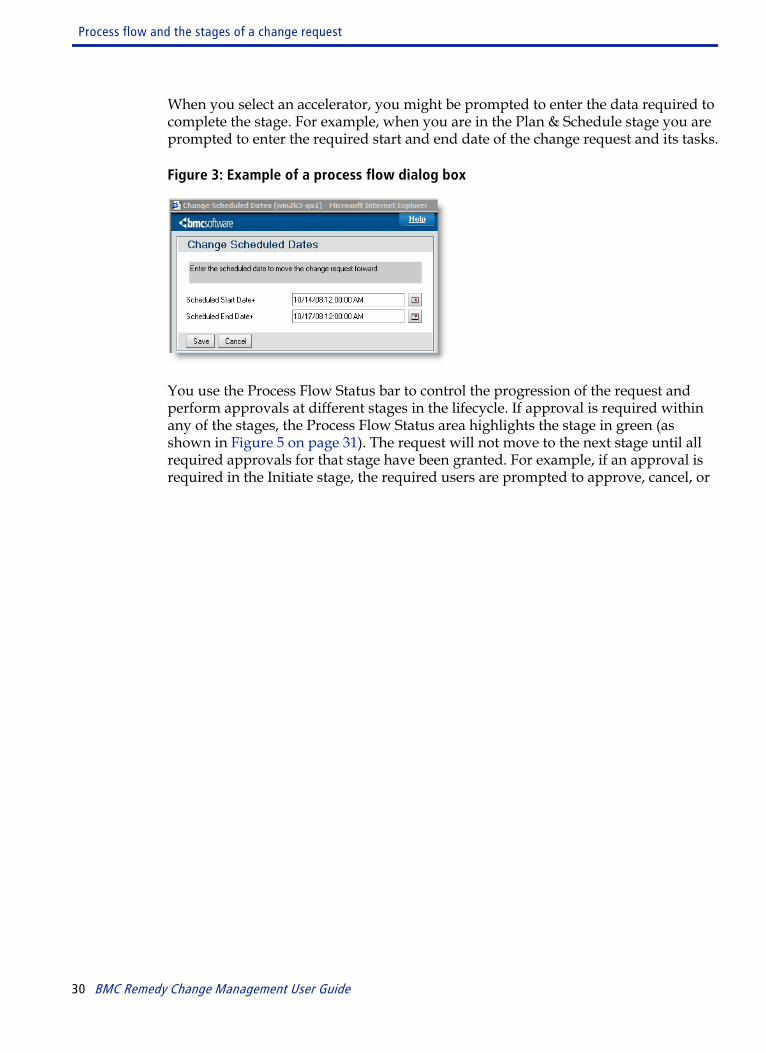
When you select an accelerator, you might be prompted to enter the data required tocomplete the stage. For example, when you are in the Plan & Schedule stage you areprompted to enter the required start and end date of the change request and its tasks.
Figure 3: Example of a process flow dialog box
You use the Process Flow Status bar to control the progression of the request andperform approvals at different stages in the lifecycle. If approval is required withinany of the stages, the Process Flow Status area highlights the stage in green (asshown in Figure 5 on page 31). The request will not move to the next stage until allrequired approvals for that stage have been granted. For example, if an approval isrequired in the Initiate stage, the required users are prompted to approve, cancel, or
Process flow and the stages of a change request
30 BMC Remedy Change Management User Guide
reject the change request before the change request can move to the Review &Authorize stage.
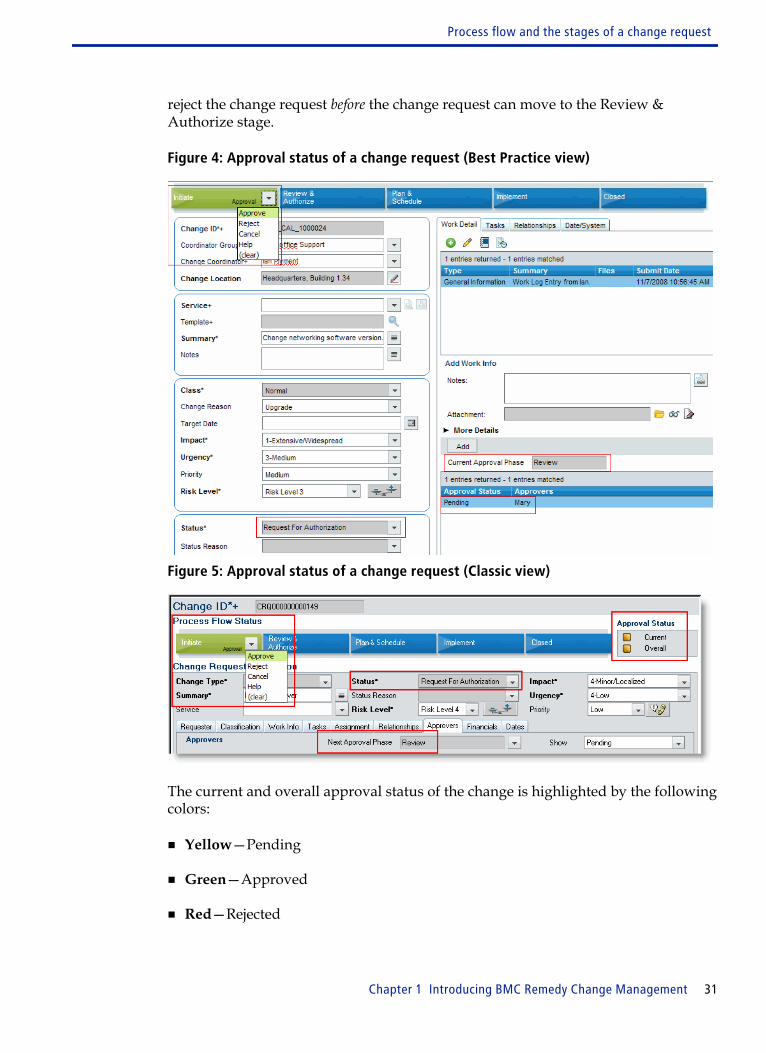
Figure 4: Approval status of a change request (Best Practice view)
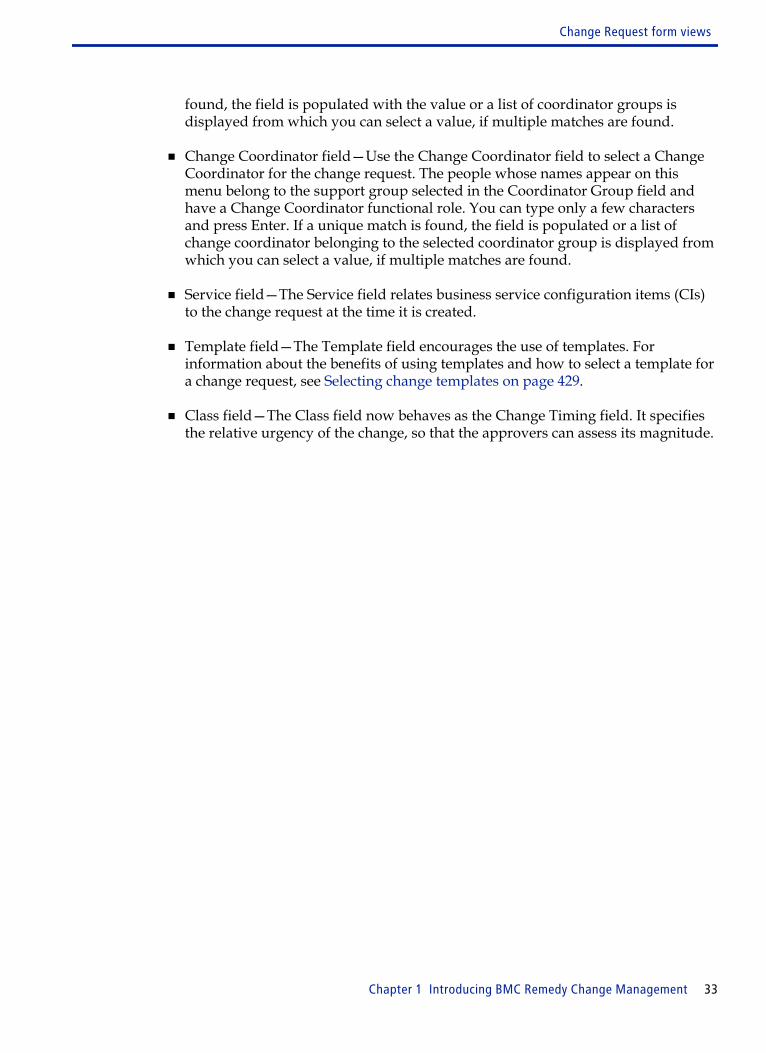
Figure 5: Approval status of a change request (Classic view)
The current and overall approval status of the change is highlighted by the followingcolors:
■ Yellow—Pending
■ Green—Approved
■ Red—Rejected
Process flow and the stages of a change request
Chapter 1 Introducing BMC Remedy Change Management 31

Note Gray indicates that you are currently in a transitional stage that does notrequire an approval.
Change Request form viewsBMC Remedy Change Management release 7.6.00 provides you with different waysto view the Change Request form:
■ Best Practice view
■ Classic view
The view that you see is configured for you by your system administrator. The BestPractice view is the default view. For a description of the Best Practice view, see BestPractice view—Change Request form on page 32. For a description of the Classicview, see Classic view—Change Request form on page 34.
Note When documenting procedures in this guide, if there is a difference between how todo something in the Best Practice view and in the Classic view, both methods aredescribed. Instructions for the Best Practice view are provided first.Some of the fields from the Classic view are not displayed in the Best Practice View.To access fields that were removed use the Classic view.
Best Practice view—Change Request form
The Best Practice view is an improved version of the Change Request form. In thisview, the fields most commonly used for creating change requests are immediatelyvisible. You can access additional, less frequently used functionality from the tabbedsections of the form or from the links in the Navigation pane.
The following list outlines Best Practice view features:
■ Coordinator Group field—The Coordinator Group and the Change Coordinatorfield replace the Change Assignee fields. Use the Coordinator Group field to selecta support group. The support groups that appear in the menu each have at leastone member with a Change Coordinator functional role. From the CoordinatorGroup menu, you select the company, the organization, and then the supportgroup. Only the selected support group name appears in the Coordinator Groupfield. You can type only a few characters and press Enter. If a unique match is
Change Request form views
32 BMC Remedy Change Management User Guide
found, the field is populated with the value or a list of coordinator groups isdisplayed from which you can select a value, if multiple matches are found.
■ Change Coordinator field—Use the Change Coordinator field to select a ChangeCoordinator for the change request. The people whose names appear on thismenu belong to the support group selected in the Coordinator Group field andhave a Change Coordinator functional role. You can type only a few charactersand press Enter. If a unique match is found, the field is populated or a list ofchange coordinator belonging to the selected coordinator group is displayed fromwhich you can select a value, if multiple matches are found.
■ Service field—The Service field relates business service configuration items (CIs)to the change request at the time it is created.
■ Template field—The Template field encourages the use of templates. Forinformation about the benefits of using templates and how to select a template fora change request, see Selecting change templates on page 429.
■ Class field—The Class field now behaves as the Change Timing field. It specifiesthe relative urgency of the change, so that the approvers can assess its magnitude.
Change Request form views
Chapter 1 Introducing BMC Remedy Change Management 33
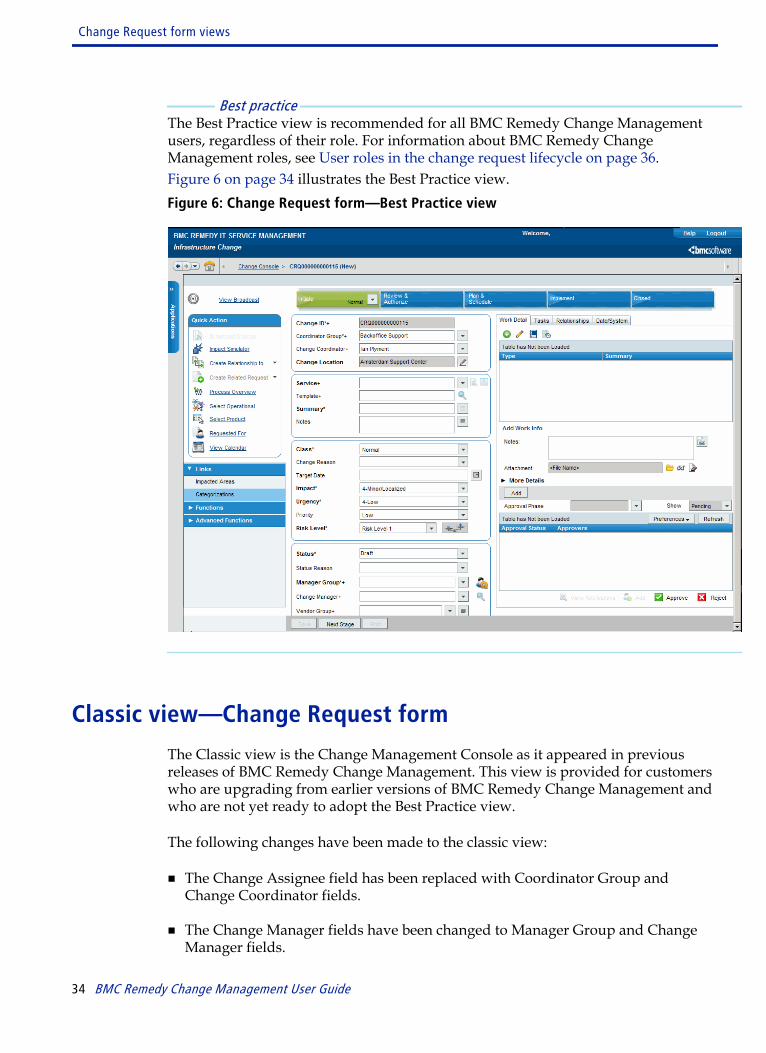
Best practice The Best Practice view is recommended for all BMC Remedy Change Managementusers, regardless of their role. For information about BMC Remedy ChangeManagement roles, see User roles in the change request lifecycle on page 36.Figure 6 on page 34 illustrates the Best Practice view.Figure 6: Change Request form—Best Practice view
Classic view—Change Request form
The Classic view is the Change Management Console as it appeared in previousreleases of BMC Remedy Change Management. This view is provided for customerswho are upgrading from earlier versions of BMC Remedy Change Management andwho are not yet ready to adopt the Best Practice view.
The following changes have been made to the classic view:
■ The Change Assignee field has been replaced with Coordinator Group andChange Coordinator fields.
■ The Change Manager fields have been changed to Manager Group and ChangeManager fields.
Change Request form views
34 BMC Remedy Change Management User Guide
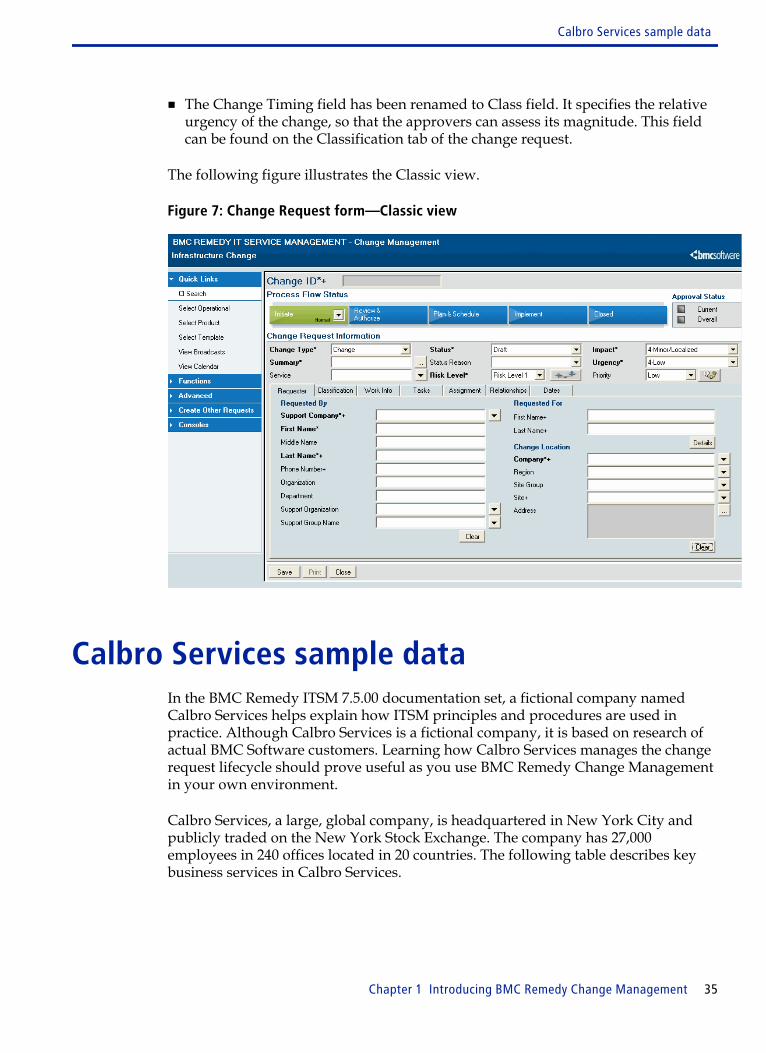
■ The Change Timing field has been renamed to Class field. It specifies the relativeurgency of the change, so that the approvers can assess its magnitude. This fieldcan be found on the Classification tab of the change request.
The following figure illustrates the Classic view.
Figure 7: Change Request form—Classic view
Calbro Services sample dataIn the BMC Remedy ITSM 7.5.00 documentation set, a fictional company namedCalbro Services helps explain how ITSM principles and procedures are used inpractice. Although Calbro Services is a fictional company, it is based on research ofactual BMC Software customers. Learning how Calbro Services manages the changerequest lifecycle should prove useful as you use BMC Remedy Change Managementin your own environment.
Calbro Services, a large, global company, is headquartered in New York City andpublicly traded on the New York Stock Exchange. The company has 27,000employees in 240 offices located in 20 countries. The following table describes keybusiness services in Calbro Services.
Calbro Services sample data
Chapter 1 Introducing BMC Remedy Change Management 35

Table 2: Key business services
Service Description
Online banking 500 ATMs in major cities
WWW presence Corporate site and online brokerage services
Discount equity brokerage Online and storefront services
Sales force automation Automated sales activities such as leads, orders, reports, and so on
Customer support Support centers in the United States, Europe, and Asia
Mass marketing World-wide marketing campaigns aimed at making Calbro Services ahousehold name
Tip If the Calbro Services sample data is installed on your server, you can log in to BMCRemedy Change Management and follow the use cases described in this guide.
User roles in the change request lifecycleBMC Remedy Change Management is a role-based application. What applicationsyou can access, and how much information you can view or modify depends uponyour role. As the Process Flow Status bar steps you through the stages of a changerequest, different roles perform different tasks. The change manager creates thechange request at the Initiate stage, the task implementer works on the tasks that areassigned to the change at the Implement stage, and so on.Figure 8: Using the Process Flow Status bar in the stages of a change request
A user with the Change Manager functional role can view functionality in theapplication that other users cannot. For example, the change manager can access theKPI flashboards, while the change coordinator does not have access to them.
Change requests track the progress of a change through its entire lifecycle, from theInitiation stage to the Closed stage. To manage a change request from start to finish,the main user roles listed in Table 3 on page 37 are required. Although theresponsibilities of these users can vary from organization to organization (and insome organizations, one person can fulfill several roles), they generally include thefollowing roles and functions. In a small company, the same person can function aschange manager, approver, and task implementer.
User roles in the change request lifecycle
36 BMC Remedy Change Management User Guide
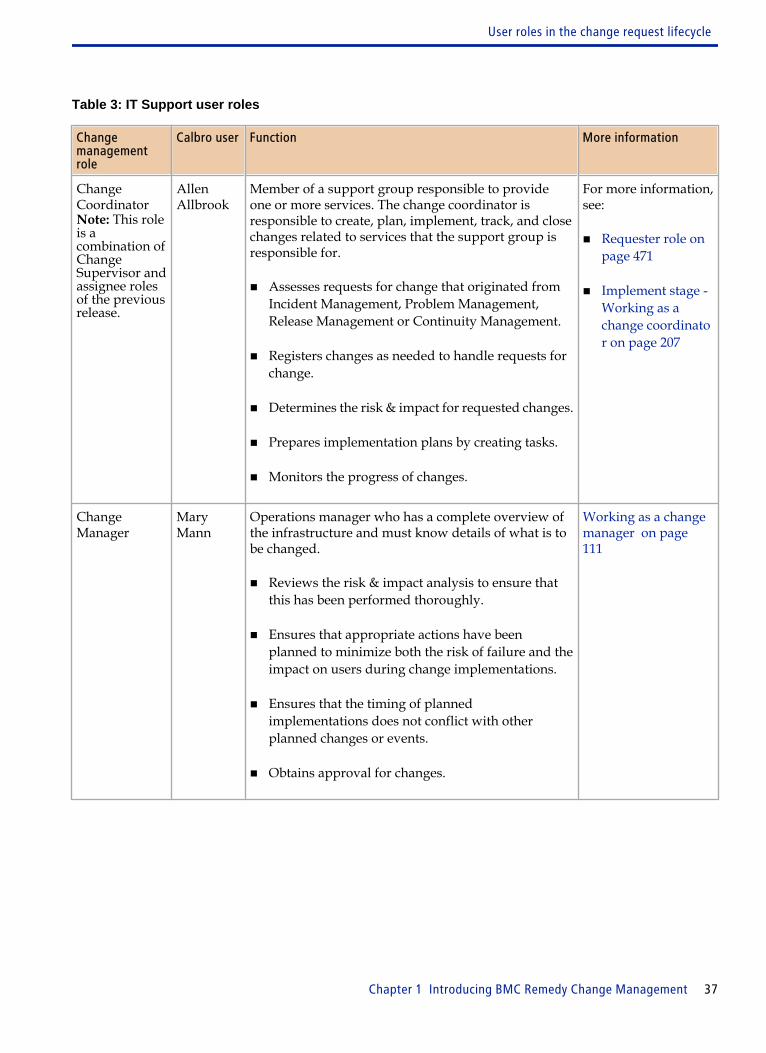
Table 3: IT Support user roles
Changemanagementrole
Calbro user Function More information
ChangeCoordinatorNote: This roleis acombination ofChangeSupervisor andassignee rolesof the previousrelease.
AllenAllbrook
Member of a support group responsible to provideone or more services. The change coordinator isresponsible to create, plan, implement, track, and closechanges related to services that the support group isresponsible for.
■ Assesses requests for change that originated fromIncident Management, Problem Management,Release Management or Continuity Management.
■ Registers changes as needed to handle requests forchange.
■ Determines the risk & impact for requested changes.
■ Prepares implementation plans by creating tasks.
■ Monitors the progress of changes.
For more information,see:
■ Requester role onpage 471
■ Implement stage -Working as achange coordinator on page 207
ChangeManager
MaryMann
Operations manager who has a complete overview ofthe infrastructure and must know details of what is tobe changed.
■ Reviews the risk & impact analysis to ensure thatthis has been performed thoroughly.
■ Ensures that appropriate actions have beenplanned to minimize both the risk of failure and theimpact on users during change implementations.
■ Ensures that the timing of plannedimplementations does not conflict with otherplanned changes or events.
■ Obtains approval for changes.
Working as a changemanager on page111
User roles in the change request lifecycle
Chapter 1 Introducing BMC Remedy Change Management 37
Changemanagementrole
Calbro user Function More information
TaskimplementerNote: This roleis sometimescalled the taskassignee.
IanPlyment
Support staff member or group who performs thetasks associated with a change request. For example, achange request for upgrading a mission-critical servermight include backing up data in the server,uninstalling the old hard drive, and installing the newhard drive.
■ Member of Front Office Support or Back OfficeSupport
■ Uses the Change Management Console to performthe tasks associated with a change request
Working with BMCRemedy ChangeManagement as a taskimplementer on page341
For more information about permissions and roles, see the BMC Remedy IT ServiceManagement Configuration Guide. For information about other roles important inChange Management, see Additional Change Management user roles on page 40.
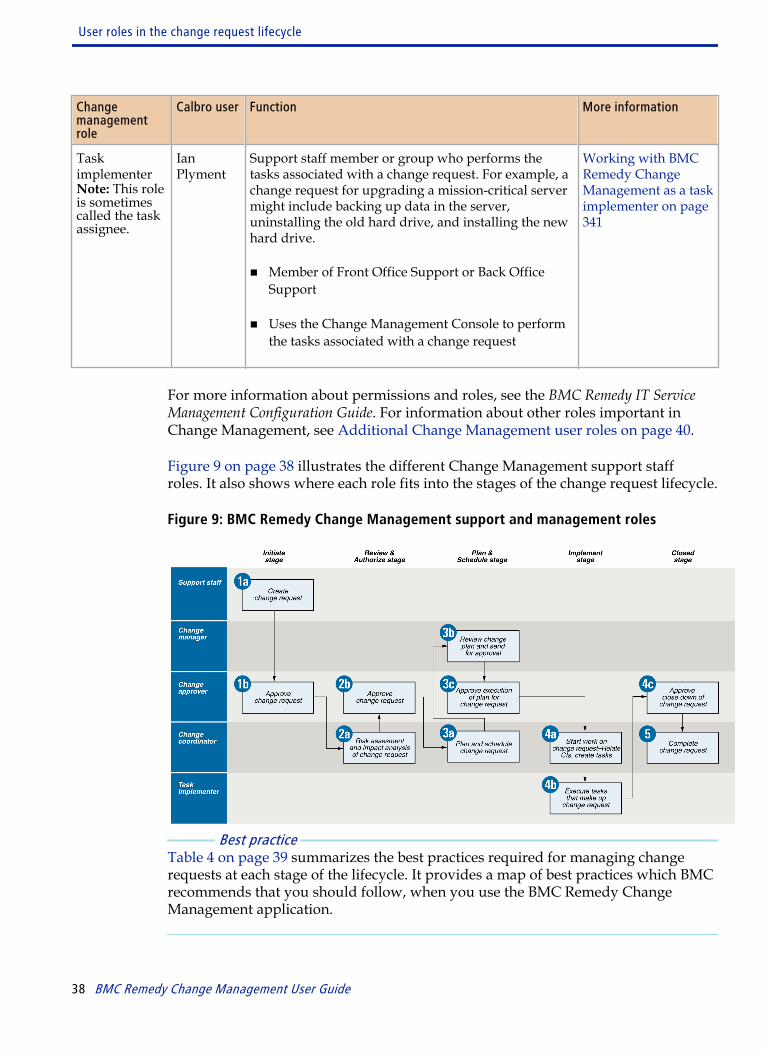
Figure 9 on page 38 illustrates the different Change Management support staffroles. It also shows where each role fits into the stages of the change request lifecycle.
Figure 9: BMC Remedy Change Management support and management roles
Best practice Table 4 on page 39 summarizes the best practices required for managing changerequests at each stage of the lifecycle. It provides a map of best practices which BMCrecommends that you should follow, when you use the BMC Remedy ChangeManagement application.
User roles in the change request lifecycle
38 BMC Remedy Change Management User Guide
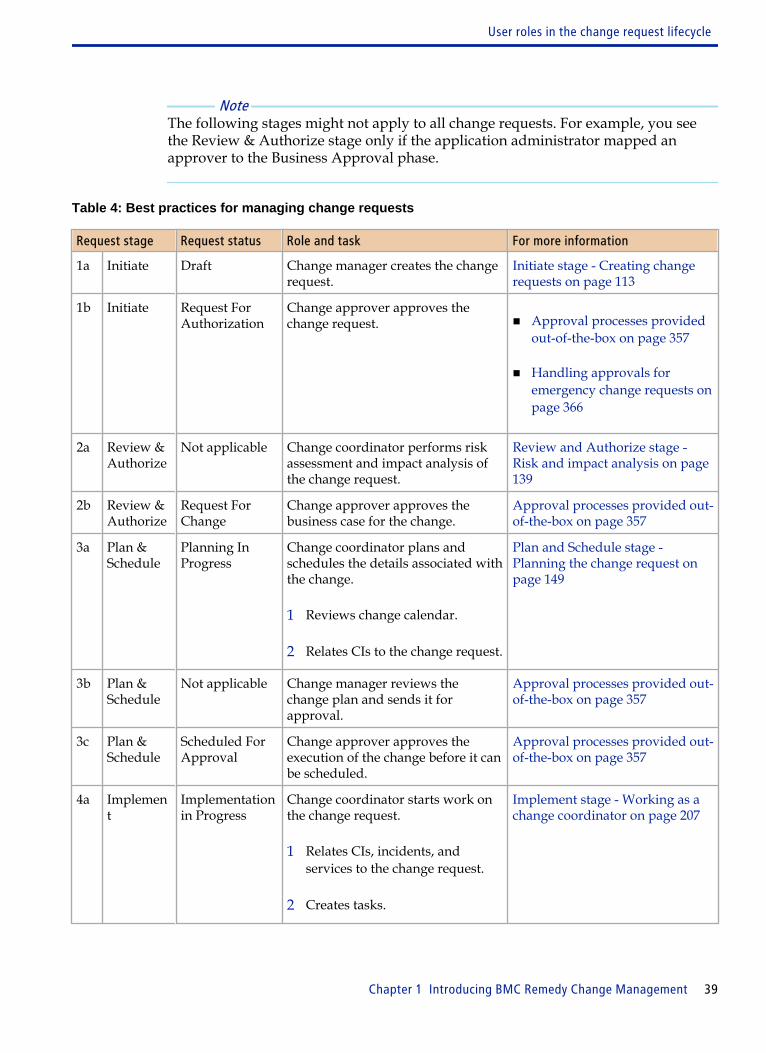
Note The following stages might not apply to all change requests. For example, you seethe Review & Authorize stage only if the application administrator mapped anapprover to the Business Approval phase.
Table 4: Best practices for managing change requests
Request stage Request status Role and task For more information
1a Initiate Draft Change manager creates the changerequest.
Initiate stage - Creating changerequests on page 113
1b Initiate Request ForAuthorization
Change approver approves thechange request. ■ Approval processes provided
out-of-the-box on page 357
■ Handling approvals foremergency change requests onpage 366
2a Review &Authorize
Not applicable Change coordinator performs riskassessment and impact analysis ofthe change request.
Review and Authorize stage -Risk and impact analysis on page139
2b Review &Authorize
Request ForChange
Change approver approves thebusiness case for the change.
Approval processes provided out-of-the-box on page 357
3a Plan &Schedule
Planning InProgress
Change coordinator plans andschedules the details associated withthe change.
1 Reviews change calendar.
2 Relates CIs to the change request.
Plan and Schedule stage -Planning the change request onpage 149
3b Plan &Schedule
Not applicable Change manager reviews thechange plan and sends it forapproval.
Approval processes provided out-of-the-box on page 357
3c Plan &Schedule
Scheduled ForApproval
Change approver approves theexecution of the change before it canbe scheduled.
Approval processes provided out-of-the-box on page 357
4a Implement
Implementationin Progress
Change coordinator starts work onthe change request.
1 Relates CIs, incidents, andservices to the change request.
2 Creates tasks.
Implement stage - Working as achange coordinator on page 207
User roles in the change request lifecycle
Chapter 1 Introducing BMC Remedy Change Management 39

Request stage Request status Role and task For more information
4b Implement
Implementationin Progress
Task implementer executes tasks. Implement stage - Working ontask assignments on page 343
4c Implement
Completed Change approver approves that therequest can now be closed.Note: At this stage, the changemanager can change the status ofthe request back to Planning inProgress or Pending.
Approval processes provided out-of-the-box on page 357
5 Closed Closed Change coordinator closes thechange request.
Closed stage - Completing changerequests on page 153
Additional Change Management user roles
The following user roles also have important responsibilities in typical companies. Note
For more information about permissions and roles, see the BMC Remedy IT ServiceManagement Configuration Guide.
Change implementer
Change implementers are support people or groups responsible for change requeststhat do not require tasks. You can designate a member of your support staff as achange implementer in the Change form.
Note As a best practice one or more tasks must be associated to a change request for actualactivities that need to be completed. The Change Implementer field is not presentwhen using the Best Practice view in Change Management.
Change implementers have their own assignment fields in the Change form whenusing the Classic view. The changes assigned to the change implementer can be anytype of routine activity that must be accomplished, for example:
■ Reviewing the weekly error log report
■ Rotating a backup tape
■ Turning off the server room lights
User roles in the change request lifecycle
40 BMC Remedy Change Management User Guide
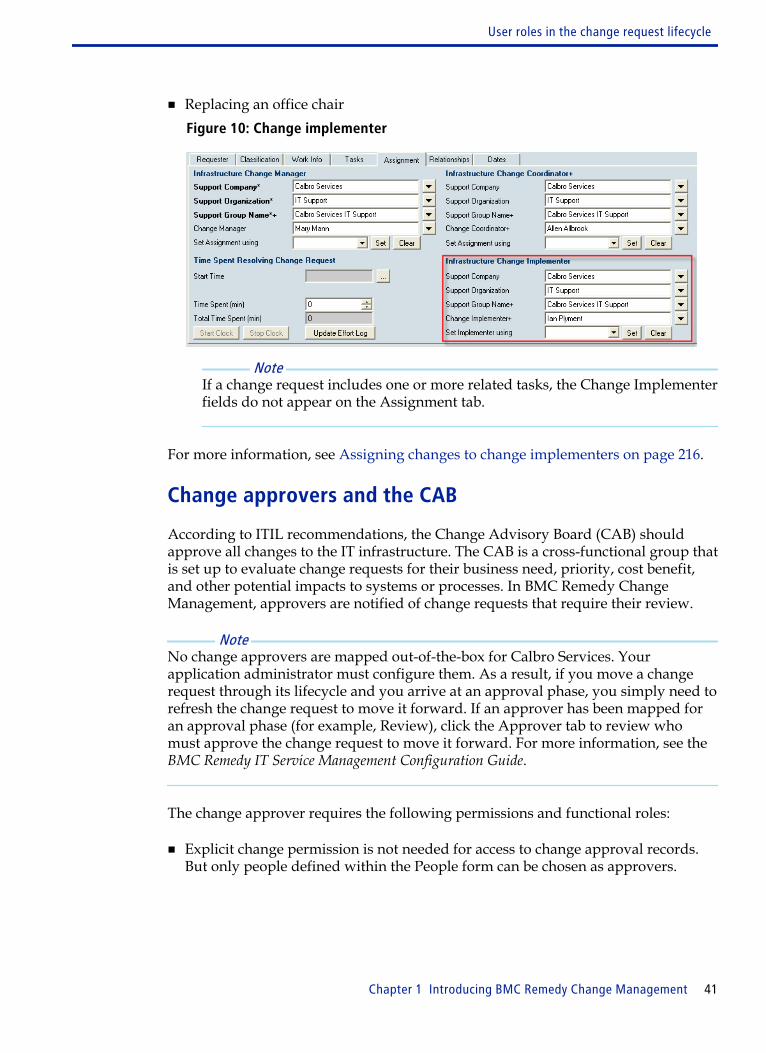
■ Replacing an office chairFigure 10: Change implementer
Note If a change request includes one or more related tasks, the Change Implementerfields do not appear on the Assignment tab.
For more information, see Assigning changes to change implementers on page 216.
Change approvers and the CAB
According to ITIL recommendations, the Change Advisory Board (CAB) shouldapprove all changes to the IT infrastructure. The CAB is a cross-functional group thatis set up to evaluate change requests for their business need, priority, cost benefit,and other potential impacts to systems or processes. In BMC Remedy ChangeManagement, approvers are notified of change requests that require their review.
Note No change approvers are mapped out-of-the-box for Calbro Services. Yourapplication administrator must configure them. As a result, if you move a changerequest through its lifecycle and you arrive at an approval phase, you simply need torefresh the change request to move it forward. If an approver has been mapped foran approval phase (for example, Review), click the Approver tab to review whomust approve the change request to move it forward. For more information, see theBMC Remedy IT Service Management Configuration Guide.
The change approver requires the following permissions and functional roles:
■ Explicit change permission is not needed for access to change approval records.But only people defined within the People form can be chosen as approvers.
User roles in the change request lifecycle
Chapter 1 Introducing BMC Remedy Change Management 41
Note The minimum permissions in Change Management to approve change requestsis Infrastructure Change Viewer. Users with this permission can view changerequests in the Change form, but they must use Approval Central to approvethem.
■ The Change Approver functional role is required to create an Approval mappingrecord for the users. The Change Approver functional role is also required toapprove or reject changes on behalf of the approver support group.
■ Users with the Change Manager or Change Coordinator functional role canapprove changes on behalf of their support group if they are defined as alternateapprovers or as a global approver.
For information about the approver role and step-by-step procedures associatedwith approvers, see Change Management approver role on page 355.
Company executives
Company executives such as CIOs can use BMC Remedy Change Managementconsoles to understand trends relating to change configuration management, andtake appropriate action to balance the flow.
For example, CIOs can use the BMC Remedy Change Management Dashboard toview important data points in an easy-to-read graphical display. They can selectappropriate flashboards to appear on the Dashboard, with a time period that appliesto all flashboards. CIOs can also use the Change Calendar to manage change andrelease activities. Executives can see a holistic picture of changes occurring in theenterprise, and associated business activities or events. Some of this informationcomes from the BMC Remedy Change Management application and some throughreferencing objects in the BMC Atrium CMDB.
For more information, see Using the Change Management Dashboard on page 203and Using the Change Calendar on page 194.
Application administrator
The responsibilities of the application administrator, also known as the changeadministrator, might include installing and licensing the application, andconfiguring it to meet the organization’s business needs. Some of the configurationtasks include:
■ Creating and maintaining change request and task categorization.
■ Defining and adding members to support and general staff notification groups inthe People form.
User roles in the change request lifecycle
42 BMC Remedy Change Management User Guide
■ Assigning licenses.
■ Configuring approvals, risk, cost, templates, assignments, and change settings.
For more information about configuring the BMC Remedy Change Managementapplication, see the BMC Remedy IT Service Management Configuration Guide.
SMPM user roles
The following roles are developed from the BMC Remedy Service ManagementProcess Model (SMPM), which is a companion product to BMC Remedy ChangeManagement. The SMPM describes a set of predefined processes for the delivery andsupport of information technology (IT) services. The processes described by theSMPM are aligned with ITIL good practices. BMC Remedy Change Managementprovides functionality for these additional SMPM defined change management roles.
Table 5 on page 44 maps the SMPM defined change management roles to theequivalent permissions that each role needs in BMC Remedy Change Management.
Note This section does not list of all permission groups and functional roles defined inBMC Remedy Change Management, only those that are mapped to SMPM roles.
User roles in the change request lifecycle
Chapter 1 Introducing BMC Remedy Change Management 43
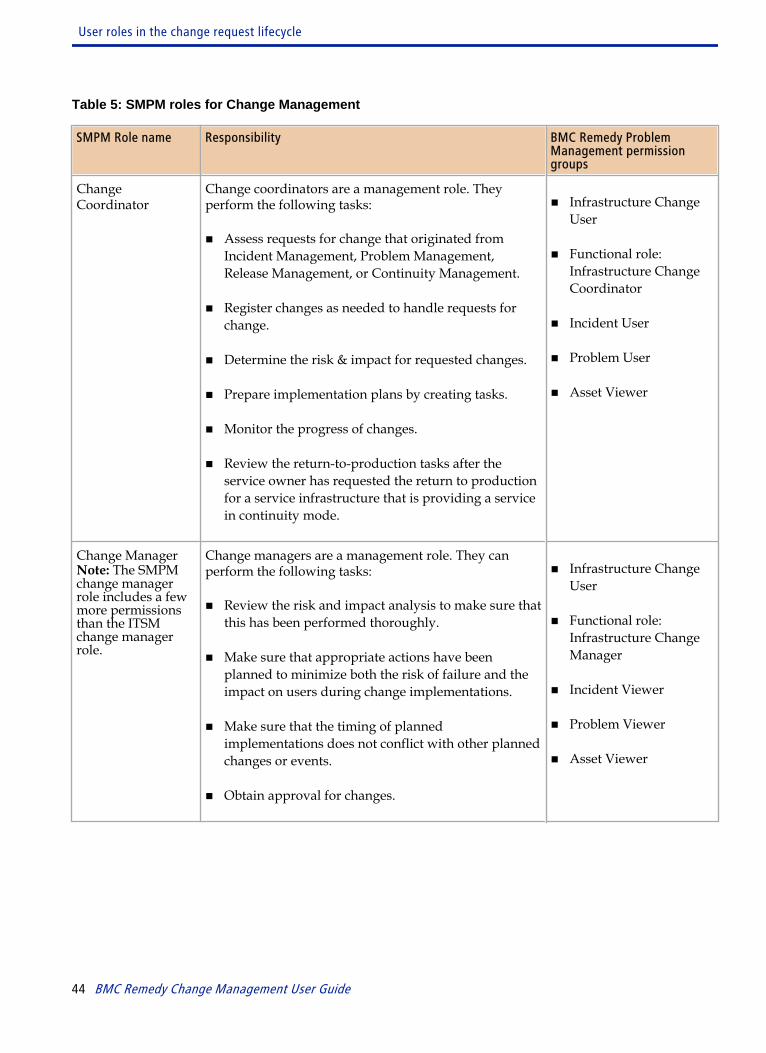
Table 5: SMPM roles for Change Management
SMPM Role name Responsibility BMC Remedy ProblemManagement permissiongroups
ChangeCoordinator
Change coordinators are a management role. Theyperform the following tasks:
■ Assess requests for change that originated fromIncident Management, Problem Management,Release Management, or Continuity Management.
■ Register changes as needed to handle requests forchange.
■ Determine the risk & impact for requested changes.
■ Prepare implementation plans by creating tasks.
■ Monitor the progress of changes.
■ Review the return-to-production tasks after theservice owner has requested the return to productionfor a service infrastructure that is providing a servicein continuity mode.
■ Infrastructure ChangeUser
■ Functional role:Infrastructure ChangeCoordinator
■ Incident User
■ Problem User
■ Asset Viewer
Change ManagerNote: The SMPMchange managerrole includes a fewmore permissionsthan the ITSMchange managerrole.
Change managers are a management role. They canperform the following tasks:
■ Review the risk and impact analysis to make sure thatthis has been performed thoroughly.
■ Make sure that appropriate actions have beenplanned to minimize both the risk of failure and theimpact on users during change implementations.
■ Make sure that the timing of plannedimplementations does not conflict with other plannedchanges or events.
■ Obtain approval for changes.
■ Infrastructure ChangeUser
■ Functional role:Infrastructure ChangeManager
■ Incident Viewer
■ Problem Viewer
■ Asset Viewer
User roles in the change request lifecycle
44 BMC Remedy Change Management User Guide

SMPM Role name Responsibility BMC Remedy ProblemManagement permissiongroups
CustomerRepresentative
Customer representatives are a support staff role. Theymake sure that planned application changes are testedbefore they are transferred to production.
■ Task User
■ Infrastructure ChangeViewer
■ Incident Viewer
■ Problem Viewer
■ Asset Viewer
Specialist Specialists are a support staff role. They perform thefollowing tasks:
■ Resolve incident requests.
■ Update incident requests with relevant informationand status changes.
■ Escalate incidents, which resolution may only beimplemented through the Change Managementprocess, to the service owner of the affected service.
■ Suggest workarounds for problems.
■ Establish the root causes of identified problems.
■ Propose structural solutions for problems.
■ Implement structural solutions for problems ifChange Management is not required.
■ Update the problem investigations with relevantinformation and status changes.
■ Complete tasks and updates them with relevantinformation and status changes.
■ Incident User
■ Problem User
■ Task User
■ Infrastructure ChangeViewer
■ Asset Viewer
User roles in the change request lifecycle
Chapter 1 Introducing BMC Remedy Change Management 45

SMPM Role name Responsibility BMC Remedy ProblemManagement permissiongroups
Releaseadministrator
Release administrator are a support staff role. Theyperform the following tasks:
■ Transfer releases after their development in thedevelopment environment to the test environment.
■ Transfer releases after they have been tested in thetest environment to the production environment.
■ Release User
■ Task User
■ Infrastructure ChangeViewer
■ Incident Viewer
■ Problem Viewer
■ Asset Viewer
Releasecoordinator
Release coordinators are a support staff role. Theyperform the following tasks:
■ Review the requests for change for the service(s) forwhich they act as the release coordinator after theyhave been passed on from Change Management.
■ Organizes and facilitates the CAB meetings for theservice(s) for which they act as the release coordinator.
■ Splits the requirements of releases into logical groupsthat can be handled efficiently by change coordinators.
■ Prepares a business case for a new release whenadditional funding is needed for its implementation.
■ Initiates the implementation of releases and decideson corrective actions as needed.
■ Organizes and conducts postimplementationmeetings to collect improvement suggestions forfuture releases.
■ Release User
■ Functional role: ReleaseCoordinator
■ Infrastructure ChangeUser
■ Functional role:Infrastructure ChangeCoordinator
■ Functional role:Infrastructure ChangeManager
■ Incident User
■ Problem User
■ Asset Viewer
For more information, see the Service Management Process Model Role Mapping to ITService Management white paper.
User roles in the change request lifecycle
46 BMC Remedy Change Management User Guide
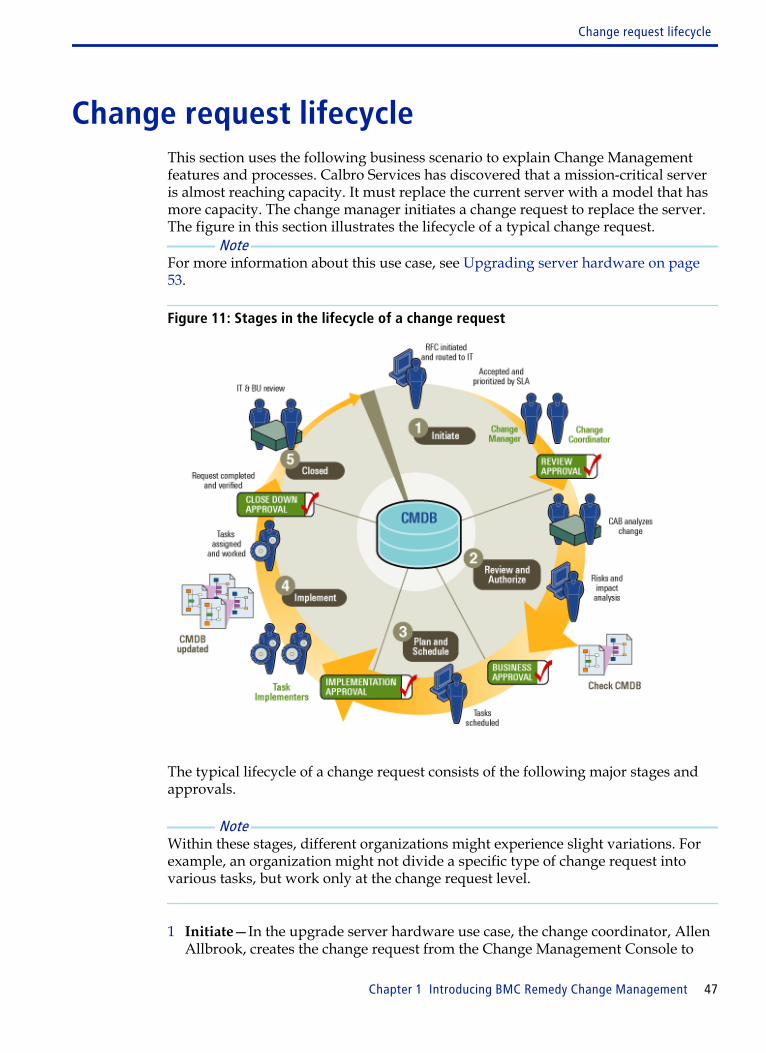
Change request lifecycleThis section uses the following business scenario to explain Change Managementfeatures and processes. Calbro Services has discovered that a mission-critical serveris almost reaching capacity. It must replace the current server with a model that hasmore capacity. The change manager initiates a change request to replace the server.The figure in this section illustrates the lifecycle of a typical change request.
Note For more information about this use case, see Upgrading server hardware on page53.
Figure 11: Stages in the lifecycle of a change request
The typical lifecycle of a change request consists of the following major stages andapprovals.
Note Within these stages, different organizations might experience slight variations. Forexample, an organization might not divide a specific type of change request intovarious tasks, but work only at the change request level.
1 Initiate—In the upgrade server hardware use case, the change coordinator, AllenAllbrook, creates the change request from the Change Management Console to
Change request lifecycle
Chapter 1 Introducing BMC Remedy Change Management 47
replace the mission-critical server. He must properly classify its Class (forexample, Normal), add relevant information (dates, configuration items, and soon), and assign a support group or change manager. When change requests areassigned to them, support staff members are notified. When the request movesinto a new status, for example, Request For Authorization, the applicationgenerates notifications to the assignee group and the support group.New change requests can be created in other ways. Examples include:
■ Problem coordinators can create a change request from a Known Error.
■ Using the Requester Console, a user can request a service that generates achange request.
■ A technician who made changes to a database server during non-work hourscan create an after the fact latent change request from the Overview Console.
■ BMC Remedy AR System workflow in the BMC Service Request Managementapplication can automatically generate change requests (for example, a servicerequest to replace a mission-critical server).
■ The discovery process can automatically generate a change request if it detectsthat a server does not have the latest patches loaded.
■ BMC Remedy Asset Management can automatically generate a change requestfrom a purchase requisition (for example, purchasing a laptop for a newemployee).
■ BMC Performance Manager can automatically generate a change request if itdetects that a mirrored web server has failed and needs to be replaced.Mary Mann, the change manager, receives a notification that a change requesthas been assigned to her. She opens the Change Management Console andreviews the change request assigned to her.At the Initiate stage, she estimates the risk impact and costs associated with thechange request. She chooses to compute the risk level of the request. If thechange request requires tasks, she can create and schedule these tasks.
Note If an approver is mapped to the approval phase, the change approver mustapprove the change request before it can move to the Review & Authorizestage. For more information, see Working with BMC Remedy ChangeManagement as an approver on page 355.
Change request lifecycle
48 BMC Remedy Change Management User Guide
2 Review & Authorize—If no approvers are mapped to this stage, change requestsbypass the Review & Authorize stage entirely.But if the application administrator added approvers, each level of approversmust review the request and approve it before it can move forward.After the request is approved, the change coordinator can move the changerequest to the Plan & Schedule stage. After the change planning is completed, thechange is sent to the change manager who reviews the change to ensure theinformation is complete and accurate, before submitting it for approval. Tasks areautomatically assigned to the appropriate task implementers. Mary continues tofill in additional details about the change request (for example, she revises thestart and end dates).
3 Plan & Schedule—The change coordinator relates the server CI to the changerequest. Mary then uses the Collision Detection tool to detect if there are otherchange requests scheduled to work on the same CI during the same time. Aftershe resolves any conflicts, she plans a forward schedule of changes (FSC). Sheopens the Change Calendar and views the current schedule of change activitiesand business events. She then blocks out a time segment to work on the changerequest by targeting the scheduled start and end dates. Larger projects can includeplanning all the changes approved for implementation. In this scenario, Marythen assigns the change request to the change coordinator, Ian Plyment.If the change request needs additional tasks, the change coordinator can createand schedule these tasks.
4 Implement—Ian Plyment, the change coordinator, receives notification that a taskis assigned to him, to replace the server. He opens the request in the ChangeManagement Console. He creates a task to replace the server, and then assigns itto himself as the task implementer who specializes in Front Office Support.As the change request enters the Implement stage, the BMC Atrium CMDB ismodified by Configuration Discovery, BMC Service Impact Manager (SIM), orother types of discovery tools as the task assignee works on the CI that needsextra memory. Ian logs his progress as he works on the tasks that need to becompleted in order to get the change implemented (for example, uninstall the oldserver, install the new server, and so on). When a task is completed, theimplementer of the next task in the sequence is notified of the task assignment.Task implementers can calculate the cost of implementing their tasks.When Allen Allbrook the change requester has verified that the change requestwas resolved satisfactorily, he can set the change request to Closed. If therequester does not close the change request, the request closes automatically aftera preconfigured time. If the change request is part of a dependent sequence, thechange manager for the next change request in the sequence is notified.Before the change request can move out of the Implement stage, the changecoordinator must enter its actual start and end dates, and then assign aperformance rating to the work performed on the change.
5 Closed—The change request enters the Closed stage. The change manager Marymust verify that the change request was completed. She also might analyze key
Change request lifecycle
Chapter 1 Introducing BMC Remedy Change Management 49

performance indicators (KPIs)—for example, whether the change successful, orhow many incidents were resolved by the installation of the new server.Reviewers also must analyze the accuracy of the BMC Atrium CMDB.
User scenariosThis section describes common BMC Remedy IT Service Management user scenariosthat you encounter as IT support staff. Calbro Services user personas help toillustrate the user scenarios. The typical steps described by these user scenarios arein keeping with BMC best practices as outlined by BMC Service ManagementProcess Model (BMC SMPM).
The user scenarios indicate people that are included with sample data. For each ofthese people, the user name is the person's first name, and the password is password.
The user scenarios do not necessarily refer to specific Calbro Services sample data(for information about Calbro Services, see “Calbro Services” on page 50). Tofollow the user scenarios, in some instances, you might need to create your ownsample data (for example, bulk inventory CIs). In addition, you might need to grantadditional permissions to certain users.
Calbro Services
In the BMC Remedy ITSM documentation set, a fictional company named CalbroServices helps explain how BMC Remedy ITSM principles and procedures are usedin practice.
Although Calbro Services is a fictional company, it is based on research of actualBMC Software customers. Learning how Calbro Services manages common ITService Management scenarios should prove useful as you use the BMC RemedyITSM applications in your own environment.
Calbro Services, a large, global company, is headquartered in New York City andpublicly traded on the New York Stock Exchange. The company has 27,000employees in 240 offices located in 20 countries. Table 6 on page 50 describes keybusiness services in Calbro Services.
Table 6: Key business services
Service Description
Online banking 500 ATMs in major cities
WWW presence Corporate site and online brokerage services
User scenarios
50 BMC Remedy Change Management User Guide
Service Description
Discount equity brokerage Online and storefront services
Sales force automation Automated sales activities such as leads, orders, reports,and so on
Customer support Support centers in the United States, Europe, and Asia
Mass marketing World-wide marketing campaigns aimed at makingCalbro Services a household name
BMC Remedy Change Management user scenarios
This section describes at a high-level common BMC Remedy Change Managementuser scenarios that you typically encounter as IT support staff. The Calbro Servicessample data is used to illustrate the user scenarios.
The following user scenarios are provided:
■ “Adding laptop memory” on page 51
■ “Upgrading server hardware” on page 53
■ “Releasing a new software program” on page 55
Adding laptop memory
Joe Unser is an employee at Calbro Services. To improve the performance of hislaptop, he needs 3 GB additional memory added. He submits a request to installmemory for his laptop.
The Calbro Services business process has predefined that this type of change requestdoes not require the standard Review and Business Approval processes. Mary Mannis the change coordinator at Calbro Services. Mary schedules and plans the changerequest. Ian Plyment, who is part of Mary’s Front Office Support team, implementsthe change request.
Table 7 on page 52 describes the typical steps involved in this user scenario.
User scenarios
Chapter 1 Introducing BMC Remedy Change Management 51
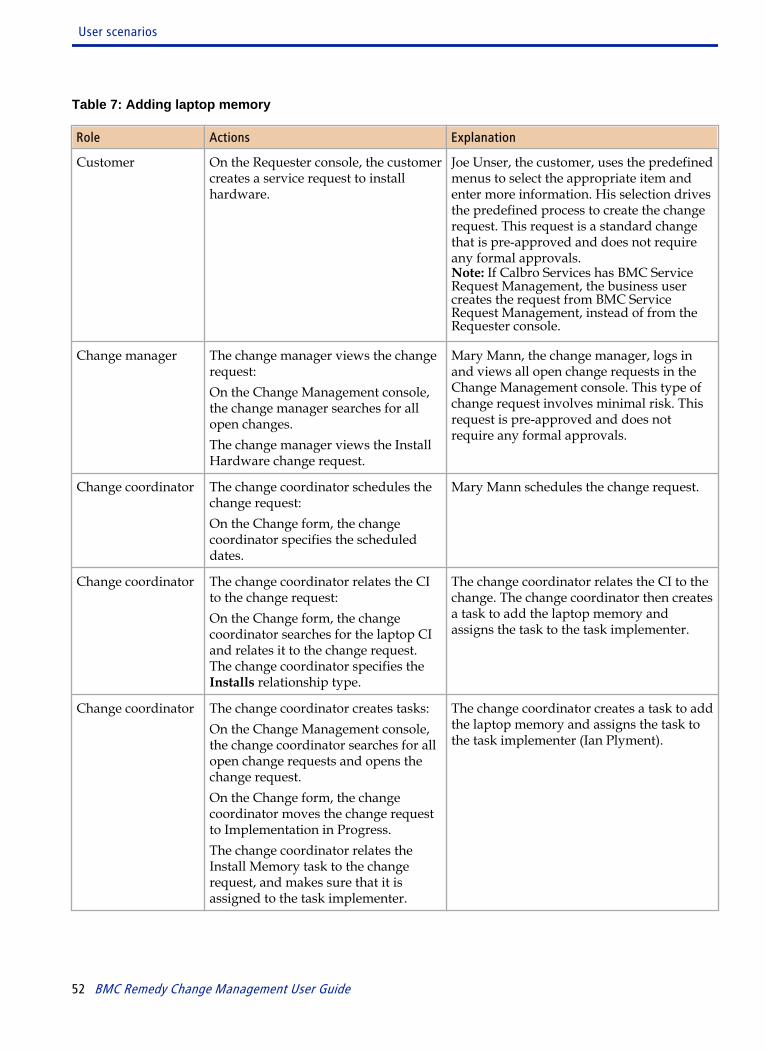
Table 7: Adding laptop memory
Role Actions Explanation
Customer On the Requester console, the customercreates a service request to installhardware.
Joe Unser, the customer, uses the predefinedmenus to select the appropriate item andenter more information. His selection drivesthe predefined process to create the changerequest. This request is a standard changethat is pre-approved and does not requireany formal approvals.Note: If Calbro Services has BMC ServiceRequest Management, the business usercreates the request from BMC ServiceRequest Management, instead of from theRequester console.
Change manager The change manager views the changerequest:On the Change Management console,the change manager searches for allopen changes.The change manager views the InstallHardware change request.
Mary Mann, the change manager, logs inand views all open change requests in theChange Management console. This type ofchange request involves minimal risk. Thisrequest is pre-approved and does notrequire any formal approvals.
Change coordinator The change coordinator schedules thechange request:On the Change form, the changecoordinator specifies the scheduleddates.
Mary Mann schedules the change request.
Change coordinator The change coordinator relates the CIto the change request:On the Change form, the changecoordinator searches for the laptop CIand relates it to the change request.The change coordinator specifies theInstalls relationship type.
The change coordinator relates the CI to thechange. The change coordinator then createsa task to add the laptop memory andassigns the task to the task implementer.
Change coordinator The change coordinator creates tasks:On the Change Management console,the change coordinator searches for allopen change requests and opens thechange request.On the Change form, the changecoordinator moves the change requestto Implementation in Progress.The change coordinator relates theInstall Memory task to the changerequest, and makes sure that it isassigned to the task implementer.
The change coordinator creates a task to addthe laptop memory and assigns the task tothe task implementer (Ian Plyment).
User scenarios
52 BMC Remedy Change Management User Guide
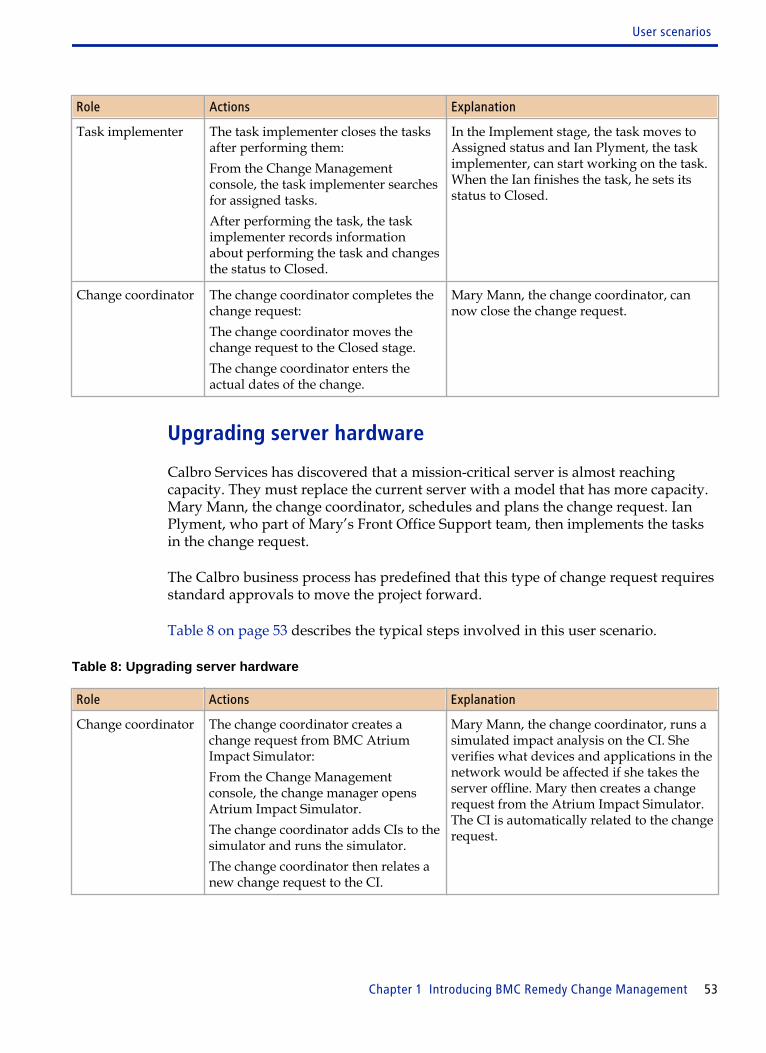
Role Actions Explanation
Task implementer The task implementer closes the tasksafter performing them:From the Change Managementconsole, the task implementer searchesfor assigned tasks.After performing the task, the taskimplementer records informationabout performing the task and changesthe status to Closed.
In the Implement stage, the task moves toAssigned status and Ian Plyment, the taskimplementer, can start working on the task.When the Ian finishes the task, he sets itsstatus to Closed.
Change coordinator The change coordinator completes thechange request:The change coordinator moves thechange request to the Closed stage.The change coordinator enters theactual dates of the change.
Mary Mann, the change coordinator, cannow close the change request.
Upgrading server hardware
Calbro Services has discovered that a mission-critical server is almost reachingcapacity. They must replace the current server with a model that has more capacity.Mary Mann, the change coordinator, schedules and plans the change request. IanPlyment, who part of Mary’s Front Office Support team, then implements the tasksin the change request.
The Calbro business process has predefined that this type of change request requiresstandard approvals to move the project forward.
Table 8 on page 53 describes the typical steps involved in this user scenario.
Table 8: Upgrading server hardware
Role Actions Explanation
Change coordinator The change coordinator creates achange request from BMC AtriumImpact Simulator:From the Change Managementconsole, the change manager opensAtrium Impact Simulator.The change coordinator adds CIs to thesimulator and runs the simulator.The change coordinator then relates anew change request to the CI.
Mary Mann, the change coordinator, runs asimulated impact analysis on the CI. Sheverifies what devices and applications in thenetwork would be affected if she takes theserver offline. Mary then creates a changerequest from the Atrium Impact Simulator.The CI is automatically related to the changerequest.
User scenarios
Chapter 1 Introducing BMC Remedy Change Management 53
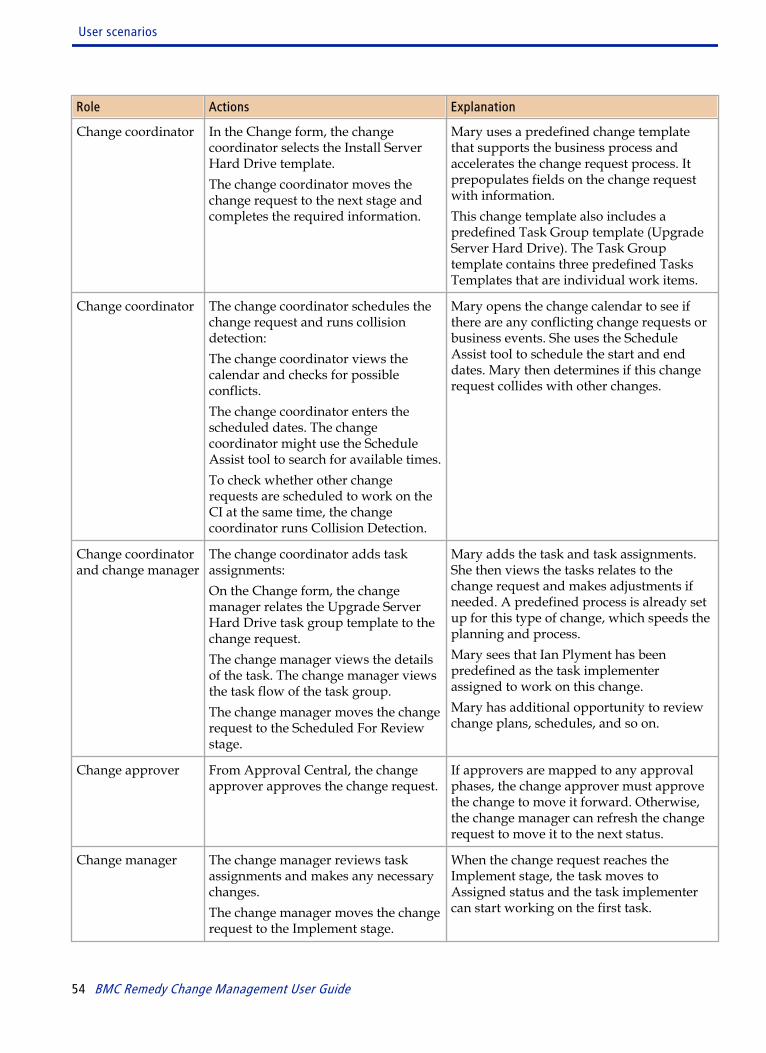
Role Actions Explanation
Change coordinator In the Change form, the changecoordinator selects the Install ServerHard Drive template.The change coordinator moves thechange request to the next stage andcompletes the required information.
Mary uses a predefined change templatethat supports the business process andaccelerates the change request process. Itprepopulates fields on the change requestwith information.This change template also includes apredefined Task Group template (UpgradeServer Hard Drive). The Task Grouptemplate contains three predefined TasksTemplates that are individual work items.
Change coordinator The change coordinator schedules thechange request and runs collisiondetection:The change coordinator views thecalendar and checks for possibleconflicts.The change coordinator enters thescheduled dates. The changecoordinator might use the ScheduleAssist tool to search for available times.To check whether other changerequests are scheduled to work on theCI at the same time, the changecoordinator runs Collision Detection.
Mary opens the change calendar to see ifthere are any conflicting change requests orbusiness events. She uses the ScheduleAssist tool to schedule the start and enddates. Mary then determines if this changerequest collides with other changes.
Change coordinatorand change manager
The change coordinator adds taskassignments:On the Change form, the changemanager relates the Upgrade ServerHard Drive task group template to thechange request.The change manager views the detailsof the task. The change manager viewsthe task flow of the task group.The change manager moves the changerequest to the Scheduled For Reviewstage.
Mary adds the task and task assignments.She then views the tasks relates to thechange request and makes adjustments ifneeded. A predefined process is already setup for this type of change, which speeds theplanning and process.Mary sees that Ian Plyment has beenpredefined as the task implementerassigned to work on this change.Mary has additional opportunity to reviewchange plans, schedules, and so on.
Change approver From Approval Central, the changeapprover approves the change request.
If approvers are mapped to any approvalphases, the change approver must approvethe change to move it forward. Otherwise,the change manager can refresh the changerequest to move it to the next status.
Change manager The change manager reviews taskassignments and makes any necessarychanges.The change manager moves the changerequest to the Implement stage.
When the change request reaches theImplement stage, the task moves toAssigned status and the task implementercan start working on the first task.
User scenarios
54 BMC Remedy Change Management User Guide
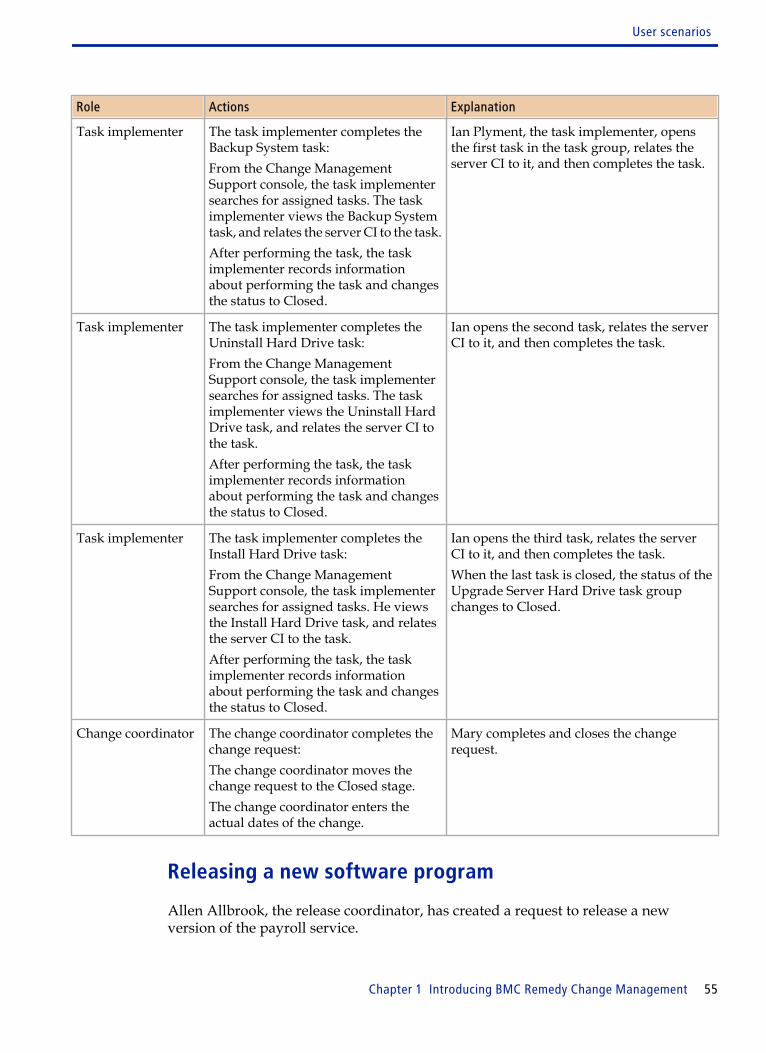
Role Actions Explanation
Task implementer The task implementer completes theBackup System task:From the Change ManagementSupport console, the task implementersearches for assigned tasks. The taskimplementer views the Backup Systemtask, and relates the server CI to the task.After performing the task, the taskimplementer records informationabout performing the task and changesthe status to Closed.
Ian Plyment, the task implementer, opensthe first task in the task group, relates theserver CI to it, and then completes the task.
Task implementer The task implementer completes theUninstall Hard Drive task:From the Change ManagementSupport console, the task implementersearches for assigned tasks. The taskimplementer views the Uninstall HardDrive task, and relates the server CI tothe task.After performing the task, the taskimplementer records informationabout performing the task and changesthe status to Closed.
Ian opens the second task, relates the serverCI to it, and then completes the task.
Task implementer The task implementer completes theInstall Hard Drive task:From the Change ManagementSupport console, the task implementersearches for assigned tasks. He viewsthe Install Hard Drive task, and relatesthe server CI to the task.After performing the task, the taskimplementer records informationabout performing the task and changesthe status to Closed.
Ian opens the third task, relates the serverCI to it, and then completes the task.When the last task is closed, the status of theUpgrade Server Hard Drive task groupchanges to Closed.
Change coordinator The change coordinator completes thechange request:The change coordinator moves thechange request to the Closed stage.The change coordinator enters theactual dates of the change.
Mary completes and closes the changerequest.
Releasing a new software program
Allen Allbrook, the release coordinator, has created a request to release a newversion of the payroll service.
User scenarios
Chapter 1 Introducing BMC Remedy Change Management 55

This release is composed of two work items to be rolled out during the Deploymentmilestone:
■ Install a new server.Allen creates a change request to include in the release manifest.
■ Train the users on the new payroll service.Since this work item is not a change request that needs to be completed by theChange Management team, Allen instead creates an Activity as part of the manifest.
Mary Mann is the change coordinator.
Depending on how your application administrator has configured phases and exitcriteria, the activity and change must be completed in the Deployment milestonebefore the release request can be closed.
Table 9 on page 56 describes the typical steps involved in this user scenario.
Table 9: Releasing a new software program
Role Actions Explanation
Releasecoordinator
From the Release Management console,the release coordinator creates a releaserequest.
Allen creates a new request to add a newPayroll Service and would like it bySeptember 1, 2009. Release starts at the Initiatemilestone. The service will be released inmultiple phases.
Releasecoordinator
On the Release form, the releasecoordinator creates a new change requestand assigns it to the change coordinator.The release coordinator relates the InstallServer task to the change request.On the Release form, the releasecoordinator assigns the activity to theDeployment milestone.The release coordinator can see thechange request listed on the manifest ofthe release.
Allen creates a change request to install thepayroll service on a new server as part of therelease manifest.
Releasecoordinator
On the Release form, the releasecoordinator creates a new activity.The release coordinator assigns thisactivity to the Deployment milestone.The release coordinator can see theactivity listed on the manifest of therelease.
Allen creates an activity to train employees onthe new payroll service as part of the releasemanifest. He assigns the activity to FrancieStafford.
User scenarios
56 BMC Remedy Change Management User Guide
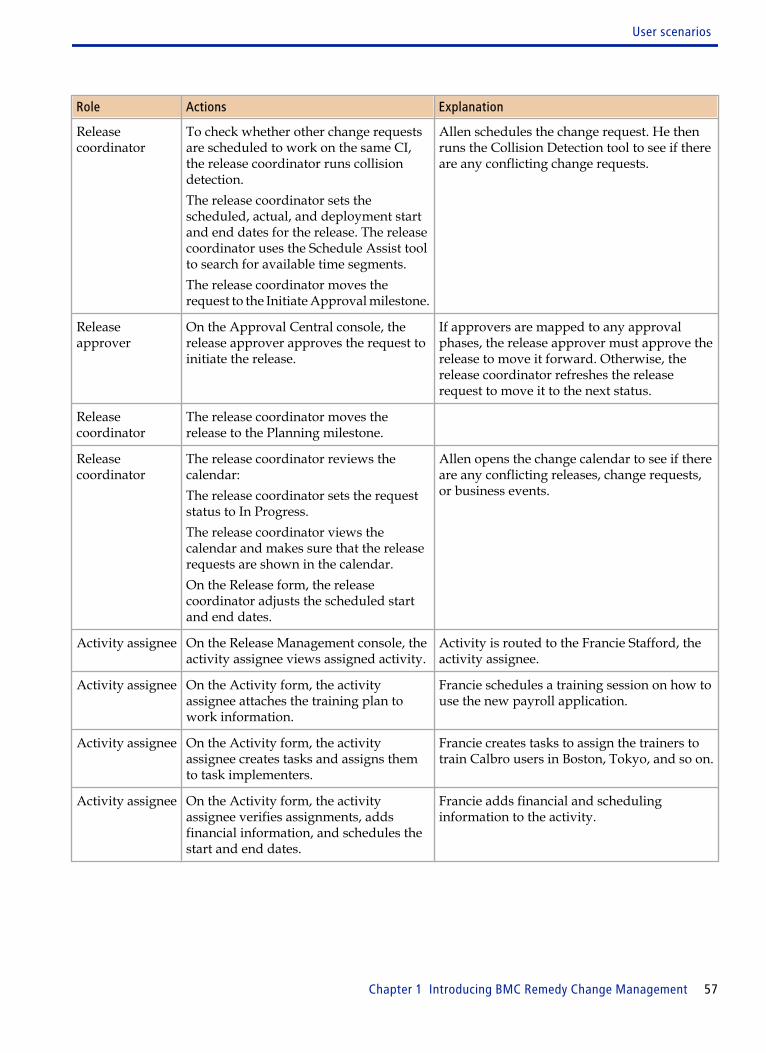
Role Actions Explanation
Releasecoordinator
To check whether other change requestsare scheduled to work on the same CI,the release coordinator runs collisiondetection.The release coordinator sets thescheduled, actual, and deployment startand end dates for the release. The releasecoordinator uses the Schedule Assist toolto search for available time segments.The release coordinator moves therequest to the Initiate Approval milestone.
Allen schedules the change request. He thenruns the Collision Detection tool to see if thereare any conflicting change requests.
Releaseapprover
On the Approval Central console, therelease approver approves the request toinitiate the release.
If approvers are mapped to any approvalphases, the release approver must approve therelease to move it forward. Otherwise, therelease coordinator refreshes the releaserequest to move it to the next status.
Releasecoordinator
The release coordinator moves therelease to the Planning milestone.
Releasecoordinator
The release coordinator reviews thecalendar:The release coordinator sets the requeststatus to In Progress.The release coordinator views thecalendar and makes sure that the releaserequests are shown in the calendar.On the Release form, the releasecoordinator adjusts the scheduled startand end dates.
Allen opens the change calendar to see if thereare any conflicting releases, change requests,or business events.
Activity assignee On the Release Management console, theactivity assignee views assigned activity.
Activity is routed to the Francie Stafford, theactivity assignee.
Activity assignee On the Activity form, the activityassignee attaches the training plan towork information.
Francie schedules a training session on how touse the new payroll application.
Activity assignee On the Activity form, the activityassignee creates tasks and assigns themto task implementers.
Francie creates tasks to assign the trainers totrain Calbro users in Boston, Tokyo, and so on.
Activity assignee On the Activity form, the activityassignee verifies assignments, addsfinancial information, and schedules thestart and end dates.
Francie adds financial and schedulinginformation to the activity.
User scenarios
Chapter 1 Introducing BMC Remedy Change Management 57
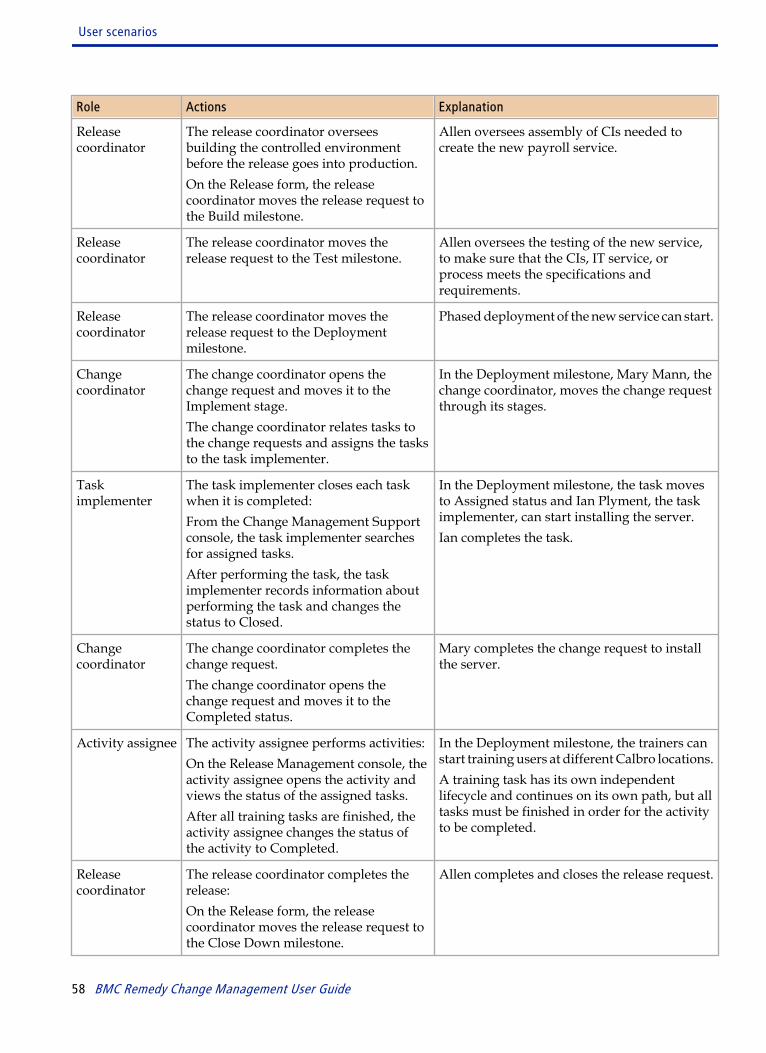
Role Actions Explanation
Releasecoordinator
The release coordinator overseesbuilding the controlled environmentbefore the release goes into production.On the Release form, the releasecoordinator moves the release request tothe Build milestone.
Allen oversees assembly of CIs needed tocreate the new payroll service.
Releasecoordinator
The release coordinator moves therelease request to the Test milestone.
Allen oversees the testing of the new service,to make sure that the CIs, IT service, orprocess meets the specifications andrequirements.
Releasecoordinator
The release coordinator moves therelease request to the Deploymentmilestone.
Phased deployment of the new service can start.
Changecoordinator
The change coordinator opens thechange request and moves it to theImplement stage.The change coordinator relates tasks tothe change requests and assigns the tasksto the task implementer.
In the Deployment milestone, Mary Mann, thechange coordinator, moves the change requestthrough its stages.
Taskimplementer
The task implementer closes each taskwhen it is completed:From the Change Management Supportconsole, the task implementer searchesfor assigned tasks.After performing the task, the taskimplementer records information aboutperforming the task and changes thestatus to Closed.
In the Deployment milestone, the task movesto Assigned status and Ian Plyment, the taskimplementer, can start installing the server.Ian completes the task.
Changecoordinator
The change coordinator completes thechange request.The change coordinator opens thechange request and moves it to theCompleted status.
Mary completes the change request to installthe server.
Activity assignee The activity assignee performs activities:On the Release Management console, theactivity assignee opens the activity andviews the status of the assigned tasks.After all training tasks are finished, theactivity assignee changes the status ofthe activity to Completed.
In the Deployment milestone, the trainers canstart training users at different Calbro locations.A training task has its own independentlifecycle and continues on its own path, but alltasks must be finished in order for the activityto be completed.
Releasecoordinator
The release coordinator completes therelease:On the Release form, the releasecoordinator moves the release request tothe Close Down milestone.
Allen completes and closes the release request.
User scenarios
58 BMC Remedy Change Management User Guide

Introducing Release ManagementThis section helps you get started using Release Management.
About Release ManagementRelease management is the process responsible for planning, scheduling, andcontrolling the movement of releases to test and live environments. ITIL specifiesthat the primary objective of Release Management is to make sure that the integrityof the live environment is protected and that the correct components are released.” Arelease is a collection of related authorized changes to an IT service that are testedand introduced into the live environment together. Release management worksclosely with Configuration Management and Change Management to make sure thatchanges to the IT infrastructure are implemented to keep the functionality andservice levels of the services aligned with the ever-changing business needs of theircustomers.
As part of BMC’s Business Services Management (BSM) strategy, the ReleaseManagement module that is included with BMC Remedy Change Managementincludes built-in ITIL V3 best practices to track and manage change and deploymentactivities. The goal of Release Management is provide enhanced out-of-the-boxsupport for managing standard release activities from request to planning anddesign, build, test, deployment, and acceptance.
Release Management includes default support for managing standard release workitems by:
■ Tracking and managing change and deployment activities
■ Automatically notifying stakeholders at every phase of the release process
■ Contributing to meeting auditable requirements for traceability through servicetransition
■ Delivering changes faster and at an optimum cost and minimized risk
■ Assuring that customers and users can use the new or changed service in a waythat supports the business goals
2
Chapter 2 Introducing Release Management 59
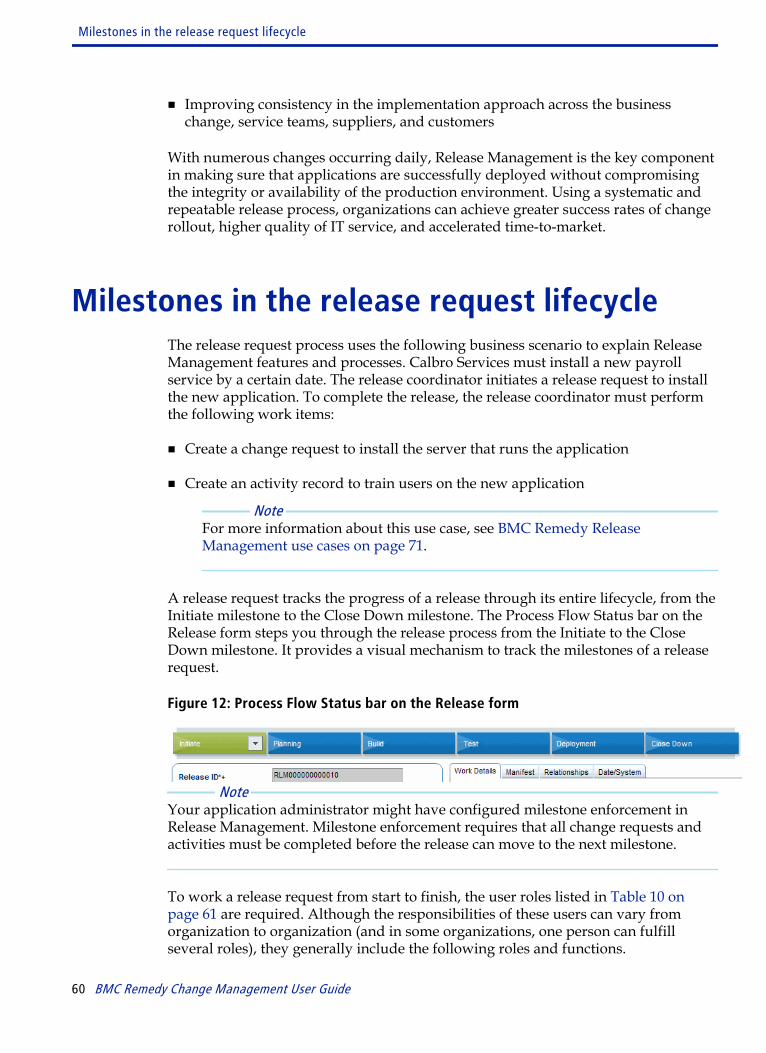
■ Improving consistency in the implementation approach across the businesschange, service teams, suppliers, and customers
With numerous changes occurring daily, Release Management is the key componentin making sure that applications are successfully deployed without compromisingthe integrity or availability of the production environment. Using a systematic andrepeatable release process, organizations can achieve greater success rates of changerollout, higher quality of IT service, and accelerated time-to-market.
Milestones in the release request lifecycleThe release request process uses the following business scenario to explain ReleaseManagement features and processes. Calbro Services must install a new payrollservice by a certain date. The release coordinator initiates a release request to installthe new application. To complete the release, the release coordinator must performthe following work items:
■ Create a change request to install the server that runs the application
■ Create an activity record to train users on the new application
Note For more information about this use case, see BMC Remedy ReleaseManagement use cases on page 71.
A release request tracks the progress of a release through its entire lifecycle, from theInitiate milestone to the Close Down milestone. The Process Flow Status bar on theRelease form steps you through the release process from the Initiate to the CloseDown milestone. It provides a visual mechanism to track the milestones of a releaserequest.
Figure 12: Process Flow Status bar on the Release form
Note Your application administrator might have configured milestone enforcement inRelease Management. Milestone enforcement requires that all change requests andactivities must be completed before the release can move to the next milestone.
To work a release request from start to finish, the user roles listed in Table 10 onpage 61 are required. Although the responsibilities of these users can vary fromorganization to organization (and in some organizations, one person can fulfillseveral roles), they generally include the following roles and functions.
Milestones in the release request lifecycle
60 BMC Remedy Change Management User Guide

Tip If the Calbro Services sample data is installed on your server, you can log in toRelease Management as these users and follow the use cases with some simplemodifications in their permissions.
Table 10: IT Support user roles
User Releasemanagement role
Function More information
AllenAllbrook
ReleaseCoordinator
Reviews the RFCs for the services for which he acts asthe release coordinator after they have been passed onfrom Change Management. He organizes andfacilitates the CAB meetings for the services for whichhe acts as the release coordinator. Allen splits therequirements of releases into logical groups that canbe handled efficiently by change managers. Heprepares a business case for a new release whenadditional funding is needed for its implementation.He initiates the implementation of releases anddecides on corrective actions as needed. Finally, heorganizes and conducts post-implementationmeetings to collect improvement suggestions forfuture releases.Note: Make sure that Allen Allbrook has ReleaseMaster or Release User permissions.
Working as arelease coordinatoron page 275
MaryMann
Change Manager Reviews the risk and impact analysis to make surethat this has been performed thoroughly. Mary makessure that appropriate actions have been planned tominimize both the risk of failure and the impact onusers during change implementations. She makessure that the timing of planned implementations doesnot conflict with other planned changes or events.Finally, Mary obtains approval for changes.Mary uses the Change Management Console tohandle the specific details of the change request. IfMary is given Release Viewer or Release Userpermissions, she can use the Release ManagementConsole to review the overall details of the releaserequest.
Working withchange requestassignments onpage 211
IanPlyment
Task Implementer Support staff member who performs the tasksassociated with a change request. In this example,Ian’s responsibility is to install the new server.
Working withBMC RemedyChangeManagement as atask implementeron page 341
Milestones in the release request lifecycle
Chapter 2 Introducing Release Management 61
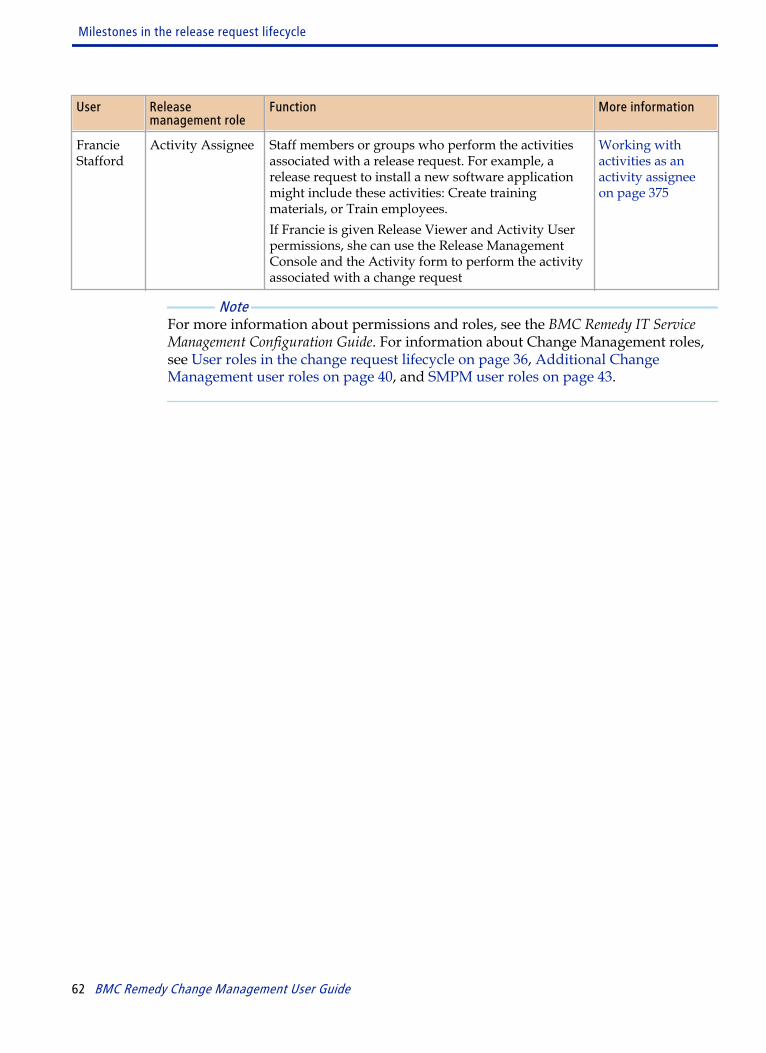
User Releasemanagement role
Function More information
FrancieStafford
Activity Assignee Staff members or groups who perform the activitiesassociated with a release request. For example, arelease request to install a new software applicationmight include these activities: Create trainingmaterials, or Train employees.If Francie is given Release Viewer and Activity Userpermissions, she can use the Release ManagementConsole and the Activity form to perform the activityassociated with a change request
Working withactivities as anactivity assigneeon page 375
Note For more information about permissions and roles, see the BMC Remedy IT ServiceManagement Configuration Guide. For information about Change Management roles,see User roles in the change request lifecycle on page 36, Additional ChangeManagement user roles on page 40, and SMPM user roles on page 43.
Milestones in the release request lifecycle
62 BMC Remedy Change Management User Guide
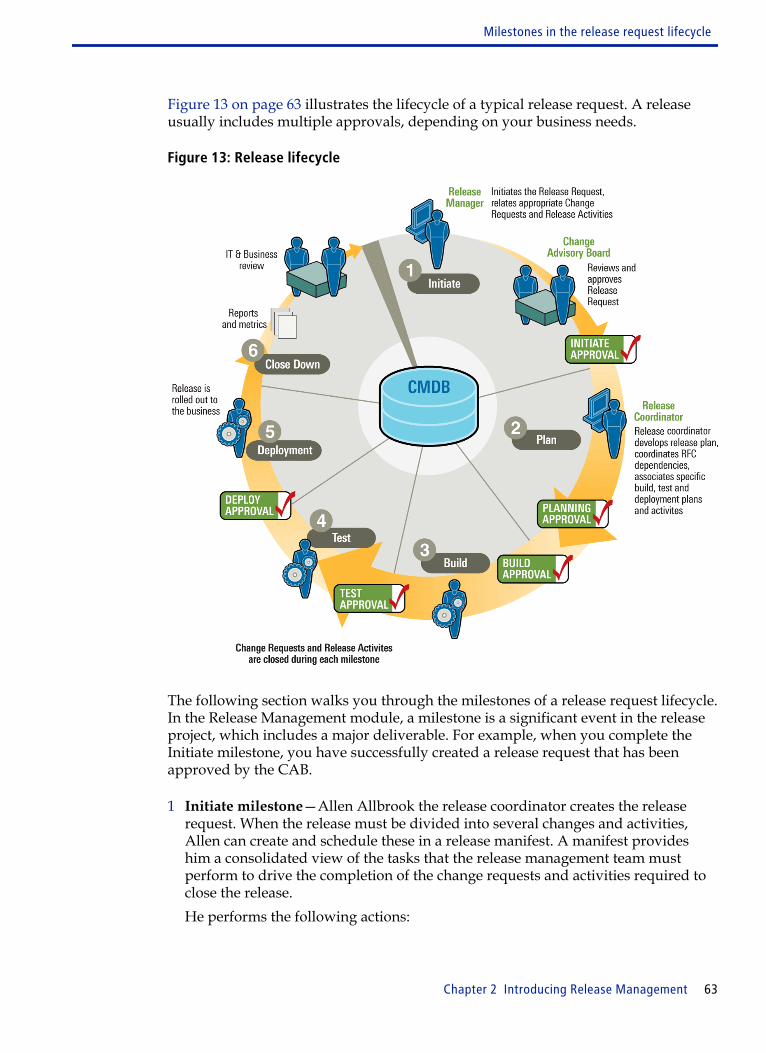
Figure 13 on page 63 illustrates the lifecycle of a typical release request. A releaseusually includes multiple approvals, depending on your business needs.
Figure 13: Release lifecycle
The following section walks you through the milestones of a release request lifecycle.In the Release Management module, a milestone is a significant event in the releaseproject, which includes a major deliverable. For example, when you complete theInitiate milestone, you have successfully created a release request that has beenapproved by the CAB.
1 Initiate milestone—Allen Allbrook the release coordinator creates the releaserequest. When the release must be divided into several changes and activities,Allen can create and schedule these in a release manifest. A manifest provideshim a consolidated view of the tasks that the release management team mustperform to drive the completion of the change requests and activities required toclose the release.He performs the following actions:
Milestones in the release request lifecycle
Chapter 2 Introducing Release Management 63
■ Creates a change request to install the new server for the payroll service at theDeployment milestone. He assigns the change request to Mary Mann, thechange manager.
■ Creates an activity to train employees on the new payroll service. He assigns itto Francie Stafford, the activity assignee.If an unforeseen situation arises that he did not anticipate, he can create or addchanges and activities at later milestones.
Note If your application administrator has configured milestone phases, you canspecify that staff must work on their change requests and activities at a certainphase (for example, installing the server at Phase 1 or training users at Phase 5of the Deployment milestone). But no phases are mapped out-of-the-box forCalbro Services.
He then blocks out a time segment to work on the release by indicating thescheduled start and end dates. Larger projects can include planning all thereleases and changes approved for implementation. He then budgets theestimated costs and rolls up the risk level from all the related change requests.Release Management provides rollup of all costs, budgets, time, and resources.Collision detection is automatically run when he saves the release. TheCollision Detection tool determines if there are other change requestsscheduled to work on the same CI during the same scheduled time, and helpshim manage and resolve these potentially harmful conflicting change requests.
Note If an approver is mapped to the approval phase, the release approver mustapprove the release request before it can move to the Planning milestone. Butno release approvers are mapped out-of-the-box for Calbro Services. Yourapplication administrator must configure them. For more information, see Working with BMC Remedy Change Management as an approver on page 355.
2 Plan milestone—Allen reviews the release plan. He opens the Change Calendarand views the current schedule of releases, change requests, and business eventsfor any potential conflicts. He adjusts the start and end dates accordingly.Allen reviews these requests for change with Mary Mann, the change manager ofthe service for which the release is to be implemented. Together they divide therequirements of the different RFCs amongst them and they draft a high-levelimplementation plan that indicates the duration of each change, and thedependencies between these changes.Francie Stafford the activity assignee plans to add training tasks to the activitythat will be implemented in the last deployment phase. Trainers must providetraining and user documentation to all Calbro Services staff. She includes costsand attaches a training schedule in the activity.
Milestones in the release request lifecycle
64 BMC Remedy Change Management User Guide

3 Build milestone—Allen establishes the approach to building the controlledenvironments before the release goes into production. For example, after a changehas been approved, he oversees the final build delivery of the new service. TheBuild milestone assembles the CIs that are needed to create the release packagebefore it goes into service.
4 Test milestone—The release coordinator makes sure that the CIs, IT service, orprocess meet their specifications and requirements. When all the tests have beencompleted satisfactorily, the release coordinator seeks approval from BMCRemedy Change Management for the actual deployment.
5 Deployment milestone—Release is rolled out to the Business. In this use case, thechange request and release activity that make up the release are marked Closedduring the Deployment milestone:
■ Mary Mann the change manager opens the change request and moves it to theImplement stage. She creates the installation task and assigns it to Ian Plyment,the task implementer. He installs the new server. Mary then closes the changerequest.
■ Francie Stafford the activity assignee executes the training activity. When allthe trainers finish their tasks, she marks the activity as Completed.
6 Close Down milestone—The release request enters the Close Down milestone.Reviewers provide feedback on the effectiveness of the release, and record metricsfor deployment to make sure the release met its service targets. Allen verifiesthere is minimal unpredicted impact to the IT infrastructure and makes sure theusers are satisfied with the user documentation and training.
Release Management form viewsBMC Remedy Release Management provides you with different ways to view theRelease Management form:
■ Best Practice view
■ Classic view
The view that you see is configured for you by your system administrator. The BestPractice view is the default view. For a description of the Best Practice view, see BestPractice view—Release Request form on page 66. For a description of the Classicview, see Classic view—Release Request form on page 67.
Release Management form views
Chapter 2 Introducing Release Management 65
Note When documenting procedures in this guide, if there is a difference between how todo something in the Best Practice view and how to do it in the Classic view, bothmethods are described. Instructions for the Best Practice view are provided first.
Best Practice view—Release Request form
The Best Practice view is an improved version of the Release Management form. Inthis view, the fields most commonly used for creating release requests areimmediately visible. You can access additional, less frequently used functionalityfrom the tabbed sections of the form or from the links in the Navigation pane.
Figure 14 on page 67 illustrates the Best Practice view.
The following list outlines Best Practice view features:
■ Coordinator Group field—Use the Coordinator Group field to select a supportgroup. The support groups that appear in the menu each have at least onemember with a Release Coordinator functional role. From the Coordinator Groupmenu, you select the company, the organization, and then the support group.Only the selected support group name appears in the Coordinator Group field.You can type only a few characters and press Enter. If a unique match is found,the field is populated with the value or a list of coordinator groups is displayedfrom which you can select a value, if multiple matches are found.
■ Release Coordinator field—Use the Release Coordinator field to select a ReleaseCoordinator. The people whose names appear on this menu belong to the supportgroup selected in the Coordinator Group field and have a Release Coordinatorfunctional role. You can type only a few characters and press Enter. If a uniquematch is found, the field is populated or if multiple matches are found a list ofrelease coordinators belonging to the selected coordinator group is displayedfrom which you can select a value.
■ Service field—The Service field relates business service configuration items (CIs)to the release at the time it is created.
■ Template field—The Template field encourages the use of templates. Forinformation about the benefits of using templates and how to select a template fora release request, see Selecting release templates on page 448.
■ Business Justification—The Business Justification field indicates the businessreason for the release request. It specifies the importance of the release so that theapprovers can assess its magnitude.
Release Management form views
66 BMC Remedy Change Management User Guide
Best practice The Best Practice view is recommended for all BMC Remedy Release Managementusers, regardless of their role.Figure 14: Release Request form—Best Practice view
Classic view—Release Request form
The Classic view is the Release Management Console as it appeared in previousreleases of BMC Remedy Release Management. This view is provided for customerswho are upgrading from earlier versions of BMC Remedy Release Management andwho are not yet ready to adopt the Best Practice view.
A new functional role, Release Coordinator, has been introduced in BMC RemedyRelease Management version 7.6.00. The following fields corresponding to this rolehave been added to the classic view:
■ Coordinator Group
■ Release Coordinator
Release Management form views
Chapter 2 Introducing Release Management 67

These fields replace the Release Manager field on the Assignment tab in the ReleaseRequest form.
Figure 15 on page 68 illustrates the Classic view.
Figure 15: Release Request form—Classic view
Best practices for managing release requests- Using this guide
As with BMC Remedy Change Management, the Release Management module is role-based. What applications you can access, and how much information you can viewor modify is dependent upon your role. As the Process Flow Status bar steps youthrough the milestones of a release request, different roles perform different tasks.The Release Coordinator creates the release request at the Initiate milestone, theRelease Approver approves the release at the Build milestone, and the ActivityAssignee completes the activity at the Deployment milestone.
Best practices for managing release requests - Using this guide
68 BMC Remedy Change Management User Guide
Note Defining approvals at the Build milestone is a best practice. However, approvals canbe defined at each milestone of the Release Management process.
Figure 16: Using the Process Flow Status bar in the milestones of a release request
How each person uses Release Management depends on their role. Figure 17 onpage 69 illustrates the different Release Management support staff roles. It alsoshows where each role fits into the milestones of the release request lifecycle.
Figure 17: BMC Remedy Release Management support and management roles
Best practice To simplify the release request process, Table 11 on page 70 navigates you throughthe BMC Remedy Change and Release Management User’s Guide. It provides a map ofbest practices which BMC recommends that you should follow, when you use theRelease Management module.
Note Approvals might not apply to all milestones in a release request. For example, yousee a Build approval if the application administrator mapped an approver to theBuild approval phase.
Best practices for managing release requests - Using this guide
Chapter 2 Introducing Release Management 69
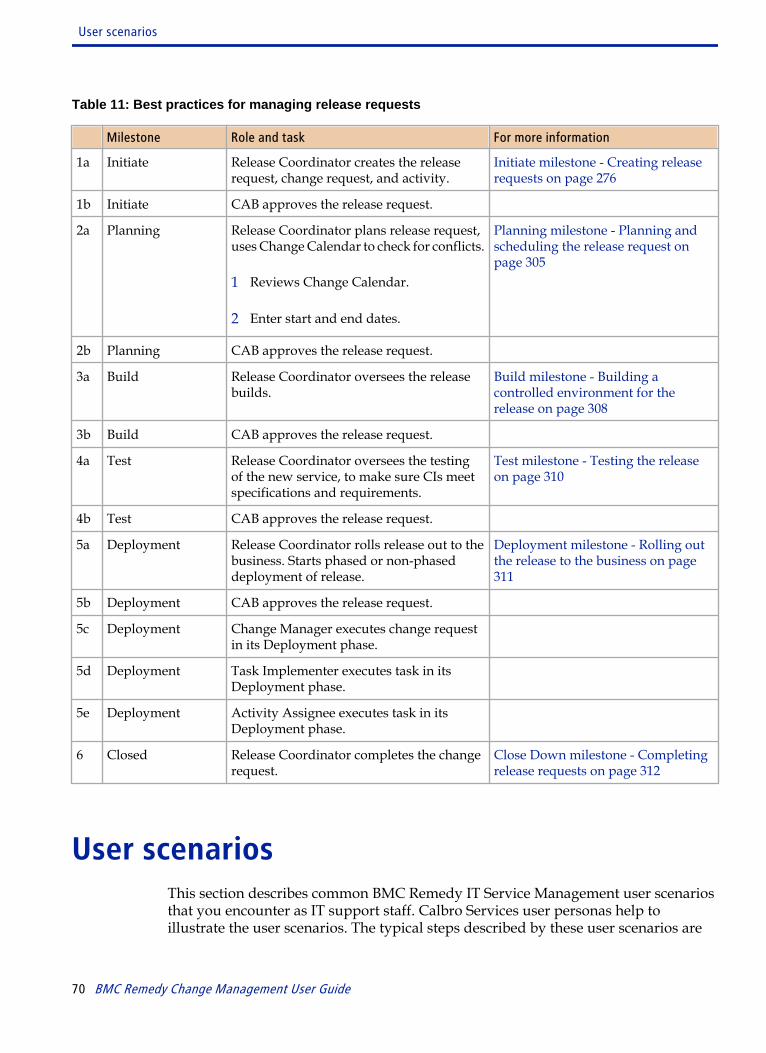
Table 11: Best practices for managing release requests
Milestone Role and task For more information
1a Initiate Release Coordinator creates the releaserequest, change request, and activity.
Initiate milestone - Creating releaserequests on page 276
1b Initiate CAB approves the release request.
2a Planning Release Coordinator plans release request,uses Change Calendar to check for conflicts.
1 Reviews Change Calendar.
2 Enter start and end dates.
Planning milestone - Planning andscheduling the release request onpage 305
2b Planning CAB approves the release request.
3a Build Release Coordinator oversees the releasebuilds.
Build milestone - Building acontrolled environment for therelease on page 308
3b Build CAB approves the release request.
4a Test Release Coordinator oversees the testingof the new service, to make sure CIs meetspecifications and requirements.
Test milestone - Testing the releaseon page 310
4b Test CAB approves the release request.
5a Deployment Release Coordinator rolls release out to thebusiness. Starts phased or non-phaseddeployment of release.
Deployment milestone - Rolling outthe release to the business on page311
5b Deployment CAB approves the release request.
5c Deployment Change Manager executes change requestin its Deployment phase.
5d Deployment Task Implementer executes task in itsDeployment phase.
5e Deployment Activity Assignee executes task in itsDeployment phase.
6 Closed Release Coordinator completes the changerequest.
Close Down milestone - Completingrelease requests on page 312
User scenariosThis section describes common BMC Remedy IT Service Management user scenariosthat you encounter as IT support staff. Calbro Services user personas help toillustrate the user scenarios. The typical steps described by these user scenarios are
User scenarios
70 BMC Remedy Change Management User Guide

in keeping with BMC best practices as outlined by BMC Service ManagementProcess Model (BMC SMPM).
The user scenarios indicate people that are included with sample data. For each ofthese people, the user name is the person's first name, and the password is password.
The user scenarios do not necessarily refer to specific Calbro Services sample data(for information about Calbro Services, see “Calbro Services” on page 50). To followthe user scenarios, in some instances, you might need to create your own sampledata (for example, bulk inventory CIs). In addition, you might need to grantadditional permissions to certain users.
BMC Remedy Release Management use cases
The following sections describe at a high-level common BMC Remedy ReleaseManagement use cases that you typically encounter as IT support staff. The CalbroServices sample data is used to illustrate the use cases. The Explanation columnprovides relevant cross-references in the BMC Remedy Change and Release ManagementUser’s Guide for more details.
For other use cases that involve Change Management and the Calbro Services userdata, see “BMC Remedy Change Management user scenarios” on page 51. For usecases that demonstrate how BMC Remedy Release Management integrates withother products in the BMC Remedy ITSM suite, see the BMC IT Service ManagementConcepts Guide.
Releasing a new software program
Allen Allbrook, the release coordinator, has created a request to release a newversion of the payroll service.
This release is composed of two work items to be rolled out during the Deploymentmilestone:
■ Install a new server.Allen creates a change request to include in the release manifest.
■ Train the users on the new payroll service.Since this work item is not a change request that needs to be completed by theChange Management team, Allen instead creates an Activity as part of the manifest.
Mary Mann is the change coordinator.
User scenarios
Chapter 2 Introducing Release Management 71
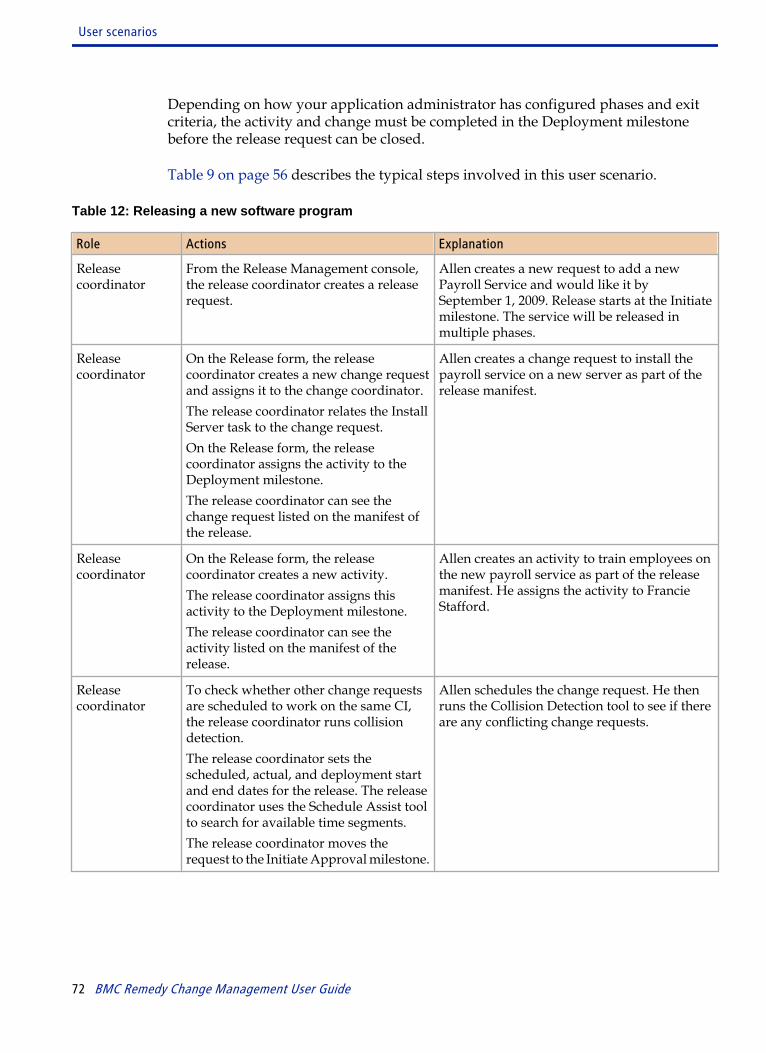
Depending on how your application administrator has configured phases and exitcriteria, the activity and change must be completed in the Deployment milestonebefore the release request can be closed.
Table 9 on page 56 describes the typical steps involved in this user scenario.
Table 12: Releasing a new software program
Role Actions Explanation
Releasecoordinator
From the Release Management console,the release coordinator creates a releaserequest.
Allen creates a new request to add a newPayroll Service and would like it bySeptember 1, 2009. Release starts at the Initiatemilestone. The service will be released inmultiple phases.
Releasecoordinator
On the Release form, the releasecoordinator creates a new change requestand assigns it to the change coordinator.The release coordinator relates the InstallServer task to the change request.On the Release form, the releasecoordinator assigns the activity to theDeployment milestone.The release coordinator can see thechange request listed on the manifest ofthe release.
Allen creates a change request to install thepayroll service on a new server as part of therelease manifest.
Releasecoordinator
On the Release form, the releasecoordinator creates a new activity.The release coordinator assigns thisactivity to the Deployment milestone.The release coordinator can see theactivity listed on the manifest of therelease.
Allen creates an activity to train employees onthe new payroll service as part of the releasemanifest. He assigns the activity to FrancieStafford.
Releasecoordinator
To check whether other change requestsare scheduled to work on the same CI,the release coordinator runs collisiondetection.The release coordinator sets thescheduled, actual, and deployment startand end dates for the release. The releasecoordinator uses the Schedule Assist toolto search for available time segments.The release coordinator moves therequest to the Initiate Approval milestone.
Allen schedules the change request. He thenruns the Collision Detection tool to see if thereare any conflicting change requests.
User scenarios
72 BMC Remedy Change Management User Guide

Role Actions Explanation
Releaseapprover
On the Approval Central console, therelease approver approves the request toinitiate the release.
If approvers are mapped to any approvalphases, the release approver must approve therelease to move it forward. Otherwise, therelease coordinator refreshes the releaserequest to move it to the next status.
Releasecoordinator
The release coordinator moves therelease to the Planning milestone.
Releasecoordinator
The release coordinator reviews thecalendar:The release coordinator sets the requeststatus to In Progress.The release coordinator views thecalendar and makes sure that the releaserequests are shown in the calendar.On the Release form, the releasecoordinator adjusts the scheduled startand end dates.
Allen opens the change calendar to see if thereare any conflicting releases, change requests,or business events.
Activity assignee On the Release Management console, theactivity assignee views assigned activity.
Activity is routed to the Francie Stafford, theactivity assignee.
Activity assignee On the Activity form, the activityassignee attaches the training plan towork information.
Francie schedules a training session on how touse the new payroll application.
Activity assignee On the Activity form, the activityassignee creates tasks and assigns themto task implementers.
Francie creates tasks to assign the trainers totrain Calbro users in Boston, Tokyo, and so on.
Activity assignee On the Activity form, the activityassignee verifies assignments, addsfinancial information, and schedules thestart and end dates.
Francie adds financial and schedulinginformation to the activity.
Releasecoordinator
The release coordinator overseesbuilding the controlled environmentbefore the release goes into production.On the Release form, the releasecoordinator moves the release request tothe Build milestone.
Allen oversees assembly of CIs needed tocreate the new payroll service.
Releasecoordinator
The release coordinator moves therelease request to the Test milestone.
Allen oversees the testing of the new service,to make sure that the CIs, IT service, orprocess meets the specifications andrequirements.
Releasecoordinator
The release coordinator moves therelease request to the Deploymentmilestone.
Phased deployment of the new service can start.
User scenarios
Chapter 2 Introducing Release Management 73

Role Actions Explanation
Changecoordinator
The change coordinator opens thechange request and moves it to theImplement stage.The change coordinator relates tasks tothe change requests and assigns the tasksto the task implementer.
In the Deployment milestone, Mary Mann, thechange coordinator, moves the change requestthrough its stages.
Taskimplementer
The task implementer closes each taskwhen it is completed:From the Change Management Supportconsole, the task implementer searchesfor assigned tasks.After performing the task, the taskimplementer records information aboutperforming the task and changes thestatus to Closed.
In the Deployment milestone, the task movesto Assigned status and Ian Plyment, the taskimplementer, can start installing the server.Ian completes the task.
Changecoordinator
The change coordinator completes thechange request.The change coordinator opens thechange request and moves it to theCompleted status.
Mary completes the change request to installthe server.
Activity assignee The activity assignee performs activities:On the Release Management console, theactivity assignee opens the activity andviews the status of the assigned tasks.After all training tasks are finished, theactivity assignee changes the status ofthe activity to Completed.
In the Deployment milestone, the trainers canstart training users at different Calbro locations.A training task has its own independentlifecycle and continues on its own path, but alltasks must be finished in order for the activityto be completed.
Releasecoordinator
The release coordinator completes therelease:On the Release form, the releasecoordinator moves the release request tothe Close Down milestone.
Allen completes and closes the release request.
User scenarios
74 BMC Remedy Change Management User Guide
Using the Change ManagementConsole and the Change form
This section contains information about getting started with BMC Remedy ChangeManagement, including information about using the Change Management Console,the Change form, and the Overview Console.
About the IT Home PageWhen you start the BMC Remedy IT Service Management Suite, the IT Home Pagedisplays the Overview console by default. However, you can set up what you wantto see on the IT Home Page. If you are a system administrator, you can configure thepage for all users. Otherwise, you can configure your own user ID to see your views.
3
Chapter 3 Using the Change Management Console and the Change form 75
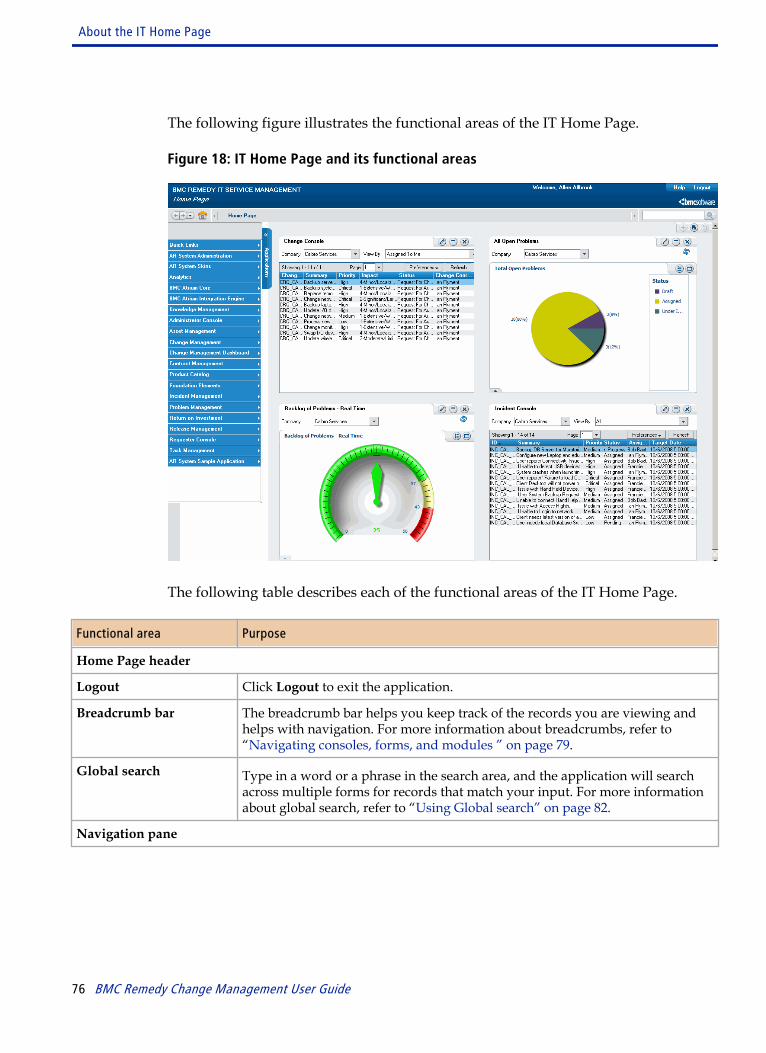
The following figure illustrates the functional areas of the IT Home Page.
Figure 18: IT Home Page and its functional areas
The following table describes each of the functional areas of the IT Home Page.
Functional area Purpose
Home Page header
Logout Click Logout to exit the application.
Breadcrumb bar The breadcrumb bar helps you keep track of the records you are viewing andhelps with navigation. For more information about breadcrumbs, refer to “Navigating consoles, forms, and modules ” on page 79.
Global search Type in a word or a phrase in the search area, and the application will searchacross multiple forms for records that match your input. For more informationabout global search, refer to “Using Global search” on page 82.
Navigation pane
About the IT Home Page
76 BMC Remedy Change Management User Guide
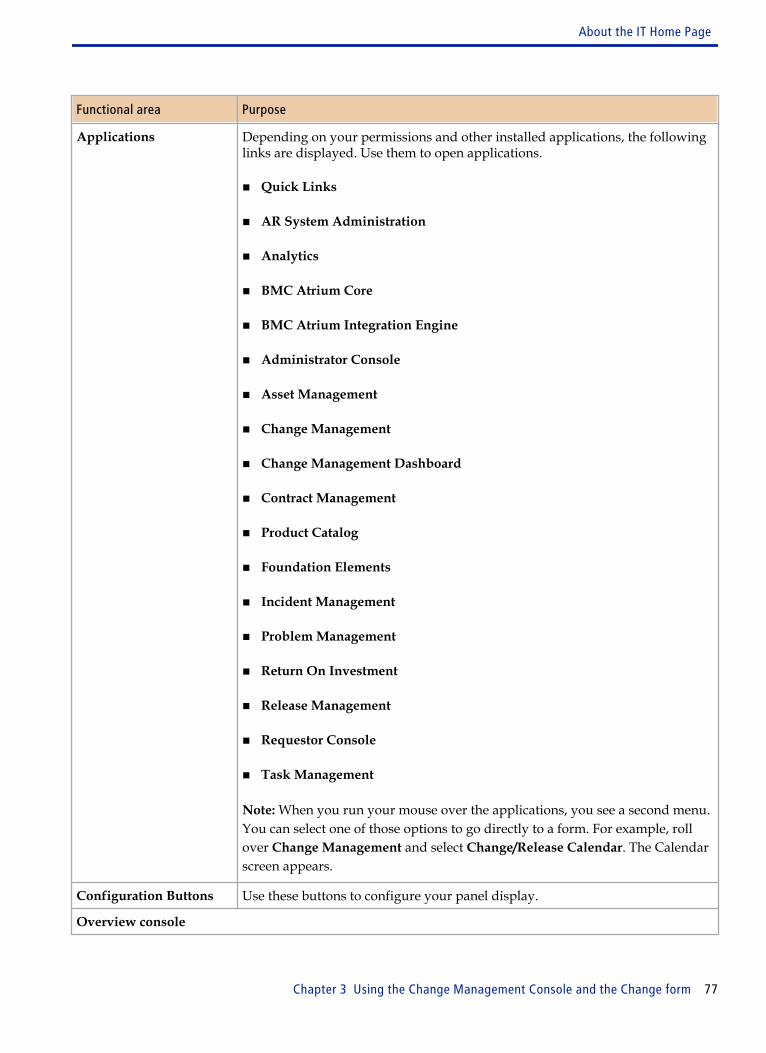
Functional area Purpose
Applications Depending on your permissions and other installed applications, the followinglinks are displayed. Use them to open applications.
■ Quick Links
■ AR System Administration
■ Analytics
■ BMC Atrium Core
■ BMC Atrium Integration Engine
■ Administrator Console
■ Asset Management
■ Change Management
■ Change Management Dashboard
■ Contract Management
■ Product Catalog
■ Foundation Elements
■ Incident Management
■ Problem Management
■ Return On Investment
■ Release Management
■ Requestor Console
■ Task Management
Note: When you run your mouse over the applications, you see a second menu.You can select one of those options to go directly to a form. For example, rollover Change Management and select Change/Release Calendar. The Calendarscreen appears.
Configuration Buttons Use these buttons to configure your panel display.
Overview console
About the IT Home Page
Chapter 3 Using the Change Management Console and the Change form 77
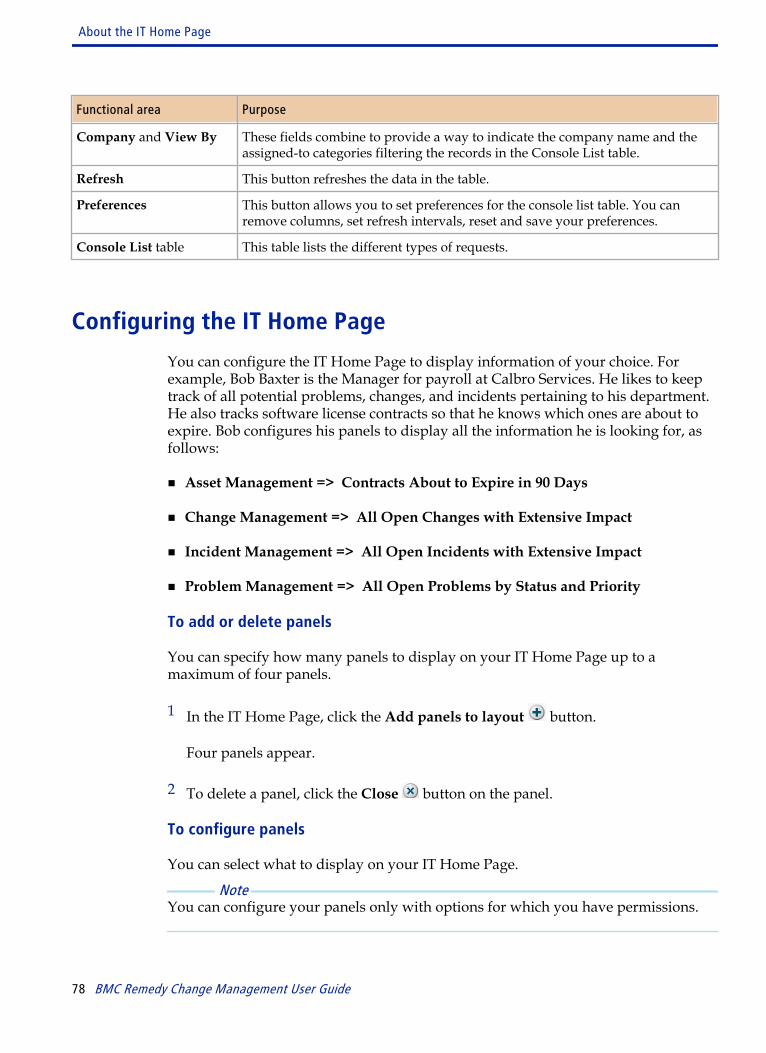
Functional area Purpose
Company and View By These fields combine to provide a way to indicate the company name and theassigned-to categories filtering the records in the Console List table.
Refresh This button refreshes the data in the table.
Preferences This button allows you to set preferences for the console list table. You canremove columns, set refresh intervals, reset and save your preferences.
Console List table This table lists the different types of requests.
Configuring the IT Home Page
You can configure the IT Home Page to display information of your choice. Forexample, Bob Baxter is the Manager for payroll at Calbro Services. He likes to keeptrack of all potential problems, changes, and incidents pertaining to his department.He also tracks software license contracts so that he knows which ones are about toexpire. Bob configures his panels to display all the information he is looking for, asfollows:
■ Asset Management => Contracts About to Expire in 90 Days
■ Change Management => All Open Changes with Extensive Impact
■ Incident Management => All Open Incidents with Extensive Impact
■ Problem Management => All Open Problems by Status and Priority
To add or delete panels
You can specify how many panels to display on your IT Home Page up to amaximum of four panels.
1 In the IT Home Page, click the Add panels to layout button.
Four panels appear.
2 To delete a panel, click the Close button on the panel.
To configure panels
You can select what to display on your IT Home Page.
Note You can configure your panels only with options for which you have permissions.
About the IT Home Page
78 BMC Remedy Change Management User Guide

1 In the panel, click the Show list and run your cursor over the list of options.
2 From the list of work areas for each option, select the one to display (for example,Asset Management => Software Certificates).
The panel displays your selection.
3 Repeat Step 1 to for your other panels.
To change display on a panel, click the Edit button to display the Show list,and make another selection.
4 Click the Save Current Layout button to save your IT Home Page.
A dialog box confirms that your customized layout has been saved.
5 Click OK.
When you next log in, you will see your saved IT Home Page.
To expand and collapse panels
1 In the panel, click the Collapse button. The panel will collapse. In the panelclick the Expand button. The panel will expand to its original size.
To restore a default IT Home Page view
1 In the IT Home Page, click the Restore Default Layout button. A dialog boxinforms you that the default layout for this page will be brought back. Click OKto proceed or Cancel to retain your current layout. If you click OK, the panels onthe IT Home Page disappear and the Overview Console is displayed.
To hide or show the navigation pane
1 In the IT Home Page, click the Applications button to hide or show thenavigation pane.
Navigating consoles, forms, and modulesThis section describes how to navigate around BMC Remedy ITSM consoles, forms,and modules.
Navigating consoles, forms, and modules
Chapter 3 Using the Change Management Console and the Change form 79
In most cases, when you open consoles, forms, and modules from the IT Home page,they open inside the IT Home page view. Similarly, if you open a form from aconsole, the form replaces the console in the view.
If you open a related record from a form, the related record opens in the view thatwas occupied by the form. For example, if you are working with a probleminvestigation (the "parent" record) and from the parent record you open a relatedincident request, the incident request replaces the parent record in the view. If youthen open a change request from the incident request, the change request replacesthe incident request in the view, and so on. To help you keep track of the recordsyou are viewing and to help with navigation, there is a breadcrumb bar across thetop of the view field.
Note Not all of the consoles, forms, and modules open in the view area. For example, theBMC Remedy AR System Approval Central module opens in a new window. Whena console, module, or form opens in a window, it is not added to the breadcrumb bar.
The breadcrumb bar contains links to the records that you opened from the parentrecord. When you open a record, the breadcrumb trail expands along thebreadcrumb bar to the right, with the new link. If there are more than six links in thebreadcrumb trail, arrows appear at one or both ends of the bar that let you scrollback and forward on the bar to see links not currently in the view.
The first link in the breadcrumb trail indicates the place from which you started. Itcan be a console or a form. For example, if you open a change request record directlyfrom the IT Home page, the first link in the breadcrumb trail takes you to the changerequest.
The last link corresponds to the record currently in the view. If you open a link to theleft of the record currently in view, the system truncates the breadcrumb trail to thatlink. The history is retained, however, so you can use the back and forward arrowsin the navigation controls to move through the bar one record at a time. There is alsoa history of your most recently viewed records, which you can use to move directlyto a record. Click the down arrow to open the history list.
Note The Forward button is only visible after you move back down the breadcrumb barby opening a link to a record that you previously viewed.
Figure 19: The breadcrumb navigation buttons and bar
If you are viewing a record from the middle of the breadcrumb trail and then branchoff to another parent-type record, the system removes the forward breadcrumb trailfrom the point where you branched off and starts a new history from there, using thenew parent-type record as the starting point. For example: You open a probleminvestigation, then open a related incident request, and from the incident request
Navigating consoles, forms, and modules
80 BMC Remedy Change Management User Guide
you open a related change request. If you go back to the incident request record andthen open a second problem investigation, the breadcrumb bar no longer contains alink to the change request. The breadcrumb trail now shows the original probleminvestigation, the incident request, and the second problem investigation. It thenshows any related records that you subsequently open from the second probleminvestigation.
When you close the parent record, the system removes the breadcrumb history.
What happens to data as I move back and forth on thebreadcrumb trail?
If you are entering information into a record and open another record from thebreadcrumb trail, the system prompts you to save the work, if you have not done so.If you do not save the information, the system does not preserve it on the record andyou must re-enter it later.
If someone updates a record on your breadcrumb trail that is not currently in theview, those changes are visible to you when you open the record again.
How does the breadcrumb trail behave with forms inSearch mode?
If you run a search from a form that is in Search mode, the last entry in thebreadcrumb trail is the name of the form.
When you open a record from the search results table, that record does not appear inthe breadcrumb trail. However, if you drill down through that record to open otherrelated records, those related records will appear in the breadcrumb trail.
To return to the originating record, use the history list.
Note All of the records that you open from a form in Search mode are added to the historylist.
To return to the results table, click the name of the form in the breadcrumb trail.
Can I force a second window to open?
If you press the Shift key and then double-click a record entry in any table, therecord opens in a second window. Also, if you hold the Shift key and click a link,button, and so on, the form or dialog box associated with the link or button opens inanother window.
Navigating consoles, forms, and modules
Chapter 3 Using the Change Management Console and the Change form 81
Note If there is a record in the history list that you want to open in a second window,press the Shift key and then double-click the entry.
If you are working in a new record that has not yet been saved and open a new childtype record (task, activity, CI, and so on), the system will open a new windowautomatically to accommodate the new child record. This prevents the informationin the new, unsaved parent record from being lost.
Which consoles, forms, and modules open in a new window?
Not all of the consoles, forms, and modules open in the IT Home page's view. Theconsoles, forms, and modules in the following list open in a new window. If youopen one of these from the IT Home page, any unsaved changes to the IT Homepage are lost.
Tip Before you open any of these consoles, forms, or modules, save the changes to the ITHome page that you want to keep.
■ BMC Action Request System Administrator
■ Application Administration
■ BMC Service Level Management
■ Analytics
■ Service Management Process Model
Using Global searchIf you have BMC Remedy Knowledge Management installed, you can use the Globalsearch feature. Global search searches across multiple forms for records that match aword or phrase that you type in the search area.
Using Global search
82 BMC Remedy Change Management User Guide

To use Global search
1 In the text field to the right of the breadcrumb bar, type your search string andthen click the Search icon.Figure 20: Global search
2 Locate the record you want in the search results table and double-click it.
The record opens in the viewing area and the system updates the breadcrumbtrail with an entry for the record you opened.
Note As you drill down through the record, each record you open is also added to thebreadcrumb trail.If you want to maintain the contents of the search results table to view later, donot change the text in the Search field. If you do, when you click the Search iconto return to the search results table, the search feature will execute a new searchbased on the changed content of the Search field.
3 To return to the search results table, click the Search icon again.
User interface standards for field labelsOn BMC Remedy ITSM forms, field labels provide data entry hints.
Table 13 on page 83 lists the significance of field-label formats and special characters.
Table 13: Significance of field labels for data entry
Field-label format or special characters Significance for data entry
Bold label followed by an asterisk (*) Field is required to submit and update the form.Note: If you leave the field blank when you attemptto submit the form, the field is highlighted with a redborder.
Field label not bolded Field is optional.
Italicized label System-generated value for this field. Typically thisfield is read-only for the user.
User interface standards for field labels
Chapter 3 Using the Change Management Console and the Change form 83
Field-label format or special characters Significance for data entry
Label followed by a plus sign (+) Additional functionality is associated with this field.Typically, you access this functionality by pressingEnter. For example, you might press Enter in a fieldto access a search dialog box or to perform a searchbased on the value typed into the field.If a field label followed by a plus sign is also bolded,the field is required. Otherwise, the field is optional.
Icons used in the interfaceThis table describes the icons used on the consoles and in the Best Practice view ofthe application interface.
Table 14: Icon descriptions
Icon Description
Detail—Displays detailed information about the field's content. For example, if youclick the Detail icon associated with the Customer field, the People form appears withinformation about the customer whose name appears in the field.
Search—Searches for field contents. This icon is associated with fields that have theability to open a search dialog box or form.
Explore CI—Opens the BMC Atrium Explorer for the CIs selected in the Service andCI fields.
Clear field contents—Clears the contents of the field and allows you to make anotherselection. It does not delete the record.
Change Management Console functional areasThe Change Management Console provides a dedicated workspace for managingchange requests. This console enables change managers and change coordinators touse BMC Remedy Change Management to plan their days more effectively.
Icons used in the interface
84 BMC Remedy Change Management User Guide

Figure 21: Change Management console and its functional areas
The roles of change manager and change coordinator display the same console, butwith different options. The change management console optimizes your visual workspace so that you can track changes quickly and efficiently. For more information, see:
■ Using the Change Management Console as a change manager on page 113
■ Using the Change Management Console as a change coordinator on page 211
Change Management Console
Various functions are available in the Change Management Console depending onyour permissions. These functions provide quick ways to go to different areas inBMC Remedy Change Management and to perform other functions.
Table 15 on page 85 describes what you can do in each of the functional areas.
Table 15: Change Management Console functional areas
Functional area Purpose
Console tab
Displays changes and tasks.
Change Management Console functional areas
Chapter 3 Using the Change Management Console and the Change form 85

Functional area Purpose
Change Management Console header
Search The Global search feature lets you search across multiple forms for records thatmatch a key term.
ShowFilter ByMagnifying glass iconMore filters
This area contains the following fields: Show, Filter By. and Search. Thesefields combine to provide a way that you can filter the change records in theChanges table.The Show field has a menu from which you select the basic criteria by whichyou want to filter the contents of the Change table, the menu choices include:
■ Submitted by me - All change requests created by you.
■ All - All change requests, regardless of who created them.
■ Assigned to me - All change requests assigned to you.
■ Assigned to my group - All change requests assigned to a specific supportgroup of which you are a member. If you select this, you are prompted toselect the support group.
■ Assigned to all my groups - All change requests assigned to all of thesupport groups of which you are a member.
The Filter By field places conditions on the basic criteria that you choose in theShow field. This helps you manage the number of records returned by theShow field. If you select Assigned to me in the Show field and All Open > AllPriorities from the Filter By field, then the Changes table contains all openchange records, regardless of their priority, that are assigned to you.The Magnifying glass icon opens a dialog box from which you can edit, save,and delete custom searches. Saved custom searches appear in the My Searchesnode of the Defined Searches list. For more information about Manage MySearches, see "Creating a custom search," later in this guide.More filters provides a way for you to further filter the contents of theChanges table. If you still have a large number of records after using the FilterBy field, click Advanced to open a dialog box that contains fields in which youcan indicate even more precise information, such as product or operationalcategories.For example, using the advanced field you can add the product categoryHardware to the filter. When added to the Show and Filter by fields, theChanges table now contains all open hardware changes, regardless of theirpriority, that are assigned to you. A checkbox appears in the More filters labelto indicate when a filter from this area is active.
Refresh icon Updates the console with the latest information.
Navigation pane
Change Management Console functional areas
86 BMC Remedy Change Management User Guide

Functional area Purpose
View Broadcast, or NewBroadcast
Click this link to open the broadcast dialog box, from where you can view,create, modify, and delete broadcasts.
When there are unread broadcast messages, this area displays the iconfollowed by the number of new messages.For more information on broadcasting messages, see Broadcasting messages onpage 402.
Counts Displays Open, Waiting Approval, In Progress, and Pending metrics that arecalculated when the console opens.Note: The count of Open requests and the actual number of requests displayedin the Changes table may vary because change requests with Draft status arealso displayed in the change table when viewing Open requests. However,when calculating the total count of Open records, the number of changerequests with status Draft are not included.
Change Management Console functional areas
Chapter 3 Using the Change Management Console and the Change form 87
Functional area Purpose
Functions Use the links in this area to do the following actions:
■ New Change - Opens the Change form in New mode. For information, see Initiate stage - Creating change requests on page 113.
■ Search Change - Opens the Change form in Search mode. You enter searchcriteria into the fields, and then click Search. For more information, see Searching for records on page 408.
■ My Profile - Lets you set your profile. For more information, see Viewingyour profile on page 393.
■ Application Preferences - Lets you set your application preferences andoptions. This function is also available from the BMC Remedy ChangeManagement console. For more information, see Setting applicationpreferences and options on page 389.
■ Reminders - Opens the Reminders dialog box. For information, see UsingReminders on page 398.
■ Reports - Opens the Reporting Console. For information, see “Workingwith reports” on page 411.
If you are logged on as a Change Manager, the following additional options aredisplayed:
■ Configuration Manager - Opens BMC Configuration Manager console (ifthe integration is enabled). For more information, see Using theConfiguration Manager on page 438.
■ Surveys - Lets you select a survey. To enable surveys, they must defined foryour company and the option must be selected.
■ KPIs - Displays the KPI flashboards available. Select to view the KPIflashboard. The flashboards that appear represent, in graphical format:
— Total Open Changes - Filters by Priority, Categorization, or Impact.
— Changes Pending - Filters by Categorization.
— Change Risk - Filters by Categorization, Impact, or Support Group.
Change Management Console functional areas
88 BMC Remedy Change Management User Guide

Functional area Purpose
Advanced Functions Use the links in this area to do the following actions:
■ Manage CIs - For information, see Managing configuration items on page453.
■ Manage Inventory - Opens the Inventory Management screen, if you haveAsset Management application. For information, see “Managing inventorylocations” on page 436.
■ View Calendar - Opens the calendar. For information, see Using theChange Calendar on page 194.
■ Time Segments - Search, select, or create the following time segments:
— Create Business Event
— Modify Business Event
— Create Op. Category Location
— Modify Op. Category Location
— Configuration Item (CI)
For more information, see Registering time segments on page 157.
■ Atrium Impact Simulator - Opens Atrium Impact Simulator. For moreinformation, see Atrium Impact Simulator analysis for change requests onpage 134.
Applications This area contains links to other BMC applications, consoles, and modules. Thecontents of this area depend on what other applications and so on are installed.Click the double greater-than sign to open or close this panel.
Changes table
The Changes table displays high-level details about the change records that match the criteria specified inthe Company and Assigned To fields, or that were found by the most recently completed search. The CRQprefix identifies the change requests. You can filter the requests in the table by using the Show and Filter Byfields.
Create Opens the New Change form so you can create a new change request record.
View Opens the change request record selected in the table.
Print Displays the details of the change request record selected in the table as a report.
Process Overview Opens the detailed SMPM change management process diagram, if the fullSMPM application is installed. Otherwise, it opens a high-level diagram of thechange management process.
Details and Tasks
Change Management Console functional areas
Chapter 3 Using the Change Management Console and the Change form 89
Functional area Purpose
Displays details or related tasks of the record selected in the Changes table.
Change Details When selected, contains detailed read-only information about the recordselected in the Changes table. To see Details when the Tasks table is showing,click Show Details.You can add notes to the Notes section from the Change Management Console.
Work Info Shows activity associated with the change.The Work Info area enables change coordinators to view or define actionsperformed or information gathered about a change request. For example, youcan define a work information entry that documents the installation and back-out procedures for a change.You can perform the following actions in this area:
■ Create - Create a new activity
■ View - Displays details of the selected activity
■ Report - Displays a report of the Change Work Info history
Show Tasks When selected, lets you view tasks associated with the record that is selected inthe Changes table. To see Tasks when Details is showing, click Show Tasks.
Tooltip data shown in consoles
To reduce the clutter on the Consoles, tooltips in the Change Management andRelease Management Consoles display additional data that is not directly availableto users. Point your mouse over the Change ID or Release ID, and the tooltipappears. Tooltips display the Change or Release ID, Impact, Priority, and so on.
Change Management Console functional areas
90 BMC Remedy Change Management User Guide
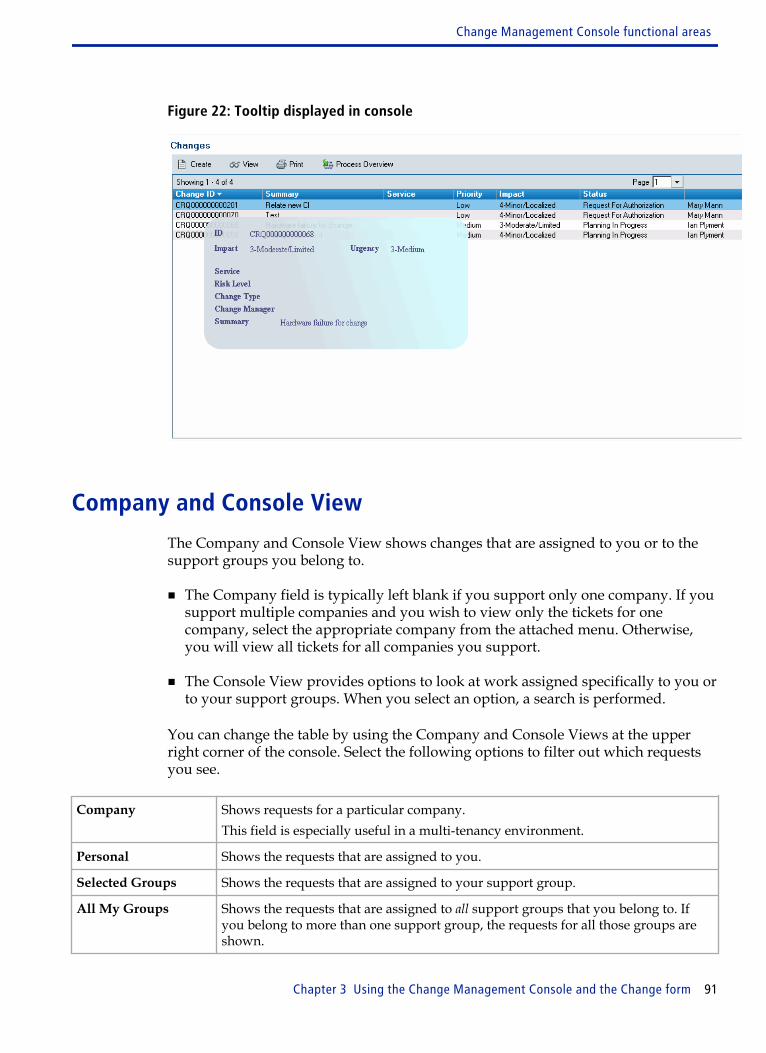
Figure 22: Tooltip displayed in console
Company and Console View
The Company and Console View shows changes that are assigned to you or to thesupport groups you belong to.
■ The Company field is typically left blank if you support only one company. If yousupport multiple companies and you wish to view only the tickets for onecompany, select the appropriate company from the attached menu. Otherwise,you will view all tickets for all companies you support.
■ The Console View provides options to look at work assigned specifically to you orto your support groups. When you select an option, a search is performed.
You can change the table by using the Company and Console Views at the upperright corner of the console. Select the following options to filter out which requestsyou see.
Company Shows requests for a particular company.This field is especially useful in a multi-tenancy environment.
Personal Shows the requests that are assigned to you.
Selected Groups Shows the requests that are assigned to your support group.
All My Groups Shows the requests that are assigned to all support groups that you belong to. Ifyou belong to more than one support group, the requests for all those groups areshown.
Change Management Console functional areas
Chapter 3 Using the Change Management Console and the Change form 91
You can view requests and refresh the items that appear in the table. For moreinformation about viewing and refreshing requests, see Searching for records onpage 408.
Change form functional areasThe Change form is used to request a change and track the progress from the Initiatestage to the Closed stage. This form also shows the impact that the change has on theorganization. The Change form is used to relate tasks to different support groups.You can relate the change to configuration items that are being modified.
Change form functional areas
92 BMC Remedy Change Management User Guide
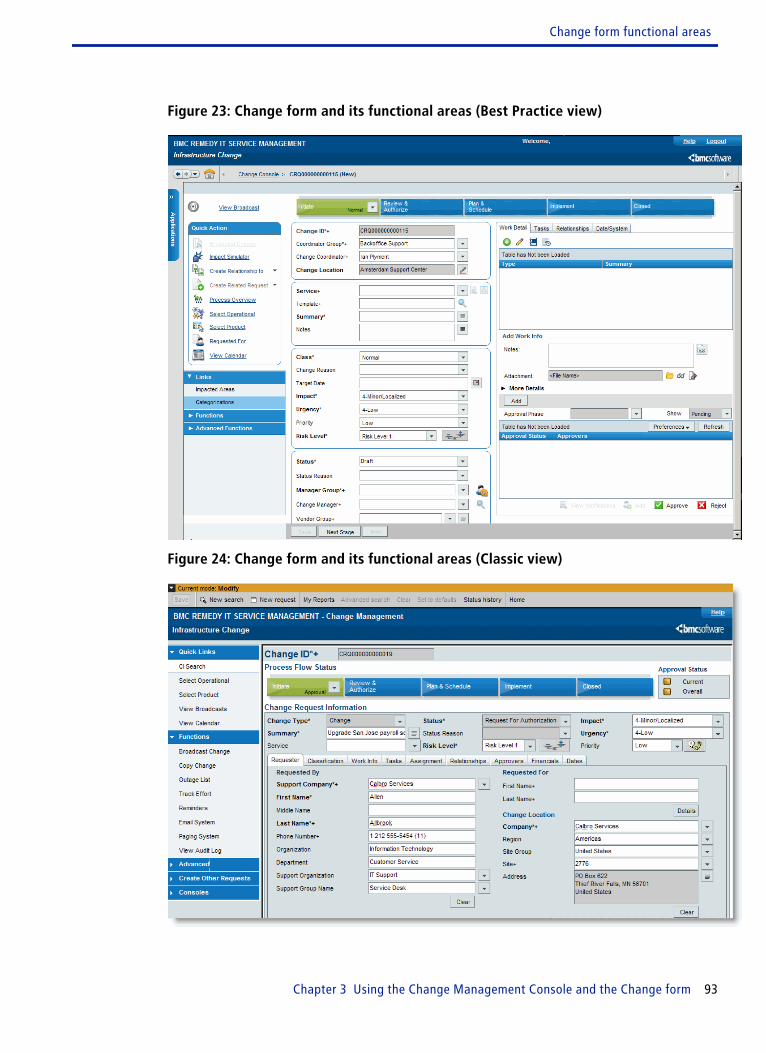
Figure 23: Change form and its functional areas (Best Practice view)
Figure 24: Change form and its functional areas (Classic view)
Change form functional areas
Chapter 3 Using the Change Management Console and the Change form 93
Before you begin creating or modifying information in the Change form, you shouldunderstand the information relationships in the different areas of this form. TheChange form provides an example of the level of integration that can occur betweenthe various modules in BMC Remedy ITSM, such as a change request that occursdue to an incident, a change to a configuration item, or a known error correction as aresult of problem investigation.
Tip As you work with the forms and dialog boxes, you might see a plus (+) signincluded in a field label. You can type part of the information in these fields andpress ENTER. If an exact match is found, the field is automatically completed. If aselection list appears, double-click the item to put in the field. Using auto-fill fieldsand lists is faster, more consistent, and more accurate than typing the information.
Note You might see additional links in the navigation pane for applications that areinstalled in addition to BMC Remedy Change Management.
The Change form has the following functional areas.
Table 16: Change form functional areas
Form Area Function
Change form header
Breadcrumb bar A navigation aid that contains links to related records that you opened from thecurrent release record.
Breadcrumb navigationcontrols
Back button - Takes you back one link in the breadcrumb trail.Forward button - Takes you forward one link in the breadcrumb trail. TheForward button is only visible if you have returned to a record on thebreadcrumb trail that you previously viewed.Drop down menu - Contains links to all the records that you viewed from thecurrent release record, including records that are not currently visible inbreadcrumb trail.Home icon - Takes you to the IT Home page.
Process Flow Status bar
Click the change stages in the Process Flow Status bar to move through the change request lifecycle from theInitiate stage to the Closed stage.
View Broadcasts
Opens the View Broadcasts dialog box. For information, see Broadcasting messages on page 402.
Navigation Pane
Change form functional areas
94 BMC Remedy Change Management User Guide
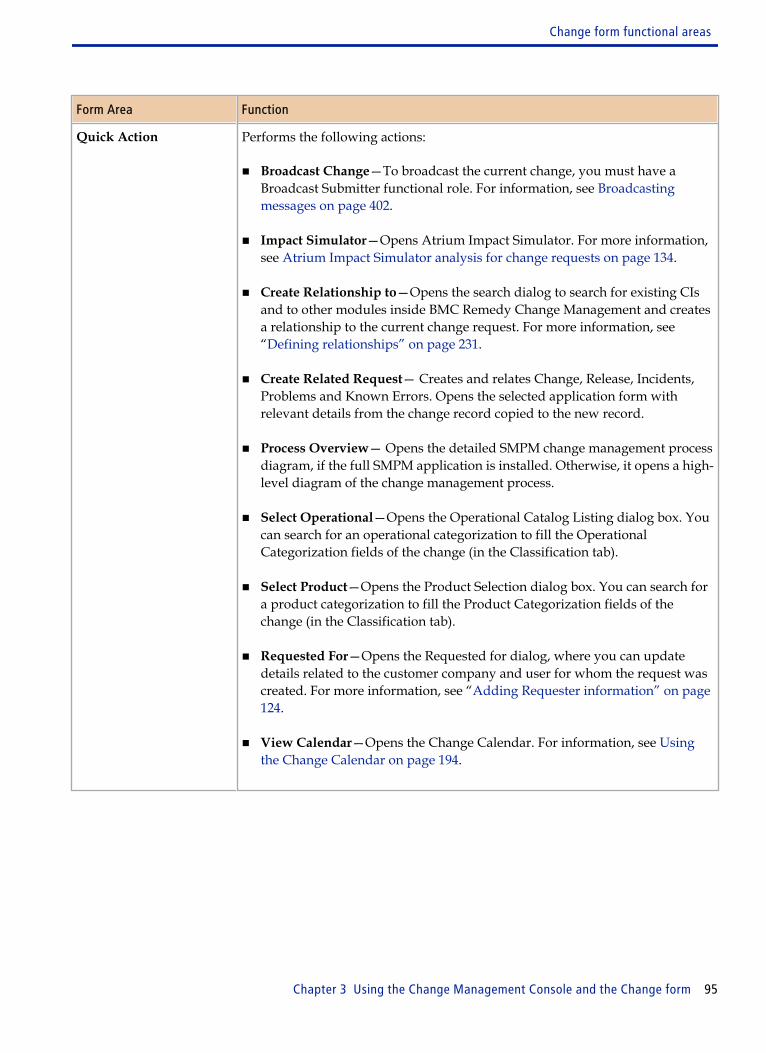
Form Area Function
Quick Action Performs the following actions:
■ Broadcast Change—To broadcast the current change, you must have aBroadcast Submitter functional role. For information, see Broadcastingmessages on page 402.
■ Impact Simulator—Opens Atrium Impact Simulator. For more information,see Atrium Impact Simulator analysis for change requests on page 134.
■ Create Relationship to—Opens the search dialog to search for existing CIsand to other modules inside BMC Remedy Change Management and createsa relationship to the current change request. For more information, see “Defining relationships” on page 231.
■ Create Related Request— Creates and relates Change, Release, Incidents,Problems and Known Errors. Opens the selected application form withrelevant details from the change record copied to the new record.
■ Process Overview— Opens the detailed SMPM change management processdiagram, if the full SMPM application is installed. Otherwise, it opens a high-level diagram of the change management process.
■ Select Operational—Opens the Operational Catalog Listing dialog box. Youcan search for an operational categorization to fill the OperationalCategorization fields of the change (in the Classification tab).
■ Select Product—Opens the Product Selection dialog box. You can search fora product categorization to fill the Product Categorization fields of thechange (in the Classification tab).
■ Requested For—Opens the Requested for dialog, where you can updatedetails related to the customer company and user for whom the request wascreated. For more information, see “Adding Requester information” on page124.
■ View Calendar—Opens the Change Calendar. For information, see Usingthe Change Calendar on page 194.
Change form functional areas
Chapter 3 Using the Change Management Console and the Change form 95
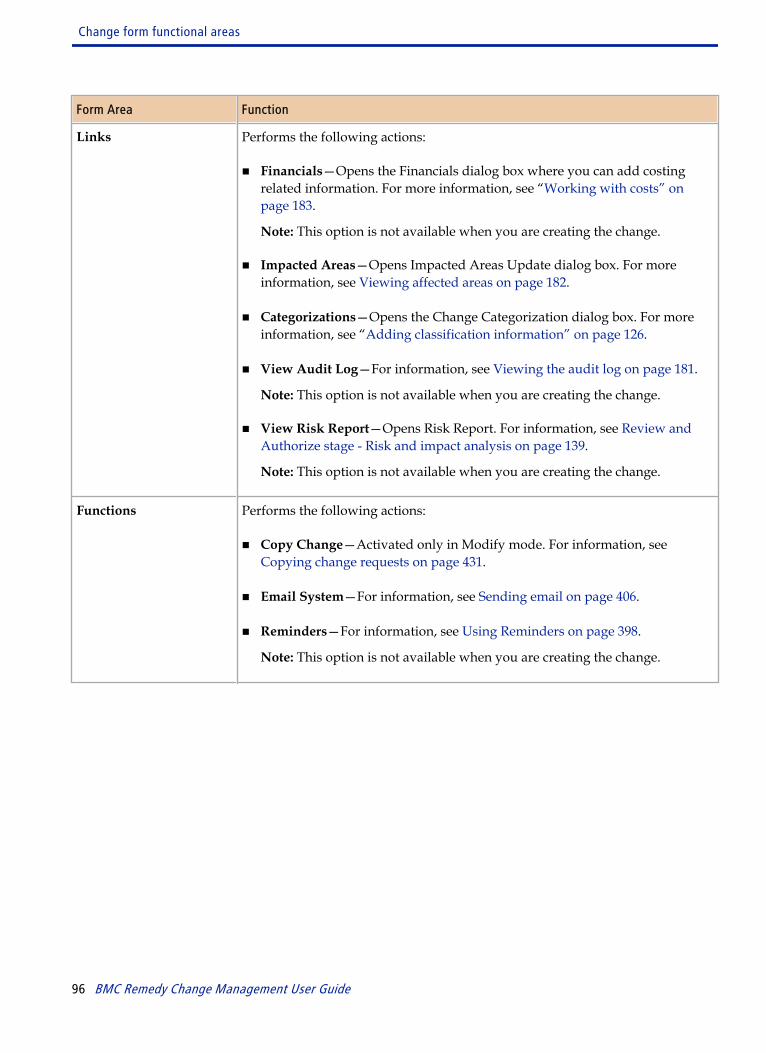
Form Area Function
Links Performs the following actions:
■ Financials—Opens the Financials dialog box where you can add costingrelated information. For more information, see “Working with costs” onpage 183.
Note: This option is not available when you are creating the change.
■ Impacted Areas—Opens Impacted Areas Update dialog box. For moreinformation, see Viewing affected areas on page 182.
■ Categorizations—Opens the Change Categorization dialog box. For moreinformation, see “Adding classification information” on page 126.
■ View Audit Log—For information, see Viewing the audit log on page 181.
Note: This option is not available when you are creating the change.
■ View Risk Report—Opens Risk Report. For information, see Review andAuthorize stage - Risk and impact analysis on page 139.
Note: This option is not available when you are creating the change.
Functions Performs the following actions:
■ Copy Change—Activated only in Modify mode. For information, see Copying change requests on page 431.
■ Email System—For information, see Sending email on page 406.
■ Reminders—For information, see Using Reminders on page 398.
Note: This option is not available when you are creating the change.
Change form functional areas
96 BMC Remedy Change Management User Guide
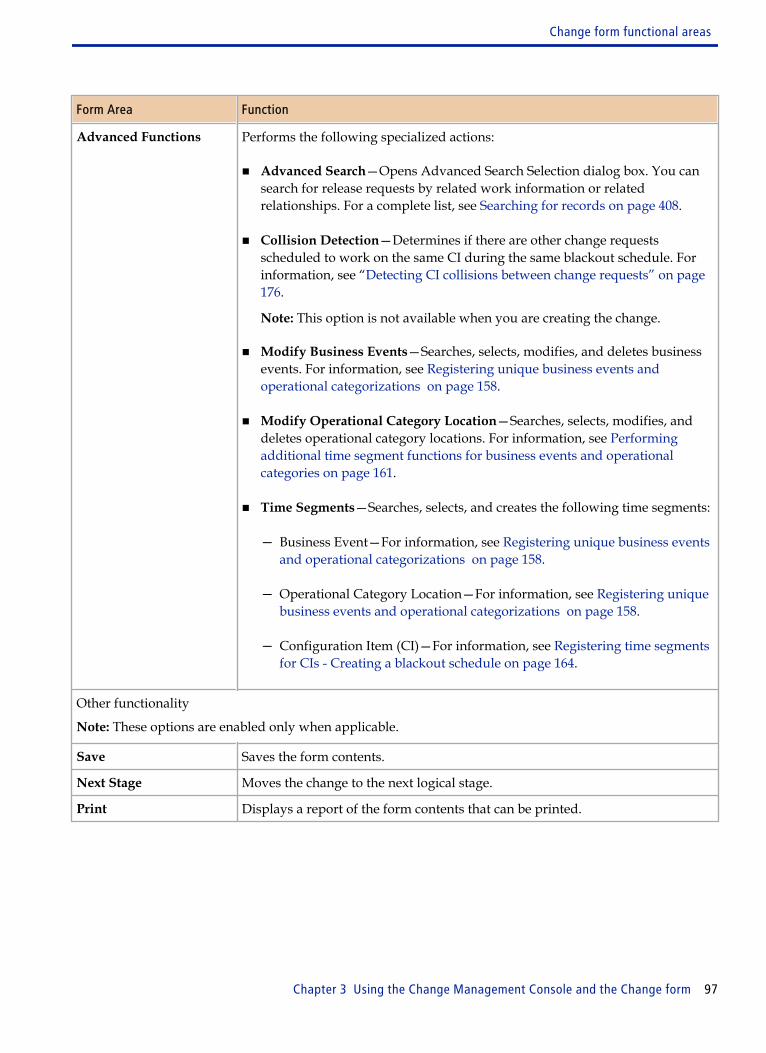
Form Area Function
Advanced Functions Performs the following specialized actions:
■ Advanced Search—Opens Advanced Search Selection dialog box. You cansearch for release requests by related work information or relatedrelationships. For a complete list, see Searching for records on page 408.
■ Collision Detection—Determines if there are other change requestsscheduled to work on the same CI during the same blackout schedule. Forinformation, see “Detecting CI collisions between change requests” on page176.
Note: This option is not available when you are creating the change.
■ Modify Business Events—Searches, selects, modifies, and deletes businessevents. For information, see Registering unique business events andoperational categorizations on page 158.
■ Modify Operational Category Location—Searches, selects, modifies, anddeletes operational category locations. For information, see Performingadditional time segment functions for business events and operationalcategories on page 161.
■ Time Segments—Searches, selects, and creates the following time segments:
— Business Event—For information, see Registering unique business eventsand operational categorizations on page 158.
— Operational Category Location—For information, see Registering uniquebusiness events and operational categorizations on page 158.
— Configuration Item (CI)—For information, see Registering time segmentsfor CIs - Creating a blackout schedule on page 164.
Other functionality
Note: These options are enabled only when applicable.
Save Saves the form contents.
Next Stage Moves the change to the next logical stage.
Print Displays a report of the form contents that can be printed.
Change form functional areas
Chapter 3 Using the Change Management Console and the Change form 97

Change form functional areas
98 BMC Remedy Change Management User Guide
Using the Release ManagementConsole and the Release form
This section contains information about getting started with Release Management,including using the Release Management Console.
The following sections described for Change Management Console are alsoapplicable to the Release Management Console:
■ “About the IT Home Page” on page 75
■ “Configuring the IT Home Page” on page 78
■ “Navigating consoles, forms, and modules ” on page 79
■ “Using Global search” on page 82
■ “User interface standards for field labels” on page 83
■ “Icons used in the interface” on page 84
Release Management Console functional areasThe Release Management Console provides a dedicated workspace for managingrelease requests. This console provides quick access to the information you need andto the procedures that you perform most often. This console optimizes your visualwork space so that you can track releases quickly and efficiently. Figure 25 on page100 illustrates the functional areas of the Release console.
4
Chapter 4 Using the Release Management Console and the Release form 99
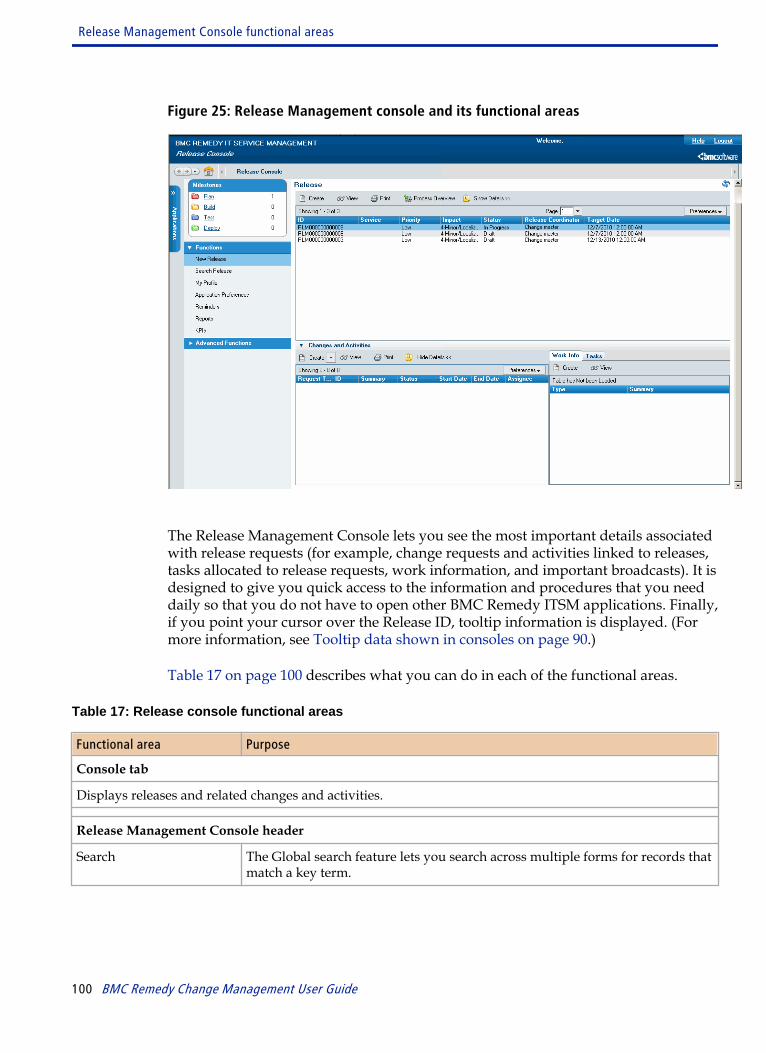
Figure 25: Release Management console and its functional areas
The Release Management Console lets you see the most important details associatedwith release requests (for example, change requests and activities linked to releases,tasks allocated to release requests, work information, and important broadcasts). It isdesigned to give you quick access to the information and procedures that you needdaily so that you do not have to open other BMC Remedy ITSM applications. Finally,if you point your cursor over the Release ID, tooltip information is displayed. (Formore information, see Tooltip data shown in consoles on page 90.)
Table 17 on page 100 describes what you can do in each of the functional areas.
Table 17: Release console functional areas
Functional area Purpose
Console tab
Displays releases and related changes and activities.
Release Management Console header
Search The Global search feature lets you search across multiple forms for records thatmatch a key term.
Release Management Console functional areas
100 BMC Remedy Change Management User Guide
Functional area Purpose
ShowFilter ByMagnifying glass iconMore filters
This area contains the following fields: Show, Filter By and Search. These fieldscombine to provide a way that you can filter the release records in the Releasestable.The Show field has a menu from which you select the basic criteria by whichyou want to filter the contents of the Releases table, the menu choices include:Submitted by me - All release requests created by you.All - All release requests, regardless of who created them.Assigned to me - All release requests assigned to you.Assigned to my group - All release requests assigned to a specific supportgroup of which you are a member. If you select this, you are prompted to selectthe support group.Assigned to all my groups - All release requests assigned to all of the supportgroups of which you are a member.The Filter By field places conditions on the basic criteria that you choose in theShow field. This helps you manage the number of records returned by theShow field. If you select Assigned to me in the Show field and All Open > AllPriorities from the Filter By field, then the Releases table contains all openrelease records, regardless of their priority, that are assigned to you.The Magnifying glass icon opens a dialog box from which you can edit, save,and delete custom searches. Saved custom searches appear in the My Searchesnode of the Defined Searches list. For more information about Manage MySearches, see "Creating a custom search," later in this guide.More filters provides a way for you to further filter the contents of the Releasestable. If you still have a large number of records after using the Filter By field,click Advanced to open a dialog box that contains fields in which you canindicate even more precise information, such as product or operationalcategories. For example, using the advanced field you can add the productcategory Hardware to the filter. When added to the Show and Filter by fields,the Releases table now contains all open hardware releases, regardless of theirpriority, that are assigned to you. A checkbox appears in the More filters labelto indicate when a filter from this area is active.
Refresh icon Updates the console with the latest information.
Navigation pane
View Broadcast, or NewBroadcast
Click this link to open the broadcast dialog box, from where you can view,create, modify, and delete broadcasts.
When there are unread broadcast messages, this area displays the iconfollowed by the number of new messages and the message New Broadcast.When there are new broadcast messages, the area also turns red.For more information on broadcasting messages, see Broadcasting messages onpage 402.Note: If you open the Release Management console with no new broadcastmessages, but the View Broadcast link is red, open the Application Preferencesdialog box and make sure that a Console View preference has been selected.See Viewing your profile on page 393 for information about how to view andselect Console View preferences.
Release Management Console functional areas
Chapter 4 Using the Release Management Console and the Release form 101
Functional area Purpose
Milestones Displays Plan, Build, Test, and Deploy milestone metrics that are calculatedwhen the console opens.
Functions Use the links in this area to do the following actions:
■ New Release—Opens the Release form in New mode. For information, see Initiate milestone - Creating release requests on page 276.
■ Search Release—Opens the Release form in Search mode. For moreinformation, see Searching for records on page 408.
■ My Profile—Sets your personal profile. See Viewing your profile on page393.
■ Application Preferences—Sets your program preferences and options. Thisfunction is also available from the Release Management console. See “Setting application preferences - Release Management” on page 440.
■ Reminders—Opens the Reminders dialog box. For information, see UsingReminders on page 398.
■ Reports—Opens the Reporting Console. For information, see “Workingwith reports” on page 411.
■ KPIs - Displays the KPI flashboards available. Select to view flashboards.The flashboards that appear represent, in graphical format:
— Process KPIs - View KPI flashboards
— Total Open Releases—Filters by Service or Priority
— Total Pending Approval—Filters by Service, Impact, or BusinessJustification
— Total By Risk—Filters by Service, Impact, or Milestone
Release Management Console functional areas
102 BMC Remedy Change Management User Guide

Functional area Purpose
Advanced Functions Use the links in this area to do the following actions:
■ View Calendar—Opens the calendar. For information, see Using theChange Calendar on page 194.
■ Time Segments—Create, modify, or search the following time segments:
— Business Event
— Operational Category Location
— Configuration Item (CI)
For information, see Registering time segments on page 157.
Applications This area contains links to other BMC applications, consoles, and modules. Thecontents of this area depend on what other applications and so on are installed.Click the double greater-than sign to open or close this panel.
Releases table
The Releases table displays high-level details about the release records that match the criteria specified inthe Company and Assigned To fields, or that were found by the most recently completed search. The RLMprefix identifies the release requests. You can filter the requests in the table by using the Show and Filter Byfields.
Create Opens the New Release form so you can create a new release request record.
View Opens the release request record selected in the Releases table.
Print Prints the details of the release request record selected in the Releases table.
Process Overview Opens the detailed SMPM release management process diagram, if the fullSMPM application is installed. Otherwise, it opens a high-level diagram of therelease management process.
Show Details/HideDetails
When selected, displays the work information table with details about therecord selected in the Releases table. It also displays the Create and View linksto create or view release activities from the Release Management Console.For more information, see the section on Recording Release Activities.
Changes and Activities
Create Opens the New Change or Activity form so you can create a new record.
View Opens the record selected in the Releases table.
Print Displays details of the release request record selected in the Releases table as areport.
Show Details/HideDetails
Displays the work information and tasks table with records selected in theChanges and Activities table. You can create or view release work informationon the Work Info tab. You can view tasks on the Tasks tab.
Release Management Console functional areas
Chapter 4 Using the Release Management Console and the Release form 103
Release form functional areasThe Release form is used to request a release and track the progress from initiation tocompletion. This form also shows the impact that the release has to the organization.The Release form is used to assign tasks to different support groups, and you canassociate the release to configuration items that are being modified.
Release form functional areas
104 BMC Remedy Change Management User Guide
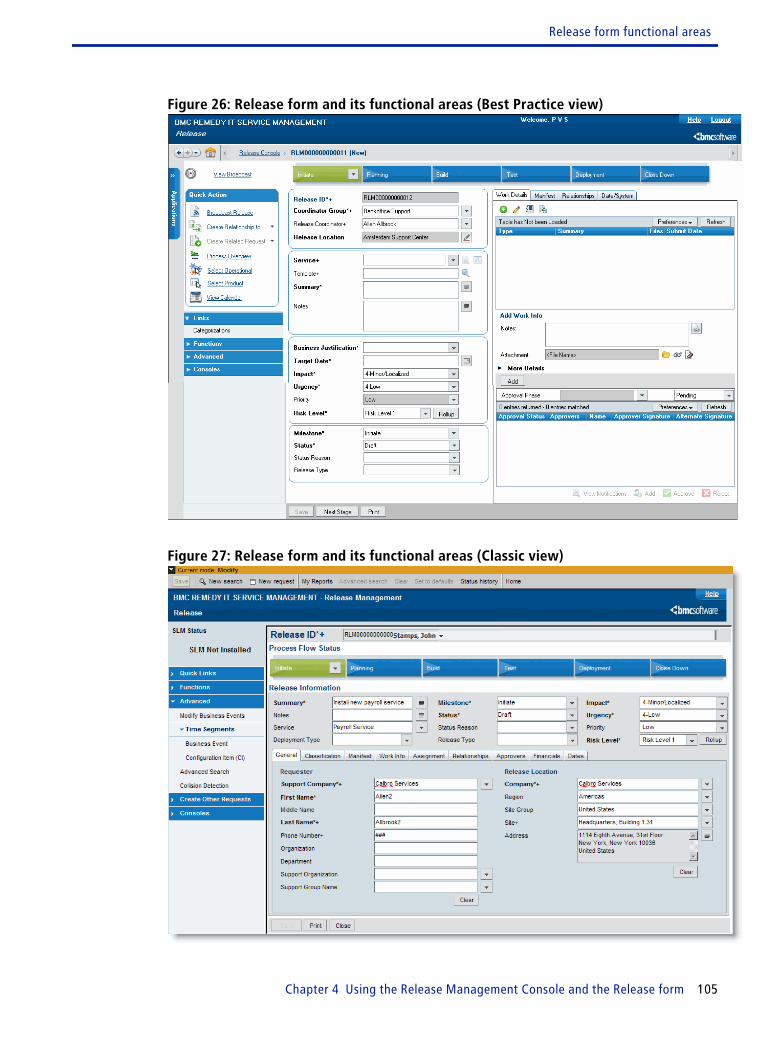
Figure 26: Release form and its functional areas (Best Practice view)
Figure 27: Release form and its functional areas (Classic view)
Release form functional areas
Chapter 4 Using the Release Management Console and the Release form 105

Before you begin searching, creating, or modifying information in the Release form,you must understand the information relationships involved in the different areas ofthis form.
First, you must create assignment mappings to assign a release to a ReleaseManagement support group, to an individual, or to both. An individual in theRelease Management group must assume the role of Release Coordinator. Forinformation about functional roles and assignment mappings, see the BMC RemedyIT Service Management Configuration Guide.
The Release form provides an excellent example of the level of integration that canoccur between the various modules available among the BMC Remedy ITSM suite asa release request can occur due to an incident, a change to a configuration item, or aknown error correction as a result of problem investigation.
Note You might see additional links appear in the navigation pane for applications thatare installed in addition to BMC Remedy Change Management.
The Release form has the following functional areas.
Table 18: Release form functional areas
Form Area Function
Release form header
Breadcrumb bar A navigation aid that contains links to related records that you opened from thecurrent release record.
Breadcrumb navigationcontrols
Back button - Takes you back one link in the breadcrumb trail.Forward button - Takes you forward one link in the breadcrumb trail. TheForward button is only visible if you have returned to a record on thebreadcrumb trail that you previously viewed.Drop down menu - Contains links to all the records that you viewed from thecurrent release record, including records that are not currently visible inbreadcrumb trail.Home icon - Takes you to the IT Home page.
Process Flow Status bar
Click the milestones in the Process Flow Status bar to steps you through the release request lifecycle fromthe Initiate milestone to the Close Down milestone.
View Broadcasts
Opens the View Broadcasts dialog box. For information, see Broadcasting messages on page 402.
Navigation Pane
Release form functional areas
106 BMC Remedy Change Management User Guide
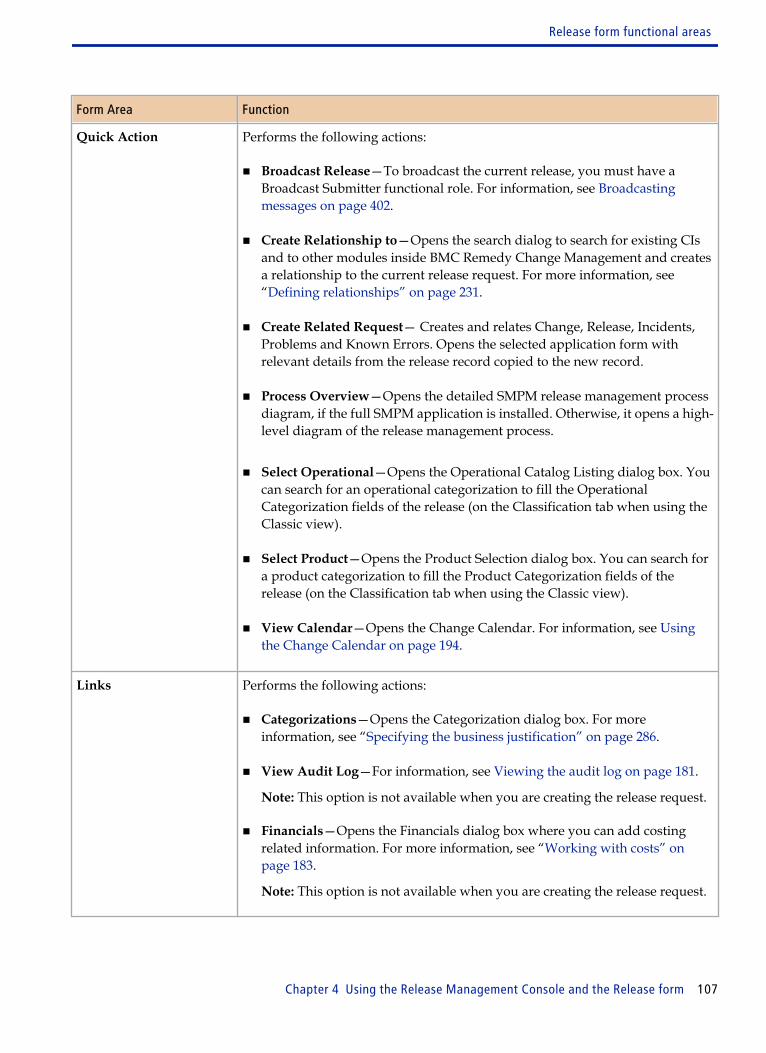
Form Area Function
Quick Action Performs the following actions:
■ Broadcast Release—To broadcast the current release, you must have aBroadcast Submitter functional role. For information, see Broadcastingmessages on page 402.
■ Create Relationship to—Opens the search dialog to search for existing CIsand to other modules inside BMC Remedy Change Management and createsa relationship to the current release request. For more information, see “Defining relationships” on page 231.
■ Create Related Request— Creates and relates Change, Release, Incidents,Problems and Known Errors. Opens the selected application form withrelevant details from the release record copied to the new record.
■ Process Overview—Opens the detailed SMPM release management processdiagram, if the full SMPM application is installed. Otherwise, it opens a high-level diagram of the release management process.
■ Select Operational—Opens the Operational Catalog Listing dialog box. Youcan search for an operational categorization to fill the OperationalCategorization fields of the release (on the Classification tab when using theClassic view).
■ Select Product—Opens the Product Selection dialog box. You can search fora product categorization to fill the Product Categorization fields of therelease (on the Classification tab when using the Classic view).
■ View Calendar—Opens the Change Calendar. For information, see Usingthe Change Calendar on page 194.
Links Performs the following actions:
■ Categorizations—Opens the Categorization dialog box. For moreinformation, see “Specifying the business justification” on page 286.
■ View Audit Log—For information, see Viewing the audit log on page 181.
Note: This option is not available when you are creating the release request.
■ Financials—Opens the Financials dialog box where you can add costingrelated information. For more information, see “Working with costs” onpage 183.
Note: This option is not available when you are creating the release request.
Release form functional areas
Chapter 4 Using the Release Management Console and the Release form 107
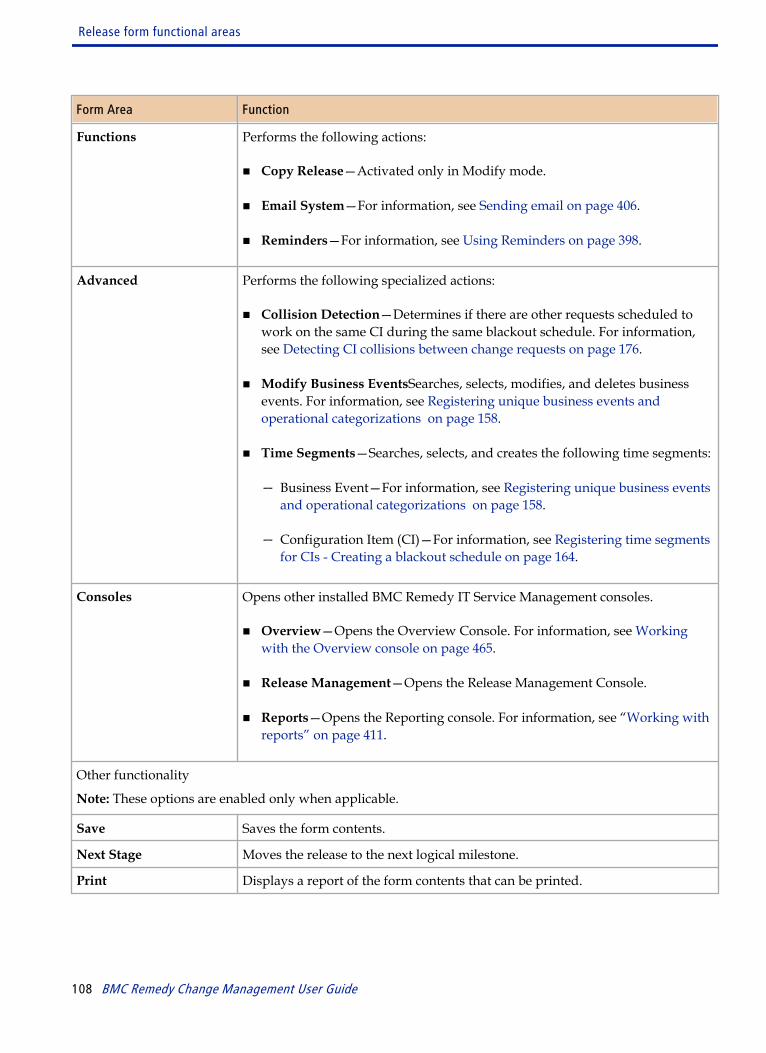
Form Area Function
Functions Performs the following actions:
■ Copy Release—Activated only in Modify mode.
■ Email System—For information, see Sending email on page 406.
■ Reminders—For information, see Using Reminders on page 398.
Advanced Performs the following specialized actions:
■ Collision Detection—Determines if there are other requests scheduled towork on the same CI during the same blackout schedule. For information,see Detecting CI collisions between change requests on page 176.
■ Modify Business EventsSearches, selects, modifies, and deletes businessevents. For information, see Registering unique business events andoperational categorizations on page 158.
■ Time Segments—Searches, selects, and creates the following time segments:
— Business Event—For information, see Registering unique business eventsand operational categorizations on page 158.
— Configuration Item (CI)—For information, see Registering time segmentsfor CIs - Creating a blackout schedule on page 164.
Consoles Opens other installed BMC Remedy IT Service Management consoles.
■ Overview—Opens the Overview Console. For information, see Workingwith the Overview console on page 465.
■ Release Management—Opens the Release Management Console.
■ Reports—Opens the Reporting console. For information, see “Working withreports” on page 411.
Other functionality
Note: These options are enabled only when applicable.
Save Saves the form contents.
Next Stage Moves the release to the next logical milestone.
Print Displays a report of the form contents that can be printed.
Release form functional areas
108 BMC Remedy Change Management User Guide

Activity form functional areasRelease Management provides basic facilities for assignment, status, workinformation, and task management. The Activity form is used to manage a releaseand track its progress from initiation to completion. The Activity form is also used toassign tasks to different support groups.Figure 28: Release Activity form
You use the Activity form to add a set of activities to a release request. You can trackrelease states and requester information, relate and assign tasks, and enter work loginformation.
For more information, see Managing release activities on page 325.
Note Any other links that are displayed in the navigation pane are determined by theapplications that are installed in addition to Release Management.
The Activity form has the following functional areas.
Table 19: Activity form functional areas
Form Area Function
Navigation Pane
Activity form functional areas
Chapter 4 Using the Release Management Console and the Release form 109
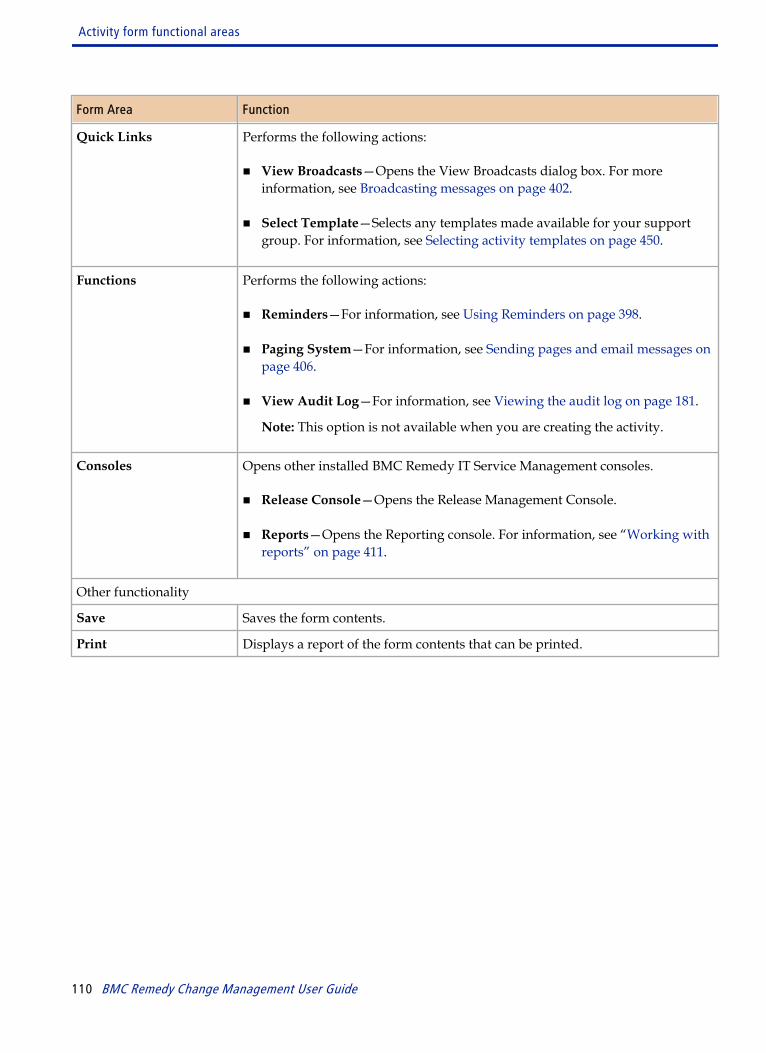
Form Area Function
Quick Links Performs the following actions:
■ View Broadcasts—Opens the View Broadcasts dialog box. For moreinformation, see Broadcasting messages on page 402.
■ Select Template—Selects any templates made available for your supportgroup. For information, see Selecting activity templates on page 450.
Functions Performs the following actions:
■ Reminders—For information, see Using Reminders on page 398.
■ Paging System—For information, see Sending pages and email messages onpage 406.
■ View Audit Log—For information, see Viewing the audit log on page 181.
Note: This option is not available when you are creating the activity.
Consoles Opens other installed BMC Remedy IT Service Management consoles.
■ Release Console—Opens the Release Management Console.
■ Reports—Opens the Reporting console. For information, see “Working withreports” on page 411.
Other functionality
Save Saves the form contents.
Print Displays a report of the form contents that can be printed.
Activity form functional areas
110 BMC Remedy Change Management User Guide

Change Manager roleThis section describes how change managers can use the BMC Remedy ChangeManagement application to monitor issues pertaining to the daily aspects of changemanagement activities and how they can help their staff meet their commitments tothe organizations that they support.
Working as a change managerThe change manager is a person or a group usually within an organization’s supportdepartment. The change manager is responsible for the quality and integrity of thechange management process. In large companies, the change manager’s mainresponsibilities usually involve planning and oversight. In small companies,however, the change manager can function as the change coordinator who isperforming the change. To be the change manager, a user must have theInfrastructure Change Manager functional role in BMC Remedy ChangeManagement.
The change manager requires the following permissions and functional roles:
■ The Infrastructure Change User or Change Master application permission isrequired for access to change and task records.
■ Infrastructure Change Manager functional role is required to be assigned as thechange manager for individual changes.
■ Membership in a company’s support group is required to create change templatesfor that group.
Note To understand the overall change request process, change managers shouldalso read Change coordinator role on page 207.
Typical change manager activities include handling assignments and monitoringsupport staff activity involved in implementing the change request. Even thoughchange managers have the same permissions as support staff and can do the same
5
Chapter 5 Change Manager role 111
procedures in BMC Remedy Change Management, they usually do not performsupport staff activities.
The typical responsibilities of a change manager are describe in Table 20 on page112.
Table 20: Change manager responsibilities
Task Description
Creating a change request Anyone can create a change request by using the Requester Console. Usually, achange manager creates change requests in BMC Remedy Change Management.For more information, see Initiate stage - Creating change requests on page 113.
Accepting a changerequest
When the change request is created it must be assigned to a change manager. Ifthe assignment engine is configured for automatic assignments it isautomatically assigned to the appropriate change manager, based on anorganization’s support staff grouping and the change request’s categorization.The change manager is notified of assigned changes. The change manager canchoose to view all assigned change requests when logging in to ChangeManagement Console. For more information, see Working with change requestassignments on page 211.
Planning and schedulinga change request
Planning activities include:
■ Scheduling the change request
■ Identifying, defining, and sequencing tasks that must be performed toaccomplish the change
■ Determining the impact by assessing the different kinds of risks
■ Creating plans
■ Scheduling people and resources to implement each task
■ Estimating the costs of the change request
For more information, see Working with relationships on page 220.
Submitting a changerequest for approval
An organization’s business rules determine whether a change request requiresapproval. The application administrator configures the approval process todetermine which approval phases are available for the change request. Ifappropriate, the change manager can designate ad hoc approvers for emergencychange approvals.After the request is approved, the change manager updates the request’s statusto Scheduled by moving to the next stage on the Process Flow bar. The changemanager can assign the tasks to the appropriate task implementers manually, orthey can be assigned automatically.For more information about submitting the change for approval, see Approvals -Approving change requests on page 144.
Working as a change manager
112 BMC Remedy Change Management User Guide
Task Description
Logging and tracking achange request
The change manager can track a request’s progress as task implementers fulfilltheir assignments. For more information, see Tracking efforts for a changerequest on page 217 and Responding to task reassignments as a changecoordinator on page 272.
Assessing the cost of achange request
The coordinator can assess the cost of a change request and charge accordingly.For more information, see Working with costs on page 183.
Resolving changerequests
A change request is resolved when all the tasks are closed or cancelled. For moreinformation, see Closed stage - Completing change requests on page 153.
The change manager is also typically responsible for addressing general, day-to-dayissues from a personnel and customer satisfaction standpoint.
Using the Change Management Console as achange manager
The Change Management Console is the primary interface for change managers. Itprovides quick access to the information you need and to the procedures that youperform most often. This console is designed for change managers who work withBMC Remedy Change Management daily and do not want to view other BMCRemedy ITSM applications.
For more information, see Change Management Console functional areas on page 84.
Initiate stage - Creating change requestsChanges start at the Initiate stage of the change request lifecycle. Most changerequests are generated from a incident, problem investigation, an RFC proposed byProblem Management, or a known error. When change requests are generated byany of these records, some information is copied from the record. For example, whena change request is generated from an incident, the Description, Impact andUrgency, and the Product and Service Categorization fields are copied to the changerequest. The Requester Information defaults to the user initiating the change request.
Using the Change Management Console as a change manager
Chapter 5 Change Manager role 113
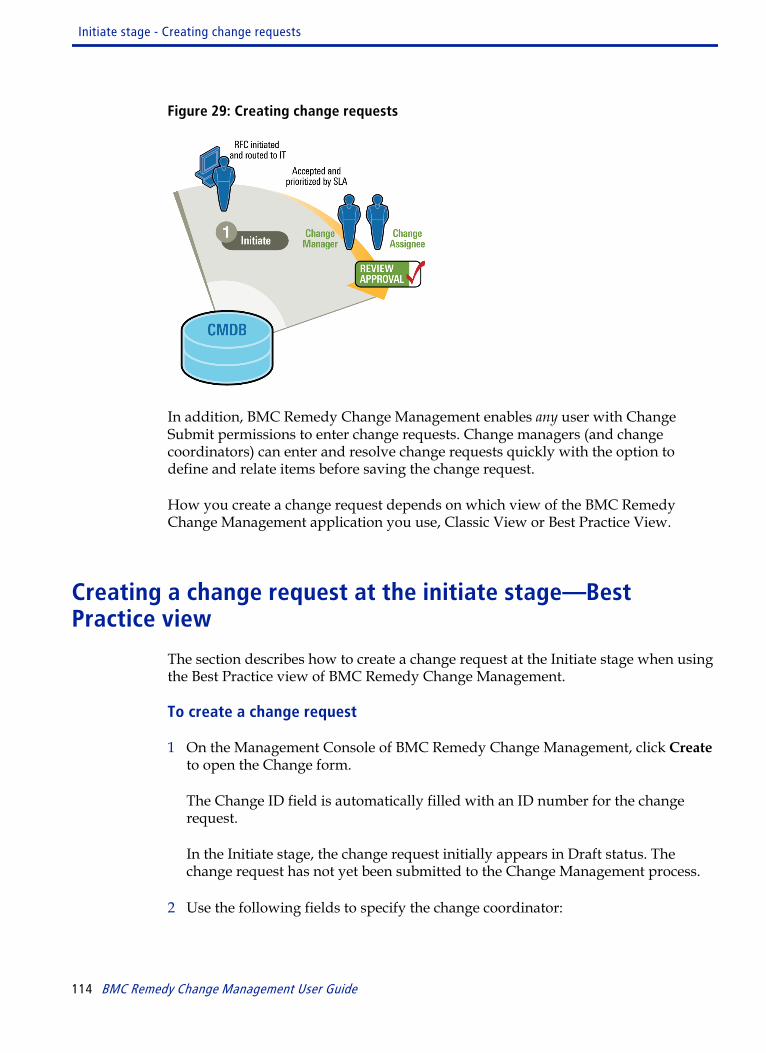
Figure 29: Creating change requests
In addition, BMC Remedy Change Management enables any user with ChangeSubmit permissions to enter change requests. Change managers (and changecoordinators) can enter and resolve change requests quickly with the option todefine and relate items before saving the change request.
How you create a change request depends on which view of the BMC RemedyChange Management application you use, Classic View or Best Practice View.
Creating a change request at the initiate stage—BestPractice view
The section describes how to create a change request at the Initiate stage when usingthe Best Practice view of BMC Remedy Change Management.
To create a change request
1 On the Management Console of BMC Remedy Change Management, click Createto open the Change form.
The Change ID field is automatically filled with an ID number for the changerequest.
In the Initiate stage, the change request initially appears in Draft status. Thechange request has not yet been submitted to the Change Management process.
2 Use the following fields to specify the change coordinator:
Initiate stage - Creating change requests
114 BMC Remedy Change Management User Guide
Coordinator Group
Specify the group of people with the Infrastructure Change Coordinatorfunctional role. This list is populated with groups that have at least one userwith a Infrastructure Change Coordinator functional role.
Change Coordinator
Specify the user responsible for the change. The list is populated with peoplewith the Change Coordinator functional role and who are included in theCoordinator Group selected.
3 From the Service field, select the business service configuration item (CI) thatrelates to the change request that you are creating.
The Service field relates business service configuration items (CIs) to the changerequest at the time it is created. Business service CIs are related either to thecustomer directly or to the customer’s company, organization, or department.
Note The business service CI is not a physical CI (such as a printer or a router); it is alogical CI. In this context, a logical CI si a business service that can be providedfrom one business, or organization within a business, to another. Service CIs caninclude customer support, employee provisioning, web farms, storage, and so on.When business service CIs are created and made available on the Service fieldmenu, they are related either to a customer directly or to the customer's company,organization, or department. If you need to have a new business service CI addedto the Service field menu, you must notify a system administrator with AssetAdministrator privileges.
4 (optional) Select a template to complete part of the change request.
Change templates are especially useful in any change request that follows well-defined methods for specific and repeated requirements.
The template is attached to the change request. The custom process flowassociated with the change template applies to the change request. A new WorkInfo record is created that includes a textual representation of the change processflow. In the process flow bar, the options for next and back are changed to reflectthe process flow.
Initiate stage - Creating change requests
Chapter 5 Change Manager role 115

Note If you start to enter fields in the change request and then select a change template,the change template overwrites any field values that are already present in thechange request. Any relationships or tasks included with the change request arenot overwritten. Any additional tasks from the template are added as peers, andadditional relationships (for example, CIs) are included with the change request.
5 (optional) Enter a date in the Target Date field.
The target date is the date by when the change must be completed, according tothe applicable service level target. Alternatively, the target date can be a date thatis agreed to on an ad hoc basis, per change.
6 Complete the following fields:
Summary
Provide a brief description of the change.
Class
Specify the relative urgency of the change, so that the approvers can assess itsmagnitude.
You have the following options:
■ Standard indicates a change (for example, a computer upgrade) that istypically pre-approved and requires only approval by the change manager.Standard changes follow the out-of-box change process defined as per ITILspecifications.
■ Emergency indicates a change that resolves an incident or problem deemedcritical to business continuity and for which a workaround is not sufficient.
■ Expedited indicates that a change has an enterprise-wide impact with anassociated risk. If you select Expedited, you must also select the TimingReason (for example, Known error correction).
■ Latent indicates a change that has already been performed (for example, if atask implementer is assigned to replace the hard drive on a computer and thendecides to upgrade the memory while the computer is open). Latent timingautomatically sets the request status to Completed after you save the changerequest.
■ Normal indicates a standard change that is typically pre-approved andrequires only approval by the change manager. The default value is Normal.
Initiate stage - Creating change requests
116 BMC Remedy Change Management User Guide

■ No Impact indicates a change that has no impact on the infrastructure andrequires no approval.By default, No Impact changes follow the Business Approval - No Impactphase and move forward to the Scheduled status. Use this process for pre-approved No Impact changes where the change is automatically scheduledafter the approval phase is satisfied.
Impact
Specify the extent to which the change affects the business. The default valueis 4-Minor/Localized. Impact is often directly related to the extent to whichthe service has degraded from agreed service levels. Impact can be measuredby the number of people affected, the criticality of the system affected, andthe loss of revenue as a result of the service degradation or disruption.
Urgency
Specify a value that indicates the importance of the change request, andreflects how quickly a change must be implemented, or the time available toreduce the impact of the change on the business. The default value of theUrgency field is Low.
Use the following factors to determine Impact and Urgency:
■ Number of customers affected by associated Incidents
■ Duration and scope of the service disruption
■ Availability of a solution or workaround
■ The type of service being disrupted, usually based on the CI involved
■ Awareness of the future impact on the business
Priority
Specify the importance that you (as support staff) assign to the change request.
Priority indicates the relative order in which to address the changes. It isinfluenced by considerations of risk and resource availability, but is primarilydriven by the combination of Urgency and Impact. The default value of thePriority field is Low.
7 The system automatically performs the risk assessment for the change request inthe Risk Level field.
The risk level is calculated from the entries that you make in the Impact, Urgency,and Priority fields field. The risk level is used as a criterion to determine required
Initiate stage - Creating change requests
Chapter 5 Change Manager role 117
approvals. The default risk level is Level 1, which is the lowest level. The highestrisk level is Level 5.
8 In the Initiate stage of the Process Flow Status bar, click the arrow and chooseNext Stage.
9 Review the information in the Change Initiation dialog box, and then click Save.
The newly created change is assigned to the appropriate group based on thepredefined assignment routing.
If there is no appropriate assignment routing, you are prompted to assign thechange request manually.
Creating a change request at the Initiate stage — Classic View
This section describes how to create a change request at the Initiate stage when usingthe Classic View of BMC Remedy Change Management.
To create a change request at the Initiate stage
1 From the IT Home Page, open the BMC Remedy Change Managementapplication.
For more information, see Configuring the IT Home Page on page 78.
2 On the BMC Remedy Change Management Console, click Create.
The Change form appears with the Change ID field is automatically filled with anID number for the change request.
In the Initiate stage, the change request initially appears in Draft status. Thechange request has not yet been submitted to the Change Management process.
Note If you create a new change from the Incident or Problem console, the changeappears in Request for Authorization status because the reason for creating thechange is already known. This information has been entered by the Incident orProblem before the new change is created.
3 By default, the Requested By fields are auto-populated with the details of the userwho creates the change. If this user is not associated to a support group, theSupport Company is set to the Location Company of the user. If this user isassociated to a support group, the Support Company, Support Organization, andSupport Group is set to the user's default Support Group.
Initiate stage - Creating change requests
118 BMC Remedy Change Management User Guide
You can modify the Requested By fields, if required. The Support Company fieldlist is based on the user selected in the Last Name field of the Requested Byinformation.
■ If the selected user does not belong to the support staff group all companies arelisted similar to Change Location companies.
■ If the selected user belongs to the support staff group this list is restricted to hisSupport Group companies.
4 The Requested for fields provide details of the company and user for which thechange request is created. To enter this information, search for the appropriateuser based on the last name field. The Change Location can, by default, be updateto the selected user's location.
Note Once updated, the Requested for fields cannot be modified.
5 (optional-recommended) Select a template to complete part of the change request.
Change templates are especially useful in any change request that follows well-defined methods for specific and repeated requirements. Change templates cando more than pre-populate fields; they can also include CIs and tasks with thechange request. BMC provides change templates for virtual machines that includestandard tasks with the change request. For more information, see Selectingchange templates on page 429.
The template is attached to the change request. The custom process flowassociated with the change template applies to the change request. A new WorkInfo record is created that includes a textual representation of the change processflow. In the process flow bar, the options for next and back are changed to reflectthe process flow.
Note If you start to enter fields in the change request and then select a change template,the change template overwrites any field values that are already present in thechange request. Any relationships or tasks included with the change request arenot overwritten. Any additional tasks from the template are added as peers, andadditional relationships (for example, CIs) are included with the change request.
6 In the Initiate stage of the Process Flow Status bar, click the arrow and chooseNext Stage.
The two tabs in the Change Initiation dialog box prompt you to enter requiredand optional information.
Initiate stage - Creating change requests
Chapter 5 Change Manager role 119

7 Enter the following information in the Required Information tab of the ChangeInitiation dialog box.
Field Description
Summary Brief description of the change.
Class Specifies the relative urgency of the change, so that the approvers can assess itsmagnitude.
■ Standard indicates a change (for example, a computer upgrade) that istypically pre-approved and requires only approval by the change manager.Standard changes follow the out-of-box change process defined as per ITILspecifications.
■ Emergency indicates a change that resolves an incident or problem deemedcritical to business continuity and for which a work-around is not sufficient.For more information, see Creating emergency change requests on page 133.
■ Expedited indicates that a change has an enterprise-wide impact with anassociated risk. If you select Expedited, you must also select the TimingReason (for example, Known error correction). For more information, seeTiming Reason under “Adding classification information” on page 126.
■ Latent indicates a change that has already been performed (for example, if atask implementer is assigned to replace the hard drive on a computer andthen decides to upgrade the memory while the computer is open). Latenttiming automatically sets the request status to Completed after you save thechange request.
■ Normal indicates a standard change (for example, the creation of a virtualmachine with standard specifications) that is typically pre-approved andrequires only approval by the change manager. Normal changes do notfollow the standard out of the box change process. The default value is Normal.
■ No Impact indicates a change that has no impact on the infrastructure andrequires no approval.
By default, No Impact changes follow the Business Approval - No Impactphase and move forward to the Scheduled status. Use this process for pre-approved No Impact changes where the change is automatically scheduledafter the approval phase is satisfied. For more information, see Approvalprocesses provided out-of-the-box on page 357.
Impact Reflects the extent to which the change affects the business.The default value is 4-Minor/Localized. Impact is often directly related to theextent to which the service has degraded from agreed service levels. Impact canbe measured by the number of people affected, the criticality of the systemaffected, and the loss of revenue as a result of the service degradation or disruption.
Initiate stage - Creating change requests
120 BMC Remedy Change Management User Guide

Field Description
Urgency Defines the importance the requester assigns to the change request and reflectshow quickly a change must be implemented, or the time available to reduce theimpact of the change on the business. The default value of the Urgency field isLow.Use the following factors to determine Impact and Urgency:
■ Number of customers affected by associated Incidents
■ Duration and scope of the service disruption
■ Availability of a solution or workaround
■ The type of service being disrupted, usually based on the CI involved
■ Awareness of the future impact on the business
Priority Identifies the importance you (as support staff) assign to the change request.Priority indicates the relative order in which to address the changes. It isinfluenced by considerations of risk and resource availability, but is primarilydriven by the combination of Urgency and Impact. The default value of thePriority field is Low.
Risk Level Defines the relative risk associated with the change, from 5 (highest risk) to 1(lowest risk).The default value is Risk Level 1. The Risk Level is used as a criterion todetermine required approvals.You can click the Risk Info icon to compute the risk level for the request. Formore information, see Review and Authorize stage - Risk and impact analysis onpage 139.
Coordinator Group Defines the groups of people with the Change Coordinator functional role.
Note: If the user creating the change has the functional role of a ChangeCoordinator, the Coordinator Group, Change Coordinator, and Change locationfields are auto filled with the user's details.
Change Coordinator Defines the user responsible for the change. The list is populated with peoplewith the Change Coordinator functional role and included in the CoordinatorGroup selected.
Note: The Change Coordinator field is found on the Assignment tab.
Change location Location of the company defined for the user requesting the change. Informationfor this field is related to the Requested By information provided for the change.
Note: The Change location details are found on the Assignment tab of theChange form.
Initiate stage - Creating change requests
Chapter 5 Change Manager role 121
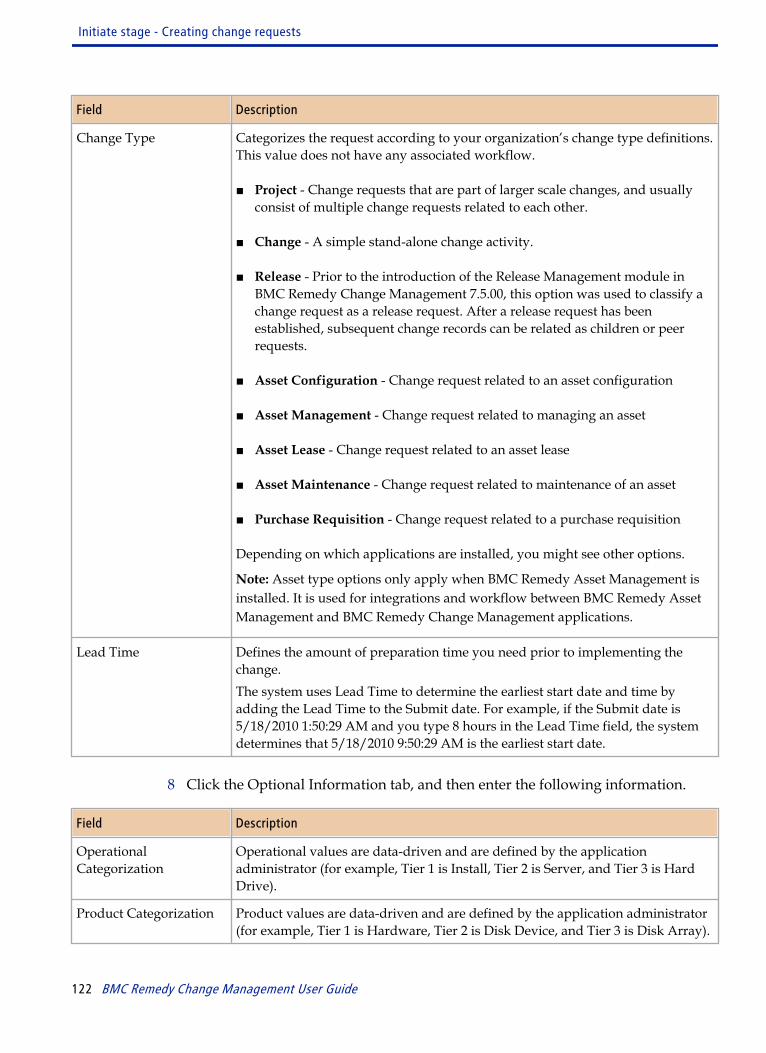
Field Description
Change Type Categorizes the request according to your organization’s change type definitions.This value does not have any associated workflow.
■ Project - Change requests that are part of larger scale changes, and usuallyconsist of multiple change requests related to each other.
■ Change - A simple stand-alone change activity.
■ Release - Prior to the introduction of the Release Management module inBMC Remedy Change Management 7.5.00, this option was used to classify achange request as a release request. After a release request has beenestablished, subsequent change records can be related as children or peerrequests.
■ Asset Configuration - Change request related to an asset configuration
■ Asset Management - Change request related to managing an asset
■ Asset Lease - Change request related to an asset lease
■ Asset Maintenance - Change request related to maintenance of an asset
■ Purchase Requisition - Change request related to a purchase requisition
Depending on which applications are installed, you might see other options.
Note: Asset type options only apply when BMC Remedy Asset Management isinstalled. It is used for integrations and workflow between BMC Remedy AssetManagement and BMC Remedy Change Management applications.
Lead Time Defines the amount of preparation time you need prior to implementing thechange.The system uses Lead Time to determine the earliest start date and time byadding the Lead Time to the Submit date. For example, if the Submit date is5/18/2010 1:50:29 AM and you type 8 hours in the Lead Time field, the systemdetermines that 5/18/2010 9:50:29 AM is the earliest start date.
8 Click the Optional Information tab, and then enter the following information.
Field Description
OperationalCategorization
Operational values are data-driven and are defined by the applicationadministrator (for example, Tier 1 is Install, Tier 2 is Server, and Tier 3 is HardDrive).
Product Categorization Product values are data-driven and are defined by the application administrator(for example, Tier 1 is Hardware, Tier 2 is Disk Device, and Tier 3 is Disk Array).
Initiate stage - Creating change requests
122 BMC Remedy Change Management User Guide
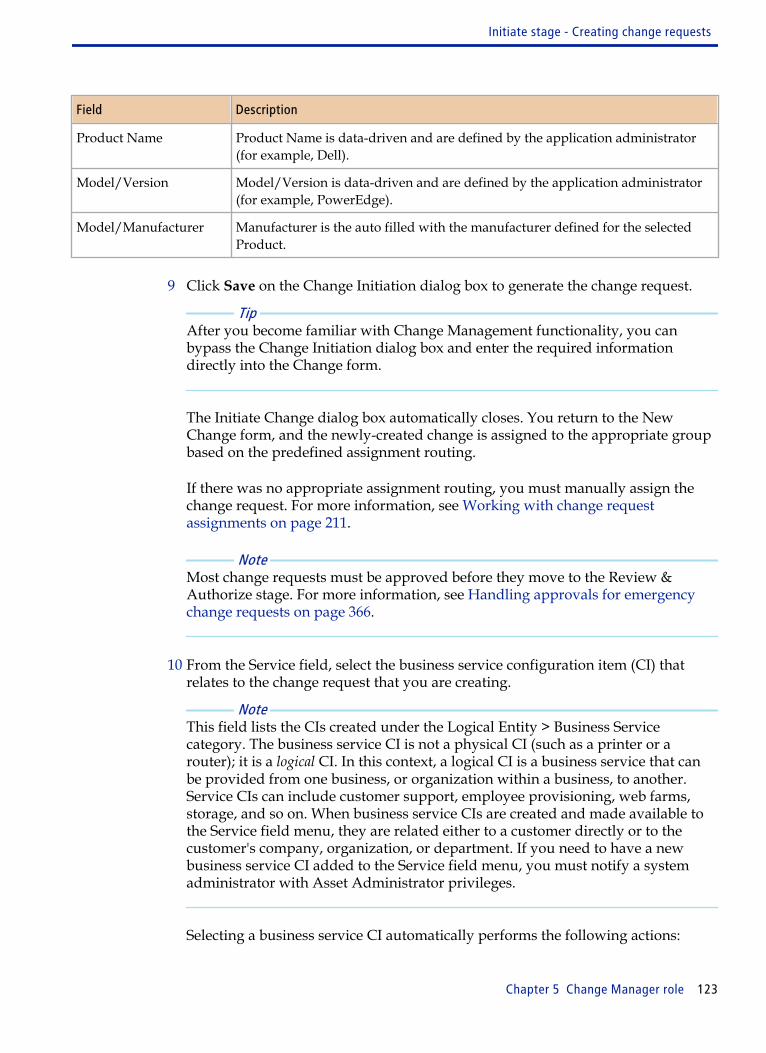
Field Description
Product Name Product Name is data-driven and are defined by the application administrator(for example, Dell).
Model/Version Model/Version is data-driven and are defined by the application administrator(for example, PowerEdge).
Model/Manufacturer Manufacturer is the auto filled with the manufacturer defined for the selectedProduct.
9 Click Save on the Change Initiation dialog box to generate the change request.
Tip After you become familiar with Change Management functionality, you canbypass the Change Initiation dialog box and enter the required informationdirectly into the Change form.
The Initiate Change dialog box automatically closes. You return to the NewChange form, and the newly-created change is assigned to the appropriate groupbased on the predefined assignment routing.
If there was no appropriate assignment routing, you must manually assign thechange request. For more information, see Working with change requestassignments on page 211.
Note Most change requests must be approved before they move to the Review &Authorize stage. For more information, see Handling approvals for emergencychange requests on page 366.
10 From the Service field, select the business service configuration item (CI) thatrelates to the change request that you are creating.
Note This field lists the CIs created under the Logical Entity > Business Servicecategory. The business service CI is not a physical CI (such as a printer or arouter); it is a logical CI. In this context, a logical CI is a business service that canbe provided from one business, or organization within a business, to another.Service CIs can include customer support, employee provisioning, web farms,storage, and so on. When business service CIs are created and made available tothe Service field menu, they are related either to a customer directly or to thecustomer's company, organization, or department. If you need to have a newbusiness service CI added to the Service field menu, you must notify a systemadministrator with Asset Administrator privileges.
Selecting a business service CI automatically performs the following actions:
Initiate stage - Creating change requests
Chapter 5 Change Manager role 123
■ Relates the business service CI to the change request as a Related to associationtype when the release is submitted. After it is established, you cannot removethe association created between the release request and the business service CIfrom the Relationships tab. However, you can select another service from theService field when the change request is in Modify mode.
■ Populates the Product Categorization of the change request based on thecategorization of the business service CI. You can modify the ProductCategorization values later.
Adding Requester information
Enter additional information about the requester on the Change form as needed.
When using the Best Practice view When using the Classic view
Open the change request and choose Quick Actions => Requested for in the left frame of the Change form.
Add this information to the Requester tab displayedon the Change form.
Note Requested for information can be modified only when the change is in the Initiatestage.
To enter requester information using the Best Practice view
1 Open the change request.
2 Choose Quick Actions => Requested for.
3 Enter information about the requester in the Requested For dialog box.
The Requested For information provides details about the company, user details,organization and department for which the request has been created.
Note The Requested By information provided in the Classic view is not available in theBest Practice view.
4 Click OK.
5 Click Save.
To enter requester information using the Classic view
1 Open the change request.
Initiate stage - Creating change requests
124 BMC Remedy Change Management User Guide
2 Click the Requester tab on the Change form.
3 Modify information as needed in the required fields on the Requester tab (forexample, Support Company, First Name, and Last Name).
This information is supplied automatically, based on your login. The SupportCompany is the organization or group to which the change request is assigned.
Tip Type a letter or name into fields with a plus sign (+) on the field label, and pressEnter to automatically fill the field. If multiple choices exist, a selection list ordialog box appears, to help you enter a name. Otherwise, you receive a prompt ifthe letter or person is not found.
4 Enter information about the requester in the Requested For dialog box.
5 Enter information into the required Change Location Company field.
The Change Location Company field is especially important in a multi-tenancyenvironment. In this field, you can specify the company, department, or othergroup that controls access to the change request.
6 (optional) After you respond to the change requester, click the Requester
Contacted icon.
The Requester Contacted icon is used to record if the requester has been contactedabout the change request. This data is useful when service providers areorganizing their work queue. If you click the Requester Contacted icon, thehidden Requester Contacted field is set to Yes when you save your changes. The
Requester Contacted icon now appears in Yes mode.
If the change was generated from a service request, workflow in the BMCRemedy Change Management application sets the SLA Responded field on theService Requests form to Yes.
Note This field is applicable only if the SLM application is installed.
7 Click Save.
Initiate stage - Creating change requests
Chapter 5 Change Manager role 125
Adding classification information
Classification information is used to describe the business justification of a request(for example, Sarbanes-Oxley requirements) and show which products and servicesare affected by the request. This information can be helpful when the request goesthrough the approval process.
To enter classification information when using the Best Practice view
1 On the Change form, choose Links => Categorizations in the left navigationframe of the Change form.
2 Enter the following information:
Field Description
Class Defines the urgency of the change (for example, Normal). For more information,see “Creating a change request at the initiate stage—Best Practice view” on page114.
Change Reason Defines the business reason for implementing the change request. Availableoptions include:
■ Upgrade
■ New functionality
■ Maintenance
■ Upgrade
■ Other
If the request needs to go through the approval process, change reasoninformation can be helpful.
3 Choose Links => Categorizations and enter the following information:
Field Description
OperationalCategorization
Operational categorization is based on a three-tier hierarchy that is configured inthe Operational Catalog.
Product Categorization Product categorization is based on a five-tier hierarchy that is configured in yourProduct Catalog.
4 Click Save.
Initiate stage - Creating change requests
126 BMC Remedy Change Management User Guide
To enter classification information when using the Classic view
1 On the Change form, click the Classification tab.
2 Enter the following information:
Field Description
Class Defines the urgency of the change (for example, Normal). For more information,see “ Creating a change request at the Initiate stage — Classic View” on page 118.
Timing Reason Defines the reason for creating a change request with a Timing of Expedited (forexample, Insufficient lead-time). For more information, see Plan and Schedulestage - Planning the change request on page 149.
Lead Time Defines the amount of time that you need to prepare for a change implementation.The system adds Lead Time to the Submit date to determine the Earliest Startdate and time. For example, if the Submit date is 5/18/2010 1:50:29 AM and youtype 8 in the Lead Time field, the system determines that the Earliest Start Dateis 5/18/2010 9:50:29 AM.
Note: The Lead Time field is available only from the Classification tab of BMCRemedy Change Management Classic view.
Change Reason Defines the business reason for implementing the change request. Availableoptions include:
■ Upgrade
■ New functionality
■ Maintenance
■ Upgrade
■ Other
If the request needs to go through the approval process, change reasoninformation can be helpful.
Initiate stage - Creating change requests
Chapter 5 Change Manager role 127
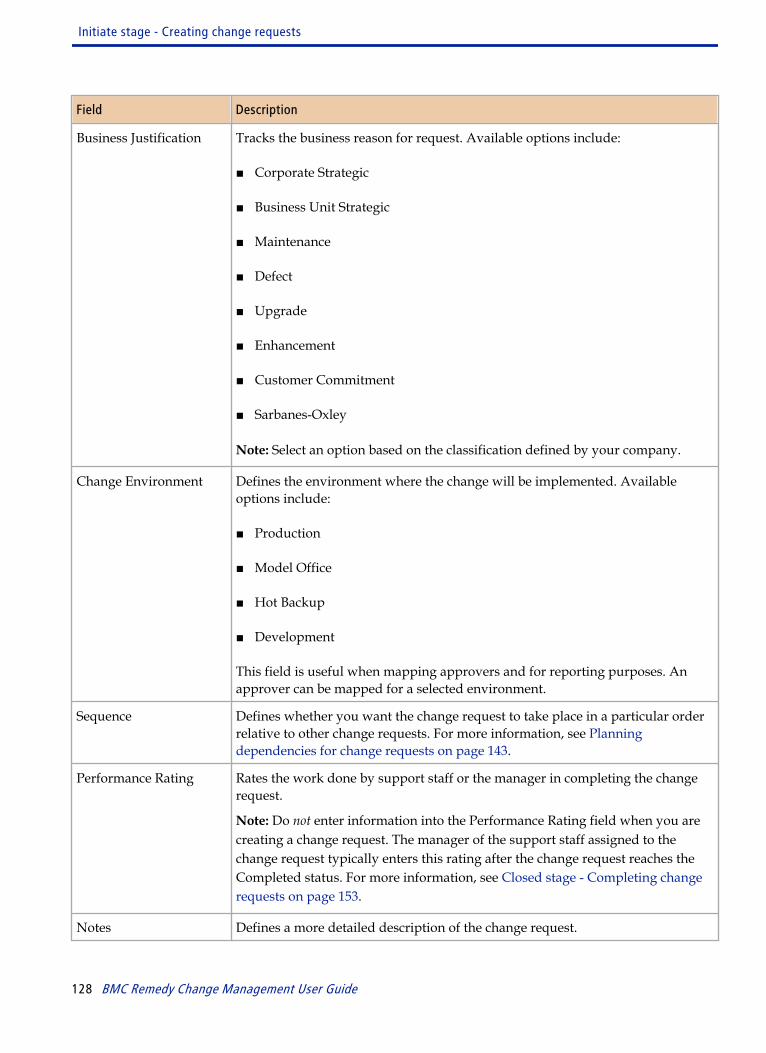
Field Description
Business Justification Tracks the business reason for request. Available options include:
■ Corporate Strategic
■ Business Unit Strategic
■ Maintenance
■ Defect
■ Upgrade
■ Enhancement
■ Customer Commitment
■ Sarbanes-Oxley
Note: Select an option based on the classification defined by your company.
Change Environment Defines the environment where the change will be implemented. Availableoptions include:
■ Production
■ Model Office
■ Hot Backup
■ Development
This field is useful when mapping approvers and for reporting purposes. Anapprover can be mapped for a selected environment.
Sequence Defines whether you want the change request to take place in a particular orderrelative to other change requests. For more information, see Planningdependencies for change requests on page 143.
Performance Rating Rates the work done by support staff or the manager in completing the changerequest.
Note: Do not enter information into the Performance Rating field when you arecreating a change request. The manager of the support staff assigned to thechange request typically enters this rating after the change request reaches theCompleted status. For more information, see Closed stage - Completing changerequests on page 153.
Notes Defines a more detailed description of the change request.
Initiate stage - Creating change requests
128 BMC Remedy Change Management User Guide
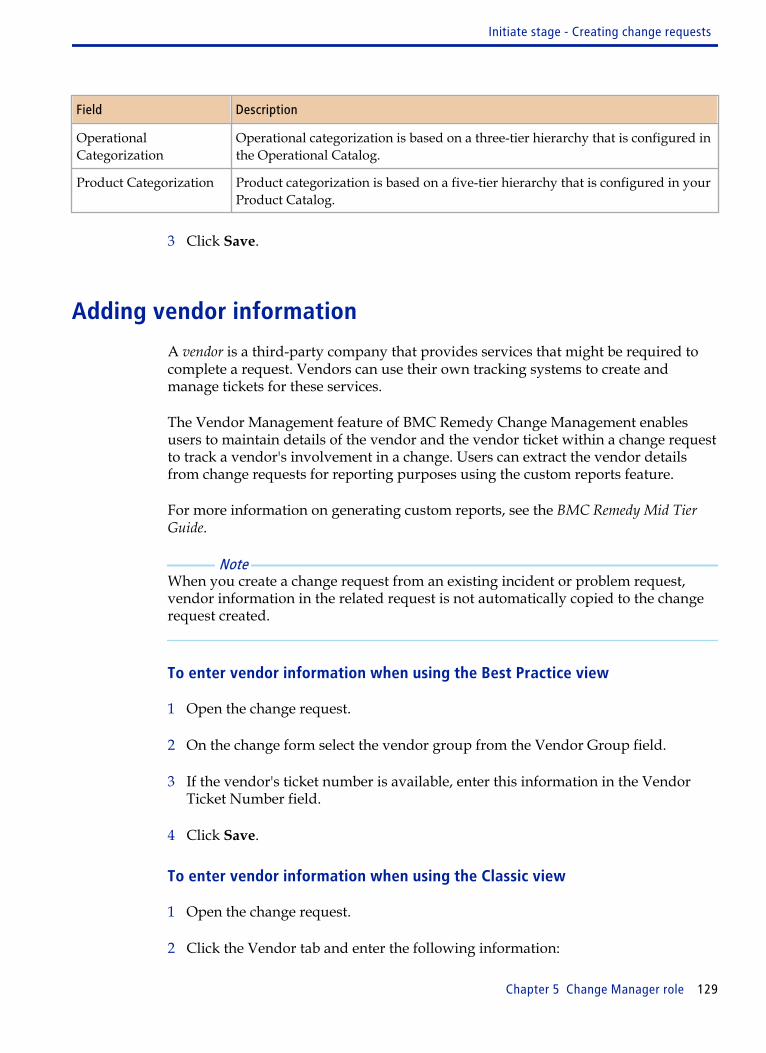
Field Description
OperationalCategorization
Operational categorization is based on a three-tier hierarchy that is configured inthe Operational Catalog.
Product Categorization Product categorization is based on a five-tier hierarchy that is configured in yourProduct Catalog.
3 Click Save.
Adding vendor information
A vendor is a third-party company that provides services that might be required tocomplete a request. Vendors can use their own tracking systems to create andmanage tickets for these services.
The Vendor Management feature of BMC Remedy Change Management enablesusers to maintain details of the vendor and the vendor ticket within a change requestto track a vendor's involvement in a change. Users can extract the vendor detailsfrom change requests for reporting purposes using the custom reports feature.
For more information on generating custom reports, see the BMC Remedy Mid TierGuide.
Note When you create a change request from an existing incident or problem request,vendor information in the related request is not automatically copied to the changerequest created.
To enter vendor information when using the Best Practice view
1 Open the change request.
2 On the change form select the vendor group from the Vendor Group field.
3 If the vendor's ticket number is available, enter this information in the VendorTicket Number field.
4 Click Save.
To enter vendor information when using the Classic view
1 Open the change request.
2 Click the Vendor tab and enter the following information:
Initiate stage - Creating change requests
Chapter 5 Change Manager role 129
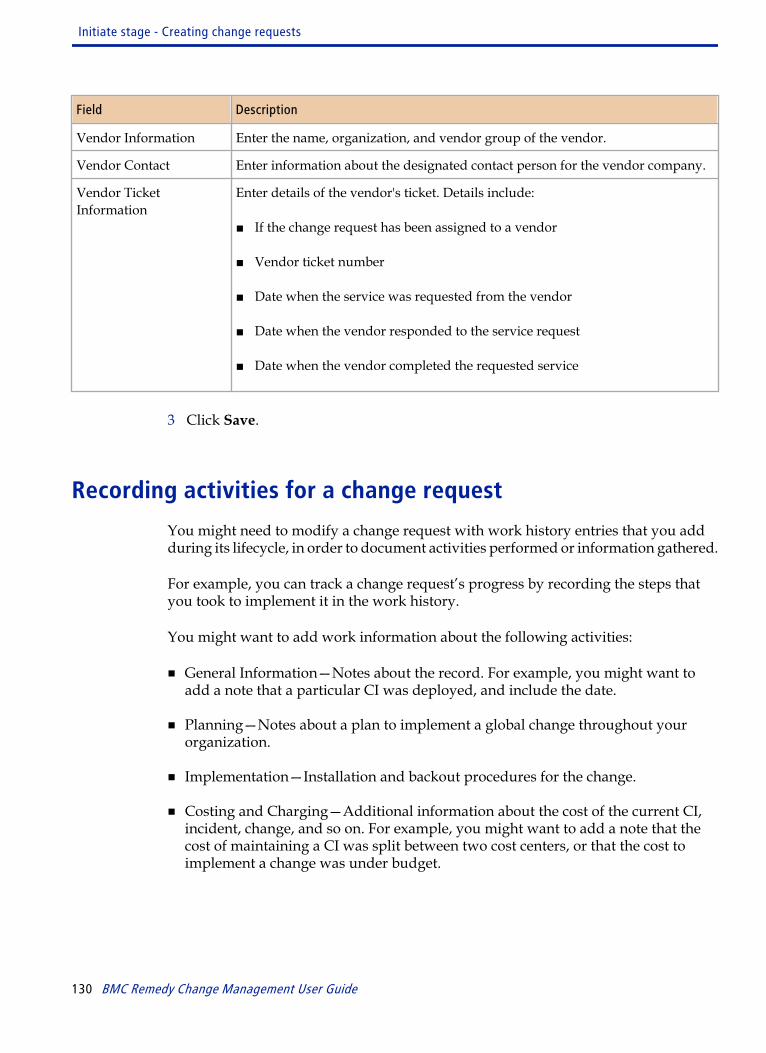
Field Description
Vendor Information Enter the name, organization, and vendor group of the vendor.
Vendor Contact Enter information about the designated contact person for the vendor company.
Vendor TicketInformation
Enter details of the vendor's ticket. Details include:
■ If the change request has been assigned to a vendor
■ Vendor ticket number
■ Date when the service was requested from the vendor
■ Date when the vendor responded to the service request
■ Date when the vendor completed the requested service
3 Click Save.
Recording activities for a change request
You might need to modify a change request with work history entries that you addduring its lifecycle, in order to document activities performed or information gathered.
For example, you can track a change request’s progress by recording the steps thatyou took to implement it in the work history.
You might want to add work information about the following activities:
■ General Information—Notes about the record. For example, you might want toadd a note that a particular CI was deployed, and include the date.
■ Planning—Notes about a plan to implement a global change throughout yourorganization.
■ Implementation—Installation and backout procedures for the change.
■ Costing and Charging—Additional information about the cost of the current CI,incident, change, and so on. For example, you might want to add a note that thecost of maintaining a CI was split between two cost centers, or that the cost toimplement a change was under budget.
Initiate stage - Creating change requests
130 BMC Remedy Change Management User Guide
Recording the change activities
Use the following procedure to add work information about activities performed forthe current change request.
To add or modify work information in a change request when using the BestPractice view
1 Open the change request.
2 To add new work information, under the Add Work Info details section on theWork Detail tab, enter the following information:
■ Notes - Enter the details of your work information record.
■ Attachment - Click to add any attachments related to the work information.You can add up to three files.
3 Click Advanced to select the work information type and add any additionalattachments.
■ From the Work Info Type list, select the type of work information to add.
■ In the Attachment fields, add any additional attachments required for the workinformation. You can add up to three files.
4 When you finish updating the change request, under Add Work Info, click Save.
The Save operation adds your entry to the work history.
5 To view or update the entries in the work information, select the work info recordand click View . Under the Edit Work Info section:
a Update the required fields.
b To delete an attachment, click delete for that attachment.
c Click Save.
6 To view a report of selected activities that you performed against this request,select the records from the work info table and click Report .
7 To view the history of when and by whom each of the work information wasadded, click History .
Initiate stage - Creating change requests
Chapter 5 Change Manager role 131

8 Click Save.
To add work information to a change request when using the Classic view
1 Open the Change request.
2 On the Work Info tab click Create.
3 From the Work Info Type list, select the type of work information to add.
4 From the Source list, select the source of this information.
Information sources can include email, system assignment, or the web.
5 Enter the details of your work information record in the Summary and Details orNotes fields.
6 To add an attachment to the record, right-click in the attachment table, and thenchoose Add.
7 From the Locked list, select Yes or No to lock the log.
WARNING If you select Yes, you cannot modify the work log after you save it. A locked worklog can only be modified by a user with the functional role of a InfrastructureChange Master.
8 From the View Access list, specify the level of access to the work entry:
■ Select Internal if you want only users with application permissions for BMCRemedy Change Management to see the entry.
■ Select Public if you want everyone with access to the system to see the entry,including requesters.
9 When you finish updating the change request, click Save.
The Save operation adds your entry to the work history. The Show field enablesyou to filter specific work entries based on the type of activity that appears in thetable.
10 To view a report of selected activities that you performed against this request,select the records from the work info table and click Report.
11 To view the history of when and by whom the work information was added, clickHistory.
Initiate stage - Creating change requests
132 BMC Remedy Change Management User Guide

12 To view or update all entries in the work information, click View.
In the Change Work Info dialog box, select the work info record you want tochange, update the required fields, and then click Save.
Note When you return to the request, refresh the Work Info table to see all the modifiedrecords.
13 Click Save.
Creating emergency change requests
An emergency change is implemented when there is an Incident that requires achange. Depending on how your application administrator has configured the BMCRemedy Change Management application, emergency change requests bypass thenormal approval process. When you create an Emergency change the new approvalprocess phase will be used, bypassing the normal change states. For example, ifemergency requests are configured to bypass the Review approval stage, the changeis not held up waiting for approvals, but is automatically approved. The requestskips to the next stage in its lifecycle.
WARNING Your application administrator must configure the approval process that bypassesthe normal approval process for emergency change requests. For more information,see the BMC Remedy IT Service Management Configuration Guide.
Note Previously, Problem records could not be related to Emergency change requests. Youcan now relate Problem records to the emergency change.
To create emergency change requests
1 As a manual step, make sure that an open incident refers to this change request.
2 Create a new change request as described in Initiate stage - Creating changerequests on page 113 or “Creating a change request at the initiate stage—BestPractice view” on page 114.
3 Select Emergency from the Class field.
The following message is displayed:
Initiate stage - Creating change requests
Chapter 5 Change Manager role 133
Make sure an open incident references this change. (ARWARN1440110)
4 Enter the required information for the change record, and then click Save.
5 Add the related Incident or Problem requests in the Relationship tab of therecord.
Atrium Impact Simulator analysis for change requests
You can create a new change request, based on a simulated impact analysisgenerated by the Atrium Impact Simulator tool. You can use the BMC AtriumImpact Simulator application to proactively determine how a change to theavailability of a CI affects other CIs and services. For example, you could run asimulation in BMC Atrium Impact Simulator to learn what devices and applicationsin the network would be affected if you were to take a server offline.
Using this tool provides many benefits for the change management staff:
■ Generates "What if?" impact simulations to determine if the change request willaffect critical upstream business services. Using the Atrium Impact Simulatorcould potentially reduce the number of CAB meetings.
■ Determines the approvers for the change request, based on the simulation result.
■ Generates simulation reports for audit or compliance purposes.
You might also use BMC Atrium Impact Simulator to plan for disaster recovery. Youcan run simulations to determine where the network is weakest, and plan accordingly.
BMC Atrium Impact Simulator uses the impact relationships that you create betweenCIs. For information about creating relationships, see Working with relationships onpage 220.
When you run a simulation, you can specify an impact state for each CI in thesimulation. Table 21 on page 134 lists the states that you can select in BMC AtriumImpact Simulator.
Table 21: Impact states in BMC Atrium Impact Simulator
BMC Atrium Impact Simulatorstate
Description
Slightly Impaired The CI is delivering services normally, but some problem might affect it.
Impaired The CI’s delivery of service is slightly affected.
Very Impaired The CI’s delivery of service is affected.
Initiate stage - Creating change requests
134 BMC Remedy Change Management User Guide
BMC Atrium Impact Simulatorstate
Description
Unavailable The CI has a failure and is unable to deliver service.
When you run a simulation, BMC Atrium Impact Simulator uses these states and theimpact relationships defined between CIs to predict the corresponding impact onthose CIs. For example, a simulation that includes a server with an impact state ofUnavailable might return several related CIs that are predicated to be unavailable asa result of the unavailable server. However, an Impaired server in that samesimulation might return impacted CIs that are predicted to be only Slightly Impaired.
Priorities can help you understand the problems that you should address first if youwere to make the changes that you simulated. For example, a simulation mightreveal that if a server were to fail, email and payroll services might be disabled. Thecomputed priority for these services would help you decide which service to restorefirst.
For more information, see the BMC Atrium CMDB User’s Guide. See also Viewing theimpact of CIs on change requests on page 237.
Creating a change request from Atrium Impact Simulator
This section describes the procedure to perform an impact simulation for CIs andcreate a new change request related to this analysis using the Atrium Impact Simulator.
Initiate stage - Creating change requests
Chapter 5 Change Manager role 135
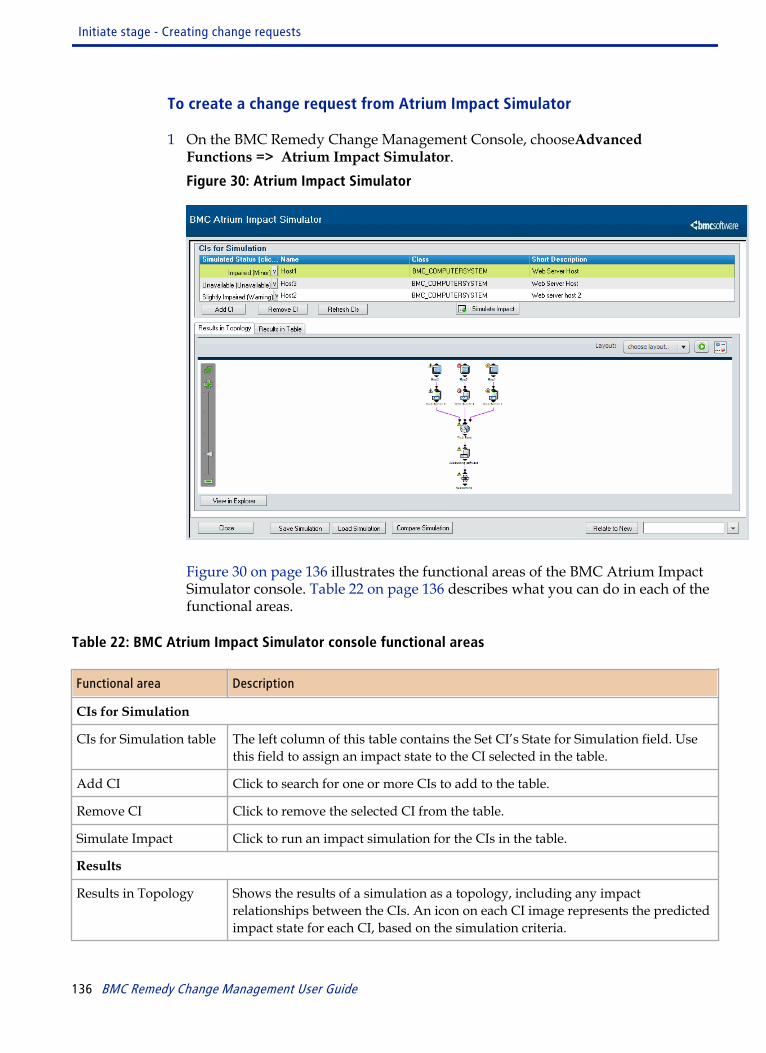
To create a change request from Atrium Impact Simulator
1 On the BMC Remedy Change Management Console, chooseAdvancedFunctions => Atrium Impact Simulator.Figure 30: Atrium Impact Simulator
Figure 30 on page 136 illustrates the functional areas of the BMC Atrium ImpactSimulator console. Table 22 on page 136 describes what you can do in each of thefunctional areas.
Table 22: BMC Atrium Impact Simulator console functional areas
Functional area Description
CIs for Simulation
CIs for Simulation table The left column of this table contains the Set CI’s State for Simulation field. Usethis field to assign an impact state to the CI selected in the table.
Add CI Click to search for one or more CIs to add to the table.
Remove CI Click to remove the selected CI from the table.
Simulate Impact Click to run an impact simulation for the CIs in the table.
Results
Results in Topology Shows the results of a simulation as a topology, including any impactrelationships between the CIs. An icon on each CI image represents the predictedimpact state for each CI, based on the simulation criteria.
Initiate stage - Creating change requests
136 BMC Remedy Change Management User Guide

Functional area Description
Results in Table Shows the results of a simulation as a table. The Predicted State column indicatesthe expected impact for each CI. To list only impacted service CIs, click ShowServices. To list all impacted CIs, click Show All Results.
Save Simulation Save the simulation. Saved simulations can be loaded and compared.
Here you choose the source CIs to include in a simulation. You can select one orseveral CIs, each with their own simulated impact state.
2 Click Add CI to search for and select CIs to add to the change request.
a In the Query window, run a query to return the CIs that you wish to include ina simulation.
b In the results list, select one or more CIs to include in your simulation.
c In the CIs for Simulation section, select a CI, and then select an impact state inthe Set CI’s State for Simulation field.
d Repeat this step until every CI in the CIs for Simulation section has the impactstate you want to simulate.
3 Click Simulate Impact to run an impact simulation for the CIs in the table.
You can view the results of the simulation on the Results in Table and Results inTopology tabs. You can filter the CIs by severity level or other options providedby the Atrium Impact Simulator.
4 To save the simulation, complete the following steps:
a Click Save Simulation.
b In the dialog box, enter a name for the simulation.
c Provide a description of the simulation, such as its purpose, and the source CIsused in the simulation.
d Click OK.
5 To create a new change request, choose Relate to New => Change Request.
The Change form opens. The CIs from the Atrium Impact Simulator are related tothe request in the Relationship tab. Work information is created for the changerequest, along with a simulation .csv file attached.
For more information, see Working with relationships on page 220.
Initiate stage - Creating change requests
Chapter 5 Change Manager role 137
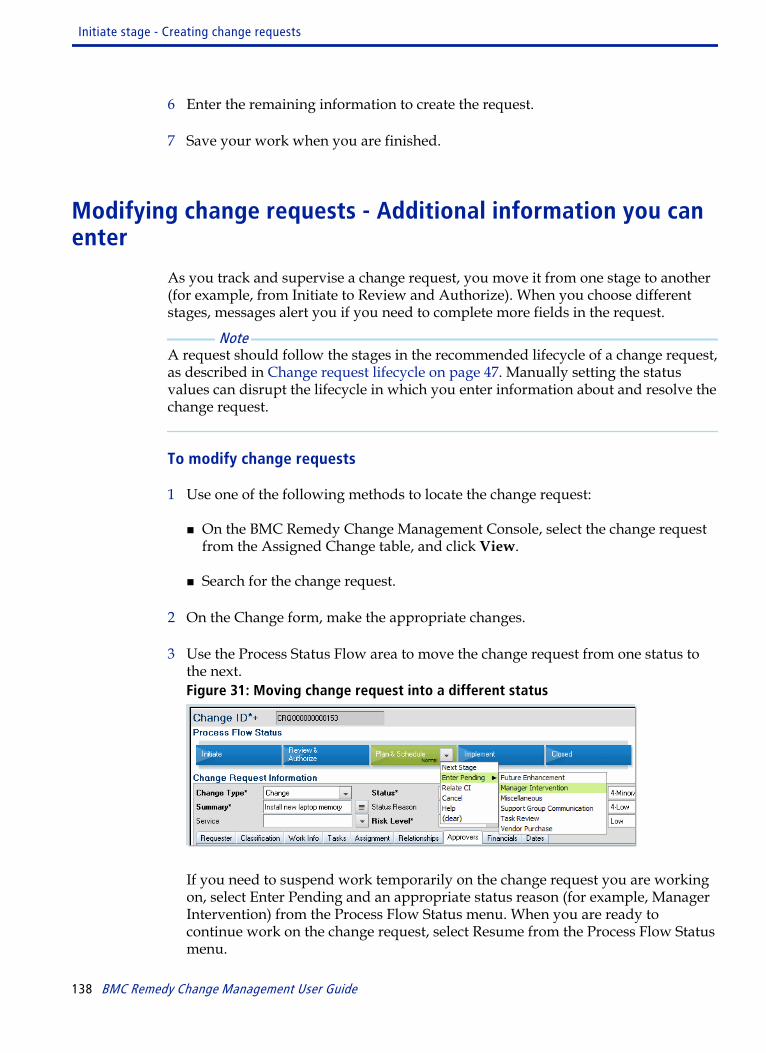
6 Enter the remaining information to create the request.
7 Save your work when you are finished.
Modifying change requests - Additional information you canenter
As you track and supervise a change request, you move it from one stage to another(for example, from Initiate to Review and Authorize). When you choose differentstages, messages alert you if you need to complete more fields in the request.
Note A request should follow the stages in the recommended lifecycle of a change request,as described in Change request lifecycle on page 47. Manually setting the statusvalues can disrupt the lifecycle in which you enter information about and resolve thechange request.
To modify change requests
1 Use one of the following methods to locate the change request:
■ On the BMC Remedy Change Management Console, select the change requestfrom the Assigned Change table, and click View.
■ Search for the change request.
2 On the Change form, make the appropriate changes.
3 Use the Process Status Flow area to move the change request from one status tothe next.Figure 31: Moving change request into a different status
If you need to suspend work temporarily on the change request you are workingon, select Enter Pending and an appropriate status reason (for example, ManagerIntervention) from the Process Flow Status menu. When you are ready tocontinue work on the change request, select Resume from the Process Flow Statusmenu.
Initiate stage - Creating change requests
138 BMC Remedy Change Management User Guide
Note The Change Manager or Change Coordinator can resume a pending change request.
Otherwise, the Status field is updated automatically during the Process Flow.
4 (optional) Perform the following actions.
Action For more information
Add a task to the change request. See Implement stage - Working with tasks on page 260.
Modify the change request assignments. See Working with change request assignments on page 211.
Relate a CI or some other object to thechange request.
See Working with relationships on page 220.
Modify the start and end dates of the changerequest.
See Plan and Schedule stage - Planning the change request onpage 149.
5 Click Save.
Review and Authorize stage - Risk and impactanalysis
No change to the IT infrastructure is without risk. Therefore, your change requestsshould minimize the severity of any impact and disruption. They also should besuccessful at the first attempt. The change manager is responsible for planning andscheduling change requests, which includes assessing their risk and impact. Duringthe Risk & Authorize stage, the change manager should estimate the impact by usingthe risk assessment functionality.
Review and Authorize stage - Risk and impact analysis
Chapter 5 Change Manager role 139
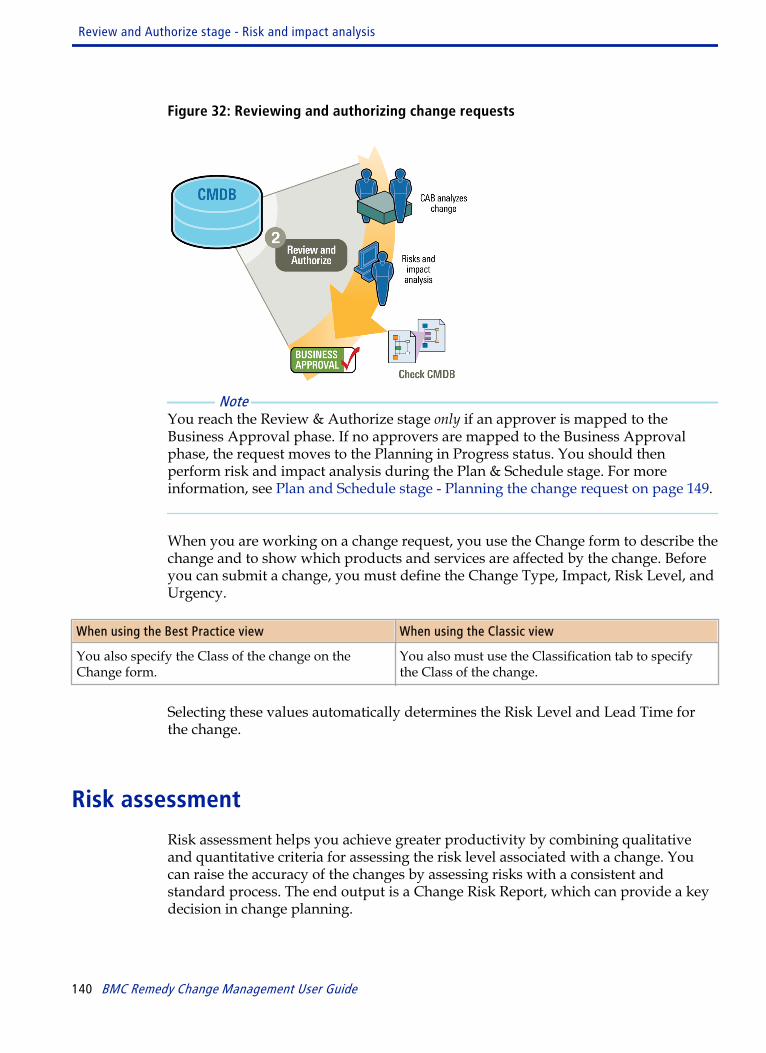
Figure 32: Reviewing and authorizing change requests
Note You reach the Review & Authorize stage only if an approver is mapped to theBusiness Approval phase. If no approvers are mapped to the Business Approvalphase, the request moves to the Planning in Progress status. You should thenperform risk and impact analysis during the Plan & Schedule stage. For moreinformation, see Plan and Schedule stage - Planning the change request on page 149.
When you are working on a change request, you use the Change form to describe thechange and to show which products and services are affected by the change. Beforeyou can submit a change, you must define the Change Type, Impact, Risk Level, andUrgency.
When using the Best Practice view When using the Classic view
You also specify the Class of the change on theChange form.
You also must use the Classification tab to specifythe Class of the change.
Selecting these values automatically determines the Risk Level and Lead Time forthe change.
Risk assessment
Risk assessment helps you achieve greater productivity by combining qualitativeand quantitative criteria for assessing the risk level associated with a change. Youcan raise the accuracy of the changes by assessing risks with a consistent andstandard process. The end output is a Change Risk Report, which can provide a keydecision in change planning.
Review and Authorize stage - Risk and impact analysis
140 BMC Remedy Change Management User Guide
Best practice No matter how well-planned or tested a change might be, you must consider thepossibility that your change can create disruptions elsewhere in the IT infrastructure.You should not approve any change request that does not explicitly plan for thepossibility of failure. For more information, see Creating change requests asrollbacks on page 156.
When approvers review a proposed change request, they want to see an analysis ofpotential risks and the impact of the change request.
During the planning phase, assess the risk of your change request. Risks can includethe number of people affected, financial concerns, loss of productivity due to systemor network downtime, resource allocation, and seasonal considerations, such asvacations, holidays, and weather. Impact analysis needs to be based on how manypeople are affected by the proposed change, and where those people are located.Here you can select the anticipated risk that this proposed change has—from 5(highest risk) to 1 (lowest risk).
You can also compute the risk of a change request. Risk factors can include a set ofquestions used to calculate the risk value. During configuration, your applicationadministrator defines a set of questions that apply to a specific company, to theoperational categorization of a change request, or globally to all change requests, anda weight for each question. For example, your application administrator can define aset of questions that apply only to change requests regarding decommissioningvirtual machines, if those change requests are identified by operational categorization.
The support staff assigned to each change request provides the risk value andprobability for each question as it pertains to their specific request. The systemcalculates the total risk and saves the value in the Risk Level field of the Change form.
Finally, you can view a report of the total impact of your risk changes.
The Change form includes the following fields for risk management:
■ Risk Level—Enter the anticipated risk that this proposed change has —from 5(highest risk) to 1 (lowest risk).
■ Impact—Determine the impact of this change based on the number of affected users.
■ Performance Rating—When using the Classic view, in the Classification tab, ratethe work done by support staff or the manager in completing the change request.Usually, the manager of the support staff assigned to the change request entersthis rating after the change request is closed. This field is not displayed in the BestPractice view.
Review and Authorize stage - Risk and impact analysis
Chapter 5 Change Manager role 141
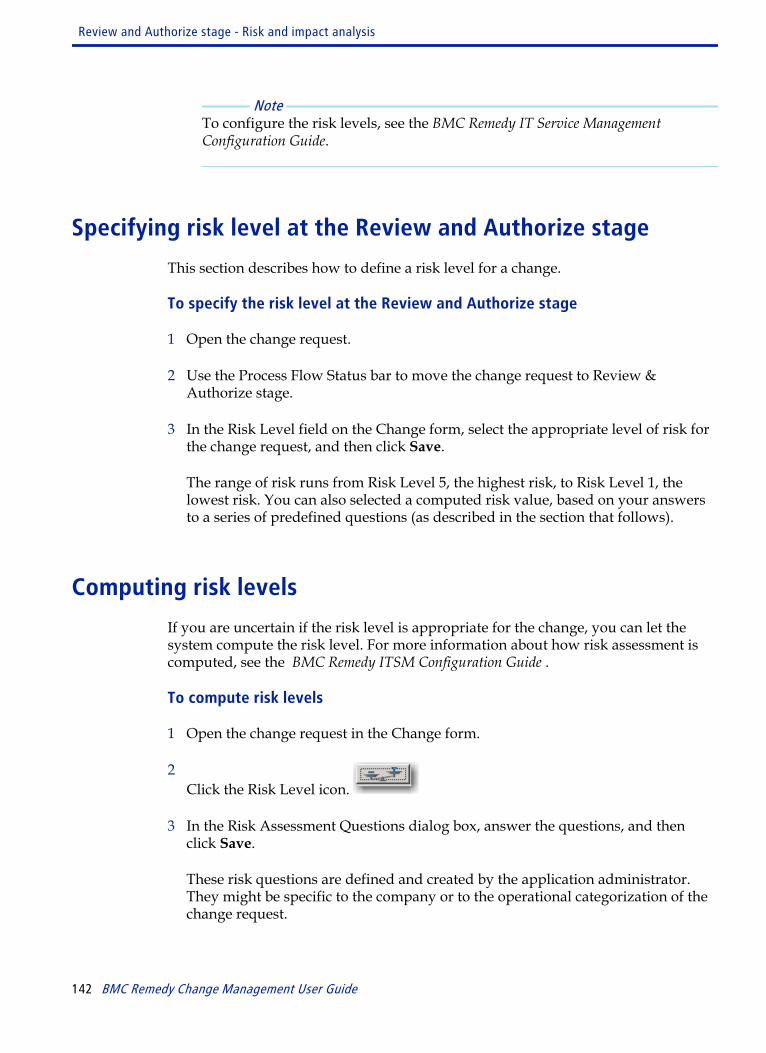
Note To configure the risk levels, see the BMC Remedy IT Service ManagementConfiguration Guide.
Specifying risk level at the Review and Authorize stage
This section describes how to define a risk level for a change.
To specify the risk level at the Review and Authorize stage
1 Open the change request.
2 Use the Process Flow Status bar to move the change request to Review &Authorize stage.
3 In the Risk Level field on the Change form, select the appropriate level of risk forthe change request, and then click Save.
The range of risk runs from Risk Level 5, the highest risk, to Risk Level 1, thelowest risk. You can also selected a computed risk value, based on your answersto a series of predefined questions (as described in the section that follows).
Computing risk levels
If you are uncertain if the risk level is appropriate for the change, you can let thesystem compute the risk level. For more information about how risk assessment iscomputed, see the BMC Remedy ITSM Configuration Guide .
To compute risk levels
1 Open the change request in the Change form.
2 Click the Risk Level icon.
3 In the Risk Assessment Questions dialog box, answer the questions, and thenclick Save.
These risk questions are defined and created by the application administrator.They might be specific to the company or to the operational categorization of thechange request.
Review and Authorize stage - Risk and impact analysis
142 BMC Remedy Change Management User Guide

4 Save the Change request.
5 To view and print a report of the total impact of your risk changes, click ViewRisk Report.
When using the Best Practice view When using the Classic view
Choose Links => View Risk Report in the leftframe of the Change form.
Choose Advanced => View Risk Report in the leftframe of the Change form.
The Change Risk Report dialog box displays the summary, which includes thequestions and responses, and the derived factors if applicable. The derived factorssection includes the change impact, change priority, CI impact, and CI priority.
Planning dependencies for change requests
When planning how to implement a series of change requests, determine in whatorder, if any, they must be completed. To set dependencies, you assign a sequencenumber to each request. Requests with a lower sequence number must be completedbefore those with higher numbers can be completed; otherwise, you are notified by awarning message (by default). More than one request can have the same sequencenumber; requests with the same sequence number are considered peers. Forexample, a request with the sequence number 3 can be completed only after allrequests with sequence numbers 1 and 2 are completed. Peer requests can becompleted in any order among themselves.
To implement sequence numbers in requests, see Assigning sequence numbers todependent change requests on page 243.
Note Your application administrator can configure the level of enforcement of the changedependency rules. For example, BMC Remedy Change Management can beconfigured so that users see an error, not just a warning, if they complete requestsout of sequence. For more information, see the BMC Remedy IT Service ManagementConfiguration Guide.
A change request can include multiple tasks. When a change request is scheduled,the first task is activated and set to Assigned. When the last task is completed and itsstatus is set to Closed, the request is Completed.
To implement sequence numbers for tasks, see Assigning a sequence number to taskgroups and tasks on page 268.
Review and Authorize stage - Risk and impact analysis
Chapter 5 Change Manager role 143
Risk Recalculation
Risks can be configured within a change template and are applied when the templateis used to create a change. Additionally, risk calculations can be configured on theRisk Factor Configuration form. Configuring risk factors overrides any risks set inthe change template.
In certain scenarios, risks are recalculated due to configuration conflicts. Forexample, when the user uses a change template that has a risk value defined, the risklevel for the change is set to this value. If at some point this change is reassigned to auser for whom risk settings have been configured, risk is recalculated based on theconfiguration defined. The value defined in the change template is overwritten andthe following error message is displayed: The system has computed a new valuefor Risk level. To use this computed value, clear the value in theRisk Level field and press Save. ARNOTE 48140
To configure risk within a change template, select Administrator Console => Application Administration Console => Custom Configuration => ChangeManagement => Template => Template and define a Risk Level.
To configure risk calculations on the Risk Factor Configuration form selectAdministrator Console => Application Administration Console => CustomConfiguration => Change Management => Risk Factors => Change RiskSelection and define risk calculation factors.
For more information on configuring change risk calculation, see the BMC RemedyITSM Configuration Guide.
Approvals - Approving change requestsWithin the life cycle of the change request, approvals might be required. There areseveral approval phases possible, which vary depending on how your organizationconfigures and implements the possible changes. Some changes bypass the approvalprocess altogether. The application administrator determines which change requestsrequire approval, what kind of approval process the change requests must undergo,and who the approvers are. Support staff and management can add more approversto the list.
Tip The SMPM process model specifies that the best practice is to include an approvalafter the risk and impact analysis of a change request.
Approvals - Approving change requests
144 BMC Remedy Change Management User Guide
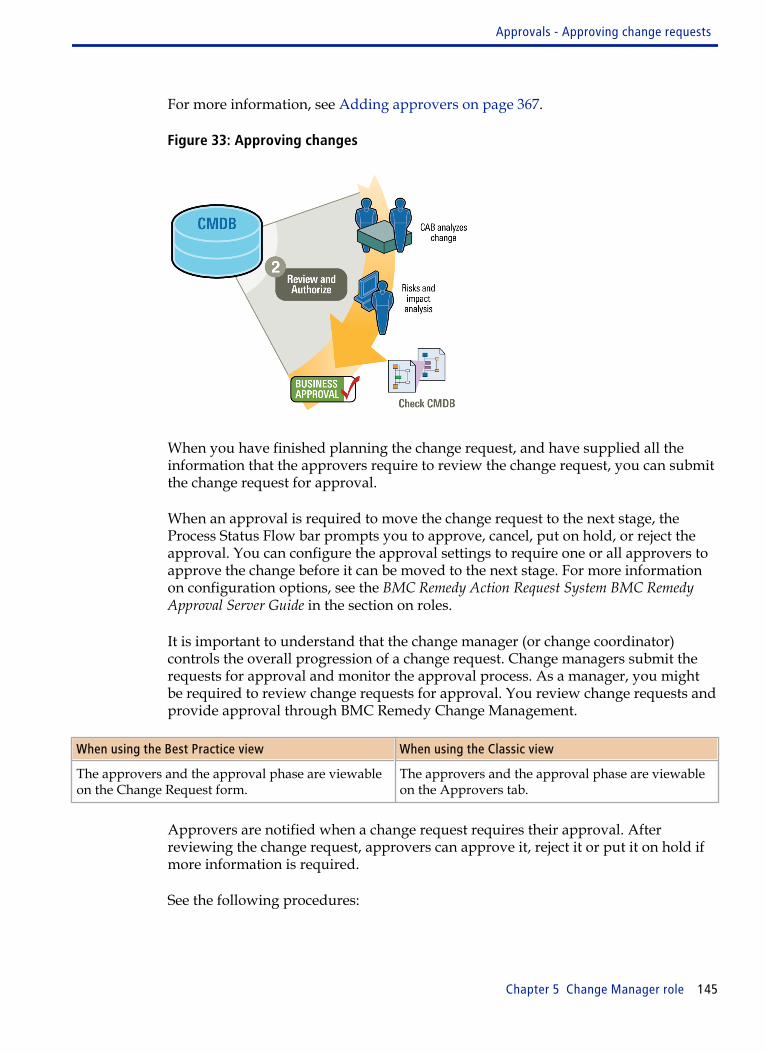
For more information, see Adding approvers on page 367.
Figure 33: Approving changes
When you have finished planning the change request, and have supplied all theinformation that the approvers require to review the change request, you can submitthe change request for approval.
When an approval is required to move the change request to the next stage, theProcess Status Flow bar prompts you to approve, cancel, put on hold, or reject theapproval. You can configure the approval settings to require one or all approvers toapprove the change before it can be moved to the next stage. For more informationon configuration options, see the BMC Remedy Action Request System BMC RemedyApproval Server Guide in the section on roles.
It is important to understand that the change manager (or change coordinator)controls the overall progression of a change request. Change managers submit therequests for approval and monitor the approval process. As a manager, you mightbe required to review change requests for approval. You review change requests andprovide approval through BMC Remedy Change Management.
When using the Best Practice view When using the Classic view
The approvers and the approval phase are viewableon the Change Request form.
The approvers and the approval phase are viewableon the Approvers tab.
Approvers are notified when a change request requires their approval. Afterreviewing the change request, approvers can approve it, reject it or put it on hold ifmore information is required.
See the following procedures:
Approvals - Approving change requests
Chapter 5 Change Manager role 145

■ For information about reviewing proposed change requests and providing ordenying approval, see Handling approvals for emergency change requests onpage 366.
■ For information about reviewing the approval process, see Working with BMCRemedy Change Management as an approver on page 355.
■ For information about adding approvers, see Adding approvers on page 367.
Understanding the change management approval process
After a change is planned and scheduled, the change request is set to a status ofScheduled for Review. The change manager or change coordinator have theopportunity to review change plans, schedules, and so on, before moving the changeto the Implementation Approval phase.
To access functions involving Approvers:
When using the Best Practice view When using the Classic view
Use the Work Detail tab on the Change form. Use the Approvers tab on the Change form.
The following buttons in the Change form control functions involving approvers:
■ View Notifications—Opens the APR:Non-ApprovalNotifications form so thatyou can view notifications in either Pending or Notified status. Notifications arelisted in the table on the form. For more information, see “Viewing and remove non-approver notifications ” on page 371.
Note The same forms allows you to add notifications for the change.
■ Add—Creates a new individual or group to approve the change. For moreinformation, see “Adding approvers” on page 367.
■ Approve—Allows an approver or a change manager or coordinator defined asalternate approvers, to approve the change request. For more information, see “Adding alternate approvers ” on page 369.
■ Reject—Allows an approver or a change manager or coordinator defined asalternate approvers, to reject the change request. For more information, see “Adding alternate approvers ” on page 369.
Approvals - Approving change requests
146 BMC Remedy Change Management User Guide
Approving or rejecting requests
When an approval is required to move the change request to the next status, theProcess Status Flow area prompts you to approve, cancel, or reject the approval. Youcannot move the change request to the next status unless you first receive an approval.
When a change requires an approval, its approvers are notified. Notifications aresent according to the method specified in the Notifications tab of the approver’srecord in the People form.
When you finish planning the change request, and have supplied all the informationthat the approvers require to review the change request, you can submit the changerequest for approval.
Note For more information, see Handling approvals for emergency change requests onpage 366 and Working with BMC Remedy Change Management as an approver onpage 355.
Performing additional approval functions
In addition to approving or rejecting approvals, you can perform the functions listedin the following table.
Table 23: Additional approval functions
Function Action
Resubmit a rejected releaserequest
If an approver rejects a request, the approval process is stopped. You canresubmit the request for approval.
1 Open the request record.
2 From the process flow bar, at the stage the request was rejected, selectRestart.
The request status is set to Pending Approval for the stage at which itwas cancelled.
3 When approving the request after it was restarted, users can enterdetails for restarting the request in the Work Info.
When using the Best Practice view: On the Work Detail tab, select theWork Info and click View. When using the Classic view, click the WorkInfo tab.
Approvals - Approving change requests
Chapter 5 Change Manager role 147
Viewing change requests awaiting approval
You can view a list of all change requests that are awaiting approval.
To view change requests awaiting approval
1 In the Change Management console, under Counts in the left navigation pane,click Waiting Approval.
The Changes table shows the change requests waiting approval.
2 Select the change request to review, and then click View.
The approver can approve or reject the change request the Change Request form,or request further information.
Viewing approvers for a change request
In the Approvers table on the Work Detail tab of the Infrastructure Change form,you can see the approvers for the change request.
Initially, the table displays all pending reviewers for the current approval phase. TheShow list provides filters so that you can display all approvers or a subset ofapprovers. The following filters are new:
Future Approvers
Displays approvers for future phases. This filter is useful when a changerequest must go through multiple approval phases.
Tip To see which approvers are required for a specific future phase, view thefuture approvers and sort on the process column.
All Approvers
Displays all approvers for all approval phases, including approvers whohave already approved or rejected the change request.
For each approver, the table displays the following information:
■ The approval status, such as Approved or Pending
■ The approver's login ID and name
■ The approval process, such as Change Level-Review
Approvals - Approving change requests
148 BMC Remedy Change Management User Guide

Plan and Schedule stage - Planning thechange request
In the Plan & Schedule stage, the change manager (or change coordinator) plans aforward schedule of changes (or FSC). This includes planning all the requestsapproved for implementation, setting target dates, and estimating the risks and costsinvolved. When you have finished planning the request, and have supplied all theinformation that the approvers require to review the request, you can submit it to theapproval process.Figure 34: Planning and scheduling change requests
Plan for the following important details:
■ Set the request’s status to Planning, and specify the planned dates.
■ Estimate the time that the project will take.
■ Estimate any applicable down time associated with the request.
■ Register an available or unavailable time segment to perform the request.
■ Assess the risks and impact of the request.
■ Specify the business justification for the request if necessary.
■ Define the tasks.
■ Calculate the costs associated with the request.
■ Submit the request for approval.
Plan and Schedule stage - Planning the change request
Chapter 5 Change Manager role 149
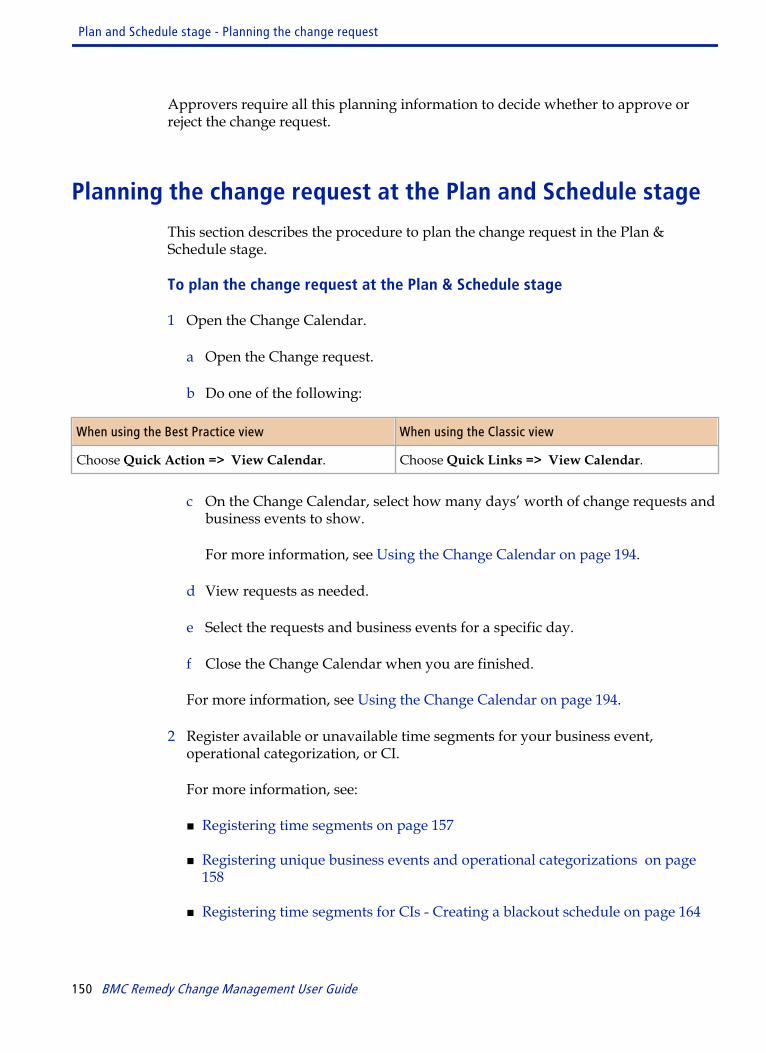
Approvers require all this planning information to decide whether to approve orreject the change request.
Planning the change request at the Plan and Schedule stage
This section describes the procedure to plan the change request in the Plan &Schedule stage.
To plan the change request at the Plan & Schedule stage
1 Open the Change Calendar.
a Open the Change request.
b Do one of the following:
When using the Best Practice view When using the Classic view
Choose Quick Action => View Calendar. Choose Quick Links => View Calendar.
c On the Change Calendar, select how many days’ worth of change requests andbusiness events to show.
For more information, see Using the Change Calendar on page 194.
d View requests as needed.
e Select the requests and business events for a specific day.
f Close the Change Calendar when you are finished.
For more information, see Using the Change Calendar on page 194.
2 Register available or unavailable time segments for your business event,operational categorization, or CI.
For more information, see:
■ Registering time segments on page 157
■ Registering unique business events and operational categorizations on page158
■ Registering time segments for CIs - Creating a blackout schedule on page 164
Plan and Schedule stage - Planning the change request
150 BMC Remedy Change Management User Guide
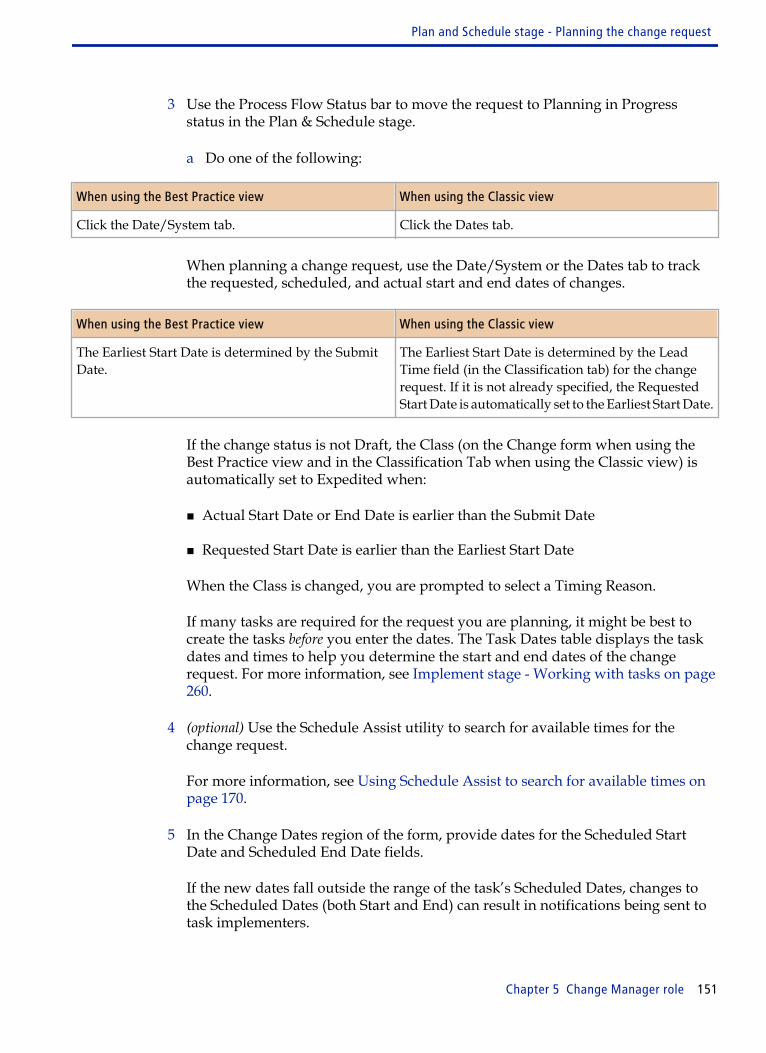
3 Use the Process Flow Status bar to move the request to Planning in Progressstatus in the Plan & Schedule stage.
a Do one of the following:
When using the Best Practice view When using the Classic view
Click the Date/System tab. Click the Dates tab.
When planning a change request, use the Date/System or the Dates tab to trackthe requested, scheduled, and actual start and end dates of changes.
When using the Best Practice view When using the Classic view
The Earliest Start Date is determined by the SubmitDate.
The Earliest Start Date is determined by the LeadTime field (in the Classification tab) for the changerequest. If it is not already specified, the RequestedStart Date is automatically set to the Earliest Start Date.
If the change status is not Draft, the Class (on the Change form when using theBest Practice view and in the Classification Tab when using the Classic view) isautomatically set to Expedited when:
■ Actual Start Date or End Date is earlier than the Submit Date
■ Requested Start Date is earlier than the Earliest Start Date
When the Class is changed, you are prompted to select a Timing Reason.
If many tasks are required for the request you are planning, it might be best tocreate the tasks before you enter the dates. The Task Dates table displays the taskdates and times to help you determine the start and end dates of the changerequest. For more information, see Implement stage - Working with tasks on page260.
4 (optional) Use the Schedule Assist utility to search for available times for thechange request.
For more information, see Using Schedule Assist to search for available times onpage 170.
5 In the Change Dates region of the form, provide dates for the Scheduled StartDate and Scheduled End Date fields.
If the new dates fall outside the range of the task’s Scheduled Dates, changes tothe Scheduled Dates (both Start and End) can result in notifications being sent totask implementers.
Plan and Schedule stage - Planning the change request
Chapter 5 Change Manager role 151
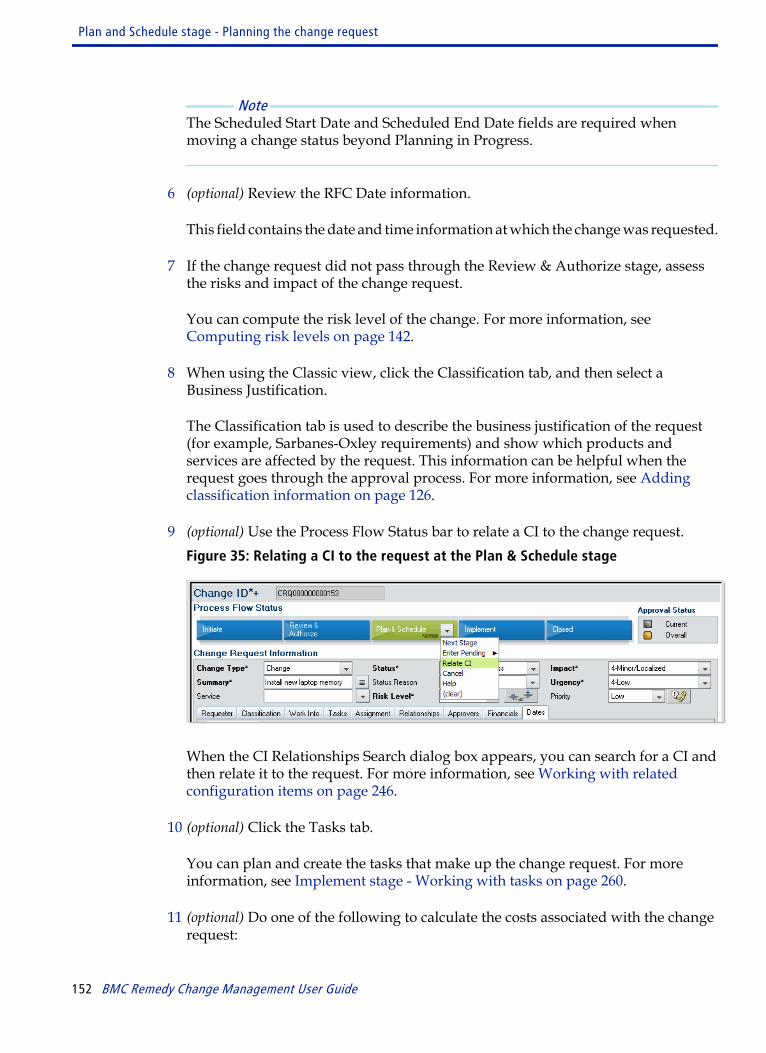
Note The Scheduled Start Date and Scheduled End Date fields are required whenmoving a change status beyond Planning in Progress.
6 (optional) Review the RFC Date information.
This field contains the date and time information at which the change was requested.
7 If the change request did not pass through the Review & Authorize stage, assessthe risks and impact of the change request.
You can compute the risk level of the change. For more information, see Computing risk levels on page 142.
8 When using the Classic view, click the Classification tab, and then select aBusiness Justification.
The Classification tab is used to describe the business justification of the request(for example, Sarbanes-Oxley requirements) and show which products andservices are affected by the request. This information can be helpful when therequest goes through the approval process. For more information, see Addingclassification information on page 126.
9 (optional) Use the Process Flow Status bar to relate a CI to the change request.Figure 35: Relating a CI to the request at the Plan & Schedule stage
When the CI Relationships Search dialog box appears, you can search for a CI andthen relate it to the request. For more information, see Working with relatedconfiguration items on page 246.
10 (optional) Click the Tasks tab.
You can plan and create the tasks that make up the change request. For moreinformation, see Implement stage - Working with tasks on page 260.
11 (optional) Do one of the following to calculate the costs associated with the changerequest:
Plan and Schedule stage - Planning the change request
152 BMC Remedy Change Management User Guide

When using the Best Practice view When using the Classic view
Choose Links => Financials. Click the Financials tab.
For more information, see Working with costs on page 183.
12 Click Save.
13 Click Next Stage in the Process Flow Status bar to move the change requestforward.
When the change request reaches Scheduled For Approval status, it must beapproved to move forward. For more information, see Approval processesprovided out-of-the-box on page 357.
Closed stage - Completing change requestsIn the Closed stage of the change request’s lifecycle, the change manager reviews allthe implemented changes to make sure that each objective was met. A requestcannot be closed until all tasks are closed. When all the tasks related to a request areclosed due to success, cancellation, or failure, the requester and the change managerare notified that the change is resolved.
Note Change requests can be closed by users with the functional role of a ChangeManager or Change Coordinator.
In this final stage, the process of closing the change request varies based on whetherthe request requires Close Down approval or not.
■ If no approval is required, the requester can set the request to Closed afterconfirming that the request was resolved to his or her satisfaction. If the requesterdoes not close the change request within the allowed response time of it beingresolved, the request is closed automatically after a specified period of time. TheStatus Reason for the request indicates that the request was automatically closed.The allowed response time depends on how the application administratorconfigured the BMC Remedy Change Management application. The default is 10days. If the requester is not satisfied with the change request, the requester canreopen it. The change manager is notified that the request is reopened, and mustrespond.
■ If the request requires Close Down approval, the change request moves to theCompleted status with the status reason Final Review Pending. The approversapprove it and moves the change to the status Final Review Completed. When
Closed stage - Completing change requests
Chapter 5 Change Manager role 153
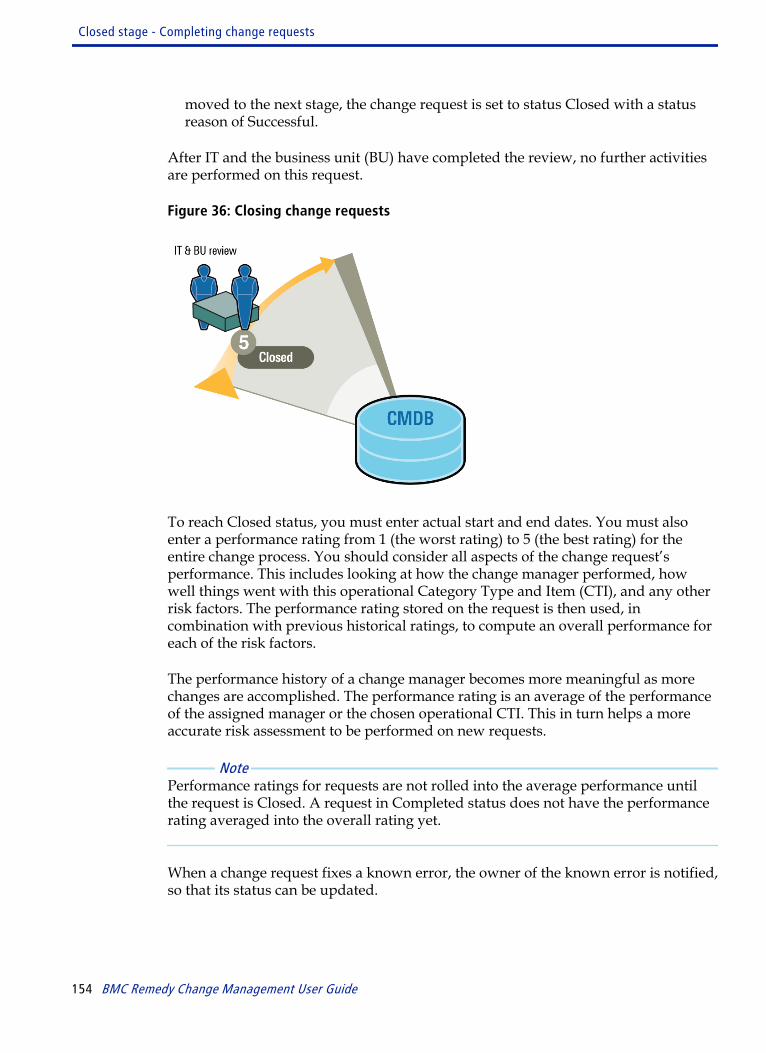
moved to the next stage, the change request is set to status Closed with a statusreason of Successful.
After IT and the business unit (BU) have completed the review, no further activitiesare performed on this request.
Figure 36: Closing change requests
To reach Closed status, you must enter actual start and end dates. You must alsoenter a performance rating from 1 (the worst rating) to 5 (the best rating) for theentire change process. You should consider all aspects of the change request’sperformance. This includes looking at how the change manager performed, howwell things went with this operational Category Type and Item (CTI), and any otherrisk factors. The performance rating stored on the request is then used, incombination with previous historical ratings, to compute an overall performance foreach of the risk factors.
The performance history of a change manager becomes more meaningful as morechanges are accomplished. The performance rating is an average of the performanceof the assigned manager or the chosen operational CTI. This in turn helps a moreaccurate risk assessment to be performed on new requests.
Note Performance ratings for requests are not rolled into the average performance untilthe request is Closed. A request in Completed status does not have the performancerating averaged into the overall rating yet.
When a change request fixes a known error, the owner of the known error is notified,so that its status can be updated.
Closed stage - Completing change requests
154 BMC Remedy Change Management User Guide

Closing a change request
This section describes the procedure to close a change request.
To close change requests
1 Open the change request.
2 Use the Process Flow Status bar to move the request forward to Completed status.
The Change Closure dialog box appears.
3 Click the Dates tab.
4 Review the Completed Date information.
This field is automatically set to the current date and time when the status of therequest is set to Completed.
5 Enter the actual start date and end date of the request.
6 Enter the In Production Date information.
Use this field to specify the date and time at which the request was taken intoproduction.
7 Click the Classification tab.
8 In the Performance Rating field, rate the work done by support staff or themanager in completing the request.
This performance value is a combined consideration of all derived factors on arequest, ranging from 1 (the lowest rating) to 5 (the highest rating).
9 Add the status reason and work information.
10 Click Save.
Note After a change request is closed, it cannot be reopened.
Closed stage - Completing change requests
Chapter 5 Change Manager role 155
Creating change requests as rollbacks
You should create a back-out plan for restoring the IT infrastructure to its initialsituation. If the actions associated with a change request need to be reversed,support staff and managers can create a change request for the system that needs tobe rolled back. This means that impacted systems need to be restored to theirprevious status before the change request was implemented.
To identify a change request as a rollback
1 Create a new change request.
2 Create a related task to implement the rollback for this change request.
For more information, see Implement stage - Working with tasks on page 260.
3 Use one of the following options to add a work info record to enter informationabout why you are rolling back the change request :
When using the Best Practice view When using the Classic view
Update the fields on the Work Detail tab. Update the fields on the Work Info tab.
4 Close the task.
5 Complete the change request.
Working with reassignment requests
Change managers are responsible for responding to reassignment requests. When achange manager reassigns a change request to another manager, the person isnotified. Upon reviewing the change, the manager can reassign the change toanother qualified change manager.
To respond to reassignment requests
1 Open the Overview Console or the Change Management Console.
For information, see:
■ Working with the Overview console on page 465
■ Change Management Console on page 85
Closed stage - Completing change requests
156 BMC Remedy Change Management User Guide
All reassignment requests appear in the table along with other change requests.BMC recommends regularly monitoring your assigned work to keep track of anychange requests reassigned to you.
2 Select the appropriate change request.
3 Click View.
After reviewing the change request, you can manually reassign the changemanager or change coordinator. When using the Classic view, you have anadditional option of reassigning it to the change implementer.
4 Click the Assignment tab.
To deny the reassignment request, you must reassign it to another changemanager, coordinator, or implementer.
a To reassign the change request, select the appropriate manager, assignee, orimplementer.
b Select an assignment method (for example, Auto Assign), and then click Set.
5 Click Save.
If you reassign the change request, the new assignee is automatically notified ofthe changed assignment.
For more information, see Assigning change requests on page 214.
Registering time segmentsRegistering time segments in BMC Remedy Change Management works like acalendering system—if you schedule a meeting in a certain conference room, nobodyelse can reserve the conference room at the same time. Similarly, you can block outtime segments around business events (such as company holidays), categorizations(Operational Category 1, 2, or 3, and location of the change), or CIs. Time segmentsenable you to define windows of time that you can designate as available orunavailable when working on a change request. An available time segment canspecify that a CI is available for use, while an unavailable time segment can be usedto schedule planned maintenance.
When you create a change request that modifies a CI—for example, you mustreplace a mission-critical server—you can schedule a time segment for the CI thatshows it is unavailable to the rest of the support staff. If another member of the
Registering time segments
Chapter 5 Change Manager role 157

support staff wants that CI to be available, they should schedule their own change ina different time segment.
Time segments enable you to perform the following tasks:
■ Search available time segments to schedule the change request.
■ Connect the selected time segments to the change request’s operationalcategorization or to a business event based on location.
■ Create time segments or use time segments around the associated CIs.
■ Select unavailable time segments from the associated CIs to help you plan theScheduled Start or End Date and time for the change request.
■ Select from available time segments from the associated CIs to help schedule workto be done.
For more information about business time and time segments, see the BMC RemedyAction Request System Configuration Guide.
Registering unique business events and operationalcategorizations
You must register business events and operational categorizations that are unique,based on their particular attributes.
Business event uniqueness is based on its title plus its specified attributes. Forexample, you might define three different business events that all use the same title,but if each has a different company location, each combination of title plus companyis unique.
In much the same way, you can only define a single categorization based on all itsattributes. Use a descriptive title specifying what particular categorization you arelooking at (for example, Calbro Services - Hardware). To save the categorization, youmust also enter the Company and Category 1 fields.
If you define a categorization that has the attributes Company (Calbro Services) andCategory 1 (Hardware), you cannot define another categorization with the sameattributes of Company (Calbro Services) and Category 1 (Hardware). You can defineanother entity where the Company is Calbro Services, Region is North, and Category1 is Hardware. Optionally you might define a categorization where Company isCalbro Services and Category 1 is Software. You define any attribute as long as noother categorization exists where all the attributes are an exact match of anothercategorization. The purpose is to prevent the creation of duplicate categorizations.
Registering time segments
158 BMC Remedy Change Management User Guide

To create and register a time segment for a business event or an operationalcategory
1 Open the Change request.
2 In the navigation pane choose Advanced Functions => Time Segments.
3 Click one of the following options:
■ Business Event
■ Op. Category Location
4 In the resulting dialog box, click New.
Depending on what you selected in the navigation pane, the Search Business Event/Location Definition dialog box or Search Operational Categorization/LocationDefinition dialog box appears.
5 Enter the minimum information required to define a unique time segment for thebusiness event or categorization.
For example, define a time segment with a title of "Holiday Shut Down” andCalbro Services as the company.
6 Click Save.
The Registration for Shared Time Segment window is displayed.
7 Click Add.
8 In the Description field on the Business Time Segment dialog box, enter adescription for the time segment.
9 In the Availability field, select Available or Unavailable.
Use the availability function to block periods of time.
■ Select Available to define a time segment open for normal use (for example,routine scheduled maintenance).
■ Select Unavailable to define a time segment that is not available for any otheruse (for example, a CI outage when you shut down a server to add more memory).
10 In the Level field, select a level of 10 or higher.
Registering time segments
Chapter 5 Change Manager role 159

Change management activities start with a default level of 10, but you can changethis level to a number from 11 through 1000. Level 1 is Workday activities andLevel 2 is Holiday activities.
If the schedules for two activities conflict, the event with the highest number takespriority. For more information, see the BMC Remedy Action Request SystemConfiguration Guide.
11 In the Duration Type field, select One time (which generates a single occurrenceof the time segment) or Recurring (which cannot span multiple days, but must bescheduled within a 24-hour period). If you select Recurring, you must specify therecurrence.
12 Enter the starting and ending dates and times for the duration of the timesegment.
Tip To define an all-day event, select 12:00:00 a.m. of the first day for the start time,and select 12:00:00 a.m. of the following day for the end time.
13 (optional) For a one-day event, use the same start day and end day and then selectEnd of Day.
This action sets the End Time to 11:59:59 p.m. When the calculation is performedthe end of day is considered the whole day, including the final second.
14 Click Save, and then click Finish.
Note For information about time zones, see Performing additional time segmentfunctions for business events and operational categories on page 161.
15 Select Quick Action => View Calendar.
The time segment appears in the Business Events section of the Calendar.
Searching for business time or operational time segments
You can search for business time or operational time segments that have alreadybeen defined. You then can modify or delete them, as needed.
To search for time segments
1 Open the change request.
2 In the navigation pane choose Advanced Functions => Time Segments.
Registering time segments
160 BMC Remedy Change Management User Guide
3 Click one of the following options:
■ Modify Business Event
■ Modify Op. Category Location
Depending on what you selected in the navigation pane, the Search Business Event/Location Definition dialog box or Search Operational Categorization/LocationDefinition dialog box appears. This forms works like a wizard. Use this form tosearch for and select a time segment.
4 Enter the search parameters to find a time segment.
5 Select a time segment from the results list and click Select.
6 Click Finish in the Registration for Shared Time Segment dialog displayed.
Performing additional time segment functions for businessevents and operational categories
In addition to creating time segments for business events and operational categories,you can perform the functions listed in the following table.
Registering time segments
Chapter 5 Change Manager role 161

Function Action
View time segments1 Choose Advanced Functions => Time Segments.
2 Click one of the following options:
■ Business Event
■ Op. Category Location
3 Enter search parameters to find a time segment.
For more information, see Searching for business time or operational timesegments on page 160.
1 Select a time segment from the results list.
2 On the Registration for Shared Time Segment form, select a time segment.
3 Click View.
4 Modify the time segment.
5 Close the form.
6 Click Finish.
Registering time segments
162 BMC Remedy Change Management User Guide

Function Action
Relate time segments1 Choose Advanced Functions => Time Segments.
2 Click one of the following options:
■ Business Event
■ Op. Category Location
3 Enter search parameters to find a time segment.
4 Select a time segment from the results list.
5 On the Registration for Shared Time Segment form, select a time segment.
6 Click Search.
7 In the Search Time Segment dialog box, select as many time segments asneeded.
8 Click Relate.
9 Close the Search Time Segment dialog box.
10 Click Finish.
Registering time segments
Chapter 5 Change Manager role 163
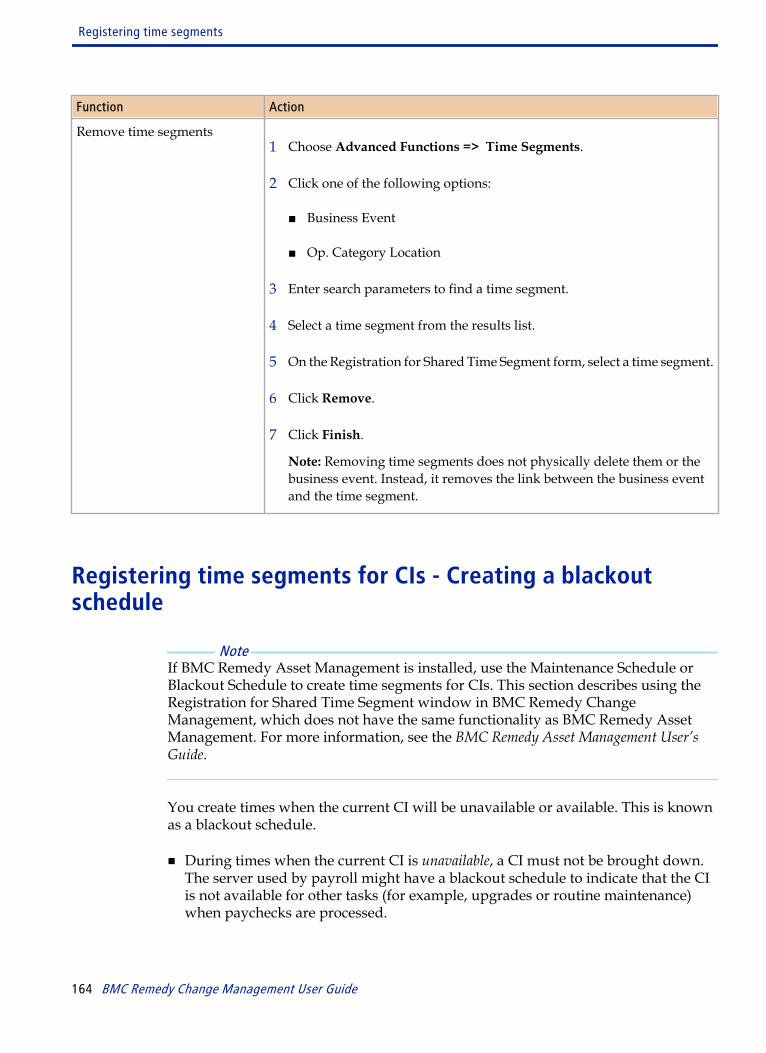
Function Action
Remove time segments1 Choose Advanced Functions => Time Segments.
2 Click one of the following options:
■ Business Event
■ Op. Category Location
3 Enter search parameters to find a time segment.
4 Select a time segment from the results list.
5 On the Registration for Shared Time Segment form, select a time segment.
6 Click Remove.
7 Click Finish.
Note: Removing time segments does not physically delete them or thebusiness event. Instead, it removes the link between the business eventand the time segment.
Registering time segments for CIs - Creating a blackoutschedule
Note If BMC Remedy Asset Management is installed, use the Maintenance Schedule orBlackout Schedule to create time segments for CIs. This section describes using theRegistration for Shared Time Segment window in BMC Remedy ChangeManagement, which does not have the same functionality as BMC Remedy AssetManagement. For more information, see the BMC Remedy Asset Management User’sGuide.
You create times when the current CI will be unavailable or available. This is knownas a blackout schedule.
■ During times when the current CI is unavailable, a CI must not be brought down.The server used by payroll might have a blackout schedule to indicate that the CIis not available for other tasks (for example, upgrades or routine maintenance)when paychecks are processed.
Registering time segments
164 BMC Remedy Change Management User Guide
■ During times when the current CI is available, you can schedule the CI forupgrade, maintenance, change requests, or release requests. This is a scheduledoutage. Other users can share this time segment and conduct multiple requests.
When creating the blackout schedule, you can also specify the levels of availability.For example, you decide that a specific application service CI must be unavailable toCalbro Services IT during the core hours Monday through Friday 8:00 A.M. to 5:00P.M. PST. You can then schedule routine change requests during the specifiedSaturday 8:00 P.M. to 10:00 P.M. maintenance window. More urgent change requestscan be scheduled outside the core hours.
As a result, you can set up the following blackout schedule for the applicationservice CI:
■ Core hours Monday to Friday 8:00 A.M. to 5:00 P.M. PST, the CI is listed asunavailable at Level 15.
■ Everything except Saturday 8 P.M. to 10 P.M. is listed as available at Level 20.
■ Everything except the core hours is listed as available at Level 25.
To define time segments for CIs
1 Open the change request.
2 In the navigation pane choose Advanced Functions => Time Segments => Configuration Item (CI).
3 In the CI Advanced Search form, enter the information necessary to search for aCI and then click Search.
The available CIs based on your search criteria appear in the results table.
4 Select a CI from the search results.
5 (optional) Click Explore CI to view a CI and its relationship in a tree structure.
For information, see Viewing CI relationships on page 168.
6 Click Select.
You return to the Registration for Shared Time Segment window.
7 Click Add.
8 In the Description field on the Business Time Segment dialog box, enter a usefuldescription for the time segment.
Registering time segments
Chapter 5 Change Manager role 165
For example, your naming convention for change request time segments caninclude the CRQ ID and a brief description of what the intended change, or thename of the business service affected.
9 In the Availability field, select Available or Unavailable.
Use the availability function to block periods of time.
■ Select Available to define a time segment open for normal use (for example,routine scheduled maintenance).
■ Select Unavailable to define a time segment that is not available for any otheruse (for example, a CI outage when you shutdown a server to add more memory).
10 In the Level field, select a level of 10 or higher.
Change management activities start with a default level of 10, but you can changethis level to a number from 11 through 1000. Level 1 is Workday activities andLevel 2 is Holiday activities.
If the schedules for two activities conflict, the event with the highest number takespriority. For more information, see the BMC Remedy Action Request SystemConfiguration Guide.
11 In the Duration Type field, select One time (which generates a single occurrenceof the time segment) or Recurring (which cannot span multiple days, but must bescheduled within a 24-hour period). If you select Recurring, you must specify therecurrence.
12 Enter the starting and ending dates and times for the duration of the timesegment.
Tip To define an all-day event, select 12:00:00 a.m. of the first day for the start time,and select 12:00:00 a.m. of the following day for the end time.
13 (optional) For a one-day event, use the same start day and end day and then selectEnd of Day.
This action sets the End Time to 11:59:59 p.m. When the calculation is performedthe end of day is considered the whole day, including the final second.
14 Click Save to associate the time segment to the CI, and then click Finish.
After you build the blackout schedule for one CI, you can reuse it for other CIs ifthey have the same schedule.
Registering time segments
166 BMC Remedy Change Management User Guide
Note For important information about time zones, see Understanding server time, timezones, and time segments on page 169.
15 Create a schedule for your change request.
For more information, see Using Schedule Assist to search for available times onpage 170.
Performing additional time segment functions for CIs
In addition to creating time segments for CIs, you can perform the functions listed inthe following table.
Table 24: Additional time segment functions
Function Action
View CI time segments1 Choose Advanced Functions => Time Segments => Configuration
Item (CI).
2 Search for a CI, and then select it.
3 On the Registration for Shared Time Segment form, select a time segment.
4 Click View.
5 Modify the time segment.
6 Close the form.
7 Click Finish.
Registering time segments
Chapter 5 Change Manager role 167

Function Action
Relate CI time segments1 Choose Advanced Functions => Time Segments => Configuration
Item (CI).
2 Search for a CI, and then select it.
3 On the Registration for Shared Time Segment form, select a time segment.
4 Click Search.
5 In the Search Time Segment dialog box, select as many time segments asneeded.
6 Click Relate.
7 Close the Search Time Segment dialog box.
8 Click Finish.
Removing CI time segments1 Choose Advanced Functions => Time Segments => Configuration
Item (CI).
2 Search for a CI, and then select it.
3 On the Registration for Shared Time Segment form, select a time segment.
4 Click Remove.
5 Click Finish.
Note: Removing time segments does not physically delete them or theCI, because there is a many-to-many relationship between entities andtime segments. One time segments can be related to many entities.Instead, it removes the link between the CI and the time segment.
Viewing CI relationships
The BMC Atrium Explorer shows CIs and their relationships to other CIs within theBMC Atrium CMDB. The BMC Atrium Explorer enables you to improve theaccuracy of change planning by locating the CI. For more information, see the BMCRemedy Asset Management User’s Guide or the BMC Atrium Configuration ManagementDatabase User’s Guide .
Registering time segments
168 BMC Remedy Change Management User Guide

To use the BMC Atrium Explorer to view CI relationships
1 In the Change form, choose Advanced => Time Segments => ConfigurationItem (CI).
2 In the CI Advanced Search dialog box, search for a CI.
3 From the CI Search Results table, select a CI and then click Explore CI.
4 From the Template list of the BMC Atrium Explorer, select the filter to use to limitthe data shown in the relationship viewer.
A filter template specifies a criteria for the relationship information that appearsin the relationship viewer.
5 Click Refresh to apply the selected filter template.
The relationship image is reloaded with the selected data. The Legend on theright pane shows the relationship types.
Understanding server time, time zones, and time segments
When adding time segments if the client and the server are in different time zones,all dates and times for the Business Time Segments appear in the adjusted servertime. That is, the Start Date, Start Time, End Date, and End Time on the BusinessTime Segment form, and the time segments date and times that are shown in thetable appear in the adjusted server time. Other dates and times on the remainder ofthe form are in the client’s time.
For example, your server is in EST and your client is in PST. Adjusted server time isdetermined converting the time at the place the Business Time Segment was createdto the time at the physical location of the server. For example, if the client is locatedin PST, and the server is located in CST, the time shown on the server is increased bytwo hours (to include both MST and PST time zones). Similarly, if the client islocated in EST, the time shown on the server is decreased by one hour.
Also, all time segments must be adjusted into the time zone of the client. Forexample, if the ticket was created in PST, the details need to be adjusted into PST. If aTime Segment for a server was defined in CST, adjust it into PST when creating thetime segment for the client.
For more information about adjusting for the time zone differences between theclient and the server, see the BMC Remedy Action Request System Configuration Guide.
Registering time segments
Chapter 5 Change Manager role 169
Using Schedule Assist to search for availabletimes
The Schedule Assist tool helps you create schedules. You can search for availabletime segments that you can schedule a change request around. Your search takesinto account the selected time segments tied to the change request’s categorization.You can define time segments or use time segments around the associated CIs.Finally, you can include the associated CIs unavailable time segments to find aScheduled Start or Scheduled End Date and Time for the change request.
Note The Schedule Assist tool is also available on the Release form. For more information,see Specifying the business justification on page 286.
Items shown in the Global Time Segments table displayed on the Time SegmentAnalysis window are based upon the following criteria:
■ Start Search Date Range
■ End Search Date Range
The table shows Business Events and Operational Categorization Location timesegments that match the Operational Categorization, and the Change Location of thecurrent change, and any items that are global.
It also shows items that are an exact match of the Categorization and Location andthose above it. For example, suppose that the Location of the change request uses thefollowing parameters:
■ Company = Calbro Services
■ Region = West
■ Site Group = California
■ Site = Sunnyvale
After determining the existence of any Location matches, the search would thenmatch any business event records that match all four parameters or less. If a businessevent existed for Company = Calbro Services, this time segment would match also.
The date range also influences which time segments appear. This criterion affects alltables that show time segments. The table shows any items that intersect the StartDate and End Date search range. If the Start Date range is 3/1/08 and the End DateRange is 3/15/08, examples of what it might include are the following business timesegments:
Using Schedule Assist to search for available times
170 BMC Remedy Change Management User Guide
■ Business time segment 1/1/08 to 3/8/08
■ Business time segment 3/10/08 to 3/31/08
■ Business time segment 1/1/08 to 7/1/08
For example, you create a normal change request to upgrade the application server.The change manager relates the application service CI to the change request. Thenyou use the Schedule Assist tool to determine the next available window to schedulethis change request. You indicate the potential start and end dates, that theUnavailability times at Level 20 should be used, and that the window needs to bescheduled for 1 hour. When you click the Find Next Avail Time button, the nextavailable time is displayed, given those criteria. After you locate an available time,you can schedule that time segment to block out that time so it is no longer availablefor the next change request.
Note Schedule Assist does not enforce that a change request has to be scheduled in certainwindows or prevent you from scheduling a change request during any unavailableor available time. You might have valid reasons for scheduling a change requestduring an unavailable window. For example, if you know System A is down formaintenance from 9:00 P.M. to 10:00 P.M. on Saturday night, you might scheduleanother change request for related System B during that same window since SystemA would already be down.
To search available times for change requests
1 Open a change request.
2 Do one of the following:
When using the Best Practice view When using the Classic view
1 On the Change Form, to search for availabletimes, make sure you enter the Change Locationinformation.
2 Choose Links => Categorization .
Make sure you enter the Operational Categoryinformation and click Save.
3 Click the Date/System tab.
1 Click the Requester tab.
To search for available times, make sure you enterthe Change Location information.
2 Click the Classification tab.
Make sure you enter the Operational Categoryinformation and click Save.
3 Click the Dates tab.
3 Click the Schedule Assist icon.
Using Schedule Assist to search for available times
Chapter 5 Change Manager role 171

Use Time Segment Analysis window displayed to analyze the time segments andsearch for available times. The following fields are available.
Start Search DateRange
Set by default to the current date.
End Search DateRange
Set by default to the current date plus 30 days. Use these dates to filter theinformation in the table fields.
Global TimeSegments
Shows all time segments tied to the change. By default, all Time Segments are selected.
Associated CI’s Shows a list of the CIs tied to the change that have an entity tied to CI.
CI’s Available/Unavailable Times
Shows available or unavailable times tied to the selected CI.If one CI is selected from the Associated CIs table and you press =>, only the Timesegment tied to that CI appears. For each additional CI selected on the AssociatedCIs table, all the associated time segments to each of the selected CIs appear whenyou click =>.
■ If you select Available times as a type, the Use Available button is enabled.Clicking Use Available fills the Available Start Date/Time+ and Available EndDate/Time+ fields from the selected record.
If more than one record is selected, only the first selected record is used to fill thefields. If more than one CI is selected when you click Use Available, only the firstselected record is used.
■ If there are unavailable times, all times that are selected from the unavailabletable, plus the selected global blackouts on the top, plus the Duration and Levelfields are used in the calculation when you use the Find Next Avail Time buttonor the Create Next Free Time button (except for those times defined using theSchedule Time Segment button).
Duration Defines the length and level of the time segment. For example, you can define a level10 time segment of 2 hours.
Available Start Date/Time+
Start date and time of available time segment.
Find Next Avail Time Factors in the duration you specified and returns the next available time. The timesegment is then entered into the Available Start Date/Time+ and Available End Date/Time+ fields.If you press ENTER in the Available Start Date/Time+ field, the duration is added tothe Available Start Date/Time+ field and the Available End Date/Time fields. Youcan manually set the TS Start Date/Time+ field to a specific date or time to give anew start Date to find the next available time segment.
Using Schedule Assist to search for available times
172 BMC Remedy Change Management User Guide

Schedule TimeSegment
Generates the next available time segment based on all the selected time segments inthe tables on the Time Segment Analysis form. You can then can associate it to aparticular CI that is tied to the change request.Time segments that were created using this button are not included in the calculationwith the Create Next Free Time button or the Find Next Avail Time button. Becausethe next free time was generated for a particular change request, the time that wasset for the current change is not blocked out.
Next Goes to the next page of the form.
Close Closes the window without returning the information to the change request.
4 In the Time Segment Analysis window, enter information to define the timesegments needed for the CIs.
This enables you to define new time segments for CIs based on selected timesegments and unavailable times of other CIs. In BMC Remedy ChangeManagement, you can only define time segments with a duration type of One Time.
After you define the time segments, the change coordinator or the changemanager can schedule the change request based on the selected unavailable itemsor based on an Available schedule.
5 Click Find Next Available Time.
Based on all the selected time segments in the tables on the Time SegmentAnalysis form, the time segment is entered into the Available Start Date/Time+and Available End Date/Time+ fields.
6 Click Schedule Time Segment.
7 On the The Associate Time Segment to CIs dialog box, use the following steps toassociate CIs to time segments.
a Select the CI to associate the time segment to.
b Enter a description of the time segment.
If your server is in a different time zone than the client, make sure you includethis in your description. For more information, see Understanding server time,time zones, and time segments on page 169.
c Click Create Time Segment.
d Close the dialog box.
The time segment is generated and associated to the CI.
Using Schedule Assist to search for available times
Chapter 5 Change Manager role 173
The actual date and time might not be exactly what you specified, if the same timesegment has been selected. If so, the first available time is used for the specifiedCIs. This functionality is similar to a calendar system. If you try to reserve aconference room, and you do not book it immediately, someone might take theroom before you book it.
8 Click Next.
The Time Segment Analysis window helps the support person pick a scheduledstart date and end date of the change request. From looking at the time segments,you can try to plan your change around the specified time segment.
The Time Segment Analysis window redisplays, to enable you schedule dates.The scheduled start date and end date of the change request does not have tomatch the unavailable time segments. If you have a time segment from 1/30/06from 2:00 p.m. to 3:00 p.m., your scheduled change does not have to be 1/30/06from 2:00 p.m. to 3:00 p.m. The actual change process can be much longer. Yourscheduled change might go from 1/25/06 8:00 a.m. to 2/2/06 8:00 a.m. You mightneed to perform additional duties to prepare for the change and then allotadditional time afterwards to verify that the change was successful.
Figure 37: Time Segment Analysis window—Scheduling dates
The CI’s Available/Unavailable Time table shows all time segments associated toall the CIs.
Using Schedule Assist to search for available times
174 BMC Remedy Change Management User Guide
The following fields are available to set the Schedule Start and Scheduled End Date/Time of the change request.
Start Search DateRange
Set by default to the current date.
End Search DateRange
Set by default to current date plus 30 days. Use these dates to filter what appears inthe table fields.
Global TimeSegments
Shows all time segments for the change request.
CI’s Available/Unavailable Times
Shows available or unavailable times that are tied to the selected CI.
■ If you select Available in the Type field, you can use one of the Available times toset the scheduled start and end dates.
■ If you select Unavailable, you can manually enter a date, or use the date based onthe information about the Available times shown for the global time segments.
Use Available If you select Available times as a type, the Use Available button is enabled. ClickingUse Available fills the Available Start Date/Time+ and Available End Date/Time+fields from the selected record.If more than one record is selected, only the first selected record is used to fill thefields. If more than one CI is selected when you click the Use Available, only the firstselected record is used.
Scheduled StartDate/Time
Enables you select a start date and time.
Scheduled End Date/Time
Enables you to select an end date and time.
Previous Goes to the previous page of the form.
Next Returns the Schedule Start Date/Time+ and Scheduled End Date/Time+ values backto the change request.
Close Closes the window without returning the information to the change request.
9 Enter the scheduled start date and end date.
10 Click Next.
The change request appears, with the time segment values returned.
11 Save the change request.
Using Schedule Assist to search for available times
Chapter 5 Change Manager role 175
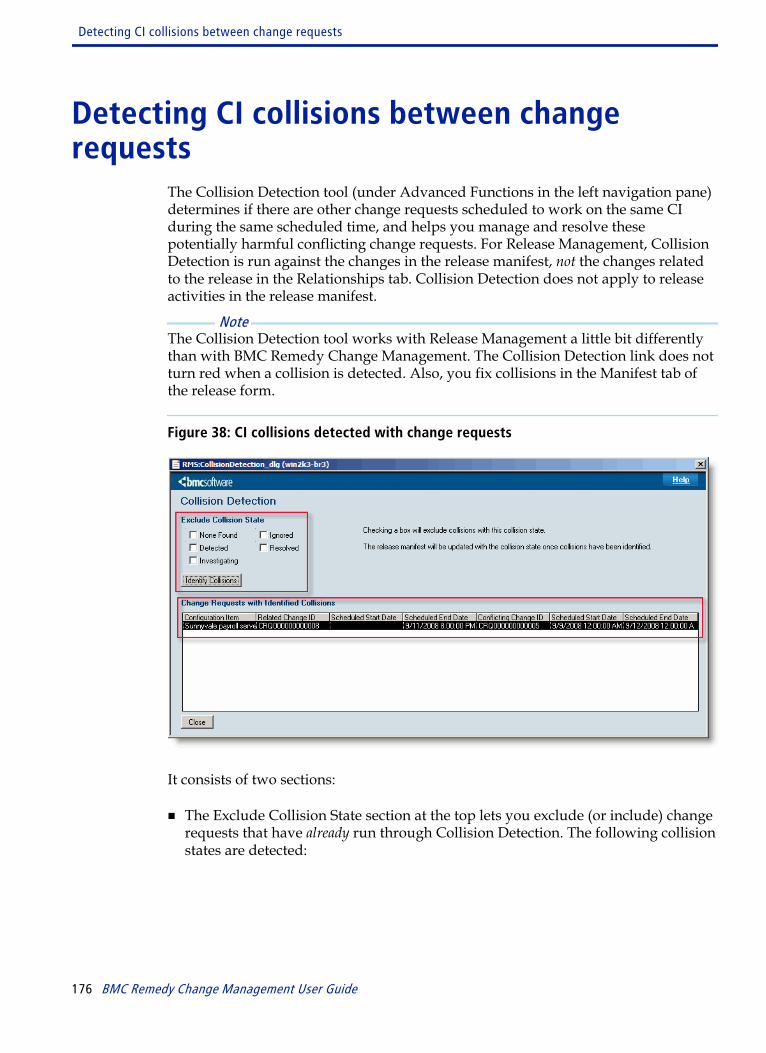
Detecting CI collisions between changerequests
The Collision Detection tool (under Advanced Functions in the left navigation pane)determines if there are other change requests scheduled to work on the same CIduring the same scheduled time, and helps you manage and resolve thesepotentially harmful conflicting change requests. For Release Management, CollisionDetection is run against the changes in the release manifest, not the changes relatedto the release in the Relationships tab. Collision Detection does not apply to releaseactivities in the release manifest.
Note The Collision Detection tool works with Release Management a little bit differentlythan with BMC Remedy Change Management. The Collision Detection link does notturn red when a collision is detected. Also, you fix collisions in the Manifest tab ofthe release form.
Figure 38: CI collisions detected with change requests
It consists of two sections:
■ The Exclude Collision State section at the top lets you exclude (or include) changerequests that have already run through Collision Detection. The following collisionstates are detected:
Detecting CI collisions between change requests
176 BMC Remedy Change Management User Guide
Collision state values Description
None Found The change request has been checked for collisions and none were found (green).When running Collision Detection from a release, changes with no scheduledstart or end dates will have a collision state of None Found.
Note: Used primarily with Release Management.
Detected Collision detected for the listed CI (red).
Ignored You ignore the collision (purple).
Investigating You are investigating the collision (orange).
Resolved You have taken action on the collision (blue).
(clear) Collision detection has not been run against this change request.
Note: Used primarily with Release Management.
N/A Used only for Activities in the manifest table. Collision Detection does not applyto Activities.
■ The Change Requests with Identified Collisions section at the bottom identifiesthe current CI collisions for the change request. It lists the CI affected, the changerequest ID, the scheduled start and end dates, and the ID and Scheduled Start andEnd dates of the change request causing the conflict.
The first time you run the Collision Detection tool, it shows you by design only thecurrent collisions in the release manifest. If you open the Collision Detection tool asecond time and maintain the default settings (all Exclude Collision State fieldsselected), only new collisions are shown. Previously detected collisions that needcorrective action are not listed. To see all CI collisions that need corrective action,you must clear the Exclude Collision State fields and then click the IdentifyCollisions button, as shown in Figure 38 on page 176 .
To detect CI collisions between change requests
1 Open the request.
2 Click the Tasks tab on the change form or the Manifest tab on the release form,and then add change requests to the request.
You must add at least one change request to the request before running CollisionDetection.
3 Choose Advanced => Collision Detection.
The Collision Detection dialog box appears (Figure 38 on page 176). In the IncludeCollision State section, you now must choose to exclude or include the collisionstates (for example, Detected) the next time you run the tool. For example, ifDetected is selected, then any records that were previously flagged as Detected
Detecting CI collisions between change requests
Chapter 5 Change Manager role 177
are excluded from collision detection the next time the tool is run. If you clearDetected, then these records are again run through collision detection.
4 Select or clear collision states as needed, and then click Identify Collisions.
5 Close the Collision Detection tool when you finish.
6 Click the Tasks tab in the change form or the Manifest tab in the release form.
The table displays the collision state of each change request that is included in therequest.
7 Use the drop-down menu in the Collision column to update the collision state.
New changes that you add to the request appear in black until you run CollisionDetection.
8 To fix the CI collision:
a Change the collision state from Detected to Resolved.
b Save and close the request .
Collision states are not saved to the database until you save the request.
c Click View to open the change request.
d Run Collision Detection from the change request to determine which CIs arecausing the collision.
e Click the Dates tab of the change request.
f Enter a new Scheduled Start Date and End Date that avoids the CI collision.
g Save and close the change request.
h Run the Collision Detection tool one more time in the request to make sure thatno other collisions are detected.
Make sure all the Exclude Collision States are cleared before you click IdentifyCollisions.
i Save and close the Collision Detection tool.
9 Save the request.
Collision states are not saved to the database until you click Save.
Detecting CI collisions between change requests
178 BMC Remedy Change Management User Guide
Monitoring the progress of a change requestAs the change request is being planned, you can follow its progress by viewing theWork Info details.
For example, during its Implementation stage, you can follow the progress of thetasks in the request as they are being completed.
To view the progress of a change request when using the Best Practice view
1 Open the change request.
The Change form provides information about the status, potential risks, andwhether it is escalated.
2 The left frame of the change form displays the details about who is assigned to thechange request as the change coordinator.
3 View progress details of the change request by clicking the appropriate tab:
Tab Description
Work Detail■ View information about each step in the process in the work information history area.
■ View who is assigned to the change request as change manager.
■ Review the current stage in the approval process for the change request, includingthe next approval phase.
Note: The Work Detail tab is displayed when you open the Change form.
Tasks View the progress of the tasks associated with the change request.
Relationships View all the related change requests, dependent change requests, related CIs, and so on.
Date/System View the dates related to the change, time spent on the change and details of thechange submitter.
SLM Review the agreed-upon service targets for the request. This tab is visible only if theBMC Service Level Management application is installed.
4 View additional details by clicking the appropriate links:
Link Description
Quick Action => Requested For
View for whom the change request was created. When the change request wascreated, the change request was automatically assigned to the appropriate supportstaff group or person.
Monitoring the progress of a change request
Chapter 5 Change Manager role 179

Link Description
Links => Categorization>
View the timing of the change request and its categorizations.
Links => Financials View information relating to cost types, total costs, and the total costs in a specificcurrency.
5 Close the Change form.
To view the progress of a change request when using the Classic view
1 Open the change request.
The Change form provides information about the status, potential risks, andwhether it is escalated.
2 View progress details of the change request by clicking the appropriate tab:
Tab Description
Requester View for whom the change was requested and who is assigned to the request. Whenthe change request was created, it was automatically assigned to the appropriatesupport staff group or person.
Classification View the timing of the change request and its categorizations.
Work Info View information about each step in the process in the work information history area.
Tasks View the progress of the tasks associated with the change request.
Assignments View who is assigned to the change request as change manager, change coordinator,or change implementer.
Relationships View all the related change requests, dependent change requests, related CIs, and so on.
Approvers Review the current stage in the approval process for the change request, including thenext approval phase.
SLM Review the agreed-upon service targets for the request. This tab is visible only if theBMC Service Level Management application is installed.
Financials View information relating to cost types, total costs, and the total costs in a specificcurrency.
Dates View the planned dates.
3 Close the Change form.
Monitoring the progress of a change request
180 BMC Remedy Change Management User Guide

Monitoring associated tasks
As change manager or change coordinator, you must keep track of the changerequest to which you have been assigned. This includes monitoring tasks associatedwith the change request.
To view a task associated with a change request
1 Open the change request.
2 Click the Tasks tab.
All the tasks for that change request are listed.
3 To view details about a task, select the task in the list and click View.
4 In the work history on the Work Info tab of the Task form, you can viewinformation about each step in the process. You can also view work informationfor each task in the Work Info of the Selected Task table on the Change form.
5 If you modified the task, click Save.
Viewing the audit log
Viewing audit logs enables you to view field and notification audits against therequest. When certain fields are changed, when the status is changed, or whensystem notifications are sent, an audit entry is generated to track the modification.The Login ID of the individual making the change appears next to the audit entry.
Note The View Audit Log function is not available until you create and display the request.
To filter the information shown, you can select the Audit Type to view (for example,All, Change Coordinator, or Priority).
To view audit logs
1 Open the change request, from which to view the log.
2 Do one of the following:
When using the Best Practice view When using the Classic view
From the left navigation pane, choose Links => View Audit Log.
From the left navigation pane, choose Functions => View Audit Log.
Monitoring the progress of a change request
Chapter 5 Change Manager role 181
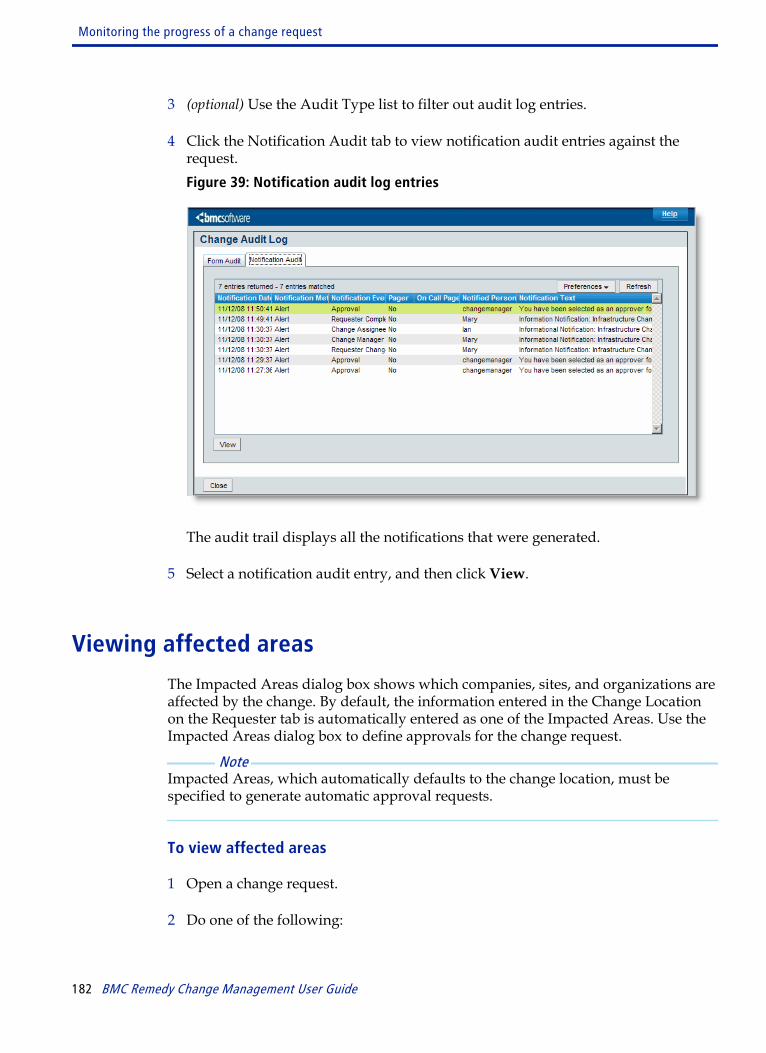
3 (optional) Use the Audit Type list to filter out audit log entries.
4 Click the Notification Audit tab to view notification audit entries against therequest.Figure 39: Notification audit log entries
The audit trail displays all the notifications that were generated.
5 Select a notification audit entry, and then click View.
Viewing affected areas
The Impacted Areas dialog box shows which companies, sites, and organizations areaffected by the change. By default, the information entered in the Change Locationon the Requester tab is automatically entered as one of the Impacted Areas. Use theImpacted Areas dialog box to define approvals for the change request.
Note Impacted Areas, which automatically defaults to the change location, must bespecified to generate automatic approval requests.
To view affected areas
1 Open a change request.
2 Do one of the following:
Monitoring the progress of a change request
182 BMC Remedy Change Management User Guide

When using the Best Practice view When using the Classic view
From the left navigation pane, choose Links => Impacted Areas.
From the left navigation pane, choose Advanced => Impacted Areas.
3 On the Impacted Areas dialog box, complete the required fields and enter anyother information, as needed.
4 Click Add to add each area to the Impacted Areas table.
You can add as many impacted areas for a particular change as necessary. Youcan also delete impacted areas that you have previously chosen in this form.
5 Click Close.
The additional impacted areas are added to the change request.
Working with costsIn the Financials tab, the change manager or the release coordinator can specify andassess the costs of the change request or release request including parts, labor, andother associated costs. The cost can be related to services or a configuration item (CI).The total of all allocated costs for a change request or a release request isautomatically calculated.
You can calculate the financial affect in implementing a change request. You cancalculate costs after a request has been created; however, usually you do this whenthe change request has been resolved. You can calculate the various kinds of costs,and you can associate costs with CIs.
Note Only users with Cost Manager permissions can define, modify, or delete cost entries,including the costs that they have submitted. If you make a mistake when adding acost entry—for example, if you charge too much for a service—you cannot delete therecord. However, you can reverse the cost of the record by adding a new cost record,and then entering a negative value equal to the amount to negate. If you negate acost, make sure that you document this in the Description field.
To add a cost to a change request
1 Open the change request in the Change form.
2 Do one of the following:
Working with costs
Chapter 5 Change Manager role 183

When using the Best Practice view When using the Classic view
From the left navigation pane, choose Links => Financials.
Click the Financials tab.
Note The Financials option is not available when the change request is in New mode orin the Draft status.
3 Click Add.
4 In the Costs dialog box, enter the relevant information in the following fields:
Field Description
Company This field is automatically filled with the cost center specified in the Cost Center Codefield. The company field identifies the company charged for servicing the change request.
Cost Center Code Identifies the code name for the business unit or organization within the company thatis charged for servicing the change request. The default cost center is the business unitto which the user logging the change request belongs, but you can modify this.When you select the cost center code, the Company and Cost Center Name fields showthe values attached to the cost center code.
Cost Center Name This field is automatically filled with the name of the cost center specified in the CostCenter Code field.
Cost Category This field is automatically filled according to the application you are working in.
Cost Type Enter the cost type. Options are Fixed, Labor, Other, or Parts. (These values can differdepending on how your application administrator has configured cost categorizationsand the chosen company.)
Cost Classification Options are Actual or Budget.
Description Enter a cost description.
Related Cost Enter the rate. You select the Currency from the list. Your administrator sets theavailable currencies.
Related Units Enter how many units (for example, hours or minutes) were required to implement thechange.
Unit Type Choose how to measure the cost. Choices are Flat Rate, Hours, or Minutes.
Date Incurred Date the charge was incurred. If you leave this field blank, it is set to the current datewhen you save the cost.
5 Click Save.
6 Perform steps Step 3 on page 184 through Step 5 on page 184 for each costassociated with the change request.
Working with costs
184 BMC Remedy Change Management User Guide
The totals for budgeted and actual costs appear at the bottom of the table.
Calculating the costs of a change request
When a change request has been resolved, you can calculate the cost involved inimplementing it. If a change manager or task implementer has already added a costcalculation, you can view the calculation.
You can calculate the various kinds of costs, and you can associate costs with CIs. Allthe costs of a change request are totaled automatically.
To modify a cost
1 Open the change request in the Change form.
2 Do one of the following:
When using the Best Practice view When using the Classic view
From the left navigation pane, choose Links => Financials.
Click the Financials tab.
3 In the Show field, select the type of cost to view.
4 From the table, select the cost to modify. and then click View.
The Costs dialog box contains information about the kind of cost. You cannotmake changes in the Cost Category field.
5 Change the Cost Center Code, Cost Type, Description, or other information asappropriate and click Save.
Note To delete a cost from a change request, select it, and then click Delete.
Using auto-cost estimates
You can include auto-cost estimates in a change request.
To use auto-cost estimates
1 Open the change request in the Change form.
Working with costs
Chapter 5 Change Manager role 185

2 Do one of the following:
When using the Best Practice view When using the Classic view
From the left navigation pane, choose Links => Financials.
Click the Financials tab.
3 In the Calculation Unit Type select Flat Rate, Hours, or Minutes.
4 In the Budget Estimated Total Time enter the time based on unit type.
Use this information to forecast the cost. For example, you budget that the changewill take 2 hours to perform.
5 In the Actual Total Time, enter the time according to the calculation unit type.
Enter this information after the change is completed (for example, you budgetedtwo hours to do the change but it took three hours).
6 Save the change request.
If a matching cost rate is found, a cost is generated.
Allocating costs to configuration items
When relating CIs to a change request, you need only one related CI to generate theallocation. If you have two or more CIs related to a change request, you candistribute the costs of the change request between the different CIs.
You cannot perform these steps until you relate the CIs to the change request. Formore information, see Working with related configuration items on page 246.
To allocate costs to configuration items
1 Open the change request in the Change form.
2 Do one of the following:
When using the Best Practice view When using the Classic view
From the left navigation pane, choose Links => Financials.
Click the Financials tab.
3 Click Create Allocation.
Working with costs
186 BMC Remedy Change Management User Guide
In the Cost Allocation form, the following sets of information appear:
■ Cost Information—Shows information used to calculate the cost of the changerequest.
■ Relate To CIs—Shows all CIs that are related to the change request.
■ Related CIs With Cost Allocated—Shows all the CIs after you have allocatedthe costs to them.
Note When you are viewing financials on CIs, only actual costs are shown. As a result,a budgeted cost that is allocated to a CI appears on the change, but does notappear on the CIs financial table.
4 Enter missing information for cost type, cost rate, and so on.
5 In the Relate To CIs? field, specify whether to relate the cost to a CI:
■ Divide evenly between CIs—Divides the cost between all the CIs (includingservices) that are related to the change. Doing so divides the Current Total bythe number of related CIs.
■ Let me allocate to CIs—Distributes the cost among the different CIs. If youchoose this option, the Selected CI Desc and Allocate To Selected CI fieldsbecome active. If you do not have CIs or services related to this change request,you cannot choose this option.
The Related CIs Count field automatically shows the number of CIs that arerelated to the change request. You cannot change this information.
6 In the Relate To CIs table, click the CI to which to allocate a cost. The ID appearsin the Selected CI Desc field.
7 In the Allocate to Selected CI field, enter the amount that to allocate to the CI.
8 Click Create Cost Record.
This allocates costs according to your input. The cost record appears in theRelated CIs with Costs Allocated table, and the Unallocated Cost decreases by theamount applied to the CI.
The remaining fields in the form are read-only. They provide the followinginformation:
■ Unallocated Cost—Displays the Current Total less the amount alreadyallocated to CIs during this session.
Working with costs
Chapter 5 Change Manager role 187
■ Average Cost Per CI—Displays the Current Total divided by Related CIsCount. This field indicates the amount that each cost record would be if youchose to automatically allocate the costs to the CIs.
9 Continue selecting CIs from the Related CIs table, and apply costs until theUnallocated Cost is equal to 0.
10 Click Close.
The table in the Costs tab shows the cost records you have created. You cannotmodify or delete these records.
Performing additional functions with costs
You can perform the additional functions with costs that are listed in the followingtable:
Function Action
View the cost of a changerequest 1 Open the change request in the Change form.
2 When using the Best Practice view, choose Links => Financials.
When using the Classic view, Click the Financials tab.
1 In the Show field, select the type of cost to view.
Delete costs1 Open the change request in the Change form.
2 When using the Best Practice view, choose Links => Financials.
When using the Classic view, Click the Financials tab.
1 Select a cost entry, and then click Delete.
Using BMC Service Level Management withBMC Remedy Change Management
If you have BMC Service Level Management (BMC SLM) installed, the Change formshows both overview and in-depth information about the change request in relationto applicable service targets. You can view the service targets and milestones for therestoration of the unavailability. Service targets and milestones are defined from
Using BMC Service Level Management with BMC Remedy Change Management
188 BMC Remedy Change Management User Guide
within BMC SLM. Escalations can be set up to notify the assignment group prior toacknowledgement or resolution breach times.
From the Change form, you can view service targets defined in BMC SLM. Servicetargets can be defined in BMC SLM for response time and resolution time. Servicetargets can be determined by related CIs, product and operational categorization,and many other criteria. The Next Target Date field indicates the next deadline out ofall the service targets attached to the change.
For information about managing BMC SLM, see the BMC Service Level ManagementUser’s Guide.
Viewing service targets in BMC Remedy Change Management
You can view service targets that have been attached to change requests. This allowsyou to see whether the service target has been met, missed, or is in a warning state.You can also create service targets for the Release Management module includedwith BMC Remedy Change Management. The release management service targetsattach to release requests and you can track these service targets using the BMC SLMStatus icons and Status Gauge.
To view service targets related to a change request
1 Open the change request.
SLM Status is displayed in the left navigation pane of the Change Request form.
Table 25 on page 189 shows the icons and explains what they mean.
Table 25: BMC SLM Status icons
Icon Description
Status: Not Attached.No service target is attached to the incident.Click Details or the icon to display the SLM:Integration Dialog form.You can also create service targets for the Release Management moduleincluded with BMC Remedy Change Management. The releasemanagement service targets attach to release requests and you can trackthese service targets using the BMC SLM Status icons and Status Gauge.
Status: Attached.Green: The service targets are in compliance.Click the icon to display the SLM:Integration Dialog form.
Using BMC Service Level Management with BMC Remedy Change Management
Chapter 5 Change Manager role 189

Icon Description
Status: Warning.Yellow: At least one service target is at risk.Click the icon to display the SLM:Integration Dialog form.
Status: Breached.Red: At least one service target did not meet its goal. Click Details or theicon to display the SLM:IntegrationDialog form.
Figure 41: SLM:IntegrationDialog form
The colors on the Status Gauge on the SLM:Integration Dialog form show thecurrent status of the selected service targets. Table 26 on page 190 explains theStatus Gauge displays.
Table 26: The Status Gauge on the SLM:Integration Dialog form
Item Status
Green The service target is in compliance.
Yellow The service target has a warning status.
Red The service target has missed its goal.
Due Date and Time The goal time within which there must either be an initiation or a completion forthe change request otherwise the goal is missed.
Time Until Due The amount of time left until the goal is considered missed.
Time Past Due The amount of time that has passed since the goal was due.
Table 27 on page 191 describes the information in the SLM:IntegrationDialog form.
Using BMC Service Level Management with BMC Remedy Change Management
190 BMC Remedy Change Management User Guide

Table 27: Information about the SLM:IntegrationDialog form
Column Description
Case ID The ID of the change request.
Details... Click to see details about the selected service targets.
Service Target table
SVT Title The name of the service target.
Goal The type of goal for the service target:
■ Initiation goal—The change request must be responded to within the timespecified
■ Completion goal—The change request must be resolved within the timespecified.
Hours/Min The initiation or completion time stipulated in the goal.
Cost Per Min The cost per minute for missing the initiation or completion time goal.
Due Date/Time The goal time within which there must either be an initiation or a completion forthe change request otherwise the goal is missed.
Progress The status of the service target:
■ Attached—The service target has been attached to the change request
■ Detached—The service target has not been attached to the change request
■ In Process—Work on the change request is taking place
■ Pending—Work on the change request is stopped, for example, waiting for apart
■ Warning—The service target is at risk
■ Missed or Met—The service target has either missed or met its goal
■ Invalid—The service target is disabled.
Milestones for SVT
Title The title of the milestone.
Execution Time The time the milestone actions are executed.
Status The current status of the milestone, this is either active or inactive (pending), orAction Performed.
Using BMC Service Level Management with BMC Remedy Change Management
Chapter 5 Change Manager role 191
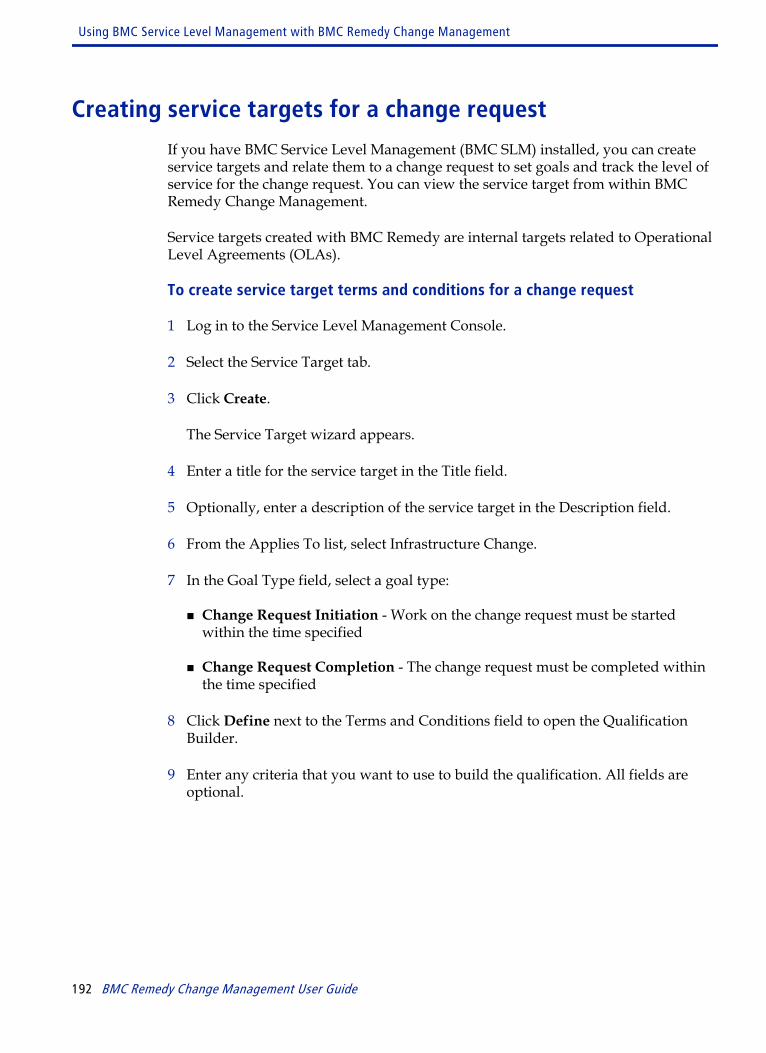
Creating service targets for a change request
If you have BMC Service Level Management (BMC SLM) installed, you can createservice targets and relate them to a change request to set goals and track the level ofservice for the change request. You can view the service target from within BMCRemedy Change Management.
Service targets created with BMC Remedy are internal targets related to OperationalLevel Agreements (OLAs).
To create service target terms and conditions for a change request
1 Log in to the Service Level Management Console.
2 Select the Service Target tab.
3 Click Create.
The Service Target wizard appears.
4 Enter a title for the service target in the Title field.
5 Optionally, enter a description of the service target in the Description field.
6 From the Applies To list, select Infrastructure Change.
7 In the Goal Type field, select a goal type:
■ Change Request Initiation - Work on the change request must be startedwithin the time specified
■ Change Request Completion - The change request must be completed withinthe time specified
8 Click Define next to the Terms and Conditions field to open the QualificationBuilder.
9 Enter any criteria that you want to use to build the qualification. All fields areoptional.
Using BMC Service Level Management with BMC Remedy Change Management
192 BMC Remedy Change Management User Guide
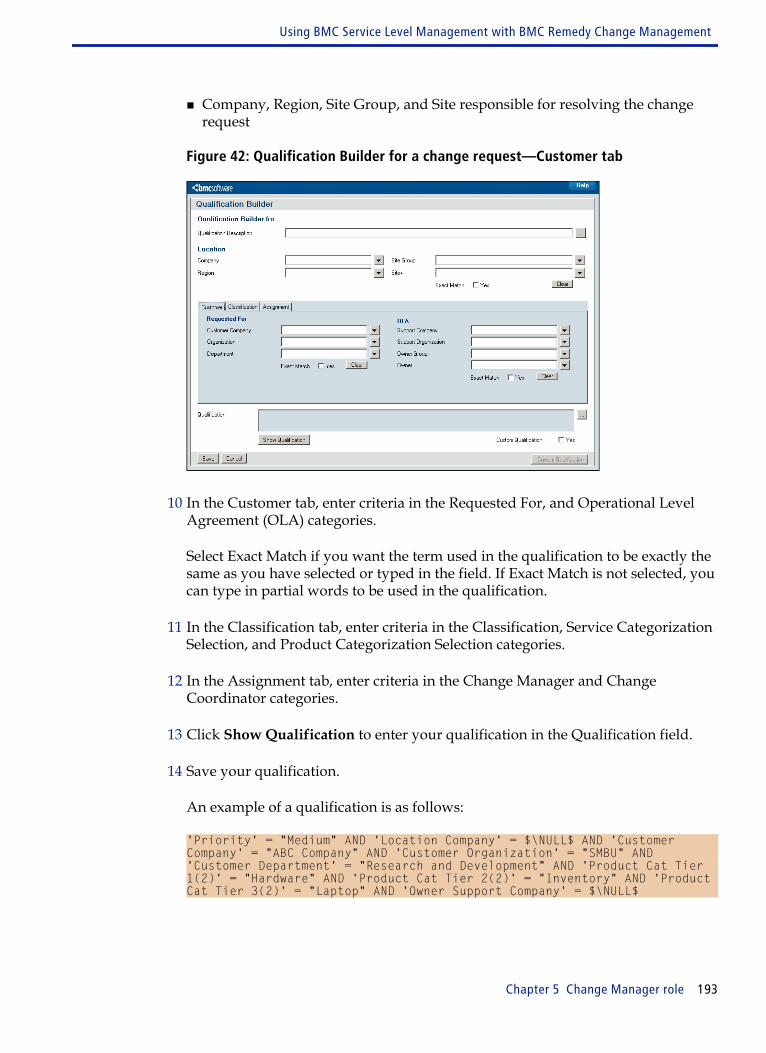
■ Company, Region, Site Group, and Site responsible for resolving the changerequest
Figure 42: Qualification Builder for a change request—Customer tab
10 In the Customer tab, enter criteria in the Requested For, and Operational LevelAgreement (OLA) categories.
Select Exact Match if you want the term used in the qualification to be exactly thesame as you have selected or typed in the field. If Exact Match is not selected, youcan type in partial words to be used in the qualification.
11 In the Classification tab, enter criteria in the Classification, Service CategorizationSelection, and Product Categorization Selection categories.
12 In the Assignment tab, enter criteria in the Change Manager and ChangeCoordinator categories.
13 Click Show Qualification to enter your qualification in the Qualification field.
14 Save your qualification.
An example of a qualification is as follows:
'Priority' = "Medium" AND 'Location Company' = $\NULL$ AND 'Customer Company' = "ABC Company" AND 'Customer Organization' = "SMBU" AND 'Customer Department' = "Research and Development" AND 'Product Cat Tier 1(2)' = "Hardware" AND 'Product Cat Tier 2(2)' = "Inventory" AND 'Product Cat Tier 3(2)' = "Laptop" AND 'Owner Support Company' = $\NULL$
Using BMC Service Level Management with BMC Remedy Change Management
Chapter 5 Change Manager role 193

To build a custom qualification
1 Log in to the Service Level Management Console.
2 Select the Service Target tab.
3 Click Create to display the Service Target wizard.
4 Fill in the basic information.
5 Click Define to display the Qualification Builder for terms and conditions.
6 Select Yes in the Custom Qualification check box.
7 Select Custom Qualification to open the Advanced Qualification Builder.
8 Enter your qualification by typing entries or use the operators, keywords, andfields from the application form.
9 Click OK to return to the Qualification Builder, the system enters yourQualification in the Qualification field.
10 Save your qualification.
Note If the service target is related to an agreement with an associated business serviceCI, an additional qualification is added to your terms and conditions.
Using the Change CalendarThe Change Calendar is a console for managing change and release activities,intended to be used by enterprise CIOs and members of the CAB, usually during aCAB meeting. It provides a graphical view of change requests, release requests, andbusiness events occurring in the organization.
The Change Calendar uses the graphical view to show change requests, releaserequests, and scheduled business events, similar to how a project managementapplication shows activities and tasks in a Gantt chart, except that the ChangeCalendar is more dynamic and interactive.
Aided by links to investigative and analysis tools, you can better understand the riskand impact of changes and releases. Because of better planning, you can make moreproductive decisions about the forward schedule of changes (FSC). The ChangeCalendar helps you consider the interdependencies and potential conflicts madevisible through the Calendar console.
Using the Change Calendar
194 BMC Remedy Change Management User Guide
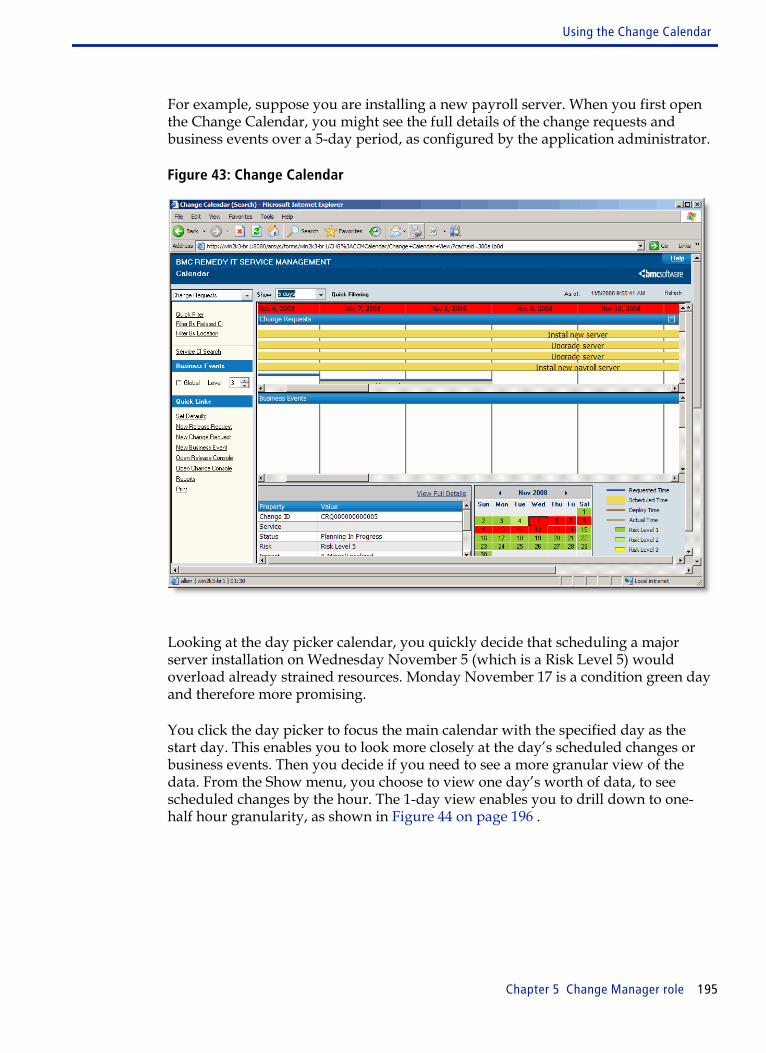
For example, suppose you are installing a new payroll server. When you first openthe Change Calendar, you might see the full details of the change requests andbusiness events over a 5-day period, as configured by the application administrator.
Figure 43: Change Calendar
Looking at the day picker calendar, you quickly decide that scheduling a majorserver installation on Wednesday November 5 (which is a Risk Level 5) wouldoverload already strained resources. Monday November 17 is a condition green dayand therefore more promising.
You click the day picker to focus the main calendar with the specified day as thestart day. This enables you to look more closely at the day’s scheduled changes orbusiness events. Then you decide if you need to see a more granular view of thedata. From the Show menu, you choose to view one day’s worth of data, to seescheduled changes by the hour. The 1-day view enables you to drill down to one-half hour granularity, as shown in Figure 44 on page 196 .
Using the Change Calendar
Chapter 5 Change Manager role 195
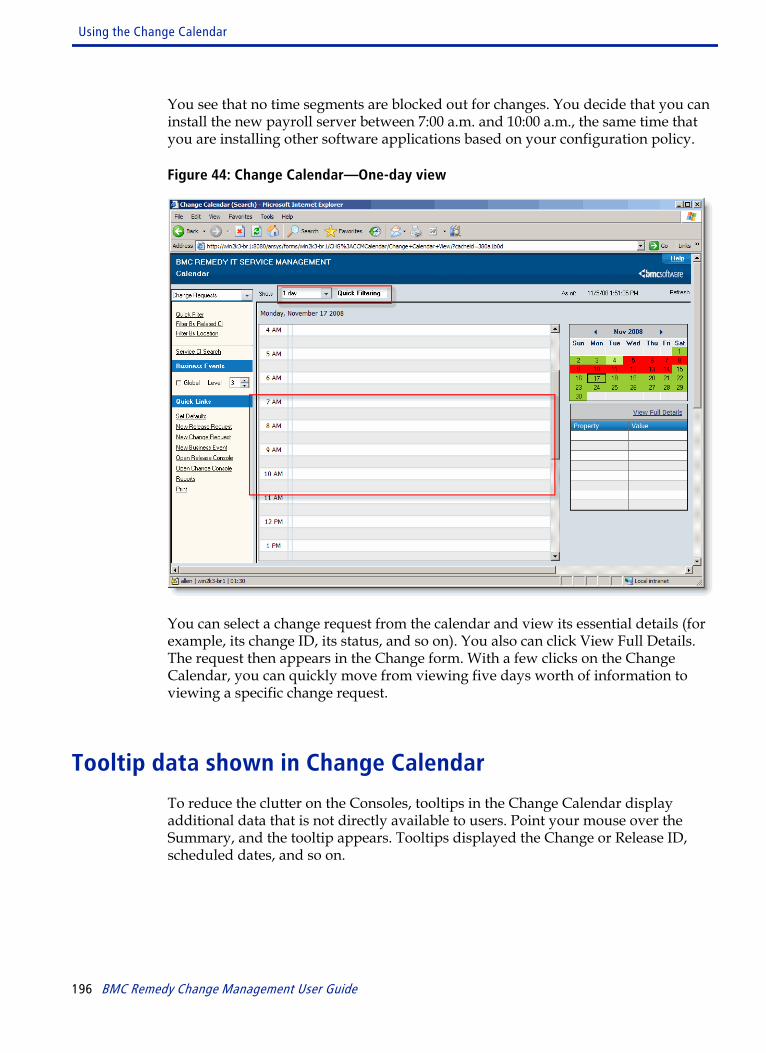
You see that no time segments are blocked out for changes. You decide that you caninstall the new payroll server between 7:00 a.m. and 10:00 a.m., the same time thatyou are installing other software applications based on your configuration policy.
Figure 44: Change Calendar—One-day view
You can select a change request from the calendar and view its essential details (forexample, its change ID, its status, and so on). You also can click View Full Details.The request then appears in the Change form. With a few clicks on the ChangeCalendar, you can quickly move from viewing five days worth of information toviewing a specific change request.
Tooltip data shown in Change Calendar
To reduce the clutter on the Consoles, tooltips in the Change Calendar displayadditional data that is not directly available to users. Point your mouse over theSummary, and the tooltip appears. Tooltips displayed the Change or Release ID,scheduled dates, and so on.
Using the Change Calendar
196 BMC Remedy Change Management User Guide
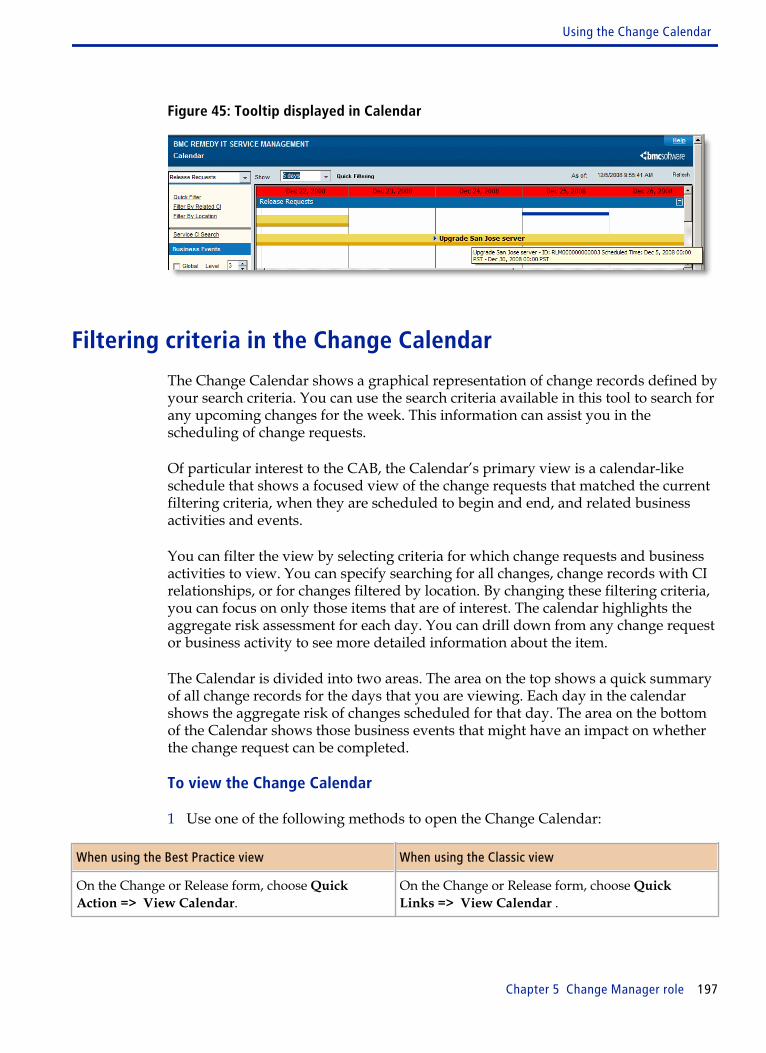
Figure 45: Tooltip displayed in Calendar
Filtering criteria in the Change Calendar
The Change Calendar shows a graphical representation of change records defined byyour search criteria. You can use the search criteria available in this tool to search forany upcoming changes for the week. This information can assist you in thescheduling of change requests.
Of particular interest to the CAB, the Calendar’s primary view is a calendar-likeschedule that shows a focused view of the change requests that matched the currentfiltering criteria, when they are scheduled to begin and end, and related businessactivities and events.
You can filter the view by selecting criteria for which change requests and businessactivities to view. You can specify searching for all changes, change records with CIrelationships, or for changes filtered by location. By changing these filtering criteria,you can focus on only those items that are of interest. The calendar highlights theaggregate risk assessment for each day. You can drill down from any change requestor business activity to see more detailed information about the item.
The Calendar is divided into two areas. The area on the top shows a quick summaryof all change records for the days that you are viewing. Each day in the calendarshows the aggregate risk of changes scheduled for that day. The area on the bottomof the Calendar shows those business events that might have an impact on whetherthe change request can be completed.
To view the Change Calendar
1 Use one of the following methods to open the Change Calendar:
When using the Best Practice view When using the Classic view
On the Change or Release form, choose QuickAction => View Calendar.
On the Change or Release form, choose QuickLinks => View Calendar .
Using the Change Calendar
Chapter 5 Change Manager role 197
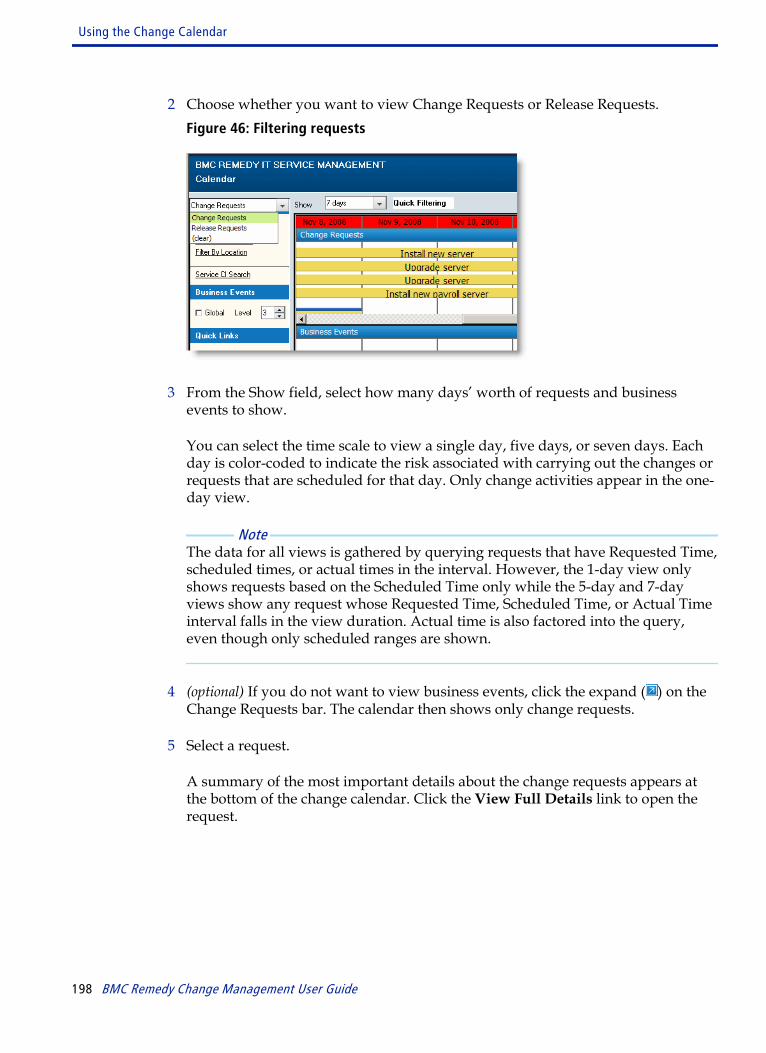
2 Choose whether you want to view Change Requests or Release Requests.Figure 46: Filtering requests
3 From the Show field, select how many days’ worth of requests and businessevents to show.
You can select the time scale to view a single day, five days, or seven days. Eachday is color-coded to indicate the risk associated with carrying out the changes orrequests that are scheduled for that day. Only change activities appear in the one-day view.
Note The data for all views is gathered by querying requests that have Requested Time,scheduled times, or actual times in the interval. However, the 1-day view onlyshows requests based on the Scheduled Time only while the 5-day and 7-dayviews show any request whose Requested Time, Scheduled Time, or Actual Timeinterval falls in the view duration. Actual time is also factored into the query,even though only scheduled ranges are shown.
4 (optional) If you do not want to view business events, click the expand ( ) on theChange Requests bar. The calendar then shows only change requests.
5 Select a request.
A summary of the most important details about the change requests appears atthe bottom of the change calendar. Click the View Full Details link to open therequest.
Using the Change Calendar
198 BMC Remedy Change Management User Guide
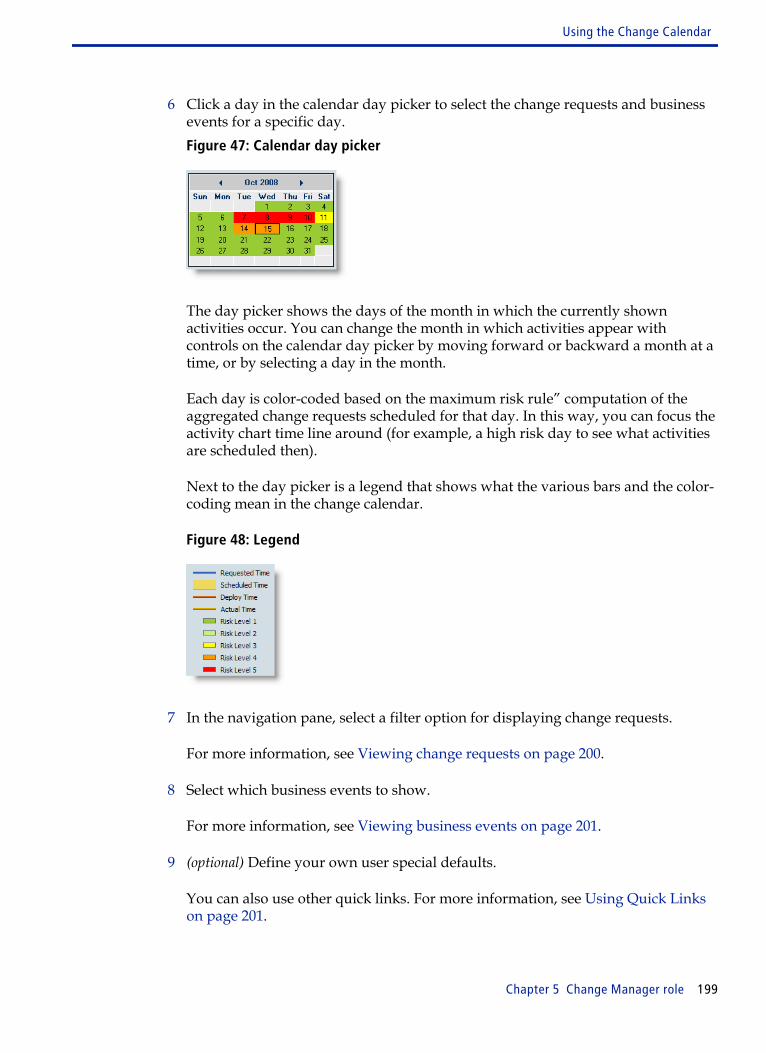
6 Click a day in the calendar day picker to select the change requests and businessevents for a specific day.Figure 47: Calendar day picker
The day picker shows the days of the month in which the currently shownactivities occur. You can change the month in which activities appear withcontrols on the calendar day picker by moving forward or backward a month at atime, or by selecting a day in the month.
Each day is color-coded based on the maximum risk rule” computation of theaggregated change requests scheduled for that day. In this way, you can focus theactivity chart time line around (for example, a high risk day to see what activitiesare scheduled then).
Next to the day picker is a legend that shows what the various bars and the color-coding mean in the change calendar.
Figure 48: Legend
7 In the navigation pane, select a filter option for displaying change requests.
For more information, see Viewing change requests on page 200.
8 Select which business events to show.
For more information, see Viewing business events on page 201.
9 (optional) Define your own user special defaults.
You can also use other quick links. For more information, see Using Quick Linkson page 201.
Using the Change Calendar
Chapter 5 Change Manager role 199
10 (optional) Click the Refresh to refresh the requests and business events shown inthe Change Calendar.
Viewing change requests
The links in the navigation pane enable you to specify which change requests yousee in the Change Calendar. When you select a filter option, its label is shown next tothe Show field to alert users which search is being shown.
WARNING If you do not provide any criteria for the CI, Location, or Service CI, then the filtersearches for change requests that satisfy the general specified criteria. The ChangeCalendar shows all change requests that have any relation to the CI, Location, orService CI.
Filter option Description
Quick Filter Lets you view requests by your own search criteria, based on categories such as statusor risk level. When you select a search and click the Search button, the results based onyour search criteria appear in the Change Calendar.
Filter By Related CI Lets you view requests by their related CI.You can define, save, and delete your own search criteria, based on categories such asstatus, impact, and so on. You can further filter requests by choosing options, such asOperational Categorization (for example, Add) and Assignment (by manager’s name,group, or assignee).Finally, you can include CI criteria in your search (for example, a CI class such assoftware).When you select a search and click the Search button, the results based on your searchcriteria appear in the Change Calendar.
Filter By Location Lets you include an impact location in your search (for example, by region, site group,or site).Note: You can only filter by Location for release requests.You can define, save, and delete your own search criteria, based on categories, such asChange Status, Approval Status, and so on. But you can further filter requests bychoosing options, such as Product Categorization (for example, Software) andAssignment (by manager’s name, group, or assignee).When you select a search and click the Search button, the results based on your searchcriteria appear in the Change Calendar.
Using the Change Calendar
200 BMC Remedy Change Management User Guide
Filter option Description
Service CI Search Lets you view requests by service CIs.You can define, save, and delete your own search criteria, based on service CIs. ServiceCIs are in a hierarchical structure as defined by the user company. In searching forchange requests by Service CI, you can specify the depth level to search. For example,depth level 2 means that you are searching the specified CI, its children, and itsgrandchildren (in the hierarchy tree) for all the related change requests.When you select a search and click the Search button, the results based on your searchcriteria appear in the Change Calendar.For more information about service CIs, see the BMC Remedy Asset Management User’sGuide.
Viewing business events
The Business Events links in the navigation pane enable you to specify whichbusiness events you see in the Change Calendar. Each business event has a levelattached to it. Make sure you are comparing the same level of business events.Events can be any level of 0 and above.
Note If the Company field is cleared (every filter has a company field), then all businessevents of all companies are retrieved. Otherwise, only business events associatedwith the specified company are retrieved.
Global This setting is especially useful in a multi-tenancy environment. The global flagretrieves business events with Global as company identifier.
■ If selected, shows all business events.
■ If clear, shows only the business events for the company.
Level Retrieves level of business event indicated. If no level is defined (that is, it contains novalue), all business events of all levels are retrieved.
Using Quick Links
Quick Links in the navigation pane enables you to select important functions fromthe Change Calendar.
Using the Change Calendar
Chapter 5 Change Manager role 201
Set Defaults Opens the User Defaults dialog box.Your application administrator can define optional defaults for you.The Change or Release tab is displayed based on the calendar selected, Change or Release.You can define Release and Change user settings for displaying change requests andrelease requests, based on categories, such as status, risk level, company, and so on.You can override the following settings in the General tab:
■ Business Events—Defines user setting for displaying global business events andtheir level.
■ Service CI—Defines the user setting of the depth level shown for service CIs.
■ Duration—Defines the user setting of duration (for example, 5 days).
■ Print Preferences—Defines the user setting for page type and orientation whenprinting.
When you click Save and close and open the Change Calendar, your user defaults areused.
New ReleaseRequest
Opens the Release form in New mode. For information, see Initiate milestone - Creatingrelease requests on page 276.
New ChangeRequest
Opens the Change form in New mode. For information, see Initiate stage - Creatingchange requests on page 113.
New BusinessEvent
Opens the Registration for Shared Time Segment form in New mode. For information,see Registering time segments on page 157.
Open ReleaseConsole
Opens the Release Console. For information, see Release Management Consolefunctional areas on page 99.
Open ChangeConsole
Opens the Change Console. For information, see Change Management Consolefunctional areas on page 84.
Reports Opens the Reporting Console. For information, see “Working with reports” on page411.
Print Opens the Print Properties dialog box. You can select page type (letter or A4),orientation (portrait or landscape), or supply a title for the printable page. Do not usethe single-quote character (‘) in this string because it triggers a JavaScript error.
Setting time zone preferences for the Change Calendar
If your BMC Remedy Change Management application accesses a BMC Remedy MidTier server that is located in a different time zone, the time information that appearsin your Change Calendar is not your local time, but is the time where the BMCRemedy Mid Tier server is located.
Using the Change Calendar
202 BMC Remedy Change Management User Guide

For example, you work in the Pacific time zone and you are assigned a change thatshould start at 10:00 a.m., local time. However, your BMC Remedy Mid Tier server isin the Eastern time zone (which is three hours ahead of Pacific time), so your ChangeCalendar shows a scheduled start time of 1:00 p.m.
You can fix this discrepancy by indicating your local time zone in the BMC RemedyAR System user preference record associated with your BMC Remedy AR Systemlogin ID.
To set the time zone in your BMC Remedy AR System user preference record
1 Using BMC Remedy User, open the AR System User Preference form in Searchmode.
a In BMC Remedy User, click the Open icon.
b In the Object List dialog box, click the Find tab.
c In the Search What Key Words field, type AR System User Preference, andclick Find.
d In the list of forms returned by the search, locate and double-click AR SystemUser Preference.
e Search for your user preference record, and then select it.
2 Click the Locale tab.
3 From the menu beside the Time Zone field, select your time zone.
4 Click Save.
Using the Change Management DashboardThe Change Management Dashboard provides flashboards containing key metricsassociated with changes occurring in the organization. This dashboard enables theorganization to make sure that change-related activities are meeting identified goals.
Using the Change Management Dashboard
Chapter 5 Change Manager role 203
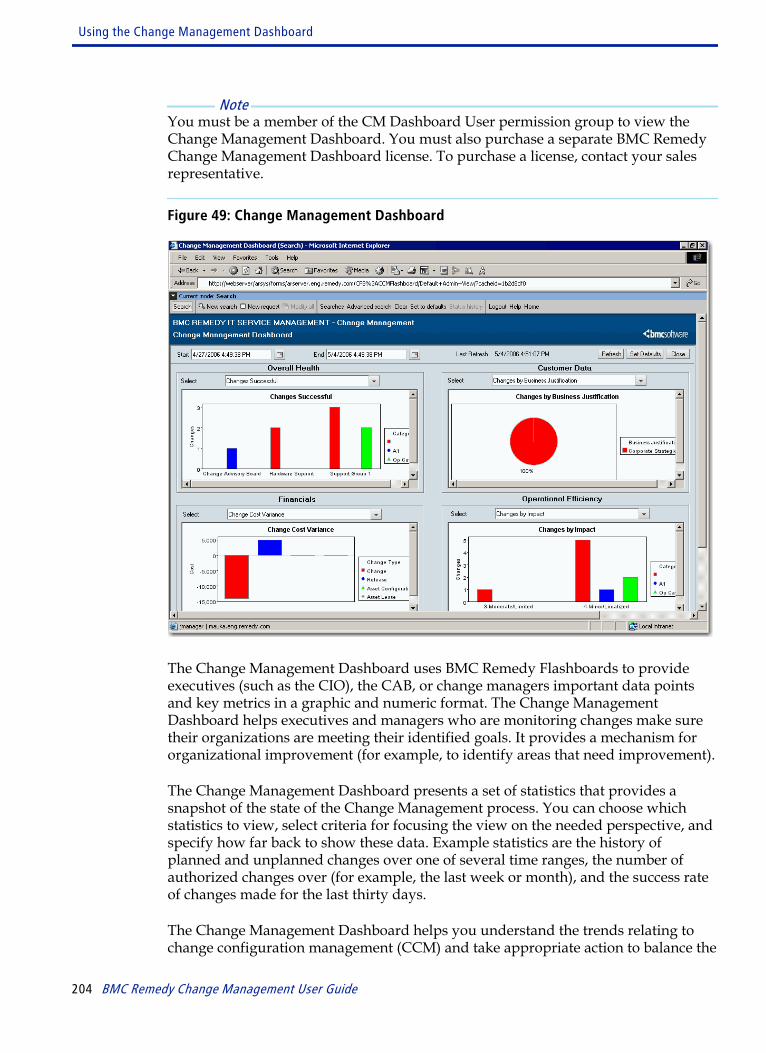
Note You must be a member of the CM Dashboard User permission group to view theChange Management Dashboard. You must also purchase a separate BMC RemedyChange Management Dashboard license. To purchase a license, contact your salesrepresentative.
Figure 49: Change Management Dashboard
The Change Management Dashboard uses BMC Remedy Flashboards to provideexecutives (such as the CIO), the CAB, or change managers important data pointsand key metrics in a graphic and numeric format. The Change ManagementDashboard helps executives and managers who are monitoring changes make suretheir organizations are meeting their identified goals. It provides a mechanism fororganizational improvement (for example, to identify areas that need improvement).
The Change Management Dashboard presents a set of statistics that provides asnapshot of the state of the Change Management process. You can choose whichstatistics to view, select criteria for focusing the view on the needed perspective, andspecify how far back to show these data. Example statistics are the history ofplanned and unplanned changes over one of several time ranges, the number ofauthorized changes over (for example, the last week or month), and the success rateof changes made for the last thirty days.
The Change Management Dashboard helps you understand the trends relating tochange configuration management (CCM) and take appropriate action to balance the
Using the Change Management Dashboard
204 BMC Remedy Change Management User Guide
flow. The Dashboard enables you to view four different graphical Flashboards withdifferent change request metrics at once. You can filter the data presented by theFlashboards by date to refine the shown information.
You can configure the Change Management Dashboard as needed. For maximumflexibility, you can select various flashboards to appear on the Dashboard screen,along with a time period that applies to all the flashboards shown.
To use the Change Management Dashboard
1 On the IT Home page, click the Change Management Dashboard link.
2 On the Change Management Dashboard, enter a start time and end time for theFlashboard data to view.
3 In the change statistics area, define how you want the flashboards to appear:
■ Overall Health - Choose one of the following settings:
Flashboard name Metric
Change Success Rate Successful closed change requests by Status Reason
Changes by Priority Open change requests by 'Priority' and 'Categorization Tier 1'
Changes by Timing/Category Closed change requests by 'Change Timing' and 'Categorization Tier 1'
Changes by Timing/Group Closed change requests by 'Change Timing' and 'Support Group Name'
Changes Successful Change requests with Status = Closed & Status Reason = Successfulgrouped by 'Support Group Name' and 'Categorization Tier 1'
Changes Unsuccessful Change requests with Status = Closed & Status Reason = Unsuccessfulgrouped by 'Support Group Name' and 'Categorization Tier 1'
■ Financials - Choose one of the following settings:
Flashboard name Metric
Change Cost Variance Not applicable
Changes by Cost/Category Average cost of closed changes by Category
Changes by Cost/Department Average cost of closed changes by Department
■ Customer Data - Choose one of the following settings:
Flashboard name Metric
Change Requests by Change requests by Organization and Company
Using the Change Management Dashboard
Chapter 5 Change Manager role 205
Flashboard name Metric
Changes By BusinessJustification
Closed change requests by Business Justification
■ Operational Efficiency - Choose one of the following settings:
Flashboard name Metric
Change End Date Variance Closed change requests by Category/Company versus closed emergencychange requests by Category/Company
Change Start Date Variance Closed change requests by Group/Company versus closed emergencychange requests by Group/Company
Change Status Open change requests by change request Status and Support Group
Changes by Impact Closed change requests by Impact and Category
Changes by Performance Rating Closed change requests by Performance Rating and Group
Changes Completed Completed change requests by actual End Date and Category
Changes Rolled Back Closed, backed-out change requests by Group and Category
4 (optional) Click Refresh to refresh the flashboards, including the date criteria(Start Date and End Date) specified, and show the change request data thatmatches the qualifications.
5 Click Set Defaults to open the User View dialog box, where you can save theflashboards which automatically appear when the Change ManagementDashboard form opens.
The list for each Flashboard category shows the available Flashboards. In theDuration field, you can select a time period to show data for the last 7, 30, or 90days.
6 Click Save.
Using the Change Management Dashboard
206 BMC Remedy Change Management User Guide
Change coordinator roleThis section contains information about using the BMC Remedy ChangeManagement application as a change coordinator, and describes how to define, plan,schedule, and track change requests and related tasks.
Implement stage - Working as achange coordinator
At the Implement stage, change coordinators take over responsibility for working onthe change request. Change coordinators are support staff members with specializedabilities who handle the details of the change request. Change coordinatorsfrequently exercise lead” responsibilities based on factors such as location, skill set,troubleshooting skills, difficulty of the change request, and company (if you are aservice provider). In large companies, the change manager would be responsible forthe overall change such as scheduling, but the change coordinator would performthe day-to-day management of the change request process, for example, building
6
Chapter 6 Change coordinator role 207
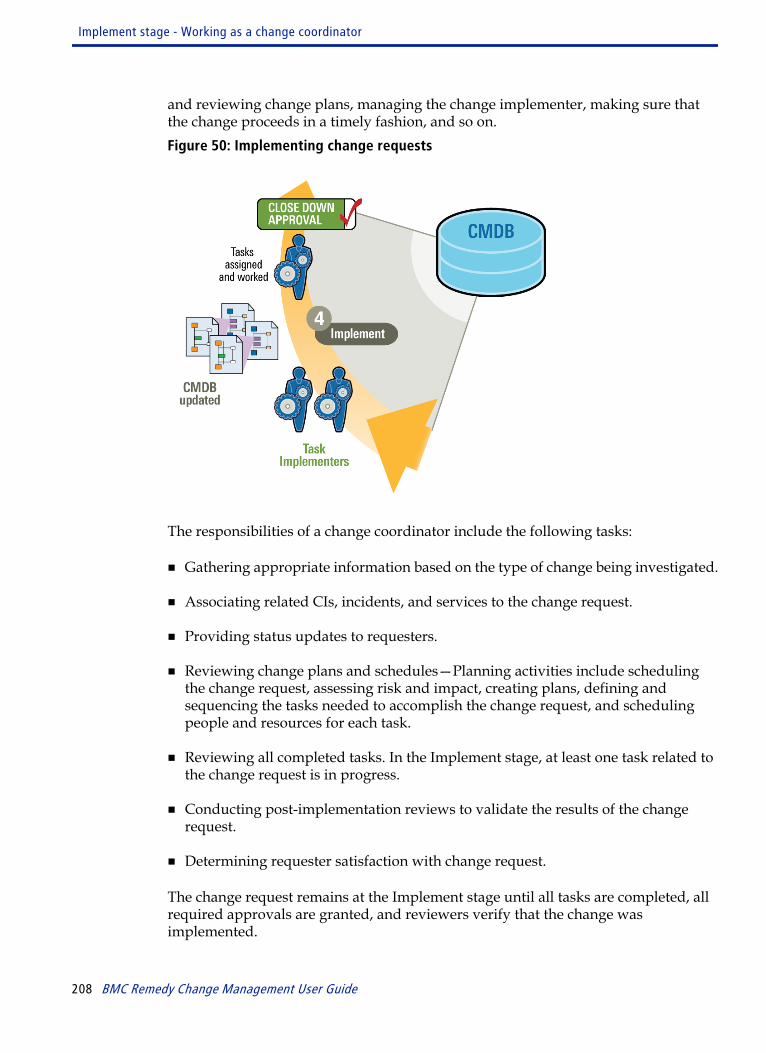
and reviewing change plans, managing the change implementer, making sure thatthe change proceeds in a timely fashion, and so on.Figure 50: Implementing change requests
The responsibilities of a change coordinator include the following tasks:
■ Gathering appropriate information based on the type of change being investigated.
■ Associating related CIs, incidents, and services to the change request.
■ Providing status updates to requesters.
■ Reviewing change plans and schedules—Planning activities include schedulingthe change request, assessing risk and impact, creating plans, defining andsequencing the tasks needed to accomplish the change request, and schedulingpeople and resources for each task.
■ Reviewing all completed tasks. In the Implement stage, at least one task related tothe change request is in progress.
■ Conducting post-implementation reviews to validate the results of the changerequest.
■ Determining requester satisfaction with change request.
The change request remains at the Implement stage until all tasks are completed, allrequired approvals are granted, and reviewers verify that the change wasimplemented.
Implement stage - Working as a change coordinator
208 BMC Remedy Change Management User Guide

For more information about procedures frequently used by change coordinators, seethe following links:
■ Tracking efforts for a change request on page 217.
■ Working with relationships on page 220.
Implementing a change request
This section describes the procedure to implement a change request.
To implement the change request
1 Open the change request.
2 Use the Process Flow Status bar to move the change request to Implement stage.
3 To modify the change request assignments, do one of the following:
When using the Best Practice view When using the Classic view
Click the Work Detail tab. Click the Assignment tab.
For information, see Working with change request assignments on page 211.
4 Click the Relationships tab.
Define the relationship of the change request to other change requests, CIs, LDAPobjects, SLIs, and so on. For information, see Working with relationships on page220.
5 Click the Tasks tab.
a Create the tasks necessary to implement the change request. For information,see Implement stage - Working with tasks on page 260.
b Assign the tasks to the appropriate task implementers. For information, see Working with BMC Remedy Change Management as a task implementer onpage 341.
c Reassign tasks as necessary. For information, see Responding to taskreassignments as a change coordinator on page 272.
Implement stage - Working as a change coordinator
Chapter 6 Change coordinator role 209
Identifying change requests as rollbacksIf the actions associated with a change request need to be reversed, your supportstaff and managers can identify the request as needing to be rolled back. This meansthat impacted systems need to be restored to their previous state before the changerequest was implemented. The status of a change request must be Implementation InProgress for you to identify it as a rollback.
Note This procedure is a part of a more detailed user story that describes how to resolve aproblem investigation with a change rollback.In the user story, the known error is the result of an incident review request ofincident request records associated with a specific CI. The change is initiated by theknown error that identifies the problem's root cause and indicates to the changecoordinator that a rollback is required.For more information about incident request reviews, see the BMC Remedy ProblemManagement User's Guide. For more information about the use case, see the BMCRemedy IT Service Management Concepts and Planning Guide.
To identify a change request as a rollback
1 Open the change request.
2 Use the Process Flow Status bar to move the change request to Implement stage.
3 Make sure the Status field is set to Implementation In Progress.
4 Set the Status Reason field to In Rollback.
5 Create a related task to implement the rollback for this change request.
6 Roll back the change request.
7 Use one of the following options to add a work info record to enter informationabout why you are rolling back the change request :
When using the Best Practice view When using the Classic view
Update the fields on the Work Detail tab. Update the fields on the Work Info tab.
8 Move the change request to Completed or Closed status.
Changes in value to the Status field are tracked in the audit trail.
9 Click Save.
Identifying change requests as rollbacks
210 BMC Remedy Change Management User Guide
Using the Change Management Console as achange coordinator
The Change Management Console is the primary interface for support staff,especially change coordinators. It provides a dedicated workspace for working onchange requests. It provides quick access to the information and procedures that youneed daily, so you do not need to open other BMC Remedy ITSM applications. TheChange Management Console shows the most important details associated withchanges requests, for example, tasks associated with changes, work information, andimportant broadcasts.
For more information, see Change Management Console functional areas on page 84.
Working with change request assignmentsWhen BMC Remedy Change Management was being configured, the applicationadministrator determined to whom the change request is to be assigned based on acombination of field values, such as the change location, operational categorization,and product categorization. Changes can be assigned to an individual or a supportgroup. For example, all change requests that are categorized as hardware issuesmight be assigned to the IT Support Hardware group.
There are different roles within the assignment process—the change manager andchange coordinator. The classic view has an additional change implementer role. Thechange manager typically oversees the overall change process, but the changecoordinator plans and coordinates the efforts.
Note This section focuses on change assignment from the perspective of the changecoordinator. But there is potentially a great deal of overlap in responsibility betweenthe change manager and the change coordinator.
Responsibilities for change coordinators include both assigning and acceptingchange requests. You must make sure that the assignment is correct and accept thechange request. If you cannot accept or resolve an assigned change request, you oryour manager can reassign the change request to another change coordinator. If thechange request was categorized incorrectly, you can also reassign it. (Forinformation, see Reassigning change requests on page 219.)
Change requests can be assigned manually or automatically. If an assignmentdefinition has not been done for BMC Remedy Change Management, you mustassign the change manually. (For information, see Automatically assigning changeson page 212.)
Using the Change Management Console as a change coordinator
Chapter 6 Change coordinator role 211
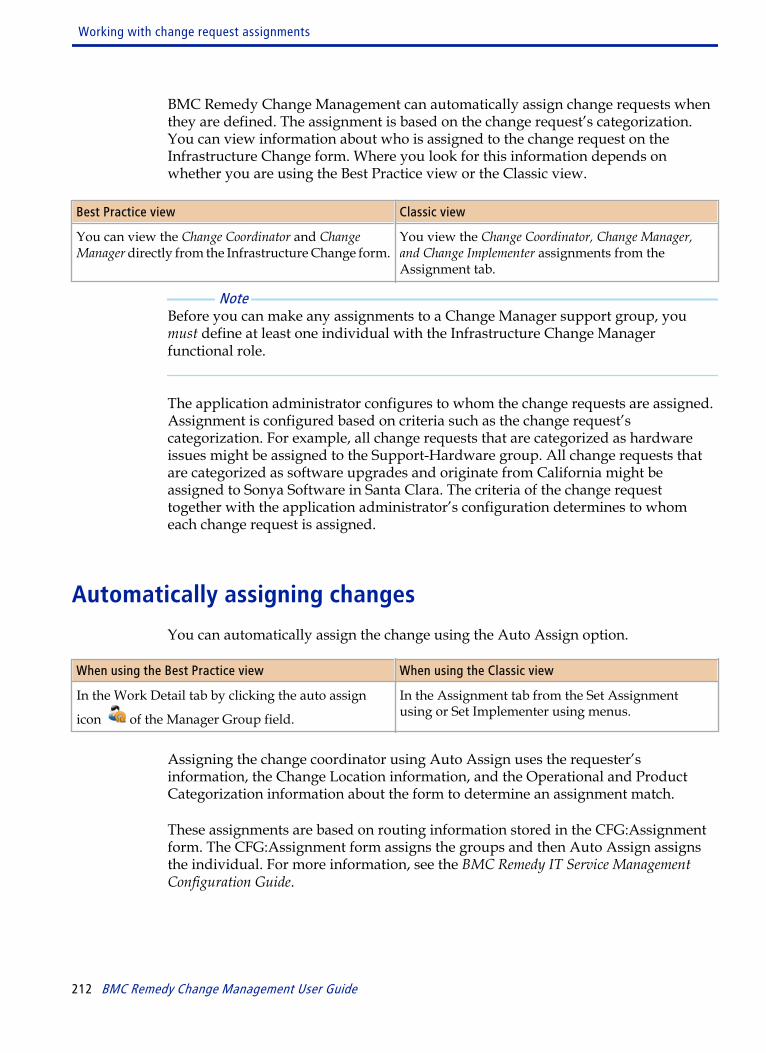
BMC Remedy Change Management can automatically assign change requests whenthey are defined. The assignment is based on the change request’s categorization.You can view information about who is assigned to the change request on theInfrastructure Change form. Where you look for this information depends onwhether you are using the Best Practice view or the Classic view.
Best Practice view Classic view
You can view the Change Coordinator and ChangeManager directly from the Infrastructure Change form.
You view the Change Coordinator, Change Manager,and Change Implementer assignments from theAssignment tab.
Note Before you can make any assignments to a Change Manager support group, youmust define at least one individual with the Infrastructure Change Managerfunctional role.
The application administrator configures to whom the change requests are assigned.Assignment is configured based on criteria such as the change request’scategorization. For example, all change requests that are categorized as hardwareissues might be assigned to the Support-Hardware group. All change requests thatare categorized as software upgrades and originate from California might beassigned to Sonya Software in Santa Clara. The criteria of the change requesttogether with the application administrator’s configuration determines to whomeach change request is assigned.
Automatically assigning changes
You can automatically assign the change using the Auto Assign option.
When using the Best Practice view When using the Classic view
In the Work Detail tab by clicking the auto assign
icon of the Manager Group field.
In the Assignment tab from the Set Assignmentusing or Set Implementer using menus.
Assigning the change coordinator using Auto Assign uses the requester’sinformation, the Change Location information, and the Operational and ProductCategorization information about the form to determine an assignment match.
These assignments are based on routing information stored in the CFG:Assignmentform. The CFG:Assignment form assigns the groups and then Auto Assign assignsthe individual. For more information, see the BMC Remedy IT Service ManagementConfiguration Guide.
Working with change request assignments
212 BMC Remedy Change Management User Guide
Receiving notifications of change request assignments
Change coordinators are notified of new change requests, based on their notificationmethod preferences defined in their personal record.
For more information, see Sending and receiving change notifications on page 400.
The available notifications follow:
■ Individual Notification - An individual change coordinator is notified accordingto the notification method specified in their personal record.For example, if Bob Backline has a notification method of BMC Remedy Alert, hereceives a notification from BMC Remedy Alert for each change request that isassigned to him.
■ Group Notification - A change manager group is notified according to thenotification method specified by each group member’s entry in their personalrecord.For example, if a change request is assigned to the Support-Software group, eachgroup member is notified through the notification method specified in theirpersonal record. If Sarah Software has Email specified as the notification methodin her personal record, the notification is sent to her by email. If Bob Backline hasBMC Remedy Alert specified, he is notified accordingly.
To receive notification of change assignment by BMC Remedy Alert
1 Log in to BMC Remedy Alert. You must have support staff member permissions.
When you or your group receives a notification that you or your group has beenassigned to a change request, the information appears in the BMC Remedy Alertwindow.
2 To evaluate a change, select a change request in the BMC Remedy Alert window.
3 Choose Alerts => Details.
The change request appears in the Change form. For more information, see Setting application preferences - Change Management on page 390.
Viewing assigned changes
When the system notifies you that a change request was assigned to you or to one ofyour groups, you can view the request from the Changes table on the ChangeManagement console. You can also view all unassigned change requests.
Working with change request assignments
Chapter 6 Change coordinator role 213
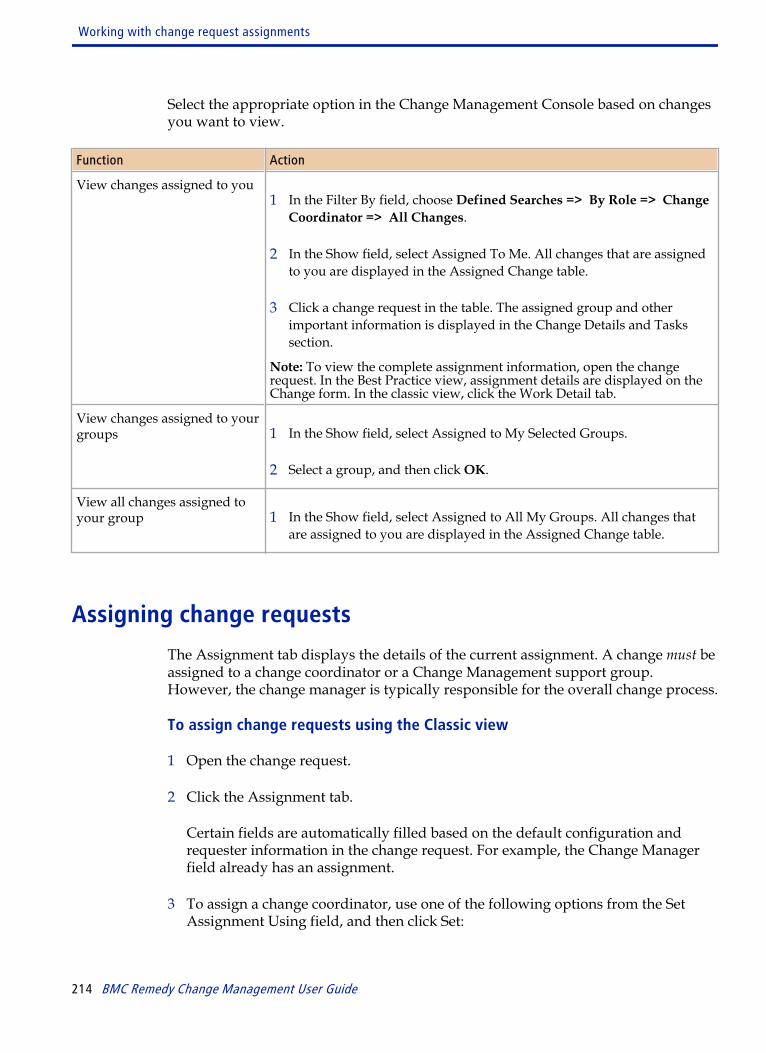
Select the appropriate option in the Change Management Console based on changesyou want to view.
Function Action
View changes assigned to you1 In the Filter By field, choose Defined Searches => By Role => Change
Coordinator => All Changes.
2 In the Show field, select Assigned To Me. All changes that are assignedto you are displayed in the Assigned Change table.
3 Click a change request in the table. The assigned group and otherimportant information is displayed in the Change Details and Taskssection.
Note: To view the complete assignment information, open the changerequest. In the Best Practice view, assignment details are displayed on theChange form. In the classic view, click the Work Detail tab.
View changes assigned to yourgroups 1 In the Show field, select Assigned to My Selected Groups.
2 Select a group, and then click OK.
View all changes assigned toyour group 1 In the Show field, select Assigned to All My Groups. All changes that
are assigned to you are displayed in the Assigned Change table.
Assigning change requests
The Assignment tab displays the details of the current assignment. A change must beassigned to a change coordinator or a Change Management support group.However, the change manager is typically responsible for the overall change process.
To assign change requests using the Classic view
1 Open the change request.
2 Click the Assignment tab.
Certain fields are automatically filled based on the default configuration andrequester information in the change request. For example, the Change Managerfield already has an assignment.
3 To assign a change coordinator, use one of the following options from the SetAssignment Using field, and then click Set:
Working with change request assignments
214 BMC Remedy Change Management User Guide
■ My Default Group- Assigns the change to you and your default group.
■ My Group List- Opens a list of all groups to which you belong. Select theappropriate group from this list.
■ Favorite Groups- Assigns the change to the typical groups to which yoursupport group assigns requests.
■ Auto Assign- Automatically assigns the request based on predefined mapping.Use this option if no change coordinator is assigned to the request.
■ Change Manager - When the Change Manager and the Change Coordinatorare the same group or person.
A user must have the Infrastructure Change Coordinator or InfrastructureChange Manager functional role to be a Change Coordinator. Groups that do nothave a user with one of these functional roles are not available for selection in theChange Coordinator fields.
4 Save the change request.
The change manager and the change coordinator are automatically notified oftheir assignments.
To assign change requests using the Best Practice view
1 Open the change request.
Certain fields are automatically filled based on the default configuration andrequester information in the change request. For example, the Change Managerfield already has an assignment.
2 To assign a change coordinator, select the appropriate option:
■ Coordinator Group- Provides a list of coordinator groups. Select the group ofthe change coordinator you want to assign the change to.Groups that have at least one user with the Infrastructure Change Coordinatoror Infrastructure Change Manager functional role are listed for selection.
■ Change Coordinator- Provides a list of users with the functional role of anInfrastructure Change Coordinator in the selected coordinator group. Select theappropriate change coordinator from this list.
3 To assign a change manager, select the appropriate option:
Working with change request assignments
Chapter 6 Change coordinator role 215
■ Manager Group- Provides a list of groups where at least one member has theInfrastructure Change Manager functional role. Select the Change ManagerGroup to which you want to assign the change.
■ Change Manager- Provides a list of users with the functional role of anInfrastructure Change Manager in the selected Manager Group. Select theappropriate change manager from this list.
■ Auto Assign- Automatically assigns the request based on predefined mapping.Use this option by clicking the auto-assign icon if no change coordinator isassigned to the request.
4 Save the change request.
The change manager and the change coordinator are automatically notified oftheir assignments.
Assigning changes to change implementers
You can assign changes to a change implementer. Assignments are similar for achange coordinator, except when you select Change Coordinator from the SetImplementer using field. Use this option to define the change coordinator as thechange implementer.
Note This section only applies if your are using BMC Remedy Change Management inClassic view. The Change Implementer fields were removed from the Best Practiceview, since adding tasks to a change request is a best practice.When a change request includes tasks, the Change Implementer fields no longerappear on the Assignment tab.
Note If change implementer fields have been set, for example in a change template thatwas used, change implementers will be assigned and notified about the changerequest, but this information will not be displayed in the Best Practice view.
To assign changes to change implementers using the Classic view
1 Open the change request.
Working with change request assignments
216 BMC Remedy Change Management User Guide
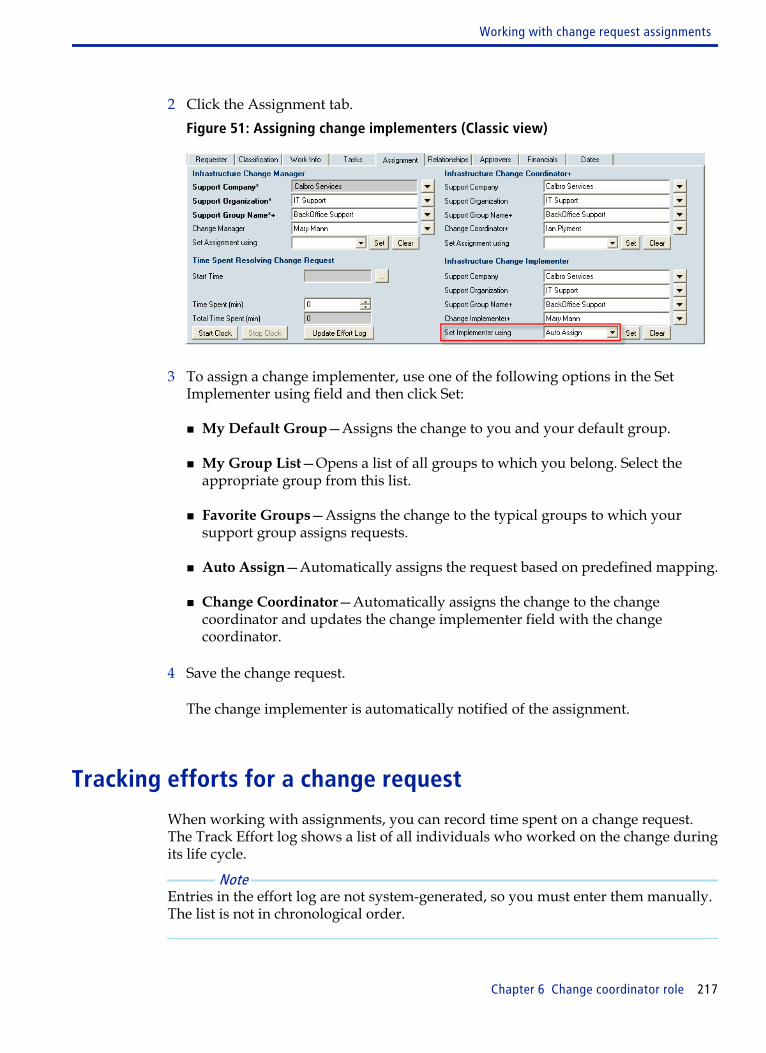
2 Click the Assignment tab.Figure 51: Assigning change implementers (Classic view)
3 To assign a change implementer, use one of the following options in the SetImplementer using field and then click Set:
■ My Default Group—Assigns the change to you and your default group.
■ My Group List—Opens a list of all groups to which you belong. Select theappropriate group from this list.
■ Favorite Groups—Assigns the change to the typical groups to which yoursupport group assigns requests.
■ Auto Assign—Automatically assigns the request based on predefined mapping.
■ Change Coordinator—Automatically assigns the change to the changecoordinator and updates the change implementer field with the changecoordinator.
4 Save the change request.
The change implementer is automatically notified of the assignment.
Tracking efforts for a change request
When working with assignments, you can record time spent on a change request.The Track Effort log shows a list of all individuals who worked on the change duringits life cycle.
Note Entries in the effort log are not system-generated, so you must enter them manually.The list is not in chronological order.
Working with change request assignments
Chapter 6 Change coordinator role 217
To track efforts
1 Open the change request.
2 Choose Functions => Track Effort.
3 Fill in the Select an Assignee fields.
This information is required to select the individual for whom the effort log isbeing generated.
4 Fill in the Select Effort Classification fields.
Select an Assessment Type, Phase, and Area. This information is required to showwhat kind of effort is being logged, for example, implementation activity.
5 Fill in the Enter Effort Time Spent fields.
Enter the number of hours and minutes you worked on the change. Thisinformation records where the time was spent.
Note As needed, you can adjust the time spent in the Update Assignee Effort Durationsection. For information, see Responding to task reassignments as a changecoordinator on page 272.
6 Click Add, and then click Close.
Performing additional functions when tracking efforts
In addition to creating a track effort log entry, you can perform the functions listedin the following table. All the listed functions are performed from the Change form.
Note You must be the change manager or the change coordinator to modify the effort time.
Working with change request assignments
218 BMC Remedy Change Management User Guide
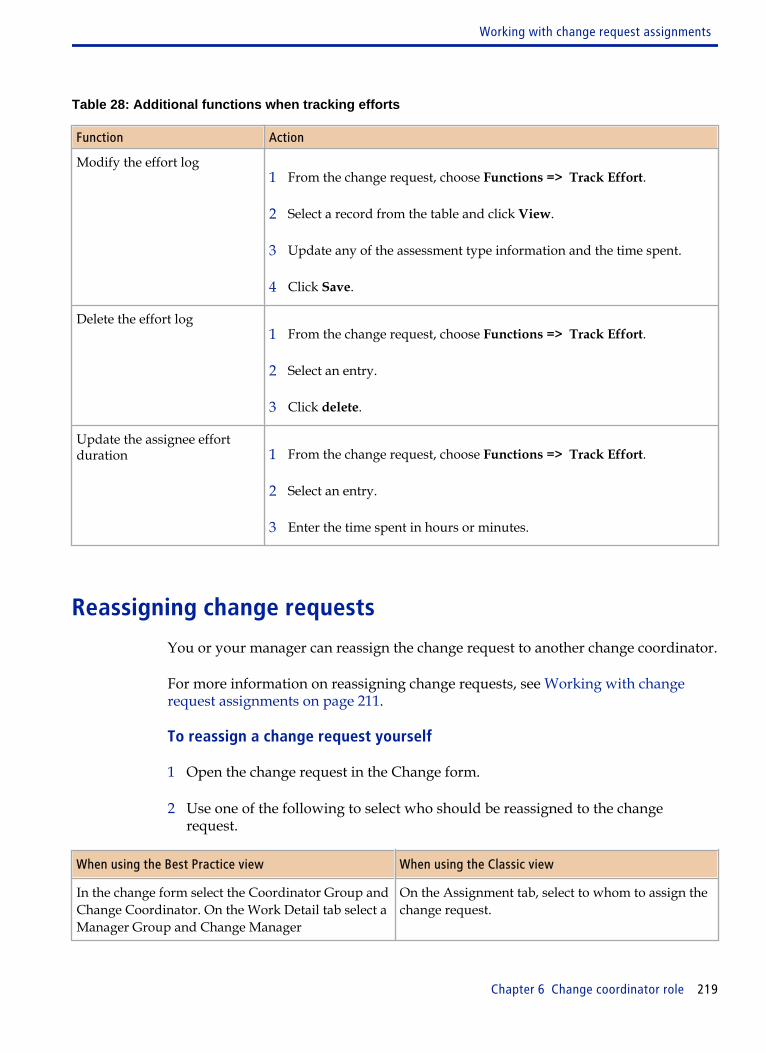
Table 28: Additional functions when tracking efforts
Function Action
Modify the effort log1 From the change request, choose Functions => Track Effort.
2 Select a record from the table and click View.
3 Update any of the assessment type information and the time spent.
4 Click Save.
Delete the effort log1 From the change request, choose Functions => Track Effort.
2 Select an entry.
3 Click delete.
Update the assignee effortduration 1 From the change request, choose Functions => Track Effort.
2 Select an entry.
3 Enter the time spent in hours or minutes.
Reassigning change requests
You or your manager can reassign the change request to another change coordinator.
For more information on reassigning change requests, see Working with changerequest assignments on page 211.
To reassign a change request yourself
1 Open the change request in the Change form.
2 Use one of the following to select who should be reassigned to the changerequest.
When using the Best Practice view When using the Classic view
In the change form select the Coordinator Group andChange Coordinator. On the Work Detail tab select aManager Group and Change Manager
On the Assignment tab, select to whom to assign thechange request.
Working with change request assignments
Chapter 6 Change coordinator role 219
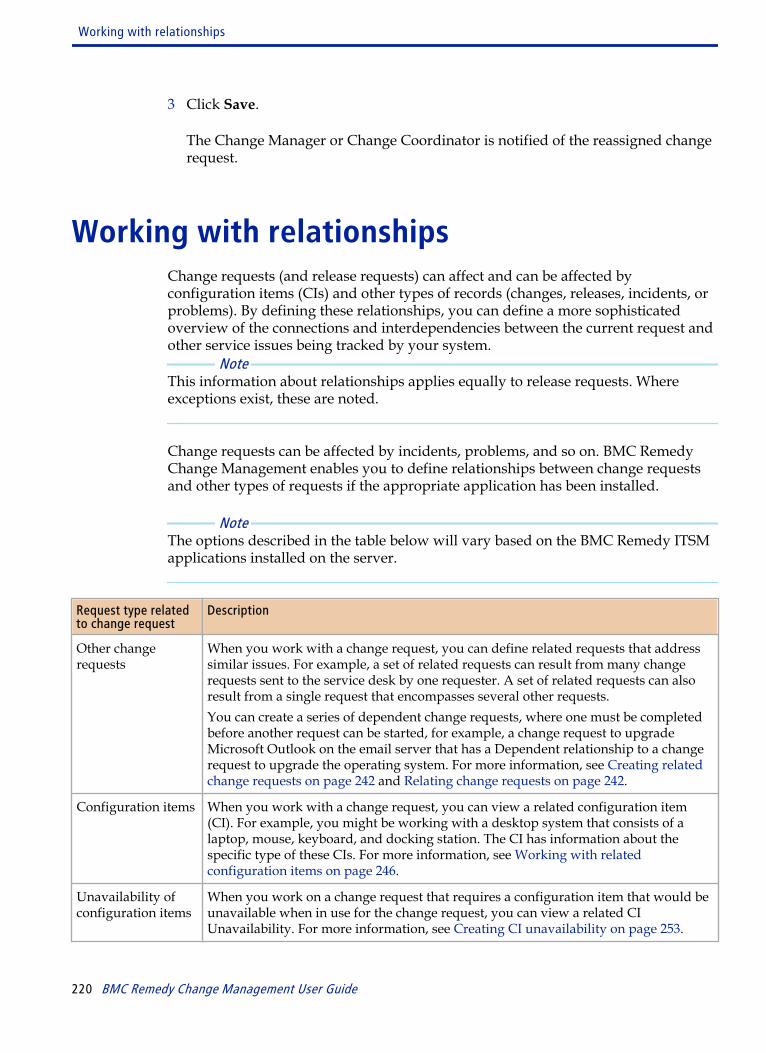
3 Click Save.
The Change Manager or Change Coordinator is notified of the reassigned changerequest.
Working with relationshipsChange requests (and release requests) can affect and can be affected byconfiguration items (CIs) and other types of records (changes, releases, incidents, orproblems). By defining these relationships, you can define a more sophisticatedoverview of the connections and interdependencies between the current request andother service issues being tracked by your system.
Note This information about relationships applies equally to release requests. Whereexceptions exist, these are noted.
Change requests can be affected by incidents, problems, and so on. BMC RemedyChange Management enables you to define relationships between change requestsand other types of requests if the appropriate application has been installed.
Note The options described in the table below will vary based on the BMC Remedy ITSMapplications installed on the server.
Request type relatedto change request
Description
Other changerequests
When you work with a change request, you can define related requests that addresssimilar issues. For example, a set of related requests can result from many changerequests sent to the service desk by one requester. A set of related requests can alsoresult from a single request that encompasses several other requests.You can create a series of dependent change requests, where one must be completedbefore another request can be started, for example, a change request to upgradeMicrosoft Outlook on the email server that has a Dependent relationship to a changerequest to upgrade the operating system. For more information, see Creating relatedchange requests on page 242 and Relating change requests on page 242.
Configuration items When you work with a change request, you can view a related configuration item(CI). For example, you might be working with a desktop system that consists of alaptop, mouse, keyboard, and docking station. The CI has information about thespecific type of these CIs. For more information, see Working with relatedconfiguration items on page 246.
Unavailability ofconfiguration items
When you work on a change request that requires a configuration item that would beunavailable when in use for the change request, you can view a related CIUnavailability. For more information, see Creating CI unavailability on page 253.
Working with relationships
220 BMC Remedy Change Management User Guide

Request type relatedto change request
Description
LDAP objects When you work with a change request, you can view related LDAP objects. Forexample, you might want to relate a change request to an LDAP server where all thepermission rights are stored to enable seamless authentication with Policy Manager.For more information, see Performing additional functions with relationships on page248.
Release When you work with a change request, you can view or create release requests.Releases can be related to a change request (in the Relationships tab, or contain thechange request in the Release manifest. For example, you might want to create arelease request and include the change in the Release manifest. For more information,see Working with release manifests on page 323.
Software libraryitems
When you work with a change request, you can view related software library items(SLI), for example, different versions of Microsoft Office along with their licensecontracts. For more information, see Performing additional functions withrelationships on page 248.
Asset configuration When you work with a change request, you might need to work with a related assetconfiguration. For example, if you are working on a change request involving amonitor, relate the change to the monitor. You might also want to temporarily assignanother monitor to the requester because work is being done on the original monitor.In this case, you can relate the change request to both monitor asset records. Toperform this procedure, BMC Remedy Asset Management must be installed andintegrated.
Incidents andproblems
When you work with a change request, you might need to relate incidents andproblems. If a change request for a server upgrade results in connection problems forthe people affected by the change, for example, you can relate their incident to theserver upgrade change request as you open the cases. This relationship can providehelpful information to the support staff working on resolving the incident. Toperform this procedure, BMC Remedy Incident Management must be installed andintegrated. For more information, see Performing additional functions with relatedchange requests on page 245. For problem and known error investigation, BMCRemedy Problem Management must be installed.
Projects A change request can be a part of a larger project. This relationship providesinformation about the project to which the change is related. To view this option,BMC IT Business Management Suite must be installed and integrated.Currently, you cannot relate a change request to a Project from the Change form.
For more information about relationships and request types, see “Related requesttypes for BMC Remedy Change Management and Release Management” on page222.
Working with relationships
Chapter 6 Change coordinator role 221

Related request types for BMC Remedy Change Managementand Release Management
The Relationships tab shows the relationships between the current change request toCIs and to other modules inside BMC Remedy Change Management.
You use request types to define these relationships. The following table displays alist of request types to which you can relate changes (or releases) and their availableactions, along with their start and end dates. The list varies depending on the otherBMC Remedy ITSM applications you have installed with BMC Remedy ChangeManagement.
Note The Start date and End date values are not displayed in the Best Practice view.
Table 29: Related request types to Change and Release Management modules
Request type Actions Relationship type Start date End date More information
CIUnavailability(AssetManagement)
■ Search—Opens the CIUnavailabilityRelationships Searchform tosearch for anunavailableCI, and thenrelate it tothe release.
■ View—Opens the CIthat isrelated to therelease.
■ Remove—Removes theCI from therelationshipwith therelease; itdoes notdelete the CI.
Related to■ Scheduled
Start Date
■ Actual StartDate
■ ScheduledEnd Date
■ Actual EndDate
See Creating CIunavailabilityon page 253.
Working with relationships
222 BMC Remedy Change Management User Guide

Request type Actions Relationship type Start date End date More information
ConfigurationItem ■ Search—
Opens the CIRelationships Searchform tosearch for aCI, and thenrelate it tothe change orrelease.
■ View—Opens the CIthat isrelated to thechange orrelease.
■ Remove—Removes theCI from therelationshipwith thechange orrelease; itdoes notdelete the CI.
■ Related to
■ Upgrades
■ Installs
■ Repairs
■ Removes
■ Impacts
■ Moves
■ Changes
Note: For moreinformationabout therelationshiptypes, see “Related requesttypes for BMCRemedy ChangeManagementand ReleaseManagement”on page 222
Not applicable Not applicable See Workingwith relatedconfigurationitems on page246.
Project (If BMCRemedy ITBusinessManagement isinstalled)
View—Opensthe Projectsummary formthat displaysdetails of theProject to whichthe change isrelated.
Not applicable Not applicable Not applicable
Working with relationships
Chapter 6 Change coordinator role 223

Request type Actions Relationship type Start date End date More information
Incident (IfBMC RemedyIncidentManagement isinstalled)
■ Search—Opens theIncidentRelationshipSearch formto search foran incident,and thenrelate it tothe change orrelease.
■ Create—Opens theIncidentform in Newmode.
■ View—Opens theincident thatis related tothe change orrelease.
■ Remove—Removes theincidentfrom therelationshipwith thechange orrelease; itdoes notdelete theincident.
■ Related to
■ Caused
■ Corrects
Reported Date Responded Date See Performingadditionalfunctions withrelationships onpage 248.
Working with relationships
224 BMC Remedy Change Management User Guide

Request type Actions Relationship type Start date End date More information
InfrastructureChange ■ Search—
Opens theChangeRelationshipSearch formto search fora change,and thenrelate it tothe change orrelease.
■ Create—Opens theChange formin Newmode.
■ View—Opens thechange thatis related tothe change orrelease.
■ Remove—Removes thechange fromtherelationshipwith thechange orrelease; itdoes notdelete thechange.
■ Dependent
■ Related to
Note: For moreinformationabout theserelationshiptypes, see “Relatingchangerequests” onpage 242
■ ScheduledStart Date
■ Actual StartDate
■ ScheduledEnd Date
■ Actual EndDate
See Creatingrelated changerequests onpage 242.
Working with relationships
Chapter 6 Change coordinator role 225
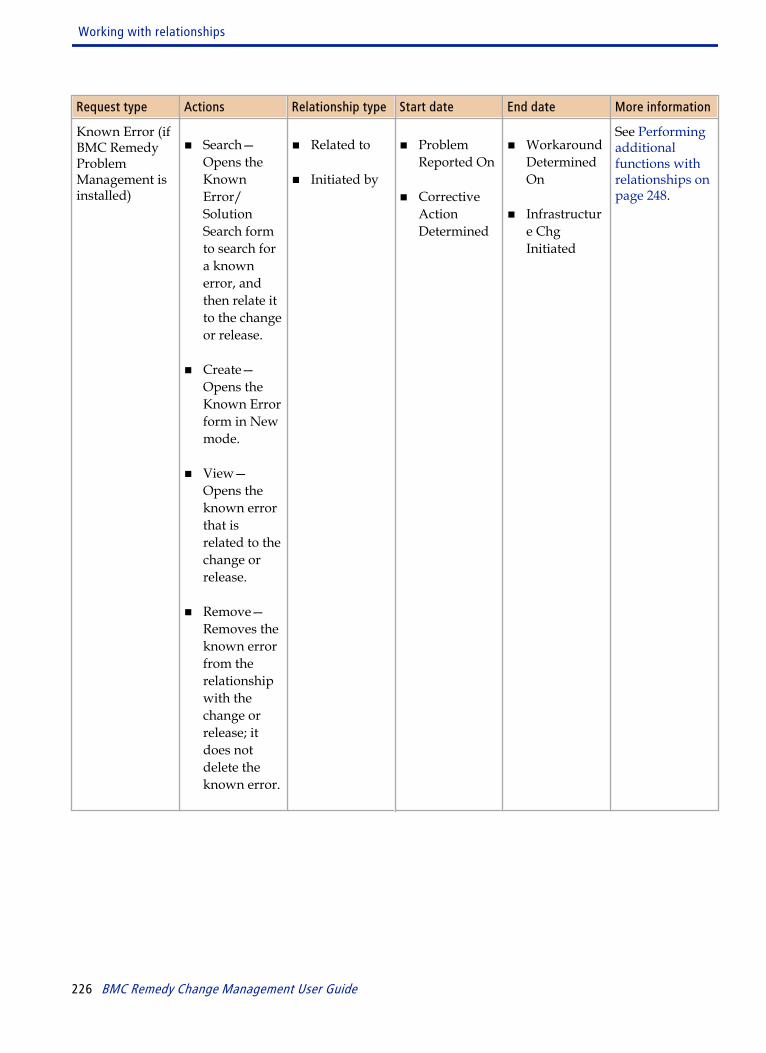
Request type Actions Relationship type Start date End date More information
Known Error (ifBMC RemedyProblemManagement isinstalled)
■ Search—Opens theKnownError/SolutionSearch formto search fora knownerror, andthen relate itto the changeor release.
■ Create—Opens theKnown Errorform in Newmode.
■ View—Opens theknown errorthat isrelated to thechange orrelease.
■ Remove—Removes theknown errorfrom therelationshipwith thechange orrelease; itdoes notdelete theknown error.
■ Related to
■ Initiated by
■ ProblemReported On
■ CorrectiveActionDetermined
■ WorkaroundDeterminedOn
■ Infrastructure ChgInitiated
See Performingadditionalfunctions withrelationships onpage 248.
Working with relationships
226 BMC Remedy Change Management User Guide

Request type Actions Relationship type Start date End date More information
LDAP Object■ Search—
Opens theLDAP Searchform tosearch for anLDAP item,and thenrelate it tothe change orrelease.
■ View—Opens theLDAP itemthat isrelated to thechange orrelease.
■ Remove—Removes theLDAP itemfrom therelationshipwith thechange orrelease; itdoes notdelete theLDAP item.
Not applicable Not applicable Not applicable SeePerformingadditionalfunctions withrelationships onpage 248 .
Working with relationships
Chapter 6 Change coordinator role 227
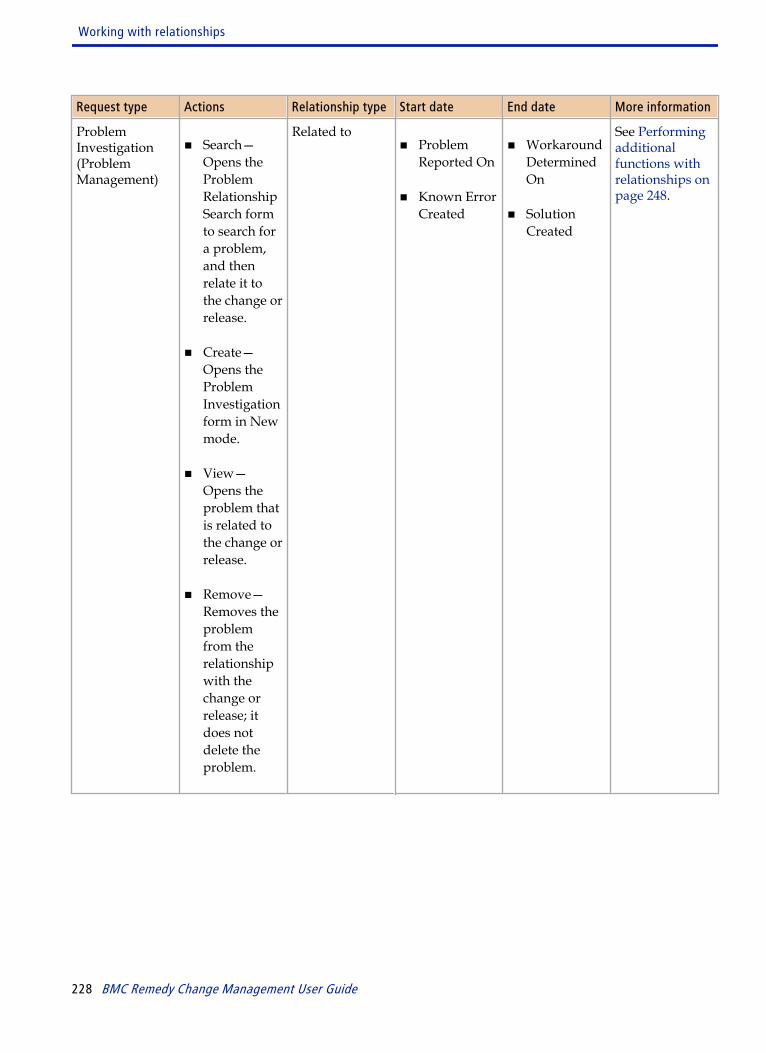
Request type Actions Relationship type Start date End date More information
ProblemInvestigation(ProblemManagement)
■ Search—Opens theProblemRelationshipSearch formto search fora problem,and thenrelate it tothe change orrelease.
■ Create—Opens theProblemInvestigationform in Newmode.
■ View—Opens theproblem thatis related tothe change orrelease.
■ Remove—Removes theproblemfrom therelationshipwith thechange orrelease; itdoes notdelete theproblem.
Related to■ Problem
Reported On
■ Known ErrorCreated
■ WorkaroundDeterminedOn
■ SolutionCreated
See Performingadditionalfunctions withrelationships onpage 248.
Working with relationships
228 BMC Remedy Change Management User Guide

Request type Actions Relationship type Start date End date More information
Release■ Search—
Opens theReleaseRelationshipSearch formto search fora releaserequest, andthen relate itto the changeor release.
■ Create—Opens theRelease formin Newmode.
■ View—Opens thereleaserequest thatis related tothe change orrelease.
■ Remove—Removes thereleaserequest fromtherelationshipwith thechange orrelease; itdoes notdelete thechange orrelease.
■ Related to
■ Member of
■ ScheduledStart Date
■ DeploymentStart Date
■ ScheduledEnd Date
■ DeploymentEnd Date
See Searchingfor requesttypes andestablishing therelationshiptype on page333.
Working with relationships
Chapter 6 Change coordinator role 229

Request type Actions Relationship type Start date End date More information
SoftwareLibrary Item ■ Search—
Opens theSoftwareLibrary ItemSearch formto search foran SLI, andthen relate itto the changeor release.
■ View—Opens theSLI that isrelated to thechange orrelease.
■ Remove—Removes theSLI from therelationshipwith thechange orrelease; itdoes notdelete theSLI.
Not applicable Not applicable Not applicable See Performingadditionalfunctions withrelationships onpage 248.
Configuration Item relationship types
When you work with a change request, you can view a related configuration item(CI). This section lists the relationship types available when defining a relationshipbetween a Configuration Item and a Change Request.
When defining a relationship between a Configuration Item and a Change Request,the following options are available:
■ Related to - Relates the item or request to the Change Request
■ Upgrades - Upgrades the item or items as part of the Change Request process
■ Repairs - Repairs the items or items as part of the Change Request process
Working with relationships
230 BMC Remedy Change Management User Guide
■ Impacts - Impacts the item that as part of the Change Request process
■ Moves - Moves an item from one location to another location as part of theChange Request process
■ Installs - Installs the item as part of the Change Request process
■ Removes - Removes an item from the location as part the Change Request process
■ Changes - Changes items as part of the Change Request process
These options are for information purpose which can be used while reporting. Youhave the option to use them based on the organizational requirements and processes.
Defining relationships
Use the following procedure to define a relationship.
To define a relationship when using the Best Practice view
1 Open the change request
2 In the Quick Action area, click the arrow beside Create Relationship to.
3 From the menu, select the type of record to which you want to relate the currentrecord.
4 In the Search field of the dialog box that opens, type a search string. For example,if you are creating a relationship to an incident request about a printer thatregularly goes off-line, you might type printer off line. Try to supply as muchinformation as possible in each type of search to reduce the overall number ofrecords returned by the search.
Note The type of search dialog box that appears depends on the type of record youchose from the menu.
The search scans multiple fields in each record looking for a match, and returns alist of records that contain any of the words - printer, off, or line in one of thescanned fields.
Working with relationships
Chapter 6 Change coordinator role 231

Note If, after using a more specific search string, the search returns too many records,consider using the advanced search. To do this, click Use Advanced Search,which opens a form in search mode that is relevant to the type of relationship youare making.
The keyword search is available only when BMC Remedy KnowledgeManagement is installed with BMC Remedy IT Service Management. If BMCRemedy Knowledge Management is not installed, the Advanced Search isdisplayed. If the Advanced Search is displayed, in the search window for therequest type, enter information about the search criteria tabs, and then clickSearch.
Note The Alternate Data Set field defines the dataset will be used to search for a CI. Formore information about datasets, see the BMC Remedy Asset Management UserGuide.
5 From the search results table, select the specific record to which you want tocreate the relationship.
6 From the Relationship Type list at the bottom of the search dialog box, select thetype of relationship you want to create.
7 Clicking Relate to create the relationship.
Note The specific list for Select a Relationship Type depends on the type ofrelationship you are creating. For example, if you are creating a relationship withanother change request record, the list includes Related to, if you are creating arelationship with an incident request record, the list includes Related to, Caused,and Corrects. If you are creating a relationship with a known error, there are tworelate buttons: Initiated by and Related to, and so on.
Note Additional buttons might be displayed depending on the type of relationship youare creating. For example, if you are creating a relationship with another incidentrequest record, only the Relate button is displayed. If you are creating arelationship with a known error, there are two relate buttons: Relate WithSolution and Relate Without Solution, and so on.
8 Close the search dialog.
Working with relationships
232 BMC Remedy Change Management User Guide
To define relationships when using the Classic view
1 Open the change request from which to define the relationship, and then click theRelationships tab.
The Relationships tab shows the record types that you can relate to the change.
2 (optional) In the Alternate Data Set field, select a data set to relate with CIs.
For more information, see Relating CIs to alternate data sets on page 251.
3 From the Request Type list at the bottom of the Relationships tab, select the typeof record to which to relate the current record.
You can relate a change to any of the options listed in the Request Type field, forexample, Infrastructure Change. For specific instructions on CIs, see Relatingconfiguration items to change requests on page 247.
4 Click Search to search for a request type or Create to create a new request. Formore information on these options, see the Related request types to Change andRelease Management modules table.
If you create a new change request, the request is automatically related to thechange request when you save it.
5 In the Search field of the dialog box that opens, type a search string. For example,if you are creating a relationship to an incident request about a printer thatregularly goes off-line, you might type printer off line. Try to supply as muchinformation as possible in each type of search to reduce the overall number ofrecords returned by the search.
Note The type of search dialog box that appears depends on the type of record youchose from the menu.
The search scans multiple fields in each record looking for a match, and returns alist of records that contain any of the words - printer, off, or line in one of thescanned fields.
Note If, after using a more specific search string, the search returns too many records,consider using the advanced search. To do this, click Use Advanced Search,which opens a form in search mode that is relevant to the type of relationship youare making.
The keyword search is available only when BMC Remedy KnowledgeManagement is installed with BMC Remedy IT Service Management. If BMC
Working with relationships
Chapter 6 Change coordinator role 233
Remedy Knowledge Management is not installed, the Advanced Search isdisplayed. If the Advanced Search is displayed, in the search window for therequest type, enter information about the search criteria tabs, and then clickSearch.
6 From the search results table, select the change request with which to define therelationship.
7 From the Relationship Type list at the bottom of the search dialog box, select thetype of relationship to define.
8 Click Relate, and then click OK.
Note The specific list for Select a Relationship Type depends on the type ofrelationship you are creating. For example, if you are creating a relationship withanother change request record, the list includes Related to, if you are creating arelationship with an incident request record, the list includes Related to, Caused,and Corrects. If you are creating a relationship with a known error, there are tworelate buttons: Initiated by and Related to, and so on.
Note Additional buttons might be displayed depending on the type of relationship youare creating. For example, if you are creating a relationship with another incidentrequest record, only the Relate button is displayed. If you are creating arelationship with a known error, there are two relate buttons: Relate WithSolution and Relate Without Solution, and so on.
9 Click OK.
10 Close the search window.
The related request types and relationship types appear in the Relationships table.To refresh the table, click Refresh from the right-click menu.
Using Quick Actions on relationships
The Quick Actions menu on the Relationships Tab enables you to perform advancedactions on relationships. Not all actions are available with all request types. Thistable shows the relationship between request types and the available actions you canperform on them.
Working with relationships
234 BMC Remedy Change Management User Guide
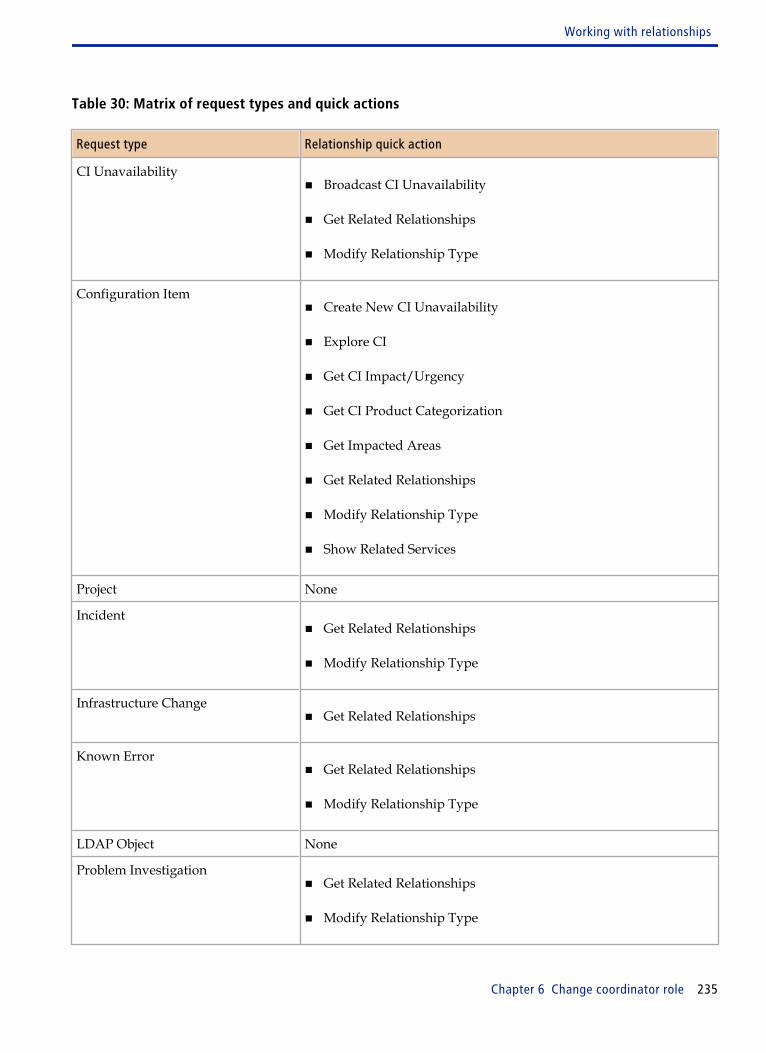
Table 30: Matrix of request types and quick actions
Request type Relationship quick action
CI Unavailability■ Broadcast CI Unavailability
■ Get Related Relationships
■ Modify Relationship Type
Configuration Item■ Create New CI Unavailability
■ Explore CI
■ Get CI Impact/Urgency
■ Get CI Product Categorization
■ Get Impacted Areas
■ Get Related Relationships
■ Modify Relationship Type
■ Show Related Services
Project None
Incident■ Get Related Relationships
■ Modify Relationship Type
Infrastructure Change■ Get Related Relationships
Known Error■ Get Related Relationships
■ Modify Relationship Type
LDAP Object None
Problem Investigation■ Get Related Relationships
■ Modify Relationship Type
Working with relationships
Chapter 6 Change coordinator role 235
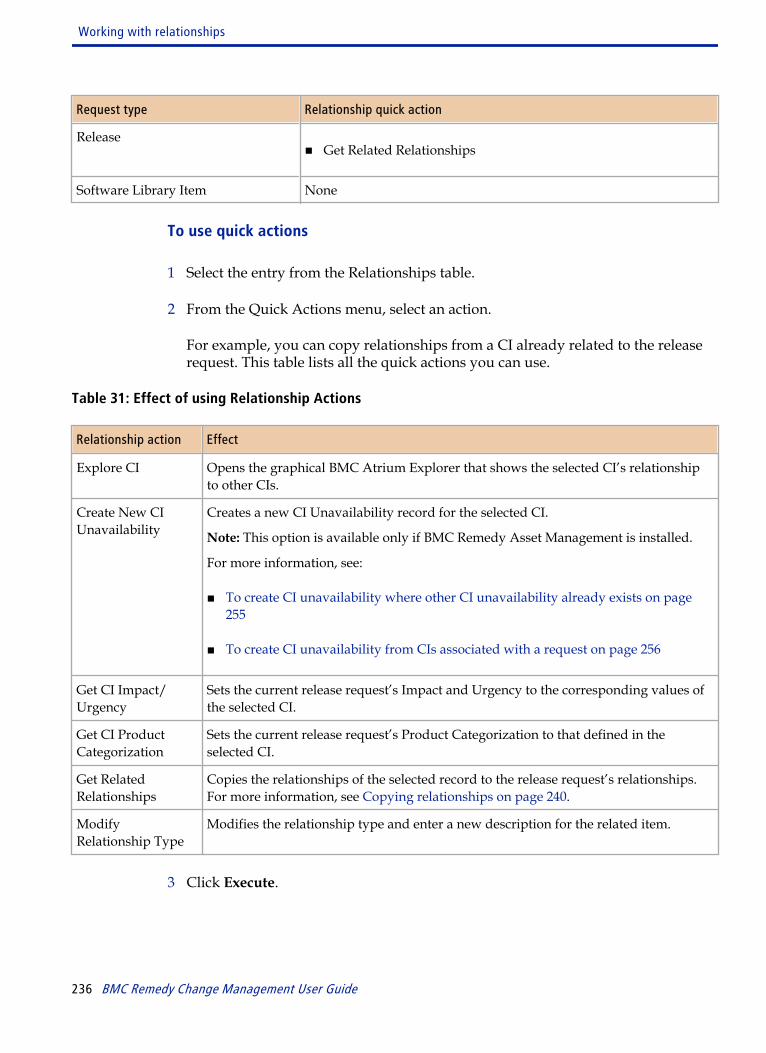
Request type Relationship quick action
Release■ Get Related Relationships
Software Library Item None
To use quick actions
1 Select the entry from the Relationships table.
2 From the Quick Actions menu, select an action.
For example, you can copy relationships from a CI already related to the releaserequest. This table lists all the quick actions you can use.
Table 31: Effect of using Relationship Actions
Relationship action Effect
Explore CI Opens the graphical BMC Atrium Explorer that shows the selected CI’s relationshipto other CIs.
Create New CIUnavailability
Creates a new CI Unavailability record for the selected CI.
Note: This option is available only if BMC Remedy Asset Management is installed.
For more information, see:
■ To create CI unavailability where other CI unavailability already exists on page255
■ To create CI unavailability from CIs associated with a request on page 256
Get CI Impact/Urgency
Sets the current release request’s Impact and Urgency to the corresponding values ofthe selected CI.
Get CI ProductCategorization
Sets the current release request’s Product Categorization to that defined in theselected CI.
Get RelatedRelationships
Copies the relationships of the selected record to the release request’s relationships.For more information, see Copying relationships on page 240.
ModifyRelationship Type
Modifies the relationship type and enter a new description for the related item.
3 Click Execute.
Working with relationships
236 BMC Remedy Change Management User Guide
Viewing the impact of CIs on change requests
You can relate CIs to change requests, based on a simulated impact analysisgenerated by the Atrium Impact Simulator tool. Additional workflow in BMCRemedy Change Management lets you use Atrium Impact Simulator functionality topredict how a change to the availability of a CI affects other CIs and services. Forexample, you could run a simulation in Atrium Impact Simulator to learn whatdevices and applications in the network are affected if you take a specific serveroffline due to scheduled maintenance or lease returns.
Atrium Impact Simulator is transparently integrated into other BMC applications asan integral part of their workflow. From BMC Remedy Change Management,Atrium Impact Simulator exposes only the features required for the user, simplifyingthe user experience.
For additional information, see Atrium Impact Simulator analysis for changerequests on page 134.
Note The Impact Analysis functionality is not available on the Relationships tab of theRelease form.
To view impact of CIs on change requests
1 Open the change request, and then click the Relationships tab.
2 Relate at least one CI to the request.
You can layer multiple requests for different types of CIs and add to the impactedlist. You can use any Relationship Type except Impacts.
3 In the Relationships tab, click Impact Analysis.
Working with relationships
Chapter 6 Change coordinator role 237
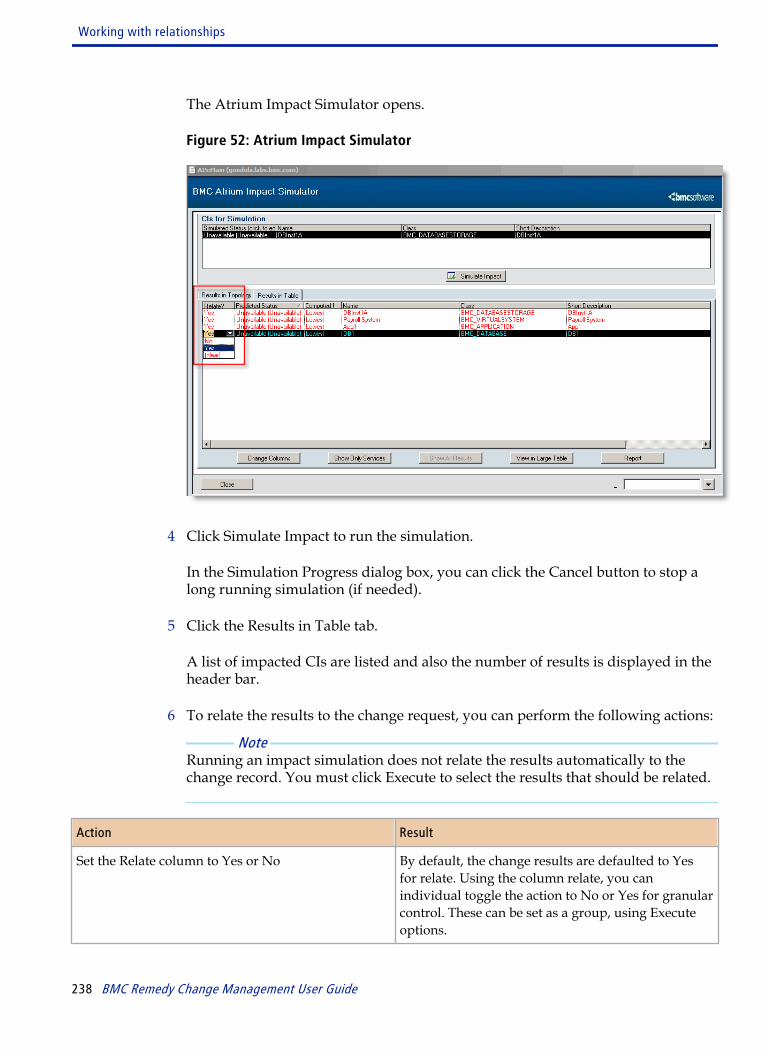
The Atrium Impact Simulator opens.
Figure 52: Atrium Impact Simulator
4 Click Simulate Impact to run the simulation.
In the Simulation Progress dialog box, you can click the Cancel button to stop along running simulation (if needed).
5 Click the Results in Table tab.
A list of impacted CIs are listed and also the number of results is displayed in theheader bar.
6 To relate the results to the change request, you can perform the following actions:
Note Running an impact simulation does not relate the results automatically to thechange record. You must click Execute to select the results that should be related.
Action Result
Set the Relate column to Yes or No By default, the change results are defaulted to Yesfor relate. Using the column relate, you canindividual toggle the action to No or Yes for granularcontrol. These can be set as a group, using Executeoptions.
Working with relationships
238 BMC Remedy Change Management User Guide

Action Result
Show Only Services (click to toggle) Lists only impacted service CIs in the view. Thisaction has no effect on relating.
Show All Results (click to toggle) Lists all impacted CIs in the view. This action has noeffect on relating.
Pick list and Execute button These options modify the relate options. Theyprovide a quick way to select groups of CIs to relateor unrelate. You can select from the following options:
■ Relate All—Relates all CIs and services from thechange request.
■ Unrelate All—Unrelates all CIs and services fromthe change request.
■ Relate All Services—Relates only services to thechange request.
■ Unrelate All Services—Unrelates only servicesfrom the change request.
■ Relate Selected—Based on the CIs or services youpick, relates them to the change request.
■ Unrelate Selected—Based on the CIs or servicesyou pick, unrelates them from the change request.
Click Report Runs a report that exports all the fields in thesimulation. This report can export all fields that arein the new .csv file or any subset of them.The report file, which is attached to the changerequest, provides a history that can be referenced inthe future.
Click Cancel Exits the window without make any changes.
Click Save Creates the CI relationships between the changerequest and the selected CIs. The CIs are nowdisplayed in the Relationships tab. Work informationis created for the change request, along with asimulation .csv file attached.
7 Click Close to create the CI relationships between the change request and theselected CIs.
The CIs are now displayed in the Relationships tab. Work information is createdfor the change request, along with a simulation .csv file attached.
Working with relationships
Chapter 6 Change coordinator role 239
Copying relationships
When you define a relationship between the current change and another change, theother change request might also have one or more changes related to it. On theRelationships tab opened from the Copy Related Relationships form, you can see therelated change’s other relationships. If you determine that any of these otherrelationships need to be related to the current change, you can define therelationship from this form.
By doing this, you can more thoroughly document the change relationships.
To copy relationships
1 Open the change request, and then click the Relationships tab.
2 Select a change related to the current change.
3 From the Quick Actions list, select Get Related Relationships, and then clickExecute.
The Copy Related Relationships form appears, containing a table of all otherrecords related to the record you selected in Step 2 on page 143.
4 From the table of related items, select the other items to relate to the currentchange.
Note To see a detailed description of an item in the table, select it, and then click View.Use this feature to help determine whether to relate the other item to the currentchange.
5 In the Relationship Type field, select the type of relationship to define, and thenclick Select.
Note The contents of the Relationship Type list depends on the type of related item youare using to define the relationship.
The newly created relationship appears in the Relationships table. For moreinformation, see Performing additional functions with relationships on page 248.
Working with relationships
240 BMC Remedy Change Management User Guide

Viewing relationships
You can limit which relationships shown with the current change record. You canalso limit the list of associated relationships by selecting Show Related <option>, forexample, to see only Known Errors.
To view relationships
1 Open the change request, and then click the Relationships tab.
2 Select the entry from the Relationships table.
3 To view a specific request type, choose it from the Show Related field.
The list varies depending on the other applications you have installed with BMCRemedy Change Management.
Relationship Description
ALL Shows all related assets, change requests, incidents, CIs, and so on (if you havethe corresponding application installed).
CI Unavailability Shows the related CI unavailability tied to the change entry. This option isenabled only if BMC Remedy Asset Management is installed.
Configuration Item Shows the related CIs.
Incident Shows the related incidents. This option is enabled only if BMC Remedy IncidentManagement is installed.
Infrastructure Change Shows the related change records.
Known Error Shows the related known errors. This option is enabled only if you have BMCRemedy Problem Management is installed.
LDAP Object Shows the related LDAP objects.
Problem Investigation Shows the related problems. This option is enabled only if you BMC RemedyProblem Management is installed.
Project Shows related projects.
Release Shows the related release objects.
Software Library Item Shows the related software library items, that is, the location where the mastercopy of the software program and its version are stored.
The related items appear in the table.
4 Click the icon.
You can now view the details of the related item.
Working with relationships
Chapter 6 Change coordinator role 241
For example, if you select an incident relationship and click the icon, theIncident Request form opens, showing information about the Incident.
Note Double-click a relationship entry to open the associated form. You then canmodify the record, depending on your configuration.
For relationships external to BMC Remedy Change Management (such as anincident or a problem), you must have the required view permissions for the BMCRemedy ITSM application to view the record details.
Creating related change requests
When you work with a change request, you might need to define a related changerequest. For example, you might need to define related change requests that addresssimilar problems. A set of related change requests can result from many changesneeded by one requester at the same time.
To define a change request related to another change request, with nodependency
1 Open the change request, and then click the Relationships tab.
2 Select the entry from the Relationships table.
3 From the Quick Actions list, select Create Related Request => InfrastructureChange.
In the Change form, fill in the details on the Change form as described in Initiatestage - Creating change requests on page 113.
4 Click Save.
5 Return to the original change request using the breadcrumb bar.
6 Save the original change request.
Relating change requests
When you work with a change request, you might also need to relate a changerequest to it. Relating change requests enables the support staff to work withmultiple change requests for the same requester at once. With related change
Working with relationships
242 BMC Remedy Change Management User Guide

requests, you can optionally designate if the current change request exists in adependent relationship to a change request.
To relate a change request to another change request
1 Open the change request, and then click the Relationships tab.
2 Select the entry from the Relationships table.
3 In the Request Type field, select Infrastructure Change, and then click Search.
4 In the Change Relationship Search form, use the various tabs to choose theappropriate search criteria.
5 To use more specific search criteria, click the Advanced Search tab, enter theappropriate search criteria, and then click Search.
6 In the Change Results table, select the item to relate.
7 In the Relationship Type field, select how to relate the current request to theselected change request.
The options are:
■ Related To—Indicates the two changes are related to each other.
■ Dependent—Indicates the current change request depends on the originalchange. Dependent changes can be assigned sequence numbers to specify thesequence in which the dependent change requests should be completed. Formore information about dependencies, see the next procedure, Assigningsequence numbers to dependent change requests on page 243.
8 Click Relate, and then click OK.
If you create a Dependent relationship, the sequence appears in the Relationshipstable.
9 Save the change request.
Assigning sequence numbers to dependent change requests
When you create change requests with relationship as dependent, you shouldspecify the sequence in which change requests are to be completed. When youspecify a sequence for the dependent change requests, you must complete a changerequest with the sequence number 0 before you can start a change request with thesequence number 1.
Working with relationships
Chapter 6 Change coordinator role 243
In the following example, you have two related change requests—the change requestto update the I/O device software has Dependent relationships to two other changerequests.
Note You cannot assign sequence numbers to release requests. To add sequence numbersto tasks, see Assigning a sequence number to task groups and tasks on page 268.
To define a dependent change request
1 Open the change request to upgrade the operating system, and then click theRelationships tab.
2 Select the Dependent change request from the Relationships table.
The default sequence number for the dependent change request is 0.
3 Click View.
4 In the dependent change request, do one of the following:
When using the Best Practice view When using the Classic view
Click the Relationships tab. Click the Classification tab.
5 In the Sequence field, enter a number (for example, 1).
The sequence number indicates the order in which the dependent change requestmust be completed relative to the original change request.
6 If necessary, add any additional information about the Change form to finishrelating the change request.
7 Save your work, and then close the change request.
You return to the original change request.
8 To view the updated sequence number, refresh the table.
The record now shows a sequence of 1. The sequence number indicates the orderin which you must complete the current request relative to the dependent request.In this example, you must now complete the change request (sequence 1) to
Working with relationships
244 BMC Remedy Change Management User Guide

remove the old software before you can start work on installing the new software(sequence 2).
Figure 53: Related change requests with sequence numbers (Classic view)
9 Save the change request.
Performing additional functions with related change requests
You can perform the additional functions with related change requests that are listedin the following table.
Working with relationships
Chapter 6 Change coordinator role 245

Function Action
View change dependencies1 Open the change request in the Change form, and then click the
Relationships tab.
2 In the Show Related field, select Infrastructure Change.
A list of change requests appears in the table. Changes with adependent relationship to the current request are shown as Dependentunder the Relationship Type column. The table shows the status of eachrequest and enables you to monitor the progress of the change requestimplementation.
3 To view a request, select it, and then click View.
Remove a related changerequest 1 Open the change request in the Change form, and then click the Related
Items tab.
2 Select the request to unrelate, and then click Remove Relationship.
3 Save the change request.
Note: This procedure removes the change request from the relationshipwith another change request. It does not delete any change requests.
Working with related configuration items
When you work with a change request or a task, you might need to work withrelated CIs. For example, if you are working on a change request to upgradememory for a department, you work with the asset records for the departmentmembers, configuration information for desktop systems, and information about thememory in inventory.
For more information about CIs, see Managing configuration items on page 453.
Working with configuration items related to changerequests
You can do the following when working with configuration items related to changerequets:
■ View configuration items related to a change request
■ Relate configuration items to change requests
Working with relationships
246 BMC Remedy Change Management User Guide
■ Define new configuration items to relate to change requests
■ Unrelate configuration items from change requests
Viewing configuration items related to change requests
You can view the configuration information from within BMC Remedy ChangeManagement in the Relationships tab of the Change form. Select the configurationitem from the Show Related list, select the configuration item, and then click View.The Asset Management Configuration Information form appears, showing details ofthe configuration.
Note You cannot define a new configuration item on the Relationships tab. Use theAdvanced Functions => Manage CIs on the Change Management console to definenew CIs. For more information, see Managing configuration items on page 453.
Relating configuration items to change requests
The following section provides detailed instructions about searching forconfiguration items and relating them to change requests.
For more information, see Defining relationships on page 231.
To relate configuration items to change requests
1 Open a change request, and then click the Relationships tab.
2 From the Request Type field, select Configuration Item, and then click Search.
3 On the CI Relationships Search form, complete the search criteria tabs with therelevant information, and then click Search.
Matching results appear in the CIs table.
4 In the Relationship Type field, select the type to relate with the change request,for example, Installs.
For more information on relationship types, see Configuration Item relationshiptypes on page 230.
5 Click Relate.
The original change request and the related configuration item appear in theRelationships tab.
Working with relationships
Chapter 6 Change coordinator role 247
Note When you relate a CI to a change, the CI’s Impacted Areas can be automaticallycopied into the change’s Impacted Areas, based on the Relationship Type. Thisallows for impact analysis within the change record and makes sure that ChangeApprovers can be generated based on any Impacted Area Approval mappingsrelated to moves, upgrades, impact, or repairs. In the SYS:Association Types form,administrators can define whether a particular Relationship Type copies the CI’sImpacted Area to the change.
Performing additional functions with relationships
You can perform the additional functions with relationships that are listed in thefollowing table.
Function Action
Modify a relationship1 On the Relationships tab of the Change form, select the change with the
relationship to modify.
2 From the Quick Actions menu, choose Modify Relationship Type, andthen click Execute.
3 Modify the Relationship Type or Relationship Description, and thenclick Save.
Remove a relationship1 On the Relationships tab of the Change form, select the change with the
relationship to remove.
2 Click Remove.
Copy relationships to a CI thatis related to the change 1 On the Relationships tab of the Change form, select the corresponding
CI relationship entry from the Relationships table
2 From the Quick Actions menu, choose Get Related Relationships, andthen click Execute.
3 On the Relationships for Configuration Item dialog box, select the itemto relate to the current change. Select a Relationship Type, and themclick Select.
Working with relationships
248 BMC Remedy Change Management User Guide

Function Action
Unrelate a CI from a changerequest 1 In the Show Related field on the Relationships tab of the Change form,
select Configuration Item.
2 Select the configuration item to unrelate, and then click Remove.
Relate a change request to anLDAP object
When you work with a change request, you must define a related LDAPobject. For example, to enable seamless authentication with Policy Manageryou might want to relate a change request to an LDAP server where thepermission rights are stored.
1 On the Relationships tab of the Change form, select the entry to relate toan LDAP object.
2 In the Request Type field, select LDAP Objects, and then Search.
3 From the search results, select the LDAP object to relate to the changerequest, and then click Relate.
The change request and the related LDAP item appear on the Relationshipstab.
Relate a change request to ansoftware library item (SLI)
When you work with a change request, you might need to define a relatedsoftware library item. For example, you might need to view relatedsoftware library items (SLIs), for example, different versions of MicrosoftOffice along with their license contracts. SLIs are also used by PolicyManager to determine the location of software to deploy.
1 On the Relationships tab of the Change form, select the entry to relate toan SLI.
2 In the Request Type field, select Software Library Item, and then Search.
3 From the search results, select the Software Library Item to relate to thechange request, and then click Relate.
The change request and the related SLI appear on the Relationships tab.For more information, see the BMC Remedy Asset Management User’s Guide.
Working with relationships
Chapter 6 Change coordinator role 249

Function Action
Define an incident related to achange request 1 On the Relationships tab of the Change form, select the entry for which
to define an incident.
2 In the Request Type field, select Incident, and then click Create.
3 On the Incident form, define the incident. For instructions, see the BMCRemedy Incident Management User’s Guide.
4 Save the incident and the change request.
5 To see the incident, refresh the Related Items table.
Note: To perform this function, BMC Remedy Incident Managementmust be installed.
Relate an incident to a changerequest 1 On the Relationships tab of the Change form, select the entry to relate to
change request
2 In the Request Type field, select Incident, and then Search.
3 From the search results, select the incident to relate to the change request.
4 Select the option for how to relate the incident to the change request,and then click Relate.
Note: To perform this function, BMC Remedy Incident Managementmust be installed.
Unrelate an incident from achange request 1 On the Relationships tab of the Change form, select the entry to relate to
change request
2 In the Show Related field, select Incident.
3 Select the incident to unrelate, and then click Remove.
4 Save the change request.
Note: To perform this function, BMC Remedy Incident Managementmust be installed.
Working with relationships
250 BMC Remedy Change Management User Guide
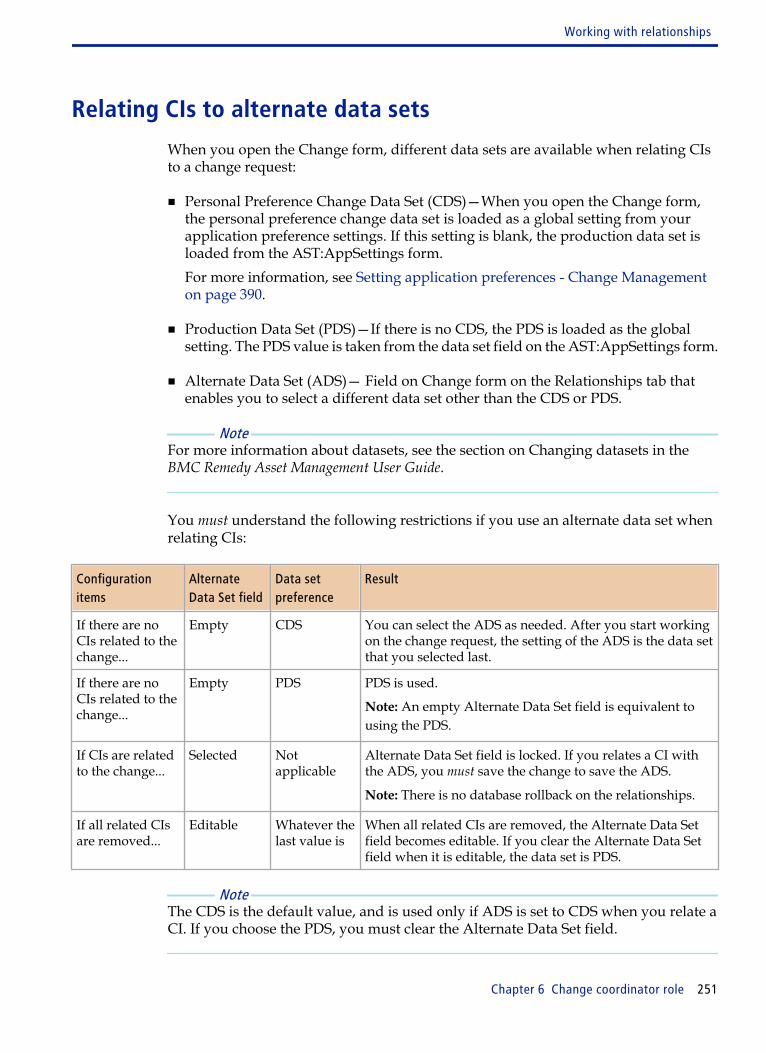
Relating CIs to alternate data sets
When you open the Change form, different data sets are available when relating CIsto a change request:
■ Personal Preference Change Data Set (CDS)—When you open the Change form,the personal preference change data set is loaded as a global setting from yourapplication preference settings. If this setting is blank, the production data set isloaded from the AST:AppSettings form.For more information, see Setting application preferences - Change Managementon page 390.
■ Production Data Set (PDS)—If there is no CDS, the PDS is loaded as the globalsetting. The PDS value is taken from the data set field on the AST:AppSettings form.
■ Alternate Data Set (ADS)— Field on Change form on the Relationships tab thatenables you to select a different data set other than the CDS or PDS.
Note For more information about datasets, see the section on Changing datasets in theBMC Remedy Asset Management User Guide.
You must understand the following restrictions if you use an alternate data set whenrelating CIs:
Configurationitems
AlternateData Set field
Data setpreference
Result
If there are noCIs related to thechange...
Empty CDS You can select the ADS as needed. After you start workingon the change request, the setting of the ADS is the data setthat you selected last.
If there are noCIs related to thechange...
Empty PDS PDS is used.
Note: An empty Alternate Data Set field is equivalent tousing the PDS.
If CIs are relatedto the change...
Selected Notapplicable
Alternate Data Set field is locked. If you relates a CI withthe ADS, you must save the change to save the ADS.
Note: There is no database rollback on the relationships.
If all related CIsare removed...
Editable Whatever thelast value is
When all related CIs are removed, the Alternate Data Setfield becomes editable. If you clear the Alternate Data Setfield when it is editable, the data set is PDS.
Note The CDS is the default value, and is used only if ADS is set to CDS when you relate aCI. If you choose the PDS, you must clear the Alternate Data Set field.
Working with relationships
Chapter 6 Change coordinator role 251
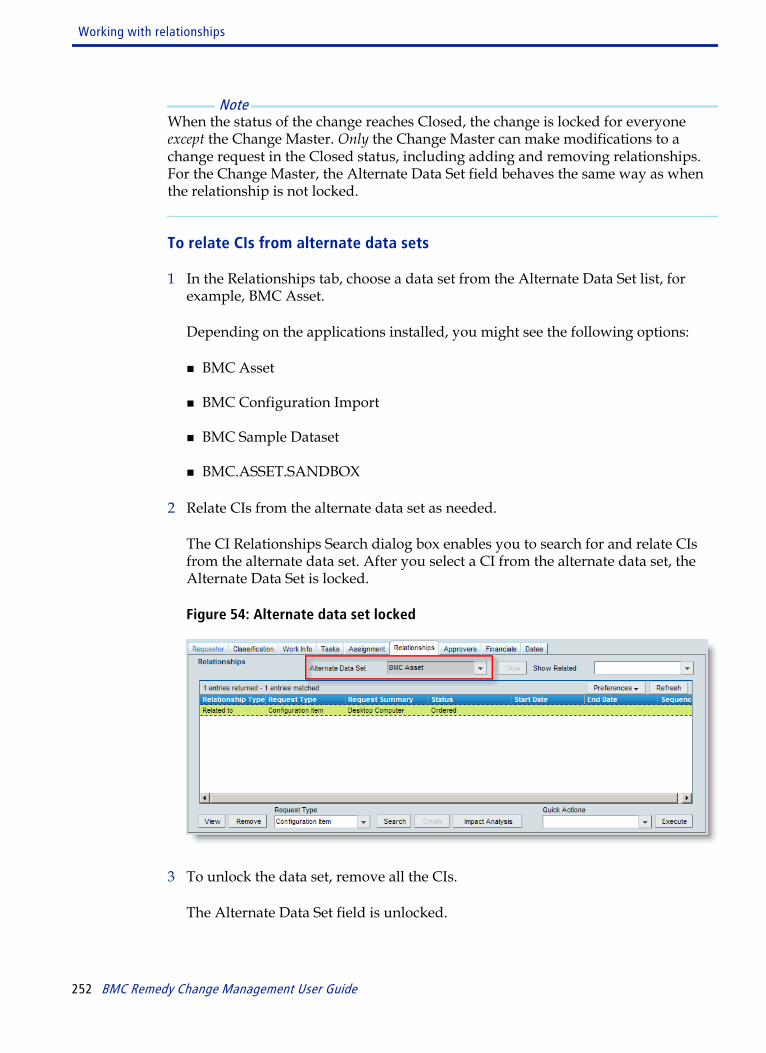
Note When the status of the change reaches Closed, the change is locked for everyoneexcept the Change Master. Only the Change Master can make modifications to achange request in the Closed status, including adding and removing relationships.For the Change Master, the Alternate Data Set field behaves the same way as whenthe relationship is not locked.
To relate CIs from alternate data sets
1 In the Relationships tab, choose a data set from the Alternate Data Set list, forexample, BMC Asset.
Depending on the applications installed, you might see the following options:
■ BMC Asset
■ BMC Configuration Import
■ BMC Sample Dataset
■ BMC.ASSET.SANDBOX
2 Relate CIs from the alternate data set as needed.
The CI Relationships Search dialog box enables you to search for and relate CIsfrom the alternate data set. After you select a CI from the alternate data set, theAlternate Data Set is locked.
Figure 54: Alternate data set locked
3 To unlock the data set, remove all the CIs.
The Alternate Data Set field is unlocked.
Working with relationships
252 BMC Remedy Change Management User Guide
4 Select another data set as needed.
5 To return to the PDS, click Clear.
Creating CI unavailability
CI Unavailability entries track down time of an outage against a CI. For example, CIunavailability can be an outage due to scheduled maintenance, usually through ascheduled change. Also, CI unavailability can occur due to an unexpectedcircumstance, usually related to an incident.
WARNING You can define CI Unavailability entries only if BMC Remedy Asset Management isinstalled.
There are two ways to define CI Unavailability entries for a related CI:
■ Directly—By clicking the Relate with Unavailability button from the CIRelationships Search form, when you are creating the relationship with the CI.
■ Indirectly—By creating the unavailability after the CI has been associated with thechange. For more information, see Defining new CI unavailability for a record—alternative method on page 256.
When you save the CI Unavailability entry, the CI Unavailability relationship entryis generated. A CI Unavailability relationship entry then appears on theRelationships tab.
Note CI Unavailability cannot be tracked directly against CI Components. The Relate withUnavailability button does not appear on the CI Relationships Search form whenyou are searching for CIs from a release request.
Relating unavailable CIs and changes
Typically, change requests occur because a CI needs to be upgraded (such as anoperating system) or needs repair (such as a server). Using BMC Remedy ChangeManagement, you can relate unavailable CIs (also known as outage records) to theirrelated change request. By relating an unavailable CI record to a change request, youcan track its history, and the costs related to changes to the CI.
To relate an unavailable CI to a change request
1 Open a change request, and then click the Relationships tab.
Working with relationships
Chapter 6 Change coordinator role 253
If unavailable CIs are related to the change request, they appear in theRelationships table.
2 From the Request Type list, select CI Unavailability, and then click Search.
3 In the CI Unavailability Search form, enter search parameters to filter the CIrelationships shown, and then click Search.
The quick search buttons enable you to easily filter CI unavailability withdifferent criteria:
■ All unavailability
■ All scheduled unavailability
■ All unscheduled unavailability
4 Select an unavailable record from the list.
5 From the Relationship Type list, select Related to, and then click Relate.
The following actions occur:
■ Messages alert you that the CI has been automatically related to the change.
■ The CI Relationships Search form closes.
■ The unavailable CI and its related CI record appear in the Relationships table.
6 If needed, you can broadcast the CI unavailability.
For more information, see Performing additional functions with CI unavailabilityon page 259.
To relate a change request to a CI with unavailability
1 Open a change request, and then click Relationships tab.
The Relationships tab shows the requests that you can relate to the change.
2 From the Request Type field, select Configuration Item, and then click Search.
3 On the CI Relationships Search form, complete the search criteria tabs with therelevant information, and then click Search.
4 In the Relationship Type field, select the type to relate with the change request,for example, Related to.
Working with relationships
254 BMC Remedy Change Management User Guide
5 (optional) Click Explore CI to view a CI and its relationship in the BMC AtriumExplorer.
6 Click Relate with Unavailability.
If the CI has open unavailability entries created against it, the CI UnavailabilityExist dialog box appears.
7 Enter the unavailability settings (for example, Scheduled Full and the scheduledstart and end dates), and then click Save.
For information about filling out this dialog box, see To create CI unavailabilitywhere other CI unavailability already exists on page 255.
8 Close the CI Relationships Search dialog box.
The CI Unavailability request type appears in the Relationships table.
To create CI unavailability where other CI unavailability already exists
1 Select the associated Configuration Item from the Relationships table.
2 From the Quick Actions menu, select Create New CI Unavailability, and thenclick Execute.
3 Perform one of the following procedures.
Procedure Steps
If the CI has open unavailabilityentries created against it, the ExistingConfiguration Item Unavailabilitydialog box appears.
Do one of the following actions:
■ Click Create New to define an unavailability entry. You are thenprompted to define the configuration item unavailability, forexample, unscheduled full unavailability type, start and enddates, and so on.
■ Select an entry from the table, and then click Relate to CurrentRequest to relate the change directly against the CI unavailabilityentry. You are then prompted to specify the relationship typebetween the current request and the selected CI unavailability.
Working with relationships
Chapter 6 Change coordinator role 255

Procedure Steps
If the CI does not have anyunavailable CI entries, theConfiguration Item Unavailabilitydialog box appears.
1 Select the unavailability type that best describes the down time(for example, Scheduled Full).
2 Enter the appropriate Scheduled Start and Schedule End dates.
3 Enter remaining information, as needed.
4 Click Save.
For more information about filling out the Configuration ItemUnavailability dialog box, see To create CI unavailability whereother CI unavailability already exists on page 255.
4 Save the request.
Defining new CI unavailability for a record—alternativemethod
You can also define CI unavailability entries after the CI has been associated with thechange request (or release request).
Note You can perform these steps only if BMC Remedy Asset Management is installed.
To create CI unavailability from CIs associated with a request
1 Select the associated CI from the Relationships table.
2 From the Quick Actions menu, select Create New CI Unavailability, and thenclick Execute.
In the Configuration Item Unavailability form the Unavailability Class defaults toChange. Here you enter specific details, for example, unscheduled fullunavailability type, the actual start date, or the assignment status.
3 Select the unavailability type that best describes the down time.
The options are:
■ Scheduled Full—Creates high priority.
■ Scheduled Partial—Creates medium priority.
■ Unscheduled Full—Creates critical priority.
Working with relationships
256 BMC Remedy Change Management User Guide

■ Unscheduled Partial—Creates high priority.
Note After you select the unavailability class and type, the Priority field is filled basedon a configurable CI Unavailability Prioritization mapping.
4 (optional) Modify the description identifying the reason why this unavailability isbeing defined.
5 Enter the appropriate Scheduled Start and Schedule End dates.
After you enter the dates into these fields, the system automatically calculates theEstimated Duration.
Note When a Scheduled Start Date is entered without an Actual Start Date, theUnavailability Status is automatically set to Scheduled.
6 Enter the Actual Start and End dates, as needed.
The system automatically calculates the Actual Duration, based on the actual dates.
Note When an Actual Start Date is entered without an Actual End Date, theUnavailability Status is automatically set to Current Unavailability. TheUnavailability Status is automatically set to Restored when the Actual End date isfilled in. After the Actual End Date is set, you can modify it, but not blank it out.
7 Select where the assignment is set from.
The Assignment is set from field determines where the assignment is based.
■ Configuration Item—Assigns automatically the CI Unavailability entry if anassignment record has been defined for unavailability from within theConfiguration Item Contact relationship.
Note This type of assignment can be configured to be locked or open. Locked meansthat the system selects the Assignment Group from the Configuration ItemContact relationship, and then locks the fields so that they cannot be re-assigned or manually overridden. Open means that the system selects theAssignment Group from the Configuration Item Contact Association and thenenables you to select another assignment method.
Working with relationships
Chapter 6 Change coordinator role 257
■ Cross Referenced Request—Assigns the CI Unavailability entry when the CIUnavailability is generated from either an Infrastructure Change or an Incident.This setting keeps the CI Unavailability assignment synchronized with eitherthe Change or Incident record assignment.
■ Manually—Lets you assign the CI Unavailability entry manually to any groupdefined within the application.Setting the Assignment Status to Completed marks the CI Unavailability recordas closed.
■ Automated Routing—Assigns the CI Unavailability entry automatically to asupport group if you do not assign a support group from the People tab.Automated Routing is configured using the CFG:Assignment configuration form.
For more information about configuring BMC Remedy ITSM, see the BMCRemedy IT Service Management Configuration Guide.
8 If you selected Manual assignment, set the assignment company, organization,group, and assignee.
The individual or group assigned to this unavailability record must set the statusto Completed after recording the actual start and end times.
9 Set the Assignment Status to Assigned.
Note The Assignment Status governs whether the CI Unavailability entry is consideredOpen or Closed. Setting the Assignment Status to Completed marks the CIUnavailability entry Closed.
10 (optional) Click Set From Change Schedule to retrieve the request’s ScheduledStart and End dates and times.
You can use this button to fill the Schedule Start and End date and times on the CIUnavailability record. This feature is available only for CI Unavailability recordsthat were generated from a change request (not release requests).
11 (optional) Click the CI Status Information tab to change the status of the CI, forexample, In Repair.
12 (optional) Click the Relationships tab to see possible relationships against theunavailability that might exist, for example, relationships to incidents, changes, orproblems. You can also define relationships to these respective modules.
13 (optional) Click the Financials tab to define cost entries against the unavailability.This enables you to track costs associated to the down time.
Working with relationships
258 BMC Remedy Change Management User Guide
Note You must save the CI Unavailability record before you can define Relationshipsand Financials.
14 (optional) Click the References tab to see the record identification numbers for anyincidents or changes that might have created the unavailability entry.
15 (optional) Click the SLM tab to see the service targets and milestones for therestoration of the unavailability. Service targets and milestones are defined fromwithin BMC Service Level Management. Escalations can defined to notify theassignment group prior to acknowledgement or resolution breach times.
16 Click Save to define the new CI unavailability for the record.
Performing additional functions with CI unavailability
You can perform the additional functions with CI unavailability that are listed in thefollowing table.
Function Action
Modify CI unavailability1 On the Relationships tab of the Change form, select the unavailability
entry to modify, and then click View.
2 On the Configuration Item Unavailability form, modify the informationas needed, and then click Save.
3 To create a financial cost for the unavailability, click Add on theFinancials tab of the Configuration Item. On the Costs dialog box, enterrequired information as needed, and then click Save.
Note: The CI unavailability entry represents the entry as seen within theCI Unavailability form. The CI unavailability entry that appears on theRelationships tab represents the relationship between the Unavailabilityand the Change.
Modify outage information1 From the Change form, choose Functions => Outage List.
2 On the CI Unavailability form, modify the information as needed, andclick Save.
For more information, see the BMC Remedy Asset Management User’s Guide.
Working with relationships
Chapter 6 Change coordinator role 259
Function Action
Delete CI unavailability1 On the Relationships tab of the Change form, select the unavailability
entry to delete.
2 Click Remove.
Note: Deleting a CI Unavailability entry also deletes all relatedrelationships and cost entries against the unavailability. The CIUnavailability is deleted if the cross-referenced ID is the change ID.
Broadcast CI unavailability1 On the Relationships tab of the Change form, select the unavailability
entry to broadcast.
2 From the Quick Actions menu, select Broadcast CI Unavailability, andthen click Execute.
3 On the New/Modify Broadcasts dialog box, complete the requiredfields and any other information, and then click Save.
The View Access field is used to make the broadcast available on the web(if your Broadcast form is web-enabled and the View Access is set to Public).Note: You must have the Broadcast Submitter functional role to broadcastthe current change.
Implement stage - Working with tasksIn the Implement stage of the request, the change coordinator (or change manager)reviews all the tasks that are needed to complete the change request. Generally,change requests are divided into smaller units, called tasks. They are then assignedto task implementers who complete the tasks. When you plan a change request,determine whether you can divide it into separate tasks.
Note For more information on task implementers, see Task implementer role on page 341.If you create a change request and then do not save it before you close it, the tasksyou created do not exist because there is no parent change request.
The Tasks tab shows the tasks that must be performed to complete the change. Youcan use task groups to manage changes with many tasks, each having its own
Implement stage - Working with tasks
260 BMC Remedy Change Management User Guide

schedule, task implementer, and plan. For less complex changes, tasks are optional.A single change can have an any number of tasks.
Figure 55: Creating and assigning tasks
After a task is assigned to a support group or an individual, the assignee receivesnotifications to perform the various task activities based on the change process.
Note For less complex changes, tasks are optional. If no tasks are created, the change isassigned to a Change Implementer. The Change Implementer field is applicable onlywhen using the Classic view.
Task Management System overview
In the Task Management System integration with BMC Remedy ChangeManagement, which is installed and integrated as part of the application set, all tasksbelonging to a change request or a release request are related to one another throughtheir association with the parent change request or release request. You use BMCRemedy Change Management to set dependencies among the tasks associated with achange request or a release request. You can also set dependencies among changerequests and among release requests.
Implement stage - Working with tasks
Chapter 6 Change coordinator role 261
Relation of task statuses to change statuses
Tasks, similar to change requests, go through many status transitions as theyprogress. The status in which a task is generated depends on the status of the parentchange request.
Implement stage - Working with tasks
262 BMC Remedy Change Management User Guide
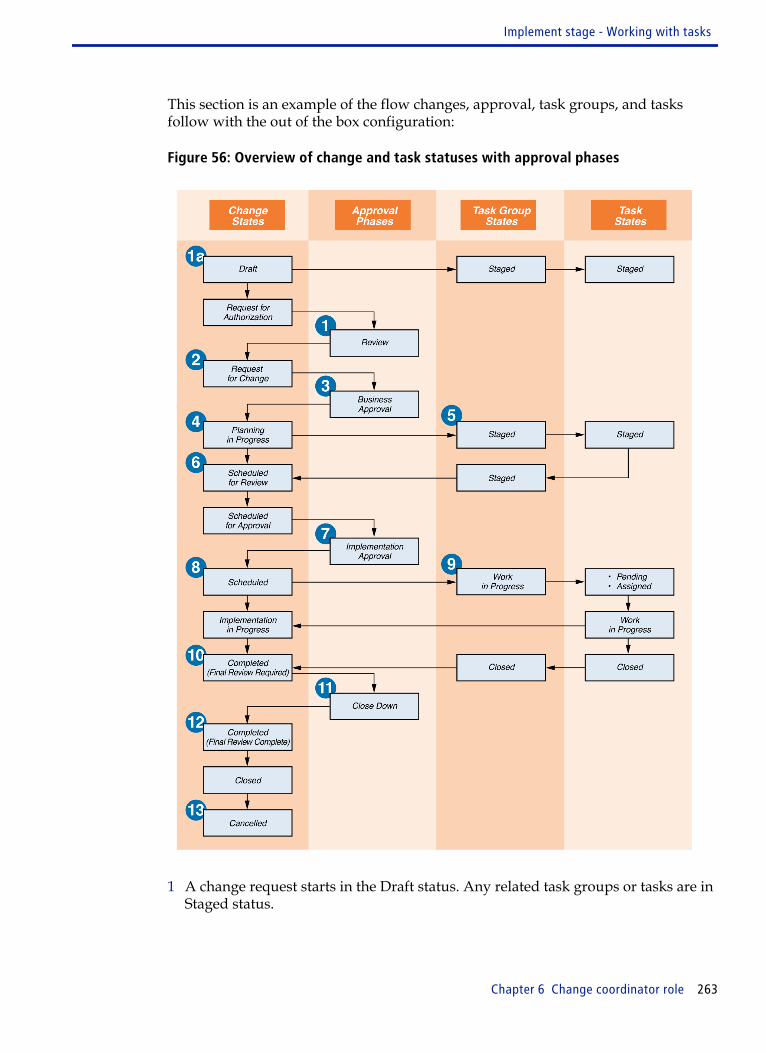
This section is an example of the flow changes, approval, task groups, and tasksfollow with the out of the box configuration:
Figure 56: Overview of change and task statuses with approval phases
1 A change request starts in the Draft status. Any related task groups or tasks are inStaged status.
Implement stage - Working with tasks
Chapter 6 Change coordinator role 263
■ If a change request is cancelled, the task groups and tasks associated with thechange are also cancelled.
■ If a task group is cancelled, its tasks are also cancelled.If a request is moved from Cancelled to Draft (Rescheduled Notification), thechange manager or change coordinator is notified. The change requester isnotified of the rescheduled change.
2 The change request moves into the Request For Authorization status and theapproval group or approvers are notified that the change request requiresapproval for the Review phase. Any task groups or tasks are in the Staged status.The Status Reason field is updated to Staging in Progress.
3 The change manager or change coordinator is notified when the change request ismoved into Request For Change status. The change manager or changecoordinator are also notified when the request is moved from Cancelled toRequest for Change (Rescheduled Notification).
4 The approval group or approvers are notified that the change request requiresapproval for the Business Approval phase.
5 All people assigned to the change are notified when the change request is readyfor planning. For taskless changes only, the change implementer is notified.When the status reason of all the tasks is Staging Complete, the change moves tothe Schedule For Review status.
6 Task implementers are notified that the task group or tasks are set to Staged.
7 The change manager or change coordinator is notified when the change request isscheduled for review.
8 The approval group or approvers are notified that the change request requiresapproval for the Implementation Approval phase.
9 All people assigned to the change are notified when the change request has beenscheduled as a change with no impact. For taskless changes only, the changeimplementer is notified. Tasks can be set to the Assigned status.
10 When change request is moved into the Implementation In Progress status, thetask group is set to Work in Progress and the first task is set to Pending or Assigned.The task implementers are notified to start working on tasks. They set the task toWork in Progress when work begins. Task implementers can now update the taskinformation, and start implementing the task.
11 After last task is set to Closed, the task group is set to Closed. The changemanager, change coordinator, and change requester are notified that the change
Implement stage - Working with tasks
264 BMC Remedy Change Management User Guide

request is completed. Workflow enters required information into the Actual StartDate, Actual End Date, and Performance Rating fields.
12 The approval group or approvers are notified that the change request requiresapproval for the Close Down phase.
13 The change manager or change coordinator is notified when the final review iscompleted.
14 If change request is cancelled, the requester is notified.
Viewing task groups and tasks
To view your assigned tasks and task groups click the Show Tasks Details link in theChange Details And Tasks section of the BMC Remedy Change ManagementConsole. Tasks are prefixed with TAS, and task groups with TGR. You can also viewtasks and task groups related to a change request on the Tasks tab of the Change form.
Note You can click View Flow to see a read-only view of the task flow in the task group.For more information about using the View Flow button, see Using CCM tasks onpage 347.
To view task groups and tasks
1 In the Assigned Tasks table on the BMC Remedy Change Management Console,or from within the Tasks tab of a change request, select the task group or the taskto view.
2 Click View.
3 Modify the task details as needed.
4 Save your work.
Relating ad hoc tasks to change requests
You can relate an ad hoc task to the change request. The status of these tasks can beStaged, Assigned, Pending, Work in Progress, or Closed. You can manually set theassignment for any task. Finally, if you close the task, you must select whether youare canceling the task or completing it as a success or failure.
Implement stage - Working with tasks
Chapter 6 Change coordinator role 265
To relate an ad hoc task to a change request
1 Open the change request, and then click the Tasks tab.
2 In the Request Type field, select Ad hoc, and then click Relate.
The Task form appears with certain fields in the form filled with data from thechange request.
You can click the Open link next to the Request ID field to open the parent changerequest.
3 Fill in the following required fields:
■ Name—Enter a descriptive name of the task.
■ Summary—Enter a brief description of the task.
The Type field is set by default to Manual when you create an ad hoc task.
4 In the General tab, fill in information about the company.
The Company field defaults to the contents of the Change Location field in theChange form. Your task can be assigned to a different department or company.
5 On the Requester tab, enter information about the person defining the task(Requester) and the intended target of the task (Requested For).
Some information is filled by default from the Requested By information of thechange request.
6 In the Classification tab, fill in information about the product and operationalcategorizations.
7 In the Assignment/Dates tab, fill in the following fields to assign the task:
■ Assignee Group—Optionally, select a task implementer group from the list.
■ Assignee—Optionally, select a task implementer from the list.
The assignment engine automatically assigns the task when the task is generated.You can override this if needed by manually assigned the task.
Note If you manually assign a task, the assignee is immediately notified when the taskis staged. If the assignment engine assigns the task, the task is staged but thenotification is not sent to the assignee until the task is activated.
Implement stage - Working with tasks
266 BMC Remedy Change Management User Guide
For more information about assignment configuration, see the BMC Remedy ITService Management Configuration Guide.
■ Scheduled Start Date—Optionally, enter an estimated start date.
■ Scheduled End Date—Optionally, enter an estimated end date.
You might want to set the Start Date and End Date to be different from the datesof the parent change request.
8 In the Relationships tab, search for and then relate configuration items, LDAPobjects, and software library items that are needed with this task.
Additionally, you can execute any quick actions like Update Attributes, ExploreCI or get Related Relationships for the task.
9 When you finish creating the task, click Save.
10 To specify if you want to notify the assignee or not, reopen the task and in theAssignment tab select the appropriate option from the Notify Assignee field.
Relating predefined task group or task templates to achange request
You can relate a predefined task or task group template to the change request. TheCalbro Services sample data includes best practice” task group and task templatesthat you can use.
Best practice In addition, special templates were created for the integration with BMCConfiguration Automation for Clients (previously known as BMC ConfigurationManagement). Other templates might have been added by your applicationadministrator.
To add predefined task group and task templates to a change
1 Open the change request.
2 Click the Tasks tab.
3 Select Task Group Template or Task Template from the Request Type field, andthen click Relate.
All template types for all categories are listed in the Select Template dialog box.
Implement stage - Working with tasks
Chapter 6 Change coordinator role 267

4 (optional) You can filter the list by selecting the type or category, or both, of thetemplate. To filter the list:
a Select the type of template:
■ With task group templates, select Standard or Sequencing.
■ With task templates, select Manual, Automatic, or ALL.
b (optional) From the Category list, select which application the task belongs to,for example, Change Management System.
The available task groups or tasks for that selection appear in the list. Thecategorization of the change request determines which list items appear.
5 (optional) Click View to see more details about the task group or task template.
6 If a relevant task set appears on the list to include with the change request, selectit, and then click Relate.
7 Define a numerical sequence of the tasks, as described in Assigning a sequencenumber to task groups and tasks on page 268.
8 When you finish adding templates, save the change request.
Assigning a sequence number to task groups and tasks
The task management subsystem enforces the dependencies between tasks. Theserelate to any Sequence order you might have specified in the Change form.
For more information, see Assigning sequence numbers to dependent changerequests on page 243.
When you include task group templates, task templates, or ad hoc tasks in a changerequest, they are automatically assigned a sequence number in the order in whichyou add them to the change request. More than one task can have the same sequencenumber; tasks with the same sequence number are considered peers. Peer tasks canbe completed in any order among themselves.
Tasks must be completed sequentially. When the change request’s status is set toScheduled, the task with sequence number 1 is activated and its status is set toAssigned. When the last task is completed, the change request is closed.
Implement stage - Working with tasks
268 BMC Remedy Change Management User Guide
To renumber a task group or task, you can use the arrow buttons next to the Tasks
and Task Groups table on the Tasks tab of the Change Request. Tasks withlower sequence numbers, for example 1, must be completed before those with highernumbers, for example, 2, 3, or 4.
Adding work information to a task
You can add work information to each task included in the change request. Thework information for each task appears in the Work Info of Selected Task table onthe Change form.
To add work information to a task
1 Open the task and then click the Work Info tab.
2 Modify the work information type, if needed.
3 From the Source list, select the source of this information.
Information sources can include, for example, email, system assignment, or the web.
4 Enter details of your work information record in the Date, Summary, and WorkInfo Notes fields.
5 To add attachments, right-click in the attachment table, and then select Add.
6 From the Locked list, select Yes or No to lock the log.
7 Select the view access:
■ Internal—If you want only users within your organization to see the entry.
■ External—If you want everyone with access to the system to see the entry.
8 When you finish updating, click Save.
Your entry is added to the task’s work history. The Show field enables you tofilter specific work entries based on the type of activity shown in the table.
9 To see a report of the activities you performed against this task, click Report.
10 To see all work information history entries, click View.
Implement stage - Working with tasks
Chapter 6 Change coordinator role 269
Note When you return to the Change form, you might need to refresh the Work Info ofAssigned Task table to see all the entries.
Performing additional service request functions
In addition to creating a service request, you can perform the functions listed in thefollowing table. All the listed functions are performed from the Requester Console.
Function Action
Modify a task1 On the Tasks tab of the Change form, select the tasks to modify, and
then click View.
2 Modify the task details.
3 Click Save.
Assign a task1 On the Tasks tab of the Change form, select a parent task or child task
that is related to the change request, and then click View.
2 Select the Assignment tab, select the group or person to work on thetask, and then click Save.
The implementer for that task is notified of the task assignment.
Assign all tasks in a changerequests 1 Open the change request in the Change form.
2 Set the Status field to Scheduled.
The change request is set to Scheduled and the status of the first task is setto Assigned.
Plan the time for tasks1 Open the task, and then click the Dates tab.
2 In the Time Segment Action field, select the a time segment option, andthen click Save.
For more information, see Registering time segments on page 157.
Implement stage - Working with tasks
270 BMC Remedy Change Management User Guide

Function Action
Automatically track the timespent working on tasks (usingthe Start Clock and Stop Clockbuttons)
1 Open the task.
2 Click the Assignment tab on the Task form.
3 Click Start Time, and then click Save.
4 When you finish working on the task, click Stop Clock, and then clickSave.
You can use the start and stop clock buttons as many times as needed. Eachsuccessive time, the new time is added to the value in the Total Time Spentfield. The time is automatically calculated, based on when you click thebuttons.
1 Click the Assignment tab on the Task form.
2 Click Effort Log.
3 Enter information into the effort log, and then click Add to Effort Log.
Track manually the time spentworking on tasks 1 Open the task.
2 Click the Assignment tab on the Task form.
3 Enter a number of hours or minutes in the Time Spent fields, and thenclick Save.
The time you entered is added to the value in the Total Time Hours andMinutes fields.
4 Click the Assignment tab on the Task form.
5 Click Effort Log.
6 Enter information into the effort log, and then click Add to Effort Log.
Cancel a task1 Open the change request in the Change form.
2 Click the Tasks tab.
3 Select a task, and then click Cancel.
The status of the task is set to Closed.Note: If the task has related CIs, you can update any CI costs that areaffected by this cancellation. See Working with related configuration itemson page 246.
Implement stage - Working with tasks
Chapter 6 Change coordinator role 271
Responding to task reassignments as achange coordinator
As a change coordinator, you might need to assign new assignees to tasks associatedwith your change. Task reassignment is performed manually, directly on the Taskform.
To respond to task reassignment requests as change coordinator
1 In the change request, from the Tasks tab, open the task you want to reassign.
2 Click the Assignment tab.
3 After reviewing the task, reassign the request as needed.
If you decide to reassign the task:
a In the Assignee field, select a new staff member.
The task is assigned to this new staff member.
b In the Notify Assignee field, select Yes.
c Update the work history.
Note If you reject the assignment request, set Notify Assignee to Yes and update thework history.
4 Click Save.
When the task is reassigned, the previous and new assignees are automaticallynotified of the changed assignment.
Tracking the time spent working on change requests
You can track the time spent working on a change request after it has been fullyassigned. The Support Company, Support Organization, Support Group, andChange Coordinator must be set before you can use the Start Clock and Stop Clockbuttons.
There are three ways to track the time spent working on a request:
Responding to task reassignments as a change coordinator
272 BMC Remedy Change Management User Guide
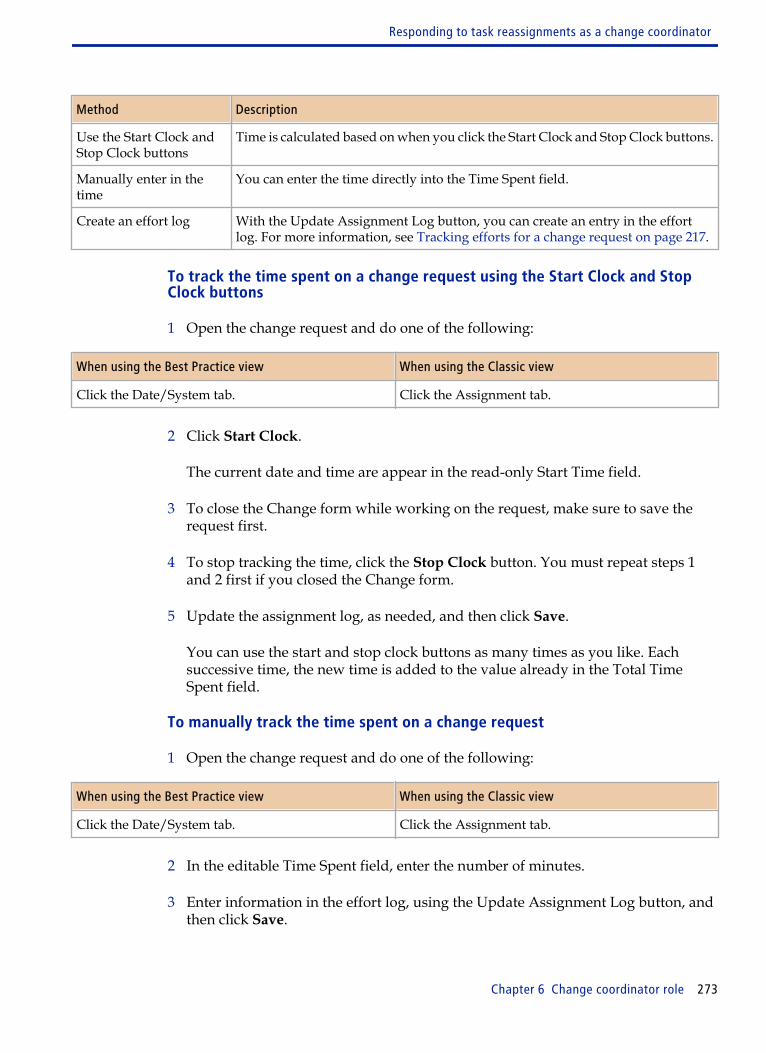
Method Description
Use the Start Clock andStop Clock buttons
Time is calculated based on when you click the Start Clock and Stop Clock buttons.
Manually enter in thetime
You can enter the time directly into the Time Spent field.
Create an effort log With the Update Assignment Log button, you can create an entry in the effortlog. For more information, see Tracking efforts for a change request on page 217.
To track the time spent on a change request using the Start Clock and Stop Clock buttons
1 Open the change request and do one of the following:
When using the Best Practice view When using the Classic view
Click the Date/System tab. Click the Assignment tab.
2 Click Start Clock.
The current date and time are appear in the read-only Start Time field.
3 To close the Change form while working on the request, make sure to save therequest first.
4 To stop tracking the time, click the Stop Clock button. You must repeat steps 1and 2 first if you closed the Change form.
5 Update the assignment log, as needed, and then click Save.
You can use the start and stop clock buttons as many times as you like. Eachsuccessive time, the new time is added to the value already in the Total TimeSpent field.
To manually track the time spent on a change request
1 Open the change request and do one of the following:
When using the Best Practice view When using the Classic view
Click the Date/System tab. Click the Assignment tab.
2 In the editable Time Spent field, enter the number of minutes.
3 Enter information in the effort log, using the Update Assignment Log button, andthen click Save.
Responding to task reassignments as a change coordinator
Chapter 6 Change coordinator role 273

The time you entered is added to the value in the Total Time Spent field.
Responding to task reassignments as a change coordinator
274 BMC Remedy Change Management User Guide
Release coordinator roleThis section describes how release coordinators can use the Release Managementapplication to monitor issues pertaining to the daily aspects of Release Managementactivities and how they can help their staff meet their commitments to theorganizations they support.
Working as a release coordinatorThe release coordinator in ITIL terminology is typically a member of the supportstaff who is responsible for the following release tasks:
Table 32: Release coordinator responsibilities
Responsibility Explanation
Manages all aspects ofthe end-to-end releaseprocess
Makes sure the build and test environment team and the release team arecoordinated. Establishes final release configuration, builds the final releasedelivery, and tests the final delivery before independent testing.
Creates releases, changerequests, and activities
Creates release manifest that consists of change requests and activities, andreviews the RFCs if they have been passed on from BMC Remedy ChangeManagement. Deals with release, distribution, and installation of packagedsoftware.
Submits the releaserequest for approval
Whether a release request requires approval is determined by yourorganization’s business rules. The application administrator configures theapproval process to determine which approval phases are available for therelease request.
Plans and schedules therelease
Organizes and facilitates the CAB meetings; schedules the release request.Determines the impact by assessing the different kinds of risks. Splits therequirements of releases into logical groups that can be handled efficiently bychange coordinators. Prepares a business case for a new release when additionalfunding is needed for its implementation. Schedules people and resources toimplement each task.
Initiates theimplementation ofreleases.
Decides on corrective actions as needed. Estimates the costs of the releaserequest. Coordinates release acceptance, rollout planning, releasecommunications, preparations and training activities, and distribution andinstallation of releases. Provides management information about ReleaseManagement quality and operations.
7
Chapter 7 Release coordinator role 275

Responsibility Explanation
Closes release requests A release request is resolved when all work for the release is completed.Organizes and conducts post-implementation meetings to collect improvementsuggestions for future releases.
The release coordinator is usually responsible for addressing general, day-to-dayissues from a personnel and customer satisfaction standpoint.
The release coordinator requires the following permissions and functional roles:
■ Release Coordinator functional role is required to be assigned as the ReleaseCoordinator for individual releases.
■ Membership in your company’s support group is required to create releasetemplates for that group.
■ Release User permission is required for access to release and manifest records.
■ Release Config permission to setup and modify the Release Module configurationforms.
Using the Release Management ConsoleThe Release Management Console provides a dedicated workspace for managingrelease requests. This console is designed for release coordinators who deal withRelease Management daily and do not want to view other BMC Remedy ITSMapplications. It provides quick access to the information you need and to theprocedures that you perform most often.
Various functions are available in the navigation pane of the Release ManagementConsole. They provide you with quick ways to go to different areas in ReleaseManagement and to perform other functions.
For more information, see Release Management Console functional areas on page 99.
Initiate milestone - Creating release requestsReleases start at the Initiate milestone of the release request lifecycle. ReleaseManagement enables any user with Release User permissions to enter releaserequests into the system. But it is typically release coordinators who create releaserequests.
Using the Release Management Console
276 BMC Remedy Change Management User Guide
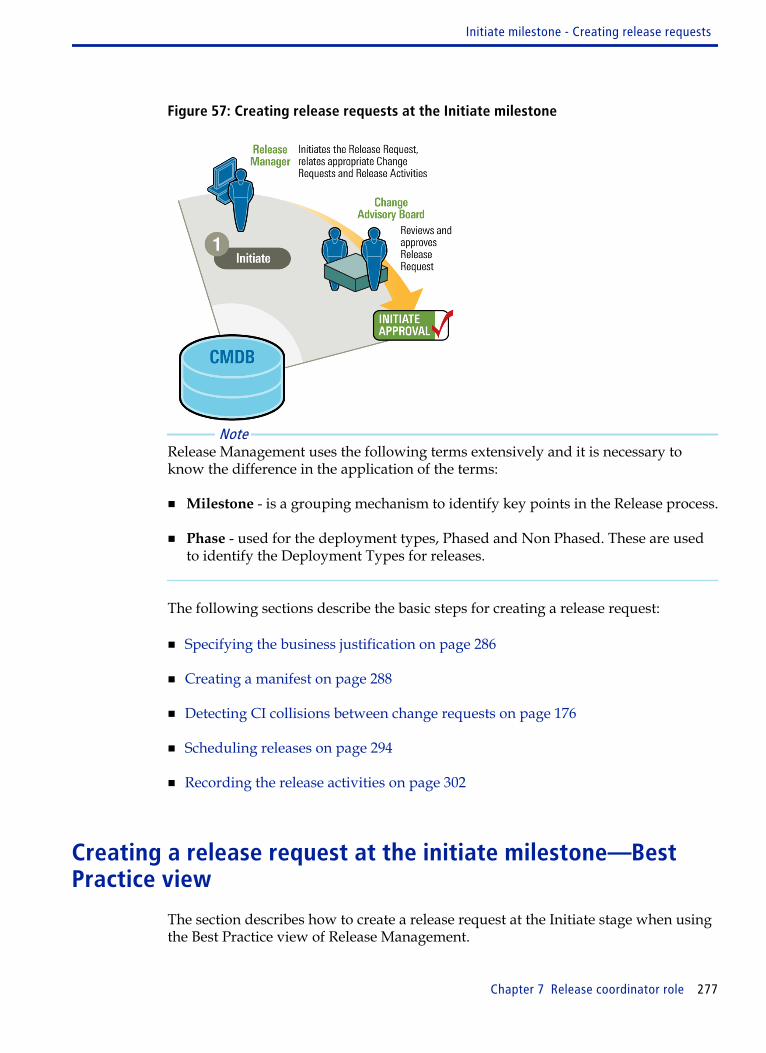
Figure 57: Creating release requests at the Initiate milestone
Note Release Management uses the following terms extensively and it is necessary toknow the difference in the application of the terms:
■ Milestone - is a grouping mechanism to identify key points in the Release process.
■ Phase - used for the deployment types, Phased and Non Phased. These are usedto identify the Deployment Types for releases.
The following sections describe the basic steps for creating a release request:
■ Specifying the business justification on page 286
■ Creating a manifest on page 288
■ Detecting CI collisions between change requests on page 176
■ Scheduling releases on page 294
■ Recording the release activities on page 302
Creating a release request at the initiate milestone—BestPractice view
The section describes how to create a release request at the Initiate stage when usingthe Best Practice view of Release Management.
Initiate milestone - Creating release requests
Chapter 7 Release coordinator role 277
To create a release request at the Initiate milestone
1 Review the RFCs to make sure you understand their requirements.
This is a manual step you should perform before you open Release Management.You should understand the scheduled start and end dates, the CIs involved, themanifests necessary to complete the release, the CAB approvers, and so on.
Best practice You should enter information into Release Management as soon as it is availableto you. You can always revise it at later milestones.
2 On the Release Management Console, click Create to open the Release form.
The Release ID field is automatically filled with an ID number for the release request.
In the Initiate stage, the release request initially appears in Draft status. Therelease request has not yet been submitted to the Release Management process.
3 Use the following fields to specify the release coordinator:
Coordinator Group
Specify the group of people with the Release Coordinator functional role.This list is populated with groups that have at least one user with a ReleaseCoordinator functional role.
Coordinator
Specify the user responsible for the release. The list is populated with peoplewith the Release Coordinator functional role and who are included in theCoordinator Group selected.
4 From the Service field, select the business service configuration item (CI) thatrelates to the release request that you are creating.
The Service field relates business service configuration items (CIs) to the releaserequest at the time it is created. Business service CIs are related either to thecustomer directly or to the customer’s company, organization, or department.
Initiate milestone - Creating release requests
278 BMC Remedy Change Management User Guide

Note The business service CI is not a physical CI (such as a printer or a router); it is alogical CI. In this context, a logical CI is a business service that can be providedfrom one business, or organization within a business, to another. Service CIs caninclude customer support, employee provisioning, web farms, storage, and so on.When business service CIs are created and made available on the Service fieldmenu, they are related either to a customer directly or to the customer's company,organization, or department. If you need to have a new business service CI addedto the Service field menu, you must notify a system administrator with AssetAdministrator privileges.
5 (optional) Select a template to complete part of the release request.
Release templates are especially useful in any release request that follows well-defined methods for specific and repeated requirements. Release templates domore than simply fill out fields for you; they can also include CIs and manifests tothe release request. For more information, see Selecting release templates on page448.
The template is attached to the release request.
Note If you start to enter fields in the release request and then select a release template,the release template overwrites any field values that are already present in therelease request. Any relationships or manifests included with the release requestare not overwritten. Any additional manifests from the template are added aspeers, and additional relationships (for example, CIs) are included with therelease request.
6 Complete the following fields:
Summary
Provide a brief description of the release.
Target Date
The target date is the date by when the release must be completed, accordingto the applicable service level target. Alternatively, the target date can be adate that is agreed to on an ad hoc basis, per release.
Business Justification
Specify the business requirement for the request. Select an option based onthe policies defined by your company.
You have the following options:
Initiate milestone - Creating release requests
Chapter 7 Release coordinator role 279

■ Corporate Strategic
■ Business Unit Strategic
■ Maintenance
■ Defect
■ Upgrade
■ Enhancement
■ Customer Commitment
■ Sarbanes-Oxley
Impact
Specify the extent to which the release affects the business. The default valueis 4-Minor/Localized. Impact is often directly related to the extent to whichthe service has degraded from agreed service levels. Impact can be measuredby the number of people affected, the criticality of the system affected, andthe loss of revenue as a result of the service degradation or disruption.
Urgency
Specify a value that indicates the importance of the release request, andreflects how quickly a release must be implemented, or the time available toreduce the impact of the release on the business. The default value is Low.
Use the following factors to determine Impact and Urgency:
■ Number of customers affected by associated Releases
■ Duration and scope of the service disruption
■ Availability of a solution or workaround
■ The type of service being disrupted, usually based on the CI involved
■ Awareness of the future impact on the business
Priority
(Optional) Specify the importance that you (as support staff) assign to therelease request.
Initiate milestone - Creating release requests
280 BMC Remedy Change Management User Guide
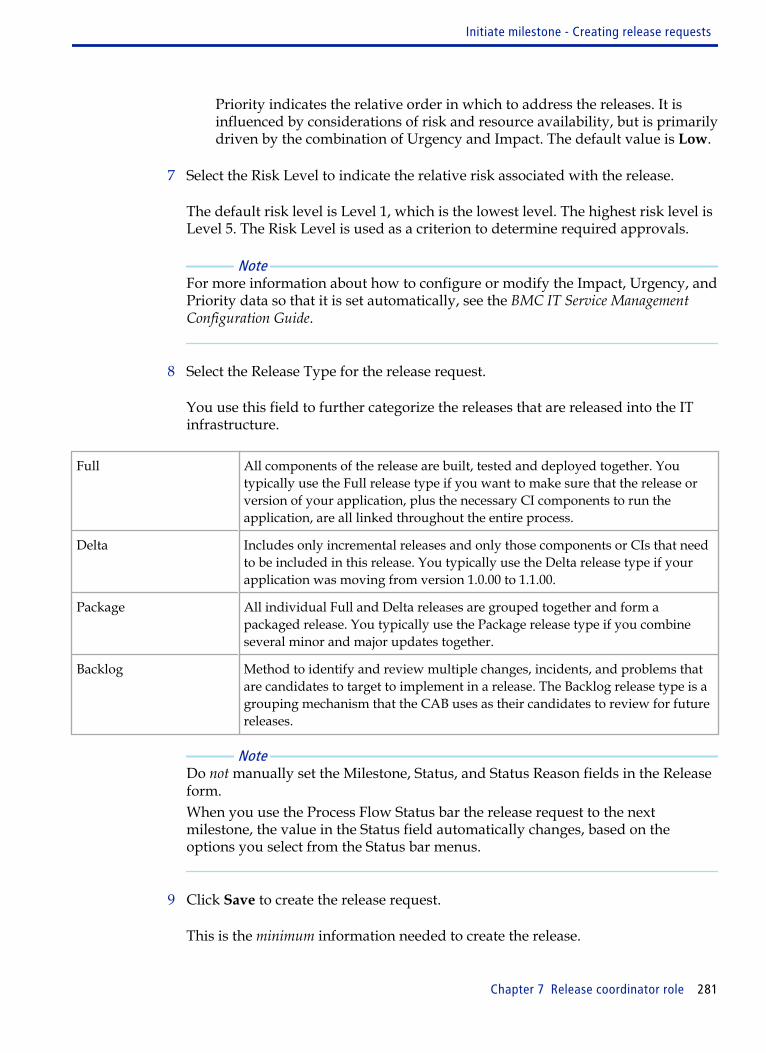
Priority indicates the relative order in which to address the releases. It isinfluenced by considerations of risk and resource availability, but is primarilydriven by the combination of Urgency and Impact. The default value is Low.
7 Select the Risk Level to indicate the relative risk associated with the release.
The default risk level is Level 1, which is the lowest level. The highest risk level isLevel 5. The Risk Level is used as a criterion to determine required approvals.
Note For more information about how to configure or modify the Impact, Urgency, andPriority data so that it is set automatically, see the BMC IT Service ManagementConfiguration Guide.
8 Select the Release Type for the release request.
You use this field to further categorize the releases that are released into the ITinfrastructure.
Full All components of the release are built, tested and deployed together. Youtypically use the Full release type if you want to make sure that the release orversion of your application, plus the necessary CI components to run theapplication, are all linked throughout the entire process.
Delta Includes only incremental releases and only those components or CIs that needto be included in this release. You typically use the Delta release type if yourapplication was moving from version 1.0.00 to 1.1.00.
Package All individual Full and Delta releases are grouped together and form apackaged release. You typically use the Package release type if you combineseveral minor and major updates together.
Backlog Method to identify and review multiple changes, incidents, and problems thatare candidates to target to implement in a release. The Backlog release type is agrouping mechanism that the CAB uses as their candidates to review for futurereleases.
Note Do not manually set the Milestone, Status, and Status Reason fields in the Releaseform.When you use the Process Flow Status bar the release request to the nextmilestone, the value in the Status field automatically changes, based on theoptions you select from the Status bar menus.
9 Click Save to create the release request.
This is the minimum information needed to create the release.
Initiate milestone - Creating release requests
Chapter 7 Release coordinator role 281
Creating a release request at the initiate milestone—Classicview
The section describes how to create a release request at the Initiate stage when usingthe Classic view of Release Management.
To create a release request at the Initiate milestone
1 Review the RFCs to make sure you understand their requirements.
This is a manual step you should perform before you open Release Management.You should understand the scheduled start and end dates, the CIs involved, themanifests necessary to complete the release, the CAB approvers, and so on.
Best practice You should enter information into Release Management as soon as it is availableto you. You can always revise it at later milestones.
2 On the Release Management Console, click Create.
The Release form appears with the Request ID field automatically filled with anID number for the release request.
The release request initially appears in Draft status. To enable the release requestfrom Draft status to be moved to its next status, enter information into the requiredfields.
3 (optional) Use a release template to fill out the contents of the release request.
Best practice Release templates are especially useful in any release request that follows well-defined methods for specific and repeated requirements. Release templates domore than simply fill out fields for you; they can also include CIs and manifestswith the release request. For more information, see Selecting release templates onpage 448.
4 The Requested By fields are auto-populated with the details of the user whocreates the release. If this user is not associated to a support group, the SupportCompany is set to the Location Company of the user. If this user is associated to asupport group, the Support Company, Support Organization, and Support Groupis set to the user's default Support Group.
You can modify the Requested By fields if required. The Support Company list ismodified based on profile of the user selected in the Requested By field. For userswho are support staff the list includes only Support Group companies only for
Initiate milestone - Creating release requests
282 BMC Remedy Change Management User Guide
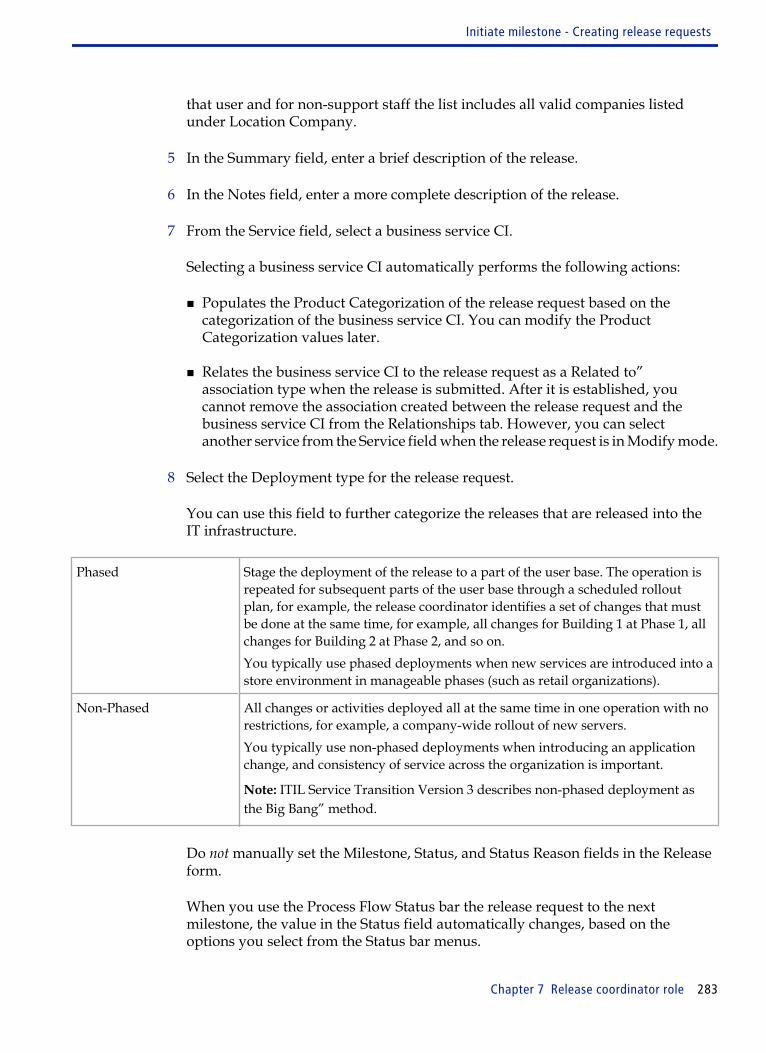
that user and for non-support staff the list includes all valid companies listedunder Location Company.
5 In the Summary field, enter a brief description of the release.
6 In the Notes field, enter a more complete description of the release.
7 From the Service field, select a business service CI.
Selecting a business service CI automatically performs the following actions:
■ Populates the Product Categorization of the release request based on thecategorization of the business service CI. You can modify the ProductCategorization values later.
■ Relates the business service CI to the release request as a Related to”association type when the release is submitted. After it is established, youcannot remove the association created between the release request and thebusiness service CI from the Relationships tab. However, you can selectanother service from the Service field when the release request is in Modify mode.
8 Select the Deployment type for the release request.
You can use this field to further categorize the releases that are released into theIT infrastructure.
Phased Stage the deployment of the release to a part of the user base. The operation isrepeated for subsequent parts of the user base through a scheduled rolloutplan, for example, the release coordinator identifies a set of changes that mustbe done at the same time, for example, all changes for Building 1 at Phase 1, allchanges for Building 2 at Phase 2, and so on.You typically use phased deployments when new services are introduced into astore environment in manageable phases (such as retail organizations).
Non-Phased All changes or activities deployed all at the same time in one operation with norestrictions, for example, a company-wide rollout of new servers.You typically use non-phased deployments when introducing an applicationchange, and consistency of service across the organization is important.
Note: ITIL Service Transition Version 3 describes non-phased deployment asthe Big Bang” method.
Do not manually set the Milestone, Status, and Status Reason fields in the Releaseform.
When you use the Process Flow Status bar the release request to the nextmilestone, the value in the Status field automatically changes, based on theoptions you select from the Status bar menus.
Initiate milestone - Creating release requests
Chapter 7 Release coordinator role 283
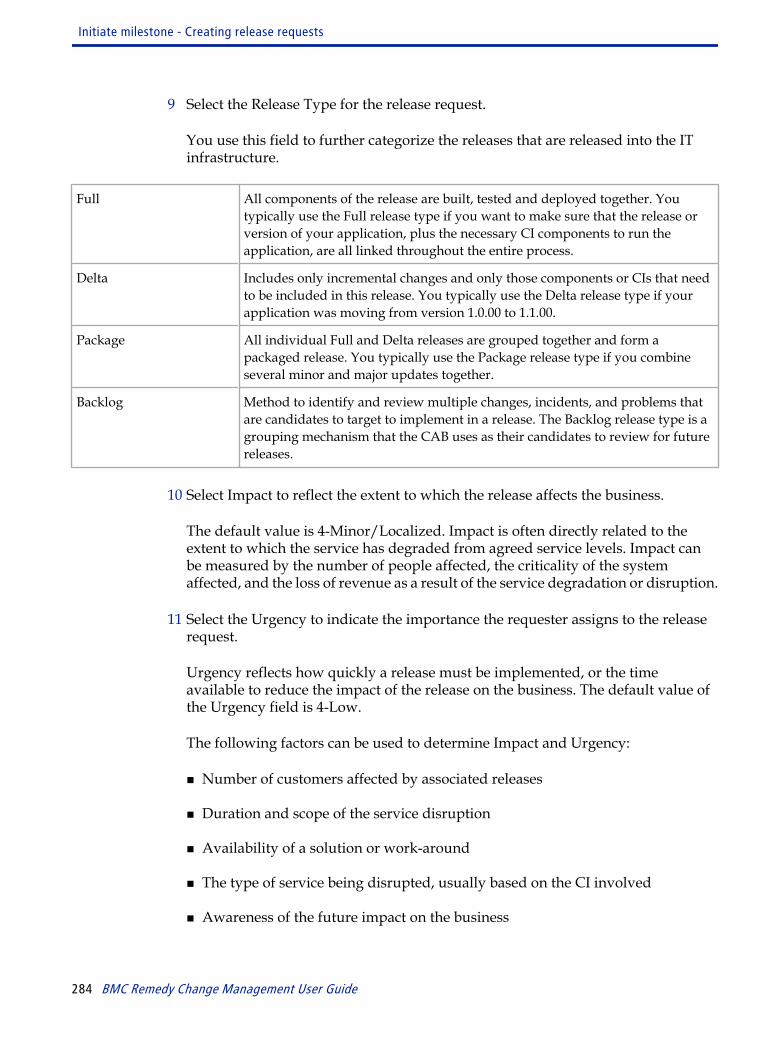
9 Select the Release Type for the release request.
You use this field to further categorize the releases that are released into the ITinfrastructure.
Full All components of the release are built, tested and deployed together. Youtypically use the Full release type if you want to make sure that the release orversion of your application, plus the necessary CI components to run theapplication, are all linked throughout the entire process.
Delta Includes only incremental changes and only those components or CIs that needto be included in this release. You typically use the Delta release type if yourapplication was moving from version 1.0.00 to 1.1.00.
Package All individual Full and Delta releases are grouped together and form apackaged release. You typically use the Package release type if you combineseveral minor and major updates together.
Backlog Method to identify and review multiple changes, incidents, and problems thatare candidates to target to implement in a release. The Backlog release type is agrouping mechanism that the CAB uses as their candidates to review for futurereleases.
10 Select Impact to reflect the extent to which the release affects the business.
The default value is 4-Minor/Localized. Impact is often directly related to theextent to which the service has degraded from agreed service levels. Impact canbe measured by the number of people affected, the criticality of the systemaffected, and the loss of revenue as a result of the service degradation or disruption.
11 Select the Urgency to indicate the importance the requester assigns to the releaserequest.
Urgency reflects how quickly a release must be implemented, or the timeavailable to reduce the impact of the release on the business. The default value ofthe Urgency field is 4-Low.
The following factors can be used to determine Impact and Urgency:
■ Number of customers affected by associated releases
■ Duration and scope of the service disruption
■ Availability of a solution or work-around
■ The type of service being disrupted, usually based on the CI involved
■ Awareness of the future impact on the business
Initiate milestone - Creating release requests
284 BMC Remedy Change Management User Guide
12 (optional) To override the priority, select a new Priority to identify the importanceyou (as support staff) assign to the release request.
Priority indicates the relative order in which releases should be addressed, forexample, Medium. The priority of the request is automatically calculated for you,based on the Urgency and the Impact values that you specify. These values areconfigured in the Release Prioritization form. But you can override the calculationby selecting a different value, for example, High or Critical.
Note For more information about how to configure or modify the Impact, Urgency, andPriority data so that it is set automatically, see the BMC IT Service ManagementConfiguration Guide.
13 Select the Risk Level to indicate the relative risk associated with the release, from5 (highest risk) to 1 (lowest risk).
The default value is Risk Level 1. The Risk Level is used as a criterion todetermine required approvals.
14 Click Rollup to accumulate the risk level from the related change requests(displayed on the Manifest tab).
The highest Risk Level of all the related change requests is used when rolling upthe Risk Level. The risk rollup is not performed automatically. You can overridethe risk rollup with a different value.
15 Modify information as needed in the required fields on the General tab, forexample, Company, First Name, and Last Name.
This information is auto-filled, based on your login. The Company is theorganization or group that the release request is assigned to.
Tip If you type a letter or name into any of the fields with a (+) sign and press Enter,the field is auto-filled. If multiple choices exist, a selection list or dialog boxappears, to help you enter a name. Otherwise, you are prompted if no such letteror person exists in the system.
16 (optional) Modify information in the required Release Location Company field.
The Release Location Company field is especially important in a multi-tenancyenvironment. In this field, you can specify the company, department, or othergroup that controls access to the release request.
17 Click the Assignment tab.
Initiate milestone - Creating release requests
Chapter 7 Release coordinator role 285
Make sure the release is properly assigned. You can manually reassign it toanother release coordinator.
a Select an assignment method (for example, Auto Assign), and then click Set.
b Review the Support Company, Support Organization, and Support GroupName (if this information is not already supplied).
c Select the release coordinator to whom to reassign the request.
For more information, see Working with release request assignments on page 316.
18 Click Save to create the release request.
This is the minimum information needed to create the release. You should includeadditional information as it is available to you.
19 (optional) If you need to suspend work temporarily on the release request, use theProcess Status Flow area to move the release request to Pending status.Figure 58: Moving release request into a different status
Select Enter Pending and an appropriate status reason (for example, ManagerIntervention) from the Process Flow Status menu. When you are ready tocontinue work on the release request, select Resume from the Process Flow Statusmenu.
The Status field is updated automatically during the Process Flow for otheroptions. For more information, see Performing additional functions from theProcess Flow Status bar on page 299.
Specifying the business justification
At the Initiate milestone, the release coordinator prepares a business case to justifythe release, for example, compliance with Sarbanes-Oxley requirements or fixing adefect in a mission-critical server.
Initiate milestone - Creating release requests
286 BMC Remedy Change Management User Guide
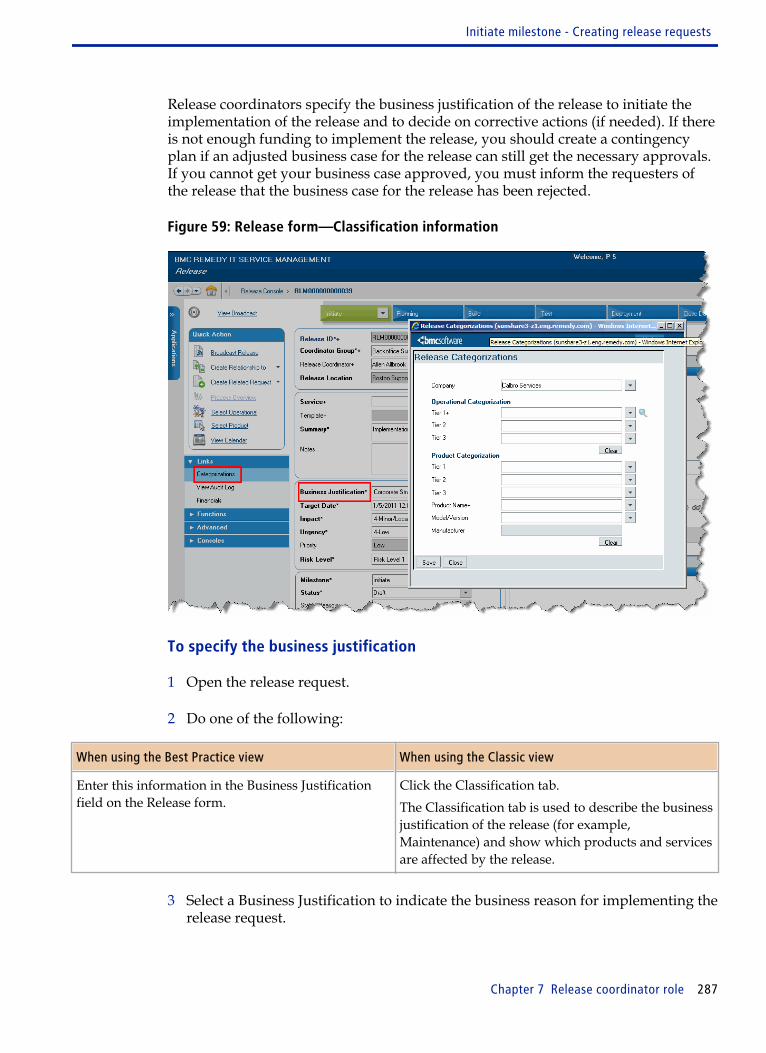
Release coordinators specify the business justification of the release to initiate theimplementation of the release and to decide on corrective actions (if needed). If thereis not enough funding to implement the release, you should create a contingencyplan if an adjusted business case for the release can still get the necessary approvals.If you cannot get your business case approved, you must inform the requesters ofthe release that the business case for the release has been rejected.
Figure 59: Release form—Classification information
To specify the business justification
1 Open the release request.
2 Do one of the following:
When using the Best Practice view When using the Classic view
Enter this information in the Business Justificationfield on the Release form.
Click the Classification tab.The Classification tab is used to describe the businessjustification of the release (for example,Maintenance) and show which products and servicesare affected by the release.
3 Select a Business Justification to indicate the business reason for implementing therelease request.
Initiate milestone - Creating release requests
Chapter 7 Release coordinator role 287
Business justification information is important when the request goes through theapproval process. You use this information to make sure funding is available toimplement the release.
4 Categorize the release request by filling in the categorization fields.
When using the Best Practice view When using the Classic view
Select Links => Categorizations in the left frame ofthe Release form.
Add this information to the Classification tab.
The application automatically assigns the release request to the submitter if theyhave the functional role of a Release Coordinator when the request is saved.Assignments are determined by the rules configured by the applicationadministrator.
5 To create or relate other items to the release request, click the Relationships tab.
You can create and relate release requests to your current release request before itis saved. You can also create and relate configuration items, change requests, andso on, to the release request.
Note If you close the new release request before saving, any new items you created as arelationship or a manifest, still exist. There is no relationship between these newitems and the release request since the release request was not created.
6 Click Save.
Depending on the settings configured by your application administrator, youmight see the Release form in Modify mode. You might also have to open theRelease form in Search mode and query for your request.
Creating a manifest
When you are in the Initiate milestone, you should create a release manifest. Amanifest functions like a packing list or an invoice-it describes the schedule andprovides an overview of the contents of a particular release. Here you split therequirements of the release into logical groups of change requests and activities thatcan be handled efficiently by change coordinators and activity assignees.
Note You can create change requests and activities during all milestones, except Close Down.
Initiate milestone - Creating release requests
288 BMC Remedy Change Management User Guide
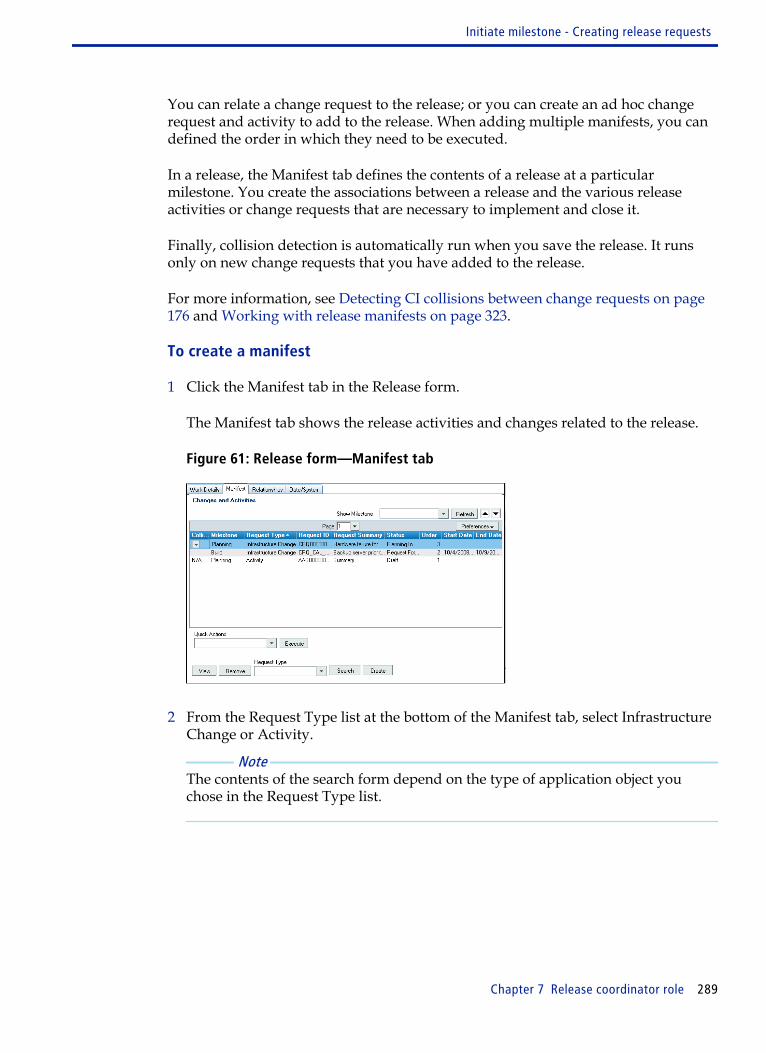
You can relate a change request to the release; or you can create an ad hoc changerequest and activity to add to the release. When adding multiple manifests, you candefined the order in which they need to be executed.
In a release, the Manifest tab defines the contents of a release at a particularmilestone. You create the associations between a release and the various releaseactivities or change requests that are necessary to implement and close it.
Finally, collision detection is automatically run when you save the release. It runsonly on new change requests that you have added to the release.
For more information, see Detecting CI collisions between change requests on page176 and Working with release manifests on page 323.
To create a manifest
1 Click the Manifest tab in the Release form.
The Manifest tab shows the release activities and changes related to the release.
Figure 61: Release form—Manifest tab
2 From the Request Type list at the bottom of the Manifest tab, select InfrastructureChange or Activity.
Note The contents of the search form depend on the type of application object youchose in the Request Type list.
Initiate milestone - Creating release requests
Chapter 7 Release coordinator role 289
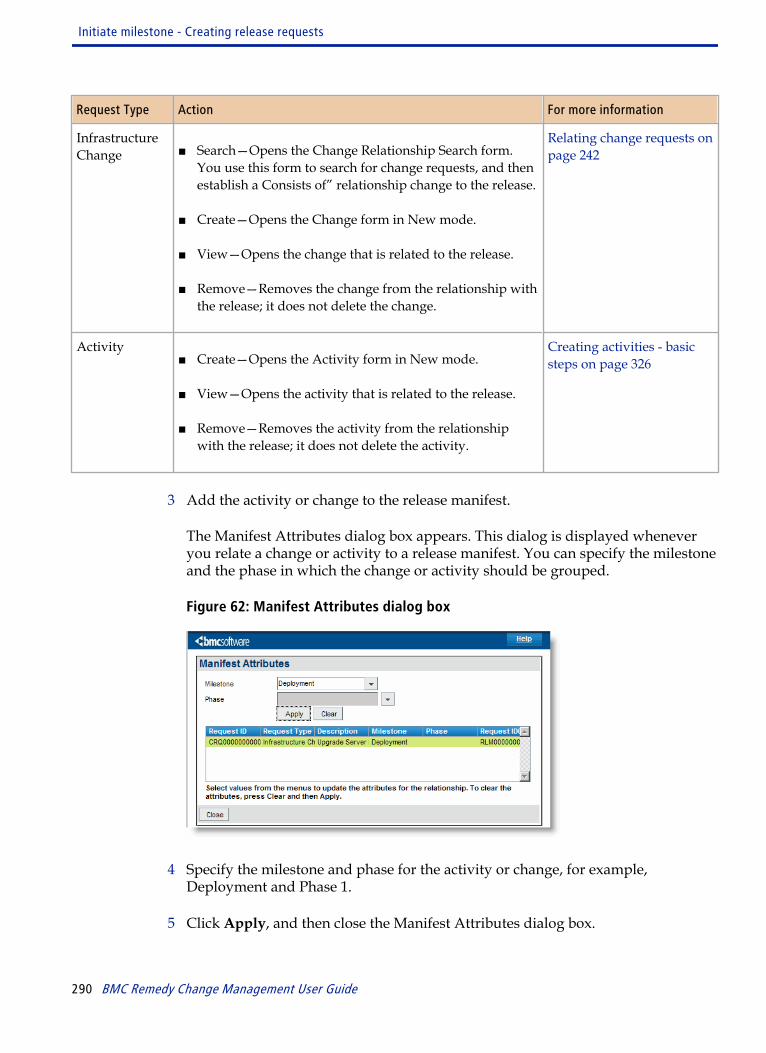
Request Type Action For more information
InfrastructureChange ■ Search—Opens the Change Relationship Search form.
You use this form to search for change requests, and thenestablish a Consists of” relationship change to the release.
■ Create—Opens the Change form in New mode.
■ View—Opens the change that is related to the release.
■ Remove—Removes the change from the relationship withthe release; it does not delete the change.
Relating change requests onpage 242
Activity■ Create—Opens the Activity form in New mode.
■ View—Opens the activity that is related to the release.
■ Remove—Removes the activity from the relationshipwith the release; it does not delete the activity.
Creating activities - basicsteps on page 326
3 Add the activity or change to the release manifest.
The Manifest Attributes dialog box appears. This dialog is displayed wheneveryou relate a change or activity to a release manifest. You can specify the milestoneand the phase in which the change or activity should be grouped.
Figure 62: Manifest Attributes dialog box
4 Specify the milestone and phase for the activity or change, for example,Deployment and Phase 1.
5 Click Apply, and then close the Manifest Attributes dialog box.
Initiate milestone - Creating release requests
290 BMC Remedy Change Management User Guide
6 The original release request is displayed. Click Refresh to view the relatedrequest types appear in the Changes and Activities table.
7 Click the up or down arrows next to Refresh, to change the order of items thathave been added to the release manifest.
The manifest items are grouped in the Order column, for example, 0, 1, 2, and soon and must be executed in the defined order.
8 Click Rollup next to the Risk Level field to accumulate the risk level, cost, andtime from the related change requests and activities (displayed on the Manifesttab).
The highest Risk Level of all the related change requests is used when rolling upthe Risk Level. The risk rollup is not performed automatically. The release usercan override the risk rollup with a different value.
Note If you need to add change requests or activities at other milestone, you can clickRollup as needed on demand.
Rollup also rolls up the following information from the changes in the releasemanifest.
■ Budget Cost and Actual Cost—Rolls up financial data from change requestsand activities into the release. You can see costs under Links => Financialswhen using the Best Practice view and on the Financials tab of theRelease form when using the Classic view.
■ Time—Rolls up time spent (in minutes) from change requests and activities tothe Release form. You can see time spent on the Date/System tab when usingthe Best Practice view and the Assignment tab of the Release form.
9 Save your work.
Detecting CI collisions between change requests
The Collision Detection tool (under Advanced Functions in the left navigation pane)determines if there are other change requests scheduled to work on the same CIduring the same scheduled time, and helps you manage and resolve thesepotentially harmful conflicting change requests. For Release Management, CollisionDetection is run against the changes in the release manifest, not the changes relatedto the release in the Relationships tab. Collision Detection does not apply to releaseactivities in the release manifest.
Initiate milestone - Creating release requests
Chapter 7 Release coordinator role 291
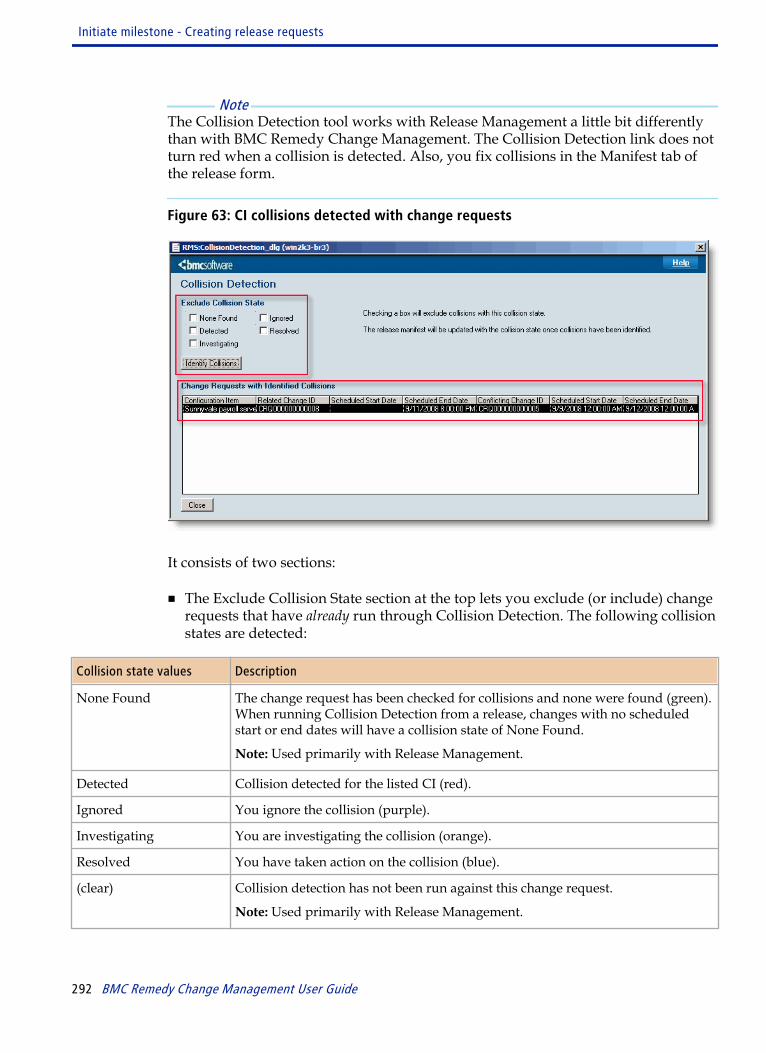
Note The Collision Detection tool works with Release Management a little bit differentlythan with BMC Remedy Change Management. The Collision Detection link does notturn red when a collision is detected. Also, you fix collisions in the Manifest tab ofthe release form.
Figure 63: CI collisions detected with change requests
It consists of two sections:
■ The Exclude Collision State section at the top lets you exclude (or include) changerequests that have already run through Collision Detection. The following collisionstates are detected:
Collision state values Description
None Found The change request has been checked for collisions and none were found (green).When running Collision Detection from a release, changes with no scheduledstart or end dates will have a collision state of None Found.
Note: Used primarily with Release Management.
Detected Collision detected for the listed CI (red).
Ignored You ignore the collision (purple).
Investigating You are investigating the collision (orange).
Resolved You have taken action on the collision (blue).
(clear) Collision detection has not been run against this change request.
Note: Used primarily with Release Management.
Initiate milestone - Creating release requests
292 BMC Remedy Change Management User Guide
Collision state values Description
N/A Used only for Activities in the manifest table. Collision Detection does not applyto Activities.
■ The Change Requests with Identified Collisions section at the bottom identifiesthe current CI collisions for the change request. It lists the CI affected, the changerequest ID, the scheduled start and end dates, and the ID and Scheduled Start andEnd dates of the change request causing the conflict.
The first time you run the Collision Detection tool, it shows you by design only thecurrent collisions in the release manifest. If you open the Collision Detection tool asecond time and maintain the default settings (all Exclude Collision State fieldsselected), only new collisions are shown. Previously detected collisions that needcorrective action are not listed. To see all CI collisions that need corrective action,you must clear the Exclude Collision State fields and then click the IdentifyCollisions button, as shown in Figure 38 on page 176 .
To detect CI collisions between change requests
1 Open the request.
2 Click the Tasks tab on the change form or the Manifest tab on the release form,and then add change requests to the request.
You must add at least one change request to the request before running CollisionDetection.
3 Choose Advanced => Collision Detection.
The Collision Detection dialog box appears (Figure 38 on page 176). In the IncludeCollision State section, you now must choose to exclude or include the collisionstates (for example, Detected) the next time you run the tool. For example, ifDetected is selected, then any records that were previously flagged as Detectedare excluded from collision detection the next time the tool is run. If you clearDetected, then these records are again run through collision detection.
4 Select or clear collision states as needed, and then click Identify Collisions.
5 Close the Collision Detection tool when you finish.
6 Click the Tasks tab in the change form or the Manifest tab in the release form.
The table displays the collision state of each change request that is included in therequest.
7 Use the drop-down menu in the Collision column to update the collision state.
Initiate milestone - Creating release requests
Chapter 7 Release coordinator role 293
New changes that you add to the request appear in black until you run CollisionDetection.
8 To fix the CI collision:
a Change the collision state from Detected to Resolved.
b Save and close the request .
Collision states are not saved to the database until you save the request.
c Click View to open the change request.
d Run Collision Detection from the change request to determine which CIs arecausing the collision.
e Click the Dates tab of the change request.
f Enter a new Scheduled Start Date and End Date that avoids the CI collision.
g Save and close the change request.
h Run the Collision Detection tool one more time in the request to make sure thatno other collisions are detected.
Make sure all the Exclude Collision States are cleared before you click IdentifyCollisions.
i Save and close the Collision Detection tool.
9 Save the request.
Collision states are not saved to the database until you click Save.
Scheduling releases
For the Initiate milestone, in the Release form, use the Dates tab in the Classic viewor the Dates/System tab in the Best Practice view to add the scheduled start and enddates for the release. These dates can also be revised for the Planning milestone.During deployment, you also use this tab to track actual and deployment start andend dates for the release.
The following information describes each of these date fields on the Release form:
Initiate milestone - Creating release requests
294 BMC Remedy Change Management User Guide

Requested Availability Date
For the Planning milestone, provide the date and time when the releaseshould be available.
Scheduled Start Date
For the Initiate milestone, use this field to specify the date and time at whichthe release implementation is scheduled to start (the moment at which therelease is planned to be set to the status "Work in Progress").
Actual Start Date
For the Deployment milestone, provide the date for when work started onthe release.
Deployment Start Date
For the Deployment milestone, provide the date when the release starts to bedeployed to the IT infrastructure.
Completed Date
This field is read-only and is automatically set to the current date and timewhen the status of the release is set to "Completed."
Scheduled End Date
For the Initiate milestone, use this field to specify the date and time at whichthe release implementation is scheduled to be completed (the moment atwhich the release is planned to be set to the status "Closed").
Actual End Date
For the Deployment milestone, provide the date for when work ended for therelease.
Deployment End Date
For the Deployment milestone, provide the date when the release finishesdeploying to the IT infrastructure.
Initiate milestone - Creating release requests
Chapter 7 Release coordinator role 295
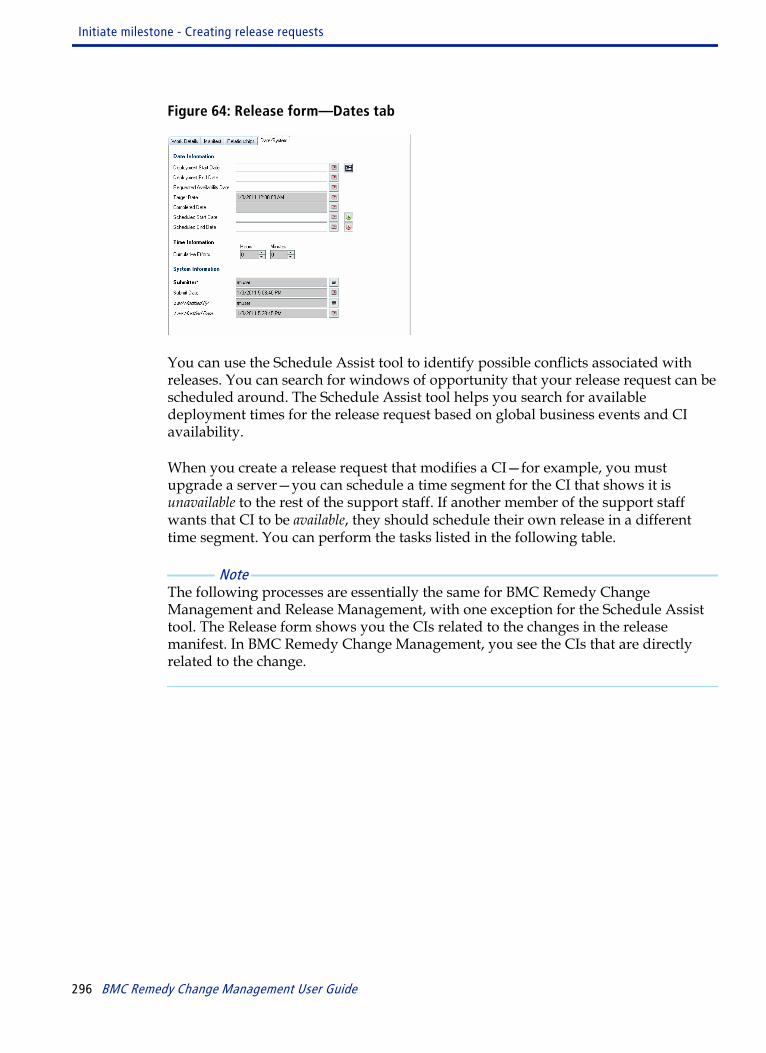
Figure 64: Release form—Dates tab
You can use the Schedule Assist tool to identify possible conflicts associated withreleases. You can search for windows of opportunity that your release request can bescheduled around. The Schedule Assist tool helps you search for availabledeployment times for the release request based on global business events and CIavailability.
When you create a release request that modifies a CI—for example, you mustupgrade a server—you can schedule a time segment for the CI that shows it isunavailable to the rest of the support staff. If another member of the support staffwants that CI to be available, they should schedule their own release in a differenttime segment. You can perform the tasks listed in the following table.
Note The following processes are essentially the same for BMC Remedy ChangeManagement and Release Management, with one exception for the Schedule Assisttool. The Release form shows you the CIs related to the changes in the releasemanifest. In BMC Remedy Change Management, you see the CIs that are directlyrelated to the change.
Initiate milestone - Creating release requests
296 BMC Remedy Change Management User Guide

Task Action Explanation
Register uniquebusiness events forreleases
1 In the navigation pane of the Release form, chooseAdvanced Time Segments Business Event.
2 On the Search Business Event/Location Definitiondialog box, click New.
3 On the Business Event/Location Definition dialogbox, define a unique time segment for the businessevent or categorization.
4 Click Save.
5 Click Add to create a time segment.
6 In the Description field on the Business TimeSegment dialog box, enter a description for thetime segment.
7 In the Availability field, select Available orUnavailable.
8 In the Level field, select a level of 10 or higher.
9 In the Duration Type field, select One time (whichgenerates a single occurrence of the time segment)or Recurring (which cannot span multiple days,but must be scheduled within a 24-hour period).
10 Enter the starting and ending dates and times forthe duration of the time segment.
11 Click Save, and then click Finish.
For more information, see:
■ Registering timesegments on page 157
■ Registering uniquebusiness events andoperationalcategorizations onpage 158
■ Understanding servertime, time zones, andtime segments on page169
Initiate milestone - Creating release requests
Chapter 7 Release coordinator role 297
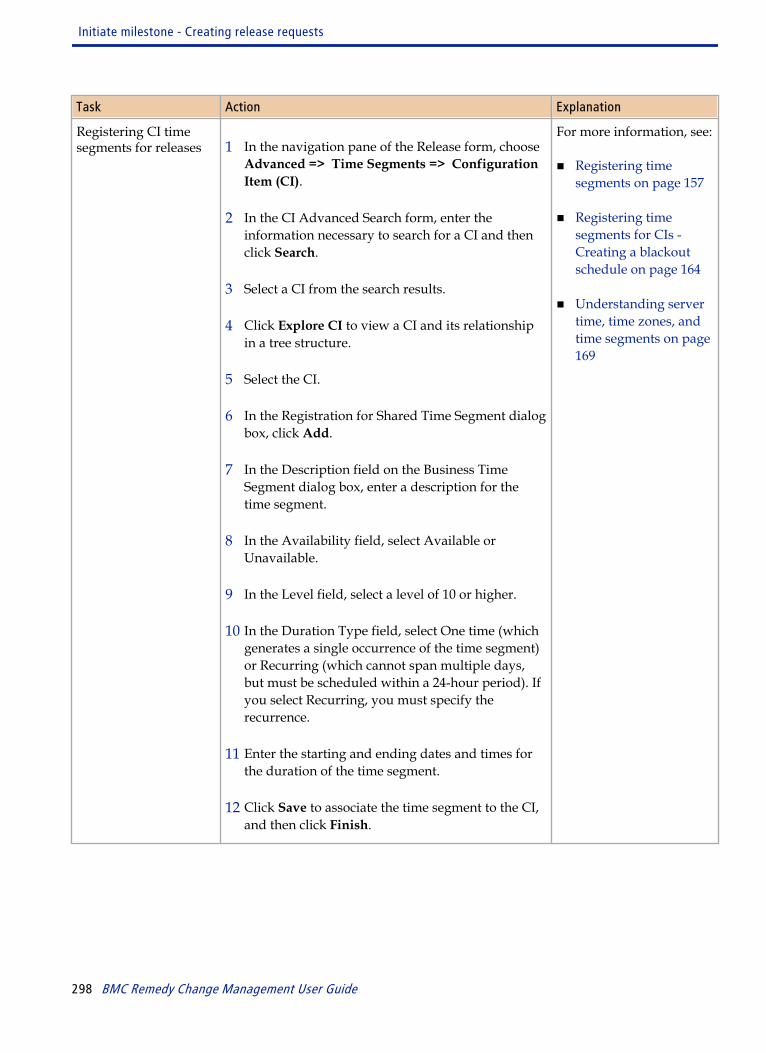
Task Action Explanation
Registering CI timesegments for releases 1 In the navigation pane of the Release form, choose
Advanced => Time Segments => ConfigurationItem (CI).
2 In the CI Advanced Search form, enter theinformation necessary to search for a CI and thenclick Search.
3 Select a CI from the search results.
4 Click Explore CI to view a CI and its relationshipin a tree structure.
5 Select the CI.
6 In the Registration for Shared Time Segment dialogbox, click Add.
7 In the Description field on the Business TimeSegment dialog box, enter a description for thetime segment.
8 In the Availability field, select Available orUnavailable.
9 In the Level field, select a level of 10 or higher.
10 In the Duration Type field, select One time (whichgenerates a single occurrence of the time segment)or Recurring (which cannot span multiple days,but must be scheduled within a 24-hour period). Ifyou select Recurring, you must specify therecurrence.
11 Enter the starting and ending dates and times forthe duration of the time segment.
12 Click Save to associate the time segment to the CI,and then click Finish.
For more information, see:
■ Registering timesegments on page 157
■ Registering timesegments for CIs -Creating a blackoutschedule on page 164
■ Understanding servertime, time zones, andtime segments on page169
Initiate milestone - Creating release requests
298 BMC Remedy Change Management User Guide
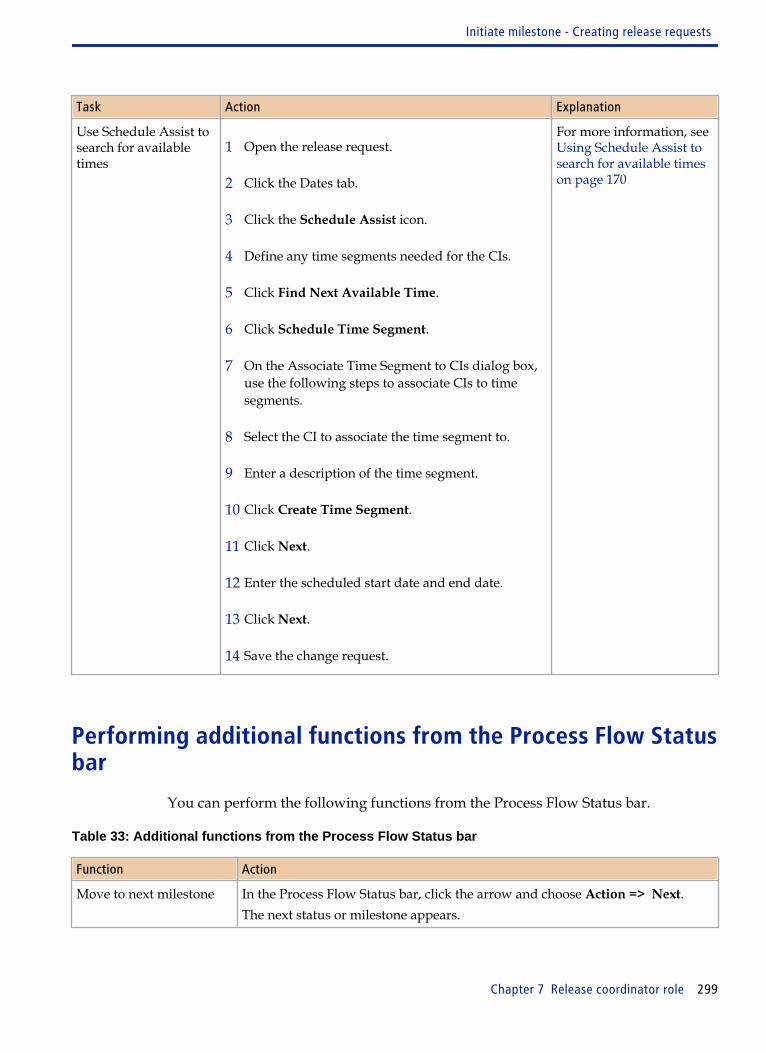
Task Action Explanation
Use Schedule Assist tosearch for availabletimes
1 Open the release request.
2 Click the Dates tab.
3 Click the Schedule Assist icon.
4 Define any time segments needed for the CIs.
5 Click Find Next Available Time.
6 Click Schedule Time Segment.
7 On the Associate Time Segment to CIs dialog box,use the following steps to associate CIs to timesegments.
8 Select the CI to associate the time segment to.
9 Enter a description of the time segment.
10 Click Create Time Segment.
11 Click Next.
12 Enter the scheduled start date and end date.
13 Click Next.
14 Save the change request.
For more information, see Using Schedule Assist tosearch for available timeson page 170
Performing additional functions from the Process Flow Statusbar
You can perform the following functions from the Process Flow Status bar.
Table 33: Additional functions from the Process Flow Status bar
Function Action
Move to next milestone In the Process Flow Status bar, click the arrow and choose Action => Next.The next status or milestone appears.
Initiate milestone - Creating release requests
Chapter 7 Release coordinator role 299
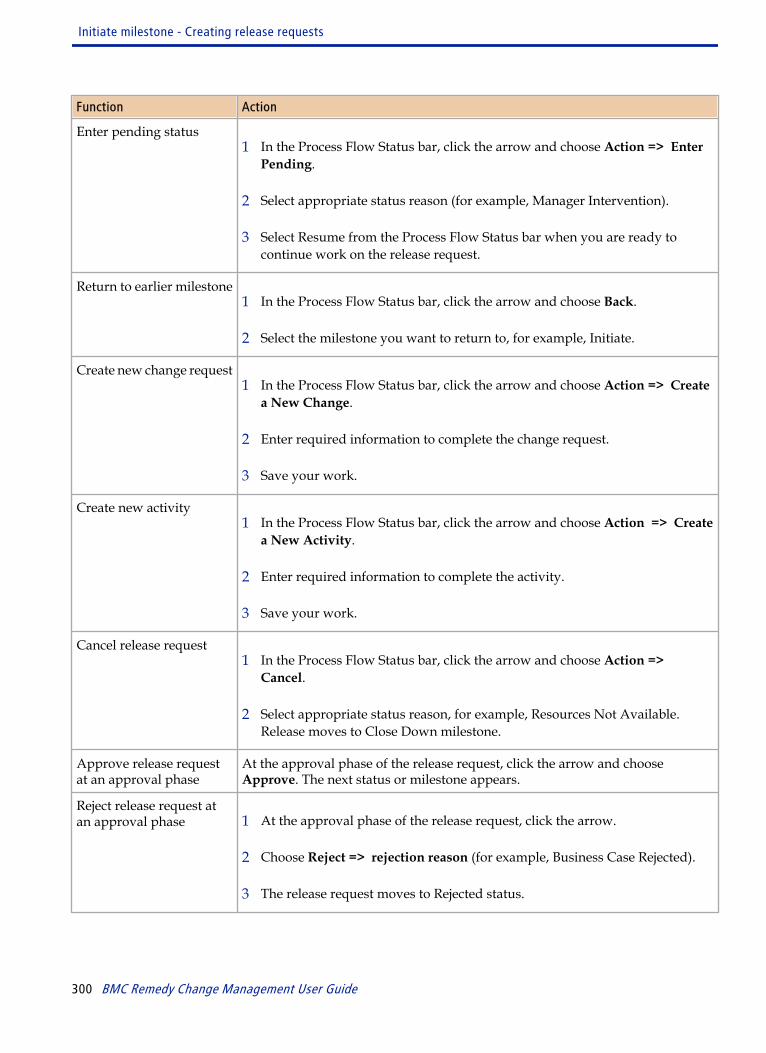
Function Action
Enter pending status1 In the Process Flow Status bar, click the arrow and choose Action => Enter
Pending.
2 Select appropriate status reason (for example, Manager Intervention).
3 Select Resume from the Process Flow Status bar when you are ready tocontinue work on the release request.
Return to earlier milestone1 In the Process Flow Status bar, click the arrow and choose Back.
2 Select the milestone you want to return to, for example, Initiate.
Create new change request1 In the Process Flow Status bar, click the arrow and choose Action => Create
a New Change.
2 Enter required information to complete the change request.
3 Save your work.
Create new activity1 In the Process Flow Status bar, click the arrow and choose Action => Create
a New Activity.
2 Enter required information to complete the activity.
3 Save your work.
Cancel release request1 In the Process Flow Status bar, click the arrow and choose Action =>
Cancel.
2 Select appropriate status reason, for example, Resources Not Available.Release moves to Close Down milestone.
Approve release requestat an approval phase
At the approval phase of the release request, click the arrow and chooseApprove. The next status or milestone appears.
Reject release request atan approval phase 1 At the approval phase of the release request, click the arrow.
2 Choose Reject => rejection reason (for example, Business Case Rejected).
3 The release request moves to Rejected status.
Initiate milestone - Creating release requests
300 BMC Remedy Change Management User Guide
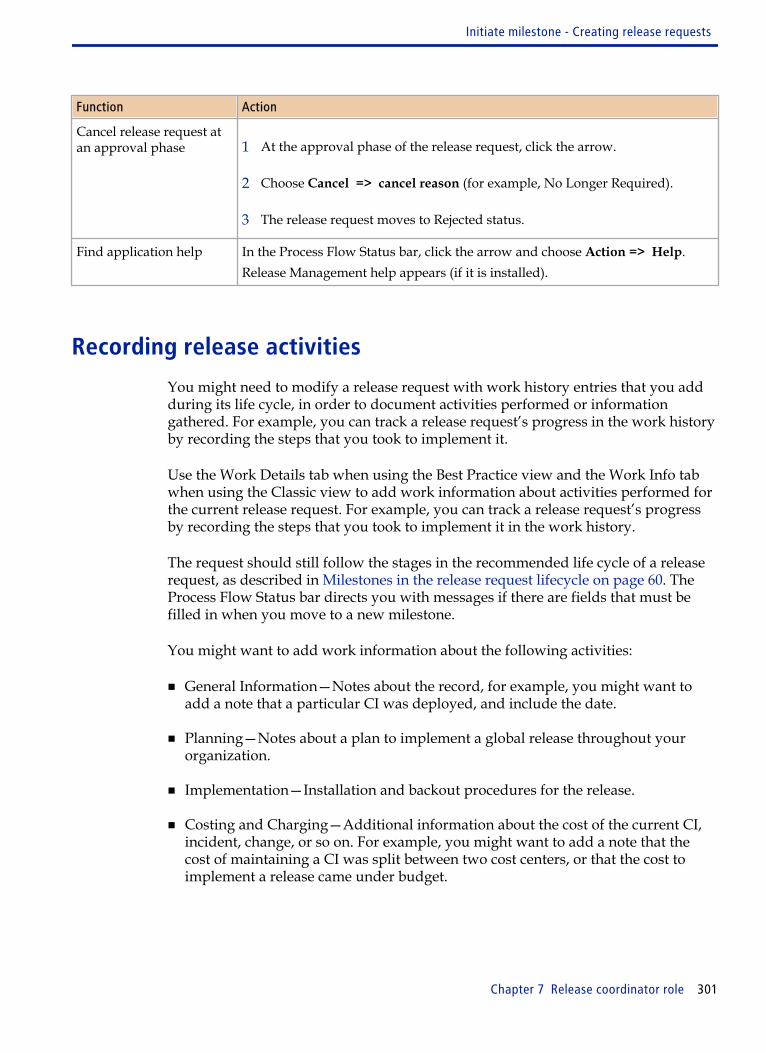
Function Action
Cancel release request atan approval phase 1 At the approval phase of the release request, click the arrow.
2 Choose Cancel => cancel reason (for example, No Longer Required).
3 The release request moves to Rejected status.
Find application help In the Process Flow Status bar, click the arrow and choose Action => Help.Release Management help appears (if it is installed).
Recording release activities
You might need to modify a release request with work history entries that you addduring its life cycle, in order to document activities performed or informationgathered. For example, you can track a release request’s progress in the work historyby recording the steps that you took to implement it.
Use the Work Details tab when using the Best Practice view and the Work Info tabwhen using the Classic view to add work information about activities performed forthe current release request. For example, you can track a release request’s progressby recording the steps that you took to implement it in the work history.
The request should still follow the stages in the recommended life cycle of a releaserequest, as described in Milestones in the release request lifecycle on page 60. TheProcess Flow Status bar directs you with messages if there are fields that must befilled in when you move to a new milestone.
You might want to add work information about the following activities:
■ General Information—Notes about the record, for example, you might want toadd a note that a particular CI was deployed, and include the date.
■ Planning—Notes about a plan to implement a global release throughout yourorganization.
■ Implementation—Installation and backout procedures for the release.
■ Costing and Charging—Additional information about the cost of the current CI,incident, change, or so on. For example, you might want to add a note that thecost of maintaining a CI was split between two cost centers, or that the cost toimplement a release came under budget.
Initiate milestone - Creating release requests
Chapter 7 Release coordinator role 301
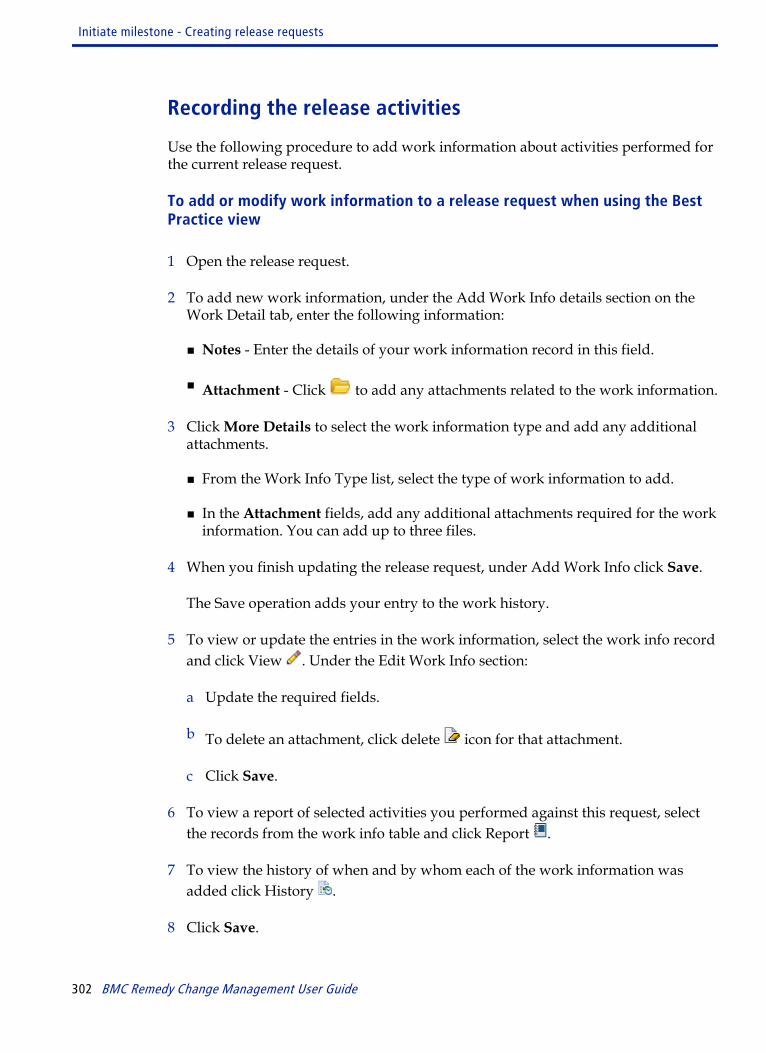
Recording the release activities
Use the following procedure to add work information about activities performed forthe current release request.
To add or modify work information to a release request when using the BestPractice view
1 Open the release request.
2 To add new work information, under the Add Work Info details section on theWork Detail tab, enter the following information:
■ Notes - Enter the details of your work information record in this field.
■ Attachment - Click to add any attachments related to the work information.
3 Click More Details to select the work information type and add any additionalattachments.
■ From the Work Info Type list, select the type of work information to add.
■ In the Attachment fields, add any additional attachments required for the workinformation. You can add up to three files.
4 When you finish updating the release request, under Add Work Info click Save.
The Save operation adds your entry to the work history.
5 To view or update the entries in the work information, select the work info recordand click View . Under the Edit Work Info section:
a Update the required fields.
b To delete an attachment, click delete icon for that attachment.
c Click Save.
6 To view a report of selected activities you performed against this request, selectthe records from the work info table and click Report .
7 To view the history of when and by whom each of the work information wasadded click History .
8 Click Save.
Initiate milestone - Creating release requests
302 BMC Remedy Change Management User Guide
To add or modify work information to a release request when using theClassic view
1 Open the release request and click the Work Info tab.
2 From the Work Info Type list, select the type of work information to add.
3 From the Source list, select the source of this information.
Information sources can include, for example, email, system assignment, or the Web.
4 Enter the details of your work information record in the Summary and Detailsfields.
5 To add an attachment to the record, right-click in the attachment table and selectAdd from the menu that appears. With browsers, click the Add button.
6 From the Locked list, select Yes or No to lock the log.
WARNING If you select Yes you cannot modify the work log after you save the record.
7 From the View Access list, select Internal or Public.
■ Internal—If you want only users within your organization to see the entry.
■ Public—If you want everyone with access to the system to see the entry,including requesters.
8 When you have finished updating the release request, click Save.
The Save operation adds your entry to the work history. The Show field allowsyou to filter out specific work entries based on the type of activity that appear inthe table.
9 To see a report of the activities you performed against this release, click Report.
10 To see all entries for work information history, click View.
You can view but not modify the work info records if they are locked.
Note When you return to the Release Management Console, you might need to refreshthe Release Information table to display all the modified records.
11 Click Save.
Initiate milestone - Creating release requests
Chapter 7 Release coordinator role 303

Modifying release requests - Moving the release forward
As you track and supervise a release request, you move it from one milestone toanother (for example, from Initiate to Planning). When you choose differentmilestones, messages alert you if you need to complete more fields in the request.
Note A request should follow the milestones in the recommended lifecycle of a releaserequest, as described in Milestones in the release request lifecycle on page 60.Manually setting the status values can disrupt the lifecycle in which you enterinformation about and resolve the release request.
To modify release requests
1 Open the release request.
2 On the Release form, make the appropriate changes.
3 (optional) Add manifests to the release request.
For more information, see Creating a manifest on page 288.
4 (optional) Modify the release request assignments.
For more information, see Working with release request assignments on page 316.
5 (optional) Relate a CI or some other object to the release request.
For more information, see Working with release relationships on page 330.
6 (optional) Modify the start and end dates of the release request.
For more information, see Planning milestone - Planning and scheduling therelease request on page 305.
7 Save your work.
8 Use the Process Flow Status bar to move the release request forward to theInitiation Approval phase.Figure 65: Moving release request to next approval phase
For more information, see Performing additional functions from the Process FlowStatus bar on page 299.
Initiate milestone - Creating release requests
304 BMC Remedy Change Management User Guide
Note Out-of-the-box, release requests must be approved before they move to thePlanning milestone. For more information, see Working with BMC RemedyChange Management as an approver on page 355 and Approval processesprovided out-of-the-box on page 357.
9 After the release request is approved, use the Process Flow Status bar to move therelease request forward to the Initiation Registered status.
10 Use the Process Flow Status bar to move the release request forward to thePlanning Approval phase.
The release must be approved before it can move forward. For more information,see Planning milestone - Planning and scheduling the release request on page305.
Planning milestone - Planning and schedulingthe release request
After a release request is approved at the Planning Approval phase, the releasecoordinator must plan the details associated with the release.Figure 66: Planning the release request
Plan for the following important details:
■ Set the release request’s status to Planning, and review the planned dates.
■ Estimate the time the project will take.
■ Estimate any applicable downtime associated with the release request.
Planning milestone - Planning and scheduling the release request
Chapter 7 Release coordinator role 305
■ Register an available or unavailable time segment to perform the release.
■ Assess the risks and impact of the release request.
■ Specify the business justification for the release (if this was not already done whenthe release request was created).
■ Create your plans.
■ Calculate the costs associated with the release request.
■ Submit the release request for approval.
Approvers require this information to be able to decide whether to approve or rejectthe release request.
To plan and schedule the release request
1 Open the release request at the Planning In Progress status.
2 Open the Change Calendar.Figure 67: Change Calendar—Viewing release requests
a Do one of the following:
When using the Best Practice view When using the Classic view
Choose Quick Action => View Calendar. Choose Quick Links => View Calendar.
Planning milestone - Planning and scheduling the release request
306 BMC Remedy Change Management User Guide
b Select how many days’ worth of requests and business events to show.
c Select Release Requests to view release requests in the calendar.
d Select the requests and business events for a specific day.
e Close the Change Calendar when you are finished.
For more information, see Using the Change Calendar on page 194.
3 Register available or unavailable time segments for your business event,operational categorization, or CI.
For more information, see Using Schedule Assist to search for available times onpage 170.
4 Click the Dates/System tab in the Best Practice view or Dates tab in the Classicview.
When planning a release request, you use this tab to track the scheduled, actual,and deployment start and end dates of releases.
Planning milestone - Planning and scheduling the release request
Chapter 7 Release coordinator role 307
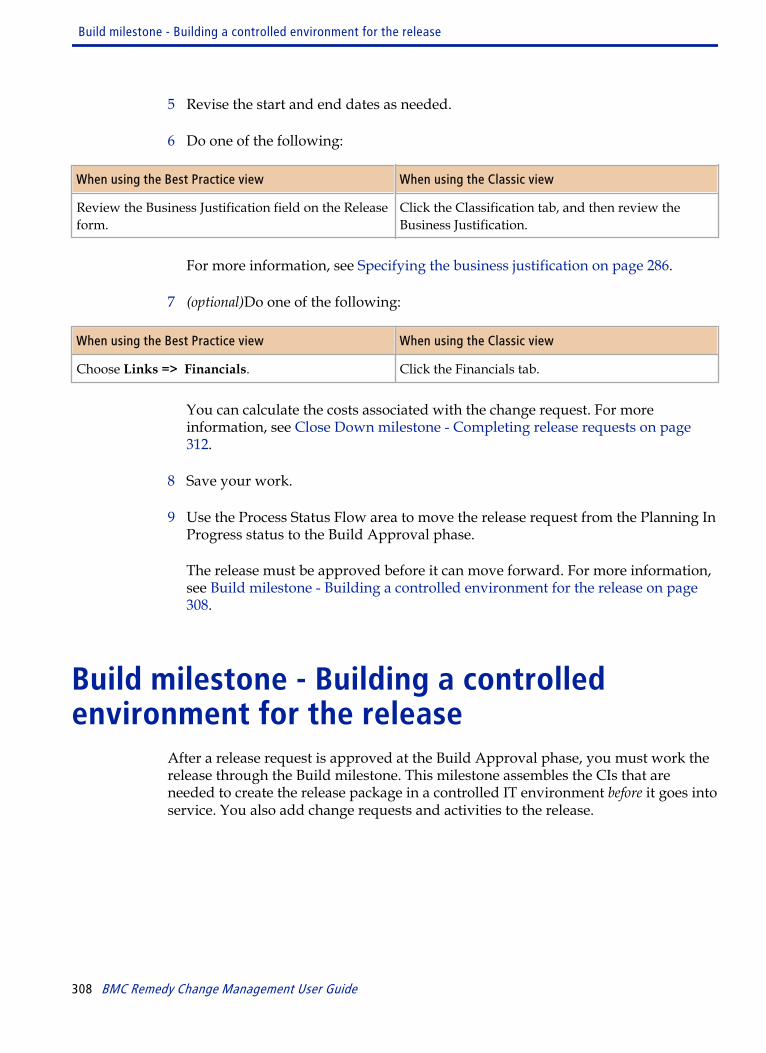
5 Revise the start and end dates as needed.
6 Do one of the following:
When using the Best Practice view When using the Classic view
Review the Business Justification field on the Releaseform.
Click the Classification tab, and then review theBusiness Justification.
For more information, see Specifying the business justification on page 286.
7 (optional)Do one of the following:
When using the Best Practice view When using the Classic view
Choose Links => Financials. Click the Financials tab.
You can calculate the costs associated with the change request. For moreinformation, see Close Down milestone - Completing release requests on page312.
8 Save your work.
9 Use the Process Status Flow area to move the release request from the Planning InProgress status to the Build Approval phase.
The release must be approved before it can move forward. For more information,see Build milestone - Building a controlled environment for the release on page308.
Build milestone - Building a controlledenvironment for the release
After a release request is approved at the Build Approval phase, you must work therelease through the Build milestone. This milestone assembles the CIs that areneeded to create the release package in a controlled IT environment before it goes intoservice. You also add change requests and activities to the release.
Build milestone - Building a controlled environment for the release
308 BMC Remedy Change Management User Guide
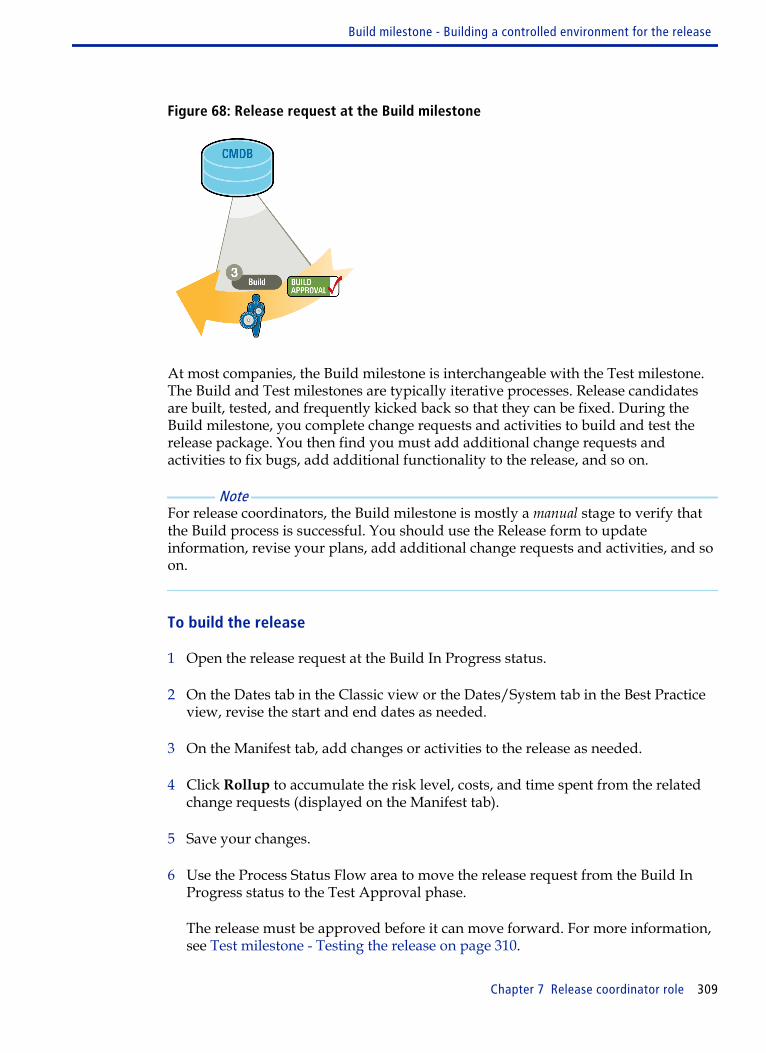
Figure 68: Release request at the Build milestone
At most companies, the Build milestone is interchangeable with the Test milestone.The Build and Test milestones are typically iterative processes. Release candidatesare built, tested, and frequently kicked back so that they can be fixed. During theBuild milestone, you complete change requests and activities to build and test therelease package. You then find you must add additional change requests andactivities to fix bugs, add additional functionality to the release, and so on.
Note For release coordinators, the Build milestone is mostly a manual stage to verify thatthe Build process is successful. You should use the Release form to updateinformation, revise your plans, add additional change requests and activities, and soon.
To build the release
1 Open the release request at the Build In Progress status.
2 On the Dates tab in the Classic view or the Dates/System tab in the Best Practiceview, revise the start and end dates as needed.
3 On the Manifest tab, add changes or activities to the release as needed.
4 Click Rollup to accumulate the risk level, costs, and time spent from the relatedchange requests (displayed on the Manifest tab).
5 Save your changes.
6 Use the Process Status Flow area to move the release request from the Build InProgress status to the Test Approval phase.
The release must be approved before it can move forward. For more information,see Test milestone - Testing the release on page 310.
Build milestone - Building a controlled environment for the release
Chapter 7 Release coordinator role 309
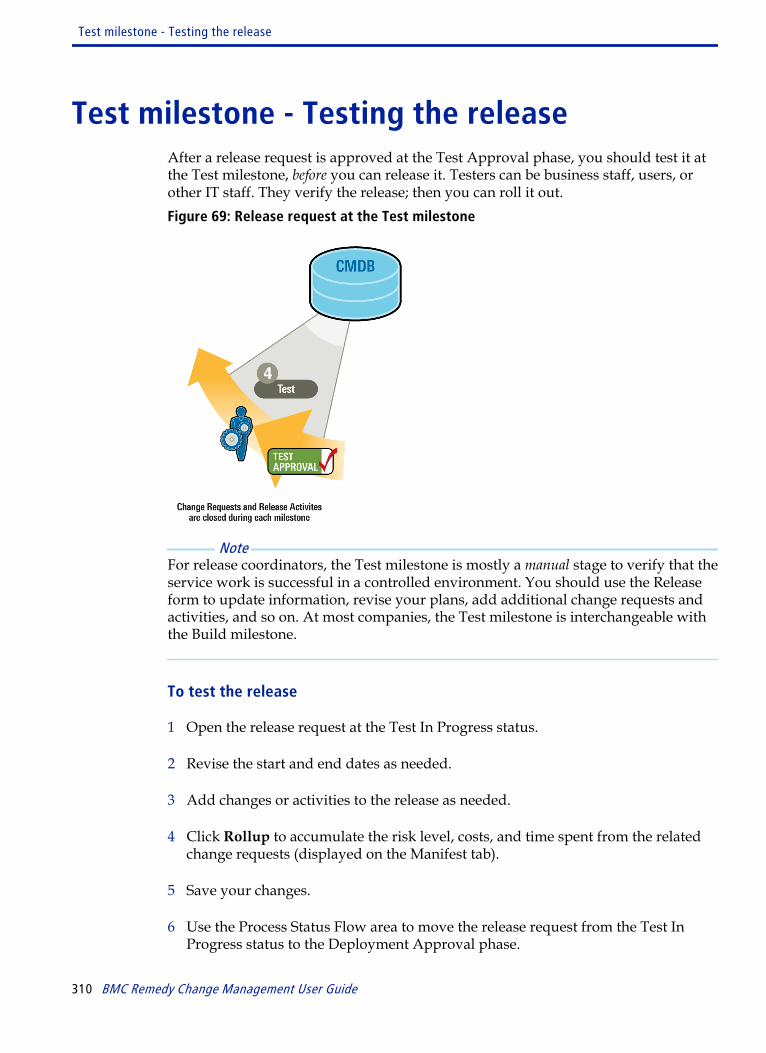
Test milestone - Testing the releaseAfter a release request is approved at the Test Approval phase, you should test it atthe Test milestone, before you can release it. Testers can be business staff, users, orother IT staff. They verify the release; then you can roll it out.Figure 69: Release request at the Test milestone
Note For release coordinators, the Test milestone is mostly a manual stage to verify that theservice work is successful in a controlled environment. You should use the Releaseform to update information, revise your plans, add additional change requests andactivities, and so on. At most companies, the Test milestone is interchangeable withthe Build milestone.
To test the release
1 Open the release request at the Test In Progress status.
2 Revise the start and end dates as needed.
3 Add changes or activities to the release as needed.
4 Click Rollup to accumulate the risk level, costs, and time spent from the relatedchange requests (displayed on the Manifest tab).
5 Save your changes.
6 Use the Process Status Flow area to move the release request from the Test InProgress status to the Deployment Approval phase.
Test milestone - Testing the release
310 BMC Remedy Change Management User Guide

The release must be approved before it can move forward. For more information,see Deployment milestone - Rolling out the release to the business on page 311.
Deployment milestone - Rolling out therelease to the business
After a release request is approved at the Deployment Approval phase, the release isrolled out to the business at the Deployment milestone. You deploy the release to theIT infrastructure according to the prepared plan at the scheduled start date (forexample, over a long holiday weekend). You must distribute hardware and softwareto the installation site. Task implementers must follow a prepared script of tasks andactivities to complete the installation.
The Deployment milestone can require approvals to make sure the release does notneed to be rolled back.
Figure 70: Rolling out the release at the Deployment milestone
To deploy the release to the business
1 Open the release request at the Deployment In Progress status.
2 On the Dates tab in the Classic view or the Dates/System tab in the BestPractice view, revise the deployment start and end dates if needed.
You use these date fields to specify when the release is deployed to the ITinfrastructure. These dates are usually different than the Scheduled Start and EndDates, which is typically a longer process.
3 On the Manifest tab, review the status of the change requests and activities thatare included in the release manifest.
Deployment milestone - Rolling out the release to the business
Chapter 7 Release coordinator role 311
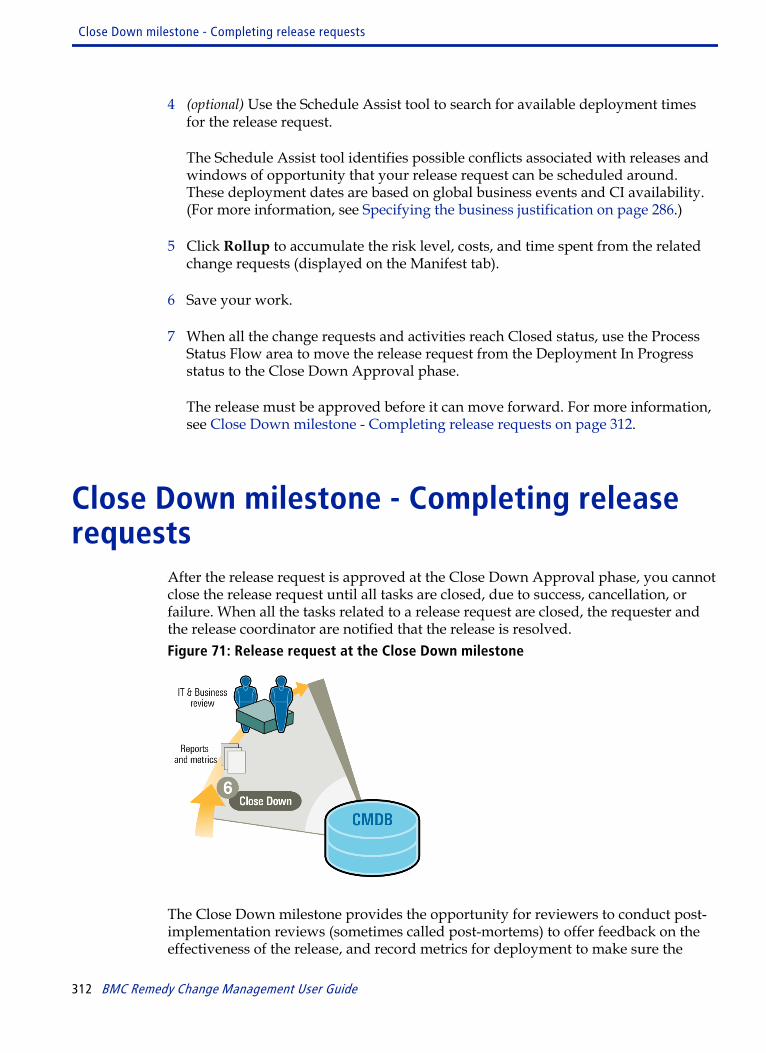
4 (optional) Use the Schedule Assist tool to search for available deployment timesfor the release request.
The Schedule Assist tool identifies possible conflicts associated with releases andwindows of opportunity that your release request can be scheduled around.These deployment dates are based on global business events and CI availability.(For more information, see Specifying the business justification on page 286.)
5 Click Rollup to accumulate the risk level, costs, and time spent from the relatedchange requests (displayed on the Manifest tab).
6 Save your work.
7 When all the change requests and activities reach Closed status, use the ProcessStatus Flow area to move the release request from the Deployment In Progressstatus to the Close Down Approval phase.
The release must be approved before it can move forward. For more information,see Close Down milestone - Completing release requests on page 312.
Close Down milestone - Completing releaserequests
After the release request is approved at the Close Down Approval phase, you cannotclose the release request until all tasks are closed, due to success, cancellation, orfailure. When all the tasks related to a release request are closed, the requester andthe release coordinator are notified that the release is resolved.Figure 71: Release request at the Close Down milestone
The Close Down milestone provides the opportunity for reviewers to conduct post-implementation reviews (sometimes called post-mortems) to offer feedback on theeffectiveness of the release, and record metrics for deployment to make sure the
Close Down milestone - Completing release requests
312 BMC Remedy Change Management User Guide
release met its service targets. After IT and the business unit (BU) have completedthe review, no further changes or activities are performed on this release
When the requester has verified that the release request was resolved satisfactorily,the release request can be set to Closed. If the requester does not close the releaserequest within the allowed response time of it being resolved, the release request isclosed automatically after a specified period of time. The Status Reason for therelease request indicates that the release was automatically closed.
The allowed response time depends on how the application administratorconfigured the Release Management application. The default is 15 days.
If the requester is not satisfied with the release request, the requester can reopen therelease request.
The release coordinator is notified that the release request is reopened, and mustrespond to the release request.
A release request is moved to the Close Down milestone when it is cancelled.
To close down the release
1 Open the release request at the Close Down In Progress status.
2 Revise the start and end dates as needed.
3 Add changes or activities to the release as needed.
4 Click Rollup to accumulate the risk level, costs, and time spent from the relatedchange requests (displayed on the Manifest tab).
5 Save your changes.
6 Click Next in the Process Flow Status bar to move the release request forward.
To cancel a release
Once the release moves into the Planning milestone it can be cancelled. Cancelling arelease will close the release record and move it to the Close Down milestone. Allchanges and activities created or related to the release must either be Completed,cancelled or Closed to cancel the release request.
1 Open the release request.
2 For the current milestone, select Cancel => Reason.
Reason can have the following values:
Close Down milestone - Completing release requests
Chapter 7 Release coordinator role 313
■ No Longer Required
■ Funding Not Available
■ To Be Re-Scheduled
■ Resources Not Available
If all related Changes and Activities defined in the Manifest tab are eitherCompleted, Cancelled or Closed, the status of the release request is changed toCancelled, with the status reason as the reason selected and the release request ismoved to the Close Down milestone.
Monitoring the progress of a release requestAs a release request is being worked on, you can follow its progress by viewing theinformation by one of the following methods:
When using the Best Practice view When using the Classic view
On the Work Detail tab, select the Work Info fromthe table and then click View. 1 Click the Work Info tab on the Release form.
2 Select the Work Info from the table and then clickView.
For example, during its Deployment milestone, you can follow the progress of thetasks as they are being completed.
To view the progress of a release request when using the Best Practice view
1 Open the release request.
The release request form displays details about the release assignments, targetdate, status, next approval phase, potential risks, and whether the release requesthas been escalated.
2 View progress details of the release request by clicking the appropriate tab:
Monitoring the progress of a release request
314 BMC Remedy Change Management User Guide

Tab Description
Work Detail■ View information about each step in the process in the work information history area.
■ Review the current stage in the approval process for the release request, includingthe next approval phase.
Note: The Work Detail tab is displayed when you open the Release form.
Manifest View and create associations to activities and change requests.
Relationships View and create associations between releases and other application objects (example- incidents, known errors, changes, problem investigations, software library items,LDAP objects, CI unavailability and configuration items, and other releases).
Date/System View the planned dates, information related to who and when the release request wassubmitted and by who and when the release request was last modified.
SLM Review the agreed-upon service targets for the request. This tab is visible only if theBMC Service Level Management application is installed.
3 View additional details by clicking the appropriate links:
Link Description
Links => Categorization>
View the timing of the release request and its categorizations.
Links => Financials View information relating to cost types, total costs, and the total costs in a specificcurrency.
4 Close the Release form.
To view the progress of a release request when using the Classic view
1 Open the release request.
The top part of the release request provides information about the status, nextapproval phase, potential risks, and whether it is escalated.
2 View progress details of the release request by clicking the appropriate tab:
Tab Description
General View who requested the release request and who is assigned to the request. When therelease request was created, it was automatically assigned to the appropriate supportstaff group or person.
Classification View the timing of the release request and its categorizations.
Monitoring the progress of a release request
Chapter 7 Release coordinator role 315

Tab Description
Work Info View information about each step in the process written in the work informationhistory area.
Manifest View and create associations to activities and change requests.
Assignments View who is assigned to the release request as the release coordinator.
Relationships View or create associations between releases and other application objects (example -incidents, known errors, changes, problem investigations, software library items,LDAP objects, CI unavailability and configuration items, and other releases).
Approvers Review the current stage in the approval process for the release request, including thenext approval phase.
SLM Review the agreed-upon service targets for the request. This tab is visible only if theBMC Service Level Management application is installed.
Financials View information relating to cost types, total costs, and the total costs in a specificcurrency.
Dates View the planned dates.
3 Close the Release form.
Working with release request assignmentsOne responsibility for release coordinators is creating the release requestassignments. They can be assigned manually or automatically. If an assignmentdefinition has not been created for the Release Management application, you mustassign the release manually.
For information on assigning the release manually, see Automatically assigningreleases on page 318.
The release assignee is then notified of release request assignments by email, pager,or BMC Remedy Alert. Assigned release requests can also be listed in the ReleaseInformation table in the console.
Release requests are assigned automatically on creation by the Release Managementapplication. The assignment is based on the release request’s categorization. TheAssignment tab displays information about people assigned to a release as theRelease Coordinator.
The time spent resolving activities or change requests is automatically rolled up intothe release. Separate Time Spent (Classic view) and Time Information fields display
Working with release request assignments
316 BMC Remedy Change Management User Guide
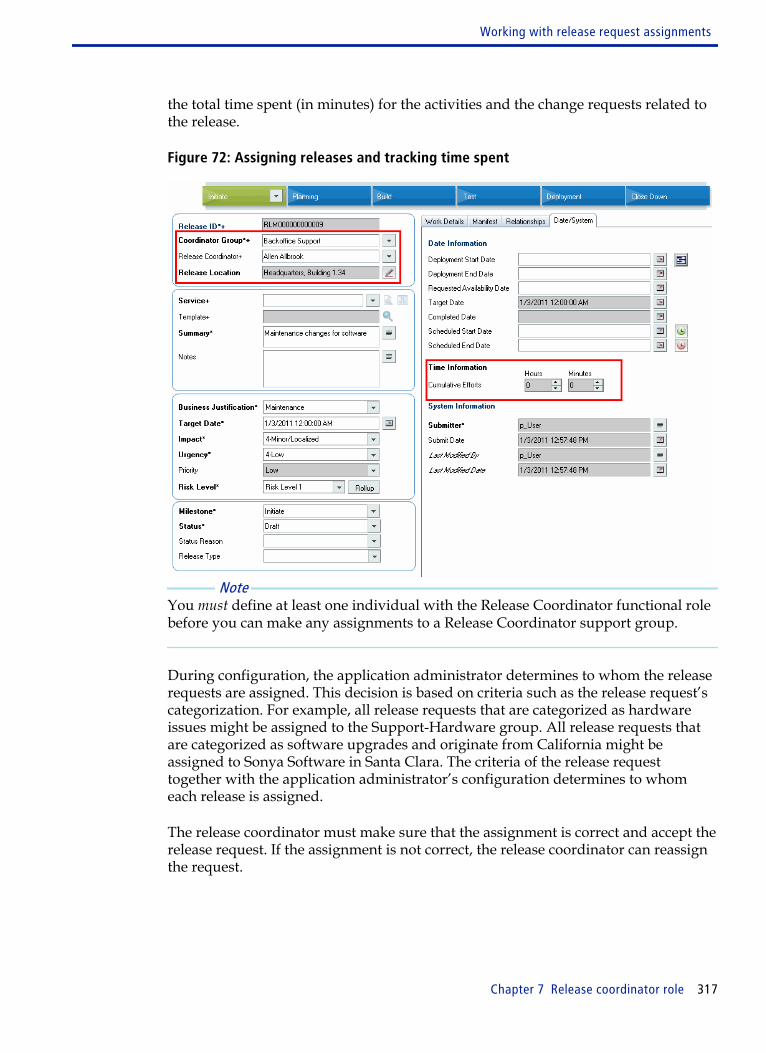
the total time spent (in minutes) for the activities and the change requests related tothe release.
Figure 72: Assigning releases and tracking time spent
Note You must define at least one individual with the Release Coordinator functional rolebefore you can make any assignments to a Release Coordinator support group.
During configuration, the application administrator determines to whom the releaserequests are assigned. This decision is based on criteria such as the release request’scategorization. For example, all release requests that are categorized as hardwareissues might be assigned to the Support-Hardware group. All release requests thatare categorized as software upgrades and originate from California might beassigned to Sonya Software in Santa Clara. The criteria of the release requesttogether with the application administrator’s configuration determines to whomeach release is assigned.
The release coordinator must make sure that the assignment is correct and accept therelease request. If the assignment is not correct, the release coordinator can reassignthe request.
Working with release request assignments
Chapter 7 Release coordinator role 317
Automatically assigning releases
You can automatically assign the release using the Auto Assign option from the SetAssignment using menus. Assigning the release coordinator using Auto Assign usesthe requester’s information, the Release Location information, and the Operationaland Product Categorization information about the form to determine an assignmentmatch.
These assignments are based on routing information stored in CFG:Assignmentform. The CFG:Assignment form assigns the groups and then Auto Assign assignsthe individual. For more information, see the BMC Remedy IT Service ManagementConfiguration Guide .
Reassigning release requests
If you cannot work on an assigned release request, you can reassign it to anotherrelease coordinator in the Best Practice view. You can ask your coordinator toreassign the release request.
If the release request was categorized incorrectly, it can also be reassigned.
Note You must set a notification rule and define a milestone for it to enable thenotification workflow. For more information on setting notification rules, see theBMC Remedy IT Service Management Configuration Guide.
To reassign a release request when using the Best Practice view
1 Open the release request.
2 On the Release form, select the Release Coordinator to whom the release requestis to be assigned
3 Click Save.
The release coordinator is notified of the reassigned release request.
To reassign a release request when using the Classic view
1 Open the release request.
2 Click the Assignment tab.
3 Select the Release Coordinator to whom to assign the release request.
Working with release request assignments
318 BMC Remedy Change Management User Guide
4 Click Save.
The release coordinator is notified of the reassigned release request.
Working with release reassignment requests
Release coordinators are responsible for responding to reassignment requests. Whena release coordinator reassigns a release request to another coordinator, the person isnotified. Upon reviewing the release, the coordinator can reassign the release toanother qualified release coordinator.
To respond to release reassignment requests
1 Open the Overview Console or the Release Management Console.
All reassignment requests appear in the table along with other release requests.BMC recommends regularly monitoring your assigned work to keep track of anyrelease requests reassigned to you.
2 Select the appropriate release request.
3 Click View.
After reviewing the release request, you can manually reassign the releasecoordinator.
4 To deny the reassignment request, you must reassign it to another releasecoordinator. To reassign the release request, do one of the following:
When using the Best Practice view When using the Classic view
Select the Release Coordinator on the Release form.1 Click the Assignment tab.
2 Select the Release Coordinator to whom toreassign the request.
3 Select an assignment method (for example, AutoAssign), and then click Set.
5 Click Save.
If you reassign the release request, the new assignee is automatically notified ofthe changed assignment.
For more information, see Assigning release requests on page 322.
Working with release request assignments
Chapter 7 Release coordinator role 319
Tracking efforts for a release record
The Effort log displays a list of all individuals who have worked on the releaseduring its life cycle.
Note Entries in the effort log are not system-generated, so you must enter them manually.The list is not in chronological order.
To track efforts
1 Open the release request.
2 Choose Functions => Track Effort.
3 Fill in the Select an Assignee fields.
This information is required to select the individual for whom the effort log isbeing created.
4 Fill in the Select Effort Classification fields.
This information is required to show what kind of effort is being logged, forexample, actual implementation activity.
5 Fill in the Enter Effort Time Spent fields.
This information records where the time was spent.
Note As needed, you can adjust the time spent in the Update Assignee Effort Durationsection. For information, see Performing additional release request functions onpage 320.
6 Click Add, and then click Close.
Performing additional release request functions
In addition to creating a release request, you can perform the functions listed in thefollowing table.
Working with release request assignments
320 BMC Remedy Change Management User Guide
Table 34: Additional release request functions
Function Action
Modify the effort log From the release request, choose Functions => Track Effort. Update any ofthe assessment type information and the time spent, and then click Save.Note: You must be the release coordinator to modify the effort time.
Delete the effort log From the release request, choose Functions => Track Effort. Select anentry and then click delete.Note: You must be the release coordinator to modify the effort time.
Update assignee effort duration From the release request, choose Functions => Track Effort. Select anentry and then enter the time spent in hours or minutes.Note: You must be the release coordinator to modify the effort time.
Receiving notifications of release request assignments
Release coordinators are notified of new release requests based on their notificationmethod preferences defined in their personal record.
The available notifications follow:
■ Individual Notification—A release coordinator is notified according to thenotification method specified in their personal record.For example, if Bob Backline has a notification method of BMC Remedy Alert, hereceives a notification from BMC Remedy Alert for each release request that isassigned to him.
■ Group Notification—A release coordinator group is notified according to thenotification method specified by each group member’s entry in their personalrecord.For example, if a release request is assigned to the Support-Software group, eachgroup member is notified through the notification method specified in theirpersonal record. If Sarah Software has Email specified as the notification methodin her personal record, the notification is sent to her by email. If Bob Backline hasBMC Remedy Alert specified, he is notified accordingly.
To receive release assignment notification by BMC Remedy Alert
1 Log in to BMC Remedy Alert as a Support staff member.
When you or your group receives a notification that you or your group has beenassigned to a release request, the information appears in the BMC Remedy Alertwindow.
2 To evaluate a release, select the release request listed in the BMC Remedy Alertwindow.
Working with release request assignments
Chapter 7 Release coordinator role 321
3 Choose Alerts => Details.
The release request appears in the Release form. For more information, see Settingapplication preferences - Release Management on page 440.
Assigning release requests
The release coordinator is typically responsible for the overall release process.
To assign release requests using the Best Practice view
1 Open the release request.
Certain fields are automatically filled based on the default configuration andrequester information in the release request. For example, the ReleaseCoordinator field already has an assignment.
2 To assign a release coordinator, select the appropriate option:
■ Coordinator Group- Provides a list of coordinator groups. Select the group ofthe release coordinator you want to assign the release to.Groups that have at least one user with the Release Coordinator functional roleare listed for selection.
■ Release Coordinator- Provides a list of users with the functional role of aRelease Coordinator in the selected coordinator group. Select the appropriaterelease coordinator from this list.
3 Save the release request.
The release coordinator is automatically notified of the assignment.
To assign release requests when using the Classic view
1 Open the release request.
2 Click the Assignment tab.
Based on the default configuration and requester information in the releaserequest, certain fields are already filled. For example, the Release Coordinatorfield already has an assignment.
3 To assign a release coordinator if none is assigned, select Auto Assign from theSet Assignment Using field and then click Set.
Working with release request assignments
322 BMC Remedy Change Management User Guide

4 To assign a release coordinator, use one of the following options and then clickSet:
■ My Default Group—Assigns the release to you and your default group.
■ My Group List—Opens a list of all groups to which you belong. Select theappropriate group from this list.
■ Favorite Groups—Assigns the release to the typical groups to which yoursupport group assigns requests.
■ Auto Assign—Automatically assigns the request based on predefined mapping.
■ Release Coordinator—Assigns the release to you.
To be eligible as the release coordinator, a user must have the ReleaseCoordinator functional role. Groups that do not have a user with one of theseroles are not available for selection in the Release Coordinator field.
5 Save the release request.
The release coordinator is automatically notified of the assignment.
Working with release manifestsIn the Manifests tab, you can perform the additional functions with related releaserequests that are listed in the following table.
Button Action
View View the selected item in the Changes and Activities table. Opens the application objectform.
Remove Deletes the relationship with the release.
Search Opens the Search dialog box for the specified Request Type.
Create Opens a window allowing you to create the specified Request Type. You can create anActivity or an Infrastructure Change. For more information:
■ Managing release activities on page 325
■ Creating related change requests on page 242
Request Type Displays list of all the available application objects that can be related to a release.
Show Milestone Filters list by selected milestone, for example, Deploy.
Show Related Filters list of all the available application objects that are related to a release.
Working with release manifests
Chapter 7 Release coordinator role 323

Button Action
Quick Actions Performs advanced actions on relationships.
Execute Executes selected Quick Action.
Using Quick Actions on changes and activities
The Quick Actions menu on the Manifests Tab enables you to perform advancedactions on changes and activities. Not all actions are available with all request types.This table shows the relationship between request types and the available actionsyou can perform on them.
Table 35: Matrix of request types and quick actions
Request type Relationship quick action
Activity Update Attributes
Infrastructure Change■ Get Related Relationships
■ Update Attributes
To use quick actions
1 Select the entry from the Relationships table.
2 From the Quick Actions menu, select an action.
For example, you can copy relationships from a CI already related to the releaserequest. This table lists all the quick actions you can use.
Table 36: Effect of using Relationship Actions
Relationship action Effect
Update Attributes Opens Manifest Attributes dialog box for updating milestone attributes for therelationship.
Get RelatedRelationships
Copies the relationships of the selected record to the release request’s relationships.For more information, see Copying relationships on page 240.
3 Click Execute.
Working with release manifests
324 BMC Remedy Change Management User Guide
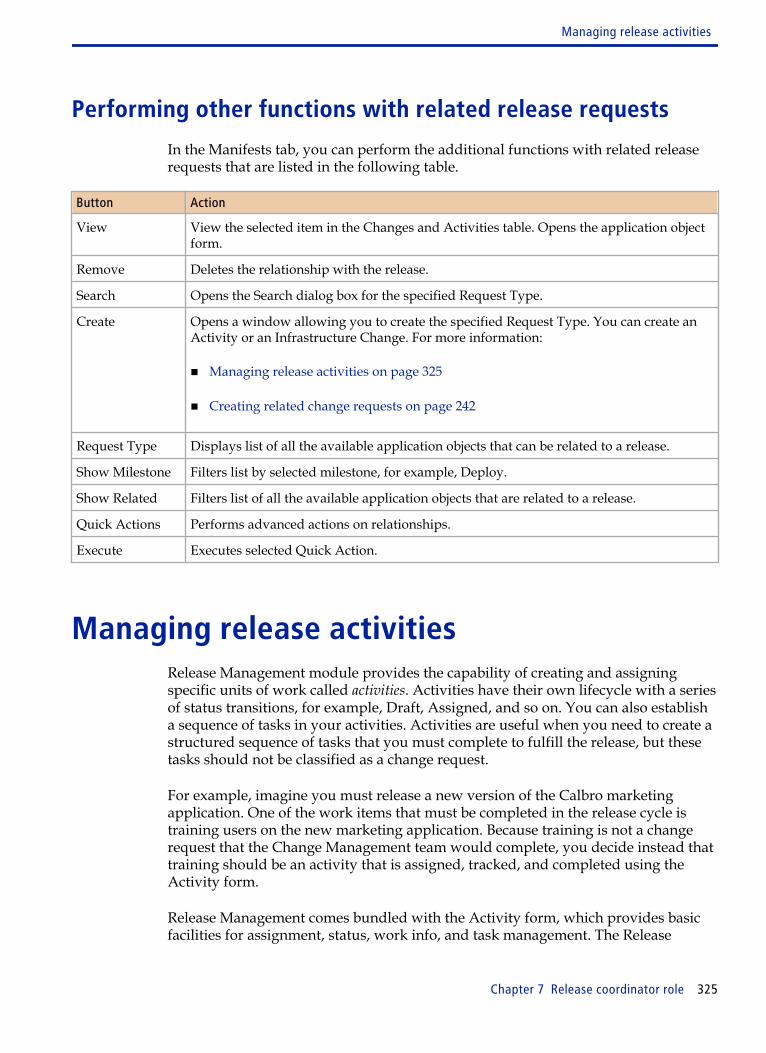
Performing other functions with related release requests
In the Manifests tab, you can perform the additional functions with related releaserequests that are listed in the following table.
Button Action
View View the selected item in the Changes and Activities table. Opens the application objectform.
Remove Deletes the relationship with the release.
Search Opens the Search dialog box for the specified Request Type.
Create Opens a window allowing you to create the specified Request Type. You can create anActivity or an Infrastructure Change. For more information:
■ Managing release activities on page 325
■ Creating related change requests on page 242
Request Type Displays list of all the available application objects that can be related to a release.
Show Milestone Filters list by selected milestone, for example, Deploy.
Show Related Filters list of all the available application objects that are related to a release.
Quick Actions Performs advanced actions on relationships.
Execute Executes selected Quick Action.
Managing release activitiesRelease Management module provides the capability of creating and assigningspecific units of work called activities. Activities have their own lifecycle with a seriesof status transitions, for example, Draft, Assigned, and so on. You can also establisha sequence of tasks in your activities. Activities are useful when you need to create astructured sequence of tasks that you must complete to fulfill the release, but thesetasks should not be classified as a change request.
For example, imagine you must release a new version of the Calbro marketingapplication. One of the work items that must be completed in the release cycle istraining users on the new marketing application. Because training is not a changerequest that the Change Management team would complete, you decide instead thattraining should be an activity that is assigned, tracked, and completed using theActivity form.
Release Management comes bundled with the Activity form, which provides basicfacilities for assignment, status, work info, and task management. The Release
Managing release activities
Chapter 7 Release coordinator role 325

Management integration with the Activity form lets you create any generic activitythat you need to track.
Figure 73: Activity form
You use the Activity form to add a set of activities to a release request. You can trackrelease states and requester information, relate and assign tasks, and enter work loginformation.
Note For more information about the activity assignee role, see Working with activities asan activity assignee on page 375.
Creating activities - basic steps
The following section describes the basic steps for creating an activity.
To create a new activity—basic steps
1 Perform one of the following actions:
■ In the Initiate milestone of the Process Flow Status bar, click the arrow andchoose Action => Create a New Activity .
Managing release activities
326 BMC Remedy Change Management User Guide
■ On the Release Management Console, click Create (above the Change Requestsand Activities table).
■ On the Manifest tab of the Release form, choose the Activity request type andthen click Create.
The Activity form is displayed. The tabs you see vary according to which otherapplications are installed, for example, BMC SLM.
The activity initially appears in Draft status. To enable the activity from Draftstatus to be moved to its next status, enter information into the following requiredfields.
2 (optional) Use an activity template to fill out the contents of the activity.
Activity templates are especially useful in any activity that follows well-definedmethods for specific and repeated requirements. Activity templates do more thansimply fill out fields for you; they can also include tasks with the activity. Formore information, see Selecting activity templates on page 450.
3 In the Summary field, enter a brief description of the activity.
4 In the Detailed Description field, enter a more complete description of theactivity.
5 Select the Priority to identify the importance you (as support staff) assign to theactivity.
Priority indicates the relative order in which activities should be addressed. It isinfluenced by considerations of risk and resource availability. The default value ofthe Priority field is Low.
6 In the Requester tab, enter the person creating the activity (Requested By).
When creating an activity, the Requested By information is populatedautomatically with the people and group information of the person logged in. InSearch mode, these fields are blank.
To modify this information, you can click in the Last Name field, enter partialinformation you might know about the individual you are looking for, and thenpress ENTER.
From the People Search dialog box that appears, select the appropriate userrecord, and then click Select. The other fields in the Requested By section arefilled in with information from the user’s People form record.
7 Enter the location information for the activity.
Managing release activities
Chapter 7 Release coordinator role 327
The Location Information is populated automatically with the companyinformation of the person logged in.
8 Complete Assignment information about the activity.
For information, see Creating activity assignments on page 328.
9 (optional) Define work information about the activity.
For information, see Entering work information on page 381.
10 (optional) Create tasks associated with the activity.
For information, see Creating activity task groups and tasks on page 383.
11 (optional) Complete financial information associated with the activity.
For information, see Planning financial information for activities on page 385.
12 (optional) Plan the activity’s dates.
For information, see Planning dates on page 386.
13 Click Save.
Creating activity assignments
Your responsibility as a release coordinator is to properly assign the activity. If anassignment definition has not been created for the activity, you must assign theactivity manually. Otherwise, the best practice is to use the assignment rules alreadyconfigured for you by your Release Management administrator.
The activity assignee is then notified of activity assignments by email, pager, or BMCRemedy Alert. Assigned activities can also be listed in the Assigned Work Orderstable in the console.
Activity assignment is based on the activity’s categorization. The Assignment tabdisplays information about people assigned to an activity as the Request Manager orRequest Assignee.
Note You must define at least one individual with the Request Manager functional rolebefore you can make any assignments to a Support Group.
Managing release activities
328 BMC Remedy Change Management User Guide
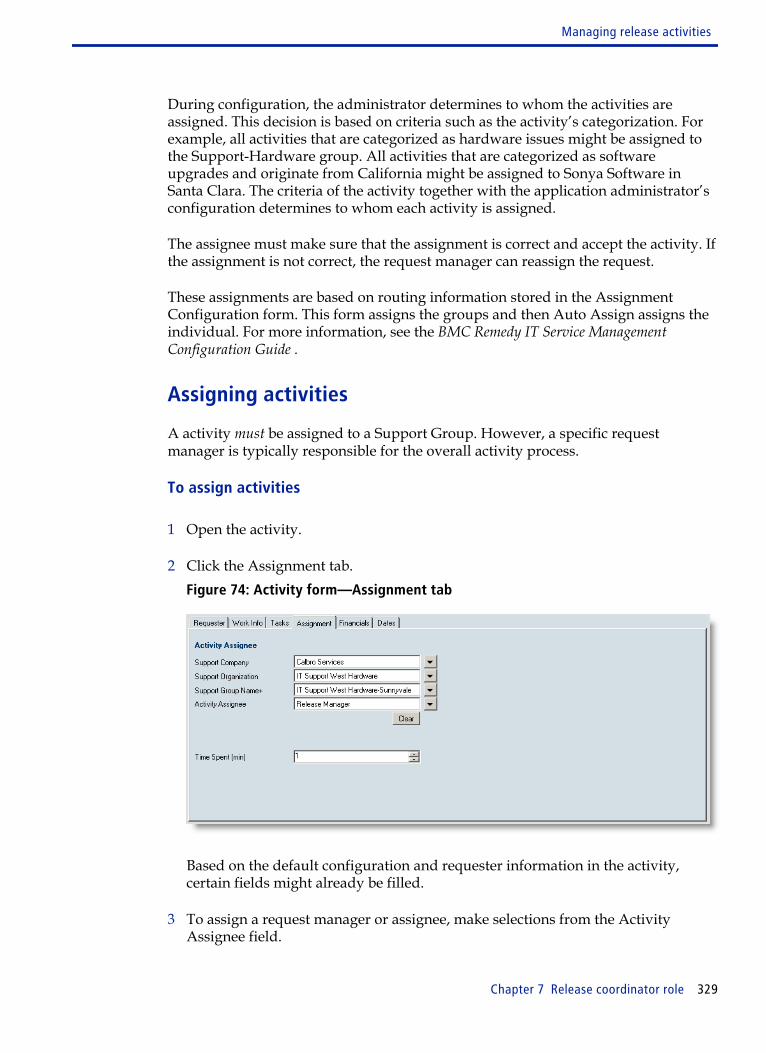
During configuration, the administrator determines to whom the activities areassigned. This decision is based on criteria such as the activity’s categorization. Forexample, all activities that are categorized as hardware issues might be assigned tothe Support-Hardware group. All activities that are categorized as softwareupgrades and originate from California might be assigned to Sonya Software inSanta Clara. The criteria of the activity together with the application administrator’sconfiguration determines to whom each activity is assigned.
The assignee must make sure that the assignment is correct and accept the activity. Ifthe assignment is not correct, the request manager can reassign the request.
These assignments are based on routing information stored in the AssignmentConfiguration form. This form assigns the groups and then Auto Assign assigns theindividual. For more information, see the BMC Remedy IT Service ManagementConfiguration Guide .
Assigning activities
A activity must be assigned to a Support Group. However, a specific requestmanager is typically responsible for the overall activity process.
To assign activities
1 Open the activity.
2 Click the Assignment tab.Figure 74: Activity form—Assignment tab
Based on the default configuration and requester information in the activity,certain fields might already be filled.
3 To assign a request manager or assignee, make selections from the ActivityAssignee field.
Managing release activities
Chapter 7 Release coordinator role 329

If needed, you can click Clear to remove information from Activity Assignee field.
4 Enter the time spent resolving the activity.
5 Save the activity.
The activity assignee is automatically notified of his assignment.
Working with release relationshipsYou can use the Relationships tab to create associations between releases and otherapplication objects, for example, CI unavailability, configuration items, incidents,infrastructure changes, known errors, LDAP objects, problem investigations, otherreleases, and software library items. Relating application objects (such as CIs) to therelease request lets you identify items that the Release Coordinator plans to addressin the release.
Note For more information, see Working with relationships on page 220. The informationabout relationships in the context of change requests applies equally to releaserequests. Where exceptions exist, these are noted.
Figure 75: Release form—Relationships tab
Note The relations in a release request are informational only, and are not required to bepart of any milestone of the release request. In addition, the application objects donot have to be Completed or Closed for this release to be Closed
Defining release relationships
You use request types to define these relationships. The Related request types toBMC Remedy Change Management and Release Management modules table
Working with release relationships
330 BMC Remedy Change Management User Guide
displays a list of request types to which you can relate releases and their availableactions, along with their start and end dates. The list varies depending on the otherBMC Remedy ITSM applications you have installed with BMC Remedy ChangeManagement.
To view a list of request types to which you can relate releases and their availableactions, along with their start and end dates, see “Related request types for BMCRemedy Change Management and Release Management” on page 222.
To define a relationship when using the Best Practice view
1 Open the release request record.
2 In the Quick Action area, click the arrow beside Create Relationship to.
3 From the menu, select the type of record to you want to relate the current recordto.
4 In the Search field of the dialog box that opens, type a search string. For example,if you are creating a relationship to an incident request about a printer thatregularly goes off-line, you might type printer off line.
The search scans multiple fields in each record looking for a match, and returns alist of records that contain the phrase "printer off line" in one of the scanned fields.For a list of the fields that are scanned during a search, see "Fields scanned,"which follows.
Note The type of search dialog box that appears depends on the type of record youchose from the menu.
Tip Try to supply as much information as possible in each type of search to reduce theoverall number of records returned by the search. If, after using a more specificsearch string, the search returns too many records, consider using the advancedsearch. To do this, click Use Advanced Search, which opens a form in searchmode that is relevant to the type of relationship you are making.
5 From the search results table, select the specific record to which you want tocreate the relationship.
6 From the Relationship Type list at the bottom of the search dialog box, select thetype of relationship you want to create.
7 Create the relationship by clicking Relate.
Working with release relationships
Chapter 7 Release coordinator role 331

Note The specific list for Select a Relationship Type depends on the type ofrelationship you are creating. For example, if you are creating a relationship witha change request record, the list includes Related to, if you are creating arelationship with an incident request record, the list includes Related to, Caused,and Corrects. If you are creating a relationship with a known error, there are tworelate buttons: Initiated by and Related to, and so on.
8 Close the search dialog.
To define release relationships when using the Classic view
1 Open the release request from which to define the relationship, and then click theRelationships tab.
The Relationships tab shows the record types that you can relate to the release.
Note The Relationships tab appears in New and Modify mode, but does not in Searchmode.
2 From the Request Type list at the bottom of the Relationships tab, select the typeof application object to which to relate the current release request.
You can relate a release to any of the options listed in the Request Type field, forexample, Infrastructure Change.
3 Add the release type to the release.
You can perform the following functions with related release requests.
GUI item Action
Search button Opens the Search dialog box for the specified Request Type. For information, see Searching for request types and establishing the relationship type on page 333.
Create button Opens a window allowing you to create the specified Request Type.
Note: The Create button is disabled for Configuration Item, CI Unavailability, SoftwareLibrary Item, or LDAP Objects.
Request Typemenu
Displays list of all the available application objects that can be related to a release.
View button View the selected item in the Relationship table. Opens the application object form.
Working with release relationships
332 BMC Remedy Change Management User Guide
GUI item Action
Remove button Deletes the relationship with the release.
Note: You can delete items from this release request if you later decide that they will notbe addressed. You should remove the relationships before the release request is closed.
Show Relatedmenu
Filters list of all the available application objects that are related to a release.
Quick Actionsmenu
Performs advanced actions on relationships. For more information, see Using QuickActions on relationships on page 234.
Execute button Executes selected Quick Action.
The original release request and the related request types appear in theRelationships table. To refresh the table right-click in the table and select RefreshAll in Table.
4 Save your changes.
Searching for request types and establishing the relationshiptype
You can search for a request type (for example, Release or Infrastructure Change)and then establish a relationship (for example, Related to) to the release.
To search for releases to relate to the current release, use the following criteria:
Table 37: Release relationship searches
Search type Criteria
Basic Search Release ID, Summary, Status, Status Reason, Impact, Urgency, Risk Level,Milestone, Release Type, Priority, and Deployment Type fields.You can also perform advanced searches.
Categorization Search Product and Operational Categorization fields.
Release Coordinator Support Company, Support Organization, Support Group Name, and ReleaseCoordinator Login fields.
Date and Location Release Location and Release Dates fields.
To search for request types and establish the relationship type
1 Open the release request from which to define the relationship, and then click theRelationships tab.
Working with release relationships
Chapter 7 Release coordinator role 333

2 From the Request Type list at the bottom of the Relationships tab, select the typeof application object to which to relate the current release request.
3 In the search window for the request type, complete the search criteria tabs withthe relevant query information (for example, the Deployment Type), and thenclick Search.
The search form appears.
Note The contents of the search form depend on the type of application object youchose in the Request Type list.
Figure 76: Release Relationship Search form
Supply as much information as possible in the search dialog box to reduce theoverall number of records returned by the search. Matching results appear in asearch results table.
4 From the search results table, select the release request with which to create therelationship.
5 From the Relationship Type list at the bottom of the search dialog box, select thetype of relationship to create (for example, Related to).
Working with release relationships
334 BMC Remedy Change Management User Guide
6 Click Relate, and then click OK to close the confirmation dialog box.
The search window closes automatically. The original release request and therelated request types appear in the Relationships table. To refresh the table, right-click in the table and select Refresh All in Table.
Using Quick Actions on relationships
The Quick Actions menu on the Relationships Tab enables you to perform advancedactions on relationships. Not all actions are available with all request types. Thistable shows the relationship between request types and the available actions you canperform on them.
Table 38: Matrix of request types and quick actions
Request type Relationship quick action
CI Unavailability■ Broadcast CI Unavailability
■ Get Related Relationships
■ Modify Relationship Type
Configuration Item■ Create New CI Unavailability
■ Explore CI
■ Get CI Impact/Urgency
■ Get CI Product Categorization
■ Get Impacted Areas
■ Get Related Relationships
■ Modify Relationship Type
■ Show Related Services
Project None
Incident■ Get Related Relationships
■ Modify Relationship Type
Working with release relationships
Chapter 7 Release coordinator role 335

Request type Relationship quick action
Infrastructure Change■ Get Related Relationships
Known Error■ Get Related Relationships
■ Modify Relationship Type
LDAP Object None
Problem Investigation■ Get Related Relationships
■ Modify Relationship Type
Release■ Get Related Relationships
Software Library Item None
To use quick actions
1 Select the entry from the Relationships table.
2 From the Quick Actions menu, select an action.
For example, you can copy relationships from a CI already related to the releaserequest. This table lists all the quick actions you can use.
Table 39: Effect of using Relationship Actions
Relationship action Effect
Explore CI Opens the graphical BMC Atrium Explorer that shows the selected CI’s relationshipto other CIs.
Create New CIUnavailability
Creates a new CI Unavailability record for the selected CI.
Note: This option is available only if BMC Remedy Asset Management is installed.
For more information, see:
■ To create CI unavailability where other CI unavailability already exists on page255
■ To create CI unavailability from CIs associated with a request on page 256
Working with release relationships
336 BMC Remedy Change Management User Guide
Relationship action Effect
Get CI Impact/Urgency
Sets the current release request’s Impact and Urgency to the corresponding values ofthe selected CI.
Get CI ProductCategorization
Sets the current release request’s Product Categorization to that defined in theselected CI.
Get RelatedRelationships
Copies the relationships of the selected record to the release request’s relationships.For more information, see Copying relationships on page 240.
ModifyRelationship Type
Modifies the relationship type and enter a new description for the related item.
3 Click Execute.
Rolling up costs - Working with financialinformation
Risk, time, and costs (actual and budget) from activities and change requests that arerelated to the release manifest are rolled up on the Financials tab.
■ For activities, only the time spent, and the actual and budget costs, are rolled upto the release.
■ For change requests, in addition to time spent and costs, the highest Risk Level isalso rolled up to the release.
To roll up costs
1 Open the release request.
2 Do one of the following:
Rolling up costs - Working with financial information
Chapter 7 Release coordinator role 337
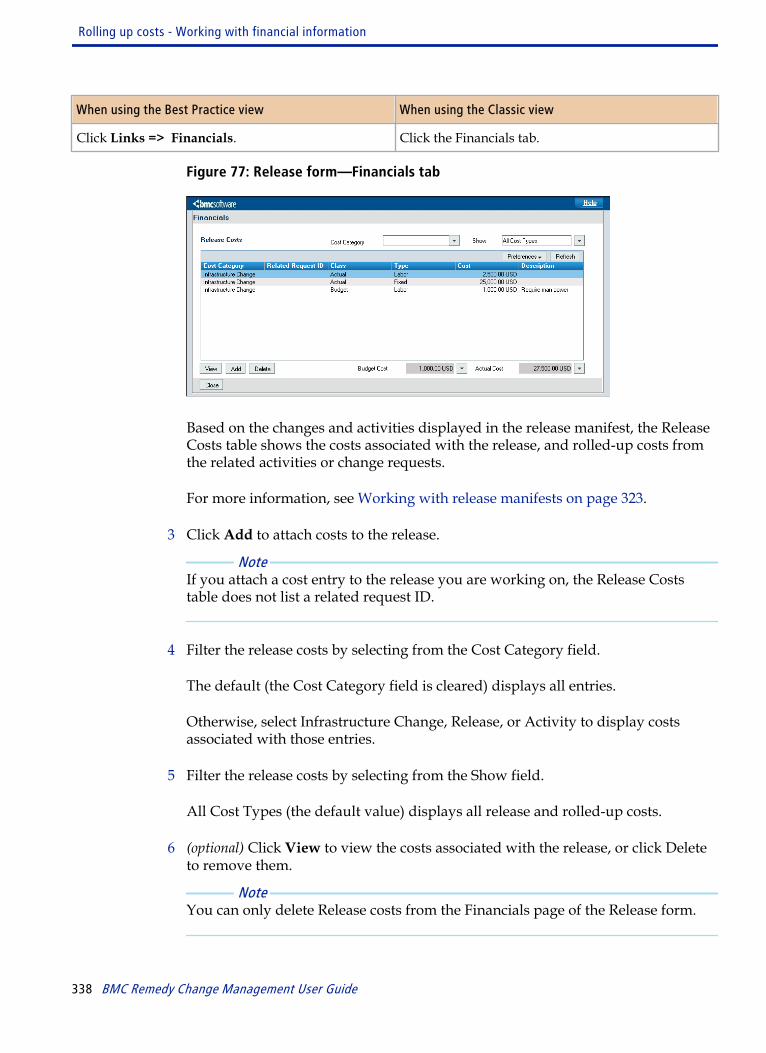
When using the Best Practice view When using the Classic view
Click Links => Financials. Click the Financials tab.
Figure 77: Release form—Financials tab
Based on the changes and activities displayed in the release manifest, the ReleaseCosts table shows the costs associated with the release, and rolled-up costs fromthe related activities or change requests.
For more information, see Working with release manifests on page 323.
3 Click Add to attach costs to the release.
Note If you attach a cost entry to the release you are working on, the Release Coststable does not list a related request ID.
4 Filter the release costs by selecting from the Cost Category field.
The default (the Cost Category field is cleared) displays all entries.
Otherwise, select Infrastructure Change, Release, or Activity to display costsassociated with those entries.
5 Filter the release costs by selecting from the Show field.
All Cost Types (the default value) displays all release and rolled-up costs.
6 (optional) Click View to view the costs associated with the release, or click Deleteto remove them.
Note You can only delete Release costs from the Financials page of the Release form.
Rolling up costs - Working with financial information
338 BMC Remedy Change Management User Guide
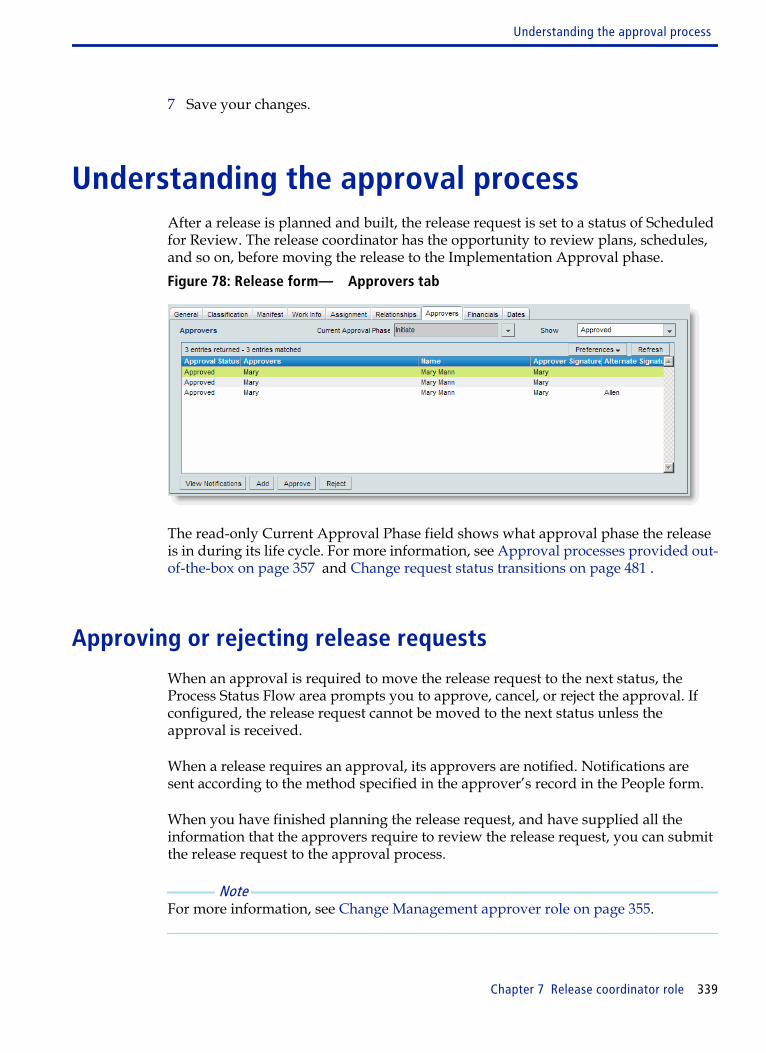
7 Save your changes.
Understanding the approval processAfter a release is planned and built, the release request is set to a status of Scheduledfor Review. The release coordinator has the opportunity to review plans, schedules,and so on, before moving the release to the Implementation Approval phase.Figure 78: Release form— Approvers tab
The read-only Current Approval Phase field shows what approval phase the releaseis in during its life cycle. For more information, see Approval processes provided out-of-the-box on page 357 and Change request status transitions on page 481 .
Approving or rejecting release requests
When an approval is required to move the release request to the next status, theProcess Status Flow area prompts you to approve, cancel, or reject the approval. Ifconfigured, the release request cannot be moved to the next status unless theapproval is received.
When a release requires an approval, its approvers are notified. Notifications aresent according to the method specified in the approver’s record in the People form.
When you have finished planning the release request, and have supplied all theinformation that the approvers require to review the release request, you can submitthe release request to the approval process.
Note For more information, see Change Management approver role on page 355.
Understanding the approval process
Chapter 7 Release coordinator role 339
Performing additional functions with related change requests
You can perform the additional functions with related change requests that are listedin the following table.
Function Action
View change dependencies1 Open the change request in the Change form, and then click the
Relationships tab.
2 In the Show Related field, select Infrastructure Change.
A list of change requests appears in the table. Changes with adependent relationship to the current request are shown as Dependentunder the Relationship Type column. The table shows the status of eachrequest and enables you to monitor the progress of the change requestimplementation.
3 To view a request, select it, and then click View.
Remove a related changerequest 1 Open the change request in the Change form, and then click the Related
Items tab.
2 Select the request to unrelate, and then click Remove Relationship.
3 Save the change request.
Note: This procedure removes the change request from the relationshipwith another change request. It does not delete any change requests.
Understanding the approval process
340 BMC Remedy Change Management User Guide
Task implementer roleThis section contains information about using the BMC Remedy ChangeManagement application as a task implementer to manage and fulfill your taskassignments.
Working with BMC Remedy ChangeManagement as a task implementer
When tasks are added to a change request the change can be implemented using thetasks implementers. In the Classic view, the Change Implementer fields are hidden.Task implementers are the people or groups responsible for the tasks related to achange request. Change requests typically start in the Draft status and any relatedtask groups or tasks are in Staged status. When the change request status is set toScheduled, the following takes place:
■ If there is a task group, the first task group in the list is activated, and its status isset to Work In Progress. The status of the first task in the task group is set to Assigned.
■ If there is no task group, the first task in the list is activated and its status is set toAssigned.
8
Chapter 8 Task implementer role 341
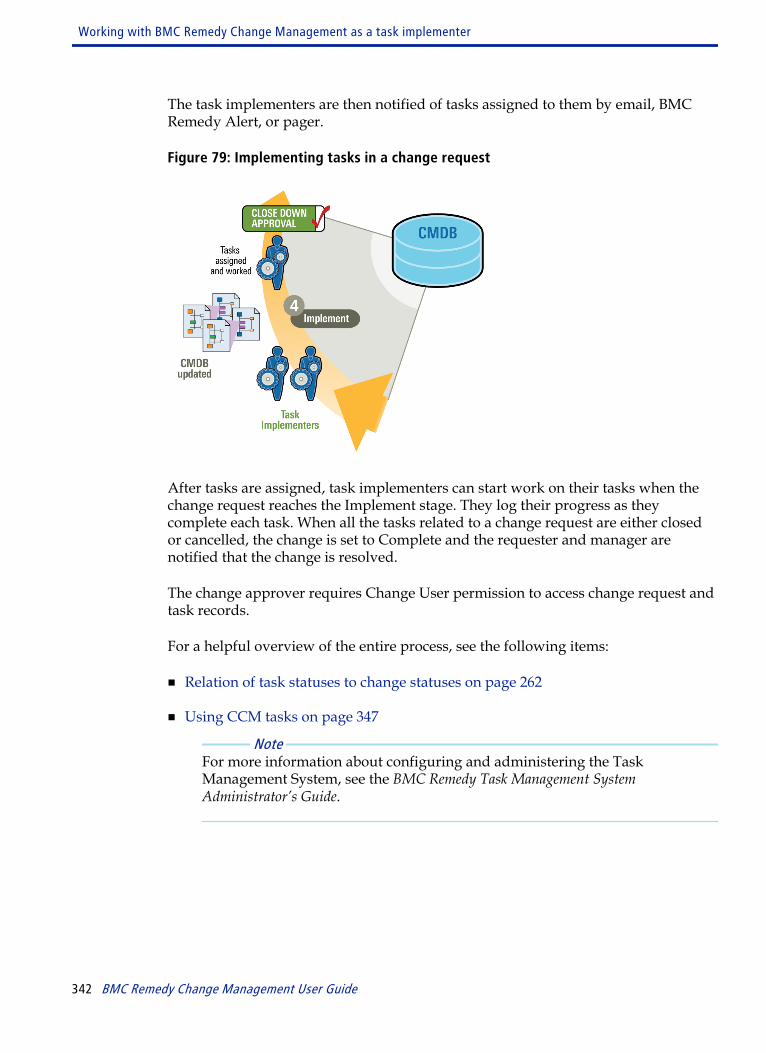
The task implementers are then notified of tasks assigned to them by email, BMCRemedy Alert, or pager.
Figure 79: Implementing tasks in a change request
After tasks are assigned, task implementers can start work on their tasks when thechange request reaches the Implement stage. They log their progress as theycomplete each task. When all the tasks related to a change request are either closedor cancelled, the change is set to Complete and the requester and manager arenotified that the change is resolved.
The change approver requires Change User permission to access change request andtask records.
For a helpful overview of the entire process, see the following items:
■ Relation of task statuses to change statuses on page 262
■ Using CCM tasks on page 347
Note For more information about configuring and administering the TaskManagement System, see the BMC Remedy Task Management SystemAdministrator’s Guide.
Working with BMC Remedy Change Management as a task implementer
342 BMC Remedy Change Management User Guide
Implement stage - Working on taskassignments
Following the recommended life cycle of a change request, the status of a taskshould be in Scheduled before you accept the task. You cannot start working on atask until the change request reaches the Implement stage.
You receive notification of assigned tasks by BMC Remedy Alert, email, and so on.You can also use the Overview Console or the Change Management Console to viewall tasks assigned to you. The table list includes a column that shows the assignee ofthe task. Tasks are identified by the TAS prefix. To access the Change ManagementConsole, the task implementer must have Infrastructure Change Master,Infrastructure Change User, Infrastructure Change Submit, or (at a minimum)Infrastructure Change Viewer permissions.
Note Tasks do not support functional roles; they have their own permission model. BMCRemedy Change Management maps its groups into the relevant task computedgroups for access. For this reason, users with Infrastructure Change Viewerpermission cannot update the task assigned to them from the parent change request.To work on a task with Infrastructure Change Viewer permission, you must also beassigned a functional role (for example, Infrastructure Change Coordinator) and youmust open the task from the Change Management console.
Following the recommended lifecycle of a change request, the task must be inScheduled status before you accept the task. For more information, see User roles inthe change request lifecycle on page 36.
Receiving notification of task assignment by BMC RemedyAlert
You can receive notification of assigned tasks by BMC Remedy Alert.
To receive notification of task assignment by BMC Remedy Alert
1 Log in to BMC Remedy Alert. You must be a Support staff member.
When you or your group receive a notification that you or your group have beenassigned to a task, the information appears in BMC Remedy Alert.
2 To evaluate a task, select the task listed in the BMC Remedy Alert window, andthen choose Alerts => Details.
Implement stage - Working on task assignments
Chapter 8 Task implementer role 343
Working on assigned tasks
When change request reaches the Implement stage you can start working on the taskassigned to you. When a change request is set to Scheduled and a task is notassigned, the task status is set to Pending. If the task is assigned, its status is set toWork in Progress.
Note When the change is in Planning in Progress, all the tasks have a status of Staged anda status reason of Staging In Progress. When all the tasks’ status reasons havebecome Staging Complete, the change moves from Planning in Progress toScheduled For Approval.
To work on tasks assigned to you
1 Open the Change Management Console.
2 From the View By, select Personal.
3 Click the Show Tasks Details link in the Change Details and Tasks section to viewthe Task table.
4 In the Assigned Tasks table, select the task to accept, and then click View.
Tasks are identified by the prefix of TAS.
On the Task Management screen, you can click Open next to the Request ID fieldto open the parent change request.
5 If you are ready to begin working on the task - that is, if the Status Field of thechange request is set to Scheduled - set the Status field to Work in Progress.
This is an important step, because the task then moves into Work in Progressstatus. In addition, different escalations occur based on the task’s status. If thetask is still in the Scheduled status while you are working on it, an inaccurateescalation can occur.
6 Click the Assignment tab.
7 Enter the time spent.
When you are ready to start working on the task, you can use the start and stopclock or the effort log to keep track of how much time you spent.
8 Click the Work Info tab, and then enter the progress you have made on the task.
Implement stage - Working on task assignments
344 BMC Remedy Change Management User Guide
Optionally, you can add relevant information to the Task Plans field to describehow you intend to complete the task.
9 Click Save.
If this is the first task to be moved to Work in Progress status, the followingchanges are automatically made to the change request:
■ The entire change request’s status is also moved to Implementation in Progress.This includes all tasks included in the change request. The change manager isnotified of the changed status, and the requester is notified when the status ofthe change is set to Scheduled.
■ In the Task Dates region of the Change form, the Start Date field is filled withthe date and time at which the task was saved.
For additional responsibilities (for example, closing a task), see Performingadditional task functions on page 345.
Performing additional task functions
In addition to accepting assigned tasks, you can perform the functions listed in thefollowing table.
Table 40: Additional task functions
Function Action
Reassign a task1 To view a list of tasks, click the Show Tasks Details link.
2 In the Assigned Tasks table on the Change Management Console, selectthe task to reassign, and then click View.
3 On the Assignment tab, choose the group or person to assign the task toin the Assignee Group or Assignee fields.
4 Make sure the Notify Assignee field is set to Yes, and then click Save.
Until the new implementer accepts the task assignment, you are assignedto the task and have responsibility for it.
Implement stage - Working on task assignments
Chapter 8 Task implementer role 345
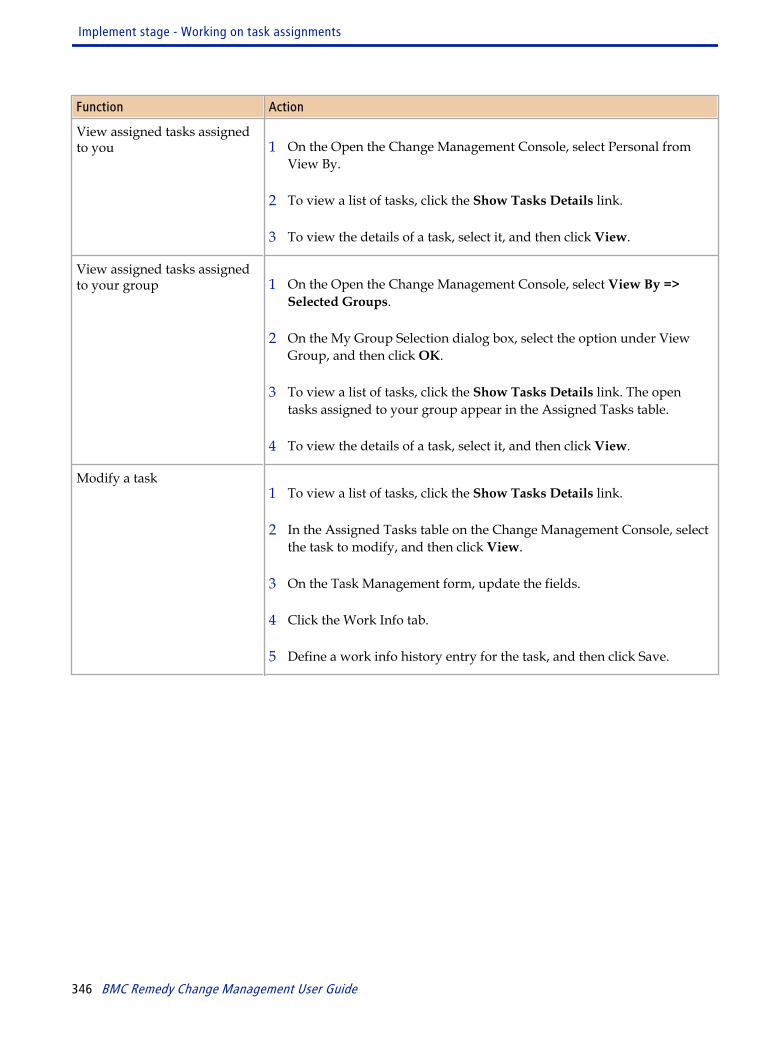
Function Action
View assigned tasks assignedto you 1 On the Open the Change Management Console, select Personal from
View By.
2 To view a list of tasks, click the Show Tasks Details link.
3 To view the details of a task, select it, and then click View.
View assigned tasks assignedto your group 1 On the Open the Change Management Console, select View By =>
Selected Groups.
2 On the My Group Selection dialog box, select the option under ViewGroup, and then click OK.
3 To view a list of tasks, click the Show Tasks Details link. The opentasks assigned to your group appear in the Assigned Tasks table.
4 To view the details of a task, select it, and then click View.
Modify a task1 To view a list of tasks, click the Show Tasks Details link.
2 In the Assigned Tasks table on the Change Management Console, selectthe task to modify, and then click View.
3 On the Task Management form, update the fields.
4 Click the Work Info tab.
5 Define a work info history entry for the task, and then click Save.
Implement stage - Working on task assignments
346 BMC Remedy Change Management User Guide
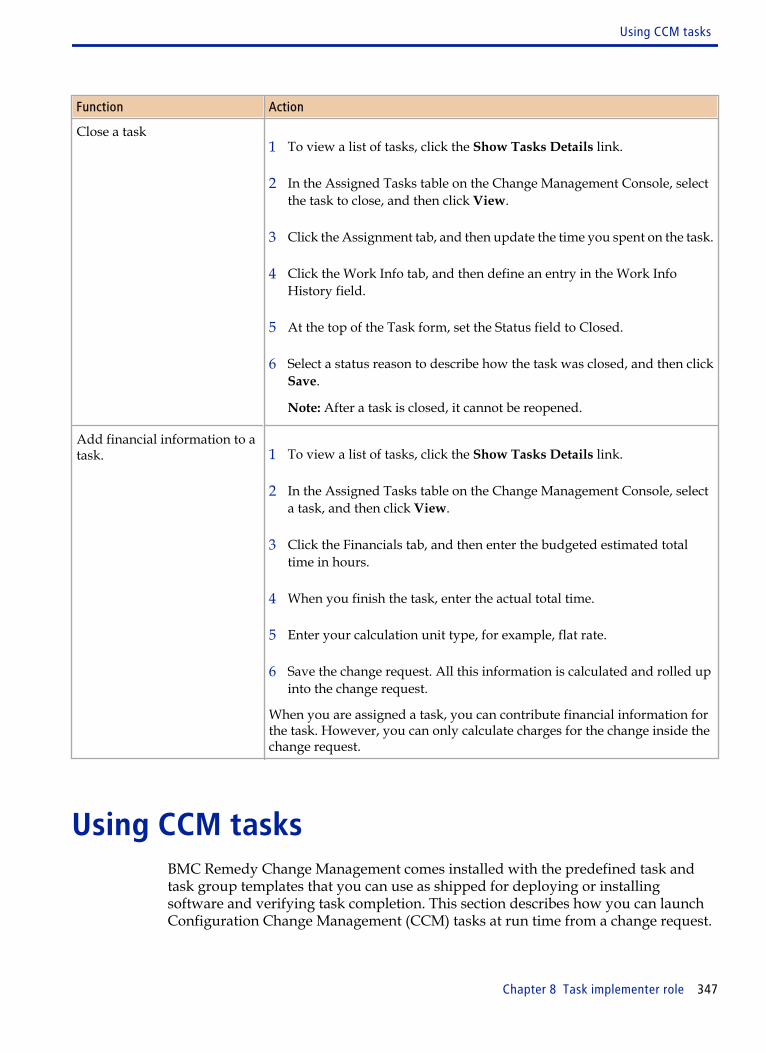
Function Action
Close a task1 To view a list of tasks, click the Show Tasks Details link.
2 In the Assigned Tasks table on the Change Management Console, selectthe task to close, and then click View.
3 Click the Assignment tab, and then update the time you spent on the task.
4 Click the Work Info tab, and then define an entry in the Work InfoHistory field.
5 At the top of the Task form, set the Status field to Closed.
6 Select a status reason to describe how the task was closed, and then clickSave.
Note: After a task is closed, it cannot be reopened.
Add financial information to atask. 1 To view a list of tasks, click the Show Tasks Details link.
2 In the Assigned Tasks table on the Change Management Console, selecta task, and then click View.
3 Click the Financials tab, and then enter the budgeted estimated totaltime in hours.
4 When you finish the task, enter the actual total time.
5 Enter your calculation unit type, for example, flat rate.
6 Save the change request. All this information is calculated and rolled upinto the change request.
When you are assigned a task, you can contribute financial information forthe task. However, you can only calculate charges for the change inside thechange request.
Using CCM tasksBMC Remedy Change Management comes installed with the predefined task andtask group templates that you can use as shipped for deploying or installingsoftware and verifying task completion. This section describes how you can launchConfiguration Change Management (CCM) tasks at run time from a change request.
Using CCM tasks
Chapter 8 Task implementer role 347
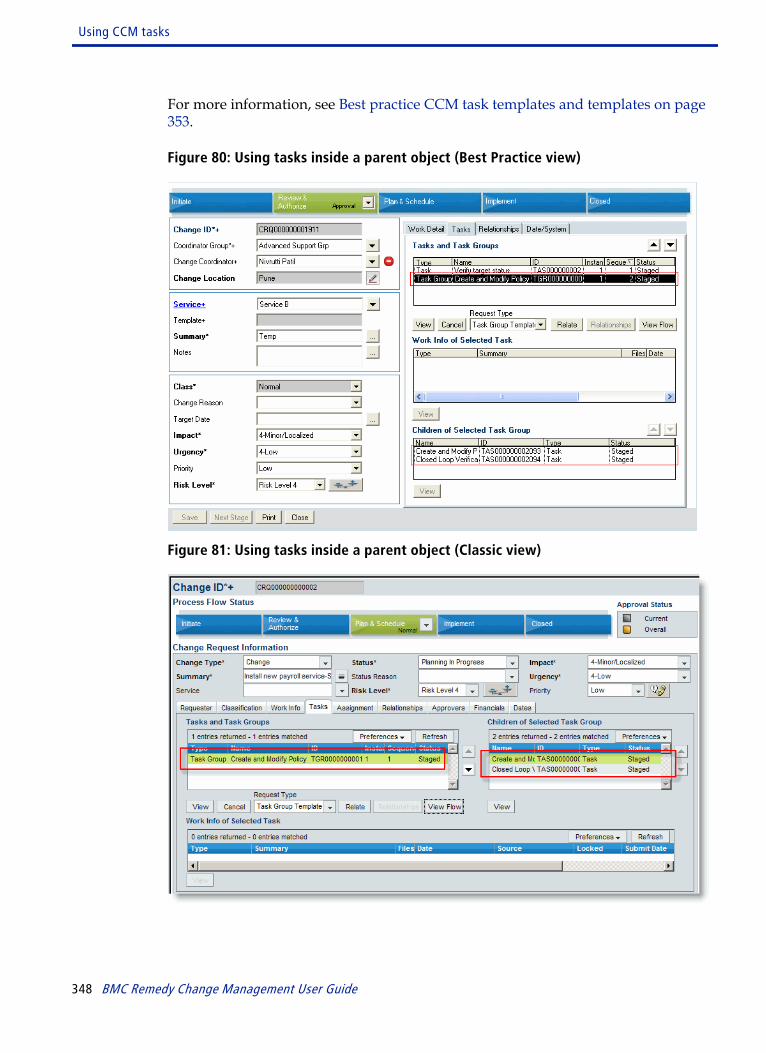
For more information, see Best practice CCM task templates and templates on page353.
Figure 80: Using tasks inside a parent object (Best Practice view)
Figure 81: Using tasks inside a parent object (Classic view)
Using CCM tasks
348 BMC Remedy Change Management User Guide
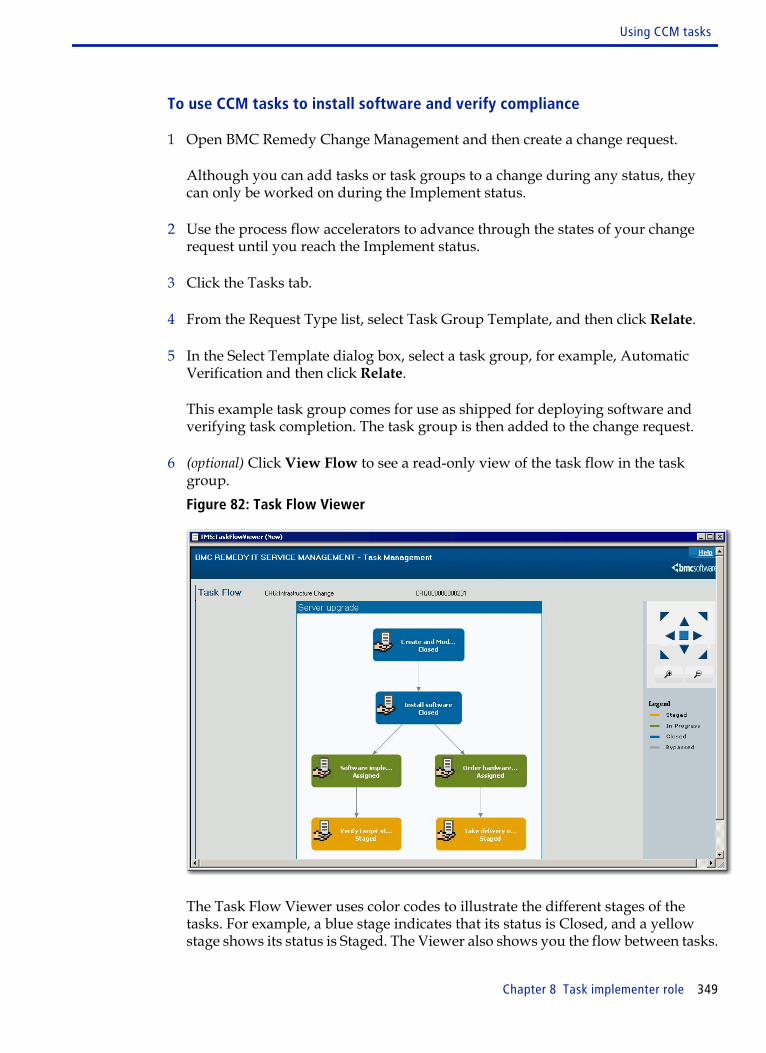
To use CCM tasks to install software and verify compliance
1 Open BMC Remedy Change Management and then create a change request.
Although you can add tasks or task groups to a change during any status, theycan only be worked on during the Implement status.
2 Use the process flow accelerators to advance through the states of your changerequest until you reach the Implement status.
3 Click the Tasks tab.
4 From the Request Type list, select Task Group Template, and then click Relate.
5 In the Select Template dialog box, select a task group, for example, AutomaticVerification and then click Relate.
This example task group comes for use as shipped for deploying software andverifying task completion. The task group is then added to the change request.
6 (optional) Click View Flow to see a read-only view of the task flow in the taskgroup.Figure 82: Task Flow Viewer
The Task Flow Viewer uses color codes to illustrate the different stages of thetasks. For example, a blue stage indicates that its status is Closed, and a yellowstage shows its status is Staged. The Viewer also shows you the flow between tasks.
Using CCM tasks
Chapter 8 Task implementer role 349
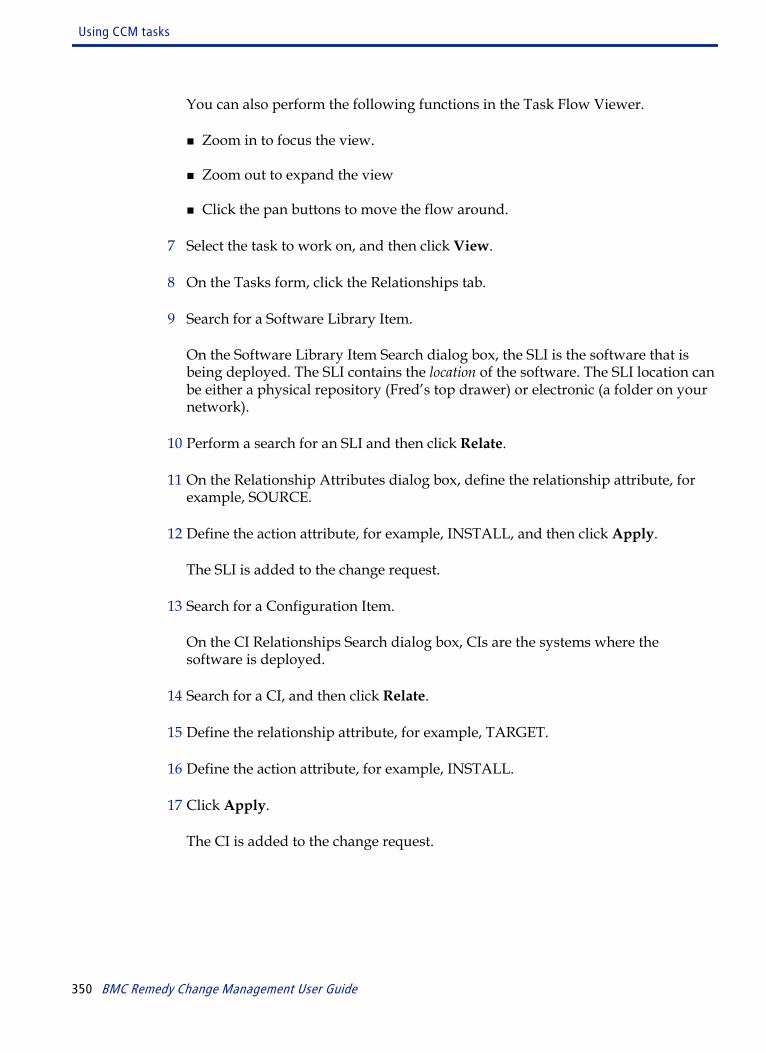
You can also perform the following functions in the Task Flow Viewer.
■ Zoom in to focus the view.
■ Zoom out to expand the view
■ Click the pan buttons to move the flow around.
7 Select the task to work on, and then click View.
8 On the Tasks form, click the Relationships tab.
9 Search for a Software Library Item.
On the Software Library Item Search dialog box, the SLI is the software that isbeing deployed. The SLI contains the location of the software. The SLI location canbe either a physical repository (Fred’s top drawer) or electronic (a folder on yournetwork).
10 Perform a search for an SLI and then click Relate.
11 On the Relationship Attributes dialog box, define the relationship attribute, forexample, SOURCE.
12 Define the action attribute, for example, INSTALL, and then click Apply.
The SLI is added to the change request.
13 Search for a Configuration Item.
On the CI Relationships Search dialog box, CIs are the systems where thesoftware is deployed.
14 Search for a CI, and then click Relate.
15 Define the relationship attribute, for example, TARGET.
16 Define the action attribute, for example, INSTALL.
17 Click Apply.
The CI is added to the change request.
Using CCM tasks
350 BMC Remedy Change Management User Guide
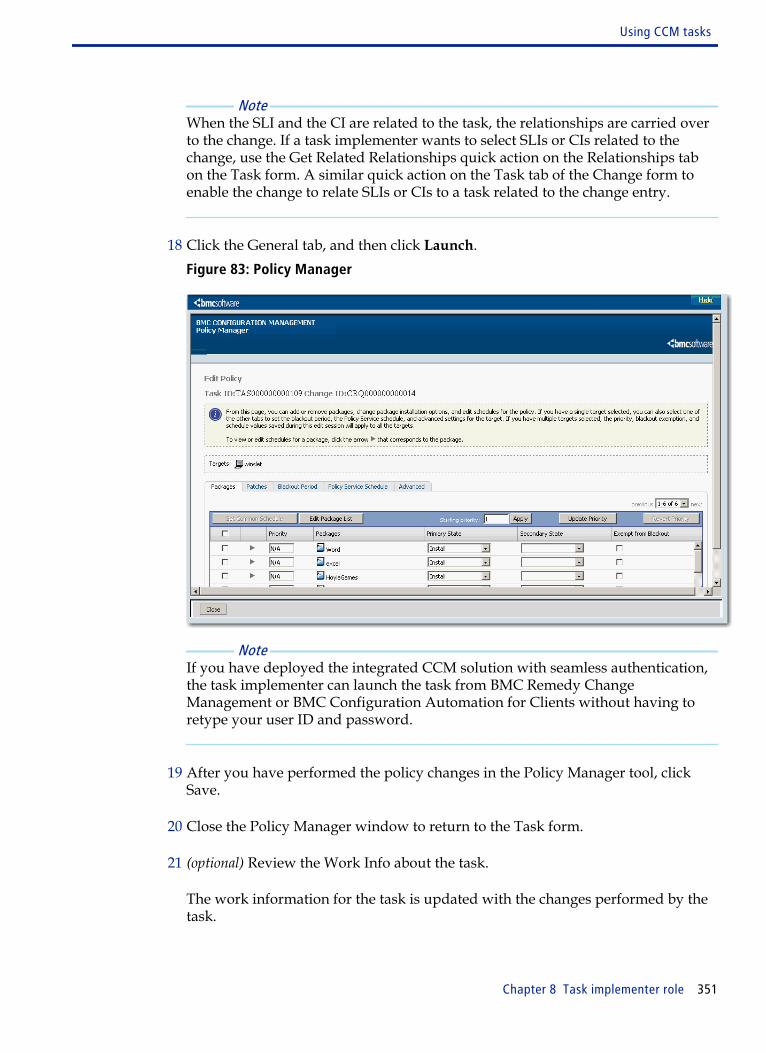
Note When the SLI and the CI are related to the task, the relationships are carried overto the change. If a task implementer wants to select SLIs or CIs related to thechange, use the Get Related Relationships quick action on the Relationships tabon the Task form. A similar quick action on the Task tab of the Change form toenable the change to relate SLIs or CIs to a task related to the change entry.
18 Click the General tab, and then click Launch.Figure 83: Policy Manager
Note If you have deployed the integrated CCM solution with seamless authentication,the task implementer can launch the task from BMC Remedy ChangeManagement or BMC Configuration Automation for Clients without having toretype your user ID and password.
19 After you have performed the policy changes in the Policy Manager tool, clickSave.
20 Close the Policy Manager window to return to the Task form.
21 (optional) Review the Work Info about the task.
The work information for the task is updated with the changes performed by thetask.
Using CCM tasks
Chapter 8 Task implementer role 351
a Click the Work Info tab.
b In the Work Info History area, select the Policy Manager entry and then clickView.
c After you view the information, close the Work Info dialog box.
d Click Report to view an ASCII-format report of the task changes.
The report lists the software installed, if the policy was successful, and so on.
22 In the Status field, set the task status to Closed.
The status reason automatically is set to Success. You can select a different statusreason, for example, Failed or Cancelled.
23 After you have made all your modifications, save and close the task.
24 On the Change form, refresh the children of the task group table.
The status of the first task is marked as Closed and the status of the second task isnow Waiting.
25 Open the second task:
a Select the Check Compliance task and then click View.
b On the Task form, click Details to view the target and package compliance.
c Verify the compliance in Policy Manager.
d Close the Viewer to return to the Task form.
26 In the Status field, set the task status to Closed.
You can view the work information for the task as needed. The task record isupdated with the changes performed by the task.
27 After you have made all your modifications, save and close the task.
28 In the Change form, refresh the children of the task group and the task and taskgroups tables.
All tasks and the task group are marked as Closed.
29 Click Save.
Using CCM tasks
352 BMC Remedy Change Management User Guide
Best practice CCM task templates and templates
BMC Remedy Change Management ships with the following predefined bestpractice” task group and task templates that you can use for installing or deployingsoftware and verifying task completion. These templates were specially created forthe integration with BMC Configuration Automation for Clients (previously knownas BMC Configuration Management).
Best practice
Table 41: CMM task templates and templates
Template Description
Create and ModifyPolicy with ClosedLoop Verification
Task group that includes the following tasks:
■ Create and Modify Policy
■ Closed Loop Verification (automatically)
You use this task group template when creating or modifying aBMC CM based policy. This template automatically performs a closed-loop verification to make sure that the task was executed properly.
Closed LoopVerification(automatic)
Automatic task that calls BMC Configuration Management PolicyManager to set up compliance parameters for Closed LoopVerification. It verifies the task automatically against compliancestatus.
Create and ModifyPolicy
Manual task that defines or modifies a policy using Policy Manager.It uses the Relationships feature to add the CI and SLI to the task.
Deploy Package Manual task that deploys a package using BMC ConfigurationManagement Deployment Manager. It adds the CI and SLI using theRelationships feature on task. Verification of a Deployment Managertask is based on the exit status of the Deployment Manager job.
Execute RemoteCommand
Manual task that executes a remote command using BMCConfiguration Management Deployment Manager. Verification of aDeployment Manager task is based on the exit status of theDeployment Manager job.
Execute RemoteScript
Manual task that executes a remote script using BMC ConfigurationManagement Deployment Manager. Use the Task Attachments tableto define the remote scripts. Verification of a Deployment Managertask is based on the exit status of the Deployment Manager job.
Verify Target Status Manual task for manually verifying the status of a target againstBMC Configuration Management. Use this task to verify that aspecified target is in compliance with the policies to which the targethas been assigned.
Using CCM tasks
Chapter 8 Task implementer role 353

Using CCM tasks
354 BMC Remedy Change Management User Guide
Change Management approverrole
This section describes the Change Management approver role. The approver uses theapproval feature to review, approve, or reject change requests, and to ask for moreinformation about them.
Working with BMC Remedy ChangeManagement as an approver
BMC Remedy Change Management integrates fully with the BMC RemedyApproval Server for business, technical, and financial approvals.
An approver must:
■ Be defined in the ITSM Foundational People form
■ Be assigned an appropriate application permissions. For example, InfrastructureChange Viewer is sufficient for a user who only needs to approve a requestthrough the Approval Central.
■ Have a BMC Remedy Action Request System Read license.
■ Have the functional role of Infrastructure Change Approver
Additionally, the server must have the appropriate BMC Remedy ITSM applicationlicense.
Note The BMC Remedy Change Management application ships with defined approvalprocesses. Most companies should not have to define additional approval processes.However, you can use the Approval Process Configuration form to define additionalapproval processes for your company. For more information, see Approvalprocesses provided out-of-the-box on page 357.
9
Chapter 9 Change Management approver role 355

In BMC Remedy Change Management, application administrators can define anapproval process in which a series of people must review and approve a proposedchange request or release request. Only after all approvals are granted can thechange request or release request be moved to the next status.
A change request goes through several phases as it progresses through its lifecycle.Approvers are responsible for reviewing their assigned change requests, and forapproving or rejecting them. Approvers are configured by the applicationadministrator and are responsible for change requests with a specific categorizationand location. The application administrator also determines which types of changerequests need approval, and what type of approval process they require.
As the change request moves from one status to another, the default workflow onthe change request queries the approval server to find out which approval process touse, and then executes it. For example, when a change request moves from the Draftstatus into the Review phase (shown in Figure 84 on page 356), the Approval Serverchecks the Review approval process. If the application administrator mapped anapprover to the Review process, the change request must be approved before itmoves to the next stage. Also, the Class and Timing Reason fields are locked byworkflow. You cannot make modifications to the values set in these fields until thechange request is approved and it moves to the next status in its lifecycle.
Figure 84: Change request going through Review Approval in the Review & Authorizestage
The Approve option is enabled in the Process Flow bar when a change request issent for Approval.
Figure 85: Approval option enabled
Working with BMC Remedy Change Management as an approver
356 BMC Remedy Change Management User Guide
When the user clicks the approve option the change request is approved and itmoves to the next status in its lifecycle. In case of an auto-approval (no approver isassigned), the change form is refreshed to show the updated Change status afterapproval.
Note The Approve option is displayed to all users, even if the user is not an approver forthat change request. If a user, who not an approver for that change request clicks theapprove option the following error message is displayed: You are not currentlydefined as an alternate for any user and you are not on the Approverslist for this approval. (ARERR 45802) .
The change manager or change coordinator controls the overall progression of achange request, and can perform approvals at several points in the change life cycle.For change requests in the Request for Change status with no approvers, the changemanager and the change coordinator can move the change forward to Planning InProgress, cancel it, or send it back to the requester by assigning it a status of Draft.
After a change is planned and built, the change request is set to a status of Scheduledfor Review. Once again, the change manager or change coordinator has theopportunity to review change plans, schedules, and so on, before moving the changeto the Implementation Approval phase.
The following people perform the approval process:
Approver Responsibility
Applicationadministrator
Selects the approval process, and if necessary, modifies the approval rules.Configures the approval mappings. For more information, see the BMC RemedyIT Service Management Configuration Guide.
Change manager (orchange coordinator)
Monitors the approval process to make sure that it proceeds as expected. Thechange manager also determines which types of change requests need approval,and in some cases, selects the approvers.
Change approvers Review the change request and approve or reject it. If approvers need moreinformation about a change request, they can request it. Their signature is put onhold while they are waiting for the information and the status is set to MoreInformation.
Requester Checks the status of the change request and follows the approval processthroughout its cycle.
Approval processes provided out-of-the-boxBMC Remedy Change Management ships with default approval processes designedout-of-the-box for global use. These best practice approval processes are already
Approval processes provided out-of-the-box
Chapter 9 Change Management approver role 357
defined for you by default. These processes specify which status occurs next if arequest is approved or rejected, or if no approvers are defined.
Table 42: Preconfigured approval processes for BMC Remedy Change Management
Approval Process (phase) Definition
Review In the Initiate stage, the out-of-the-box behavior for change requests is thatwhen their Status moves out of Draft status into Request For Authorizationstatus, the Review approval phase starts.
■ If the change request is approved, the request moves to the BusinessApproval phase and its Status becomes Request For Change.
■ If the change request is rejected, its Status changes to Rejected.
■ If there are no approvers defined for the request (that is, if no approvers aremapped to the Review approval phase), its Status changes to Request ForChange and requires the change manager or the change coordinator to movethe request forward.
■ If the Class of the change is Latent, it moves to the Completed status.
Business Approval - NoImpact
The Change Ad Hoc approval process is used in the No Impact BusinessApproval phase with the Change Manager login as the first approver. Bydefault, this Ad Hoc approval process applies only to changes with a Classsetting of No Impact. No approver mapping is required to be configured for thisphase.When the change moves through the process flow and Change Managerapproves the change in the Business Approval - No Impact phase, it then movesto the Scheduled status. You use this process for pre-approved No Impactchanges where the change is automatically scheduled after the approval phaseis satisfied.
■ If the change is approved, it moves to the Scheduled status.
■ If the request is cancelled, it moves to the Cancelled status.
■ If the request is rejected, its status changes to Rejected.
Approval processes provided out-of-the-box
358 BMC Remedy Change Management User Guide
Approval Process (phase) Definition
Business Approval The Review & Authorize stage focuses on risk assessment and impact analysis.The Business Approval Phase starts when the change request is placed inRequest for Change status. The Business Approval phase requires that thebusiness case for the change be approved before it can move forward.
■ If the change is approved, it moves to the Planning in Progress status.
■ If no approvers are mapped to the Business Approval phase, the changemoves to the Planning in Progress status and requires the change manager orchange coordinator to move the change forward.
■ If the request is cancelled, it moves to the Cancelled status.
Implementation Approval In the Plan & Schedule stage, the out-of-the-box behavior for change requests isthat the Implementation Approval phase starts when their Status moves intoScheduled For Approval status. At this phase, the system notifies you that thechange must be approved before it can be implemented.
■ If the change request is approved, its Status becomes Scheduled.
■ If there are no approvers defined for the change (that is, if no approvers aremapped to the Implementation approval phase), its Status changes toScheduled.
■ If the change request is rejected, its Status changes to Rejected.
Close Down Approval In the Implement stage, the out-of-the-box behavior for change requests is thatthe Close Down approval phase starts when their Status moves into Completedstatus (with a status reason of Final Review Required). At this phase, the systemnotifies you that the request must be approved before it can be closed down.
■ If the change request is approved, its Status Reason becomes Final ReviewComplete. You can then move the request to the Closed stage.
■ If the change request is rejected, its Status changes to Rejected.
■ If there are no approvers defined for the change (that is, if no approvers aremapped to the Close Down approval phase), its Status is Completed. Youcan then move the request to the Closed stage.
■ Approval Administrators can globally approve or reject the change request.This may be required if approvers are not available or the CAB makes adecision the requires an urgent approval or rejection of a change request. Ifthe change is globally approved or rejected, the approval status is changed toClosed.
Approval processes provided out-of-the-box
Chapter 9 Change Management approver role 359
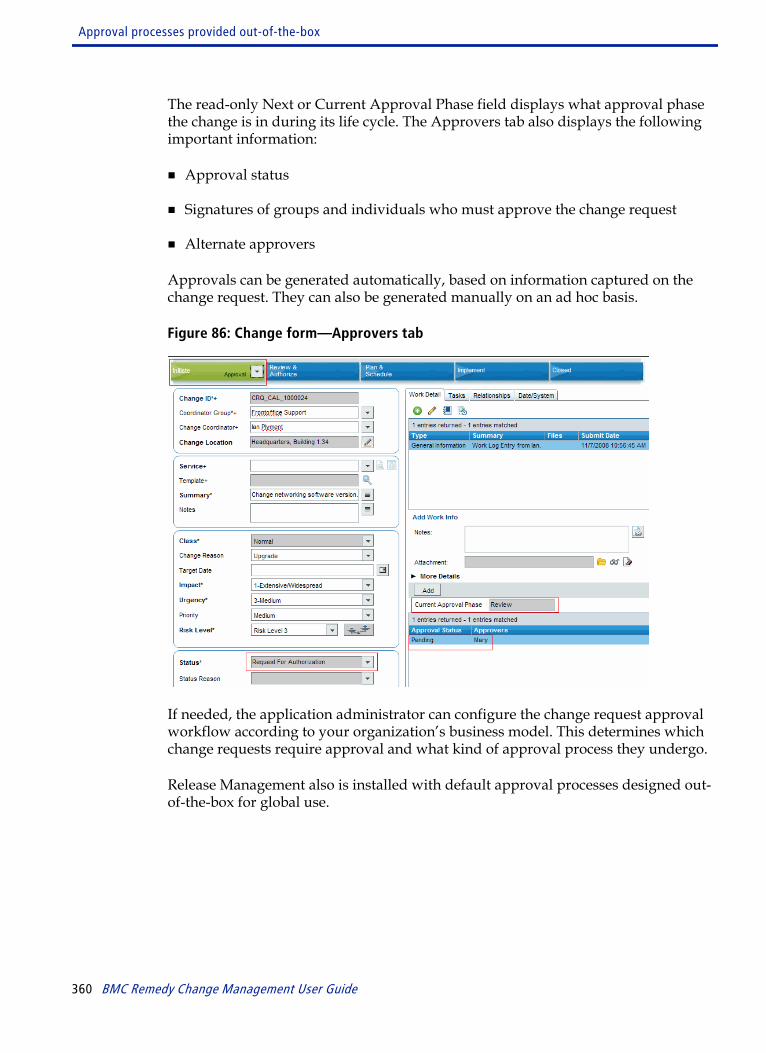
The read-only Next or Current Approval Phase field displays what approval phasethe change is in during its life cycle. The Approvers tab also displays the followingimportant information:
■ Approval status
■ Signatures of groups and individuals who must approve the change request
■ Alternate approvers
Approvals can be generated automatically, based on information captured on thechange request. They can also be generated manually on an ad hoc basis.
Figure 86: Change form—Approvers tab
If needed, the application administrator can configure the change request approvalworkflow according to your organization’s business model. This determines whichchange requests require approval and what kind of approval process they undergo.
Release Management also is installed with default approval processes designed out-of-the-box for global use.
Approval processes provided out-of-the-box
360 BMC Remedy Change Management User Guide
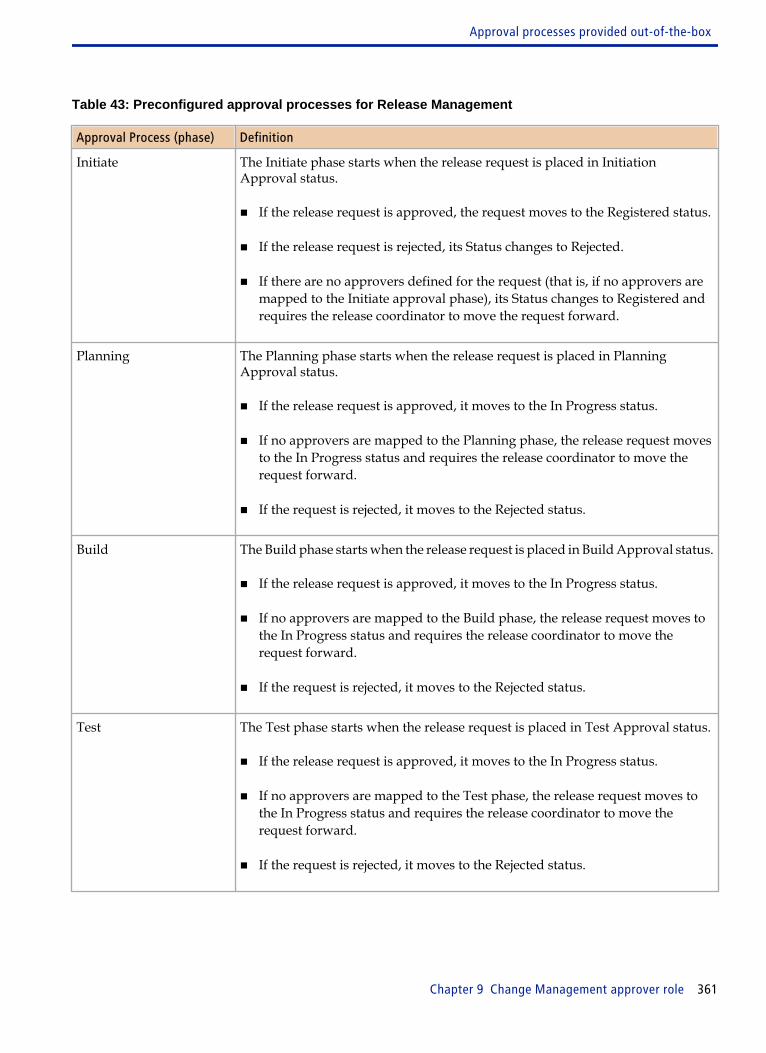
Table 43: Preconfigured approval processes for Release Management
Approval Process (phase) Definition
Initiate The Initiate phase starts when the release request is placed in InitiationApproval status.
■ If the release request is approved, the request moves to the Registered status.
■ If the release request is rejected, its Status changes to Rejected.
■ If there are no approvers defined for the request (that is, if no approvers aremapped to the Initiate approval phase), its Status changes to Registered andrequires the release coordinator to move the request forward.
Planning The Planning phase starts when the release request is placed in PlanningApproval status.
■ If the release request is approved, it moves to the In Progress status.
■ If no approvers are mapped to the Planning phase, the release request movesto the In Progress status and requires the release coordinator to move therequest forward.
■ If the request is rejected, it moves to the Rejected status.
Build The Build phase starts when the release request is placed in Build Approval status.
■ If the release request is approved, it moves to the In Progress status.
■ If no approvers are mapped to the Build phase, the release request moves tothe In Progress status and requires the release coordinator to move therequest forward.
■ If the request is rejected, it moves to the Rejected status.
Test The Test phase starts when the release request is placed in Test Approval status.
■ If the release request is approved, it moves to the In Progress status.
■ If no approvers are mapped to the Test phase, the release request moves tothe In Progress status and requires the release coordinator to move therequest forward.
■ If the request is rejected, it moves to the Rejected status.
Approval processes provided out-of-the-box
Chapter 9 Change Management approver role 361
Approval Process (phase) Definition
Deployment The Deployment phase starts when the release request is placed in DeploymentApproval status.
■ If the release request is approved, it moves to the In Progress status.
■ If no approvers are mapped to the Deployment phase, the release requestmoves to the In Progress status and requires the release coordinator to movethe request forward.
■ If the request is rejected, it moves to the Rejected status.
Close Down The Close Down phase starts when the release request is placed in Close DownApproval status.
■ If the release request is approved, it moves to the Completed status.
■ If no approvers are mapped to the Close Down phase, the release requestmoves to the Completed status.
■ If the request is rejected, it moves to the Rejected status.
Note You can view the included approval phases on the Status Flow tab of the ApprovalProcess Configuration form. For information about configuring approvals as anadministrator for BMC Remedy Change Management, see the BMC Remedy IT ServiceManagement Configuration Guide. For information about working with the BMCRemedy Approval Server as an administrator, see the BMC Remedy Approval ServerGuide.
Approving changes using Approval CentralYou can use BMC AR System Approval Central to approve change requests. This isespecially important if the Approve functionality in the Process Flow Status bar isnot available under your current access permission for the change request. Not allapprovers have access to the BMC Remedy Change Management applicationthrough their home pages, yet still have the role to approve change requests beforethey can move forward.
Note To access approvals using the Process Flow Status bar you must have appropriatepermissions to modify a change request. For more information on roles andpermissions, see the BMC IT Service Management Configuration Guide.
Approving changes using Approval Central
362 BMC Remedy Change Management User Guide
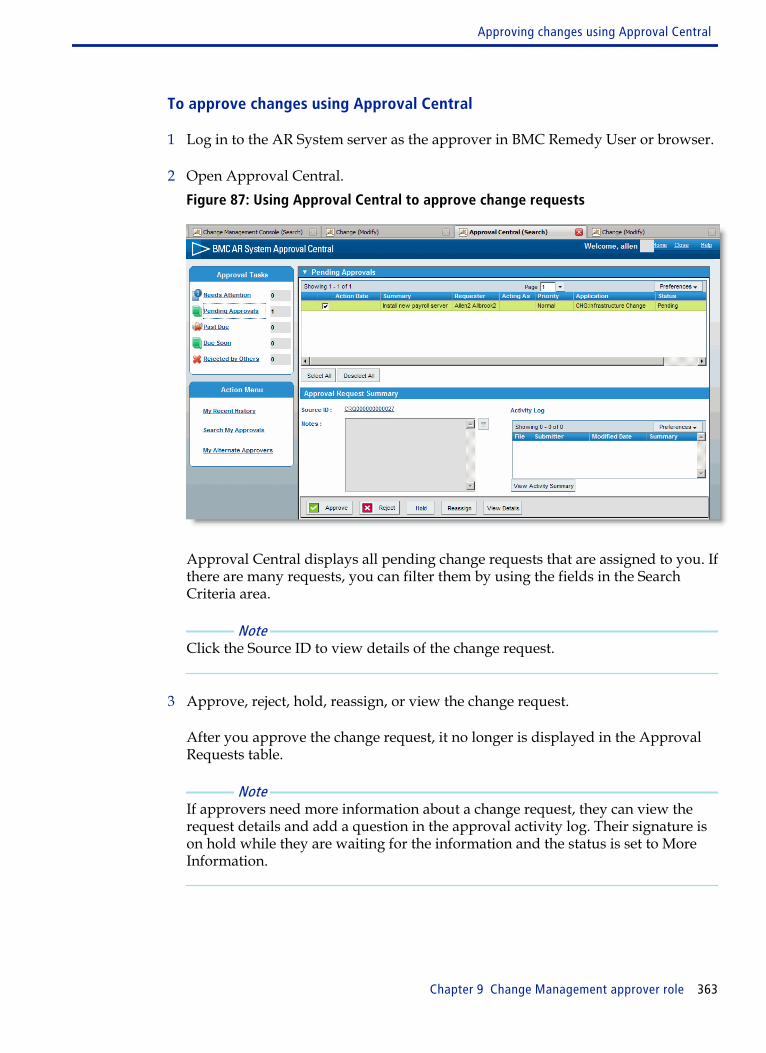
To approve changes using Approval Central
1 Log in to the AR System server as the approver in BMC Remedy User or browser.
2 Open Approval Central.Figure 87: Using Approval Central to approve change requests
Approval Central displays all pending change requests that are assigned to you. Ifthere are many requests, you can filter them by using the fields in the SearchCriteria area.
Note Click the Source ID to view details of the change request.
3 Approve, reject, hold, reassign, or view the change request.
After you approve the change request, it no longer is displayed in the ApprovalRequests table.
Note If approvers need more information about a change request, they can view therequest details and add a question in the approval activity log. Their signature ison hold while they are waiting for the information and the status is set to MoreInformation.
Approving changes using Approval Central
Chapter 9 Change Management approver role 363
Multiple approvers and multiple approval levels
There can be more than one level of approval, and there can be several approvers oneach level. At least one approver on each level must approve the change requestbefore it can be reviewed by the next level of approvers. Approvers can review theactions of previous approvers by viewing their comments and the approval audittrail. Release Management module also
Note
■ This information in also applicable for the Release Management module.
■ You can configure the approval process to have one or all approvers on each levelapprove the change request before the change can be reviewed by the next levelof approvers. Modify the If Multiple Approvers setting to configure this option.For information about modifying the If Multiple Approvers setting, see the BMCRemedy ITSM Configuration Guide.
The application administrator can also configure the change management chain(parent-child) approval process. If the change is configured for the managementchain approval process, the requester’s manager is notified.
If the change is approved by all approvers, the approval process is complete and thechange moves to the next status. If the change is rejected by any approver, thechange is stopped. The change manager or change coordinator can then cancel thechange or update it and resubmit it for approval.
Approving the change request can complete the approval or trigger the next step inthe approval process. If there are several levels of approvers, your approval can sendthe approval request to the next approver or if you deny the request the approvalprocess is completed, regardless of whether more approvers are defined. Anapproval signature cannot be modified after the request has been rejected, and theapproval process is finished. If the change request is to be implemented, the changemanager must first restart the approval process.
Approving changes using the Process FlowStatus bar
When a change request reaches an approval phase, the Process Flow Status barprompts you to approve, cancel, or reject the approval. You must have appropriatepermissions to modify a change request to access approvals using the Process FlowStatus bar. For more information on roles and permissions, see the BMC IT ServiceManagement Configuration Guide.
Approving changes using the Process Flow Status bar
364 BMC Remedy Change Management User Guide
To approve the change request, the required approvers must click the accelerator,and then approve, cancel, or reject the change request before it can then move to thenext status. For more information, see Approval processes provided out-of-the-boxon page 357.
You cannot move the change request to the next status unless you first receive anapproval. The change remains in the approval phase and will not move to the stageuntil it is approved.
When a change requires an approval, its approvers are notified. Notifications aresent according to the method specified in the approver’s record in the People form.
If you need more information about a change request, approvers can request thatinformation.
To use the Process Flow Status bar to approve change requests
1 Open the change request.
2 Use the Process Flow Status bar to move the change request to an approval phase.Figure 88: Approving the change request at the Review approval phase
3 Click the accelerator in the Process Flow Status bar, and then approve, cancel, orreject the change request.
Note As a change manager or a change coordinator, you can perform these actions forNormal requests if you are the approver, or if you are an alternate approver.
4 Click the Approvers tab to view the current approval status or any other approvalsignatures required to approve the change request.
Approving changes using the Process Flow Status bar
Chapter 9 Change Management approver role 365
From the Approvers tab, the following options in the Show menu enable you tofilter the approval signature entries on the table, for example, Hold or Approved.No action is taken without refreshing the table contents.
5 Save your work.
■ If the change is configured for the change level approval process, all approverson the first level are notified that they must review the request.
■ If the change is configured for the change management chain (parent-child)approval process, the requester’s manager is notified.
The signature of the last approver completes the approval process, andautomatically moves the change request to the next status.
Handling approvals for emergency changerequests
Depending on how the application administrator has configured the application,change requests that have been designated as emergencies can be allowed to bypassthe approval process even if they normally require approval. In this scenario, theemergency change request is not held up waiting for approvals.
For more information, see Creating emergency change requests on page 133.
These are possible configurations:
■ The application administrator can configure emergency change requests to bypassthe normal change states and approval process. To configure a new approvalprocess for emergency changes, the application administrator must create a newapproval process for your company. As a result, when a change manager orchange coordinator creates a change and selects Emergency in the Timing field,the new approval process phase is then used. For more information, see the BMCRemedy IT Service Management Configuration Guide.
■ The change manager or the change coordinator can choose to add approvers tothe process. The Approval Status field is set to Approval Required.
— If the change manager assigns approvers, the approval process proceeds as usual.
— If the change manager does not assign approvers, the Approval Status is set toApproved, and the change request can be implemented.
■ If the change request is designated as an emergency and your organization usesthe Change Management Chain approval process, the manager of the Requested
Handling approvals for emergency change requests
366 BMC Remedy Change Management User Guide

For user (in the Requester tab) is the first approver in the management chain. Ifthe Requested For fields are empty, the emergency approval process is bypassed.Change managers can add more approvers if appropriate. They cannot deleteapprovers.
Resubmitting a rejected change requestIf an approver rejects a proposed change request, the approval process is stopped.The Approval Status is set to Rejected. You can resubmit the request for approval.
To resubmit a rejected change request
1 Open the change request.
2 Click the accelerator in the Process Flow Status area and then select Restart. Thechange request returns to the approval process phase it was in when it wasrejected, for example, Review.
Note When an approver rejects a request, all signature lines associated with the requestare closed. If this request is restarted, any ad hoc approver assigned to the requestwill have to be added again.
3 Do one of the following:
When using the Best Practice view When using the Classic view
Click the Work Details tab and explain in the Notesfield why you are resubmitting the request forapproval.
Click the Work Info tab and explain in the Detailsfield why you are resubmitting the request forapproval.
4 Save your changes.
Adding approversYou can create additional approvers on an ad hoc basis. The following rules apply:
■ You can add Support Groups or Individuals as approvers.
■ Group approval requests are sent only to group members with the InfrastructureChange Approver role.
Resubmitting a rejected change request
Chapter 9 Change Management approver role 367
■ If an individual approver is needed, only people defined within the People formcan be chosen as approvers.
Note The ability to add someone as an approver is restricted, based on thepermissions of the user adding an approver. If the person adding signaturescannot see the person based on row-level access, they cannot add them as anapprover. But anyone with a record in the People form can become an approverif the assigner has access to that information.
There are slight differences between ad hoc approvals and the typical approvalprocesses configured by the application administrator.
■ If you add an ad hoc approver (Bob Baxter) and an approver mapping does notexist, the approval server immediately generates an approval signature for the adhoc approver and Bob is notified that he must approve the change request. Thechange request cannot move past the next approval phase until Bob (the ad hocapprover) approves the request.
■ If you add an ad hoc approver (Bob Baxter) at the Draft status and an approvermapping already exists (Mary Mann for the Review phase), the approval serverimmediately generates an approval signature for the ad hoc approver and Bob isnotified that he must approve the change request. The change request cannotmove past the next approval phase until both Bob (the ad hoc approver) and Mary(the mapped approver) approve the request.
■ If the request is already at the Review phase and you add an ad hoc approverwhere an approver mapping already exists (Mary Mann), the approval servergenerates two approval signatures—one for Bob (the ad hoc approver) and onefor Mary (the mapped approver). Also, Bob is notified that he must approve thechange request. The change request cannot move past the next approval phaseuntil both Bob (the ad hoc approver) and Mary (the mapped approver) approvethe request.
For more information about the relationship between approver mappings andapproval process configuration records, see the BMC Remedy IT Service ManagementConfiguration Guide.
Adding additional approvers
This section describes the procedure to create additional approvers on an ad hocbasis for a change request.
To add approvers
1 Open the change request.
Adding approvers
368 BMC Remedy Change Management User Guide

2 Advance through the states of your change request until you reach an approvalstage.
3 Click the Approvers tab.
The Approvers table shows the list of approvers generated for the change request.Their signature is required for approval. You might need to refresh the table tosee the lists. The list contains the following information:
■ Approval Status—Indicates status of work on the change.
■ Approvers—Indicates the names of the approvers.
■ Name—Indicates either the individual’s full name or the support group name.
■ Alternate Signature—Appears when someone other than the original signatureowner has approved or rejected the change.
4 Click Add.
5 On the Add Approver dialog box, select an individual, or a group to add.
6 Enter the name of one or more individuals or groups.
7 (optional) To search for an individual, enter a name or initial in the Full Name+field, and press ENTER.
8 Click Save.
You might have to refresh the table field to see all approvers.
9 Click Save.
The approver is notified that they must review the change request.
Adding alternate approvers
Sometimes an approver might be unavailable because of a scheduled vacation orbusiness event. For that period of time, the approver should designate an alternateapprover because change requests still require approval.
From the People form, you can set up one or more people to approve changerequests that are pending your approval, for example, to add the change manager orchange coordinator as an alternate approver.
Adding approvers
Chapter 9 Change Management approver role 369
Note You can only configure alternate approvers for yourself.
To add alternate approvers for people
1 Open the People form.
2 Search for yourself.
3 Select your record, then click the Alternate Approvers tab.
4 Click Update Alternate Approvers.
The Alternate Approvers form appears.
5 To locate the alternate approver, click Search.
6 In the People Search form, select the alternate approver, then click Select.
7 Select the start date and the end date.
8 In the Notify Alternate field, select whether to notify the alternate approver.
9 In the Covering field, select whether this will be an alternate for all approvals oronly for a specific process.
10 If you selected Specific Process in the Covering field, select the applicable processin the Process field.
11 Click Add.
Acting as an alternate approver
If you are acting as an alternate approver of a change request, you have the samesignature authority as the approver for whom you are serving. Your authority as analternate approver exists for a specific time period, and for the designated approvalprocess or processes.
To act as an alternate approver
1 Open the Approval Console.
Adding approvers
370 BMC Remedy Change Management User Guide
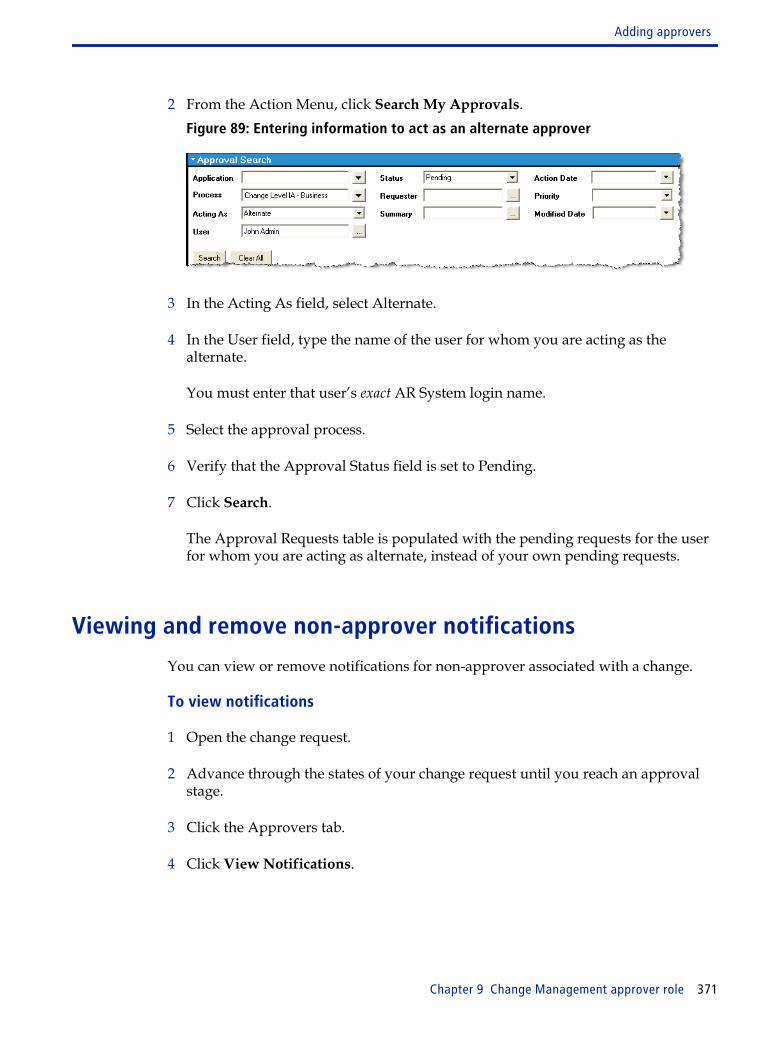
2 From the Action Menu, click Search My Approvals.Figure 89: Entering information to act as an alternate approver
3 In the Acting As field, select Alternate.
4 In the User field, type the name of the user for whom you are acting as thealternate.
You must enter that user’s exact AR System login name.
5 Select the approval process.
6 Verify that the Approval Status field is set to Pending.
7 Click Search.
The Approval Requests table is populated with the pending requests for the userfor whom you are acting as alternate, instead of your own pending requests.
Viewing and remove non-approver notifications
You can view or remove notifications for non-approver associated with a change.
To view notifications
1 Open the change request.
2 Advance through the states of your change request until you reach an approvalstage.
3 Click the Approvers tab.
4 Click View Notifications.
Adding approvers
Chapter 9 Change Management approver role 371
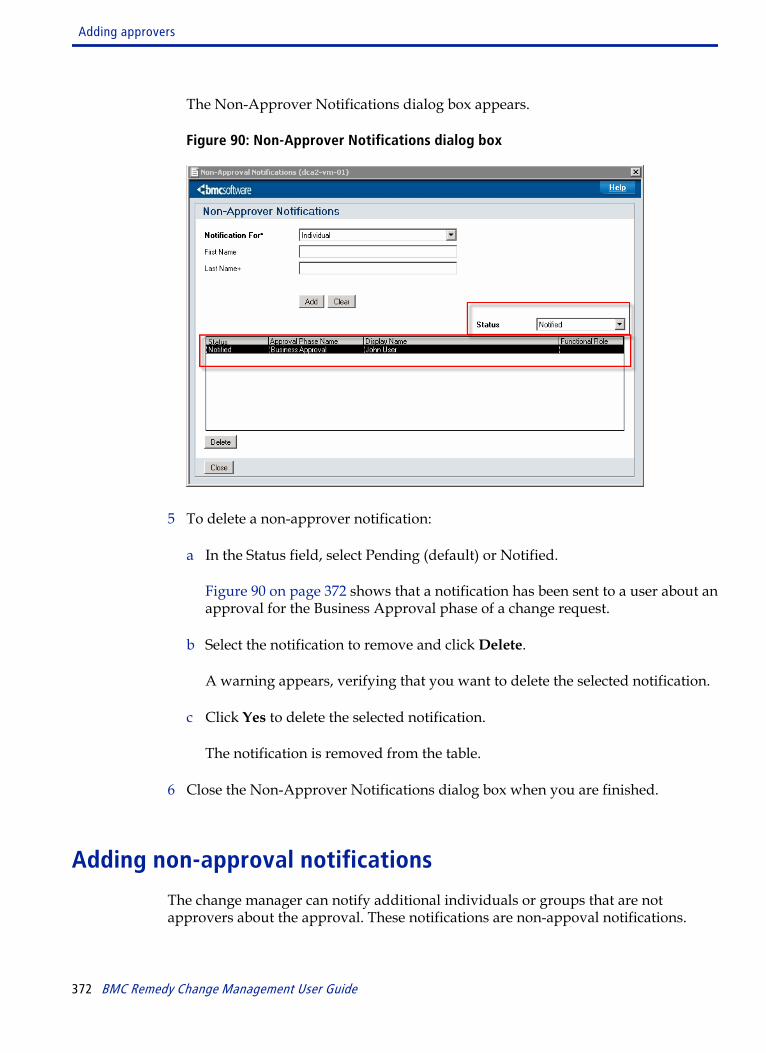
The Non-Approver Notifications dialog box appears.
Figure 90: Non-Approver Notifications dialog box
5 To delete a non-approver notification:
a In the Status field, select Pending (default) or Notified.
Figure 90 on page 372 shows that a notification has been sent to a user about anapproval for the Business Approval phase of a change request.
b Select the notification to remove and click Delete.
A warning appears, verifying that you want to delete the selected notification.
c Click Yes to delete the selected notification.
The notification is removed from the table.
6 Close the Non-Approver Notifications dialog box when you are finished.
Adding non-approval notifications
The change manager can notify additional individuals or groups that are notapprovers about the approval. These notifications are non-appoval notifications.
Adding approvers
372 BMC Remedy Change Management User Guide

To add non-approver notifications
1 Open the change request.
2 Advance through the states of your change request until you reach an approvalstage.
3 Click the Approvers tab.
4 Click View Notifications.
The Non-Approver Notifications dialog box appears. You can select the type ofnotification you want to add. The options are:
■ Individual
■ Group
5 To add an individual:
a Select Individual in the Notification For field.Figure 91: Adding an individual notification
b Enter the individual’s first or last name.
You can enter a last name (or partial last name) and then press RETURN tobring up the People Search form.
Adding approvers
Chapter 9 Change Management approver role 373
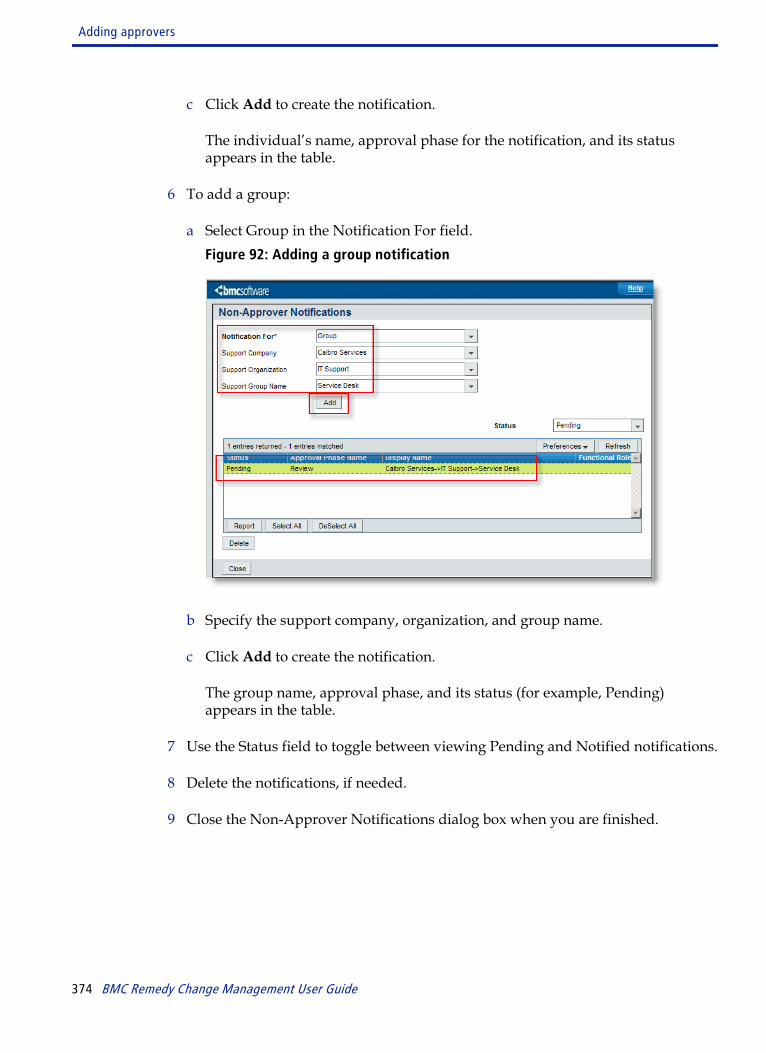
c Click Add to create the notification.
The individual’s name, approval phase for the notification, and its statusappears in the table.
6 To add a group:
a Select Group in the Notification For field.Figure 92: Adding a group notification
b Specify the support company, organization, and group name.
c Click Add to create the notification.
The group name, approval phase, and its status (for example, Pending)appears in the table.
7 Use the Status field to toggle between viewing Pending and Notified notifications.
8 Delete the notifications, if needed.
9 Close the Non-Approver Notifications dialog box when you are finished.
Adding approvers
374 BMC Remedy Change Management User Guide
Activity assignee roleThis section describes how activity assignees can use the Release Managementapplication and the Activity form to work on activity actions.
Working with activities as an activity assigneeRelease Management provides the capability to assign specific units of work knownas activities. When work in a release must be tracked in a lifecycle with specific statustransitions, but does not require the complexity of a change request (for example,approvals), you can use an activity instead. For example, a new payroll applicationrequires that your user base receives proper documentation and training. Since thisrequirement is not a change request that needs to be completed by the ChangeManagement team, the release coordinator creates it as an Activity using the Activityform, and then assigns it to an activity assignee.
Note Activities do not typically involve changes to the IT infrastructure.
The activity assignee is typically a member of the support staff and is responsible forplanning the activity, for example, adding scheduled start and end dates; addingwork information to the activity, for example, attaching a training schedule; creatingand assigning tasks, for example, the Payroll staff to create training materials, the HRstaff to train the users; and adding financial information, for example, budgeted andactual costs. For more information, see Activities on page 376.
The activity assignee requires the following User permissions:
■ Release User permission grants general access to the Release ManagementConsole. You can open, query, submit and modify release requests. ReleaseViewer permission grants access to the Release Management, but you can onlyopen and query release requests.
■ Activity User permission grants general access to the Activity form. The activityassignee will be permitted to query and modify activity requests.
10
Chapter 10 Activity assignee role 375
Using the Release Management Console
The Release Management Console provides a dedicated workspace for managingrelease requests. This console is designed for release coordinators who deal withRelease Management daily and do not want to view other BMC Remedy ITSMapplications. It provides quick access to the information you need and to theprocedures that you perform most often.
Various functions are available in the navigation pane of the Release ManagementConsole. They provide you with quick ways to go to different areas in ReleaseManagement and to perform other functions.
For more information, see Release Management Console functional areas on page 99.
ActivitiesThe Release Management module provides the capability of creating and assigningspecific units of work called activities. Activities have their own lifecycle with a seriesof status transitions, for example, Assigned, In Progress, and so on. You can alsoestablish a sequence of tasks in your activities. Activities are useful when you needto create a structured sequence of tasks that you must complete to fulfill the release,but these tasks should not be classified as a change request.
For example, you must release a new version of the Calbro payroll application. Oneof the work items that must be completed in the release cycle is training users on thenew payroll application. Because training is not a change request that the ChangeManagement team would complete, you decide instead that training should be anactivity that is assigned, tracked, and completed using the Activity form.
Activities
376 BMC Remedy Change Management User Guide
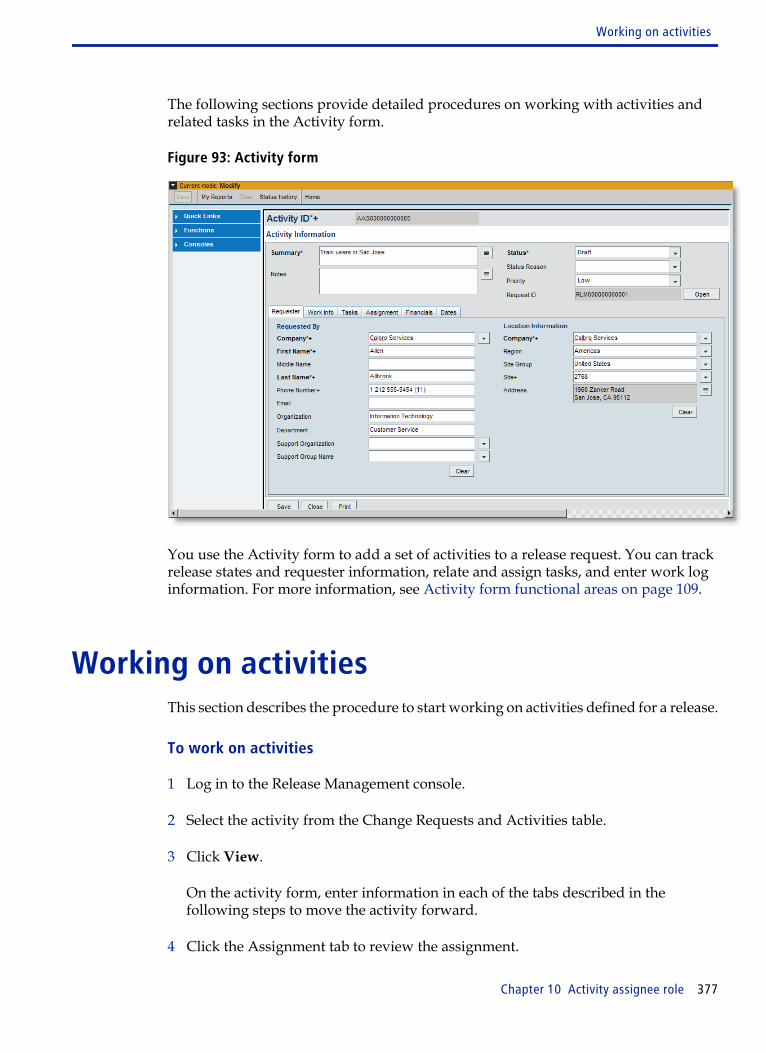
The following sections provide detailed procedures on working with activities andrelated tasks in the Activity form.
Figure 93: Activity form
You use the Activity form to add a set of activities to a release request. You can trackrelease states and requester information, relate and assign tasks, and enter work loginformation. For more information, see Activity form functional areas on page 109.
Working on activitiesThis section describes the procedure to start working on activities defined for a release.
To work on activities
1 Log in to the Release Management console.
2 Select the activity from the Change Requests and Activities table.
3 Click View.
On the activity form, enter information in each of the tabs described in thefollowing steps to move the activity forward.
4 Click the Assignment tab to review the assignment.
Working on activities
Chapter 10 Activity assignee role 377

If necessary, you can reassign the activity. For more information, see Acceptingactivity assignments on page 379.
5 Click the Work Info tab to enter work information about the activity.
You can track the activity’s progress by recording the steps you took toimplement it in the work history or attach a detailed Training Plan. For moreinformation, see Entering work information on page 381.
6 Click the Tasks tab to add tasks to the activity.
Tasks allow you to provide more granularity to the Activity if needed. You canassign specific tasks to specific task implementers. For example, if there aremultiple people that need to train users in multiple locations, you can want toassign work to them using tasks.
You can create activities with related tasks at each release milestone. Tasks havetheir own independent lifecycle and continue on their own path. You mightdecide to complete the training materials tasks during the Planning milestone, butcomplete training tasks during Deployment.
For more information, see Creating activity task groups and tasks on page 383.
7 Click the Financials tab to add budget and actual costs of the activity.
As you work the activities, you can add the costs associated to each activity ineach activity record that is part of the Release Request. The release activity can bein any status except Closed or Completed. For more information, see Planningfinancial information for activities on page 385.
8 Click the Dates tab to add start and end dates.
When you start working on an activity, you should enter the Scheduled Start Dateand Scheduled End Date. For more information, see Planning dates on page 386.
9 If there is no need to update information, move the status to In Progress and saveyour work.
■ If you need to temporarily stop work on the activity, you can move the activityto the Pending status.
■ If you must cancel the activity, you can move it to the Cancelled status. This is aterminal status for the activity. All open tasks are marked as Closed.
Working on activities
378 BMC Remedy Change Management User Guide

Accepting activity assignmentsOne responsibility for activity assignees is accepting the activities assigned to them.If an assignment definition has not been created for the activity, you must assign theactivity manually. Otherwise, the best practice is to use the assignment rules alreadyconfigured for you by your Release Management administrator.
The activity assignee is then notified of activity assignments by email, pager, or BMCRemedy Alert. Assigned activities can also be listed in the Assigned Work Orderstable in the Release Management Console.
Activity assignment is based on the activity’s categorization. The Assignment tabdisplays information about people assigned to an activity as the Request Manager.The assignee must make sure that the assignment is correct and accept the activity. Ifthe assignment is not correct, the request manager can reassign the request.
These assignments are based on routing information stored in the AssignmentConfiguration form. This form assigns the groups, and then Auto Assign assigns theindividual. For more information, see the BMC Remedy IT Service ManagementConfiguration Guide .
Reviewing activity assignments
A activity must be assigned to a Support Group. However, a specific request assigneeis typically responsible for the overall activity process.
To review activity assignments
1 Open the activity.
2 Click the Assignment tab.Figure 94: Activity form—Assignment tab
Accepting activity assignments
Chapter 10 Activity assignee role 379
Based on the default configuration and requester information in the activity,certain fields might already be filled.
3 To assign an activity assignee, make selections from the menu options.
If needed, you can click Clear to remove information from the Activity Assigneefields.
4 Enter the time spent resolving the activity.
5 Save the activity.
The request assignee are automatically notified of their assignments.
Receiving notifications of activity assignments
Request assignees are notified of new activities based on their notification methodpreferences defined in their personal record. In addition, when an activity movesinto a new status, for example, Completed, the activity executes workflow thattriggers notifications. Based on your group or role, you might receive notificationsduring various activity states. For more information about notification preferences,see the BMC Remedy IT Service Management Configuration Guide .
The available notifications follow:
■ Individual Notification—An individual assignee is notified according to thenotification method specified in their personal record.For example, if Bob Backline has a notification method of BMC Remedy Alert, hereceives a notification from BMC Remedy Alert for each activity that is assignedto him.
■ Group Notification—A support group is notified according to the notificationmethod specified by each group member’s entry in their personal record.For example, if an activity is assigned to the Support-Software group, each groupmember is notified through the notification method specified in their personalrecord. If Sarah Software has Email specified as the notification method in herpersonal record, the notification is sent to her by email. If Bob Backline has BMCRemedy Alert specified, he is notified accordingly.
To receive notification of activity assignment by BMC Remedy Alert
1 Log in to BMC Remedy Alert.
Accepting activity assignments
380 BMC Remedy Change Management User Guide
When you or your group receives a notification that you or your group has beenassigned to an activity, the information is displayed in the BMC Remedy Alertwindow.
2 To evaluate your assignment, select the activity listed in the BMC Remedy Alertwindow.
3 Choose Alerts => Details.
The activity is displayed in the Activity form.
Reassigning activities
If you cannot accept or resolve an assigned activity, you can reassign the activity toanother assignee, or you can ask your manager to reassign the activity.
If the activity was categorized incorrectly, it can also be reassigned.
To reassign an activity yourself
1 Open the activity so that it is displayed in the Activity form.
2 In the Assignment tab, select the manager or assignee to whom you want toassign the activity.
3 Click Save.
The manager or assignee is notified of the reassigned activity.
Entering work informationYou sometimes need to modify the activity with work history entries that you cancreate during its life cycle to document activities performed or information gathered.You use the Work Info tab to add work information regarding tasks performed onthe current activity. For example, you can track an activity’s progress by recordingthe steps you took to implement it in the work history, or you can attach a detailedtraining plan as part of your overall release strategy.
As you track and supervise an activity, you move it from one status to another, forexample, from Assigned to In Progress. The activity should follow the stages in the
Entering work information
Chapter 10 Activity assignee role 381
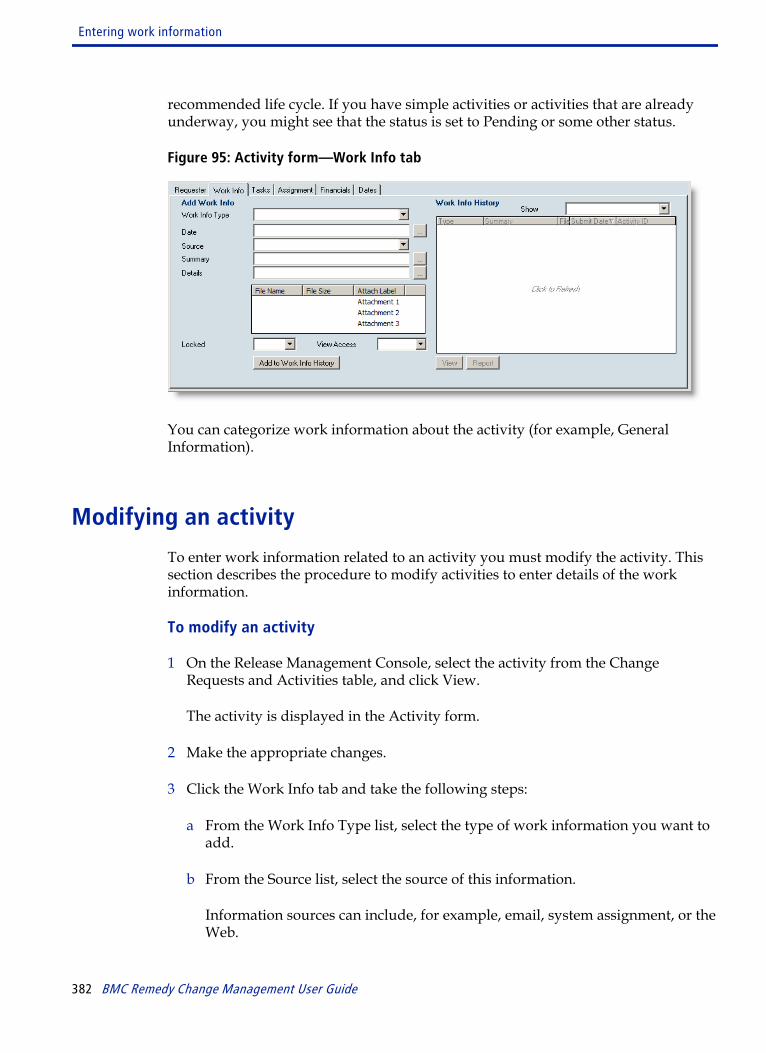
recommended life cycle. If you have simple activities or activities that are alreadyunderway, you might see that the status is set to Pending or some other status.
Figure 95: Activity form—Work Info tab
You can categorize work information about the activity (for example, GeneralInformation).
Modifying an activity
To enter work information related to an activity you must modify the activity. Thissection describes the procedure to modify activities to enter details of the workinformation.
To modify an activity
1 On the Release Management Console, select the activity from the ChangeRequests and Activities table, and click View.
The activity is displayed in the Activity form.
2 Make the appropriate changes.
3 Click the Work Info tab and take the following steps:
a From the Work Info Type list, select the type of work information you want toadd.
b From the Source list, select the source of this information.
Information sources can include, for example, email, system assignment, or theWeb.
Entering work information
382 BMC Remedy Change Management User Guide
c Enter the details of your work information record in the Summary and Detailsfields.
d To add an attachment to the record, right-click in the attachment table andselect Add from the menu that appears. With browsers, click the Add button.
e From the Locked list, select Yes or No to lock the log.
WARNING You cannot modify the work log after you save it.
f From the View Access list, select Internal or Public.
■ Internal—If you want only users within your organization to see the entry.
■ Public—If you want everyone with access to the system to see the entry,including requesters.
4 When you have finished updating the activity, click Save.
The Save operation adds your entry to the work history. The Show field allowsyou to filter out specific work entries based on the type of activity displayed inthe table.
5 To see a report of the activities you performed against this activity, click Report.
6 To display all entries for work information history, click View.
Note When you return to the Release Management Console, you might need to refreshthe Change Requests and Activities table to display all the modified records.
7 Save your changes.
Creating activity task groups and tasksWhen you plan an activity, determine whether you can divide it into separate tasks,especially if you need to add more granularity to the activity. Tasks are theindividual components of an activity, and can be assigned to specific assignees whocomplete the tasks.
When you add an activity, by default, the Requested By and Location informationfields on the Activity form are populated with information of the user creating theactivity.
Creating activity task groups and tasks
Chapter 10 Activity assignee role 383

Tip When you are creating tasks for an activity, you must complete the Company, FirstName and Last Name fields under Requester Information, Company fields underLocation information and the Summary field on the activity form before you includethe tasks.
The Tasks tab displays the tasks that are required to be performed to complete theactivity. You can use task groups to manage an activity with many tasks, eachhaving its own schedule, task assignee, and plan. For less complex activities, tasksare optional. Tasks are created and modified within the activity and are storedseparately within the Tasks form. A single activity can have an unlimited number oftasks.
After a task is assigned to a support group or an individual, the assignee receivesnotifications to perform the various task activities when the activity reaches theAssigned status. The task dates are also displayed on the Dates tab.
Tasks, like activities, go through many status transitions as they progress. The statusin which a task is created depends upon the status of the parent activity.
Your assigned tasks and task groups are listed in the Tasks and Task Groups table onthe Activity form. Tasks are prefixed with TAS and task groups with TGR.
You can also view tasks and task groups related to an activity from within the Taskstab of the Activity form.
Figure 96: Activity form—Tasks tab
Note You can click the View Flow button to see a read-only view of the task flow in thetask group. For more information about using the View Flow button, see Using CCMtasks on page 347.
Adding task groups and tasks to activities follows the same steps as change requests.For more information, see Implement stage - Working with tasks on page 260.
Creating activity task groups and tasks
384 BMC Remedy Change Management User Guide
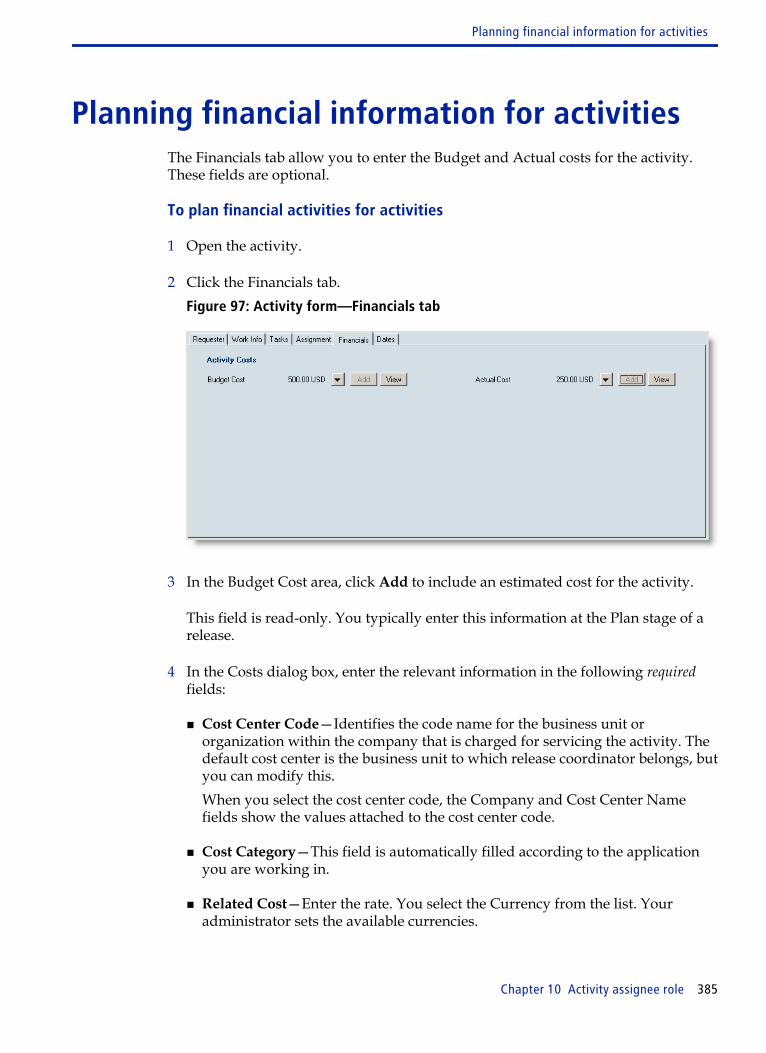
Planning financial information for activitiesThe Financials tab allow you to enter the Budget and Actual costs for the activity.These fields are optional.
To plan financial activities for activities
1 Open the activity.
2 Click the Financials tab.Figure 97: Activity form—Financials tab
3 In the Budget Cost area, click Add to include an estimated cost for the activity.
This field is read-only. You typically enter this information at the Plan stage of arelease.
4 In the Costs dialog box, enter the relevant information in the following requiredfields:
■ Cost Center Code—Identifies the code name for the business unit ororganization within the company that is charged for servicing the activity. Thedefault cost center is the business unit to which release coordinator belongs, butyou can modify this.When you select the cost center code, the Company and Cost Center Namefields show the values attached to the cost center code.
■ Cost Category—This field is automatically filled according to the applicationyou are working in.
■ Related Cost—Enter the rate. You select the Currency from the list. Youradministrator sets the available currencies.
Planning financial information for activities
Chapter 10 Activity assignee role 385
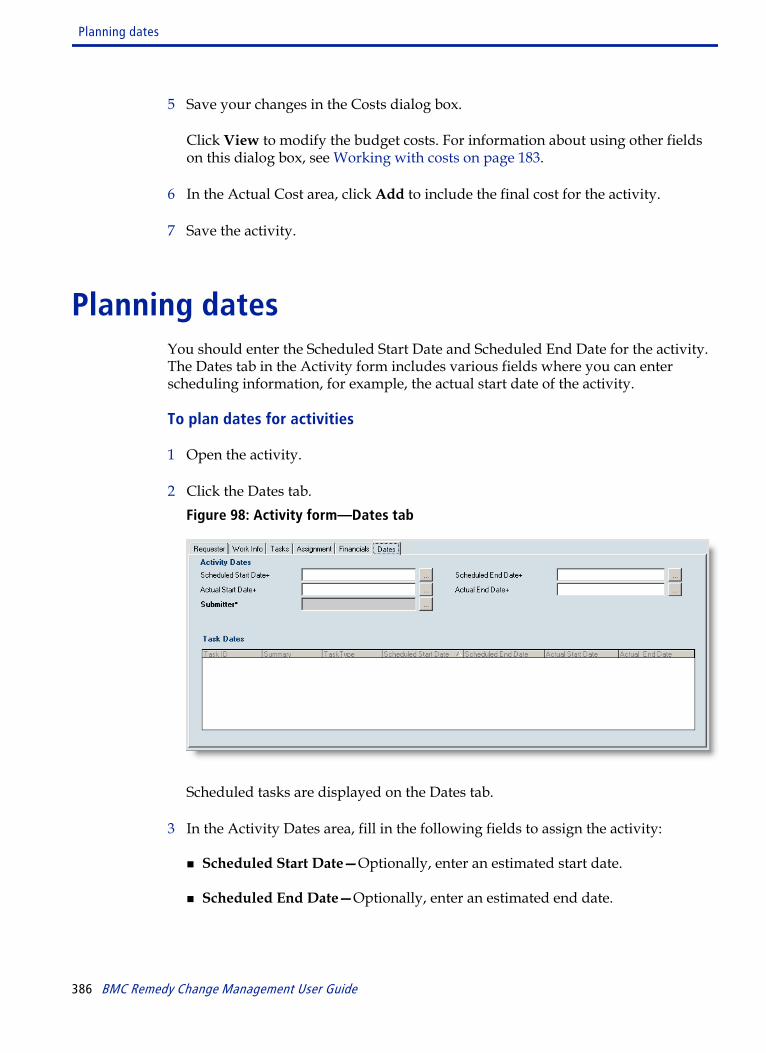
5 Save your changes in the Costs dialog box.
Click View to modify the budget costs. For information about using other fieldson this dialog box, see Working with costs on page 183.
6 In the Actual Cost area, click Add to include the final cost for the activity.
7 Save the activity.
Planning datesYou should enter the Scheduled Start Date and Scheduled End Date for the activity.The Dates tab in the Activity form includes various fields where you can enterscheduling information, for example, the actual start date of the activity.
To plan dates for activities
1 Open the activity.
2 Click the Dates tab.Figure 98: Activity form—Dates tab
Scheduled tasks are displayed on the Dates tab.
3 In the Activity Dates area, fill in the following fields to assign the activity:
■ Scheduled Start Date—Optionally, enter an estimated start date.
■ Scheduled End Date—Optionally, enter an estimated end date.
Planning dates
386 BMC Remedy Change Management User Guide
You should set the Start Date and End Date to be different from the dates of theparent release.
4 Save the activity.
Closing the activityIn the final stage of the activity, the activity assignee reviews all the implementedtasks to make sure that each objective was met. An activity cannot be closed until alltasks are closed.
To close the activity
1 Open the activity.
2 Click the Dates tab, and enter the actual start date and end date.
3 Moves the activity to the Completed status.
4 After everything is verified using your company’s criteria, move the status of theactivity to Closed.
Closing the activity
Chapter 10 Activity assignee role 387
Closing the activity
388 BMC Remedy Change Management User Guide

Supplemental ChangeManagement tasks
This section contains descriptions of supplemental tasks that you might also performif you work with the Overview console or the BMC Remedy Change Managementapplication.
Setting application preferences and optionsWhen you click Functions => Application Preferences, you can view and edit thesettings that affect the default appearance of the main application console.Depending on which applications you have installed, you can also view theirpreferences and options.
When an application opens, you can determine:
■ Default console view.
■ Forms that appear.
■ Search criteria defaults.
■ What happens after you save a request.
■ What appears in the Overview Console.
■ The Data Set Name that is selected when the form opens.
■ Statistics.
Note For the changes to take effect, close the application console and reopen it. Thepreferences you set are applicable until they are modified.
11
Chapter 11 Supplemental Change Management tasks 389

Setting application preferences - Change Management
You can set preferences to:
■ Set defaults for the consoles.
■ Determine the action that occurs after you save an Change Request form.
■ Determine which console appears by default when you open BMC Remedy ITService Management.
To set application preferences for Change Management
1 From the Change Management console, click Functions => ApplicationPreferences.
2 On the Application Preferences dialog box, click the Change Management tab.
The following table describes the settings available on the form.
Setting Description
Preferences for This is a read-only field that identifies the user.
Default Home Page Select the console that you want to appear as your home page when you log into theBMC Remedy Action Request System (BMC Remedy AR System) server. For example,if you want the Change Management console to appear, select Change ManagementConsole. The default value is IT Home Page.
Company Select the company that you want to appear in the Company field of the ChangeManagement console by default.
Setting application preferences and options
390 BMC Remedy Change Management User Guide

Setting Description
Show The default console view, with the search criteria, controls which change requestsappear in the Assigned Work area. You can temporarily change this setting from thenavigation pane of the console. The following list shows you the available selections:
■ Submitted By Me -Shows all change request that you submitted.
■ Assigned To Me - Displays change requests assigned to you.
■ Assigned To My Selected Groups - Prompts you to select any support groups towhich you belong. You can select to display all change requests assigned to yourgroup, or change requests assigned to your group that are not yet assigned to anindividual.
■ Assigned To All My Groups - Displays change requests assigned to all yoursupport groups. You can choose to display all change requests, or change requeststhat are not yet assigned to an individual.
Note: If you are a new user, you must select the preference for the View Broadcastlink to function correctly.
Confirm on Submit Choose whether to display a confirmation message when you submit a new changerecord.
Console Page>OnForm Open ■ Data Set Name - Choose a personal preference data set, for example, BMC Asset.
For more information about how this data set is used, see Relating CIs to alternatedata sets on page 251.
Form■ After New Save - This setting controls the action after you click Save on the Change
form. The following list shows the available selections:
— New Request After Submit - Opens the Change form in New mode ready foryou to record a new change.
— Modify Request After Submit - Leaves the Change form open and changes themode from New to Modify.
■ Tab Views - You can choose whether to show the following panels:
— Show Approvers
— Show Financials
Note: These preferences apply only when you are using the Classic view.
Overview Console You can choose whether to show change records based on the status and user role onthe Overview console.
Setting application preferences and options
Chapter 11 Supplemental Change Management tasks 391

3 To select task related options, on the Application Preferences dialog box click theTask Management tab.
The following table describes the settings available on the form.
Setting Description
Console Page■ Show Task - Choose Yes to show tasks.
■ Task Status - Choose one of the following options:
— All Tasks - Shows all tasks irrelevant of their status.
— All Open Tasks - Displays all tasks that are not in the Closed status.
— All Closed Tasks - Displays all tasks with the status of Closed.
4 Click Save.
Setting the BMC Remedy Change Management view
BMC Remedy Change Management is configured by your application administrator.For information about customizing your options to help you quickly process changerequests, see BMC Remedy ITSM Configuration Guide. The following procedureprovides information about setting the view.
To set the view
1 From the Applications menu, choose Application Administrator => ApplicationAdministrator Console.
2 From the Application Administration Console, click the Custom Configurationtab.
3 On the Custom Configuration tab, choose Foundation => Advanced Options => View Selection Framework - Deploy View, and then click Open.
4 In the navigation pane on the left side of the form, select the application name(Remedy Change Management) and the role (Change Classic View User forClassic view, Change Best Practice View User for Best Practice view) andVirtualization Administrator for the VLM view, if applicable.
5 To deploy the view to a company, perform the following steps:
Setting application preferences and options
392 BMC Remedy Change Management User Guide
a On the Company Mapping tab, select the company to which you are mappingthe view.
b If necessary, change the sorting order number.
The sorting order is used when a support group or an individual belongs tomore than one company. A company with a lower sort order value takesprecedence over a company with a higher sort order value.
6 To deploy the view to a support group, perform the following steps:
a On the Support Group Mapping tab, select the company and organization towhich the support group belongs.
b From the Support Group list, select the support group.
c If necessary, change the sorting order number.
The sorting order is used when a support group or an individual belongs tomore than one company. A company with a lower sort order value takesprecedence over a company with a higher sort order value.
Note If you need to change the sort order after you save the deployment, you mustfirst delete the deployment by using the Remove button, and then re-create thedeployment with the new sort order number.
7 To deploy the view to an individual, perform the following steps:
a On the Individual Mapping tab, select the company, organization, and supportgroup to which the individual belongs.
b From the People list, select the individual to whom you are mapping the view.
8 To save the deployment, click Add.
9 Close the form and then have the affected users log back in to the application.
Viewing your profileYou can view and modify your personal profile. When you click My Profile, thePeople (Search) form appears.
In this form, you can:
Viewing your profile
Chapter 11 Supplemental Change Management tasks 393
■ Update company information such as organization, business, and home address,and so on.
■ View permissions.
For detailed information about the People form, see the BMC Remedy IT ServiceManagement Configuration Guide.
To modify your profile
1 To open your profile, from the navigation pane in the application console, chooseFunctions => My Profile.
2 On the People form, update the information at the top of the form, or click the tabcorresponding to the area in which you want to change the profile information.
Make your changes by selecting from the various lists that are available.
Updating assignment availability
Your assignment availability status indicates whether you are available to acceptwork assignments. If your status is yes,” you are available. If your status is no,” youare not available.
You can quickly update your status using the My Profile function.
Note If you have management level permissions, you can also update the status of thepeople in the support group that you manage.
To update assignment availability
1 To open your profile, from the navigation pane in the Release ManagementConsole, choose Functions => My Profile .
2 From the Assignment Availability menu, choose the status you want.
3 Click Save.
Working with recordsThis section discusses some of the common functions related to record handling.
Working with records
394 BMC Remedy Change Management User Guide

WARNING For the purpose of data integrity, BMC does not recommend deleting changerequests. Deleting a change request does not delete the underlying related data, suchas approvals, tasks, relationships, and any other dependencies.
Searching all records
The following procedure describes how to search all changes. Use this type of searchwhen you are looking for a change that is not associated with your ID or yourgroup’s ID, or anytime you search all changes.
To search all records
1 From the navigation pane in the Change Management console, chooseFunctions => Search Change.
The Change (search) form appears that with which you can perform the search.The search form is similar to the Change form.
It contains the same tabs and the same fields. You can use any of the tabs andfields in the form to specify your search criteria.
2 Use the tabs and fields to build your search condition.
To reduce the number of records found by the search, enter as much informationinto the form as you can.
3 When you finish entering your search criteria, click Search.
When the search finishes, the search results table lists all the records that matchthe search criteria.
4 Scroll through the table to find the specific record you want.
5 When you find the record, double-click it to open it.
Printing records
You can print a copy of a record to keep for filing purposes or to share with someonewho does not have access to the application.
Working with records
Chapter 11 Supplemental Change Management tasks 395
To print a record
1 Open the record you want to print.
2 Click Print at the bottom of the form to open the Business Objects Report Previewdialog box, then go to Step 3 on page 349.
The Business Objects Report Preview dialog box appears, enabling you to viewthe record before you print it.
3 Click the Print icon on the menu bar at the top of the dialog box.
When the print confirmation dialog box appears, click the Print icon to send therecord to your local printer.
4 Close the Business Objects dialog box.
Modifying records
After you generate a record, you can modify or update the information it contains.
To modify a record
1 Open the record that you want to modify.
2 Click the field, tab, or link in the navigation pane that contains or takes you to theinformation you want to update.
3 Make the appropriate changes.
4 Click Save.
Working with requester recordsWhen you define change and release requests, or monitor them, you frequently workwith requester information. For example, you might need to search for a requester inthe database. If the requester does not exist, you must define a new requester. Or,you might need to change requester information.
The People form contains all user records. You can access this form in different ways:
■ Select People on the Application Administration Console.
Working with requester records
396 BMC Remedy Change Management User Guide
■ Select My Profile on the Overview Console, the Change Management Console, orthe Release Management Console. You then can see your own user record.
■ Click in the Last Name field, enter partial information about the individual youare looking for, and then press ENTER.
Information stored here is used to automatically fill in requester information fieldson many forms. For more information, see the BMC Remedy IT Service ManagementConfiguration Guide.
Creating a requester record
While defining a new change request, release request, or task, you might find thatthe requester does not have a record in the database. If this is the case, you mustdefine a record for the requester. You can do this while you are defining the requestor task.
To define a requester record
1 From the IT Home page, click Application Administration Console.
2 Select the appropriate company from the Company field.
3 Click Create next to People.
4 On the People form, complete all the required fields:
■ First Name—Enter the requester’s first name.
■ Last Name—Enter the requester’s last name.
■ Client Type—Select Operating Company, Customer, or Vendor.
■ Profile Status—Set the Status to Enabled (or other option, as needed).
■ Client Sensitivity—Select Standard or Sensitive.
■ VIP—Select Yes or No to indicate the person’s appropriate status.
■ Support Staff—Select Yes or No to indicate if the requester is a support staffmember.
■ Site— Select a Site loction.
Working with requester records
Chapter 11 Supplemental Change Management tasks 397
■ Company—Select access data for one company but not another, based on thecompanies to which the person is assigned. The Company field controls accesswhen configuring people.
■ Business—Enter a business phone number. Also enter an email address.
5 Optionally, complete the remaining fields, including fields on the other tabs.
6 Click Save.
Using RemindersReminders enable you to define notes for yourself and others. You can send them byemail or through BMC Remedy Alert, and you can specify when they are sent.
You can define generic reminders, or you can define reminders that are associatedwith a specific change request or task. For example, you can send yourself a noteabout a specific change request to remind yourself to follow up on it.
Whether you access reminders from the console or from within a change requestdetermines which reminders you are able to view:
■ When you open the Reminders dialog box from the console, you can view allreminders that you have created.
■ When you open reminders from within a change request, you can view remindersassociated with that request. This includes not only your reminders but also thosecreated by other users of the application.
You can modify or delete only the reminders that you have created.
Creating and viewing reminders
You can set reminders to send notes to yourself and others.
To view and create reminders
1 On the Change Management console select Functions => Reminders.
The Show Reminders tab displays a list of reminders that you can filter using theoptions in the Show Reminder drop down.
2 Select the Create Reminder tab to create a new reminder.
Using Reminders
398 BMC Remedy Change Management User Guide

3 Enter information in the fields as appropriate.
Notify
Select the type of notification.
The options are:
■ Individual—Select this option to notify a user.
■ Group— Select this option to notify a group.
Note If you select the Group option, all the people who belong to the supportgroup and have the Infrastructure Change Approver functional role are setup as approvers. By default, only one approver in the group must sign off onthe approval before it can move to the next status.
Recipient
Enter the name of the user or group and press Enter.
AR login
If you select Individual, this field appears. The login ID of the user isautomatically included when you select the user.
Time
Select the calendar icon to select the date and time for when the reminderneeds to be set. By default, the time is set to an hour ahead of the current time.
Subject
Specify a subject for the reminder.
Message
Enter a brief message related to the reminder.
4 Click Save.
A confirmation message with details of the notifier and time of the reminder isdisplayed.
Using Reminders
Chapter 11 Supplemental Change Management tasks 399

Modifying and deleting reminders
If you open the Reminders dialog box from the BMC Remedy Change ManagementConsole, all reminders that you created are shown. If you open the Reminders dialogbox from within a change request, only the reminders associated with that requestare shown.
To modify or delete reminders
1 In the BMC Remedy Change Management Console, or from within a changerequest, choose Functions => Reminders.
2 In the Show Reminders field on the Reminders dialog box, select the set ofreminders to view. The choices are All, Pending, and Sent.
3 Select a reminder, and then click View.
4 On the Reminder Details dialog box, make your changes to the reminder, andthen click Save.
5 To delete a reminder, select it, and then click Delete.
Sending and receiving change notificationsWhen a change request moves into a new status, for example, Completed, theapplication generates notifications. Based on your group or role, you might receivenotifications during various change statuses.
For more information, see Reassigning change requests on page 219. For moreinformation about notification preferences, see the BMC Remedy IT ServiceManagement Configuration Guide.
For more detailed information about notifications, see the BMC Remedy IT ServiceManagement 7.6.xx Notification Engine Guide.
Notifications by groups
The following table lists the change events that trigger notifications and the changemanagement groups they are sent to.
Sending and receiving change notifications
400 BMC Remedy Change Management User Guide
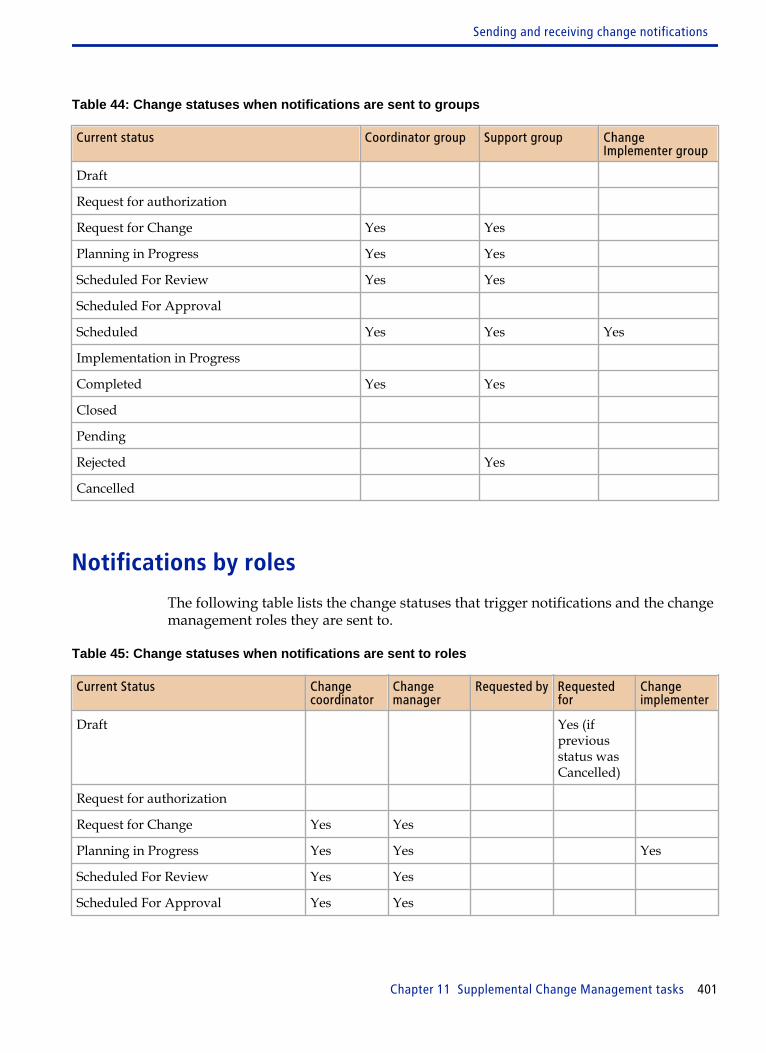
Table 44: Change statuses when notifications are sent to groups
Current status Coordinator group Support group ChangeImplementer group
Draft
Request for authorization
Request for Change Yes Yes
Planning in Progress Yes Yes
Scheduled For Review Yes Yes
Scheduled For Approval
Scheduled Yes Yes Yes
Implementation in Progress
Completed Yes Yes
Closed
Pending
Rejected Yes
Cancelled
Notifications by roles
The following table lists the change statuses that trigger notifications and the changemanagement roles they are sent to.
Table 45: Change statuses when notifications are sent to roles
Current Status Changecoordinator
Changemanager
Requested by Requestedfor
Changeimplementer
Draft Yes (ifpreviousstatus wasCancelled)
Request for authorization
Request for Change Yes Yes
Planning in Progress Yes Yes Yes
Scheduled For Review Yes Yes
Scheduled For Approval Yes Yes
Sending and receiving change notifications
Chapter 11 Supplemental Change Management tasks 401
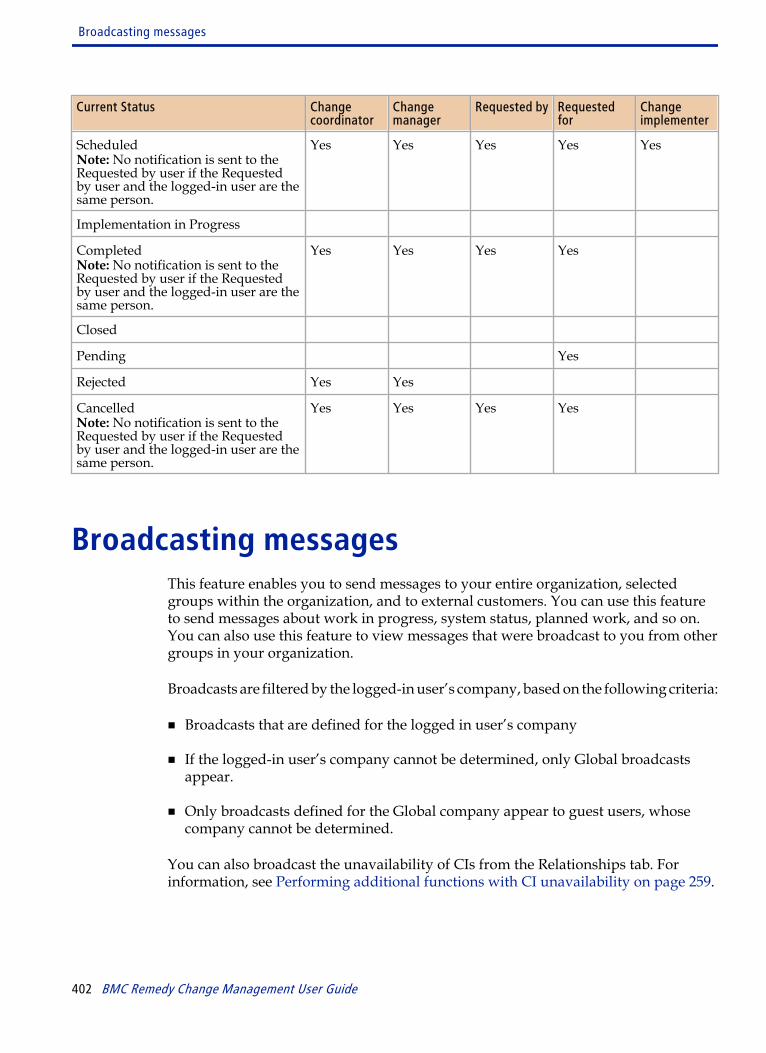
Current Status Changecoordinator
Changemanager
Requested by Requestedfor
Changeimplementer
ScheduledNote: No notification is sent to theRequested by user if the Requestedby user and the logged-in user are thesame person.
Yes Yes Yes Yes Yes
Implementation in Progress
CompletedNote: No notification is sent to theRequested by user if the Requestedby user and the logged-in user are thesame person.
Yes Yes Yes Yes
Closed
Pending Yes
Rejected Yes Yes
CancelledNote: No notification is sent to theRequested by user if the Requestedby user and the logged-in user are thesame person.
Yes Yes Yes Yes
Broadcasting messagesThis feature enables you to send messages to your entire organization, selectedgroups within the organization, and to external customers. You can use this featureto send messages about work in progress, system status, planned work, and so on.You can also use this feature to view messages that were broadcast to you from othergroups in your organization.
Broadcasts are filtered by the logged-in user’s company, based on the following criteria:
■ Broadcasts that are defined for the logged in user’s company
■ If the logged-in user’s company cannot be determined, only Global broadcastsappear.
■ Only broadcasts defined for the Global company appear to guest users, whosecompany cannot be determined.
You can also broadcast the unavailability of CIs from the Relationships tab. Forinformation, see Performing additional functions with CI unavailability on page 259.
Broadcasting messages
402 BMC Remedy Change Management User Guide
Managing broadcasts
While viewing broadcasts, you can modify the message, define a new broadcastmessage, and under some circumstances (when viewing the message from thecurrent record) relate the broadcast message to the current record.
To manage broadcasts
1 From the BMC Remedy Change Management console or the application consoleclick View Broadcast.
If there are pending broadcasts that you have not viewed, this link will display asNew Broadcast.
2 To view a broadcast, select the message to view from the Broadcast table and thenclick View.
The View Broadcast dialog displays details of the selected broadcast.
To view another message, close the current broadcast, select another messagefrom the Broadcast table and click View.
3 If the broadcast table contains many messages, limit the number of messagesusing the Broadcast Search Criteria tab. For more information, see “Limiting thenumber of messages” on page 403.
4 Click Modify to update the broadcast message.
You must belong to the authorized authoring group for the selected broadcastand have the functional role of a Broadcast Submitter to modify the broadcast. Formore details on modifying broadcasts, see “Creating broadcast messages” onpage 404.
Note Authorized authoring groups are defined on the Authoring Groups tab of the New/Modify Broadcasts dialog.
Limiting the number of messages
When viewing broadcast messages from the current record, you can limit thenumber of messages that appear in the Broadcast table. Click the Broadcast SearchCriteria tab and define a set of criteria that filters out messages.
Broadcasting messages
Chapter 11 Supplemental Change Management tasks 403
To limit the number of messages
1 Click the Broadcast Search Criteria tab, and then complete the fields in the tab.
To return the smallest number of broadcast messages, complete as many of thefields as possible.
2 When you finish specifying the search criteria, click Search.
Creating broadcast messages
This section describes how to define a broadcast message. To define a broadcast, youmust have the Broadcast Submitter functional role.
To define a broadcast message
1 You can open the New/Modify Broadcasts dialog box from two locations, asfollows:
■ To broadcast a change, from the navigation pane of the change record, chooseFunctions => Broadcast Change. If you define a broadcast from a change orrelease, a relationship is generated between the broadcast and the change orrelease.
■ To broadcast generic information, from the BMC Remedy Change ManagementConsole, click Create, which appears below the Broadcast table. If you define abroadcast from the main console, it is not related to a specific record.
Note To boradcast a release, select the given options in the release record or console.For a release broadcast, the Broadcast originated from and Broadcastoriginated from ID fields are pre-populated because a relationship between arelease and broadcast has been associated.
2 Enter information in the required fields.
Required fields appear in bold on the Broadcast Details tab.
■ Company—Select the company where this broadcast will be sent. Only userswith access to this company see the broadcast. To send the broadcast toeveryone, select Global from the Company list.The Company field is mandatory. To specify a specific part of the company, fillin the other location fields. For example, you can specify the site, organization,or department.
Broadcasting messages
404 BMC Remedy Change Management User Guide

■ Subject—A short description of what the broadcast is about.
■ Broadcast Message—The text of your message.
■ Broadcast Type—Select a broadcast type from the list.
■ Broadcast Start Date and Broadcast End Date—To start the broadcast now,click in the Broadcast Start Date field, and then press Enter. To select a datefrom the calendar, click the Browse button next to the field. Select a date fromthe calendar on which to start the broadcast and the date to end it. You can alsospecify times of the day using the Time feature at the bottom of the calendar.
■ Broadcast Originated From—This is automatically filled in. The contentsdepend on where you are creating the broadcast. If you broadcast from aninvestigation, the value is set to Problem Investigation.
■ Broadcast Originated From ID—When you define a broadcast from within arecord, this field is automatically filled in. If you define a broadcast from themain console, the field is unavailable.
■ View Access—To make the broadcast visible only to members of yourorganization, select Internal. To make the broadcast visible from the Requesterconsole, select Public.
■ Notify—Select Yes to broadcast notification automatically sent to an individualor group.If you select Yes, an Email button and the Notify Support area appears.Use the Manual Email button to manually send an email about the broadcast.On the Email System form, enter the recipient’s email address in the InternetEmail field, and then click Send Email Now.Use the Notify Support area to indicate which group to notify of the broadcast.You must complete all three fields, Support Company, Support Organization,and Support Group. The notification is sent at the time and on the datespecified in the Broadcast Start Date field.
■ Priority—Select a priority level for the broadcast. The choices are Low,Medium, and High.
3 To add an attachment to the Broadcast, right-click inside the table and select Addfrom the menu.
In the Add Attachment dialog box, click Open to attach the indicated file. Onlyone attachment is allowed for each broadcast.
4 If you want members of another group to be able to modify the message, followthese steps:
a Click the Authoring Groups tab, and then click Manage Authoring Groups.
Broadcasting messages
Chapter 11 Supplemental Change Management tasks 405
b On the Authoring Group dialog box, select the group to have authoring rights,and then click Add.
5 Click Save.
Sending pages and email messagesIn BMC Remedy Change Management, you can send messages to individuals byemail. You can page an individual or member of an on-call group.
Sending email
You can send messages about the current record using the BMC Remedy ChangeManagement email system.
To send an email message
1 Open the change or release from which to send the email.
2 From the left navigation pane, choose Functions => Email System.
3 On the Email System dialog box, indicate the recipient by selecting either:
■ Current Contact—When you open the Email System form, if there is a currentcontact assigned to the record, the contact’s name and contact informationappears in the table and is the default recipient.
■ Current Assignee—To select the current assignee, click Select Current Assignee.The current assignee’s name and contact information appears in the table.
4 To select another recipient, complete the following steps:
a Complete the fields in the People Search Criteria area, and then click Search.
b Select the recipient’s name in the search results table. If you need help decidingwhich is the correct name in the list, click View to see more information aboutan individual.
5 Complete the email information fields as described in the following list:
Sending pages and email messages
406 BMC Remedy Change Management User Guide
■ Internet Email—Type the recipient’s email address.To find this information, select the person’s name from the search results list,and then click View. The Internet Email field is on the General tab of the Peopleform.
■ Email Subject Line—The subject line contains the request ID number. You cantype over or add to this information.
■ Email Message Body—Type the message text here. A series of buttons, to theright of the Email Message Body field, enable you to automatically insert textfrom the record into the message text.
Note If one or more of these buttons is unavailable, the corresponding field in therecord contains no information.
■ Email Attachment—To attach a single file to the email message, right-clickinside the Email Attachment table, and then click Add. On the Add Attachmentdialog box, select the file to attach, and then click Open.
6 Click Send Email Now.
Paging a person or on-call group
You can page individuals or the on-call member of a group about the current recordusing the BMC Remedy Change Management paging system feature.
To page a person or an on-call group
1 Open the change from which to send the page.
2 From the navigation pane on the left side of the form, choose Functions => Paging System.
3 On The Paging System dialog box, select either:
■ Page By Person—To page an individual.
■ Page By On-Call Group—To page the on-call member of a specified group.
4 Complete the fields in the Search Criteria area, and then click Search.
5 Select the recipient’s name in the search results table, and then click Select.
Sending pages and email messages
Chapter 11 Supplemental Change Management tasks 407
If you are sending a page to a person instead of an on-call group, and need helpfinding the correct person, click View.
6 Complete the fields in the Paging Information area, as follows, and then clickSend Page Now.
■ Pager Service Provider—Select the recipient’s pager service provider.If you are sending a page to a person, you can find this information by selectingthe person’s name from the search results list, and then clicking View. On thePeople form, click the Notifications tab to see the Pager Service Provider field.
Note If you need more information about the service provider, click the button withthe globe icon beside the field. This opens a link that takes you to the serviceprovider’s website.
■ Pager Type—This field is automatically filled.
■ Pager Number—This field is automatically filled with the pager’s telephonenumber, when possible. If the pager number is unavailable to the system, youmust enter the pager number manually.
■ Pager Email—If the pager has an email address, type it here. If you are sendingthe page to a person, this information is available on the Notifications tab.
■ Manual Pager Number—If the pager’s telephone number is not availableautomatically from the paging system, type the pager’s telephone number here.
■ Alphanumeric Pager Message or Numeric Pager Message—Type yourmessage in this field. Only one of these fields is enabled, depending on therecipient’s type of pager.
Searching for recordsFrom the Change Management console or Release Management console, you cansearch for records.
To do this, you can run a series of predefined searches, run a one-time custom searchusing the Search form, or create and save your own custom searches using advancedqualifications.
Searching for records
408 BMC Remedy Change Management User Guide
Using custom searches
A custom search looks through all the records that meet your search criteria,regardless of their associations to people or groups. You run this type of search byusing the Search Problem link in the Navigation pane.
Use this type of search when you are looking for a record not associated with yourID or your group’s ID, or any time you need to search all records.
To use a custom search
1 From the Navigation pane, choose Functions => Search Release (or SearchChange).
A form appears that enables you to perform the search. The form is laid out in asimilar way to the Change form or Release form, and contains the same tabs andfields. You can use any of the tabs and fields in the form to specify your searchcriteria.
2 Using the tabs and fields, build your search condition.
To reduce the number of records found by the search, enter as much informationinto the form as you can.
3 When you finish entering your search criteria, click Search.
When the search finishes, the search results list contains all the records that matchthe search criteria.
4 Scroll through the list to find the specific record you want.
Manage My Searches - Creating a custom search withadvanced qualifications
In the Manage My Searches area in the left navigation pane, you can define and savea custom search. Custom searches using advanced qualifications allow you to createsearches with very specific search criteria, which you can save for reuse. After yousave the custom search, it appears in the My Searches node of the Defined Searcheslist.
Note The My Searches node only appears after a custom search is defined.
Searching for records
Chapter 11 Supplemental Change Management tasks 409
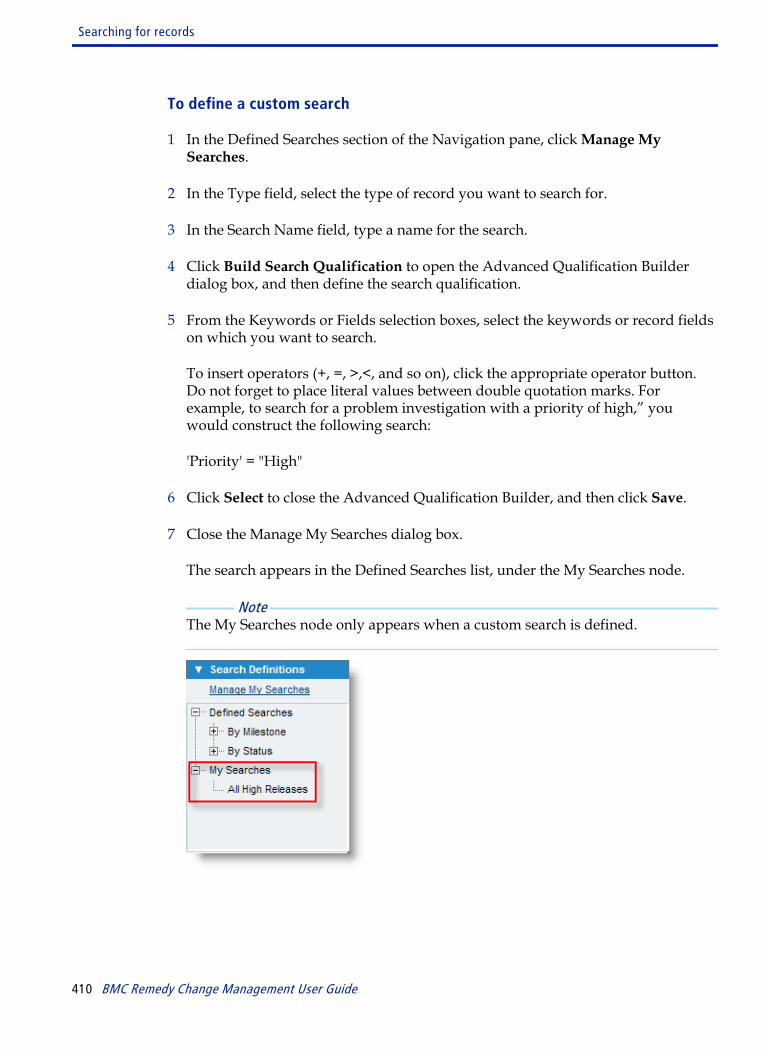
To define a custom search
1 In the Defined Searches section of the Navigation pane, click Manage MySearches.
2 In the Type field, select the type of record you want to search for.
3 In the Search Name field, type a name for the search.
4 Click Build Search Qualification to open the Advanced Qualification Builderdialog box, and then define the search qualification.
5 From the Keywords or Fields selection boxes, select the keywords or record fieldson which you want to search.
To insert operators (+, =, >,<, and so on), click the appropriate operator button.Do not forget to place literal values between double quotation marks. Forexample, to search for a problem investigation with a priority of high,” youwould construct the following search:
'Priority' = "High"
6 Click Select to close the Advanced Qualification Builder, and then click Save.
7 Close the Manage My Searches dialog box.
The search appears in the Defined Searches list, under the My Searches node.
Note The My Searches node only appears when a custom search is defined.
Searching for records
410 BMC Remedy Change Management User Guide
Editing or deleting custom searches
If you want the power of a custom search with advanced qualifications, but do notwant to save the search, you can delete it.
To edit or delete the custom search
1 Open the Manage My Searches dialog box as described in the precedingprocedure.
2 From the list of searches, select the search you need to modify or delete.
3 Perform one of the actions described in the following table.
To modify the search To delete the search
1 Edit the search as required.
2 Click Save.
3 Click Close.
1 Click Delete.
2 Click Close.
Working with reportsBMC Remedy ITSM provides a variety of predefined reports to give you quick andeasy access to information about your system. Use the Report console to generatethese reports. If the predefined reports return more information than you need, youcan manage the scope of the report using qualifications. From the Applicationsmenu, choose Quick Links => AR System Report Consoleto view customized reports.
This release of BMC Remedy ITSM integrates the Crystal reports from version 7.6.00and Web reports from version 7.6.01. On the web interface, a number of reports areavailable in the Web format. Additional Crystal reports are available only if usershave a valid Crystal license and have chosen to install them for the web at the timeof installation.
Note Customer Support can only provide limited assistance if you modify predefinedreports and have a reporting problem. In addition, there is no guarantee that BMCCustomer Support can solve problems that result from these modifications. Thestandard reports included with the BMC Remedy ITSM application are designed tobe used without modification.
Working with reports
Chapter 11 Supplemental Change Management tasks 411
WARNING If your database does not support the Not Equal To argument in this format: "!=", thecontent of your reports can be affected. Reports that have additional qualificationsthat filter out Group By fields (for example, ‘Department’ != "Engineering") also filterout the specified conditions and records that have Group By fields set to Unspecifiedor Null. Check with your system administrator to determine whether your databasesupports this form of the Not Equal To argument.
Generating a report
Use this procedure to generate a standard report without qualifications by using theBMC Remedy web console.
For information about generating reports with qualifications, see Usingqualifications to generate a report on page 413 or Using qualifications to generate areport on page 413.
To generate a report by using the Remedy web console
1 In the navigation pane on the application console, choose Functions => Reports.
2 On the Reporting console, select one of the options under Show:
All Reports Displays all available reports
Created by me Displays reports that you created
3 Under Category, select applicationName => reportCategory => reportName.
A list of available reports is displayed. Reports are organized by category, someof which contain subcategories. The reports that you see vary according to whichapplications are installed.
4 Select the report that you want to run.
5 Click Run.
If you select a report that requires additional parameters, you are prompted toenter the required parameters. For example, if the selected report requires a daterange, the date range field appears.
6 Enter the required parameters, and click OK.
Working with reports
412 BMC Remedy Change Management User Guide
7 If the report displayed is a web report, you can specify the following additionaloptions:
ToggleTable ofContents
Display the table of contents for the current report
ExportReport
Export the report to a file of the specified format
To export the report, select one of the following formats fromthe Export Format list:
■ Excel
■ PostScript
■ Word
■ PowerPoint
Select the appropriate page options, and click OK.
Print Report Print the report to HTML or PDF format
Using qualifications to generate a report
You can manage the scope of a report by adding qualifications to the criteria that thereport engine uses to generate the report content. You can tell the report to searchonly certain specified fields for particular values, or you can build advancedqualifications by using field names, keywords, and operators.
This procedure describes how to generate basic qualifications by using the ShowAdditional Filter option. To generate a report by using advanced qualifications, see Using advanced qualifications to generate a report on page 415.
To use qualifications to generate a report
1 From the navigation pane in the application console, choose Functions => Reports.
2 On the Reporting console, select one of the options under Show:
Working with reports
Chapter 11 Supplemental Change Management tasks 413
All Reports Displays all available reports
Created by me Displays reports that you created
3 Under Category, select applicationName => reportCategory => reportName.
A list of available reports is displayed. Reports are organized by category, someof which contain subcategories. The reports that you see vary according to whichapplications are installed.
4 Select the Show Additional Filter option.
Along with a list of available fields, two sections are displayed—the simple querybuilder and the advanced query builder. You use the simple query builder toquickly construct a simple query. Alternatively, advanced users can use theadvanced query builder to build the query by using BMC Remedy AR Systemquery syntax.
For additional information about the BMC Remedy AR System Reporting console,see the BMC Remedy Mid Tier Guide.
5 Select a field name from the Available Fields list, and click Add next to thesimple query builder.
Note Click to remove a qualification.
6 Click the down arrow next to the field name listed in the qualification box, andselect the appropriate operator.
7 Enter or select a value for the field in the right column.
Example If you want to enter the qualification Cost Center = 001, select the Cost Centerfield, click the down arrow next to the field and select =, and then enter 001 in theright column.
8 Repeat steps 5 through 7 for each field that you want to include in the report.
9 When you finish defining your additional qualifications, click Run.
10 If the report displayed is a web report, you can specify the following additionaloptions:
Working with reports
414 BMC Remedy Change Management User Guide

Toggle Tableof Contents
Display the table of contents
Export Report Export the report to a file of the specified format
To export the report, select one of the following formats fromthe Export Format list:
■ Excel
■ PostScript
■ Word
■ PowerPoint
Select the appropriate page options, and click OK.
Print Report Print the file to HTML or PDF format
Using advanced qualifications to generate a report
You can manage the scope of a report by adding qualifications to the criteria that thereport engine uses to generate the report content. You can tell the report to searchonly specified fields for particular values, or you can build advanced qualificationsby using field names, keywords, and operators.
To generate a report by using advanced qualifications
1 From the Navigation pane in the application console, choose Functions => Reports.
2 On the Reporting Console, select one of the options under Show:
All Reports Displays all available reports
Created by me Displays reports that you created
3 Under Category, select applicationName => reportCategory => reportName.
Working with reports
Chapter 11 Supplemental Change Management tasks 415
A list of available reports is displayed. Reports are organized by category, someof which contain subcategories. The reports that you see vary according to whichapplications are installed.
4 Select the Show Additional Filter option.
Along with a list of available fields, two sections are displayed—the simple querybuilder and the advanced query builder. You use the simple query builder toquickly construct a simple query. Alternatively, advanced users can use theadvanced query builder to build the query by using BMC Remedy AR Systemquery syntax.
For additional information about the BMC Remedy AR System Reporting console,see the BMC Remedy Mid Tier Guide.
5 Select a field name from the Available Fields list, and click Add next to theadvanced query builder. Use the BMC Remedy AR System query syntax to buildyour qualification.
6 Construct your qualification by using the various operators provided by thequalification builder.
7 Repeat steps 5 and 6 for each field that you want to include in the report.
Note Select the qualification and press Delete to remove a qualification.
8 When you finish defining your advanced qualification, click Run to view theupdated report.
BMC Remedy Change Management predefined reports
This section lists the predefined Web reports and Crystal Reports available for BMCRemedy Change Management. It provides a brief description of each report andshows you where to find it.
You first select the type of report that you want to run. The report type pullsinformation from the appropriate BMC Remedy ITSM application form. After youselect a report type, you select the individual report that you want to run.
Table 46 on page 417 describes the predefined Web reports and Table 47 on page417 describes the predefined Crystal Reports included, organized by the type of report.
Working with reports
416 BMC Remedy Change Management User Guide
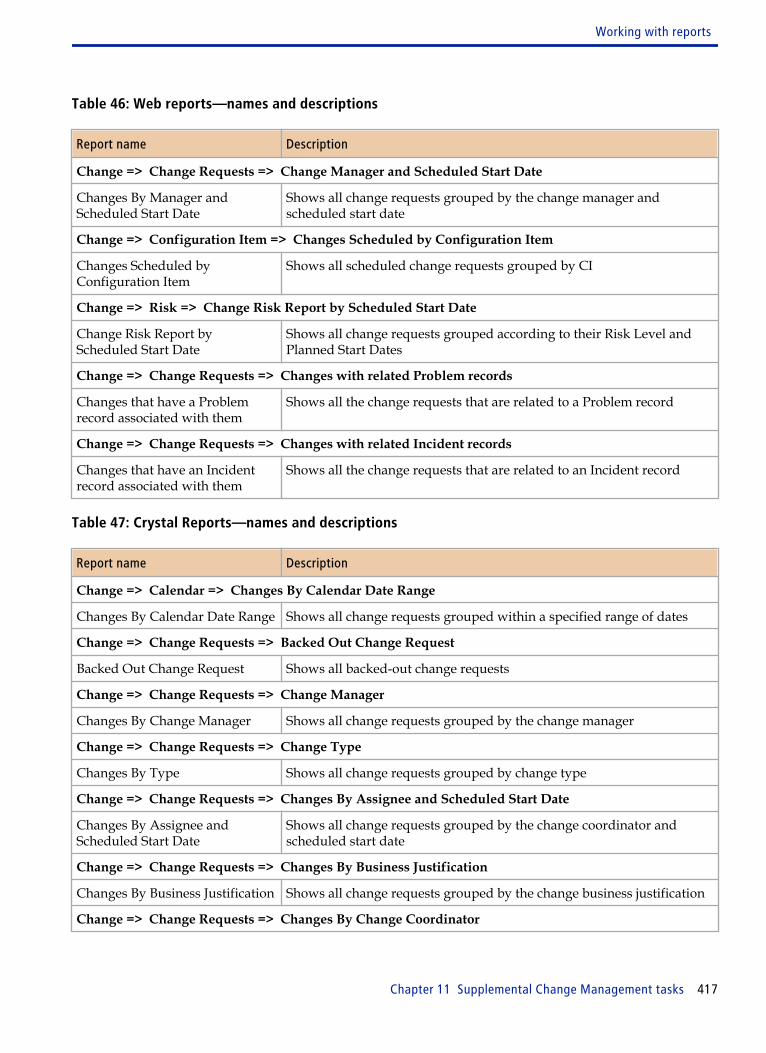
Table 46: Web reports—names and descriptions
Report name Description
Change => Change Requests => Change Manager and Scheduled Start Date
Changes By Manager andScheduled Start Date
Shows all change requests grouped by the change manager andscheduled start date
Change => Configuration Item => Changes Scheduled by Configuration Item
Changes Scheduled byConfiguration Item
Shows all scheduled change requests grouped by CI
Change => Risk => Change Risk Report by Scheduled Start Date
Change Risk Report byScheduled Start Date
Shows all change requests grouped according to their Risk Level andPlanned Start Dates
Change => Change Requests => Changes with related Problem records
Changes that have a Problemrecord associated with them
Shows all the change requests that are related to a Problem record
Change => Change Requests => Changes with related Incident records
Changes that have an Incidentrecord associated with them
Shows all the change requests that are related to an Incident record
Table 47: Crystal Reports—names and descriptions
Report name Description
Change => Calendar => Changes By Calendar Date Range
Changes By Calendar Date Range Shows all change requests grouped within a specified range of dates
Change => Change Requests => Backed Out Change Request
Backed Out Change Request Shows all backed-out change requests
Change => Change Requests => Change Manager
Changes By Change Manager Shows all change requests grouped by the change manager
Change => Change Requests => Change Type
Changes By Type Shows all change requests grouped by change type
Change => Change Requests => Changes By Assignee and Scheduled Start Date
Changes By Assignee andScheduled Start Date
Shows all change requests grouped by the change coordinator andscheduled start date
Change => Change Requests => Changes By Business Justification
Changes By Business Justification Shows all change requests grouped by the change business justification
Change => Change Requests => Changes By Change Coordinator
Working with reports
Chapter 11 Supplemental Change Management tasks 417
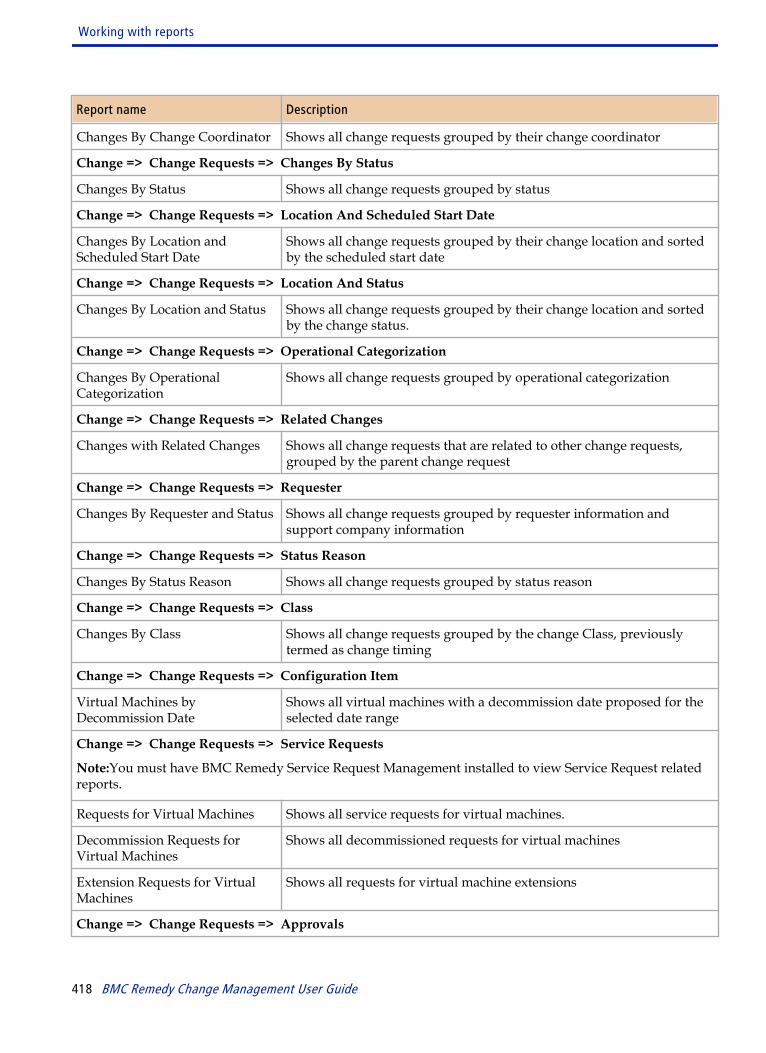
Report name Description
Changes By Change Coordinator Shows all change requests grouped by their change coordinator
Change => Change Requests => Changes By Status
Changes By Status Shows all change requests grouped by status
Change => Change Requests => Location And Scheduled Start Date
Changes By Location andScheduled Start Date
Shows all change requests grouped by their change location and sortedby the scheduled start date
Change => Change Requests => Location And Status
Changes By Location and Status Shows all change requests grouped by their change location and sortedby the change status.
Change => Change Requests => Operational Categorization
Changes By OperationalCategorization
Shows all change requests grouped by operational categorization
Change => Change Requests => Related Changes
Changes with Related Changes Shows all change requests that are related to other change requests,grouped by the parent change request
Change => Change Requests => Requester
Changes By Requester and Status Shows all change requests grouped by requester information andsupport company information
Change => Change Requests => Status Reason
Changes By Status Reason Shows all change requests grouped by status reason
Change => Change Requests => Class
Changes By Class Shows all change requests grouped by the change Class, previouslytermed as change timing
Change => Change Requests => Configuration Item
Virtual Machines byDecommission Date
Shows all virtual machines with a decommission date proposed for theselected date range
Change => Change Requests => Service Requests
Note:You must have BMC Remedy Service Request Management installed to view Service Request relatedreports.
Requests for Virtual Machines Shows all service requests for virtual machines.
Decommission Requests forVirtual Machines
Shows all decommissioned requests for virtual machines
Extension Requests for VirtualMachines
Shows all requests for virtual machine extensions
Change => Change Requests => Approvals
Working with reports
418 BMC Remedy Change Management User Guide
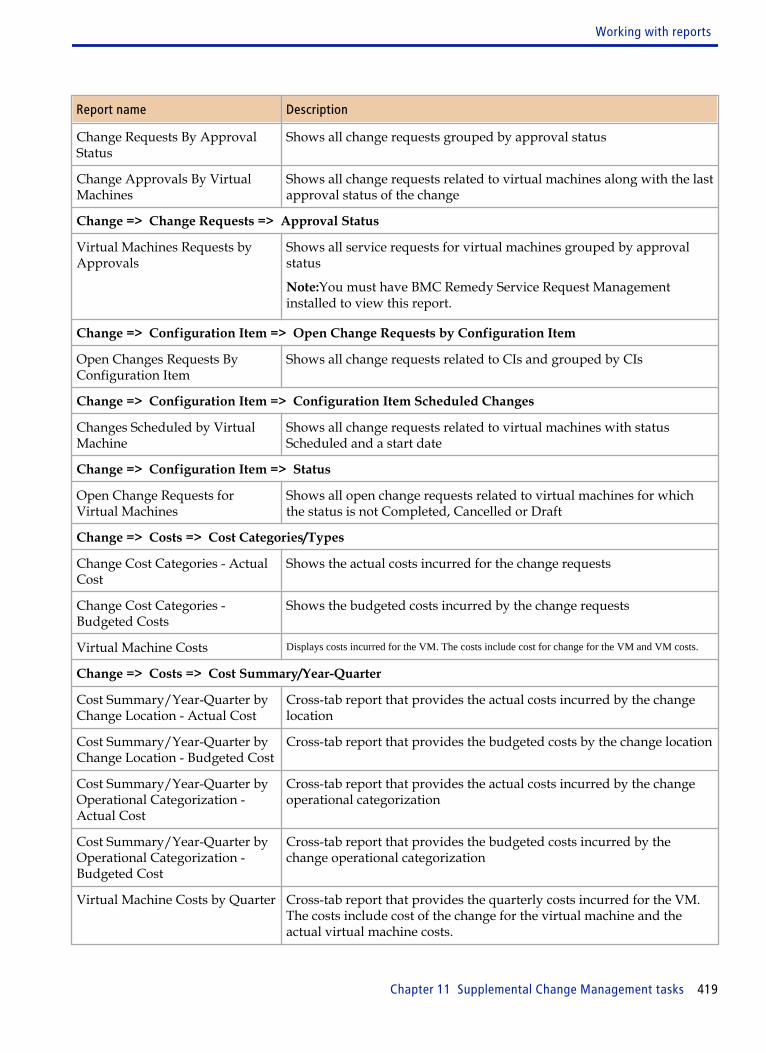
Report name Description
Change Requests By ApprovalStatus
Shows all change requests grouped by approval status
Change Approvals By VirtualMachines
Shows all change requests related to virtual machines along with the lastapproval status of the change
Change => Change Requests => Approval Status
Virtual Machines Requests byApprovals
Shows all service requests for virtual machines grouped by approvalstatus
Note:You must have BMC Remedy Service Request Managementinstalled to view this report.
Change => Configuration Item => Open Change Requests by Configuration Item
Open Changes Requests ByConfiguration Item
Shows all change requests related to CIs and grouped by CIs
Change => Configuration Item => Configuration Item Scheduled Changes
Changes Scheduled by VirtualMachine
Shows all change requests related to virtual machines with statusScheduled and a start date
Change => Configuration Item => Status
Open Change Requests forVirtual Machines
Shows all open change requests related to virtual machines for whichthe status is not Completed, Cancelled or Draft
Change => Costs => Cost Categories/Types
Change Cost Categories - ActualCost
Shows the actual costs incurred for the change requests
Change Cost Categories -Budgeted Costs
Shows the budgeted costs incurred by the change requests
Virtual Machine Costs Displays costs incurred for the VM. The costs include cost for change for the VM and VM costs.
Change => Costs => Cost Summary/Year-Quarter
Cost Summary/Year-Quarter byChange Location - Actual Cost
Cross-tab report that provides the actual costs incurred by the changelocation
Cost Summary/Year-Quarter byChange Location - Budgeted Cost
Cross-tab report that provides the budgeted costs by the change location
Cost Summary/Year-Quarter byOperational Categorization -Actual Cost
Cross-tab report that provides the actual costs incurred by the changeoperational categorization
Cost Summary/Year-Quarter byOperational Categorization -Budgeted Cost
Cross-tab report that provides the budgeted costs incurred by thechange operational categorization
Virtual Machine Costs by Quarter Cross-tab report that provides the quarterly costs incurred for the VM.The costs include cost of the change for the virtual machine and theactual virtual machine costs.
Working with reports
Chapter 11 Supplemental Change Management tasks 419
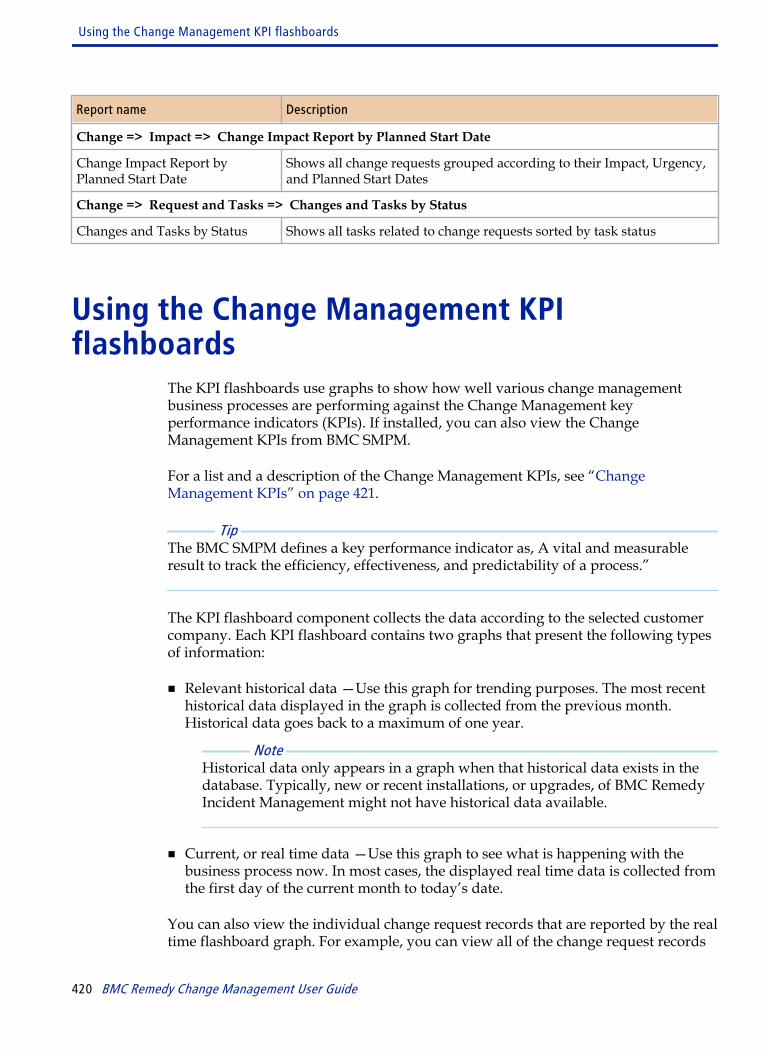
Report name Description
Change => Impact => Change Impact Report by Planned Start Date
Change Impact Report byPlanned Start Date
Shows all change requests grouped according to their Impact, Urgency,and Planned Start Dates
Change => Request and Tasks => Changes and Tasks by Status
Changes and Tasks by Status Shows all tasks related to change requests sorted by task status
Using the Change Management KPIflashboards
The KPI flashboards use graphs to show how well various change managementbusiness processes are performing against the Change Management keyperformance indicators (KPIs). If installed, you can also view the ChangeManagement KPIs from BMC SMPM.
For a list and a description of the Change Management KPIs, see “ChangeManagement KPIs” on page 421.
Tip The BMC SMPM defines a key performance indicator as, A vital and measurableresult to track the efficiency, effectiveness, and predictability of a process.”
The KPI flashboard component collects the data according to the selected customercompany. Each KPI flashboard contains two graphs that present the following typesof information:
■ Relevant historical data —Use this graph for trending purposes. The most recenthistorical data displayed in the graph is collected from the previous month.Historical data goes back to a maximum of one year.
Note Historical data only appears in a graph when that historical data exists in thedatabase. Typically, new or recent installations, or upgrades, of BMC RemedyIncident Management might not have historical data available.
■ Current, or real time data —Use this graph to see what is happening with thebusiness process now. In most cases, the displayed real time data is collected fromthe first day of the current month to today’s date.
You can also view the individual change request records that are reported by the realtime flashboard graph. For example, you can view all of the change request records
Using the Change Management KPI flashboards
420 BMC Remedy Change Management User Guide
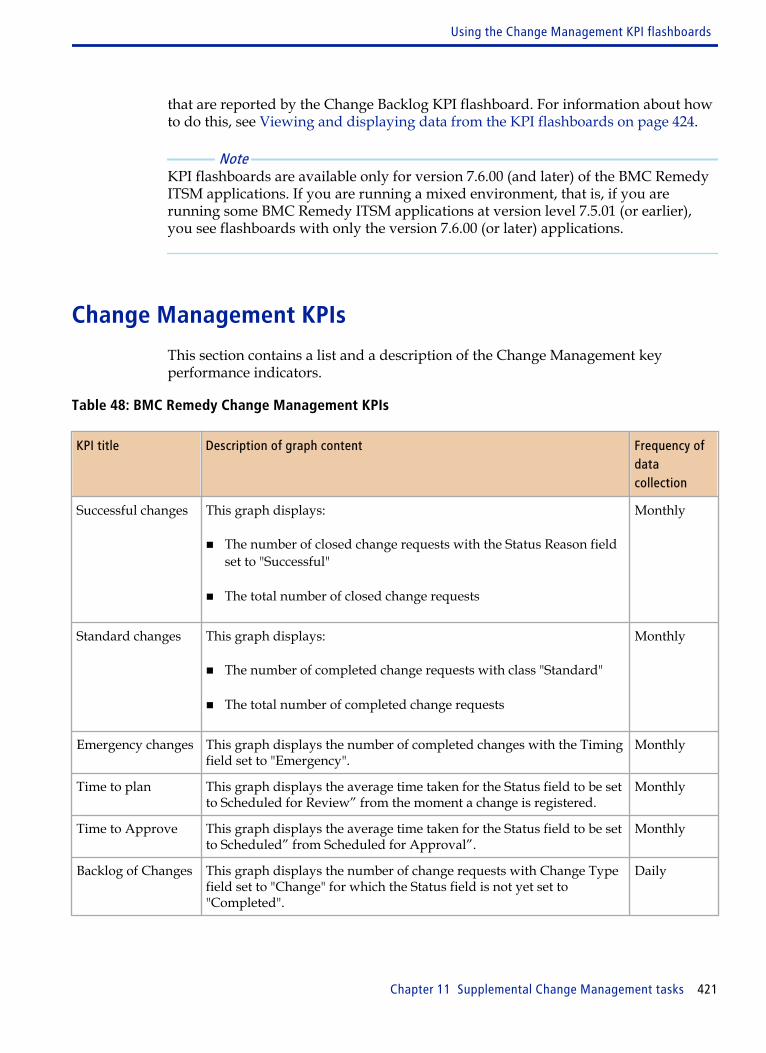
that are reported by the Change Backlog KPI flashboard. For information about howto do this, see Viewing and displaying data from the KPI flashboards on page 424.
Note KPI flashboards are available only for version 7.6.00 (and later) of the BMC RemedyITSM applications. If you are running a mixed environment, that is, if you arerunning some BMC Remedy ITSM applications at version level 7.5.01 (or earlier),you see flashboards with only the version 7.6.00 (or later) applications.
Change Management KPIs
This section contains a list and a description of the Change Management keyperformance indicators.
Table 48: BMC Remedy Change Management KPIs
KPI title Description of graph content Frequency ofdatacollection
Successful changes This graph displays:
■ The number of closed change requests with the Status Reason fieldset to "Successful"
■ The total number of closed change requests
Monthly
Standard changes This graph displays:
■ The number of completed change requests with class "Standard"
■ The total number of completed change requests
Monthly
Emergency changes This graph displays the number of completed changes with the Timingfield set to "Emergency".
Monthly
Time to plan This graph displays the average time taken for the Status field to be setto Scheduled for Review” from the moment a change is registered.
Monthly
Time to Approve This graph displays the average time taken for the Status field to be setto Scheduled” from Scheduled for Approval”.
Monthly
Backlog of Changes This graph displays the number of change requests with Change Typefield set to "Change" for which the Status field is not yet set to"Completed".
Daily
Using the Change Management KPI flashboards
Chapter 11 Supplemental Change Management tasks 421
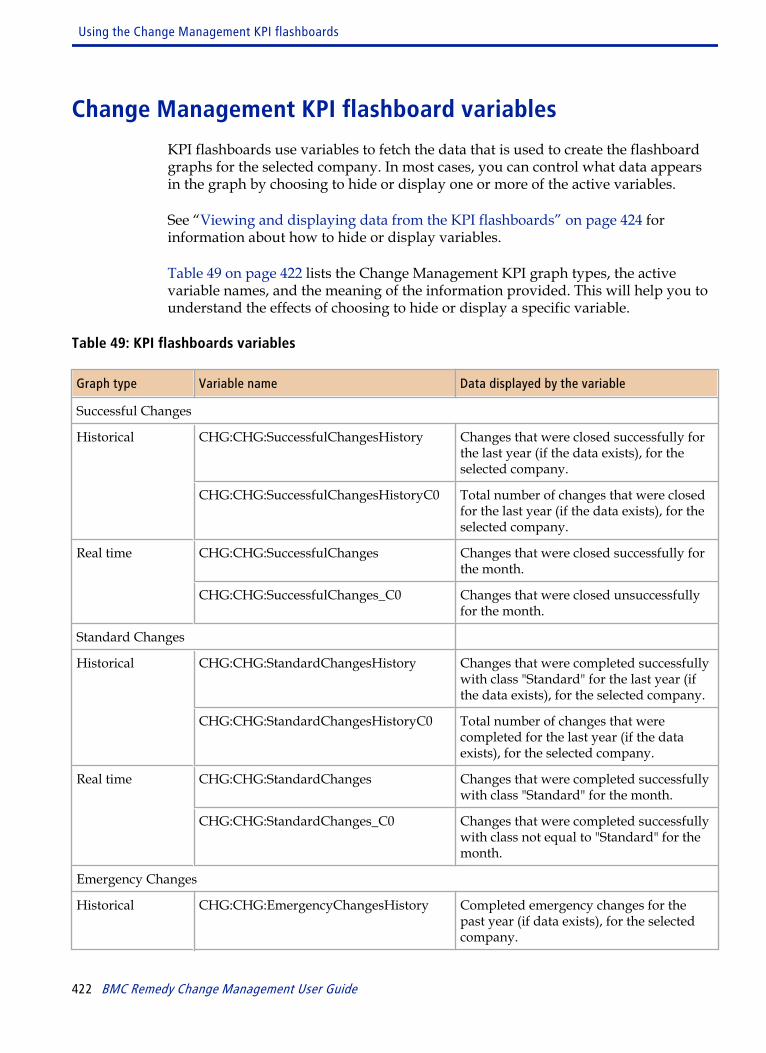
Change Management KPI flashboard variables
KPI flashboards use variables to fetch the data that is used to create the flashboardgraphs for the selected company. In most cases, you can control what data appearsin the graph by choosing to hide or display one or more of the active variables.
See “Viewing and displaying data from the KPI flashboards” on page 424 forinformation about how to hide or display variables.
Table 49 on page 422 lists the Change Management KPI graph types, the activevariable names, and the meaning of the information provided. This will help you tounderstand the effects of choosing to hide or display a specific variable.
Table 49: KPI flashboards variables
Graph type Variable name Data displayed by the variable
Successful Changes
Historical CHG:CHG:SuccessfulChangesHistory Changes that were closed successfully forthe last year (if the data exists), for theselected company.
CHG:CHG:SuccessfulChangesHistoryC0 Total number of changes that were closedfor the last year (if the data exists), for theselected company.
Real time CHG:CHG:SuccessfulChanges Changes that were closed successfully forthe month.
CHG:CHG:SuccessfulChanges_C0 Changes that were closed unsuccessfullyfor the month.
Standard Changes
Historical CHG:CHG:StandardChangesHistory Changes that were completed successfullywith class "Standard" for the last year (ifthe data exists), for the selected company.
CHG:CHG:StandardChangesHistoryC0 Total number of changes that werecompleted for the last year (if the dataexists), for the selected company.
Real time CHG:CHG:StandardChanges Changes that were completed successfullywith class "Standard" for the month.
CHG:CHG:StandardChanges_C0 Changes that were completed successfullywith class not equal to "Standard" for themonth.
Emergency Changes
Historical CHG:CHG:EmergencyChangesHistory Completed emergency changes for thepast year (if data exists), for the selectedcompany.
Using the Change Management KPI flashboards
422 BMC Remedy Change Management User Guide
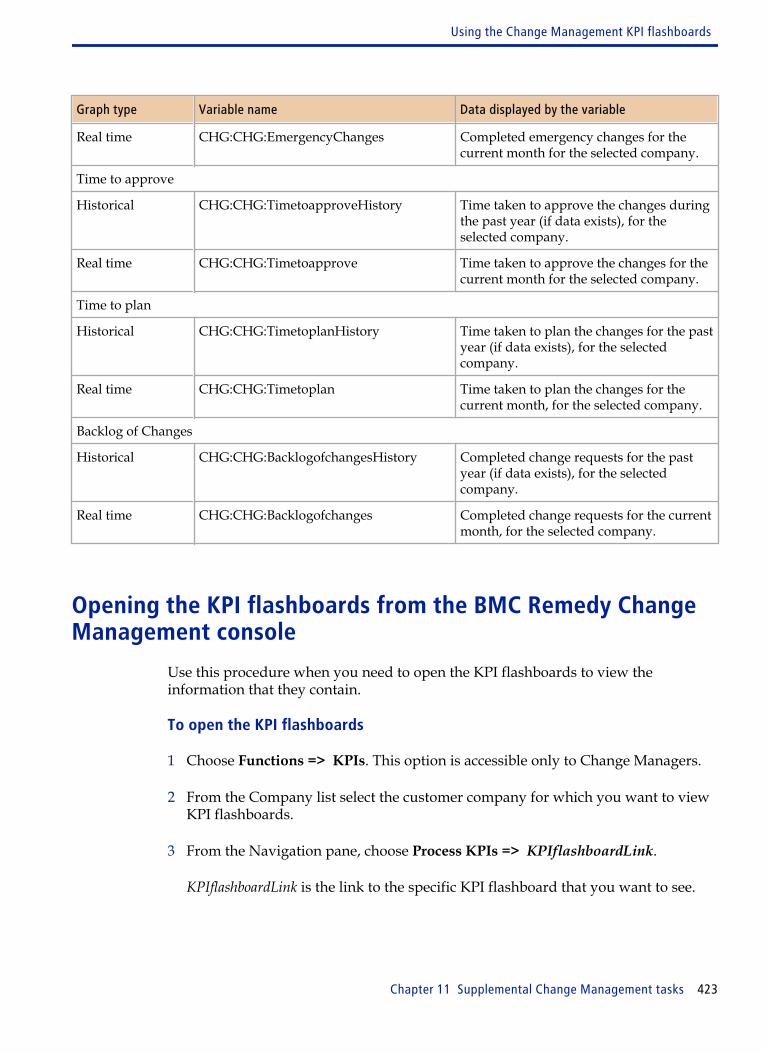
Graph type Variable name Data displayed by the variable
Real time CHG:CHG:EmergencyChanges Completed emergency changes for thecurrent month for the selected company.
Time to approve
Historical CHG:CHG:TimetoapproveHistory Time taken to approve the changes duringthe past year (if data exists), for theselected company.
Real time CHG:CHG:Timetoapprove Time taken to approve the changes for thecurrent month for the selected company.
Time to plan
Historical CHG:CHG:TimetoplanHistory Time taken to plan the changes for the pastyear (if data exists), for the selectedcompany.
Real time CHG:CHG:Timetoplan Time taken to plan the changes for thecurrent month, for the selected company.
Backlog of Changes
Historical CHG:CHG:BacklogofchangesHistory Completed change requests for the pastyear (if data exists), for the selectedcompany.
Real time CHG:CHG:Backlogofchanges Completed change requests for the currentmonth, for the selected company.
Opening the KPI flashboards from the BMC Remedy ChangeManagement console
Use this procedure when you need to open the KPI flashboards to view theinformation that they contain.
To open the KPI flashboards
1 Choose Functions => KPIs. This option is accessible only to Change Managers.
2 From the Company list select the customer company for which you want to viewKPI flashboards.
3 From the Navigation pane, choose Process KPIs => KPIflashboardLink.
KPIflashboardLink is the link to the specific KPI flashboard that you want to see.
Using the Change Management KPI flashboards
Chapter 11 Supplemental Change Management tasks 423

Tip Click the triangle beside the Key Performance Indicator text to open and close thisarea of the Navigation pane.
Viewing and displaying data from the KPI flashboards
After the KPI flashboard opens, there are controls on the flashboard that help youview and display the data. The actions you can perform and the procedures that youuse to perform them are described under KPI flasboard actions and procedures.
See, Table 50 on page 424.
Note Not all of the KPI flashboards support all of these procedures.
Table 50: KPI flashboard actions and procedures
Action Procedure
View specific records used to create the real time KPIflashboard dataNote: Use this procedure, for example, to view all of thechange request records with the Status Reason field set to"Successful". This does not work on the historical data graph.
1 Click anywhere inside the real time graph.
2 In the search results list, select the recordyou want to view.
Zoom a graphNote: Use the zoom feature to enlarge a section of thegraph. You can also use full screen mode to enlarge theentire graph as described by "View a graph in full screenmode" which appears later in this table.
1 Click the arrow in the lower left corner ofthe graph to expand the bottom control panel.
2 Click the magnifying glass icon, then followthe onscreen instructions.
Hide or display the graph legendNote: The default setting is to show the graph legend. Thelegend provides information about how to interpret thegraph. Not all graphs have a legend.
1 Click the arrow in the lower left corner ofthe graph to expand the bottom control panel.
2 Deselect or select the Show Legend checkbox to either hide or display the legend.
Change the graph styleNote: There are a number of different graph styles fromwhich you can choose. For example, you can select todisplay the KPI data in a line graph, a bar graph, a stackedbar graph, an area chart, and so on. Not all graphs supportall graph styles.
1 Click the arrow in the lower left corner ofthe graph to expand the bottom control panel.
2 Click the double-arrow button, then selectthe graph style you want.
Using the Change Management KPI flashboards
424 BMC Remedy Change Management User Guide
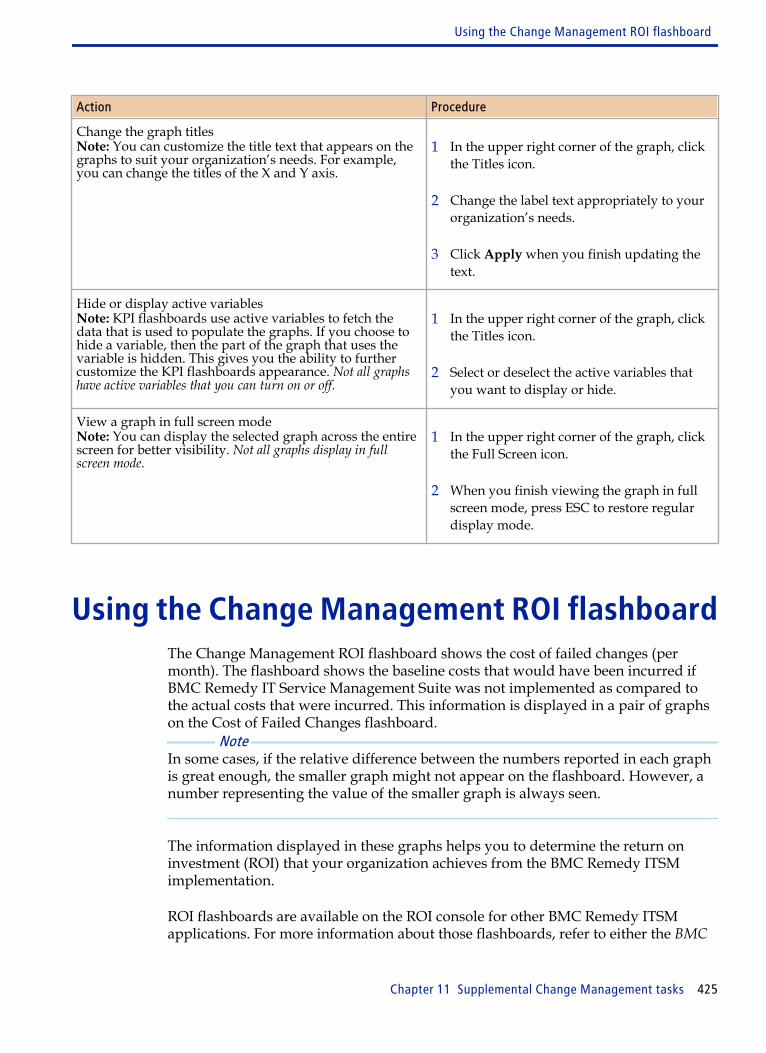
Action Procedure
Change the graph titlesNote: You can customize the title text that appears on thegraphs to suit your organization’s needs. For example,you can change the titles of the X and Y axis.
1 In the upper right corner of the graph, clickthe Titles icon.
2 Change the label text appropriately to yourorganization’s needs.
3 Click Apply when you finish updating thetext.
Hide or display active variablesNote: KPI flashboards use active variables to fetch thedata that is used to populate the graphs. If you choose tohide a variable, then the part of the graph that uses thevariable is hidden. This gives you the ability to furthercustomize the KPI flashboards appearance. Not all graphshave active variables that you can turn on or off.
1 In the upper right corner of the graph, clickthe Titles icon.
2 Select or deselect the active variables thatyou want to display or hide.
View a graph in full screen modeNote: You can display the selected graph across the entirescreen for better visibility. Not all graphs display in fullscreen mode.
1 In the upper right corner of the graph, clickthe Full Screen icon.
2 When you finish viewing the graph in fullscreen mode, press ESC to restore regulardisplay mode.
Using the Change Management ROI flashboardThe Change Management ROI flashboard shows the cost of failed changes (permonth). The flashboard shows the baseline costs that would have been incurred ifBMC Remedy IT Service Management Suite was not implemented as compared tothe actual costs that were incurred. This information is displayed in a pair of graphson the Cost of Failed Changes flashboard.
Note In some cases, if the relative difference between the numbers reported in each graphis great enough, the smaller graph might not appear on the flashboard. However, anumber representing the value of the smaller graph is always seen.
The information displayed in these graphs helps you to determine the return oninvestment (ROI) that your organization achieves from the BMC Remedy ITSMimplementation.
ROI flashboards are available on the ROI console for other BMC Remedy ITSMapplications. For more information about those flashboards, refer to either the BMC
Using the Change Management ROI flashboard
Chapter 11 Supplemental Change Management tasks 425
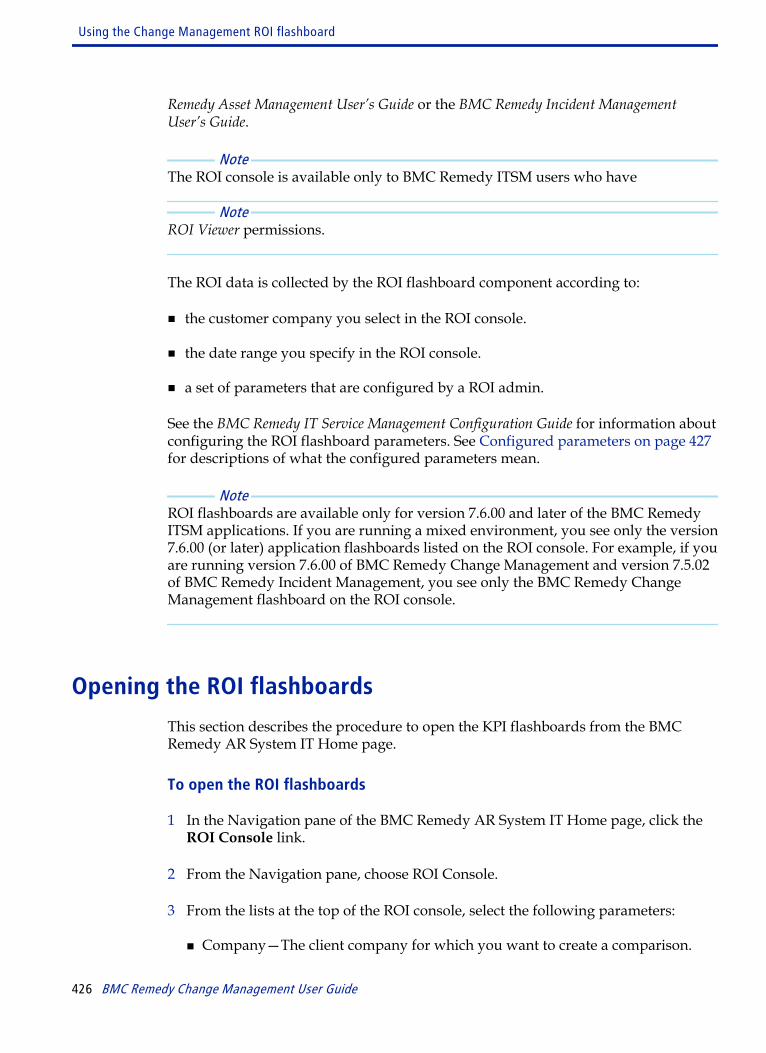
Remedy Asset Management User’s Guide or the BMC Remedy Incident ManagementUser’s Guide.
Note The ROI console is available only to BMC Remedy ITSM users who have
Note ROI Viewer permissions.
The ROI data is collected by the ROI flashboard component according to:
■ the customer company you select in the ROI console.
■ the date range you specify in the ROI console.
■ a set of parameters that are configured by a ROI admin.
See the BMC Remedy IT Service Management Configuration Guide for information aboutconfiguring the ROI flashboard parameters. See Configured parameters on page 427for descriptions of what the configured parameters mean.
Note ROI flashboards are available only for version 7.6.00 and later of the BMC RemedyITSM applications. If you are running a mixed environment, you see only the version7.6.00 (or later) application flashboards listed on the ROI console. For example, if youare running version 7.6.00 of BMC Remedy Change Management and version 7.5.02of BMC Remedy Incident Management, you see only the BMC Remedy ChangeManagement flashboard on the ROI console.
Opening the ROI flashboards
This section describes the procedure to open the KPI flashboards from the BMCRemedy AR System IT Home page.
To open the ROI flashboards
1 In the Navigation pane of the BMC Remedy AR System IT Home page, click theROI Console link.
2 From the Navigation pane, choose ROI Console.
3 From the lists at the top of the ROI console, select the following parameters:
■ Company—The client company for which you want to create a comparison.
Using the Change Management ROI flashboard
426 BMC Remedy Change Management User Guide
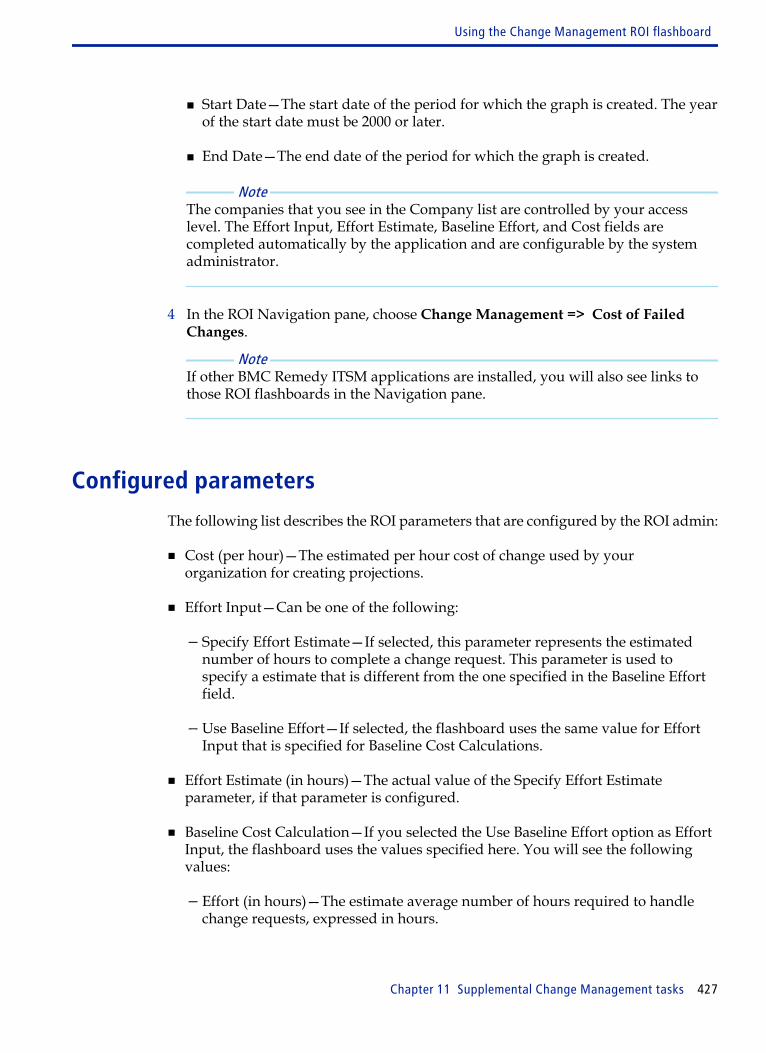
■ Start Date—The start date of the period for which the graph is created. The yearof the start date must be 2000 or later.
■ End Date—The end date of the period for which the graph is created.
Note The companies that you see in the Company list are controlled by your accesslevel. The Effort Input, Effort Estimate, Baseline Effort, and Cost fields arecompleted automatically by the application and are configurable by the systemadministrator.
4 In the ROI Navigation pane, choose Change Management => Cost of FailedChanges.
Note If other BMC Remedy ITSM applications are installed, you will also see links tothose ROI flashboards in the Navigation pane.
Configured parameters
The following list describes the ROI parameters that are configured by the ROI admin:
■ Cost (per hour)—The estimated per hour cost of change used by yourorganization for creating projections.
■ Effort Input—Can be one of the following:
— Specify Effort Estimate—If selected, this parameter represents the estimatednumber of hours to complete a change request. This parameter is used tospecify a estimate that is different from the one specified in the Baseline Effortfield.
— Use Baseline Effort—If selected, the flashboard uses the same value for EffortInput that is specified for Baseline Cost Calculations.
■ Effort Estimate (in hours)—The actual value of the Specify Effort Estimateparameter, if that parameter is configured.
■ Baseline Cost Calculation—If you selected the Use Baseline Effort option as EffortInput, the flashboard uses the values specified here. You will see the followingvalues:
— Effort (in hours)—The estimate average number of hours required to handlechange requests, expressed in hours.
Using the Change Management ROI flashboard
Chapter 11 Supplemental Change Management tasks 427
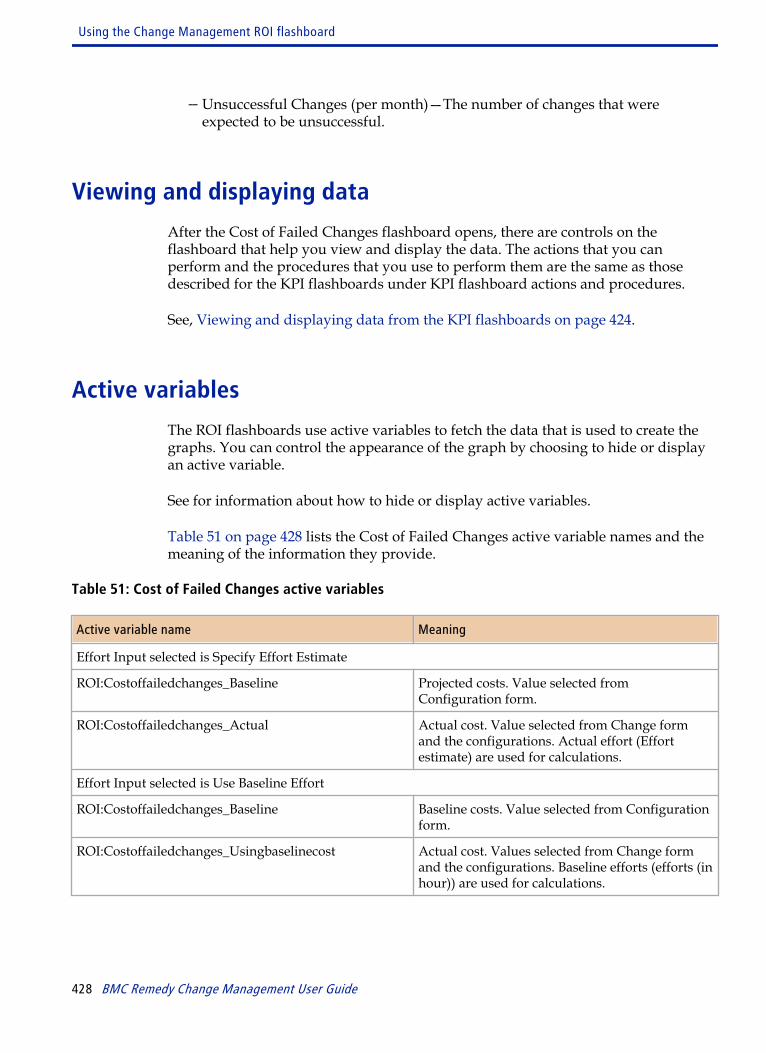
— Unsuccessful Changes (per month)—The number of changes that wereexpected to be unsuccessful.
Viewing and displaying data
After the Cost of Failed Changes flashboard opens, there are controls on theflashboard that help you view and display the data. The actions that you canperform and the procedures that you use to perform them are the same as thosedescribed for the KPI flashboards under KPI flashboard actions and procedures.
See, Viewing and displaying data from the KPI flashboards on page 424.
Active variables
The ROI flashboards use active variables to fetch the data that is used to create thegraphs. You can control the appearance of the graph by choosing to hide or displayan active variable.
See for information about how to hide or display active variables.
Table 51 on page 428 lists the Cost of Failed Changes active variable names and themeaning of the information they provide.
Table 51: Cost of Failed Changes active variables
Active variable name Meaning
Effort Input selected is Specify Effort Estimate
ROI:Costoffailedchanges_Baseline Projected costs. Value selected fromConfiguration form.
ROI:Costoffailedchanges_Actual Actual cost. Value selected from Change formand the configurations. Actual effort (Effortestimate) are used for calculations.
Effort Input selected is Use Baseline Effort
ROI:Costoffailedchanges_Baseline Baseline costs. Value selected from Configurationform.
ROI:Costoffailedchanges_Usingbaselinecost Actual cost. Values selected from Change formand the configurations. Baseline efforts (efforts (inhour)) are used for calculations.
Using the Change Management ROI flashboard
428 BMC Remedy Change Management User Guide
Selecting change templatesThe Change Template function enables you to select any templates for your supportgroup. Use change templates to quickly and efficiently create standard” changerequests with a minimum of mouse clicks and key strokes. Change templates areuseful in any change request that follows well-defined methods for specific andrepeated requirements—for example, Installs, Moves, and Add Changes (IMAC).Change templates are most helpful to new and occasional BMC Remedy ChangeManagement users.
To select templates
1 Create or open a change request.
2 Do one of the following:
When using the Best Practice view When using the Classic view
To attach a change template click the template fieldon the change form.
To attach a change template click Quick Links => Select Template on the left navigation pane.
Note The change template can be applied in the Draft state, that is, while creating thechange request. You can select a template only once for each change request.
3 On the Change Template Selection dialog box, click View to examine the contentsof a change template.
The template appears in read-only mode. Viewing a template enables you to seeits relationship, its task and task group templates, and other important features.
Note You cannot create, modify, or delete change templates in the BMC RemedyChange Management application; you can only view them. You must use theApplication Administration Console to create, modify, or delete changetemplates. Besides change managers, users with Infrastructure Change Masterand Change Config permissions can create, modify, and delete change templates.Any member of your support group can modify change templates for that group.For more information, see the BMC Remedy IT Service Management ConfigurationGuide.
4 Select a template and click OK.
The contents of the template are applied to the change request. The changetemplate overwrites any field values that are already present in the changerequest. Any relationships or tasks included with the change request are not
Selecting change templates
Chapter 11 Supplemental Change Management tasks 429
overwritten. Any additional tasks from the template are added as peers, andadditional relationships (for example, CIs) are included with the change request.
Assignments defined in the template overwrite the assignments defined for thechange. For example, when the user create a new change request, the Changecoordinator group and Change coordinator fields are auto-populated with theuser's details, if the user is a change coordinator. After selecting a template forthis change request, if the template defines a change coordinator group, but nochange coordinator, the change coordinator group is modified to the groupspecified in the template and the change coordinator is set to null since no value isdefined in the template.
Associating custom process flows to a changetemplate
You can create and modify custom process flows, which determine the changelifecycle. You must associate the custom process flow with the appropriate changetemplate or templates. Then when the change coordinator selects the template on thechange request form, the custom process flow applies to the change request.
To associate a custom process flow with a change template
1 From the Application Administration Console, click the Custom Configurationtab.
2 From the Application Settings list, choose Change Management => Template => Template, and then click Open.
3 Either search for and open an existing change template, or create a new changetemplate.
4 Click the Process Flow tab.
5 In the Change Process Flow field, select the custom process flow.
The Status Transition field displays a textual representation of the status flowtransitions.
6 Click Save.
Associating custom process flows to a change template
430 BMC Remedy Change Management User Guide
Copying change requestsThe Copy Change function is available on the Change form only when it is inModify mode. This function enables you to copy a request into a new changerequest. When using the copy function, you have options to include differentsections of the original change request, for example, Requested For Customer,Impacted Areas, CI/Component Relationships, Related Changes, or Work Info withattachments.
The following fields are filled with information from the change from which you arecopying: Summary, Change Timing, Class, Timing Reason, Impact, Urgency,Priority, Risk Level, Lead Time, Environment, Reason For Change, and Notes. Youcan change the information in these fields to reflect the new change. You are alsopresented with different sections of the change that you can copy.
To copy a change request
1 From the left navigation pane on the Change form, choose Functions => CopyChange.
2 On the Copy Infrastructure Change dialog box, click the sections to include in thenew request.
Note If you select Copy Tasks, you will be prompted to enter additional information.For more details, see Copying tasks from another change request on page 432
3 Make any modifications to the new request you are creating (for example,changing its priority or timing).
4 Click Start Copy.
The copy function can take several minutes to process.
After the change is copied, the Change form opens in New mode with the newlycopied change information in a Draft status. You now can modify and submit thenew request.
5 If you select the Copy Related Changes option, Related Infrastructure ChangeRequests with a Dependent relationship type will be converted to Related Torelationships.
To keep the dependent relationship, in the Relationship tab, search for thedependent change request, make a new dependent relationship and delete theRelated To relationship that were copied.
6 Save the new copy of the request.
Copying change requests
Chapter 11 Supplemental Change Management tasks 431
Note A copied change request is not automatically submitted.
Copying tasks from another change requestThe Copy Change function enables you to copy a request into a new change request.When using the copy function, you have the option to copy the tasks associated withthe original change request.
To copy tasks from another change request
1 From the left navigation pane on the Change form, choose Functions => CopyChange.
2 On the Copy Infrastructure Change dialog box, select Copy Tasks.
3 (optional) On the Copy Tasks dialog box, specify a value in the Summary field.
If you specify a summary value, the Summary field of all the new copied tasksuses this value. Otherwise, the Summary field of all the new copied tasks uses thevalues of the source tasks.
4 On the Copy Tasks dialog box, select the related task information that you wantto copy, and then click OK.
Depending on the options that you select, the following information is copied tothe new change request:
Option Copied information
Location Informationwith Attachments
The following information from the General tab related to Task Location and theTask Attachments, except Command field:
■ Company
■ Region
■ Site Group
■ Site
■ Address
■ All related attachments
Copying tasks from another change request
432 BMC Remedy Change Management User Guide
Option Copied information
Requester Information The following information from the Requester tab:
■ Requester Company
■ First Name
■ Middle Name
■ Last Name
■ Phone Number
■ Organization
■ Department
■ Support Organization
■ Support Group Name
Work Info withAttachments
All information on the Work Info tab including any attachments
Relationships All information from the Relationships tab
Dates The following information from the Dates tab is copied:
■ Schedule start date
■ Schedule end date
Financials The following information from the Financials tab:
■ Calculation Unit type
■ Budget Estimated Total Time
5 Click Start Copy.
Note It can take several minutes for the copy process to be completed.
All tasks and child tasks related to the task are copied. After the change is copied,the Change form opens in New mode with the newly copied change informationin a Draft status. Any tasks that are copied are in Staged status. You now canmodify and submit the new request.
Copying tasks from another change request
Chapter 11 Supplemental Change Management tasks 433

6 Save the new copy of the request.
Note A copied change request is not automatically submitted.
Using phases with change requestsVersion 7.5.01 of BMC Remedy Change Management introduced a feature thatallowed you to complete tasks during any phase of a change request, not just theImplementation phase as in earlier versions of BMC Remedy Change Management.The following table describes when the Phase field is visible or hidden on theChange form.
Table 52: Phase field hidden or visible on Change form
Change request createdusing change template?
Phase Managementenabled in Change Rules?
Phase Managementenabled on changetemplate?
Phase field hidden orvisible on Change form
No Disabled Not applicable Hidden
No Enabled Not applicable Visible
Yes Disabled No Hidden
Yes Disabled Yes Visible
Yes Enabled No Hidden
Yes Enabled Yes Visible
For more information about creating change requests and working with tasks, see Initiate stage - Creating change requests on page 113.
To use phases with change requests
1 Create or open a change request.
2 Enter the required information.
3 Click the Tasks tab.
Using phases with change requests
434 BMC Remedy Change Management User Guide

If Phase Management has been enabled, the Phase field appears on the Change form.
Figure 99: Selecting phases in a change request
4 From the Phase field, choose a phase.
5 Relate an ad hoc task, task template, or task group template to the change request.
6 Assign a task implementer to the task.
After you select a phase and relate your tasks, the Related Templates table showsonly tasks included with that phase.
7 Repeat step 4 through step 6 until you finish all the phases and all the tasks toinclude in the change request.
8 Save the change request.
9 Use the Process Flow Status bar to move the change request through the changemanagement lifecycle.
Tasks remain in Staged status until they are ready to be worked on. When youenter a stage in the lifecycle that includes tasks, the status of those tasks is set toAssigned. The task implementers are then notified (by email, BMC Remedy Alert,or pager) of tasks assigned to them.
10 Open the tasks defined for the stage and complete them.
Using phases with change requests
Chapter 11 Supplemental Change Management tasks 435
Note If validation of tasks performed in that phase is enabled, you must close any tasksactivated for that phase before you can move the change request to the next stage.
11 Continue to use the Process Flow Status bar to move the change request throughits lifecycle until all the tasks are completed and you reach the Closed stage.
Using BMC Remedy Change Managementwith other applications
You can access additional functionality from BMC Remedy Change Management(for example, manage inventory locations).
Managing inventory locations
If you have Asset Admin permissions, you can use the Manage Inventory dialog boxto view inventory locations, relocate configuration items (CIs), and reserve and useCIs and bulk inventory items. For more information, see the BMC Remedy AssetManagement User’s Guide .
Viewing inventory locations
You can view the location of all your CIs from the Manage Inventory dialog box.
To view inventory locations
1 In the BMC Remedy Change Management Console, choose Advanced => Manage Inventory.
2 On the Manage Inventory dialog box, enter your search criteria, and click Search.
3 Select a CI or bulk inventory item from the table, and then click View Location.
Relocating CIs
You can relocate CIs or bulk inventory items from one location to another.
Using BMC Remedy Change Management with other applications
436 BMC Remedy Change Management User Guide

To relocate CIs
1 In the BMC Remedy Change Management Console, choose Advanced => Manage Inventory.
2 On the Manage Inventory dialog box, select the CI or bulk inventory item torelocate, and click Relocate CIs.
3 From the Location list on the Search Inventory Locations dialog box, select thelocation where to relocate the CI, and then click Search.
4 Select the location where to relocate your CI.
5 In the Quantity field, enter the number of CIs to relocate, and then click Relocate.
Reserving and using inventory
You can reserve and use the CIs and bulk inventory items that are in inventory.
To reserve and use inventory
1 In the BMC Remedy Change Management Console, choose Advanced => Manage Inventory.
2 On the Manage Inventory dialog box, select the CI or bulk inventory item toreserve and use.
3 Click in the Transaction Qty column and enter the number of CIs or bulkinventory items to use.Figure 100: Transaction Qty column
4 Click Reserve/Use Inventory.
5 The number of CIs or bulk inventory items in the Qty in Stock column is reducedby the number reserved and used.
Using BMC Remedy Change Management with other applications
Chapter 11 Supplemental Change Management tasks 437
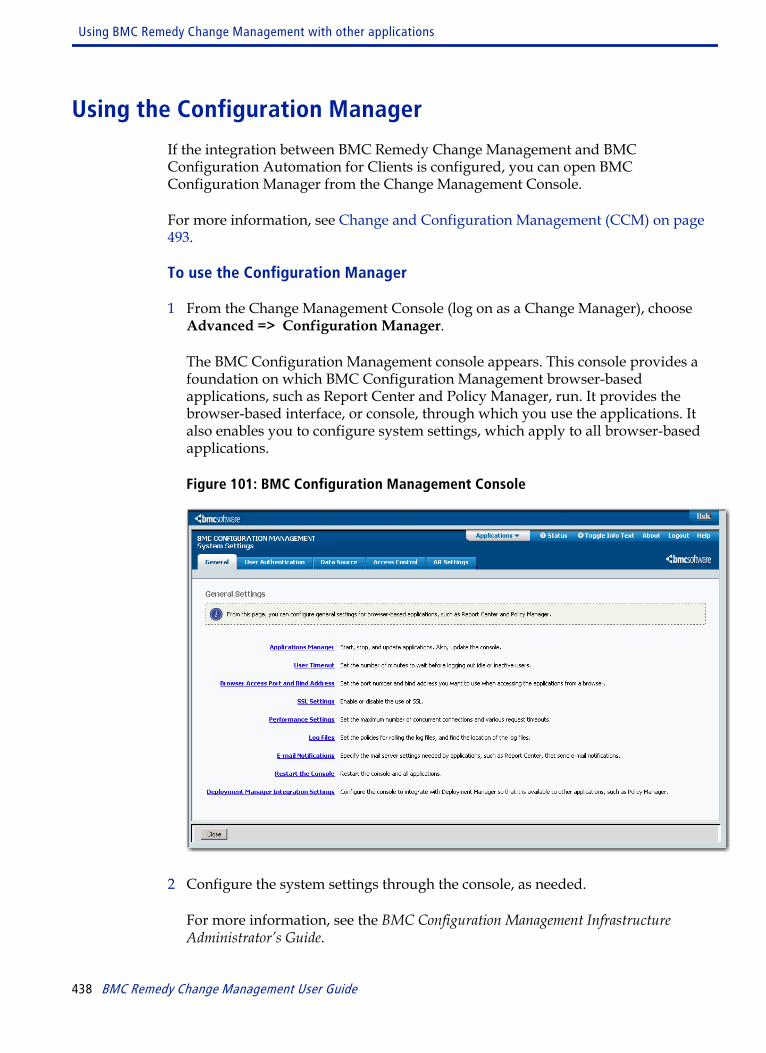
Using the Configuration Manager
If the integration between BMC Remedy Change Management and BMCConfiguration Automation for Clients is configured, you can open BMCConfiguration Manager from the Change Management Console.
For more information, see Change and Configuration Management (CCM) on page493.
To use the Configuration Manager
1 From the Change Management Console (log on as a Change Manager), chooseAdvanced => Configuration Manager.
The BMC Configuration Management console appears. This console provides afoundation on which BMC Configuration Management browser-basedapplications, such as Report Center and Policy Manager, run. It provides thebrowser-based interface, or console, through which you use the applications. Italso enables you to configure system settings, which apply to all browser-basedapplications.
Figure 101: BMC Configuration Management Console
2 Configure the system settings through the console, as needed.
For more information, see the BMC Configuration Management InfrastructureAdministrator’s Guide.
Using BMC Remedy Change Management with other applications
438 BMC Remedy Change Management User Guide
Supplemental ReleaseManagement tasks
This section contains descriptions of supplemental tasks that you might also performwhen you work with Release Management.
Setting application preferences and optionsWhen you click Functions => Application Preferences, you can view and edit thesettings that affect the default appearance of the main application console.Depending on which applications you have installed, you can also view theirpreferences and options.
When an application opens, you can determine:
■ Default console view.
■ Forms that appear.
■ Search criteria defaults.
■ What happens after you save a request.
■ What appears in the Overview Console.
■ The Data Set Name that is selected when the form opens.
■ Statistics.
Note For the changes to take effect, close the application console and reopen it. Thepreferences you set are applicable until they are modified.
12
Chapter 12 Supplemental Release Management tasks 439
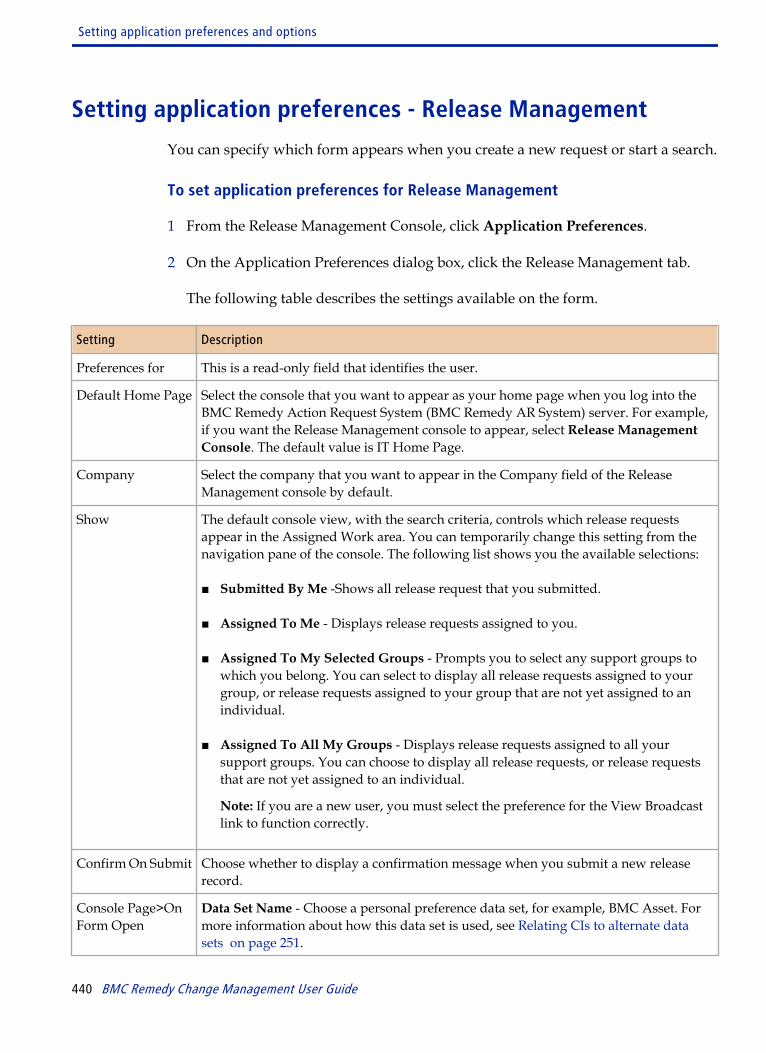
Setting application preferences - Release Management
You can specify which form appears when you create a new request or start a search.
To set application preferences for Release Management
1 From the Release Management Console, click Application Preferences.
2 On the Application Preferences dialog box, click the Release Management tab.
The following table describes the settings available on the form.
Setting Description
Preferences for This is a read-only field that identifies the user.
Default Home Page Select the console that you want to appear as your home page when you log into theBMC Remedy Action Request System (BMC Remedy AR System) server. For example,if you want the Release Management console to appear, select Release ManagementConsole. The default value is IT Home Page.
Company Select the company that you want to appear in the Company field of the ReleaseManagement console by default.
Show The default console view, with the search criteria, controls which release requestsappear in the Assigned Work area. You can temporarily change this setting from thenavigation pane of the console. The following list shows you the available selections:
■ Submitted By Me -Shows all release request that you submitted.
■ Assigned To Me - Displays release requests assigned to you.
■ Assigned To My Selected Groups - Prompts you to select any support groups towhich you belong. You can select to display all release requests assigned to yourgroup, or release requests assigned to your group that are not yet assigned to anindividual.
■ Assigned To All My Groups - Displays release requests assigned to all yoursupport groups. You can choose to display all release requests, or release requeststhat are not yet assigned to an individual.
Note: If you are a new user, you must select the preference for the View Broadcastlink to function correctly.
Confirm On Submit Choose whether to display a confirmation message when you submit a new releaserecord.
Console Page>OnForm Open
Data Set Name - Choose a personal preference data set, for example, BMC Asset. Formore information about how this data set is used, see Relating CIs to alternate datasets on page 251.
Setting application preferences and options
440 BMC Remedy Change Management User Guide
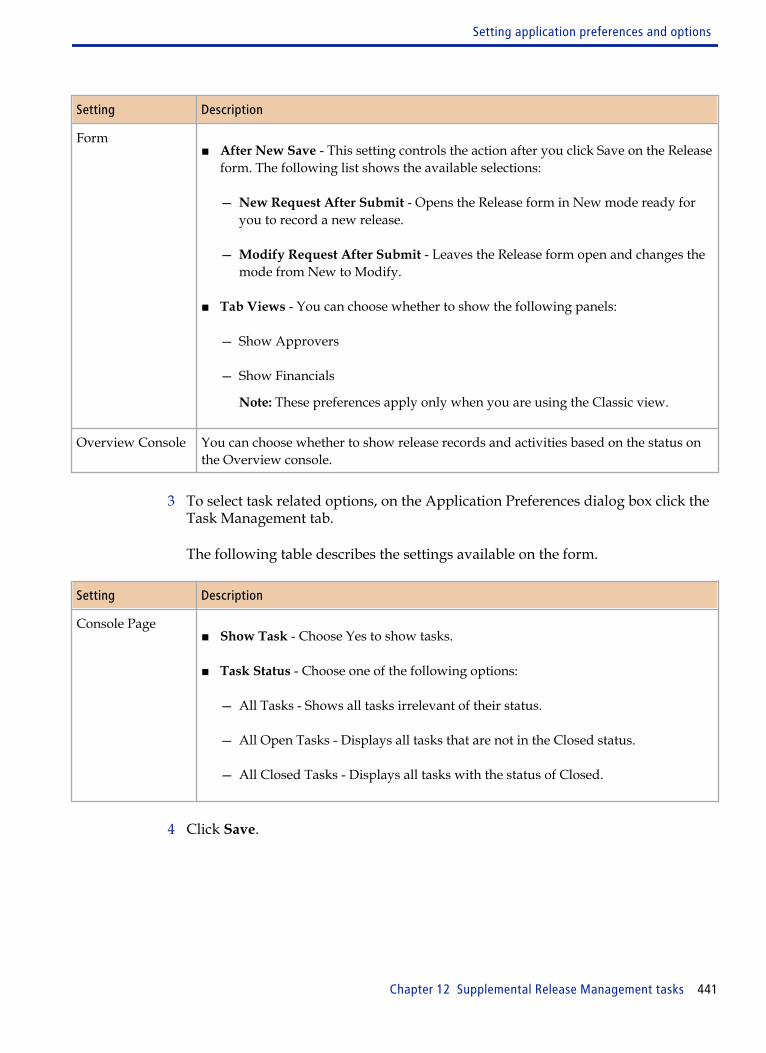
Setting Description
Form■ After New Save - This setting controls the action after you click Save on the Release
form. The following list shows the available selections:
— New Request After Submit - Opens the Release form in New mode ready foryou to record a new release.
— Modify Request After Submit - Leaves the Release form open and changes themode from New to Modify.
■ Tab Views - You can choose whether to show the following panels:
— Show Approvers
— Show Financials
Note: These preferences apply only when you are using the Classic view.
Overview Console You can choose whether to show release records and activities based on the status onthe Overview console.
3 To select task related options, on the Application Preferences dialog box click theTask Management tab.
The following table describes the settings available on the form.
Setting Description
Console Page■ Show Task - Choose Yes to show tasks.
■ Task Status - Choose one of the following options:
— All Tasks - Shows all tasks irrelevant of their status.
— All Open Tasks - Displays all tasks that are not in the Closed status.
— All Closed Tasks - Displays all tasks with the status of Closed.
4 Click Save.
Setting application preferences and options
Chapter 12 Supplemental Release Management tasks 441
Setting the Release Management view
Release Management is configured by your application administrator. For detailedinformation about customizing your options to help you quickly process releaserequests, see BMC Remedy ITSM Configuration Guide. The following procedureprovides information about setting the view.
To set the view
1 From the Applications menu, choose Application Administrator => ApplicationAdministrator Console.
2 From the Application Administration Console, click the Custom Configurationtab.
3 On the Custom Configuration tab, choose Foundation => Advanced Options => View Selection Framework - Deploy View, and then click Open.
4 In the navigation pane on the left side of the form, select the application name(Remedy Release Management) and the role (Release Classic View User forClassic view and Release Best Practice View User for Best Practice view).
5 To deploy the view to a company, perform the following steps:
a On the Company Mapping tab, select the company to which you are mappingthe view.
b If necessary, change the sorting order number.
The sorting order is used when a support group or an individual belongs tomore than one company. A company with a lower sort order value takesprecedence over a company with a higher sort order value.
6 To deploy the view to a support group, perform the following steps:
a On the Support Group Mapping tab, select the company and organization towhich the support group belongs.
b From the Support Group list, select the support group.
c If necessary, change the sorting order number.
The sorting order is used when a support group or an individual belongs tomore than one company. A company with a lower sort order value takesprecedence over a company with a higher sort order value.
Setting application preferences and options
442 BMC Remedy Change Management User Guide

Note If you need to change the sort order after you save the deployment, you mustfirst delete the deployment by using the Remove button, and then re-create thedeployment with the new sort order number.
7 To deploy the view to an individual, perform the following steps:
a On the Individual Mapping tab, select the company, organization, and supportgroup to which the individual belongs.
b From the People list, select the individual to whom you are mapping the view.
8 To save the deployment, click Add.
9 Close the form and then have the affected users log back in to the application.
Sending release or activity notificationsWhen a release request moves into a new Milestone and Status, for example,Deployment In Progress, Release Management generates notifications. Based onyour assignee group or role (release coordinator or requester), you might receivenotifications during various status transitions.
Release notifications are data-driven and easily configured. The followingnotifications are enabled out-of-the-box. Your administrator might have createdadditional notification rules.
Table 53: Milestones and statuses when notifications are sent
Milestone Status ReleaseCoordinator
Assignee Group Requester
Initiate Draft Yes No Yes
Deployment Deployment Approval Yes No Yes
Deployment In Progress Yes Yes Yes
Deployment Cancelled Yes Yes Yes
Activities work the same way, except that no out-of-the-box notifications areenabled. Your administrator can easily configure a rule in which, for example, theactivity assignee is notified when the Status of the activity is set to Draft.
For more information, see Receiving notifications of release request assignments onpage 321. For more information about notification rules, see the BMC Remedy ITService Management Configuration Guide.
Sending release or activity notifications
Chapter 12 Supplemental Release Management tasks 443
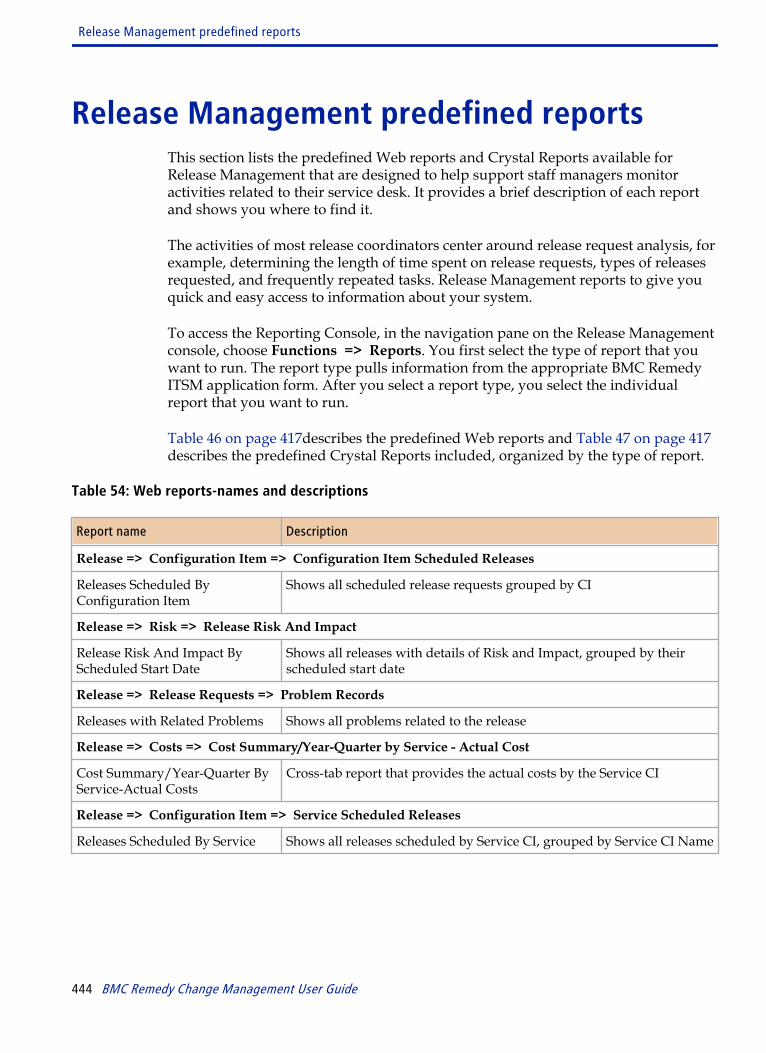
Release Management predefined reportsThis section lists the predefined Web reports and Crystal Reports available forRelease Management that are designed to help support staff managers monitoractivities related to their service desk. It provides a brief description of each reportand shows you where to find it.
The activities of most release coordinators center around release request analysis, forexample, determining the length of time spent on release requests, types of releasesrequested, and frequently repeated tasks. Release Management reports to give youquick and easy access to information about your system.
To access the Reporting Console, in the navigation pane on the Release Managementconsole, choose Functions => Reports. You first select the type of report that youwant to run. The report type pulls information from the appropriate BMC RemedyITSM application form. After you select a report type, you select the individualreport that you want to run.
Table 46 on page 417describes the predefined Web reports and Table 47 on page 417describes the predefined Crystal Reports included, organized by the type of report.
Table 54: Web reports-names and descriptions
Report name Description
Release => Configuration Item => Configuration Item Scheduled Releases
Releases Scheduled ByConfiguration Item
Shows all scheduled release requests grouped by CI
Release => Risk => Release Risk And Impact
Release Risk And Impact ByScheduled Start Date
Shows all releases with details of Risk and Impact, grouped by theirscheduled start date
Release => Release Requests => Problem Records
Releases with Related Problems Shows all problems related to the release
Release => Costs => Cost Summary/Year-Quarter by Service - Actual Cost
Cost Summary/Year-Quarter ByService-Actual Costs
Cross-tab report that provides the actual costs by the Service CI
Release => Configuration Item => Service Scheduled Releases
Releases Scheduled By Service Shows all releases scheduled by Service CI, grouped by Service CI Name
Release Management predefined reports
444 BMC Remedy Change Management User Guide
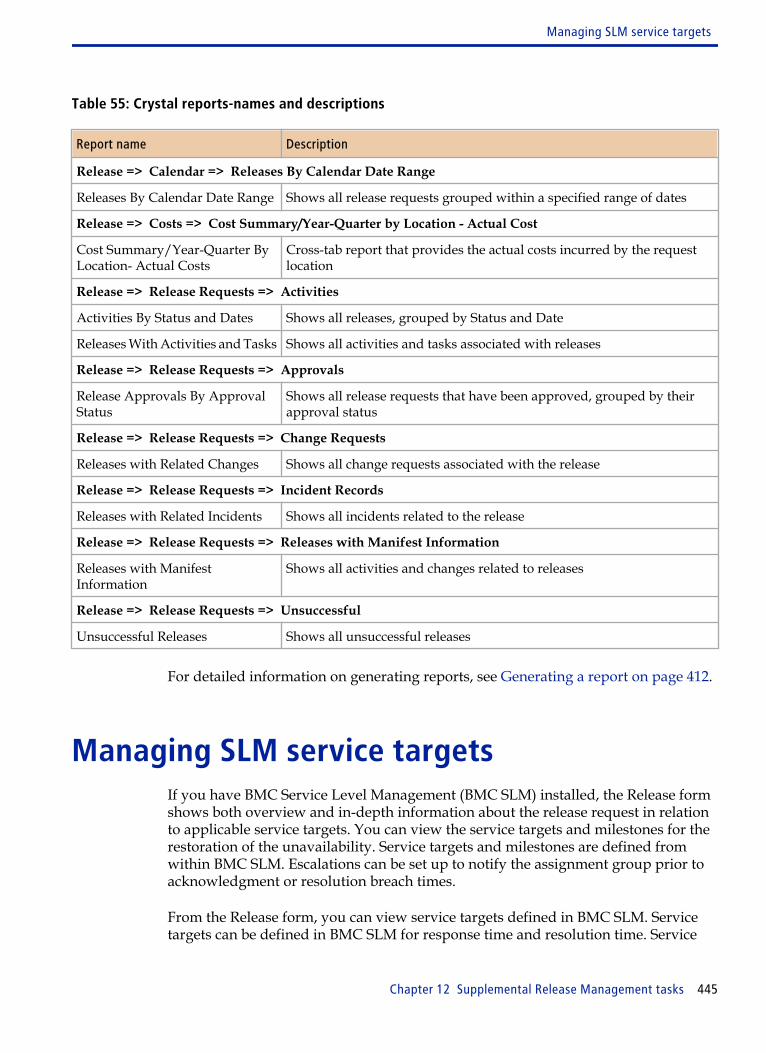
Table 55: Crystal reports-names and descriptions
Report name Description
Release => Calendar => Releases By Calendar Date Range
Releases By Calendar Date Range Shows all release requests grouped within a specified range of dates
Release => Costs => Cost Summary/Year-Quarter by Location - Actual Cost
Cost Summary/Year-Quarter ByLocation- Actual Costs
Cross-tab report that provides the actual costs incurred by the requestlocation
Release => Release Requests => Activities
Activities By Status and Dates Shows all releases, grouped by Status and Date
Releases With Activities and Tasks Shows all activities and tasks associated with releases
Release => Release Requests => Approvals
Release Approvals By ApprovalStatus
Shows all release requests that have been approved, grouped by theirapproval status
Release => Release Requests => Change Requests
Releases with Related Changes Shows all change requests associated with the release
Release => Release Requests => Incident Records
Releases with Related Incidents Shows all incidents related to the release
Release => Release Requests => Releases with Manifest Information
Releases with ManifestInformation
Shows all activities and changes related to releases
Release => Release Requests => Unsuccessful
Unsuccessful Releases Shows all unsuccessful releases
For detailed information on generating reports, see Generating a report on page 412.
Managing SLM service targetsIf you have BMC Service Level Management (BMC SLM) installed, the Release formshows both overview and in-depth information about the release request in relationto applicable service targets. You can view the service targets and milestones for therestoration of the unavailability. Service targets and milestones are defined fromwithin BMC SLM. Escalations can be set up to notify the assignment group prior toacknowledgment or resolution breach times.
From the Release form, you can view service targets defined in BMC SLM. Servicetargets can be defined in BMC SLM for response time and resolution time. Service
Managing SLM service targets
Chapter 12 Supplemental Release Management tasks 445
targets can be determined by related CIs, product and operational categorization,and many other criteria. The Next Target Date field indicates the next deadline out ofall the service targets attached to the change.
For more information, see Using BMC Service Level Management with BMCRemedy Change Management on page 188.
Working with release request approvalsCertain release requests must pass through an approval process before they can bedeployed. Approvals can be defined for each milestone of the release request fromInitiate to Close Down.
The read-only Approval Phase field shows what approval phase the release is induring its life cycle.
The application administrators configure the approval processes. The process ownerdetermines the approvals based on the policies of the business. They determinewhich release requests require approval, what kind of approval process the releaserequests must undergo, and who the approvers are. Support staff and managementcan add more approvers to the list.
Viewing release requests awaiting approval
Release coordinators submit the requests for approval and monitor the approvalprocess.
Approvers are notified when a release request requires their approval. Afterreviewing the release request, they can approve it or reject it.
As an approver, you are required to review release requests for approval. Youreview release requests and provide approval through the Release Managementapplication or the Approval Central.
To view the release requests awaiting approval from the Approval Central, clickPending Approvals under the Approval Tasks list of the Approval Central.
To view release requests awaiting approval from the Release Managementconsole
1 In the Release Management console, from the Show list, select All.
2 From the Filter By list, select By Status > All Open Approvals.
Working with release request approvals
446 BMC Remedy Change Management User Guide

The Releases table shows the release requests waiting approval.
3 Select the release request to review, and then click View.
The approver can approve or reject the release request from the Release Requestform, or request further information.
Approving or rejecting release requests
When an approval is required to move the release request to the next status, theProcess Status Flow area prompts you to approve, cancel, or reject the approval. Ifconfigured, the release request cannot be moved to the next status unless theapproval is received.
When a release requires an approval, its approvers are notified. Notifications aresent according to the method specified in the approver’s record in the People form.
When you have finished planning the release request, and have supplied all theinformation that the approvers require to review the release request, you can submitthe release request to the approval process.
Note For more information, see Change Management approver role on page 355.
Performing additional approval functions
In addition to approving or rejecting approvals, you can perform the functions listedin the following table.
Working with release request approvals
Chapter 12 Supplemental Release Management tasks 447
Table 56: Additional approval functions
Function Action
Resubmit a rejected releaserequest
If an approver rejects a request, the approval process is stopped. You canresubmit the request for approval.
1 Open the request record.
2 From the process flow bar, at the stage the request was rejected, selectRestart.
The request status is set to Pending Approval for the stage at which itwas cancelled.
3 When approving the request after it was restarted, users can enterdetails for restarting the request in the Work Info.
When using the Best Practice view: On the Work Detail tab, select theWork Info and click View. When using the Classic view, click the WorkInfo tab.
Selecting release templatesThe Release Template function allows you to select any templates that can be madeavailable for your support group. You use release templates to quickly andefficiently create standard releases with a minimum of mouse clicks and keyboardentry. Release templates are useful in any release request that follows well-definedmethods for specific and repeated requirements, for example, Installs, Moves, AddChanges (IMAC). New and occasional users to Release Management should findrelease templates very helpful.
To select release templates
1 Create or open a release request.
2 Do one of the following:
Selecting release templates
448 BMC Remedy Change Management User Guide
When using the Best Practice view When using the Classic view
To attach a release template:
1 Click the magnifying glass icon next to thetemplate field on the release form.
2 Select the support group from the ViewingTemplates for Support Group.
3 Select the desired template from the list displayed.
To attach a release template click Quick Links => Select Template on the left navigation pane.
Note You can apply a release template to a release request in any status beforeApproval and as long as the request is not waiting any approval. You can select arelease template only once for each release request.
3 On the Release Template Selection dialog box, click View to examine the contentsof a release template.
The template appears in read-only mode. Viewing a template lets you see itsrelationship, its task and task group templates, and other important features.
Note You cannot create, modify, or delete release templates in the Release Managementapplication; you can only view them. You must use the ApplicationAdministration Console to create, modify, or delete release templates instead.Any member of your support group with Release Master permissions can modifyrelease templates for that group. For more information, see the BMC Remedy ITService Management Configuration Guide.
4 Select a template and click OK.
The contents of the template are applied to the release request. The releasetemplate overwrites any field values that are already present in the releaserequest. If the release request already includes relationships or manifests, theseare not overwritten. Any additional manifests from the template are added aspeers, and additional relationships, for example, CIs, are included with the releaserequest.
Selecting release templates
Chapter 12 Supplemental Release Management tasks 449

Selecting activity templatesThe Activity Template function allows you to select any templates that can be madeavailable for your support group. Activity templates are useful in any activity thatfollows well-defined methods for specific and repeated requirements
To select activity templates
1 Create or open an activity.
2 From the navigation pane on the left side of the form, choose Quick Links => Select Template.
3 On the Activity Template Selection dialog box, click View to examine the contentsof an activity template.
The template appears in read-only mode. Viewing a template lets you see itsrelationship, its task and task group templates, and other important features.
Note You cannot create, modify, or delete activity templates in the ReleaseManagement application; you can only view them. You must use the ApplicationAdministration Console to create, modify, or delete activity templates instead.Any member of your support group with Release Coordinator permissions canmodify activity templates for that group. For more information, see the BMCRemedy IT Service Management Configuration Guide.
4 Select a template and click OK.
The contents of the template are applied to the activity. The activity templateoverwrites any field values that are already present in the activity. If the activityalready includes tasks, these are not overwritten. Any additional tasks from thetemplate are added as peers.
Using the Release Management KPIflashboards
The KPI flashboards use graphs to show how well various release managementbusiness processes are performing against the Release Management key performanceindicators (KPIs). If installed, you can also view the Release Management KPIs fromBMC SMPM.
Selecting activity templates
450 BMC Remedy Change Management User Guide
For a list and a description of the Release Management KPIs, see “ReleaseManagement KPIs” on page 451.
Tip The BMC SMPM defines a key performance indicator as: A vital and measurableresult to track the efficiency, effectiveness, and predictability of a process.”
The KPI data is collected from a variety of application forms by the underlying KPIflashboard component according to the customer company selected at the top of theKPI tab. Each KPI flashboard contains two graphs that present the following types ofinformation:
■ Relevant historical data, which you can use for trending purposes.
■ Current data collected at regularly scheduled times, depending on the specific KPIyou are viewing.
Release Management KPIs
This section contains a list and a description of the Release Management keyperformance indicators.
Table 57: BMC Remedy Release Management KPIs
KPI title Description of graph content Frequency ofdatacollection
Successful Releases This graph displays the number of closed releases with the StatusReason field set to “Successful”, compared to the total number ofclosed releases.:
Monthly
Backlog of Releases This graph displays the number of releases that do not yet havetheir Status field set to “Completed” or higher.
Daily
Release Management KPI flashboard variables
KPI flashboards use variables to fetch the data that is used to create the flashboardgraphs for the selected company. In most cases, you can control what data appearsin the graph by choosing to hide or display one or more of the active variables.
See “Table 50” on page 424 for information about how to hide or display variables.
Using the Release Management KPI flashboards
Chapter 12 Supplemental Release Management tasks 451
Table 58 on page 452 lists the Release Management KPI graph types, the activevariable names, and the meaning of the information provided. This will help you tounderstand the effects of choosing to hide or display a specific variable.
Table 58: Release Management KPI flashboards variables
Graph type Variable name Data displayed by the variable
Successful Releases
Historical RMS:RMS:SuccessfulReleaseHistory Releases that were closed successfully forthe last year (if the data exists), for theselected company.
RMS:RMS:SuccessfulReleaseHistoryC0 Releases that were closed unsuccessfullyfor the last year (if the data exists), for theselected company.
Real time RMS:RMS:SuccessfulReleases Releases that were closed successfully forthe month (if the data exists), for theselected company
RMS:RMS:SuccessfulReleases_C0 Releases that were closed unsuccessfullyfor the month (if the data exists), for theselected company.
Backlog of Releases
Historical RMS:RMS:BacklogofReleasesHistory Completed release requests for the lastyear (if the data exists), for the selectedcompany.
Real time RMS:RMS:BacklogofReleases Completed release requests as of date (ifthe data exists), for the selected company.
Viewing and displaying data
After the Cost of Failed Changes flashboard opens, there are controls on theflashboard that help you view and display the data. The actions that you canperform and the procedures that you use to perform them are the same as thosedescribed for the KPI flashboards under KPI flashboard actions and procedures.
See, Viewing and displaying data from the KPI flashboards on page 424.
Using the Release Management KPI flashboards
452 BMC Remedy Change Management User Guide
Managing configuration items
Overview - Configuration itemsYou can define a new Configuration item (CI), search for CIs, and update recordswithin BMC Remedy Change Management. When creating a CI name, follow aconsistent naming convention. According to ITIL guidelines, use identifiers that areshort, but meaningful, For hardware, do not use identifiers that are based onsupplier device names. For example, the name might include an indicator of the CI’sfunction (such as Workstation” or Monitor”) followed by a numeric code, such asMONITOR100.
Note When creating CIs in BMC Remedy Change Management, if BMC Remedy AssetManagement is not installed on your server, the data is always taken from theAST:AppSettings form. For more information, see Relating CIs to alternate data setson page 251.
A configuration item (CI) is any component of an infrastructure.
Some CI types are virtual, while others are physical. The Service CI type is anexample of a virtual CI. In this context, a service can be provided from one businessor organization within a business to another. Service CIs can include customersupport, employee provisioning, web farms, storage, and so on.
Other CI types are physical and include hardware and software.
You can use the information in CIs to determine if a change to a CI or the ITinfrastructure must be made. To record information against CIs, such as CIunavailability, or to relate a change request to a CI, the CI must be recorded in theBMC Remedy Atrium CMDB. If you do not have BMC Remedy Asset Management,then BMC Remedy Change Management provides limited ability to manage CIs andinventory.
13
Chapter 13 Managing configuration items 453
Note This functionality is available even if your environment does not run BMC RemedyAsset Management, and does not need any Asset License. If you have BMC RemedyAsset Management, you have access to additional functionality, as described in BMCRemedy Asset Management User's Guide. You will however need to have Asset Adminor User permissions and AR fixed or floating licenses to make use of these additionalfunctions.
Creating a CITo create a CI, you must have Asset Admin permission. If you have Asset Userpermission and you are modifying a CI, your administrator must open theappropriate CI, and then relate your support group to the CI.
There are many different types of CIs that you can create. While the generalprocedure for creating each CI type is similar, only the specific fields on the CI formchange depending on the CI type.
This section provides several examples of how to create CIs.
To create a Service CI
Note Step 1 on page 454 to Step 5 on page 344 creates the service CI. Step Step 6 on page210 to Step 14 on page 456 relates the service CI to a company. This is necessary toensure the service CI appears in the Service field menu on the Classification tab,when relating the incident request to a company.
1 From the Navigation pane of the Change Management console, choose AdvancedFunctions => Manage CIs.
2 From the CI Type list , select Logical Entity => Business Service and then clickCreate.
3 On the Business System form, type the CI name and description.
Best practice When creating a CI name, BMC recommends that you follow a consistent namingconvention. According to ITIL guidelines, identifiers should be short butmeaningful. For example, Payroll” or Network.” The name can be followed by anumeric code, such as NETWORK100.
Creating a CI
454 BMC Remedy Change Management User Guide
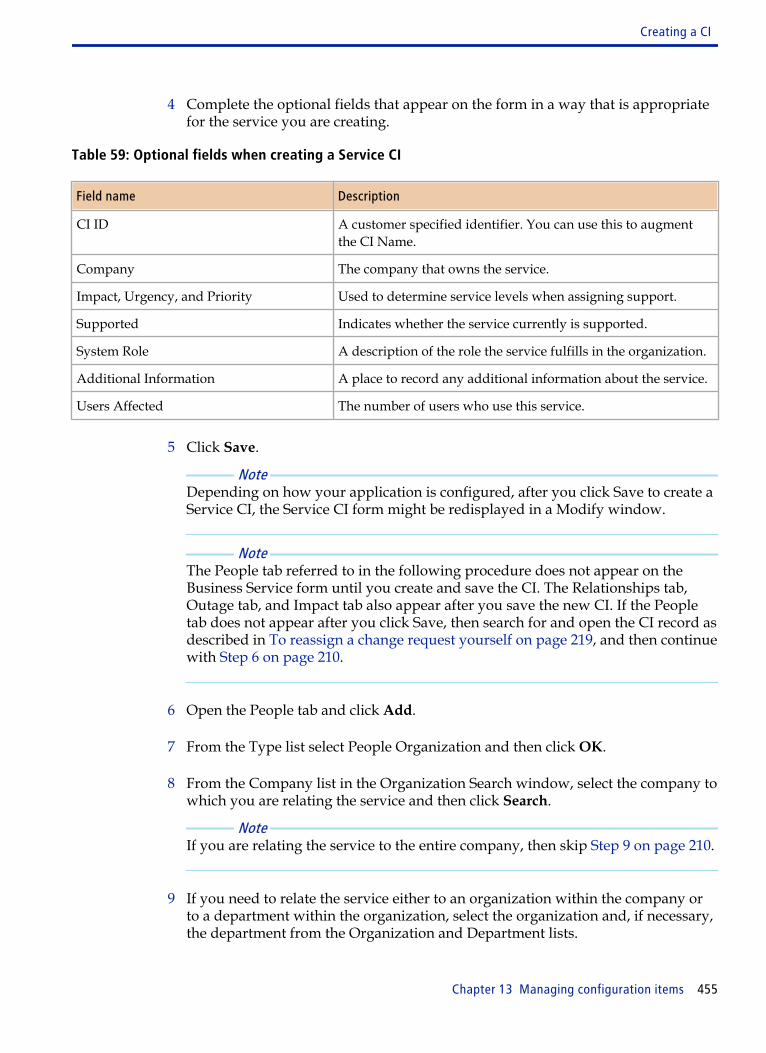
4 Complete the optional fields that appear on the form in a way that is appropriatefor the service you are creating.
Table 59: Optional fields when creating a Service CI
Field name Description
CI ID A customer specified identifier. You can use this to augmentthe CI Name.
Company The company that owns the service.
Impact, Urgency, and Priority Used to determine service levels when assigning support.
Supported Indicates whether the service currently is supported.
System Role A description of the role the service fulfills in the organization.
Additional Information A place to record any additional information about the service.
Users Affected The number of users who use this service.
5 Click Save.
Note Depending on how your application is configured, after you click Save to create aService CI, the Service CI form might be redisplayed in a Modify window.
Note The People tab referred to in the following procedure does not appear on theBusiness Service form until you create and save the CI. The Relationships tab,Outage tab, and Impact tab also appear after you save the new CI. If the Peopletab does not appear after you click Save, then search for and open the CI record asdescribed in To reassign a change request yourself on page 219, and then continuewith Step 6 on page 210.
6 Open the People tab and click Add.
7 From the Type list select People Organization and then click OK.
8 From the Company list in the Organization Search window, select the company towhich you are relating the service and then click Search.
Note If you are relating the service to the entire company, then skip Step 9 on page 210.
9 If you need to relate the service either to an organization within the company orto a department within the organization, select the organization and, if necessary,the department from the Organization and Department lists.
Creating a CI
Chapter 13 Managing configuration items 455

■ Organization—If you choose Organization, the service is related to thespecified organization within the specified company.
■ Department—If you choose Department, the service is related to the specifieddepartment within the specified organization.
10 From the Choose a Relationship Level list, select how much of the company willbe related to this service.
For example, if you are relating the service to the entire company, then selectCompany. If you specified department in the preceding step, then selectDepartment, and so on.
11 Click Select.
12 From the Role list in the Asset Person Role window, select Used By and click OK.
13 Click OK to dismiss the confirmation note.
14 Click Save and then click Close.
To create a computer system CI
1 From the Navigation pane of the Change Management console, choose AdvancedFunctions => Manage CIs .
2 From the CI Type list of the CI Type dialog box, select System => ComputerSystem.
3 Click Create.
4 In the CI Name field of the Computer System form, type a name for the CI.
Best practice When creating a CI name, BMC recommends that you follow a consistent namingconvention. According to ITIL guidelines, identifiers should be short butmeaningful, and for hardware they should not based on supplier device names.For example, the name can include an indicator of the CI’s function (such asWorkstation” or Monitor”) followed by a numeric code, such as MONITOR100.
5 In the CI ID field, type a unique alphanumeric value for the CI.
6 Select the company to which this CI belongs.
7 From the Primary Capability and Capability lists, select the roles this CI performsin your company’s topology.
Creating a CI
456 BMC Remedy Change Management User Guide
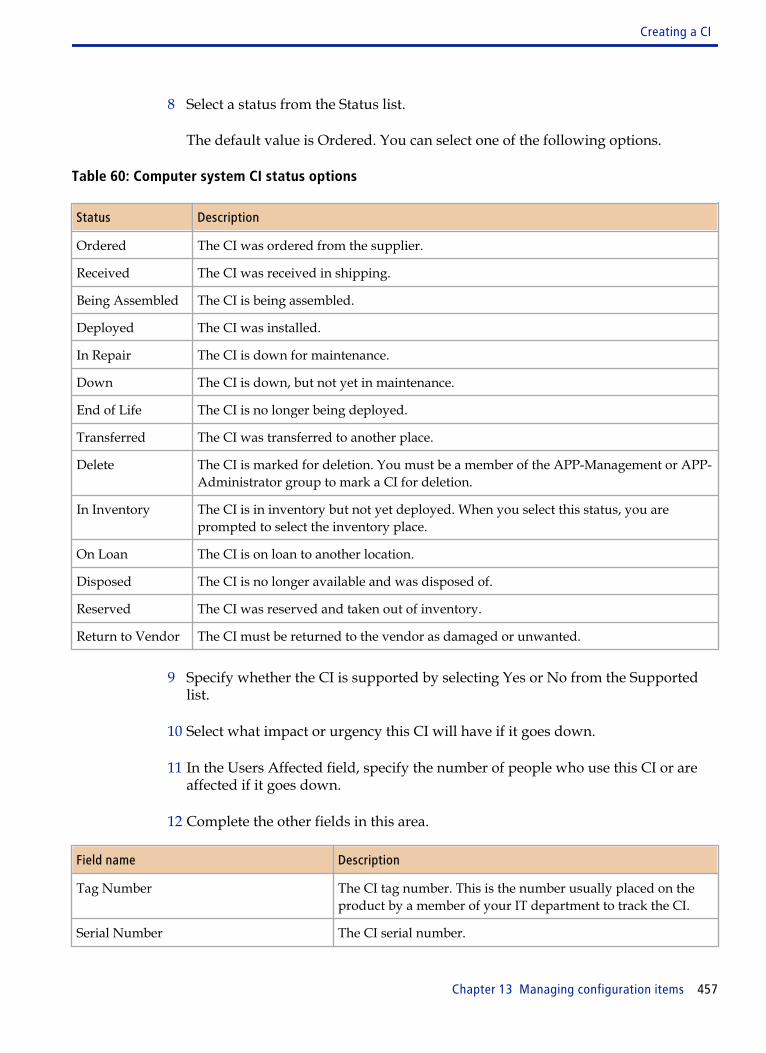
8 Select a status from the Status list.
The default value is Ordered. You can select one of the following options.
Table 60: Computer system CI status options
Status Description
Ordered The CI was ordered from the supplier.
Received The CI was received in shipping.
Being Assembled The CI is being assembled.
Deployed The CI was installed.
In Repair The CI is down for maintenance.
Down The CI is down, but not yet in maintenance.
End of Life The CI is no longer being deployed.
Transferred The CI was transferred to another place.
Delete The CI is marked for deletion. You must be a member of the APP-Management or APP-Administrator group to mark a CI for deletion.
In Inventory The CI is in inventory but not yet deployed. When you select this status, you areprompted to select the inventory place.
On Loan The CI is on loan to another location.
Disposed The CI is no longer available and was disposed of.
Reserved The CI was reserved and taken out of inventory.
Return to Vendor The CI must be returned to the vendor as damaged or unwanted.
9 Specify whether the CI is supported by selecting Yes or No from the Supportedlist.
10 Select what impact or urgency this CI will have if it goes down.
11 In the Users Affected field, specify the number of people who use this CI or areaffected if it goes down.
12 Complete the other fields in this area.
Field name Description
Tag Number The CI tag number. This is the number usually placed on theproduct by a member of your IT department to track the CI.
Serial Number The CI serial number.
Creating a CI
Chapter 13 Managing configuration items 457

Field name Description
Part Number The CI part number.
System Role The role this CI plays in your company.
Status Reason The reason this CI has the status it does.
13 Click the General tab.
14 Categorize your CI using the lists and fields in the Product Categorization area.
15 Specify the place of the CI using the lists and fields in the Location area.
16 Enter the dates of the CI in the lifecycle area.
17 Click the Specifications tab.
18 Add more information about the CI.
19 Click Save.
To create a bulk inventory CI
Note Bulk inventory items are not tracked by an separate record for each item. Instead,bulk items are tracked by quantities of an item type. For example, cables used toconnect desktop computers to the network do not require individual records butrather, one record for a bulk quantity of the specific cable type.
1 From the Navigation pane of the Change Management console, choose AdvancedFunctions => Manage CIs.
2 From the CI Type list of the Manage CI Information dialog box, select BulkInventory => Bulk Inventory, and click Create.
3 In the Bulk Inventory form, complete the following required fields.
Field name Description
CI Name Enter the name of the bulk inventory item, for example,Microsoft Windows XP.
Tier 1, Tier 2, and Tier 3 Categorize the item.
Received Quantity Enter the number of items received.
4 Click Save.
Creating a CI
458 BMC Remedy Change Management User Guide
To create an inventory location CI
Note You can use inventory location CIs to indicate where bulk inventory and other CIsare located.
1 From the Navigation pane of the console, choose Functions => Manage CIs.
2 From the Type list of the Manage CI Information dialog box, select System => Inventory Location, and click Create.
3 In the CI Name field of the Inventory Location form, enter the location name.
4 Complete the optional fields.
5 Click Save.
Searching for CIs from the ChangeManagement console
Use the following procedure to search for CI records from the Change Managementconsole. Use this procedure any time you need to open a CI record to see detailsabout it, or to modify it.
To search for CIs from the Change Management console
1 From the Navigation pane of the console, choose Functions => Manage CIs.
2 From the CI Type list on the Manage CI Information window, select the type of CIand click Search.
3 On the search form provide information about the CI and click Search. ClickSearch without entering any information in the form to search for all availableCIs.
4 Select the CI from the search results displayed on the top of the page. Details ofthe selected CI are displayed in the CI form.
Searching for CIs from the Change Management console
Chapter 13 Managing configuration items 459

Inventory managementYou can use the Manage Inventory function to track bulk inventory items and otherCIs that are available for deployment.
Before you can track inventory, you must:
■ Create bulk inventory CIs, or other CIs to be tracked as inventory. For informationabout how to do this, see “To create a bulk inventory CI” on page 458 or “To setthe view” on page 392.
■ Create inventory location CIs. For information about how to do this, see “Tocreate an inventory location CI” on page 459.
■ For bulk inventory, specify the received quantity and the inventory locations. Forinformation about how to do this, see To enter requester information using theBest Practice view on page 124.
■ For non-bulk inventory CIs, set the inventory status to In Inventory, and select alocation. For information about how to do this, see To place non-bulk CIs ininventory on page 461.
Placing bulk CIs in inventory
To place bulk CIs in inventory, you must specify the location or locations for them.
Tip If you do not see a location, make sure that the CI has a CI type of inventory location,and not physical location. For information about creating inventory locations, see Tocreate an inventory location CI on page 459.
To place bulk CIs in inventory
1 Open a bulk CI, as described in To reassign a change request yourself on page219.
2 On the Inventory Location tab, click Add.
3 In the Search Inventory Locations dialog box, specify the search criteria and clickSearch.
4 Select a location, and click Relate.
5 In the message about the relationship, click OK.
Inventory management
460 BMC Remedy Change Management User Guide
6 If the inventory is stored in multiple locations, for each location, repeat Step 4 onpage 460 and Step 5 on page 218.
7 Click Close.
On the Bulk Inventory form, the Inventory Location tab lists each of the relatedlocations.
8 Click in the Quantity Per Location field for a location, and type the quantity inthat location.
9 Continue to enter the quantity for each location, until all the quantity in stock forthe bulk CI is accounted for.
10 Click Save.
After items are in inventory, you can use the Manage Inventory function to:
■ view
■ relocate
■ reserve and use CIs and bulk inventory items
Placing non-bulk CIs in inventory
You can place non-bulk CIs that you want to manage in inventory by changing thestatus of the CI to In Inventory, and then designating a location for that CI.
To place non-bulk CIs in inventory
1 Open a CI, as described in To reassign a change request yourself on page 219.
2 From the Status list, select In Inventory.
3 Click OK in the confirmation message that appears.
4 In the Search Inventory Locations dialog box , from the Location list, select alocation, make sure other values are correct, and click Search.
5 Select a location and click Return.
Inventory management
Chapter 13 Managing configuration items 461
Managing inventory tasks
This section describes how to perform inventory management tasks that you mostcommonly use.
To search for CIs from the console
1 From the Navigation pane of the console, choose Advanced Functions => Manage CIs.
2 From the CI Type list on the Manage CI Information window, select the type of CIand click Search.
3 On the search form provide information about the CI and click Search. ClickSearch without entering any information in the form to search for all availableCIs.
4 Select the CI from the search results displayed on the top of the page. Details ofthe selected CI are displayed in the CI form.
To view inventory locations
1 From the Navigation pane of console, choose Advanced Functions => ManageInventory.
2 Enter your search criteria in the Manage Inventory dialog box, and click Search.
Results matching your search criteria appear in the table.
3 Select a CI or bulk inventory item from the table, and click View Location.
4 View the CIs in the inventory listed in the Inventory Location form.
5 Click Close.
To relocate CIs
1 From the Navigation pane of the console, choose Advanced Functions => Manage Inventory.
2 Search for inventory in the current location using the Manage Inventory dialogbox.
3 Select the CI or bulk inventory item you want to relocate, and click Relocate CIs.
4 For the location where you want to relocate the CI, specify search criteria, andclick Search in the Search Inventory Locations dialog box.
Inventory management
462 BMC Remedy Change Management User Guide
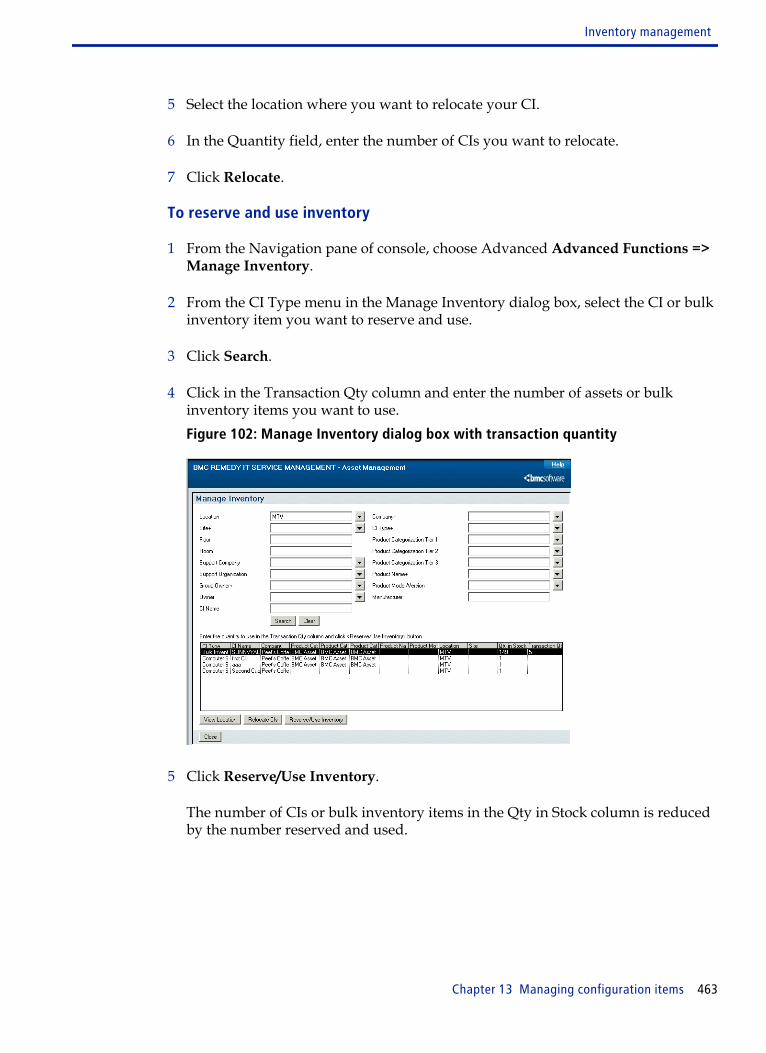
5 Select the location where you want to relocate your CI.
6 In the Quantity field, enter the number of CIs you want to relocate.
7 Click Relocate.
To reserve and use inventory
1 From the Navigation pane of console, choose Advanced Advanced Functions => Manage Inventory.
2 From the CI Type menu in the Manage Inventory dialog box, select the CI or bulkinventory item you want to reserve and use.
3 Click Search.
4 Click in the Transaction Qty column and enter the number of assets or bulkinventory items you want to use.Figure 102: Manage Inventory dialog box with transaction quantity
5 Click Reserve/Use Inventory.
The number of CIs or bulk inventory items in the Qty in Stock column is reducedby the number reserved and used.
Inventory management
Chapter 13 Managing configuration items 463
Inventory management
464 BMC Remedy Change Management User Guide

Working with the Overviewconsole
The information in this section is for people who fulfill one or more of the followingsupport roles:
■ problem coordinators
■ service desk analysts
■ specialists
■ group coordinators
■ on-duty managers
Use the Overview console if you must respond to, manage, or track individual orgroup work assignments from a variety of sources. For example: if your companyruns the full BMC Remedy ITSM suite, either you or the group you manage mightreceive work assignments from BMC Remedy Incident Management, BMC RemedyProblem Management, and BMC Remedy Change Management. From the Overviewconsole, you can quickly get information about all your work assignments andperform the procedures that you use most often.
As you work with the forms and dialog boxes associated with this console, youmight see a plus sign (+) included in a field label. You can type part of theinformation next to these fields and press ENTER. If an exact match is located, theprogram automatically completes the field. If a selection list appears, double-clickthe item you want to put in the field. Using auto-fill fields and lists is faster, moreconsistent, and more accurate than typing the information.
Functional areasThis section illustrates the functional areas of the Overview console and describeswhat you can do in each of the functional areas.
14
Chapter 14 Working with the Overview console 465
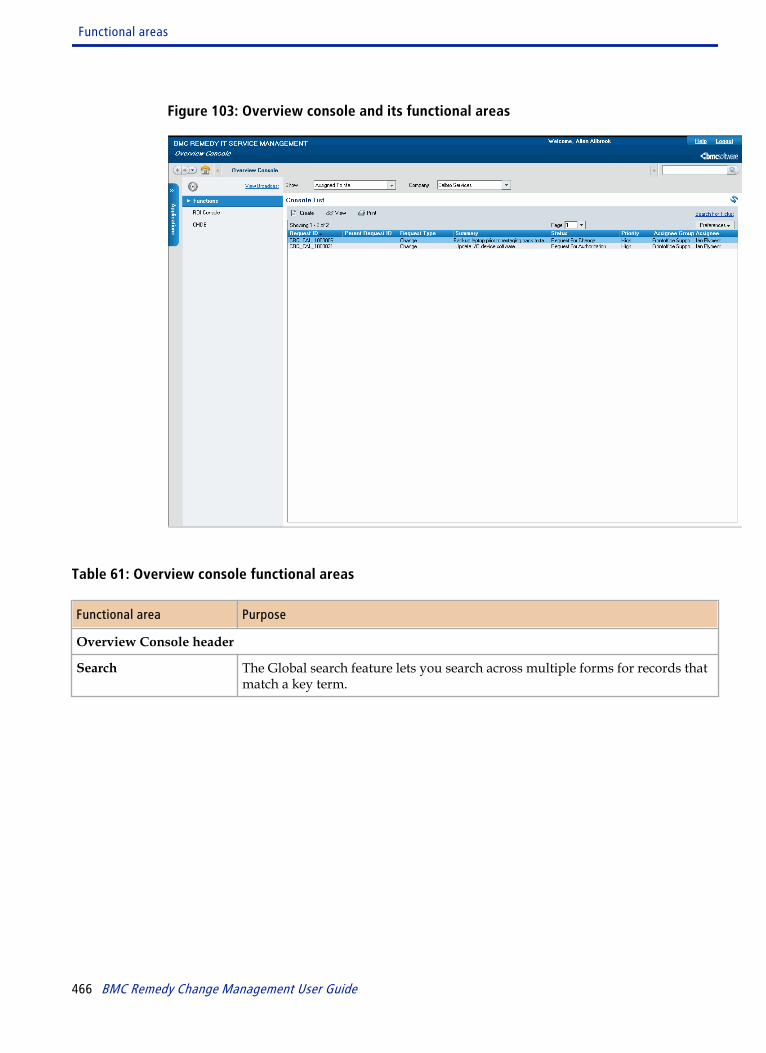
Figure 103: Overview console and its functional areas
Table 61: Overview console functional areas
Functional area Purpose
Overview Console header
Search The Global search feature lets you search across multiple forms for records thatmatch a key term.
Functional areas
466 BMC Remedy Change Management User Guide
Functional area Purpose
ShowCompany
This area contains the following fields: Show and Company. These fieldscombine to provide a way that you can filter the change records in the consoletable.The Show field provides a filter by which you can manage the contents of theConsole List table. The choices are:
■ All—Shows all records
Submitted By Me—Shows all records submitted by you.
Assigned To Me—Shows all records assigned to you.
Assigned To My Selected Groups—Asks you to select one of the groups towhich you belong, and then displays the records assigned to that group.
Assigned To All My Groups—Displays the records assigned to all of thesupport groups to which you belong.
The Company field restricts the criteria that you choose in the Show field forthe selected company. This helps you manage the number of records returnedby the Show field.
Refresh Refreshes the data in the tables.
Navigation pane
View Broadcast, or NewBroadcast
Opens the broadcast dialog box, from where you can view, create, modify, anddelete broadcasts.When there are unread broadcast messages, this area displays a message: NewBroadcasts, followed by the number of new messages. When there are newbroadcast messages, the area also turns red.
Note: If you open the Overview console with no new broadcast messages, butthe View Broadcast link is red, open the Application Preferences dialog box andmake sure that a Console View preference has been selected.
See Broadcasting messages on page 402 for more information aboutbroadcasting messages.
Functions Use the links in this area to do the following actions:
■ Select Status Values—See only those records in a certain state, which youspecify from the Select Status Values dialog box. See Selecting status valueson page 469.
■ My Profile—Set your profile. See Viewing your profile on page 393.
■ Application Preferences—Set your program preferences and options. Thisfunction is also available from the application console.
IT Home Page Use this link to open the IT Home Page.
ROI Console Use this link to open the Return on Investment (ROI) console.
Functional areas
Chapter 14 Working with the Overview console 467
Functional area Purpose
CMDB Use this link to open the BMC Atrium CMDB.
Console List panel
View Displays a form containing detailed information about the selected record in theConsole List table.
Create Creates a new record.
Print Displays a report of the record contents that can be printed.
Search for Ticket Opens a dialog box from which you can select the type of ticket you aresearching for. After you select the type of record from the menu, click the Selectbutton to open a search form specific to the type of ticket you are searching for.
Note: To see activity records and CI unavailability records, you must search forthose tickets, because these records are not displayed in the Console List table.
Preferences Using Preferences, you can control the appearance of the Console List table. Forexample, you can add or remove a column.
Console List table Lists the different types of requests. See Console List table on page 468.
Console List tableThe Console List table lists different types of requests. The types of requests that youcan choose from depend on the applications that are installed.
A specific prefix identifies each type of request:
■ CRQ—Identifies change requests. To view and define change requests, BMCRemedy Change Management must be installed.
■ RLM—Identifies release requests. To view and define release requests, BMCRemedy Change Management must be installed.
■ TAS—Identifies tasks.
■ SDB—Identifies solution database entries. To view and define solution entries,BMC Remedy Service Desk must be installed.
■ INC—Identifies incidents. To view and define incidents, Service Desk must beinstalled.
■ PBI—Identifies problems. To view and define problems, Service Desk must beinstalled.
Console List table
468 BMC Remedy Change Management User Guide

■ PKE—Identifies known errors. To view and define known errors, Service Deskmust be installed.
■ PR—Identifies purchase requisitions. To view and define purchase requisitions,BMC Remedy Asset Management must be installed.
You can also change the table’s contents by using the Show and Company filters atthe top of the console:
Show—Shows records that either are assigned to you or to your support groups.
■ Submitted By Me - All change requests created by you.
■ All - All change requests, regardless of who created them.
■ Assigned To Me - All change requests assigned to you.
■ Assigned To My Selected Group - All change requests assigned to a specificsupport group of which you are a member. If you select this, you are prompted toselect the support group.
■ Assigned To All My Groups - All change requests assigned to all of the supportgroups of which you are a member.
Company—Shows records that are created for the selected company.
If there are more entries than the system can show in the table, use the arrow keys atthe right top corner of the table to scroll through the table.
Selecting status valuesYou can use the Select Status Values dialog box to filter the requests that appear inthe Overview console based on their status.
To select status values
1 From the Navigation pane, choose Functions => Select Status Values.
2 In the Select Status Values dialog box, select the status values for each categoryfrom the lists, then click OK to close the dialog box.
3 If the Assigned Work table does not refresh with the filtered records, clickRefresh to reload the table’s contents.
Selecting status values
Chapter 14 Working with the Overview console 469

Selecting status values
470 BMC Remedy Change Management User Guide
Working with the Requesterconsole
The Requester console enables users to quickly submit changes and incidents toBMC Remedy Change Management and BMC Remedy Incident Management.
Note If you have BMC Service Request Management installed, the Requester console isreplaced by BMC Service Request Management. For information about BMC ServiceRequest Management, see BMC Service Request Management User’s Guide.
Requester roleUser’s of the Requester Console are usually employees who need assistance from theIT support staff. The user or requester is typically an employee in the organizationwho must have a change implemented or an incident resolved. But any member ofyour organization can be a requester.
However, the user might not be an employee. Non-employees can also be requesters,since non-registered users can also submit service requests.
Traditionally, after a requester made a telephone call to a central help desk, asupport staff member logged the request. BMC Remedy Incident Management andBMC Remedy Change Management provide user self-provisioning. Using theRequester console, requesters can submit, track, and (in some cases) resolve theirown requests, and, as a result, improve the overall efficiency. BMC Remedy ChangeManagement and BMC Remedy Incident Management are preconfigured to workwith the Requester console. However, an organization can set an option to make theRequester console unavailable.
The Requester console is the primary interface for requesters to define and view theirrequests. From the Requester console, you can define a request that is submitted toBMC Remedy Change Management and BMC Remedy Incident Management. Youcan also view requests and respond to a survey after the request has been resolved.
15
Chapter 15 Working with the Requester console 471
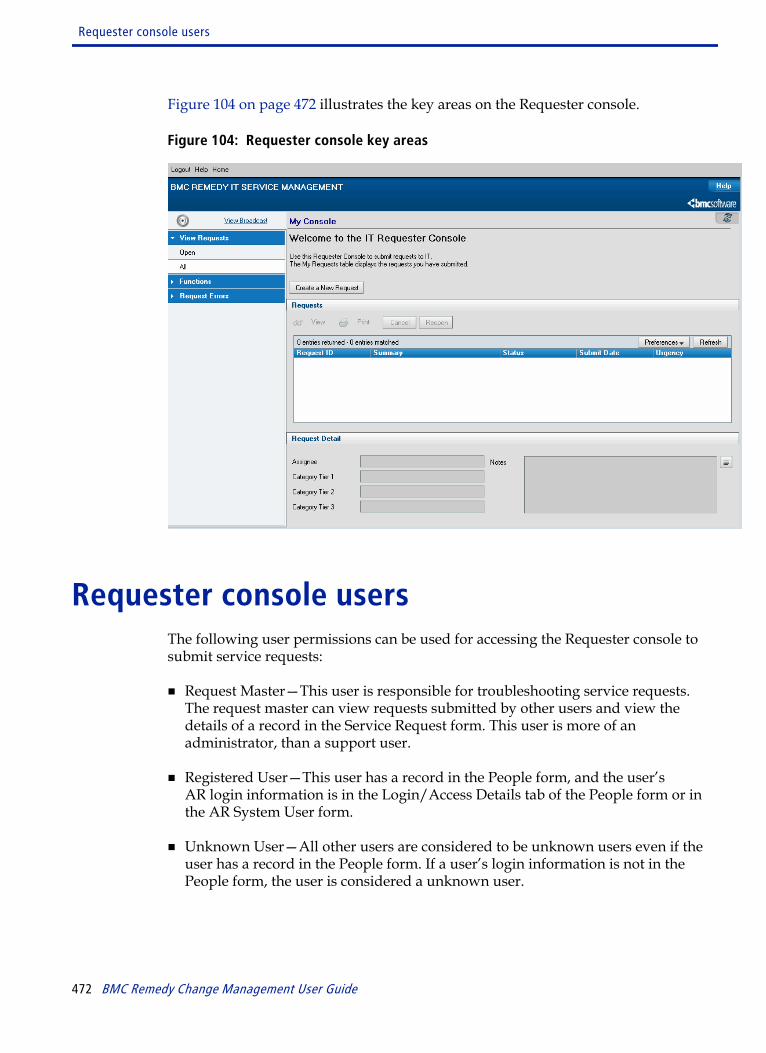
Figure 104 on page 472 illustrates the key areas on the Requester console.
Figure 104: Requester console key areas
Requester console usersThe following user permissions can be used for accessing the Requester console tosubmit service requests:
■ Request Master—This user is responsible for troubleshooting service requests.The request master can view requests submitted by other users and view thedetails of a record in the Service Request form. This user is more of anadministrator, than a support user.
■ Registered User—This user has a record in the People form, and the user’sAR login information is in the Login/Access Details tab of the People form or inthe AR System User form.
■ Unknown User—All other users are considered to be unknown users even if theuser has a record in the People form. If a user’s login information is not in thePeople form, the user is considered a unknown user.
Requester console users
472 BMC Remedy Change Management User Guide

Note For unknown users who do not have an AR System login to be able to accessthe Requester console, the AR System server Allow Guest User option must beselected. The Allow Guest User option is unavailable in multi-tenancy mode(for more information about multi-tenancy, see the BMC Remedy IT ServiceManagement Guide to Multi-Tenancy). Also, the AR Submitter locked modeoption must be selected for users with a read-only license to respond tosurveys. A default People record with a valid AR System login must be definedin the application for use by unknown users. For more information, see theBMC Remedy IT Service Management Configuration Guide.
If a user meets any of the following conditions, the user type is unknown user:
■ The user has an entry in the People form and in the AR System User form, butdoes not have an AR System Login ID in the People form.
■ The user has an entry in the People form, but does not have an entry in theAR System User form or an AR System Login ID in the People form. This type ofuser is also an AR System Guest User.
■ The user does not have an entry in the People form, but has an entry in theAR System User form.
■ The user does not have an entry in the People form or in the AR System Userform. This type of user is also an AR System Guest User.
Some other factors that control allowing unknown users access to the Requesterconsole follow:
■ Unknown users are not allowed access if the multi-tenancy option is selected. Multi-tenancy restricts access of data from different companies or business units.
■ In addition to setting the Tenancy Mode to Single-Tenancy, the Allow UnknownUsers option must be set to Yes and login information added.The console is the entry point for users to define, view, update, or cancel servicerequests.
Working with service requestsThis section describes working with service requests.
Working with service requests
Chapter 15 Working with the Requester console 473
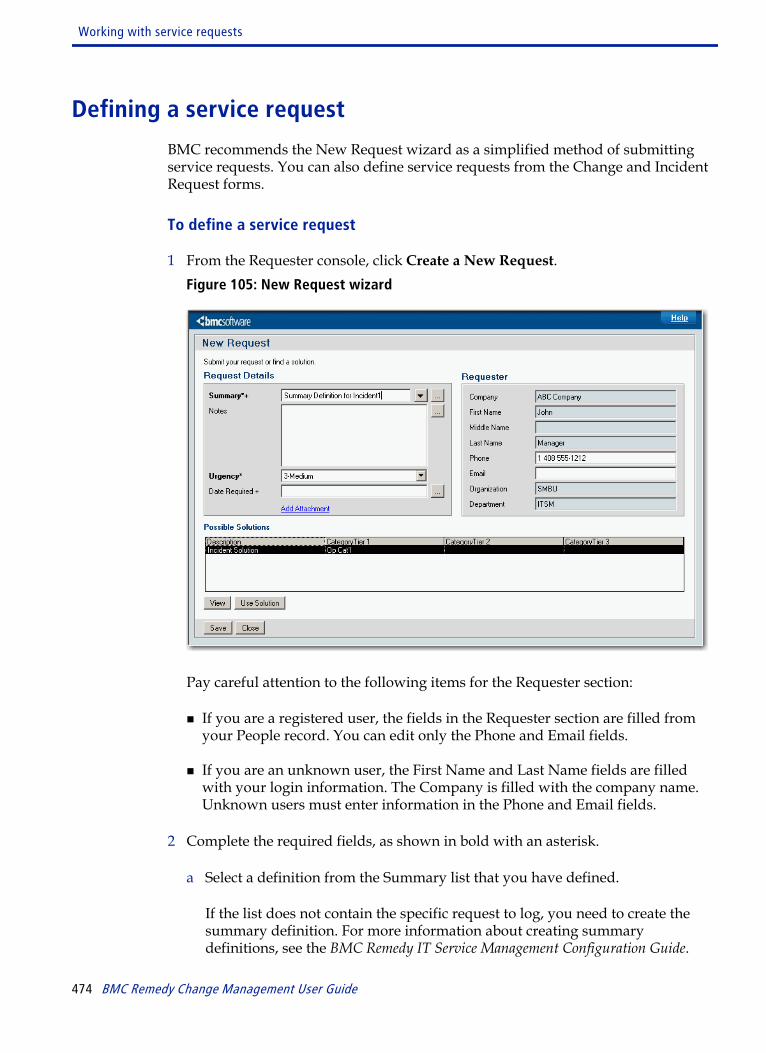
Defining a service request
BMC recommends the New Request wizard as a simplified method of submittingservice requests. You can also define service requests from the Change and IncidentRequest forms.
To define a service request
1 From the Requester console, click Create a New Request.Figure 105: New Request wizard
Pay careful attention to the following items for the Requester section:
■ If you are a registered user, the fields in the Requester section are filled fromyour People record. You can edit only the Phone and Email fields.
■ If you are an unknown user, the First Name and Last Name fields are filledwith your login information. The Company is filled with the company name.Unknown users must enter information in the Phone and Email fields.
2 Complete the required fields, as shown in bold with an asterisk.
a Select a definition from the Summary list that you have defined.
If the list does not contain the specific request to log, you need to create thesummary definition. For more information about creating summarydefinitions, see the BMC Remedy IT Service Management Configuration Guide.
Working with service requests
474 BMC Remedy Change Management User Guide
Note If BMC Remedy BMC Remedy Change Management and BMC RemedyIncident Management is installed, entering a summary or ad hoc requestgenerates an incident request. If only BMC Remedy Change Management isinstalled, a change request is generated.
If you select a summary definition that is an incident request, related solutiondatabase entries appear in the Possible Solutions table. If BMC RemedyProblem Management is not installed, possible solutions do not appear formanually entered summaries.
If there is a solution database entry that might be valid, click the entry, andthen click View. Review the solution entry. If the solution resolves yourrequest, click Use Solution.
If you choose a matching solution, the solution entry is related your requestand the request is resolved automatically.
b Select an Urgency level for your request.
c If you do not have a record in the People form, enter your company, first nameand last name.
3 (Optional) Click Add Attachment to enter request work information. You caninclude a note or an attachment.
4 Complete the optional fields:
■ Date Required—Enter a date by when you require that this request to becompleted.
Note If a change request is created for the service request, the date is populated asthe Requested Date on the Date/System tab of the Change request.
■ Phone—Enter or edit your phone number.
■ Email—Enter or edit your email address.
5 Click Save.
The request appears in the My Requests table.
Working with service requests
Chapter 15 Working with the Requester console 475
Service request state changes
For changes and incidents, the My Requests table console lists the status of itsunderlying service request. Users are notified by email when a service requestundergoes a status change, for example, when a service request is moved fromIn Progress to Completed or a change request reaches the Completed state.
Performing other service request functions
In addition to defining a service request, you can perform the functions listed in thefollowing table. All the listed functions are performed from the Requester console.
Table 62: Additional service request functions
Function Action
Filter your service requests Click the appropriate link from the View Requests section, located in theNavigation pane, and then select Open or All.Note: Open is the default view. To change the default view, select anothersort option, and then click Save As Default View.
View a service request From the My Requests table, select the service request, and then click View.Only the requests that the logged in user has submitted appear in the MyRequests table. Change requests are prefixed with CRQ and Incidentrequests are prefixed by INC.
Add work information From the My Requests table, select the service request, and then click View.Click the Add Work Info link in the Console Functions section of theNavigation pane.You can add:
■ A summary of the work log in the Summary field.
■ Additional information in the Notes field.
■ An attachment. You can add only one attachment for each workinformation entry. To add multiple attachments, add multiple workinformation entries.
Search for a request by requestID
In the General Functions area of the Navigation pane, click Search byRequest ID, and then enter the complete Request ID or the numeric part ofthe ID.
Print a service request From the My Requests table, select the service request, and then click Print.Review the report, and then click the Print icon on the toolbar.Note: If you are having problems printing from BMC Remedy User, chooseTools => Options in BMC Remedy User. On the Advanced tab of theOptions dialog box, make sure the ODBC Use Underscores option isselected.
Working with service requests
476 BMC Remedy Change Management User Guide
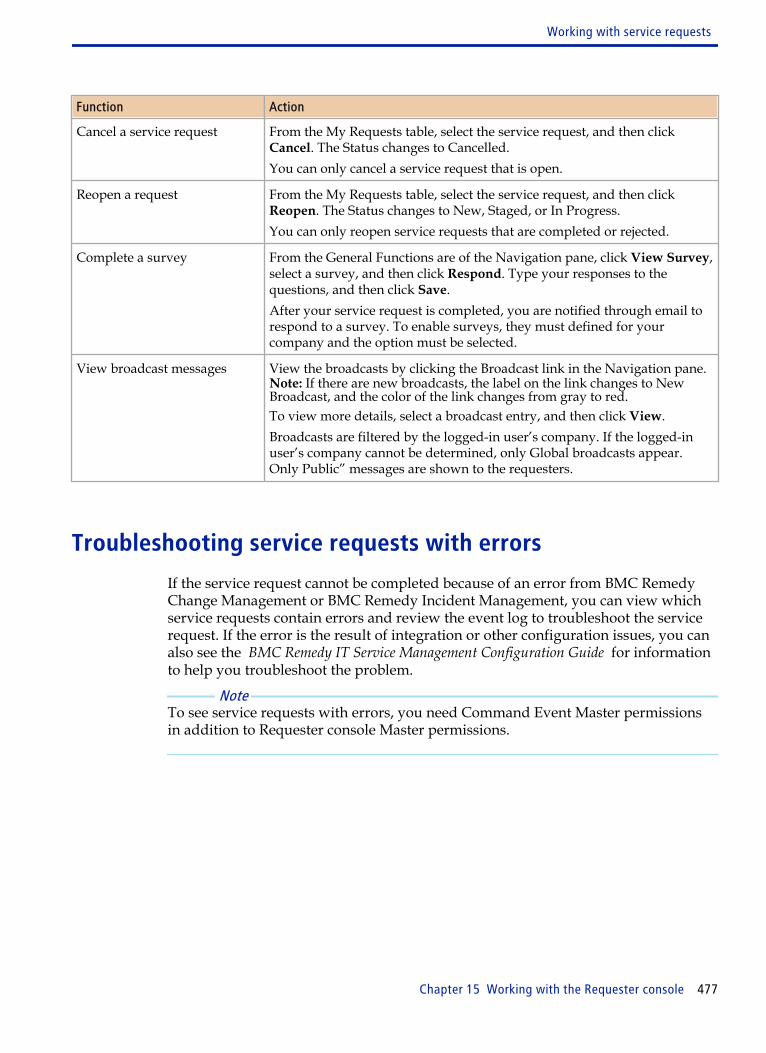
Function Action
Cancel a service request From the My Requests table, select the service request, and then clickCancel. The Status changes to Cancelled.You can only cancel a service request that is open.
Reopen a request From the My Requests table, select the service request, and then clickReopen. The Status changes to New, Staged, or In Progress.You can only reopen service requests that are completed or rejected.
Complete a survey From the General Functions are of the Navigation pane, click View Survey,select a survey, and then click Respond. Type your responses to thequestions, and then click Save.After your service request is completed, you are notified through email torespond to a survey. To enable surveys, they must defined for yourcompany and the option must be selected.
View broadcast messages View the broadcasts by clicking the Broadcast link in the Navigation pane.Note: If there are new broadcasts, the label on the link changes to NewBroadcast, and the color of the link changes from gray to red.To view more details, select a broadcast entry, and then click View.Broadcasts are filtered by the logged-in user’s company. If the logged-inuser’s company cannot be determined, only Global broadcasts appear.Only Public” messages are shown to the requesters.
Troubleshooting service requests with errors
If the service request cannot be completed because of an error from BMC RemedyChange Management or BMC Remedy Incident Management, you can view whichservice requests contain errors and review the event log to troubleshoot the servicerequest. If the error is the result of integration or other configuration issues, you canalso see the BMC Remedy IT Service Management Configuration Guide for informationto help you troubleshoot the problem.
Note To see service requests with errors, you need Command Event Master permissionsin addition to Requester console Master permissions.
Working with service requests
Chapter 15 Working with the Requester console 477

To view requests with errors
1 From the Navigation pane of the Requester console, choose Request Errors => View Requests with Errors.Figure 106: Service Request form—entries containing errors
2 Click the Change/Incident Data tab.
3 Click Reset Error to restart the service request.
Users can now continue to work on the service request.
4 Click View Events to review the event log and troubleshoot the service request.
5 View the event details:
■ Protocol
■ Access Mode
■ Error Code
■ Error Message
6 Take any of the following actions for events that are in error:
■ Retry
Working with service requests
478 BMC Remedy Change Management User Guide

■ Ignore
Best practice It is best to retry each event in the order the events are generated. By default, theevent table is sorted with the recent event on top, in reverse chronological order.Typically events should be retried when the problem indicated by the errormessage has been fixed.
WARNING Delete service requests with caution. They cannot be recovered. You must haveAR System Administrator permissions to delete service request records.
Viewing service request details from a change request form
When someone submits a service request from which BMC Service RequestManagement subsequently generates a change request, you can view informationabout the originating request from the change request form. The informationavailable includes the date on which the service request was submitted, whosubmitted it, and the related company. You can also view information aboutapprovers, an activity log, and process flow diagram showing the status of the request.
1 Open a Change Request form.
2 In the navigation pane, click Advanced Functions > View Service Request.
Working with service requests
Chapter 15 Working with the Requester console 479

Working with service requests
480 BMC Remedy Change Management User Guide
Change request status transitionsThis section describes the state transitions of a Change request, starting from Draft toClosed. Task Phases have not been included here.
State transitions - Draft to ClosedYou can use the following change request status transition information to follow theflow of a change request from Draft to Completed status.
A
Appendix A Change request status transitions 481

Note The Change Implementer is applicable only when using the Classic View.
Figure 107: State transitions—Steps 1 to 7
1 A change request starts in the Draft status. Any related task groups or tasks are inStaged status.
2 When the request moves through the process flow:
State transitions - Draft to Closed
482 BMC Remedy Change Management User Guide
■ If approvers are mapped to the Review approval phase, the request remains inthe Request For Authorization status.
■ If no approvers are mapped to the Review approval phase, the request movesto the Request for Change status and requires the change manager or thechange coordinator to move it forward.
■ If no approvers are mapped to any of the approval phases and you are usingonly the standard approvals, the request moves to the Planning In Progressstatus and requires the change manager or the change coordinator to move itforward.
■ If the Timing of the request is Latent, it moves to the Completed status.
3 The Review approval phase requires that the request be approved before it canmove forward. If the request is approved, it moves to the Request for Change status.
4 If no approvers are mapped to the Business Approval phase, the request moves tothe Planning In Progress status and requires the change manager or the changecoordinator to move it forward.By default, No Impact changes follow the Business Approval - No Impact phaseand move forward to the Scheduled status.
5 The Business Approval phase requires that the request be approved before it canmove forward.
■ If the request is approved, it moves to the Planning In Progress status.
■ If the request is cancelled, it moves to the Cancelled status.
State transitions - Draft to Closed
Appendix A Change request status transitions 483
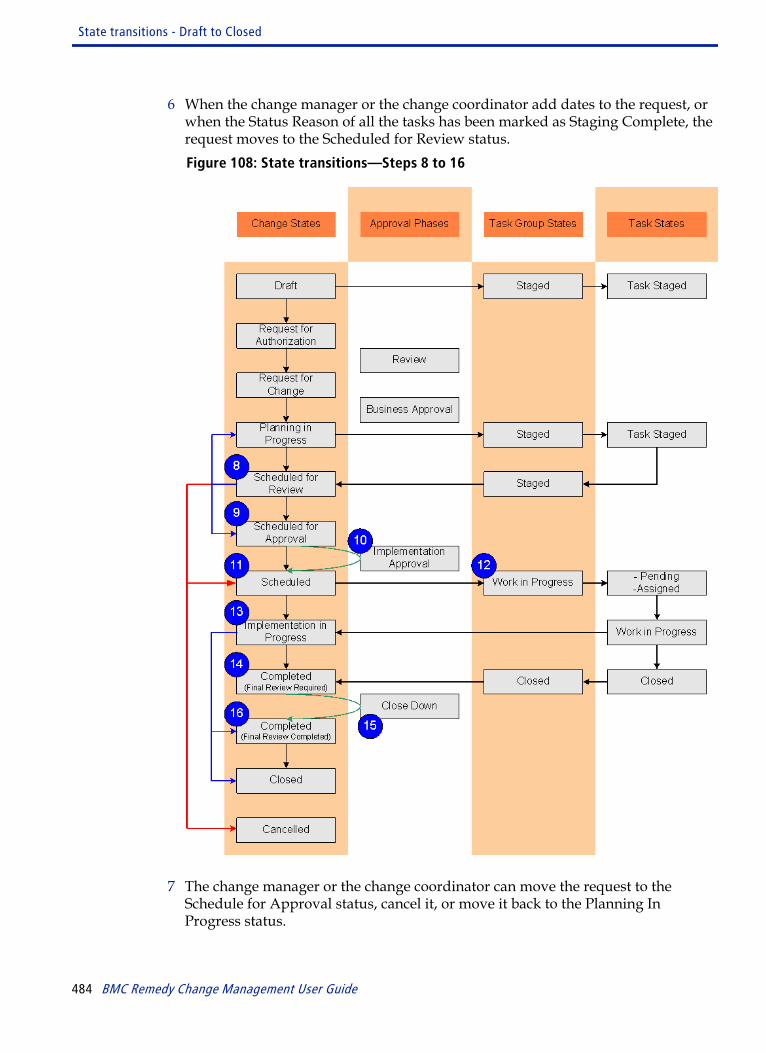
6 When the change manager or the change coordinator add dates to the request, orwhen the Status Reason of all the tasks has been marked as Staging Complete, therequest moves to the Scheduled for Review status.Figure 108: State transitions—Steps 8 to 16
7 The change manager or the change coordinator can move the request to theSchedule for Approval status, cancel it, or move it back to the Planning InProgress status.
State transitions - Draft to Closed
484 BMC Remedy Change Management User Guide

8 The request remains in the Scheduled for Approval status if there are approvers inthe Implementation Approval phase. If no approvers are mapped to the phase, therequest moves to the Scheduled status and requires the change manager or thechange coordinator to move it forward.
9 If the request is approved, it moves to the Scheduled status. The change managerand the change coordinator can approve the request on behalf of approvers, ifthey are defined as alternates.
10 The change manager or the change coordinator must move the request to theImplementation in Progress status. For taskless changes only, the changeimplementer is notified.
11 When the change manager or the change coordinator move the request into theImplementation in Progress status, the task group is set to Work in Progress andthe first task is set to Pending or Assigned.
12 Task implementers can start work on tasks. When all tasks are marked Closed, thechange manager or the change coordinator enter information into Actual StartDate, Actual End Date, and Performance Rating fields to move the request to theCompleted status.If the Status Reason is set to Final Review Complete, the request moves toCompleted status. If the Status Reason is set to Final Review Required, the requestmoves to Close Down Approval phase.
13 After last task is marked as Closed, task group is set to Closed. Changeautomatically moves to Completed (Final Review Required) status when all tasksare completed and there are approvers for Close Down Approval phase. Changemanagers and change coordinators can approve requests on behalf of approvers ifthey are defined as alternates.
14 The approval group or individual approvers are notified that change requestsrequire approval for Close Down Approval phase. The request is placed inCompleted status with status reason of Final Review Required. If approved,Status Reason is automatically updated to Final Review Complete. If no approversare mapped to the Close Down Approval phase, the request moves to theCompleted status.
15 The change manager is notified when final review is completed. The requestmoves to Completed (Final Review Complete) status if all tasks are completed orif there are no approvers for the Close Down Approval phase. The Requested Foruser (Requester tab) is then notified.
State transitions - Draft to Closed
Appendix A Change request status transitions 485
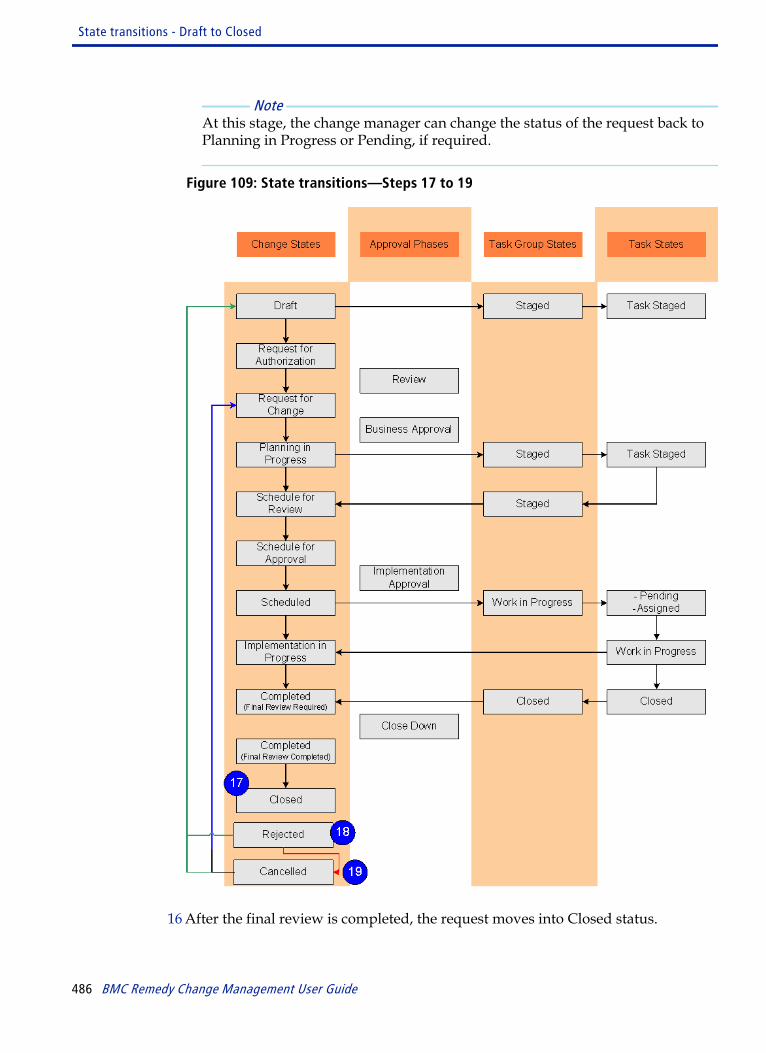
Note At this stage, the change manager can change the status of the request back toPlanning in Progress or Pending, if required.
Figure 109: State transitions—Steps 17 to 19
16 After the final review is completed, the request moves into Closed status.
State transitions - Draft to Closed
486 BMC Remedy Change Management User Guide
17 If a change has been rejected, it can be moved back to Cancelled status. Thechange manager or the change coordinator can also move it back to Draft statusand start the process over. The Requested For user is notified of the rescheduledchange.
18 If change request is cancelled, the Requested For user is notified.
■ If a change request is cancelled, all the task groups and tasks associated withthe request are also cancelled.
■ If a task group is cancelled, all its tasks are cancelled.
State transitions of change requestsSome status transitions in the change request lifecycle can be performed only byusers who have been assigned a specific role. For example, while all users can movea change request into Request For Authorization status, only a change manager cancancel a change request.
Note Some status transitions in the change request lifecycle can be performed only byusers who have been assigned a specific role. For example, while all users can movea change request into Request For Authorization status, only a change manager cancancel a change request.
This table describes the successive stages and approval phases of a change request. Italso identifies legal status transitions for each of these forms.
Table 63: Stages and approval phases of a change request
Stage Approval phase Status Description Tasks
Initiate Draft Verifies that all the fields required togenerate the change request are enteredin the Change form. Use the Draft statusto record a change request withoutsubmitting it to the ChangeManagement process.For information, see Initiate stage -Creating change requests on page 113.
■ Next stage
■ Enterpending (orresume)
■ Cancel
State transitions of change requests
Appendix A Change request status transitions 487
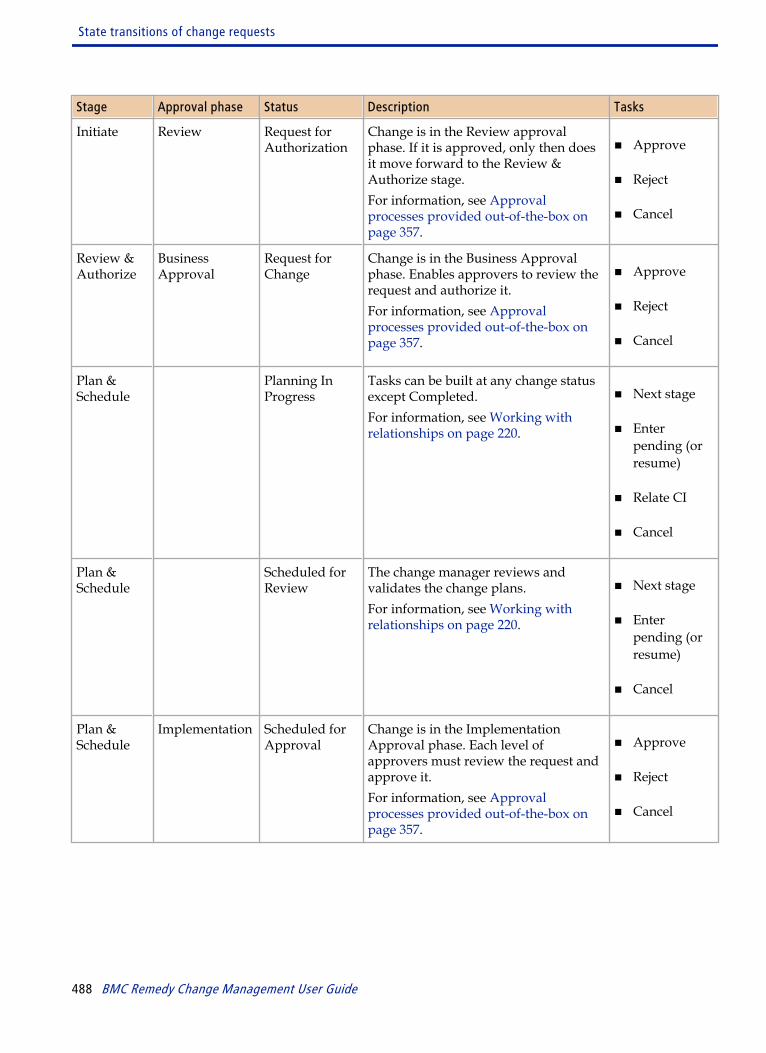
Stage Approval phase Status Description Tasks
Initiate Review Request forAuthorization
Change is in the Review approvalphase. If it is approved, only then doesit move forward to the Review &Authorize stage.For information, see Approvalprocesses provided out-of-the-box onpage 357.
■ Approve
■ Reject
■ Cancel
Review &Authorize
BusinessApproval
Request forChange
Change is in the Business Approvalphase. Enables approvers to review therequest and authorize it.For information, see Approvalprocesses provided out-of-the-box onpage 357.
■ Approve
■ Reject
■ Cancel
Plan &Schedule
Planning InProgress
Tasks can be built at any change statusexcept Completed.For information, see Working withrelationships on page 220.
■ Next stage
■ Enterpending (orresume)
■ Relate CI
■ Cancel
Plan &Schedule
Scheduled forReview
The change manager reviews andvalidates the change plans.For information, see Working withrelationships on page 220.
■ Next stage
■ Enterpending (orresume)
■ Cancel
Plan &Schedule
Implementation Scheduled forApproval
Change is in the ImplementationApproval phase. Each level ofapprovers must review the request andapprove it.For information, see Approvalprocesses provided out-of-the-box onpage 357.
■ Approve
■ Reject
■ Cancel
State transitions of change requests
488 BMC Remedy Change Management User Guide
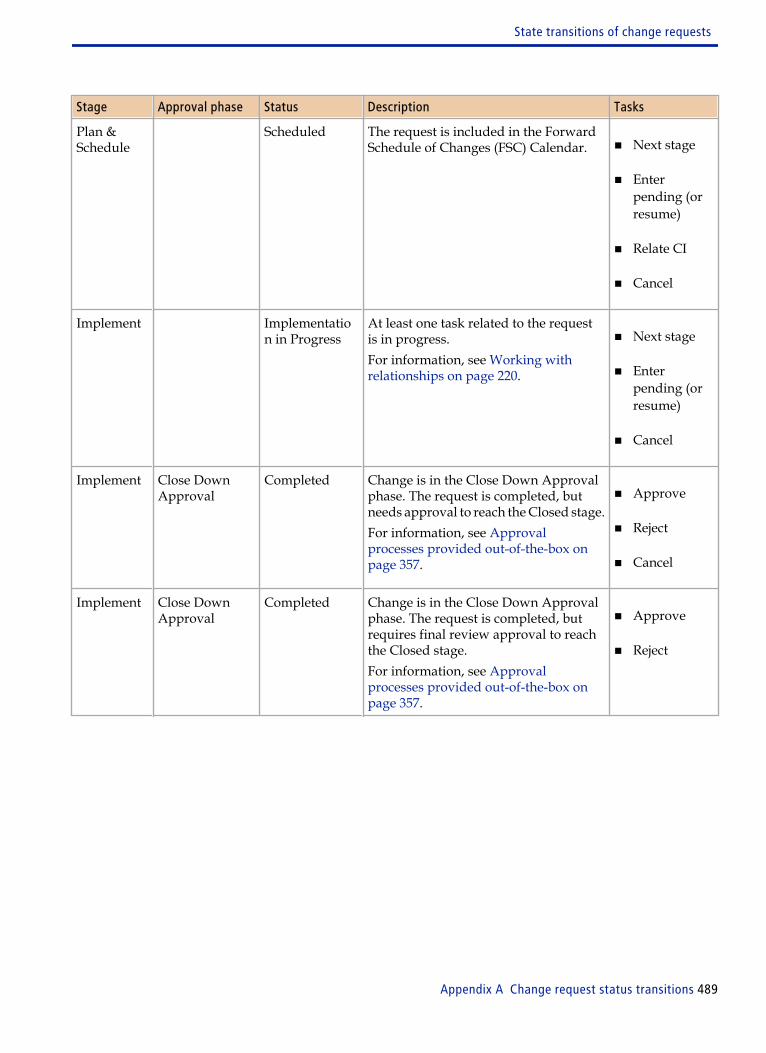
Stage Approval phase Status Description Tasks
Plan &Schedule
Scheduled The request is included in the ForwardSchedule of Changes (FSC) Calendar. ■ Next stage
■ Enterpending (orresume)
■ Relate CI
■ Cancel
Implement Implementation in Progress
At least one task related to the requestis in progress.For information, see Working withrelationships on page 220.
■ Next stage
■ Enterpending (orresume)
■ Cancel
Implement Close DownApproval
Completed Change is in the Close Down Approvalphase. The request is completed, butneeds approval to reach the Closed stage.For information, see Approvalprocesses provided out-of-the-box onpage 357.
■ Approve
■ Reject
■ Cancel
Implement Close DownApproval
Completed Change is in the Close Down Approvalphase. The request is completed, butrequires final review approval to reachthe Closed stage.For information, see Approvalprocesses provided out-of-the-box onpage 357.
■ Approve
■ Reject
State transitions of change requests
Appendix A Change request status transitions 489
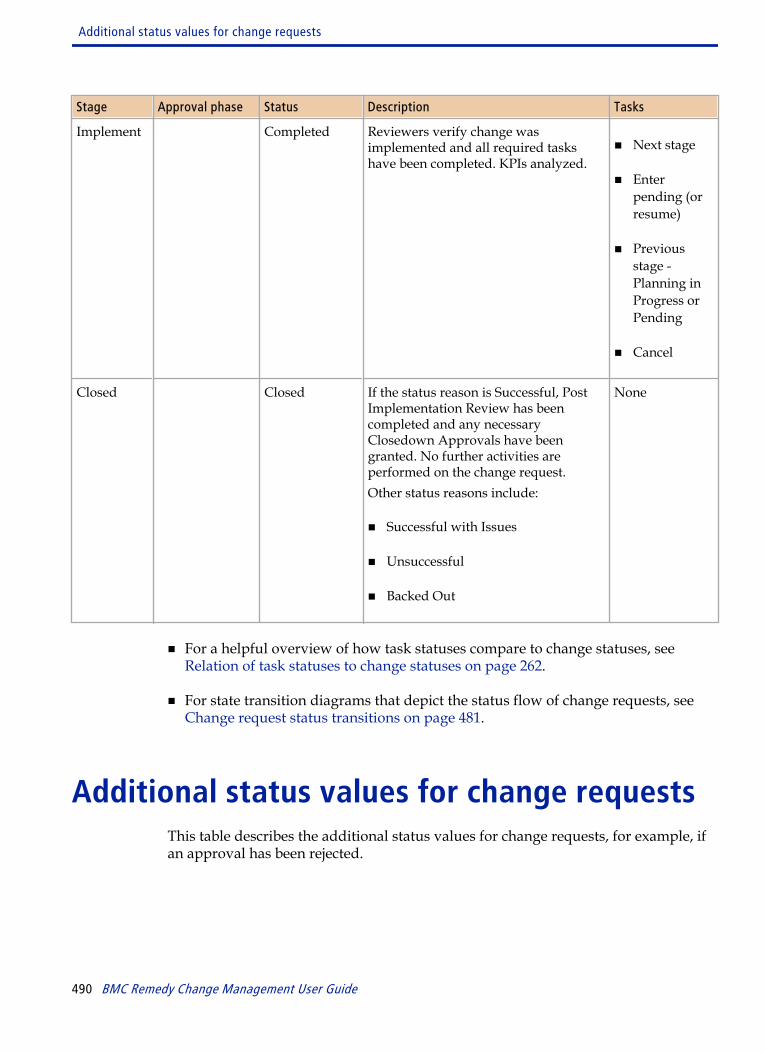
Stage Approval phase Status Description Tasks
Implement Completed Reviewers verify change wasimplemented and all required taskshave been completed. KPIs analyzed.
■ Next stage
■ Enterpending (orresume)
■ Previousstage -Planning inProgress orPending
■ Cancel
Closed Closed If the status reason is Successful, PostImplementation Review has beencompleted and any necessaryClosedown Approvals have beengranted. No further activities areperformed on the change request.Other status reasons include:
■ Successful with Issues
■ Unsuccessful
■ Backed Out
None
■ For a helpful overview of how task statuses compare to change statuses, see Relation of task statuses to change statuses on page 262.
■ For state transition diagrams that depict the status flow of change requests, see Change request status transitions on page 481.
Additional status values for change requestsThis table describes the additional status values for change requests, for example, ifan approval has been rejected.
Additional status values for change requests
490 BMC Remedy Change Management User Guide
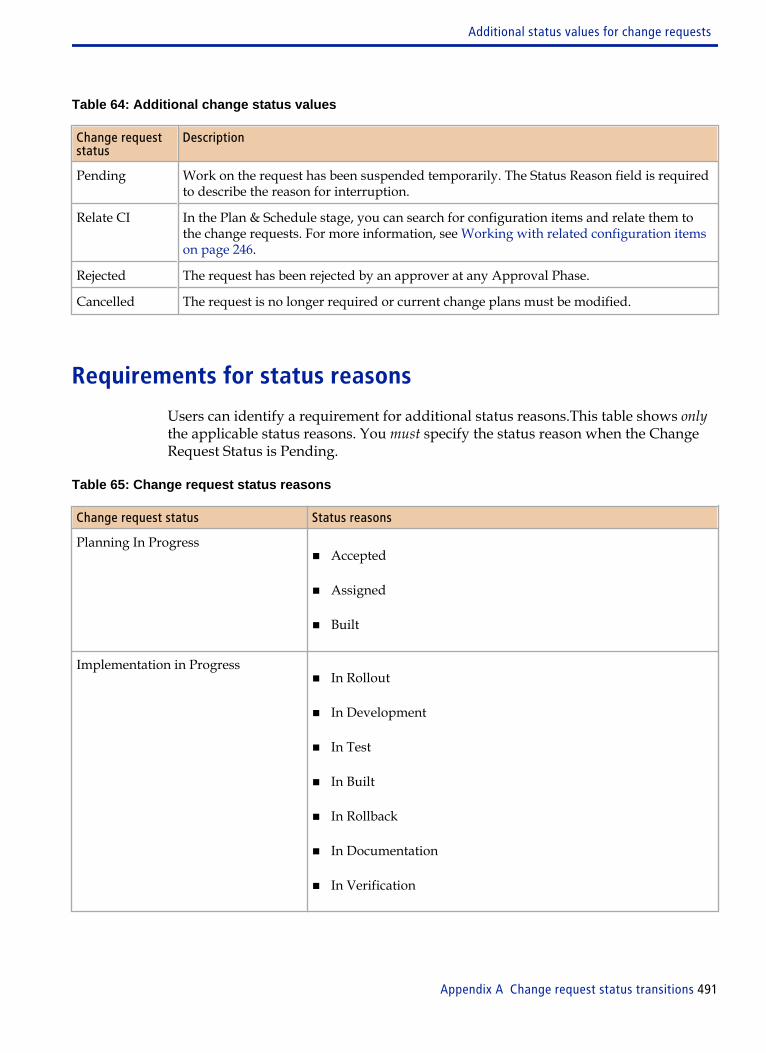
Table 64: Additional change status values
Change requeststatus
Description
Pending Work on the request has been suspended temporarily. The Status Reason field is requiredto describe the reason for interruption.
Relate CI In the Plan & Schedule stage, you can search for configuration items and relate them tothe change requests. For more information, see Working with related configuration itemson page 246.
Rejected The request has been rejected by an approver at any Approval Phase.
Cancelled The request is no longer required or current change plans must be modified.
Requirements for status reasons
Users can identify a requirement for additional status reasons.This table shows onlythe applicable status reasons. You must specify the status reason when the ChangeRequest Status is Pending.
Table 65: Change request status reasons
Change request status Status reasons
Planning In Progress■ Accepted
■ Assigned
■ Built
Implementation in Progress■ In Rollout
■ In Development
■ In Test
■ In Built
■ In Rollback
■ In Documentation
■ In Verification
Additional status values for change requests
Appendix A Change request status transitions 491
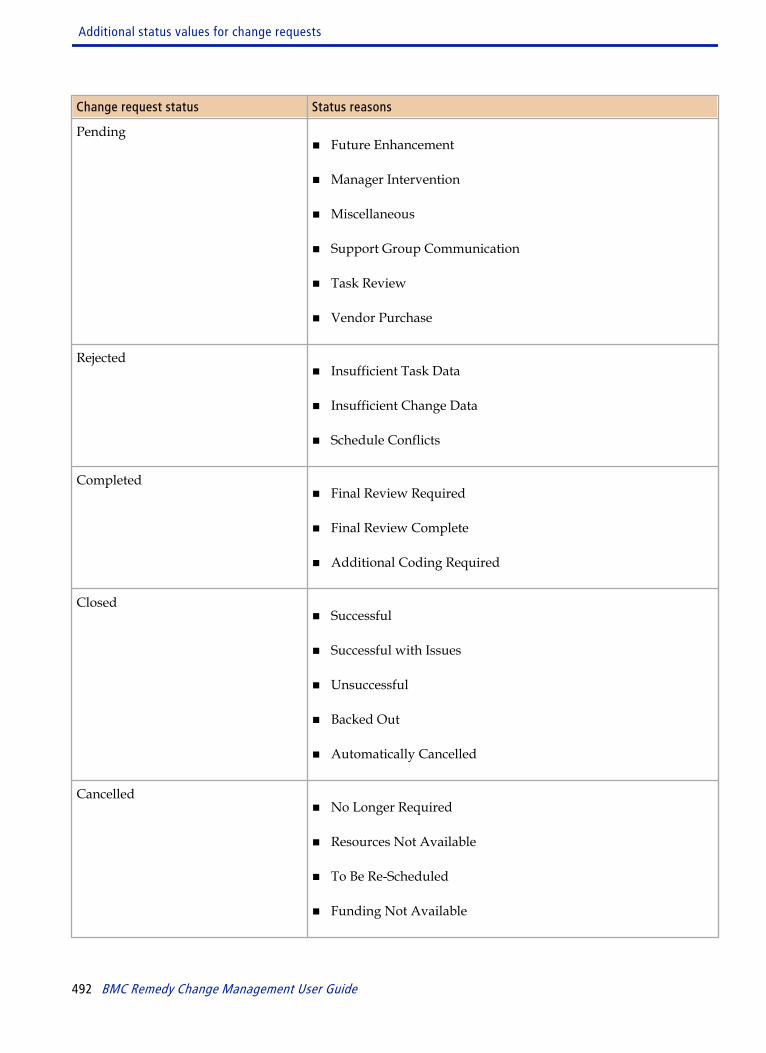
Change request status Status reasons
Pending■ Future Enhancement
■ Manager Intervention
■ Miscellaneous
■ Support Group Communication
■ Task Review
■ Vendor Purchase
Rejected■ Insufficient Task Data
■ Insufficient Change Data
■ Schedule Conflicts
Completed■ Final Review Required
■ Final Review Complete
■ Additional Coding Required
Closed■ Successful
■ Successful with Issues
■ Unsuccessful
■ Backed Out
■ Automatically Cancelled
Cancelled■ No Longer Required
■ Resources Not Available
■ To Be Re-Scheduled
■ Funding Not Available
Additional status values for change requests
492 BMC Remedy Change Management User Guide
Change and ConfigurationManagement (CCM)
This section provides an overview of Change and Configuration Management (CCM).
About Change and ConfigurationManagement (CCM)
Closed loop integration with BMC Configuration Automation for Clients is themechanism for the accelerated execution of a change request. It also providesverification that the change was successfully performed, based on requirementsspecified in the change request.
When you perform a change to the configuration of IT managed resources, you mustmaintain consistency and control through the entire process. A closed loop”approach makes sure that the change is properly documented, assessed, tracked,implemented, and verified. A closed-loop CCM solution from beginning to endmakes sure that the change requested was completed. all these stages are provided
B
Appendix B Change and Configuration Management (CCM) 493

in the CCM suite of products. This section provides an overview of the integrationpoints between the components in the solution.
Figure 110: BMC Remedy CCM solution overview
The BMC CCM solution addresses three types of change essential to an IT organization:
■ Software packaging
■ Patch deployment
■ Software license managementAmong the numerous advantages in using BMC’s CCM solution are these:
■ Consistent identification of Configuration Items (CI) and Software Library Items(SLI) throughout the change process, which improves communication betweenmembers of the support staff.
■ Reduction of cost and overhead using an integrated out of the box solution thatpreserves flexibility.
■ Automatic transfer of critical information between steps to maintain the integrityof the change.
■ Closed loop” verification of software-related tasks to make sure that the changewas successful and to provide an audit trail.
At the heart of the CCM solution is the Remedy Administrator. The RemedyAdministrator, in the context of ITIL, supports the following primary functions:
About Change and Configuration Management (CCM)
494 BMC Remedy Change Management User Guide
■ Accounts for all IT assets.
■ Provides accurate information to support other Service Management processes.
■ Provides a sound basis for Incident, Problem, Change, Asset, and ReleaseManagement.
■ Enables the verification (and correction) of records against the infrastructure.
■ Provides access to federated data stored outside the Remedy Administrator, butlinked to CIs, extending the Remedy Administrator functionality to a vastdatastore of related information and detailed attributes.
— Related information, such as detailed Incident or Discovery data, does notqualify as a CI, but its data relationships with CIs enable you to view it throughthe Remedy Administrator.
— Detailed attributes, such as machine details or problem records, are CIattributes you do not track at the Remedy Administrator level.
Processing Configuration Management tasksA change request can include multiple configuration management tasks, eachessential to the successful implementation of the change. The CCM TaskManagement Subsystem (TMS) manages these tasks in a sequence you define.
The CCM solution organizes tasks into three main categories:
■ Policy-based
■ Deployment-based
■ Verification-based
Policy-based tasks
BMC Configuration Automation for Clients enables you to maintain centralizedcontrol of packaged data and applications across the enterprise. You administer thestate of each endpoint on your network using Policy Manager. A policy consists of alist of software packages or patches your targets (users, computers, or groups) areexpected to have. Use Policy Manager to manage the state of software and data onan ongoing basis.
Policy-based tasks include:
Processing Configuration Management tasks
Appendix B Change and Configuration Management (CCM) 495
■ Deploying applications and data
■ Deploying patches
■ Harvesting licenses when you have exceeded maximum limits
■ Enforcing the removal of unauthorized applications
Deployment-based tasks
BMC Configuration Automation for Clients also supports the deployment of largevolumes of software or data, and execution of one-time jobs. You administer thesetasks using Deployment Manager (DM). Use DM to run deployment jobs that typicallydo not require ongoing management. Deployment-based tasks include distribution of:
■ Data
■ Applications
■ Commands and scripts
Verification-based tasks
The Task Management Subsystem launches verification tasks when it receivesnotification that a policy-based task has succeeded. You can verify compliance forpolicy-based tasks based on a target, package, or both.
You can configure TMS to launch verification tasks manually or automatically. Thesystem verifies tasks based on:
■ The compliance percentage of specified targets or software packages.
■ A time window that you specify for completing the task.
CCM solution overviewThe need for a company to have the latest version of a software program installed ontheir system is a perfect example of a typical CCM solution. The following scenariodescribes a CCM solution in which users interact with the BMC Remedy ITSM suite,including an IT Product/Service Catalog and fulfillment. Imagine users who needAdobe Acrobat on their computer. This requires that the IT organization undertake aservice-related Change process.
CCM solution overview
496 BMC Remedy Change Management User Guide
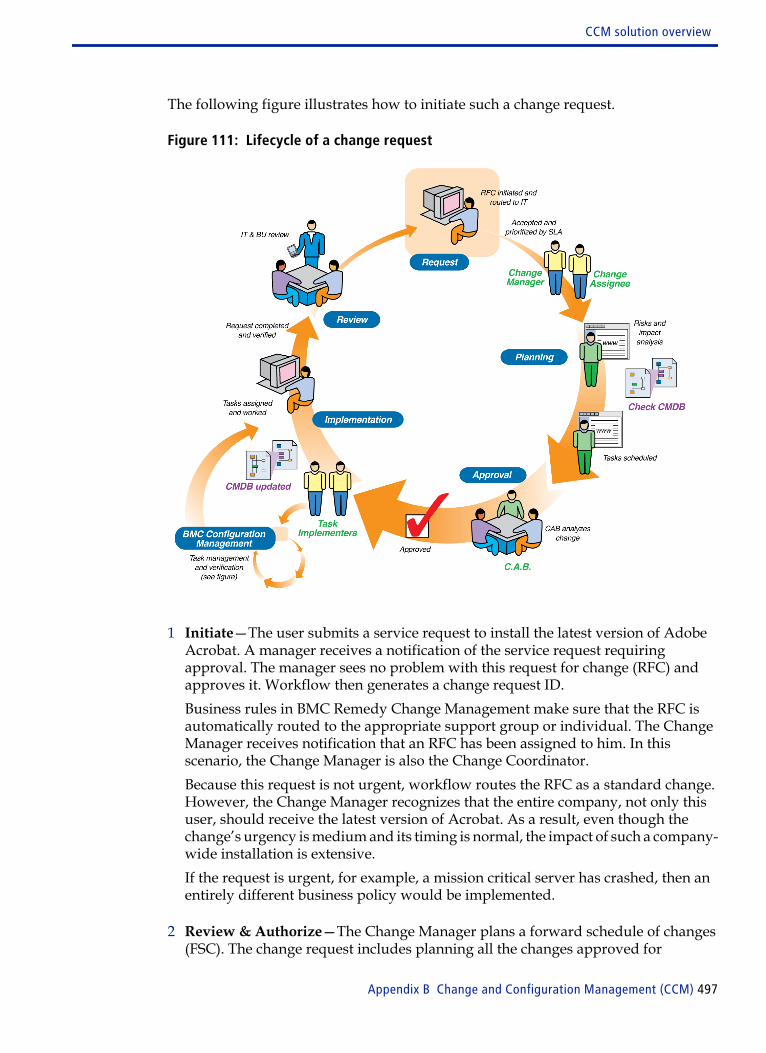
The following figure illustrates how to initiate such a change request.
Figure 111: Lifecycle of a change request
1 Initiate—The user submits a service request to install the latest version of AdobeAcrobat. A manager receives a notification of the service request requiringapproval. The manager sees no problem with this request for change (RFC) andapproves it. Workflow then generates a change request ID.Business rules in BMC Remedy Change Management make sure that the RFC isautomatically routed to the appropriate support group or individual. The ChangeManager receives notification that an RFC has been assigned to him. In thisscenario, the Change Manager is also the Change Coordinator.Because this request is not urgent, workflow routes the RFC as a standard change.However, the Change Manager recognizes that the entire company, not only thisuser, should receive the latest version of Acrobat. As a result, even though thechange’s urgency is medium and its timing is normal, the impact of such a company-wide installation is extensive.If the request is urgent, for example, a mission critical server has crashed, then anentirely different business policy would be implemented.
2 Review & Authorize—The Change Manager plans a forward schedule of changes(FSC). The change request includes planning all the changes approved for
CCM solution overview
Appendix B Change and Configuration Management (CCM) 497

implementation, targeting dates, and estimating the risks and costs. The timesegment for the change is scheduled on the calendar. The Change Managerreviews the RFC and verifies that the correct change request template and tasksare connected to the change request generated by the service request. Here theChange Manager relates the two Policy Manager and Compliance Check tasks(already provided with BMC Remedy Change Management) to the changerequest, and edits the appropriate change request and task information as necessary.The Change Manager updates the RFC by adding the appropriate implementersor assignees for the tasks, and any Backout, Test, and Implementation plans, ifneeded. Finally, the Change Manager adds the appropriate date information forthe tasks and updates the Status of the RFC from Planning in Progress to Scheduled.
3 Plan & Schedule—Because this is a standard change, the business rules dictatethat this type of change does not require more approvals. The Change Managerapproves it.If the change request requires additional approvals, for example, because thechange’s impact is widespread and potentially disruptive to users, the ChangeManager initiates the approval process. In this case, each level of approvers mustreview the request and approve it. Within the ITIL framework, the ChangeAdvisory Board (CAB) must approve all significant changes.
4 Implement—Workflow routes the tasks to the task implementers. BMCConfiguration Automation for Clients takes over the process of task managementand verification. The Task Management Subsystem (TMS) within BMC RemedyChange Management hands off policy, deployment, or verification tasks in thespecified sequence. You can configure verification tasks to kick off manually or
CCM solution overview
498 BMC Remedy Change Management User Guide
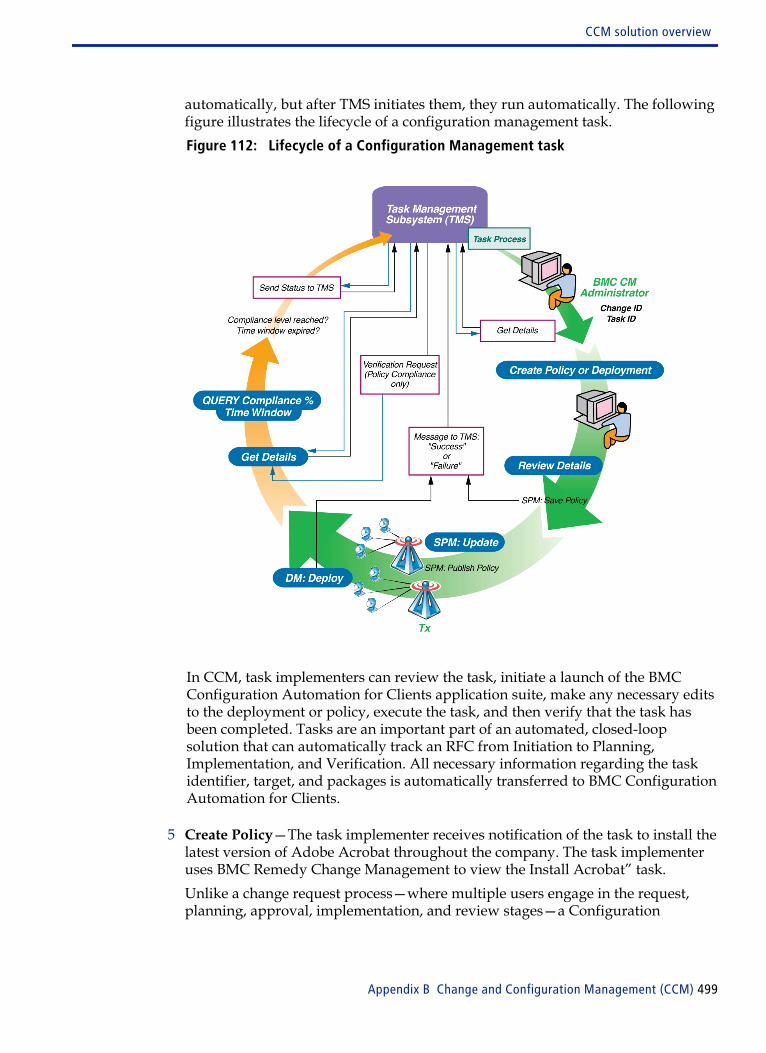
automatically, but after TMS initiates them, they run automatically. The followingfigure illustrates the lifecycle of a configuration management task.Figure 112: Lifecycle of a Configuration Management task
In CCM, task implementers can review the task, initiate a launch of the BMCConfiguration Automation for Clients application suite, make any necessary editsto the deployment or policy, execute the task, and then verify that the task hasbeen completed. Tasks are an important part of an automated, closed-loopsolution that can automatically track an RFC from Initiation to Planning,Implementation, and Verification. All necessary information regarding the taskidentifier, target, and packages is automatically transferred to BMC ConfigurationAutomation for Clients.
5 Create Policy—The task implementer receives notification of the task to install thelatest version of Adobe Acrobat throughout the company. The task implementeruses BMC Remedy Change Management to view the Install Acrobat” task.Unlike a change request process—where multiple users engage in the request,planning, approval, implementation, and review stages—a Configuration
CCM solution overview
Appendix B Change and Configuration Management (CCM) 499

Management task process benefits from automation features in the update ordeployment stages.In this scenario, the first step is saving a policy. The task implementer defines orupdates a policy, then reviews job details.
WARNING If you open a BMC Configuration Automation for Clients console windowfrom BMC Remedy Change Management to edit a policy or deployment job,make sure you work on only one Configuration Management task during thatsession. Launching new browser windows can generate session conflicts andcorrupt your data.
As the change request enters the Implementation stage, task implementers logtheir progress as they work to implement the change request and its related tasks.When the first task is completed, task implementers for the next stage in thesequence are notified of their task assignment. Task implementers can calculatethe cost of implementing their tasks.
6 Review Details—The task implementer reviews the details and makes anynecessary edits.The task implementer views task details from TMS, retrieving data based on theChange ID and Task ID, and defines a new policy as required.BMC Remedy Change Management fills out the program’s online form with theRemedy Administrator data the task requires, in this case, a target. The RemedyAdministrator contains a single source of truth about the content andconfiguration of computers on your network. The Remedy Administrator isupdated as task implementers work on the CIs that need improvement oralteration. In addition to the target information provided by the RemedyAdministrator, the Definitive Software Library (DSL) provides source informationabout Software Library Items (SLIs). SLIs represent the packaged software anddata available in the system.Because the task implementer's company has deployed the integrated CCMsolution with seamless authentication, which uses web services as thecommunication protocol between BMC Remedy Change Management and BMCConfiguration Automation for Clients, the task implementer can open the taskfrom BMC Remedy Change Management or BMC Configuration Automation forClients without having to retype a user ID and password.
7 SPM:Update—The task implementer uses Policy Manager to update policyinformation and store the policy in the directory service. When the policy is saved,Policy Manager sends a Success message to TMS.
8 Get Details—When tuners running on the endpoints check in, they receive theirnew policy and update the local system. Because packaged applications use theBMC Configuration Automation for Clients channel format, the process takesadvantage of file compression, bandwidth throttling, checkpoint restart, and byte-
CCM solution overview
500 BMC Remedy Change Management User Guide

level and file-level differencing. The location of a package application is capturedin the DSL as Software Library Items are available for future service requests.At the scheduled time, the Policy Service running on their systems updates allcompany computers.
9 Query Compliance—The verification task queries the BMC ConfigurationAutomation for Clients inventory database for information about the compliancepercentage you specified as the threshold for success, and elapsed time. The goalIT configured in the compliance task was to deploy the software on 80 percent ofthe company’s computers within seven days.When the task achieves the specified compliance level or the time windowexpires, the verification process sends a status message to TMS.In this scenario, the verification process notifies TMS that the task completedsuccessfully. In this case, at least 80 percent of the systems are in compliancewithin seven days.All necessary information about the task identifier, target, and packages isautomatically transferred to BMC Remedy Change Management.If the task is not successful, the task verification process notifies TMS of thefailure. Details of the failure from BMC Configuration Automation for Clients arerecorded in the Work Info tab of the change request and the task is closed with astatus reason of Failed.The configuration management lifecycle is now finished. BMC Remedy ChangeManagement picks up the process again at the Review step.
10 Review and Close—The change request enters the Review stage. The taskimplementer must now verify that the task has been completed.Figure 113: Review
During the task and verification process, BMC Configuration Automation forClients captures audit trail data, including:
■ Task ID
CCM solution overview
Appendix B Change and Configuration Management (CCM) 501
■ Change ID
■ Time stamps
■ MachinesIn BMC Configuration Management’s Report Center, you can view predefinedqueries on the Machine Details page summarizing tasks performed on anycomputer. For more information, see the Report Center Administrator’s Guide(available on the Customer Support website) or Report Center help.When all task implementers finish their tasks and mark them as Closed in BMCRemedy Change Management, CCM automatically verifies the status of thetask and the system notifies the requester that the change request has beenresolved.If the task is successful, CCM marks the task as Closed. The requester isautomatically notified that the change request has been resolved.When the requester is notified of the status change, the requester can close thechange request by setting Confirm Resolution to Closed. If the requester doesnot close the change request, the request closes automatically after apreconfigured time. If the change request is part of a dependent sequence, theChange Manager for the next change request in the sequence is notified.Reviewers verify that the change request was completed successfully. Forexample, reviewers can analyze key performance indicators (KPIs) that applyperformance analytics to the change, such as how many incidents the changeeliminated. Reviewers can also analyze the accuracy of the RemedyAdministrator.The service request and the RFC are Closed.
CCM solution overview
502 BMC Remedy Change Management User Guide

Index
Aaccelerators, process flow 29accessing
Change Calendar 95, 107Configuration Manager 438Operational Catalog Listing dialog box 95, 107Policy Manager 351Product Selection dialog box 95, 107View Broadcasts dialog box 94, 106
active variablesdescribed 422, 428, 451
activities 377assigning 329assignments, reviewing 379closing 387creating 326creating assignments 328, 379creating tasks 383dates 386financial information 385managing 325modifying 381reassigning 381templates 450
activity assigneesabout 375activities, working on 144, 376modifying activities 381
Activity formabout 109functional areas 109
ad hocchange tasks, relating 265requests 475
Add Approver dialog box 369Add Attachment dialog box 405, 407
addingalternate approvers 369approvers to change requests 367costs to change requests 183predefined task groups to change requests 267,
353predefined tasks to change requests 267, 353time segments 169
additional user roles 40Advanced Qualification dialog box, generating
reports 415advanced qualifications, using to generate reports
415Advanced Search Selection dialog box 97allocating costs to CIs 186alternate approvers
acting as 370adding 369
alternate data sets, relating CIs to 251application administrators
configuring approvals 355responsibilities 42working with Change Management 42
approval central 362Approval Process Configuration form 355, 362approvals
about 146, 339bypassing standard process 366change request 144, 148change requests 367creating 182default phases 362emergency 366multiple 364pending, viewing 148phases 487process 355process flow status bar, using 364release management approval processes 360release request 446status, viewing 31
A B C D E F G H I J K L M N O P Q R S T U V W X Y Z
Index 503

approversabout 355adding alternate 369adding to change requests 367alternate, acting as 370Change Advisory Board (CAB) 40change requests 148multiple 364responsibilities 356viewing 148viewing non-approver notifications 371working with Change Management 40
Approvers tab 339Assigned Work table 468assigning
automatically, change requests 212change requests, about 211change requests, manually 214changes to change implementers 216reassigning change requests 219reassigningrelease requests 318release requests automatically 318release requests manually 322release requests, about 316sequence numbers, change 128sequence numbers, change request 243task group sequence numbers 268task sequence numbers 268
assigning change requestsmanually 214
assignmentdenying reassignment 157
assignment tabchange form 217Change form 157
Assignment tab 328, 379Change form 214release form 322Task form 270, 272, 344
assignmentsaccepting 344availability, updating 394creating work orders 328, 379group notification 213, 321, 380individual notification 321individual notifications 213Remedy Alert notification 321, 343view 213work orders 329, 379
Associate Time Segment to CIs dialog box 173, 299Atrium Impact Simulator
change requests, creating 134CI impact, viewing on change requests 237
audit logs, viewing 181
Authoring Group dialog box 406auto-cost estimates 185available time segments
search 170
BBest Practice view
Change Management 32Release Management 66
Best Practice view, described 32best practices
CI naming conventions 454, 456ITIL 28process flow status 29using CIs to diagnose user problems 453
blackout schedule, creating 164BMC Atrium CMDB
functions defined by ITIL 494viewing CI relationships 168
BMC Configuration Management Policy Manager..See Policy Manager
BMC Remedy Alert 381change coordinator notification 213release coordinator notifications 321task implementer notifications 343
BMC Remedy Change Managementscenarios 51
BMC SLMChange Management, integrating with 189Customer tab in change request 192status gauge 190tab (changes) 189, 192tab (releases) 445
breadcrumb bar 79Broadcast Details tab 404Broadcast Search Criteria tab 403Broadcast Submitter role 404broadcasts
about 402CI unavailability 260create 403creating 404limiting 403modify 403view, 403
Build milestone for release management 309Business Approval - No Impact phase 358, 483Business Approval phase 359, 483Business Event/Location Definition dialog box 159,
297
A B C D E F G H I J K L M N O P Q R S T U V W X Y Z
504 BMC Remedy Change Management User Guide
business eventsregistering 158viewing in Change Calendar 201
business justificationchange requests 128release requests 286, 398
business models, sample 47Business Time Segment dialog box 159, 165, 297,
298
CCalbro Services 50Calbro Services user data 35calendars.. See Change CalendarCancelled state 483CCM.. See Change and Configuration Managementchang request form views, described 32change administrators.. See application
administratorsChange and Configuration Management
about 493CCM solution 496predefined task groups 347predefined tasks 347Task Management Subsystem 495
change approvalsstatus, viewing 31
Change Calendarfilter criteria 197opening 197quick links 201time zone preferences 202tooltip data 197viewing 194viewing business events 201viewing change requests 200
Change Calendar.. See Change CalendarChange Class 120change coordinators
accepting assignments 211, 316assignments notification 321change requests, creating 114notifying assignments 213reassigning change requests 219responsibilities 208using change form 93using Change Management Console 85
change dependencies, viewing 246, 340Change Environment field 128
Change formabout 93audit logs 181change templates, selecting 429Classification tab 127, 152copying change requests 431Date/System tab 151Dates tab 151, 307designating change implementer 40Email System link 96email, sending from 406Financials tab 188functional areas 93, 94impacted areas 182pages, sending from 406Relationships tab 222, 231, 233, 234, 333, 335Reminders link 96Requester tab 124stages, viewing 28Task tab 265–267Work Detail tab (Best Practice view) 130Work Info tab (Classic view) 130
change implementersassigning change requests 216designating in Change form 40responsibilities 40working with Change Management 40
Change Initiation dialog box 119Change Location Company field 125, 285Change Location of the Requester tab 182change management
approvals process 146user roles 36
Change Managementintegrating with BMC SLM 189introduction 21requester role 471roles, approver 355roles, change manager 111service targets, viewing 189
A B C D E F G H I J K L M N O P Q R S T U V W X Y Z
Index 505

Change Management Consoleabout 113CIs, searching for 459Company and Console View 91Configuration Manager, opening 438flashboards 88functional areas 85generating reports 88inventory
locations 436inventory, reserving 437inventory, using 437relocating CIs 436reminders 398tooltip data 91using 85
Change Management Dashboard form 206Change Management Dashboard.. See DashboardChange Management KPI flashboards
active variables 422change manager
about 111change managers
approvals process 146approvals, about 355approving change requests 144, 446change request approvals 144ITIL 355managing SLM targets 189planning change requests 305reassigning change requests 156responsibilities 112user role 37using Change Management Console 85, 113working with Change Management 37
Change Reason field 126, 127Change Relationship Search dialog box 243change request lifecycle 36change request status
relation to task status 262
change requestsapproval phases 487approvals 30, 147, 362assigning, about 211Atrium Impact Simulator 134automatically assigning 212basic steps, creating 114calculating costs 183Closed stage 153completing 153controlling progression 30copying 431costs 183costs, modifying 185creating 114creating approvals 182dependent 143emergency 133emergency requests, approvals 366Initiate stage 114lifecycle 497modifying 138peer 143Plan & Schedule stage 149planning 149predefined task, task groups 353process flow 28Process Flow Status bar 29progress, viewing 179reassigning 219registering time segments 157rejecting 147related change tasks 181related CI 247related configuration items 247related predefined task groups, tasks 267relationships 220removing related 246, 340resolving 153Review & Authorize stage 140rollbacks 156, 210sample business model 47sequence 143SLM targets 189stages 28, 487status reason requirements 491status transitions 487viewing approvals 148
change tasks.. See taskschange template
associating custom process flows 430Change Template Selection dialog box 429
A B C D E F G H I J K L M N O P Q R S T U V W X Y Z
506 BMC Remedy Change Management User Guide
change templates 429associating with custom process flows 430using 115
change templates, creating 119Change Type field
changes 122Releases 284
CI Advanced Search formchanges 165release 298
CI relationship types 230CI Relationship Viewer 168CI Relationships Search form
change coordinator 247, 254task implementer 350
CI Status Information tab 258CI unavailability
additional information 255creating 253existing records 256
CI Unavailability Search form 254CIs.. See configuration itemsClass field 126, 127Classic view
Change Management 34Release Management 67
Classification tabChange form 140
Close Down Approval phaseapprovers 359status transition 485
Close Down milestone in release management 312Closed stage of changes 153collision detection
release requests 176, 291Command Event Master permission 477Company and Console View 91Company field
Change Location 125, 285multi-tenancy (change requests) 91, 125multi-tenancy (release requests) 285
Completed (Final Review Complete) state 485Completed (Final Review Required) state 485Completed Date field 155Completed state 483, 485Configuration Information form 247
configuration itemsadditional unavailability, creating 255allocating costs to 186alternate data sets, relating 251change requests 220change requests, relating 247CI Relationship Viewer, using 168default global approval process 358impact on changes 237locations 436modify CI unavailability 259naming conventions, best practice 454, 456non-bulk 461outage information, modify 259problem diagnosis 453related change requests, viewing from 247related to change requests 246relationships in BMC Atrium CMDB, viewing
168relocating 436, 462searching for 459Service CI type 123status 457time segments, creating 164unavailability, broadcast 260unavailability, creating 253, 256unavailability, delete 260unavailable to change requests, relating 253
configuration management tasksabout 495deployment-based 496life cycle 499policy-based 495predefined CCM 347verification-based 496
Configuration Manager, using 438consoles
Overview 465Requester 471, 472
conventions, documentation 19coordinator group field, behavior described 32, 66Copy Infrastructure Change dialog box 431Copy Related Relationships form 240copying
change request relationships 240change requests 431
copying tasks 432Cost Allocation form 187Cost User permissions 183
A B C D E F G H I J K L M N O P Q R S T U V W X Y Z
Index 507
costsadditional functions 188change request, calculating 183change requests, adding to 183configuration items, allocating to 186Cost User permissions 183estimating 185modifying change request 185negating 183reversing 183
Costs dialog box 184, 185, 259create relationship to link 231create release requests
Best Practice view 277Classic view 282
creatingadditional CI unavailability 255approvals for change requests 182broadcasts 404change requests, dependent 243CI unavailability 253CI unavailability (alternate method) 256custom searches 409effort logs 217, 320related change requests 242relationships between change requests 222, 231,
243requester records 397service requests 474service targets in change requests 192time segments 158time segments, configuration items 164work order assignments 328, 379work order task groups 383work order tasks 383
creating, change requestsas change coordinator 114
crystal reportslicense 411
custom process flowsassociate 430associating with change templates 430
custom searches 408, 409creating 409editing 411
customer field, behavior described 33
DDashboard
about 203using 203
data setsalternate 251preferences 251
Date/System tabChange form 140
Datesactivities 386change requests 151release requests 307, 311
denying reassignmentchange request 157change task 272
dependencieschange request 220configuring enforcement levels 143creating between change requests 243specifying change request sequence 243
dependent change requests 220Deployment Manager 496Deployment milestone in release management 311deployment-based tasks 496DM.. See Deployment Managerdocuments available for ITSM 15Draft state 482
EEarliest Start Date 151editing custom searches 411effort logs
creating for change 217creating for release 320tracking assignee time 273
email 406Email System link on Change form 96Email System link on Release form 108sending from Change form 406
Email System dialog box 406emergency change requests
approving 366defining 133
enforcement, configuring dependency levels 143Existing Configuration Item Unavailability dialog
box 255
Ffields
standards for labels 83Final Review Complete status reason 485Final Review Required status reason 485Financials tab 188, 347flashboards 88
A B C D E F G H I J K L M N O P Q R S T U V W X Y Z
508 BMC Remedy Change Management User Guide
formsRelease Template Selection 449Add Approver 369Add Attachment 405, 407Advanced Qualification 415Advanced Search Selection 97Approval Process Configuration 355, 362Associate Time Segment to CIs 173, 299Authoring Group 406Business Event/Location Definition 159, 161,
297Business Time Segment 159, 165, 297, 298Change 28, 40, 93Change Management Dashboard 206Change Relationship Search 243Change Template Selection 429, 450CI Advanced Search 165, 298CI Relationships Search 247, 254, 350CI Unavailability Search 254Configuration Information 247Copy Infrastructure Change 431Copy Related Relationships 240Cost Allocation 187Costs 184, 185, 259Email System 406Existing Configuration Item Unavailability 255Impacted Areas 182Manage Inventory 436My Group Selection 346New/Modify Broadcasts 260Operational Catalog Listing 95, 107Paging System 407People 397Print Properties 202Product Selection 95, 107Registration for Shared Time Segment 162–164,
167, 168Relationship Attributes 350Relationships for Configuration Item 248Release 60, 105Reminder Details 400Reminders 400Risk Assessment Questions 142Search Inventory Locations 437Search Operational Categorization/Location
Definition 159, 161Search Time Segment 163, 168Select Template 267, 349Simple Qualification 414Software Library Item Search 350Task 266Time Segment Analysis 170User Defaults 202User View 206Work Info 352
Ggenerating
reports with advanced qualifications 415reports with qualifications 413reports without qualifications 412standard reports 412
global flag, multi-tenancy and 201Global search 82groups 267
assignment notification 213, 321non-approver notifications, adding 372notifications of work order assignments 380viewing
task 265See also support groups
Iicons
Compute Level 121icons, recognizing 84impact analysis in Review & Authorize stage of
changes 140Impact field
change requests 120release requests 284
impacted areas, viewing 182Implement stage
task assignments 343tasks, working with 260
Implementation Approval phase 359, 485Implementation in Progress state 485In Production Date field 155incident requests, viewing related service targets
189Index Term 26, 75individual non-approver notifications, adding 372individual notifications of work order assignments
380Information Technology Infrastructure Library.. See
ITILInitiate milestone in release management 277Initiate stage of change requests 114inventory 460
managing locations 436non-bulk CIs 461reserving 437, 462using 437viewing locations 436, 462
A B C D E F G H I J K L M N O P Q R S T U V W X Y Z
Index 509
ITILbest practices 28BMC Atrium CMDB functions 494change managers 355
KKey Performance Indicator (change),. See KPI
flashboardsKey Performance Indicator (Release),. See KPI
flashboardsknown error request type 226KPI flashboards
changing the appearance of 424, 425described 420, 450enlarging 424, 425opening the Flashboard console 423view and display controls 424, 428, 452viewing underlying records 424
LLDAP Object request type 227Lead Time field 122, 127lifecycle
change requests 36, 47release requests 60
limiting number of broadcast messages 403Locked field (work information) 132logs
audit, viewing 181effort (Change form) 217, 273effort (Release form) 320
MManage Inventory dialog box 436Manifest tab 291manifests
creating 288working with 323
Manufacturer field 123messages.. See broadcastsModel/Version field 123modifying
costs 185profile 393records 396reminders 400work orders 381
multi-tenancyChange Location Company field 125, 285changes 91, 125, 201Company field 91global flag 201releases 285unknown users 473
My Group Selection dialog box 346my searches
custom searches 408, 409managing 408, 409
NNew Request Wizard, defined 474New/Modify Broadcasts dialog box 260Non-Approver Notifications dialog box 372, 373non-approver notifications, adding individual 372non-bulk CIs, placing in inventory 461Non-Phased deployment type of releases 283Notes field 128notification
individual 380Remedy Alerts 213task implementer 343
Notification Audit tab 182notifications
activity assignment 380activity by BMC Remedy Alert 380adding individual or group non-approval 372audit log entries 181change management 400group work order assignment 380groups 400individual work order assignment 380release management 443Remedy Alert 213, 321roles 401sending 400, 443triggering with state changes 400, 443viewing non-approver 371See also assignments
Notifications tab (change requests) 408
A B C D E F G H I J K L M N O P Q R S T U V W X Y Z
510 BMC Remedy Change Management User Guide
Oopening
Change Calendar 95, 107Configuration Manager 438Operational Catalog Listing dialog box 95, 107Policy Manager 351Product Selection dialog box 95, 107View Broadcasts dialog box 94, 106
Operational Catalog Listing dialog box 95, 107operational categorizations, registering 158options
setting 389, 439viewing 389, 439
Overview ConsoleAssigned Work table 468
Ppaging 406
a person 407on-call groups 407
Paging System dialog box 407peers
change request 143task 268
People form 397Performance Rating field 128, 155permissions
Command Event Master 477Cost User 183ITSM 38, 40, 62Requester console 472
Phased deployment type of releases 283phases
Business Approval 359, 483Business Approval - No Impact 358, 483Close Down Approval 359, 485Implementation Approval 359, 485Review approval 483
Plan & Schedule stage of requests 149Planning in Progress state 483, 484planning milestone in release management 305policies
defined 495updating 500
Policy ManagerClosed Loop Verification task and 353Create and Modify Policy task and 353launching 351managing software and data 495updating policies 500using SLIs 249
policy-based tasks 495predefined
task groups 267, 347, 353tasks 267, 347, 353
predefined reportsCrystal Reports 416, 444Web reports 416, 444
preferencesadvanced change management options 392advanced release management options 442change management 389, 439change request view 392data sets 251new change request form 390new release request form 440new Release request form 440release management 389, 439release request view 442search change request form 390search release request form 440
Print Properties dialog box 202printing
records 395Priority field 121Problem Investigation request type 228process flow
accelerators 29change request 28moving changes to another state 138moving releases to another state 286, 308–310,
312status bar 30
process flow status barchange management 29, 138change requests 29release management 286, 308–310, 312requests, approving 364
process flows. See custom process flowsProduct Categorization fields 122Product Name field 123Product Selection dialog box 95, 107profile, viewing and modifying 393
A B C D E F G H I J K L M N O P Q R S T U V W X Y Z
Index 511
Qqualifications
change request, customizing 192Qualification Builder in service targets 192
qualifications, generating reports with 413Quick Links
Change Calendar 201Release Console 110
Rreassigning
change requests 156, 219change requests, denying 157release requests 318tasks
denying 272work orders 381
reassigning release requests 319recent records, viewing 79recording activities 130
Classic view 131records
handling 394modifying 396printing 395searching 395
refreshing data 467registering
business events 158operational categorizations 158time segments 157users 472
Registration for Shared Time Segment form 162–164,167, 168
rejectionschange requests 147release requests 339, 447resubmitting 367
related change requests 242unavailable CIs 254without dependencies 242
Related CIs with Costs Allocated table 187related configuration items
change requests 246related predefined tasks 353
relatingchange requests 243change tasks 265configuration items to alternate data sets 251configuration items to change requests 247new change requests 242predefined task groups to change requests 267,
353predefined tasks to change requests 267, 353unavailable CIs to change requests 253
Relationship Attributes dialog box 350relationships
about 220additional functions 245, 248, 340change requests 220copying 240copying to CI related to change 248creating 222, 231define incident related to change 250defining 222, 231, 331incident to change 250modifying 248quick actions 234, 324, 335relating change to LDAP object 249relating change to SLI 249relating CIs to alternate data sets 251removing 248request types 222unrelate incident from change 250unrelating CI 249viewing 241
Relationships for Configuration Item dialog box248
Relationships tab 233, 247, 333, 335change coordinator 222, 231Change form 234Release form 332
release coordinator 67release coordinators
cess approvals 339introduction 275reassigning release requests 319reassigning requests 318using Release form 105using Release Management Console 276, 376
release formRelationships tab 332, 333
A B C D E F G H I J K L M N O P Q R S T U V W X Y Z
512 BMC Remedy Change Management User Guide

Release formabout 105Approvers tab 339Date/System tab 311Dates tab 311Email System link 108functional areas 106Manifest tab 291release templates, selecting 448, 450Reminders link 108stages, viewing 60
release managementBuild milestone 309Close Down milestone 312Deployment milestone 311Initiate milestone 277introduction 59notifications, receiving 443planning milestone 305release coordinator role 275scenario 55, 71Test milestone 310user roles 61
Release Managementuse cases 71See also Release Management Console
Release Management Consoleabout 100, 276, 376tooltip data 91
Release Management KPI flashboardsactive variables 451
release managersapprovals 446managing SLM targets 445
Release Request form views, described 65
release requestsapprovals 446approvals process 146, 339approving 339, 447assigning, about 316assigning, automatically 318assigning, manually 322assignment notification 321available time segments, searching for 299best practices 68business justification 286, 398completing 312controlled environment, building 309creating 277, 282financial information 337lifecycle 60manifests 323manifests, creating 288milestones 60modifying 304monitoring 314pending approvals 446planning 305progress 314reassigning 318, 319recording work information 301, 302rejecting 339, 447relationship types 333relationships 330Release Management Console and 100resolving 312rolling out 311, 312rollup costs 337scheduling 296status 314templates 448, 450testing 310type 229
Release Template Selection dialog box 449, 450release templates
using 279Release Type 281, 284Release Type field
Releases 281relocating CIs 436, 462Reminder Details dialog box 400reminders
about 398create 398deleting 400modifying 400Reminders link on Change form 96, 108viewing 400
Reminders dialog box 400
A B C D E F G H I J K L M N O P Q R S T U V W X Y Z
Index 513
reportsabout 411generating 412generating in change console 88generating with advanced qualifications 415generating with qualifications 413generating without qualifications 412predefined 416, 444View Risk 143
Request for Authorization state 483Request for Change state 483request masters
Command Event Master permission 477defined 472
request types in relationships 222Requested Start Date 151Requester console
Command Event Master permissions 477functions 466registered user permissions 472reqeust master permissions 472unknown user permissions 472
Requester Contacted icon 125requester records
about 396creating 397
Requester tabactivities 327Change form 124
requestersapproval 355role 471See also requester records
resubmit change requestsrejected 367
retrying events in order, best practice 479Review approval phase 483RFC Date 152Risk Info icon 121risks
analysis 140assessment 140computing levels of 142levels, computing 140, 142Risk Level field (changes) 121Risk Level field (releases) 281, 285View Risk report 143
ROI flashboards 425active variables 428
rolesapplication administrator 42approver 40, 355Broadcast Submitter 404change coordinator 37change implementer 40change manager 37, 111, 275, 375company executive 42ITSM 38, 40, 62Release Coordinator 67requester 471SMPM 43task implementer 38, 341
roles, Release Manager 68rollback change request 210rollback change requests 156rollup in release requests 285
Ssample business model 47scenarios 50, 71Schedule assist
search available times 170Schedule Assist, using 170Scheduled for Approval state 484, 485Scheduled for Review state 484Scheduled state 483, 485Search Business Event/Location Definition form 159,
161, 297Search Inventory Locations dialog box 437Search Operational Categorization/Location
Definition form 159, 161Search Time Segment dialog box 163, 168searching
all records 409CIs 459inventory locations 461records 395time segments, available (change) 299time segments, available (release) 170
Select Template dialog box 267, 349sending notifications 400, 443Sequence field 128, 143sequence numbers
add to task, task groups 268adding 128adding to, change requests 243change request 143
Service CI type 123Service field 123Service field, behavior described 33, 66service level targets.. See SLM targets
A B C D E F G H I J K L M N O P Q R S T U V W X Y Z
514 BMC Remedy Change Management User Guide
service request details, viewing from ChangeRequest form 479
service requestsad hoc requests 475creating 474events, retrying in order 479Service Request Wizard 474status 476See also Requester Console
service targetsChange Management, viewing in 189change requests, creating for 192managing 189, 445related incident requests, viewing 189See also BMC SLM
settingchange management view 392new request form options 390, 440preferences and options 389, 439release management view 442search request form options 390, 440view 392, 442
Simple Qualification dialog box, generating reports414
SLIs.. See software library itemsSMPM
process overview of change management 89, 95,107
user roles 43Software Library Item request type 230Software Library Item Search dialog box 350software library items
relationships 230request type 221
Source list 132Staged state 482Staging Complete status reason 484status
Cancelled 483comparing change and task 262Completed 483, 485Completed (Final Review Complete) 485Completed (Final Review Required) 485Draft 482Implementation in Progress 485Planning in Progress 483, 484reason requirements for change requests 491Request for Authorization 483Request for Change 483Scheduled 483, 485Scheduled for Review 484Staged 482triggering notifications when changed 400, 443viewing in Change Management 189, 190
Status field 118, 278, 282Status Flow tab 362status gauge 190status reasons
Final Review Complete 485Final Review Required 485Staging Complete 484
status valueschange requests 490
status values, selecting 469Summary field
Change form 120Release form 283
support groups 267task groups 267See also groups
syntax statement conventions 19
Ttabs
Approvers 339assignment 217Assignment 272, 328, 379
Task form 344assignment, change form 157Broadcast Details 404Broadcast Search Criteria 403Change Location of the Requester 182CI Status Information 258Classification 140Customer, Qualification Builder in change
requests 192Dates 151, 307, 311Financials 188Manifest 291Notification Audit 182Notifications 408Relationships 222, 231, 233, 234, 247, 332, 333,
335Requester 327SLM 189, 192, 445Status Flow 362Tasks 181, 260, 265–267, 384Work Info 269, 314, 381
targets, viewing SLM 189Task form
Assignment tab 270relating ad hoc tasks to change requests 266
A B C D E F G H I J K L M N O P Q R S T U V W X Y Z
Index 515

task groupscreating work order 383predefined 267, 353predefined CCM 347sequence numbers, assigning 268support groups 267viewing 265See also groups
task implementersabout 341accepting assignments 343assignment notifications 343responsibilities 341tasks
handling 260user role 38using predefined CCM tasks 347working with Change Management 38
task management system 495installed with Change Management 261integrated with Change Management 261overview 261
tasksabout 260accepting assignments 343activities 383ad hoc 265adding work information 269all task assignments 270assignments 270
accepting 344assignments notification 343cancelling 271closing 347configuration management 495copying 432creating 265creating work order 383denying reassignment 272deployment-based 496financial information, adding 347life cycle 499manually tracking time 271modifying 270, 346monitoring 181peer 268planning time 270policy-based 495predefined 267, 347, 353predefined CCM 347reassigning 345reviewing 500sequence number assignments 268status 262time, automatically tracking 271verification-based 496viewing 181, 265viewing assignments 346
Tasks tab 181, 260, 265–267, 384Template field, behavior described 33, 66templates
activity 450change request 429predefined task 267, 353predefined task group 267, 353release request 448
Test milestone in release management 310Time Segment Analysis window 170
A B C D E F G H I J K L M N O P Q R S T U V W X Y Z
516 BMC Remedy Change Management User Guide
time segmentsadditional functions 161available
release 299available (change) 170blackout schedule, creating 164CIs 167configuration item 164creating 158, 164registering 157, 160searching 160selecting 160server time and time zones 169
Timing Reason 127TMS.. See task management systemtracking
change request efforts 218change request time 272
in effort log 273efforts 218task time manually 245, 340task time, manually 167
tracking automaticallychange request time 273task time 271
tracking manuallychange request time 273task time 147, 161, 270, 323, 325, 332, 345, 447
Uunavailability.. See CI unavailabilityunknown users
defined 472multi-tenancy 473
Urgency field 121, 284usability improvements 22use cases
release management 71use scenarios
adding laptop memory 51BMC Remedy Change Management 51overview 50, 71releasing new software 55, 71upgrading server hardware 53
User Defaults dialog box 202user interfaces
standards for field labels 83
user rolesadditional 40change manager 37change requests 36release management 61SMPM 43task implementer 38
User View dialog box 206users
registered 472request master 472unknown 472
VVendor Contact 130vendor information 130Vendor Ticket Information 130verification-based tasks 496View Access list 132View Broadcasts dialog box 110View Flow button 265View Risk report 143viewing
approval phases, default 362assigned change requests 91audit logs from Change form 181business events in Change Calendar 201Change Calendar 197change request progress 179change request relationships 241change task groups 265change tasks 181, 265CI related to change requests 247configuration items relationships 168impacted areas from Change form 182incident requests related to service targets 189inventory locations 436non-approver notifications 371preferences and options 389, 439profile 393progress of release requests 314release request approvals 446reminders 400service targets in Change Management 189SLM targets 189
viewing change requestsin Change Calendar 200
Wweb reports 411
A B C D E F G H I J K L M N O P Q R S T U V W X Y Z
Index 517
wizardsProcess Flow Status bar 29Service Request 474
Work Infoedit 302editing 131view 302viewing 131
Work Info dialog box 352
Work Info tab 381adding information 269progress of change request, monitoring 314
Work Info Type list 131, 132, 302work orders
BMC Remedy Alert 380creating task groups 383notification of assignments 380
A B C D E F G H I J K L M N O P Q R S T U V W X Y Z
518 BMC Remedy Change Management User Guide


49532*174386*