BEA Tuxedo - Oracle Help Center
56
Using BEA Tuxedo ATMI BEA Tuxedo Release 8.0 Document Edition 8.0 June 2001 BEA Tuxedo on Windows
-
Upload
khangminh22 -
Category
Documents
-
view
1 -
download
0
Transcript of BEA Tuxedo - Oracle Help Center

Using BEA Tuxedo ATMI
B E A T u x e d o R e l e a s e 8 . 0D o c u m e n t E d i t i o n 8 . 0
J u n e 2 0 0 1
BEA Tuxedo
on Windows
Copyright
Copyright © 2001 BEA Systems, Inc. All Rights Reserved.
Restricted Rights Legend
This software and documentation is subject to and made available only pursuant to the terms of the BEA Systems License Agreement and may be used or copied only in accordance with the terms of that agreement. It is against the law to copy the software except as specifically allowed in the agreement. This document may not, in whole or in part, be copied photocopied, reproduced, translated, or reduced to any electronic medium or machine readable form without prior consent, in writing, from BEA Systems, Inc.
Use, duplication or disclosure by the U.S. Government is subject to restrictions set forth in the BEA Systems License Agreement and in subparagraph (c)(1) of the Commercial Computer Software-Restricted Rights Clause at FAR 52.227-19; subparagraph (c)(1)(ii) of the Rights in Technical Data and Computer Software clause at DFARS 252.227-7013, subparagraph (d) of the Commercial Computer Software--Licensing clause at NASA FAR supplement 16-52.227-86; or their equivalent.
Information in this document is subject to change without notice and does not represent a commitment on the part of BEA Systems. THE SOFTWARE AND DOCUMENTATION ARE PROVIDED "AS IS" WITHOUT WARRANTY OF ANY KIND INCLUDING WITHOUT LIMITATION, ANY WARRANTY OF MERCHANTABILITY OR FITNESS FOR A PARTICULAR PURPOSE. FURTHER, BEA Systems DOES NOT WARRANT, GUARANTEE, OR MAKE ANY REPRESENTATIONS REGARDING THE USE, OR THE RESULTS OF THE USE, OF THE SOFTWARE OR WRITTEN MATERIAL IN TERMS OF CORRECTNESS, ACCURACY, RELIABILITY, OR OTHERWISE.
Trademarks or Service Marks
BEA, WebLogic, Tuxedo, and Jolt are registered trademarks of BEA Systems, Inc. How Business Becomes E-Business, BEA WebLogic E-Business Platform, BEA Builder, BEA Manager, BEA eLink, BEA WebLogic Commerce Server, BEA WebLogic Personalization Server, BEA WebLogic Process Integrator, BEA WebLogic Collaborate, BEA WebLogic Enterprise, and BEA WebLogic Server are trademarks of BEA Systems, Inc.
All other product names may be trademarks of the respective companies with which they are associated.
Using BEA Tuxedo ATMI on Windows
Document Edition Date Software Version
8.0 June 2001 BEA Tuxedo Release 8.0
Contents
About This DocumentWhat You Need to Know ......................................................................................v
e-docs Web Site ................................................................................................... vi
How to Print the Document................................................................................. vi
Contact Us! .......................................................................................................... vi
Documentation Conventions .............................................................................. vii
1. Differences Between Using BEA Tuxedo ATMI on UNIX and on Windows 2000
Windows 2000 Platform Considerations........................................................... 1-2
Configuration Issues .......................................................................................... 1-2
Specifying Machine Type and User ID Numbers ............................................. 1-3
Using Network Drives....................................................................................... 1-3
Allocating and Releasing Memory Buffers ....................................................... 1-4
Updating TxRPC ............................................................................................... 1-4
Using the bankapp Driver.................................................................................. 1-5
Starting BEA Tuxedo ATMI Applications Automatically................................ 1-5
See Also............................................................................................................. 1-5
2. Configuring BEA Tuxedo ATMI for Windows 2000Invoking the Control Panel to Configure BEA Tuxedo ATMI......................... 2-2
Accessing Machines on a Network ................................................................... 2-3
Modifying Environment Variables.................................................................... 2-5
Directing BEA Tuxedo Messages to the Windows 2000 Event Log ................ 2-7
Setting Up Logs.......................................................................................... 2-8
Setting Up a Windows 2000 Event Log.............................................. 2-8
Setting Up a ULOG............................................................................. 2-8
Using BEA Tuxedo ATMI on Windows iii

Viewing Logs ............................................................................................. 2-8
Viewing Windows 2000 Event Log Entries........................................ 2-8
Viewing ULOG Entries..................................................................... 2-11
Configuring tlisten Processes to Start Automatically ...................................... 2-11
Maximizing System Performance ................................................................... 2-13
3. Developing a BEA Tuxedo ATMI Application in the Microsoft Visual C++ Environment
Using Development Tools ................................................................................. 3-2
Using the buildserver and buildclient Commands............................................. 3-2
Adding BuildTuxedo to the MSDEV Tools Menu............................................ 3-4
Creating BEA Tuxedo ATMI Project Files ....................................................... 3-6
Setting Up Your Environment ........................................................................... 3-6
Specifying the Build Type, Header File, and Filename ............................. 3-7
How BuildTuxedo Uses the Header File.................................................... 3-8
Specifying Function and Service Names.................................................... 3-9
Specifying a Resource Manager............................................................... 3-11
Debugging a BEA Tuxedo ATMI Server Application .................................... 3-12
Developing an ATMI Application Using the Command Line Instead of the Visual C++ IDE GUI................................................................................ 3-13
Using the Tuxdev Application......................................................................... 3-13
Using the BEA Tuxedo ATMI Editors ............................................................ 3-14
Using the FML Table Editor .................................................................... 3-15
Using the VIEW Table Editor .................................................................. 3-18
Working in Multiple Documents Simultaneously.................................... 3-21
How the Editors Validate Entries ............................................................. 3-21
See Also ........................................................................................................... 3-22
iv Using BEA Tuxedo ATMI on Windows

About This Document
This document explains how to use BEA Tuxedo® ATMI on Microsoft Windows 2000.
This document includes the following topics:
n Chapter 1, “Differences Between Using BEA Tuxedo ATMI on UNIX and on Windows 2000,” describes the difference between using BEA Tuxedo ATMI on UNIX and Windows 2000.
n Chapter 2, “Configuring BEA Tuxedo ATMI for Windows 2000,” describes how to configure BEA Tuxedo ATMI on Windows 2000.
n Chapter 3, “Developing a BEA Tuxedo ATMI Application in the Microsoft Visual C++ Environment,” describes how to develop ATMI applications in the Microsoft Visual C++ Integrated Development Environment (msdev).
What You Need to Know
This document is intended mainly for application developers who are interested in developing their BEA Tuxedo ATMI applications on the Windows 2000 platform.
Using BEA Tuxedo ATMI on Windows v

e-docs Web Site
BEA product documentation is available on the BEA corporate Web site. From the BEA Home page, click on Product Documentation in the Service and Support drop-down menu or enter http://www.e-docs.bea.com to go directly to the “e-docs” Product Documentation page.
How to Print the Document
You can print a copy of this document from a Web browser, one file at a time, by using the File—>Print option on your Web browser.
A PDF version of this document is available on the BEA Tuxedo documentation Home page on the e-docs Web site (and also on the documentation CD). You can open the PDF in Adobe Acrobat Reader and print the entire document (or a portion of it) in book format. To access the PDFs, open the BEA Tuxedo documentation Home page, click the PDF files button and select the document you want to print.
If you do not have the Adobe Acrobat Reader, you can get it for free from the Adobe Web site at http://www.adobe.com/.
Contact Us!
Your feedback on the BEA Tuxedo documentation is important to us. Send us e-mail at [email protected] if you have questions or comments. Your comments will be reviewed directly by the BEA professionals who create and update the BEA Tuxedo documentation.
In your e-mail message, please indicate that you are using the documentation for the BEA Tuxedo 8.0 release.
vi Using BEA Tuxedo ATMI on Windows
If you have any questions about this version of BEA Tuxedo, or if you have problems installing and running BEA Tuxedo, contact BEA Customer Support through BEA WebSUPPORT at www.bea.com. You can also contact Customer Support by using the contact information provided on the Customer Support Card, which is included in the product package.
When contacting Customer Support, be prepared to provide the following information:
n Your name, e-mail address, phone number, and fax number
n Your company name and company address
n Your machine type and authorization codes
n The name and version of the product you are using
n A description of the problem and the content of pertinent error messages
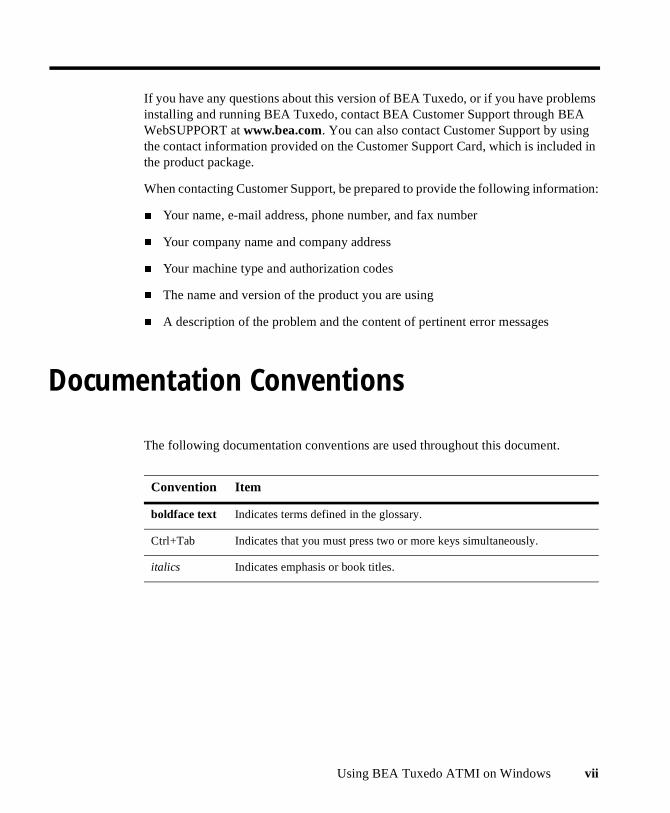
Documentation Conventions
The following documentation conventions are used throughout this document.
Convention Item
boldface text Indicates terms defined in the glossary.
Ctrl+Tab Indicates that you must press two or more keys simultaneously.
italics Indicates emphasis or book titles.
Using BEA Tuxedo ATMI on Windows vii

monospace text
Indicates code samples, commands and their options, data structures and their members, data types, directories, and filenames and their extensions. Monospace text also indicates text that you must enter from the keyboard.
Examples:
#include <iostream.h> void main ( ) the pointer psz
chmod u+w *
\tux\data\ap
.doc
tux.doc
BITMAP
float
monospace boldface text
Identifies significant words in code.
Example:
void commit ( )
monospace italic text
Identifies variables in code.
Example:
String expr
UPPERCASE TEXT
Indicates device names, environment variables, and logical operators.
Examples:
LPT1
SIGNON
OR
{ } Indicates a set of choices in a syntax line. The braces themselves should never be typed.
[ ] Indicates optional items in a syntax line. The brackets themselves should never be typed.
Example:
buildobjclient [-v] [-o name ] [-f file-list]... [-l file-list]...
| Separates mutually exclusive choices in a syntax line. The symbol itself should never be typed.
Convention Item
viii Using BEA Tuxedo ATMI on Windows

... Indicates one of the following in a command line:
n That an argument can be repeated several times in a command line
n That the statement omits additional optional arguments
n That you can enter additional parameters, values, or other information
The ellipsis itself should never be typed.
Example:
buildobjclient [-v] [-o name ] [-f file-list]... [-l file-list]...
.
.
.
Indicates the omission of items from a code example or from a syntax line. The vertical ellipsis itself should never be typed.
Convention Item
Using BEA Tuxedo ATMI on Windows ix

x Using BEA Tuxedo ATMI on Windows

CHAPTER
1 Differences Between Using BEA Tuxedo ATMI on UNIX and on Windows 2000
This topic includes the following sections:
n Windows 2000 Platform Considerations
n Configuration Issues
n Specifying Machine Type and User ID Numbers
n Using Network Drives
n Updating TxRPC
n Using the bankapp Driver
n Starting BEA Tuxedo ATMI Applications Automatically
Using BEA Tuxedo ATMI on Windows 1-1
1 Differences Between Using BEA Tuxedo ATMI on UNIX and on Windows 2000
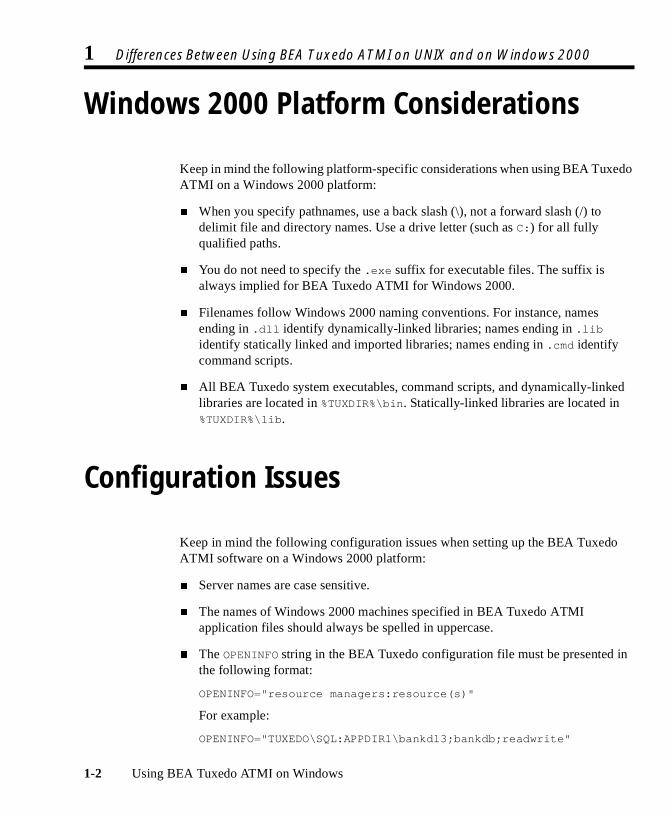
Windows 2000 Platform Considerations
Keep in mind the following platform-specific considerations when using BEA Tuxedo ATMI on a Windows 2000 platform:
n When you specify pathnames, use a back slash (\), not a forward slash (/) to delimit file and directory names. Use a drive letter (such as C:) for all fully qualified paths.
n You do not need to specify the .exe suffix for executable files. The suffix is always implied for BEA Tuxedo ATMI for Windows 2000.
n Filenames follow Windows 2000 naming conventions. For instance, names ending in .dll identify dynamically-linked libraries; names ending in .lib identify statically linked and imported libraries; names ending in .cmd identify command scripts.
n All BEA Tuxedo system executables, command scripts, and dynamically-linked libraries are located in %TUXDIR%\bin. Statically-linked libraries are located in %TUXDIR%\lib.
Configuration Issues
Keep in mind the following configuration issues when setting up the BEA Tuxedo ATMI software on a Windows 2000 platform:
n Server names are case sensitive.
n The names of Windows 2000 machines specified in BEA Tuxedo ATMI application files should always be spelled in uppercase.
n The OPENINFO string in the BEA Tuxedo configuration file must be presented in the following format:
OPENINFO="resource managers:resource(s)"
For example:
OPENINFO="TUXEDO\SQL:APPDIR1\bankdl3;bankdb;readwrite"
1-2 Using BEA Tuxedo ATMI on Windows

Specifying Machine Type and User ID Numbers
Note: The first separator in the preceding string is a colon; subsequent separators are semicolons.
Specifying Machine Type and User ID Numbers
On the Machines page of the configuration file, include the following three entries:
n TYPE="WinNT"
n UID=0
n GID=0
Note: These entries require different settings on a UNIX platform.
Whenever you create a configuration file for an environment with both UNIX and 2000 machines, include these entries in the Machines page for every Windows 2000 node in your configuration.
Using Network Drives
For reliability purposes, we recommend that you do not use network drives. If, however, you try to start BEA Tuxedo ATMI on a Windows 2000 machine in which the TUXCONFIG file resides on a network drive, you must set the following permissions:
n The network drive must be connected as administrator.
n The administrator must use the same password on the local and remote systems.
n In the tuxipc service startup options, the ENTRY option must have administrator set for Log On As This Account. The password must be the same as the administrator’s so that the tuxipc service has full administrator access rights.
Using BEA Tuxedo ATMI on Windows 1-3
1 Differences Between Using BEA Tuxedo ATMI on UNIX and on Windows 2000
Allocating and Releasing Memory Buffers
When allocating and releasing memory buffers on a Windows 2000 system, make sure each memory buffer is released from the same heap in which it was allocated. If it is not, a segmentation fault occurs.
For example, a memory buffer that is allocated using Falloc() must be released using Ffree(). If a memory buffer allocated with malloc() is freed using Ffree(), a segmentation fault occurs. The free() routine must be used, in the latter case, to free the memory buffer.
For more information about Falloc, Falloc32(3fml)and Ffree, Ffree32(3fml), see the BEA Tuxedo ATMI FML Function Reference. For more information about malloc() and free(), see the documentation delivered with your operating system.
Updating TxRPC
When BEA Tuxedo ATMI interoperates with OSF/DCE, you must update the environment file to include the appropriate PATH variable for the application, allowing BEA Tuxedo ATMI programs to find the OSF/DCE DLLs whenever needed. Review the bldc_dce(1) and blds_dce(1) reference pages in BEA Tuxedo Command Reference for information about using these commands on the Windows 2000 platform:
n The bldc_dce command builds a BEA Tuxedo ATMI client that can be called via OSF/DCE RPC.
n The blds_dce command builds a BEA Tuxedo ATMI server that calls OSF/DCE.
1-4 Using BEA Tuxedo ATMI on Windows

Using the bankapp Driver
Using the bankapp Driver
The bankapp program is a small example application bundled with BEA Tuxedo ATMI for Windows 2000. Besides demonstrating the operation of BEA Tuxedo ATMI and providing an example of BEA Tuxedo ATMI application code, the %APPDIR%\UBB file generated by the bankapp driver (driver.exe is located in %TUXDIR%\APPS\bankapp\2000\driver) can act as a template for configurations for any new applications.
Starting BEA Tuxedo ATMI Applications Automatically
When BEA Tuxedo ATMI is installed on Windows 2000 as a server, it may be useful to configure the machine to start a BEA Tuxedo ATMI application automatically when booting up your system using the srvany.exe utility program provided in Microsoft’s Resource Kit for Windows 2000. For configuration instructions, see srvany.wri and rktools.hlp.
To ensure proper operation of BEA Tuxedo ATMI programs that start automatically when booting up, you must set the BEA Tuxedo system environment variables %TUXDIR% and %NLSPATH%. Set these variables using the conventional Windows 2000 method or by using the BEA Tuxedo control panel. For more information, see “Modifying Environment Variables” on page 2-5.
See Also
For information about installing BEA Tuxedo ATMI on a Windows 2000 system, see Installing the BEA Tuxedo System. For more information about the BEA Tuxedo system, see the following documents:
Using BEA Tuxedo ATMI on Windows 1-5

1 Differences Between Using BEA Tuxedo ATMI on UNIX and on Windows 2000
n Setting Up a BEA Tuxedo Application
n Administering a BEA Tuxedo Application at Run Time
n Using the ATMI Workstation Component
n BEA Tuxedo Command Reference
n BEA Tuxedo ATMI C Function Reference
n BEA Tuxedo ATMI COBOL Function Reference
n BEA Tuxedo ATMI FML Function Reference
n File Formats, Data Descriptions, MIBs, and System Processes Reference
1-6 Using BEA Tuxedo ATMI on Windows

CHAPTER
2 Configuring BEA Tuxedo ATMI for Windows 2000
This topic includes the following sections:
n Invoking the Control Panel to Configure BEA Tuxedo ATMI
n Accessing Machines on a Network
n Modifying Environment Variables
n Configuring tlisten Processes to Start Automatically
n Maximizing System Performance
Note: The BEA Administration Console offers extensive online help: instructions for all the administrative tasks that can be performed through the Console, plus reference information for all configuration tool folders.
Using BEA Tuxedo ATMI on Windows 2-1
2 Configuring BEA Tuxedo ATMI for Windows 2000
Invoking the Control Panel to Configure BEA Tuxedo ATMI
In addition to the BEA Administration Console, BEA Tuxedo for Windows 2000 provides a control panel that you can use to configure BEA Tuxedo ATMI for Windows 2000. You can use the control panel to perform the following tasks:
n Access machines on a network by setting the Machines page
n Modify environment variables on the Environment page
n Direct BEA Tuxedo system messages to the Windows 2000 Event Log by setting the Logging page
n Configure one or more tlisten processes to start automatically by setting the Listener page
n Maximize system performance by tuning the IPC Resources page setting
To open the control panel:
1. From the Windows 2000 desktop, click:
Select Start→Settings→Control Panel
The Microsoft Windows Control Panel is displayed, as shown in the following figure.
2-2 Using BEA Tuxedo ATMI on Windows

Accessing Machines on a Network
Figure 2-1 Microsoft Windows Control Panel
2. Double-click the BEA Administration icon to open the control panel (see Figure 2-2).
Accessing Machines on a Network
The Machines page of the BEA Administration control panel gives an administrator access to any machine on the Microsoft Windows Network on which:
n Windows 2000 is being run.
n The administrator has logon privileges.
The administrator can then perform the following tasks:
Using BEA Tuxedo ATMI on Windows 2-3
2 Configuring BEA Tuxedo ATMI for Windows 2000
n Set environment variables remotely
n Determine the location of BEA Tuxedo event logging
n Add, start, or remove tlisten services
n Tune IPC resources
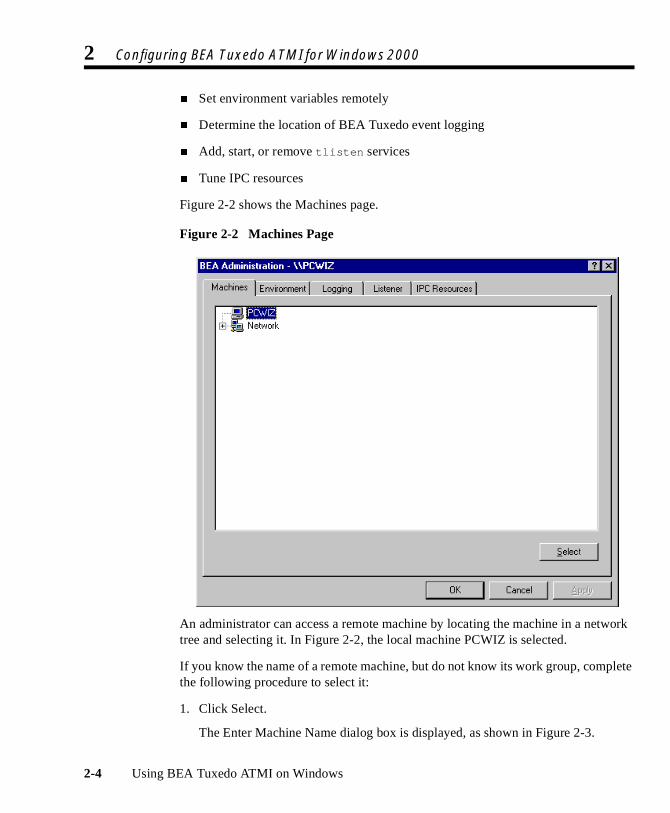
Figure 2-2 shows the Machines page.
Figure 2-2 Machines Page
An administrator can access a remote machine by locating the machine in a network tree and selecting it. In Figure 2-2, the local machine PCWIZ is selected.
If you know the name of a remote machine, but do not know its work group, complete the following procedure to select it:
1. Click Select.
The Enter Machine Name dialog box is displayed, as shown in Figure 2-3.
2-4 Using BEA Tuxedo ATMI on Windows
Modifying Environment Variables
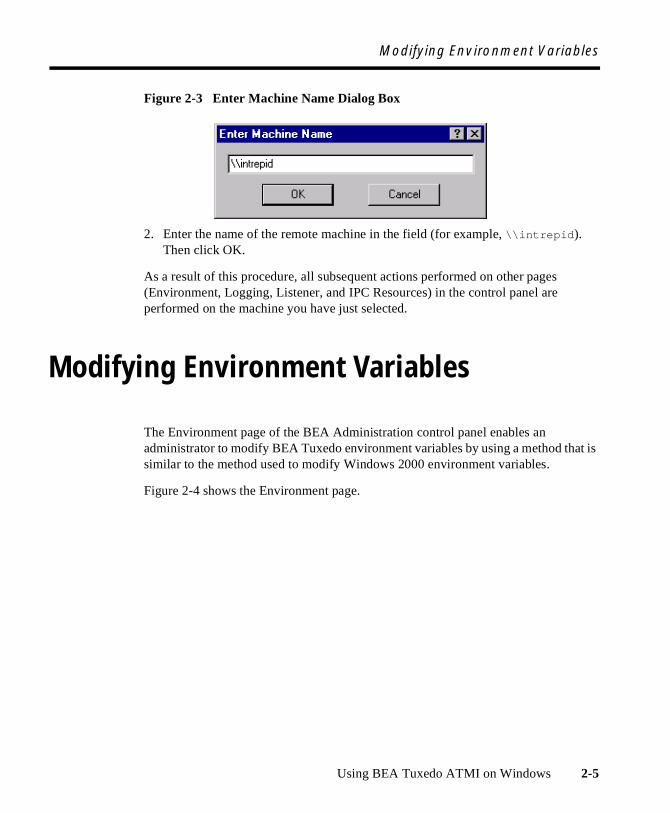
Figure 2-3 Enter Machine Name Dialog Box
2. Enter the name of the remote machine in the field (for example, \\intrepid). Then click OK.
As a result of this procedure, all subsequent actions performed on other pages (Environment, Logging, Listener, and IPC Resources) in the control panel are performed on the machine you have just selected.
Modifying Environment Variables
The Environment page of the BEA Administration control panel enables an administrator to modify BEA Tuxedo environment variables by using a method that is similar to the method used to modify Windows 2000 environment variables.
Figure 2-4 shows the Environment page.
Using BEA Tuxedo ATMI on Windows 2-5

2 Configuring BEA Tuxedo ATMI for Windows 2000
Figure 2-4 Environment Page
The Variable field contains a list of the most commonly used BEA Tuxedo environment variables.
To modify the variables:
1. To add a variable, complete the following procedure:
a. Select any variable in the current list, select the variable in the Variable field, and enter the name of the new variable.
b. Select the value in the Value field, enter the value, and click Set. The new variable is added to the list.
2. To edit a variable, select the variable in the current list, select the variable in the Value field and enter its new value, and click Set. The variable is updated in the list.
2-6 Using BEA Tuxedo ATMI on Windows

Directing BEA Tuxedo Messages to the Windows 2000 Event Log
3. To delete a variable, select the variable in the current list, and click Delete. The variable is deleted from the list.
4. Click Set. The changes to the variables are applied.
Directing BEA Tuxedo Messages to the Windows 2000 Event Log
The Logging page of the BEA Administration control panel enables you to direct BEA Tuxedo system messages to the Windows 2000 Event Log.
Figure 2-5 shows the Logging page.
Figure 2-5 Logging Page
Using BEA Tuxedo ATMI on Windows 2-7
2 Configuring BEA Tuxedo ATMI for Windows 2000
In the box labeled Tuxedo Log Output, select one of the three choices offered: the Logging option (Windows 2000 Event Log), the traditional ULOG (Disk File), or both.
Setting Up Logs
This section explains what you must do to set up a log after selecting the types of logs you want.
Setting Up a Windows 2000 Event Log
No setup is required.
Setting Up a ULOG
If you want ULOG messages, you must select a storage directory by completing the following procedure:
1. At the top of the Logging page, click the Browse button to the right of the Directory field. A drop-down list of directories is displayed.
2. Click the name of the directory in which you want ULOG messages to be stored.
3. In the Prefix field, type a prefix for the name of the log file. The default prefix is ULOG; the default filename, ULOG.mmddyy.
Viewing Logs
This section provides procedures for viewing entries in both Windows 2000 Event Logs and ULOGs.
Viewing Windows 2000 Event Log Entries
To view Windows 2000 Event Log entries, complete the following procedure:
1. From the Windows 2000 desktop, select the following:
Start→Programs→Administrative Tools→Event Viewer
2-8 Using BEA Tuxedo ATMI on Windows

Directing BEA Tuxedo Messages to the Windows 2000 Event Log
A list of all the events that have occurred since the application booted is displayed, as shown in Figure 2-6.
Figure 2-6 Event View Window
2. On the menu bar (across the top of the Event Viewer window), click Log. A drop-down menu is displayed.
3. From the drop-down Log menu, select Application. As a result of this selection, only application-specific events are listed in the Event Viewer window.
4. Double-click the entry for the event for which you want more information. The Windows 2000 Event Detail window is displayed, with information about the event you have specified, as shown in Figure 2-7.
Using BEA Tuxedo ATMI on Windows 2-9

2 Configuring BEA Tuxedo ATMI for Windows 2000
Figure 2-7 Event Detail Window
This window provides the following information:
n Date—date on which the event occurred.
n Time—time at which the event occurred.
n User—person using the software at the time the event occurred.
n Computer—machine on which the event occurred.
n Event ID—number under which the message is listed in System Messages.
n Source—section of System Messages in which the event is described and an appropriate action is recommended.
2-10 Using BEA Tuxedo ATMI on Windows

Configuring tlisten Processes to Start Automatically
n Type—purpose of the message; specifically, whether the message is intended to provide information, a warning, or notification of an error.
n Description—brief summary of the event.
Viewing ULOG Entries
A ULOG is a text file. You can use any text editor to open a ULOG and view its contents.
Configuring tlisten Processes to Start Automatically
The Listener page of the BEA Administration control panel enables you to configure one or more tlisten(1) processes to start automatically when you boot up your system.
Figure 2-8 shows the Listener page.
Using BEA Tuxedo ATMI on Windows 2-11

2 Configuring BEA Tuxedo ATMI for Windows 2000
Figure 2-8 Listener Page
To add a listener, complete the following procedure:
1. Type a port number in the Port Number field. Then click Add.
2. Click OK.
3. Click the Start or Stop button to start or stop, respectively, your newly added listener.
Note: You can also use the Windows 2000 Services control panel to start or stop a tlisten service or to configure a tlisten service to start automatically.
You can use the tlisten(1) program to perform administrative actions in an application distributed across multiple computers. You must start the tlisten program on each computer before running the application. Generally, you need one tlisten for each BEA Tuxedo ATMI application running on the computer.
2-12 Using BEA Tuxedo ATMI on Windows
Maximizing System Performance
Maximizing System Performance
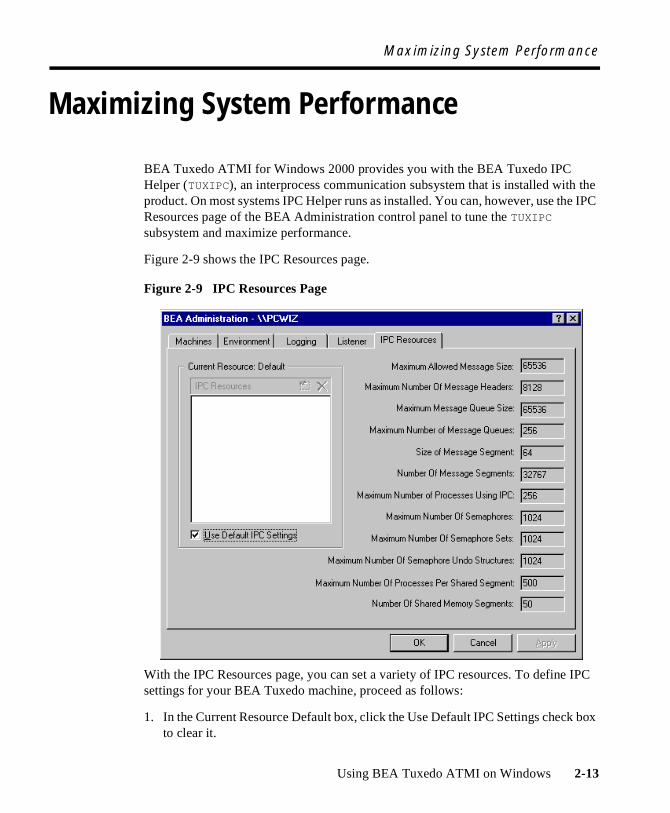
BEA Tuxedo ATMI for Windows 2000 provides you with the BEA Tuxedo IPC Helper (TUXIPC), an interprocess communication subsystem that is installed with the product. On most systems IPC Helper runs as installed. You can, however, use the IPC Resources page of the BEA Administration control panel to tune the TUXIPC subsystem and maximize performance.
Figure 2-9 shows the IPC Resources page.
Figure 2-9 IPC Resources Page
With the IPC Resources page, you can set a variety of IPC resources. To define IPC settings for your BEA Tuxedo machine, proceed as follows:
1. In the Current Resource Default box, click the Use Default IPC Settings check box to clear it.
Using BEA Tuxedo ATMI on Windows 2-13
2 Configuring BEA Tuxedo ATMI for Windows 2000
2. Click the New (Insert) icon in the IPC Resources pane.
3. Enter the name of your machine and press Enter.
4. Click the fields next to the IPC resources you want to set, enter the desired values, and click Apply. Clicking Apply saves the changes in the Registry Table. You must then stop and then restart the Tuxedo IPC Helper for the changes to take effect.
5. Click OK to close the BEA Administration Console.
When interpreting the Maximum Number of Processes Using IPC parameter on the IPC Resources page, remember the following:
n You must count any multicontexted BEA Tuxedo ATMI client multiple times. Your total should match the number of application associations (contexts) that can be outstanding concurrently.
n You must count any multicontexted BEA Tuxedo ATMI server multiple times. Your total should match the number of contexts calculated by adding 1 to the value of MAXDISPATCHTHREADS, where 1 represents the main dispatcher thread.
You can view the performance of a running BEA Tuxedo ATMI application from the Performance Monitor, as shown in Figure 2-10.
For example, to start the Performance Monitor, click Start→Programs→Administration Tools→Performance Monitor on the Windows 2000 taskbar. The Performance Monitor screen is displayed (see Figure 2-10).
2-14 Using BEA Tuxedo ATMI on Windows

Maximizing System Performance
Figure 2-10 Performance Monitor
Using BEA Tuxedo ATMI on Windows 2-15

2 Configuring BEA Tuxedo ATMI for Windows 2000
2-16 Using BEA Tuxedo ATMI on Windows

CHAPTER
3 Developing a BEA Tuxedo ATMI Application in the Microsoft Visual C++ Environment
This topic includes the following sections:
n Using Development Tools
n Using the buildserver and buildclient Commands
n Adding BuildTuxedo to the MSDEV Tools Menu
n Creating BEA Tuxedo ATMI Project Files
n Setting Up Your Environment
n Debugging a BEA Tuxedo ATMI Server Application
n Developing an ATMI Application Using the Command Line Instead of the Visual C++ IDE GUI
n Using the Tuxdev Application
n Using the BEA Tuxedo ATMI Editors
Using BEA Tuxedo ATMI on Windows 3-1

3 Developing a BEA Tuxedo ATMI Application in the Microsoft Visual C++ Environment
Using Development Tools
BEA Tuxedo ATMI integrates into the Microsoft Visual C++ (msdev) environment and emulates the functionality of msdev when integration is not possible. This integration makes it easier for you to develop BEA Tuxedo ATMI applications for 16-bit and 32-bit Windows operating systems.
The coding required to create BEA Tuxedo ATMI service requests, send requests, set up conversational connections, and get replies is fundamentally the same in both UNIX and Windows 2000 environments. BuildTuxedo and TUXDEV are tools that help you in your development environment.
n BuildTuxedo is a single tool, tightly integrated with the msdev build environment, that developers can use instead of the buildserver, buildclient, and buildclt commands. (Of course, these commands are still available for those who prefer to use them.) The BuildTuxedo system operates seamlessly on all currently supported Windows environments.
n TUXDEV allows you to create, edit, and compile multiple 16/32-bit FML tables and multiple 16/32-bit VIEW files. It also uses Multiple Document Interface (MDI) architecture so that you can use multiple views of these file types simultaneously.
Using the buildserver and buildclient Commands
Although the buildserver(1) and buildclient(1) commands are available on the Windows 2000 platform, there are differences between how the options to these commands work on Windows 2000 platforms and non-Windows 2000 platforms. The following table lists these differences.
3-2 Using BEA Tuxedo ATMI on Windows
Using the buildserver and buildclient Commands
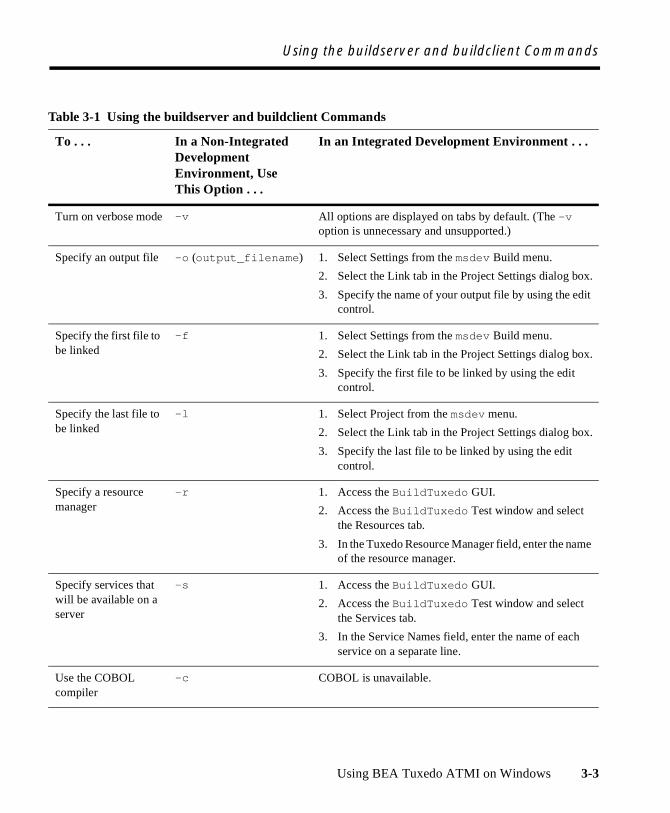
Table 3-1 Using the buildserver and buildclient Commands
To . . . In a Non-Integrated Development Environment, Use This Option . . .
In an Integrated Development Environment . . .
Turn on verbose mode -v All options are displayed on tabs by default. (The -v option is unnecessary and unsupported.)
Specify an output file -o (output_filename) 1. Select Settings from the msdev Build menu.
2. Select the Link tab in the Project Settings dialog box.
3. Specify the name of your output file by using the edit control.
Specify the first file to be linked
-f 1. Select Settings from the msdev Build menu.
2. Select the Link tab in the Project Settings dialog box.
3. Specify the first file to be linked by using the edit control.
Specify the last file to be linked
-l 1. Select Project from the msdev menu.
2. Select the Link tab in the Project Settings dialog box.
3. Specify the last file to be linked by using the edit control.
Specify a resource manager
-r 1. Access the BuildTuxedo GUI.
2. Access the BuildTuxedo Test window and select the Resources tab.
3. In the Tuxedo Resource Manager field, enter the name of the resource manager.
Specify services that will be available on a server
-s 1. Access the BuildTuxedo GUI.
2. Access the BuildTuxedo Test window and select the Services tab.
3. In the Service Names field, enter the name of each service on a separate line.
Use the COBOL compiler
-c COBOL is unavailable.
Using BEA Tuxedo ATMI on Windows 3-3

3 Developing a BEA Tuxedo ATMI Application in the Microsoft Visual C++ Environment
To modify the build environment in an integrated development environment, complete the following procedure:
1. Select Settings from the msdev Project menu.
2. Select the C/C++ or Link tab.
Note: CC and CFLAGS are no longer needed.
To specify the library and include paths in an integrated development environment, complete the following procedure:
1. From the MSDEV Tools menu, select Options. The Options dialog box is displayed.
2. From the Options dialog box, select the Directories tab.
Adding BuildTuxedo to the MSDEV Tools Menu
To add BuildTuxedo to the MSDEV Tools menu:
1. From within the Microsoft Visual C++ (msdev) graphical user interface (GUI), select Tools→Customize→Tools. The Customize window is displayed.
2. Click the Tools tab. The Tools tab is displayed, as shown in the Figure 3-1.
3-4 Using BEA Tuxedo ATMI on Windows

Adding BuildTuxedo to the MSDEV Tools Menu
Figure 3-1 Tools Tab in the Customize Dialog Box
3. Click the New icon in the Menu contents pane, and type &BuildTuxedo in the blank box at the end of the Menu Contents box. Then press the Enter key.
Note: To enable a letter key as a hot key, put an ampersand (&) before the appropriate letter.
4. Provide a pathname in the Command field by doing one of the following:
l Type the full pathname of BuildTuxedo (%TUXDIR%\bin\BuildTuxedo).
l Click the ellipsis button to the right of the Command field, browse to the desired directory, select buildtuxedo.exe, and click Open. The selected pathname is displayed in the Customize window.
5. In the Initial Directory field, click the right arrow button. A pop-up menu is displayed. Select Current Directory from the pop-up menu ($(CurDir)).
Note: To modify an item, highlight it and type over it. To move any item, highlight it and select the up or down arrow at the top of the Menu Contents box.
Using BEA Tuxedo ATMI on Windows 3-5
3 Developing a BEA Tuxedo ATMI Application in the Microsoft Visual C++ Environment
6. Click Close.
BuildTuxedo is now part of the MSDEV Tools menu.
Creating BEA Tuxedo ATMI Project Files
BuildTuxedo maintains a separate project file in the current directory for each BEA Tuxedo ATMI application using it. When BuildTuxedo begins, it searches for a valid project file in the current directory. If one is found, the various dialog controls are set to the values stored in the file and the dialog is displayed. The title bar displays the following information:
BuildTuxedo project_name
Because your BuildTuxedo project is closely associated with the msdev project in the current directory, BuildTuxedo also searches for two other files:
n A valid msdev makefile (filename.mak)
n An msdev project file (filename.mdp, filename.dsw, or filename.dsp)
If BuildTuxedo cannot find either of these files, it displays a warning and/or fails to activate. If the directory contains multiple BuildTuxedo project files, or multiple msdev project files or make files, menu items that contain appropriate target names are added to the System menu.
To save the current project file, select OK or Apply. To cancel any changes that you make to the project file or any file maintained by the BEA Tuxedo system, click Cancel or Esc.
Setting Up Your Environment
Before you can build your BEA Tuxedo ATMI application in an IDE, you must set the following fundamental parameters in your environment:
n Build type
3-6 Using BEA Tuxedo ATMI on Windows
Setting Up Your Environment
n Header file
n Filename of the C or C++ file to be created and maintained by BuildTuxedo
n Function names
n Service names
To provide this information, access the BuildTuxedo project_name dialog box in the msdev GUI.
Specifying the Build Type, Header File, and Filename
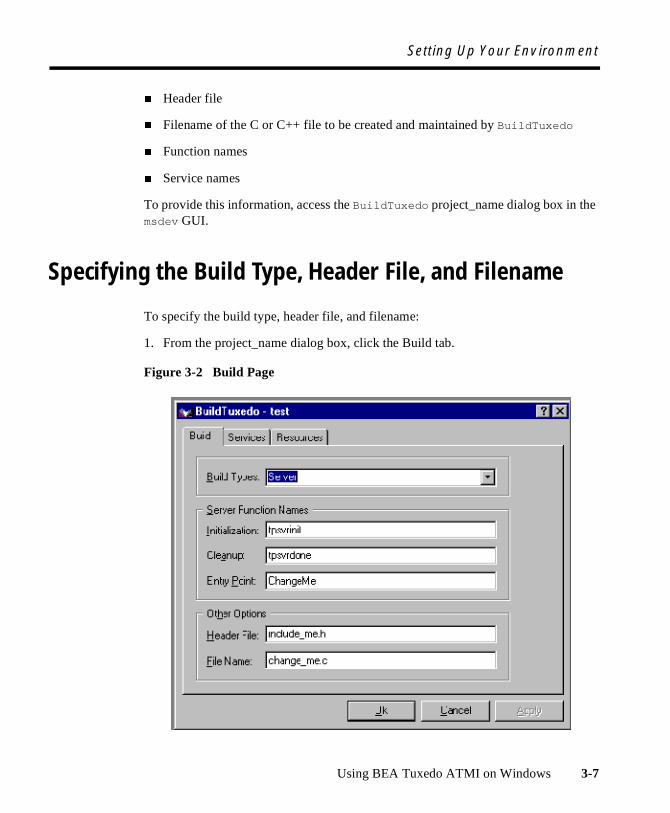
To specify the build type, header file, and filename:
1. From the project_name dialog box, click the Build tab.
Figure 3-2 Build Page
Using BEA Tuxedo ATMI on Windows 3-7
3 Developing a BEA Tuxedo ATMI Application in the Microsoft Visual C++ Environment
2. In the Build Types field, click the down arrow and choose one of the following:
l Server
l Native client or Workstation client
Note: Windows 98 users can select only Workstation Client type.
The Initialization and Cleanup options allow you to override the default init/exit functions by specifying valid function names. The Entry Point option allows you to specify the name of the function generated by BuildTuxedo. After specifying its name, you can call the function from anywhere in the application.
3. In the Header File field, enter stdafx.h.
4. In the File Name field, enter the name of the C or C++ file to be generated and maintained by BuildTuxedo.
How BuildTuxedo Uses the Header File
In the header file, BuildTuxedo adds the necessary pragma statements to build the current BEA Tuxedo ATMI project correctly. BuildTuxedo opens the file specified in the Header File field of the Build page, if the file is present; otherwise, it creates a new one. A section starting with:
//Begin Tuxedo Section*****DO NOT EDIT*****
and ending with:
//End Tuxedo Section
If You Select . . . Then, After Making Your Selection . . .
Server Enter information in the Initialization, Cleanup, and Entry Point fields. Proceed to step 3.
Native Client or Workstation Client Proceed to step 3.
3-8 Using BEA Tuxedo ATMI on Windows

Setting Up Your Environment
designates the area in the header file in which pragma statements are written. This area is maintained by BuildTuxedo. If BuildTuxedo does not locate this section in the file, it appends it to the end of the header file. Because all other text within the file remains unchanged, you can specify stdafx.h as the header file.
Note: If your project is new, and you select OK or Apply, you must select Files into Project from the MSDEV Insert menu. You then add the file generated by BuildTuxedo to the current project. You need to do this only for a new project or when you change the name of the C/C++ output file.
Specifying Function and Service Names
Select the Services tab to specify function and service names. The following figure shows the Services page.
Figure 3-3 Services Page
Two lists are used to maintain the service dispatch table:
Using BEA Tuxedo ATMI on Windows 3-9

3 Developing a BEA Tuxedo ATMI Application in the Microsoft Visual C++ Environment
n Function Names is a user-maintained list of functions that you can associate with a service.
n Service Names is a user-maintained list of the associated services.
Note: To scroll up and down either list, use the arrow keys.
Generally, the service and the function that performs the service are represented by the same name. For example, function x performs service x. In some cases, the function may have a different name from the service it performs. For example, in one case, function abc performs services x, y, and z. In another case, the service name may not be known until run time.
You must specify any function associated with a service when you build the server. For any function associated with a service, you must specify the service, the appropriate prototype, a C linkage, a void return, and a single TPSVCINFO pointer parameter. To specify a function to which a service name can be mapped, you must add the function to the Function Name list. This information is required for the service dispatch table.
Note: If you are using the buildserver(1) command, you can provide this information with the -s option. For more information about the -s option, see Programming BEA Tuxedo ATMI Applications Using C or Programming BEA Tuxedo ATMI Applications Using COBOL.
To add or edit names on the Function Names list:
1. In the Services folder, choose one of the actions described in the following table.
To Action
Add an item 1. Click the New icon (broken box with twinkle in the upper left corner).
2. Click Insert, or select a blank area on the list (that is, a dotted lined box).
3. Type the name of the new function.
Modify an existing name Highlight the name, and type over it.
Delete a name Highlight the name on the list and click the X icon or click Delete.
3-10 Using BEA Tuxedo ATMI on Windows
Setting Up Your Environment
4. When complete, click OK or press Enter to save your changes and exit. (To exit without saving your changes, click Esc or Tab.)
Specifying a Resource Manager
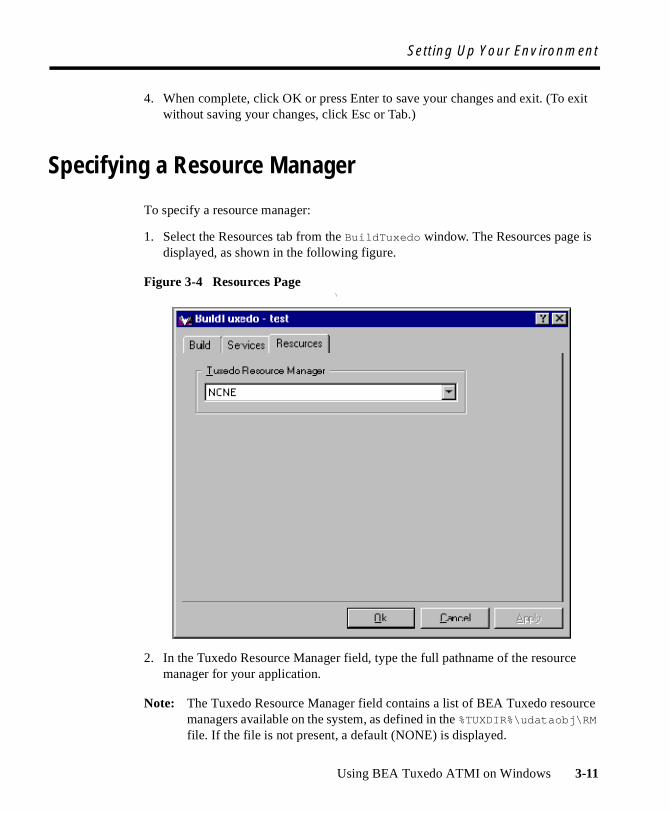
To specify a resource manager:
1. Select the Resources tab from the BuildTuxedo window. The Resources page is displayed, as shown in the following figure.
Figure 3-4 Resources Page\
2. In the Tuxedo Resource Manager field, type the full pathname of the resource manager for your application.
Note: The Tuxedo Resource Manager field contains a list of BEA Tuxedo resource managers available on the system, as defined in the %TUXDIR%\udataobj\RM file. If the file is not present, a default (NONE) is displayed.
Using BEA Tuxedo ATMI on Windows 3-11
3 Developing a BEA Tuxedo ATMI Application in the Microsoft Visual C++ Environment
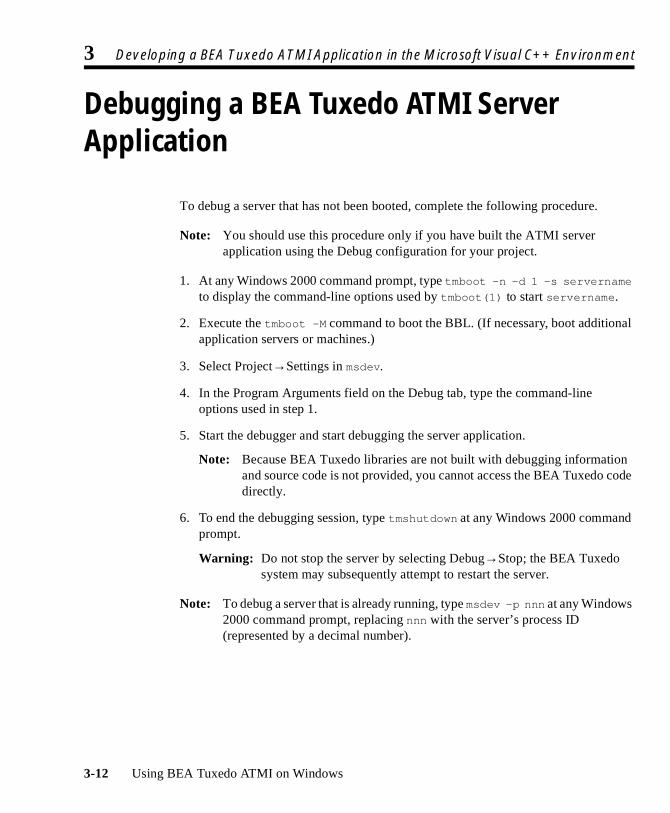
Debugging a BEA Tuxedo ATMI Server Application
To debug a server that has not been booted, complete the following procedure.
Note: You should use this procedure only if you have built the ATMI server application using the Debug configuration for your project.
1. At any Windows 2000 command prompt, type tmboot -n -d 1 -s servername to display the command-line options used by tmboot(1) to start servername.
2. Execute the tmboot -M command to boot the BBL. (If necessary, boot additional application servers or machines.)
3. Select Project→Settings in msdev.
4. In the Program Arguments field on the Debug tab, type the command-line options used in step 1.
5. Start the debugger and start debugging the server application.
Note: Because BEA Tuxedo libraries are not built with debugging information and source code is not provided, you cannot access the BEA Tuxedo code directly.
6. To end the debugging session, type tmshutdown at any Windows 2000 command prompt.
Warning: Do not stop the server by selecting Debug→Stop; the BEA Tuxedo system may subsequently attempt to restart the server.
Note: To debug a server that is already running, type msdev -p nnn at any Windows 2000 command prompt, replacing nnn with the server’s process ID (represented by a decimal number).
3-12 Using BEA Tuxedo ATMI on Windows

Developing an ATMI Application Using the Command Line Instead of the Visual C++
Developing an ATMI Application Using the Command Line Instead of the Visual C++ IDE GUI
If you must develop a BEA Tuxedo ATMI application using the command line instead of the Microsoft Visual C++ Integrated Development Environment (IDE) graphical user interface (GUI), use the buildserver(1) and buildclient(1) commands. To do this, specify the compiler and link options necessary to build a BEA Tuxedo ATMI application. For information about using these tools, see the following documents:
n File Formats, Data Descriptions, MIBs, and System Processes Reference
n Tutorials for Developing BEA Tuxedo ATMI Applications
n One of the following language-specific guides:
l Programming BEA Tuxedo ATMI Applications Using C
l Programming BEA Tuxedo ATMI Applications Using COBOL
To build a debug version of your ATMI application using buildserver or buildclient, you must compile all source files with the /Zi and /Od options. The /Zi option enables debugging; the /Od option disables optimization. In addition, you may need to define the _DEBUG preprocessor directive. To complete the process, indicate the link option as follows:
-l"/link/debug:full /debugtype:both"
Using the Tuxdev Application
To install the Tuxdev application, complete the following procedure:
1. In the Microsoft Visual C++ (msdev) environment, select
Tools→Customize→Tools→Add
Using BEA Tuxedo ATMI on Windows 3-13
3 Developing a BEA Tuxedo ATMI Application in the Microsoft Visual C++ Environment
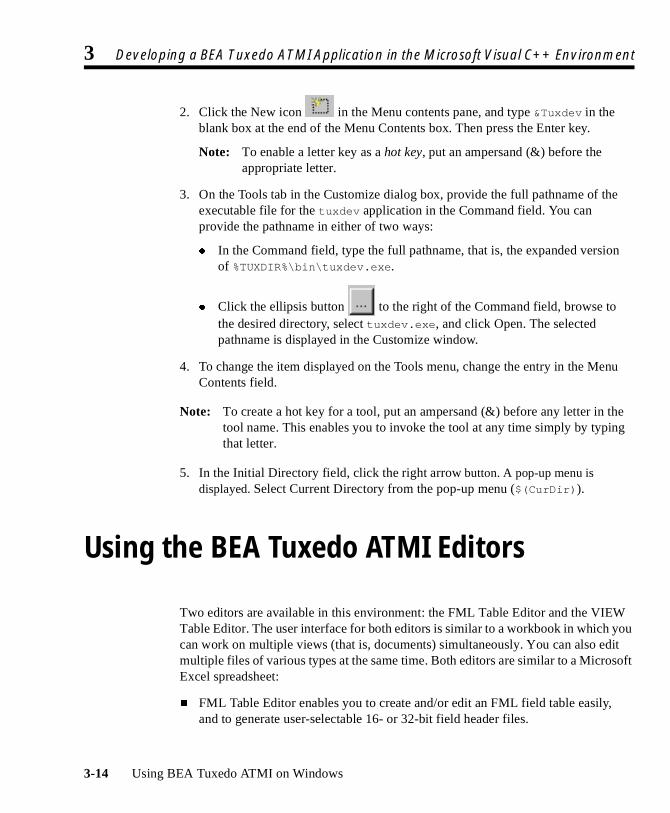
2. Click the New icon in the Menu contents pane, and type &Tuxdev in the blank box at the end of the Menu Contents box. Then press the Enter key.
Note: To enable a letter key as a hot key, put an ampersand (&) before the appropriate letter.
3. On the Tools tab in the Customize dialog box, provide the full pathname of the executable file for the tuxdev application in the Command field. You can provide the pathname in either of two ways:
l In the Command field, type the full pathname, that is, the expanded version of %TUXDIR%\bin\tuxdev.exe.
l Click the ellipsis button to the right of the Command field, browse to the desired directory, select tuxdev.exe, and click Open. The selected pathname is displayed in the Customize window.
4. To change the item displayed on the Tools menu, change the entry in the Menu Contents field.
Note: To create a hot key for a tool, put an ampersand (&) before any letter in the tool name. This enables you to invoke the tool at any time simply by typing that letter.
5. In the Initial Directory field, click the right arrow button. A pop-up menu is displayed. Select Current Directory from the pop-up menu ($(CurDir)).
Using the BEA Tuxedo ATMI Editors
Two editors are available in this environment: the FML Table Editor and the VIEW Table Editor. The user interface for both editors is similar to a workbook in which you can work on multiple views (that is, documents) simultaneously. You can also edit multiple files of various types at the same time. Both editors are similar to a Microsoft Excel spreadsheet:
n FML Table Editor enables you to create and/or edit an FML field table easily, and to generate user-selectable 16- or 32-bit field header files.
3-14 Using BEA Tuxedo ATMI on Windows
Using the BEA Tuxedo ATMI Editors
n VIEW Table Editor enables you to create and/or edit a VIEW Table file easily, and to generate user-selectable 16- or 32-bit VIEWS and header files.
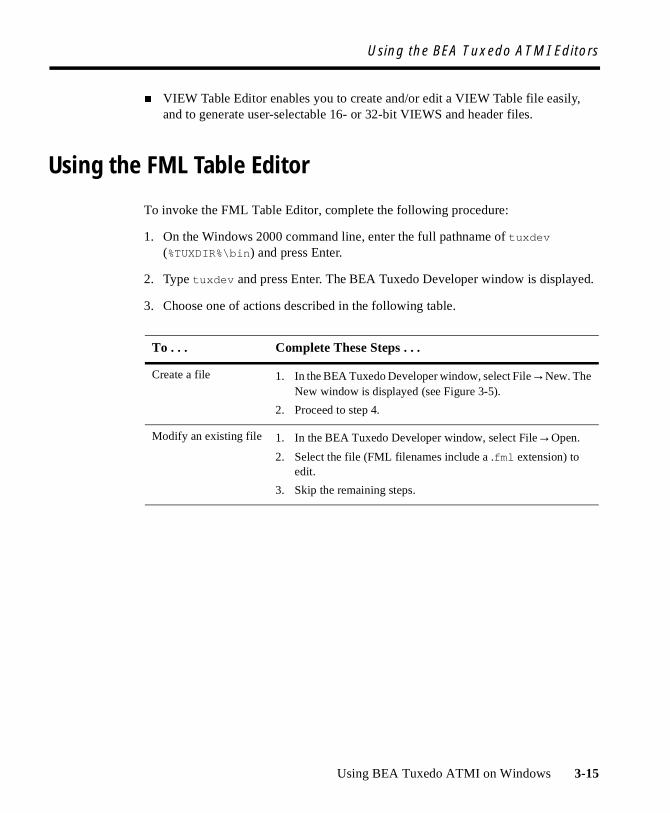
Using the FML Table Editor
To invoke the FML Table Editor, complete the following procedure:
1. On the Windows 2000 command line, enter the full pathname of tuxdev (%TUXDIR%\bin) and press Enter.
2. Type tuxdev and press Enter. The BEA Tuxedo Developer window is displayed.
3. Choose one of actions described in the following table.
To . . . Complete These Steps . . .
Create a file 1. In the BEA Tuxedo Developer window, select File→New. The New window is displayed (see Figure 3-5).
2. Proceed to step 4.
Modify an existing file 1. In the BEA Tuxedo Developer window, select File→Open.
2. Select the file (FML filenames include a .fml extension) to edit.
3. Skip the remaining steps.
Using BEA Tuxedo ATMI on Windows 3-15

3 Developing a BEA Tuxedo ATMI Application in the Microsoft Visual C++ Environment
Figure 3-5 New Window
4. In the New window, select FML Table. Then type the name of the new file in the File Name field.
5. Click OK. The FML Table Editor is invoked, as shown Figure 3-6.
3-16 Using BEA Tuxedo ATMI on Windows
Using the BEA Tuxedo ATMI Editors
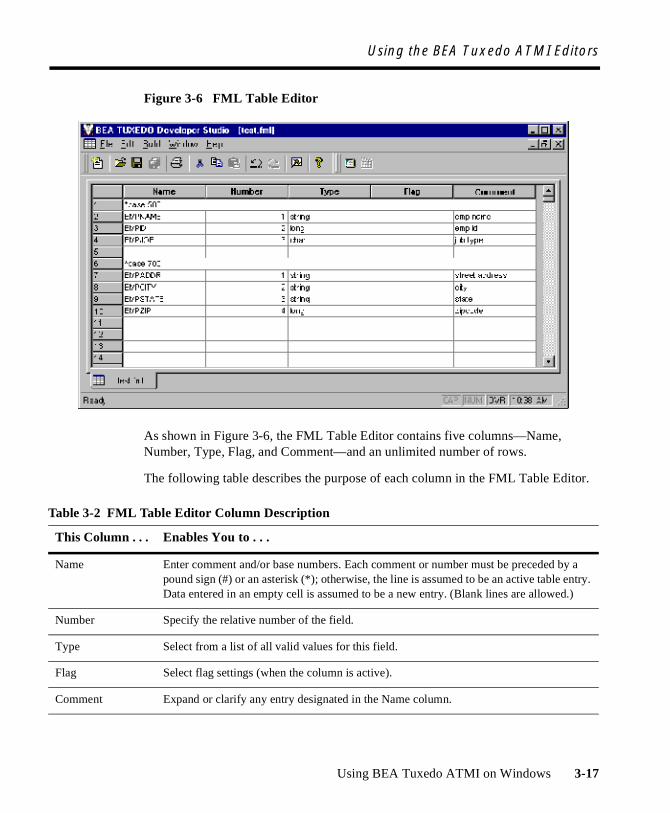
Figure 3-6 FML Table Editor
As shown in Figure 3-6, the FML Table Editor contains five columns—Name, Number, Type, Flag, and Comment—and an unlimited number of rows.
The following table describes the purpose of each column in the FML Table Editor.
Table 3-2 FML Table Editor Column Description
This Column . . . Enables You to . . .
Name Enter comment and/or base numbers. Each comment or number must be preceded by a pound sign (#) or an asterisk (*); otherwise, the line is assumed to be an active table entry. Data entered in an empty cell is assumed to be a new entry. (Blank lines are allowed.)
Number Specify the relative number of the field.
Type Select from a list of all valid values for this field.
Flag Select flag settings (when the column is active).
Comment Expand or clarify any entry designated in the Name column.
Using BEA Tuxedo ATMI on Windows 3-17

3 Developing a BEA Tuxedo ATMI Application in the Microsoft Visual C++ Environment
You can open new (unnamed) FML tables. A blank grid is created for the table named FML Tablex, where x is a value tracked by the MDI and incremented by one each time a new table is created. You can specify a name if and when the table is saved. You can also open an existing text file for editing. Unless otherwise specified, files are saved in the directory in which the file was opened in tabbed delimited format, with .fml appended to the end of the filename when applicable. You can compile this file to produce either a 16-bit or 32-bit FML header file.
Using the VIEW Table Editor
To invoke the VIEW Table Editor, complete the following procedure:
1. On the Windows 2000 command line, type the full pathname of tuxdev (%TUXDIR%\bin) and press Enter.
2. Type tuxdev and press Enter. The BEA Tuxedo Developer window is displayed.
3. Choose one of the actions described in the following table.
4. In the New window, select VIEW Table. Then type the name of the new file in the File Name field.
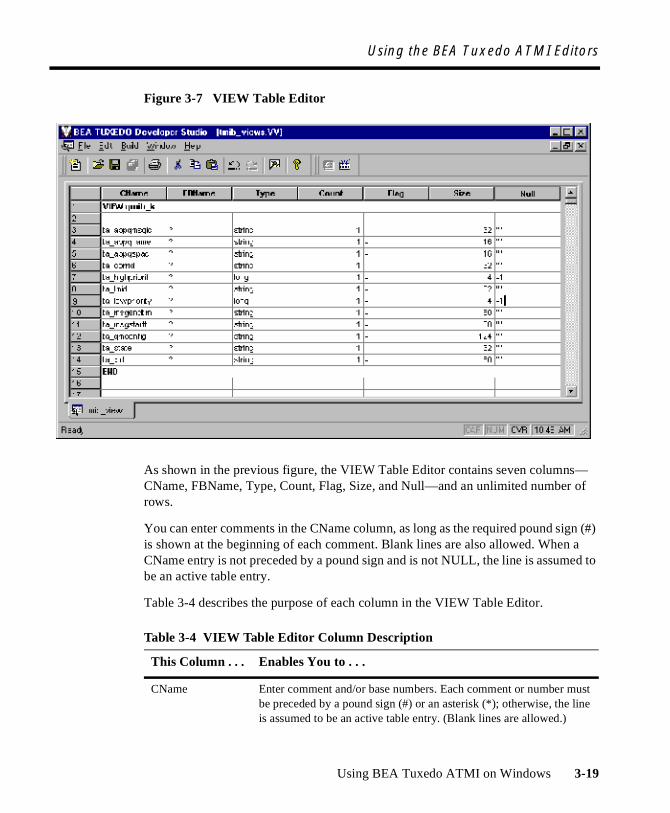
5. Click OK. The VIEW Table Editor is invoked, as shown in Figure 3-7.
Table 3-3 Using the View Table Editor Actions
To . . . Complete These Steps . . .
Create a file 1. In the BEA Tuxedo Developer window select File→New to display the New window (see Figure 3-5).
2. Proceed to step 4.
Modify an existing file 1. In the BEA Tuxedo Developer window, select File→Open.
2. Select the file (FML filenames include a .fml extension) to edit.
3. Skip the remaining steps.
3-18 Using BEA Tuxedo ATMI on Windows
Using the BEA Tuxedo ATMI Editors
Figure 3-7 VIEW Table Editor
As shown in the previous figure, the VIEW Table Editor contains seven columns— CName, FBName, Type, Count, Flag, Size, and Null—and an unlimited number of rows.
You can enter comments in the CName column, as long as the required pound sign (#) is shown at the beginning of each comment. Blank lines are also allowed. When a CName entry is not preceded by a pound sign and is not NULL, the line is assumed to be an active table entry.
Table 3-4 describes the purpose of each column in the VIEW Table Editor.
Table 3-4 VIEW Table Editor Column Description
This Column . . . Enables You to . . .
CName Enter comment and/or base numbers. Each comment or number must be preceded by a pound sign (#) or an asterisk (*); otherwise, the line is assumed to be an active table entry. (Blank lines are allowed.)
Using BEA Tuxedo ATMI on Windows 3-19

3 Developing a BEA Tuxedo ATMI Application in the Microsoft Visual C++ Environment
Note: You must specify the following information to denote the start and end of the view information:
VIEW table_name...END
The information must appear in the CName column in a row by itself. You can enter multiple views within the same file, provided that each table entry is preceded by VIEW table_name and followed by END.
You can open new (unnamed) view files in which a blank grid is created for the view, Viewx, where x is a value tracked by the MDI and incremented by one each time you create a new view. You can specify a name if and when you save the view file. You can also edit an existing view file (either text or binary). Unless otherwise specified, files are saved in the directory in which the file was opened in tabbed delimited format, with .v appended to the filename when applicable. You can compile this file to produce either 16- or 32-bit binary VIEW and header files.
FBName Specify the [field in the] fielded buffer; this name is displayed in the field table file.
Type Select from a list of all valid values for this field.
Count Specify the number of elements to allocate (that is, the maximum number of occurrences to be stored for this member).
Flag Select flag settings (when the column is active).
Size Indicate the size of the member if the type is string, carray, or dec_t. Otherwise, you can specify ‘-’, and the view compiler computes the size.
Null Specify a null value or ‘-’ (default null value) for that field.
Table 3-4 VIEW Table Editor Column Description
This Column . . . Enables You to . . .
3-20 Using BEA Tuxedo ATMI on Windows

Using the BEA Tuxedo ATMI Editors
Working in Multiple Documents Simultaneously
The MDI, as part of the basic framework, provides a multiple-document architecture in which you can open documents and views, regardless of type, at the same time. Examples of this design are msdev, Excel, and Word. In BEA Tuxedo terms, you can open x number of FML tables and y number of VIEW Table files at any time, and then use any one of them. Each document looks and feels like a workbook that contains tabs for each open document.
How the Editors Validate Entries
Table 3-5 describes the information that is validated in each column of the FML Table Editor.
Table 3-5 Information Validated in the FML Table Editor
In This Column . . .
This Information Is Validated . . .
Name Comments, base numbers, and valid text strings
Number Numbers only. (The range is determined by a 16/32-bit user mode.)
Type Valid FML types.
Flag Valid FML flags. Extra checking is done for mutually exclusive flags.
Comment Entries are not validated.
Using BEA Tuxedo ATMI on Windows 3-21

3 Developing a BEA Tuxedo ATMI Application in the Microsoft Visual C++ Environment
Table 3-6 describes the information that is validated in each column of the VIEW Table Editor.
See Also
For information about the BEA Tuxedo ATMI, see the following documents:
n Programming BEA Tuxedo ATMI Applications Using C
n Programming BEA Tuxedo ATMI Applications Using COBOL
n Programming BEA Tuxedo ATMI Applications Using FML
n Programming BEA Tuxedo ATMI Applications Using TxRPC
n BEA Tuxedo Command Reference
n BEA Tuxedo ATMI C Function Reference
Table 3-6 Information Validated in the VIEW Table Editor
In This Column . . . This Information Is Validated . . .
CName Entries are not validated.
FBName Entries are not validated.
Type Valid BEA Tuxedo types.
Count Numbers only. (The range is determined by a 16/32-bit user mode.)
Flag Valid FML flags. Extra checking is done for mutually exclusive flags.
Size Numbers only. (The range is determined by a 16/32-bit user mode.)
Null Entries are not validated.
3-22 Using BEA Tuxedo ATMI on Windows
See Also
n BEA Tuxedo ATMI COBOL Function Reference
n File Formats, Data Descriptions, MIBs, and System Processes Reference
Using BEA Tuxedo ATMI on Windows 3-23

3 Developing a BEA Tuxedo ATMI Application in the Microsoft Visual C++ Environment
3-24 Using BEA Tuxedo ATMI on Windows