
BEA Tuxedo® - Oracle Help Center
200
BEA Tuxedo fi Installing the BEA Tuxedo System Release 8.0 June 2001 Revised: August 2002
-
Upload
khangminh22 -
Category
Documents
-
view
3 -
download
0
Transcript of BEA Tuxedo® - Oracle Help Center
BEA
Tuxedo®Installing the BEA Tuxedo System
Release 8.0June 2001Revised: August 2002
Copyright
Copyright © 2002 BEA Systems, Inc. All Rights Reserved.
Restricted Rights Legend
This software and documentation is subject to and made available only pursuant to the terms of the BEA Systems License Agreement and may be used or copied only in accordance with the terms of that agreement. It is against the law to copy the software except as specifically allowed in the agreement. This document may not, in whole or in part, be copied photocopied, reproduced, translated, or reduced to any electronic medium or machine readable form without prior consent, in writing, from BEA Systems, Inc.
Use, duplication or disclosure by the U.S. Government is subject to restrictions set forth in the BEA Systems License Agreement and in subparagraph (c)(1) of the Commercial Computer Software-Restricted Rights Clause at FAR 52.227-19; subparagraph (c)(1)(ii) of the Rights in Technical Data and Computer Software clause at DFARS 252.227-7013, subparagraph (d) of the Commercial Computer Software--Licensing clause at NASA FAR supplement 16-52.227-86; or their equivalent.
Information in this document is subject to change without notice and does not represent a commitment on the part of BEA Systems. THE SOFTWARE AND DOCUMENTATION ARE PROVIDED �AS IS� WITHOUT WARRANTY OF ANY KIND INCLUDING WITHOUT LIMITATION, ANY WARRANTY OF MERCHANTABILITY OR FITNESS FOR A PARTICULAR PURPOSE. FURTHER, BEA Systems DOES NOT WARRANT, GUARANTEE, OR MAKE ANY REPRESENTATIONS REGARDING THE USE, OR THE RESULTS OF THE USE, OF THE SOFTWARE OR WRITTEN MATERIAL IN TERMS OF CORRECTNESS, ACCURACY, RELIABILITY, OR OTHERWISE.
Trademarks or Service Marks
BEA, Jolt, Tuxedo, and WebLogic are registered trademarks of BEA Systems, Inc. BEA Builder, BEA Campaign Manager for WebLogic, BEA eLink, BEA Manager, BEA WebLogic Commerce Server, BEA WebLogic Enterprise, BEA WebLogic Enterprise Platform, BEA WebLogic Express, BEA WebLogic Integration, BEA WebLogic Personalization Server, BEA WebLogic Platform, BEA WebLogic Portal, BEA WebLogic Server, BEA WebLogic Workshop and How Business Becomes E-Business are trademarks of BEA Systems, Inc.
All other trademarks are the property of their respective companies.
Installing the BEA Tuxedo System
Part Number Date Software Version
801-001001-005 June 2001 BEA Tuxedo Release 8.0
N/A August 2002 BEA Tuxedo Release 8.0
Contents
About This DocumentWhat You Need to Know ................................................................................... xiie-docs Web Site.................................................................................................. xiiHow to Print the Document............................................................................... xiiiContact Us! ........................................................................................................ xiiiDocumentation Conventions ............................................................................. xiv
1. Preparing to Install the BEA Tuxedo SystemBEA Installation Program ................................................................................. 1-1BEA Tuxedo Distribution Methods................................................................... 1-2
Web Distribution of BEA Tuxedo ............................................................. 1-2CD-ROM Distribution of BEA Tuxedo ..................................................... 1-3
BEA Tuxedo Software Components ................................................................. 1-3Hardware and Software Prerequisites ............................................................... 1-4
System Requirements................................................................................. 1-5Temporary Storage Space Requirements ................................................... 1-5
Configuring Interprocess Communication Resources....................................... 1-7BEA Home Directory ........................................................................................ 1-8
Choosing a BEA Home Directory.............................................................. 1-9Understanding the Functions of the BEA Home Directory ....................... 1-9Creating More than One BEA Home Directory....................................... 1-11
Installation Road Map ..................................................................................... 1-11
2. Installing BEA Tuxedo Using GUI-Mode InstallationWhat Is GUI-Mode Installation? ....................................................................... 2-2Before You Start................................................................................................ 2-2Starting GUI-Mode Installation on a Windows System.................................... 2-2
Installing the BEA Tuxedo System iii
Starting GUI-Mode Installation on a UNIX System ......................................... 2-4Running GUI-Mode Installation........................................................................ 2-5Assigning File Ownership on a UNIX System................................................ 2-10Understanding the BEA Tuxedo Shortcuts on a Windows System................. 2-11Understanding the BEA Administration Program on a Windows System ...... 2-12
Accessing Other Machines on the Network ............................................. 2-14Setting and Modifying Environment Variables........................................ 2-15Directing System Messages to the Windows 2000 Event Log................. 2-16Configuring tlisten Processes to Start Automatically............................... 2-17Configuring IPC Resources to Maximize System Performance .............. 2-18
Reviewing the Windows 2000 Registry Content ............................................ 2-21Developer Key.......................................................................................... 2-21Environment Key...................................................................................... 2-21Security Key ............................................................................................. 2-22
What Do I Do Next? ........................................................................................ 2-22
3. Installing BEA Tuxedo on UNIX Systems Using Console-Mode Installation
What Is Console-Mode Installation? ................................................................. 3-2Before You Start ................................................................................................ 3-2Starting Console-Mode Installation................................................................... 3-2Running Console-Mode Installation.................................................................. 3-3What Do I Do Next? .......................................................................................... 3-9
4. Installing BEA Tuxedo Using Silent InstallationWhat Is Silent Installation?................................................................................ 4-2Before You Start ................................................................................................ 4-2Using Silent Installation: Main Steps ................................................................ 4-2Creating a Template File ................................................................................... 4-3Invoking the Silent Installation Process on a Windows System ....................... 4-5Invoking the Silent Installation Process on a UNIX System............................. 4-6Windows Template File..................................................................................... 4-8UNIX Template File ........................................................................................ 4-10What Do I Do Next? ........................................................................................ 4-12
iv Installing the BEA Tuxedo System
5. Upgrading the BEA Tuxedo System to Release 8.0Preparing Your Machine for an Upgrade .......................................................... 5-2Selecting an Upgrade Procedure ....................................................................... 5-2Backing Up Files ............................................................................................... 5-3Performing a Simple Upgrade ........................................................................... 5-4Additional Upgrade Requirements for Windows 2000 ..................................... 5-4Performing a Hot Upgrade ................................................................................ 5-6
Pre-Upgrade Notes ..................................................................................... 5-6Hot-Upgrade Procedure.............................................................................. 5-7Hot-Upgrade Example................................................................................ 5-8
Upgrading BEA Jolt to Release 8.0................................................................. 5-10Rebuilding an Application............................................................................... 5-10
6. Performing Post-Installation TasksUnderstanding the BEA Tuxedo Directory Structure ....................................... 6-2Understanding the BEA Tuxedo Architecture .................................................. 6-5
UBBCONFIG File...................................................................................... 6-6MASTER Machine..................................................................................... 6-6TUXCONFIG File...................................................................................... 6-7TUXCONFIG Environment Variable ........................................................ 6-7TUXDIR Environment Variable ................................................................ 6-7
Installing the Product License After You Install BEA Tuxedo......................... 6-8Installing the Product License on a Windows System ............................. 6-10Installing the Product License on a UNIX System .................................. 6-11
Using the Registry to Further Restrict Access on a Windows System............ 6-12Setting Up Your Environment......................................................................... 6-12
Setting Environment Variables on a Windows System ........................... 6-15Setting Environment Variables on a UNIX System................................. 6-16
Starting the tlisten Process............................................................................... 6-17tlisten Invocation ...................................................................................... 6-17tlisten Password........................................................................................ 6-18
Editing a UBBCONFIG File ........................................................................... 6-19Using the TYPE Parameter in UBBCONFIG ................................................. 6-22Checking IPC Requirements ........................................................................... 6-22
Installing the BEA Tuxedo System v
Creating the Universal Device List and the Transaction Log.......................... 6-24Defining the TLOG .................................................................................. 6-24Creating the UDL and UDL Entries for TLOG........................................ 6-25
Running simpapp to Verify Your Installation ................................................. 6-26Running simpapp to Verify the BEA Tuxedo ATMI Software
Installation......................................................................................... 6-27Running simpapp to Verify the BEA Tuxedo CORBA C++ Software
Installation......................................................................................... 6-33Running buildtms and buildXAJS for BEA Tuxedo Applications that
Use XA Resource Managers .................................................................... 6-36Uninstalling BEA Tuxedo ............................................................................... 6-36Reinstalling BEA Tuxedo................................................................................ 6-38
7. Starting the BEA Tuxedo Administration ConsoleHardware Requirements .................................................................................... 7-1Operating System Requirements ....................................................................... 7-2Server Requirements.......................................................................................... 7-2Browser Requirements ...................................................................................... 7-3Understanding the BEA Tuxedo Administration Console File Tree................. 7-4Setting Up Your Environment for the BEA Tuxedo Administration Console.. 7-5
Starting tuxwsvr.......................................................................................... 7-6Starting wlisten........................................................................................... 7-6
Starting the BEA Tuxedo Administration Console ........................................... 7-7Exiting the BEA Tuxedo Administration Console ............................................ 7-9
A. BEA Tuxedo 8.0 Platform Data SheetsSupported Platforms ......................................................................................... A-2Install Sets......................................................................................................... A-3Compaq Tru64 UNIX Version 5.1 on Alpha Systems ..................................... A-4
Available BEA Tuxedo 8.0 Install Sets for Compaq Tru64 UNIX Version 5.1 ......................................................................................... A-4
Hardware Requirements for Tru64 UNIX Version 5.1 ............................. A-5Software Requirements for Tru64 UNIX Version 5.1 .............................. A-5Network Requirements for Tru64 UNIX Version 5.1............................... A-7Disk Space Requirements for Tru64 UNIX Version 5.1........................... A-7Mounting and Unmounting the CD for Tru64 UNIX Version 5.1............ A-8
vi Installing the BEA Tuxedo System
Tunable Parameters for Tru64 UNIX Version 5.1 .................................... A-9HP-UX Version 11.0 (32-Bit) on HP 9000 Series ......................................... A-11
Available BEA Tuxedo 8.0 Install Sets for HP-UX 11.0 (32-Bit).......... A-11Hardware Requirements for HP-UX 11.0 (32-Bit) ................................. A-11Software Requirements for HP-UX 11.0 (32-Bit) .................................. A-12Network Requirements for HP-UX 11.0 (32-Bit) ................................... A-14Disk Space Requirements for HP-UX 11.0 (32-Bit)............................... A-14Mounting and Unmounting the CD for HP-UX 11.0 (32-Bit) ................ A-15Tunable Parameters for HP-UX 11.0 (32-Bit) ........................................ A-15
IBM AIX 4.3.3 on IBM PowerPC 32-Bit....................................................... A-17Available BEA Tuxedo Release 8.0 Packages........................................ A-17Hardware Requirements .......................................................................... A-17Software Requirements ........................................................................... A-17Network................................................................................................... A-18Disk Space Requirements for IBM AIX 4.3.3 (32-bit) ........................... A-18Tunable Parameter................................................................................... A-19Mounting and Unmounting the CD for AIX 4.3.3 (32-Bit) .................... A-19
Microsoft Windows 2000 on Intel.................................................................. A-20BEA Tuxedo 8.0 Install Sets for Windows 2000 (Intel) ......................... A-20Hardware Requirements for Windows 2000 (Intel) ................................ A-21Software Requirements for Windows 2000 (Intel) ................................. A-21Network Requirements for Windows 2000 (Intel).................................. A-23Disk Space Requirements for Windows 2000 (Intel).............................. A-23Tunable Parameters for Windows 2000 (Intel) ....................................... A-24
Microsoft Windows 98 on Intel...................................................................... A-25Available BEA Tuxedo 8.0 Install Sets for Windows 98 (Intel) ............ A-25Hardware Requirements for Windows 98 (Intel) .................................... A-25Software Requirements for Windows 98 (Intel) ..................................... A-26Network Requirements for Windows 98 (Intel)...................................... A-27Disk Space Requirements for Windows 98 (Intel).................................. A-27
Red Hat Linux 6.2 on Intel IA32 (x86) .......................................................... A-28Available BEA Tuxedo 8.0 Install Sets for Red Hat Linux 6.2 (Intel) ... A-28Hardware Requirements for Red Hat Linux 6.2 (Intel) .......................... A-28Software Requirements for Red Hat Linux 6.2 (Intel)............................ A-29Network Requirements for Red Hat Linux 6.2 (Intel) ............................ A-30
Installing the BEA Tuxedo System vii
Disk Space Requirements for Red Hat Linux 6.2 (Intel) ........................ A-31Mounting and Unmounting the CD for Red Hat Linux 6.2 (Intel) ......... A-32Tunable Parameters for Red Hat Linux 6.2 (Intel).................................. A-32
Sun Microsystems Solaris 8 (32-Bit) SPARC................................................ A-33Available BEA Tuxedo 8.0 Install Sets for Solaris 8 (32-Bit) SPARC .. A-33Hardware Requirements for Solaris 8 (32-Bit) SPARC.......................... A-33Software Requirements for Solaris 8 (32-Bit) SPARC ........................... A-34Network Requirements for Solaris 8 (32-Bit) SPARC............................ A-35Disk Space Requirements for Solaris 8 (32-Bit) SPARC ....................... A-35Mounting and Unmounting the CD for Solaris 8 (32-Bit) SPARC......... A-36Tunable Parameters for Solaris 8 (32-Bit) SPARC................................. A-37
Platforms Supporting Threads ........................................................................ A-39
B. BEA Jolt 8.0 PreparationsBEA Jolt Server Support .................................................................................. B-1Supported Web Servers .................................................................................... B-2BEA Jolt Client Support ................................................................................... B-2
BEA Jolt Client Requirements .................................................................. B-3BEA Jolt Client Class Library................................................................... B-4
BEA Jolt Release Migration/Interoperability ................................................... B-4ASP Connectivity Prerequisites........................................................................ B-5BEA Jolt Pre-Installation Checklist.................................................................. B-5Installing and Configuring Jolt 8.0 with BEA Tuxedo 8.0 and WebLogic
Server 6.0................................................................................................... B-6Installation ................................................................................................. B-6Configuration............................................................................................. B-7Example Servlet......................................................................................... B-8
C. File and Database Management and Disk Space AllocationIntroduction ...................................................................................................... C-1How the BEA Tuxedo System Manages Files ................................................. C-2Arranging for Raw Disk Space......................................................................... C-3How the BEA Tuxedo Filesystem Is Organized .............................................. C-3Space for Queue Spaces.................................................................................... C-5Space for Application Servers .......................................................................... C-5
viii Installing the BEA Tuxedo System
D. IPC Resource Configuration on a UNIX SystemParameter Sets Controlling IPC Resources ...................................................... D-1Shared Memory ................................................................................................ D-2Semaphores....................................................................................................... D-3Message Queues and Messages........................................................................ D-4
What Is Application Deadlock? ................................................................ D-5Performance Implications of Blocking Conditions................................... D-6Tunable Message Parameters .................................................................... D-6
Other Kernel Tunables ..................................................................................... D-7
Index
Installing the BEA Tuxedo System ix

x Installing the BEA Tuxedo System
About This Document
This document explains how to install the BEA Tuxedo® system software on both Windows and UNIX systems. The BEA Tuxedo system is a framework for distributed online transaction processing applications.
This document includes the following sections:
! Chapter 1, �Preparing to Install the BEA Tuxedo System,� covers what you need to know and do before installing BEA Tuxedo.
! Chapter 2, �Installing BEA Tuxedo Using GUI-Mode Installation,� describes how to install the BEA Tuxedo software on Windows and UNIX systems using a graphical user interface.
! Chapter 3, �Installing BEA Tuxedo on UNIX Systems Using Console-Mode Installation,� discusses how to install BEA Tuxedo on UNIX systems using a text-based interface.
! Chapter 4, �Installing BEA Tuxedo Using Silent Installation,� describes how to install BEA Tuxedo without user intervention by using a template file during the installation process.
! Chapter 5, �Upgrading the BEA Tuxedo System to Release 8.0,� provides procedures for upgrading your BEA WebLogic Enterprise or BEA Tuxedo application to BEA Tuxedo 8.0 using both simple and hot upgrade procedures.
! Chapter 6, �Performing Post-Installation Tasks,� describes the directory structure after you finish the installation. It also explains how to configure the installation, verify the installation, and uninstall the BEA Tuxedo software.
! Chapter 7, �Starting the BEA Tuxedo Administration Console,� provides the system requirements for the Console, describes how to set up the environment, and explains how to start and exit the Console.
Installing the BEA Tuxedo System xi
! Appendix A, �BEA Tuxedo 8.0 Platform Data Sheets,� provides platform-specific information for the platforms on which the BEA Tuxedo system is supported.
! Appendix B, �BEA Jolt 8.0 Preparations,� provides prerequisites and preparatory information for installing the BEA Jolt software components.
! Appendix C, �File and Database Management and Disk Space Allocation,� describes BEA Tuxedo file and database management and provides guidelines for allocating disk space for a BEA Tuxedo application.
! Appendix D, �IPC Resource Configuration on a UNIX System,� describes the interprocess communication (IPC) parameters on a UNIX system and provides guidelines for configuring them.
What You Need to Know
This document is written for system administrators or application developers who are installing the BEA Tuxedo software. It is assumed that readers have a general understanding of the Windows and UNIX operating systems and the workstation platforms on which the BEA Tuxedo system runs.
e-docs Web Site
BEA product documentation is available on the BEA corporate Web site. From the BEA Home page, click on Product Documentation or go directly to the �e-docs� Product Documentation page at http://e-docs.bea.com.
xii Installing the BEA Tuxedo System

How to Print the Document
You can print a copy of this document from a Web browser, one file at a time, by using the File→Print option on your Web browser.
A PDF version of this document is available on the BEA Tuxedo documentation Home page on the e-docs Web site (and also on the documentation CD). You can open the PDF in Adobe Acrobat Reader and print the entire document (or a portion of it) in book format. To access the PDFs, open the BEA Tuxedo documentation Home page, click Download Documentation, and select the document you want to print.
Adobe Acrobat Reader is available at no charge from the Adobe Web site at http://www.adobe.com.
Contact Us!
Your feedback on BEA documentation is important to us. Send us e-mail at [email protected] if you have questions or comments. Your comments will be reviewed directly by the BEA professionals who create and update the documentation.
In your e-mail message, please indicate that you are using the documentation for the BEA Tuxedo 8.0 release.
If you have any questions about this version of BEA Tuxedo, or if you have problems installing and running BEA Tuxedo, contact BEA Customer Support through BEA WebSUPPORT at http://www.bea.com. You can also contact Customer Support by using the contact information provided on the Customer Support Card, which is included in the product package.
When contacting Customer Support, be prepared to provide the following information:
! Your name, e-mail address, phone number, and fax number
! Your company name and company address
! Your machine type and authorization codes
Installing the BEA Tuxedo System xiii

! The name and version of the product you are using
! A description of the problem and the content of pertinent error messages
Documentation Conventions
The following documentation conventions are used throughout this document.
Convention Item
boldface text Indicates terms defined in the glossary.
Ctrl+Tab Indicates that you must press two or more keys simultaneously.
italics Indicates emphasis or book titles.
monospace text
Indicates code samples, commands and their options, data structures and their members, data types, directories, and filenames and their extensions. Monospace text also indicates text that you must enter from the keyboard.Examples:#include <iostream.h> void main ( ) the pointer psz
chmod u+w *
\tux\data\ap
.doc
tux.doc
BITMAP
float
monospace boldface text
Identifies significant words in code.Example:void commit ( )
monospace italic text
Identifies variables in code.Example:String expr
xiv Installing the BEA Tuxedo System
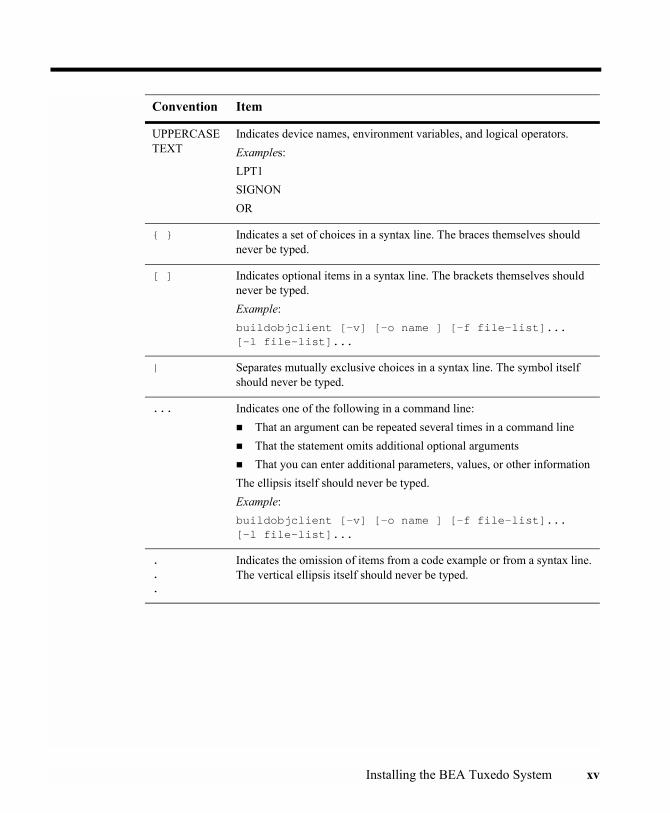
UPPERCASE TEXT
Indicates device names, environment variables, and logical operators.Examples:LPT1SIGNONOR
{ } Indicates a set of choices in a syntax line. The braces themselves should never be typed.
[ ] Indicates optional items in a syntax line. The brackets themselves should never be typed.Example:buildobjclient [-v] [-o name ] [-f file-list]... [-l file-list]...
| Separates mutually exclusive choices in a syntax line. The symbol itself should never be typed.
... Indicates one of the following in a command line: ! That an argument can be repeated several times in a command line! That the statement omits additional optional arguments! That you can enter additional parameters, values, or other informationThe ellipsis itself should never be typed.Example:buildobjclient [-v] [-o name ] [-f file-list]... [-l file-list]...
.
.
.
Indicates the omission of items from a code example or from a syntax line. The vertical ellipsis itself should never be typed.
Convention Item
Installing the BEA Tuxedo System xv

xvi Installing the BEA Tuxedo System
CHAPTER
1 Preparing to Install the BEA Tuxedo System
The following sections provide information that you need to know before installing the BEA Tuxedo product software:
! BEA Installation Program
! BEA Tuxedo Distribution Methods
! BEA Tuxedo Software Components
! Hardware and Software Prerequisites
! Configuring Interprocess Communication Resources
! BEA Home Directory
! Installation Road Map
BEA Installation Program
The BEA Installation program is the BEA standard tool for BEA Tuxedo product installation. Use the BEA Installation program to unpack the BEA Tuxedo archive and install the archive files on the target Windows or UNIX system (machine). The BEA Installation program itself is included with the BEA Tuxedo archive.
Installing the BEA Tuxedo System 1-1
1 Preparing to Install the BEA Tuxedo System
Included with the BEA Tuxedo 8.0 install set is the BEA Jolt 8.0 product software, which enables Java clients to call BEA Tuxedo services.
The BEA Installation program supports three installation methods:
! Graphical user interface (GUI) mode installation�for details, see �Installing BEA Tuxedo Using GUI-Mode Installation� on page 2-1.
! Console-mode installation (UNIX systems only)�for details, see �Installing BEA Tuxedo on UNIX Systems Using Console-Mode Installation� on page 3-1.
! Silent installation�for details, see �Installing BEA Tuxedo Using Silent Installation� on page 4-1.
You can use any of these methods to install the BEA Tuxedo 8.0 product software.
BEA Tuxedo Distribution Methods
BEA Tuxedo is distributed on both the Web and CD-ROM.
Web Distribution of BEA Tuxedo
An evaluation copy of BEA Tuxedo 8.0 is available for download from the BEA corporate Web site at the following URL: http://commerce.bea.com/downloads/tuxedo.jsp#tuxedo
When you download BEA Tuxedo, you get a 30-day evaluation license with access for client connections from up to three IP addresses. After the 30-day trial period, you can purchase a development or production license for your BEA Tuxedo product.
BEA Tuxedo 8.0 is distributed as an installer file, which contains the BEA Installation program and the BEA Tuxedo and BEA Jolt archive files. Platform-specific installers for the BEA Tuxedo product software are available for download.
1-2 Installing the BEA Tuxedo System

BEA Tuxedo Software Components
CD-ROM Distribution of BEA Tuxedo
If you purchased BEA Tuxedo from your local sales representative, you will find the following items in the BEA Tuxedo product box:
! Two CD-ROMs:
" BEA Tuxedo and BEA Jolt product software CD
" BEA Tuxedo Online Documentation CD
! The following printed documents:
" �Read-Me-First� card containing an overview of the product box content
" �Customer Support Quick Reference and Other Important Information� card
" �BEA Software License and Limited Warranty� pamphlet
" BEA Tuxedo Release Notes
" BEA Tuxedo Product Overview
" Installing the BEA Tuxedo System (this document)
You can also access the BEA Tuxedo Online Documentation at http://edocs.bea.com/index.html.
BEA Tuxedo Software Components
BEA Tuxedo 8.0 contains the following components:
! Server components:
" Application-to-Transaction Monitor Interface (ATMI) server software
" Common Object Request Broker Architecture (CORBA) C++ server software
" BEA Jolt 8.0 server software
Installing the BEA Tuxedo System 1-3
1 Preparing to Install the BEA Tuxedo System
" BEA Tuxedo Administration Console software
" Link-level encryption (LLE) and secure sockets layer (SSL) encryption software
! Client components:
" BEA Tuxedo Workstation (/WS) client software
" CORBA C++ client software�includes the C++ client Object Request Broker (ORB) and the environmental objects
" CORBA Java client software�includes the BEA-branded Java client ORB and the environmental objects
" BEA Jolt 8.0 client software
" ActiveX client software for Windows systems�includes the environmental objects and the BEA Application Builder GUI
" LLE and SSL encryption software
Note: LLE and SSL are available with two levels of encryption: 56-bit and 128-bit. Licenses for the 128-bit client versions of LLE and SSL are available in the United States and Canada. With proper authorization, customers outside the United States and Canada may also acquire licenses with 128-bit encryption enabled. For details, see the BEA Tuxedo Release Notes.
Hardware and Software Prerequisites
The BEA Tuxedo software must be installed on each machine that will participate in a BEA Tuxedo application, also known as a Tuxedo domain. A Tuxedo application is a business software program, built on top of the Tuxedo system, that is defined and controlled by a single configuration file: the UBBCONFIG file. For more information about BEA Tuxedo applications, see Setting Up a BEA Tuxedo Application.
A BEA Tuxedo application consists of one or more clients (local or remote), one or more servers, and one or more machines. In a multimachine BEA Tuxedo application running different releases of the BEA Tuxedo software, the MASTER machine�designated in the RESOURCES section of the UBBCONFIG file�must run the highest release of the BEA Tuxedo software in the application.
1-4 Installing the BEA Tuxedo System
Hardware and Software Prerequisites
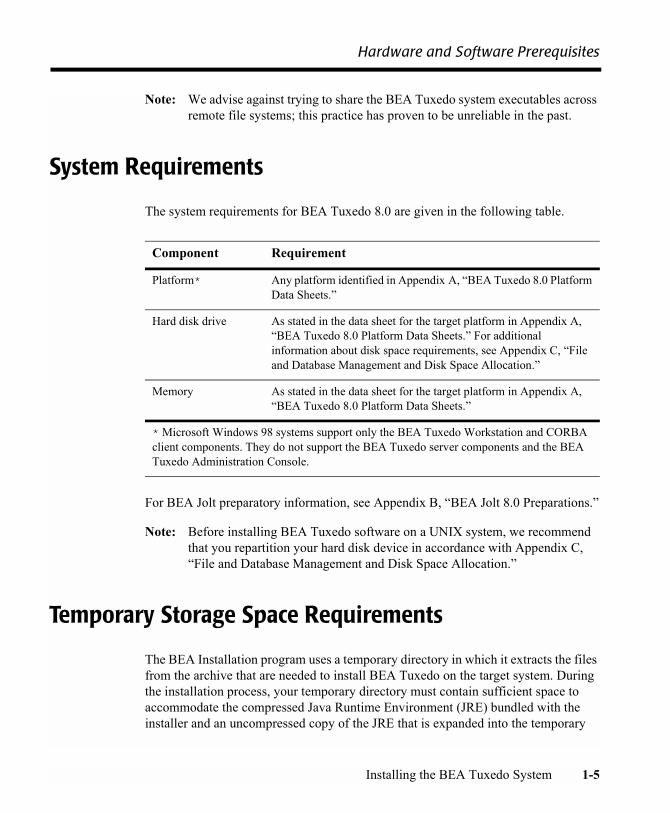
Note: We advise against trying to share the BEA Tuxedo system executables across remote file systems; this practice has proven to be unreliable in the past.
System Requirements
The system requirements for BEA Tuxedo 8.0 are given in the following table.
For BEA Jolt preparatory information, see Appendix B, �BEA Jolt 8.0 Preparations.�
Note: Before installing BEA Tuxedo software on a UNIX system, we recommend that you repartition your hard disk device in accordance with Appendix C, �File and Database Management and Disk Space Allocation.�
Temporary Storage Space Requirements
The BEA Installation program uses a temporary directory in which it extracts the files from the archive that are needed to install BEA Tuxedo on the target system. During the installation process, your temporary directory must contain sufficient space to accommodate the compressed Java Runtime Environment (JRE) bundled with the installer and an uncompressed copy of the JRE that is expanded into the temporary
Component Requirement
Platform* Any platform identified in Appendix A, �BEA Tuxedo 8.0 Platform Data Sheets.�
Hard disk drive As stated in the data sheet for the target platform in Appendix A, �BEA Tuxedo 8.0 Platform Data Sheets.� For additional information about disk space requirements, see Appendix C, �File and Database Management and Disk Space Allocation.�
Memory As stated in the data sheet for the target platform in Appendix A, �BEA Tuxedo 8.0 Platform Data Sheets.�
* Microsoft Windows 98 systems support only the BEA Tuxedo Workstation and CORBA client components. They do not support the BEA Tuxedo server components and the BEA Tuxedo Administration Console.
Installing the BEA Tuxedo System 1-5

1 Preparing to Install the BEA Tuxedo System
directory. The installation program moves the JRE from the temporary directory to the BEA Home directory at the end of the installation process. For information about the BEA Home directory, see �BEA Home Directory� on page 1-8.
The amount of temporary storage space needed depends upon the target system. A minimum of 46 MB is required.
By default, the installation program uses the temporary directories shown in the following table.
To ensure there is adequate temporary space, you may want to allocate an alternate directory for use as a temporary directory for the installation. To do so, perform the appropriate step in the following table before starting the BEA Installation program.
Platform Directory
Windows Directory referenced by the TMP system variable
UNIX /tmp
On this platform . . . Perform this Step . . .
Windows Set the TMP system variable to a directory of your choice.
UNIX Enter the following command at the shell prompt:export IATEMPDIR=tmpdirname
Replace tmpdirname with the name of a temporary directory of your choice.
1-6 Installing the BEA Tuxedo System
Configuring Interprocess Communication Resources
Configuring Interprocess Communication Resources
Interprocess communication (IPC) is a capability supported by the Windows and UNIX operating systems that allows one process to communicate with another process. The processes can be running on the same computer or on different computers connected through a network.
On a Windows 2000 system, the BEA Tuxedo system provides an IPC service called the BEA ProcMGR (Process Manager), which facilitates interprocess communications. You use the BEA ProcMGR service to adjust the IPC parameters and maximize the performance of a BEA Tuxedo application.
On a UNIX system, you use methods native to the UNIX system to adjust the IPC parameters and maximize the performance of a BEA Tuxedo application. Because most UNIX systems are shipped with default values that are too low for a BEA Tuxedo application, you need to adjust the IPC parameters, using the methods given in Appendix A, �BEA Tuxedo 8.0 Platform Data Sheets.� For the recommended IPC values, see Appendix D, �IPC Resource Configuration on a UNIX System.�
After installing the BEA Tuxedo software and creating an application configuration file (UBBCONFIG file), you use the tmloadcf(1) command to calculate and print a list of the minimum IPC resources needed to support the application. If your BEA Tuxedo application is distributed, the minimum IPC resources must be available on every machine participating in the application. For more information about calculating IPC resources using the tmloadcf(1) command, see �Performing Post-Installation Tasks� on page 6-1.
Note: Before installing BEA Tuxedo software on a UNIX system, we recommend that you adjust the IPC parameters on the target machine in accordance with Appendix D, �IPC Resource Configuration on a UNIX System.�
Installing the BEA Tuxedo System 1-7
1 Preparing to Install the BEA Tuxedo System
BEA Home Directory
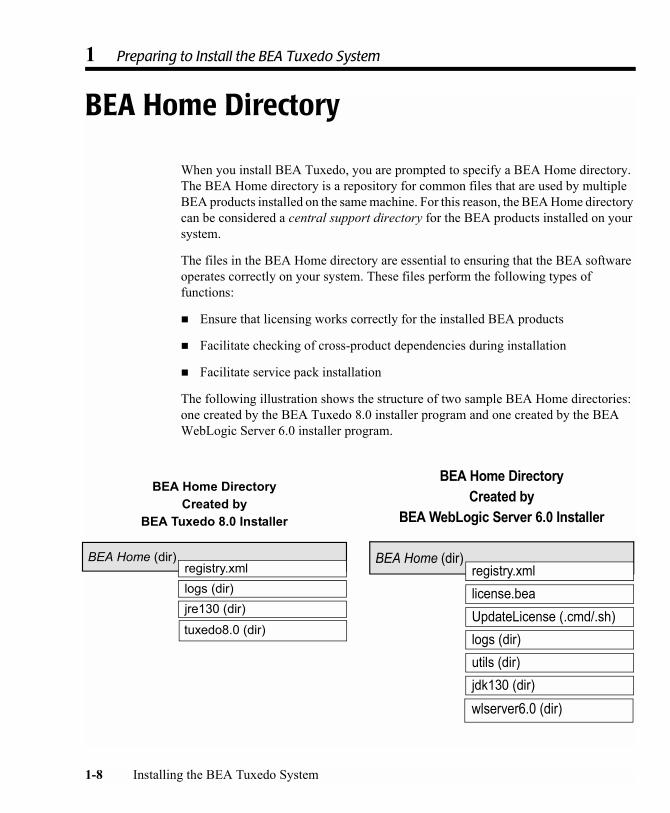
When you install BEA Tuxedo, you are prompted to specify a BEA Home directory. The BEA Home directory is a repository for common files that are used by multiple BEA products installed on the same machine. For this reason, the BEA Home directory can be considered a central support directory for the BEA products installed on your system.
The files in the BEA Home directory are essential to ensuring that the BEA software operates correctly on your system. These files perform the following types of functions:
! Ensure that licensing works correctly for the installed BEA products
! Facilitate checking of cross-product dependencies during installation
! Facilitate service pack installation
The following illustration shows the structure of two sample BEA Home directories: one created by the BEA Tuxedo 8.0 installer program and one created by the BEA WebLogic Server 6.0 installer program.
BEA Home (dir)registry.xmllogs (dir)jre130 (dir)
BEA Home DirectoryCreated by
BEA Tuxedo 8.0 Installer
BEA Home (dir)
jdk130 (dir)
logs (dir)
registry.xmllicense.beaUpdateLicense (.cmd/.sh)
utils (dir)
BEA Home DirectoryCreated by
BEA WebLogic Server 6.0 Installer
wlserver6.0 (dir)
tuxedo8.0 (dir)
1-8 Installing the BEA Tuxedo System
BEA Home Directory
Choosing a BEA Home Directory
During the installation of BEA Tuxedo 8.0, you are prompted to choose an existing BEA Home directory or specify a path for a new BEA Home directory. If you choose a BEA Home directory created previously by the BEA WebLogic Server installer, the BEA Tuxedo installer automatically adds the jre130 directory to the BEA Home directory.
Note: If an administrator installing BEA WebLogic Server 6.0 chooses a BEA Home directory created previously by the BEA Tuxedo 8.0 installer, the BEA WebLogic Server installer automatically adds the following files and directories to the BEA Home directory: license.bea, UpdateLicense, utils, and jdk130.
Upon choosing a BEA Home directory, you are prompted to choose a BEA product directory for your BEA Tuxedo installation. You may choose to create your BEA product directory under the BEA Home directory, but there is no requirement to do so.
Understanding the Functions of the BEA Home Directory
The files and directories in the BEA Home directory are described in the following table.
Table 1-1 Files and Directories in a BEA Home Directory
Component Description
registry.xml file An XML registry file that contains a persistent record of all BEA products installed on the target system. This registry contains product-related information, such as version level, service pack level, and product installation directory.
logs directory A directory containing a BEA Home location file and a history file of installation and uninstallation for the BEA Home directory. For more information about these files, see �Understanding the BEA Tuxedo Shortcuts on a Windows System� on page 2-11.
Installing the BEA Tuxedo System 1-9
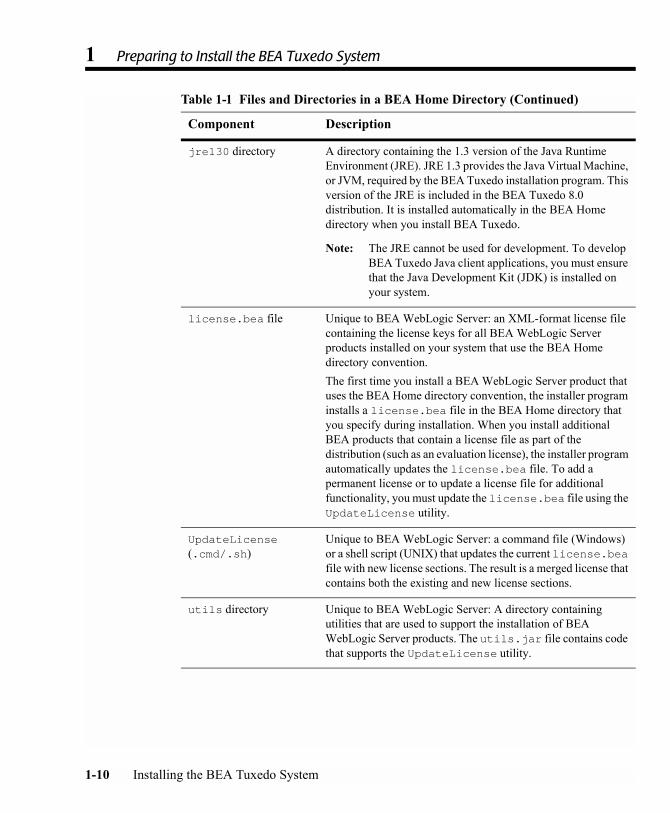
1 Preparing to Install the BEA Tuxedo System
jre130 directory A directory containing the 1.3 version of the Java Runtime Environment (JRE). JRE 1.3 provides the Java Virtual Machine, or JVM, required by the BEA Tuxedo installation program. This version of the JRE is included in the BEA Tuxedo 8.0 distribution. It is installed automatically in the BEA Home directory when you install BEA Tuxedo.
Note: The JRE cannot be used for development. To develop BEA Tuxedo Java client applications, you must ensure that the Java Development Kit (JDK) is installed on your system.
license.bea file Unique to BEA WebLogic Server: an XML-format license file containing the license keys for all BEA WebLogic Server products installed on your system that use the BEA Home directory convention. The first time you install a BEA WebLogic Server product that uses the BEA Home directory convention, the installer program installs a license.bea file in the BEA Home directory that you specify during installation. When you install additional BEA products that contain a license file as part of the distribution (such as an evaluation license), the installer program automatically updates the license.bea file. To add a permanent license or to update a license file for additional functionality, you must update the license.bea file using the UpdateLicense utility.
UpdateLicense (.cmd/.sh)
Unique to BEA WebLogic Server: a command file (Windows) or a shell script (UNIX) that updates the current license.bea file with new license sections. The result is a merged license that contains both the existing and new license sections.
utils directory Unique to BEA WebLogic Server: A directory containing utilities that are used to support the installation of BEA WebLogic Server products. The utils.jar file contains code that supports the UpdateLicense utility.
Table 1-1 Files and Directories in a BEA Home Directory (Continued)
Component Description
1-10 Installing the BEA Tuxedo System

Installation Road Map
Creating More than One BEA Home Directory
Although it is possible to create more than one BEA Home directory, we recommend that you avoid doing so. In almost all situations, a single BEA Home directory is sufficient. There may be circumstances, however, in which you prefer to maintain separate development and production environments, each containing a separate product stack. With two directories, you can update your development environment (in a BEA Home directory) without modifying the production environment until you are ready to do so.
Installation Road Map
You are now ready to begin your installation. To install BEA Tuxedo 8.0, see one of the following sections:
! Installing BEA Tuxedo Using GUI-Mode Installation
! Installing BEA Tuxedo on UNIX Systems Using Console-Mode Installation
! Installing BEA Tuxedo Using Silent Installation
If you are upgrading from a 5.1 or pre-5.1 version of BEA WebLogic Enterprise, or from a 7.1 or pre-7.1 version of the BEA Tuxedo system, see �Upgrading the BEA Tuxedo System to Release 8.0.�
jdk130 directory Unique to BEA WebLogic Server: A directory containing the 1.3 version of the Java Development Kit. JDK 1.3 provides the the Java Virtual Machine, or JVM, and tools for compiling and debugging Java applications. This version of the JDK is included in the BEA WebLogic Server 6.0 distribution. It is installed automatically in the BEA Home directory when you install BEA WebLogic Server 6.0.
Table 1-1 Files and Directories in a BEA Home Directory (Continued)
Component Description
Installing the BEA Tuxedo System 1-11
1 Preparing to Install the BEA Tuxedo System
1-12 Installing the BEA Tuxedo System
CHAPTER
2 Installing BEA Tuxedo Using GUI-Mode Installation
The following sections describe how to install BEA Tuxedo by using a graphical user interface (GUI) on both Windows and UNIX systems:
! What Is GUI-Mode Installation?
! Before You Start
! Starting GUI-Mode Installation on a Windows System
! Starting GUI-Mode Installation on a UNIX System
! Running GUI-Mode Installation
! Assigning File Ownership on a UNIX System
! Understanding the BEA Tuxedo Shortcuts on a Windows System
! Understanding the BEA Administration Program on a Windows System
! Reviewing the Windows 2000 Registry Content
! What Do I Do Next?
Installing the BEA Tuxedo System 2-1
2 Installing BEA Tuxedo Using GUI-Mode Installation
What Is GUI-Mode Installation?
The graphical user interface mode of installation is the graphics-based method of executing the BEA Installation program. It can be run on both Windows and UNIX systems.
To run GUI-mode installation, the console attached to the machine on which you are installing the software must support a Java-based GUI. All consoles for Windows systems support Java-based GUIs, but not all consoles for UNIX systems do.
Note: To install BEA Tuxedo on a UNIX system with a nongraphics console, see �Installing BEA Tuxedo on UNIX Systems Using Console-Mode Installation� on page 3-1.
Before You Start
If you are upgrading from a 5.1 or pre-5.1 version of WebLogic Enterprise, or from a 7.1 or pre-7.1 version of BEA Tuxedo, see �Upgrading the BEA Tuxedo System to Release 8.0� on page 5-1 and follow the instructions given there. Then return here to continue your BEA Tuxedo installation.
Starting GUI-Mode Installation on a Windows System
To start the GUI-mode installation process on a Windows system, follow these steps:
1. Select a Windows system that meets the hardware and software requirements described in Appendix A, �BEA Tuxedo 8.0 Platform Data Sheets.�
The Windows 98 system supports only BEA Tuxedo client components.
2-2 Installing the BEA Tuxedo System

Starting GUI-Mode Installation on a Windows System
2. Log in to the target machine using the Administrator username.
You need administrative privileges to install BEA Tuxedo server components on a Windows system. If you are going to install only BEA Tuxedo client components, you do not need administrative privileges.
3. Make sure that you have enough free space for the BEA Tuxedo installation.
For disk space requirements, see Appendix A, �BEA Tuxedo 8.0 Platform Data Sheets.� For important disk space allocation information, see Appendix C, �File and Database Management and Disk Space Allocation.�
4. If you are installing BEA Tuxedo by downloading it from the BEA Web site:
Go to the directory in which you downloaded the BEA Tuxedo installer specific to your platform and double-click filename.exe file, where filename is the name of the BEA Tuxedo installer.
For instructions on completing the installation process, see �Running GUI-Mode Installation� on page 2-5.
5. If you are installing BEA Tuxedo from the CD-ROM:
a. Insert the BEA Tuxedo CD-ROM into the CD-ROM drive.
b. Go to the tux8_new_installer directory of the mounted CD-ROM.
c. Double-click filename.exe file, where filename is the name of the BEA Tuxedo installer specific to your platform. The installation program begins to install BEA Tuxedo.
6. If you are installing on a Windows 2000 machine on which the BEA WebLogic Enterprise software or an older version of the BEA Tuxedo software is installed, the Previous Version Detected! window is displayed. This window contains a message that directs you to exit the installation program and remove the older software before installing BEA Tuxedo 8.0.
If you choose to remove the older software, see �Additional Upgrade Requirements for Windows 2000� on page 5-4, follow the instructions to remove the older software from your machine, and restart the installation.
If you prefer not to remove the older software because you want to have two versions installed on your machine, you must observe the guidelines in the following list. (If you do not observe these guidelines, the older software will be rendered unusable and files associated with the older installation, which you may have modified, will be overwritten.)
Installing the BEA Tuxedo System 2-3
2 Installing BEA Tuxedo Using GUI-Mode Installation
a. You must install the BEA Tuxedo 8.0 software in a directory other than the directory in which the BEA WebLogic Enterprise software or the older version of the BEA Tuxedo software is installed.
b. Before you can use the BEA Tuxedo 8.0 software, you must set the system environment variables to point to the BEA Tuxedo 8.0 software. For instructions about setting environment variables, see �Setting Up Your Environment� on page 6-12.
c. If you want to revert to using the BEA WebLogic Enterprise software or the older version of the BEA Tuxedo software, you must reset the system environment variables so that they point to the older software.
7. For instructions on completing the installation process, see �Running GUI-Mode Installation� on page 2-5.
Starting GUI-Mode Installation on a UNIX System
To start the GUI-mode installation process on a UNIX system, follow these steps:
1. Select a UNIX system that meets the hardware and software requirements described in Appendix A, �BEA Tuxedo 8.0 Platform Data Sheets.�
2. Log in to the target UNIX system using the root username.
You need superuser privileges to mount the BEA Tuxedo CD on a UNIX system. If you are installing BEA Tuxedo by downloading it from the BEA Web site, you do not need superuser privileges.
3. Make sure that you have enough free space for the BEA Tuxedo installation.
For disk space requirements, see Appendix A, �BEA Tuxedo 8.0 Platform Data Sheets.� For important disk space allocation information, see Appendix C, �File and Database Management and Disk Space Allocation.�
4. If you are installing BEA Tuxedo by downloading it from the BEA Web site:
2-4 Installing the BEA Tuxedo System
Running GUI-Mode Installation
a. Go to the directory in which you downloaded the BEA Tuxedo installer specific to your platform.
b. Invoke the installation procedure by entering the following command:sh filename.bin
In this command, filename is the name of the BEA Tuxedo installer.
For instructions on completing the installation process, see �Running GUI-Mode Installation� on page 2-5.
5. If you are installing BEA Tuxedo from the CD-ROM:
a. Mount the CD-ROM as a filesystem and insert the BEA Tuxedo CD-ROM into the CD-ROM drive.
b. Go to the tux8_new_installer directory of the mounted CD-ROM.
c. Invoke the installation procedure by entering the following command:sh filename.bin
In this command, filename is the name of the BEA Tuxedo installer specific to your platform.
6. For instructions on completing the installation process, see �Running GUI-Mode Installation� on page 2-5.
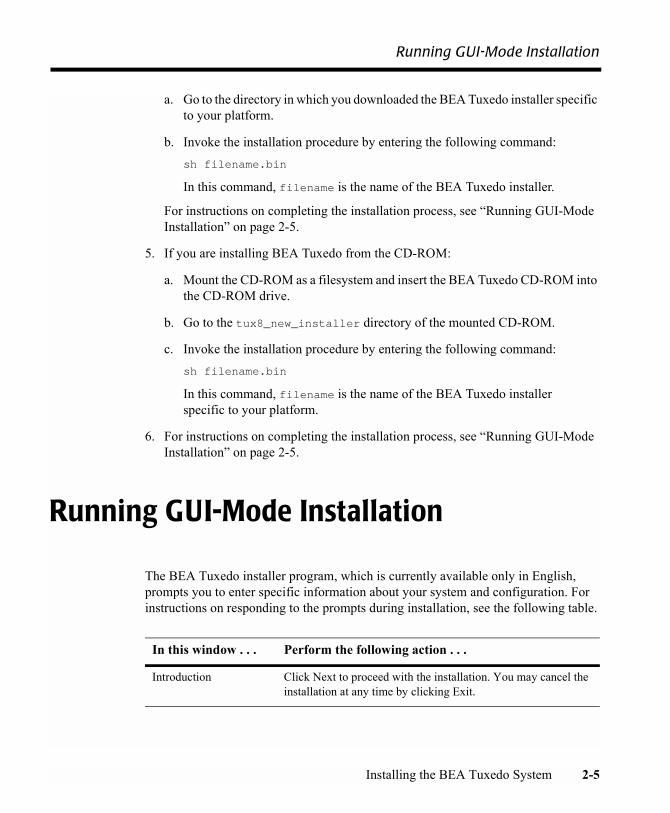
Running GUI-Mode Installation
The BEA Tuxedo installer program, which is currently available only in English, prompts you to enter specific information about your system and configuration. For instructions on responding to the prompts during installation, see the following table.
In this window . . . Perform the following action . . .
Introduction Click Next to proceed with the installation. You may cancel the installation at any time by clicking Exit.
Installing the BEA Tuxedo System 2-5
2 Installing BEA Tuxedo Using GUI-Mode Installation
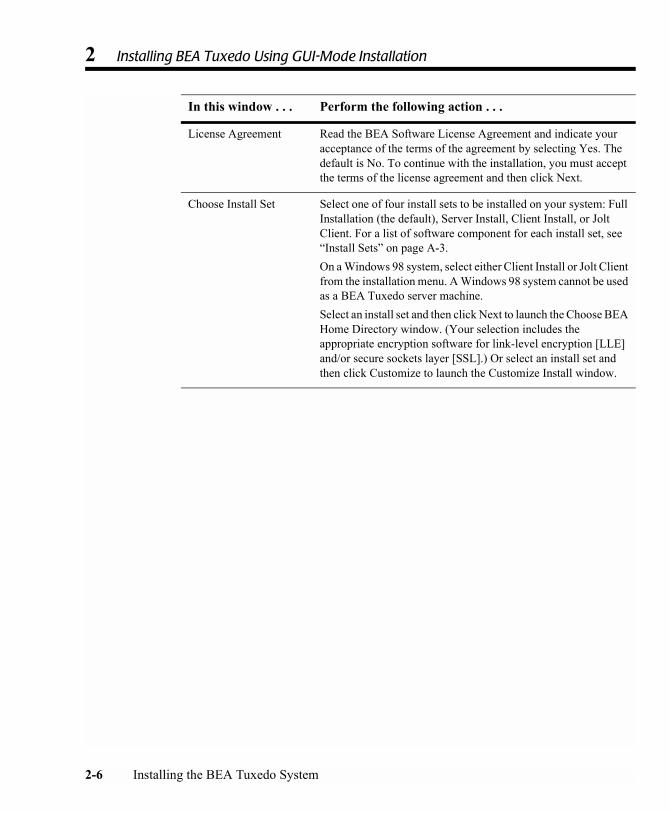
License Agreement Read the BEA Software License Agreement and indicate your acceptance of the terms of the agreement by selecting Yes. The default is No. To continue with the installation, you must accept the terms of the license agreement and then click Next.
Choose Install Set Select one of four install sets to be installed on your system: Full Installation (the default), Server Install, Client Install, or Jolt Client. For a list of software component for each install set, see �Install Sets� on page A-3.On a Windows 98 system, select either Client Install or Jolt Client from the installation menu. A Windows 98 system cannot be used as a BEA Tuxedo server machine.Select an install set and then click Next to launch the Choose BEA Home Directory window. (Your selection includes the appropriate encryption software for link-level encryption [LLE] and/or secure sockets layer [SSL].) Or select an install set and then click Customize to launch the Customize Install window.
In this window . . . Perform the following action . . .
2-6 Installing the BEA Tuxedo System

Running GUI-Mode Installation
Customize Install Deselect (clear) one or more software components from the selected install set, or choose one of the other three install sets or the Custom Set from the drop-down list menu and customize its software components.Observe the following software component mappings, deselect the software components that you do not want to install, and then click Next to continue with the installation:! Tuxedo Server�contains ATMI server software; CORBA
C++ server software; BEA Jolt server software; and BEA Tuxedo Administration Console software
! Tuxedo Client�contains BEA Tuxedo Workstation (/WS) client software
! CORBA Client�Contains CORBA C++ client software (C++ client ORB), including environmental objects; and CORBA Java client software (BEA-branded Java client ORB), including environmental objects
! Jolt Client�contains BEA Jolt client software! ActiveX Client�contains the ActiveX client software for
Windows systems, including environmental objects and the BEA Application Builder
Your selections include the appropriate encryption software for LLE and/or SSL.
Choose BEA Home Directory
Specify the BEA Home directory that will serve as the central support directory for all BEA products installed on the target system. If you already have a BEA Home directory on your system, you can select that directory (recommended) or create a new BEA Home directory. If you choose to create a new directory, the BEA Tuxedo installer program will automatically create the directory for you. For details about the BEA Home directory, see �BEA Home Directory� on page 1-8.Choose a BEA Home directory and then click Next to continue with the installation.
In this window . . . Perform the following action . . .
Installing the BEA Tuxedo System 2-7
2 Installing BEA Tuxedo Using GUI-Mode Installation
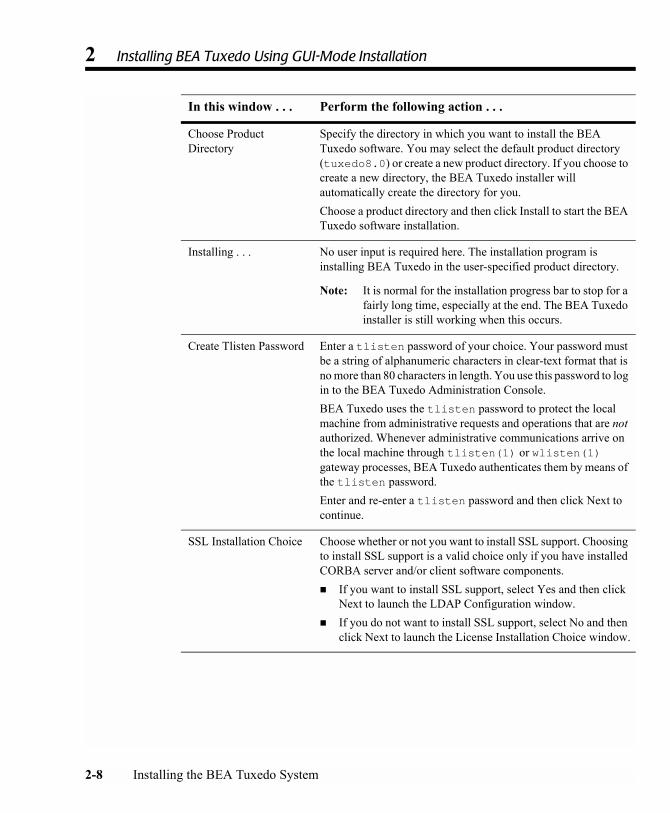
Choose Product Directory
Specify the directory in which you want to install the BEA Tuxedo software. You may select the default product directory (tuxedo8.0) or create a new product directory. If you choose to create a new directory, the BEA Tuxedo installer will automatically create the directory for you.Choose a product directory and then click Install to start the BEA Tuxedo software installation.
Installing . . . No user input is required here. The installation program is installing BEA Tuxedo in the user-specified product directory.
Note: It is normal for the installation progress bar to stop for a fairly long time, especially at the end. The BEA Tuxedo installer is still working when this occurs.
Create Tlisten Password Enter a tlisten password of your choice. Your password must be a string of alphanumeric characters in clear-text format that is no more than 80 characters in length. You use this password to log in to the BEA Tuxedo Administration Console.BEA Tuxedo uses the tlisten password to protect the local machine from administrative requests and operations that are not authorized. Whenever administrative communications arrive on the local machine through tlisten(1) or wlisten(1) gateway processes, BEA Tuxedo authenticates them by means of the tlisten password.Enter and re-enter a tlisten password and then click Next to continue.
SSL Installation Choice Choose whether or not you want to install SSL support. Choosing to install SSL support is a valid choice only if you have installed CORBA server and/or client software components.! If you want to install SSL support, select Yes and then click
Next to launch the LDAP Configuration window. ! If you do not want to install SSL support, select No and then
click Next to launch the License Installation Choice window.
In this window . . . Perform the following action . . .
2-8 Installing the BEA Tuxedo System
Running GUI-Mode Installation
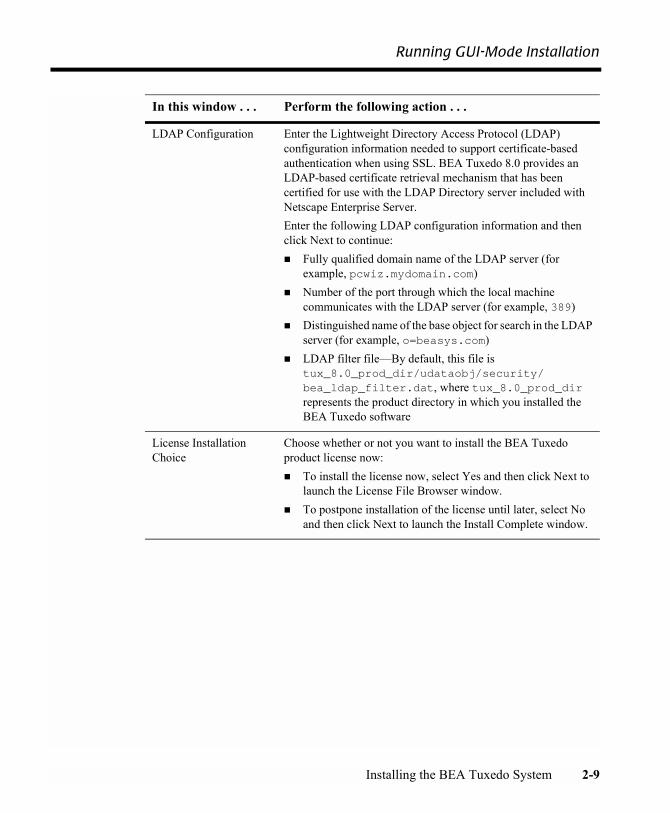
LDAP Configuration Enter the Lightweight Directory Access Protocol (LDAP) configuration information needed to support certificate-based authentication when using SSL. BEA Tuxedo 8.0 provides an LDAP-based certificate retrieval mechanism that has been certified for use with the LDAP Directory server included with Netscape Enterprise Server.Enter the following LDAP configuration information and then click Next to continue:! Fully qualified domain name of the LDAP server (for
example, pcwiz.mydomain.com)! Number of the port through which the local machine
communicates with the LDAP server (for example, 389)! Distinguished name of the base object for search in the LDAP
server (for example, o=beasys.com)! LDAP filter file�By default, this file is
tux_8.0_prod_dir/udataobj/security/bea_ldap_filter.dat, where tux_8.0_prod_dir represents the product directory in which you installed the BEA Tuxedo software
License Installation Choice
Choose whether or not you want to install the BEA Tuxedo product license now:! To install the license now, select Yes and then click Next to
launch the License File Browser window. ! To postpone installation of the license until later, select No
and then click Next to launch the Install Complete window.
In this window . . . Perform the following action . . .
Installing the BEA Tuxedo System 2-9
2 Installing BEA Tuxedo Using GUI-Mode Installation
Congratulations! Your installation of the BEA Tuxedo software is complete!
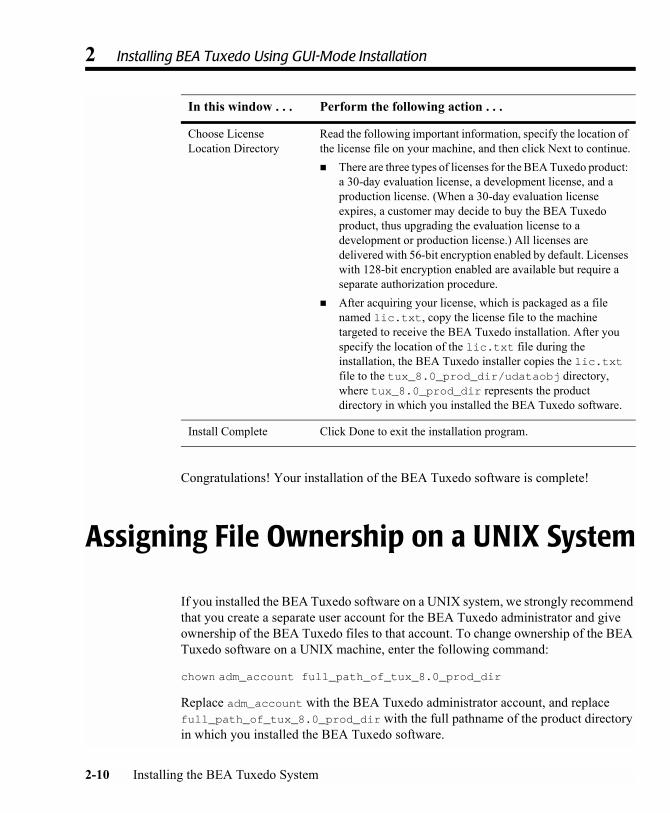
Assigning File Ownership on a UNIX System
If you installed the BEA Tuxedo software on a UNIX system, we strongly recommend that you create a separate user account for the BEA Tuxedo administrator and give ownership of the BEA Tuxedo files to that account. To change ownership of the BEA Tuxedo software on a UNIX machine, enter the following command:
chown adm_account full_path_of_tux_8.0_prod_dir
Replace adm_account with the BEA Tuxedo administrator account, and replace full_path_of_tux_8.0_prod_dir with the full pathname of the product directory in which you installed the BEA Tuxedo software.
Choose License Location Directory
Read the following important information, specify the location of the license file on your machine, and then click Next to continue.! There are three types of licenses for the BEA Tuxedo product:
a 30-day evaluation license, a development license, and a production license. (When a 30-day evaluation license expires, a customer may decide to buy the BEA Tuxedo product, thus upgrading the evaluation license to a development or production license.) All licenses are delivered with 56-bit encryption enabled by default. Licenses with 128-bit encryption enabled are available but require a separate authorization procedure.
! After acquiring your license, which is packaged as a file named lic.txt, copy the license file to the machine targeted to receive the BEA Tuxedo installation. After you specify the location of the lic.txt file during the installation, the BEA Tuxedo installer copies the lic.txt file to the tux_8.0_prod_dir/udataobj directory, where tux_8.0_prod_dir represents the product directory in which you installed the BEA Tuxedo software.
Install Complete Click Done to exit the installation program.
In this window . . . Perform the following action . . .
2-10 Installing the BEA Tuxedo System
Understanding the BEA Tuxedo Shortcuts on a Windows System
Understanding the BEA Tuxedo Shortcuts on a Windows System
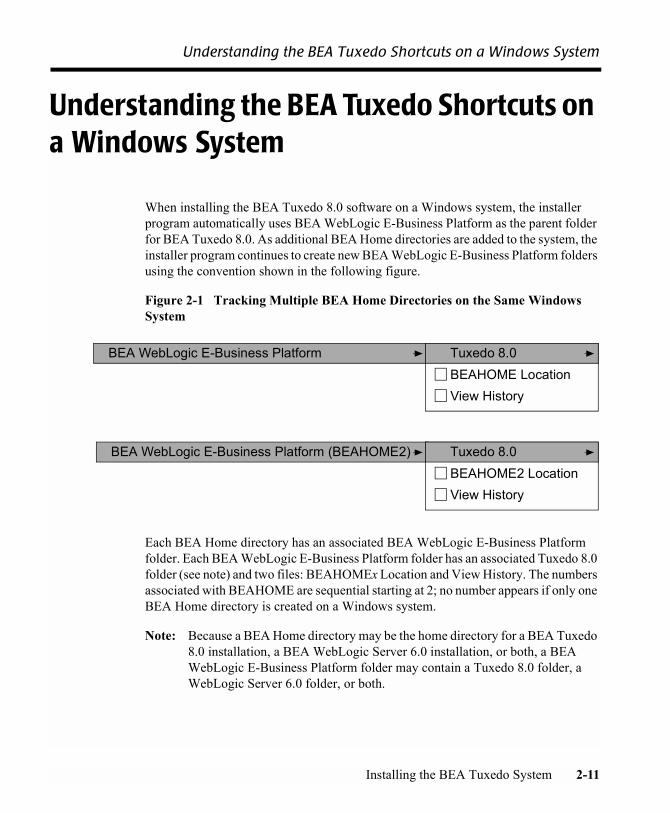
When installing the BEA Tuxedo 8.0 software on a Windows system, the installer program automatically uses BEA WebLogic E-Business Platform as the parent folder for BEA Tuxedo 8.0. As additional BEA Home directories are added to the system, the installer program continues to create new BEA WebLogic E-Business Platform folders using the convention shown in the following figure.
Figure 2-1 Tracking Multiple BEA Home Directories on the Same Windows System
Each BEA Home directory has an associated BEA WebLogic E-Business Platform folder. Each BEA WebLogic E-Business Platform folder has an associated Tuxedo 8.0 folder (see note) and two files: BEAHOMEx Location and View History. The numbers associated with BEAHOME are sequential starting at 2; no number appears if only one BEA Home directory is created on a Windows system.
Note: Because a BEA Home directory may be the home directory for a BEA Tuxedo 8.0 installation, a BEA WebLogic Server 6.0 installation, or both, a BEA WebLogic E-Business Platform folder may contain a Tuxedo 8.0 folder, a WebLogic Server 6.0 folder, or both.
BEA WebLogic E-Business Platform
View HistoryBEAHOME LocationTuxedo 8.0
BEA WebLogic E-Business Platform (BEAHOME2)
View HistoryBEAHOME2 LocationTuxedo 8.0
Installing the BEA Tuxedo System 2-11

2 Installing BEA Tuxedo Using GUI-Mode Installation
For a given BEA Home directory and BEA WebLogic E-Business Platform folder, the BEAHOME file contains the pathname of the BEA Home directory, and the View History file contains a history of installation and uninstallation for the BEA Home directory. To display the content of either file, double-click the text icon associated with the appropriate file. The BEAHOME and history files contain information extracted from the logs/log.txt file located in the BEA Home directory.
The Tuxedo 8.0 folder (Start→Programs→BEA WebLogic E-Business Platform→Tuxedo 8.0) contains the following shortcuts:
! AppBuilder�appears even if you did not install ActiveX clients. Choosing AppBuilder enables you to enter the full pathname of a BEA Tuxedo IIOP listener. (IIOP is an acronym for Internet Inter-ORB Protocol; ORB, for Object Request Broker.) For more information about Application Builder, see the appropriate Microsoft documentation.
! BEAlic�appears even if you did install the BEA Tuxedo product license during the installation. Choosing BEAlic enables you to install the product license (lic.txt file) after the installation. For more information about installing the license file, see �Installing the Product License After You Install BEA Tuxedo� on page 6-8.
! Uninstall Tuxedo 8.0�choosing Uninstall Tuxedo 8.0 enables you to uninstall the BEA Tuxedo 8.0 software. For more information about uninstalling BEA Tuxedo, see �Uninstalling BEA Tuxedo� on page 6-36.
Understanding the BEA Administration Program on a Windows System
In addition to the BEA Tuxedo Administration Console, the BEA Tuxedo 8.0 software for Windows provides a BEA Administration program and two Windows services (Tlisten and BEA procMGR) for configuring the BEA Tuxedo system on a Windows 2000 system. These tools are installed on a Windows 2000 system, however, only if the installation included BEA Tuxedo server components.
After you have installed or upgraded the BEA Tuxedo software on a Windows 2000 system, you can use the BEA Administration window to perform the following tasks:
2-12 Installing the BEA Tuxedo System
Understanding the BEA Administration Program on a Windows System
! Accessing Other Machines on the Network
! Setting and Modifying Environment Variables
! Directing System Messages to the Windows 2000 Event Log
! Configuring tlisten Processes to Start Automatically
! Configuring IPC Resources to Maximize System Performance
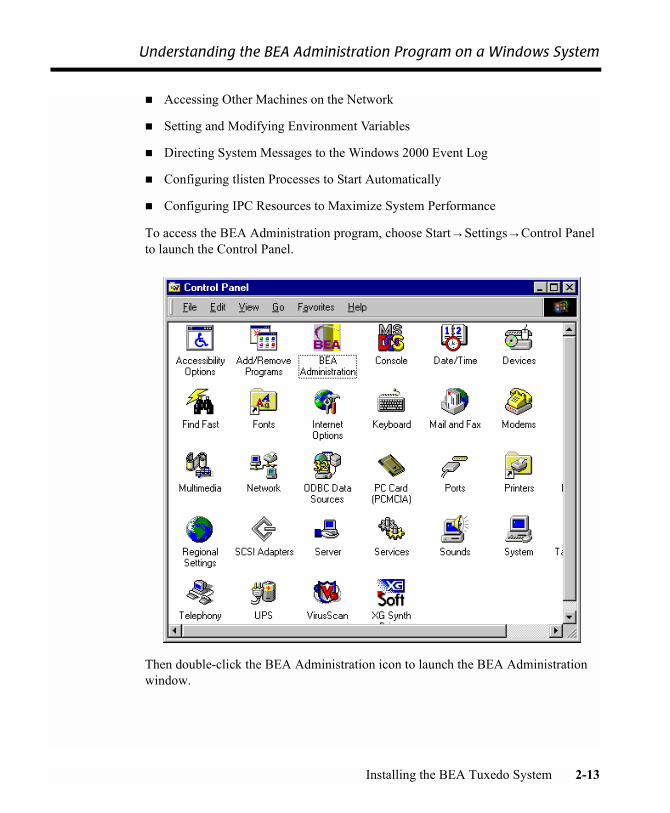
To access the BEA Administration program, choose Start→Settings→Control Panel to launch the Control Panel.
Then double-click the BEA Administration icon to launch the BEA Administration window.
Installing the BEA Tuxedo System 2-13
2 Installing BEA Tuxedo Using GUI-Mode Installation
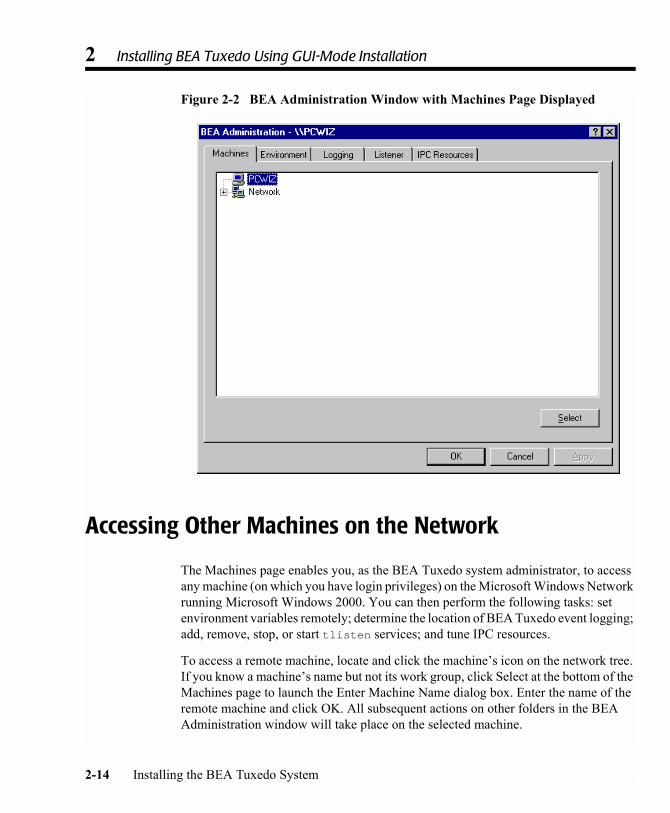
Figure 2-2 BEA Administration Window with Machines Page Displayed
Accessing Other Machines on the Network
The Machines page enables you, as the BEA Tuxedo system administrator, to access any machine (on which you have login privileges) on the Microsoft Windows Network running Microsoft Windows 2000. You can then perform the following tasks: set environment variables remotely; determine the location of BEA Tuxedo event logging; add, remove, stop, or start tlisten services; and tune IPC resources.
To access a remote machine, locate and click the machine�s icon on the network tree. If you know a machine�s name but not its work group, click Select at the bottom of the Machines page to launch the Enter Machine Name dialog box. Enter the name of the remote machine and click OK. All subsequent actions on other folders in the BEA Administration window will take place on the selected machine.
2-14 Installing the BEA Tuxedo System
Understanding the BEA Administration Program on a Windows System
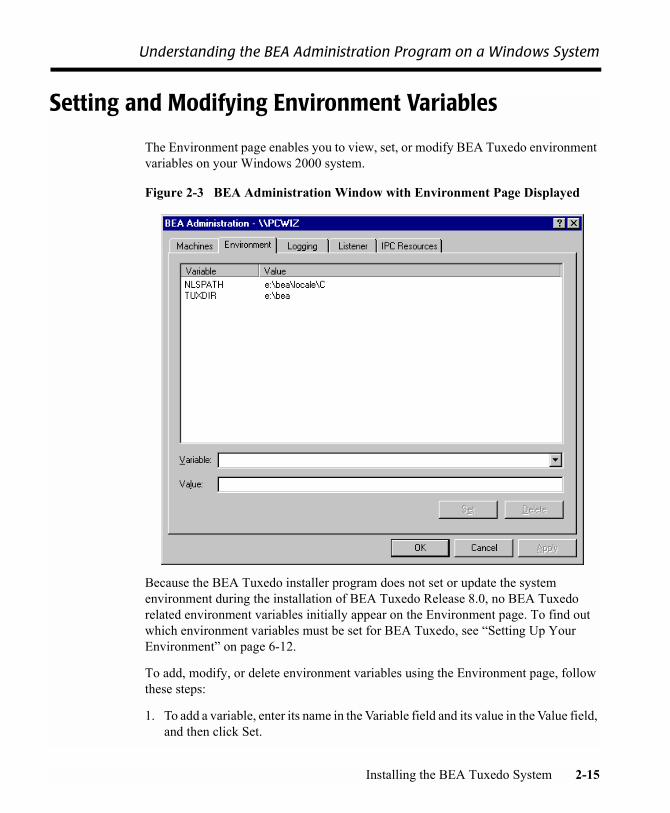
Setting and Modifying Environment Variables
The Environment page enables you to view, set, or modify BEA Tuxedo environment variables on your Windows 2000 system.
Figure 2-3 BEA Administration Window with Environment Page Displayed
Because the BEA Tuxedo installer program does not set or update the system environment during the installation of BEA Tuxedo Release 8.0, no BEA Tuxedo related environment variables initially appear on the Environment page. To find out which environment variables must be set for BEA Tuxedo, see �Setting Up Your Environment� on page 6-12.
To add, modify, or delete environment variables using the Environment page, follow these steps:
1. To add a variable, enter its name in the Variable field and its value in the Value field, and then click Set.
Installing the BEA Tuxedo System 2-15
2 Installing BEA Tuxedo Using GUI-Mode Installation
2. To modify a variable, select the variable, enter its new value in the Value field, and then click Set.
3. To delete a variable, select the variable you want to delete and then click Delete.
4. Click OK or Apply to write your changes to the Windows 2000 Registry.
Directing System Messages to the Windows 2000 Event Log
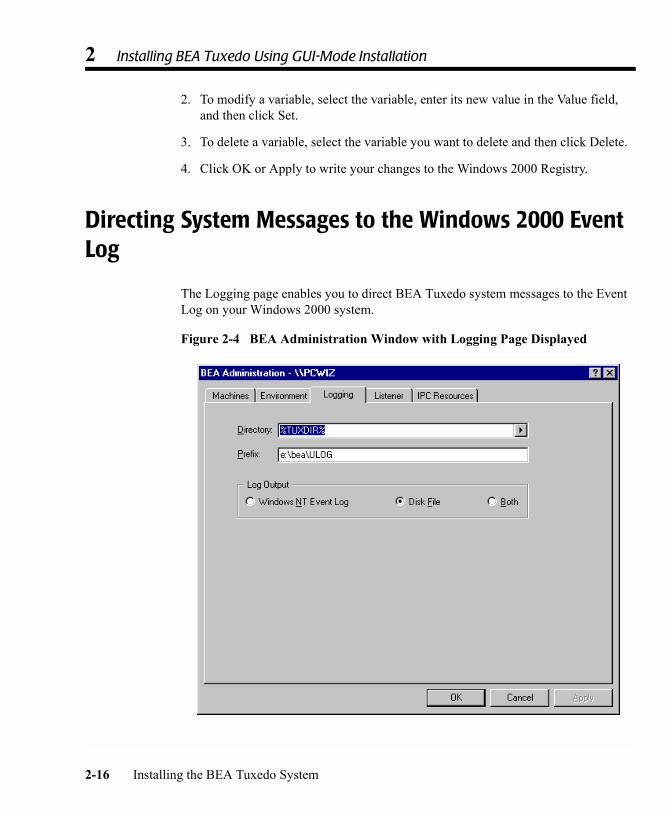
The Logging page enables you to direct BEA Tuxedo system messages to the Event Log on your Windows 2000 system.
Figure 2-4 BEA Administration Window with Logging Page Displayed
2-16 Installing the BEA Tuxedo System
Understanding the BEA Administration Program on a Windows System
You may select the Event Log option, the traditional user log Disk File option, or both. If you want traditional user log (ULOG) messages, select the directory into which ULOG messages will be written, as well as the prefix for the filename. The default prefix is ULOG, and the default filename is ULOG.mmddyy, where mmddyy represents the month, day, and year in which the log file was created.
To save your selections to the Windows 2000 Registry, click OK or Apply. To view Event Log entries, click Start→Programs→Administrative Tools→Event Viewer.
Configuring tlisten Processes to Start Automatically
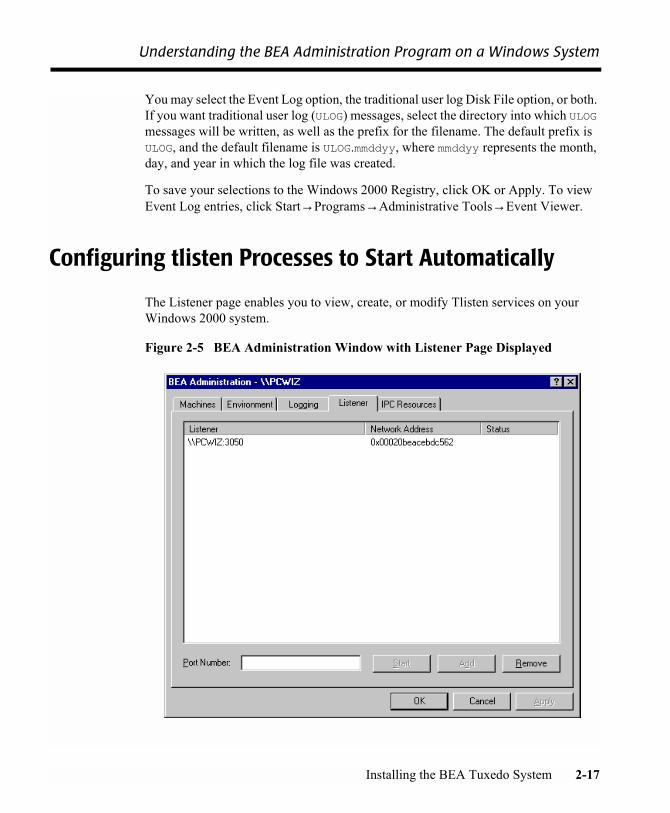
The Listener page enables you to view, create, or modify Tlisten services on your Windows 2000 system.
Figure 2-5 BEA Administration Window with Listener Page Displayed
Installing the BEA Tuxedo System 2-17
2 Installing BEA Tuxedo Using GUI-Mode Installation
During the BEA Tuxedo installation, the installer program installed a Tlisten service on your Windows 2000 system. Each time you boot your system, the Tlisten service starts a tlisten process on port 3050 of your machine. The password associated with the tlisten process is the one you entered during the installation.
A tlisten process must be started on each machine of a networked BEA Tuxedo application before the BEA Tuxedo system and application servers can boot. You use the tlisten process to perform administrative actions across multiple machines. To learn more about tlisten processes, see �Starting the tlisten Process� on page 6-17.
To add, remove, stop, or start Tlisten services using the Listener page, follow these steps:
1. To add a Tlisten service, enter a port number in the Port Number field and then click Add. (Generally, you need one tlisten process for each BEA Tuxedo application running on your machine.)
2. To remove a Tlisten service, select the Tlisten service you want to delete and then click Remove.
3. To stop a Tlisten service that has been started, select the Tlisten service you want to stop and then click Stop.
4. To start a Tlisten service that has been stopped, select the Tlisten service you want to start and then click Start.
5. Click OK or Apply to write your changes to the Windows 2000 Registry.
In addition to viewing and controlling Tlisten services using the Listener page, you can click Start→Programs→Administrative Tools→Services to launch the Services window and then view and control Tlisten services via the Services window.
Configuring IPC Resources to Maximize System Performance
The IPC Resources page enables you to configure the interprocess communication (IPC) resources on your Windows 2000 system to maximize BEA Tuxedo performance.
2-18 Installing the BEA Tuxedo System
Understanding the BEA Administration Program on a Windows System
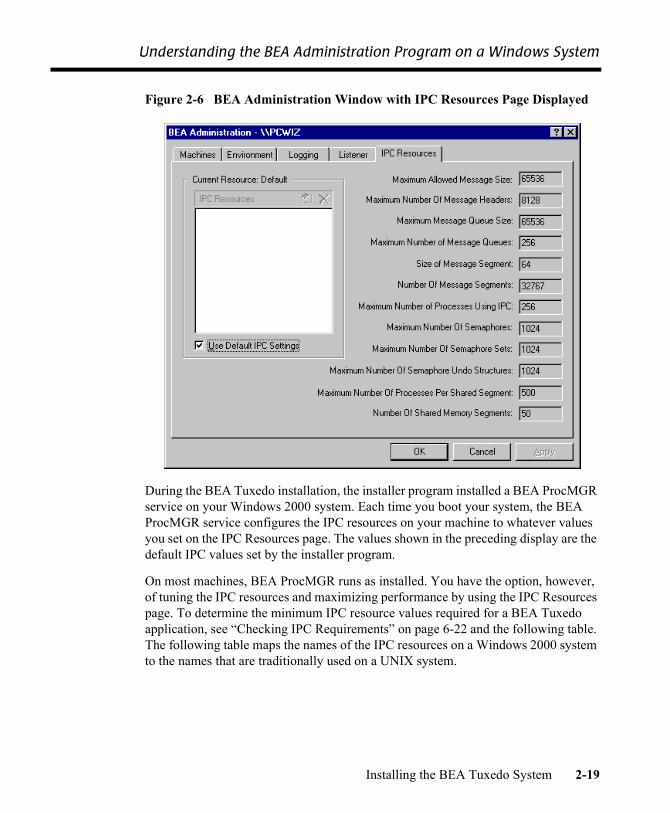
Figure 2-6 BEA Administration Window with IPC Resources Page Displayed
During the BEA Tuxedo installation, the installer program installed a BEA ProcMGR service on your Windows 2000 system. Each time you boot your system, the BEA ProcMGR service configures the IPC resources on your machine to whatever values you set on the IPC Resources page. The values shown in the preceding display are the default IPC values set by the installer program.
On most machines, BEA ProcMGR runs as installed. You have the option, however, of tuning the IPC resources and maximizing performance by using the IPC Resources page. To determine the minimum IPC resource values required for a BEA Tuxedo application, see �Checking IPC Requirements� on page 6-22 and the following table. The following table maps the names of the IPC resources on a Windows 2000 system to the names that are traditionally used on a UNIX system.
Installing the BEA Tuxedo System 2-19

2 Installing BEA Tuxedo Using GUI-Mode Installation
To modify IPC Resource values using the IPC Resources page, follow these steps:
1. In the Current Resource: Default box, click the Use Default IPC Settings check box to clear it. An insert box appears in the Current Resource: Default box.
2. Click the insert box, enter the name of your Windows 2000 machine, and press Enter.
3. Click the fields next to the IPC resources you want to change and enter the desired values.
4. Click OK or Apply to write your changes to the Windows 2000 Registry.
5. Stop and restart the BEA ProcMGR service to put your changes into effect: click Start→Programs→Administrative Tools→Services to launch the Services window and then stop and restart the BEA ProcMGR via the Services window.
Table 2-1 IPC Resource Name Mappings Between Windows and UNIX Systems
Windows 2000 Name Traditional UNIX Name
Maximum Allowed Message Size MSGMAX
Maximum Number of Message Headers No matching name
Maximum Message Queue Size MSGMNB
Maximum Number of Message Queues MSGMNI
Size of Message Segment MSGSSZ
Number of Message Segments MSGSEG
Maximum Number of Processes Using IPC NPROC
Maximum Number of Semaphores SEMMNS
Maximum Number of Semaphore Sets SEMMNI
Maximum Number of Semaphore Undo Structures SEMMNU
Maximum Number of Processes Per Shared Segment SHMSEG
Number of Shared Memory Segments SHMMNI
2-20 Installing the BEA Tuxedo System
Reviewing the Windows 2000 Registry Content
You can view the performance of a running BEA Tuxedo application on the Windows 2000 Performance Monitor. Choose Start→Programs→Administration Tools→Performance Monitor to launch the Performance Monitor window.
Reviewing the Windows 2000 Registry Content
The Windows 2000 Registry is the repository for all hardware, software, and application configuration settings for the Windows 2000 system. During the BEA Tuxedo installation, the installer program writes general installation information as well as IPC Resource values to the Registry. The structure of the Registry relevant to BEA Tuxedo is as follows.
HKEY_LOCAL_MACHINE\Software\BEA Systems\Tuxedo\8.0\...
! Developer
! Environment
! Security
To view this structure, choose Start→Run to launch the Run dialog box, enter regEdt32, and click OK to launch the Registry Editor window.
Developer Key
The Developer key stores product information, including the major and minor version numbers of the release, and user and company names.
Environment Key
The Environment key stores the locations referenced by the BEA Tuxedo environment variables set on your Windows 2000 system. It also stores other values, such as IPC resource settings.
Installing the BEA Tuxedo System 2-21
2 Installing BEA Tuxedo Using GUI-Mode Installation
Security Key
The Security key holds the access permissions for BEA Tuxedo processes and services. The following permissions are mandatory:
! Any user who runs tlisten(1) must have read access permissions.
! The account under which the BEA ProcMGR service is running must have read access permissions.
We recommend full control permissions for the administrator.
What Do I Do Next?
To configure your BEA Tuxedo software and verify that your software is installed correctly, see �Performing Post-Installation Tasks� on page 6-1.
2-22 Installing the BEA Tuxedo System
CHAPTER
3 Installing BEA Tuxedo on UNIX Systems Using Console-Mode Installation
The following sections describe how to install BEA Tuxedo using console-mode installation:
! What Is Console-Mode Installation?
! Before You Start
! Starting Console-Mode Installation
! Running Console-Mode Installation
! What Do I Do Next?
Installing the BEA Tuxedo System 3-1
3 Installing BEA Tuxedo on UNIX Systems Using Console-Mode Installation
What Is Console-Mode Installation?
Console-mode installation is the text-based method of executing the BEA Installation program. It can be run only on UNIX systems and is intended for UNIX systems with nongraphics consoles. Console-mode installation offers the same capabilities as graphics-based installation.
Before You Start
If you are upgrading from a 5.1 or pre-5.1 version of WebLogic Enterprise, or from a 7.1 or pre-7.1 version of BEA Tuxedo, see �Upgrading the BEA Tuxedo System to Release 8.0� on page 5-1, and follow the instructions given there. Then return here to continue your BEA Tuxedo installation.
Starting Console-Mode Installation
To start the console-mode installation process, follow these steps:
1. Select a UNIX system that meets the hardware and software requirements described in Appendix A, �BEA Tuxedo 8.0 Platform Data Sheets.�
2. Log in to the target UNIX system using the root username.
You need superuser privileges to mount the BEA Tuxedo CD on a UNIX system. If you are installing BEA Tuxedo by downloading it from the BEA Web site, you do not need superuser privileges.
3. Make sure that you have enough free space for the BEA Tuxedo installation.
For disk space requirements, see Appendix A, �BEA Tuxedo 8.0 Platform Data Sheets.� For important disk space allocation information, see Appendix C, �File and Database Management and Disk Space Allocation.�
3-2 Installing the BEA Tuxedo System
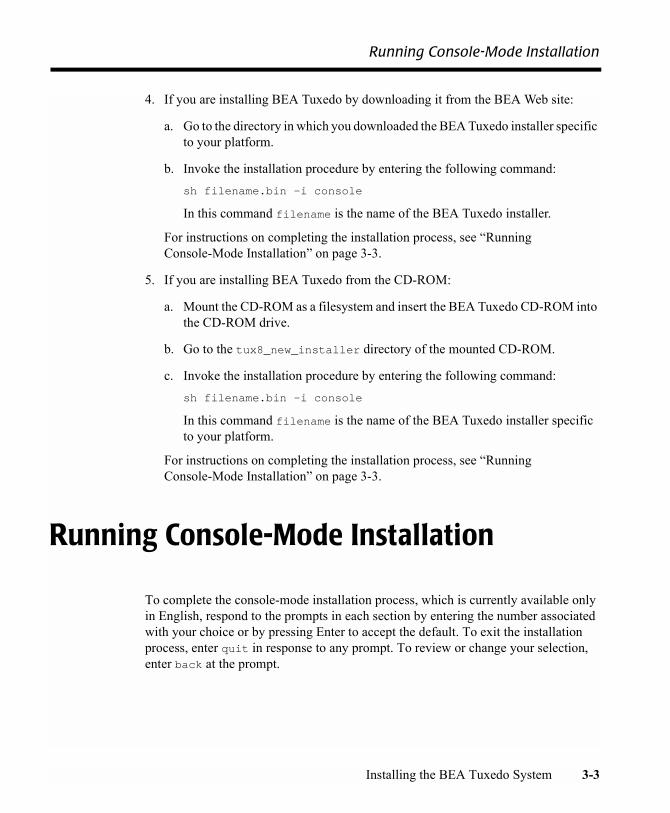
Running Console-Mode Installation
4. If you are installing BEA Tuxedo by downloading it from the BEA Web site:
a. Go to the directory in which you downloaded the BEA Tuxedo installer specific to your platform.
b. Invoke the installation procedure by entering the following command:sh filename.bin -i console
In this command filename is the name of the BEA Tuxedo installer.
For instructions on completing the installation process, see �Running Console-Mode Installation� on page 3-3.
5. If you are installing BEA Tuxedo from the CD-ROM:
a. Mount the CD-ROM as a filesystem and insert the BEA Tuxedo CD-ROM into the CD-ROM drive.
b. Go to the tux8_new_installer directory of the mounted CD-ROM.
c. Invoke the installation procedure by entering the following command:sh filename.bin -i console
In this command filename is the name of the BEA Tuxedo installer specific to your platform.
For instructions on completing the installation process, see �Running Console-Mode Installation� on page 3-3.
Running Console-Mode Installation
To complete the console-mode installation process, which is currently available only in English, respond to the prompts in each section by entering the number associated with your choice or by pressing Enter to accept the default. To exit the installation process, enter quit in response to any prompt. To review or change your selection, enter back at the prompt.
Installing the BEA Tuxedo System 3-3
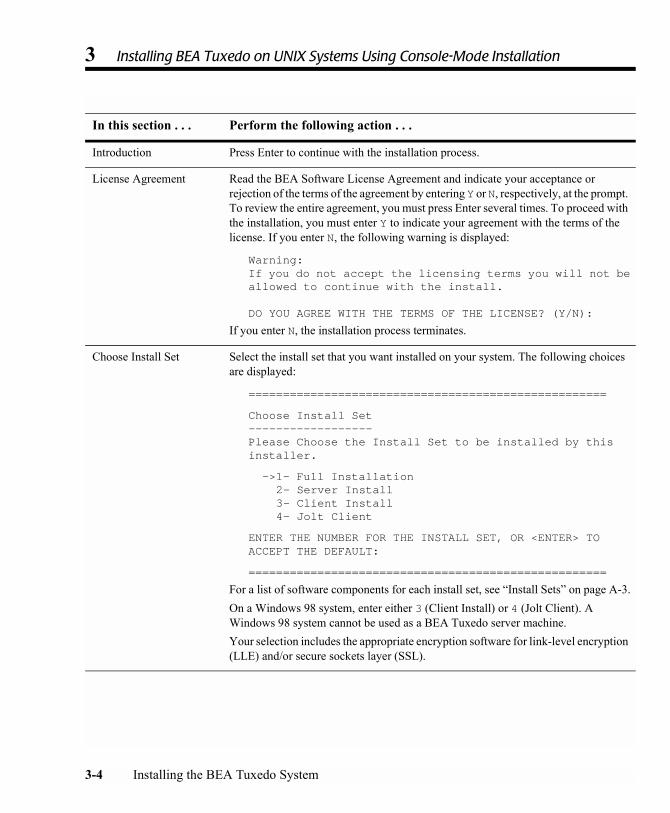
3 Installing BEA Tuxedo on UNIX Systems Using Console-Mode Installation
In this section . . . Perform the following action . . .
Introduction Press Enter to continue with the installation process.
License Agreement Read the BEA Software License Agreement and indicate your acceptance or rejection of the terms of the agreement by entering Y or N, respectively, at the prompt. To review the entire agreement, you must press Enter several times. To proceed with the installation, you must enter Y to indicate your agreement with the terms of the license. If you enter N, the following warning is displayed:
Warning:If you do not accept the licensing terms you will not beallowed to continue with the install.
DO YOU AGREE WITH THE TERMS OF THE LICENSE? (Y/N):
If you enter N, the installation process terminates.
Choose Install Set Select the install set that you want installed on your system. The following choices are displayed:
====================================================
Choose Install Set------------------Please Choose the Install Set to be installed by this installer.
->1- Full Installation2- Server Install3- Client Install4- Jolt Client
ENTER THE NUMBER FOR THE INSTALL SET, OR <ENTER> TO ACCEPT THE DEFAULT:
====================================================
For a list of software components for each install set, see �Install Sets� on page A-3.On a Windows 98 system, enter either 3 (Client Install) or 4 (Jolt Client). A Windows 98 system cannot be used as a BEA Tuxedo server machine.Your selection includes the appropriate encryption software for link-level encryption (LLE) and/or secure sockets layer (SSL).
3-4 Installing the BEA Tuxedo System
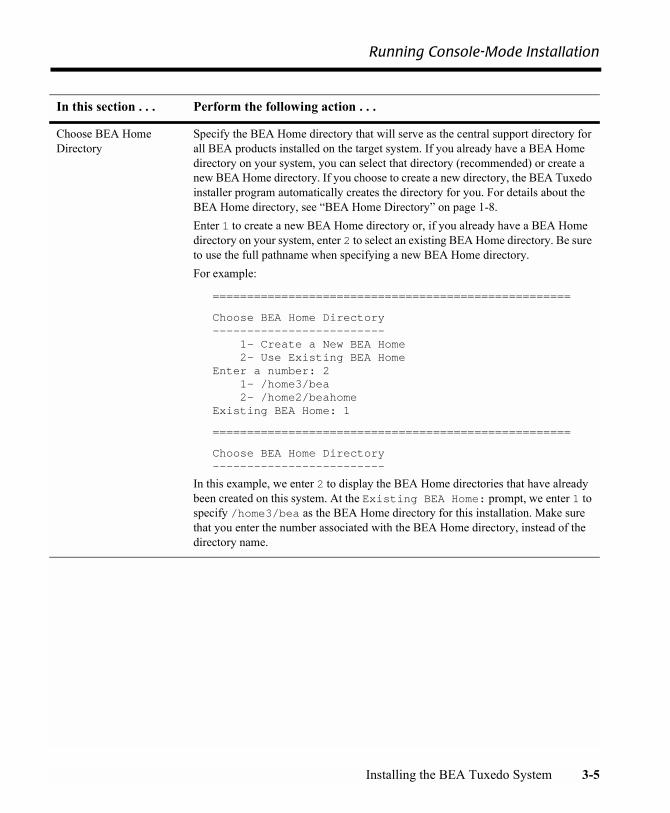
Running Console-Mode Installation
Choose BEA Home Directory
Specify the BEA Home directory that will serve as the central support directory for all BEA products installed on the target system. If you already have a BEA Home directory on your system, you can select that directory (recommended) or create a new BEA Home directory. If you choose to create a new directory, the BEA Tuxedo installer program automatically creates the directory for you. For details about the BEA Home directory, see �BEA Home Directory� on page 1-8.Enter 1 to create a new BEA Home directory or, if you already have a BEA Home directory on your system, enter 2 to select an existing BEA Home directory. Be sure to use the full pathname when specifying a new BEA Home directory.For example:
====================================================
Choose BEA Home Directory-------------------------
1- Create a New BEA Home 2- Use Existing BEA Home
Enter a number: 2 1- /home3/bea 2- /home2/beahome
Existing BEA Home: 1
====================================================
Choose BEA Home Directory-------------------------
In this example, we enter 2 to display the BEA Home directories that have already been created on this system. At the Existing BEA Home: prompt, we enter 1 to specify /home3/bea as the BEA Home directory for this installation. Make sure that you enter the number associated with the BEA Home directory, instead of the directory name.
In this section . . . Perform the following action . . .
Installing the BEA Tuxedo System 3-5
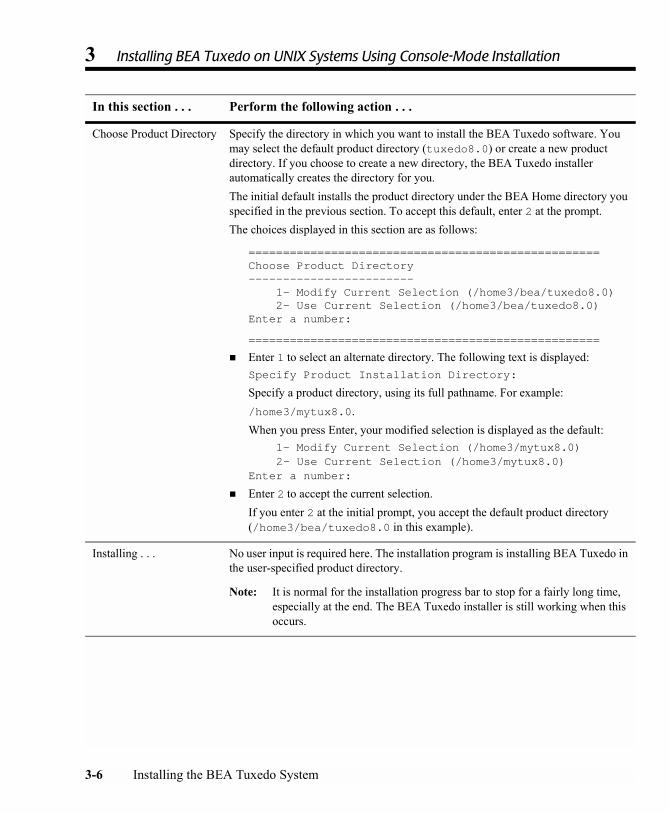
3 Installing BEA Tuxedo on UNIX Systems Using Console-Mode Installation
Choose Product Directory Specify the directory in which you want to install the BEA Tuxedo software. You may select the default product directory (tuxedo8.0) or create a new product directory. If you choose to create a new directory, the BEA Tuxedo installer automatically creates the directory for you.The initial default installs the product directory under the BEA Home directory you specified in the previous section. To accept this default, enter 2 at the prompt.The choices displayed in this section are as follows:
===================================================Choose Product Directory------------------------
1- Modify Current Selection (/home3/bea/tuxedo8.0) 2- Use Current Selection (/home3/bea/tuxedo8.0)
Enter a number:
===================================================
! Enter 1 to select an alternate directory. The following text is displayed:Specify Product Installation Directory:
Specify a product directory, using its full pathname. For example:/home3/mytux8.0. When you press Enter, your modified selection is displayed as the default:
1- Modify Current Selection (/home3/mytux8.0) 2- Use Current Selection (/home3/mytux8.0)
Enter a number:
! Enter 2 to accept the current selection.If you enter 2 at the initial prompt, you accept the default product directory (/home3/bea/tuxedo8.0 in this example).
Installing . . . No user input is required here. The installation program is installing BEA Tuxedo in the user-specified product directory.
Note: It is normal for the installation progress bar to stop for a fairly long time, especially at the end. The BEA Tuxedo installer is still working when this occurs.
In this section . . . Perform the following action . . .
3-6 Installing the BEA Tuxedo System
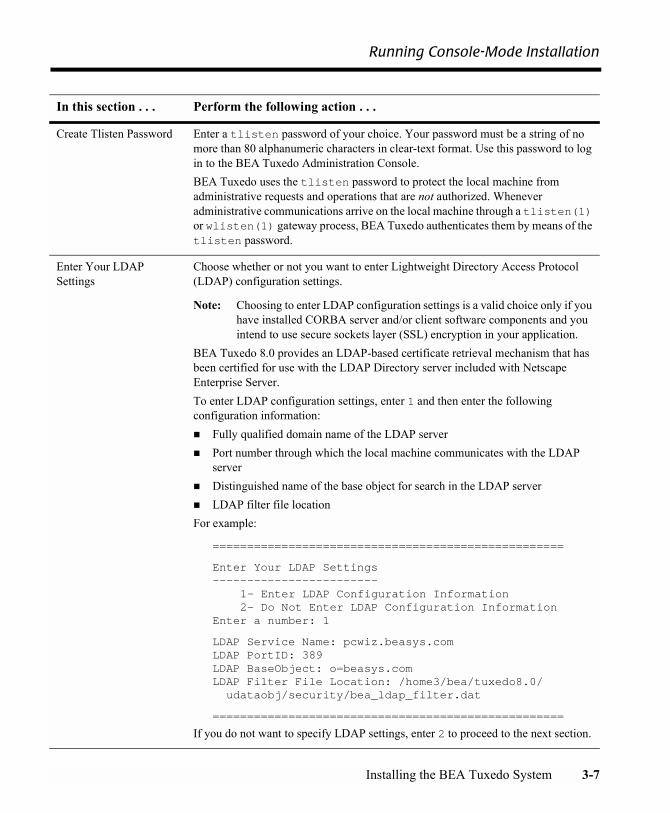
Running Console-Mode Installation
Create Tlisten Password Enter a tlisten password of your choice. Your password must be a string of no more than 80 alphanumeric characters in clear-text format. Use this password to log in to the BEA Tuxedo Administration Console.BEA Tuxedo uses the tlisten password to protect the local machine from administrative requests and operations that are not authorized. Whenever administrative communications arrive on the local machine through a tlisten(1) or wlisten(1) gateway process, BEA Tuxedo authenticates them by means of the tlisten password.
Enter Your LDAP Settings
Choose whether or not you want to enter Lightweight Directory Access Protocol (LDAP) configuration settings.
Note: Choosing to enter LDAP configuration settings is a valid choice only if you have installed CORBA server and/or client software components and you intend to use secure sockets layer (SSL) encryption in your application.
BEA Tuxedo 8.0 provides an LDAP-based certificate retrieval mechanism that has been certified for use with the LDAP Directory server included with Netscape Enterprise Server.To enter LDAP configuration settings, enter 1 and then enter the following configuration information:! Fully qualified domain name of the LDAP server! Port number through which the local machine communicates with the LDAP
server! Distinguished name of the base object for search in the LDAP server! LDAP filter file locationFor example:
===================================================
Enter Your LDAP Settings------------------------
1- Enter LDAP Configuration Information2- Do Not Enter LDAP Configuration Information
Enter a number: 1
LDAP Service Name: pcwiz.beasys.comLDAP PortID: 389LDAP BaseObject: o=beasys.comLDAP Filter File Location: /home3/bea/tuxedo8.0/udataobj/security/bea_ldap_filter.dat
===================================================
If you do not want to specify LDAP settings, enter 2 to proceed to the next section.
In this section . . . Perform the following action . . .
Installing the BEA Tuxedo System 3-7
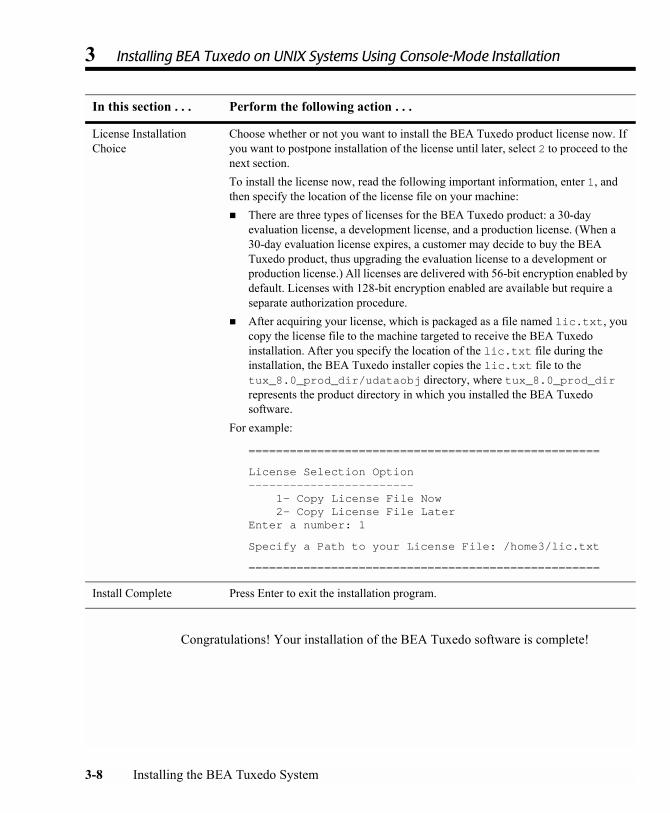
3 Installing BEA Tuxedo on UNIX Systems Using Console-Mode Installation
Congratulations! Your installation of the BEA Tuxedo software is complete!
License Installation Choice
Choose whether or not you want to install the BEA Tuxedo product license now. If you want to postpone installation of the license until later, select 2 to proceed to the next section.To install the license now, read the following important information, enter 1, and then specify the location of the license file on your machine:! There are three types of licenses for the BEA Tuxedo product: a 30-day
evaluation license, a development license, and a production license. (When a 30-day evaluation license expires, a customer may decide to buy the BEA Tuxedo product, thus upgrading the evaluation license to a development or production license.) All licenses are delivered with 56-bit encryption enabled by default. Licenses with 128-bit encryption enabled are available but require a separate authorization procedure.
! After acquiring your license, which is packaged as a file named lic.txt, you copy the license file to the machine targeted to receive the BEA Tuxedo installation. After you specify the location of the lic.txt file during the installation, the BEA Tuxedo installer copies the lic.txt file to the tux_8.0_prod_dir/udataobj directory, where tux_8.0_prod_dir represents the product directory in which you installed the BEA Tuxedo software.
For example:
===================================================
License Selection Option------------------------
1- Copy License File Now2- Copy License File Later
Enter a number: 1
Specify a Path to your License File: /home3/lic.txt
===================================================
Install Complete Press Enter to exit the installation program.
In this section . . . Perform the following action . . .
3-8 Installing the BEA Tuxedo System
What Do I Do Next?
What Do I Do Next?
To prepare for tasks that must be performed after you finish installing the software, read the following sections:
! �Assigning File Ownership on a UNIX System� on page 2-10
! �Understanding the BEA Tuxedo Shortcuts on a Windows System� on page 2-11
! �Understanding the BEA Administration Program on a Windows System� on page 2-12
! �Reviewing the Windows 2000 Registry Content� on page 2-21
To configure your BEA Tuxedo software and verify that your software is installed correctly, see �Performing Post-Installation Tasks� on page 6-1.
Installing the BEA Tuxedo System 3-9
3 Installing BEA Tuxedo on UNIX Systems Using Console-Mode Installation
3-10 Installing the BEA Tuxedo System
CHAPTER
4 Installing BEA Tuxedo Using Silent Installation
The following sections describe how to install BEA Tuxedo using the silent mode on both Windows and UNIX systems:
! What Is Silent Installation?
! Before You Start
! Using Silent Installation: Main Steps
! Creating a Template File
! Invoking the Silent Installation Process on a Windows System
! Invoking the Silent Installation Process on a UNIX System
! Windows Template File
! UNIX Template File
! What Do I Do Next?
Installing the BEA Tuxedo System 4-1
4 Installing BEA Tuxedo Using Silent Installation
What Is Silent Installation?
When you perform a silent installation, the settings for your configuration are read from a text file that you create before beginning the installation, so manual intervention is unnecessary. Silent installation works on both Windows and UNIX systems.
Silent installation enables you to set installation configurations only once and then use those configurations to duplicate the installation on many machines.
Note: Using silent installation implies your consent to the BEA License Agreement. You neither see a copy of the BEA Software License Agreement nor have any means of accepting the terms of the agreement.
Before You Start
If you are upgrading from a 5.1 or pre-5.1 version of BEA WebLogic Enterprise, or from a 7.1 or pre-7.1 version of the BEA Tuxedo software, see �Upgrading the BEA Tuxedo System to Release 8.0� on page 5-1 and follow the instructions given there. Then return here to continue your BEA Tuxedo installation.
Using Silent Installation: Main Steps
To use the silent installation method, you must perform two primary steps:
1. Create a template file that contains configuration settings for items such as the BEA Home directory, the product directory, and the install set appropriate for your installation. For a detailed procedure, see �Creating a Template File� on page 4-3. Two sample template files are provided in �Windows Template File� on page 4-8 and �UNIX Template File� on page 4-10.
4-2 Installing the BEA Tuxedo System
Creating a Template File
2. Invoke the installation process using the values specified in the template files. For a detailed procedure, see �Invoking the Silent Installation Process on a Windows System� on page 4-5 and �Invoking the Silent Installation Process on a UNIX System� on page 4-6.
Creating a Template File
To create a template file for use in the silent installation process, follow these steps:
1. Display the template file specific to your platform in a supported browser. The following templates are available in the online documentation:
" Windows template file at:http://edocs.bea.com/tuxedo/tux80/ins_temp/win_tmp.htm
" UNIX template file at:http://edocs.bea.com/tuxedo/tux80/ins_temp/unix_tmp.htm
2. Copy and save the contents of the template file in a text file named installer.properties.
3. In the installer.properties file, modify the values for the keywords shown in the following table to create your desired configuration.
Table 4-1 The installer.properties File
For this keyword . . . Enter the following value . . .
INSTALLER_UI= The mode of installation. The default is silent; do not modify this value.
USER_LOCALE= The language of the text displayed during the installation. The default is en for English; do not modify this value.
BEAHOME= The full pathname of the BEA Home directory of your choice.
USER_INSTALL_DIR= The full pathname of the product directory of your choice.
C_ldapName= The fully qualified domain name of the Lightweight Directory Access Protocol (LDAP) server of your choice; for example, pcwiz.mydomain.com. (See Note after the table.)
Installing the BEA Tuxedo System 4-3
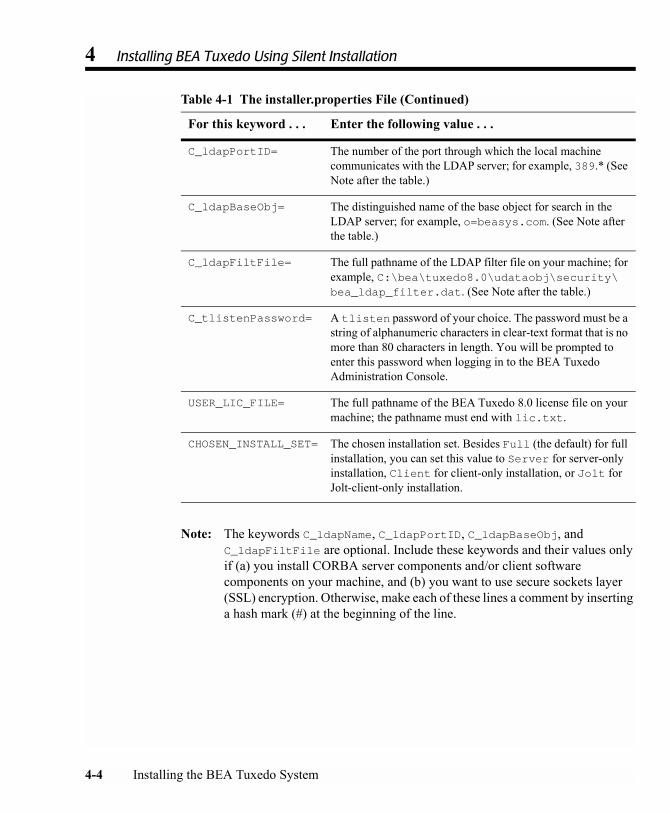
4 Installing BEA Tuxedo Using Silent Installation
Note: The keywords C_ldapName, C_ldapPortID, C_ldapBaseObj, and C_ldapFiltFile are optional. Include these keywords and their values only if (a) you install CORBA server components and/or client software components on your machine, and (b) you want to use secure sockets layer (SSL) encryption. Otherwise, make each of these lines a comment by inserting a hash mark (#) at the beginning of the line.
C_ldapPortID= The number of the port through which the local machine communicates with the LDAP server; for example, 389.* (See Note after the table.)
C_ldapBaseObj= The distinguished name of the base object for search in the LDAP server; for example, o=beasys.com. (See Note after the table.)
C_ldapFiltFile= The full pathname of the LDAP filter file on your machine; for example, C:\bea\tuxedo8.0\udataobj\security\bea_ldap_filter.dat. (See Note after the table.)
C_tlistenPassword= A tlisten password of your choice. The password must be a string of alphanumeric characters in clear-text format that is no more than 80 characters in length. You will be prompted to enter this password when logging in to the BEA Tuxedo Administration Console.
USER_LIC_FILE= The full pathname of the BEA Tuxedo 8.0 license file on your machine; the pathname must end with lic.txt.
CHOSEN_INSTALL_SET= The chosen installation set. Besides Full (the default) for full installation, you can set this value to Server for server-only installation, Client for client-only installation, or Jolt for Jolt-client-only installation.
Table 4-1 The installer.properties File (Continued)
For this keyword . . . Enter the following value . . .
4-4 Installing the BEA Tuxedo System

Invoking the Silent Installation Process on a Windows System
Invoking the Silent Installation Process on a Windows System
To invoke the silent installation process on a Windows system, follow these steps:
1. Select a Windows system that meets the hardware and software requirements described in Appendix A, �BEA Tuxedo 8.0 Platform Data Sheets.�
The Windows 98 system supports only BEA Tuxedo client components.
2. Log in to the target machine using the Administrator username.
You need administrative privileges to install BEA Tuxedo server components on a Windows system. If you are going to install only BEA Tuxedo client components, you do not need administrative privileges.
3. Ensure that you have enough free space for the BEA Tuxedo installation.
For disk space requirements, see Appendix A, �BEA Tuxedo 8.0 Platform Data Sheets.� For important disk space allocation information, see Appendix C, �File and Database Management and Disk Space Allocation.�
4. If you are installing BEA Tuxedo by downloading it from the BEA Web site:
a. Open a command-line shell.
b. Go to the directory in which you downloaded the BEA Tuxedo installer specific to your platform.
c. Invoke the installation procedure by entering the following command, making sure to specify the full pathname of the installer.properties file:filename.exe -f full_path\installer.properties
In this command filename is the name of the BEA Tuxedo installer, and full_path is the full pathname of the installer.properties file.
A silent installation requires the same amount of time as a standard installation. During a silent installation, an initial installation program window is displayed briefly, indicating that the installation has started.
Installing the BEA Tuxedo System 4-5
4 Installing BEA Tuxedo Using Silent Installation
5. If you are installing BEA Tuxedo from the CD-ROM:
a. Insert the BEA Tuxedo CD-ROM into the CD-ROM drive.
b. Open a command-line shell.
c. Go to the tux8_new_installer directory of the mounted CD-ROM.
d. Invoke the installation procedure by entering the following command, making sure to specify the full pathname of the installer.properties file:filename.exe -f full_path\installer.properties
In this command, filename is the name of the BEA Tuxedo installer specific to your platform, and full_path is the full pathname of the installer.properties file.
A silent installation requires the same amount of time as a standard installation. During a silent installation, an initial installation program window is displayed briefly, indicating that the installation has started.
Invoking the Silent Installation Process on a UNIX System
To invoke the silent installation process on a UNIX system, follow these steps:
1. Select a UNIX system that meets the hardware and software requirements described in Appendix A, �BEA Tuxedo 8.0 Platform Data Sheets.�
2. Log in to the target UNIX system using the root username.
You need superuser privileges to mount the BEA Tuxedo CD on a UNIX system. If you are installing BEA Tuxedo by downloading it from the BEA Web site, you do not need superuser privileges.
3. Make sure that you have enough free space for the BEA Tuxedo installation.
For disk space requirements, see Appendix A, �BEA Tuxedo 8.0 Platform Data Sheets.� For important disk space allocation information, see Appendix C, �File and Database Management and Disk Space Allocation.�
4-6 Installing the BEA Tuxedo System
Invoking the Silent Installation Process on a UNIX System
4. If you are installing BEA Tuxedo by downloading it from the BEA Web site:
a. Go to the directory in which you downloaded the BEA Tuxedo installer specific to your platform.
b. Invoke the installation procedure by entering the following command, making sure to specify the full pathname of the installer.properties file:sh filename.bin -f full_path/installer.properties
In this command filename is the name of the BEA Tuxedo installer, and full_path is the full pathname of the installer.properties file.
A silent installation requires the same amount of time as a standard installation. During a silent installation, a startup message is displayed, followed by an �Installing . . .� message, indicating that the installation has started.
5. If you are installing BEA Tuxedo from the CD-ROM:
a. Mount the CD-ROM as a filesystem and insert the BEA Tuxedo CD-ROM into the CD-ROM drive.
b. Go to the tux8_new_installer directory of the mounted CD-ROM.
c. Invoke the installation procedure by entering the following command, making sure to specify the full pathname of the installer.properties file:sh filename.bin -f full_path/installer.properties
In this command filename is the name of the BEA Tuxedo installer specific to your platform, and full_path is the full pathname of the installer.properties file.
A silent installation requires the same amount of time as a standard installation. During a silent installation, a startup message is displayed, followed by an �Installing . . .� message, indicating that the installation has started.
Installing the BEA Tuxedo System 4-7
4 Installing BEA Tuxedo Using Silent Installation
Windows Template File
The following sample Windows template file applies to a silent installation of BEA Tuxedo 8.0:
###############################################
### Silent Installation Properties File
###############################################
INSTALLER_UI=silent
###############################################
### Locale
###############################################
USER_LOCALE=en
###############################################
### BEA Home Directory
### NOTE: backslashes must be escaped.
###############################################
BEAHOME=C:\\bea
###############################################
### Product Installation Directory
###############################################
USER_INSTALL_DIR=C:\\bea\\tuxedo8.0
###############################################
### LDAP Service Name
###############################################
### C_ldapName=pcwiz.mydomain.com
###############################################
### LDAP PortID
4-8 Installing the BEA Tuxedo System
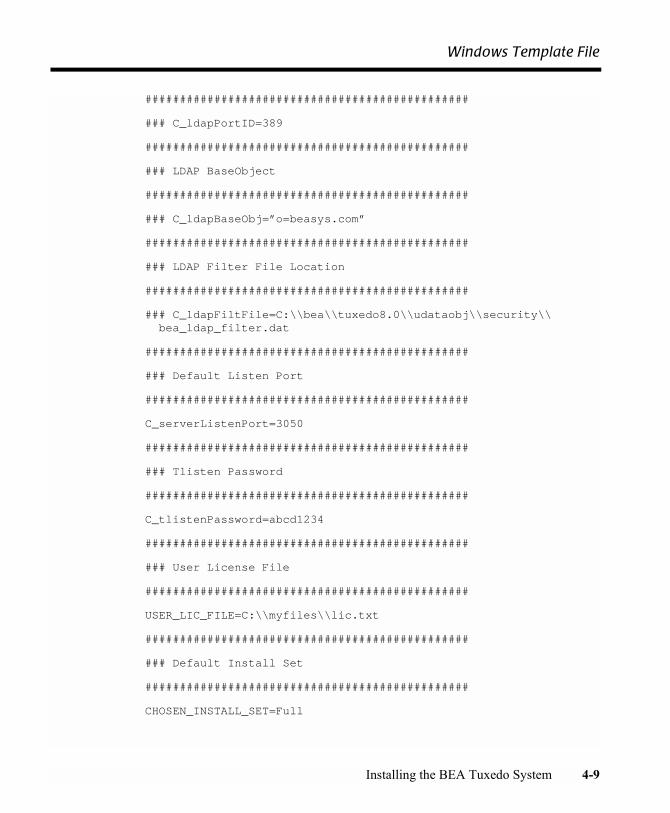
Windows Template File
###############################################
### C_ldapPortID=389
###############################################
### LDAP BaseObject
###############################################
### C_ldapBaseObj=”o=beasys.com”
###############################################
### LDAP Filter File Location
###############################################
### C_ldapFiltFile=C:\\bea\\tuxedo8.0\\udataobj\\security\\bea_ldap_filter.dat
###############################################
### Default Listen Port
###############################################
C_serverListenPort=3050
###############################################
### Tlisten Password
###############################################
C_tlistenPassword=abcd1234
###############################################
### User License File
###############################################
USER_LIC_FILE=C:\\myfiles\\lic.txt
###############################################
### Default Install Set
###############################################
CHOSEN_INSTALL_SET=Full
Installing the BEA Tuxedo System 4-9
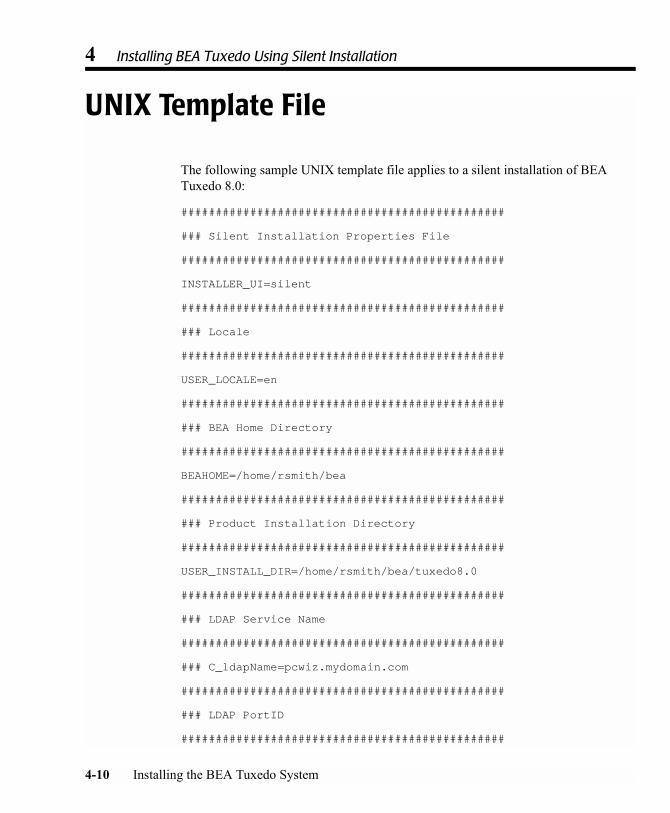
4 Installing BEA Tuxedo Using Silent Installation
UNIX Template File
The following sample UNIX template file applies to a silent installation of BEA Tuxedo 8.0:
###############################################
### Silent Installation Properties File
###############################################
INSTALLER_UI=silent
###############################################
### Locale
###############################################
USER_LOCALE=en
###############################################
### BEA Home Directory
###############################################
BEAHOME=/home/rsmith/bea
###############################################
### Product Installation Directory
###############################################
USER_INSTALL_DIR=/home/rsmith/bea/tuxedo8.0
###############################################
### LDAP Service Name
###############################################
### C_ldapName=pcwiz.mydomain.com
###############################################
### LDAP PortID
###############################################
4-10 Installing the BEA Tuxedo System
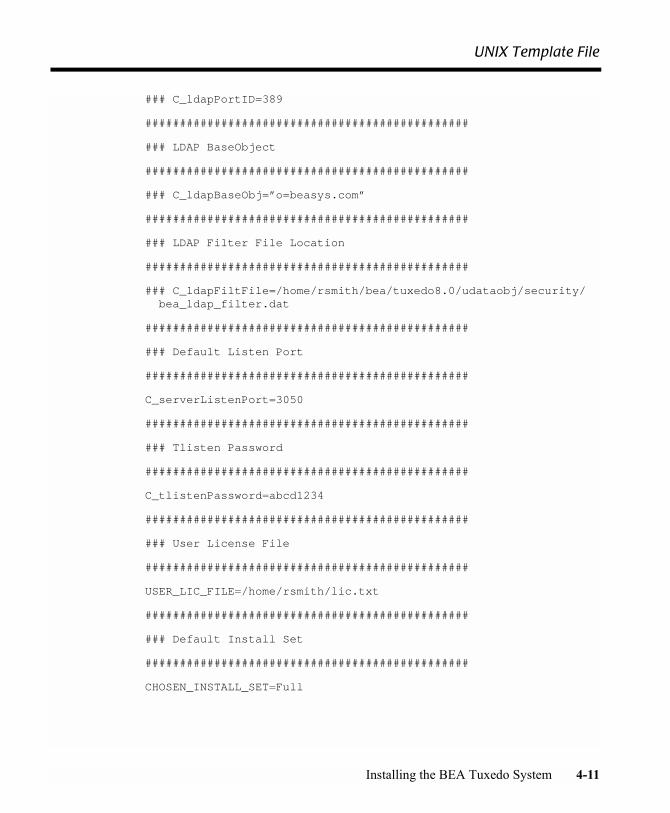
UNIX Template File
### C_ldapPortID=389
###############################################
### LDAP BaseObject
###############################################
### C_ldapBaseObj=”o=beasys.com”
###############################################
### LDAP Filter File Location
###############################################
### C_ldapFiltFile=/home/rsmith/bea/tuxedo8.0/udataobj/security/bea_ldap_filter.dat
###############################################
### Default Listen Port
###############################################
C_serverListenPort=3050
###############################################
### Tlisten Password
###############################################
C_tlistenPassword=abcd1234
###############################################
### User License File
###############################################
USER_LIC_FILE=/home/rsmith/lic.txt
###############################################
### Default Install Set
###############################################
CHOSEN_INSTALL_SET=Full
Installing the BEA Tuxedo System 4-11
4 Installing BEA Tuxedo Using Silent Installation
What Do I Do Next?
To prepare for tasks that must be performed after you finish installing the software, read the following sections:
! �Assigning File Ownership on a UNIX System� on page 2-10
! �Understanding the BEA Tuxedo Shortcuts on a Windows System� on page 2-11
! �Understanding the BEA Administration Program on a Windows System� on page 2-12
! �Reviewing the Windows 2000 Registry Content� on page 2-21
To configure your BEA Tuxedo software and verify that your software is installed correctly, see �Performing Post-Installation Tasks� on page 6-1.
4-12 Installing the BEA Tuxedo System

CHAPTER
5 Upgrading the BEA Tuxedo System to Release 8.0
The following sections provide procedures for upgrading your BEA WebLogic Enterprise or BEA Tuxedo application to BEA Tuxedo 8.0, using simple and hot upgrade procedures:
! Preparing Your Machine for an Upgrade
! Selecting an Upgrade Procedure
! Backing Up Files
! Performing a Simple Upgrade
! Additional Upgrade Requirements for Windows 2000
! Performing a Hot Upgrade
! Upgrading BEA Jolt to Release 8.0
! Rebuilding an Application
Installing the BEA Tuxedo System 5-1
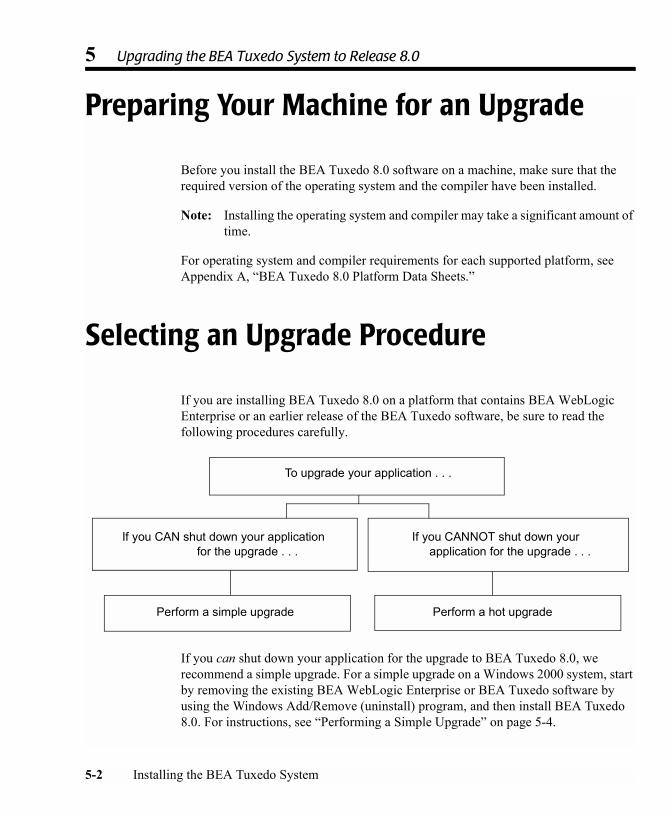
5 Upgrading the BEA Tuxedo System to Release 8.0
Preparing Your Machine for an Upgrade
Before you install the BEA Tuxedo 8.0 software on a machine, make sure that the required version of the operating system and the compiler have been installed.
Note: Installing the operating system and compiler may take a significant amount of time.
For operating system and compiler requirements for each supported platform, see Appendix A, �BEA Tuxedo 8.0 Platform Data Sheets.�
Selecting an Upgrade Procedure
If you are installing BEA Tuxedo 8.0 on a platform that contains BEA WebLogic Enterprise or an earlier release of the BEA Tuxedo software, be sure to read the following procedures carefully.
If you can shut down your application for the upgrade to BEA Tuxedo 8.0, we recommend a simple upgrade. For a simple upgrade on a Windows 2000 system, start by removing the existing BEA WebLogic Enterprise or BEA Tuxedo software by using the Windows Add/Remove (uninstall) program, and then install BEA Tuxedo 8.0. For instructions, see �Performing a Simple Upgrade� on page 5-4.
Perform a simple upgrade Perform a hot upgrade
To upgrade your application . . .
If you CAN shut down your application for the upgrade . . .
If you CANNOT shut down your application for the upgrade . . .
5-2 Installing the BEA Tuxedo System
Backing Up Files
If you cannot shut down your application for the upgrade to BEA Tuxedo 8.0, you can perform a hot upgrade, instead, from any of the following products:
! Versions 4.2, 5.0.1, or 5.1 of BEA WebLogic Enterprise
! Versions 6.3, 6.4, 6.5, or 7.1 of BEA Tuxedo
The hot upgrade process allows you to add the BEA Tuxedo 8.0 software to existing BEA WebLogic Enterprise or BEA Tuxedo domains without first shutting down those domains. It also enables you to add new BEA Tuxedo 8.0 applications to those domains without shutting down the existing applications. For instructions on performing a hot upgrade, see �Performing a Hot Upgrade� on page 5-6.
Backing Up Files
Certain files on your system, such as RM and webgui.ini, are overwritten when the new BEA Tuxedo software is installed. As a result, any modifications you have made to these files are lost at that time. If you want to preserve your modifications to these files, you must make backup copies of the files before starting the installation process. Then you will be able to restore your versions once installation is complete.
To avoid losing your modifications, complete the following procedure:
1. Back up the RM file to a temporary location. The RM file contains database vendor-specific settings that are used by commands, such as buildtms and buildXAJS. It is located in the %TUXDIR%\udataobj or $TUXDIR/udataobj directory, where TUXDIR is the directory in which you installed the BEA WebLogic Enterprise or BEA Tuxedo software.
2. Back up the webgui.ini file to a temporary location. The webgui.ini file contains customized initialization settings for the BEA Tuxedo Administration Console. It is located in %TUXDIR%\udataobj\webgui or in the $TUXDIR/udataobj/webgui directory.
3. Move any files that you or your coworkers added to the %TUXDIR% directory to a temporary location.
4. After the installation is complete, restore these files to their original locations.
Installing the BEA Tuxedo System 5-3
5 Upgrading the BEA Tuxedo System to Release 8.0
Performing a Simple Upgrade
A simple upgrade consists of the following basic steps:
1. Shut down the application.
2. Back up any files you want to preserve, as described in �Backing Up Files� on page 5-3.
3. Update the text version of the configuration file on the MASTER machine by running the tmunloadcf(1) command.
4. Back up the old binary version of the configuration file.
5. If you are upgrading the software on a Windows 2000 machine, perform the additional steps specified in �Additional Upgrade Requirements for Windows 2000� on page 5-4.
6. Install the BEA Tuxedo 8.0 software on at least the MASTER and backup machines.
7. Reload the text version of the configuration file by running tmloadcf(1) on the MASTER machine.
8. If necessary, recompile and relink your application programs.
9. Reboot the application.
10. As time permits, shut down and upgrade the other machines in your configuration.
Additional Upgrade Requirements for Windows 2000
For a Windows 2000 machine, to ensure that you are starting with a clean system, perform the following additional steps before installing the BEA Tuxedo 8.0 software.
5-4 Installing the BEA Tuxedo System
Additional Upgrade Requirements for Windows 2000
1. Stop the TListen and Tuxedo IPC Helper services. From the Start menu, click Start→Programs→Administrative Services→Services. The Services window appears.
Note: The Tuxedo IPC Helper service is called BEA procMGR in BEA Tuxedo 8.0.
2. Scroll to the entry for the TListen service, select it, and then click the Stop button. The Status value should change from Started to a blank entry. Then scroll to the Tuxedo IPC Helper service, select it, and click the Stop button. In some cases, you may see an error; however, the service�s Status value should change from Started to a blank entry. Click the Close button.
3. Run the Windows Add/Remove program to remove the prior BEA WebLogic Enterprise or BEA Tuxedo software version. From the Start menu, choose Start→Settings→Control Panel→Add/Remove Programs. The Add/Remove Programs Properties window is displayed.
4. Scroll to the entry for the prior BEA WebLogic Enterprise or BEA Tuxedo software, select it, and click the Add/Remove button.
Note: If you have both the C++ and Java components of WebLogic Enterprise 4.2 installed on your machine, you must remove the Java software before removing the C++ software.
5. In response to the prompt, confirm that you want to uninstall the software. After the program finishes, the Remove Programs From Your Computer window is displayed.
6. If the uninstall program was not able to remove all directories (usually because the files were added after the original installation), you can click the Details button to find out which directories remain on your system. If the files in those directories contain changes that you made, such as a modified sample file, move them to a temporary location.
7. If the prior version was WebLogic Enterprise 4.2, you may need to uninstall the WebLogic Enterprise Java and WebLogic Enterprise C++ software in separate steps. Remember: if you have both the C++ and Java components of WebLogic Enterprise 4.2 installed on your machine, you must remove the Java software before removing the C++ software, as shown in step 5.
8. Reboot your system after the uninstall process is completed.
Installing the BEA Tuxedo System 5-5

5 Upgrading the BEA Tuxedo System to Release 8.0
Performing a Hot Upgrade
Before performing a hot upgrade, back up any files that you need to save, as described in �Backing Up Files� on page 5-3.
During the hot upgrade, you must shut down the backup and MASTER machines serially; the remainder of the configuration is unaffected.
Pre-Upgrade Notes
Once you have finished migrating the MASTER to BEA Tuxedo 8.0 (via a hot upgrade), you will not be able to migrate it back to the acting backup until you have upgraded the backup to BEA Tuxedo 8.0. In other words, migrating the MASTER is an irreversible procedure; once you have completed it, you cannot change the MASTER back to the release of the BEA Tuxedo software on which it was running previously.
When you run tmadmin(1) on a BEA Tuxedo 8.0 machine with an old-release MASTER, the UPGRADE file (as shown in the section �Hot-Upgrade Example� on page 5-8) must reside in the current directory. To make sure that the files are in the current directory, you might, for example, run tmadmin from APPDIR.
During migration, keep in mind the following guidelines regarding the BEA Tuxedo data storage areas:
! You will be instructed to remove the old TUXCONFIG file. The TUXCONFIG file is propagated automatically when the backup machine is run; therefore, you do not need to do anything.
! Create the TLOG when you load the software. If you already have a TLOG, remove it.
! Do not do anything with application queue spaces and queues.
! If you have a BDMCONFIG file, leave it as is.
To minimize downtime, we recommend installing BEA Tuxedo 8.0 on the MASTER and backup, and rebuilding all clients and servers in the directory on each machine that is defined by APPDIR, in parallel with the directory in which the old-release clients and
5-6 Installing the BEA Tuxedo System
Performing a Hot Upgrade
servers were created. (In other words, both an old-release application and a BEA Tuxedo 8.0 application should be available on each machine.) This is not a requirement, but a recommendation.
When migrating from an old release, you must rebuild your clients and servers. Additionally, you must always rebuild whenever you reinstall the BEA Tuxedo software on HP-UX. Note that the HP-UX shared library loader does not, by default, use the paths specified in the SHLIB_PATH environment variable when trying to locate the shared libraries needed by an executable at run time. To enable the SHLIB_PATH lookup, the “W1, +s” compilation option must be passed to either the C or C++ compiler. (This procedure is not necessary on any other platform supported by the BEA Tuxedo system.) That is, your application programs must be recompiled with the following setting:
CFLAGS=Wl,+s
This setting causes the compiler to pass the +s option to the link editor when the application is recompiled. It changes the program�s default behavior during future upgrades.
Note: The buildserver, buildobjserver, buildclient, and buildobjclient commands include the +s option of the link editor; you do not need to specify +s explicitly. If you are using a different build procedure, however, you must specify the +s option.
Hot-Upgrade Procedure
1. Make sure your environment is set up as follows:
" The configuration must have a backup machine.
" The MODEL option must be set to MP.
" The MIGRATE option must be set.
2. If you are upgrading a Windows 2000 machine, perform the additional steps specified in �Additional Upgrade Requirements for Windows 2000� on page 5-4.
3. Shut down the backup machine.
4. Install the BEA Tuxedo 8.0 software on the backup machine and reboot the backup machine.
Installing the BEA Tuxedo System 5-7
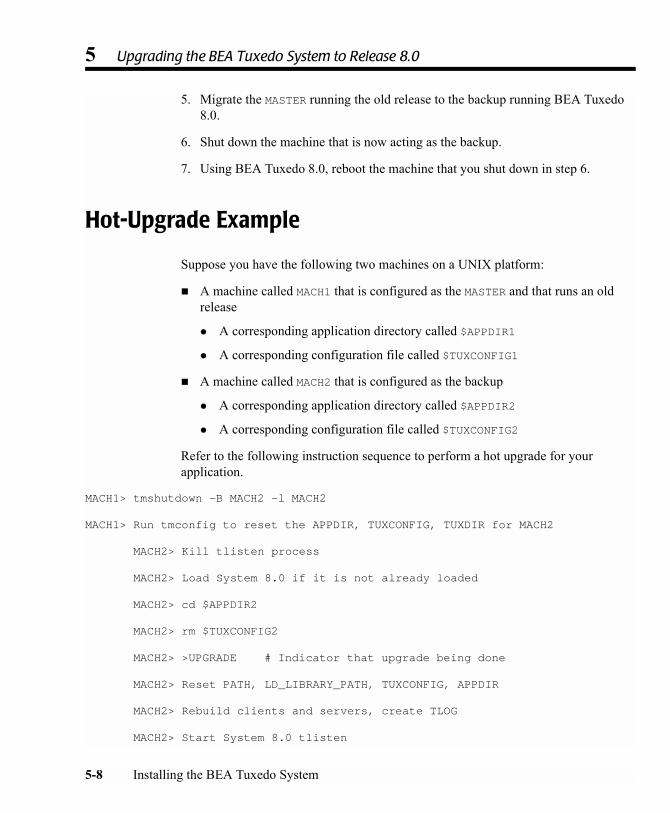
5 Upgrading the BEA Tuxedo System to Release 8.0
5. Migrate the MASTER running the old release to the backup running BEA Tuxedo 8.0.
6. Shut down the machine that is now acting as the backup.
7. Using BEA Tuxedo 8.0, reboot the machine that you shut down in step 6.
Hot-Upgrade Example
Suppose you have the following two machines on a UNIX platform:
! A machine called MACH1 that is configured as the MASTER and that runs an old release
" A corresponding application directory called $APPDIR1
" A corresponding configuration file called $TUXCONFIG1
! A machine called MACH2 that is configured as the backup
" A corresponding application directory called $APPDIR2
" A corresponding configuration file called $TUXCONFIG2
Refer to the following instruction sequence to perform a hot upgrade for your application.
MACH1> tmshutdown -B MACH2 -l MACH2 MACH1> Run tmconfig to reset the APPDIR, TUXCONFIG, TUXDIR for MACH2 MACH2> Kill tlisten process MACH2> Load System 8.0 if it is not already loaded MACH2> cd $APPDIR2 MACH2> rm $TUXCONFIG2 MACH2> >UPGRADE # Indicator that upgrade being done MACH2> Reset PATH, LD_LIBRARY_PATH, TUXCONFIG, APPDIR MACH2> Rebuild clients and servers, create TLOG MACH2> Start System 8.0 tlisten
5-8 Installing the BEA Tuxedo System
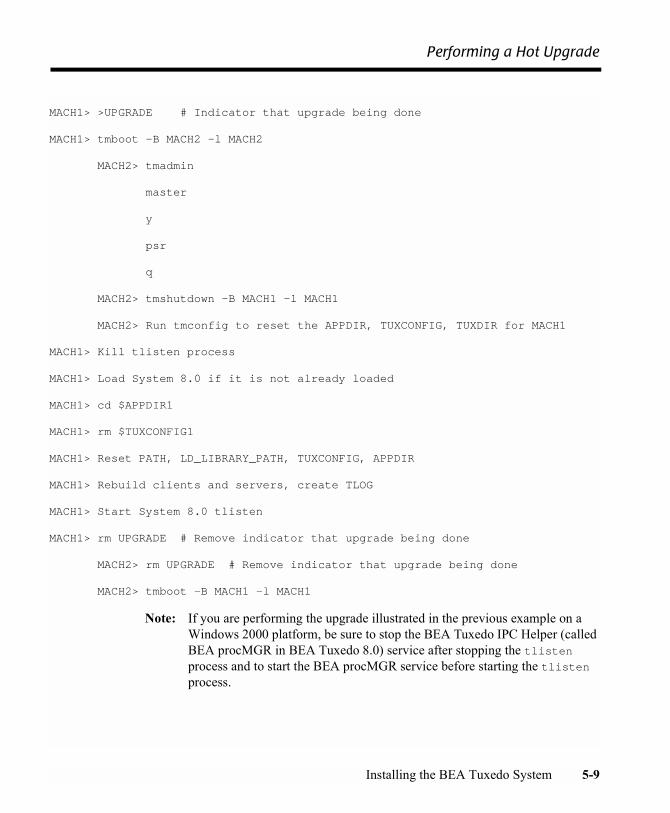
Performing a Hot Upgrade
MACH1> >UPGRADE # Indicator that upgrade being done MACH1> tmboot -B MACH2 -l MACH2 MACH2> tmadmin master y psr q MACH2> tmshutdown -B MACH1 -l MACH1 MACH2> Run tmconfig to reset the APPDIR, TUXCONFIG, TUXDIR for MACH1 MACH1> Kill tlisten process MACH1> Load System 8.0 if it is not already loaded MACH1> cd $APPDIR1 MACH1> rm $TUXCONFIG1 MACH1> Reset PATH, LD_LIBRARY_PATH, TUXCONFIG, APPDIR MACH1> Rebuild clients and servers, create TLOG MACH1> Start System 8.0 tlisten MACH1> rm UPGRADE # Remove indicator that upgrade being done MACH2> rm UPGRADE # Remove indicator that upgrade being done MACH2> tmboot -B MACH1 -l MACH1
Note: If you are performing the upgrade illustrated in the previous example on a Windows 2000 platform, be sure to stop the BEA Tuxedo IPC Helper (called BEA procMGR in BEA Tuxedo 8.0) service after stopping the tlisten process and to start the BEA procMGR service before starting the tlisten process.
Installing the BEA Tuxedo System 5-9
5 Upgrading the BEA Tuxedo System to Release 8.0
Upgrading BEA Jolt to Release 8.0
BEA Jolt 8.0 interoperates with BEA Tuxedo 8.0, but Release 1.2.1 and earlier releases of BEA Jolt do not. Therefore, if you are planning to run BEA Jolt with BEA Tuxedo 8.0, you must install BEA Jolt 8.0.
If you have an earlier release of Jolt installed, you must uninstall it and then install Release 8.0; you cannot upgrade directly from an earlier release of BEA Jolt.
Rebuilding an Application
Now that you have successfully installed the BEA Tuxedo software, you need to rebuild all application clients and servers that you want to execute on a system upgraded to BEA Tuxedo 8.0. You should also remove any old TUXCONFIG files and reload them using the newly installed tmloadcf(1).
If your BEA Tuxedo system applications are distributed, then the MASTER and backup MASTER nodes must run the highest release of the BEA Tuxedo software of any nodes in the configuration. Other nodes, including Workstation clients, may continue to use executables from an earlier release. For example, even if your MASTER and backup MASTER are running BEA Tuxedo 8.0, BEA Tuxedo 6.3 or later may still be used on other machines.
There is one important exception to the highest release rule. If you want to install BEA Tuxedo 8.0 only on Workstation clients, and you do not want to upgrade any of your BEA Tuxedo system server machines to BEA Tuxedo 8.0, you may do so. In other words, with any release level beginning with 6.3, Workstation clients may be intermixed freely in a configuration in which the MASTER is running release 6.3 or later.
5-10 Installing the BEA Tuxedo System
CHAPTER
6 Performing Post-Installation Tasks
The following sections describe the tasks you must perform after installing BEA Tuxedo:
! Understanding the BEA Tuxedo Directory Structure
! Understanding the BEA Tuxedo Architecture
! Installing the Product License After You Install BEA Tuxedo
! Using the Registry to Further Restrict Access on a Windows System
! Setting Up Your Environment
! Starting the tlisten Process
! Editing a UBBCONFIG File
! Checking IPC Requirements
! Creating the Universal Device List and the Transaction Log
! Running simpapp to Verify Your Installation
! Running buildtms and buildXAJS for BEA Tuxedo Applications that Use XA Resource Managers
! Uninstalling BEA Tuxedo
! Reinstalling BEA Tuxedo
Installing the BEA Tuxedo System 6-1
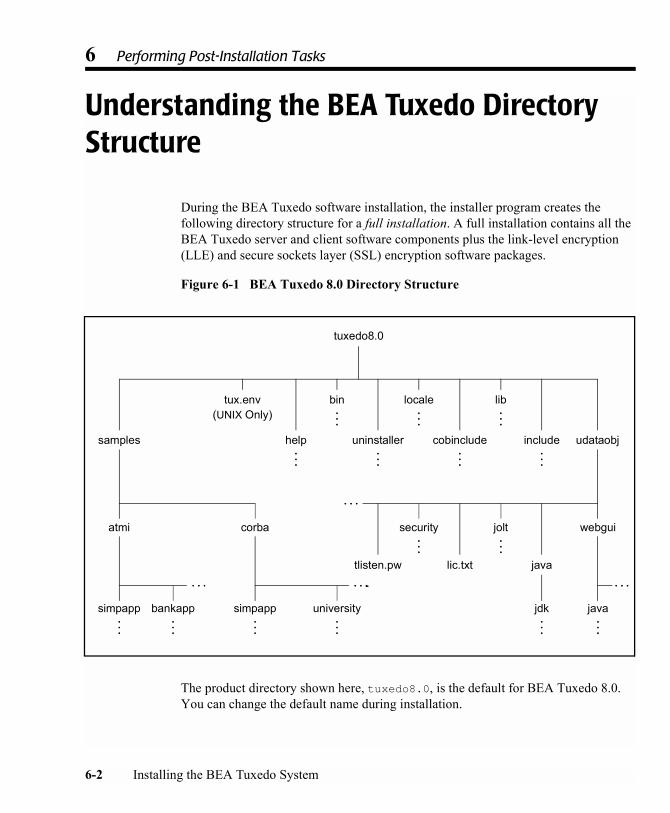
6 Performing Post-Installation Tasks
Understanding the BEA Tuxedo Directory Structure
During the BEA Tuxedo software installation, the installer program creates the following directory structure for a full installation. A full installation contains all the BEA Tuxedo server and client software components plus the link-level encryption (LLE) and secure sockets layer (SSL) encryption software packages.
Figure 6-1 BEA Tuxedo 8.0 Directory Structure
The product directory shown here, tuxedo8.0, is the default for BEA Tuxedo 8.0. You can change the default name during installation.
samples udataobj
tuxedo8.0
tux.env
help
bin
uninstaller
locale
cobinclude
lib
include
(UNIX Only)
atmi corba
java
webguijolt
tlisten.pw
bankappsimpapp universitysimpapp
security
lic.txt
javajdk
6-2 Installing the BEA Tuxedo System
Understanding the BEA Tuxedo Directory Structure
The top-level directories and files of the BEA Tuxedo directory structure are briefly described in the following table.
Directory Name Description
samples Contains sample code and resources designed to help you learn how to develop your own applications using BEA Tuxedo. The samples directory contains the following subdirectories:! atmi
A collection of simple applications that demonstrate many features of the BEA Tuxedo Application-to-Transaction Monitor Interface (ATMI) server software.
! corbaA collection of simple applications that demonstrate many features of the BEA Tuxedo Common Object Request Broker Architecture (CORBA) C++ server software.
help Contains online help files for the BEA Tuxedo Administration Console.
bin Contains executable programs.
uninstaller Contains code required to uninstall the BEA Tuxedo software.
locale Contains subdirectories to support the localization of system messages. C subdirectory contains message catalogs for the default locale (U.S. English).
cobinclude Contains copylib entries for use in COBOL programs.
lib Contains compiled object files, including dynamic shared libraries (for platforms on which BEA Tuxedo uses dynamic shared libraries) and other object files needed to build BEA Tuxedo clients and servers.
include Contains C and C++ language header files, as well as OMG IDL files. May include subdirectories such as rpc, depending on the platform.
Installing the BEA Tuxedo System 6-3
6 Performing Post-Installation Tasks
udataobj Contains other directories and files required by BEA Tuxedo. The udataobj directory contains the following subdirectories and files:! security
Contains the default Lightweight Directory Access Protocol (LDAP) filter file (bea_ldap_filter.dat) and LLE and SSL encryption files.
! joltContains the files for the BEA Jolt software components that you selected to install.
! javaContains the classes and Java archive files needed to run Java applications.
! webguiContains the Java and image files for the BEA Tuxedo Administration Console.
! tlisten.pw (file)Contains the tlisten administrative password that you entered during the installation.
! lic.txt (file)Contains the BEA Tuxedo product license. The lic.txt file is present only if you installed your license during the installation.
Filename Description
tux.env Contains BEA Tuxedo environment variables for UNIX installations and serves as a model for setting those variables.
Directory Name Description
6-4 Installing the BEA Tuxedo System
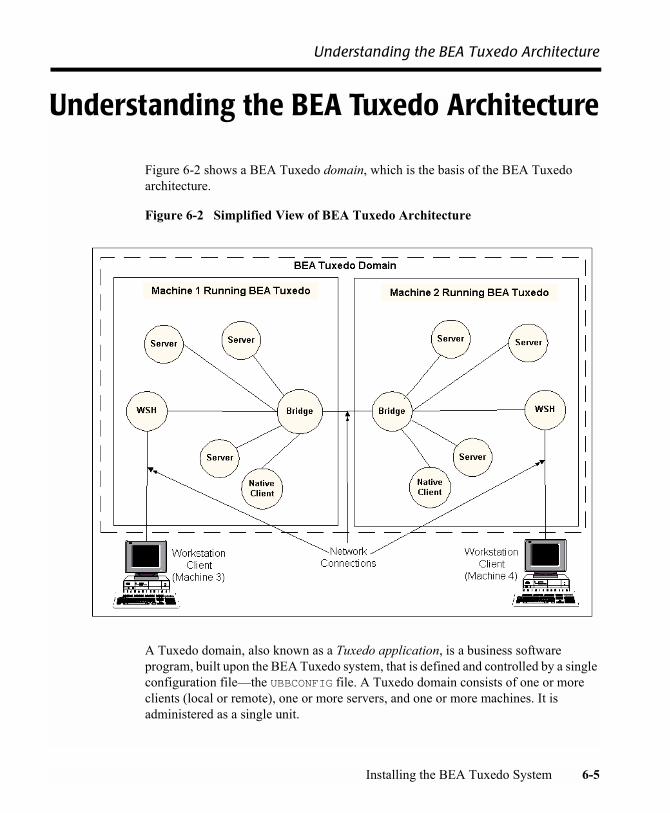
Understanding the BEA Tuxedo Architecture
Understanding the BEA Tuxedo Architecture
Figure 6-2 shows a BEA Tuxedo domain, which is the basis of the BEA Tuxedo architecture.
Figure 6-2 Simplified View of BEA Tuxedo Architecture
A Tuxedo domain, also known as a Tuxedo application, is a business software program, built upon the BEA Tuxedo system, that is defined and controlled by a single configuration file�the UBBCONFIG file. A Tuxedo domain consists of one or more clients (local or remote), one or more servers, and one or more machines. It is administered as a single unit.
Installing the BEA Tuxedo System 6-5
6 Performing Post-Installation Tasks
The following sections describe other important terms and concepts about BEA Tuxedo with which you need to be familiar before performing post-installation checks:
! �UBBCONFIG File� on page 6-6
! �MASTER Machine� on page 6-6
! �TUXCONFIG File� on page 6-7
! �TUXCONFIG Environment Variable� on page 6-7
! �TUXDIR Environment Variable� on page 6-7
There is no need to fully understand these terms now; rather, use the sections as a reference. As you encounter these terms during the post-installation procedures, you can refer back to these sections to understand exactly what these terms mean. For detailed descriptions of these terms, visit the BEA Tuxedo Online Documentation set at http://e-docs.bea.com.
UBBCONFIG File
Each Tuxedo domain is controlled by a configuration file in which installation-dependent parameters are defined. The text version of the configuration file is referred to as UBBCONFIG, although the configuration file may have any name, as long as the content of the file conforms to the format described for UBBCONFIG(5) in the File Formats, Data Descriptions, MIBs, and System Processes Reference. Typical configuration filenames begin with the string ubb, followed by a mnemonic string, such as simple in the filename ubbsimple.
MASTER Machine
The MASTER machine, or MASTER node, for a Tuxedo domain contains the domain�s UBBCONFIG file, and is designated as the MASTER machine in the RESOURCES section of the UBBCONFIG file. Starting, stopping, and administering a Tuxedo domain is done through the MASTER machine.
In a multimachine Tuxedo domain running different releases of the Tuxedo system software, the MASTER machine must run the highest release of the Tuxedo system software in the domain.
6-6 Installing the BEA Tuxedo System
Understanding the BEA Tuxedo Architecture
TUXCONFIG File
The TUXCONFIG file is a binary version of the UBBCONFIG file. It is created by running the tmloadcf(1) command, which parses UBBCONFIG and loads the binary TUXCONFIG file to the location referenced by the TUXCONFIG environment variable. As with UBBCONFIG, the TUXCONFIG file may be given any name.
The MASTER machine for a Tuxedo domain contains the master copy of the TUXCONFIG file. Copies of the TUXCONFIG file are propagated to all other machines�referred to as non-MASTER machines�in a Tuxedo domain whenever the Tuxedo system is booted on the MASTER machine.
TUXCONFIG Environment Variable
The TUXCONFIG environment variable defines the location on the MASTER machine in which the tmloadcf(1) command loads the binary TUXCONFIG file. It must be set to the absolute pathname for the device or system file in which TUXCONFIG is to be loaded.
The pathname for TUXCONFIG is designated in the MACHINES section of the UBBCONFIG file. It is specified for the MASTER machine and for every other machine in the Tuxedo domain. When copies of the binary TUXCONFIG file are propagated to non-MASTER machines during system boot, the copies are stored on the non-MASTER machines according to the TUXCONFIG pathname values.
TUXDIR Environment Variable
The value of the TUXDIR environment variable must be the absolute pathname of the directory in which the BEA Tuxedo software is installed on the MASTER machine. TUXDIR is defined in the MACHINES section of the UBBCONFIG file. It is specified for the MASTER machine and for every other machine in the Tuxedo domain.
Installing the BEA Tuxedo System 6-7
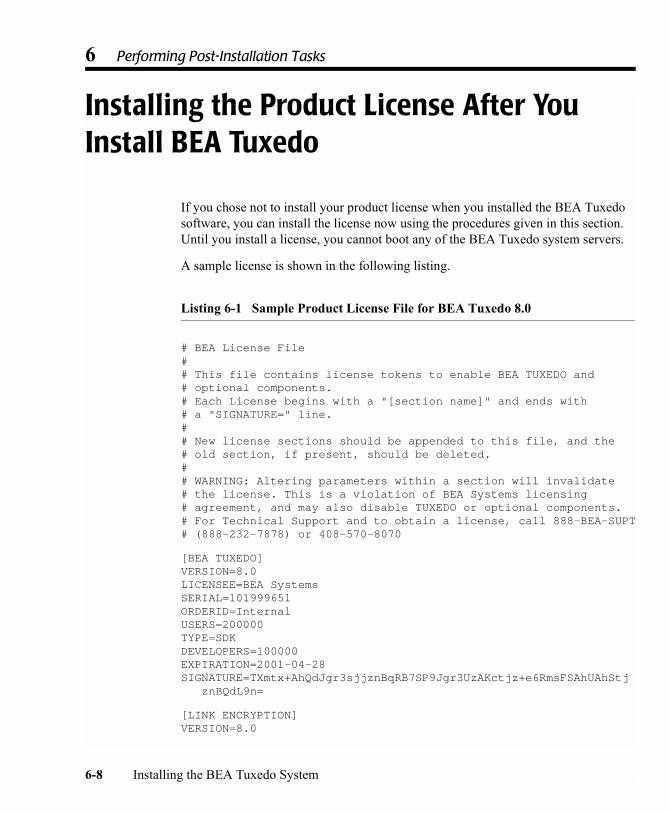
6 Performing Post-Installation Tasks
Installing the Product License After You Install BEA Tuxedo
If you chose not to install your product license when you installed the BEA Tuxedo software, you can install the license now using the procedures given in this section. Until you install a license, you cannot boot any of the BEA Tuxedo system servers.
A sample license is shown in the following listing.
Listing 6-1 Sample Product License File for BEA Tuxedo 8.0
# BEA License File## This file contains license tokens to enable BEA TUXEDO and# optional components.# Each License begins with a "[section name]" and ends with# a "SIGNATURE=" line.## New license sections should be appended to this file, and the# old section, if present, should be deleted.## WARNING: Altering parameters within a section will invalidate# the license. This is a violation of BEA Systems licensing# agreement, and may also disable TUXEDO or optional components.# For Technical Support and to obtain a license, call 888-BEA-SUPT# (888-232-7878) or 408-570-8070
[BEA TUXEDO]VERSION=8.0LICENSEE=BEA SystemsSERIAL=101999651ORDERID=InternalUSERS=200000TYPE=SDKDEVELOPERS=100000EXPIRATION=2001-04-28SIGNATURE=TXmtx+AhQdJgr3sjjznBqRB7SP9Jgr3UzAKctjz+e6RmsFSAhUAhStj
znBQdL9n=
[LINK ENCRYPTION]VERSION=8.0
6-8 Installing the BEA Tuxedo System
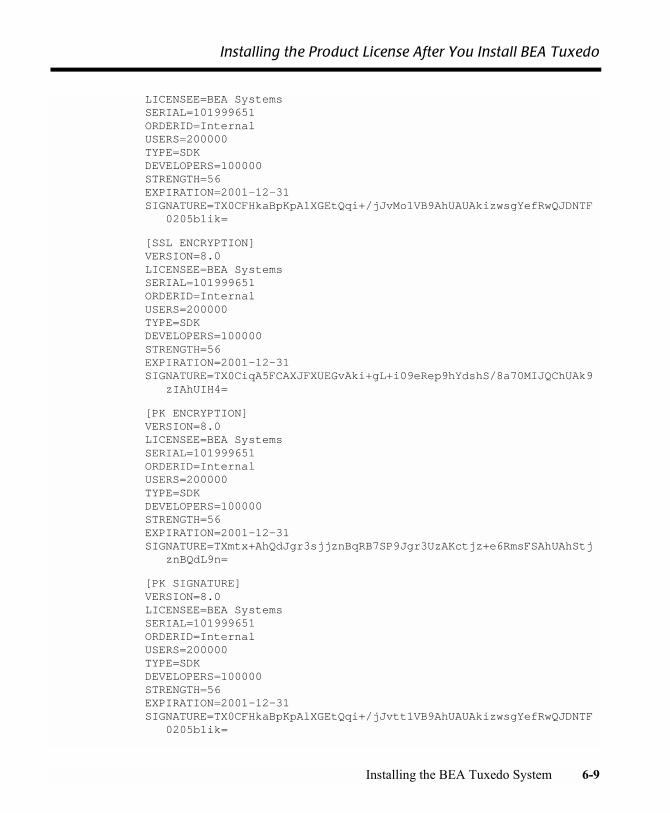
Installing the Product License After You Install BEA Tuxedo
LICENSEE=BEA SystemsSERIAL=101999651ORDERID=InternalUSERS=200000TYPE=SDKDEVELOPERS=100000STRENGTH=56EXPIRATION=2001-12-31SIGNATURE=TX0CFHkaBpKpAlXGEtQqi+/jJvMo1VB9AhUAUAkizwsgYefRwQJDNTF
0205b1ik=
[SSL ENCRYPTION]VERSION=8.0LICENSEE=BEA SystemsSERIAL=101999651ORDERID=InternalUSERS=200000TYPE=SDKDEVELOPERS=100000STRENGTH=56EXPIRATION=2001-12-31SIGNATURE=TX0CiqA5FCAXJFXUEGvAki+gL+i09eRep9hYdshS/8a70MIJQChUAk9
zIAhUIH4=
[PK ENCRYPTION]VERSION=8.0LICENSEE=BEA SystemsSERIAL=101999651ORDERID=InternalUSERS=200000TYPE=SDKDEVELOPERS=100000STRENGTH=56EXPIRATION=2001-12-31SIGNATURE=TXmtx+AhQdJgr3sjjznBqRB7SP9Jgr3UzAKctjz+e6RmsFSAhUAhStj
znBQdL9n=
[PK SIGNATURE]VERSION=8.0LICENSEE=BEA SystemsSERIAL=101999651ORDERID=InternalUSERS=200000TYPE=SDKDEVELOPERS=100000STRENGTH=56EXPIRATION=2001-12-31SIGNATURE=TX0CFHkaBpKpAlXGEtQqi+/jJvtt1VB9AhUAUAkizwsgYefRwQJDNTF
0205b1ik=
Installing the BEA Tuxedo System 6-9
6 Performing Post-Installation Tasks
[BEA JOLT]VERSION=8.0LICENSEE=BEA SystemsSERIAL=101999651ORDERID=InternalEXPIRATION=2001-12-31SIGNATURE=TX0CFHkaBpKpAlXGEtQqi+/jJvMo1VB9AhUAUzxizwsgYefRwQJDNTF
0205b1ik=
Licenses are delivered with 56-bit encryption enabled by default. Licenses with 128-bit encryption enabled are available but require a separate authorization procedure.
You can acquire a license in either of two ways: from the BEA Web site when you download an evaluation copy of the BEA Tuxedo product, or via e-mail when you buy the BEA Tuxedo product. A license is packaged in a file named lic.txt.
License files from previous BEA Tuxedo releases are not valid for BEA Tuxedo 8.0. If you later add BEA Tuxedo Security capabilities or BEA Jolt, you must append license files for those items to the BEA Tuxedo 8.0 license file.
Installing the Product License on a Windows System
To install your BEA Tuxedo product license on a Windows system, follow these steps:
1. Transfer the license file lic.txt to your machine.
2. Choose Start→Programs→BEA WebLogic E-Business Platform→Tuxedo 8.0→BEAlic to launch the BEA License Utility window.
6-10 Installing the BEA Tuxedo System
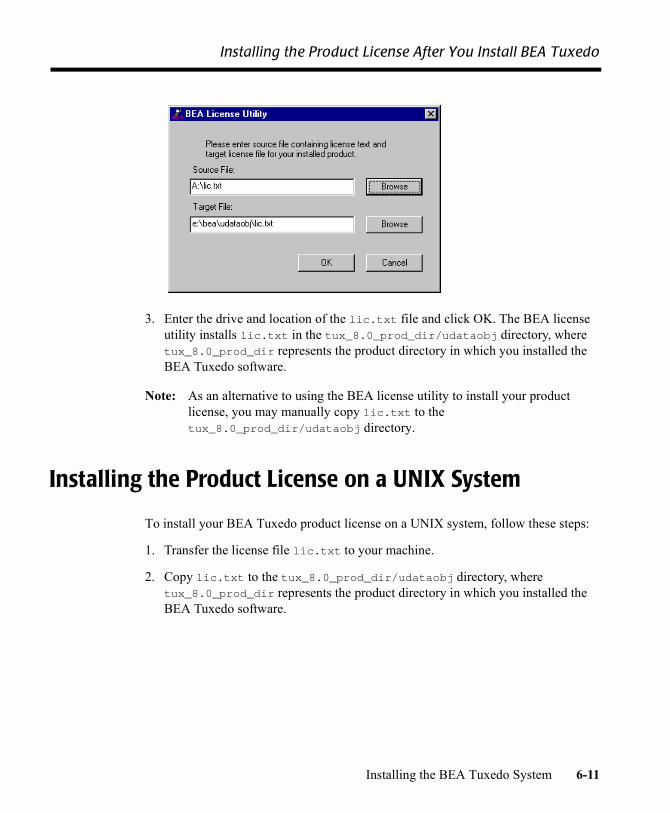
Installing the Product License After You Install BEA Tuxedo
3. Enter the drive and location of the lic.txt file and click OK. The BEA license utility installs lic.txt in the tux_8.0_prod_dir/udataobj directory, where tux_8.0_prod_dir represents the product directory in which you installed the BEA Tuxedo software.
Note: As an alternative to using the BEA license utility to install your product license, you may manually copy lic.txt to the tux_8.0_prod_dir/udataobj directory.
Installing the Product License on a UNIX System
To install your BEA Tuxedo product license on a UNIX system, follow these steps:
1. Transfer the license file lic.txt to your machine.
2. Copy lic.txt to the tux_8.0_prod_dir/udataobj directory, where tux_8.0_prod_dir represents the product directory in which you installed the BEA Tuxedo software.
Installing the BEA Tuxedo System 6-11
6 Performing Post-Installation Tasks
Using the Registry to Further Restrict Access on a Windows System
BEA Tuxedo-provided client programs are run directly by users with the users� own permissions. In addition, when users run native clients (that is, clients run on the same machine on which the server program is running), they have access to the UBBCONFIG file and interprocess communication (IPC) mechanisms such as the bulletin board (a reserved piece of shared memory in which parameters governing the application and statistics about the application are stored).
To gain access to BEA Tuxedo functionality, native clients join a BEA Tuxedo application using the identity of the application administrator (tpsysadm). However, because tpsysadm is a trusted user, this setting causes the BEA Tuxedo system to bypass the user authentication process.
To prevent this lapse in security on your Windows 2000 server machine, follow these steps:
1. Choose Start→Run to launch the Run dialog box, enter regEdt32, and click OK. The Registry Editor window is displayed.
2. Select HKEY_LOCAL_MACHINE→Software→BEA Systems→Tuxedo→8.0.
3. Select SECURITY→Permissions.
4. Disable control for Everyone and allow access only to users with administrative privileges.
Setting Up Your Environment
You need to set several environment variables before using BEA Tuxedo to build and run BEA Tuxedo applications. The following tables list and define many of those environment variables.
6-12 Installing the BEA Tuxedo System

Setting Up Your Environment
Table 6-1 BEA Tuxedo Core Environment Variables
Environment Variable Value
TUXDIR Absolute pathname of the product directory in which you installed the BEA Tuxedo software on this machine. TUXDIR must be set on both server and client-only machines.
APPDIR Absolute pathname of the application directory in which application and administrative servers will be booted on this machine. APPDIR may be set to more than one application directory.
TUXCONFIG Absolute pathname of the device or system file in which the binary TUXCONFIG file is found on this machine. The TUXCONFIG file is created by running the tmloadcf(1) command on the UBBCONFIG configuration file.
WEBJAVADIR Absolute pathname of the Java and image files for the BEA Tuxedo Administration Console on this machine.
Table 6-2 BEA Tuxedo Client-Only Environment Variables
Environment Variable Value
WSENVFILE Tuxedo Workstation (/WS) client: Name of the file in which all environment variables are set for this workstation. There is no default for this variable.
TOBJADDR Remote CORBA client: Address of the server�s listener; must match exactly (including case) the host and port specified in the server�s UBBCONFIG file.
Installing the BEA Tuxedo System 6-13
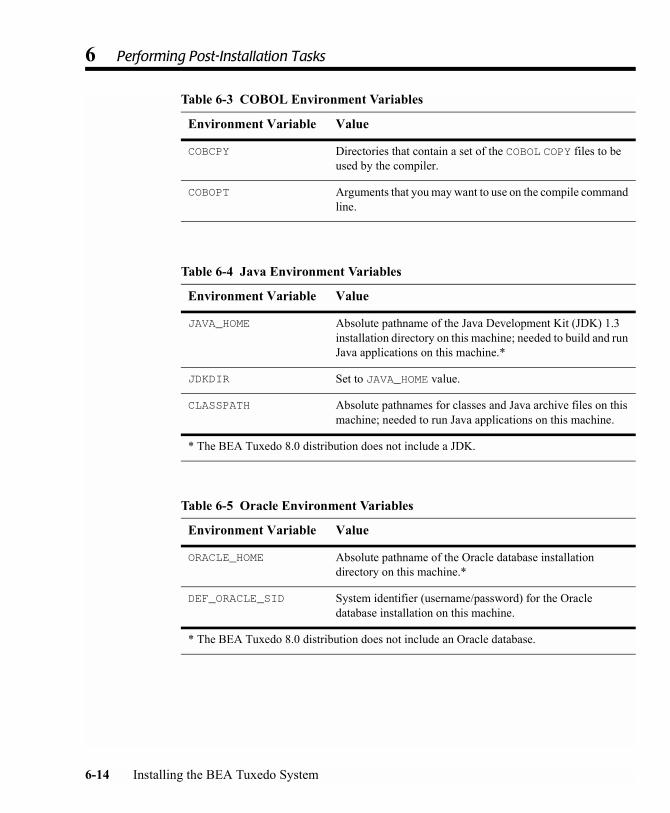
6 Performing Post-Installation Tasks
Table 6-3 COBOL Environment Variables
Environment Variable Value
COBCPY Directories that contain a set of the COBOL COPY files to be used by the compiler.
COBOPT Arguments that you may want to use on the compile command line.
Table 6-4 Java Environment Variables
Environment Variable Value
JAVA_HOME Absolute pathname of the Java Development Kit (JDK) 1.3 installation directory on this machine; needed to build and run Java applications on this machine.*
JDKDIR Set to JAVA_HOME value.
CLASSPATH Absolute pathnames for classes and Java archive files on this machine; needed to run Java applications on this machine.
* The BEA Tuxedo 8.0 distribution does not include a JDK.
Table 6-5 Oracle Environment Variables
Environment Variable Value
ORACLE_HOME Absolute pathname of the Oracle database installation directory on this machine.*
DEF_ORACLE_SID System identifier (username/password) for the Oracle database installation on this machine.
* The BEA Tuxedo 8.0 distribution does not include an Oracle database.
6-14 Installing the BEA Tuxedo System
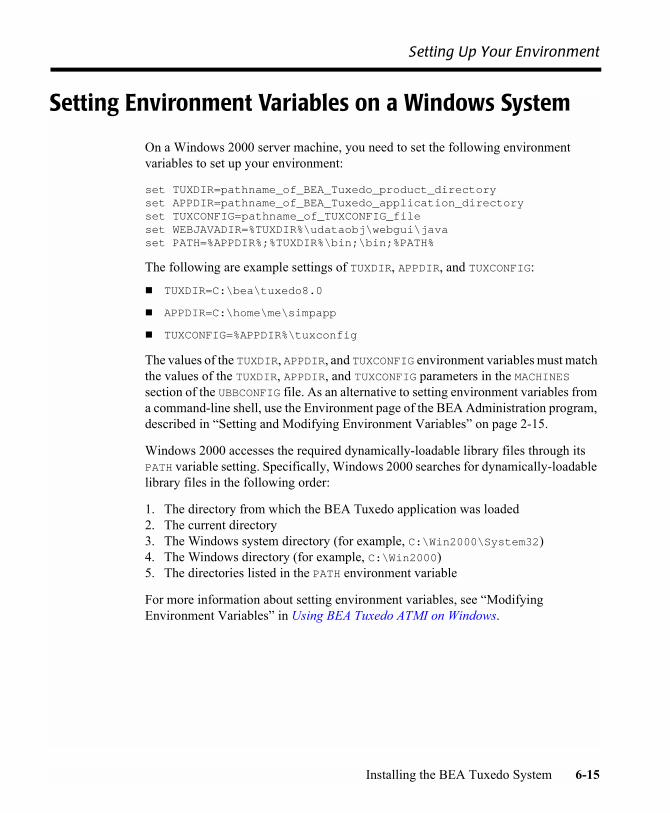
Setting Up Your Environment
Setting Environment Variables on a Windows System
On a Windows 2000 server machine, you need to set the following environment variables to set up your environment:
set TUXDIR=pathname_of_BEA_Tuxedo_product_directoryset APPDIR=pathname_of_BEA_Tuxedo_application_directoryset TUXCONFIG=pathname_of_TUXCONFIG_fileset WEBJAVADIR=%TUXDIR%\udataobj\webgui\javaset PATH=%APPDIR%;%TUXDIR%\bin;\bin;%PATH%
The following are example settings of TUXDIR, APPDIR, and TUXCONFIG:
! TUXDIR=C:\bea\tuxedo8.0
! APPDIR=C:\home\me\simpapp
! TUXCONFIG=%APPDIR%\tuxconfig
The values of the TUXDIR, APPDIR, and TUXCONFIG environment variables must match the values of the TUXDIR, APPDIR, and TUXCONFIG parameters in the MACHINES section of the UBBCONFIG file. As an alternative to setting environment variables from a command-line shell, use the Environment page of the BEA Administration program, described in �Setting and Modifying Environment Variables� on page 2-15.
Windows 2000 accesses the required dynamically-loadable library files through its PATH variable setting. Specifically, Windows 2000 searches for dynamically-loadable library files in the following order:
1. The directory from which the BEA Tuxedo application was loaded2. The current directory3. The Windows system directory (for example, C:\Win2000\System32)4. The Windows directory (for example, C:\Win2000)5. The directories listed in the PATH environment variable
For more information about setting environment variables, see �Modifying Environment Variables� in Using BEA Tuxedo ATMI on Windows.
Installing the BEA Tuxedo System 6-15

6 Performing Post-Installation Tasks
Setting Environment Variables on a UNIX System
On a UNIX server machine, set and export the following environment variables to set up your environment:TUXDIR=pathname_of_BEA_Tuxedo_product_directoryAPPDIR=pathname_of_BEA_Tuxedo_application_directoryTUXCONFIG=pathname_of_TUXCONFIG_fileWEBJAVADIR=$TUXDIR/udataobj/webgui/javaPATH=$APPDIR:$TUXDIR/bin:/bin:$PATH
Note: For Sun Solaris systems only, add /usr/sbin as the first directory in your PATH and add brackets ({}) to TUXDIR, as shown in the following example:
PATH=/usr/sbin:${TUXDIR}/bin:$PATHLD_LIBRARY_PATH=$APPDIR:$TUXDIR/lib:/lib:/usr/lib:$LD_LIBRARY_PATH
Note: For HP-UX systems only, use SHLIB_PATH instead of LD_LIBRARY_PATH.export TUXDIR APPDIR TUXCONFIG WEBJAVADIR PATH LD_LIBRARY_PATH
The following are example settings of TUXDIR, APPDIR, and TUXCONFIG:
! TUXDIR=/home/bea/tuxedo8.0
! APPDIR=/home/me/simpapp
! TUXCONFIG=$APPDIR/tuxconfig
The TUXDIR, APPDIR, and TUXCONFIG environment variables must match the values of the TUXDIR, APPDIR, and TUXCONFIG parameters in the MACHINES section of the UBBCONFIG file. A Bourne shell script named tux.env, located in the BEA Tuxedo product directory, serves as a model for setting these and other environment variables on a UNIX system.
6-16 Installing the BEA Tuxedo System

Starting the tlisten Process
Starting the tlisten Process
As the application administrator, you must start a tlisten process on each machine of a networked BEA Tuxedo application before the application is booted. The tlisten process enables you and the BEA Tuxedo software running on the MASTER machine to start, shut down, and administer BEA Tuxedo processes running on the nonMASTER machines. For example, tmboot(1) can start BEA Tuxedo system servers on the non-MASTER machines. Generally, one tlisten process is required for each BEA Tuxedo application running on a server machine.
In addition to the installer program starting a tlisten process on port 3050 during the installation of BEA Tuxedo, a tlisten process may be started as follows.
tlisten Invocation
In all cases, the same basic syntax is used to invoke tlisten.
%TUXDIR%\bin\tlisten -l nlsaddr [-u appuid] (Windows)$TUXDIR/bin/tlisten [-d devname] -l nlsaddr [-u appuid] (UNIX)
On this machine . . . By this administrator . . . Using this method . . .
Windows 2000 server BEA Tuxedo application administrator
Listener page of the BEA Administration program; for details, see �Configuring tlisten Processes to Start Automatically� on page 2-17
Manually starting a tlisten process from a command-line shell
UNIX server UNIX system administrator As part of a UNIX initialization (boot) script
BEA Tuxedo application administrator
As a cron job
Manually starting a tlisten process from a command-line shell
Installing the BEA Tuxedo System 6-17

6 Performing Post-Installation Tasks
The -l option is required. The argument to -l must match the value of the NLSADDR parameter in the NETWORK section of the UBBCONFIG file. For information about determining the value of NLSADDR, see UBBCONFIG(5) in the File Formats, Data Descriptions, MIBs, and System Processes Reference.
The value of devname is the device name of the network provider; for example, Starlan. If the tlisten process is operating with Sockets, the -d option is not needed.
The value of appuid is the user identifier (UID), or login name, of the BEA Tuxedo application administrator. It must match the value of the UID parameter in the RESOURCES section of the UBBCONFIG file.
Note: To obtain the UID on a Windows 2000 or UNIX system, run the id command.
On a UNIX machine, use the -u appuid option when the command is part of an installation script run by user root to run the tlisten process with the effective UID of the owner of the BEA Tuxedo software installation on this machine. If tlisten is started by the BEA Tuxedo application administrator, either as a cron job or manually, the -u option is unnecessary because the job is already owned by the correct account.
For more information about the tlisten command, see the tlisten(1) reference page in the BEA Tuxedo Command Reference. For details about starting the tlisten process on a Windows 2000 server machine, see �Configuring tlisten Processes to Start Automatically� in Using BEA Tuxedo ATMI on Windows.
tlisten Password
BEA Tuxedo uses the administrative password that you specified during the installation to protect the machine on which BEA Tuxedo is installed from administrative requests and operations (such as tmboot(1)) that are not authorized. Whenever administrative communications arrive on this machine through tlisten(1) or wlisten(1) gateway processes, BEA Tuxedo authenticates them by means of the password.
A tlisten password must be a string of alphanumeric characters in clear-text format. It may contain no more than 80 characters.
A common password is required for two machines in a BEA Tuxedo application to communicate successfully. For this reason, you must use the same password whenever you install BEA Tuxedo on multiple machines for a single application. If, during the
6-18 Installing the BEA Tuxedo System
Editing a UBBCONFIG File
BEA Tuxedo installation process, you use a different password for one machine, you must add that password to the tlisten.pw file on each machine with which you want that machine to communicate.
For these reasons, you may have more than one administrative password in your tlisten.pw file. A single password file may contain no more than 20 passwords, with one password per line. You can use a simple text editor to add passwords to the tlisten.pw file.
Editing a UBBCONFIG File
Each BEA Tuxedo application is controlled by a UBBCONFIG file in which installation-dependent parameters are defined. The UBBCONFIG file for an application usually requires editing before the application can be booted.
Each BEA Tuxedo application is controlled by a configuration file in which installation-dependent parameters are defined. The configuration file for an application usually requires editing before the application can be booted. In the BEA Tuxedo documentation, this file is referred to as UBBCONFIG, but you can give your configuration file any name you like. Typical configuration filenames begin with the string ubb, followed by a mnemonic string, such as simple in the filename ubbsimple.
As an example, consider ubbsimple, the UBBCONFIG file for the rudimentary ATMI-based simpapp application delivered with the BEA Tuxedo installation. On a Windows system, this application is found in the directory %TUXDIR%\samples\atmi\simpapp; on a UNIX system, it is found in the directory $TUXDIR/samples/atmi/simpapp.
The following sample listing shows ubbsimple. The examples in the sample listing have been modified from the ubbsimple file delivered on a Windows or UNIX system to include example pathname values for both Windows and UNIX systems.
Listing 6-2 ubbsimple for the ATMI-based simpapp Application
#ident “@(#)apps:simpapp/ubbsimple $Revision: 1.3 $ #Skeleton UBBCONFIG file for the Tuxedo Simple Application. #Replace the <bracketed> items with the appropriate values.
Installing the BEA Tuxedo System 6-19

6 Performing Post-Installation Tasks
*RESOURCES IPCKEY <Replace with a valid IPC Key> #Example: #IPCKEY 123456 DOMAINID simpapp MASTER simple MAXACCESSERS 10 MAXSERVERS 5 MAXSERVICES 10 MODEL SHM LDBAL N *MACHINES DEFAULT: APPDIR=“<Replace with the current directory pathname>” TUXCONFIG=“<Replace with your TUXCONFIG Pathname>” TUXDIR=“<Directory where Tuxedo is installed>”#Windows#Example: # APPDIR=“C:\home\me\simpapp” # TUXCONFIG=“C:\home\me\simpapp\tuxconfig” # TUXDIR=“C:\bea\tuxedo8.0”#UNIX#Example: # APPDIR=“/home/me/simpapp” # TUXCONFIG=“/home/me/simpapp/tuxconfig” # TUXDIR=“/home/bea/tuxedo8.0”
<Machine-name> LMID=simple #Example: #beatux LMID=simple *GROUPS GROUP1 LMID=simple GRPNO=1 OPENINFO=NONE *SERVERS DEFAULT: CLOPT=“-A”simpserv SRVGRP=GROUP1 SRVID=1 *SERVICES TOUPPER
6-20 Installing the BEA Tuxedo System
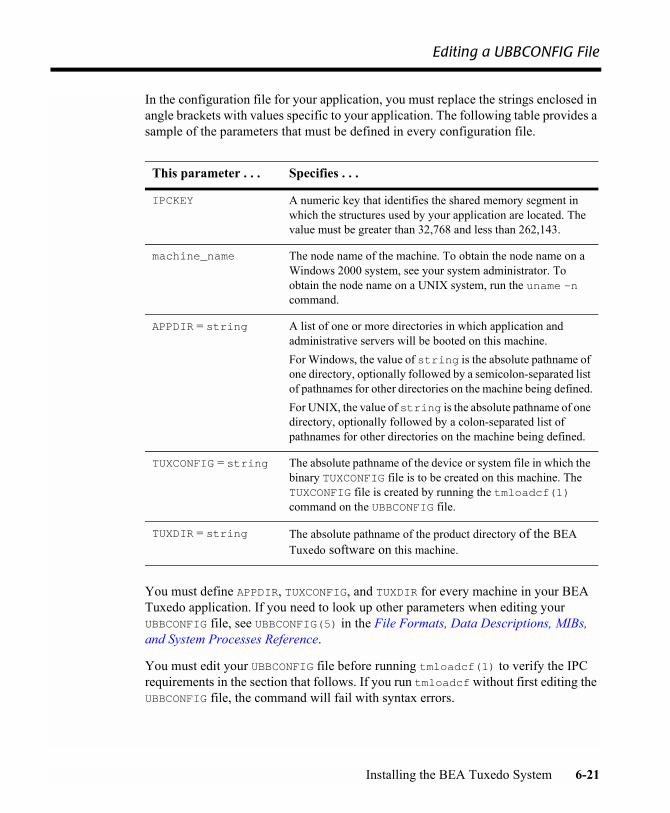
Editing a UBBCONFIG File
In the configuration file for your application, you must replace the strings enclosed in angle brackets with values specific to your application. The following table provides a sample of the parameters that must be defined in every configuration file.
You must define APPDIR, TUXCONFIG, and TUXDIR for every machine in your BEA Tuxedo application. If you need to look up other parameters when editing your UBBCONFIG file, see UBBCONFIG(5) in the File Formats, Data Descriptions, MIBs, and System Processes Reference.
You must edit your UBBCONFIG file before running tmloadcf(1) to verify the IPC requirements in the section that follows. If you run tmloadcf without first editing the UBBCONFIG file, the command will fail with syntax errors.
This parameter . . . Specifies . . .
IPCKEY A numeric key that identifies the shared memory segment in which the structures used by your application are located. The value must be greater than 32,768 and less than 262,143.
machine_name The node name of the machine. To obtain the node name on a Windows 2000 system, see your system administrator. To obtain the node name on a UNIX system, run the uname -n command.
APPDIR = string A list of one or more directories in which application and administrative servers will be booted on this machine.For Windows, the value of string is the absolute pathname of one directory, optionally followed by a semicolon-separated list of pathnames for other directories on the machine being defined.For UNIX, the value of string is the absolute pathname of one directory, optionally followed by a colon-separated list of pathnames for other directories on the machine being defined.
TUXCONFIG = string The absolute pathname of the device or system file in which the binary TUXCONFIG file is to be created on this machine. The TUXCONFIG file is created by running the tmloadcf(1) command on the UBBCONFIG file.
TUXDIR = string The absolute pathname of the product directory of the BEA Tuxedo software on this machine.
Installing the BEA Tuxedo System 6-21
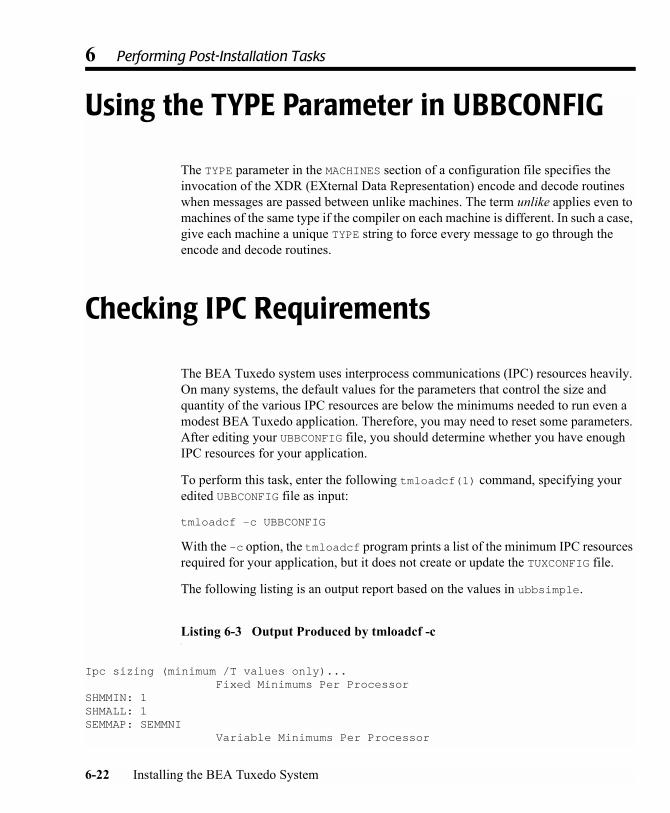
6 Performing Post-Installation Tasks
Using the TYPE Parameter in UBBCONFIG
The TYPE parameter in the MACHINES section of a configuration file specifies the invocation of the XDR (EXternal Data Representation) encode and decode routines when messages are passed between unlike machines. The term unlike applies even to machines of the same type if the compiler on each machine is different. In such a case, give each machine a unique TYPE string to force every message to go through the encode and decode routines.
Checking IPC Requirements
The BEA Tuxedo system uses interprocess communications (IPC) resources heavily. On many systems, the default values for the parameters that control the size and quantity of the various IPC resources are below the minimums needed to run even a modest BEA Tuxedo application. Therefore, you may need to reset some parameters. After editing your UBBCONFIG file, you should determine whether you have enough IPC resources for your application.
To perform this task, enter the following tmloadcf(1) command, specifying your edited UBBCONFIG file as input:
tmloadcf -c UBBCONFIG
With the -c option, the tmloadcf program prints a list of the minimum IPC resources required for your application, but it does not create or update the TUXCONFIG file.
The following listing is an output report based on the values in ubbsimple.
Listing 6-3 Output Produced by tmloadcf -c
Ipc sizing (minimum /T values only)... Fixed Minimums Per ProcessorSHMMIN: 1SHMALL: 1SEMMAP: SEMMNI Variable Minimums Per Processor
6-22 Installing the BEA Tuxedo System
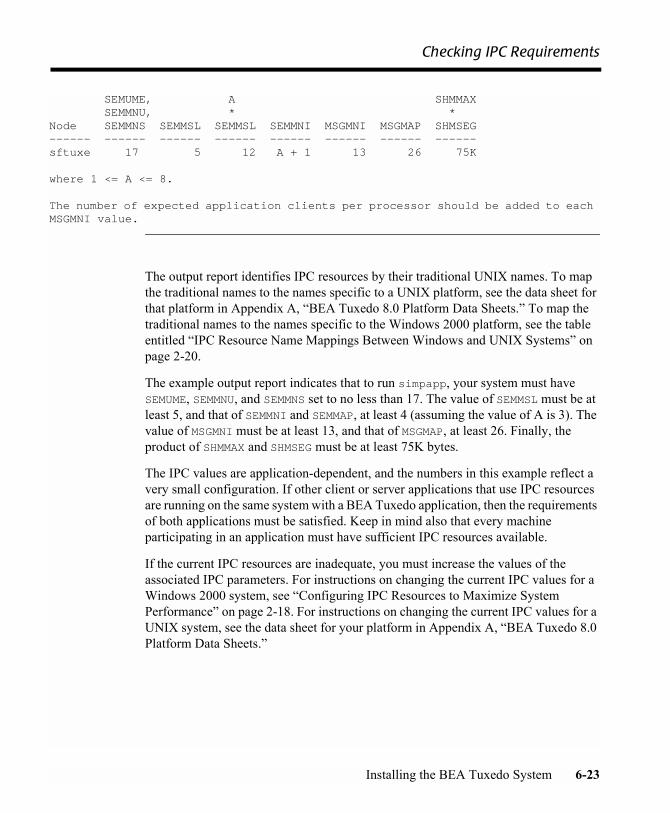
Checking IPC Requirements
SEMUME, A SHMMAX SEMMNU, * *Node SEMMNS SEMMSL SEMMSL SEMMNI MSGMNI MSGMAP SHMSEG------ ------ ------ ------ ------ ------ ------ ------sftuxe 17 5 12 A + 1 13 26 75K where 1 <= A <= 8. The number of expected application clients per processor should be added to each MSGMNI value.
The output report identifies IPC resources by their traditional UNIX names. To map the traditional names to the names specific to a UNIX platform, see the data sheet for that platform in Appendix A, �BEA Tuxedo 8.0 Platform Data Sheets.� To map the traditional names to the names specific to the Windows 2000 platform, see the table entitled �IPC Resource Name Mappings Between Windows and UNIX Systems� on page 2-20.
The example output report indicates that to run simpapp, your system must have SEMUME, SEMMNU, and SEMMNS set to no less than 17. The value of SEMMSL must be at least 5, and that of SEMMNI and SEMMAP, at least 4 (assuming the value of A is 3). The value of MSGMNI must be at least 13, and that of MSGMAP, at least 26. Finally, the product of SHMMAX and SHMSEG must be at least 75K bytes.
The IPC values are application-dependent, and the numbers in this example reflect a very small configuration. If other client or server applications that use IPC resources are running on the same system with a BEA Tuxedo application, then the requirements of both applications must be satisfied. Keep in mind also that every machine participating in an application must have sufficient IPC resources available.
If the current IPC resources are inadequate, you must increase the values of the associated IPC parameters. For instructions on changing the current IPC values for a Windows 2000 system, see �Configuring IPC Resources to Maximize System Performance� on page 2-18. For instructions on changing the current IPC values for a UNIX system, see the data sheet for your platform in Appendix A, �BEA Tuxedo 8.0 Platform Data Sheets.�
Installing the BEA Tuxedo System 6-23
6 Performing Post-Installation Tasks
Creating the Universal Device List and the Transaction Log
You must create a Universal Device List (UDL) and define a UDL entry for the global transaction log (TLOG) on each machine in your application that will use global transactions. The TLOG is a log file in which information about transactions is kept until the transaction is completed.
Defining the TLOG
Before creating the UDL and defining UDL entries for TLOG, you must set the following parameters in the MACHINES section of the UBBCONFIG file for each machine in your application that will use global transactions.
Because the TLOG seldom needs to be larger than 100 blocks (pages) and because disk partitions are always substantially larger than that, it may make sense to use the same device for both the TUXCONFIG file and the TLOG. If so, the pathname of the device
This parameter . . . Specifies . . .
TLOGDEVICE = string The BEA Tuxedo filesystem containing the distributed transaction processing (DTP) transaction log (TLOG) for this machine. If not specified, it is assumed that this machine has no TLOG.
TLOGOFFSET = offset The numeric offset in pages (from the beginning of the device) to the start of the BEA Tuxedo filesystem containing the DTP transaction log for this machine. The default is 0.
TLOGNAME = string The name of the DTP transaction log for this machine. If a name is not specified, the default, TLOG, is used.
TLOGSIZE = size The numeric size, in pages, of the DTP transaction log for this machine. If a size is not specified, the default, 100 pages, is used.
6-24 Installing the BEA Tuxedo System
Creating the Universal Device List and the Transaction Log
needs to be specified by both the TUXCONFIG and the FSCONFIG environment variables. FSCONFIG specifies the absolute pathname of the application�s databases on this machine.
Creating the UDL and UDL Entries for TLOG
You must manually create a UDL entry for the TLOGDEVICE on each machine on which a TLOG is needed. You may create these entries either before or after you have loaded TUXCONFIG, but you must create these entries before booting the application.
To access the create device list command, crdl, invoke tmadmin -c with the application inactive. The -c option invokes tmadmin in configuration mode.
To create the UDL and a UDL entry for TLOG on each machine in your application that will use global transactions, follow these steps:
1. Log in as the application administrator on the MASTER machine.
2. Enter the following command:
tmadmin -ccrdl -z config -b blocks
Here -z config specifies the full pathname of the device on which the UDL should be created (that is, the device on which the TLOG will reside), and -b blocks specifies the number of blocks to be allocated on the device. The value of config should match the value of the TLOGDEVICE parameter in the MACHINES section of the UBBCONFIG file. The blocks must be larger than the value of TLOGSIZE. If -z is not specified, the value of config defaults to the value of the FSCONFIG environment variable.
3. Log in as the application administrator on each remaining non-MASTER machine that will use global transactions and repeat step 2.
If the TLOGDEVICE is mirrored between two machines, step 3 is not required on the paired machine. To be recoverable, the TLOG should reside on a device that can be mirrored.
Installing the BEA Tuxedo System 6-25
6 Performing Post-Installation Tasks
Running simpapp to Verify Your Installation
One of the ways to verify that your BEA Tuxedo software is installed correctly is to run one or more of the sample applications included with the installation. The sample applications demonstrate the capabilities of the ATMI and CORBA clients, and the ATMI and CORBA C++ servers.
The following sections provide procedures for verifying both the ATMI and CORBA C++ parts of your BEA Tuxedo installation:
! �Running simpapp to Verify the BEA Tuxedo ATMI Software Installation� on page 6-27
! �Running simpapp to Verify the BEA Tuxedo CORBA C++ Software Installation� on page 6-33
The simpapp application is a nondistributed application, meaning that it runs on a single machine. It is designed in such a way that it can be up and running within minutes after the BEA Tuxedo software is installed.
The simpapp application offers a single service called TOUPPER, which converts strings from lowercase to uppercase. The client is invoked with a single argument: a lowercase string to be converted to uppercase. The server returns the converted string to the client, and the client prints the converted string.
For example, the invocation
simpcl “hello world”
results in the output
Returned string is: HELLO WORLD
Two versions of simpapp exist: an ATMI version and a CORBA version. The ATMI version consists of an ATMI server, an ATMI client, and a UBBCONFIG file. The CORBA version consists of a CORBA C++ server, a CORBA C++ client, and a CORBA Java client. Building and running the CORBA Java client requires the installation of JDK 1.3 on your system.
6-26 Installing the BEA Tuxedo System

Running simpapp to Verify Your Installation
Running simpapp to Verify the BEA Tuxedo ATMI Software Installation
To verify that you have successfully installed the BEA Tuxedo ATMI software on your system, run the ATMI version of the simpapp application. The pathname for this application on a Windows system is %TUXDIR%\samples\atmi\simpapp; on a UNIX system, it is $TUXDIR/samples/atmi/simpapp. The procedure presented in the following two sections is also provided in the README file in the simpapp directory, and in �Tutorial for Simpapp, a Simple C Application� in Tutorials for Developing BEA Tuxedo ATMI Applications.
Running simpapp to Verify the BEA Tuxedo ATMI Software Installation on a Windows System
To configure and run the ATMI version of simpapp on a Windows system, follow these steps:
1. Log in to the target machine using the Administrator username and open a command-line shell.
2. Create a working directory for your sample application and change to it:
cd C:\home\memkdir atmicd atmi
3. Set the environment variables used by the BEA Tuxedo system, as explained in �Setting Environment Variables on a Windows System� on page 6-15. Set APPDIR and TUXCONFIG as follows:
set APPDIR=C:\home\me\atmiset TUXCONFIG=%APPDIR%\tuxconfig
Note: You do not have to set the WEBJAVADIR environment variable.
4. Copy the simpapp files to your working directory. You will need to edit the configuration file, ubbsimple. Check the permissions on all the files in your working directory and, if necessary, change the permissions to allow full access. For example:
copy %TUXDIR%\samples\atmi\simpapp\*.* *.*attrib -R /S *.*
Installing the BEA Tuxedo System 6-27
6 Performing Post-Installation Tasks
5. Compile the simpapp client and server programs by entering the following commands:
buildclient -o simpcl -f simpcl.cbuildserver -o simpserv -f simpserv.c -s TOUPPER
6. In the sample configuration file, ubbsimple, replace the strings shown in angle brackets with values appropriate to your BEA Tuxedo system installation. Comments in ubbsimple explain how to customize the file. Set the following parameters in the ubbsimple file:
" Set IPCKEY to a valid IPC key. This value must be greater than 32,768 and less than 262,143.
" Set APPDIR to ”C:\home\me\atmi”.
" Set TUXCONFIG to the literal pathname corresponding to $APPDIR/tuxconfig (in our example, ”C:\home\me\atmi\tuxconfig”).
" Set TUXDIR to the absolute pathname of the product directory of the BEA Tuxedo software on this machine (for example, ”C:\bea\tuxedo8.0”).
" Set machine-name to the name of your system. To determine the name of your system, see your system administrator.
Note: The APPDIR, TUXCONFIG, and TUXDIR parameter settings in the ubbsimple file must match the settings of the APPDIR, TUXCONFIG, and TUXDIR environment variables.
7. Create the binary version of your edited configuration file by invoking tmloadcf(1), which produces a file named tuxconfig. This file, referenced by the TUXCONFIG environment variable, provides the BEA Tuxedo system with a description of the application configuration at run time:
tmloadcf -y ubbsimple
8. Boot simpapp by typing the following command:
tmboot -y
If the boot succeeds, output similar to the following is displayed and you can proceed to step 10.
6-28 Installing the BEA Tuxedo System

Running simpapp to Verify Your Installation
Listing 6-4 Output Produced by tmboot -y
Booting all admin and server processes in C:\home\me\atmi\tuxconfigINFO: BEA TUXEDO(r) System Release 8.0INFO: Serial #: 000102-9125503751, Maxusers 25Booting admin processes ...exec BBL -A: process id=24180 ... Started.Booting server processes ...exec simpserv -A : process id=24181 ... Started.2 processes started.
9. If the boot fails, examine the log named ULOG.mmddyy in your application directory (%APPDIR%, C:\home\me\atmi). The string mmddyy is a placeholder for the date (digits representing the current month, day, and year) that will make up the end of the filename. Near the end of the log, you may see a message such as the following:
can’t create enough semaphores for BB
If such a message is displayed, the interprocess communication (IPC) resources configured in your operating system are not adequate for running simpapp.
To confirm this hypothesis, invoke the BEA Tuxedo system command tmloadcf(1) and specify the name of your configuration file, as shown in the following example:
tmloadcf -c %APPDIR%\ubbsimple
If the current value of any IPC parameter configured in your operating system is less than a minimum (either variable or fixed) listed in the tmloadcf output, you must increase the value of that parameter. For instructions on determining and changing the current IPC values for your platform, see �Configuring IPC Resources to Maximize System Performance� on page 2-18.
10. If the boot succeeds, you can invoke the client. For example, enter the following command:
simpcl “hello world”
The following message is displayed:
Returned string is: HELLO WORLD
Installing the BEA Tuxedo System 6-29
6 Performing Post-Installation Tasks
11. When you have finished, shut down simpapp with the following command:
tmshutdown -y
Running simpapp to Verify the BEA Tuxedo ATMI Software Installation on a UNIX System
To configure and run the ATMI version of simpapp on a UNIX system, follow these steps:
1. Log in to the target machine as the BEA Tuxedo application administrator and open a command-line shell.
2. Create a working directory for your sample application and change to it:
cd /home/memkdir atmicd atmi
3. Set and export the environment variables used by the BEA Tuxedo system, as explained in �Setting Environment Variables on a UNIX System� on page 6-16. Set APPDIR and TUXCONFIG as follows:
APPDIR=/home/me/atmiTUXCONFIG=$APPDIR/tuxconfigexport APPDIR TUXCONFIG
Note: You do not have to set the WEBJAVADIR environment variable.
4. Copy the simpapp files to your working directory. You must edit the configuration file, ubbsimple. Make sure that the client and server files, simpcl and simpserv, are executable, and that the configuration file, ubbsimple, is writable. For example:
cp $TUXDIR/samples/atmi/simpapp/* .chmod 755 simpserv simpclchmod 644 ubbsimple
5. Compile the simpapp client and server programs by entering the following commands:
buildclient -o simpcl -f simpcl.cbuildserver -o simpserv -f simpserv.c -s TOUPPER
6-30 Installing the BEA Tuxedo System
Running simpapp to Verify Your Installation
6. In the sample configuration file, ubbsimple, replace the strings shown in angle brackets with values appropriate to your BEA Tuxedo system installation. Comments in ubbsimple explain how to customize the file. Set the following parameters in the ubbsimple file:
" Set IPCKEY to a valid IPC key. This value must be greater than 32,768 and less than 262,143.
" Set APPDIR to ”/home/me/atmi”.
" Set TUXCONFIG to the literal pathname corresponding to $APPDIR/tuxconfig (in our example, ”/home/me/atmi/tuxconfig”).
" Set TUXDIR to the absolute pathname of the product directory of the BEA Tuxedo software on this machine (for example, ”/home/bea/tuxedo8.0”).
" Set machine-name to the name of your system. To determine the name of your system on a UNIX machine enter the command:
uname -n
Note: The APPDIR, TUXCONFIG, and TUXDIR parameter settings in the ubbsimple file must match the settings of the APPDIR, TUXCONFIG, and TUXDIR environment variables.
7. Create the binary version of your edited configuration file by invoking tmloadcf(1), which produces a file named tuxconfig. This file, referenced by the TUXCONFIG environment variable, provides the BEA Tuxedo system with a description of the application configuration at run time:
tmloadcf -y ubbsimple
8. Boot simpapp by typing the following command:
tmboot -y
If the boot succeeds, output similar to the following is displayed and you can proceed to step 10.
Listing 6-5 Output Produced by tmboot -y
Booting all admin and server processes in /home/me/atmi/tuxconfigINFO: BEA TUXEDO(r) System Release 8.0INFO: Serial #: 000102-9125503751, Maxusers 25Booting admin processes ...exec BBL -A: process id=24180 ... Started.
Installing the BEA Tuxedo System 6-31
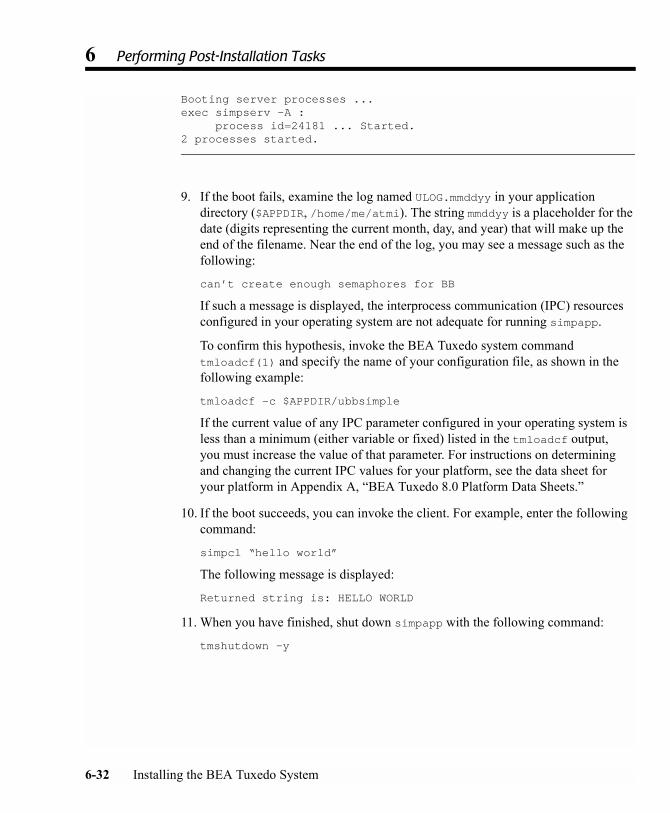
6 Performing Post-Installation Tasks
Booting server processes ...exec simpserv -A : process id=24181 ... Started.2 processes started.
9. If the boot fails, examine the log named ULOG.mmddyy in your application directory ($APPDIR, /home/me/atmi). The string mmddyy is a placeholder for the date (digits representing the current month, day, and year) that will make up the end of the filename. Near the end of the log, you may see a message such as the following:
can’t create enough semaphores for BB
If such a message is displayed, the interprocess communication (IPC) resources configured in your operating system are not adequate for running simpapp.
To confirm this hypothesis, invoke the BEA Tuxedo system command tmloadcf(1) and specify the name of your configuration file, as shown in the following example:
tmloadcf -c $APPDIR/ubbsimple
If the current value of any IPC parameter configured in your operating system is less than a minimum (either variable or fixed) listed in the tmloadcf output, you must increase the value of that parameter. For instructions on determining and changing the current IPC values for your platform, see the data sheet for your platform in Appendix A, �BEA Tuxedo 8.0 Platform Data Sheets.�
10. If the boot succeeds, you can invoke the client. For example, enter the following command:
simpcl “hello world”
The following message is displayed:
Returned string is: HELLO WORLD
11. When you have finished, shut down simpapp with the following command:
tmshutdown -y
6-32 Installing the BEA Tuxedo System
Running simpapp to Verify Your Installation
Running simpapp to Verify the BEA Tuxedo CORBA C++ Software Installation
To verify that you have successfully installed the BEA Tuxedo CORBA C++ software on your system, run the CORBA version of the simpapp application. The pathname for this application on a Windows system is %TUXDIR%\samples\corba\simpapp; on a UNIX system, it is $TUXDIR/samples/corba/simpapp. The procedure presented in the following two sections is also provided in the Readme.txt file in the simpapp directory, and in �Tutorial for simpapp, a Simple C Application� in Tutorials for Developing BEA Tuxedo ATMI Applications.
Running simpapp to Verify the BEA Tuxedo CORBA C++ Software Installation on a Windows System
To configure and run the CORBA version of simpapp on a Windows system, follow these steps:
1. Log in to the target machine using the Administrator username and open a command-line shell.
2. Create a working directory for your sample application and change to it:
cd C:\home\memkdir corbacd corba
3. Make sure that the product directory in which you installed the BEA Tuxedo software is set in the TUXDIR environment variable. For example, if you installed the software in the C:\bea\tuxedo8.0 directory, set TUXCONFIG as follows:
set TUXDIR=C:\bea\tuxedo8.0
4. Copy the simpapp files to your working directory and change the permissions on all files to allow full access. For example:
copy %TUXDIR%\samples\corba\simpapp\*.* *.*attrib -R /S *.*
5. Make sure that nmake is included in your path.
6. To run simpapp automatically, enter runme. The simpapp application runs and prints the following messages:
Installing the BEA Tuxedo System 6-33

6 Performing Post-Installation Tasks
Testing simpapp cleaned up prepared built loaded ubb booted ran shutdown saved results PASSED
7. To run the sample manually, so you can observe the starting and stopping of the simpapp processes, follow these steps:
a. Enter results\setenv.
b. Enter tmboot -y. The application starts several processes.
c. Enter simple_client. The prompt String? appears.
d. Enter a word in lowercase letters. The application converts the word to uppercase and then to lowercase letters.
e. Enter tmshutdown -y. The application shuts down the processes.
8. To restore the directory to its original state, perform these steps:
a. results\setenv
b. nmake -f makefile.nt clean
Running simpapp to Verify the BEA Tuxedo CORBA C++ Software Installation on a UNIX System
To configure and run the CORBA version of simpapp on a UNIX system, follow these steps:
1. Log in to the target machine as the BEA Tuxedo application administrator and select the ksh shell.
2. Create a working directory for your sample application and change to it:
cd /home/memkdir corbacd corba
6-34 Installing the BEA Tuxedo System
Running simpapp to Verify Your Installation
3. Make sure that the product directory in which you installed the BEA Tuxedo software is set in the TUXDIR environment variable. For example, if you installed the software in the /home/bea/tuxedo8.0 directory, set and export TUXCONFIG as follows:
TUXDIR=/home/bea/tuxedo8.0export TUXDIR
4. Copy the simpapp files to your working directory and change the permissions on all files to allow full access. For example:
cp $TUXDIR/samples/corba/simpapp/* .chmod 777 *
5. Make sure that make is included in your path.
6. To run simpapp automatically, enter . ./runme.ksh. The simpapp application runs and displays the following messages:
Testing simpapp cleaned up prepared built loaded ubb booted ran shutdown saved results PASSED
7. To run simpapp manually, so you can observe the starting and stopping of the processes, follow these steps:
a. Enter ksh.
b. Enter . ./results/setenv.ksh.
c. Enter tmboot -y. The application starts several processes.
d. Enter simple_client. The prompt String? is displayed.
e. Enter a word in lowercase letters. The application converts the word to uppercase and then to lowercase letters and displays the results.
f. Enter tmshutdown -y. The application shuts down the processes.
8. To restore the directory to its original state, follow these steps:
Installing the BEA Tuxedo System 6-35
6 Performing Post-Installation Tasks
a. . ./results/setenv.ksh
b. make -f makefile.mk clean
Running buildtms and buildXAJS for BEA Tuxedo Applications that Use XA Resource Managers
For BEA Tuxedo applications that use distributed transactions and XA-compliant resource managers, you must use the buildtms command to construct a transaction manager server load module. This requirement applies to both Windows 2000 and UNIX platforms. When the module has been created, it must reside in %TUXDIR%\bin on Windows 2000 systems, and in $TUXDIR/bin on UNIX systems.
If you run the CORBA C++ University sample applications, each sample�s makefile creates the TMS load module for you and calls it tms_ora.exe. Therefore, running buildtms as a separate step is necessary only if you do not plan to run any of these sample applications.
For information about the buildtms command with BEA Tuxedo applications, see the buildtms(1) reference page in BEA Tuxedo Command Reference, which is included in the BEA Tuxedo Online Documentation.
Uninstalling BEA Tuxedo
When you uninstall BEA Tuxedo, all components that were installed by the installation process are removed. Configuration and application files that were created after the installation are not removed.
To uninstall BEA Tuxedo, complete the procedure for your platform provided in the following table.
6-36 Installing the BEA Tuxedo System

Uninstalling BEA Tuxedo
To uninstall BEA Tuxedo on this platform . . .
Perform the following procedure . . .
Windows 1. Shut down any BEA Tuxedo servers that are running. For instructions on using the tmshutdown command to shut down BEA Tuxedo applications, see the tmshutdown(1) reference page in the BEA Tuxedo Command Reference.
2. From the Windows Start menu, choose Start→Programs→BEA WebLogic E-Business Platform→Tuxedo 8.0→Uninstall Tuxedo 8.0.The BEA Installation program Uninstaller window appears.
3. Click Uninstall to start the uninstall program. 4. Click Exit in the Uninstall Complete window.
UNIX 1. Shut down any BEA Tuxedo servers that are running. For instructions on using the tmshutdown command to shut down BEA Tuxedo applications, see the tmshutdown(1) reference page in the BEA Tuxedo Command Reference.
2. Go to the tux_8.0_prod_dir/uninstaller directory. (tux_8.0_prod_dir represents the directory in which you installed the BEA Tuxedo software.)
3. Choose one of two methods for uninstalling the software:! To use the GUI-mode installation program, go to step 4.! To use the console-mode procedure, go to step 5.
4. (GUI-mode method) At the prompt, enter the following command:sh Uninstall_Tuxedo8In the Uninstaller window, click Uninstall to start the uninstall program, then click Exit in the Uninstall Complete window to complete the uninstallation.
5. (Console-mode method) At the prompt, enter the following command:sh Uninstall_Tuxedo8 -i console When the uninstall process is complete, press Enter to exit the uninstaller.
Installing the BEA Tuxedo System 6-37
6 Performing Post-Installation Tasks
Reinstalling BEA Tuxedo
When you start the BEA Installation program on a system on which a copy of BEA Tuxedo 8.0 is already installed, the BEA Installation program detects the existing installation and provides you with the prompts shown in the following table.
Click . . . To . . .
Continue Close the warning window and continue with the installation. This option overwrites the previous installation.
Cancel Return to the Choose BEA Home Directory window. You cannot install multiple copies of BEA Tuxedo 8.0 in the same BEA Home directory. To continue installing the software using a different BEA Home directory, select an existing BEA Home directory that does not contain the release 8.0 software or create a new BEA Home directory.
Exit Exit the installation program and uninstall the previous installation. You can invoke the uninstall program, as described in �Uninstalling BEA Tuxedo� on page 6-36, and reinstall the software as described in one of the following sections of this document:! �Installing BEA Tuxedo Using GUI-Mode Installation� on
page 2-1! �Installing BEA Tuxedo on UNIX Systems Using
Console-Mode Installation� on page 3-1! �Installing BEA Tuxedo Using Silent Installation� on page
4-1
6-38 Installing the BEA Tuxedo System

CHAPTER
7 Starting the BEA Tuxedo Administration Console
The following sections provide the system requirements for the BEA Tuxedo Administration Console and explain how to start and exit the Console:
! Hardware Requirements
! Operating System Requirements
! Server Requirements
! Browser Requirements
! Understanding the BEA Tuxedo Administration Console File Tree
! Setting Up Your Environment for the BEA Tuxedo Administration Console
! Starting the BEA Tuxedo Administration Console
! Exiting the BEA Tuxedo Administration Console
Hardware Requirements
To run the BEA Tuxedo Administration Console, you need a color display device that meets the following requirements:
Installing the BEA Tuxedo System 7-1
7 Starting the BEA Tuxedo Administration Console
! Resolution: 800 by 600 or more is required; 1024 by 768 or more is recommended.
! Colors: A minimum of 256 colors is recommended.
Operating System Requirements
Given the broad outlines of an application design, you must verify the availability of the operating system resources needed to support your application. Operating system resources include:
! UNIX system shared resources (IPC)�for control of the maximum message size and maximum queue length
! Resources governed by kernel parameters
For additional information about interprocess communication (IPC) parameters and other system tunables, see the following sections of this document: Appendix A, �BEA Tuxedo 8.0 Platform Data Sheets,� and Appendix D, �IPC Resource Configuration on a UNIX System.�
Server Requirements
The BEA Tuxedo Administration Console server is supported on the following platforms:
! Compaq Tru64 UNIX v5.1 on Alpha Systems
! HP-UX Version 11.0 (32-bit) on HP 9000 Series
! Microsoft Windows 2000 on Intel
! Red Hat Linux 6.2 on Intel IA32 (x86)
! Sun Microsystems Solaris 8 (32-bit) SPARC
7-2 Installing the BEA Tuxedo System

Browser Requirements
Browser Requirements
If used with no encryption (0-bit encryption), the BEA Tuxedo Administration Console is supported on Netscape 4.61 or later.
If used with encryption, the BEA Tuxedo Administration Console requires Java Plug-In 1.3 or higher to be able to run in the browser.
The encryption level for the BEA Tuxedo Administration Console is set with the ENCRYPTBITS parameter in the webgui.ini file for the Console. This parameter specifies the strength of encryption used in communication between the GUI applet and the BEA Tuxedo Administration Console server. The ENCRYPTBITS parameter can be set to 0, 56, or 128. The default value is 128.
The following table lists the browsers and platforms supported when the BEA Tuxedo Administration Console is configured for 56-bit or 128-bit encryption.
Note: While the Microsoft Internet Explorer browser is supported, the Netscape browser is recommended. If you experience any difficulty using the Internet Explorer browser, use Netscape.
This platform . . . Supports these browsers . . .(See note after the table.)
And requires the following Java plug-in . . .
Compaq Tru64 UNIX v5.1 on Alpha Systems
Netscape 4.7Internet Explorer 4.7 and 5.0
1.3 or higher
HP-UX Version 11.0 (32-bit) on HP 9000 Series
Netscape 4.72Internet Explorer 4.7 and 5.0
1.3 or higher
Microsoft Windows 2000 on Intel
Netscape 4.7Internet Explorer 4.7 and 5.0
1.3 or higher
Red Hat Linux 6.2 on Intel IA32 (x86)
Netscape 4.7Internet Explorer 4.7 and 5.0
1.3 or higher
Sun Microsystems Solaris 8 (32-bit) SPARC
Netscape 4.7Internet Explorer 4.7 and 5.0
1.3 or higher
Installing the BEA Tuxedo System 7-3
7 Starting the BEA Tuxedo Administration Console
Understanding the BEA Tuxedo Administration Console File Tree
During the BEA Tuxedo software installation, the installer program places most of the directories and files for the BEA Tuxedo Administration Console in the webgui directory, as shown in the following figure.
Figure 7-1 BEA Tuxedo Administration Console File Tree
The installer program installs the following HTML files:
! An HTML template file named webgui.html, which is used by the common gateway interface (CGI) program tuxadm as the basis for many screens displayed during a BEA Tuxedo Administration Console session.
udataobj
tuxedo8.0
wlisten tlisten.pwtuxwsvr.inituxwsvr
java
webgui
webgui.html
webguitop.htmlwebgui.ini
cgi-bin
admconsole.jpg
TUXADM.text
bin
bea tuxadm
help
7-4 Installing the BEA Tuxedo System
Setting Up Your Environment for the BEA Tuxedo Administration Console
! An HTML file named webguitop.html, which displays legal notices and warnings when the BEA Tuxedo Administration Console is first brought up on the screen.
! The HTML documentation files for the BEA Tuxedo Administration Console, which are installed in a top-level directory named help.
The installer program installs the class files for the Java applet in the java directory, and installs the tuxadm program in the cgi-bin directory. The installer assigns an alias pathname for tuxadm, which will be used by Web clients to access tuxadm. The alias pathname is \cgi-bin on a Windows 2000 system and /cgi-bin on a UNIX system.
Setting Up Your Environment for the BEA Tuxedo Administration Console
To run the BEA Tuxedo Administration Console, first set up your environment as described in �Setting Up Your Environment� on page 6-12. (Make sure that your TUXDIR, WEBJAVADIR, and PATH environment variables are set correctly.) Then set up the following two server processes:
! tuxwsvr(1)
A Web server provided with the BEA Tuxedo system software. You are not required to use this server; you may, if you prefer, use your own commercial Web server.
! wlisten(1)
A server required to administer the BEA Tuxedo Administration Console. It must be run on the MASTER machine in a multimachine configuration.
After starting the tuxwsvr and wlisten server processes, you can start the BEA Tuxedo Administration Console to monitor the tuxwsvr server and the BEA Tuxedo application.
Installing the BEA Tuxedo System 7-5
7 Starting the BEA Tuxedo Administration Console
Starting tuxwsvr
tuxwsvr is a World Wide Web server process that can be used to support the BEA Tuxedo Web GUI by customers who do not have a commercial Web server or a public-domain Web server on the machine on which the BEA Tuxedo Web GUI processes are running. When invoked, tuxwsvr runs in the background unless otherwise specified. It continues running until the machine shuts down or the tuxwsvr process is killed through an operating system command.
The BEA Tuxedo installer program creates the tuxwsvr.ini file. Usually, you do not need to edit this file, but under certain circumstances, you may want to do so. For example, if you decide to move your Java files to a nondefault directory, you must edit the pathnames in the initialization file appropriately. For details, see the tuxwsvr(1) reference page in the BEA Tuxedo Command Reference.
Starting wlisten
wlisten is a listener process that receives incoming connections from Web GUI applets and starts a Web GUI gateway process (wgated). All wlisten options are taken from an initialization file that is specified by the -i option. If the -i option is not given, then %TUXDIR%\udataobj\webgui\webgui.ini is used as the default initialization file on a Windows 2000 system, and $TUXDIR/udataobj/webgui/webgui.ini is used as the default initialization file on a UNIX system.
To start wlisten, follow these steps:
1. Check the webgui.ini file to make sure that the default values assigned to the parameters during installation are appropriate. If they are not, make the necessary changes.
To start tuxwsvr on this platform . . .
Enter the following command . . .
Windows 2000 system tuxwsvr -l //machine:port -i %TUXDIR%\udataobj\tuxwsvr.ini
UNIX system tuxwsvr -l //machine:port -i $TUXDIR/udataobj/tuxwsvr.ini
7-6 Installing the BEA Tuxedo System
Starting the BEA Tuxedo Administration Console
For example, on a machine called popeye, the default port assigned to wlisten is 4003. To run wlisten with port 6060, edit the NADDR parameter as follows:
NADDR=//popeye:6060
For details about other parameters in the webgui.ini file, see the wlisten(1) reference page in the BEA Tuxedo Command Reference.
2. Enter the following command:
wlisten
Starting the BEA Tuxedo Administration Console
tuxadm is a CGI process used to initialize the Web GUI from a browser. As shown in the �Synopsis� section of the tuxadm(1) reference page, this program can be used only as a location, or URL from a Web browser; normally it is not executed from a standard command-line prompt. Like other CGI programs, tuxadm uses the QUERY_STRING environment variable to parse its argument list.
To start the BEA Tuxedo Administration Console, complete the following four-step procedure:
1. Start the browser.
2. Enter the following URL:
http://machine:port/webguitop.html
It is assumed that the user of this URL is using tuxwsvr with the tuxwsvr.ini file.
Note: If you are using a commercial browser on the default port (8080), you can use a URL such as http://ctomsn:8080/webguitop.html.
The BEA Tuxedo Administration Console entry page, which includes warranty and license notices, is displayed.
Installing the BEA Tuxedo System 7-7
7 Starting the BEA Tuxedo Administration Console
3. To start the BEA Tuxedo Administration Console, select the Click Here to Run the BEA Tuxedo Administration Console prompt at the bottom of the screen. The Login window is displayed.
4. Enter your login name and password in the appropriate fields, and select LOGIN. The password must be one of the entries in the tlisten.pw file.
The main window of the BEA Tuxedo Administration Console is displayed.
The following table contains instructions for accessing additional information about the BEA Tuxedo Administration Console main window.
Table 7-1 Accessing Information About the BEA Tuxedo Administration Console Main Window
If . . . Then . . .
The main window is displayed and you want to start working with the GUI
See �Administration Console Tutorial� in the BEA Tuxedo Administration Console online help.
The main window is displayed and you want to read a description of it
See �Installing BEA Tuxedo Using GUI-Mode Installation� in the BEA Tuxedo Administration Console online help.
The main window is not displayed and the Connect Failed error message is displayed
1. Enter the ps command to verify that the wlisten process is running.2. If wlisten is not running, open the webgui.ini file and, in the line
NADDR=//lcsol1:4003, replace the port number (4003) with a valid port number.
3. Enter wlisten again with the command appropriate for your platform:! On a Windows 2000 platform:
$ wlisten -i %TUXDIR%\udataobj\webgui\webgui.ini ! On a UNIX platform:
$ wlisten -i $TUXDIR/udataobj/webgui/webgui.ini 4. Check that the tuxwsvr process is running at the port specified in the
URL.5. Verify that the password matches one of the entries in the tlisten.pw
file.6. Return to step 1.
7-8 Installing the BEA Tuxedo System
Exiting the BEA Tuxedo Administration Console
Exiting the BEA Tuxedo Administration Console
To exit the BEA Tuxedo Administration Console, choose Domain→Exit from the menu bar. This menu option closes the current domain and exits the BEA Tuxedo Administration Console applet.
Installing the BEA Tuxedo System 7-9
7 Starting the BEA Tuxedo Administration Console
7-10 Installing the BEA Tuxedo System

APPENDIX
A BEA Tuxedo 8.0 Platform Data Sheets
This topic includes the following sections:
! Supported Platforms
! Compaq Tru64 UNIX Version 5.1 on Alpha Systems
! HP-UX Version 11.0 (32-Bit) on HP 9000 Series
! IBM AIX 4.3.3 on IBM PowerPC 32-Bit
! Microsoft Windows 2000 on Intel
! Microsoft Windows 98 on Intel
! Red Hat Linux 6.2 on Intel IA32 (x86)
! Sun Microsystems Solaris 8 (32-Bit) SPARC
! Platforms Supporting Threads
Installing the BEA Tuxedo System A-1
A BEA Tuxedo 8.0 Platform Data Sheets
Supported Platforms
The following table lists the platforms on which the BEA Tuxedo system is supported for Release 8.0.
A data sheet is provided for each platform. Each data sheet includes the following platform-specific information:
! A list of available BEA Tuxedo install sets
! Hardware, software, network, and disk space requirements
! Instructions for mounting and unmounting the BEA Tuxedo software CD
! Tunable parameters
Vendor Operating System Release/Version
Compaq Tru64 UNIX 5.1 (Alpha)
HP HP-UX 11.00, 32-bit, plus patches PHKL_21039, PHKL_21684, and PHKL_21778 for the HP 9000 Series
IBM AIX 4.3.3
Microsoft Windows 2000 Windows 2000 on Intel
Windows 98 (clients only)
Windows 98 on Intel
Red Hat Linux 6.2
Sun Microsystems Solaris Solaris 8 SPARC (32-bit)
A-2 Installing the BEA Tuxedo System
Install Sets
Install Sets
An install set is a bundle of product software components related by function. BEA Tuxedo 8.0 offers the following four install sets:
! Full install set�consists of all the BEA Tuxedo 8.0 server and client components
! Server install set�consists of all the BEA Tuxedo 8.0 server components:
" Application-to-Transaction Monitor Interface (ATMI) server software
" Common Object Request Broker Architecture (CORBA) C++ server software
" BEA Jolt 8.0 server software
" BEA Tuxedo Administration Console software
" Link-level encryption (LLE) and secure sockets layer (SSL) encryption software
! Client install set�consists of all the BEA Tuxedo 8.0 client components:
" BEA Tuxedo Workstation (/WS) client software
" CORBA C++ client software (C++ client Object Request Broker, or ORB), including environmental objects
" CORBA Java client software (BEA-branded Java client ORB), including environmental objects
" BEA Jolt 8.0 client software
" Windows 2000 and 98 systems only: ActiveX client software, including environmental objects and the BEA Application Builder graphical user interface (GUI)
" LLE and SSL encryption software
! Jolt client install set�consists of the following BEA Tuxedo 8.0 components:
" BEA Jolt 8.0 client software
" SSL and LLE encryption software
Installing the BEA Tuxedo System A-3
A BEA Tuxedo 8.0 Platform Data Sheets
In addition to selecting an install set during a BEA Tuxedo 8.0 installation, a user can further customize the installation by deselecting (deleting) one or more software components from the install set.
SSL and LLE are available with two levels of encryption: 56-bit and 128-bit. Licenses for the 128-bit client versions of SSL and LLE are available in the United States and Canada. With proper authorization, customers outside the United States and Canada may also acquire licenses with 128-bit encryption enabled. For details, see the BEA Tuxedo Release Notes.
Note: BEA Jolt 8.0 supports the same platforms that are supported by BEA Tuxedo 8.0.
Compaq Tru64 UNIX Version 5.1 on Alpha Systems
The following sections list BEA Tuxedo 8.0 requirements for Compaq Tru64 UNIX v5.1 on Alpha systems.
Available BEA Tuxedo 8.0 Install Sets for Compaq Tru64 UNIX Version 5.1
! Full install set
! Server install set
! Client install set
! Jolt client install set
For descriptions of BEA Tuxedo install sets, see �Install Sets� on page A-3.
A-4 Installing the BEA Tuxedo System
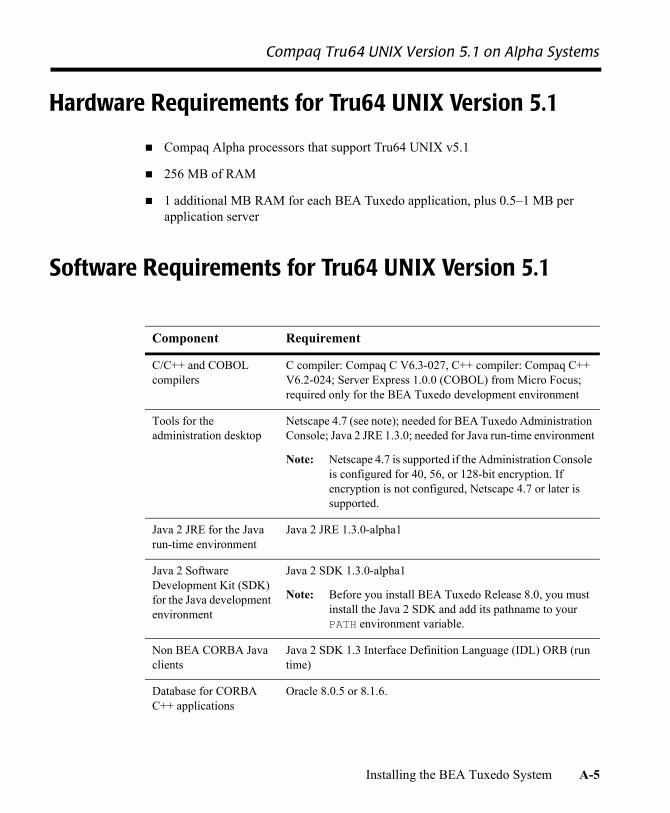
Compaq Tru64 UNIX Version 5.1 on Alpha Systems
Hardware Requirements for Tru64 UNIX Version 5.1
! Compaq Alpha processors that support Tru64 UNIX v5.1
! 256 MB of RAM
! 1 additional MB RAM for each BEA Tuxedo application, plus 0.5�1 MB per application server
Software Requirements for Tru64 UNIX Version 5.1
Component Requirement
C/C++ and COBOL compilers
C compiler: Compaq C V6.3-027, C++ compiler: Compaq C++ V6.2-024; Server Express 1.0.0 (COBOL) from Micro Focus; required only for the BEA Tuxedo development environment
Tools for the administration desktop
Netscape 4.7 (see note); needed for BEA Tuxedo Administration Console; Java 2 JRE 1.3.0; needed for Java run-time environment
Note: Netscape 4.7 is supported if the Administration Console is configured for 40, 56, or 128-bit encryption. If encryption is not configured, Netscape 4.7 or later is supported.
Java 2 JRE for the Java run-time environment
Java 2 JRE 1.3.0-alpha1
Java 2 Software Development Kit (SDK) for the Java development environment
Java 2 SDK 1.3.0-alpha1
Note: Before you install BEA Tuxedo Release 8.0, you must install the Java 2 SDK and add its pathname to your PATH environment variable.
Non BEA CORBA Java clients
Java 2 SDK 1.3 Interface Definition Language (IDL) ORB (run time)
Database for CORBA C++ applications
Oracle 8.0.5 or 8.1.6.
Installing the BEA Tuxedo System A-5
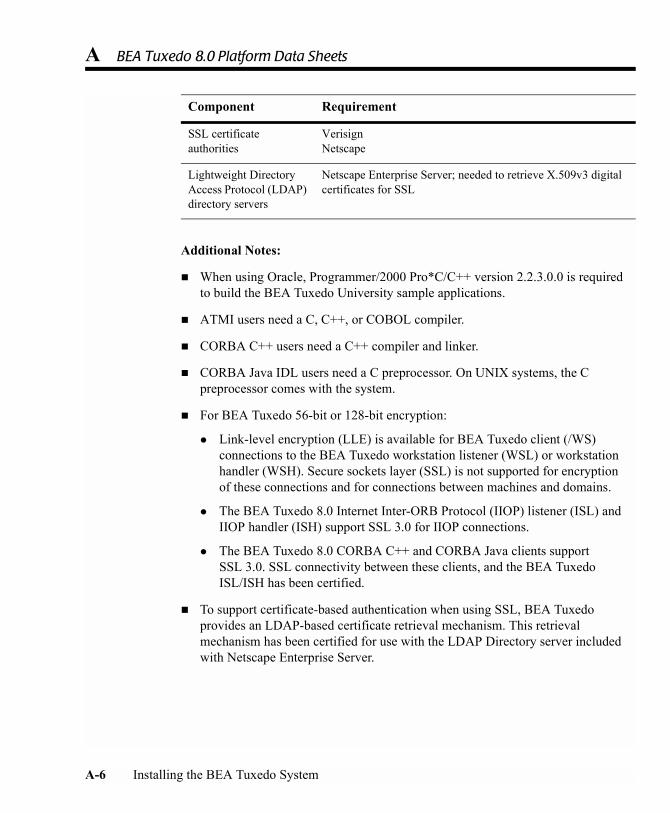
A BEA Tuxedo 8.0 Platform Data Sheets
Additional Notes:
! When using Oracle, Programmer/2000 Pro*C/C++ version 2.2.3.0.0 is required to build the BEA Tuxedo University sample applications.
! ATMI users need a C, C++, or COBOL compiler.
! CORBA C++ users need a C++ compiler and linker.
! CORBA Java IDL users need a C preprocessor. On UNIX systems, the C preprocessor comes with the system.
! For BEA Tuxedo 56-bit or 128-bit encryption:
" Link-level encryption (LLE) is available for BEA Tuxedo client (/WS) connections to the BEA Tuxedo workstation listener (WSL) or workstation handler (WSH). Secure sockets layer (SSL) is not supported for encryption of these connections and for connections between machines and domains.
" The BEA Tuxedo 8.0 Internet Inter-ORB Protocol (IIOP) listener (ISL) and IIOP handler (ISH) support SSL 3.0 for IIOP connections.
" The BEA Tuxedo 8.0 CORBA C++ and CORBA Java clients support SSL 3.0. SSL connectivity between these clients, and the BEA Tuxedo ISL/ISH has been certified.
! To support certificate-based authentication when using SSL, BEA Tuxedo provides an LDAP-based certificate retrieval mechanism. This retrieval mechanism has been certified for use with the LDAP Directory server included with Netscape Enterprise Server.
SSL certificate authorities
VerisignNetscape
Lightweight Directory Access Protocol (LDAP) directory servers
Netscape Enterprise Server; needed to retrieve X.509v3 digital certificates for SSL
Component Requirement
A-6 Installing the BEA Tuxedo System
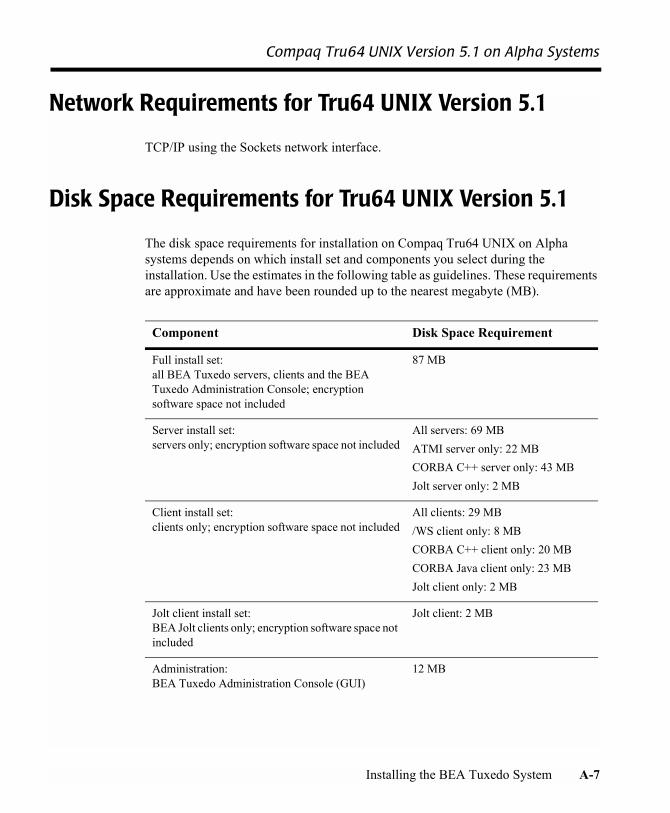
Compaq Tru64 UNIX Version 5.1 on Alpha Systems
Network Requirements for Tru64 UNIX Version 5.1
TCP/IP using the Sockets network interface.
Disk Space Requirements for Tru64 UNIX Version 5.1
The disk space requirements for installation on Compaq Tru64 UNIX on Alpha systems depends on which install set and components you select during the installation. Use the estimates in the following table as guidelines. These requirements are approximate and have been rounded up to the nearest megabyte (MB).
Component Disk Space Requirement
Full install set: all BEA Tuxedo servers, clients and the BEA Tuxedo Administration Console; encryption software space not included
87 MB
Server install set:servers only; encryption software space not included
All servers: 69 MBATMI server only: 22 MBCORBA C++ server only: 43 MBJolt server only: 2 MB
Client install set:clients only; encryption software space not included
All clients: 29 MB /WS client only: 8 MBCORBA C++ client only: 20 MBCORBA Java client only: 23 MBJolt client only: 2 MB
Jolt client install set:BEA Jolt clients only; encryption software space not included
Jolt client: 2 MB
Administration:BEA Tuxedo Administration Console (GUI)
12 MB
Installing the BEA Tuxedo System A-7

A BEA Tuxedo 8.0 Platform Data Sheets
Mounting and Unmounting the CD for Tru64 UNIX Version 5.1
Mounting a CD requires the type CDFS. Because CDFS is a configurable kernel option, the following line must exist in the system configuration file:
options CDFS
If the system configuration file does not contain this line, modify the file and then rebuild the kernel.
To mount a CD, enter the following commands:
sumkdir /cdrom/usr/sbin/mount -r -t cdfs -o noversion /dev/rzunit#c /cdrom
In the mount command line, unit# is the unit number of your CD-ROM drive; cdrom (literal) is the mounting point.
In almost all cases, the unit number of the CD-ROM drive on a new system is 4 (that is, /dev/rz4c). However, to ensure that you have the correct unit number of the drive, enter the following commands:
sufile /dev/rrz*c
The output identifies the CD-ROM drive as an RRD disk. The unit number of the drive is in the far left column. For example:
/dev/rrz4c: character special (8/4098) SCSI #0 RRD43 disk #32 (SCSI ID #4)
To unmount the CD, enter the following command:
umount /cdrom
Encryption software:56-bit and 128-bit
2 MB for LLE only on ATMI server or /WS client system4 MB for LLE and SSL
Component Disk Space Requirement
A-8 Installing the BEA Tuxedo System
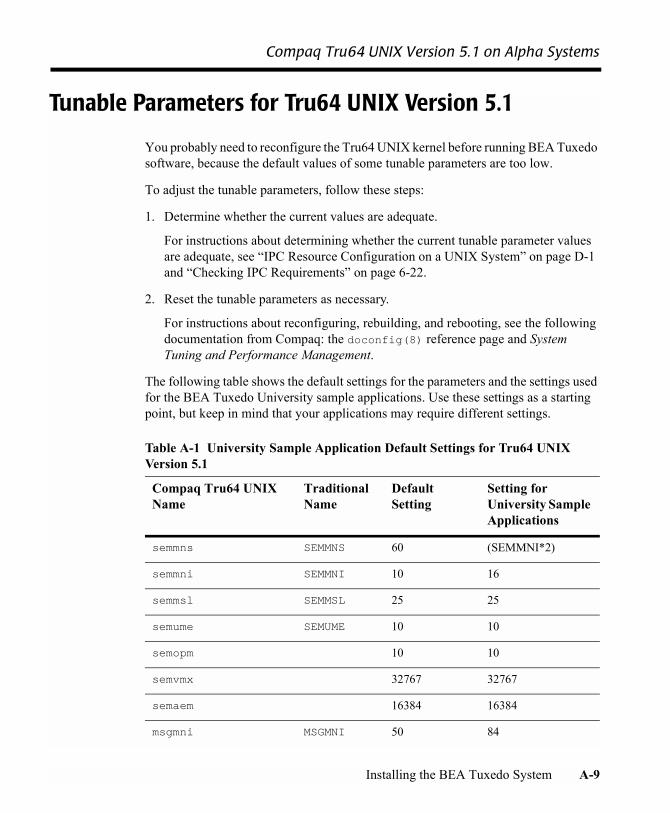
Compaq Tru64 UNIX Version 5.1 on Alpha Systems
Tunable Parameters for Tru64 UNIX Version 5.1
You probably need to reconfigure the Tru64 UNIX kernel before running BEA Tuxedo software, because the default values of some tunable parameters are too low.
To adjust the tunable parameters, follow these steps:
1. Determine whether the current values are adequate.
For instructions about determining whether the current tunable parameter values are adequate, see �IPC Resource Configuration on a UNIX System� on page D-1 and �Checking IPC Requirements� on page 6-22.
2. Reset the tunable parameters as necessary.
For instructions about reconfiguring, rebuilding, and rebooting, see the following documentation from Compaq: the doconfig(8) reference page and System Tuning and Performance Management.
The following table shows the default settings for the parameters and the settings used for the BEA Tuxedo University sample applications. Use these settings as a starting point, but keep in mind that your applications may require different settings.
Table A-1 University Sample Application Default Settings for Tru64 UNIX Version 5.1
Compaq Tru64 UNIX Name
Traditional Name
DefaultSetting
Setting for University Sample Applications
semmns SEMMNS 60 (SEMMNI*2)
semmni SEMMNI 10 16
semmsl SEMMSL 25 25
semume SEMUME 10 10
semopm 10 10
semvmx 32767 32767
semaem 16384 16384
msgmni MSGMNI 50 84
Installing the BEA Tuxedo System A-9
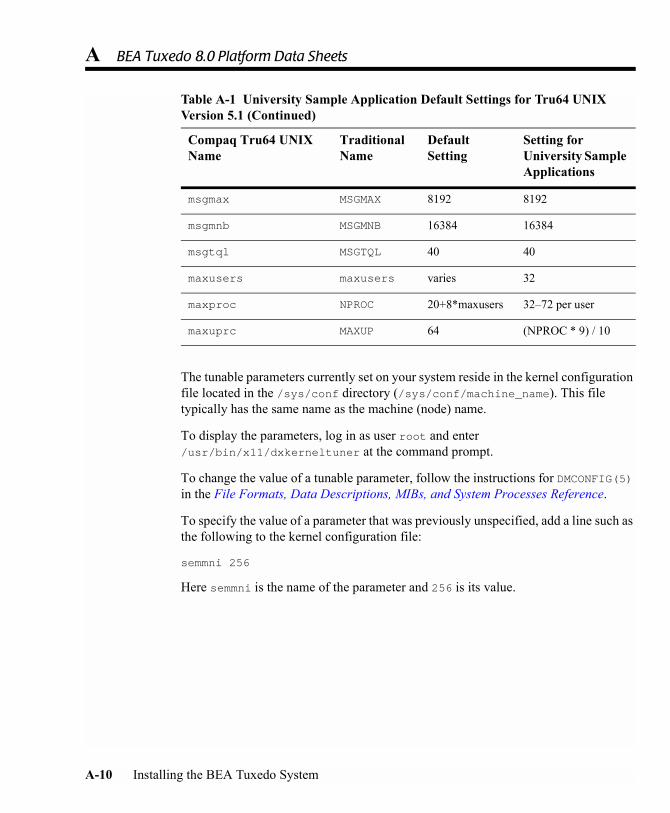
A BEA Tuxedo 8.0 Platform Data Sheets
The tunable parameters currently set on your system reside in the kernel configuration file located in the /sys/conf directory (/sys/conf/machine_name). This file typically has the same name as the machine (node) name.
To display the parameters, log in as user root and enter /usr/bin/x11/dxkerneltuner at the command prompt.
To change the value of a tunable parameter, follow the instructions for DMCONFIG(5) in the File Formats, Data Descriptions, MIBs, and System Processes Reference.
To specify the value of a parameter that was previously unspecified, add a line such as the following to the kernel configuration file:
semmni 256
Here semmni is the name of the parameter and 256 is its value.
msgmax MSGMAX 8192 8192
msgmnb MSGMNB 16384 16384
msgtql MSGTQL 40 40
maxusers maxusers varies 32
maxproc NPROC 20+8*maxusers 32�72 per user
maxuprc MAXUP 64 (NPROC * 9) / 10
Table A-1 University Sample Application Default Settings for Tru64 UNIX Version 5.1 (Continued)
Compaq Tru64 UNIX Name
Traditional Name
DefaultSetting
Setting for University Sample Applications
A-10 Installing the BEA Tuxedo System

HP-UX Version 11.0 (32-Bit) on HP 9000 Series
HP-UX Version 11.0 (32-Bit) on HP 9000 Series
The following sections list BEA Tuxedo 8.0 requirements for HP-UX 11.0 (32-bit) systems.
Available BEA Tuxedo 8.0 Install Sets for HP-UX 11.0 (32-Bit)
! Full install set
! Server install set
! Client install set
! Jolt client install set
For descriptions of BEA Tuxedo install sets, see �Install Sets� on page A-3.
Hardware Requirements for HP-UX 11.0 (32-Bit)
! HP 9000 Series
! 256 MB of RAM
! 1 additional MB RAM for each BEA Tuxedo application, plus 0.5�1 MB per application server
Installing the BEA Tuxedo System A-11
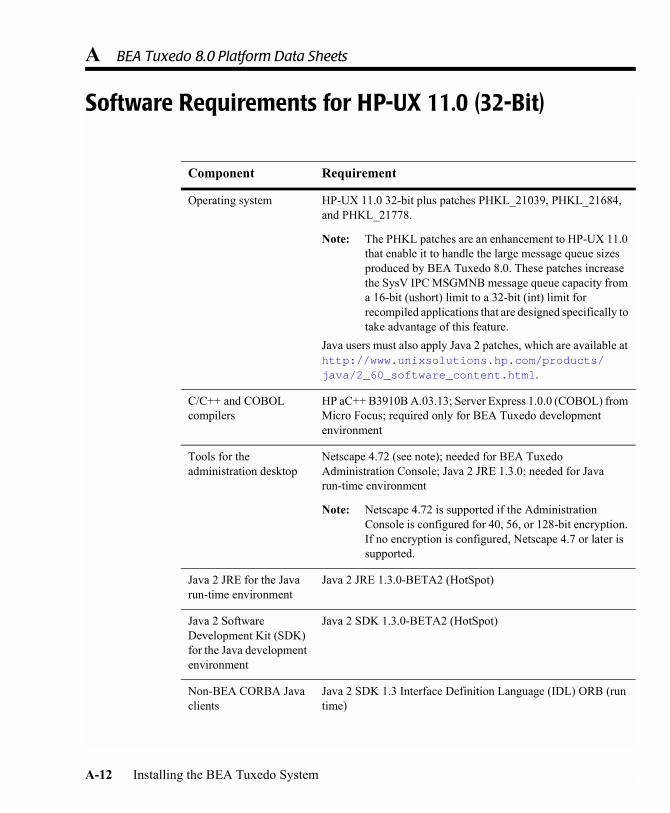
A BEA Tuxedo 8.0 Platform Data Sheets
Software Requirements for HP-UX 11.0 (32-Bit)
Component Requirement
Operating system HP-UX 11.0 32-bit plus patches PHKL_21039, PHKL_21684, and PHKL_21778.
Note: The PHKL patches are an enhancement to HP-UX 11.0 that enable it to handle the large message queue sizes produced by BEA Tuxedo 8.0. These patches increase the SysV IPC MSGMNB message queue capacity from a 16-bit (ushort) limit to a 32-bit (int) limit for recompiled applications that are designed specifically to take advantage of this feature.
Java users must also apply Java 2 patches, which are available at http://www.unixsolutions.hp.com/products/java/2_60_software_content.html.
C/C++ and COBOL compilers
HP aC++ B3910B A.03.13; Server Express 1.0.0 (COBOL) from Micro Focus; required only for BEA Tuxedo development environment
Tools for the administration desktop
Netscape 4.72 (see note); needed for BEA Tuxedo Administration Console; Java 2 JRE 1.3.0; needed for Java run-time environment
Note: Netscape 4.72 is supported if the Administration Console is configured for 40, 56, or 128-bit encryption. If no encryption is configured, Netscape 4.7 or later is supported.
Java 2 JRE for the Java run-time environment
Java 2 JRE 1.3.0-BETA2 (HotSpot)
Java 2 Software Development Kit (SDK) for the Java development environment
Java 2 SDK 1.3.0-BETA2 (HotSpot)
Non-BEA CORBA Java clients
Java 2 SDK 1.3 Interface Definition Language (IDL) ORB (run time)
A-12 Installing the BEA Tuxedo System
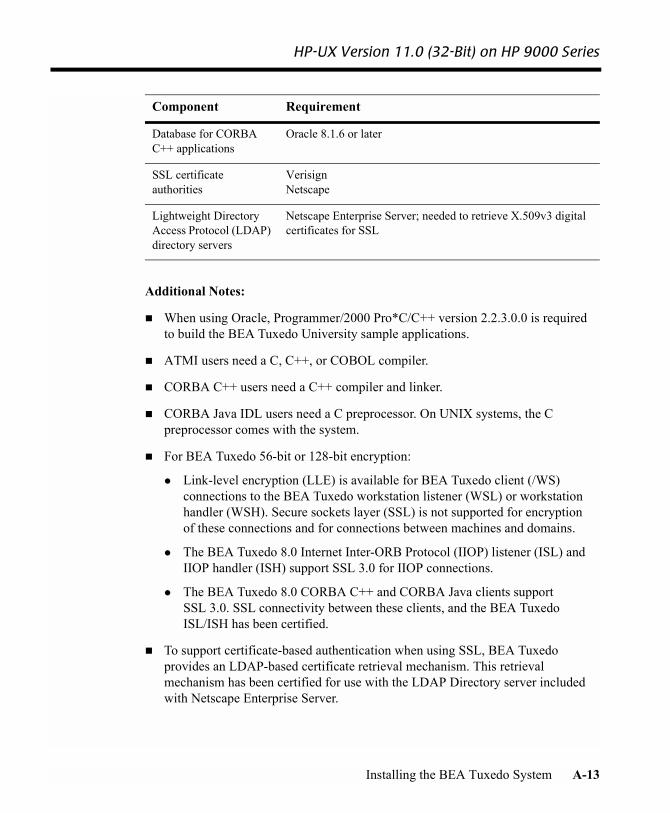
HP-UX Version 11.0 (32-Bit) on HP 9000 Series
Additional Notes:
! When using Oracle, Programmer/2000 Pro*C/C++ version 2.2.3.0.0 is required to build the BEA Tuxedo University sample applications.
! ATMI users need a C, C++, or COBOL compiler.
! CORBA C++ users need a C++ compiler and linker.
! CORBA Java IDL users need a C preprocessor. On UNIX systems, the C preprocessor comes with the system.
! For BEA Tuxedo 56-bit or 128-bit encryption:
" Link-level encryption (LLE) is available for BEA Tuxedo client (/WS) connections to the BEA Tuxedo workstation listener (WSL) or workstation handler (WSH). Secure sockets layer (SSL) is not supported for encryption of these connections and for connections between machines and domains.
" The BEA Tuxedo 8.0 Internet Inter-ORB Protocol (IIOP) listener (ISL) and IIOP handler (ISH) support SSL 3.0 for IIOP connections.
" The BEA Tuxedo 8.0 CORBA C++ and CORBA Java clients support SSL 3.0. SSL connectivity between these clients, and the BEA Tuxedo ISL/ISH has been certified.
! To support certificate-based authentication when using SSL, BEA Tuxedo provides an LDAP-based certificate retrieval mechanism. This retrieval mechanism has been certified for use with the LDAP Directory server included with Netscape Enterprise Server.
Database for CORBA C++ applications
Oracle 8.1.6 or later
SSL certificate authorities
VerisignNetscape
Lightweight Directory Access Protocol (LDAP) directory servers
Netscape Enterprise Server; needed to retrieve X.509v3 digital certificates for SSL
Component Requirement
Installing the BEA Tuxedo System A-13
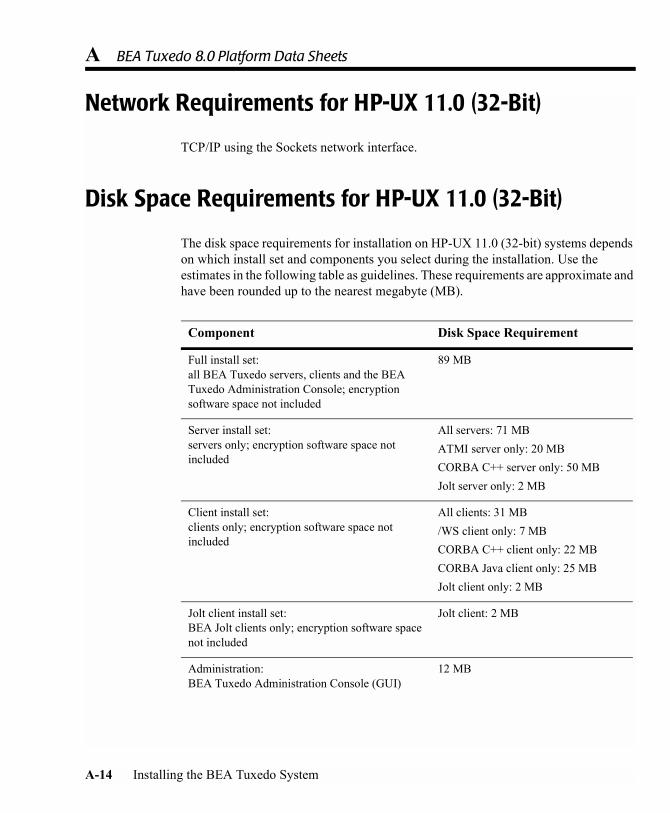
A BEA Tuxedo 8.0 Platform Data Sheets
Network Requirements for HP-UX 11.0 (32-Bit)
TCP/IP using the Sockets network interface.
Disk Space Requirements for HP-UX 11.0 (32-Bit)
The disk space requirements for installation on HP-UX 11.0 (32-bit) systems depends on which install set and components you select during the installation. Use the estimates in the following table as guidelines. These requirements are approximate and have been rounded up to the nearest megabyte (MB).
Component Disk Space Requirement
Full install set: all BEA Tuxedo servers, clients and the BEA Tuxedo Administration Console; encryption software space not included
89 MB
Server install set:servers only; encryption software space not included
All servers: 71 MBATMI server only: 20 MBCORBA C++ server only: 50 MBJolt server only: 2 MB
Client install set:clients only; encryption software space not included
All clients: 31 MB /WS client only: 7 MBCORBA C++ client only: 22 MBCORBA Java client only: 25 MBJolt client only: 2 MB
Jolt client install set:BEA Jolt clients only; encryption software space not included
Jolt client: 2 MB
Administration:BEA Tuxedo Administration Console (GUI)
12 MB
A-14 Installing the BEA Tuxedo System
HP-UX Version 11.0 (32-Bit) on HP 9000 Series
Mounting and Unmounting the CD for HP-UX 11.0 (32-Bit)
To mount a CD, enter the following commands: su mkdir /cdrommount -F cdfs -o cdcase /dev/dsk/cdrom_device /cdrom
Here cdrom_device is listed in the output of the ioscan -f -n command; cdrom (literal) is the mounting point.
To unmount the CD, enter the following command:
umount /cdrom
Tunable Parameters for HP-UX 11.0 (32-Bit)
You probably need to reconfigure the HP-UX kernel before running BEA Tuxedo software because the default values of some tunable parameters are too low.
To adjust the tunable parameters, follow these steps:
1. Determine whether the current values are adequate.
For instructions about determining whether the current tunable parameter values are adequate, see �IPC Resource Configuration on a UNIX System� on page D-1 and �Checking IPC Requirements� on page 6-22.
2. Reset the tunable parameters as necessary.
For instructions about reconfiguring HP-UX, see �Setting Up a System� in the HP-UX System Administration Tasks Manual.
Encryption software:56-bit and 128-bit
2 MB for LLE only on ATMI server or /WS client system4 MB for LLE and SSL
Component Disk Space Requirement
Installing the BEA Tuxedo System A-15
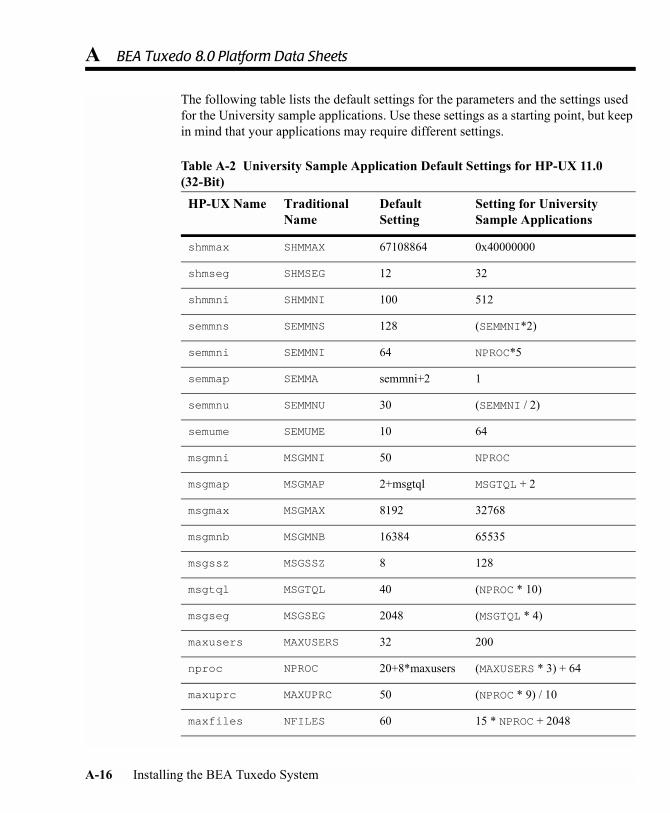
A BEA Tuxedo 8.0 Platform Data Sheets
The following table lists the default settings for the parameters and the settings used for the University sample applications. Use these settings as a starting point, but keep in mind that your applications may require different settings.
Table A-2 University Sample Application Default Settings for HP-UX 11.0 (32-Bit)
HP-UX Name Traditional Name
DefaultSetting
Setting for University Sample Applications
shmmax SHMMAX 67108864 0x40000000
shmseg SHMSEG 12 32
shmmni SHMMNI 100 512
semmns SEMMNS 128 (SEMMNI*2)
semmni SEMMNI 64 NPROC*5
semmap SEMMA semmni+2 1
semmnu SEMMNU 30 (SEMMNI / 2)
semume SEMUME 10 64
msgmni MSGMNI 50 NPROC
msgmap MSGMAP 2+msgtql MSGTQL + 2
msgmax MSGMAX 8192 32768
msgmnb MSGMNB 16384 65535
msgssz MSGSSZ 8 128
msgtql MSGTQL 40 (NPROC * 10)
msgseg MSGSEG 2048 (MSGTQL * 4)
maxusers MAXUSERS 32 200
nproc NPROC 20+8*maxusers (MAXUSERS * 3) + 64
maxuprc MAXUPRC 50 (NPROC * 9) / 10
maxfiles NFILES 60 15 * NPROC + 2048
A-16 Installing the BEA Tuxedo System
IBM AIX 4.3.3 on IBM PowerPC 32-Bit
The tunable parameters currently set on your system are in the kernel configuration file tune.h located in the /stand/build directory (/stand/build/tune.h).
IBM AIX 4.3.3 on IBM PowerPC 32-Bit
The following sections list BEA Tuxedo 8.0 requirements for AIX 4.3.3 on PowerPC (32-bit) systems.
Available BEA Tuxedo Release 8.0 Packages
! BEA Tuxedo Core System
! BEA Tuxedo Workstation
! BEA Jolt
Note: The BEA Tuxedo Release 8.0 Online Documentation is provided on a separate CD-ROM.
Hardware Requirements
! IBM PowerPC
! 256 MB of RAM minimum
! 1 additional MB RAM for each BEA Tuxedo application, plus 0.5-1 MB per application server
Software Requirements
! IBM AIX 4.3.3 (supports threads)
! IBM AIX XL C Compiler (BEA Tuxedo development environment only)
Installing the BEA Tuxedo System A-17
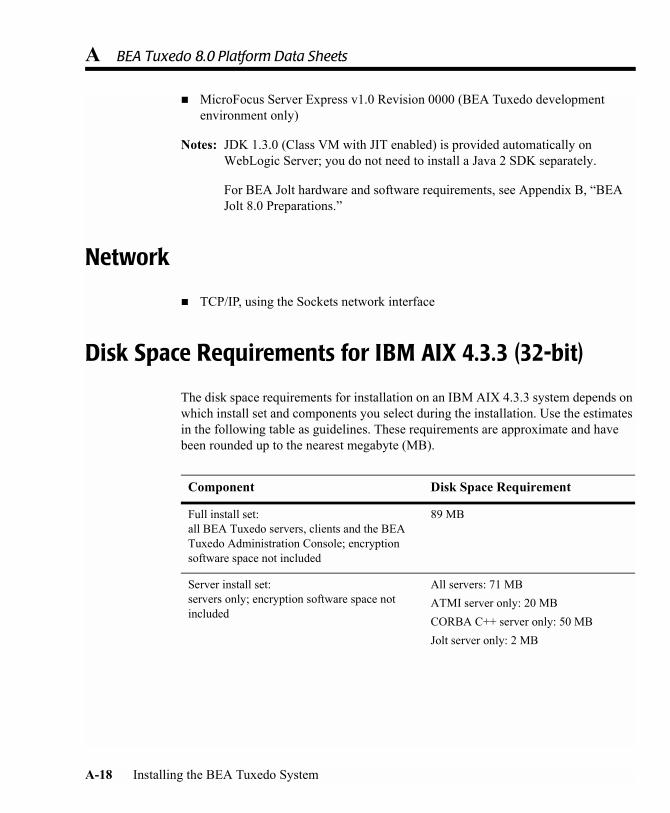
A BEA Tuxedo 8.0 Platform Data Sheets
! MicroFocus Server Express v1.0 Revision 0000 (BEA Tuxedo development environment only)
Notes: JDK 1.3.0 (Class VM with JIT enabled) is provided automatically on WebLogic Server; you do not need to install a Java 2 SDK separately.
For BEA Jolt hardware and software requirements, see Appendix B, �BEA Jolt 8.0 Preparations.�
Network
! TCP/IP, using the Sockets network interface
Disk Space Requirements for IBM AIX 4.3.3 (32-bit)
The disk space requirements for installation on an IBM AIX 4.3.3 system depends on which install set and components you select during the installation. Use the estimates in the following table as guidelines. These requirements are approximate and have been rounded up to the nearest megabyte (MB).
Component Disk Space Requirement
Full install set: all BEA Tuxedo servers, clients and the BEA Tuxedo Administration Console; encryption software space not included
89 MB
Server install set:servers only; encryption software space not included
All servers: 71 MBATMI server only: 20 MBCORBA C++ server only: 50 MBJolt server only: 2 MB
A-18 Installing the BEA Tuxedo System
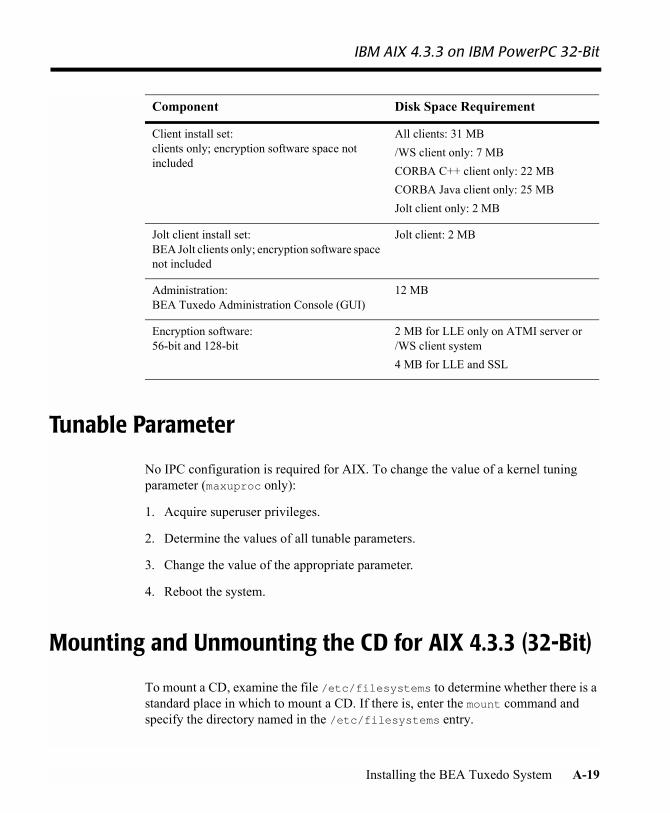
IBM AIX 4.3.3 on IBM PowerPC 32-Bit
Tunable Parameter
No IPC configuration is required for AIX. To change the value of a kernel tuning parameter (maxuproc only):
1. Acquire superuser privileges.
2. Determine the values of all tunable parameters.
3. Change the value of the appropriate parameter.
4. Reboot the system.
Mounting and Unmounting the CD for AIX 4.3.3 (32-Bit)
To mount a CD, examine the file /etc/filesystems to determine whether there is a standard place in which to mount a CD. If there is, enter the mount command and specify the directory named in the /etc/filesystems entry.
Client install set:clients only; encryption software space not included
All clients: 31 MB /WS client only: 7 MBCORBA C++ client only: 22 MBCORBA Java client only: 25 MBJolt client only: 2 MB
Jolt client install set:BEA Jolt clients only; encryption software space not included
Jolt client: 2 MB
Administration:BEA Tuxedo Administration Console (GUI)
12 MB
Encryption software:56-bit and 128-bit
2 MB for LLE only on ATMI server or /WS client system4 MB for LLE and SSL
Component Disk Space Requirement
Installing the BEA Tuxedo System A-19
A BEA Tuxedo 8.0 Platform Data Sheets
For example, to mount a CD when an entry in /etc/filesystems specifies /cd as the mount point, enter:
su/etc/mount /cd
If /etc/fileystems does not contain a CD entry, enter:
sumkdir /cd/etc/mount -v cdrfs -r cd_device /cd
In the latter command line, cd_device represents the name of the CD device file, typically /dev/cd0.
Alternatively, you can use the System Management Interface Tool (SMIT) to perform the mount. To use SMIT, enter the following:
smit mount
To unmount the CD, enter the following command:
unmount /cdrom
In this command line cdrom represents the mount point.
Microsoft Windows 2000 on Intel
The following sections list BEA Tuxedo 8.0 requirements for Microsoft Windows 2000 systems.
BEA Tuxedo 8.0 Install Sets for Windows 2000 (Intel)
! Full install set
! Server install set
A-20 Installing the BEA Tuxedo System
Microsoft Windows 2000 on Intel
! Client install set (includes ActiveX clients)
! Jolt client install set
For descriptions of BEA Tuxedo install sets, see �Install Sets� on page A-3.
Hardware Requirements for Windows 2000 (Intel)
! Pentium processor
! 128 MB of RAM
! 1 additional MB RAM for each BEA Tuxedo application, plus 0.5�1 MB per application server
Software Requirements for Windows 2000 (Intel)
Component Requirement
C/C++ and COBOL compilers
Visual C++ 6.0 SP4; required for full (development) installations, but not for client-only or server-only installations; Net Express 3.1 (COBOL) from Micro Focus.Also, either Visual C++ 6.0 SP4, Visual Basic 6.0, or another OLE Automation development tool is required for client systems that run ActiveX client applications.
Internet browser for BEA Application Builder Help
Netscape 4.0 or later. This browser is required only for the online help used in the BEA Application Builder. This GUI is installed on your system if you included ActiveX clients in your BEA Tuxedo 8.0 installation.
Installing the BEA Tuxedo System A-21
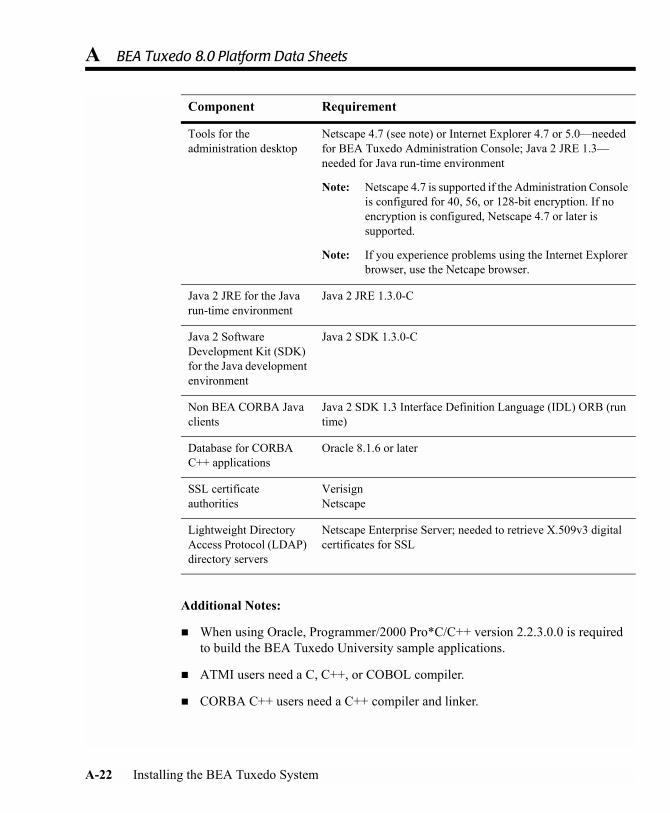
A BEA Tuxedo 8.0 Platform Data Sheets
Additional Notes:
! When using Oracle, Programmer/2000 Pro*C/C++ version 2.2.3.0.0 is required to build the BEA Tuxedo University sample applications.
! ATMI users need a C, C++, or COBOL compiler.
! CORBA C++ users need a C++ compiler and linker.
Tools for the administration desktop
Netscape 4.7 (see note) or Internet Explorer 4.7 or 5.0�needed for BEA Tuxedo Administration Console; Java 2 JRE 1.3�needed for Java run-time environment
Note: Netscape 4.7 is supported if the Administration Console is configured for 40, 56, or 128-bit encryption. If no encryption is configured, Netscape 4.7 or later is supported.
Note: If you experience problems using the Internet Explorer browser, use the Netcape browser.
Java 2 JRE for the Java run-time environment
Java 2 JRE 1.3.0-C
Java 2 Software Development Kit (SDK) for the Java development environment
Java 2 SDK 1.3.0-C
Non BEA CORBA Java clients
Java 2 SDK 1.3 Interface Definition Language (IDL) ORB (run time)
Database for CORBA C++ applications
Oracle 8.1.6 or later
SSL certificate authorities
VerisignNetscape
Lightweight Directory Access Protocol (LDAP) directory servers
Netscape Enterprise Server; needed to retrieve X.509v3 digital certificates for SSL
Component Requirement
A-22 Installing the BEA Tuxedo System
Microsoft Windows 2000 on Intel
! CORBA Java IDL users need a C preprocessor. On Windows 2000, for example, Visual C++ includes a C preprocessor.
! For BEA Tuxedo 56-bit or 128-bit encryption:
" Link-level encryption (LLE) is available for BEA Tuxedo client (/WS) connections to the BEA Tuxedo workstation listener (WSL) or workstation handler (WSH). Secure sockets layer (SSL) is not supported for encryption of these connections and for connections between machines and domains.
" The BEA Tuxedo 8.0 Internet Inter-ORB Protocol (IIOP) listener (ISL) and IIOP handler (ISH) support SSL 3.0 for IIOP connections.
" The BEA Tuxedo 8.0 CORBA C++ and CORBA Java clients support SSL 3.0. SSL connectivity between these clients, and the BEA Tuxedo ISL/ISH has been certified.
! To support certificate-based authentication when using SSL, BEA Tuxedo provides an LDAP-based certificate retrieval mechanism. This retrieval mechanism has been certified for use with the LDAP Directory server included with Netscape Enterprise Server.
Network Requirements for Windows 2000 (Intel)
TCP/IP provided by Microsoft Windows 2000 (32-bit Winsock).
Disk Space Requirements for Windows 2000 (Intel)
The disk space requirements for installation on Windows 2000 (Intel) systems depends on which install set and components you select during the installation. Use the estimates in the following table as guidelines. These requirements are approximate and have been rounded up to the nearest megabyte (MB).
Installing the BEA Tuxedo System A-23

A BEA Tuxedo 8.0 Platform Data Sheets
Tunable Parameters for Windows 2000 (Intel)
Before running the BEA Tuxedo software, you may need to reconfigure the interprocess communication (IPC) parameters shown in the figure entitled �BEA Administration Window with IPC Resources Page Displayed� on page 2-19. For
Component Disk Space Requirement
Full install set: all BEA Tuxedo servers, clients and the BEA Tuxedo Administration Console; encryption software space not included
83 MB
Server install set:servers only; encryption software space not included
All servers: 54 MBATMI server only: 21 MBCORBA C++ server only: 37 MBJolt server only: 2 MB
Client install set:clients only; encryption software space not included
All clients: 42 MB /WS client only: 13 MBCORBA C++ client only: 24 MBCORBA Java client only: 24 MBJolt client only: 2 MBActiveX client only: 13 MB
Jolt client install set:BEA Jolt clients only; encryption software space not included
Jolt client: 2 MB
Administration:BEA Tuxedo Administration Console (GUI)
11 MB
Encryption software:56-bit and 128-bit
1 MB for LLE only on ATMI server or /WS client system3 MB for LLE and SSL
A-24 Installing the BEA Tuxedo System
Microsoft Windows 98 on Intel
instructions about reconfiguring the IPC parameters, see �Configuring IPC Resources to Maximize System Performance� on page 2-18 and �Checking IPC Requirements� on page 6-22.
Microsoft Windows 98 on Intel
The following sections list BEA Tuxedo 8.0 requirements for Microsoft Windows 98 systems.
Available BEA Tuxedo 8.0 Install Sets for Windows 98 (Intel)
! Client install set (includes ActiveX clients)
! Jolt client install set
For descriptions of BEA Tuxedo install sets, see �Install Sets.�
Hardware Requirements for Windows 98 (Intel)
! Pentium processor
! 32 MB of RAM
Installing the BEA Tuxedo System A-25
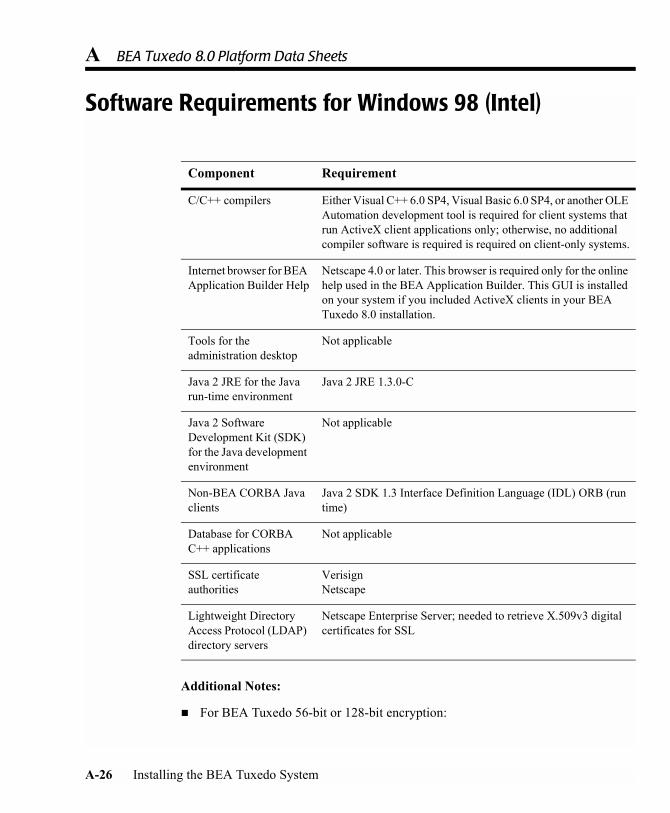
A BEA Tuxedo 8.0 Platform Data Sheets
Software Requirements for Windows 98 (Intel)
Additional Notes:
! For BEA Tuxedo 56-bit or 128-bit encryption:
Component Requirement
C/C++ compilers Either Visual C++ 6.0 SP4, Visual Basic 6.0 SP4, or another OLE Automation development tool is required for client systems that run ActiveX client applications only; otherwise, no additional compiler software is required is required on client-only systems.
Internet browser for BEA Application Builder Help
Netscape 4.0 or later. This browser is required only for the online help used in the BEA Application Builder. This GUI is installed on your system if you included ActiveX clients in your BEA Tuxedo 8.0 installation.
Tools for the administration desktop
Not applicable
Java 2 JRE for the Java run-time environment
Java 2 JRE 1.3.0-C
Java 2 Software Development Kit (SDK) for the Java development environment
Not applicable
Non-BEA CORBA Java clients
Java 2 SDK 1.3 Interface Definition Language (IDL) ORB (run time)
Database for CORBA C++ applications
Not applicable
SSL certificate authorities
VerisignNetscape
Lightweight Directory Access Protocol (LDAP) directory servers
Netscape Enterprise Server; needed to retrieve X.509v3 digital certificates for SSL
A-26 Installing the BEA Tuxedo System

Microsoft Windows 98 on Intel
" Link-level encryption (LLE) is available for BEA Tuxedo client (/WS) connections to the BEA Tuxedo workstation listener (WSL) or workstation handler (WSH). Secure sockets layer (SSL) is not supported for encryption of these connections and for connections between machines and domains.
" The BEA Tuxedo 8.0 Internet Inter-ORB Protocol (IIOP) listener (ISL) and IIOP handler (ISH) support SSL 3.0 for IIOP connections.
" The BEA Tuxedo 8.0 CORBA C++ and CORBA Java clients support SSL 3.0. SSL connectivity between these clients, and the BEA Tuxedo ISL/ISH has been certified.
! To support certificate-based authentication when using SSL, BEA Tuxedo provides an LDAP-based certificate retrieval mechanism. This retrieval mechanism has been certified for use with the LDAP Directory server included with Netscape Enterprise Server.
Network Requirements for Windows 98 (Intel)
TCP/IP provided by Microsoft Windows 98 (32-bit Winsock).
Disk Space Requirements for Windows 98 (Intel)
The disk space requirements for installation on Windows 98 (Intel) systems depends on which client install set and components you select during the installation. Use the estimates in the following table as guidelines. These requirements are approximate and have been rounded up to the nearest megabyte (MB).
Component Disk Space Requirement
Client install set:clients only; encryption software space not included
All clients: 42 MB /WS client only: 13 MBCORBA C++ client only: 24 MBCORBA Java client only: 24 MBJolt client only: 2 MBActiveX client only: 13 MB
Installing the BEA Tuxedo System A-27
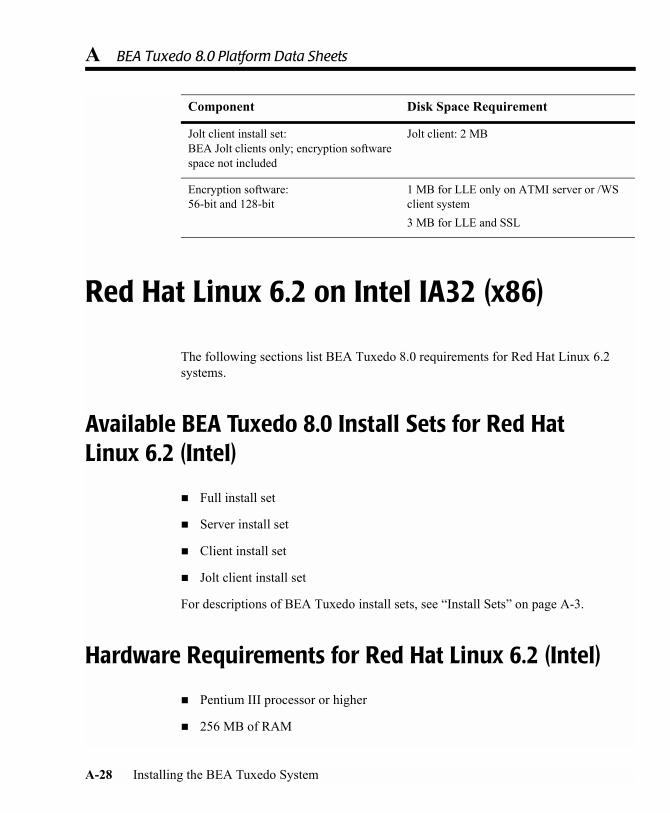
A BEA Tuxedo 8.0 Platform Data Sheets
Red Hat Linux 6.2 on Intel IA32 (x86)
The following sections list BEA Tuxedo 8.0 requirements for Red Hat Linux 6.2 systems.
Available BEA Tuxedo 8.0 Install Sets for Red Hat Linux 6.2 (Intel)
! Full install set
! Server install set
! Client install set
! Jolt client install set
For descriptions of BEA Tuxedo install sets, see �Install Sets� on page A-3.
Hardware Requirements for Red Hat Linux 6.2 (Intel)
! Pentium III processor or higher
! 256 MB of RAM
Jolt client install set:BEA Jolt clients only; encryption software space not included
Jolt client: 2 MB
Encryption software:56-bit and 128-bit
1 MB for LLE only on ATMI server or /WS client system3 MB for LLE and SSL
Component Disk Space Requirement
A-28 Installing the BEA Tuxedo System
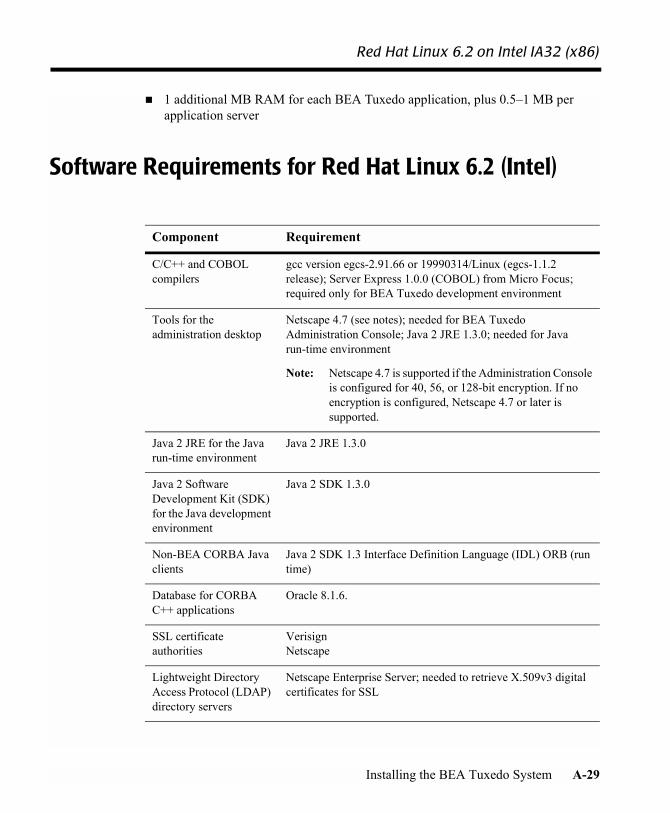
Red Hat Linux 6.2 on Intel IA32 (x86)
! 1 additional MB RAM for each BEA Tuxedo application, plus 0.5�1 MB per application server
Software Requirements for Red Hat Linux 6.2 (Intel)
Component Requirement
C/C++ and COBOL compilers
gcc version egcs-2.91.66 or 19990314/Linux (egcs-1.1.2 release); Server Express 1.0.0 (COBOL) from Micro Focus; required only for BEA Tuxedo development environment
Tools for the administration desktop
Netscape 4.7 (see notes); needed for BEA Tuxedo Administration Console; Java 2 JRE 1.3.0; needed for Java run-time environment
Note: Netscape 4.7 is supported if the Administration Console is configured for 40, 56, or 128-bit encryption. If no encryption is configured, Netscape 4.7 or later is supported.
Java 2 JRE for the Java run-time environment
Java 2 JRE 1.3.0
Java 2 Software Development Kit (SDK) for the Java development environment
Java 2 SDK 1.3.0
Non-BEA CORBA Java clients
Java 2 SDK 1.3 Interface Definition Language (IDL) ORB (run time)
Database for CORBA C++ applications
Oracle 8.1.6.
SSL certificate authorities
VerisignNetscape
Lightweight Directory Access Protocol (LDAP) directory servers
Netscape Enterprise Server; needed to retrieve X.509v3 digital certificates for SSL
Installing the BEA Tuxedo System A-29

A BEA Tuxedo 8.0 Platform Data Sheets
Additional Notes
! When using Oracle, Programmer/2000 Pro*C/C++ version 2.2.3.0.0 is required to build the BEA Tuxedo University sample applications.
! ATMI users need a C, C++, or COBOL compiler.
! CORBA C++ users need a C++ compiler and linker.
! CORBA Java IDL users need a C preprocessor. On UNIX systems, the C preprocessor comes with the system.
! For BEA Tuxedo 56-bit or 128-bit encryption:
" Link-level encryption (LLE) is available for BEA Tuxedo client (/WS) connections to the BEA Tuxedo workstation listener (WSL) or workstation handler (WSH). Secure sockets layer (SSL) is not supported for encryption of these connections and for connections between machines and domains.
" The BEA Tuxedo 8.0 Internet Inter-ORB Protocol (IIOP) listener (ISL) and IIOP handler (ISH) support SSL 3.0 for IIOP connections.
" The BEA Tuxedo 8.0 CORBA C++ and CORBA Java clients support SSL 3.0. SSL connectivity between these clients, and the BEA Tuxedo ISL/ISH has been certified.
! To support certificate-based authentication when using SSL, BEA Tuxedo provides an LDAP-based certificate retrieval mechanism. This retrieval mechanism has been certified for use with the LDAP Directory server included with Netscape Enterprise Server.
Network Requirements for Red Hat Linux 6.2 (Intel)
TCP/IP using the Sockets network interface.
A-30 Installing the BEA Tuxedo System

Red Hat Linux 6.2 on Intel IA32 (x86)
Disk Space Requirements for Red Hat Linux 6.2 (Intel)
The disk space requirements for installation on Red Hat Linux 6.2 (Intel) systems depends on which install set and components you select during the installation. Use the estimates in the following table as guidelines. These requirements are approximate and have been rounded up to the nearest megabyte (MB).
Component Disk Space Requirement
Full install set: all BEA Tuxedo servers, clients and the BEA Tuxedo Administration Console; encryption software space not included
87 MB
Server install set:servers only; encryption software space not included
All servers: 69 MBATMI server only: 22 MBCORBA C++ server only: 43 MBJolt server only: 2 MB
Client install set:clients only; encryption software space not included
All clients: 29 MB/WS client only: 8 MBCORBA C++ client only: 20 MBCORBA Java client only: 23 MBJolt client only: 2 MB
Jolt client install set:BEA Jolt clients only; encryption software space not included
Jolt client: 2 MB
Administration:BEA Tuxedo Administration Console (GUI)
12 MB
Encryption software:56-bit and 128-bit
2 MB for LLE only on ATMI server or /WS client system4 MB for LLE and SSL
Installing the BEA Tuxedo System A-31

A BEA Tuxedo 8.0 Platform Data Sheets
Mounting and Unmounting the CD for Red Hat Linux 6.2 (Intel)
To mount a CD, enter the following commands:
sumkdir /cdrom1mount -t iso9660 -r /dev/cd_device /cdrom1
To determine the value of cd_device, execute the following command:
dmesg | grep -i cd
Linux displays the following output:
cd_device device_description
The value of device_description may contain more than one field. For example, in the following output, the value of device description contains three fields:
hd20 Sony CDU-55 ATAPI
In this output:
! hd20 is the value of cd_device.
! Sony CDU-55 ATAPI is the value of device_description.
To unmount the CD, enter the following command:
umount /cdrom1
Tunable Parameters for Red Hat Linux 6.2 (Intel)
The Red Hat Linux kernel parameters are preconfigured with setting sufficient for running the BEA Tuxedo 8.0 software. If you want to change any parameter settings, refer to the Red Hat Linux documentation.
A-32 Installing the BEA Tuxedo System
Sun Microsystems Solaris 8 (32-Bit) SPARC
Sun Microsystems Solaris 8 (32-Bit) SPARC
The following sections list BEA Tuxedo 8.0 requirements for Sun Microsystems Solaris 8 (32-bit) SPARC systems.
Available BEA Tuxedo 8.0 Install Sets for Solaris 8 (32-Bit) SPARC
! Full install set
! Server install set
! Client install set
! Jolt client install set
For descriptions of BEA Tuxedo install sets, see �Install Sets� on page A-3.
Hardware Requirements for Solaris 8 (32-Bit) SPARC
! UltraSPARC
! 256 MB of RAM
! 1 additional MB RAM for each BEA Tuxedo application, plus 0.5�1 MB per application server
Installing the BEA Tuxedo System A-33
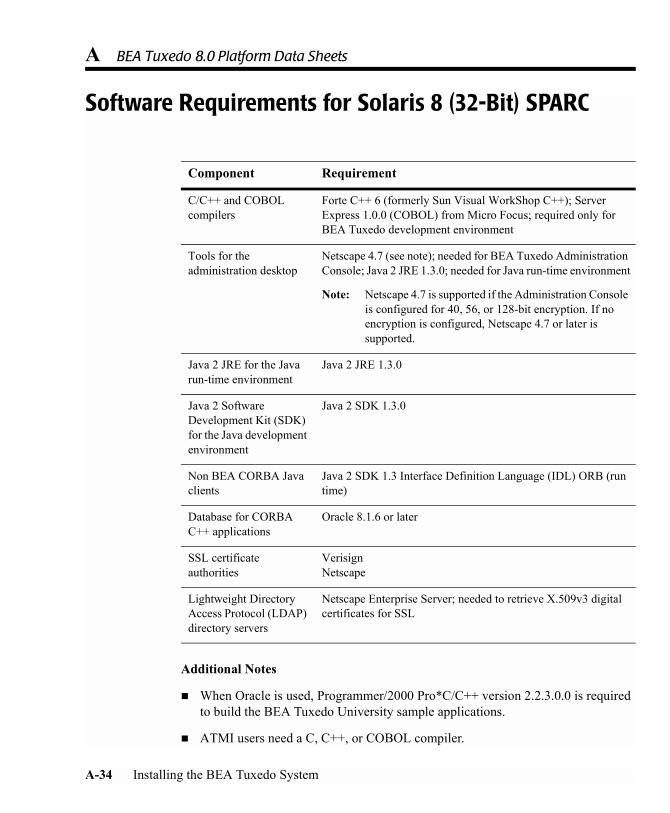
A BEA Tuxedo 8.0 Platform Data Sheets
Software Requirements for Solaris 8 (32-Bit) SPARC
Additional Notes
! When Oracle is used, Programmer/2000 Pro*C/C++ version 2.2.3.0.0 is required to build the BEA Tuxedo University sample applications.
! ATMI users need a C, C++, or COBOL compiler.
Component Requirement
C/C++ and COBOL compilers
Forte C++ 6 (formerly Sun Visual WorkShop C++); Server Express 1.0.0 (COBOL) from Micro Focus; required only for BEA Tuxedo development environment
Tools for the administration desktop
Netscape 4.7 (see note); needed for BEA Tuxedo Administration Console; Java 2 JRE 1.3.0; needed for Java run-time environment
Note: Netscape 4.7 is supported if the Administration Console is configured for 40, 56, or 128-bit encryption. If no encryption is configured, Netscape 4.7 or later is supported.
Java 2 JRE for the Java run-time environment
Java 2 JRE 1.3.0
Java 2 Software Development Kit (SDK) for the Java development environment
Java 2 SDK 1.3.0
Non BEA CORBA Java clients
Java 2 SDK 1.3 Interface Definition Language (IDL) ORB (run time)
Database for CORBA C++ applications
Oracle 8.1.6 or later
SSL certificate authorities
VerisignNetscape
Lightweight Directory Access Protocol (LDAP) directory servers
Netscape Enterprise Server; needed to retrieve X.509v3 digital certificates for SSL
A-34 Installing the BEA Tuxedo System
Sun Microsystems Solaris 8 (32-Bit) SPARC
! CORBA C++ users need a C++ compiler and linker.
! CORBA Java IDL users need a C preprocessor. On UNIX systems, the C preprocessor comes with the system.
! For BEA Tuxedo 56-bit or 128-bit encryption:
" Link-level encryption (LLE) is available for BEA Tuxedo client (/WS) connections to the BEA Tuxedo workstation listener (WSL) or workstation handler (WSH). Secure sockets layer (SSL) is not supported for encryption of these connections and for connections between machines and domains.
" The BEA Tuxedo 8.0 Internet Inter-ORB Protocol (IIOP) listener (ISL) and IIOP handler (ISH) support SSL 3.0 for IIOP connections.
" The BEA Tuxedo 8.0 CORBA C++ and CORBA Java clients support SSL 3.0. SSL connectivity between these clients, and the BEA Tuxedo ISL/ISH has been certified.
! To support certificate-based authentication when using SSL, BEA Tuxedo provides an LDAP-based certificate retrieval mechanism. This retrieval mechanism has been certified for use with the LDAP Directory server included with Netscape Enterprise Server.
Network Requirements for Solaris 8 (32-Bit) SPARC
TCP/IP using the Transport Layer Interface (TLI) network interface.
Disk Space Requirements for Solaris 8 (32-Bit) SPARC
The disk space requirements for installation on Solaris 8 (32-bit) SPARC systems depends on which install set and components you select during the installation. Use the estimates in the following table as guidelines. These requirements are approximate and have been rounded up to the nearest megabyte (MB).
Installing the BEA Tuxedo System A-35

A BEA Tuxedo 8.0 Platform Data Sheets
Mounting and Unmounting the CD for Solaris 8 (32-Bit) SPARC
The Solaris Volume Management software automatically mounts CDs on /cdrom/cdrom0/s0.
Component Disk Space Requirement
Full install set: all BEA Tuxedo servers, clients and the BEA Tuxedo Administration Console; encryption software space not included
87 MB
Server install set:servers only; encryption software space not included
All servers: 69 MBATMI server only: 22 MBCORBA C++ server only: 43 MBCORBA Java server only: 68 MBJolt server only: 2 MB
Client install set:clients only; encryption software space not included
All clients: 29 MB /WS client only: 8 MBCORBA C++ client only: 20 MBCORBA Java client only: 23 MBJolt client only: 2 MB
Jolt client install set:BEA Jolt clients only; encryption software space not included
Jolt client: 2 MB
Administration:BEA Tuxedo Administration Console (GUI)
12 MB
Encryption software:56-bit and 128-bit
2 MB for LLE only on ATMI server or /WS client system4 MB for LLE and SSL
A-36 Installing the BEA Tuxedo System
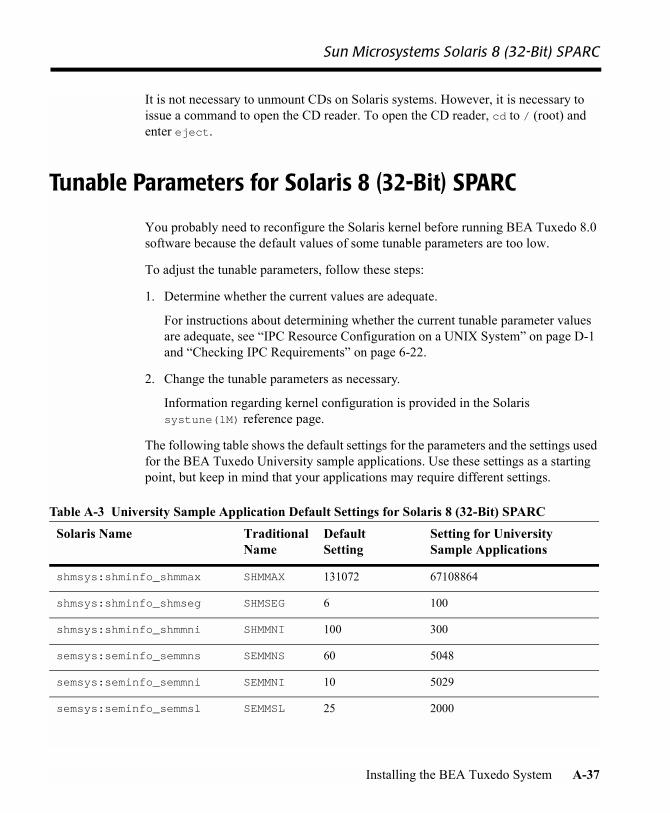
Sun Microsystems Solaris 8 (32-Bit) SPARC
It is not necessary to unmount CDs on Solaris systems. However, it is necessary to issue a command to open the CD reader. To open the CD reader, cd to / (root) and enter eject.
Tunable Parameters for Solaris 8 (32-Bit) SPARC
You probably need to reconfigure the Solaris kernel before running BEA Tuxedo 8.0 software because the default values of some tunable parameters are too low.
To adjust the tunable parameters, follow these steps:
1. Determine whether the current values are adequate.
For instructions about determining whether the current tunable parameter values are adequate, see �IPC Resource Configuration on a UNIX System� on page D-1 and �Checking IPC Requirements� on page 6-22.
2. Change the tunable parameters as necessary.
Information regarding kernel configuration is provided in the Solaris systune(1M) reference page.
The following table shows the default settings for the parameters and the settings used for the BEA Tuxedo University sample applications. Use these settings as a starting point, but keep in mind that your applications may require different settings.
Table A-3 University Sample Application Default Settings for Solaris 8 (32-Bit) SPARCSolaris Name Traditional
NameDefaultSetting
Setting for University Sample Applications
shmsys:shminfo_shmmax SHMMAX 131072 67108864
shmsys:shminfo_shmseg SHMSEG 6 100
shmsys:shminfo_shmmni SHMMNI 100 300
semsys:seminfo_semmns SEMMNS 60 5048
semsys:seminfo_semmni SEMMNI 10 5029
semsys:seminfo_semmsl SEMMSL 25 2000
Installing the BEA Tuxedo System A-37
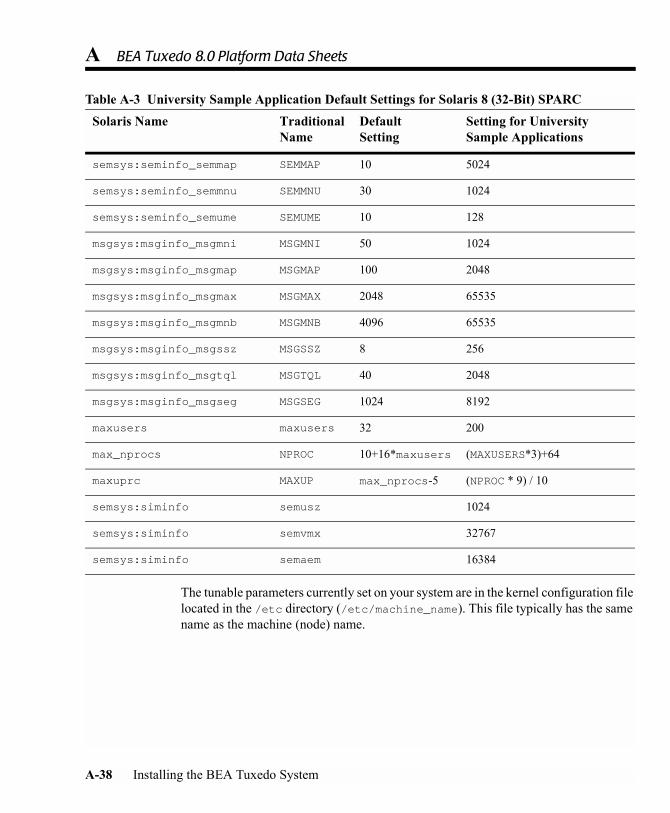
A BEA Tuxedo 8.0 Platform Data Sheets
The tunable parameters currently set on your system are in the kernel configuration file located in the /etc directory (/etc/machine_name). This file typically has the same name as the machine (node) name.
semsys:seminfo_semmap SEMMAP 10 5024
semsys:seminfo_semmnu SEMMNU 30 1024
semsys:seminfo_semume SEMUME 10 128
msgsys:msginfo_msgmni MSGMNI 50 1024
msgsys:msginfo_msgmap MSGMAP 100 2048
msgsys:msginfo_msgmax MSGMAX 2048 65535
msgsys:msginfo_msgmnb MSGMNB 4096 65535
msgsys:msginfo_msgssz MSGSSZ 8 256
msgsys:msginfo_msgtql MSGTQL 40 2048
msgsys:msginfo_msgseg MSGSEG 1024 8192
maxusers maxusers 32 200
max_nprocs NPROC 10+16*maxusers (MAXUSERS*3)+64
maxuprc MAXUP max_nprocs-5 (NPROC * 9) / 10
semsys:siminfo semusz 1024
semsys:siminfo semvmx 32767
semsys:siminfo semaem 16384
Table A-3 University Sample Application Default Settings for Solaris 8 (32-Bit) SPARC Solaris Name Traditional
NameDefaultSetting
Setting for University Sample Applications
A-38 Installing the BEA Tuxedo System

Platforms Supporting Threads
Platforms Supporting Threads
The following platforms support threads:
! Compaq Tru64 UNIX Version 5.1 on Alpha Systems
! HP-UX Version 11.0 (32-bit) on HP 9000 Series
! IBM AIX 4.3.3 (32-bit) on IBM PowerPC
! Microsoft Windows 2000 on Intel
! Microsoft Windows 98 on Intel
! Red Hat Linux 6.2 on Intel IA32 (x86)
! Sun Microsystems Solaris 8 (32-bit) on SPARC
Note: If threads are not supported on your platform, your application must either (1) exclude threads or (2) serialize threaded access through all BEA Tuxedo system calls.
Installing the BEA Tuxedo System A-39
A BEA Tuxedo 8.0 Platform Data Sheets
A-40 Installing the BEA Tuxedo System
APPENDIX
B BEA Jolt 8.0 Preparations
The following sections provide prerequisites for installing the BEA Jolt software components, and installation instructions:
! BEA Jolt Server Support
! Supported Web Servers
! BEA Jolt Client Support
! BEA Jolt Release Migration/Interoperability
! ASP Connectivity Prerequisites
! BEA Jolt Pre-Installation Checklist
! Installing and Configuring Jolt 8.0 with BEA Tuxedo 8.0 and WebLogic Server 6.0
BEA Jolt Server Support
The server components of BEA Jolt 8.0 and BEA Jolt Relay can be installed on any system on which the BEA Tuxedo 8.0 product can be installed. Your environment must provide:
! CD-ROM access
! 2 MB of disk space
Installing the BEA Tuxedo System B-1
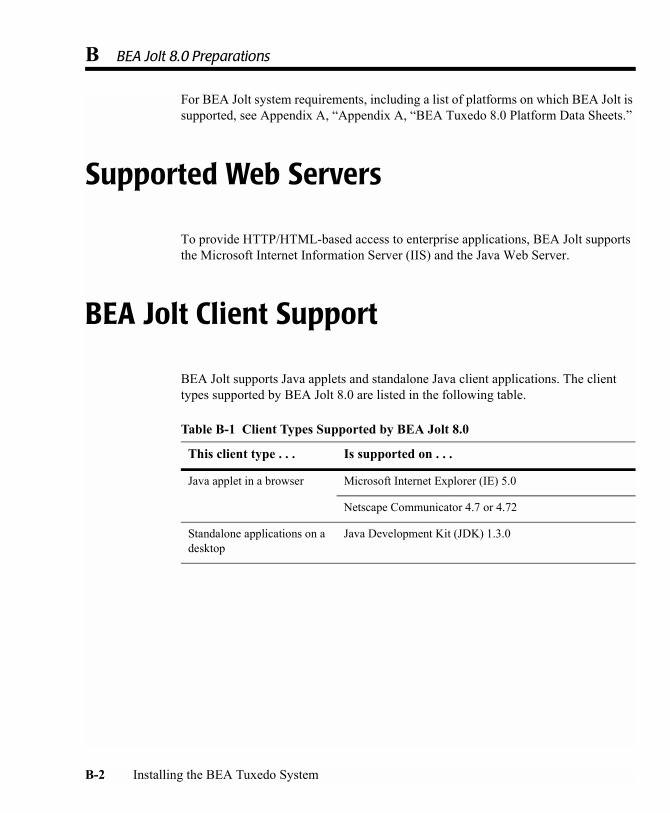
B BEA Jolt 8.0 Preparations
For BEA Jolt system requirements, including a list of platforms on which BEA Jolt is supported, see Appendix A, �Appendix A, �BEA Tuxedo 8.0 Platform Data Sheets.�
Supported Web Servers
To provide HTTP/HTML-based access to enterprise applications, BEA Jolt supports the Microsoft Internet Information Server (IIS) and the Java Web Server.
BEA Jolt Client Support
BEA Jolt supports Java applets and standalone Java client applications. The client types supported by BEA Jolt 8.0 are listed in the following table.
Table B-1 Client Types Supported by BEA Jolt 8.0
This client type . . . Is supported on . . .
Java applet in a browser Microsoft Internet Explorer (IE) 5.0
Netscape Communicator 4.7 or 4.72
Standalone applications on a desktop
Java Development Kit (JDK) 1.3.0
B-2 Installing the BEA Tuxedo System
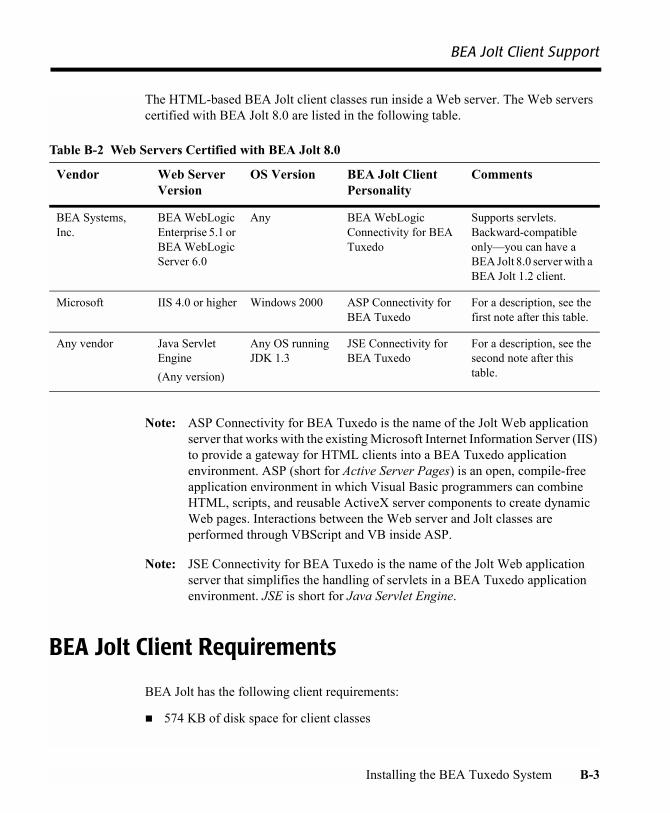
BEA Jolt Client Support
The HTML-based BEA Jolt client classes run inside a Web server. The Web servers certified with BEA Jolt 8.0 are listed in the following table.
Note: ASP Connectivity for BEA Tuxedo is the name of the Jolt Web application server that works with the existing Microsoft Internet Information Server (IIS) to provide a gateway for HTML clients into a BEA Tuxedo application environment. ASP (short for Active Server Pages) is an open, compile-free application environment in which Visual Basic programmers can combine HTML, scripts, and reusable ActiveX server components to create dynamic Web pages. Interactions between the Web server and Jolt classes are performed through VBScript and VB inside ASP.
Note: JSE Connectivity for BEA Tuxedo is the name of the Jolt Web application server that simplifies the handling of servlets in a BEA Tuxedo application environment. JSE is short for Java Servlet Engine.
BEA Jolt Client Requirements
BEA Jolt has the following client requirements:
! 574 KB of disk space for client classes
Table B-2 Web Servers Certified with BEA Jolt 8.0
Vendor Web Server Version
OS Version BEA Jolt Client Personality
Comments
BEA Systems, Inc.
BEA WebLogic Enterprise 5.1 or BEA WebLogic Server 6.0
Any BEA WebLogic Connectivity for BEA Tuxedo
Supports servlets. Backward-compatible only�you can have a BEA Jolt 8.0 server with a BEA Jolt 1.2 client.
Microsoft IIS 4.0 or higher Windows 2000 ASP Connectivity for BEA Tuxedo
For a description, see the first note after this table.
Any vendor Java Servlet Engine(Any version)
Any OS running JDK 1.3
JSE Connectivity for BEA Tuxedo
For a description, see the second note after this table.
Installing the BEA Tuxedo System B-3
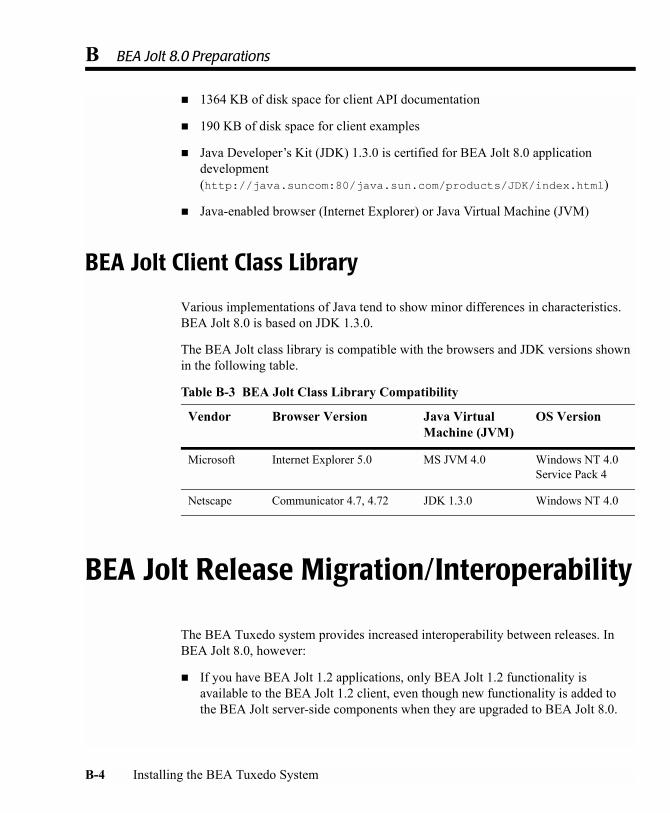
B BEA Jolt 8.0 Preparations
! 1364 KB of disk space for client API documentation
! 190 KB of disk space for client examples
! Java Developer�s Kit (JDK) 1.3.0 is certified for BEA Jolt 8.0 application development (http://java.suncom:80/java.sun.com/products/JDK/index.html)
! Java-enabled browser (Internet Explorer) or Java Virtual Machine (JVM)
BEA Jolt Client Class Library
Various implementations of Java tend to show minor differences in characteristics. BEA Jolt 8.0 is based on JDK 1.3.0.
The BEA Jolt class library is compatible with the browsers and JDK versions shown in the following table.
BEA Jolt Release Migration/Interoperability
The BEA Tuxedo system provides increased interoperability between releases. In BEA Jolt 8.0, however:
! If you have BEA Jolt 1.2 applications, only BEA Jolt 1.2 functionality is available to the BEA Jolt 1.2 client, even though new functionality is added to the BEA Jolt server-side components when they are upgraded to BEA Jolt 8.0.
Table B-3 BEA Jolt Class Library Compatibility
Vendor Browser Version Java Virtual Machine (JVM)
OS Version
Microsoft Internet Explorer 5.0 MS JVM 4.0 Windows NT 4.0 Service Pack 4
Netscape Communicator 4.7, 4.72 JDK 1.3.0 Windows NT 4.0
B-4 Installing the BEA Tuxedo System
ASP Connectivity Prerequisites
! A BEA Jolt 8.0 client can operate with a BEA Jolt 1.2 server, but the client cannot use the new features available with BEA Jolt 8.0.
If BEA Jolt 1.2 is installed on your system, we recommend uninstalling it before installing BEA Jolt 8.0.
ASP Connectivity Prerequisites
The following components are required before you can install BEA Jolt 8.0 ASP Connectivity for the BEA Tuxedo system:
! Microsoft Windows 2000 server
! Microsoft Internet Information Server (IIS) 4.0 or higher
! BEA Tuxedo 8.0
For details about the Microsoft products listed here, see the online Microsoft 2000 Option Pack product documentation, specifically the documentation about Microsoft Internet Information Server.
Note: Always use the latest version of the Java Virtual Machine (JVM) to ensure that ASP Connectivity for the BEA Tuxedo system works properly.
BEA Jolt Pre-Installation Checklist
BEA Tuxedo 8.0 server software includes BEA Jolt 8.0, so before you start an installation, check the following:
! If an earlier release of BEA Jolt is installed on your system:
" Back up your existing jrepository, CATNAMES, and jrly.config files.
" Uninstall any previous releases of BEA Jolt. A single uninstall removes everything associated with the product: files, directories and registry entries.
! Review the BEA Tuxedo Release Notes for any new information.
Installing the BEA Tuxedo System B-5
B BEA Jolt 8.0 Preparations
On Windows systems, BEA Jolt 8.0 automatically installs two Microsoft dynamic link libraries (DLLs), MSVCRT.DLL and MFC42U.DLL, and overwrites older versions of these libraries. Before you begin installation, check whether older versions of these dynamic link libraries already exist. If they do exist and you do not want them to be overwritten, back them up.
Installing and Configuring Jolt 8.0 with BEA Tuxedo 8.0 and WebLogic Server 6.0
This section provides supplementary installation and configuration instructions for customers using BEA Jolt 8.0 with BEA Tuxedo 6.5 or 7.1 and WebLogic Server 6.0. It also offers code for a sample servlet that demonstrates how a WebLogic servlet may connect to BEA Tuxedo and call on a BEA Tuxedo service.
Installation
The Jolt client consists of two JAR files: jolt.jar and joltwls.jar. Include both files in your classpath setting.
The client should not get the PoolManager by doing a JNDI lookup (as in an earlier release of Jolt).
On this platform . . . Complete this procedure . . .
UNIX 1. Download the WLS60_Tux_JoltClient.tar file.2. Run the following command:
tar -xvf WLS60_Tux_JoltClient.tar
Windows NT 1. Download the self-extracting WLS60_Tux_JoltClient.zip file.
2. Unzip the file.
B-6 Installing the BEA Tuxedo System
Installing and Configuring Jolt 8.0 with BEA Tuxedo 8.0 and WebLogic Server 6.0
For an example of a Jolt client, go to the section titled �Example Servlet� and see the code shown after the comment �Required change for Weblogic 6.0� (highlighted in bold).
Configuration
To configure the Jolt connection pool, open the WebLogic Server Administration Console and complete the following procedure:
1. Under the services entry in the left pane, click Jolt. The Jolt Connection Pools table is displayed in the right pane. It shows all the Jolt connection pools defined in the domain.
2. Click the Create a New Jolt Connection Pool text link. A dialog box is displayed in the right pane showing the tabs on which you can configure a new connection pool.
3. Enter values in the following attribute fields: Name, Minimum Pool Size, Maximum Pool Size, and Recv Timeout.
4. Click Create to create a connection pool instance with the name you specified in the Name field. The new instance is added to the list for the Jolt node in the left pane.
5. On the Config-Addresses tab, review the default values in the attribute fields. Accept or replace them, as necessary. Repeat this procedure with the Config-User tab.
6. Click Apply to save any changes you have made.
7. Select the Targets tab. A list of available servers is displayed. Select the one on which you want to start the JoltConnectionPool.
8. In the left pane, under Deployments, click Startup&Shutdown.
9. The Startup and Shutdown table is displayed in the right pane. All the startup classes defined in your domain are listed in this table.
10. Click the Create a New Startup Class link. A dialog box is displayed in the right pane showing the tabs that you can use to configure a new startup class.
11. In the dialog box:
Installing the BEA Tuxedo System B-7
B BEA Jolt 8.0 Preparations
a. Enter values in the Name, Class Name, and Arguments attribute fields.
b. Click the Abort startup on failure option. (By selecting this option, you ensure that if a failure occurs, startup of WebLogic Server will be aborted.)
c. For the Class Name, enter the following:
bea.jolt.pool.servlet.weblogic.PoolManagerStartUp.
There are no arguments for this startup class.
12. Click Create to create a startup-class instance with the name you specified in the Name field. The new instance is added to the list for the Startup & Shutdown node in the left pane.
13. To restart the connection pool, restart the server.
Example Servlet
The following sample servlet shows how a WebLogic servlet, invoked from simpapp.html, connects to the BEA Tuxedo system and calls a BEA Tuxedo service.
Listing 7-1 Example WebLogic Servlet
package examples.jolt.servlet.simpapp;
import bea.jolt.pool.servlet.weblogic.PoolManagerStartUp;import bea.jolt.pool.servlet.*;import bea.jolt.pool.ApplicationException;import bea.jolt.pool.SessionPoolException;import bea.jolt.pool.ServiceException;import bea.jolt.pool.SessionPoolManager;
import java.util.Hashtable;import java.io.IOException;import java.io.PrintWriter;import javax.servlet.*;import javax.servlet.http.*;import javax.naming.*;import weblogic.jndi.*;
/** * This example demonstrates how a WebLogic Servlet may connect to
B-8 Installing the BEA Tuxedo System
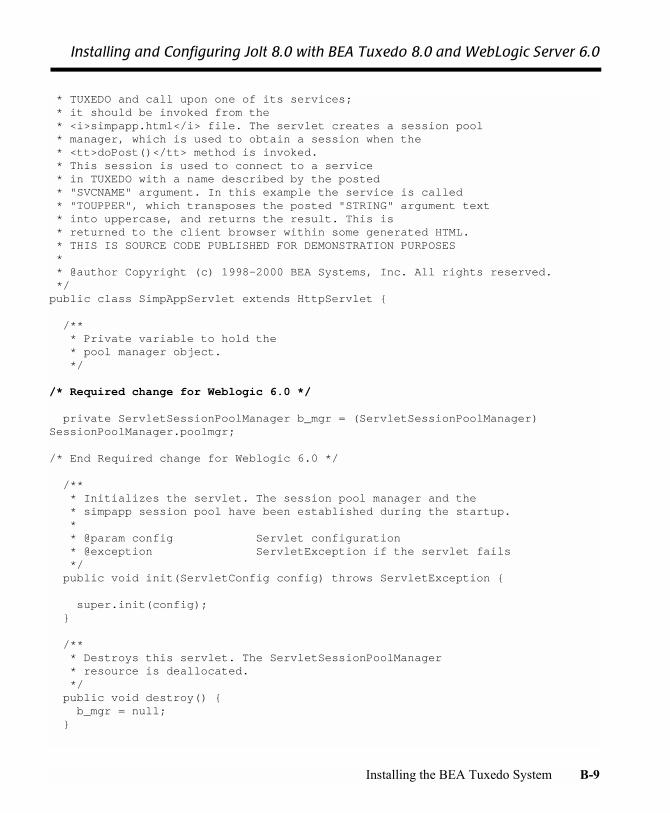
Installing and Configuring Jolt 8.0 with BEA Tuxedo 8.0 and WebLogic Server 6.0
* TUXEDO and call upon one of its services; * it should be invoked from the * <i>simpapp.html</i> file. The servlet creates a session pool * manager, which is used to obtain a session when the * <tt>doPost()</tt> method is invoked. * This session is used to connect to a service * in TUXEDO with a name described by the posted * "SVCNAME" argument. In this example the service is called * "TOUPPER", which transposes the posted "STRING" argument text * into uppercase, and returns the result. This is * returned to the client browser within some generated HTML. * THIS IS SOURCE CODE PUBLISHED FOR DEMONSTRATION PURPOSES * * @author Copyright (c) 1998-2000 BEA Systems, Inc. All rights reserved. */ public class SimpAppServlet extends HttpServlet {
/** * Private variable to hold the * pool manager object. */
/* Required change for Weblogic 6.0 */
private ServletSessionPoolManager b_mgr = (ServletSessionPoolManager) SessionPoolManager.poolmgr;
/* End Required change for Weblogic 6.0 */
/** * Initializes the servlet. The session pool manager and the * simpapp session pool have been established during the startup. * * @param config Servlet configuration * @exception ServletException if the servlet fails */ public void init(ServletConfig config) throws ServletException {
super.init(config); }
/** * Destroys this servlet. The ServletSessionPoolManager * resource is deallocated. */ public void destroy() { b_mgr = null; }
Installing the BEA Tuxedo System B-9

B BEA Jolt 8.0 Preparations
/** * Implements the HttpServlet <tt>doPost()</tt> method. * This method expects POSTed arguments for: * <dl> * <dt>"SVCNAME"<dd>The name of the service to be invoked in TUXEDO. * <dt>"STRING"<dd>The text to be transposed to uppercase. * </dl> * * <p> See the provided simpapp.html for the HTML form * used to submit the data. */
public void doPost(HttpServletRequest req, HttpServletResponse resp) throws ServletException, IOException { ServletResult result; ServletOutputStream out = resp.getOutputStream();
out.println("<html><head><title>Jolt SimpApp ExampleResponse</title></head>"); out.println("<body><font face=\"Helvetica\">" + "<h2><font color=#DB1260>" + "This is the response from the SimpAppServlet:" + "</font></h2>");
/* Begin Required change for Weblogic 6.0 */ // Get the "demojoltpool" session pool ServletSessionPool session = (ServletSessionPool) b_mgr.getSessionPool("demojoltpool");
/* End Required change for Weblogic 6.0 */
if (session == null) { out.println("The servlet failed to obtain a SessionPool for simpapp. "+ "<br>"+ "Possibly the TUXEDO server is not running, "+ "or there is a configuration problem."+ "</font></body></html>"); out.close(); return; } String svcnm[] = req.getParameterValues("SVCNAME");
// Invoke a service and get the result. Process the // template with input and result if there is no error. try { result = session.call(svcnm[0], req);
B-10 Installing the BEA Tuxedo System
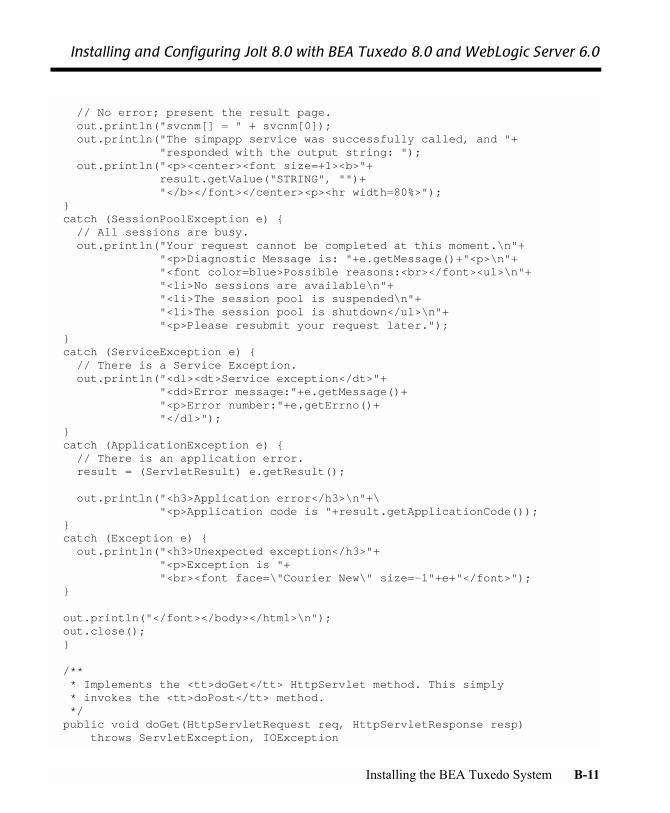
Installing and Configuring Jolt 8.0 with BEA Tuxedo 8.0 and WebLogic Server 6.0
// No error; present the result page. out.println("svcnm[] = " + svcnm[0]); out.println("The simpapp service was successfully called, and "+ "responded with the output string: "); out.println("<p><center><font size=+1><b>"+ result.getValue("STRING", "")+ "</b></font></center><p><hr width=80%>"); } catch (SessionPoolException e) { // All sessions are busy. out.println("Your request cannot be completed at this moment.\n"+ "<p>Diagnostic Message is: "+e.getMessage()+"<p>\n"+ "<font color=blue>Possible reasons:<br></font><ul>\n"+ "<li>No sessions are available\n"+ "<li>The session pool is suspended\n"+ "<li>The session pool is shutdown</ul>\n"+ "<p>Please resubmit your request later."); } catch (ServiceException e) { // There is a Service Exception. out.println("<dl><dt>Service exception</dt>"+ "<dd>Error message:"+e.getMessage()+ "<p>Error number:"+e.getErrno()+ "</dl>"); } catch (ApplicationException e) { // There is an application error. result = (ServletResult) e.getResult();
out.println("<h3>Application error</h3>\n"+\ "<p>Application code is "+result.getApplicationCode()); } catch (Exception e) { out.println("<h3>Unexpected exception</h3>"+ "<p>Exception is "+ "<br><font face=\"Courier New\" size=-1"+e+"</font>"); }
out.println("</font></body></html>\n"); out.close(); }
/** * Implements the <tt>doGet</tt> HttpServlet method. This simply * invokes the <tt>doPost</tt> method. */ public void doGet(HttpServletRequest req, HttpServletResponse resp) throws ServletException, IOException
Installing the BEA Tuxedo System B-11
B BEA Jolt 8.0 Preparations
{ doPost(req, resp); }
/* public void service(HttpServletRequest req, HttpServletResponse res) throws IOException { PrintWriter out = res.getWriter();
out.flush(); out.println("<title> SimpAppServlet </title>"); } */}
B-12 Installing the BEA Tuxedo System
APPENDIX
C File and Database Management and Disk Space Allocation
The following sections describe BEA Tuxedo file and database management and provide guidelines for allocating disk space for a BEA Tuxedo application:
! Introduction
! How the BEA Tuxedo System Manages Files
! Arranging for Raw Disk Space
! How the BEA Tuxedo Filesystem Is Organized
! Space for Queue Spaces
! Space for Application Servers
Introduction
With the exception of the guidelines for repartitioning hard disk devices, the following discussions apply, for the most part, to both Windows and UNIX systems. On a Windows system, I/O (input and output) is buffered by default, but BEA Tuxedo sets
Installing the BEA Tuxedo System C-1
C File and Database Management and Disk Space Allocation
a certain system-level flag to change the default. Thus, all I/O for BEA Tuxedo processes is unbuffered, meaning that you do not need to make any special disk-space arrangements on a Windows system.
How the BEA Tuxedo System Manages Files
The BEA Tuxedo system provides a facility called the Disk Management Interface (DMI), which manages logical files within a single disk device or set of devices. The DMI performs tasks such as storing binary configuration tables and the transaction log. You can use it to create, initialize, or destroy entries in the BEA Tuxedo filesystem. To access the DMI, use the tmadmin(1)administrative commands described in the BEA Tuxedo Command Reference.
There are two ways that the logical files managed by the DMI can be stored physically:
! Stored on an operating-system (OS) filesystem
! Stored on disk space, set aside for the BEA Tuxedo system, that is outside the control of all OS filesystems
BEA Tuxedo files reside on device special files in the designated space and are managed directly by the DMI disk management software. The DMI supports the notion of a BEA Tuxedo filesystem distinct from any OS filesystem.
Space outside the OS filesystem is usually referred to as raw disk space. Not only is I/O faster when done by system calls reading directly from and writing directly to device special files on raw disks, but a physical write() is done immediately. When using an OS filesystem, BEA Tuxedo cannot predict or control the precise moment at which a write() is done. When using raw disk space, however, BEA Tuxedo has accurate control of the write operation, which is particularly important for entries in the BEA Tuxedo transaction log. Also, when multiple users are accessing the system, being able to control the write operation is important for assuring database consistency.
C-2 Installing the BEA Tuxedo System

Arranging for Raw Disk Space
Arranging for Raw Disk Space
If you decide to use raw disk space for your BEA Tuxedo application, and you are using a UNIX system, you may find that the hard disk devices on your system are fully allocated to filesystems, such as / (root) and /usr. If that is the case, you must repartition your hard disk device in order to set aside some partitions for use as non-OS filesystems. For repartitioning instructions, see the system administration documentation for your platform.
How the BEA Tuxedo Filesystem Is Organized
A BEA Tuxedo filesystem has a Volume Table of Contents (VTOC), which lists the files residing on the devices named in the Universal Device List (UDL). The UDL contains information about the location of the physical storage space for BEA Tuxedo system tables.
In a BEA Tuxedo application, all system files might be stored together on the same raw disk slice or OS filesystem. While it is possible to use regular OS filesystem files for the configuration tables, we strongly recommend that you store the transaction log, TLOG, on a raw disk device. Because the TLOG seldom needs to be larger than 100 blocks (51200 bytes, assuming 512-byte blocks), and because disk partitions are always substantially larger than 100 blocks, it may make sense to use the same device for both the configuration files and the TLOG.
The following sample listing shows a sample VTOC and UDL diagram for a bankapp (sample application) configuration on a single machine.
Installing the BEA Tuxedo System C-3

C File and Database Management and Disk Space Allocation
Listing C-1 VTOC and UDL Diagram
Output based on setting FSCONFIG=$TUXCONFIG, and invoking tmadmin:
No bulletin board exists. Entering boot mode.
> livtocVolume Table of Contents on /usr2/bank/tuxconfig:0: VTOC: Device 0 Offset 0 Pages 71: UDL: Device 0 Offset 7 Pages 282: _RESOURCE_SECT: Device 0 Offset 35 Pages 63: _MACHINES_SECT: Device 0 Offset 41 Pages 404: _GROUPS_SECT: Device 0 Offset 141 Pages 1005: _SERVERS_SECT: Device 0 Offset 241 Pages 1506: _SERVICES_SECT: Device 0 Offset 391 Pages 607: _ROUTING_SECT: Device 0 Offset 451 Pages 1008: _NETWORK_SECT: Device 0 Offset 551 Pages 209: _MIBPERMS_SECT: Device 0 Offset 571 Pages 210: _NETGROUPS_SECT: Device 0 Offset 573 Pages 211: _INTERFACES_SECT: Device 0 Offset 575 Pages 10
# If the TLOG is stored on the same device, there will be an# entry something like:
12: TLOG: Device 0 Offset 585 Pages 100
The BEA Tuxedo application administrator must make sure raw disk slices are available as needed on each node participating in an application. The following table lists the size of each element in the BEA Tuxedo filesystem.
Table C-1 Size of BEA Tuxedo System Tables
Entity 512-Byte Pages (Blocks)
VTOC 7
TUXCONFIG 550
TLOG 100 (default)
UDL 28
TOTAL 685
C-4 Installing the BEA Tuxedo System
Space for Queue Spaces
The amount of space required for the TUXCONFIG file must be larger if there are more entries in the configuration file, UBBCONFIG, than in the bankapp sample application. The administrator is encouraged to allocate additional space for dynamic reconfiguration and growth of the application. The default block size assumed by the crdl subcommand of tmadmin is 1000 blocks (512000 bytes, assuming 512-byte blocks), which should be adequate for the initial installation.
Space for Queue Spaces
If your BEA Tuxedo application uses /Q for store-and-forward queue management, your queue space can be listed in the same UDL as the one used to store the TUXCONFIG file and the TLOG, and managed by the BEA Tuxedo VTOC.
Space for Application Servers
As you are calculating your space requirements for the BEA Tuxedo system, you should also consider the requirements of the servers that perform the work of the application. These requirements are specified by the application; they are unrelated to the requirements for the BEA Tuxedo system itself (unless otherwise specified).
Installing the BEA Tuxedo System C-5
C File and Database Management and Disk Space Allocation
C-6 Installing the BEA Tuxedo System
APPENDIX
D IPC Resource Configuration on a UNIX System
The following sections describe the interprocess communication (IPC) parameters on a UNIX system and provide guidelines for configuring them:
! Parameter Sets Controlling IPC Resources
! Shared Memory
! Semaphores
! Message Queues and Messages
! Other Kernel Tunables
Parameter Sets Controlling IPC Resources
On a UNIX system, the BEA Tuxedo system uses the IPC resources provided by the UNIX operating system, which are controlled by the three sets of tunable parameters listed in the following table.
Installing the BEA Tuxedo System D-1
D IPC Resource Configuration on a UNIX System
The settings for these parameters are application-dependent. Most UNIX systems are shipped with default values that are too low for a BEA Tuxedo application.
Because the IPC parameters vary across different versions of the UNIX system, the descriptions provided in the following sections are generic. For exact parameter names and defaults for each platform, and for information about how to change parameter values, see Appendix A, �BEA Tuxedo 8.0 Platform Data Sheets.�
If you change a parameter value, you must rebuild the kernel and reboot the operating system, using standard administrative tools. For details, consult your operating system administrator or the system administrator�s guide for your platform.
If your BEA Tuxedo application is distributed, the minimum IPC resources must be available on every UNIX platform participating in the application.
Shared Memory
In the BEA Tuxedo environment, shared memory is used for the bulletin board and the control table of the workstation listener (WSL) and the IIOP listener (ISL) processes. An application may also use shared memory for its own purposes.
The following shared memory parameters may need to be adjusted:
SHMMAX
Maximum size, in bytes, of a shared memory segment. This number represents the largest shared memory segment that can be allocated. A process can, however, attach to more than one segment of size SHMMAX.
SHMSEG
Maximum number of shared memory segments per process. For a given configuration, the maximum amount of shared memory to which a process
Tunable parameters starting with this prefix . . .
Control the . . .
SHM Amount of shared memory
SEM Number of semaphores
MSG Size of message queues and messages
D-2 Installing the BEA Tuxedo System
Semaphores
can attach is the product (in bytes) of SHMMAX * SHMSEG. A value between 6 and 15 should be adequate.
SHMMNI
Maximum number of shared memory identifiers in the system. The BEA Tuxedo system requires one identifier per bulletin board and an additional identifier for each workstation listener (WSL) and IIOP listener (ISL) that is running.
SHMMIN
Minimum size, in bytes, of shared memory segment. This parameter should always be set to 1.
Semaphores
Every process that participates in a BEA Tuxedo application requires a semaphore. A semaphore is a hardware or software flag used to prevent processes from accessing the same shared memory space at the same time. When a process has control of a shared memory resource, all other processes are locked out of the shared memory resource until the process releases the resource.
When the BEA Tuxedo application is booted, the underlying BEA Tuxedo system checks the number of semaphores configured in the operating system. If the configured number is not high enough, the boot fails.
The following semaphore parameters may need to be adjusted:
SEMMNS
Maximum number of semaphores in the system. The minimum requirement for SEMMNS is
MAXACCESSERS - MAXWSCLIENTS + 13
MAXACCESSERS is the maximum number of BEA Tuxedo system processes on a particular machine (including servers and native clients) and MAXWSCLIENTS is the maximum number of BEA Tuxedo remote clients. Both of these parameters are specified in the UBBCONFIG file for the application. For more information about UBBCONFIG, see �Creating the Configuration File� in Setting Up a BEA Tuxedo Application or UBBCONFIG(5) in the File Formats, Data Descriptions, MIBs, and System Processes Reference.
Installing the BEA Tuxedo System D-3

D IPC Resource Configuration on a UNIX System
SEMMNI
Maximum number of active semaphore sets.
SEMMSL
Maximum number of semaphores per semaphore set. SEMMNI and SEMMSL are commonly chosen so that their product equals SEMMNS. The BEA Tuxedo system does not perform semaphore operations on semaphore sets, but it tries to allocate as many semaphores per semaphore set as possible.
SEMMAP
Size of the control map used to manage semaphore sets. SEMMAP should be equal to SEMMNI.
SEMMNU
Number of undo structures in the system. Because an undo structure is needed for each process that can access the bulletin board, SEMMNU must be at least as large as SEMMNS. (The UNIX operating system uses undo structures to unlock semaphores held by processes that die unexpectedly.)
SEMUME
Maximum number of undo entries per undo structure. The value 1 suffices.
Message Queues and Messages
The BEA Tuxedo system uses UNIX system messages and message queues for client/server communication. Examples of such messages are service requests, service replies, conversational messages, unsolicited notification messages, administrative messages, and transaction control messages.
Every Multiple Servers, Single Queue (MSSQ) set of servers and every individual server has a message queue for receiving requests. Every client has its own queue for receiving replies. Servers that specify the REPLYQ parameter also get individual reply queues.
The adjustment of kernel message parameters is important to the proper tuning of an application. Inappropriate values can lead to an inability to boot, or to severe performance degradation.
Several message queue parameters are available to define various characteristics of the queue space, as indicated in the following table.
D-4 Installing the BEA Tuxedo System
Message Queues and Messages
If the limit specified by any of these parameters is exceeded, then a blocking condition occurs. There is one exception to this rule: MSGMAX. Messages that exceed 75 percent of MSGMNB, or that are larger than MSGMAX, are placed in a UNIX file. A very small message containing the filename is then sent to the recipient. Because this mode of operation results in a severe reduction in performance, we strongly recommend that you avoid it.
What Is Application Deadlock?
An application deadlock can result if every process is blocked while trying to send a message. For example, when clients fill up the message space with requests, servers that are trying to send replies are blocked. Therefore, no server can read a message and a deadlock results. Occasionally, timeouts can break a deadlock, but no useful work will have been done.
A client that sends its requests with the TPNOREPLY flag is especially troublesome. This practice can fill either individual queues or the system message space, depending on the size of the messages. Such applications may have to implement their own flow control to limit the number of outstanding messages.
To summarize, if clients or servers are blocking on their send operations (requesting services or sending replies), there is potential for trouble. It is usually no problem, though, for a single server request queue to remain full, as long as there is space in the system for more messages on other queues.
This parameter. . . Specifies the . . .
MSGTQL Total number of outstanding messages that can be stored by the kernel
MSGMNB Total number of bytes that can be stored on one queue
MSGMAX Maximum size of an individual message
MSGSEG Total number of message segments that can be outstanding at one time
MSGSSZ Size of each segment
Installing the BEA Tuxedo System D-5
D IPC Resource Configuration on a UNIX System
Performance Implications of Blocking Conditions
There are performance implications to queue blocking conditions, both on the sending side and the receiving side. When waking up blocked processes, the UNIX operating system wakes up all the processes blocked on a particular event, even if only one can proceed. The other processes go back to sleep. This process scheduling overhead can be expensive.
For example, on an empty server request queue on which more than one server (MSSQ) resides, an arriving message wakes up all the idle (blocked) servers on that queue. In the case of a full server request queue, as each request is read by a server, the system wakes up all the blocked clients. Depending on the size of the messages, zero or more clients can place messages on the queue. The rest go back to sleep. Because there may be hundreds of clients in the system, the mass wakeup of all of these clients every time a service request is processed can severely degrade performance.
Tunable Message Parameters
A properly tuned system rarely fills its queues. Enough slack should be left in the queues to handle the natural variability of the message flow. No exact settings can be recommended. Tuning is very application dependent. The UNIX ipcs(1) command provides a snapshot of the queues so you can determine whether they are full. You can try setting the TPNOBLOCK flag when sending requests. If you do, clients can tell when queues are full, and they can slow down a bit. It might help to increase the scheduling priority of servers with full request queues.
The following message parameters may need to be adjusted:
MSGMNI
Number of unique message queue identifiers. Each process participating in a BEA Tuxedo application on a particular machine typically needs at least one message queue. This number is reduced if MSSQ sets are used, which means that multiple server processes share a single queue. For transaction processing, count an additional queue per server group for transaction manager server (TMS) processes. Thus, the minimum requirement for MSGMNI can be determined by the following formula:
MSGMNI = MAXACCESSERS + 7+ (number of servers with REPLYQ)
D-6 Installing the BEA Tuxedo System
Other Kernel Tunables
+ (number of MSSQ sets)- (number of servers in MSSQ sets)
MSGMAX
Maximum message size in bytes. MSGMAX must be big enough to handle any BEA Tuxedo application running on this machine.
MSGMNB
Maximum message queue length in bytes. This number must accommodate the total size of all messages that are on a queue and have not been taken off by the associated processes. The minimum value for MSGMNB is the value of MSGMAX. Messages longer than 75% of MSGMNB are sent to a file instead of a message queue�a situation that should be avoided because it severely degrades performance.
MSGMAP
Number of entries in the control map used to manage message segments. The value of MSGMAP should be the number of message segments (specified in MSGSEG).
MSGSSZ
Size, in bytes, of a message segment. A message can consist of several such segments. The value of MSGSSZ should be such that a multiple of MSGSSZ is equal to the size (including the BEA Tuxedo system header) of the most commonly sent message. By dividing messages into segments in this way, you can avoid wasting space.
MSGSEG
Number of message segments in the system.
MSGTQL
Total number of outstanding messages that can be stored by the kernel. This is the maximum number of unread messages at any given time.
Other Kernel Tunables
Experience with the BEA Tuxedo system has shown that some other UNIX system tunables may need to be set to higher values. These parameters are very application dependent and do not apply to all applications. The section BEA Tuxedo 8.0 Platform Data Sheets includes information on the defaults for each platform and instructions for changing them.
Installing the BEA Tuxedo System D-7
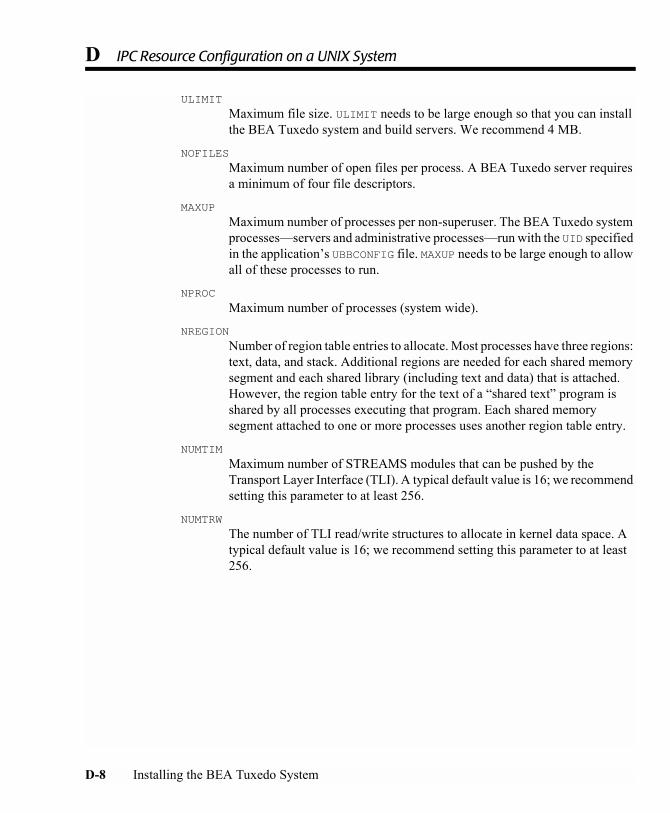
D IPC Resource Configuration on a UNIX System
ULIMIT
Maximum file size. ULIMIT needs to be large enough so that you can install the BEA Tuxedo system and build servers. We recommend 4 MB.
NOFILES
Maximum number of open files per process. A BEA Tuxedo server requires a minimum of four file descriptors.
MAXUP
Maximum number of processes per non-superuser. The BEA Tuxedo system processes�servers and administrative processes�run with the UID specified in the application�s UBBCONFIG file. MAXUP needs to be large enough to allow all of these processes to run.
NPROC
Maximum number of processes (system wide).
NREGION
Number of region table entries to allocate. Most processes have three regions: text, data, and stack. Additional regions are needed for each shared memory segment and each shared library (including text and data) that is attached. However, the region table entry for the text of a �shared text� program is shared by all processes executing that program. Each shared memory segment attached to one or more processes uses another region table entry.
NUMTIM
Maximum number of STREAMS modules that can be pushed by the Transport Layer Interface (TLI). A typical default value is 16; we recommend setting this parameter to at least 256.
NUMTRW
The number of TLI read/write structures to allocate in kernel data space. A typical default value is 16; we recommend setting this parameter to at least 256.
D-8 Installing the BEA Tuxedo System
Index
AAdministration Console
browser requirements 7-3color display requirements 7-1entry page 7-7exiting 7-9file tree 7-4hardware requirements 7-1login window 7-8main window 7-8operating system requirements 7-2server requirements 7-2starting 7-7webguitop.html 7-5
BBEA Administration program 2-12BEA Administration window
Environment page 2-15IPC Resources page 2-18Listener page 2-17Logging page 2-16Machines page 2-14
BEA Home directoryabout 1-8component descriptions 1-9sample structure 1-8
BEA Installation program 1-1
BEA Tuxedoapplications, description 6-5domains, description 6-5
BEA Tuxedo Administration Consolefile tree 7-4
BEA Tuxedo directory structure 6-2
Ccdfs A-8, A-15cgi-bin directory 7-5Compaq Tru64 UNIX
platform requirements A-4compilers supported
C/C++ A-5, A-12, A-21, A-26, A-29, A-34
COBOL A-5, A-12, A-21, A-29, A-34console-mode installation 3-2
about 3-2console-mode installation descriptions
Choose BEA Home Directory 3-5Choose Install Set 3-4Choose Product Directory 3-6Create Tlisten Password 3-7Enter Your LDAP Settings 3-7Introduction 3-4License Agreement 3-4License Installation Choice 3-8
customer support contact information 0-xiii
Installing the BEA Tuxedo System I-1
Ddistribution
BEA Tuxedo 8.0 1-2documentation, where to find it 0-xiidomains
description 1-4, 6-5
Eenvironment variables 7-5
PATH 7-5TUXDIR 6-33, 6-35WEBJAVADIR 7-5
GGUI-mode installation
about 2-2GUI-mode installation descriptions
Choose BEA Home Directory 2-7Choose Install Set 2-6Choose Product Directory 2-8Create Tlisten Password 2-8Customize Install 2-7Enter LDAP Server 2-9Introduction 2-5License Agreement 2-6License Installation Choice 2-9SSL Installation Choice 2-8
Hhardware requirements
HP-UX A-11Microsoft Windows 2000 (Intel) A-21Microsoft Windows 98 (Intel) A-25Red Hat Linux A-28Solaris A-33
Iinstallation
console-mode 3-2graphics-based 1-2, 2-2installing more than one version on same
machine 2-3silent 1-2, 4-2starting GUI-mode installation on a
UNIX system 2-4starting GUI-mode installation on a
Windows system 2-2starting on a UNIX system 2-4starting on a Windows system 2-2text-based 1-2, 3-2
installation programconsole-mode description 3-3GUI-mode installation descriptions 2-5
Installation program, BEA 1-1installer.properties
modifying 4-3
JJava applet 7-5jdk130 directory
about 1-11jre130 directory
about 1-10
LLDAP server
setting and configuring in console-mode installation 3-7
setting and configuring in GUI-mode installation 2-9
license filespecifying in GUI-mode installation
2-10
I-2 Installing the BEA Tuxedo System
license.bea fileabout 1-10
logs directoryabout 1-9
Mmakefile 6-36MASTER machine 6-6, 7-5MASTER node 6-6mounting and unmounting a CD
HP-UX A-15, A-19Red Hat Linux A-32Solaris A-36Tru64 UNIX A-8
PPATH 7-5platforms supported A-2Previous Version Detected window 2-3printing product documentation 0-xiii
Rregistry.xml file
about 1-9requirements
temporary storage 1-5
Sserver processes
tuxwsrv 7-5wlisten 7-5
silent installationabout 4-2creating template file 4-3installer.properties file 4-3process 4-2UNIX template 4-10windows template 4-8
softwarecomponents 1-3
software requirementsCompaq Tru64 UNIX A-5HP-UX A-12Microsoft Windows 2000 (Intel) A-21Microsoft Windows 98 (Intel) A-26Red Hat Linux A-29Solaris A-34
supporttechnical 0-xiii
system requirements 1-5
Ttemplate files
UNIX 4-10Windows 4-8
temporary storage requirements 1-5tlisten password 7-8
setting during silent installation 4-4setting in console-mode installation 3-7setting in GUI-mode installation 2-8
tlisten processes 2-18tlisten.pw 7-8tmboot 6-35tmshutdown 6-35Tru64 UNIX
platform requirements A-4tuning parameters
HP-UX A-15Microsoft Windows 2000 (Intel) A-24Red Hat Linux A-32Solaris A-37Tru64 UNIX A-9
tuxadm 7-4, 7-5TUXDIR 6-33, 6-35, 7-5Tuxedo
applications, description 1-4tuxwsvr 7-5
starting 7-6
Installing the BEA Tuxedo System I-3
Uuninstall
on UNIX systems 6-37on Windows systems 6-37
UpdateLicense toolabout 1-10
utils directoryabout 1-10
Wwebgui.html 7-4webgui.ini 7-6webguitop.html 7-5wlisten 7-8
starting 7-6
I-4 Installing the BEA Tuxedo System