Basic Operation Guide - Imaging | PFU
514
P3PC-6912-02ENZ2 Basic Operation Guide (Windows)
-
Upload
khangminh22 -
Category
Documents
-
view
3 -
download
0
Transcript of Basic Operation Guide - Imaging | PFU
P3PC-6912-02ENZ2
Basic Operation Guide(Windows)
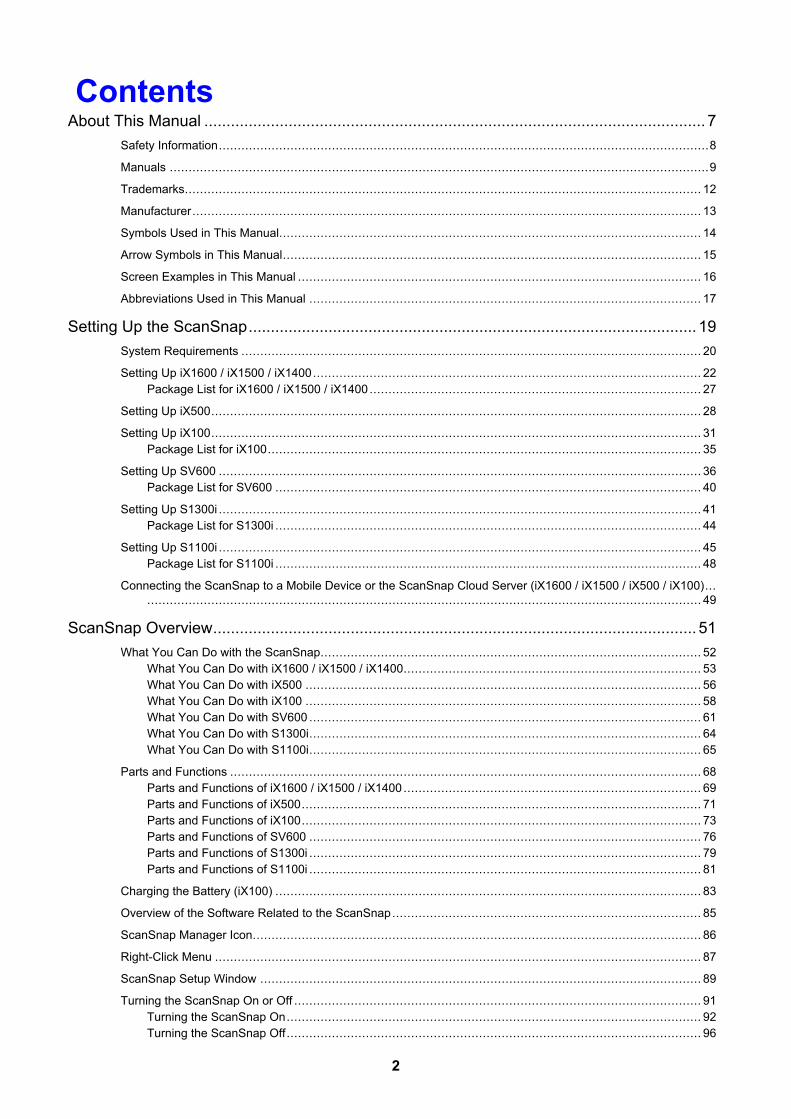
ContentsAbout This Manual ................................................................................................................. 7
Safety Information..................................................................................................................................8
Manuals ...............................................................................................................................................9
Trademarks......................................................................................................................................... 12
Manufacturer....................................................................................................................................... 13
Symbols Used in This Manual................................................................................................................ 14
Arrow Symbols in This Manual............................................................................................................... 15
Screen Examples in This Manual ........................................................................................................... 16
Abbreviations Used in This Manual ........................................................................................................ 17
Setting Up the ScanSnap..................................................................................................... 19System Requirements .......................................................................................................................... 20
Setting Up iX1600 / iX1500 / iX1400....................................................................................................... 22Package List for iX1600 / iX1500 / iX1400 ........................................................................................ 27
Setting Up iX500.................................................................................................................................. 28
Setting Up iX100.................................................................................................................................. 31Package List for iX100................................................................................................................... 35
Setting Up SV600 ................................................................................................................................ 36Package List for SV600 ................................................................................................................. 40
Setting Up S1300i ................................................................................................................................ 41Package List for S1300i ................................................................................................................. 44
Setting Up S1100i ................................................................................................................................ 45Package List for S1100i ................................................................................................................. 48
Connecting the ScanSnap to a Mobile Device or the ScanSnap Cloud Server (iX1600 / iX1500 / iX500 / iX100)...................................................................................................................................................... 49
ScanSnap Overview............................................................................................................. 51What You Can Do with the ScanSnap..................................................................................................... 52
What You Can Do with iX1600 / iX1500 / iX1400............................................................................... 53What You Can Do with iX500 ......................................................................................................... 56What You Can Do with iX100 ......................................................................................................... 58What You Can Do with SV600 ........................................................................................................ 61What You Can Do with S1300i........................................................................................................ 64What You Can Do with S1100i........................................................................................................ 65
Parts and Functions ............................................................................................................................. 68Parts and Functions of iX1600 / iX1500 / iX1400 ............................................................................... 69Parts and Functions of iX500.......................................................................................................... 71Parts and Functions of iX100.......................................................................................................... 73Parts and Functions of SV600 ........................................................................................................ 76Parts and Functions of S1300i ........................................................................................................ 79Parts and Functions of S1100i ........................................................................................................ 81
Charging the Battery (iX100) ................................................................................................................. 83
Overview of the Software Related to the ScanSnap.................................................................................. 85
ScanSnap Manager Icon....................................................................................................................... 86
Right-Click Menu ................................................................................................................................. 87
ScanSnap Setup Window ..................................................................................................................... 89
Turning the ScanSnap On or Off ............................................................................................................ 91Turning the ScanSnap On.............................................................................................................. 92Turning the ScanSnap Off.............................................................................................................. 96
2
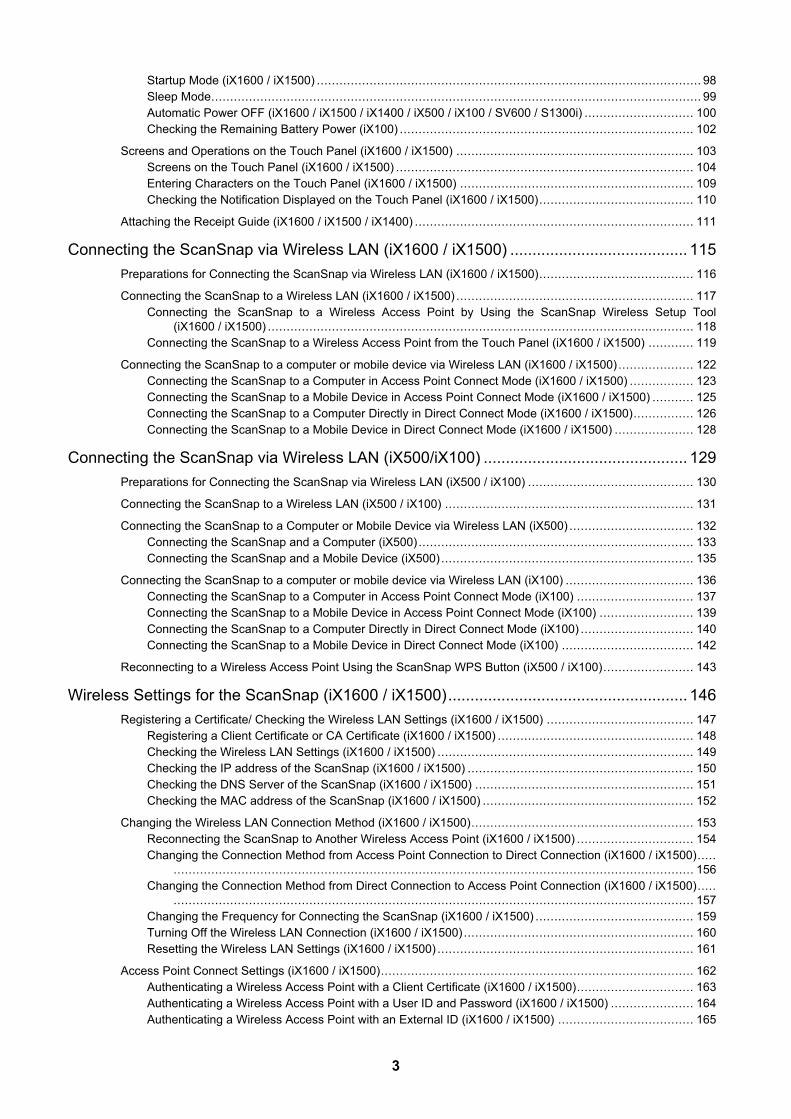
Startup Mode (iX1600 / iX1500) ...................................................................................................... 98Sleep Mode.................................................................................................................................. 99Automatic Power OFF (iX1600 / iX1500 / iX1400 / iX500 / iX100 / SV600 / S1300i) ............................. 100Checking the Remaining Battery Power (iX100) .............................................................................. 102
Screens and Operations on the Touch Panel (iX1600 / iX1500) ............................................................... 103Screens on the Touch Panel (iX1600 / iX1500) ............................................................................... 104Entering Characters on the Touch Panel (iX1600 / iX1500) .............................................................. 109Checking the Notification Displayed on the Touch Panel (iX1600 / iX1500)......................................... 110
Attaching the Receipt Guide (iX1600 / iX1500 / iX1400) .......................................................................... 111
Connecting the ScanSnap via Wireless LAN (iX1600 / iX1500) ........................................ 115Preparations for Connecting the ScanSnap via Wireless LAN (iX1600 / iX1500)......................................... 116
Connecting the ScanSnap to a Wireless LAN (iX1600 / iX1500) ............................................................... 117Connecting the ScanSnap to a Wireless Access Point by Using the ScanSnap Wireless Setup Tool
(iX1600 / iX1500) ................................................................................................................. 118Connecting the ScanSnap to a Wireless Access Point from the Touch Panel (iX1600 / iX1500) ............ 119
Connecting the ScanSnap to a computer or mobile device via Wireless LAN (iX1600 / iX1500) .................... 122Connecting the ScanSnap to a Computer in Access Point Connect Mode (iX1600 / iX1500) ................. 123Connecting the ScanSnap to a Mobile Device in Access Point Connect Mode (iX1600 / iX1500) ........... 125Connecting the ScanSnap to a Computer Directly in Direct Connect Mode (iX1600 / iX1500)................ 126Connecting the ScanSnap to a Mobile Device in Direct Connect Mode (iX1600 / iX1500) ..................... 128
Connecting the ScanSnap via Wireless LAN (iX500/iX100) .............................................. 129Preparations for Connecting the ScanSnap via Wireless LAN (iX500 / iX100) ............................................ 130
Connecting the ScanSnap to a Wireless LAN (iX500 / iX100) .................................................................. 131
Connecting the ScanSnap to a Computer or Mobile Device via Wireless LAN (iX500) ................................. 132Connecting the ScanSnap and a Computer (iX500) ......................................................................... 133Connecting the ScanSnap and a Mobile Device (iX500) ................................................................... 135
Connecting the ScanSnap to a computer or mobile device via Wireless LAN (iX100) .................................. 136Connecting the ScanSnap to a Computer in Access Point Connect Mode (iX100) ............................... 137Connecting the ScanSnap to a Mobile Device in Access Point Connect Mode (iX100) ......................... 139Connecting the ScanSnap to a Computer Directly in Direct Connect Mode (iX100) .............................. 140Connecting the ScanSnap to a Mobile Device in Direct Connect Mode (iX100) ................................... 142
Reconnecting to a Wireless Access Point Using the ScanSnap WPS Button (iX500 / iX100)........................ 143
Wireless Settings for the ScanSnap (iX1600 / iX1500)...................................................... 146Registering a Certificate/ Checking the Wireless LAN Settings (iX1600 / iX1500) ....................................... 147
Registering a Client Certificate or CA Certificate (iX1600 / iX1500) .................................................... 148Checking the Wireless LAN Settings (iX1600 / iX1500) .................................................................... 149Checking the IP address of the ScanSnap (iX1600 / iX1500) ............................................................ 150Checking the DNS Server of the ScanSnap (iX1600 / iX1500) .......................................................... 151Checking the MAC address of the ScanSnap (iX1600 / iX1500) ........................................................ 152
Changing the Wireless LAN Connection Method (iX1600 / iX1500)........................................................... 153Reconnecting the ScanSnap to Another Wireless Access Point (iX1600 / iX1500) ............................... 154Changing the Connection Method from Access Point Connection to Direct Connection (iX1600 / iX1500).....
.......................................................................................................................................... 156Changing the Connection Method from Direct Connection to Access Point Connection (iX1600 / iX1500).....
.......................................................................................................................................... 157Changing the Frequency for Connecting the ScanSnap (iX1600 / iX1500) .......................................... 159Turning Off the Wireless LAN Connection (iX1600 / iX1500) ............................................................. 160Resetting the Wireless LAN Settings (iX1600 / iX1500) .................................................................... 161
Access Point Connect Settings (iX1600 / iX1500)................................................................................... 162Authenticating a Wireless Access Point with a Client Certificate (iX1600 / iX1500)............................... 163Authenticating a Wireless Access Point with a User ID and Password (iX1600 / iX1500) ...................... 164Authenticating a Wireless Access Point with an External ID (iX1600 / iX1500) .................................... 165
3
Setting an IP Address for the ScanSnap (iX1600 / iX1500) ............................................................... 166Using a DNS Server for the Internet Connection (iX1600 / iX1500) .................................................... 167Using a Proxy Server for the Internet Connection (iX1600 / iX1500)................................................... 168
Changing a Connected Computer to a Computer that You Want to Connect to theScanSnap (iX1600 / iX1500)........................................................................................ 169
Setting a User Name Displayed on the Touch Panel (iX1600 / iX1500) ..................................................... 170
Changing a Connected Computer to a Computer That You Want to Connect to the ScanSnap from the TouchPanel (iX1600 / iX1500) ............................................................................................................... 172
Troubleshooting When You Cannot Connect to the ScanSnap (iX1600 / iX1500) ....................................... 175Checking Whether Another Computer Is Connected to the ScanSnap (iX1600 / iX1500) ...................... 176Checking Whether a Setting for the ScanSnap Has Been Changed or Not (iX1600 / iX1500) ................ 177
Scanning Documents ......................................................................................................... 179Scanning Documents with iX1600 / iX1500 / iX1400 ............................................................................... 180
Documents to Scan (iX1600 / iX1500 / iX1400) ............................................................................... 181Scanning Documents (iX1600 / iX1500 / iX1400) ............................................................................ 185Scanning Long Pages (iX1600 / iX1500 / iX1400) ........................................................................... 190Scanning Documents of Different Widths or Lengths in One Batch (iX1600 / iX1500 / iX1400) .............. 194Scanning Small Size Documents such as Receipts in One Go (iX1600 / iX1500 / iX1400) .................... 199Scanning Documents Larger Than A4 or Letter Size (iX1600 / iX1500 / iX1400).................................. 203Scanning Documents Such as Photographs and Clippings (iX1600 / iX1500 / iX1400) ......................... 207
Scanning Documents with iX500.......................................................................................................... 211Documents to Scan (iX500).......................................................................................................... 212Scanning Documents (iX500) ....................................................................................................... 216Scanning Long Pages (iX500) ...................................................................................................... 222Scanning Documents of Different Widths or Lengths in One Batch (iX500) ......................................... 226Scanning Documents Larger Than A4 or Letter Size (iX500) ............................................................ 232Scanning Documents Such as Photographs and Clippings (iX500) .................................................... 236
Scanning Documents with iX100.......................................................................................................... 240Documents to Scan (iX100).......................................................................................................... 241Scanning Documents (iX100) ....................................................................................................... 245Scanning Documents by Inserting Two Documents at a Time or by Inserting the Next Document While the
Current Document Is Being Scanned (iX100)........................................................................... 250Scanning Documents Larger Than A4 or Letter Size by Directly Inserting Them in the ScanSnap (iX100).....
.......................................................................................................................................... 257Scanning Documents Larger than A4 or Letter Size with the Carrier Sheet (iX100) .............................. 261Scanning Documents Such as Photographs and Clippings (iX100) .................................................... 266
Scanning Documents with SV600 ........................................................................................................ 270Documents to Scan (SV600) ........................................................................................................ 271How to Place Documents (SV600) ................................................................................................ 272Scanning Documents (SV600)...................................................................................................... 275Scanning Books (SV600) ............................................................................................................. 280Scanning Multiple Documents at Once (SV600) .............................................................................. 285Scanning Books Using Page Turning Detection (SV600).................................................................. 290Scanning Documents Using Timed Mode (SV600) .......................................................................... 294Scanning Documents with Two ScanSnaps Connected to a Computer (SV600) .................................. 297
Scanning Documents with S1300i ........................................................................................................ 298Documents to Scan (S1300i) ........................................................................................................ 299Scanning Documents (S1300i) ..................................................................................................... 301Scanning Long Pages (S1300i)..................................................................................................... 306Scanning Documents of Different Widths or Lengths in One Batch (S1300i) ....................................... 310
Scanning Documents with S1100i ........................................................................................................ 315Documents to Scan (S1100i) ........................................................................................................ 316Scanning Documents (S1100i) ..................................................................................................... 320Scanning Documents by Inserting Two Documents at a Time or by Inserting the Next Document While the
Current Document Is Being Scanned (S1100i) ......................................................................... 325
4
Scanning Documents Larger Than A4 or Letter Size by Directly Inserting It in the ScanSnap (S1100i) ... 332Scanning Documents Larger than A4 or Letter Size with the Carrier Sheet (S1100i) ............................ 336Scanning Documents Such as Photographs and Clippings (S1100i) .................................................. 341
What You Can Do with Related Software .......................................................................... 345What You Can Do with ScanSnap Home .............................................................................................. 346
What You Can Do with the ScanSnap Organizer.................................................................................... 348Basic Operation Procedure of ScanSnap Organizer ........................................................................ 349Managing Files ........................................................................................................................... 351Editing Files ............................................................................................................................... 353Using Files................................................................................................................................. 354
What You Can Do with CardMinder ...................................................................................................... 355Basic Operation Procedure of CardMinder ..................................................................................... 357Linking Card Data with Other Applications...................................................................................... 360Searching Card Data with the Basic Search Toolbar........................................................................ 361Searching Card Data with CardMinder Viewer ................................................................................ 362Attaching a File to Card Data........................................................................................................ 363
Useful Usages.................................................................................................................... 364Managing Paper Documents by Folder on a Computer with ScanSnap Home............................................ 365
Managing Paper Documents by Folder on a Computer with ScanSnap Organizer ...................................... 368
Saving Business Card Data to a Computer with ScanSnap Home ............................................................ 371
Saving Business Cards to a Computer with CardMinder.......................................................................... 374
Saving Receipt Data to a Computer...................................................................................................... 377
Creating a Photo Album and Saving it to a Computer.............................................................................. 380
Correcting Scanned Images (SV600) ................................................................................ 383When a Document Is Scanned (SV600) ................................................................................................ 384
Filling in Fingers Captured in a Scanned Image (When a Document Is Scanned)(SV600)..................... 385
When a Book Is Scanned (SV600) ....................................................................................................... 389Correcting Distorted Book Images (SV600) .................................................................................... 390Splitting a Double-Page Spread Image into Two Page Images (SV600) ............................................. 395Filling in Fingers Captured in a Scanned Image (When a Book Is Scanned)(SV600) ............................ 398
When Multiple Documents Are Scanned at Once (SV600)....................................................................... 401Correcting the Scanned Image Orientation (SV600) ........................................................................ 402Modifying the Crop Area (SV600).................................................................................................. 405Adding the Necessary Scanned Images (SV600) ............................................................................ 407Deleting Unnecessary Scanned Images (SV600) ............................................................................ 409
Uninstalling Software/Troubleshooting during Uninstallation ............................................. 412How to Find Your Solution................................................................................................................... 413
If Your First Attempt to Install Failed ..................................................................................................... 414
If You Have Installed the Software Before ............................................................................................. 415Uninstalling the Software ............................................................................................................. 416Removing the Installation Information ............................................................................................ 417Reinstalling the Software ............................................................................................................. 418
Cannot Connect to the ScanSnap even after the Installation Has Been Complete (iX1600 / iX1500) ............. 419
When the ScanSnap Manager Icon Does Not Appear ............................................................................. 420Displaying the ScanSnap Manager Icon......................................................................................... 421
When ScanSnap Manager Does Not Operate Normally .......................................................................... 422Removing Unnecessary Icons from the Notification Area.................................................................. 423Checking the Connection between the ScanSnap and the Computer ................................................. 424Checking If ScanSnap Manager Is Operating Normally .................................................................... 425
5
Removing the ScanSnap's Connection Information ......................................................................... 428
When You Cannot Uninstall the Software.............................................................................................. 430
Cleaning the ScanSnap ..................................................................................................... 431Cleaning Materials ............................................................................................................................. 432
Cleaning iX1600 / iX1500 / iX1400 ....................................................................................................... 433Cleaning the Outside of iX1600 / iX1500 / iX1400 ........................................................................... 434Cleaning the Inside of iX1600 / iX1500 / iX1400 .............................................................................. 435
Cleaning iX500 .................................................................................................................................. 442Cleaning the Outside of iX500 ...................................................................................................... 443Cleaning the Inside of iX500......................................................................................................... 444
Cleaning iX100 .................................................................................................................................. 448Cleaning the Outside of iX100 ...................................................................................................... 449Cleaning the Inside of iX100......................................................................................................... 450
Cleaning SV600................................................................................................................................. 453
Cleaning S1300i ................................................................................................................................ 454Cleaning the Outside of S1300i..................................................................................................... 455Cleaning the Inside of S1300i ....................................................................................................... 456
Cleaning S1100i ................................................................................................................................ 460Cleaning the Outside of S1100i..................................................................................................... 461Cleaning the Inside of S1100i ....................................................................................................... 462
Cleaning the Carrier Sheet (iX1600 / iX1500 / iX1400 / iX500/ iX100 / S1100i)........................................... 465
Cleaning the Background Pad (SV600)................................................................................................. 466
Consumables for the ScanSnap (iX1600 / iX1500 / iX1400 / iX500 / S1300i) ................... 467Part Numbers and Replacement Cycle of Consumables (iX1600 / iX1500 / iX1400 / iX500 / S1300i) ............ 468
Checking the Status of Consumables (iX1400 / iX500 / S1300i) ............................................................... 470
Replacing Consumables for iX1600 / iX1500 / iX1400............................................................................. 471
Replacing Consumables for iX500 ....................................................................................................... 478
Replacing Consumables for S1300i...................................................................................................... 485Replacing the Pad Assy (S1300i) .................................................................................................. 486Replacing the Pick Roller Assembly (S1300i).................................................................................. 489
Appendix ............................................................................................................................ 494Updating the Software ........................................................................................................................ 495
Updating the Firmware (iX1600 / iX1500) .............................................................................................. 496
Uninstalling the Software .................................................................................................................... 497
Part Number of the Background Pad (SV600)........................................................................................ 499
Part Number of the Carrier Sheet (iX1600 / iX1500 / iX1400 / iX500 / iX100 / S1100i) ................................. 500
Specifications of the ScanSnap............................................................................................................ 501Specifications for iX1600 / iX1500 / iX1400 .................................................................................... 502Specifications for iX500 ............................................................................................................... 504Specifications of iX100 ................................................................................................................ 506Specifications of SV600 ............................................................................................................... 508Specifications of S1300i............................................................................................................... 510Specifications for S1100i.............................................................................................................. 512
About Customer Support and Maintenance ....................................................................... 514
6

About This Manual
l "Safety Information" (page 8)l "Manuals" (page 9)l "Trademarks" (page 12)l "Manufacturer" (page 13)l "Symbols Used in This Manual" (page 14)l "Arrow Symbols in This Manual" (page 15)l "Screen Examples in This Manual" (page 16)l "Abbreviations Used in This Manual" (page 17)
About This Manual
7

Safety Information
The attached "Safety Precautions" manual contains important information about the safe and correctuse of the ScanSnap. Make sure that you read and understand it before using the ScanSnap.
Safety Information
8
Manuals
Read the following manuals according to your needs when using the ScanSnap.
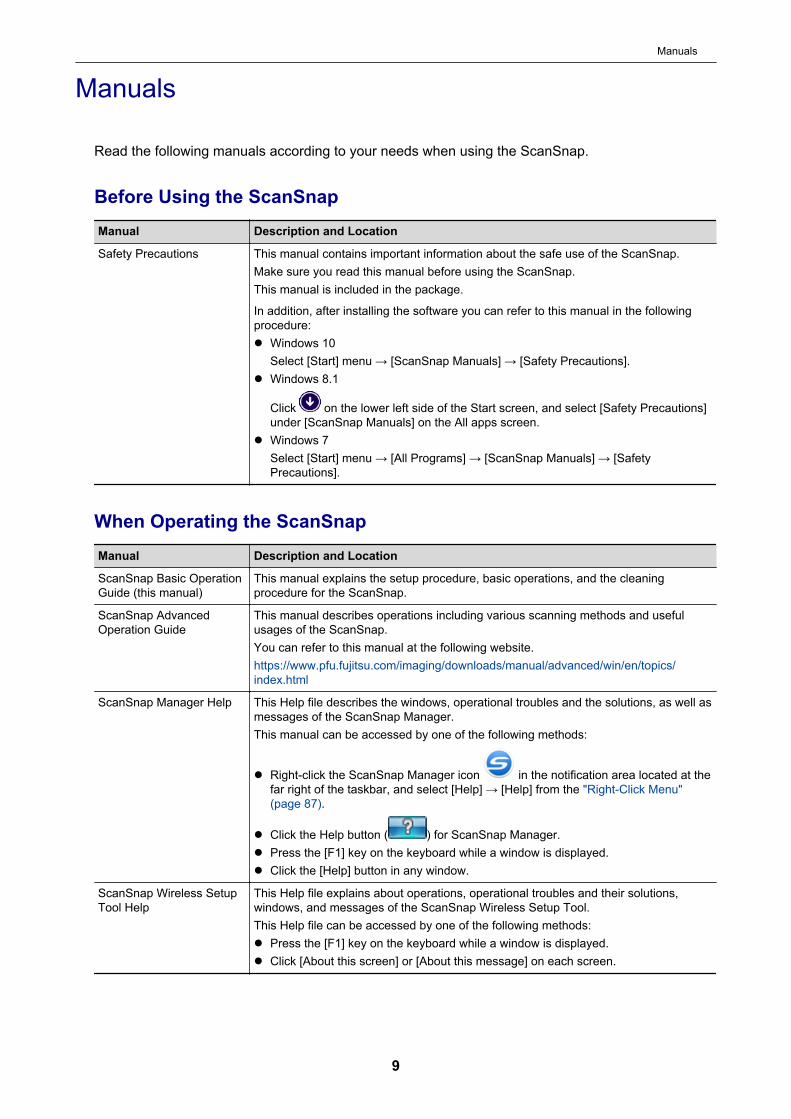
Before Using the ScanSnapManual Description and Location
Safety Precautions This manual contains important information about the safe use of the ScanSnap.Make sure you read this manual before using the ScanSnap.This manual is included in the package.
In addition, after installing the software you can refer to this manual in the followingprocedure:l Windows 10
Select [Start] menu → [ScanSnap Manuals] → [Safety Precautions].l Windows 8.1
Click on the lower left side of the Start screen, and select [Safety Precautions]under [ScanSnap Manuals] on the All apps screen.
l Windows 7Select [Start] menu → [All Programs] → [ScanSnap Manuals] → [SafetyPrecautions].
When Operating the ScanSnapManual Description and Location
ScanSnap Basic OperationGuide (this manual)
This manual explains the setup procedure, basic operations, and the cleaningprocedure for the ScanSnap.
ScanSnap AdvancedOperation Guide
This manual describes operations including various scanning methods and usefulusages of the ScanSnap.You can refer to this manual at the following website.https://www.pfu.fujitsu.com/imaging/downloads/manual/advanced/win/en/topics/index.html
ScanSnap Manager Help This Help file describes the windows, operational troubles and the solutions, as well asmessages of the ScanSnap Manager.This manual can be accessed by one of the following methods:
l Right-click the ScanSnap Manager icon in the notification area located at thefar right of the taskbar, and select [Help] → [Help] from the "Right-Click Menu"(page 87).
l Click the Help button ( ) for ScanSnap Manager.l Press the [F1] key on the keyboard while a window is displayed.l Click the [Help] button in any window.
ScanSnap Wireless SetupTool Help
This Help file explains about operations, operational troubles and their solutions,windows, and messages of the ScanSnap Wireless Setup Tool.This Help file can be accessed by one of the following methods:l Press the [F1] key on the keyboard while a window is displayed.l Click [About this screen] or [About this message] on each screen.
Manuals
9

When Saving Scanned Images to a Mobile DeviceManual Description and Location
ScanSnap Basic OperationGuide (Mobile Connectionfor iOS)
This manual describes operations to be performed on an iOS-based mobile devicewhen you save scanned images to the mobile device.This manual can be accessed by the following method:1. Start up ScanSnap Connect Application on the mobile device.a The [File List] screen appears.
2. Tap .a The [Information] screen appears.
3. Tap the [Help] button.
ScanSnap Basic OperationGuide (Mobile Connectionfor Android)
This manual describes operations to be performed on an Android-based mobile devicewhen you save scanned images to the mobile device.This manual can be accessed by the following method:1. Start up ScanSnap Connect Application on the mobile device.a The [File List] screen appears.
2. Tap .a The menu appears.
3. Tap [Help].
Scan to Mobile Help This Help file describes the operations, windows, and messages of Scan to Mobile.This Help file can be accessed by one of the following methods:l The [Scan to Mobile] icon is displayed in the menu that appears when you click
in the notification area located at the far right of the taskbar. Right-click the[Scan to Mobile] icon, and select [Help] from the menu that appears.
l Press the [F1] key on the keyboard while a window is displayed.l Click the [Help] button in any window.
When Updating the SoftwareManual Description and Location
ScanSnap Online UpdateHelp
This Help file describes the operations, windows, and messages of ScanSnap OnlineUpdate.This Help file can be accessed by one of the following methods:l Press the [F1] key on the keyboard while a window is displayed.l Click the Help button in any window.
When Using Related ApplicationsManual Description and Location
ScanSnap Home Help This Help file explains about operations, troubles that occur during operations, and thesolutions to the troubles for ScanSnap Home when it is used in conjunction withScanSnap Manager.You can refer to this manual at the following website.https://www.pfu.fujitsu.com/imaging/downloads/manual/ss_webhelpmgr/en/top/index.html
Manuals
10
Manual Description and Location
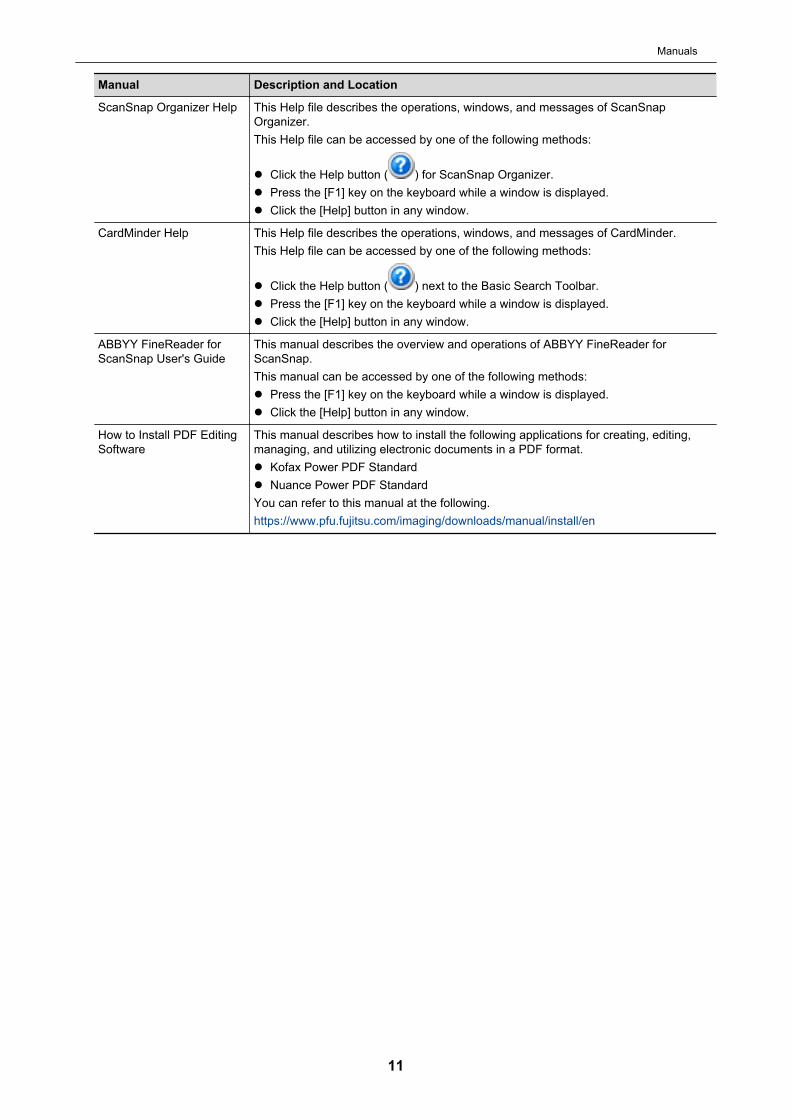
ScanSnap Organizer Help This Help file describes the operations, windows, and messages of ScanSnapOrganizer.This Help file can be accessed by one of the following methods:
l Click the Help button ( ) for ScanSnap Organizer.l Press the [F1] key on the keyboard while a window is displayed.l Click the [Help] button in any window.
CardMinder Help This Help file describes the operations, windows, and messages of CardMinder.This Help file can be accessed by one of the following methods:
l Click the Help button ( ) next to the Basic Search Toolbar.l Press the [F1] key on the keyboard while a window is displayed.l Click the [Help] button in any window.
ABBYY FineReader forScanSnap User's Guide
This manual describes the overview and operations of ABBYY FineReader forScanSnap.This manual can be accessed by one of the following methods:l Press the [F1] key on the keyboard while a window is displayed.l Click the [Help] button in any window.
How to Install PDF EditingSoftware
This manual describes how to install the following applications for creating, editing,managing, and utilizing electronic documents in a PDF format.l Kofax Power PDF Standardl Nuance Power PDF StandardYou can refer to this manual at the following.https://www.pfu.fujitsu.com/imaging/downloads/manual/install/en
Manuals
11

Trademarks
Apple, App Store, the Apple logo, Mac, Mac OS, OS X, macOS, iPad, iPadOS, iPhoto, iPod touch,and iTunes are trademarks of Apple Inc.Kofax is a registered trademark or trademark of Kofax Limited.Adobe, Acrobat, and Reader are either registered trademarks or trade names of Adobe SystemsIncorporated in the United States and/or other countries.Intel and Intel Core are trademarks of Intel Corporation or its subsidiaries in the U.S. and/or othercountries.
ABBYY™ FineReader™ Engine © ABBYY. OCR by ABBYY
ABBYY and FineReader are trademarks of ABBYY Software, Ltd. which may be registered in somejurisdictions.Evernote is a trademark of Evernote Corporation.Google, Android, Google Play, Google Drive, and Google Chrome are trademarks or registeredtrademarks of Google LLC. Use of these registered trademarks or trademarks is subject to GooglePermissions.Salesforce, the Salesforce logo, and Salesforce CRM are registered trademarks or trademarks ofsalesforce.com, inc. in the United States and other countries.Wi-Fi, Wi-Fi Protected Setup, and the Wi-Fi Protected Setup logo are trademarks of Wi-Fi Alliance.Amazon is a trademark of Amazon.com, Inc. or its affiliates.
For iX1600/iX1500 UsersBesides the software authored by the product developer (PFU Limited), the ScanSnap containsother free software, such as software copyrighted under the GNU General Public License (GPL) orthe GNU Lesser General Public License (LGPL). For details concerning the conditions of thelicenses for Open Source Software (OSS), refer to the screen that appears when you press thesettings icon in the lower right of the home screen on the ScanSnap touch panel and then press[Scanner settings] and [License].
For iX500 UsersBesides the software authored by the product developer (PFU Limited), the ScanSnap containsother free software, such as software copyrighted under the GNU General Public License (GPL) orthe GNU Lesser General Public License (LGPL). For details concerning the conditions of thelicenses, refer to "Terms and Conditions for End User License" (file name: OSS_License.pdf)contained in the installation folder of ScanSnap Home or ScanSnap Manager.
For iX100 UsersBesides the software authored by the product developer (PFU Limited), the ScanSnap containsother free software created by third parties. For details concerning the conditions of the licenses,refer to "Terms and Conditions for End User License" (file name: OSS_License.pdf) contained in theinstallation folder of ScanSnap Home or ScanSnap Manager.ScanSnap, the ScanSnap logo, ScanSnap Home, ScanSnap Manager, ScanSnap Organizer,CardMinder, Rack2-Filer, and Magic Desktop are registered trademarks or trademarks of PFULimited in Japan.Other company names and product names are the registered trademarks or trademarks of therespective companies.
Trademarks
12

Manufacturer
PFU LimitedYOKOHAMA i-MARK PLACE, 4-4-5 Minatomirai, Nishi-ku, Yokohama, Kanagawa, 220-8567, Japan
© PFU Limited 2020
Manufacturer
13
Symbols Used in This Manual
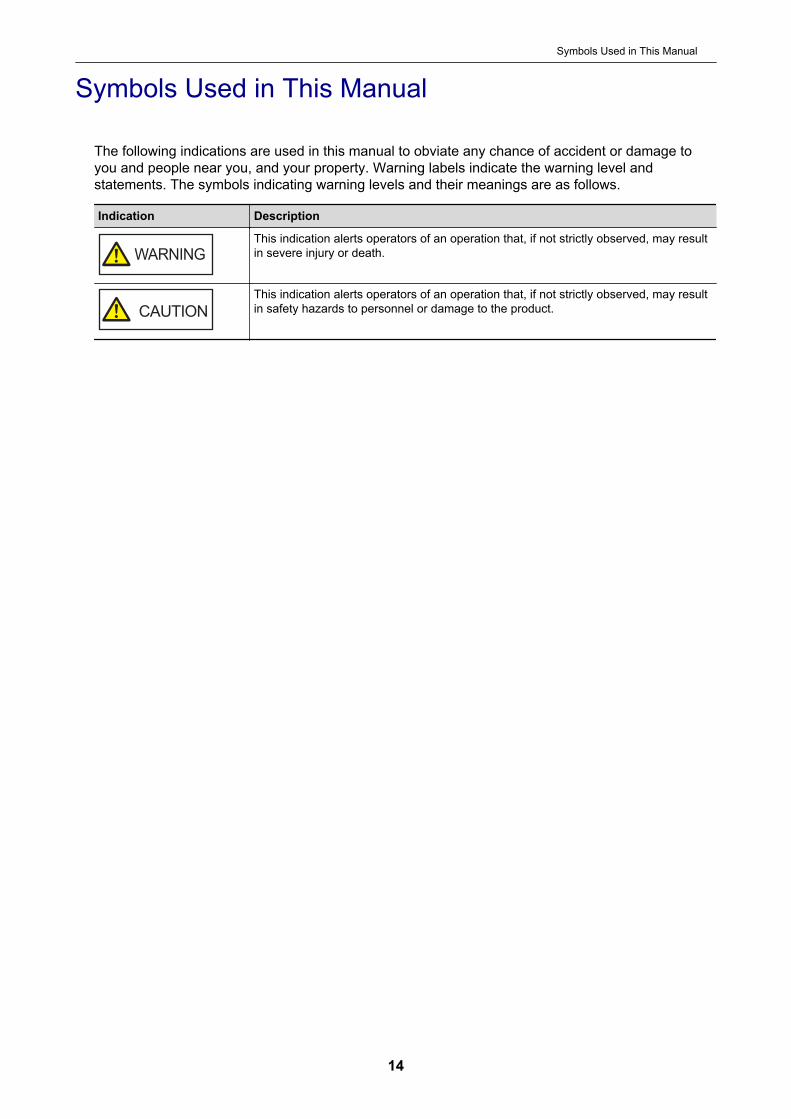
The following indications are used in this manual to obviate any chance of accident or damage toyou and people near you, and your property. Warning labels indicate the warning level andstatements. The symbols indicating warning levels and their meanings are as follows.
Indication Description
WARNING
This indication alerts operators of an operation that, if not strictly observed, may resultin severe injury or death.
CAUTION
This indication alerts operators of an operation that, if not strictly observed, may resultin safety hazards to personnel or damage to the product.
Symbols Used in This Manual
14

Arrow Symbols in This Manual
Right-arrow symbols (→) are used to connect icons or menu options you should select insuccession.
Example: Select [Start] menu → [Computer].
Arrow Symbols in This Manual
15
Screen Examples in This Manual
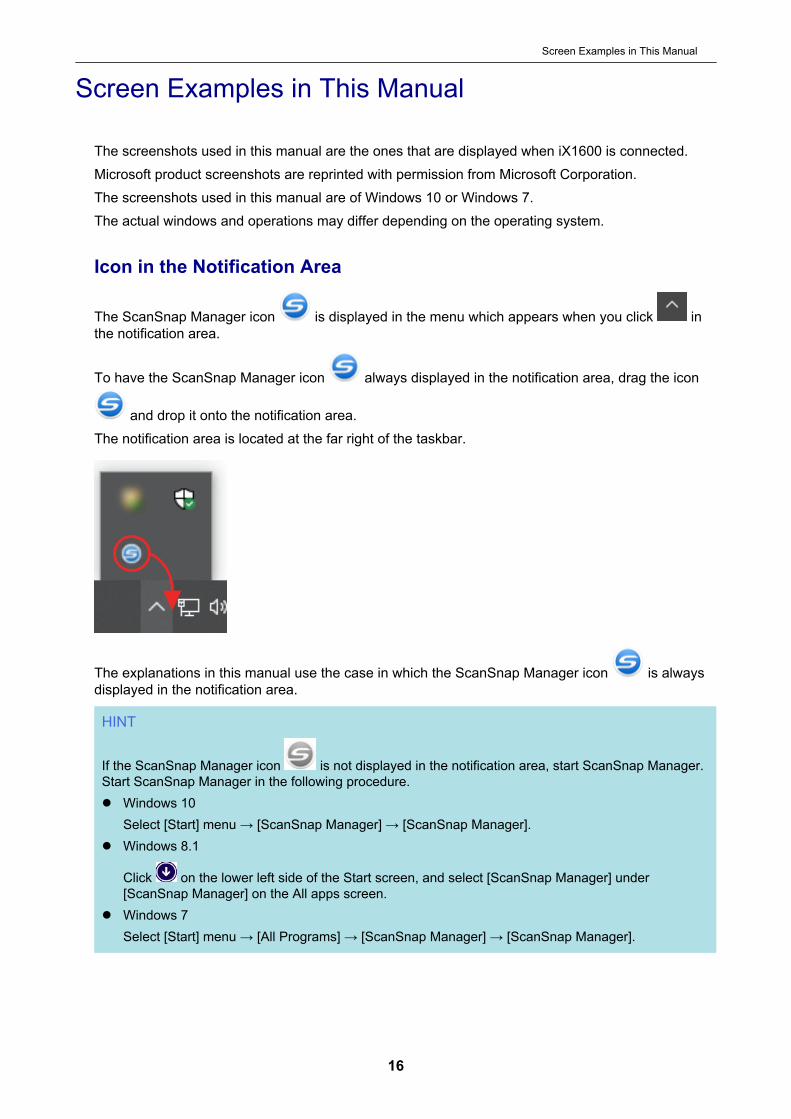
The screenshots used in this manual are the ones that are displayed when iX1600 is connected.Microsoft product screenshots are reprinted with permission from Microsoft Corporation.The screenshots used in this manual are of Windows 10 or Windows 7.The actual windows and operations may differ depending on the operating system.
Icon in the Notification Area
The ScanSnap Manager icon is displayed in the menu which appears when you click inthe notification area.
To have the ScanSnap Manager icon always displayed in the notification area, drag the icon
and drop it onto the notification area.The notification area is located at the far right of the taskbar.
The explanations in this manual use the case in which the ScanSnap Manager icon is alwaysdisplayed in the notification area.
HINT
If the ScanSnap Manager icon is not displayed in the notification area, start ScanSnap Manager.Start ScanSnap Manager in the following procedure.l Windows 10
Select [Start] menu → [ScanSnap Manager] → [ScanSnap Manager].l Windows 8.1
Click on the lower left side of the Start screen, and select [ScanSnap Manager] under[ScanSnap Manager] on the All apps screen.
l Windows 7Select [Start] menu → [All Programs] → [ScanSnap Manager] → [ScanSnap Manager].
Screen Examples in This Manual
16
Abbreviations Used in This Manual
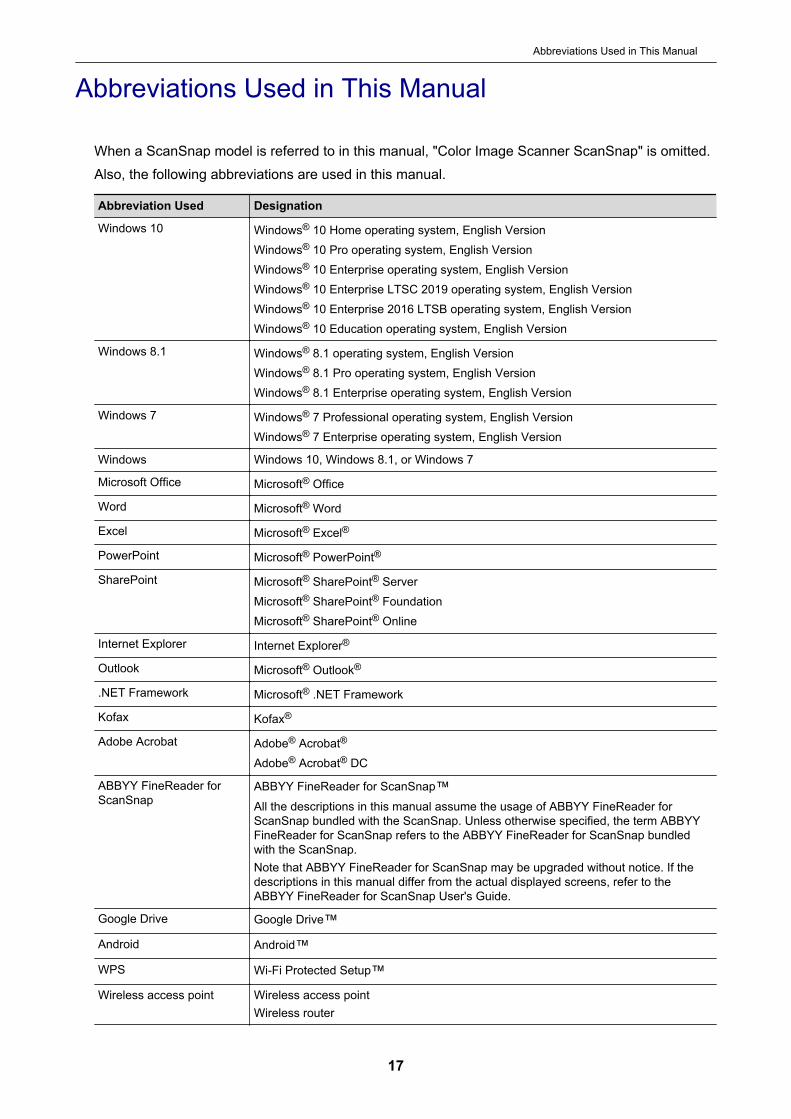
When a ScanSnap model is referred to in this manual, "Color Image Scanner ScanSnap" is omitted.Also, the following abbreviations are used in this manual.
Abbreviation Used Designation
Windows 10 Windows® 10 Home operating system, English VersionWindows® 10 Pro operating system, English VersionWindows® 10 Enterprise operating system, English VersionWindows® 10 Enterprise LTSC 2019 operating system, English VersionWindows® 10 Enterprise 2016 LTSB operating system, English VersionWindows® 10 Education operating system, English Version
Windows 8.1 Windows® 8.1 operating system, English VersionWindows® 8.1 Pro operating system, English VersionWindows® 8.1 Enterprise operating system, English Version
Windows 7 Windows® 7 Professional operating system, English VersionWindows® 7 Enterprise operating system, English Version
Windows Windows 10, Windows 8.1, or Windows 7
Microsoft Office Microsoft® Office
Word Microsoft® Word
Excel Microsoft® Excel®
PowerPoint Microsoft® PowerPoint®
SharePoint Microsoft® SharePoint® ServerMicrosoft® SharePoint® FoundationMicrosoft® SharePoint® Online
Internet Explorer Internet Explorer®
Outlook Microsoft® Outlook®
.NET Framework Microsoft® .NET Framework
Kofax Kofax®
Adobe Acrobat Adobe® Acrobat®
Adobe® Acrobat® DC
ABBYY FineReader forScanSnap
ABBYY FineReader for ScanSnap™All the descriptions in this manual assume the usage of ABBYY FineReader forScanSnap bundled with the ScanSnap. Unless otherwise specified, the term ABBYYFineReader for ScanSnap refers to the ABBYY FineReader for ScanSnap bundledwith the ScanSnap.Note that ABBYY FineReader for ScanSnap may be upgraded without notice. If thedescriptions in this manual differ from the actual displayed screens, refer to theABBYY FineReader for ScanSnap User's Guide.
Google Drive Google Drive™Android Android™WPS Wi-Fi Protected Setup™Wireless access point Wireless access point
Wireless router
Abbreviations Used in This Manual
17

Abbreviation Used Designation
ScanSnap Color Image Scanner ScanSnap series (*1)
*1: The ScanSnap N1800 series is not included.
Abbreviations Used in This Manual
18
Setting Up the ScanSnap
l "System Requirements" (page 20)l "Setting Up iX1600 / iX1500 / iX1400" (page 22)l "Setting Up iX500" (page 28)l "Setting Up iX100" (page 31)l "Setting Up SV600" (page 36)l "Setting Up S1300i" (page 41)l "Setting Up S1100i" (page 45)l "Connecting the ScanSnap to a Mobile Device or the ScanSnap Cloud Server (iX1600 / iX1500 /
iX500 / iX100)" (page 49)
Setting Up the ScanSnap
19
System Requirements
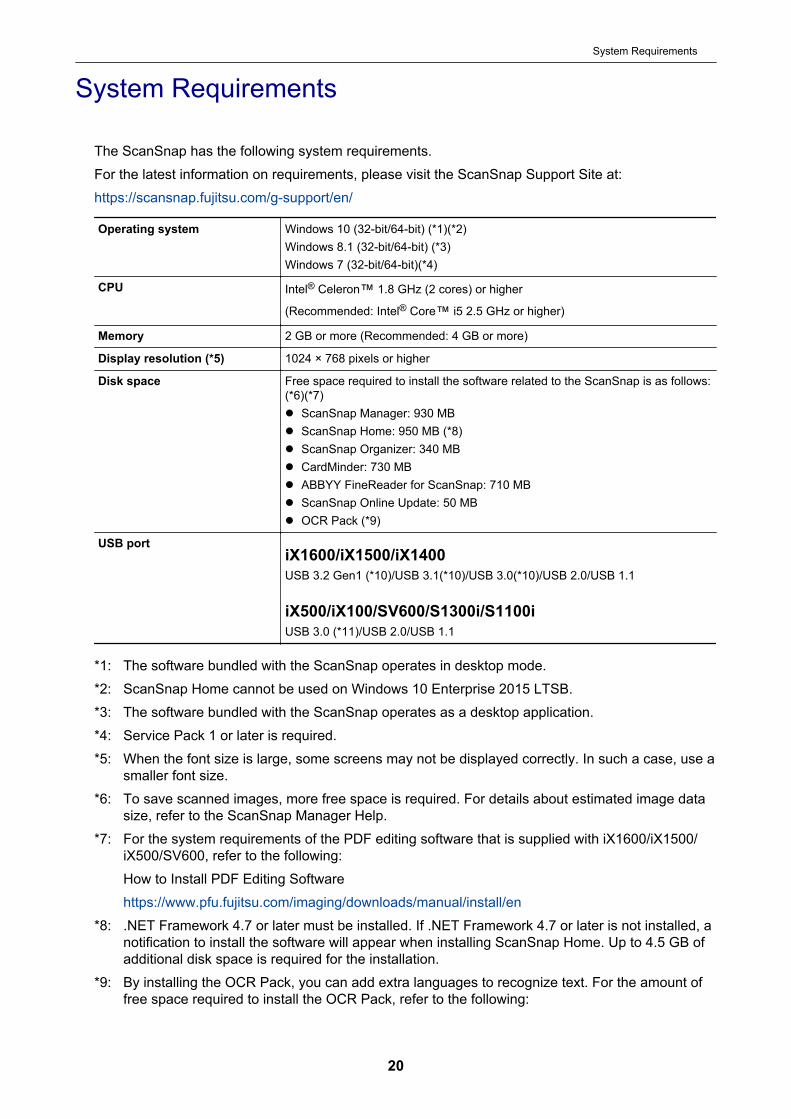
The ScanSnap has the following system requirements.For the latest information on requirements, please visit the ScanSnap Support Site at:https://scansnap.fujitsu.com/g-support/en/
Operating system Windows 10 (32-bit/64-bit) (*1)(*2)Windows 8.1 (32-bit/64-bit) (*3)Windows 7 (32-bit/64-bit)(*4)
CPU Intel® Celeron™ 1.8 GHz (2 cores) or higher
(Recommended: Intel® Core™ i5 2.5 GHz or higher)
Memory 2 GB or more (Recommended: 4 GB or more)
Display resolution (*5) 1024 × 768 pixels or higher
Disk space Free space required to install the software related to the ScanSnap is as follows:(*6)(*7)l ScanSnap Manager: 930 MBl ScanSnap Home: 950 MB (*8)l ScanSnap Organizer: 340 MBl CardMinder: 730 MBl ABBYY FineReader for ScanSnap: 710 MBl ScanSnap Online Update: 50 MBl OCR Pack (*9)
USB portiX1600/iX1500/iX1400USB 3.2 Gen1 (*10)/USB 3.1(*10)/USB 3.0(*10)/USB 2.0/USB 1.1
iX500/iX100/SV600/S1300i/S1100iUSB 3.0 (*11)/USB 2.0/USB 1.1
*1: The software bundled with the ScanSnap operates in desktop mode.*2: ScanSnap Home cannot be used on Windows 10 Enterprise 2015 LTSB.*3: The software bundled with the ScanSnap operates as a desktop application.*4: Service Pack 1 or later is required.*5: When the font size is large, some screens may not be displayed correctly. In such a case, use a
smaller font size.*6: To save scanned images, more free space is required. For details about estimated image data
size, refer to the ScanSnap Manager Help.*7: For the system requirements of the PDF editing software that is supplied with iX1600/iX1500/
iX500/SV600, refer to the following:How to Install PDF Editing Softwarehttps://www.pfu.fujitsu.com/imaging/downloads/manual/install/en
*8: .NET Framework 4.7 or later must be installed. If .NET Framework 4.7 or later is not installed, anotification to install the software will appear when installing ScanSnap Home. Up to 4.5 GB ofadditional disk space is required for the installation.
*9: By installing the OCR Pack, you can add extra languages to recognize text. For the amount offree space required to install the OCR Pack, refer to the following:
System Requirements
20
https://www.fujitsu.com/global/support/products/computing/peripheral/scanners/scansnap/software/ocrpack-setup.html
*10: When the ScanSnap is connected to a USB 3.2 Gen1 port, a USB 3.1 port, or a USB 3.0 port,the ScanSnap may not be recognized by some computers. In this case, connect the ScanSnapto a USB 2.0 port.
*11: When the ScanSnap is connected to a USB 3.0 port, the ScanSnap may not be recognized bysome computers. In this case, connect the ScanSnap to a USB 2.0 port.
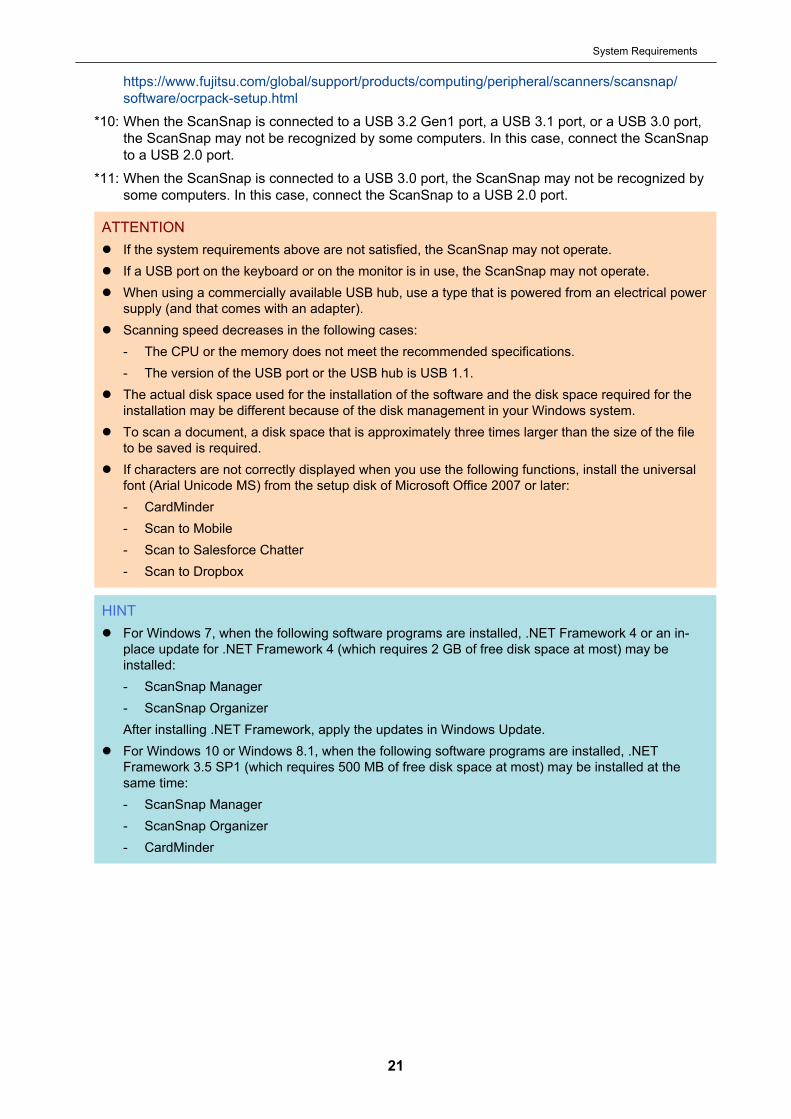
ATTENTIONl If the system requirements above are not satisfied, the ScanSnap may not operate.l If a USB port on the keyboard or on the monitor is in use, the ScanSnap may not operate.l When using a commercially available USB hub, use a type that is powered from an electrical power
supply (and that comes with an adapter).l Scanning speed decreases in the following cases:
- The CPU or the memory does not meet the recommended specifications.- The version of the USB port or the USB hub is USB 1.1.
l The actual disk space used for the installation of the software and the disk space required for theinstallation may be different because of the disk management in your Windows system.
l To scan a document, a disk space that is approximately three times larger than the size of the fileto be saved is required.
l If characters are not correctly displayed when you use the following functions, install the universalfont (Arial Unicode MS) from the setup disk of Microsoft Office 2007 or later:- CardMinder- Scan to Mobile- Scan to Salesforce Chatter- Scan to Dropbox
HINTl For Windows 7, when the following software programs are installed, .NET Framework 4 or an in-
place update for .NET Framework 4 (which requires 2 GB of free disk space at most) may beinstalled:- ScanSnap Manager- ScanSnap OrganizerAfter installing .NET Framework, apply the updates in Windows Update.
l For Windows 10 or Windows 8.1, when the following software programs are installed, .NETFramework 3.5 SP1 (which requires 500 MB of free disk space at most) may be installed at thesame time:- ScanSnap Manager- ScanSnap Organizer- CardMinder
System Requirements
21
Setting Up iX1600 / iX1500 / iX1400
Set up the ScanSnap so that it is ready to scan with ScanSnap Manager.The following preparations are required before you set up the ScanSnap.l Check that all items are included in the package
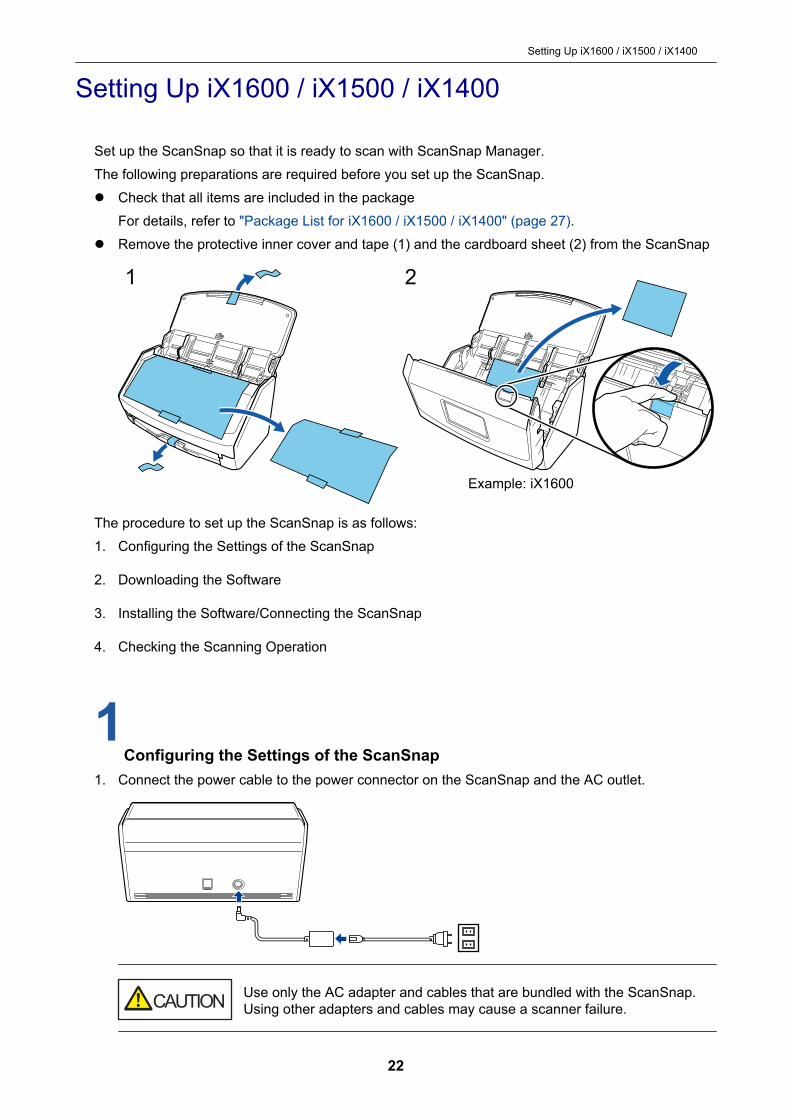
For details, refer to "Package List for iX1600 / iX1500 / iX1400" (page 27).l Remove the protective inner cover and tape (1) and the cardboard sheet (2) from the ScanSnap
Example: iX1600
1 2
The procedure to set up the ScanSnap is as follows:1. Configuring the Settings of the ScanSnap
2. Downloading the Software
3. Installing the Software/Connecting the ScanSnap
4. Checking the Scanning Operation
1Configuring the Settings of the ScanSnap
1. Connect the power cable to the power connector on the ScanSnap and the AC outlet.
Use only the AC adapter and cables that are bundled with the ScanSnap.Using other adapters and cables may cause a scanner failure.
Setting Up iX1600 / iX1500 / iX1400
22
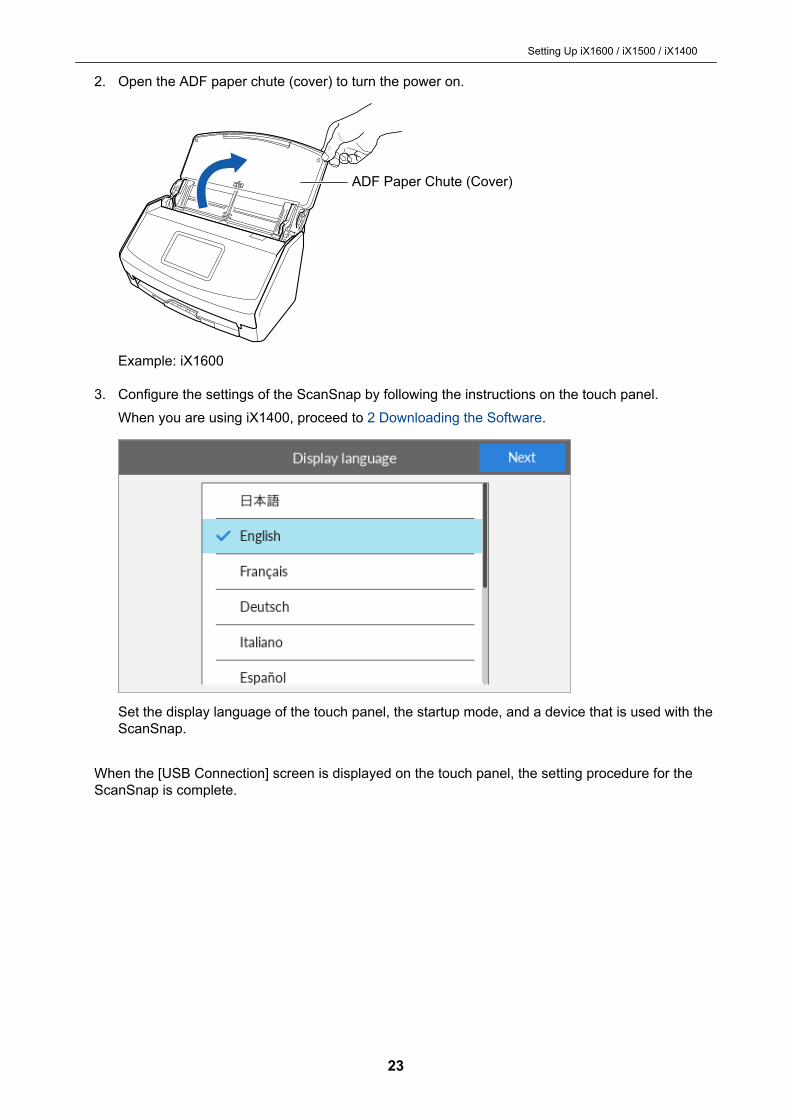
2. Open the ADF paper chute (cover) to turn the power on.
ADF Paper Chute (Cover)
Example: iX1600
3. Configure the settings of the ScanSnap by following the instructions on the touch panel.When you are using iX1400, proceed to 2 Downloading the Software.
Set the display language of the touch panel, the startup mode, and a device that is used with theScanSnap.
When the [USB Connection] screen is displayed on the touch panel, the setting procedure for theScanSnap is complete.
Setting Up iX1600 / iX1500 / iX1400
23
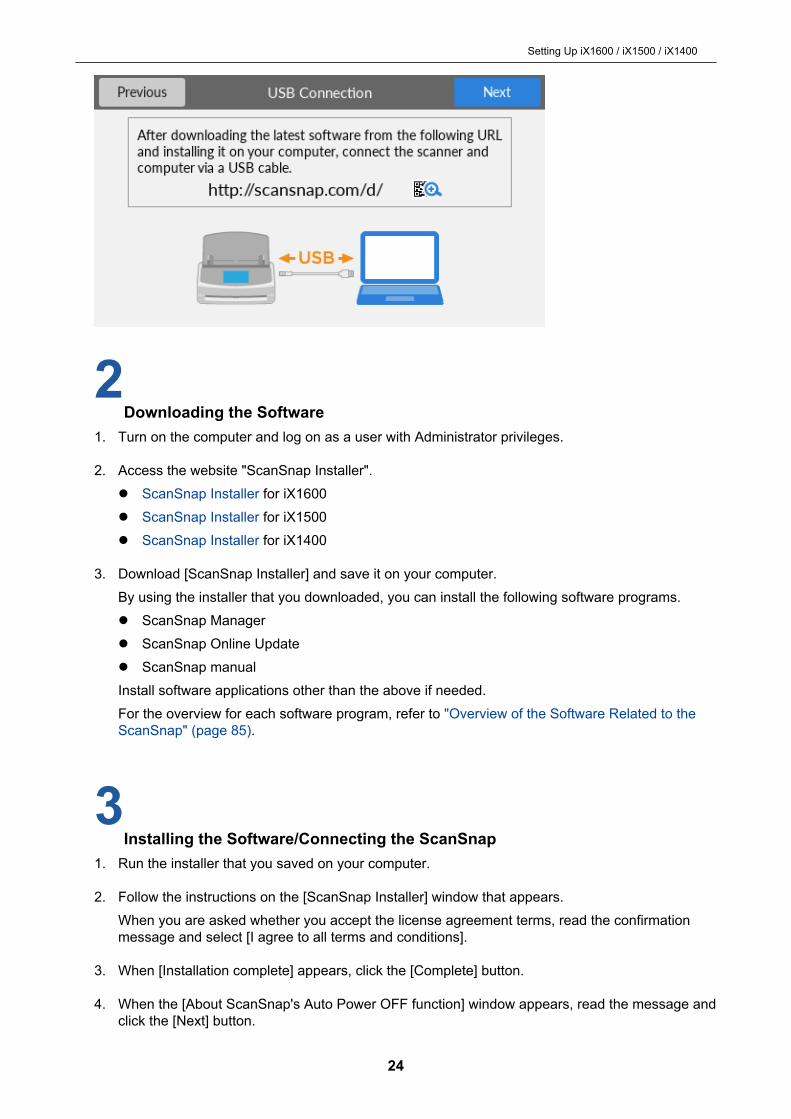
2Downloading the Software
1. Turn on the computer and log on as a user with Administrator privileges.
2. Access the website "ScanSnap Installer".l ScanSnap Installer for iX1600l ScanSnap Installer for iX1500l ScanSnap Installer for iX1400
3. Download [ScanSnap Installer] and save it on your computer.By using the installer that you downloaded, you can install the following software programs.l ScanSnap Managerl ScanSnap Online Updatel ScanSnap manualInstall software applications other than the above if needed.For the overview for each software program, refer to "Overview of the Software Related to theScanSnap" (page 85).
3Installing the Software/Connecting the ScanSnap
1. Run the installer that you saved on your computer.
2. Follow the instructions on the [ScanSnap Installer] window that appears.When you are asked whether you accept the license agreement terms, read the confirmationmessage and select [I agree to all terms and conditions].
3. When [Installation complete] appears, click the [Complete] button.
4. When the [About ScanSnap's Auto Power OFF function] window appears, read the message andclick the [Next] button.
Setting Up iX1600 / iX1500 / iX1400
24

5. Follow the instructions on the [ScanSnap - Connecting the ScanSnap] window to connect theScanSnap to a computer.
6. When you use iX1600/iX1500, on the [ScanSnap wireless network setup] window, selectwhether to configure the wireless settings in order for the ScanSnap to be connected to awireless LAN.If you want to configure the wireless settings, click [Setup now] and follow the instructions on thewindow that appears.If you do not want to configure the wireless settings, click the [Later] button. When you connectthe ScanSnap to a wireless LAN later, refer to "Connecting the ScanSnap via Wireless LAN(iX1600 / iX1500)" (page 115).
HINTl If there are available updates for ScanSnap Online Update on the server, you will be asked whether
you accept the license agreement terms for ScanSnap Online Update.For details about ScanSnap Online Update, refer to the ScanSnap Online Update Help.
l To save images created from documents that you scanned with the ScanSnap to a mobile deviceor a cloud service directly, you need to connect the ScanSnap to the mobile device or theScanSnap Cloud server.For details, refer to "Connecting the ScanSnap to a Mobile Device or the ScanSnap Cloud Server(iX1600 / iX1500 / iX500 / iX100)" (page 49).
4Checking the Scanning Operation
1. Load a document in the ScanSnap.Load a document face-down and head-first with the back facing you (when loading multipledocuments, the last page is on the top).For details about how to scan a document, refer to "Scanning Documents with iX1600 / iX1500 /iX1400" (page 180).
Example: iX1600
2. Start scanning.
Setting Up iX1600 / iX1500 / iX1400
25
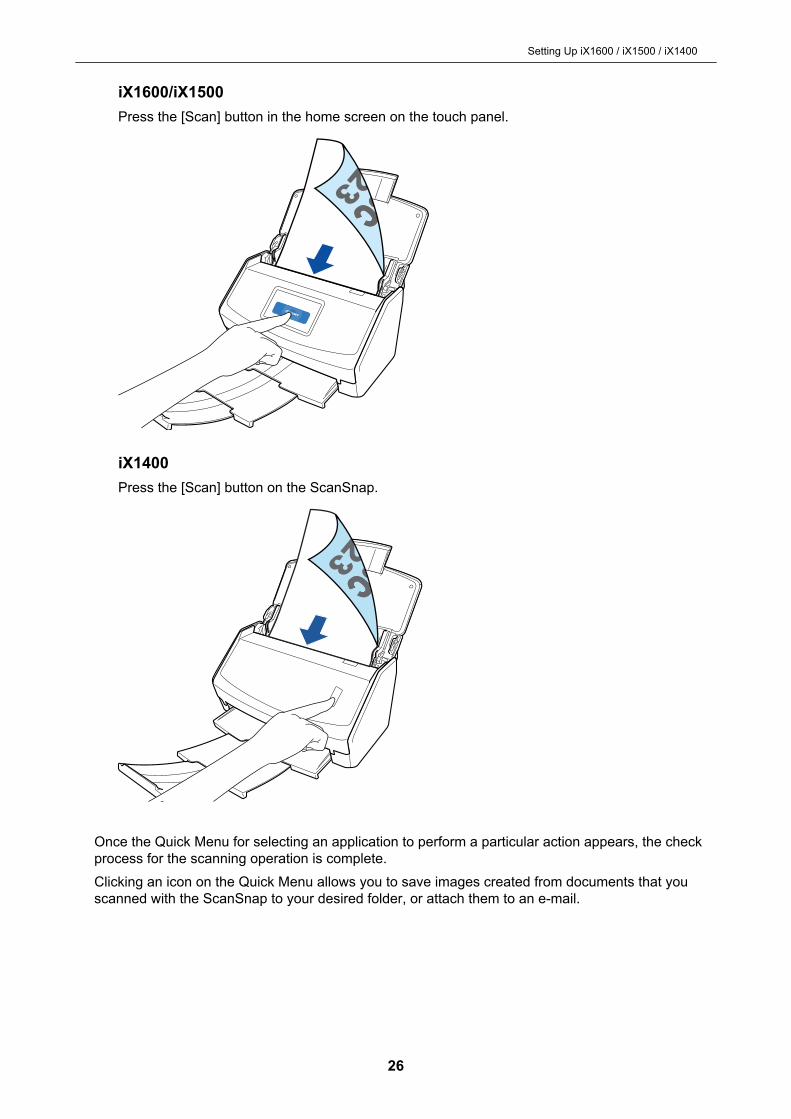
iX1600/iX1500Press the [Scan] button in the home screen on the touch panel.
iX1400Press the [Scan] button on the ScanSnap.
Once the Quick Menu for selecting an application to perform a particular action appears, the checkprocess for the scanning operation is complete.Clicking an icon on the Quick Menu allows you to save images created from documents that youscanned with the ScanSnap to your desired folder, or attach them to an e-mail.
Setting Up iX1600 / iX1500 / iX1400
26
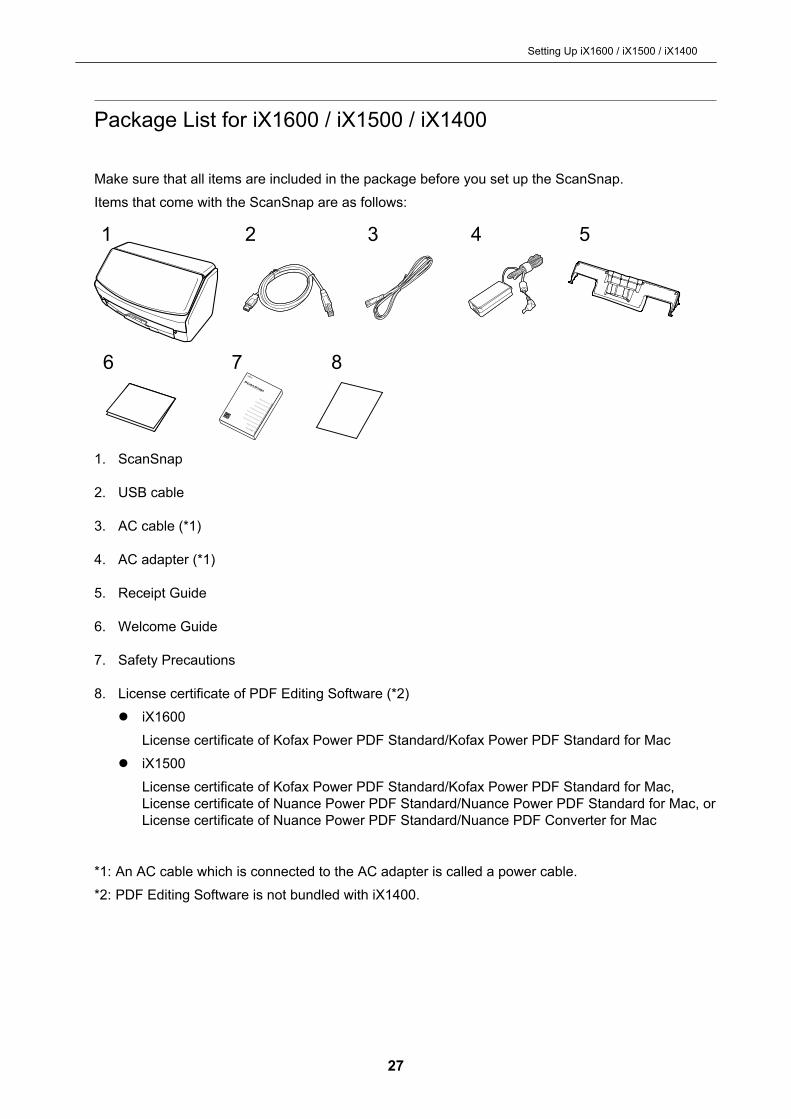
Package List for iX1600 / iX1500 / iX1400
Make sure that all items are included in the package before you set up the ScanSnap.Items that come with the ScanSnap are as follows:
1 2 3 4 5
6 7 8
1. ScanSnap
2. USB cable
3. AC cable (*1)
4. AC adapter (*1)
5. Receipt Guide
6. Welcome Guide
7. Safety Precautions
8. License certificate of PDF Editing Software (*2)l iX1600
License certificate of Kofax Power PDF Standard/Kofax Power PDF Standard for Macl iX1500
License certificate of Kofax Power PDF Standard/Kofax Power PDF Standard for Mac,License certificate of Nuance Power PDF Standard/Nuance Power PDF Standard for Mac, orLicense certificate of Nuance Power PDF Standard/Nuance PDF Converter for Mac
*1: An AC cable which is connected to the AC adapter is called a power cable.*2: PDF Editing Software is not bundled with iX1400.
Setting Up iX1600 / iX1500 / iX1400
27
Setting Up iX500
Set up the ScanSnap so that it is ready to scan with ScanSnap Manager.The following preparations are required before you set up the ScanSnap.
ATTENTIONDo not connect the ScanSnap to the computer before installing the software.
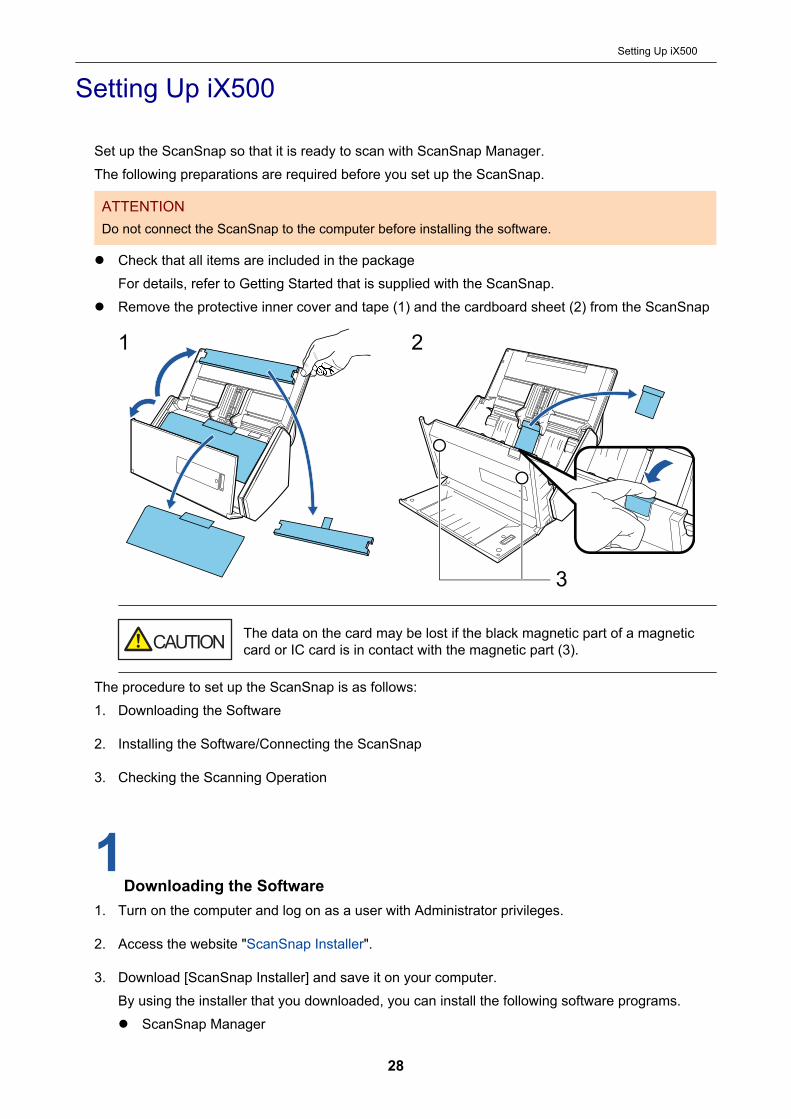
l Check that all items are included in the packageFor details, refer to Getting Started that is supplied with the ScanSnap.
l Remove the protective inner cover and tape (1) and the cardboard sheet (2) from the ScanSnap
1 2
3
The data on the card may be lost if the black magnetic part of a magneticcard or IC card is in contact with the magnetic part (3).
The procedure to set up the ScanSnap is as follows:1. Downloading the Software
2. Installing the Software/Connecting the ScanSnap
3. Checking the Scanning Operation
1Downloading the Software
1. Turn on the computer and log on as a user with Administrator privileges.
2. Access the website "ScanSnap Installer".
3. Download [ScanSnap Installer] and save it on your computer.By using the installer that you downloaded, you can install the following software programs.l ScanSnap Manager
Setting Up iX500
28

l ScanSnap Online Updatel ScanSnap manualInstall software applications other than the above if needed.For the overview for each software program, refer to "Overview of the Software Related to theScanSnap" (page 85).
2Installing the Software/Connecting the ScanSnap
1. Run the installer that you saved on your computer.
2. Follow the instructions on the [ScanSnap Installer] window that appears.When you are asked whether you accept the license agreement terms, read the confirmationmessage and select [I agree to all terms and conditions].
3. When [Installation complete] appears, click the [Complete] button.
4. When the [About ScanSnap's Auto Power OFF function] window appears, read the message andclick the [Next] button.
5. Follow the instructions on the [ScanSnap - Connecting the ScanSnap] window to connect theScanSnap to a computer.
6. On the [ScanSnap wireless network setup] window, select whether to configure the wirelesssettings in order for the ScanSnap to be connected to a wireless LAN.If you want to configure the wireless settings, click [Setup now] and follow the instructions on thewindow that appears.If you do not want to configure the wireless settings, click the [Later] button. When you connectthe ScanSnap to a wireless LAN later, refer to "Connecting the ScanSnap via Wireless LAN(iX500/iX100)" (page 129).
HINTl If there are available updates for ScanSnap Online Update on the server, you will be asked whether
you accept the license agreement terms for ScanSnap Online Update.For details about ScanSnap Online Update, refer to the ScanSnap Online Update Help.
l To save images created from documents that you scanned with the ScanSnap to a mobile deviceor a cloud service directly, you need to connect the ScanSnap to the mobile device or theScanSnap Cloud server.For details, refer to "Connecting the ScanSnap to a Mobile Device or the ScanSnap Cloud Server(iX1600 / iX1500 / iX500 / iX100)" (page 49).
3Checking the Scanning Operation
1. Load a document in the ScanSnap.Load a document face-down and head-first with the back facing you (when loading multipledocuments, the last page is on the top).
Setting Up iX500
29

For details about how to scan a document, refer to "Scanning Documents with iX500" (page211).
2. Press the [Scan] button to start scanning.
Once the Quick Menu for selecting an application to perform a particular action appears, the checkprocess for the scanning operation is complete.Clicking an icon on the Quick Menu allows you to save images created from documents that youscanned with the ScanSnap to your desired folder, or attach them to an e-mail.
Setting Up iX500
30
Setting Up iX100
Set up the ScanSnap so that it is ready to scan with ScanSnap Manager.The following preparations are required before you set up the ScanSnap.l Check that all items are included in the package
For details, refer to "Package List for iX100" (page 35).
HINTWhen Getting Started is included in the package, refer to "Package List" in Getting Started.
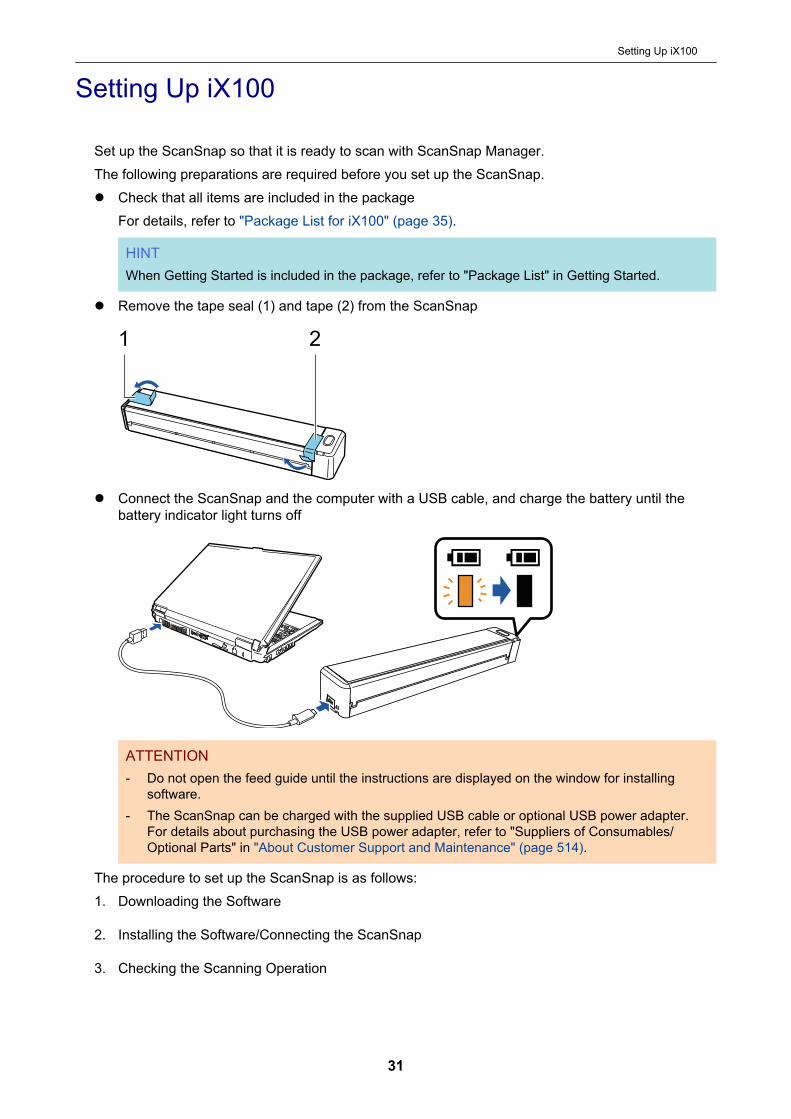
l Remove the tape seal (1) and tape (2) from the ScanSnap
1 2
l Connect the ScanSnap and the computer with a USB cable, and charge the battery until thebattery indicator light turns off
ATTENTION- Do not open the feed guide until the instructions are displayed on the window for installing
software.- The ScanSnap can be charged with the supplied USB cable or optional USB power adapter.
For details about purchasing the USB power adapter, refer to "Suppliers of Consumables/Optional Parts" in "About Customer Support and Maintenance" (page 514).
The procedure to set up the ScanSnap is as follows:1. Downloading the Software
2. Installing the Software/Connecting the ScanSnap
3. Checking the Scanning Operation
Setting Up iX100
31
1Downloading the Software
1. Turn on the computer and log on as a user with Administrator privileges.
2. Access the website "ScanSnap Installer".
3. Download [ScanSnap Installer] and save it on your computer.By using the installer that you downloaded, you can install the following software programs.l ScanSnap Managerl ScanSnap Online Updatel ScanSnap manualInstall software applications other than the above if needed.For the overview for each software program, refer to "Overview of the Software Related to theScanSnap" (page 85).
2Installing the Software/Connecting the ScanSnap
1. Run the installer that you saved on your computer.
2. Follow the instructions on the [ScanSnap Installer] window that appears.When you are asked whether you accept the license agreement terms, read the confirmationmessage and select [I agree to all terms and conditions].
3. When [Installation complete] appears, click the [Complete] button.
4. When the [About ScanSnap's Auto Power OFF function] window appears, read the message andclick the [Next] button.
5. Follow the instructions on the [ScanSnap - Connecting the ScanSnap] window to connect theScanSnap to a computer.
6. On the [ScanSnap wireless network setup] window, select whether to configure the wirelesssettings in order for the ScanSnap to be connected to a wireless LAN.If you want to configure the wireless settings, click [Setup now] and follow the instructions on thewindow that appears.If you do not want to configure the wireless settings, click the [Later] button. When you connectthe ScanSnap to a wireless LAN later, refer to "Connecting the ScanSnap via Wireless LAN(iX500/iX100)" (page 129).
HINTl If there are available updates for ScanSnap Online Update on the server, you will be asked whether
you accept the license agreement terms for ScanSnap Online Update.For details about ScanSnap Online Update, refer to the ScanSnap Online Update Help.
Setting Up iX100
32
l To save images created from documents that you scanned with the ScanSnap to a mobile deviceor a cloud service directly, you need to connect the ScanSnap to the mobile device or theScanSnap Cloud server.For details, refer to "Connecting the ScanSnap to a Mobile Device or the ScanSnap Cloud Server(iX1600 / iX1500 / iX500 / iX100)" (page 49).
3Checking the Scanning Operation
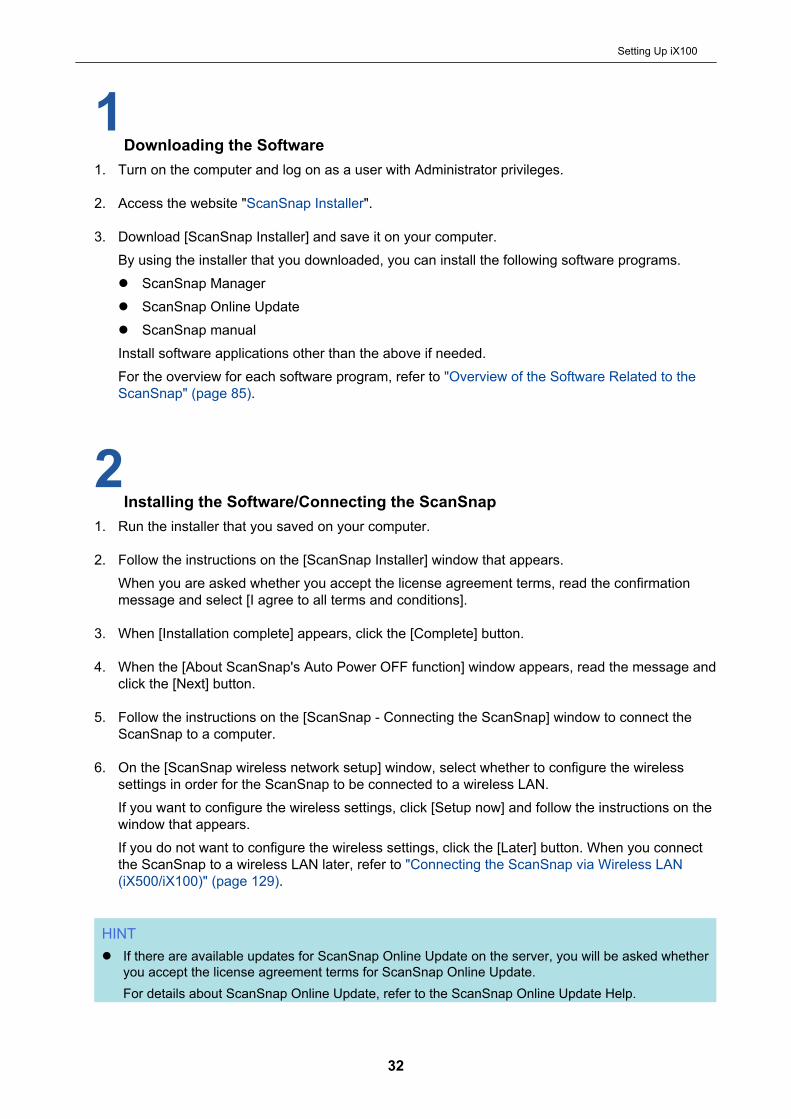
1. Insert a document in the ScanSnap.Insert the document straight into the feeding section of the ScanSnap, with the scanning sidefacing up.For details about how to scan a document, refer to "Scanning Documents with iX100" (page240).
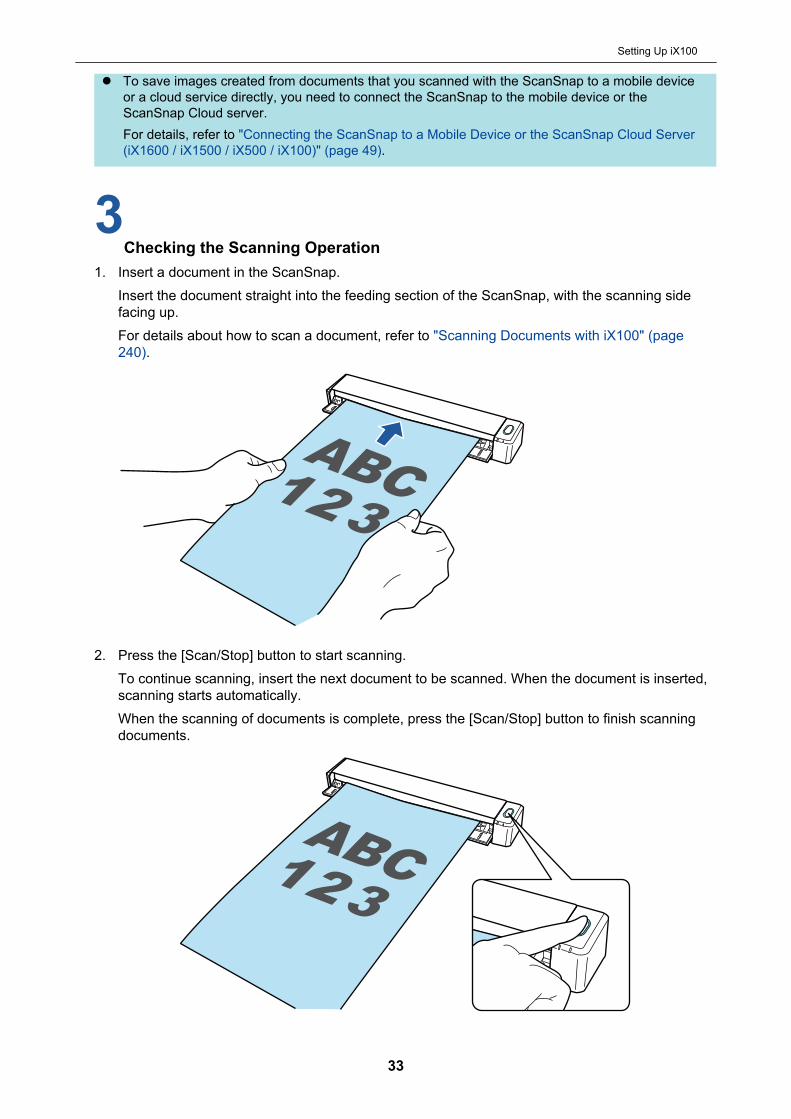
2. Press the [Scan/Stop] button to start scanning.To continue scanning, insert the next document to be scanned. When the document is inserted,scanning starts automatically.When the scanning of documents is complete, press the [Scan/Stop] button to finish scanningdocuments.
Setting Up iX100
33

Once the Quick Menu for selecting an application to perform a particular action appears, the checkprocess for the scanning operation is complete.Clicking an icon on the Quick Menu allows you to save images created from documents that youscanned with the ScanSnap to your desired folder, or attach them to an e-mail.
Setting Up iX100
34

Package List for iX100
Make sure that all items are included in the package before you set up the ScanSnap.Items that come with the ScanSnap are as follows:
1 2 3 4
1. ScanSnap
2. USB cable
3. Welcome Guide
4. Safety Precautions
Setting Up iX100
35
Setting Up SV600
Set up the ScanSnap so that it is ready to scan with ScanSnap Manager.The following preparations are required before you set up the ScanSnap.
ATTENTIONDo not connect the ScanSnap to the computer before installing the software.
l Check that all items are included in the packageFor details, refer to "Package List for SV600" (page 40).
HINTWhen Getting Started is included in the package, refer to "Package List" in Getting Started.
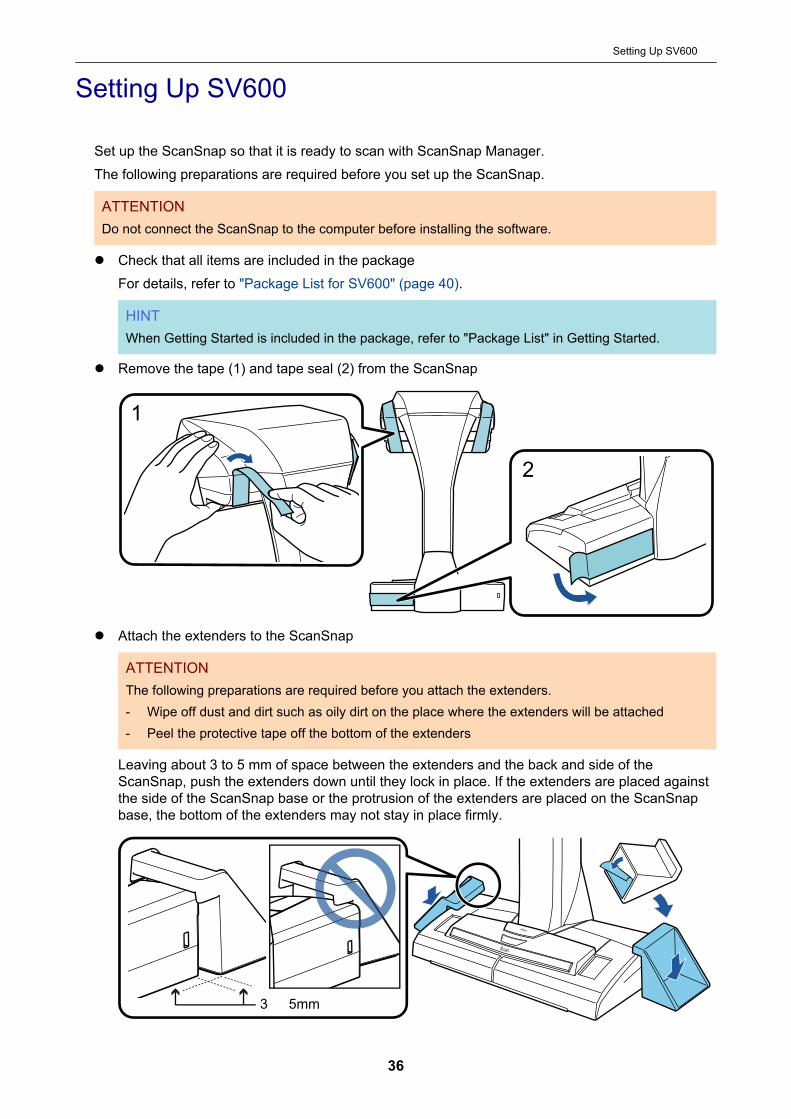
l Remove the tape (1) and tape seal (2) from the ScanSnap
1
2
l Attach the extenders to the ScanSnap
ATTENTIONThe following preparations are required before you attach the extenders.- Wipe off dust and dirt such as oily dirt on the place where the extenders will be attached- Peel the protective tape off the bottom of the extenders
Leaving about 3 to 5 mm of space between the extenders and the back and side of theScanSnap, push the extenders down until they lock in place. If the extenders are placed againstthe side of the ScanSnap base or the protrusion of the extenders are placed on the ScanSnapbase, the bottom of the extenders may not stay in place firmly.
3 5mm
Setting Up SV600
36
The procedure to set up the ScanSnap is as follows:1. Downloading the Software
2. Installing the Software/Connecting the ScanSnap
3. Checking the Scanning Operation
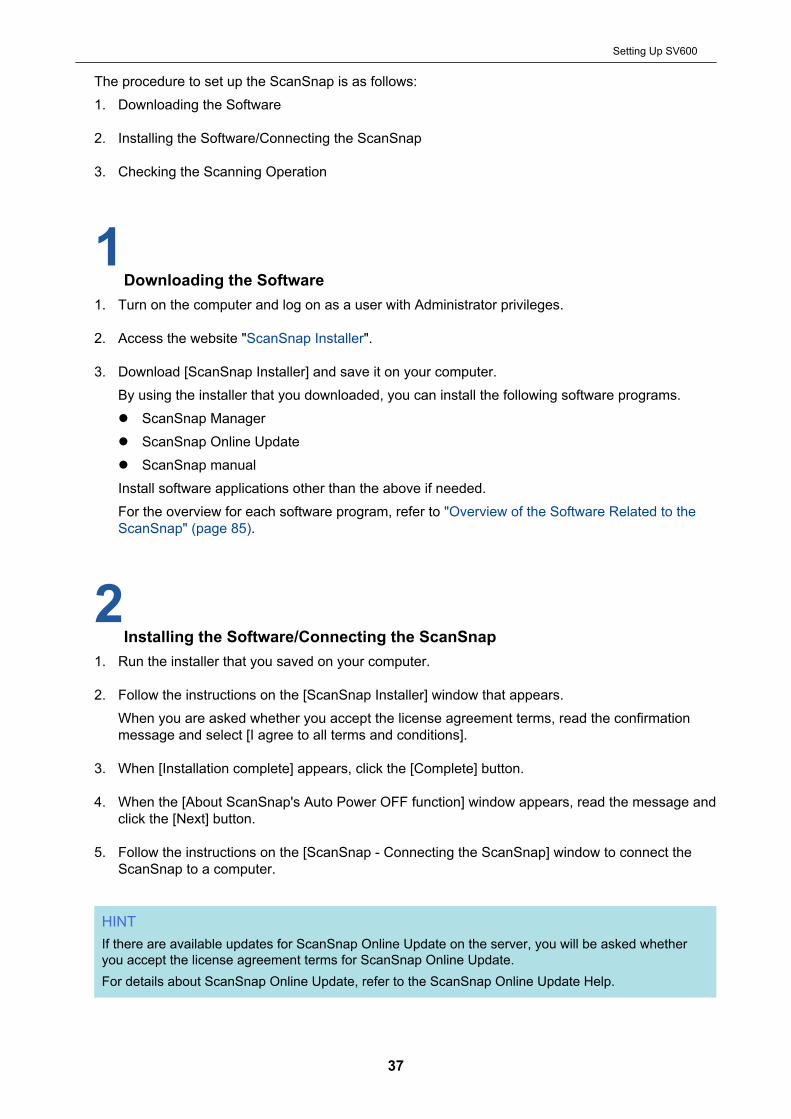
1Downloading the Software
1. Turn on the computer and log on as a user with Administrator privileges.
2. Access the website "ScanSnap Installer".
3. Download [ScanSnap Installer] and save it on your computer.By using the installer that you downloaded, you can install the following software programs.l ScanSnap Managerl ScanSnap Online Updatel ScanSnap manualInstall software applications other than the above if needed.For the overview for each software program, refer to "Overview of the Software Related to theScanSnap" (page 85).
2Installing the Software/Connecting the ScanSnap
1. Run the installer that you saved on your computer.
2. Follow the instructions on the [ScanSnap Installer] window that appears.When you are asked whether you accept the license agreement terms, read the confirmationmessage and select [I agree to all terms and conditions].
3. When [Installation complete] appears, click the [Complete] button.
4. When the [About ScanSnap's Auto Power OFF function] window appears, read the message andclick the [Next] button.
5. Follow the instructions on the [ScanSnap - Connecting the ScanSnap] window to connect theScanSnap to a computer.
HINTIf there are available updates for ScanSnap Online Update on the server, you will be asked whetheryou accept the license agreement terms for ScanSnap Online Update.For details about ScanSnap Online Update, refer to the ScanSnap Online Update Help.
Setting Up SV600
37

3Checking the Scanning Operation
1. Place the Background Pad with a document towards the ScanSnap so that they are in contactwith the ScanSnap (1) and then press the [Scan] button (2) to start a scan.Place a document with the scanning side facing up on the Background Pad.For details about how to scan a document, refer to "Scanning Documents with SV600" (page270).
1
2
2. Click the [Finish Scanning] button in the [ScanSnap Manager - Image scanning and file saving]window.
3. Select [Crop and save flat document images as-is] and then click the [Save this image] button.
Setting Up SV600
38
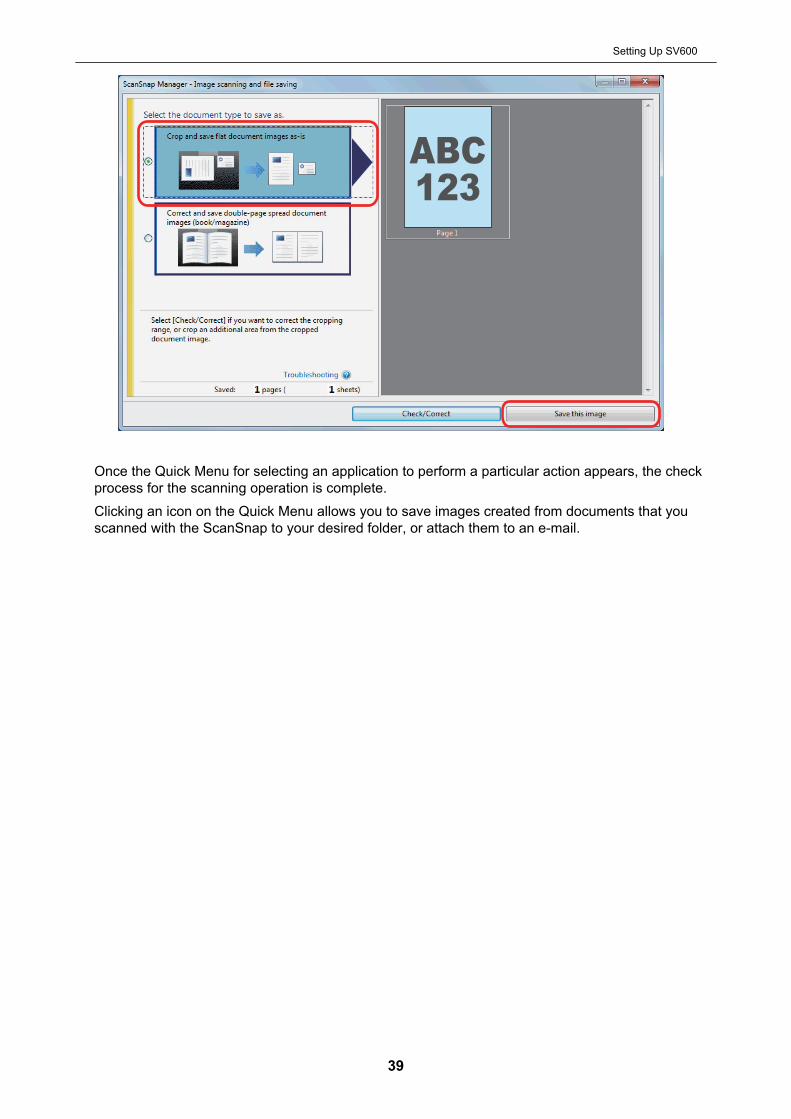
Once the Quick Menu for selecting an application to perform a particular action appears, the checkprocess for the scanning operation is complete.Clicking an icon on the Quick Menu allows you to save images created from documents that youscanned with the ScanSnap to your desired folder, or attach them to an e-mail.
Setting Up SV600
39
Package List for SV600
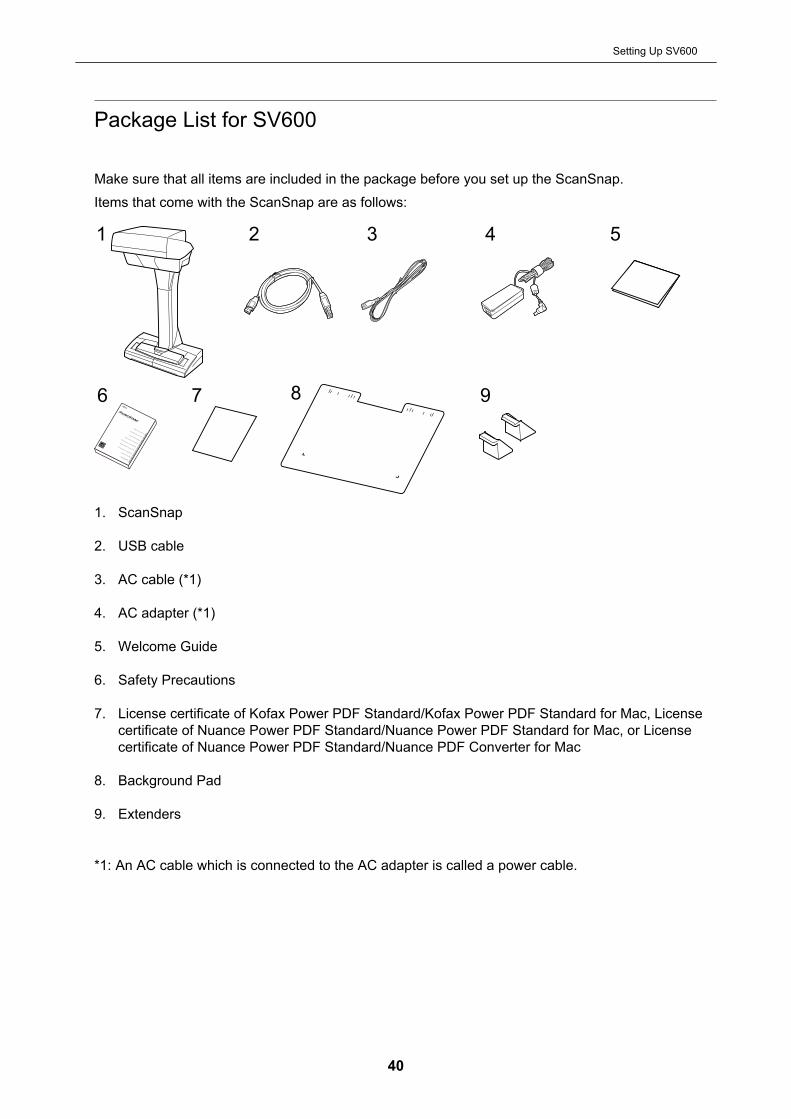
Make sure that all items are included in the package before you set up the ScanSnap.Items that come with the ScanSnap are as follows:
1 2 3 4 5
6 7 8 9
1. ScanSnap
2. USB cable
3. AC cable (*1)
4. AC adapter (*1)
5. Welcome Guide
6. Safety Precautions
7. License certificate of Kofax Power PDF Standard/Kofax Power PDF Standard for Mac, Licensecertificate of Nuance Power PDF Standard/Nuance Power PDF Standard for Mac, or Licensecertificate of Nuance Power PDF Standard/Nuance PDF Converter for Mac
8. Background Pad
9. Extenders
*1: An AC cable which is connected to the AC adapter is called a power cable.
Setting Up SV600
40
Setting Up S1300i
Set up the ScanSnap so that it is ready to scan with ScanSnap Manager.The following preparations are required before you set up the ScanSnap.
ATTENTIONDo not connect the ScanSnap to the computer before installing the software.
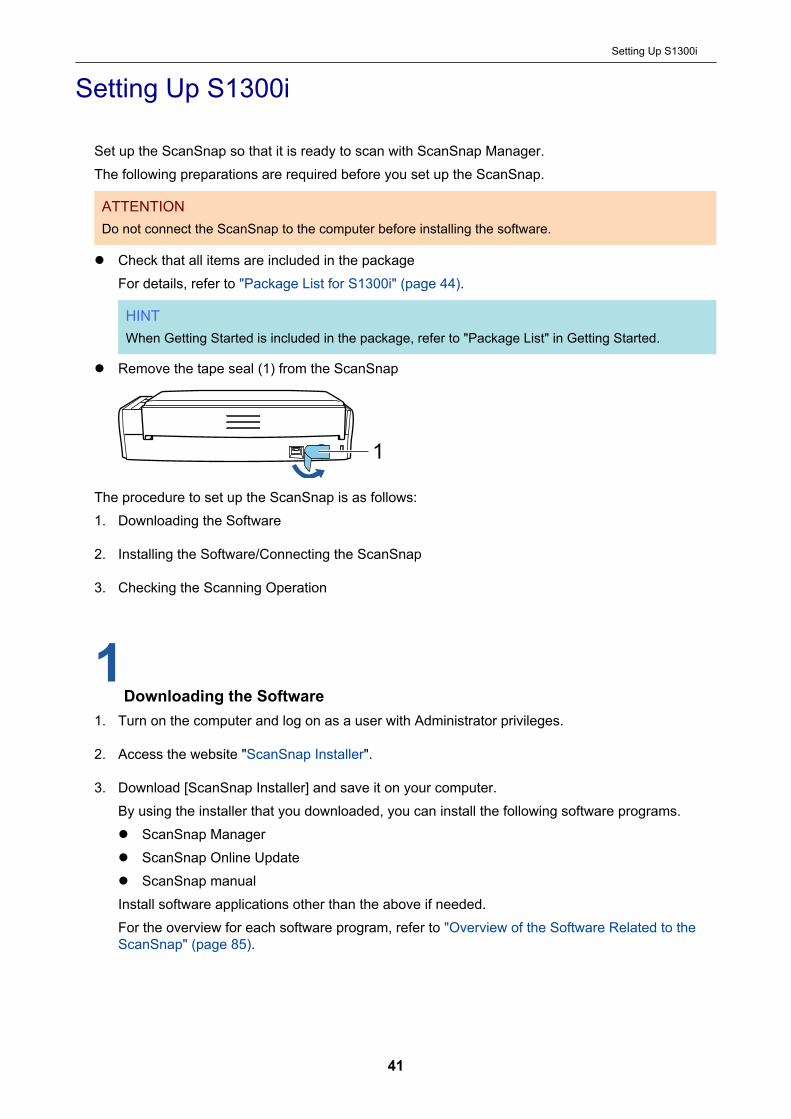
l Check that all items are included in the packageFor details, refer to "Package List for S1300i" (page 44).
HINTWhen Getting Started is included in the package, refer to "Package List" in Getting Started.
l Remove the tape seal (1) from the ScanSnap
1
The procedure to set up the ScanSnap is as follows:1. Downloading the Software
2. Installing the Software/Connecting the ScanSnap
3. Checking the Scanning Operation
1Downloading the Software
1. Turn on the computer and log on as a user with Administrator privileges.
2. Access the website "ScanSnap Installer".
3. Download [ScanSnap Installer] and save it on your computer.By using the installer that you downloaded, you can install the following software programs.l ScanSnap Managerl ScanSnap Online Updatel ScanSnap manualInstall software applications other than the above if needed.For the overview for each software program, refer to "Overview of the Software Related to theScanSnap" (page 85).
Setting Up S1300i
41

2Installing the Software/Connecting the ScanSnap
1. Run the installer that you saved on your computer.
2. Follow the instructions on the [ScanSnap Installer] window that appears.When you are asked whether you accept the license agreement terms, read the confirmationmessage and select [I agree to all terms and conditions].
3. When [Installation complete] appears, click the [Complete] button.
4. When the [About ScanSnap's Auto Power OFF function] window appears, read the message andclick the [Next] button.
5. Follow the instructions on the [ScanSnap - Connecting the ScanSnap] window to connect theScanSnap to a computer.
HINTIf there are available updates for ScanSnap Online Update on the server, you will be asked whetheryou accept the license agreement terms for ScanSnap Online Update.For details about ScanSnap Online Update, refer to the ScanSnap Online Update Help.
3Checking the Scanning Operation
1. Load a document in the ScanSnap.Load a document face-down and head-first with the back facing you (when loading multipledocuments, the last page is on the top).For details about how to scan a document, refer to "Scanning Documents with S1300i" (page298).
2. Press the [Scan] button to start scanning.
Setting Up S1300i
42
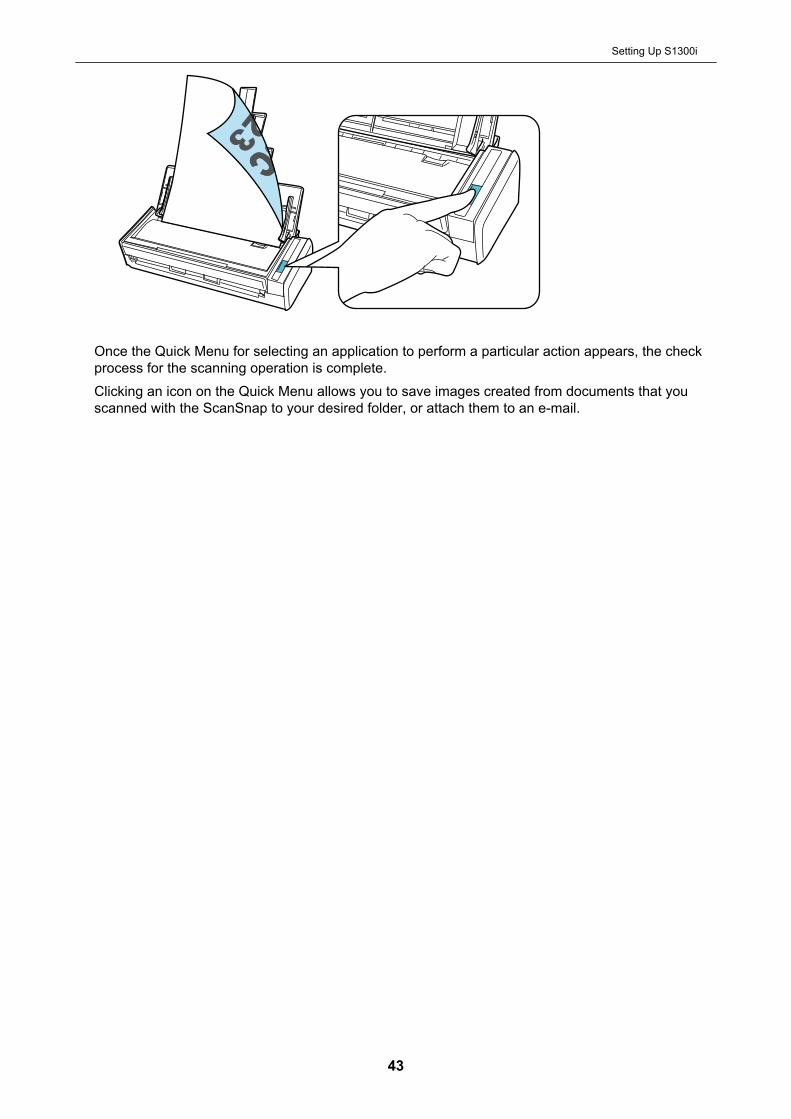
Once the Quick Menu for selecting an application to perform a particular action appears, the checkprocess for the scanning operation is complete.Clicking an icon on the Quick Menu allows you to save images created from documents that youscanned with the ScanSnap to your desired folder, or attach them to an e-mail.
Setting Up S1300i
43
Package List for S1300i
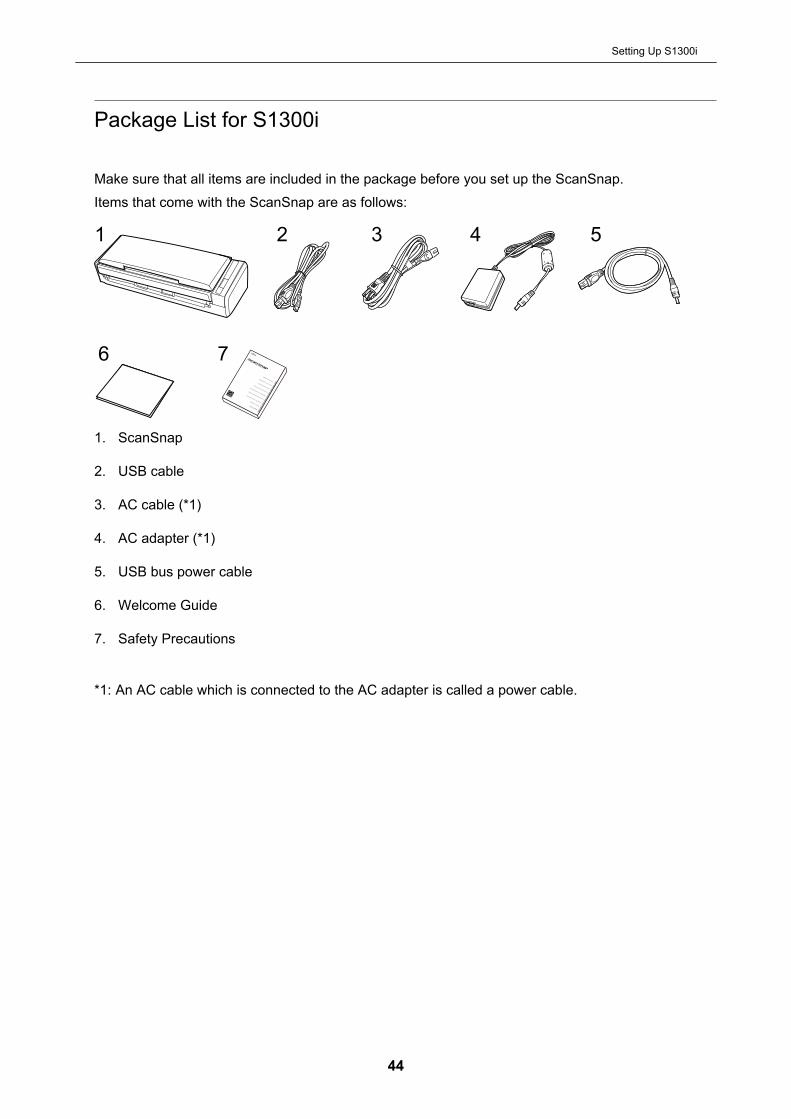
Make sure that all items are included in the package before you set up the ScanSnap.Items that come with the ScanSnap are as follows:
1 2 3 4 5
6 7
1. ScanSnap
2. USB cable
3. AC cable (*1)
4. AC adapter (*1)
5. USB bus power cable
6. Welcome Guide
7. Safety Precautions
*1: An AC cable which is connected to the AC adapter is called a power cable.
Setting Up S1300i
44
Setting Up S1100i
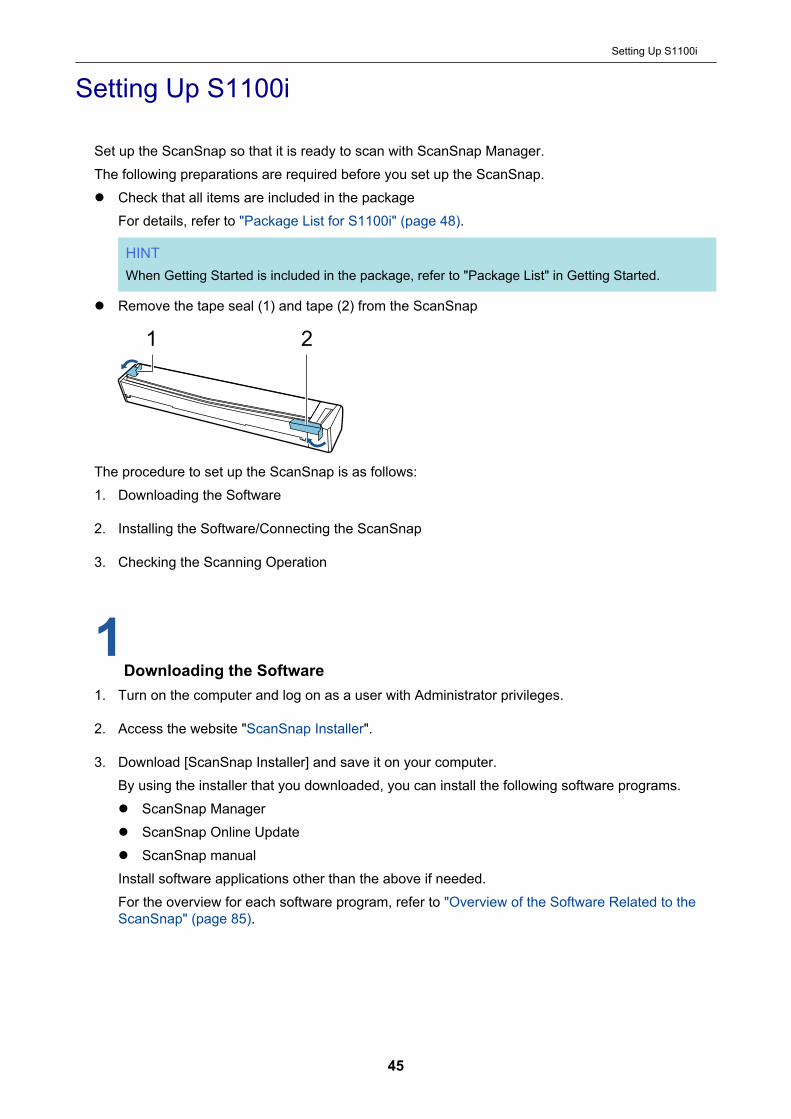
Set up the ScanSnap so that it is ready to scan with ScanSnap Manager.The following preparations are required before you set up the ScanSnap.l Check that all items are included in the package
For details, refer to "Package List for S1100i" (page 48).
HINTWhen Getting Started is included in the package, refer to "Package List" in Getting Started.
l Remove the tape seal (1) and tape (2) from the ScanSnap
1 2
The procedure to set up the ScanSnap is as follows:1. Downloading the Software
2. Installing the Software/Connecting the ScanSnap
3. Checking the Scanning Operation
1Downloading the Software
1. Turn on the computer and log on as a user with Administrator privileges.
2. Access the website "ScanSnap Installer".
3. Download [ScanSnap Installer] and save it on your computer.By using the installer that you downloaded, you can install the following software programs.l ScanSnap Managerl ScanSnap Online Updatel ScanSnap manualInstall software applications other than the above if needed.For the overview for each software program, refer to "Overview of the Software Related to theScanSnap" (page 85).
Setting Up S1100i
45
2Installing the Software/Connecting the ScanSnap
1. Run the installer that you saved on your computer.
2. Follow the instructions on the [ScanSnap Installer] window that appears.When you are asked whether you accept the license agreement terms, read the confirmationmessage and select [I agree to all terms and conditions].
3. When [Installation complete] appears, click the [Complete] button.
4. Follow the instructions on the [ScanSnap - Connecting the ScanSnap] window to connect theScanSnap to a computer.
HINTIf there are available updates for ScanSnap Online Update on the server, you will be asked whetheryou accept the license agreement terms for ScanSnap Online Update.For details about ScanSnap Online Update, refer to the ScanSnap Online Update Help.
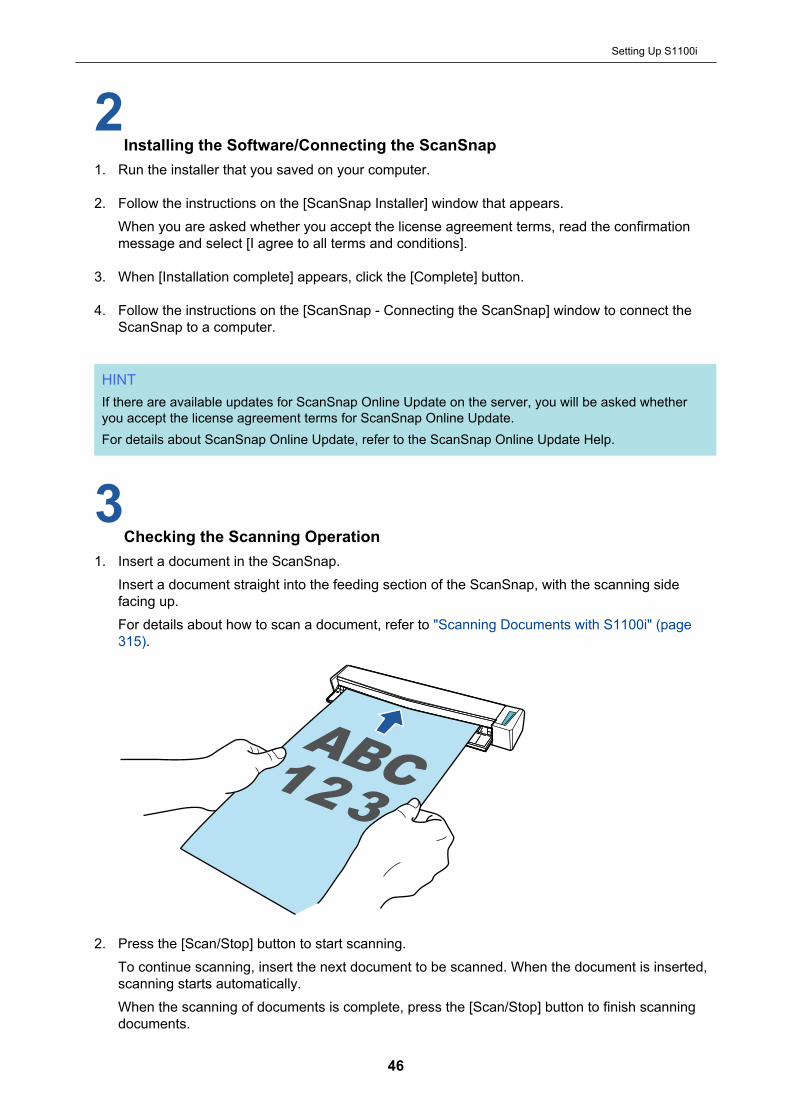
3Checking the Scanning Operation
1. Insert a document in the ScanSnap.Insert a document straight into the feeding section of the ScanSnap, with the scanning sidefacing up.For details about how to scan a document, refer to "Scanning Documents with S1100i" (page315).
2. Press the [Scan/Stop] button to start scanning.To continue scanning, insert the next document to be scanned. When the document is inserted,scanning starts automatically.When the scanning of documents is complete, press the [Scan/Stop] button to finish scanningdocuments.
Setting Up S1100i
46

Once the Quick Menu for selecting an application to perform a particular action appears, the checkprocess for the scanning operation is complete.Clicking an icon on the Quick Menu allows you to save images created from documents that youscanned with the ScanSnap to your desired folder, or attach them to an e-mail.
Setting Up S1100i
47
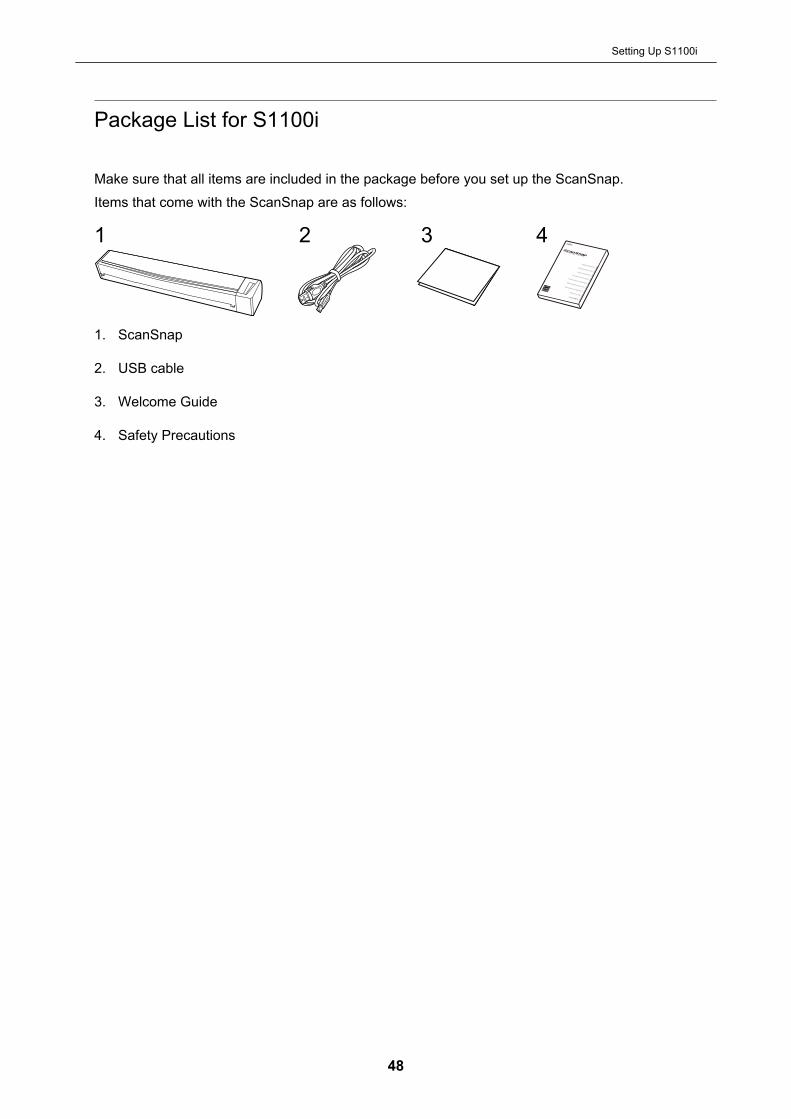
Package List for S1100i
Make sure that all items are included in the package before you set up the ScanSnap.Items that come with the ScanSnap are as follows:
1 2 3 4
1. ScanSnap
2. USB cable
3. Welcome Guide
4. Safety Precautions
Setting Up S1100i
48
Connecting the ScanSnap to a Mobile Device or theScanSnap Cloud Server (iX1600 / iX1500 / iX500 /iX100)
Connecting the ScanSnap to a mobile device or the ScanSnap Cloud server allows you to savescanned images to the mobile device or a cloud server directly.The ScanSnap Cloud server is a cloud server used exclusively with the ScanSnap.
Preparation for Connecting the ScanSnap to a Mobile DeviceUse ScanSnap Connect Application in order to connect the ScanSnap to a mobile device and saveimages created from documents that you scanned with the ScanSnap to a mobile device directly.Prepare according to the following procedures:
ATTENTIONTo connect the ScanSnap and a mobile device, you need to connect the ScanSnap and the mobiledevice to the same wireless access point.For details about how to connect the ScanSnap to a wireless access point, refer to the following:l iX1600/iX1500
"Connecting the ScanSnap via Wireless LAN (iX1600 / iX1500)" (page 115)l iX500/iX100
"Connecting the ScanSnap via Wireless LAN (iX500/iX100)" (page 129)
1. Install ScanSnap Connect Application on the mobile device.Obtain ScanSnap Connect Application from one of the following application stores in accordancewith your mobile device:l App Storel Google Playl Amazon Appstore
2. Start up ScanSnap Connect Application.Perform operations while following the instructions.
For details about how to operate ScanSnap Connect Application, refer to the Basic Operation Guide(Mobile Connection).To display the Basic Operation Guide (Mobile Connection), start up ScanSnap Connect Application
on your mobile device, tap the [ ] button (iOS)/ (Android) → the [Help] button in the [File List]screen.
Preparation for Connecting the ScanSnap to the ScanSnap CloudServerUse the ScanSnap Cloud application in order to connect the ScanSnap to the ScanSnap Cloudserver and save images created from documents that you scanned with the ScanSnap to a cloudservice directly.For details about how to set up and operate ScanSnap Cloud, refer to the ScanSnap Cloud Help.
Connecting the ScanSnap to a Mobile Device or the ScanSnap Cloud Server (iX1600 / iX1500 / iX500 / iX100)
49

For regions where ScanSnap Cloud can be used, refer to here.
Connecting the ScanSnap to a Mobile Device or the ScanSnap Cloud Server (iX1600 / iX1500 / iX500 / iX100)
50
ScanSnap Overview
This section provides an overview that you should be aware of before operating ScanSnap.l "What You Can Do with the ScanSnap" (page 52)l "Parts and Functions" (page 68)l "Charging the Battery (iX100)" (page 83)l "Overview of the Software Related to the ScanSnap" (page 85)l "ScanSnap Manager Icon" (page 86)l "Right-Click Menu" (page 87)l "ScanSnap Setup Window" (page 89)l "Turning the ScanSnap On or Off" (page 91)l "Screens and Operations on the Touch Panel (iX1600 / iX1500)" (page 103)l "Attaching the Receipt Guide (iX1600 / iX1500 / iX1400)" (page 111)
ScanSnap Overview
51

What You Can Do with the ScanSnap
l "What You Can Do with iX1600 / iX1500 / iX1400" (page 53)l "What You Can Do with iX500" (page 56)l "What You Can Do with iX100" (page 58)l "What You Can Do with SV600" (page 61)l "What You Can Do with S1300i" (page 64)l "What You Can Do with S1100i" (page 65)
What You Can Do with the ScanSnap
52
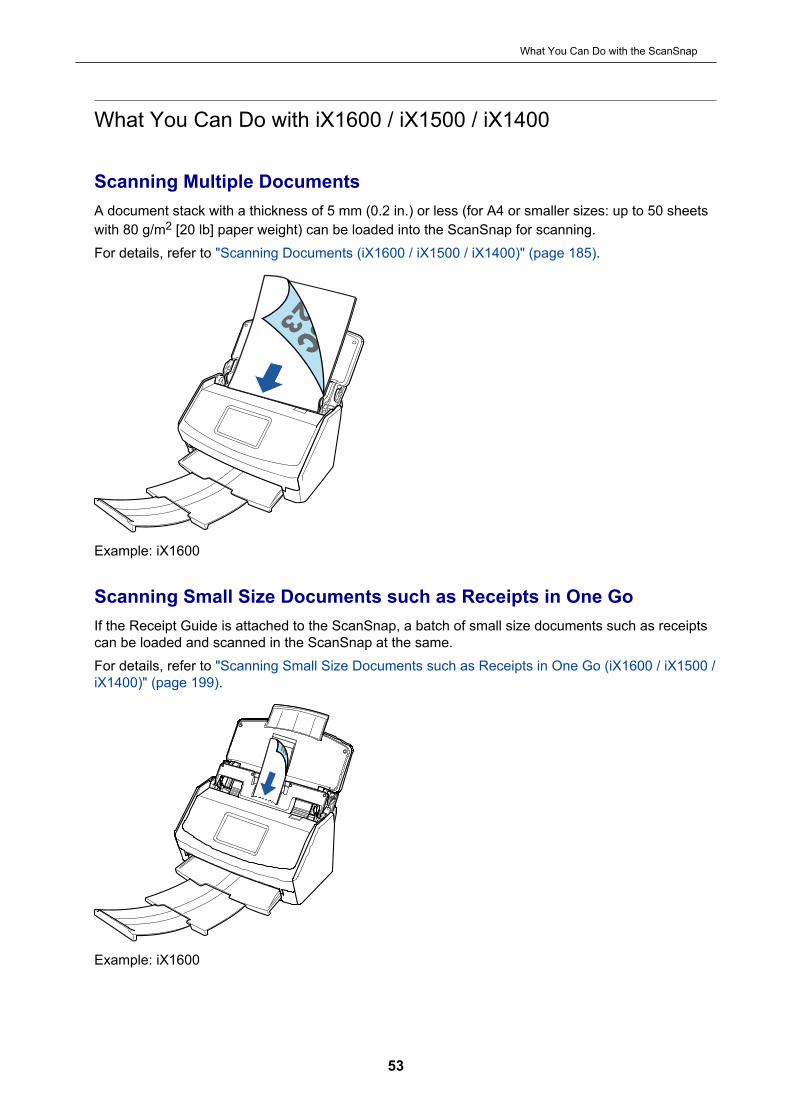
What You Can Do with iX1600 / iX1500 / iX1400
Scanning Multiple DocumentsA document stack with a thickness of 5 mm (0.2 in.) or less (for A4 or smaller sizes: up to 50 sheetswith 80 g/m2 [20 lb] paper weight) can be loaded into the ScanSnap for scanning.For details, refer to "Scanning Documents (iX1600 / iX1500 / iX1400)" (page 185).
Example: iX1600
Scanning Small Size Documents such as Receipts in One GoIf the Receipt Guide is attached to the ScanSnap, a batch of small size documents such as receiptscan be loaded and scanned in the ScanSnap at the same.For details, refer to "Scanning Small Size Documents such as Receipts in One Go (iX1600 / iX1500 /iX1400)" (page 199).
Example: iX1600
What You Can Do with the ScanSnap
53

Scanning Documents That Cannot Be Loaded Directly in theScanSnapYou can use the optional Carrier Sheet to scan the following documents.l Documents that are larger than A4/Letter size and not larger than A3 size
For details, refer to "Scanning Documents Larger Than A4 or Letter Size (iX1600 / iX1500 /iX1400)" (page 203).
Example: iX1600l Documents that can be damaged quite easily such as photographs, or non-standard size
documents such as clippingsFor details, refer to "Scanning Documents Such as Photographs and Clippings (iX1600 /iX1500 / iX1400)" (page 207).
Example: iX1600
Connecting the ScanSnap via Wireless LANFor iX1600/iX1500, you can connect the ScanSnap and a computer or mobile device via wirelessLAN.To configure the wireless settings for the ScanSnap, use the ScanSnap Wireless Setup Tool, whichis installed together with ScanSnap Manager, or use the touch panel of the ScanSnap.
What You Can Do with the ScanSnap
54
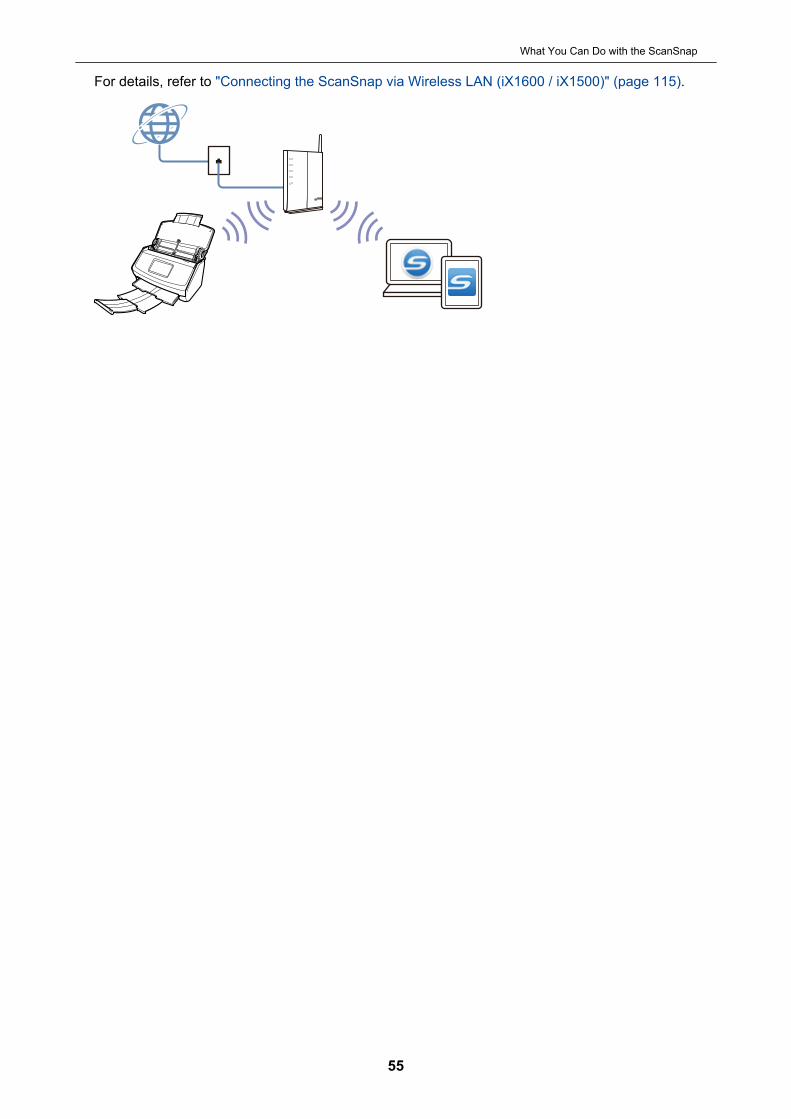
For details, refer to "Connecting the ScanSnap via Wireless LAN (iX1600 / iX1500)" (page 115).
What You Can Do with the ScanSnap
55
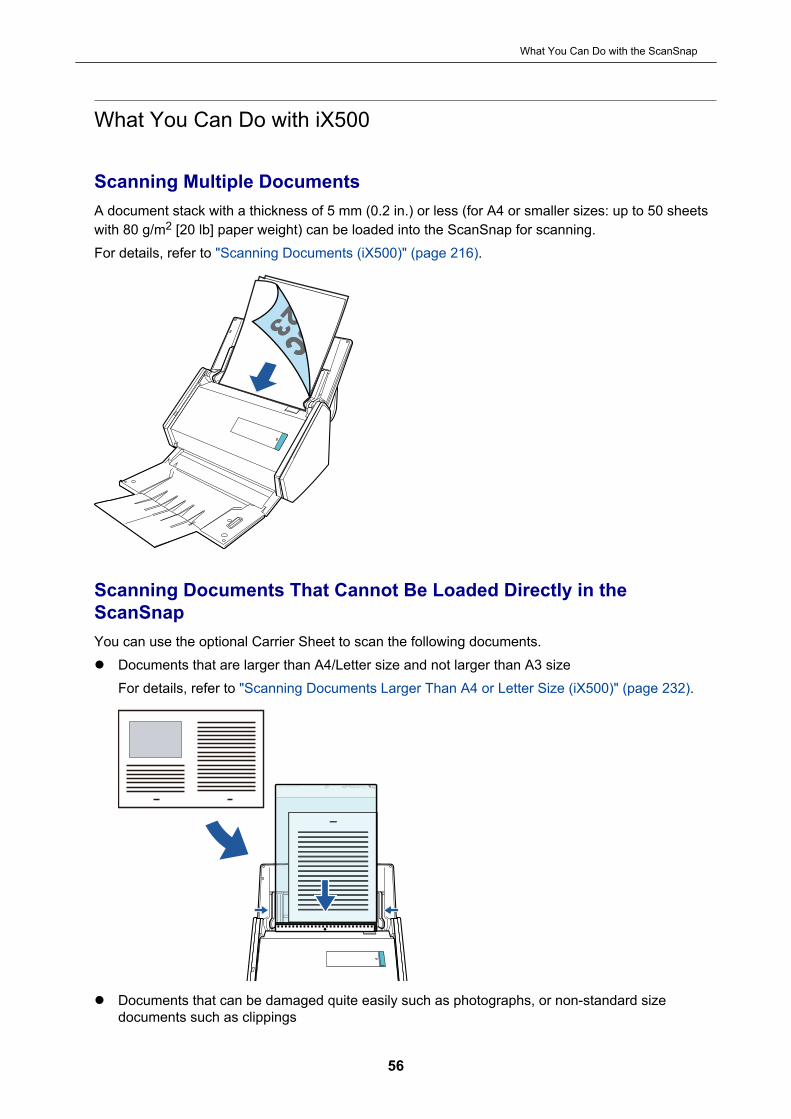
What You Can Do with iX500
Scanning Multiple DocumentsA document stack with a thickness of 5 mm (0.2 in.) or less (for A4 or smaller sizes: up to 50 sheetswith 80 g/m2 [20 lb] paper weight) can be loaded into the ScanSnap for scanning.For details, refer to "Scanning Documents (iX500)" (page 216).
Scanning Documents That Cannot Be Loaded Directly in theScanSnapYou can use the optional Carrier Sheet to scan the following documents.l Documents that are larger than A4/Letter size and not larger than A3 size
For details, refer to "Scanning Documents Larger Than A4 or Letter Size (iX500)" (page 232).
l Documents that can be damaged quite easily such as photographs, or non-standard sizedocuments such as clippings
What You Can Do with the ScanSnap
56
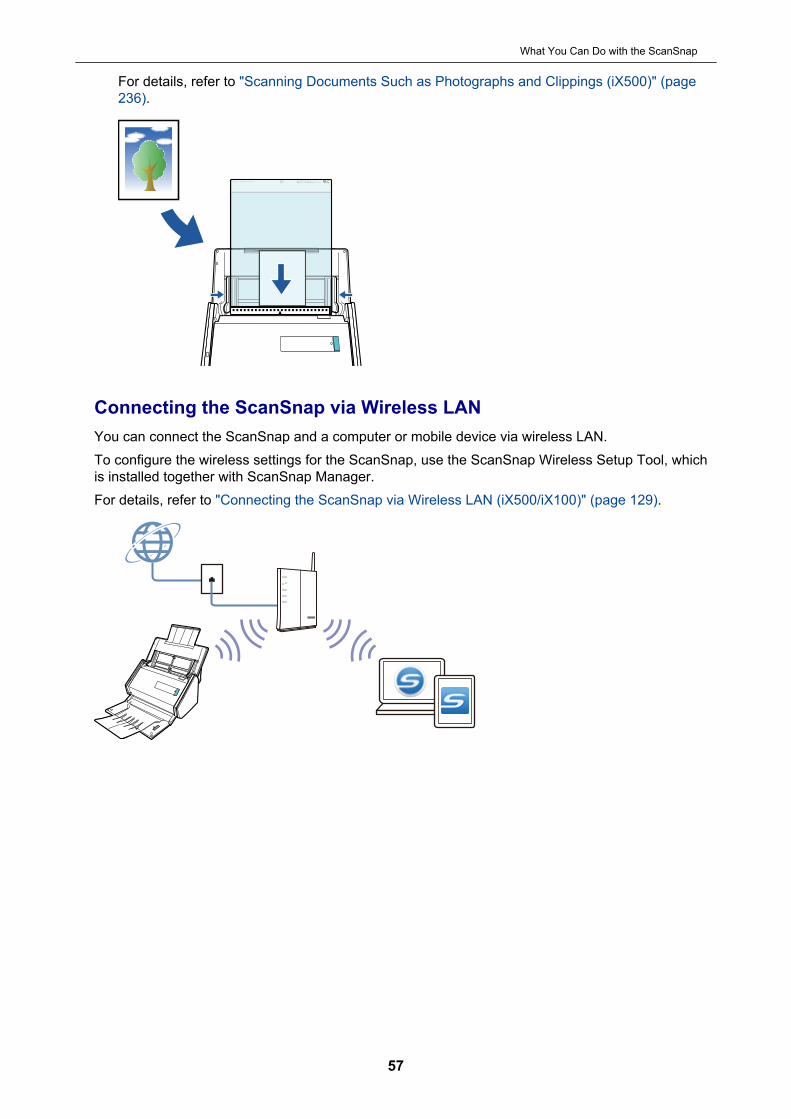
For details, refer to "Scanning Documents Such as Photographs and Clippings (iX500)" (page236).
Connecting the ScanSnap via Wireless LANYou can connect the ScanSnap and a computer or mobile device via wireless LAN.To configure the wireless settings for the ScanSnap, use the ScanSnap Wireless Setup Tool, whichis installed together with ScanSnap Manager.For details, refer to "Connecting the ScanSnap via Wireless LAN (iX500/iX100)" (page 129).
What You Can Do with the ScanSnap
57
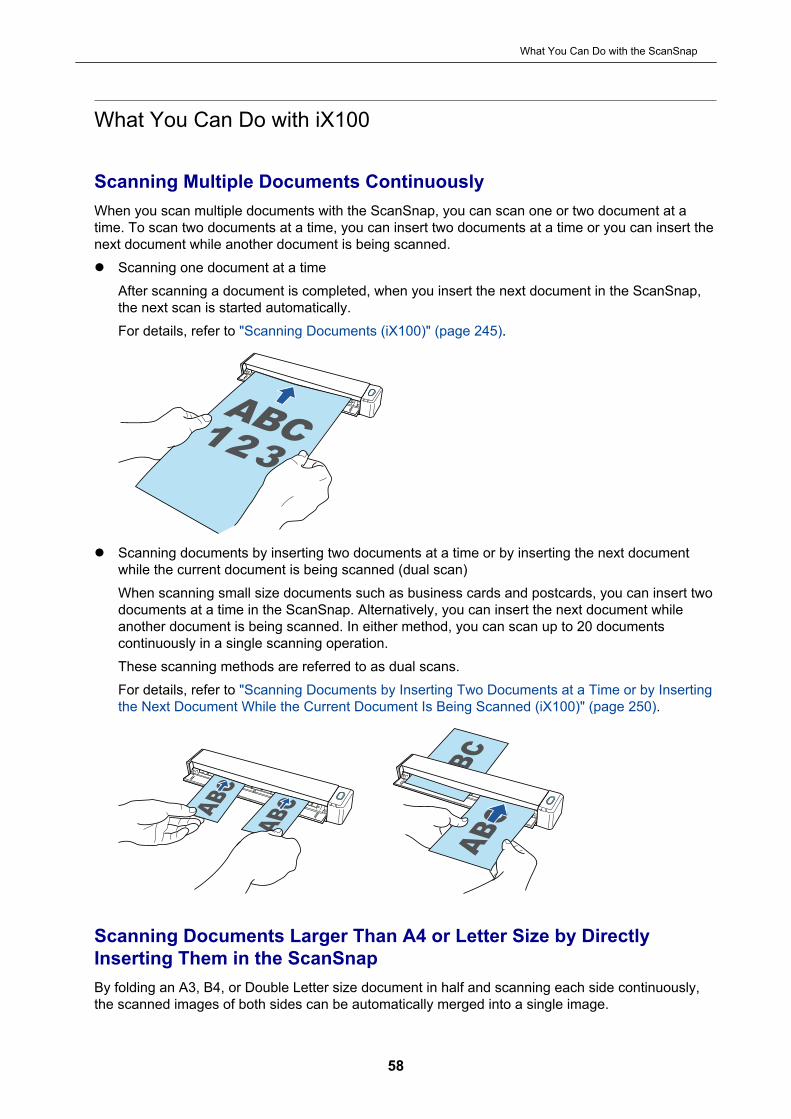
What You Can Do with iX100
Scanning Multiple Documents ContinuouslyWhen you scan multiple documents with the ScanSnap, you can scan one or two document at atime. To scan two documents at a time, you can insert two documents at a time or you can insert thenext document while another document is being scanned.l Scanning one document at a time
After scanning a document is completed, when you insert the next document in the ScanSnap,the next scan is started automatically.For details, refer to "Scanning Documents (iX100)" (page 245).
l Scanning documents by inserting two documents at a time or by inserting the next documentwhile the current document is being scanned (dual scan)When scanning small size documents such as business cards and postcards, you can insert twodocuments at a time in the ScanSnap. Alternatively, you can insert the next document whileanother document is being scanned. In either method, you can scan up to 20 documentscontinuously in a single scanning operation.These scanning methods are referred to as dual scans.For details, refer to "Scanning Documents by Inserting Two Documents at a Time or by Insertingthe Next Document While the Current Document Is Being Scanned (iX100)" (page 250).
Scanning Documents Larger Than A4 or Letter Size by DirectlyInserting Them in the ScanSnapBy folding an A3, B4, or Double Letter size document in half and scanning each side continuously,the scanned images of both sides can be automatically merged into a single image.
What You Can Do with the ScanSnap
58
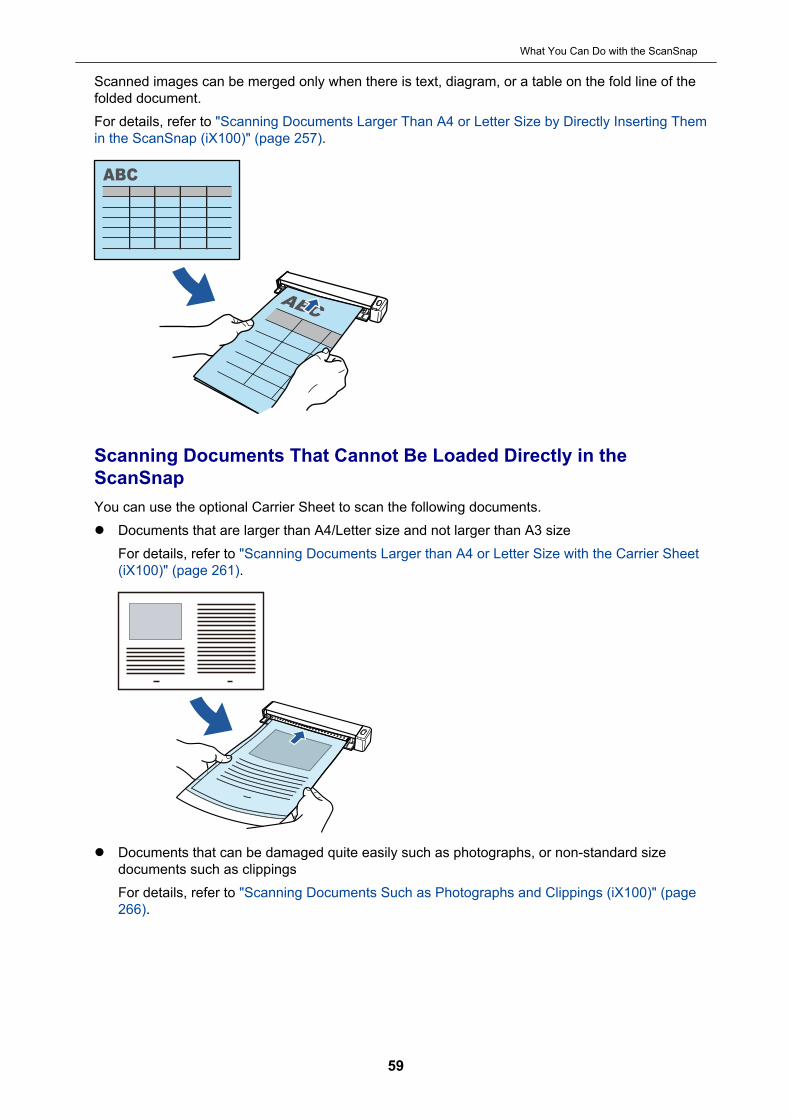
Scanned images can be merged only when there is text, diagram, or a table on the fold line of thefolded document.For details, refer to "Scanning Documents Larger Than A4 or Letter Size by Directly Inserting Themin the ScanSnap (iX100)" (page 257).
Scanning Documents That Cannot Be Loaded Directly in theScanSnapYou can use the optional Carrier Sheet to scan the following documents.l Documents that are larger than A4/Letter size and not larger than A3 size
For details, refer to "Scanning Documents Larger than A4 or Letter Size with the Carrier Sheet(iX100)" (page 261).
l Documents that can be damaged quite easily such as photographs, or non-standard sizedocuments such as clippingsFor details, refer to "Scanning Documents Such as Photographs and Clippings (iX100)" (page266).
What You Can Do with the ScanSnap
59
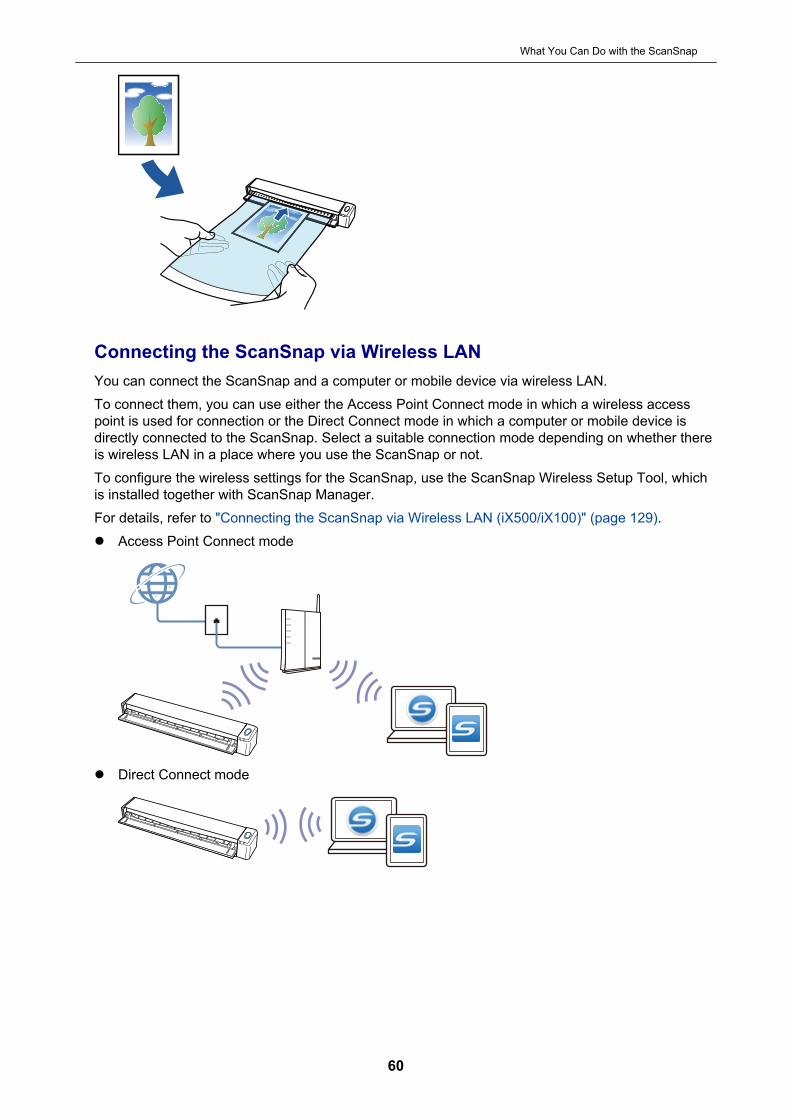
Connecting the ScanSnap via Wireless LANYou can connect the ScanSnap and a computer or mobile device via wireless LAN.To connect them, you can use either the Access Point Connect mode in which a wireless accesspoint is used for connection or the Direct Connect mode in which a computer or mobile device isdirectly connected to the ScanSnap. Select a suitable connection mode depending on whether thereis wireless LAN in a place where you use the ScanSnap or not.To configure the wireless settings for the ScanSnap, use the ScanSnap Wireless Setup Tool, whichis installed together with ScanSnap Manager.For details, refer to "Connecting the ScanSnap via Wireless LAN (iX500/iX100)" (page 129).l Access Point Connect mode
l Direct Connect mode
What You Can Do with the ScanSnap
60
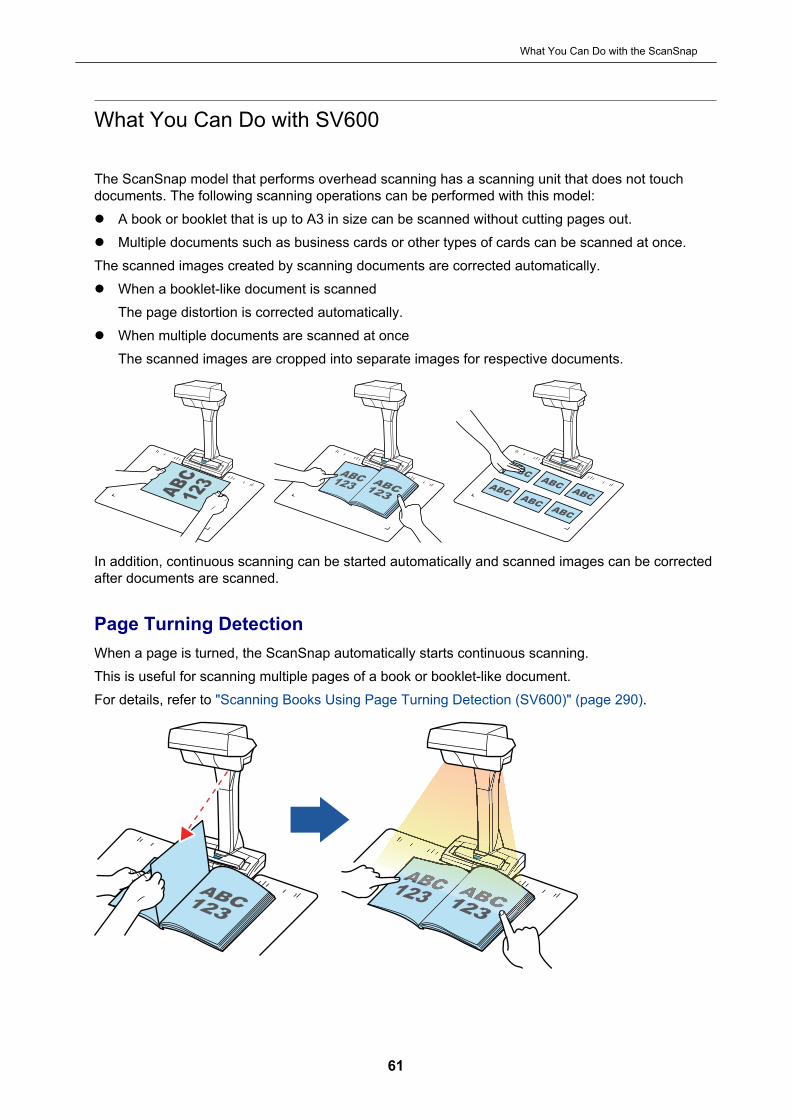
What You Can Do with SV600
The ScanSnap model that performs overhead scanning has a scanning unit that does not touchdocuments. The following scanning operations can be performed with this model:l A book or booklet that is up to A3 in size can be scanned without cutting pages out.l Multiple documents such as business cards or other types of cards can be scanned at once.The scanned images created by scanning documents are corrected automatically.l When a booklet-like document is scanned
The page distortion is corrected automatically.l When multiple documents are scanned at once
The scanned images are cropped into separate images for respective documents.
In addition, continuous scanning can be started automatically and scanned images can be correctedafter documents are scanned.
Page Turning DetectionWhen a page is turned, the ScanSnap automatically starts continuous scanning.This is useful for scanning multiple pages of a book or booklet-like document.For details, refer to "Scanning Books Using Page Turning Detection (SV600)" (page 290).
What You Can Do with the ScanSnap
61
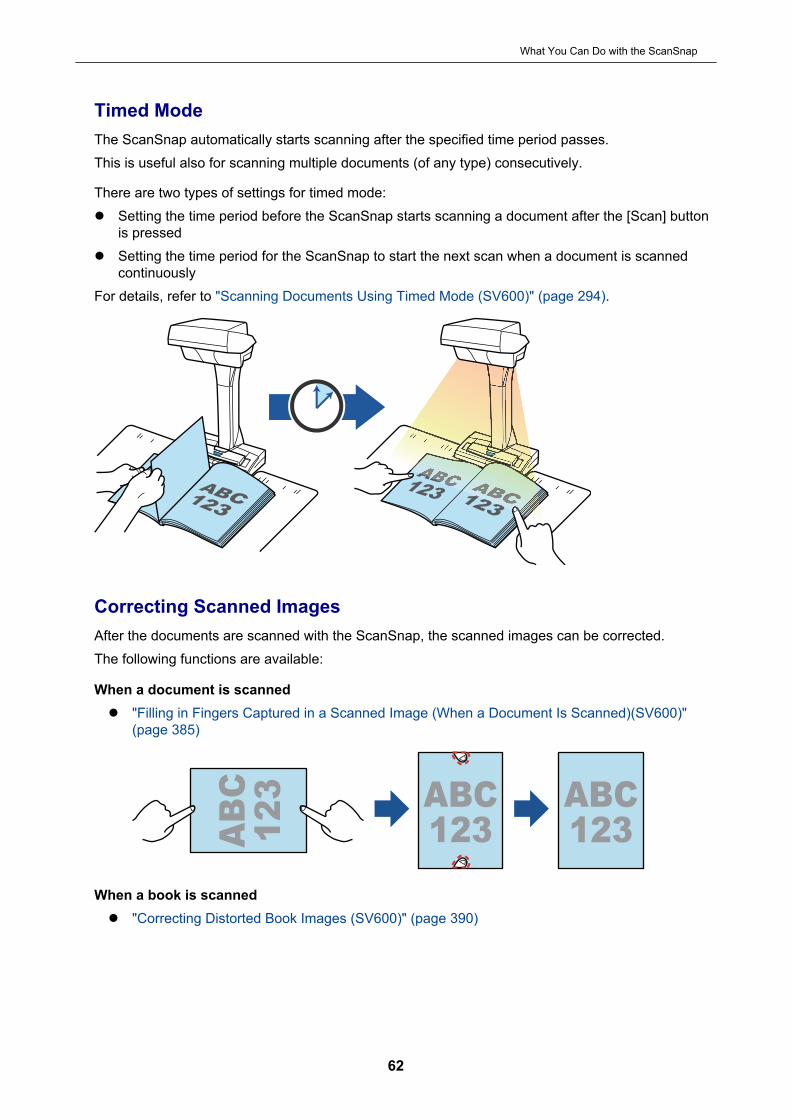
Timed ModeThe ScanSnap automatically starts scanning after the specified time period passes.This is useful also for scanning multiple documents (of any type) consecutively.
There are two types of settings for timed mode:l Setting the time period before the ScanSnap starts scanning a document after the [Scan] button
is pressedl Setting the time period for the ScanSnap to start the next scan when a document is scanned
continuouslyFor details, refer to "Scanning Documents Using Timed Mode (SV600)" (page 294).
Correcting Scanned ImagesAfter the documents are scanned with the ScanSnap, the scanned images can be corrected.The following functions are available:
When a document is scannedl "Filling in Fingers Captured in a Scanned Image (When a Document Is Scanned)(SV600)"
(page 385)
When a book is scannedl "Correcting Distorted Book Images (SV600)" (page 390)
What You Can Do with the ScanSnap
62
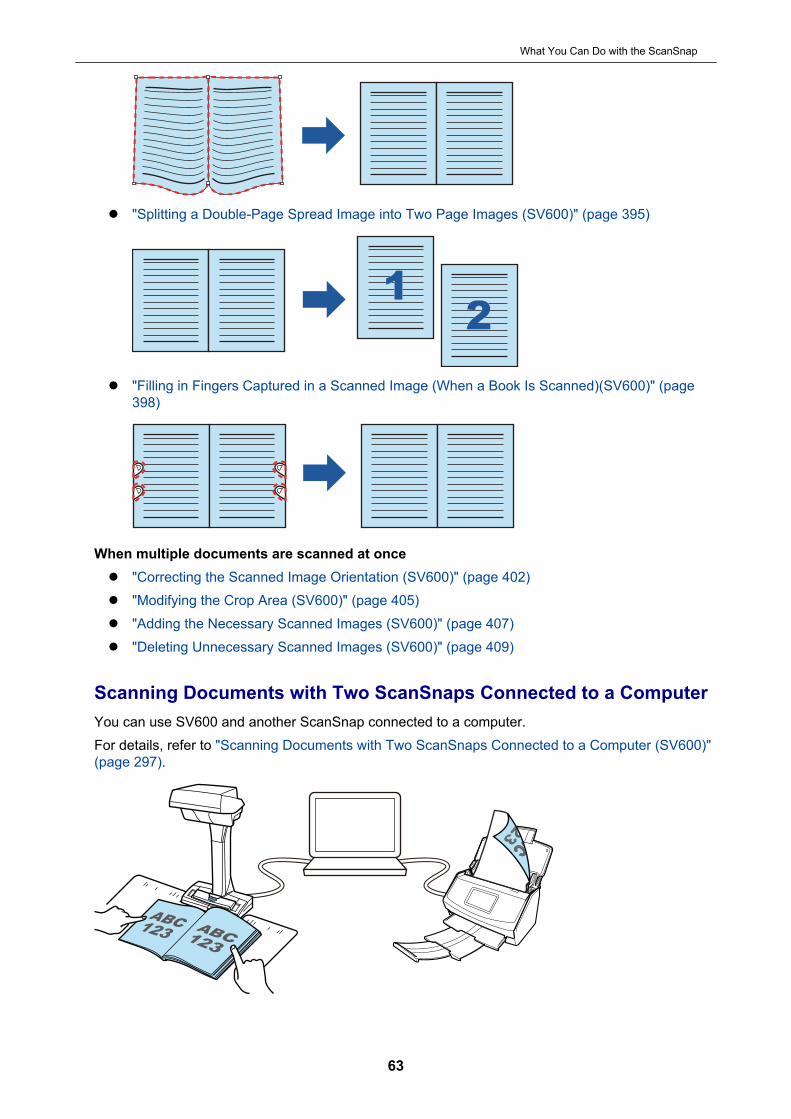
l "Splitting a Double-Page Spread Image into Two Page Images (SV600)" (page 395)
12
12
l "Filling in Fingers Captured in a Scanned Image (When a Book Is Scanned)(SV600)" (page398)
When multiple documents are scanned at oncel "Correcting the Scanned Image Orientation (SV600)" (page 402)l "Modifying the Crop Area (SV600)" (page 405)l "Adding the Necessary Scanned Images (SV600)" (page 407)l "Deleting Unnecessary Scanned Images (SV600)" (page 409)
Scanning Documents with Two ScanSnaps Connected to a ComputerYou can use SV600 and another ScanSnap connected to a computer.For details, refer to "Scanning Documents with Two ScanSnaps Connected to a Computer (SV600)"(page 297).
What You Can Do with the ScanSnap
63
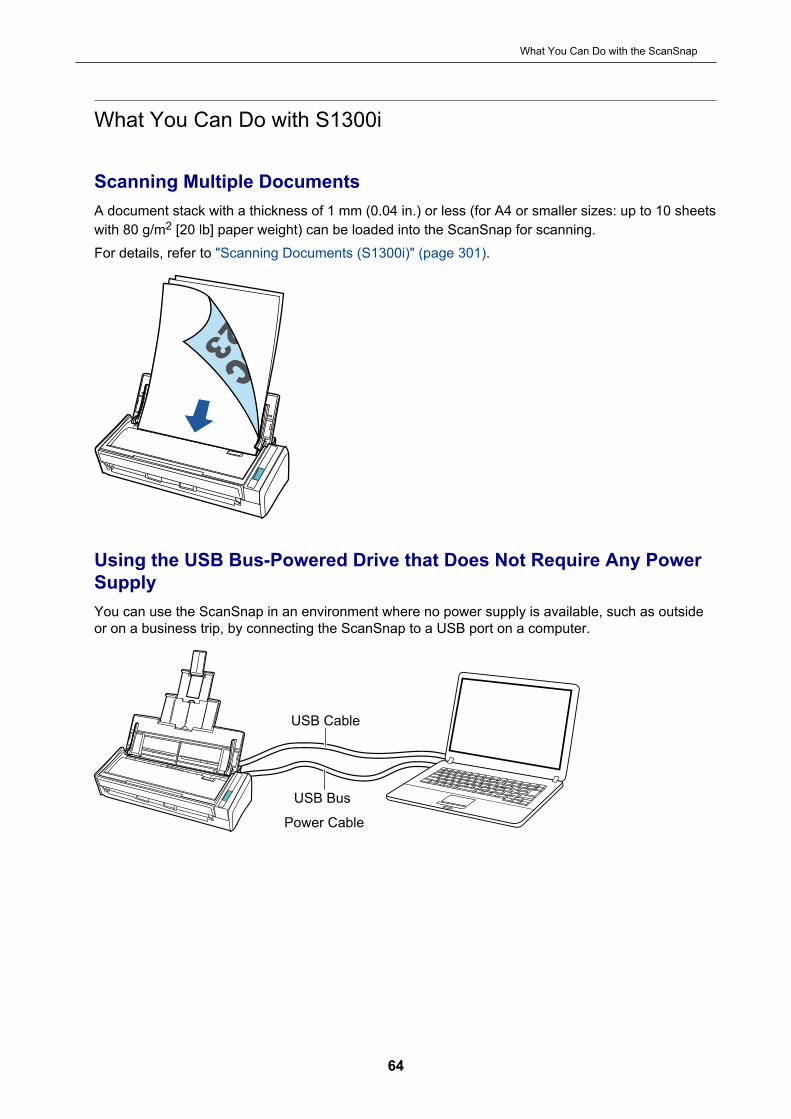
What You Can Do with S1300i
Scanning Multiple DocumentsA document stack with a thickness of 1 mm (0.04 in.) or less (for A4 or smaller sizes: up to 10 sheetswith 80 g/m2 [20 lb] paper weight) can be loaded into the ScanSnap for scanning.For details, refer to "Scanning Documents (S1300i)" (page 301).
Using the USB Bus-Powered Drive that Does Not Require Any PowerSupplyYou can use the ScanSnap in an environment where no power supply is available, such as outsideor on a business trip, by connecting the ScanSnap to a USB port on a computer.
USB Cable
USB Bus
Power Cable
What You Can Do with the ScanSnap
64

What You Can Do with S1100i
Scanning Multiple Documents ContinuouslyWhen you scan multiple documents with the ScanSnap, you can scan one or two document at atime. To scan two documents at a time, you can insert two documents at a time or you can insert thenext document while another document is being scanned.l Scanning one document at a time
After scanning a document is completed, when you insert the next document in the ScanSnap,the next scan is started automatically.For details, refer to "Scanning Documents (S1100i)" (page 320).
l Scanning documents by inserting two documents at a time or by inserting the next documentwhile the current document is being scanned (dual scan)When scanning small size documents such as business cards and postcards, you can insert twodocuments at a time in the ScanSnap. Alternatively, you can insert the next document whileanother document is being scanned. In either method, you can scan up to 20 documentscontinuously in a single scanning operation.These scanning methods are referred to as dual scans.For details, refer to "Scanning Documents by Inserting Two Documents at a Time or by Insertingthe Next Document While the Current Document Is Being Scanned (S1100i)" (page 325).
Scanning Documents Larger Than A4 or Letter Size by DirectlyInserting Them in the ScanSnapBy folding an A3, B4, or Double Letter size document in half and scanning each side continuously,the scanned images of both sides can be automatically merged into a single image.
What You Can Do with the ScanSnap
65
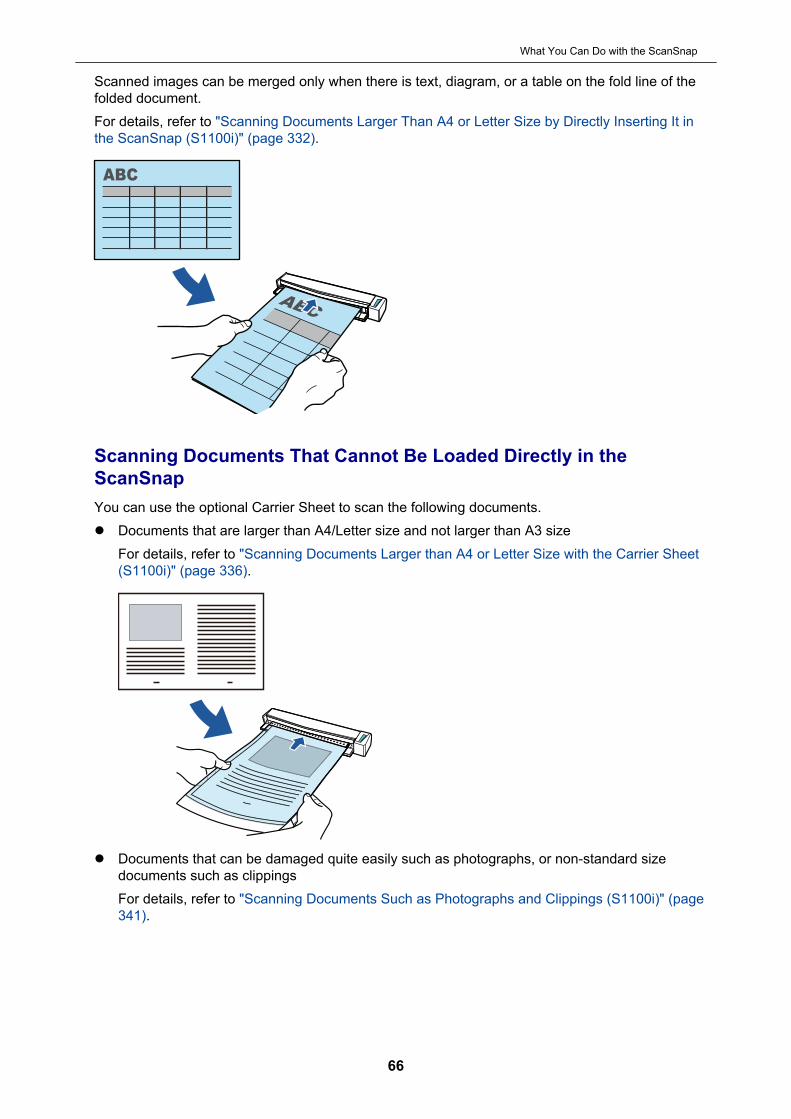
Scanned images can be merged only when there is text, diagram, or a table on the fold line of thefolded document.For details, refer to "Scanning Documents Larger Than A4 or Letter Size by Directly Inserting It inthe ScanSnap (S1100i)" (page 332).
Scanning Documents That Cannot Be Loaded Directly in theScanSnapYou can use the optional Carrier Sheet to scan the following documents.l Documents that are larger than A4/Letter size and not larger than A3 size
For details, refer to "Scanning Documents Larger than A4 or Letter Size with the Carrier Sheet(S1100i)" (page 336).
l Documents that can be damaged quite easily such as photographs, or non-standard sizedocuments such as clippingsFor details, refer to "Scanning Documents Such as Photographs and Clippings (S1100i)" (page341).
What You Can Do with the ScanSnap
66

What You Can Do with the ScanSnap
67

Parts and Functions
l "Parts and Functions of iX1600 / iX1500 / iX1400" (page 69)l "Parts and Functions of iX500" (page 71)l "Parts and Functions of iX100" (page 73)l "Parts and Functions of SV600" (page 76)l "Parts and Functions of S1300i" (page 79)l "Parts and Functions of S1100i" (page 81)
Parts and Functions
68
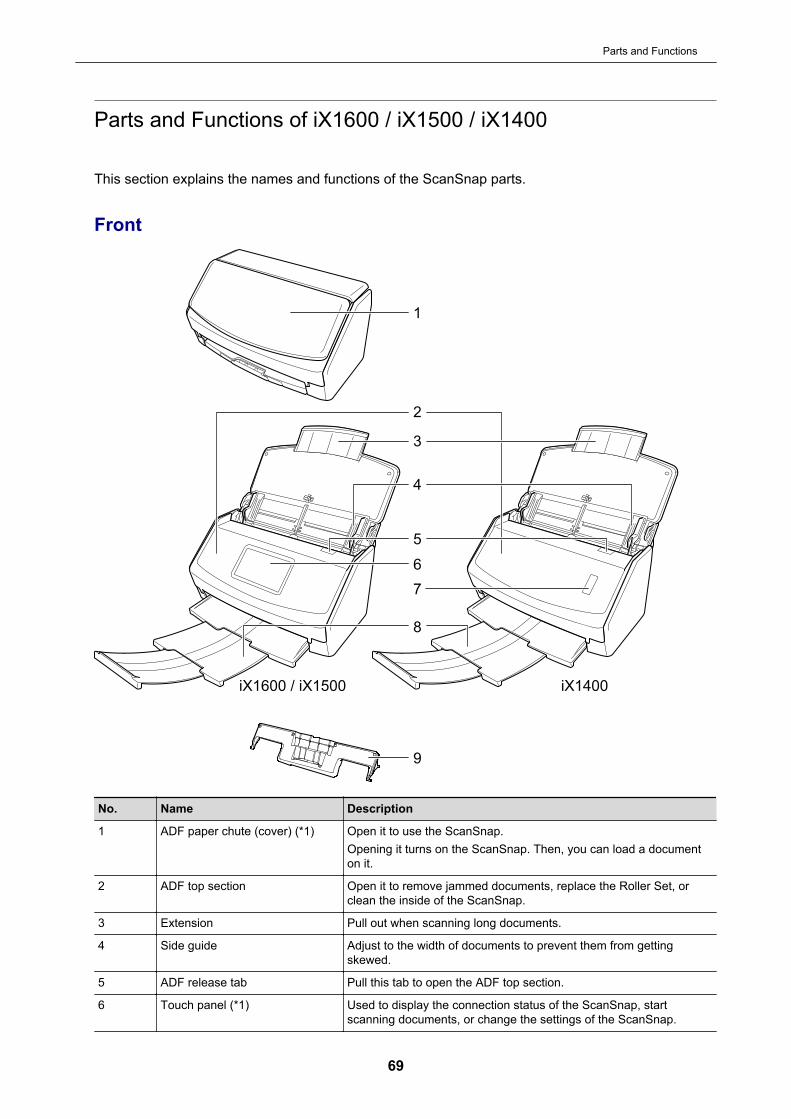
Parts and Functions of iX1600 / iX1500 / iX1400
This section explains the names and functions of the ScanSnap parts.
Front
1
3
2
5
4
8
7
9
6
iX1600 / iX1500 iX1400
No. Name Description
1 ADF paper chute (cover) (*1) Open it to use the ScanSnap.Opening it turns on the ScanSnap. Then, you can load a documenton it.
2 ADF top section Open it to remove jammed documents, replace the Roller Set, orclean the inside of the ScanSnap.
3 Extension Pull out when scanning long documents.
4 Side guide Adjust to the width of documents to prevent them from gettingskewed.
5 ADF release tab Pull this tab to open the ADF top section.
6 Touch panel (*1) Used to display the connection status of the ScanSnap, startscanning documents, or change the settings of the ScanSnap.
Parts and Functions
69
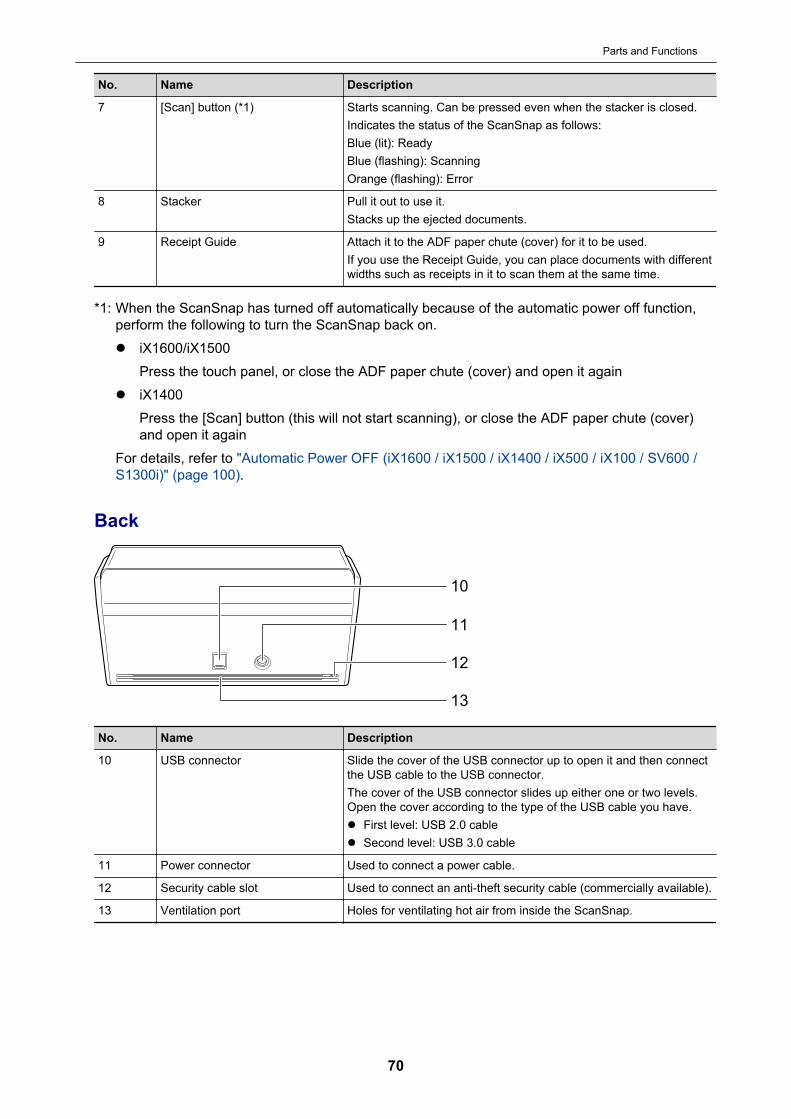
No. Name Description
7 [Scan] button (*1) Starts scanning. Can be pressed even when the stacker is closed.Indicates the status of the ScanSnap as follows:Blue (lit): ReadyBlue (flashing): ScanningOrange (flashing): Error
8 Stacker Pull it out to use it.Stacks up the ejected documents.
9 Receipt Guide Attach it to the ADF paper chute (cover) for it to be used.If you use the Receipt Guide, you can place documents with differentwidths such as receipts in it to scan them at the same time.
*1: When the ScanSnap has turned off automatically because of the automatic power off function,perform the following to turn the ScanSnap back on.l iX1600/iX1500
Press the touch panel, or close the ADF paper chute (cover) and open it againl iX1400
Press the [Scan] button (this will not start scanning), or close the ADF paper chute (cover)and open it again
For details, refer to "Automatic Power OFF (iX1600 / iX1500 / iX1400 / iX500 / iX100 / SV600 /S1300i)" (page 100).
Back
10
11
12
13
No. Name Description
10 USB connector Slide the cover of the USB connector up to open it and then connectthe USB cable to the USB connector.The cover of the USB connector slides up either one or two levels.Open the cover according to the type of the USB cable you have.l First level: USB 2.0 cablel Second level: USB 3.0 cable
11 Power connector Used to connect a power cable.
12 Security cable slot Used to connect an anti-theft security cable (commercially available).
13 Ventilation port Holes for ventilating hot air from inside the ScanSnap.
Parts and Functions
70
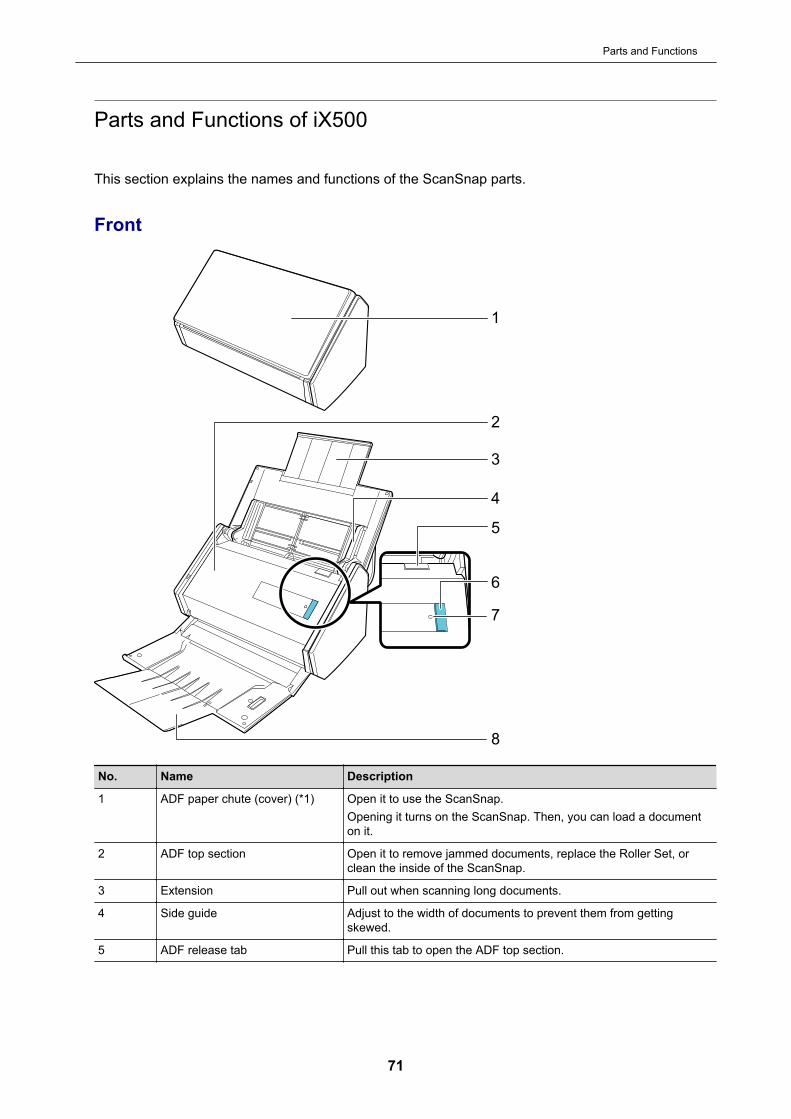
Parts and Functions of iX500
This section explains the names and functions of the ScanSnap parts.
Front
3
1
2
5
4
6
7
8
No. Name Description
1 ADF paper chute (cover) (*1) Open it to use the ScanSnap.Opening it turns on the ScanSnap. Then, you can load a documenton it.
2 ADF top section Open it to remove jammed documents, replace the Roller Set, orclean the inside of the ScanSnap.
3 Extension Pull out when scanning long documents.
4 Side guide Adjust to the width of documents to prevent them from gettingskewed.
5 ADF release tab Pull this tab to open the ADF top section.
Parts and Functions
71
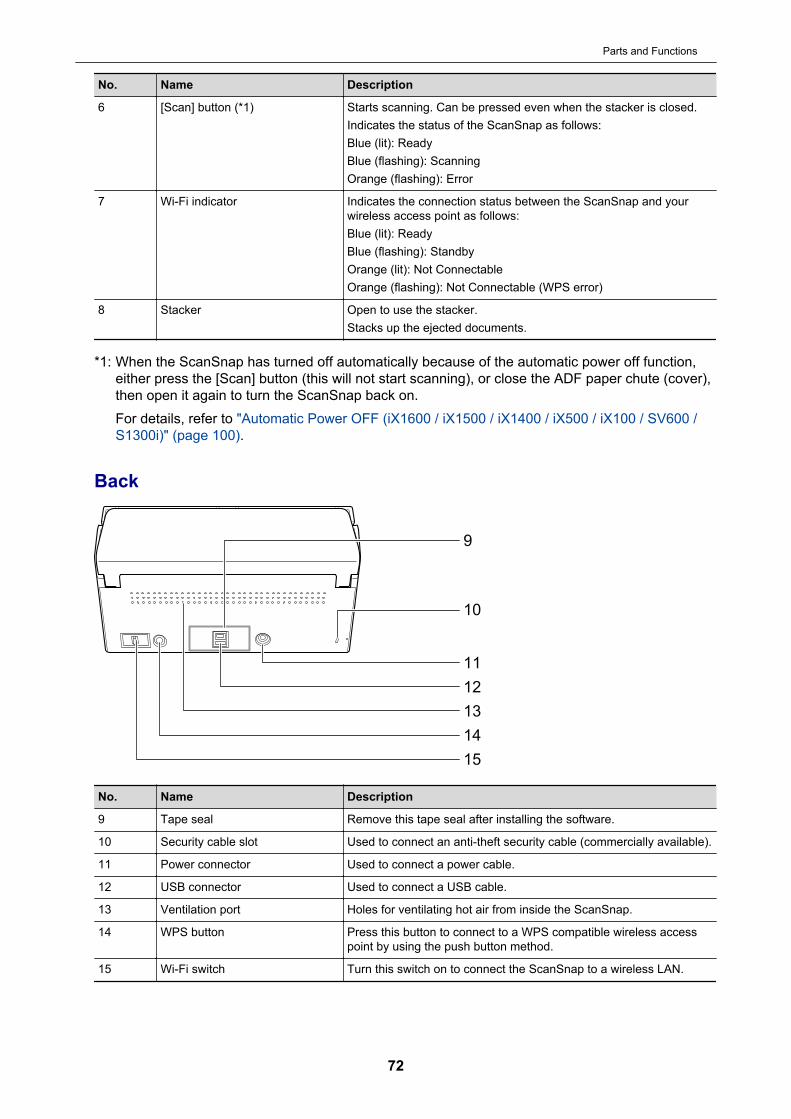
No. Name Description
6 [Scan] button (*1) Starts scanning. Can be pressed even when the stacker is closed.Indicates the status of the ScanSnap as follows:Blue (lit): ReadyBlue (flashing): ScanningOrange (flashing): Error
7 Wi-Fi indicator Indicates the connection status between the ScanSnap and yourwireless access point as follows:Blue (lit): ReadyBlue (flashing): StandbyOrange (lit): Not ConnectableOrange (flashing): Not Connectable (WPS error)
8 Stacker Open to use the stacker.Stacks up the ejected documents.
*1: When the ScanSnap has turned off automatically because of the automatic power off function,either press the [Scan] button (this will not start scanning), or close the ADF paper chute (cover),then open it again to turn the ScanSnap back on.For details, refer to "Automatic Power OFF (iX1600 / iX1500 / iX1400 / iX500 / iX100 / SV600 /S1300i)" (page 100).
Back
9
10
11
12
13
14
15
No. Name Description
9 Tape seal Remove this tape seal after installing the software.
10 Security cable slot Used to connect an anti-theft security cable (commercially available).
11 Power connector Used to connect a power cable.
12 USB connector Used to connect a USB cable.
13 Ventilation port Holes for ventilating hot air from inside the ScanSnap.
14 WPS button Press this button to connect to a WPS compatible wireless accesspoint by using the push button method.
15 Wi-Fi switch Turn this switch on to connect the ScanSnap to a wireless LAN.
Parts and Functions
72
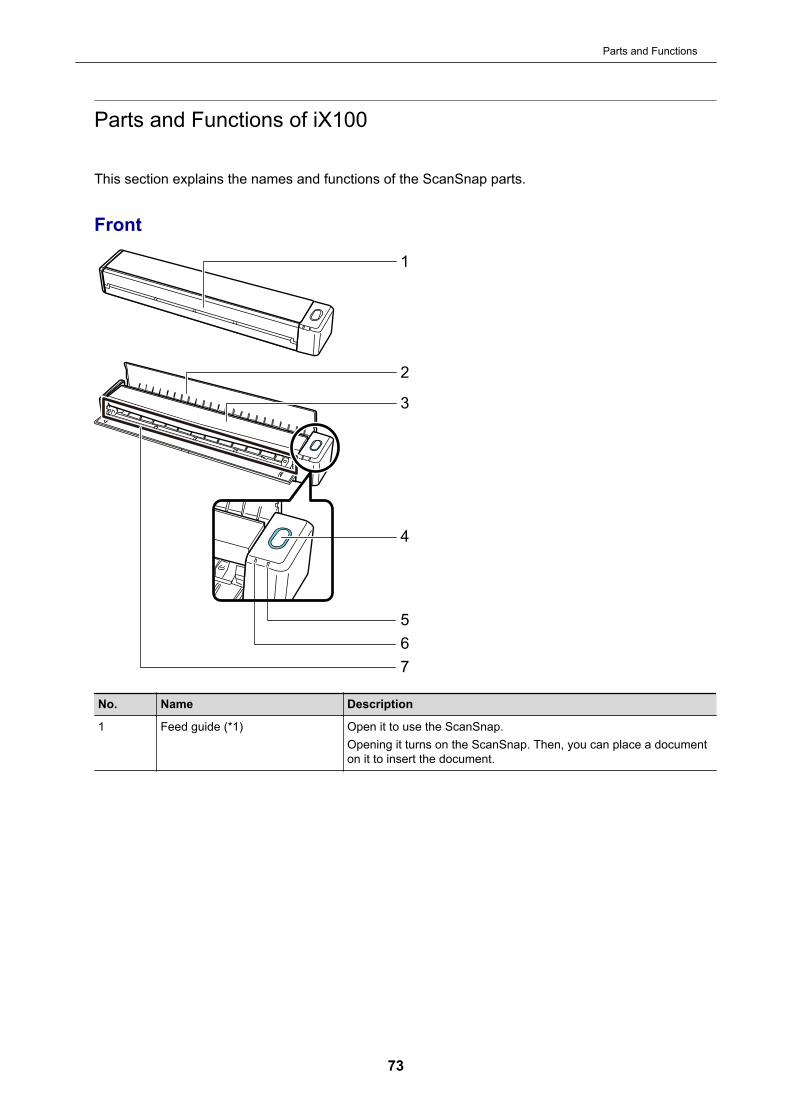
Parts and Functions of iX100
This section explains the names and functions of the ScanSnap parts.
Front
3
1
2
4
7
6
5
No. Name Description
1 Feed guide (*1) Open it to use the ScanSnap.Opening it turns on the ScanSnap. Then, you can place a documenton it to insert the document.
Parts and Functions
73
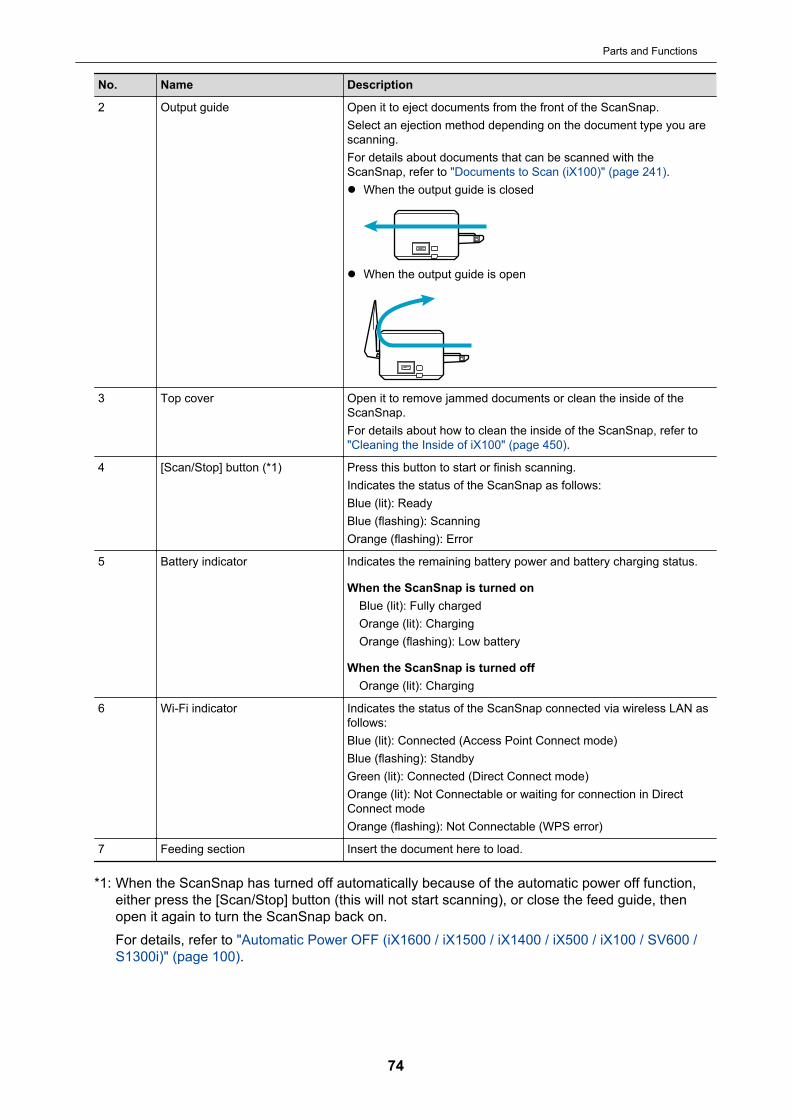
No. Name Description
2 Output guide Open it to eject documents from the front of the ScanSnap.Select an ejection method depending on the document type you arescanning.For details about documents that can be scanned with theScanSnap, refer to "Documents to Scan (iX100)" (page 241).l When the output guide is closed
l When the output guide is open
3 Top cover Open it to remove jammed documents or clean the inside of theScanSnap.For details about how to clean the inside of the ScanSnap, refer to"Cleaning the Inside of iX100" (page 450).
4 [Scan/Stop] button (*1) Press this button to start or finish scanning.Indicates the status of the ScanSnap as follows:Blue (lit): ReadyBlue (flashing): ScanningOrange (flashing): Error
5 Battery indicator Indicates the remaining battery power and battery charging status.
When the ScanSnap is turned onBlue (lit): Fully chargedOrange (lit): ChargingOrange (flashing): Low battery
When the ScanSnap is turned offOrange (lit): Charging
6 Wi-Fi indicator Indicates the status of the ScanSnap connected via wireless LAN asfollows:Blue (lit): Connected (Access Point Connect mode)Blue (flashing): StandbyGreen (lit): Connected (Direct Connect mode)Orange (lit): Not Connectable or waiting for connection in DirectConnect modeOrange (flashing): Not Connectable (WPS error)
7 Feeding section Insert the document here to load.
*1: When the ScanSnap has turned off automatically because of the automatic power off function,either press the [Scan/Stop] button (this will not start scanning), or close the feed guide, thenopen it again to turn the ScanSnap back on.For details, refer to "Automatic Power OFF (iX1600 / iX1500 / iX1400 / iX500 / iX100 / SV600 /S1300i)" (page 100).
Parts and Functions
74

Side
8
9
No. Name Description
8 Tape seal Remove this tape seal after installing the software.
9 USB connector Used to connect a USB cable.
Back
10
11
No. Name Description
10 WPS button Press this button to connect to a WPS compatible device by usingthe push button method.
11 Wi-Fi switch Turn this switch on to connect the ScanSnap via wireless LAN.
Parts and Functions
75

Parts and Functions of SV600
This section explains the names and functions of the ScanSnap parts.
Front
2
1
3
4
5
6
7
8
No. Name Description
1 Head -
2 Neck -
3 [Scan] button (*1) l Turns on the ScanSnap.l Starts scanning.
4 [Stop] button (*1) l Turns the ScanSnap on or off.l Stops scanning.
5 Base -
6 Power LED Indicates the status of the ScanSnap as follows:Blue (lit): ReadyBlue (flashing): ScanningOrange (flashing): Error
7 White sheet Used to determine the starting position for scanning documents andis also the standard color reference for the color of documents whendocuments are scanned.
8 Centering mark When placing a book or standard size document, align the center ofthe document with the centering mark.
*1: If the ScanSnap has turned off automatically because of the automatic power off function, pressthe [Scan] or [Stop] button to turn the ScanSnap back on. (Pressing the [Scan] button does notstart scanning.)
Parts and Functions
76
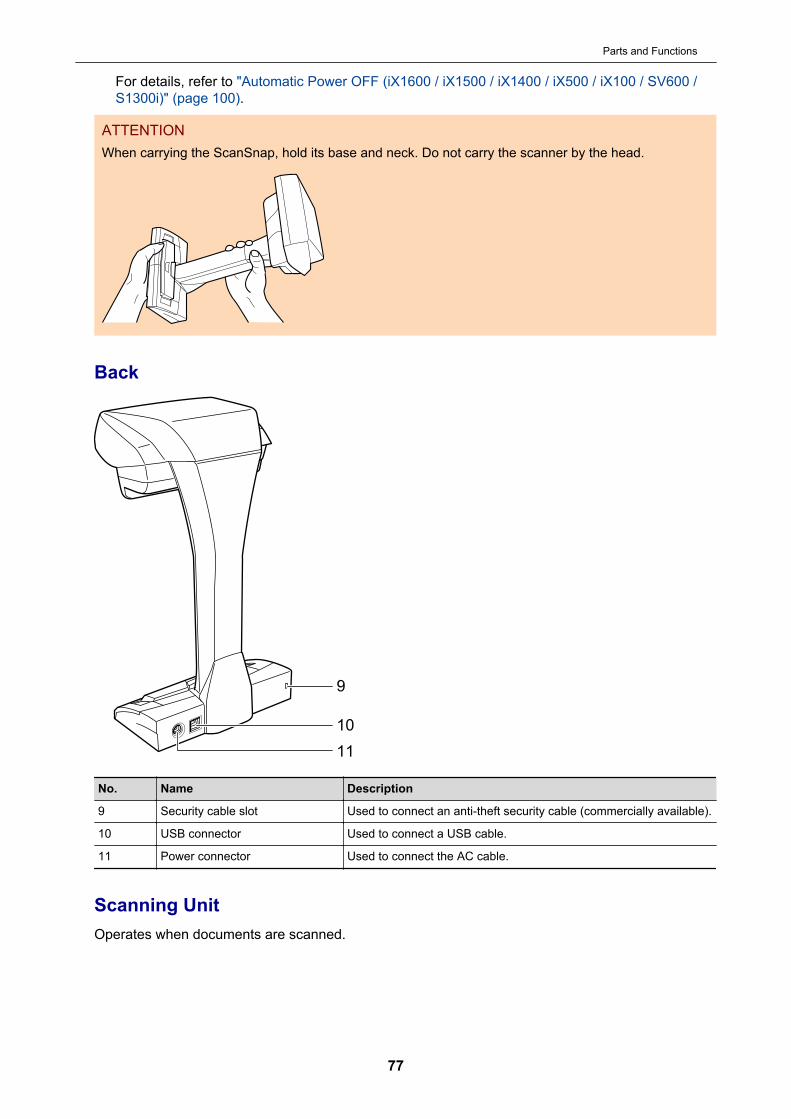
For details, refer to "Automatic Power OFF (iX1600 / iX1500 / iX1400 / iX500 / iX100 / SV600 /S1300i)" (page 100).
ATTENTIONWhen carrying the ScanSnap, hold its base and neck. Do not carry the scanner by the head.
Back
9
10
11
No. Name Description
9 Security cable slot Used to connect an anti-theft security cable (commercially available).
10 USB connector Used to connect a USB cable.
11 Power connector Used to connect the AC cable.
Scanning UnitOperates when documents are scanned.
Parts and Functions
77
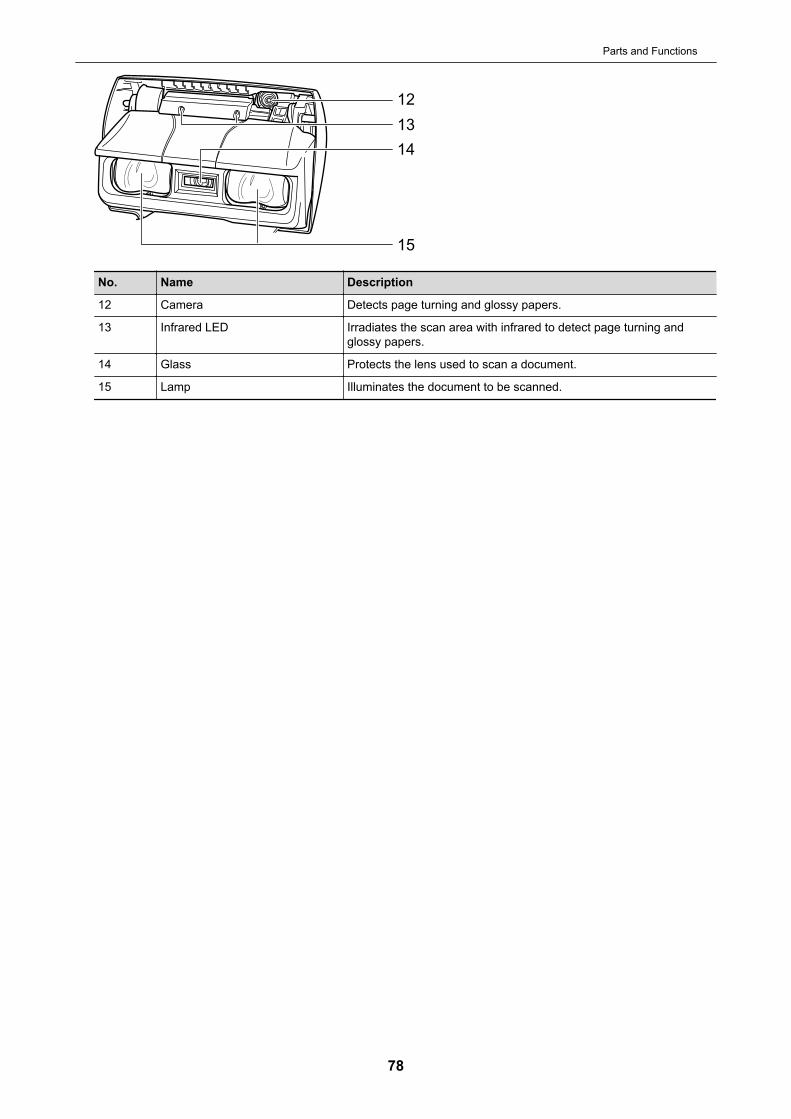
12
13
14
15
No. Name Description
12 Camera Detects page turning and glossy papers.
13 Infrared LED Irradiates the scan area with infrared to detect page turning andglossy papers.
14 Glass Protects the lens used to scan a document.
15 Lamp Illuminates the document to be scanned.
Parts and Functions
78
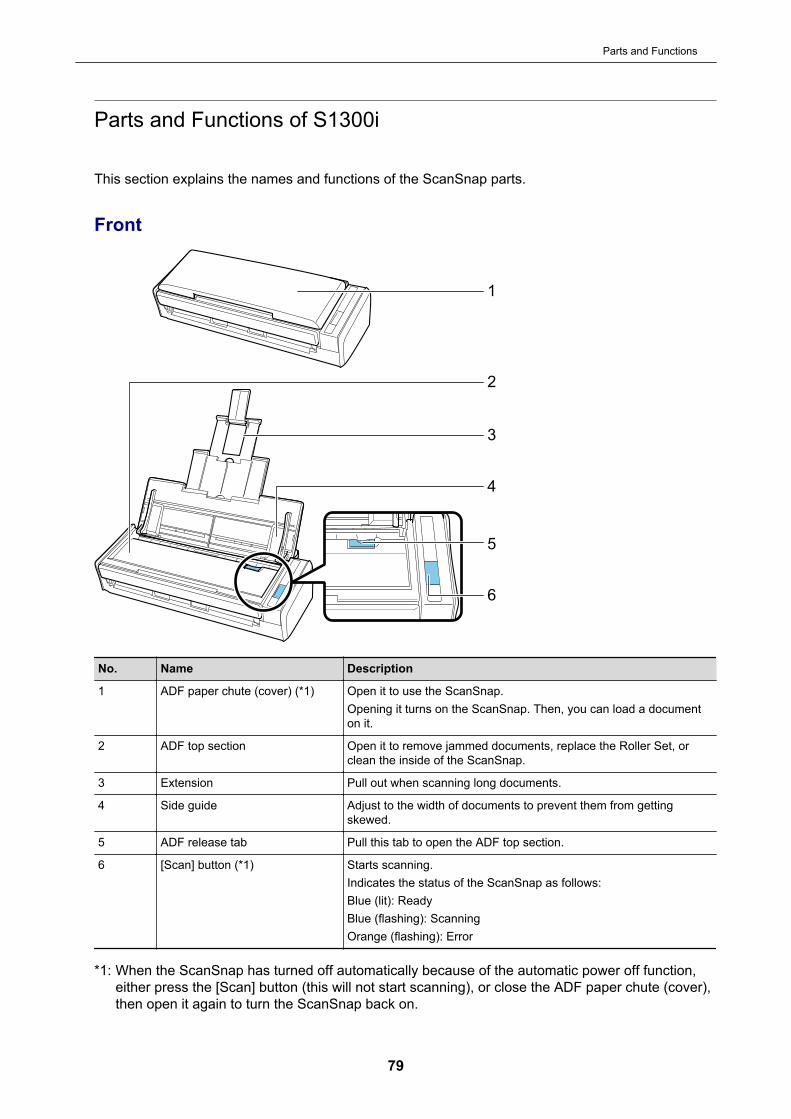
Parts and Functions of S1300i
This section explains the names and functions of the ScanSnap parts.
Front
3
1
2
5
4
6
No. Name Description
1 ADF paper chute (cover) (*1) Open it to use the ScanSnap.Opening it turns on the ScanSnap. Then, you can load a documenton it.
2 ADF top section Open it to remove jammed documents, replace the Roller Set, orclean the inside of the ScanSnap.
3 Extension Pull out when scanning long documents.
4 Side guide Adjust to the width of documents to prevent them from gettingskewed.
5 ADF release tab Pull this tab to open the ADF top section.
6 [Scan] button (*1) Starts scanning.Indicates the status of the ScanSnap as follows:Blue (lit): ReadyBlue (flashing): ScanningOrange (flashing): Error
*1: When the ScanSnap has turned off automatically because of the automatic power off function,either press the [Scan] button (this will not start scanning), or close the ADF paper chute (cover),then open it again to turn the ScanSnap back on.
Parts and Functions
79
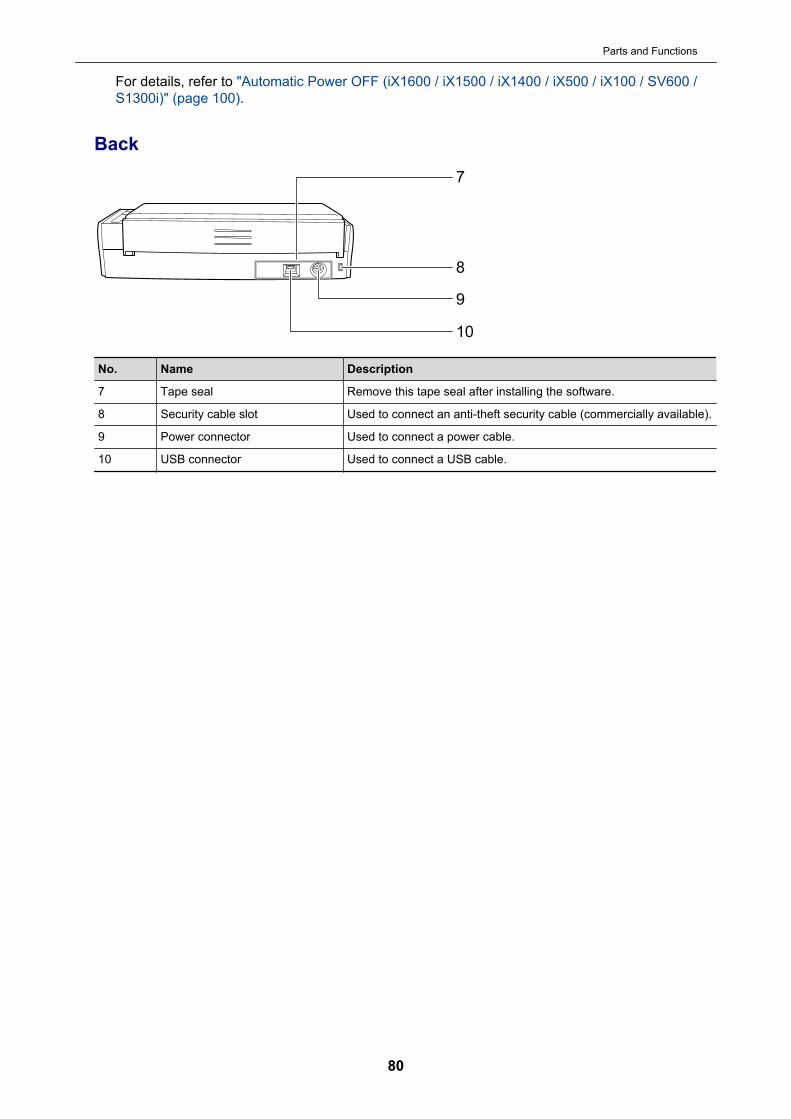
For details, refer to "Automatic Power OFF (iX1600 / iX1500 / iX1400 / iX500 / iX100 / SV600 /S1300i)" (page 100).
Back7
8
9
10
No. Name Description
7 Tape seal Remove this tape seal after installing the software.
8 Security cable slot Used to connect an anti-theft security cable (commercially available).
9 Power connector Used to connect a power cable.
10 USB connector Used to connect a USB cable.
Parts and Functions
80

Parts and Functions of S1100i
This section explains the names and functions of the ScanSnap parts.
Front
3
1
2
4
5
No. Name Description
1 Feed guide Open it to use the ScanSnap.Opening it turns on the ScanSnap. Then, you can place a documenton it to insert the document.
2 Output guide Open it to eject documents from the front of the ScanSnap.Select an ejection method depending on the document type you arescanning.For details about documents that can be scanned with theScanSnap, refer to "Documents to Scan (S1100i)" (page 316).l When the output guide is closed
l When the output guide is open
Parts and Functions
81
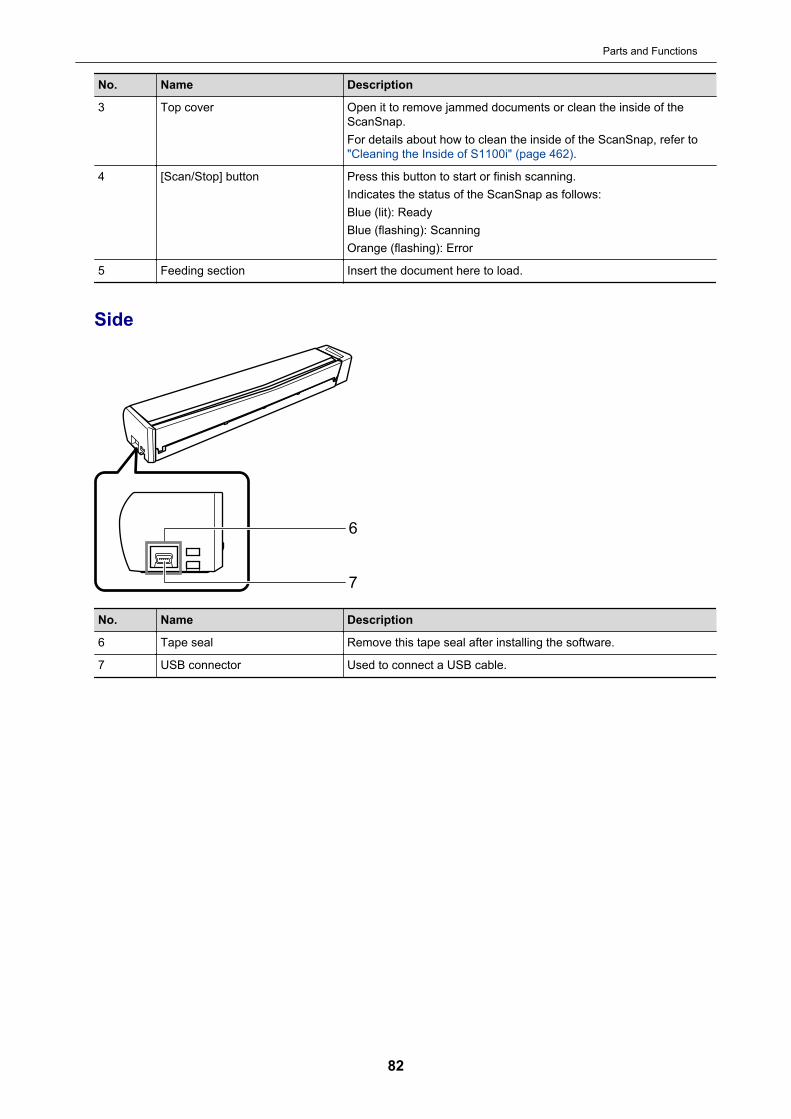
No. Name Description
3 Top cover Open it to remove jammed documents or clean the inside of theScanSnap.For details about how to clean the inside of the ScanSnap, refer to"Cleaning the Inside of S1100i" (page 462).
4 [Scan/Stop] button Press this button to start or finish scanning.Indicates the status of the ScanSnap as follows:Blue (lit): ReadyBlue (flashing): ScanningOrange (flashing): Error
5 Feeding section Insert the document here to load.
Side
6
7
No. Name Description
6 Tape seal Remove this tape seal after installing the software.
7 USB connector Used to connect a USB cable.
Parts and Functions
82
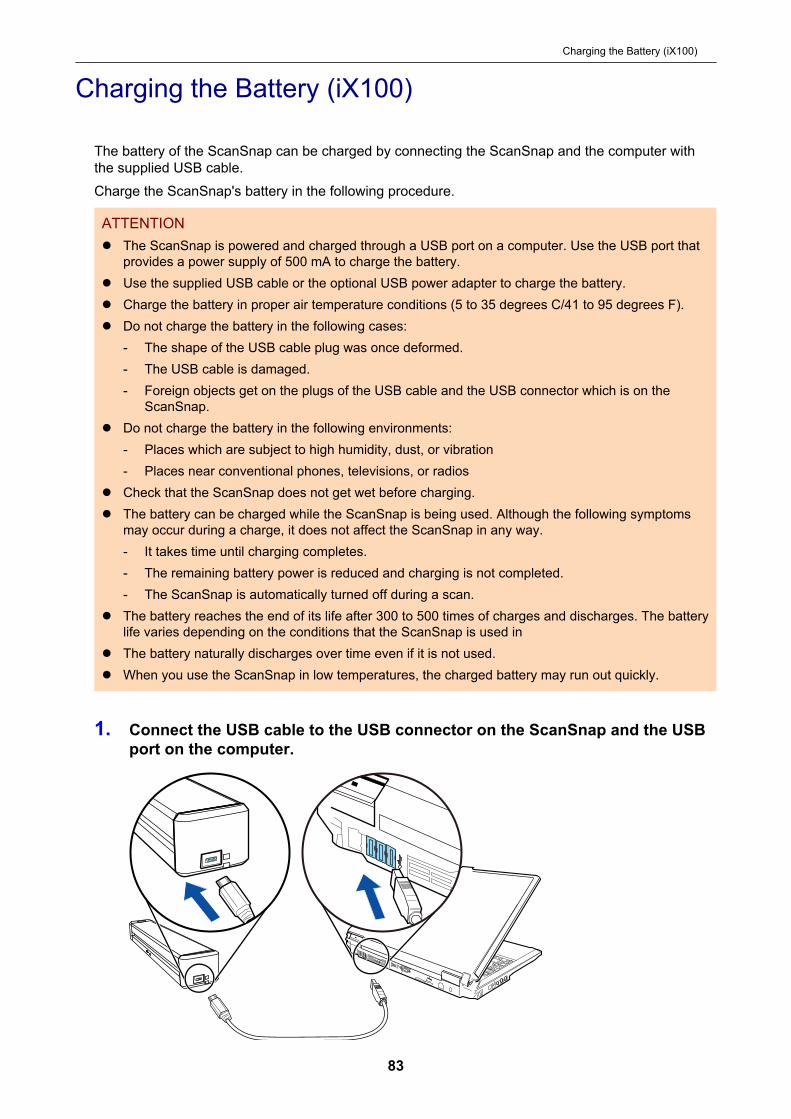
Charging the Battery (iX100)
The battery of the ScanSnap can be charged by connecting the ScanSnap and the computer withthe supplied USB cable.Charge the ScanSnap's battery in the following procedure.
ATTENTIONl The ScanSnap is powered and charged through a USB port on a computer. Use the USB port that
provides a power supply of 500 mA to charge the battery.l Use the supplied USB cable or the optional USB power adapter to charge the battery.l Charge the battery in proper air temperature conditions (5 to 35 degrees C/41 to 95 degrees F).l Do not charge the battery in the following cases:
- The shape of the USB cable plug was once deformed.- The USB cable is damaged.- Foreign objects get on the plugs of the USB cable and the USB connector which is on the
ScanSnap.l Do not charge the battery in the following environments:
- Places which are subject to high humidity, dust, or vibration- Places near conventional phones, televisions, or radios
l Check that the ScanSnap does not get wet before charging.l The battery can be charged while the ScanSnap is being used. Although the following symptoms
may occur during a charge, it does not affect the ScanSnap in any way.- It takes time until charging completes.- The remaining battery power is reduced and charging is not completed.- The ScanSnap is automatically turned off during a scan.
l The battery reaches the end of its life after 300 to 500 times of charges and discharges. The batterylife varies depending on the conditions that the ScanSnap is used in
l The battery naturally discharges over time even if it is not used.l When you use the ScanSnap in low temperatures, the charged battery may run out quickly.
1. Connect the USB cable to the USB connector on the ScanSnap and the USBport on the computer.
Charging the Battery (iX100)
83

a The battery indicator lights up in orange.When charging completes, the battery indicator turns off.
HINTYou can use the optional USB power adapter to charge the battery in a shorter time.
Charging the Battery (iX100)
84
Overview of the Software Related to the ScanSnap
This section gives an overview of each bundled software and their functions. You can edit, manage,and arrange the scanned image by using the following software:
ScanSnap ManagerThis scanner driver is required to scan documents with the ScanSnap. Scanned images can besaved as PDF or JPEG files to a computer.You need to have ScanSnap Connect Application installed on your mobile device to save PDF orJPEG files to your mobile device.You can download ScanSnap Connect Application for your mobile device from its applicationmarket.
ScanSnap HomeYou can manage a scanned image together with meta information (such as character strings thatare recognized by the text recognition function and the date when you scan a document) as acontent data record by selecting this application from ScanSnap Manager after scanningdocuments with the ScanSnap.Also, files other than the images created by scanning documents with the ScanSnap can beimported into ScanSnap Home as the content data records.Download ScanSnap Home from here, and then install it.
ScanSnap OrganizerYou can use this application to display image data (PDF or JPEG files) without opening them,create folders and arrange files as you like.
CardMinderYou can use this application to efficiently digitalize a large number of business cards.Text recognition can be performed on business cards and you can create a database to facilitatecard data management and searches. Data in the database can be printed and linked with variousapplications.
ABBYY FineReader for ScanSnapThis application can perform text recognition on the scanned images using OCR (OpticalCharacter Recognition) to convert the image data to Word, Excel, or PowerPoint files that can beedited.
ScanSnap Online UpdateThis application checks whether the latest updates or software programs are available on thedownload server. When the latest updates or software programs are available, you canautomatically apply updates or download and install the software programs manually.
Kofax Power PDF Standard or Nuance Power PDF StandardThis is a application for creating, editing, managing, and utilizing PDF format electronicdocuments.For details about the installation and activation methods of Kofax Power PDF Standard or NuancePower PDF Standard, refer to the following:How to Install PDF Editing Softwarehttps://www.pfu.fujitsu.com/imaging/downloads/manual/install/en
Overview of the Software Related to the ScanSnap
85
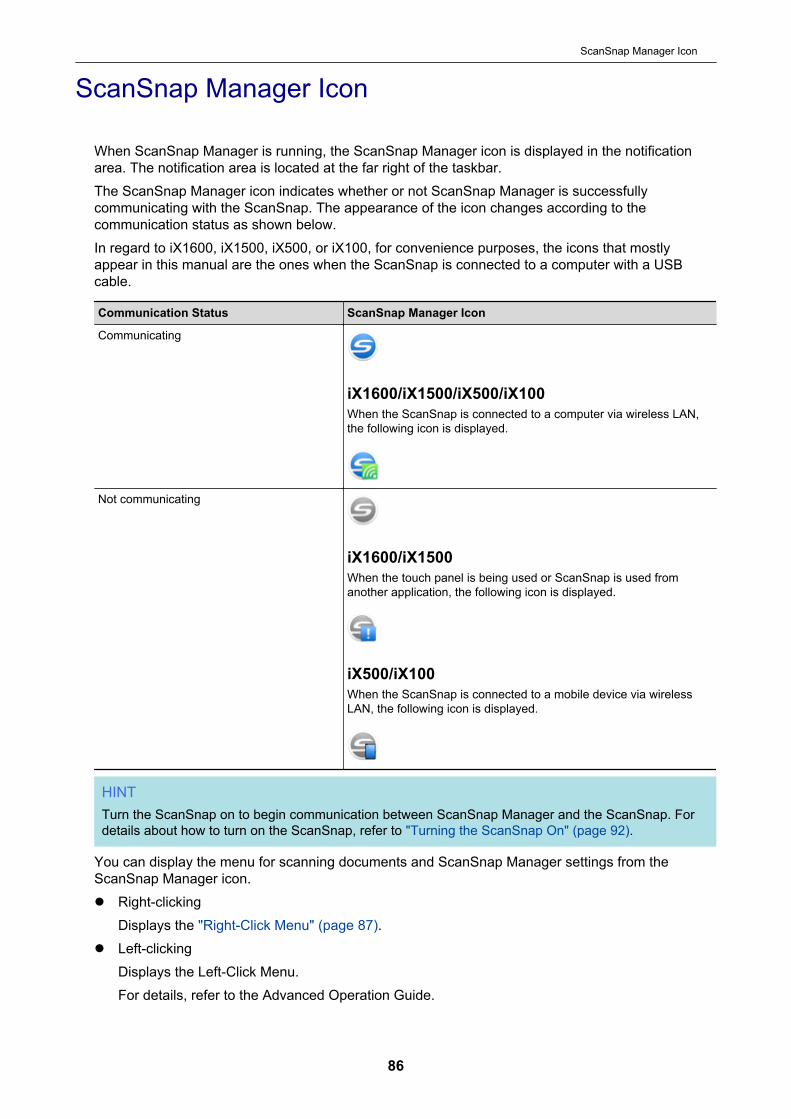
ScanSnap Manager Icon
When ScanSnap Manager is running, the ScanSnap Manager icon is displayed in the notificationarea. The notification area is located at the far right of the taskbar.The ScanSnap Manager icon indicates whether or not ScanSnap Manager is successfullycommunicating with the ScanSnap. The appearance of the icon changes according to thecommunication status as shown below.In regard to iX1600, iX1500, iX500, or iX100, for convenience purposes, the icons that mostlyappear in this manual are the ones when the ScanSnap is connected to a computer with a USBcable.
Communication Status ScanSnap Manager Icon
Communicating
iX1600/iX1500/iX500/iX100When the ScanSnap is connected to a computer via wireless LAN,the following icon is displayed.
Not communicating
iX1600/iX1500When the touch panel is being used or ScanSnap is used fromanother application, the following icon is displayed.
iX500/iX100When the ScanSnap is connected to a mobile device via wirelessLAN, the following icon is displayed.
HINTTurn the ScanSnap on to begin communication between ScanSnap Manager and the ScanSnap. Fordetails about how to turn on the ScanSnap, refer to "Turning the ScanSnap On" (page 92).
You can display the menu for scanning documents and ScanSnap Manager settings from theScanSnap Manager icon.l Right-clicking
Displays the "Right-Click Menu" (page 87).l Left-clicking
Displays the Left-Click Menu.For details, refer to the Advanced Operation Guide.
ScanSnap Manager Icon
86
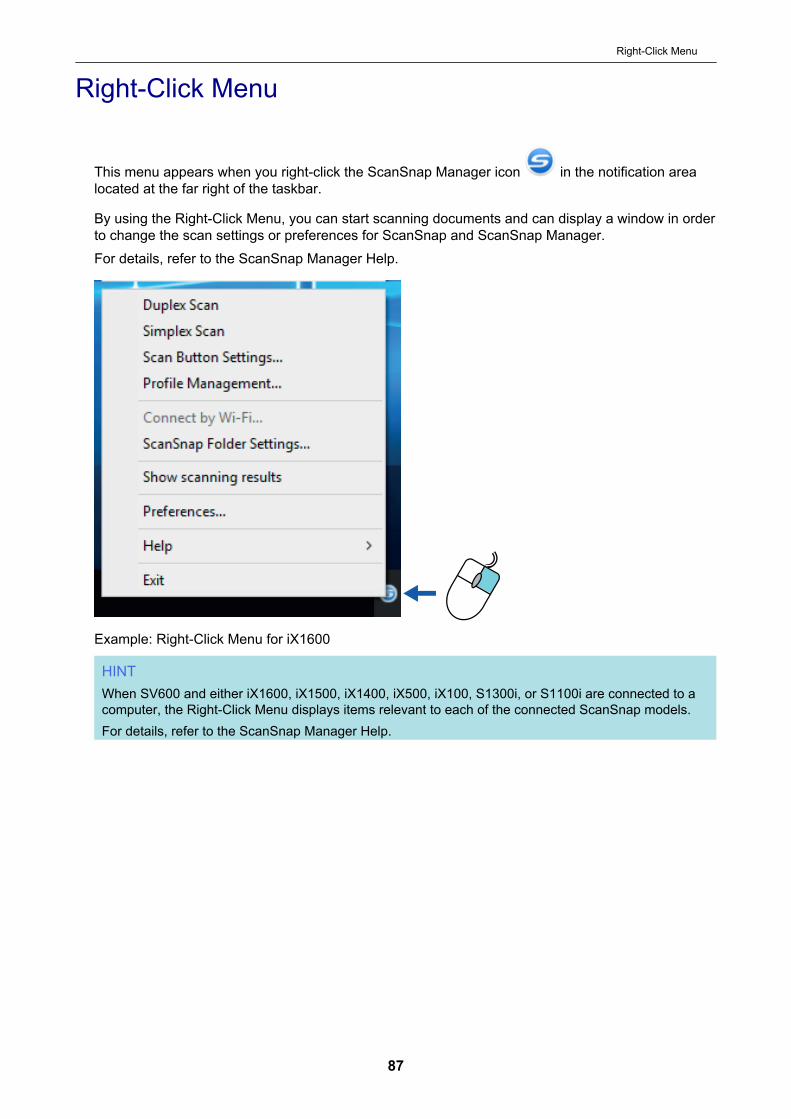
Right-Click Menu
This menu appears when you right-click the ScanSnap Manager icon in the notification arealocated at the far right of the taskbar.
By using the Right-Click Menu, you can start scanning documents and can display a window in orderto change the scan settings or preferences for ScanSnap and ScanSnap Manager.For details, refer to the ScanSnap Manager Help.
Example: Right-Click Menu for iX1600
HINTWhen SV600 and either iX1600, iX1500, iX1400, iX500, iX100, S1300i, or S1100i are connected to acomputer, the Right-Click Menu displays items relevant to each of the connected ScanSnap models.For details, refer to the ScanSnap Manager Help.
Right-Click Menu
87
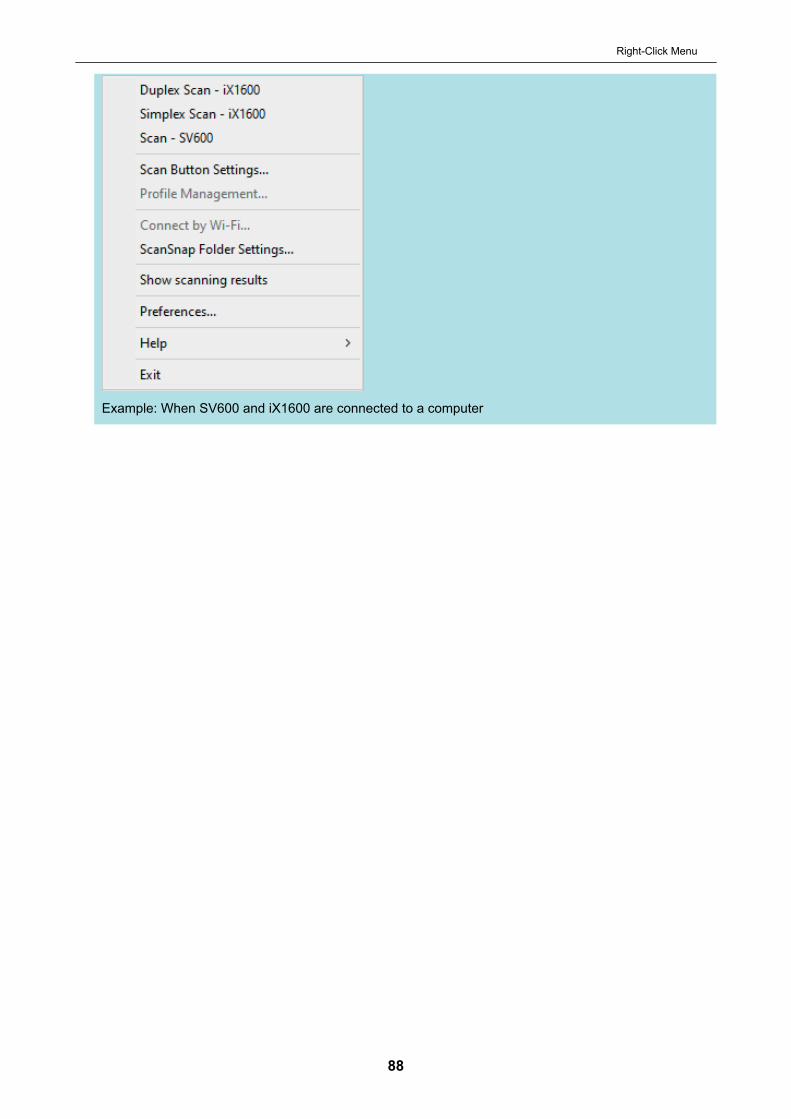
Example: When SV600 and iX1600 are connected to a computer
Right-Click Menu
88
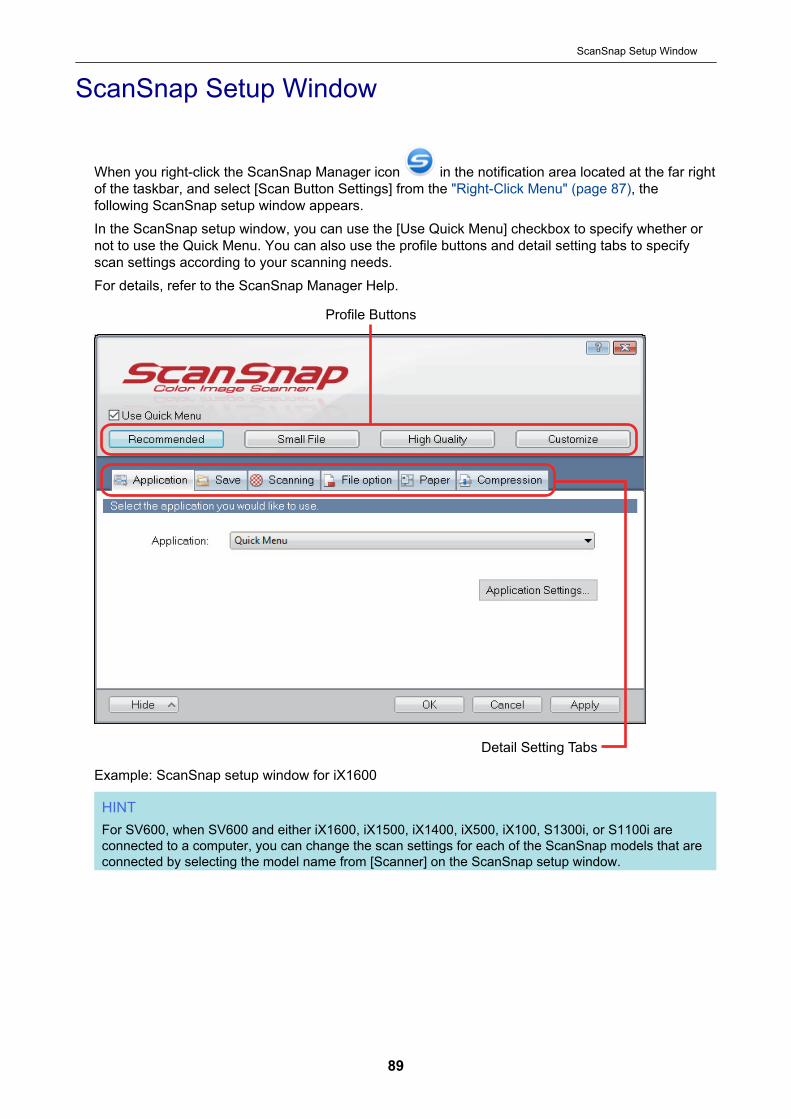
ScanSnap Setup Window
When you right-click the ScanSnap Manager icon in the notification area located at the far rightof the taskbar, and select [Scan Button Settings] from the "Right-Click Menu" (page 87), thefollowing ScanSnap setup window appears.In the ScanSnap setup window, you can use the [Use Quick Menu] checkbox to specify whether ornot to use the Quick Menu. You can also use the profile buttons and detail setting tabs to specifyscan settings according to your scanning needs.For details, refer to the ScanSnap Manager Help.
Profile Buttons
Detail Setting Tabs
Example: ScanSnap setup window for iX1600
HINTFor SV600, when SV600 and either iX1600, iX1500, iX1400, iX500, iX100, S1300i, or S1100i areconnected to a computer, you can change the scan settings for each of the ScanSnap models that areconnected by selecting the model name from [Scanner] on the ScanSnap setup window.
ScanSnap Setup Window
89

ScanSnap Setup Window
90

Turning the ScanSnap On or Off
This section explains how to turn the ScanSnap on or off.l "Turning the ScanSnap On" (page 92)l "Turning the ScanSnap Off" (page 96)l "Startup Mode (iX1600 / iX1500)" (page 98)l "Sleep Mode" (page 99)l "Automatic Power OFF (iX1600 / iX1500 / iX1400 / iX500 / iX100 / SV600 / S1300i)" (page 100)l "Checking the Remaining Battery Power (iX100)" (page 102)
Turning the ScanSnap On or Off
91
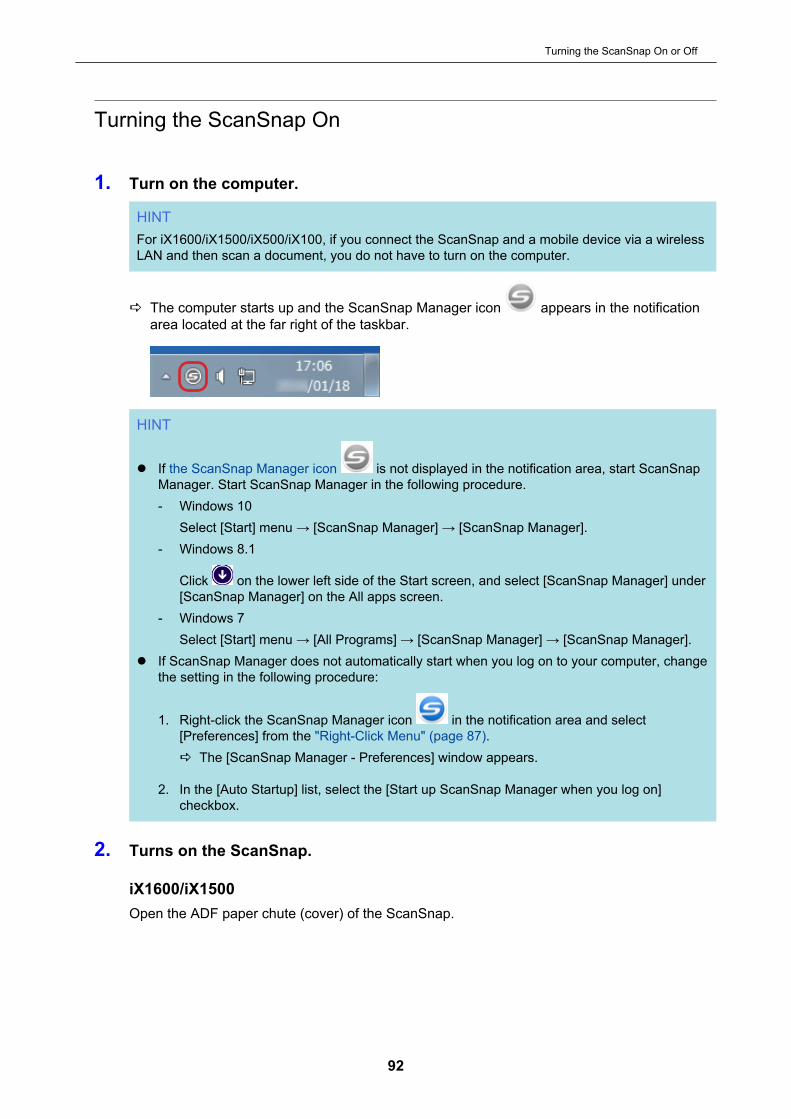
Turning the ScanSnap On
1. Turn on the computer.
HINTFor iX1600/iX1500/iX500/iX100, if you connect the ScanSnap and a mobile device via a wirelessLAN and then scan a document, you do not have to turn on the computer.
a The computer starts up and the ScanSnap Manager icon appears in the notificationarea located at the far right of the taskbar.
HINT
l If the ScanSnap Manager icon is not displayed in the notification area, start ScanSnapManager. Start ScanSnap Manager in the following procedure.- Windows 10
Select [Start] menu → [ScanSnap Manager] → [ScanSnap Manager].- Windows 8.1
Click on the lower left side of the Start screen, and select [ScanSnap Manager] under[ScanSnap Manager] on the All apps screen.
- Windows 7Select [Start] menu → [All Programs] → [ScanSnap Manager] → [ScanSnap Manager].
l If ScanSnap Manager does not automatically start when you log on to your computer, changethe setting in the following procedure:
1. Right-click the ScanSnap Manager icon in the notification area and select[Preferences] from the "Right-Click Menu" (page 87).a The [ScanSnap Manager - Preferences] window appears.
2. In the [Auto Startup] list, select the [Start up ScanSnap Manager when you log on]checkbox.
2. Turns on the ScanSnap.
iX1600/iX1500Open the ADF paper chute (cover) of the ScanSnap.
Turning the ScanSnap On or Off
92
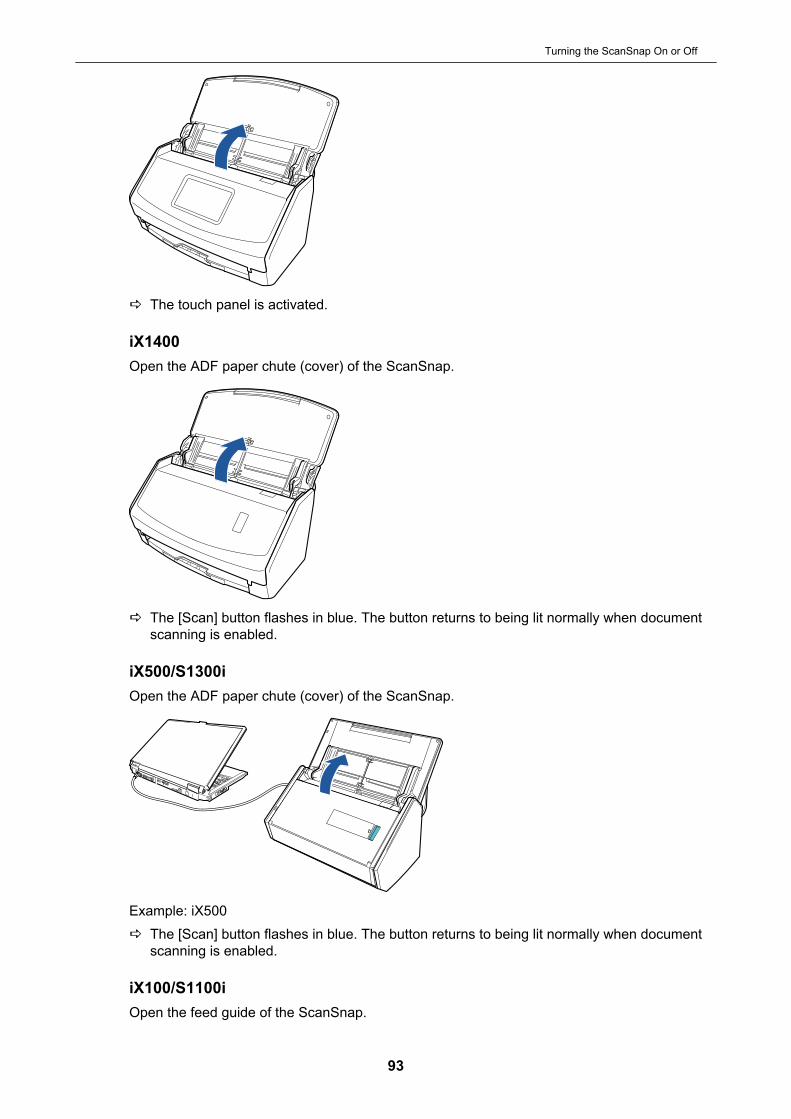
a The touch panel is activated.
iX1400Open the ADF paper chute (cover) of the ScanSnap.
a The [Scan] button flashes in blue. The button returns to being lit normally when documentscanning is enabled.
iX500/S1300iOpen the ADF paper chute (cover) of the ScanSnap.
Example: iX500a The [Scan] button flashes in blue. The button returns to being lit normally when document
scanning is enabled.
iX100/S1100iOpen the feed guide of the ScanSnap.
Turning the ScanSnap On or Off
93
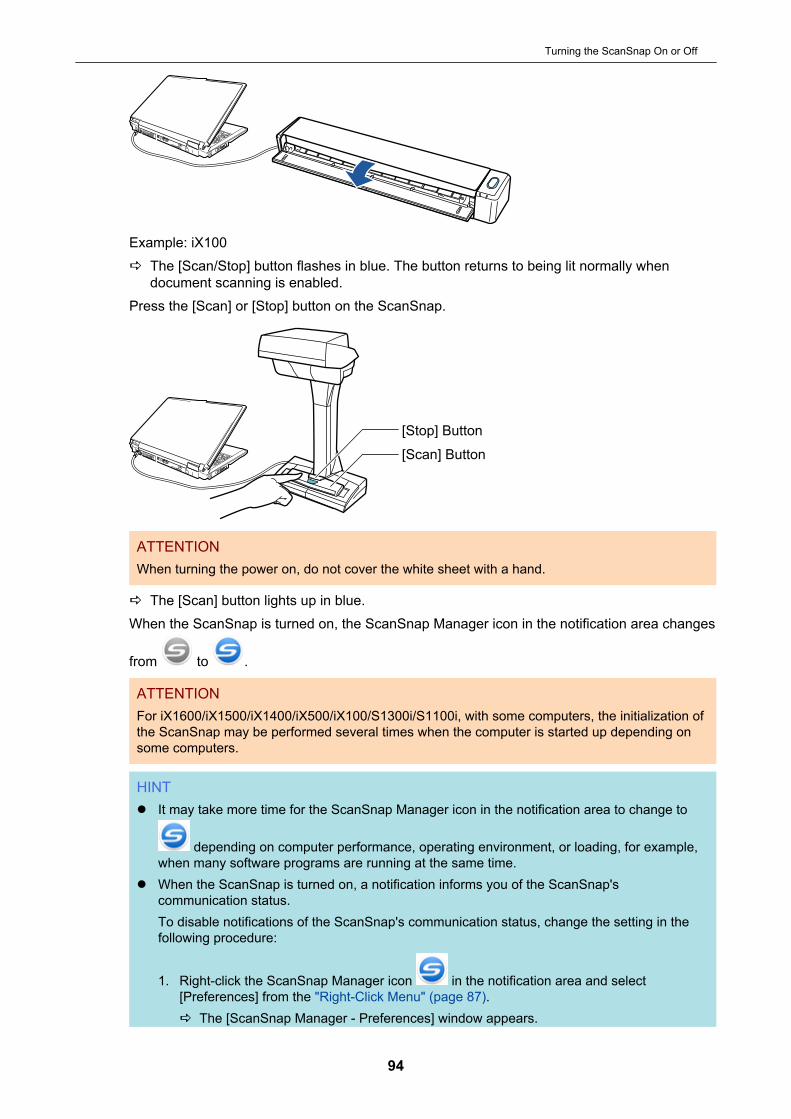
Example: iX100a The [Scan/Stop] button flashes in blue. The button returns to being lit normally when
document scanning is enabled.Press the [Scan] or [Stop] button on the ScanSnap.
[Scan] Button
[Stop] Button
ATTENTIONWhen turning the power on, do not cover the white sheet with a hand.
a The [Scan] button lights up in blue.When the ScanSnap is turned on, the ScanSnap Manager icon in the notification area changes
from to .
ATTENTIONFor iX1600/iX1500/iX1400/iX500/iX100/S1300i/S1100i, with some computers, the initialization ofthe ScanSnap may be performed several times when the computer is started up depending onsome computers.
HINTl It may take more time for the ScanSnap Manager icon in the notification area to change to
depending on computer performance, operating environment, or loading, for example,when many software programs are running at the same time.
l When the ScanSnap is turned on, a notification informs you of the ScanSnap'scommunication status.To disable notifications of the ScanSnap's communication status, change the setting in thefollowing procedure:
1. Right-click the ScanSnap Manager icon in the notification area and select[Preferences] from the "Right-Click Menu" (page 87).a The [ScanSnap Manager - Preferences] window appears.
Turning the ScanSnap On or Off
94

2. Clear the [Notify of the communication status] checkbox in the [Status Display] list.
Turning the ScanSnap On or Off
95
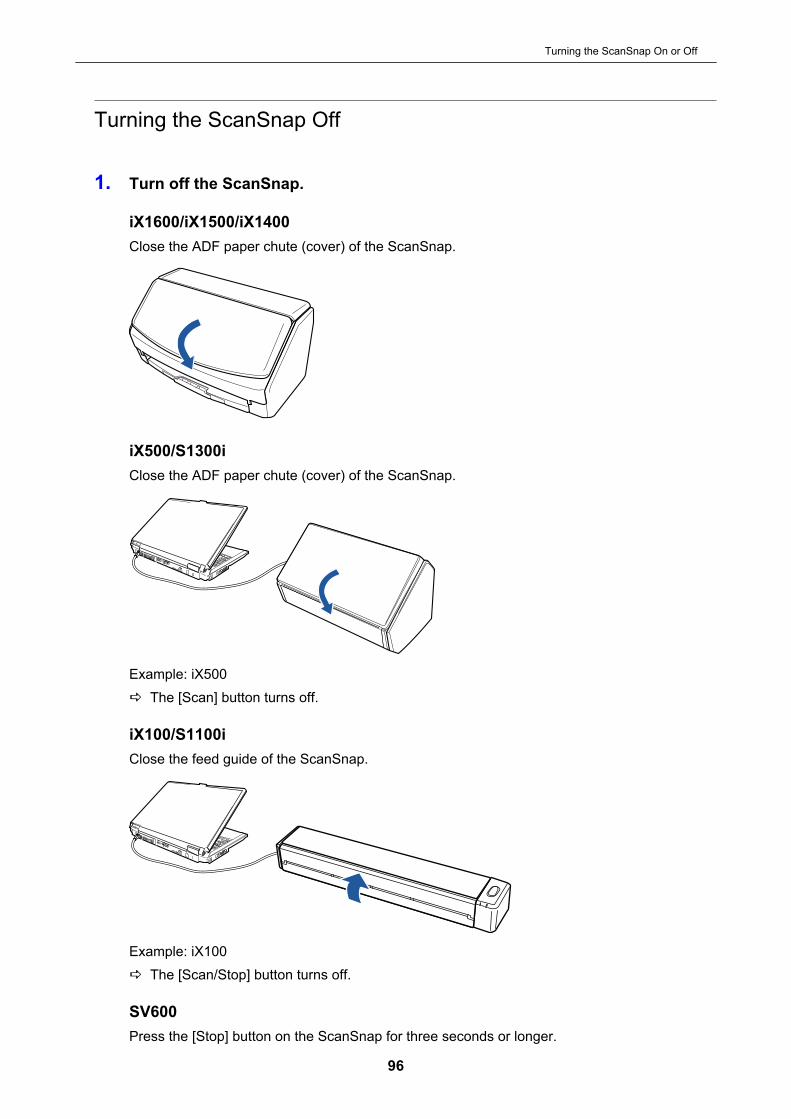
Turning the ScanSnap Off
1. Turn off the ScanSnap.
iX1600/iX1500/iX1400Close the ADF paper chute (cover) of the ScanSnap.
iX500/S1300iClose the ADF paper chute (cover) of the ScanSnap.
Example: iX500a The [Scan] button turns off.
iX100/S1100iClose the feed guide of the ScanSnap.
Example: iX100a The [Scan/Stop] button turns off.
SV600Press the [Stop] button on the ScanSnap for three seconds or longer.
Turning the ScanSnap On or Off
96
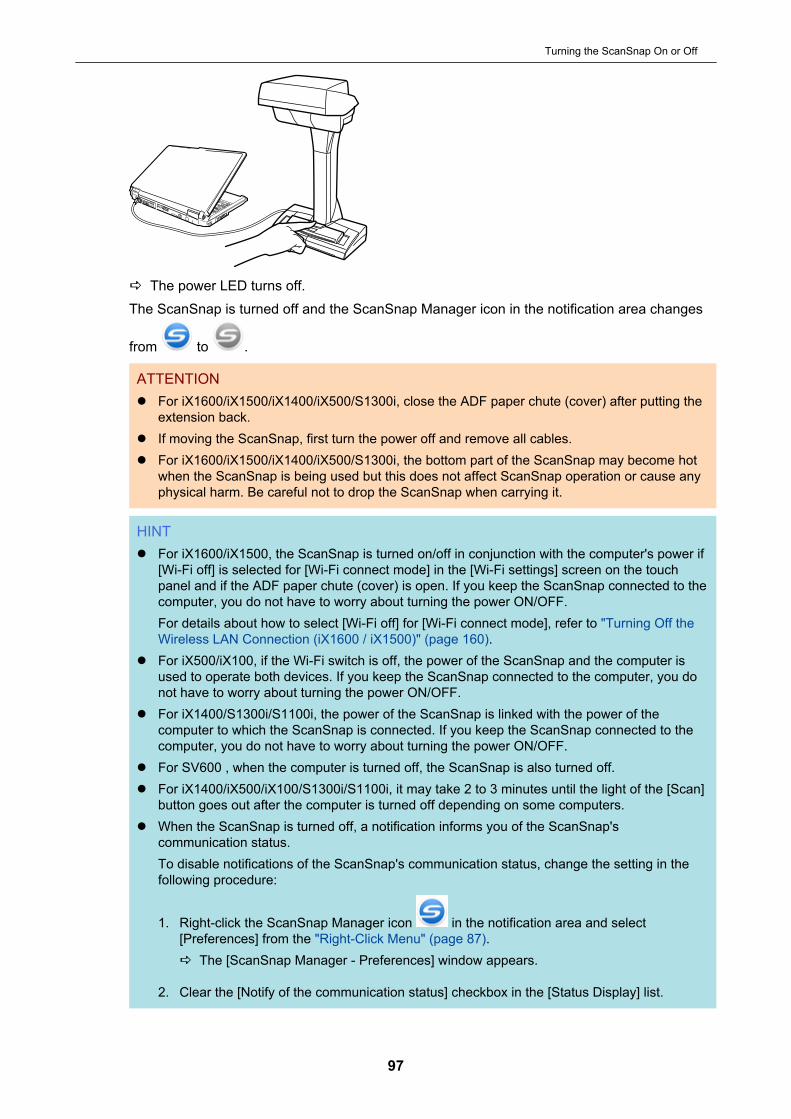
a The power LED turns off.The ScanSnap is turned off and the ScanSnap Manager icon in the notification area changes
from to .
ATTENTIONl For iX1600/iX1500/iX1400/iX500/S1300i, close the ADF paper chute (cover) after putting the
extension back.l If moving the ScanSnap, first turn the power off and remove all cables.l For iX1600/iX1500/iX1400/iX500/S1300i, the bottom part of the ScanSnap may become hot
when the ScanSnap is being used but this does not affect ScanSnap operation or cause anyphysical harm. Be careful not to drop the ScanSnap when carrying it.
HINTl For iX1600/iX1500, the ScanSnap is turned on/off in conjunction with the computer's power if
[Wi-Fi off] is selected for [Wi-Fi connect mode] in the [Wi-Fi settings] screen on the touchpanel and if the ADF paper chute (cover) is open. If you keep the ScanSnap connected to thecomputer, you do not have to worry about turning the power ON/OFF.For details about how to select [Wi-Fi off] for [Wi-Fi connect mode], refer to "Turning Off theWireless LAN Connection (iX1600 / iX1500)" (page 160).
l For iX500/iX100, if the Wi-Fi switch is off, the power of the ScanSnap and the computer isused to operate both devices. If you keep the ScanSnap connected to the computer, you donot have to worry about turning the power ON/OFF.
l For iX1400/S1300i/S1100i, the power of the ScanSnap is linked with the power of thecomputer to which the ScanSnap is connected. If you keep the ScanSnap connected to thecomputer, you do not have to worry about turning the power ON/OFF.
l For SV600 , when the computer is turned off, the ScanSnap is also turned off.l For iX1400/iX500/iX100/S1300i/S1100i, it may take 2 to 3 minutes until the light of the [Scan]
button goes out after the computer is turned off depending on some computers.l When the ScanSnap is turned off, a notification informs you of the ScanSnap's
communication status.To disable notifications of the ScanSnap's communication status, change the setting in thefollowing procedure:
1. Right-click the ScanSnap Manager icon in the notification area and select[Preferences] from the "Right-Click Menu" (page 87).a The [ScanSnap Manager - Preferences] window appears.
2. Clear the [Notify of the communication status] checkbox in the [Status Display] list.
Turning the ScanSnap On or Off
97
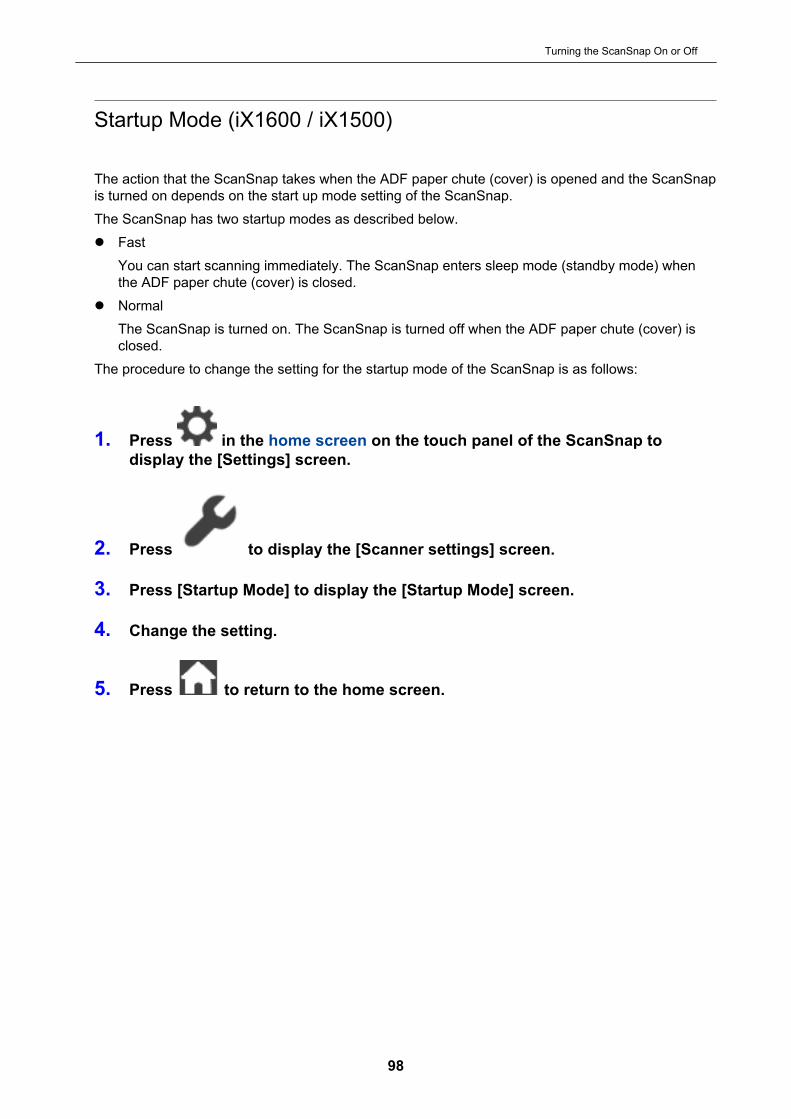
Startup Mode (iX1600 / iX1500)
The action that the ScanSnap takes when the ADF paper chute (cover) is opened and the ScanSnapis turned on depends on the start up mode setting of the ScanSnap.The ScanSnap has two startup modes as described below.l Fast
You can start scanning immediately. The ScanSnap enters sleep mode (standby mode) whenthe ADF paper chute (cover) is closed.
l NormalThe ScanSnap is turned on. The ScanSnap is turned off when the ADF paper chute (cover) isclosed.
The procedure to change the setting for the startup mode of the ScanSnap is as follows:
1. Press in the home screen on the touch panel of the ScanSnap todisplay the [Settings] screen.
2. Press to display the [Scanner settings] screen.
3. Press [Startup Mode] to display the [Startup Mode] screen.
4. Change the setting.
5. Press to return to the home screen.
Turning the ScanSnap On or Off
98
Sleep Mode
When the ScanSnap is on and has not been used for the following period of time, it enters sleep(power saving) mode.
iX1600/iX1500/iX1400/SV60015 minutes
iX50014 minutes
iX100/S1300i/S1100i1 minute
Turning the ScanSnap On or Off
99

Automatic Power OFF (iX1600 / iX1500 / iX1400 / iX500 / iX100 /SV600 / S1300i)
When the ScanSnap is turned on and left unused for the specified time, it will turn itself offautomatically.
HINTl For iX1600/iX1500/iX1400/iX500/SV600/S1300i, a notification informs you 5 minutes before the
ScanSnap turns off automatically.l For iX100, a notification appears in the following cases:
- When a USB cable is used for connection, the ScanSnap will turn off automatically five minuteslater.
- When the ScanSnap is powered by the battery, the ScanSnap has turned off automatically.
Turning the ScanSnap back on after the ScanSnap Has Turned offAutomatically
iX1600/iX1500To turn the ScanSnap back on, perform one of the following operations:l Press the touch panel of the ScanSnapl Close the ADF paper chute (cover) and open it again
HINTTo continue using the ScanSnap, reset the time until auto power-off by performing one of the following:l Load a document in the ScanSnapl Press the touch panel of the ScanSnapl Close the ADF paper chute (cover) and open it again
iX1400/iX500/S1300iTo turn the ScanSnap back on, perform one of the following operations:l Press the [Scan] button on the ScanSnap (this will not start scanning)l Close the ADF paper chute (cover) and open it again
HINTTo continue using the ScanSnap, reset the time until auto power-off by performing one of the following:l Load a document in the ScanSnapl Press the [Scan] button on the ScanSnapl Close the ADF paper chute (cover) and open it again
iX100To turn the ScanSnap back on, perform one of the following operations:l Press the [Scan/Stop] button on the ScanSnapl Close the feed guide and open it again
Turning the ScanSnap On or Off
100

HINTTo continue using the ScanSnap, reset the time until auto power-off by performing one of the following:l Insert a document in the ScanSnapl Press the [Scan/Stop] button on the ScanSnapl Close the feed guide and open it again
SV600To turn the ScanSnap back on, perform one of the following operations:l Press the [Scan] button on the ScanSnap (this will not start scanning)l Press the [Stop] button on the ScanSnap.
HINTTo continue using the ScanSnap, reset the time until auto power-off by pressing the [Scan] button onthe ScanSnap.
Changing the ScanSnap's Power Settings
iX1600/iX1500
1. Press in the home screen on the touch panel of the ScanSnap to display the [Settings]screen.
2. Press to display the [Scanner settings] screen.
3. Press [Automatic power off] to display the [Automatic power off] screen.
4. Press the setting field for [ScanSnap will automatically power off] to display a list.
5. Change the setting.
6. Press to return to the home screen.
iX1400/iX500/iX100/SV600/S1300iYou can change the time of the ScanSnap to turn off automatically or change the setting so that itwill not turn off automatically. Set according to the following procedures:
1. Right-click the ScanSnap Manager icon in the notification area and select [Preferences]from the "Right-Click Menu" (page 87).a The [ScanSnap Manager - Preferences] window appears.
2. In the [Power] list, change the settings for [Power setting] based on how it is connected.
Turning the ScanSnap On or Off
101
Checking the Remaining Battery Power (iX100)
The ScanSnap has a battery.
To check the remaining battery power, right-click the ScanSnap Manager icon in thenotification area located at the far right of the taskbar, and check [Battery] in the "Right-Click Menu"(page 87).
HINTl The remaining battery power can be checked also in the [ScanSnap Manager - Scanner and driver
information] window.To open the [ScanSnap Manager - Scanner and driver information] window, select [ScanSnapinformation] in the "Right-Click Menu" (page 87).
l A notification appears in the following cases:- The remaining battery power is 10% or less.- No battery power remains and the ScanSnap is turned off.
Turning the ScanSnap On or Off
102

Screens and Operations on the Touch Panel (iX1600 /iX1500)
l "Screens on the Touch Panel (iX1600 / iX1500)" (page 104)l "Entering Characters on the Touch Panel (iX1600 / iX1500)" (page 109)l "Checking the Notification Displayed on the Touch Panel (iX1600 / iX1500)" (page 110)
Screens and Operations on the Touch Panel (iX1600 / iX1500)
103
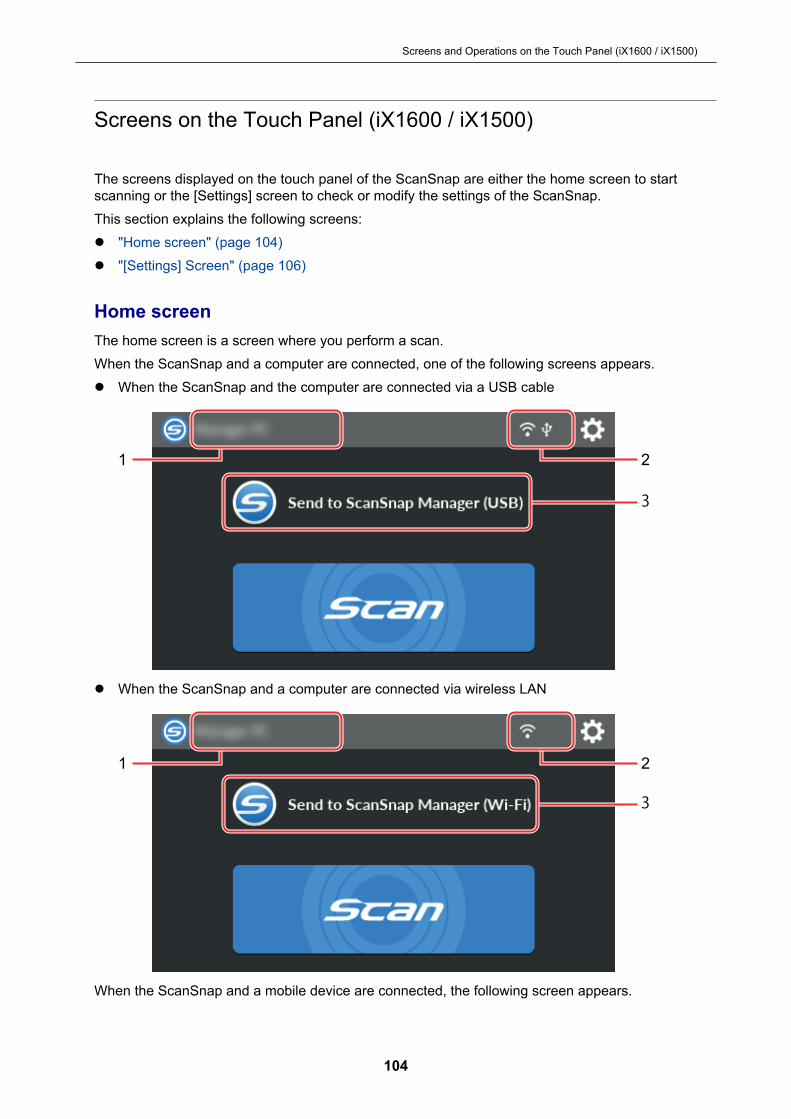
Screens on the Touch Panel (iX1600 / iX1500)
The screens displayed on the touch panel of the ScanSnap are either the home screen to startscanning or the [Settings] screen to check or modify the settings of the ScanSnap.This section explains the following screens:l "Home screen" (page 104)l "[Settings] Screen" (page 106)
Home screenThe home screen is a screen where you perform a scan.When the ScanSnap and a computer are connected, one of the following screens appears.l When the ScanSnap and the computer are connected via a USB cable
1 2
3
l When the ScanSnap and a computer are connected via wireless LAN
3
1 2
When the ScanSnap and a mobile device are connected, the following screen appears.
Screens and Operations on the Touch Panel (iX1600 / iX1500)
104
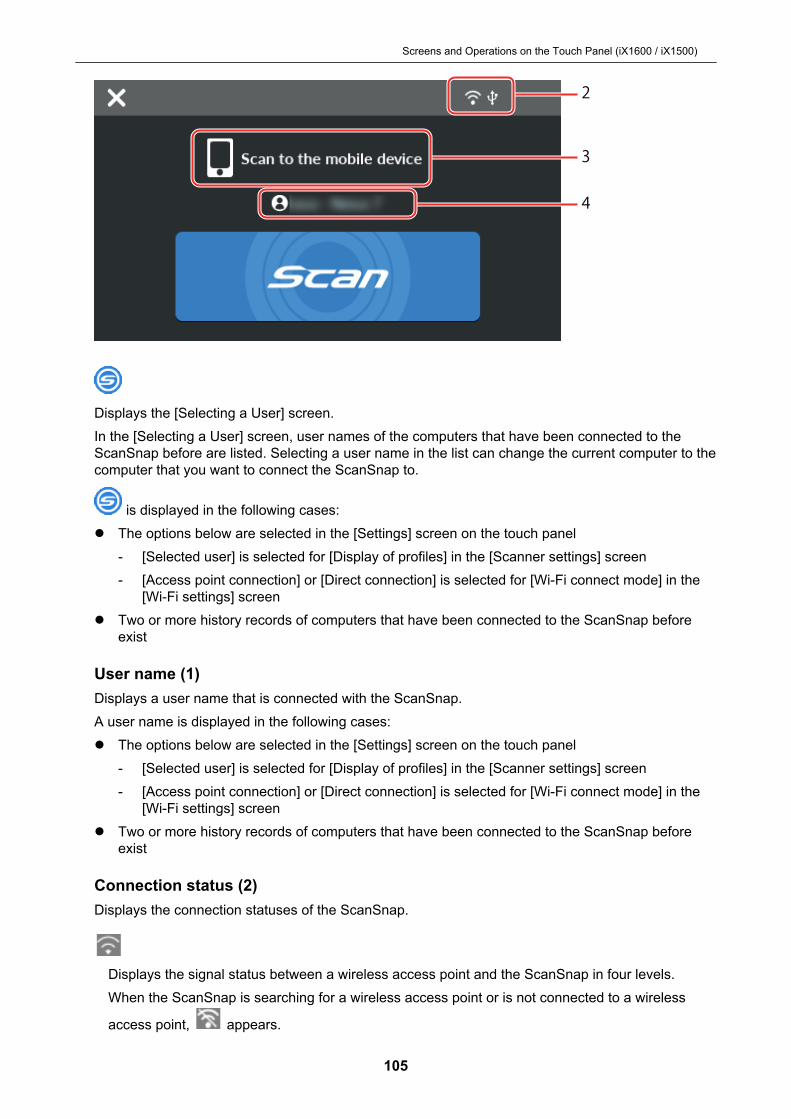
3
2
4
Displays the [Selecting a User] screen.In the [Selecting a User] screen, user names of the computers that have been connected to theScanSnap before are listed. Selecting a user name in the list can change the current computer to thecomputer that you want to connect the ScanSnap to.
is displayed in the following cases:l The options below are selected in the [Settings] screen on the touch panel
- [Selected user] is selected for [Display of profiles] in the [Scanner settings] screen- [Access point connection] or [Direct connection] is selected for [Wi-Fi connect mode] in the
[Wi-Fi settings] screenl Two or more history records of computers that have been connected to the ScanSnap before
exist
User name (1)Displays a user name that is connected with the ScanSnap.A user name is displayed in the following cases:l The options below are selected in the [Settings] screen on the touch panel
- [Selected user] is selected for [Display of profiles] in the [Scanner settings] screen- [Access point connection] or [Direct connection] is selected for [Wi-Fi connect mode] in the
[Wi-Fi settings] screenl Two or more history records of computers that have been connected to the ScanSnap before
exist
Connection status (2)Displays the connection statuses of the ScanSnap.
Displays the signal status between a wireless access point and the ScanSnap in four levels.When the ScanSnap is searching for a wireless access point or is not connected to a wireless
access point, appears.
Screens and Operations on the Touch Panel (iX1600 / iX1500)
105
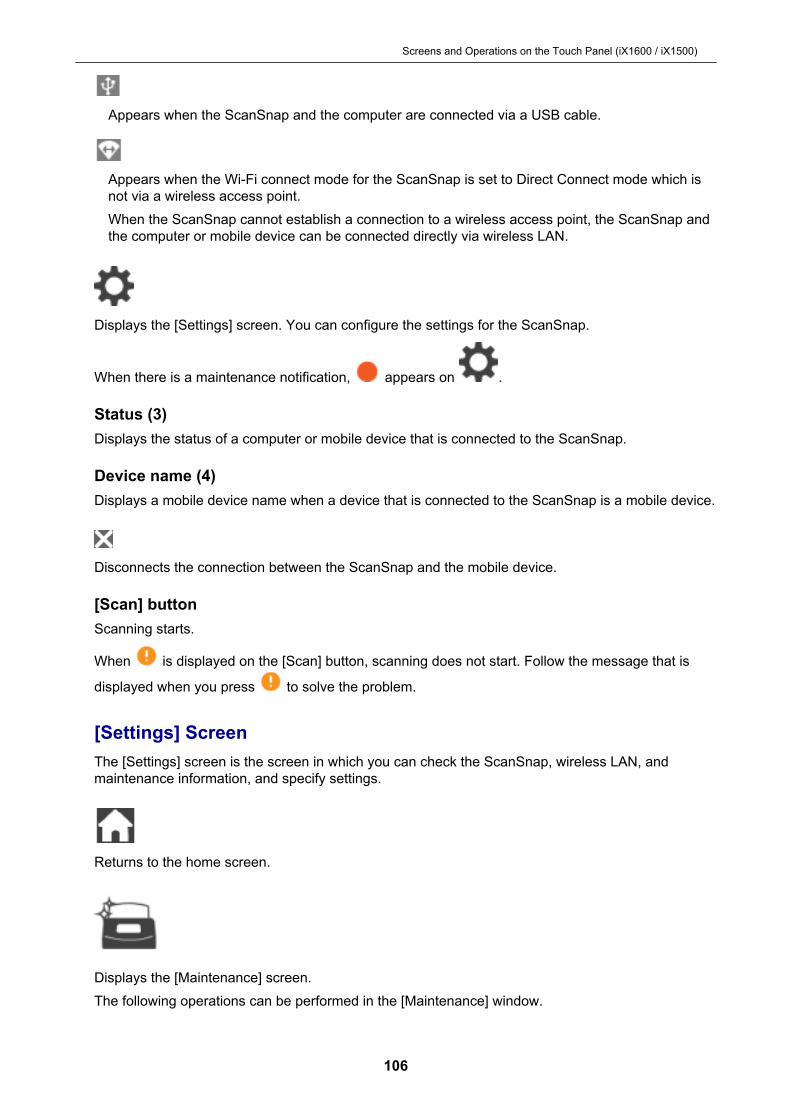
Appears when the ScanSnap and the computer are connected via a USB cable.
Appears when the Wi-Fi connect mode for the ScanSnap is set to Direct Connect mode which isnot via a wireless access point.When the ScanSnap cannot establish a connection to a wireless access point, the ScanSnap andthe computer or mobile device can be connected directly via wireless LAN.
Displays the [Settings] screen. You can configure the settings for the ScanSnap.
When there is a maintenance notification, appears on .
Status (3)Displays the status of a computer or mobile device that is connected to the ScanSnap.
Device name (4)Displays a mobile device name when a device that is connected to the ScanSnap is a mobile device.
Disconnects the connection between the ScanSnap and the mobile device.
[Scan] buttonScanning starts.
When is displayed on the [Scan] button, scanning does not start. Follow the message that is
displayed when you press to solve the problem.
[Settings] ScreenThe [Settings] screen is the screen in which you can check the ScanSnap, wireless LAN, andmaintenance information, and specify settings.
Returns to the home screen.
Displays the [Maintenance] screen.The following operations can be performed in the [Maintenance] window.
Screens and Operations on the Touch Panel (iX1600 / iX1500)
106

l Specifying the setting to notify you when the scanner detects dirt on the glass which causesvertical streaks on scanned images
l Checking when to replace consumablesl Starting the cleaning operation for the feed rollers and eject rollersl Updating the firmware to a newer version
In the following cases, appears on .l When dirt on the glass is detectedl When the scanned page count exceeded the replacement cyclel When the latest firmware is available
Displays the [Scanner settings] screen.The following operations can be performed in the [Scanner settings] window.l Checking the information on the ScanSnap, wireless LAN, or networkl Configuring the following settings
- Name of the ScanSnap- Whether or not to display the results regarding the saving process of scanned images in a
cloud service- Startup mode- Automatic power off- Method to display profiles- Language displayed on the touch panel- Type of USB operation
l Resetting the following settings- Settings other than [Display language] in the [Scanner settings] screen- Setting for the [Notify when the latest is available] checkbox in [Update firmware] in the
[Maintenance] screen- Setting for the [Notify when glass is dirty] checkbox in [Dust detection] in the [Maintenance]
screen
Displays the [Wi-Fi settings] screen.The following operations can be performed in the [Wi-Fi settings] window.l Switching the wireless LAN connect mode for connecting the ScanSnap to a computer or mobile
devicel Modifying the settings for each connect mode
Screens and Operations on the Touch Panel (iX1600 / iX1500)
107
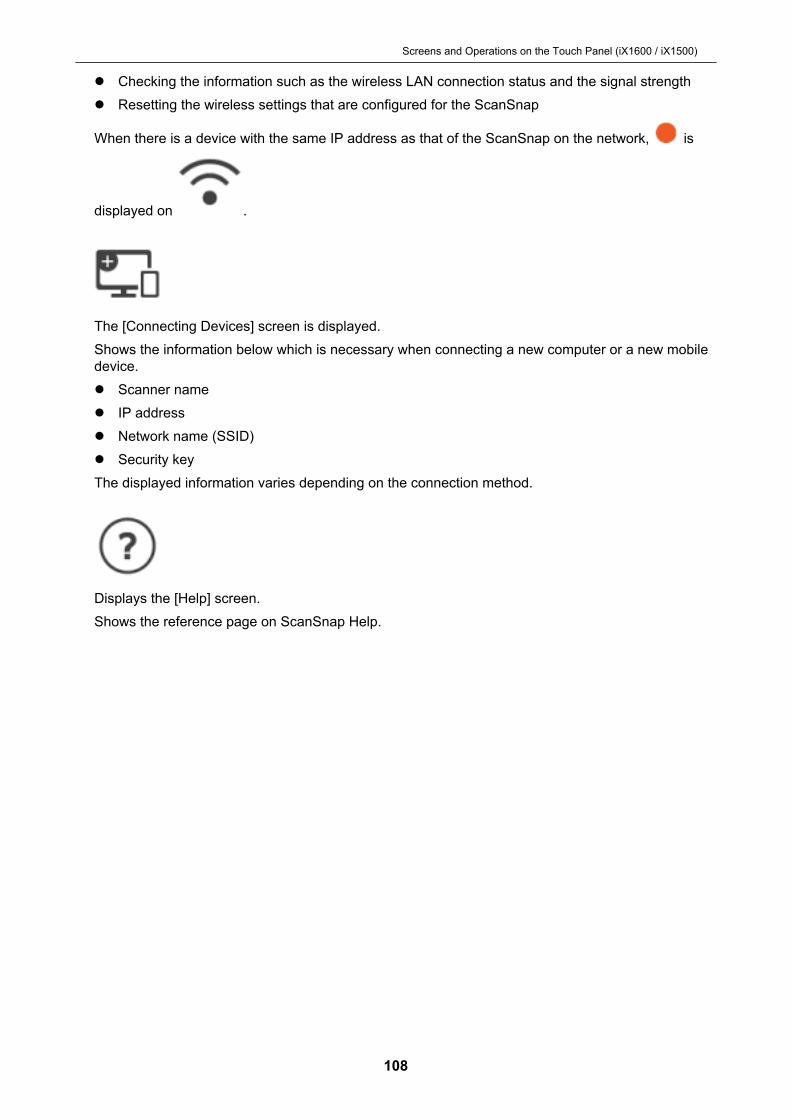
l Checking the information such as the wireless LAN connection status and the signal strengthl Resetting the wireless settings that are configured for the ScanSnap
When there is a device with the same IP address as that of the ScanSnap on the network, is
displayed on .
The [Connecting Devices] screen is displayed.Shows the information below which is necessary when connecting a new computer or a new mobiledevice.l Scanner namel IP addressl Network name (SSID)l Security keyThe displayed information varies depending on the connection method.
Displays the [Help] screen.Shows the reference page on ScanSnap Help.
Screens and Operations on the Touch Panel (iX1600 / iX1500)
108
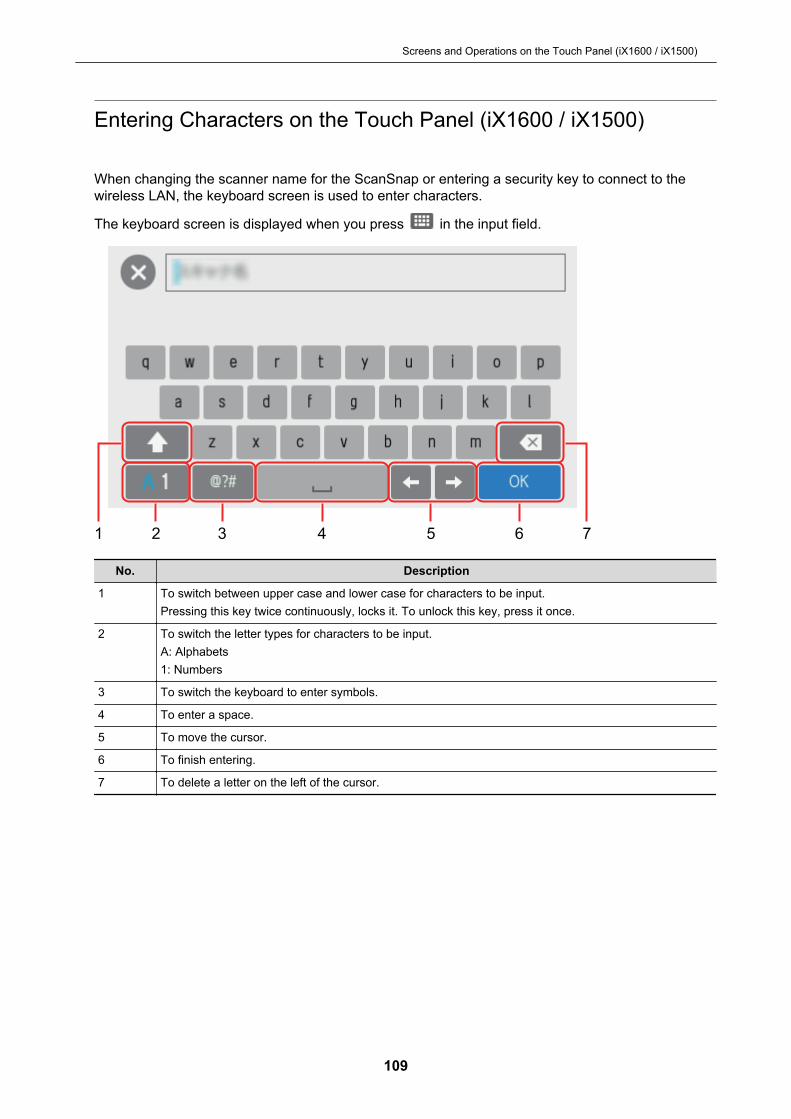
Entering Characters on the Touch Panel (iX1600 / iX1500)
When changing the scanner name for the ScanSnap or entering a security key to connect to thewireless LAN, the keyboard screen is used to enter characters.
The keyboard screen is displayed when you press in the input field.
1 2 3 4 65 7
No. Description
1 To switch between upper case and lower case for characters to be input.Pressing this key twice continuously, locks it. To unlock this key, press it once.
2 To switch the letter types for characters to be input.A: Alphabets1: Numbers
3 To switch the keyboard to enter symbols.
4 To enter a space.
5 To move the cursor.
6 To finish entering.
7 To delete a letter on the left of the cursor.
Screens and Operations on the Touch Panel (iX1600 / iX1500)
109
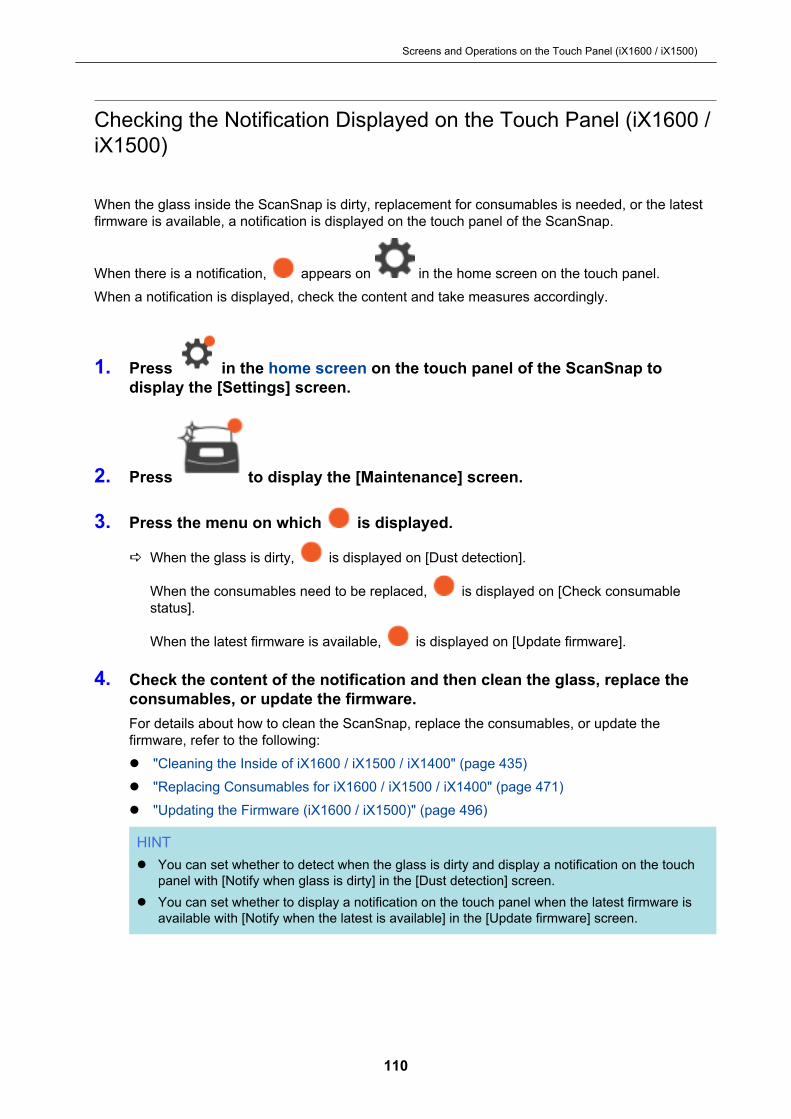
Checking the Notification Displayed on the Touch Panel (iX1600 /iX1500)
When the glass inside the ScanSnap is dirty, replacement for consumables is needed, or the latestfirmware is available, a notification is displayed on the touch panel of the ScanSnap.
When there is a notification, appears on in the home screen on the touch panel.When a notification is displayed, check the content and take measures accordingly.
1. Press in the home screen on the touch panel of the ScanSnap todisplay the [Settings] screen.
2. Press to display the [Maintenance] screen.
3. Press the menu on which is displayed.
a When the glass is dirty, is displayed on [Dust detection].
When the consumables need to be replaced, is displayed on [Check consumablestatus].
When the latest firmware is available, is displayed on [Update firmware].
4. Check the content of the notification and then clean the glass, replace theconsumables, or update the firmware.For details about how to clean the ScanSnap, replace the consumables, or update thefirmware, refer to the following:l "Cleaning the Inside of iX1600 / iX1500 / iX1400" (page 435)l "Replacing Consumables for iX1600 / iX1500 / iX1400" (page 471)l "Updating the Firmware (iX1600 / iX1500)" (page 496)
HINTl You can set whether to detect when the glass is dirty and display a notification on the touch
panel with [Notify when glass is dirty] in the [Dust detection] screen.l You can set whether to display a notification on the touch panel when the latest firmware is
available with [Notify when the latest is available] in the [Update firmware] screen.
Screens and Operations on the Touch Panel (iX1600 / iX1500)
110
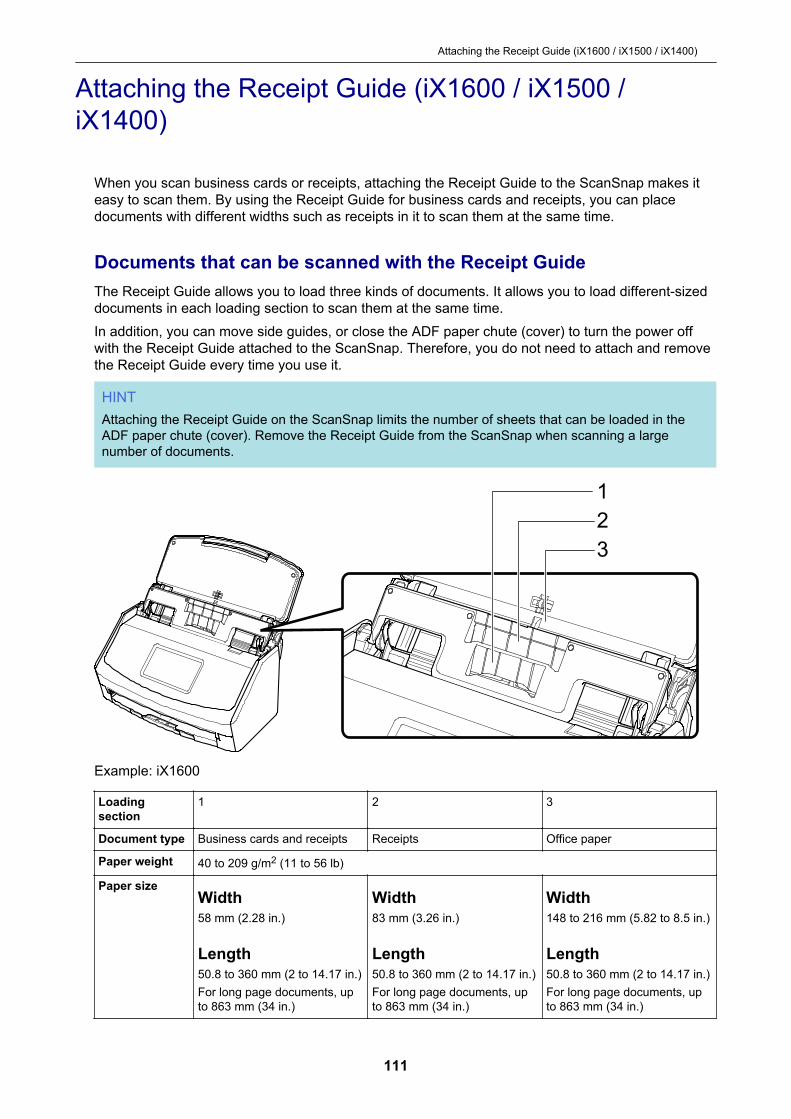
Attaching the Receipt Guide (iX1600 / iX1500 /iX1400)
When you scan business cards or receipts, attaching the Receipt Guide to the ScanSnap makes iteasy to scan them. By using the Receipt Guide for business cards and receipts, you can placedocuments with different widths such as receipts in it to scan them at the same time.
Documents that can be scanned with the Receipt GuideThe Receipt Guide allows you to load three kinds of documents. It allows you to load different-sizeddocuments in each loading section to scan them at the same time.In addition, you can move side guides, or close the ADF paper chute (cover) to turn the power offwith the Receipt Guide attached to the ScanSnap. Therefore, you do not need to attach and removethe Receipt Guide every time you use it.
HINTAttaching the Receipt Guide on the ScanSnap limits the number of sheets that can be loaded in theADF paper chute (cover). Remove the Receipt Guide from the ScanSnap when scanning a largenumber of documents.
1
2
3
Example: iX1600
Loadingsection
1 2 3
Document type Business cards and receipts Receipts Office paper
Paper weight 40 to 209 g/m2 (11 to 56 lb)
Paper sizeWidth58 mm (2.28 in.)
Length50.8 to 360 mm (2 to 14.17 in.)For long page documents, upto 863 mm (34 in.)
Width83 mm (3.26 in.)
Length50.8 to 360 mm (2 to 14.17 in.)For long page documents, upto 863 mm (34 in.)
Width148 to 216 mm (5.82 to 8.5 in.)
Length50.8 to 360 mm (2 to 14.17 in.)For long page documents, upto 863 mm (34 in.)
Attaching the Receipt Guide (iX1600 / iX1500 / iX1400)
111
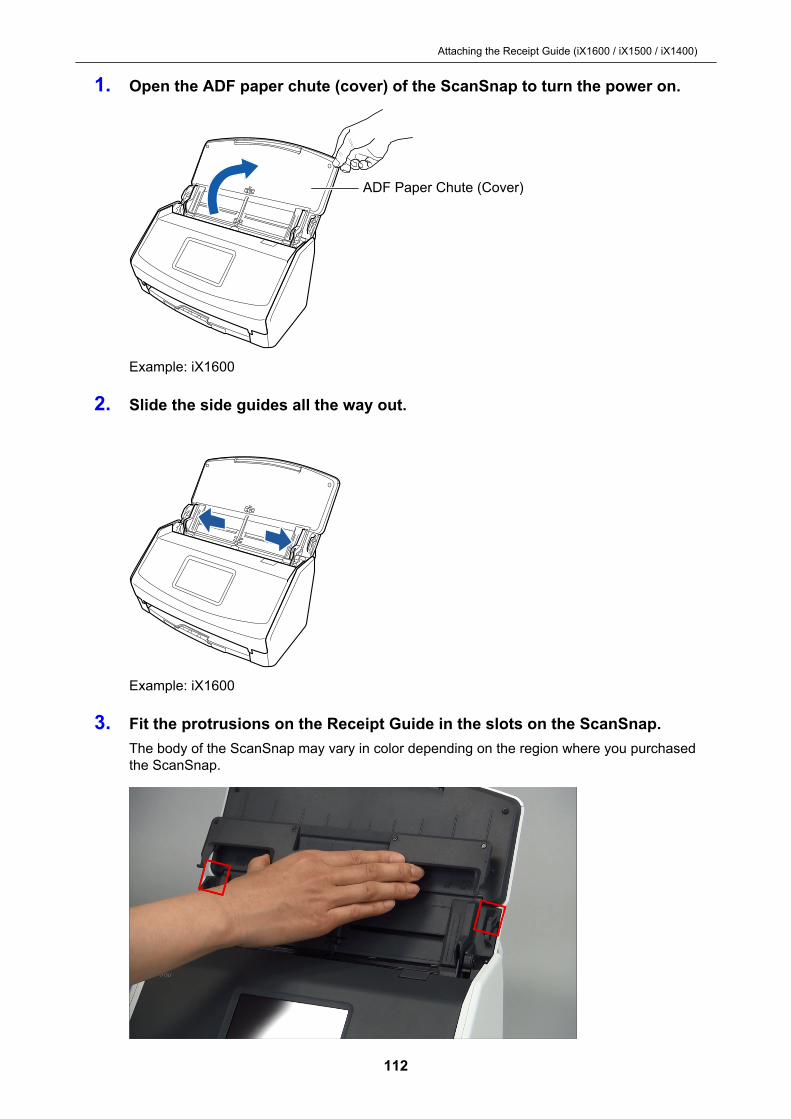
1. Open the ADF paper chute (cover) of the ScanSnap to turn the power on.
ADF Paper Chute (Cover)
Example: iX1600
2. Slide the side guides all the way out.
Example: iX1600
3. Fit the protrusions on the Receipt Guide in the slots on the ScanSnap.The body of the ScanSnap may vary in color depending on the region where you purchasedthe ScanSnap.
Attaching the Receipt Guide (iX1600 / iX1500 / iX1400)
112

Example: iX1600
4. Slide the Receipt Guide down along the guide.The body of the ScanSnap may vary in color depending on the region where you purchasedthe ScanSnap.
Example: iX1600
5. Press the protrusions on the right and left firmly to fit them in the slots untilit clicks.The body of the ScanSnap may vary in color depending on the region where you purchasedthe ScanSnap.
Example: iX1600You can remove the Receipt Guide by holding it with one hand and pulling it.
Attaching the Receipt Guide (iX1600 / iX1500 / iX1400)
113
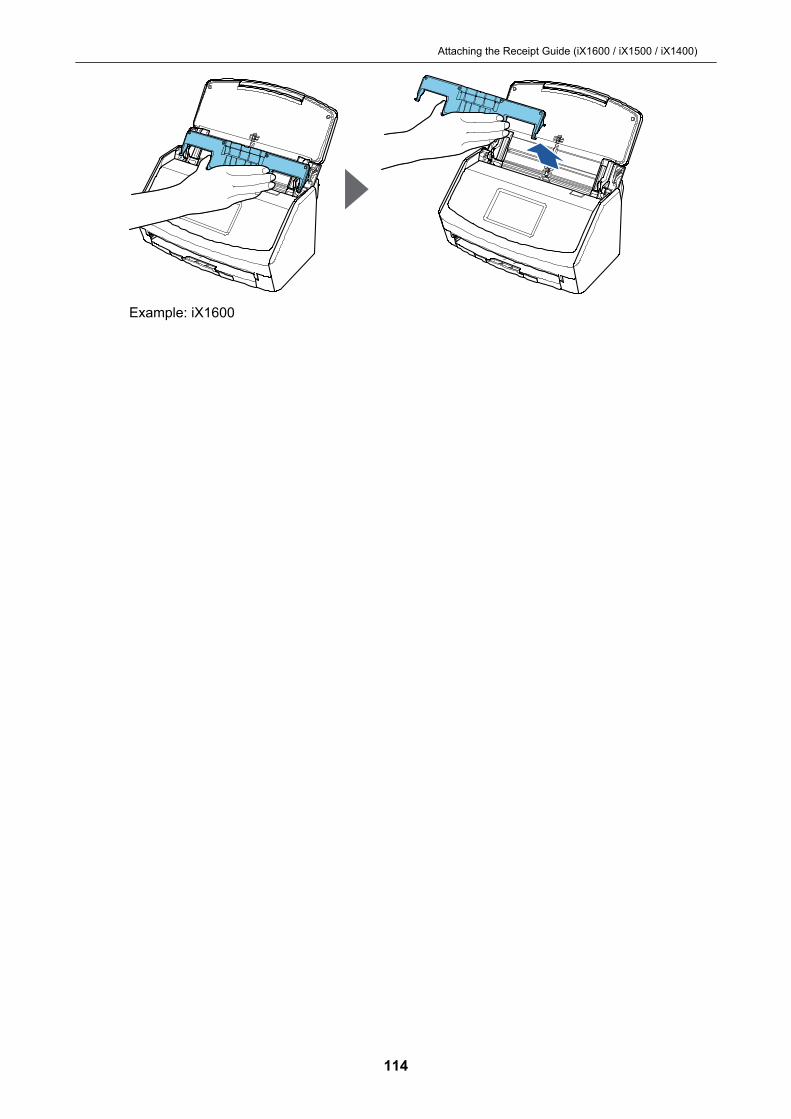
Example: iX1600
Attaching the Receipt Guide (iX1600 / iX1500 / iX1400)
114
Connecting the ScanSnap via Wireless LAN(iX1600 / iX1500)
By connecting the ScanSnap to a computer or a mobile device via wireless LAN, you can scandocuments.Select one of the following wireless modes to connect the ScanSnap to the computer or mobiledevice.l Access Point Connect mode
When a wireless LAN environment has already been configured, the ScanSnap and thecomputer or mobile device are connected via a wireless access point.
l Direct Connect modeWhen a wireless LAN environment has not been configured or the ScanSnap cannot establish aconnection to a wireless access point, the ScanSnap and the computer or mobile device areconnected directly via wireless LAN.
The wireless mode can be switched from the touch panel of the ScanSnap.l "Preparations for Connecting the ScanSnap via Wireless LAN (iX1600 / iX1500)" (page 116)l "Connecting the ScanSnap to a Wireless LAN (iX1600 / iX1500)" (page 117)l "Connecting the ScanSnap to a computer or mobile device via Wireless LAN (iX1600 / iX1500)"
(page 122)
Connecting the ScanSnap via Wireless LAN (iX1600 / iX1500)
115
Preparations for Connecting the ScanSnap viaWireless LAN (iX1600 / iX1500)
To connect the ScanSnap via wireless LAN, prepare the following:l An environment in which a wireless LAN is available
To connect the ScanSnap and a computer or a mobile device in Access Point Connect mode,prepare the wireless LAN environment.When connecting the ScanSnap to a wireless access point, you may need information such asan SSID (network name) and a security key (password).For details, refer to the manual for the wireless access point.
ATTENTIONDo not place the following within 100 mm (3.9 in.) of the ScanSnap, or near your wireless accesspoint.- Obstacles that block radio waves (such as walls and metal plates)- Devices that may cause signal interference (such as microwaves and cordless phones) and
wireless devices
l ScanSnap Connect ApplicationTo connect the ScanSnap and a mobile device, you need to install ScanSnap ConnectApplication on your mobile device.Download ScanSnap Connect Application for the mobile device from the following applicationstores:- App Store- Google Play- Amazon Appstore
Preparations for Connecting the ScanSnap via Wireless LAN (iX1600 / iX1500)
116
Connecting the ScanSnap to a Wireless LAN(iX1600 / iX1500)
To connect the ScanSnap and a computer or a mobile device in Access Point Connect mode,connect the ScanSnap to a wireless access point.
HINTWhen you cannot connect the ScanSnap to a wireless access point, use Direct Connect mode toconnect the ScanSnap to a computer or a mobile device directly.For details, refer to the following:l "Connecting the ScanSnap to a Computer Directly in Direct Connect Mode (iX1600 / iX1500)"
(page 126)l "Connecting the ScanSnap to a Mobile Device in Direct Connect Mode (iX1600 / iX1500)" (page
128)
l "Connecting the ScanSnap to a Wireless Access Point by Using the ScanSnap Wireless SetupTool (iX1600 / iX1500)" (page 118)
l "Connecting the ScanSnap to a Wireless Access Point from the Touch Panel (iX1600 / iX1500)"(page 119)
Connecting the ScanSnap to a Wireless LAN (iX1600 / iX1500)
117

Connecting the ScanSnap to a Wireless Access Point by Usingthe ScanSnap Wireless Setup Tool (iX1600 / iX1500)
The ScanSnap Wireless Setup Tool is an application to configure the wireless settings required forconnecting your ScanSnap via wireless LAN in a wizard format. The ScanSnap Wireless Setup Toolcan be used to configure and check the following wireless LAN settings and connection.l Connecting the ScanSnap to a wireless access pointl Setting the IP address and name for the ScanSnapl Checking the connection between the ScanSnap and the computerFollow the procedure below to start the ScanSnap Wireless Setup Tool and configure the wirelesssettings.
1. Start the ScanSnap Wireless Setup Tool.l Windows 10
Select [Start] menu → [ScanSnap Manager] → [ScanSnap Wireless Setup Tool].l Windows 8.1
Click on the lower left side of the Start screen, and select [ScanSnap Wireless SetupTool] under [ScanSnap Manager] on the All apps screen.
l Windows 7Select [Start] menu → [All Programs] → [ScanSnap Manager] → [ScanSnap WirelessSetup Tool].
a The ScanSnap Wireless Setup Tool will start running.
2. Click the [Wireless Network Setup Wizard] button in the mainmenu.a The Wireless Network Setup Wizard appears.
3. Follow the instructions in the Wireless Network Setup Wizard to configurethe wireless settings.Configure and check the wireless settings based on the wireless LAN environment in which theScanSnap is used.
HINTl For details and operation of ScanSnap Wireless Setup Tool, refer to the ScanSnap Wireless Setup
Tool Help.l The ScanSnap Wireless Setup Tool is also started up when the ScanSnap software is installed.
Connecting the ScanSnap to a Wireless LAN (iX1600 / iX1500)
118
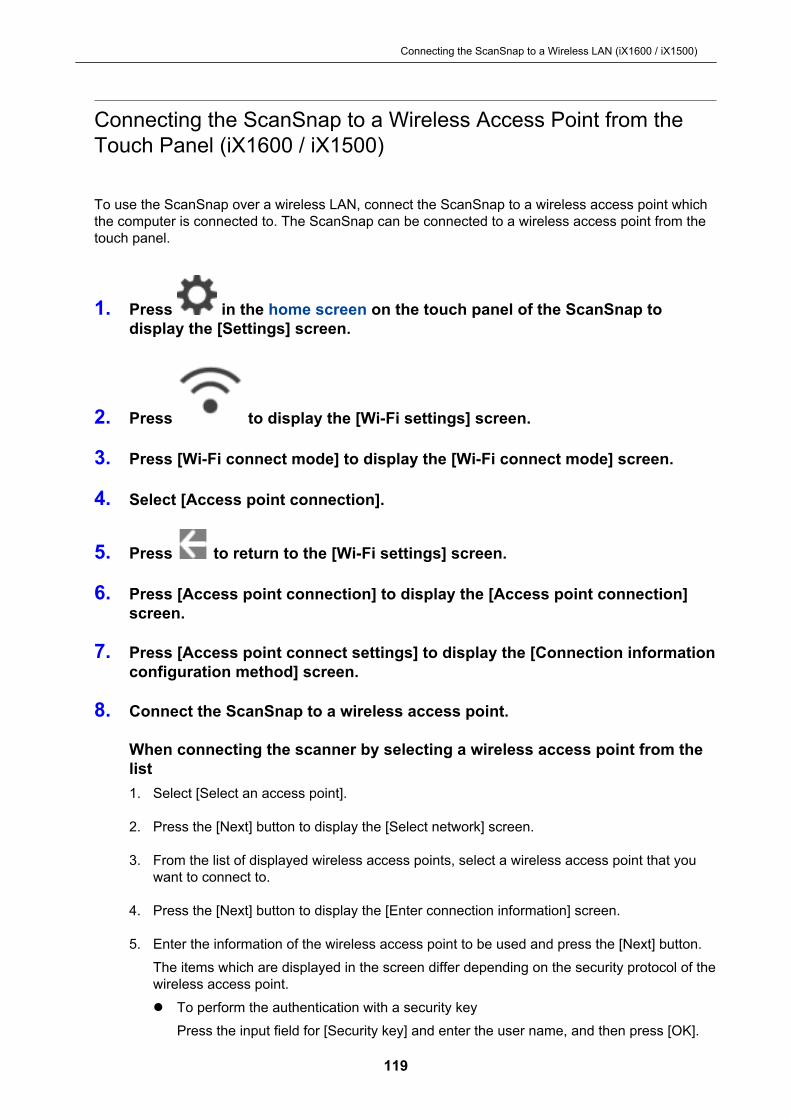
Connecting the ScanSnap to a Wireless Access Point from theTouch Panel (iX1600 / iX1500)
To use the ScanSnap over a wireless LAN, connect the ScanSnap to a wireless access point whichthe computer is connected to. The ScanSnap can be connected to a wireless access point from thetouch panel.
1. Press in the home screen on the touch panel of the ScanSnap todisplay the [Settings] screen.
2. Press to display the [Wi-Fi settings] screen.
3. Press [Wi-Fi connect mode] to display the [Wi-Fi connect mode] screen.
4. Select [Access point connection].
5. Press to return to the [Wi-Fi settings] screen.
6. Press [Access point connection] to display the [Access point connection]screen.
7. Press [Access point connect settings] to display the [Connection informationconfiguration method] screen.
8. Connect the ScanSnap to a wireless access point.
When connecting the scanner by selecting a wireless access point from thelist1. Select [Select an access point].
2. Press the [Next] button to display the [Select network] screen.
3. From the list of displayed wireless access points, select a wireless access point that youwant to connect to.
4. Press the [Next] button to display the [Enter connection information] screen.
5. Enter the information of the wireless access point to be used and press the [Next] button.The items which are displayed in the screen differ depending on the security protocol of thewireless access point.l To perform the authentication with a security key
Press the input field for [Security key] and enter the user name, and then press [OK].
Connecting the ScanSnap to a Wireless LAN (iX1600 / iX1500)
119
l To perform the authentication with a client certificatePress [Client certificate] and select the certificate to be used.
HINTTo check the details about the certificate, press the [Certificate] button.
l To perform the authentication with a user ID and a passwordPress the input field and enter a value for [User ID] and [Password] respectively, andthen press [OK].
l To perform the authentication with an external IDPress the input field for [External ID], enter the external ID, and press [OK].
6. Press the [Complete] button in the [Check Connection Results] screen.
7. Press to display the home screen.
When connecting the scanner by entering information of a wireless accesspoint1. Select [Configure manually].
2. Press the [Next] button to display the [Enter connection information] screen.
3. Enter the information of the wireless access point to be used and press the [Next] button.The items which are displayed in the screen differ depending on the security protocol of thewireless access point.
4. Press the [Complete] button in the [Check Connection Results] screen.
5. Press to display the home screen.
When connecting the scanner by using the WPS button of a wireless accesspoint1. Select [WPS (button)].
2. Press the [Next] button.
3. Press the button for the WPS function on the wireless access point.The wireless access point is ready to be connected from the ScanSnap.
HINTFor details about the WPS function, refer to the manual of your wireless access point.
4. Go back to the touch panel of the ScanSnap, and press the [Next] button in the [WPS(button)] screen within two minutes.
5. Press the [Complete] button in the [Check Connection Results] screen.
Connecting the ScanSnap to a Wireless LAN (iX1600 / iX1500)
120
6. Press to display the home screen.
When connecting the scanner by using the PIN code of the WPS function of awireless access point1. Select [WPS (PIN)].
2. Press the [Next] button to display the [WPS (PIN)] screen.Take a note of the PIN that is displayed in the screen in case you forget it.
3. Open the window for setting the WPS for the wireless access point in a computer or mobiledevice, and enter the PIN for the ScanSnap.The wireless access point is ready to be connected from the ScanSnap.
HINTFor details about the WPS function, refer to the manual of your wireless access point.
4. Go back to the touch panel of the ScanSnap, and press the [Next] button in the [WPS(PIN)] screen within two minutes.
5. Press the [Complete] button in the [Check Connection Results] screen.
6. Press to display the home screen.
a The computer and the ScanSnap are connected via wireless LAN using the same wirelessaccess point.
Connecting the ScanSnap to a Wireless LAN (iX1600 / iX1500)
121

Connecting the ScanSnap to a computer or mobiledevice via Wireless LAN (iX1600 / iX1500)
l "Connecting the ScanSnap to a Computer in Access Point Connect Mode (iX1600 / iX1500)"(page 123)
l "Connecting the ScanSnap to a Mobile Device in Access Point Connect Mode (iX1600 / iX1500)"(page 125)
l "Connecting the ScanSnap to a Computer Directly in Direct Connect Mode (iX1600 / iX1500)"(page 126)
l "Connecting the ScanSnap to a Mobile Device in Direct Connect Mode (iX1600 / iX1500)" (page128)
Connecting the ScanSnap to a computer or mobile device via Wireless LAN (iX1600 / iX1500)
122
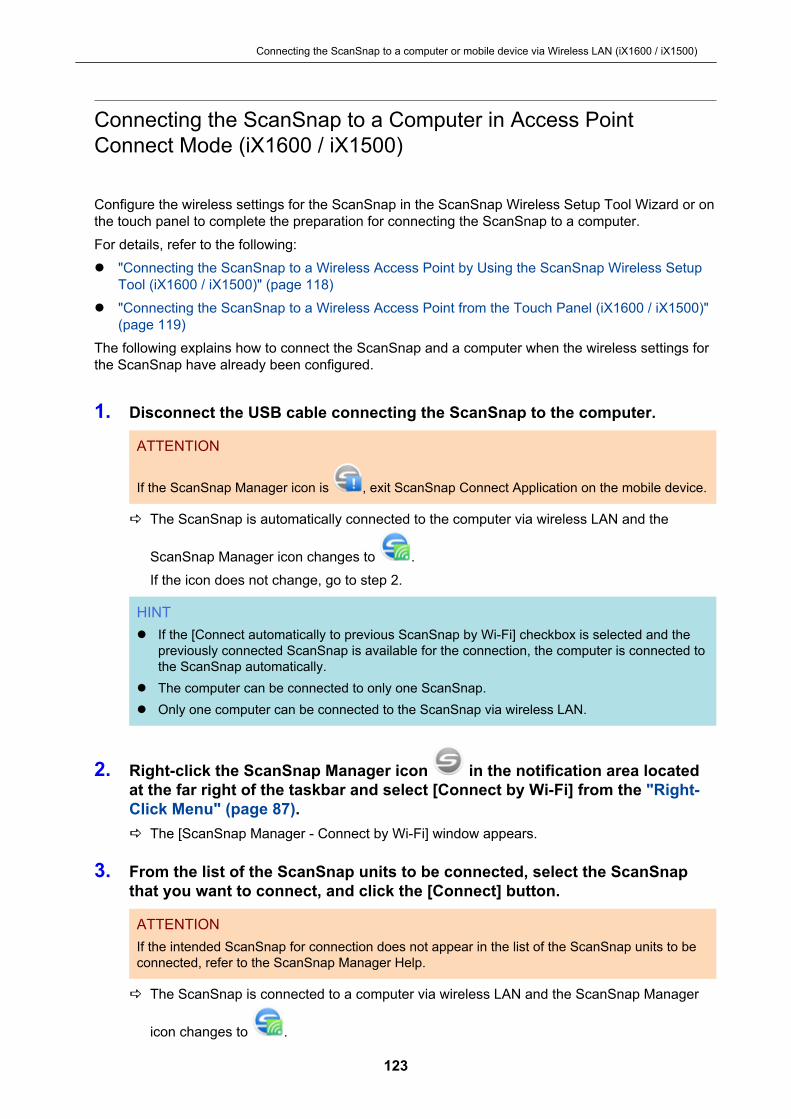
Connecting the ScanSnap to a Computer in Access PointConnect Mode (iX1600 / iX1500)
Configure the wireless settings for the ScanSnap in the ScanSnap Wireless Setup Tool Wizard or onthe touch panel to complete the preparation for connecting the ScanSnap to a computer.For details, refer to the following:l "Connecting the ScanSnap to a Wireless Access Point by Using the ScanSnap Wireless Setup
Tool (iX1600 / iX1500)" (page 118)l "Connecting the ScanSnap to a Wireless Access Point from the Touch Panel (iX1600 / iX1500)"
(page 119)The following explains how to connect the ScanSnap and a computer when the wireless settings forthe ScanSnap have already been configured.
1. Disconnect the USB cable connecting the ScanSnap to the computer.
ATTENTION
If the ScanSnap Manager icon is , exit ScanSnap Connect Application on the mobile device.
a The ScanSnap is automatically connected to the computer via wireless LAN and the
ScanSnap Manager icon changes to .If the icon does not change, go to step 2.
HINTl If the [Connect automatically to previous ScanSnap by Wi-Fi] checkbox is selected and the
previously connected ScanSnap is available for the connection, the computer is connected tothe ScanSnap automatically.
l The computer can be connected to only one ScanSnap.l Only one computer can be connected to the ScanSnap via wireless LAN.
2. Right-click the ScanSnap Manager icon in the notification area locatedat the far right of the taskbar and select [Connect by Wi-Fi] from the "Right-Click Menu" (page 87).a The [ScanSnap Manager - Connect by Wi-Fi] window appears.
3. From the list of the ScanSnap units to be connected, select the ScanSnapthat you want to connect, and click the [Connect] button.
ATTENTIONIf the intended ScanSnap for connection does not appear in the list of the ScanSnap units to beconnected, refer to the ScanSnap Manager Help.
a The ScanSnap is connected to a computer via wireless LAN and the ScanSnap Manager
icon changes to .
Connecting the ScanSnap to a computer or mobile device via Wireless LAN (iX1600 / iX1500)
123

HINTWhen the ScanSnap and a computer are connected via wireless LAN, a notification informs youof the communication status.
Connecting the ScanSnap to a computer or mobile device via Wireless LAN (iX1600 / iX1500)
124
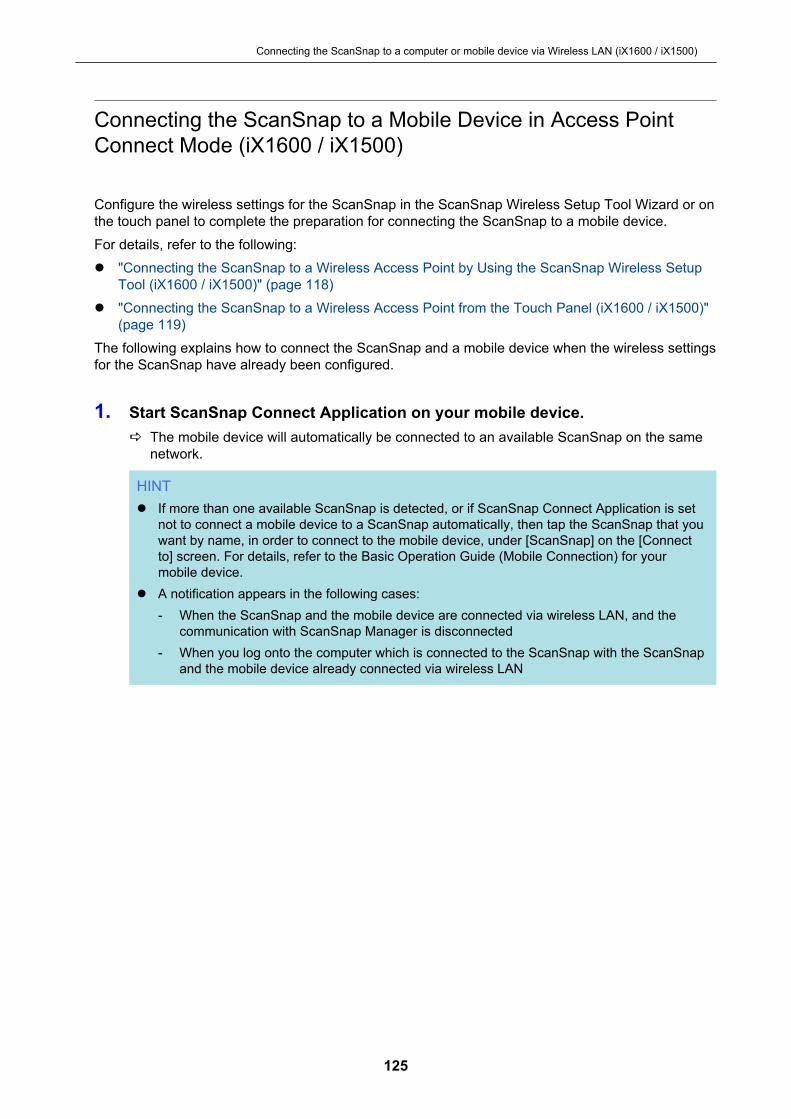
Connecting the ScanSnap to a Mobile Device in Access PointConnect Mode (iX1600 / iX1500)
Configure the wireless settings for the ScanSnap in the ScanSnap Wireless Setup Tool Wizard or onthe touch panel to complete the preparation for connecting the ScanSnap to a mobile device.For details, refer to the following:l "Connecting the ScanSnap to a Wireless Access Point by Using the ScanSnap Wireless Setup
Tool (iX1600 / iX1500)" (page 118)l "Connecting the ScanSnap to a Wireless Access Point from the Touch Panel (iX1600 / iX1500)"
(page 119)The following explains how to connect the ScanSnap and a mobile device when the wireless settingsfor the ScanSnap have already been configured.
1. Start ScanSnap Connect Application on your mobile device.a The mobile device will automatically be connected to an available ScanSnap on the same
network.
HINTl If more than one available ScanSnap is detected, or if ScanSnap Connect Application is set
not to connect a mobile device to a ScanSnap automatically, then tap the ScanSnap that youwant by name, in order to connect to the mobile device, under [ScanSnap] on the [Connectto] screen. For details, refer to the Basic Operation Guide (Mobile Connection) for yourmobile device.
l A notification appears in the following cases:- When the ScanSnap and the mobile device are connected via wireless LAN, and the
communication with ScanSnap Manager is disconnected- When you log onto the computer which is connected to the ScanSnap with the ScanSnap
and the mobile device already connected via wireless LAN
Connecting the ScanSnap to a computer or mobile device via Wireless LAN (iX1600 / iX1500)
125
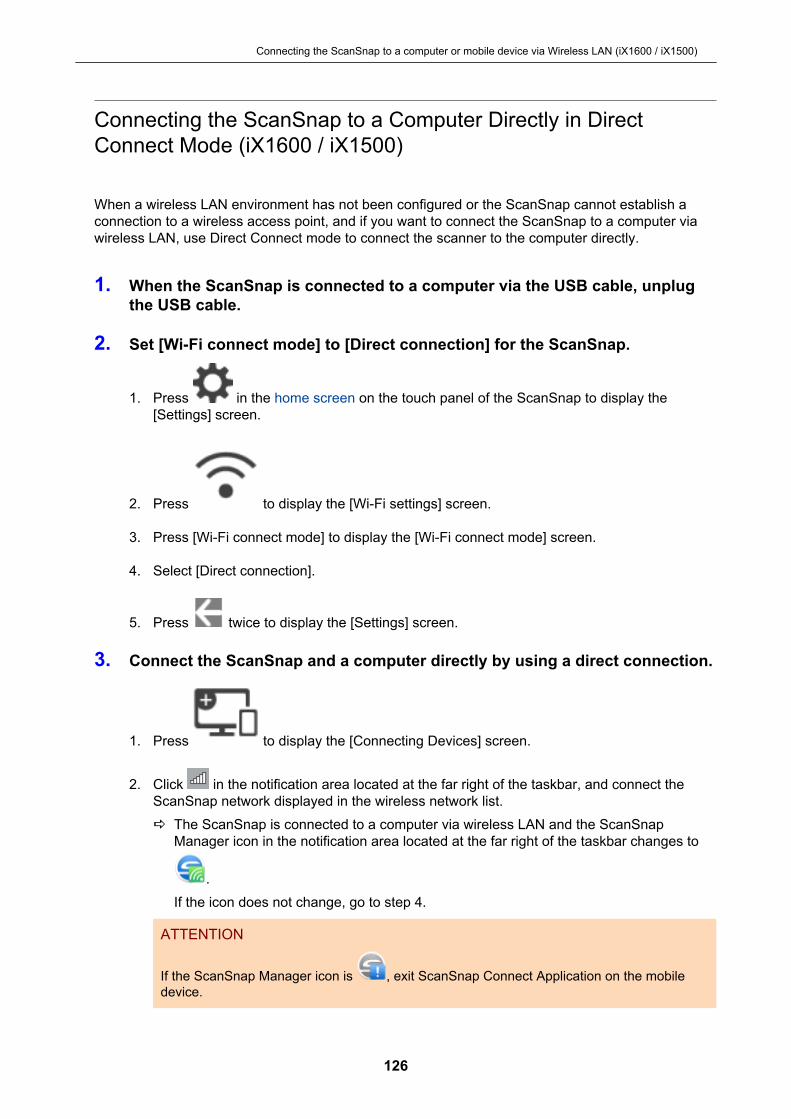
Connecting the ScanSnap to a Computer Directly in DirectConnect Mode (iX1600 / iX1500)
When a wireless LAN environment has not been configured or the ScanSnap cannot establish aconnection to a wireless access point, and if you want to connect the ScanSnap to a computer viawireless LAN, use Direct Connect mode to connect the scanner to the computer directly.
1. When the ScanSnap is connected to a computer via the USB cable, unplugthe USB cable.
2. Set [Wi-Fi connect mode] to [Direct connection] for the ScanSnap.
1. Press in the home screen on the touch panel of the ScanSnap to display the[Settings] screen.
2. Press to display the [Wi-Fi settings] screen.
3. Press [Wi-Fi connect mode] to display the [Wi-Fi connect mode] screen.
4. Select [Direct connection].
5. Press twice to display the [Settings] screen.
3. Connect the ScanSnap and a computer directly by using a direct connection.
1. Press to display the [Connecting Devices] screen.
2. Click in the notification area located at the far right of the taskbar, and connect theScanSnap network displayed in the wireless network list.a The ScanSnap is connected to a computer via wireless LAN and the ScanSnap
Manager icon in the notification area located at the far right of the taskbar changes to
.If the icon does not change, go to step 4.
ATTENTION
If the ScanSnap Manager icon is , exit ScanSnap Connect Application on the mobiledevice.
Connecting the ScanSnap to a computer or mobile device via Wireless LAN (iX1600 / iX1500)
126
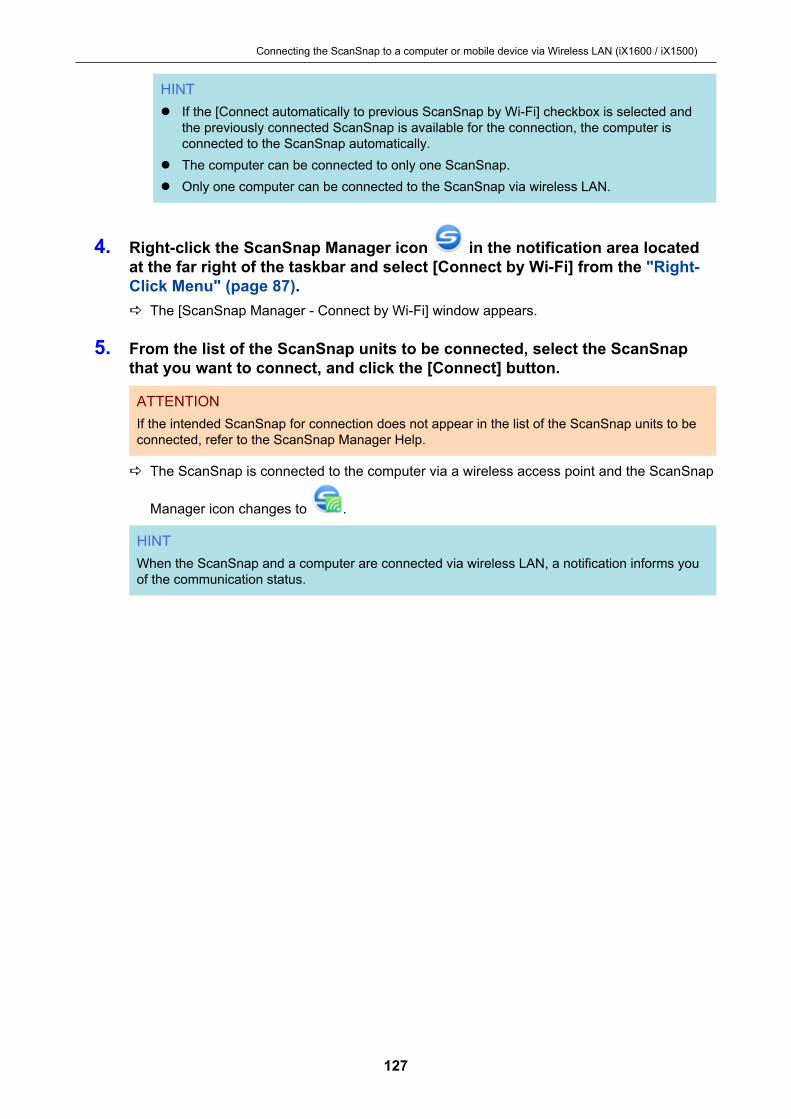
HINTl If the [Connect automatically to previous ScanSnap by Wi-Fi] checkbox is selected and
the previously connected ScanSnap is available for the connection, the computer isconnected to the ScanSnap automatically.
l The computer can be connected to only one ScanSnap.l Only one computer can be connected to the ScanSnap via wireless LAN.
4. Right-click the ScanSnap Manager icon in the notification area locatedat the far right of the taskbar and select [Connect by Wi-Fi] from the "Right-Click Menu" (page 87).a The [ScanSnap Manager - Connect by Wi-Fi] window appears.
5. From the list of the ScanSnap units to be connected, select the ScanSnapthat you want to connect, and click the [Connect] button.
ATTENTIONIf the intended ScanSnap for connection does not appear in the list of the ScanSnap units to beconnected, refer to the ScanSnap Manager Help.
a The ScanSnap is connected to the computer via a wireless access point and the ScanSnap
Manager icon changes to .
HINTWhen the ScanSnap and a computer are connected via wireless LAN, a notification informs youof the communication status.
Connecting the ScanSnap to a computer or mobile device via Wireless LAN (iX1600 / iX1500)
127
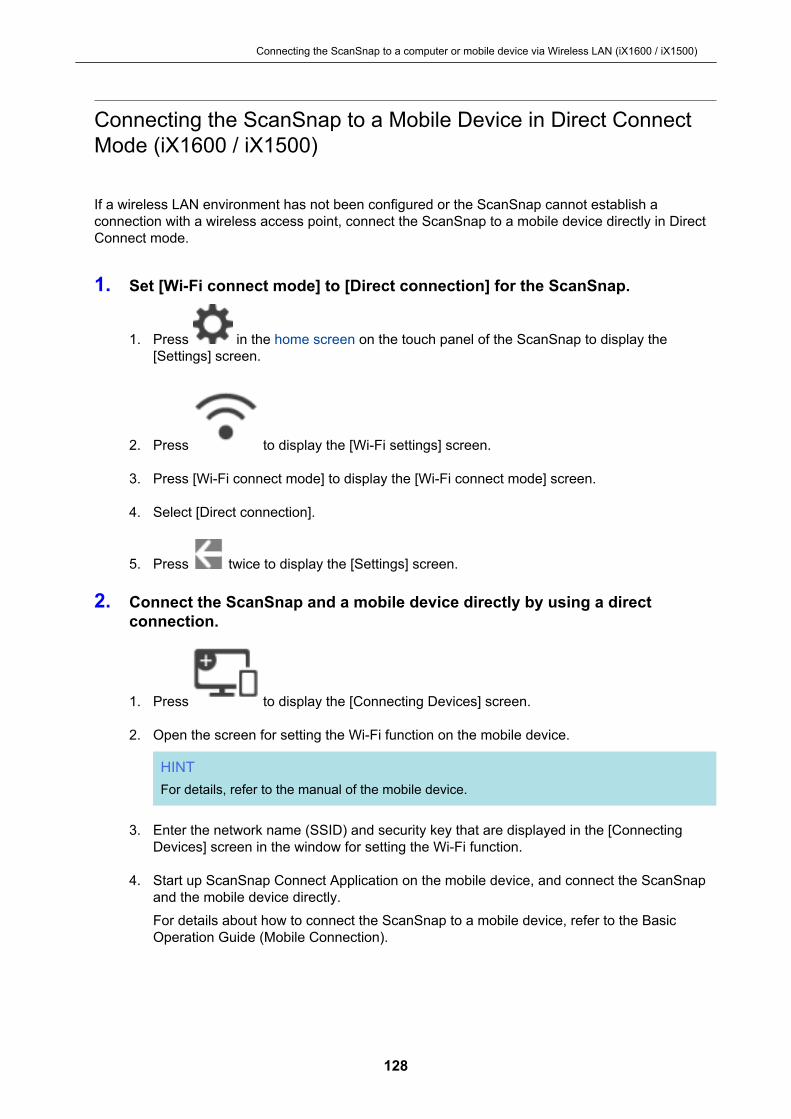
Connecting the ScanSnap to a Mobile Device in Direct ConnectMode (iX1600 / iX1500)
If a wireless LAN environment has not been configured or the ScanSnap cannot establish aconnection with a wireless access point, connect the ScanSnap to a mobile device directly in DirectConnect mode.
1. Set [Wi-Fi connect mode] to [Direct connection] for the ScanSnap.
1. Press in the home screen on the touch panel of the ScanSnap to display the[Settings] screen.
2. Press to display the [Wi-Fi settings] screen.
3. Press [Wi-Fi connect mode] to display the [Wi-Fi connect mode] screen.
4. Select [Direct connection].
5. Press twice to display the [Settings] screen.
2. Connect the ScanSnap and a mobile device directly by using a directconnection.
1. Press to display the [Connecting Devices] screen.
2. Open the screen for setting the Wi-Fi function on the mobile device.
HINTFor details, refer to the manual of the mobile device.
3. Enter the network name (SSID) and security key that are displayed in the [ConnectingDevices] screen in the window for setting the Wi-Fi function.
4. Start up ScanSnap Connect Application on the mobile device, and connect the ScanSnapand the mobile device directly.For details about how to connect the ScanSnap to a mobile device, refer to the BasicOperation Guide (Mobile Connection).
Connecting the ScanSnap to a computer or mobile device via Wireless LAN (iX1600 / iX1500)
128

Connecting the ScanSnap via Wireless LAN(iX500/iX100)
By connecting the ScanSnap to a computer or a mobile device via wireless LAN, you can scandocuments.
iX100Select one of the following wireless modes to connect the ScanSnap to the computer or mobiledevice.l Access Point Connect mode
When a wireless LAN environment has already been configured, the ScanSnap and thecomputer or mobile device are connected via a wireless access point.
l Direct Connect modeWhen a wireless LAN environment has not been configured or the ScanSnap cannot establish aconnection to a wireless access point, the ScanSnap and the computer or mobile device areconnected directly via wireless LAN.
The wireless mode automatically switches to the mode in accordance with the wireless LANenvironment in which the ScanSnap is used.When the ScanSnap is turned on, it is connected to the wireless access point that was set in theScanSnap Wireless Setup Tool. If no wireless access point is detected, the mode is switched to theDirect Connect mode.
HINTl When the wireless access point that was set in the ScanSnap Wireless Setup Tool is detected,
even if the wireless access point is not connectable, the mode is not switched from the AccessPoint Connect mode to the Direct Connect mode.To switch the mode to the Direct Connect mode, turn off the ScanSnap and then turn it on again inan environment in which no wireless access point is detected.
l Even if the wireless access point that was set in the ScanSnap Wireless Setup Tool is detectedafter the mode is switched to the Direct Connect mode, the mode is still not switched to the AccessPoint Connect mode.To connect the ScanSnap in Access Point Connect mode, turn off the ScanSnap and then turn it onagain.
For details about how to switch the wireless mode and how to configure the wireless settings, referto the ScanSnap Wireless Setup Tool Help.l "Preparations for Connecting the ScanSnap via Wireless LAN (iX500 / iX100)" (page 130)l "Connecting the ScanSnap to a Wireless LAN (iX500 / iX100)" (page 131)l "Connecting the ScanSnap to a Computer or Mobile Device via Wireless LAN (iX500)" (page
132)l "Connecting the ScanSnap to a computer or mobile device via Wireless LAN (iX100)" (page
136)l "Reconnecting to a Wireless Access Point Using the ScanSnap WPS Button (iX500 / iX100)"
(page 143)
Connecting the ScanSnap via Wireless LAN (iX500/iX100)
129
Preparations for Connecting the ScanSnap viaWireless LAN (iX500 / iX100)
To connect the ScanSnap via wireless LAN, prepare the following:l An environment in which a wireless LAN is available
To connect the ScanSnap and a computer or a mobile device in Access Point Connect mode,prepare the wireless LAN environment.When connecting the ScanSnap to a wireless access point, you may need information such asan SSID (network name) and a security key (password).For details, refer to the manual for the wireless access point.
ATTENTION- Do not place the following within 100 mm (3.9 in.) of the ScanSnap, or near your wireless
access point.l Obstacles that block radio waves (such as walls and metal plates)l Devices that may cause signal interference (such as microwaves and cordless phones) and
wireless devices- If the wireless access point has two types of SSID (2.4 GHz and 5 GHz), the 2.4 GHz SSID
needs to be used.
l ScanSnap Connect ApplicationTo connect the ScanSnap and a mobile device, you need to install ScanSnap ConnectApplication on your mobile device.Download ScanSnap Connect Application for the mobile device from the following applicationstores:- App Store- Google Play- Amazon Appstore
Preparations for Connecting the ScanSnap via Wireless LAN (iX500 / iX100)
130

Connecting the ScanSnap to a Wireless LAN (iX500 /iX100)
The ScanSnap Wireless Setup Tool is an application to configure the wireless settings required forconnecting your ScanSnap via wireless LAN in a wizard format. The ScanSnap Wireless Setup Toolcan be used to configure and check the following wireless LAN settings and connection.l Connecting the ScanSnap to a wireless access pointl Registering the computer that will be connected to the ScanSnap via wireless LANl Setting the IP address, name, and password for the ScanSnapl Checking the connection between the ScanSnap and the computer (iX100)l Checking the connection between the ScanSnap and the mobile deviceFollow the procedure below to start the ScanSnap Wireless Setup Tool and configure the wirelesssettings.
1. Start the ScanSnap Wireless Setup Tool.l Windows 10
Select [Start] menu → [ScanSnap Manager] → [ScanSnap Wireless Setup Tool].l Windows 8.1
Click on the lower left side of the Start screen, and select [ScanSnap Wireless SetupTool] under [ScanSnap Manager] on the All apps screen.
l Windows 7Select [Start] menu → [All Programs] → [ScanSnap Manager] → [ScanSnap WirelessSetup Tool].
a The ScanSnap Wireless Setup Tool will start running.
2. Click the [Wireless Network Setup Wizard] button in the mainmenu.a The Wireless Network Setup Wizard appears.
3. Follow the instructions in the Wireless Network Setup Wizard to configurethe wireless settings.For iX100, configure and check the wireless settings based on the wireless LAN environmentin which the ScanSnap is used.
HINTl For details and operation of ScanSnap Wireless Setup Tool, refer to the ScanSnap Wireless Setup
Tool Help.l The ScanSnap Wireless Setup Tool is also started up when the ScanSnap software is installed.
Connecting the ScanSnap to a Wireless LAN (iX500 / iX100)
131

Connecting the ScanSnap to a Computer or MobileDevice via Wireless LAN (iX500)
l "Connecting the ScanSnap and a Computer (iX500)" (page 133)l "Connecting the ScanSnap and a Mobile Device (iX500)" (page 135)
Connecting the ScanSnap to a Computer or Mobile Device via Wireless LAN (iX500)
132
Connecting the ScanSnap and a Computer (iX500)
You can use the ScanSnap Wireless Setup Tool Wizard to complete the preparation for connectingthe ScanSnap to a computer.For details, refer to "Connecting the ScanSnap to a Wireless LAN (iX500 / iX100)" (page 131).The following explains how to connect the ScanSnap and a computer when the wireless settingshave already been configured by using the ScanSnap Wireless Setup Tool Wizard.
1. Disconnect the USB cable connecting the ScanSnap to the computer.
ATTENTION
If the ScanSnap Manager icon is , exit ScanSnap Connect Application on the mobiledevice.
a The ScanSnap is automatically connected to the computer via wireless LAN and the
ScanSnap Manager icon changes to .If the icon does not change, go to step 2.
HINTl If the [Connect automatically to the last connected ScanSnap by Wi-Fi] checkbox is selected
and the last connected ScanSnap is available, the computer is connected to the ScanSnapautomatically.
l The computer can be connected to only one ScanSnap.l Only one computer can be connected to the ScanSnap.l When you automatically connect a computer and the ScanSnap that had been connected via
wireless LAN before, if the password for the ScanSnap to be connected is changed, anotification informs you of the status.
2. Right-click the ScanSnap Manager icon in the notification area locatedat the far right of the taskbar and select [Connect by Wi-Fi] from the "Right-Click Menu" (page 87).a The [ScanSnap Manager - Connect by Wi-Fi] window appears.
3. From the list of the ScanSnap units to be connected, select the ScanSnapthat you want to connect, and click the [Connect] button.
ATTENTIONl If the [ScanSnap Manager - Enter Destination Password] window appears, enter the
password to connect.The default password is the last four digits of the ScanSnap serial number.The password can be changed with the ScanSnap Wireless Setup Tool. For details, refer tothe ScanSnap Wireless Setup Tool Help.
l If the intended ScanSnap for connection does not appear in the list of the ScanSnap units tobe connected, refer to the ScanSnap Manager Help.
Connecting the ScanSnap to a Computer or Mobile Device via Wireless LAN (iX500)
133

a The ScanSnap is connected to a computer via wireless LAN and the ScanSnap Manager
icon changes to .
HINTWhen the ScanSnap and a computer are connected via wireless LAN, a notification informs youof the communication status.
Connecting the ScanSnap to a Computer or Mobile Device via Wireless LAN (iX500)
134
Connecting the ScanSnap and a Mobile Device (iX500)
You can use the ScanSnap Wireless Setup Tool Wizard to complete the preparation for connectingthe ScanSnap to a mobile device.For details, refer to "Connecting the ScanSnap to a Wireless LAN (iX500 / iX100)" (page 131).The following explains how to connect the ScanSnap and a mobile device when the wireless settingshave already been configured by using the ScanSnap Wireless Setup Tool Wizard.
1. Start ScanSnap Connect Application on your mobile device.a The mobile device will automatically be connected to an available ScanSnap on the same
network.
HINTl If more than one available ScanSnap is detected, or if ScanSnap Connect Application is set
not to connect a mobile device to a ScanSnap automatically, then tap the ScanSnap that youwant by name, in order to connect to the mobile device, under [ScanSnap] on the [Connectto] screen. For details, refer to the Basic Operation Guide (Mobile Connection) for yourmobile device.
l A notification appears in the following cases:- When the ScanSnap and the mobile device are connected via wireless LAN, and the
communication with ScanSnap Manager is disconnected- When you log onto the computer which is connected to the ScanSnap with the ScanSnap
and the mobile device already connected via wireless LAN
Connecting the ScanSnap to a Computer or Mobile Device via Wireless LAN (iX500)
135

Connecting the ScanSnap to a computer or mobiledevice via Wireless LAN (iX100)
l "Connecting the ScanSnap to a Computer in Access Point Connect Mode (iX100)" (page 137)l "Connecting the ScanSnap to a Mobile Device in Access Point Connect Mode (iX100)" (page
139)l "Connecting the ScanSnap to a Computer Directly in Direct Connect Mode (iX100)" (page 140)l "Connecting the ScanSnap to a Mobile Device in Direct Connect Mode (iX100)" (page 142)
Connecting the ScanSnap to a computer or mobile device via Wireless LAN (iX100)
136
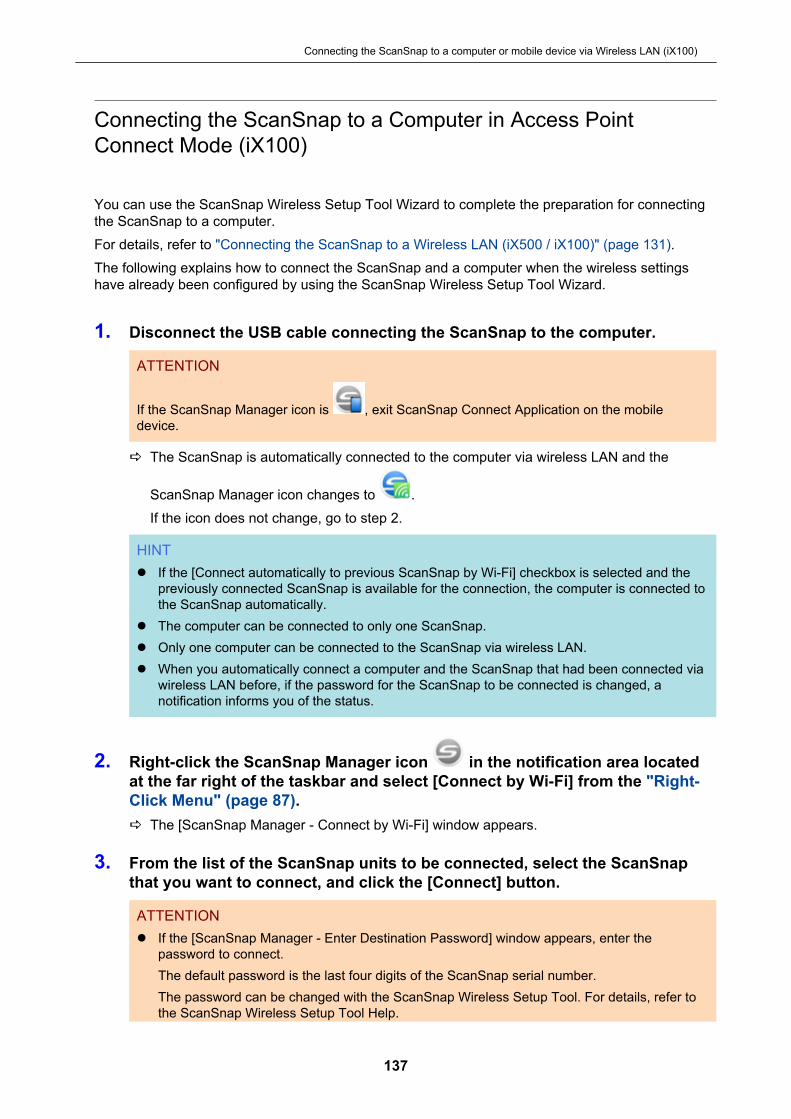
Connecting the ScanSnap to a Computer in Access PointConnect Mode (iX100)
You can use the ScanSnap Wireless Setup Tool Wizard to complete the preparation for connectingthe ScanSnap to a computer.For details, refer to "Connecting the ScanSnap to a Wireless LAN (iX500 / iX100)" (page 131).The following explains how to connect the ScanSnap and a computer when the wireless settingshave already been configured by using the ScanSnap Wireless Setup Tool Wizard.
1. Disconnect the USB cable connecting the ScanSnap to the computer.
ATTENTION
If the ScanSnap Manager icon is , exit ScanSnap Connect Application on the mobiledevice.
a The ScanSnap is automatically connected to the computer via wireless LAN and the
ScanSnap Manager icon changes to .If the icon does not change, go to step 2.
HINTl If the [Connect automatically to previous ScanSnap by Wi-Fi] checkbox is selected and the
previously connected ScanSnap is available for the connection, the computer is connected tothe ScanSnap automatically.
l The computer can be connected to only one ScanSnap.l Only one computer can be connected to the ScanSnap via wireless LAN.l When you automatically connect a computer and the ScanSnap that had been connected via
wireless LAN before, if the password for the ScanSnap to be connected is changed, anotification informs you of the status.
2. Right-click the ScanSnap Manager icon in the notification area locatedat the far right of the taskbar and select [Connect by Wi-Fi] from the "Right-Click Menu" (page 87).a The [ScanSnap Manager - Connect by Wi-Fi] window appears.
3. From the list of the ScanSnap units to be connected, select the ScanSnapthat you want to connect, and click the [Connect] button.
ATTENTIONl If the [ScanSnap Manager - Enter Destination Password] window appears, enter the
password to connect.The default password is the last four digits of the ScanSnap serial number.The password can be changed with the ScanSnap Wireless Setup Tool. For details, refer tothe ScanSnap Wireless Setup Tool Help.
Connecting the ScanSnap to a computer or mobile device via Wireless LAN (iX100)
137

l If the intended ScanSnap for connection does not appear in the list of the ScanSnap units tobe connected, refer to the ScanSnap Manager Help.
a The ScanSnap is connected to a computer via wireless LAN and the ScanSnap Manager
icon changes to .
HINTWhen the ScanSnap and a computer are connected via wireless LAN, a notification informs youof the communication status.
Connecting the ScanSnap to a computer or mobile device via Wireless LAN (iX100)
138
Connecting the ScanSnap to a Mobile Device in Access PointConnect Mode (iX100)
You can use the ScanSnap Wireless Setup Tool Wizard to complete the preparation for connectingthe ScanSnap to a mobile device.For details, refer to "Connecting the ScanSnap to a Wireless LAN (iX500 / iX100)" (page 131).The following explains how to connect the ScanSnap and a mobile device when the wireless settingshave already been configured by using the ScanSnap Wireless Setup Tool Wizard.
1. Start ScanSnap Connect Application on your mobile device.a The mobile device will automatically be connected to an available ScanSnap on the same
network.
HINTl If more than one available ScanSnap is detected, or if ScanSnap Connect Application is set
not to connect a mobile device to a ScanSnap automatically, then tap the ScanSnap that youwant by name, in order to connect to the mobile device, under [ScanSnap] on the [Connectto] screen. For details, refer to the Basic Operation Guide (Mobile Connection) for yourmobile device.
l A notification appears in the following cases:- When the ScanSnap and the mobile device are connected via wireless LAN, and the
communication with ScanSnap Manager is disconnected- When you log onto the computer which is connected to the ScanSnap with the ScanSnap
and the mobile device already connected via wireless LAN
Connecting the ScanSnap to a computer or mobile device via Wireless LAN (iX100)
139
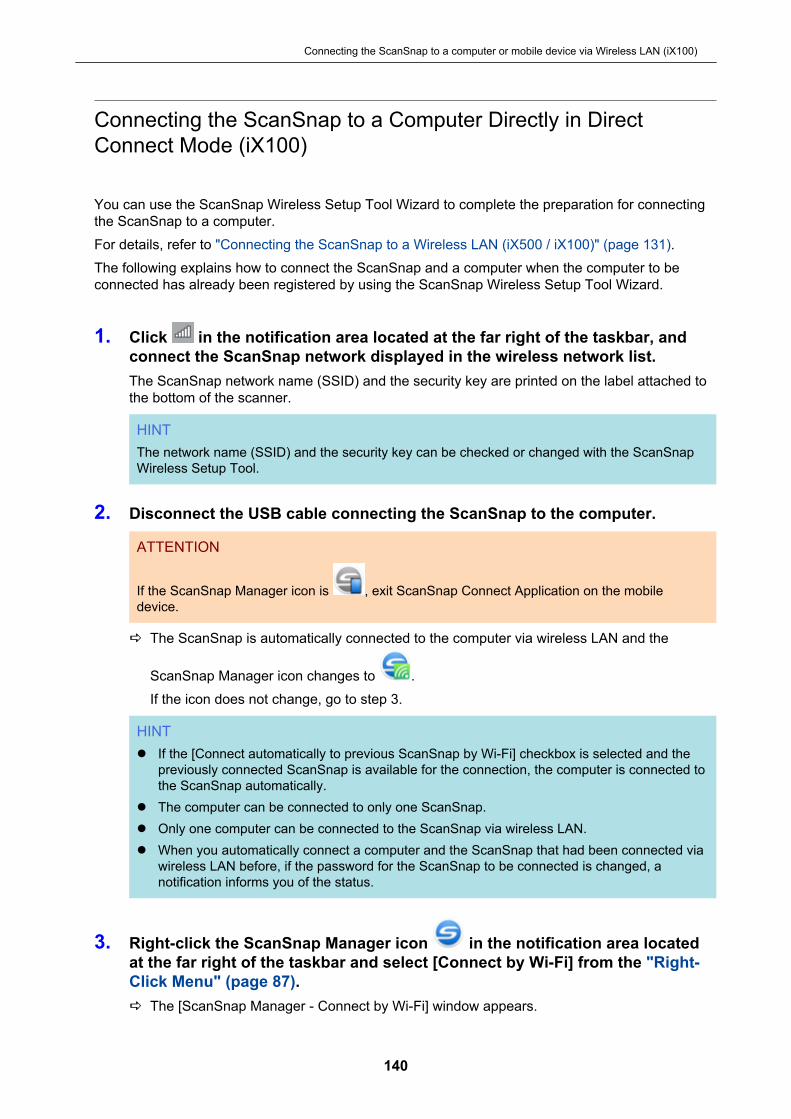
Connecting the ScanSnap to a Computer Directly in DirectConnect Mode (iX100)
You can use the ScanSnap Wireless Setup Tool Wizard to complete the preparation for connectingthe ScanSnap to a computer.For details, refer to "Connecting the ScanSnap to a Wireless LAN (iX500 / iX100)" (page 131).The following explains how to connect the ScanSnap and a computer when the computer to beconnected has already been registered by using the ScanSnap Wireless Setup Tool Wizard.
1. Click in the notification area located at the far right of the taskbar, andconnect the ScanSnap network displayed in the wireless network list.The ScanSnap network name (SSID) and the security key are printed on the label attached tothe bottom of the scanner.
HINTThe network name (SSID) and the security key can be checked or changed with the ScanSnapWireless Setup Tool.
2. Disconnect the USB cable connecting the ScanSnap to the computer.
ATTENTION
If the ScanSnap Manager icon is , exit ScanSnap Connect Application on the mobiledevice.
a The ScanSnap is automatically connected to the computer via wireless LAN and the
ScanSnap Manager icon changes to .If the icon does not change, go to step 3.
HINTl If the [Connect automatically to previous ScanSnap by Wi-Fi] checkbox is selected and the
previously connected ScanSnap is available for the connection, the computer is connected tothe ScanSnap automatically.
l The computer can be connected to only one ScanSnap.l Only one computer can be connected to the ScanSnap via wireless LAN.l When you automatically connect a computer and the ScanSnap that had been connected via
wireless LAN before, if the password for the ScanSnap to be connected is changed, anotification informs you of the status.
3. Right-click the ScanSnap Manager icon in the notification area locatedat the far right of the taskbar and select [Connect by Wi-Fi] from the "Right-Click Menu" (page 87).a The [ScanSnap Manager - Connect by Wi-Fi] window appears.
Connecting the ScanSnap to a computer or mobile device via Wireless LAN (iX100)
140
4. From the list of the ScanSnap units to be connected, select the ScanSnapthat you want to connect, and click the [Connect] button.
ATTENTIONl If the [ScanSnap Manager - Enter Destination Password] window appears, enter the
password to connect.The default password is the last four digits of the ScanSnap serial number.The password can be changed with the ScanSnap Wireless Setup Tool. For details, refer tothe ScanSnap Wireless Setup Tool Help.
l If the intended ScanSnap for connection does not appear in the list of the ScanSnap units tobe connected, refer to the ScanSnap Manager Help.
a The ScanSnap is connected to the computer via a wireless access point and the ScanSnap
Manager icon changes to .
HINTWhen the ScanSnap and a computer are connected via wireless LAN, a notification informs youof the communication status.
Connecting the ScanSnap to a computer or mobile device via Wireless LAN (iX100)
141

Connecting the ScanSnap to a Mobile Device in Direct ConnectMode (iX100)
When you connect a mobile device to the ScanSnap in Direct Connect mode, you do not need toconfigure settings in the ScanSnap Wireless Setup Tool.For details, refer to the Basic Operation Guide (Mobile Connection).
Connecting the ScanSnap to a computer or mobile device via Wireless LAN (iX100)
142
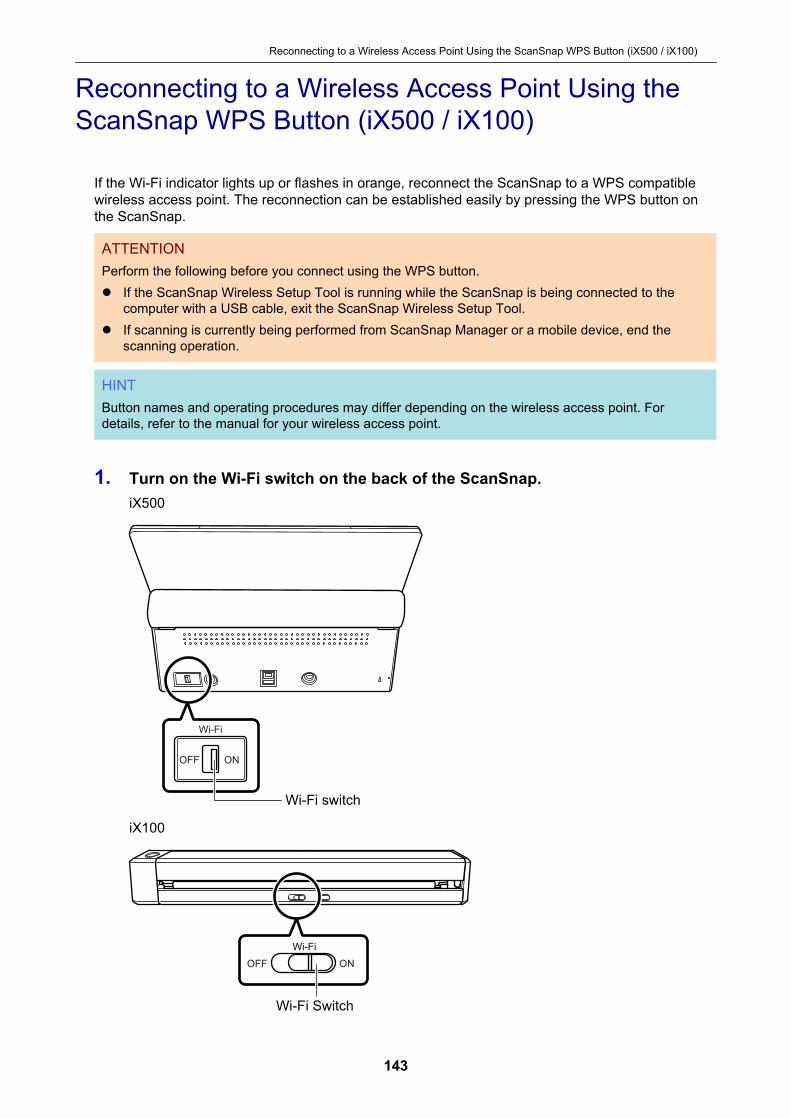
Reconnecting to a Wireless Access Point Using theScanSnap WPS Button (iX500 / iX100)
If the Wi-Fi indicator lights up or flashes in orange, reconnect the ScanSnap to a WPS compatiblewireless access point. The reconnection can be established easily by pressing the WPS button onthe ScanSnap.
ATTENTIONPerform the following before you connect using the WPS button.l If the ScanSnap Wireless Setup Tool is running while the ScanSnap is being connected to the
computer with a USB cable, exit the ScanSnap Wireless Setup Tool.l If scanning is currently being performed from ScanSnap Manager or a mobile device, end the
scanning operation.
HINTButton names and operating procedures may differ depending on the wireless access point. Fordetails, refer to the manual for your wireless access point.
1. Turn on the Wi-Fi switch on the back of the ScanSnap.iX500
Wi-Fi
OFF ON
Wi-Fi switch
iX100
Wi-Fi
OFF ON
Wi-Fi Switch
Reconnecting to a Wireless Access Point Using the ScanSnap WPS Button (iX500 / iX100)
143
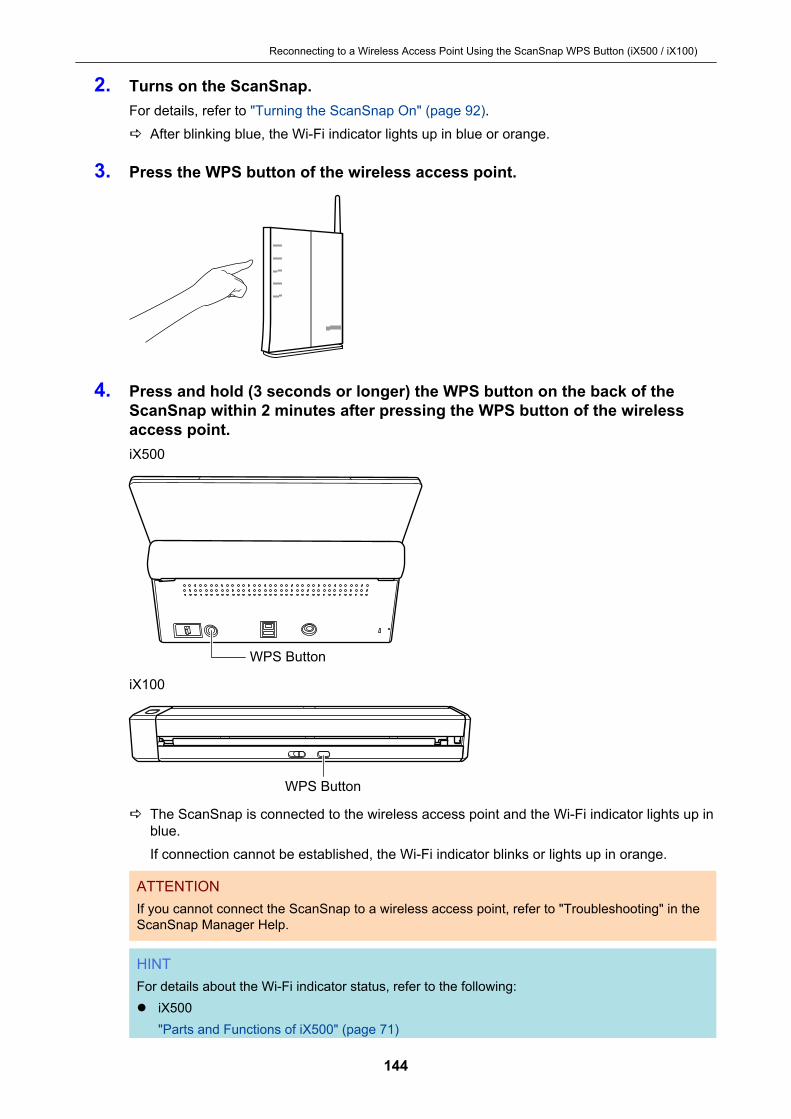
2. Turns on the ScanSnap.For details, refer to "Turning the ScanSnap On" (page 92).a After blinking blue, the Wi-Fi indicator lights up in blue or orange.
3. Press the WPS button of the wireless access point.
4. Press and hold (3 seconds or longer) the WPS button on the back of theScanSnap within 2 minutes after pressing the WPS button of the wirelessaccess point.iX500
WPS Button
iX100
WPS Button
a The ScanSnap is connected to the wireless access point and the Wi-Fi indicator lights up inblue.If connection cannot be established, the Wi-Fi indicator blinks or lights up in orange.
ATTENTIONIf you cannot connect the ScanSnap to a wireless access point, refer to "Troubleshooting" in theScanSnap Manager Help.
HINTFor details about the Wi-Fi indicator status, refer to the following:l iX500
"Parts and Functions of iX500" (page 71)
Reconnecting to a Wireless Access Point Using the ScanSnap WPS Button (iX500 / iX100)
144

l iX100"Parts and Functions of iX100" (page 73)
Reconnecting to a Wireless Access Point Using the ScanSnap WPS Button (iX500 / iX100)
145
Wireless Settings for the ScanSnap (iX1600 /iX1500)
The following explains the procedure to configure the wireless settings for the ScanSnap, such ashow to check the wireless LAN which the scanner is connected to or check network information, howto change a wireless access point which you want to connect the scanner to, and how to switch thewireless mode.l "Registering a Certificate/ Checking the Wireless LAN Settings (iX1600 / iX1500)" (page 147)l "Changing the Wireless LAN Connection Method (iX1600 / iX1500)" (page 153)l "Access Point Connect Settings (iX1600 / iX1500)" (page 162)
Wireless Settings for the ScanSnap (iX1600 / iX1500)
146

Registering a Certificate/ Checking the Wireless LANSettings (iX1600 / iX1500)
l "Registering a Client Certificate or CA Certificate (iX1600 / iX1500)" (page 148)l "Checking the Wireless LAN Settings (iX1600 / iX1500)" (page 149)l "Checking the IP address of the ScanSnap (iX1600 / iX1500)" (page 150)l "Checking the DNS Server of the ScanSnap (iX1600 / iX1500)" (page 151)l "Checking the MAC address of the ScanSnap (iX1600 / iX1500)" (page 152)
Registering a Certificate/ Checking the Wireless LAN Settings (iX1600 / iX1500)
147
Registering a Client Certificate or CA Certificate (iX1600 / iX1500)
To connect the ScanSnap to a wireless access point, use a client certificate or CA certificate thathas been registered on the ScanSnap to authenticate a connection to the wireless access point.One certificate for each certificate type (client certificates and CA certificates) can be registered onthe ScanSnap.To register a client certificate or CA certificate, use the ScanSnap Wireless Setup Tool.Follow the procedure below to start the ScanSnap Wireless Setup Tool.l Windows 10
Select [Start] menu → [ScanSnap Manager] → [ScanSnap Wireless Setup Tool].l Windows 8.1
Click the down arrow on the lower left side of the Start screen, and select [ScanSnap WirelessSetup Tool] under [ScanSnap Manager] on the All apps screen.
l Windows 7Select [Start] menu → [All Programs] → [ScanSnap Manager] → [ScanSnap Wireless SetupTool].
For details about registering a client certificate or CA certificate, refer to the ScanSnap WirelessSetup Tool Help.
Registering a Certificate/ Checking the Wireless LAN Settings (iX1600 / iX1500)
148
Checking the Wireless LAN Settings (iX1600 / iX1500)
Check the connection status of the wireless LAN and its access point.
1. Press in the home screen on the touch panel of the ScanSnap todisplay the [Settings] screen.
2. Press to display the [Wi-Fi settings] screen.
3. Press [Wi-Fi information].a Current wireless LAN information is displayed.
Registering a Certificate/ Checking the Wireless LAN Settings (iX1600 / iX1500)
149

Checking the IP address of the ScanSnap (iX1600 / iX1500)
Check the IP address of the ScanSnap on the touch panel.
1. Press in the home screen on the touch panel of the ScanSnap todisplay the [Settings] screen.
2. Press to display the [Wi-Fi settings] screen.
3. Check that the name of a network which is currently connected, is displayedin [Access point connection]If [Access point connection] is disabled or if a network name is not displayed, refer to"Connecting the ScanSnap to a Computer in Access Point Connect Mode (iX1600 / iX1500)"(page 123) and connect the ScanSnap to a wireless access point.
4. Press [Wi-Fi information] to display the [ScanSnap information] screen.
5. Check the [IP address] in the [Network] tab.
Registering a Certificate/ Checking the Wireless LAN Settings (iX1600 / iX1500)
150
Checking the DNS Server of the ScanSnap (iX1600 / iX1500)
Check the DNS server of the ScanSnap on the touch panel.
1. Press in the home screen on the touch panel of the ScanSnap todisplay the [Settings] screen.
2. Press to display the [Wi-Fi settings] screen.
3. Check that the name of a network which is currently connected, is displayedin [Access point connection]If [Access point connection] is disabled or if a network name is not displayed, refer to"Connecting the ScanSnap to a Computer in Access Point Connect Mode (iX1600 / iX1500)"(page 123) and connect the ScanSnap to a wireless access point.
4. Press [Wi-Fi information] to display the [ScanSnap information] screen.
5. Check the [DNS Server] in the [Network] tab.
Registering a Certificate/ Checking the Wireless LAN Settings (iX1600 / iX1500)
151
Checking the MAC address of the ScanSnap (iX1600 / iX1500)
Check the MAC address of the ScanSnap on the touch panel.
1. Press in the home screen on the touch panel of the ScanSnap todisplay the [Settings] screen.
2. Press to display the [Wi-Fi settings] screen.
3. Check that [Wi-Fi connect mode] is set to [Access point connection] or[Direct connection].If [Wi-Fi connect mode] is set to [Wi-Fi off], press [Wi-Fi connect mode] and set it to [Accesspoint connection] or [Direct connection]
4. Press [Wi-Fi information] to display the [ScanSnap information] screen.
5. Check the [MAC address] in the [Network] tab.
Registering a Certificate/ Checking the Wireless LAN Settings (iX1600 / iX1500)
152

Changing the Wireless LAN Connection Method(iX1600 / iX1500)
l "Reconnecting the ScanSnap to Another Wireless Access Point (iX1600 / iX1500)" (page 154)l "Changing the Connection Method from Access Point Connection to Direct Connection (iX1600 /
iX1500)" (page 156)l "Changing the Connection Method from Direct Connection to Access Point Connection (iX1600 /
iX1500)" (page 157)l "Changing the Frequency for Connecting the ScanSnap (iX1600 / iX1500)" (page 159)l "Turning Off the Wireless LAN Connection (iX1600 / iX1500)" (page 160)l "Resetting the Wireless LAN Settings (iX1600 / iX1500)" (page 161)
Changing the Wireless LAN Connection Method (iX1600 / iX1500)
153

Reconnecting the ScanSnap to Another Wireless Access Point(iX1600 / iX1500)
Change the wireless access point, to which the ScanSnap is connected, to another one.
HINTUsing the ScanSnap Wireless Setup Tool enables you to obtain the Wi-Fi settings configured on yourcomputer and easily connect the ScanSnap to the same wireless access point as your computer.For details, refer to "Connecting the ScanSnap to a Wireless Access Point by Using the ScanSnapWireless Setup Tool (iX1600 / iX1500)" (page 118).
1. On the touch panel of the ScanSnap, display the [Enter connectioninformation] screen.
1. Press in the home screen on the touch panel of the ScanSnap to display the[Settings] screen.
2. Press to display the [Wi-Fi settings] screen.
3. Press [Access point connection] to display the [Access point connection] screen.
4. Press [Access point connect settings] to display the [Connection information configurationmethod] screen.
5. Select [Select an access point].
6. Press the [Next] button to display the [Select network] screen.
7. From the list of wireless access points that appears, select a wireless access point that youwant to connect to.
8. Press the [Next] button to display the [Enter connection information] screen.
2. Enter the information of the wireless access point to be used and press the[Next] button.The items which are displayed in the screen differ depending on the security protocol of thewireless access point.l To perform the authentication with a security key
Press the input field for [Security key] and enter the user name, and then press [OK].l To perform the authentication with a client certificate
Press [Client certificate] and select the certificate to be used.
HINTTo check the details about the certificate, press the [Certificate] button.
Changing the Wireless LAN Connection Method (iX1600 / iX1500)
154

l To perform the authentication with a user ID and a passwordPress the input field and enter a value for [User ID] and [Password] respectively, and thenpress [OK].
l To perform the authentication with an external IDPress the input field for [External ID], enter the external ID, and press [OK].
3. Press the [Complete] button in the [Check Connection Results] screen.
4. Press to return to the home screen.
Changing the Wireless LAN Connection Method (iX1600 / iX1500)
155

Changing the Connection Method from Access Point Connectionto Direct Connection (iX1600 / iX1500)
When a computer or mobile device is connected to the ScanSnap by using an access point, changethe connection method for the computer or mobile device to a direct connection and connect thecomputer or the mobile device to the ScanSnap directly rather than via a wireless access point.This section explains the procedure to change the connection method for the computer and theScanSnap from an access point connection to a direct connection.
1. Set [Wi-Fi connect mode] to [Direct connection] for the ScanSnap.
1. Press in the home screen on the touch panel of the ScanSnap to display the[Settings] screen.
2. Press to display the [Wi-Fi settings] screen.
3. Press [Wi-Fi connect mode] to display the [Wi-Fi connect mode] screen.
4. Select [Direct connection].
5. Press twice to display the [Settings] screen.
2. Press to display the [Connecting Devices] screen.
3. Open the window for setting the Wi-Fi function on the computer.
HINTFor details, refer to the manual of the computer.
4. Enter the network name (SSID) and security key that are displayed in the[Connecting Devices] screen in the window for setting the Wi-Fi function.
5. Press to return to the home screen.
Changing the Wireless LAN Connection Method (iX1600 / iX1500)
156
Changing the Connection Method from Direct Connection toAccess Point Connection (iX1600 / iX1500)
When a computer or mobile device is connected to the ScanSnap directly, change the connectionmethod for the computer or mobile device to an access point connection and connect the computeror the mobile device to the ScanSnap via a wireless access point.This section explains the procedure to change the connection method for the computer and theScanSnap from a direct connection to an access point connection.
1. Set [Wi-Fi connect mode] to [Access point connection] for the ScanSnap.
1. Press in the home screen on the touch panel of the ScanSnap to display the[Settings] screen.
2. Press to display the [Wi-Fi settings] screen.
3. Press [Wi-Fi connect mode] to display the [Wi-Fi connect mode] screen.
4. Select [Access point connection].
5. Press to return to the [Wi-Fi settings] screen.
2. Connect the ScanSnap to a wireless access point.1. Press [Access point connection] to display the [Access point connection] screen.
2. Press [Access point connect settings] to display the [Connection information configurationmethod] screen.
3. Select [Select an access point].
4. Press the [Next] button to display the [Select network] screen.
5. From the list of wireless access points that appears, select a wireless access point that youwant to connect to.
6. Press the [Next] button to display the [Enter connection information] screen.
7. Enter the information of the wireless access point to be used and press the [Next] button.The items which are displayed in the screen differ depending on the security protocol of thewireless access point.l To perform the authentication with a security key
Press the input field for [Security key] and enter the user name, and then press [OK].l To perform the authentication with a client certificate
Press [Client certificate] and select the certificate to be used.
Changing the Wireless LAN Connection Method (iX1600 / iX1500)
157
HINTTo check the details about the certificate, press the [Certificate] button.
l To perform the authentication with a user ID and a passwordPress the input field and enter a value for [User ID] and [Password] respectively, andthen press [OK].
l To perform the authentication with an external IDPress the input field for [External ID], enter the external ID, and press [OK].
8. Press the [Complete] button in the [Check Connection Results] screen.
9. Press to display the home screen.
3. Click the [Network] icon in the notification area, at the far right of the taskbaron the computer.
4. In the window that appears, select the wireless access point which theScanSnap is connected to.
5. When the window for entering a password appears, enter a password andclick [Connect].a The connection method has been changed from a direct connection to an access point
connection. The computer and the ScanSnap are connected via Wi-Fi using the wirelessaccess point.
Changing the Wireless LAN Connection Method (iX1600 / iX1500)
158
Changing the Frequency for Connecting the ScanSnap (iX1600 /iX1500)
Change the setting of the frequency for connecting the ScanSnap which is used when the scanner isconnected to a wireless access point.
HINTIn some regions, a 5 GHz wireless LAN cannot be used.If you are using the ScanSnap in the region where a 5 GHz wireless LAN cannot be used, you cannotchange the frequency for the connection.
1. Press in the home screen on the touch panel of the ScanSnap todisplay the [Settings] screen.
2. Press to display the [Wi-Fi settings] screen.
3. Press [Access point connection] to display the [Access point connection]screen.
4. Press [Frequency for the Connection] to change the frequency for theconnection.
5. Press to return to the home screen.
Changing the Wireless LAN Connection Method (iX1600 / iX1500)
159
Turning Off the Wireless LAN Connection (iX1600 / iX1500)
Disable the wireless LAN function on the ScanSnap to turn off the wireless LAN connectiontemporarily.
1. Press in the home screen on the touch panel of the ScanSnap todisplay the [Settings] screen.
2. Press to display the [Wi-Fi settings] screen.
3. Press [Wi-Fi connect mode] to display the [Wi-Fi connect mode] screen.
4. Select [Wi-Fi off].
5. Press to return to the home screen.
Changing the Wireless LAN Connection Method (iX1600 / iX1500)
160

Resetting the Wireless LAN Settings (iX1600 / iX1500)
Reset the wireless LAN settings that are configured for the ScanSnap.
1. Press in the home screen on the touch panel of the ScanSnap todisplay the [Settings] screen.
2. Press to display the [Wi-Fi settings] screen.
3. Press [Initialize Wi-Fi settings] to display the [Initialize Wi-Fi settings] screen.
4. Press the [Initialize] button.
5. Press to return to the home screen.
Changing the Wireless LAN Connection Method (iX1600 / iX1500)
161

Access Point Connect Settings (iX1600 / iX1500)
l "Authenticating a Wireless Access Point with a Client Certificate (iX1600 / iX1500)" (page 163)l "Authenticating a Wireless Access Point with a User ID and Password (iX1600 / iX1500)" (page
164)l "Authenticating a Wireless Access Point with an External ID (iX1600 / iX1500)" (page 165)l "Setting an IP Address for the ScanSnap (iX1600 / iX1500)" (page 166)l "Using a DNS Server for the Internet Connection (iX1600 / iX1500)" (page 167)l "Using a Proxy Server for the Internet Connection (iX1600 / iX1500)" (page 168)
Access Point Connect Settings (iX1600 / iX1500)
162
Authenticating a Wireless Access Point with a Client Certificate(iX1600 / iX1500)
To connect the ScanSnap to a wireless access point, use a client certificate or CA certificate thathas been registered on the ScanSnap to authenticate a connection to the wireless access point.
1. On the touch panel of the ScanSnap, display the [Enter connectioninformation] screen.
1. Press in the home screen on the touch panel of the ScanSnap to display the[Settings] screen.
2. Press to display the [Wi-Fi settings] screen.
3. Press [Access point connection] to display the [Access point connection] screen.
4. Press [Access point connect settings] to display the [Connection information configurationmethod] screen.
5. Select [Select an access point].
6. Press the [Next] button to display the [Select network] screen.
7. From the list of wireless access points that appears, select a wireless access point that youwant to connect to.
8. Press the [Next] button to display the [Enter connection information] screen.
2. Press [Client certificate] and select the certificate to be used.
HINTTo check the details about the certificate, press the [Certificate] button.
3. Press the [Next] button to display the [Select network] screen.
4. Press the [Complete] button in the [Check Connection Results] screen.
5. Press to return to the home screen.
Access Point Connect Settings (iX1600 / iX1500)
163
Authenticating a Wireless Access Point with a User ID andPassword (iX1600 / iX1500)
To connect the ScanSnap to a wireless access point, authenticate a connection to the wirelessaccess point by entering a user ID and password.
1. On the touch panel of the ScanSnap, display the [Enter connectioninformation] screen.
1. Press in the home screen on the touch panel of the ScanSnap to display the[Settings] screen.
2. Press to display the [Wi-Fi settings] screen.
3. Press [Access point connection] to display the [Access point connection] screen.
4. Press [Access point connect settings] to display the [Connection information configurationmethod] screen.
5. Select [Select an access point].
6. Press the [Next] button to display the [Select network] screen.
7. From the list of wireless access points that appears, select a wireless access point that youwant to connect to.
8. Press the [Next] button to display the [Enter connection information] screen.
2. Press the input field for [User ID], enter the user ID, and press [OK].
3. Press the input field for [Password], enter the password, and press [OK].
4. Press the [Next] button.
5. Press the [Complete] button in the [Check Connection Results] screen.
6. Press to return to the home screen.
Access Point Connect Settings (iX1600 / iX1500)
164
Authenticating a Wireless Access Point with an External ID(iX1600 / iX1500)
To connect the ScanSnap to a wireless access point, authenticate a connection to the wirelessaccess point by entering an external ID.
1. On the touch panel of the ScanSnap, display the [Enter connectioninformation] screen.
1. Press in the home screen on the touch panel of the ScanSnap to display the[Settings] screen.
2. Press to display the [Wi-Fi settings] screen.
3. Press [Access point connection] to display the [Access point connection] screen.
4. Press [Access point connect settings] to display the [Connection information configurationmethod] screen.
5. Select [Select an access point].
6. Press the [Next] button to display the [Select network] screen.
7. From the list of wireless access points that appears, select a wireless access point that youwant to connect to.
8. Press the [Next] button to display the [Enter connection information] screen.
2. Press the input field for [External ID], enter the external ID, and press [OK].
3. Press the [Next] button.
4. Press the [Complete] button in the [Check Connection Results] screen.
5. Press to return to the home screen.
Access Point Connect Settings (iX1600 / iX1500)
165
Setting an IP Address for the ScanSnap (iX1600 / iX1500)
To identify your ScanSnap on a network, set an IP address for the ScanSnap.When setting an IP address, [Access point connection] needs to be selected for [Wi-Fi connectmode] temporarily.
1. Press in the home screen on the touch panel of the ScanSnap todisplay the [Settings] screen.
2. Press to display the [Wi-Fi settings] screen.
3. Press [Access point connection] to display the [Access point connection]screen.
4. Press [IP address] to display the [IP address] screen.
5. Press the setting field for [Configuration method] to display a list.
6. Set an IP Address.When obtaining an IP address from the DHCP server and automatically assigning it to theScanSnap, select [Obtain automatically (DHCP)].When setting an IP addresses manually, select [Configure IP address manually] and configurethe following settings.1. Press the input field for [IP address], enter the IP address, and then press [OK].
2. Press the input field for [Subnet Mask], enter the subnet mask, and then press [OK].
3. Press the input field for [Default Gateway], enter the default gateway, and then press [OK].
7. Press to return to the home screen.
ATTENTION
If there is a device with the same IP address as the ScanSnap on the network, is displayed on
in the [Settings] screen. Change the IP address which has been set for the ScanSnap toavoid an IP address conflict on the network.
Access Point Connect Settings (iX1600 / iX1500)
166

Using a DNS Server for the Internet Connection (iX1600 / iX1500)
When an IP address is set for the ScanSnap, the setting for using a DNS server can be configuredon the ScanSnap.
1. Press in the home screen on the touch panel of the ScanSnap todisplay the [Settings] screen.
2. Press to display the [Wi-Fi settings] screen.
3. Press [Access point connection] to display the [Access point connection]screen.
4. Press [DNS Server] to display the [DNS Server] screen.
5. Turn on [Use of DNS Server].
6. Press the input field for [Primary DNS], enter the IP address of the primaryDNS server, and then press [OK].
7. Press the input field for [Secondary DNS], enter the IP address of thesecondary DNS server, and then press [OK].
8. Press to return to the home screen.
Access Point Connect Settings (iX1600 / iX1500)
167
Using a Proxy Server for the Internet Connection (iX1600 /iX1500)
Configure the Internet connection via a proxy server.The setting for using a proxy server can be configured when [Access point connection] is selectedfor [Wi-Fi connect mode].
1. Press in the home screen on the touch panel of the ScanSnap todisplay the [Settings] screen.
2. Press to display the [Wi-Fi settings] screen.
3. Press [Access point connection] to display the [Access point connection]screen.
4. Press [Proxy Server] to display the [Proxy Server] screen.
5. Turn on [Use of Proxy Server].
6. Press the input field for [Host Name/IP address], enter the host name or theIP address, and press [OK].
7. Press the input field for [Port Number], enter the port number, and press[OK].
8. When the proxy server requires authentication, turn on [Authentication] andperform the following operations.1. Press the input field for [User name], enter the user name and press [OK].
2. Press the input field for [Password], enter the password, and press [OK].
9. Press to return to the home screen.
Access Point Connect Settings (iX1600 / iX1500)
168
Changing a Connected Computer to a Computerthat You Want to Connect to the ScanSnap(iX1600 / iX1500)
If a user name is displayed in the upper left of the home screen on the touch panel, selecting a username can change the computer that is connected to the ScanSnap.
ATTENTIONl You can change the computer that is connected to the ScanSnap from the touch panel in any of the
following cases:- The options below are selected in the [Settings] screen on the touch panell [Selected user] is selected for [Display of profiles] in the [Scanner settings] screenl [Access point connection] or [Direct connection] is selected for [Wi-Fi connect mode] in the
[Wi-Fi settings] screen- Two or more history records of computers that have been connected to the ScanSnap before
existl The default setting for [Display of profiles] is [Selected user].
If the setting is changed to [All users] or [Connected user], establishing a connection with theScanSnap may fail or another problem may occur.Do not change the setting for [Display of profiles].
This section explains how to set a user name, how to change a computer that is connected to theScanSnap, and how to troubleshoot problems that prevent you from connecting to the ScanSnap.l "Setting a User Name Displayed on the Touch Panel (iX1600 / iX1500)" (page 170)l "Changing a Connected Computer to a Computer That You Want to Connect to the ScanSnap
from the Touch Panel (iX1600 / iX1500)" (page 172)l "Troubleshooting When You Cannot Connect to the ScanSnap (iX1600 / iX1500)" (page 175)
Changing a Connected Computer to a Computer that You Want to Connect to the ScanSnap (iX1600 / iX1500)
169
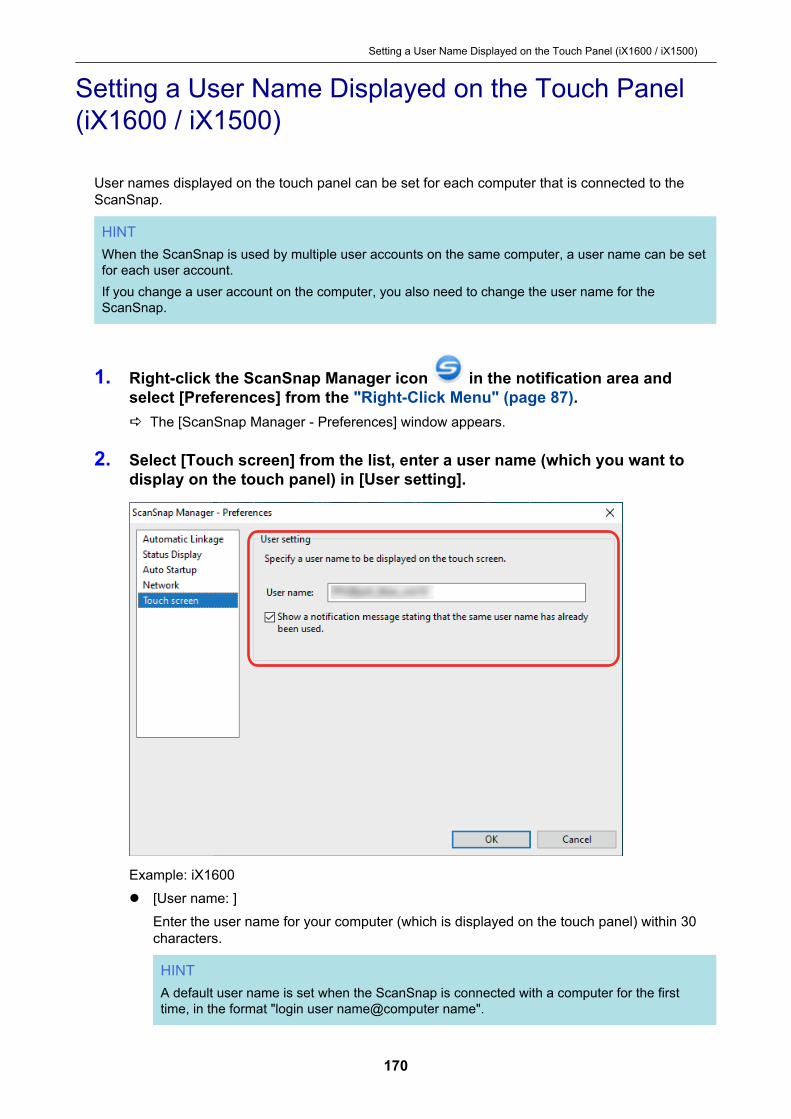
Setting a User Name Displayed on the Touch Panel(iX1600 / iX1500)
User names displayed on the touch panel can be set for each computer that is connected to theScanSnap.
HINTWhen the ScanSnap is used by multiple user accounts on the same computer, a user name can be setfor each user account.If you change a user account on the computer, you also need to change the user name for theScanSnap.
1. Right-click the ScanSnap Manager icon in the notification area andselect [Preferences] from the "Right-Click Menu" (page 87).a The [ScanSnap Manager - Preferences] window appears.
2. Select [Touch screen] from the list, enter a user name (which you want todisplay on the touch panel) in [User setting].
Example: iX1600l [User name: ]
Enter the user name for your computer (which is displayed on the touch panel) within 30characters.
HINTA default user name is set when the ScanSnap is connected with a computer for the firsttime, in the format "login user name@computer name".
Setting a User Name Displayed on the Touch Panel (iX1600 / iX1500)
170

l [Show a notification message stating that the same user name has already been used.]checkboxSelect this checkbox to display a message if a user name that is set in [User name] and auser name of a computer that has been connected with the ScanSnap you are usingbefore are the same.This checkbox is selected by default.
3. Click the [OK] button to close the [ScanSnap Manager - Preferences]window.
Setting a User Name Displayed on the Touch Panel (iX1600 / iX1500)
171
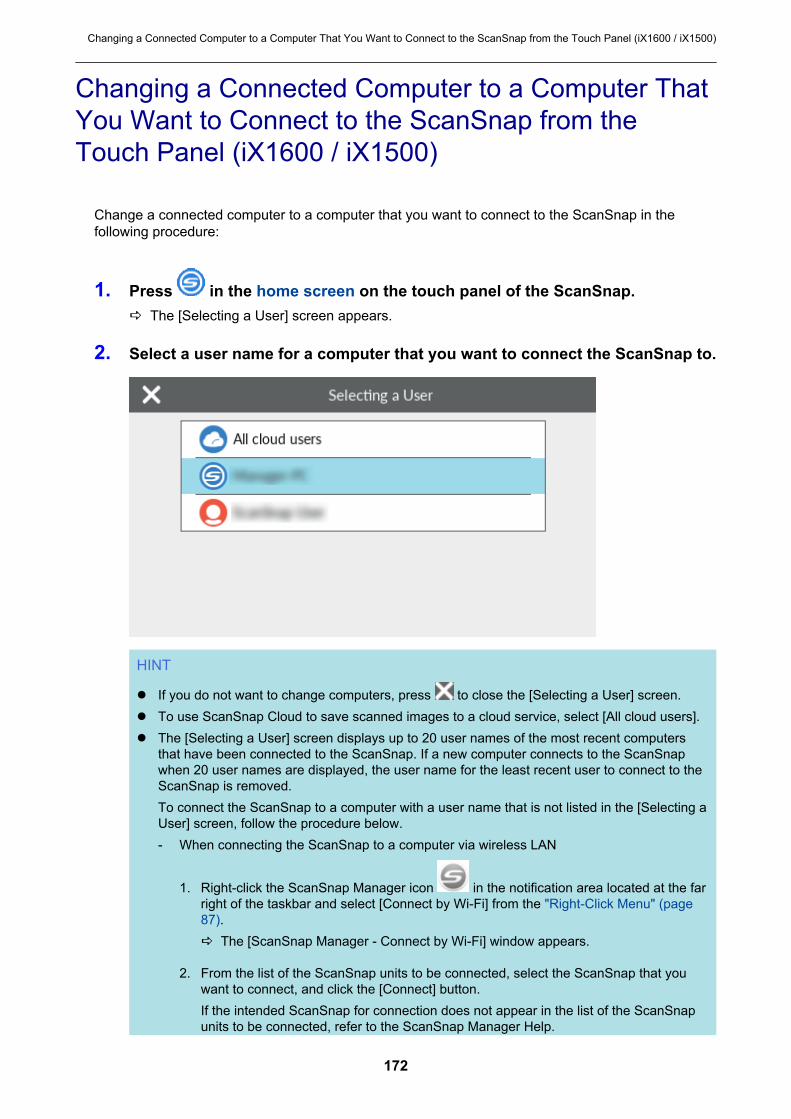
Changing a Connected Computer to a Computer ThatYou Want to Connect to the ScanSnap from theTouch Panel (iX1600 / iX1500)
Change a connected computer to a computer that you want to connect to the ScanSnap in thefollowing procedure:
1. Press in the home screen on the touch panel of the ScanSnap.a The [Selecting a User] screen appears.
2. Select a user name for a computer that you want to connect the ScanSnap to.
HINT
l If you do not want to change computers, press to close the [Selecting a User] screen.l To use ScanSnap Cloud to save scanned images to a cloud service, select [All cloud users].l The [Selecting a User] screen displays up to 20 user names of the most recent computers
that have been connected to the ScanSnap. If a new computer connects to the ScanSnapwhen 20 user names are displayed, the user name for the least recent user to connect to theScanSnap is removed.To connect the ScanSnap to a computer with a user name that is not listed in the [Selecting aUser] screen, follow the procedure below.- When connecting the ScanSnap to a computer via wireless LAN
1. Right-click the ScanSnap Manager icon in the notification area located at the farright of the taskbar and select [Connect by Wi-Fi] from the "Right-Click Menu" (page87).a The [ScanSnap Manager - Connect by Wi-Fi] window appears.
2. From the list of the ScanSnap units to be connected, select the ScanSnap that youwant to connect, and click the [Connect] button.If the intended ScanSnap for connection does not appear in the list of the ScanSnapunits to be connected, refer to the ScanSnap Manager Help.
Changing a Connected Computer to a Computer That You Want to Connect to the ScanSnap from the Touch Panel (iX1600 / iX1500)
172
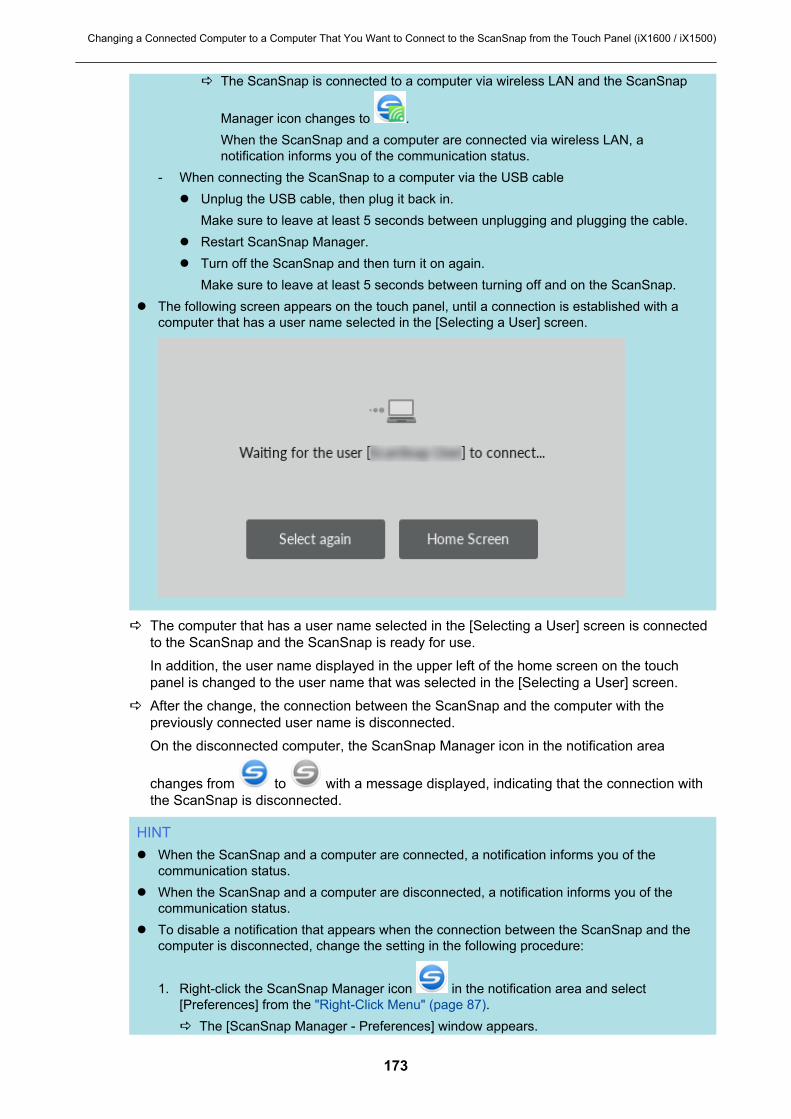
a The ScanSnap is connected to a computer via wireless LAN and the ScanSnap
Manager icon changes to .When the ScanSnap and a computer are connected via wireless LAN, anotification informs you of the communication status.
- When connecting the ScanSnap to a computer via the USB cablel Unplug the USB cable, then plug it back in.
Make sure to leave at least 5 seconds between unplugging and plugging the cable.l Restart ScanSnap Manager.l Turn off the ScanSnap and then turn it on again.
Make sure to leave at least 5 seconds between turning off and on the ScanSnap.l The following screen appears on the touch panel, until a connection is established with a
computer that has a user name selected in the [Selecting a User] screen.
a The computer that has a user name selected in the [Selecting a User] screen is connectedto the ScanSnap and the ScanSnap is ready for use.In addition, the user name displayed in the upper left of the home screen on the touchpanel is changed to the user name that was selected in the [Selecting a User] screen.
a After the change, the connection between the ScanSnap and the computer with thepreviously connected user name is disconnected.On the disconnected computer, the ScanSnap Manager icon in the notification area
changes from to with a message displayed, indicating that the connection withthe ScanSnap is disconnected.
HINTl When the ScanSnap and a computer are connected, a notification informs you of the
communication status.l When the ScanSnap and a computer are disconnected, a notification informs you of the
communication status.l To disable a notification that appears when the connection between the ScanSnap and the
computer is disconnected, change the setting in the following procedure:
1. Right-click the ScanSnap Manager icon in the notification area and select[Preferences] from the "Right-Click Menu" (page 87).a The [ScanSnap Manager - Preferences] window appears.
Changing a Connected Computer to a Computer That You Want to Connect to the ScanSnap from the Touch Panel (iX1600 / iX1500)
173
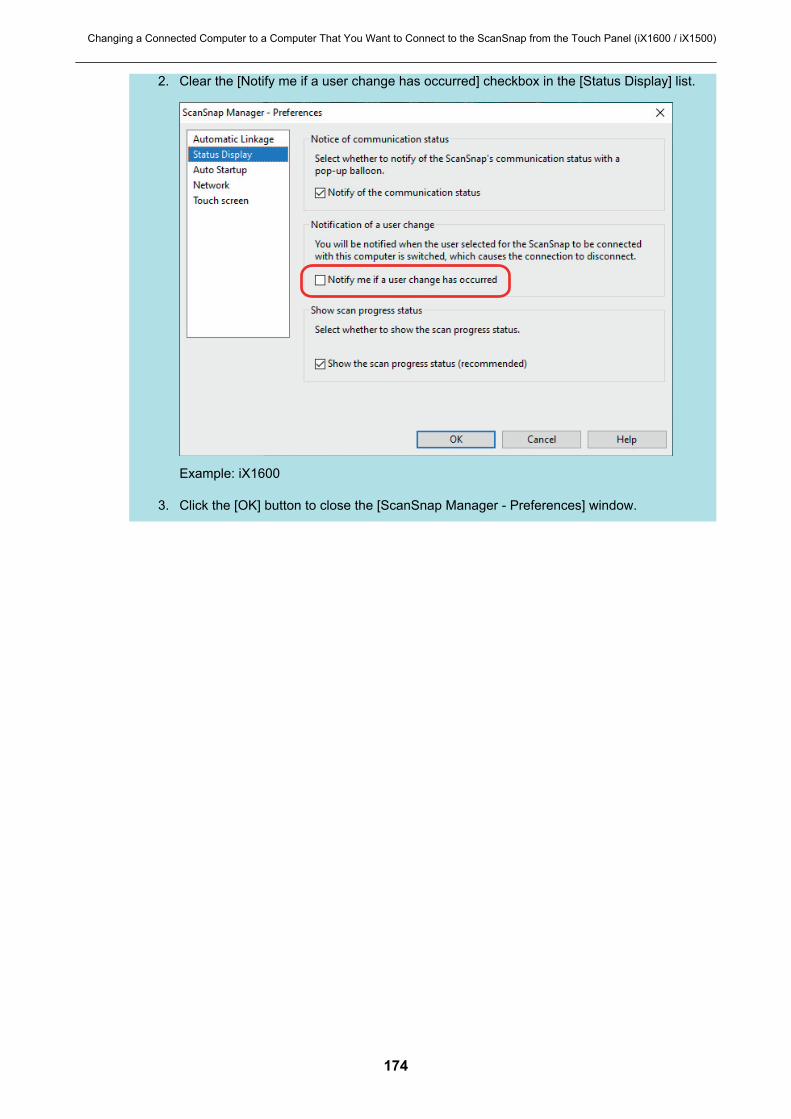
2. Clear the [Notify me if a user change has occurred] checkbox in the [Status Display] list.
Example: iX1600
3. Click the [OK] button to close the [ScanSnap Manager - Preferences] window.
Changing a Connected Computer to a Computer That You Want to Connect to the ScanSnap from the Touch Panel (iX1600 / iX1500)
174

Troubleshooting When You Cannot Connect to theScanSnap (iX1600 / iX1500)
This section explains how to troubleshoot when you cannot connect to the ScanSnap.l "Checking Whether Another Computer Is Connected to the ScanSnap (iX1600 / iX1500)" (page
176)l "Checking Whether a Setting for the ScanSnap Has Been Changed or Not (iX1600 / iX1500)"
(page 177)
Troubleshooting When You Cannot Connect to the ScanSnap (iX1600 / iX1500)
175
Checking Whether Another Computer Is Connected to theScanSnap (iX1600 / iX1500)
Another computer may be connected to the ScanSnap in the following cases:
l The ScanSnap Manager icon in the notification area is l The user name displayed in the upper left of the home screen on the touch panel is another userTo connect to the ScanSnap, select the user name of the computer that is connected to theScanSnap in the [Selecting a User] screen on the touch panel.For details, refer to "Changing a Connected Computer to a Computer That You Want to Connect tothe ScanSnap from the Touch Panel (iX1600 / iX1500)" (page 172).When the ScanSnap and the computer are connected via a USB cable, you can connect to theScanSnap in either of the following procedures.l Unplug the USB cable, then plug it back in.
Make sure to leave at least 5 seconds between unplugging and plugging the cable.l Restart ScanSnap Manager.l Turn off the ScanSnap and then turn it on again.
Make sure to leave at least 5 seconds between turning off and on the ScanSnap.
Troubleshooting When You Cannot Connect to the ScanSnap (iX1600 / iX1500)
176
Checking Whether a Setting for the ScanSnap Has BeenChanged or Not (iX1600 / iX1500)
If the setting for [Display of profiles] on the ScanSnap is changed to [All users] or [Connected user],establishing a connection with the ScanSnap may fail or another problem may occur.Reset the setting for [Display of profiles] on the ScanSnap to [Selected user] and connect theScanSnap to the computer again.
1. Check the setting for [Display of profiles] on the ScanSnap and change it ifneeded.
1. Press in the home screen on the touch panel of the ScanSnap to display the[Settings] screen.
2. Press to display the [Scanner settings] screen.
3. Press [Display of profiles] to display the [Display of profiles] screen.
4. If [All users] or [Connected user] is selected, change it to [Selected user].
HINTl If [All users] is set for [Display of profiles] and the ScanSnap and the computer are
connected via the USB cable, unplug the USB cable, then plug it back in. Once the USBcable is plugged back in, the setting for [Display of profiles] is changed to [Selected user],and the connection between the ScanSnap and the computer is established. Make sureto leave at least 5 seconds between unplugging and plugging the cable.
l When you also use ScanSnap Home to operate the ScanSnap, ScanSnap Home showsa message indicating that the setting for [Display of profiles] has been changed to[Selected user].
5. Press to return to the home screen.
2. When connecting the ScanSnap to a computer via wireless LAN, establish aconnection in the following procedure.
1. Right-click the ScanSnap Manager icon in the notification area located at the far rightof the taskbar and select [Connect by Wi-Fi] from the "Right-Click Menu" (page 87).a The [ScanSnap Manager - Connect by Wi-Fi] window appears.
2. From the list of the ScanSnap units to be connected, select the ScanSnap that you want toconnect, and click the [Connect] button.
Troubleshooting When You Cannot Connect to the ScanSnap (iX1600 / iX1500)
177

ATTENTIONIf the intended ScanSnap for connection does not appear in the list of the ScanSnap units tobe connected, refer to the ScanSnap Manager Help.
a The ScanSnap is connected to a computer via wireless LAN and the ScanSnap
Manager icon changes to .
HINTWhen the ScanSnap and a computer are connected via wireless LAN, a notification informsyou of the communication status.
Troubleshooting When You Cannot Connect to the ScanSnap (iX1600 / iX1500)
178

Scanning Documents
l "Scanning Documents with iX1600 / iX1500 / iX1400" (page 180)l "Scanning Documents with iX500" (page 211)l "Scanning Documents with iX100" (page 240)l "Scanning Documents with SV600" (page 270)l "Scanning Documents with S1300i" (page 298)l "Scanning Documents with S1100i" (page 315)
Scanning Documents
179

Scanning Documents with iX1600 / iX1500 / iX1400
l "Documents to Scan (iX1600 / iX1500 / iX1400)" (page 181)l "Scanning Documents (iX1600 / iX1500 / iX1400)" (page 185)l "Scanning Long Pages (iX1600 / iX1500 / iX1400)" (page 190)l "Scanning Documents of Different Widths or Lengths in One Batch (iX1600 / iX1500 / iX1400)"
(page 194)l "Scanning Small Size Documents such as Receipts in One Go (iX1600 / iX1500 / iX1400)" (page
199)l "Scanning Documents Larger Than A4 or Letter Size (iX1600 / iX1500 / iX1400)" (page 203)l "Scanning Documents Such as Photographs and Clippings (iX1600 / iX1500 / iX1400)" (page
207)
Scanning Documents with iX1600 / iX1500 / iX1400
180

Documents to Scan (iX1600 / iX1500 / iX1400)
This section explains about the conditions for documents that can be loaded directly into theScanSnap and the conditions for documents that can be scanned using the Carrier Sheet.
Documents That Can Be Loaded Directly into the ScanSnapConditions for documents that can be loaded directly into the ScanSnap are as follows:
Document type Office paper, postcards, business cardsPlastic cards conforming to the ISO7810 ID-1 type (54 × 86 mm)
Paper weight 40 to 209 g/m2 (10.7 to 55.7 lb)
A8 size (52 × 72 mm) or less128 to 209 g/m2 (33.9 to 55.7 lb)
Plastic cards0.76 mm (0.03 in.) or less (embossed cards can be used)
Paper sizeWidth50.8 to 216 mm (2 to 8.5 in.)
Length50.8 to 360 mm (2 to 14.17 in.)For long page (*1), up to 863 mm (34 in.)
*1: For iX1600/iX1500, scanning starts when you hold down the [Scan] button in the home screen onthe touch panel for 3 seconds or longer.For iX1400, scanning starts when you hold down the [Scan] button on the ScanSnap for 3seconds or longer.
ATTENTIONl The following types of documents must not be scanned:
- Documents attached with the metals such as paper clips or staples that can damage the insideof the ScanSnapRemove the metals for scanning.
- Documents on which the ink is still wetWait until the ink dries completely to scan these documents.
- Documents larger than 216 × 863 (mm)/8.5 × 34 (in.) (width × length)- Documents other than paper such as fabric, metal foil and OHP film
l When you scan picture postcards, be aware that the picture side may get damaged. It is theresponsibility of the customer to scan picture postcards.
l When you scan plastic cards, in [Multifeed Detection] of the [Paper] tab of the "ScanSnap SetupWindow" (page 89), select [None] or [Check Length].
l Be careful of the following when you scan plastic cards:- Cards that are bent may not be fed properly.- If the surface of the card is dirty with grease marks such as fingerprints, perform scanning after
wiping the dirt off.
Scanning Documents with iX1600 / iX1500 / iX1400
181
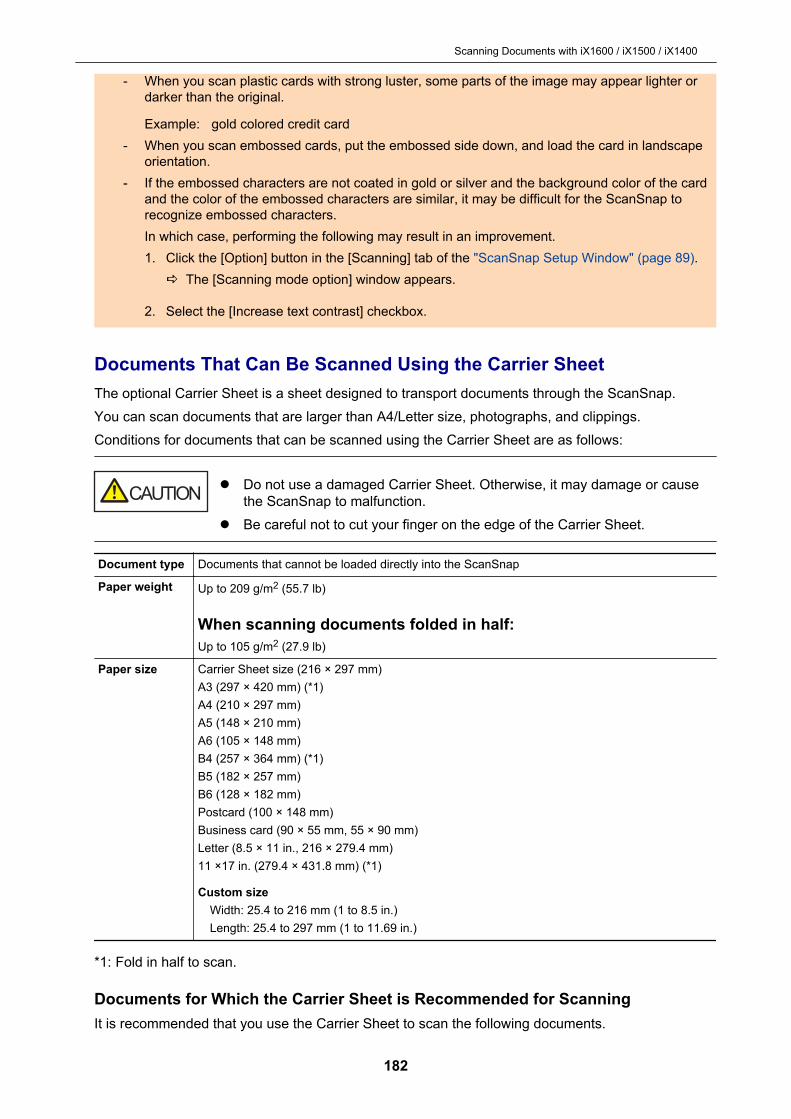
- When you scan plastic cards with strong luster, some parts of the image may appear lighter ordarker than the original.
Example: gold colored credit card- When you scan embossed cards, put the embossed side down, and load the card in landscape
orientation.- If the embossed characters are not coated in gold or silver and the background color of the card
and the color of the embossed characters are similar, it may be difficult for the ScanSnap torecognize embossed characters.In which case, performing the following may result in an improvement.1. Click the [Option] button in the [Scanning] tab of the "ScanSnap Setup Window" (page 89).
a The [Scanning mode option] window appears.
2. Select the [Increase text contrast] checkbox.
Documents That Can Be Scanned Using the Carrier SheetThe optional Carrier Sheet is a sheet designed to transport documents through the ScanSnap.You can scan documents that are larger than A4/Letter size, photographs, and clippings.Conditions for documents that can be scanned using the Carrier Sheet are as follows:
l Do not use a damaged Carrier Sheet. Otherwise, it may damage or causethe ScanSnap to malfunction.
l Be careful not to cut your finger on the edge of the Carrier Sheet.
Document type Documents that cannot be loaded directly into the ScanSnap
Paper weight Up to 209 g/m2 (55.7 lb)
When scanning documents folded in half:Up to 105 g/m2 (27.9 lb)
Paper size Carrier Sheet size (216 × 297 mm)A3 (297 × 420 mm) (*1)A4 (210 × 297 mm)A5 (148 × 210 mm)A6 (105 × 148 mm)B4 (257 × 364 mm) (*1)B5 (182 × 257 mm)B6 (128 × 182 mm)Postcard (100 × 148 mm)Business card (90 × 55 mm, 55 × 90 mm)Letter (8.5 × 11 in., 216 × 279.4 mm)11 ×17 in. (279.4 × 431.8 mm) (*1)
Custom sizeWidth: 25.4 to 216 mm (1 to 8.5 in.)Length: 25.4 to 297 mm (1 to 11.69 in.)
*1: Fold in half to scan.
Documents for Which the Carrier Sheet is Recommended for ScanningIt is recommended that you use the Carrier Sheet to scan the following documents.
Scanning Documents with iX1600 / iX1500 / iX1400
182
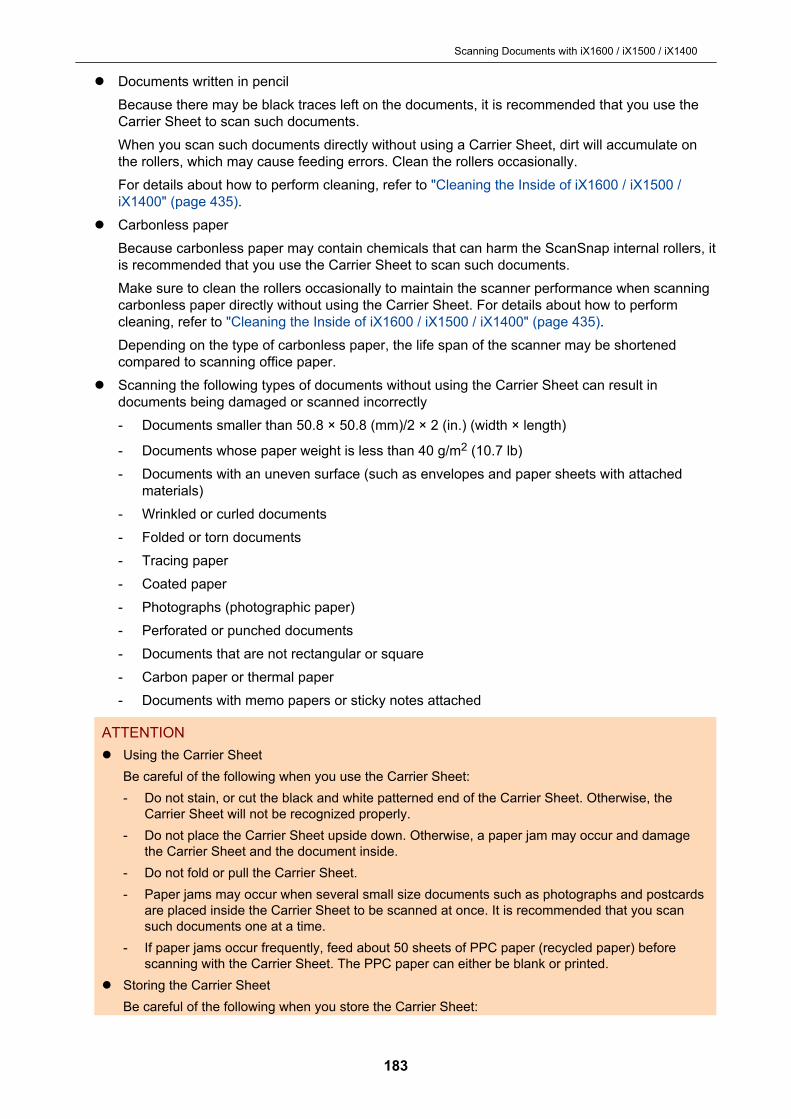
l Documents written in pencilBecause there may be black traces left on the documents, it is recommended that you use theCarrier Sheet to scan such documents.When you scan such documents directly without using a Carrier Sheet, dirt will accumulate onthe rollers, which may cause feeding errors. Clean the rollers occasionally.For details about how to perform cleaning, refer to "Cleaning the Inside of iX1600 / iX1500 /iX1400" (page 435).
l Carbonless paperBecause carbonless paper may contain chemicals that can harm the ScanSnap internal rollers, itis recommended that you use the Carrier Sheet to scan such documents.Make sure to clean the rollers occasionally to maintain the scanner performance when scanningcarbonless paper directly without using the Carrier Sheet. For details about how to performcleaning, refer to "Cleaning the Inside of iX1600 / iX1500 / iX1400" (page 435).Depending on the type of carbonless paper, the life span of the scanner may be shortenedcompared to scanning office paper.
l Scanning the following types of documents without using the Carrier Sheet can result indocuments being damaged or scanned incorrectly- Documents smaller than 50.8 × 50.8 (mm)/2 × 2 (in.) (width × length)
- Documents whose paper weight is less than 40 g/m2 (10.7 lb)- Documents with an uneven surface (such as envelopes and paper sheets with attached
materials)- Wrinkled or curled documents- Folded or torn documents- Tracing paper- Coated paper- Photographs (photographic paper)- Perforated or punched documents- Documents that are not rectangular or square- Carbon paper or thermal paper- Documents with memo papers or sticky notes attached
ATTENTIONl Using the Carrier Sheet
Be careful of the following when you use the Carrier Sheet:- Do not stain, or cut the black and white patterned end of the Carrier Sheet. Otherwise, the
Carrier Sheet will not be recognized properly.- Do not place the Carrier Sheet upside down. Otherwise, a paper jam may occur and damage
the Carrier Sheet and the document inside.- Do not fold or pull the Carrier Sheet.- Paper jams may occur when several small size documents such as photographs and postcards
are placed inside the Carrier Sheet to be scanned at once. It is recommended that you scansuch documents one at a time.
- If paper jams occur frequently, feed about 50 sheets of PPC paper (recycled paper) beforescanning with the Carrier Sheet. The PPC paper can either be blank or printed.
l Storing the Carrier SheetBe careful of the following when you store the Carrier Sheet:
Scanning Documents with iX1600 / iX1500 / iX1400
183

- Do not leave your document inside the Carrier Sheet for a long time. Otherwise, the ink on thedocument may be transferred onto the Carrier Sheet.
- Do not leave the Carrier Sheet in high temperature places such as under direct sunlight or neara heating apparatus for a long time. Also, do not use the Carrier Sheet in high temperatureplaces. The Carrier Sheet may be deformed.
- To avoid deformation, store the Carrier Sheet on a flat surface without any weight on it.
Scanning Documents with iX1600 / iX1500 / iX1400
184
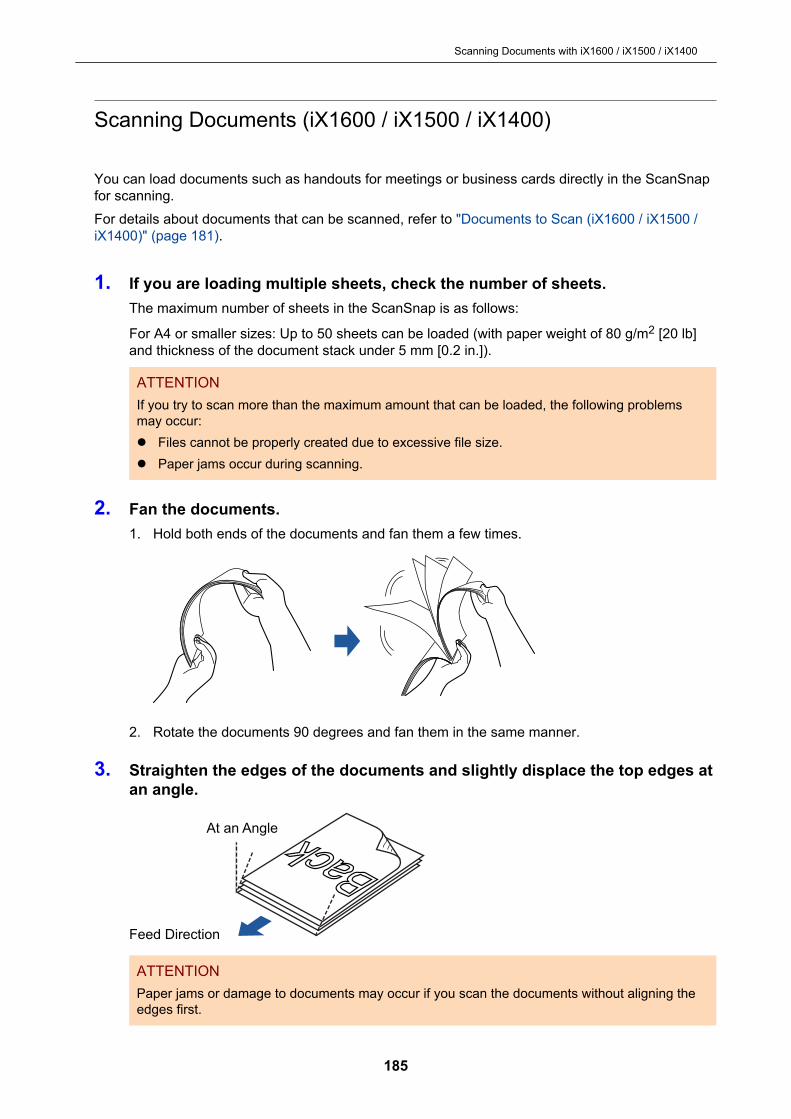
Scanning Documents (iX1600 / iX1500 / iX1400)
You can load documents such as handouts for meetings or business cards directly in the ScanSnapfor scanning.For details about documents that can be scanned, refer to "Documents to Scan (iX1600 / iX1500 /iX1400)" (page 181).
1. If you are loading multiple sheets, check the number of sheets.The maximum number of sheets in the ScanSnap is as follows:
For A4 or smaller sizes: Up to 50 sheets can be loaded (with paper weight of 80 g/m2 [20 lb]and thickness of the document stack under 5 mm [0.2 in.]).
ATTENTIONIf you try to scan more than the maximum amount that can be loaded, the following problemsmay occur:l Files cannot be properly created due to excessive file size.l Paper jams occur during scanning.
2. Fan the documents.1. Hold both ends of the documents and fan them a few times.
2. Rotate the documents 90 degrees and fan them in the same manner.
3. Straighten the edges of the documents and slightly displace the top edges atan angle.
At an Angle
Feed Direction
ATTENTIONPaper jams or damage to documents may occur if you scan the documents without aligning theedges first.
Scanning Documents with iX1600 / iX1500 / iX1400
185
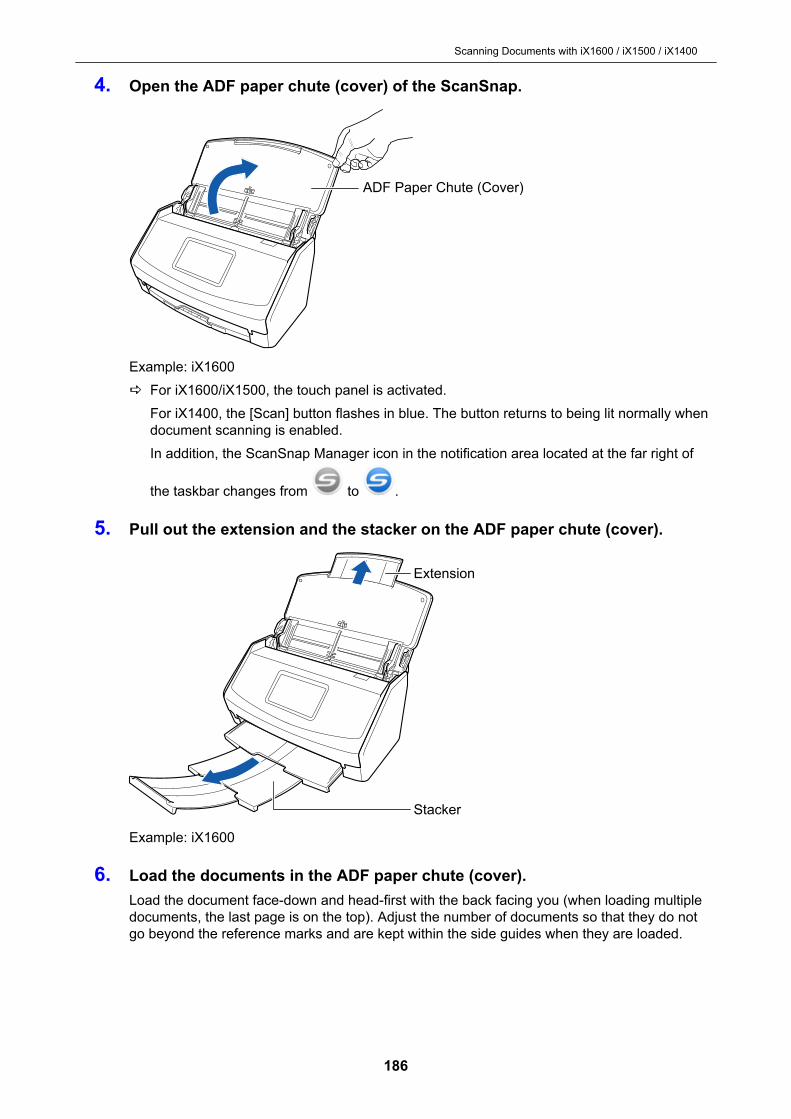
4. Open the ADF paper chute (cover) of the ScanSnap.
ADF Paper Chute (Cover)
Example: iX1600a For iX1600/iX1500, the touch panel is activated.
For iX1400, the [Scan] button flashes in blue. The button returns to being lit normally whendocument scanning is enabled.In addition, the ScanSnap Manager icon in the notification area located at the far right of
the taskbar changes from to .
5. Pull out the extension and the stacker on the ADF paper chute (cover).
Extension
Stacker
Example: iX1600
6. Load the documents in the ADF paper chute (cover).Load the document face-down and head-first with the back facing you (when loading multipledocuments, the last page is on the top). Adjust the number of documents so that they do notgo beyond the reference marks and are kept within the side guides when they are loaded.
Scanning Documents with iX1600 / iX1500 / iX1400
186
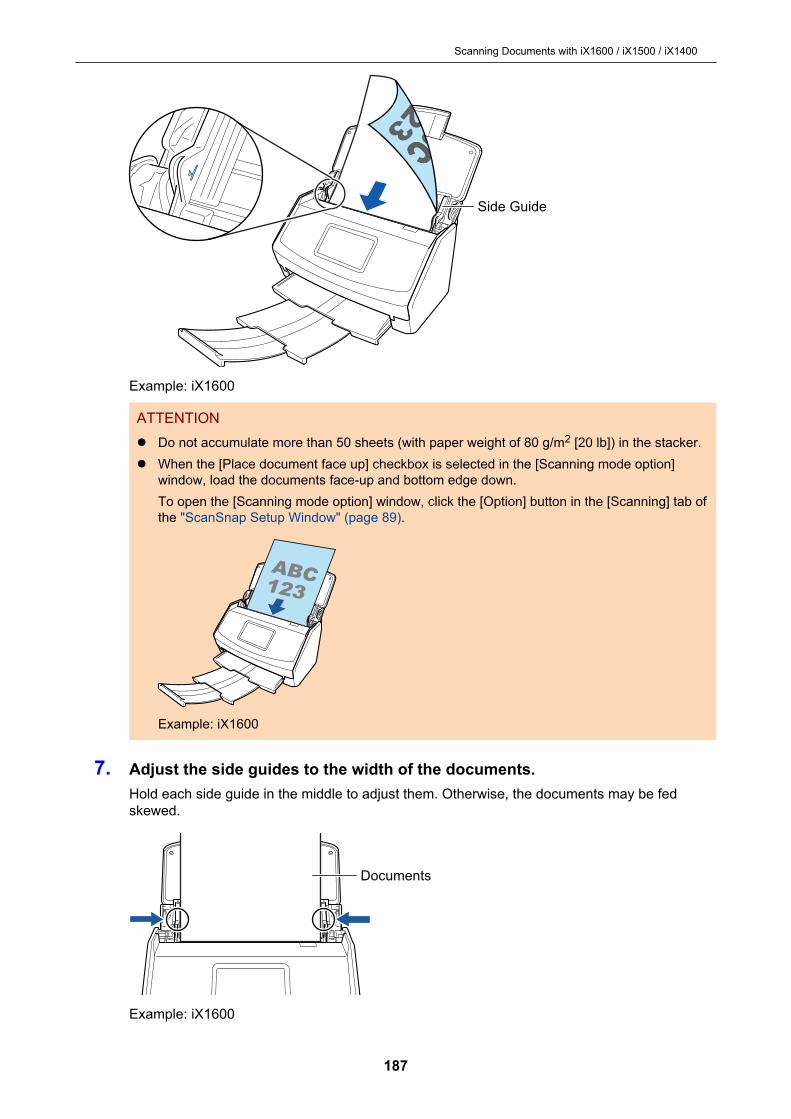
Side Guide
Example: iX1600
ATTENTIONl Do not accumulate more than 50 sheets (with paper weight of 80 g/m2 [20 lb]) in the stacker.l When the [Place document face up] checkbox is selected in the [Scanning mode option]
window, load the documents face-up and bottom edge down.To open the [Scanning mode option] window, click the [Option] button in the [Scanning] tab ofthe "ScanSnap Setup Window" (page 89).
Example: iX1600
7. Adjust the side guides to the width of the documents.Hold each side guide in the middle to adjust them. Otherwise, the documents may be fedskewed.
Documents
Example: iX1600
Scanning Documents with iX1600 / iX1500 / iX1400
187
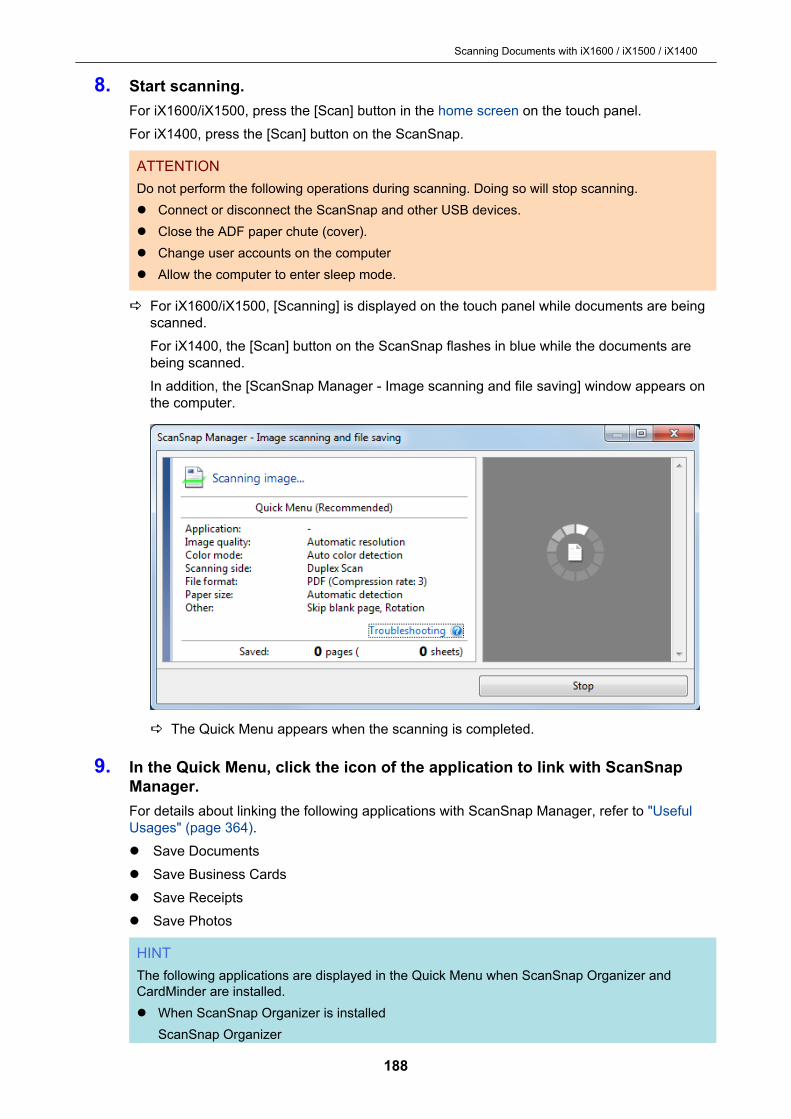
8. Start scanning.For iX1600/iX1500, press the [Scan] button in the home screen on the touch panel.For iX1400, press the [Scan] button on the ScanSnap.
ATTENTIONDo not perform the following operations during scanning. Doing so will stop scanning.l Connect or disconnect the ScanSnap and other USB devices.l Close the ADF paper chute (cover).l Change user accounts on the computerl Allow the computer to enter sleep mode.
a For iX1600/iX1500, [Scanning] is displayed on the touch panel while documents are beingscanned.For iX1400, the [Scan] button on the ScanSnap flashes in blue while the documents arebeing scanned.In addition, the [ScanSnap Manager - Image scanning and file saving] window appears onthe computer.
a The Quick Menu appears when the scanning is completed.
9. In the Quick Menu, click the icon of the application to link with ScanSnapManager.For details about linking the following applications with ScanSnap Manager, refer to "UsefulUsages" (page 364).l Save Documentsl Save Business Cardsl Save Receiptsl Save Photos
HINTThe following applications are displayed in the Quick Menu when ScanSnap Organizer andCardMinder are installed.l When ScanSnap Organizer is installed
ScanSnap Organizer
Scanning Documents with iX1600 / iX1500 / iX1400
188
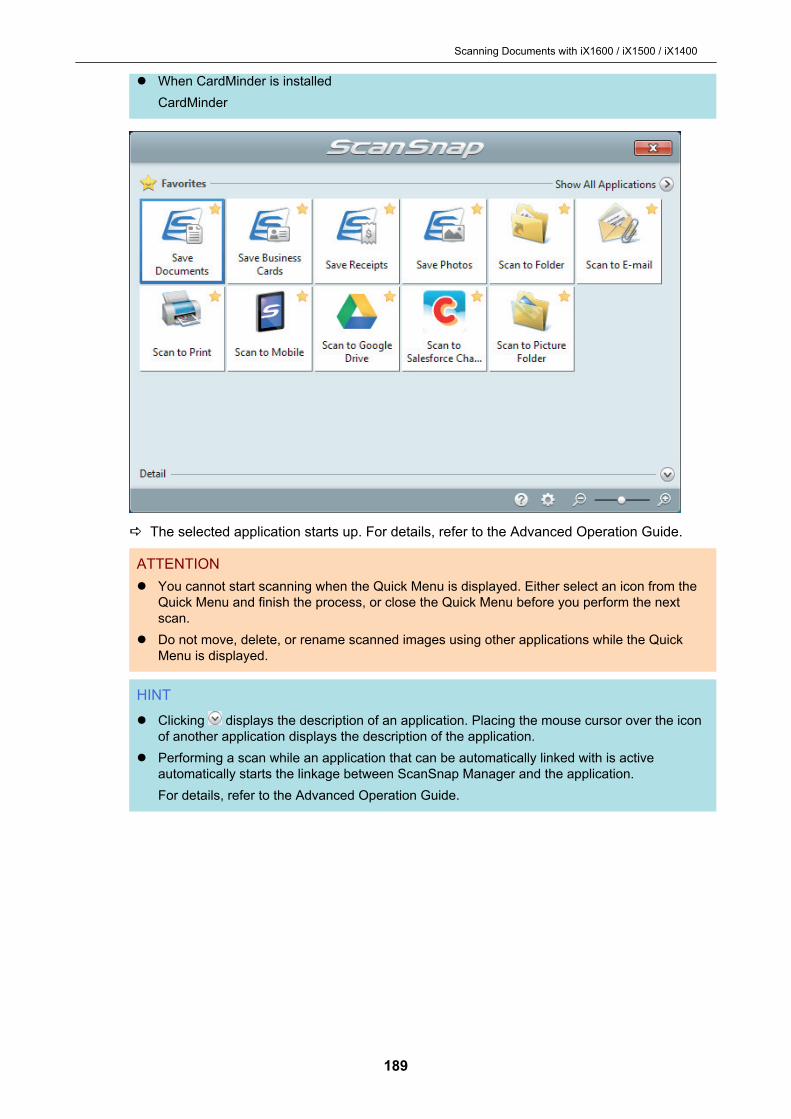
l When CardMinder is installedCardMinder
a The selected application starts up. For details, refer to the Advanced Operation Guide.
ATTENTIONl You cannot start scanning when the Quick Menu is displayed. Either select an icon from the
Quick Menu and finish the process, or close the Quick Menu before you perform the nextscan.
l Do not move, delete, or rename scanned images using other applications while the QuickMenu is displayed.
HINT
l Clicking displays the description of an application. Placing the mouse cursor over the iconof another application displays the description of the application.
l Performing a scan while an application that can be automatically linked with is activeautomatically starts the linkage between ScanSnap Manager and the application.For details, refer to the Advanced Operation Guide.
Scanning Documents with iX1600 / iX1500 / iX1400
189

Scanning Long Pages (iX1600 / iX1500 / iX1400)
Documents up to 863 mm (34 in.) in length can be scanned.For details about documents that can be scanned, refer to "Documents to Scan (iX1600 / iX1500 /iX1400)" (page 181).
HINTFor details about how to load documents that are 360 mm (14.17 in.) or less in length, refer to"Scanning Documents (iX1600 / iX1500 / iX1400)" (page 185).
1. Open the ADF paper chute (cover) of the ScanSnap.
ADF Paper Chute (Cover)
Example: iX1600a For iX1600/iX1500, the touch panel is activated.
For iX1400, the [Scan] button flashes in blue. The button returns to being lit normally whendocument scanning is enabled.In addition, the ScanSnap Manager icon in the notification area located at the far right of
the taskbar changes from to .
2. Pull out the extension and the stacker on the ADF paper chute (cover).
Scanning Documents with iX1600 / iX1500 / iX1400
190

Extension
Stacker
Example: iX1600
3. Load only one document in the ADF paper chute (cover).Hold the document with your hand so that it does not fall out of the ADF paper chute (cover).
Example: iX1600
4. Start scanning.For iX1600/iX1500, press the [Scan] button in the home screen on the touch panel for 3seconds or longer until the button changes color.For iX1400, press the [Scan] button on the ScanSnap (for three seconds or longer) until thebutton flashes in blue.
ATTENTIONl Secure enough space where the scanned documents are ejected from the ScanSnap, and
pick up the documents with your hands to prevent them from falling off the unit where theScanSnap is placed on.
Scanning Documents with iX1600 / iX1500 / iX1400
191
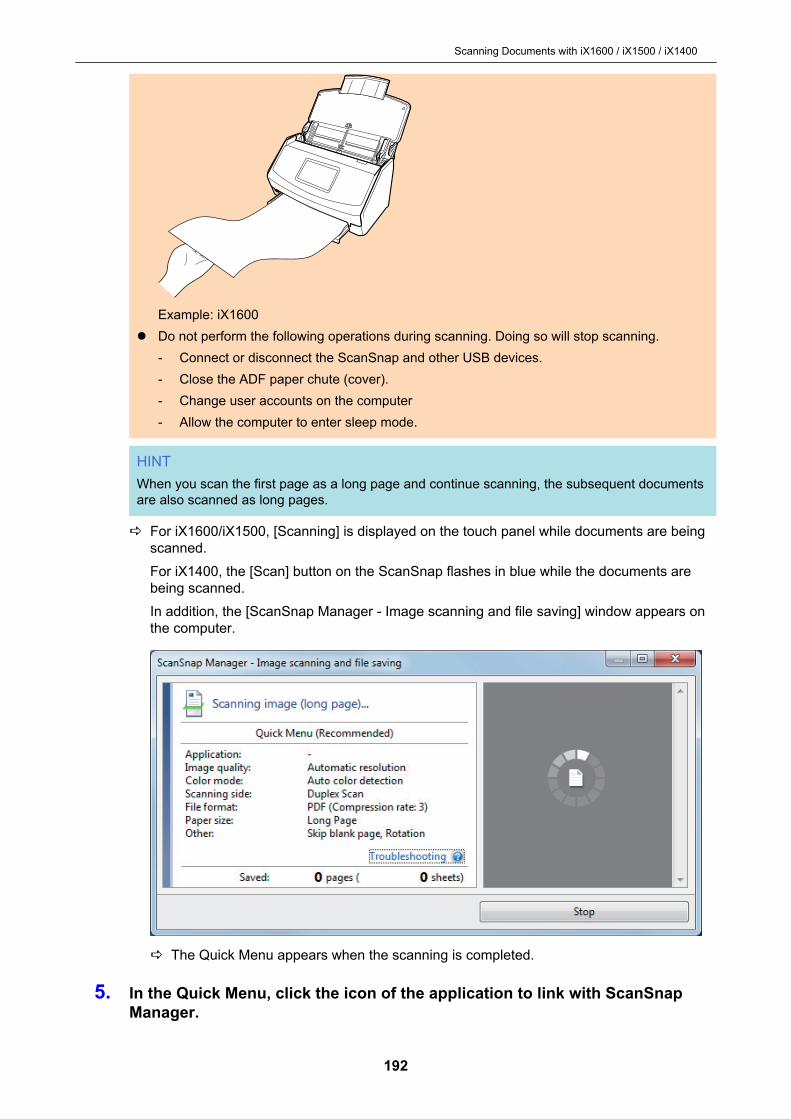
Example: iX1600l Do not perform the following operations during scanning. Doing so will stop scanning.
- Connect or disconnect the ScanSnap and other USB devices.- Close the ADF paper chute (cover).- Change user accounts on the computer- Allow the computer to enter sleep mode.
HINTWhen you scan the first page as a long page and continue scanning, the subsequent documentsare also scanned as long pages.
a For iX1600/iX1500, [Scanning] is displayed on the touch panel while documents are beingscanned.For iX1400, the [Scan] button on the ScanSnap flashes in blue while the documents arebeing scanned.In addition, the [ScanSnap Manager - Image scanning and file saving] window appears onthe computer.
a The Quick Menu appears when the scanning is completed.
5. In the Quick Menu, click the icon of the application to link with ScanSnapManager.
Scanning Documents with iX1600 / iX1500 / iX1400
192

When you select [Save Documents], you can manage scanned images by folder withScanSnap Home.For details, refer to "Managing Paper Documents by Folder on a Computer with ScanSnapHome" (page 365).
HINT[ScanSnap Organizer] is displayed in the Quick Menu when ScanSnap Organizer is installed.To manage scanned images by folder with ScanSnap Organizer, refer to "Managing PaperDocuments by Folder on a Computer with ScanSnap Organizer" (page 368).
a The selected application starts up. For details, refer to the Advanced Operation Guide.
ATTENTIONl You cannot start scanning when the Quick Menu is displayed. Either select an icon from the
Quick Menu and finish the process, or close the Quick Menu before you perform the nextscan.
l Do not move, delete, or rename scanned images using other applications while the QuickMenu is displayed.
HINT
l Clicking displays the description of an application. Placing the mouse cursor over the iconof another application displays the description of the application.
l Performing a scan while an application that can be automatically linked with is activeautomatically starts the linkage between ScanSnap Manager and the application.For details, refer to the Advanced Operation Guide.
Scanning Documents with iX1600 / iX1500 / iX1400
193
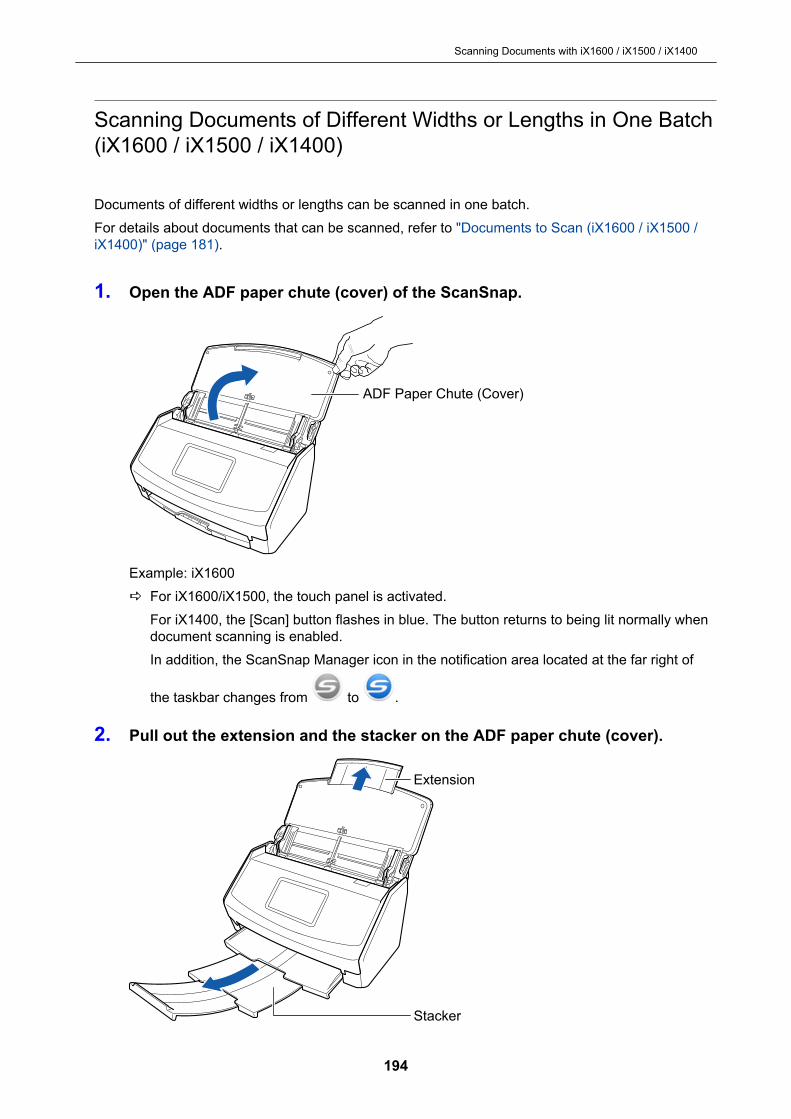
Scanning Documents of Different Widths or Lengths in One Batch(iX1600 / iX1500 / iX1400)
Documents of different widths or lengths can be scanned in one batch.For details about documents that can be scanned, refer to "Documents to Scan (iX1600 / iX1500 /iX1400)" (page 181).
1. Open the ADF paper chute (cover) of the ScanSnap.
ADF Paper Chute (Cover)
Example: iX1600a For iX1600/iX1500, the touch panel is activated.
For iX1400, the [Scan] button flashes in blue. The button returns to being lit normally whendocument scanning is enabled.In addition, the ScanSnap Manager icon in the notification area located at the far right of
the taskbar changes from to .
2. Pull out the extension and the stacker on the ADF paper chute (cover).
Extension
Stacker
Scanning Documents with iX1600 / iX1500 / iX1400
194

Example: iX1600
3. Right-click the ScanSnap Manager icon in the notification area locatedat the far right of the taskbar, and select the [Scan Button Settings] from the"Right-Click Menu" (page 87).a The ScanSnap setup window appears.
4. In the [Paper] tab, select [Automatic detection] in [Paper size].
5. Select [None] in [Multifeed Detection].
6. Click the [OK] button to close the ScanSnap setup window.
7. Load documents in the ScanSnap.1. Align the edges of the documents.
Scanning Documents with iX1600 / iX1500 / iX1400
195
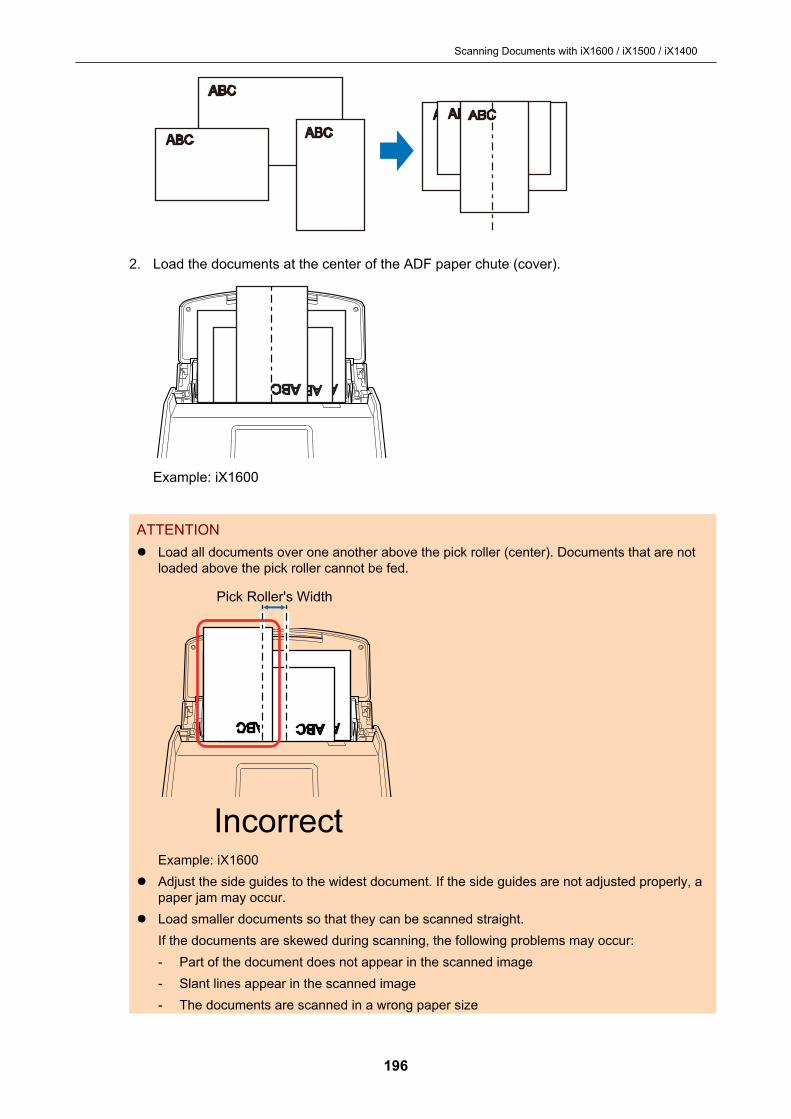
2. Load the documents at the center of the ADF paper chute (cover).
Example: iX1600
ATTENTIONl Load all documents over one another above the pick roller (center). Documents that are not
loaded above the pick roller cannot be fed.
Incorrect
Pick Roller's Width
Example: iX1600l Adjust the side guides to the widest document. If the side guides are not adjusted properly, a
paper jam may occur.l Load smaller documents so that they can be scanned straight.
If the documents are skewed during scanning, the following problems may occur:- Part of the document does not appear in the scanned image- Slant lines appear in the scanned image- The documents are scanned in a wrong paper size
Scanning Documents with iX1600 / iX1500 / iX1400
196
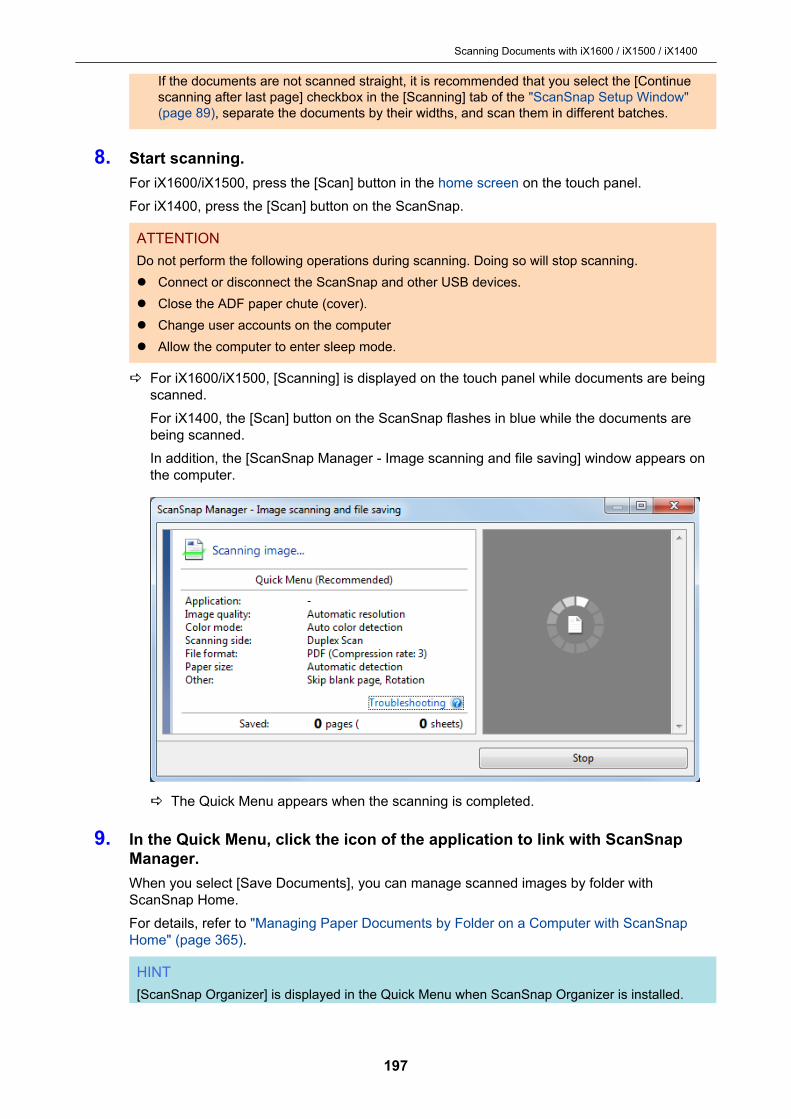
If the documents are not scanned straight, it is recommended that you select the [Continuescanning after last page] checkbox in the [Scanning] tab of the "ScanSnap Setup Window"(page 89), separate the documents by their widths, and scan them in different batches.
8. Start scanning.For iX1600/iX1500, press the [Scan] button in the home screen on the touch panel.For iX1400, press the [Scan] button on the ScanSnap.
ATTENTIONDo not perform the following operations during scanning. Doing so will stop scanning.l Connect or disconnect the ScanSnap and other USB devices.l Close the ADF paper chute (cover).l Change user accounts on the computerl Allow the computer to enter sleep mode.
a For iX1600/iX1500, [Scanning] is displayed on the touch panel while documents are beingscanned.For iX1400, the [Scan] button on the ScanSnap flashes in blue while the documents arebeing scanned.In addition, the [ScanSnap Manager - Image scanning and file saving] window appears onthe computer.
a The Quick Menu appears when the scanning is completed.
9. In the Quick Menu, click the icon of the application to link with ScanSnapManager.When you select [Save Documents], you can manage scanned images by folder withScanSnap Home.For details, refer to "Managing Paper Documents by Folder on a Computer with ScanSnapHome" (page 365).
HINT[ScanSnap Organizer] is displayed in the Quick Menu when ScanSnap Organizer is installed.
Scanning Documents with iX1600 / iX1500 / iX1400
197
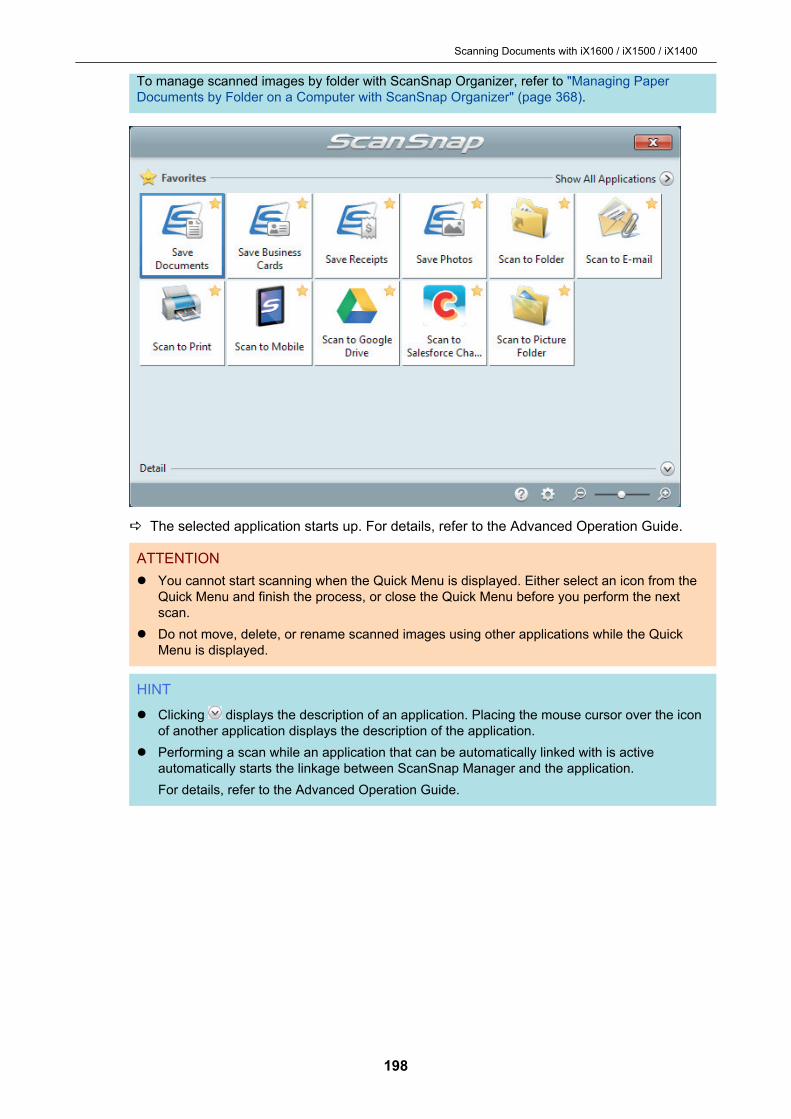
To manage scanned images by folder with ScanSnap Organizer, refer to "Managing PaperDocuments by Folder on a Computer with ScanSnap Organizer" (page 368).
a The selected application starts up. For details, refer to the Advanced Operation Guide.
ATTENTIONl You cannot start scanning when the Quick Menu is displayed. Either select an icon from the
Quick Menu and finish the process, or close the Quick Menu before you perform the nextscan.
l Do not move, delete, or rename scanned images using other applications while the QuickMenu is displayed.
HINT
l Clicking displays the description of an application. Placing the mouse cursor over the iconof another application displays the description of the application.
l Performing a scan while an application that can be automatically linked with is activeautomatically starts the linkage between ScanSnap Manager and the application.For details, refer to the Advanced Operation Guide.
Scanning Documents with iX1600 / iX1500 / iX1400
198
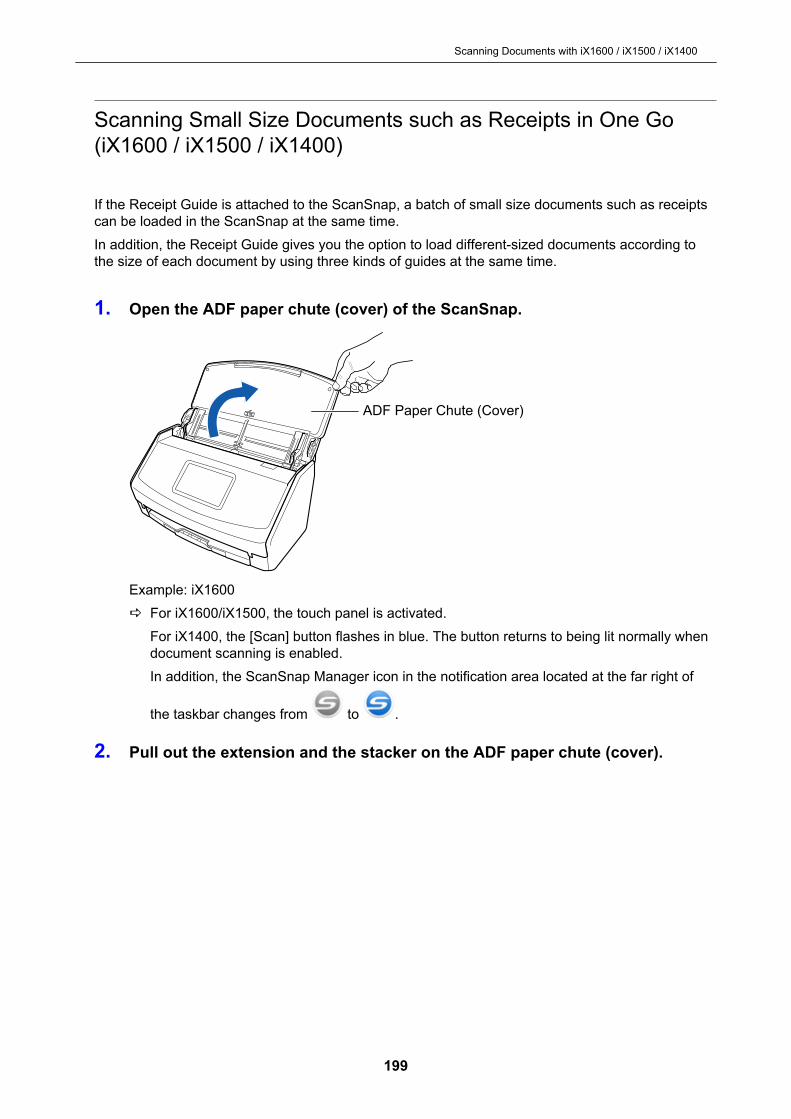
Scanning Small Size Documents such as Receipts in One Go(iX1600 / iX1500 / iX1400)
If the Receipt Guide is attached to the ScanSnap, a batch of small size documents such as receiptscan be loaded in the ScanSnap at the same time.In addition, the Receipt Guide gives you the option to load different-sized documents according tothe size of each document by using three kinds of guides at the same time.
1. Open the ADF paper chute (cover) of the ScanSnap.
ADF Paper Chute (Cover)
Example: iX1600a For iX1600/iX1500, the touch panel is activated.
For iX1400, the [Scan] button flashes in blue. The button returns to being lit normally whendocument scanning is enabled.In addition, the ScanSnap Manager icon in the notification area located at the far right of
the taskbar changes from to .
2. Pull out the extension and the stacker on the ADF paper chute (cover).
Scanning Documents with iX1600 / iX1500 / iX1400
199

Extension
Stacker
Example: iX1600
3. Attach the Receipt Guide.For details, refer to "Attaching the Receipt Guide (iX1600 / iX1500 / iX1400)" (page 111).
4. Load documents in the ADF paper chute (cover).Load documents in the guides on the Receipt Guide according to the width of each guide.Load the documents face-down and top-first with their back facing you.
Example: iX1600
5. Start scanning.For iX1600/iX1500, press the [Scan] button in the home screen on the touch panel.For iX1400, press the [Scan] button on the ScanSnap.
ATTENTIONDo not perform the following operations during scanning. Doing so will stop scanning.l Connect or disconnect the ScanSnap and other USB devices.l Close the ADF paper chute (cover).l Change user accounts on the computerl Allow the computer to enter sleep mode.
Scanning Documents with iX1600 / iX1500 / iX1400
200
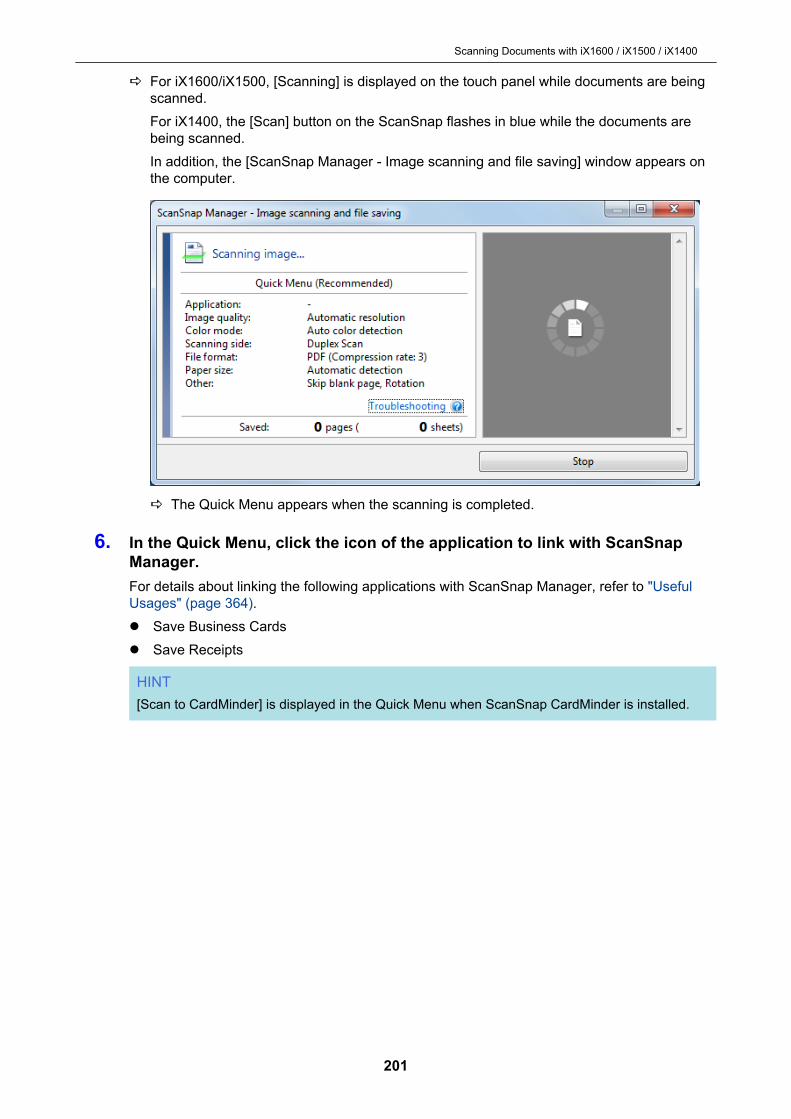
a For iX1600/iX1500, [Scanning] is displayed on the touch panel while documents are beingscanned.For iX1400, the [Scan] button on the ScanSnap flashes in blue while the documents arebeing scanned.In addition, the [ScanSnap Manager - Image scanning and file saving] window appears onthe computer.
a The Quick Menu appears when the scanning is completed.
6. In the Quick Menu, click the icon of the application to link with ScanSnapManager.For details about linking the following applications with ScanSnap Manager, refer to "UsefulUsages" (page 364).l Save Business Cardsl Save Receipts
HINT[Scan to CardMinder] is displayed in the Quick Menu when ScanSnap CardMinder is installed.
Scanning Documents with iX1600 / iX1500 / iX1400
201

a The selected application starts up. For details, refer to the Advanced Operation Guide.
ATTENTIONl You cannot start scanning when the Quick Menu is displayed. Either select an icon from the
Quick Menu and finish the process, or close the Quick Menu before you perform the nextscan.
l Do not move, delete, or rename scanned images using other applications while the QuickMenu is displayed.
HINT
l Clicking displays the description of an application. Placing the mouse cursor over the iconof another application displays the description of the application.
l Performing a scan while an application that can be automatically linked with is activeautomatically starts the linkage between ScanSnap Manager and the application.For details, refer to the Advanced Operation Guide.
Scanning Documents with iX1600 / iX1500 / iX1400
202
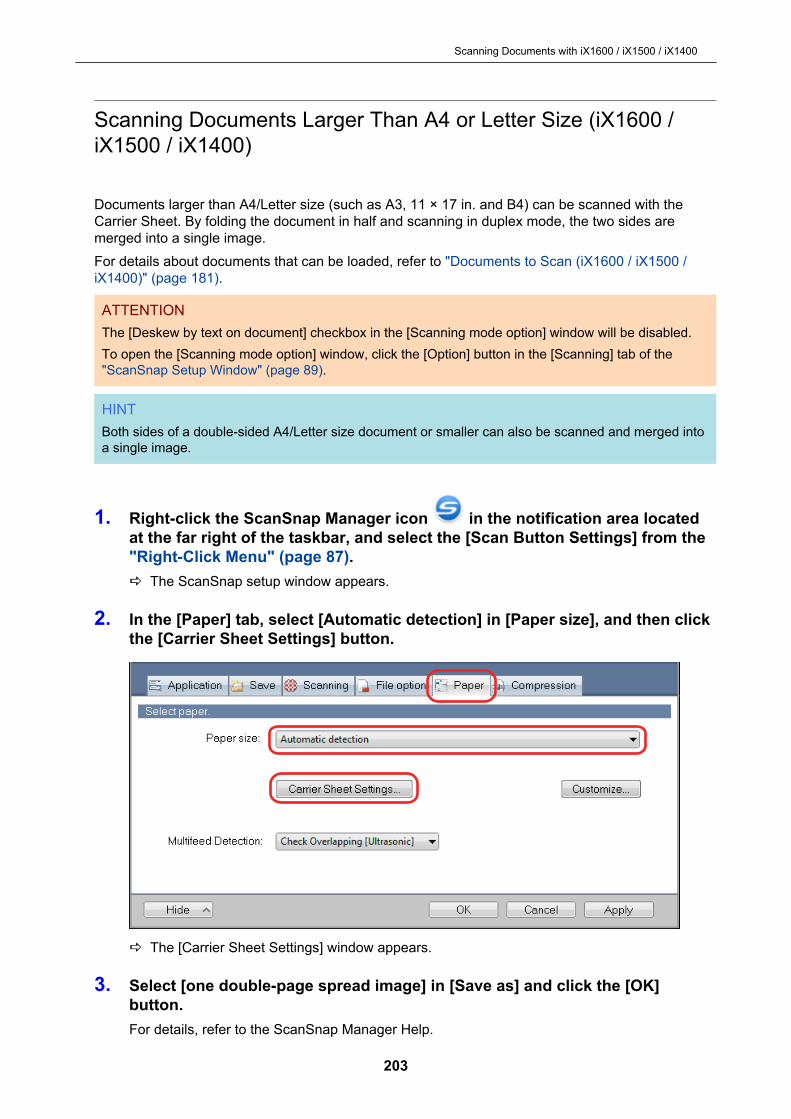
Scanning Documents Larger Than A4 or Letter Size (iX1600 /iX1500 / iX1400)
Documents larger than A4/Letter size (such as A3, 11 × 17 in. and B4) can be scanned with theCarrier Sheet. By folding the document in half and scanning in duplex mode, the two sides aremerged into a single image.For details about documents that can be loaded, refer to "Documents to Scan (iX1600 / iX1500 /iX1400)" (page 181).
ATTENTIONThe [Deskew by text on document] checkbox in the [Scanning mode option] window will be disabled.To open the [Scanning mode option] window, click the [Option] button in the [Scanning] tab of the"ScanSnap Setup Window" (page 89).
HINTBoth sides of a double-sided A4/Letter size document or smaller can also be scanned and merged intoa single image.
1. Right-click the ScanSnap Manager icon in the notification area locatedat the far right of the taskbar, and select the [Scan Button Settings] from the"Right-Click Menu" (page 87).a The ScanSnap setup window appears.
2. In the [Paper] tab, select [Automatic detection] in [Paper size], and then clickthe [Carrier Sheet Settings] button.
a The [Carrier Sheet Settings] window appears.
3. Select [one double-page spread image] in [Save as] and click the [OK]button.For details, refer to the ScanSnap Manager Help.
Scanning Documents with iX1600 / iX1500 / iX1400
203

4. In [Scanning side] in the [Scanning] tab, select [Duplex Scan (Double-sided)]and click the [OK] button.
ATTENTIONIf [Simplex Scan (Single-sided)] is selected, the ScanSnap outputs the same result as performinga simplex scan in [two separate images (front and back)] mode.
5. Place the document inside the Carrier Sheet.1. Fold the document in half with the sides to be scanned facing out.
Fold it tightly and smooth out any creases.
Scanning Documents with iX1600 / iX1500 / iX1400
204
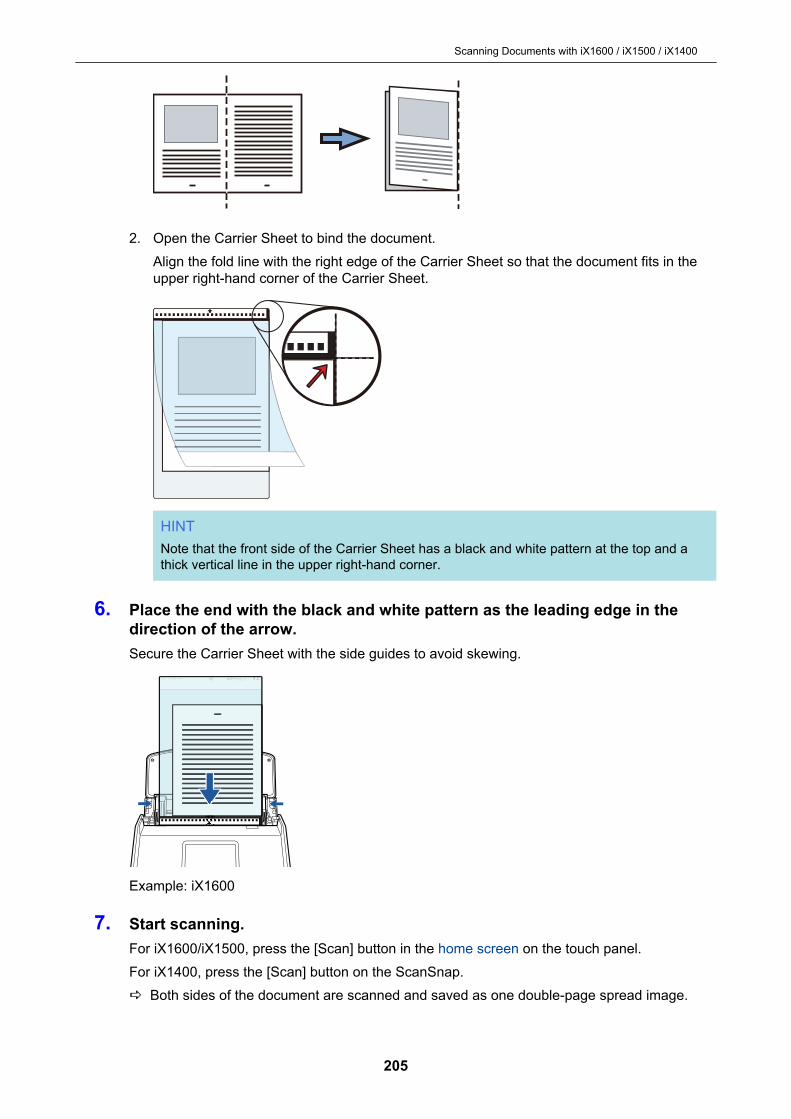
2. Open the Carrier Sheet to bind the document.Align the fold line with the right edge of the Carrier Sheet so that the document fits in theupper right-hand corner of the Carrier Sheet.
HINTNote that the front side of the Carrier Sheet has a black and white pattern at the top and athick vertical line in the upper right-hand corner.
6. Place the end with the black and white pattern as the leading edge in thedirection of the arrow.Secure the Carrier Sheet with the side guides to avoid skewing.
Example: iX1600
7. Start scanning.For iX1600/iX1500, press the [Scan] button in the home screen on the touch panel.For iX1400, press the [Scan] button on the ScanSnap.a Both sides of the document are scanned and saved as one double-page spread image.
Scanning Documents with iX1600 / iX1500 / iX1400
205
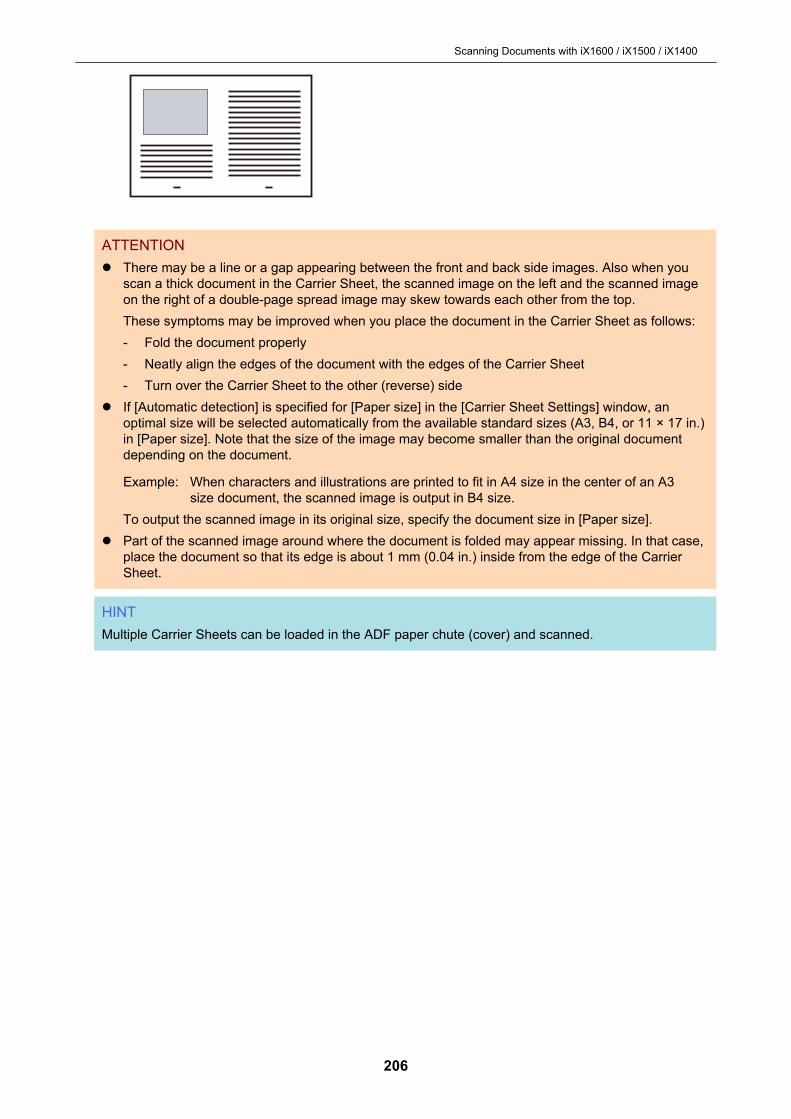
ATTENTIONl There may be a line or a gap appearing between the front and back side images. Also when you
scan a thick document in the Carrier Sheet, the scanned image on the left and the scanned imageon the right of a double-page spread image may skew towards each other from the top.These symptoms may be improved when you place the document in the Carrier Sheet as follows:- Fold the document properly- Neatly align the edges of the document with the edges of the Carrier Sheet- Turn over the Carrier Sheet to the other (reverse) side
l If [Automatic detection] is specified for [Paper size] in the [Carrier Sheet Settings] window, anoptimal size will be selected automatically from the available standard sizes (A3, B4, or 11 × 17 in.)in [Paper size]. Note that the size of the image may become smaller than the original documentdepending on the document.
Example: When characters and illustrations are printed to fit in A4 size in the center of an A3size document, the scanned image is output in B4 size.
To output the scanned image in its original size, specify the document size in [Paper size].l Part of the scanned image around where the document is folded may appear missing. In that case,
place the document so that its edge is about 1 mm (0.04 in.) inside from the edge of the CarrierSheet.
HINTMultiple Carrier Sheets can be loaded in the ADF paper chute (cover) and scanned.
Scanning Documents with iX1600 / iX1500 / iX1400
206
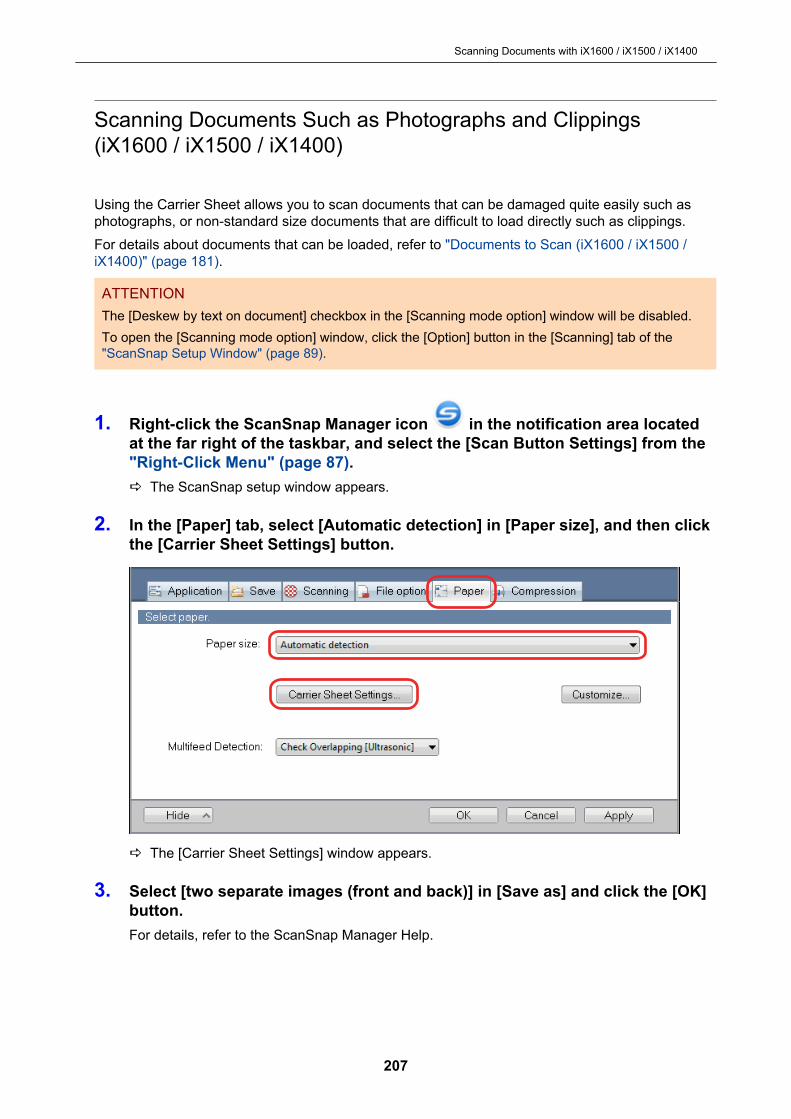
Scanning Documents Such as Photographs and Clippings(iX1600 / iX1500 / iX1400)
Using the Carrier Sheet allows you to scan documents that can be damaged quite easily such asphotographs, or non-standard size documents that are difficult to load directly such as clippings.For details about documents that can be loaded, refer to "Documents to Scan (iX1600 / iX1500 /iX1400)" (page 181).
ATTENTIONThe [Deskew by text on document] checkbox in the [Scanning mode option] window will be disabled.To open the [Scanning mode option] window, click the [Option] button in the [Scanning] tab of the"ScanSnap Setup Window" (page 89).
1. Right-click the ScanSnap Manager icon in the notification area locatedat the far right of the taskbar, and select the [Scan Button Settings] from the"Right-Click Menu" (page 87).a The ScanSnap setup window appears.
2. In the [Paper] tab, select [Automatic detection] in [Paper size], and then clickthe [Carrier Sheet Settings] button.
a The [Carrier Sheet Settings] window appears.
3. Select [two separate images (front and back)] in [Save as] and click the [OK]button.For details, refer to the ScanSnap Manager Help.
Scanning Documents with iX1600 / iX1500 / iX1400
207

4. Click the [OK] button to close the ScanSnap setup window.
5. Place the document inside the Carrier Sheet.Open the Carrier Sheet and place the top of the document against the top center of the CarrierSheet.
6. Place the end with the black and white pattern as the leading edge in thedirection of the arrow.Place the back side of the document towards you.Secure the Carrier Sheet with the side guides to avoid skewing.
Scanning Documents with iX1600 / iX1500 / iX1400
208
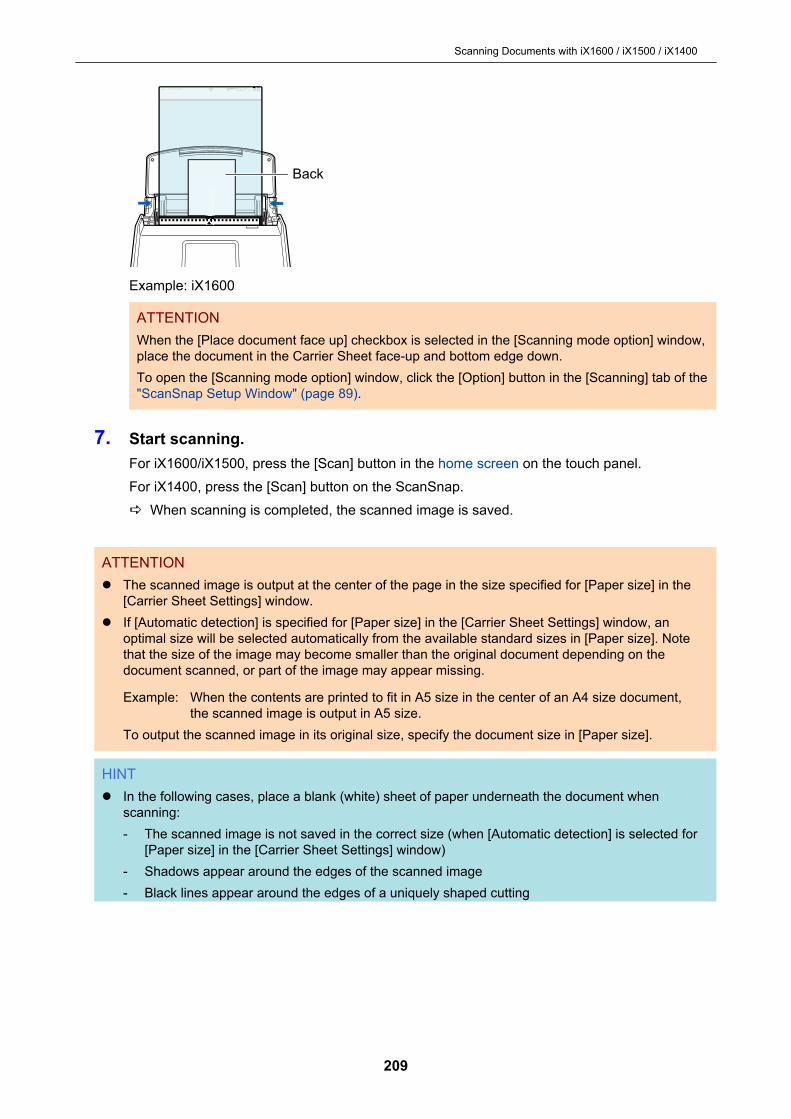
Back
Example: iX1600
ATTENTIONWhen the [Place document face up] checkbox is selected in the [Scanning mode option] window,place the document in the Carrier Sheet face-up and bottom edge down.To open the [Scanning mode option] window, click the [Option] button in the [Scanning] tab of the"ScanSnap Setup Window" (page 89).
7. Start scanning.For iX1600/iX1500, press the [Scan] button in the home screen on the touch panel.For iX1400, press the [Scan] button on the ScanSnap.a When scanning is completed, the scanned image is saved.
ATTENTIONl The scanned image is output at the center of the page in the size specified for [Paper size] in the
[Carrier Sheet Settings] window.l If [Automatic detection] is specified for [Paper size] in the [Carrier Sheet Settings] window, an
optimal size will be selected automatically from the available standard sizes in [Paper size]. Notethat the size of the image may become smaller than the original document depending on thedocument scanned, or part of the image may appear missing.
Example: When the contents are printed to fit in A5 size in the center of an A4 size document,the scanned image is output in A5 size.
To output the scanned image in its original size, specify the document size in [Paper size].
HINTl In the following cases, place a blank (white) sheet of paper underneath the document when
scanning:- The scanned image is not saved in the correct size (when [Automatic detection] is selected for
[Paper size] in the [Carrier Sheet Settings] window)- Shadows appear around the edges of the scanned image- Black lines appear around the edges of a uniquely shaped cutting
Scanning Documents with iX1600 / iX1500 / iX1400
209

l Multiple Carrier Sheets can be loaded in the ADF paper chute (cover) and scanned.
Scanning Documents with iX1600 / iX1500 / iX1400
210

Scanning Documents with iX500
l "Documents to Scan (iX500)" (page 212)l "Scanning Documents (iX500)" (page 216)l "Scanning Long Pages (iX500)" (page 222)l "Scanning Documents of Different Widths or Lengths in One Batch (iX500)" (page 226)l "Scanning Documents Larger Than A4 or Letter Size (iX500)" (page 232)l "Scanning Documents Such as Photographs and Clippings (iX500)" (page 236)
Scanning Documents with iX500
211
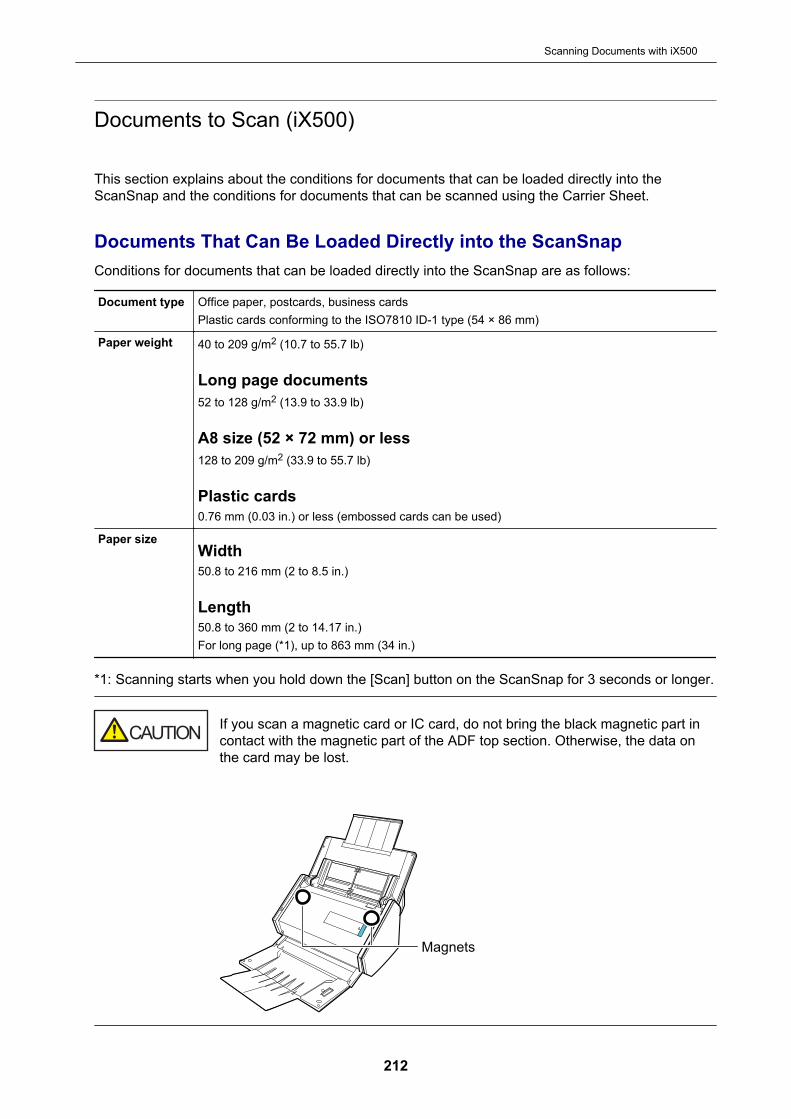
Documents to Scan (iX500)
This section explains about the conditions for documents that can be loaded directly into theScanSnap and the conditions for documents that can be scanned using the Carrier Sheet.
Documents That Can Be Loaded Directly into the ScanSnapConditions for documents that can be loaded directly into the ScanSnap are as follows:
Document type Office paper, postcards, business cardsPlastic cards conforming to the ISO7810 ID-1 type (54 × 86 mm)
Paper weight 40 to 209 g/m2 (10.7 to 55.7 lb)
Long page documents52 to 128 g/m2 (13.9 to 33.9 lb)
A8 size (52 × 72 mm) or less128 to 209 g/m2 (33.9 to 55.7 lb)
Plastic cards0.76 mm (0.03 in.) or less (embossed cards can be used)
Paper sizeWidth50.8 to 216 mm (2 to 8.5 in.)
Length50.8 to 360 mm (2 to 14.17 in.)For long page (*1), up to 863 mm (34 in.)
*1: Scanning starts when you hold down the [Scan] button on the ScanSnap for 3 seconds or longer.
If you scan a magnetic card or IC card, do not bring the black magnetic part incontact with the magnetic part of the ADF top section. Otherwise, the data onthe card may be lost.
Magnets
Scanning Documents with iX500
212

ATTENTIONl The following types of documents must not be scanned:
- Documents attached with the metals such as paper clips or staples that can damage the insideof the ScanSnapRemove the metals for scanning.
- Documents on which the ink is still wetWait until the ink dries completely to scan these documents.
- Documents larger than 216 × 863 (mm)/8.5 × 34 (in.) (width × length)- Documents other than paper such as fabric, metal foil and OHP film
l When you scan picture postcards, be aware that the picture side may get damaged. It is theresponsibility of the customer to scan picture postcards.
l When you scan plastic cards, in [Multifeed Detection] of the [Paper] tab of the "ScanSnap SetupWindow" (page 89), select [None] or [Check Length].
l Be careful of the following when you scan plastic cards:- Cards that are bent may not be fed properly.- If the surface of the card is dirty with grease marks such as fingerprints, perform scanning after
wiping the dirt off.- When you scan plastic cards with strong luster, some parts of the image may appear lighter or
darker than the original.
Example: gold colored credit card- When you scan embossed cards, put the embossed side down, and load the card in landscape
orientation.- If the embossed characters are not coated in gold or silver and the background color of the card
and the color of the embossed characters are similar, it may be difficult for the ScanSnap torecognize embossed characters.In which case, performing the following may result in an improvement.1. Click the [Option] button in the [Scanning] tab of the "ScanSnap Setup Window" (page 89).
a The [Scanning mode option] window appears.
2. Select the [Increase text contrast] checkbox.
Documents That Can Be Scanned Using the Carrier SheetThe bundled Carrier Sheet is a sheet designed to transport documents through the ScanSnap.You can scan documents that are larger than A4/Letter size, photographs, and clippings.Conditions for documents that can be scanned using the Carrier Sheet are as follows:
l Do not use a damaged Carrier Sheet. Otherwise, it may damage or causethe ScanSnap to malfunction.
l Be careful not to cut your finger on the edge of the Carrier Sheet.
Document type Documents that cannot be loaded directly into the ScanSnap
Paper weight Up to 209 g/m2 (55.7 lb)
When scanning documents folded in half:Up to 105 g/m2 (27.9 lb)
Scanning Documents with iX500
213

Paper size Carrier Sheet size (216 × 297 mm)A3 (297 × 420 mm) (*1)A4 (210 × 297 mm)A5 (148 × 210 mm)A6 (105 × 148 mm)B4 (257 × 364 mm) (*1)B5 (182 × 257 mm)B6 (128 × 182 mm)Postcard (100 × 148 mm)Business card (90 × 55 mm, 55 × 90 mm)Letter (8.5 × 11 in., 216 × 279.4 mm)11 ×17 in. (279.4 × 431.8 mm) (*1)
Custom sizeWidth: 25.4 to 216 mm (1 to 8.5 in.)Length: 25.4 to 297 mm (1 to 11.69 in.)
*1: Fold in half to scan.
Documents for Which the Carrier Sheet is Recommended for ScanningIt is recommended that you use the Carrier Sheet to scan the following documents.l Documents written in pencil
Because there may be black traces left on the documents, it is recommended that you use theCarrier Sheet to scan such documents.When you scan such documents directly without using a Carrier Sheet, dirt will accumulate onthe rollers, which may cause feeding errors. Clean the rollers occasionally.For details about how to perform cleaning, refer to "Cleaning the Inside of iX500" (page 444).
l Carbonless paperBecause carbonless paper may contain chemicals that can harm the ScanSnap internal rollers, itis recommended that you use the Carrier Sheet to scan such documents.Make sure to clean the rollers occasionally to maintain the scanner performance when scanningcarbonless paper directly without using the Carrier Sheet. For details about how to performcleaning, refer to "Cleaning the Inside of iX500" (page 444).Depending on the type of carbonless paper, the life span of the scanner may be shortenedcompared to scanning office paper.
l Scanning the following types of documents without using the Carrier Sheet can result indocuments being damaged or scanned incorrectly- Documents smaller than 50.8 × 50.8 (mm)/2 × 2 (in.) (width × length)
- Documents whose paper weight is less than 40 g/m2 (10.7 lb)- Documents with an uneven surface (such as envelopes and paper sheets with attached
materials)- Wrinkled or curled documents- Folded or torn documents- Tracing paper- Coated paper- Photographs (photographic paper)- Perforated or punched documents- Documents that are not rectangular or square
Scanning Documents with iX500
214
- Carbon paper or thermal paper- Documents with memo papers or sticky notes attached
ATTENTIONl Using the Carrier Sheet
Be careful of the following when you use the Carrier Sheet:- Do not stain, or cut the black and white patterned end of the Carrier Sheet. Otherwise, the
Carrier Sheet will not be recognized properly.- Do not place the Carrier Sheet upside down. Otherwise, a paper jam may occur and damage
the Carrier Sheet and the document inside.- Do not fold or pull the Carrier Sheet.- Paper jams may occur when several small size documents such as photographs and postcards
are placed inside the Carrier Sheet to be scanned at once. It is recommended that you scansuch documents one at a time.
- If paper jams occur frequently, feed about 50 sheets of PPC paper (recycled paper) beforescanning with the Carrier Sheet. The PPC paper can either be blank or printed.
l Storing the Carrier SheetBe careful of the following when you store the Carrier Sheet:- Do not leave your document inside the Carrier Sheet for a long time. Otherwise, the ink on the
document may be transferred onto the Carrier Sheet.- Do not leave the Carrier Sheet in high temperature places such as under direct sunlight or near
a heating apparatus for a long time. Also, do not use the Carrier Sheet in high temperatureplaces. The Carrier Sheet may be deformed.
- To avoid deformation, store the Carrier Sheet on a flat surface without any weight on it.
Scanning Documents with iX500
215

Scanning Documents (iX500)
You can load documents such as handouts for meetings or business cards directly in the ScanSnapfor scanning.For details about documents that can be scanned, refer to "Documents to Scan (iX500)" (page 212).
1. If you are loading multiple sheets, check the number of sheets.The maximum number of sheets in the ScanSnap is as follows:
For A4 or smaller sizes: Up to 50 sheets can be loaded (with paper weight of 80 g/m2 [20 lb]and thickness of the document stack under 5 mm [0.2 in.]).
ATTENTIONIf you try to scan more than the maximum amount that can be loaded, the following problemsmay occur:l Files cannot be properly created due to excessive file size.l Paper jams occur during scanning.
2. Fan the documents.1. Hold both ends of the documents and fan them a few times.
2. Rotate the documents 90 degrees and fan them in the same manner.
3. Straighten the edges of the documents and slightly displace the top edges atan angle.
At an Angle
Feed Direction
ATTENTIONPaper jams or damage to documents may occur if you scan the documents without aligning theedges first.
Scanning Documents with iX500
216
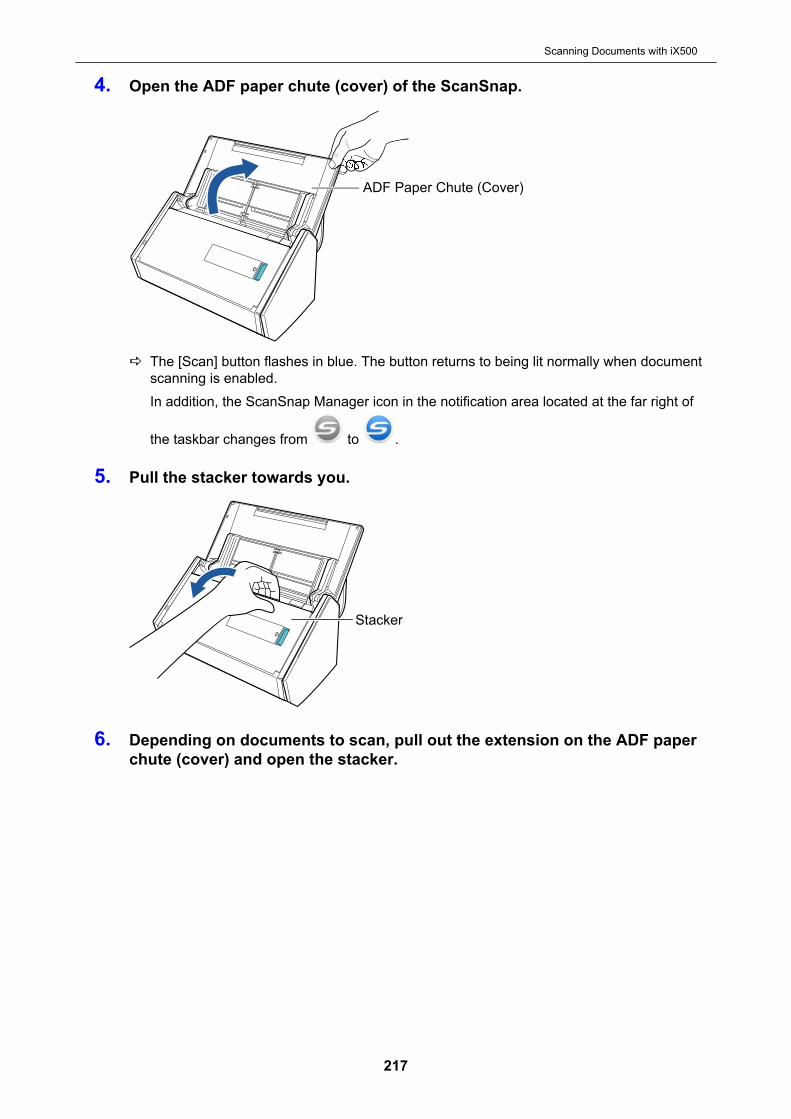
4. Open the ADF paper chute (cover) of the ScanSnap.
ADF Paper Chute (Cover)
a The [Scan] button flashes in blue. The button returns to being lit normally when documentscanning is enabled.In addition, the ScanSnap Manager icon in the notification area located at the far right of
the taskbar changes from to .
5. Pull the stacker towards you.
Stacker
6. Depending on documents to scan, pull out the extension on the ADF paperchute (cover) and open the stacker.
Scanning Documents with iX500
217
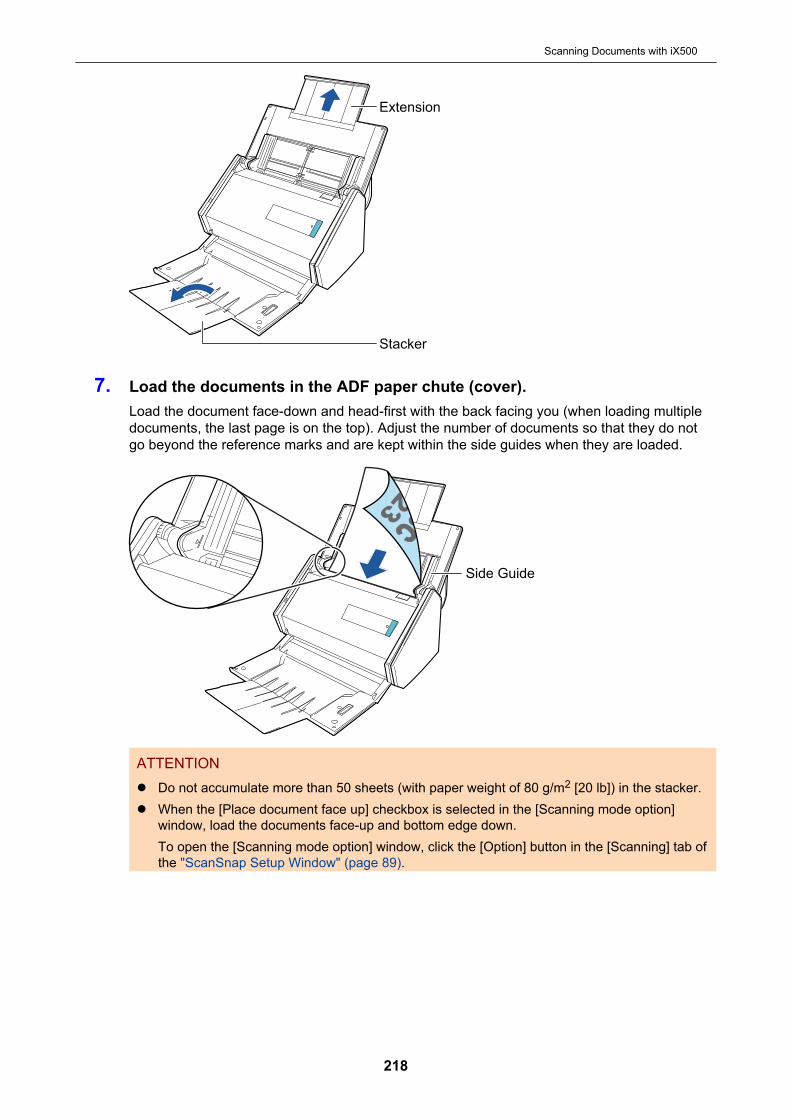
Extension
Stacker
7. Load the documents in the ADF paper chute (cover).Load the document face-down and head-first with the back facing you (when loading multipledocuments, the last page is on the top). Adjust the number of documents so that they do notgo beyond the reference marks and are kept within the side guides when they are loaded.
Side Guide
ATTENTIONl Do not accumulate more than 50 sheets (with paper weight of 80 g/m2 [20 lb]) in the stacker.l When the [Place document face up] checkbox is selected in the [Scanning mode option]
window, load the documents face-up and bottom edge down.To open the [Scanning mode option] window, click the [Option] button in the [Scanning] tab ofthe "ScanSnap Setup Window" (page 89).
Scanning Documents with iX500
218
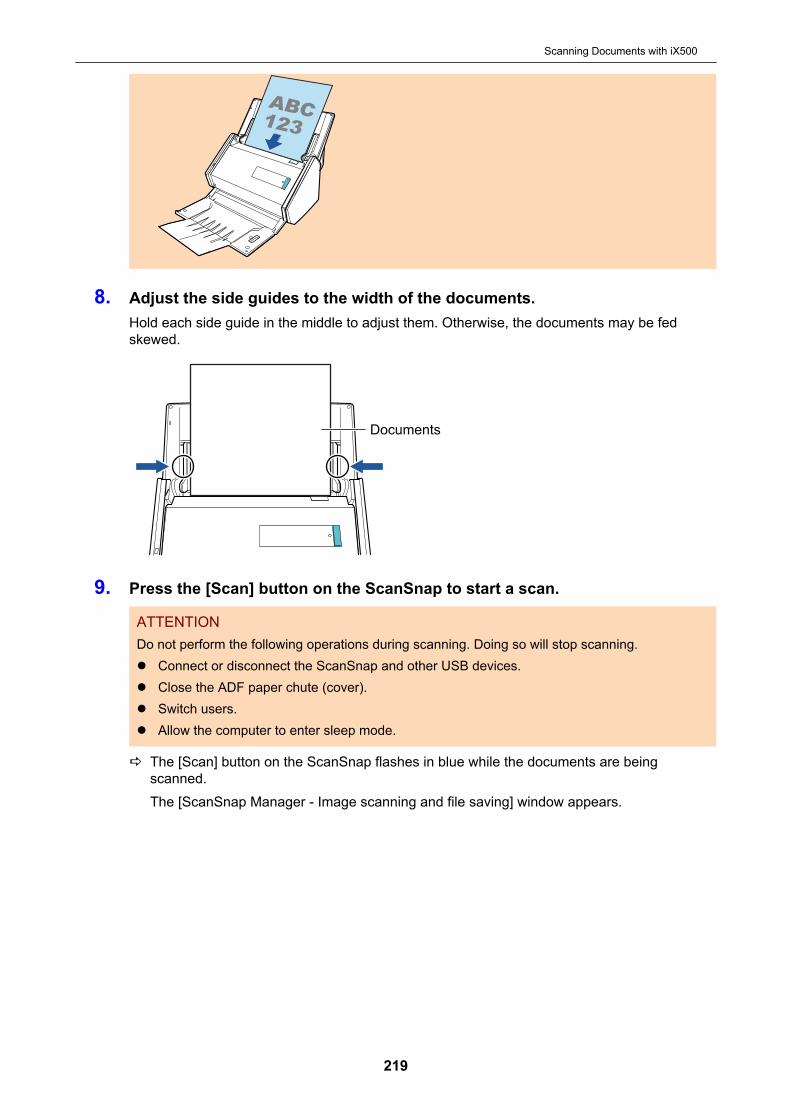
8. Adjust the side guides to the width of the documents.Hold each side guide in the middle to adjust them. Otherwise, the documents may be fedskewed.
Documents
9. Press the [Scan] button on the ScanSnap to start a scan.
ATTENTIONDo not perform the following operations during scanning. Doing so will stop scanning.l Connect or disconnect the ScanSnap and other USB devices.l Close the ADF paper chute (cover).l Switch users.l Allow the computer to enter sleep mode.
a The [Scan] button on the ScanSnap flashes in blue while the documents are beingscanned.The [ScanSnap Manager - Image scanning and file saving] window appears.
Scanning Documents with iX500
219
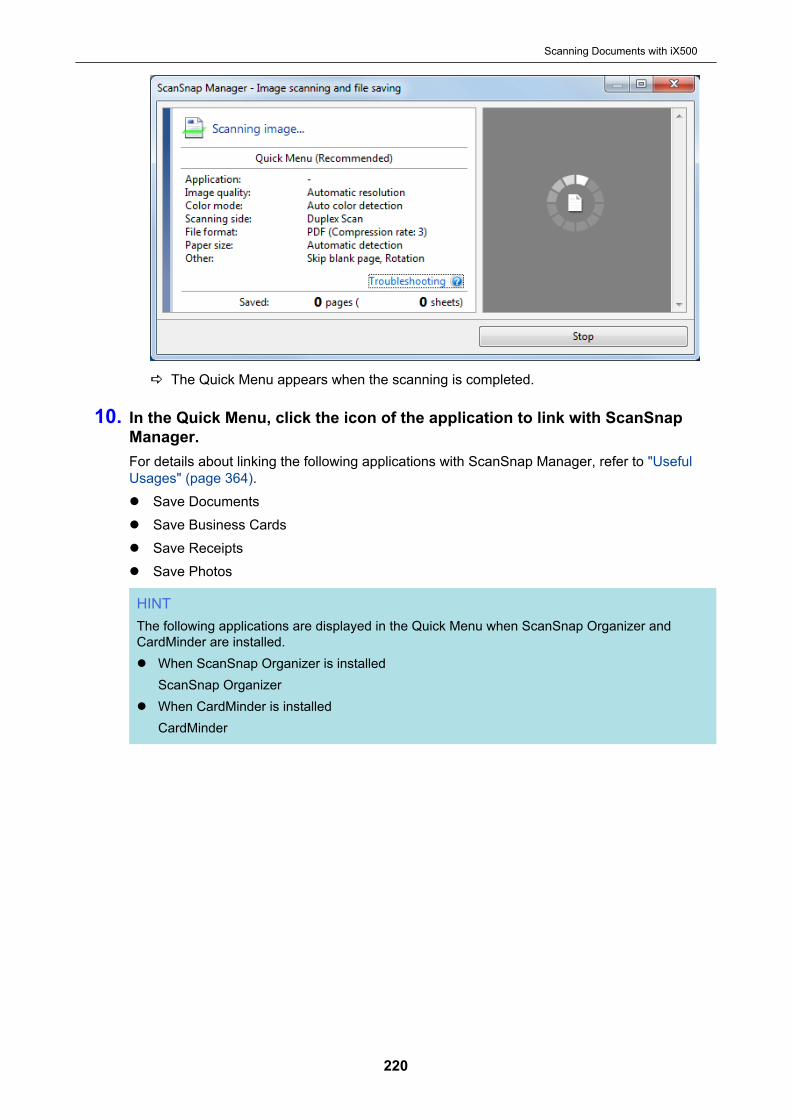
a The Quick Menu appears when the scanning is completed.
10. In the Quick Menu, click the icon of the application to link with ScanSnapManager.For details about linking the following applications with ScanSnap Manager, refer to "UsefulUsages" (page 364).l Save Documentsl Save Business Cardsl Save Receiptsl Save Photos
HINTThe following applications are displayed in the Quick Menu when ScanSnap Organizer andCardMinder are installed.l When ScanSnap Organizer is installed
ScanSnap Organizerl When CardMinder is installed
CardMinder
Scanning Documents with iX500
220

a The selected application starts up. For details, refer to the Advanced Operation Guide.
ATTENTIONl You cannot start scanning when the Quick Menu is displayed. Either select an icon from the
Quick Menu and finish the process, or close the Quick Menu before you perform the nextscan.
l Do not move, delete, or rename scanned images using other applications while the QuickMenu is displayed.
HINT
l Clicking displays the description of an application. Placing the mouse cursor over the iconof another application displays the description of the application.
l Performing a scan while an application that can be automatically linked with is activeautomatically starts the linkage between ScanSnap Manager and the application.For details, refer to the Advanced Operation Guide.
Scanning Documents with iX500
221

Scanning Long Pages (iX500)
Documents up to 863 mm (34 in.) in length can be scanned.For details about documents that can be scanned, refer to "Documents to Scan (iX500)" (page 212).
HINTFor details about how to load documents that are 360 mm (14.17 in.) or less in length, refer to"Scanning Documents (iX500)" (page 216).
1. Open the ADF paper chute (cover) of the ScanSnap.
ADF Paper Chute (Cover)
a The [Scan] button flashes in blue. The button returns to being lit normally when documentscanning is enabled.In addition, the ScanSnap Manager icon in the notification area located at the far right of
the taskbar changes from to .
2. Pull the stacker towards you.
Stacker
3. Pull out the extension on the ADF paper chute (cover) and open the stacker.
Scanning Documents with iX500
222

Extension
Stacker
4. Load only one document in the ADF paper chute (cover).Hold the document with your hand so that it does not fall out of the ADF paper chute (cover).
5. Press the [Scan] button on the ScanSnap (for three seconds or longer) untilthe button flashes in blue to start a scan.
ATTENTIONl Secure enough space where the scanned documents are ejected from the ScanSnap, and
pick up the documents with your hands to prevent them from falling off the unit where theScanSnap is placed on.
Scanning Documents with iX500
223
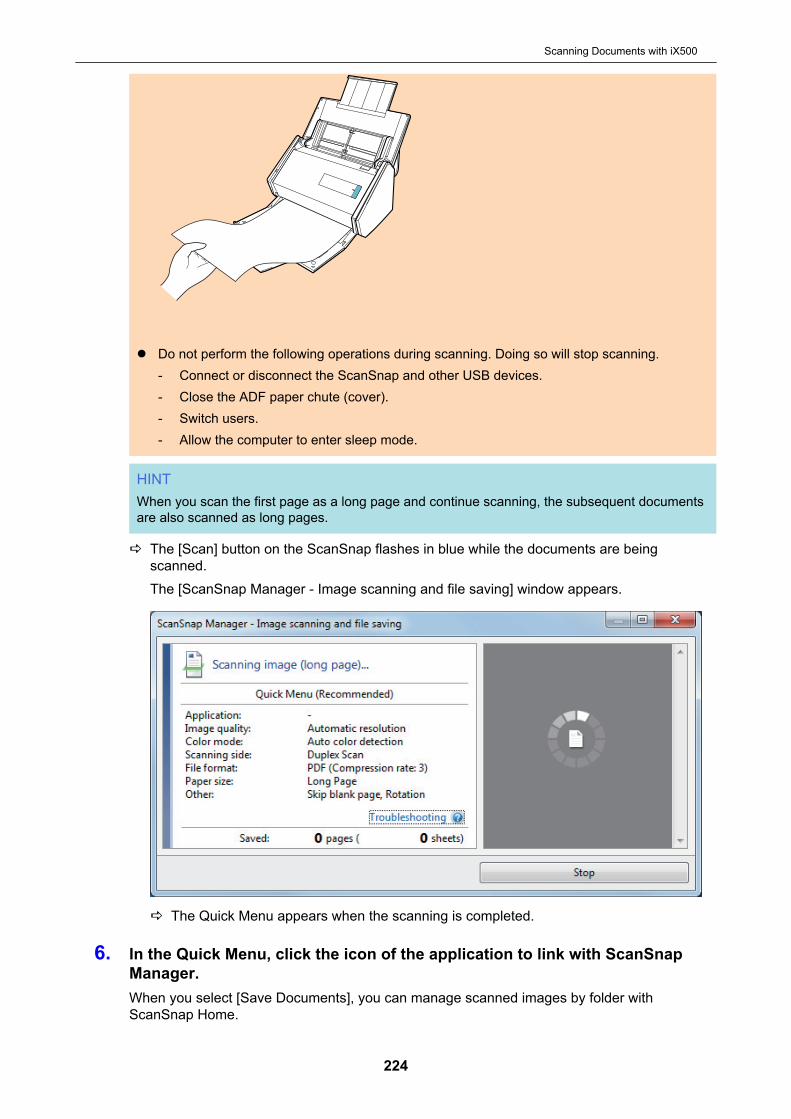
l Do not perform the following operations during scanning. Doing so will stop scanning.- Connect or disconnect the ScanSnap and other USB devices.- Close the ADF paper chute (cover).- Switch users.- Allow the computer to enter sleep mode.
HINTWhen you scan the first page as a long page and continue scanning, the subsequent documentsare also scanned as long pages.
a The [Scan] button on the ScanSnap flashes in blue while the documents are beingscanned.The [ScanSnap Manager - Image scanning and file saving] window appears.
a The Quick Menu appears when the scanning is completed.
6. In the Quick Menu, click the icon of the application to link with ScanSnapManager.When you select [Save Documents], you can manage scanned images by folder withScanSnap Home.
Scanning Documents with iX500
224

For details, refer to "Managing Paper Documents by Folder on a Computer with ScanSnapHome" (page 365).
HINT[ScanSnap Organizer] is displayed in the Quick Menu when ScanSnap Organizer is installed.To manage scanned images by folder with ScanSnap Organizer, refer to "Managing PaperDocuments by Folder on a Computer with ScanSnap Organizer" (page 368).
a The selected application starts up. For details, refer to the Advanced Operation Guide.
ATTENTIONl You cannot start scanning when the Quick Menu is displayed. Either select an icon from the
Quick Menu and finish the process, or close the Quick Menu before you perform the nextscan.
l Do not move, delete, or rename scanned images using other applications while the QuickMenu is displayed.
HINT
l Clicking displays the description of an application. Placing the mouse cursor over the iconof another application displays the description of the application.
l Performing a scan while an application that can be automatically linked with is activeautomatically starts the linkage between ScanSnap Manager and the application.For details, refer to the Advanced Operation Guide.
Scanning Documents with iX500
225

Scanning Documents of Different Widths or Lengths in One Batch(iX500)
Documents of different widths or lengths can be scanned in one batch.For details about documents that can be scanned, refer to "Documents to Scan (iX500)" (page 212).
1. Open the ADF paper chute (cover) of the ScanSnap.
ADF Paper Chute (Cover)
a The [Scan] button flashes in blue. The button returns to being lit normally when documentscanning is enabled.In addition, the ScanSnap Manager icon in the notification area located at the far right of
the taskbar changes from to .
2. Pull the stacker towards you.
Stacker
3. Depending on documents to scan, pull out the extension on the ADF paperchute (cover) and open the stacker.
Scanning Documents with iX500
226
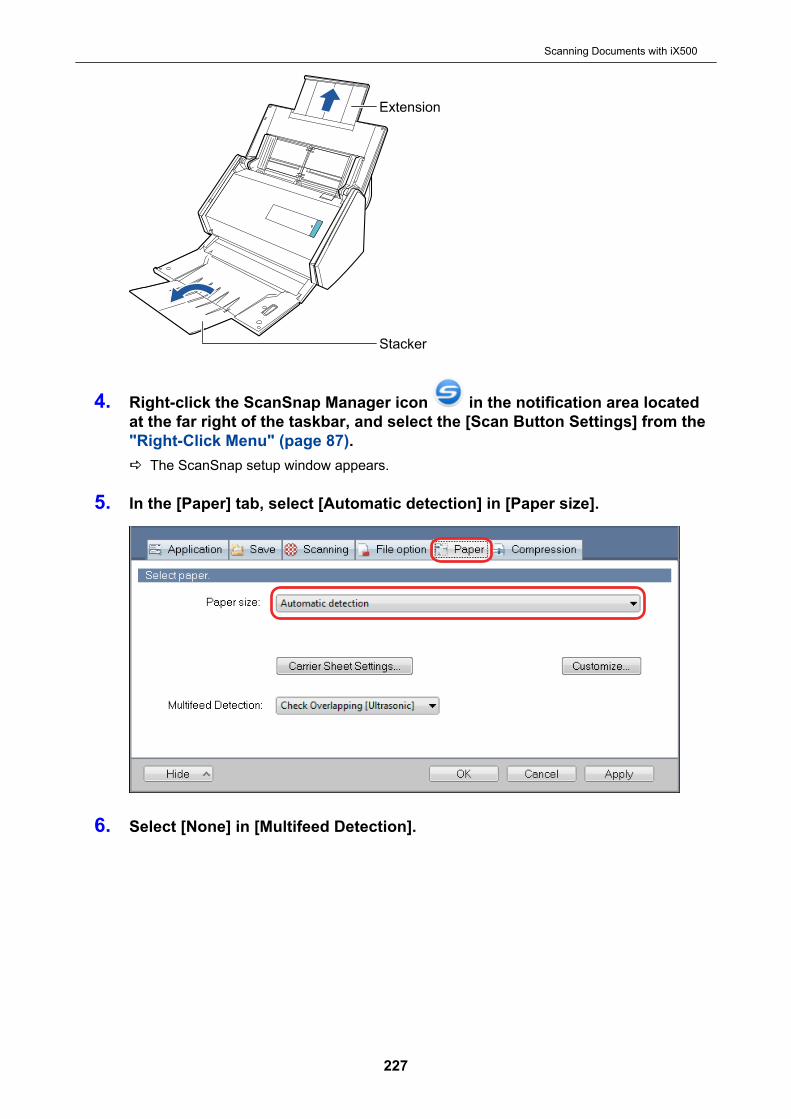
Extension
Stacker
4. Right-click the ScanSnap Manager icon in the notification area locatedat the far right of the taskbar, and select the [Scan Button Settings] from the"Right-Click Menu" (page 87).a The ScanSnap setup window appears.
5. In the [Paper] tab, select [Automatic detection] in [Paper size].
6. Select [None] in [Multifeed Detection].
Scanning Documents with iX500
227
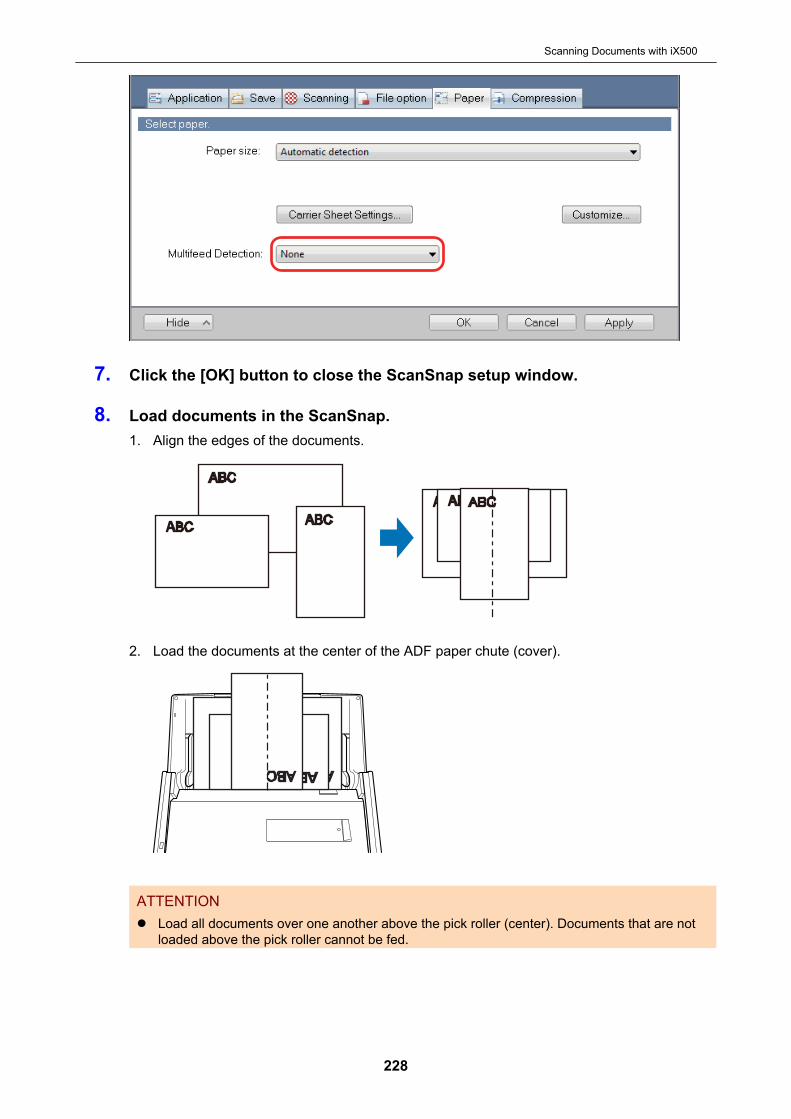
7. Click the [OK] button to close the ScanSnap setup window.
8. Load documents in the ScanSnap.1. Align the edges of the documents.
2. Load the documents at the center of the ADF paper chute (cover).
ATTENTIONl Load all documents over one another above the pick roller (center). Documents that are not
loaded above the pick roller cannot be fed.
Scanning Documents with iX500
228
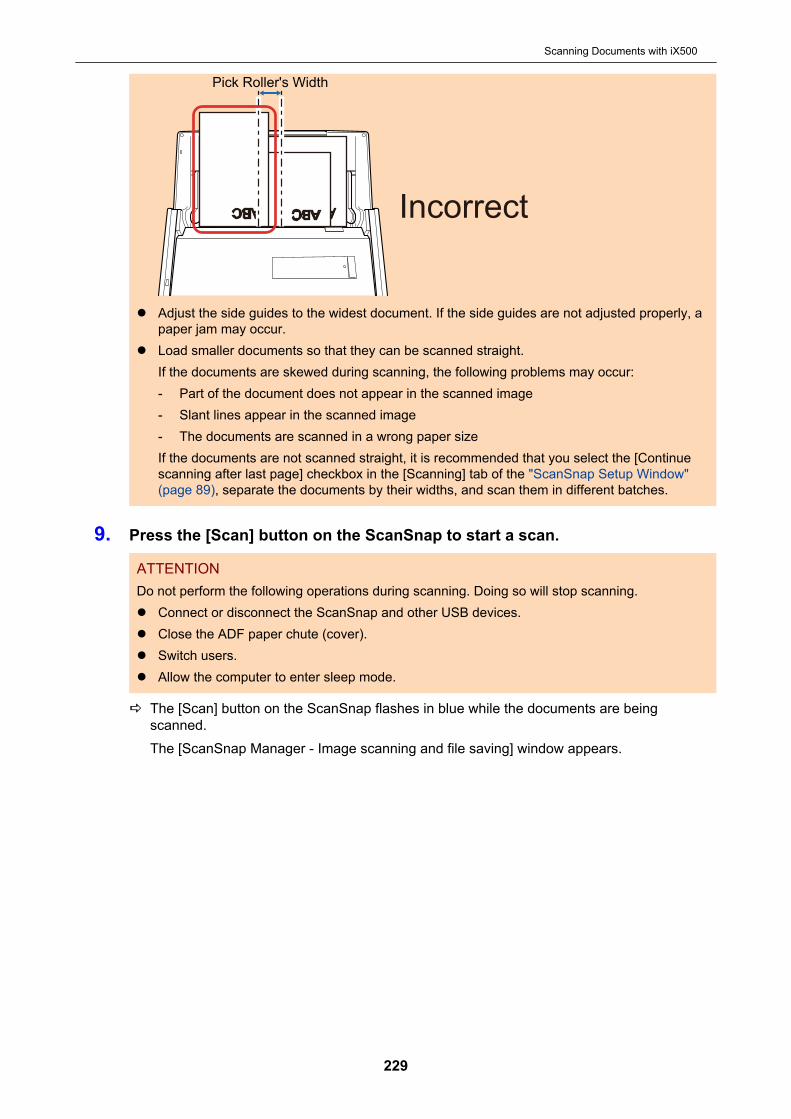
Incorrect
Pick Roller's Width
l Adjust the side guides to the widest document. If the side guides are not adjusted properly, apaper jam may occur.
l Load smaller documents so that they can be scanned straight.If the documents are skewed during scanning, the following problems may occur:- Part of the document does not appear in the scanned image- Slant lines appear in the scanned image- The documents are scanned in a wrong paper sizeIf the documents are not scanned straight, it is recommended that you select the [Continuescanning after last page] checkbox in the [Scanning] tab of the "ScanSnap Setup Window"(page 89), separate the documents by their widths, and scan them in different batches.
9. Press the [Scan] button on the ScanSnap to start a scan.
ATTENTIONDo not perform the following operations during scanning. Doing so will stop scanning.l Connect or disconnect the ScanSnap and other USB devices.l Close the ADF paper chute (cover).l Switch users.l Allow the computer to enter sleep mode.
a The [Scan] button on the ScanSnap flashes in blue while the documents are beingscanned.The [ScanSnap Manager - Image scanning and file saving] window appears.
Scanning Documents with iX500
229
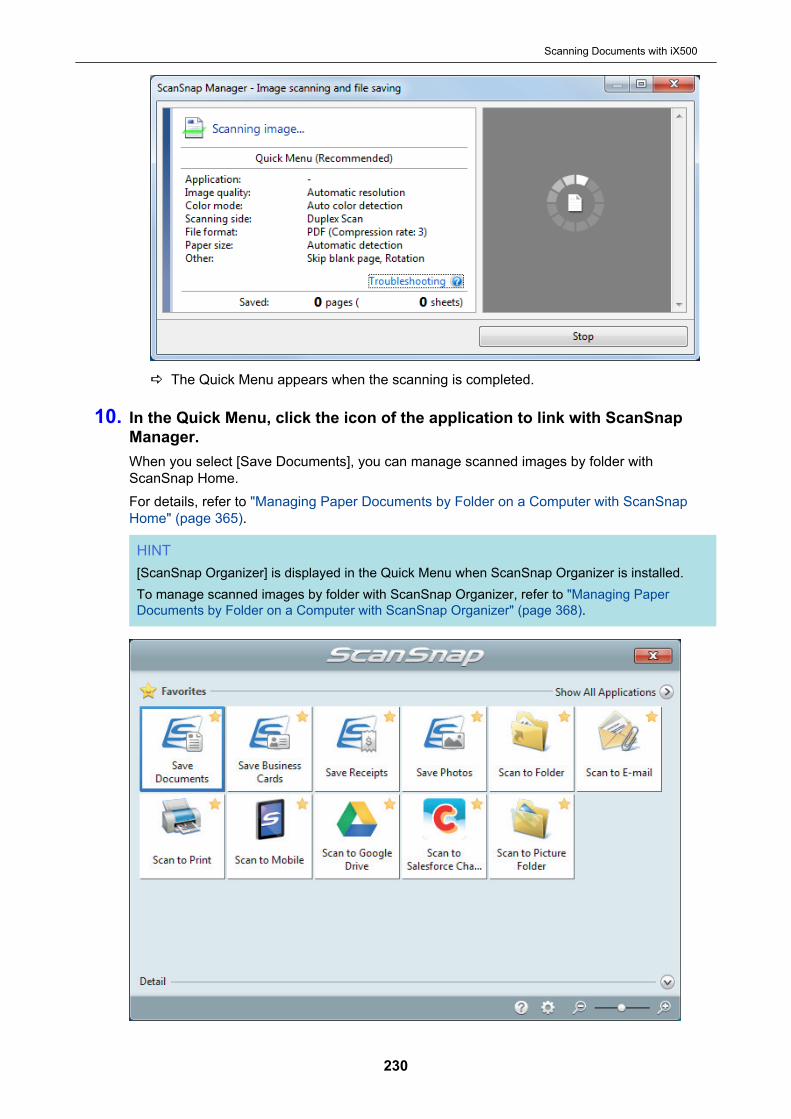
a The Quick Menu appears when the scanning is completed.
10. In the Quick Menu, click the icon of the application to link with ScanSnapManager.When you select [Save Documents], you can manage scanned images by folder withScanSnap Home.For details, refer to "Managing Paper Documents by Folder on a Computer with ScanSnapHome" (page 365).
HINT[ScanSnap Organizer] is displayed in the Quick Menu when ScanSnap Organizer is installed.To manage scanned images by folder with ScanSnap Organizer, refer to "Managing PaperDocuments by Folder on a Computer with ScanSnap Organizer" (page 368).
Scanning Documents with iX500
230
a The selected application starts up. For details, refer to the Advanced Operation Guide.
ATTENTIONl You cannot start scanning when the Quick Menu is displayed. Either select an icon from the
Quick Menu and finish the process, or close the Quick Menu before you perform the nextscan.
l Do not move, delete, or rename scanned images using other applications while the QuickMenu is displayed.
HINT
l Clicking displays the description of an application. Placing the mouse cursor over the iconof another application displays the description of the application.
l Performing a scan while an application that can be automatically linked with is activeautomatically starts the linkage between ScanSnap Manager and the application.For details, refer to the Advanced Operation Guide.
Scanning Documents with iX500
231
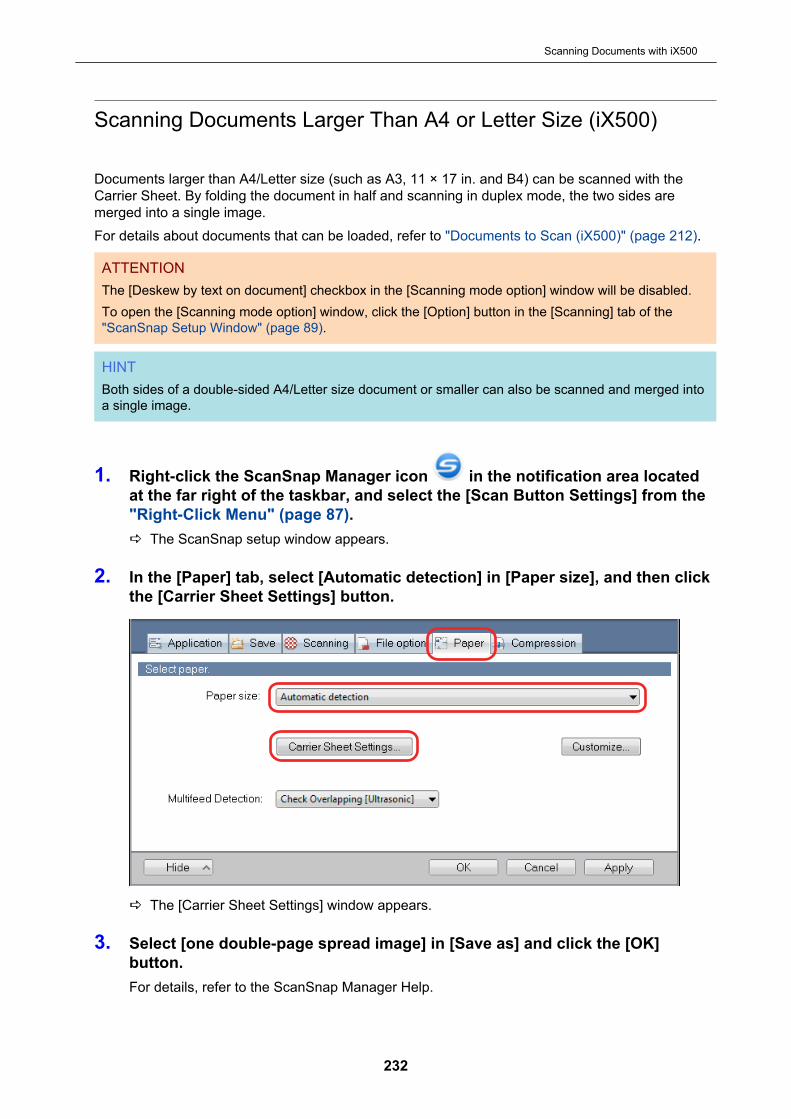
Scanning Documents Larger Than A4 or Letter Size (iX500)
Documents larger than A4/Letter size (such as A3, 11 × 17 in. and B4) can be scanned with theCarrier Sheet. By folding the document in half and scanning in duplex mode, the two sides aremerged into a single image.For details about documents that can be loaded, refer to "Documents to Scan (iX500)" (page 212).
ATTENTIONThe [Deskew by text on document] checkbox in the [Scanning mode option] window will be disabled.To open the [Scanning mode option] window, click the [Option] button in the [Scanning] tab of the"ScanSnap Setup Window" (page 89).
HINTBoth sides of a double-sided A4/Letter size document or smaller can also be scanned and merged intoa single image.
1. Right-click the ScanSnap Manager icon in the notification area locatedat the far right of the taskbar, and select the [Scan Button Settings] from the"Right-Click Menu" (page 87).a The ScanSnap setup window appears.
2. In the [Paper] tab, select [Automatic detection] in [Paper size], and then clickthe [Carrier Sheet Settings] button.
a The [Carrier Sheet Settings] window appears.
3. Select [one double-page spread image] in [Save as] and click the [OK]button.For details, refer to the ScanSnap Manager Help.
Scanning Documents with iX500
232
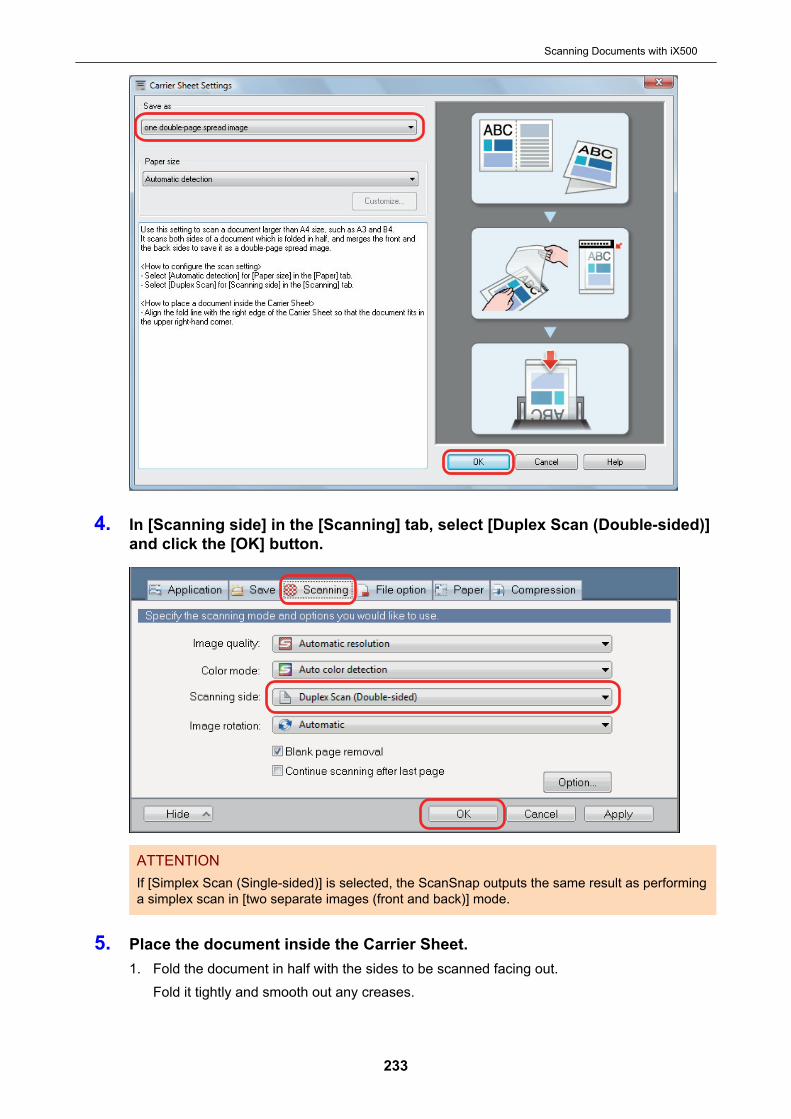
4. In [Scanning side] in the [Scanning] tab, select [Duplex Scan (Double-sided)]and click the [OK] button.
ATTENTIONIf [Simplex Scan (Single-sided)] is selected, the ScanSnap outputs the same result as performinga simplex scan in [two separate images (front and back)] mode.
5. Place the document inside the Carrier Sheet.1. Fold the document in half with the sides to be scanned facing out.
Fold it tightly and smooth out any creases.
Scanning Documents with iX500
233
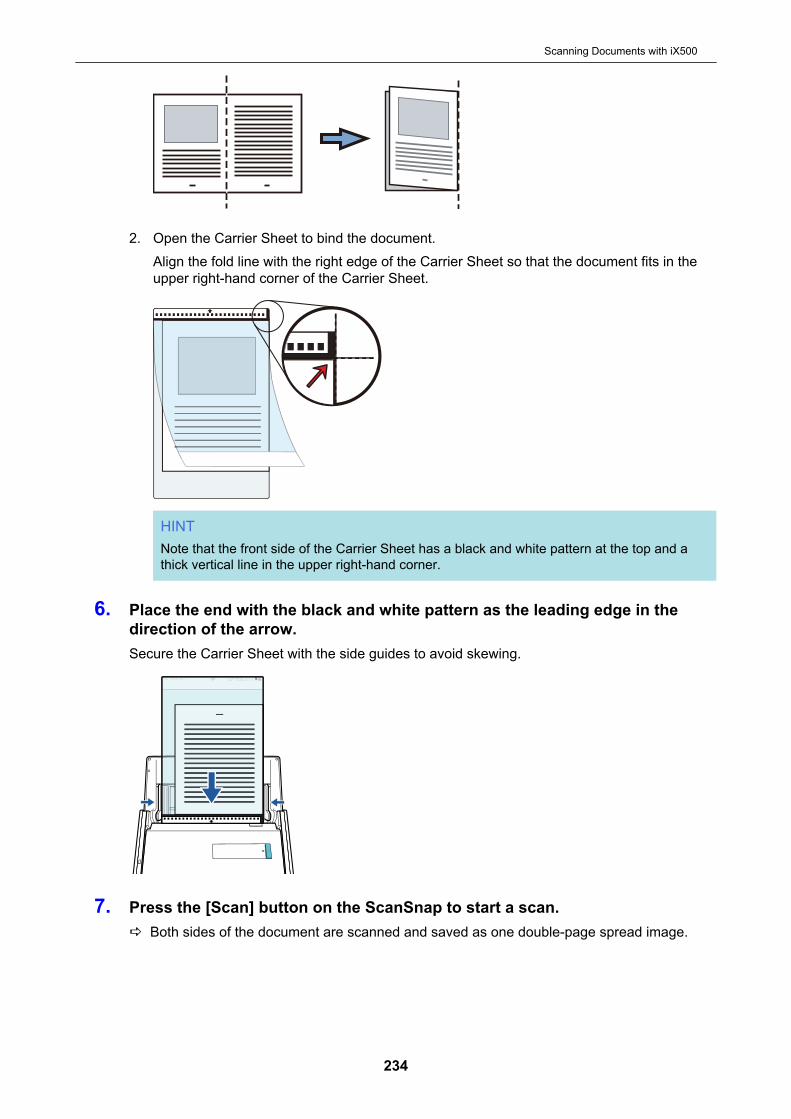
2. Open the Carrier Sheet to bind the document.Align the fold line with the right edge of the Carrier Sheet so that the document fits in theupper right-hand corner of the Carrier Sheet.
HINTNote that the front side of the Carrier Sheet has a black and white pattern at the top and athick vertical line in the upper right-hand corner.
6. Place the end with the black and white pattern as the leading edge in thedirection of the arrow.Secure the Carrier Sheet with the side guides to avoid skewing.
7. Press the [Scan] button on the ScanSnap to start a scan.a Both sides of the document are scanned and saved as one double-page spread image.
Scanning Documents with iX500
234
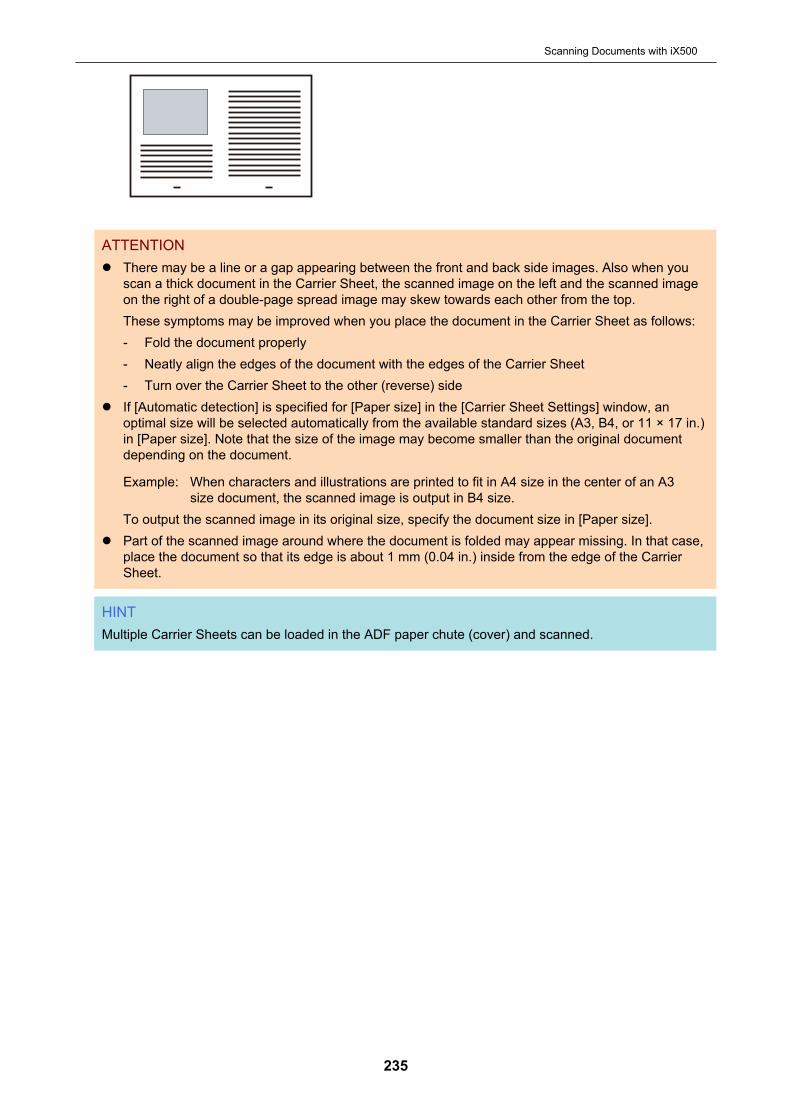
ATTENTIONl There may be a line or a gap appearing between the front and back side images. Also when you
scan a thick document in the Carrier Sheet, the scanned image on the left and the scanned imageon the right of a double-page spread image may skew towards each other from the top.These symptoms may be improved when you place the document in the Carrier Sheet as follows:- Fold the document properly- Neatly align the edges of the document with the edges of the Carrier Sheet- Turn over the Carrier Sheet to the other (reverse) side
l If [Automatic detection] is specified for [Paper size] in the [Carrier Sheet Settings] window, anoptimal size will be selected automatically from the available standard sizes (A3, B4, or 11 × 17 in.)in [Paper size]. Note that the size of the image may become smaller than the original documentdepending on the document.
Example: When characters and illustrations are printed to fit in A4 size in the center of an A3size document, the scanned image is output in B4 size.
To output the scanned image in its original size, specify the document size in [Paper size].l Part of the scanned image around where the document is folded may appear missing. In that case,
place the document so that its edge is about 1 mm (0.04 in.) inside from the edge of the CarrierSheet.
HINTMultiple Carrier Sheets can be loaded in the ADF paper chute (cover) and scanned.
Scanning Documents with iX500
235
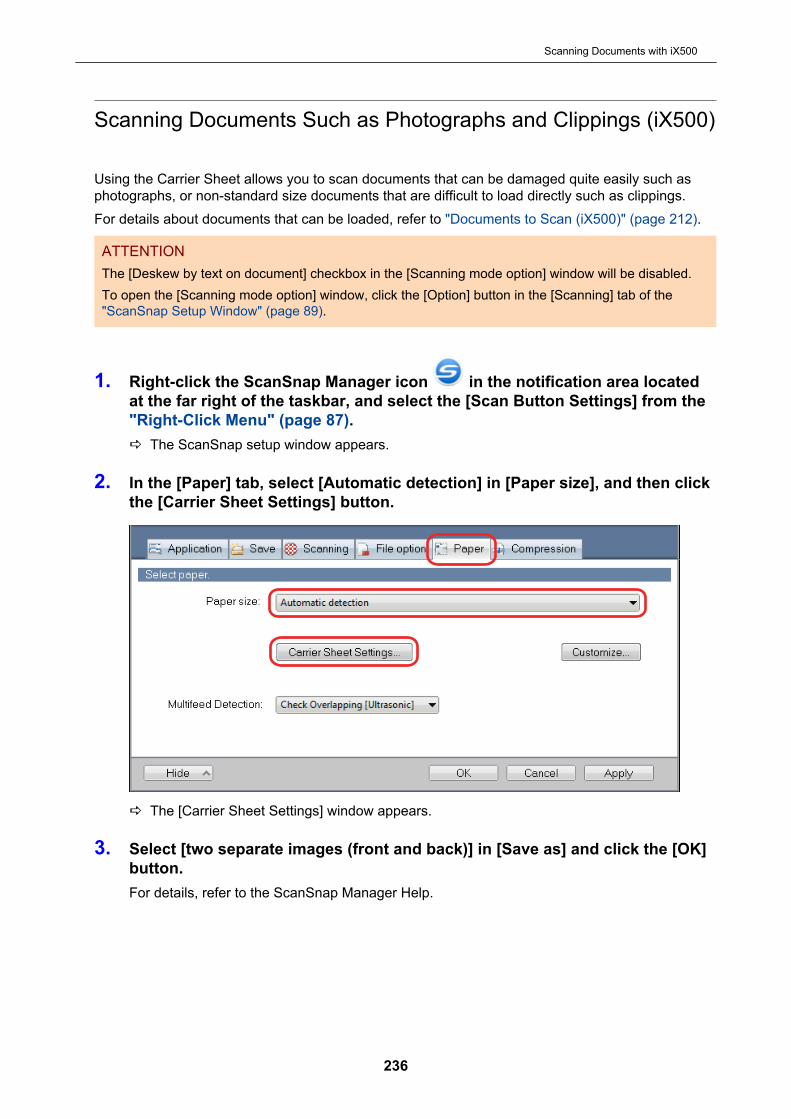
Scanning Documents Such as Photographs and Clippings (iX500)
Using the Carrier Sheet allows you to scan documents that can be damaged quite easily such asphotographs, or non-standard size documents that are difficult to load directly such as clippings.For details about documents that can be loaded, refer to "Documents to Scan (iX500)" (page 212).
ATTENTIONThe [Deskew by text on document] checkbox in the [Scanning mode option] window will be disabled.To open the [Scanning mode option] window, click the [Option] button in the [Scanning] tab of the"ScanSnap Setup Window" (page 89).
1. Right-click the ScanSnap Manager icon in the notification area locatedat the far right of the taskbar, and select the [Scan Button Settings] from the"Right-Click Menu" (page 87).a The ScanSnap setup window appears.
2. In the [Paper] tab, select [Automatic detection] in [Paper size], and then clickthe [Carrier Sheet Settings] button.
a The [Carrier Sheet Settings] window appears.
3. Select [two separate images (front and back)] in [Save as] and click the [OK]button.For details, refer to the ScanSnap Manager Help.
Scanning Documents with iX500
236
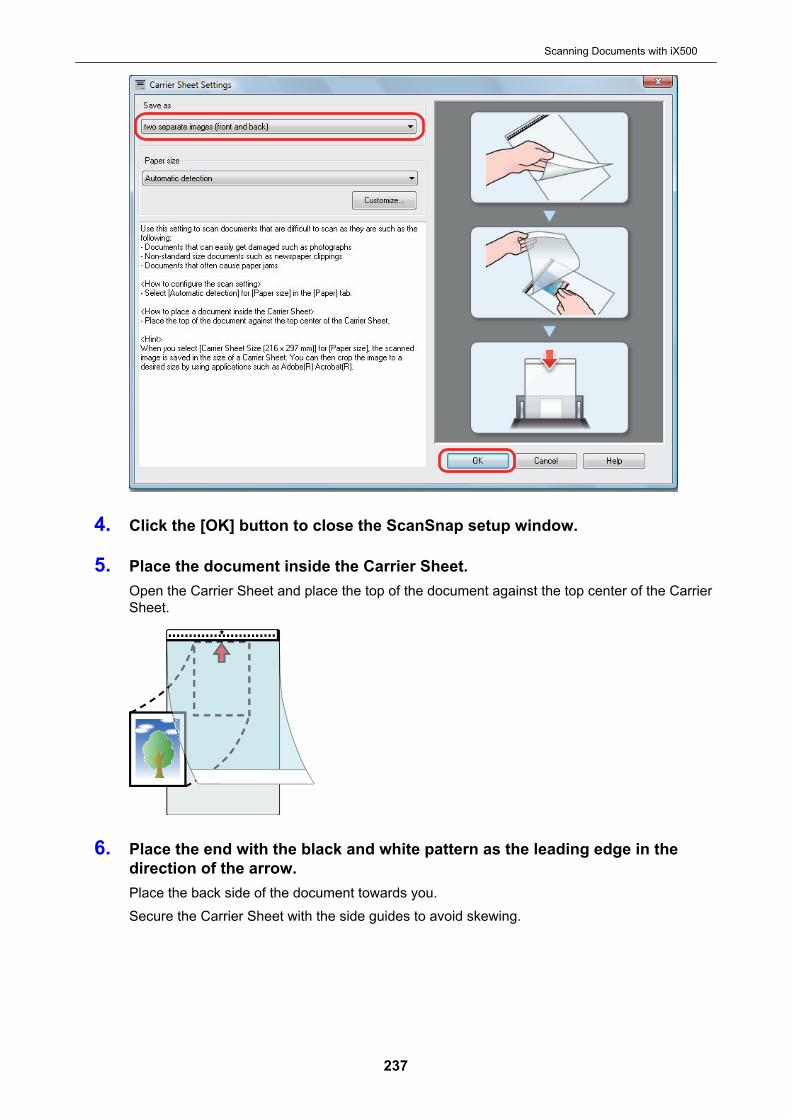
4. Click the [OK] button to close the ScanSnap setup window.
5. Place the document inside the Carrier Sheet.Open the Carrier Sheet and place the top of the document against the top center of the CarrierSheet.
6. Place the end with the black and white pattern as the leading edge in thedirection of the arrow.Place the back side of the document towards you.Secure the Carrier Sheet with the side guides to avoid skewing.
Scanning Documents with iX500
237
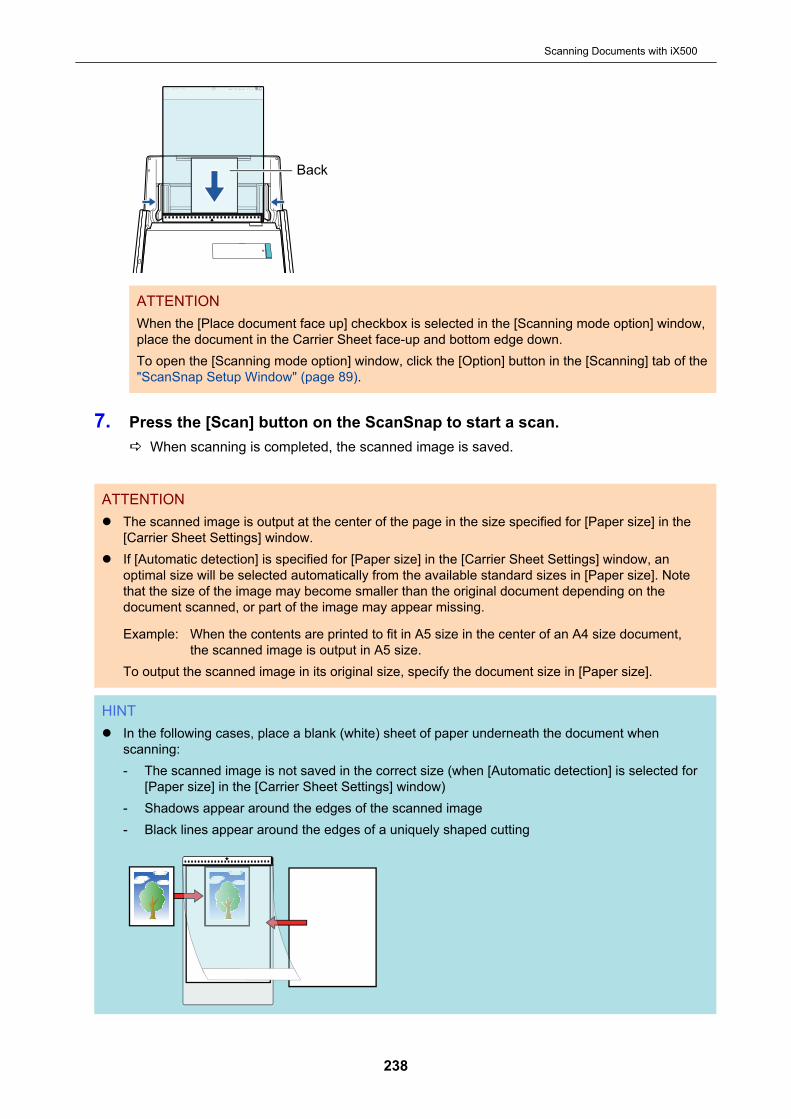
Back
ATTENTIONWhen the [Place document face up] checkbox is selected in the [Scanning mode option] window,place the document in the Carrier Sheet face-up and bottom edge down.To open the [Scanning mode option] window, click the [Option] button in the [Scanning] tab of the"ScanSnap Setup Window" (page 89).
7. Press the [Scan] button on the ScanSnap to start a scan.a When scanning is completed, the scanned image is saved.
ATTENTIONl The scanned image is output at the center of the page in the size specified for [Paper size] in the
[Carrier Sheet Settings] window.l If [Automatic detection] is specified for [Paper size] in the [Carrier Sheet Settings] window, an
optimal size will be selected automatically from the available standard sizes in [Paper size]. Notethat the size of the image may become smaller than the original document depending on thedocument scanned, or part of the image may appear missing.
Example: When the contents are printed to fit in A5 size in the center of an A4 size document,the scanned image is output in A5 size.
To output the scanned image in its original size, specify the document size in [Paper size].
HINTl In the following cases, place a blank (white) sheet of paper underneath the document when
scanning:- The scanned image is not saved in the correct size (when [Automatic detection] is selected for
[Paper size] in the [Carrier Sheet Settings] window)- Shadows appear around the edges of the scanned image- Black lines appear around the edges of a uniquely shaped cutting
Scanning Documents with iX500
238

l Multiple Carrier Sheets can be loaded in the ADF paper chute (cover) and scanned.
Scanning Documents with iX500
239

Scanning Documents with iX100
l "Documents to Scan (iX100)" (page 241)l "Scanning Documents (iX100)" (page 245)l "Scanning Documents by Inserting Two Documents at a Time or by Inserting the Next Document
While the Current Document Is Being Scanned (iX100)" (page 250)l "Scanning Documents Larger Than A4 or Letter Size by Directly Inserting Them in the ScanSnap
(iX100)" (page 257)l "Scanning Documents Larger than A4 or Letter Size with the Carrier Sheet (iX100)" (page 261)l "Scanning Documents Such as Photographs and Clippings (iX100)" (page 266)
Scanning Documents with iX100
240

Documents to Scan (iX100)
This section explains about the conditions for documents that can be loaded directly into theScanSnap and the conditions for documents that can be scanned using the Carrier Sheet.
Documents That Can Be Loaded Directly into the ScanSnapConditions for documents that can be loaded directly into the ScanSnap are as follows:
Eject method(*1)
With the output guide closed With the output guide open
Document type Office paper, postcards, business cardsPlastic cards conforming to the ISO7810 ID-1type (54 × 86 mm/3.37 × 2.13 in.) (*2)
Office paper
Paper weight 52 to 209 g/m2 (14 to 56.1 lb)
When merging scanned imagesautomatically (*3)52 to 105 g/m2 (14 to 28 lb)
Plastic cards0.76 mm (0.03 in.) or less (embossed cardscan be used)
52 to 80 g/m2 (14 to 20 lb)
Paper sizeWidth25.4 to 216 mm (1 to 8.5 in.)For a dual scan, a total width of 200 mm (7.87 in.) or less for two documents
Length25.4 to 863 mm (1 to 34 in.)
When merging scanned images automatically (*3)l A3 (297 × 420 mm)l B4 (257 × 364 mm)l Double Letter (11 × 17 in. (279.4 × 432 mm))
*1: For details about the eject methods, refer to "Parts and Functions of iX100" (page 73).*2: A dual scan cannot be used for plastic cards.*3: Fold in half to scan.
ATTENTIONl The following types of documents must not be scanned:
- Documents attached with the metals such as paper clips or staples that can damage the insideof the ScanSnapRemove the metals for scanning.
- Documents on which the ink is still wetWait until the ink dries completely to scan these documents.
- Documents larger than 216 × 863 (mm)/8.5 × 34 (in.) (width × length)
Scanning Documents with iX100
241
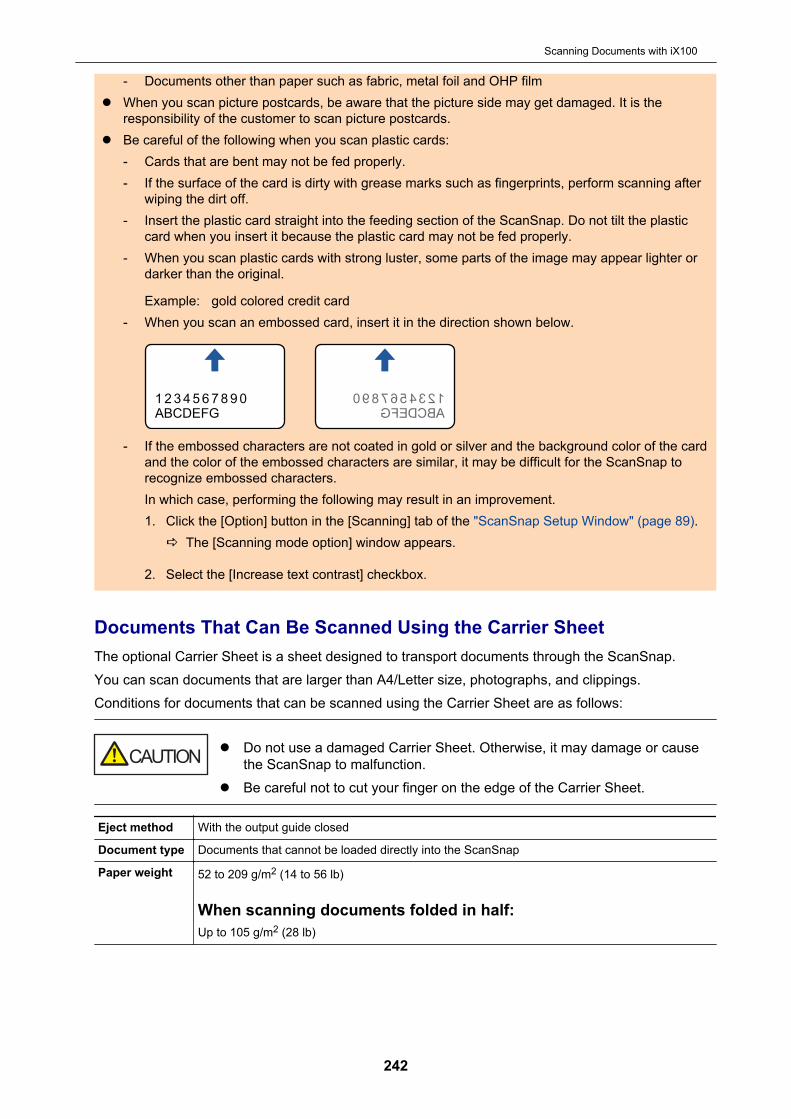
- Documents other than paper such as fabric, metal foil and OHP filml When you scan picture postcards, be aware that the picture side may get damaged. It is the
responsibility of the customer to scan picture postcards.l Be careful of the following when you scan plastic cards:
- Cards that are bent may not be fed properly.- If the surface of the card is dirty with grease marks such as fingerprints, perform scanning after
wiping the dirt off.- Insert the plastic card straight into the feeding section of the ScanSnap. Do not tilt the plastic
card when you insert it because the plastic card may not be fed properly.- When you scan plastic cards with strong luster, some parts of the image may appear lighter or
darker than the original.
Example: gold colored credit card- When you scan an embossed card, insert it in the direction shown below.
1234567890
ABCDEFG
1234567890
ABCDEFG
- If the embossed characters are not coated in gold or silver and the background color of the cardand the color of the embossed characters are similar, it may be difficult for the ScanSnap torecognize embossed characters.In which case, performing the following may result in an improvement.1. Click the [Option] button in the [Scanning] tab of the "ScanSnap Setup Window" (page 89).
a The [Scanning mode option] window appears.
2. Select the [Increase text contrast] checkbox.
Documents That Can Be Scanned Using the Carrier SheetThe optional Carrier Sheet is a sheet designed to transport documents through the ScanSnap.You can scan documents that are larger than A4/Letter size, photographs, and clippings.Conditions for documents that can be scanned using the Carrier Sheet are as follows:
l Do not use a damaged Carrier Sheet. Otherwise, it may damage or causethe ScanSnap to malfunction.
l Be careful not to cut your finger on the edge of the Carrier Sheet.
Eject method With the output guide closed
Document type Documents that cannot be loaded directly into the ScanSnap
Paper weight 52 to 209 g/m2 (14 to 56 lb)
When scanning documents folded in half:Up to 105 g/m2 (28 lb)
Scanning Documents with iX100
242

Paper size Carrier Sheet size (216 × 297 mm)A3 (297 × 420 mm) (*1)A4 (210 × 297 mm)A5 (148 × 210 mm)A6 (105 × 148 mm)B4 (257 × 364 mm) (*1)B5 (182 × 257 mm)B6 (128 × 182 mm)Postcard (100 × 148 mm)Business card (90 × 55 mm, 55 × 90 mm)Letter (8.5 × 11 in., 216 × 279.4 mm)11 ×17 in. (279.4 × 431.8 mm) (*1)
Custom sizeWidth: 25.4 to 216 mm (1 to 8.5 in.)Length: 25.4 to 297 mm (1 to 11.69 in.)
*1: Fold in half to scan.
Documents for Which the Carrier Sheet is Recommended for ScanningIt is recommended that you use the Carrier Sheet to scan the following documents.l Documents written in pencil
Because there may be black traces left on the documents, it is recommended that you use theCarrier Sheet to scan such documents.When you scan such documents directly without using a Carrier Sheet, dirt will accumulate onthe rollers, which may cause feeding errors. Clean the rollers occasionally.For details about how to perform cleaning, refer to "Cleaning the Inside of iX100" (page 450).
l Carbonless paperBecause carbonless paper may contain chemicals that can harm the ScanSnap internal rollers, itis recommended that you use the Carrier Sheet to scan such documents.Make sure to clean the rollers occasionally to maintain the scanner performance when scanningcarbonless paper directly without using the Carrier Sheet. For details about how to performcleaning, refer to "Cleaning the Inside of iX100" (page 450).Depending on the type of carbonless paper, the life span of the scanner may be shortenedcompared to scanning office paper.
l Scanning the following types of documents without using the Carrier Sheet can result indocuments being damaged or scanned incorrectly- Documents smaller than 25.4 × 25.4 (mm)/1 × 1 (in.) (width × length)
- Documents whose paper weight is less than 52.3 g/m2 (14 lb)- Documents with an uneven surface (such as envelopes and paper sheets with attached
materials)- Wrinkled or curled documents- Folded or torn documents- Tracing paper- Coated paper- Photographs (photographic paper)- Perforated or punched documents- Documents that are not rectangular or square
Scanning Documents with iX100
243

- Carbon paper or thermal paper- Documents with memo papers or sticky notes attached
ATTENTIONl Using the Carrier Sheet
Be careful of the following when you use the Carrier Sheet:- Do not stain, or cut the black and white patterned end of the Carrier Sheet. Otherwise, the
Carrier Sheet will not be recognized properly.- Do not place the Carrier Sheet upside down. Otherwise, a paper jam may occur and damage
the Carrier Sheet and the document inside.- Do not fold or pull the Carrier Sheet.- Paper jams may occur when several small size documents such as photographs and postcards
are placed inside the Carrier Sheet to be scanned at once. It is recommended that you scansuch documents one at a time.
l Storing the Carrier SheetBe careful of the following when you store the Carrier Sheet:- Do not leave your document inside the Carrier Sheet for a long time. Otherwise, the ink on the
document may be transferred onto the Carrier Sheet.- Do not leave the Carrier Sheet in high temperature places such as under direct sunlight or near
a heating apparatus for a long time. Also, do not use the Carrier Sheet in high temperatureplaces. The Carrier Sheet may be deformed.
- To avoid deformation, store the Carrier Sheet on a flat surface without any weight on it.
Scanning Documents with iX100
244
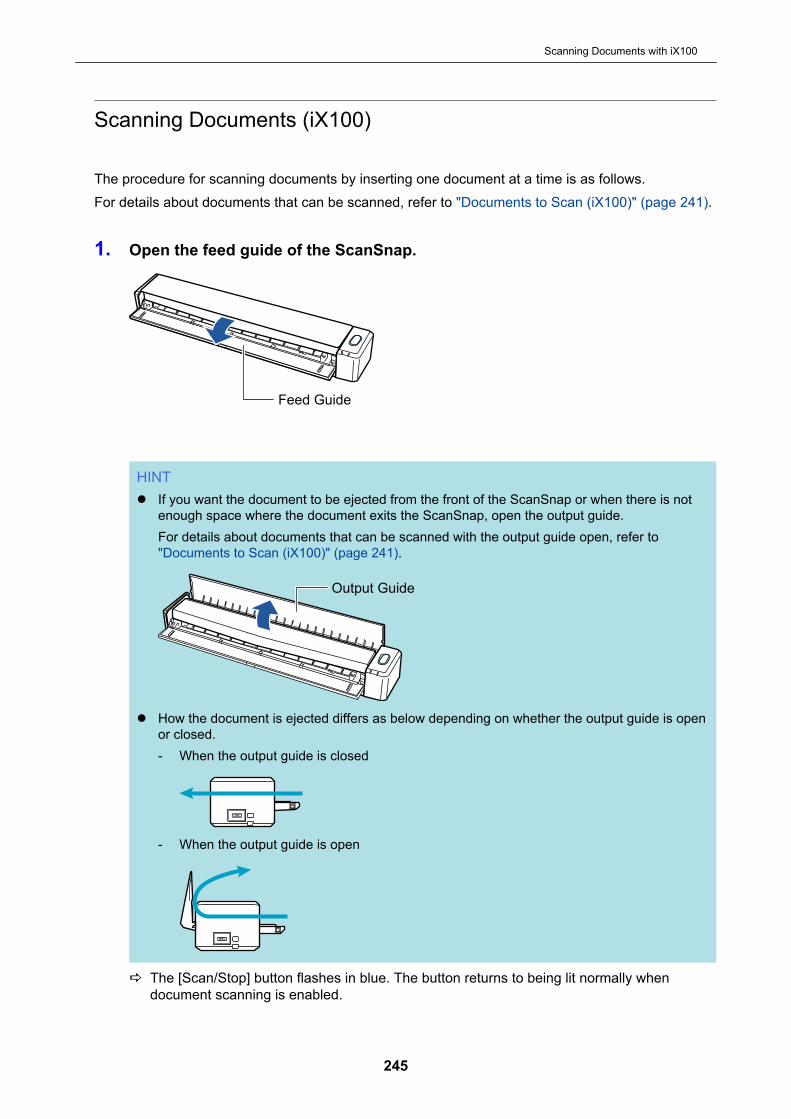
Scanning Documents (iX100)
The procedure for scanning documents by inserting one document at a time is as follows.For details about documents that can be scanned, refer to "Documents to Scan (iX100)" (page 241).
1. Open the feed guide of the ScanSnap.
Feed Guide
HINTl If you want the document to be ejected from the front of the ScanSnap or when there is not
enough space where the document exits the ScanSnap, open the output guide.For details about documents that can be scanned with the output guide open, refer to"Documents to Scan (iX100)" (page 241).
Output Guide
l How the document is ejected differs as below depending on whether the output guide is openor closed.- When the output guide is closed
- When the output guide is open
a The [Scan/Stop] button flashes in blue. The button returns to being lit normally whendocument scanning is enabled.
Scanning Documents with iX100
245
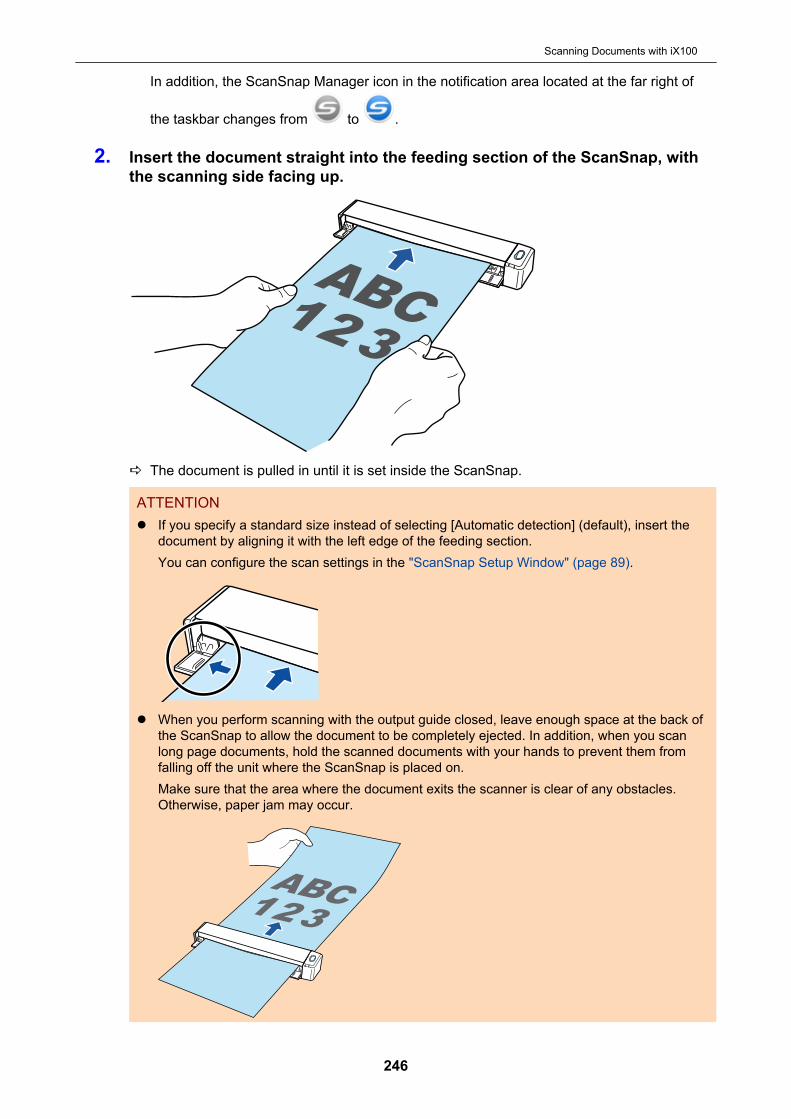
In addition, the ScanSnap Manager icon in the notification area located at the far right of
the taskbar changes from to .
2. Insert the document straight into the feeding section of the ScanSnap, withthe scanning side facing up.
a The document is pulled in until it is set inside the ScanSnap.
ATTENTIONl If you specify a standard size instead of selecting [Automatic detection] (default), insert the
document by aligning it with the left edge of the feeding section.You can configure the scan settings in the "ScanSnap Setup Window" (page 89).
l When you perform scanning with the output guide closed, leave enough space at the back ofthe ScanSnap to allow the document to be completely ejected. In addition, when you scanlong page documents, hold the scanned documents with your hands to prevent them fromfalling off the unit where the ScanSnap is placed on.Make sure that the area where the document exits the scanner is clear of any obstacles.Otherwise, paper jam may occur.
Scanning Documents with iX100
246
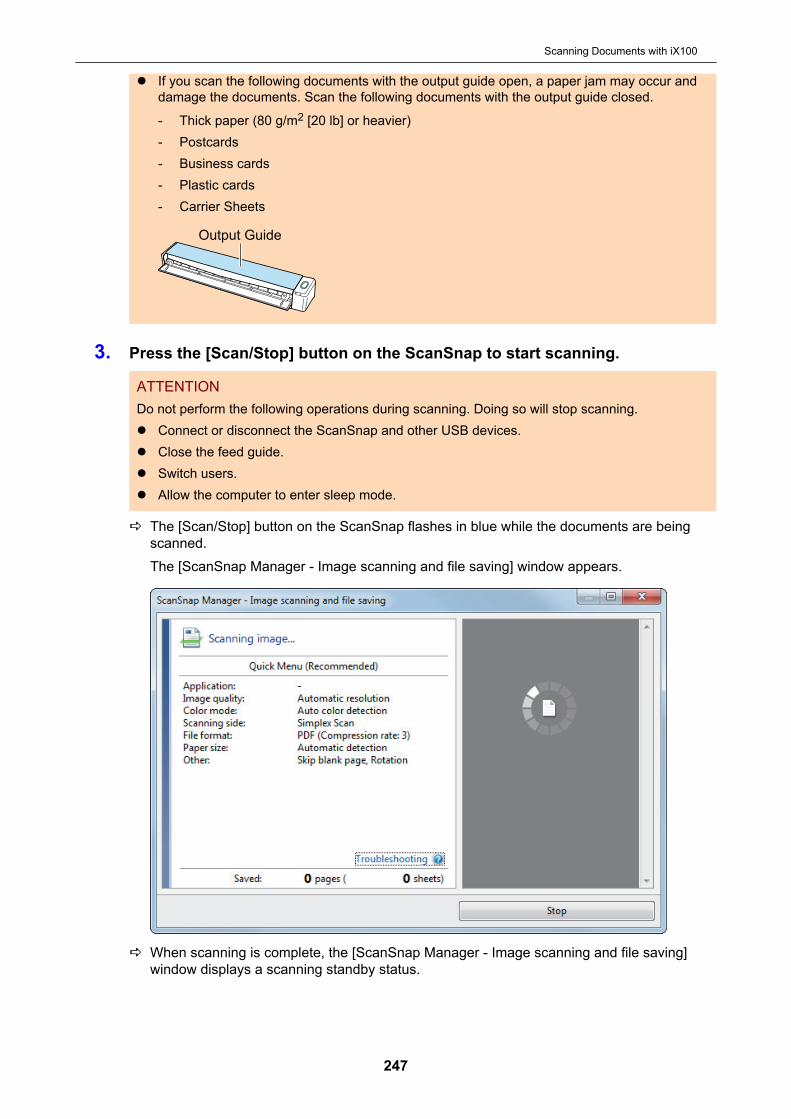
l If you scan the following documents with the output guide open, a paper jam may occur anddamage the documents. Scan the following documents with the output guide closed.
- Thick paper (80 g/m2 [20 lb] or heavier)- Postcards- Business cards- Plastic cards- Carrier Sheets
Output Guide
3. Press the [Scan/Stop] button on the ScanSnap to start scanning.
ATTENTIONDo not perform the following operations during scanning. Doing so will stop scanning.l Connect or disconnect the ScanSnap and other USB devices.l Close the feed guide.l Switch users.l Allow the computer to enter sleep mode.
a The [Scan/Stop] button on the ScanSnap flashes in blue while the documents are beingscanned.The [ScanSnap Manager - Image scanning and file saving] window appears.
a When scanning is complete, the [ScanSnap Manager - Image scanning and file saving]window displays a scanning standby status.
Scanning Documents with iX100
247
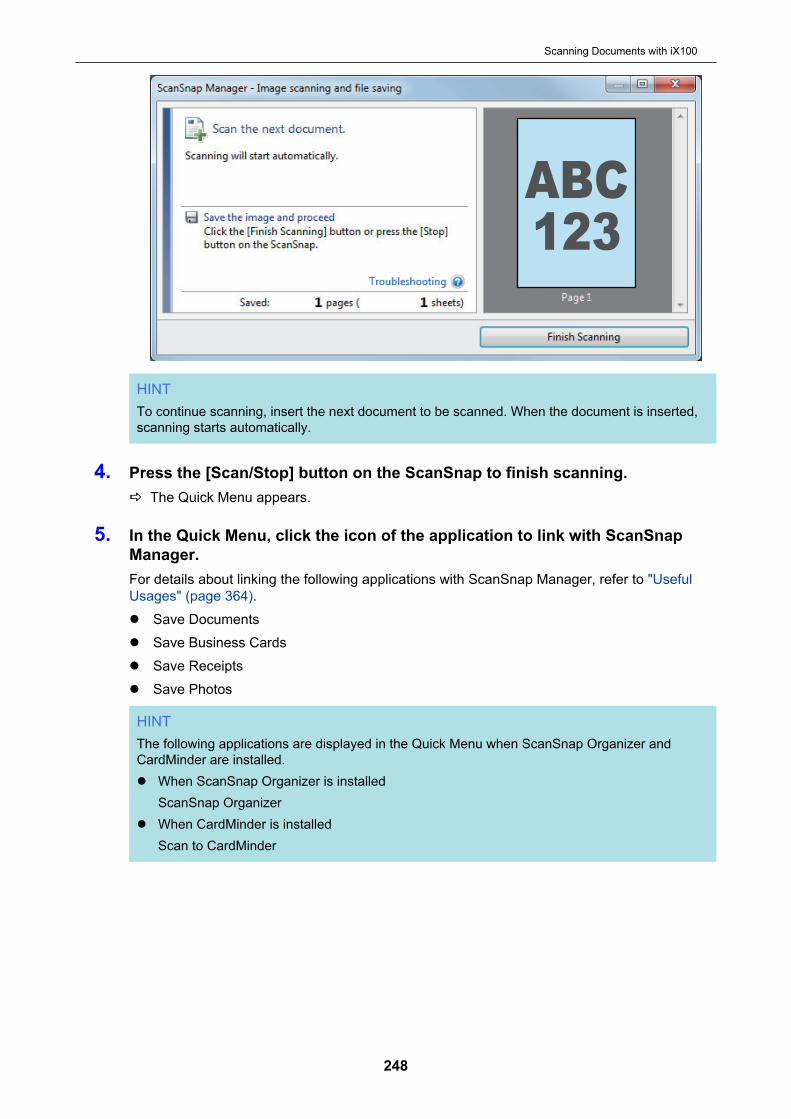
HINTTo continue scanning, insert the next document to be scanned. When the document is inserted,scanning starts automatically.
4. Press the [Scan/Stop] button on the ScanSnap to finish scanning.a The Quick Menu appears.
5. In the Quick Menu, click the icon of the application to link with ScanSnapManager.For details about linking the following applications with ScanSnap Manager, refer to "UsefulUsages" (page 364).l Save Documentsl Save Business Cardsl Save Receiptsl Save Photos
HINTThe following applications are displayed in the Quick Menu when ScanSnap Organizer andCardMinder are installed.l When ScanSnap Organizer is installed
ScanSnap Organizerl When CardMinder is installed
Scan to CardMinder
Scanning Documents with iX100
248

a The selected application starts up. For details, refer to the Advanced Operation Guide.
ATTENTIONl You cannot start scanning when the Quick Menu is displayed. Either select an icon from the
Quick Menu and finish the process, or close the Quick Menu before you perform the nextscan.
l Do not move, delete, or rename scanned images using other applications while the QuickMenu is displayed.
HINT
l Clicking displays the description of an application. Placing the mouse cursor over the iconof another application displays the description of the application.
l Performing a scan while an application that can be automatically linked with is activeautomatically starts the linkage between ScanSnap Manager and the application.For details, refer to the Advanced Operation Guide.
Scanning Documents with iX100
249

Scanning Documents by Inserting Two Documents at a Time orby Inserting the Next Document While the Current Document IsBeing Scanned (iX100)
When scanning small size documents such as business cards and postcards with the ScanSnap,you can insert two documents at a time or you can insert the next document while the currentdocument is being scanned. These scanning methods are referred to as dual scans.Documents can be inserted in the following two methods:l Inserting two documents at a time in the ScanSnap
l Inserting the next document while the current document is being scanned
For details about documents that can be scanned, refer to "Documents to Scan (iX100)" (page 241).
ATTENTIONl When you select an option other than [Automatic detection] for [Paper size] in the [Paper] tab of the
"ScanSnap Setup Window" (page 89), the dual scan function is disabled.l Use a dual scan to scan a document within the following ranges. If one of the following ranges is
exceeded, a length error occurs and part of the document may not appear in the scanned image.- Maximum scanning length: 863 mm (34 in.) (355.6 mm (14 in.) when [Excellent] is specified for
[Image Quality] in the [Scanning] tab of the "ScanSnap Setup Window" (page 89))- Maximum number of documents for scanning: 20 sheets
l When you continue scanning by inserting the next document while the current document is beingscanned, the [Scan/Stop] button flashes more quickly if the scanning length exceeds 650 mm (26in.). If this occurs, wait until scanning is complete without continuing to insert more documents.After scanning is complete, insert the next document. The next scan is started automatically.
Scanning Documents with iX100
250
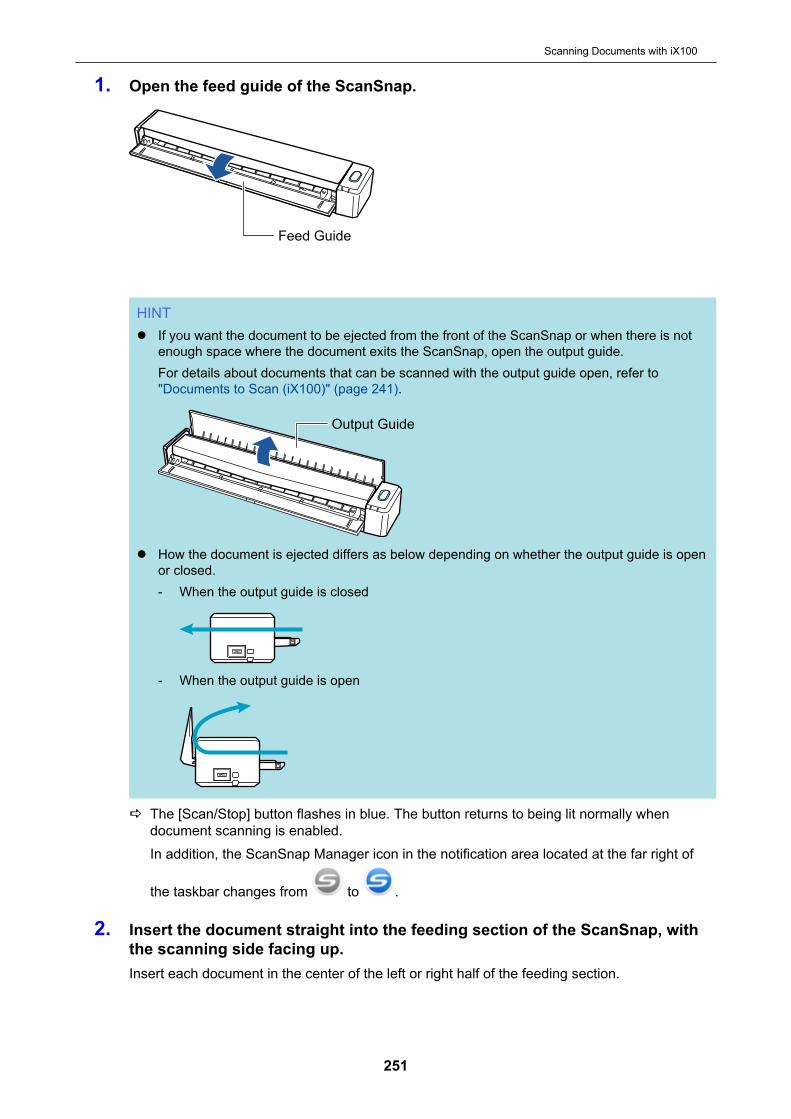
1. Open the feed guide of the ScanSnap.
Feed Guide
HINTl If you want the document to be ejected from the front of the ScanSnap or when there is not
enough space where the document exits the ScanSnap, open the output guide.For details about documents that can be scanned with the output guide open, refer to"Documents to Scan (iX100)" (page 241).
Output Guide
l How the document is ejected differs as below depending on whether the output guide is openor closed.- When the output guide is closed
- When the output guide is open
a The [Scan/Stop] button flashes in blue. The button returns to being lit normally whendocument scanning is enabled.In addition, the ScanSnap Manager icon in the notification area located at the far right of
the taskbar changes from to .
2. Insert the document straight into the feeding section of the ScanSnap, withthe scanning side facing up.Insert each document in the center of the left or right half of the feeding section.
Scanning Documents with iX100
251
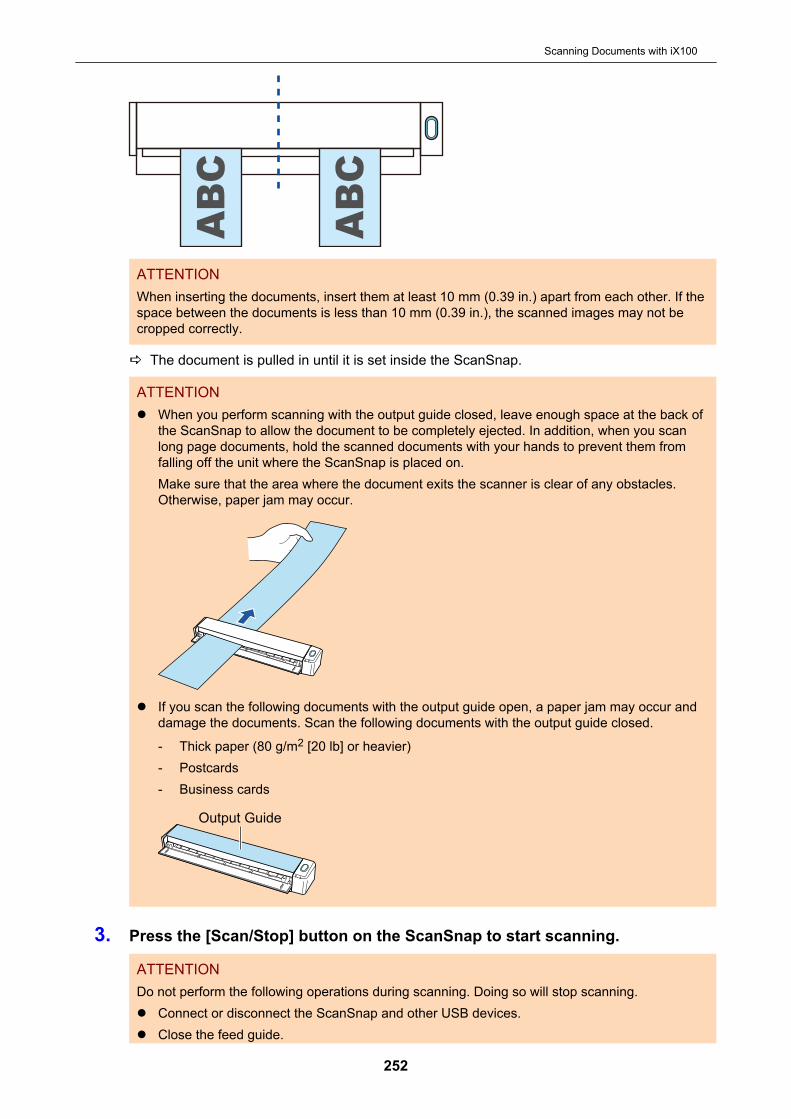
ATTENTIONWhen inserting the documents, insert them at least 10 mm (0.39 in.) apart from each other. If thespace between the documents is less than 10 mm (0.39 in.), the scanned images may not becropped correctly.
a The document is pulled in until it is set inside the ScanSnap.
ATTENTIONl When you perform scanning with the output guide closed, leave enough space at the back of
the ScanSnap to allow the document to be completely ejected. In addition, when you scanlong page documents, hold the scanned documents with your hands to prevent them fromfalling off the unit where the ScanSnap is placed on.Make sure that the area where the document exits the scanner is clear of any obstacles.Otherwise, paper jam may occur.
l If you scan the following documents with the output guide open, a paper jam may occur anddamage the documents. Scan the following documents with the output guide closed.
- Thick paper (80 g/m2 [20 lb] or heavier)- Postcards- Business cards
Output Guide
3. Press the [Scan/Stop] button on the ScanSnap to start scanning.
ATTENTIONDo not perform the following operations during scanning. Doing so will stop scanning.l Connect or disconnect the ScanSnap and other USB devices.l Close the feed guide.
Scanning Documents with iX100
252
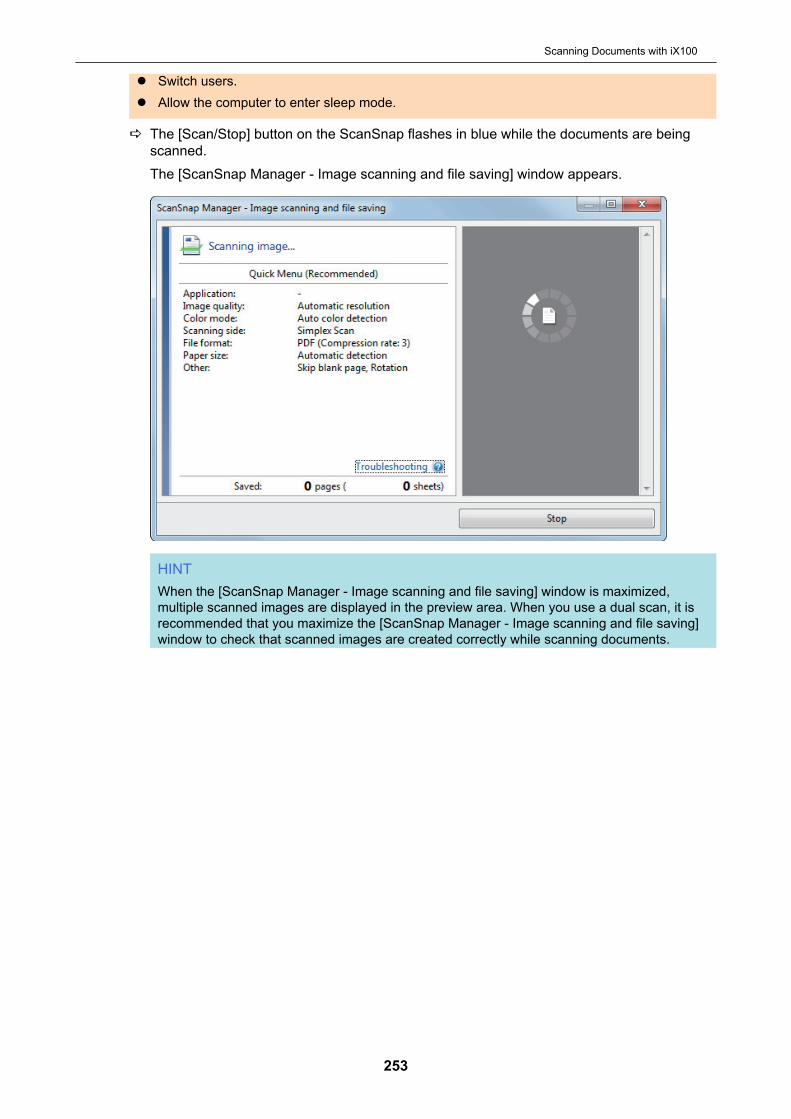
l Switch users.l Allow the computer to enter sleep mode.
a The [Scan/Stop] button on the ScanSnap flashes in blue while the documents are beingscanned.The [ScanSnap Manager - Image scanning and file saving] window appears.
HINTWhen the [ScanSnap Manager - Image scanning and file saving] window is maximized,multiple scanned images are displayed in the preview area. When you use a dual scan, it isrecommended that you maximize the [ScanSnap Manager - Image scanning and file saving]window to check that scanned images are created correctly while scanning documents.
Scanning Documents with iX100
253
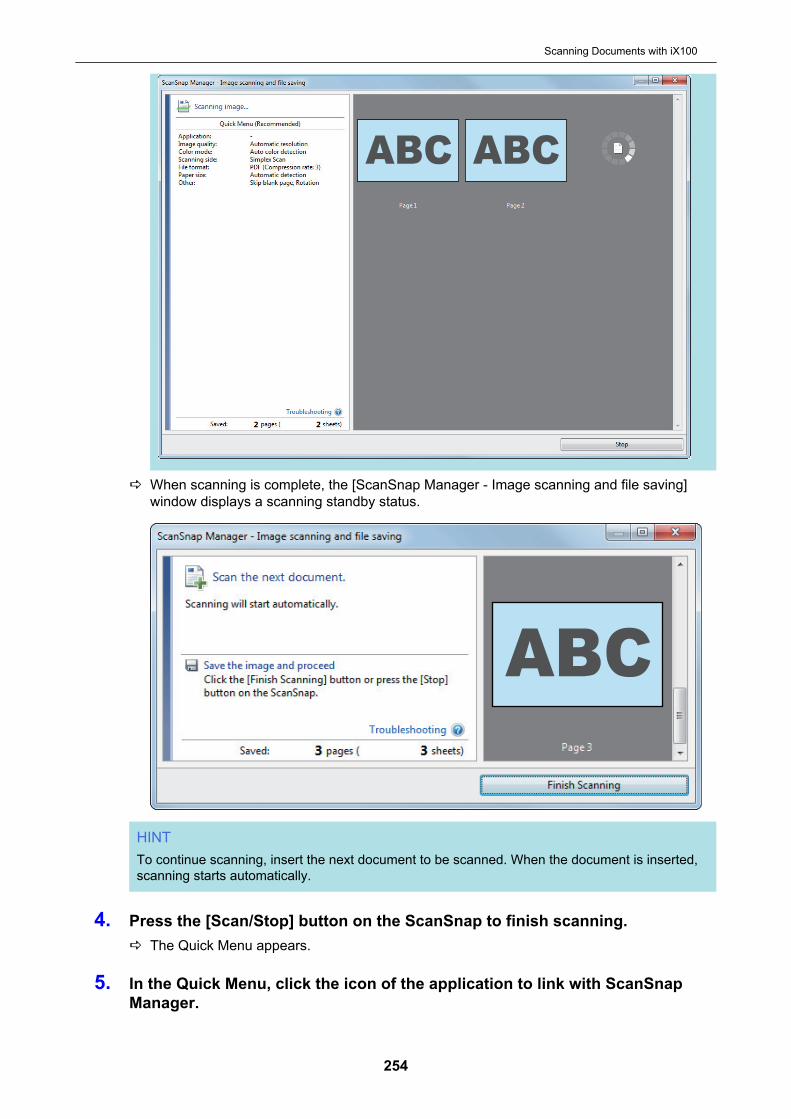
a When scanning is complete, the [ScanSnap Manager - Image scanning and file saving]window displays a scanning standby status.
HINTTo continue scanning, insert the next document to be scanned. When the document is inserted,scanning starts automatically.
4. Press the [Scan/Stop] button on the ScanSnap to finish scanning.a The Quick Menu appears.
5. In the Quick Menu, click the icon of the application to link with ScanSnapManager.
Scanning Documents with iX100
254

For details about linking the following applications with ScanSnap Manager, refer to "UsefulUsages" (page 364).l Save Documentsl Save Business Cardsl Save Receiptsl Save Photos
HINTThe following applications are displayed in the Quick Menu when ScanSnap Organizer andCardMinder are installed.l When ScanSnap Organizer is installed
ScanSnap Organizerl When CardMinder is installed
Scan to CardMinder
a The selected application starts up. For details, refer to the Advanced Operation Guide.
ATTENTIONl You cannot start scanning when the Quick Menu is displayed. Either select an icon from the
Quick Menu and finish the process, or close the Quick Menu before you perform the nextscan.
l Do not move, delete, or rename scanned images using other applications while the QuickMenu is displayed.
HINT
l Clicking displays the description of an application. Placing the mouse cursor over the iconof another application displays the description of the application.
l Performing a scan while an application that can be automatically linked with is activeautomatically starts the linkage between ScanSnap Manager and the application.
Scanning Documents with iX100
255

For details, refer to the Advanced Operation Guide.
Scanning Documents with iX100
256
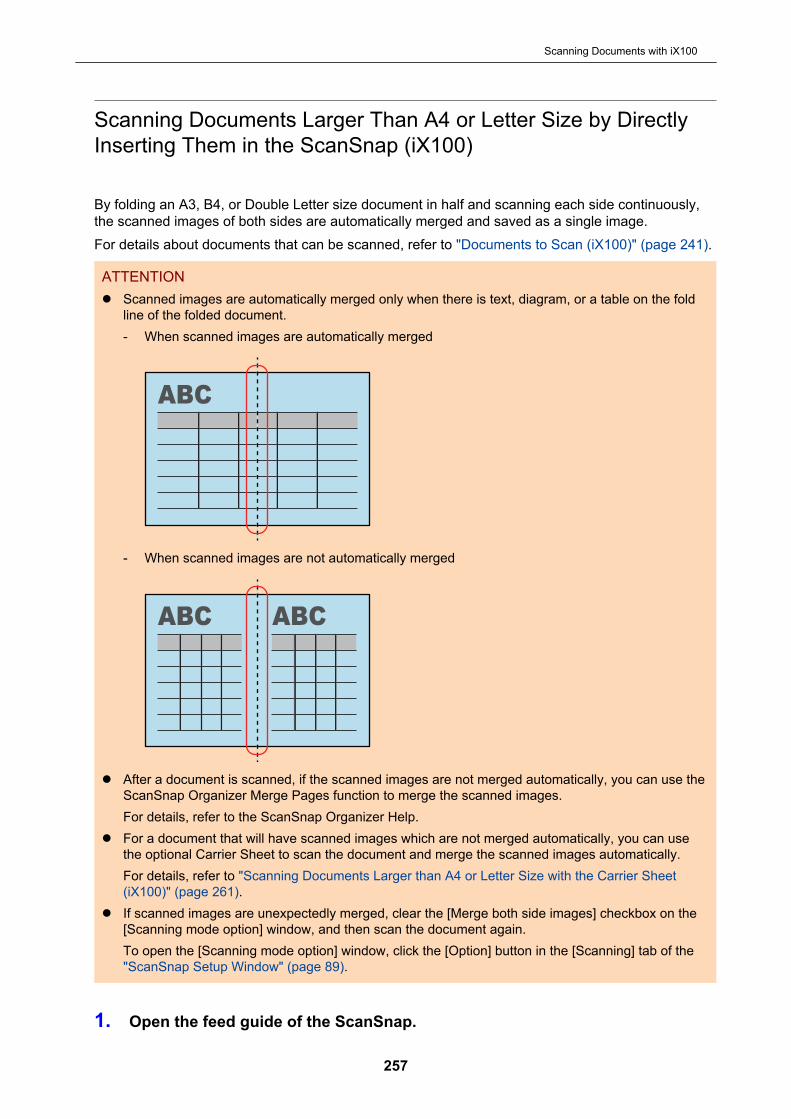
Scanning Documents Larger Than A4 or Letter Size by DirectlyInserting Them in the ScanSnap (iX100)
By folding an A3, B4, or Double Letter size document in half and scanning each side continuously,the scanned images of both sides are automatically merged and saved as a single image.For details about documents that can be scanned, refer to "Documents to Scan (iX100)" (page 241).
ATTENTIONl Scanned images are automatically merged only when there is text, diagram, or a table on the fold
line of the folded document.- When scanned images are automatically merged
- When scanned images are not automatically merged
l After a document is scanned, if the scanned images are not merged automatically, you can use theScanSnap Organizer Merge Pages function to merge the scanned images.For details, refer to the ScanSnap Organizer Help.
l For a document that will have scanned images which are not merged automatically, you can usethe optional Carrier Sheet to scan the document and merge the scanned images automatically.For details, refer to "Scanning Documents Larger than A4 or Letter Size with the Carrier Sheet(iX100)" (page 261).
l If scanned images are unexpectedly merged, clear the [Merge both side images] checkbox on the[Scanning mode option] window, and then scan the document again.To open the [Scanning mode option] window, click the [Option] button in the [Scanning] tab of the"ScanSnap Setup Window" (page 89).
1. Open the feed guide of the ScanSnap.
Scanning Documents with iX100
257
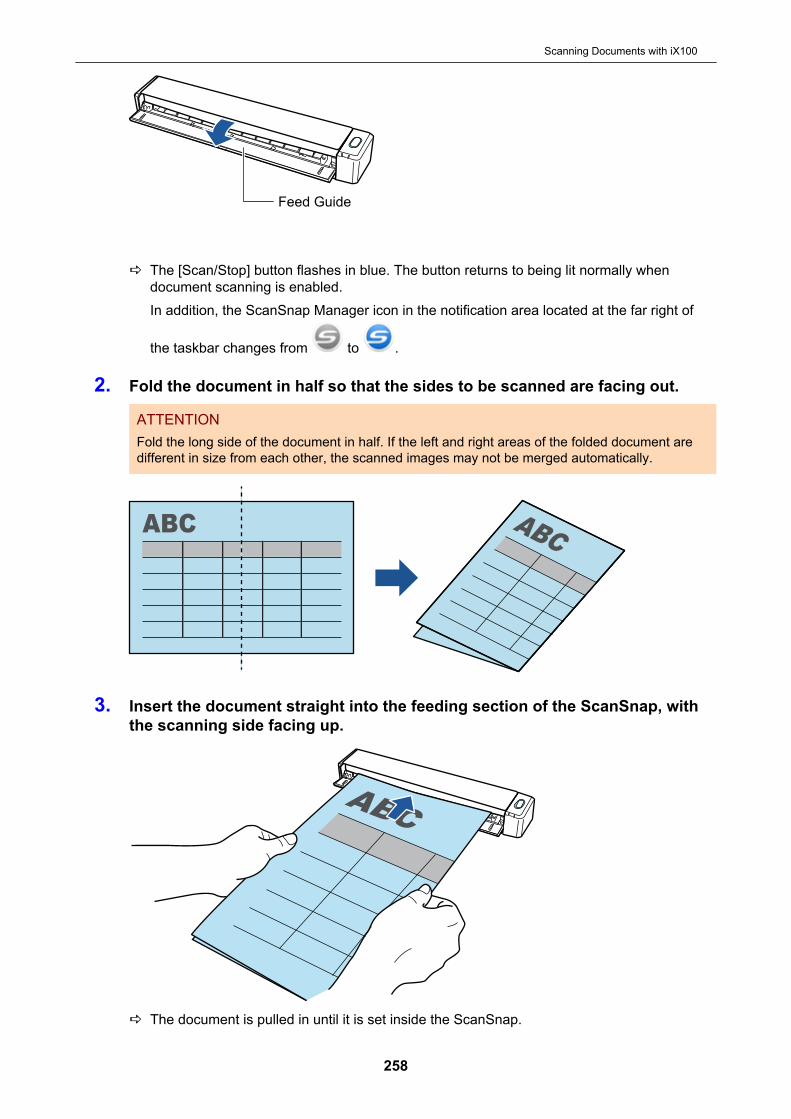
Feed Guide
a The [Scan/Stop] button flashes in blue. The button returns to being lit normally whendocument scanning is enabled.In addition, the ScanSnap Manager icon in the notification area located at the far right of
the taskbar changes from to .
2. Fold the document in half so that the sides to be scanned are facing out.
ATTENTIONFold the long side of the document in half. If the left and right areas of the folded document aredifferent in size from each other, the scanned images may not be merged automatically.
3. Insert the document straight into the feeding section of the ScanSnap, withthe scanning side facing up.
a The document is pulled in until it is set inside the ScanSnap.
Scanning Documents with iX100
258

HINTIf you scan a document folded in half with the output guide open, a paper jam may occur. Makesure to close the output guide when you scan a document folded in half.
Output Guide
4. Press the [Scan/Stop] button on the ScanSnap to start scanning.a The [Scan/Stop] button on the ScanSnap flashes in blue and the [ScanSnap Manager -
Image scanning and file saving] window appears while the document is being scanned.When scanning is complete, the scanned image of the scanning side is displayed in thepreview area.
5. Turn over the document and insert it as described in step 3.
ATTENTIONMake sure to scan the front and back sides of the document folded in half consecutively.
a Scanning starts automatically.
HINTRepeat steps 2 to 5 to continue scanning more A3, B4, or Double Letter size documents. Youcan also continue scanning documents smaller than A4 or Letter size.For details about how to perform a scan, refer to "Scanning Documents (iX100)" (page 245).
6. Press the [Scan/Stop] button on the ScanSnap to finish scanning.a The Quick Menu appears.
7. In the Quick Menu, click the icon of the application to link with ScanSnapManager.
Scanning Documents with iX100
259

When you select [Save Documents], you can manage scanned images by folder withScanSnap Home.For details, refer to "Managing Paper Documents by Folder on a Computer with ScanSnapHome" (page 365).
HINT[ScanSnap Organizer] is displayed in the Quick Menu when ScanSnap Organizer is installed.To manage scanned images by folder with ScanSnap Organizer, refer to "Managing PaperDocuments by Folder on a Computer with ScanSnap Organizer" (page 368).
a The selected application starts up. For details, refer to the Advanced Operation Guide.
ATTENTIONl You cannot start scanning when the Quick Menu is displayed. Either select an icon from the
Quick Menu and finish the process, or close the Quick Menu before you perform the nextscan.
l Do not move, delete, or rename scanned images using other applications while the QuickMenu is displayed.
HINT
l Clicking displays the description of an application. Placing the mouse cursor over the iconof another application displays the description of the application.
l Performing a scan while an application that can be automatically linked with is activeautomatically starts the linkage between ScanSnap Manager and the application.For details, refer to the Advanced Operation Guide.
Scanning Documents with iX100
260

Scanning Documents Larger than A4 or Letter Size with theCarrier Sheet (iX100)
Documents larger than A4/Letter size (such as A3, 11 × 17 in. and B4) can be scanned with theoptional Carrier Sheet. By folding the document in half and scanning both sides, one at a time, thetwo sides are merged into a single image.For details about documents that can be loaded, refer to "Scanning Documents (iX100)" (page 245).
ATTENTIONThe [Deskew by text on document] checkbox in the [Scanning mode option] window will be disabled.To open the [Scanning mode option] window, click the [Option] button in the [Scanning] tab of the"ScanSnap Setup Window" (page 89).
HINTBoth sides of a double-sided A4/Letter size document or smaller can also be scanned and merged intoa single image.
1. Right-click the ScanSnap Manager icon in the notification area locatedat the far right of the taskbar, and select the [Scan Button Settings] from the"Right-Click Menu" (page 87).a The ScanSnap setup window appears.
2. In the [Paper] tab, select [Automatic detection] in [Paper size], and then clickthe [Carrier Sheet Settings] button.
a The [Carrier Sheet Settings] window appears.
3. Select [one double-page spread image] in [Save as] and click the [OK]button.For details, refer to the ScanSnap Manager Help.
Scanning Documents with iX100
261
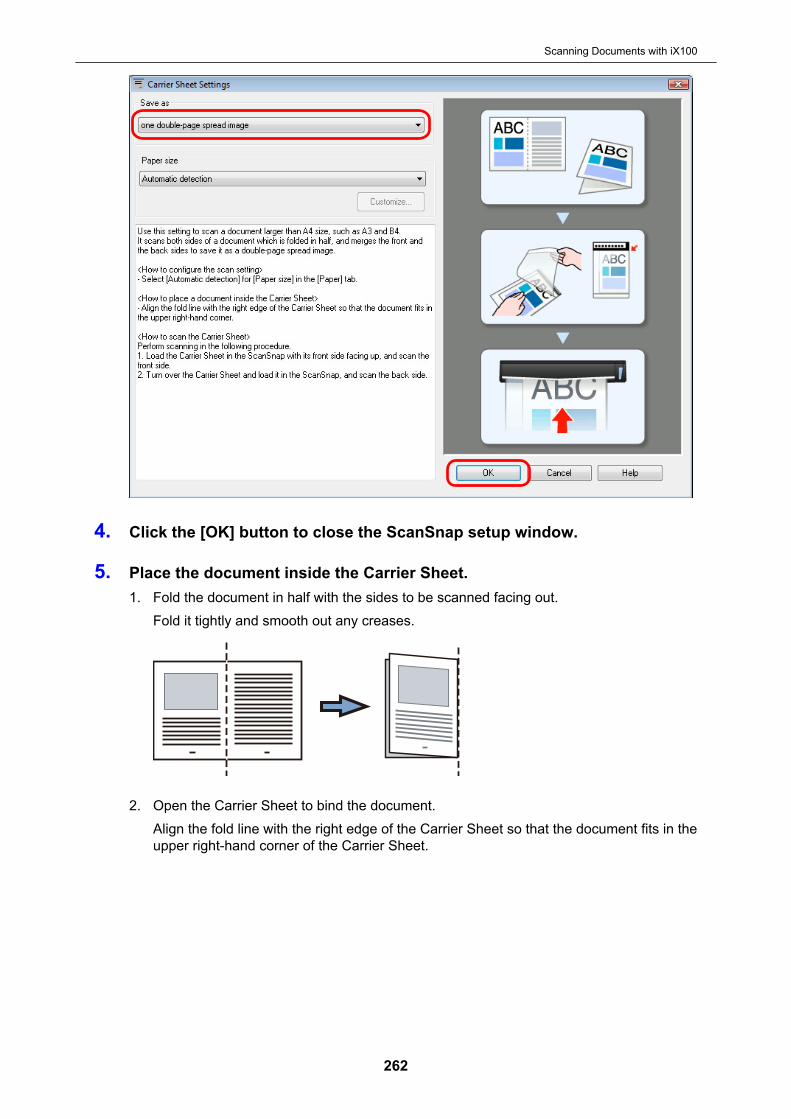
4. Click the [OK] button to close the ScanSnap setup window.
5. Place the document inside the Carrier Sheet.1. Fold the document in half with the sides to be scanned facing out.
Fold it tightly and smooth out any creases.
2. Open the Carrier Sheet to bind the document.Align the fold line with the right edge of the Carrier Sheet so that the document fits in theupper right-hand corner of the Carrier Sheet.
Scanning Documents with iX100
262
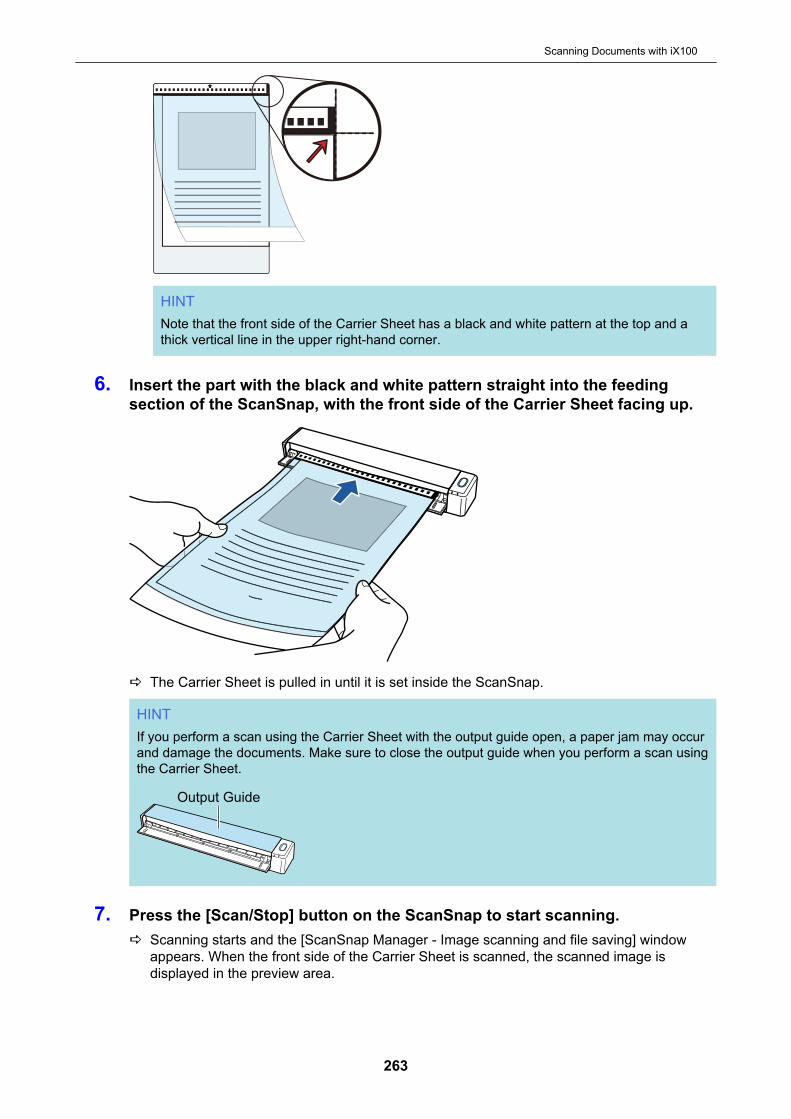
HINTNote that the front side of the Carrier Sheet has a black and white pattern at the top and athick vertical line in the upper right-hand corner.
6. Insert the part with the black and white pattern straight into the feedingsection of the ScanSnap, with the front side of the Carrier Sheet facing up.
a The Carrier Sheet is pulled in until it is set inside the ScanSnap.
HINTIf you perform a scan using the Carrier Sheet with the output guide open, a paper jam may occurand damage the documents. Make sure to close the output guide when you perform a scan usingthe Carrier Sheet.
Output Guide
7. Press the [Scan/Stop] button on the ScanSnap to start scanning.a Scanning starts and the [ScanSnap Manager - Image scanning and file saving] window
appears. When the front side of the Carrier Sheet is scanned, the scanned image isdisplayed in the preview area.
Scanning Documents with iX100
263

8. Turn over the Carrier Sheet and insert it as described in step 6.
ATTENTIONMake sure to scan the front and back side of the Carrier Sheet consecutively.
a Scanning starts automatically and the [ScanSnap Manager - Image scanning and filesaving] window appears. When scanning is completed, scanned images of the front andback side of the document inside the Carrier Sheet are displayed as a double-page spreadimage in the preview area.
HINTRepeat steps 5 to 8 to scan more documents larger than A4/Letter size. You can continue toscan documents that can be inserted directly in the ScanSnap.For details about how to perform a scan, refer to "Scanning Documents (iX100)" (page 245).
9. Press the [Scan/Stop] button on the ScanSnap to finish scanning.a The scanned images of the front and back sides of the document are saved as a double-
page spread image.
Scanning Documents with iX100
264
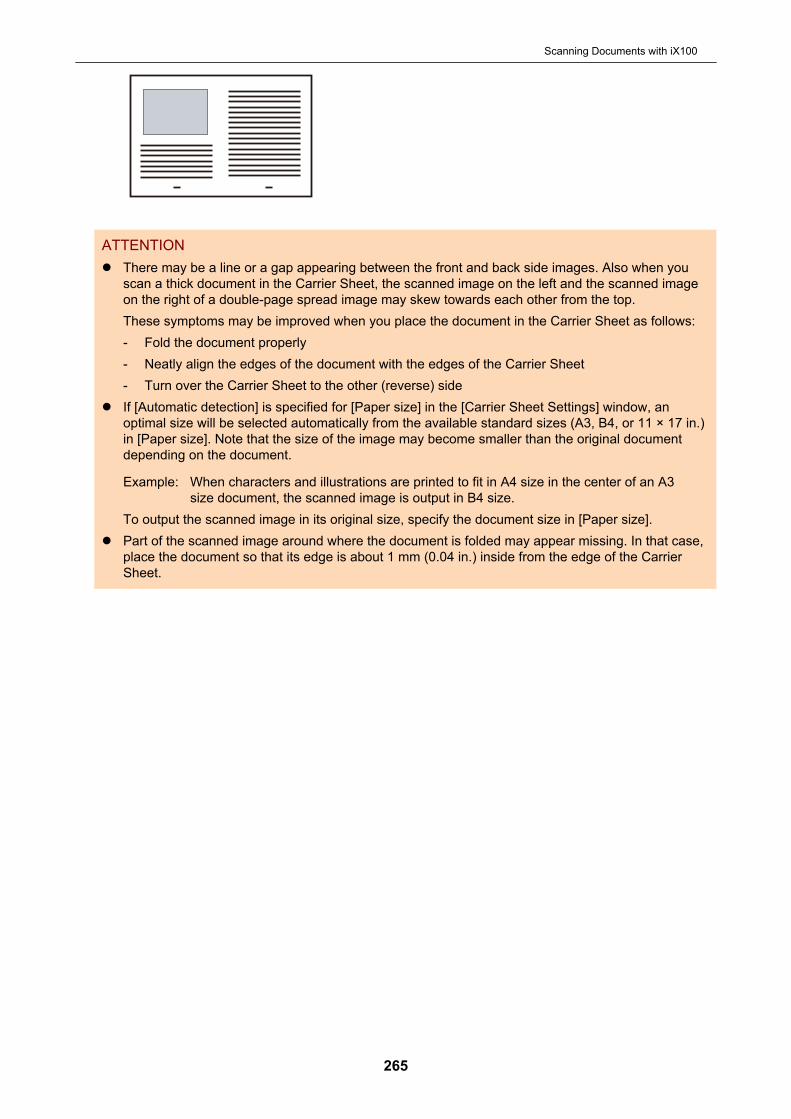
ATTENTIONl There may be a line or a gap appearing between the front and back side images. Also when you
scan a thick document in the Carrier Sheet, the scanned image on the left and the scanned imageon the right of a double-page spread image may skew towards each other from the top.These symptoms may be improved when you place the document in the Carrier Sheet as follows:- Fold the document properly- Neatly align the edges of the document with the edges of the Carrier Sheet- Turn over the Carrier Sheet to the other (reverse) side
l If [Automatic detection] is specified for [Paper size] in the [Carrier Sheet Settings] window, anoptimal size will be selected automatically from the available standard sizes (A3, B4, or 11 × 17 in.)in [Paper size]. Note that the size of the image may become smaller than the original documentdepending on the document.
Example: When characters and illustrations are printed to fit in A4 size in the center of an A3size document, the scanned image is output in B4 size.
To output the scanned image in its original size, specify the document size in [Paper size].l Part of the scanned image around where the document is folded may appear missing. In that case,
place the document so that its edge is about 1 mm (0.04 in.) inside from the edge of the CarrierSheet.
Scanning Documents with iX100
265
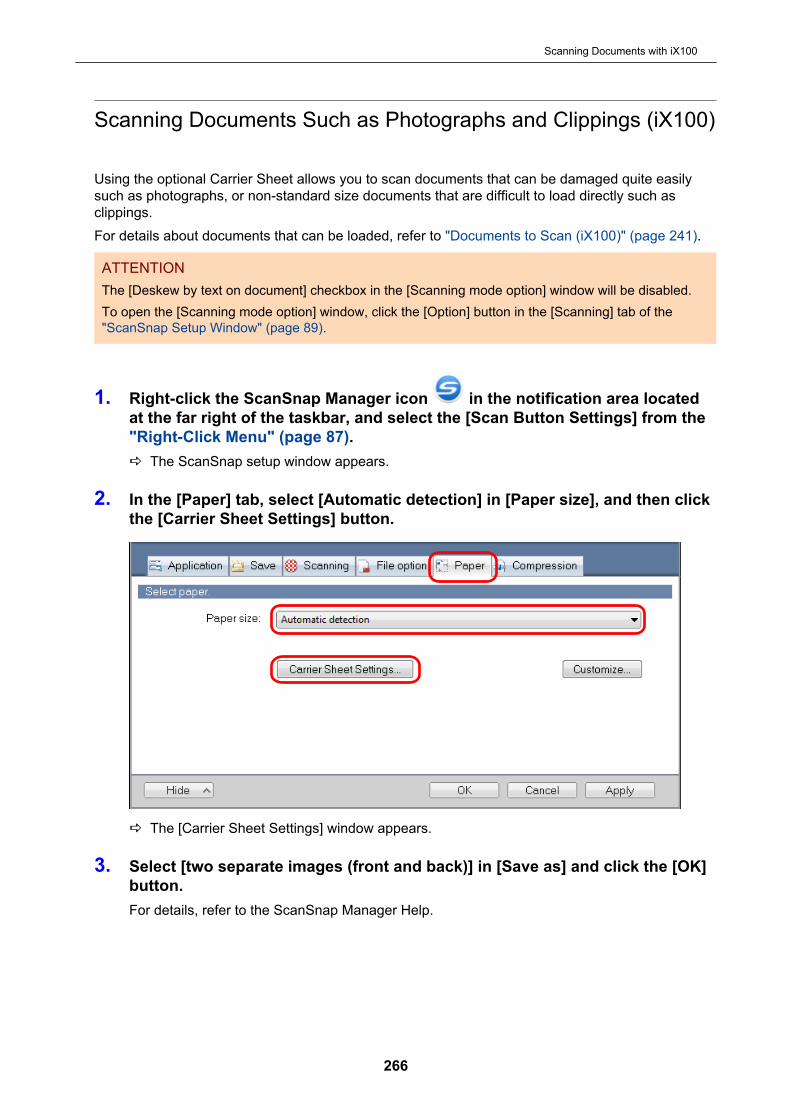
Scanning Documents Such as Photographs and Clippings (iX100)
Using the optional Carrier Sheet allows you to scan documents that can be damaged quite easilysuch as photographs, or non-standard size documents that are difficult to load directly such asclippings.For details about documents that can be loaded, refer to "Documents to Scan (iX100)" (page 241).
ATTENTIONThe [Deskew by text on document] checkbox in the [Scanning mode option] window will be disabled.To open the [Scanning mode option] window, click the [Option] button in the [Scanning] tab of the"ScanSnap Setup Window" (page 89).
1. Right-click the ScanSnap Manager icon in the notification area locatedat the far right of the taskbar, and select the [Scan Button Settings] from the"Right-Click Menu" (page 87).a The ScanSnap setup window appears.
2. In the [Paper] tab, select [Automatic detection] in [Paper size], and then clickthe [Carrier Sheet Settings] button.
a The [Carrier Sheet Settings] window appears.
3. Select [two separate images (front and back)] in [Save as] and click the [OK]button.For details, refer to the ScanSnap Manager Help.
Scanning Documents with iX100
266
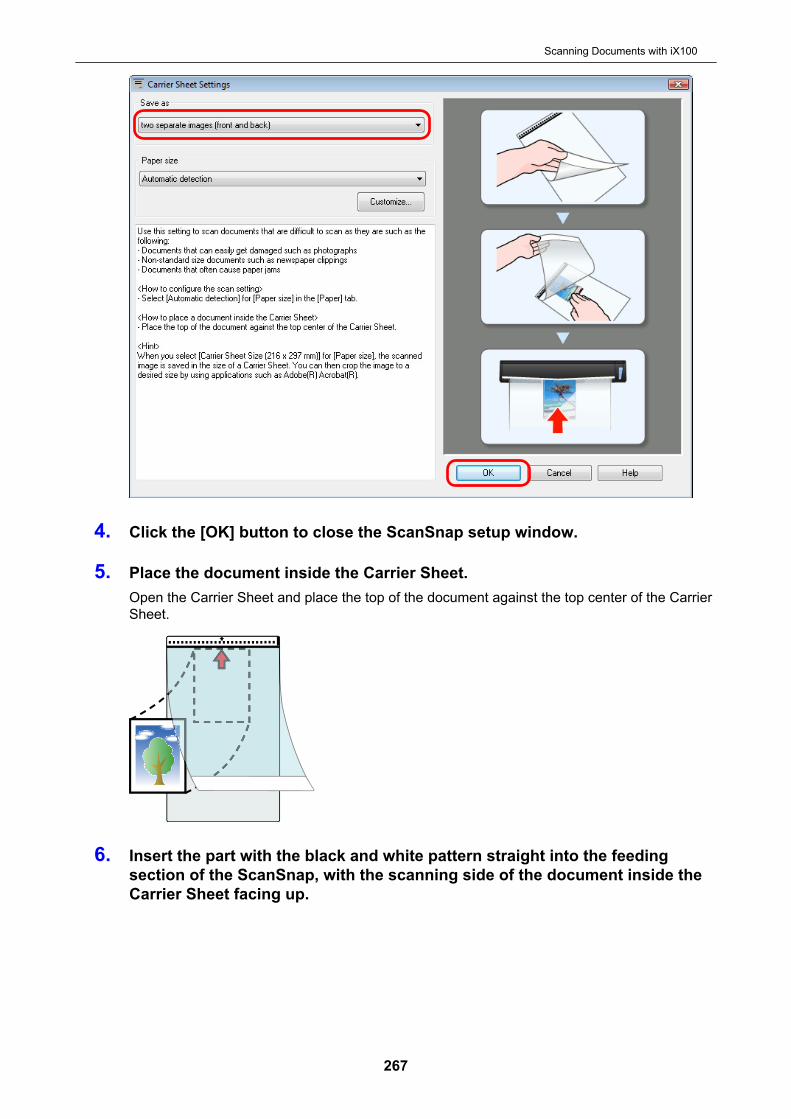
4. Click the [OK] button to close the ScanSnap setup window.
5. Place the document inside the Carrier Sheet.Open the Carrier Sheet and place the top of the document against the top center of the CarrierSheet.
6. Insert the part with the black and white pattern straight into the feedingsection of the ScanSnap, with the scanning side of the document inside theCarrier Sheet facing up.
Scanning Documents with iX100
267

a The Carrier Sheet is pulled in until it is set inside the ScanSnap.
ATTENTIONIf you perform a scan using the Carrier Sheet with the output guide open, a paper jam may occurand damage the documents. Make sure to close the output guide when you perform a scan usingthe Carrier Sheet.
Output Guide
7. Press the [Scan/Stop] button on the ScanSnap to start scanning.a When scanning is complete, the scanned image of the document that is inside the Carrier
Sheet is displayed in the preview area.
HINTRepeat steps 5 to 7 to scan more documents such as photographs and clippings.You can continue to scan documents that can be inserted directly in the ScanSnap.For details about how to perform a scan, refer to "Scanning Documents (iX100)" (page 245).
Scanning Documents with iX100
268
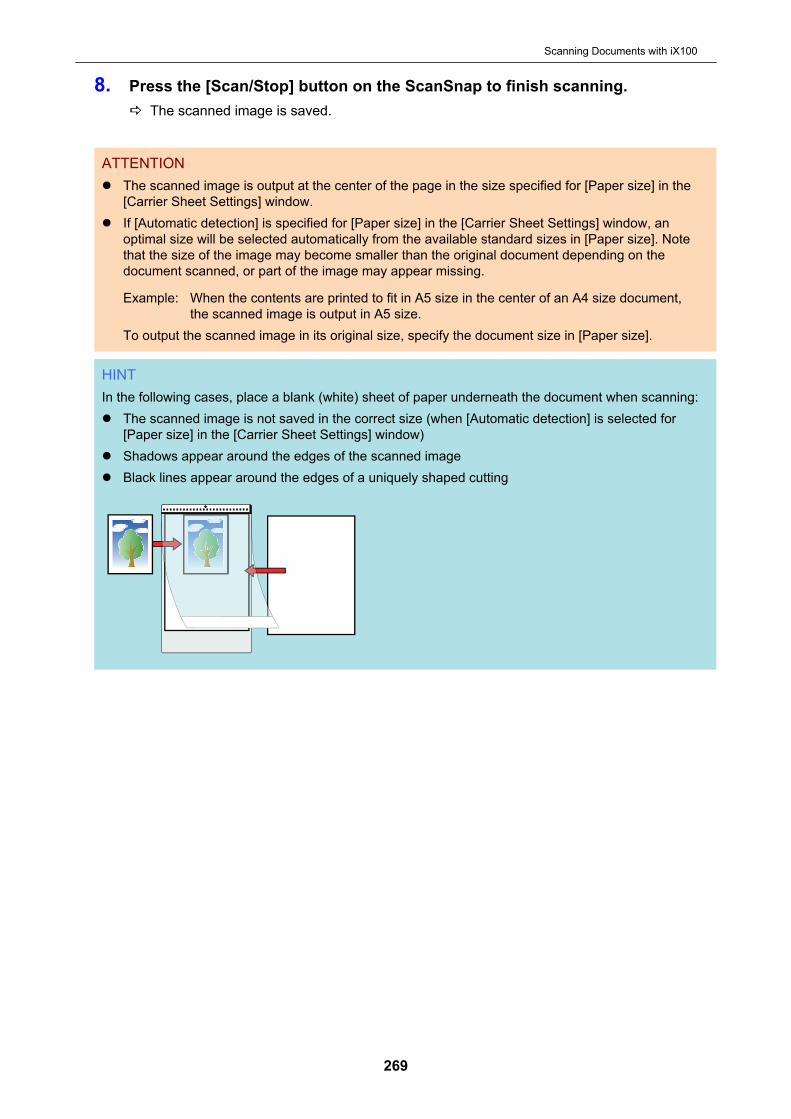
8. Press the [Scan/Stop] button on the ScanSnap to finish scanning.a The scanned image is saved.
ATTENTIONl The scanned image is output at the center of the page in the size specified for [Paper size] in the
[Carrier Sheet Settings] window.l If [Automatic detection] is specified for [Paper size] in the [Carrier Sheet Settings] window, an
optimal size will be selected automatically from the available standard sizes in [Paper size]. Notethat the size of the image may become smaller than the original document depending on thedocument scanned, or part of the image may appear missing.
Example: When the contents are printed to fit in A5 size in the center of an A4 size document,the scanned image is output in A5 size.
To output the scanned image in its original size, specify the document size in [Paper size].
HINTIn the following cases, place a blank (white) sheet of paper underneath the document when scanning:l The scanned image is not saved in the correct size (when [Automatic detection] is selected for
[Paper size] in the [Carrier Sheet Settings] window)l Shadows appear around the edges of the scanned imagel Black lines appear around the edges of a uniquely shaped cutting
Scanning Documents with iX100
269

Scanning Documents with SV600
l "Documents to Scan (SV600)" (page 271)l "How to Place Documents (SV600)" (page 272)l "Scanning Documents (SV600)" (page 275)l "Scanning Books (SV600)" (page 280)l "Scanning Multiple Documents at Once (SV600)" (page 285)l "Scanning Books Using Page Turning Detection (SV600)" (page 290)l "Scanning Documents Using Timed Mode (SV600)" (page 294)l "Scanning Documents with Two ScanSnaps Connected to a Computer (SV600)" (page 297)
Scanning Documents with SV600
270
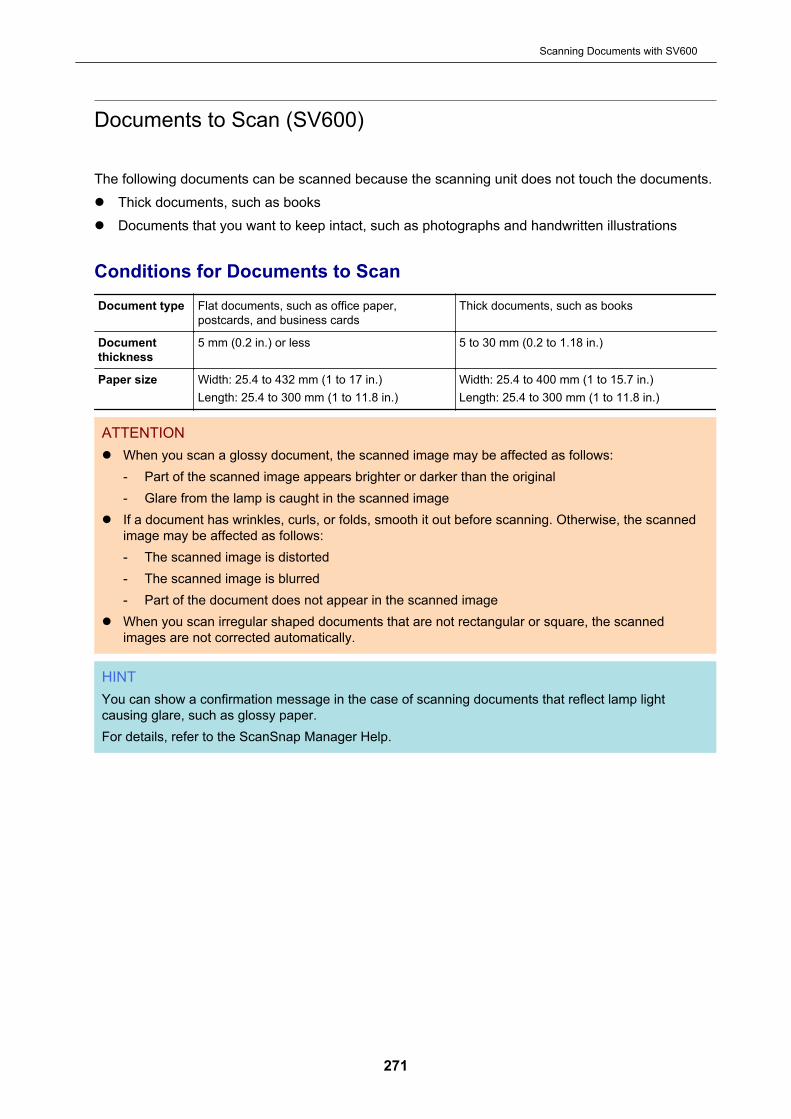
Documents to Scan (SV600)
The following documents can be scanned because the scanning unit does not touch the documents.l Thick documents, such as booksl Documents that you want to keep intact, such as photographs and handwritten illustrations
Conditions for Documents to ScanDocument type Flat documents, such as office paper,
postcards, and business cardsThick documents, such as books
Documentthickness
5 mm (0.2 in.) or less 5 to 30 mm (0.2 to 1.18 in.)
Paper size Width: 25.4 to 432 mm (1 to 17 in.)Length: 25.4 to 300 mm (1 to 11.8 in.)
Width: 25.4 to 400 mm (1 to 15.7 in.)Length: 25.4 to 300 mm (1 to 11.8 in.)
ATTENTIONl When you scan a glossy document, the scanned image may be affected as follows:
- Part of the scanned image appears brighter or darker than the original- Glare from the lamp is caught in the scanned image
l If a document has wrinkles, curls, or folds, smooth it out before scanning. Otherwise, the scannedimage may be affected as follows:- The scanned image is distorted- The scanned image is blurred- Part of the document does not appear in the scanned image
l When you scan irregular shaped documents that are not rectangular or square, the scannedimages are not corrected automatically.
HINTYou can show a confirmation message in the case of scanning documents that reflect lamp lightcausing glare, such as glossy paper.For details, refer to the ScanSnap Manager Help.
Scanning Documents with SV600
271
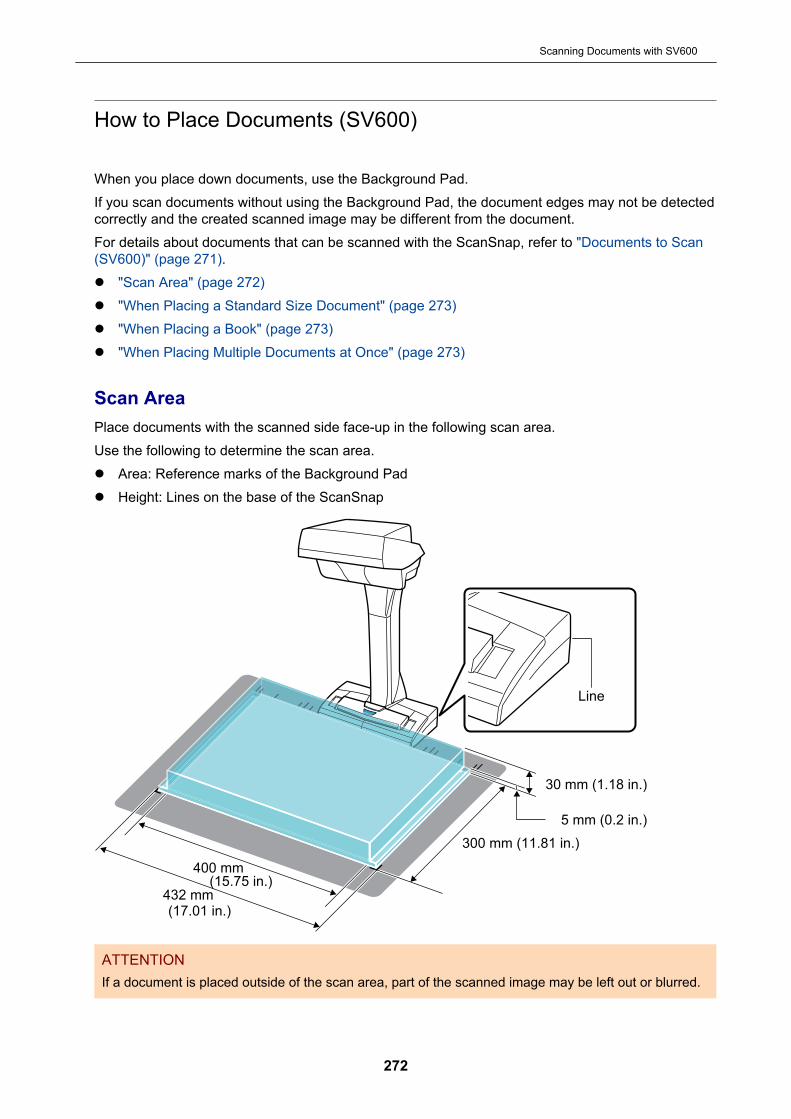
How to Place Documents (SV600)
When you place down documents, use the Background Pad.If you scan documents without using the Background Pad, the document edges may not be detectedcorrectly and the created scanned image may be different from the document.For details about documents that can be scanned with the ScanSnap, refer to "Documents to Scan(SV600)" (page 271).l "Scan Area" (page 272)l "When Placing a Standard Size Document" (page 273)l "When Placing a Book" (page 273)l "When Placing Multiple Documents at Once" (page 273)
Scan AreaPlace documents with the scanned side face-up in the following scan area.Use the following to determine the scan area.l Area: Reference marks of the Background Padl Height: Lines on the base of the ScanSnap
30 mm (1.18 in.)
Line
5 mm (0.2 in.)
300 mm (11.81 in.)
400 mm
432 mm
(15.75 in.)
(17.01 in.)
ATTENTIONIf a document is placed outside of the scan area, part of the scanned image may be left out or blurred.
Scanning Documents with SV600
272
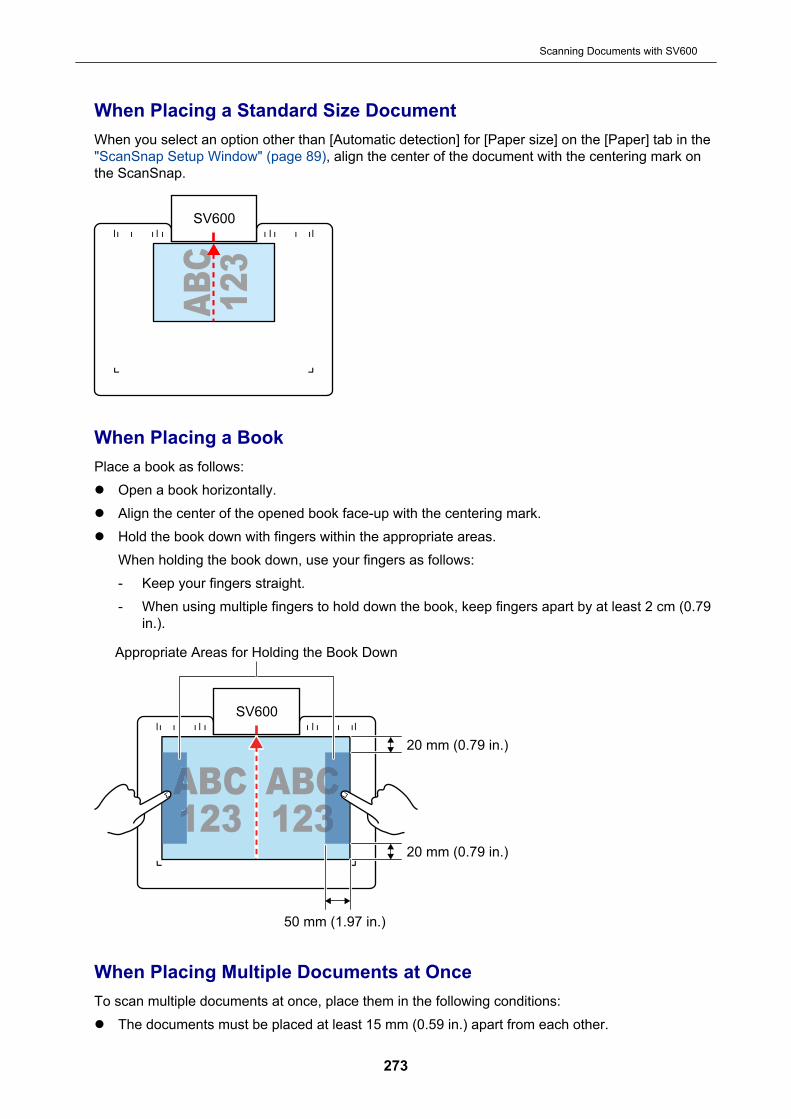
When Placing a Standard Size DocumentWhen you select an option other than [Automatic detection] for [Paper size] on the [Paper] tab in the"ScanSnap Setup Window" (page 89), align the center of the document with the centering mark onthe ScanSnap.
SV600
When Placing a BookPlace a book as follows:l Open a book horizontally.l Align the center of the opened book face-up with the centering mark.l Hold the book down with fingers within the appropriate areas.
When holding the book down, use your fingers as follows:- Keep your fingers straight.- When using multiple fingers to hold down the book, keep fingers apart by at least 2 cm (0.79
in.).
SV600
20 mm (0.79 in.)
50 mm (1.97 in.)
20 mm (0.79 in.)
Appropriate Areas for Holding the Book Down
When Placing Multiple Documents at OnceTo scan multiple documents at once, place them in the following conditions:l The documents must be placed at least 15 mm (0.59 in.) apart from each other.
Scanning Documents with SV600
273
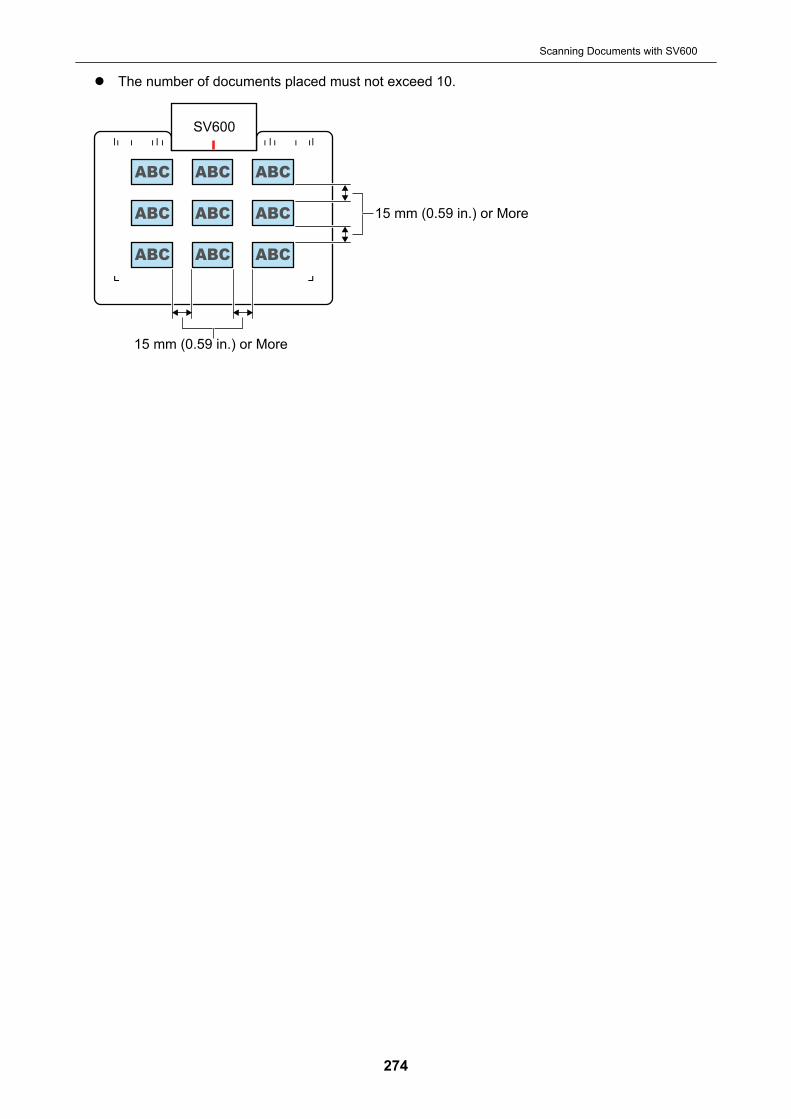
l The number of documents placed must not exceed 10.
SV600
15 mm (0.59 in.) or More
15 mm (0.59 in.) or More
Scanning Documents with SV600
274
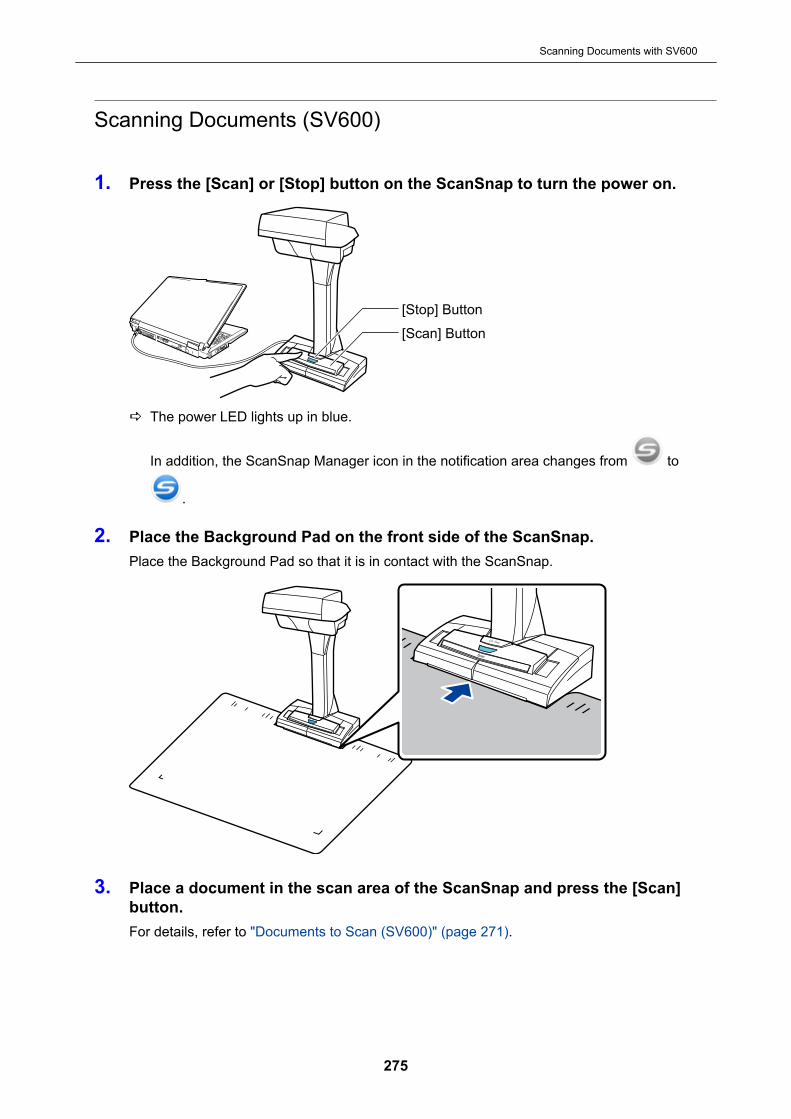
Scanning Documents (SV600)
1. Press the [Scan] or [Stop] button on the ScanSnap to turn the power on.
[Scan] Button
[Stop] Button
a The power LED lights up in blue.
In addition, the ScanSnap Manager icon in the notification area changes from to
.
2. Place the Background Pad on the front side of the ScanSnap.Place the Background Pad so that it is in contact with the ScanSnap.
3. Place a document in the scan area of the ScanSnap and press the [Scan]button.For details, refer to "Documents to Scan (SV600)" (page 271).
Scanning Documents with SV600
275
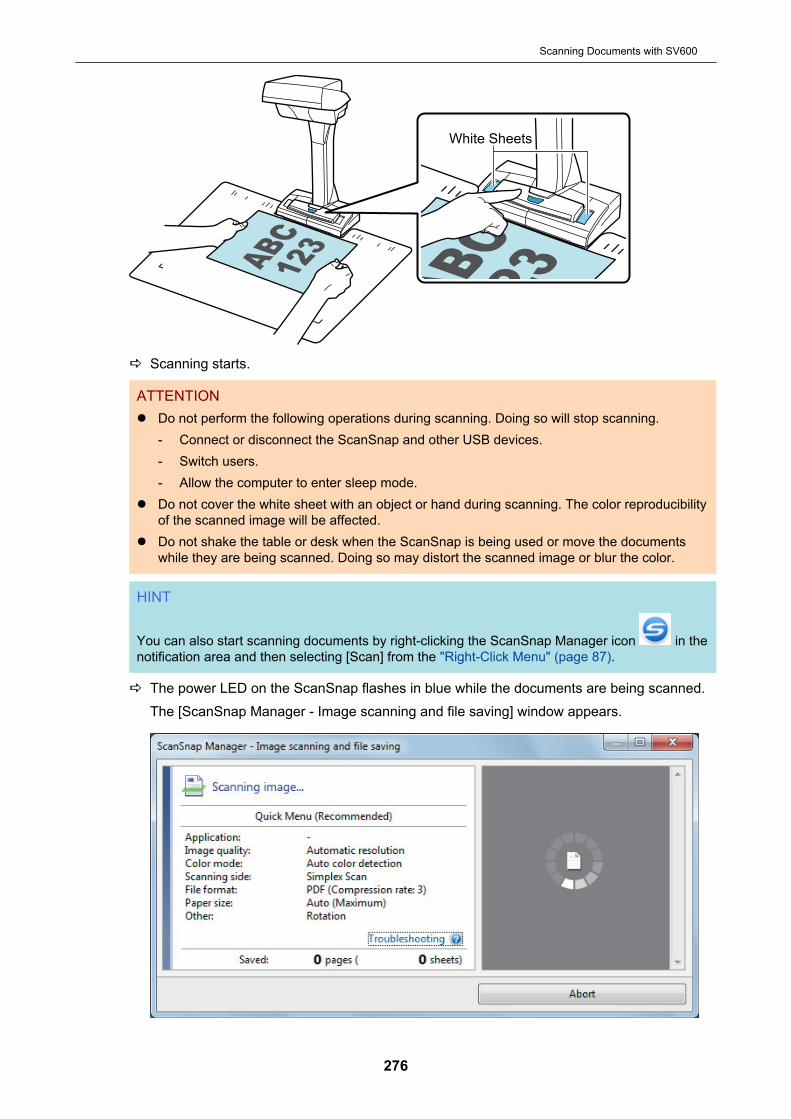
White Sheets
a Scanning starts.
ATTENTIONl Do not perform the following operations during scanning. Doing so will stop scanning.
- Connect or disconnect the ScanSnap and other USB devices.- Switch users.- Allow the computer to enter sleep mode.
l Do not cover the white sheet with an object or hand during scanning. The color reproducibilityof the scanned image will be affected.
l Do not shake the table or desk when the ScanSnap is being used or move the documentswhile they are being scanned. Doing so may distort the scanned image or blur the color.
HINT
You can also start scanning documents by right-clicking the ScanSnap Manager icon in thenotification area and then selecting [Scan] from the "Right-Click Menu" (page 87).
a The power LED on the ScanSnap flashes in blue while the documents are being scanned.The [ScanSnap Manager - Image scanning and file saving] window appears.
Scanning Documents with SV600
276
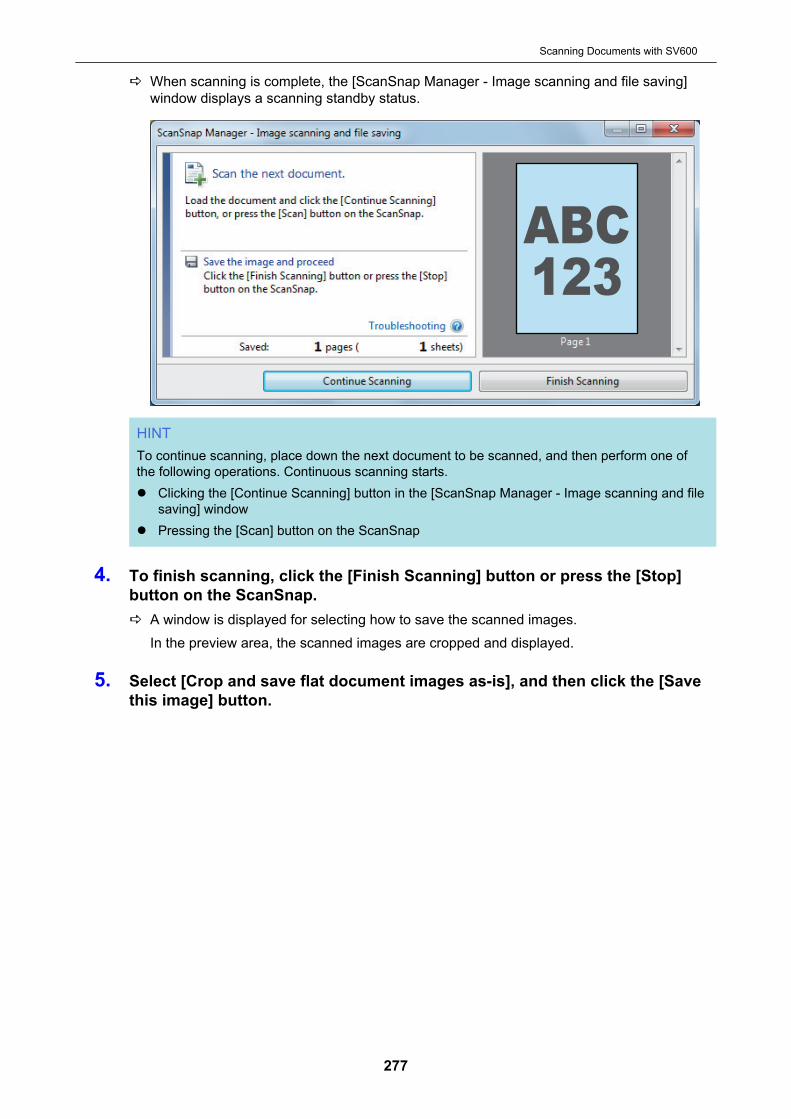
a When scanning is complete, the [ScanSnap Manager - Image scanning and file saving]window displays a scanning standby status.
HINTTo continue scanning, place down the next document to be scanned, and then perform one ofthe following operations. Continuous scanning starts.l Clicking the [Continue Scanning] button in the [ScanSnap Manager - Image scanning and file
saving] windowl Pressing the [Scan] button on the ScanSnap
4. To finish scanning, click the [Finish Scanning] button or press the [Stop]button on the ScanSnap.a A window is displayed for selecting how to save the scanned images.
In the preview area, the scanned images are cropped and displayed.
5. Select [Crop and save flat document images as-is], and then click the [Savethis image] button.
Scanning Documents with SV600
277
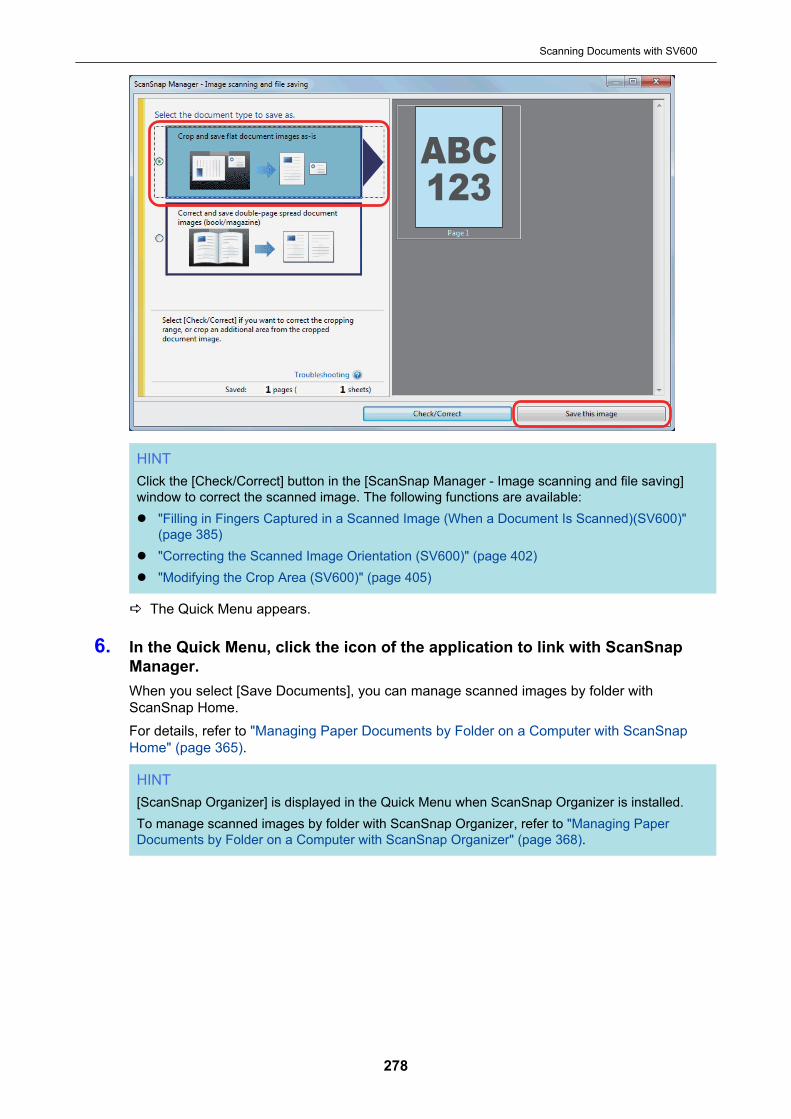
HINTClick the [Check/Correct] button in the [ScanSnap Manager - Image scanning and file saving]window to correct the scanned image. The following functions are available:l "Filling in Fingers Captured in a Scanned Image (When a Document Is Scanned)(SV600)"
(page 385)l "Correcting the Scanned Image Orientation (SV600)" (page 402)l "Modifying the Crop Area (SV600)" (page 405)
a The Quick Menu appears.
6. In the Quick Menu, click the icon of the application to link with ScanSnapManager.When you select [Save Documents], you can manage scanned images by folder withScanSnap Home.For details, refer to "Managing Paper Documents by Folder on a Computer with ScanSnapHome" (page 365).
HINT[ScanSnap Organizer] is displayed in the Quick Menu when ScanSnap Organizer is installed.To manage scanned images by folder with ScanSnap Organizer, refer to "Managing PaperDocuments by Folder on a Computer with ScanSnap Organizer" (page 368).
Scanning Documents with SV600
278

a The selected application starts up. For details, refer to the Advanced Operation Guide.
ATTENTIONl You cannot start scanning when the Quick Menu is displayed. Either select an icon from the
Quick Menu and finish the process, or close the Quick Menu before you perform the nextscan.
l Do not move, delete, or rename scanned images using other applications while the QuickMenu is displayed.
HINT
l Clicking displays the description of an application. Placing the mouse cursor over the iconof another application displays the description of the application.
l Performing a scan while an application that can be automatically linked with is activeautomatically starts the linkage between ScanSnap Manager and the application.For details, refer to the Advanced Operation Guide.
Scanning Documents with SV600
279
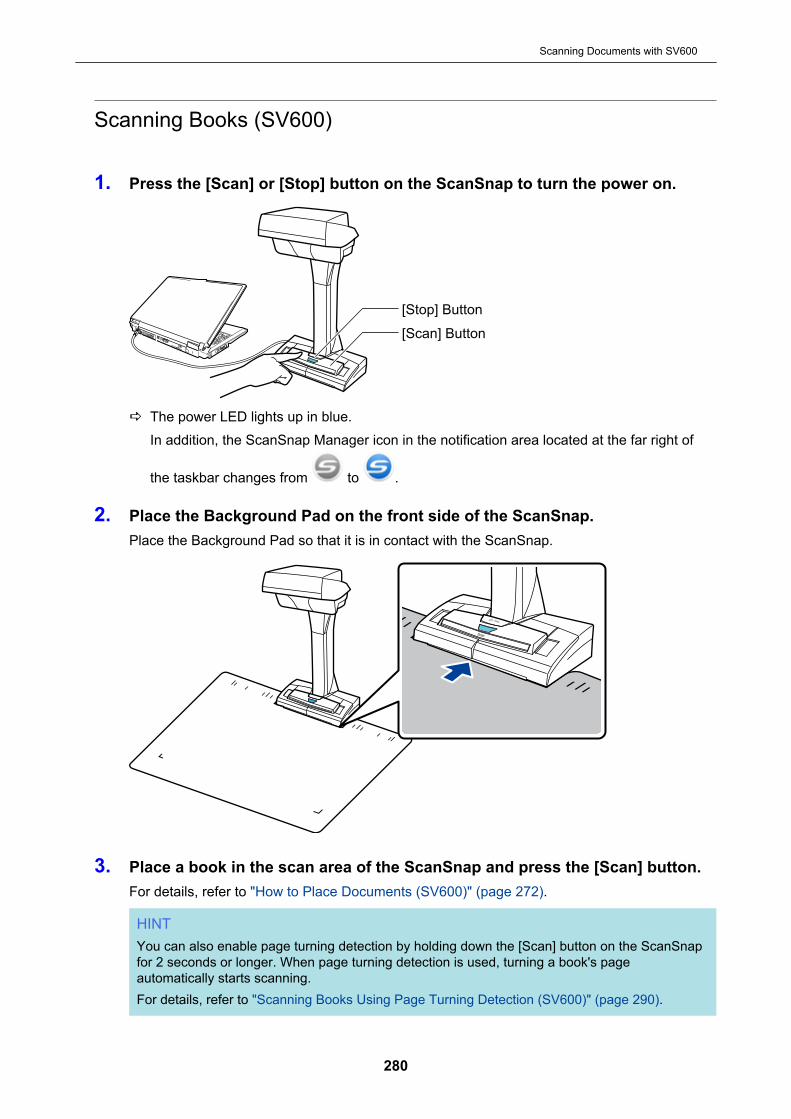
Scanning Books (SV600)
1. Press the [Scan] or [Stop] button on the ScanSnap to turn the power on.
[Scan] Button
[Stop] Button
a The power LED lights up in blue.In addition, the ScanSnap Manager icon in the notification area located at the far right of
the taskbar changes from to .
2. Place the Background Pad on the front side of the ScanSnap.Place the Background Pad so that it is in contact with the ScanSnap.
3. Place a book in the scan area of the ScanSnap and press the [Scan] button.For details, refer to "How to Place Documents (SV600)" (page 272).
HINTYou can also enable page turning detection by holding down the [Scan] button on the ScanSnapfor 2 seconds or longer. When page turning detection is used, turning a book's pageautomatically starts scanning.For details, refer to "Scanning Books Using Page Turning Detection (SV600)" (page 290).
Scanning Documents with SV600
280
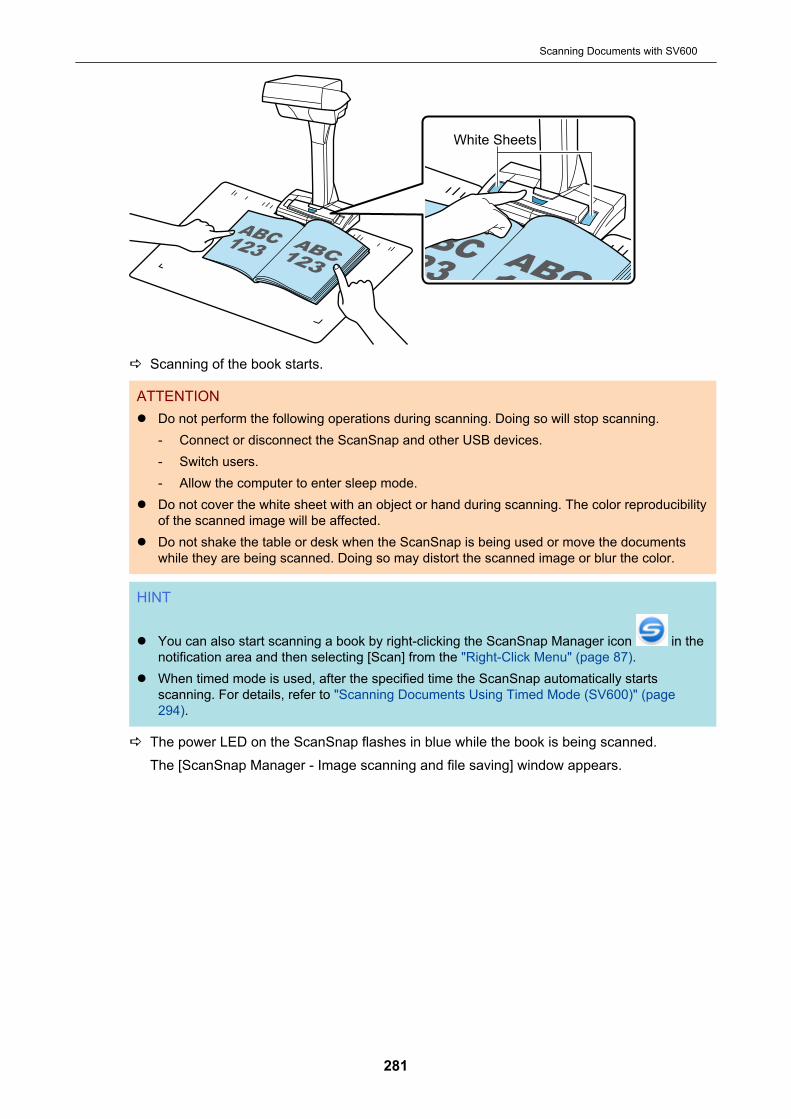
White Sheets
a Scanning of the book starts.
ATTENTIONl Do not perform the following operations during scanning. Doing so will stop scanning.
- Connect or disconnect the ScanSnap and other USB devices.- Switch users.- Allow the computer to enter sleep mode.
l Do not cover the white sheet with an object or hand during scanning. The color reproducibilityof the scanned image will be affected.
l Do not shake the table or desk when the ScanSnap is being used or move the documentswhile they are being scanned. Doing so may distort the scanned image or blur the color.
HINT
l You can also start scanning a book by right-clicking the ScanSnap Manager icon in thenotification area and then selecting [Scan] from the "Right-Click Menu" (page 87).
l When timed mode is used, after the specified time the ScanSnap automatically startsscanning. For details, refer to "Scanning Documents Using Timed Mode (SV600)" (page294).
a The power LED on the ScanSnap flashes in blue while the book is being scanned.The [ScanSnap Manager - Image scanning and file saving] window appears.
Scanning Documents with SV600
281
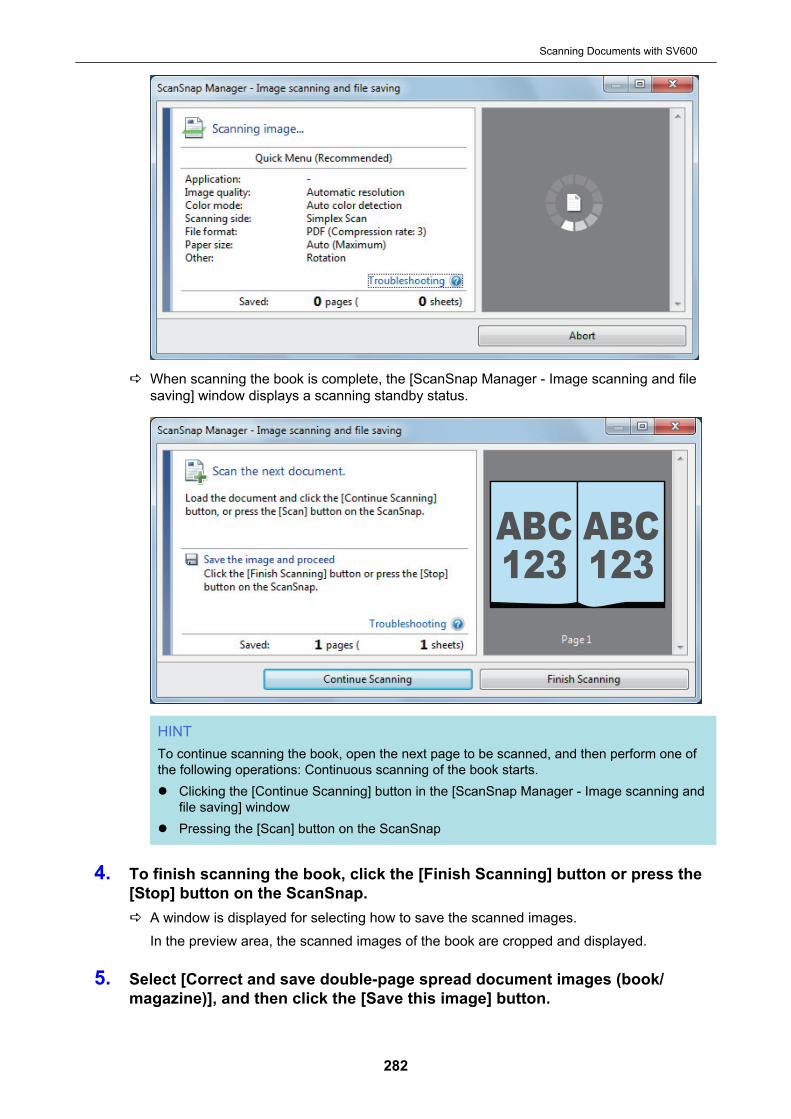
a When scanning the book is complete, the [ScanSnap Manager - Image scanning and filesaving] window displays a scanning standby status.
HINTTo continue scanning the book, open the next page to be scanned, and then perform one ofthe following operations: Continuous scanning of the book starts.l Clicking the [Continue Scanning] button in the [ScanSnap Manager - Image scanning and
file saving] windowl Pressing the [Scan] button on the ScanSnap
4. To finish scanning the book, click the [Finish Scanning] button or press the[Stop] button on the ScanSnap.a A window is displayed for selecting how to save the scanned images.
In the preview area, the scanned images of the book are cropped and displayed.
5. Select [Correct and save double-page spread document images (book/magazine)], and then click the [Save this image] button.
Scanning Documents with SV600
282
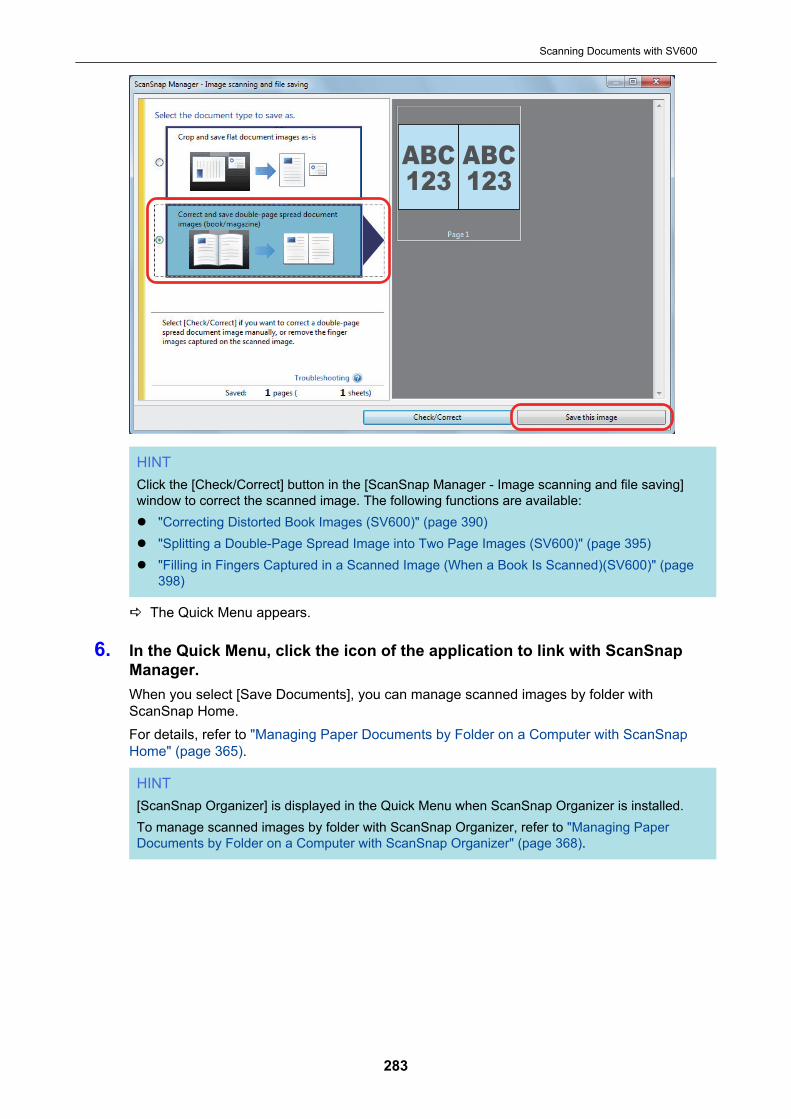
HINTClick the [Check/Correct] button in the [ScanSnap Manager - Image scanning and file saving]window to correct the scanned image. The following functions are available:l "Correcting Distorted Book Images (SV600)" (page 390)l "Splitting a Double-Page Spread Image into Two Page Images (SV600)" (page 395)l "Filling in Fingers Captured in a Scanned Image (When a Book Is Scanned)(SV600)" (page
398)
a The Quick Menu appears.
6. In the Quick Menu, click the icon of the application to link with ScanSnapManager.When you select [Save Documents], you can manage scanned images by folder withScanSnap Home.For details, refer to "Managing Paper Documents by Folder on a Computer with ScanSnapHome" (page 365).
HINT[ScanSnap Organizer] is displayed in the Quick Menu when ScanSnap Organizer is installed.To manage scanned images by folder with ScanSnap Organizer, refer to "Managing PaperDocuments by Folder on a Computer with ScanSnap Organizer" (page 368).
Scanning Documents with SV600
283
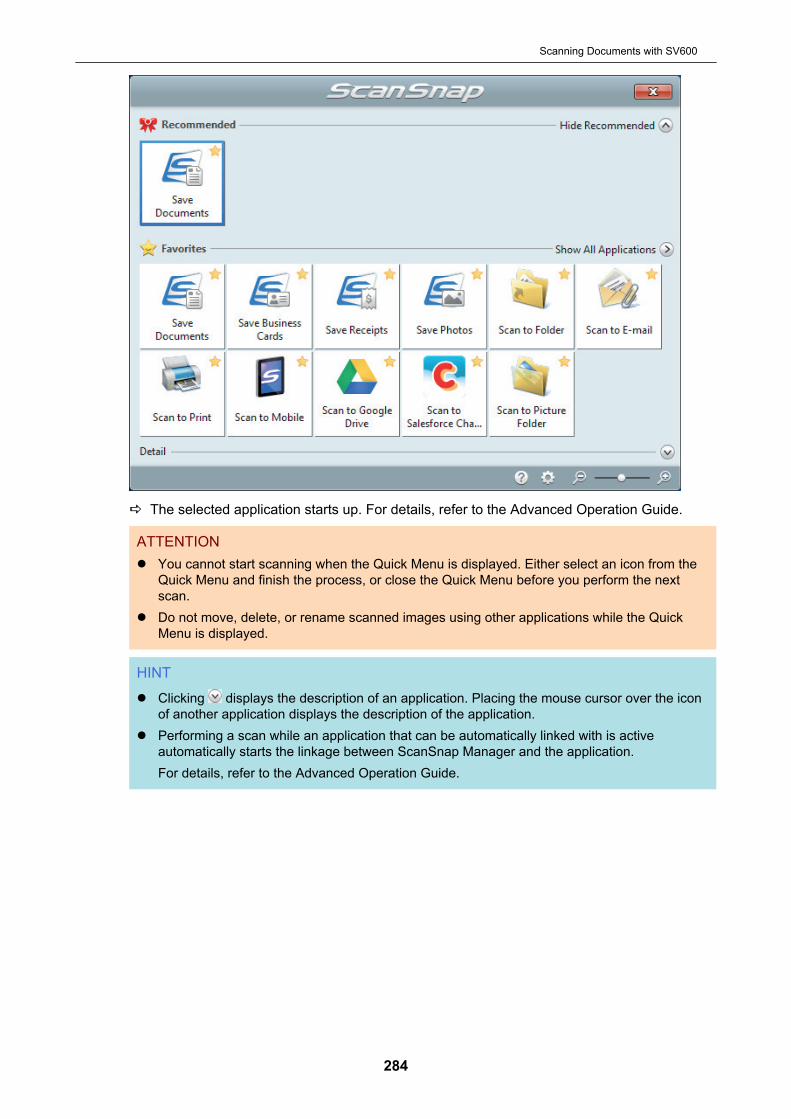
a The selected application starts up. For details, refer to the Advanced Operation Guide.
ATTENTIONl You cannot start scanning when the Quick Menu is displayed. Either select an icon from the
Quick Menu and finish the process, or close the Quick Menu before you perform the nextscan.
l Do not move, delete, or rename scanned images using other applications while the QuickMenu is displayed.
HINT
l Clicking displays the description of an application. Placing the mouse cursor over the iconof another application displays the description of the application.
l Performing a scan while an application that can be automatically linked with is activeautomatically starts the linkage between ScanSnap Manager and the application.For details, refer to the Advanced Operation Guide.
Scanning Documents with SV600
284
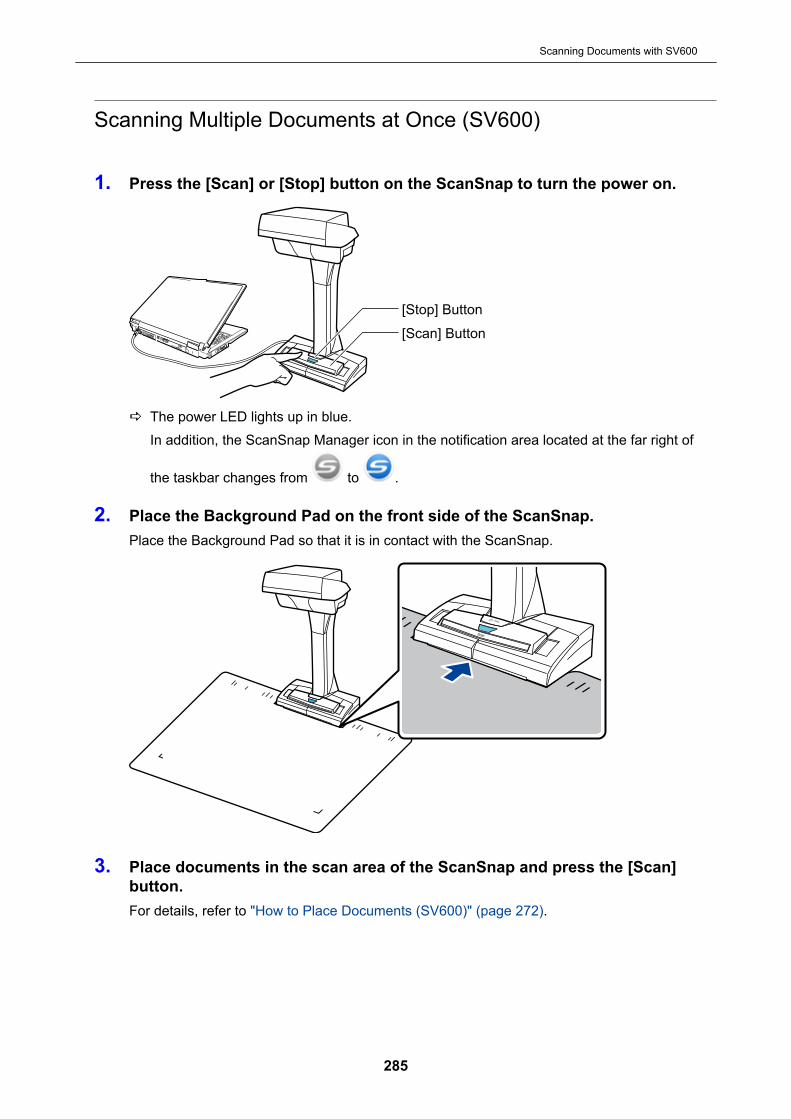
Scanning Multiple Documents at Once (SV600)
1. Press the [Scan] or [Stop] button on the ScanSnap to turn the power on.
[Scan] Button
[Stop] Button
a The power LED lights up in blue.In addition, the ScanSnap Manager icon in the notification area located at the far right of
the taskbar changes from to .
2. Place the Background Pad on the front side of the ScanSnap.Place the Background Pad so that it is in contact with the ScanSnap.
3. Place documents in the scan area of the ScanSnap and press the [Scan]button.For details, refer to "How to Place Documents (SV600)" (page 272).
Scanning Documents with SV600
285
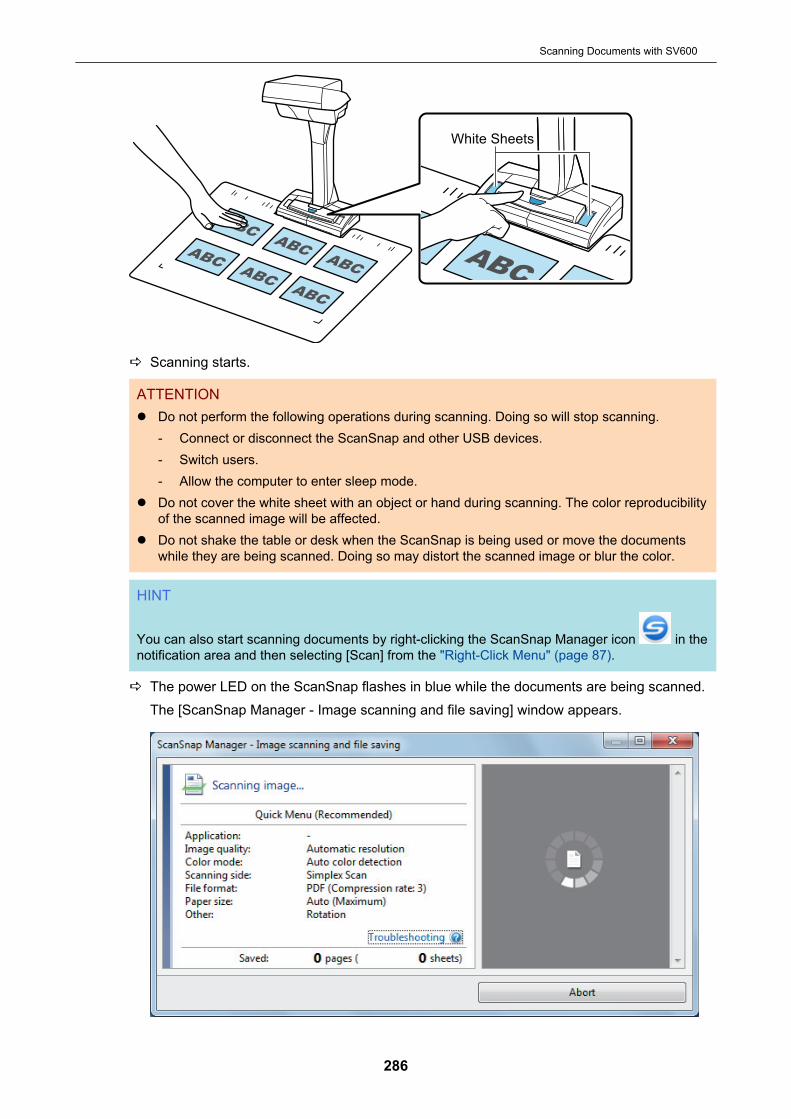
White Sheets
a Scanning starts.
ATTENTIONl Do not perform the following operations during scanning. Doing so will stop scanning.
- Connect or disconnect the ScanSnap and other USB devices.- Switch users.- Allow the computer to enter sleep mode.
l Do not cover the white sheet with an object or hand during scanning. The color reproducibilityof the scanned image will be affected.
l Do not shake the table or desk when the ScanSnap is being used or move the documentswhile they are being scanned. Doing so may distort the scanned image or blur the color.
HINT
You can also start scanning documents by right-clicking the ScanSnap Manager icon in thenotification area and then selecting [Scan] from the "Right-Click Menu" (page 87).
a The power LED on the ScanSnap flashes in blue while the documents are being scanned.The [ScanSnap Manager - Image scanning and file saving] window appears.
Scanning Documents with SV600
286
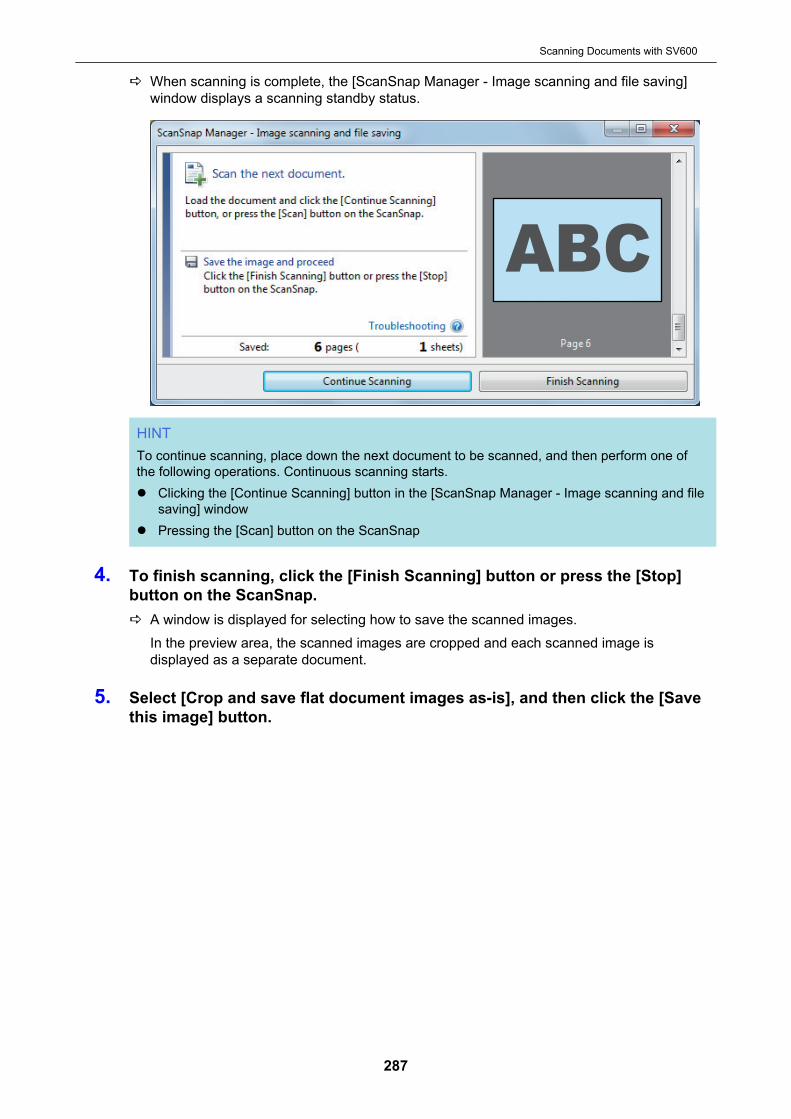
a When scanning is complete, the [ScanSnap Manager - Image scanning and file saving]window displays a scanning standby status.
HINTTo continue scanning, place down the next document to be scanned, and then perform one ofthe following operations. Continuous scanning starts.l Clicking the [Continue Scanning] button in the [ScanSnap Manager - Image scanning and file
saving] windowl Pressing the [Scan] button on the ScanSnap
4. To finish scanning, click the [Finish Scanning] button or press the [Stop]button on the ScanSnap.a A window is displayed for selecting how to save the scanned images.
In the preview area, the scanned images are cropped and each scanned image isdisplayed as a separate document.
5. Select [Crop and save flat document images as-is], and then click the [Savethis image] button.
Scanning Documents with SV600
287

HINTClick the [Check/Correct] button in the [ScanSnap Manager - Image scanning and file saving]window to correct the scanned image. The following functions are available:l "Correcting the Scanned Image Orientation (SV600)" (page 402)l "Modifying the Crop Area (SV600)" (page 405)l "Adding the Necessary Scanned Images (SV600)" (page 407)l "Deleting Unnecessary Scanned Images (SV600)" (page 409)
a The Quick Menu appears.
6. In the Quick Menu, click the icon of the application to link with ScanSnapManager.When you select [Save Business Cards], you can manage the card data with ScanSnap Home.For details, refer to "Saving Business Card Data to a Computer with ScanSnap Home" (page371).
HINT[Scan to CardMinder] is displayed in the Quick Menu when ScanSnap CardMinder is installed.To manage scanned images by folder with ScanSnap CardMinder, refer to "Saving BusinessCards to a Computer with CardMinder" (page 374).
Scanning Documents with SV600
288
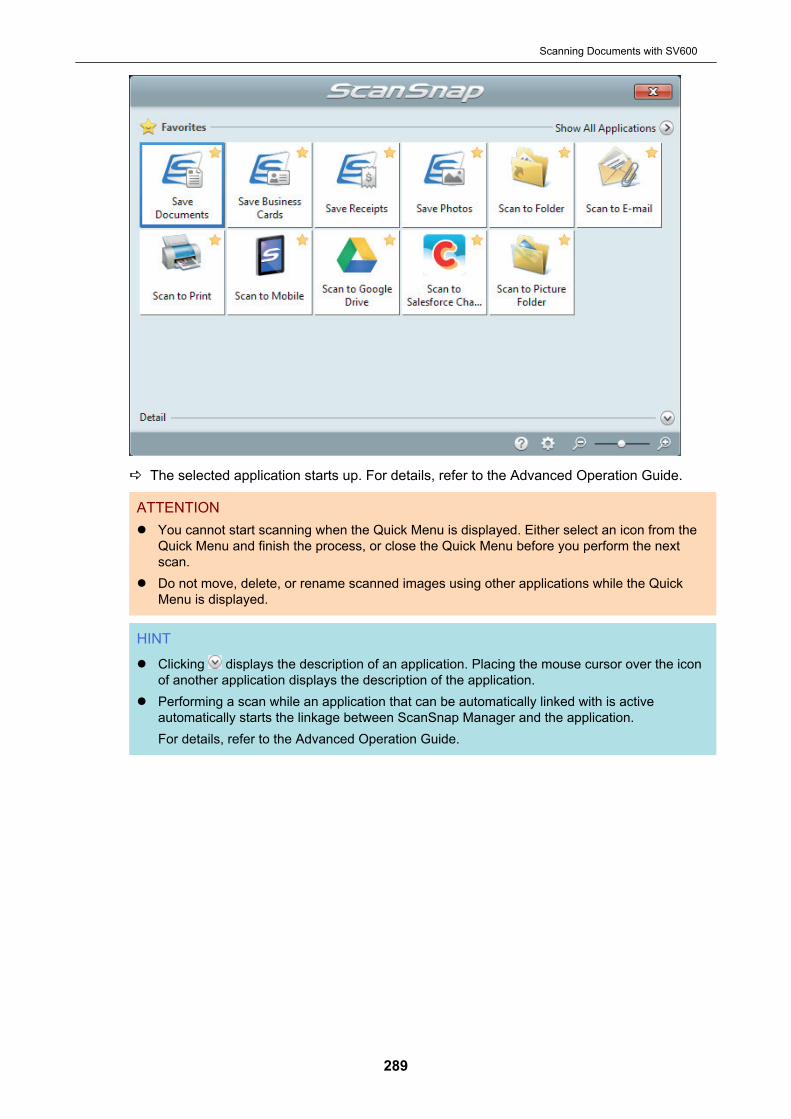
a The selected application starts up. For details, refer to the Advanced Operation Guide.
ATTENTIONl You cannot start scanning when the Quick Menu is displayed. Either select an icon from the
Quick Menu and finish the process, or close the Quick Menu before you perform the nextscan.
l Do not move, delete, or rename scanned images using other applications while the QuickMenu is displayed.
HINT
l Clicking displays the description of an application. Placing the mouse cursor over the iconof another application displays the description of the application.
l Performing a scan while an application that can be automatically linked with is activeautomatically starts the linkage between ScanSnap Manager and the application.For details, refer to the Advanced Operation Guide.
Scanning Documents with SV600
289

Scanning Books Using Page Turning Detection (SV600)
This section explains how to detect page turning to start scanning automatically.
ATTENTIONWhen the installation environment of the ScanSnap or the specification of the book to be scannedencounters any of the following, use timed mode to scan a document.l Installation environment of the ScanSnap
- The ScanSnap is installed under direct sunlight- The ScanSnap is installed under lighting that emits a lot of infrared rays such as incandescent
lamps- The ScanSnap is under uneven lighting caused by some environmental factors such as the use
of a spotlight- An object other than the book to be scanned is placed on the Background Pad- A device that emits infrared light such as a heater is placed near the ScanSnap- Movement of shadow such as a person appears on the Background Pad
l Book specificationsBooks that are smaller than A4 (210 × 297 mm)/Letter (8.5 × 11 in. (216 × 279.4 mm)) whenopened in a double-page spread
Example: Comic books or pocket edition books
HINTWhen scanning a document, you can also enable page turning detection by holding down the [Scan]button on the ScanSnap for 2 seconds or longer. In this case, when one scanning operation is finished,the page turning detection returns to disabled.
1. Right-click the ScanSnap Manager icon in the notification area locatedat the far right of the taskbar, and select the [Scan Button Settings] from the"Right-Click Menu" (page 87).a The ScanSnap setup window appears.
2. In the "ScanSnap Setup Window" (page 89), select the [Scanning] tab, andclick the [Option] button.
Scanning Documents with SV600
290
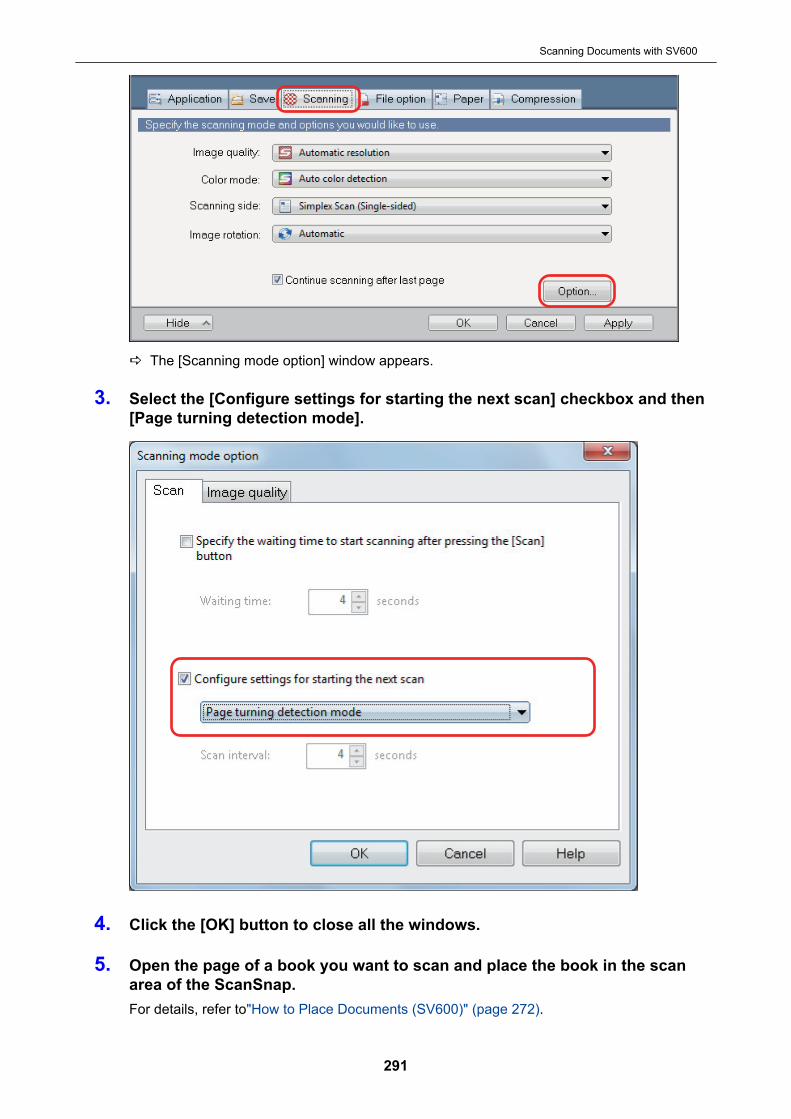
a The [Scanning mode option] window appears.
3. Select the [Configure settings for starting the next scan] checkbox and then[Page turning detection mode].
4. Click the [OK] button to close all the windows.
5. Open the page of a book you want to scan and place the book in the scanarea of the ScanSnap.For details, refer to"How to Place Documents (SV600)" (page 272).
Scanning Documents with SV600
291
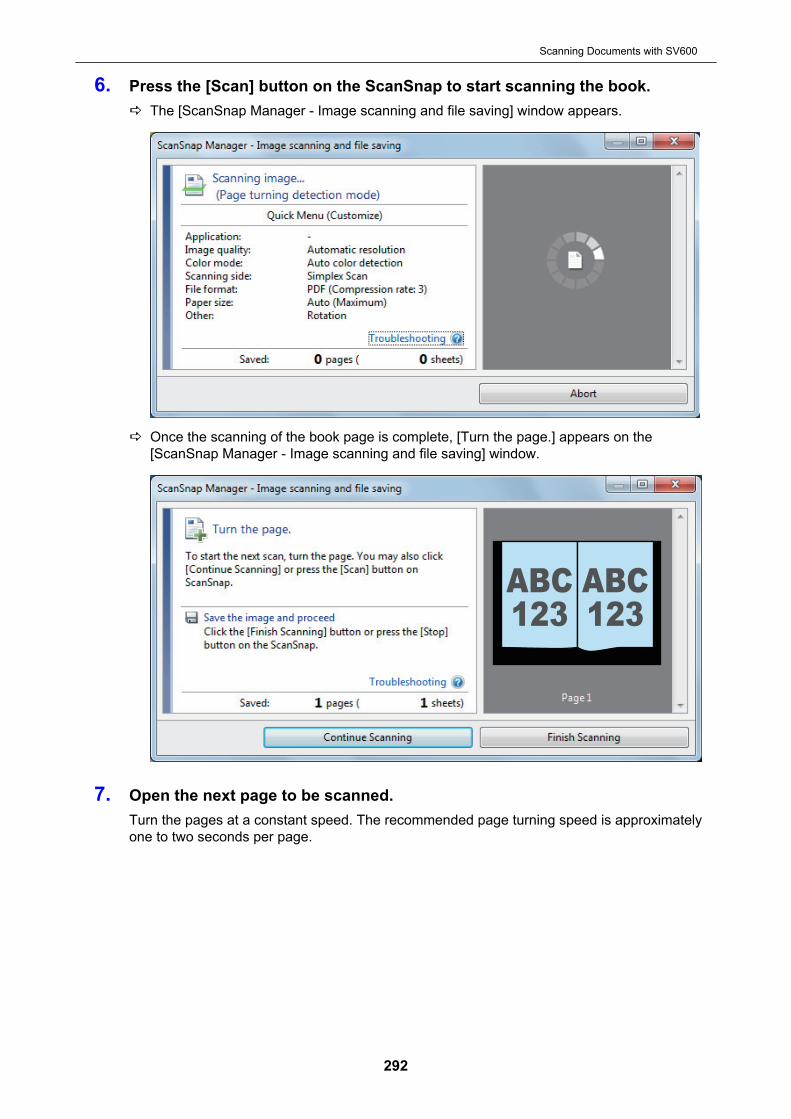
6. Press the [Scan] button on the ScanSnap to start scanning the book.a The [ScanSnap Manager - Image scanning and file saving] window appears.
a Once the scanning of the book page is complete, [Turn the page.] appears on the[ScanSnap Manager - Image scanning and file saving] window.
7. Open the next page to be scanned.Turn the pages at a constant speed. The recommended page turning speed is approximatelyone to two seconds per page.
Scanning Documents with SV600
292
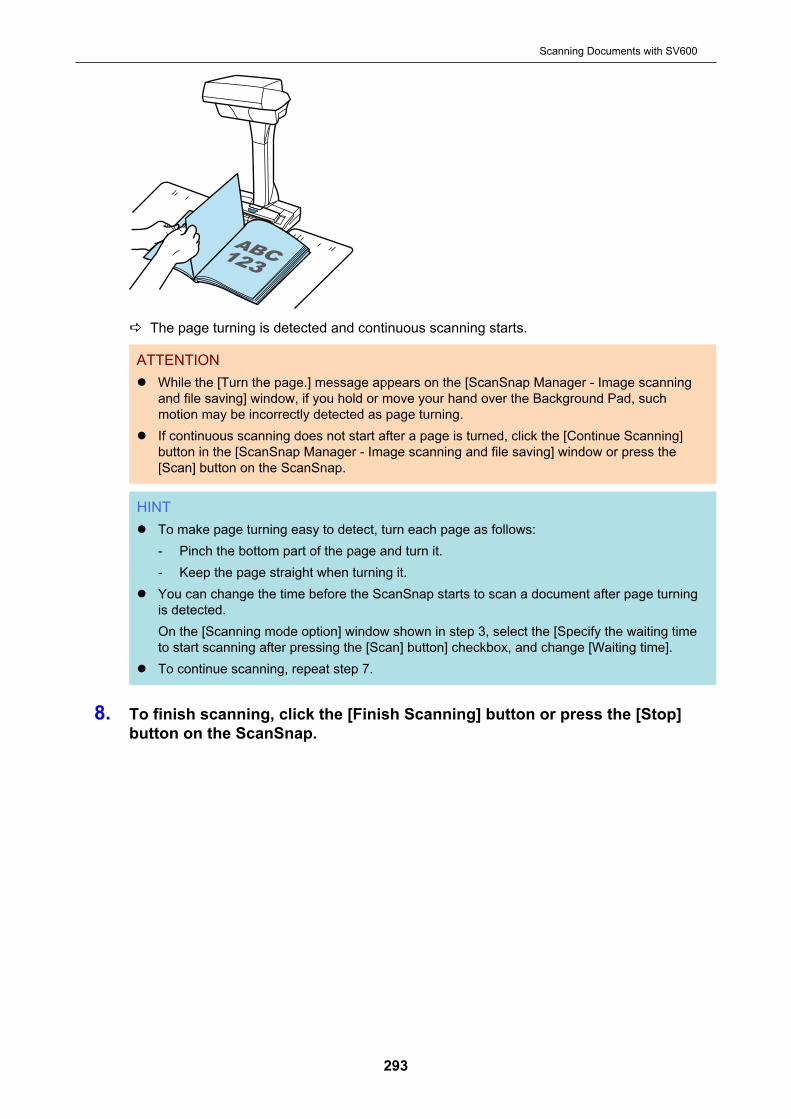
a The page turning is detected and continuous scanning starts.
ATTENTIONl While the [Turn the page.] message appears on the [ScanSnap Manager - Image scanning
and file saving] window, if you hold or move your hand over the Background Pad, suchmotion may be incorrectly detected as page turning.
l If continuous scanning does not start after a page is turned, click the [Continue Scanning]button in the [ScanSnap Manager - Image scanning and file saving] window or press the[Scan] button on the ScanSnap.
HINTl To make page turning easy to detect, turn each page as follows:
- Pinch the bottom part of the page and turn it.- Keep the page straight when turning it.
l You can change the time before the ScanSnap starts to scan a document after page turningis detected.On the [Scanning mode option] window shown in step 3, select the [Specify the waiting timeto start scanning after pressing the [Scan] button] checkbox, and change [Waiting time].
l To continue scanning, repeat step 7.
8. To finish scanning, click the [Finish Scanning] button or press the [Stop]button on the ScanSnap.
Scanning Documents with SV600
293
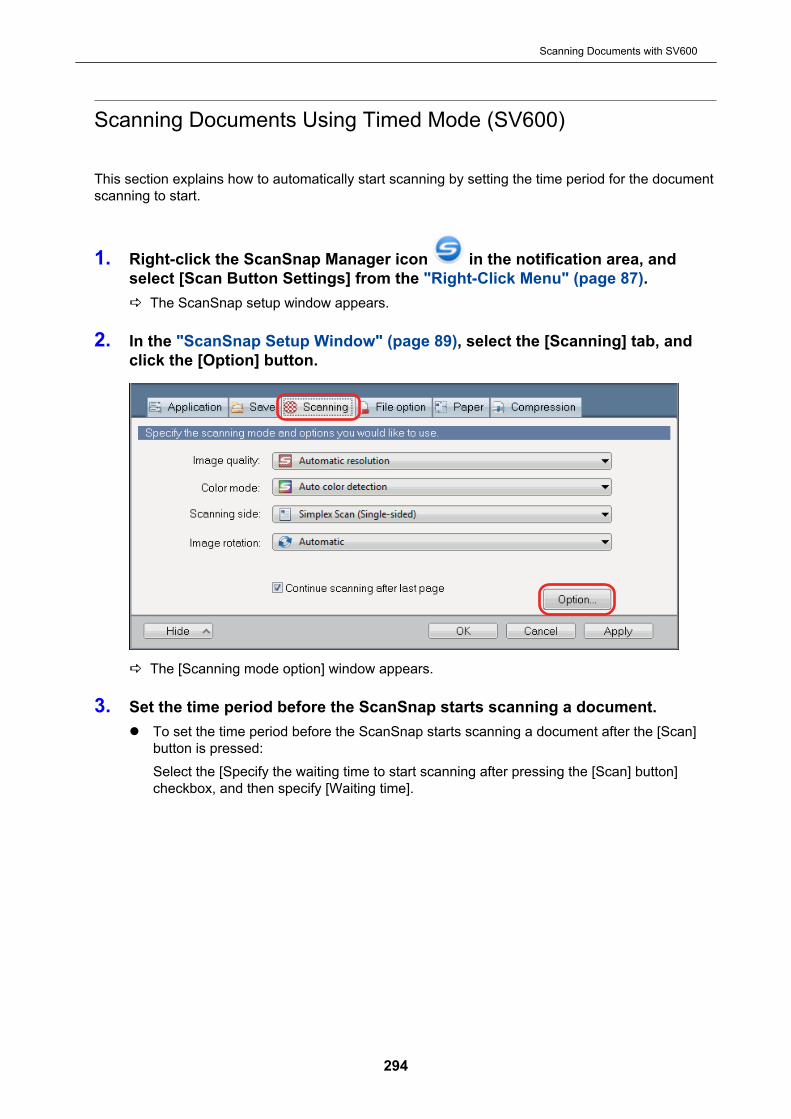
Scanning Documents Using Timed Mode (SV600)
This section explains how to automatically start scanning by setting the time period for the documentscanning to start.
1. Right-click the ScanSnap Manager icon in the notification area, andselect [Scan Button Settings] from the "Right-Click Menu" (page 87).a The ScanSnap setup window appears.
2. In the "ScanSnap Setup Window" (page 89), select the [Scanning] tab, andclick the [Option] button.
a The [Scanning mode option] window appears.
3. Set the time period before the ScanSnap starts scanning a document.l To set the time period before the ScanSnap starts scanning a document after the [Scan]
button is pressed:Select the [Specify the waiting time to start scanning after pressing the [Scan] button]checkbox, and then specify [Waiting time].
Scanning Documents with SV600
294

l To set the time period for the ScanSnap to start the next scan when a document isscanned continuously:1. Select the [Configure settings for starting the next scan] checkbox, and then select
[Timed interval (Timed mode)].
2. Specify [Scan interval].
Scanning Documents with SV600
295
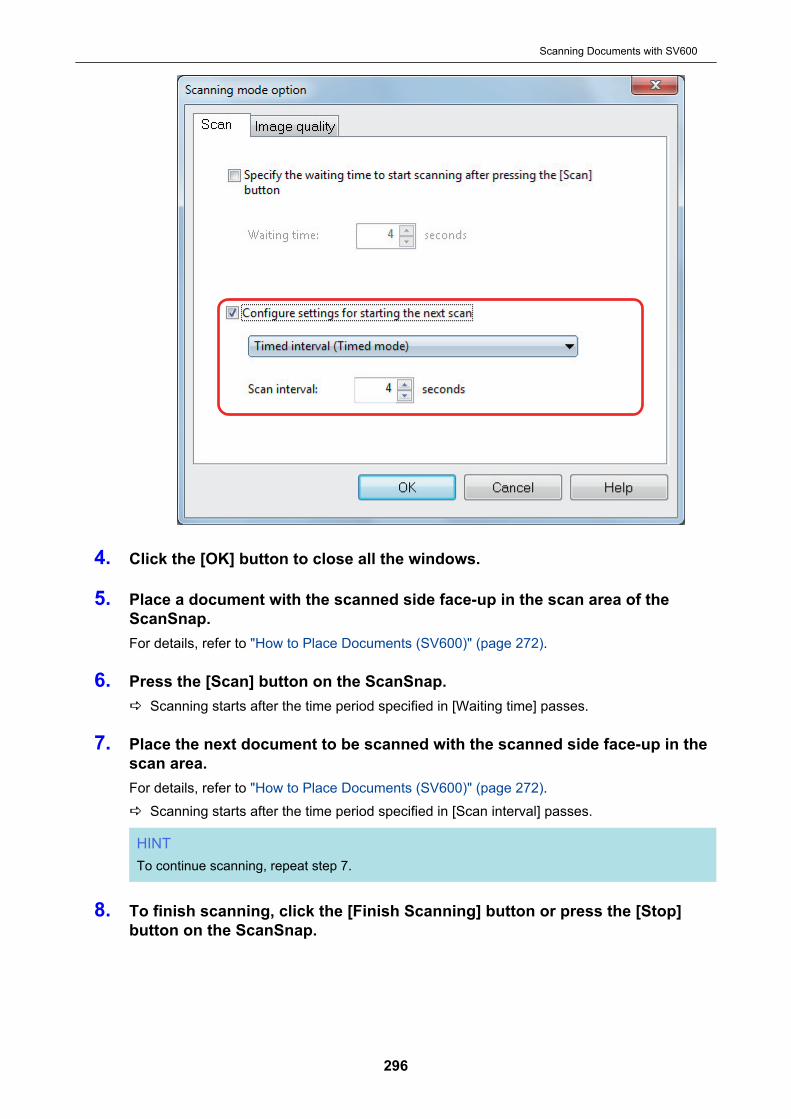
4. Click the [OK] button to close all the windows.
5. Place a document with the scanned side face-up in the scan area of theScanSnap.For details, refer to "How to Place Documents (SV600)" (page 272).
6. Press the [Scan] button on the ScanSnap.a Scanning starts after the time period specified in [Waiting time] passes.
7. Place the next document to be scanned with the scanned side face-up in thescan area.For details, refer to "How to Place Documents (SV600)" (page 272).a Scanning starts after the time period specified in [Scan interval] passes.
HINTTo continue scanning, repeat step 7.
8. To finish scanning, click the [Finish Scanning] button or press the [Stop]button on the ScanSnap.
Scanning Documents with SV600
296
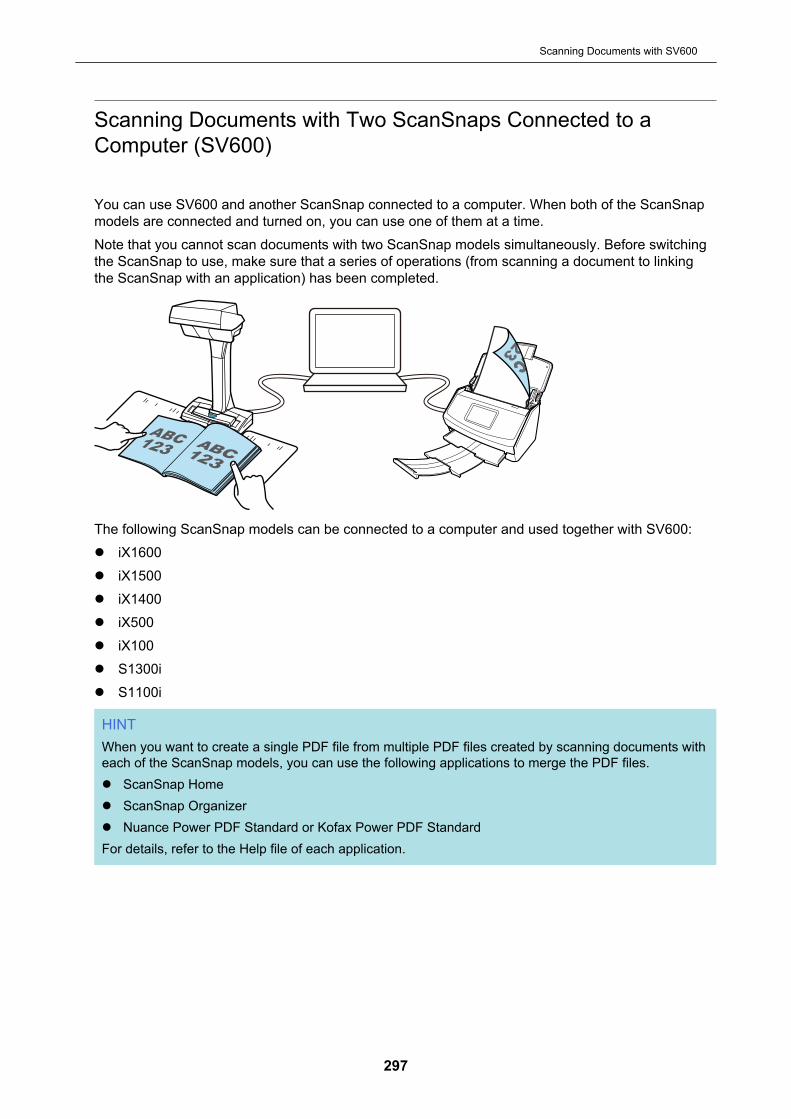
Scanning Documents with Two ScanSnaps Connected to aComputer (SV600)
You can use SV600 and another ScanSnap connected to a computer. When both of the ScanSnapmodels are connected and turned on, you can use one of them at a time.Note that you cannot scan documents with two ScanSnap models simultaneously. Before switchingthe ScanSnap to use, make sure that a series of operations (from scanning a document to linkingthe ScanSnap with an application) has been completed.
The following ScanSnap models can be connected to a computer and used together with SV600:l iX1600l iX1500l iX1400l iX500l iX100l S1300il S1100i
HINTWhen you want to create a single PDF file from multiple PDF files created by scanning documents witheach of the ScanSnap models, you can use the following applications to merge the PDF files.l ScanSnap Homel ScanSnap Organizerl Nuance Power PDF Standard or Kofax Power PDF StandardFor details, refer to the Help file of each application.
Scanning Documents with SV600
297

Scanning Documents with S1300i
l "Documents to Scan (S1300i)" (page 299)l "Scanning Documents (S1300i)" (page 301)l "Scanning Long Pages (S1300i)" (page 306)l "Scanning Documents of Different Widths or Lengths in One Batch (S1300i)" (page 310)
Scanning Documents with S1300i
298
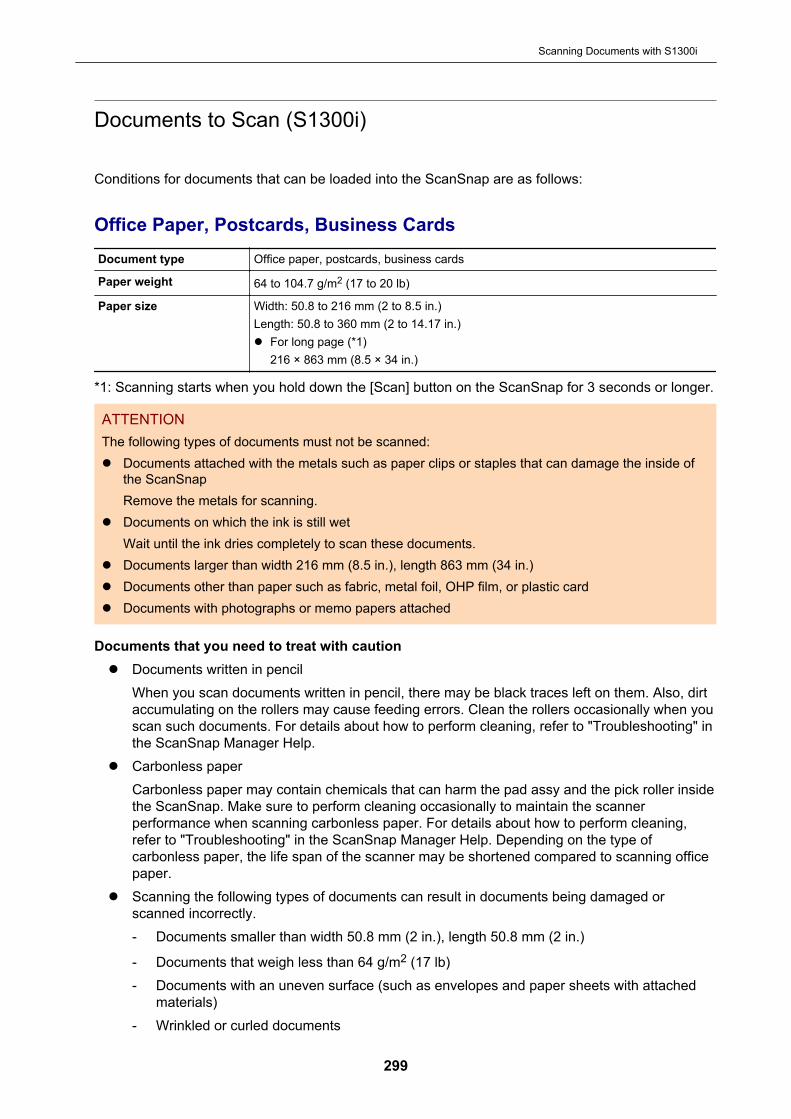
Documents to Scan (S1300i)
Conditions for documents that can be loaded into the ScanSnap are as follows:
Office Paper, Postcards, Business CardsDocument type Office paper, postcards, business cards
Paper weight 64 to 104.7 g/m2 (17 to 20 lb)
Paper size Width: 50.8 to 216 mm (2 to 8.5 in.)Length: 50.8 to 360 mm (2 to 14.17 in.)l For long page (*1)
216 × 863 mm (8.5 × 34 in.)
*1: Scanning starts when you hold down the [Scan] button on the ScanSnap for 3 seconds or longer.
ATTENTIONThe following types of documents must not be scanned:l Documents attached with the metals such as paper clips or staples that can damage the inside of
the ScanSnapRemove the metals for scanning.
l Documents on which the ink is still wetWait until the ink dries completely to scan these documents.
l Documents larger than width 216 mm (8.5 in.), length 863 mm (34 in.)l Documents other than paper such as fabric, metal foil, OHP film, or plastic cardl Documents with photographs or memo papers attached
Documents that you need to treat with cautionl Documents written in pencil
When you scan documents written in pencil, there may be black traces left on them. Also, dirtaccumulating on the rollers may cause feeding errors. Clean the rollers occasionally when youscan such documents. For details about how to perform cleaning, refer to "Troubleshooting" inthe ScanSnap Manager Help.
l Carbonless paperCarbonless paper may contain chemicals that can harm the pad assy and the pick roller insidethe ScanSnap. Make sure to perform cleaning occasionally to maintain the scannerperformance when scanning carbonless paper. For details about how to perform cleaning,refer to "Troubleshooting" in the ScanSnap Manager Help. Depending on the type ofcarbonless paper, the life span of the scanner may be shortened compared to scanning officepaper.
l Scanning the following types of documents can result in documents being damaged orscanned incorrectly.- Documents smaller than width 50.8 mm (2 in.), length 50.8 mm (2 in.)
- Documents that weigh less than 64 g/m2 (17 lb)- Documents with an uneven surface (such as envelopes and paper sheets with attached
materials)- Wrinkled or curled documents
Scanning Documents with S1300i
299
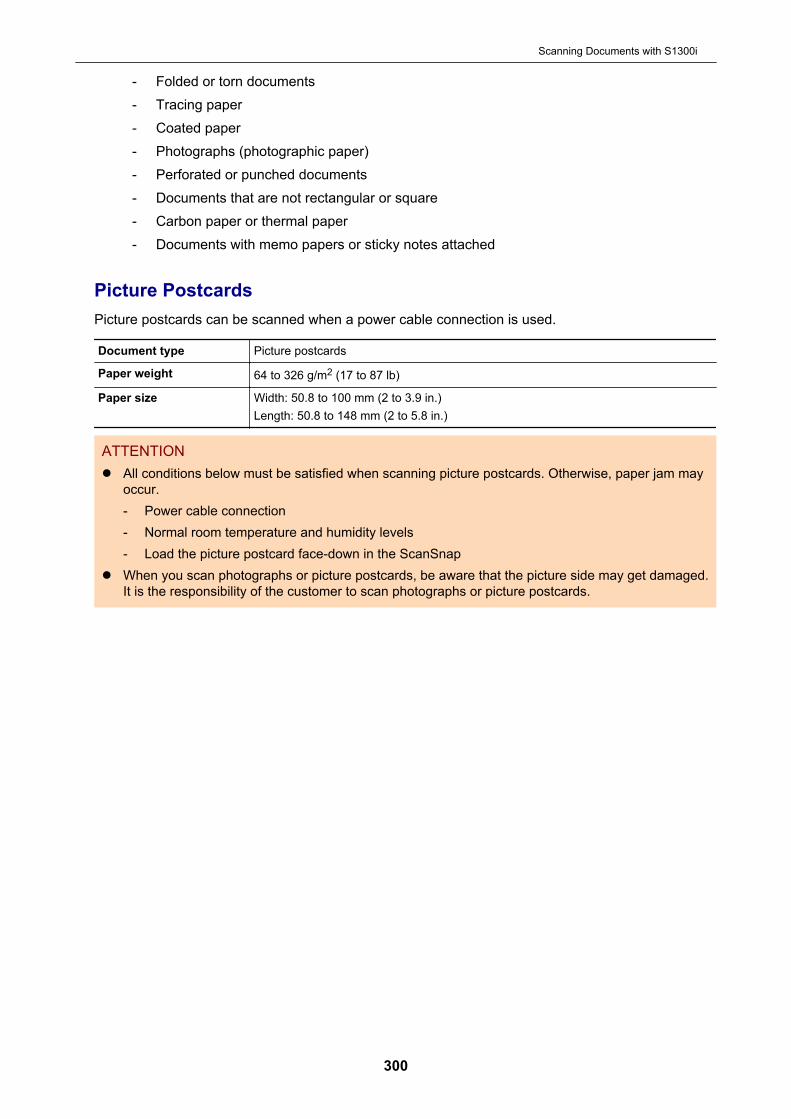
- Folded or torn documents- Tracing paper- Coated paper- Photographs (photographic paper)- Perforated or punched documents- Documents that are not rectangular or square- Carbon paper or thermal paper- Documents with memo papers or sticky notes attached
Picture PostcardsPicture postcards can be scanned when a power cable connection is used.
Document type Picture postcards
Paper weight 64 to 326 g/m2 (17 to 87 lb)
Paper size Width: 50.8 to 100 mm (2 to 3.9 in.)Length: 50.8 to 148 mm (2 to 5.8 in.)
ATTENTIONl All conditions below must be satisfied when scanning picture postcards. Otherwise, paper jam may
occur.- Power cable connection- Normal room temperature and humidity levels- Load the picture postcard face-down in the ScanSnap
l When you scan photographs or picture postcards, be aware that the picture side may get damaged.It is the responsibility of the customer to scan photographs or picture postcards.
Scanning Documents with S1300i
300
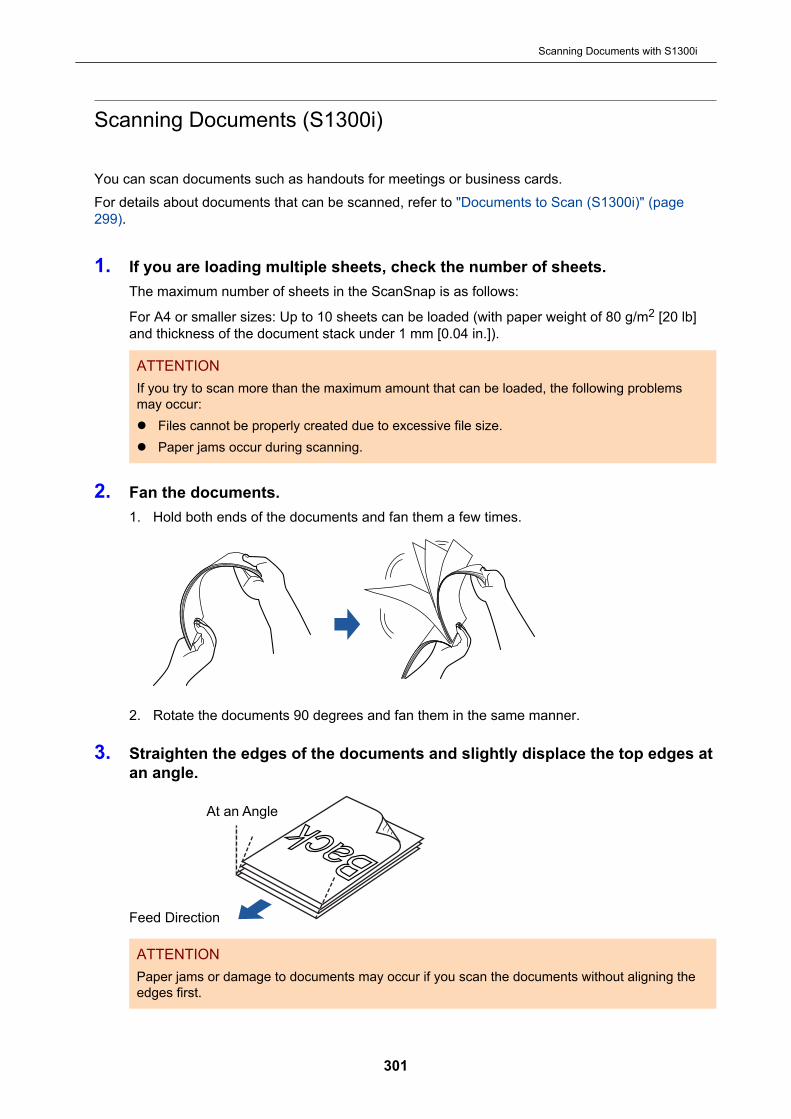
Scanning Documents (S1300i)
You can scan documents such as handouts for meetings or business cards.For details about documents that can be scanned, refer to "Documents to Scan (S1300i)" (page299).
1. If you are loading multiple sheets, check the number of sheets.The maximum number of sheets in the ScanSnap is as follows:
For A4 or smaller sizes: Up to 10 sheets can be loaded (with paper weight of 80 g/m2 [20 lb]and thickness of the document stack under 1 mm [0.04 in.]).
ATTENTIONIf you try to scan more than the maximum amount that can be loaded, the following problemsmay occur:l Files cannot be properly created due to excessive file size.l Paper jams occur during scanning.
2. Fan the documents.1. Hold both ends of the documents and fan them a few times.
2. Rotate the documents 90 degrees and fan them in the same manner.
3. Straighten the edges of the documents and slightly displace the top edges atan angle.
At an Angle
Feed Direction
ATTENTIONPaper jams or damage to documents may occur if you scan the documents without aligning theedges first.
Scanning Documents with S1300i
301
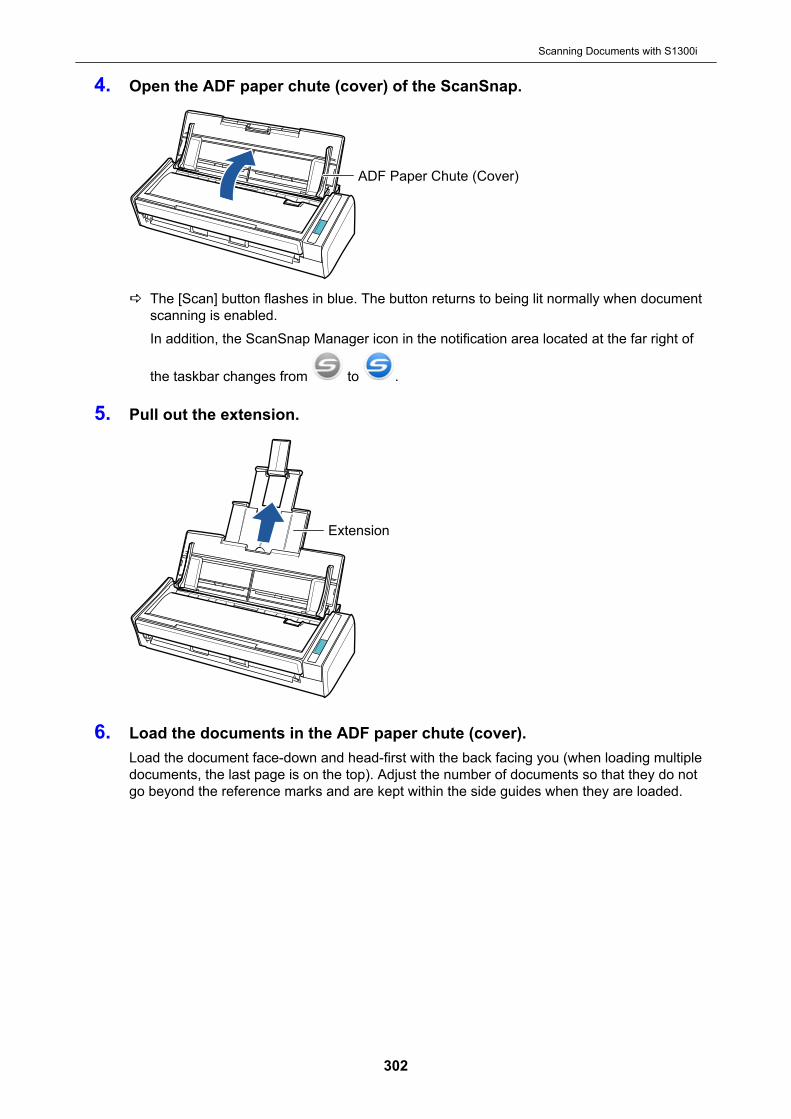
4. Open the ADF paper chute (cover) of the ScanSnap.
ADF Paper Chute (Cover)
a The [Scan] button flashes in blue. The button returns to being lit normally when documentscanning is enabled.In addition, the ScanSnap Manager icon in the notification area located at the far right of
the taskbar changes from to .
5. Pull out the extension.
Extension
6. Load the documents in the ADF paper chute (cover).Load the document face-down and head-first with the back facing you (when loading multipledocuments, the last page is on the top). Adjust the number of documents so that they do notgo beyond the reference marks and are kept within the side guides when they are loaded.
Scanning Documents with S1300i
302
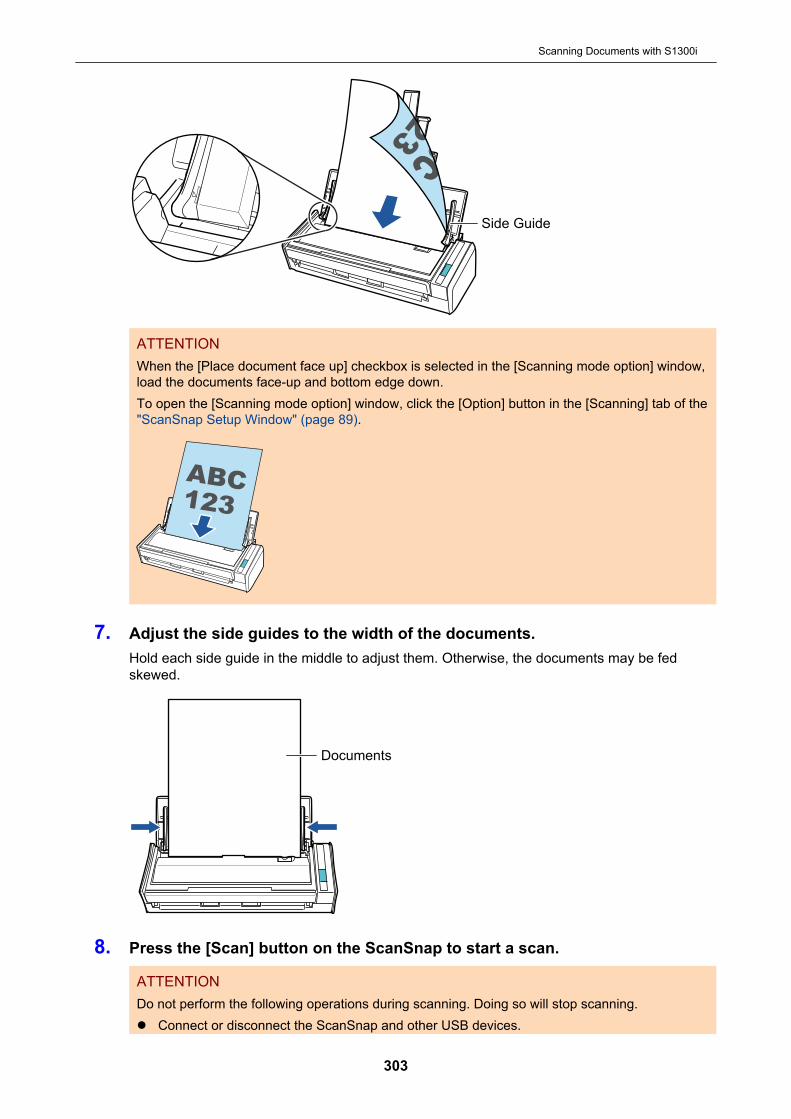
Side Guide
ATTENTIONWhen the [Place document face up] checkbox is selected in the [Scanning mode option] window,load the documents face-up and bottom edge down.To open the [Scanning mode option] window, click the [Option] button in the [Scanning] tab of the"ScanSnap Setup Window" (page 89).
7. Adjust the side guides to the width of the documents.Hold each side guide in the middle to adjust them. Otherwise, the documents may be fedskewed.
Documents
8. Press the [Scan] button on the ScanSnap to start a scan.
ATTENTIONDo not perform the following operations during scanning. Doing so will stop scanning.l Connect or disconnect the ScanSnap and other USB devices.
Scanning Documents with S1300i
303
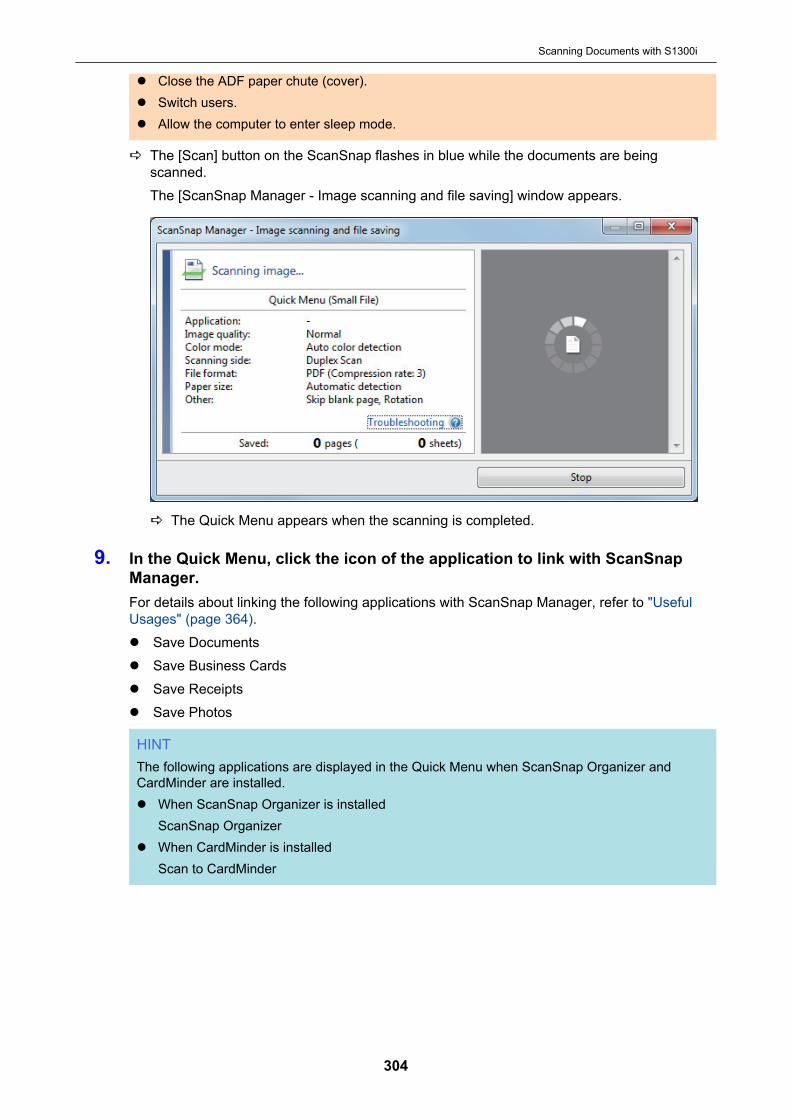
l Close the ADF paper chute (cover).l Switch users.l Allow the computer to enter sleep mode.
a The [Scan] button on the ScanSnap flashes in blue while the documents are beingscanned.The [ScanSnap Manager - Image scanning and file saving] window appears.
a The Quick Menu appears when the scanning is completed.
9. In the Quick Menu, click the icon of the application to link with ScanSnapManager.For details about linking the following applications with ScanSnap Manager, refer to "UsefulUsages" (page 364).l Save Documentsl Save Business Cardsl Save Receiptsl Save Photos
HINTThe following applications are displayed in the Quick Menu when ScanSnap Organizer andCardMinder are installed.l When ScanSnap Organizer is installed
ScanSnap Organizerl When CardMinder is installed
Scan to CardMinder
Scanning Documents with S1300i
304

a The selected application starts up. For details, refer to the Advanced Operation Guide.
ATTENTIONl You cannot start scanning when the Quick Menu is displayed. Either select an icon from the
Quick Menu and finish the process, or close the Quick Menu before you perform the nextscan.
l Do not move, delete, or rename scanned images using other applications while the QuickMenu is displayed.
HINT
l Clicking displays the description of an application. Placing the mouse cursor over the iconof another application displays the description of the application.
l Performing a scan while an application that can be automatically linked with is activeautomatically starts the linkage between ScanSnap Manager and the application.For details, refer to the Advanced Operation Guide.
Scanning Documents with S1300i
305
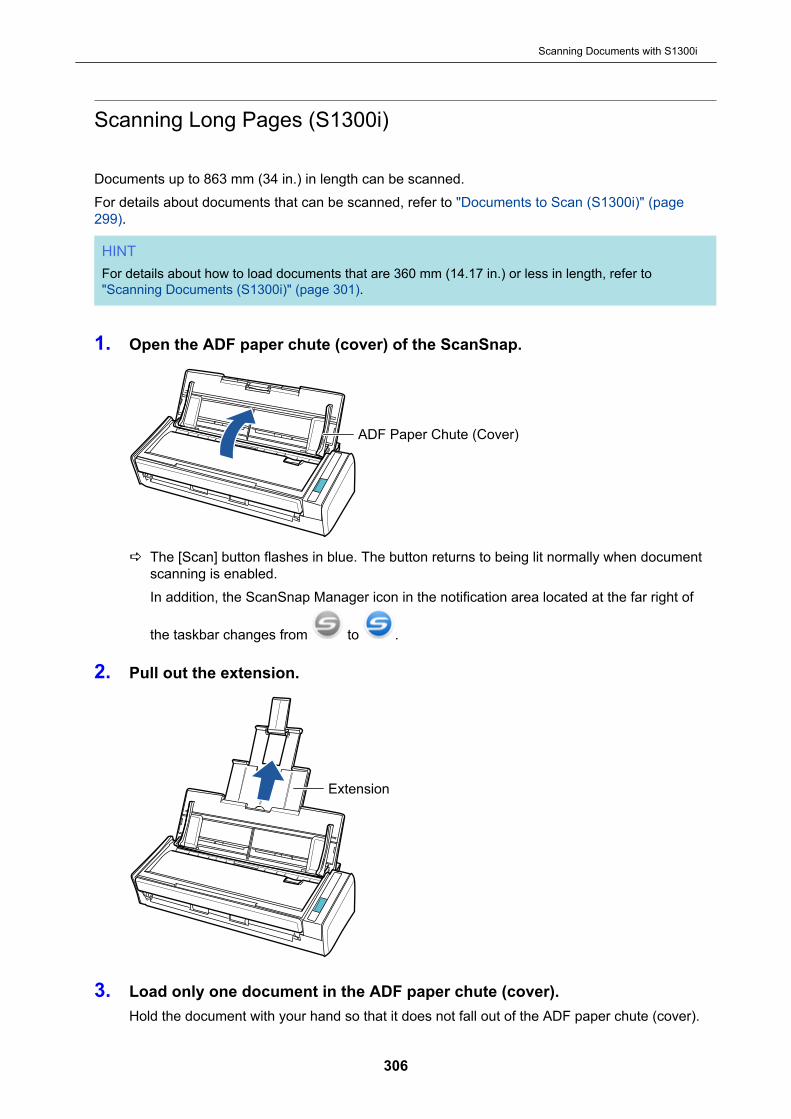
Scanning Long Pages (S1300i)
Documents up to 863 mm (34 in.) in length can be scanned.For details about documents that can be scanned, refer to "Documents to Scan (S1300i)" (page299).
HINTFor details about how to load documents that are 360 mm (14.17 in.) or less in length, refer to"Scanning Documents (S1300i)" (page 301).
1. Open the ADF paper chute (cover) of the ScanSnap.
ADF Paper Chute (Cover)
a The [Scan] button flashes in blue. The button returns to being lit normally when documentscanning is enabled.In addition, the ScanSnap Manager icon in the notification area located at the far right of
the taskbar changes from to .
2. Pull out the extension.
Extension
3. Load only one document in the ADF paper chute (cover).Hold the document with your hand so that it does not fall out of the ADF paper chute (cover).
Scanning Documents with S1300i
306

4. Press the [Scan] button on the ScanSnap (for three seconds or longer) untilthe button flashes in blue to start a scan.
ATTENTIONl Secure enough space where the scanned documents are ejected from the ScanSnap, and
pick up the documents with your hands to prevent them from falling off the unit where theScanSnap is placed on.
l Do not perform the following operations during scanning. Doing so will stop scanning.- Connect or disconnect the ScanSnap and other USB devices.- Close the ADF paper chute (cover).- Switch users.- Allow the computer to enter sleep mode.
HINTWhen you scan the first page as a long page and continue scanning, the subsequent documentsare also scanned as long pages.
a The [Scan] button on the ScanSnap flashes in blue while the documents are beingscanned.The [ScanSnap Manager - Image scanning and file saving] window appears.
Scanning Documents with S1300i
307
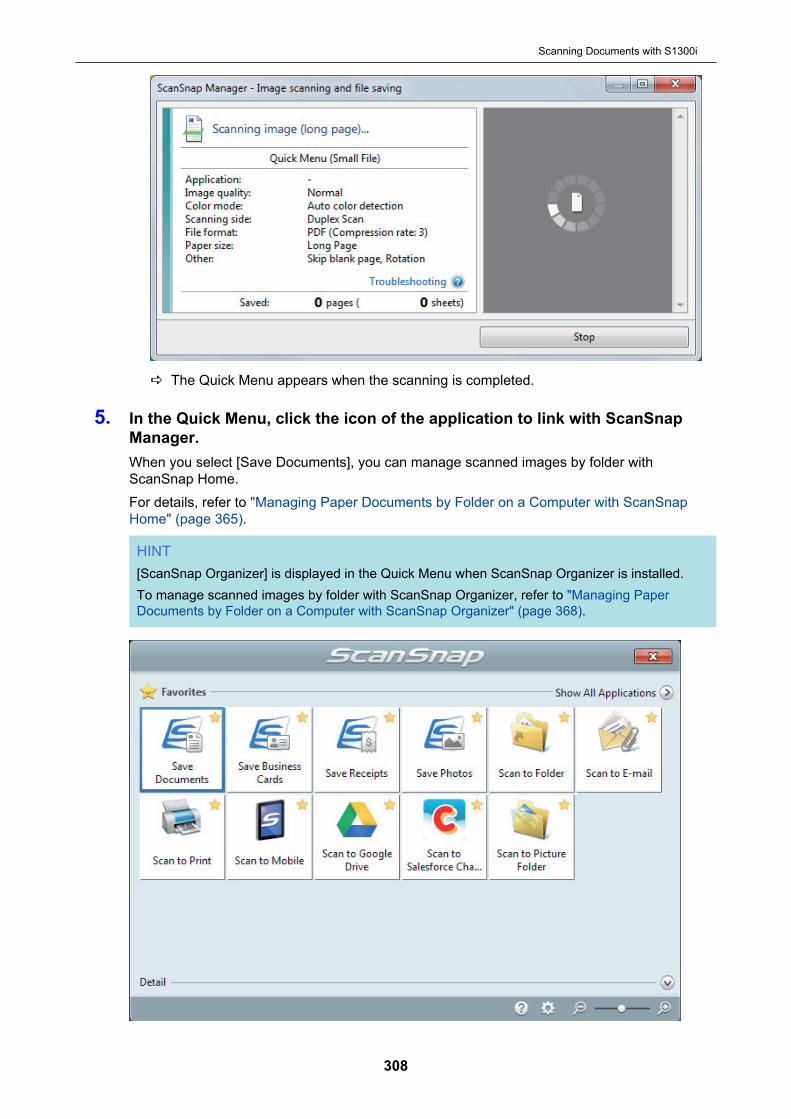
a The Quick Menu appears when the scanning is completed.
5. In the Quick Menu, click the icon of the application to link with ScanSnapManager.When you select [Save Documents], you can manage scanned images by folder withScanSnap Home.For details, refer to "Managing Paper Documents by Folder on a Computer with ScanSnapHome" (page 365).
HINT[ScanSnap Organizer] is displayed in the Quick Menu when ScanSnap Organizer is installed.To manage scanned images by folder with ScanSnap Organizer, refer to "Managing PaperDocuments by Folder on a Computer with ScanSnap Organizer" (page 368).
Scanning Documents with S1300i
308

a The selected application starts up. For details, refer to the Advanced Operation Guide.
ATTENTIONl You cannot start scanning when the Quick Menu is displayed. Either select an icon from the
Quick Menu and finish the process, or close the Quick Menu before you perform the nextscan.
l Do not move, delete, or rename scanned images using other applications while the QuickMenu is displayed.
HINT
l Clicking displays the description of an application. Placing the mouse cursor over the iconof another application displays the description of the application.
l Performing a scan while an application that can be automatically linked with is activeautomatically starts the linkage between ScanSnap Manager and the application.For details, refer to the Advanced Operation Guide.
Scanning Documents with S1300i
309
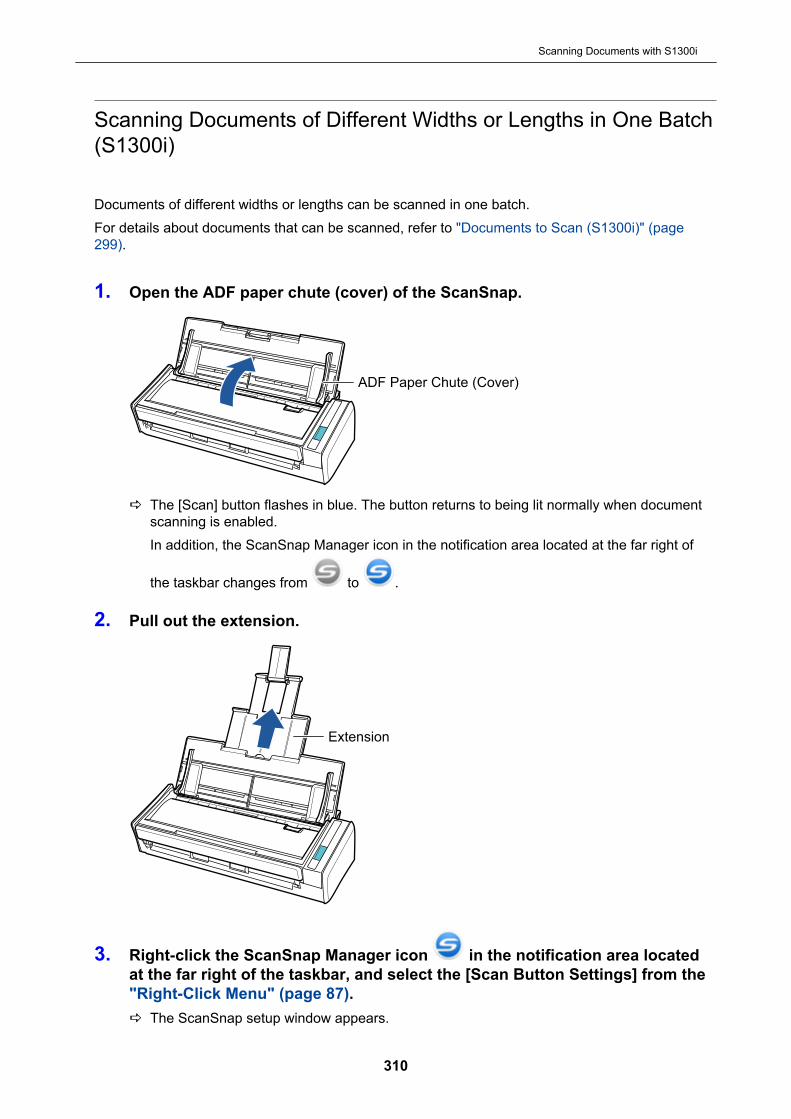
Scanning Documents of Different Widths or Lengths in One Batch(S1300i)
Documents of different widths or lengths can be scanned in one batch.For details about documents that can be scanned, refer to "Documents to Scan (S1300i)" (page299).
1. Open the ADF paper chute (cover) of the ScanSnap.
ADF Paper Chute (Cover)
a The [Scan] button flashes in blue. The button returns to being lit normally when documentscanning is enabled.In addition, the ScanSnap Manager icon in the notification area located at the far right of
the taskbar changes from to .
2. Pull out the extension.
Extension
3. Right-click the ScanSnap Manager icon in the notification area locatedat the far right of the taskbar, and select the [Scan Button Settings] from the"Right-Click Menu" (page 87).a The ScanSnap setup window appears.
Scanning Documents with S1300i
310
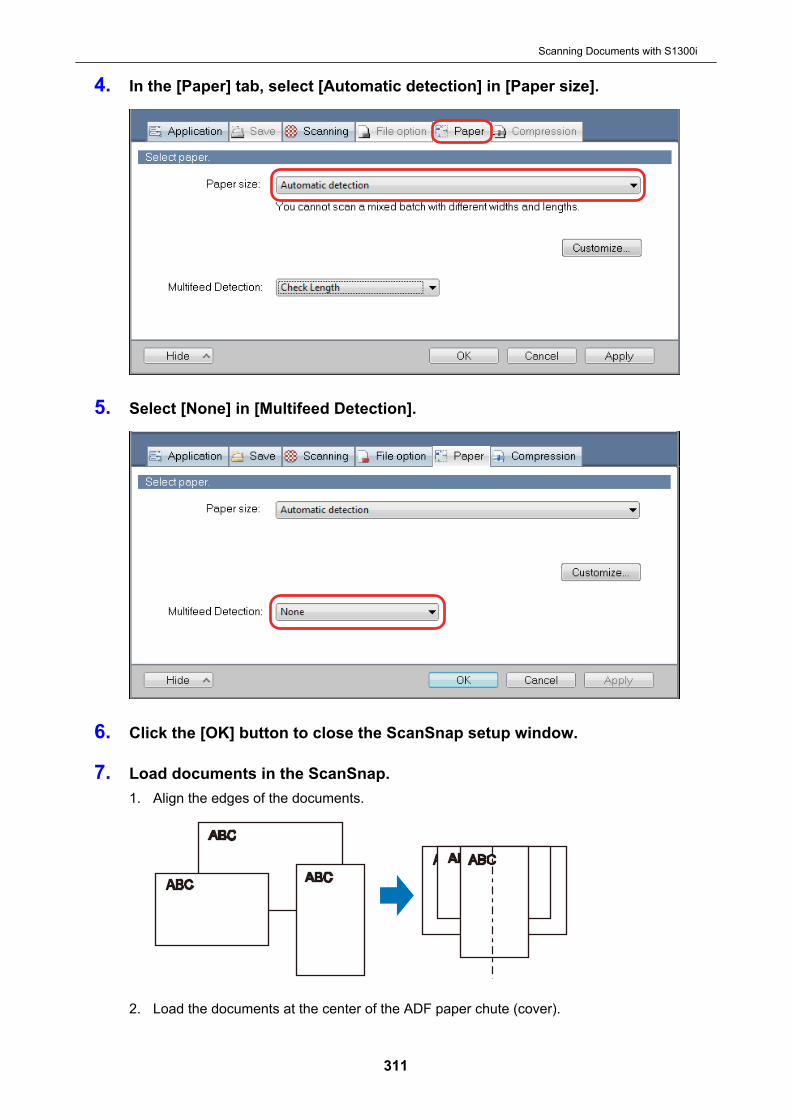
4. In the [Paper] tab, select [Automatic detection] in [Paper size].
5. Select [None] in [Multifeed Detection].
6. Click the [OK] button to close the ScanSnap setup window.
7. Load documents in the ScanSnap.1. Align the edges of the documents.
2. Load the documents at the center of the ADF paper chute (cover).
Scanning Documents with S1300i
311
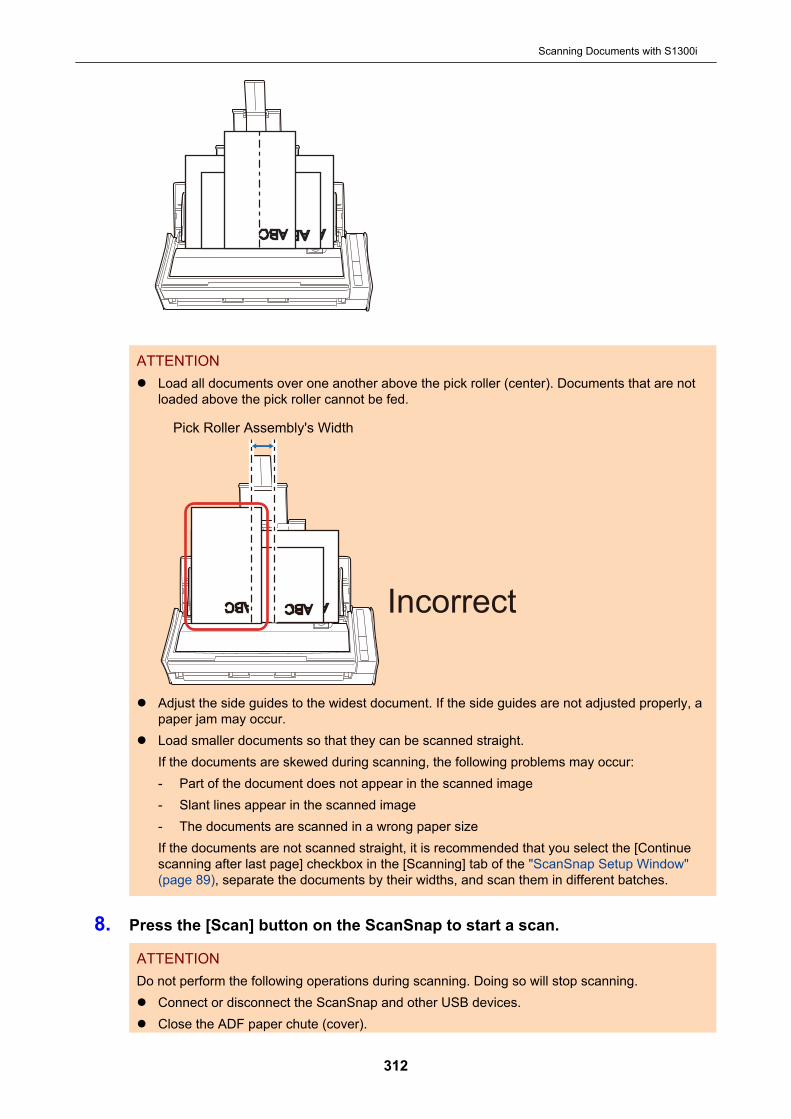
ATTENTIONl Load all documents over one another above the pick roller (center). Documents that are not
loaded above the pick roller cannot be fed.
Incorrect
Pick Roller Assembly's Width
l Adjust the side guides to the widest document. If the side guides are not adjusted properly, apaper jam may occur.
l Load smaller documents so that they can be scanned straight.If the documents are skewed during scanning, the following problems may occur:- Part of the document does not appear in the scanned image- Slant lines appear in the scanned image- The documents are scanned in a wrong paper sizeIf the documents are not scanned straight, it is recommended that you select the [Continuescanning after last page] checkbox in the [Scanning] tab of the "ScanSnap Setup Window"(page 89), separate the documents by their widths, and scan them in different batches.
8. Press the [Scan] button on the ScanSnap to start a scan.
ATTENTIONDo not perform the following operations during scanning. Doing so will stop scanning.l Connect or disconnect the ScanSnap and other USB devices.l Close the ADF paper chute (cover).
Scanning Documents with S1300i
312
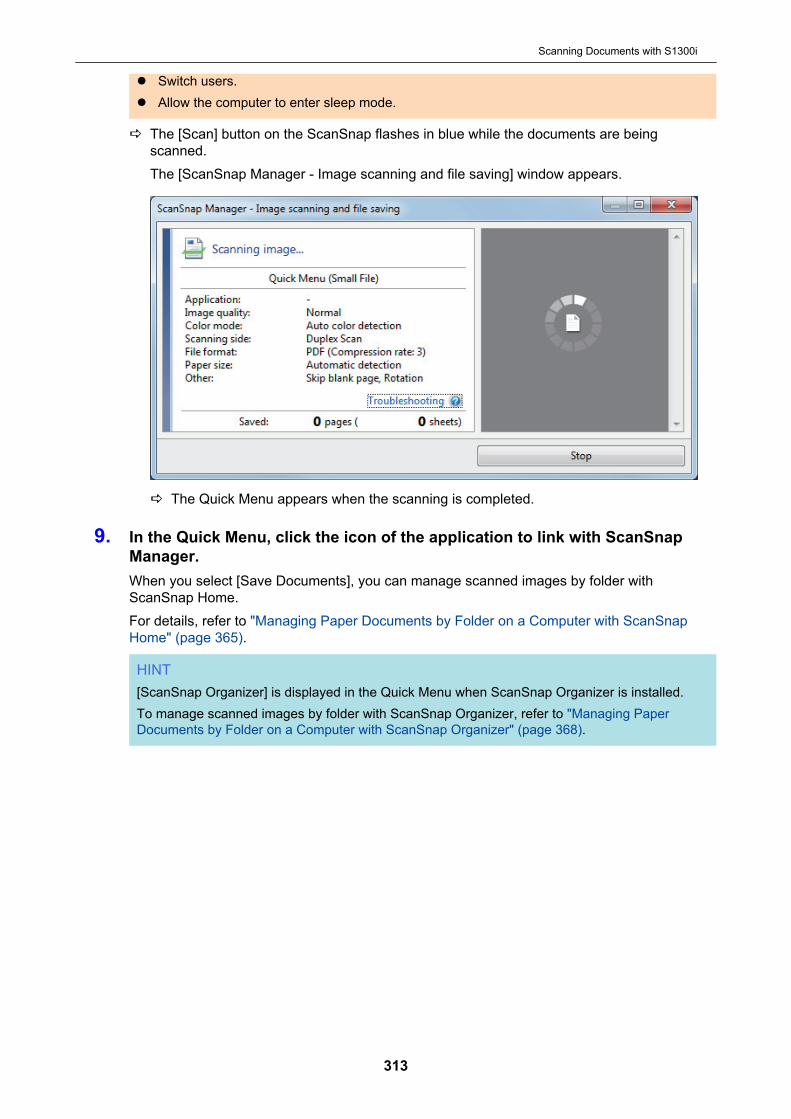
l Switch users.l Allow the computer to enter sleep mode.
a The [Scan] button on the ScanSnap flashes in blue while the documents are beingscanned.The [ScanSnap Manager - Image scanning and file saving] window appears.
a The Quick Menu appears when the scanning is completed.
9. In the Quick Menu, click the icon of the application to link with ScanSnapManager.When you select [Save Documents], you can manage scanned images by folder withScanSnap Home.For details, refer to "Managing Paper Documents by Folder on a Computer with ScanSnapHome" (page 365).
HINT[ScanSnap Organizer] is displayed in the Quick Menu when ScanSnap Organizer is installed.To manage scanned images by folder with ScanSnap Organizer, refer to "Managing PaperDocuments by Folder on a Computer with ScanSnap Organizer" (page 368).
Scanning Documents with S1300i
313

a The selected application starts up. For details, refer to the Advanced Operation Guide.
ATTENTIONl You cannot start scanning when the Quick Menu is displayed. Either select an icon from the
Quick Menu and finish the process, or close the Quick Menu before you perform the nextscan.
l Do not move, delete, or rename scanned images using other applications while the QuickMenu is displayed.
HINT
l Clicking displays the description of an application. Placing the mouse cursor over the iconof another application displays the description of the application.
l Performing a scan while an application that can be automatically linked with is activeautomatically starts the linkage between ScanSnap Manager and the application.For details, refer to the Advanced Operation Guide.
Scanning Documents with S1300i
314

Scanning Documents with S1100i
l "Documents to Scan (S1100i)" (page 316)l "Scanning Documents (S1100i)" (page 320)l "Scanning Documents by Inserting Two Documents at a Time or by Inserting the Next Document
While the Current Document Is Being Scanned (S1100i)" (page 325)l "Scanning Documents Larger Than A4 or Letter Size by Directly Inserting It in the ScanSnap
(S1100i)" (page 332)l "Scanning Documents Larger than A4 or Letter Size with the Carrier Sheet (S1100i)" (page 336)l "Scanning Documents Such as Photographs and Clippings (S1100i)" (page 341)
Scanning Documents with S1100i
315
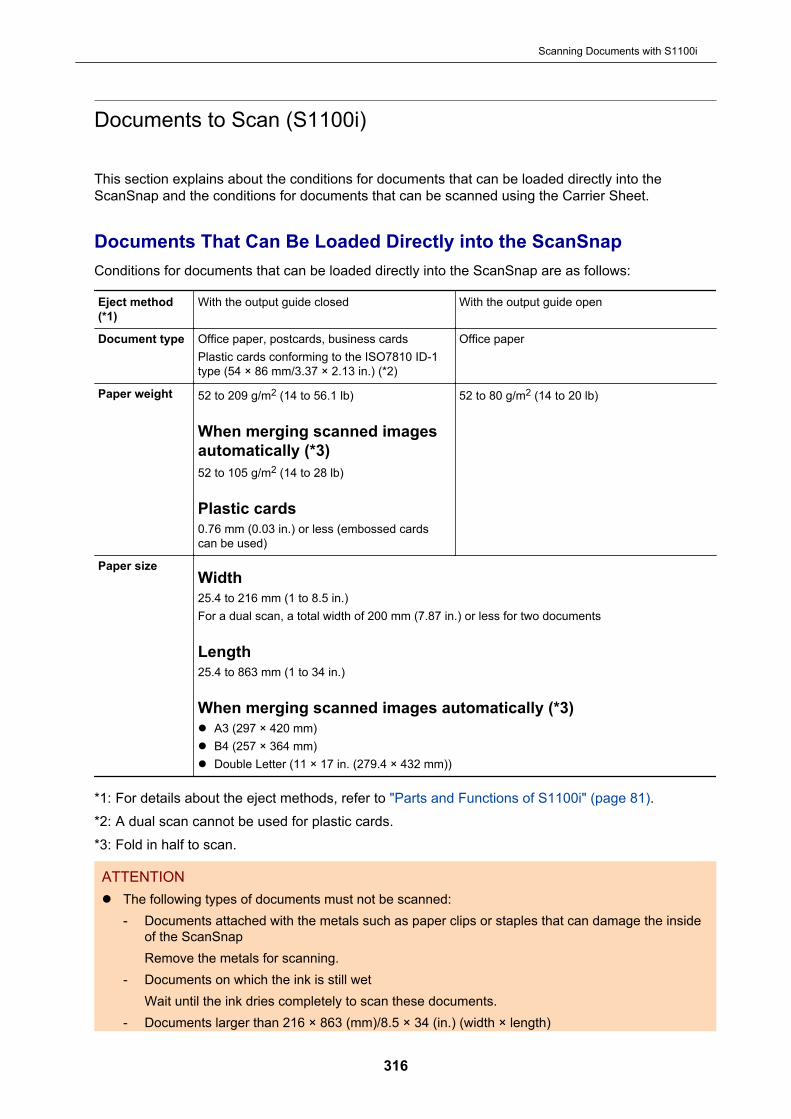
Documents to Scan (S1100i)
This section explains about the conditions for documents that can be loaded directly into theScanSnap and the conditions for documents that can be scanned using the Carrier Sheet.
Documents That Can Be Loaded Directly into the ScanSnapConditions for documents that can be loaded directly into the ScanSnap are as follows:
Eject method(*1)
With the output guide closed With the output guide open
Document type Office paper, postcards, business cardsPlastic cards conforming to the ISO7810 ID-1type (54 × 86 mm/3.37 × 2.13 in.) (*2)
Office paper
Paper weight 52 to 209 g/m2 (14 to 56.1 lb)
When merging scanned imagesautomatically (*3)52 to 105 g/m2 (14 to 28 lb)
Plastic cards0.76 mm (0.03 in.) or less (embossed cardscan be used)
52 to 80 g/m2 (14 to 20 lb)
Paper sizeWidth25.4 to 216 mm (1 to 8.5 in.)For a dual scan, a total width of 200 mm (7.87 in.) or less for two documents
Length25.4 to 863 mm (1 to 34 in.)
When merging scanned images automatically (*3)l A3 (297 × 420 mm)l B4 (257 × 364 mm)l Double Letter (11 × 17 in. (279.4 × 432 mm))
*1: For details about the eject methods, refer to "Parts and Functions of S1100i" (page 81).*2: A dual scan cannot be used for plastic cards.*3: Fold in half to scan.
ATTENTIONl The following types of documents must not be scanned:
- Documents attached with the metals such as paper clips or staples that can damage the insideof the ScanSnapRemove the metals for scanning.
- Documents on which the ink is still wetWait until the ink dries completely to scan these documents.
- Documents larger than 216 × 863 (mm)/8.5 × 34 (in.) (width × length)
Scanning Documents with S1100i
316
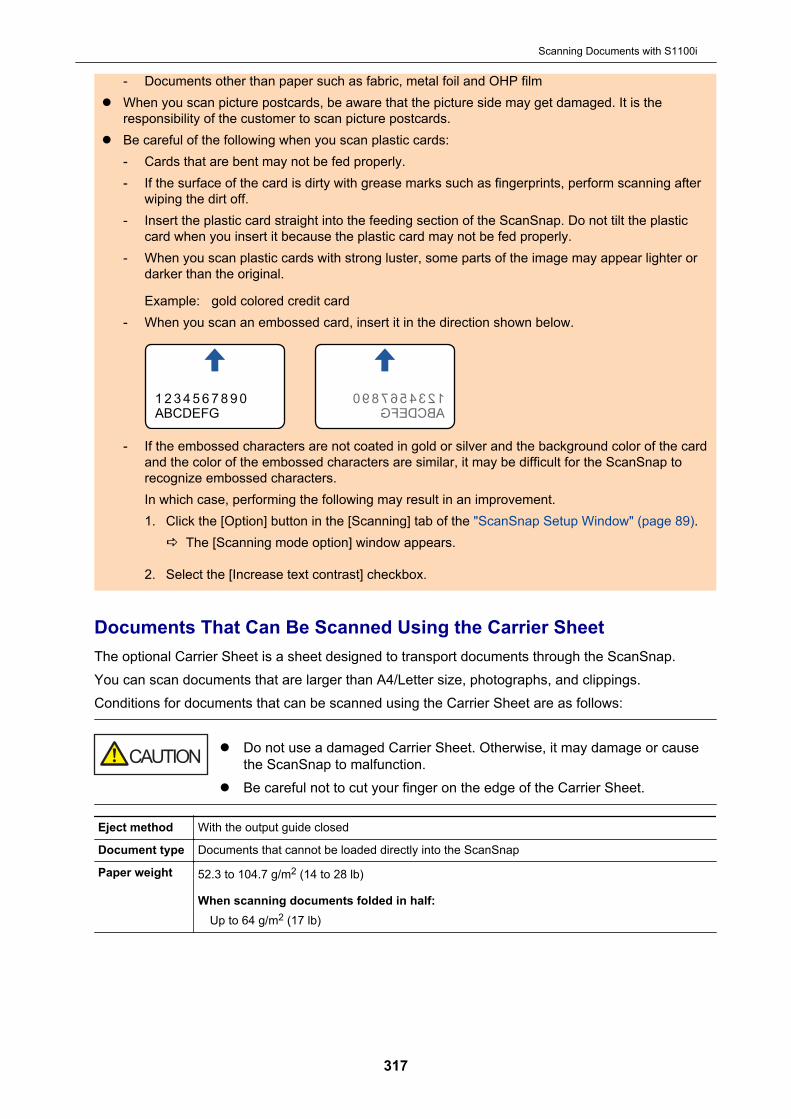
- Documents other than paper such as fabric, metal foil and OHP filml When you scan picture postcards, be aware that the picture side may get damaged. It is the
responsibility of the customer to scan picture postcards.l Be careful of the following when you scan plastic cards:
- Cards that are bent may not be fed properly.- If the surface of the card is dirty with grease marks such as fingerprints, perform scanning after
wiping the dirt off.- Insert the plastic card straight into the feeding section of the ScanSnap. Do not tilt the plastic
card when you insert it because the plastic card may not be fed properly.- When you scan plastic cards with strong luster, some parts of the image may appear lighter or
darker than the original.
Example: gold colored credit card- When you scan an embossed card, insert it in the direction shown below.
1234567890
ABCDEFG
1234567890
ABCDEFG
- If the embossed characters are not coated in gold or silver and the background color of the cardand the color of the embossed characters are similar, it may be difficult for the ScanSnap torecognize embossed characters.In which case, performing the following may result in an improvement.1. Click the [Option] button in the [Scanning] tab of the "ScanSnap Setup Window" (page 89).
a The [Scanning mode option] window appears.
2. Select the [Increase text contrast] checkbox.
Documents That Can Be Scanned Using the Carrier SheetThe optional Carrier Sheet is a sheet designed to transport documents through the ScanSnap.You can scan documents that are larger than A4/Letter size, photographs, and clippings.Conditions for documents that can be scanned using the Carrier Sheet are as follows:
l Do not use a damaged Carrier Sheet. Otherwise, it may damage or causethe ScanSnap to malfunction.
l Be careful not to cut your finger on the edge of the Carrier Sheet.
Eject method With the output guide closed
Document type Documents that cannot be loaded directly into the ScanSnap
Paper weight 52.3 to 104.7 g/m2 (14 to 28 lb)
When scanning documents folded in half:Up to 64 g/m2 (17 lb)
Scanning Documents with S1100i
317
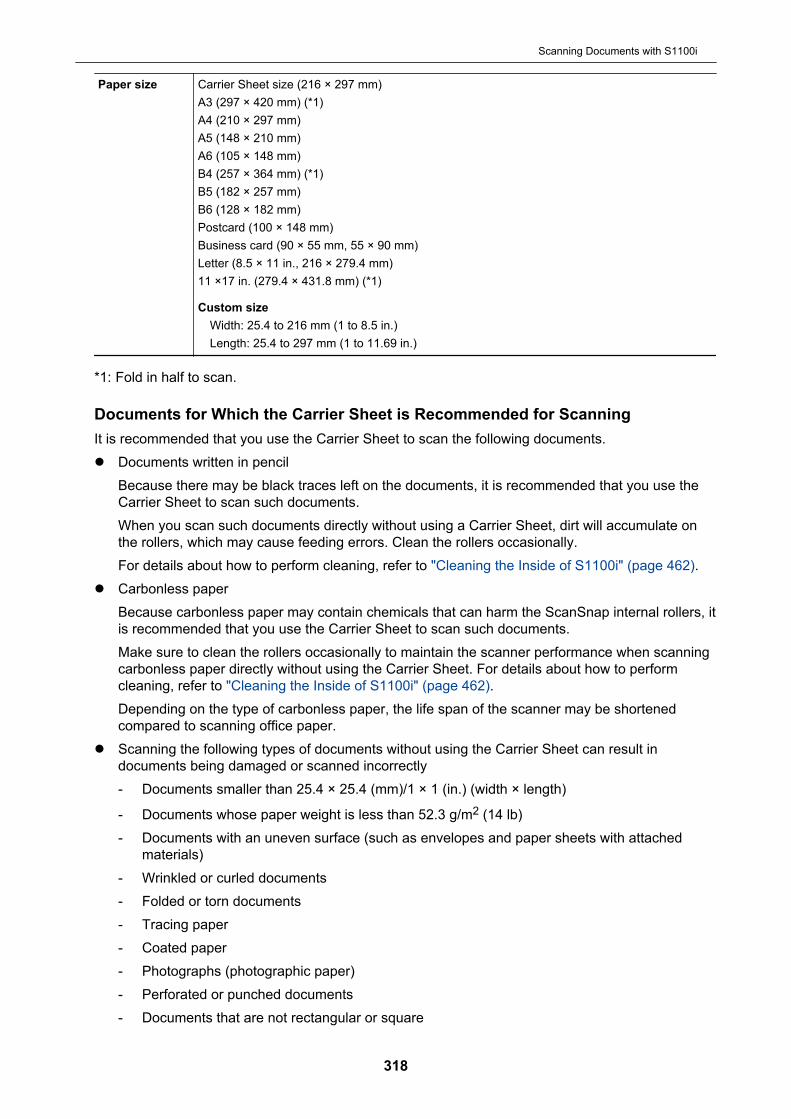
Paper size Carrier Sheet size (216 × 297 mm)A3 (297 × 420 mm) (*1)A4 (210 × 297 mm)A5 (148 × 210 mm)A6 (105 × 148 mm)B4 (257 × 364 mm) (*1)B5 (182 × 257 mm)B6 (128 × 182 mm)Postcard (100 × 148 mm)Business card (90 × 55 mm, 55 × 90 mm)Letter (8.5 × 11 in., 216 × 279.4 mm)11 ×17 in. (279.4 × 431.8 mm) (*1)
Custom sizeWidth: 25.4 to 216 mm (1 to 8.5 in.)Length: 25.4 to 297 mm (1 to 11.69 in.)
*1: Fold in half to scan.
Documents for Which the Carrier Sheet is Recommended for ScanningIt is recommended that you use the Carrier Sheet to scan the following documents.l Documents written in pencil
Because there may be black traces left on the documents, it is recommended that you use theCarrier Sheet to scan such documents.When you scan such documents directly without using a Carrier Sheet, dirt will accumulate onthe rollers, which may cause feeding errors. Clean the rollers occasionally.For details about how to perform cleaning, refer to "Cleaning the Inside of S1100i" (page 462).
l Carbonless paperBecause carbonless paper may contain chemicals that can harm the ScanSnap internal rollers, itis recommended that you use the Carrier Sheet to scan such documents.Make sure to clean the rollers occasionally to maintain the scanner performance when scanningcarbonless paper directly without using the Carrier Sheet. For details about how to performcleaning, refer to "Cleaning the Inside of S1100i" (page 462).Depending on the type of carbonless paper, the life span of the scanner may be shortenedcompared to scanning office paper.
l Scanning the following types of documents without using the Carrier Sheet can result indocuments being damaged or scanned incorrectly- Documents smaller than 25.4 × 25.4 (mm)/1 × 1 (in.) (width × length)
- Documents whose paper weight is less than 52.3 g/m2 (14 lb)- Documents with an uneven surface (such as envelopes and paper sheets with attached
materials)- Wrinkled or curled documents- Folded or torn documents- Tracing paper- Coated paper- Photographs (photographic paper)- Perforated or punched documents- Documents that are not rectangular or square
Scanning Documents with S1100i
318
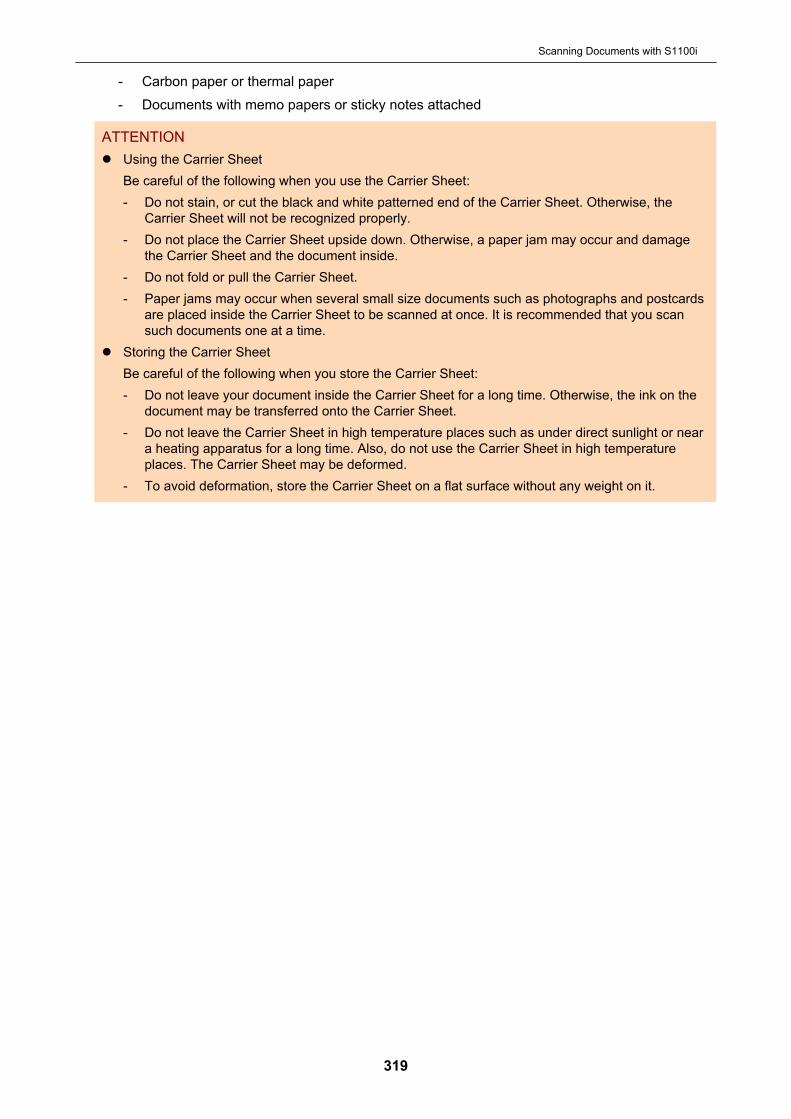
- Carbon paper or thermal paper- Documents with memo papers or sticky notes attached
ATTENTIONl Using the Carrier Sheet
Be careful of the following when you use the Carrier Sheet:- Do not stain, or cut the black and white patterned end of the Carrier Sheet. Otherwise, the
Carrier Sheet will not be recognized properly.- Do not place the Carrier Sheet upside down. Otherwise, a paper jam may occur and damage
the Carrier Sheet and the document inside.- Do not fold or pull the Carrier Sheet.- Paper jams may occur when several small size documents such as photographs and postcards
are placed inside the Carrier Sheet to be scanned at once. It is recommended that you scansuch documents one at a time.
l Storing the Carrier SheetBe careful of the following when you store the Carrier Sheet:- Do not leave your document inside the Carrier Sheet for a long time. Otherwise, the ink on the
document may be transferred onto the Carrier Sheet.- Do not leave the Carrier Sheet in high temperature places such as under direct sunlight or near
a heating apparatus for a long time. Also, do not use the Carrier Sheet in high temperatureplaces. The Carrier Sheet may be deformed.
- To avoid deformation, store the Carrier Sheet on a flat surface without any weight on it.
Scanning Documents with S1100i
319
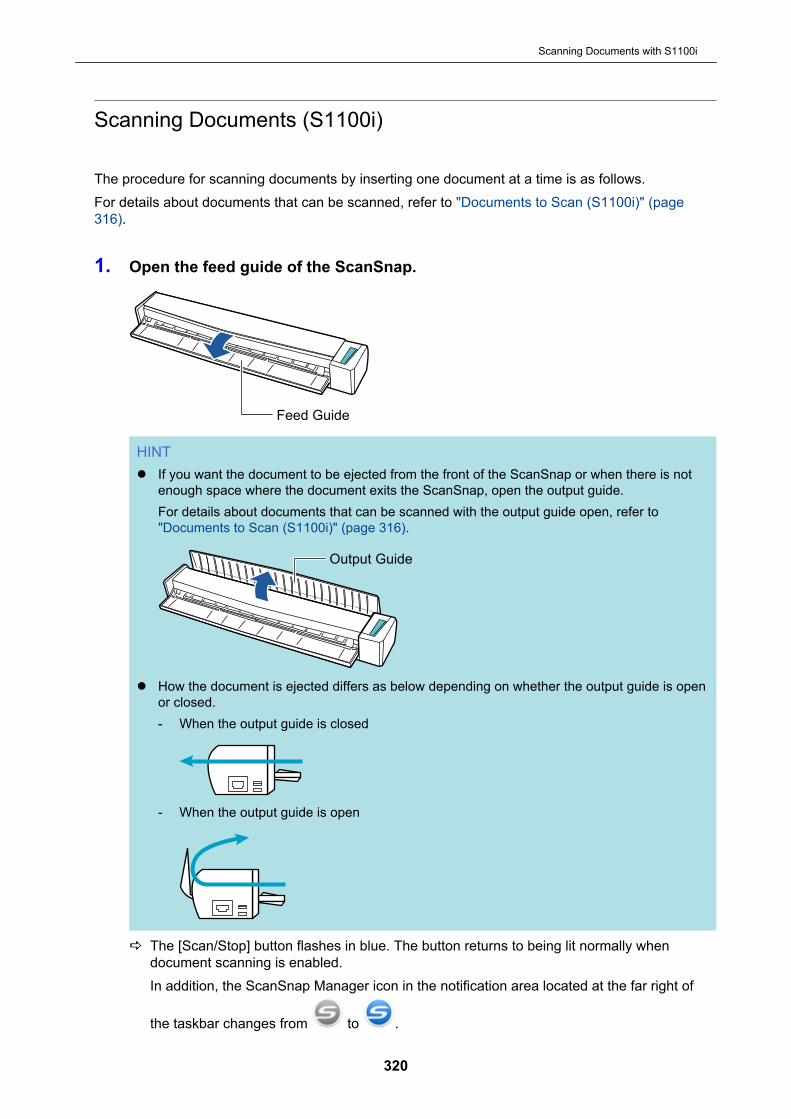
Scanning Documents (S1100i)
The procedure for scanning documents by inserting one document at a time is as follows.For details about documents that can be scanned, refer to "Documents to Scan (S1100i)" (page316).
1. Open the feed guide of the ScanSnap.
Feed Guide
HINTl If you want the document to be ejected from the front of the ScanSnap or when there is not
enough space where the document exits the ScanSnap, open the output guide.For details about documents that can be scanned with the output guide open, refer to"Documents to Scan (S1100i)" (page 316).
Output Guide
l How the document is ejected differs as below depending on whether the output guide is openor closed.- When the output guide is closed
- When the output guide is open
a The [Scan/Stop] button flashes in blue. The button returns to being lit normally whendocument scanning is enabled.In addition, the ScanSnap Manager icon in the notification area located at the far right of
the taskbar changes from to .
Scanning Documents with S1100i
320

2. Insert the document straight into the feeding section of the ScanSnap, withthe scanning side facing up.
a The document is pulled in until it is set inside the ScanSnap.
ATTENTIONl If you specify a standard size instead of selecting [Automatic detection] (default), insert the
document by aligning it with the left edge of the feeding section.You can configure the scan settings in the "ScanSnap Setup Window" (page 89).
l When you perform scanning with the output guide closed, leave enough space at the back ofthe ScanSnap to allow the document to be completely ejected. In addition, when you scanlong page documents, hold the scanned documents with your hands to prevent them fromfalling off the unit where the ScanSnap is placed on.Make sure that the area where the document exits the scanner is clear of any obstacles.Otherwise, paper jam may occur.
l If you scan the following documents with the output guide open, a paper jam may occur anddamage the documents. Scan the following documents with the output guide closed.
- Thick paper (80 g/m2 [20 lb] or heavier)- Postcards
Scanning Documents with S1100i
321
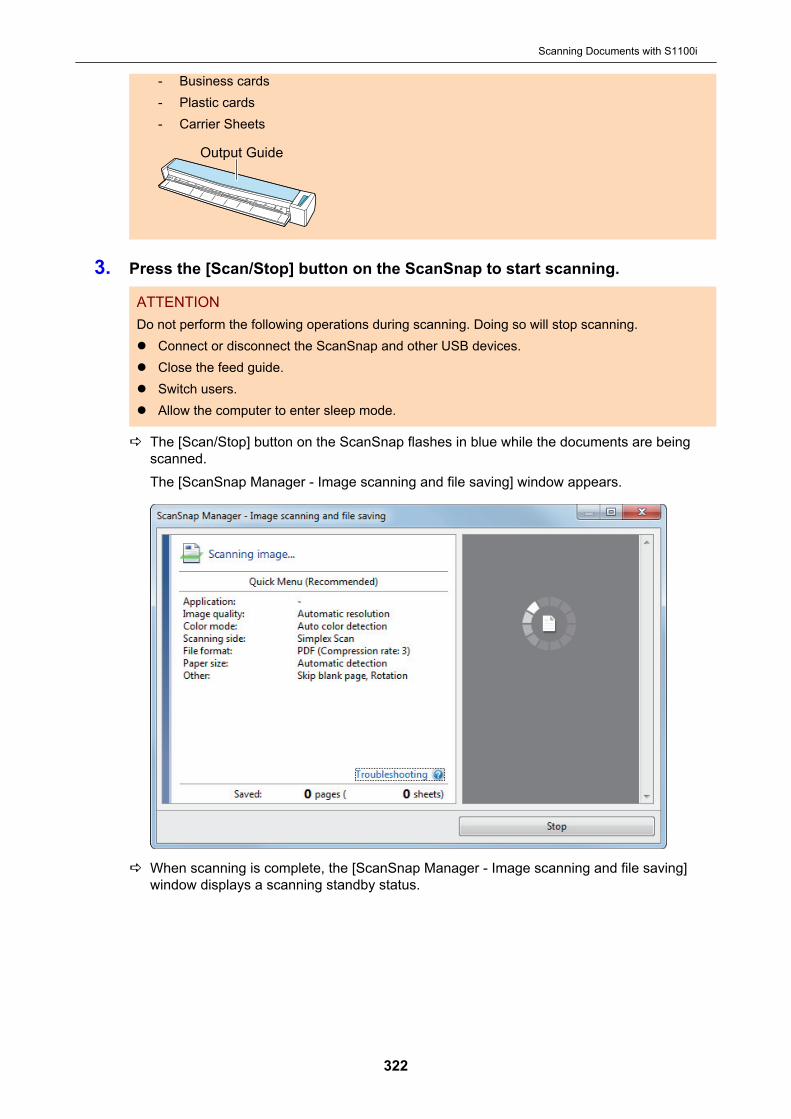
- Business cards- Plastic cards- Carrier Sheets
Output Guide
3. Press the [Scan/Stop] button on the ScanSnap to start scanning.
ATTENTIONDo not perform the following operations during scanning. Doing so will stop scanning.l Connect or disconnect the ScanSnap and other USB devices.l Close the feed guide.l Switch users.l Allow the computer to enter sleep mode.
a The [Scan/Stop] button on the ScanSnap flashes in blue while the documents are beingscanned.The [ScanSnap Manager - Image scanning and file saving] window appears.
a When scanning is complete, the [ScanSnap Manager - Image scanning and file saving]window displays a scanning standby status.
Scanning Documents with S1100i
322

HINTTo continue scanning, insert the next document to be scanned. When the document is inserted,scanning starts automatically.
4. Press the [Scan/Stop] button on the ScanSnap to finish scanning.a The Quick Menu appears.
5. In the Quick Menu, click the icon of the application to link with ScanSnapManager.For details about linking the following applications with ScanSnap Manager, refer to "UsefulUsages" (page 364).l Save Documentsl Save Business Cardsl Save Receiptsl Save Photos
HINTThe following applications are displayed in the Quick Menu when ScanSnap Organizer andCardMinder are installed.l When ScanSnap Organizer is installed
ScanSnap Organizerl When CardMinder is installed
Scan to CardMinder
Scanning Documents with S1100i
323

a The selected application starts up. For details, refer to the Advanced Operation Guide.
ATTENTIONl You cannot start scanning when the Quick Menu is displayed. Either select an icon from the
Quick Menu and finish the process, or close the Quick Menu before you perform the nextscan.
l Do not move, delete, or rename scanned images using other applications while the QuickMenu is displayed.
HINT
l Clicking displays the description of an application. Placing the mouse cursor over the iconof another application displays the description of the application.
l Performing a scan while an application that can be automatically linked with is activeautomatically starts the linkage between ScanSnap Manager and the application.For details, refer to the Advanced Operation Guide.
Scanning Documents with S1100i
324

Scanning Documents by Inserting Two Documents at a Time orby Inserting the Next Document While the Current Document IsBeing Scanned (S1100i)
When scanning small size documents such as business cards and postcards with the ScanSnap,you can insert two documents at a time or you can insert the next document while the currentdocument is being scanned. These scanning methods are referred to as dual scans.Documents can be inserted in the following two methods:l Inserting two documents at a time in the ScanSnap
l Inserting the next document while the current document is being scanned
For details about documents that can be scanned, refer to "Documents to Scan (S1100i)" (page316).
ATTENTIONl When you select an option other than [Automatic detection] for [Paper size] in the [Paper] tab of the
"ScanSnap Setup Window" (page 89), the dual scan function is disabled.l Use a dual scan to scan a document within the following ranges. If one of the following ranges is
exceeded, a length error occurs and part of the document may not appear in the scanned image.- Maximum scanning length: 863 mm (34 in.) (355.6 mm (14 in.) when [Excellent] is specified for
[Image Quality] in the [Scanning] tab of the "ScanSnap Setup Window" (page 89))- Maximum number of documents for scanning: 20 sheets
l When you continue scanning by inserting the next document while the current document is beingscanned, the [Scan/Stop] button flashes more quickly if the scanning length exceeds 650 mm (26in.). If this occurs, wait until scanning is complete without continuing to insert more documents.After scanning is complete, insert the next document. The next scan is started automatically.
Scanning Documents with S1100i
325
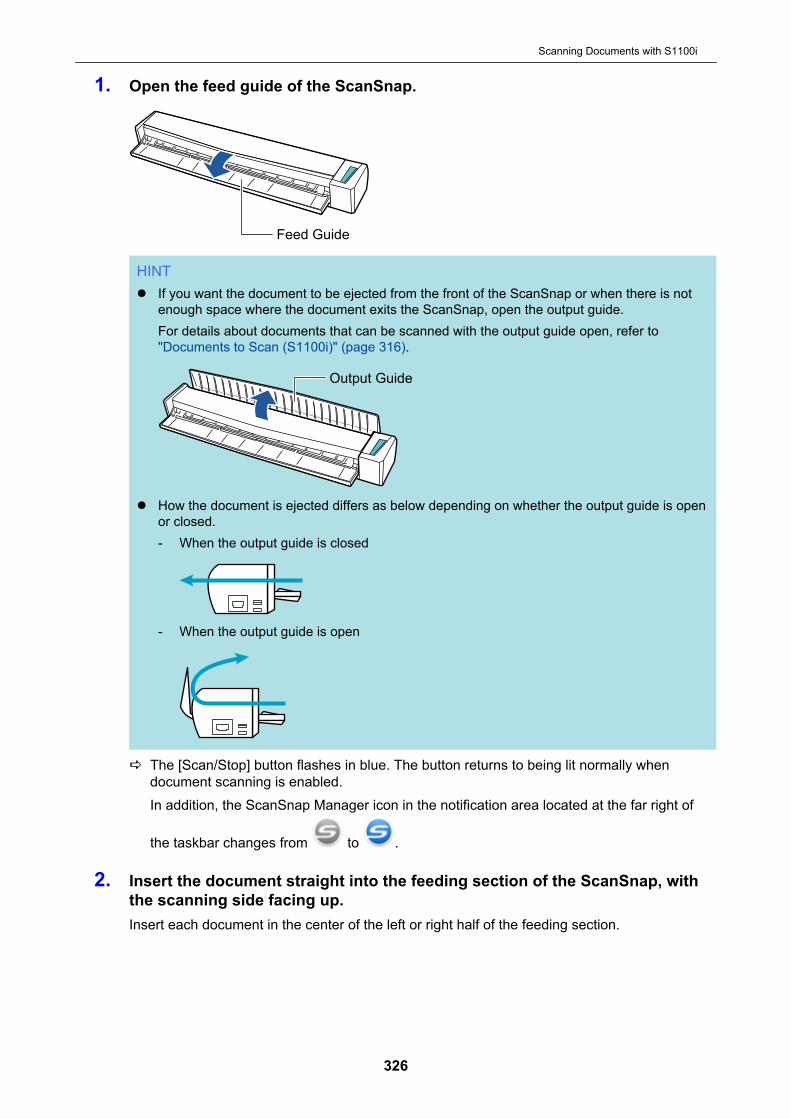
1. Open the feed guide of the ScanSnap.
Feed Guide
HINTl If you want the document to be ejected from the front of the ScanSnap or when there is not
enough space where the document exits the ScanSnap, open the output guide.For details about documents that can be scanned with the output guide open, refer to"Documents to Scan (S1100i)" (page 316).
Output Guide
l How the document is ejected differs as below depending on whether the output guide is openor closed.- When the output guide is closed
- When the output guide is open
a The [Scan/Stop] button flashes in blue. The button returns to being lit normally whendocument scanning is enabled.In addition, the ScanSnap Manager icon in the notification area located at the far right of
the taskbar changes from to .
2. Insert the document straight into the feeding section of the ScanSnap, withthe scanning side facing up.Insert each document in the center of the left or right half of the feeding section.
Scanning Documents with S1100i
326
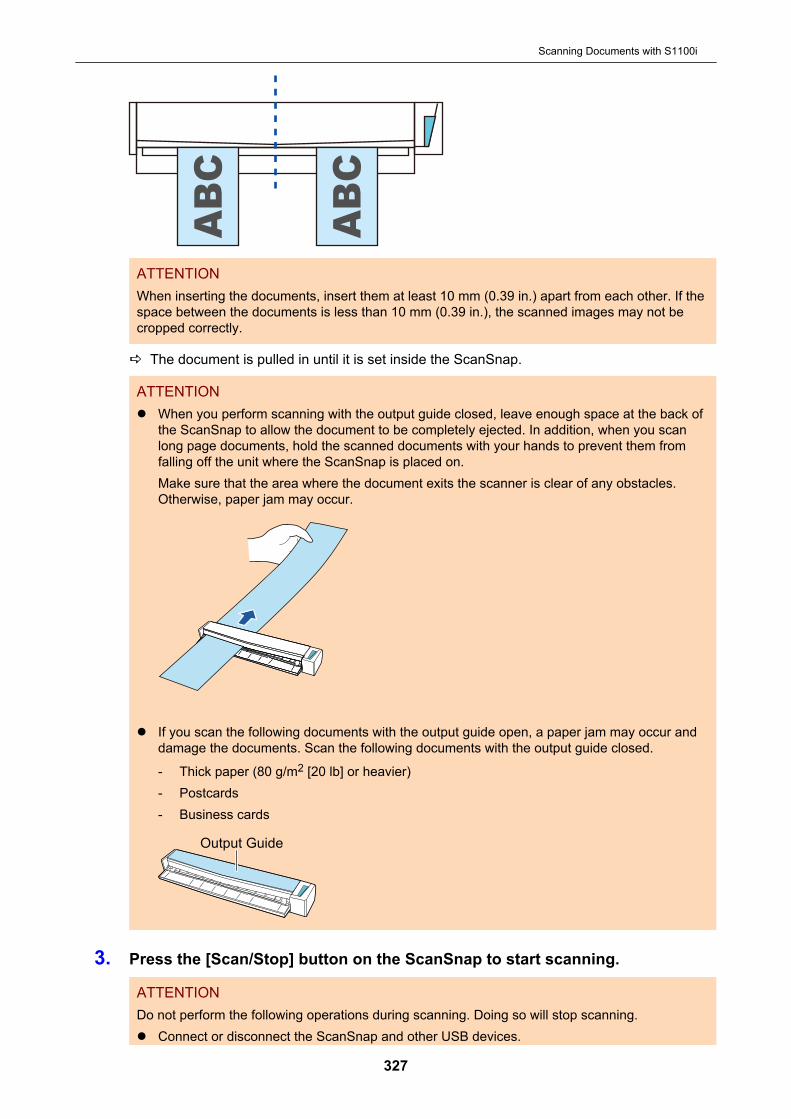
ATTENTIONWhen inserting the documents, insert them at least 10 mm (0.39 in.) apart from each other. If thespace between the documents is less than 10 mm (0.39 in.), the scanned images may not becropped correctly.
a The document is pulled in until it is set inside the ScanSnap.
ATTENTIONl When you perform scanning with the output guide closed, leave enough space at the back of
the ScanSnap to allow the document to be completely ejected. In addition, when you scanlong page documents, hold the scanned documents with your hands to prevent them fromfalling off the unit where the ScanSnap is placed on.Make sure that the area where the document exits the scanner is clear of any obstacles.Otherwise, paper jam may occur.
l If you scan the following documents with the output guide open, a paper jam may occur anddamage the documents. Scan the following documents with the output guide closed.
- Thick paper (80 g/m2 [20 lb] or heavier)- Postcards- Business cards
Output Guide
3. Press the [Scan/Stop] button on the ScanSnap to start scanning.
ATTENTIONDo not perform the following operations during scanning. Doing so will stop scanning.l Connect or disconnect the ScanSnap and other USB devices.
Scanning Documents with S1100i
327
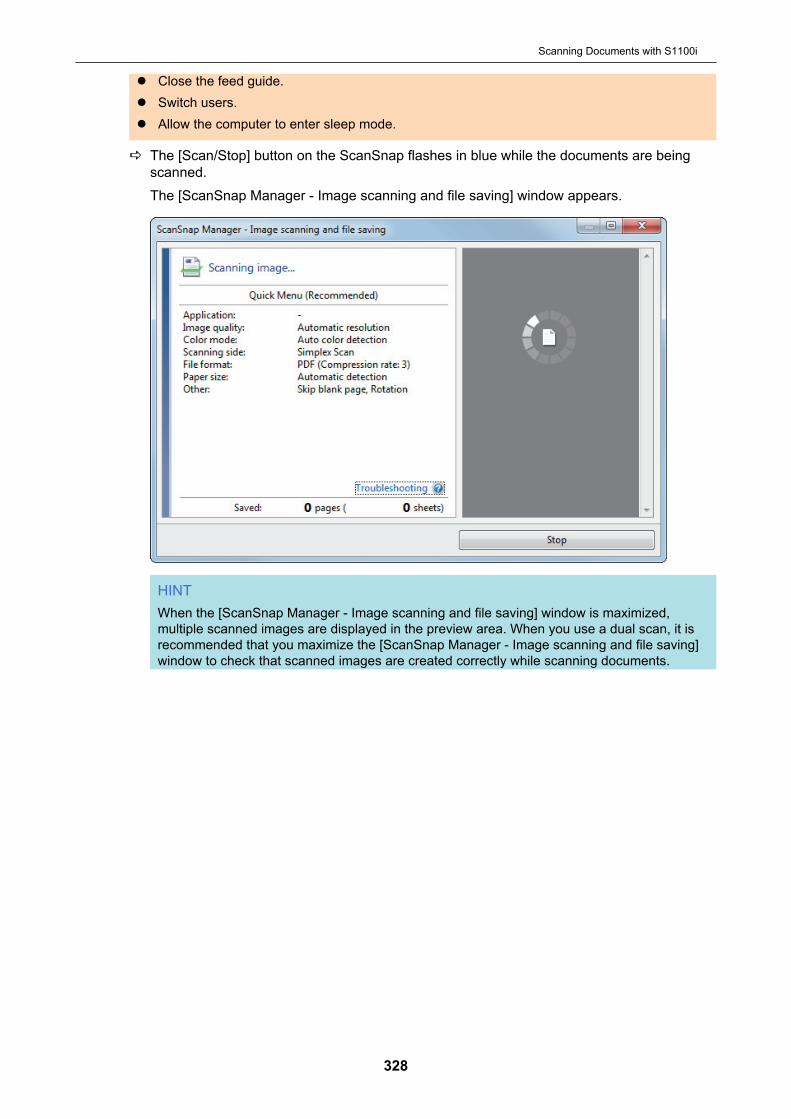
l Close the feed guide.l Switch users.l Allow the computer to enter sleep mode.
a The [Scan/Stop] button on the ScanSnap flashes in blue while the documents are beingscanned.The [ScanSnap Manager - Image scanning and file saving] window appears.
HINTWhen the [ScanSnap Manager - Image scanning and file saving] window is maximized,multiple scanned images are displayed in the preview area. When you use a dual scan, it isrecommended that you maximize the [ScanSnap Manager - Image scanning and file saving]window to check that scanned images are created correctly while scanning documents.
Scanning Documents with S1100i
328

a When scanning is complete, the [ScanSnap Manager - Image scanning and file saving]window displays a scanning standby status.
HINTTo continue scanning, insert the next document to be scanned. When the document is inserted,scanning starts automatically.
4. Press the [Scan/Stop] button on the ScanSnap to finish scanning.a The Quick Menu appears.
5. In the Quick Menu, click the icon of the application to link with ScanSnapManager.
Scanning Documents with S1100i
329
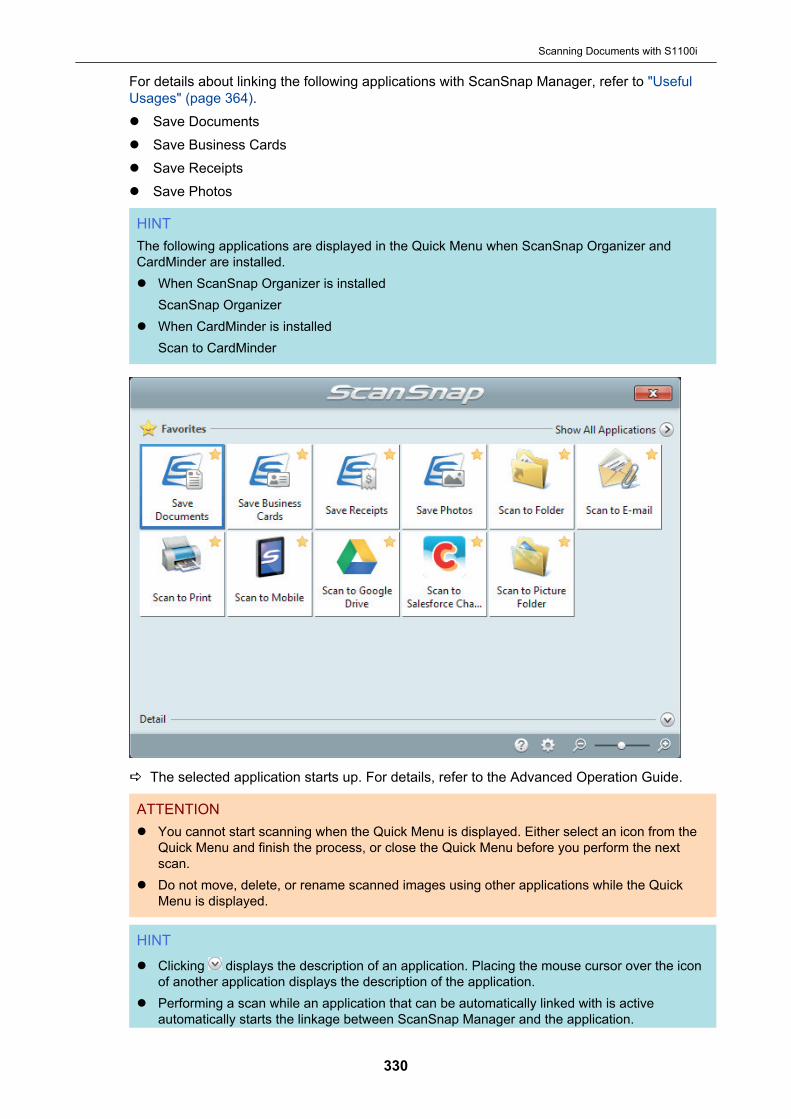
For details about linking the following applications with ScanSnap Manager, refer to "UsefulUsages" (page 364).l Save Documentsl Save Business Cardsl Save Receiptsl Save Photos
HINTThe following applications are displayed in the Quick Menu when ScanSnap Organizer andCardMinder are installed.l When ScanSnap Organizer is installed
ScanSnap Organizerl When CardMinder is installed
Scan to CardMinder
a The selected application starts up. For details, refer to the Advanced Operation Guide.
ATTENTIONl You cannot start scanning when the Quick Menu is displayed. Either select an icon from the
Quick Menu and finish the process, or close the Quick Menu before you perform the nextscan.
l Do not move, delete, or rename scanned images using other applications while the QuickMenu is displayed.
HINT
l Clicking displays the description of an application. Placing the mouse cursor over the iconof another application displays the description of the application.
l Performing a scan while an application that can be automatically linked with is activeautomatically starts the linkage between ScanSnap Manager and the application.
Scanning Documents with S1100i
330

For details, refer to the Advanced Operation Guide.
Scanning Documents with S1100i
331
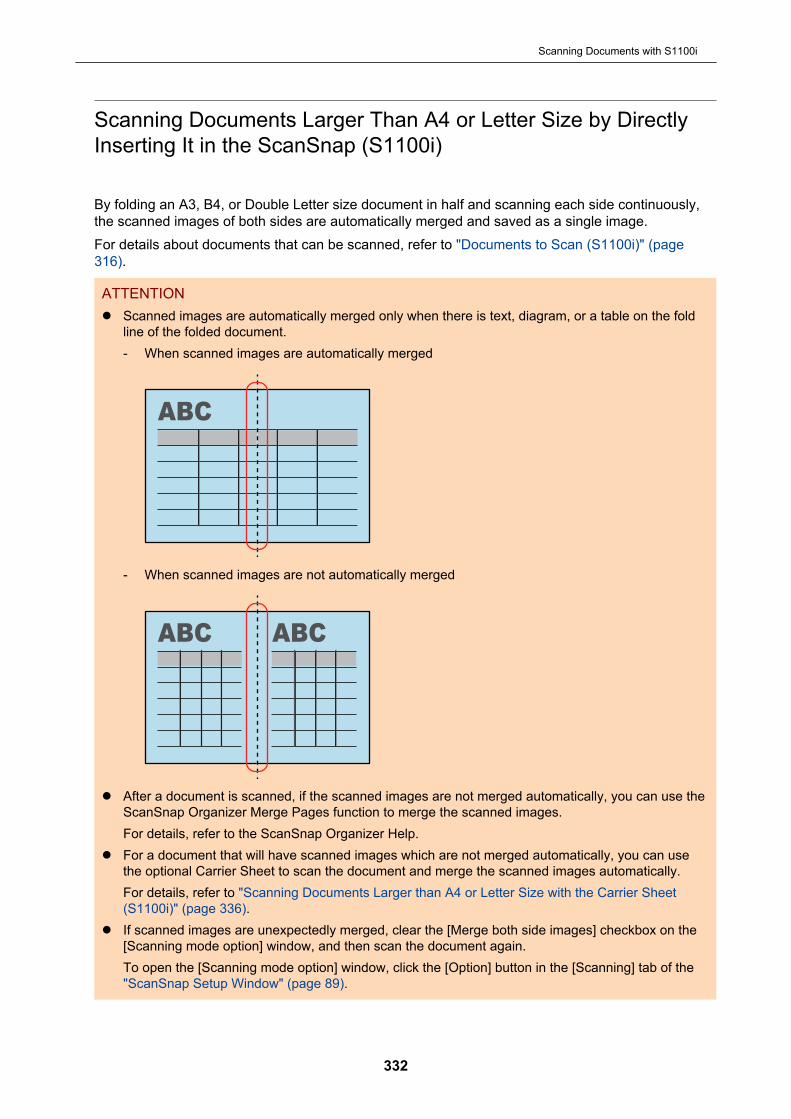
Scanning Documents Larger Than A4 or Letter Size by DirectlyInserting It in the ScanSnap (S1100i)
By folding an A3, B4, or Double Letter size document in half and scanning each side continuously,the scanned images of both sides are automatically merged and saved as a single image.For details about documents that can be scanned, refer to "Documents to Scan (S1100i)" (page316).
ATTENTIONl Scanned images are automatically merged only when there is text, diagram, or a table on the fold
line of the folded document.- When scanned images are automatically merged
- When scanned images are not automatically merged
l After a document is scanned, if the scanned images are not merged automatically, you can use theScanSnap Organizer Merge Pages function to merge the scanned images.For details, refer to the ScanSnap Organizer Help.
l For a document that will have scanned images which are not merged automatically, you can usethe optional Carrier Sheet to scan the document and merge the scanned images automatically.For details, refer to "Scanning Documents Larger than A4 or Letter Size with the Carrier Sheet(S1100i)" (page 336).
l If scanned images are unexpectedly merged, clear the [Merge both side images] checkbox on the[Scanning mode option] window, and then scan the document again.To open the [Scanning mode option] window, click the [Option] button in the [Scanning] tab of the"ScanSnap Setup Window" (page 89).
Scanning Documents with S1100i
332
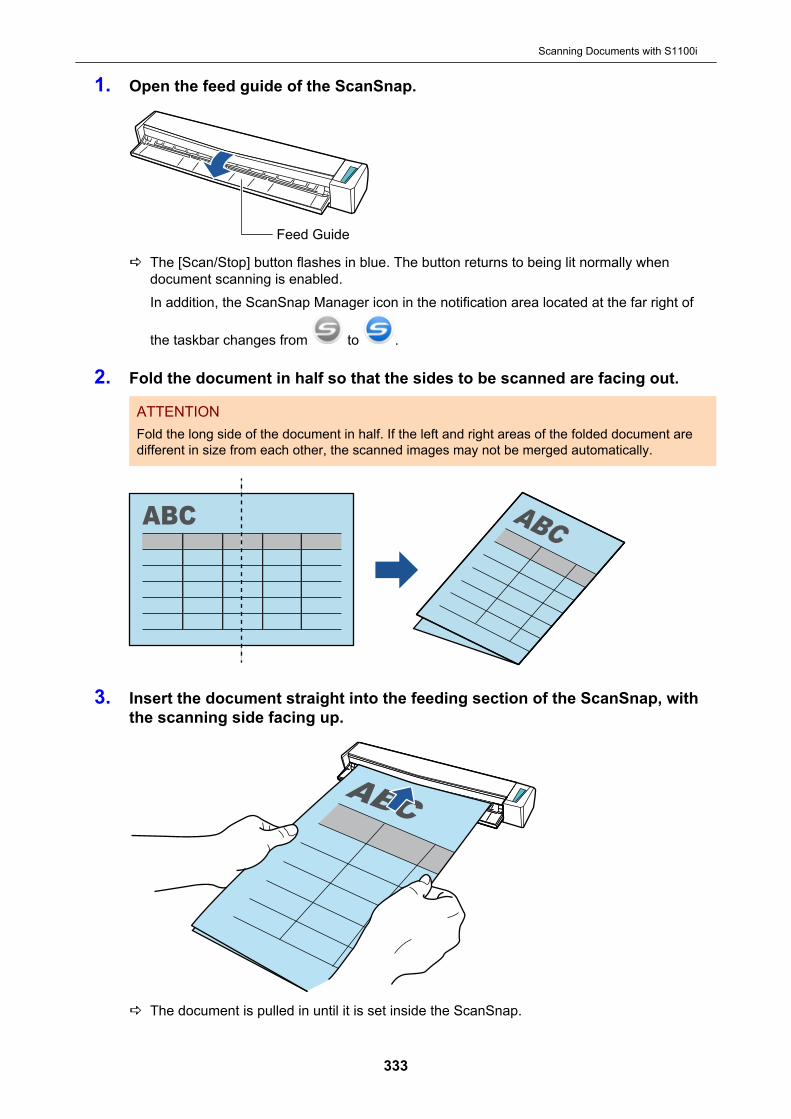
1. Open the feed guide of the ScanSnap.
Feed Guide
a The [Scan/Stop] button flashes in blue. The button returns to being lit normally whendocument scanning is enabled.In addition, the ScanSnap Manager icon in the notification area located at the far right of
the taskbar changes from to .
2. Fold the document in half so that the sides to be scanned are facing out.
ATTENTIONFold the long side of the document in half. If the left and right areas of the folded document aredifferent in size from each other, the scanned images may not be merged automatically.
3. Insert the document straight into the feeding section of the ScanSnap, withthe scanning side facing up.
a The document is pulled in until it is set inside the ScanSnap.
Scanning Documents with S1100i
333

HINTIf you scan a document folded in half with the output guide open, a paper jam may occur. Makesure to close the output guide when you scan a document folded in half.
Output Guide
4. Press the [Scan/Stop] button on the ScanSnap to start scanning.a The [Scan/Stop] button on the ScanSnap flashes in blue and the [ScanSnap Manager -
Image scanning and file saving] window appears while the document is being scanned.When scanning is complete, the scanned image of the scanning side is displayed in thepreview area.
5. Turn over the document and insert it as described in step 3.
ATTENTIONMake sure to scan the front and back sides of the document folded in half consecutively.
a Scanning starts automatically.
HINTRepeat steps 2 to 5 to continue scanning more A3, B4, or Double Letter size documents. Youcan also continue scanning documents smaller than A4 or Letter size.For details about how to perform a scan, refer to "Scanning Documents (S1100i)" (page 320).
6. Press the [Scan/Stop] button on the ScanSnap to finish scanning.a The Quick Menu appears.
7. In the Quick Menu, click the icon of the application to link with ScanSnapManager.
Scanning Documents with S1100i
334

When you select [Save Documents], you can manage scanned images by folder withScanSnap Home.For details, refer to "Managing Paper Documents by Folder on a Computer with ScanSnapHome" (page 365).
HINT[ScanSnap Organizer] is displayed in the Quick Menu when ScanSnap Organizer is installed.To manage scanned images by folder with ScanSnap Organizer, refer to "Managing PaperDocuments by Folder on a Computer with ScanSnap Organizer" (page 368).
a The selected application starts up. For details, refer to the Advanced Operation Guide.
ATTENTIONl You cannot start scanning when the Quick Menu is displayed. Either select an icon from the
Quick Menu and finish the process, or close the Quick Menu before you perform the nextscan.
l Do not move, delete, or rename scanned images using other applications while the QuickMenu is displayed.
HINT
l Clicking displays the description of an application. Placing the mouse cursor over the iconof another application displays the description of the application.
l Performing a scan while an application that can be automatically linked with is activeautomatically starts the linkage between ScanSnap Manager and the application.For details, refer to the Advanced Operation Guide.
Scanning Documents with S1100i
335
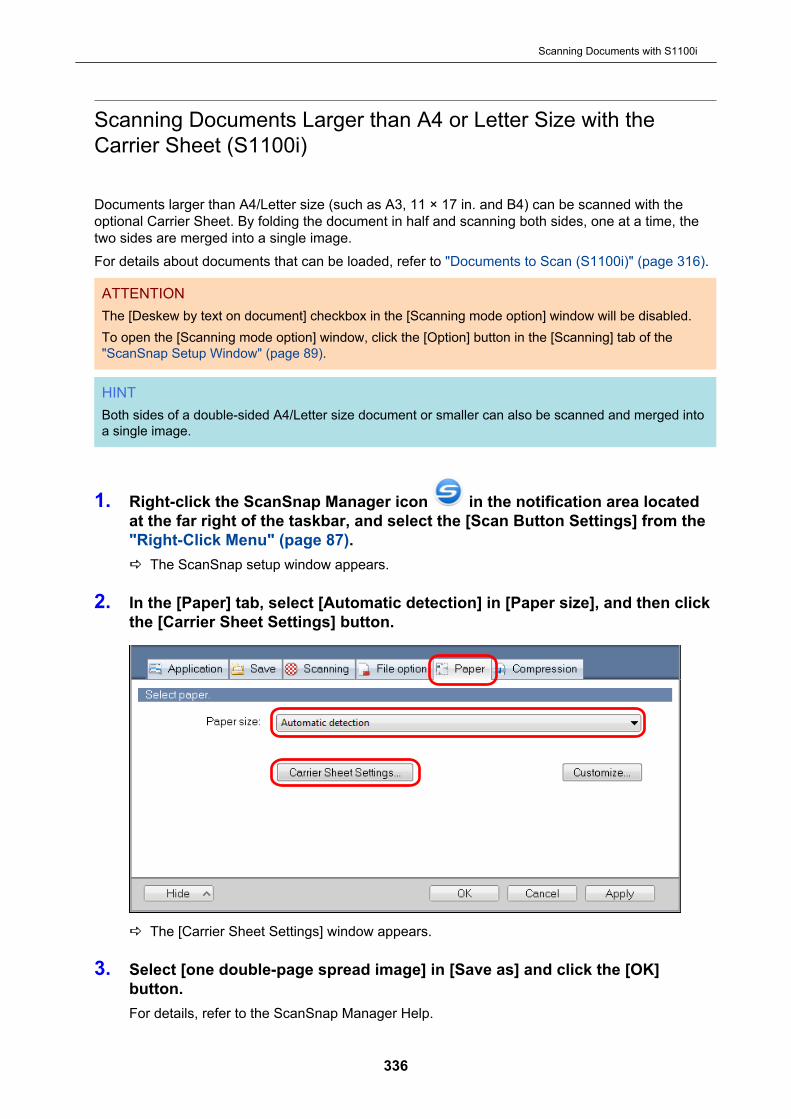
Scanning Documents Larger than A4 or Letter Size with theCarrier Sheet (S1100i)
Documents larger than A4/Letter size (such as A3, 11 × 17 in. and B4) can be scanned with theoptional Carrier Sheet. By folding the document in half and scanning both sides, one at a time, thetwo sides are merged into a single image.For details about documents that can be loaded, refer to "Documents to Scan (S1100i)" (page 316).
ATTENTIONThe [Deskew by text on document] checkbox in the [Scanning mode option] window will be disabled.To open the [Scanning mode option] window, click the [Option] button in the [Scanning] tab of the"ScanSnap Setup Window" (page 89).
HINTBoth sides of a double-sided A4/Letter size document or smaller can also be scanned and merged intoa single image.
1. Right-click the ScanSnap Manager icon in the notification area locatedat the far right of the taskbar, and select the [Scan Button Settings] from the"Right-Click Menu" (page 87).a The ScanSnap setup window appears.
2. In the [Paper] tab, select [Automatic detection] in [Paper size], and then clickthe [Carrier Sheet Settings] button.
a The [Carrier Sheet Settings] window appears.
3. Select [one double-page spread image] in [Save as] and click the [OK]button.For details, refer to the ScanSnap Manager Help.
Scanning Documents with S1100i
336

4. Click the [OK] button to close the ScanSnap setup window.
5. Place the document inside the Carrier Sheet.1. Fold the document in half with the sides to be scanned facing out.
Fold it tightly and smooth out any creases.
2. Open the Carrier Sheet to bind the document.Align the fold line with the right edge of the Carrier Sheet so that the document fits in theupper right-hand corner of the Carrier Sheet.
Scanning Documents with S1100i
337

HINTNote that the front side of the Carrier Sheet has a black and white pattern at the top and athick vertical line in the upper right-hand corner.
6. Insert the part with the black and white pattern straight into the feedingsection of the ScanSnap, with the front side of the Carrier Sheet facing up.
a The Carrier Sheet is pulled in until it is set inside the ScanSnap.
HINTIf you perform a scan using the Carrier Sheet with the output guide open, a paper jam may occurand damage the documents. Make sure to close the output guide when you perform a scan usingthe Carrier Sheet.
Output Guide
7. Press the [Scan/Stop] button on the ScanSnap to start scanning.a Scanning starts and the [ScanSnap Manager - Image scanning and file saving] window
appears. When the front side of the Carrier Sheet is scanned, the scanned image isdisplayed in the preview area.
Scanning Documents with S1100i
338

8. Turn over the Carrier Sheet and insert it as described in step 6.
ATTENTIONMake sure to scan the front and back side of the Carrier Sheet consecutively.
a Scanning starts automatically and the [ScanSnap Manager - Image scanning and filesaving] window appears. When scanning is completed, scanned images of the front andback side of the document inside the Carrier Sheet are displayed as a double-page spreadimage in the preview area.
HINTRepeat steps 5 to 8 to scan more documents larger than A4/Letter size. You can continue toscan documents that can be inserted directly in the ScanSnap.For details about how to perform a scan, refer to "Scanning Documents (S1100i)" (page 320).
9. Press the [Scan/Stop] button on the ScanSnap to finish scanning.a The scanned images of the front and back sides of the document are saved as a double-
page spread image.
Scanning Documents with S1100i
339

ATTENTIONl There may be a line or a gap appearing between the front and back side images. Also when you
scan a thick document in the Carrier Sheet, the scanned image on the left and the scanned imageon the right of a double-page spread image may skew towards each other from the top.These symptoms may be improved when you place the document in the Carrier Sheet as follows:- Fold the document properly- Neatly align the edges of the document with the edges of the Carrier Sheet- Turn over the Carrier Sheet to the other (reverse) side
l If [Automatic detection] is specified for [Paper size] in the [Carrier Sheet Settings] window, anoptimal size will be selected automatically from the available standard sizes (A3, B4, or 11 × 17 in.)in [Paper size]. Note that the size of the image may become smaller than the original documentdepending on the document.
Example: When characters and illustrations are printed to fit in A4 size in the center of an A3size document, the scanned image is output in B4 size.
To output the scanned image in its original size, specify the document size in [Paper size].l Part of the scanned image around where the document is folded may appear missing. In that case,
place the document so that its edge is about 1 mm (0.04 in.) inside from the edge of the CarrierSheet.
Scanning Documents with S1100i
340
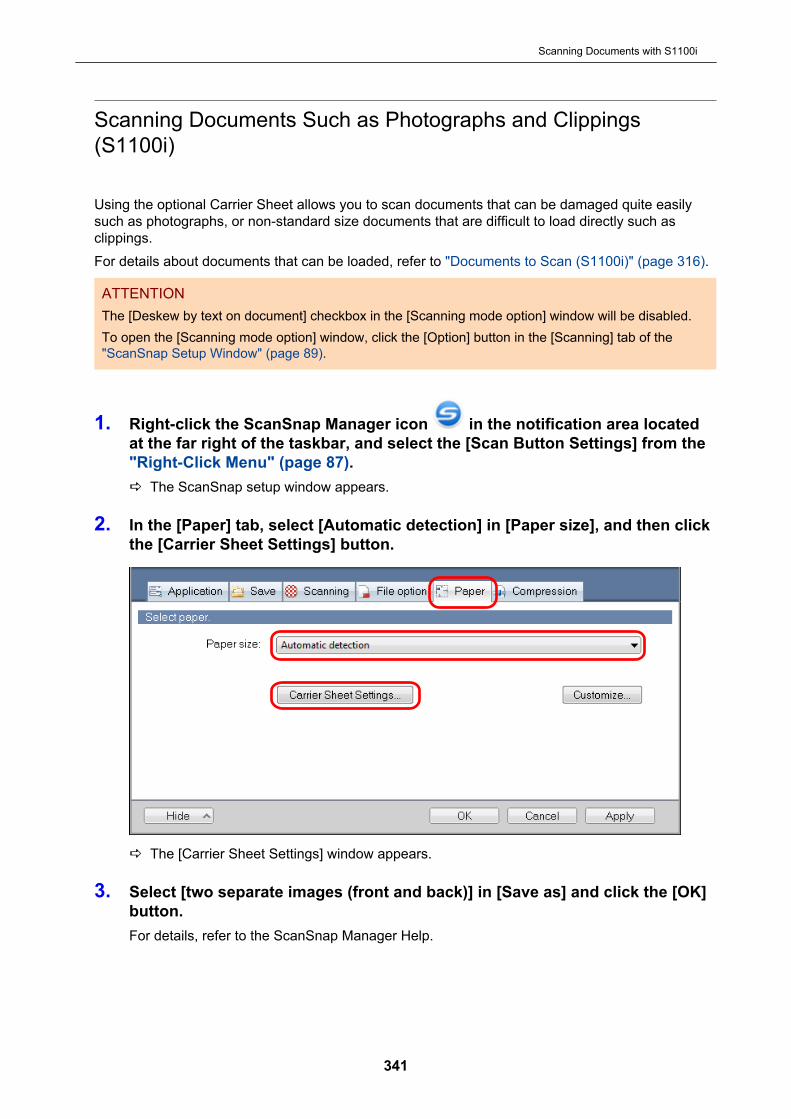
Scanning Documents Such as Photographs and Clippings(S1100i)
Using the optional Carrier Sheet allows you to scan documents that can be damaged quite easilysuch as photographs, or non-standard size documents that are difficult to load directly such asclippings.For details about documents that can be loaded, refer to "Documents to Scan (S1100i)" (page 316).
ATTENTIONThe [Deskew by text on document] checkbox in the [Scanning mode option] window will be disabled.To open the [Scanning mode option] window, click the [Option] button in the [Scanning] tab of the"ScanSnap Setup Window" (page 89).
1. Right-click the ScanSnap Manager icon in the notification area locatedat the far right of the taskbar, and select the [Scan Button Settings] from the"Right-Click Menu" (page 87).a The ScanSnap setup window appears.
2. In the [Paper] tab, select [Automatic detection] in [Paper size], and then clickthe [Carrier Sheet Settings] button.
a The [Carrier Sheet Settings] window appears.
3. Select [two separate images (front and back)] in [Save as] and click the [OK]button.For details, refer to the ScanSnap Manager Help.
Scanning Documents with S1100i
341

4. Click the [OK] button to close the ScanSnap setup window.
5. Place the document inside the Carrier Sheet.Open the Carrier Sheet and place the top of the document against the top center of the CarrierSheet.
6. Insert the part with the black and white pattern straight into the feedingsection of the ScanSnap, with the scanning side of the document inside theCarrier Sheet facing up.
Scanning Documents with S1100i
342
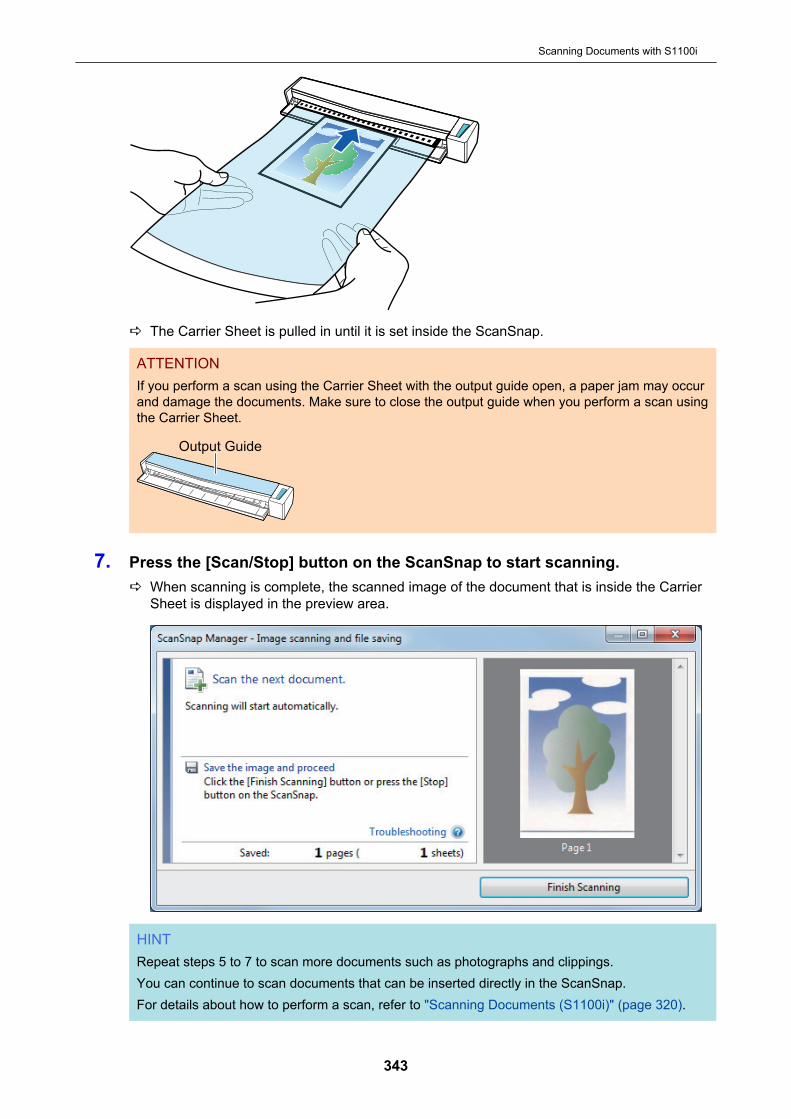
a The Carrier Sheet is pulled in until it is set inside the ScanSnap.
ATTENTIONIf you perform a scan using the Carrier Sheet with the output guide open, a paper jam may occurand damage the documents. Make sure to close the output guide when you perform a scan usingthe Carrier Sheet.
Output Guide
7. Press the [Scan/Stop] button on the ScanSnap to start scanning.a When scanning is complete, the scanned image of the document that is inside the Carrier
Sheet is displayed in the preview area.
HINTRepeat steps 5 to 7 to scan more documents such as photographs and clippings.You can continue to scan documents that can be inserted directly in the ScanSnap.For details about how to perform a scan, refer to "Scanning Documents (S1100i)" (page 320).
Scanning Documents with S1100i
343

8. Press the [Scan/Stop] button on the ScanSnap to finish scanning.a The scanned image is saved.
ATTENTIONl The scanned image is output at the center of the page in the size specified for [Paper size] in the
[Carrier Sheet Settings] window.l If [Automatic detection] is specified for [Paper size] in the [Carrier Sheet Settings] window, an
optimal size will be selected automatically from the available standard sizes in [Paper size]. Notethat the size of the image may become smaller than the original document depending on thedocument scanned, or part of the image may appear missing.
Example: When the contents are printed to fit in A5 size in the center of an A4 size document,the scanned image is output in A5 size.
To output the scanned image in its original size, specify the document size in [Paper size].
HINTIn the following cases, place a blank (white) sheet of paper underneath the document when scanning:l The scanned image is not saved in the correct size (when [Automatic detection] is selected for
[Paper size] in the [Carrier Sheet Settings] window)l Shadows appear around the edges of the scanned imagel Black lines appear around the edges of a uniquely shaped cutting
Scanning Documents with S1100i
344

What You Can Do with Related Software
This section explains the basic operation procedure of software related to the ScanSnap and givesan overview of its functions.l "What You Can Do with ScanSnap Home" (page 346)l "What You Can Do with the ScanSnap Organizer" (page 348)l "What You Can Do with CardMinder" (page 355)
What You Can Do with Related Software
345

What You Can Do with ScanSnap Home
ScanSnap Home is a desktop application used for managing images created from documents thatyou scanned with the ScanSnap and for managing the meta information of those images (such asthe date and time you scanned the documents and the result of the text recognition for the characterstring of a document) for all document types ("Documents", "Business Cards", "Receipts" or"Photos").
What you can do with ScanSnap Home are as follows:For details about operations, refer to the ScanSnap Home Help.
HINTA scanned image together with meta information is referred to as a content data record in ScanSnapHome.
Managing files in a local folder or a network folder comprehensivelyYou can comprehensively manage the files in the local folders or the network folders as well as theimages created from the documents that you scanned with the ScanSnap.
Editing scanned images by using ScanSnap Home viewerYou can perform a variety of editing operations (such as rearranging, adding, or rotating a page) onan image created from a document that you scanned by using ScanSnap Home viewer.
Categorizing content data records by adding tagsYou can display the content data records for each record that is tagged or search for content datarecords by tags after tags are added to content data records in ScanSnap Home.Scan recipes with the ScanSnap and tag them by ingredients such as "Meat" and "Fish" or bycooking methods such as "Boil", "Grill", and "Steam" so that you can search for a recipe with ease.
Performing a particular action on content data records by using otherapplications linked with ScanSnap HomeIf you add an application to ScanSnap Home, you can perform a particular action on the scannedimages or business card data by selecting the added application from ScanSnap Home.
What You Can Do with ScanSnap Home
346

For example, if you add client applications for Dropbox, Evernote, or other cloud services inScanSnap Home, you can send images to those cloud services.Also, adding a business card management application to ScanSnap Home allows you to importcontact information on a business card (in a format such as CSV) to the added application and use itwith the application.
What You Can Do with ScanSnap Home
347
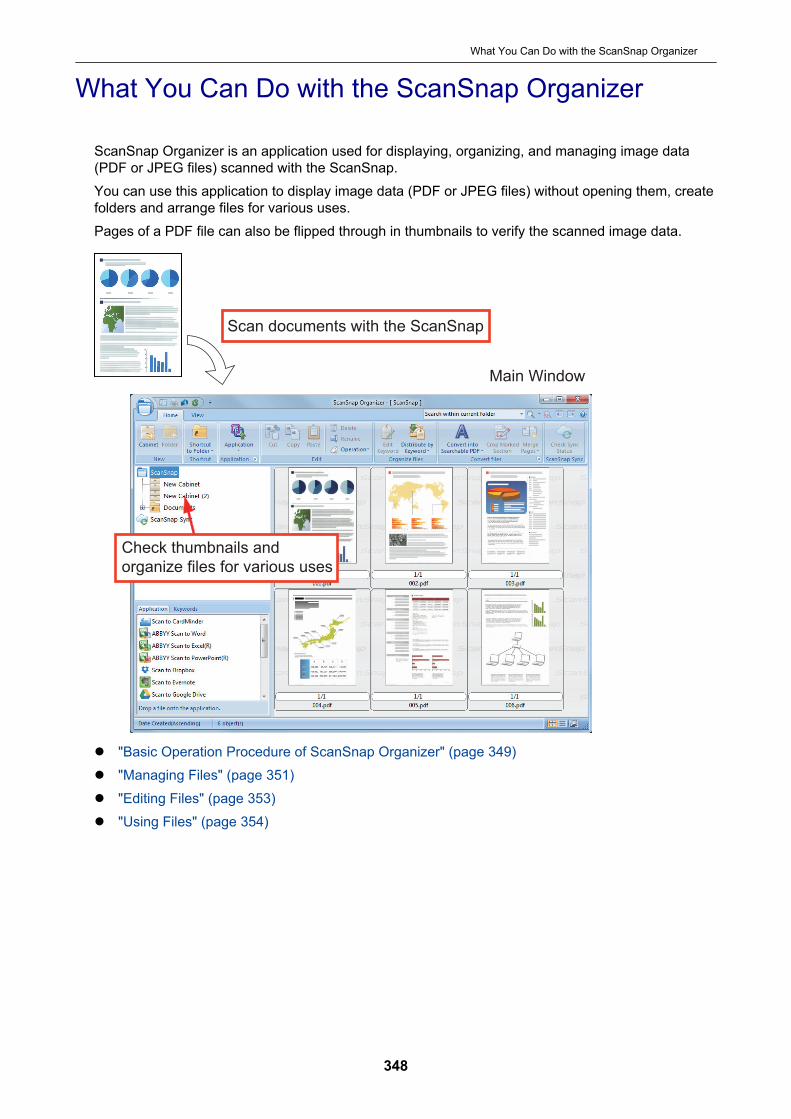
What You Can Do with the ScanSnap Organizer
ScanSnap Organizer is an application used for displaying, organizing, and managing image data(PDF or JPEG files) scanned with the ScanSnap.You can use this application to display image data (PDF or JPEG files) without opening them, createfolders and arrange files for various uses.Pages of a PDF file can also be flipped through in thumbnails to verify the scanned image data.
Main Window
Scan documents with the ScanSnap
Check thumbnails and
organize files for various uses
l "Basic Operation Procedure of ScanSnap Organizer" (page 349)l "Managing Files" (page 351)l "Editing Files" (page 353)l "Using Files" (page 354)
What You Can Do with the ScanSnap Organizer
348
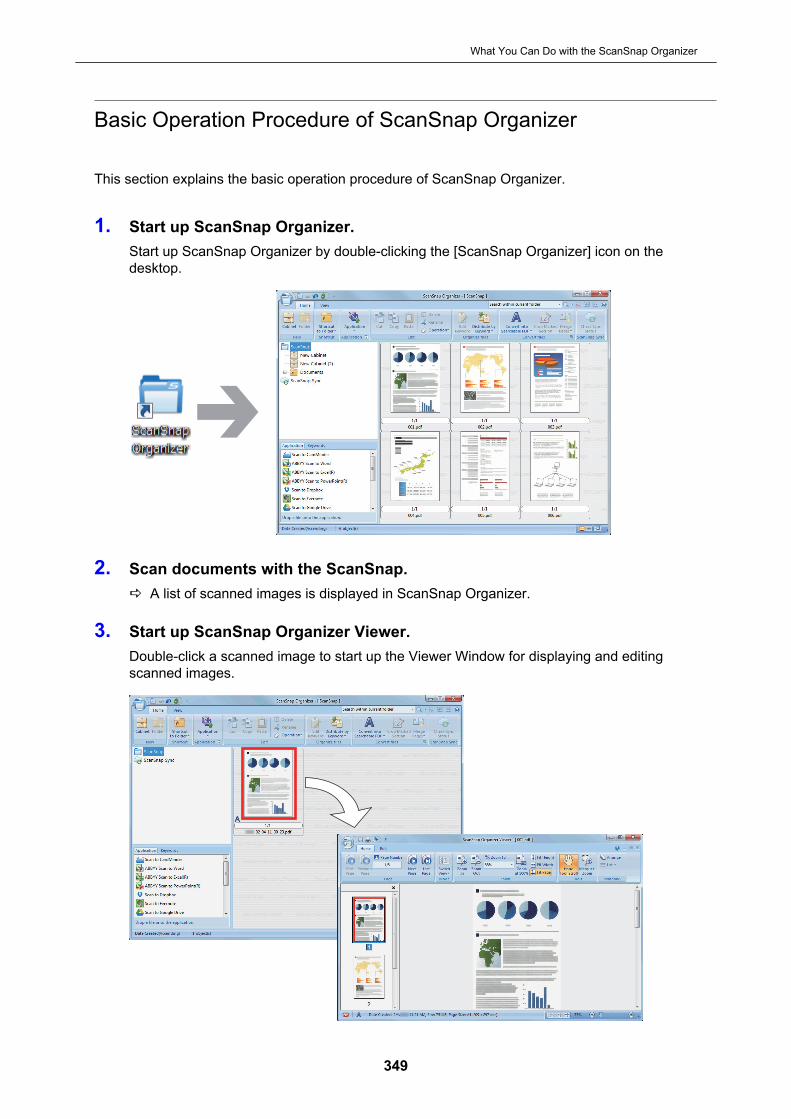
Basic Operation Procedure of ScanSnap Organizer
This section explains the basic operation procedure of ScanSnap Organizer.
1. Start up ScanSnap Organizer.Start up ScanSnap Organizer by double-clicking the [ScanSnap Organizer] icon on thedesktop.
2. Scan documents with the ScanSnap.a A list of scanned images is displayed in ScanSnap Organizer.
3. Start up ScanSnap Organizer Viewer.Double-click a scanned image to start up the Viewer Window for displaying and editingscanned images.
What You Can Do with the ScanSnap Organizer
349

4. In the Viewer Window, check the orientation of scanned images, and checkfor unnecessary pages.Rotate any scanned images that are not oriented correctly. Delete any unnecessary pages.Make other edits such as inserting a page where necessary.
5. Exit ScanSnap Organizer Viewer.To exit ScanSnap Organizer Viewer, click the Application button and then click the [Exit] buttonin the menu that appears.
What You Can Do with the ScanSnap Organizer
350
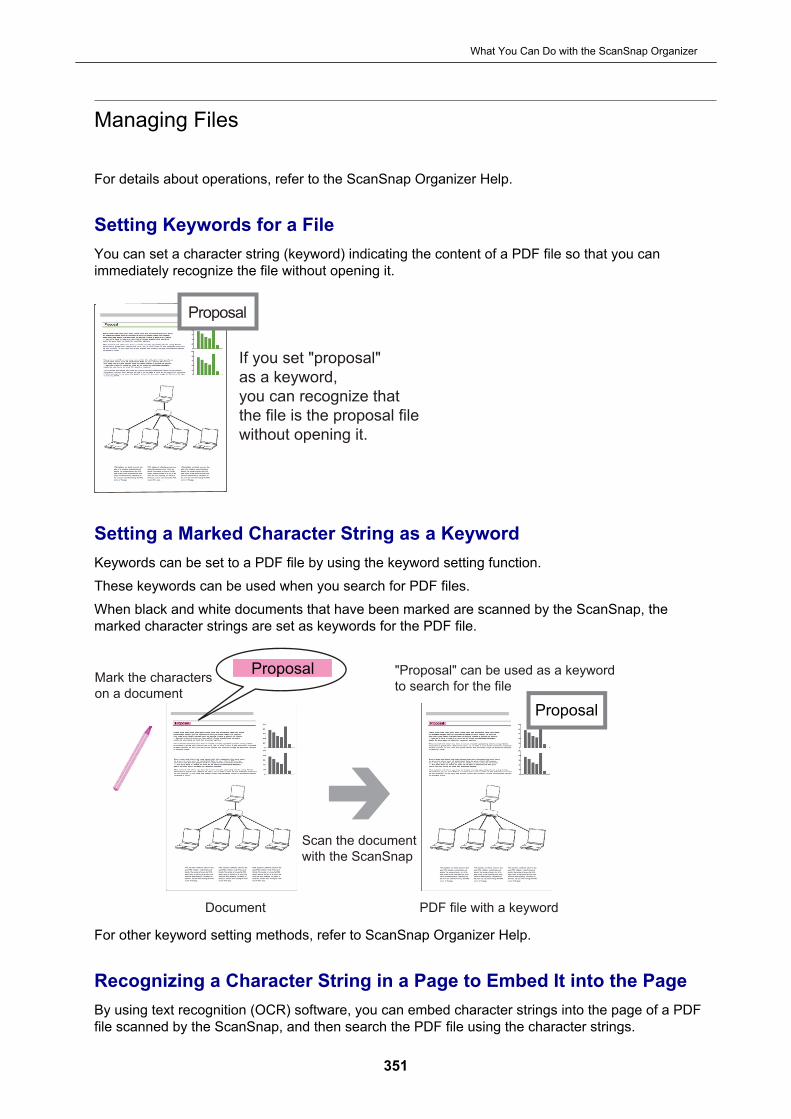
Managing Files
For details about operations, refer to the ScanSnap Organizer Help.
Setting Keywords for a FileYou can set a character string (keyword) indicating the content of a PDF file so that you canimmediately recognize the file without opening it.
Proposal
If you set "proposal"
as a keyword,
you can recognize that
the file is the proposal file
without opening it.
Setting a Marked Character String as a KeywordKeywords can be set to a PDF file by using the keyword setting function.These keywords can be used when you search for PDF files.When black and white documents that have been marked are scanned by the ScanSnap, themarked character strings are set as keywords for the PDF file.
Mark the characters
on a document
"Proposal" can be used as a keyword
to search for the file
Document PDF file with a keyword
Proposal
Proposal
Scan the document
with the ScanSnap
For other keyword setting methods, refer to ScanSnap Organizer Help.
Recognizing a Character String in a Page to Embed It into the PageBy using text recognition (OCR) software, you can embed character strings into the page of a PDFfile scanned by the ScanSnap, and then search the PDF file using the character strings.
What You Can Do with the ScanSnap Organizer
351
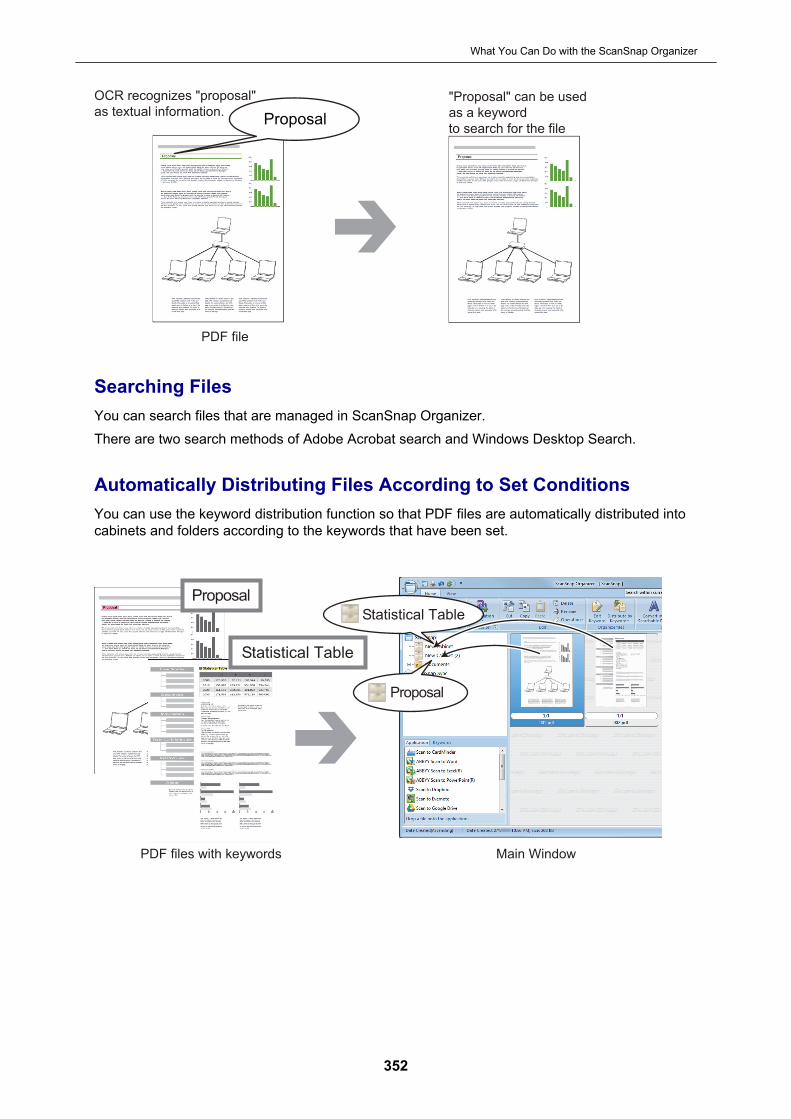
OCR recognizes "proposal"
as textual information.
PDF file
"Proposal" can be used
as a keyword
to search for the fileProposal
Searching FilesYou can search files that are managed in ScanSnap Organizer.There are two search methods of Adobe Acrobat search and Windows Desktop Search.
Automatically Distributing Files According to Set ConditionsYou can use the keyword distribution function so that PDF files are automatically distributed intocabinets and folders according to the keywords that have been set.
Proposal
Proposal
PDF files with keywords Main Window
Statistical Table
Statistical Table
What You Can Do with the ScanSnap Organizer
352
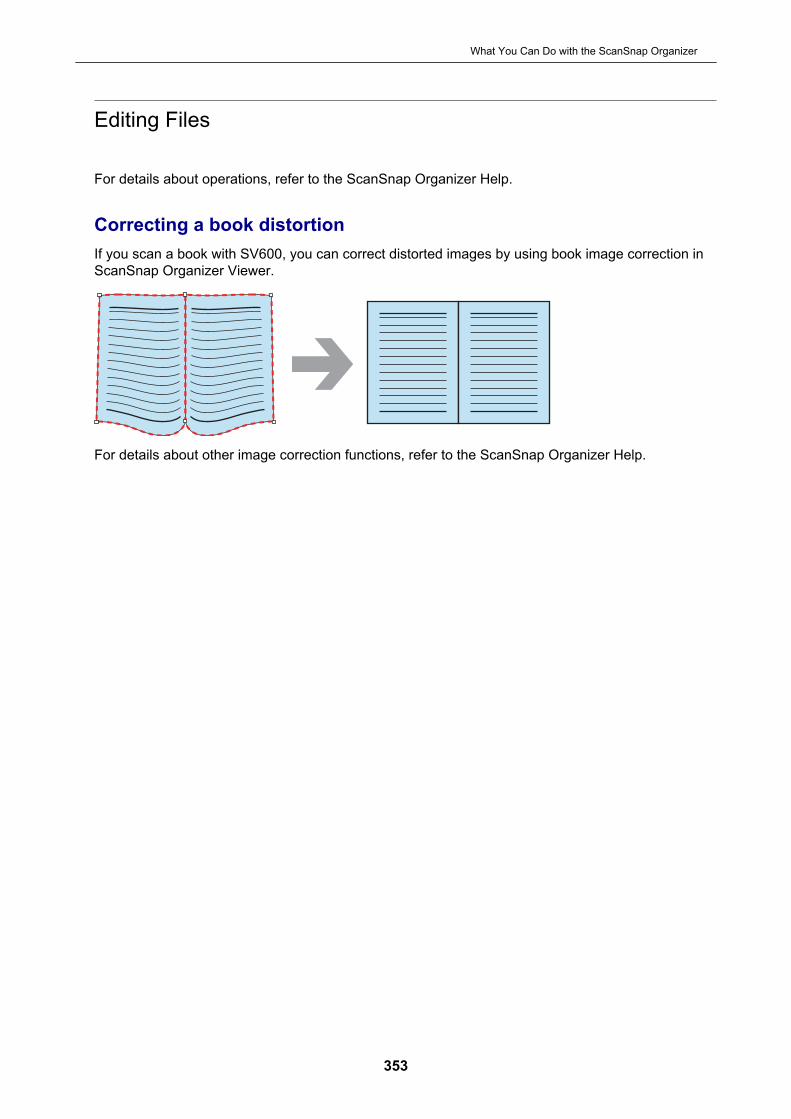
Editing Files
For details about operations, refer to the ScanSnap Organizer Help.
Correcting a book distortionIf you scan a book with SV600, you can correct distorted images by using book image correction inScanSnap Organizer Viewer.
For details about other image correction functions, refer to the ScanSnap Organizer Help.
What You Can Do with the ScanSnap Organizer
353
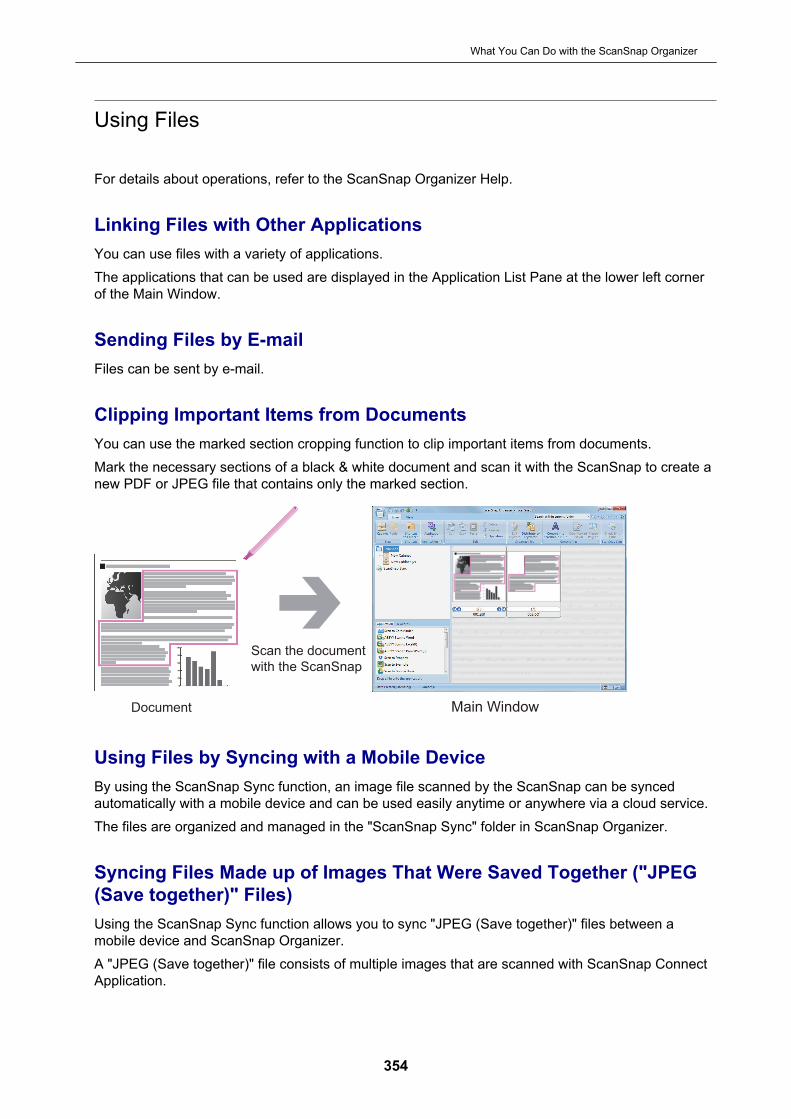
Using Files
For details about operations, refer to the ScanSnap Organizer Help.
Linking Files with Other ApplicationsYou can use files with a variety of applications.The applications that can be used are displayed in the Application List Pane at the lower left cornerof the Main Window.
Sending Files by E-mailFiles can be sent by e-mail.
Clipping Important Items from DocumentsYou can use the marked section cropping function to clip important items from documents.Mark the necessary sections of a black & white document and scan it with the ScanSnap to create anew PDF or JPEG file that contains only the marked section.
Document Main Window
Scan the document
with the ScanSnap
Using Files by Syncing with a Mobile DeviceBy using the ScanSnap Sync function, an image file scanned by the ScanSnap can be syncedautomatically with a mobile device and can be used easily anytime or anywhere via a cloud service.The files are organized and managed in the "ScanSnap Sync" folder in ScanSnap Organizer.
Syncing Files Made up of Images That Were Saved Together ("JPEG(Save together)" Files)Using the ScanSnap Sync function allows you to sync "JPEG (Save together)" files between amobile device and ScanSnap Organizer.A "JPEG (Save together)" file consists of multiple images that are scanned with ScanSnap ConnectApplication.
What You Can Do with the ScanSnap Organizer
354
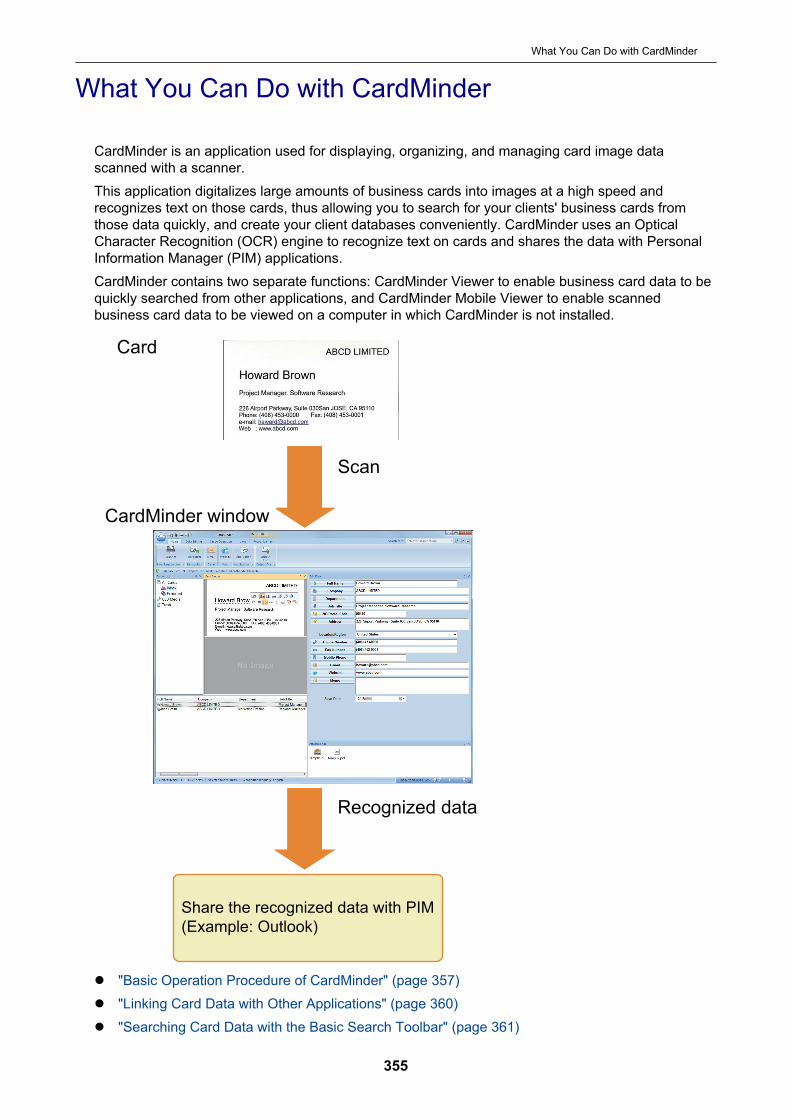
What You Can Do with CardMinder
CardMinder is an application used for displaying, organizing, and managing card image datascanned with a scanner.This application digitalizes large amounts of business cards into images at a high speed andrecognizes text on those cards, thus allowing you to search for your clients' business cards fromthose data quickly, and create your client databases conveniently. CardMinder uses an OpticalCharacter Recognition (OCR) engine to recognize text on cards and shares the data with PersonalInformation Manager (PIM) applications.CardMinder contains two separate functions: CardMinder Viewer to enable business card data to bequickly searched from other applications, and CardMinder Mobile Viewer to enable scannedbusiness card data to be viewed on a computer in which CardMinder is not installed.
Share the recognized data with PIM
(Example: Outlook)
Card
Scan
CardMinder window
Recognized data
l "Basic Operation Procedure of CardMinder" (page 357)l "Linking Card Data with Other Applications" (page 360)l "Searching Card Data with the Basic Search Toolbar" (page 361)
What You Can Do with CardMinder
355

l "Searching Card Data with CardMinder Viewer" (page 362)l "Attaching a File to Card Data" (page 363)
What You Can Do with CardMinder
356
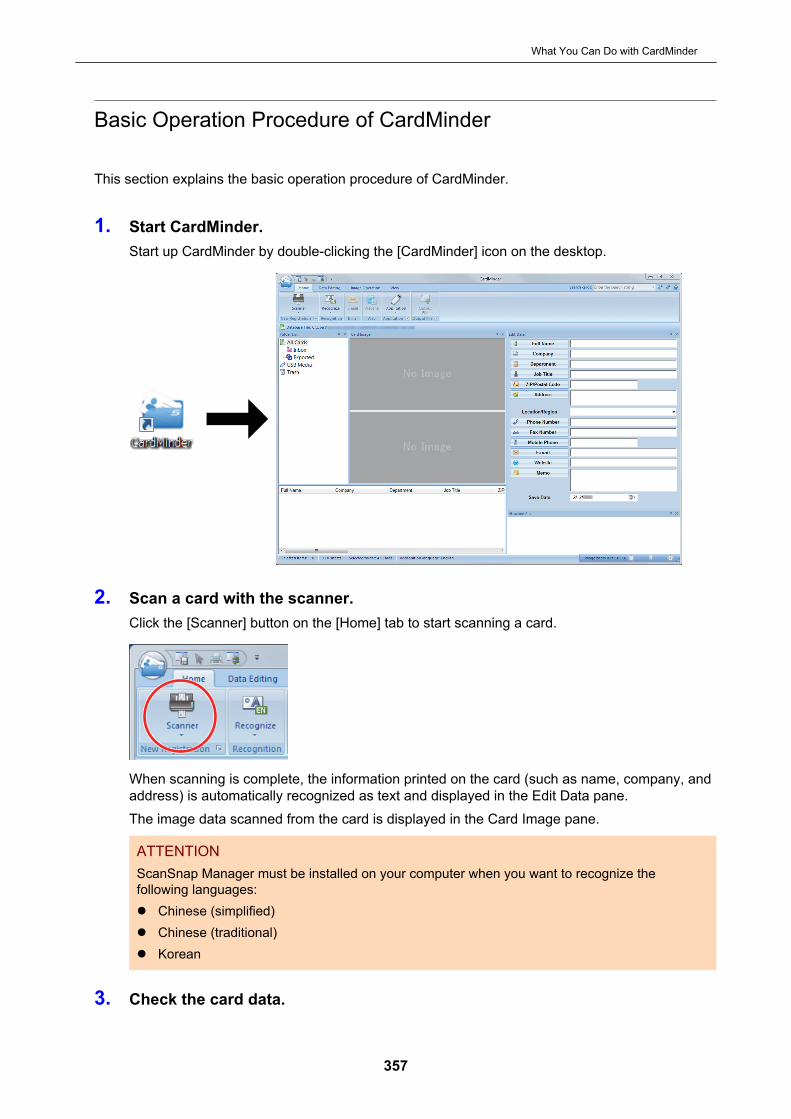
Basic Operation Procedure of CardMinder
This section explains the basic operation procedure of CardMinder.
1. Start CardMinder.Start up CardMinder by double-clicking the [CardMinder] icon on the desktop.
2. Scan a card with the scanner.Click the [Scanner] button on the [Home] tab to start scanning a card.
When scanning is complete, the information printed on the card (such as name, company, andaddress) is automatically recognized as text and displayed in the Edit Data pane.The image data scanned from the card is displayed in the Card Image pane.
ATTENTIONScanSnap Manager must be installed on your computer when you want to recognize thefollowing languages:l Chinese (simplified)l Chinese (traditional)l Korean
3. Check the card data.
What You Can Do with CardMinder
357
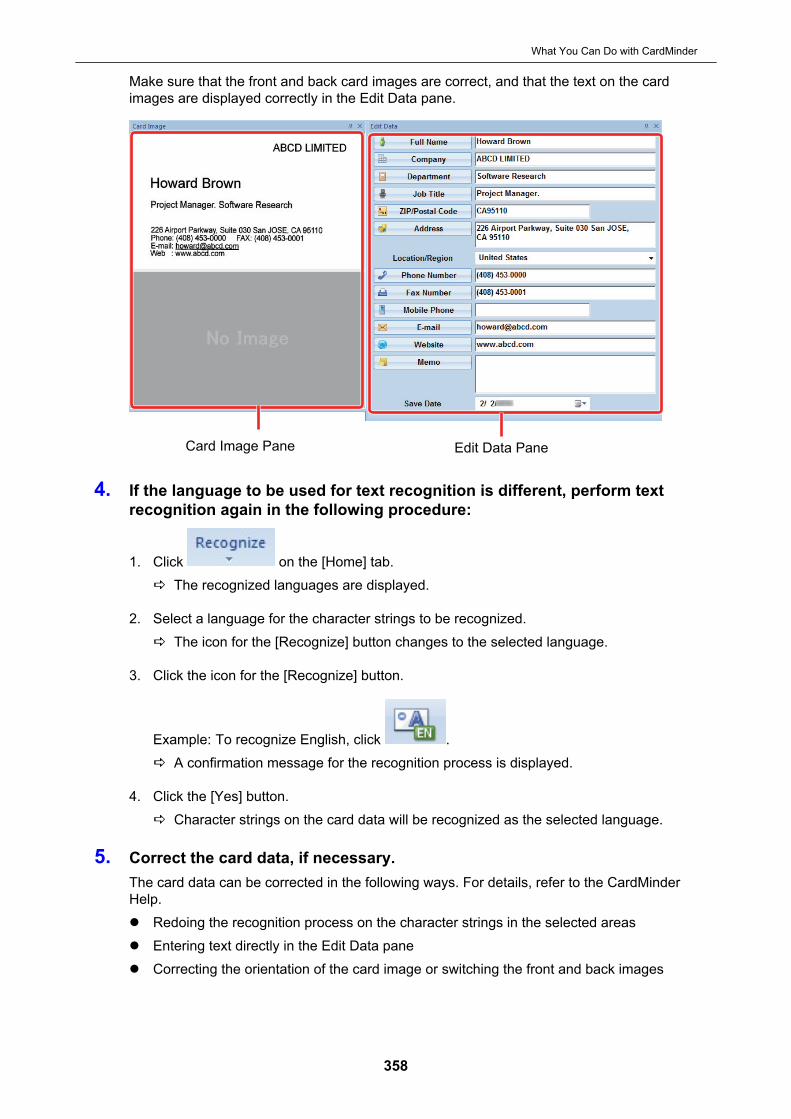
Make sure that the front and back card images are correct, and that the text on the cardimages are displayed correctly in the Edit Data pane.
Edit Data PaneCard Image Pane
4. If the language to be used for text recognition is different, perform textrecognition again in the following procedure:
1. Click on the [Home] tab.a The recognized languages are displayed.
2. Select a language for the character strings to be recognized.a The icon for the [Recognize] button changes to the selected language.
3. Click the icon for the [Recognize] button.
Example: To recognize English, click .a A confirmation message for the recognition process is displayed.
4. Click the [Yes] button.a Character strings on the card data will be recognized as the selected language.
5. Correct the card data, if necessary.The card data can be corrected in the following ways. For details, refer to the CardMinderHelp.l Redoing the recognition process on the character strings in the selected areasl Entering text directly in the Edit Data panel Correcting the orientation of the card image or switching the front and back images
What You Can Do with CardMinder
358
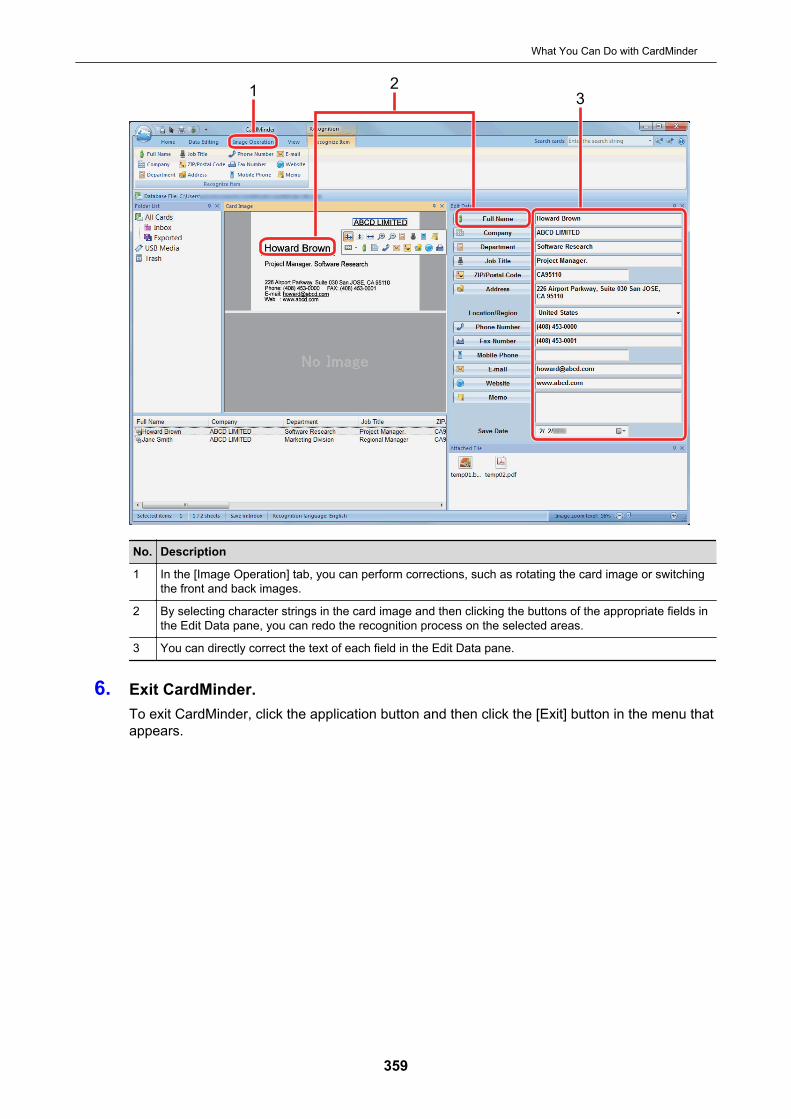
2
31
No. Description
1 In the [Image Operation] tab, you can perform corrections, such as rotating the card image or switchingthe front and back images.
2 By selecting character strings in the card image and then clicking the buttons of the appropriate fields inthe Edit Data pane, you can redo the recognition process on the selected areas.
3 You can directly correct the text of each field in the Edit Data pane.
6. Exit CardMinder.To exit CardMinder, click the application button and then click the [Exit] button in the menu thatappears.
What You Can Do with CardMinder
359
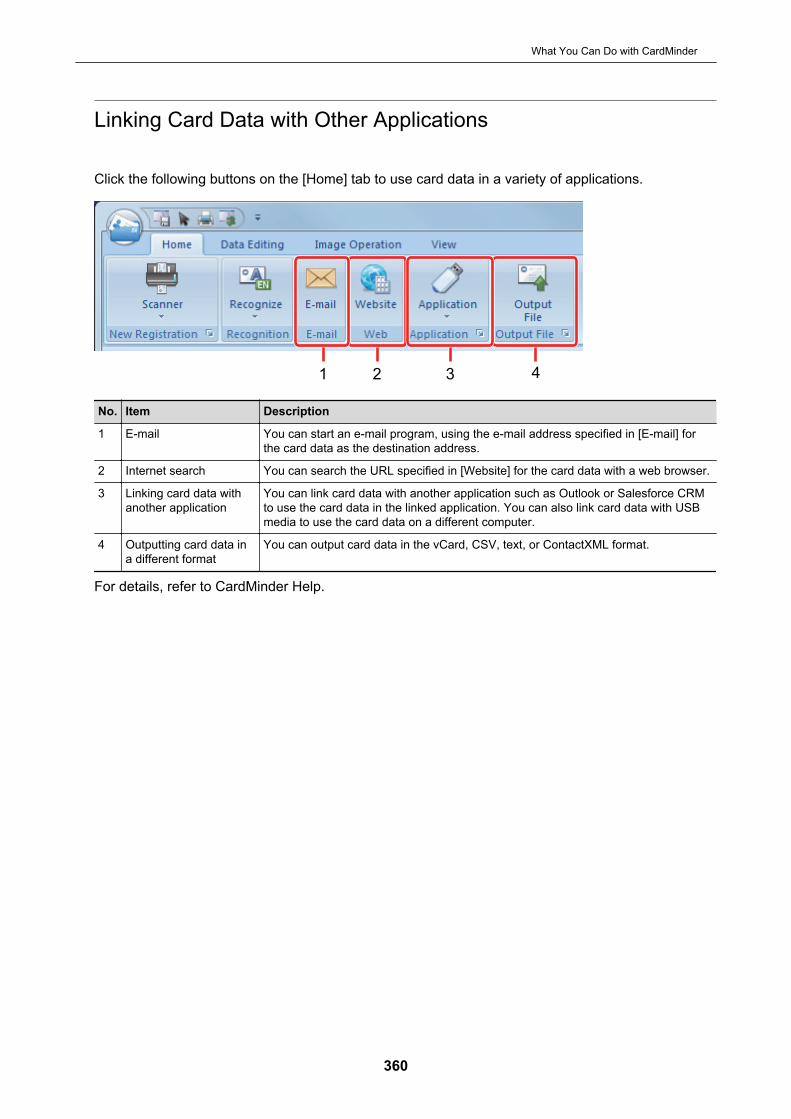
Linking Card Data with Other Applications
Click the following buttons on the [Home] tab to use card data in a variety of applications.
1 2 3 4
No. Item Description
1 E-mail You can start an e-mail program, using the e-mail address specified in [E-mail] forthe card data as the destination address.
2 Internet search You can search the URL specified in [Website] for the card data with a web browser.
3 Linking card data withanother application
You can link card data with another application such as Outlook or Salesforce CRMto use the card data in the linked application. You can also link card data with USBmedia to use the card data on a different computer.
4 Outputting card data ina different format
You can output card data in the vCard, CSV, text, or ContactXML format.
For details, refer to CardMinder Help.
What You Can Do with CardMinder
360

Searching Card Data with the Basic Search Toolbar
This section explains how to search card data with the CardMinder Basic Search Toolbar.
Search cards (Basic Search Toolbar)
To search card data, type in a search term (such as an individual name or a company name) in theBasic Search Toolbar.The search results are displayed in the main window.
If multiple cards match the search conditions, click to display the next result of the search inthe main window.
What You Can Do with CardMinder
361
Searching Card Data with CardMinder Viewer
This section explains how to search card data with CardMinder Viewer.Even when CardMinder is not running, you can search card data by using a character string inanother application (such as Microsoft Notepad) as the keyword for searching.
1. Drag the mouse to select a character string you want to search for.
2. Press [Alt] + [F3] keys on the keyboard at the same time.a CardMinder Viewer starts and the card data found, based on the search conditions entered
(such as an individual name and a company name), is displayed in the window.
If multiple cards match the search conditions, click to display the next result of thesearch in the CardMinder Viewer window.
HINT
Click to display in the CardMinder window the details of the card data selected in the CardMinderViewer window.
What You Can Do with CardMinder
362
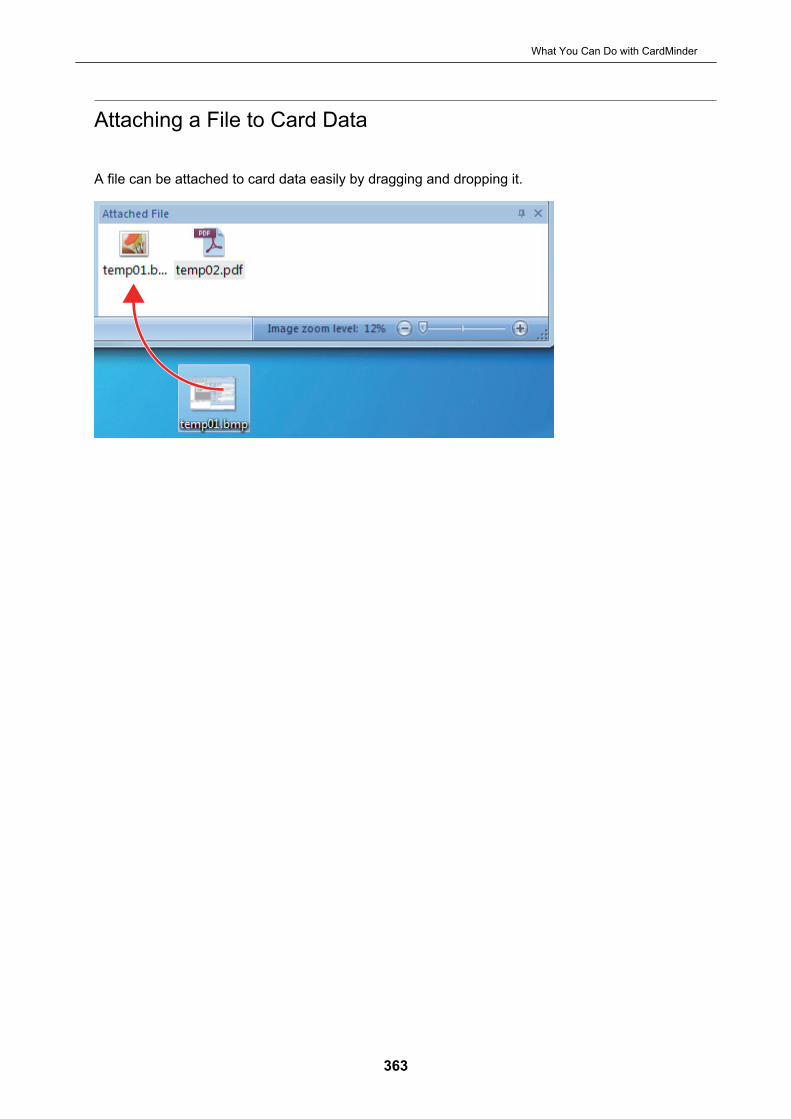
Attaching a File to Card Data
A file can be attached to card data easily by dragging and dropping it.
What You Can Do with CardMinder
363

Useful Usages
This section explains how to use related software for the scanned image that is created after adocument is scanned with the ScanSnap.l "Managing Paper Documents by Folder on a Computer with ScanSnap Home" (page 365)l "Managing Paper Documents by Folder on a Computer with ScanSnap Organizer" (page 368)l "Saving Business Card Data to a Computer with ScanSnap Home" (page 371)l "Saving Business Cards to a Computer with CardMinder" (page 374)l "Saving Receipt Data to a Computer" (page 377)l "Creating a Photo Album and Saving it to a Computer" (page 380)
Useful Usages
364
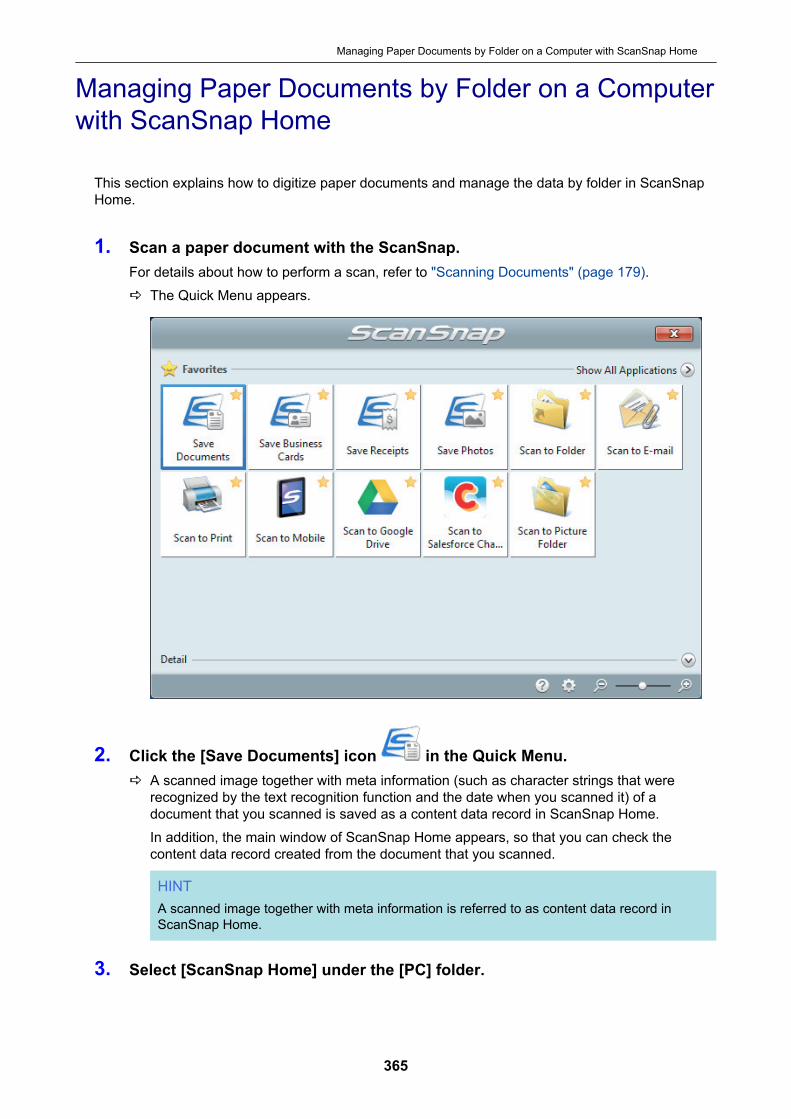
Managing Paper Documents by Folder on a Computerwith ScanSnap Home
This section explains how to digitize paper documents and manage the data by folder in ScanSnapHome.
1. Scan a paper document with the ScanSnap.For details about how to perform a scan, refer to "Scanning Documents" (page 179).a The Quick Menu appears.
2. Click the [Save Documents] icon in the Quick Menu.a A scanned image together with meta information (such as character strings that were
recognized by the text recognition function and the date when you scanned it) of adocument that you scanned is saved as a content data record in ScanSnap Home.In addition, the main window of ScanSnap Home appears, so that you can check thecontent data record created from the document that you scanned.
HINTA scanned image together with meta information is referred to as content data record inScanSnap Home.
3. Select [ScanSnap Home] under the [PC] folder.
Managing Paper Documents by Folder on a Computer with ScanSnap Home
365
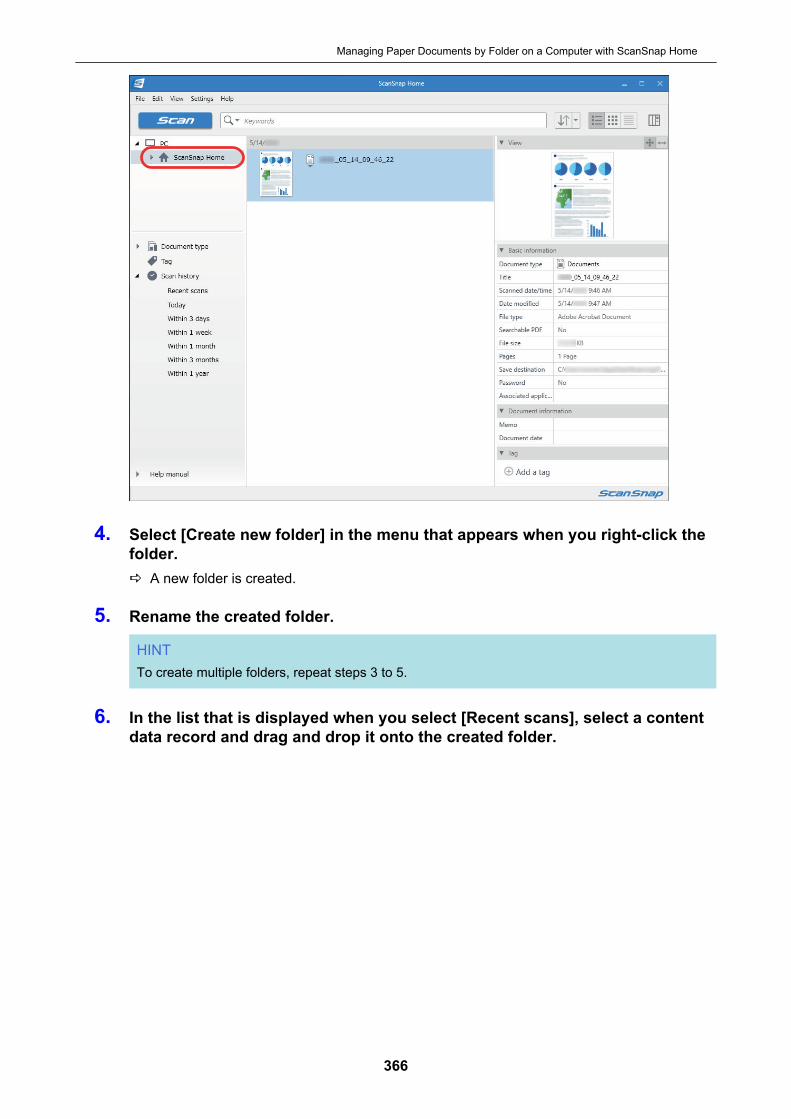
4. Select [Create new folder] in the menu that appears when you right-click thefolder.a A new folder is created.
5. Rename the created folder.
HINTTo create multiple folders, repeat steps 3 to 5.
6. In the list that is displayed when you select [Recent scans], select a contentdata record and drag and drop it onto the created folder.
Managing Paper Documents by Folder on a Computer with ScanSnap Home
366

a The content data record is moved to the folder.
HINTScanSnap Home has various functions for using saved content data records.For details, refer to the ScanSnap Home Help.
Managing Paper Documents by Folder on a Computer with ScanSnap Home
367
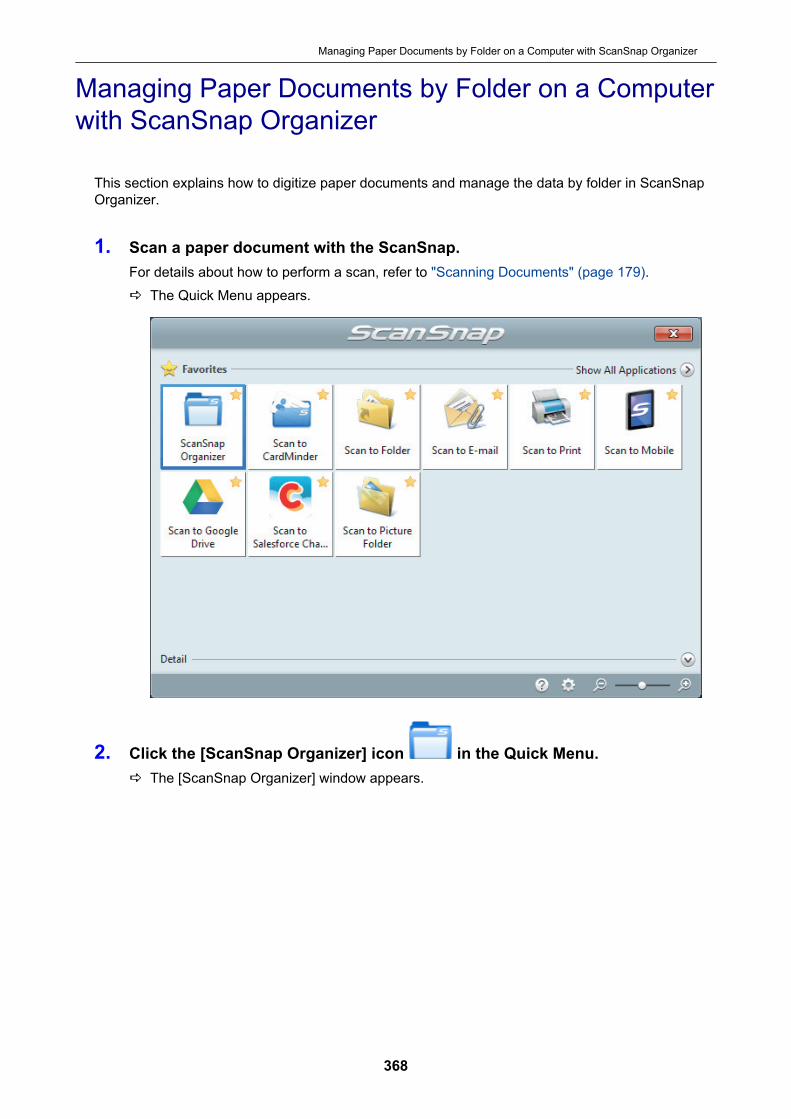
Managing Paper Documents by Folder on a Computerwith ScanSnap Organizer
This section explains how to digitize paper documents and manage the data by folder in ScanSnapOrganizer.
1. Scan a paper document with the ScanSnap.For details about how to perform a scan, refer to "Scanning Documents" (page 179).a The Quick Menu appears.
2. Click the [ScanSnap Organizer] icon in the Quick Menu.a The [ScanSnap Organizer] window appears.
Managing Paper Documents by Folder on a Computer with ScanSnap Organizer
368

3. Click on the [Home] tab.a A new cabinet is created in the folder list.
4. Rename the created cabinet.
HINTTo create multiple cabinets, repeat steps 3 to 4.
5. Select the scanned image from the file list, and drag and drop it to thecabinet.
Managing Paper Documents by Folder on a Computer with ScanSnap Organizer
369
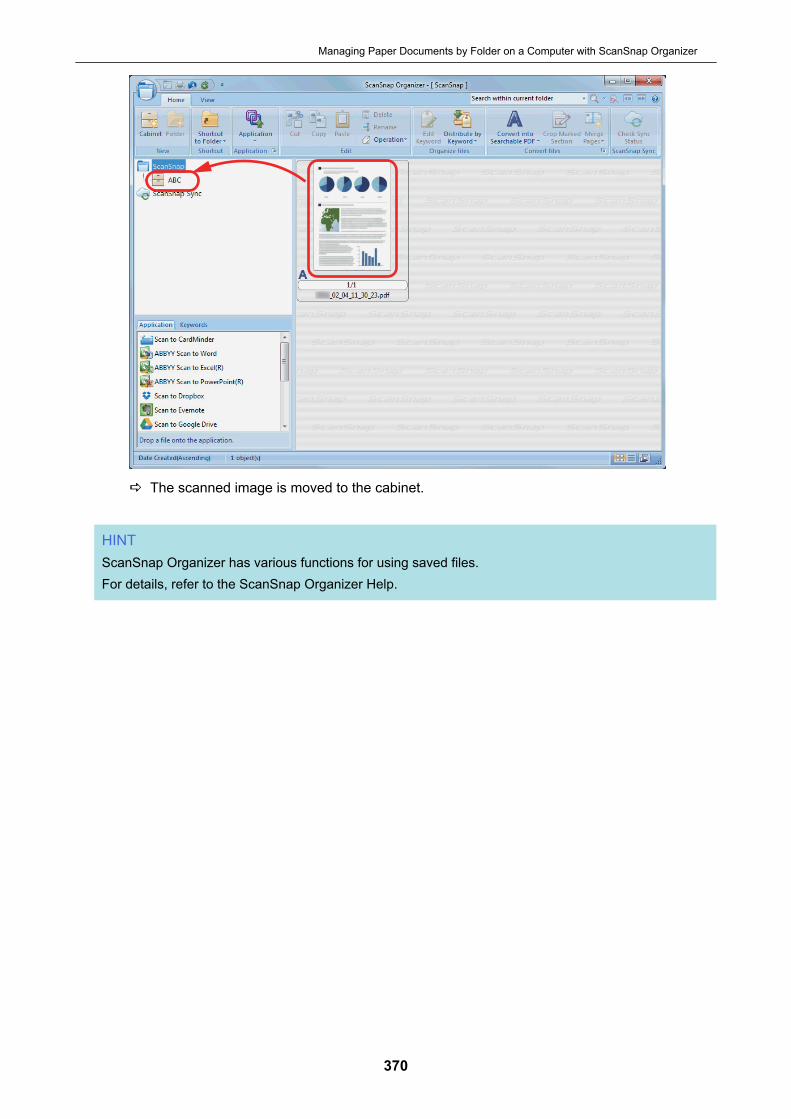
a The scanned image is moved to the cabinet.
HINTScanSnap Organizer has various functions for using saved files.For details, refer to the ScanSnap Organizer Help.
Managing Paper Documents by Folder on a Computer with ScanSnap Organizer
370

Saving Business Card Data to a Computer withScanSnap Home
This section explains how to digitize business cards and save the card data in ScanSnap Home.
1. Scan business cards with the ScanSnap.For details about how to perform a scan, refer to "Scanning Documents" (page 179).a The Quick Menu appears.
2. Click the [Save Business Cards] icon in the Quick Menu.a A scanned image together with meta information (such as character strings that were
recognized by the text recognition function and the date when you scanned it) of a businesscard that you scanned is saved as a content data record in ScanSnap Home. In addition,the main window of ScanSnap Home appears, so that you can check the content datarecord created from the business card that you scanned.
HINTA scanned image together with meta information is referred to as content data record inScanSnap Home.
Saving Business Card Data to a Computer with ScanSnap Home
371
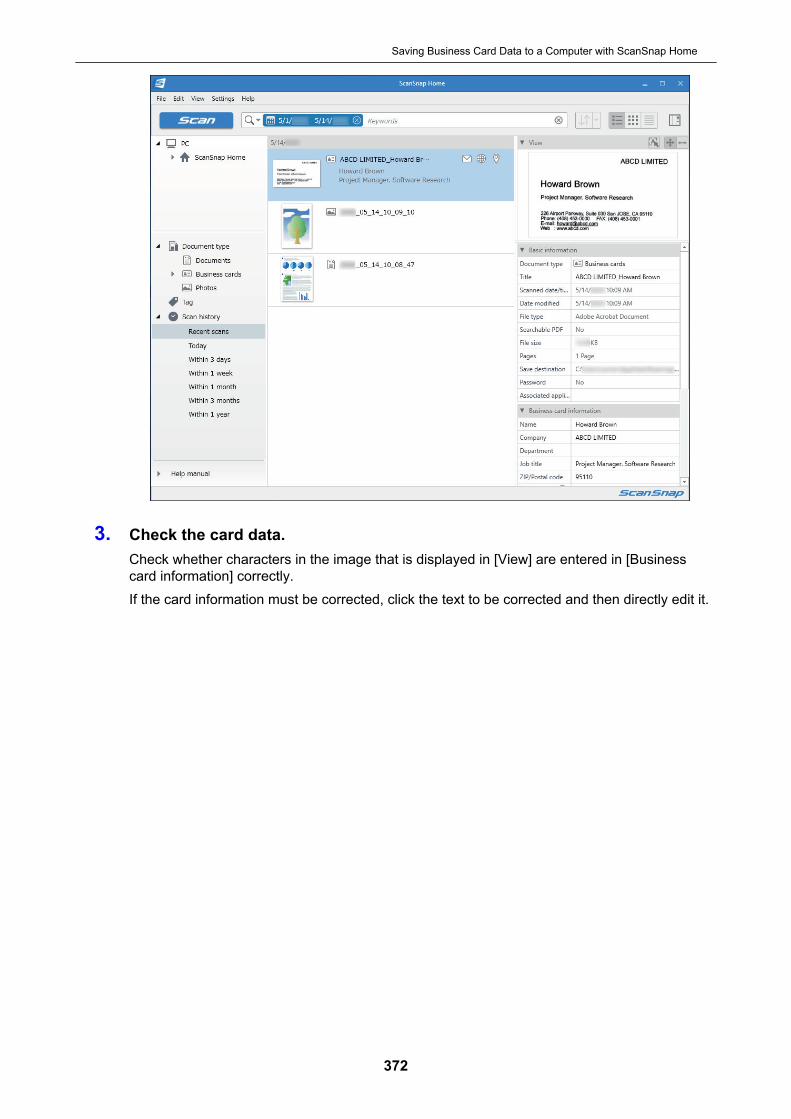
3. Check the card data.Check whether characters in the image that is displayed in [View] are entered in [Businesscard information] correctly.If the card information must be corrected, click the text to be corrected and then directly edit it.
Saving Business Card Data to a Computer with ScanSnap Home
372
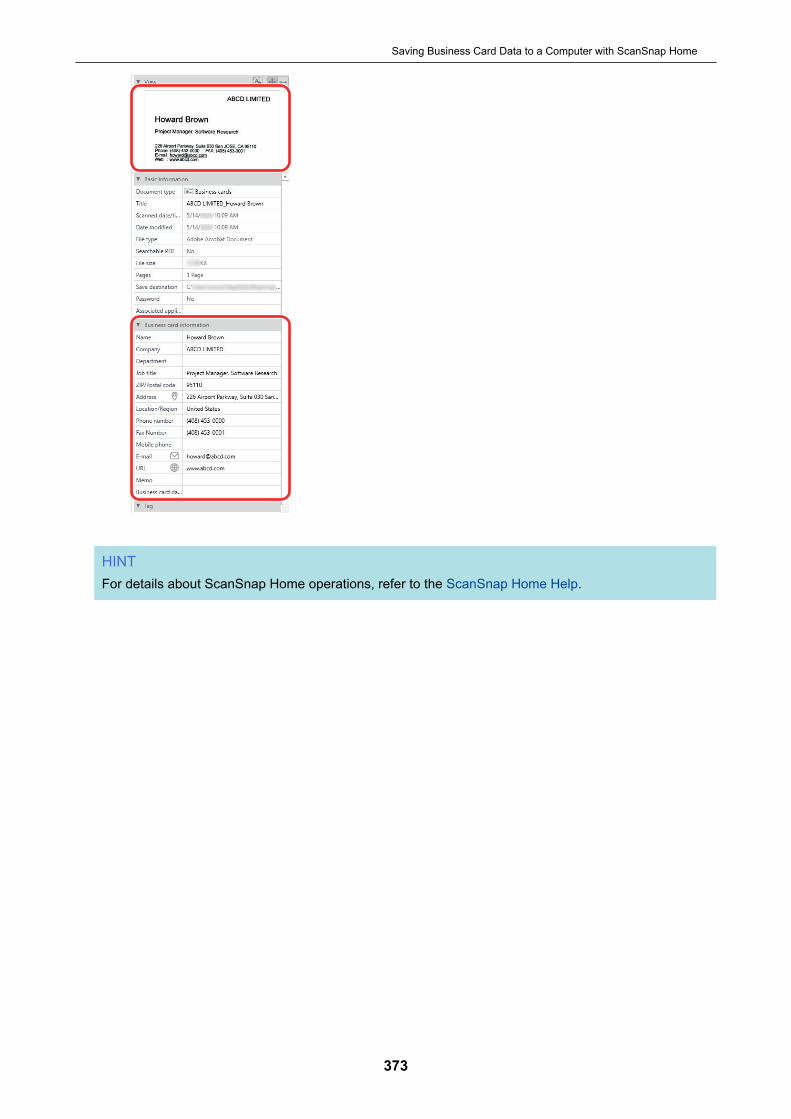
HINTFor details about ScanSnap Home operations, refer to the ScanSnap Home Help.
Saving Business Card Data to a Computer with ScanSnap Home
373
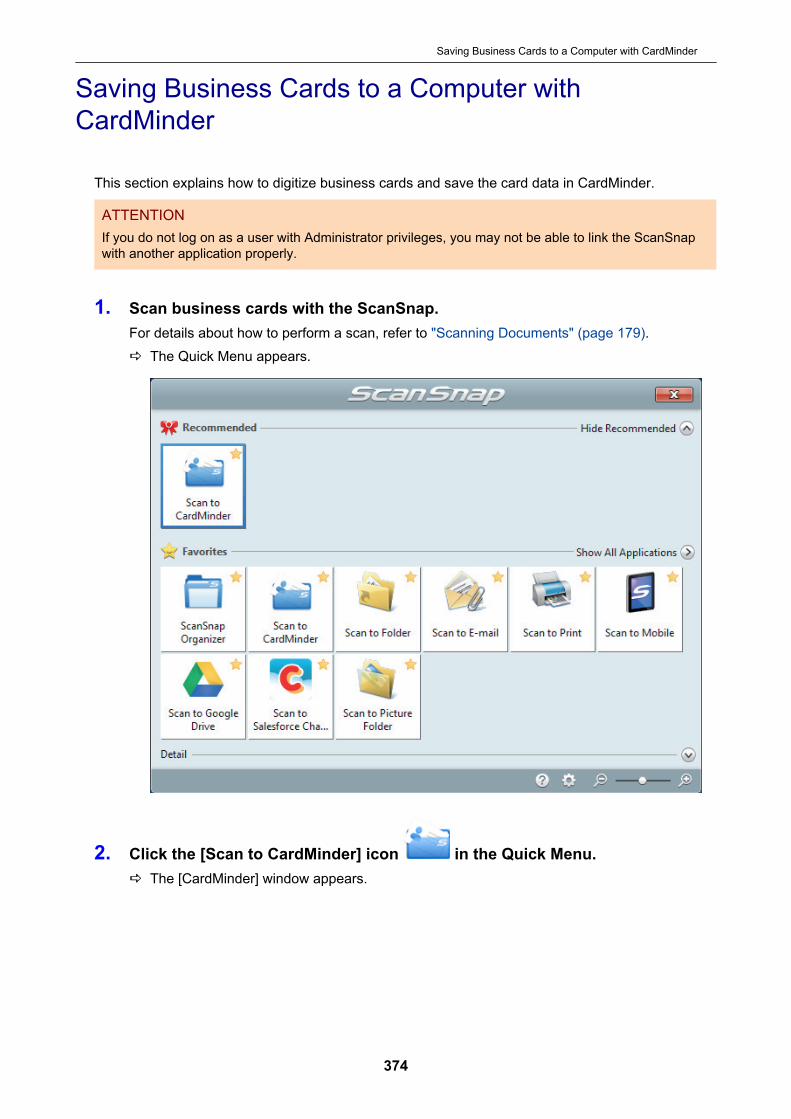
Saving Business Cards to a Computer withCardMinder
This section explains how to digitize business cards and save the card data in CardMinder.
ATTENTIONIf you do not log on as a user with Administrator privileges, you may not be able to link the ScanSnapwith another application properly.
1. Scan business cards with the ScanSnap.For details about how to perform a scan, refer to "Scanning Documents" (page 179).a The Quick Menu appears.
2. Click the [Scan to CardMinder] icon in the Quick Menu.a The [CardMinder] window appears.
Saving Business Cards to a Computer with CardMinder
374

3. Check the card data.Make sure that the text on the card images are displayed correctly in the Edit Data pane.If the card data must be corrected, click the text to be corrected and then directly edit it.
Edit Data PaneCard Image Pane
HINTWhen you scan double-sided business cards, you must scan one side of each card and edit the carddata in CardMinder.
Saving Business Cards to a Computer with CardMinder
375

For details, refer to the CardMinder Help.
Saving Business Cards to a Computer with CardMinder
376
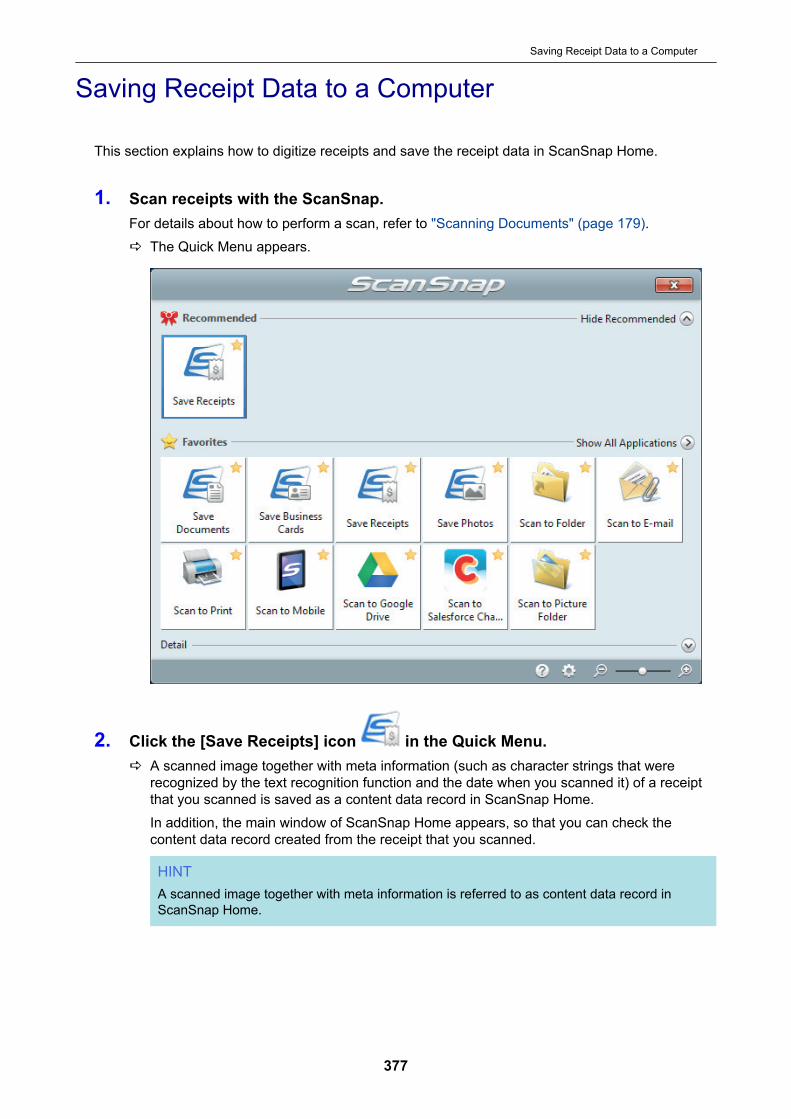
Saving Receipt Data to a Computer
This section explains how to digitize receipts and save the receipt data in ScanSnap Home.
1. Scan receipts with the ScanSnap.For details about how to perform a scan, refer to "Scanning Documents" (page 179).a The Quick Menu appears.
2. Click the [Save Receipts] icon in the Quick Menu.a A scanned image together with meta information (such as character strings that were
recognized by the text recognition function and the date when you scanned it) of a receiptthat you scanned is saved as a content data record in ScanSnap Home.In addition, the main window of ScanSnap Home appears, so that you can check thecontent data record created from the receipt that you scanned.
HINTA scanned image together with meta information is referred to as content data record inScanSnap Home.
Saving Receipt Data to a Computer
377
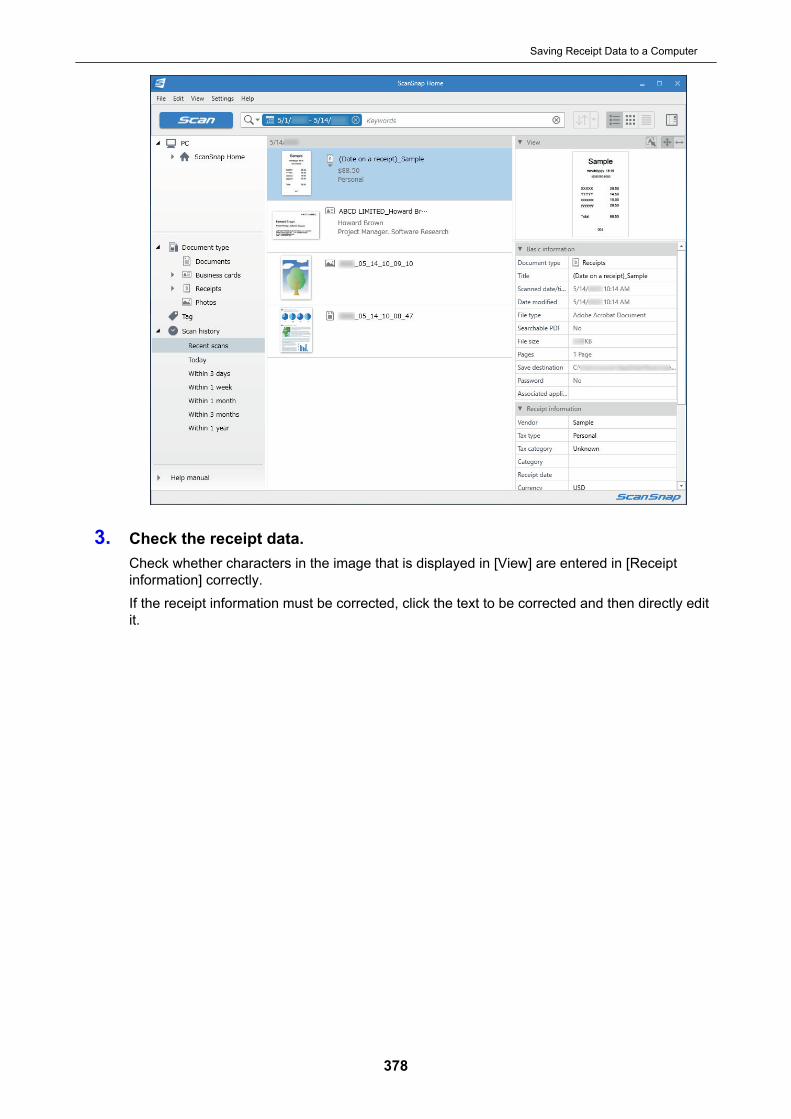
3. Check the receipt data.Check whether characters in the image that is displayed in [View] are entered in [Receiptinformation] correctly.If the receipt information must be corrected, click the text to be corrected and then directly editit.
Saving Receipt Data to a Computer
378

HINTFor details about ScanSnap Home operations, refer to the ScanSnap Home Help.
Saving Receipt Data to a Computer
379

Creating a Photo Album and Saving it to a Computer
This section explains how to digitize photos and tag each digitized photo by name or by place inorder to create an album in ScanSnap Home.
1. Scan photos with the ScanSnap.For details about how to perform a scan, refer to "Scanning Documents" (page 179).a The Quick Menu appears.
2. Click the [Save Photos] icon in the Quick Menu.a A scanned image together with meta information (such as the date when you scanned it) of
a photo that you scanned is saved as a content data record in ScanSnap Home.In addition, the main window of ScanSnap Home appears, so that you can check thecontent data record created from the photo that you scanned.
HINTA scanned image together with meta information is referred to as content data record inScanSnap Home.
3. Select a content data record created from the photo that you scanned.
4. Click for [Tag].a The input field appears.
Creating a Photo Album and Saving it to a Computer
380

5. Enter a name in the input field to categorize the photo and press the [Enter]key.a A content data record created from the photo that you scanned is tagged with the specified
name used to categorize the photo.
6. Select a tag that you specified as a name used to categorize the photo in[Tag].
Creating a Photo Album and Saving it to a Computer
381

a The tagged content data record created from the photo is displayed.
HINTFor details about ScanSnap Home operations, refer to the ScanSnap Home Help.
Creating a Photo Album and Saving it to a Computer
382

Correcting Scanned Images (SV600)
The scanned images can be corrected before ScanSnap Manager is linked with an application. Thescanned images can be corrected in the following cases:l "When a Document Is Scanned (SV600)" (page 384)l "When a Book Is Scanned (SV600)" (page 389)l "When Multiple Documents Are Scanned at Once (SV600)" (page 401)
Correcting Scanned Images (SV600)
383

When a Document Is Scanned (SV600)
When a document is scanned with the ScanSnap, the following correction can be made on thescanned image:l "Filling in Fingers Captured in a Scanned Image (When a Document Is Scanned)(SV600)" (page
385)
When a Document Is Scanned (SV600)
384
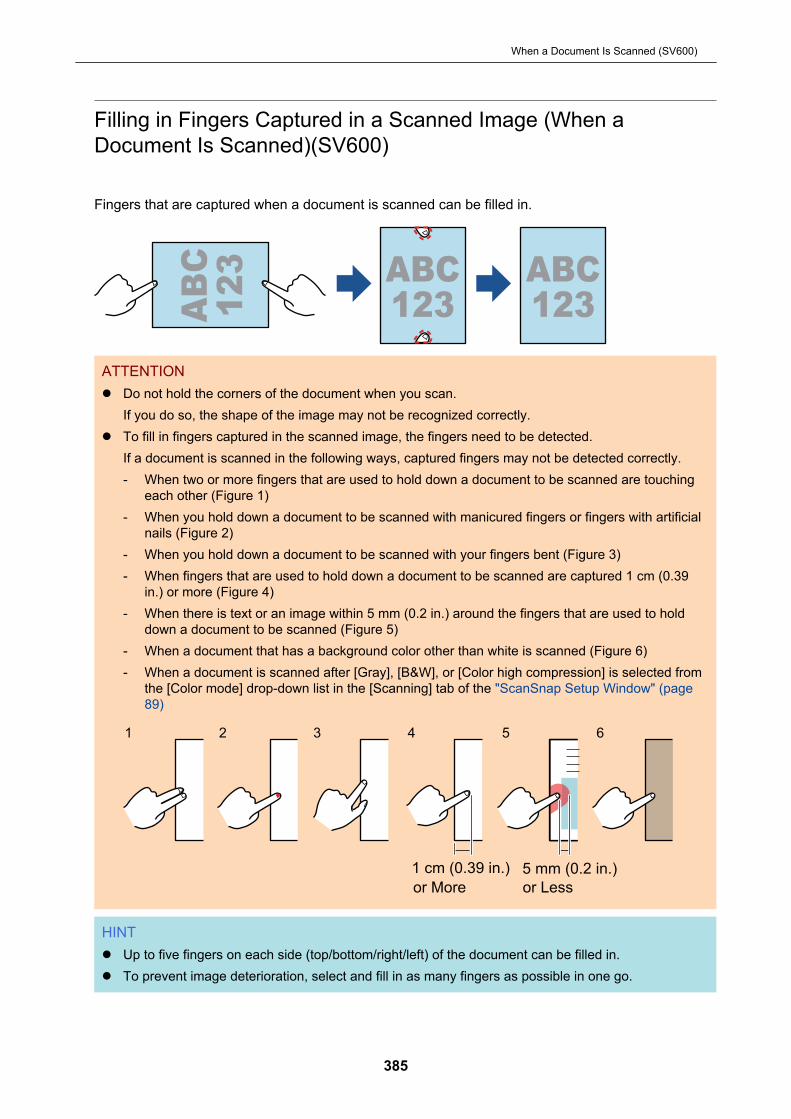
Filling in Fingers Captured in a Scanned Image (When aDocument Is Scanned)(SV600)
Fingers that are captured when a document is scanned can be filled in.
ATTENTIONl Do not hold the corners of the document when you scan.
If you do so, the shape of the image may not be recognized correctly.l To fill in fingers captured in the scanned image, the fingers need to be detected.
If a document is scanned in the following ways, captured fingers may not be detected correctly.- When two or more fingers that are used to hold down a document to be scanned are touching
each other (Figure 1)- When you hold down a document to be scanned with manicured fingers or fingers with artificial
nails (Figure 2)- When you hold down a document to be scanned with your fingers bent (Figure 3)- When fingers that are used to hold down a document to be scanned are captured 1 cm (0.39
in.) or more (Figure 4)- When there is text or an image within 5 mm (0.2 in.) around the fingers that are used to hold
down a document to be scanned (Figure 5)- When a document that has a background color other than white is scanned (Figure 6)- When a document is scanned after [Gray], [B&W], or [Color high compression] is selected from
the [Color mode] drop-down list in the [Scanning] tab of the "ScanSnap Setup Window" (page89)
1 cm (0.39 in.) 5 mm (0.2 in.)
1 2 3 4 5 6
or More or Less
HINTl Up to five fingers on each side (top/bottom/right/left) of the document can be filled in.l To prevent image deterioration, select and fill in as many fingers as possible in one go.
When a Document Is Scanned (SV600)
385
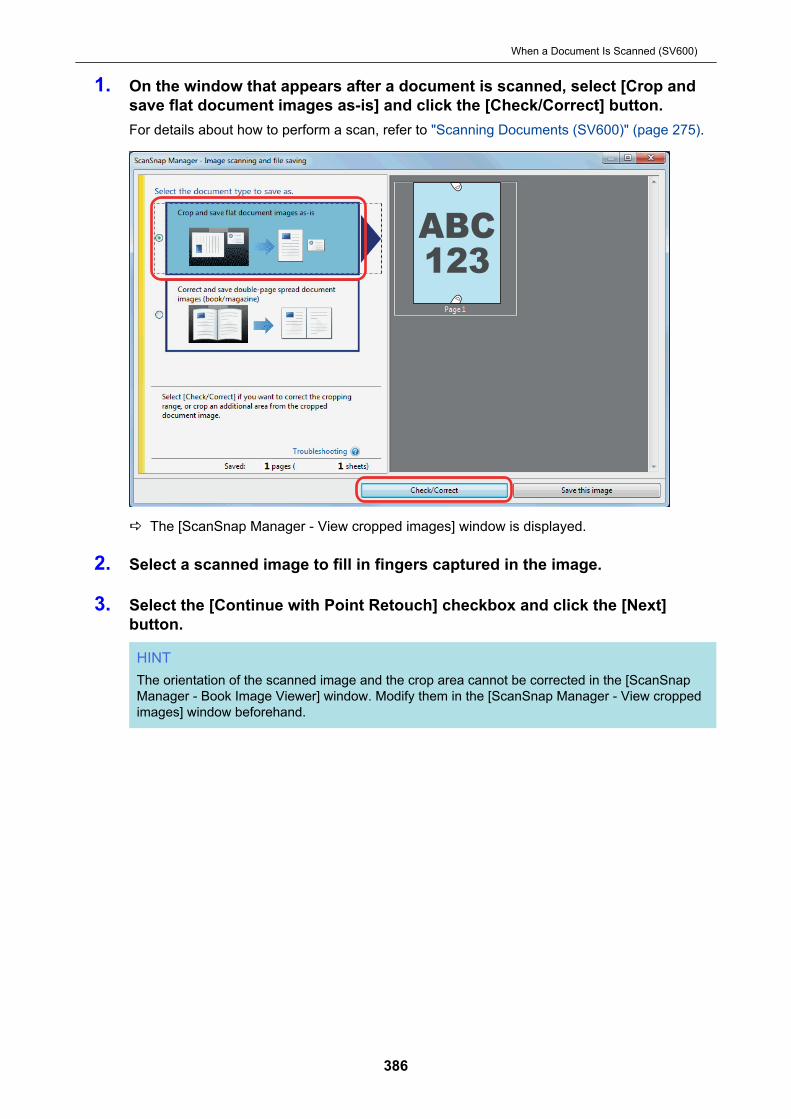
1. On the window that appears after a document is scanned, select [Crop andsave flat document images as-is] and click the [Check/Correct] button.For details about how to perform a scan, refer to "Scanning Documents (SV600)" (page 275).
a The [ScanSnap Manager - View cropped images] window is displayed.
2. Select a scanned image to fill in fingers captured in the image.
3. Select the [Continue with Point Retouch] checkbox and click the [Next]button.
HINTThe orientation of the scanned image and the crop area cannot be corrected in the [ScanSnapManager - Book Image Viewer] window. Modify them in the [ScanSnap Manager - View croppedimages] window beforehand.
When a Document Is Scanned (SV600)
386
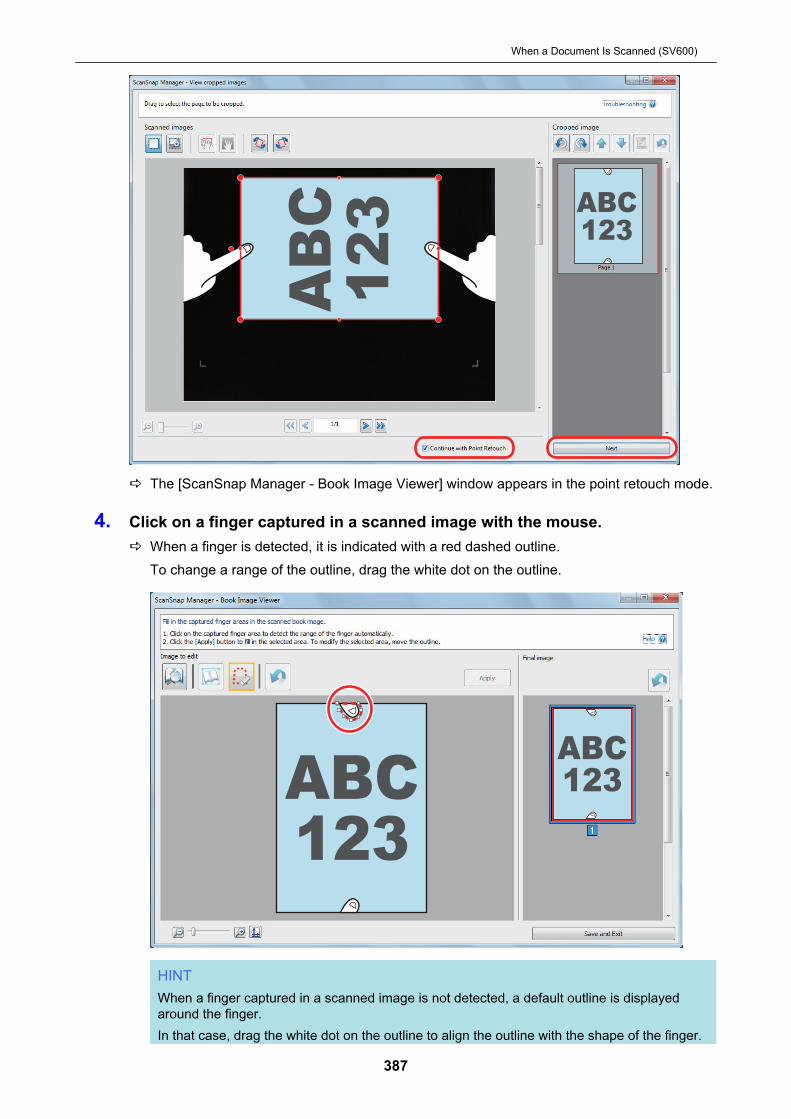
a The [ScanSnap Manager - Book Image Viewer] window appears in the point retouch mode.
4. Click on a finger captured in a scanned image with the mouse.a When a finger is detected, it is indicated with a red dashed outline.
To change a range of the outline, drag the white dot on the outline.
HINTWhen a finger captured in a scanned image is not detected, a default outline is displayedaround the finger.In that case, drag the white dot on the outline to align the outline with the shape of the finger.
When a Document Is Scanned (SV600)
387
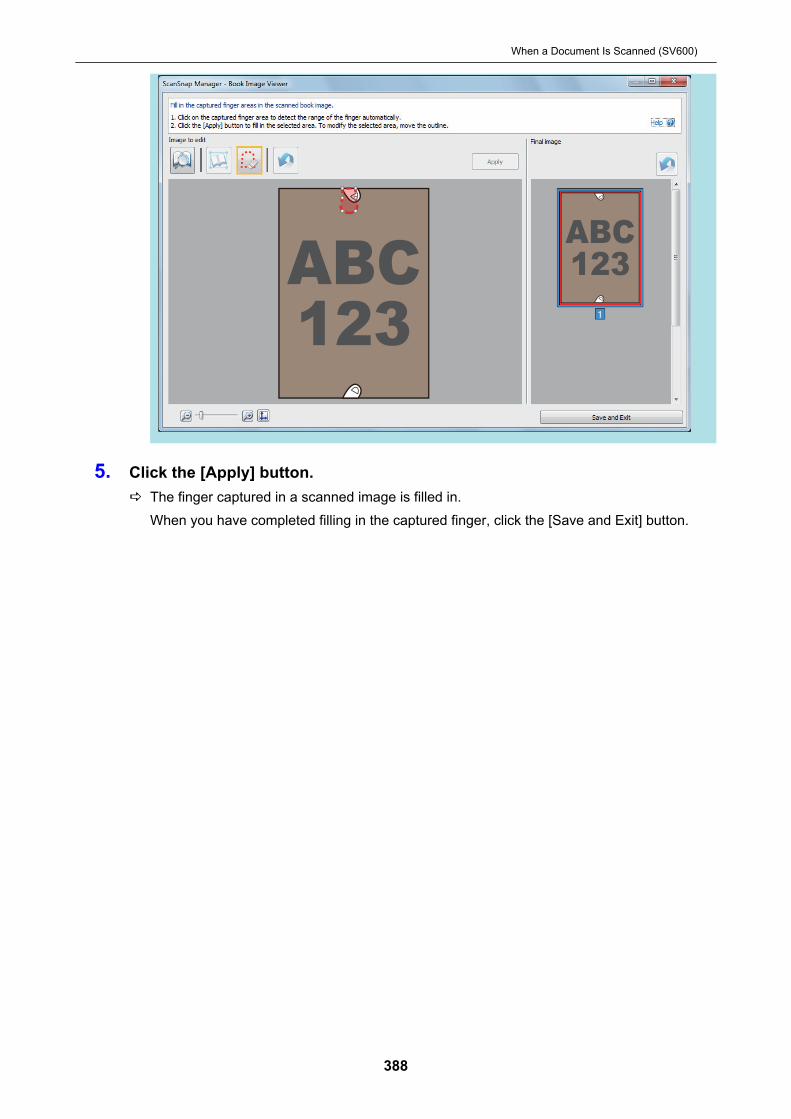
5. Click the [Apply] button.a The finger captured in a scanned image is filled in.
When you have completed filling in the captured finger, click the [Save and Exit] button.
When a Document Is Scanned (SV600)
388

When a Book Is Scanned (SV600)
The book image correction allows you to correct scanned images.The book image correction refers to making the following corrections to the images scanned frombooks with the ScanSnap:l "Correcting Distorted Book Images (SV600)" (page 390)l "Splitting a Double-Page Spread Image into Two Page Images (SV600)" (page 395)l "Filling in Fingers Captured in a Scanned Image (When a Book Is Scanned)(SV600)" (page
398)
When a Book Is Scanned (SV600)
389

Correcting Distorted Book Images (SV600)
To correct the distortion of a scanned image from a book, follow the procedure below.
ATTENTIONl To correct the distortion of a scanned image, the shape of the book needs to be detected.
If a book is scanned as follows, the shape of the book may not be detected correctly.- When a book to be scanned is held down outside of the appropriate areas (Figure 1)- When a book is scanned without the Background Pad (Figure 2)- When a book to be scanned is spread open and is placed face-down (Figure 3)- When a book to be scanned is placed in a vertical orientation (Figure 4)- When a book that is not rectangular or square is scanned (Figure 5)- When a book that has a background color other than white (such as a comic magazine) is
scanned (Figure 6)- When a book that has a narrow margin space (such as a catalogue or a magazine) is scanned
(Figure 7)- When a book that is smaller than A5 size (148 × 210 mm/5.83 × 8.27 in.) in a double-page
spread is scanned (Figure 8)
1
5 6 7 8
2 3 4
l Follow the procedure below to perform multiple book image correction for one page.
1. Edit in book image correction mode ( ).- Correcting a distorted book image- Splitting a double-page spread image
When a Book Is Scanned (SV600)
390
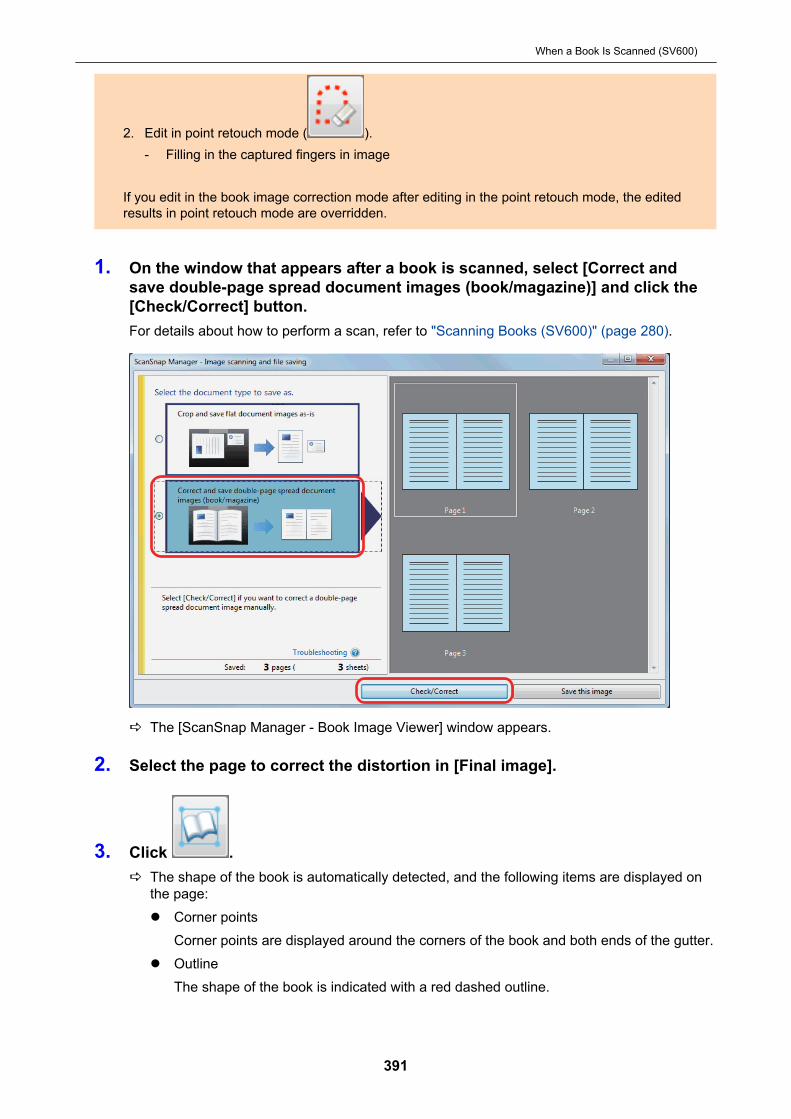
2. Edit in point retouch mode ( ).- Filling in the captured fingers in image
If you edit in the book image correction mode after editing in the point retouch mode, the editedresults in point retouch mode are overridden.
1. On the window that appears after a book is scanned, select [Correct andsave double-page spread document images (book/magazine)] and click the[Check/Correct] button.For details about how to perform a scan, refer to "Scanning Books (SV600)" (page 280).
a The [ScanSnap Manager - Book Image Viewer] window appears.
2. Select the page to correct the distortion in [Final image].
3. Click .a The shape of the book is automatically detected, and the following items are displayed on
the page:l Corner points
Corner points are displayed around the corners of the book and both ends of the gutter.l Outline
The shape of the book is indicated with a red dashed outline.
When a Book Is Scanned (SV600)
391

HINT
For the output format selection button, select .
4. On the page, drag the corner points to move the corners of the book andboth ends of the gutter to any location.On the front and back cover of the book, make the middle outline for the gutter parallel to theright and left outlines.
If the outline of the book is not aligned with the shape of the book in the scanned image, dragthe upper part and lower part of the outline to correct each position.
HINTIf the shape of the book was not detected, the corner points and the outline are displayed on theentire window.If this is the case, align the corner points and the outline with the shape of the book.
When a Book Is Scanned (SV600)
392

Follow the procedure below to modify the corner points and the outline.1. Modify the corner points.
The corner points can be modified by either of the following:l Double-click the position where you want to move the corner points.
a The corner points automatically move to the double-clicked position.If the corner points cannot be modified properly, drag them to move.
l Drag the corner points to desired positions.Modify the corner points at both ends of the gutter first and then the corners of the book.
2. Modify the outline.Drag the outline to align it with the shape of the book. If it is hard to align the outline with theshape of the book, position the outline little by little.To make it easy, click an outline near the corner points and drag and drop the outline to alignit with the shape of the book repeatedly.
5. Click the [Apply] button.a A message for confirming the correction target appears.
6. Click the [Selected Pages] button.a The page distortion is corrected.
When you have completed correcting the page distortion, click the [Save and Exit] button.
HINTl To correct another distorted page, select the page for which the distortion is to be corrected
in [Final image], and repeat steps 2 to 6.l When the text, lines, or graphics in the scanned image are horizontally skewed, clear the
[Correct skewed text] checkbox.
When a Book Is Scanned (SV600)
393

When there are curved/slanted lines or graphics with curved/slanted lines on the document,the scanned image of the document may not be corrected properly and the layout may notlook right.
When a Book Is Scanned (SV600)
394
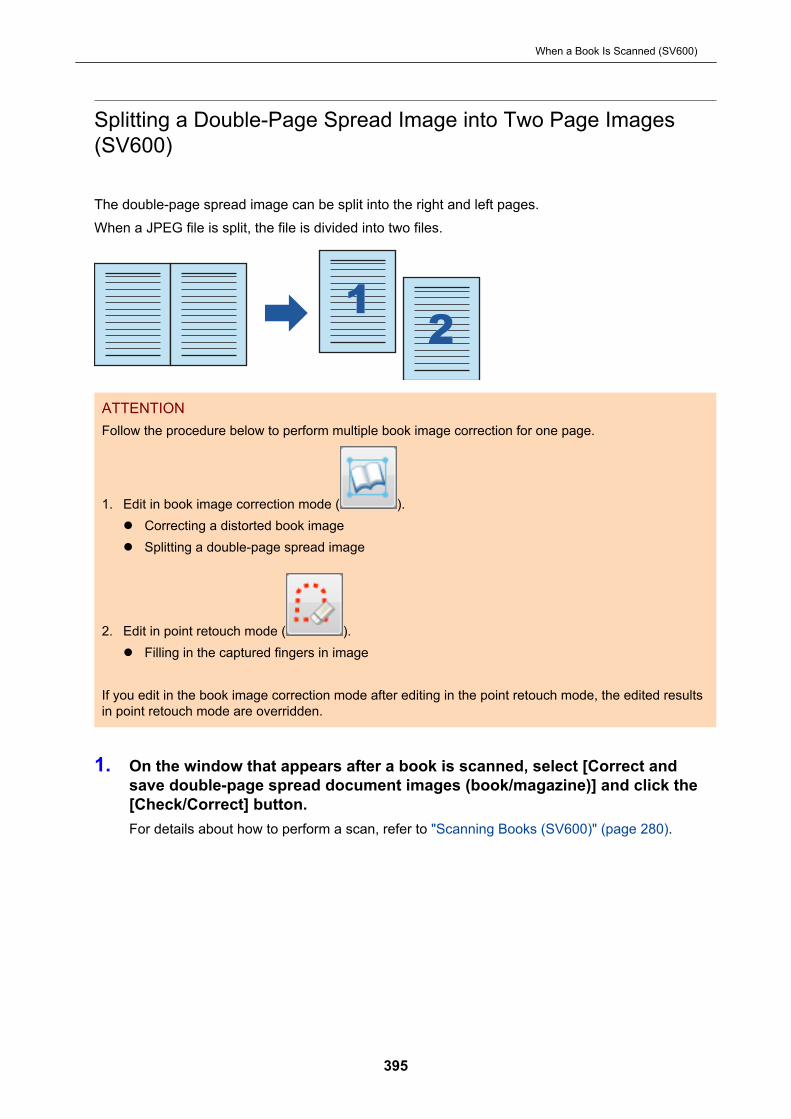
Splitting a Double-Page Spread Image into Two Page Images(SV600)
The double-page spread image can be split into the right and left pages.When a JPEG file is split, the file is divided into two files.
12
12
ATTENTIONFollow the procedure below to perform multiple book image correction for one page.
1. Edit in book image correction mode ( ).l Correcting a distorted book imagel Splitting a double-page spread image
2. Edit in point retouch mode ( ).l Filling in the captured fingers in image
If you edit in the book image correction mode after editing in the point retouch mode, the edited resultsin point retouch mode are overridden.
1. On the window that appears after a book is scanned, select [Correct andsave double-page spread document images (book/magazine)] and click the[Check/Correct] button.For details about how to perform a scan, refer to "Scanning Books (SV600)" (page 280).
When a Book Is Scanned (SV600)
395

a The [ScanSnap Manager - Book Image Viewer] window appears.
2. Select the page to be split in [Final image].
3. Click , and then click or .a The split line is indicated with a green dashed line.
If the split line is not aligned with the gutter of the book, drag the corner points to correct theposition.
When a Book Is Scanned (SV600)
396

4. Click the [Apply] button.a A message for confirming the split target appears.
5. Click the [Selected Pages] button.a The page is split.
When you have completed splitting the page, click the [Save and Exit] button.
When a Book Is Scanned (SV600)
397
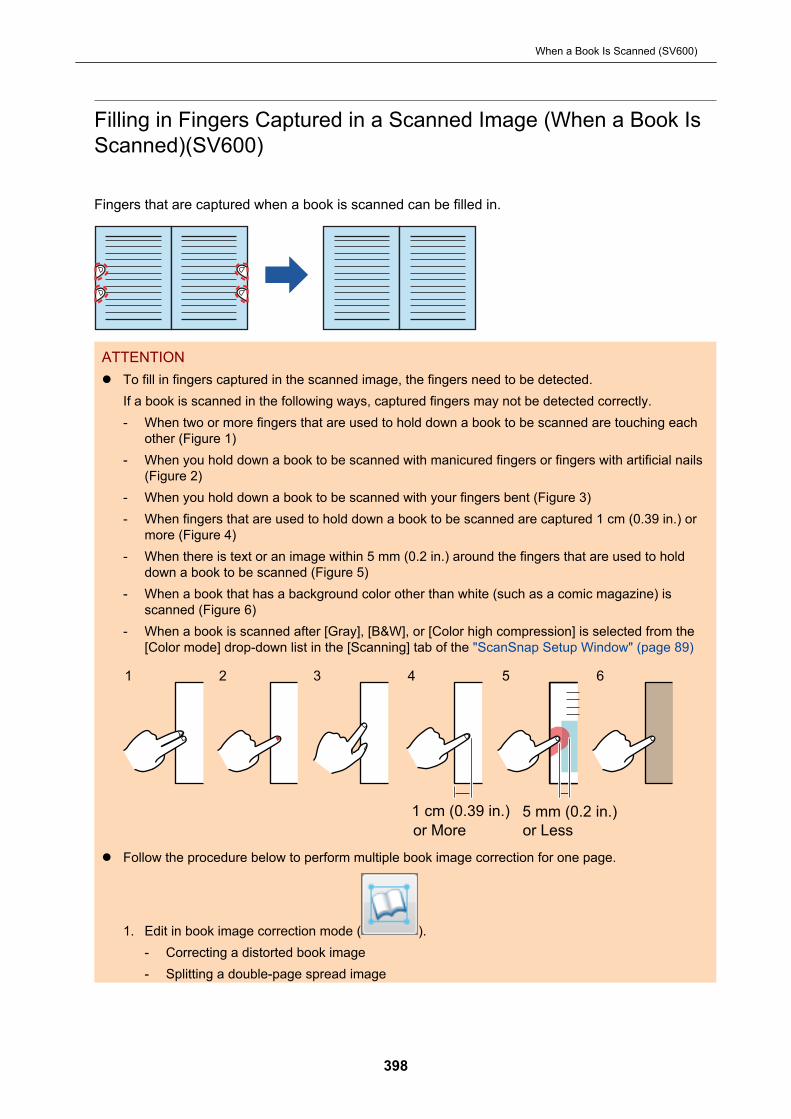
Filling in Fingers Captured in a Scanned Image (When a Book IsScanned)(SV600)
Fingers that are captured when a book is scanned can be filled in.
ATTENTIONl To fill in fingers captured in the scanned image, the fingers need to be detected.
If a book is scanned in the following ways, captured fingers may not be detected correctly.- When two or more fingers that are used to hold down a book to be scanned are touching each
other (Figure 1)- When you hold down a book to be scanned with manicured fingers or fingers with artificial nails
(Figure 2)- When you hold down a book to be scanned with your fingers bent (Figure 3)- When fingers that are used to hold down a book to be scanned are captured 1 cm (0.39 in.) or
more (Figure 4)- When there is text or an image within 5 mm (0.2 in.) around the fingers that are used to hold
down a book to be scanned (Figure 5)- When a book that has a background color other than white (such as a comic magazine) is
scanned (Figure 6)- When a book is scanned after [Gray], [B&W], or [Color high compression] is selected from the
[Color mode] drop-down list in the [Scanning] tab of the "ScanSnap Setup Window" (page 89)
1 cm (0.39 in.) 5 mm (0.2 in.)
1 2 3 4 5 6
or More or Less
l Follow the procedure below to perform multiple book image correction for one page.
1. Edit in book image correction mode ( ).- Correcting a distorted book image- Splitting a double-page spread image
When a Book Is Scanned (SV600)
398

2. Edit in point retouch mode ( ).- Filling in the captured fingers in image
If you edit in the book image correction mode after editing in the point retouch mode, the editedresults in point retouch mode are overridden.
HINTl Up to five fingers on each side (right/left) can be filled in.l To prevent image deterioration, select and fill in as many fingers as possible in one go.
1. On the window that appears after a book is scanned, select [Correct andsave double-page spread document images (book/magazine)] and click the[Check/Correct] button.For details about how to perform a scan, refer to "Scanning Books (SV600)" (page 280).
a The [ScanSnap Manager - Book Image Viewer] window appears.
2. Select the page for filling in captured fingers in [Final image].
3. Click .
4. Click on a finger captured in a scanned image with the mouse.a When a finger is detected, it is indicated with a red dashed outline.
To change a range of the outline, drag the white dot on the outline.
When a Book Is Scanned (SV600)
399

HINTWhen a finger captured in a scanned image is not detected, a default outline is displayedaround the finger.In that case, drag the white dot on the outline to align the outline with the shape of the finger.
5. Click the [Apply] button.a The finger captured in a scanned image is filled in.
When you have completed filling in the captured finger, click the [Save and Exit] button.
When a Book Is Scanned (SV600)
400

When Multiple Documents Are Scanned at Once(SV600)
When multiple documents are scanned at once with the ScanSnap, the following corrections can bemade on the scanned images:l "Correcting the Scanned Image Orientation (SV600)" (page 402)l "Modifying the Crop Area (SV600)" (page 405)l "Adding the Necessary Scanned Images (SV600)" (page 407)l "Deleting Unnecessary Scanned Images (SV600)" (page 409)
When Multiple Documents Are Scanned at Once (SV600)
401
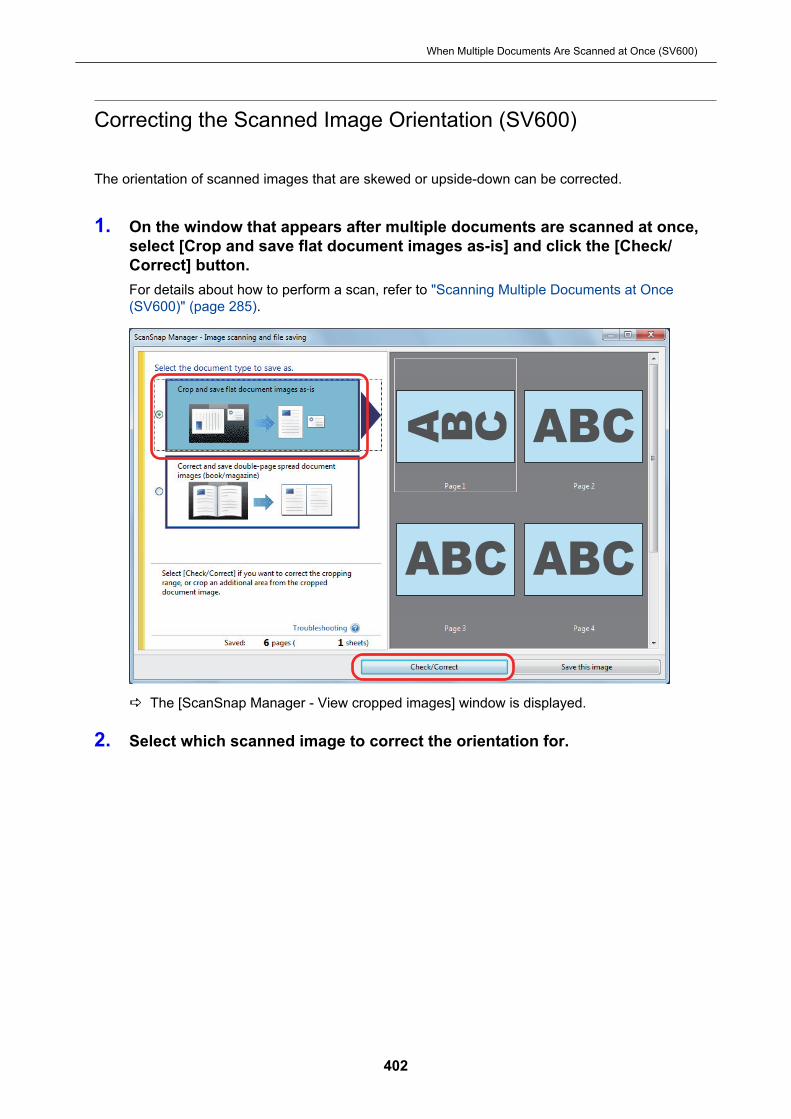
Correcting the Scanned Image Orientation (SV600)
The orientation of scanned images that are skewed or upside-down can be corrected.
1. On the window that appears after multiple documents are scanned at once,select [Crop and save flat document images as-is] and click the [Check/Correct] button.For details about how to perform a scan, refer to "Scanning Multiple Documents at Once(SV600)" (page 285).
a The [ScanSnap Manager - View cropped images] window is displayed.
2. Select which scanned image to correct the orientation for.
When Multiple Documents Are Scanned at Once (SV600)
402
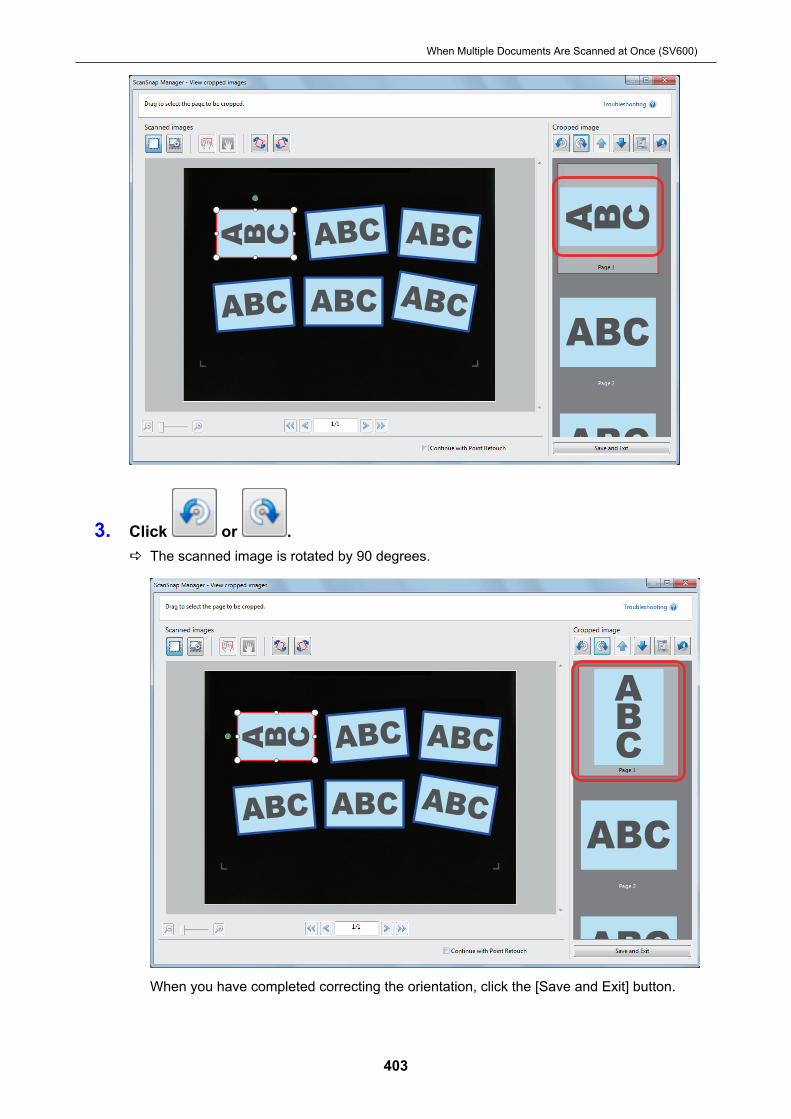
3. Click or .a The scanned image is rotated by 90 degrees.
When you have completed correcting the orientation, click the [Save and Exit] button.
When Multiple Documents Are Scanned at Once (SV600)
403

HINTl To fine-tune the orientation of the crop frame, select which scanned image you want to rotate and
then perform one of the following operations:- Drag the green operating point that appears at the top of the crop frame by as little or as much
as you want.
- Click or .l If the [Next] button is displayed, clear the [Continue with Point Retouch] checkbox. The [Next]
button changes to the [Save and Exit] button.
When Multiple Documents Are Scanned at Once (SV600)
404

Modifying the Crop Area (SV600)
The size of the crop frame that is used to crop the scanned image can be modified.
1. On the window that appears after multiple documents are scanned at once,select [Crop and save flat document images as-is] and click the [Check/Correct] button.For details about how to perform a scan, refer to "Scanning Multiple Documents at Once(SV600)" (page 285).
a The [ScanSnap Manager - View cropped images] window is displayed.
2. Select the crop area of the scanned image to change the crop area.
3. Drag the operating points of the crop frame to change the crop area.
When Multiple Documents Are Scanned at Once (SV600)
405
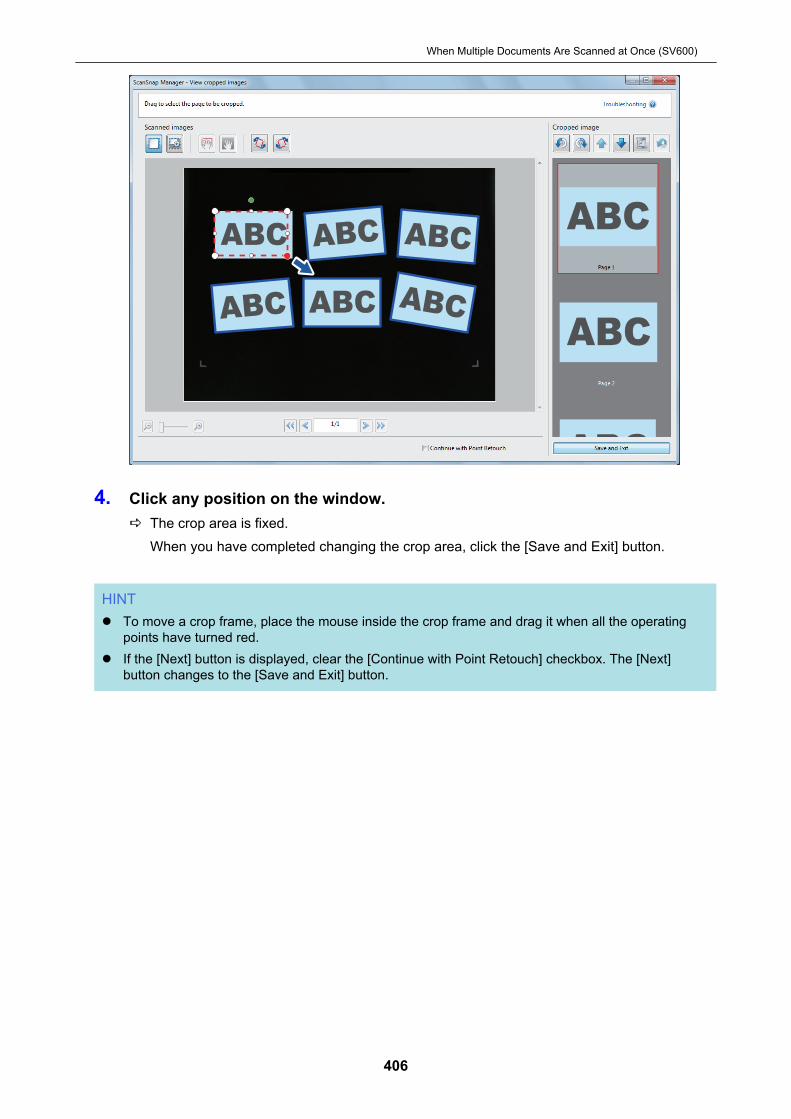
4. Click any position on the window.a The crop area is fixed.
When you have completed changing the crop area, click the [Save and Exit] button.
HINTl To move a crop frame, place the mouse inside the crop frame and drag it when all the operating
points have turned red.l If the [Next] button is displayed, clear the [Continue with Point Retouch] checkbox. The [Next]
button changes to the [Save and Exit] button.
When Multiple Documents Are Scanned at Once (SV600)
406
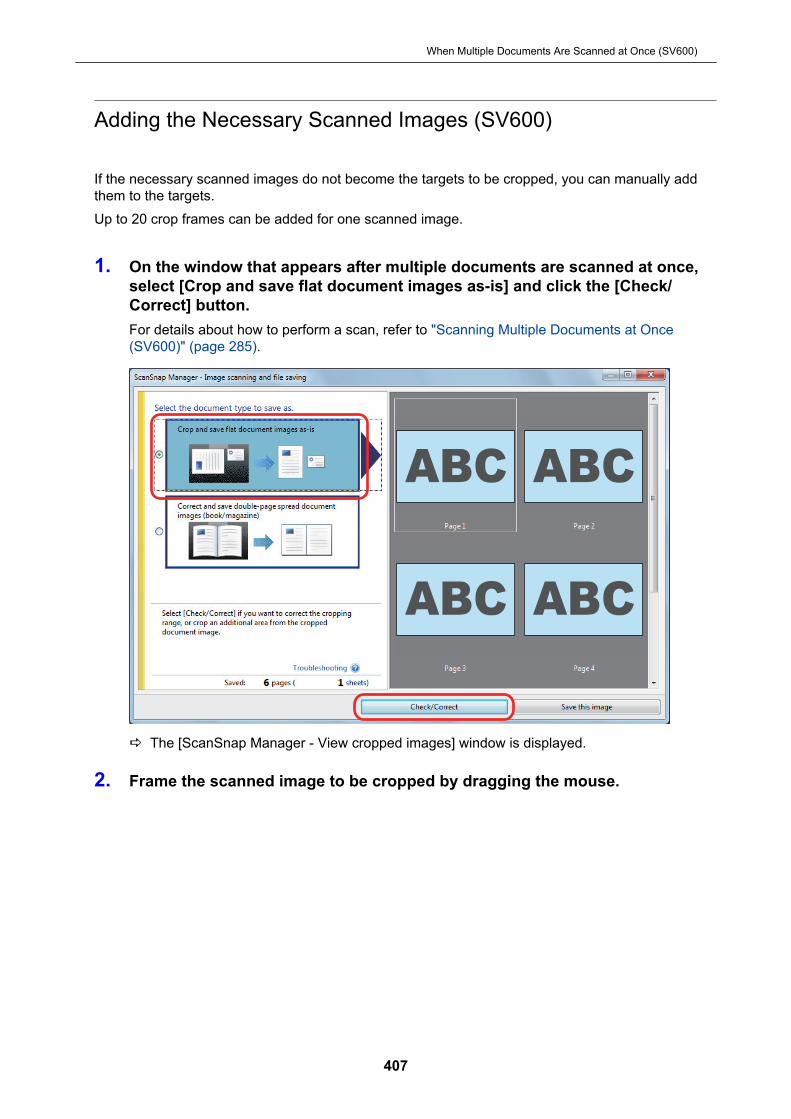
Adding the Necessary Scanned Images (SV600)
If the necessary scanned images do not become the targets to be cropped, you can manually addthem to the targets.Up to 20 crop frames can be added for one scanned image.
1. On the window that appears after multiple documents are scanned at once,select [Crop and save flat document images as-is] and click the [Check/Correct] button.For details about how to perform a scan, refer to "Scanning Multiple Documents at Once(SV600)" (page 285).
a The [ScanSnap Manager - View cropped images] window is displayed.
2. Frame the scanned image to be cropped by dragging the mouse.
When Multiple Documents Are Scanned at Once (SV600)
407

a A crop frame is added to the scanned image that is automatically recognized, and thescanned image that was cropped by dragging the mouse is added to the end of [Croppedimage].After you have added a crop frame, click the [Save and Exit] button.
HINTIf the [Next] button is displayed, clear the [Continue with Point Retouch] checkbox. The [Next] buttonchanges to the [Save and Exit] button.
When Multiple Documents Are Scanned at Once (SV600)
408

Deleting Unnecessary Scanned Images (SV600)
When there are multiple scanned images, unnecessary crop frames can be deleted.Scanned images without crop frames are not output and cannot be linked with an application.
1. On the window that appears after multiple documents are scanned at once,select [Crop and save flat document images as-is] and click the [Check/Correct] button.For details about how to perform a scan, refer to "Scanning Multiple Documents at Once(SV600)" (page 285).
a The [ScanSnap Manager - View cropped images] window is displayed.
2. Select a scanned image to remove the crop frame.
When Multiple Documents Are Scanned at Once (SV600)
409
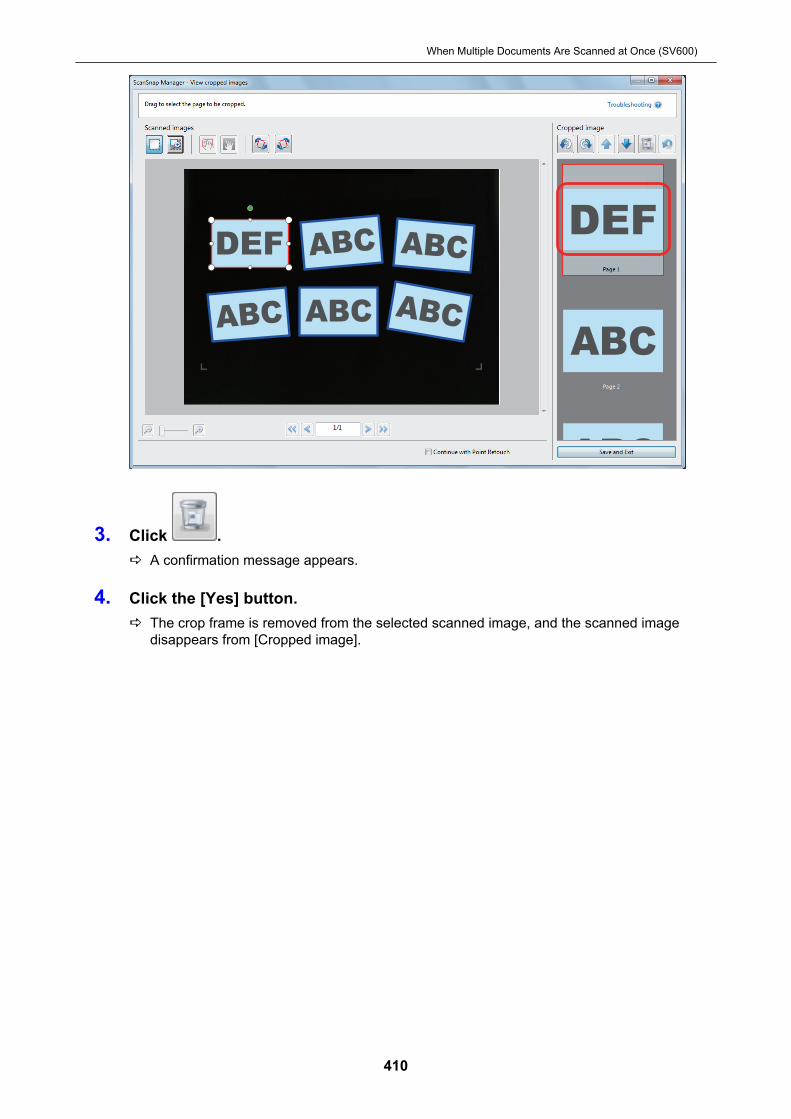
3. Click .a A confirmation message appears.
4. Click the [Yes] button.a The crop frame is removed from the selected scanned image, and the scanned image
disappears from [Cropped image].
When Multiple Documents Are Scanned at Once (SV600)
410
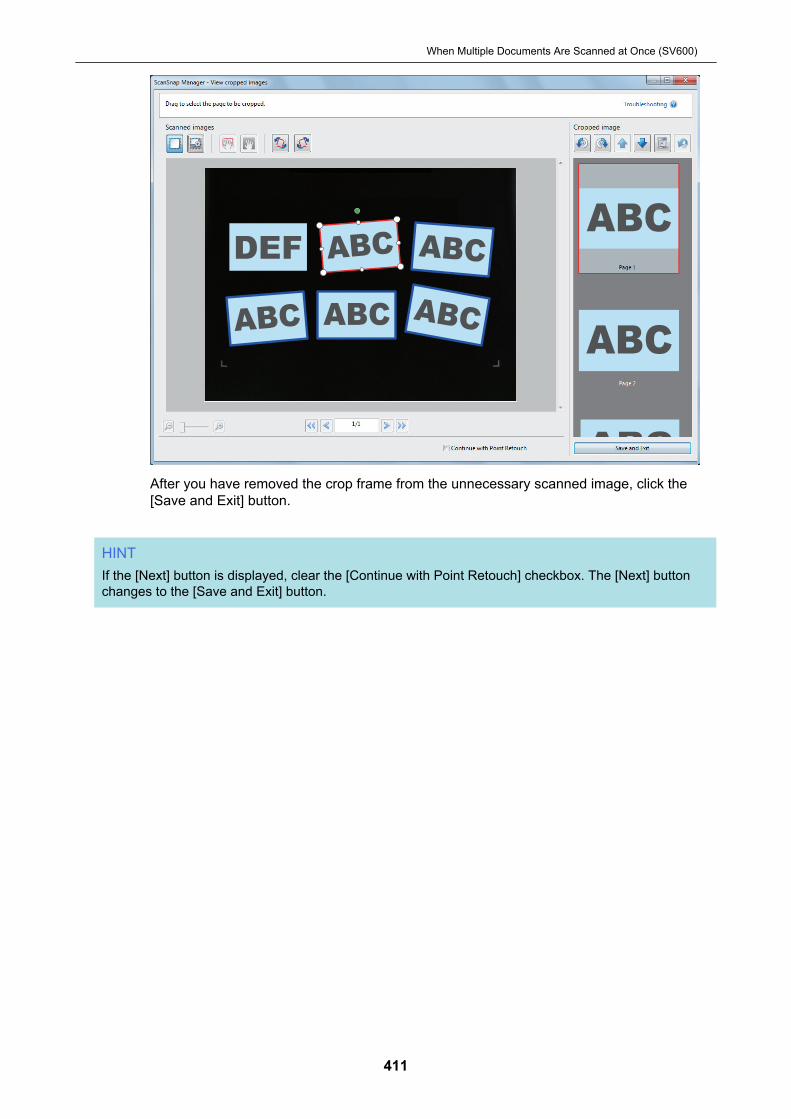
After you have removed the crop frame from the unnecessary scanned image, click the[Save and Exit] button.
HINTIf the [Next] button is displayed, clear the [Continue with Point Retouch] checkbox. The [Next] buttonchanges to the [Save and Exit] button.
When Multiple Documents Are Scanned at Once (SV600)
411
Uninstalling Software/Troubleshooting duringUninstallation
This section explains how to solve troubles you may encounter upon installing or uninstalling thefollowing software related to the ScanSnap.l ScanSnap Managerl ScanSnap Organizerl CardMinderFor ScanSnap Home, refer to "Troubleshooting" in the ScanSnap Manager Help.For details about the troubles you may encounter and the solutions while using the ScanSnap, referto the following:l "Troubleshooting" in the ScanSnap Manager Help
To display this section, right-click the ScanSnap Manager icon in the notification area, andselect [Help] → [Troubleshooting] from the "Right-Click Menu" (page 87).
l ScanSnap Support Site (https://scansnap.fujitsu.com/g-support/en/)If you cannot solve the problem after referring to the above section, contact your FUJITSU scannerdealer or an authorized FUJITSU scanner service provider.l "How to Find Your Solution" (page 413)l "If Your First Attempt to Install Failed" (page 414)l "If You Have Installed the Software Before" (page 415)l "Cannot Connect to the ScanSnap even after the Installation Has Been Complete (iX1600 /
iX1500)" (page 419)l "When the ScanSnap Manager Icon Does Not Appear" (page 420)l "When ScanSnap Manager Does Not Operate Normally" (page 422)l "When You Cannot Uninstall the Software" (page 430)
Uninstalling Software/Troubleshooting during Uninstallation
412
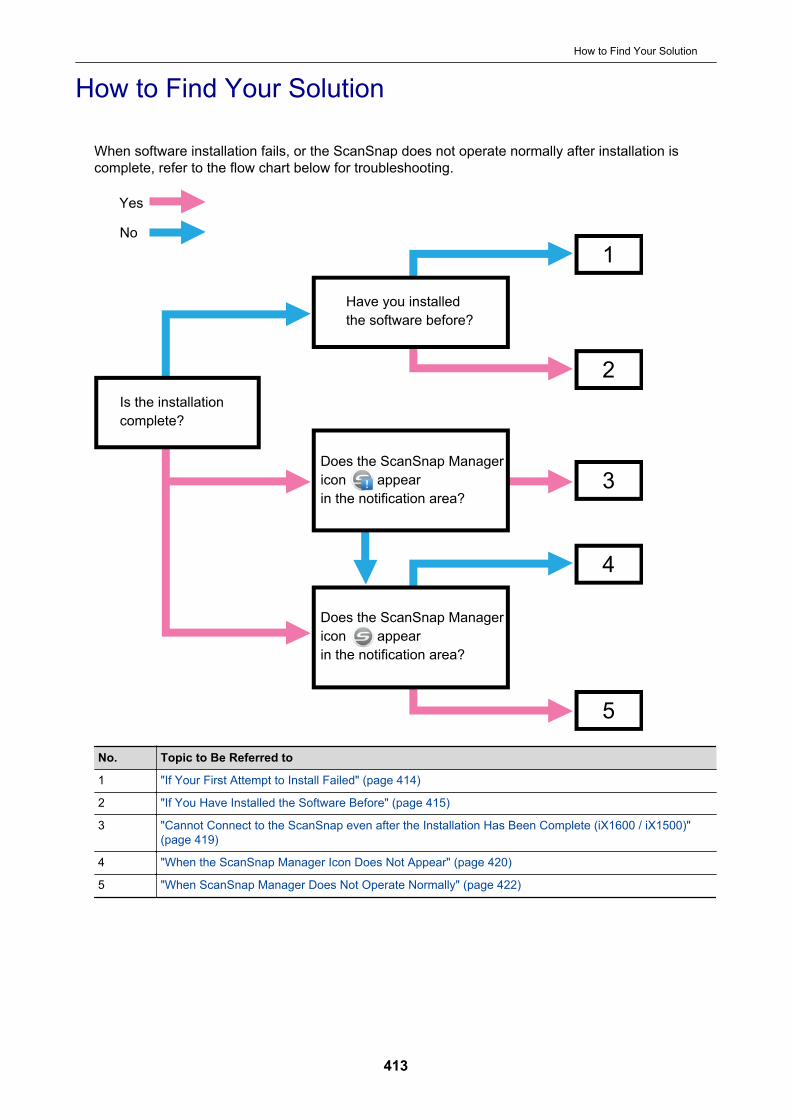
How to Find Your Solution
When software installation fails, or the ScanSnap does not operate normally after installation iscomplete, refer to the flow chart below for troubleshooting.
5
4
3
2
1
Yes
No
Have you installed
the software before?
Is the installation
complete?
Does the ScanSnap Manager
icon appear
in the notification area?
Does the ScanSnap Manager
icon appear
in the notification area?
No. Topic to Be Referred to
1 "If Your First Attempt to Install Failed" (page 414)
2 "If You Have Installed the Software Before" (page 415)
3 "Cannot Connect to the ScanSnap even after the Installation Has Been Complete (iX1600 / iX1500)"(page 419)
4 "When the ScanSnap Manager Icon Does Not Appear" (page 420)
5 "When ScanSnap Manager Does Not Operate Normally" (page 422)
How to Find Your Solution
413

If Your First Attempt to Install Failed
This section explains how to troubleshoot when the first attempt to install the software related to theScanSnap failed.If any software related to the ScanSnap has been installed before, refer to "If You Have Installed theSoftware Before" (page 415).
1. Restart the computer and log on as a user with Administrator privileges.
2. Reinstall the software.For details, refer to "Reinstalling the Software" (page 418).
If Your First Attempt to Install Failed
414

If You Have Installed the Software Before
This section explains how to troubleshoot if your attempt to reinstall the software related to theScanSnap failed.l "Uninstalling the Software" (page 416)l "Removing the Installation Information" (page 417)l "Reinstalling the Software" (page 418)
If You Have Installed the Software Before
415

Uninstalling the Software
Uninstall the software that is already installed.The uninstallation procedure is as follows.
1. If the ScanSnap is connected to the computer, unplug the USB cable fromthe computer.
2. Log on as a user with Administrator privileges.
3. If security software is running, stop it temporarily.
ATTENTIONIf you cannot stop the security software, make sure that the setting on the security software is notset to lock an application.
4. Uninstall the software.The following software programs must be uninstalled:l ScanSnap Managerl ScanSnap Homel ScanSnap Organizerl CardMinderFor details, refer to "Uninstalling the Software" (page 497).
l If the software was successfully uninstalled, proceed to "Reinstalling the Software" (page 418).l If the software still remains in the list, proceed to the next topic "Removing the Installation Information" (page
417).
If You Have Installed the Software Before
416

Removing the Installation Information
If the name of the software that you tried to uninstall still remains in the list in [Programs andFeatures] of the Control Panel, or if the software cannot be uninstalled for some reason, use theuninstall tool (SSHomeClean.exe) to remove the installation information.For details on how to use the uninstall tool and details on the existing software which is to beuninstalled, run a search for "SSHomeClean.exe" in ScanSnap FAQ, click the appropriate link that islisted in the search results, and refer to the webpage.Before you run the uninstall tool, read "Installation Information Cleanup Guide for ScanSnap Home"that is on the displayed webpage.
If You Have Installed the Software Before
417
Reinstalling the Software
Once the software is uninstalled or the installation information is removed, reinstall the software.Install the software in the following procedure.
1. Restart the computer.
2. Log on as a user with Administrator privileges.
3. If security software is running, stop it temporarily.
ATTENTIONIf you cannot stop the security software, make sure that the setting on the security software is notset to lock an application.
4. Access the download web pages of the software programs.ScanSnap Software Downloadshttps://scansnap.fujitsu.com/global/dl/
5. Select your model and operating system and click [Display software list] todisplay the list of software programs to be installed.
6. Download a software program from the software list that is displayed in[Those using ScanSnap Manager] in [Setup Programs] and install it.
If you did not perform the procedure in "Removing the Installation Information" (page 417) and then failed to installthe software, perform the following procedures again:l "Uninstalling the Software" (page 416)l "Removing the Installation Information" (page 417)l "Reinstalling the Software" (page 418)
If You Have Installed the Software Before
418
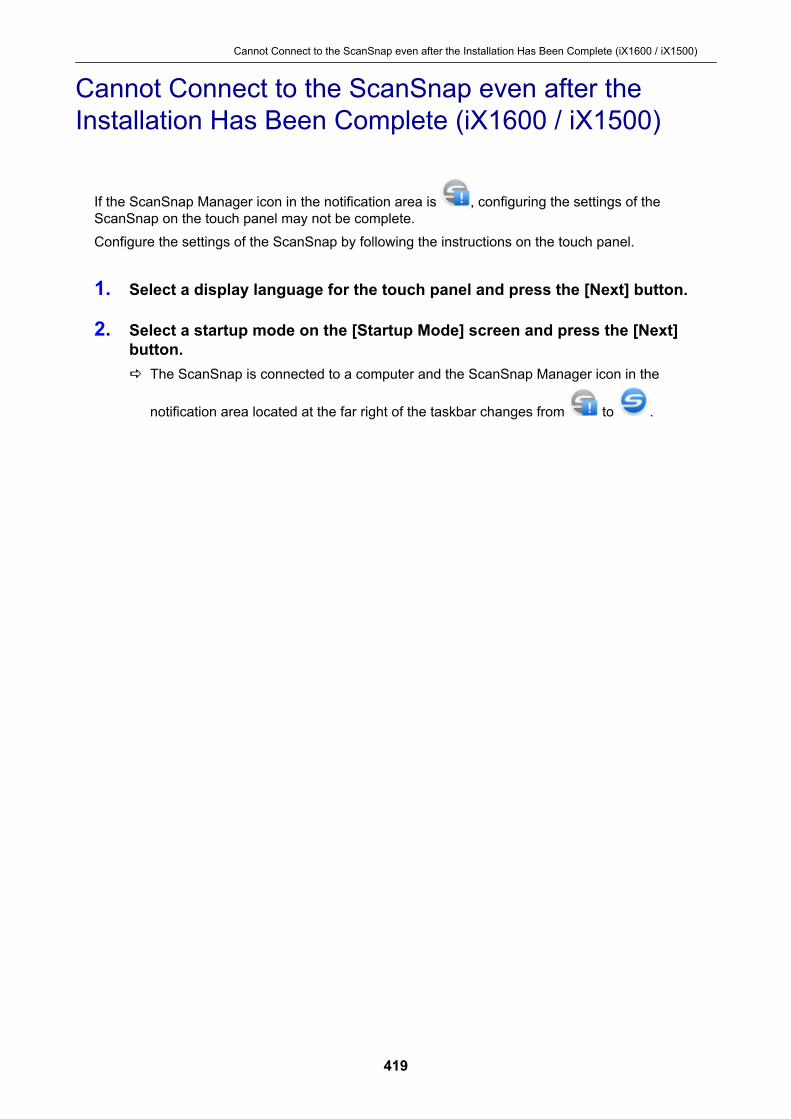
Cannot Connect to the ScanSnap even after theInstallation Has Been Complete (iX1600 / iX1500)
If the ScanSnap Manager icon in the notification area is , configuring the settings of theScanSnap on the touch panel may not be complete.Configure the settings of the ScanSnap by following the instructions on the touch panel.
1. Select a display language for the touch panel and press the [Next] button.
2. Select a startup mode on the [Startup Mode] screen and press the [Next]button.a The ScanSnap is connected to a computer and the ScanSnap Manager icon in the
notification area located at the far right of the taskbar changes from to .
Cannot Connect to the ScanSnap even after the Installation Has Been Complete (iX1600 / iX1500)
419

When the ScanSnap Manager Icon Does Not Appear
This section explains how to troubleshoot when the ScanSnap Manager icon does not appearin the notification area even though the software is installed and the ScanSnap is connected to thecomputer.l "Displaying the ScanSnap Manager Icon" (page 421)
When the ScanSnap Manager Icon Does Not Appear
420

Displaying the ScanSnap Manager Icon
1. Start ScanSnap Manager.l Windows 10
Select [Start] menu → [ScanSnap Manager] → [ScanSnap Manager].l Windows 8.1
Click on the lower left side of the Start screen, and select [ScanSnap Manager] under[ScanSnap Manager] on the All apps screen.
l Windows 7Select [Start] menu → [All Programs] → [ScanSnap Manager] → [ScanSnap Manager].
HINTIf the problem is solved, you can change the setting so that ScanSnap Manager will start upautomatically from the next time you log on to the computer. The procedure is as follows.
1. Right-click the ScanSnap Manager icon in the notification area located at the far right ofthe task bar and select [Preferences] from the "Right-Click Menu" (page 87).a The [ScanSnap Manager - Preferences] window appears.
2. In the [Auto Startup] list, select the [Start up ScanSnap Manager when you log on] checkbox.
Example: iX1600
If the problem persists, refer to "When ScanSnap Manager Does Not Operate Normally" (page 422).
When the ScanSnap Manager Icon Does Not Appear
421

When ScanSnap Manager Does Not OperateNormally
If the ScanSnap Manager icon in the notification area located at the far right of the taskbar is
displayed as even though the software is installed and the ScanSnap is connected to thecomputer, perform the following procedures.l "Removing Unnecessary Icons from the Notification Area" (page 423)l "Checking the Connection between the ScanSnap and the Computer" (page 424)l "Checking If ScanSnap Manager Is Operating Normally" (page 425)l "Removing the ScanSnap's Connection Information" (page 428)
When ScanSnap Manager Does Not Operate Normally
422
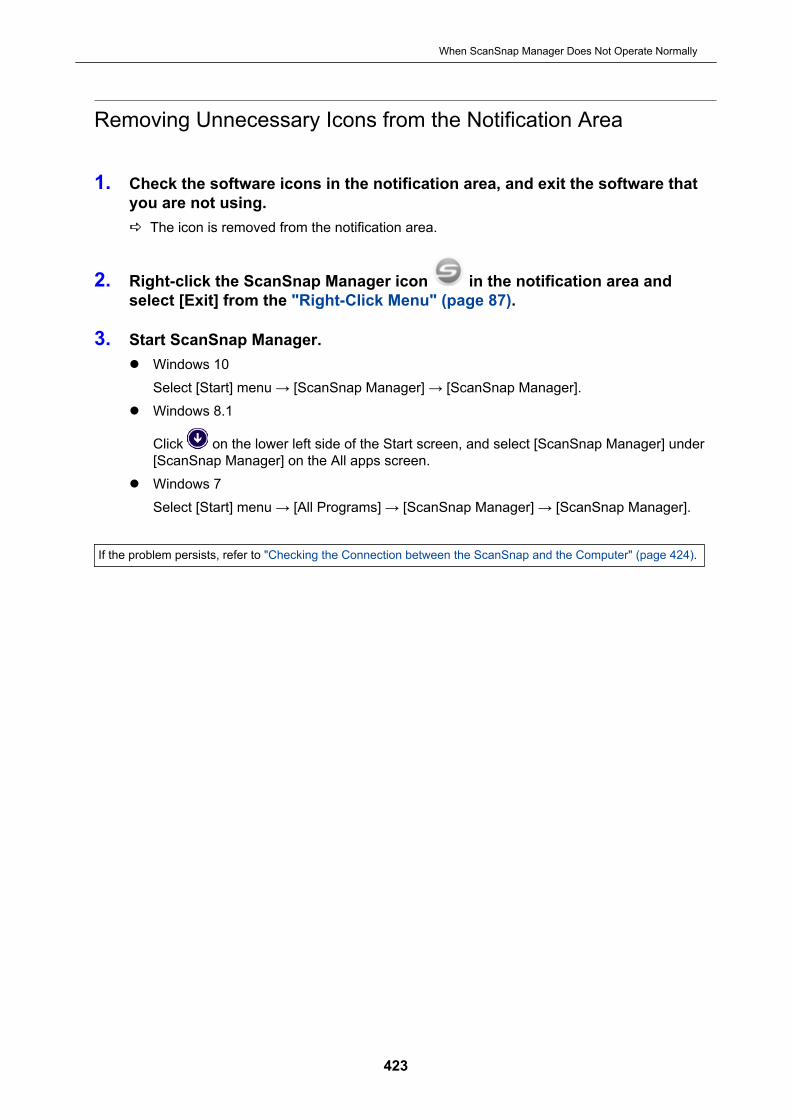
Removing Unnecessary Icons from the Notification Area
1. Check the software icons in the notification area, and exit the software thatyou are not using.a The icon is removed from the notification area.
2. Right-click the ScanSnap Manager icon in the notification area andselect [Exit] from the "Right-Click Menu" (page 87).
3. Start ScanSnap Manager.l Windows 10
Select [Start] menu → [ScanSnap Manager] → [ScanSnap Manager].l Windows 8.1
Click on the lower left side of the Start screen, and select [ScanSnap Manager] under[ScanSnap Manager] on the All apps screen.
l Windows 7Select [Start] menu → [All Programs] → [ScanSnap Manager] → [ScanSnap Manager].
If the problem persists, refer to "Checking the Connection between the ScanSnap and the Computer" (page 424).
When ScanSnap Manager Does Not Operate Normally
423

Checking the Connection between the ScanSnap and theComputer
1. Unplug the USB cable from the computer and the ScanSnap, then plug itback in.Make sure to leave at least 5 seconds between unplugging and plugging the cable.If you are using a USB hub, connect the USB cable to the computer directly.
If the problem persists, refer to "Checking If ScanSnap Manager Is Operating Normally" (page 425).
When ScanSnap Manager Does Not Operate Normally
424
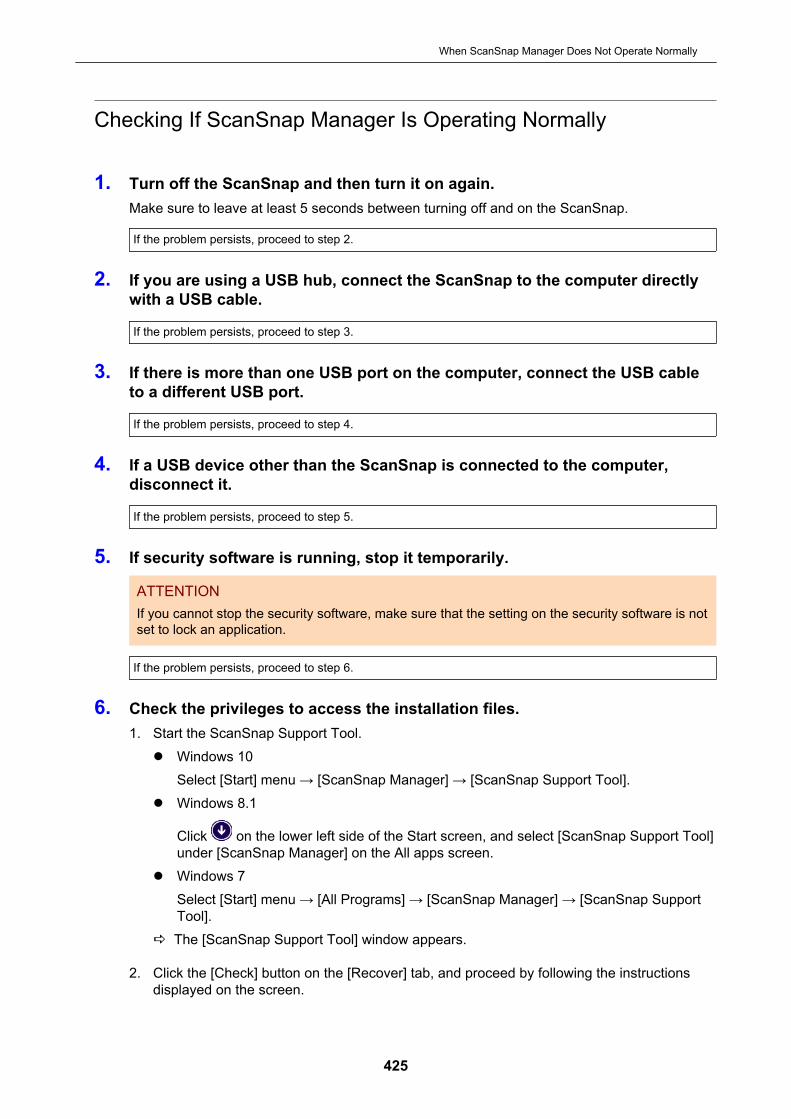
Checking If ScanSnap Manager Is Operating Normally
1. Turn off the ScanSnap and then turn it on again.Make sure to leave at least 5 seconds between turning off and on the ScanSnap.
If the problem persists, proceed to step 2.
2. If you are using a USB hub, connect the ScanSnap to the computer directlywith a USB cable.
If the problem persists, proceed to step 3.
3. If there is more than one USB port on the computer, connect the USB cableto a different USB port.
If the problem persists, proceed to step 4.
4. If a USB device other than the ScanSnap is connected to the computer,disconnect it.
If the problem persists, proceed to step 5.
5. If security software is running, stop it temporarily.
ATTENTIONIf you cannot stop the security software, make sure that the setting on the security software is notset to lock an application.
If the problem persists, proceed to step 6.
6. Check the privileges to access the installation files.1. Start the ScanSnap Support Tool.l Windows 10
Select [Start] menu → [ScanSnap Manager] → [ScanSnap Support Tool].l Windows 8.1
Click on the lower left side of the Start screen, and select [ScanSnap Support Tool]under [ScanSnap Manager] on the All apps screen.
l Windows 7Select [Start] menu → [All Programs] → [ScanSnap Manager] → [ScanSnap SupportTool].
a The [ScanSnap Support Tool] window appears.
2. Click the [Check] button on the [Recover] tab, and proceed by following the instructionsdisplayed on the screen.
When ScanSnap Manager Does Not Operate Normally
425
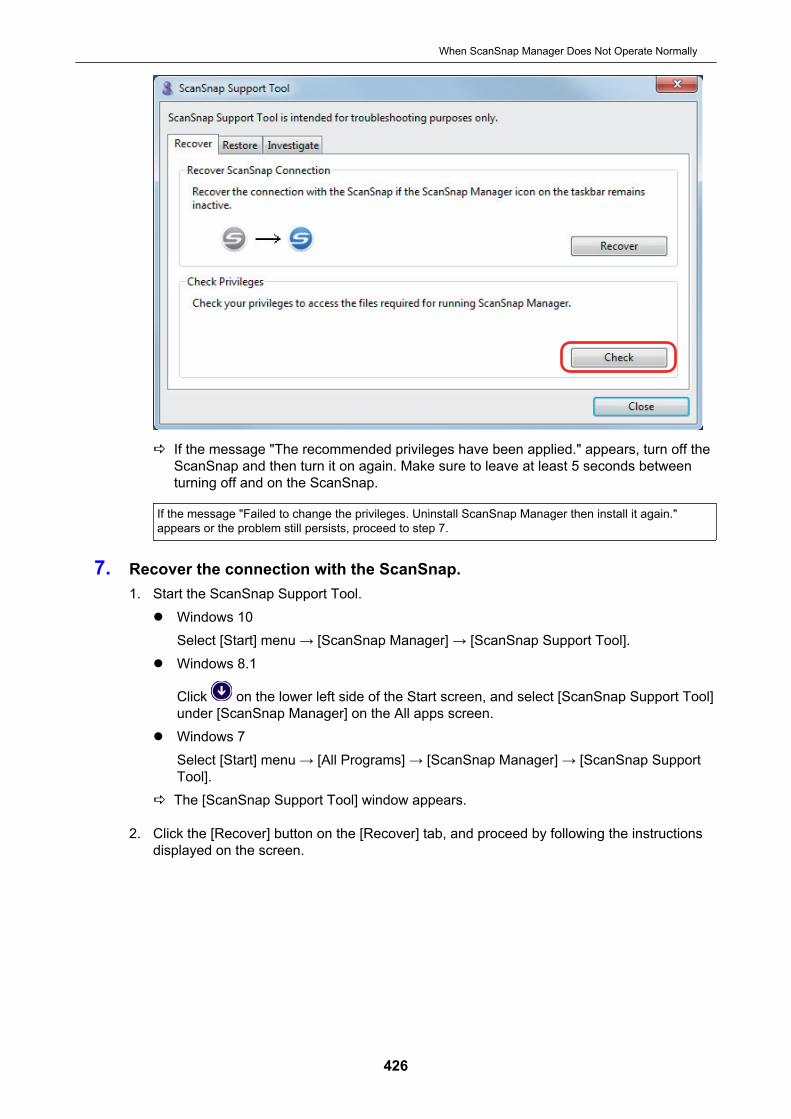
a If the message "The recommended privileges have been applied." appears, turn off theScanSnap and then turn it on again. Make sure to leave at least 5 seconds betweenturning off and on the ScanSnap.
If the message "Failed to change the privileges. Uninstall ScanSnap Manager then install it again."appears or the problem still persists, proceed to step 7.
7. Recover the connection with the ScanSnap.1. Start the ScanSnap Support Tool.l Windows 10
Select [Start] menu → [ScanSnap Manager] → [ScanSnap Support Tool].l Windows 8.1
Click on the lower left side of the Start screen, and select [ScanSnap Support Tool]under [ScanSnap Manager] on the All apps screen.
l Windows 7Select [Start] menu → [All Programs] → [ScanSnap Manager] → [ScanSnap SupportTool].
a The [ScanSnap Support Tool] window appears.
2. Click the [Recover] button on the [Recover] tab, and proceed by following the instructionsdisplayed on the screen.
When ScanSnap Manager Does Not Operate Normally
426
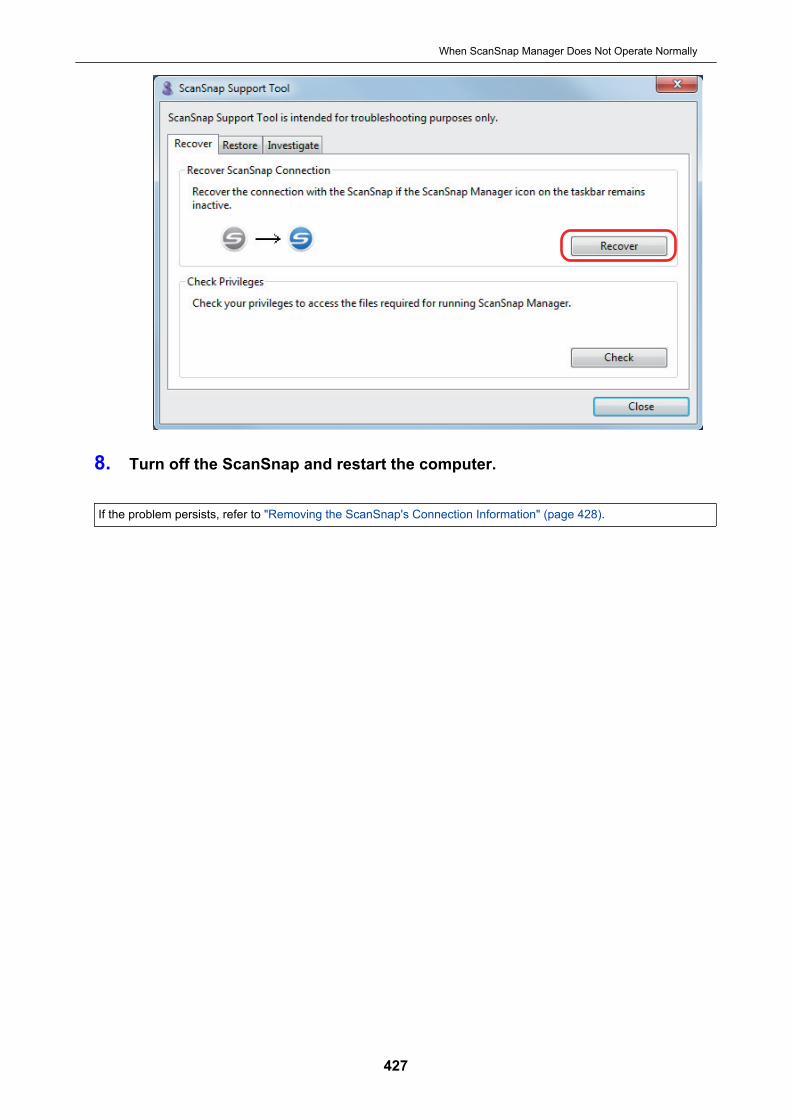
8. Turn off the ScanSnap and restart the computer.
If the problem persists, refer to "Removing the ScanSnap's Connection Information" (page 428).
When ScanSnap Manager Does Not Operate Normally
427
Removing the ScanSnap's Connection Information
The ScanSnap might have been connected to the computer before the software was installed. In thiscase, the ScanSnap's connection information needs to be removed. Remove the ScanSnap'sconnection information in the following procedure.
1. Connect the ScanSnap to the computer, and turn on the ScanSnap.
2. Open Device Manager.l Windows 10
Right-click the [Start] menu and select [Device Manager].l Windows 8.1
Click on the lower left side of the Start screen → [Control Panel] under [WindowsSystem] → [Hardware and Sound] → [Device Manager].
l Windows 7Select [Start] menu → [Control Panel] → [Hardware and Sound] → [Device Manager].
3. Remove the connection information.l iX1600
Select [Imaging devices] and right-click on [ScanSnap iX1600] (or [Other devices] →[ScanSnap iX1600]), and then select [Uninstall] from the displayed menu.
l iX1500Select [Imaging devices] and right-click on [ScanSnap iX1500] (or [Other devices] →[ScanSnap iX1500]), and then select [Uninstall] from the displayed menu.
l iX1400Select [Imaging devices] and right-click on [ScanSnap iX1400] (or [Other devices] →[ScanSnap iX1400]), and then select [Uninstall] from the displayed menu.
l iX500Select [Imaging devices] and right-click on [ScanSnap iX500] (or [Other devices] →[ScanSnap iX500]), and then select [Uninstall] from the displayed menu.
l iX100Select [Imaging devices] and right-click on [ScanSnap iX100] (or [Other devices] →[ScanSnap iX100]), and then select [Uninstall] from the displayed menu.
l SV600Select [Imaging devices] and right-click on [ScanSnap SV600] (or [Other devices] →[ScanSnap SV600]), and then select [Uninstall] from the displayed menu.
l S1300iSelect [Imaging devices] and right-click on [ScanSnap S1300i] (or [Other devices] →[ScanSnap S1300i]), and then select [Uninstall] from the displayed menu.
l S1100iSelect [Imaging devices] and right-click on [ScanSnap S1100i] (or [Other devices] →[ScanSnap S1100i]), and then select [Uninstall] from the displayed menu.
When ScanSnap Manager Does Not Operate Normally
428

4. If other USB ports have been used to connect to the ScanSnap, performsteps 1 to 3 for each of the ports.
5. Turn off the ScanSnap.
6. Unplug the USB cable from the computer.
7. Restart the computer.
8. Connect the USB cable to the computer.
9. Turn on the ScanSnap.a The ScanSnap Manager icon appears in the notification area. Make sure that the displayed
icon is .
If the problem persists, refer to "If You Have Installed the Software Before" (page 415).If the problem still persists, perform the procedures described in "When ScanSnap Manager Does Not OperateNormally" (page 422) once again.If the above procedures do not solve the problem, please attach the data of your system information to an email andsend it to your FUJITSU scanner dealer or an authorized FUJITSU scanner service provider. For details about howto collect system information, refer to "Troubleshooting" in the ScanSnap Manager Help.
When ScanSnap Manager Does Not Operate Normally
429

When You Cannot Uninstall the Software
This section explains how to troubleshoot when you cannot uninstall the following softwareprograms:l ScanSnap Managerl ScanSnap Homel ScanSnap Organizerl CardMinderl ScanSnap Online Update
1. Restart the computer and log on as a user with Administrator privileges.
2. Remove the installation information.a For details, refer to "Removing the Installation Information" (page 417).
3. Install the software.a For details, refer to "Reinstalling the Software" (page 418).
4. Uninstall the software.a For details, refer to "Uninstalling the Software" (page 497).
When You Cannot Uninstall the Software
430
Cleaning the ScanSnap
l "Cleaning Materials" (page 432)l "Cleaning iX1600 / iX1500 / iX1400" (page 433)l "Cleaning iX500" (page 442)l "Cleaning iX100" (page 448)l "Cleaning SV600" (page 453)l "Cleaning S1300i" (page 454)l "Cleaning S1100i" (page 460)l "Cleaning the Carrier Sheet (iX1600 / iX1500 / iX1400 / iX500/ iX100 / S1100i)" (page 465)l "Cleaning the Background Pad (SV600)" (page 466)
Cleaning the ScanSnap
431
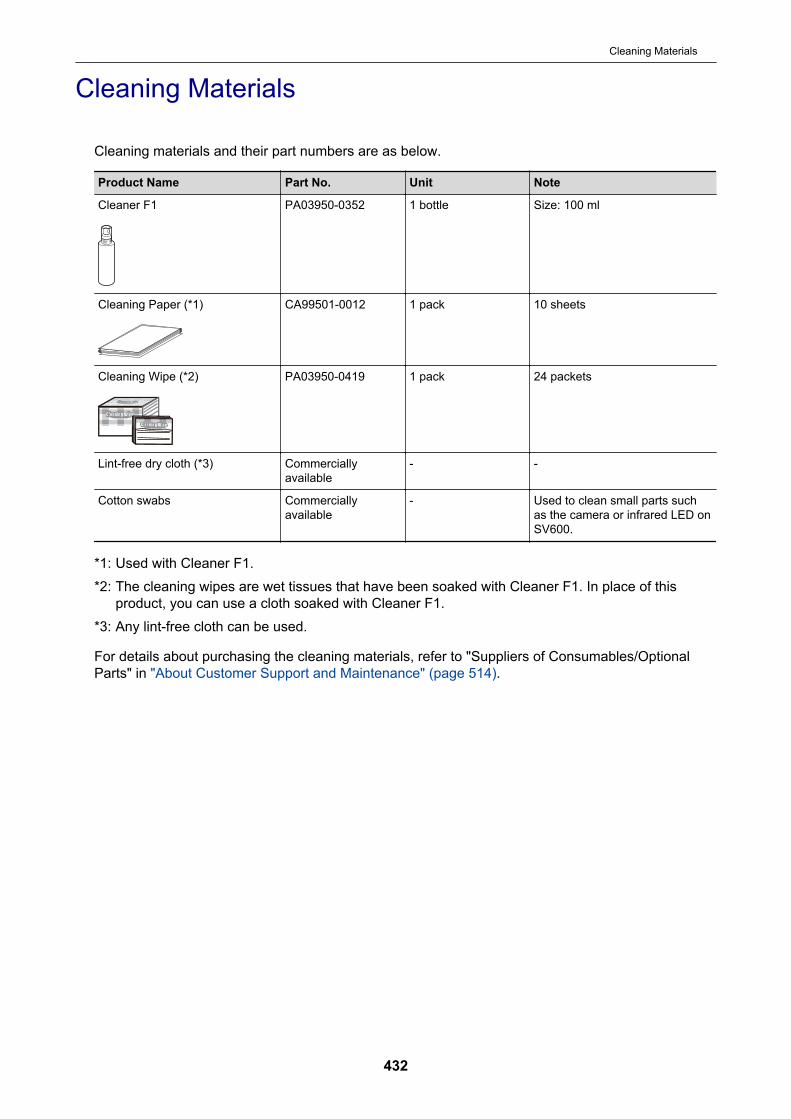
Cleaning Materials
Cleaning materials and their part numbers are as below.
Product Name Part No. Unit Note
Cleaner F1 PA03950-0352 1 bottle Size: 100 ml
Cleaning Paper (*1) CA99501-0012 1 pack 10 sheets
Cleaning Wipe (*2) PA03950-0419 1 pack 24 packets
Lint-free dry cloth (*3) Commerciallyavailable
- -
Cotton swabs Commerciallyavailable
- Used to clean small parts suchas the camera or infrared LED onSV600.
*1: Used with Cleaner F1.*2: The cleaning wipes are wet tissues that have been soaked with Cleaner F1. In place of this
product, you can use a cloth soaked with Cleaner F1.*3: Any lint-free cloth can be used.
For details about purchasing the cleaning materials, refer to "Suppliers of Consumables/OptionalParts" in "About Customer Support and Maintenance" (page 514).
Cleaning Materials
432

Cleaning iX1600 / iX1500 / iX1400
This section explains about the cleaning materials and how to clean the ScanSnap.
ATTENTIONThe bottom part of the ScanSnap may become hot when the ScanSnap is being used but this does notaffect ScanSnap operation or cause any physical harm. Be careful not to drop the ScanSnap whencarrying it.
l "Cleaning the Outside of iX1600 / iX1500 / iX1400" (page 434)l "Cleaning the Inside of iX1600 / iX1500 / iX1400" (page 435)
Cleaning iX1600 / iX1500 / iX1400
433
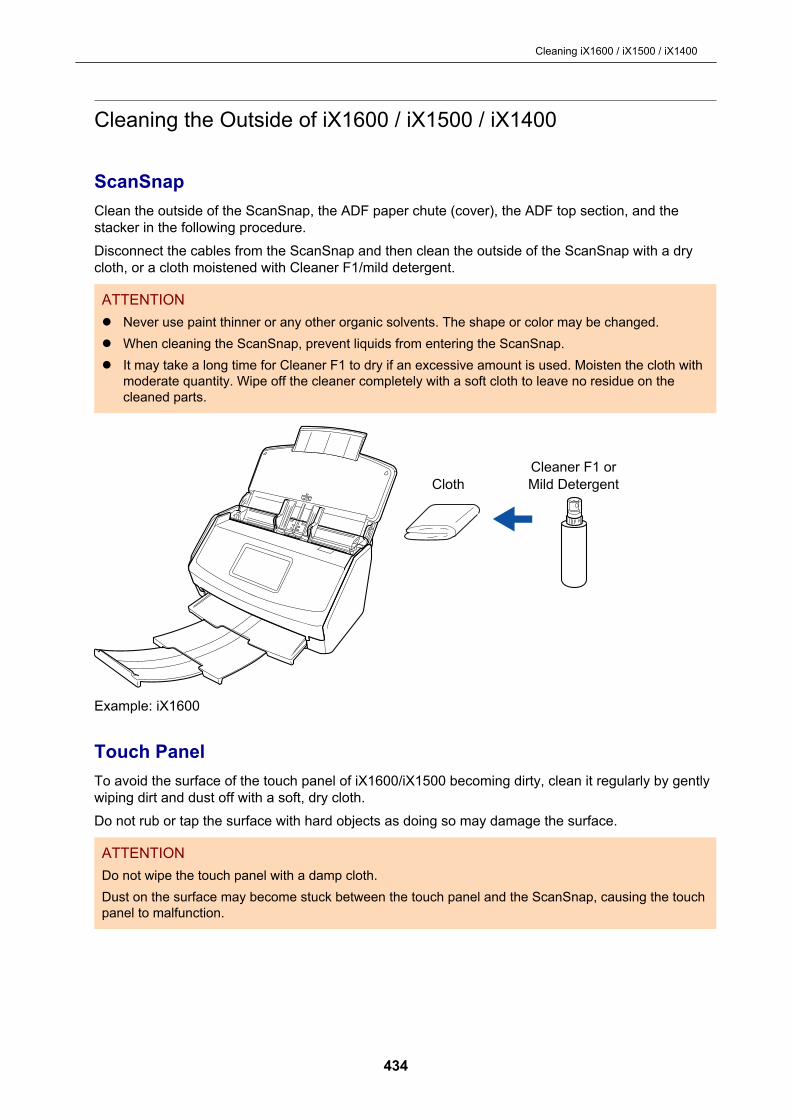
Cleaning the Outside of iX1600 / iX1500 / iX1400
ScanSnapClean the outside of the ScanSnap, the ADF paper chute (cover), the ADF top section, and thestacker in the following procedure.Disconnect the cables from the ScanSnap and then clean the outside of the ScanSnap with a drycloth, or a cloth moistened with Cleaner F1/mild detergent.
ATTENTIONl Never use paint thinner or any other organic solvents. The shape or color may be changed.l When cleaning the ScanSnap, prevent liquids from entering the ScanSnap.l It may take a long time for Cleaner F1 to dry if an excessive amount is used. Moisten the cloth with
moderate quantity. Wipe off the cleaner completely with a soft cloth to leave no residue on thecleaned parts.
Cleaner F1 or
Mild DetergentCloth
Example: iX1600
Touch PanelTo avoid the surface of the touch panel of iX1600/iX1500 becoming dirty, clean it regularly by gentlywiping dirt and dust off with a soft, dry cloth.Do not rub or tap the surface with hard objects as doing so may damage the surface.
ATTENTIONDo not wipe the touch panel with a damp cloth.Dust on the surface may become stuck between the touch panel and the ScanSnap, causing the touchpanel to malfunction.
Cleaning iX1600 / iX1500 / iX1400
434

Cleaning the Inside of iX1600 / iX1500 / iX1400
Scanning repeatedly may cause dust and paper dust to accumulate inside the ScanSnap resulting ina scanning error.As a guideline, the inside of the ScanSnap should be cleaned every 1,000 sheets scanned. Notethat this guideline varies depending on the types of documents you scan. For instance, it may benecessary to clean the scanner more frequently when you scan documents on which the toner is notsufficiently fused.
l Before cleaning the ScanSnap, you must turn off the ScanSnap and unplugthe power cable from the AC outlet. Not doing so may cause fire or electricalshock.
l Do not place internal parts such as the brake roller and the pick roller withinreach of small children. Doing so may cause injury.
l The glass inside becomes very hot while the ScanSnap is being used.Before you clean the inside of the ScanSnap, you must unplug the powercable from the AC outlet and leave the ScanSnap for 15 minutes or more.
Do not use aerosol spray or spray that contains alcohol to clean the scanner.Paper dust and other dust blown up by strong air from the spray may enter theinside of the scanner which may cause scanner failure or malfunction.Also note that sparks generated by static electricity may cause a fire.
ATTENTIONl Do not use water or mild detergent to clean the inside of the ScanSnap.l It may take a long time for Cleaner F1 to dry if an excessive amount is used. Moisten the cloth with
moderate quantity.Wipe off the cleaner completely to leave no residue on the cleaned parts.
1. Unplug the power cable of the ScanSnap from the AC outlet.
2. Remove any documents from the ADF paper chute (cover).
3. Remove the Receipt Guide if it is attached.You can remove the Receipt Guide by holding it with one hand and pulling it.
Cleaning iX1600 / iX1500 / iX1400
435

Example: iX1600
4. Pull the ADF release tab towards you to open the ADF top section.The body of the ScanSnap may vary in color depending on the region where you purchasedthe ScanSnap.
Example: iX1600
5. Clean the following locations with a cloth moistened with Cleaner F1.
Cleaning iX1600 / iX1500 / iX1400
436
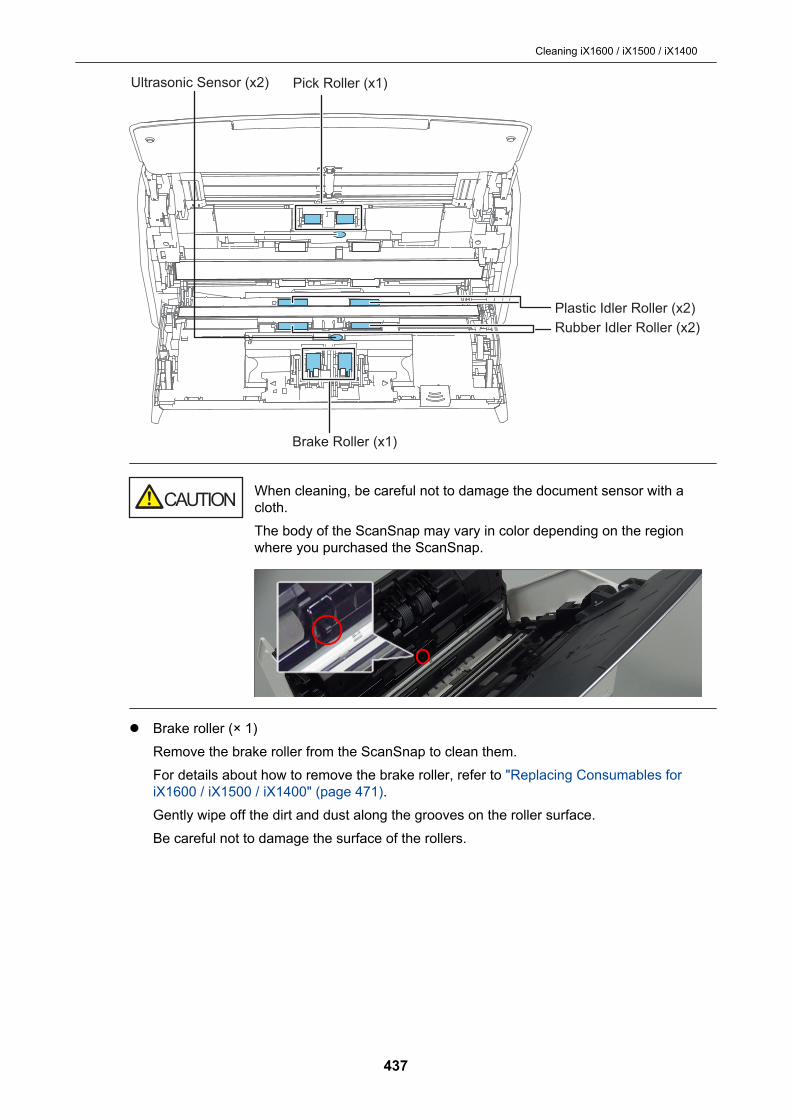
Rubber Idler Roller (x2)
Ultrasonic Sensor (x2)
Brake Roller (x1)
Pick Roller (x1)
Plastic Idler Roller (x2)
When cleaning, be careful not to damage the document sensor with acloth.The body of the ScanSnap may vary in color depending on the regionwhere you purchased the ScanSnap.
l Brake roller (× 1)Remove the brake roller from the ScanSnap to clean them.For details about how to remove the brake roller, refer to "Replacing Consumables foriX1600 / iX1500 / iX1400" (page 471).Gently wipe off the dirt and dust along the grooves on the roller surface.Be careful not to damage the surface of the rollers.
Cleaning iX1600 / iX1500 / iX1400
437
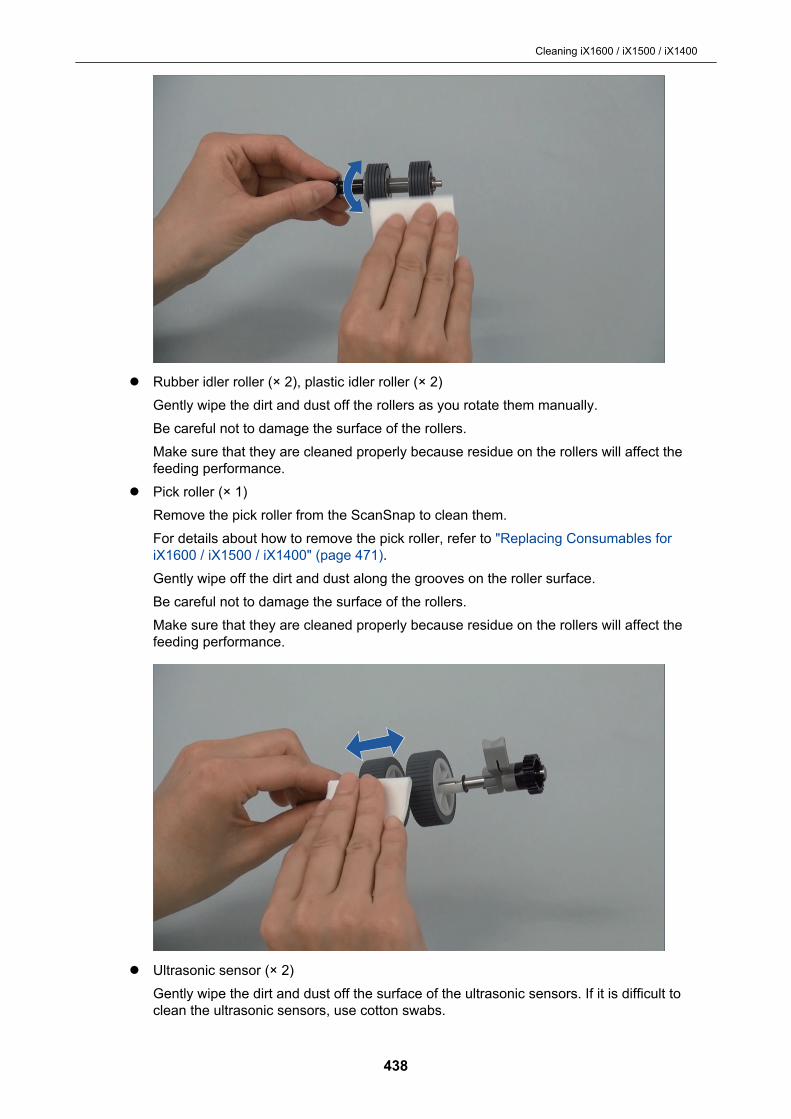
l Rubber idler roller (× 2), plastic idler roller (× 2)Gently wipe the dirt and dust off the rollers as you rotate them manually.Be careful not to damage the surface of the rollers.Make sure that they are cleaned properly because residue on the rollers will affect thefeeding performance.
l Pick roller (× 1)Remove the pick roller from the ScanSnap to clean them.For details about how to remove the pick roller, refer to "Replacing Consumables foriX1600 / iX1500 / iX1400" (page 471).Gently wipe off the dirt and dust along the grooves on the roller surface.Be careful not to damage the surface of the rollers.Make sure that they are cleaned properly because residue on the rollers will affect thefeeding performance.
l Ultrasonic sensor (× 2)Gently wipe the dirt and dust off the surface of the ultrasonic sensors. If it is difficult toclean the ultrasonic sensors, use cotton swabs.
Cleaning iX1600 / iX1500 / iX1400
438
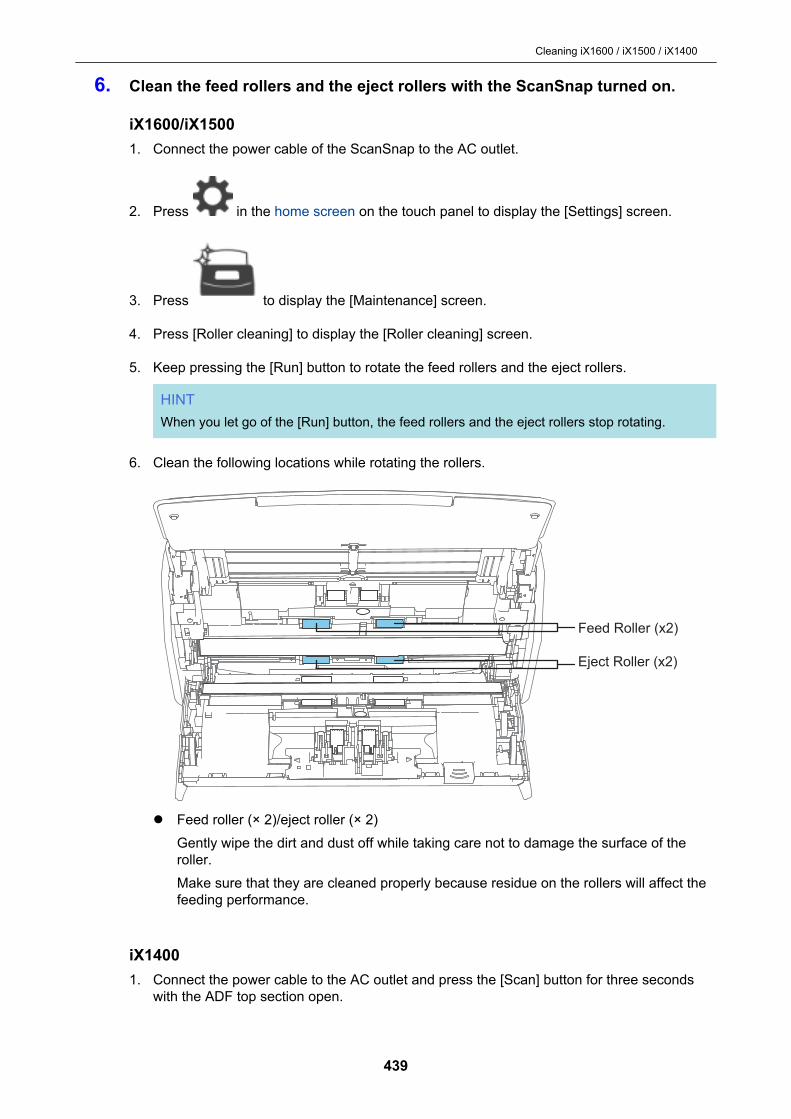
6. Clean the feed rollers and the eject rollers with the ScanSnap turned on.
iX1600/iX15001. Connect the power cable of the ScanSnap to the AC outlet.
2. Press in the home screen on the touch panel to display the [Settings] screen.
3. Press to display the [Maintenance] screen.
4. Press [Roller cleaning] to display the [Roller cleaning] screen.
5. Keep pressing the [Run] button to rotate the feed rollers and the eject rollers.
HINTWhen you let go of the [Run] button, the feed rollers and the eject rollers stop rotating.
6. Clean the following locations while rotating the rollers.
Feed Roller (x2)
Eject Roller (x2)
l Feed roller (× 2)/eject roller (× 2)Gently wipe the dirt and dust off while taking care not to damage the surface of theroller.Make sure that they are cleaned properly because residue on the rollers will affect thefeeding performance.
iX14001. Connect the power cable to the AC outlet and press the [Scan] button for three seconds
with the ADF top section open.
Cleaning iX1600 / iX1500 / iX1400
439
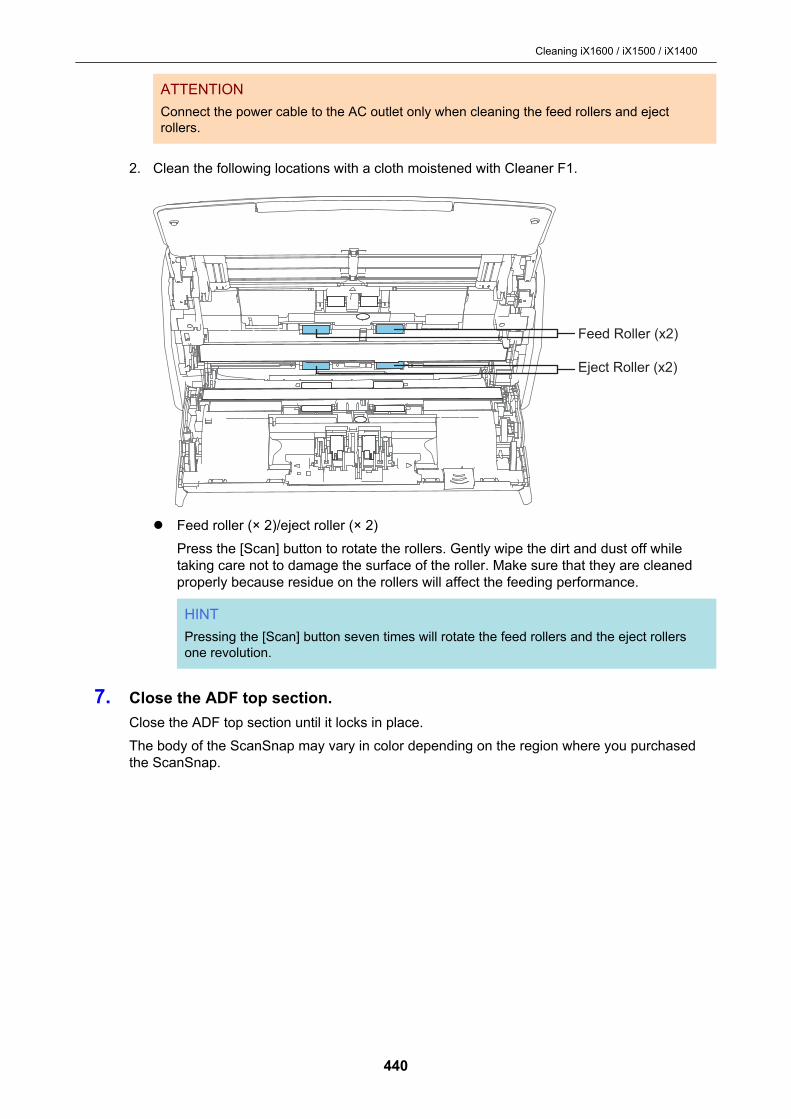
ATTENTIONConnect the power cable to the AC outlet only when cleaning the feed rollers and ejectrollers.
2. Clean the following locations with a cloth moistened with Cleaner F1.
Feed Roller (x2)
Eject Roller (x2)
l Feed roller (× 2)/eject roller (× 2)Press the [Scan] button to rotate the rollers. Gently wipe the dirt and dust off whiletaking care not to damage the surface of the roller. Make sure that they are cleanedproperly because residue on the rollers will affect the feeding performance.
HINTPressing the [Scan] button seven times will rotate the feed rollers and the eject rollersone revolution.
7. Close the ADF top section.Close the ADF top section until it locks in place.The body of the ScanSnap may vary in color depending on the region where you purchasedthe ScanSnap.
Cleaning iX1600 / iX1500 / iX1400
440
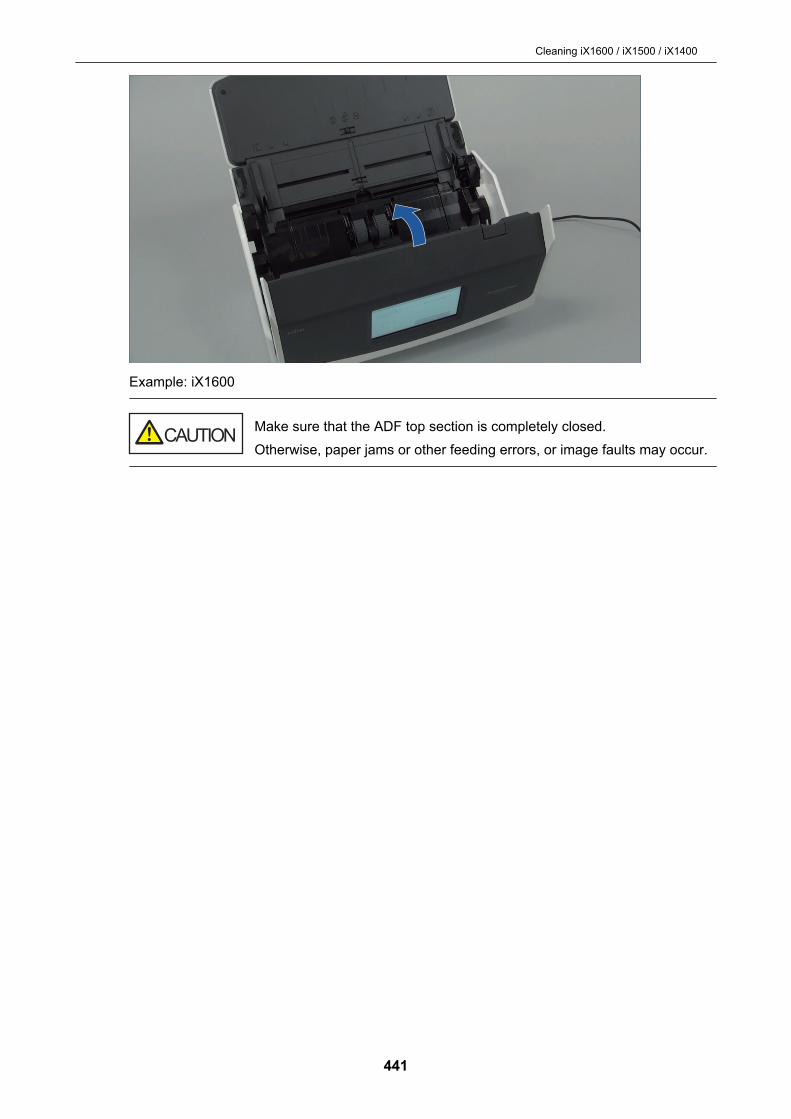
Example: iX1600
Make sure that the ADF top section is completely closed.Otherwise, paper jams or other feeding errors, or image faults may occur.
Cleaning iX1600 / iX1500 / iX1400
441

Cleaning iX500
This section explains about the cleaning materials and how to clean the ScanSnap.
ATTENTIONThe bottom part of the ScanSnap may become hot when the ScanSnap is being used but this does notaffect ScanSnap operation or cause any physical harm. Be careful not to drop the ScanSnap whencarrying it.
l "Cleaning the Outside of iX500" (page 443)l "Cleaning the Inside of iX500" (page 444)
Cleaning iX500
442
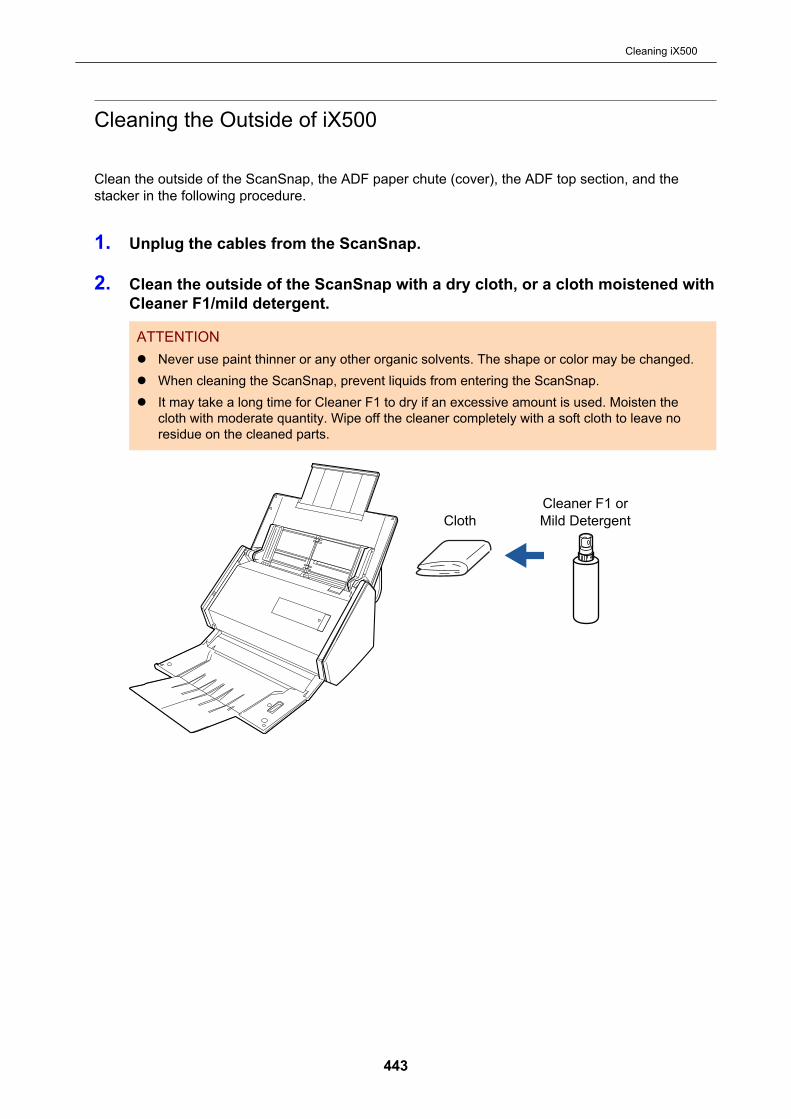
Cleaning the Outside of iX500
Clean the outside of the ScanSnap, the ADF paper chute (cover), the ADF top section, and thestacker in the following procedure.
1. Unplug the cables from the ScanSnap.
2. Clean the outside of the ScanSnap with a dry cloth, or a cloth moistened withCleaner F1/mild detergent.
ATTENTIONl Never use paint thinner or any other organic solvents. The shape or color may be changed.l When cleaning the ScanSnap, prevent liquids from entering the ScanSnap.l It may take a long time for Cleaner F1 to dry if an excessive amount is used. Moisten the
cloth with moderate quantity. Wipe off the cleaner completely with a soft cloth to leave noresidue on the cleaned parts.
Cleaner F1 or
Mild DetergentCloth
Cleaning iX500
443
Cleaning the Inside of iX500
Scanning repeatedly may cause dust and paper dust to accumulate inside the ScanSnap resulting ina scanning error.As a guideline, the inside of the ScanSnap should be cleaned every 1,000 sheets scanned. Notethat this guideline varies depending on the types of documents you scan. For instance, it may benecessary to clean the scanner more frequently when you scan documents on which the toner is notsufficiently fused.
l Before cleaning the ScanSnap, you must turn off the ScanSnap and unplugthe power cable from the AC outlet. Not doing so may cause fire or electricalshock.
l Do not place internal parts such as the brake roller and the pick roller withinreach of small children. Doing so may cause injury.
l The glass inside becomes very hot while the ScanSnap is being used.Before you clean the inside of the ScanSnap, you must unplug the powercable from the AC outlet and leave the ScanSnap for 15 minutes or more.
Do not use aerosol spray or spray that contains alcohol to clean the scanner.Paper dust and other dust blown up by strong air from the spray may enter theinside of the scanner which may cause scanner failure or malfunction.Also note that sparks generated by static electricity may cause a fire.
ATTENTIONl Do not use water or mild detergent to clean the inside of the ScanSnap.l It may take a long time for Cleaner F1 to dry if an excessive amount is used. Moisten the cloth with
moderate quantity.Wipe off the cleaner completely to leave no residue on the cleaned parts.
HINTTo check the number of sheets scanned with the ScanSnap, see [Total Page Count] in the [ScanSnapManager - Check consumable status] window.To open the [ScanSnap Manager - Check consumable status] window, right-click the ScanSnap
Manager icon in the notification area located at the far right of the taskbar, and select [Checkconsumable status] from the "Right-Click Menu" (page 87).
1. Clean the following items:l Brake rollerl Idler rollerl Glassl Pick rollerl Ultrasonic sensor
Cleaning iX500
444

1. Unplug the power cable from the AC outlet.
2. Pull the ADF release tab towards you to open the ADF top section.
ADF Paper Chute (Cover)
ADF Release Tab
ADF Top Section
3. Clean the following locations with a cloth moistened with Cleaner F1.
ATTENTIONWhen cleaning, be careful not to damage the document sensor with a cloth.
Document Sensor
Brake Roller (x2)
Pick Roller (x2)
Ultrasonic Sensor (x2)
Scan Glass (x2)
Idler Roller (x4)
l Brake roller (× 2)Remove the brake rollers from the ScanSnap to clean them.
Cleaning iX500
445
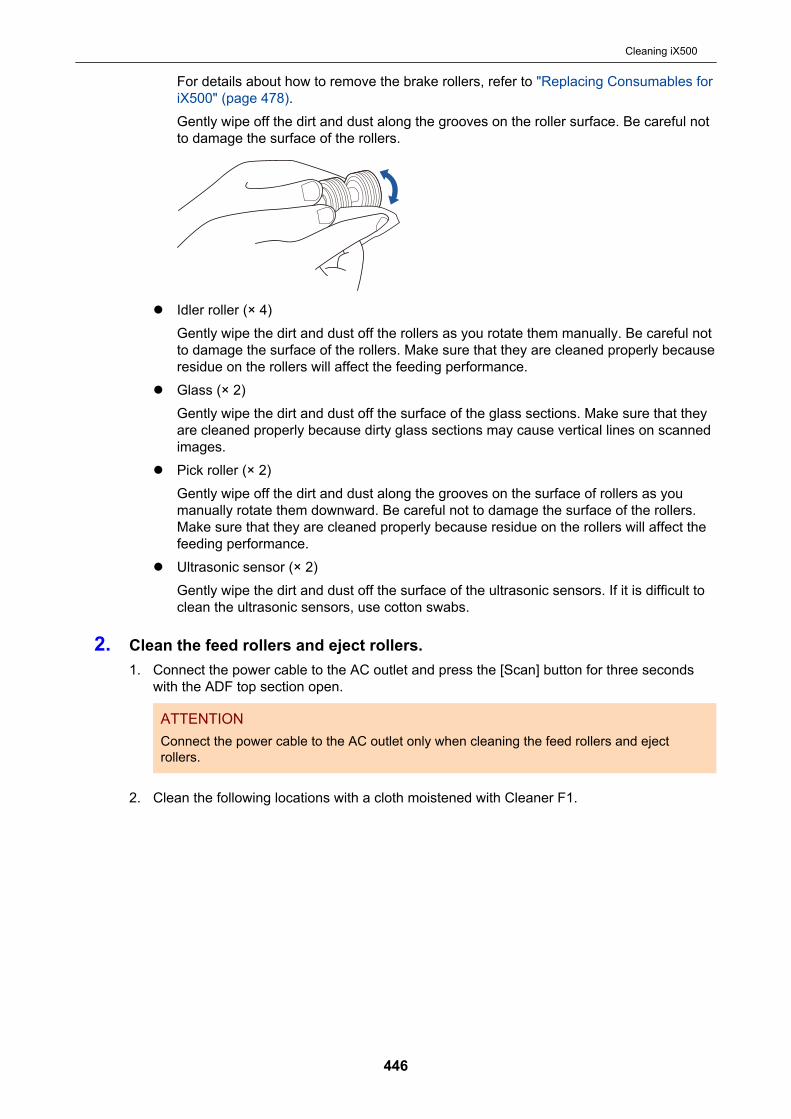
For details about how to remove the brake rollers, refer to "Replacing Consumables foriX500" (page 478).Gently wipe off the dirt and dust along the grooves on the roller surface. Be careful notto damage the surface of the rollers.
l Idler roller (× 4)Gently wipe the dirt and dust off the rollers as you rotate them manually. Be careful notto damage the surface of the rollers. Make sure that they are cleaned properly becauseresidue on the rollers will affect the feeding performance.
l Glass (× 2)Gently wipe the dirt and dust off the surface of the glass sections. Make sure that theyare cleaned properly because dirty glass sections may cause vertical lines on scannedimages.
l Pick roller (× 2)Gently wipe off the dirt and dust along the grooves on the surface of rollers as youmanually rotate them downward. Be careful not to damage the surface of the rollers.Make sure that they are cleaned properly because residue on the rollers will affect thefeeding performance.
l Ultrasonic sensor (× 2)Gently wipe the dirt and dust off the surface of the ultrasonic sensors. If it is difficult toclean the ultrasonic sensors, use cotton swabs.
2. Clean the feed rollers and eject rollers.1. Connect the power cable to the AC outlet and press the [Scan] button for three seconds
with the ADF top section open.
ATTENTIONConnect the power cable to the AC outlet only when cleaning the feed rollers and ejectrollers.
2. Clean the following locations with a cloth moistened with Cleaner F1.
Cleaning iX500
446

Eject Roller (x2)
Feed Roller (x2)
l Feed roller (× 2)/eject roller (× 2)Press the [Scan] button to rotate the rollers. Gently wipe the dirt and dust off whiletaking care not to damage the surface of the roller. Make sure that they are cleanedproperly because residue on the rollers will affect the feeding performance.
HINTPressing the [Scan] button seven times will rotate the feed rollers and the eject rollersone revolution.
3. Close the ADF top section.
ADF Paper Chute (Cover)
ADF Top Section
a It clicks when it returns to its original position.
ATTENTIONMake sure that the ADF top section is completely closed.Otherwise, paper jams or other feeding errors, or image faults may occur.
Cleaning iX500
447

Cleaning iX100
This section explains about the cleaning materials and how to clean the ScanSnap.l "Cleaning the Outside of iX100" (page 449)l "Cleaning the Inside of iX100" (page 450)
Cleaning iX100
448
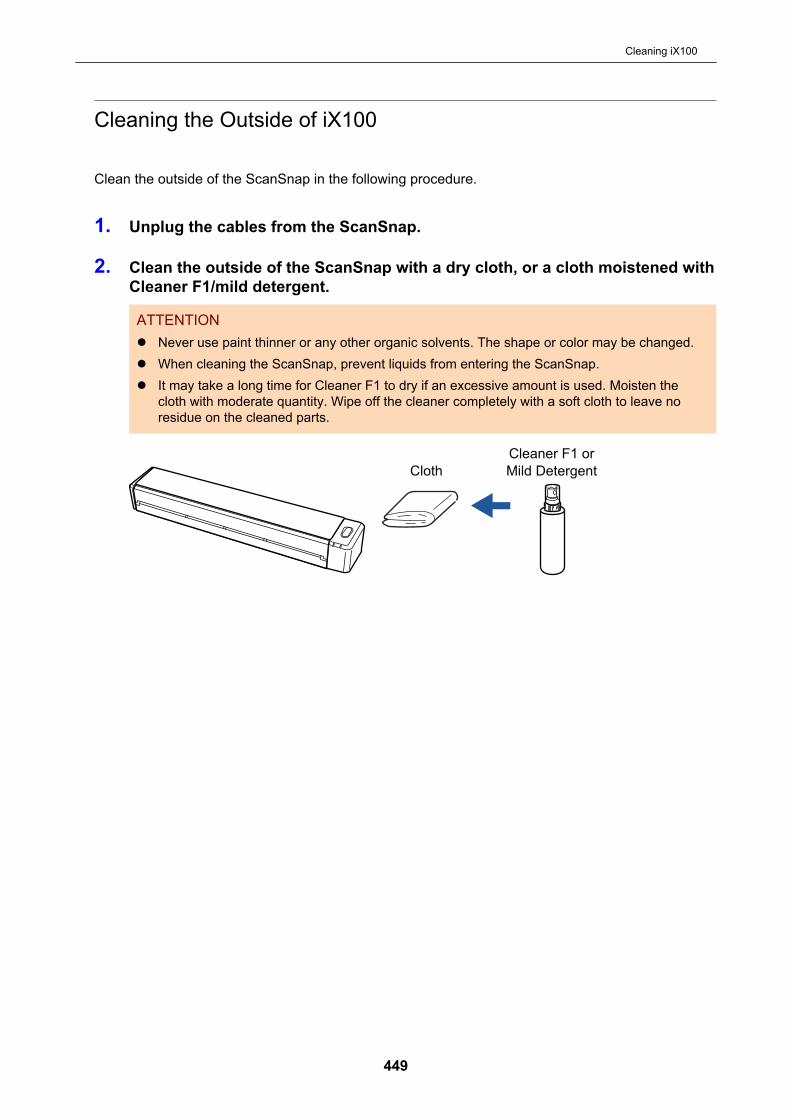
Cleaning the Outside of iX100
Clean the outside of the ScanSnap in the following procedure.
1. Unplug the cables from the ScanSnap.
2. Clean the outside of the ScanSnap with a dry cloth, or a cloth moistened withCleaner F1/mild detergent.
ATTENTIONl Never use paint thinner or any other organic solvents. The shape or color may be changed.l When cleaning the ScanSnap, prevent liquids from entering the ScanSnap.l It may take a long time for Cleaner F1 to dry if an excessive amount is used. Moisten the
cloth with moderate quantity. Wipe off the cleaner completely with a soft cloth to leave noresidue on the cleaned parts.
Cleaner F1 or
Mild DetergentCloth
Cleaning iX100
449

Cleaning the Inside of iX100
Scanning repeatedly may cause dust and paper dust to accumulate inside the ScanSnap resulting ina scanning error.As a guideline, the inside of the ScanSnap should be cleaned every 100 sheets scanned. Note thatthis guideline varies depending on the types of documents you scan. For instance, it may benecessary to clean the scanner more frequently when you scan documents on which the toner is notsufficiently fused.
Do not use aerosol spray or spray that contains alcohol to clean the scanner.Paper dust and other dust blown up by strong air from the spray may enter theinside of the scanner which may cause scanner failure or malfunction.Also note that sparks generated by static electricity may cause a fire.
ATTENTIONl Do not use water or mild detergent to clean the inside of the ScanSnap.l It may take a long time for Cleaner F1 to dry if an excessive amount is used. Moisten the cloth with
moderate quantity.Wipe off the cleaner completely to leave no residue on the cleaned parts.
HINTTo check the number of sheets scanned with the ScanSnap, see [Total Page Count] in the [ScanSnapManager - Scanner and driver information] window.To open the [ScanSnap Manager - Scanner and driver information] window, right-click the ScanSnap
Manager icon in the notification area located at the far right of the taskbar, and click [Help] →[ScanSnap information] from the "Right-Click Menu" (page 87).
1. Clean the glass and idler rollers.1. Open the feed guide.
The ScanSnap is turned on and a roller rotation sound comes out of the ScanSnap.After the sound stops, proceed to the next step.
2. Open the top cover and output guide.
Cleaning iX100
450

Feed Guide
Top Cover
Output Guide
3. Clean the following locations with a cloth moistened with Cleaner F1.
Glass (x 2)
Idler Roller (x 12)
l Glass (× 2, one on the top cover and one on the opposite side)Gently wipe the dirt and dust off the surface of the glass sections.
l Idler roller (× 12, located on the top cover)Gently wipe the dirt and dust off the rollers as you rotate them manually. Be careful notto damage the surface of the rollers. Make sure that they are cleaned properly becauseresidue on the rollers will affect the feeding performance.
2. Clean the feed rollers and eject rollers.1. Press the [Scan/Stop] button for 3 seconds with the top cover open.
2. Clean the following locations with a cloth moistened with Cleaner F1.
Cleaning iX100
451

Eject Roller (x 1)
Feed Roller (x 1)
l Feed roller (× 1, located on the scanner side)Press the [Scan/Stop] button to rotate the roller. Gently wipe the dirt and dust off whiletaking care not to damage the surface of the roller. Make sure that they are cleanedproperly because residue on the roller will affect the feeding performance.
l Eject roller (× 1, located on the scanner side)Press the [Scan/Stop] button to rotate the roller. Gently wipe the dirt and dust off whiletaking care not to damage the surface of the roller. Make sure that they are cleanedproperly because residue on the roller will affect the feeding performance.If the eject roller is difficult to clean, try cleaning it from the back of the ScanSnap whileyou keep the top cover slightly open.
Eject Roller (x 1)
HINTPressing the [Scan/Stop] button seven times will rotate the feed roller and the eject roller onerevolution.
3. Close the top cover and the output guide.
Top Cover Feed Guide
Output Guide
a It clicks when it returns to its original position.
ATTENTIONMake sure that the top cover is completely closed.Otherwise, paper jams or other feeding errors, or image faults may occur.
Cleaning iX100
452
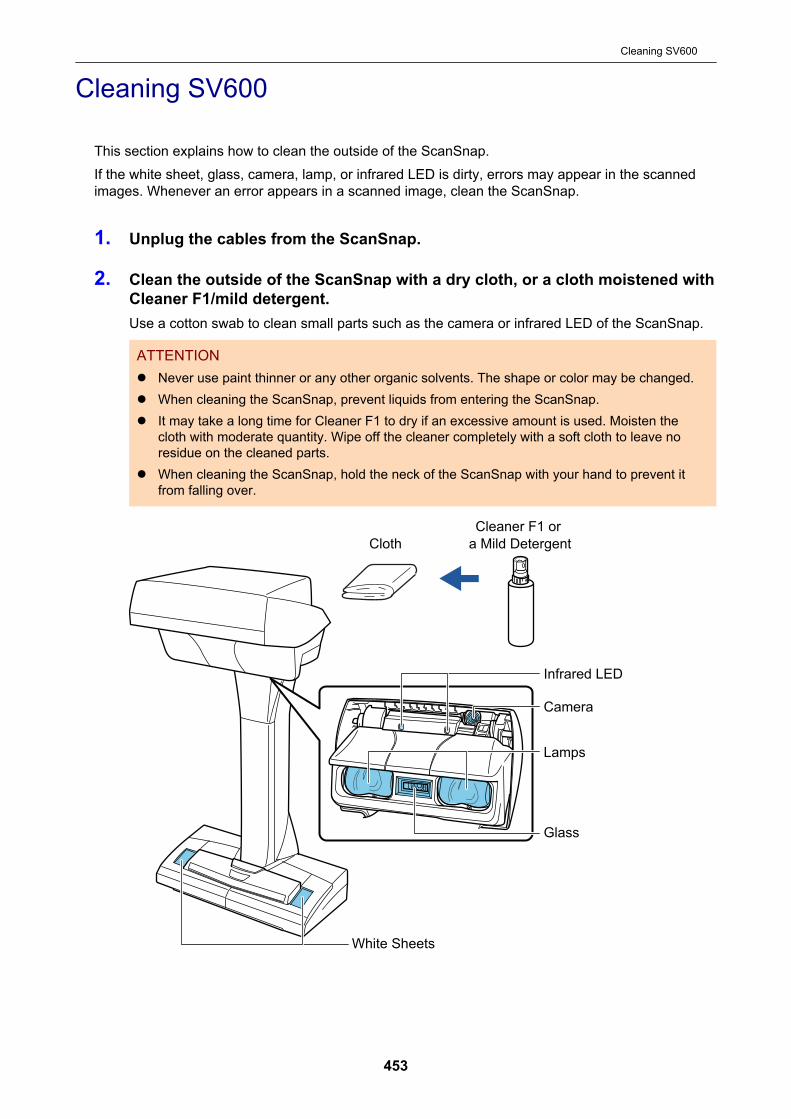
Cleaning SV600
This section explains how to clean the outside of the ScanSnap.If the white sheet, glass, camera, lamp, or infrared LED is dirty, errors may appear in the scannedimages. Whenever an error appears in a scanned image, clean the ScanSnap.
1. Unplug the cables from the ScanSnap.
2. Clean the outside of the ScanSnap with a dry cloth, or a cloth moistened withCleaner F1/mild detergent.Use a cotton swab to clean small parts such as the camera or infrared LED of the ScanSnap.
ATTENTIONl Never use paint thinner or any other organic solvents. The shape or color may be changed.l When cleaning the ScanSnap, prevent liquids from entering the ScanSnap.l It may take a long time for Cleaner F1 to dry if an excessive amount is used. Moisten the
cloth with moderate quantity. Wipe off the cleaner completely with a soft cloth to leave noresidue on the cleaned parts.
l When cleaning the ScanSnap, hold the neck of the ScanSnap with your hand to prevent itfrom falling over.
Cleaner F1 or
a Mild DetergentCloth
Lamps
Glass
White Sheets
Camera
Infrared LED
Cleaning SV600
453

Cleaning S1300i
This section explains about the cleaning materials and how to clean the ScanSnap.l "Cleaning the Outside of S1300i" (page 455)l "Cleaning the Inside of S1300i" (page 456)
Cleaning S1300i
454
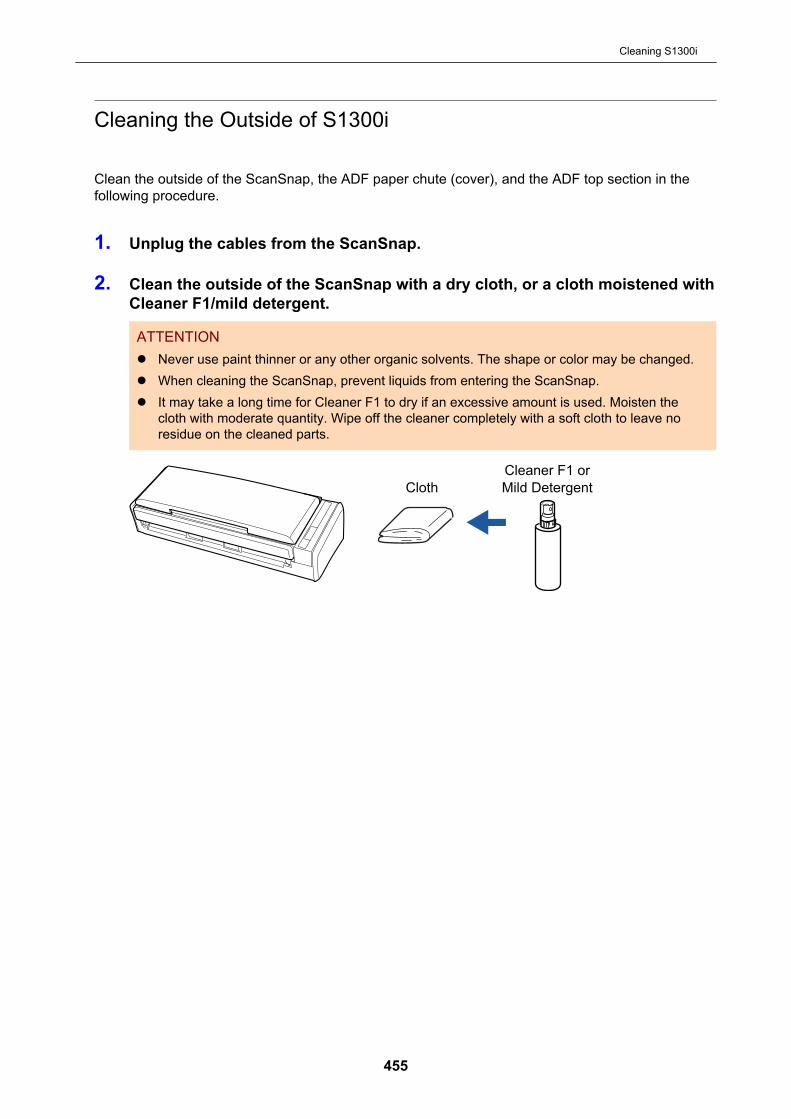
Cleaning the Outside of S1300i
Clean the outside of the ScanSnap, the ADF paper chute (cover), and the ADF top section in thefollowing procedure.
1. Unplug the cables from the ScanSnap.
2. Clean the outside of the ScanSnap with a dry cloth, or a cloth moistened withCleaner F1/mild detergent.
ATTENTIONl Never use paint thinner or any other organic solvents. The shape or color may be changed.l When cleaning the ScanSnap, prevent liquids from entering the ScanSnap.l It may take a long time for Cleaner F1 to dry if an excessive amount is used. Moisten the
cloth with moderate quantity. Wipe off the cleaner completely with a soft cloth to leave noresidue on the cleaned parts.
Cleaner F1 or
Mild DetergentCloth
Cleaning S1300i
455

Cleaning the Inside of S1300i
Scanning repeatedly may cause dust and paper dust to accumulate inside the ScanSnap resulting ina scanning error.As a guideline, the inside of the ScanSnap should be cleaned every 200 sheets scanned. Note thatthis guideline varies depending on the types of documents you scan. For instance, it may benecessary to clean the scanner more frequently when you scan documents on which the toner is notsufficiently fused.
l Before cleaning the ScanSnap, you must turn off the ScanSnap and unplugthe power connection cable (power cable or USB bus power cable) from thepower supply source (AC outlet or computer). Not doing so may cause fireor electrical shock.
l Do not place internal parts such as the pad assy and the pick rollerassembly within reach of small children. Doing so may cause injury.
l When the ScanSnap is operating, the internal glass surface will be hot.Before you clean the inside of the ScanSnap, you must unplug the powerconnection cable (power cable or USB bus power cable) from the powersupply source (AC outlet or computer) and leave the ScanSnap for 15minutes or more.
l Do not use aerosol spray or spray that contains alcohol to clean thescanner. Paper dust and other dust blown up by strong air from the spraymay enter the inside of the scanner which may cause scanner failure ormalfunction.Also note that sparks generated by static electricity may cause a fire.
l While cleaning the ScanSnap, pay attention to the inside structure of theScanSnap and avoid accidentally getting your hand or a cloth caught on thepick spring (metal part). Otherwise, the pick spring (metal part) may bedeformed, which causes injury.
ATTENTIONl Do not use water or mild detergent to clean the inside of the ScanSnap.l It may take a long time for Cleaner F1 to dry if an excessive amount is used. Moisten the cloth with
moderate quantity.Wipe off the cleaner completely to leave no residue on the cleaned parts.
HINTTo check the number of sheets scanned with the ScanSnap, see [Total Page Count] in the [ScanSnapManager - Check consumable status] window.To open the [ScanSnap Manager - Check consumable status] window, right-click the ScanSnap
Manager icon in the notification area located at the far right of the taskbar, and select [Checkconsumable status] from the "Right-Click Menu" (page 87).
Cleaning S1300i
456
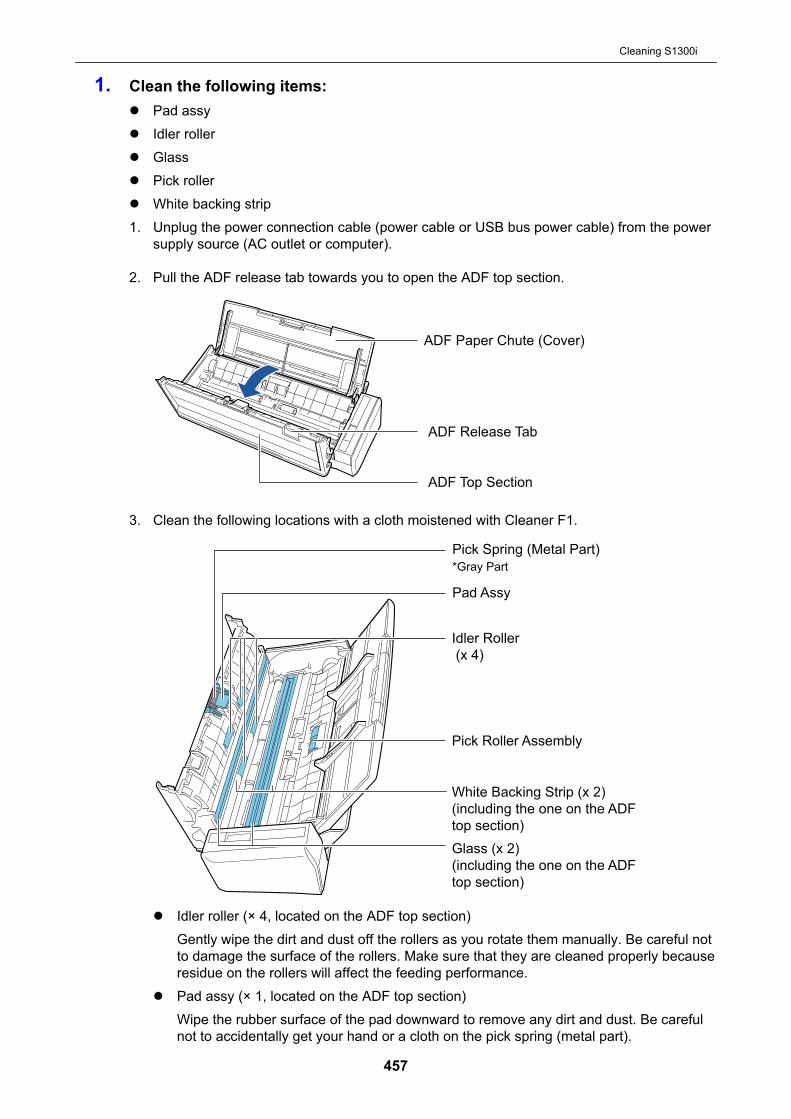
1. Clean the following items:l Pad assyl Idler rollerl Glassl Pick rollerl White backing strip1. Unplug the power connection cable (power cable or USB bus power cable) from the power
supply source (AC outlet or computer).
2. Pull the ADF release tab towards you to open the ADF top section.
ADF Paper Chute (Cover)
ADF Release Tab
ADF Top Section
3. Clean the following locations with a cloth moistened with Cleaner F1.
Pad Assy
Pick Spring (Metal Part)
*Gray Part
Pick Roller Assembly
White Backing Strip (x 2)
(including the one on the ADF
top section)
Glass (x 2)
(including the one on the ADF
top section)
Idler Roller
(x 4)
l Idler roller (× 4, located on the ADF top section)Gently wipe the dirt and dust off the rollers as you rotate them manually. Be careful notto damage the surface of the rollers. Make sure that they are cleaned properly becauseresidue on the rollers will affect the feeding performance.
l Pad assy (× 1, located on the ADF top section)Wipe the rubber surface of the pad downward to remove any dirt and dust. Be carefulnot to accidentally get your hand or a cloth on the pick spring (metal part).
Cleaning S1300i
457
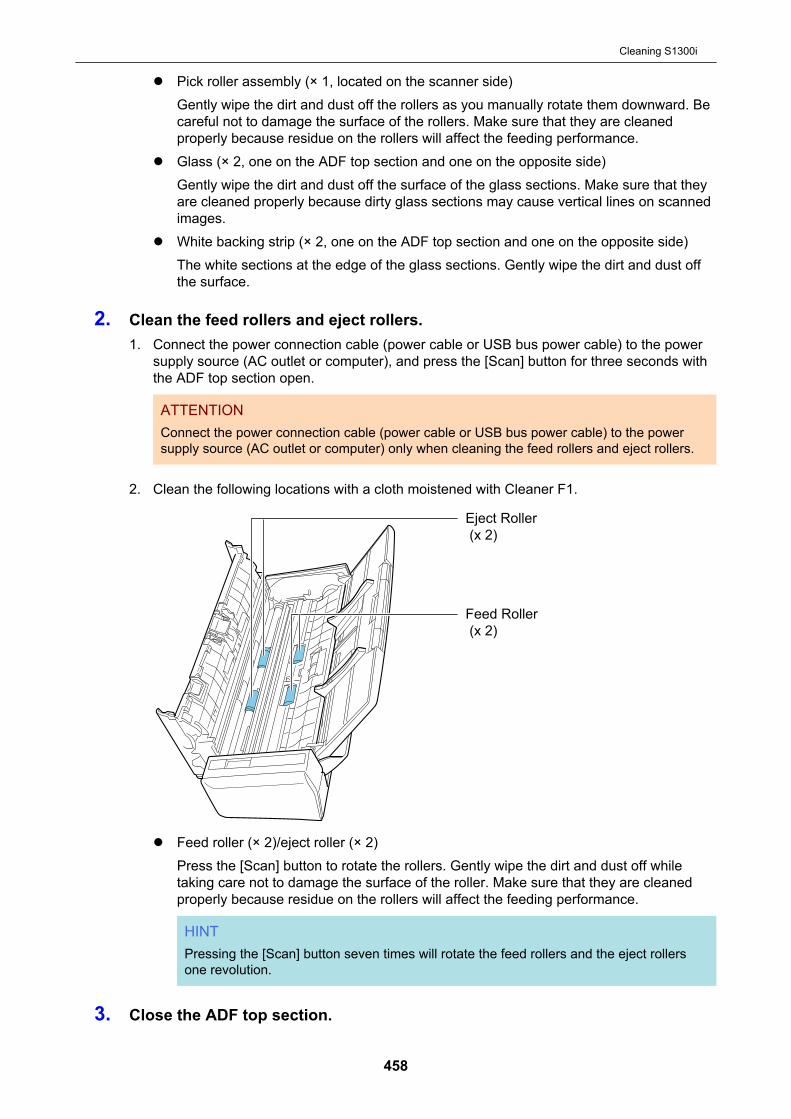
l Pick roller assembly (× 1, located on the scanner side)Gently wipe the dirt and dust off the rollers as you manually rotate them downward. Becareful not to damage the surface of the rollers. Make sure that they are cleanedproperly because residue on the rollers will affect the feeding performance.
l Glass (× 2, one on the ADF top section and one on the opposite side)Gently wipe the dirt and dust off the surface of the glass sections. Make sure that theyare cleaned properly because dirty glass sections may cause vertical lines on scannedimages.
l White backing strip (× 2, one on the ADF top section and one on the opposite side)The white sections at the edge of the glass sections. Gently wipe the dirt and dust offthe surface.
2. Clean the feed rollers and eject rollers.1. Connect the power connection cable (power cable or USB bus power cable) to the power
supply source (AC outlet or computer), and press the [Scan] button for three seconds withthe ADF top section open.
ATTENTIONConnect the power connection cable (power cable or USB bus power cable) to the powersupply source (AC outlet or computer) only when cleaning the feed rollers and eject rollers.
2. Clean the following locations with a cloth moistened with Cleaner F1.
Eject Roller
(x 2)
Feed Roller
(x 2)
l Feed roller (× 2)/eject roller (× 2)Press the [Scan] button to rotate the rollers. Gently wipe the dirt and dust off whiletaking care not to damage the surface of the roller. Make sure that they are cleanedproperly because residue on the rollers will affect the feeding performance.
HINTPressing the [Scan] button seven times will rotate the feed rollers and the eject rollersone revolution.
3. Close the ADF top section.
Cleaning S1300i
458
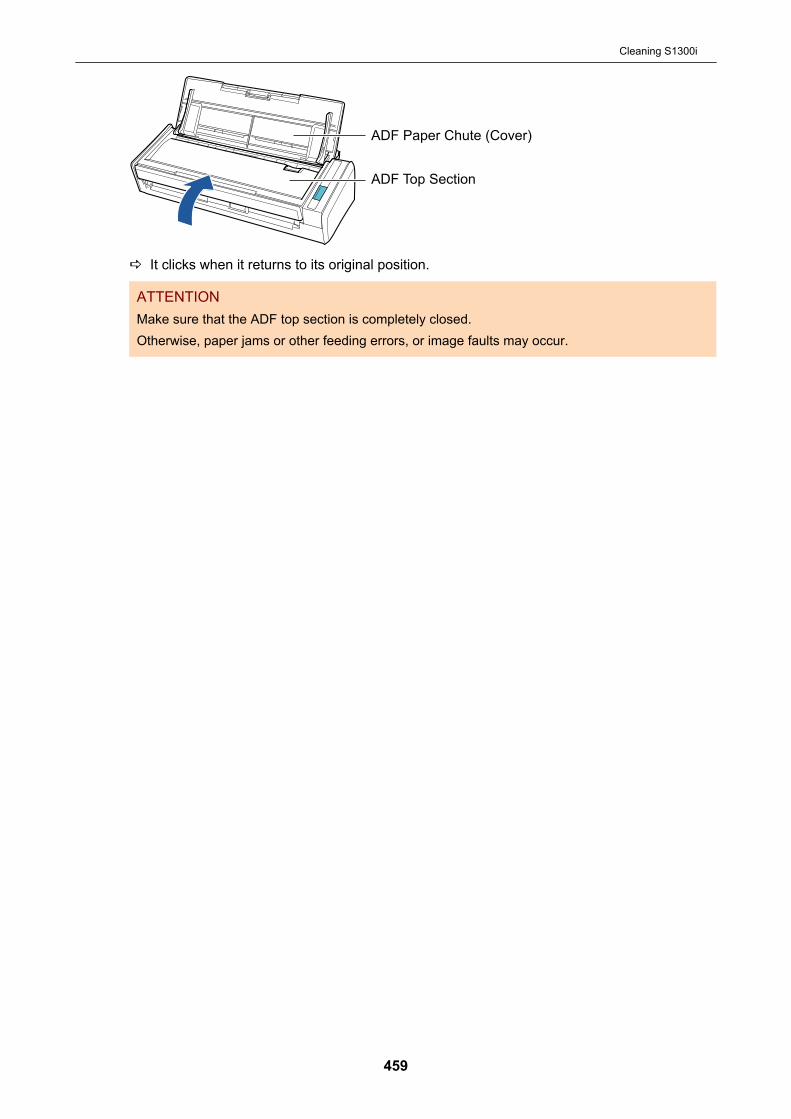
ADF Paper Chute (Cover)
ADF Top Section
a It clicks when it returns to its original position.
ATTENTIONMake sure that the ADF top section is completely closed.Otherwise, paper jams or other feeding errors, or image faults may occur.
Cleaning S1300i
459

Cleaning S1100i
This section explains about the cleaning materials and how to clean the ScanSnap.l "Cleaning the Outside of S1100i" (page 461)l "Cleaning the Inside of S1100i" (page 462)
Cleaning S1100i
460
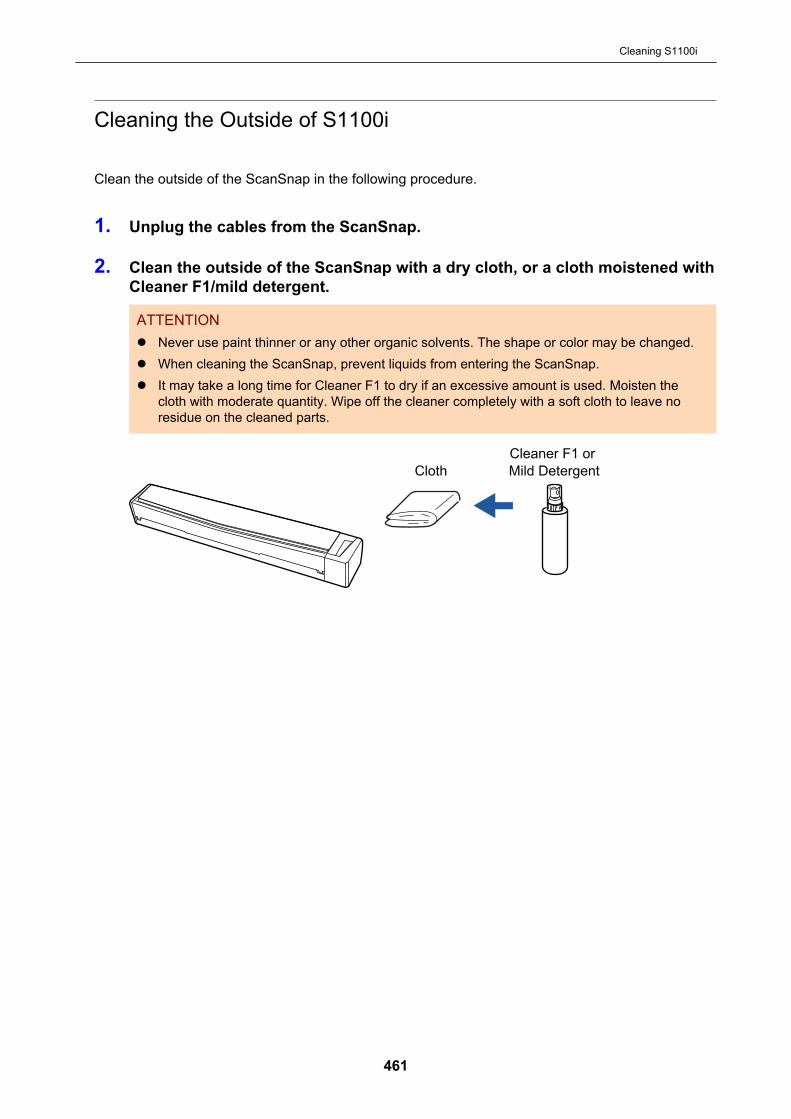
Cleaning the Outside of S1100i
Clean the outside of the ScanSnap in the following procedure.
1. Unplug the cables from the ScanSnap.
2. Clean the outside of the ScanSnap with a dry cloth, or a cloth moistened withCleaner F1/mild detergent.
ATTENTIONl Never use paint thinner or any other organic solvents. The shape or color may be changed.l When cleaning the ScanSnap, prevent liquids from entering the ScanSnap.l It may take a long time for Cleaner F1 to dry if an excessive amount is used. Moisten the
cloth with moderate quantity. Wipe off the cleaner completely with a soft cloth to leave noresidue on the cleaned parts.
Cleaner F1 or
Mild DetergentCloth
Cleaning S1100i
461
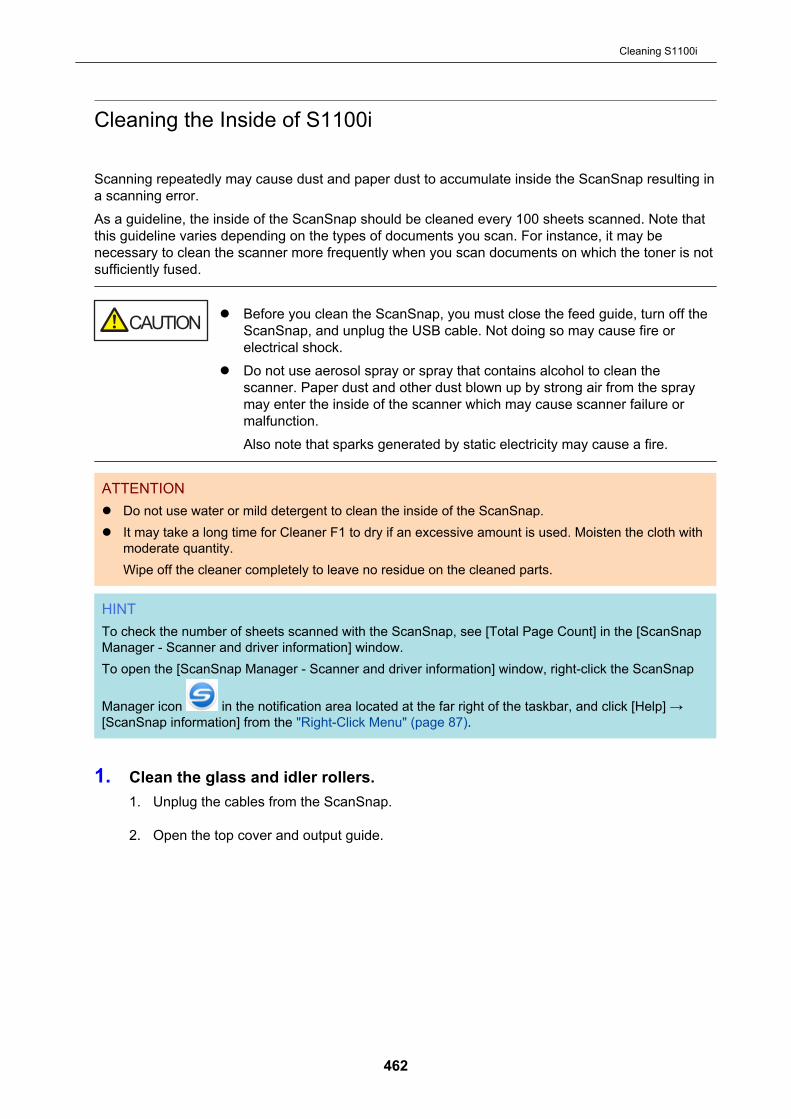
Cleaning the Inside of S1100i
Scanning repeatedly may cause dust and paper dust to accumulate inside the ScanSnap resulting ina scanning error.As a guideline, the inside of the ScanSnap should be cleaned every 100 sheets scanned. Note thatthis guideline varies depending on the types of documents you scan. For instance, it may benecessary to clean the scanner more frequently when you scan documents on which the toner is notsufficiently fused.
l Before you clean the ScanSnap, you must close the feed guide, turn off theScanSnap, and unplug the USB cable. Not doing so may cause fire orelectrical shock.
l Do not use aerosol spray or spray that contains alcohol to clean thescanner. Paper dust and other dust blown up by strong air from the spraymay enter the inside of the scanner which may cause scanner failure ormalfunction.Also note that sparks generated by static electricity may cause a fire.
ATTENTIONl Do not use water or mild detergent to clean the inside of the ScanSnap.l It may take a long time for Cleaner F1 to dry if an excessive amount is used. Moisten the cloth with
moderate quantity.Wipe off the cleaner completely to leave no residue on the cleaned parts.
HINTTo check the number of sheets scanned with the ScanSnap, see [Total Page Count] in the [ScanSnapManager - Scanner and driver information] window.To open the [ScanSnap Manager - Scanner and driver information] window, right-click the ScanSnap
Manager icon in the notification area located at the far right of the taskbar, and click [Help] →[ScanSnap information] from the "Right-Click Menu" (page 87).
1. Clean the glass and idler rollers.1. Unplug the cables from the ScanSnap.
2. Open the top cover and output guide.
Cleaning S1100i
462

Feed Guide
Top Cover
Output Guide
3. Clean the following locations with a cloth moistened with Cleaner F1.
Glass (x 2) Idler Roller (x 12)
l Glass (× 2, one on the top cover and one on the opposite side)Gently wipe the dirt and dust off the surface of the glass sections.
l Idler roller (× 12, located on the top cover)Gently wipe the dirt and dust off the rollers as you rotate them manually. Be careful notto damage the surface of the rollers. Make sure that they are cleaned properly becauseresidue on the rollers will affect the feeding performance.
2. Clean the feed rollers and eject rollers.1. Connect the USB cable to the USB connector on the ScanSnap and the USB port on the
computer, and press the [Scan/Stop] button for three seconds with the top cover open.
ATTENTIONConnect the USB cable to the USB port on the computer only when cleaning the feed rollersand eject rollers.
2. Clean the following locations with a cloth moistened with Cleaner F1.
Eject Roller (x 1)
Feed Roller (x 1)
l Feed roller (× 1, located on the scanner side)
Cleaning S1100i
463
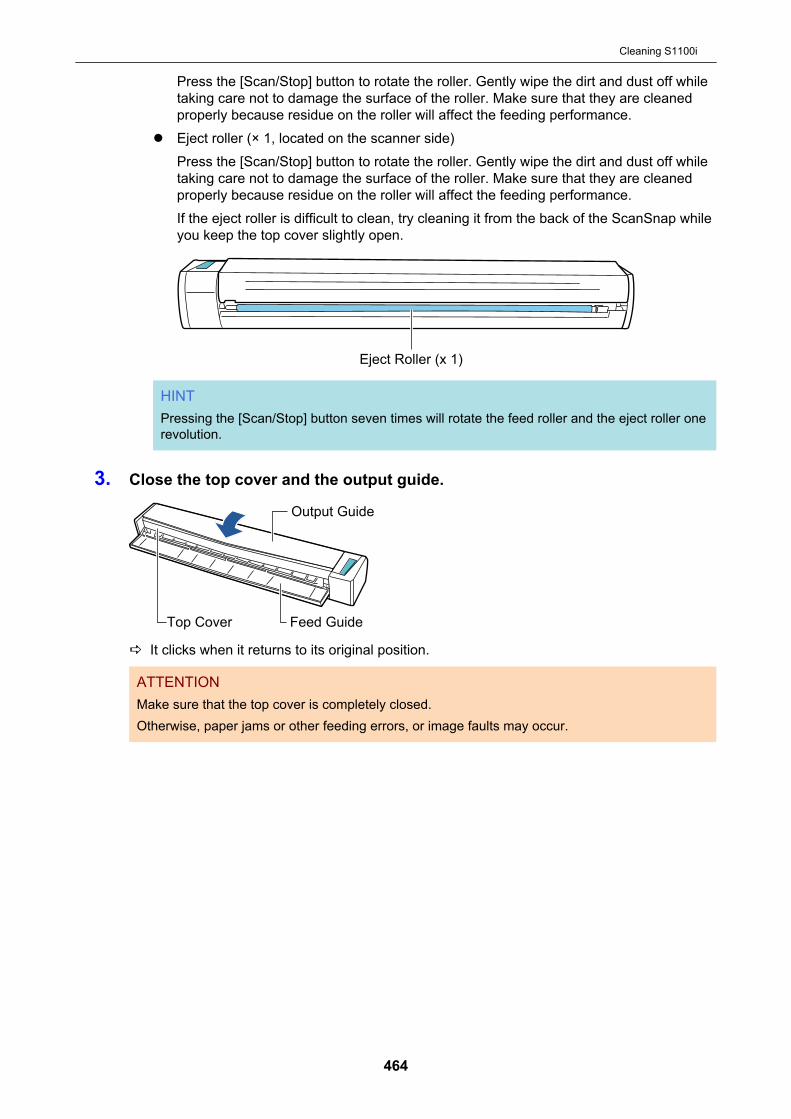
Press the [Scan/Stop] button to rotate the roller. Gently wipe the dirt and dust off whiletaking care not to damage the surface of the roller. Make sure that they are cleanedproperly because residue on the roller will affect the feeding performance.
l Eject roller (× 1, located on the scanner side)Press the [Scan/Stop] button to rotate the roller. Gently wipe the dirt and dust off whiletaking care not to damage the surface of the roller. Make sure that they are cleanedproperly because residue on the roller will affect the feeding performance.If the eject roller is difficult to clean, try cleaning it from the back of the ScanSnap whileyou keep the top cover slightly open.
Eject Roller (x 1)
HINTPressing the [Scan/Stop] button seven times will rotate the feed roller and the eject roller onerevolution.
3. Close the top cover and the output guide.
Top Cover Feed Guide
Output Guide
a It clicks when it returns to its original position.
ATTENTIONMake sure that the top cover is completely closed.Otherwise, paper jams or other feeding errors, or image faults may occur.
Cleaning S1100i
464

Cleaning the Carrier Sheet (iX1600 / iX1500 / iX1400 /iX500/ iX100 / S1100i)
As you keep using the Carrier Sheet, dirt and dust will accumulate on the surface and the inside.Clean the Carrier Sheet regularly because it may result in scanning errors.The procedure for cleaning the Carrier Sheet is as follows.
CleaningGently wipe the dirt and dust off the surface and the inside of the Carrier Sheet with a dry cloth, or acloth moistened with Cleaner F1/mild detergent.
ATTENTIONl Do not use paint thinner or any other organic solvents.l Do not apply too much force when rubbing. Doing so may damage or deform the Carrier Sheet.l Be careful not to leave any crease on the Carrier Sheet.l After cleaning the inside of the Carrier Sheet with a cloth moistened with Cleaner F1/mild detergent,
make sure that it is completely dry before closing the Carrier Sheet.l The Carrier Sheet should be replaced approximately every 500 scans.
Cleaning the Carrier Sheet (iX1600 / iX1500 / iX1400 / iX500/ iX100 / S1100i)
465
Cleaning the Background Pad (SV600)
As you keep using the Background Pad, dirt and dust will accumulate on the surface.Clean the Background Pad in the following procedure.
CleaningClean the Background Pad with a dry or damp cloth.
ATTENTIONl Do not use any detergent.l Keep the Background Pad away from fire or high-temperature objects.l Do not wrinkle or fold the Background Pad.l It is recommended that you store the Background Pad in the tube and bag in which the Background
Pad was packaged.l Keep the Background Pad out of direct sunlight when storing it.
Cleaning the Background Pad (SV600)
466

Consumables for the ScanSnap (iX1600 /iX1500 / iX1400 / iX500 / S1300i)
l "Part Numbers and Replacement Cycle of Consumables (iX1600 / iX1500 / iX1400 / iX500 /S1300i)" (page 468)
l "Checking the Status of Consumables (iX1400 / iX500 / S1300i)" (page 470)l "Replacing Consumables for iX1600 / iX1500 / iX1400" (page 471)l "Replacing Consumables for iX500" (page 478)l "Replacing Consumables for S1300i" (page 485)
Consumables for the ScanSnap (iX1600 / iX1500 / iX1400 / iX500 / S1300i)
467
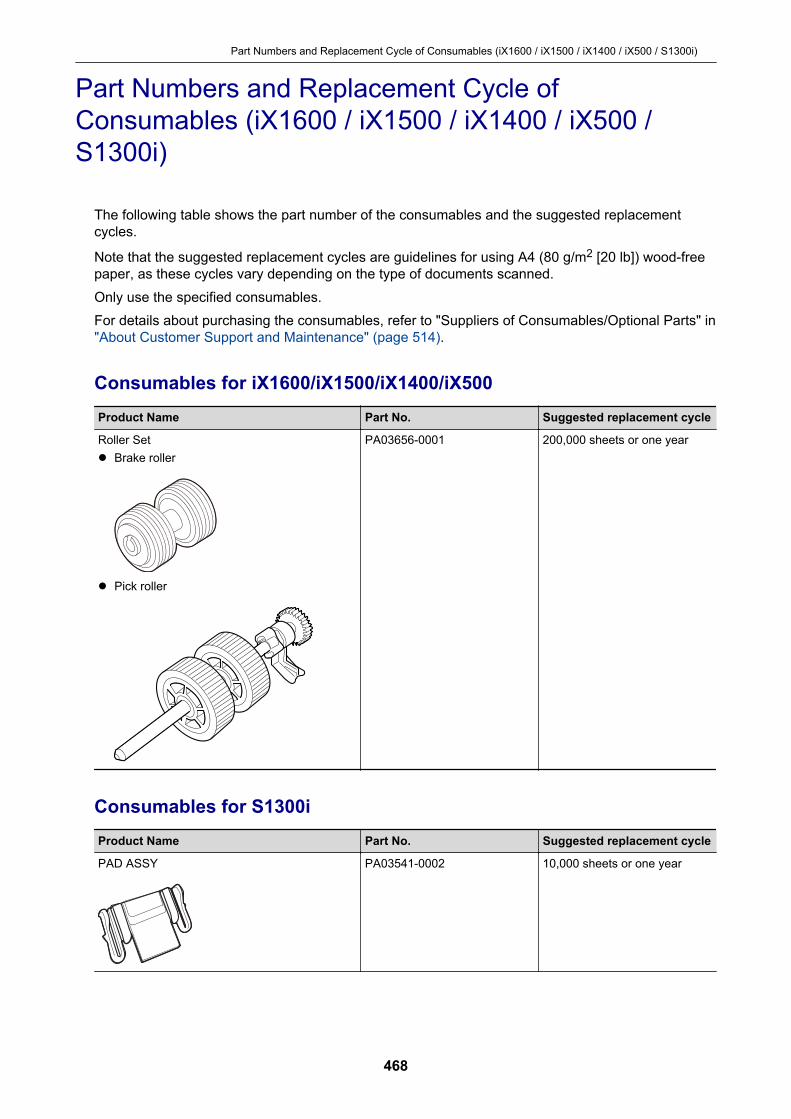
Part Numbers and Replacement Cycle ofConsumables (iX1600 / iX1500 / iX1400 / iX500 /S1300i)
The following table shows the part number of the consumables and the suggested replacementcycles.
Note that the suggested replacement cycles are guidelines for using A4 (80 g/m2 [20 lb]) wood-freepaper, as these cycles vary depending on the type of documents scanned.Only use the specified consumables.For details about purchasing the consumables, refer to "Suppliers of Consumables/Optional Parts" in"About Customer Support and Maintenance" (page 514).
Consumables for iX1600/iX1500/iX1400/iX500Product Name Part No. Suggested replacement cycle
Roller Setl Brake roller
l Pick roller
PA03656-0001 200,000 sheets or one year
Consumables for S1300iProduct Name Part No. Suggested replacement cycle
PAD ASSY PA03541-0002 10,000 sheets or one year
Part Numbers and Replacement Cycle of Consumables (iX1600 / iX1500 / iX1400 / iX500 / S1300i)
468

Product Name Part No. Suggested replacement cycle
PICK ROLLER PA03541-0001 100,000 sheets or one year
Part Numbers and Replacement Cycle of Consumables (iX1600 / iX1500 / iX1400 / iX500 / S1300i)
469

Checking the Status of Consumables (iX1400 /iX500 / S1300i)
You can check the status of each consumable in the following procedure.
1. Right-click the ScanSnap Manager icon in the notification area locatedat the far right of the taskbar and select [Check consumable status] from the"Right-Click Menu" (page 87).a The [ScanSnap Manager - Check consumable status] window appears.
2. Check the status of each consumable.Refer to [Suggested replacement cycle] as a guideline and replace the consumables.
Example: The [ScanSnap Manager - Check consumable status] window for iX1400
Checking the Status of Consumables (iX1400 / iX500 / S1300i)
470
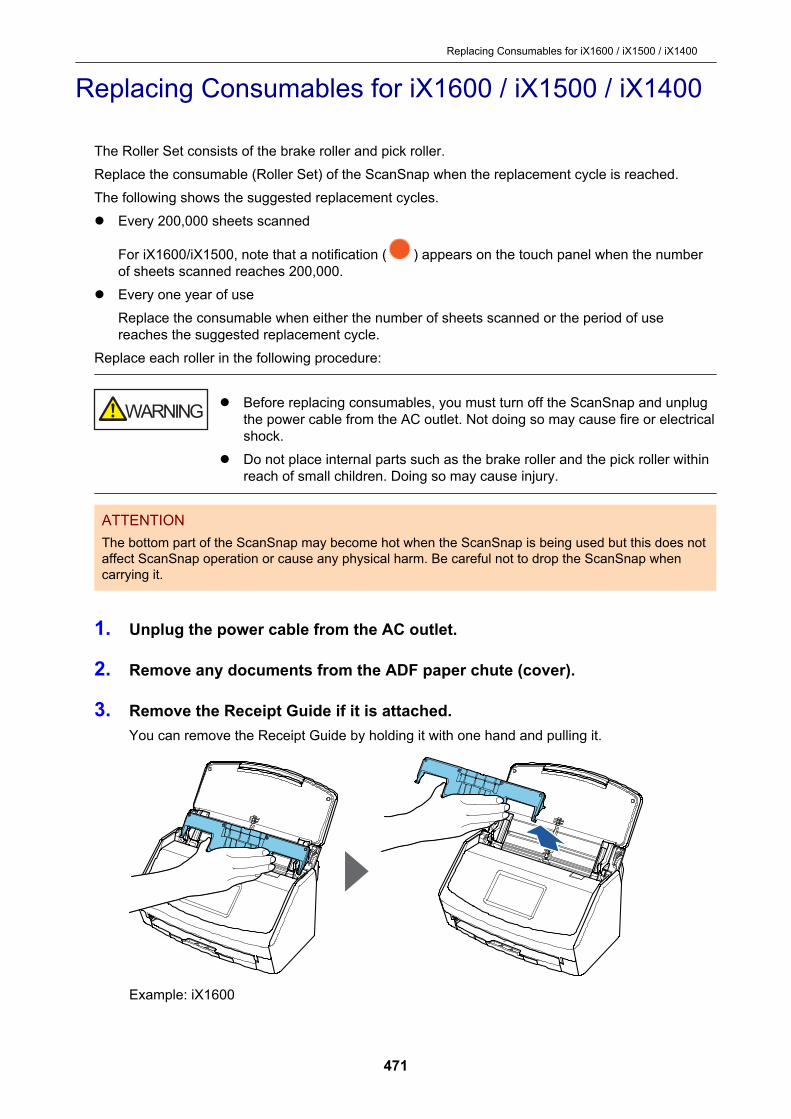
Replacing Consumables for iX1600 / iX1500 / iX1400
The Roller Set consists of the brake roller and pick roller.Replace the consumable (Roller Set) of the ScanSnap when the replacement cycle is reached.The following shows the suggested replacement cycles.l Every 200,000 sheets scanned
For iX1600/iX1500, note that a notification ( ) appears on the touch panel when the numberof sheets scanned reaches 200,000.
l Every one year of useReplace the consumable when either the number of sheets scanned or the period of usereaches the suggested replacement cycle.
Replace each roller in the following procedure:
l Before replacing consumables, you must turn off the ScanSnap and unplugthe power cable from the AC outlet. Not doing so may cause fire or electricalshock.
l Do not place internal parts such as the brake roller and the pick roller withinreach of small children. Doing so may cause injury.
ATTENTIONThe bottom part of the ScanSnap may become hot when the ScanSnap is being used but this does notaffect ScanSnap operation or cause any physical harm. Be careful not to drop the ScanSnap whencarrying it.
1. Unplug the power cable from the AC outlet.
2. Remove any documents from the ADF paper chute (cover).
3. Remove the Receipt Guide if it is attached.You can remove the Receipt Guide by holding it with one hand and pulling it.
Example: iX1600
Replacing Consumables for iX1600 / iX1500 / iX1400
471
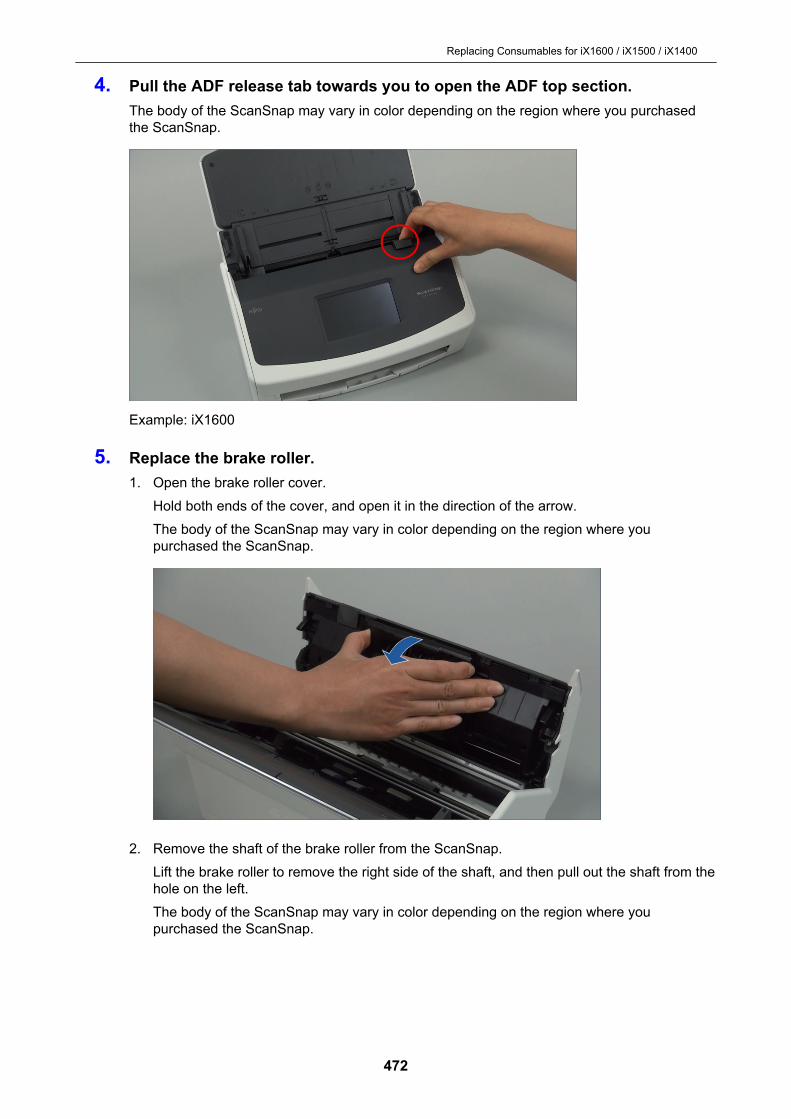
4. Pull the ADF release tab towards you to open the ADF top section.The body of the ScanSnap may vary in color depending on the region where you purchasedthe ScanSnap.
Example: iX1600
5. Replace the brake roller.1. Open the brake roller cover.
Hold both ends of the cover, and open it in the direction of the arrow.The body of the ScanSnap may vary in color depending on the region where youpurchased the ScanSnap.
2. Remove the shaft of the brake roller from the ScanSnap.Lift the brake roller to remove the right side of the shaft, and then pull out the shaft from thehole on the left.The body of the ScanSnap may vary in color depending on the region where youpurchased the ScanSnap.
Replacing Consumables for iX1600 / iX1500 / iX1400
472
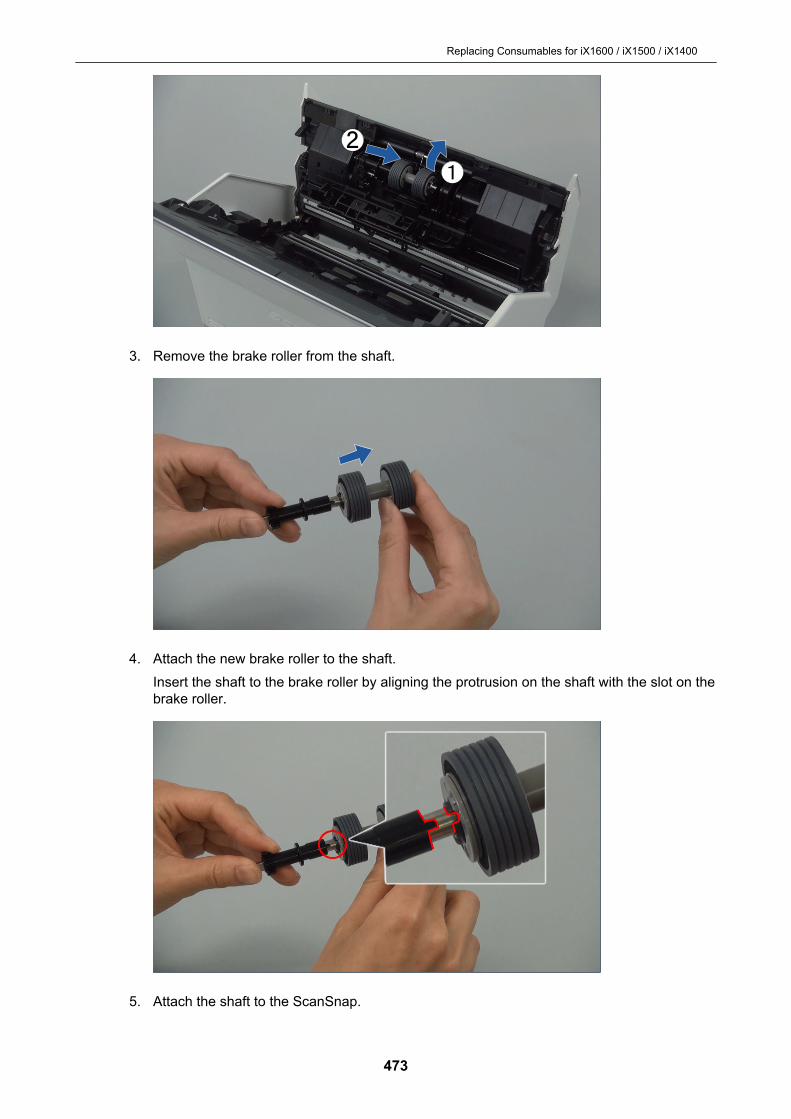
3. Remove the brake roller from the shaft.
4. Attach the new brake roller to the shaft.Insert the shaft to the brake roller by aligning the protrusion on the shaft with the slot on thebrake roller.
5. Attach the shaft to the ScanSnap.
Replacing Consumables for iX1600 / iX1500 / iX1400
473
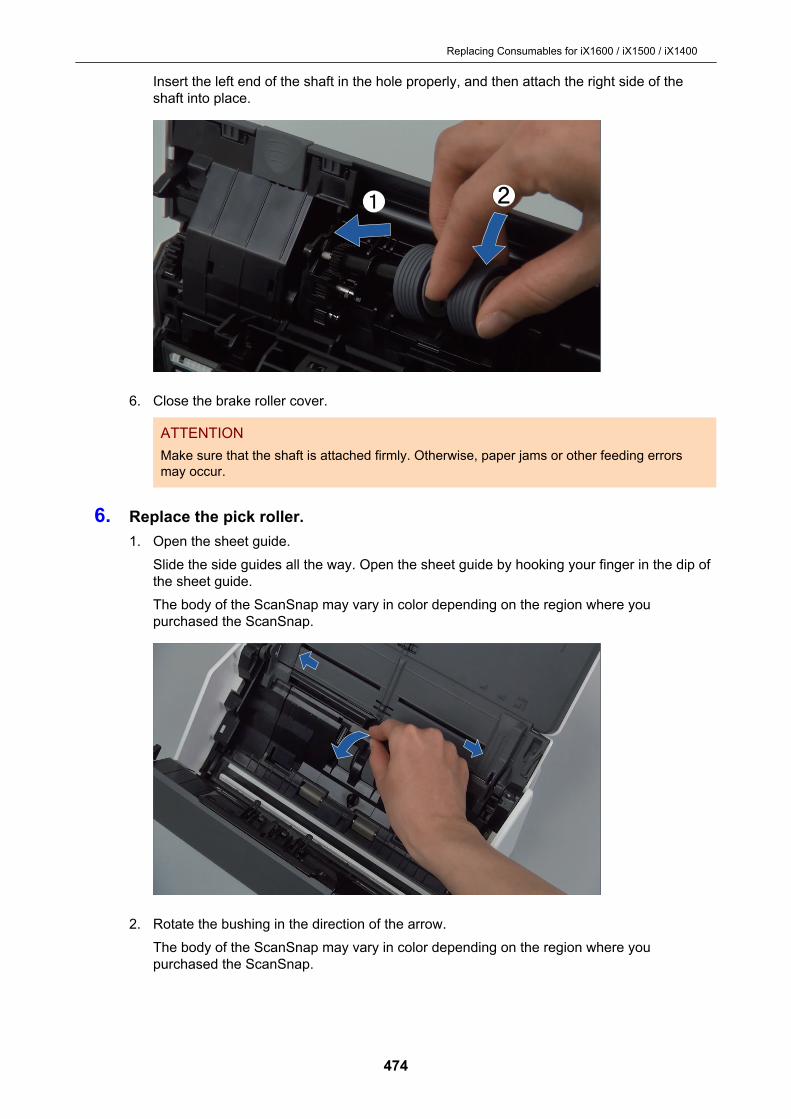
Insert the left end of the shaft in the hole properly, and then attach the right side of theshaft into place.
6. Close the brake roller cover.
ATTENTIONMake sure that the shaft is attached firmly. Otherwise, paper jams or other feeding errorsmay occur.
6. Replace the pick roller.1. Open the sheet guide.
Slide the side guides all the way. Open the sheet guide by hooking your finger in the dip ofthe sheet guide.The body of the ScanSnap may vary in color depending on the region where youpurchased the ScanSnap.
2. Rotate the bushing in the direction of the arrow.The body of the ScanSnap may vary in color depending on the region where youpurchased the ScanSnap.
Replacing Consumables for iX1600 / iX1500 / iX1400
474
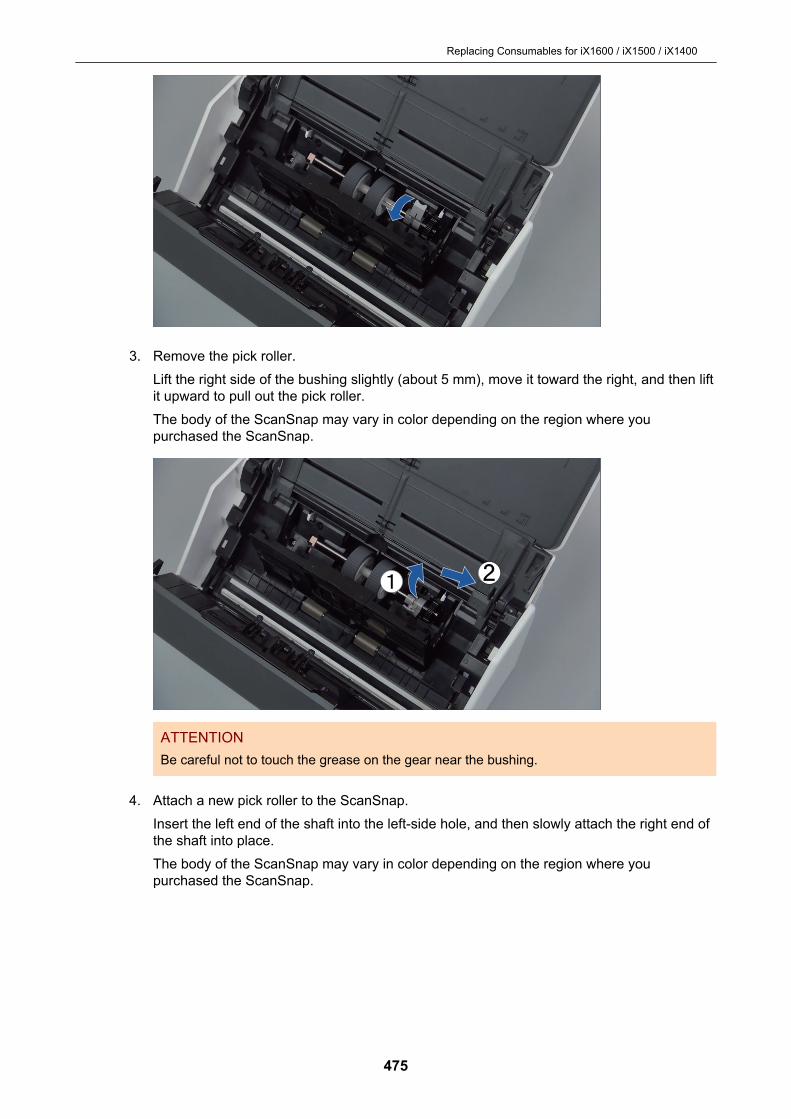
3. Remove the pick roller.Lift the right side of the bushing slightly (about 5 mm), move it toward the right, and then liftit upward to pull out the pick roller.The body of the ScanSnap may vary in color depending on the region where youpurchased the ScanSnap.
ATTENTIONBe careful not to touch the grease on the gear near the bushing.
4. Attach a new pick roller to the ScanSnap.Insert the left end of the shaft into the left-side hole, and then slowly attach the right end ofthe shaft into place.The body of the ScanSnap may vary in color depending on the region where youpurchased the ScanSnap.
Replacing Consumables for iX1600 / iX1500 / iX1400
475
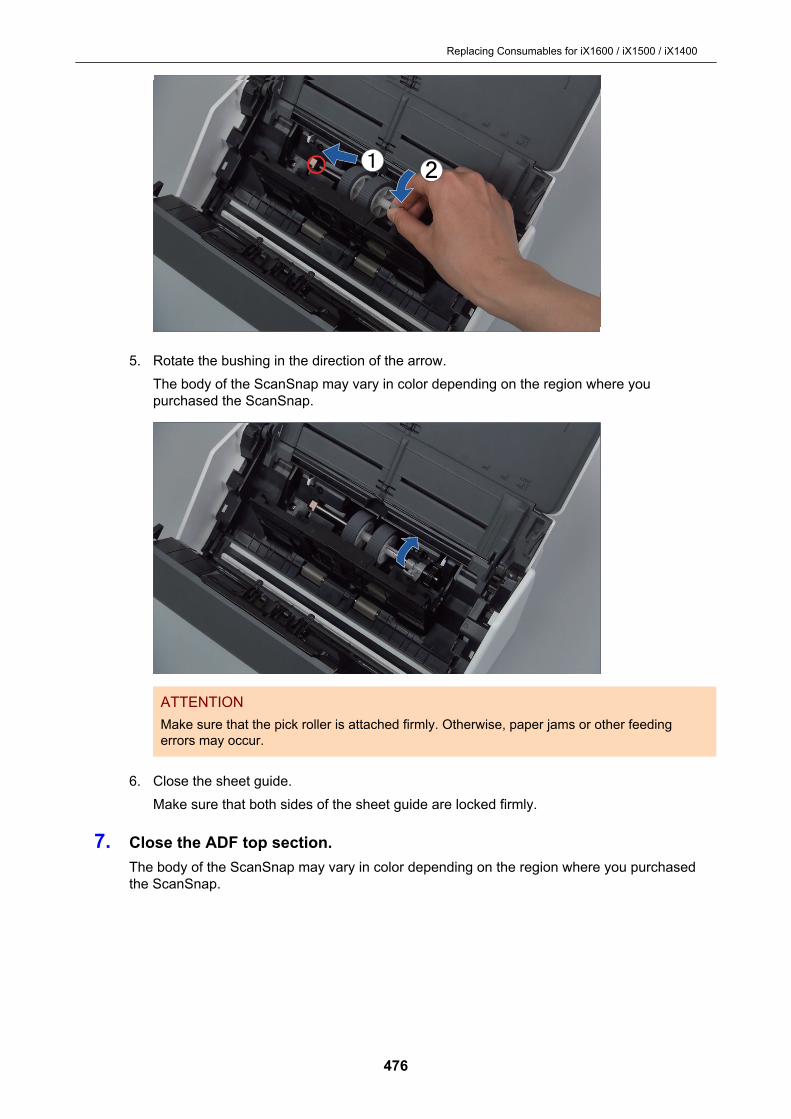
5. Rotate the bushing in the direction of the arrow.The body of the ScanSnap may vary in color depending on the region where youpurchased the ScanSnap.
ATTENTIONMake sure that the pick roller is attached firmly. Otherwise, paper jams or other feedingerrors may occur.
6. Close the sheet guide.Make sure that both sides of the sheet guide are locked firmly.
7. Close the ADF top section.The body of the ScanSnap may vary in color depending on the region where you purchasedthe ScanSnap.
Replacing Consumables for iX1600 / iX1500 / iX1400
476

Example: iX1600a It clicks when it returns to its original position.
8. Connect the power cable to the AC outlet, and turn on the ScanSnap.
9. Reset the Roller Set counter.
iX1600/iX1500
1. Press in the home screen on the touch panel to display the [Settings] screen.
2. Press to display the [Maintenance] screen.
3. Press [Check consumable status] to display the [Check consumable status] screen.
4. Press the [Reset] button.
5. When a message is displayed, press the [OK] button.a The value of the current count for the [Current Count / Replacement Cycle] is set to "0".
iX1400
1. Right-click the ScanSnap Manager icon in the notification area located at the far rightof the taskbar and select [Check consumable status] from the "Right-Click Menu" (page87).a The [ScanSnap Manager - Check consumable status] window appears.
2. Click the [Reset] button for [Roller Set Count].a A confirmation window appears.
3. Click the [Yes] button.a [Roller Set Count] is reset to 0.
Replacing Consumables for iX1600 / iX1500 / iX1400
477
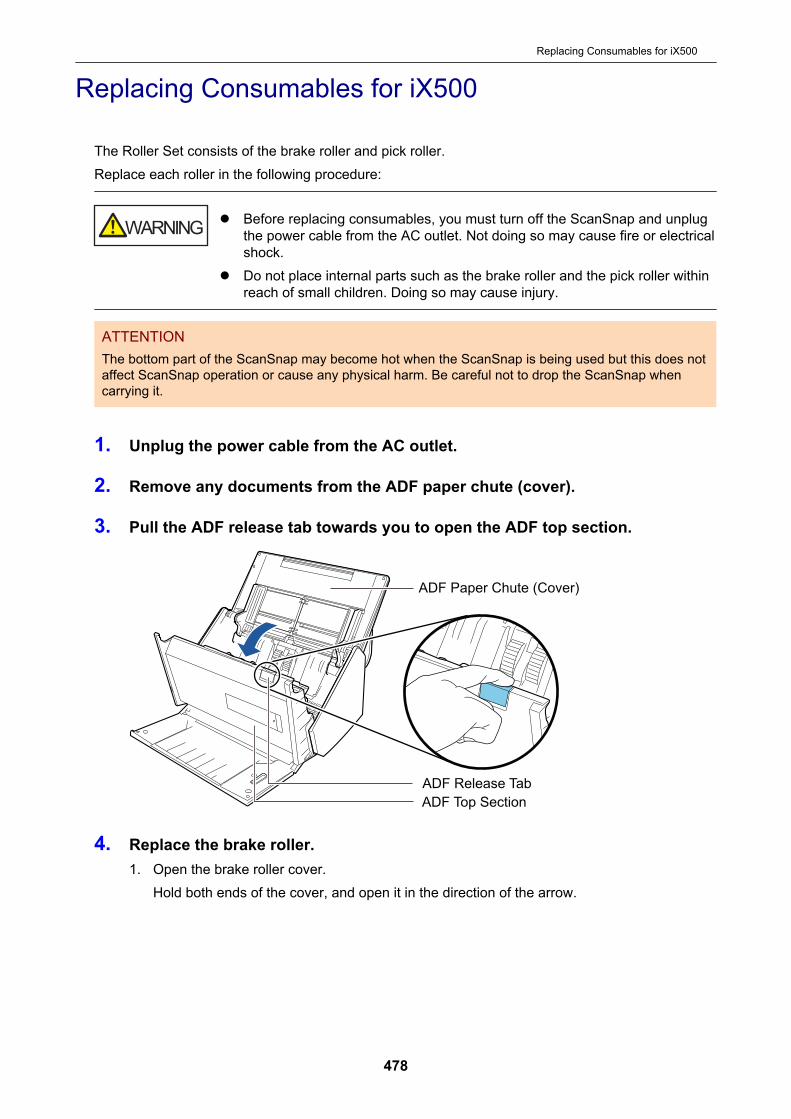
Replacing Consumables for iX500
The Roller Set consists of the brake roller and pick roller.Replace each roller in the following procedure:
l Before replacing consumables, you must turn off the ScanSnap and unplugthe power cable from the AC outlet. Not doing so may cause fire or electricalshock.
l Do not place internal parts such as the brake roller and the pick roller withinreach of small children. Doing so may cause injury.
ATTENTIONThe bottom part of the ScanSnap may become hot when the ScanSnap is being used but this does notaffect ScanSnap operation or cause any physical harm. Be careful not to drop the ScanSnap whencarrying it.
1. Unplug the power cable from the AC outlet.
2. Remove any documents from the ADF paper chute (cover).
3. Pull the ADF release tab towards you to open the ADF top section.
ADF Paper Chute (Cover)
ADF Release Tab
ADF Top Section
4. Replace the brake roller.1. Open the brake roller cover.
Hold both ends of the cover, and open it in the direction of the arrow.
Replacing Consumables for iX500
478
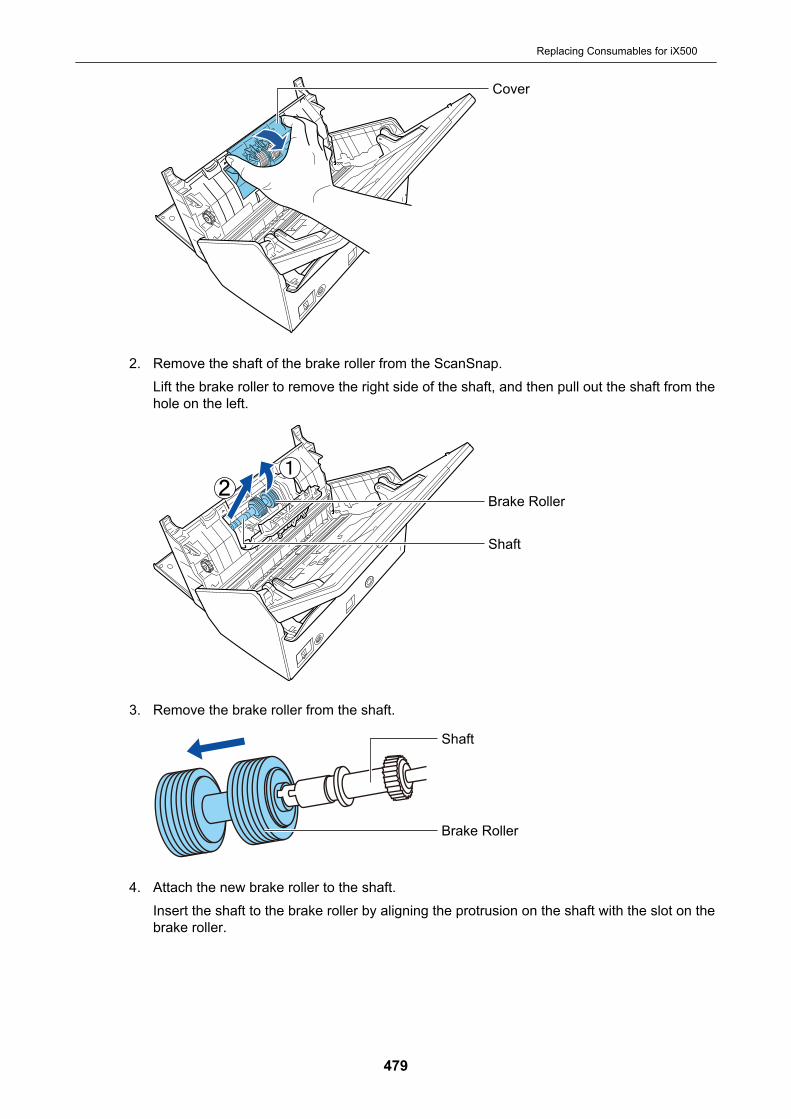
Cover
2. Remove the shaft of the brake roller from the ScanSnap.Lift the brake roller to remove the right side of the shaft, and then pull out the shaft from thehole on the left.
Brake Roller
Shaft
3. Remove the brake roller from the shaft.
Shaft
Brake Roller
4. Attach the new brake roller to the shaft.Insert the shaft to the brake roller by aligning the protrusion on the shaft with the slot on thebrake roller.
Replacing Consumables for iX500
479
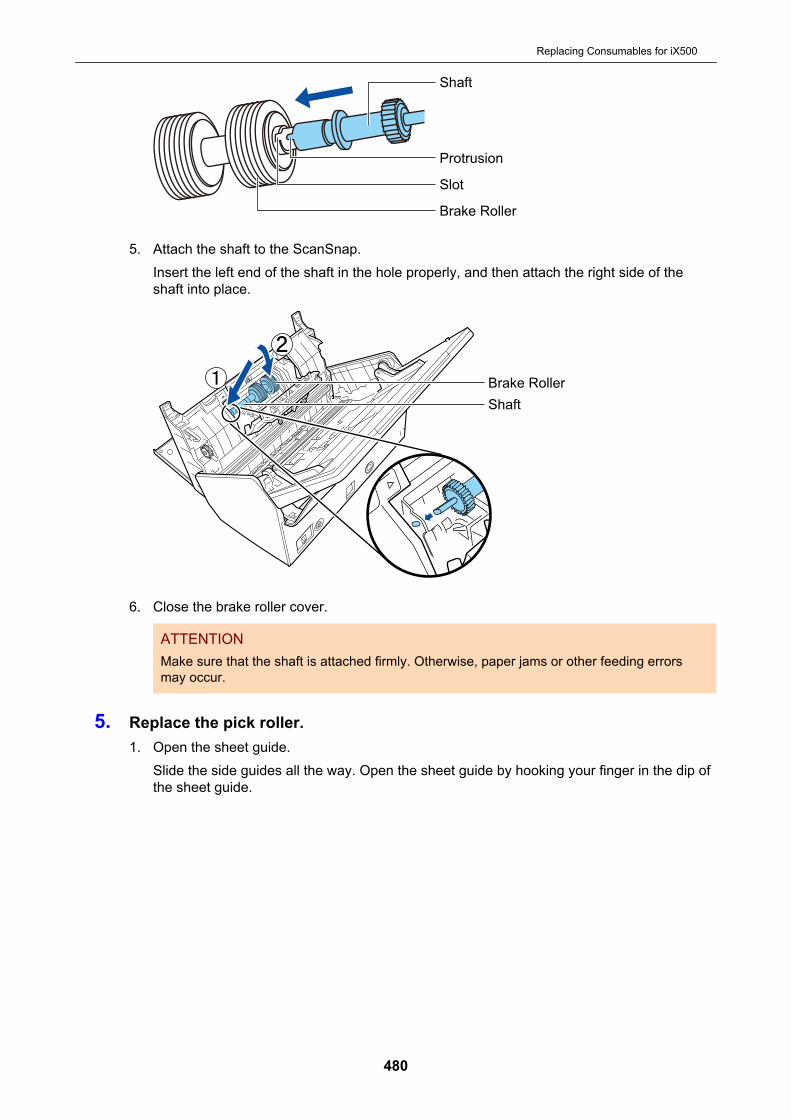
Shaft
Brake Roller
Protrusion
Slot
5. Attach the shaft to the ScanSnap.Insert the left end of the shaft in the hole properly, and then attach the right side of theshaft into place.
Brake Roller
Shaft
6. Close the brake roller cover.
ATTENTIONMake sure that the shaft is attached firmly. Otherwise, paper jams or other feeding errorsmay occur.
5. Replace the pick roller.1. Open the sheet guide.
Slide the side guides all the way. Open the sheet guide by hooking your finger in the dip ofthe sheet guide.
Replacing Consumables for iX500
480

Side Guides
Sheet Guide
Dip
2. Rotate the bushing in the direction of the arrow.
Bushing
3. Remove the pick roller.Lift the right side of the bushing slightly (about 5 mm), move it toward the right, and then liftit upward to pull out the pick roller.
Replacing Consumables for iX500
481
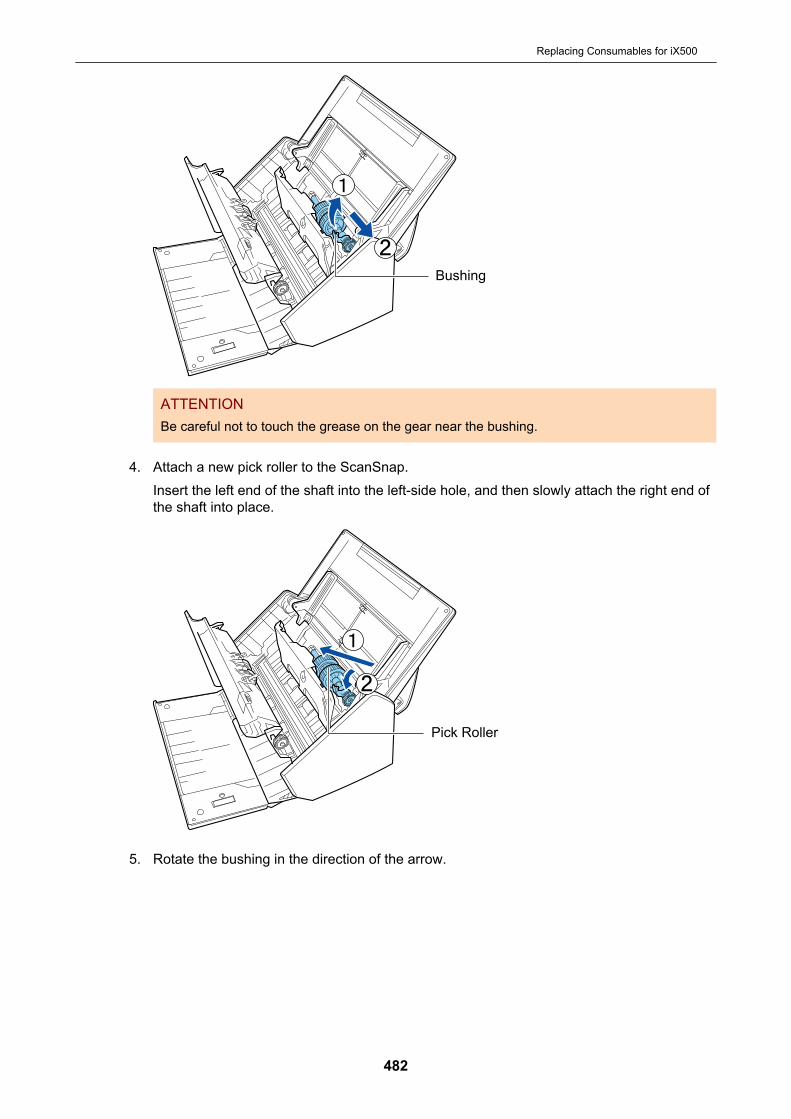
Bushing
ATTENTIONBe careful not to touch the grease on the gear near the bushing.
4. Attach a new pick roller to the ScanSnap.Insert the left end of the shaft into the left-side hole, and then slowly attach the right end ofthe shaft into place.
Pick Roller
5. Rotate the bushing in the direction of the arrow.
Replacing Consumables for iX500
482
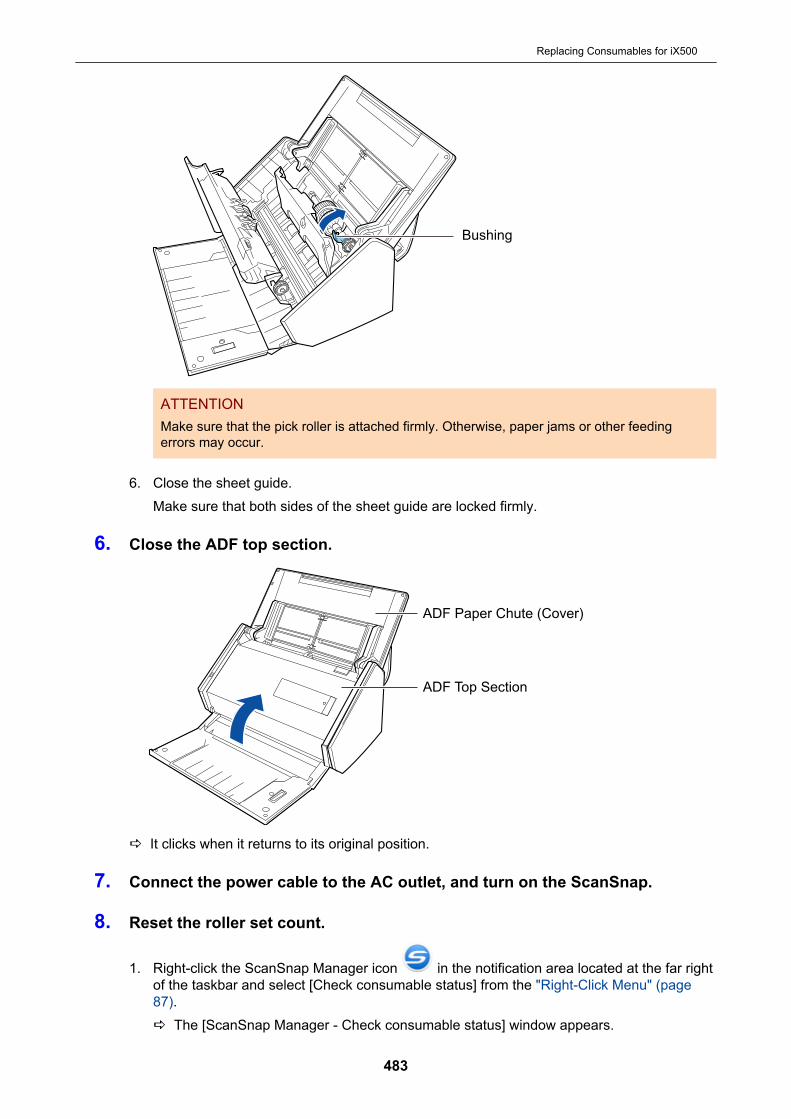
Bushing
ATTENTIONMake sure that the pick roller is attached firmly. Otherwise, paper jams or other feedingerrors may occur.
6. Close the sheet guide.Make sure that both sides of the sheet guide are locked firmly.
6. Close the ADF top section.
ADF Paper Chute (Cover)
ADF Top Section
a It clicks when it returns to its original position.
7. Connect the power cable to the AC outlet, and turn on the ScanSnap.
8. Reset the roller set count.
1. Right-click the ScanSnap Manager icon in the notification area located at the far rightof the taskbar and select [Check consumable status] from the "Right-Click Menu" (page87).a The [ScanSnap Manager - Check consumable status] window appears.
Replacing Consumables for iX500
483

2. Click the [Reset] button for [Roller Set Count].a A confirmation window appears.
3. Click the [Yes] button.a [Roller Set Count] is reset to 0.
Replacing Consumables for iX500
484

Replacing Consumables for S1300i
This section explains how to replace the pad assy and the pick roller assembly.
l Before replacing consumables, you must turn off the ScanSnap and unplugthe power connection cable (power cable or USB bus power cable) from thepower supply source (AC outlet or computer). Not doing so may cause fireor electrical shock.
l Do not place internal parts such as the pad assy and the pick rollerassembly within reach of small children. Doing so may cause injury.
ATTENTIONThe bottom part of the ScanSnap may become hot when the ScanSnap is being used but this does notaffect ScanSnap operation or cause any physical harm. Be careful not to drop the ScanSnap whencarrying it.
l "Replacing the Pad Assy (S1300i)" (page 486)l "Replacing the Pick Roller Assembly (S1300i)" (page 489)
Replacing Consumables for S1300i
485

Replacing the Pad Assy (S1300i)
Replace the pad assy in the following procedure:
1. Unplug the power connection cable (power cable or USB bus power cable)from the power supply source (AC outlet or computer).
2. Remove any documents from the ADF paper chute (cover).
3. Pull the ADF release tab towards you to open the ADF top section.
ADF Paper Chute (Cover)
ADF Release Tab
ADF Top Section
4. Remove the pad assy.Hold the both ends of the pad assy and remove it in the direction of the arrow.
ADF Top Section
Pad Assy
5. Attach the new pad assy while pressing the pad plate.
Replacing Consumables for S1300i
486

Pad Assy
ADF Top Section
Pad Plate
ATTENTIONAttach the pad assy with the front side up.If the pad assy is attached upside down, paper jams or other feeding errors may occur.
Correct Incorrect
Front Back
6. Make sure that the pad assy is attached to the retaining hook firmly.
ATTENTIONMake sure that the pad assy is attached firmly. Otherwise, paper jams or other feeding errorsmay occur.
7. Close the ADF top section.
ADF Paper Chute (Cover)
ADF Top Section
→ It clicks when it returns to its original position.
8. Connect the power connection cable (power cable or USB bus power cable)to the power supply source (AC outlet or computer), and turn on theScanSnap.
9. Reset the pad assy count.
Replacing Consumables for S1300i
487

1. Click the ScanSnap Manager icon in the notification area located at the far right ofthe taskbar and select [Check consumable status] from the "Right-Click Menu" (page 87).→ The [ScanSnap Manager - Check consumable status] window appears.
2. Click the [Reset] button for [PAD ASSY Count].→ A confirmation window appears.
3. Click the [Yes] button.→ [PAD ASSY Count] is reset to 0.
Replacing Consumables for S1300i
488
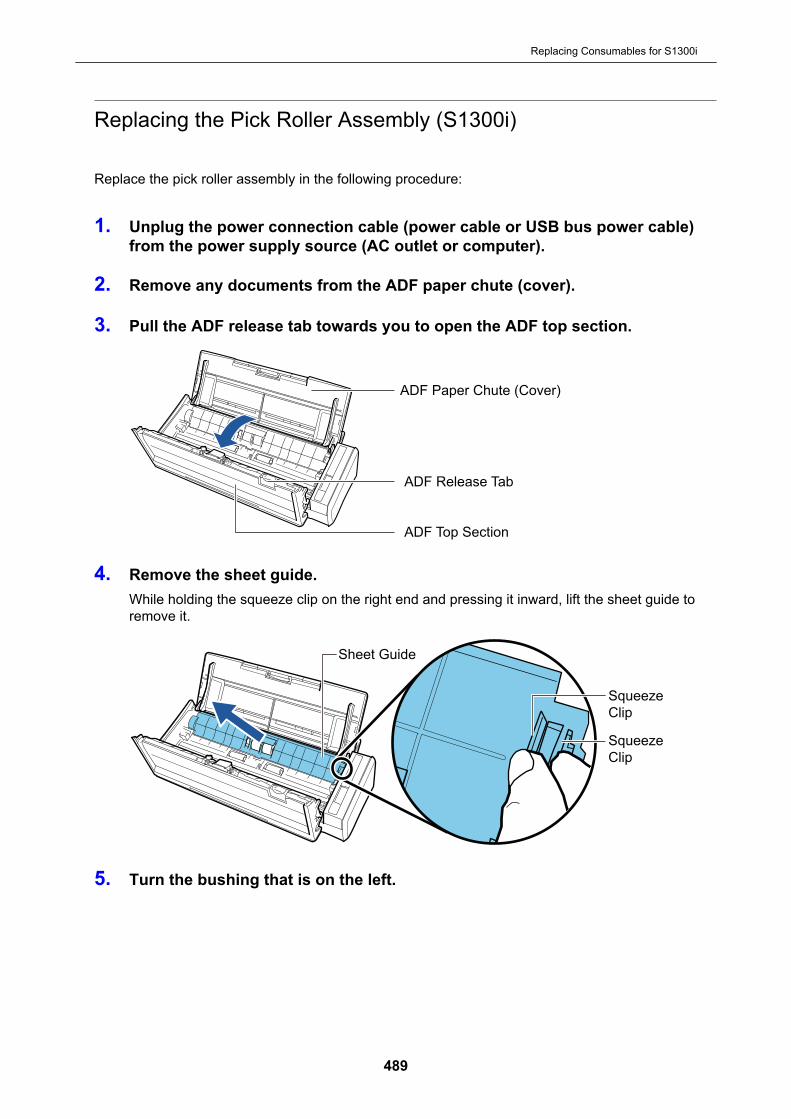
Replacing the Pick Roller Assembly (S1300i)
Replace the pick roller assembly in the following procedure:
1. Unplug the power connection cable (power cable or USB bus power cable)from the power supply source (AC outlet or computer).
2. Remove any documents from the ADF paper chute (cover).
3. Pull the ADF release tab towards you to open the ADF top section.
ADF Paper Chute (Cover)
ADF Release Tab
ADF Top Section
4. Remove the sheet guide.While holding the squeeze clip on the right end and pressing it inward, lift the sheet guide toremove it.
Squeeze
Clip
Squeeze
Clip
Sheet Guide
5. Turn the bushing that is on the left.
Replacing Consumables for S1300i
489
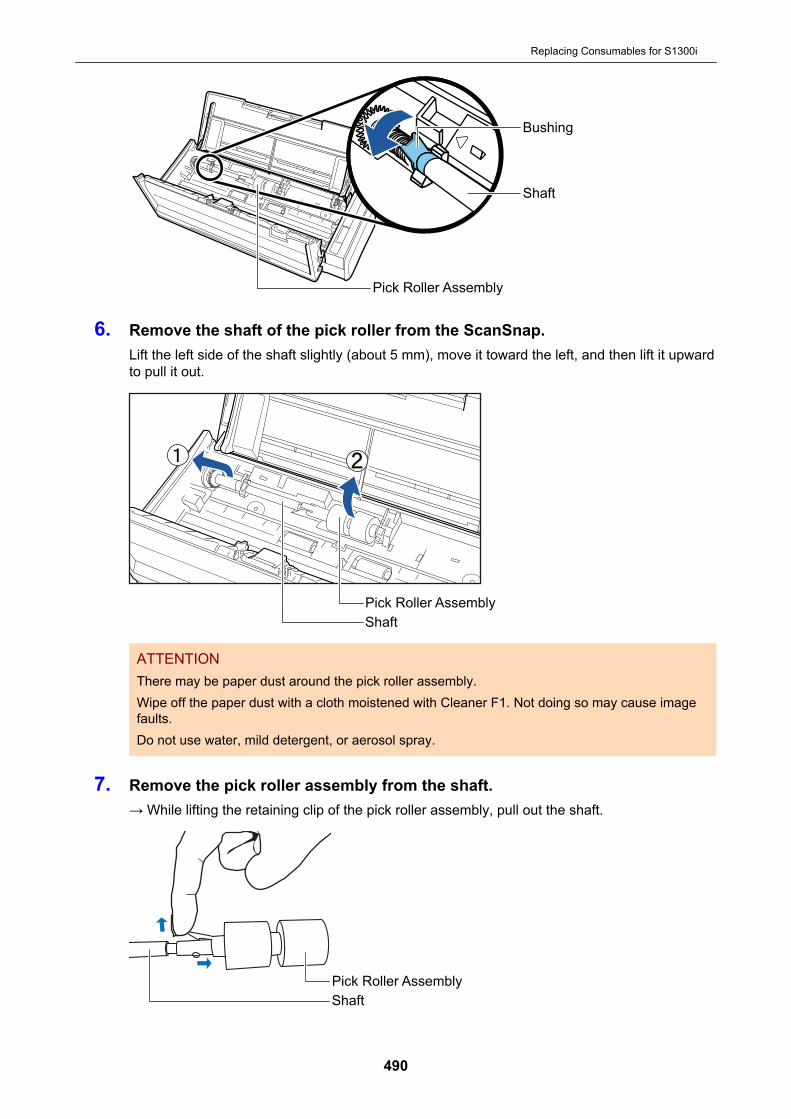
Bushing
Shaft
Pick Roller Assembly
6. Remove the shaft of the pick roller from the ScanSnap.Lift the left side of the shaft slightly (about 5 mm), move it toward the left, and then lift it upwardto pull it out.
Pick Roller Assembly
Shaft
ATTENTIONThere may be paper dust around the pick roller assembly.Wipe off the paper dust with a cloth moistened with Cleaner F1. Not doing so may cause imagefaults.Do not use water, mild detergent, or aerosol spray.
7. Remove the pick roller assembly from the shaft.→ While lifting the retaining clip of the pick roller assembly, pull out the shaft.
Pick Roller Assembly
Shaft
Replacing Consumables for S1300i
490
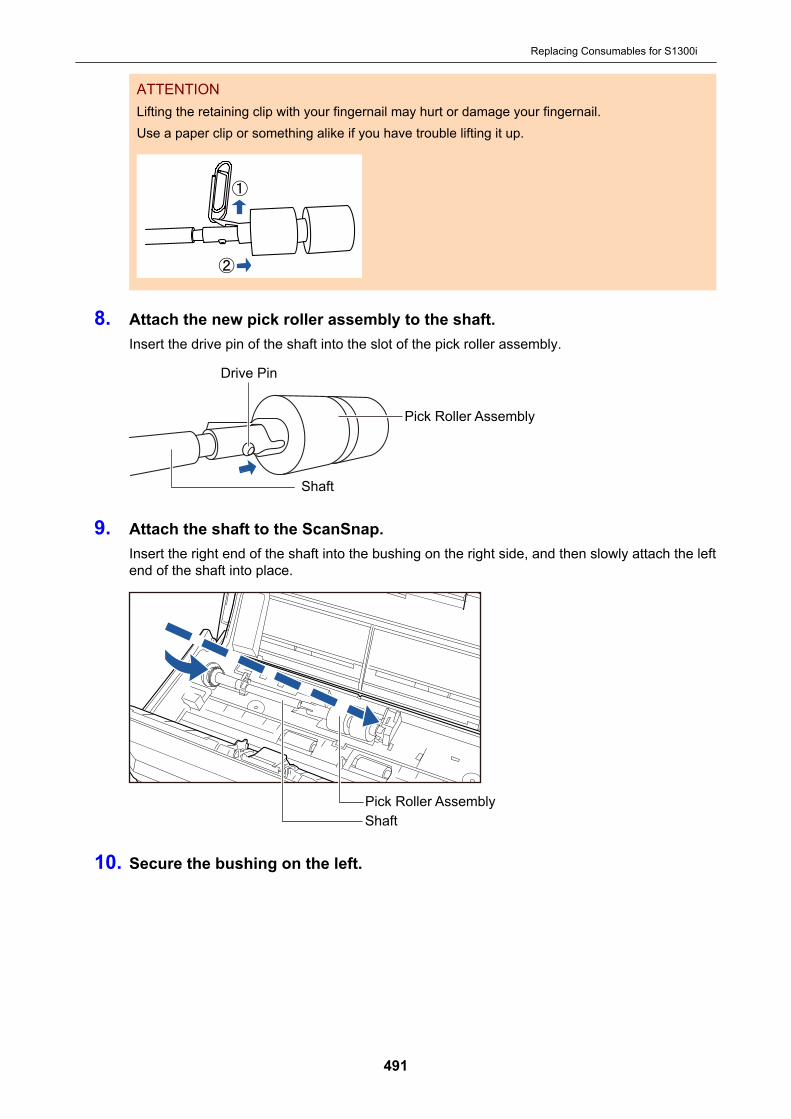
ATTENTIONLifting the retaining clip with your fingernail may hurt or damage your fingernail.Use a paper clip or something alike if you have trouble lifting it up.
8. Attach the new pick roller assembly to the shaft.Insert the drive pin of the shaft into the slot of the pick roller assembly.
Pick Roller Assembly
Drive Pin
Shaft
9. Attach the shaft to the ScanSnap.Insert the right end of the shaft into the bushing on the right side, and then slowly attach the leftend of the shaft into place.
Pick Roller Assembly
Shaft
10. Secure the bushing on the left.
Replacing Consumables for S1300i
491
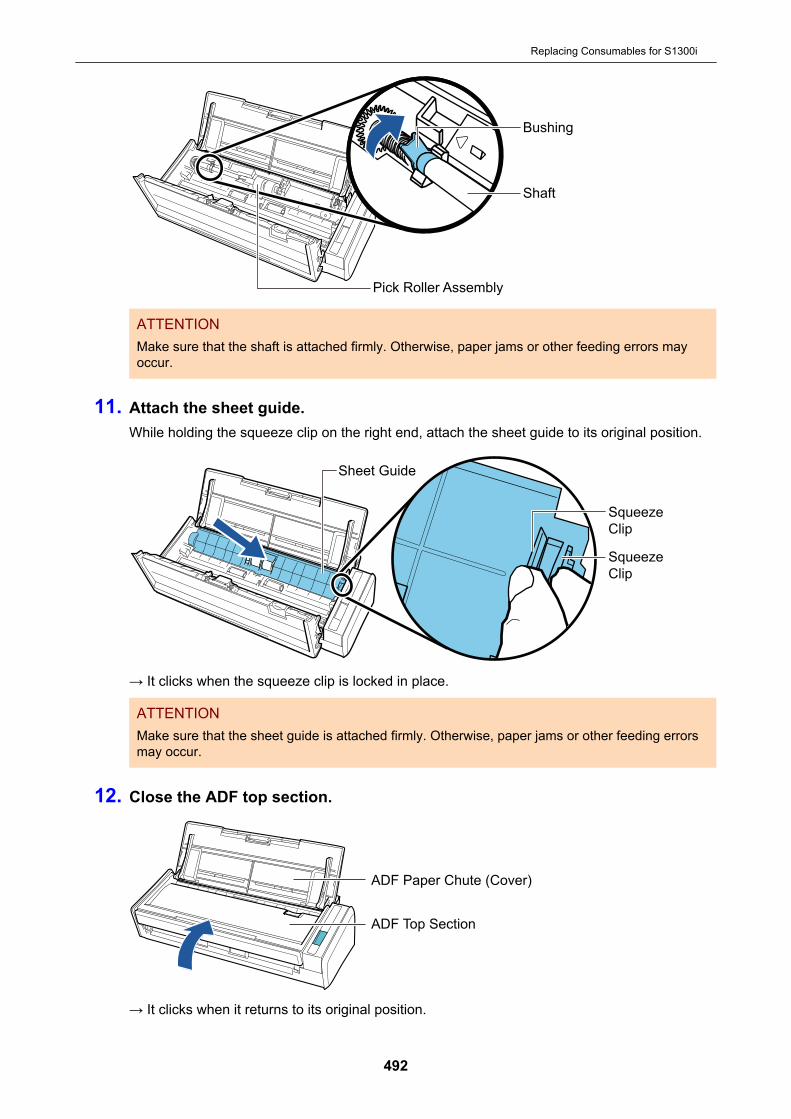
Bushing
Shaft
Pick Roller Assembly
ATTENTIONMake sure that the shaft is attached firmly. Otherwise, paper jams or other feeding errors mayoccur.
11. Attach the sheet guide.While holding the squeeze clip on the right end, attach the sheet guide to its original position.
Squeeze
Clip
Squeeze
Clip
Sheet Guide
→ It clicks when the squeeze clip is locked in place.
ATTENTIONMake sure that the sheet guide is attached firmly. Otherwise, paper jams or other feeding errorsmay occur.
12. Close the ADF top section.
ADF Paper Chute (Cover)
ADF Top Section
→ It clicks when it returns to its original position.
Replacing Consumables for S1300i
492
13. Connect the power connection cable (power cable or USB bus power cable)to the power supply source (AC outlet or computer), and turn on theScanSnap.
14. Reset the pick roller count.
1. Click the ScanSnap Manager icon in the notification area located at the far right ofthe taskbar and select [Check consumable status] from the "Right-Click Menu" (page 87).→ The [ScanSnap Manager - Check consumable status] window appears.
2. Click the [Reset] button for [PICK ROLLER Count].→ A confirmation window appears.
3. Click the [Yes] button.→ [PICK ROLLER Count] is reset to 0.
Replacing Consumables for S1300i
493

Appendix
l "Updating the Software" (page 495)l "Updating the Firmware (iX1600 / iX1500)" (page 496)l "Uninstalling the Software" (page 497)l "Part Number of the Background Pad (SV600)" (page 499)l "Part Number of the Carrier Sheet (iX1600 / iX1500 / iX1400 / iX500 / iX100 / S1100i)" (page
500)l "Specifications of the ScanSnap" (page 501)
Appendix
494
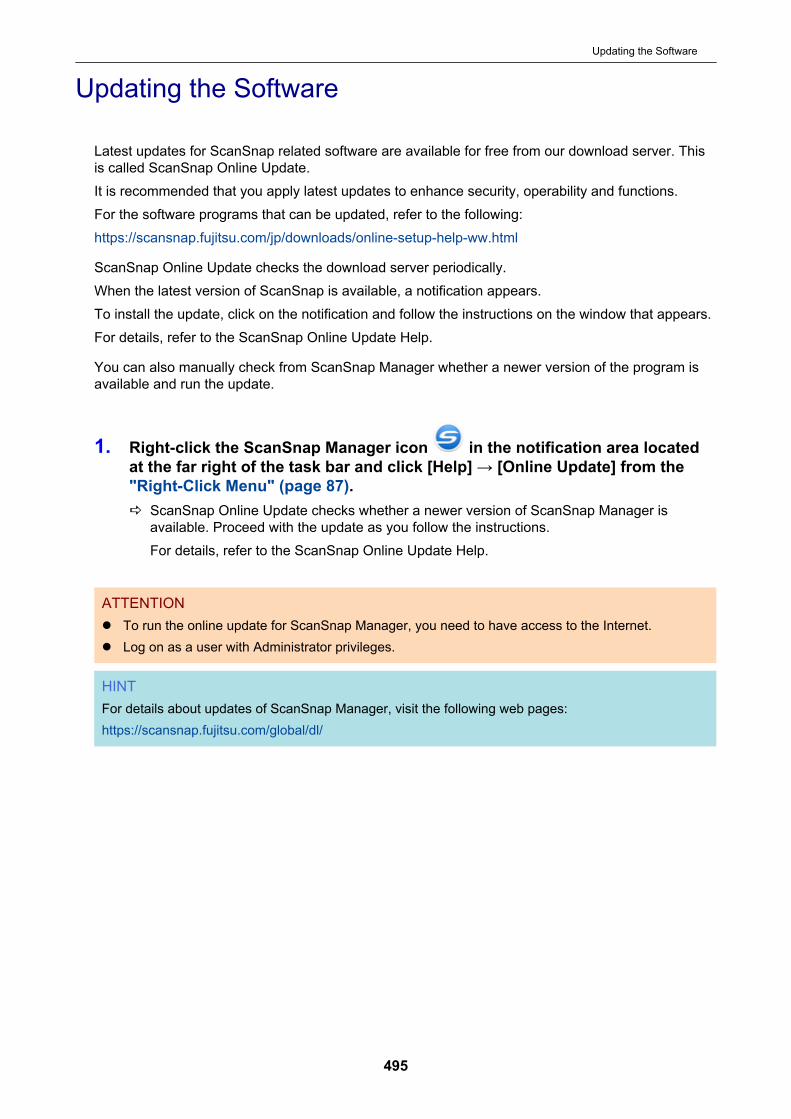
Updating the Software
Latest updates for ScanSnap related software are available for free from our download server. Thisis called ScanSnap Online Update.It is recommended that you apply latest updates to enhance security, operability and functions.For the software programs that can be updated, refer to the following:https://scansnap.fujitsu.com/jp/downloads/online-setup-help-ww.html
ScanSnap Online Update checks the download server periodically.When the latest version of ScanSnap is available, a notification appears.To install the update, click on the notification and follow the instructions on the window that appears.For details, refer to the ScanSnap Online Update Help.
You can also manually check from ScanSnap Manager whether a newer version of the program isavailable and run the update.
1. Right-click the ScanSnap Manager icon in the notification area locatedat the far right of the task bar and click [Help] → [Online Update] from the"Right-Click Menu" (page 87).a ScanSnap Online Update checks whether a newer version of ScanSnap Manager is
available. Proceed with the update as you follow the instructions.For details, refer to the ScanSnap Online Update Help.
ATTENTIONl To run the online update for ScanSnap Manager, you need to have access to the Internet.l Log on as a user with Administrator privileges.
HINTFor details about updates of ScanSnap Manager, visit the following web pages:https://scansnap.fujitsu.com/global/dl/
Updating the Software
495
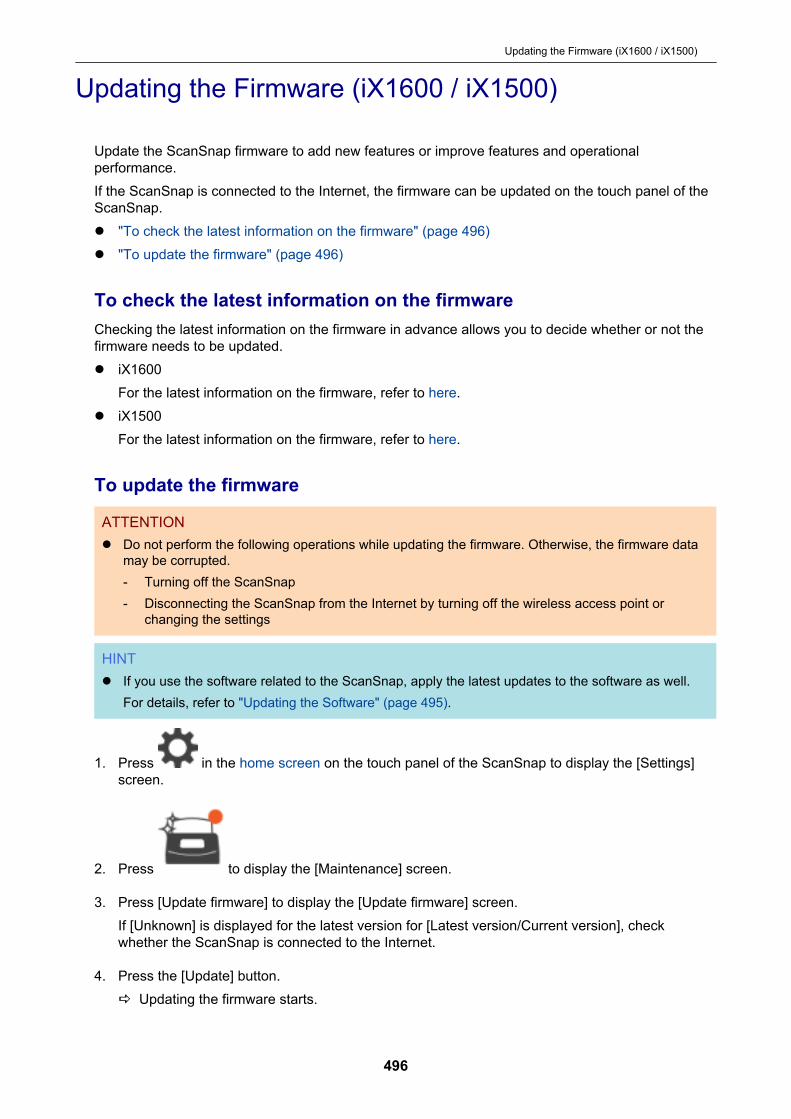
Updating the Firmware (iX1600 / iX1500)
Update the ScanSnap firmware to add new features or improve features and operationalperformance.If the ScanSnap is connected to the Internet, the firmware can be updated on the touch panel of theScanSnap.l "To check the latest information on the firmware" (page 496)l "To update the firmware" (page 496)
To check the latest information on the firmwareChecking the latest information on the firmware in advance allows you to decide whether or not thefirmware needs to be updated.l iX1600
For the latest information on the firmware, refer to here.l iX1500
For the latest information on the firmware, refer to here.
To update the firmware
ATTENTIONl Do not perform the following operations while updating the firmware. Otherwise, the firmware data
may be corrupted.- Turning off the ScanSnap- Disconnecting the ScanSnap from the Internet by turning off the wireless access point or
changing the settings
HINTl If you use the software related to the ScanSnap, apply the latest updates to the software as well.
For details, refer to "Updating the Software" (page 495).
1. Press in the home screen on the touch panel of the ScanSnap to display the [Settings]screen.
2. Press to display the [Maintenance] screen.
3. Press [Update firmware] to display the [Update firmware] screen.If [Unknown] is displayed for the latest version for [Latest version/Current version], checkwhether the ScanSnap is connected to the Internet.
4. Press the [Update] button.a Updating the firmware starts.
Updating the Firmware (iX1600 / iX1500)
496
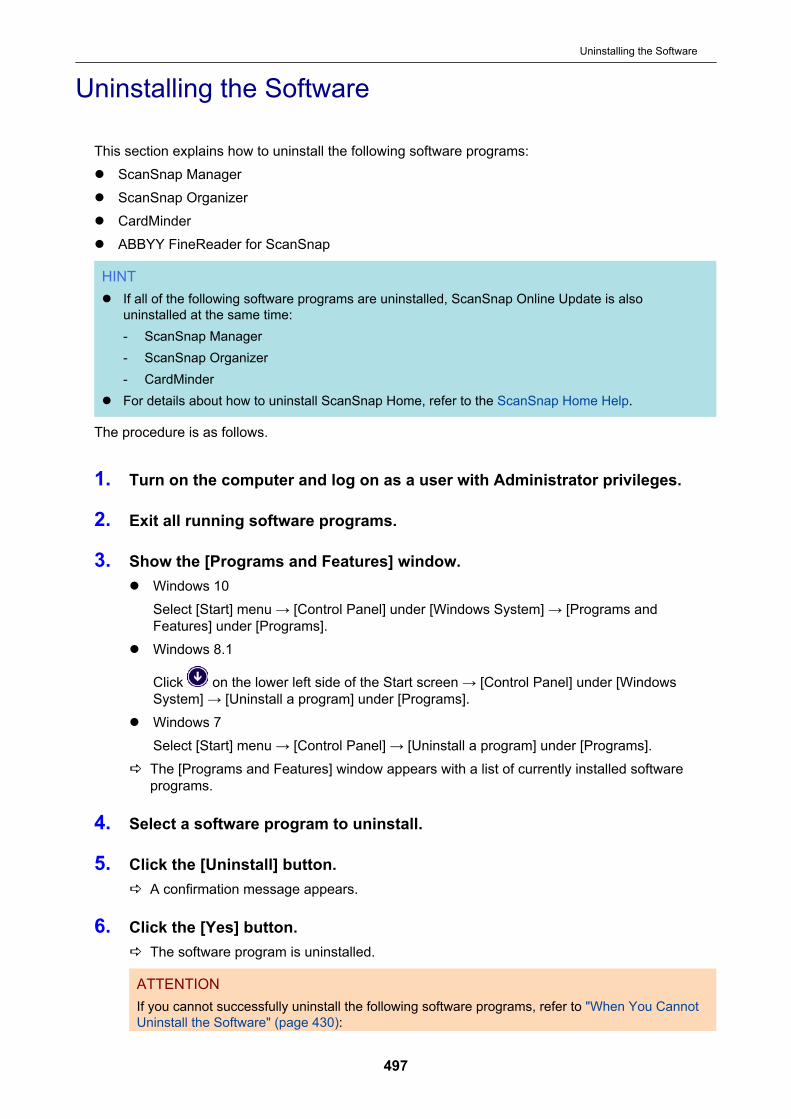
Uninstalling the Software
This section explains how to uninstall the following software programs:l ScanSnap Managerl ScanSnap Organizerl CardMinderl ABBYY FineReader for ScanSnap
HINTl If all of the following software programs are uninstalled, ScanSnap Online Update is also
uninstalled at the same time:- ScanSnap Manager- ScanSnap Organizer- CardMinder
l For details about how to uninstall ScanSnap Home, refer to the ScanSnap Home Help.
The procedure is as follows.
1. Turn on the computer and log on as a user with Administrator privileges.
2. Exit all running software programs.
3. Show the [Programs and Features] window.l Windows 10
Select [Start] menu → [Control Panel] under [Windows System] → [Programs andFeatures] under [Programs].
l Windows 8.1
Click on the lower left side of the Start screen → [Control Panel] under [WindowsSystem] → [Uninstall a program] under [Programs].
l Windows 7Select [Start] menu → [Control Panel] → [Uninstall a program] under [Programs].
a The [Programs and Features] window appears with a list of currently installed softwareprograms.
4. Select a software program to uninstall.
5. Click the [Uninstall] button.a A confirmation message appears.
6. Click the [Yes] button.a The software program is uninstalled.
ATTENTIONIf you cannot successfully uninstall the following software programs, refer to "When You CannotUninstall the Software" (page 430):
Uninstalling the Software
497

l ScanSnap Managerl ScanSnap Organizerl CardMinderl ScanSnap Online Update
HINTTo uninstall more than one software program, repeat steps 4 to 6 for each software program.
Uninstalling the Software
498
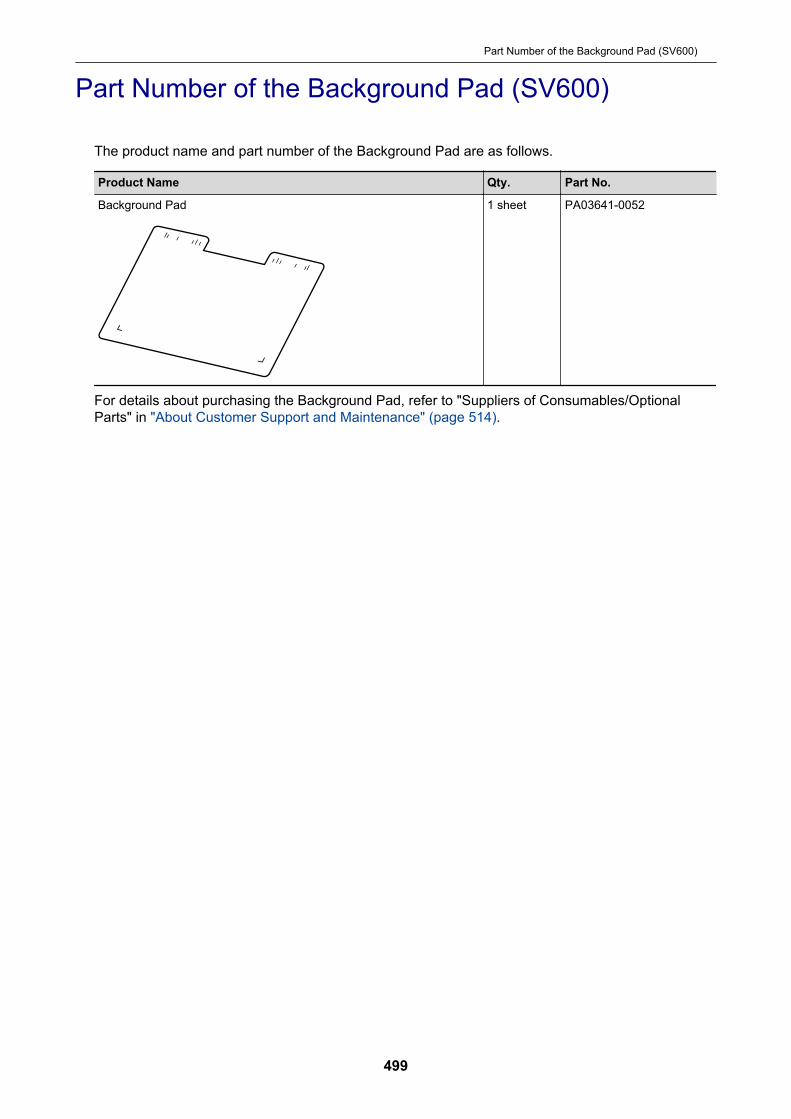
Part Number of the Background Pad (SV600)
The product name and part number of the Background Pad are as follows.
Product Name Qty. Part No.
Background Pad 1 sheet PA03641-0052
For details about purchasing the Background Pad, refer to "Suppliers of Consumables/OptionalParts" in "About Customer Support and Maintenance" (page 514).
Part Number of the Background Pad (SV600)
499
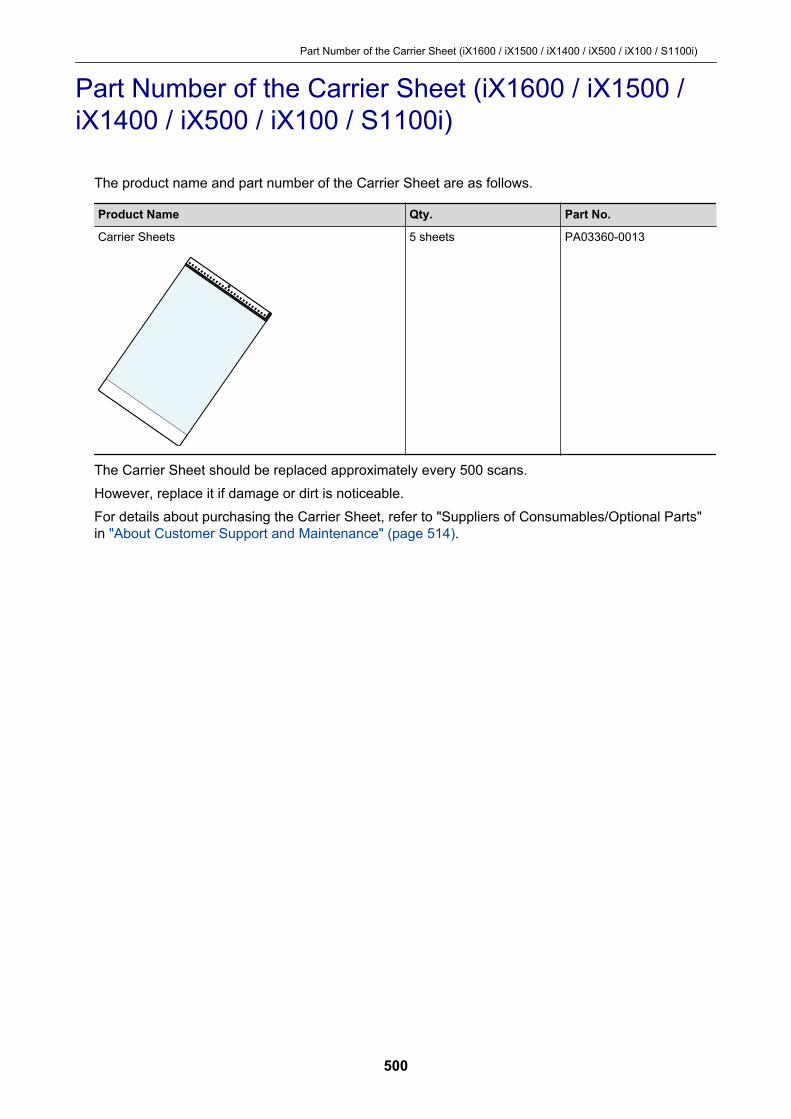
Part Number of the Carrier Sheet (iX1600 / iX1500 /iX1400 / iX500 / iX100 / S1100i)
The product name and part number of the Carrier Sheet are as follows.
Product Name Qty. Part No.
Carrier Sheets 5 sheets PA03360-0013
The Carrier Sheet should be replaced approximately every 500 scans.However, replace it if damage or dirt is noticeable.For details about purchasing the Carrier Sheet, refer to "Suppliers of Consumables/Optional Parts"in "About Customer Support and Maintenance" (page 514).
Part Number of the Carrier Sheet (iX1600 / iX1500 / iX1400 / iX500 / iX100 / S1100i)
500

Specifications of the ScanSnap
l "Specifications for iX1600 / iX1500 / iX1400" (page 502)l "Specifications for iX500" (page 504)l "Specifications of iX100" (page 506)l "Specifications of SV600" (page 508)l "Specifications of S1300i" (page 510)l "Specifications for S1100i" (page 512)
Specifications of the ScanSnap
501
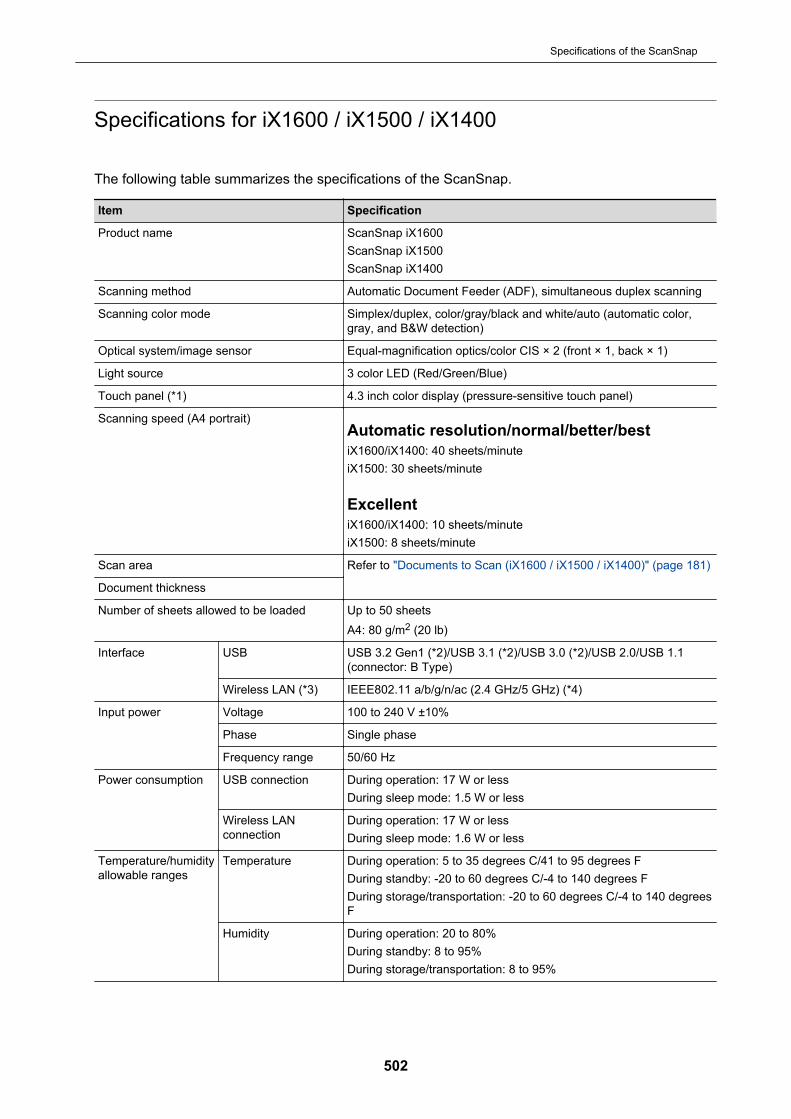
Specifications for iX1600 / iX1500 / iX1400
The following table summarizes the specifications of the ScanSnap.
Item Specification
Product name ScanSnap iX1600ScanSnap iX1500ScanSnap iX1400
Scanning method Automatic Document Feeder (ADF), simultaneous duplex scanning
Scanning color mode Simplex/duplex, color/gray/black and white/auto (automatic color,gray, and B&W detection)
Optical system/image sensor Equal-magnification optics/color CIS × 2 (front × 1, back × 1)
Light source 3 color LED (Red/Green/Blue)
Touch panel (*1) 4.3 inch color display (pressure-sensitive touch panel)
Scanning speed (A4 portrait)Automatic resolution/normal/better/bestiX1600/iX1400: 40 sheets/minuteiX1500: 30 sheets/minute
ExcellentiX1600/iX1400: 10 sheets/minuteiX1500: 8 sheets/minute
Scan area Refer to "Documents to Scan (iX1600 / iX1500 / iX1400)" (page 181)
Document thickness
Number of sheets allowed to be loaded Up to 50 sheetsA4: 80 g/m2 (20 lb)
Interface USB USB 3.2 Gen1 (*2)/USB 3.1 (*2)/USB 3.0 (*2)/USB 2.0/USB 1.1(connector: B Type)
Wireless LAN (*3) IEEE802.11 a/b/g/n/ac (2.4 GHz/5 GHz) (*4)
Input power Voltage 100 to 240 V ±10%
Phase Single phase
Frequency range 50/60 Hz
Power consumption USB connection During operation: 17 W or lessDuring sleep mode: 1.5 W or less
Wireless LANconnection
During operation: 17 W or lessDuring sleep mode: 1.6 W or less
Temperature/humidityallowable ranges
Temperature During operation: 5 to 35 degrees C/41 to 95 degrees FDuring standby: -20 to 60 degrees C/-4 to 140 degrees FDuring storage/transportation: -20 to 60 degrees C/-4 to 140 degreesF
Humidity During operation: 20 to 80%During standby: 8 to 95%During storage/transportation: 8 to 95%
Specifications of the ScanSnap
502

Item Specification
Outer dimensions (Width × Depth × Height) Min.: 292 × 161 × 152 mm/11.50 × 6.34 × 5.98 in. (when the ADFpaper chute (cover) is closed)Max.: 292 × 494 × 293 mm/11.50 × 19.45 × 11.54 in. (when the ADFpaper chute (cover) is open and the extension is extended)
Weight iX1600/iX1500: 3.4 kg (approx. 7.50 lb)iX1400: 3.2 kg (approx. 7.1 lb)
Environmental specification Compliant with the International Energy Star Program, and RoHSDirective
Related software Scanner driver ScanSnap Manager
File management l ScanSnap Homel ScanSnap Organizer
Business cardmanagement
CardMinder
Text recognition ABBYY FineReader for ScanSnap
Update managementand application
ScanSnap Online Update
ECM linkage Scan to Microsoft SharePoint
PDF editing iX1600: Kofax Power PDF StandardiX1500: Kofax Power PDF Standard or Nuance Power PDFStandard
*1: Not featured on iX1400.*2: When the ScanSnap is connected to a USB 3.2 Gen1 port, a USB 3.1 port, or a USB 3.0 port,
the ScanSnap may not be recognized by some computers. In this case, connect the ScanSnapto a USB 2.0 port.
*3: Available for iX1600/iX1500. However, IPv6 is not supported.*4: Depending on the country where the ScanSnap is purchased, the ScanSnap may not support the
5 GHz SSID.Change the settings of the wireless access point so that the 2.4 GHz SSID is used.
Specifications of the ScanSnap
503

Specifications for iX500
The following table summarizes the specifications of the ScanSnap.
Item Specification
Product name ScanSnap iX500
Scanning method Automatic Document Feeder (ADF), simultaneous duplex scanning
Scanning color mode Simplex/duplex, color/gray/black and white/auto (automatic color,gray, and B&W detection)
Optical system/image sensor Equal-magnification optics/color CIS × 2 (front × 1, back × 1)
Light source 3 color LED (Red/Green/Blue)
Scanning speed (A4 portrait)Automatic resolution/normal/better/best25 sheets/minute
Excellent7 sheets/minute
Scan area Refer to "Documents to Scan (iX500)" (page 212)
Document thickness
Number of sheets allowed to be loaded Up to 50 sheetsA4: 80 g/m2 (20 lb)
Interface USB USB 3.0 (*1)/USB 2.0/USB 1.1 (connector: B type)
Wireless LAN (*2) IEEE802.11b/g/n compliant
Input power Voltage 100 to 240 V ±10%
Phase Single phase
Frequency range 50/60 Hz
Power consumption USB connection During operation: 20 W or lessDuring sleep mode: 1.6 W or less
Wireless LANconnection
During operation: 20 W or lessDuring sleep mode: 2.5 W or less
Temperature/humidityallowable ranges
Temperature During operation: 5 to 35 degrees C/41 to 95 degrees FDuring standby: -20 to 60 degrees C/-4 to 140 degrees FDuring storage/transportation: -20 to 60 degrees C/-4 to 140 degreesF
Humidity During operation: 20 to 80%During standby: 8 to 95%During storage/transportation: 8 to 95%
Outer dimensions (Width × Depth × Height) Min.: 292 × 159 × 168 mm/11.50 × 6.26 × 6.61 in. (when the ADFpaper chute (cover) is closed)Max.: 292 × 484 × 293 mm/11.50 × 19.06 × 11.54 in. (when the ADFpaper chute (cover) is open and the extension is extended)
Weight 3.0 kg (approx. 6.62 lb)
Environmental specification Compliant with the International Energy Star Program, and RoHSDirective
Specifications of the ScanSnap
504

Item Specification
Related software Scanner driver ScanSnap Manager
File management l ScanSnap Homel ScanSnap Organizer
Business cardmanagement
CardMinder
Text recognition ABBYY FineReader for ScanSnap
Update managementand application
ScanSnap Online Update
ECM linkage Scan to Microsoft SharePoint
PDF editing Nuance Power PDF Standard
*1: When the ScanSnap is connected to a USB 3.0 port, the ScanSnap may not be recognized bysome computers. In this case, connect the ScanSnap to a USB 2.0 port.
*2: IPv6 is not supported.
Specifications of the ScanSnap
505
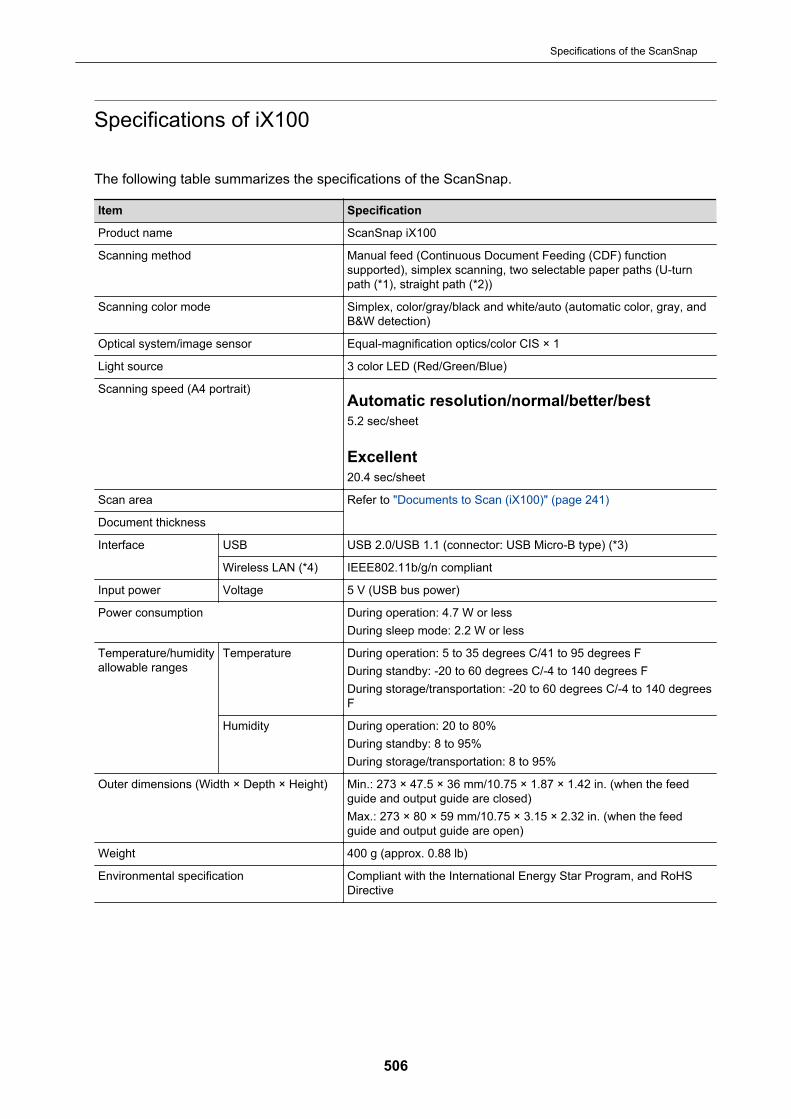
Specifications of iX100
The following table summarizes the specifications of the ScanSnap.
Item Specification
Product name ScanSnap iX100
Scanning method Manual feed (Continuous Document Feeding (CDF) functionsupported), simplex scanning, two selectable paper paths (U-turnpath (*1), straight path (*2))
Scanning color mode Simplex, color/gray/black and white/auto (automatic color, gray, andB&W detection)
Optical system/image sensor Equal-magnification optics/color CIS × 1
Light source 3 color LED (Red/Green/Blue)
Scanning speed (A4 portrait)Automatic resolution/normal/better/best5.2 sec/sheet
Excellent20.4 sec/sheet
Scan area Refer to "Documents to Scan (iX100)" (page 241)
Document thickness
Interface USB USB 2.0/USB 1.1 (connector: USB Micro-B type) (*3)
Wireless LAN (*4) IEEE802.11b/g/n compliant
Input power Voltage 5 V (USB bus power)
Power consumption During operation: 4.7 W or lessDuring sleep mode: 2.2 W or less
Temperature/humidityallowable ranges
Temperature During operation: 5 to 35 degrees C/41 to 95 degrees FDuring standby: -20 to 60 degrees C/-4 to 140 degrees FDuring storage/transportation: -20 to 60 degrees C/-4 to 140 degreesF
Humidity During operation: 20 to 80%During standby: 8 to 95%During storage/transportation: 8 to 95%
Outer dimensions (Width × Depth × Height) Min.: 273 × 47.5 × 36 mm/10.75 × 1.87 × 1.42 in. (when the feedguide and output guide are closed)Max.: 273 × 80 × 59 mm/10.75 × 3.15 × 2.32 in. (when the feedguide and output guide are open)
Weight 400 g (approx. 0.88 lb)
Environmental specification Compliant with the International Energy Star Program, and RoHSDirective
Specifications of the ScanSnap
506
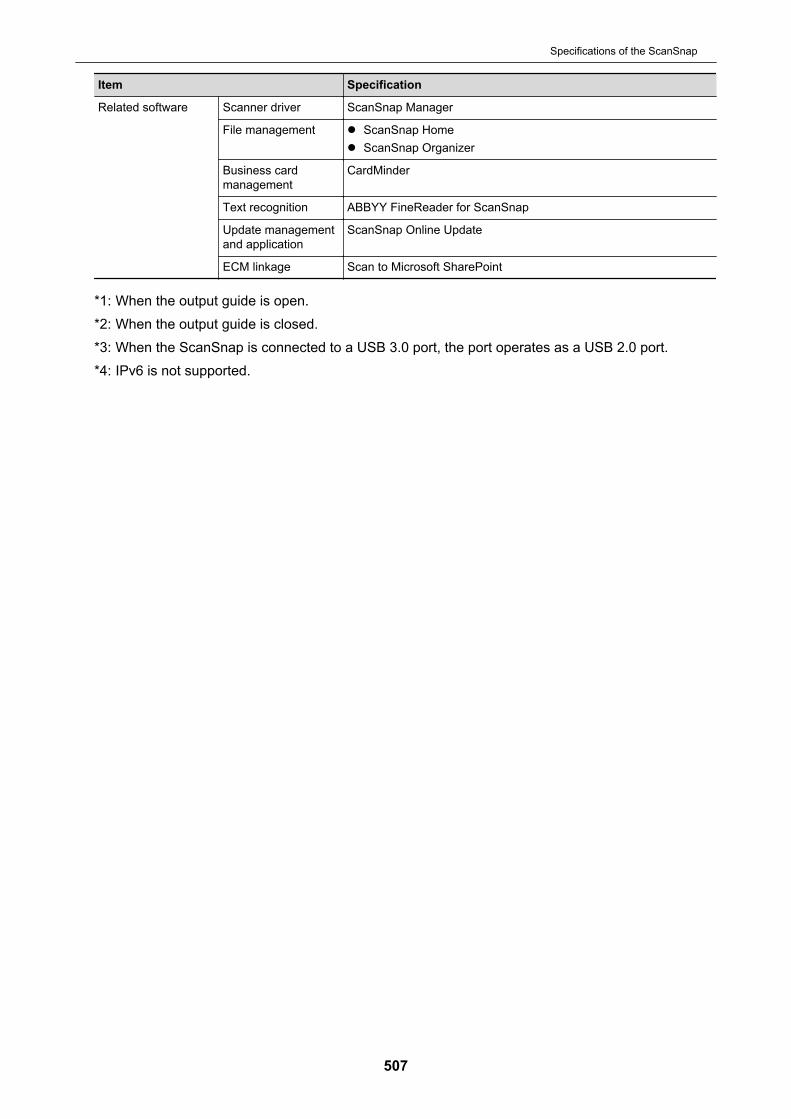
Item Specification
Related software Scanner driver ScanSnap Manager
File management l ScanSnap Homel ScanSnap Organizer
Business cardmanagement
CardMinder
Text recognition ABBYY FineReader for ScanSnap
Update managementand application
ScanSnap Online Update
ECM linkage Scan to Microsoft SharePoint
*1: When the output guide is open.*2: When the output guide is closed.*3: When the ScanSnap is connected to a USB 3.0 port, the port operates as a USB 2.0 port.*4: IPv6 is not supported.
Specifications of the ScanSnap
507
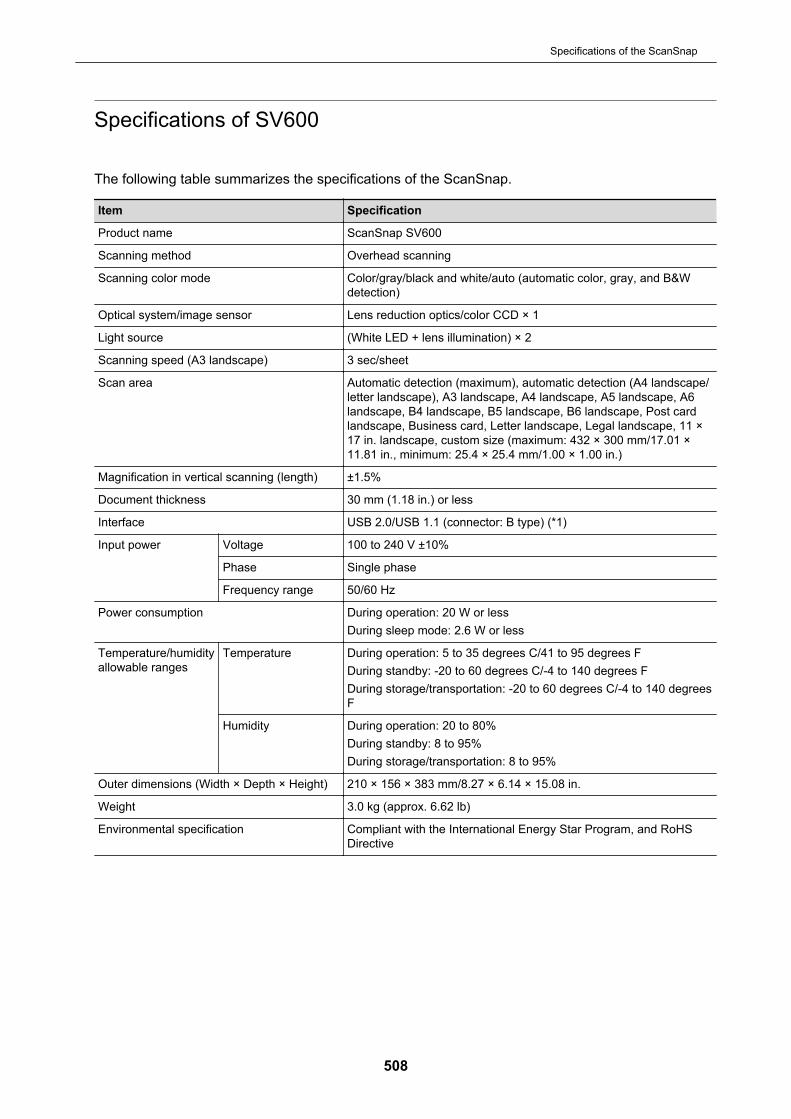
Specifications of SV600
The following table summarizes the specifications of the ScanSnap.
Item Specification
Product name ScanSnap SV600
Scanning method Overhead scanning
Scanning color mode Color/gray/black and white/auto (automatic color, gray, and B&Wdetection)
Optical system/image sensor Lens reduction optics/color CCD × 1
Light source (White LED + lens illumination) × 2
Scanning speed (A3 landscape) 3 sec/sheet
Scan area Automatic detection (maximum), automatic detection (A4 landscape/letter landscape), A3 landscape, A4 landscape, A5 landscape, A6landscape, B4 landscape, B5 landscape, B6 landscape, Post cardlandscape, Business card, Letter landscape, Legal landscape, 11 ×17 in. landscape, custom size (maximum: 432 × 300 mm/17.01 ×11.81 in., minimum: 25.4 × 25.4 mm/1.00 × 1.00 in.)
Magnification in vertical scanning (length) ±1.5%
Document thickness 30 mm (1.18 in.) or less
Interface USB 2.0/USB 1.1 (connector: B type) (*1)
Input power Voltage 100 to 240 V ±10%
Phase Single phase
Frequency range 50/60 Hz
Power consumption During operation: 20 W or lessDuring sleep mode: 2.6 W or less
Temperature/humidityallowable ranges
Temperature During operation: 5 to 35 degrees C/41 to 95 degrees FDuring standby: -20 to 60 degrees C/-4 to 140 degrees FDuring storage/transportation: -20 to 60 degrees C/-4 to 140 degreesF
Humidity During operation: 20 to 80%During standby: 8 to 95%During storage/transportation: 8 to 95%
Outer dimensions (Width × Depth × Height) 210 × 156 × 383 mm/8.27 × 6.14 × 15.08 in.
Weight 3.0 kg (approx. 6.62 lb)
Environmental specification Compliant with the International Energy Star Program, and RoHSDirective
Specifications of the ScanSnap
508

Item Specification
Related software Scanner driver ScanSnap Manager
File management l ScanSnap Homel ScanSnap Organizer
Business cardmanagement
CardMinder
Text recognition ABBYY FineReader for ScanSnap
Update managementand application
ScanSnap Online Update
ECM linkage Scan to Microsoft SharePoint
PDF editing Kofax Power PDF Standard or Nuance Power PDF Standard
*1: When the ScanSnap is connected to a USB 3.0 port, the port operates as a USB 2.0 port.
Specifications of the ScanSnap
509
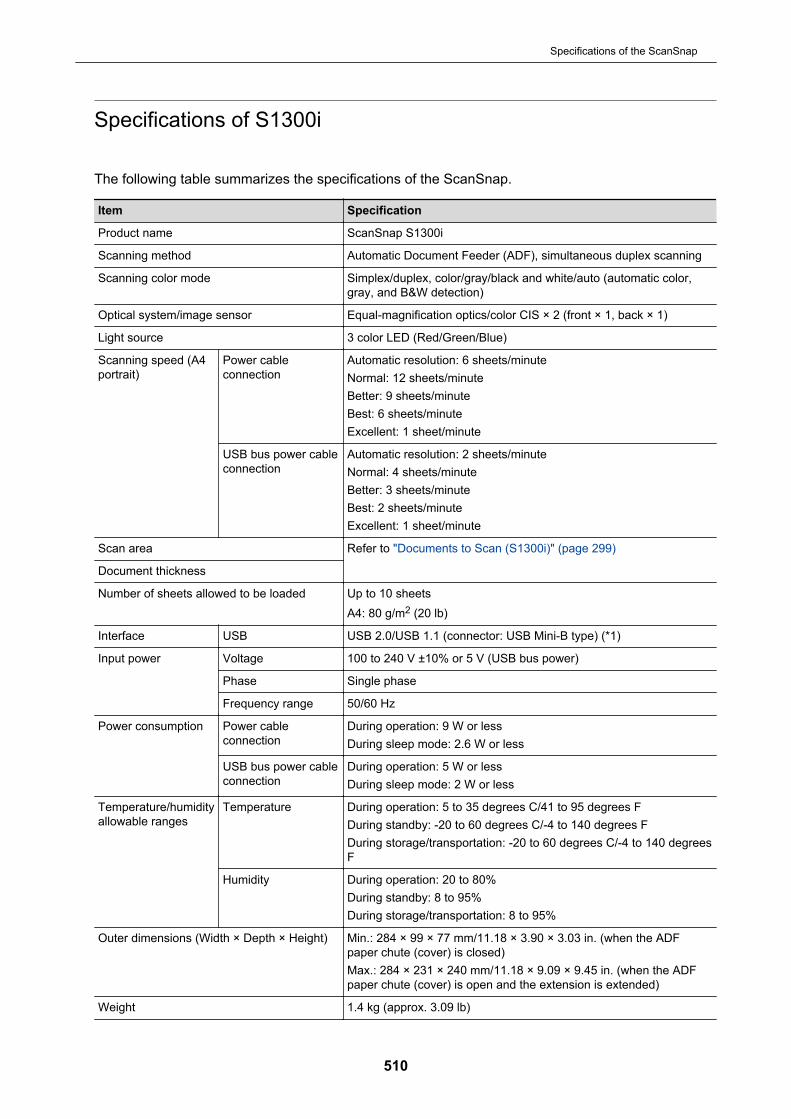
Specifications of S1300i
The following table summarizes the specifications of the ScanSnap.
Item Specification
Product name ScanSnap S1300i
Scanning method Automatic Document Feeder (ADF), simultaneous duplex scanning
Scanning color mode Simplex/duplex, color/gray/black and white/auto (automatic color,gray, and B&W detection)
Optical system/image sensor Equal-magnification optics/color CIS × 2 (front × 1, back × 1)
Light source 3 color LED (Red/Green/Blue)
Scanning speed (A4portrait)
Power cableconnection
Automatic resolution: 6 sheets/minuteNormal: 12 sheets/minuteBetter: 9 sheets/minuteBest: 6 sheets/minuteExcellent: 1 sheet/minute
USB bus power cableconnection
Automatic resolution: 2 sheets/minuteNormal: 4 sheets/minuteBetter: 3 sheets/minuteBest: 2 sheets/minuteExcellent: 1 sheet/minute
Scan area Refer to "Documents to Scan (S1300i)" (page 299)
Document thickness
Number of sheets allowed to be loaded Up to 10 sheetsA4: 80 g/m2 (20 lb)
Interface USB USB 2.0/USB 1.1 (connector: USB Mini-B type) (*1)
Input power Voltage 100 to 240 V ±10% or 5 V (USB bus power)
Phase Single phase
Frequency range 50/60 Hz
Power consumption Power cableconnection
During operation: 9 W or lessDuring sleep mode: 2.6 W or less
USB bus power cableconnection
During operation: 5 W or lessDuring sleep mode: 2 W or less
Temperature/humidityallowable ranges
Temperature During operation: 5 to 35 degrees C/41 to 95 degrees FDuring standby: -20 to 60 degrees C/-4 to 140 degrees FDuring storage/transportation: -20 to 60 degrees C/-4 to 140 degreesF
Humidity During operation: 20 to 80%During standby: 8 to 95%During storage/transportation: 8 to 95%
Outer dimensions (Width × Depth × Height) Min.: 284 × 99 × 77 mm/11.18 × 3.90 × 3.03 in. (when the ADFpaper chute (cover) is closed)Max.: 284 × 231 × 240 mm/11.18 × 9.09 × 9.45 in. (when the ADFpaper chute (cover) is open and the extension is extended)
Weight 1.4 kg (approx. 3.09 lb)
Specifications of the ScanSnap
510
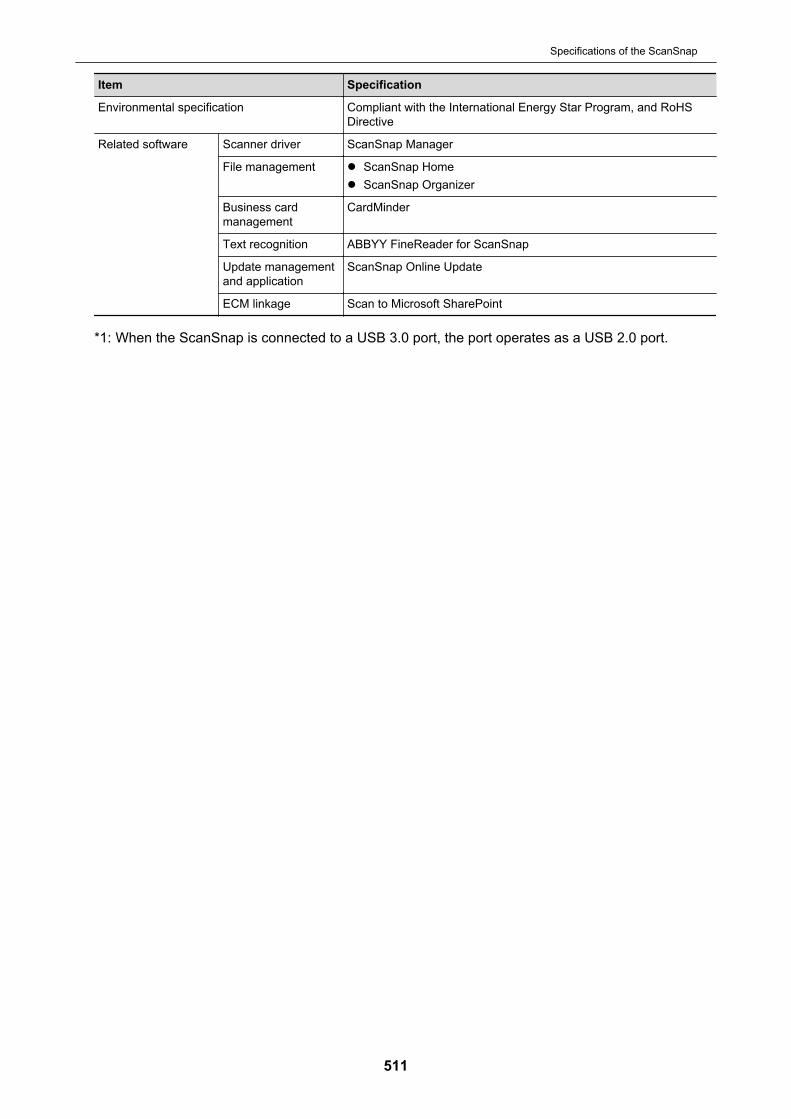
Item Specification
Environmental specification Compliant with the International Energy Star Program, and RoHSDirective
Related software Scanner driver ScanSnap Manager
File management l ScanSnap Homel ScanSnap Organizer
Business cardmanagement
CardMinder
Text recognition ABBYY FineReader for ScanSnap
Update managementand application
ScanSnap Online Update
ECM linkage Scan to Microsoft SharePoint
*1: When the ScanSnap is connected to a USB 3.0 port, the port operates as a USB 2.0 port.
Specifications of the ScanSnap
511
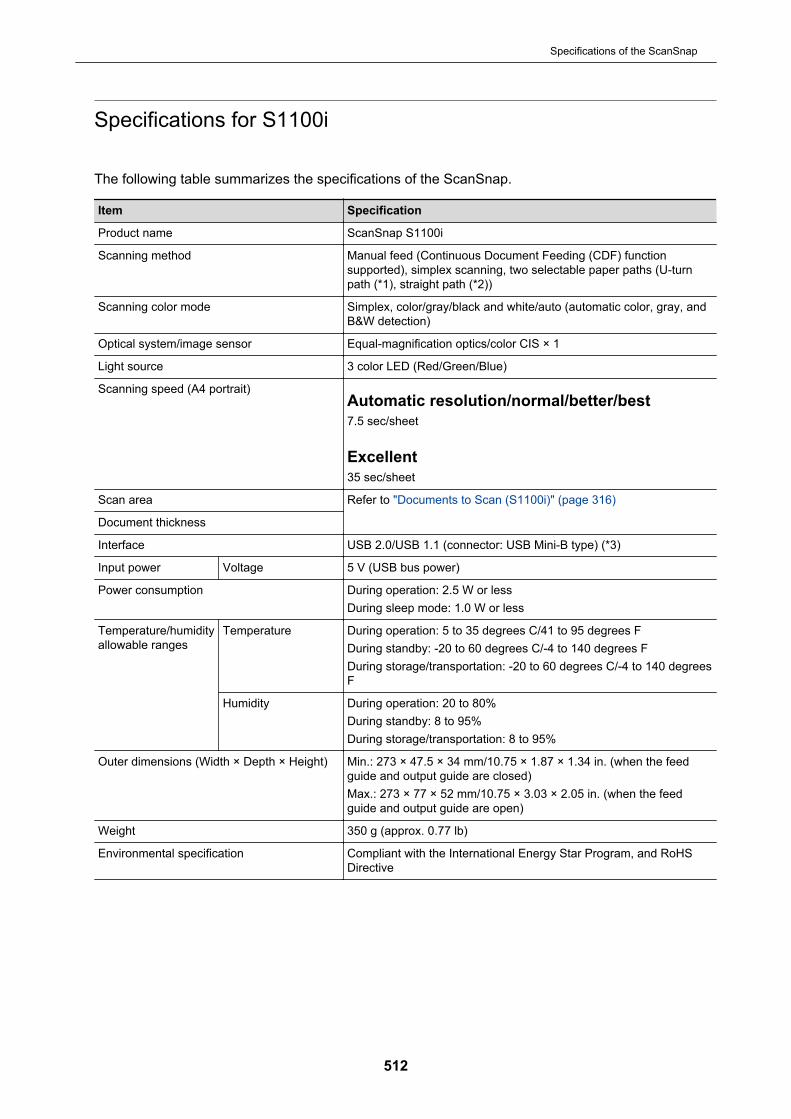
Specifications for S1100i
The following table summarizes the specifications of the ScanSnap.
Item Specification
Product name ScanSnap S1100i
Scanning method Manual feed (Continuous Document Feeding (CDF) functionsupported), simplex scanning, two selectable paper paths (U-turnpath (*1), straight path (*2))
Scanning color mode Simplex, color/gray/black and white/auto (automatic color, gray, andB&W detection)
Optical system/image sensor Equal-magnification optics/color CIS × 1
Light source 3 color LED (Red/Green/Blue)
Scanning speed (A4 portrait)Automatic resolution/normal/better/best7.5 sec/sheet
Excellent35 sec/sheet
Scan area Refer to "Documents to Scan (S1100i)" (page 316)
Document thickness
Interface USB 2.0/USB 1.1 (connector: USB Mini-B type) (*3)
Input power Voltage 5 V (USB bus power)
Power consumption During operation: 2.5 W or lessDuring sleep mode: 1.0 W or less
Temperature/humidityallowable ranges
Temperature During operation: 5 to 35 degrees C/41 to 95 degrees FDuring standby: -20 to 60 degrees C/-4 to 140 degrees FDuring storage/transportation: -20 to 60 degrees C/-4 to 140 degreesF
Humidity During operation: 20 to 80%During standby: 8 to 95%During storage/transportation: 8 to 95%
Outer dimensions (Width × Depth × Height) Min.: 273 × 47.5 × 34 mm/10.75 × 1.87 × 1.34 in. (when the feedguide and output guide are closed)Max.: 273 × 77 × 52 mm/10.75 × 3.03 × 2.05 in. (when the feedguide and output guide are open)
Weight 350 g (approx. 0.77 lb)
Environmental specification Compliant with the International Energy Star Program, and RoHSDirective
Specifications of the ScanSnap
512

Item Specification
Related software Scanner driver ScanSnap Manager
File management l ScanSnap Homel ScanSnap Organizer
Business cardmanagement
CardMinder
Text recognition ABBYY FineReader for ScanSnap
Update managementand application
ScanSnap Online Update
ECM linkage Scan to Microsoft SharePoint
*1: When the output guide is open.*2: When the output guide is closed.*3: When the ScanSnap is connected to a USB 3.0 port, the port operates as a USB 2.0 port.
Specifications of the ScanSnap
513
About Customer Support and Maintenance
Customer Supportl ScanSnap
For other inquiries on the ScanSnap, refer to the ScanSnap Support Site.https://scansnap.fujitsu.com/g-support/en/If your problem cannot be solved after referring to the above web pages, visit the following webpage to check the contact information of a suitable Fujitsu office and contact the Fujitsu office.https://www.fujitsu.com/global/about/resources/shop/computing/peripheral/scanners/index.html
l ABBYY FineReader for ScanSnap- Windows 10
From the [Start] menu, select [ABBYY FineReader for ScanSnap(TM)] → [User's Guide] →[Technical Support].
- Windows 8.1
Click on the lower left side of the Start screen, and select [User's Guide] under [ABBYYFineReader for ScanSnap(TM)] on the All apps screen → [Technical Support].
- Windows 7Select [Start] menu → [All Programs] → [ABBYY FineReader for ScanSnap(TM)] → [User'sGuide] → [Technical Support].
Suppliers of Consumables/Optional Partshttps://scansnap.fujitsu.com/
MaintenanceContact the distributor/dealer where you purchased this product. Refer to the contact information inthe Contact List if supplied with this product, or refer to the contact information in the Contact forInquiries section if provided in Safety Precautions supplied with this product, and then make aninquiry.For details, refer to the following portal site:https://www.fujitsu.com/global/about/resources/shop/computing/peripheral/scanners/index.html
ATTENTIONFor safety reasons, never attempt repairs by yourself.
About Customer Support and Maintenance
514