BASIC CONTROLS
14
1 BASIC CONTROLS Label: Label, the simplest control in the Visual Basic toolbox, displays formatted text on a user interface form. Typical uses for the Label control include: Help text Program splash screen headings Formatted output, such as names, times, and dates Descriptive labels for other objects, including text boxes and list boxes. A label is a control you use to display text that a user can't edit directly. Label Properties: Alignment Aligns caption within border. Appearance Selects 3-D or flat appearance. AutoSize If True, the label is resized to fit the text specified by the caption property. If False, the label will remain the size defined at design time and the text may be clipped. BorderStyle Determines type of border. Caption String to be displayed in box. Font Sets font type, style, size.WordWrap Works in conjunction with AutoSize property. If AutoSize = True, WordWrap = True, then the text will wrap and label will expand vertically to fit the Caption. If AutoSize = True, WordWrap = False, then the text will not wrap and the label expands horizontally to fit the Caption. If AutoSize = False, the text will not wrap regardless of WordWrap value. Label Events: Click Event triggered when user clicks on a label. DblClick Event triggered when user double-clicks on a label. Example: You can also set label properties with program code, as shown in the following. The program codes below, when command1 button is clicked, will set the caption of label1 as “Welcome” and label2 as “Please enter your name below:” Private Sub Command1_Click () Label1.Caption = "Welcome" Label2.Caption = "Please enter your name below:" lblDigitalClock.Caption = Time End Sub Text Box: A Textbox is used to display information entered at design time, by a user at run-time, or assigned within code. The displayed text may be edited. The Textbox control is one of the most versatile tools in the Visual Basic toolbox. This control performs two functions: Displaying output (such as operating instructions or the contents of a file) on a form. Receiving text (such as names and phone numbers) as user input. How a text box works depends on how you set its properties and how you reference the text box in your program code. The following popup illustration shows a text box that:
-
Upload
khangminh22 -
Category
Documents
-
view
6 -
download
0
Transcript of BASIC CONTROLS
1
BASIC CONTROLS
Label: Label, the simplest control in the Visual Basic toolbox, displays formatted text on a user interface
form. Typical uses for the Label control include:
Help text
Program splash screen headings
Formatted output, such as names, times, and dates
Descriptive labels for other objects, including text boxes and list boxes.
A label is a control you use to display text that a user can't edit directly.
Label Properties:
Alignment Aligns caption within border.
Appearance Selects 3-D or flat appearance.
AutoSize If True, the label is resized to fit the text specified by the caption
property. If False, the label will remain the size defined at design time
and the text may be clipped.
BorderStyle Determines type of border.
Caption String to be displayed in box.
Font Sets font type, style, size.WordWrap Works in conjunction with
AutoSize property. If AutoSize = True, WordWrap = True, then the text
will wrap and label will expand vertically to fit the Caption. If AutoSize
= True, WordWrap = False, then the text will not wrap and the label
expands horizontally to fit the Caption. If AutoSize = False, the text will
not wrap regardless of WordWrap value.
Label Events:
Click Event triggered when user clicks on a label.
DblClick Event triggered when user double-clicks on a label.
Example:
You can also set label properties with program code, as shown in the following. The program codes
below, when command1 button is clicked, will set the caption of label1 as “Welcome” and label2 as
“Please enter your name below:”
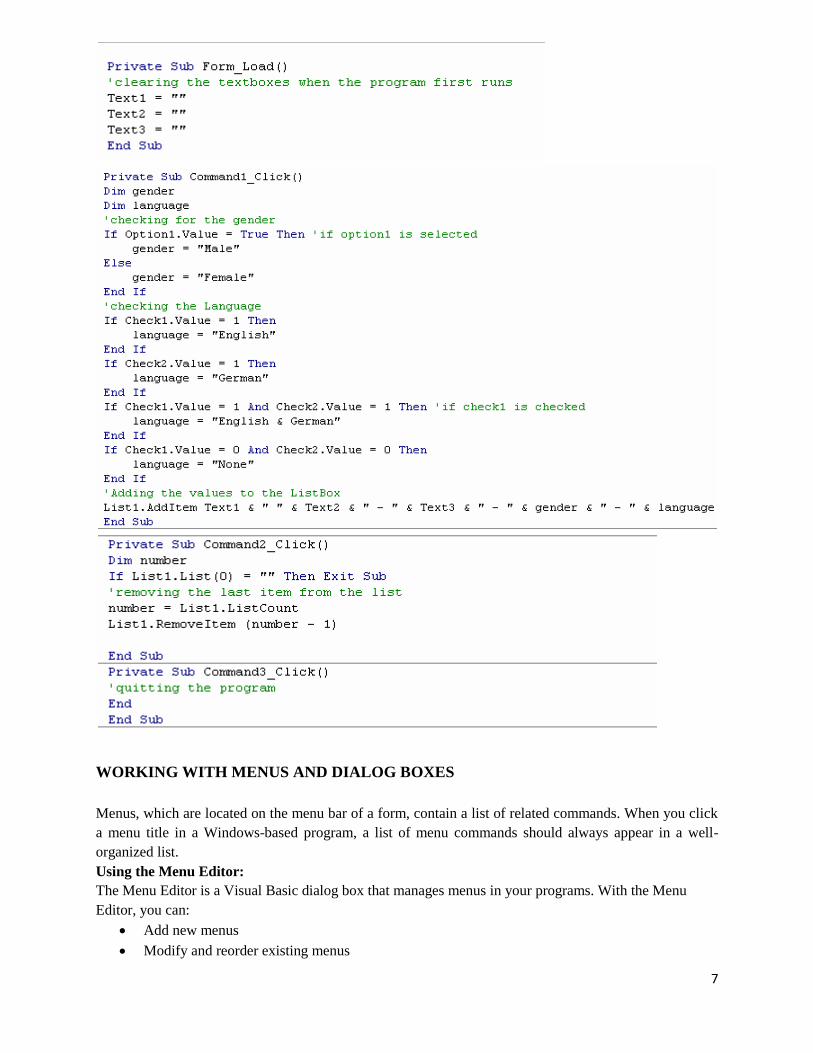
Private Sub Command1_Click ()
Label1.Caption = "Welcome"
Label2.Caption = "Please enter your name below:"
lblDigitalClock.Caption = Time
End Sub
Text Box:
A Textbox is used to display information entered at design time, by a user at run-time, or assigned within
code. The displayed text may be edited. The Textbox control is one of the most versatile tools in the
Visual Basic toolbox. This control performs two functions:
Displaying output (such as operating instructions or the contents of a file) on a form.
Receiving text (such as names and phone numbers) as user input.
How a text box works depends on how you set its properties and how you reference the text box in your
program code. The following popup illustration shows a text box that:
2
Displays data entry instructions for the user.
Receives input when the user types in a delivery note and clicks the Print Order button.
Text Box Properties:
Appearance Selects 3-D or flat appearance.
BorderStyle Determines type of border.
Font Sets font type, style, size.
MaxLength Limits the length of displayed text (0 value indicates unlimited length).
MultiLine Specifies whether text box displays single line or multiple lines.
PasswordChar Hides text with a single character.
ScrollBars Specifies type of displayed scroll bar(s).
SelLength Length of selected text (run-time only).
SelStart Starting position of selected text (run-time only).
SelText Selected text (run-time only).
Tag Stores a string expression.
Text Displayed text.
Text Box Events:
Change Triggered every time the Text property changes.
LostFocus Triggered when the user leaves the text box. This is a good place to
examine the contents of a text box after editing.
KeyPress Triggered whenever a key is pressed. Used for key trapping, as seen in
last class.
Text Box Methods:
SetFocus Places the cursor in a specified text box.
Example: The sample code below shows how to control a text box, Command 1 is clicked,
Private Sub Command1_Click()
'The following line places text in a text box:
Text1.Text = "Enter your delivery note here."
End Sub
Command 2 is clicked,
Private Sub Command2_Click()
'This line saves input from a text box in a variable:
DeliveryNote = Text1.Text
End Sub
Command Button
A command button is the most basic way to get user input while a program is running. By clicking a command
button, the user requests that a specific action be taken in the program. Or, in Visual Basic terms, clicking a
command button creates an event, which must be processed in your program.
Here are some command buttons that you’d typically find in a program:
OK Accepts a list of options and indicates that the user is ready to proceed.
Cancel Discards a list of options.
Quit Exits an open dialog box or program.
In each case, you should use command buttons carefully so that they work as expected when they are clicked.

3
Command Button Properties:
Appearance Selects 3-D or flat appearance.
Cancel Allows selection of button with Esc key (only one button on a form can have
this property True).
Caption String to be displayed on button.
Default Allows selection of button with Enter key (only one button on a form can have
this property True).
Font Sets font type, style, size.
Command Button Events:
Click Event triggered when button is selected either by clicking on it or by pressing
the access key.
Changing Command Button Properties
You can change command button properties (like those of all objects) in two ways:
By adjusting property settings in the Properties window.
By changing properties with program code.
Example:
Data Input Controls:
Visual Basic provides several other controls that you can use to collect user input in a program. This section
includes the following topics:
Option Button: To receive user input in a Visual Basic program, you can use controls that:
Present a range of acceptable choices.
Receive input in an acceptable format.
The Option Button control satisfies these requirements. It displays a list of choices on a form and requires the user
to pick one (but only one) item from a list of choices.
Creating Option Buttons
Like the other items in the Visual Basic toolbox, you create an option button on a form by clicking Option Button
in the toolbox and then drawing on the form.
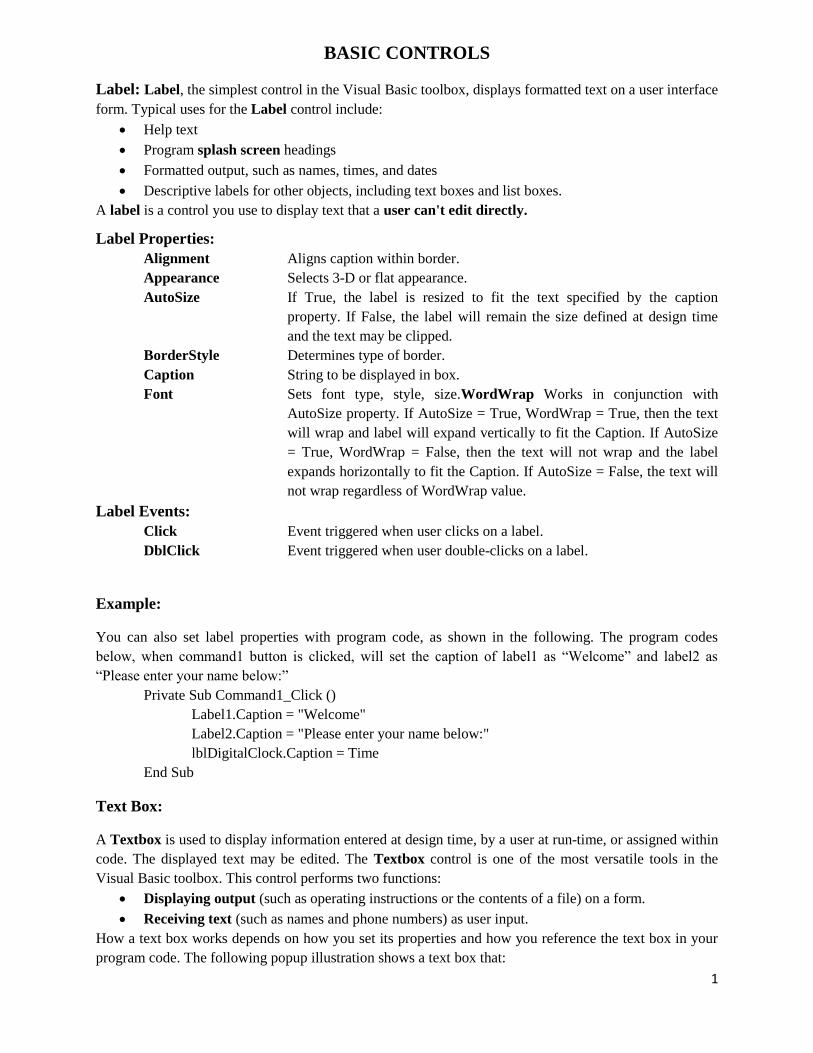
Grouping Option Buttons
If you want to create a group of option buttons that work together, you must first create a frame for the buttons. (To
do this, use Frame, a Visual Basic toolbox control.) Next, place your option buttons inside the frame so that they
can be processed as a group in your program code and moved as a group along with the frame. See figure below.
4
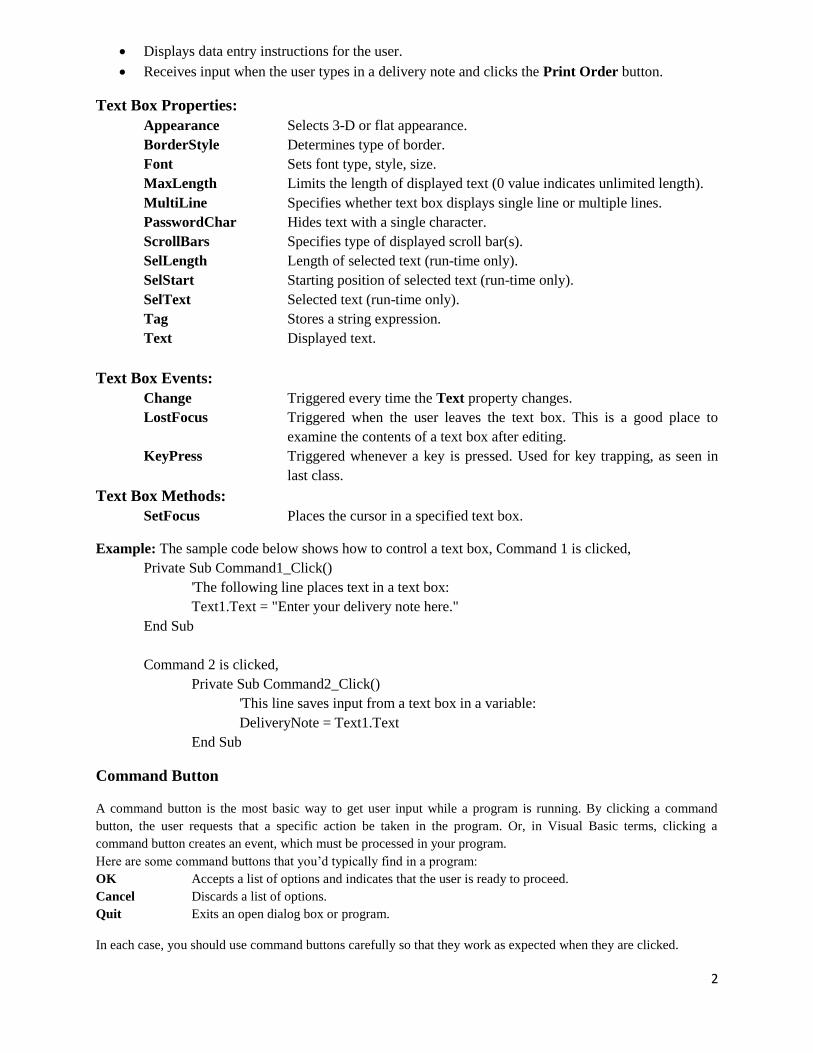
Checkbox
The Checkbox control is similar to the OptionButton control, except that Checkbox displays a list of choices and
gives the user the option to pick multiple items (or none at all) from a list of choices.
You create a check box on a form much as you would make an option button. Start by clicking the Checkbox
control in the toolbox, and then draw on the form. If you want to create a group of check boxes that work together,
create a frame for the buttons with Frame, a toolbox control. Then, you can place your check boxes inside the frame
so that they can be processed as a group in your program code or moved as a group along with the frame. See figure
below.
ListBox
When you want a user to choose a single response from a long list of choices, you use the ListBox control. (Scroll
bars appear if the list is longer than the list box.) Unlike option buttons, however, list boxes don’t require a default
selection.

5
Creating List Boxes
Building a list box is simple, since it doesn’t require creating a frame or a separate object for each list item. You just
click ListBox in the Visual Basic toolbox and draw a suitably sized list box on your form.
Setting List Box Properties
In a Visual Basic program, you can define list box characteristics in the Properties window or by using program
code, so that users can add, remove, or sort list box items while the program runs.
You add choices to a list box with the AddItem method, which is typically placed in the Form_Load event
procedure. (AddItem is a method normally used with list-oriented objects).
The sample code below shows an example of the AddItem method.
Private Sub Form_Load()
List1.AddItem “Extra hard disk”
List1.AddItem “Printer”
List1.AddItem “Satellite dish”
End Sub
ComboBox
Objects created with the ComboBox control are similar to those created with the ListBox control. Like a list box,
items can be added to, removed from, or sorted in a combo (combination) box while your program runs. However,
there are differences. Combo boxes take up less space on the form, show a default setting, and in their default Style
property setting are only one line high. But if the user clicks the combo box while your program runs, the combo
box expands to reveal a full list of choices. (If the list is too long to be displayed in the combo box, scroll bars
appear).

6
Adding Combo Box Items
Typically, choices are added to a combo box with the AddItem method (a method normally used with list-oriented
objects). You use the AddItem method by writing code in the Form_Load event procedure.
The sample code below shows an example of the Form_Load event procedure.
Private Sub Form_Load()
Combo1.AddItem “U.S. Dollars”
Combo1.AddItem “Check”
Combo1.AddItem “English Pounds”
End Sub
Exercise:
7
WORKING WITH MENUS AND DIALOG BOXES
Menus, which are located on the menu bar of a form, contain a list of related commands. When you click
a menu title in a Windows-based program, a list of menu commands should always appear in a well-
organized list.
Using the Menu Editor:
The Menu Editor is a Visual Basic dialog box that manages menus in your programs. With the Menu
Editor, you can:
Add new menus
Modify and reorder existing menus

8
Delete old menus
Add special effects to your menus, such as access keys, check marks, and keyboard shortcuts.
See the Figure below for Menu editor Window
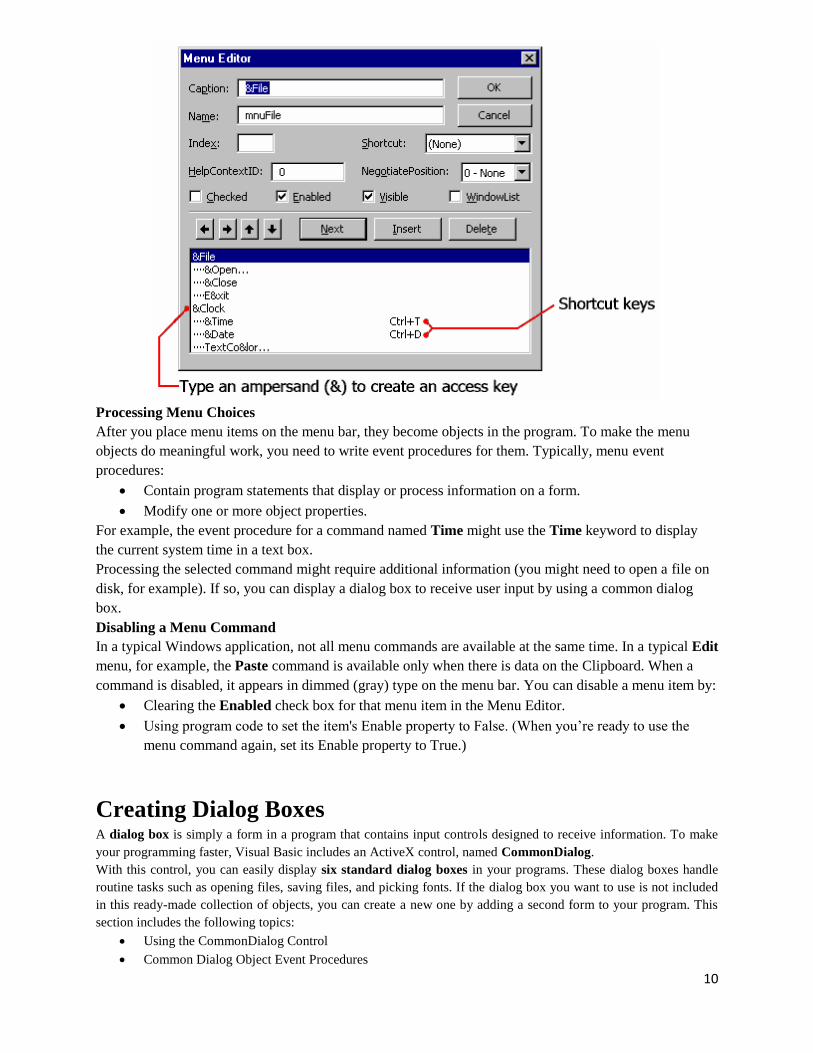
Figure 1: The Menu Editor Window
Creating Menu Command Lists
To build lists of menu commands, you first need to create the menus and then add them to the program
menu bar.
To create a list of menu commands on a form
1. Click the form itself (not an object on the form).
2. On the Visual Basic toolbar, click the Menu Editor icon, or select Menu Editor from the Tools menu.
3. In the Caption text box, type the menu caption (the name that will appear on the menu bar), and then
press TAB.
4. In the Name text box, type the menu name (the name the menu has in the program code).
By convention, programmers use the mnu object name prefix to identify both menus and menu
commands.
5. To add the menu to your program menu bar, click Next.
The Menu Editor clears the dialog box for the next menu item. As you build your menus, the structure of
the menus and commands appear at the bottom of the dialog box.
6. In the Caption text box, type the caption of your first menu command.
7. Press tab, and then type the object name of the command in the Name text box.
8. With this first command highlighted in the menu list box, click the right arrow button in the Menu
Editor.
In the Menu list box, the command moves one indent (four spaces) to the right. Click the right arrow
button in the Menu Editor dialog box to move items to the right, and click the left arrow button to move
items to the left.
9. Click Next, and then continue to add commands to your menu.
The position of list box items determines what they are:
List box item Position
Menu title Flush left

9
Menu command One indent
Submenu title Two indents
Submenu command Three indents
To add more menus
1. When you’re ready to add another menu, click the left arrow button to make the menu flush left in the
Menu list box.
2. To add another menu and menu commands, repeat Steps 3 through 9 in the preceding procedure.
3. When you’re finished entering menus and commands, click OK to close the Menu Editor.
(Don’t accidentally click Cancel or all your menu work will be lost.)
The Menu Editor closes, and your form appears in the programming environment with the menus you
created.
Adding Event Procedures
After you add menus to your form, you can use event procedures to process the menu commands.
Clicking a menu command on the form in the programming environment displays the event procedure
that runs when the menu command is chosen.
Adding Access and Shortcut Keys
Visual Basic makes it easy to provide access key and shortcut key support for menus and menu
commands.
Access and Shortcut Keys
The access key for a command is the letter the user can press to execute the command when the menu is
open. The shortcut key is the key combination the user can press to run the command without opening the
menu. Here's a quick look at how to add access and shortcut keys to existing menu items:
Add an access key to a menu item Start the Menu Editor. Prefix the access key letter in the menu item
caption with an ampersand (&).
Add a shortcut key to a menu command Start the Menu Editor. Highlight the command in the menu list
box. Pick a key combination from the Shortcut drop-down list box.
Creating Access and Shortcut Keys
You can create access keys and shortcut keys either when you first create your menu commands or at a
later time.
The following illustration shows the menu commands associated with two menus, File and Clock.
Each menu item has an access key ampersand character, and the Time and Date commands are assigned
shortcut keys. See figure below.
10
Processing Menu Choices
After you place menu items on the menu bar, they become objects in the program. To make the menu
objects do meaningful work, you need to write event procedures for them. Typically, menu event
procedures:
Contain program statements that display or process information on a form.
Modify one or more object properties.
For example, the event procedure for a command named Time might use the Time keyword to display
the current system time in a text box.
Processing the selected command might require additional information (you might need to open a file on
disk, for example). If so, you can display a dialog box to receive user input by using a common dialog
box.
Disabling a Menu Command
In a typical Windows application, not all menu commands are available at the same time. In a typical Edit
menu, for example, the Paste command is available only when there is data on the Clipboard. When a
command is disabled, it appears in dimmed (gray) type on the menu bar. You can disable a menu item by:
Clearing the Enabled check box for that menu item in the Menu Editor.
Using program code to set the item's Enable property to False. (When you’re ready to use the
menu command again, set its Enable property to True.)
Creating Dialog Boxes A dialog box is simply a form in a program that contains input controls designed to receive information. To make
your programming faster, Visual Basic includes an ActiveX control, named CommonDialog.
With this control, you can easily display six standard dialog boxes in your programs. These dialog boxes handle
routine tasks such as opening files, saving files, and picking fonts. If the dialog box you want to use is not included
in this ready-made collection of objects, you can create a new one by adding a second form to your program. This
section includes the following topics:
Using the CommonDialog Control
Common Dialog Object Event Procedures

11
Using the Common Dialog Control Before you can use the CommonDialog control, you need to verify that it is in your toolbox. If you don’t see the
CommonDialog icon, follow this procedure to add it to the toolbox.
To add the CommonDialog control to the toolbox
1. From the Project menu, click Components.
2. Click the Controls tab.
3. Ensure that the Selected Items Only box is not checked.
4. Place a check mark next to Microsoft Common Dialog Control, and then click OK.
Creating a Dialog Box Follow this procedure to create a dialog box with the CommonDialog control.
To create a common dialog object on your form
1. In the toolbox, double-click the CommonDialog control.
2. When the common dialog object appears on your form, drag it to an out -of-the-way location.
Note: You cannot resize a common dialog object, and it disappears when your program runs.
The common dialog object itself displays nothing — its only purpose is to display a standard dialog box on the
screen when you use a method in program code to request it.
This table lists the name and purpose of the six standard dialog boxes that the common dialog object provides and
the methods you use to display them:
Dialog Box Purpose Method
Open Gets the drive, folder name, and file name ShowOpen
for an existing file that is being opened.
Save As Gets the drive, folder name, and file name for a file that is ShowSave
being saved.
Print Provides user-defined printing options. ShowPrinter
Font Provides user-defined font type and style options. ShowFont
Help Provides online user information. ShowHelp
Color Provides user-defined color selection from a palette. ShowColor
Common Dialog Object event Procedures To display a standard dialog box in a program, you need to call the common dialog object. You do this by using the
appropriate object method in an event procedure. If necessary, you also use program code to set one or more
common dialog object properties before the call. (For example, if you are using the Open dialog box, you might
12
want to control what type of files is displayed in the list box.) Finally, your event procedure needs to process the
choices made by the user when they complete the standard dialog box.
This section presents two simple event procedures, one that manages an Open dialog box and one that uses
information received from a Color dialog box.
The following topics are included in this section:
Creating an Open Dialog Box
Creating a Color Dialog Box
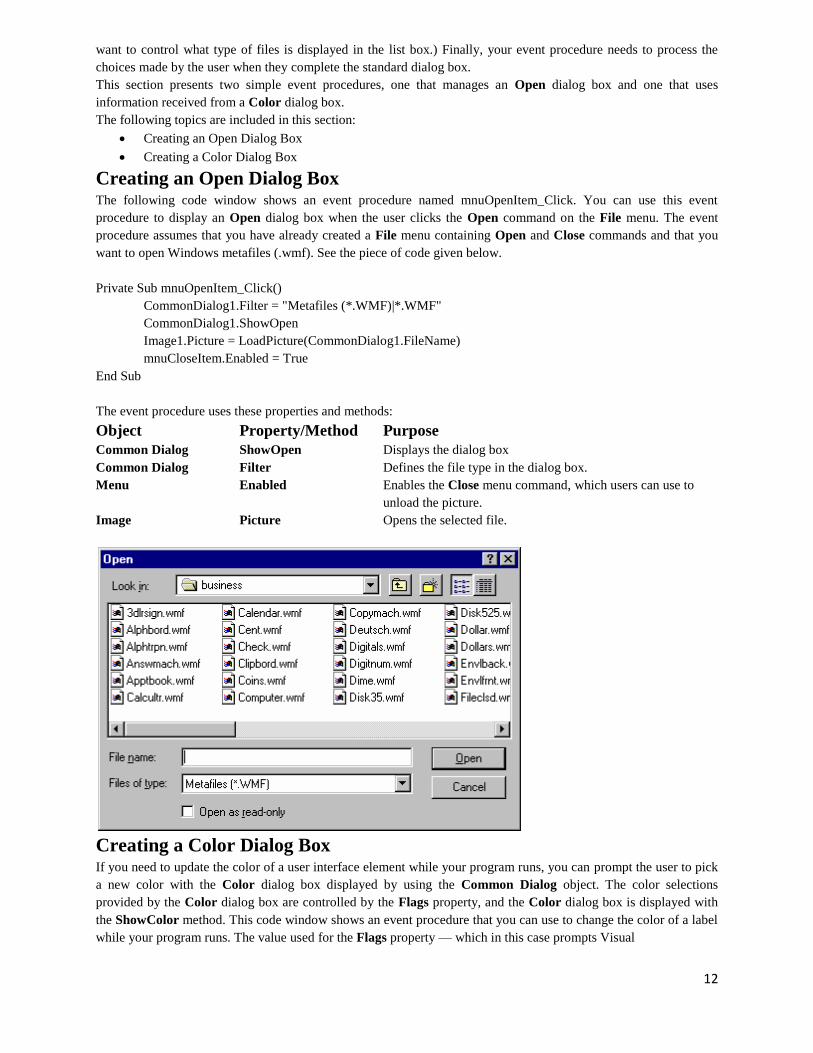
Creating an Open Dialog Box The following code window shows an event procedure named mnuOpenItem_Click. You can use this event
procedure to display an Open dialog box when the user clicks the Open command on the File menu. The event
procedure assumes that you have already created a File menu containing Open and Close commands and that you
want to open Windows metafiles (.wmf). See the piece of code given below.
Private Sub mnuOpenItem_Click()
CommonDialog1.Filter = "Metafiles (*.WMF)|*.WMF"
CommonDialog1.ShowOpen
Image1.Picture = LoadPicture(CommonDialog1.FileName)
mnuCloseItem.Enabled = True
End Sub
The event procedure uses these properties and methods:
Object Property/Method Purpose
Common Dialog ShowOpen Displays the dialog box
Common Dialog Filter Defines the file type in the dialog box.
Menu Enabled Enables the Close menu command, which users can use to
unload the picture.
Image Picture Opens the selected file.
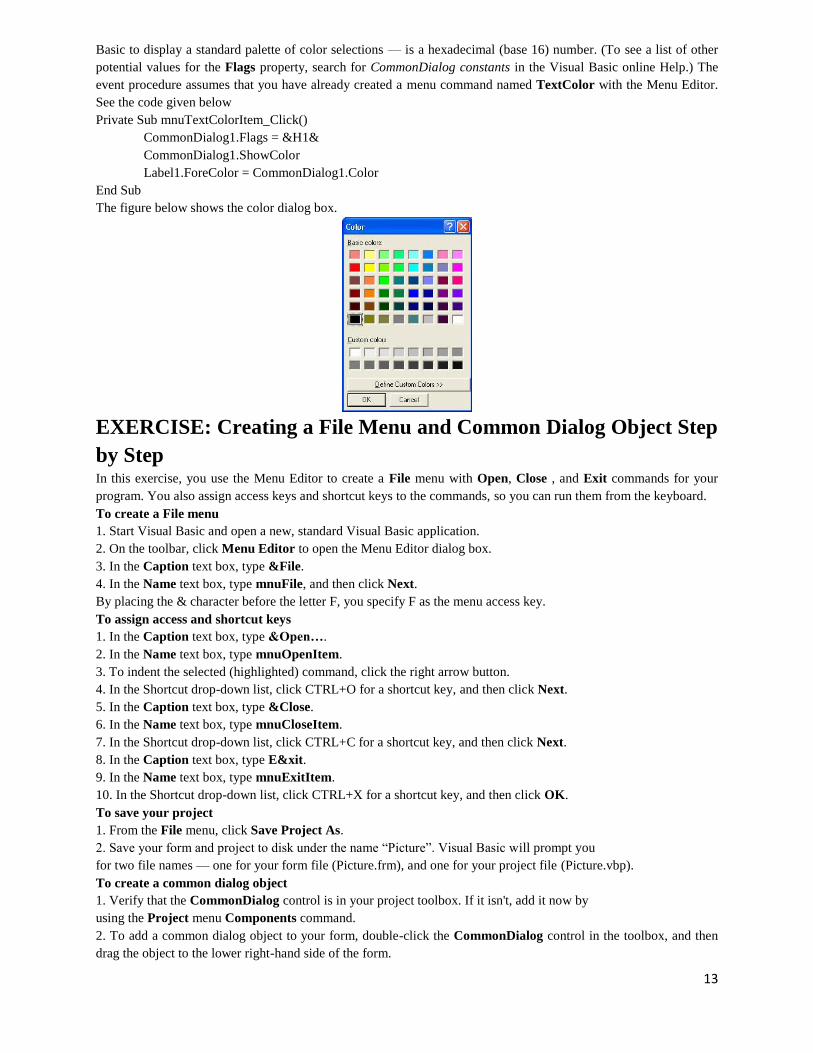
Creating a Color Dialog Box If you need to update the color of a user interface element while your program runs, you can prompt the user to pick
a new color with the Color dialog box displayed by using the Common Dialog object. The color selections
provided by the Color dialog box are controlled by the Flags property, and the Color dialog box is displayed with
the ShowColor method. This code window shows an event procedure that you can use to change the color of a label
while your program runs. The value used for the Flags property — which in this case prompts Visual
13
Basic to display a standard palette of color selections — is a hexadecimal (base 16) number. (To see a list of other
potential values for the Flags property, search for CommonDialog constants in the Visual Basic online Help.) The
event procedure assumes that you have already created a menu command named TextColor with the Menu Editor.
See the code given below
Private Sub mnuTextColorItem_Click()
CommonDialog1.Flags = &H1&
CommonDialog1.ShowColor
Label1.ForeColor = CommonDialog1.Color
End Sub
The figure below shows the color dialog box.
EXERCISE: Creating a File Menu and Common Dialog Object Step
by Step In this exercise, you use the Menu Editor to create a File menu with Open, Close , and Exit commands for your
program. You also assign access keys and shortcut keys to the commands, so you can run them from the keyboard.
To create a File menu
1. Start Visual Basic and open a new, standard Visual Basic application.
2. On the toolbar, click Menu Editor to open the Menu Editor dialog box.
3. In the Caption text box, type &File.
4. In the Name text box, type mnuFile, and then click Next.
By placing the & character before the letter F, you specify F as the menu access key.
To assign access and shortcut keys
1. In the Caption text box, type &Open….
2. In the Name text box, type mnuOpenItem.
3. To indent the selected (highlighted) command, click the right arrow button.
4. In the Shortcut drop-down list, click CTRL+O for a shortcut key, and then click Next.
5. In the Caption text box, type &Close.
6. In the Name text box, type mnuCloseItem.
7. In the Shortcut drop-down list, click CTRL+C for a shortcut key, and then click Next.
8. In the Caption text box, type E&xit.
9. In the Name text box, type mnuExitItem.
10. In the Shortcut drop-down list, click CTRL+X for a shortcut key, and then click OK.
To save your project
1. From the File menu, click Save Project As.
2. Save your form and project to disk under the name “Picture”. Visual Basic will prompt you
for two file names — one for your form file (Picture.frm), and one for your project file (Picture.vbp).
To create a common dialog object
1. Verify that the CommonDialog control is in your project toolbox. If it isn't, add it now by
using the Project menu Components command.
2. To add a common dialog object to your form, double-click the CommonDialog control in the toolbox, and then
drag the object to the lower right-hand side of the form.

14
To create the image object
1. Click the Image control and create a large image object in the middle of your form.
When you run your program, the image object displays picture files with *.jpg extension on a form.
2. On the form, click Image1. To restore the Properties window to full size, double-click the Properties window title
bar.
If you cannot see the Properties window, click Properties on the toolbar to display it.
3. Click the Stretch property and set it to True.
When you run your program, Stretch makes the metafile fill the entire image object.
4. On the toolbar, click Save Project to save these changes to your program.
To write event procedures
1. In the Project window, click View Code , click the Code window Object drop-down list box, and then click
mnuOpenItem.
2. In the mnuOpenItem_Click event procedure, type the following code:
CommonDialog1.Filter = "JPEG FILES (*.JPG)|*.JPG"
CommonDialog1.ShowOpen
Image1.Picture = LoadPicture(CommonDialog1.Filename)
mnuCloseItem.Enabled = True
3. In the Object drop-down list box, click mnuCloseItem, and then type the following code:
Image1.Picture = LoadPicture("")
mnuCloseItem.Enabled = False
4. In the Object drop-down list box, click mnuExitItem, and then type End in the event procedure.
5. On the toolbar, click Save Project to save your changes.
To run the program
1. On the Visual Basic toolbar, click Start.
Visual Basic loads the program and the form with its File menu.
2. From the File menu, click Open.
3. When the Open dialog box appears, load a picture file from your computer. The picture selected should appear
correctly sized in your image object.
4. From the File menu, click Close.
Your program should clear the picture file and turn off the Close command.
5. Try using the access keys and the shortcut keys to run the File menu commands. When you’re finished, click the
File menu Exit command.