
BASIC HAND STITCH
84
BASIC HAND STITCH Sadia Alam KCC Women's College (Affiliated by Khulna University) Khulna, Bangladesh Email: [email protected] 1.1Basic Hand Stitch: In everyday language, a stitch in the context of embroidery or hand-sewing is defined as the movement of the needle from the backside of the fabric to the front side and back to the back side. The thread stroke on the front side produced by this is also called stitch.Hand sewing is an art to be perfected with patience and perseverance. It helps us in creative expression and ultimately gives us a satisfaction that most other hobbies can give. Hand stitches have many uses. Before thesewing machine,garment-making was done exclusively by hand. However, in today’shome sewing world of sophisticated sewingmachines and sergers, few garments are madeentirely by hand. But, many home-sewn and custom-made garments continue to have some type of hand stitching used primarily as finishing techniques (hemming, securing,fasteners, etc.).
-
Upload
independent -
Category
Documents
-
view
0 -
download
0
Transcript of BASIC HAND STITCH

BASIC HAND STITCHSadia Alam
KCC Women's College (Affiliated by Khulna University) Khulna, Bangladesh
Email: [email protected]
1.1Basic Hand Stitch: In everyday language, a stitch in the context of embroideryor hand-sewing is defined as the movement of the needle fromthe backside of the fabric to the front side and back to theback side. The thread stroke on the front side produced bythis is also called stitch.Hand sewing is an art to beperfected with patience and perseverance. It helps us increative expression and ultimately gives us a satisfactionthat mostother hobbies can give. Hand stitches have many uses. Beforethesewing machine,garment-making was done exclusively by hand.However, in today’shome sewing world of sophisticatedsewingmachines and sergers, few garments are madeentirely byhand. But, many home-sewn and custom-made garments continue tohave some type of hand stitching used primarily as finishingtechniques (hemming, securing,fasteners, etc.).

BASIC HAND STITCH
Fig: Basic handstitch
1.2History of Basic Hand Stitching:
Stitching or sewing has a history dating back to the prehistorictimes. It is believed, with archaeological evidences, that sewingmust have come into being since the stone ages, when people hadbegun to sew to attach pieces of animal skin using needles madeof bones, antlers and ivory. They probably must have used threadsmade of animal parts like veins.
As the times progressed and sewing started to become an integralpart of life, not only newer methods of sewing styles developed,but many other materials were tried as needles and threads. Formany thousands of years, sewing or stitching was done exclusivelyby hands. Later, machines which helped to assist sewing and

BASIC HAND STITCHweaving were developed. The invention of sewing machines in 19thcentury and computerization in the 20th century, led to arevolution in the textile industry with mass production of sewnobjects.
Although sewing or stitching is commonly associated with clothingand fabrics, it must not be forgotten that this skill is used inmany other craft areas like making shoes, bags, sporting goodsand all those things associated with attaching pieces of fabric.Sewing also comprises a wider range of art in the textileindustry like embroidery, tapestry, quilting, applique, weavingetc.
1.3Hand Stitching Basic-Background:
It was started in the Middle Age, In the London and Yorkexcavations and Great Wardrobe accounts (14th century), thethread most commonly used was linen. Interestingly enough, woolthread is found in abundance in York and London in the 10th and11th century digs, but drops off in 14th century London.Presumably, silk and linen replaced it as a favourite. TheHerjolfsnes finds in Greenland (14th c) show nothing but woolthread. Irish textiles from both that century and later areuniformly wool sewn with wool thread. The wool thread found inthe digs appears to have been simply unraveled from the cloth. Inthe Great Wardrobe accounts, wool thread is only specified forembroidery motifs.Clothing preserved by royalty shows silk threadfor seams and hems of silk garments and for decorative work,topstitching, buttons, buttonholes, etc. Silk thread was alsoused on woolen cloth, but more typically for decorative andhighly visible stitching.In the MoL and Coopergate books, theyshow stitches from the Coppergate, York, and London digs (amongothers).

BASIC HAND STITCH
1.4Basic Hand Stitch Types:
There are many types and names of hand stitches. The handstitches whitch mostly used in home sewing and hand embroideryare discussed below---
1. Straight Stitch2. Running Stitch3. Back Stitch4. Stem Stitch5. Chain Stitch6. Chevron Stitch7. Knot Stitch8. Palestrina Stitch9. Satin Stitch10. Fishbone Stitch11. Fly Stitch12. Feather Stitch13. Blanket Stitch14. Cretan Stitch15. Cross Stitch16. Herringbone Stitch17. Weaving Stitch18. Darning19. Knitting

BASIC HAND STITCH20. Pick Stitch21. Tent Stitch22. Couching
BackStitchBack stitch is made by taking the thread backward than theconventional forward motion, and thus the name. It is a veryflexible to follow curves and bends in a design. There are nospaces between each stich and so gives a continuous appearance.Cross stitch patterns use them too. Like the running stitch, backstitch also lays a foundation for many variations over it.
Also known as : Point de Sable

BASIC HAND STITCH
Fig 1: Bring thethread through A andtake it in through B.This creates onestitch.
Fig 2: Bring the thread through C and takeit in through B. This way, we are creatinga stich by taking the thread backward.
Fig 4: A finished line of back stitch willlook like this.
Fig 3:Continue thispattern to finish thedesign.

BASIC HAND STITCH
Fig:Back stitch.
Vareations of Back Stitch:
1.Whipped back stitch 2. Threaded back stitch 3. Pekinese stitch 4. Herringbone ladder filling stitchch5. Slip stitch

BASIC HAND STITCH
1. Whipped back stitch:This variety gives a twisted effect like what you will see in awhipped running stitch.Back stitch: Lay the foundation by doing aback stitch.
Fig 1: Take anotherthread and needle andbring it out throughA. Pass the needleunder the stitch A-B,from above, as shown.Do not pluck thefabric underneath.
Fig 2: Similarly, passthe needle under thestitch B-C, fromabove, as shown.

BASIC HAND STITCHFig 3: Continue this process of taking theneedle under each back stitch foundation togive it a twining effect.
Whiped back stitch

BASIC HAND STITCH
2. Threaded back stitch :
This variety of stitch gives a wavy effect to the pattern andfollows the same stitching pattern as the Laced running stitch.
Back stitch: Lay the foundation by doing a back stitch

BASIC HAND STITCH
Fig 1: Take another thread and needle and bring it out through A. Pass the needleunder the stich.
Fig 3: Continue this process of taking the needle under each back stitch from above and below.
Fig 4: The completed pattern would show up like this.

BASIC HAND STITCH
Threaded backstitch
3. Pekinese stitch:Also known as: Chinese Stitch
It is commonly found in chinese embroderies. Using contrastingthreads will throw up the beauty of the design well.

BASIC HAND STITCHBack stitch: Lay the foundation by doing a back stitch.
Fig 1: Take another threadand needle and bring itout through A. Pass theneedle under the stitch B-C, from above, as shown.Do not pluck the fabricunderneath.
Fig 2: Now, pass theneedle under the stitch A-B, from below, as shown.
Fig 5: Your completed pattern would look like this.

BASIC HAND STITCH
Fig 5: Your completed pattern would look likethis.

BASIC HAND STITCH
4. Herringbone ladder filling stitch:Also known as : Interlaced Band
This variety is similar to that of the stepped running stitch(variety 2) and takes a braided effect. It is done over twoparallel lines of ‘stepped’ back stitches. Such a foundationhelps to create braid like effects.
Stepped back stitch: Lay the foundation by doingtwo parallel back stitches. ‘Step’ the second asillustrated.Note that by stepping the twoparallel stitches, A1 falls in the mid point ofA2 and B2. Similary, B2 falls in the mid point

BASIC HAND STITCHof A1 and B1.
Fig 1: Take anotherthread and bring it outthrough A2. Takeit under A2-B2 andthen under A1-B1, fromthe bottom. Make surenot to pluck the fabricunderneath.
Fig 2: Continue theneedle from beneaththe thread, to takeit under B2-C2, asshown.
Fig 3: Take the needle from beneath the thread
Fig 4: Continue this‘twisted’ pattern to

BASIC HAND STITCH
and pass it under B1-C1,from the bottom.
give it a finalbraided effect.Remember to take theneedle always beneaththe thread beforegoing under the backstitches.
Fig 5: The completed pattern would look likethis. Note how the herringbones between thebackstitches grow out and close in at the twocurves.
Herringbone ladder fillingstitch

BASIC HAND STITCH

BASIC HAND STITCH
5. Slip stitch:This stitch looks similar to the split stitch, but flatter on thefabric. The technique followed is like the back stitch. Thisstitch is ideal for making outlines or even for laboriousfillings.
You need to know the back stitch to be able to do this stitch.The knowledge of the split stitch will be an advantage.
Fig 1: We start normallylike a back stitch. Makea stitch A-B. Bring theneedle out from C.
Fig 2: Now, like a normal backstitch, take the needle towards Band, splitting through the stitch A-B, put in the needle near B or Bitself.

BASIC HAND STITCH
Fig 3: The stitch wouldlook like this. It lookssimilar to the splitstitch with a slightchain like effect.
Fig 4: A finished row of split backstitch would show up like this.
Slip stitch

BASIC HAND STITCH
StemStitch
Origin:
The Stem stitch family can be called the cousins of Back stitchfamily. This is because, stem stitch family follows a patternwhere you put the needle in and take a backward motion to bringthe needle out and make a single stitch. The interesting thing to
BASIC HAND STITCHnote is that the reverse side/ underside of a stem stitch familywill produce a backstitch!
Also known as: crewel stitch, stalk stitch, point de cable
Through my research,stem stitch is crewel stitch. It is one ofthe easiest to be done and perhaps even one of the first stitchesto be taught to any beginner. But, many times, people often referto embroidery work itself as crewel work, though the actualcrewel stitch (stem stitch) is never as commonly employed in it!This creates a bit of a confusion on if crewel work consists ofonly crewel stitch (stem stitch).
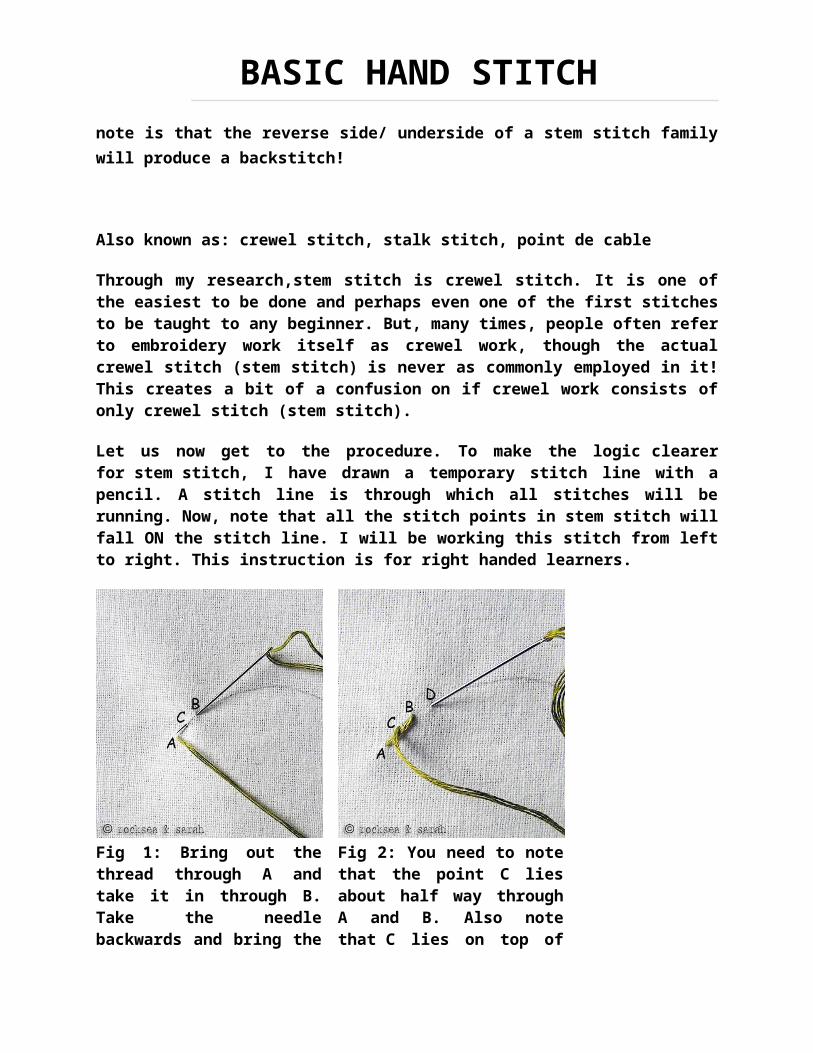
Let us now get to the procedure. To make the logic clearerfor stem stitch, I have drawn a temporary stitch line with apencil. A stitch line is through which all stitches will berunning. Now, note that all the stitch points in stem stitch willfall ON the stitch line. I will be working this stitch from leftto right. This instruction is for right handed learners.
Fig 1: Bring out thethread through A andtake it in through B.Take the needlebackwards and bring the
Fig 2: You need to notethat the point C liesabout half way throughA and B. Also notethat C lies on top of

BASIC HAND STITCHthread out through C.Make sure the point Clies over the stitch A-B.
the stitch A-B. So, allthe subsequent stitchpoints will lie ontop their previousstitch.
Fig 3: Take the needlein through D. Try tomark D in such a waythat the point B willlie half way through C-D. Bring the needle outthrough B.
Fig 4: So, the patternof two stitches of thestem stitch will be asshown above.
Fig 5: Continue this pattern of stitching withthe needle coming out through the top of theprevious stitch always.

BASIC HAND STITCH
Fig 6: The reverse of the fabric will give you aback stitch pattern.
The stitches in this family is usually used to make outlines fora design or pattern.

BASIC HAND STITCH
Fig: : stem stitch family
Vareations of Stem Stitch1. whipped stem stitch2. outline stitch 3. cable stitch 4. split stitch 5. portuguese stem stitch 6. japanese stitch

BASIC HAND STITCH
1. whipped stem stitch:
Fig 1: Lay a foundation ofstem stitch. Bring outanother thread through thestart point and pass itthrough the first stemstitch.
Fig 2 : Continue thiswinding action betweeneach stem stitch.

BASIC HAND STITCHFig 3: you should finally get a pattern as shown.
whipped stem stitch

BASIC HAND STITCH
2. Outline stitch:
Fig 1: Bring out the threadthrough A and take it in
Fig 2: You need to notethat the point C lies

BASIC HAND STITCHthrough B. Take the needlebackwards and bring thethread out through C. Makesure the point C lies underthe stitch A-B.
about half way through Aand B. Also note that Clies under the stitch A-B.
Fig 3: Take the needle in through D. Try to mark D insuch a way that the point B will lie half way throughC-D. Bring the needle out through B. The stitch point Bwill be at the bottom of the previous stitch.

BASIC HAND STITCH
Fig 4: Continue this pattern of stitching with theneedle coming out from the bottom the previous stitchalways.
Fig 5: The reverse of the fabric will give you a backstitch pattern.

BASIC HAND STITCH
Outlinestitch

BASIC HAND STITCH

BASIC HAND STITCH
3. Cable stitch:
This is a very old stitch which is used for outlining and alsofor filling in colors for patterns.
Fig 1: Bring out thethread out through Aand put it in throughB
Fig 2: Take the needlebackwards to bring itout through C. Notethat C lies half waybetween A and B.

BASIC HAND STITCH
Fig 3: While bringingout the thread throughC, take it in betweenthe thread, splittingit into two.
Fig 4: Again, put theneedle in through D tobring it out throughB, splitting thethread.
Fig 5: Continue this procedure to finish thestitch.The only thing to keep in mind is tosplit the thread when bringing the needle out.In some way, it will give you a visual feel ofchain stitch.

BASIC HAND STITCHFig 6: The reverse of the fabric will give youa back stitch pattern.
4.split stitch:Also known as: Side to Side stem stitch
This uses stem stitch and outline stitch alternately. The finaleffect is a line with a ‘bricked’ look.
To make the logic clearer,drawn a temporary stitch line with apencil. A stitch line is through which all stitches will berunning. Now, note that all the stitch points in cable stitchwill fall ON the stitch line. working this stitch from left toright. This instruction is for right handed learners.

BASIC HAND STITCH
Fig 1: Bring out thethread out through A andput it in through B. Takethe needle backwards tobring it out through C.Note that C lies half waybetween A and B.
Fig 2: This creates asingle stem stitch.
Fig 3: Now, take thethread in through D andbring it out from B. Takethe point D in such a waythat B lies half waythrough C- D. Also, thepoint B will lie BELOW thestitch C-D. This willcreate an outline stitch.

BASIC HAND STITCH
Fig 4: Continue making a stem stitch and outline stitchalternately to get a final brick-like effect.
Fig 5: The reverse of the fabric will give you a backstitch pattern.

BASIC HAND STITCH4. Portuguese stem stitch:This stem stitch looks sophisticated after being completed. It isnot though. It follows a simple stem stitch technique with alittle extra loopings between each stitch.
I will work on a slightly curved stitch line to demonstrate thisstitch to you. You need to know the stem stitch to be able to dothis stitch.
Fig 1: We start with asingle stem stitch. Bringthe needle out through A,take it in through B andout through C.
Fig 2: Now, take the needleunder the stitch A-Bwithout pluckign the fabricbeneath. Make sure theneedle comes out from theleft side of the point C,as shown. This makes a looparound the stitch A-B.

BASIC HAND STITCH
Fig 3: Make anothersimilar loop around thestitch A-B, keeping ittowards the left of theprevious loop.
Fig 4:Now,make the nextstem stitch. After makingboth loops, continue totake the needle in throughD and bring it out throughE.
Fig 5: Half way through,our portugese stem stitchwould look like this. Itgives out a complicatedlook.
Fig 6: A full curved stitchline woud look like this.Observe how the stitchshows up at the two curves.
BASIC HAND STITCH
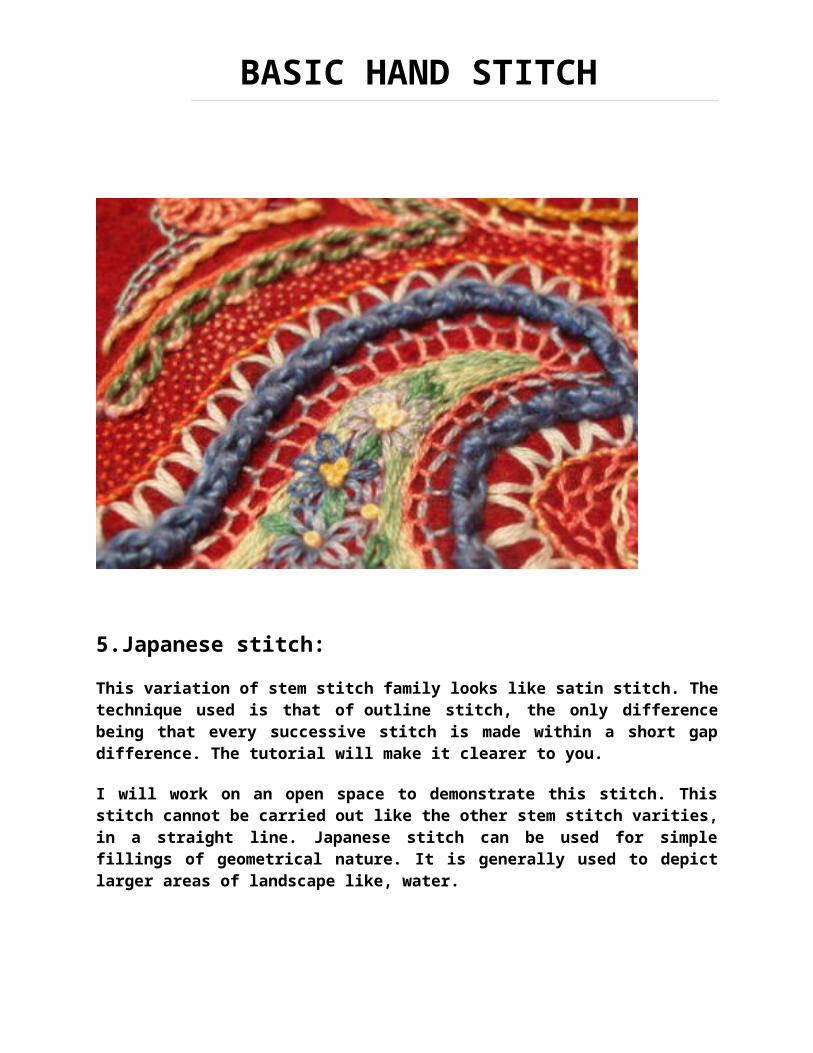
5.Japanese stitch:This variation of stem stitch family looks like satin stitch. Thetechnique used is that of outline stitch, the only differencebeing that every successive stitch is made within a short gapdifference. The tutorial will make it clearer to you.
I will work on an open space to demonstrate this stitch. Thisstitch cannot be carried out like the other stem stitch varities,in a straight line. Japanese stitch can be used for simplefillings of geometrical nature. It is generally used to depictlarger areas of landscape like, water.

BASIC HAND STITCH
Fig 1: Bring the needle out through A. Now, put the needlein through B and bring it out through C.This processis similar to outline stitch. Only, make sure that C lies ata closer distance to A, and not exactly between A-B like itwould in outline stitch.
Fig 2: Continue this process ofstitching.

BASIC HAND STITCH
Fig 3: A finished series of this stitch would look likethis. You will see that though it uses the outline stitchprocess, it looks like satin stitch.

BASIC HAND STITCH

BASIC HAND STITCH

BASIC HAND STITCH
PickstitchA pick stitch in sewing is a simple running stitch that catchesonly a few threads of the fabric, showing very little of thethread on the right side (outer side) of the garment. It is alsosometimes known as 'stab stitch'.
A pick stitch can be made from either the inside of the garment,or the outside, depending upon how much thread is meant to showon the outside of the garment.[1] A pick stitch is commonly usedfor making hems, although it is also used with contrasting threadto create a decorative finish on some garments. It has decorativeuses in embroideryA finely made pick stitch is difficult toaccomplish, and can be achieved only with practice. As long as asewer or dressmaker is patient, it works very well and is not asdifficult as it sometimes looks! A pick stitch along the outsideof a lapel is a hallmark of a "high-end, hand-made" men's suit orblazer.

BASIC HAND STITCH
1.
A pick stitched hem. Using thread that closely matches the colourof the fabric, it appears almost invisible on the outside of thegarment.
2.
A pick stitch in contrasting thread creates a decorativeembroidery outline inside the petals of a fabric poppy.
KnittingKnitting is a method by which thread or yarn is used to create acloth.
Knitted fabric consists of a number of consecutive rows of loops,called stitches. As each row progresses, a new loop is pulledthrough an existing loop. The active stitches are held on a

BASIC HAND STITCHneedle until another loop can be passed through them. Thisprocess eventually results in a fabric, often used for blanketsor garments.Knitting may be done by hand or by machine. Thereexist numerous styles and methods of hand knitting.Differenttypes of yarns and needles may be used to achieve a plethora ofknitted materials; these tools give the final piece a differentcolour, texture, weight, and/or integrity. Other factors that
Ornamentations and additionsOrnamental pieces may also be knitted separately and thenattached using applique. For example, differently colored leavesand petals of a flower could be knit separately and attached toform the final picture. Separately knitted tubes can be appliedto a knitted fabric to form complex Celtic knots and oth erpatterns that would be difficult to knit.

BASIC HAND STITCH

BASIC HAND STITCH
TentstitchTent stitch is a small, diagonal needlepoint stitch that crossesover the intersection of one horizontal (weft) and one vertical(warp) thread of needlepoint canvas forming a slanted stitch at a45-degree angle. It is also known as Needlepoint stitch and isone of the most basic and versatile stitches used in Needlepointand other Canvas work embroidery. When worked on fine weavecanvas over a single warp and weft thread it is known as Petitpoint in contrast to stitches, such as Gobelin, worked overmultiple warp and/or weft threads.
"Petit point" comes from the French language, meaning “smallpoint”.
Tent stitch variants
1. Basket weave tent stitch2. Continental tent stitch3. Half cross tent stitch
Half cross tent stitch
There are three types of tent stitch, all producing the sameappearance on the front of the canvas but each worked in aslightly different way and having particular characteristics,uses, benefits and drawbacks. These variants of tent stitch areknown as basketweave, continental and half cross tent stitches

BASIC HAND STITCH
Basketweave tent stitchThe basketweave form of tent stitch is worked in diagonal rows upand down the canvas. The yarn on the back of the canvas has a typical basketweave appearance, with alternating horizontal and vertical stitches. Basketweave is the best stitch to cover large areas of canvas as it distorts the canvas least and gives the firmest backing to the work, provided it is worked in diagonal rows alternately ascending and descending so that the yarn in ascending rows is laid over warp threads and in descending rows is laid over weft threads.

BASIC HAND STITCH
Continental tent stitchContinental stitch is worked horizontally or vertically acrossthe canvas. On the back of the work, the stitches appeardiagonally across two threads. This method uses more yarn thanhalf cross stitch tent stitch but is more hardwearing.

BASIC HAND STITCH

BASIC HAND STITCH

BASIC HAND STITCH
Basic HandEmbroideryTo learn embroidery, it is essential that we start with theknowledge of the simplest of stitches. Every embroidery orembroidery style comprises of one or more combinations ofdifferent stitches. For instance, the ethnic Kasuti work of Indiaand the Black work of Europe consists of the Holbein stitch,which is an enhanced version of the simple running stitch.So, the ’Basic Stitches’ section will consist of all the basicand simple stitches categorised into different family ofstitches. The ‘Embroidery’ section will consist of differentembroideries that uses the stitches that has already been

BASIC HAND STITCHdisplayed in the ‘Basic Stitches’ section. This way, you shouldbe able to learn how different stitches can be used in practicalembroidery work.
Types of basic hand embroidery:
1. Red work2. Pattern drning3. Zalakdozi4. Kasuti5. Chicken 6. Sashiko7. Kantha from bengle8. Lambani 9. Monipuri Embroidery10. Chikankari 11. Zardosi12. Chamba rumal13. Phulkari14. Rajasthani Embriodary15. Toda16. Pipli applique17. Sequence embroidery18. Gujrati19. Organja Ribbon rose
Pattern darning

BASIC HAND STITCHAbout Pattern darningThe darning stitch is used in an embroidery technique called ‘Pattern darning’. Using rows of straight running stitches of long and short length, patterns are created. This embroidery type is one of the oldest and has been found to be used across cultures from Egypt, Iceland, Japan, India, and the mediterranean regions. It is a very easy technique to follow, especially if done over an even weave cloth.
The visual effect of pattern darning is that of satinstitch, but it differs in its stitch technique. Whilesatin stitch concentrates on each motif or pattern at atime, pattern darning involves carrying the thread forthe entire width or length of the design at a time. Thelessons will make this point clear.

BASIC HAND STITCHembroidery sample: pattern darning
HistoryIn Egypt, some 12th century textile examples prove theuse of such embroidery. The Mamluk period (1250-1517)shows the extensive use of pattern darning overclothing of various sorts. Silk was a more popularlyused thread than cotton or linen.
In Iceland, pattern darning is known as ‘skakkaglit’.It was used to work on many church embroideries andhave been used during the early 14th century. Textilesfrom 15th century to the 17th depict the use of thisembroidery style as well. Wool was the prefered threadover linen.
In Japan, this embrodiery style is known as ‘Kogin’. Itwas found to be done with white cotton thread overindigo hemp or linen fabric. Kogin originated duringthe feudal period of 16th to 19th century. Kogin isused even today for embroidering quilts.
Interstingly, a 15th century towel from Germany depictsthe use of pattern darning as an effort to imitate thepopular Italian Perugian towels where the patterns werewoven into the towel. The pattern on the german towelwere similar to the egyptian pattern darning patterns.

BASIC HAND STITCHPatterns usedThe patterns used are geometrical patterns. Yet, there have been examples where stylised and geometrically inclined figures of birds, animals and humans have beenused.
Stitch usedDarning stitch
LessonsPattern darning : non reversible Pattern darning: reversiblePattern darning: reference
1. Fabric and thread-
2. Choosing and planning the pattern-

BASIC HAND STITCH3. Making the pattern workable
4. Beginning-
5 . When the thread runs out-
6. Ending-

BASIC HAND STITCH
In the end, all loose threads are tiedup.Cut the knot of the beginning threadand weave it into the pattern where thestitches are. Do the same with the looseend of the final thread. So, the reversewould look like this.
7. Finished pattern-
The finished pattern would look likethis.

BASIC HAND STITCH
This type of pattern darning will give you an equally goodreverse side, if not the same. It is used on fabrics that areused on both sides, like towels and napkins. Here we have to becareful about how to choose the pattern and go about stitchingit.
1. Fabric and thread -
3. Planning the pattern-

BASIC HAND STITCH
4. Making the pattern workable -
5. Beginning and ending-
6. The finished pattern

BASIC HAND STITCH
The front and the reverse would look like this.

BASIC HAND STITCH
Chikan (embroidery)
Chikan (Hindi: चचचच, Urdu: کن� is a traditional embroidery style (چ��from Lucknow, India. Literally translated, the word meansembroidery. Believed to have been introduced by Nur Jehan, Mughalemperor Jahangir's wife,[1] it is one of Lucknow's most famoustextile decoration styles.
Origin:
There are several theories about the origin of Chikankari.Chikankari - the process of chikan - was basically invented inLucknow. It developed quickly during the period when the Mughalsruled and consisted of styles inspired by Persians. Lucknow grew

BASIC HAND STITCHinto an international market for its renowned Chikankari work.There are references to Indian Chikan work as early as 3rdcentury BC by Megasthenes, who mentioned the use of floweredmuslins by Indians. There is also a tale that mentions how atraveler taught Chikankari to a peasant in return of water todrink. However, the Noor Jahan story is the most popular of thelot.[2] The name Chikan has been derived from the Persian wordChakin or Chikeen meaning a cloth wrought with needlework
Chikan began as a type of white-on-white (or whitework)embroidery.

BASIC HAND STITCH

BASIC HAND STITCH
Chamba RumalThe word “Chamba rumal” implies a peculiar visual art formthat represents unique and charming embroidery done on ahand spun cloth with untwisted silken thread,which is greatlyinspired from pahari painting. The cloth employed for the embroidery was generallyunbleached muslin or khaddar.The drawing was drawnin outlines with fine brush by the accomplished paharipainters sometimes,the female embroiders would pre-fer to draw the patterns and figures themselves.
ORIGIN OF CRAFTThis craft originated, developed and flourished in theerstwhile state of Chamba in the 17 – 18 century AD,when the fascinating art of painting was at its zenith.Thus,the image of miniature paintings were translatedinto kashidakari (embroidery), which took the pride ofbecoming the celebrated feminine craft tradition

BASIC HAND STITCHofChamba.The pictorial handicraft of Chamba possessesdistinct characteristic of its own, which differentiates it from other forms of embroideries in India.Floral and Bird motifs called Hathapura
Basic motifs
The artistic activity of Chamba rumal survived andpracticed only in old Chamba state where painterscontinued to work even up to the present time. Wom-en of the royal house or the wife of the nobles usedto embroider the well composed rumal in the leisurehours as a pastime activity.
Stitches

BASIC HAND STITCH1. Do-rukha’ – the double satin stitc2. Dandi Tanka the stem stitch3. Criss Cross stitch
Motif:

BASIC HAND STITCH
An embroidered rumal is a customary gift given during a girl’s marriage

BASIC HAND STITCH
Zardosi EmbroideryThe embroidery done on silk sarees, satin is known as zardosi. Zardosi work is done by laying the color threads mostly gold threads over the material and is very heavy when the weight of the fabric and the metal wire used for embroidery are combined. Zardosi sarees displayed the beauty that combined with wealth. The designs were original or mainly made according to the currenttrends are of royal taste. Zardosi work purely display the wealthin the garments worn by men and women.
Types of Zardosi Embroidery:

BASIC HAND STITCH1.Embroidery Thread Work
2.Bridal Embroidery Work
3.Hand Work Emborideries
4.Sequin Embroidery
1.Embroidery Thread Work
We specialize in offering sequin hand embroidery to clients with a stunning gamut that blends the traditional techniques with modern designs. The meticulous sequin hand embroidery work of sequins interwoven within various embroidered patterns such as borders, coronets, floral and lace provides a distinctive look tothe fabric or garment.

BASIC HAND STITCH
2.Bridal Embroidery Work
We offer wedding embroidery to undertake embroidery work for lehengas on varied fabrics. Depending on the client preference, we offer light embroidery on wedding embroidery on the sides or heavy work all over the lehenga. We make use of excellent qualitymetallic threads and sequins to embellish the lengthens and make it a unique one for all special occasions.

BASIC HAND STITCH
3.Hand Work Emborideries

BASIC HAND STITCHWe offer wedding embroidery to undertake embroidery work for lehengas on varied fabrics. Depending on the client preference, we offer light embroidery on wedding embroidery on the sides or heavy work all over the lehenga. We make use of excellent qualitymetallic threads and sequins to embellish the lehengas and make it a unique one for all special occasions.

BASIC HAND STITCH
4.Sequin Embroidery
we offer wedding embroidery to undertake embroidery work for lehengas on varied fabrics. Depending on the client preference, we offer light embroidery on wedding embroidery on the sides or heavy work all over the lehenga. We make use of excellent qualitymetallic threads and sequins to embellish the lehengas and make it a unique one for all special occasions.

BASIC HAND STITCH
Couching

BASIC HAND STITCHIn embroidery, couching and laid work are techniques in which yarn or other materials are laid across the surface of the groundfabric and fastened in place with small stitches of the same or adifferent yarn.The couching threads may be either the same color as the laid threads or a contrasting color. When couching threadscontrast with laid threads, patterns may be worked in the couching stitches
Variations of Couching :
1. Couched filling2. laid work3. Bokhara couching4. Underside couching5. Roumanian stitch
1. Couched filling:
In couched filling, threads are laid on the surface in a trellis pattern and sewn to the fabric at the intersections.

BASIC HAND STITCH
2. laid work:
In laid work or Bayeux stitch, threads are laid side-by-side to fill a shape, then held in place with a thread at right angles tothe laid threads. This crossing thread is then couched to the fabric t o hold the laid threads in place.

BASIC HAND STITCH3. Bokhara couching:
In Bokhara couching or Bokhara stitch, the couched threads are held in place with many tiny crossing stitches, which may be aligned from row to row to produce patterns.
4. Roumanian stitch:
In Roumanian stitch, long satin stitches are each held in place with a small diagonal stitch made in the center In Roumanian couching, bundles of laid threads are held in place with Roumanian stitches

BASIC HAND STITCH
5. Underside couching:
In Underside couching, a heavy couching thread (historically, a stout linen) is brought up from the wrong side of the work, looped over the laid thread, and returned to the wrong side. The couching thread is then given a sharp pull which draws a small loop of laid thread through to the wrong side of the fabric. Underside couching has the advantages that the couching th read is completely concealed from the front and is not subject to wear.[8]

BASIC HAND STITCH
Organza ribbons roseThe Silk and Organza ribbons are variegated and designed for authentic, life-like flowers and leaves. They are colourfast and washable. As her ribbons are all hand painted and not dyed, the colour is stronger along the edge of the ribbon. This is what results in such a natural finish.
The different shades blend beautifully, allowing the colours to merge with one another so that your completed embroidery looks soreal, you will be delighted with the results! There are 11

BASIC HAND STITCH