
Banner Document Management Suite Introduction to BDMS ...
130
Banner Document Management Suite Introduction to BDMS Training Workbook Release 8.0 - April 2008 Updated 4/29/2008 What can we help you achieve? HIGHER EDUCATION
-
Upload
khangminh22 -
Category
Documents
-
view
0 -
download
0
Transcript of Banner Document Management Suite Introduction to BDMS ...

Banner Document Management SuiteIntroduction to BDMS Training Workbook
Release 8.0 - April 2008 Updated 4/29/2008
What can we help you achieve? HIGHER EDUCATION

_________________________________________________________________________________________________________________ SunGard Higher Education 4 Country View Road Malvern, Pennsylvania 19355 United States of America (800) 522 - 4827 Customer Support Center website http://connect.sungardhe.com Distribution Services e-mail address [email protected] Other services In preparing and providing this publication, SunGard Higher Education is not rendering legal, accounting, or other similar professional services. SunGard Higher Education makes no claims that an institution's use of this publication or the software for which it is provided will insure compliance with applicable federal or state laws, rules, or regulations. Each organization should seek legal, accounting and other similar professional services from competent providers of the organization's own choosing. Trademark Without limitation, SunGard, the SunGard logo, Banner, Campus Pipeline, Luminis, PowerCAMPUS, Matrix, and Plus are trademarks or registered trademarks of SunGard Data Systems Inc. or its subsidiaries in the U.S. and other countries. Third-party names and marks referenced herein are trademarks or registered trademarks of their respective owners. Revision History Log Publication Date Summary
Original Date New version that supports Banner 8.0 software. Revision Date Revised to support Banner 8.0.
Notice of rights Copyright © SunGard Higher Education 2005-8. This document is proprietary and confidential information of SunGard Higher Education Inc. and is not to be copied, reproduced, lent, displayed or distributed, nor used for any purpose other than that for which it is specifically provided without the express written permission of SunGard Higher Education Inc.

Table of Contents
Introduction ............................................................................................................... 5
Introduction to Document Imaging........................................................................... 7 Introduction .................................................................................................................. 8 Step 1: Bringing in Documents .....................................................................................10 Step 2: Archival Methods .............................................................................................12 Step 3: Indexing ..........................................................................................................13 Step 4: Retrieval Tools.................................................................................................14 Step 5: Access Control .................................................................................................16
Getting Started......................................................................................................... 17 Introduction .................................................................................................................18 New Login....................................................................................................................19 ApplicationXtender Views..............................................................................................20 ApplicationXtender Views..............................................................................................20 ApplicationXtender Toolbars..........................................................................................25 Function Keys ..............................................................................................................33
Create Documents .................................................................................................... 34 Create a New Document ...............................................................................................35 Create Documents in Batch...........................................................................................39 Index New Documents..................................................................................................42 Index Batches ..............................................................................................................45
Scan Documents....................................................................................................... 47 Select a Scanner ..........................................................................................................48 Scan a Single-Page Document.......................................................................................49 Scan Multiple Pages......................................................................................................50
Retrieve Documents ................................................................................................. 52 Queries 53 Query a Single Application ............................................................................................54 Query Multiple Applications ...........................................................................................57 Display Documents From the Result Set.........................................................................59 Document Text Queries ................................................................................................62 Manage Queries ...........................................................................................................65
View Documents....................................................................................................... 67 View Documents ..........................................................................................................68 Select Pages to View Within a Document .......................................................................69 View Multiple Documents and Pages..............................................................................70 Page View Functions For Multiple Page Types ................................................................73 View Specific Page Types..............................................................................................75 Document View Properties ............................................................................................77 Page Information .........................................................................................................78

Overview of BDMS.................................................................................................... 79 Overview of Banner Document Management Suite .........................................................80 BDMS Functionality.......................................................................................................81 Banner 8 Enhancements to BDMS .................................................................................82 BDMS Terminology .......................................................................................................83 BDMS Applications........................................................................................................85 BDMS Context Rules .....................................................................................................87 Banner Linking .............................................................................................................89 Attaching Documents....................................................................................................90 Correcting Indexes .......................................................................................................91
Executing Queries in BDMS...................................................................................... 92 BDMS Query Icon .........................................................................................................93 BDMS Add Document Icon ............................................................................................94 Running a Query from Banner.......................................................................................95 Running a Query from Banner.......................................................................................95 BDMS Messages ...........................................................................................................96
Exercises................................................................................................................... 98 Exercise 1 ....................................................................................................................99 Exercise 2 ..................................................................................................................101 Exercise 3 ..................................................................................................................103 Exercise 4 ..................................................................................................................104 Exercise 5 ..................................................................................................................105 Exercise 6 ..................................................................................................................106 Exercise 7 ..................................................................................................................107 Exercise 8 ..................................................................................................................108 Exercise 9 ..................................................................................................................109 Exercise 10 ................................................................................................................110 Exercise 10 ................................................................................................................110 Exercise 11 ................................................................................................................111 Exercise 12 ................................................................................................................112
Sample Pages ......................................................................................................... 114 Sample Pages ............................................................................................................115 Exercise Page 1..........................................................................................................116 Exercise Page 2..........................................................................................................117 Exercise Page 3..........................................................................................................118 Exercise Page 4..........................................................................................................119 Exercise Page 5..........................................................................................................120 Exercise Page 6..........................................................................................................121 Exercise Page 7..........................................................................................................122 Exercise Page 8..........................................................................................................123
Document Types..................................................................................................... 124 Document Types ........................................................................................................125

© SunGard 2004-2008 Introduction to BDMS Page 5
Introduction
Course goal
This training workbook is designed for new users of ApplicationXtender. The course will cover all basic functionality of ApplicationXtender.
This workbook also serves as a reference tool, and offers instructions for using the Banner Document Management Suite system.
Course objectives
At the conclusion of this course, participants will be able to:
• Navigate the views and toolbars of ApplicationXtender
• Create new documents
• Create documents in batch
• Index documents
• Scan documents
• Retrieve documents
• Query applications for specific documents
• Query by index values, full-text values or both
• View documents within ApplicationXtender

© SunGard 2004-2008 Introduction to BDMS Page 6
Intended audience
Participants in this course will be new users of ApplicationXtender. These users will be working with documents and involved in the scanning and indexing of existing documents, as well as the creation of new documents.
Users who need only to access and view data will also benefit from this course.
Prerequisites
To complete this section, you should have completed the Education Practices computer-based training (CBT) tutorial “Banner 8 Fundamentals,” or have equivalent experience navigating in the Banner system.
Other prerequisites include:
• Familiarity with your version of Windows
• General understanding of scanning and indexing procedures on a user level

© SunGard 2004-2008 Introduction to BDMS Page 7
Introduction to Document Imaging
Introduction
This section discusses the steps involved in document imaging.
Objectives
At the conclusion of this section, participants will be able to:
• better understand the basics of document imaging.

© SunGard 2004-2008 Introduction to BDMS Page 8
Introduction
Introduction
Document imaging is the conversion of paper documents into electronic images stored on computer. Once stored, these electronic duplicates should be catalogued for quick retrieval.
Organizations generate masses of paper. Systems are developed for storing and retrieving these paper documents, but they are far from foolproof. Everyone knows the frustration of not being able to find a document when you need it. It is invariably misfiled, on someone else’s desk, shredded or just plain lost.
Components
Document imaging revolutionizes the archival of documents and provides rapid access to those documents. All document imaging systems provide five basic components:
• Scanning and importing tools for bringing paper documents into the system
• Archival methods for storing the documents
• Indexing system for organizing the documents
• Retrieval tools for finding the documents
• Access control to provide security to authorized people
Popularity
Document imaging has exploded in popularity with the advent of cheap electronic storage. 100-gigabyte hard drives are fast becoming affordable devices. The capability of storing 300,000 scanned images on a single drive, the ease of access to systems through the Internet, and the standardization of document types have all contributed to making document imaging a viable solution to a substantial problem.

© SunGard 2004-2008 Introduction to BDMS Page 9
OCR
Document imaging is also capable of reading the text on the page via Optical Character Recognition (OCR). Once the documents have been read and catalogued, searches may be made of the text within the documents. Imagine standing next to a traditional filing cabinet and, in a matter of moments, locating all the documents within the cabinet that contain a certain set of words!
You are not restricted to the index key under which a document was filed, (e.g. date, last name or organization).
What document imaging should do
• Allow management of millions of records
• Allow for retrieval of records within seconds
• Allow information to be shared while maintaining confidentiality
• Conform to your working practices, rather than change them
• Be a pleasure to use, whether managing the system or using it
The following sections will explain the five basic components of document imaging.

© SunGard 2004-2008 Introduction to BDMS Page 10
Step 1: Bringing in Documents
Scanning
A scanner is a device that digitizes documents (converts them into digital information). A scanner converts a document line-by-line and column-by-column. It uses a light sensor to tell it what color the dot on the page beneath the head is. This dot or area that the head is looking at is then converted into a number, which is associated with a corresponding color for display. Stringing all of the numbers together and displaying their corresponding colors composes an image.
The number of lines and columns the scanner digitizes determines the resolution. Therefore, the more lines and columns that the scanner analyzes, the higher the detail captured. On the flip side, the more detail that is captured, the more space the resulting image requires for storage. The user of the system will need to determine the best resolution for capturing images to reach the best balance of image detail and storage space required.
Document imaging commonly refers to resolution as dots per inch (DPI). Higher DPIs indicate images with more detail. The human eye can define detail down to 300DPI. This, coincidentally, is the resolution that OCR software prefers to work at. Therefore, when scanning documents that are to be OCRed, the resolution used should be 300DPI. If documents are scanned for simple archival purposes, a lower resolution may suffice.
Changing the dimensions of a scanned image will alter its resolution. For example, an image that is scanned at 600DPI and then enlarged from 400x300 to 800x600 will no longer be a 600DPI image; the same amount of information is spread over four times the image size. This image would now be 150DPI.
Scanners used for document imaging should also have an Automatic Document Feeder (ADF). This allows batches of documents to be processed. When processing batched documents, they are fed into the scanner one at a time. Scanners that do not have an ADF are normally concerned with graphical-type applications.
A mark of a quality document imaging application is its ability to utilize multiple types of scanners.
The speed of a scanner is also important when selecting a scanner. Faster scanners allow users to process more documents and avoid backlogs, while offices with light scanning needs may be able to use a slower scanner. If there is a large back file process to be carried out, it may be advisable to get an outside agency to do the work.

© SunGard 2004-2008 Introduction to BDMS Page 11
Conversion
Conversion is the process where electronic documents are added to the document imaging system. Many programs, such as Microsoft Word, Microsoft Excel and others, can print directly to a file. This file does not need to be scanned, as it is already in the computer. The document imaging system becomes the backbone for all documents within the organization. Any document generated within the organization can be collected and stored centrally within the system.
Importing
Up until now, we have discussed the conversion of paper documents to electronic images. There is no reason why this system could not store other types of information, as most document imaging systems can treat any computer file as a document. Therefore, a video file or a sound file can be stored within the imaging system. These files are not converted, but remain in their native format. To view these files, either the originating software is launched or a viewer is employed.

© SunGard 2004-2008 Introduction to BDMS Page 12
Step 2: Archival Methods
Databases
The document imaging system needs to store these images somewhere, which creates a need for databases. Another mark of a good document imaging system is its ability to utilize multiple database types.
The SunGard Higher Education solution to document imaging can leverage the investment in databases you have already created and store their data in your main systems database under a different name space. This reduces purchase costs and maintenance costs and provides enhanced security for accessing the system, as well as data integrity through backups.
Security
Accidents happen and files get lost. With a document imaging system in place, measures can be taken to dramatically reduce the possibility of ever losing a file again. Images are held electronically, and with that come all the other benefits and tools developed over the years to keep your data secure. Raid servers can be employed to mirror data over distances. Hierarchical backup systems can be utilized for long-term storage. Security can be put in place to prevent accidental or malicious damage. Journaling can be instigated to recover errors. Auditing can be utilized to uncover problems.

© SunGard 2004-2008 Introduction to BDMS Page 13
Step 3: Indexing
Indexes
An index is the means by which documents are associated in the system. In many ways, the index in the document imaging system works like the card index you may have on your desk. It is a method for associating images with a key for retrieving the image.
Your filing cabinets already use indexes; for instance, a drawer may be labeled “A-F,” with the last names “Abbot” through “Fusco” on the files therein. In ApplicationXtender terms, indexing is a method of applying a sticky tab to the top of each electronic document and enabling the system to retrieve them accurately.
The key to a good index is to keep it simple and only include the necessary information to uniquely identify a document. For example, a typical student may have a number of documents in the system. You would create a simple index for the student’s documents with the following keys:
• Student ID = the unique identifier for a particular student
• Document type = the document stored here (invoice copy, admission form, etc.)
• Date = date that the document was added to the system
In document imaging terms, an index is also referred to as an application.
You may have multiple indexes/applications within the system. Each application can store anything you desire. You could create indexes for storing admissions letters, test scores, financial forms, or just about anything else where multiple documents need to be stored.

© SunGard 2004-2008 Introduction to BDMS Page 14
Step 4: Retrieval Tools
Queries
Information that is not easily retrieved is of little use to you; if you can’t find the information you stored, you might as well have never stored it at all. Hence, this document imaging system will provide a means of retrieving its documents quickly and accurately.
When a document is indexed, you have a key by which it is identifiable and that you can query for. With multiple documents in the system, you may query the system for specific documents or sets of documents that fulfill your query parameters.
Sample
This index was used in an earlier example:
• Student ID = the unique identifier for a particular student
• Document type = the document stored here (invoice copy, admission form, etc.)
• Date = date that the document was added to the system
With this index, you could query the system for all documents belonging to a particular student, all admissions forms, or all invoices added to the system between a certain date ranges.
Query engine
The query engine is the tool that allows you to build queries and run them against the documents in your system. It is even possible to run cross-application queries (for example, finding a student’s admissions forms from the student application, but only if the student’s tuition payments are a month overdue in the finance application).

© SunGard 2004-2008 Introduction to BDMS Page 15
Full text search
With an OCR engine in your document imaging system, you can also enter all the words within your documents into a database. You may then search for keywords or phrases as well as index terms. This provides unprecedented retrieval and analysis opportunities that a traditional filing system could never hope to compete with. For example, you could pull all the documents from your system across applications that contain certain strings of characters (e.g. all the documents in the system containing a particular number or name), even if the document was incorrectly indexed or in an incorrect application!

© SunGard 2004-2008 Introduction to BDMS Page 16
Step 5: Access Control
Privileges
Every document imaging system will provide user access security, but some go a stage further. SunGard Higher Education’s solution provides for users to be grouped and assigned certain privileges within groups. These privileges can range from the ability to only view certain documents to having full add/delete/modify rights to the system across all groups and applications.
Annotations
Along with standard user/password security, security can be placed within a page of a document via annotations. An annotation is a mark that can be made on a page, like a rubber stamp. You can design annotations to look like anything you wish. These annotations can be designed to block out areas of text so that only authorized persons can read them, or they can be placed on a page to signify a significant event. (For example, an “Invoice paid” annotation could be designed to be placed or removed only by authorized persons in the Finance office.)

© SunGard 2004-2008 Introduction to BDMS Page 17
Getting Started
Introduction
This section provides an introduction to ApplicationXtender and its components.
Objectives
At the conclusion of this section, participants will be able to:
• log onto ApplicationXtender and recognize its icons and basic functions.

© SunGard 2004-2008 Introduction to BDMS Page 18
Introduction
Introduction
When you first start ApplicationXtender, you will be prompted for your user name and password.
The Logon Type field lets you specify which types of data you are licensed to view. Choose AX if you have an ApplicationXtender license, CX/ERMX for CX/ERMX data, or AX & CX/ERMX for both.

© SunGard 2004-2008 Introduction to BDMS Page 19
New Login
Introduction
The New Login function (from the File pull-down menu) allows you to change your username in mid-session.
When you have selected this function, another login box will appear. Change your logon type, user name and password as appropriate, then click Login to continue. (If you click Cancel, the application will close.)

© SunGard 2004-2008 Introduction to BDMS Page 20
ApplicationXtender Views
View modes
The view modes of ApplicationXtender allow you to manipulate images in several different ways.
Application view
The Application view lists applications and queries in a tree structure, much like that found in Windows Explorer. You may expand or collapse applications to view or hide their associated lists of queries.

© SunGard 2004-2008 Introduction to BDMS Page 21
Query view
The Query view allows you to search for desired documents using keywords. You may search for documents via index information or via full-text information.

© SunGard 2004-2008 Introduction to BDMS Page 22
Document display view
The Document Display view calls up the stored image of your selected document. Within it, you may pan around the image’s dimensions or select a portion of the image and manipulate it in various ways.

© SunGard 2004-2008 Introduction to BDMS Page 23
Index view
The Index view lists index terms for a document. You may enter index information for new documents here, or view or change index information for existing documents.

© SunGard 2004-2008 Introduction to BDMS Page 24
Thumbnail view
The Thumbnail view shows your image in greatly reduced scale. It is typically used when working with multiple documents or batch documents containing multiple images (typically pages), allowing you to quickly locate and select the precise image you need.

© SunGard 2004-2008 Introduction to BDMS Page 25
ApplicationXtender Toolbars
Main toolbar

© SunGard 2004-2008 Introduction to BDMS Page 26
The Main toolbar contains the following functions:
Function Icon
Toggle the Application View
Toggle the Query View
Toggle the Thumbnail view
Create a new document
Run a query
Create a new query
Create a new cross-application query
Cut to Clipboard
Copy to Clipboard
Paste from Clipboard
Text search
Configuration
Tile windows horizontally
Tile windows vertically
Cascade windows
View full screen
Select a scanner
Scan a document
EmailXtender Search

© SunGard 2004-2008 Introduction to BDMS Page 27
Annotation toolbar
The Annotation toolbar allows you to add annotations to your documents and manipulate them. Annotations allow users to add notes to a page, block areas from view, or highlight selected information. Annotations can be configured so that only certain logins have access to certain annotations.

© SunGard 2004-2008 Introduction to BDMS Page 28
Functions
The Annotation toolbar contains the following functions:
Function Icon
Toggle selection of annotations Text annotation Highlight annotation Freehand line annotation Line annotation Arrow annotation Rectangular annotation Rounded rectangular annotation Oval annotation Polyline annotation Polygon annotation Erase annotation Toggle filled/hollow annotation Toggle annotation redaction Select default annotation group
Select all annotations Bring selected annotation to front Send selected annotation to back Toggle showing/hiding annotations
Select line width Select annotation colors Delete selected annotation(s) Save annotations Cancel changes Rubber Stamp annotations

© SunGard 2004-2008 Introduction to BDMS Page 29
Image toolbar
The Image toolbar allows you to manipulate images that have been imported or inserted into ApplicationXtender.

© SunGard 2004-2008 Introduction to BDMS Page 30
Functions
The Image toolbar contains the following functions:
Function Icon
Display settings (zoom, rotation, scale-to-gray, form overlay) for image
Fit entire page to Document Display view
Fit page vertically to Document Display view
Fit page horizontally to Document Display view
Rotate image 90 degrees to left
Rotate image 90 degrees to right
Zoom in
Zoom out
Use Magnifier
Navigate to previous page
Navigate to next page
Display previous version of a page
Display next version of a page
Show text/image for document
Perform OCR (optical character recognition)
Toggle pan mode/selection mode
Toggle Index view
Toggle form overlays on COLD/ERM documents

© SunGard 2004-2008 Introduction to BDMS Page 31
Script toolbar
The Script toolbar allows the user to perform up to twenty administrator-defined script functions. If the administrator has not assigned ApplicationXtender functions to these buttons, they will be grayed out.
Batch Index toolbar
The Batch Index toolbar contains functions involved in indexing batch documents.
Functions
The Batch Index toolbar contains the following functions:
Function Icon
Create a new document
Add current page to most recently indexed document
Add all batch pages to most recently indexed document
Delete a page from the batch
Navigate to the previous page
Navigate to the next page

© SunGard 2004-2008 Introduction to BDMS Page 32
Scan toolbar

© SunGard 2004-2008 Introduction to BDMS Page 33
Function Keys
Keys
The following function keys perform one-keystroke functions in ApplicationXtender:
Function Key Action
[F1] Opens an online help window.
[F3] Opens the Search box, for use with text documents.
[F4] Searches for existing document indexes.
[F5] Displays the List of Values for the selected index field, when searching.
[F7] Auto-indexes, during document creation.
[F8] Displays the Search Expression box for the selected index field.
[F9] Copies index data from the last saved document index. Used during document creation.
[Shift-F4] Searches for existing names

© SunGard 2004-2008 Introduction to BDMS Page 34
Create Documents
Introduction
This section discusses how to create and index new documents.
Objectives
At the conclusion of this section, participants will be able to:
• create documents in ApplicationXtender.

© SunGard 2004-2008 Introduction to BDMS Page 35
Create a New Document
Input methods
There are several methods for creating new documents in ApplicationXtender. Which one you choose will likely depend on the type of document you want to archive.
Scanning
The Scan function creates a document from the image your scanner generates. This method is best used with paper documents that are not yet in an electronic file format.
Windows Clipboard
If you have a file in the Windows Clipboard, you may paste it to an ApplicationXtender document directly. This allows you to create documents from a wide variety of file types, as the Clipboard can contain multiple types of information. Data pasted from the Clipboard will be inserted as OLE objects.
If there is no valid or usable data in the Clipboard, this option will be grayed out.
Clipboard Paste pastes the data in the default format; Clipboard Paste Special allows you to specify the format of the data.

© SunGard 2004-2008 Introduction to BDMS Page 36
Insert objects
With this function, you may insert files from a variety of other applications, such as Microsoft Office documents, media clips, image files or sounds. The file may be displayed as an icon, or as the beginning of the file (for files with visual components).
You may insert an object from an existing file, or create a new object of a particular file type within a new document.
Double-clicking the file calls up the application associated with the file type. For example, double-clicking an inserted .doc file would likely call up Microsoft Word or WordPad, depending on the file type associations on your system.
Import files
Importing a file into a new document allows the file to be manipulated directly within ApplicationXtender.
The following importable file types are supported by ApplicationXtender:
• most image file types (TIFF, GIF, JPEG, BMP, PCS, DCX, TGA)
• HTML files
• Adobe Portable Document Format (PDF) files
• Rich Text Format (RTF) files
• plain text files

© SunGard 2004-2008 Introduction to BDMS Page 37
Other file types may be imported, but will be viewed within ApplicationXtender’s Outside In Viewer:
• Microsoft Word, Excel and PowerPoint documents (most versions, up to and including Office for XP)
• Corel WordPerfect for Windows files (through version 9)
• Lotus WordPro and 1-2-3 files (through SmartSuite Millenium)
• Corel Draw files (through version 8.0)
• AutoCAD Native Drawing Format files (versions 12 through 14)
• Adobe Illustrator File Format (versions through 7.0)
• Adobe Photoshop File Format (version 4.0)
• Windows Metafiles
• VISIO files (multi-page Page Preview mode only) (through VISIO 2000)
• Microsoft Project (text only)
If a file type is not supported by ApplicationXtender or Outside In, it will be displayed as an icon within the Document Display view. These unsupported files will be inserted as objects, and will require a third-party viewer to be displayed.
Note: When you use Import File or Insert Object to create a new document, keep in mind that ApplicationXtender treats the file as a single entity. An imported Microsoft Word document may contain 50 pages, for example, but the ApplicationXtender document it is imported into will start with only one page. You may scroll through the imported/inserted file and view all of its content, but its pages are not automatically mapped to separate ApplicationXtender document pages.

© SunGard 2004-2008 Introduction to BDMS Page 38
Fax-in queue
This function allows you to capture an incoming document from your fax source (such as a faxmodem) as an image within an ApplicationXtender document.

© SunGard 2004-2008 Introduction to BDMS Page 39
Create Documents in Batch
Introduction
ApplicationXtender allows you to create documents in batch, which can then be indexed individually or as a group.
Batch import
The Batch Import utility creates batches from existing files, specified in a text file on your hard drive. Once imported, the files are temporarily stored for indexing.
The text file (.txt) used by this utility can be created in any common text editor (Microsoft Word, WordPad, DOS Edit, etc.) It may specify one or multiple batches to be created. Each batch requires two components in the text file:
The name of the batch can be up to 32 alphanumeric characters long. If an existing batch name is specified, the files listed underneath the batch name will be appended to the existing batch
The filenames to be included in the batch should be listed as full pathnames, preceded by one or more ‘@’ symbols. One @ may be used for supported file types (single-page image types, PDFs, Windows RTF, HTML) or for importing only the first page of multi-page image files. When importing foreign files (including text files) or every page of multi-page image files, two @s must precede the pathname.

© SunGard 2004-2008 Introduction to BDMS Page 40
Sample batch text file
A sample batch text file follows, specifying two batches: Sample Image Batch 1 @c:\pictures\picture1.bmp @c:\My Documents\johnson report-01.tif @c:\My Documents\johnson report-02.tif Johnson Report Specifications @@c:\My Documents\johnson report.doc @@c:\My Documents\readme.txt
Once this file has been created, select it via the Batch Import utility to import the specified files.
A status box will inform you as to the success or failure of the file imports.
Click View Log for a breakdown of successful import processes, or View Reject Log to see which files failed to be imported and why.

© SunGard 2004-2008 Introduction to BDMS Page 41
Batch creation
The Batch Creation utility allows you to quickly create a batch from a group of files. The files can either exist on your hard drive, be queued on your fax source, or be obtained via the optional ScanXtender module.
Select the appropriate application from the Application View, then select Batch Create. A dialog box will prompt you for the filenames you wish to include, and for the name of the batch in which they will be grouped. (You may enter the name of an existing batch to append these new files to it, or enter a new batch name.)
A status box will inform you of the success or failure of the importing of the selected files. Click View Log for a breakdown of successful import processes, or View Reject Log to see which files failed to be imported and why.
ScanXtender
The ScanXtender module allows you to scan multiple documents and import them as a batch in ApplicationXtender, indexing them at a later time.

© SunGard 2004-2008 Introduction to BDMS Page 42
Index New Documents
Introduction
New documents are indexed, so that they may be easily located within the database via queries. The fields available for a new document are dependent on their associated application.
These fields may be entered manually, or automated methods may be used.
OCR proofing
If FineReader is installed as the OCR engine for ApplicationXtender, you may index new image documents with OCR proofing. Only Plain Text image documents may be proofed; if Rich Text Format is selected on the OCR tab of the Configuration box, OCR proofing cannot be used.
Once your image document is in the Document Display view (in image view) and has undergone OCR, select Index and OCR Index from the Document menu. FineReader will analyze the document and output results. You may then edit the text boxes to make any necessary corrections.
Click the AX icon, then click Save.

© SunGard 2004-2008 Introduction to BDMS Page 43
Automated indexing features
There are several automated methods within ApplicationXtender that can reduce the amount of data entry required. Index information can be inserted into a table, which can then automatically populate some or all of a new document’s index fields as appropriate.
Automated indexing features include:
• Auto Index
• Key Reference
• Append Page
• Copy Index Info
• Copy Previous Index Info
• Cut and Paste
Some preparation by the administrator is involved in setting up Auto Index and Key Reference features. For more information about these functions, consult your administrator.

© SunGard 2004-2008 Introduction to BDMS Page 44
Index validation
Your ApplicationXtender administrator may enable certain features that help prevent errors in index data entry, or configure your entries in desired ways.
Some examples of this include:
• Index fields may convert entries to a desired syntax. Example: an entered phone number of 2125557843 could be automatically converted to (212) 555-7843
• Index fields may reject values in an incorrect format. Example: a phone number field could reject letter input, such as 212-EL6-5744 or 610-BIZNESS
• Index fields may be configured to auto-populate. Example: fields such as Date or Time may be configured to assume the current system date or time. Such fields are read-only
• Unique Index Validation ensures that the same index value for selected fields cannot be used for more than one document in an application
• Dual Data Entry features require selected index fields to be entered twice before being accepted, and rejects entries where the second entry differs from the first (thus aiding accuracy).

© SunGard 2004-2008 Introduction to BDMS Page 45
Index Batches
Batch index a single batch
If you want to index a single batch and know its name, select Batch Index (Single) from the Utilities menu and enter the name of the batch when prompted.
Batch index from a list
Select an application from the drop-down box to list its available batches. To index a batch, highlight it and click Index.
When the first page of the first document appears, you may perform Previous Page or Next Page functions to navigate between pages, or Delete Page to remove unwanted pages from the batch.
Perform a New Document function to create a new document that can be indexed and saved.
The Attach Page and Attach All buttons will add other batch pages to the most recently indexed document.

© SunGard 2004-2008 Introduction to BDMS Page 46
Memoing
From the Batch Index window, you may add a memo to a batch by clicking Memo. Enter your descriptive text and click OK.
If a batch has the status “Indexing”, the only available option for that batch will be Cancel. This can also happen when a batch is stuck in an error state. If this happens, contact your administrator.

© SunGard 2004-2008 Introduction to BDMS Page 47
Scan Documents
Introduction
This section discusses how to scan documents into ApplicationXtender.
Objectives
At the conclusion of this section, participants will be able to:
• scan documents into ApplicationXtender.

© SunGard 2004-2008 Introduction to BDMS Page 48
Select a Scanner
Introduction
There are three places in ApplicationXtender where you may select a scanner:
• From the Scan pull-down menu, select Configuration, then select Select Scanner
• From the Main toolbar, click Select Scanner
• From the Scan toolbar, click the arrow on the right side of the Scanner Setup button. Choose Select Scanner from the drop-down list
If your scanner does not appear in the Select Scanner list, make sure that your scanner is turned on and ready, and that its drivers were properly installed prior to starting up ApplicationXtender. For further reference, consult your administrator.
If your scanner does appear in the list, select it and click OK. If further instructions on scanner configuration appear, consult the documentation for your scanner or your administrator.
Via the Scanner Setup button on the Scan toolbar, you should be able to customize your scanner’s settings to produce a quality image. DPI settings, rotation, image enhancement, brightness, contrast, feeder settings and other settings can be configured here. The full list of available options will vary with individual scanners.

© SunGard 2004-2008 Introduction to BDMS Page 49
Scan a Single-Page Document
Steps
Once your scanner is operational and ready, close any open documents and feed the paper you want to scan to your scanner.
There are several ways to activate the scanner from within ApplicationXtender:
• Right-click an application in the Application view, then select New Document and Scan from its shortcut menu
• Click New Document on the Main toolbar, then select Scan from the New AX Document Object dialog box
• Click Scan a New Document on the Main toolbar
• Click Scan on the Scan toolbar
These functions are also found on the main pull-down menu bar, in its Document and Scan menus.
The document will be scanned, and the resulting image will be displayed in the Document Display view. If you wish to stop a scan in progress, click Cancel.

© SunGard 2004-2008 Introduction to BDMS Page 50
Scan Multiple Pages
Scan feeder options
There are three (mutually exclusive) options for scan sessions in ApplicationXtender: Single Feed, Automatic Feed and Manual Feed modes.
• If you select Single Feed mode by clicking Single Feed from the Scan toolbar, ApplicationXtender will scan one page at a time. If you wish to scan multiple pages, you will have to click Scan once for each page to be scanned.
• You may select Automatic Feed mode by clicking Auto Feed from the Scan toolbar. In this mode, ApplicationXtender will scan all pages in the scanner’s feeder, and end its scanning session when the feeder is empty.
• You may also select Manual Feed mode by clicking Manual Feed from the Scan toolbar. In Manual Feed mode, ApplicationXtender will scan all pages in the feeder, then wait for a specified number of seconds for more pages to be added to the feeder. If more pages are added before the time period expires, the scan session continues. The time period may be set on the ApplicationXtender Configuration screen on the Scan tab.
Insert a scanned page before the current page
To insert a page into a document before the current page, make sure that the document is open and selected, then place the new page into your scanner. From the Page pull-down menu, select New and Scan, then select Insert Before from the shortcut menu.
ApplicationXtender will scan the new page and insert it in the proper place in the Document Display view.

© SunGard 2004-2008 Introduction to BDMS Page 51
Insert a scanned page after the current page
To insert a page into a document after the current page, make sure that the document is open and selected, then place the new page into your scanner. From the Page pull-down menu, select New and Scan, then select Insert After from the shortcut menu.
ApplicationXtender will scan the new page and insert it in the proper place in the Document Display view.
Append a page to the current document
To append a page to the end of a document, make sure that the document is open and selected, then place the new page into your scanner. From the Page pull-down menu, select New and Scan, then select Append from the shortcut menu. (Alternatively, you can simply click Scan from the Scan toolbar, as in this case it will put the new page in the right place.)
ApplicationXtender will scan the new page and append it to the end of your document in Document Display view.
Batch scanning via ScanXtender
If you have the ScanXtender module installed, you may scan a batch of documents and index them in ApplicationXtender later.
ScanXtender’s interface is very similar to that of ApplicationXtender, so most of the functions and toolbar buttons should be familiar.
You may create a batch in ScanXtender by scanning, by selecting files from disk or from a batch import file. The latter two methods work the same way as the “Create Documents in Batch” section described in the previous lesson.
When your scanner and documents to be scanned are ready, right-click the name of the application in Application view into which you want to scan a batch. From the shortcut menu, select New Batch.
As above, you may select single feed, manual feed or automatic feed mode. ScanXtender will scan the batch of documents and display them in its Batch Display view.

© SunGard 2004-2008 Introduction to BDMS Page 52
Retrieve Documents
Introduction
This section discusses how to query ApplicationXtender and retrieve scanned documents.
Objectives
At the conclusion of this section, participants will be able to:
• retrieve documents from ApplicationXtender.

© SunGard 2004-2008 Introduction to BDMS Page 53
Queries
Introduction
A query is a process that searches the documents in the database. You may query a single application or search across multiple applications, and search on either index fields, the text contained in the documents (where applicable), or both.

© SunGard 2004-2008 Introduction to BDMS Page 54
Query a Single Application
Steps
1. To query an application, right-click its name in the Applications view. From the shortcut menu, select New Query.
2. The Query view should appear.
Enter index values as search criteria
The Search tab contains the index fields associated with the selected application. To search for specific values, enter those values in their respective fields on the Search tab and click Search. If more than one search term is entered, only results that match all terms will be returned.
You may enter an asterisk (*) as a wildcard as part of a search string. For example, searching for Jo* will return all terms that begin with “Jo”; searching for J*n would return all terms that begin with “J” and end with “n”, regardless of what was in the middle. Wildcards are valid for text, time-stamp, SSN, telephone, Zip code, boolean and user-defined list index field types.

© SunGard 2004-2008 Introduction to BDMS Page 55
Matches found
If one match is found, the matching document will be opened in Document Display view.
If more than one match is found, the Result Set tab will list all matching documents. Selecting one of these documents will open it in Document Display view.
Enter full-text values as search criteria
If documents have been submitted to the Index Server (an ApplicationXtender add-on module), their text may be queried as well as their index fields. (Consult your administrator as to whether the Index Server is available on your system, if you’re not sure.)
If the Index Server is available and the selected documents have been submitted to it, the Search tab will allow you to enter full-text strings.
You may search for:
• All Words (results matching all words entered are returned)
• Any Words (results matching one or more words entered are returned)
• Exact Phrase (results matching the search string exactly are returned)
• Expression (results containing the search string are returned)

© SunGard 2004-2008 Introduction to BDMS Page 56
Expression operators
To build a full-text search expression, enter the words you are searching for in the field, using expression operators between them:
Expression Operator
Sample Result
And Dick and Jane Results containing both Dick and Jane are returned.
Or Dick or Jane Results containing Dick, Jane or both are returned.
Not Dick not Jane Results containing Dick but not containing Jane are returned.
Near (x) Dick near (5) Jane Results where Dick appears within five words of Jane are returned.
? J?ne Any character can take the place of the question mark. In this case, results containing either Jane or June are returned.
* Jo* Any string can take the place of the asterisk. In this case, all results containing words beginning with Jo are returned.
( ) Dick and (Jane or June)
The section of the search expression within the parentheses is evaluated first. In this case, results containing Dick and also containing either Jane, June or both are returned.
Enter a combination of values as search criteria
If your document has been submitted to the Index Server, you may search for both index fields and full-text strings. To do so, enter all search terms (both index terms and text strings) in their respective sections of the Search tab.
Select AND to query for documents containing both the entered text string and the entered index terms. Select OR to search for documents matching either type of entry.

© SunGard 2004-2008 Introduction to BDMS Page 57
Query Multiple Applications
Introduction
Queries can be spread across multiple applications. These are known as cross-application queries.
Create a cross-application query
To begin a cross-application query, right-click the name of an application in the Query view, and select New Cross App Query from its shortcut menu.
Select the applications you wish to query from the Applications box, and double-click them or click Add to move them to the Query Applications box. Within the Query Applications box, you may designate application fields as follows:
This field will not be used in the query.
This field will be used as search criteria in the query.
This field will appear in the query results, but will not be used as search criteria.

© SunGard 2004-2008 Introduction to BDMS Page 58
Search criteria
Each application selected for a cross-application query must have at least one search criteria field in common with another application in the query. For example, in the sample above, COUNTY shares DATE with COLDAPP, and HR shares SSN and DOC TYPE with COLDAPP.
Applications that do not share fields (that are set as search criteria with a question mark) with other query applications will return error messages and will be excluded from the query.
Click OK to save the query, Apply to apply changes to an existing query, or Cancel to exit without saving the query. Saved queries will appear in the Applications view under all applications that were selected within them.
Perform a cross-application query
Right-click a cross-application query, then select Edit Query from its shortcut menu. Enter the desired values in the Search tab of the Query view, then click Search. You may use wildcards, expressions, full-text or combinations of these, just as in a normal query.
Modify a cross-application query
To modify an existing cross-application query, right-click it in the Application view and select Configure. You may then edit the contents of the query.

© SunGard 2004-2008 Introduction to BDMS Page 59
Display Documents From the Result Set
Introduction
When a query has executed and more than one matching result has been found, the Result Set tab will be added to the Query view. (If only one result matches the query, the matching document will automatically be displayed.)
Display ApplicationXtender documents
To open a document in Document Display mode, double-click it in the Result Set window.
A yellow folder icon indicates that the document is available for viewing and editing. If the folder icon also contains a red checkmark, someone else has “checked out” the document; in this case, you may open the document in read-only mode. A gray folder icon indicates that the matching document is a previous revision, and can only be opened in read-only mode.

© SunGard 2004-2008 Introduction to BDMS Page 60
Select the display mode for an ApplicationXtender document
The Data tab of the Configuration dialog box contains the following check box:
If this check box is not selected, you are in Normal mode. You may open any document that is not checked out by another user, make changes to it, and save those changes as needed.
If this check box is selected, ApplicationXtender will be in Check In/Check Out mode. In this mode, whenever a document is opened that another user has not checked out, the following box appears:
(This box also appears when you select Check Out from the Document pull-down menu, regardless of which access mode you are in. This allows a Normal mode user to check a document out to prevent others from modifying it.)
Select Open as Read-Only to work with a non-editable copy of the document, or select Check Out to obtain a writable document.
Until you check the document back in, other users will be restricted to a read-only version of the document, based on the last version available before you checked it out. (The system administrator can cancel checked-out status, if necessary.)

© SunGard 2004-2008 Introduction to BDMS Page 61
The Check In function is found on the Document pull-down menu.
You may check the document back in as a new revision or by replacing the previous version, and can label the revision as major or minor. Changes to your ApplicationXtender document are not available to other users until the document has been checked in.
View full-text search results
When you have retrieved a document using a full-text query, the Full Text Search Results box will appear when you display the document.
You may navigate between occurrences of your search string with the Previous and Next functions, or click Show All Hits to highlight all appearances of your search string within the text.
View documents from Unknown Data Sources
When opening ApplicationXtender documents from outside sources (such as documents received via email, or documents saved on your desktop), ApplicationXtender may not recognize the data source.
If the Allow map of unknown data sources check box is selected on the Configuration tab, the Pick A Data Source dialog box may appear when opening one of these documents. Select the correct data source from the list and click OK.
If this check box is not selected, you cannot open documents from unrecognized data sources.

© SunGard 2004-2008 Introduction to BDMS Page 62
Document Text Queries
Introduction
In ApplicationXtender, you may search for keywords or phrases in text documents.
Text query from the document display view
To find text within the current document, select Text search from the Edit pull-down menu, or click Text Search on the Main toolbar.
1. In the Search dialog box, enter the desired text in the Find Text field.
2. Select Ignore Case to ignore upper/lower case distinctions in searchable text.
3. Select the Fuzzy check box to employ “fuzzy logic” when searching. When fuzzy logic is activated, text that is not an exact match but does match the first two or last two letters will be returned. This can be very useful when searching for many common names that are similar (Klein and Kline, John and Jon, or Jeff and Geoff, for instance).
4. Select Page to search only the current page, or Doc for all pages in a document.
5. Select Next to search downward (toward the end of the document) from the current position, or Previous to search upwards (toward the beginning).
6. Select Top to start the search at the top of the page, or Last Match to start at the last match found.
7. Click OK to begin the search.
The first match found will be highlighted, or a “No Match Found” message will be returned if the search text is not located in the document.
Select Text Search Again from the Edit menu to repeat the search.

© SunGard 2004-2008 Introduction to BDMS Page 63
Text query from the result set
Searching from the Result Set allows multiple documents to be searched at once, without having to open or display the searched documents.
1. Select the document(s) to be searched from the Result Set.
2. Right-click the Result set, then select Text Search from its shortcut menu.
3. Enter your desired text string in the Search String field.
4. Select the Fuzzy check box to employ “fuzzy logic” when searching. When fuzzy logic is activated, text that is not an exact match but does match the first two or last two letters will be returned. This can be very useful when searching for many common names that are similar (Klein and Kline, John and Jon, or Jeff and Geoff, for instance).
5. Select Ignore Case to ignore upper/lower case distinctions in searchable text.
6. Click OK to begin the search.
If the search string is found in any of the searched documents, a report will be generated listing the lines where the string was found. The search string will appear as a hyperlink within each line; to view the document in which the line was found, click the search string.

© SunGard 2004-2008 Introduction to BDMS Page 64
Special search characters
There are several characters that may be used as search operators in text searches.
Character Function
* The asterisk serves as a wild card, and can be used to find words that match strings of characters.
Examples:
tele* would return telephone, telegram and telemarketer, but not clientele.
*tele would return clientele.
tel*m would return telegram, but not telephone or teleprompter.
@ The @ can replace any single letter in a text search.
Examples:
telephon@ would return telephone but not telephonic.
cho@e would return choke, chose and chore, but not chosen.
# The # can replace any numeric character in a text search.
Examples:
91# would return 911 or 915, but not 9111 or 91X.
! The ! can replace any non-space character.
Examples:
81!8 would return 8158, 81K8 or 81Q8, but not 81558.
? The ? can replace any single character, including the other special search characters.
Examples:
bob?bignet.com would return [email protected].

© SunGard 2004-2008 Introduction to BDMS Page 65
Manage Queries
Save a query
To save a query, click Save in its Search tab. If the query has already been run, you may right-click its name in the Applications view, then select Save As from the shortcut menu.
Enter a name for your query when prompted. You may select the Available to all users check box to make your query public, or leave the check box empty to keep it private.
Run a query
To run a query, right-click its name in the Applications view. From the shortcut menu, select Run Query. Alternatively, click Run Query from the Main toolbar.
Edit a query
To edit an existing query, right-click its name in the Applications view. From the shortcut menu, select Edit Query. The Query Search tab will appear.
Change the query as needed, then click Save to save it under its existing name.
Query access rights
Queries may be either public or private. Public queries may be run by anyone who has access to the associated application; private queries may only be run by their creator. Public queries have an unlocked padlock icon next to them; private queries have a locked padlock icon.
You may also right-click a query’s name in the Applications view to view its public/private status. If Make Public is grayed out, the query is public; if Make Private is grayed out, the query is private.
Select Make Public or Make Private (whichever is appropriate) to change the saved query’s status.

© SunGard 2004-2008 Introduction to BDMS Page 66
Rename a saved query
From the Applications view, right-click a query to call up its shortcut menu, then select Rename to rename it.
Delete a query
From the Applications view, right-click a query to call up its shortcut menu, then select Delete to delete it.

© SunGard 2004-2008 Introduction to BDMS Page 67
View Documents
Introduction
This section discusses how to view retrieved documents in ApplicationXtender.
Objectives
At the conclusion of this section, participants will be able to:
• view retrieved documents in ApplicationXtender.

© SunGard 2004-2008 Introduction to BDMS Page 68
View Documents
Introduction
Once you have retrieved your desired documents, ApplicationXtender contains several methods of viewing them. You can easily navigate between pages in a document, rotate the document, scale the document, zoom in and out, view thumbnails, view differing versions of a page, or display multiple documents at once.

© SunGard 2004-2008 Introduction to BDMS Page 69
Select Pages to View Within a Document
Introduction
You may navigate between pages of a multiple-page document via several methods: the Document pull-down menu, the keyboard and the Image toolbar all contain these functions.
Next, Previous and GoTo Page functions
The Previous Page function navigates to the previous page in a document. If you perform this repeatedly and reach the first page in the document, it will wrap around to the end of the document.
The Next Page function navigates to the next page in a document. If you perform this repeatedly and reach the last page in the document, it will wrap around to the beginning of the document.
The GoTo Page function lets you specify a page to navigate to.
View thumbnails
Select the Thumbnail view from the Main toolbar to open up the Thumbnails window. With that window open, select Thumbnails from the Document pull-down menu to call up buttons that jump directly to specific pages of your multiple-page document. A miniature image of each page is depicted on its corresponding button.
Double-click a button to view its corresponding page.
View versions of a page
If more than one version of a page exists, the newest version is displayed under normal circumstances. The Show Version functions of the Page pull-down menu let you view the previous, next, oldest or newest version of the current document.

© SunGard 2004-2008 Introduction to BDMS Page 70
View Multiple Documents and Pages
Cascade
The Cascade function takes all open document windows and arranges them in a diagonal line, with the active window at the lower right (on the top of the pile).
Tile
The Tile functions resize all active document windows so that all are visible and they all have the same dimensions on the screen.
You may select the Tile function from the Window pull-down menu, or click the Tile Vertical or Tile Horizontal buttons on the Main toolbar. (The Window pull-down menu function is equivalent to the Tile Horizontal button.)
If you have three or fewer document windows open, the Tile Vertical button will arrange the windows across the page, as vertical rectangles.

© SunGard 2004-2008 Introduction to BDMS Page 71
If you have three or fewer document windows open, the Tile Horizontal button (or Tile function from the Windows pull-down menu) will arrange the windows across the page, as horizontal rectangles.
If there are four or more document windows open, all of the Tile functions and buttons will arrange the windows both horizontally and vertically, fitting the windows onto the screen as they best fit.

© SunGard 2004-2008 Introduction to BDMS Page 72
Split view
The View menu contains two functions that allow you to view two pages of a single document at once.
Split Vertically and Split Horizontally arrange two windows across the screen in a similar manner to Tile Vertical and Tile Horizontal, except that the maximum number of pages displayable is two. The No Split function returns the window to a single page.
When a page is split into two, the Previous and Next Page functions increment the page count by two instead of by one. (For instance, if you’re viewing pages 3 and 4 of a ten-page document, clicking Next Page will call up pages 5 and 6.)
Display documents in a duplicate window
To open a second copy of a document in read-only mode, select Duplicate Document from the Document pull-down menu (or enter [CTRL-F5]). A new window will open with a read-only duplicate of your current document.

© SunGard 2004-2008 Introduction to BDMS Page 73
Page View Functions For Multiple Page Types
Sticky view
Sticky View modes allow you to save settings for viewing specific types of documents.
Zoom
The Zoom In and Zoom Out functions allow you to increase or decrease the viewing scale of your document. If you want to select a viewing scale with precision, the Zoom Percent function allows you to select a percentage of actual size to zoom to.
Zoom can be used with images, text or OLE objects.
Rotate
You may rotate images in 90-degree increments to the left or the right.
Magnifier
The Magnifier function changes the mouse pointer to a magnifying glass. You can move the pointer over a document and click to focus on a specific area, and resize the Magnifier window to change the size of the viewable area.
Use the slide bar to determine the degree of magnification (from 50% to 400%).
Scale-to-Gray
Black-and-white images can be converted to grayscale via the Scale-to-Gray function. This greatly enhances readability for many documents.

© SunGard 2004-2008 Introduction to BDMS Page 74
Regions
You can select specific regions of an image by deselecting the Pan Mode button on the Image toolbar. This puts you into Select mode. To select a region, click-and-drag the cursor across the current document image; the selected region will turn green.
Once a region has been selected, you can right-click to call up a menu with the following functions:
• You may cut or copy a region to the Clipboard. (Cutting a region does not remove it from the document image itself; it merely removes the green selection rectangle from the image.)
• You may delete a selected region
• You may print the region as-is
• You may magnify a region and save it, print it or copy it to the Clipboard in its magnified state
• You may perform OCR on a selected region

© SunGard 2004-2008 Introduction to BDMS Page 75
View Specific Page Types
Image pages
After performing OCR on an image, you may switch between image and text views of that page by clicking the Show OCR Text toggle button on the Image toolbar.
Text pages
Text documents may always be displayed in plain text mode without an overlay, with a text overlay or with an image form overlay. Documents appear as text documents in plain text or text overlay modes, and as images in image form overlay mode.
Users of ColdXtender or ErmXtender may display a document with a form overlay. (Consult your administrator for more information on these products.)
When in text mode, you may freeze horizontal and/or vertical regions for viewing purposes.
You must be in Pan mode (your cursor appears as a hand; the Pan mode button on the Image toolbar must be selected) to lock a title region. Place your cursor at the desired location in the text region and right-click. Select Set Horizontal Title, Set Vertical Title or Set Horizontal and Vertical Title to place blue bars across the text window.
When you use the scrollbars on the text window, the text above a horizontal blue bar or to the left of a vertical blue bar will not scroll. Right-click and select Clear Title to remove the bars from the text window.
PDF files
The View tab of the Configuration window (accessible by clicking Configuration from the Main toolbar) lets you specify whether or not to use the Outside In viewer to display Adobe PDF files.
If the Use Outside In Viewer to display PDF files check box is selected, Outside In will be used to view PDFs. If the check box is not selected, you will need to have Adobe Acrobat Viewer 4.0 (or higher) installed on your system to view PDFs.

© SunGard 2004-2008 Introduction to BDMS Page 76
Foreign files
The View tab of the Configuration window (accessible by clicking Configuration from the Main toolbar) lets you specify whether or not to use the Outside In viewer to display unsupported file types.
If the Use Outside In Viewer to display foreign files check box is selected, Outside In will be used to view file types not directly supported by ApplicationXtender. If the check box is not selected, you will need to have an appropriate third-party viewer for each unsupported file type installed on your system. File types that cannot be viewed by ApplicationXtender will be displayed as icons.
OLE objects
OLE objects can be viewed and edited in the Document Display view, as long as the appropriate application for your OLE object type is installed on your system.

© SunGard 2004-2008 Introduction to BDMS Page 77
Document View Properties
Introduction
Right-click a document and select Properties from the subsequent menu to edit the view properties for the document.
General tab
On this tab, you can select the appropriate action for the left mouse button when viewing documents (scrolling the image, select an image w/o scrolling, or select annotations), temporarily disable the right-click context menu (to reenable it, close the document and reopen it), turn scrollbars on or off, and specify the zoom percentage at which to view the document.
Image tab
On this tab, you can select black-and-white, 16-color grayscale or 256-color grayscale for the images in the current document.
If the Display image in its actual scale check box is selected, you can select a custom DPI at which to view the image.
Text tab
On this tab, you can enable colored bars across OCRed text for readability purposes, and select the height and color of the bars. You may also select the font and font settings, tab size and form overlay.
OCR tab
This tab allows you to specify various options for OCR output.

© SunGard 2004-2008 Introduction to BDMS Page 78
Page Information
Introduction
Right-click a document and select Information from the subsequent menu to view various information about the document. Information types displayed include file type, file size, width, height, bits per pixel, resolution and/or compression type on the Information tab, or image and annotation pathnames on the Files tab.

© SunGard 2004-2008 Introduction to BDMS Page 79
Overview of BDMS
Introduction
Welcome to the Banner Document Management Suite (BDMS) document management enterprise solution for Banner. BDMS is a powerful addition to your family of Banner applications.
Objectives
This section introduces you to the BDMS enterprise solution and describes its key concepts and features. It includes the following:
• Overview of Banner Document Management Suite
• Description of BDMS functionality
• BDMS terminology
• Using BDMS query rules
• Executing queries

© SunGard 2004-2008 Introduction to BDMS Page 80
Overview of Banner Document Management Suite
Introduction
BDMS is an imaging and electronic document management system for clients who use Banner products. It is designed to meet the imaging and document management requirements of higher education.
BDMS provides integration with the Banner application suite. Specific integration is within each of the five functional areas – Human Resources, Finance, Student, Financial Aid, and Advancement. BDMS works as an integrated product with Banner and Documentum’s document management system, ApplicationXtender (AX).
Scanning and indexing tie image and document data to Banner information. In addition, ApplicationXtender (as well as other Documentum products) can be used standalone outside the Banner environment so clients can scan important documents which do not need indexing to Banner applications.
BDMS allows you to:
• Generate a query from within a Banner form
• Limit the scope of the query based on document type, and where applicable, to block level, item level, or value level
• Access ApplicationXtender to view Banner documents online
• Index new documents on the fly from a Banner Form

© SunGard 2004-2008 Introduction to BDMS Page 81
BDMS Functionality
Introduction
A BDMS toolbar icon is available on all Banner forms as part of the Banner General 6.1 release. This icon allows you to access the AX application from within Banner. It also allows auto-querying of objects based on the cursor’s location (touchpoint) within a Banner form.
ApplicationXtender can run stand-alone and can store index values that are not Banner-related.
Clients are able to utilize ApplicationXtender, DiskXtender, WebXtender, and OCR/ICR applications without Banner for information that doesn’t logically fit with Banner. Documents such as letters to college personnel, can be captured and managed in this way.
ApplicationXtender can manage and view the images, and WebXtender can make these images available on the Web.
• Clients may scan and index documents singularly or in batch
• All documents can be retrieved through Banner and AX stand-alone, subject to security restrictions
• Images and documents are available across the entire enterprise, including both client server-connected Banner workstations and clients using the Web-enabled version of Banner

© SunGard 2004-2008 Introduction to BDMS Page 82
Banner 8 Enhancements to BDMS
Enhancements
The following technical enhancements are part of the Banner 8.0 release.
HR FLAC Self-Service Integration with BDMS
The BDMS 8.0 release includes streamlining of the optional integration components and guidelines for linking the HR Faculty Load and Compensation Self-Service Banner enhancement, delivered with Banner HR 8.0 and Employee Self-Service 8.0 to the AppXtender Web Access (WX) product.
For technical details on this enhancement, please refer to the Banner Document Management Suite 8.0 Release Guide.
Financial Aid Requirements Linking
The BDMS 8.0 Financial Aid requirements linking process was modified to accommodate the addition of a new Active indicator field in Financial Aid's Tracking Requirements Table (RTVTREQ) and their Fund Code table (RFRBASE). The new fields were added as part of the new Financial Aid Algorithmic Packaging enhancement for Financial Aid 8.0.
BDMS PL/SQL packages and forms for the tracking requirements linking functionality in BDMS have been modified accordingly.
For technical details on this enhancement, please refer to the Banner Document Management Suite 8.0 Release Guide.
Internationalization
• BDMS 8.0 has been certified to work with databases using the UTF8 standard.
• BDMS 8.0 PL/SQL packages and some forms have been modified to accommodate column name expansions for the First Name and Social Security Number columns.
For technical details on this enhancement, please refer to the Banner Document Management Suite 8.0 Release Guide.

© SunGard 2004-2008 Introduction to BDMS Page 83
BDMS Terminology
Annotation
Note or shape you can add to a document page, typically to focus attention on a particular part of the page.
Application XtenderTM (AX)
Component of Documentum Software’s suite of Document Management SuiteTM products that facilitates file/object storage, OCR, and many other features for document management.
BDMS Application
Index-driven data storage structure where documents can be stored and retrieved. An application stores related documents pertaining to a specific functional area.
BDMS-enabled
Form has been regenerated (recompiled) following installation of Banner General 6.1.
BDMS Query icon
Icon on the Banner toolbar which, when clicked, opens the ApplicationXtender product so a query can be performed.
BDMS Add Document icon
Icon on the Banner toolbar which, when clicked, opens the ApplicationXtender product so a new document may be indexed.
Context
Actual cursor location within a Banner form where you are when you click the BDMS icon to access the ApplicationXtender system and create a query.

© SunGard 2004-2008 Introduction to BDMS Page 84
Document
File or group of files stored in an application and identified by one unique set of index information. Each page of a document is a single object, such as a scanned image file or a word processing document. A document can be as small as one page, or it can contain thousands of pages.
Document Type
User-defined code that identifies each type of document that is stored and indexed in a BDMS application.
Index
Group of fields where information relating to documents is stored. When a document is stored in an application, the index values you enter identify the document.
Documentum
Formerly OTG Software, Inc., and Legato Systems, Inc. (Bethesda, MD). The SunGard Higher Education partner for this integrated enterprise solution.
Page
Single object within a document. Each page of a document shares the document’s index values.
Banner Document Management Suite (BDMS)
Combination of the ApplicationXtender product with all the Banner-based software that integrates the two products into a functional model where Banner can drive AX.

© SunGard 2004-2008 Introduction to BDMS Page 85
BDMS Applications
Introduction
A BDMS application is an index-driven data storage structure where documents are stored and retrieved. Banner Document Management Suite includes 18 BDMS applications.
Not all of the applications are available to every user. You can access only those applications that are appropriate to your area of functionality.
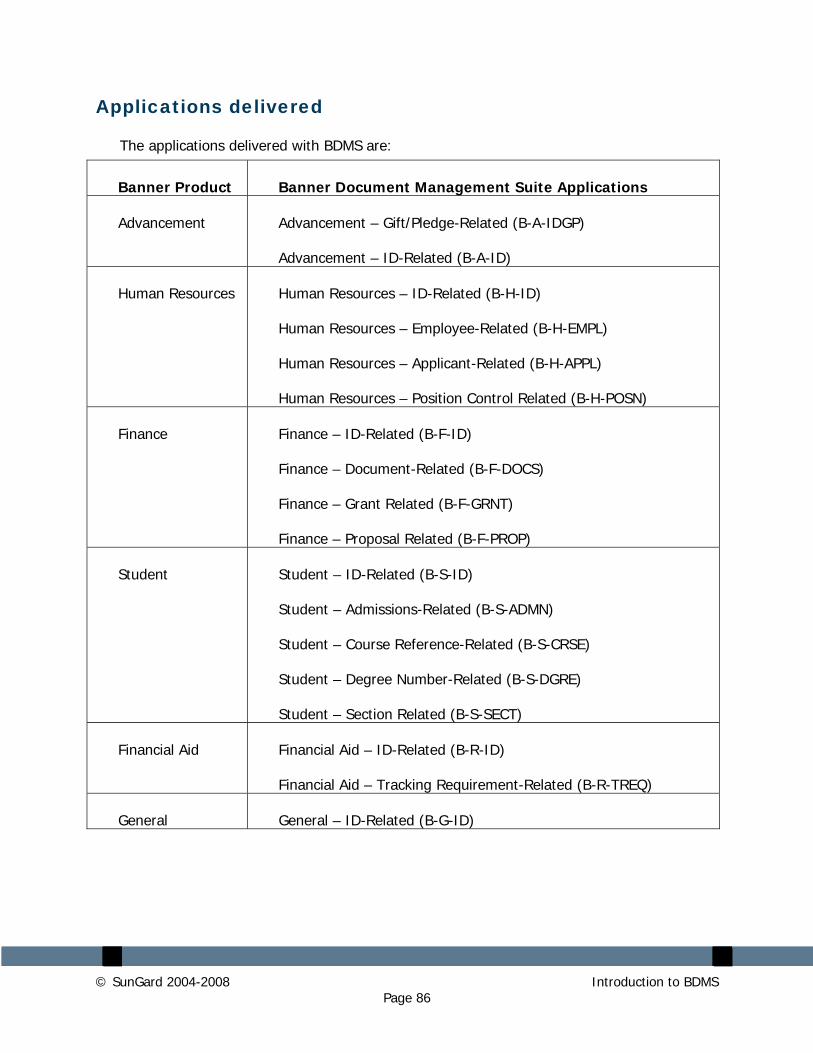
© SunGard 2004-2008 Introduction to BDMS Page 86
Applications delivered
The applications delivered with BDMS are:
Banner Product Banner Document Management Suite Applications
Advancement Advancement – Gift/Pledge-Related (B-A-IDGP)
Advancement – ID-Related (B-A-ID)
Human Resources Human Resources – ID-Related (B-H-ID)
Human Resources – Employee-Related (B-H-EMPL)
Human Resources – Applicant-Related (B-H-APPL)
Human Resources – Position Control Related (B-H-POSN)
Finance Finance – ID-Related (B-F-ID)
Finance – Document-Related (B-F-DOCS)
Finance – Grant Related (B-F-GRNT)
Finance – Proposal Related (B-F-PROP)
Student Student – ID-Related (B-S-ID)
Student – Admissions-Related (B-S-ADMN)
Student – Course Reference-Related (B-S-CRSE)
Student – Degree Number-Related (B-S-DGRE)
Student – Section Related (B-S-SECT)
Financial Aid Financial Aid – ID-Related (B-R-ID)
Financial Aid – Tracking Requirement-Related (B-R-TREQ)
General General – ID-Related (B-G-ID)

© SunGard 2004-2008 Introduction to BDMS Page 87
BDMS Context Rules
Introduction
Context rules define the actual cursor location (context) within the Banner form that you are in immediately before you click the BDMS icon on the Banner toolbar.
When the BDMS icon is clicked, ApplicationXtender (AX) or WebXtender (WX) is accessed and the query is run based on the location of the cursor within the Banner form.
The rule identifies the BDMS application that is used in the query, as well as the document type. If no document type is specified in the rule, the query will run for all document types within that BDMS application.
Types
There are four types of context rules in BDMS:
• Form-level rules run a query from any location on the Banner form.
• Block-level rules run a query from any location within a specific block of a Banner form.
• Item-level rules run a query from a specific field within a Banner form.
• Item-value-level rules run a query based on the value of the specific field within a Banner form.

© SunGard 2004-2008 Introduction to BDMS Page 88
Examples
In example 1, clicking the BDMS icon anywhere in SPAPERS uses the B-S-ID BDMS application to query all document types.
In example 2, clicking the BDMS icon anywhere in the SARADAP block in SAAADMS uses the B-S-ADMN BDMS application to query the Admissions Application document type.
In example 3, clicking the BDMS icon in the SPBPERS_SSN field of the SPBPERS block in SPAPERS uses the B-S-ID BDMS application to query the Social Security Card document type.
In example 4, clicking the BDMS icon in the SPBPERS_DEAD_IND field when it has a value of Y in the SPBPERS block in SPAPERS uses the B-S-ID BDMS application to query the Death Notice document type.
# Form Name
Block Name
Item Name Item Value
BDMS App
Doc Type
1 SPAPERS B-S-ID
2 SAAADMS SARADAP B-S-ADMN
ADMISSIONS APP
3 SPAPERS SPBPERS SPBPERS_SSN B-S-ID SSN CARD
4 SPAPERS SPBPERS SPBPERS_DEAD_IND Y B-S-ID DEATH NOTICE
Context Rules Hierarchy
When a query is executed, the level of the context rule involved determines the results returned by the query. A form level rule can be superseded by a rule that has higher priority. The priority of rules from lowest to highest is form, block, item, and item-value.
If two or more rules apply to a cursor location, the rule with the highest priority takes precedence. For example, if an item-level rule and a block-level rule both apply to a specific field, the item-level rule has higher priority and is used to run the query.

© SunGard 2004-2008 Introduction to BDMS Page 89
Banner Linking
Introduction
Functionality is in place in BDMS to allow the indexing of certain Student and Financial Aid documents to automatically update Banner data.
There are two specific situations when indexed documents in AX automatically update Banner data:
• When a Banner Student Admissions checklist requirement document (for example, a high school transcript) is indexed in AX
• When a Banner Financial Aid Tracking Requirements checklist document (for example, a savings statement) is indexed in AX
The indexing of these documents in AX is essentially the same as marking them as “received” in Banner, which means there is no need to manually update Banner. Double processing is eliminated.

© SunGard 2004-2008 Introduction to BDMS Page 90
Attaching Documents
Introduction
The ability to toggle between Banner and the Documentum system allows scanning, indexing and querying to be accomplished with one login. The BDMS system comes with 18 delivered applications, complete with context points, Banner linking and document types already in a validation table.
Levels
Documents can be attached on any of four levels:
• Form - Documents may be attached and queried at this level. Any documents attached at a lower level (the Block, Item or Item value) may also be queried.
• Block - Documents may be attached and queried at this level.
• Item - Documents may be attached and queried at this level.
• Item Value - Documents may be attached and queried at this level.
Requirements
The appropriate context rules must be in place to allow the documents to be attached at any of these levels. In addition, the context rules also identify the Imaging application that the documents will be queried and attached through.
The scanning and indexing process is the primary method of obtaining documents and attaching them to the Banner system.

© SunGard 2004-2008 Introduction to BDMS Page 91
Correcting Indexes
Introduction
Occasionally, mistakes are made when indexing documents. When this happens, corrections need to be made.
Methods
With the BDMS system, the correction is accomplished by exporting the document to the desktop, importing it back in and re-indexing it.
Alternatively, the document may be cut to the clipboard, and then pasted as a new document and indexed to the correct individual.
Once the document has been re-indexed, the version of the document that was in error should be deleted. Remember to remove the erroneous document from the desktop, as well.

© SunGard 2004-2008 Introduction to BDMS Page 92
Executing Queries in BDMS
Introduction
This section discusses BDMS queries and how to execute them in Banner.
Objectives
At the conclusion of this section, participants will be able to
• execute BDMS queries in Banner.

© SunGard 2004-2008 Introduction to BDMS Page 93
BDMS Query Icon
Introduction
A BDMS Query icon has been added to the Banner toolbar. This icon allows you to open ApplicationXtender from within Banner and execute queries. It also allows autoquerying of objects based on the location of your cursor (touchpoint) within a Banner form.
Defaults
By default, client/server Banner will attempt to open ApplicationXtender first, and WebXtender if AX is not available on the workstation. On the other hand, INB (Internet Native) Banner will default to the WebXtender application when the BDMS icon is invoked. These defaults may be overridden by selecting the <Tools> menu and choosing <User Preferences> to invoke the EXAUPRF form. Additional bridging components must be installed to use one of the non-default options.
Icon
Here is an enlarged image of the BDMS Query icon:

© SunGard 2004-2008 Introduction to BDMS Page 94
BDMS Add Document Icon
Introduction
A BDMS Add Document icon has been added to the Banner toolbar. This icon allows you to invoke ApplicationXtender (or WebXtender) from within Banner and index a new document from an imported file. In addition, this feature will open the appropriate application to store the new document based on the context rules outlined above, and will auto-fill the index fields with the information from the currently selected student record in Banner.
Icon
Here is an enlarged image of the BDMS Add Document icon:
The next lesson contains a screen capture of a Banner form with the BDMS icons on the toolbar.

© SunGard 2004-2008 Introduction to BDMS Page 95
Running a Query from Banner
Steps
1. Access the appropriate form in Banner.
If the query can be executed at block-level, item-level, or item-value-level, place the cursor at the appropriate location in the form.
If the query is to be executed at form-level, the cursor can be placed anywhere in the form.
2. Click the BDMS Query icon on the Banner toolbar.
Your results are automatically displayed in ApplicationXtender (or WebXtender).

© SunGard 2004-2008 Introduction to BDMS Page 96
BDMS Messages
Messages
When executing a query, messages display to give you the information pertaining to the query, or to the status of the system. There are two types of messages:
Tooltip messages – Customized messages which display by right-clicking the BDMS icon; messages are based on the results returned during the execution of a query.
Alert messages – Messages which display if you are not set up to use BDMS, or if the required software is not present.
Tooltip Messages
The following messages appear during a “right-click” of the BDMS icon on the Banner toolbar:
• Banner Document Management Suite – Displays whenever the mouse is moved over the BDMS icon at a non-BDMS site. This message also appears at a BDMS site until AX is opened.
• (Customized text, based on a real query of AX Data) – Displays when you right-click the BDMS icon and AX is running. This will only occur when BDMS is installed and the form has been BDMS-enabled.
• No Banner Document Management Suite Context Rules Apply to This Location – Displays when the mouse is right-clicked on the BDMS icon at BDMS sites where the form has been BDMS-enabled and no context rules apply to the cursor

© SunGard 2004-2008 Introduction to BDMS Page 97
Alert Messages
• The link to Banner Document Management Suite cannot be established because the required software is not present. For information about Banner Document Management Suite, contact your Account Consultant. Displays when the BDMS icon is clicked and the form is not BDMS-enabled.
• While Banner Document Management Suite is installed at your site, you are not set up as a user in that system. Please contact your Administrator for information. Displays when the BDMS icon is clicked and the Banner form is BDMS-enabled, but you have not been set up as a user

© SunGard 2004-2008 Introduction to BDMS Page 98
Exercises
Introduction
This chapter contains exercises that will demonstrate common procedures using ApplicationXtender.
The sample pages for these exercises are found in the next chapter.
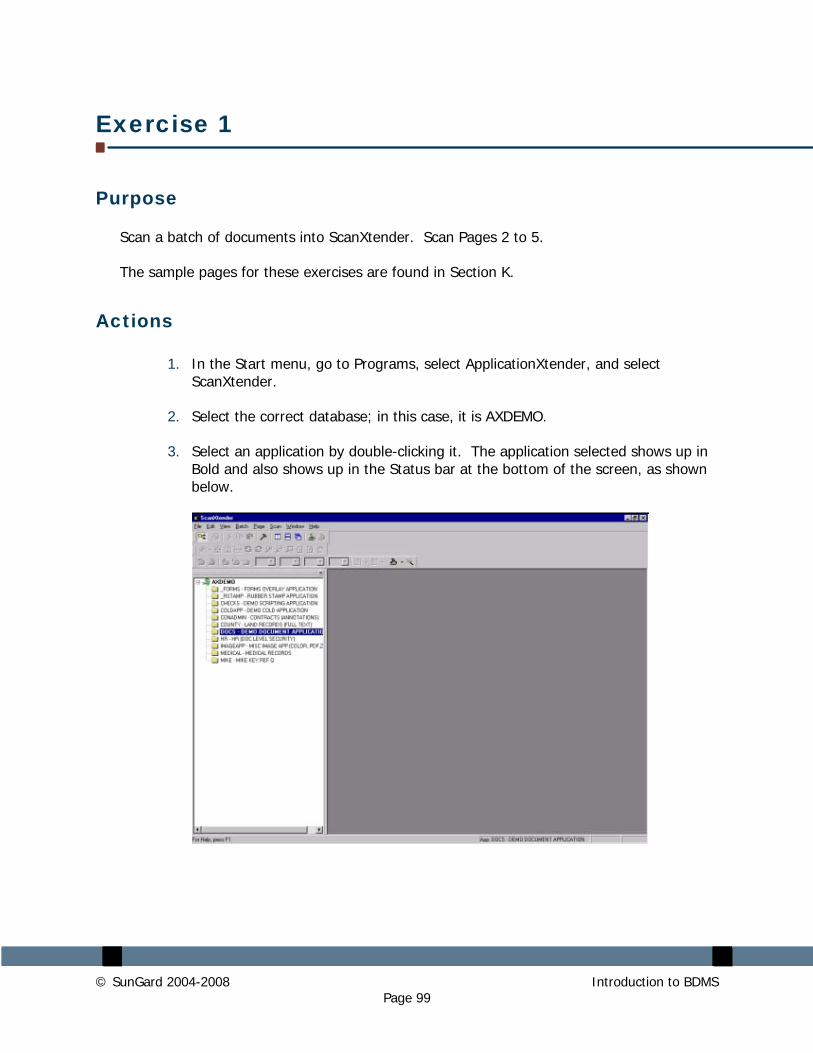
© SunGard 2004-2008 Introduction to BDMS Page 99
Exercise 1
Purpose
Scan a batch of documents into ScanXtender. Scan Pages 2 to 5.
The sample pages for these exercises are found in Section K.
Actions
1. In the Start menu, go to Programs, select ApplicationXtender, and select ScanXtender.
2. Select the correct database; in this case, it is AXDEMO.
3. Select an application by double-clicking it. The application selected shows up in Bold and also shows up in the Status bar at the bottom of the screen, as shown below.

© SunGard 2004-2008 Introduction to BDMS Page 100
4. Select Batch from the menu bar.
5. Type in the Batch ID and name it (e.g. “two-five”) in the dialog box.
(It is assumed that the trainees are familiar with their scanners and their settings. For our exercise, a HP PrecisionScan scanner was used.)
6. Make sure the settings on the scanner are set for Multiple feed, correct DPI and Color.
7. Make sure you are logged in the right database and application. (E.g. DOCS-DEMO DOCUMENTS APPLICATION)
8. Load the sheets numbered 2 to 5 to scan in the scanner.
9. From the Menu bar, select ‘Scan’.
10. A dialog box pops up and requests name of the batch. Type in a name, by which you can link this batch of scans (e.g. “two-five”).
11. Make sure the page orientation matches the way the document should be viewed on the monitor. (E.g., If the document is fed upside down then you will view it upside down on your screen. You can rotate displayed documents, however.)
12. The HP Scanner dialog box pops up. It shows “Scan to AX”.
13. Uncheck the box in front of “Select parts of page of view page first”.
14. Click on Scan. This may differ with the scanner installed at the client’s site.
15. To close the batch, go to File and select Close.
16. Exit out of ScanXtender.

© SunGard 2004-2008 Introduction to BDMS Page 101
Exercise 2
Purpose
Launch AX (ApplicationXtender).
It is assumed that the software has been loaded on the Windows workstation and the trainee is ready to roll.
Steps
1. From the Start menu, go to Programs, select ApplicationXtender, and select ApplicationXtender as shown below.

© SunGard 2004-2008 Introduction to BDMS Page 102
2. Select the correct database; in this case, it is AXDEMO.
3. Select an application by double-clicking it. The application selected shows up in Bold and also shows up in the Status bar at the bottom of the screen, as shown below.
4. Index the batch in AX.
5. Launch AX, and select Utilities from the menu bar.
6. Select Batch Index (List). You will see the batch “two-five” displayed in the dialog box.
7. Select it by double-clicking on it. The “two-five” document will be displayed.
A new menu bar shows up with icons depicting ‘Previous page’ and ‘Next page’.
8. Select the icon New Document.
9. Enter the Index values (e.g. “two-five”). Remember the values or note them down, as you will need them later.
10. Click on the Attach All icon.
11. Save it. (You will also see the Save button at the bottom of the window)

© SunGard 2004-2008 Introduction to BDMS Page 103
Exercise 3
Purpose
Scan a New document into the sample application and different index values. “Pages 6-8”.
Steps
1. To show the scanning toolbar, go to View-> Toolbars.
2. Select Scan. A check mark will appear next to Scan.
3. From the Menu bar, select Document, New, Scan.
4. Click on the Scan icon to scan the document “six-eight”.
5. Uncheck the ‘Parts of scan selection’ in the HP scanner dialog box.
6. Index the document, under Doc Type (e.g. ”six-eight”).
7. Click on Save in the lower right corner of the window.
This exercise shows that your scanner is correct for multiple pages and image quality.

© SunGard 2004-2008 Introduction to BDMS Page 104
Exercise 4
Purpose
Query the application to locate your first document, “Pages 2-5”.
Steps
1. Right-click on the active application (e.g. DOCS-DEMO DOCUMENTS APPLICATION).
2. Select New query.
3. Open the query window and define your query (i.e. under DOCTYPE, “two-five”) to open the document for you.

© SunGard 2004-2008 Introduction to BDMS Page 105
Exercise 5
Purpose
Insert Page 1 into the first document “Pages 2-5” in the correct position.
This involves scanning a single page (page 1) and inserting it at the right location within the document “two-five”.
Steps
1. From the Menu bar, select Page, New, Scan, Insert Before, and the displayed page two of the Document called “two-five”.
You should now have page 1 inserted in front of page 2.
Please note that the document named “two-five” now contains pages 1 to 5.

© SunGard 2004-2008 Introduction to BDMS Page 106
Exercise 6
Purpose
Create a new version of your second Document “Pages 6-8”, scanned in exercise 3.
Steps
1. Right-click on the active application to locate your second document.
2. Select New Query, and enter the Index value “six-eight” in the DOCTYPE field.
This is the same task as Exercise 4.

© SunGard 2004-2008 Introduction to BDMS Page 107
Exercise 7
Purpose
Create a new version of the existing Page 6.
Steps
1. Alter Page 6 of your document to be scanned in some way.
2. Scan it as a new version, not as a new document.
3. From the Menu bar, select Page, New Version, Scan.
You should see the new version displayed on the screen.

© SunGard 2004-2008 Introduction to BDMS Page 108
Exercise 8
Purpose
Delete the old version of Page 6.
Steps
1. Make sure you have the current version on display.
2. From the Menu bar, select Page, Show Version, Previous. If this is an old version, select Delete Version.
A message will be displayed to confirm if the version displayed has to be deleted.

© SunGard 2004-2008 Introduction to BDMS Page 109
Exercise 9
Purpose
Export the document “Pages 6-8”.
Steps
1. Go to the Menu bar and select Document, Export, and Images.
You will see a dialog box showing you the destination you would like to send your document.
2. Choose the appropriate directory and send your document (e.g. C:\Temp\Folder Name\File Name).

© SunGard 2004-2008 Introduction to BDMS Page 110
Exercise 10
Purpose
Import the document “Pages 6-8” and add it to the end of the new document “Pages 2-5”.
Steps
1. In the active application, right-click to get a New Query.
2. Search for the document “two-five”, which now contains Pages 1 to 6. Remember, we added Page 1 to the original document “two-five” (which had Pages 2 to 5) before we did Exercise 5.
Make sure you display the last Page 5 on your screen.
3. From the Menu bar, select Page, New, Import File, Insert After, C:\Temp\Folder Name\File Name.
4. Select the pages and click Open to import and place the pages from the “six-eight” document in sequence, after the displayed file “two-five”.
5. Confirm by clicking on Page Before and Page After icons on the menu bar.
The result of this exercise is that the document “two-five” now contains pages 1 to 8.

© SunGard 2004-2008 Introduction to BDMS Page 111
Exercise 11
Purpose
Attach a document to a Banner Record.
Steps
1. Start a Banner session.
2. Navigate to SAAADMS, and enter the ID you have been working with.
3. While still in the ID field, click on the BDMS icon on the toolbar.
4. Once in BDMS, select Document, New, and Import from file.
5. Find a document on your hard drive to import.
6. Enter the same ID that you entered into SAAADMS.
7. Save and close the document, and return to Banner.
8. Click on the BDMS icon on the toolbar.
A query should call up all documents associated with the current ID.
9. Double-click on a document to view the document.

© SunGard 2004-2008 Introduction to BDMS Page 112
Exercise 12
Purpose
Correct the indexes.
Steps
1. Start a Banner session.
2. Click on the BDMS icon on the toolbar.
3. Right-click on the Application, and select New Query.
4. Enter an incorrect ID.
5. Click on Search.
6. Display the incorrect image.
7. Select Document, Export, Image from the menu bar.
8. Select the place where you want to put the image on your desktop.
9. Name the image, click OK, and close it.
10. Select Document , New, Import from file from the menu bar.
11. Select the file that was just saved to disk.
12. Enter the correct index and save.
13. Execute a query on the new ID.
14. Right-click on the Application, and select New Query.
15. Enter the new ID and click on Search.
16. Select the new ID and display the associated document.

© SunGard 2004-2008 Introduction to BDMS Page 113
If the new document is correct, delete the incorrectly imaged document as follows:
1. Right-click on the Application, and select New Query.
2. Enter the incorrect ID, and click on Search.
3. Display the incorrect image
4. Select Document, Delete from the menu bar. Click OK to delete the document.
5. Delete the incorrect document from your desktop.

© SunGard 2004-2008 Introduction to BDMS Page 114
Sample Pages
Introduction
This section contains the sample pages to be used in the exercises in the previous section.

© SunGard 2004-2008 Introduction to BDMS Page 115
Sample Pages
The following eight pages are to be used with the exercises in Appendix A.

© SunGard 2004-2008 Introduction to BDMS Page 116
Exercise Page 1
PAGE 1

© SunGard 2004-2008 Introduction to BDMS Page 117
Exercise Page 2
PAGE 2

© SunGard 2004-2008 Introduction to BDMS Page 118
Exercise Page 3
PAGE 3

© SunGard 2004-2008 Introduction to BDMS Page 119
Exercise Page 4
PAGE 4

© SunGard 2004-2008 Introduction to BDMS Page 120
Exercise Page 5
PAGE 5
The other day I was walking down a country lane and saw a young girl walking towards me with a cow on a lead. I stopped and asked her what she was doing. She said, "I'm taking the cow to see the bull." I said, "couldn't your father do it?" "Oh no" she said, "it has to be the bull."
So I went to the Chinese restaurant and this duck came up to me with a red rose and says "Your eyes sparkle like diamonds". I said "Waiter, I asked for a-ROMATIC duck".
Two Aerials meet on a roof - fall in love - get married. The ceremony was rubbish but the Reception was Brilliant
Dyslexic man walks into a bra
There are 2 rules to success in life: 1. Don't tell people everything you know
So this bloke says to me, "Can I come in your house and talk about your carpets?". I thought "That's all I need, a Je-hoover's witness". A fellow goes into a 'Chippie' and says to the fryer:"Jumbo Sausage please." The fryer says:"It won't be long." The fellow says "Well it'd better be fat then!"
So I was having dinner with Garry Kasparov and there was a check tablecloth. It took him two hours to pass me the salt. He said "You remind me of a pepper-pot", I said "I'll take that as a condiment".
But I'm in great mood tonight because the other day I entered a competition and I won a years supply of Marmite... one jar.
A guy goes into the butchers and says I bet you fifty quid you can't touch that meat hanging up in the corner. The butcher says I'm not betting on that, the steaks are too high!!
Now you know those trick candles that you blow out and a couple of seconds later they come alight again, well the other day there was a fire at the factory that makes them.
But I'm in great mood tonight because the other day I entered a competition and I won a years supply of Marmite... one jar. A guy goes into the butchers and says I bet you fifty quid you can't touch that meat hanging up in the corner. The butcher says I'm not betting on that, the steaks are too high!!

© SunGard 2004-2008 Introduction to BDMS Page 121
Exercise Page 6
The other day I sent my girlfriend a huge pile of snow. I rang her up, I said "Do you get my drift?”
There was a man who entered a local paper's pun contest. He sent in ten different puns, in the hope that at least one of the puns would win. Unfortunately, no pun in ten did.
Four fonts walk into a bar. The barman says "Oi - get out! We don't want your type in here"
Police arrested two kids yesterday, one was drinking battery acid, and the other was eating fireworks. They charged one and let the other one off.
Guy goes into the doctor's. "Doc, I've got a cricket ball stuck up my backside "How's that?" "Don't you start"
Man goes to the doc, with a strawberry growing out of his head. Doc says, "I'll give you some cream to put on it."
Now did you know all male tennis players are witches, for example Goran, even he's a witch.
I went to the dentist. He said "Say Aaah." I said "Why?" He said "My dog's died.'"
So a lorry-load of tortoises crashed into a trainload of terrapins, I thought, "That's a turtle disaster".
So I said "Do you want a game of Darts?” he said "OK then", I said "Nearest to bull starts". He said "Baa", I said "Moo", he said, "You're closest".
"Doc, I can't stop singing the green green grass of home." "That sounds like Tom Jones syndrome." "Is it common?" "It's not unusual."
So I was in Tesco's and I saw this man and woman wrapped in a barcode, I said "Are you two an item?"
PAGE 6

© SunGard 2004-2008 Introduction to BDMS Page 122
Exercise Page 7
Two peanuts walk into a bar. One was a salted.
Two men in an open top airplane. The one in the front says to the one in the back, "if I fly the plane upside down do you think we'll fall out?" He replies "no, we'll always be friends".
A man walks into a bar with a roll of tarmac under his arm and says: "Pint please, and one for the road."
Two elephants walk off a cliff...... boom boom!
So I rang up British Telecom, I said, "I want to report a nuisance caller", he said "Not you again".
Now, most dentist's chairs go up and down, don't they? The one I was in went back and forwards. I thought 'This is unusual'. And the dentist said to me 'Mr Vine, get out of the filing cabinet.
Did you hear about the flasher who was thinking of retiring? He decided to stick it out for another year!
So I went down the local supermarket, I said "I want to make a complaint, this vinegar's got lumps in it", he said, "Those are pickled onions".
"Doctor, I can't pronounce my F's, T's and H's." "Well you can't say fairer than that then"
A woman walks into a bar and asks the barman for a double entendre. So he gave her one.
Two Eskimos sitting in a kayak were chilly; but when they lit a fire in the craft, it sank, proving once and for all that you can't have your kayak and heat it too.
Two boll weevils grew up in Cornwall. One went to Hollywood and became a famous actor. The other stayed behind, drove a tractor and never amounted to much. The second one, naturally, became known as the lesser of two weevils.
A group of chess enthusiasts checked into a hotel and were standing in the lobby discussing their recent tournament victories. After about an hour, the manager came out of the office and asked them to disperse. "But why?" they asked, as they moved off. "Because," he said, "I can't stand chess nuts boasting in an open foyer."
PAGE 7

© SunGard 2004-2008 Introduction to BDMS Page 123
Exercise Page 8
PAGE 8

© SunGard 2004-2008 Introduction to BDMS Page 124
Document Types
Introduction
This section contains a list of available document type codes.
Objectives

© SunGard 2004-2008 Introduction to BDMS Page 125
Document Types
Introduction
The integration of Banner documents with ApplicationXtender is accomplished using pre-established document types codes that are in each BDMS application. These codes are set up on the Banner Document Management Suite Document Type Validation Form (ETVDTYP).

© SunGard 2004-2008 Introduction to BDMS Page 126
The following list contains the document type codes and a description of each.
Document Type Description
401K FORMS 401k Forms, Checks and Amortization Schedules
ACCEPTANCE LETTER Acceptance Letter
ADMISSIONS APP Admissions Application
ADMISSIONS REQS Admissions Requirements
ALIEN REG CARD Alien Registration Card (Green Card)
APPLICANT INFO Applicant Information
APPLICATION FORM Application Form
APPLICATION INFO Application Information
ATTENDANCE ROSTER Attendance Roster
AWARD ACCEPTANCE Award Acceptance
AWARD OFFER LETTER Award Offer Letter
BENEFIT BACK-UP DOCS Birth/Marriage Certificates, Family Change Forms, Insurance Claims
BENEFIT FORMS Enrollment Forms, Medical and Dental Forms, Benefits Confirmations and Statements
BROKERAGE STMT Brokerage Statement
CERTIFICATIONS Certifications
CHARITABLE CONT United Way Donations
CHECK Check
CLASS ROSTER Class Roster
COBRA FORMS Termination Letters, Continue Medical Benefits for 18 Months
COLLEGE TRNSCRPT College Transcript

© SunGard 2004-2008 Introduction to BDMS Page 127
Document Type Description
CONFIDENTIAL PAPERS Payers for Employee Disciplinary Action
CONTACT FORM Contact Form
CONTRACT INFO Contract Information
COURSE SUMMARY Course Summary
CURRENT VISA INFO Current Visa Information
DEATH CERTIFICATE Death Certificate
DEATH NOTICE Death Notice Documentation
DEGREE INFO Degree Information
DIPLOMA INFO Diploma Information
DIRECT CASH RECEIPT Direct Cash Receipt Form
DRIVERS LICENSE Copy of Drivers License
EDUCATIONAL TRNSCRPT Educational Transcript
ELECTRONIC LOAN APPL Electronic Loan Application
EMAIL E-mail Document
EMPLOYEE INFO FORM Employee Information Forms, Employee Recs
EMPLOYEE REVIEW FORMS Employee Review Forms
EMPLOYMENT AUTH FORMS Employment Authorization Forms
ENCUMBRANCES Encumbrances
ENROLL VERIFICATION Enrollment Verification Form
ENTRY VISA INFO Entry Visa Information
EXAM SCORES Examination Scores
EXECUTIVE BENEFITS Executive Benefits
FACULTY COURSE LOAD Faculty Course Load
FEDERAL TAX RETURN Federal Tax Return

© SunGard 2004-2008 Introduction to BDMS Page 128
Document Type Description
FLEXIBLE ACCOUNT FORMS Flexible Spending Accounts/Forms
FMLA Family Medical Leave Act
FY COMMISSION PLANS Commission Plans and Analysis
GIFT Gift
GIFT CHECK Copy of Gift Check
GIFT STOCK CERT Gift Stock Certificate
HIGH SCHOOL TRNSCRPT High School Transcript
HOLD INFO Hold Information
I-9 FORM I-9 Form
I-94 FORM I-94 Form
IMMIGRATION DOCS Immigration Forms, Visa Agreement Forms, Extension of Visa Forms
INTERNATIONAL DOCS International Documentation
INVOICE Invoice
INVOICE PAYMENT Invoice Payment
JOURNAL VOUCHER Journal Voucher
LEAVE OF ABSENCE Maternity Leave, Short Term Disability, Doctors Letters/Evaluations
LIFE INSURANCE Voluntary Life Insurance Forms
LOAN DISBURSEMENT Loan Disbursement Form
LONG TERM CARE FORMS Long Term Care Forms
LONG TERM DISABILITY Long Term Disability Forms
MAILINGS Mailings – Annual Report, Event Flyers, Letters, etc.
MANUAL LOAN APPL Manual Loan Application
MEDICAL DOCS Medical Documents
MEDICAL INS Medical Insurance

© SunGard 2004-2008 Introduction to BDMS Page 129
Document Type Description
MISC BENEFIT FORMS Miscellaneous Benefit Forms
MISC EMPLOYEE DOCS Direct Deposit Forms, Time Reports, Employee Referrals, Employment Authorization and Other Docs
NAME/ADDRESS CHANGE Name and Address Change Forms
NEW HIRE DOCS Offer Letters, Confidential Agreements, Resume
OFFER LETTER Offer Letter
PASSPORT Passport Information
PC LOANS Promissory Notes, Receipts from PC Purchase, Loan Amortization Schedules
PERFORMANCE LETTERS Awards, Peer Counselor Letters, Employees Performance Skills Letters
PHOTO-CHILD Photograph of Child
PHOTO-CONSTITUENT Photograph of Constituent
PHOTO-SPOUSE Photograph of Spouse
PLEDGE Pledge
PLEDGE PAYMENT Pledge Payment
PROMISSORY NOTE Promissory Note
PROOF OF CITIZENSHIP Proof of Citizenship
PROPOSAL FORM Proposal Form
PRSPECT RESEARCH DOC Prospect Research Document
PUBLICATIONS Publications
PURCHASE ORDER Purchase Order
RECRUITMENT INFO CARD Recruitment Information Card
REGISTRATION INFO Registration Information
RELOCATION FORMS Relocation Agreements, E-mails, Relocation Analysis
REQUISITION Requisitions
RESUME/CV Resume or Curriculum Vitae

© SunGard 2004-2008 Introduction to BDMS Page 130
Document Type Description
SALARY AND JOB INFO Salary Adjustment Forms, Job Detail Info., Misc. Job Info., Payroll Action Forms, Bonuses
SSN CARD Social Security Card
STOCK FORMS Stock Purchase Forms
SUPPLEMENTAL INFO Supplemental Information
TAX FORMS Federal Tax Forms, W4
TERMINATION FORMS Termination Forms, Letter of Resignation
TEST SCORES INFO Test Score Information
TIME OFF DOCS Time Off Documents – Vacation, Sick, Holiday
TRACKING REQUIREMENT Tracking Requirement
TRANSCRIPT INFO Transcript Information
VACATION FORM Vacation Requests, Vacation Rollover Forms
VETERAN CARD Veteran Information Card
WITHDRAWAL FORM Withdrawal Form
WITHDRAWAL QUERY Withdrawal Query Form
WORKERS COMP Workers Compensation