
Innovation and education - Faculty of Medicine, Dentistry and ...
Upload
khangminh22Category
view
1download
0
AXIUM USER GUIDE
TABLE OF CONTENTS
Section 1: AxiUm Basics 4
Do’s and Don’ts in AxiUm 5
Intro to Clinic for 3rd Years (preparing for patients) 6
Selecting a Patient via Rolodex 10
Using Scheduler & Reserving a Chair 11
Viewing Patient’s Appointments 13
Section 2: New Patients and Using EHR 14
EHR Forms Guide 15
General and Privacy Consent (mandatory for all new patients) 17
Medical History 18
Medical Alerts 20
Charting Findings (Chart Add) 22
Perio Chart – Adding PSR Scores 23
Section 3: Treatments in EHR 24
Creating Treatment Plans (adding options, estimates, & patient sig) 25
Creating a New Treatment with Chart Add 28
Printing a Treatment Estimate 30
Altering Final Treatment Plans 31
Completing and Approving Treatment 33
Viewing a Treatment for a Specific Tooth/Teeth 34
Adding Treatment for a Supernumerary Tooth 35
Entering Standardized Provider Notes 36
Adding Notes to the Tx History Tab 38
Checking Unapproved Charting & Treatment 39
Adding Assists to Tx History in EHR 40
Writing a Prescription 41
Section 4: Referrals (Chart Add) 42
Nobel Biocare 43
General Referrals (Anaesthesia, Endo, Perio, Ortho, Paedo) 45
Pathology 47
Oral Surgery 49
Section 5: Personal Planner 51
Surgery Consent (Perio, Endo, Oral Surgery) 52
Personal Planner
Selecting a Patient 54
Viewing Unapproved Treatments, Notes & Forms 55
Patient Contact List 56
Patient Needs Request 57
Patient Needs (continued), Plus Entering & Viewing Various Notes 58
Section 7: Grad Section 59
Patient Calls for Adult Grad Ortho Screening 60
Searching for Patients in the Wait List 61

SECTION 1: AXIUM BASICS
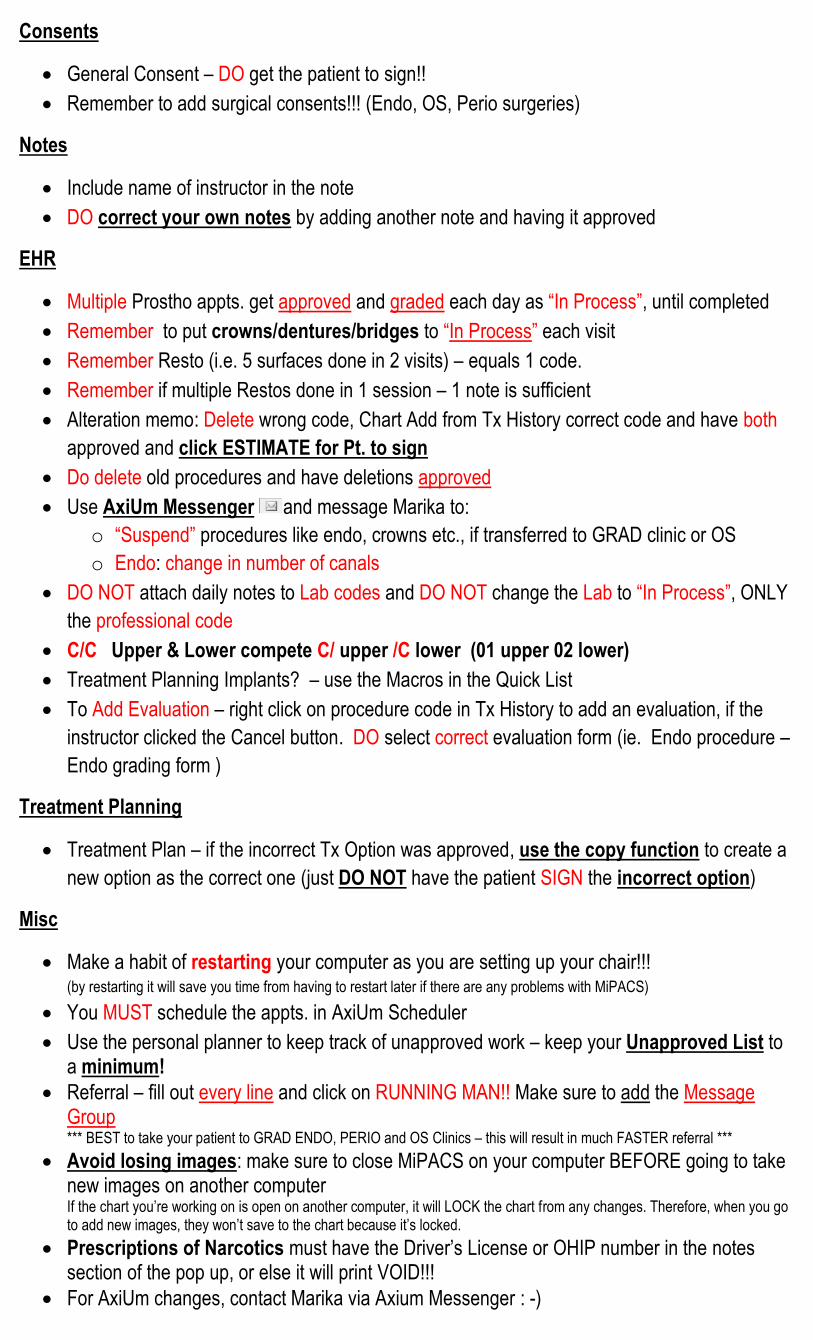
Consents
General Consent – DO get the patient to sign!!
Remember to add surgical consents!!! (Endo, OS, Perio surgeries)
Notes
Include name of instructor in the note
DO correct your own notes by adding another note and having it approved
EHR
Multiple Prostho appts. get approved and graded each day as “In Process”, until completed
Remember to put crowns/dentures/bridges to “In Process” each visit
Remember Resto (i.e. 5 surfaces done in 2 visits) – equals 1 code.
Remember if multiple Restos done in 1 session – 1 note is sufficient
Alteration memo: Delete wrong code, Chart Add from Tx History correct code and have both
approved and click ESTIMATE for Pt. to sign
Do delete old procedures and have deletions approved
Use AxiUm Messenger and message Marika to:
o “Suspend” procedures like endo, crowns etc., if transferred to GRAD clinic or OS
o Endo: change in number of canals
DO NOT attach daily notes to Lab codes and DO NOT change the Lab to “In Process”, ONLY
the professional code
C/C Upper & Lower compete C/ upper /C lower (01 upper 02 lower)
Treatment Planning Implants? – use the Macros in the Quick List
To Add Evaluation – right click on procedure code in Tx History to add an evaluation, if the
instructor clicked the Cancel button. DO select correct evaluation form (ie. Endo procedure –
Endo grading form )
Treatment Planning
Treatment Plan – if the incorrect Tx Option was approved, use the copy function to create a
new option as the correct one (just DO NOT have the patient SIGN the incorrect option)
Misc
Make a habit of restarting your computer as you are setting up your chair!!!(by restarting it will save you time from having to restart later if there are any problems with MiPACS)
You MUST schedule the appts. in AxiUm Scheduler
Use the personal planner to keep track of unapproved work – keep your Unapproved List toa minimum!
Referral – fill out every line and click on RUNNING MAN!! Make sure to add the MessageGroup*** BEST to take your patient to GRAD ENDO, PERIO and OS Clinics – this will result in much FASTER referral ***
Avoid losing images: make sure to close MiPACS on your computer BEFORE going to takenew images on another computerIf the chart you’re working on is open on another computer, it will LOCK the chart from any changes. Therefore, when you goto add new images, they won’t save to the chart because it’s locked.
Prescriptions of Narcotics must have the Driver’s License or OHIP number in the notessection of the pop up, or else it will print VOID!!!
For AxiUm changes, contact Marika via Axium Messenger : -)

INTRO TO CLINIC FOR 3rd YEARS
FIRST CHECK FOR:
Medical Consult
o Mandatory to do before seeing patient
o If you don’t see it in the alert box (top right EHR), check your paper chart for a sticker
Anaesthesia/Sedation Consult
o Mandatory before applying local anaesthesia/sedation
o If you don’t see it in the alert box (top right EHR), check for the code 05203 “ANAES CONSULT yearly or upon chart transfer”
WHEN YOU FIRST CONTACT PATIENT:
Introduce yourself as their new primary care provider
Briefly check medical history for any changes
If they have high blood pressure or diabetes, inform that you’ll be taking blood pressure and glucose level readings. If patient regularly assesses blood pressure with an electronic blood pressure cuff, you can ask him or her recent blood pressure readings.
Medication:
o Ask them to bring their pharmacy slip with all their meds. If they don’t have that, ask them to write the drug name and dose before the appt. If all fails, ask them to bring their meds to appointment.
Ask them about their scheduling preferences (i.e. job schedule)
Give them your contact information:
o Voicemail
o Location: Clinic and chair #
o Email (not necessary, but you could provide your school email if you’re comfortable)
New Patient (your Oral Diagnosis (OD) Patient) Prior to your 1st appointment
Book your appointment using axiUm Scheduler
o Please choose the right chair. You may prevent your fellow classmates from booking patients if you incorrectly book the wrong chair.
Medical History can be done over the phone
Medical consult Pts. – must do consult before seeing the patient
o Book medical consult with Pia in OD office
o Fill out electronic medical consult form (this form is new in axiUm as of Sept 2015)
No need for anesthesia consult immediately unless freezing will be done for sure (i.e. emerg tx)
If you think you think you can do perio charting, and complete the “Treatment Plan” form, ALL on the first appointment, you can proceed to book a treatment planning session with your coordinator
o This will be highly unlikely at the beginning 3rd year since EVERYONE is getting perio charting, diagnosis and prognosis checked at the same time
On the 1st appointment
1. Medical hx update -> present it to the instructor you will be working with (i.e. perio, prostho, or restorative instructor or treatment plan coordinator,)
a. Add and fill out “OD/Emerg & Med Hist” Form if not already added in OD appointment i. Complete subtab “Med History”
ii. Remember to take blood pressure reading and blood glucose levels as needed 2. After medical hx update, if the intraoral/extraoral exam has not been done and recorded, please
do so now (this can be approved later by treatment plan coordinator) a. Complete subtab “OD Oral Exam” if not done already
3. Start Perio Assessment: a. Chart add code 01204P (zero cost) b. Complete Full Perio Charting c. Under “TP, CCP & Recall” Form, fill out “UG Perio Exam TP” Form
i. You will be required to present perio diagnosis, prognosis and treatment. ii. Please fill it out this form ENTIRELY. If not, students will be waiting forever.
4. Start Dentition Assessment: a. For new patients you saw in OD in 2nd year, you may need to re-check caries. However, this
is instructor dependent as you already one to assess caries in 2nd year. b. You may also have to take additional radiographs
5. Prostho assessment (as needed for patient): a. Before appointment, please review prostho knowledge as required b. Find prostho instructor and they will help you to fill out the prostho form, BUT not until
Tx Plan approved by Coordinator. 6. Tx Coordinator:
a. Under “TP, CCP & Recall Form” fill out “Treatment Plan” tab b. Schedule Tx Plan Coordinator to review & approve your Completed ”Treatment Plan” c. Add code 06000, or 06001 to the Tx Plan (“Tx Plans” tab in the EHR)
7. Commonly Used Codes a. 01103 – Complete Exam (if not already added in OD) b. Perio charting Codes:
i. If you do full mouth perio charting, add 01204P ii. If you do PSR, add 01202P
c. Scaling 11111, 11112, 11113 d. Oral Hygiene Instruction 13211 e. ½ Polishing 11107 f. Treatment Planning Codes (06001 if you finished, 06000 if incomplete)
On the 2nd appointment
- Continue wherever you left off in 1st appointment - If you didn’t finish, have your Tx planning session (book this with Holly at Clinic 2 reception)
o When booking, know your student provider code provided in the bottom left corner of Axium, chair number, patient chart number, and treatment plan coordinator’s name
- If tx planning completed, start providing treatment (usually scaling)
Transferred Patient Prior to Appointment
Book an appointment Complete Medical consult and anaesthesia/sedation consult Book an Tx review session with your Coordinator
o When booking, know your student provider code provided in the bottom left corner of Axium, chair number, patient chart number, and treatment plan coordinator’s name
o Please remember to delete planned procedures that are no longer needed (coordinator can approve deleted procedures)
On the 1st appointment
1. Med history update 2. If last appointment was more than 1 year ago do a Recall Exam & Perio Recall Exam. 3. Do dentition check and prostho check as required 4. Do Tx review with your coordinator. 5. If you have time, start planned tx
Recall Patient Prior to Recall Appointment
Book an appointment Complete Medical consult and anaesthesia/sedation consult
1st appointment
1. Medical Hx update -> present it to the instructor (usually Perio instructor, but you can also ask the Resto or Tx Coordinator
2. Add 01202 code – for recall (fill out the Recall/Perio Recall Exam tabs under the “TP, CCP & Recall Exam” form)
3. Check Chief Complaint a. Sometimes they do have specific chief complaint -> then assess accordingly b. Usually the patient say that they are here for a check-up
4. Check Dentition a. Check for caries and integrity of old fillings. b. Fill out the recall exam form - > Present Dx and Tx Plan to Resto Instructor -> if any resto
Tx is required, Do ‘CHART ADD’’ and get it swiped by instructor as the form, make sure you click Estimate icon to get the pt. signature!!!!!!
c. You may need to take radiographs to assess caries progress. The instructor will prescribe the required radiographs BEFORE you take the radiographs
d. PLEASE get approval for your radiographs (get them swiped in MiPACS). Make Dr. Ernest Lam happy.
5. Check Perio a. complete PSR under perio tab b. if full charting indicated by PSR, or previous full charting was > 1 year ago) and fill the
Perio Recall Exam form – Present Dx and Tx Plan to Perio instructor and then approve codes and form.
If you didn’t need full perio charting -> add 01202P code If you did full perio charting, add 01204P code. **** Don’t forget to add code with ‘P’ for your Perio Credits ****
6. Prostho assessment (as needed for patient): a. Before appointment, please review prostho knowledge as required b. Find prostho instructor and they will help you to fill out the prostho form ONLY as directed
by your Coordinator
Codes o Add recall exam code – 01202 - OralExam&DiagForPreviousPt o Perio Charting Codes:
If you do full mouth perio charting, add 01204P If you do PSR, add 01202P
o Usually add: Scaling 11111, 11112 Oral Hygiene Instruction 13211 ½ Polishing 11107
Re-eval Patient
Perio re-evaluation when indicated for certain patients: o Full perio charting (6-8 weeks after scaling completed) and put perio re-eval code into the
EHR. Complete Re-eval tab in “TP, CCP, & Recall Exam” form.
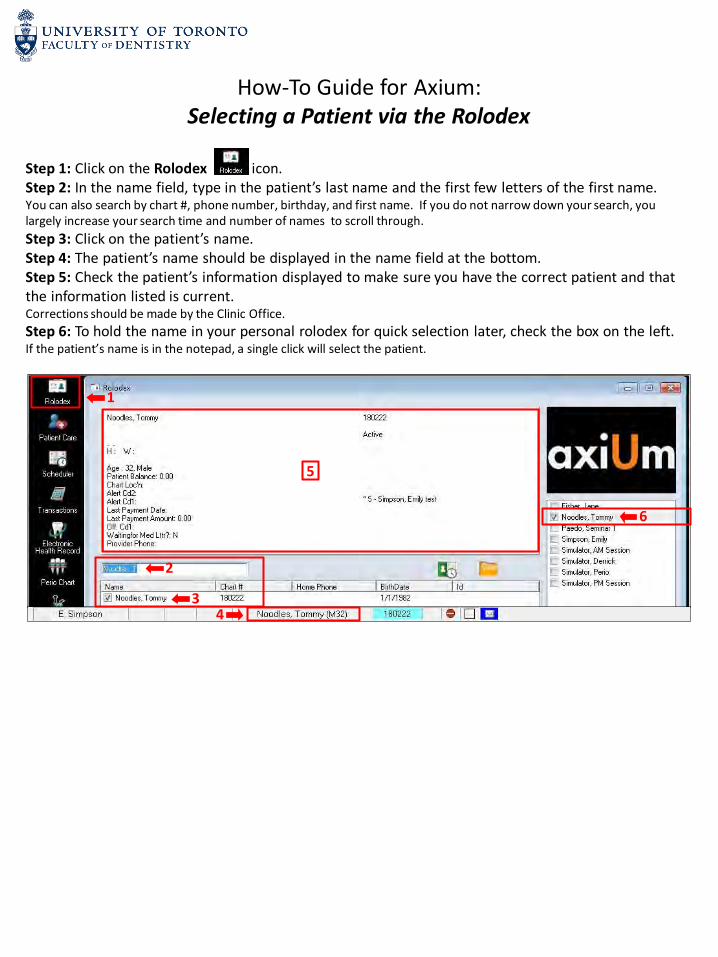
How-To Guide for Axium: Selecting a Patient via the Rolodex
Step 1: Click on the Rolodex icon. Step 2: In the name field, type in the patient’s last name and the first few letters of the first name. You can also search by chart #, phone number, birthday, and first name. If you do not narrow down your search, you largely increase your search time and number of names to scroll through.
Step 3: Click on the patient’s name. Step 4: The patient’s name should be displayed in the name field at the bottom. Step 5: Check the patient’s information displayed to make sure you have the correct patient and that the information listed is current. Corrections should be made by the Clinic Office.
Step 6: To hold the name in your personal rolodex for quick selection later, check the box on the left. If the patient’s name is in the notepad, a single click will select the patient.
1
2
5
3 4
6
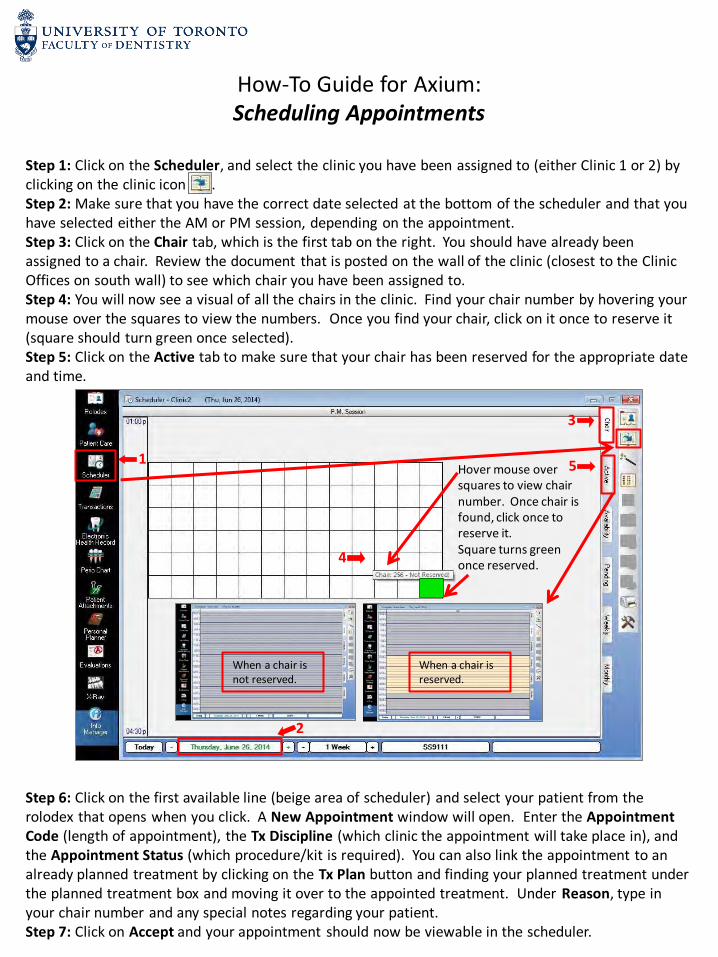
How-To Guide for Axium: Scheduling Appointments
Step 1: Click on the Scheduler, and select the clinic you have been assigned to (either Clinic 1 or 2) by clicking on the clinic icon . Step 2: Make sure that you have the correct date selected at the bottom of the scheduler and that you have selected either the AM or PM session, depending on the appointment. Step 3: Click on the Chair tab, which is the first tab on the right. You should have already been assigned to a chair. Review the document that is posted on the wall of the clinic (closest to the Clinic Offices on south wall) to see which chair you have been assigned to. Step 4: You will now see a visual of all the chairs in the clinic. Find your chair number by hovering your mouse over the squares to view the numbers. Once you find your chair, click on it once to reserve it (square should turn green once selected). Step 5: Click on the Active tab to make sure that your chair has been reserved for the appropriate date and time. Step 6: Click on the first available line (beige area of scheduler) and select your patient from the rolodex that opens when you click. A New Appointment window will open. Enter the Appointment Code (length of appointment), the Tx Discipline (which clinic the appointment will take place in), and the Appointment Status (which procedure/kit is required). You can also link the appointment to an already planned treatment by clicking on the Tx Plan button and finding your planned treatment under the planned treatment box and moving it over to the appointed treatment. Under Reason, type in your chair number and any special notes regarding your patient. Step 7: Click on Accept and your appointment should now be viewable in the scheduler.
Hover mouse over squares to view chair number. Once chair is found, click once to reserve it. Square turns green once reserved.
When a chair is not reserved.
When a chair is reserved.
1
2
3
4
5
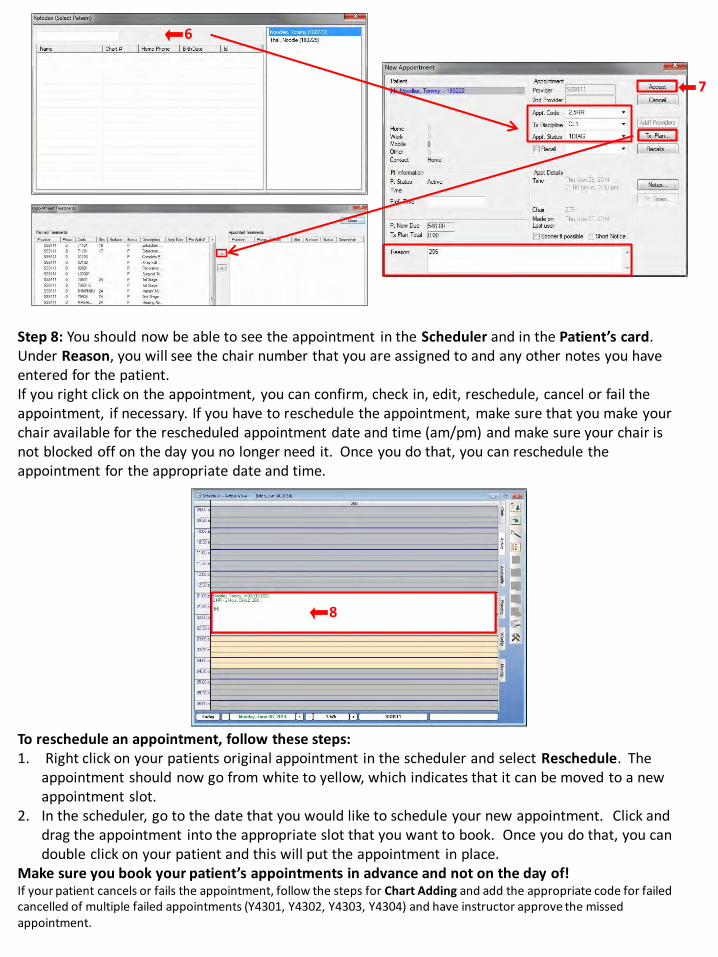
Step 8: You should now be able to see the appointment in the Scheduler and in the Patient’s card. Under Reason, you will see the chair number that you are assigned to and any other notes you have entered for the patient. If you right click on the appointment, you can confirm, check in, edit, reschedule, cancel or fail the appointment, if necessary. If you have to reschedule the appointment, make sure that you make your chair available for the rescheduled appointment date and time (am/pm) and make sure your chair is not blocked off on the day you no longer need it. Once you do that, you can reschedule the appointment for the appropriate date and time. To reschedule an appointment, follow these steps: 1. Right click on your patients original appointment in the scheduler and select Reschedule. The
appointment should now go from white to yellow, which indicates that it can be moved to a new appointment slot.
2. In the scheduler, go to the date that you would like to schedule your new appointment. Click and drag the appointment into the appropriate slot that you want to book. Once you do that, you can double click on your patient and this will put the appointment in place.
Make sure you book your patient’s appointments in advance and not on the day of! If your patient cancels or fails the appointment, follow the steps for Chart Adding and add the appropriate code for failed cancelled of multiple failed appointments (Y4301, Y4302, Y4303, Y4304) and have instructor approve the missed appointment.
6
7
8
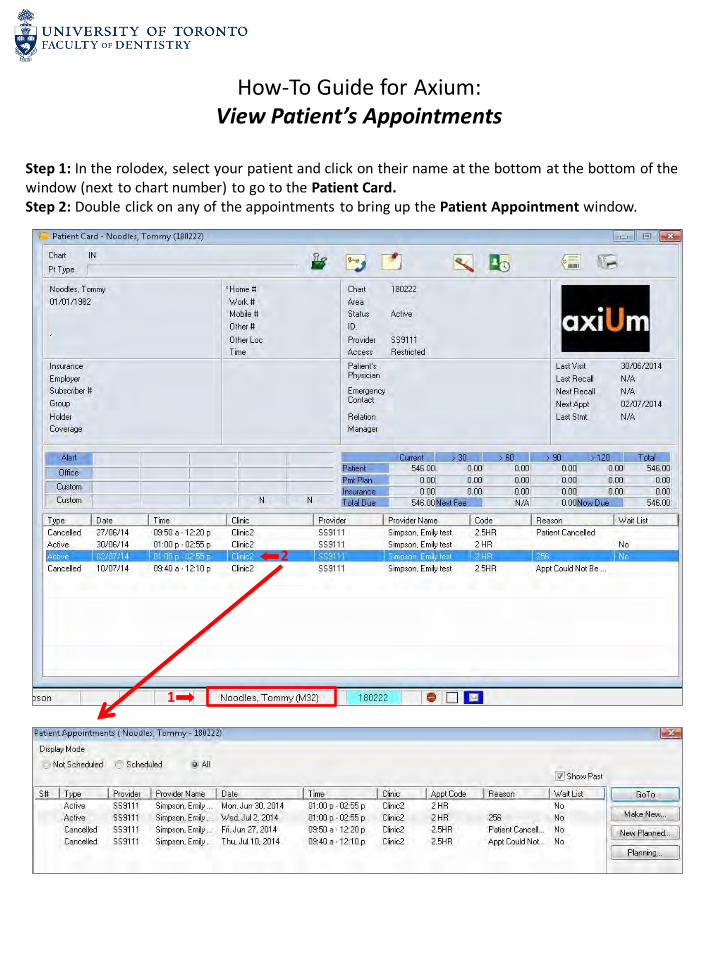
How-To Guide for Axium: View Patient’s Appointments
Step 1: In the rolodex, select your patient and click on their name at the bottom at the bottom of the window (next to chart number) to go to the Patient Card. Step 2: Double click on any of the appointments to bring up the Patient Appointment window.
1
2

SECTION 2: NEW PATIENTS AND USING EHR
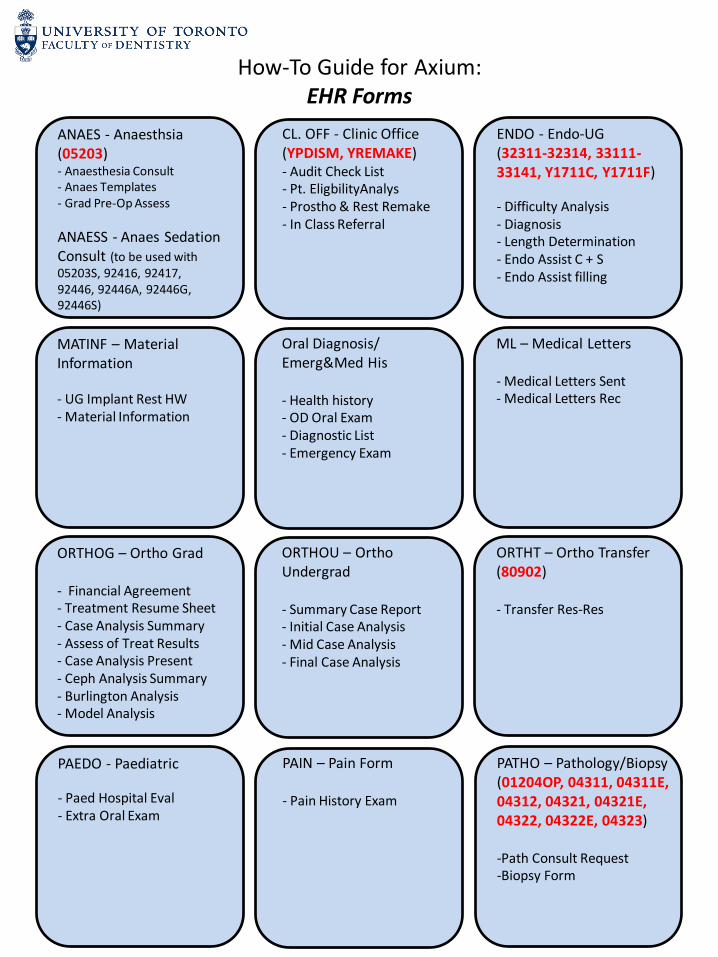
How-To Guide for Axium: EHR Forms
MATINF – Material Information - UG Implant Rest HW - Material Information
ML – Medical Letters - Medical Letters Sent - Medical Letters Rec
Oral Diagnosis/ Emerg&Med His - Health history - OD Oral Exam - Diagnostic List - Emergency Exam
ORTHOG – Ortho Grad - Financial Agreement - Treatment Resume Sheet - Case Analysis Summary - Assess of Treat Results - Case Analysis Present - Ceph Analysis Summary - Burlington Analysis - Model Analysis
ORTHT – Ortho Transfer (80902) - Transfer Res-Res
ORTHOU – Ortho Undergrad - Summary Case Report - Initial Case Analysis - Mid Case Analysis - Final Case Analysis
PATHO – Pathology/Biopsy (01204OP, 04311, 04311E, 04312, 04321, 04321E, 04322, 04322E, 04323) -Path Consult Request -Biopsy Form
PAIN – Pain Form - Pain History Exam
PAEDO - Paediatric
- Paed Hospital Eval - Extra Oral Exam
ANAES - Anaesthsia (05203) - Anaesthesia Consult - Anaes Templates - Grad Pre-Op Assess
ANAESS - Anaes Sedation Consult (to be used with 05203S, 92416, 92417, 92446, 92446A, 92446G, 92446S)
CL. OFF - Clinic Office (YPDISM, YREMAKE) - Audit Check List - Pt. EligbilityAnalys - Prostho & Rest Remake - In Class Referral
ENDO - Endo-UG (32311-32314, 33111-33141, Y1711C, Y1711F)
- Difficulty Analysis - Diagnosis - Length Determination - Endo Assist C + S - Endo Assist filling
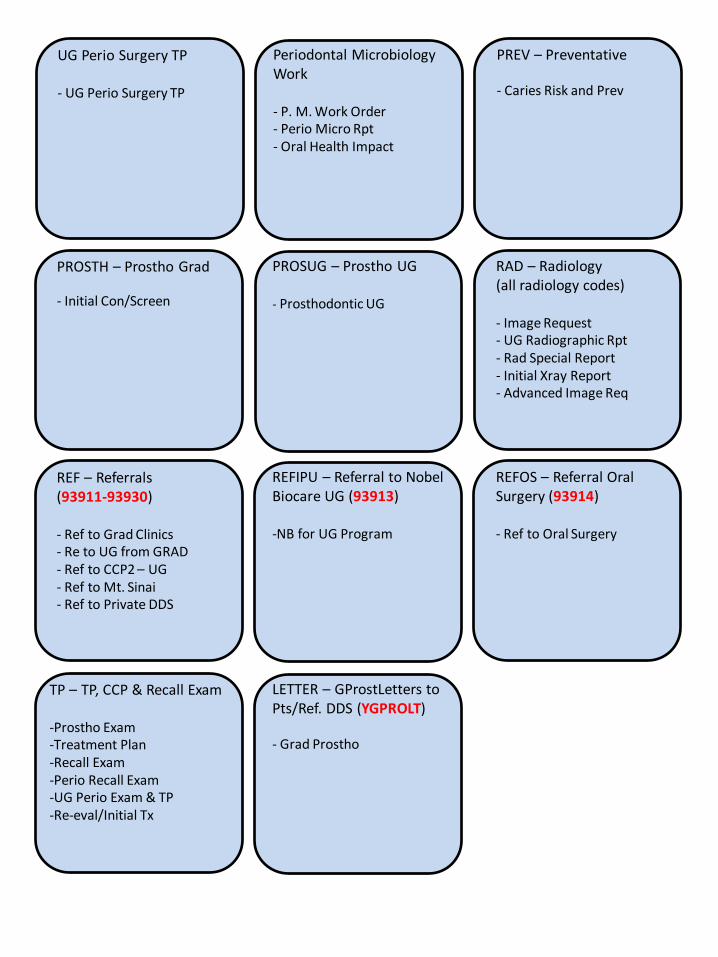
PREV – Preventative - Caries Risk and Prev
Periodontal Microbiology Work - P. M. Work Order - Perio Micro Rpt - Oral Health Impact
UG Perio Surgery TP - UG Perio Surgery TP
RAD – Radiology (all radiology codes) - Image Request - UG Radiographic Rpt - Rad Special Report - Initial Xray Report - Advanced Image Req
PROSUG – Prostho UG - Prosthodontic UG
PROSTH – Prostho Grad
- Initial Con/Screen
REFOS – Referral Oral Surgery (93914) - Ref to Oral Surgery
REFIPU – Referral to Nobel Biocare UG (93913) -NB for UG Program
REF – Referrals (93911-93930) - Ref to Grad Clinics - Re to UG from GRAD - Ref to CCP2 – UG - Ref to Mt. Sinai - Ref to Private DDS
LETTER – GProstLetters to Pts/Ref. DDS (YGPROLT) - Grad Prostho
TP – TP, CCP & Recall Exam -Prostho Exam -Treatment Plan -Recall Exam -Perio Recall Exam -UG Perio Exam & TP -Re-eval/Initial Tx
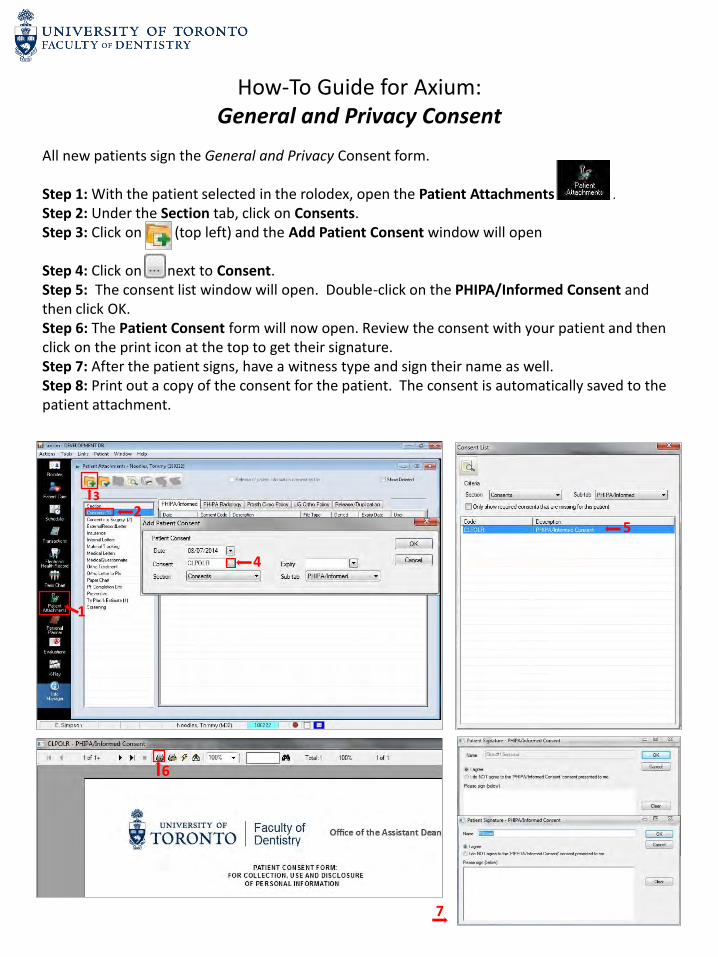
How-To Guide for Axium: General and Privacy Consent
All new patients sign the General and Privacy Consent form.
Step 1: With the patient selected in the rolodex, open the Patient Attachments . Step 2: Under the Section tab, click on Consents. Step 3: Click on (top left) and the Add Patient Consent window will open
Step 4: Click on next to Consent. Step 5: The consent list window will open. Double-click on the PHIPA/Informed Consent and then click OK. Step 6: The Patient Consent form will now open. Review the consent with your patient and then click on the print icon at the top to get their signature. Step 7: After the patient signs, have a witness type and sign their name as well. Step 8: Print out a copy of the consent for the patient. The consent is automatically saved to the patient attachment.
6
4
1
2 3
5
7
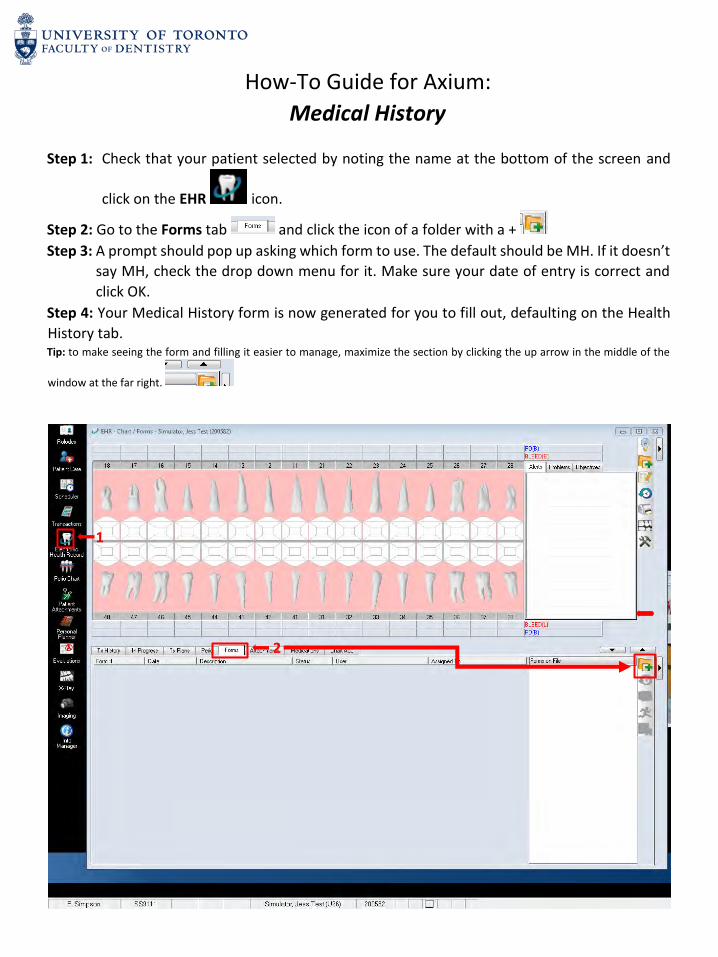
How-To Guide for Axium:
Medical History
Step 1: Check that your patient selected by noting the name at the bottom of the screen and
click on the EHR icon.
Step 2: Go to the Forms tab and click the icon of a folder with a +
Step 3: A prompt should pop up asking which form to use. The default should be MH. If it doesn’t
say MH, check the drop down menu for it. Make sure your date of entry is correct and
click OK.
Step 4: Your Medical History form is now generated for you to fill out, defaulting on the Health
History tab. Tip: to make seeing the form and filling it easier to manage, maximize the section by clicking the up arrow in the middle of the
window at the far right.
1
2

3
4
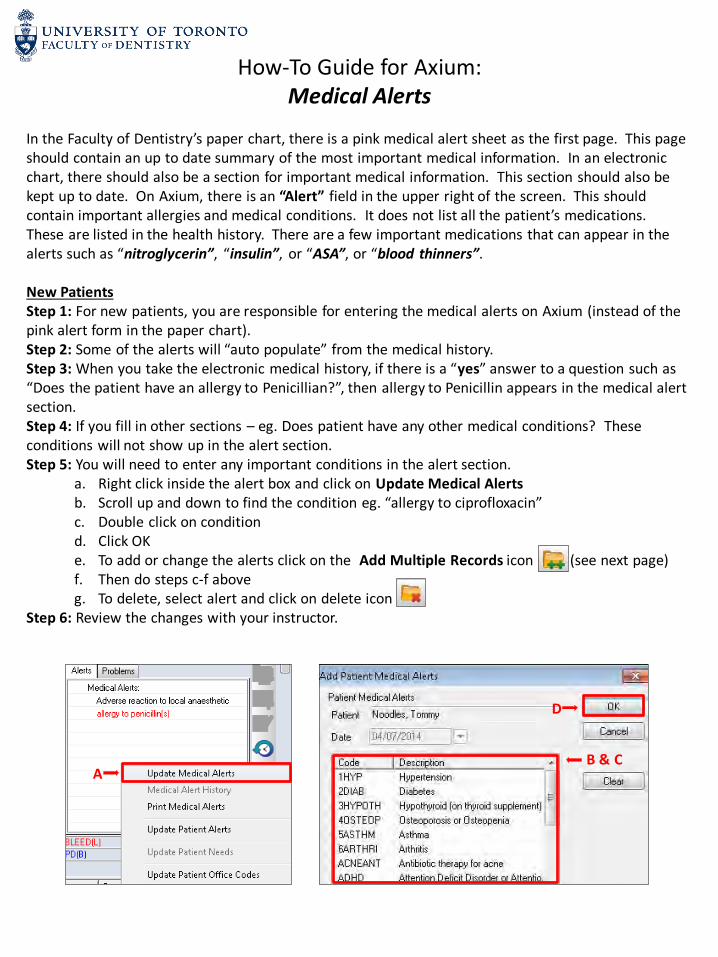
How-To Guide for Axium: Medical Alerts
In the Faculty of Dentistry’s paper chart, there is a pink medical alert sheet as the first page. This page should contain an up to date summary of the most important medical information. In an electronic chart, there should also be a section for important medical information. This section should also be kept up to date. On Axium, there is an “Alert” field in the upper right of the screen. This should contain important allergies and medical conditions. It does not list all the patient’s medications. These are listed in the health history. There are a few important medications that can appear in the alerts such as “nitroglycerin”, “insulin”, or “ASA”, or “blood thinners”. New Patients Step 1: For new patients, you are responsible for entering the medical alerts on Axium (instead of the pink alert form in the paper chart). Step 2: Some of the alerts will “auto populate” from the medical history. Step 3: When you take the electronic medical history, if there is a “yes” answer to a question such as “Does the patient have an allergy to Penicillian?”, then allergy to Penicillin appears in the medical alert section. Step 4: If you fill in other sections – eg. Does patient have any other medical conditions? These conditions will not show up in the alert section. Step 5: You will need to enter any important conditions in the alert section.
a. Right click inside the alert box and click on Update Medical Alerts b. Scroll up and down to find the condition eg. “allergy to ciprofloxacin” c. Double click on condition d. Click OK e. To add or change the alerts click on the Add Multiple Records icon (see next page) f. Then do steps c-f above g. To delete, select alert and click on delete icon
Step 6: Review the changes with your instructor.
A B & C
D
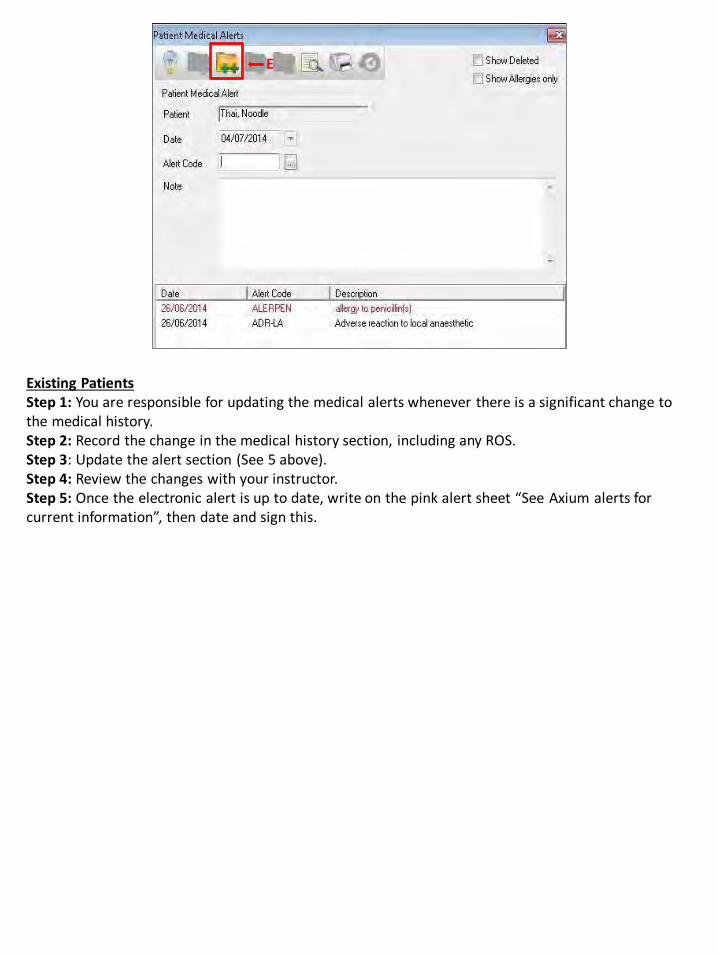
Existing Patients Step 1: You are responsible for updating the medical alerts whenever there is a significant change to the medical history. Step 2: Record the change in the medical history section, including any ROS. Step 3: Update the alert section (See 5 above). Step 4: Review the changes with your instructor. Step 5: Once the electronic alert is up to date, write on the pink alert sheet “See Axium alerts for current information”, then date and sign this.
E
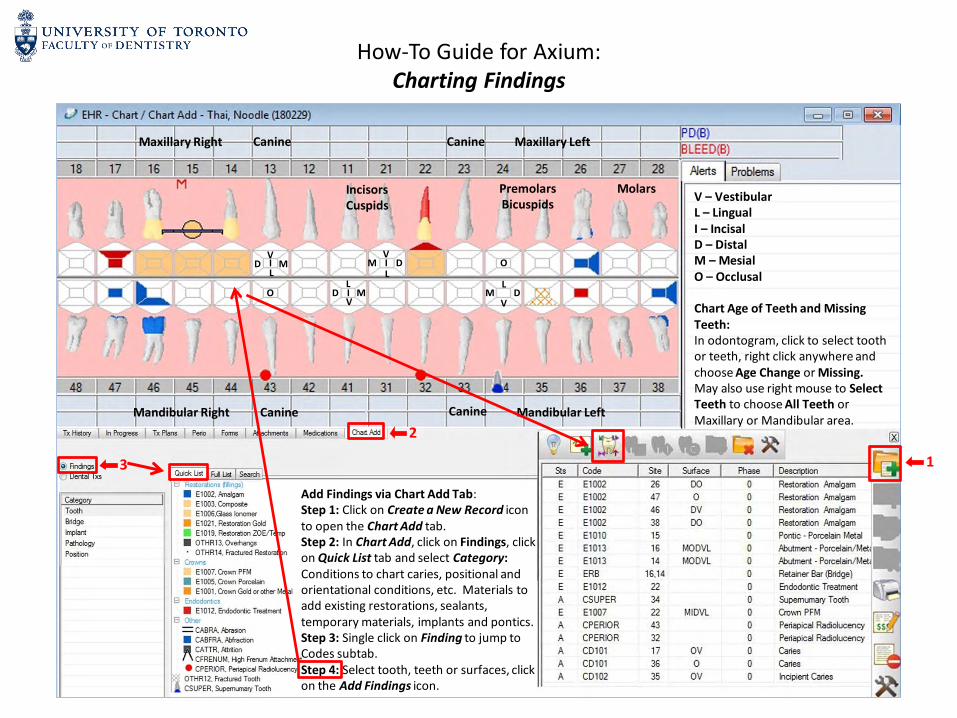
How-To Guide for Axium: Charting Findings
V – Vestibular L – Lingual I – Incisal D – Distal M – Mesial O – Occlusal Chart Age of Teeth and Missing Teeth: In odontogram, click to select tooth or teeth, right click anywhere and choose Age Change or Missing. May also use right mouse to Select Teeth to choose All Teeth or Maxillary or Mandibular area.
Canine Canine Maxillary Right Maxillary Left
Mandibular Right Mandibular Left Canine Canine
Incisors Cuspids
Premolars Bicuspids
Molars
V
L I D M
O L
V I M D
M D V
L I
D M L
V
O
Add Findings via Chart Add Tab: Step 1: Click on Create a New Record icon to open the Chart Add tab. Step 2: In Chart Add, click on Findings, click on Quick List tab and select Category: Conditions to chart caries, positional and orientational conditions, etc. Materials to add existing restorations, sealants, temporary materials, implants and pontics. Step 3: Single click on Finding to jump to Codes subtab. Step 4: Select tooth, teeth or surfaces, click on the Add Findings icon.
1
2
3
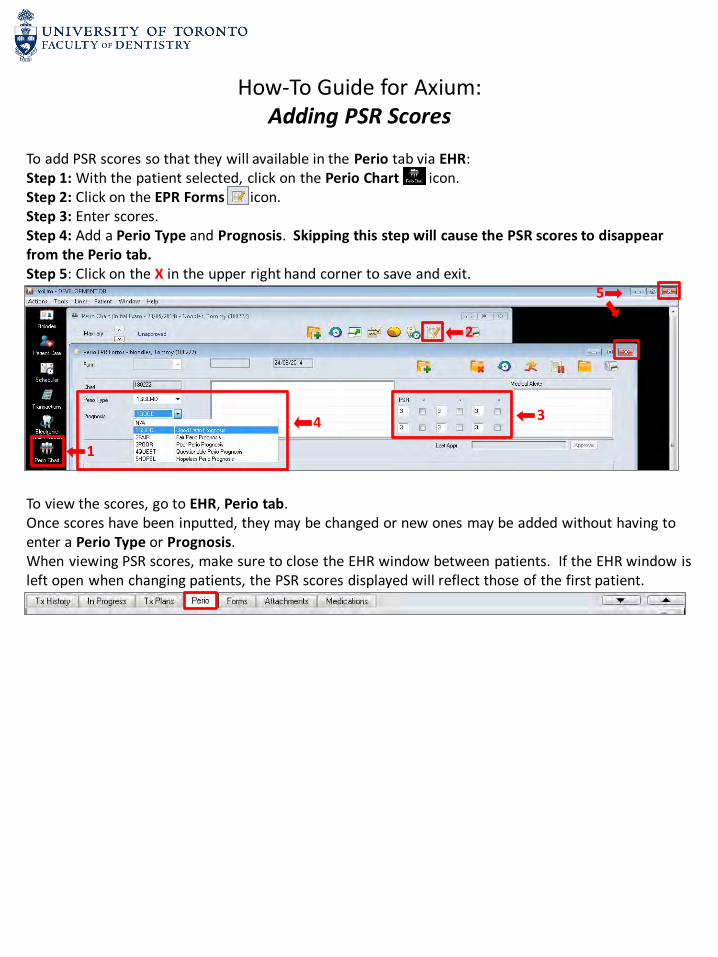
How-To Guide for Axium: Adding PSR Scores
To add PSR scores so that they will available in the Perio tab via EHR: Step 1: With the patient selected, click on the Perio Chart icon. Step 2: Click on the EPR Forms icon. Step 3: Enter scores. Step 4: Add a Perio Type and Prognosis. Skipping this step will cause the PSR scores to disappear from the Perio tab. Step 5: Click on the X in the upper right hand corner to save and exit. To view the scores, go to EHR, Perio tab. Once scores have been inputted, they may be changed or new ones may be added without having to enter a Perio Type or Prognosis. When viewing PSR scores, make sure to close the EHR window between patients. If the EHR window is left open when changing patients, the PSR scores displayed will reflect those of the first patient.
2
3
1
4
5
SECTION 3: TREATMENTS IN EHR
How-To Guide for Axium: Creating Treatment Plans – Student Version
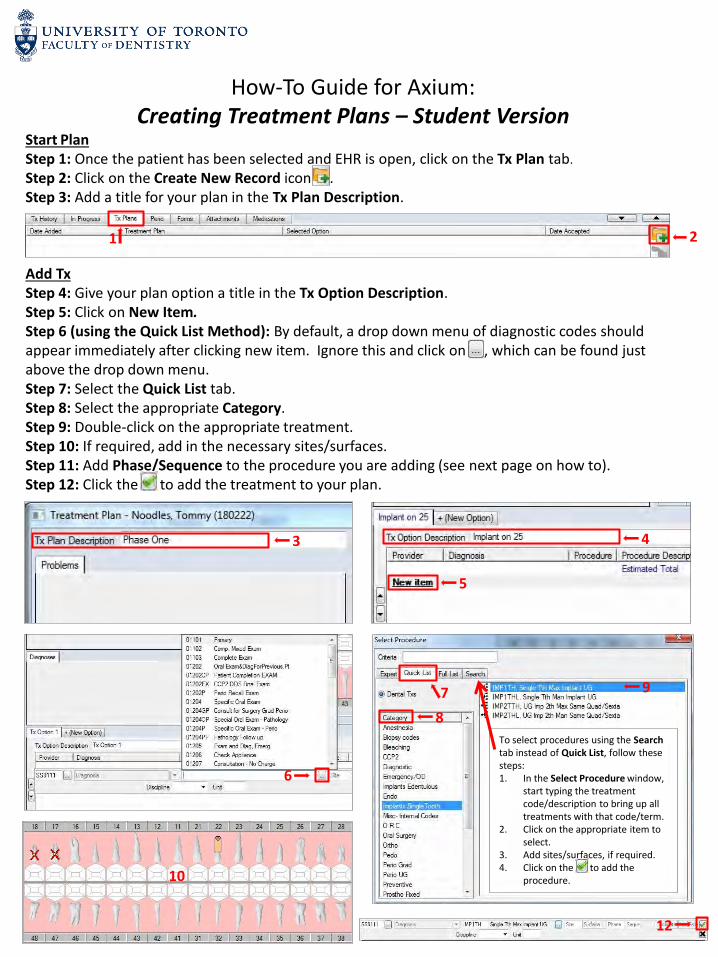
Start Plan Step 1: Once the patient has been selected and EHR is open, click on the Tx Plan tab.
Step 2: Click on the Create New Record icon . Step 3: Add a title for your plan in the Tx Plan Description. Add Tx Step 4: Give your plan option a title in the Tx Option Description. Step 5: Click on New Item. Step 6 (using the Quick List Method): By default, a drop down menu of diagnostic codes should appear immediately after clicking new item. Ignore this and click on , which can be found just above the drop down menu. Step 7: Select the Quick List tab. Step 8: Select the appropriate Category. Step 9: Double-click on the appropriate treatment. Step 10: If required, add in the necessary sites/surfaces. Step 11: Add Phase/Sequence to the procedure you are adding (see next page on how to). Step 12: Click the to add the treatment to your plan.
1 2
3 4
5
6
7
8
9
10
12
To select procedures using the Search tab instead of Quick List, follow these steps: 1. In the Select Procedure window,
start typing the treatment code/description to bring up all treatments with that code/term.
2. Click on the appropriate item to select.
3. Add sites/surfaces, if required. 4. Click on the to add the
procedure.
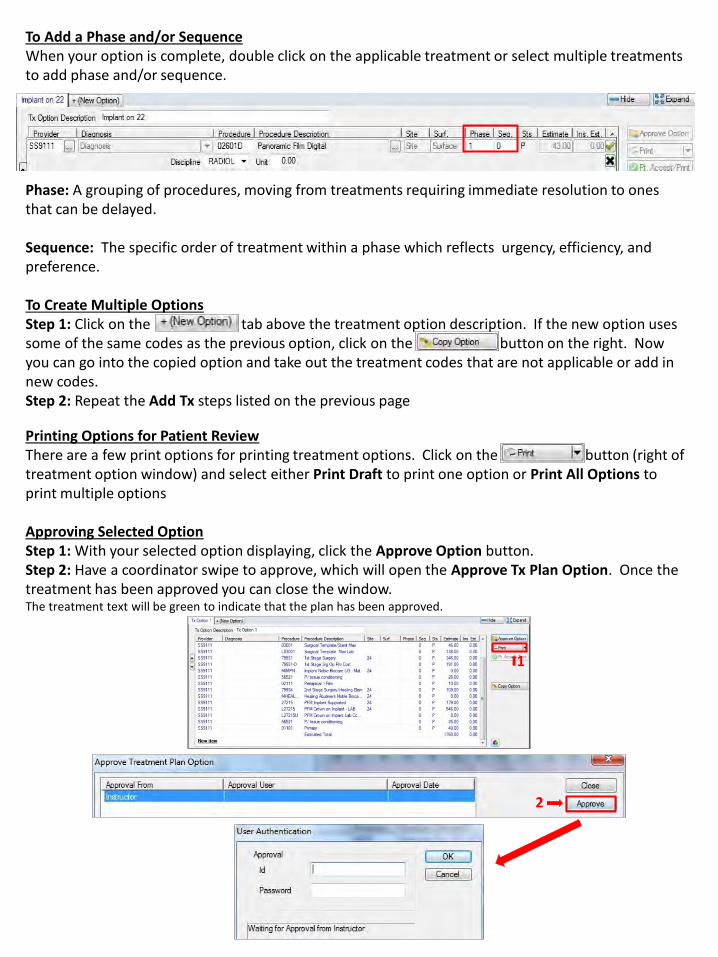
To Add a Phase and/or Sequence When your option is complete, double click on the applicable treatment or select multiple treatments to add phase and/or sequence. Phase: A grouping of procedures, moving from treatments requiring immediate resolution to ones that can be delayed. Sequence: The specific order of treatment within a phase which reflects urgency, efficiency, and preference. To Create Multiple Options Step 1: Click on the tab above the treatment option description. If the new option uses some of the same codes as the previous option, click on the button on the right. Now you can go into the copied option and take out the treatment codes that are not applicable or add in new codes. Step 2: Repeat the Add Tx steps listed on the previous page
Printing Options for Patient Review There are a few print options for printing treatment options. Click on the button (right of treatment option window) and select either Print Draft to print one option or Print All Options to print multiple options Approving Selected Option Step 1: With your selected option displaying, click the Approve Option button. Step 2: Have a coordinator swipe to approve, which will open the Approve Tx Plan Option. Once the treatment has been approved you can close the window. The treatment text will be green to indicate that the plan has been approved.
1
2
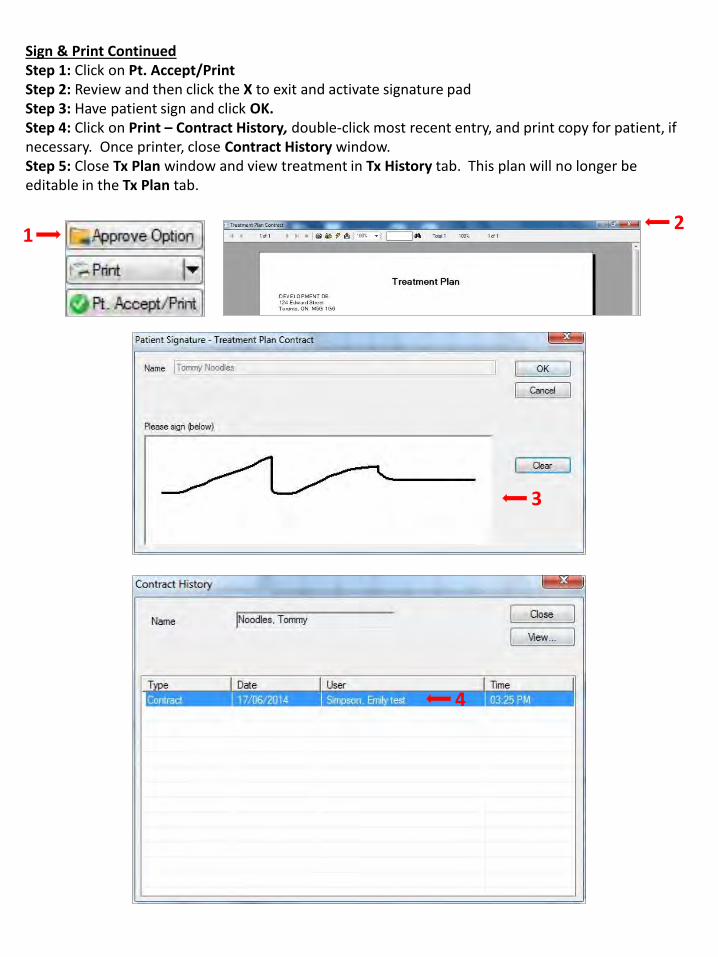
Sign & Print Continued Step 1: Click on Pt. Accept/Print Step 2: Review and then click the X to exit and activate signature pad Step 3: Have patient sign and click OK. Step 4: Click on Print – Contract History, double-click most recent entry, and print copy for patient, if necessary. Once printer, close Contract History window. Step 5: Close Tx Plan window and view treatment in Tx History tab. This plan will no longer be editable in the Tx Plan tab.
1 2
3
4
How-To Guide for axiUm: Chart Add University of Toronto Faculty of Dentistry
How‐To Guide for Axium: Chart Add
Each step is reflected in the diagram on the second page with the corresponding number.
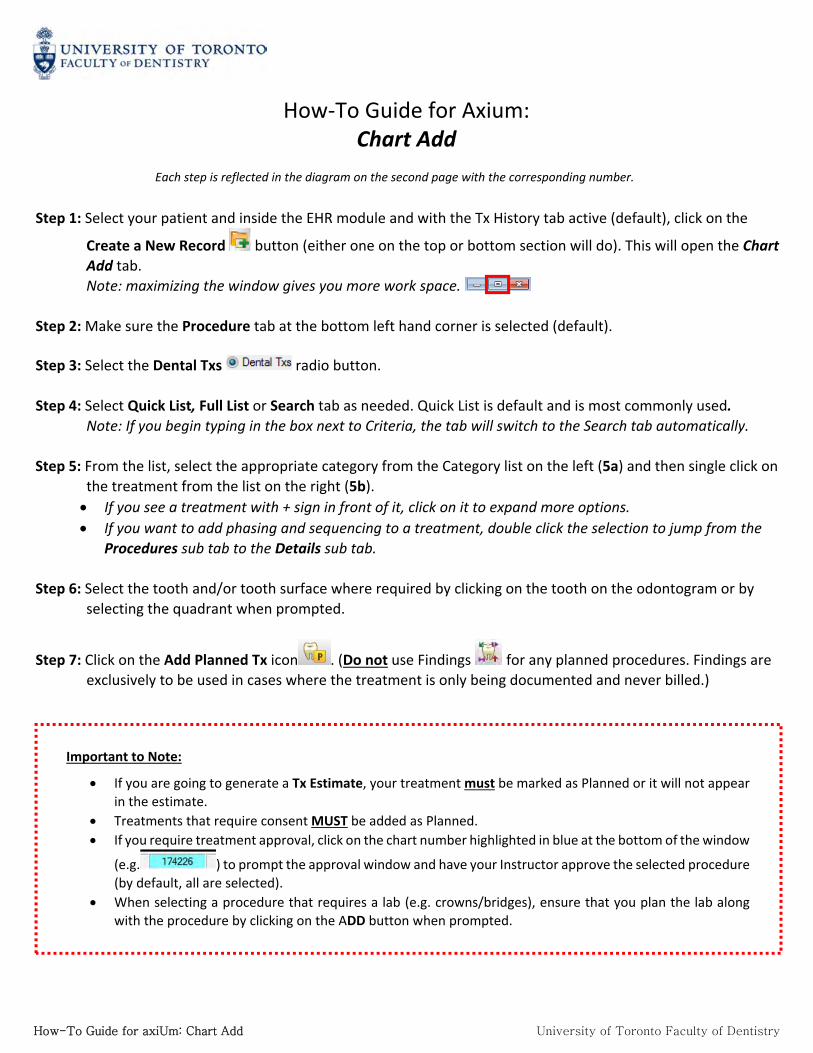
Step 1: Select your patient and inside the EHR module and with the Tx History tab active (default), click on the
Create a New Record button (either one on the top or bottom section will do). This will open the Chart Add tab. Note: maximizing the window gives you more work space.
Step 2: Make sure the Procedure tab at the bottom left hand corner is selected (default).
Step 3: Select the Dental Txs radio button.
Step 4: Select Quick List, Full List or Search tab as needed. Quick List is default and is most commonly used. Note: If you begin typing in the box next to Criteria, the tab will switch to the Search tab automatically.
Step 5: From the list, select the appropriate category from the Category list on the left (5a) and then single click on the treatment from the list on the right (5b). If you see a treatment with + sign in front of it, click on it to expand more options.
If you want to add phasing and sequencing to a treatment, double click the selection to jump from the
Procedures sub tab to the Details sub tab.
Step 6: Select the tooth and/or tooth surface where required by clicking on the tooth on the odontogram or by selecting the quadrant when prompted.
Step 7: Click on the Add Planned Tx icon . (Do not use Findings for any planned procedures. Findings are exclusively to be used in cases where the treatment is only being documented and never billed.)
Important to Note:
If you are going to generate a Tx Estimate, your treatment must be marked as Planned or it will not appear in the estimate.
Treatments that require consent MUST be added as Planned. If you require treatment approval, click on the chart number highlighted in blue at the bottom of the window
(e.g. ) to prompt the approval window and have your Instructor approve the selected procedure (by default, all are selected).
When selecting a procedure that requires a lab (e.g. crowns/bridges), ensure that you plan the lab along with the procedure by clicking on the ADD button when prompted.

How-To Guide for axiUm: Chart Add University of Toronto Faculty of Dentistry
2
3
4
5a
5b
6
7
Note: once treatment plans have been approved, the
colour of the text will change from blue to black.
1
How-To Guide for Axium: Print a Treatment Estimate
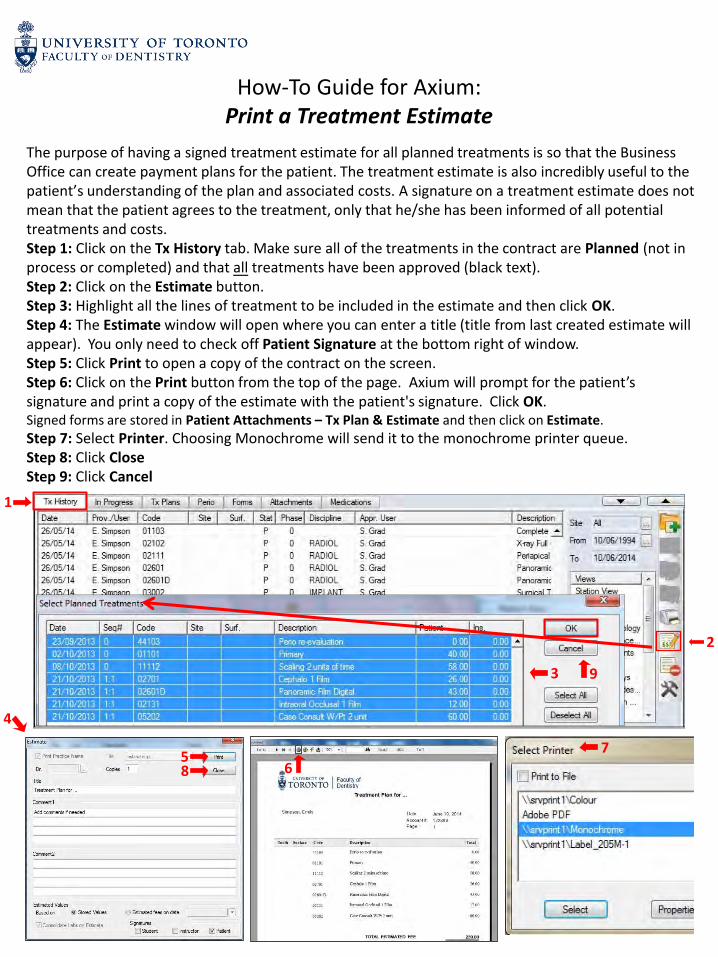
The purpose of having a signed treatment estimate for all planned treatments is so that the Business Office can create payment plans for the patient. The treatment estimate is also incredibly useful to the patient’s understanding of the plan and associated costs. A signature on a treatment estimate does not mean that the patient agrees to the treatment, only that he/she has been informed of all potential treatments and costs. Step 1: Click on the Tx History tab. Make sure all of the treatments in the contract are Planned (not in process or completed) and that all treatments have been approved (black text). Step 2: Click on the Estimate button. Step 3: Highlight all the lines of treatment to be included in the estimate and then click OK. Step 4: The Estimate window will open where you can enter a title (title from last created estimate will appear). You only need to check off Patient Signature at the bottom right of window. Step 5: Click Print to open a copy of the contract on the screen. Step 6: Click on the Print button from the top of the page. Axium will prompt for the patient’s signature and print a copy of the estimate with the patient's signature. Click OK. Signed forms are stored in Patient Attachments – Tx Plan & Estimate and then click on Estimate.
Step 7: Select Printer. Choosing Monochrome will send it to the monochrome printer queue.Step 8: Click Close Step 9: Click Cancel
4
6 5 8
1
2
3 9
7

How-To Guide for Axium: Altering Final Tx Plans
It is important to note that once a treatment plan has been approved by an instructor, it cannot be changed. However, an unapproved treatment plan can easily be altered if the wrong treatment was included or if plans have changed. If you need to change a plan that has already been approved (let’s say you initially planned an endo for your patient, but that option is no longer viable and you now need to extract the tooth), you will have to add a new Planned Tx with the correct procedure codes in the Tx History tab. When the treatment is ready to be approved, you will have your instructor approve both the newly added procedure AND the initial treatment that you deleted. Step 1: Select your patient from the rolodex and go to EHR. Click on the Create a New Record icon. Step 2: Under Quick List, select and under Category, click on appropriate category. Step 3: Select the new procedure code. Step 4: Click on the Add Planned Tx icon. Step 5: Click on the blue chart number at the bottom of the screen Step 6: Have your Instructor approve the newly added treatment as well as the deleted treatment.
2 3
4
5
6
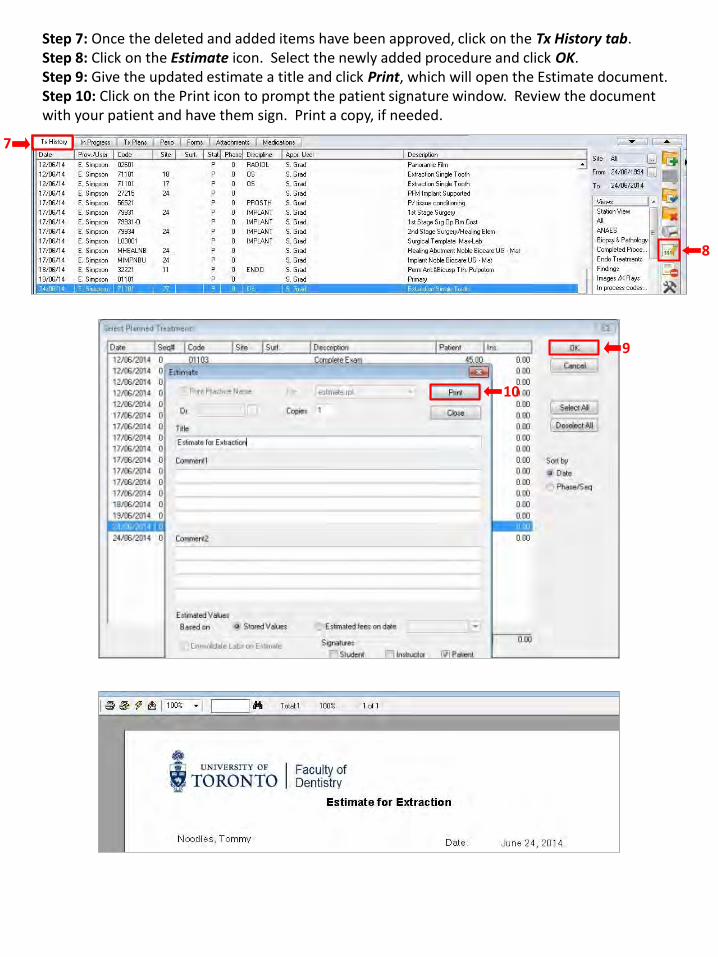
Step 7: Once the deleted and added items have been approved, click on the Tx History tab. Step 8: Click on the Estimate icon. Select the newly added procedure and click OK. Step 9: Give the updated estimate a title and click Print, which will open the Estimate document. Step 10: Click on the Print icon to prompt the patient signature window. Review the document with your patient and have them sign. Print a copy, if needed.
7
8
9
10
How-To Guide for Axium: Completing and Approving Treatment
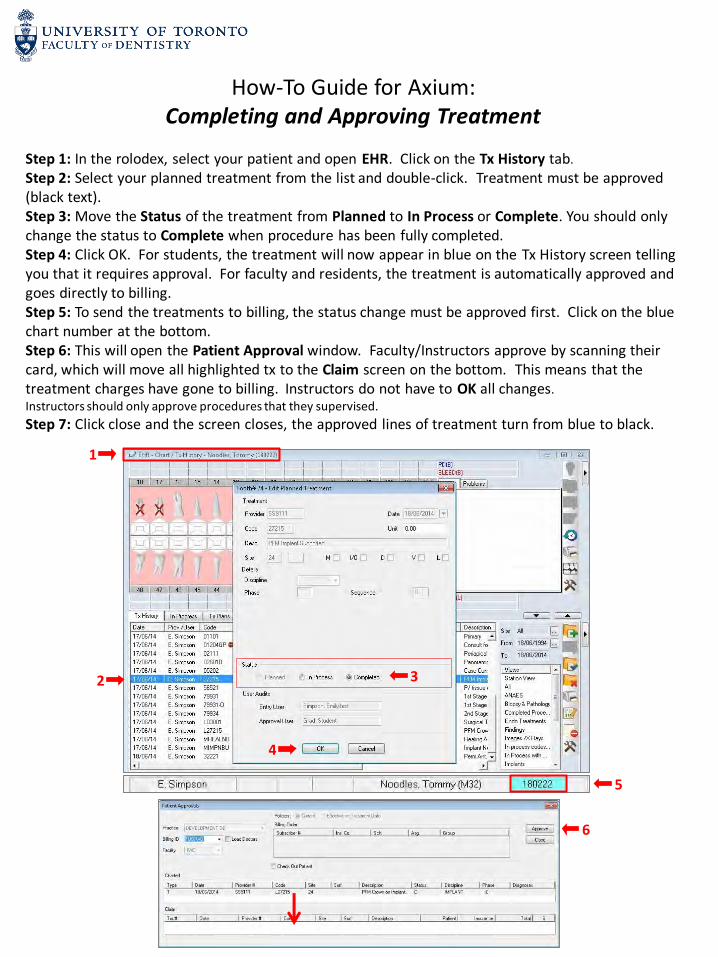
Step 1: In the rolodex, select your patient and open EHR. Click on the Tx History tab.
Step 2: Select your planned treatment from the list and double-click. Treatment must be approved (black text). Step 3: Move the Status of the treatment from Planned to In Process or Complete. You should only change the status to Complete when procedure has been fully completed. Step 4: Click OK. For students, the treatment will now appear in blue on the Tx History screen telling you that it requires approval. For faculty and residents, the treatment is automatically approved and goes directly to billing. Step 5: To send the treatments to billing, the status change must be approved first. Click on the blue chart number at the bottom. Step 6: This will open the Patient Approval window. Faculty/Instructors approve by scanning their card, which will move all highlighted tx to the Claim screen on the bottom. This means that the treatment charges have gone to billing. Instructors do not have to OK all changes.
Instructors should only approve procedures that they supervised.
Step 7: Click close and the screen closes, the approved lines of treatment turn from blue to black.
1
2 3
4
5
6
How-To Guide for Axium: Viewing Treatment on a Specific Tooth/Teeth
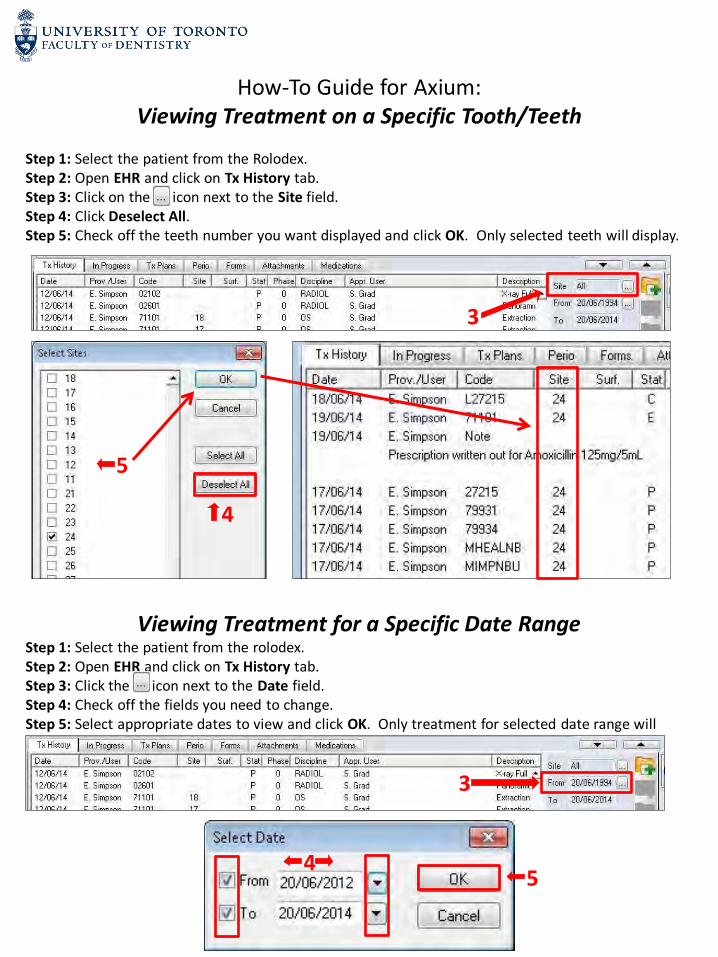
Step 1: Select the patient from the Rolodex. Step 2: Open EHR and click on Tx History tab. Step 3: Click on the icon next to the Site field. Step 4: Click Deselect All. Step 5: Check off the teeth number you want displayed and click OK. Only selected teeth will display.
Viewing Treatment for a Specific Date Range Step 1: Select the patient from the rolodex. Step 2: Open EHR and click on Tx History tab. Step 3: Click the icon next to the Date field. Step 4: Check off the fields you need to change. Step 5: Select appropriate dates to view and click OK. Only treatment for selected date range will display.
3
4
5
3
4
5
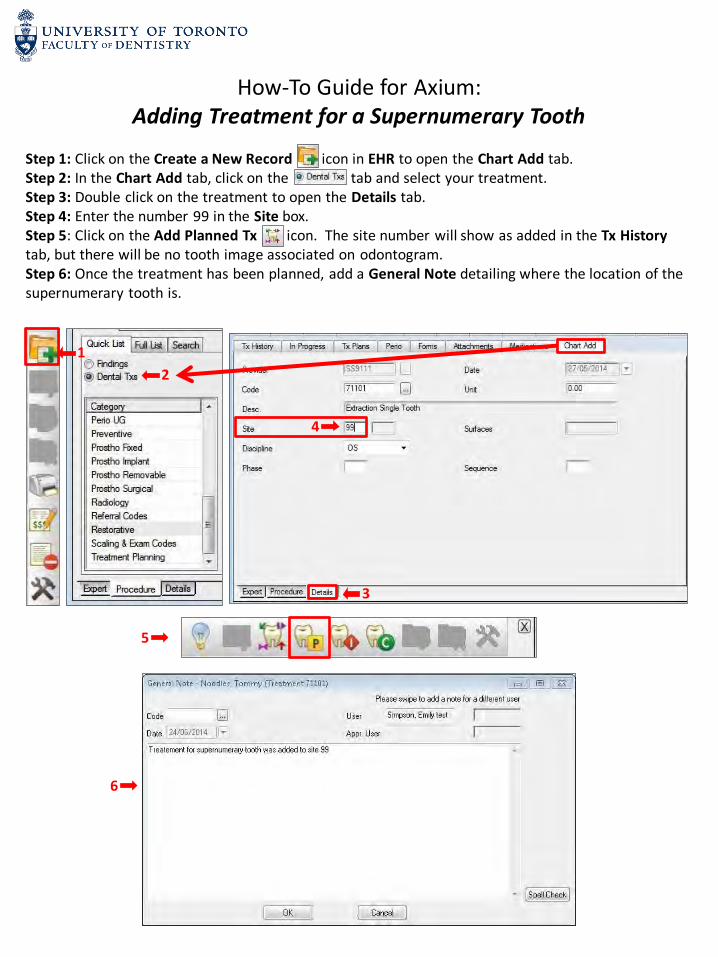
How-To Guide for Axium: Adding Treatment for a Supernumerary Tooth
Step 1: Click on the Create a New Record icon in EHR to open the Chart Add tab. Step 2: In the Chart Add tab, click on the tab and select your treatment. Step 3: Double click on the treatment to open the Details tab. Step 4: Enter the number 99 in the Site box. Step 5: Click on the Add Planned Tx icon. The site number will show as added in the Tx History tab, but there will be no tooth image associated on odontogram. Step 6: Once the treatment has been planned, add a General Note detailing where the location of the supernumerary tooth is.
1
2
3
4
5
6
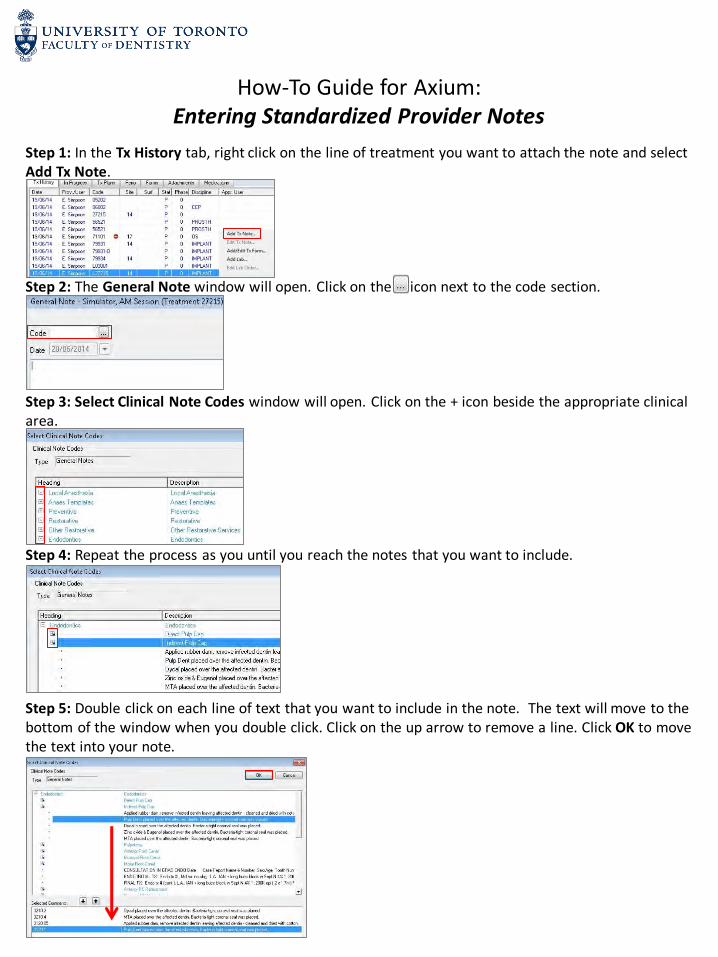
How-To Guide for Axium: Entering Standardized Provider Notes
Step 1: In the Tx History tab, right click on the line of treatment you want to attach the note and select Add Tx Note. Step 2: The General Note window will open. Click on the icon next to the code section. Step 3: Select Clinical Note Codes window will open. Click on the + icon beside the appropriate clinical area. Step 4: Repeat the process as you until you reach the notes that you want to include. Step 5: Double click on each line of text that you want to include in the note. The text will move to the bottom of the window when you double click. Click on the up arrow to remove a line. Click OK to move the text into your note.
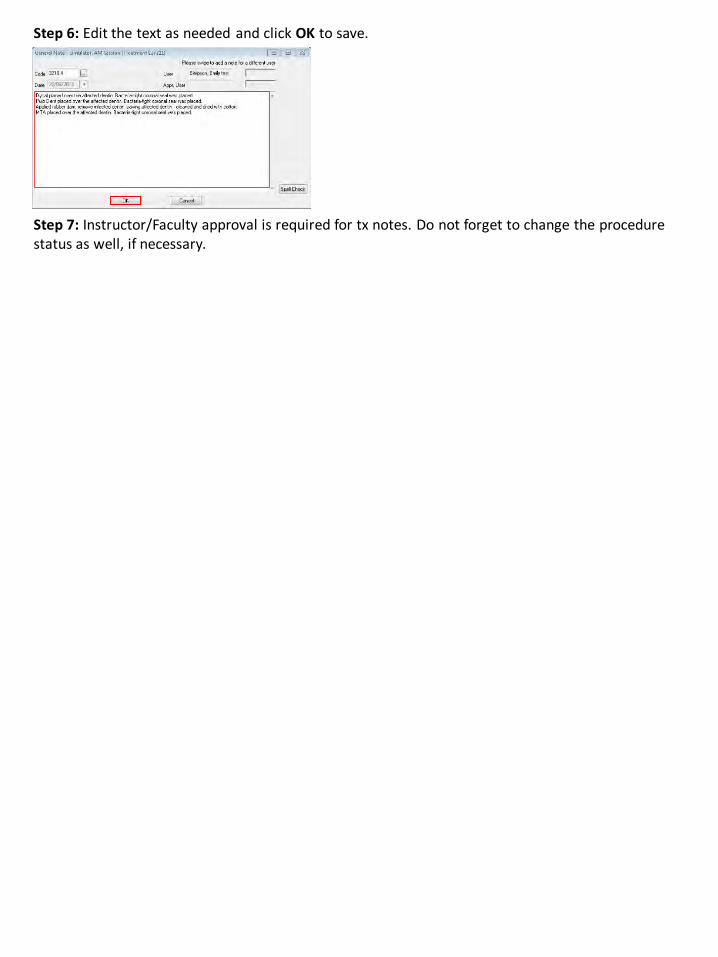
Step 6: Edit the text as needed and click OK to save. Step 7: Instructor/Faculty approval is required for tx notes. Do not forget to change the procedure status as well, if necessary.
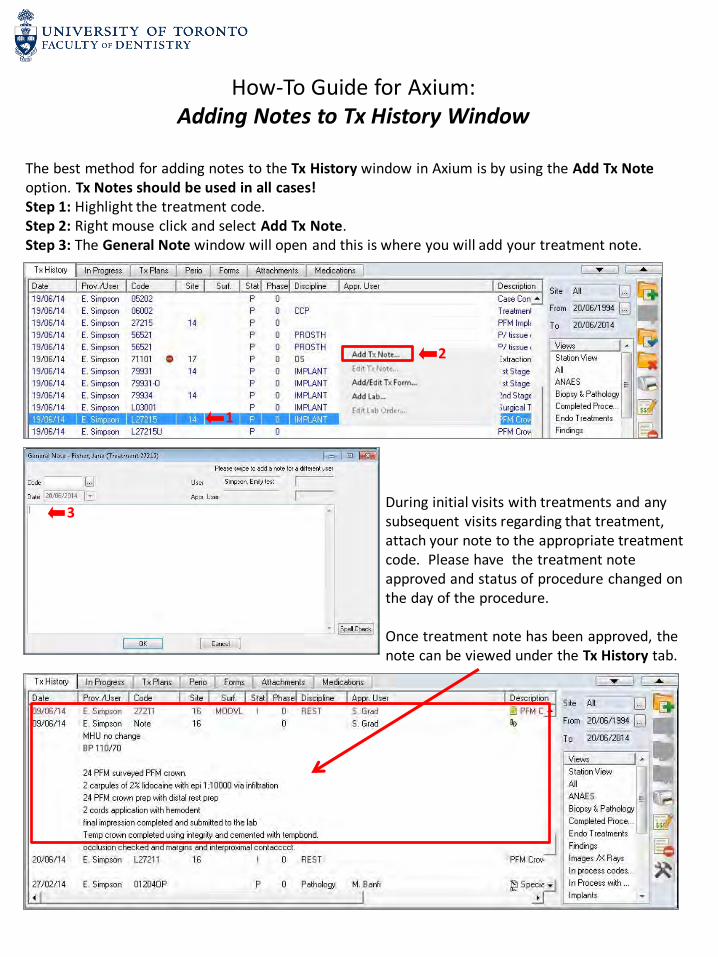
How-To Guide for Axium: Adding Notes to Tx History Window
The best method for adding notes to the Tx History window in Axium is by using the Add Tx Note option. Tx Notes should be used in all cases! Step 1: Highlight the treatment code. Step 2: Right mouse click and select Add Tx Note. Step 3: The General Note window will open and this is where you will add your treatment note.
During initial visits with treatments and any subsequent visits regarding that treatment, attach your note to the appropriate treatment code. Please have the treatment note approved and status of procedure changed on the day of the procedure. Once treatment note has been approved, the note can be viewed under the Tx History tab.
1
2
3
How-To Guide for Axium: Unapproved Charting & Treatment
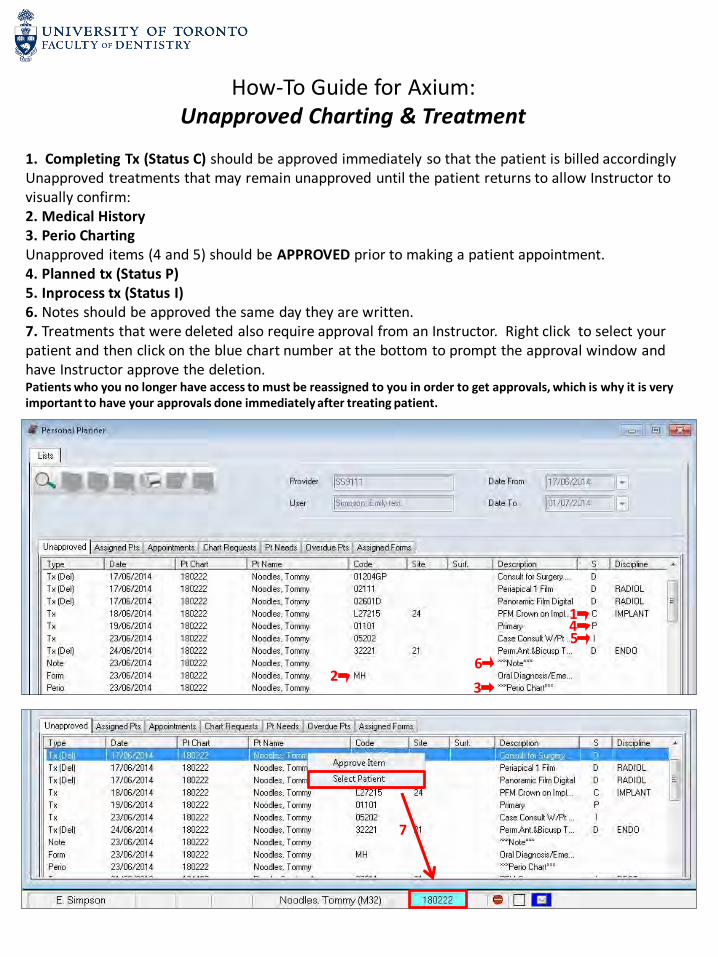
1. Completing Tx (Status C) should be approved immediately so that the patient is billed accordingly Unapproved treatments that may remain unapproved until the patient returns to allow Instructor to visually confirm: 2. Medical History 3. Perio Charting Unapproved items (4 and 5) should be APPROVED prior to making a patient appointment. 4. Planned tx (Status P) 5. Inprocess tx (Status I) 6. Notes should be approved the same day they are written. 7. Treatments that were deleted also require approval from an Instructor. Right click to select your patient and then click on the blue chart number at the bottom to prompt the approval window and have Instructor approve the deletion. Patients who you no longer have access to must be reassigned to you in order to get approvals, which is why it is very important to have your approvals done immediately after treating patient.
1
2
2
3
4 5
6
7
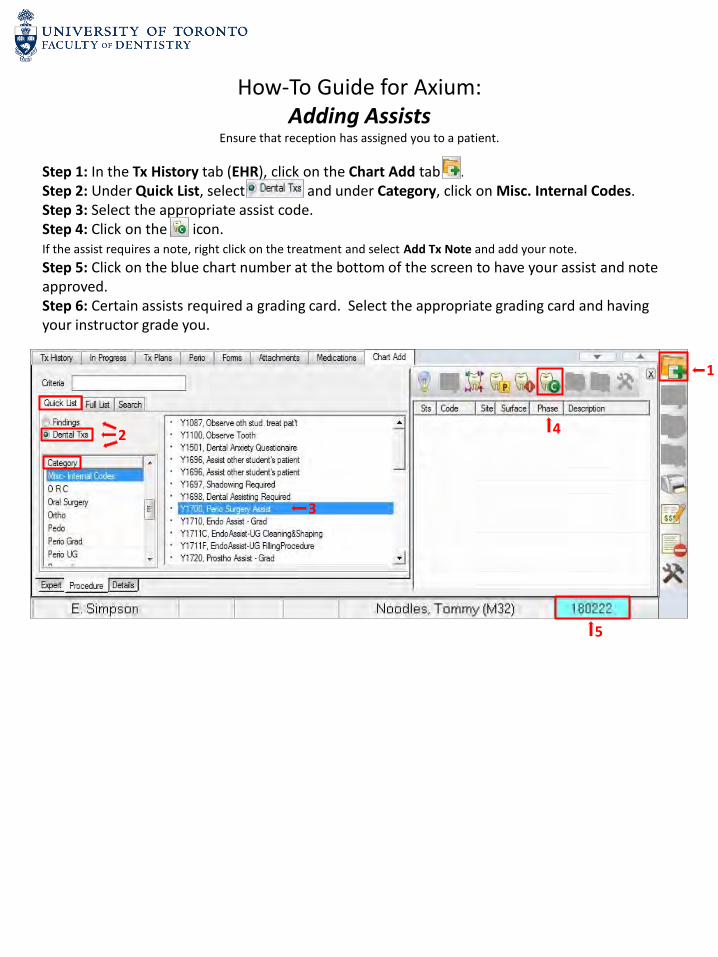
How-To Guide for Axium: Adding Assists
Ensure that reception has assigned you to a patient.
Step 1: In the Tx History tab (EHR), click on the Chart Add tab . Step 2: Under Quick List, select and under Category, click on Misc. Internal Codes. Step 3: Select the appropriate assist code. Step 4: Click on the icon. If the assist requires a note, right click on the treatment and select Add Tx Note and add your note. Step 5: Click on the blue chart number at the bottom of the screen to have your assist and note approved. Step 6: Certain assists required a grading card. Select the appropriate grading card and having your instructor grade you.
2
3
1
5
4 2
12
3, 4, 5,6 &7
1 9
10
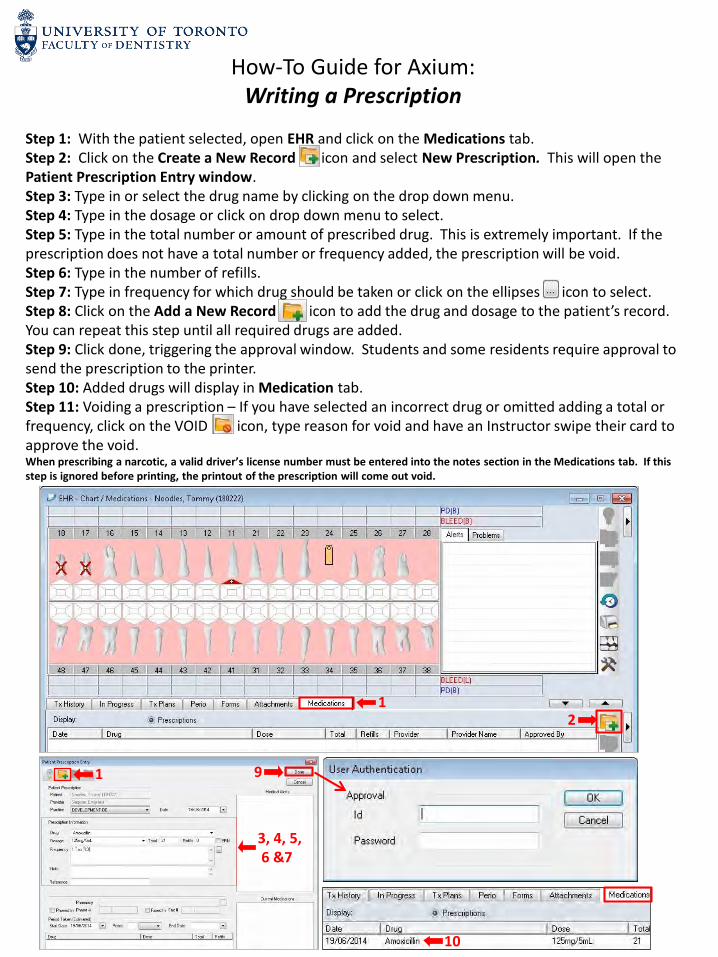
How-To Guide for Axium:Writing a Prescription
Step 1: With the patient selected, open EHR and click on the Medications tab.Step 2: Click on the Create a New Record icon and select New Prescription. This will open the Patient Prescription Entry window.Step 3: Type in or select the drug name by clicking on the drop down menu.Step 4: Type in the dosage or click on drop down menu to select.Step 5: Type in the total number or amount of prescribed drug. This is extremely important. If the prescription does not have a total number or frequency added, the prescription will be void.Step 6: Type in the number of refills.Step 7: Type in frequency for which drug should be taken or click on the ellipses icon to select.Step 8: Click on the Add a New Record icon to add the drug and dosage to the patient’s record. You can repeat this step until all required drugs are added. Step 9: Click done, triggering the approval window. Students and some residents require approval to send the prescription to the printer.Step 10: Added drugs will display in Medication tab.Step 11: Voiding a prescription – If you have selected an incorrect drug or omitted adding a total or frequency, click on the VOID icon, type reason for void and have an Instructor swipe their card to approve the void.When prescribing a narcotic, a valid driver’s license number must be entered into the notes section in the Medications tab. If this step is ignored before printing, the printout of the prescription will come out void.

SECTION 4: REFERRALS (CHART ADD)

How-To Guide for Axium: Referrals – Nobel Biocare
Step 1: Select your patient from the Rolodex and then click on the EHR icon. Step 2: Click on the Create a New Record Icon to open the Chart Add tab. Step 3: Under the Quick List tab, select Dental Txs and under Category, select Referral Codes. Step 4: Highlight code 93913 Referred to Nobel Biocare UG Program to IPU. Step 5: Once your referral code is highlighted, click on the Add In Process Tx icon. Step 6: Click on the Tx History tab, highlight and right click the referral code and select Add/Edit Tx Form.
2 3
4
5
6
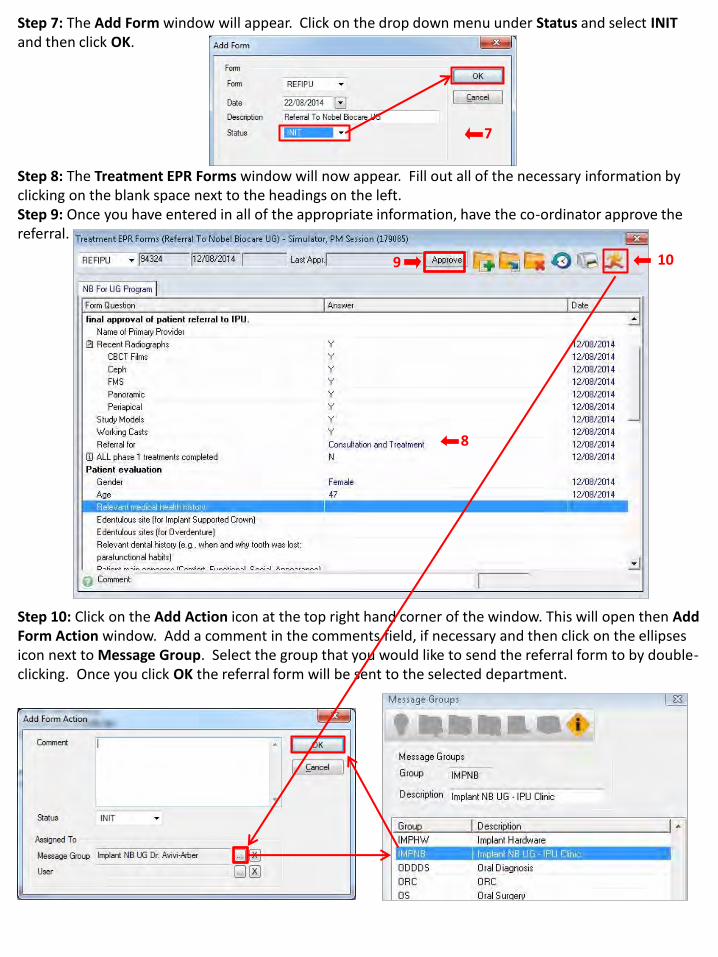
Step 7: The Add Form window will appear. Click on the drop down menu under Status and select INIT and then click OK. Step 8: The Treatment EPR Forms window will now appear. Fill out all of the necessary information by clicking on the blank space next to the headings on the left. Step 9: Once you have entered in all of the appropriate information, have the co-ordinator approve the referral. Step 10: Click on the Add Action icon at the top right hand corner of the window. This will open then Add Form Action window. Add a comment in the comments field, if necessary and then click on the ellipses icon next to Message Group. Select the group that you would like to send the referral form to by double-clicking. Once you click OK the referral form will be sent to the selected department.
7
8
10 9
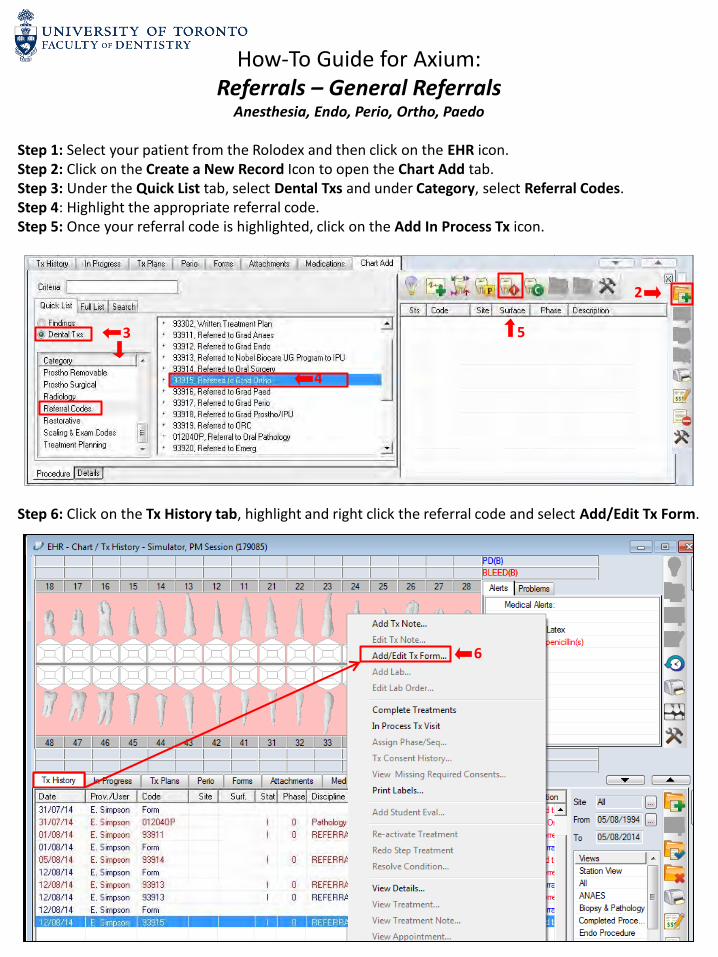
How-To Guide for Axium: Referrals – General Referrals
Anesthesia, Endo, Perio, Ortho, Paedo Step 1: Select your patient from the Rolodex and then click on the EHR icon. Step 2: Click on the Create a New Record Icon to open the Chart Add tab. Step 3: Under the Quick List tab, select Dental Txs and under Category, select Referral Codes. Step 4: Highlight the appropriate referral code. Step 5: Once your referral code is highlighted, click on the Add In Process Tx icon. Step 6: Click on the Tx History tab, highlight and right click the referral code and select Add/Edit Tx Form.
2
3
4
5
6

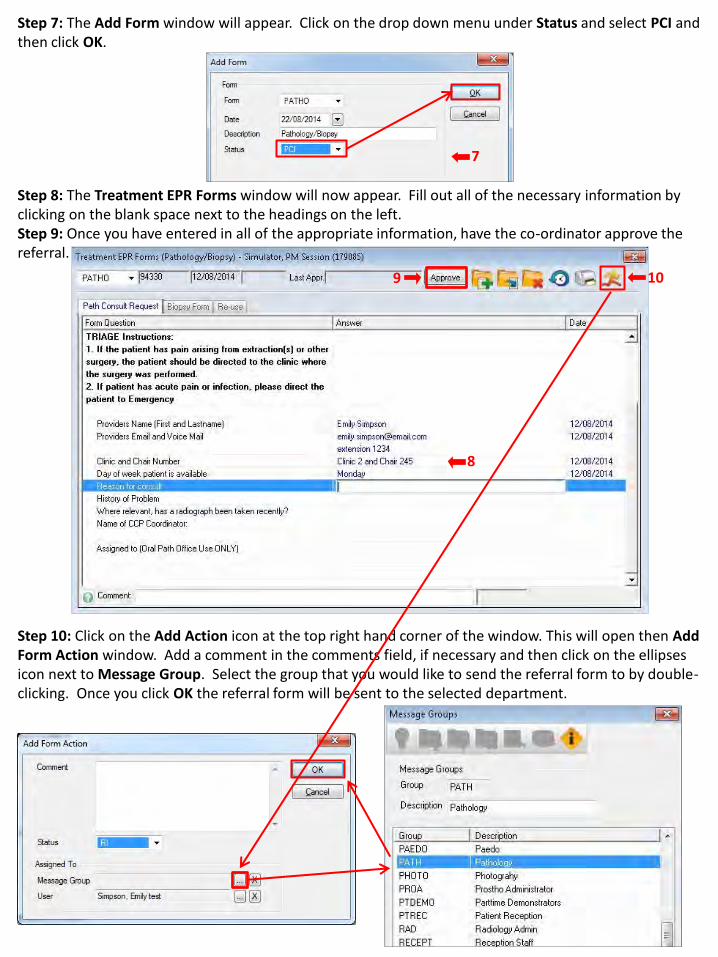
Step 7: The Add Form window will appear. Click on the drop down menu under Status and select RI (Referral Initiated) and then click OK. Step 8: The Treatment EPR Forms window will now appear. Fill out all of the necessary information by clicking on the blank space next to the headings on the left. Step 9: Once you have entered in all of the appropriate information, have the co-ordinator approve the referral. Step 10: Click on the Add Action icon at the top right hand corner of the window. This will open then Add Form Action window. Add a comment in the comments field, if necessary and then click on the ellipses icon next to Message Group. Select the group that you would like to send the referral form to by double-clicking. Once you click OK the referral form will be sent to the selected department.
7
8
9 10

How-To Guide for Axium: Referrals – Pathology
Step 1: Select your patient from the Rolodex and then click on the EHR icon. Step 2: Click on the Create a New Record Icon to open the Chart Add tab. Step 3: Under the Quick List tab, select Dental Txs and under Category, select Referral Codes. Step 4: Highlight the appropriate referral code. Step 5: Once your referral code is highlighted, click on the Add In Process Tx icon. Step 6: Click on the Tx History tab, highlight and right click the referral code and select Add/Edit Tx Form.
2
3
4
5
6
Step 7: The Add Form window will appear. Click on the drop down menu under Status and select PCI and then click OK. Step 8: The Treatment EPR Forms window will now appear. Fill out all of the necessary information by clicking on the blank space next to the headings on the left. Step 9: Once you have entered in all of the appropriate information, have the co-ordinator approve the referral. Step 10: Click on the Add Action icon at the top right hand corner of the window. This will open then Add Form Action window. Add a comment in the comments field, if necessary and then click on the ellipses icon next to Message Group. Select the group that you would like to send the referral form to by double-clicking. Once you click OK the referral form will be sent to the selected department.
7
8
9 10
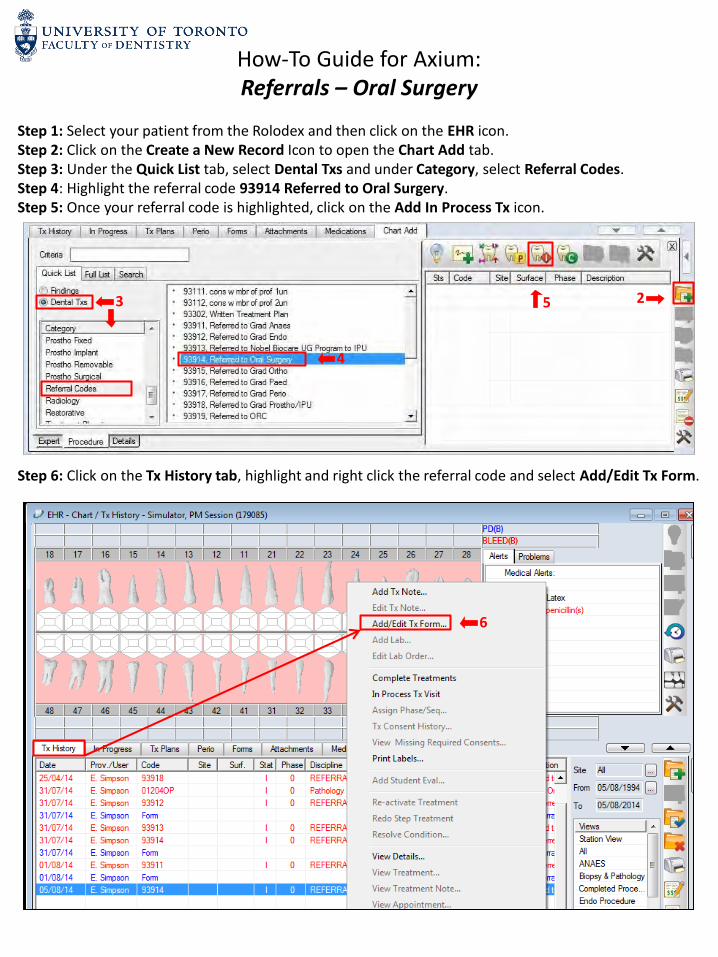
How-To Guide for Axium: Referrals – Oral Surgery
Step 1: Select your patient from the Rolodex and then click on the EHR icon. Step 2: Click on the Create a New Record Icon to open the Chart Add tab. Step 3: Under the Quick List tab, select Dental Txs and under Category, select Referral Codes. Step 4: Highlight the referral code 93914 Referred to Oral Surgery. Step 5: Once your referral code is highlighted, click on the Add In Process Tx icon. Step 6: Click on the Tx History tab, highlight and right click the referral code and select Add/Edit Tx Form.
2 3
4
5
6
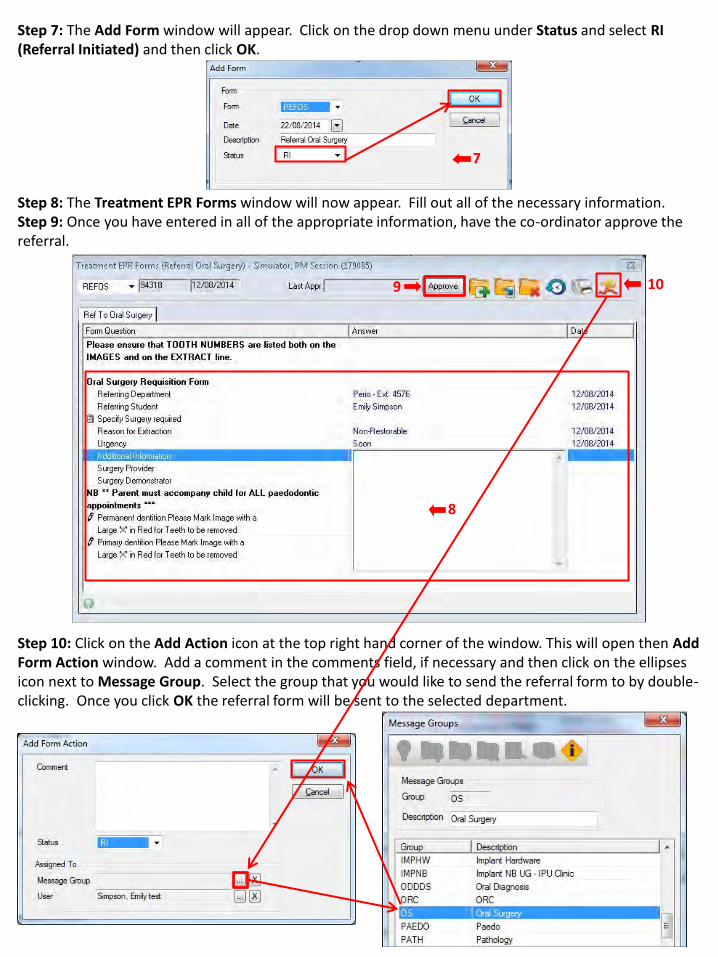
Step 7: The Add Form window will appear. Click on the drop down menu under Status and select RI (Referral Initiated) and then click OK. Step 8: The Treatment EPR Forms window will now appear. Fill out all of the necessary information. Step 9: Once you have entered in all of the appropriate information, have the co-ordinator approve the referral. Step 10: Click on the Add Action icon at the top right hand corner of the window. This will open then Add Form Action window. Add a comment in the comments field, if necessary and then click on the ellipses icon next to Message Group. Select the group that you would like to send the referral form to by double-clicking. Once you click OK the referral form will be sent to the selected department.
7
8
9 10

SECTION 5: PERSONAL PLANNER
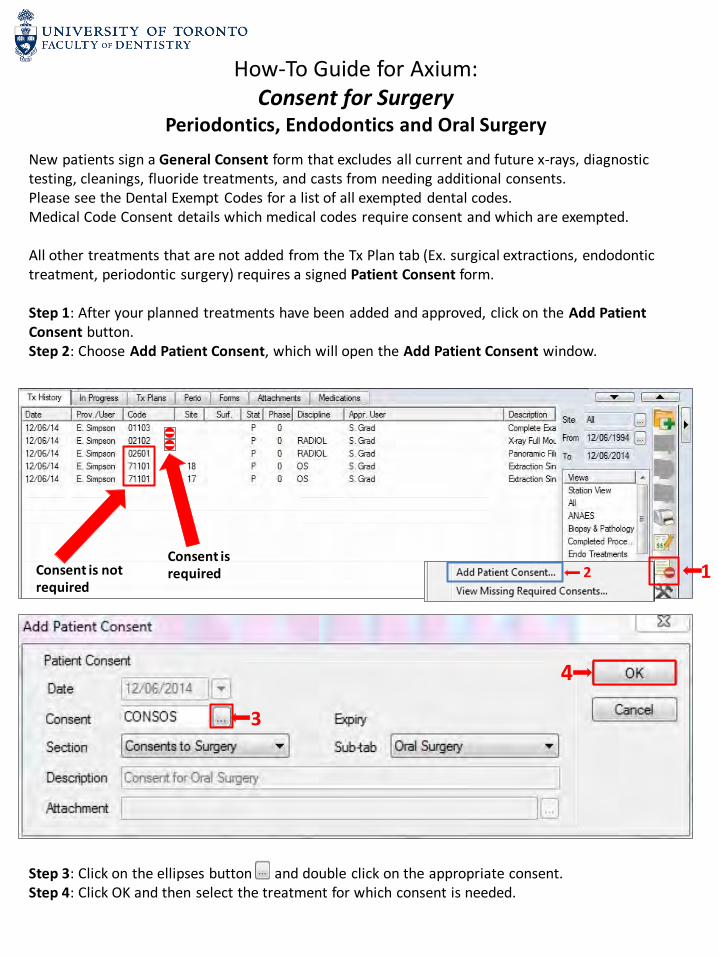
How-To Guide for Axium: Consent for Surgery
Periodontics, Endodontics and Oral Surgery
New patients sign a General Consent form that excludes all current and future x-rays, diagnostic testing, cleanings, fluoride treatments, and casts from needing additional consents. Please see the Dental Exempt Codes for a list of all exempted dental codes. Medical Code Consent details which medical codes require consent and which are exempted. All other treatments that are not added from the Tx Plan tab (Ex. surgical extractions, endodontic treatment, periodontic surgery) requires a signed Patient Consent form. Step 1: After your planned treatments have been added and approved, click on the Add Patient Consent button. Step 2: Choose Add Patient Consent, which will open the Add Patient Consent window.
3
4
Consent is not required
Consent is required
1 2
Step 3: Click on the ellipses button and double click on the appropriate consent. Step 4: Click OK and then select the treatment for which consent is needed.
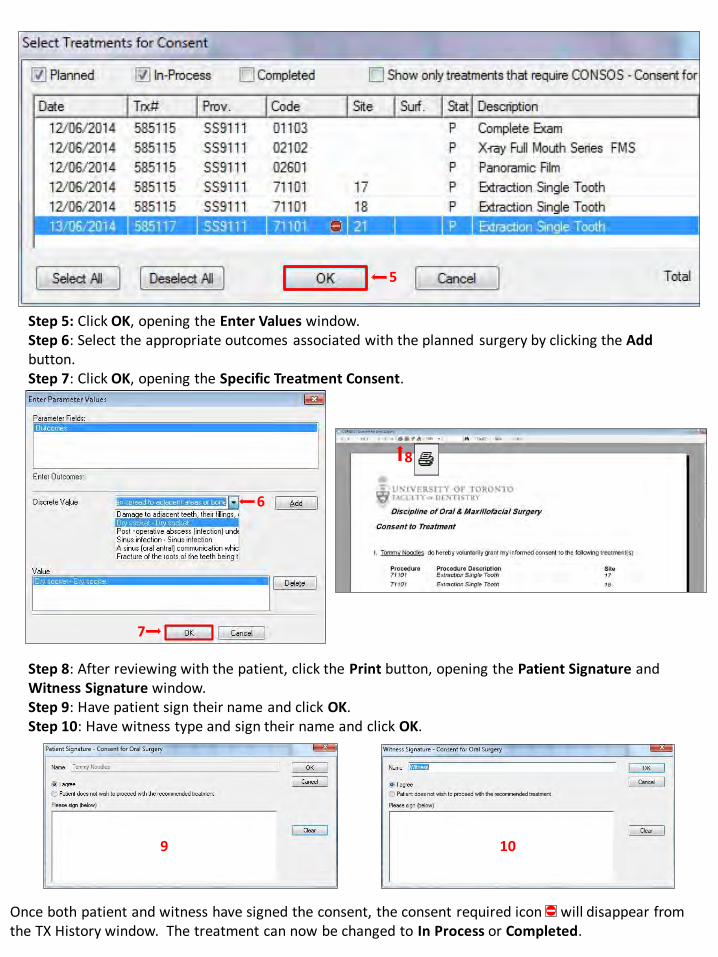
Step 5: Click OK, opening the Enter Values window. Step 6: Select the appropriate outcomes associated with the planned surgery by clicking the Add button. Step 7: Click OK, opening the Specific Treatment Consent.
Once both patient and witness have signed the consent, the consent required icon will disappear from the TX History window. The treatment can now be changed to In Process or Completed.
6
7
8
Step 8: After reviewing with the patient, click the Print button, opening the Patient Signature and Witness Signature window. Step 9: Have patient sign their name and click OK. Step 10: Have witness type and sign their name and click OK.
9 10
5
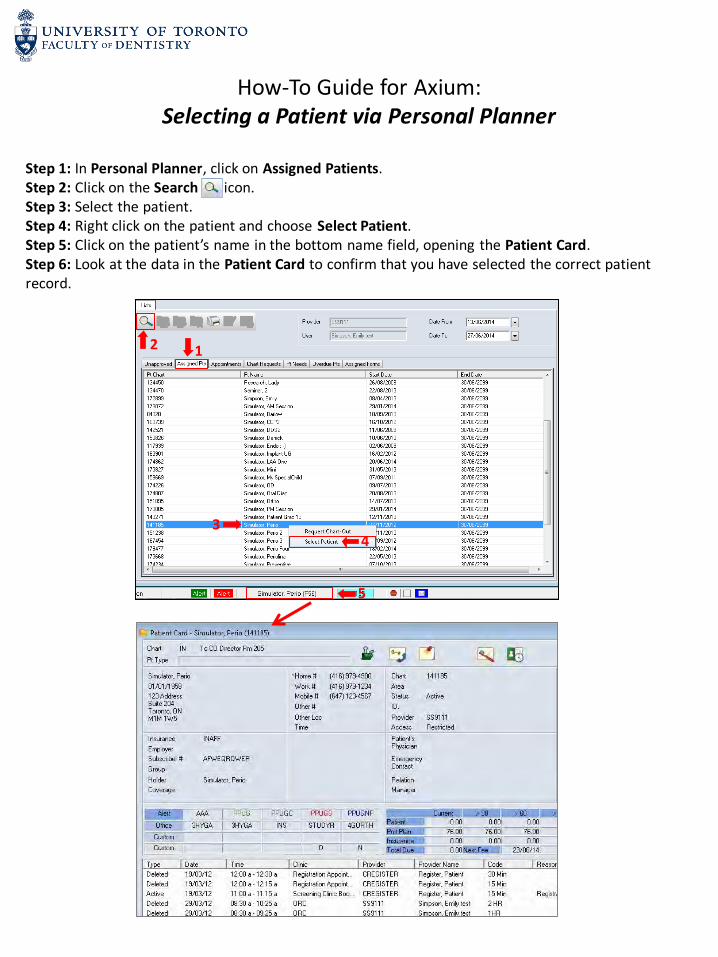
How-To Guide for Axium: Selecting a Patient via Personal Planner
Step 1: In Personal Planner, click on Assigned Patients. Step 2: Click on the Search icon. Step 3: Select the patient. Step 4: Right click on the patient and choose Select Patient. Step 5: Click on the patient’s name in the bottom name field, opening the Patient Card. Step 6: Look at the data in the Patient Card to confirm that you have selected the correct patient record.
1 2
3 4
5

How-To Guide for Axium: Verifying Unapproved Treatments, Notes and Forms Using
Personal Planner Step 1: In Personal Planner, click on the Unapproved tab. Step 2: Click on the Search icon. A list of all your unapproved treatments, notes and forms will appear. The Type column tells you the type of approval that is needed and the Status column (S) lists the status of each item. Some Status characters that you may see in your unapproved list are:
P – Planned, D – Deleted Tx, E – Pre-existing Conditions, I – In process, C – Complete
Run unapproved list on a weekly basis and be sure to check and have all of your unapproved treatments, forms, etc. approved asap. It will make your sign-out run much more smoothly!
1 2

How-To Guide for Axium: Patient Contact List
Step 1: Select your patient from the rolodex and open Personal Planner . Step 2: Click on the patient’s name at the bottom of the window, which will open their patient card. Step 3: Click on Contact Notes . Step 4: To add a note, type note in notes field and click on the Add New Record icon to submit note. Step 5: Click on the print icon to print to one of the network printers.
1
2
3
4
5
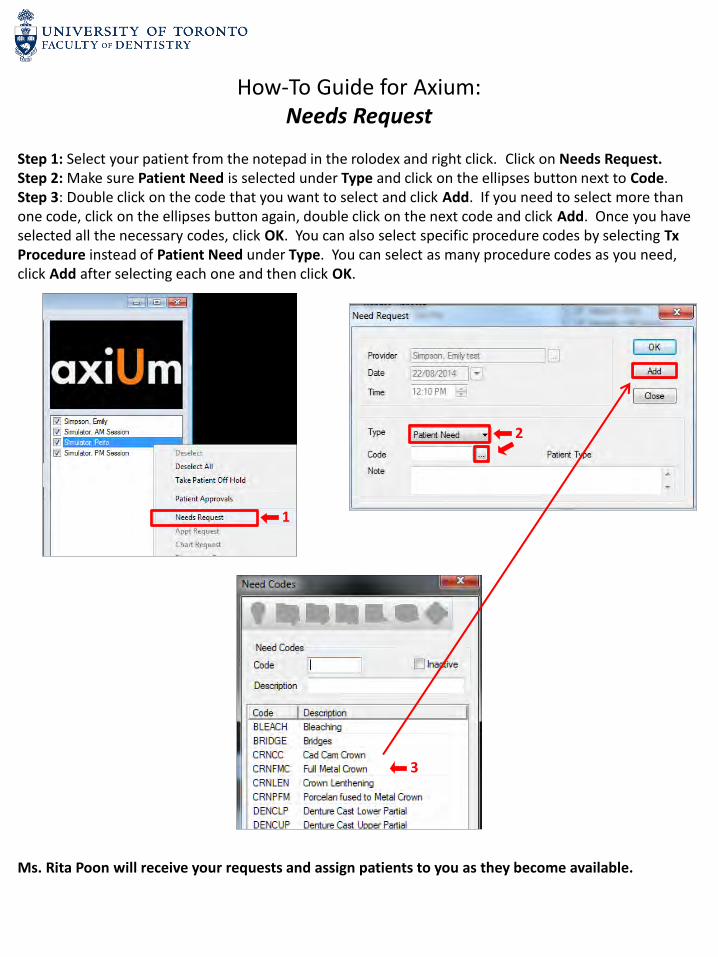
How-To Guide for Axium: Needs Request
Step 1: Select your patient from the notepad in the rolodex and right click. Click on Needs Request. Step 2: Make sure Patient Need is selected under Type and click on the ellipses button next to Code. Step 3: Double click on the code that you want to select and click Add. If you need to select more than one code, click on the ellipses button again, double click on the next code and click Add. Once you have selected all the necessary codes, click OK. You can also select specific procedure codes by selecting Tx Procedure instead of Patient Need under Type. You can select as many procedure codes as you need, click Add after selecting each one and then click OK.
Ms. Rita Poon will receive your requests and assign patients to you as they become available.
1
2
3
How-To Guide for Axium: Entering and Viewing Notes
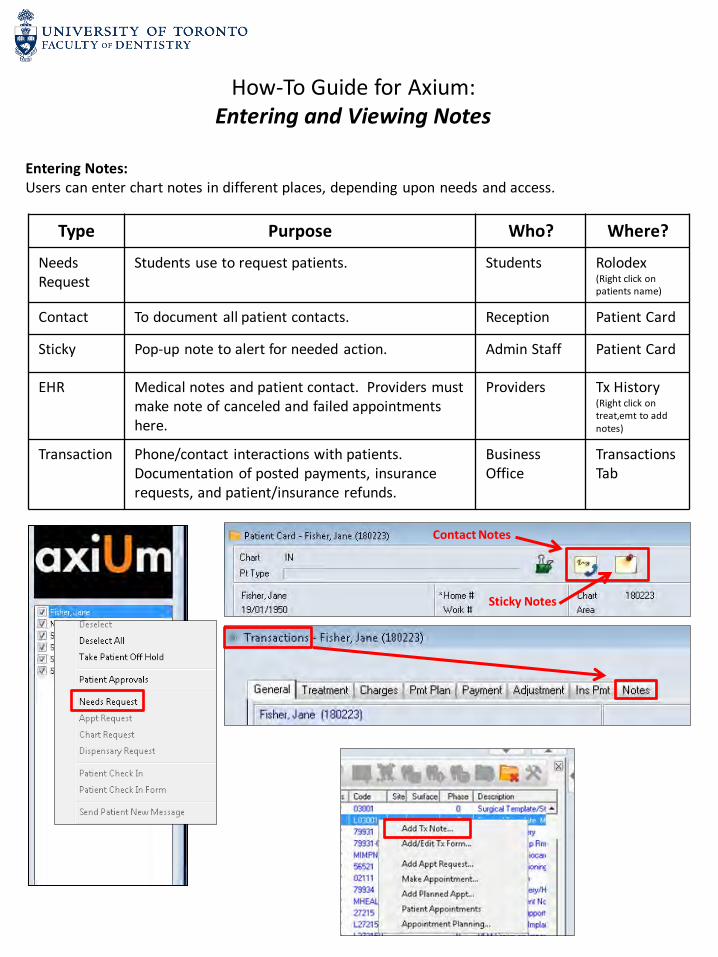
Entering Notes: Users can enter chart notes in different places, depending upon needs and access.
Type Purpose Who? Where?
Needs Request
Students use to request patients. Students Rolodex (Right click on patients name)
Contact To document all patient contacts. Reception Patient Card
Sticky Pop-up note to alert for needed action. Admin Staff Patient Card
EHR Medical notes and patient contact. Providers must make note of canceled and failed appointments here.
Providers Tx History (Right click on treat,emt to add notes)
Transaction Phone/contact interactions with patients. Documentation of posted payments, insurance requests, and patient/insurance refunds.
Business Office
Transactions Tab
Contact Notes
Sticky Notes

SECTION 7: GRAD SECTION
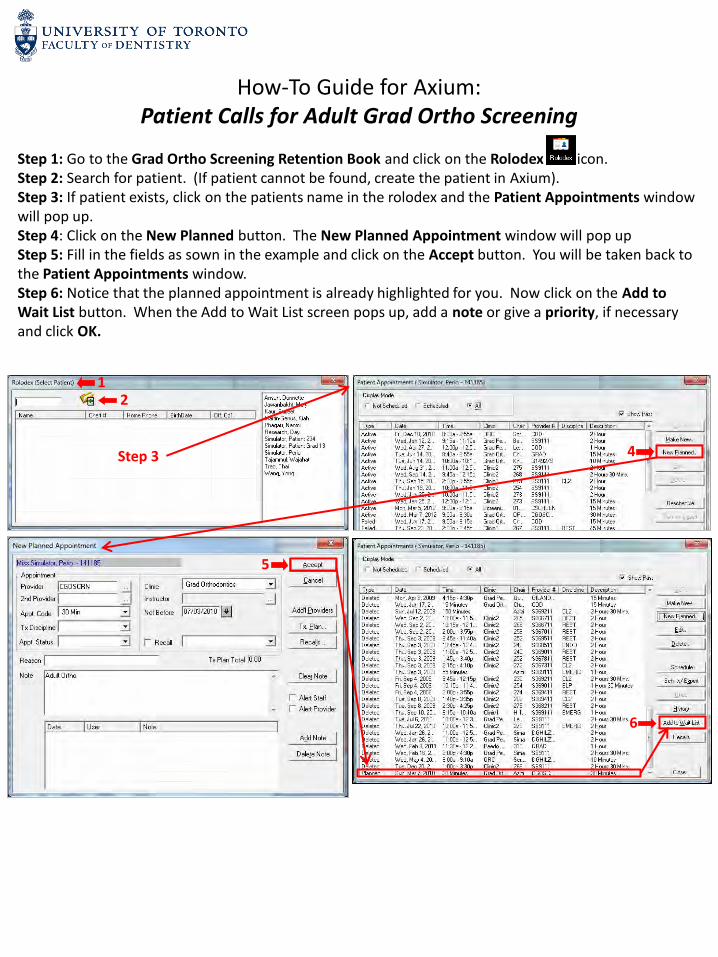
How-To Guide for Axium: Patient Calls for Adult Grad Ortho Screening
Step 1: Go to the Grad Ortho Screening Retention Book and click on the Rolodex icon. Step 2: Search for patient. (If patient cannot be found, create the patient in Axium). Step 3: If patient exists, click on the patients name in the rolodex and the Patient Appointments window will pop up. Step 4: Click on the New Planned button. The New Planned Appointment window will pop up Step 5: Fill in the fields as sown in the example and click on the Accept button. You will be taken back to the Patient Appointments window. Step 6: Notice that the planned appointment is already highlighted for you. Now click on the Add to Wait List button. When the Add to Wait List screen pops up, add a note or give a priority, if necessary and click OK.
1 2
Step 3 4
5
6
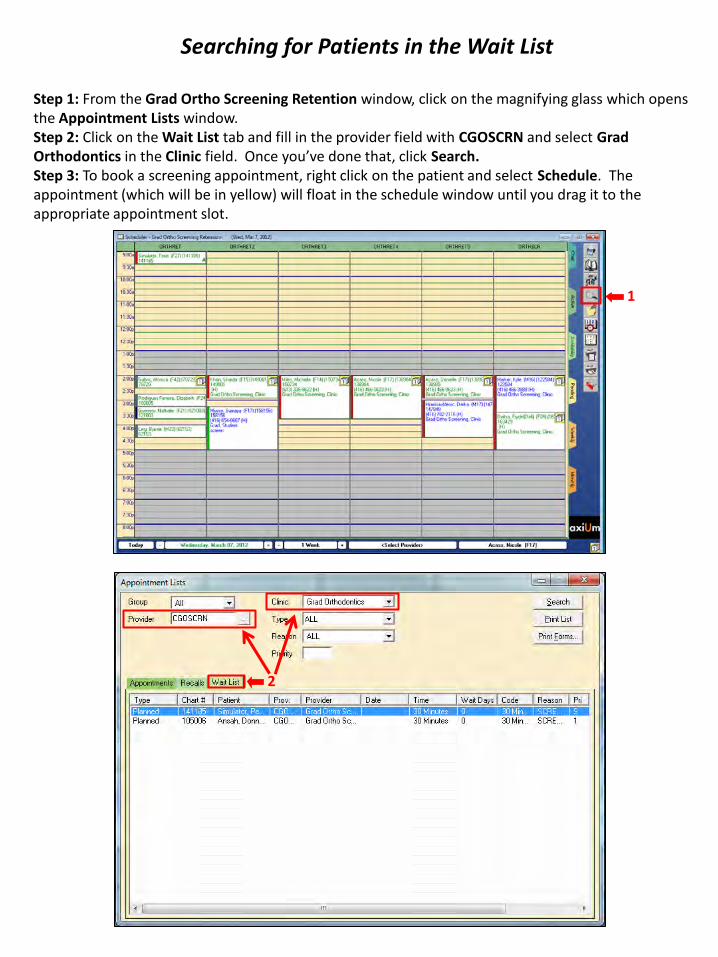
Searching for Patients in the Wait List
Step 1: From the Grad Ortho Screening Retention window, click on the magnifying glass which opens the Appointment Lists window. Step 2: Click on the Wait List tab and fill in the provider field with CGOSCRN and select Grad Orthodontics in the Clinic field. Once you’ve done that, click Search. Step 3: To book a screening appointment, right click on the patient and select Schedule. The appointment (which will be in yellow) will float in the schedule window until you drag it to the appropriate appointment slot.
1
2
Copyright © 2022 FDOKUMEN