Automatic Smart Plant Watering Kit
18
Automatic Smart Plant Watering Kit Quick Start Guide F-building 8 floor, Fusen Industry Park Phone: +86 0755-23204330 GushuHangcheng road, Bao'an Ave, Web: www.elecrow.com Shenzhen city Twitter: @Elecrow1 China 518126 Facebook: @Elecrow
-
Upload
khangminh22 -
Category
Documents
-
view
1 -
download
0
Transcript of Automatic Smart Plant Watering Kit
Automatic Smart Plant Watering Kit
Quick Start Guide
F-building 8 floor, Fusen Industry Park Phone: +86 0755-23204330GushuHangcheng road, Bao'an Ave, Web: www.elecrow.comShenzhen city Twitter: @Elecrow1China 518126 Facebook: @Elecrow

Automatic Smart Plant Watering Kit
Page 1
ContentsAbout Elecrow........................................................................................................................2
Welcome message................................................................................................................2
Introduction.............................................................................................................................2
Automatic Smart Plant Watering Kit features....................................................................3
What’s included in the Box?.............................................................................................4-6
System Operation Overview................................................................................................7
Arduino IDE installation and configuration........................................................................ 8
Uploading the program into the Smart Pump Board......................................................11
Assembling the components.............................................................................................13
Troubleshooting...................................................................................................................17
Warranty Information........................................................................................................177

Automatic Smart Plant Watering Kit
Page 2
About Elecrow
Established in 2014, Elecrow is devoted to the open source hardware industry. Wehave helped thousands of innovators produce custom PCB and PCBA boards.Weare dedicated to providing millions of electronic modules for industrial applicationand STEAM education.
Our mission is to build long-term relationship with our customers and provideexceptional customer services by pursuing business through innovation andadvanced technology.
Welcome messageThanks for purchasing Elecrow’s Automatic Smart Plant Watering Kit! You madeyour first step towards protecting your beautiful plants without the hassle ofremembering to water your plants.
IntroductionThis document is divided in seven sections. The first section lists the AutomaticSmart Plant Watering Kit features. The second describes what is in the box. Itidentifies the different components included in the kit, including a brief description ofeach component and what they are used for.
The third section provides an overview of how the system works. The next onedescribes how to install and configure the Arduino IDE. The fifth section explainshow to upload the Arduino program in the Arduino Leonardo controller integrated inthe Smart Pump Board. The sixth section describes how to assemble thecomponents and powering the system for the first time.
The final section contains troubleshooting guides and how to reach out to us in therare case you experience problems not described in the section.

Automatic Smart Plant Watering Kit
Page 3
Automatic Smart Plant Watering Kit Features1. Smart Pump Board with integrated control board (Arduino Leonardo).
No need for an external control board!
2. Very low noiseWater Pump.Less than 65 dB when operating compared to 70dB when a desktop fan operates in highmode.
3. Long life Soil Humidity Sensors that can test the soil moisture.
4. Plug and play components.Say goodbye to messy jumpers and wire! Easy to assemble components, anyone cando it!
5. Watering control for up to 4 plants with one kit.
6. One power supply to power all the components.
7. 1.3” OLED screen displays humidity percent for each plant.
8. Real Time Clock and Battery backupo The RTC can keep track of the current time and can be used in order to program
actions at a certain time. It can also be used to set how frequent your plants arewatered as well as show the watering time on the OLED display.
o The RTC is powered by a CR1220 battery that keeps the time.
Automatic Smart Plant Watering Kit
Page 4
What’s Included in the Box?
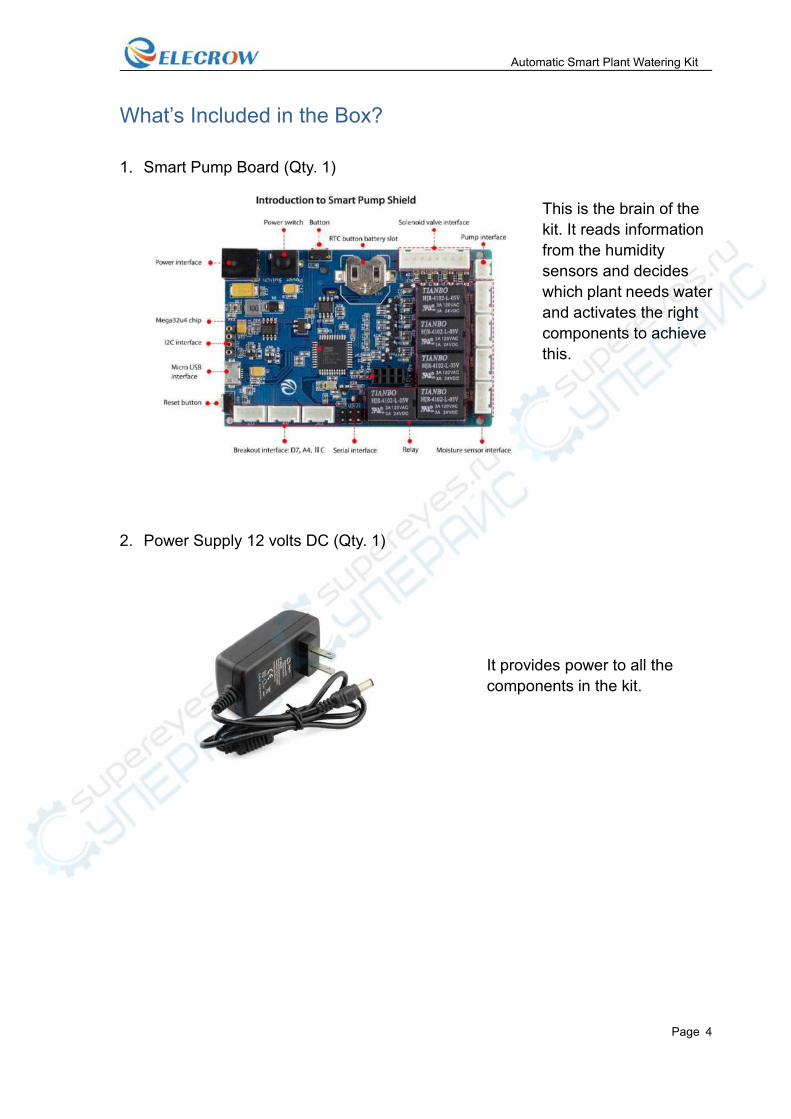
1. Smart Pump Board (Qty. 1)
This is the brain of thekit. It reads informationfrom the humiditysensors and decideswhich plant needs waterand activates the rightcomponents to achievethis.
2. Power Supply 12 volts DC (Qty. 1)
It provides power to all thecomponents in the kit.

Automatic Smart Plant Watering Kit
Page 5
3. Low Noise Water Pump (Qty. 1)
Takes water from a source and pumpsit through the output valve.
4. Five-way Water Pipe (Qty. 1)
Allows water coming from the waterpump output valve to be distributed tofour outputs.This component, in combination withthe Four-way valve allows wateringindividual plants.
5. Four-way Water Valve (Qty. 1)Each valve has an input and output.The input takes water from a singlewater output from the five-way waterpipe but only allows water to gothrough the output valve when theSmart Pump Board commands it.This permits that the a controlled waterdistribution, allowing the plants thatneed the water to receive it, whileavoiding watering the plants that don’tneed it while at the same time savingwater in the process.
Automatic Smart Plant Watering Kit
Page 6
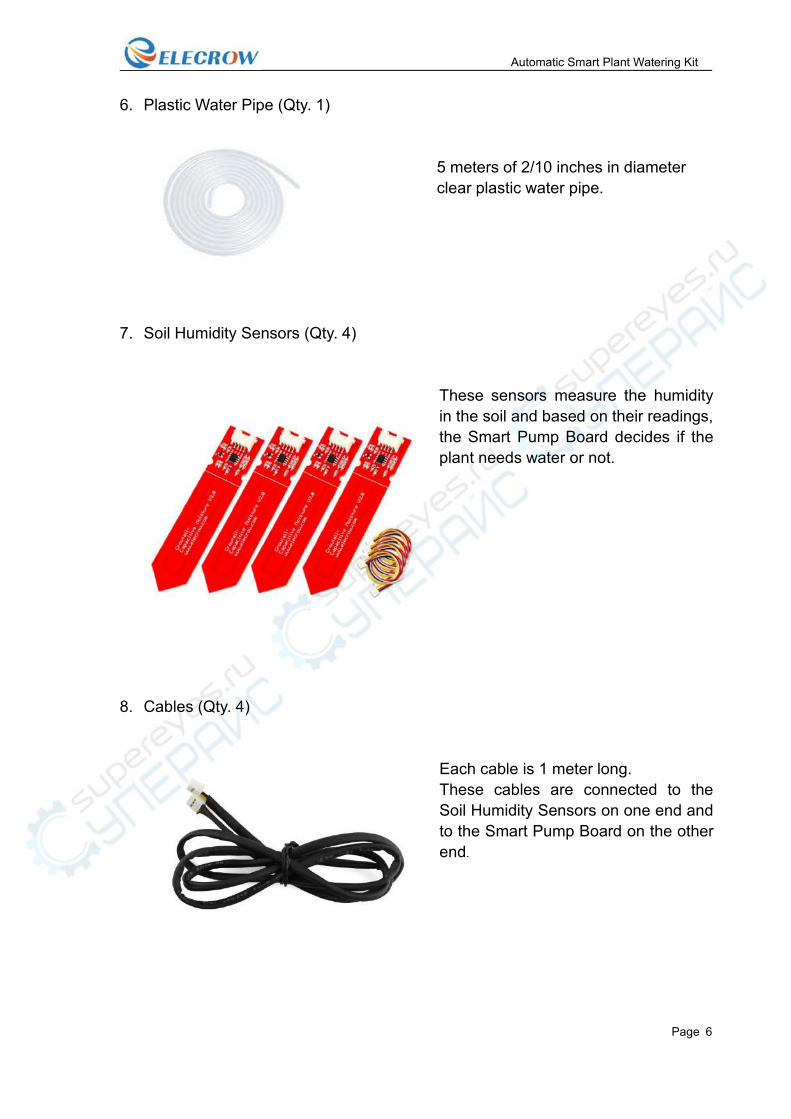
6. Plastic Water Pipe (Qty. 1)
5 meters of 2/10 inches in diameterclear plastic water pipe.
7. Soil Humidity Sensors (Qty. 4)
These sensors measure the humidityin the soil and based on their readings,the Smart Pump Board decides if theplant needs water or not.
8. Cables (Qty. 4)
Each cable is 1 meter long.These cables are connected to theSoil Humidity Sensors on one end andto the Smart Pump Board on the otherend.
Automatic Smart Plant Watering Kit
Page 7
System Operation OverviewAfter uploading the complementary program into the controller (Arduino Leonardo)integrated in the Smart Pump Board and interconnect all the components you areready to power the kit.
Once power is connected, the controller will initialize the display, and it will readinformation from the Soil Humidity Sensors and determine the moisture content inthe soil for each of the plants. If the moisture content in the soil of any of the plants isless than 20% (you can reset by yourself), the controller will initiate the process towater the corresponding plants.
The steps in the watering process are:a. The controller triggers the relay controlling the power to the water pump.
This energizes the water pump by sending 12volts DC from the power supplyto the water pump.
b. The water pump will take water from the source into the input valve andsends it with a gentle pressure to the output valve.
c. The output valve from the water valve goes into the input valve of the five-waywater pipe and goes through the output valves that are connected to thefour-way valve.
d. The controller also opens the corresponding output in the four-way valvecorresponding to the sensors reporting the low soil moisture content. In thisway the plants that need watering will get the water.
e. The controller will keep watering the plants until it detects that the moisturecontent in the soil gets to 20%.
f. When the moisture content gets to the desired level, the controller will stopthe watering process by sending a signal to the proper relays.
g. The controller will resume the monitoring process.
Automatic Smart Plant Watering Kit
Page 8
Arduino IDE installation and configuration1. Download the Arduino IDE
- Use the latest version of the Arduino IDE for your computer system.- Here are the links to the latest version (at the time this document was created):
o Windows (XP and up)https://www.arduino.cc/download_handler.php?f=/arduino-1.8.9-windows.exe
o Mac OS X (10.8 Mountain Lion or newer) -https://www.arduino.cc/download_handler.php?f=/arduino-1.8.9-macosx.zip
- To verify if there is a newer version.o Visit the Arduino website at https://www.arduino.cc/en/Main/Softwareo Locate the Download the Arduino IDE section and download the latest version
for your computer system.
2. Install the Arduino IDE
o Windows users, follow the installation instructions available here.o Mac OS X users follow these instructions instead.
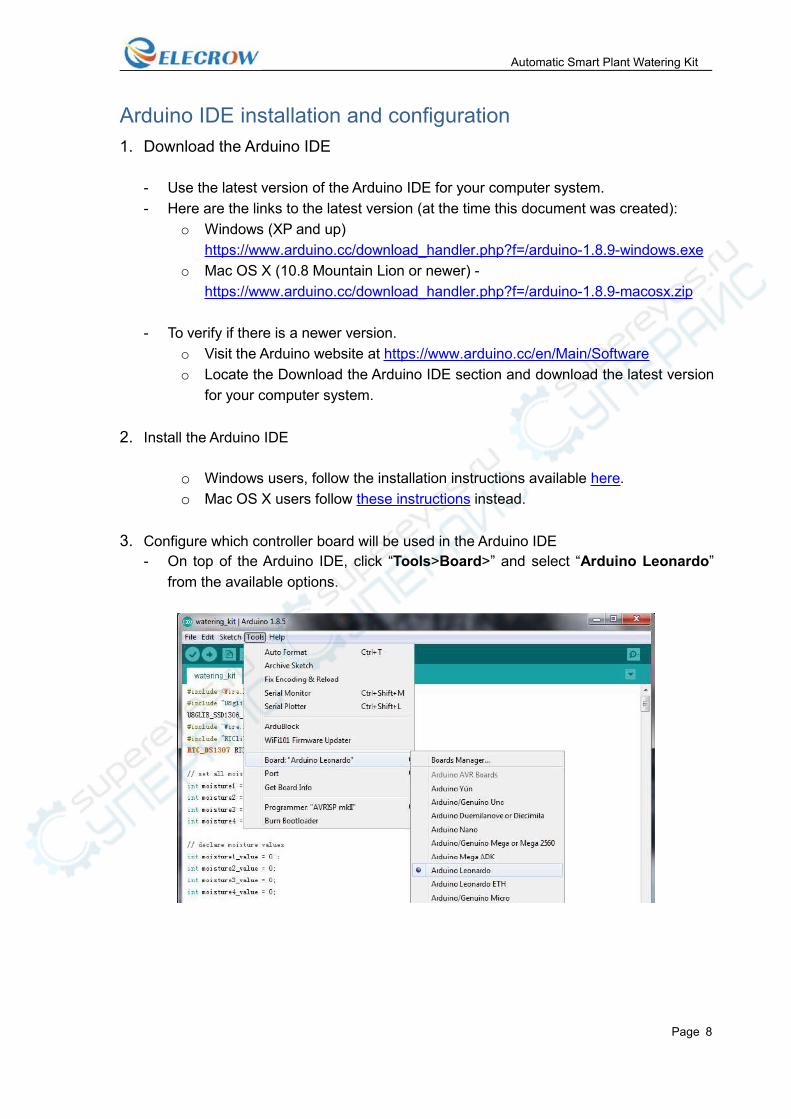
3. Configure which controller board will be used in the Arduino IDE- On top of the Arduino IDE, click “Tools>Board>” and select “Arduino Leonardo”
from the available options.

Automatic Smart Plant Watering Kit
Page 9
4. Connect the Smart Pump Board to your computer system
- Attach the micro usb side of the cable to the Smart Pump Board
- Connect the other end of the usb cable to an usb port in your computer.- (Notice: Please power the board by DC power when you upload the code)

Automatic Smart Plant Watering Kit
Page 10
5. Configure which communication port to use
- The Arduino IDE needs to know in which usb computer port the Arduino Leonardocontroller is connected in order to communicate with it.
- To do so, select “Tools>Port” and select the COM port that indicates ArduinoLeonardo. Please note that the actual numbers after the “COM” word will vary fromcomputer to computer, so they could be different from the ones shown in the figure.
6. Once completed, proceed to the next section to upload the program into the Arduino IDEand program the Arduino Leonard controller in the Smart Pump Board.
Automatic Smart Plant Watering Kit
Page 11
Uploading the Program into the Smart Pump Board1. Download the Library: www.elecrow.com/download/Watering_kit_library.zip and extract it.
Copy it to the file-libraries in the arduino IDE file,
i.e. D:\Program Files (x86)\Arduino\libraries.
2. Download the Program
Download the program at https://www.elecrow.com/download/watering_kit.zip
3. Extract the file from the zip file. The filename is watering_kit.ino
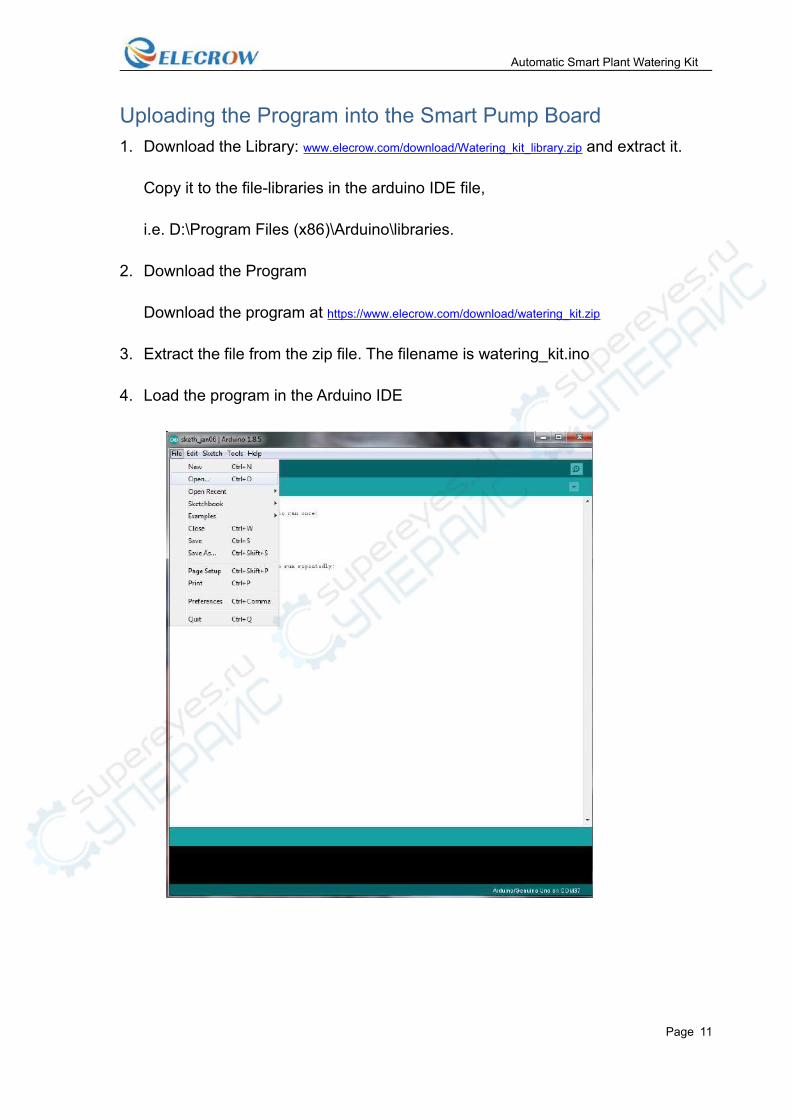
4. Load the program in the Arduino IDE

Automatic Smart Plant Watering Kit
Page 12
Automatic Smart Plant Watering Kit
Page 13
5. Upload the Code to the Arduino Board
- Click the to upload the code
Assembling the componentsNote: For an overview of the process please watch this YouTube video
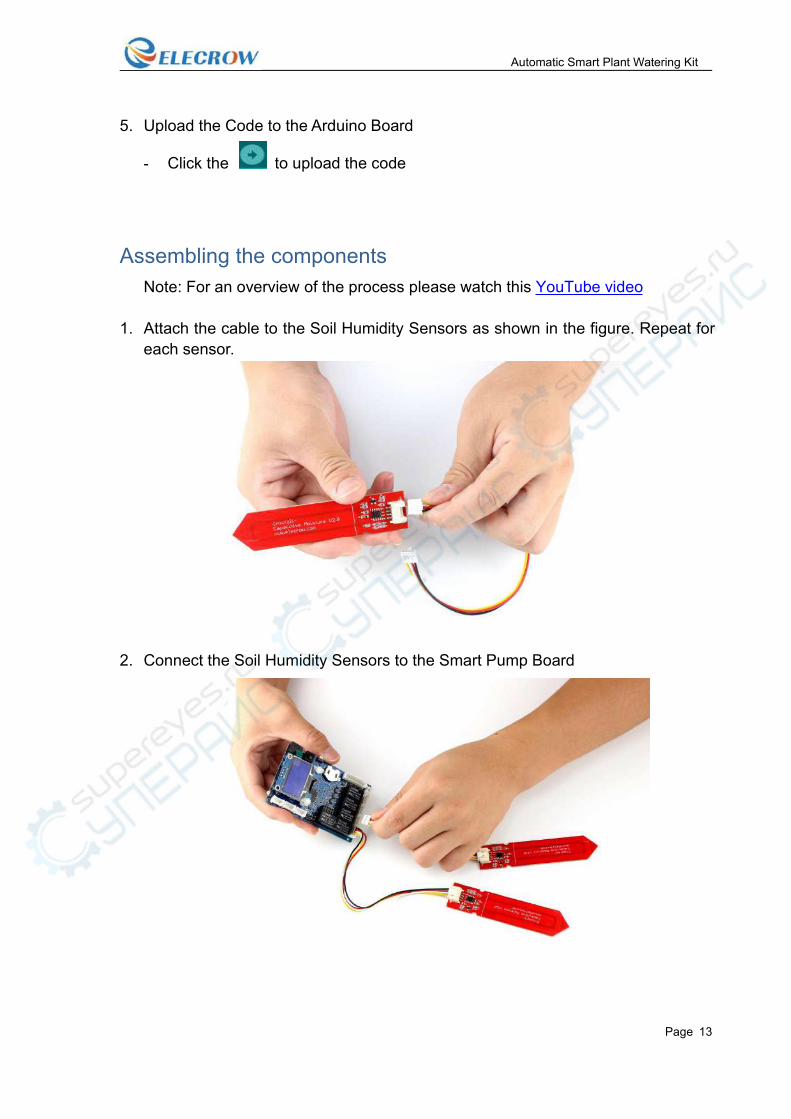
1. Attach the cable to the Soil Humidity Sensors as shown in the figure. Repeat foreach sensor.
2. Connect the Soil Humidity Sensors to the Smart Pump Board
Automatic Smart Plant Watering Kit
Page 14
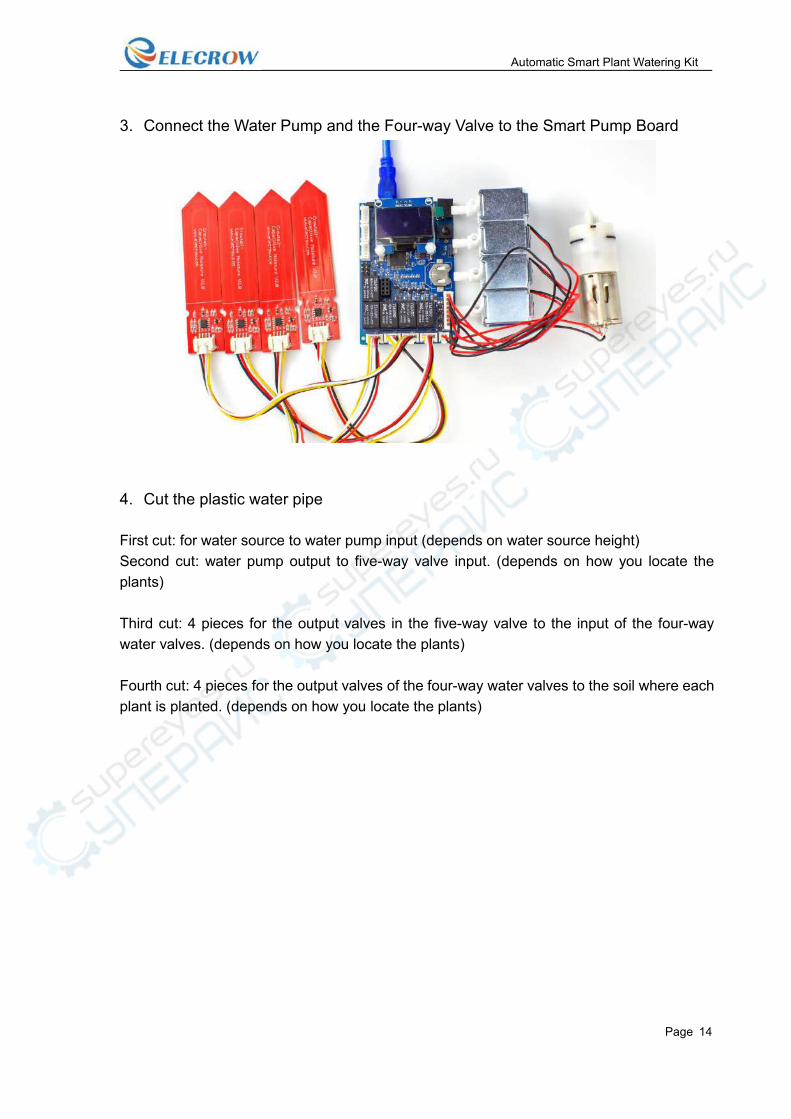
3. Connect the Water Pump and the Four-way Valve to the Smart Pump Board
4. Cut the plastic water pipe
First cut: for water source to water pump input (depends on water source height)Second cut: water pump output to five-way valve input. (depends on how you locate theplants)
Third cut: 4 pieces for the output valves in the five-way valve to the input of the four-waywater valves. (depends on how you locate the plants)
Fourth cut: 4 pieces for the output valves of the four-way water valves to the soil where eachplant is planted. (depends on how you locate the plants)
Automatic Smart Plant Watering Kit
Page 15
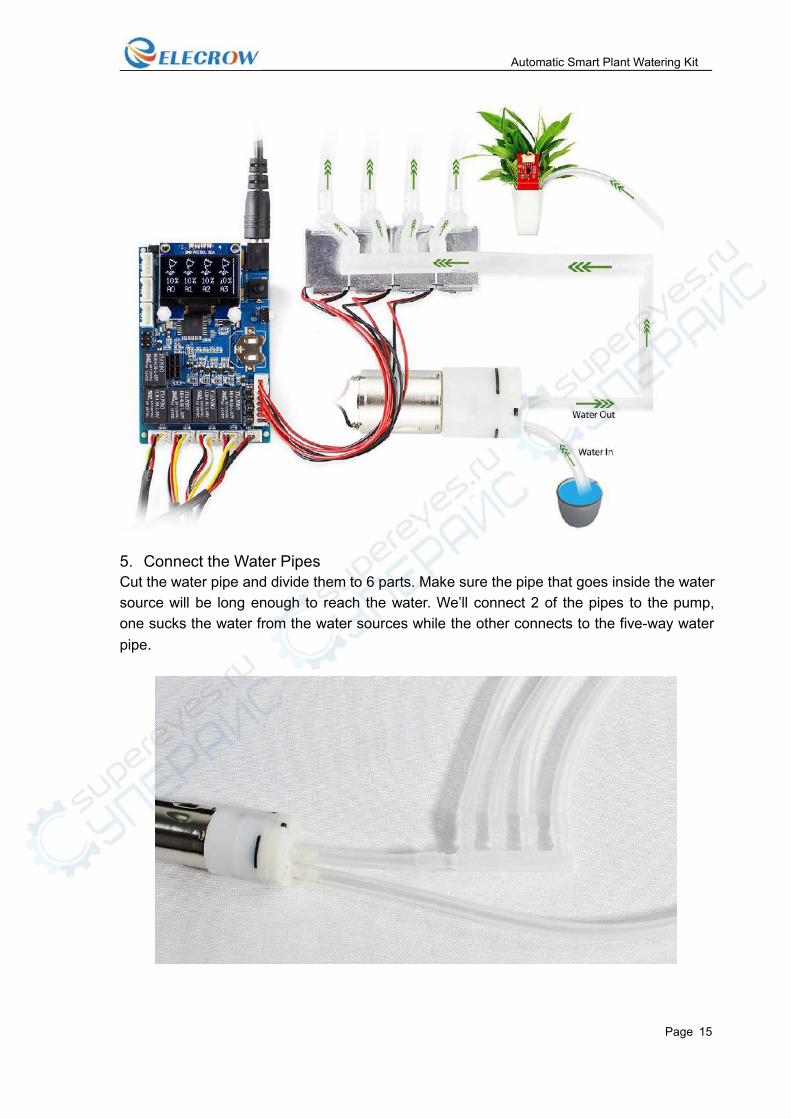
5. Connect the Water PipesCut the water pipe and divide them to 6 parts. Make sure the pipe that goes inside the watersource will be long enough to reach the water. We’ll connect 2 of the pipes to the pump,one sucks the water from the water sources while the other connects to the five-way waterpipe.
Automatic Smart Plant Watering Kit
Page 16
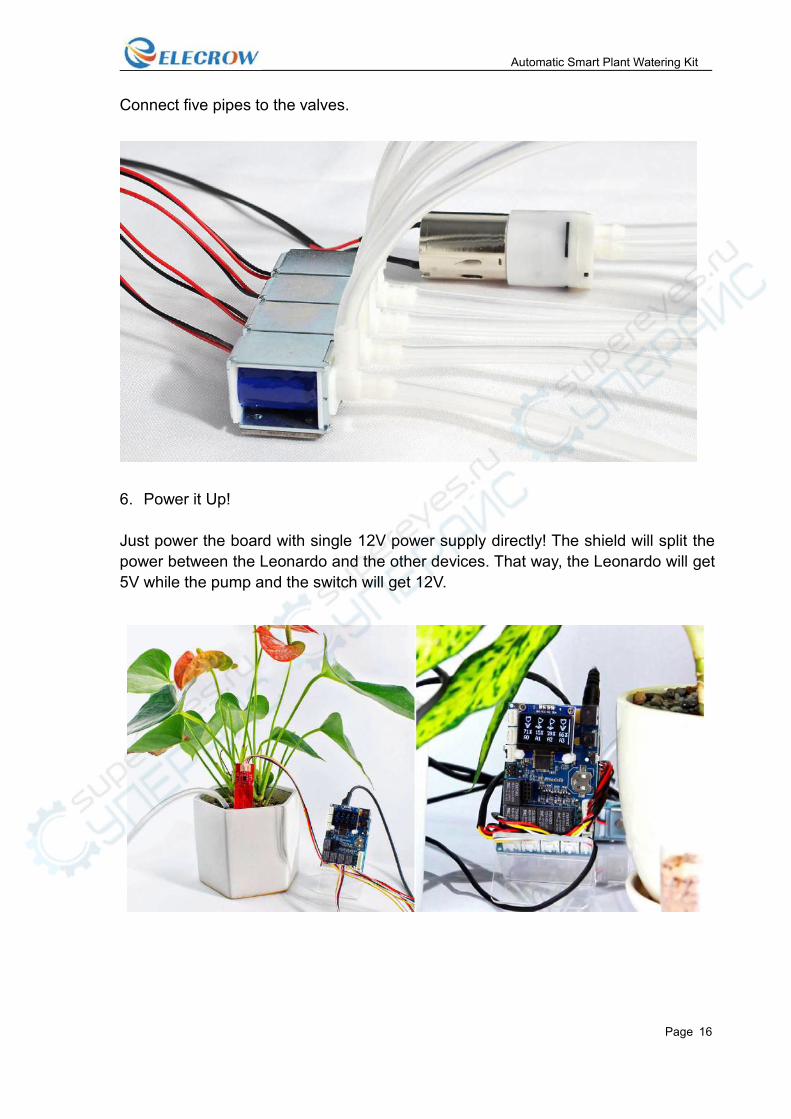
Connect five pipes to the valves.
6. Power it Up!
Just power the board with single 12V power supply directly! The shield will split thepower between the Leonardo and the other devices. That way, the Leonardo will get5V while the pump and the switch will get 12V.

Automatic Smart Plant Watering Kit
Page 17
Troubleshooting
Your Elecrow Arduino Plant Watering Kit is guaranteed to operate properly for aperiod of 365 days.
Symptom Recommendations
Warranty Information
Your Elecrow Arduino Plant Watering Kit is guaranteed to operate properly for aperiod of 365 days. This warranty provides for repair or replacement, atmanufacturer’s option, of any defective components. This warranty is limited to theactual cost of repairs and will not cover shipping costs or any consequentialdamages resulting from failure of the unit or its components to perform as stated. Allwarranty work must be done by the manufacturer. The manufacturer will not coverthe costs of repairs done elsewhere.
Warranty will be voided if unit has been tampered with, altered or repaired byunauthorized persons or companies.
Should there be any questions about the kit, please feel free to reach us [email protected].